
The Linux Network Administrator's Guide, Third Edition ...
453
• Table of Contents • Index • Reviews • Reader Reviews • Errata • Academic Linux Network Administrator's Guide, 3rd Edition By Tony Bautts, Terry Dawson, Gregor N. Purdy Publisher: O'Reilly Pub Date : February 2005 ISBN: 0-596-00548-2 Pages : 362 The Linux Network Administrator's Guide , Third Edition updates a classic Linux title from O'Reilly. This refreshed resource takes an in-depth look at everything you need to know to join a network. Topics covered include all of the essential networking software that comes with the Linux operating system, plus information on a host of cutting-edge services including wireless hubs, spam filtering, and more.
-
Upload
khangminh22 -
Category
Documents
-
view
1 -
download
0
Transcript of The Linux Network Administrator's Guide, Third Edition ...

• Table of
Contents
• Index
• Reviews
• Reader
Reviews
• Errata
• Academic
Linux Network Administrator's Guide, 3rd Edition
By Tony Bautts, Terry Dawson, Gregor N. Purdy
Publisher: O'Reilly
Pub Date: February 2005
ISBN: 0-596-00548-2
Pages: 362
The Linux Network Administrator's Guide, Third Edition updates a classicLinux title from O'Reilly. This refreshed resource takes an in-depth look ateverything you need to know to join a network. Topics covered include allof the essential networking software that comes with the Linux operatingsystem, plus information on a host of cutting-edge services includingwireless hubs, spam filtering, and more.

• Table of
Contents
• Index
• Reviews
• Reader
Reviews
• Errata
• Academic
Linux Network Administrator's Guide, 3rd Edition
By Tony Bautts, Terry Dawson, Gregor N. Purdy
Publisher: O'Reilly
Pub Date: February 2005
ISBN: 0-596-00548-2
Pages: 362
Copyright
Preface
Purpose and Audience for This Book
Sources of Information
Obtaining Linux
Filesystem Standards
Standard Linux Base
About This Book
Overview
Conventions Used in This Book
Safari Enabled
How to Contact Us
Acknowledgments
Chapter 1. Introduction to Networking
Section 1.1. History
Section 1.2. TCP/IP Networks
Section 1.3. Linux Networking
Section 1.4. Maintaining Your System
Chapter 2. Issues of TCP/IP Networking
Section 2.1. Networking Interfaces
Section 2.2. IP Addresses
Section 2.3. The Internet Control Message Protocol
Chapter 3. Configuring the Serial Hardware
Section 3.1. Communications Software for Modem Links
Section 3.2. Accessing Serial Devices
Section 3.3. Using the Configuration Utilities
Section 3.4. Serial Devices and the login: Prompt

Chapter 4. Configuring TCP/IP Networking
Section 4.1. Understanding the /proc Filesystem
Chapter 5. Name Service and Configuration
Section 5.1. The Resolver Library
Section 5.2. How DNS Works
Section 5.3. Alternatives to BIND
Chapter 6. The Point-to-Point Protocol
Section 6.1. PPP on Linux
Section 6.2. Running pppd
Section 6.3. Using Options Files
Section 6.4. Using chat to Automate Dialing
Section 6.5. IP Configuration Options
Section 6.6. Link Control Options
Section 6.7. General Security Considerations
Section 6.8. Authentication with PPP
Section 6.9. Debugging Your PPP Setup
Section 6.10. More Advanced PPP Configurations
Section 6.11. PPPoE Options in Linux
Chapter 7. TCP/IP Firewall
Section 7.1. Methods of Attack
Section 7.2. What Is a Firewall?
Section 7.3. What Is IP Filtering?
Section 7.4. Netfilter and iptables
Section 7.5. iptables Concepts
Section 7.6. Setting Up Linux for Firewalling
Section 7.7. Using iptables
Section 7.8. The iptables Subcommands
Section 7.9. Basic iptables Matches
Section 7.10. A Sample Firewall Configuration
Section 7.11. References
Chapter 8. IP Accounting
Section 8.1. Configuring the Kernel for IP Accounting
Section 8.2. Configuring IP Accounting
Section 8.3. Using IP Accounting Results
Section 8.4. Resetting the Counters
Section 8.5. Flushing the Rule Set
Section 8.6. Passive Collection of Accounting Data
Chapter 9. IP Masquerade and Network Address Translation
Section 9.1. Side Effects and Fringe Benefits
Section 9.2. Configuring the Kernel for IP Masquerade
Section 9.3. Configuring IP Masquerade
Section 9.4. Handling Nameserver Lookups
Section 9.5. More About Network Address Translation
Chapter 10. Important Network Features
Section 10.1. The inetd Super Server
Section 10.2. The tcpd Access Control Facility

Section 10.3. The xinetd Alternative
Section 10.4. The Services and Protocols Files
Section 10.5. Remote Procedure Call
Section 10.6. Configuring Remote Login and Execution
Chapter 11. Administration Issues with Electronic Mail
Section 11.1. What Is a Mail Message?
Section 11.2. How Is Mail Delivered?
Section 11.3. Email Addresses
Section 11.4. How Does Mail Routing Work?
Section 11.5. Mail Routing on the Internet
Chapter 12. sendmail
Section 12.1. Installing the sendmail Distribution
Section 12.2. sendmail Configuration Files
Section 12.3. sendmail.cf Configuration Language
Section 12.4. Creating a sendmail Configuration
Section 12.5. sendmail Databases
Section 12.6. Testing Your Configuration
Section 12.7. Running sendmail
Section 12.8. Tips and Tricks
Section 12.9. More Information
Chapter 13. Configuring IPv6 Networks
Section 13.1. The IPv4 Problem and Patchwork Solutions
Section 13.2. IPv6 as a Solution
Chapter 14. Configuring the Apache Web Server
Section 14.1. Apache HTTPD ServerAn Introduction
Section 14.2. Configuring and Building Apache
Section 14.3. Configuration File Options
Section 14.4. VirtualHost Configuration Options
Section 14.5. Apache and OpenSSL
Section 14.6. Troubleshooting
Chapter 15. IMAP
Section 15.1. IMAPAn Introduction
Section 15.2. Cyrus IMAP
Chapter 16. Samba
Section 16.1. SambaAn Introduction
Chapter 17. OpenLDAP
Section 17.1. Understanding LDAP
Section 17.2. Obtaining OpenLDAP
Chapter 18. Wireless Networking
Section 18.1. History
Section 18.2. The Standards
Section 18.3. 802.11b Security Concerns
Appendix A. Example Network: The Virtual Brewery
Section A.1. Connecting the Virtual Subsidiary Network
Colophon
Index

Copyright © 2005 O'Reilly Media, Inc. All rights reserved.
Printed in the United States of America.
Published by O'Reilly Media, Inc., 1005 Gravenstein Highway North, Sebastopol, CA 95472.
O'Reilly books may be purchased for educational, business, or sales promotional use. Online editionsare also available for most titles (http://safari.oreilly.com). For more information, contact ourcorporate/institutional sales department: (800) 998-9938 or [email protected].
Nutshell Handbook, the Nutshell Handbook logo, and the O'Reilly logo are registered trademarks ofO'Reilly Media, Inc. The Linux series designations, Linux Network Administrator's Guide, ThirdEdition, images of the American West, and related trade dress are trademarks of O'Reilly Media, Inc.
Many of the designations used by manufacturers and sellers to distinguish their products are claimedas trademarks. Where those designations appear in this book, and O'Reilly Media, Inc. was aware ofa trademark claim, the designations have been printed in caps or initial caps.
While every precaution has been taken in the preparation of this book, the publisher and authorsassume no responsibility for errors or omissions, or for damages resulting from the use of theinformation contained herein.
This work is licensed under the Creative Commons Attribution-NonCommercial-ShareAlike 2.0License. To view a copy of this license, visit http://creativecommons.org/licenses/by-sa/2.0/ or senda letter to Creative Commons, 559 Nathan Abbott Way, Stanford, California 94305, USA.

PrefaceThe Internet is now a household term in many countries and has become a part of life for most of thebusiness world. With millions of people connecting to the World Wide Web, computer networking hasmoved to the status of TV sets and microwave ovens. You can purchase and install a wireless hubwith just about an equal amount of effort. The Internet has unusually high media coverage, withweblogs often "scooping" traditional media outlets for news stories, while virtual reality environmentssuch as online games and the rest have developed into the "Internet culture."
Of course, networking has been around for a long time. Connecting computers to form local areanetworks has been common practice, even at small installations, and so have long-haul links usingtransmission lines provided by telecommunications companies. A rapidly growing conglomerate ofworldwide networks has, however, made joining the global village a perfectly reasonable option fornearly everyone with access to a computer. Setting up a broadband Internet host with fast mail andweb access is becoming more and more affordable.
Talking about computer networks often means talking about Unix. Of course, Unix is not the onlyoperating system with network capabilities, nor will it remain a frontrunner forever, but it has been inthe networking business for a long time and will surely continue to be for some time to come. Whatmakes Unix particularly interesting to private users is that there has been much activity to bring freeUnix-like operating systems to the PC, such as NetBSD, FreeBSD, and Linux.
Linux is a freely distributable Unix clone for personal computers that currently runs on a variety ofmachines that includes the Intel family of processors, but also PowerPC architectures such as theApple Macintosh; it can also run on Sun SPARC and Ultra-SPARC machines; Compaq Alphas; MIPS;and even a number of video game consoles, such as the Sony PlayStation 2, the NintendoGamecube, and the Microsoft Xbox. Linux has also been ported to some relatively obscure platforms,such as the Fujitsu AP-1000 and the IBM System 3/90. Ports to other interesting architectures arecurrently in progress in developers' labs, and the quest to move Linux into the embedded controllerspace promises success.
Linux was developed by a large team of volunteers across the Internet. The project was started in1990 by Linus Torvalds, a Finnish college student, as an operating systems course project. Since thattime, Linux has snowballed into a full-featured Unix clone capable of running applications as diverseas simulation and modeling programs, word processors, speech-recognition systems, World WideWeb browsers, and a horde of other software, including a variety of excellent games. A great deal ofhardware is supported, and Linux contains a complete implementation of TCP/IP networking,including PPP, firewalls, and many features and protocols not found in any other operating system.Linux is powerful, fast, and free, and its popularity in the world beyond the Internet is growingrapidly.
The Linux operating system itself is covered by the GNU General Public License, the same copyrightlicense used by software developed by the Free Software Foundation. This license allows anyone toredistribute or modify the software (free of charge or for a profit) as long as all modifications anddistributions are freely distributable as well. The term "free software" refers to freedom ofapplication, not freedom of cost.

Purpose and Audience for This Book
This book was written to provide a single reference for network administration in a Linuxenvironment. Beginners and experienced users alike should find the information they need to covernearly all important administration activities required to manage a Linux network configuration. Thepossible range of topics to cover is nearly limitless, so of course it has been impossible to includeeverything there is to say on all subjects. We've tried to cover the most important and common ones.Beginners to Linux networking, even those with no prior exposure to Unix-like operating systems,have found earlier editions of this book good enough to help them successfully get their Linuxnetwork configurations up and running and get them ready to learn more.
There are many books and other sources of information from which you can learn any of the topicscovered in this book in greater depth. We've provided a bibliography when you are ready to exploremore.

Sources of Information
If you are new to the world of Linux, there are a number of resources to explore and become familiarwith. Having access to the Internet is helpful, but not essential.
Linux Documentation Project Guides
The Linux Documentation Project is a group of volunteers who have worked to produce books(guides), HOWTO documents, and manpages on topics ranging from installation to kernelprogramming.
Books
Linux Installation and Getting Started
By Matt Welsh, et al. This book describes how to obtain, install, and use Linux. It includes anintroductory Unix tutorial and information on systems administration, the X Window System,and networking.
Linux System Administrators Guide
By Lars Wirzenius and Joanna Oja. This book is a guide to general Linux system administrationand covers topics such as creating and configuring users, performing system backups,configuring of major software packages, and installing and upgrading software.
Linux System Adminstration Made Easy
By Steve Frampton. This book describes day-to-day administration and maintenance issues ofrelevance to Linux users.
Linux Programmers Guide
By B. Scott Burkett, Sven Goldt, John D. Harper, Sven van der Meer, and Matt Welsh. Thisbook covers topics of interest to people who wish to develop application software for Linux.

The Linux Kernel
By David A. Rusling. This book provides an introduction to the Linux kernel, how it isconstructed, and how it works. Take a tour of your kernel.
The Linux Kernel Module Programming Guide
By Ori Pomerantz. This guide explains how to write Linux kernel modules. This book alsooriginated in the LDP. The text of the current version is released under the Creative CommonsAttribution-Share Alike License, so it can be freely altered and distributed.
More manuals are in development. For more information about the LDP, consult their server athttp://www.linuxdoc.org/ or one of its many mirrors.
HOWTO documents
The Linux HOWTOs are a comprehensive series of papers detailing various aspects of the systemsuchas how to install and configure the X Window System software, or write in assembly languageprogramming under Linux. These are available online at one of the many Linux DocumentationProject mirror sites (see next section). See the file HOWTO-INDEX for a list of what's available.
You might want to obtain the Installation HOWTO, which describes how to install Linux on yoursystem; the Hardware Compatibility HOWTO, which contains a list of hardware known to work withLinux; and the Distribution HOWTO, which lists software vendors selling Linux on diskette and CD-ROM.
Linux Frequently Asked Questions
The Linux Frequently Asked Questions with Answers (FAQ) contains a wide assortment of questionsand answers about the system. It is a must-read for all newcomers.
Documentation Available via WWW
There are many Linux-based WWW sites available. The home site for the Linux DocumentationProject can be accessed at http://www.tldp.org/.
Any additional information can probably be found with a quick Google search. It seems that almosteverything has been tried and likely written up by someone in the Linux community.
Documentation Available Commercially
A number of publishing companies and software vendors publish the works of the LinuxDocumentation Project. Two such vendors are Specialized Systems Consultants, Inc. (SSC)(http://www.ssc.com) and Linux Systems Labs (http://www.lsl.com). Both companies sell

compendiums of Linux HOWTO documents and other Linux documentation in printed and boundform.
O'Reilly Media publishes a series of Linux books. This one is a work of the Linux DocumentationProject, but most have been authored independently:
Running Linux
An installation and user guide to the system describing how to get the most out of personalcomputing with Linux.
Linux Server Security
An excellent guide to configuring airtight Linux servers. Administrators who are building webservers or other bastion hosts should consider this book a great source of information.
Linux in a Nutshell
Another in the successful "in a Nutshell" series, this book focuses on providing a broadreference text for Linux.
Linux iptables Pocket Reference
A brief but complete compendium of features in the Linux firewall system.
Linux Journal and Linux Magazine
Linux Journal and Linux Magazine are monthly magazines for the Linux community, written andpublished by a number of Linux activists. They contain articles ranging from novice questions andanswers to kernel programming internals. Even if you have Usenet access, these magazines are agood way to stay in touch with the Linux community.
Linux Journal is the oldest magazine and is published by SSC, for which details were listed in theprevious section. You can also find the magazine at http://www.linuxjournal.com/.
LinuxMagazine is a newer, independent publication. The home web site for the magazine ishttp://www.linuxmagazine.com/.
Linux Usenet Newsgroups
If you have access to Usenet news, the following Linux-related newsgroups are available:

comp.os.linux.announce
A moderated newsgroup containing announcements of new software, distributions, bug reports,and goings-on in the Linux community. All Linux users should read this group.
comp.os.linux.help
General questions and answers about installing or using Linux.
comp.os.linux.admin
Discussions relating to systems administration under Linux.
comp.os.linux.networking
Discussions relating to networking with Linux.
comp.os.linux.development
Discussions about developing the Linux kernel and system itself.
comp.os.linux.misc
A catch-all newsgroup for miscellaneous discussions that don't fall under the previouscategories.
There are also several newsgroups devoted to Linux in languages other than English, such asfr.comp.os.linux in French and de.comp.os.linux in German.
Linux Mailing Lists
There are a large number of specialist Linux mailing lists on which you will find many people willing tohelp with your questions.
The best-known of these is the Linux Kernel Mailing List. It's a very busy and dense mailing list, withan enormous volume of information posted daily. For more information, visithttp://www.tux.org/lkml.

Linux User Groups
Many Linux User Groups around the world offer direct support to users, engaging in activities such asinstallation days, talks and seminars, demonstration nights, and other social events. Linux UserGroups are a great way to meet other Linux users in your area. There are a number of published listsof Linux User Groups. One of the most comprehensive is Linux Users Groups Worldwide(http://lugww.counter.li.org/index.cms).

Obtaining Linux
There is no single distribution of the Linux software; instead, there are many distributions, such asDebian, Fedora, Red Hat, SUSE, Gentoo, and Slackware. Each distribution contains everything youneed to run a complete Linux system: the kernel, basic utilities, libraries, support files, andapplications software.
Linux distributions may be obtained via a number of online sources, such as the Internet. Each of themajor distributions has its own FTP and web site. Some of these sites are as follows:
Debian
http://www.debian.org/
Gentoo
http://www.gentoo.org/
Red Hat
http://www.redhat.com/
Fedora
http://fedora.redhat.com/
Slackware
http://www.slackware.com/
SUSE
http://www.suse.com/
Many of the popular general WWW archive sites also mirror various Linux distributions. The best-known of these sites is http://www.linuxiso.org.

Every major distribution can be downloaded directly from the Internet, but Linux may be purchasedon CD-ROM from an increasing number of software vendors. If your local computer store doesn'thave it, perhaps you should ask them to stock it! Most of the popular distributions can be obtained onCD-ROM. Some vendors produce products containing multiple CD-ROMs, each of which provides adifferent Linux distribution. This is an ideal way to try a number of different distributions beforesettling on your favorite.

Filesystem Standards
In the past, one of the problems that afflicted Linux distributions, as well as the packages of softwarerunning on Linux, was the lack of a single accepted filesystem layout. This resulted in incompatibilitiesbetween different packages, and confronted users and administrators with the task of locatingvarious files and programs.
To improve this situation, in August 1993, several people formed the Linux File System StandardGroup (FSSTND). After six months of discussion, the group created a draft that presents a coherentfilesystem structure and defines the location of the most essential programs and configuration files.
This standard was supposed to have been implemented by most major Linux distributions andpackages. It is a little unfortunate that, while most distributions have made some attempt to worktoward the FSSTND, there is a very small number of distributions that has actually adopted it fully.Throughout this book, we will assume that any files discussed reside in the location specified by thestandard; alternative locations will be mentioned only when there is a long tradition that conflicts withthis specification.
The Linux FSSTND continued to develop, but was replaced by the Linux File Hierarchy Standard(FHS) in 1997. The FHS addresses the multi-architecture issues that the FSSTND did not. The FHScan be obtained from http://www.freestandards.org.

Standard Linux Base
The vast number of different Linux distributions, while providing lots of healthy choices for Linuxusers, has created a problem for software developersparticularly developers of non-free software.
Each distribution packages and supplies certain base libraries, configuration tools, systemapplications, and configuration files. Unfortunately, differences in their versions, names, and locationsmake it very difficult to know what will exist on any distribution. This makes it hard to develop binaryapplications that will work reliably on all Linux distribution bases.
To help overcome this problem, a new project sprang up called the Linux Standard Base. It aims todescribe a standard base distribution that complying distributions will use. If a developer designs anapplication to work with the standard base platform, the application will work with, and be portableto, any complying Linux distribution.
You can find information on the status of the Linux Standard Base project at its home web site athttp://www.linuxbase.org/.
If you're concerned about interoperability, particularly of software from commercial vendors, youshould ensure that your Linux distribution is making an effort to participate in the standardizationproject.

About This Book
When Olaf Kirche joined the LDP in 1992, he wrote two small chapters on UUCP and smail, which hemeant to contribute to the System Administrator's Guide. Development of TCP/IP networking wasjust beginning, and when those "small chapters" started to grow, he wondered aloud whether itwould be nice to have a Networking Guide. "Great!" everyone said. "Go for it!" So he went for it andwrote the first version of the Networking Guide, which was released in September 1993.
Olaf continued work on the Networking Guide and eventually produced a much enhanced version ofthe guide. Vince Skahan contributed the original sendmail mail chapter, which was completelyreplaced in that edition because of a new interface to the sendmail configuration.
In March of 2000, Terry Dawson updated Olaf's original, adding several new chapters and bringing itinto the new millennium.
The version of the guide that you are reading now is a fairly large revision and update prompted byO'Reilly Media and undertaken by Tony Bautts. Tony has been enthusiastic Linux user andinformation security consultant for longer than he would care to admit. He is coauthor of severalother computer security-related books and likes to give talks on the subject as well. Tony is a bigproponent of Linux in the commercial environment and routinely attempts to convert people toGentoo Linux. For this edition he has added a few new chapters describing features of Linuxnetworking that have been developed since the second edition, plus a bunch of changes to bring therest of the book up to date.
The three iptables chapters (Chapters 7, 8, and 9) were updated by Gregor Purdy for this edition.
The book is organized roughly along the sequence of steps that you have to take to configure yoursystem for networking. It starts by discussing basic concepts of networks, and TCP/IP-basednetworks in particular. It then slowly works its way up from configuring TCP/IP at the device level tofirewall, accounting, and masquerade configuration, to the setup of common applications such asSSH, Apache, and Samba. The email part features an introduction to the more intimate parts of mailtransport and routing and the myriad of addressing schemes that you may be confronted with. Itdescribes the configuration and management of sendmail, the most common mail transport agent,and IMAP, used for delivery to individual mail users. Chapters on LDAP and wireless networking roundout the infrastructure for modern network administration.
Of course, a book can never exhaustively answer all questions you might have. So if you follow theinstructions in this book and something still does not work, please be patient. Some of your problemsmay be due to mistakes on our part (see "How to Contact Us," later in this Preface), but they alsomay be caused by changes in the networking software. Therefore, you should check the listedinformation resources first. There's a good chance that you are not alone with your problems, so a fixor at least a proposed workaround is likely to be knownthis is where search engines are particularlyhandy! If you have the opportunity, you should also try to get the latest kernel and network releasefrom http://www.kernel.org. Many problems are caused by software from different stages ofdevelopment, which fail to work together properly. After all, Linux is a "work in progress."

The Official Printed Version
In Autumn 1993, Andy Oram, who had been around the LDP mailing list from almost the verybeginning, asked Olaf about publishing this book at O'Reilly & Associates. He was excited about thisbook, but never imagined that it would become as successful as it has. He and Andy finally agreedthat O'Reilly would produce an enhanced Official Printed Version of the Networking Guide, while Olafretained the original copyright so that the source of the book could be freely distributed. This meansthat you can choose freely: you can get the various free forms of the document from your nearestLDP mirror site and print it out, or you can purchase the official printed version from O'Reilly.
Why, then, would you want to pay money for something you can get for free? Is Tim O'Reilly out ofhis mind for publishing something everyone can print and even sell themselves?[1] Is there anydifference between these versions?
[1] Note that while you are allowed to print out the online version, you may not run the O'Reilly book through a photocopier, much
less sell any of its (hypothetical) copies.
The answers are "It depends," "No, definitely not," and "Yes and no." O'Reilly Media does take a riskin publishing the Network Administrator's Guide, but it seems to have paid off for them (since they'veasked us to do it two more times). We believe this project serves as a fine example of how the freesoftware world and companies can cooperate to produce something both can benefit from. In ourview, the great service O'Reilly provides the Linux community (apart from the book becoming readilyavailable in your local bookstore) is that it has helped Linux become recognized as something to betaken seriously: a viable and useful alternative to other commercial operating systems. It's a sadtechnical bookstore that doesn't have at least one shelf stacked with O'Reilly Linux books.
Why are they publishing it? They see it as their kind of book. It's what they would hope to produce ifthey contracted with an author to write about Linux. The pace, level of detail, and style fit in well withtheir other offerings.
The point of the LDP license is to make sure no one gets shut out. Other people can print out copiesof this book, and no one will blame you if you get one of these copies. But if you haven't gotten achance to see the O'Reilly version, try to get to a bookstore or look at a friend's copy. We think you'lllike what you see and will want to buy it for yourself.
So what about the differences between the printed and online versions? Andy Oram has made greatefforts at transforming our ramblings into something actually worth printing. (He has also reviewed afew other books produced by the LDP, contributing whatever professional skills he can to the Linuxcommunity.)
Since Andy started reviewing the Networking Guide and editing the copies sent to him, the book hasimproved vastly from its original form, and with every round of submission and feedback, it improvesagain. The opportunity to take advantage of a professional editor's skill is not to be wasted. In manyways, Andy's contribution has been as important as that of the authors. The same is also true of theproduction staff, who got the book into the shape that you see now. All these edits have been fedback into the online version, so there is no difference in content.
Still, the O'Reilly version will be different. It will be professionally bound, and while you may go to thetrouble to print the free version, it is unlikely that you will get the same quality result. Secondly, ouramateurish attempts at illustration will have been replaced with nicely redone figures by O'Reilly'sprofessional artists. Indexers have generated an improved index, which makes locating information inthe book a much simpler process. If this book is something you intend to read from start to finish,

Overview
Chapter 1, discusses the history of Linux and covers basic networking information on UUCP, TCP/IP,various protocols, hardware, and security. The next few chapters deal with configuring Linux forTCP/IP networking and running some major applications.
Chapter 2, examines IP a little more closely before we get our hands dirty with file editing and thelike. If you already know how IP routing works and how address resolution is performed, you can skipthis chapter.
Chapter 3, Configuring the Serial Hardware, deals with the configuration of your serial ports.
Chapter 4, Configuring TCP/IP Networking, helps you set up your machine for TCP/IP networking. Itcontains installation hints for standalone hosts and those connected to a network. It also introducesyou to a few useful tools you can use to test and debug your setup.
Chapter 5, Name Service and Configuration, discusses how to configure hostname resolution andexplains how to set up a name server.
Chapter 6, The Point-to-Point Protocol, covers PPP and pppd, the PPP daemon.
Chapter 7, TCP/IP Firewall, extends our discussion on network security and describes the LinuxTCP/IP firewall iptables. IP firewalling provides a means of very precisely controlling who can accessyour network and hosts.
Chapter 8, IP Accounting, explains how to configure IP Accounting in Linux so that you can keep trackof how much traffic is going where and who is generating it.
Chapter 9, IP Masquerade and Network Address Translation, covers a feature of the Linux networkingsoftware called IP masquerade, or NAT, which allows whole IP networks to connect to and use theInternet through a single IP address, hiding internal systems from outsiders in the process.
Chapter 10, Important Network Features, gives a short introduction to setting up some of the mostimportant network infrastructure and applications, such as SSH. This chapter also covers howservices are managed by the inetd superuser and how you may restrict certain security-relevantservices to a set of trusted hosts.
Chapter 11, Administration Issues with Electronic Mail, introduces you to the central concepts ofelectronic mail, such as what a mail address looks like and how the mail handling system manages toget your message to the recipient.
Chapter 12, sendmail, covers the configuration of sendmail, a mail transport agent that you can usefor Linux.
Chapter 13, Configuring IPv6 Networks, covers new ground by explaining how to configure IPv6 andconnect to the IPv6 backbone.
Chapter 14, Configuring the Apache Web Server, describes the steps necessary to build an Apache

web server and host basic web services.
Chapter 15, IMAP, explains the steps necessary to configure an IMAP mail server, and discusses itsadvantages over the traditional POP mail solution.
Chapter 16, Samba, helps you understand how to configure your Linux server to play nicely in theWindows networking worldso nicely, in fact, that your Windows users might not be able to tell thedifference.[2]
[2] The obvious joke here is left to the reader.
Chapter 17, OpenLDAP, introduces OpenLDAP and discusses the configuration and potential uses ofthis service
Chapter 18, finally, details the steps required to configure wireless networking and build a WirelessAccess Point on a Linux server.

Conventions Used in This Book
All examples presented in this book assume that you are using an sh-compatible shell. The bash shellis sh compatible and is the standard shell of all Linux distributions. If you happen to be a csh user,you will have to make appropriate adjustments.
The following is a list of the typographical conventions used in this book:
Italic
Used for file and directory names, program and command names, email addresses andpathnames, URLs, and for emphasizing new terms.
Boldface
Used for machine names, hostnames, site names, and for occasional emphasis.
Constant Width
Used in examples to show the contents of code files or the output from commands and toindicate environment variables and keywords that appear in code.
Constant Width Italic
Used to indicate variable options, keywords, or text that the user is to replace with an actualvalue.
Constant Width Bold
Used in examples to show commands or other text that should be typed literally by the user.
Indicates a tip, suggestion, or general note.

Text appearing in this manner offers a warning. You can make a mistake herethat hurts your system or is hard to recover from.

Safari Enabled
When you see a Safari® Enabled icon on the cover of your favorite technology book,that means the book is available online through the O'Reilly Network Safari Bookshelf.
Safari offers a solution that's better than e-books. It's a virtual library that lets you easily searchthousands of top tech books, cut and paste code samples, download chapters, and find quick answerswhen you need the most accurate, current information. Try it for free at http://safari.oreilly.com.

How to Contact Us
We have tested and verified the information in this book to the best of our ability, but you may findthat features have changed (or even that we have made mistakes!). Please let us know about anyerrors you find, as well as your suggestions for future editions, by writing to:
O'Reilly Media, Inc.1005 Gravenstein Highway NorthSebastopol, CA 95472(800) 998-9938 (in the United States or Canada)(707) 829-0515 (international or local)(707) 829-0104 (fax)
You can send us messages electronically. To be put on the mailing list or request a catalog, sendemail to:
To ask technical questions or comment on the book, send email to:
We have a web site for the book, where we'll list examples, errata, and any plans for future editions.You can access this page at:
http://www.oreilly.com/catalog/linag3
For more information about this book and others, see the O'Reilly web site:
http://www.oreilly.com

Acknowledgments
This edition of the Networking Guide owes much to the outstanding work of Olaf, Vince, and Terry. Itis difficult to appreciate the effort that goes into researching and writing a book of this nature untilyou've had a chance to work on one yourself. Updating the book was a challenging task, but with anexcellent base to work from, it was an enjoyable one.
This book owes very much to the numerous people who took the time to proofread it and help ironout many mistakes. Phil Hughes, John Macdonald, and Kenneth Geisshirt all provided very helpful(and on the whole, quite consistent) feedback on the content of the third edition of this book. AndresSepúlveda, Wolfgang Michaelis, and Michael K. Johnson offered invaluable help on the second edition.Finally, the book would not have been possible without the support of Holger Grothe, who providedOlaf with the Internet connectivity he needed to make the original version happen.
Terry thanks his wife, Maggie, who patiently supported him throughout his participation in the projectdespite the challenges presented by the birth of their first child, Jack. Additionally, he thanks themany people of the Linux community who either nurtured or suffered him to the point at which hecould actually take part and actively contribute. "I'll help you if you promise to help someone else inreturn."
Tony would like to thank Linux gurus Dan Ginsberg and Nicolas Lidzborski for their support andtechnical expertise in proofreading the new chapters. Additionally, he thanks Katherine for her inputwith each chapter, when all she really wanted to do was check her email. Thanks to Mick Bauer forgetting me involved with this project and supporting me along the way. Finally, many thanks to thecountless Linux users who have very helpfully documented their perils in getting things to work, notto mention the countless others who respond on a daily basis to questions posted on the mailing lists.Without this kind of community support, Linux would be nowhere.

Chapter 1. Introduction to Networking
Section 1.1. History
Section 1.2. TCP/IP Networks
Section 1.3. Linux Networking
Section 1.4. Maintaining Your System

1.1. History
The idea of networking is probably as old as telecommunications itself. Consider people living in theStone Age, when drums may have been used to transmit messages between individuals. Supposecaveman A wants to invite caveman B over for a game of hurling rocks at each other, but they livetoo far apart for B to hear A banging his drum. What are A's options? He could 1) walk over to B'splace, 2) get a bigger drum, or 3) ask C, who lives halfway between them, to forward the message.The last option is called networking.
Of course, we have come a long way from the primitive pursuits and devices of our forebears.Nowadays, we have computers talk to each other over vast assemblages of wires, fiber optics,microwaves, and the like, to make an appointment for Saturday's soccer match.[1] In the followingdescription, we will deal with the means and ways by which this is accomplished, but leave out thewires, as well as the soccer part.
[1] The original spirit of which (see above) still shows on some occasions in Europe.
We define a network as a collection of hosts that are able to communicate with each other, often byrelying on the services of a number of dedicated hosts that relay data between the participants.Hosts are often computers, but need not be; one can also think of X terminals or intelligent printersas hosts. A collection of hosts is also called a site.
Communication is impossible without some sort of language or code. In computer networks, theselanguages are collectively referred to as protocols. However, you shouldn't think of written protocolshere, but rather of the highly formalized code of behavior observed when heads of state meet, forinstance. In a very similar fashion, the protocols used in computer networks are nothing but verystrict rules for the exchange of messages between two or more hosts.

1.2. TCP/IP Networks
Modern networking applications require a sophisticated approach to carry data from one machine toanother. If you are managing a Linux machine that has many users, each of whom may wish tosimultaneously connect to remote hosts on a network, you need a way of allowing them to shareyour network connection without interfering with each other. The approach that a large number ofmodern networking protocols use is called packet switching. A packet is a small chunk of data that istransferred from one machine to another across the network. The switching occurs as the datagramis carried across each link in the network. A packet-switched network shares a single network linkamong many users by alternately sending packets from one user to another across that link.
The solution that Unix systems, and subsequently many non-Unix systems, have adopted is known asTCP/IP. When learning about TCP/IP networks, you will hear the term datagram, which technicallyhas a special meaning but is often used interchangeably with packet. In this section, we will have alook at underlying concepts of the TCP/IP protocols.
1.2.1. Introduction to TCP/IP Networks
TCP/IP traces its origins to a research project funded by the United States Defense AdvancedResearch Projects Agency (DARPA) in 1969. The ARPANET was an experimental network that wasconverted into an operational one in 1975 after it had proven to be a success.
In 1983, the new protocol suite TCP/IP was adopted as a standard, and all hosts on the network wererequired to use it. When ARPANET finally grew into the Internet (with ARPANET itself passing out ofexistence in 1990), the use of TCP/IP had spread to networks beyond the Internet itself. Manycompanies have now built corporate TCP/IP networks, and the Internet has become a mainstreamconsumer technology. It is difficult to read a newspaper or magazine now without seeing referencesto the Internet; almost everyone can use it now.
For something concrete to look at as we discuss TCP/IP throughout the following sections, we willconsider Groucho Marx University (GMU), situated somewhere in Freedonia, as an example. Mostdepartments run their own Local Area Networks, while some share one and others run several ofthem. They are all interconnected and hooked to the Internet through a single high-speed link.
Suppose your Linux box is connected to a LAN of Unix hosts at the mathematics department, and itsname is erdos. To access a host at the physics department, say quark, you enter the followingcommand:
$ ssh quark.school.edu
Enter password:Last login: Wed Dec 3 18:21:25 2003 from 10.10.0.1quark$

At the prompt, you enter your password. You are then given a shell[2] on quark, to which you cantype as if you were sitting at the system's console. After you exit the shell, you are returned to yourown machine's prompt. You have just used one of the instantaneous, interactive applications thatuses TCP/IP: secure shell.
[2] The shell is a command-line interface to the Unix operating system. It's similar to the DOS prompt in a Microsoft Windows
environment, albeit much more powerful.
While being logged into quark, you might also want to run a graphical user interface application, likea word processing program, a graphics drawing program, or even a World Wide Web browser. The XWindows System is a fully network-aware graphical user environment, and it is available for manydifferent computing systems. To tell this application that you want to have its windows displayed onyour host's screen, you will need to make sure that you're SSH server and client are capable oftunneling X. To do this, you can check the sshd_config file on the system, which should contain a linelike this:
X11Forwarding yes
If you now start your application, it will tunnel your X Window System applications so that they willbe displayed on your X server instead of quark's. Of course, this requires that you have X11runnning on erdos. The point here is that TCP/IP allows quark and erdos to send X11 packets backand forth to give you the illusion that you're on a single system. The network is almost transparenthere.
Of course, these are only examples of what you can do with TCP/IP networks. The possibilities arealmost limitless, and we'll introduce you to more as you read on through the book.
We will now have a closer look at the way TCP/IP works. This information will help you understandhow and why you have to configure your machine. We will start by examining the hardware andslowly work our way up.
1.2.2. Ethernets
The most common type of LAN hardware is known as Ethernet. In its simplest form, it consists of asingle cable with hosts attached to it through connectors, taps, or transceivers. Simple Ethernets arerelatively inexpensive to install, which together with a net transfer rate of 10, 100, 1,000, and noweven 10,000 megabits per second (Mbps), accounts for much of its popularity.
Ethernets come in many flavors: thick, thin, and twisted pair. Older Ethernet types such as thin andthick Ethernet, rarely in use today, each use a coaxial cable, differing in diameter and the way youmay attach a host to this cable. Thin Ethernet uses a T-shaped "BNC" connector, which you insertinto the cable and twist onto a plug on the back of your computer. Thick Ethernet requires that youdrill a small hole into the cable and attach a transceiver using a "vampire tap." One or more hostscan then be connected to the transceiver. Thin and thick Ethernet cable can run for a maximum of200 and 500 meters, respectively, and are also called 10-base2 and 10-base5. The "base" refers to"baseband modulation" and simply means that the data is directly fed onto the cable without anymodem. The number at the start refers to the speed in megabits per second, and the number at theend is the maximum length of the cable in hundreds of metres. Twisted pair uses a cable made oftwo pairs of copper wires and usually requires additional hardware known as active hubs. Twistedpair is also known as 10-baseT, the "T" meaning twisted pair. The 100 Mbps version is known as

100-baseT, and not surprisingly, 1000 Mbps is called 1000-baseT or gigabit.
To add a host to a thin Ethernet installation, you have to disrupt network service for at least a fewminutes because you have to cut the cable to insert the connector. Although adding a host to a thickEthernet system is a little complicated, it does not typically bring down the network. Twisted pairEthernet is even simpler. It uses a device called a hub or switch that serves as an interconnectionpoint. You can insert and remove hosts from a hub or switch without interrupting any other users atall.
Thick and thin Ethernet deployments are somewhat difficult to find anymore because they have beenmostly replaced by twisted pair deployments. This has likely become a standard because of the cheapnetworking cards and cablesnot to mention that it's almost impossible to find an old BNC connector ina modern laptop machine.
Wireless LANs are also very popular. These are based on the 802.11a/b/g specification and provideEthernet over radio transmission. Offering similar functionality to its wired counterpart, wirelessEthernet has been subject to a number of security issues, namely surrounding encryption. However,advances in the protocol specification combined with different encryption keying methods are quicklyhelping to alleviate some of the more serious security concerns. Wireless networking for Linux isdiscussed in detail in Chapter 18.
Ethernet works like a bus system, where a host may send packets (or frames) of up to 1,500 bytesto another host on the same Ethernet. A host is addressed by a 6-byte address hardcoded into thefirmware of its Ethernet network interface card (NIC). These addresses are usually written as asequence of two-digit hex numbers separated by colons, as in aa:bb:cc:dd:ee:ff.
A frame sent by one station is seen by all attached stations, but only the destination host actuallypicks it up and processes it. If two stations try to send at the same time, a collision occurs. Collisionson an Ethernet are detected very quickly by the electronics of the interface cards and are resolved bythe two stations aborting the send, each waiting a random interval and re-attempting thetransmission. You'll hear lots of stories about collisions on Ethernet being a problem and thatutilization of Ethernets is only about 30 percent of the available bandwidth because of them.Collisions on Ethernet are a normal phenomenon, and on a very busy Ethernet network you shouldn'tbe surprised to see collision rates of up to about 30 percent. Ethernet networks need to be morerealistically limited to about 60 percent before you need to start worrying about it.[3]
[3] The Ethernet FAQ at http://www.faqs.org/faqs/LANs/ethernet-faq/talks about this issue, and a wealth of detailed historical and
technical information is available at Charles Spurgeon's Ethernet web site at http://www.ethermanage.com/ethernet/ethernet.htm/.
1.2.3. Other Types of Hardware
In larger installations, or in legacy corporate environments, Ethernet is usually not the only type ofequipment used. There are many other data communications protocols available and in use. All of theprotocols listed are supported by Linux, but due to space constraints we'll describe them briefly. Manyof the protocols have HOWTO documents that describe them in detail, so you should refer to those ifyou're interested in exploring those that we don't describe in this book.
One older and quickly disappearing technology is IBM's Token Ring network. Token Ring is used as analternative to Ethernet in some LAN environments, and runs at lower speeds (4 Mbps or 16 Mbps). InLinux, Token Ring networking is configured in almost precisely the same way as Ethernet, so we don'tcover it specifically.

Many national networks operated by telecommunications companies support packet-switchingprotocols. Previously, the most popular of these was a standard named X.25. It defines a set ofnetworking protocols that describes how data terminal equipment, such as a host, communicateswith data communications equipment (an X.25 switch). X.25 requires a synchronous data link andtherefore special synchronous serial port hardware. It is possible to use X.25 with normal serial portsif you use a special device called a Packet Assembler Disassembler (PAD). The PAD is a standalonedevice that provides asynchronous serial ports and a synchronous serial port. It manages the X.25protocol so that simple terminal devices can make and accept X.25 connections. X.25 is often used tocarry other network protocols, such as TCP/IP. Since IP datagrams cannot simply be mapped ontoX.25 (or vice versa), they are encapsulated in X.25 packets and sent over the network. There is animplementation of the X.25 protocol available for Linux, but it will not be discussed in depth here.
A protocol commonly used by telecommunications companies is called Frame Relay. The Frame Relayprotocol shares a number of technical features with the X.25 protocol, but is much more like the IPprotocol in behavior. Like X.25, Frame Relay requires special synchronous serial hardware. Becauseof their similarities, many cards support both of these protocols. An alternative is available thatrequires no special internal hardware, again relying on an external device called a Frame RelayAccess Device (FRAD) to manage the encapsulation of Ethernet packets into Frame Relay packets fortransmission across a network. Frame Relay is ideal for carrying TCP/IP between sites. Linux providesdrivers that support some types of internal Frame Relay devices.
If you need higher-speed networking that can carry many different types of data, such as digitizedvoice and video, alongside your usual data, Asynchronous Transfer Mode (ATM) is probably whatyou'll be interested in. ATM is a new network technology that has been specifically designed toprovide a manageable, high-speed, low-latency means of carrying data and control over the Qualityof Service (QoS). Many telecommunications companies are deploying ATM network infrastructurebecause it allows the convergence of a number of different network services into one platform, in thehope of achieving savings in management and support costs. ATM is often used to carry TCP/IP. TheNetworking HOWTO offers information on the Linux support available for ATM.
Frequently, radio amateurs use their radio equipment to network their computers; this is commonlycalled packet radio. One of the protocols used by amateur radio operators is called AX.25 and isloosely derived from X.25. Amateur radio operators use the AX.25 protocol to carry TCP/IP and otherprotocols, too. AX.25, like X.25, requires serial hardware capable of synchronous operation, or anexternal device called a Terminal Node Controller to convert packets transmitted via an asynchronousserial link into packets transmitted synchronously. There are a variety of different sorts of interfacecards available to support packet radio operation; these cards are generally referred to as being"Z8530 SCC based," named after the most popular type of communications controller used in thedesigns. Two of the other protocols that are commonly carried by AX.25 are the NetRom and Roseprotocols, which are network layer protocols. Since these protocols run over AX.25, they have thesame hardware requirements. Linux supports a fully featured implementation of the AX.25, NetRom,and Rose protocols. The AX25 HOWTO is a good source of information on the Linux implementationof these protocols.
Other types of Internet access involve dialing up a central system over slow but cheap serial lines(telephone, ISDN, and so on). These require yet another protocol for transmission of packets, suchas SLIP or PPP, which will be described later.
1.2.4. The Internet Protocol
Of course, you wouldn't want your networking to be limited to one Ethernet or one point-to-point

data link. Ideally, you would want to be able to communicate with a host computer regardless ofwhat type of physical network it is connected to. For example, in larger installations such as GrouchoMarx University, you usually have a number of separate networks that have to be connected in someway. At GMU, the math department runs two Ethernets: one with fast machines for professors andgraduates, and another with slow machines for students.
This connection is handled by a dedicated host called a gateway that handles incoming and outgoingpackets by copying them between the two Ethernets and the FDDI fiber optic cable. For example, ifyou are at the math department and want to access quark on the physics department's LAN fromyour Linux box, the networking software will not send packets to quark directly because it is not onthe same Ethernet. Therefore, it has to rely on the gateway to act as a forwarder. The gateway(named sophus) then forwards these packets to its peer gateway niels at the physics department,using the backbone network, with niels delivering it to the destination machine. Data flow betweenerdos and quark is shown in Figure 1-1.
Figure 1-1. The three steps of sending a datagram from erdos to quark
This scheme of directing data to a remote host is called routing, and packets are often referred to asdatagrams in this context. To facilitate things, datagram exchange is governed by a single protocolthat is independent of the hardware used: IP, or Internet Protocol. In Chapter 2, we will cover IP andthe issues of routing in greater detail.
The main benefit of IP is that it turns physically dissimilar networks into one apparently homogeneousnetwork. This is called internetworking, and the resulting "meta-network" is called an internet. Notethe subtle difference here between an internet and the Internet. The latter is the official name of oneparticular global internet.
Of course, IP also requires a hardware-independent addressing scheme. This is achieved by assigning

each host a unique 32-bit number called the IP address. An IP address is usually written as fourdecimal numbers, one for each 8-bit portion, separated by dots. For example, quark might have anIP address of 0x954C0C04, which would be written as 149.76.12.4. This format is also calleddotted decimal notation and sometimes dotted quad notation. It is increasingly going under the nameIPv4 (for Internet Protocol, Version 4) because a new standard called IPv6 offers much more flexibleaddressing, as well as other modern features. It will be at least a year after the release of this editionbefore IPv6 is in use.
You will notice that we now have three different types of addresses: first there is the host's name,like quark, then there is an IP address, and finally, there is a hardware address, such as the 6-byteEthernet address. All these addresses somehow have to match so that when you type ssh quark, thenetworking software can be given quark's IP address; and when IP delivers any data to the physicsdepartment's Ethernet, it somehow has to find out what Ethernet address corresponds to the IPaddress.
We will deal with these situations in Chapter 2. For now, it's enough to remember that these steps offinding addresses are called hostname resolution, for mapping hostnames onto IP addresses, andaddress resolution, for mapping the latter to hardware addresses.
1.2.5. IP over Serial Lines
On serial lines, a "de facto" standard exists known as Serial Line IP (SLIP). A modification of SLIPknown as Compressed SLIP (CSLIP), performs compression of IP headers to make better use of therelatively low bandwidth provided by most serial links. Another serial protocol is Point-to-PointProtocol (PPP). PPP is more modern than SLIP and includes a number of features that make it moreattractive. Its main advantage over SLIP is that it isn't limited to transporting IP datagrams, but isdesigned to allow just about any protocol to be carried across it. This book discusses PPP in Chapter6.
1.2.6. The Transmission Control Protocol
Sending datagrams from one host to another is not the whole story. If you log in to quark, you wantto have a reliable connection between your ssh process on erdos and the shell process on quark.Thus, the information sent to and fro must be split into packets by the sender and reassembled into acharacter stream by the receiver. Trivial as it seems, this involves a number of complicated tasks.
A very important thing to know about IP is that, by intent, it is not reliable. Assume that 10 people onyour Ethernet started downloading the latest release of the Mozilla web browser source code fromGMU's FTP server. The amount of traffic generated might be too much for the gateway to handlebecause it's too slow and it's tight on memory. Now if you happen to send a packet to quark,sophus might be out of buffer space for a moment and therefore unable to forward it. IP solves thisproblem by simply discarding it. The packet is irrevocably lost. It is therefore the responsibility of thecommunicating hosts to check the integrity and completeness of the data and retransmit it in case oferror.
This process is performed by yet another protocol, Transmission Control Protocol (TCP), which buildsa reliable service on top of IP. The essential property of TCP is that it uses IP to give you the illusionof a simple connection between the two processes on your host and the remote machine so that youdon't have to care about how and along which route your data actually travels. A TCP connection

works essentially like a two-way pipe that both processes may write to and read from. Think of it as atelephone conversation.
TCP identifies the end points of such a connection by the IP addresses of the two hosts involved andthe number of a port on each host. Ports may be viewed as attachment points for networkconnections. If we are to strain the telephone example a little more, and you imagine that cities arelike hosts, one might compare IP addresses to area codes (where numbers map to cities), and portnumbers to local codes (where numbers map to individual people's telephones). An individual hostmay support many different services, each distinguished by its own port number.
In the ssh example, the client application (ssh) opens a port on erdos and connects to port 22 onquark, to which the sshd server is known to listen. This action establishes a TCP connection. Usingthis connection, sshd performs the authorization procedure and then spawns the shell. The shell'sstandard input and output are redirected to the TCP connection so that anything you type to ssh onyour machine will be passed through the TCP stream and be given to the shell as standard input.
1.2.7. The User Datagram Protocol
Of course, TCP isn't the only user protocol in TCP/IP networking. Although suitable for applicationslike ssh, the overhead involved is prohibitive for applications like NFS, which instead uses a siblingprotocol of TCP called User Datagram Protocol (UDP). Just like TCP, UDP allows an application tocontact a service on a certain port of the remote machine, but it doesn't establish a connection forthis. Instead, you use it to send single packets to the destination servicehence its name.
Assume that you want to request a small amount of data from a database server. It takes at leastthree datagrams to establish a TCP connection, another three to send and confirm a small amount ofdata each way, and another three to close the connection. UDP provides us with a means of usingonly two datagrams to achieve almost the same result. UDP is said to be connectionless, and itdoesn't require us to establish and close a session. We simply put our data into a datagram and sendit to the server; the server formulates its reply, puts the data into a datagram addressed back to us,and transmits it back. While this is both faster and more efficient than TCP for simple transactions,UDP was not designed to deal with datagram loss. It is up to the application, a nameserver, forexample, to take care of this.
1.2.8. More on Ports
Ports may be viewed as attachment points for network connections. If an application wants to offer acertain service, it attaches itself to a port and waits for clients (this is also called listening on theport). A client who wants to use this service allocates a port on its local host and connects to theserver's port on the remote host. The same port may be open on many different machines, but oneach machine only one process can open a port at any one time.
An important property of ports is that once a connection has been established between the client andthe server, another copy of the server may attach to the server port and listen for more clients. Thisproperty permits, for instance, several concurrent remote logins to the same host, all using the sameport 513. TCP is able to tell these connections from one another because they all come from differentports or hosts. For example, if you log in twice to quark from erdos, the first ssh client may use thelocal port 6464, and the second one could use port 4235. Both, however, will connect to the sameport 513 on quark. The two connections will be distinguished by use of the port numbers used at

erdos.
This example shows the use of ports as rendezvous points, where a client contacts a specific port toobtain a specific service. In order for a client to know the proper port number, an agreement has tobe reached between the administrators of both systems on the assignment of these numbers. Forservices that are widely used, such as ssh, these numbers have to be administered centrally. This isdone by the Internet Engineering Task Force (IETF), which regularly releases an RFC titled AssignedNumbers (RFC-1700). It describes, among other things, the port numbers assigned to well-knownservices. Linux uses a file called /etc/services that maps service names to numbers.
It is worth noting that, although both TCP and UDP connections rely on ports, these numbers do notconflict. This means that TCP port 22, for example, is different from UDP port 22.
1.2.9. The Socket Library
In Unix operating systems, the software performing all the tasks and protocols described above isusually part of the kernel, and so it is in Linux. The programming interface most common in the Unixworld is the Berkeley Socket Library. Its name derives from a popular analogy that views ports assockets and connecting to a port as plugging in. It provides the bind call to specify a remote host, atransport protocol, and a service that a program can connect or listen to (using connect, listen, andaccept). The socket library is somewhat more general in that it provides not only a class of TCP/IP-based sockets (the AF_INET sockets), but also a class that handles connections local to the machine(the AF_UNIX class). Some implementations can also handle other classes, like the Xerox NetworkingSystem (XNS) protocol or X.25.
In Linux, the socket library is part of the standard libc C library. It supports the AF_INET andAF_INET6 sockets for TCP/IP and AF_UNIX for Unix domain sockets. It also supports AF_IPX forNovell's network protocols, AF_ X25 for the X.25 network protocol, AF_ATMPVC and AF_ATMSVC forthe ATM network protocol and AF_AX25, AF_NETROM, and AF_ ROSE sockets for Amateur Radioprotocol support. Other protocol families are being developed and will be added in time.

1.3. Linux Networking
As it is the result of a concerted effort of programmers around the world, Linux wouldn't have beenpossible without the global network. So it's not surprising that in the early stages of development,several people started to work on providing it with network capabilities. A UUCP implementation wasrunning on Linux almost from the very beginning, and work on TCP/IP-based networking startedaround autumn 1992, when Ross Biro and others created what has now become known as Net-1.
After Ross quit active development in May 1993, Fred van Kempen began to work on a newimplementation, rewriting major parts of the code. This project was known as Net-2. The first publicrelease, Net-2d, was made in the summer of 1993 (as part of the 0.99.10 kernel), and has sincebeen maintained and expanded by several people, most notably Alan Cox. Alan's original work wasknown as Net-2Debugged. After heavy debugging and numerous improvements to the code, hechanged its name to Net-3 after Linux 1.0 was released. The Net-3 code was further developed forLinux 1.2 and Linux 2.0. The 2.2 and later kernels use the Net-4 version network support, whichremains the standard official offering today.
The Net-4 Linux Network code offers a wide variety of device drivers and advanced features.Standard Net-4 protocols include SLIP and PPP (for sending network traffic over serial lines), PLIP(for parallel lines), IPX (for Novell compatible networks), Appletalk (for Apple networks) and AX.25,NetRom, and Rose (for amateur radio networks). Other standard Net-4 features include IP firewalling(discussed in Chapter 7), IP accounting (Chapter 8), and IP Masquerade (Chapter 9). IP tunneling ina couple of different flavors and advanced policy routing are supported. A very large variety ofEthernet devices are supported, in addition to support for some FDDI, Token Ring, Frame Relay, andISDN, and ATM cards.
Additionally, there are a number of other features that greatly enhance the flexibility of Linux. Thesefeatures include interoperability with the Microsoft Windows network environment, in a project calledSamba, discussed in Chapter 16, and an implementation of the Novell NCP (NetWare CoreProtocol).[4]
[4] NCP is the protocol on which Novell file and print services are based.
1.3.1. Different Streaks of Development
There have been, at various times, varying network development efforts active for Linux.
Fred continued development after Net-2Debugged was made the official network implementation.This development led to the Net-2e, which featured a much revised design of the networking layer.Fred was working toward a standardized Device Driver Interface (DDI), but the Net-2e work hasended now.
Yet another implementation of TCP/IP networking came from Matthias Urlichs, who wrote an ISDNdriver for Linux and FreeBSD. For this driver, he integrated some of the BSD networking code in theLinux kernel. That project, too, is no longer being worked on.

There has been a lot of rapid change in the Linux kernel networking implementation, and change isstill the watchword as development continues. Sometimes this means that changes also have tooccur in other software, such as the network configuration tools. While this is no longer as large aproblem as it once was, you may still find that upgrading your kernel to a later version means thatyou must upgrade your network configuration tools, too. Fortunately, with the large number of Linuxdistributions available today, this is a quite simple task.
The Net-4 network implementation is now a standard and is in use at a very large number of sitesaround the world. Much work has been done on improving the performance of the Net-4implementation, and it now competes with the best implementations available for the same hardwareplatforms. Linux is proliferating in the Internet Service Provider environment, and is often used tobuild cheap and reliable World Wide Web servers, mail servers, and news servers for these sorts oforganizations. There is now sufficient development interest in Linux that it is managing to keepabreast of networking technology as it changes, and current releases of the Linux kernel offer thenext generation of the IP protocol, IPv6, as a standard offering, which will be discussed at greaterdetail in Chapter 13.
1.3.2. Where to Get the Code
It seems odd now to remember that in the early days of the Linux network code development, thestandard kernel required a huge patch kit to add the networking support to it. Today, networkdevelopment occurs as part of the mainstream Linux kernel development process. The latest stableLinux kernels can be found on ftp://ftp.kernel.org in /pub/linux/kernel/v2.x/, where x is an evennumber. The latest experimental Linux kernels can be found on ftp://ftp.kernel.org in/pub/linux/kernel/v2.y/, where y is an odd number. The kernel.org distributions can also be accessedvia HTTP at http://www.kernel.org. There are Linux kernel source mirrors all over the world.

1.4. Maintaining Your System
Throughout this book, we will mainly deal with installation and configuration issues. Administration is,however, much more than thatafter setting up a service, you have to keep it running, too. For mostservices, only a little attendance will be necessary, while some, such as mail, require that youperform routine tasks to keep your system up to date. We will discuss these tasks in later chapters.
The absolute minimum in maintenance is to check system and per-application logfiles regularly forerror conditions and unusual events. Often, you will want to do this by writing a couple ofadministrative shell scripts and periodically running them from cron. The source distributions of somemajor applications contain such scripts. You only have to tailor them to suit your needs andpreferences.
The output from any of your cron jobs should be mailed to an administrative account. By default,many applications will send error reports, usage statistics, or logfile summaries to the root account.This makes sense only if you log in as root frequently; a much better idea is to forward root's mail toyour personal account by setting up a mail alias as described in Chapters Chapter 11 and Chapter12.
However carefully you have configured your site, Murphy's Law guarantees that some problem willsurface eventually. Therefore, maintaining a system also means being available for complaints.Usually, people expect that the system administrator can at least be reached via email as root, butthere are also other addresses that are commonly used to reach the person responsible for a specificaspect of maintenence. For instance, complaints about a malfunctioning mail configuration will usuallybe addressed to postmaster, and problems with the news system may be reported to newsmaster orusenet. Mail to hostmaster should be redirected to the person in charge of the host's basic networkservices, and the DNS name service if you run a nameserver.
1.4.1. System Security
Another very important aspect of system administration in a network environment is protecting yoursystem and users from intruders. Carelessly managed systems offer malicious people many targets.Attacks range from password guessing to Ethernet snooping, and the damage caused may rangefrom faked mail messages to data loss or violation of your users' privacy. We will mention someparticular problems when discussing the context in which they may occur and some commondefenses against them.
This section will discuss a few examples and basic techniques for dealing with system security. Ofcourse, the topics covered cannot treat all security issues in detail; they merely serve to illustrate theproblems that may arise. Therefore, reading a good book on security is an absolute must, especiallyin a networked system.
System security starts with good system administration. This includes checking the ownership andpermissions of all vital files and directories and monitoring use of privileged accounts. The COPSprogram, for instance, will check your filesystem and common configuration files for unusualpermissions or other anomalies. Another tool, Bastille Linux, developed by Jay Beale and found at

http://www.bastille-linux.org, contains a number of scripts and programs that can be used to lockdown a Linux system. It is also wise to use a password suite that enforces certain rules on the users'passwords that make them hard to guess. The shadow password suite, now a default, requires apassword to have at least five letters and to contain both upper- and lowercase numbers, as well asnonalphabetic characters.
When making a service accessible to the network, make sure to give it "least privilege"; don't permitit to do things that aren't required for it to work as designed. For example, you should makeprograms setuid to root or some other privileged account only when necessary. Also, if you want touse a service for only a very limited application, don't hesitate to configure it as restrictively as yourspecial application allows. For instance, if you want to allow diskless hosts to boot from your machine,you must provide Trivial File Transfer Protocol (TFTP) so that they can download basic configurationfiles from the /boot directory. However, when used unrestrictively, TFTP allows users anywhere in theworld to download any world-readable file from your system. If this is not what you want, restrictTFTP service to the /boot directory (we'll come back to this in Chapter 10). You might also want torestrict certain services to users from certain hosts, say from your local network. In Chapter 10, weintroduce tcpd, which does this for a variety of network applications. More sophisticated methods ofrestricting access to particular hosts or services will be explored in Chapter 7.
Another important point is to avoid "dangerous" software. Of course, any software you use can bedangerous because software may have bugs that clever people might exploit to gain access to yoursystem. Things like this happen, and there's no complete protection against it. This problem affectsfree software and commercial products alike.[5] However, programs that require special privilege areinherently more dangerous than others because any loophole can have drastic consequences.[6] Ifyou install a setuid program for network purposes, be doubly careful to check the documentation sothat you don't create a security breach by accident.
[5] There have been commercial Unix systems (that you have to pay lots of money for) that came with a setuid root shell script,
which allowed users to gain root privilege using a simple standard trick.
[6] In 1988, the RTM worm brought much of the Internet to a grinding halt, partly by exploiting a gaping hole in some programs,
including the sendmail program. This hole has long since been fixed.
Another source of concern should be programs that enable login or command execution with limitedauthentication. The rlogin, rsh, and rexec commands are all very useful, but offer very limitedauthentication of the calling party. Authentication is based on trust of the calling hostname obtainedfrom a nameserver (we'll talk about these later), which can be faked. Today it should be standardpractice to disable the r commands completely and replace them with the ssh suite of tools. The sshtools use a much more reliable authentication method and provide other services, such as encryptionand compression, as well.
You can never rule out the possibility that your precautions might fail, regardless of how careful youhave been. You should therefore make sure that you detect intruders early. Checking the systemlogfiles is a good starting point, but the intruder is probably clever enough to anticipate this actionand will delete any obvious traces he or she left. However, there are tools like tripwire, written byGene Kim and Gene Spafford, that allow you to check vital system files to see if their contents orpermissions have been changed. tripwire computes various strong checksums over these files andstores them in a database. During subsequent runs, the checksums are recomputed and compared tothe stored ones to detect any modifications.
Finally, it's always important to be proactive about security. Monitoring the mailing lists for updatesand fixes to the applications that you use is critical in keeping current with new releases. Failing toupdate something such as Apache or OpenSSL can lead directly to system compromise. One fairly

recent example of this was found with the Linux Slapper worm, which propagated using an OpenSSLvulnerability. While keeping up to date can seem a daunting and time-consuming effort,administrators who were quick to react and upgrade their OpenSSL implementations ended up savinga great deal of time because they did not have to restore compromised systems!

Chapter 2. Issues of TCP/IP NetworkingIn this chapter we turn to the configuration decisions that you'll need to make when connecting yourLinux machine to a TCP/IP network, including dealing with IP addresses, hostnames, and routingissues. This chapter gives you the background you need in order to understand what your setuprequires, while the next chapters cover the tools that you will use.
To learn more about TCP/IP and the reasons behind it, refer to the three-volume set Internetworkingwith TCP/IP (Prentice Hall) by Douglas R. Comer. For a more detailed guide to managing a TCP/IPnetwork, see TCP/IP Network Administration (O'Reilly) by Craig Hunt.

2.1. Networking Interfaces
To hide the diversity of equipment that may be used in a networking environment, TCP/IP defines anabstract interface through which the hardware is accessed. This interface offers a set of operationsthat is the same for all types of hardware and basically deals with sending and receiving packets.
For each peripheral networking device, a corresponding interface has to be present in the kernel. Forexample, Ethernet interfaces in Linux are called by such names as eth0 and eth1; PPP (discussed inChapter 6) interfaces are named ppp0 and ppp1; and FDDI interfaces are given names such as fddi0and fddi1. These interface names are used for configuration purposes when you want to specify aparticular physical device in a configuration command, and they have no meaning beyond this use.
Before being used by TCP/IP networking, an interface must be assigned an IP address that serves asits identification when communicating with the rest of the world. This address is different from theinterface name mentioned previously; if you compare an interface to a door, the address is like thenameplate pinned on it.
Other device parameters may be set, such as the maximum size of datagrams that can be processedby a particular piece of hardware, which is referred to as Maximum Transfer Unit (MTU). Otherattributes will be introduced later. Fortunately, most attributes have sensible defaults.

2.2. IP Addresses
As mentioned in Chapter 1, the IP networking protocol understands addresses as 32-bit numbers.Each machine must be assigned a number unique to the networking environment. If you are runninga local network that does not have TCP/IP traffic with other networks, you may assign these numbersaccording to your personal preferences. There are some IP address ranges that have been reservedfor such private networks. These ranges are listed in Table 2-1. However, for sites on the Internet,numbers are assigned by a central authority, the Network Information Center (NIC).
IP addresses are split up into four 8-bit numbers called octets for readability. For example,quark.physics.groucho.edu has an IP address of 0x954C0C04, which is written as 149.76.12.4.This format is often referred to as dotted quad notation.
Another reason for this notation is that IP addresses are split into a network number, which iscontained in the leading octets, and a host number, which is the remainder. When applying to theNIC for IP addresses, you are not assigned an address for each single host you plan to use. Instead,you are given a network number and allowed to assign all valid IP addresses within this range tohosts on your network according to your preferences.
The size of the host partly depends on the size of the network. To accommodate different needs,several classes of networks have been defined, with different places to split IP addresses. The classnetworks are described here:
Class A
Class A comprises networks 1.0.0.0 through 127.0.0.0. The network number is contained inthe first octet. This class provides for a 24-bit host part, allowing roughly 1.6 million hosts pernetwork.
Class B
Class B contains networks 128.0.0.0 through 191.255.0.0; the network number is in the firsttwo octets. This class allows for 16,320 nets with 65,024 hosts each.
Class C
Class C networks range from 192.0.0.0 through 223.255.255.0, with the network numbercontained in the first three octets. This class allows for nearly 2 million networks with up to 254hosts.

Classes D, E, and F
Addresses falling into the range of 224.0.0.0 through 254.0.0.0 are either experimental orare reserved for special purpose use and don't specify any network. IP Multicast, which is aservice that allows material to be transmitted to many points on an internet at one time, hasbeen assigned addresses from within this range.
If we go back to the example in Chapter 1, we find that 149.76.12.4, the address of quark, refersto host 12.4 on the class B network 149.76.0.0.
You may have noticed that not all possible values in the previous list were allowed for each octet inthe host part. This is because octets 0 and 255 are reserved for special purposes. An address whereall host part bits are 0 refers to the network, and an address where all bits of the host part are 1 iscalled a broadcast address. This refers to all hosts on the specified network simultaneously. Thus,149.76.255.255 is not a valid host address, but refers to all hosts on network 149.76.0.0.
A number of network addresses are reserved for special purposes. 0.0.0.0 and 127.0.0.0 are twosuch addresses. The first is called the default route, and the second is the loopback address. Thedefault route is a place holder for the router your local area network uses to reach the outside world.
Network 127.0.0.0 is reserved for IP traffic local to your host. Usually, address 127.0.0.1 will beassigned to a special interface on your host, the loopback interface, which acts like a closed circuit.Any IP packet handed to this interface from TCP or UDP will be returned as if it had just arrived fromsome network. This allows you to develop and test networking software without ever using a "real"network. The loopback network also allows you to use networking software on a standalone host.This may not be as uncommon as it sounds; for instance, services such as MySQL, which may only beused by other applications resident on the server, can be bound to the local host interface to providean added layer of security.
Some address ranges from each of the network classes have been set aside and designated"reserved" or "private" address ranges. Sometimes referred to as RFC-1918 addresses, these arereserved for use by private networks and are not routed on the Internet. They are commonly used byorganizations building their own intranet, but even small networks often find them useful. Thereserved network addresses appear in Table 2-1.
Table 2-1. IP address ranges reserved for private use
Class Networks
A 10.0.0.0 through 10.255.255.255
B 172.16.0.0 through 172.31.0.0
C 192.168.0.0 through 192.168.255.0
2.2.1. Classless Inter-Domain Routing
Classless Inter-Domain routing (CIDR), discussed more in Chapter 4, is a newer and more efficientmethod of allocating IP addresses. With CIDR, network administrators can assign networks

containing as few as two IP addresses, rather than the previous method of assigning an entire 254addresses with a class C block. CIDR was designed for a number of reasons, but the primary reasonsare the rapid depletion of IP addresses and various capacity issues with the global routing tables.
CIDR addresses are written using a new notation, not surprisingly called the CIDR block notation. Anexample is 172.16.0.0/24, which represents the range of addresses from 172.16.0.0 to172.16.0.255. The 24 in the notation means that there are 24 address bits set, which leaves usable8 bits of the 32-bit IP address. To reduce the number of addresses in this range, we could add threeto the number of address bits, giving us a network address of 172.16.0.0/27. This means that wewould now have only five usable host bits, giving us a total of 32 addresses. CIDR addresses can alsobe used to create ranges larger than a class C. For example, removing two bits from the above 24-bitnetwork example yields 172.16.0.0/22. This provides a network space a network of 1,024addresses, four times the size of a traditional class C space. Some common CIDR configurations areshown in Table 2-2.
Table 2-2. Common CIDR block notations
CIDR block prefix Host bits Number of addresses
/29 3 bits 8
/28 4 bits 16
/27 5 bits 32
/25 6 bits 128
/24 8 bits 256
/22 10 bits 1024
2.2.2. Address Resolution
Now that you've seen how IP addresses are composed, you may be wondering how they are used onan Ethernet or Token Ring network to address different hosts. After all, these protocols have theirown addresses to identify hosts that have absolutely nothing in common with an IP address, don'tthey? Right.
A mechanism is needed to map IP addresses onto the addresses of the underlying network. Themechanism used is the Address Resolution Protocol (ARP). In fact, ARP is not confined to Ethernet orToken Ring, but is used on other types of networks, such as the amateur radio AX.25 protocol. Theidea underlying ARP is exactly what most people do when they have to find Mr. X in a throng of 150people: the person who wants him calls out loudly enough that everyone in the room can hear her,expecting him to respond if he is there. When he responds, she knows which person he is.
When ARP wants to find the Ethernet address corresponding to a given IP address, it uses anEthernet feature called broadcasting, in which a datagram is addressed to all stations on the networksimultaneously. The broadcast datagram sent by ARP contains a query for the IP address. Eachreceiving host compares this query to its own IP address and if it matches, returns an ARP reply to
the inquiring host. The inquiring host can now extract the sender's Ethernet address from the reply. Auseful utility to assist you in determining ARP addresses on your network is the arp utility. When runwithout any options, the command will return output similar to the following:
vbrew root # arpAddress HWtype HWaddress Flags Mask Iface172.16.0.155 ether 00:11:2F:53:4D:EF C eth0172.16.0.65 ether 00:90:4B:C1:4A:E5 C eth0vlager.vbrew.com ether 00:10:67:00:C3:7B C eth1172.16.0.207 ether 00:0B:DB:53:E7:D4 C eth0
It is also possible to request specific ARP addresses from hosts on your network, and should it benecessary, network administrators can also modify, add, or remove ARP entries from their localcache.
Let's talk a little more about ARP. Once a host has discovered an Ethernet address, it stores it in itsARP cache so that it doesn't have to query for it again the next time it wants to send a datagram tothe host in question. However, it is unwise to keep this information forever; the remote host'sEthernet card may be replaced because of technical problems, so the ARP entry would becomeinvalid. Therefore, entries in the ARP cache are discarded after some time to force another query forthe IP address.
Sometimes it is also necessary to find the IP address associated with a given Ethernet address. Thishappens when a diskless machine wants to boot from a server on the network, which is a commonsituation on Local Area Networks. A diskless client, however, has virtually no information aboutitselfexcept for its Ethernet address! So it broadcasts a message containing a request asking a bootserver to provide it with an IP address. There's another protocol for this situation named ReverseAddress Resolution Protocol (RARP). Along with the BOOTP protocol, it serves to define a procedurefor bootstrapping diskless clients over the network.
2.2.3. IP Routing
We now take up the question of finding the host that datagrams go to based on the IP address.Different parts of the address are handled in different ways; it is your job to set up the files thatindicate how to treat each part.
2.2.3.1 IP networks
When you write a letter to someone, you usually put a complete address on the envelope specifyingthe country, state, and Zip Code. After you put it in the mailbox, the post office will deliver it to itsdestination: it will be sent to the country indicated, where the national service will dispatch it to theproper state and region. The advantage of this hierarchical scheme is obvious: wherever you post theletter, the local postmaster knows roughly which direction to forward the letter, but the postmasterdoesn't care which way the letter will travel once it reaches its country of destination.
IP networks are structured similarly. The whole Internet consists of a number of proper networks,called autonomous systems. Each system performs routing between its member hosts internally sothat the task of delivering a datagram is reduced to finding a path to the destination host's network.

As soon as the datagram is handed to any host on that particular network, further processing is doneexclusively by the network itself.
2.2.3.2 Subnetworks
This structure is reflected by splitting IP addresses into a host and network part, as explained earlierin this chapter. By default, the destination network is derived from the network part of the IPaddress. Thus, hosts with identical IP network numbers should be found within the same network.[1]
[1] Autonomous systems are slightly more general. They may comprise more than one IP network.
It makes sense to offer a similar scheme inside the network, too, since it may consist of a collectionof hundreds of smaller networks, with the smallest units being physical networks like Ethernets.Therefore, IP allows you to subdivide an IP network into several subnets.
A subnet takes responsibility for delivering datagrams to a certain range of IP addresses. It is anextension of the concept of splitting bit fields, as in the A, B, and C classes. However, the networkpart is now extended to include some bits from the host part. The number of bits that are interpretedas the subnet number is given by the so-called subnet mask, or netmask. This is a 32-bit numbertoo, which specifies the bit mask for the network part of the IP address.
The campus network of Groucho Marx University (GMU) is an example of such a network. It has aclass B network number of 149.76.0.0, and its netmask is therefore 255.255.0.0.
Internally, GMU's campus network consists of several smaller networks, such as various departments'LANs. So the range of IP addresses is broken up into 254 subnets, 149.76.1.0 through149.76.254.0. For example, the department of Theoretical Physics has been assigned 149.76.12.0.The campus backbone is a network in its own right, and is given 149.76.1.0. These subnets sharethe same IP network number, while the third octet is used to distinguish between them. They willthus use a subnet mask of 255.255.255.0.
Figure 2-1 shows how 149.76.12.4, the address of quark, is interpreted differently when theaddress is taken as an ordinary class B network and when used with subnetting.
Figure 2-1. Subnetting a class B network

It is worth noting that subnetting (the technique of generating subnets) is only an internal division ofthe network. Subnets are generated by the network owner (or the administrators). Frequently,subnets are created to reflect existing boundaries, be they physical (between two Ethernets),administrative (between two departments), or geographical (between two locations), and authorityover each subnet is delegated to some contact person. However, this structure affects only thenetwork's internal behavior and is completely invisible to the outside world.
2.2.3.3 Gateways
Subnetting is not only a benefit to the organization; it is frequently a natural consequence ofhardware boundaries. The viewpoint of a host on a given physical network, such as an Ethernet, is avery limited one: it can only talk to the host of the network it is on. All other hosts can be accessedonly through special-purpose machines called gateways. A gateway is a host that is connected to twoor more physical networks simultaneously and is configured to switch packets between them.
Figure 2-2 shows part of the network topology at GMU. Hosts that are on two subnets at the sametime are shown with both addresses.
Figure 2-2. A part of the net topology at Groucho Marx University

Different physical networks have to belong to different IP networks for IP to be able to recognize if ahost is on a local network. For example, the network number 149.76.4.0 is reserved for hosts onthe mathematics LAN. When sending a datagram to quark, the network software on erdosimmediately sees from the IP address 149.76.12.4 that the destination host is on a differentphysical network, and therefore can be reached only through a gateway (sophus by default).
sophus itself is connected to two distinct subnets: the Mathematics department and the campusbackbone. It accesses each through a different interface, eth0 and fddi0, respectively. Now, what IPaddress do we assign it? Should we give it one on subnet 149.76.1.0 or on 149.76.4.0?
The answer is: "both." sophus has been assigned the address 149.76.1.1 for use on the149.76.1.0 network and address 149.76.4.1 for use on the 149.76.4.0 network. A gateway mustbe assigned one IP address for each network it belongs to. These addressesalong with thecorresponding netmaskare tied to the interface through which the subnet is accessed. Thus, theinterface and address mapping for sophus would be as shown in Table 2-3.
Table 2-3. Sample interfaces and addresses

Interface Address Netmask
eth0 149.76.4.1 255.255.255.0
fddi0 149.76.1.1 255.255.255.0
lo 127.0.0.1 255.0.0.0
The last entry describes the loopback interface lo, which we talked about earlier in this chapter.
Generally, you can ignore the subtle difference between attaching an address to a host or itsinterface. For hosts that are on one network only, such as erdos, you would generally refer to thehost as having this-and-that IP address, although strictly speaking, it's the Ethernet interface thathas this IP address. The distinction is really important only when you refer to a gateway.
2.2.4. The Routing Table
We now focus our attention on how IP chooses a gateway to use to deliver a datagram to a remotenetwork.
We have seen that erdos, when given a datagram for quark, checks the destination address andfinds that it is not on the local network. erdos therefore sends the datagram to the default gatewaysophus, which is now faced with the same task. sophus recognizes that quark is not on any of thenetworks it is connected to directly, so it has to find yet another gateway to forward it through. Thecorrect choice would be niels, the gateway to the physics department. sophus thus needsinformation to associate a destination network with a suitable gateway.
IP uses a table for this task that associates networks with the gateways by which they may bereached. A catch-all entry (the default route) must generally be supplied too; this is the gatewayassociated with network 0.0.0.0. All destination addresses match this route, since none of the 32 bitsare required to match, and therefore packets to an unknown network are sent through the defaultroute. On sophus, the table might look as shown in Table 2-4.
Table 2-4. Sample routing table
Network Netmask Gateway Interface
149.76.1.0 255.255.255.0 - eth1
149.76.2.0 255.255.255.0 149.76.1.2 eth1
149.76.3.0 255.255.255.0 149.76.1.3 eth1
149.76.4.0 255.255.255.0 - eth0
149.76.5.0 255.255.255.0 149.76.1.5 eth1
0.0.0.0 0.0.0.0 149.76.1.2 eth1

If you need to use a route to a network that sophus is directly connected to, you don't need agateway; the gateway column here contains a hyphen.
It is possible to determine this information from the routing table by using the route command andthe -n option, which will display IP addresses, rather than DNS names.
The process for identifying whether a particular destination address matches a route is amathematical operation. The process is quite simple, but it requires an understanding of binaryarithmetic and logic: a route matches a destination if the network address logically ANDed with thenetmask precisely equals the destination address logically ANDed with the netmask.
Translation: a route matches if the number of bits of the network address specified by the netmask(starting from the left-most bit, the high order bit of byte one of the address) match that samenumber of bits in the destination address.
When the IP implementation is searching for the best route to a destination, it may find a number ofrouting entries that match the target address. For example, we know that the default route matchesevery destination, but datagrams destined for locally attached networks will match their local route,too. How does IP know which route to use? It is here that the netmask plays an important role. Whileboth routes match the destination, one of the routes has a larger netmask than the other. Wepreviously mentioned that the netmask was used to break up our address space into smallernetworks. The larger a netmask is, the more specifically a target address is matched; when routingdatagrams, we should always choose the route that has the largest netmask. The default route has anetmask of zero bits, and in the configuration presented above, the locally attached networks have a24-bit netmask. If a datagram matches a locally attached network, it will be routed to theappropriate device in preference to following the default route because the local network routematches with a greater number of bits. The only datagrams that will be routed via the default routeare those that don't match any other route.
You can build routing tables by a variety of means. For small LANs, it is usually most efficient toconstruct them by hand and feed them to IP using the route command at boot time (see Chapter 4).For larger networks, they are built and adjusted at runtime by routing daemons; these daemons runon central hosts of the network and exchange routing information to compute "optimal" routesbetween the member networks.
Depending on the size of the network, you'll need to use different routing protocols. For routing insideautonomous systems (such as the Groucho Marx campus), the internal routing protocols are used.The most prominent one of these is the Routing Information Protocol (RIP), which is implemented bythe BSD routed daemon. For routing between autonomous systems, external routing protocols suchas External Gateway Protocol (EGP) or Border Gateway Protocol (BGP) have to be used; theseprotocols, including RIP, have been implemented in the University of Cornell's gated daemon.
2.2.5. Metric Values
We depend on dynamic routing to choose the best route to a destination host or network based onthe number of hops. Hops are the gateways a datagram has to pass before reaching a host ornetwork. The shorter a route is, the better RIP rates it. Very long routes with 16 or more hops areregarded as unusable and are discarded.
RIP manages routing information internal to your local network, but you have to run gated on allhosts. At boot time, gated checks for all active network interfaces. If there is more than one active

interface (not counting the loopback interface), it assumes that the host is switching packets betweenseveral networks and will actively exchange and broadcast routing information. Otherwise, it will onlypassively receive RIP updates and update the local routing table.
When broadcasting information from the local routing table, gated computes the length of the routefrom the so-called metric value associated with the routing table entry. This metric value is set by thesystem administrator when configuring the route, and should reflect the actual route cost.[2]
Therefore, the metric of a route to a subnet that the host is directly connected to should always bezero, while a route going through two gateways should have a metric of two. You don't have tobother with metrics if you don't use RIP or gated.
[2] The cost of a route can be thought of, in a simple case, as the number of hops required to reach the destination. Proper
calculation of route costs can be a fine art in complex network designs.

2.3. The Internet Control Message Protocol
IP has a companion protocol that we haven't talked about yet. This is the Internet Control MessageProtocol (ICMP), used by the kernel networking code to communicate error messages to other hosts.For instance, assume that you are on erdos again and want to telnet to port 12345 on quark, butthere's no process listening on that port. When the first TCP packet for this port arrives on quark,the networking layer will recognize this arrival and immediately return an ICMP message to erdosstating "Port Unreachable."
The ICMP protocol provides several different messages, many of which deal with error conditions.However, there is one very interesting message called the Redirect message. It is generated by therouting module when it detects that another host is using it as a gateway, even though a muchshorter route exists. For example, after booting, the routing table of sophus may be incomplete. Itmight contain the routes to the math department's network, to the FDDI backbone, and the defaultroute pointing at the Groucho Computing Center's gateway (gcc1). Thus, packets for quark wouldbe sent to gcc1 rather than to niels, the gateway to the physics department. When receiving such adatagram, gcc1 will notice that this is a poor choice of route and will forward the packet to niels,meanwhile returning an ICMP Redirect message to sophus telling it of the superior route.
This seems to be a very clever way to avoid manually setting up any but the most basic routes.However, be warned that relying on dynamic routing schemes, be it RIP or ICMP Redirect messages,is not always a good idea. ICMP Redirect and RIP offer you little or no choice in verifying that somerouting information is indeed authentic. This situation allows malicious good-for-nothings to disruptyour entire network traffic, or even worse. Consequently, the Linux networking code treats NetworkRedirect messages as if they were Host Redirects. This minimizes the damage of an attack byrestricting it to just one host, rather than the whole network. On the flip side, it means that a littlemore traffic is generated in the event of a legitimate condition, as each host causes the generation ofan ICMP Redirect message. It is generally considered bad practice to rely on ICMP redirects foranything these days.
2.3.1. Resolving Hostnames
As described earlier in this chapter, addressing in TCP/IP networking, at least for IP Version 4,revolves around 32-bit numbers. However, you will have a hard time remembering more than a fewof these numbers. Therefore, hosts are generally known by "ordinary" names, such as gauss orstrange. It becomes the application's duty to find the IP address corresponding to this name. Thisprocess is called hostname resolution. When an application needs to find the IP address of a givenhost, it relies on the library functions gethostbyname(3) and gethostbyaddr(3). Traditionally, theseand a number of related procedures were grouped in a separate library called the resolverlibrary; onLinux, these functions are part of the standard libc. Colloquially, this collection of functions istherefore referred to as "the resolver." Resolver name configuration is detailed in Chapter 5.
On a small network like an Ethernet or even a cluster of Ethernets, it is not very difficult to maintaintables mapping hostnames to addresses. This information is usually kept in a file named /etc/hosts.When adding or removing hosts, or reassigning addresses, all you have to do is update the hosts file

on all hosts. Obviously, this will become burdensome with networks that comprise more than ahandful of machines.
On the Internet, address information was initially stored in a single HOSTS.TXT database, too. Thisfile was maintained at the NIC, and had to be downloaded and installed by all participating sites.When the network grew, several problems with this scheme arose. Besides the administrativeoverhead involved in installing HOSTS.TXT regularly, the load on the servers that distributed itbecame too high. Even more severe, all names had to be registered with the NIC, which made surethat no name was issued twice.
This is why a new name resolution scheme was adopted in 1994: the Domain Name System. DNSwas designed by Paul Mockapetris and addresses both problems simultaneously. We discuss theDomain Name System in detail in Chapter 5.

Chapter 3. Configuring the Serial HardwareThe Internet is growing at an incredible rate. Much of this growth is attributed to Internet users whohave cheap and easy access to DSL, cable, and other high-speed permanent network connectionsand who use protocols such as PPP to dial in to a network provider to retrieve their daily dose ofemail and news.
This chapter is intended to help all people who rely on modems to maintain their link to the outsideworld. We won't cover the mechanics of how to configure your modem, as you can find detaileddocumentation of this in many of the available modem HOWTO documents on the web. We will covermost of the Linux-specific aspects of managing devices that use serial ports. Topics include serialcommunications software, creating the serial device files, serial hardware, and configuring serialdevices using the setserial and stty commands. Many other related topics are covered in the SerialHOWTO by David Lawyer.

3.1. Communications Software for Modem Links
There are a number of communications packages available for Linux. Many of these packages areterminal programs, which allow a user to dial in to another computer as if she were sitting in front ofa simple terminal. The traditional terminal program for Unix-like environments is kermit. It is,however, ancient now, and would probably be considered difficult to use. There are more comfortableprograms available that support features such as telephone-dialing dictionaries, script languages toautomate dialing and logging in to remote computer systems, and a variety of file exchangeprotocols. One of these programs is minicom, which was modeled after some of the most popularDOS terminal programs. X11 users are accommodated, too. seyon is a fully featured X11-basedcommunications program.
Terminal programs aren't the only type of serial communication programs available. Other programslet you connect to a host and download email in a single bundle, to read and reply to later at yourleisure. This can save a lot of time and is especially useful if you are unfortunate enough to live in anarea where your connectivity is time charged. All of the reading and replying time can be spentoffline, and when you are ready, you can reconnect and upload your responses in a single bundle.
PPP is in-between, allowing both interactive and noninteractive use. Many people use PPP to dial in totheir campus network or other Internet Service Provider to access the Internet. PPP (in the form ofPPPoE) is also, however, commonly used over permanent or semipermanent connections like cable orDSL modems. We'll discuss PPPoE in Chapter 7.
3.1.1. Introduction to Serial Devices
The Unix kernel provides devices for accessing serial hardware, typically called tty devices(pronounced as it is spelled: T-T-Y).
This is an abbreviation for Teletype device, which used to be one of the major manufacturers ofterminal devices in the early days of Unix. The term is used now for any character-based dataterminal. Throughout this chapter, we use the term to refer exclusively to the Linux device filesrather than the physical terminal.
Linux provides three classes of tty devices: serial devices, virtual terminals (all of which you canaccess by pressing Alt-F1 through Alt-Fnn on the local console), and pseudo-terminals (similar to atwo-way pipe, used by applications such as X11). The former were called tty devices because theoriginal character-based terminals were connected to the Unix machine by a serial cable or telephoneline and modem. The latter two were named after the tty device because they were created tobehave in a similar fashion from the programmer's perspective.
PPP is most commonly implemented in the kernel. The kernel doesn't really treat the tty device as anetwork device that you can manipulate like an Ethernet device, using commands such as ifconfig.However, it does treat tty devices as places where network devices can be bound. To do this, thekernel changes what is called the "line discipline" of the tty device. PPP is a line discipline that may beenabled on tty devices. The general idea is that the serial driver handles data given to it differently,depending on the line discipline it is configured for. In its default line discipline, the driver simply

transmits each character it is given in turn. When the PPP line discipline is selected, the driver insteadreads a block of data, wraps a special header around it that allows the remote end to identify thatblock of data in a stream, and transmits the new data block. It isn't too important to understand thisyet; we'll cover PPP in a later chapter, and it all happens automatically anyway.

3.2. Accessing Serial Devices
Like all devices in a Unix system, serial ports are accessed through device special files, located in the/dev directory. There are two varieties of device files related to serial drivers, and there is one devicefile of each type for each port. The device will behave slightly differently, depending on which of itsdevice files we open. We'll cover the differences because it will help you understand some of theconfigurations and advice that you might see relating to serial devices, but in practice you need touse only one of these. At some point in the future, one of them may even disappear completely.
The most important of the two classes of serial device has a major number of 4, and its devicespecial files are named ttyS0, ttyS1, etc. The second variety has a major number of 5 and wasdesigned for use when dialing out (calling out) through a port; its device special files are called cua0,cua1, etc. In the Unix world, counting generally starts at zero, while laypeople tend to start at one.This creates a small amount of confusion for people because COM1: is represented by /dev/ttyS0,COM2: by /dev/ttyS1, etc. Anyone familiar with IBM PC-style hardware knows that COM3: and greater
were never really standardized anyway.
The cua, or "callout," devices were created to solve the problem of avoiding conflicts on serial devicesfor modems that have to support both incoming and outgoing connections. Unfortunately, they'vecreated their own problems and are now likely to be discontinued. Let's briefly look at the problem.
Linux, like Unix, allows a device, or any other file, to be opened by more than one processsimultaneously. Unfortunately, this is rarely useful with tty devices, as the two processes will almostcertainly interfere with each other. Luckily, a mechanism was devised to allow a process to check if atty device had already been opened by another device. The mechanism uses what are called lockfiles. The idea was that when a process wanted to open a tty device, it would check for the existenceof a file in a special location, named similarly to the device it intends to open. If the file did not exist,the process created it and opened the tty device. If the file did exist, the process assumed thatanother process already had the tty device open and took appropriate action. One last clever trick tomake the lock file management system work was writing the process ID (pid) of the process that hadcreated the lock file into the lock file itself; we'll talk more about that in a moment.
The lock file mechanism works perfectly well in circumstances in which you have a defined locationfor the lock files and all programs know where to find them. Alas, this wasn't always the case forLinux. It wasn't until the Linux Filesystem Standard defined a standard location for lock files when ttylock files began to work correctly. At one time there were at least four, and possibly more, locationschosen by software developers to store lock files: /usr/spool/locks/, /var/spool/locks/, /var/lock/,and /usr/lock/. Confusion caused chaos. Programs were opening lock files in different locations thatwere meant to control a single tty device; it was as if lock files weren't being used at all.
The cua devices were created to provide a solution to this problem. Rather than relying on the use oflock files to prevent clashes between programs wanting to use the serial devices, it was decided thatthe kernel could provide a simple means of arbitrating who should be given access. If the ttyS devicewere already opened, an attempt to open the cua would result in an error that a program couldinterpret to mean the device was already being used. If the cua device were already open and anattempt was made to open the ttyS, the request would block; that is, it would be put on hold andwait until the cua device was closed by the other process. This worked quite well if you had a single

modem that you had configured for dial-in access and you occasionally wanted to dial out on thesame device. But it did not work very well in environments where you had multiple programs wantingto call out on the same device. The only way to solve the contention problem was to use lock files!Back to square one.
Suffice it to say that the Linux Filesystem Standard came to the rescue and now mandates that lockfiles be stored in the /var/lock directory, and that by convention, the lock filename for the ttyS1device, for instance, is LCK..ttyS1. The cua lock files should also go in this directory, but use of cuadevices is now discouraged.
The cua devices will probably still be around for some time to provide a period of backwardcompatibility, but in time they will be retired. If you are wondering what to use, stick to the ttySdevice and make sure that your system is Linux FSSTND compliant, or at the very least that allprograms using the serial devices agree on where the lock files are located. Most software dealingwith serial tty devices provides a compile-time option to specify the location of the lock files. Moreoften than not, this will appear as a variable called something like LOCKDIR in the Makefile or in a
configuration header file. If you're compiling the software yourself, it is best to change this to agreewith the FSSTND-specified location. If you're using a precompiled binary and you're not sure wherethe program will write its lock files, you can use the following command to gain a hint:
strings binaryfile | grep lock
If the location found does not agree with the rest of your system, you can try creating a symbolic linkfrom the lock directory that the foreign executable wants to use back to /var/lock/. This is ugly, but
it will work.
3.2.1. The Serial Device Special Files
Minor numbers are identical for both types of serial devices. If you have your modem on one of theports COM1: tHRough COM4:, its minor number will be the COM port number plus 63. If you are using
special serial hardware, such as a high-performance multiple port serial controller, you will probablyneed to create special device files for it; it probably won't use the standard device driver. The SerialHOWTO should be able to assist you in finding the appropriate details.
Assume your modem is on COM2:. Its minor number will be 65, and its major number will be 4 for
normal use. There should be a device called ttyS1 that has these numbers. List the serial ttys in the/dev/ directory. The fifth and sixth columns show the major and minor numbers, respectively:
$ ls -l /dev/ttyS*
0 crw-rw---- 1 uucp dialout 4, 64 Oct 13 1997 /dev/ttyS00 crw-rw---- 1 uucp dialout 4, 65 Jan 26 21:55 /dev/ttyS10 crw-rw---- 1 uucp dialout 4, 66 Oct 13 1997 /dev/ttyS20 crw-rw---- 1 uucp dialout 4, 67 Oct 13 1997 /dev/ttyS3
If there is no device with major number 4 and minor number 65, you will have to create one. Becomethe superuser and type:
# mknod -m 666 /dev/ttyS1 c 4 65

# chown uucp.dialout /dev/ttyS1
The various Linux distributions use slightly differing strategies for who should own the serial devices.Sometimes they will be owned by root, and other times they will be owned by another user. Mostdistributions have a group specifically for dial-out devices, and any users who are allowed to usethem are added to this group.
Some people suggest making /dev/modem a symbolic link to your modem device so that casualusers don't have to remember the somewhat unintuitive ttyS1. However, you cannot use modem inone program and the real device filename in another. Their lock files would have different names andthe locking mechanism wouldn't work.
3.2.2. Serial Hardware
RS-232 is currently the most common standard for serial communications in the PC world. It uses anumber of circuits for transmitting single bits, as well as for synchronization. Additional lines may beused for signaling the presence of a carrier (used by modems) and for handshaking. Linux supports awide variety of serial cards that use the RS-232 standard.
Hardware handshake is optional, but very useful. It allows either of the two stations to signal whetherit is ready to receive more data, or if the other station should pause until the receiver is doneprocessing the incoming data. The lines used for this are called Clear to Send (CTS) and Request toSend (RTS), respectively, which explains the colloquial name for hardware handshake: RTS/CTS.
The other type of handshake you might be familiar with is called XON/XOFF handshaking. XON/XOFFuses two nominated characters, conventionally Ctrl-S and Ctrl-Q, to signal to the remote end that itshould stop and start transmitting data, respectively. While this method is simple to implement andokay for use by dumb terminals, it causes great confusion when you are dealing with binary data, asyou may want to transmit those characters as part of your data stream, and not have theminterpreted as flow control characters. It is also somewhat slower to take effect than hardwarehandshake. Hardware handshake is clean, fast, and recommended in preference to XON/XOFF whenyou have a choice.
In the original IBM PC, the RS-232 interface was driven by a UART chip called the 8250. PCs aroundthe time of the 486 used a newer version of the UART called the 16450. It was slightly faster thanthe 8250. Nearly all Pentium-based machines have been supplied with an even newer version of theUART called the 16550. Some brands (most notably internal modems equipped with the Rockwellchip set) use completely different chips that emulate the behavior of the 16550 and can be treatedsimilarly. Linux supports all of these in its standard serial port driver.[1]
[1] Note that we are not talking about WinModem© here! WinModems have very simple hardware and rely completely on the main
CPU of your computer instead of dedicated hardware to do all of the hard work. If you're purchasing a modem, it is our strongest
recommendation to not purchase such a modem; get a real modem, though if you're stuck with a WinModem, there's hope!
Check out http://linmodems.org for drivers, instructions, and the LINMODEM HOWTO.
The 16550 was a significant improvement over the 8250 and the 16450 because it offered a 16-byteFIFO buffer. The 16550 is actually a family of UART devices, comprising the 16550, the 16550A, andthe 16550AFN (later renamed PC16550DN). The differences relate to whether the FIFO actuallyworks; the 16550AFN is the one that is sure to work. There was also an NS16550, but its FIFO neverreally worked either.

The 8250 and 16450 UARTs had a simple 1-byte buffer. This means that a 16450 generates aninterrupt for every character transmitted or received. Each interrupt takes a short period of time toservice, and this small delay limits 16450s to a reliable maximum bit speed of about 9,600 bps in atypical ISA bus machine.
In the default configuration, the kernel checks the four standard serial ports, COM1: through COM4:.
The kernel is also able to automatically detect what UART is used for each of the standard serial portsand will make use of the enhanced FIFO buffer of the 16550, if it is available.

3.3. Using the Configuration Utilities
Now let's spend some time looking at the two most useful serial device configuration utilities:setserial and stty.
3.3.1. The setserial Command
The kernel will make its best effort to correctly determine how your serial hardware is configured, butthe variations on serial device configuration makes this determination difficult to achieve 100 percentreliably in practice. A good example of where this is a problem is the internal modems we talkedabout earlier. The UART they use has a 16-byte FIFO buffer, but it looks like a 16450 UART to thekernel device driver: unless we specifically tell the driver that this port is a 16550 device, the kernelwill not make use of the extended buffer. Yet another example is that of the dumb 4-port cards thatallow sharing of a single IRQ among a number of serial devices. We may have to specifically tell thekernel which IRQ port it's supposed to use, and that IRQs may be shared.
setserial was created to configure the serial driver at runtime. The setserial command is mostcommonly executed at boot time from a script called rc.serial on some distributions, though yoursmay very. This script is charged with the responsibility of initializing the serial driver to accommodateany nonstandard or unusual serial hardware in the machine.
The general syntax for the setserial command is:
setserial device [parameters]
in which the device is one of the serial devices, such as ttyS0.
The setserial command has a large number of parameters. The most common of these are describedin Table 3-1. For information on the remainder of the parameters, you should refer to the setserialmanpage.
Table 3-1. setserial command-line parameters
Parameter Description
port port_number Specify the I/O port address of the serial device. Port numbers should bespecified in hexadecimal notation, e.g., 0x2f8.
irq numSpecify the interrupt request line the serial device is using.

Parameter Description
uart uart_type Specify the UART type of the serial device. Common values are 16450, 16550,etc. Setting this value to none will disable this serial device.
fourport Specifying this parameter instructs the kernel serial driver that this port is oneport of an AST Fourport card.
spd_hi Program the UART to use a speed of 57.6 kbps when a process requests 38.4kbps.
spd_vhi Program the UART to use a speed of 115 kbps when a process requests 38.4kbps.
spd_normal Program the UART to use the default speed of 38.4 kbps when requested. Thisparameter is used to reverse the effect of a spd_hi or spd_vhi performed on
the specified serial device.
auto_irq
This parameter will cause the kernel to attempt to automatically determine theIRQ of the specified device. This attempt may not be completely reliable, so itis probably better to think of this as a request for the kernel to guess the IRQ.If you know the IRQ of the device, you should specify that it use the irq
parameter instead.
autoconfig
This parameter must be specified in conjunction with the port parameter.When this parameter is supplied, setserial instructs the kernel to attempt to
automatically determine the UART type located at the supplied port address. Ifthe auto_irq parameter is also supplied, the kernel attempts to automatically
determine the IRQ, too.
skip_test This parameter instructs the kernel not to bother performing the UART typetest during auto-configuration. This is necessary when the UART is incorrectlydetected by the kernel.
A typical and simple rc file to configure your serial ports at boot time might look something like that
shown in Example 3-1. Most Linux distributions will include something slightly more sophisticatedthan this one.
Example 3-1. rc.serial setserial commands
# /etc/rc.serial - serial line configuration script.## Configure serial devices/sbin/setserial /dev/ttyS0 auto_irq skip_test autoconfig/sbin/setserial /dev/ttyS1 auto_irq skip_test autoconfig/sbin/setserial /dev/ttyS2 auto_irq skip_test autoconfig/sbin/setserial /dev/ttyS3 auto_irq skip_test autoconfig## Display serial device configuration/sbin/setserial -bg /dev/ttyS*

The -bg /dev/ttyS* argument in the last command will print a neatly formatted summary of the
hardware configuration of all active serial devices. The output will look like that shown in Example 3-2.
Example 3-2. Output of setserial -bg /dev/ttyS command
/dev/ttyS0 at 0x03f8 (irq = 4) is a 16550A/dev/ttyS1 at 0x02f8 (irq = 3) is a 16550A
3.3.2. The stty Command
The name stty probably means "set tty," but the stty command can also be used to display aterminal's configuration. Perhaps even more so than setserial, the stty command provides abewildering number of characteristics that you can configure. We'll cover the most important of thesein a moment. You can find the rest described in the stty manpage.
The stty command is most commonly used to configure terminal parameters, such as whethercharacters will be echoed or what key should generate a break signal. We explained earlier that serialdevices are tty devices and the stty command is therefore equally applicable to them.
One of the more important uses of the stty for serial devices is to enable hardware handshaking onthe device. We talked briefly about hardware handshaking earlier in this chapter. The defaultconfiguration for serial devices is for hardware handshaking to be disabled. This setting allows "threewire" serial cables to work; they don't support the necessary signals for hardware handshaking, andif it were enabled by default, they'd be unable to transmit any characters to change it.
Surprisingly, some serial communications programs don't enable hardware handshaking, so if yourmodem supports hardware handshaking, you should configure the modem to use it (check yourmodem manual for what command to use), and also configure your serial device to use it. The sttycommand has a crtscts flag that enables hardware handshaking on a device; you'll need to use
this. The command is probably best issued from the rc.serial file (or equivalent) at boot time usingcommands such as those shown in Example 3-3.
Example 3-3. rc.serial stty commands
#stty crtscts < /dev/ttyS0stty crtscts < /dev/ttyS1stty crtscts < /dev/ttyS2stty crtscts < /dev/ttyS3#
The stty command works on the current terminal by default, but by using the input redirection (<)feature of the shell, we can have stty manipulate any tty device. It's a common mistake to forgetwhether you are supposed to use < or >; modern versions of the stty command have a much cleanersyntax for doing this. To use the new syntax, we'd rewrite our sample configuration to look like that

shown in Example 3-4.
Example 3-4. rc.serial stty commands using modern syntax
#stty crtscts -F /dev/ttyS0stty crtscts -F /dev/ttyS1stty crtscts -F /dev/ttyS2stty crtscts -F /dev/ttyS3#
We mentioned that the stty command can be used to display the terminal configuration parametersof a tty device. To display all of the active settings on a tty device, use:
$ stty -a -F /dev/ttyS1
The output of this command, shown in Example 3-5, gives you the status of all flags for that device;a flag shown with a preceding minus, as in -crtscts, means that the flag has been turned off.
Example 3-5. Output of stty -a command
speed 19200 baud; rows 0; columns 0; line = 0;intr = ^C; quit = ^\; erase = ^?; kill = ^U; eof = ^D; eol = <undef>; eol2 = <undef>; start = ^Q; stop = ^S; susp = ^Z; rprnt = ^R; werase = ^W; lnext = ^V; flush = ^O; min = 1; time = 0;-parenb -parodd cs8 hupcl -cstopb cread clocal -crtscts-ignbrk -brkint -ignpar -parmrk -inpck -istrip -inlcr -igncr -icrnl -ixon -ixoff -iuclc -ixany -imaxbel-opost -olcuc -ocrnl onlcr -onocr -onlret -ofill -ofdel nl0 cr0 tab0 bs0 vt0 ff0-isig -icanon iexten echo echoe echok -echonl -noflsh -xcase -tostop -echoprt echoctl echoke
A description of the most important of these flags is given in Table 3-2. Each of these flags is enabledby supplying it to stty and disabled by supplying it to stty with the - character in front of it. Thus, todisable hardware handshaking on the ttyS0 device, you would use:
$ stty -crtscts -F /dev/ttyS0
Table 3-2. stty flags most relevant to configuring serial devices

Flags Description
N Set the line speed to N bits per second.
crtsdts Enable/disable hardware handshaking.
ixon Enable/disable XON/XOFF flow control.
clocalEnable/disable modem control signals such as DTR/DTS and DCD. This is necessary ifyou are using a "three wire" serial cable because it does not supply these signals.
cs5 cs6 cs7cs8
Set number of data bits to 5, 6, 7, or 8, respectively.
parodd Enable odd parity. Disabling this flag enables even parity.
parenb Enable parity checking. When this flag is negated, no parity is used.
cstopbEnable use of two stop bits per character. When this flag is negated, one stop bit percharacter is used.
echo Enable/disable echoing of received characters back to sender.
The next example combines some of these flags and sets the ttyS0 device to 19,200 bps, 8 data bits,no parity, and hardware handshaking with echo disabled:
$ stty 19200 cs8 -parenb crtscts -echo -F /dev/ttyS0

3.4. Serial Devices and the login: Prompt
It was once very common that a Unix installation involved one server machine and many "dumb"character mode terminals or dial-up modems. Today that sort of installation is less common, which isgood news for many people interested in operating this way, because the "dumb" terminals are nowvery cheap to acquire. Dial-up modem configurations are no less common, but these days they wouldprobably be used to support a PPP login (discussed in Chapter 6) rather than a simple login.Nevertheless, each of these configurations can make use of a simple program called a getty program.
The term getty is probably a contraction of "get tty." A getty program opens a serial device,configures it appropriately, optionally configures a modem, and waits for a connection to be made. Anactive connection on a serial device is usually indicated by the Data Carrier Detect (DCD) pin on theserial device being raised. When a connection is detected, the getty program issues a login: prompt,
and then invokes the login program to handle the actual system login. Each of the virtual terminals(e.g., /dev/tty1) in Linux has a getty running against it.
There are a number of different getty implementations, each designed to suit some configurationsbetter than others. The getty that we'll describe here is called mgetty, which is quite popular becauseit has all sorts of features that make it especially modem-friendly, including support for automatic faxprograms and voice modems. We'll concentrate on configuring mgetty to answer conventional datacalls and leave the rest for you to explore at your convenience.
3.4.1. Configuring the mgetty Daemon
The mgetty daemon is available in just about all Linux distributions in prepackaged form. The mgettydaemon differs from most other getty implementations in that it has been designed specifically formodems with the AT command set.
It still supports direct terminal connections but is best suited for dialup applications. Rather thanusing the DCD line to detect an incoming call, it listens for the RING message generated by modern
modems when they detect an incoming call and are not configured for auto-answer.
The main executable program is called /usr/sbin/mgetty, and its main configuration file is called/etc/mgetty/mgetty.config. There are a number of other binary programs and configuration files thatcover other mgetty features.
For most installations, configuration is a matter of editing the /etc/mgetty/ mgetty.config file andadding appropriate entries to the /etc/inittab file to execute mgetty automatically.
Example 3-6 shows a very simple mgetty configuration file. This example configures two serialdevices. The first, /dev/ttyS0, supports a Hayes-compatible modem at 38,400 bps. The second,/dev/ttyS0, supports a directly connected VT100 terminal at 19,200 bps.
Example 3-6. Sample /etc/mgetty/mgetty.config file

## mgetty configuration file## this is a sample configuration file, see mgetty.info for details## comment lines start with a "#", empty lines are ignored## ----- global section -----## In this section, you put the global defaults, per-port stuff is below## access the modem(s) with 38400 bpsspeed 38400## set the global debug level to "4" (default from policy.h)debug 4## ----- port specific section -----# # Here you can put things that are valid only for one line, not the others### Hayes modem connected to ttyS0: don't do fax, less logging#port ttyS0 debug 3 data-only y## direct connection of a VT100 terminal which doesn't like DTR drops#port ttyS1 direct y speed 19200 toggle-dtr n#
The configuration file supports global and port-specific options. In our example we used a globaloption to set the speed to 38,400 bps. This value is inherited by the ttyS0 port. Ports we applymgetty to use this speed setting unless it is overwritten by a port-specific speed setting, as we havedone in the ttyS1 configuration.
The debug keyword controls the verbosity of mgetty logging. The data-only keyword in the ttyS0
configuration causes mgetty to ignore any modem fax features, to operate just as a data modem.The direct keyword in the ttyS1 configuration instructs mgetty not to attempt any modeminitialization on the port. Finally, the toggle-dtr keyword instructs mgetty not to attempt to hang up
the line by dropping the Data Terminal Ready (DTR) pin on the serial interface; some terminals don'tlike this to happen.
You can also choose to leave the mgetty.config file empty and use command-line arguments tospecify most of the same parameters. The documentation accompanying the application includes acomplete description of the mgetty configuration file parameters and command-line arguments. See

the following example.
We need to add two entries to the /etc/inittab file to activate this configuration. The inittab file is theconfiguration file of the Unix System V init command. The init command is responsible for systeminitialization; it provides a means of automatically executing programs at boot time and re-executingthem when they terminate. This is ideal for the goals of running a getty program.
T0:23:respawn:/sbin/mgetty ttyS0T1:23:respawn:/sbin/mgetty ttyS1
Each line of the /etc/inittab file contains four fields, separated by colons. The first field is an identifierthat uniquely labels an entry in the file; traditionally it is two characters, but modern versions allowfour. The second field is the list of run levels at which this entry should be active. A run level is ameans of providing alternate machine configurations and is generally implemented using trees ofstartup scripts stored in directories called /etc/rc1.d, /etc/rc2.d, etc. This feature is typicallyimplemented very simply, and you should model your entries on others in the file or refer to yoursystem documentation for more information. The third field describes when to take action. For thepurposes of running a getty program, this field should be set to respawn, meaning that the command
should be re-executed automatically when it dies. There are several other options, as well, but theyare not useful for our purposes here. The fourth field is the actual command to execute; this is wherewe specify the mgetty command and any arguments we wish to pass it. In our simple example we'restarting and restarting mgetty whenever the system is operating at either of run levels two or three,and are supplying as an argument just the name of the device we wish it to use. The mgettycommand assumes the /dev/, so we don't need to supply it.
This chapter was a quick introduction to mgetty and how to offer login prompts to serial devices. Youcan find more extensive information in the Serial HOWTO.
After you've edited the configuration files, you need to reload init to make the changes take effect.Simply send a hangup signal to the init process; it always has a process ID of one, so you can usethe following command safely:
# kill -HUP 1

Chapter 4. Configuring TCP/IP NetworkingIn this chapter, we walk you through all the necessary steps to set up TCP/IP networking on yourmachine. Starting with the assignment of IP addresses, we slowly work our way through theconfiguration of TCP/IP network interfaces and introduce a few tools that come in handy whenhunting down network installation problems.
Most of the tasks covered in this chapter will generally have to be done only once. Afterward, youhave to touch most configuration files only when adding a new system to your network orreconfiguring your system entirely. Some of the commands used to configure TCP/IP, however, haveto be executed each time the system is booted. This is usually done by invoking them from thesystem /etc/rc scripts.
Commonly, the network-specific part of this procedure is contained in a script. The name of thisscript varies in different Linux distributions. In many older Linux distributions, it is known as rc.net orrc.inet. Sometimes you will also see two scripts named rc.inet1 and rc.inet2; the former initializes thekernel part of networking and the latter starts basic networking services and applications. In moderndistributions, the rc files are structured in a more sophisticated arrangement; here you may findscripts in the /etc/init.d/ (or /etc/rc.d/init.d/) directory that create the network devices and other rcfiles that run the network application programs. This book's examples are based on the latterarrangement.
This chapter discusses parts of the script that configure your network interfaces. After finishing thischapter, you should have established a sequence of commands that properly configure TCP/IPnetworking on your computer. You should then replace any sample commands in the configurationscripts with your commands, make sure the script is executed from the basic rc script at startuptime, and reboot your machine. The networking rc scripts that come along with your favorite Linuxdistribution should provide a solid example from which to work.

4.1. Understanding the /proc Filesystem
Linux 2.4 distributions rely on the /proc filesystem for communicating with the kernel, 2.6 uses thenew sysfs. Both interfaces permit access to kernel runtime information through a filesystem-likemechanism. For purposes of this chapter, we'll focus more on the /proc filesystem, as it is currentlymore widely used. This filesystem, when mounted, can list files like any other filesystem, or displaytheir contents. Typical items include the loadavg file, which contains the system load average, andmeminfo , which shows current core memory and swap usage.
To this, the networking code adds the net directory. It contains a number of files that show thingssuch as the kernel ARP tables, the state of TCP connections, and the routing tables. Most networkadministration tools get their information from these files.
The proc filesystem (or procfs , as it is also known) is usually mounted on /proc at system boot time.The best method is to add the following line to /etc/fstab :
# procfs mount point:none /proc proc defaults
Then execute mount /proc from your /etc/rc script.
The procfs is now configured into most kernels by default.
4.1.1. Installing the Tools
Prepackaged Linux distributions contain the major networking applications and utilities along with acoherent set of sample files. The only case in which you might have to obtain and install new utilitiesis when you install a new kernel release. Because they occasionally involve changes in the kernelnetworking layer, you will need to update the basic configuration tools. This update at least involvesrecompiling, but sometimes you may also be required to obtain the latest set of binaries. Thesebinaries are available at their official home site atftp://ftp.inka.de/pub/comp/Linux/networking/NetTools/ , packaged in an archive called net-tools-XXX.tar.gz , where XXX is the version number.
If you want to compile and install the standard TCP/IP network applications yourself, you can obtainthe sources from most Linux FTP servers. All modern Linux distributions include a fairlycomprehensive range of TCP/IP network applications, such as World Wide Web browsers, Telnet andFTP programs, and other network applications such as talk. If you do find something that you need tocompile yourself, the chances are good that it will compile under Linux from source quite easily if youfollow the instructions included in the source package.
4.1.2. Setting the Hostname
Most, if not all, network applications rely on you to set the local host's name to some reasonablevalue. This setting is usually made during the boot procedure by executing the hostname command.

To set the hostname to name , enter:
# hostname name
It is common practice to use the unqualified hostname without specifying the domain name. Forinstance, if we had a site called the Virtual Brewery (an imaginary but typical small network used inseveral chapters of this book) a host might be called vale.vbrew.com or vlager.vbrew.com . Theseare their official fully qualified domain names (FQDNs). Their local hostnames would be the firstcomponent of the name, such as vale . However, because the local hostname is frequently used tolook up the host's IP address, you have to make sure that the resolver library is able to look up thehost's IP address. This usually means that you have to enter the name in /etc/hosts .
Some people suggest using the domainname command to set the kernel's idea of a domain name tothe remaining part of the FQDN. This way you could combine the output from hostname anddomainname to get the FQDN again. However, this is at best only half correct. domainname isgenerally used to set the host's NIS domain, which may be entirely different from the DNS domain towhich your host belongs. Instead, to ensure that the short form of your hostname is resolvable withall recent versions of the hostname command, either add it as an entry in your local Domain NameServer or place the fully qualified domain name in the /etc/hosts file. You may then use the --fqdn
argument to the hostname command, and it will print the fully qualified domain name.
4.1.3. Assigning IP Addresses
If you configure the networking software on your host for standalone operation, you can safely skipthis section, because the only IP address you will need is for the loopback interface, which is always127.0.0.1 .
Things are a little more complicated with real networks such as Ethernets. If you want to connectyour host to an existing network, you have to ask its administrators to give you an IP address on thisnetwork, though this is not always the case. Many networks now have a system of dynamicallyassigned IPs called Dynamic Host Configuration Protocol (DHCP), which we will discuss in the nextsection. When setting up a network all by yourself, you have to assign IP addresses by hand or byconfiguring a DHCP server. If you have a machine connected directly to the Internet, you will need toobtain an IP address from your ISP, DSL provider, or cable network.
Hosts within a local network usually share addresses from the same logical IP network, meaning thatthe first octets of their IP addresses are usually the same. If you have several physical networks, youhave to either assign them different network numbers, or use subnetting to split your IP addressrange into several subnetworks. Subnetting will be revisited in the "Creating Subnets" section later inthis chapter.
If your network is not connected to the Internet or will use network address translation to connect,you are free to choose any legal network address. Just make sure no packets from your internalnetwork escape to the real Internet. To make sure no harm can be done even if packets do escape,you should use one of the network numbers reserved for private use. The Internet Assigned NumbersAuthority (IANA) has set aside several network numbers from classes A, B, and C that you can usewithout registering. These addresses are valid only within your private network and are not routedbetween real Internet sites. The numbers are defined by RFC 1918 and are listed in Table 2-1 inChapter 2 . Note that the second and third blocks contain 16 and 256 networks, respectively.
Picking your addresses from one of these network numbers is not only useful for networks completely

unconnected to the Internet; you can still implement restricted access to the Internet using a singlehost as a gateway. To your local network, the gateway is accessible by its internal IP address, whilethe outside world knows it by an officially registered address (assigned to you by your provider). Wecome back to this concept in connection with the IP masquerade facility in Chapter 9 .
Throughout the remainder of the book, we will assume that the brewery's network manager uses aclass B network number, say 172.16.0.0 . Of course, a class C network number would definitelysuffice to accommodate both the brewery's and the winery's networks. We'll use a class B networkhere for the sake of simplicity; it will make the subnetting examples in the next section of this chaptera little more intuitive.
4.1.4. Using DHCP to Obtain an IP Address
Many networks now use the Dynamic Host Configuration Protocol (DHCP). This protocol runs onnetwork layer two and listens for DHCP requests. The DHCP server has a predefined listing of IPaddress assigned by the network administrator, which can be assigned to users. When the DHCPreceives a request for an IP address, it replies by issuing a DHCP lease. The lease means that the IPaddress is assigned to the requesting client for a predetermined amount of time. Busy networks oftenset the lease for a fixed number of hours to prevent the use of an address by an idle machine. Somenetworks set the threshold as low as two hours. Smaller networks may wish to set the DHCP leasetimes to a longer value, perhaps a day, or even a week. The value is entirely up to the networkadministrator and should be based on network usage.
To request a DHCP lease on a network, you will need to have the dhcpcd software. The latest versionof the software can be obtained by visiting its home sitehttp://www.phystech.com/download/dhcpcd.html . There you will find the latest versions of thesoftware as well as supporting documentation. Many modern Linux distributions will come with thissoftware preinstalled and will even allow you to configure your interfaces with DHCP during the initialsetup and configuration of the system.
Obtaining an IP address via DHCP is simple and is accomplished by issuing the following command:
vlager# dhcpcd eth0vlager#
The daemon will at this point, reconfigure your eth0 interface, not only assigning an IP address, butalso properly configuring the subnetting. Many DHCP servers will also provide default route and DNSinformation. In the case of the latter, your /etc/resolv.conf file will be rewritten with the updated DNSserver information. If for some reason you do not want the daemon to rewrite your resolv.conf file,you can specify -R on the command line. There are a number of additional command-line options
available for dhcpcd , which may be needed in some environments. For a list of these, please contactthe dhcpcd manpage. The resolv.conf file will be discussed in greater detail in the chapter on DNS.
4.1.4.1 Running a DHCP server
With larger, more dynamic networks, DHCP is essential. However, in order for this service to beoffered, the clients must receive their IP address from a DHCP server. While a number of routers,firewalls, and other network devices will offer this functionality, a network administrator may wish toconsider using a Linux machine to provide it. Linux DHCP servers tend to provide a greater flexibilitywith their configuration options. There are a number of DHCP servers available, but one of the more

popular and better recommended offerings comes from the ISC and can be found atftp://ftp.isc.org/isc/dhcp/ . The configuration and installation of this is very standard and uses thewell-known automake configuration script. When the software has been compiled and installed, youare ready to begin configuration.
First, though, you need to make sure that your network interfaces are configured for multicastsupport. This is most easily checked by using the ifconfig command:
ticktock root # ifconfigeth0 Link encap:Ethernet HWaddr C0:FF:EE:C0:FF:EE inet addr:172.16.1.1 Bcast:172.16.1.255 Mask:255.255.255.0 UP BROADCAST RUNNING MULTICAST MTU:1500 Metric:1 RX packets:80272 errors:0 dropped:0 overruns:0 frame:0 TX packets:55339 errors:0 dropped:0 overruns:0 carrier:0 collisions:0 txqueuelen:100 RX bytes:8522502 (8.1 Mb) TX bytes:9203192 (8.7 Mb) Interrupt:10 Base address:0x4000
If you don't see MULTICAST specified in the output, you need to reconfigure your kernel to support
network multicast. The likelihood of this is slim because most kernel configurations contain this as adefault option.
Now you're ready to write a dhcpd.conf file. A sample dhcpd.conf file looks like this:
# Sample DHCP Server Configurationoption domain-name "vbrew.com";option domain-name-servers ns1.vbrew.com, ns2.vbrew.com;default-lease-time 1600;max-lease-time 7200;log-facility local7;# This is a very basic subnet declaration.subnet 172.16.1.0 netmask 255.255.255.0 { range 172.16.1.10 172.16.1.50; option routers router1.vbrew.com;}
This configuration will create which will assign addresses on the 172.16.1.0 network. It can assign atotal of 40 IP addresses from 172.16.1.10 to 172.16.1.50 . The option routers and domain-name-servers commands allow you to set the default router and DNS servers for the clients.
Here's a brief listing of some of the more useful DHCP server configuration options:
option domain-name
Between quotes, you have the ability to specify the domain name for your network. This isn'tnecessary, but may be useful to speed up local name lookups.

option domain-name-servers
While considered optional, in most cases it is not. This is where the IP addresses or the FQDNdomain name servers are listed.
default-lease-time
When a host asks for a lease and does not request a specific amount of time, this value, inseconds, is assigned.
max-lease-time
This option specifies the maximum amount of time that will be assigned as a lease.
fixed-address
The fixed address option lets you assign a fixed IP address to specific clients. This option isgenerally paired with the MAC address filtering options.
hardware Ethernet
With this option, network administrators can specify which MAC addresses will receive IPaddress allocations. This can be used to secure a DHCP range, or can be used to pair MACaddresses with specific IP addresses.
The DHCP server can use the client MAC address as a method to restrict or assign IP addresses. Thistype of configuration might be necessary in higher security environments where only known machinesare to be assigned addresses. The following example shows how the DHCP server can assign aspecific address to a host based on its MAC address, also important to note is that the range directivecan be used here as well:
host vale { hardware ethernet 0:0f:d0:ee:ag:4e;fixed-address 172.16.1.55;}
Make sure that your DHCP address pool ranges do not contain statically assigned addresses,otherwise IP address conflict problems are sure to follow.
4.1.5. Creating Subnets
To operate several Ethernets, you have to split your network into subnets. Note that subnetting isrequired only if you have more than one broadcast networkpoint-to-point links don't count. For

instance, if you have one Ethernet, and one or more PPP links to the outside world, you don't need tosubnet your network. This is explained in more detail in Chapter 6 .
To accommodate the two Ethernets, the brewery's network manager decides to use 8 bits of the hostpart as additional subnet bits. This leaves another 8 bits for the host part, allowing for 254 hosts oneach of the subnets. She then assigns subnet number 1 to the brewery and gives the winery number2. Their respective network addresses are thus 172.16.1.0 and 172.16.2.0 . The subnet mask is255.255.255.0 .
vlager , which is the gateway between the two networks, is assigned a host number of 1 on both ofthem, which gives it the IP addresses 172.16.1.1 and 172.16.2.1 , respectively.
Note that in this example we are using a class B network to keep things simple, but a class C networkwould be more realistic. With the new networking code, subnetting is not limited to byte boundaries,so even a class C network may be split into several subnets. For instance, you could use two bits ofthe host part for the netmask, giving you 4 possible subnets with 64 hosts on each.[1]
[1] The first number on each subnet is the subnetwork address, and the last number on each subnet, is reserved as the broadcast
address, so it's actually 62 hosts per subnet.
4.1.6. Writing Hosts and Networks Files
After you have subnetted your network, you should prepare for some simple sort of hostnameresolution using the /etc/hosts file. If you are not going to use DNS or NIS for address resolution, youhave to put all hosts in the hosts file.
Even if you want to run DNS during normal operation, you should have some subset of all hostnamesin /etc/hosts . You should have some sort of name resolution, even when no network interfaces arerunning, for example, during boot time. This is not only a matter of convenience, but it allows you touse symbolic hostnames in your network rc scripts. Thus, when changing IP addresses, you only haveto copy an updated hosts file to all machines and reboot, rather than edit a large number of rc filesseparately. Usually you put all local hostnames and addresses in hosts , adding those of anygateways and NIS servers used.
You should make sure that your resolver uses information from the hosts file only during initialtesting. Sample files that come with your DNS software may produce strange results. To make allapplications use /etc/hosts exclusively when looking up the IP address of a host, you have to edit the/etc/host.conf file. Comment out any lines that begin with the keyword order by preceding them with
a hash sign, and insert the line:
order hosts
The configuration of the resolver library is covered in detail in Chapter 6 .
The hosts file contains one entry per line, consisting of an IP address, a hostname, and an optional listof aliases for the hostname. The fields are separated by spaces or tabs, and the address field mustbegin in the first column. Anything following a hash sign (#) is regarded as a comment and is ignored.
Hostnames can be either fully qualified or relative to the local domain. For vale , you would usuallyenter the fully qualified name, vale.vbrew.com , and vale by itself in the hosts file, so that it isknown by both its official name and the shorter local name.

This is an example how a hosts file at the Virtual Brewery might look. Two special names areincluded, vlager-if1 and vlager-if2 , which give the addresses for both interfaces used on vlager :
## Hosts file for Virtual Brewery/Virtual Winery## IP FQDN aliases#127.0.0.1 localhost#172.16.1.1 vlager.vbrew.com vlager vlager-if1172.16.1.2 vstout.vbrew.com vstout172.16.1.3 vale.vbrew.com vale#172.16.2.1 vlager-if2172.16.2.2 vbeaujolais.vbrew.com vbeaujolais172.16.2.3 vbardolino.vbrew.com vbardolino172.16.2.4 vchianti.vbrew.com vchianti
Just as with a host's IP address, you should sometimes use a symbolic name for network numbers,too. Therefore, the hosts file has a companion called /etc/networks that maps network names tonetwork numbers, and vice versa. At the Virtual Brewery, we might install a networks file as shown inthe following.[2]
[2] Note that names in networks must not collide with hostnames from the hosts file, or else some programs may produce strange
results.
# /etc/networks for the Virtual Brewerybrew-net 172.16.1.0wine-net 172.16.2.0
4.1.7. Interface Configuration for IP
After setting up your hardware as explained in Chapter 3 , you have to make these devices known tothe kernel networking software. A couple of commands are used to configure the network interfacesand initialize the routing table. These tasks are usually performed from the network initialization scripteach time you boot the system. The basic tools for this process are called ifconfig (where "if" standsfor interface) and route .
ifconfig is used to make an interface accessible to the kernel networking layer. This involves theassignment of an IP address and other parameters, and activation of the interface, also known as"bringing up" the interface. Being active here means that the kernel will send and receive IPdatagrams through the interface. The simplest way to invoke it is with:
ifconfig interface ip-address
This command assigns ip-address to interface and activates it. All other parameters are set to
default values. For instance, the default network mask is derived from the network class of the IP

address, such as 255.255.0.0 for a class B address. ifconfig is described in detail later in thischapter.
route allows you to add or remove routes from the kernel routing table. It can be invoked as:
route [add|del] [-net|-host] target [if]
The add and del arguments determine whether to add or delete the route to target . The -net and
-host arguments tell the route command whether the target is a network or a host. The if
argument is again optional, and allows you to specify to which network interface the route should bedirectedthe Linux kernel makes a sensible guess if you don't supply this information. This topic will beexplained in more detail in succeeding sections.
4.1.8. The Loopback Interface
Almost always, the very first interface to be activated is the loopback interface:
# ifconfig lo 127.0.0.1
Occasionally, you will see the dummy hostname localhost being used instead of the IP address.ifconfig will look up the name in the hosts file, where an entry should declare it as the hostname for127.0.0.1 :
# Sample /etc/hosts entry for localhostlocalhost 127.0.0.1
To view the configuration of an interface, you invoke ifconfig , giving it only the interface name asargument:
$ ifconfig lolo Link encap:Local Loopback inet addr:127.0.0.1 Mask:255.0.0.0 UP LOOPBACK RUNNING MTU:3924 Metric:1 RX packets:0 errors:0 dropped:0 overruns:0 frame:0 TX packets:0 errors:0 dropped:0 overruns:0 carrier:0 Collisions:0
As you can see, the loopback interface has been assigned a netmask of 255.0.0.0 , since 127.0.0.1is a class A address.
Now you can almost start playing with your mini-network. What is still missing is an entry in therouting table that tells IP that it may use this interface as a route to destination 127.0.0.1 . This isaccomplished by using:
# route add 127.0.0.1

Again, you can use localhost instead of the IP address, provided you've entered it into your
/etc/hosts .
Next, you should check that everything works fine, for example, by using ping . ping is thenetworking equivalent of a sonar device. The command is used to verify that a given address isactually reachable, and to measure the delay that occurs when sending a datagram to it and backagain. The time required for this process is often referred to as the "round-trip time":
# ping localhostPING localhost (127.0.0.1): 56 data bytes64 bytes from 127.0.0.1: icmp_seq=0 ttl=255 time=0.4 ms64 bytes from 127.0.0.1: icmp_seq=1 ttl=255 time=0.4 ms64 bytes from 127.0.0.1: icmp_seq=2 ttl=255 time=0.4 ms^C--- localhost ping statistics ---3 packets transmitted, 3 packets received, 0% packet lossround-trip min/avg/max = 0.4/0.4/0.4 ms#
When you invoke ping as shown here, it will continue emitting packets forever, unless interrupted bythe user. The ̂ C marks the place where we pressed Ctrl-C.
The previous example shows that packets for 127.0.0.1 are properly delivered and a reply isreturned to ping almost instantaneously. This shows that you have successfully set up your firstnetwork interface.
If the output you get from ping does not resemble that shown in the previous example, you are introuble. Check any errors if they indicate that some file hasn't been installed properly. Check that theifconfig and route binaries you use are compatible with the kernel release you run, and above all,that the kernel has been compiled with networking enabled (you see this from the presence of the/proc/net directory). If you get an error message saying "Network unreachable," you probably got theroute command wrong. Make sure you use the same address that you gave to ifconfig .
The steps previously described are enough to use networking applications on a standalone host. Afteradding the lines mentioned earlier to your network initialization script and making sure it will beexecuted at boot time, you may reboot your machine and try out various applications. For instance,ssh localhost should establish an ssh connection to your host, giving you an SSH login prompt.
However, the loopback interface is useful not only as an example in networking books, or as a testbed during development, but is actually used by some applications during normal operation.[3]
Therefore, you always have to configure it, regardless of whether your machine is attached to anetwork or not.
[3] For example, all applications based on RPC use the loopback interface to register themselves with the portmapper daemon at
startup. These applications include NIS and NFS.
4.1.9. Ethernet Interfaces
Configuring an Ethernet interface is pretty much the same as the loopback interface; it just requires afew more parameters when you are using subnetting.

At the Virtual Brewery, we have subnetted the IP network, which was originally a class B network,into class C subnetworks. To make the interface recognize this, the ifconfig incantation would look likethis:
# ifconfig eth0 vstout netmask 255.255.255.0
This command assigns the eth0 interface the IP address of vstout (172.16.1.2 ). If we omitted thenetmask, ifconfig would deduce the netmask from the IP network class, which would result in anincorrect netmask of 255.255.0.0 . Now a quick check shows:
# ifconfig eth0eth0 Link encap 10Mps Ethernet HWaddr 00:00:C0:90:B3:42 inet addr 172.16.1.2 Bcast 172.16.1.255 Mask 255.255.255.0 UP BROADCAST RUNNING MTU 1500 Metric 1 RX packets 0 errors 0 dropped 0 overrun 0 TX packets 0 errors 0 dropped 0 overrun 0
You can see that ifconfig automatically sets the broadcast address (the Bcast field) to the usual
value, which is the host's network number with all the host bits set. Also, the maximum transmissionunit (the maximum size of IP datagrams the kernel will generate for this interface) has been set tothe maximum size of Ethernet packets: 1,500 bytes. The defaults are usually what you will use, butall these values can be overidden if required, with special options that will be described under later inthis chapter.
Just as for the loopback interface, you now have to install a routing entry that informs the kernelabout the network that can be reached through eth0 . For the Virtual Brewery, you might invokeroute as:
# route add -net 172.16.1.0
At first this looks a little like magic, because it's not really clear how route detects which interface toroute through. However, the trick is rather simple: the kernel checks all interfaces that have beenconfigured so far and compares the destination address (172.16.1.0 in this case) to the network partof the interface address (that is, the bitwise AND of the interface address and the netmask). The onlyinterface that matches is eth0 .
Now, what's that -net option for? This is used because route can handle both routes to networks androutes to single hosts (as you saw before with localhost ). When given an address in dotted quad
notation, route attempts to guess whether it is a network or a hostname by looking at the host partbits. If the address's host part is zero, route assumes it denotes a network; otherwise, route takes itas a host address. Therefore, route would think that 172.16.1.0 is a host address rather than anetwork number because it cannot know that we use subnetting. We have to tell route explicitly thatit denotes a network, so we give it the -net flag.
Of course, the route command is a little tedious to type, and it's prone to spelling mistakes. A moreconvenient approach is to use the network names we defined in /etc/networks . This approach makesthe command much more readable; even the -net flag can be omitted because route knows that
172.16.1.0 denotes a network:
# route add brew-net
Now that you've finished the basic configuration steps, we want to make sure that your Ethernetinterface is indeed running happily. Choose a host from your Ethernet, for instance vlager , and type:
# ping vlagerPING vlager: 64 byte packets64 bytes from 172.16.1.1: icmp_seq=0. time=11. ms64 bytes from 172.16.1.1: icmp_seq=1. time=7. ms64 bytes from 172.16.1.1: icmp_seq=2. time=12. ms64 bytes from 172.16.1.1: icmp_seq=3. time=3. ms^C----vstout.vbrew.com PING Statistics----4 packets transmitted, 4 packets received, 0round-trip (ms) min/avg/max = 3/8/12
If you don't see similar output, something is broken. If you encounter unusual packet loss rates, thishints at a hardware problem, such as bad or missing terminators. If you don't receive any replies atall, you should check the interface configuration with netstat , described later in the chapter. Thepacket statistics displayed by ifconfig should tell you whether any packets have been sent out on theinterface at all. If you have access to the remote host too, you should go over to that machine andcheck the interface statistics. This way you can determine exactly where the packets got dropped. Inaddition, you should display the routing information with route to see whether both hosts have thecorrect routing entry. route prints out the complete kernel routing table when invoked without anyarguments (-n just makes it print addresses as dotted quad instead of using the hostname):
# route -nKernel routing tableDestination Gateway Genmask Flags Metric Ref Use Iface127.0.0.1 * 255.255.255.255 UH 1 0 112 lo172.16.1.0 * 255.255.255.0 U 1 0 10 eth0
The detailed meaning of these fields is explained later in the chapter. The Flags column contains a listof flags set for each interface. U is always set for active interfaces, and H says the destination addressdenotes a host. If the H flag is set for a route that you meant to be a network route, you have toreissue the route command with the -net option. To check whether a route you have entered is usedat all, check to see if the Use field in the second to last column increases between two invocations of
ping.
4.1.10. Routing Through a Gateway
In the previous section, we covered only the case of setting up a host on a single Ethernet. Quitefrequently, however, one encounters networks connected to one another by gateways. Thesegateways may simply link two or more Ethernets but may also provide a link to the outside world,such as the Internet. In order to use a gateway, you have to provide additional routing information tothe networking layer.
The Ethernets of the Virtual Brewery and the Virtual Winery are linked through such a gateway,namely the host vlager . Assuming that vlager has already been configured, we just have to add

another entry to vstout 's routing table that tells the kernel it can reach all hosts on the winery'snetwork through vlager . The appropriate incantation of route is shown below; the gw keyword tells
it that the next argument denotes a gateway:
# route add wine-net gw vlager
Of course, any host on the winery network you wish to talk to must have a routing entry for thebrewery's network. Otherwise you would only be able to send data to the winery network from thebrewery network, but the hosts on the winery would be unable to reply.
This example describes only a gateway that switches packets between two isolated Ethernets. Nowassume that vlager also has a connection to the Internet (say, through an additional SLIP link). Thenwe would want datagrams to any destination network other than the brewery to be handed to vlager. This action can be accomplished by making it the default gateway for vstout :
# route add default gw vlager
The network name default is shorthand for 0.0.0.0 , which denotes the default route. The defaultroute matches every destination and will be used if there is no more specific route that matches. Youdo not have to add this name to /etc/networks because it is built into route .
If you see high packet loss rates when pinging a host behind one or more gateways, this may hint ata very congested network. Packet loss is not so much due to technical deficiencies as to temporaryexcess loads on forwarding hosts, which makes them delay or even drop incoming datagrams.
4.1.11. Configuring a Gateway
Configuring a machine to switch packets between two Ethernets is pretty straightforward. Assumewe're back at vlager , which is equipped with two Ethernet cards, each connected to one of the twonetworks. All you have to do is configure both interfaces separately, giving them their respective IPaddresses and matching routes, and that's it.
It is quite useful to add information on the two interfaces to the hosts file as shown in the followingexample, so we have handy names for them, too:
172.16.1.1 vlager.vbrew.com vlager vlager-if1172.16.2.1 vlager-if2
The sequence of commands to set up the two interfaces is then:
# ifconfig eth0 vlager-if1# route add brew-net# ifconfig eth1 vlager-if2# route add wine-net
If this sequence doesn't work, make sure your kernel has been compiled with support for IPforwarding enabled. One good way to do this is to ensure that the first number on the second line of/proc/net/snmp is set to 1 .

4.1.12. The Point-to-Point Interface
A PLIP link used to connect two machines is a little different from an Ethernet. PLIP links are anexample of what are called point-to-point links, meaning that there is a single host at each end of thelink. Networks like Ethernet are called broadcast networks. Configuration of point-to-point links isdifferent because unlike broadcast networks, point-to-point links don't support a network of theirown.
PLIP provides very cheap and portable links between computers. As an example, we'll consider thelaptop computer of an employee at the Virtual Brewery that is connected to vlager via PLIP. Thelaptop itself is called vlite and has only one parallel port. At boot time, this port will be registered asplip1 . To activate the link, you have to configure the plip1 interface using the following commands:[4]
[4] Note that pointopoint is not a typo. It really is spelled like this.
# ifconfig plip1 vlite pointopoint vlager# route add default gw vlager
The first command configures the interface, telling the kernel that this is a point-to-point link, with theremote side having the address of vlager . The second installs the default route, using vlager asgateway. On vlager , a similar ifconfig command is necessary to activate the link (a routeinvocation is not needed):
# ifconfig plip1 vlager pointopoint vlite
Note that the plip1 interface on vlager does not need a separate IP address, but may also be giventhe address 172.16.1.1 . Point-to-point networks don't support a network directly, so the interfacesdon't require an address on any supported network. The kernel uses the interface information in therouting table to avoid any possible confusion.[5] Now we have configured routing from the laptop tothe brewery's network; what's still missing is a way to route from any of the brewery's hosts to vlite .One particularly cumbersome way is to add a specific route to every host's routing table that namesvlager as a gateway to vlite :
[5] As a matter of caution, you should configure a PLIP link only after you have completely set up the routing table entries for your
Ethernets. With some older kernels, your network route might otherwise end up pointing at the point-to-point link.
# route add vlite gw vlager
Dynamic routing offers a much better option for temporary routes. You could use gated , a routingdaemon, which you would have to install on each host in the network in order to distribute routinginformation dynamically. The easiest option, however, is to use proxy ARP (Address ResolutionProtocol). With proxy ARP, vlager will respond to any ARP query for vlite by sending its ownEthernet address. All packets for vlite will wind up at vlager , which then forwards them to thelaptop. We will come back to proxy ARP in the section "Checking the ARP Tables," later in the chapter.
Current net-tools releases contain a tool called plipconfig , which allows you to set certain PLIP timingparameters. The IRQ to be used for the printer port can be set using the ifconfig command.

4.1.13. The PPP Interface
Although PPP links are only simple point-to-point links like PLIP connections, there is much more to besaid about them. We discuss PPP in detail in Chapter 6 .
4.1.14. IP Alias
The Linux kernel supports a feature that completely replaces the old dummy interface and servesother useful functions. IP Alias allows you to configure multiple IP addresses onto a physical device. Inmost cases, you could configure your host to look like many different hosts, each with its own IPaddress. This configuration is sometimes called virtual hosting , although technically it is also used fora variety of other techniques.[6]
[6] More correctly, using IP aliasing is known as network layer virtual hosting. It is more common in the WWW and STMP worlds to
use application layer virtual hosting, in which the same IP address is used for each virtual host, but a different hostname is passed
with each application layer request.
To configure an alias for an interface, you must first ensure that your kernel has been compiled withsupport for IP Alias (check that you have a /proc/net/ip_alias file; if not, you will have to recompileyour kernel). Configuration of an IP alias is virtually identical to configuring a real network device; youuse a special name to indicate it's an alias that you want. For example:
# ifconfig eth0:0 172.16.1.1
This command would produce an alias for the eth0 interface with the address 172.16.1.1 . IP aliasesare referred to by appending :n to the actual network device, in which "n" is an integer. In our
example, the network device we are creating the alias on is eth0 , and we are creating an aliasnumbered zero for it. This way, a single physical device may support a number of aliases.
Each alias may be treated as though it is a separate device, and as far as the kernel IP software isconcerned, it will be; however, it will be sharing its hardware with another interface.
4.1.15. All About ifconfig
There are many more parameters to ifconfig than we have described so far. Its normal invocation isthis:
ifconfig interface [address [parameters]]
interface is the interface name, and address is the IP address to be assigned to the interface. This
may be either an IP address in dotted quad notation or a name that ifconfig will look up in /etc/hosts .
If ifconfig is invoked with only the interface name, it displays that interface's configuration. Wheninvoked without any parameters, it displays all interfaces you have configured so far; a -a option
forces it to show the inactive ones as well. A sample invocation for the Ethernet interface eth0 maylook like this:
# ifconfig eth0

eth0 Link encap 10Mbps Ethernet HWaddr 00:00:C0:90:B3:42 inet addr 172.16.1.2 Bcast 172.16.1.255 Mask 255.255.255.0 UP BROADCAST RUNNING MTU 1500 Metric 0 RX packets 3136 errors 217 dropped 7 overrun 26 TX packets 1752 errors 25 dropped 0 overrun 0
The MTU and MeTRic fields show the current maximum transmission unit size and metric value for that
interface. The metric value is traditionally used by some operating systems to compute the cost of aroute.
The RX and TX lines show how many packets have been received or transmitted error free, how many
errors occurred, how many packets were dropped (probably because of low memory), and how manywere lost because of an overrun. Receiver overruns usually occur when packets come in faster thanthe kernel can service the last interrupt. The flag values printed by ifconfig roughly correspond to thenames of its command-line options; they will be explained later.
The following is a list of parameters recognized by ifconfig , with the corresponding flag names.Options that simply turn on a feature also allow it to be turned off again by preceding the optionname by a dash (-).
up
This option makes an interface accessible to the IP layer. This option is implied when anaddress is given on the command line. It may also be used to reenable an interface that hasbeen taken down temporarily using the down option.
This option corresponds to the flags UP and RUNNING .
down
This option marks an interface inaccessible to the IP layer. This effectively disables any IP trafficthrough the interface. Note that this option also automatically deletes all routing entries thatuse this interface.
netmask mask
This option assigns a subnet mask to be used by the interface. It may be given as either a 32-bit hexadecimal number preceded by 0x, or as a dotted quad of decimal numbers. While thedotted quad format is more common, the hexadecimal representation is often easier to workwith. Netmasks are essentially binary, and it is easier to do binary-to-hexadecimal than binary-to-decimal conversion.
pointopoint address

This option is used for point-to-point IP links that involve only two hosts. This option is neededto configure SLIP or PLIP interfaces, for example. If a point-to-point address has been set,ifconfig displays the POINTOPOINT flag.
broadcast address
The broadcast address is usually made up from the network number by setting all bits of thehost part. Some IP implementations (systems derived from BSD 4.2, for instance) use adifferent scheme in which all host part bits are cleared instead. The broadcast option adapts to
these strange environments. If a broadcast address has been set, ifconfig displays theBROADCAST flag.
irq
This option allows you to set the IRQ line used by certain devices. This is especially useful forPLIP, but may also be useful for certain Ethernet cards.
metric number
This option may be used to assign a metric value to the routing table entry created for theinterface. This metric is used by the RIP to build routing tables for the network.[7] The defaultmetric used by ifconfig is zero. If you don't run a RIP daemon, you don't need this option at all;if you do, you will rarely need to change the metric value.
[7] RIP chooses the optimal route to a given host based on the "length" of the path. It is computed bysumming up the individual metric values of each host-to-host link. By default, a hop has length 1, butthis may be any positive integer less than 16. (A route length of 16 is equal to infinity. Such routes areconsidered unusable.) The metric parameter sets this hop cost, which is then broadcast by the routingdaemon.
mtu bytes
This sets the Maximum Transmission Unit, which is the maximum number of octets theinterface is able to handle in one transaction. For Ethernets, the MTU defaults to 1,500 (thelargest allowable size of an Ethernet packet); for SLIP interfaces, it is 296. (There is noconstraint on the MTU of SLIP links; this value is a good compromise.)
arp
This is an option specific to broadcast networks such as Ethernets or packet radio. It enablesthe use of the ARP to detect the physical addresses of hosts attached to the network. Forbroadcast networks, it is on by default. If ARP is disabled, ifconfig displays the NOARP flag.

-arp
This option disables the use of ARP on this interface.
promisc
This option puts the interface in promiscuous mode. On a broadcast network, this makes theinterface receive all packets, regardless of whether they were destined for this host. This allowsnetwork traffic analysis using packet filters and such, also called Ethernet snooping . Usually,this is a good technique for hunting down network problems that are otherwise hard to detect.Tools such as tcpdump rely on this.
On the other hand, this option allows attackers to do nasty things, such as skim the traffic of yournetwork for passwords. You can protect against this type of attack by prohibiting just anyone fromplugging their computers into your Ethernet. You could also use secure authentication protocols, suchas Kerberos or the secure shell login suite.[8] This option corresponds to the PROMISC flag.
[8] OpenSSH can be obtained from ftp://ftp.openbsd.org/OpenBSD/OpenSSH/portable .
-promisc
This option turns promiscuous mode off.
allmulti
Multicast addresses are like Ethernet broadcast addresses, except that instead of automaticallyincluding everybody, the only people who receive packets sent to a multicast address are thoseprogrammed to listen to it. This is useful for applications such as Ethernet-based videoconferencing or network audio, to which only those interested can listen. Multicast addressing issupported by most, but not all, Ethernet drivers. When this option is enabled, the interfacereceives and passes multicast packets for processing. This option corresponds to the ALLMULTI
flag.
-allmulti
This option turns multicast addresses off.
4.1.16. The netstat Command
netstat is a useful tool for checking your network configuration and activity. It is in fact a collection ofseveral tools lumped together. We discuss each of its functions in the following sections.
4.1.16.1 Displaying the routing table

When you invoke netstat with the -r flag, it displays the kernel routing table in the way we've been
doing with route. On vstout , it produces:
# netstat -nrKernel IP routing tableDestination Gateway Genmask Flags MSS Window irtt Iface127.0.0.1 * 255.255.255.255 UH 0 0 0 lo172.16.1.0 * 255.255.255.0 U 0 0 0 eth0172.16.2.0 172.16.1.1 255.255.255.0 UG 0 0 0 eth0
The -n option makes netstat print addresses as dotted quad IP numbers rather than the symbolic
host and network names. This option is especially useful when you want to avoid address lookupsover the network (e.g., to a DNS or NIS server).
The second column of netstat 's output shows the gateway to which the routing entry points. If nogateway is used, an asterisk is printed instead. The third column shows the "generality" of the route,i.e., the network mask for this route. When given an IP address to find a suitable route for, the kernelsteps through each of the routing table entries, taking the bitwise AND of the address and thegenmask before comparing it to the target of the route. The most specific match is used.
The fourth column displays the following flags that describe the route:
G
The route uses a gateway.
U
The interface to be used is up.
H
Only a single host can be reached through the route. For example, this is the case for theloopback entry 127.0.0.1 .
D
This route is dynamically created. It is set if the table entry has been generated by a routingdaemon such as gated or by an ICMP redirect message (see Chapter 2 ).
M

This route is set if the table entry was modified by an ICMP redirect message.
!
The route is a reject route and datagrams will be dropped.
The next three columns show the MSS, Window, and irtt that will be applied to TCP connectionsestablished via this route. The MSS is the Maximum Segment Size and is the size of the largestdatagram the kernel will construct for transmission via this route. The Window is the maximumamount of data the system will accept in a single burst from a remote host. The acronym irtt standsfor "initial round trip time." The TCP protocol ensures that data is reliably delivered between hosts byretransmitting a datagram if it has been lost. The TCP protocol keeps a running count of how long ittakes for a datagram to be delivered to the remote end and an acknowledgement to be received, sothat it knows how long to wait before assuming a datagram needs to retransmitted; this process iscalled the round-trip time. The initial round-trip time is the value that the TCP protocol uses when aconnection is first established. For most network types, the default value is okay, but for some slownetworks, notably certain types of amateur packet radio networks, the time is too short and causesunnecessary retransmission. The irtt value can be set using the route command. Values of zero inthese fields mean that the default is being used.
Finally, the last field displays the network interface that this route will use.
4.1.16.2 Displaying interface statistics
When invoked with the -i flag, netstat displays statistics for the network interfaces currentlyconfigured. If the -a option is also given, it prints all interfaces present in the kernel, not only those
that have been configured currently. On vstout , the output from netstat will look like this:
# netstat -iKernel Interface tableIface MTU Met RX-OK RX-ERR RX-DRP RX-OVR TX-OK TX-ERR TX-DRP TX-OVR Flagslo 0 0 3185 0 0 0 3185 0 0 0 BLRUeth0 1500 0 972633 17 20 120 628711 217 0 0 BRU
The MTU and Met fields show the current MTU and metric values for that interface. The RX and TXcolumns show how many packets have been received or transmitted error-free (RX-OK /TX-OK ) ordamaged (RX-ERR /TX-ERR ); how many were dropped (RX-DRP /TX-DRP ); and how many were lostbecause of an overrun (RX-OVR /TX-OVR ).
The last column shows the flags that have been set for this interface. These characters are one-character versions of the long flag names that are printed when you display the interfaceconfiguration with ifconfig:
B
A broadcast address has been set.

L
This interface is a loopback device.
M
All packets are received (promiscuous mode).
O
ARP is turned off for this interface.
P
This is a point-to-point connection.
R
Interface is running.
U
Interface is up.
4.1.16.3 Displaying connections
netstat supports a set of options to display active or passive sockets. The options -t , -u , -w , and -x show active TCP, UDP, RAW, and Unix socket connections. If you provide the -a flag in addition,
sockets that are waiting for a connection (i.e., listening) are displayed as well. This display will giveyou a list of all servers that are currently running on your system.
Invoking netstat -ta on vlager produces this output:
$ netstat -taActive Internet connections (servers and established)Proto Recv-Q Send-Q Local Address Foreign Address Statetcp 0 0 localhost:mysql *:* LISTENtcp 0 0 localhost:webcache *:* LISTENtcp 0 0 *:www *:* LISTENtcp 0 0 *:ssh *:* LISTENtcp 0 0 *:https *:* LISTENtcp 0 0 ::ffff:1.2.3.4:ssh ::ffff:4.5.6.:49152 ESTABLISHED

tcp 0 652 ::ffff:1.2.3.4:ssh ::ffff:4.5.6.:31996 ESTABLISHED
This output shows most servers simply waiting for an incoming connection. However, the fourth lineshows an incoming SMTP connection from vstout , and the sixth line tells you there is an outgoingtelnet connection to vbardolino .[9]
[9] You can tell whether a connection is outgoing from the port numbers. The port number shown for the calling host will always be
a simple integer. The host being called will use a well-known service port will be in use for which netstat uses the symbolic name
such as smtp , found in /etc/services . Of course, it is possible to specify your source port in a number of applications these
days, so this isn't a guarantee!
Using the -a flag by itself will display all sockets from all families.
4.1.17. Testing Connectivity with traceroute
A very simple way to test connectivity between hosts, and to verify routing paths is to use thetraceroute tool. traceroute uses UDP datagrams (or ICMP if the -I option is specified) to determine
the path which packets take over the network. The command can be invoked as follows:
# traceroute -n www.oreilly.comtraceroute to www.oreilly.com (208.201.239.37), 30 hops max, 40 byte packets 1 22.44.55.23 187.714 ms 178.548 ms 177.132 ms 2 206.171.134.130 186.730 ms 168.750 ms 150.769 ms 3 216.102.176.193 168.499 ms 209.232.130.82 194.629 ms 209.232.130.28 185.999 ms 4 151.164.243.121 212.852 ms 230.590 ms 132.040 ms 5 151.164.240.134 80.049 ms 71.191 ms 53.450 ms 6 151.164.40.150 45.320 ms 44.579 ms 176.651 ms 7 151.164.191.82 168.499 ms 194.864 ms 149.789 ms 8 151.164.248.90 80.065 ms 71.185 ms 88.922 ms 9 69.22.143.178 228.883 ms 222.204 ms 179.093 ms10 69.22.143.6 131.573 ms 89.394 ms 71.180 ms..
4.1.18. Checking the ARP Tables
On some occasions, it is useful to view or alter the contents of the kernel's ARP tables, for example,when you suspect a duplicate Internet address is the cause for some intermittent network problem.The arp tool was made for situations like this. Its command-line options are:
arp [-v] [-t hwtype] -a [hostname]
arp [-v] [-t hwtype] -s hostname hwaddr
arp [-v] -d hostname [hostname]
All hostname arguments may be either symbolic hostnames or IP addresses in dotted quad notation.
The first invocation displays the ARP entry for the IP address or host specified, or all hosts known if nohostname is given. For example, invoking arp on vlager may yield something similar to:

# arp -eAddress HWtype HWaddress Flags Mask Iface172.16.0.1 (incomplete) eth0172.16.0.155 ether 00:11:2F:38:4E:4F C eth0172.16.0.69 ether 00:90:4B:F1:3A:B5 C eth0vale.vbrew.com ether 00:10:67:30:C5:7B C eth1172.16.0.207 ether 00:0B:DB:1A:C7:E2 C eth0
which shows the Ethernet addresses of several hosts.
The -s option is used to permanently add hostname 's Ethernet address to the ARP tables. The
hwaddr argument specifies the hardware address, which is by default expected to be an Ethernet
address specified as six hexadecimal bytes separated by colons. You may also set the hardwareaddress for other types of hardware, using the -t option.
For some reason, ARP queries for the remote host sometimes fail, for instance, when its ARP driver isbuggy or there is another host in the network that erroneously identifies itself with that host's IPaddress; this problem requires you to manually add an IP address to the ARP table. Hard-wiring IPaddresses in the ARP table is also a (very drastic) measure to protect yourself from hosts on yourEthernet that pose as someone else.
Invoking arp using the -d switch deletes all ARP entries relating to the given host. This switch may be
used to force the interface to reattempt obtaining the Ethernet address for the IP address in question.This is useful when a misconfigured system has broadcasted wrong ARP information (of course, youhave to reconfigure the broken host first).
The -s option may also be used to implement proxy ARP. This is a special technique through which a
host, say gate , acts as a gateway to another host named fnord by pretending that both addressesrefer to the same host, namely gate . It does so by publishing an ARP entry for fnord that points toits own Ethernet interface. Now when a host sends out an ARP query for fnord , gate will return areply containing its own Ethernet address. The querying host will then send all datagrams to gate ,which dutifully forwards them to fnord .
These contortions may be necessary when you want to access fnord from a DOS machine with abroken TCP implementation that doesn't understand routing too well. When you use proxy ARP, it willappear to the DOS machine as if fnord was on the local subnet, so it doesn't have to know about howto route through a gateway.
Another useful application of proxy ARP is when one of your hosts acts as a gateway to some otherhost only temporarily, for instance, through a dial-up link. In a previous example, we encountered thelaptop vlite , which was connected to vlager through a PLIP link from time to time. Of course, thisapplication will work only if the address of the host you want to provide proxy ARP for is on the sameIP subnet as your gateway. vstout could proxy ARP for any host on the brewery subnet (172.16.1.0), but never for a host on the winery subnet (172.16.2.0 ).
The proper invocation to provide proxy ARP for fnord is given below; of course, the given Ethernetaddress must be that of gate :
# arp -s fnord 00:00:c0:a1:42:e0 pub

Chapter 5. Name Service and ConfigurationAs we discussed in Chapter 2, TCP/IP networking may rely on different schemes to convert namesinto addresses. The simplest way is to use a host table stored in /etc/hosts. This is useful only for asmall LAN that is run by a single administrator and no IP traffic with the outside world. The format ofthe hosts file has already been described in Chapter 4.
While a hosts file approach may be appropriate on a small network, most administrators will need toinvestigate a DNS server. There are multiple services that you can use to resolve IP addresses. Themost commonly used is the Berkeley Internet Name Domain service (BIND) Version 8.x. BIND v9.xhas been available for some time now and seeks to add a variety of new features, as well as contendwith security issues in BIND v8.x. The jump from BIND 8 to BIND 9 isn't quite as significant as wasthe leap from BIND 4 to 8; many of the configuration files and options are the same. ConfiguringBIND can be a real chore, but once you've done it, you can easily make changes in the networktopology. On Linux, as on many other Unix-ish systems, BIND service is provided through a programcalled named. At startup, it loads a set of master files into its internal cache and waits for queriesfrom remote or local user processes. There are different ways to set up BIND, and not all require youto run a nameserver on every host.
We will also discuss a simpler and more secure option, djbdns, written by David J. Bernstein. Thisresolver was written from scratch with security in mind and simplifies server setup in a number ofways, primarily by eliminating the need for multiple confusing zone files.
This chapter can do little more than give a rough sketch of how DNS works and how to operate anameserver. It should be sufficient for readers with a small LAN and an Internet connection. For themost current information, you may want to check the documentation contained in the BIND or djbdnssource packages, which supply manual pages, release notes, and in the BIND package, the BINDOperator's Guide (BOG). Don't let this name scare you off; it's actually a very useful document. Formore comprehensive coverage of DNS and associated issues, you may find DNS and BIND by PaulAlbitz and Cricket Liu (O'Reilly) a useful reference. DNS questions may be answered in a newsgroupcalled comp.protocols.tcp-ip.domains. For technical details, the Domain Name System is defined byRFC numbers 1033, 1034, and 1035 .

5.1. The Resolver Library
The term resolver refers not to a special application, but to the resolver library. This is a collection offunctions that can be found in the standard C library and are invoked by a wide range of networkingapplications. The central routines are gethostbyname(2) and gethostbyaddr(2), which look up all IPaddresses associated with a hostname, and vice versa. They may be configured to simply look up theinformation in hosts, or to query a number of DNS nameservers.
The resolver functions read configuration files when they are invoked. From these configuration files,they determine what databases to query, in which order, and other details relevant to how you'veconfigured your environment. The older Linux standard library, libc, used /etc/host.conf as its masterconfiguration file, but since Version 2 of the GNU standard library, glibc, uses /etc/nsswitch.conf.
5.1.1. The nsswitch.conf File
The nsswitch.conf file allows the system administrator to configure a wide variety of differentdatabases. We'll limit our discussion to options that relate to host and network IP address resolution.You can easily find more information about the other features by reading the GNU standard librarydocumentation.
Options in nsswitch.conf must appear on separate lines. Fields may be separated by whitespace(spaces or tabs). A hash sign (#) introduces a comment that extends to the next newline. Each line
describes a particular service; hostname resolution is one of these. The first field in each line is thename of the database, ending with a colon. The database name associated with host addressresolution is hosts. A related database is networks, which is used for resolution of network names
into network addresses. The remainder of each line stores options that determine the way lookups forthat database are performed.
The following options are available:
dns
Use the DNS service to resolve the address. This makes sense only for host address resolution,not network address resolution. This mechanism uses the fs file that we'll describe later in thechapter.
files
Search a local file for the host or network name and its corresponding address. This option usesthe traditional /etc/hosts and /etc/networks files.

The order in which the services to be queried are listed determines the order in which they arequeried when attempting to resolve a name. The query-order list is in the service description in the/etc/nsswitch.conf file. The services are queried from left to right and by default searching stopswhen a resolution is successful.
A simple example of host and network database specification that would mimic our configurationusing the older libc standard library is shown in Example 5-1.
Example 5-1. Sample nsswitch.conf file
# /etc/nsswitch.conf## Example configuration of GNU Name Service Switch functionality.# Information about this file is available in the `libc6-doc' package. hosts: dns filesnetworks: files
This example causes the system to look up hosts first in the DNS and, if that can't find them, the/etc/hosts file. Network name lookups would be attempted using only the /etc/networks file.
You are able to control the lookup behavior more precisely using "action items" that describe whataction to take given the result of the previous lookup attempt. Action items appear between servicespecifications and are enclosed within square brackets, [ ]. The general syntax of the action
statement is:
[ [!] status = action ... ]
There are two possible actions:
return
Controls returns to the program that attempted the name resolution. If a lookup attempt wassuccessful, the resolver will return with the details; otherwise, it will return a zero result.
continue
The resolver will move on to the next service in the list and use it to attempt resolution.
The optional (!) character specifies that the status value should be inverted before testing; that is, itmeans "not."
The available status values on which we can act are as follows:

success
The requested entry was found without error. The default action for this status is return.
notfound
There was no error in the lookup, but the target host or network could not be found. Thedefault action for this status is continue.
unavail
The service queried was unavailable. This could mean that the hosts or networks file wasunreadable for the files service or that a nameserver or NIS server did not respond for thedns or nis services. The default action for this status is continue.
tryagain
This status means that the service is temporarily unavailable. For the files service, this wouldusually indicate that the relevant file was locked by some process. For other services, it maymean the server was temporarily unable to accept connections. The default action for thisstatus is continue.
A simple example of how you might use this mechanism is shown in Example 5-2.
Example 5-2. Sample nsswitch.conf file using an action statement
# /etc/nsswitch.conf## Example configuration of GNU Name Service Switch functionality.# Information about this file is available in the `libc6-doc' package. hosts: dns [!UNAVAIL=return] filesnetworks: files
This example attempts host resolution using DNS. If the return status is anything other thanunavailable, the resolver returns whatever it has found. If, and only if, the DNS lookup attemptreturns an unavailable status, the resolver attempts to use the local /etc/hosts. This means that weshould use the hosts file only if our nameserver is unavailable for some reason.
5.1.2. Configuring Nameserver Lookups Using resolv.conf
When configuring the resolver library to use the DNS name service for host lookups, you also have to

tell it which nameservers to use. There is a separate file for this called resolv.conf. If this file does notexist or is empty, the resolver assumes the nameserver is on your local host.
To run a nameserver on your local host, you have to set it up separately, as will be explained in thefollowing section, "How DNS Works." If you are on a local network and have the opportunity to usean existing nameserver, this should always be preferred. If you use a dialup IP connection to theInternet, you would normally specify the nameserver of your service provider in the resolv.conf file.
The most important option in resolv.conf is nameserver, which gives the IP address of a nameserverto use. If you specify several nameservers by giving the nameserver option several times, they are
tried in the order given. You should therefore put the most reliable server first. The currentimplementation allows you to have up to three nameserver statements in resolv.conf. If nonameserver option is given, the resolver attempts to connect to the nameserver on the local host.
Two other options, domain and search, let you use shortcut names for hosts in your local domain.
Usually, when just contacting another host in your local domain, you don't want to type in the fullyqualified hostname, but use a name such as gauss on the command line and have the resolver tackon the mathematics.groucho.edu part.
This is just the domain statement's purpose. It lets you specify a default domain name to be
appended when DNS fails to look up a hostname. For instance, when given the name gauss, theresolver first tries to find gauss. in DNS and fails, because there is no such top-level domain. Whengiven mathematics.groucho.edu as a default domain, the resolver repeats the query for gausswith the default domain appended, this time succeeding.
That's just fine, you may think, but as soon you get out of the math department's domain, you'reback to those fully qualified domain names. Of course, you would also want to have shorthands likequark.physics for hosts in the physics department's domain.
This is where the search list comes in. A search list can be specified using the search option, which isa generalization of the domain statement. Where the latter gives a single default domain, the former
specifies a whole list of them, each to be tried in turn until a lookup succeeds. This list must beseparated by blanks or tabs.
The search and domain statements are mutually exclusive and may not appear more than once. If
neither option is given, the resolver will try to guess the default domain from the local hostnameusing the getdomainname(2) system call. If the local hostname doesn't have a domain part, the rootdomain is the default.
Assume you're at the Virtual Brewery and want to log in to foot.groucho.edu. By a slip of yourfingers, you mistype foot as foo, which doesn't exist. GMU's nameserver will therefore tell you that itknows no such host. Using older search methods, the resolver used to keep trying the name withvbrew.com and com appended. The latter is problematic because groucho.edu.com might actuallybe a valid domain name. Their nameserver might then even find foo in their domain, pointing you toone of their hosts, which is not what you're looking for.
For some applications, these bogus host lookups can be a security problem. Therefore, you shouldusually limit the domains on your search list to your local organization or something comparable. Atthe mathematics department of Groucho Marx University, the search list would commonly be set tomaths.groucho.edu and groucho.edu.
If default domains sound confusing to you, consider this sample resolv.conf file for the VirtualBrewery:

# /etc/resolv.conf# Our domaindomain vbrew.com## We use vlager as central name server:nameserver 172.16.1.1
When resolving the name vale, the resolver looks up vale. and, failing this, vale.vbrew.com.
5.1.3. Resolver Robustness
When running a LAN inside a larger network, you definitely should use central nameservers if theyare available. The nameservers develop rich caches that speed up repeat queries, since all queriesare forwarded to them. However, this scheme has a drawback: when a fire destroyed the backbonecable at one author's university, no more work was possible on his department's LAN because theresolver could no longer reach any of the nameservers. This situation caused difficulties with mostnetwork services, such as X terminal logins and printing.
Although it is not very common for campus backbones to go down in flames, one might want to takeprecautions against such cases.
One option is to set up a local nameserver that resolves hostnames from your local domain andforwards all queries for other hostnames to the main servers. Of course, this is applicable only if youare running your own domain.
Alternatively, you can maintain a backup host table for your domain or LAN in /etc/hosts. This is verysimple to do. You simply ensure that the resolver library queries DNS first and the hosts file next. Inthe /etc/nsswitch.conf file you'd use hosts: dns files to make the resolver fall back to the hosts file
if the central nameserver is unreachable.

5.2. How DNS Works
DNS organizes hostnames in a domain hierarchy. A domain is a collection of sites that are related in somesensebecause they form a proper network (e.g., all machines on a campus), because they all belong to acertain organization (e.g., the U.S. government), or because they're simply geographically close. Forinstance, universities are commonly grouped in the edu domain, with each university or college using aseparate subdomain , below which their hosts are subsumed. Groucho Marx University the groucho.edudomain, while the LAN of the mathematics department is assigned maths.groucho.edu . Hosts on thedepartmental network would have this domain name tacked onto their hostname, so erdos would be knownas erdos.maths.groucho.edu , which would be the FQDN (see Section 4.1.2 in Chapter 4 ).
Figure 5-1 shows a section of the namespace. The entry at the root of this tree, which is denoted by a singledot, is quite appropriately called the root domain and encompasses all other domains. To indicate that ahostname is a FQDN, rather than a name relative to some (implicit) local domain, it is sometimes writtenwith a trailing dot. This dot signifies that the name's last component is the root domain. Depending on itslocation in the name hierarchy, a domain may be called top-level, second-level, or third-level. More levels ofsubdivision occur, but they are rare. Table 5-1 lists several top-level domains that you may see frequently.
Figure 5-1. A part of the domain namespace
Table 5-1. Common top-level domains

Domain Description
edu (Mostly U.S.) educational institutions such as universities.
com Commercial organizations and companies.
org Noncommercial organizations.
netOriginally for gateways and other administrative entities, now commercial organizations andcompanies as well.
mil U.S. military institutions.
gov U.S. government institutions.
biz For use by companies or commercial entities
name Designated for individuals to use for personal web sites
info Established for informational resource sites
Historically, the first four of these were assigned to the U.S., but changes in policy have meant that thesedomains, named global Top-Level Domains (gTLD), are now considered global in nature. Recentnegotiations to broaden the range of gTLDs resulted in the last three additions. However, these new optionshave so far proven to be quite unpopular.
Outside the U.S., each country generally uses a top-level domain of its own named after the two-lettercountry code defined in ISO-3166. Finland, for instance, uses the fi domain; fr is used by France, de byGermany, and aq by Antarctica. Below this top-level domain, each country's NIC is free to organizehostnames in whatever way they want. Australia has second-level domains similar to the international top-level domains, named com.au and edu.au . Other countries, such as Germany, don't use this extra level,but have slightly long names that refer directly to the organizations running a particular domain. It's notuncommon to see hostnames such as ftp://ftp.informatik.uni-erlangen.de . Chalk that up to Germanefficiency.
Of course, these national domains do not necessarily mean that a host below that domain is actually locatedin that country; it means only that the host has been registered with that country's NIC. A Swedishmanufacturer might have a branch in Australia and still have all its hosts registered with the se top-leveldomain.
This practice has become more popular in recent years, with countries such as Tuvalu (tv ) and Togo (to )selling TLDs to enterprising agents who resell domain names such as go.to or watch.tv .
Organizing the namespace in a hierarchy of domain names nicely solves the problem of name uniqueness;with DNS, a hostname has to be unique only within its domain to give it a name different from all otherhosts worldwide. Furthermore, fully qualified names are easy to remember. Taken by themselves, these arealready very good reasons to split up a large domain into several subdomains.
DNS does even more for you than this. It also allows you to delegate authority over a subdomain to itsadministrators. For example, the maintainers at the Groucho Computing Center might create a subdomainfor each department; we already encountered the math and physics subdomains above. When they find thenetwork at the physics department too large and chaotic to manage from outside (after all, physicists areknown to be an unruly bunch), they may simply pass control of the physics.groucho.edu domain to theadministrators of this network. These administrators are free to use whatever hostnames they like and

assign them IP addresses from their network in whatever fashion they desire, without outside interference.
To this end, the namespace is split up into zones, each rooted at a domain. Note the subtle differencebetween a zone and a domain: the domain groucho.edu encompasses all hosts at Groucho MarxUniversity, while the zone groucho.edu includes only the hosts that are managed by the Computing Centerdirectlythose at the mathematics department, for example. The hosts at the physics department belong to adifferent zone, namely physics.groucho.edu . In Figure 5-1 , the start of a zone is marked by a smallcircle to the right of the domain name.
5.2.1. Name Lookups with DNS
At first glance, all this domain and zone fuss seems to make name resolution an awfully complicatedbusiness. After all, if no central authority controls what names are assigned to which hosts, how is a humbleapplication supposed to know?
Now comes the really ingenious part about DNS. If you want to find the IP address of erdos , for example,DNS says, "Go ask the people who manage it, and they will tell you."
In fact, DNS is a giant distributed database. It is implemented by so-called nameservers that supplyinformation on a given domain or set of domains. For each zone there are at least two, or at most a few,nameservers that hold all authoritative information on hosts in that zone. To obtain the IP address of erdos, all you have to do is contact the nameserver for the groucho.edu zone, which will then return the desireddata.
Easier said than done, you might think. So how do I know how to reach the nameserver at Groucho MarxUniversity? In case your computer isn't equipped with an address-resolving oracle, DNS provides for this,too. When your application wants to look up information on erdos , it contacts a local nameserver, whichconducts a so-called iterative query for it. It starts off by sending a query to a nameserver for the rootdomain, asking for the address of erdos.maths.groucho.edu . The root nameserver recognizes that thisname does not belong to its zone of authority, but rather to one below the edu domain. Thus, it tells you tocontact an edu zone nameserver for more information and encloses a list of all edu nameservers along withtheir addresses. Your local nameserver will then go on and query one of those for instance, a.isi.edu . In amanner similar to the root nameserver, a.isi.edu knows that the groucho.edu people run a zone of theirown and points you to their servers. The local nameserver will then present its query for erdos to one ofthese, which will finally recognize the name as belonging to its zone and return the corresponding IPaddress.
This looks like a lot of traffic for looking up a measly IP address, but it's miniscule considering the speed ofnetworking today. There's still room for improvement with this scheme, however.
To improve response time during future queries, the nameserver stores the information obtained in its localcache. So the next time anyone on your local network wants to look up the address of a host in thegroucho.edu domain, your nameserver will go directly to the groucho.edu nameserver.[1]
[1] If information weren't cached, DNS would be as inefficient as any other method because each query would involve the root name
servers.
Of course, the nameserver will not keep this information forever; it will discard it after some time. Theexpiration interval is called the time to live (ttl). Each datum in the DNS database is assigned such a ttl byadministrators of the responsible zone.
5.2.2. Types of Nameservers

Nameservers that hold all information on hosts within a zone are called authoritative for this zone. Anyquery for a host within this zone will end up at one of these nameservers.
Authoritative servers must be fairly well synchronized. Thus, the zone's network administrator must makeone the primary server, which loads its zone information from datafiles, and make the others secondaryservers, which transfer the zone data from the primary server at regular intervals.
Having several nameservers distributes workload; it also provides backup. When one nameserver machinefails in a benign way, such as crashing or losing its network connection, all queries fall back to the otherservers. Of course, this scheme doesn't protect you from server malfunctions that produce wrong replies toall DNS requests, such as from software bugs in the server program itself.
You can also run a nameserver that is not authoritative for any domain.[2] This is useful since thenameserver will still be able to conduct DNS queries for the applications running on the local network andcache the information. Hence, it is called a caching-only server.
[2] Well, almost. A nameserver has to provide at least name service for localhost and reverse lookups of 127.0.0.1 .
5.2.3. The DNS Database
We have seen that DNS not only deals with IP addresses of hosts, but also exchanges information onnameservers. DNS databases may have, in fact, many different types of entries.
A single piece of information from the DNS database is called a resource record (RR). Each record has atype associated with it describing the sort of data it represents, and a class specifying the type of network itapplies to. The latter accommodates the needs of different addressing schemes, including IP addresses (theIN class), Hesiod addresses (used by MIT's Kerberos system), and a few more. The prototypical resourcerecord type is the A record, which associates a fully qualified domain name with an IP address.
A host may be known by more than one name. For example you might have a server that provides both FTPand World Wide Web servers, which you give two names: ftp.machine.org and www.machine.org .However, one of these names must be identified as the official or canonical hostname, while the others aresimply aliases referring to the official hostname. The difference is that the canonical hostname is the onewith an associated A record, while the others only have a record of type CNAME that points to the canonicalhostname.
We will not go through all record types here, but we will give you a brief example. Example 5-3 shows apart of the domain database that is loaded into the nameservers for the physics.groucho.edu zone.
Example 5-3. An excerpt from a BIND zone file for the physics department
; Authoritative Information on physics.groucho.edu.$TTL 3D@ IN SOA niels.physics.groucho.edu. janet.niels.physics.groucho.edu. { 2004010200 ; serial no 8H ; refresh 2H ; retry 4W ; expire 1D ; default ttl }

;; Name servers IN NS niels IN NS gauss.maths.groucho.edu.gauss.maths.groucho.edu. IN A 149.76.4.23;; Theoretical Physics (subnet 12)niels IN A 149.76.12.1 IN A 149.76.1.12nameserver IN CNAME nielsotto IN A 149.76.12.2quark IN A 149.76.12.4down IN A 149.76.12.5iowa IN AAAA 2001:30fa::3strange IN A 149.76.12.6...; Collider Lab. (subnet 14)boson IN A 149.76.14.1muon IN A 149.76.14.7bogon IN A 149.76.14.12...
Apart from the A and CNAME records, you can see a special record at the top of the file, stretching severallines. This is the SOA resource record signaling the Start of Authority , which holds general information onthe zone that the server is authoritative for. The SOA record comprises, for instance, the default time to livefor all records.
Note that all names in the sample file that do not end with a dot should be interpreted relative to thephysics.groucho.edu domain. The special name (@ ) used in the SOA record refers to the domain nameby itself.
We have seen earlier that the nameservers for the groucho.edu domain somehow have to know about thephysics zone so that they can point queries to their nameservers. This is usually achieved by a pair ofrecords: the NS record that gives the server's FQDN, and an A record that associates an address with thatname. Since these records are what holds the namespace together, they are frequently called glue records .They are the only instances of records in which a parent zone actually holds information on hosts in thesubordinate zone. The glue records pointing to the nameservers for physics.groucho.edu are shown inExample 5-4 .
Example 5-4. An excerpt from a zone file for GMU
; Zone data for the groucho.edu zone..... ; ; Glue records for the physics.groucho.edu zone physics IN NS niels.physics.groucho.edu. IN NS gauss.maths.groucho.edu. niels.physics IN A 149.76.12.1 gauss.maths IN A 149.76.4.23 ...

5.2.4. The BIND named.conf File
The primary configuration file of BIND is /etc/named.conf . This style of configuration file has been in use byBIND since Version 8 replaced the old named.boot file.
The syntax is somewhat complex and supports a wide range of functions, but is fairly straightforward whenconfigured to provide basic functionality. Example 5-5 shows a simple configuration file for the vbrewdomain.
Example 5-5. The BIND named.conf file for vlager
// This is the primary configuration file for the BIND DNS server named.// options { directory "/var/cache/bind"; allow-query { any; }; recursion no; zone "localhost" { type master; file "/etc/bind/db.local";}; zone "127.in-addr.arpa" { type master; file "/etc/bind/db.127";}; zone "vbrew.com" { type master; allow-transfer { 10.10.0.5; 172.16.90.4; 1.2.3.4; }; file "/etc/bind/db.vbrew.com";}; zone "0.168.192.in-addr.arpa" { type master; file "/etc/bind/db.192.168.0";};
If you take a close look, you will see that each of the statements is written similar to a C-like statement withattributes enclosed within { } characters in the named.conf file.
The comments, often indicated by a pound character (#) in Linux, are indicated by two forward slashes (//)instead.

One of the most important options in this configuration file is zone . This is how you tell BIND what it'ssupposed to know. Beneath zone is another very important option, allow-transfer . This option allows
you to set the IP addresses permitted to perform a zone transfer. It is important to restrict this toauthorized entities only because it contains a lot of information that could be useful to potential attackers.In the example configuration files, we've restricted zone transfers to the three IP addresses listed.
In the option statement, we've also disabled DNS recursion. This allows us to separate the DNS serverfunctionality from the DNS cache functionality. For security reasons it's a good idea to do this. There havebeen many papers written on this subject, with one of the best explanations found athttp://cr.yp.to/djbdns/separation.html . If you need recursive functionality, it is best to configure a caching-only server on an IP address separate from your DNS server. We'll discuss how to make a caching-onlyserver with BIND a little bit later.
If you've decided that you can't live without recursion on the same server, there are ways within thenamed.conf to restrict recursion to specified domains. By using the allow-recursion option in place of therecursion no , you can specify a range of IP addresses allowed to perform recursive queries.
You've probably noticed that in this file we've included quite a few other entries than just the vbrew.comdomain. These are present to be compliant with the specifications established in RFC 1912, "Common DNSOperational and Configuration Errors." This specification requests that sites be authoritative for the localhostforward and reverse zones, and for broadcast zones.
The BIND configuration supports many more options that we haven't covered here. If you'd like informationall of the options, the best source of information is the documentation supplied with the BIND Version 8 or 9source package.
5.2.5. The DNS Database Files
Master files included with named , zone files, always have a domain associated with them, which is calledthe origin . This is the domain name specified with the cache and primary options. Within a master file, you
are allowed to specify domain and hostnames relative to this domain. A name given in a configuration file isconsidered absolute if it ends in a single dot; otherwise, it is considered relative to the origin. The origin byitself may be referred to using (@ ).
The data contained in a master file is split up in RRs, the smallest units of information available throughDNS. Each RR has a type. A records, for instance, map a hostname to an IP address, and a CNAME recordassociates an alias for a host with its official hostname. Examples appear later in the chapter when acomplete set of configuation and zone files are shown.
RR representations in master files share a common format:
[domain] [ttl] [class] type rdata
Fields are separated by spaces or tabs. An entry may be continued across several lines if an opening braceoccurs before the first newline and the last field is followed by a closing brace. Anything between asemicolon and a newline is ignored. A description of the format terms follows:

domain
This term is the domain name to which the entry applies. If no domain name is given, the RR isassumed to apply to the domain of the previous RR.
ttl
In order to force resolvers to discard information after a certain time, each RR is associated a time tolive (ttl ). The ttl field specifies the time in seconds that the information is valid after it has beenretrieved from the server. It is a decimal number with at most eight digits.
If no ttl value is given, the field value defaults to that of the minimum field of the preceding SOA record.
class
This is an address class, such as IN for IP addresses or HS for objects in the Hesiod class. For TCP/IPnetworking, you have to specify IN.
If no class field is given, the class of the preceding RR is assumed.
type
This describes the type of the RR. The most common types are A, SOA, PTR, and NS. The followingsections describe the various types of RRs.
rdata
This holds the data associated with the RR. The format of this field depends on the type of RR. In thefollowing discussion, it will be described for each RR separately.
The following is partial list of RRs to be used in DNS master files. There are a couple more of them that wewill not explain; they are experimental and of little use, generally.
SOA
This RR describes a zone of authority. It signals that the records following the SOA RR containauthoritative information for the domain. Every master file included by a primary statement must
contain an SOA record for this zone. The resource data contains the following fields:

origin
This field is the canonical hostname of the primary nameserver for this domain. It is usually given asan absolute name.
contact
This field is the email address of the person responsible for maintaining the domain, with the "@ " sign
replaced by a dot. For instance, if the responsible person at the Virtual Brewery were janet , this fieldwould contain janet.vbrew.com .
serial
This field is the version number of the zone file, expressed as a single decimal number. Wheneverdata is changed in the zone file, this number should be incremented. A common convention is to use anumber that reflects the date of the last update, with a version number appended to it to cover thecase of multiple updates occurring on a single day, e.g., 2000012600 being update 00 that occurredon January 26, 2000.
The serial number is used by secondary nameservers to recognize zone information changes. To stayup to date, secondary servers request the primary server's SOA record at certain intervals andcompare the serial number to that of the cached SOA record. If the number has changed, thesecondary servers transfer the whole zone database from the primary server.
refresh
This field specifies the interval in seconds that the secondary servers should wait between checkingthe SOA record of the primary server. Again, this is a decimal number with at most eight digits.
Generally, the network topology doesn't change too often, so this number should specify an intervalof roughly a day for larger networks, and even more for smaller ones.
retry
This number determines the intervals at which a secondary server should retry contacting the primaryserver if a request or a zone refresh fails. It must not be too low, or a temporary failure of the serveror a network problem could cause the secondary server to waste network resources. One hour, orperhaps one-half hour, might be a good choice.
expire
This field specifies the time in seconds after which a secondary server should finally discard all zonedata if it hasn't been able to contact the primary server. You should normally set this field to at leasta week (604,800 seconds), but increasing it to a month or more is also reasonable.

minimum
This field is the default time to live value for resource records that do not explicitly contain one. Thettl value specifies the maximum amount of time other nameservers may keep the RR in their cache.This time applies only to normal lookups, and has nothing to do with the time after which a secondaryserver should try to update the zone information.
If the topology of your network does not change frequently, a week or even more is probably a goodchoice. If single RRs change more frequently, you could still assign them smaller ttls individually. Ifyour network changes frequently, you may want to set minimum to one day (86,400 seconds).
A
This record associates an IP address with a hostname. The resource data field contains the address indotted quad notation.
For each hostname, there must be only one A record. The hostname used in this A record is considered thecanonical hostname. All other hostnames are aliases and must be mapped onto the canonical hostnameusing a CNAME record. If the canonical name of our host were vlager , we'd have an A record thatassociated that hostname with its IP address. Since we may also want another name associated with thataddress, say news , we'd create a CNAME record that associates this alternate name with the canonicalname. We'll talk more about CNAME records shortly.
AAAA
This record is exactly the same as the A record, but is used exclusively for IPv6 addresses.
NS
NS records are used to specify a zone's primary server and all its secondary servers. An NS recordpoints to a master nameserver of the given zone, with the resource data field containing thehostname of the nameserver.
You will meet NS records in two situations: the first is when you delegate authority to a subordinate zone;the second is within the master zone database of the subordinate zone itself. The sets of servers specified inboth the parent and delegated zones should match.
The NS record specifies the name of the primary and secondary nameservers for a zone. These names mustbe resolved to an address so they can be used. Sometimes the servers belong to the domain, they areserving, which causes a "chicken-and-egg" problem; we can't resolve the address until the nameserver isreachable, but we can't reach the nameserver until we resolve its address. To solve this dilemma, we canconfigure special A records directly into the nameserver of the parent zone. The A records allow thenameservers of the parent domain to resolve the IP address of the delegated zone nameservers. Theserecords are commonly called glue records because they provide the "glue" that binds a delegated zone to its

parent. Refer to the "DNS Database" section earlier for an explanation of how this works.
CNAME
This record associates an alias with a host's canonical hostname. It provides an alternate name bywhich users can refer to the host whose canonical name is supplied as a parameter. The canonicalhostname is the one the master file provides an A record for; aliases are simply linked to that nameby a CNAME record, but don't have any other records of their own.
PTR
This type of record is used to associate names in the in-addr.arpa domain with hostnames. It isused for reverse mapping of IP addresses to hostnames. The hostname given must be the canonicalhostname.
MX
This RR announces a mail exchanger for a domain. Mail exchangers are discussed in Chapter 11 ,Section 11.5 . The syntax of an MX record is
[domain] [ttl] [class] MX preference host
host names the MX for domain . Every MX has an integer preference associated with it. A mail transport
agent that wants to deliver mail to domain tries all hosts that have an MX record for this domain until it
succeeds. The one with the lowest preference value is tried first, and then the others, in order of increasingpreference value.
HINFO
This record provides information on the system's hardware and software. Its syntax is:
[domain] [ttl] [class] HINFO hardware software
The hardware field identifies the hardware used by this host. Special conventions are used to specify this. If
the field contains any blanks, it must be enclosed in double quotes. The software field names the
operating system software used by the system. However, for security reasons, it's not a great idea to havethis information publicly available, as it provides potentially valuable information to attackers. It's veryuncommon to see it used lately, but some administrators like to use it to provide spurious or humorousinformation about their hosts.
Example HINFO records to describe machines look something like:
tao 36500 IN HINFO SEGA-DREAMCAST LINUX2.6cevad 36500 IN HINFO ATARI-104ST LINUX2.0jedd 36500 IN HINFO TIMEX-SINCLAIR LINUX2.6
5.2.6. Caching-Only named Configuration
There is a special type of named configuration that we'll talk about before we explain how to build a fullnameserver configuration. It is called a caching-only configuration. It doesn't really serve a domain, butacts as a relay for all DNS queries produced on your host. The advantage of this scheme is that it builds upa cache so that only the first query for a particular host is actually sent to the nameservers on the Internet.Any repeated request will be answered directly from the cache in your local nameserver. It's also importantto note here that a cache server should not be run from the same IP address as the DNS server.
A named.conf file for a caching-only server looks like this:
// Define networks to allow queries from. acl allowednets { 192.168.99.0/24; 192.168.44.0/24; };options { directory "/etc/bind"; // Working directory allow-query { allowednets; };}; // Root server hintszone "." { type hint; file "root.hint"; }; // Provide a reverse mapping for the loopback address 127.0.0.1zone "0.0.127.in-addr.arpa" { type master; file "localhost.rev"; notify no;};
In addition to this named.conf file, you must set up the root.hint file with a valid list of root nameservers.You could copy and use Example 6.10 for this purpose, or, better yet, you could use a BIND tool called digto get the most current version of this file. No other files are needed for a caching-only server configuration.We'll discuss dig in more detail later in this chapter, but for now, to obtain the information to create theroot.hint file, you can use the following command:
vbrew# dig at e.root-servers.net . ns
5.2.7. Writing the Master Files
Examples Example 5-6 , Example 5-7 , Example 5-8 , and Example 5-9 give sample configuration and zonefiles for a nameserver at the brewery, located on vlager . Due to the nature of the network discussed (asingle LAN), the example is pretty straightforward.

The root.hint cache file shown in Example 5-6 shows sample hint records for a root nameserver. A typicalcache file usually describes about a dozen nameservers. You can obtain the current list of nameservers forthe root domain using the dig tool as described above.
Example 5-6. The root.hint file
; <<>> DiG 9.2.2 <<>> at e.root-servers.net . ns;; global options: printcmd;; Got answer:;; ->>HEADER<<- opcode: QUERY, status: NOERROR, id: 21972;; flags: qr aa rd ra; QUERY: 1, ANSWER: 0, AUTHORITY: 1, ADDITIONAL: 0 ;; QUESTION SECTION:;at. IN A ;; AUTHORITY SECTION: ;; Query time: 54 msec;; SERVER: 206.13.28.12#53(206.13.28.12);; WHEN: Sat Jan 31 11:28:44 2004;; MSG SIZE rcvd: 83 ;; Got answer:;; ->>HEADER<<- opcode: QUERY, status: NOERROR, id: 8039;; flags: qr rd ra; QUERY: 1, ANSWER: 1, AUTHORITY: 4, ADDITIONAL: 4 ;; QUESTION SECTION:;e.root-servers.net. IN A ;; ANSWER SECTION:e.root-servers.net. 566162 IN A 192.203.230.10 ;; AUTHORITY SECTION:ROOT-SERVERS.net. 134198 IN NS a.ROOT-SERVERS.net.ROOT-SERVERS.net. 134198 IN NS f.ROOT-SERVERS.net.ROOT-SERVERS.net. 134198 IN NS j.ROOT-SERVERS.net.ROOT-SERVERS.net. 134198 IN NS k.ROOT-SERVERS.net. ;; ADDITIONAL SECTION:a.ROOT-SERVERS.net. 566162 IN A 198.41.0.4f.ROOT-SERVERS.net. 566162 IN A 192.5.5.241j.ROOT-SERVERS.net. 566162 IN A 192.58.128.30k.ROOT-SERVERS.net. 566162 IN A 193.0.14.129 ;; Query time: 12 msec;; SERVER: 206.13.28.12#53(206.13.28.12);; WHEN: Sat Jan 31 11:28:44 2004;; MSG SIZE rcvd: 196 ;; Got answer:;; ->>HEADER<<- opcode: QUERY, status: NOERROR, id: 61551

;; flags: qr rd ra; QUERY: 1, ANSWER: 13, AUTHORITY: 0, ADDITIONAL: 13 ;; QUESTION SECTION:;. IN NS ;; ANSWER SECTION:. 479762 IN NS F.ROOT-SERVERS.NET.. 479762 IN NS B.ROOT-SERVERS.NET.. 479762 IN NS J.ROOT-SERVERS.NET.. 479762 IN NS K.ROOT-SERVERS.NET.. 479762 IN NS L.ROOT-SERVERS.NET.. 479762 IN NS M.ROOT-SERVERS.NET.. 479762 IN NS I.ROOT-SERVERS.NET.. 479762 IN NS E.ROOT-SERVERS.NET.. 479762 IN NS D.ROOT-SERVERS.NET.. 479762 IN NS A.ROOT-SERVERS.NET.. 479762 IN NS H.ROOT-SERVERS.NET.. 479762 IN NS C.ROOT-SERVERS.NET.. 479762 IN NS G.ROOT-SERVERS.NET. ;; ADDITIONAL SECTION:F.ROOT-SERVERS.NET. 566162 IN A 192.5.5.241B.ROOT-SERVERS.NET. 566162 IN A 192.228.79.201J.ROOT-SERVERS.NET. 566162 IN A 192.58.128.30K.ROOT-SERVERS.NET. 566162 IN A 193.0.14.129L.ROOT-SERVERS.NET. 566162 IN A 198.32.64.12M.ROOT-SERVERS.NET. 566162 IN A 202.12.27.33I.ROOT-SERVERS.NET. 566162 IN A 192.36.148.17E.ROOT-SERVERS.NET. 566162 IN A 192.203.230.10D.ROOT-SERVERS.NET. 566162 IN A 128.8.10.90A.ROOT-SERVERS.NET. 566162 IN A 198.41.0.4H.ROOT-SERVERS.NET. 566162 IN A 128.63.2.53C.ROOT-SERVERS.NET. 566162 IN A 192.33.4.12G.ROOT-SERVERS.NET. 566162 IN A 192.112.36.4 ;; Query time: 17 msec;; SERVER: 206.13.28.12#53(206.13.28.12);; WHEN: Sat Jan 31 11:28:44 2004;; MSG SIZE rcvd: 436
Example 5-7. The vbrew.com zone file
;; Hosts at the brewery; /etc/bind/zone/vbrew.com; Origin is vbrew.com;$TTL 3D@ IN SOA vlager.vbrew.com. janet.vbrew.com. ( 200401206 ; serial, date + todays serial #

8H ; refresh, seconds 2H ; retry, seconds 4W ; expire, seconds 1D ) ; minimum, seconds IN NS vlager.vbrew.com.;; local mail is distributed on vlager IN MX 10 vlager;; loopback addresslocalhost. IN A 127.0.0.1;; Virtual Brewery Ethernetvlager IN A 172.16.1.1vlager-if1 IN CNAME vlager; vlager is also news servernews IN CNAME vlagervstout IN A 172.16.1.2vale IN A 172.16.1.3;; Virtual Winery Ethernetvlager-if2 IN A 172.16.2.1vbardolino IN A 172.16.2.2vchianti IN A 172.16.2.3vbeaujolais IN A 172.16.2.4;; Virtual Spirits (subsidiary) Ethernetvbourbon IN A 172.16.3.1vbourbon-if1 IN CNAME vbourbon
Example 5-8. The loopback zone file
;; /etc/bind/zone/127.0.0 Reverse mapping of 127.0.0; Origin is 0.0.127.in-addr.arpa.;$TTL 3D@ IN SOA vlager.vbrew.com. joe.vbrew.com. ( 1 ; serial 360000 ; refresh: 100 hrs 3600 ; retry: one hour 3600000 ; expire: 42 days 360000 ; minimum: 100 hrs ) IN NS vlager.vbrew.com.1 IN PTR localhost.
Example 5-9. The vbrew reverse lookup file

;; /etc/bind/zones/16.172.in-addr.arpa ; Origin is 16.172.in-addr.arpa.;$TTL 3D@ IN SOA vlager.vbrew.com. joe.vbrew.com. ( 16 ; serial 86400 ; refresh: once per day 3600 ; retry: one hour 3600000 ; expire: 42 days 604800 ; minimum: 1 week ) IN NS vlager.vbrew.com.; brewery1.1 IN PTR vlager.vbrew.com.2.1 IN PTR vstout.vbrew.com.3.1 IN PTR vale.vbrew.com.; winery1.2 IN PTR vlager-if2.vbrew.com.2.2 IN PTR vbardolino.vbrew.com.3.2 IN PTR vchianti.vbrew.com.4.2 IN PTR vbeaujolais.vbrew.com.
5.2.8. Verifying the Nameserver Setup
dig is the current nameserver query tool of choice, replacing the commonly known nslookup . It is flexible,fast, and can be used to query almost anything from a DNS server. The syntax for dig is verystraightforward.
vbrew# dig nameserver name type
The command-line parameters are defined as follows:
nameserver
This is the name of the server that you are querying. It can be entered as a name or as an IPaddress. If you leave this blank, dig will use the DNS server listed in the resolv.conf file.
name
This is the name of the DNS record that you want to look up.

type
This is the type of query you want to execute. Common types are ANY, MX, and TXT. If left blank, digwill default to looking for an A record.
So, using this, if we wanted to see which servers handle mail for the Virtual Brewery, we would create thefollowing dig query:
vbrew# dig vlager.vbrew.com MX ; <<>> DiG 9.2.2 <<>> vlager.vbrew.com MX;; global options: printcmd;; Got answer:;; ->>HEADER<<- opcode: QUERY, status: NOERROR, id: 40590;; flags: qr rd ra; QUERY: 1, ANSWER: 0, AUTHORITY: 1, ADDITIONAL: 0 ;; QUESTION SECTION:;vlager.vbrew.com. IN MX ;; AUTHORITY SECTION:vbrew.com. 10794 IN SOA vlager.vbrew.com. vlager.vbrew.com. 2003080803 10800 3600 604800 86400 ;; Query time: 14 msec;; SERVER: 192.168.28.12#53(192.168.28.12);; WHEN: Sun Feb 1 12:19:06 2004;; MSG SIZE rcvd: 104
Another example of an interesting query type which can be useful is the BIND version query. This is easilydone with dig with the following syntax:
vlager# dig @vlager.vbrew.com version.bind. CHAOS TXT..; QUERY: 1, ANSWER: 1, AUTHORITY: 0, ADDITIONAL: 0 ;; QUESTION SECTION:;version.bind. CH TXT ;; ANSWER SECTION:VERSION.BIND. 0 CH TXT "BIND 8.2.2-P5"..
5.2.9. Using nslookup
nslookup , while now deprecated, is still a good tool for checking the operation of your nameserver setup.
It can be used both interactively with prompts and as a single command with immediate output. In thelatter case, you simply invoke it as:

$ nslookup hostname
nslookup queries the nameserver specified in resolv.conf for hostname . (If this file names more than oneserver, nslookup chooses one at random.)
The interactive mode, however, is much more exciting. Besides looking up individual hosts, you may queryfor any type of DNS record and transfer the entire zone information for a domain.
When invoked without an argument, nslookup displays the nameserver it uses and enters interactive mode.At the prompt, you may type any domain name that you want to query. By default, it asks for class Arecordsthose containing the IP address relating to the domain name.
You can look for record types by issuing:
> set type= type
in which type is one of the RRs names described earlier, or ANY .
For instance, you might have the following nslookup session:
$ nslookupDefault Server: tao.linux.org.auAddress: 203.41.101.121 > metalab.unc.eduServer: tao.linux.org.auAddress: 203.41.101.121 Name: metalab.unc.eduAddress: 152.2.254.81 >
The output first displays the DNS server being queried, and then the result of the query.
If you try to query for a name that has no IP address associated with it, but other records were found in theDNS database, nslookup returns with an error message saying "No type A records found." However, you
can make it query for records other than type A by issuing the set type command. To get the SOA record ofunc.edu , you would issue:
> unc.eduServer: tao.linux.org.auAddress: 203.41.101.121 *** No address (A) records available for unc.edu> set type=SOA> unc.eduServer: tao.linux.org.auAddress: 203.41.101.121

unc.edu origin = ns.unc.edu mail addr = host-reg.ns.unc.edu serial = 1998111011 refresh = 14400 (4H) retry = 3600 (1H) expire = 1209600 (2W) minimum ttl = 86400 (1D)unc.edu name server = ns2.unc.eduunc.edu name server = ncnoc.ncren.netunc.edu name server = ns.unc.eduns2.unc.edu internet address = 152.2.253.100ncnoc.ncren.net internet address = 192.101.21.1ncnoc.ncren.net internet address = 128.109.193.1ns.unc.edu internet address = 152.2.21.1
In a similar fashion, you can query for MX records:
> set type=MX> unc.eduServer: tao.linux.org.auAddress: 203.41.101.121 unc.edu preference = 0, mail exchanger = conga.oit.unc.eduunc.edu preference = 10, mail exchanger = imsety.oit.unc.eduunc.edu name server = ns.unc.eduunc.edu name server = ns2.unc.eduunc.edu name server = ncnoc.ncren.netconga.oit.unc.edu internet address = 152.2.22.21imsety.oit.unc.edu internet address = 152.2.21.99ns.unc.edu internet address = 152.2.21.1ns2.unc.edu internet address = 152.2.253.100ncnoc.ncren.net internet address = 192.101.21.1ncnoc.ncren.net internet address = 128.109.193.1
Using a type of ANY returns all resource records associated with a given name.
A practical application of nslookup , besides debugging, is to obtain the current list of root nameservers.You can obtain this list by querying for all NS records associated with the root domain:
> set type=NS> .Server: tao.linux.org.auAddress: 203.41.101.121 Non-authoritative answer:(root) name server = A.ROOT-SERVERS.NET(root) name server = H.ROOT-SERVERS.NET(root) name server = B.ROOT-SERVERS.NET

(root) name server = C.ROOT-SERVERS.NET(root) name server = D.ROOT-SERVERS.NET(root) name server = E.ROOT-SERVERS.NET(root) name server = I.ROOT-SERVERS.NET(root) name server = F.ROOT-SERVERS.NET(root) name server = G.ROOT-SERVERS.NET(root) name server = J.ROOT-SERVERS.NET(root) name server = K.ROOT-SERVERS.NET(root) name server = L.ROOT-SERVERS.NET(root) name server = M.ROOT-SERVERS.NET Authoritative answers can be found from:A.ROOT-SERVERS.NET internet address = 198.41.0.4H.ROOT-SERVERS.NET internet address = 128.63.2.53B.ROOT-SERVERS.NET internet address = 128.9.0.107C.ROOT-SERVERS.NET internet address = 192.33.4.12D.ROOT-SERVERS.NET internet address = 128.8.10.90E.ROOT-SERVERS.NET internet address = 192.203.230.10I.ROOT-SERVERS.NET internet address = 192.36.148.17F.ROOT-SERVERS.NET internet address = 192.5.5.241G.ROOT-SERVERS.NET internet address = 192.112.36.4J.ROOT-SERVERS.NET internet address = 198.41.0.10K.ROOT-SERVERS.NET internet address = 193.0.14.129L.ROOT-SERVERS.NET internet address = 198.32.64.12M.ROOT-SERVERS.NET internet address = 202.12.27.33
To see the complete set of available commands, use the help command in nslookup .
5.2.10. Other Useful Tools
There are a few other tools that can help you with your tasks as a BIND administrator. We will brieflydescribe two of them here. Please refer to the documentation that comes with these tools for moreinformation on how to use them.
hostcvt helps you with your initial BIND configuration by converting your /etc/hosts file into master files fornamed . It generates both the forward (A) and reverse mapping (PTR) entries, and takes care of aliases. Ofcourse, it won't do the whole job for you, as you may still want to tune the timeout values in the SOArecord, for example, or add MX records. Still, it may save you a few aspirins. hostcvt is part of the BINDsource, but can also be found as a standalone package.
After setting up your nameserver, you may want to test your configuration. Some good tools that make thisjob much simpler; the first is called dnswalk , which is a Perl-based package. The second is called nslint .They both examine your DNS database for common mistakes and verify that the information is consistent.Two other useful tools are host , which is a general purpose DNS database query tool. You can use this toolto manually inspect and diagnose DNS database entries.
This tool is likely to be available in prepackaged form. dnswalk and nslint are available in source fromhttp://www.visi.com/~barr/dnswalk/ and ftp://ftp.ee.lbl.gov/nslint.tar.Z . The host 's source code can befound at ftp://ftp.nikhef.nl/pub/network/ and ftp://ftp.is.co.za/networking/ip/dns/dig/ .

5.3. Alternatives to BIND
Those who have been concerned with the number of security vulnerabilities found in the BIND serverthrough the years, or who prefer an easier DNS solution, may wish to investigate an alternative,djbdns. This software, written from scratch by D.J. Bernstein, provides a much more robust,simplified and secure framework for DNS. djbdns is easy to install and configure, and is much lesscomplex than BIND, essentially the same functionality. In this next section, we'll cover the basics ofinstalling and configuring a DNS server using djbdns. It is important to note that a djbdns DNS serveris designed to be just that, a DNS server, meaning that by default it won't be resolving queries formachines outside of your authority. For that, you will need to build a separate caching server on aseparate machine or IP address. As recommended earlier, caches and DNS servers should beseparated for security reasons. To read more about this topic, please refer to the djbdns web site athttp://cr.yp.to/djbdns.html.
5.3.1. Installing djbdns
To run djbdns, you first need to install another DJB program called daemontools, which is basically acollection of tools used to manage various Unix daemons. To view full documentation and sourcecode for daemontools, visit its webpage at http://cr.yp.to/daemontools.html. When you'vesuccessfully downloaded the software, extract it to a directory on your machine and compile thesoftware. daemontools comes with a script that will automatically compile and install the software. Itcan be launched as follows:
vlager# mkdir softwarevlager# cd softwarevlager# tar xzpf daemontools-0.76.tar.gzvlager# cd admin/daemontools-0.76vlager# package/install
When the script finishes, you can remove the installation directories, and begin installing the nextdependency, ucspi-tcp, which is DJB's very own TCP client-server handling program. It is also veryeasy to install:
vlager# mkdir softwarevlager# cd softwarevlager# tar xzpf ucspi-tcp-0.88.tar.gzvlager# cd ucspi-tcp-0.88vlager# makevlager# make setup check
This will install the software to the /usr/local directory on your machine. You won't need to doanything else with the operation or configuration of this software for the moment.

Once it is installed, you are ready to install the djbdns software. The djbdns installation isaccomplished using the same steps documented above for ucspi-tcp. This process will also installdjbdns to the /usr/local directory. You will need to make sure that the svscan process is runningbefore configuring djbdns. svscan is part of the daemontools package and must be running for
djbdns to function.
When you've verified that svscan is running, you can start the configuration of the DNS server. Thefirst step is to create two user accounts, tinydns and dnslog. djbdns will use both of these to conductits business, rather than run as root, as BIND installations often do.
Next, you will need to create a directory for your DNS server's configuration files and logs, and thenconfigure it as follows:
vlager# mkdir /etc/tinydnsvlager# tinydns-conf tinydns dnslog /etc/tinydns 172.16.0.2
The IP address 172.16.0.2 in the example should be replaced with your DNS server's external IPaddress. Following this, svscan needs to be informed of the new service. This process accomplishedwith three commands:
vlager# ln -s /etc/tinydns /servicevlager# svstat /service/tinydns
This will complete the installation of your djbdns server; all that's left is to do is configure your hosts.Under BIND, this is where a majority of the complexity and confusion exists; dbjdns, however, makesadding new DNS records much easier.
5.3.2. Adding Hosts
You will need to configure your host information so that your DNS server is providing a service. Thefirst step in this process is to establish yourself as an authority over your domain. For our example,the Virtual Brewery, we will want to configure our DNS server to answer all queries for thevbrew.com domain. Rather than hassle with long zone files, this can be done with a few short steps.
vlager# cd /service/tinydns/rootvlager# ./add-ns vlager.com 172.16.1.1vlager# ./add-ns 1.16.172.in-addr.arpa 172.16.1.1vlager# make
Now that the server will handle queries for our vbrew domain, we can use it to configure individualhosts on our network. Fortuantely, this is just as easy as the previous step. To associate an addressto our favorite host, vlager, and to our web server, we need to use the following commands:
vlager# cd /service/tinydns/rootvlager# ./add-host vlager.vbrew.com 172.16.1.10vlager# ./add-host www.vlager.com 172.16.1.11vlager# ./add-alias mail.vbrew.com 172.16.1.10vlager# make

Using the add-host command, we enter the FDQN followed by the IP addresss to create our DNSrecords. You might have noticed the other command used in the example, add-alias. This commandadds an alias to an already assigned IP. In the example, we have our host vlager set to also answerto the name mail. This is useful if a server serves multiple purposes. Take special notice of the lastcommand executed in the series, make. Things won't work if you forget to execute this command,since it is responsible for compiling the raw configuration file, into one readable by the server. Ifyou're having problems with your installation, check this first.
The commands add-host, add-ns, and add-alias just edit the master djbdns configuration file calleddata located in /service/tinydns/root. If you want to do this manually, you can just open the datafilein your browser and add the following lines:
=vlager.vbrew.com:172.16.1.10 =www.vlager.com:172.16.1.11 +mail.vbrew.com:172.16.1.10
You'll notice that the host entry lines begin with = and the alias lines begin with a + character. Whilethe manual method does work, it adds more complexity, since you will now be required to alsomanually check your datafile for duplicate entries. Most administrators will just want to stick with theautomated tools to avoid complications.
5.3.3. Installing an External DNS Cache
When you've successfully created your DNS server and have everything functioning properly, youmay want to craete an external DNS cache, so hosts on your network can resolve the IP addresses ofexternal machines. This is done by installing a DNS cache, which again with djbdns is simple.Assuming that you have svscan running, you must first create (or verify the existance of) two systemaccounts, one for the cache program and one for the logging mechanism. Though it isn't necessary todo so, it is a good idea to call them something meaningful, such as dnscache and dnslog,respectively.
Next, you'll need to determine the IP address on which to run your DNS cache. Remember thisshould be a different IP address than you're using for your DNS server. Now, as root, create adirectory for the DNS service and configure it with the following commands:
vstout# mkdir /etc/dnscachevstout# dnscache-conf dnscache dnslog /etc/dnscache <cache.ip.address>
Again, as root, you now need to inform svscan that you have a new service for it to run:
vstout# ln -s /etc/dnscache /service
Now, to be certain that the new service is running, wait a few moments and issue the followingcommand:
vstout# svstat /service/dnscache

/service/dnscache: up (pid 1139) 149 seconds
When you've made certain that the service is running, you need to tell it which IP addresses areauthorized to access the cache. In the case of the Virtual Brewery, we want to authorize the entire172.16 network, so we'll enter the following command:
vstout# touch /etc/dnscache/root/ip/172.16
Of course, you'll want to make sure that your /etc/resolv.conf knows about your new DNS cache. Youcan test to see whether or not your cache is working with nslookup, dig, or one of the included
djbdns tools, dnsip:
vlager# dnsip www.google.com216.239.57.104 216.239.57.99vlager#

Chapter 6. The Point-to-Point ProtocolPoint-to-point protocol (PPP) is a protocol used to send datagrams across a serial connection. In thischapter, we briefly cover its basic building blocks. We will also cover PPP over Ethernet (PPPoE),which is now commonly used by telecom providers to establish DSL sessions. There is also acomprehensive O'Reilly book on the topic, Using & Managing PPP, by Andrew Sun.
At the very bottom of PPP is the High-Level Data Link Control (HDLC) protocol, which defines theboundaries around the individual PPP frames and provides a 16-bit checksum.[1] A PPP frame iscapable of holding packets from protocols other than IP, such as Novell's IPX or Appletalk. PPPachieves this by adding a protocol field to the basic HDLC frame that identifies the type of packetcarried by the frame.
[1] In fact, HDLC is a much more general protocol devised by the International Standards Organization (ISO) and is also an
essential component of the X.25 specification.
The Link Control Protocol (LCP) is used on top of HDLC to negotiate options pertaining to the datalink. For instance, the Maximum Receive Unit (MRU) states the maximum datagram size that one sideof the link agrees to receive.
An important step at the configuration stage of a PPP link is client authorization. Although it is notmandatory, it is really a must for dial-up lines in order to keep out intruders. Usually the called host(the server) asks the client to authorize itself by proving it knows some secret key. If the caller failsto produce the correct secret, the connection is terminated. With PPP, authorization works bothways; the caller may also ask the server to authenticate itself. These authentication procedures aretotally independent of each other. There are two protocols for different types of authorization, whichwe will discuss further in this chapter: Password Authentication Protocol (PAP) and ChallengeHandshake Authentication Protocol (CHAP).
Each network protocol that is routed across the data link (like IP and AppleTalk) is configureddynamically using a corresponding Network Control Protocol (NCP). To send IP datagrams across thelink, both sides running PPP must first negotiate which IP address each of them uses. The controlprotocol used for this negotiation is the Internet Protocol Control Protocol (IPCP).
Besides sending standard IP datagrams across the link, PPP also supports Van Jacobson headercompression of IP datagrams. This technique shrinks the headers of TCP packets to as little as 3bytes. It is more colloquially referred to as VJ header compression. The use of compression may benegotiated at startup time through IPCP, as well.

6.1. PPP on Linux
On Linux, PPP functionality is split into two parts: a kernel component that handles the low-levelprotocols (HDLC, IPCP, IPXCP, etc.) and the user space pppd daemon that handles the varioushigher-level protocols, such as PAP and CHAP. The current release of the PPP software for Linuxcontains the PPP daemon pppd and a program named chat that automates the dialing of the remotesystem.
The PPP kernel driver was written by Michael Callahan and reworked by Paul Mackerras. pppd wasderived from a free PPP implementation for Sun and 386BSD machines that was written by DrewPerkins and others, and is maintained by Paul Mackerras. It was ported to Linux by Al Longyear. chatwas written by Karl Fox.
PPP is implemented by a special line discipline. To use a serial line as a PPP link, you first establishthe connection over your modem as usual and subsequently convert the line to PPP mode. In thismode, all incoming data is passed to the PPP driver, which checks the incoming HDLC frames forvalidity (each HDLC frame carries a 16-bit checksum), and unwraps and dispatches them. Currently,PPP is able to transport both the IP protocol, optionally using Van Jacobson header compression, andthe IPX protocol.
pppd aids the kernel driver, performing the initialization and authentication phase that is necessarybefore actual network traffic can be sent across the link. pppd's behavior may be fine-tuned using anumber of options. As PPP is rather complex, it is impossible to explain all of them in a single chapter.This book therefore cannot cover all aspects of pppd, but only gives you an introduction. For moreinformation, consult Using & Managing PPP or the pppd manpages, or READMEs in the pppd sourcedistribution, which should help you sort out most questions this chapter fails to discuss. The PPPHOWTO might also be of use.
Probably the greatest help you will find in configuring PPP will come from other users of the sameLinux distribution. PPP configuration questions are very common, so try your local usergroup mailinglist or the IRC Linux channel. If your problems persist even after reading the documentation, youcould try the comp.protocols.ppp newsgroup. This is the place where you can find most of the peopleinvolved in pppd development.

6.2. Running pppd
When you want to connect to the Internet through a PPP link, you have to set up basic networkingcapabilities, such as the loopback device and the resolver. Both have been covered in Chapter 4 andChapter 5. You can simply configure the nameserver of your Internet Service Provider in the/etc/resolv.conf file, but this will mean that every DNS request is sent across your serial link. Thissituation is not optimal; the closer (network-wise) you are to your nameserver, the faster the namelookups will be. An alternative solution is to configure a caching-only nameserver at a host on yournetwork. This means that the first time you make a DNS query for a particular host, your request willbe sent across your serial link, but every subsequent request will be answered directly by your localnameserver, and will be much faster. This configuration is described in Chapter 5.
As an introductory example of how to establish a PPP connection with pppd, assume you are atvlager again. First, dial in to the PPP server c3po and log in to the ppp account. c3po will executeits PPP driver. After exiting the communications program you used for dialing, execute the followingcommand, substituting the name of the serial device you used for the ttyS3 shown here:
# pppd /dev/ttyS3 38400 crtscts defaultroute
This command flips the serial line ttyS3 to the PPP line discipline and negotiates an IP link with c3po.The transfer speed used on the serial port will be 38,400 bps. The crtscts option turns on hardware
handshake on the port, which is an absolute must at speeds above 9,600 bps.
The first thing pppd does after starting up is negotiate several link characteristics with the remoteend using LCP. Usually, the default set of options pppd tries to negotiate will work, so we won't gointo this here, except to say that part of this negotiation involves requesting or assigning the IPaddresses at each end of the link.
For the time being, we also assume that c3po doesn't require any authentication from us, so theconfiguration phase is completed successfully.
pppd will then negotiate the IP parameters with its peer using IPCP, the IP control protocol. Since wedidn't specify any particular IP address to pppd earlier, it will try to use the address obtained byhaving the resolver look up the local hostname. Both will then announce their addresses to eachother.
Usually, there's nothing wrong with these defaults. Even if your machine is on an Ethernet, you canuse the same IP address for both the Ethernet and the PPP interface. Nevertheless, pppd allows youto use a different address, or even to ask your peer to use some specific address. These options arediscussed in Section 6.5.1, later in this chapter.
After going through the IPCP setup phase, pppd will prepare your host's networking layer to use thePPP link. It first configures the PPP network interface as a point-to-point link, using ppp0 for the firstPPP link that is active, ppp1 for the second, and so on. Next, it sets up a routing table entry thatpoints to the host at the other end of the link. In the previous example, pppd made the defaultnetwork route point to c3po, because we gave it the defaultroute option. [2] The default route

simplifies your routing by causing any IP datagram destined to a nonlocal host to be sent to c3po;this makes sense since it is the only way they can be reached. There are a number of differentrouting schemes pppd supports, which we will cover in detail later in this chapter.
[2] The default network route is installed only if none is already present.

6.3. Using Options Files
Before pppd parses its command-line arguments, it scans several files for default options. These filesmay contain any valid command-line arguments spread out across an arbitrary number of lines. Hashsigns introduce comments.
The first options file is /etc/ppp/options, which is always scanned when pppd starts up. Using it to setsome global defaults is a good idea, because it allows you to keep your users from doing severalthings that may compromise security. For instance, to make pppd require some kind ofauthentication (either PAP or CHAP) from the peer, you add the auth option to this file. This option
cannot be overridden by the user, so it becomes impossible to establish a PPP connection with anysystem that is not in your authentication databases. Note, however, that some options can beoverridden; the connect string is a good example.
The other options file, which is read after /etc/ppp/options, is .ppprc in the user's home directory. Itallows each user to specify her own set of default options.
A sample /etc/ppp/options file might look like this:
# Global options for pppd running on vlager.vbrew.comlock # use UUCP-style device lockingauth # require authenticationusehostname # use local hostname for CHAPdomain vbrew.com # our domain name
The lock keyword makes pppd comply to the standard UUCP method of device locking. With this
convention, each process that accesses a serial device, say /dev/ttyS3, creates a lock file with aname such as LCK..ttyS3 in a special lock-file directory to signal that the device is in use. This isnecessary to prevent other programs, such as minicom or uucico, from opening the serial devicewhile it is used by PPP.
The next three options relate to authentication and, therefore, to system security. The authenticationoptions are best placed in the global configuration file because they are "privileged" and cannot beoverridden by users' ~/.ppprc options files.

6.4. Using chat to Automate Dialing
One of the things that may have struck you as inconvenient in the previous example is that you hadto establish the connection manually before you could fire up pppd. pppd relies on an externalprogram or shell script to log in and connect to the remote system. The command to be executed canbe given to pppd with the connect command-line option. pppd will redirect the command's standard
input and output to the serial line.
The pppd software package is supplied with a very simple program called chat, which is capable ofbeing used in this way to automate simple login sequences. We'll talk about this command in somedetail.
If your login sequence is complex, you will need something more powerful than chat. One usefulalternative you might consider is expect, written by Don Libes. It has a very powerful language basedon Tcl and was designed exactly for this sort of application. Those of you whose login sequencerequires, for example, challenge/response authentication involving calculator-like key generators willfind expect powerful enough to handle the task. Since there are so many possible variations on thistheme, we won't describe how to develop an appropriate expect script in this book. Suffice it to say,you'd call your expect script by specifying its name using the pppd connect option. It's also
important to note that when the script is running, the standard input and output will be attached tothe modem, not to the terminal that invoked pppd. If you require user interaction, you shouldmanage it by opening a spare virtual terminal, or arrange some other means.
The chat command lets you specify a chat script. Basically, a chat script consists of an alternatingsequence of strings that we expect to receive from the remote system, and the answers we are tosend. We will call them expect and send strings, respectively. This is a typical excerpt from a chatscript:
ogin: b1ff ssword: s3|<r1t
This script tells chat to wait for the remote system to send the login prompt and return the loginname b1ff. We wait only for ogin: so that it doesn't matter if the login prompt starts with an
uppercase or lowercase l, or if it arrives garbled. The following string is another expect string thatmakes chat wait for the password prompt and send our response password.
This is basically what chat scripts are all about. A complete script to dial up a PPP server would, ofcourse, also have to include the appropriate modem commands. Assume that your modemunderstands the Hayes command set, and the server's telephone number is 318714. The completechat invocation to establish a connection with c3po would then be:
$ chat -v '' ATZ OK ATDT318714 CONNECT '' ogin: ppp word: GaGariN
By definition, the first string must be an expect string, but as the modem won't say anything beforewe have kicked it, we make chat skip the first expect by specifying an empty string. We then sendATZ, the reset command for Hayes-compatible modems and wait for its response (OK). The next

string sends the dial command along with the phone number to chat and expects the CONNECT
message in response. This is followed by an empty string again because we don't want to sendanything now, but rather wait for the login prompt. The remainder of the chat script works exactly asdescribed previously. This description probably looks a bit confusing, but we'll see in a moment thatthere is a way to make chat scripts a lot easier to understand.
The -v option makes chat log all activities to the syslog daemon local2 facility.[3]
[3] If you edit syslog.conf to redirect these log messages to a file, make sure this file isn't world readable, as chat also logs the
entire chat script by defaultincluding passwords.
Specifying the chat script on the command line bears a certain risk because users can view aprocess's command line with the ps command. You can avoid this risk by putting the chat script in afile such as dial-c3po. You make chat read the script from the file instead of the command line bygiving it the -f option, followed by the filename. This action has the added benefit of making our chat
expect sequences easier to understand. To convert our example, our dial-c3po file would look likethis:
'' ATZOK ATDT318714CONNECT ''ogin: pppword: GaGariN
When we use a chat script file in this way, the string we expect to receive is on the left and theresponse we will send is on the right. They are much easier to read and understand when presentedthis way.
The complete pppd incantation would now look like this:
# pppd connect "chat -f dial-c3po" /dev/ttyS3 38400 -detach \ crtscts modem defaultroute
Besides the connect option that specifies the dial-up script, we have added two more options to thecommand line: -detach, which tells pppd not to detach from the console and become a backgroundprocess, and the modem keyword, which makes it perform modem-specific actions on the serial
device, such as disconnecting the line before and after the call. If you don't use this keyword, pppdwill not monitor the port's DCD line and will therefore not detect whether the remote end hangs upunexpectedly.
The examples we have shown are rather simple; chat allows for much more complex scripts. Forinstance, it can specify strings on which to abort the chat with an error. Typical abort strings aremessages such as BUSY or NO CARRIER that your modem usually generates when the called number
is busy or doesn't answer. To make chat recognize these messages immediately rather than timingout, you can specify them at the beginning of the script using the ABORT keyword:
$ chat -v ABORT BUSY ABORT 'NO CARRIER' '' ATZ OK ...
Similarly, you can change the timeout value for parts of the chat scripts by inserting TIMEOUT
options.

Sometimes you also need to have conditional execution for parts of the chat script: when you don'treceive the remote end's login prompt, you might want to send a BREAK or a carriage return. You can
achieve this by appending a subscript to an expect string. The subscript consists of a sequence ofsend and expect strings, just like the overall script itself, which are separated by hyphens. Thesubscript is executed whenever the expected string it is appended to is not received in time. In theexample above, we would modify the chat script as follows:
ogin:-BREAK-ogin: ppp ssword: GaGariN
When chat doesn't see the remote system send the login prompt, the subscript is executed by firstsending a BREAK and then waiting for the login prompt again. If the prompt now appears, the script
continues as usual; otherwise, it will terminate with an error.

6.5. IP Configuration Options
IPCP is used to negotiate a number of IP parameters at link configuration time. Usually, each peersends an IPCP configuration request packet, indicating which values it wants to change from thedefaults and the new value. Upon receipt, the remote end inspects each option in turn and eitheracknowledges or rejects it.
pppd gives you a lot of control over which IPCP options it will try to negotiate. You can tune itthrough various command-line options that we will discuss in this section.
6.5.1. Choosing IP Addresses
All IP interfaces require that IP addresses be assigned to them; a PPP device always has an IPaddress. The PPP suite of protocols provides a mechanism that allows the automatic assignment of IPaddresses to PPP interfaces. It is possible for the PPP program at one end of a point-to-point link toassign an IP address for the remote end to use, or each may use its own.
Some PPP servers that handle a lot of client sites assign addresses dynamically; addresses areassigned to systems only when calling in and are reclaimed after they have logged off again. Thisallows the number of IP addresses required to be limited to the number of dial-up lines. Whilelimitation is convenient for managers of the PPP dial-up server, it is often less convenient for userswho are dialing in. We discussed the way that hostnames are mapped to IP addresses by use of adatabase in Chapter 5. In order for people to connect to your host, they must know your IP addressor the hostname associated with it. If you are a user of a PPP service that assigns you an IP addressdynamically, this knowledge is difficult without providing some means of allowing the DNS databaseto be updated after you are assigned an IP address. Such systems do exist, but we won't cover themin detail here; instead, we will look at the preferable approach, which involves you being able to usethe same IP address each time you establish a network connection.[4]
[4] More information on two dynamic host assignment mechanisms can be found at http://www.dynip.com/.
In the previous example, we had pppd dial up c3po and establish an IP link. No provisions weretaken to choose a particular IP address on either end of the link. Instead, we let pppd take its defaultaction. It attempts to resolve the local hostname, vlager in our example, to an IP address, which ituses for the local end, while letting the remote machine, c3po, provide its own. PPP supports severalalternatives to this arrangement.
To ask for particular addresses, you generally provide pppd with the following option:
local_addr:remote_addr
local_addr and remote_addr may be specified either in dotted quad notation or as hostnames.[5]
This option makes pppd attempt to use the first address supplied as its own IP address, and thesecond as the peer's. If the peer rejects either of the addresses during IPCP negotiation, no IP linkwill be established.[6]

[5] Using hostnames in this option has consequences for CHAP authentication. Please refer to the section "The CHAP Secrets
File" later in this chapter.
[6] The ipcp-accept-local and ipcp-accept-remote options instruct your pppd to accept the local and remote IP addresses being
offered by the remote PPP, even if you've supplied some in your configuration. If these options are not configured, your pppd will
reject any attempt to negotiate the IP addresses used.
If you are dialing in to a server and expect it to assign you an IP address, you should ensure thatpppd does not attempt to negotiate one for itself. To do this, use the noipdefault option and leave
the local_addr blank. The noipdefault option will stop pppd from trying to use the IP address
associated with the hostname as the local address.
If you want to set only the local address but accept any address the peer uses, simply leave out theremote_addr part. To make vlager use the IP address 130.83.4.27 instead of its own, give it
130.83.4.27: on the command line. Similarly, to set the remote address only, leave the local_addr
field blank. By default, pppd will then use the address associated with your hostname.
6.5.2. Routing Through a PPP Link
After setting up the network interface, pppd will usually set up a host route to its peer only. If theremote host is on a LAN, you certainly want to be able to connect to hosts "behind" your peer aswell; in that case, a network route must be set up.
We have already seen that pppd can be asked to set the default route using the defaultroute
option. This option is very useful if the PPP server you dialed up acts as your Internet gateway.
The reverse case, in which your system acts as a gateway for a single host, is also relatively easy toaccomplish. For example, take some employee at the Virtual Brewery whose home machine is calledoneshot. Let's also assume that we've configured vlager as a dial-in PPP server. If we've configuredvlager to dynamically assign an IP address that belongs to the Brewery's subnet, we can use theproxyarp option with pppd, which will install a proxy ARP entry for oneshot. This automatically
makes oneshot accessible from all hosts at the brewery and the winery.
However, things aren't always that simple. Linking two local area networks usually requires adding aspecific network route because these networks may have their own default routes. Besides, havingboth peers use the PPP link as the default route would generate a loop, through which packets tounknown destinations would ping-pong between the peers until their time to live expired.
Suppose the Virtual Brewery opens a branch in another city. The subsidiary runs an Ethernet of itsown using the IP network number 172.16.3.0, which is subnet 3 of the brewery's class B network.The subsidiary wants to connect to the brewery's network via PPP to update customer databases.Again, vlager acts as the gateway for the brewery network and will support the PPP link; its peer atthe new branch is called vbourbon and has an IP address of 172.16.3.1.
When vbourbon connects to vlager, it makes the default route point to vlager as usual. Onvlager, however, we will have only the point-to-point route to vbourbon and will have to speciallyconfigure a network route for subnet 3 that uses vbourbon as its gateway. We could do thismanually using the route command by hand after the PPP link is established, but this is not a verypractical solution. Fortunately, we can configure the route automatically by using a feature of pppdthat we haven't discussed yetthe ip-up command. This command is a shell script or program locatedin /etc/ppp that is executed by pppd after the PPP interface has been configured. When present, it is

invoked with the following parameters:
ip-up iface device speed local_addr remote_addr
Table 6-1 summarizes the meaning of each of the arguments (in the first column, we show thenumber used by the shell script to refer to each argument).
Table 6-1. ip-up arguments
Name Purpose
iface The network interface used, e.g., ppp0
device The pathname of the serial device file used (/dev/tty, if stdin/stdout are used)
speed The speed of the serial device in bits per second
local_addr The IP address of the link's remote end in dotted quad notation
remote_addr The IP address of the remote end of the link in dotted quad notation
In our case, the ip-up script may contain the following code fragment:[7]
[7] If we wanted to have routes for other sites created when they dial in, we'd add appropriate case statements to cover those
where the ... appears in the example.
#!/bin/shcase $5 in172.16.3.1) # this is vbourbon route add -net 172.16.3.0 gw 172.16.3.1;;...esacexit 0
Similarly, /etc/ppp/ip-down can be used to undo any actions of ip-up after the PPP link has beentaken down again. So in our /etc/ppp/ip-down script we would have a route command that removedthe route we created in the /etc/ppp/ip-up script.
However, the routing scheme is not yet complete. We have set up routing table entries on both PPPhosts, but so far none of the hosts on either network knows anything about the PPP link. This is not abig problem if all hosts at the subsidiary have their default route pointing at vbourbon and allbrewery hosts route to vlager by default.

6.6. Link Control Options
We already encountered LCP, which is used to negotiate link characteristics and test the link.
The two most important options negotiated by LCP are the Asynchronous Control Character Map andthe Maximum Receive Unit. There are a number of other LCP configuration options, but they are fartoo specialized to discuss here.
The Asynchronous Control Character Map, colloquially called the async map, is used on asynchronouslinks, such as telephone lines, to identify control characters that must be escaped (replaced by aspecific two-character sequence) to avoid them being interpreted by equipment used to establish thelink. For instance, you may want to avoid the XON and XOFF characters used for software handshakebecause a misconfigured modem might choke upon receipt of an XOFF. Other candidates include Ctrl-l (the telnet escape character). PPP allows you to escape any of the characters with ASCII codes 0through 31 by specifying them in the async map.
The async map is a 32-bit-wide bitmap expressed in hexadecimal. The least significant bitcorresponds to the ASCII NULL character, and the most significant bit corresponds to ASCII 31decimal. These 32 ASCII characters are the control characters. If a bit is set in the bitmap, it signalsthat the corresponding character must be escaped before it is transmitted across the link.
To tell your peer that it doesn't have to escape all control characters, but only a few of them, you canspecify an async map to pppd using the asyncmap option. For example, if only ̂ S and ^Q (ASCII 17
and 19, commonly used for XON and XOFF) must be escaped, use the following option:
asyncmap 0x000A0000
The conversion is simple as long as you can convert binary to hex. Lay out 32 bits in front of you.The right-most bit corresponds to ASCII 00 (NULL), and the left-most bit corresponds to ASCII 32decimal. Set the bits corresponding to the characters you want escaped to one, and all others tozero. To convert that into the hexadecimal number pppd expects, simply take each set of 4 bits andconvert them into hex. You should end up with eight hexadecimal figures. String them all togetherand preprend "0x" to signify it is a hexadecimal number, and you are done.
Initially, the async map is set to 0xffffffffthat is, all control characters will be escaped. This is a
safe default, but is usually much more than you need. Each character that appears in the async mapresults in two characters being transmitted across the link, so escaping comes at the cost ofincreased link utilization and a corresponding performance reduction.
In most circumstances, an async map of 0x0 works fine. No escaping is performed.
The Maximum Receive Unit (MRU) signals to the peer the maximum size of HDLC frames that wewant to receive. Although this may remind you of the Maximum Transfer Unit (MTU) value, these twohave little in common. The MTU is a parameter of the kernel networking device and describes themaximum frame size that the interface is able to transmit. The MRU is more of an advice to theremote end not to generate frames larger than the MRU; the interface must nevertheless be able toreceive frames of up to 1,500 bytes.

Choosing an MRU is therefore not so much a question of what the link is capable of transferring, butof what gives you the best throughput. If you intend to run interactive applications over the link,setting the MRU to values as low as 296 is a good idea, so that an occasional larger packet (say, froman FTP session) doesn't make your cursor "jump." To tell pppd to request an MRU of 296, you give itthe option mru 296. Small MRUs, however, make sense only if you have VJ header compression (it is
enabled by default), because otherwise you'd waste a large amount of your bandwidth just carryingthe IP header for each datagram.
pppd also understands a couple of LCP options that configure the overall behavior of the negotiationprocess, such as the maximum number of configuration requests that may be exchanged before thelink is terminated. Unless you know exactly what you are doing, you should leave these optionsalone.
Finally, there are two options that apply to LCP echo messages. PPP defines two messages, EchoRequest and Echo Response. pppd uses this feature to check whether a link is still operating. You canenable this by using the lcp-echo-interval option together with a time in seconds. If no frames are
received from the remote host within this interval, pppd generates an Echo Request and expects thepeer to return an Echo Response. If the peer does not produce a response, the link is terminatedafter a certain number of requests are sent. This number can be set using the lcp-echo-failure
option. By default, this feature is disabled altogether.

6.7. General Security Considerations
A misconfigured PPP daemon can be a devastating security breach. It can be as bad as letting anyoneplug their machine into your Ethernet (and that can be very bad). In this section, we discuss a fewmeasures that should make your PPP configuration safe.
Root privilege is required to configure the network device and routing table. Youwill usually solve this by running pppd setuid root. However, pppd allows usersto set various security-relevant options.
To protect against any attacks a user may launch by manipulating pppd options, you should set acouple of default values in the global /etc/ppp/options file, like those shown in the sample file inSection 6.3Section 6.3, earlier in this chapter. Some of them, such as the authentication options,cannot be overridden by the user, and thus provide reasonable protection against manipulations. Animportant option to protect is the connect option. If you intend to allow non-root users to invokepppd to connect to the Internet, you should always add the connect and noauth options to the global
options file /etc/ppp/options. If you fail to do this, users will be able to execute arbitrary commandswith root privileges by specifying the command as their connect command on the pppd line or in theirpersonal options file.
Another good idea is to restrict which users may execute pppd by creating a group in /etc/group
and adding only those users who you wish to have the ability to execute the PPP daemon. You shouldthen change group ownership of the pppd daemon to that group and remove the world executeprivileges. To do this, assuming you've called your group dialout, you could use something like:
# chown root /usr/sbin/pppd# chgrp dialout /usr/sbin/pppd# chmod 4750 /usr/sbin/pppd
Of course, you have to protect yourself from the systems you speak PPP with, too. To fend off hostsposing as someone else, you should always require some sort of authentication from your peer.Additionally, you should not allow foreign hosts to use any IP address they choose, but restrict themto at most a few. The following section will deal with these topics in detail.

6.8. Authentication with PPP
With PPP, each system may require its peer to authenticate itself using one of two authenticationprotocols: the Password Authentication Protocol (PAP) or the Challenge Handshake AuthenticationProtocol (CHAP). When a connection is established, each end can request the other to authenticateitself, regardless of whether it is the caller or the callee. In the description that follows, we will looselytalk of "client" and "server" when we want to distinguish between the system sending authenticationrequests and the system responding to them. A PPP daemon can ask its peer for authentication bysending yet another LCP configuration request identifying the desired authentication protocol.
6.8.1. PAP Versus CHAP
PAP, which is offered by many Internet Service Providers, works basically the same way as thenormal login procedure. The client authenticates itself by sending a username and a (optionallyencrypted) password to the server, which the server compares to its secrets database. This techniqueis vulnerable to eavesdroppers, who may try to obtain the password by listening in on the serial line,and to repeated trial and error attacks.
CHAP does not have these deficiencies. With CHAP, the server sends a randomly generated"challenge" string to the client along with its hostname. The client uses the hostname to look up theappropriate secret, combines it with the challenge, and encrypts the string using a one-way hashingfunction. The result is returned to the server along with the client's hostname. The server nowperforms the same computation and acknowledges the client if it arrives at the same result.
CHAP also doesn't require the client to authenticate itself only at startup time, but sends challengesat regular intervals to make sure that the client hasn't been replaced by an intruder, for instance, byswitching phone lines or because of a modem configuration error that causes the PPP daemon not tonotice that the original phone call has dropped out and someone else has dialed in.
pppd keeps the secret keys for PAP and CHAP in two separate files called /etc/ppp/pap-secrets and/etc/ppp/chap-secrets. By entering a remote host in one or the other file, you have fine control overwhether PAP or CHAP is used to authenticate yourself with your peer, and vice versa.
By default, pppd doesn't require authentication from the remote host, but it will agree to authenticateitself when requested by the remote host. Since CHAP is so much stronger than PAP, pppd tries touse the former whenever possible. If the peer does not support it, or if pppd can't find a CHAP secretfor the remote system in its chap-secrets file, it reverts to PAP. If it doesn't have a PAP secret for itspeer either, it refuses to authenticate altogether. As a consequence, the connection is shut down.
You can modify this behavior in several ways. When given the auth keyword, pppd requires the peer
to authenticate itself. pppd agrees to use either CHAP or PAP as long as it has a secret for the peer inits CHAP or PAP database. There are other options to turn a particular authentication protocol on oroff, but I won't describe them here.
If all systems you talk to with PPP agree to authenticate themselves with you, you should put theauth option in the global /etc/ppp/options file and define passwords for each system in the chap-

secrets file. If a system doesn't support CHAP, add an entry for it to the pap-secrets file. That way,you can make sure no unauthenticated system connects to your host.
The next two sections discuss the two PPP secrets files, pap-secrets and chap-secrets. They arelocated in /etc/ppp and contain triplets of clients, servers, and passwords, optionally followed by a listof IP addresses. The interpretation of the client and server fields is different for CHAP and PAP, andalso depends on whether we authenticate ourselves with the peer or whether we require the serverto authenticate itself with us.
6.8.2. The CHAP Secrets File
When it has to authenticate itself with a server using CHAP, pppd searches the chap-secrets file foran entry with the client field equal to the local hostname, and the server field equal to the remotehostname sent in the CHAP challenge. When requiring the peer to authenticate itself, the roles aresimply reversed: pppd then looks for an entry with the client field equal to the remote hostname(sent in the client's CHAP response), and the server field equal to the local hostname.
The following is a sample chap-secrets file for vlager:[8]
[8] The double quotes are not part of the secret; they merely serve to protect the whitespace within it.
# CHAP secrets for vlager.vbrew.com## client server secret addrs#---------------------------------------------------------------------vlager.vbrew.com c3po.lucas.com "Use The Source Luke" vlager.vbrew.comc3po.lucas.com vlager.vbrew.com "arttoo! arttoo!" c3po.lucas.com* vlager.vbrew.com "TuXdrinksVicBitter" pub.vbrew.com
When vlager establishes a PPP connection with c3po, c3po asks vlager to authenticate itself bysending a CHAP challenge. pppd on vlager then scans chap-secrets for an entry with the client fieldequal to vlager.vbrew.com and the server field equal to c3po.lucas.com, and finds the first lineshown in the example.[9] It then produces the CHAP response from the challenge string and thesecret (Use The Source Luke), and sends it off to c3po.
[9] This hostname is taken from the CHAP challenge.
pppd also composes a CHAP challenge for c3po containing a unique challenge string and its fullyqualified hostname, vlager.vbrew.com. c3po constructs a CHAP response in the way we discussed,and returns it to vlager. pppd then extracts the client hostname (c3po.vbrew.com) from theresponse and searches the chap-secrets file for a line matching c3po as a client and vlager as theserver. The second line does this, so pppd combines the CHAP challenge and the secret arttoo!arttoo!, encrypts them, and compares the result to c3po's CHAP response.
The optional fourth field lists the IP addresses that are acceptable for the client named in the firstfield. The addresses can be given in dotted quad notation or as hostnames that are looked up withthe resolver. For instance, if c3po asks to use an IP address during IPCP negotiation that is not inthis list, the request is rejected and IPCP is shut down. In the sample file shown above, c3po istherefore limited to using its own IP address. If the address field is empty, any addresses areallowed; a value of "-" prevents the use of IP with that client altogether.

The third line of the sample chap-secrets file allows any host to establish a PPP link with vlagerbecause a client or server field of * is a wildcard matching any hostname. The only requirements are
that the connecting host must know the secret and that it must use the IP address associated withpub.vbrew.com. Entries with wildcard hostnames may appear anywhere in the secrets file, sincepppd will always use the best match it can find for the server/client pair.
pppd may need some help forming hostnames. As explained before, the remote hostname is alwaysprovided by the peer in the CHAP challenge or response packet. The local hostname is obtained bycalling the gethostname(2) function by default. If you have set the system name to your unqualifiedhostname, you also have to provide pppd with the domain name using the domain option:
# pppd domain vbrew.com
This provision appends the Brewery's domain name to vlager for all authentication related activities.Other options that modify pppd's idea of the local hostname are usehostname and name. When you
give the local IP address on the command line using local:remote and local as a name instead of a
dotted quad, pppd uses this as the local hostname.
6.8.3. The PAP Secrets File
The PAP secrets file is very similar to CHAP's. The first two fields always contain a username and aserver name; the third holds the PAP secret. When the remote host sends its authenticationinformation, pppd uses the entry that has a server field equal to the local hostname, and a user fieldequal to the username sent in the request. When it is necessary for us to send our credentials to thepeer, pppd uses the secret that has a user field equal to the local username and the server field equalto the remote hostname.
A sample PAP secrets file might look like this:
# /etc/ppp/pap-secrets## user server secret addrsvlager-pap c3po cresspahl vlager.vbrew.comc3po vlager DonaldGNUth c3po.lucas.com
The first line is used to authenticate ourselves when talking to c3po. The second line describes how auser named c3po has to authenticate itself with us.
The name vlager-pap in the first column is the username that we send to c3po. By default, pppd
picks the local hostname as the username, but you can also specify a different name by giving theuser option followed by that name.
When picking an entry from the pap-secrets file to identify yourself to a remote host, pppd mustknow the remote host's name. As it has no way of finding that out, you must specify it on thecommand line using the remotename keyword followed by the peer's hostname. To use the above
entry for authentication with c3po, for example, we must add the following option to pppd'scommand line:
# pppd ... remotename c3po user vlager-pap

In the fourth field of the PAP secrets file (and all following fields), you can specify what IP addressesare allowed for that particular host, just as in the CHAP secrets file. The peer will be allowed torequest only addresses from that list. In the sample file, the entry that c3po will use when it dialsinthe line where c3po is the clientallows it to use its real IP address and no other.
Note that PAP is a rather weak authentication method, you should use CHAP instead wheneverpossible. We will therefore not cover PAP in greater detail here; if you are interested in using it, youwill find more PAP features in the pppd(8) manpage.

6.9. Debugging Your PPP Setup
By default, pppd logs any warnings and error messages to syslog's daemon facility. You have to addan entry to syslog.conf that redirects these messages to a file or even the console; otherwise, syslog
simply discards them. The following entry sends all messages to /var/log/ppp-log:
daemon.* /var/log/ppp-log
If your PPP setup doesn't work right away, you should look in this logfile. If the log messages don'thelp, you can also turn on extra debugging output using the debug option. This output makes pppdlog the contents of all control packets sent or received to syslog. All messages then go to the daemon
facility.
Finally, the most drastic way to check a problem is to enable kernel-level debugging by invoking pppdwith the kdebug option. It is followed by a numeric argument that is the sum of the following values:
1 for general debug messages, 2 for printing the contents of all incoming HDLC frames, and 4 tomake the driver print all outgoing HDLC frames. To capture kernel debugging messages, you musteither run a syslogd daemon that reads the /proc/kmsg file, or the klogd daemon. Either of themdirects kernel debugging to the syslog kernel facility.

6.10. More Advanced PPP Configurations
While configuring PPP to dial in to a network like the Internet is the most common application, someusers have more advanced requirements. In this section we'll talk about a few of the more advancedconfigurations possible with PPP under Linux.
6.10.1. PPP Server
Running pppd as a server is just a matter of configuring a serial tty device to invoke pppd withappropriate options when an incoming data call has been received. One way to do this is to create aspecial account, say ppp, and give it a script or program as a login shell that invokes pppd with theseoptions. Alternatively, if you intend to support PAP or CHAP authentication, you can use the mgettyprogram to support your modem and exploit its "/AutoPPP/" feature.
To build a server using the login method, you add a line similar to the following to your /etc/passwdfile:[10]
[10] The useradd or adduser utility, if you have it, will simplify this task.
ppp:x:500:200:Public PPP Account:/tmp:/etc/ppp/ppplogin
If your system supports shadow passwords, you also need to add an entry to the /etc/shadow file:
ppp:!:10913:0:99999:7:::
Of course, the UID and GID you use depends on which user you wish to own the connection, and howyou've created it. You also have to set the password for the mentioned account using the passwdcommand.
The ppplogin script might look like this:
#!/bin/sh# ppplogin - script to fire up pppd on loginmesg nstty -echoexec pppd -detach silent modem crtscts
The mesg command disables other users from writing to the tty by using, for instance, the writecommand. The stty command turns off character echoing. This command is necessary; otherwise,everything the peer sends would be echoed back to it. The most important pppd option given is -detach because it prevents pppd from detaching from the controlling tty. If we didn't specify this
option, it would go to the background, making the shell script exit. This in turn would cause the serialline to hang up and the connection to be dropped. The silent option causes pppd to wait until it

receives a packet from the calling system before it starts sending. This option prevents transmittimeouts from occurring when the calling system is slow in firing up its PPP client. The modem option
makes pppd drive the modem control lines of the serial port. You should always turn this option onwhen using pppd with a modem. The crtscts option turns on hardware handshake.
Besides these options, you might want to force some sort of authenticationfor example, by specifyingauth on pppd's command line or in the global options file. The manual page also discusses more
specific options for turning individual authentication protocols on and off.
If you wish to use mgetty, all you need to do is configure mgetty to support the serial device yourmodem is connected to (see Chapter 3 for details), configure pppd for either PAP or CHAPauthentication with appropriate options in its options file, and finally, add a section similar to thefollowing to your /etc/mgetty/login.config file:
# Configure mgetty to automatically detect incoming PPP calls and invoke# the pppd daemon to handle the connection.#/AutoPPP/ - ppp /usr/sbin/pppd auth -chap +pap login
The first field is a special piece of magic used to detect that an incoming call is a PPP one. You mustnot change the case of this string; it is case sensitive. The third column is the username that appearsin who listings when someone has logged in. The rest of the line is the command to invoke. In ourexample, we've ensured that PAP authentication is required, disabled CHAP, and specified that thesystem passwd file should be used for authenticating users. This is probably similar to what you'llwant. Remember, you can specify the options in the options file or on the command line if you prefer.
Here is a small checklist of tasks to perform and the sequence you should perform them to get PPPdial in working on your machine. Make sure each step works before moving on to the next:
Configure the modem for auto-answer mode. On Hayes-compatible modems, this is performedusing a command such as ATS0=3. If you're going to be using the mgetty daemon, this isn't
necessary.
1.
Configure the serial device with a getty-type of command to answer incoming calls. A commonlyused getty variant is mgetty.
2.
Consider authentication. Will your callers authenticate using PAP, CHAP, or system login?3.
Configure pppd as server as described in this section.4.
Consider routing. Will you need to provide a network route to callers? Routing can be performedusing the ip-up script.
5.
6.10.2. Demand Dialing
When there is IP traffic to be carried across the link, demand dialing causes your telephone modemto dial and to establish a connection to a remote host. Demand dialing is most useful when you can'tleave your telephone line permanently switched to your Internet provider. For example, you might

have to pay timed local calls, so it might be cheaper to have the telephone line switched on onlywhen you need it and disconnected when you aren't using the Internet.
In the past, Linux solutions used the diald command, which worked well but was fairly tricky toconfigure. Versions 2.3.0 and later of the PPP daemon have built-in support for demand dialing andmake it very simple to configure.
To configure pppd for demand dialing, all you need to do is add options to your options file or thepppd command line. Table 6-2 summarizes the options related to demand dialing.
Table 6-2. Demand dialing options
Option Description
demand
This option specifies that the PPP link should be placed in demand dial mode. ThePPP network device will be created, but the connect command will not be useduntil a datagram is transmitted by the local host. This option is mandatory fordemand dialing to work.
active-filter
expression
This option allows you to specify which data packets are to be considered activetraffic. Any traffic matching the specified rule will restart the demand dial idletimer, ensuring that pppd waits again before closing the link. The filter syntax hasbeen borrowed from the tcpdump command. The default filter matches alldatagrams.
holdoff n
This option allows you to specify the minimum amount of time, in seconds, to waitbefore reconnecting this link if it terminates. If the connection fails while pppdbelieves it is in active use, it will be reestablished after this timer has expired. Thistimer does not apply to reconnections after an idle timeout.
idle nIf this option is configured, pppd will disconnect the link whenever this timerexpires. Idle times are specified in seconds. Each new active data packet will resetthe timer.
A simple demand dialing configuration would therefore look something like this:
demandholdoff 60idle 180
This configuration would enable demand dialing, wait 60 seconds before reestablishing a failedconnection, and drop the link if 180 seconds pass without any active data on the link.
6.10.3. Persistent Dialing
Persistent dialing is what people who have permanent dial-up connections to a network will want touse. There is a subtle difference between demand dialing and persistent dialing. With persistent

dialing, the connection is automatically established as soon as the PPP daemon is started, and thepersistent aspect comes into play whenever the telephone call supporting the link fails. Persistentdialing ensures that the link is always available by automatically rebuilding the connection if it fails.
You might be fortunate to not have to pay for your telephone calls; perhaps they are local and free,or perhaps they're paid by your company. The persistent dialing option is extremely useful in thissituation. If you do have to pay for your telephone calls, then you have to be a little careful. If youpay for your telephone calls on a time-charged basis, persistent dialing is almost certainly not whatyou want; unless you're very sure you'll be using the connection fairly steadily 24 hours a day. If youdo pay for calls, but they are not time charged, you need to be careful to protect yourself againstsituations that might cause the modem to endlessly redial. The pppd daemon provides an option thatcan help reduce the effects of this problem.
To enable persistent dialing, you must include the persist option in one of your pppd options files.
Including this option alone is all you need to have pppd automatically invoke the command specifiedby the connect option to rebuild the connection when the link fails. If you are concerned about the
modem redialing too rapidly (in the case of modem or server fault at the other end of theconnection), you can use the holdoff option to set the minimum amount of time that pppd will wait
before attempting to reconnect. This option won't solve the problem of a fault costing you money inwasted phone calls, but it will at least serve to reduce the impact of one.
A typical configuration might have persistent dialing options that look like this:
persistholdoff 600
The holdoff time is specified in seconds. In our example, pppd waits a full five minutes before
redialing after the call drops out.
It is possible to combine persistent dialing with demand dialing, using idle to drop the link if it has
been idle for a specified period of time. We doubt many users would want to do so, but this scenariois described briefly in the pppd manpage, if you'd like to pursue it.

6.11. PPPoE Options in Linux
PPPoE has become much more important recently, as it is the connection method of choice by anumber of DSL providers. Fortunately for Linux users, a number of functional options are available,most of which are easily configurable. PPPoE is nothing new; it is simply the same PPP as used overdial-up, except it is used over Ethernet.
For the purposes of this section, we'll assume that your DSL modem and equipment are properlyconfigured and ready for use. More information on how this is accomplished can be found in theexcellent Linux DSL HOWTO, written by David Fannin and Hal Burgiss(http://www.tldp.org/HOWTO/DSL-HOWTO). Additionally, we'll assume that the Ethernet card in yourPC is installed and operational.
In most DSL environments the DSL modem is configured to be a bridge, meaning that it won't havean IP address. As a result of this, your server will be configured with a WAN IP address. Beforeenabling the WAN interface, you should make certain that you've patched all of the listening serviceson your machine. Additionally, you should consider using an IPtables or other firewall. Security whenconnecting directly to the Internet should be of the utmost importance. It has been reported thatunpatched versions of some Linux distributions survive only a few hours on the Internet beforethey're compromised. Make sure you've done as much as possible to ensure that this doesn't happento you!
6.11.1. PPPoE Clients
To get started with configuring PPPoE, you will need to obtain a PPPoE client. There are a number ofclients available, including one from Roaring Penguin that has become very popular with many usersand providers. It can be downloaded from http://www.roaringpenguin.com in both source format andas pre-compiled RPMs. When you've downloaded and compiled or installed the software, you areready for configuration. The client software comes with a very easy to use configuration script calledadsl-setup. It will ask you a number of questions about your system, network, and PPPoE userinformation. In some cases it will have already provided the answers, requiring you to only confirm!
However helpful, the script isn't foolproof, so we'll walk through a manual configuration. It's also agood idea, especially from the network administrator's viewpoint, to have a good idea of howsoftware is configured, just in case something goes wrong in the future.
6.11.1.1 PPPoE manual client configuration
Configuring the client is pretty easy, especially if you've previously set up a standard PPPconfiguration. First, you'll need to edit the /etc/ppp/pap-secrets file. You will need to replace thedefault values with your PPPoE username and password. The file will look something like this:
#User #Server #Password #[email protected] * my_password *

Next, open the /etc/ppp/pppoe.conf file in your text editor. You will need to tell it both your WANinterface name, and your PPPoE username. The relevant lines in the file appear as follows:
# Ethernet card connected to ADSL modemETH=eth0 # ADSL user name. You may have to supply "@provider.com" [email protected]
The file contains a number of additional configuration options. Unless you're really certain that youneed to change these, you probably shouldn't. If you are determined to make some changes, refer tothe PPP manpages for more information.
Lastly, if you haven't already configured your DNS servers in the /etc/resolv.conf file, this should bedone now. Detailed information about DNS configuration can be found in Chapter 5.
When you've finished with the configuration, you can now test the connection to see if it works. Theadsl-start script is used specifically for this purpose. You can call it from the command line, or,ideally, include it in your system startup scripts. This is accomplished differently for almost everydistribution. Consult documentation specific to your distribution for specifics on how to install startupscripts.
If the startup script completes without errors, you should be connected to the Internet. A quick andeasy way to test this is to ping something that will answer. Success will look like this:
vlager# ping www.google.comPING www.google.akadns.net (66.102.7.99) 56(84) bytes of data.64 bytes from 66.102.7.99: icmp_seq=1 ttl=245 time=5.94 ms64 bytes from 66.102.7.99: icmp_seq=2 ttl=245 time=5.02 ms64 bytes from 66.102.7.99: icmp_seq=3 ttl=245 time=5.02 msctrl-c--- www.google.akadns.net ping statistics ---3 packets transmitted, 3 received, 0% packet loss, time 2009msrtt min/avg/max/mdev = 5.028/5.333/5.945/0.440 msvlager#
Additionally, you can check the configuration by using ifconfig:
vlager# ifconfig -aeth0 Link encap:Ethernet HWaddr 00:08:02:F0:BB:0E UP BROADCAST RUNNING MULTICAST MTU:1500 Metric:1 RX packets:8701578 errors:6090 dropped:0 overruns:0 frame:5916 TX packets:3888596 errors:0 dropped:0 overruns:0 carrier:0 collisions:6289 txqueuelen:100 RX bytes:1941625928 (1851.6 Mb) TX bytes:1481305134 (1412.6 Mb) Interrupt:30 eth1 Link encap:Ethernet HWaddr 00:90:27:FE:02:A0

inet addr:10.10.0.254 Bcast:10.10.0.255 Mask:255.255.255.0 UP BROADCAST RUNNING MULTICAST MTU:1500 Metric:1 RX packets:48920435 errors:0 dropped:0 overruns:0 frame:0 TX packets:55211769 errors:0 dropped:0 overruns:2 carrier:9 collisions:367030 txqueuelen:100 RX bytes:2018181326 (1924.6 Mb) TX bytes:1564406617 (1491.9 Mb) Interrupt:10 Base address:0x4000. ppp0 Link encap:Point-to-Point Protocol inet addr: 64.168.44.33 P-t-P:64.168.44.1 Mask:255.255.255.255 UP POINTOPOINT RUNNING NOARP MULTICAST MTU:1492 Metric:1 RX packets: 8701576 errors:0 dropped:0 overruns:0 frame:0 TX packets: 3888594 errors:0 dropped:0 overruns:0 carrier:0 collisions:0 txqueuelen:10
If something isn't working properly at this point, check all of your connections, and ensure the DSLgear is properly configured. Additionally, recheck your username and password in the configurationfilesa mistyped password is one of the most common configuration problems!

Chapter 7. TCP/IP FirewallSecurity is increasingly important for companies and individuals alike. The Internet provides themwith a powerful tool to distribute information about themselves and obtain information from others,but it also exposes them to dangers from which they were previously exempt. Computer crime,information theft, and malicious damage are all potential dangers.
This chapter covers the Linux features for setting up a firewall, known both by its command interface(iptables) and its kernel subsystem name (netfilter). This firewall implementation was new in the2.4 kernel and works substantially the same way in 2.6.
A malicious person who gains access to a computer system may guess system passwords or exploitthe bugs and idiosyncratic behavior of certain programs to obtain a working account on that host.Once they are able to log in to the host, they may have access to sensitive information. In acommercial setting, stealing, deleting, or modifying information such as marketing plans, new projectdetails, or customer information databases can cause significant damage to the company.
The safest way to avoid such widespread damage is to prevent unauthorized people from gainingnetwork access to the host. This is where firewalls come in.
Constructing secure firewalls is an art. It involves a good understanding oftechnology, but equally important, it requires an understanding of thephilosophy behind firewall designs. We won't cover everything you need toknow in this book; we strongly recommend you do some additional researchbefore trusting any particular firewall design, including any we present here.
We will focus on the Linux-specific technical issues in this chapter. Later we will present a samplefirewall configuration that should serve as a useful starting point in your own configuration, but aswith all security-related matters, you'll want to make sure that you understand the information wellenough to customize it to suit your needs and verify that the result is sufficient. Double-check thedesign, make sure that you understand it, and then modify it to suit your requirements. To be safe,be sure.

7.1. Methods of Attack
As a network administrator, it is important that you understand the nature of potential attacks oncomputer security. We'll briefly describe the most important types of attacks so that you can betterunderstand precisely what the Linux IP firewall will protect you against. You should do someadditional reading to ensure that you are able to protect your network against other types of attacks.Here are some of the more important methods of attack and ways of protecting yourself againstthem:
Unauthorized access
This simply means that people who shouldn't be allowed to use your computer services areable to connect to and use them. For example, people outside your company might try toconnect to your company accounting host or to your NFS server.
There are various ways to avoid this attack by carefully specifying who can gain access through theseservices. You can prevent network access to all except the intended users.
Exploitation of known weaknesses in programs
Some programs and network services were not originally designed with strong security in mindand are inherently vulnerable to attack. The BSD remote services (rlogin, rexec, etc.) are anexample.
The best way to protect yourself against this type of attack is to disable any vulnerable services orfind alternatives. A good place to start is to only install, run and expose services that you absolutelyhave to. Start with no network services and work your way up from there. Use the netstat commandto determine the ports that your host is listening on, make sure the list is as small as possible, andknow exactly what each of them is for. Don't run any network services on the firewall host, with thepossible exception of Secure Shell (SSH)

SSH and iptables
With SSH and iptables, you have two easy ways to access hosts and services inside yournetwork from the outside world without exposing them directly. First, you can run SSHon the firewall and use SSH's port forwarding feature to access internal hosts andservices from the outside, without exposing them directly to the outside. Section 12.1 ofBob Toxen's book Real World Linux Security, Second Edition (Prentice Hall), hasadditional information on using SSH in this way. Second, you can use iptables DestinationNetwork Address Translation to expose SSH for multiple servers as distinct ports on thefirewall's public IP address, with the connections forwarded to the individual hosts insidethe network. See Chapter 9 for more information on Network Address Translation.
Track bug databases and patch lists and keep your systems up to date. Two of the most popular bugdatabases are the Bugtraq database, available online at http://www.securityfocus.com/bid (see alsohttp://www.securityfocus.com/rss for information on accessing Bugtraq via an RSS feed) and theCommon Vulnerabilities and Exposures (CVE) database, available online at http://cve.mitre.org/ (seealso the RSS at http://www.opensec.org/feeds/cve/latest.xml). Most Linux distributors provide toolsto download and install updates. Red Hat has a utility called yum, SuSE has a utility called YaSTOnline Update (YOU), and Debian uses apt-get.
Denial of service
Denial of service attacks cause the service or program to cease functioning or prevent othersfrom making use of the service or program. These may be performed at the network layer bysending carefully crafted and malicious packets that cause network connections to fail. Theymay also be performed at the application layer, where carefully crafted application commandsare given to a program that cause it to become extremely busy or stop functioning.
Preventing suspicious network traffic from reaching your hosts and preventing suspicious programcommands and requests (this requires software that understands the underlying protocols, such asproxy servers) are the best ways of minimizing the risk of a denial of service attack. It's useful toknow the details of the attack method, so you should educate yourself about each new attack as itgets publicized.
Spoofing
This type of attack involves one host or application pretending to be another. Typically theattacker's host pretends to be an innocent host by forging IP addresses in network packets. Forexample, a well-documented exploit of the BSD rlogin service can use this method to mimic a
TCP connection from another host by guessing TCP sequence numbers.
To protect against this type of attack, verify the authenticity of packets and commands (acombination of filtering and proxy servers can help here). Prevent packet routing with invalid

source addresses. Use operating systems (such as Linux) with unpredictable connection controlmechanisms, such as TCP sequence numbers and the allocation of dynamic port addresses.
Putting hosts with operating systems that have insecure sequence number algorithms behind aLinux firewall performing Network Address Translation allows you to continue to use them withincreased safety, since the firewall host will use its own sequence numbering algorithms forcommunication with the outside world.
Eavesdropping
This is the simplest type of attack. A host is configured to "listen" to and capture data notbelonging to it (by putting its network interface into "promiscuous" mode and monitoring allpackets traversing the network segment). Carefully written eavesdropping programs can takeusernames and passwords from user login network connections. Broadcast networks such asunswitched Ethernet are especially vulnerable to this type of attack, although it does requirephysical access to the Ethernet network. Wireless networks have similar problems and can bemore dangerous since physical access is not required; proximity is sufficient.
To protect against this type of threat, avoid use of broadcast network technologies and enforcethe use of data encryption.
It is more complicated, but not impossible, to do packet sniffing in a switched environment.Some Ethernet switches have administrative settings or even failure modes that cause them tocopy all packets to one or more of their ports.
IP firewalling is very useful in preventing or reducing unauthorized access, network layer denial ofservice, and IP spoofing attacks. It not very useful in avoiding exploitation of weaknesses in networkservices or programs and eavesdropping.

7.2. What Is a Firewall?
A firewall is a hardened and trusted host that acts as a choke point among a group of networks(usually a single private network and a single public network).[1] All network traffic among theaffected networks is routed through the firewall. The firewall host is configured with a set of rulesthat determine which network traffic will be allowed to pass and which will be blocked (droppedwithout response) or refused (rejected with a response). In some large organizations, you may evenfind a firewall located inside their corporate network to segregate sensitive areas of the organizationfrom employees in other areas. Many cases of computer crime originate within an organization,rather than from outside.
[1] The term firewall comes from a device used to protect people from fire. The firewall is a shield of material resistant to fire that
is placed between a potential fire and the people it is protecting.
Firewalls can be constructed in a variety of ways. The most sophisticated arrangement involves anumber of separate hosts and is known as a perimeter network or demilitarized zone (DMZ) network.Two hosts act as "filters" (sometimes called chokes) to allow only certain types of network traffic topass, and between these chokes reside network servers such as an email (SMTP) server or a WorldWide Web (HTTP) proxy server. This configuration can be very safe and allows a great range ofcontrol over who can connect both from the inside to the outside and from the outside to the inside.This sort of configuration might be used by large organizations.
In many cases, though, people build firewalls that also provide other services (such as SMTP orHTTP). These are less secure because if someone exploits a weakness in one of the extra servicesrunning on the firewall, the entire network's security has been breached. The attacker could modifythe firewall rules to allow more access and turn off accounting that might have otherwise alerted thenetwork administrator that there was unusual network activity. Nevertheless, these types of firewallsare cheaper and easier to manage than the more sophisticated arrangement just described. Figure 7-1 illustrates the two most common firewall configurations.
Figure 7-1. The two major classes of firewall design

The Linux kernel provides a range of built-in features that allow it to function as an IP firewall. Thenetwork implementation includes code (the netfilter subsystem) to do IP packet processing in anumber of different ways, and provides a user-space mechanism (the iptables command) toconfigure what sort of rules you'd like to put in place. A Linux firewall is flexible enough to make itvery useful in either of the configurations illustrated in Figure 7-1. Linux firewall software providestwo other useful features that we'll discuss in separate chapters: IP Accounting (Chapter 8) and IPMasquerade and Network Address Translation (Chapter 9).
The three main classes of packet processing are filtering, mangling, and Network Address Translation(NAT). Filtering is simply deciding, at various points in the packet flow, whether or not to allow thepackets through to the next stage. Packet mangling is a generic term for modifying packets as theymove through the packet flow. NAT is a special application of mangling whereby source or destinationIP addresses and/or ports are modified to transparently redirect traffic.

7.3. What Is IP Filtering?
IP filtering is simply a mechanism that decides which types of IP packets will be processed normallyand which will be dropped or rejected. By dropped we mean that the packet is deleted andcompletely ignored, as if it had never been received. By rejected we mean that the firewall sends anICMP response to the sender indicating a reason why the packet was rejected. You can apply manydifferent sorts of criteria to determine which packets you wish to filter. Some examples of these are:
Protocol type: TCP, UDP, ICMP, etc.
Port number (for TCP/UPD)
Packet type: SYN/ACK, data, ICMP Echo Request, etc.
Packet source address: where it came from
Packet destination address: where it is going to
It is important to understand at this point that IP filtering is a network layer facility. This means thatit doesn't understand anything about the application using the network connections, only about theconnections themselves. For example, you may deny users access to your internal network on thedefault Telnet port, but if you rely on IP filtering alone, you can't stop them from using the Telnetprogram with a port that you do allow to pass through your firewall. You can prevent this sort ofproblem by using proxy servers for each service that you allow across your firewall. The proxyservers understand the application that they were designed to proxy and can therefore preventabuses, such as using the Telnet program to get past a firewall by using the World Wide Web port. Ifyour firewall supports a World Wide Web proxy, outbound Telnet connections on the HTTP port willalways be answered by the proxy and will allow only HTTP requests to pass. A large number of proxy-server programs exist. Some are free software and many others are commercial products. TheFirewall and Proxy Server HOWTO (available online at http://www.tldp.org/HOWTO/Firewall-HOWTO.html) discusses one popular set of these, but they are beyond the scope of this book.
The IP filtering rule set is made up of many combinations of the criteria listed previously. Forexample, let's imagine that you wanted to allow World Wide Web users within the Virtual Brewerynetwork to have no access to the Internet except to use other sites' web servers. You wouldconfigure your firewall to allow forwarding of the following:
Packets with a source address on Virtual Brewery network, a destination address of anywhere,and with a destination port of 80 (WWW)
Packets with a destination address of Virtual Brewery network and a source port of 80 (WWW)from a source address of anywhere
Note that we've used two rules here. We have to allow our data to go out, but also the correspondingreply data to come back in. In practice, as we'll see in the chapter on IP masquerade and NetworkAddress Translation (Chapter 9), iptables simplifies this and allows us to specify this in one

7.4. Netfilter and iptables
While developing the previous version of Linux IP firewalling (called ipchains), Paul "Rusty" Russell
decided that IP firewalling should be less difficult. He set about the task of simplifying aspects ofpacket processing in the kernel firewalling code and produced a filtering framework that was bothmuch cleaner and much more flexible. He called this new framework netfilter.
While ipchains was a vast improvement over its predecessor (ipfwadm) for the management offirewall rules, the way it processed packets was still complex, especially in conjunction with importantfeatures such as IP masquerade (discussed in Chapter 9) and other forms of address translation. Partof this complexity existed because IP masquerade and NAT were developed independently of the IPfirewalling code and integrated later, rather than having been designed as a true part of the firewallcode from the start. If a developer wanted to add yet more features in the packet-processingsequence, he would have had difficulty finding a place to insert the code and would have been forcedto make changes in the kernel in order to do so.
netfilter addresses both the complexity and the rigidity of older solutions by implementing a genericframework in the kernel that streamlines the way packets are processed and provides a capability toextend filtering policy without having to modify the kernel. The Linux 2.4 Packet Filtering HOWTO(available online at http://www.netfilter.org/documentation/HOWTO/packet-filtering-HOWTO.html)offers a detailed list of the changes that have been made, so let's focus on the more practical aspectshere.
To build a Linux IP firewall, it is necessary to have a kernel built with IP firewall (netfilter) supportand the iptables user-space configuration utility. The netfilter code is the result of a large redesignof the packet handling flow in Linux. netfilter provides direct backward-compatible support for both ofthe two older Linux firewalling solutions (ipfwadm and ipchains), as well as a new command callediptables. In this book, we'll only cover iptables, but you can refer to previous editions of this book ifyou need to understand ipfwadm or ipchains rules.
7.4.1. Example iptables Commands
The iptables architecture groups network packet processing rules into tables by function (packetfiltering, network address translation, and other packet mangling), each of which have chains(sequences) of processing rules. Rules consist of matches (used to determine which packets the rulewill apply to) and targets (which determine what will be done with the matching packets).
iptables operates at OSI Layer 3 (Network). For OSI Layer 2 (Link), there are other technologiessuch as ebtables (Ethernet Bridge Tables). See http://ebtables.sourceforge.net/ for moreinformation.
This section will give a couple examples of iptables usage with high-level explanations. See the"iptables Concepts" section, later in the chapter, for additional information.

7.4.1.1 A packet-filtering example
This command could be used on a firewall to filter out all non-HTTP traffic, implementing the rulesdescribed in the earlier section, "What Is IP Filtering?", assuming eth0 is the Ethernet interface onthe inside and eth1 is the Ethernet interface to the Internet.
iptables -t filter -P FORWARD DROPiptables -t filter -A FORWARD -i eth0 -p tcp --dport 80 -j ACCEPTiptables -t filter -A FORWARD -i eth1 -p tcp --sport 80 -j ACCEPT
The first command sets the default policy for the FORWARD chain of the filter table to DROP all
packets. Table 7-1 shows how the second command means "allow all outbound HTTP requests." Thethird command is similar except that it means "allow all inbound HTTP responses."
Table 7-1. Decomposed example iptables command arguments
Component Description
-t filter Operate on the filter table (actually, the default) . . .
-A FORWARD . . . by appending the following rule to its FORWARD chain.
-i eth0 Match packets coming in on the eth0 (inside) network interface . . .
-p tcp . . . and using the tcp (TCP/IP) protocol
--dport 80 . . . and intended for port 80 on the (outside) destination host.
-j ACCEPT Accept the packet for forwarding.
7.4.1.2 A Masquerading example
The previous section's packet filtering example doesn't make the best use of iptables' functionality.If you have a dynamic IP address on your Internet interface, you'd be better off using Masquerading(see Chapter 9 for more on Masquerading):
iptables -t nat -P POSTROUTING DROPiptables -t nat -A POSTROUTING -o eth1 -p tcp --dport 80 -j MASQUERADE
7.4.1.3 A network translation example
This command could be used on a firewall to forward incoming HTTP traffic to a web server on theinternal network (see Chapter 9 for more on Network Address Translation):
iptables -t nat -A PREROUTING -i eth1 -p tcp -dport 80 \ -j DNAT --to-destination 192.168.1.3:8080

Table 7-2 shows what this sample iptables command means.
Table 7-2. Decomposed example iptables command arguments
Component Description
-t nat Operate on the nat (Network Address Translation) table . . .
-A PREROUTING . . . by appending the following rule to its PREROUTING chain.
-i eth1 Match packets coming in on the etH1 network interface...
-p tcp . . . and using the tcp (TCP/IP) protocol
--dport 80 . . . and intended for local port 80.
-j DNATJump to the DNAT (Destination Network Address Translation)
target . . .
--to-destination192.168.1.3:8080
. . . and change the destination address to 192.168.1.3 anddestination port to 8080.

7.5. iptables Concepts
iptables defines five "hook points" in the kernel's packet processing pathways: PREROUTING, INPUT,FORWARD, POSTROUTING, and OUTPUT. Built-in chains are attached to these hook points; you can add a
sequence of rules for each of them. Each of these represents an opportunity to affect or monitorpacket flow.
It is common to refer to "the PREROUTING chain of the nat table," which makes
it seem like chains belong to tables. But chains and tables are only partiallycorrelated, and neither really "belongs" to the other. Chains represent hookpoints in the packet flow, and tables represent the types of processing that canoccur. Figure 7-2 shows all the legal combinations, and the order in which theyare encountered by packets flowing through the system.
7.5.1. Packet Flow
Figure 7-2 shows how packets traverse the system. The boxes represent the iptables chains, andinside each box is a list of the tables that have such a chain (in the order in which they are invoked).All of these Table and Chain combinations are involved in packet mangling.
Figure 7-2. All network packet flow hook points
In Figure 7-3, the gray boxes represent chains and tables not involved in NAT.
Figure 7-3. Network packet flow and hook points for NAT

Figure 7-4 shows how packets traverse the system for packet filtering.
Figure 7-4. Network packet flow and hook points for filtering
Table 7-3 shows the five "hook points" and describes the points in the packet flow where they allowyou to specify processing.
For the curious, the hook points are defined in the kernel header file/usr/include/linux/netfilter_ipv4.h with names such as NF_IP_FORWARD,NF_IP_LOCAL_{IN,OUT}, and NF_IP_{PRE,POST}_ROUTING.
Table 7-3. Hook points
Hook Allows you to process packets . . .
FORWARDflowing through a gateway computer, coming in one interface and going right backout another.
INPUT just before they are delivered to a local process.

Hook Allows you to process packets . . .
OUTPUT just after they are generated by a local process.
POSTROUTING just before they go out a network interface.
PREROUTINGjust as they arrive from a network interface (after dropping any packets resultingfrom the interface being in "promiscuous" mode, and after checksum validation).
Your choice of chain will be based on where in the packet lifecycle you need to apply your rules. Forexample, if you want to filter outgoing packets, you generally do so in the OUTPUT chain, since thePOSTROUTING chain is not associated with the filter table.
7.5.2. Three Ways We Can Do Filtering
Consider how a Unix host, or in fact any host capable of IP routing, processes IP packets. The basicsteps, shown in Figure 7-5 are:
Figure 7-5. The stages of IP packet processing
The IP packet is received.
The incoming IP packet is examined to determine if it is destined for a process on this host.
1.
If the packet is for this host, it is processed locally.2.
If it is not destined for this host (and IP forwarding is turned on), a search is made of therouting table for an appropriate route and the packet is forwarded to the appropriate interfaceor rejected if no route can be found.
3.
Packets from local processes are sent to the routing software for forwarding to the appropriateinterface.
4.

The outgoing IP packet is examined to determine if there is a valid route for it to take; if not, itis dropped (ignored completely) or rejected (ignored after sending an ICMP message indicatingthere is no route to the destination host).
4.
The IP packet is transmitted.5.
In our diagram, the flow 1 3 5 represents our host routing data between a host on ourEthernet network to a host reachable via our PPP link. The flows 1 2 and 4 5 represent thedata input and output flows of a network program running on our local host. The flow 4 3 2would represent data flow via a loopback connection. Naturally, data flows both into and out ofnetwork devices. The question marks on the diagram represent the points where the IP layer makesrouting decisions.
The Linux kernel IP firewall is capable of applying filtering at various stages in this process. That is,you can filter the IP packets that come into your host, filter those packets being forwarded acrossyour host, and filter those packets that are ready to be transmitted.
This may seem unnecessarily complicated at first, but it provides flexibility that allows some verysophisticated and powerful configurations to be built.
7.5.3. Tables
iptables comes with three built-in tables: filter, mangle, and nat. Each of these is preconfigured
with chains corresponding to one or more of the hook points described in Table 7-4 and shown inFigure 7-2.
Table 7-4. Built-in tables
Table Description
filter
Used to set policies for the type of traffic allowed into, through, and out of the computer.Unless you refer to a different table explicitly, iptables will operate on chains within thistable by default.
Its built-in chains are FORWARD, INPUT, and OUTPUT.
mangle
Used for specialized packet alteration, such as stripping off IP options (as with theIPV4OPTSSTRIP target extension).
Its built-in chains are FORWARD, INPUT, OUTPUT, POSTROUTING, and PREROUTING.
nat
Used in conjunction with connection tracking to redirect connections for NAT, typicallybased on source or destination addresses.
Its built-in chains are OUTPUT, POSTROUTING, and PREROUTING.
iptables arranges for the appropriate chains in these tables to be traversed by network packetsbased on the source and destination, and in the order depicted in Figure 7-2.

The default table is the filter table; If you do not specify an explicit table in an iptables command,filter is assumed.
7.5.4. Chains
Packets traverse chains, being presented to the chain's rules one at a time in order. If the packetdoes not match the rule's criteria, it moves on to the next rule in the chain. If a packet reaches thelast rule in a chain and still does not match, the chain's policy is applied to it.
By default, each table has chains (initially empty) for some or all of the hook points. See Table 7-3for a list of hook points, and Table 7-4 for a list of built-in chains for each table.
In addition, you can create your own custom chains to organize your rules.
A chain's policy is used to determine the fate of packets that reach the end of the chain withoutotherwise being sent to a specific target. Only the built-in targets ACCEPT and DROP (described in
"Targets," later in this chaper) may be used as the policy for a built-in chain, and the default isACCEPT. All user-defined chains have an implicit policy of RETURN, which cannot be changed.
If you want to have a more complicated policy target for a built-in chain, or a policy other thanRETURN for a user-defined chain, you can add a rule to the end of the chain that matches all packets,with any target you like. You can set the chain's policy to DROP just in case you make a mistake in
your catch-all rule, or to filter out traffic while you make modifications to your catch-all rule (bydeleting it and re-adding it with changes).
7.5.5. Rules
An iptables rule consists of one or more match criteria to determine which network packets it willaffect and a target specification that determines how the network packets will be affected. All matchoptions must be satisfied for the rule to match a packet.
The system maintains packet and byte counters for every rule. Every time a packet reaches a ruleand matches the rule's criteria, the packet counter is incremented and the byte counter is increasedby the size of the matching packet.
Both the match and the target portion of the rule are optional. If there are no match criteria, allpackets are considered to match. If there is no target specification, nothing is done to the packets(processing will proceed as if the rule did not exist except that the packet and byte counters will beupdated). You can add such a "null" rule to the FORWARD chain of the filter table with the commandiptables -t filter -A FORWARD.
7.5.6. Matches
There are a wide variety of matches available for use with iptables, although some are availableonly for kernels with certain features enabled. Generic Internet Protocol (IP) matches (such asprotocol or source or destination address) are applicable to any IP packet.

In addition to the generic matches, iptables includes many specialized matches available throughdynamically loaded extensions (you use the iptables -m or --match option to tell iptables that you
want to use one of these extensions).
There is one match extension for dealing with a networking layer below the IP layer. The mac match
extension matches based on Ethernet Media Access Controller (MAC) addresses.
7.5.7. Targets
Targets are used to specify the action to take when a rule matches a packet, and also to specifychain policies. There are four targets built into iptables, and extension modules that provide others.Table 7-5 describes these built-in targets.
Table 7-5. Built-in targets
Target Description
ACCEPTLet the packet through to the next stage of processing. Stop traversing the current chain,and start at the next stage shown in Figure 7-2.
DROPDiscontinue processing the packet completely. Do not check it against any other rules,chains, or tables. If you want to provide some feedback to the sender, then you can usethe REJECT target extension.
QUEUESend the packet to userspace (i.e., code not in the kernel).
See the lipipq manpage for more information.
RETURN
From a rule in a user-defined chain, discontinue processing this chain, and resumetraversing the calling chain at the rule following the one that had this chain as its target.
From a rule in a built-in chain, discontinue processing the packet and apply the chain'spolicy to it.
See the "Chains" section earlier in this chapter for more information about chain policies.

7.6. Setting Up Linux for Firewalling
The Linux kernel must be configured to support IP firewalling. There isn't much more to it thanselecting the appropriate options when performing:
# make menuconfig
of your kernel.[2] In 2.4 kernels you should select the following options:
[2] Firewall packet logging is a special feature that writes a line of information about each datagram that matches a particular
firewall rule out to a special device so you can see them.
Networking options ---> [*] Network packet filtering (replaces ipchains) IP: Netfilter Configuration ---> . <M> Userspace queueing via NETLINK (EXPERIMENTAL) <M> IP tables support (required for filtering/masq/NAT) <M> limit match support <M> MAC address match support <M> netfilter MARK match support <M> Multiple port match support
<M> TOS match support <M> Connection state match support <M> Unclean match support (EXPERIMENTAL) <M> Owner match support (EXPERIMENTAL) <M> Packet filtering <M> REJECT target support <M> MIRROR target support (EXPERIMENTAL) . <M> Packet mangling <M> TOS target support <M> MARK target support <M> LOG target support <M> ipchains (2.2-style) support <M> ipfwadm (2.0-style) support
7.6.1. Loading the Kernel Module
Before you can use the iptables command, you must load the netfilter kernel module that providessupport for it. The easiest way to do this is to use the modprobe command as follows:
# modprobe ip_tables

7.6.2. Backward Compatibility with ipfwadm and ipchains
The remarkable flexibility of Linux netfilter is illustrated by its ability to emulate the ipfwadm andipchains interfaces. Emulation makes the initial transition to the new generation of firewall softwaremuch easier (although you'd want to rewrite your rules as iptables eventually).
The two netfilter kernel modules called ipfwadm.o and ipchains.o provide backward compatibility foripfwadm and ipchains. You may load only one of these modules at a time, and use one only if the
ip_tables.o module is not loaded. When the appropriate module is loaded, netfilter works exactly likethe former firewall implementation.
netfilter mimics the ipchains interface with the following commands:
# rmmod ip_tables # modprobe ipchains
# ipchains options

7.7. Using iptables
The iptables command is extensible through dynamically loaded libraries. It is included in thenetfilter source package available at http://www.netfilter.org/. It will also be included in any Linuxdistribution based on the 2.4 series kernels.
The iptables command is used to configure IP filtering and NAT (along with other packet-processingapplications, including accounting, logging, and mangling). To facilitate this, there are two tables ofrules called filter and nat. The filter table is assumed if you do not specify the -t option to override it.Five built-in chains are also provided. The INPUT and FORWARD chains are available for the filter table,the PREROUTING and POSTROUTING chains are available for the nat table, and the OUTPUT chain is
available for both tables. In this chapter we'll discuss only the filter table. We'll look at the nat tablein Chapter 9.
The general syntax of most iptables commands is:
# iptables command rule-specification extensions
Now we'll take a look at some options in detail, after which we'll review some examples.
Most of the options for the iptables command can be grouped into subcommands and rule matchcriteria. Table 7-6 describes the other options.
Table 7-6. iptables miscellaneous options
Option Description
-c packets
bytes
When combined with the -A, -I, or -R subcommand, sets the packet counter to
packets and the byte counter to bytes for the new or modified rule.
--exact Synonym for -x.
-hDisplays information on iptables usage. If it appears after -m match or -j target,
then any additional help related to the extension match or target (respectively)
is also displayed.
--help Synonym for -h.
-j target
[options]
Determines what to do with packets matching this rule. The target can be the
name of a user-defined chain, one of the built-in targets, or an iptables extension(in which case there may be additional options).
--jump Synonym for -j.

Option Description
--line-numbers
When combined with the -L subcommand, displays numbers for the rules in eachchain, so you can refer to the rules by index when inserting rules into (via -I) ordeleting rules from (via -D) a chain. Be aware that the line numbering changes as
you add and remove rules in the chain.
-m match
[options]Invoke extended match, possibly with additional options.
--match Synonym for -m.
-M cmdUsed to load an iptables module (with new targets or match extensions) whenappending, inserting, or replacing rules.
--
modprobe=cmdSynonym for -M.
-n
Displays numeric addresses and ports, instead of looking up domain names forthe IP addresses and service names for the port numbers.
This can be especially useful if your DNS service is slow or down.
--numeric Synonym for -n.
--set-counters
Synonym for -c.
-t tablePerforms the specified subcommand on table. If this option is not used, thesubcommand operates on the filter table by default.
--table Synonym for -t.
-v Produces verbose output.
--verbose Synonym for -v.
-xDisplays exact numbers for packet and byte counters, rather than the defaultabbreviated format with metric suffixes (K, M, or G).
7.7.1. Getting Help
iptables provides some source of online help. You can get basic information via the folowingcommands:
iptables -h | --help
iptables -m match -h
iptables -j TARGET -hman iptables
Sometimes there are contradictions among these sources of information.

7.8. The iptables Subcommands
Each iptables command can contain one subcommand, which performs an operation on a particulartable (and, in some cases, chain). Table 7-7 lists the options that are used to specify thesubcommand.
The manpage for the iptables command in the 1.2.7a release shows a -Coption in the synopsis section, but there is no -C option to the iptables
command.
Table 7-7. iptables subcommand options
Option Description
-A chain rule Appends rule to chain.
--append Synonym for -A.
-D chain
[index | rule]Deletes the rule at position index or matching rule from chain.
--delete Synonym for -D.
--delete-chain Synonym for -X.
-E chain
newchainRenames chain to newchain.
-F [chain] Flushes (deletes) all rules from chain (or from all chains if no chain is given).
--flush Synonym for -F.
-I chain [index]
rule
Inserts rule into chain, at the front of the chain, or in front of the rule at
position index.
--insert Synonym for -I.
-L [chain] Lists the rules for chain (or for all chains if no chain is given).
--list Synonym for -L.
-N chain Creates a new user-defined chain.
--new-chain Synonym for -N. Commonly abbreviated --new.

Option Description
-P chain targetSets the default policy of the built-in chain to target. (applies to built-in
chains and targets only).
--policy Synonym for -P.
-R chain index
ruleReplaces the rule at position index of chain with the new rule.
--rename-chain Synonym for -E.
--replace Synonym for -R.
-V Displays the version of iptables.
--version Synonym for -V.
-X [chain] Deletes the user-defined chain, or all user-defined chains if none is given.
-Z chainZeros the packet and byte counters for chain (or for all chains if no chain is
given).
--zero Synonym for -Z.

7.9. Basic iptables Matches
iptables has a small number of built-in matches and targets and a set of extensions that are loadedif they are referenced. The matches for IP are considered built-in, and the others are consideredmatch extensions (even though the icmp, tcp and udp match extensions are automatically loadedwhen the corresponding protocols are referenced with the -p built-in IP match option).
Some options can have their senses inverted by using an optional exclamationpoint surrounded by spaces, immediately before the option. The options thatallow this are annotated with [!]. Only the non-inverted sense is described in
the sections that follow, since the inverted sense can be inferred from it.
7.9.1. Internet Protocol (IPv4) Matches
These built-in matches are available without a preceding -m argument to iptables. Table 7-8 shows
the layout of the fields in an Internet Protocol (IPv4) packet. These fields are the subjects of variousmatch and target extensions (including the set of built-in matches described in this section). Table 7-8 describes the options to this match.
Table 7-8. Internet Protocol match options
Option Description
-d [!]
addr[/mask]Destination address addr (or range, if mask is given).
--destination
Synonym for -d.
--dst Synonym for -d.
[!] -f
Second or further fragment of a packet that has undergone fragmentation.
Connection tracking does automatic defragmentation, so this option is not oftenuseful. If aren't using connection tracking, though, you can use it.
--fragmentsSynonym for -f. Commonly abbreviated (including in the iptables manpage) --fragment.
-i [!] inInput interface in (if in ends with +, any interface having a name that starts with
in will match).

Option Description
--in-interface
Synonym for -i.
-o [!] outInput interface out (if out ends with +,any interface having a name that starts
with out will match).
--out-interface
Synonym for -o.
-p [!] proto
Protocol name or number proto.
See Table 7-9 for a list of common protocol names and numbers. Your system's/etc/protocols file will be consulted to map official names (in a case-insensitivemanner) to numbers. The aliases in /etc/protocols are not available.
See also the official protocol list at http://www.iana.org/assignments/protocol-numbers.
-p protocol includes an implicit -m protocol when protocol is one of icmp, tcp,or udp.
--protocol Synonym for -p. Commonly abbreviated --proto.
-s [!]
addr[/mask]Source address addr (or range, if mask is given).
--source Synonym for -s.
--src Synonym for -s.
You can use the old-style dotted-quad notation for masks such as 192.168.1.0/255.255.255.0, orthe newer Common Inter-Domain Routing (CIDR) notation such as 192.168.1.0/24 (see RFC 1591,available online at http://www.rfc-editor.org/rfc/rfc1519.txt) for the address specifications of -s and-d.
Table 7-9. Common IP protocols
Name Number(s) Description
ALL 1, 6, 17 Equivalent to not specifying protocol at all
icmp 1 Internet Control Message Protocol
tcp 6 Transmission Control Protocol
udp 17 User Datagram Protocol
7.9.2. Ethernet Media Access Controller (MAC) Match

This match is based on the Media Access Controller (MAC) address of the source Ethernet interface.Table 7-10 describes the single option to this match.
This is actually not an IP match. Ethernet is at a lower level in the network architecture, but sincemany IP networks run over Ethernet, and the MAC information is available, this match extension isincluded anyway.
This match is available only if your kernel has been configured withCONFIG_IP_NF_MATCH_MAC enabled.
Table 7-10. MAC match options
Option Description
--mac-source [!]
mac
Match when the Ethernet frame source MAC field matches mac.
The format is: XX:XX:XX:XX:XX:XX, where each XX is replaced by two
hexadecimal digits.
Use this only with rules on the PREROUTING, FORWARD, or INPUT chains, and only for packets coming
from Ethernet devices.
For example, to allow only a single Ethernet device to communicate over an interface (such as aninterface connected to a wireless device):
iptables -A PREROUTING -i eth1 -m mac --mac-source ! 0d:bc:97:02:18:21 -j DROP
7.9.3. Internet Control Message Protocol Match
The Internet Control Message Protocol (ICMP) match extension is automatically loaded if -p icmp is
used. Table 7-11 describes the options to this match.
Table 7-11. ICMP match options
Option Description
--icmp-type [!] typename Matches ICMP type typename
--icmp-type [!] type[/code] Matches ICMP type and code given
You can find the official ICMP types and codes at the official database at

http://www.iana.org/assignments/icmp-parameters (per RFC 3232, "Assigned Numbers: RFC 1700 isReplaced by an On-line Database," available online at http://www.rfc-editor.org/rfc/rfc3232.txt).
7.9.4. User Datagram Protocol Match
The User Datagram Protocol (UDP) match extension is automatically loaded if -p udp is used. Table
7-12 describes the options to this match.
Table 7-12. UDP match options
Option Description
--destination-port [!]
port[:port]
Match when the UDP destination port number is equal to port (if only
one port is given) or in the inclusive range (if both ports are given).
Ports can be specified by name (from your system's /etc/services file)or number.
--dport Synonym for --destination-port.
--source-port [!]port[:port]
Match when the UDP source port is equal to port (if only one port is
given) or in the inclusive range (if both ports are given).
Ports can be specified by name (from your system's /etc/services file)or number.
--sport Synonym for --source-port.
7.9.5. Transmission Control Protocol Match
The Transmission Control Protocol (TCP) match extension is automatically loaded if -p tcp is used.
Table 7-13 describes the options to this match.
Table 7-13. TCP match options
Option Description
--destination-port
Synonym for --dport.

Option Description
--dport [!]
port[:port]
Match when the TCP destination port number is equal to port (if only one port
is given) or in the inclusive range (if both ports are given).
Ports can be specified by name (from your system's /etc/services file) ornumber.
--mss
value[:value]
Match SYN and ACK packets when the value of the TCP protocol MaximumSegment Size (MSS) field is equal to value (if only one value is given) or in
the inclusive range (if both values are given).
See also the tcpmss match extension.
--source-port Synonym for --sport.
--sport [!]port[:port]
Match when the TCP source port is equal to port (if only one port is given) or
in the inclusive range (if both ports are given).
Ports can be specified by name (from your system's /etc/services file) ornumber.
[!] --syn
Synonym for --tcp-flags SYN,RST,ACK SYN. Packets matching this are
called "SYN" packets.
This option can be used to construct rules to block incoming connections whilepermitting outgoing connections.
--tcp-flags
[!] mask comp
Check the mask flags, and match if only the comp flags are set.
The mask and comp arguments are comma-separated lists of flag names, orone of the two special values ALL and NONE.
--tcp-option[!]
numMatch if TCP option num is set.
7.9.6. A Naive Example
Let's suppose that we have a network in our organization and that we are using a Linux-basedfirewall host to allow our users to be able to access WWW (HTTP on port 80 only, not HTTPS on port443) servers on the Internet, but to allow no other traffic to be passed. The commands that followcould be used to set up a simple set of forwarding rules to implement this policy. Note, however, thatwhile this example is simple, the NAT and Masquerading solutions discussed in Chapter 9 are moreoften used for this type of application.
If our network has a 24-bit network mask (class C) and has an address of 172.16.1.0, then we'duse the following iptables rules:
# modprobe ip_tables# iptables -F FORWARD# iptables -P FORWARD DROP# iptables -A FORWARD -p tcp -s 0/0 --sport 80 \

-d 172.16.1.0/24 --syn -j DROP# iptables -A FORWARD -p tcp -s 172.16.1.0/24 \ --dport 80 -d 0/0 -j ACCEPT# iptables -A FORWARD -p tcp -d 172.16.1.0/24 \ --sport 80 -s 0/0 -j ACCEPT
Lines 1-3 install iptables into the running kernel, flush the FORWARD chain of the filter table (the
default table if no explicit table is mentioned in the iptables command's arguments), and sets thedefault policy for the FORWARD chain of the filter table to DROP.
Line 4 prevents Internet hosts establishing connection from to the internal network by dropping SYN
packets (but only if the source port is 80 since those are the only ones that would be let through bylater rules)
Line 5 allows all packets heading from the internal network to port 80 on any host to get out.
Line 6 allows all packets heading from port 80 on any host to hosts on the internal network through.

7.10. A Sample Firewall Configuration
We've discussed the fundamentals of firewall configuration. Let's now look at an easily customizablefirewall configuration. In this example, the network 172.16.1.0/24 is treated as if it were a publiclyroutable network, but it is actually a private, non-routable network. We are using such a non-routable network in this example because we have to use some network, and we don't want to put areal publicly routable network number here. The commands shown would work for a real class Cpublicly routable network.
#!/bin/bash########################################################################### This sample configuration is for a single host firewall configuration# with no services supported by the firewall host itself.############################################################################ USER CONFIGURABLE SECTION (Lists are comma-separated)## OURNET Internal network address space# OURBCAST Internal network broadcast address# OURDEV Internal network interface name## ANYADDR External network address space# EXTDEV External network interface name## TCPIN List of TCP ports to allow in (empty = all)# TCPOUT List of TCP ports to allow out (empty = all)## UDPIN List of TCP ports to allow in (empty = all)# UDPOUT List of TCP ports to allow out (empty = all)## LOGGING Set to 1 to turn logging on, else leave empty############################################################################ OURNET="172.29.16.0/24"OURBCAST="172.29.16.255"OURDEV="eth0" ANYADDR="0/0"EXTDEV="eth1" TCPIN="smtp,www"TCPOUT="smtp,www,ftp,ftp-data,irc" UDPIN="domain"UDPOUT="domain"

LOGGING= ############################################################################# IMPLEMENTATION############################################################################ ## Install the modules# modprobe ip_tablesmodprobe ip_conntrack # Means we won't have to deal with fragments ## Drop all packets destined for this host received from outside.# iptables -A INPUT -i $EXTDEV -j DROP ## Remove all rules on the FORWARD chain of the filter table, and set th# policy for that chain to DROP.# iptables -F FORWARD # Delete rulesiptables -P FORWARD DROP # Policy = DROPiptables -A FORWARD -s $OURNET -i $EXTDEV -j DROP # Anti-spoofiptables -A FORWARD -p icmp -i $EXTDEV -d $OURBCAST -j DROP # Anti-Smurf ## TCP - ESTABLISHED CONNECTIONS## We will accept all TCP packets belonging to an existing connection# (i.e. having the ACK bit set) for the TCP ports we're allowing through.# This should catch more than 95 % of all valid TCP packets.# iptables -A FORWARD -d $OURNET -p tcp --tcp-flags SYN,ACK ACK \ -m multiport --dports $TCPIN -j ACCEPT iptables -A FORWARD -s $OURNET -p tcp --tcp-flags SYN,ACK ACK \ -m multiport --sports $TCPIN -j ACCEPT ## TCP - NEW INCOMING CONNECTIONS## We will accept connection requests from the outside only on the# allowed TCP ports.#

iptables -A FORWARD -i $EXTDEV -d $OURNET -p tcp --syn \ -m multiport --sports $TCPIN -j ACCEPT ## TCP - NEW OUTGOING CONNECTIONS## We will accept all outgoing tcp connection requests on the allowed /# TCP ports.# iptables -A FORWARD -i $OURDEV -d $ANYADDR -p tcp --syn \ -m multiport --dports $TCPOUT -j ACCEPT ## UDP - INCOMING## We will allow UDP packets in on the allowed ports and back.# iptables -A FORWARD -i $EXTDEV -d $OURNET -p udp \ -m multiport --dports $UDPIN -j ACCEPT iptables -A FORWARD -i $EXTDEV -s $OURNET -p udp \ -m multiport --sports $UDPIN -j ACCEPT ## UDP - OUTGOING## We will allow UDP packets out to the allowed ports and back.# iptables -A FORWARD -i $OURDEV -d $ANYADDR -p udp \ -m multiport --dports $UDPOUT -j ACCEPT iptables -A FORWARD -i $OURDEV -s $ANYADDR -p udp \ -m multiport --sports $UDPOUT -j ACCEPT ## DEFAULT and LOGGING## All remaining packets fall through to the default# rule and are dropped. They will be logged if you've# configured the LOGGING variable above.# if [ "$LOGGING" ]then iptables -A FORWARD -p tcp -j LOG # Log barred TCP iptables -A FORWARD -p udp -j LOG # Log barred UDP iptables -A FORWARD -p icmp -j LOG # Log barred ICMPfi

In many simple situations, to use the sample, all you have to do is edit the top section of the filelabeled "USER CONFIGURABLE section" to specify which protocols and packets type you wish to allow
in and out. For more complex configurations, you will need to edit the section at the bottom as well.Remember, this is a simple example, so scrutinize it very carefully to ensure it does what you wantwhile implementing it.

7.11. References
There is enough material on firewall configuration and design to fill a whole book, and indeed hereare some good references that you might like to read to expand your knowledge on the subject:
Real World Linux Security, Second Edition
by Bob Toxen (Prentice Hall). A great book with broad coverage of many security topics,including firewalls.
Building Internet Firewalls, Second Edition
by E. Zwicky, S. Cooper, and D. Chapman (O'Reilly). A guide explaining how to design andinstall firewalls for Unix, Linux, and Windows NT, and how to configure Internet services towork with the firewalls.
Firewalls and Internet Security, Second Edition
by W. Cheswick, S. Bellovin, and A. Rubin (Addison Wesley). This book covers the philosophy offirewall design and implementation.
Practical Unix & Internet Security, Third Edition
by S. Garfinkel, G. Spafford, and A. Schwartz (O'Reilly). This book covers a wide variety ofsecurity topics for popular Unix variants (including Linux), such as forensics, intrusiondetection, firewalls, and more.
Linux Security Cookbook
by D. Barrett, R. Silverman, and R. Byrnes (O'Reilly). This book provides over 150 ready-to-use scripts and configuration files for important security tasks such as time-of-day networkaccess restrictions, web server firewalling, preventing IP spoofing, and much more.
Linux iptables Pocket Reference
by G. Purdy (O'Reilly). This book covers firewall concepts, Linux packet processing flows, and

contains a complete reference to the iptables command, including an encyclopedic referenceto match and target extensions, that you can use for advanced applications.

Chapter 8. IP AccountingIn today's world of commercial Internet service, it is becoming increasingly important to know howmuch data you are transmitting and receiving on your network connections. If you are an InternetService Provider and you charge your customers by volume, this will be essential to your business. Ifyou are a customer of an Internet Service Provider that charges by data volume, you will find ituseful to collect your own data to ensure the accuracy of your Internet charges.
There are other uses for network accounting that have nothing to do with dollars and bills. If youmanage a server that offers a number of different types of network services, it might be useful to youto know exactly how much data is being generated by each one. This sort of information could assistyou in making decisions, such as what hardware to buy or how many servers to run.
The Linux kernel provides a facility that allows you to collect all sorts of useful information about thenetwork traffic it sees. This facility is called IP accounting.

8.1. Configuring the Kernel for IP Accounting
The Linux IP accounting feature is very closely related to the Linux firewall software. The places youwant to collect accounting data are the same places that you would be interested in performingfirewall filtering: into and out of a network host and in the software that does the routing of packets.If you haven't read the section on firewalls, now is probably a good time to do so, as we will be usingsome of the concepts described in Chapter 7.

8.2. Configuring IP Accounting
Because IP accounting is closely related to IP firewall, the same tool was designated to configure it,so the iptables command is used to configure IP accounting. The command syntax is very similar tothat of the firewall rules, so we won't focus on it, but we will discuss what you can discover about thenature of your network traffic using this feature.
The general command syntax is:
# iptables -A chain rule-specification
The iptables command allows you to specify direction in a manner consistent with the firewall rules.
The commands are much the same as firewall rules, except that the policy rules do not apply here.We can add, insert, delete, and list accounting rules. In the case of ipchains and iptables, all validrules are accounting rules, and any command that doesn't specify the -j option performs accounting
only.
The rule specification parameters for IP accounting are the same as those used for IP firewalls. Theseare what we use to define precisely what network traffic we wish to count and total.
8.2.1. Accounting by Address
Let's work with an example to illustrate how we'd use IP accounting.
Imagine we have a Linux-based router that serves two departments at the Virtual Brewery. Therouter has two Ethernet devices, eth0 and etH1, each of which services a department; and a PPPdevice, ppp0, that connects us via a high-speed serial link to the main campus of the Groucho Marx
University.
Let's also imagine that for billing purposes that we want to know the total traffic generated by eachof the departments across the serial link, and for management purposes we want to know the totaltraffic generated between the two departments.
Table 8-1 shows the interface addresses we will use in our example:
Table 8-1. Interfaces and their addresses
Interface Address Netmask
eth0 172.16.3.0 255.255.255.0
To answer the question, "How much data does each department generate on the PPP link?", we coulduse a rule that looks like this:

Interface Address Netmask
eth1 172.16.4.0 255.255.255.0
To answer the question, "How much data does each department generate on the PPP link?", we coulduse a rule that looks like this:
# iptables -A FORWARD -i ppp0 -d 172.16.3.0/24# iptables -A FORWARD -o ppp0 -s 172.16.3.0/24# iptables -A FORWARD -i ppp0 -d 172.16.4.0/24# iptables -A FORWARD -o ppp0 -s 172.16.4.0/24
The first two rules say, "Count all data traveling in either direction across the interface named ppp0
with a source or destination address of 172.16.3.0/24." The second set of two rules do the samething, but for the second Ethernet network at our site.
To answer the second question, "How much data travels between the two departments?", we need arule that looks like this:
# iptables -A FORWARD -s 172.16.3.0/24 -d 172.16.4.0/24# iptables -A FORWARD -s 172.16.4.0/24 -d 172.16.3.0/24
These rules will count all packets with a source address belonging to one of the department networksand a destination address belonging to the other.
8.2.2. Accounting by Service Port
Okay, let's suppose we also want a better idea of exactly what sort of traffic is being carried acrossour PPP link. We might, for example, want to know how much of the link the FTP, SMTP, and WorldWide Web (HTTP) services are consuming.
A script of rules to enable us to collect this information might look like this:
#!/bin/sh# Collect ftp, smtp and www volume statistics for data carried on our# PPP link using iptables.#iptables -A FORWARD -i ppp0 -p tcp --sport 20:21iptables -A FORWARD -o ppp0 -p tcp --dport 20:21iptables -A FORWARD -i ppp0 -p tcp --sport smtpiptables -A FORWARD -o ppp0 -p tcp --dport smtpiptables -A FORWARD -i ppp0 -p tcp --sport wwwiptables -A FORWARD -o ppp0 -p tcp --dport www
There are a couple of interesting features to this configuration. First, we've specified the protocol.When we specify ports in our rules, we must also specify a protocol because TCP and UDP provide

separate sets of ports. Since all of these services are TCP based, we've specified it as the protocol.Second, we've specified the two services ftp and ftp-data in one command. The iptables
command allows either single ports or ranges of ports, which is what we've used here. The syntax"20:21" means "ports 20 (ftp-data) through 21 (ftp)," and is how we encode ranges of ports iniptables (the tcp match extension allow you to use port names in range specifications, but themultiport match extension does notand you are better off using numbers for ranges anyway so you
don't accidentally include more ports than you intend). When you have a list of ports in an accountingrule, it means that any data received for any of the ports in the list will cause the data to be added tothat entry's totals. Remembering that the FTP service uses two ports, the command port and thedata transfer port; we've added them together to total the FTP traffic.
We can expand on the second point a little to give us a different view of the data on our link. Let'snow imagine that we class FTP, SMTP, and World Wide Web (HTTP) traffic as essential traffic, and allother traffic as nonessential. If we were interested in seeing the ratio of essential traffic tononessential traffic, we could do something like this:
# iptables -A FORWARD -i ppp0 -p tcp -m multiport \ --sports ftp-data,ftp,smtp,www -j ACCEPT# iptables -A FORWARD -j ACCEPT
The first rule would count our essential traffic while the second one would count everything else.
Alternatively, we can use user-defined chains (this would be useful if the rules for determiningessential traffic were more complex):
# iptables -N a-essent# iptables -N a-noness# iptables -A a-essent -j ACCEPT# iptables -A a-noness -j ACCEPT# iptables -A FORWARD -i ppp0 -p tcp -m multiport \ --sports ftp-data,ftp,smtp,www -j a-essent# iptables -A FORWARD -j a-noness
Here we create two user-defined chainsone called a-essent, where we capture accounting data foressential services, and another called a-noness, where we capture accounting data for nonessential
services. We then add rules to our forward chain that match our essential services and jump to thea-essent chain, where we have just one rule that accepts all packets and counts them. The last rulein our forward chain is a rule that jumps to our a-noness chain, where again we have just one rulethat accepts all packets and counts them. The rule that jumps to the a-noness chain will not be
reached by any of our essential services, as they will have been accepted in their own chain. Ourtallies for essential and nonessential services will therefore be available in the rules within thosechains. This is just one approach you could take; there are others.
This looks simple enough. Unfortunately, there is a small but unavoidable problem when trying to doaccounting by service type. You will remember that we discussed the role the MTU plays in TCP/IPnetworking in an earlier chapter. The MTU defines the largest packet that will be transmitted on anetwork device. When a packet is received by a router that is larger than the MTU of the interfacethat needs to retransmit it, the router performs a trick called fragmentation. The router breaks thelarge packet into small pieces no longer than the MTU of the interface and then transmits thesepieces. The router builds new headers to put in front of each of these pieces, and these are what the

remote host uses to reconstruct the original data. Unfortunately, during the fragmentation process,the port is lost for all but the first fragment. This means that the IP accounting can't properly countfragmented packets. It can reliably count only the first fragment or unfragmented packets. To ensurethat we capture the second and later fragments, we could use a rule like this:
# iptables -A FORWARD -i ppp0 -m tcp -p tcp -f
These won't tell us what the original port for this data was, but at least we are able to see how muchof our data is fragments and account for the volume of traffic they consume.
Connection tracking does automatic defragmenting, so this technique won'toften be useful. But if you aren't doing connection tracking, you can use it.
8.2.3. Accounting of ICMP Packets
The ICMP protocol does not use service port numbers and is therefore a little bit more difficult tocollect details on. ICMP uses a number of different types of packets. Many of these are harmless andnormal, while others should only be seen under special circumstances. Sometimes people with toomuch time on their hands attempt to maliciously disrupt the network access of a user by generatinglarge numbers of ICMP messages. This is commonly called ping flooding (the generic term for thistype of denial of service attack is packet flooding, but ping flooding is a common one). While IPaccounting cannot do anything to prevent this problem (IP firewalling can help, though!), we can atleast put accounting rules in place that will show us if anybody has been trying.
ICMP doesn't use ports as TCP and UDP do. Instead ICMP has ICMP message types. We can buildrules to account for each ICMP message type. We place the ICMP message and type number in placeof the port field in the accounting commands.
An IP accounting rule to collect information about the volume of ping data that is being sent to you orthat you are generating might look like this:
# iptables -A FORWARD -m icmp -p icmp --sports echo-request# iptables -A FORWARD -m icmp -p icmp --sports echo-reply# iptables -A FORWARD -m icmp -p icmp -f
The first rule collects information about the "ICMP Echo Request" packets (ping requests), and thesecond rule collects information about the "ICMP Echo Reply" packets (ping replies). The third rulecollects information about ICMP packet fragments. This is a trick similar to that described forfragmented TCP and UDP packets.
If you specify source and/or destination addresses in your rules, you can keep track of where thepings are coming from, such as whether they originate inside or outside your network. Once you'vedetermined where the rogue packets are coming from, you can decide whether you want to putfirewall rules in place to prevent them or take some other action, such as contacting the owner of theoffending network to advise them of the problem, or perhaps even taking legal action if the problemis a malicious act.

8.2.4. Accounting by Protocol
Let's now imagine that we are interested in knowing how much of the traffic on our link is TCP, UDP,and ICMP. We would use rules like the following:
# iptables -A FORWARD -i ppp0 -m tcp -p tcp# iptables -A FORWARD -o ppp0 -m tcp -p tcp# iptables -A FORWARD -i ppp0 -m udp -p udp# iptables -A FORWARD -o ppp0 -m udp -p udp# iptables -A FORWARD -i ppp0 -m icmp -p icmp# iptables -A FORWARD -o ppp0 -m icmp -p icmp
With these rules in place, all of the traffic flowing across the ppp0 interface will be analyzed to
determine whether it is TCP, UDP, or ICMP traffic, and the appropriate counters will be updated foreach.

8.3. Using IP Accounting Results
It is all very well to be collecting this information, but how do we actually get to see it? To view thecollected accounting data and the configured accounting rules, we use our firewall configurationcommands, asking them to list our rules. The packet and byte counters for each of our rules arelisted in the output.
8.3.1. Listing Accounting Data
The iptables command behaves very similarly to the ipchains command. Again, we must use the -v
when listing tour rules to see the accounting counters. To list our accounting data, we would use:
# iptables -L -v
Just as for the ipchains command, you can use the -x argument to show the output in expanded
format with unit figures.

8.4. Resetting the Counters
The IP accounting counters will overflow if you leave them long enough. If they overflow, you willhave difficulty determining the value they actually represent. To avoid this problem, you should readthe accounting data periodically, record it, and then reset the counters back to zero to begincollecting accounting information for the next accounting interval.
The iptables command provides you with a simple means of doing this:
# iptables -Z
You can even combine the list and zeroing actions together to ensure that no accounting data is lostin between:
# iptables -L -Z -v
This command will first list the accounting data and then immediately zero the counters and begincounting again. If you are interested in collecting and using this information regularly, you wouldprobably want to put this command into a script that recorded the output and stored it somewhere,and execute the script periodically using the cron command.

8.5. Flushing the Rule Set
One last command that might be useful allows you to flush all the IP accounting rules that you haveconfigured. This is most useful when you want to radically alter your rule set without rebooting thehost.
The iptables command supports the -F argument, which flushes all the rules of the type you specify:
# iptables -F
This flushes all of your configured rules (not just your accounting rules), removing them all andsaving you having to remove each of them individually.

8.6. Passive Collection of Accounting Data
One last trick you might like to consider: if your Linux host is connected to an Ethernet, you canapply accounting rules to all of the data from the segment, not only that which it is transmitted by ordestined for it. Your host will passively listen to all of the data on the segment and count it.
You should first turn IP forwarding off on your Linux host so that it doesn't try to route the packets itreceives.[1] You can do so by running this command:
[1] This isn't a good thing to do if your Linux machine serves as a router. If you disable IP forwarding, it will cease to route! Do this
only on a machine with a single physical network interface.
# echo 0 >/proc/sys/net/ipv4/ip_forward
You should then enable promiscuous mode on your Ethernet interface using the ifconfig command.Enabling promiscuous mode for an Ethernet device causes it to deliver all packets to the operatingsystem rather than only those with its Ethernet address as the destination. This is only relevant if thedevice is connected to a broadcast medium (such as unswitched Ethernet). For example, to enablepromiscuous mode on interface etH1:
# ifconfig eth1 promisc
Now you can establish accounting rules that allow you to collect information about the packetsflowing across your Ethernet without involving your Linux accounting host in the route at all.

Chapter 9. IP Masquerade and NetworkAddress TranslationYou don't have to have a good memory to remember a time when only large organizations couldafford to have a number of computers networked together by a LAN. Today network technology hasdropped so much in price that two things have happened. First, LANs are now commonplace, even inmany household environments. Certainly many Linux users will have two or more computersconnected by some Ethernet. Second, network resources, particularly IP addresses, are now a scarceresource, and while they used to be free, they are now being bought and sold.
Most people with a LAN will probably also want an Internet connection that every computer on theLAN can use. The IP routing rules are strict in how they deal with this situation. Traditional solutionsto this problem would have involved requesting an IP network address, perhaps a class C address forsmall sites, assigning each host on the LAN an address from this network and using a router toconnect the LAN to the Internet.
In a commercialized Internet environment, this is an expensive proposition. First, you'd be requiredto pay for the network addresses that are assigned to you. Second, you'd probably have to pay yourInternet Service Provider for the privilege of having a suitable route to your network put in place sothat the rest of the Internet knows how to reach you. This might still be practical for companies, butdomestic installations don't usually justify the cost.
Fortunately, Linux provides an answer to this dilemma. This answer involves a component of a groupof advanced networking features called Network Address Translation (NAT). NAT describes theprocess of modifying the network addresses (and sometimes port numbers) contained with packetheaders while they are in transit. This might sound odd at first, but we'll show that it is ideal forsolving the problem we've just described. IP masquerading is the name given to one type of networkaddress translation that allows all of the hosts on a private network to use the Internet at the price ofa single dynamic IP address. When the single address is statically assigned, the same functionalitygoes by the name SNAT (Source NAT). We'll refer to both of these as "masquerading" in whatfollows.
IP masquerading allows you to use private (non-routable) IP network addresses for your hosts onyour LAN and have your Linux-based router perform some clever, real-time translation of IPaddresses and ports. When it receives a packet from a computer on the LAN, it takes note of the typeof packet it is, (such as TCP, UDP or ICMP) and modifies the packet so that it looks like it wasgenerated by the router host itself (and remembers that it has done so). It then transmits the packetonto the Internet with its single connection IP address. When the destination host receives thispacket, it believes the packet has come from the routing host and sends any reply packets back tothat address. When the Linux masquerade router receives a packet from its Internet connection, itlooks in its table of established masqueraded connections to see if this packet actually belongs to acomputer on the LAN, and if it does, it reverses the modification it did on the forward path andtransmits the packet to the LAN computer. A simple example is illustrated in Figure 9-1.

Figure 9-1. A typical IP masquerade configuration
We have a small Ethernet network using one of the reserved network addresses. The network has aLinux-based masquerade router providing access to the Internet. One of the workstations on thenetwork (192.168.1.3) wishes to establish a connection to the remote host 209.1.106.178. Theworkstation routes its packet to the masquerade router, which identifies this connection request asrequiring masquerade services. It accepts the packet and allocates a port number to use (1035),substitutes its own IP address and port number for those of the originating host, and transmits thepacket to the destination host. The destination host believes it has received a connection requestfrom the Linux masquerade host and generates a reply packet. The masquerade host, on receivingthis packet, finds the association in its masquerade table and reverses the substitution it performedon the outgoing packet. It then transmits the reply packet to the originating host.
The local host believes it is speaking directly to the remote host. The remote host knows nothingabout the local host at all and believes it has received a connection from the Linux masquerade host.The Linux masquerade host knows these two hosts are speaking to each other, and on what ports,and performs the address and port translations necessary to allow communication.
This might all seem a little confusing, and it can be, but it works and is actually simple to configure.So don't worry if you don't understand all the details yet.

9.1. Side Effects and Fringe Benefits
The IP masquerade facility comes with its own set of side effects, some of which are useful and someof which might become bothersome.
None of the hosts on the supported network behind the masquerade router are ever directly seen;consequently, you need only one valid and routable IP address to allow all hosts to make networkconnections out onto the Internet. This has a downside: none of those hosts are visible from theInternet and you can't directly connect to them from the Internet; the only host visible on amasqueraded network is the masquerade host itself. This is important when you consider servicessuch as mail or FTP. It helps determine what services should be provided by the masquerade hostand what services it should proxy or otherwise treat specially.
However, you can use DNAT (Destination NAT) on the router to route inbound connections to certainports to internal servers. This works great for web and mail servers. You can run those services onhosts on the private network, and use DNAT to forward inbound connections to port 80 and port 25to the appropriate internal servers. This way, the router host is only involved in routing, not inproviding any externally visible services. You can use the same technique to route incomingconnections to a high-numbered port (say, 4022) to the Secure Shell (SSH) port (usually 22) on aninternal host so you can SSH directly into one of your internal hosts through the router.
Because none of the masqueraded hosts are visible, they are relatively protected from attacks fromoutside. You can have one host serve as your firewall and masquerading router. Your whole networkwill be only as safe as your masquerade host, so you should use firewall rules to protect it and youshould not run any other externally visible services on it.
IP masquerade will have some impact on the performance of your networking. In typicalconfigurations this will probably be barely measurable. If you have large numbers of activemasquerade sessions, though, you may find that the processing required at the masquerade hostbegins to impact your network throughput. IP masquerade must do a good deal of work for eachpacket compared to the process of conventional routing. That low-end host you have been planningon using as a masquerade host supporting a personal link to the Internet might be fine, but don'texpect too much if you decide you want to use it as a router in your corporate network at Ethernetspeeds.
Finally, some network services just won't work through masquerade, or at least not without a lot ofhelp. Typically, these are services that rely on incoming sessions to work, such as some types ofDirect Communications Channels (DCC), features in IRC, or certain types of video and audiomulticasting services. Some of these services have specially developed "helper" kernel modules toprovide solutions for these, and we'll talk about those in a moment. For others, it is possible that youwill find no support, so be awareit won't be suitable in all situations.

9.2. Configuring the Kernel for IP Masquerade
To use the IP masquerade facility, your kernel must be compiled with network packet filteringsupport. You must select the following options when configuring the kernel:
Networking options --->
[M] Network packet filtering (replaces ipchains)
The netfilter package includes modules that help perform masquerading functions. For example, toprovide connection tracking of FTP sessions, you'd load and use the ip_conntrack_ftp andip_nat_ftp.o modules. This connection tracking support is required for masquerading to workcorrectly with protocols that involve multiple connections for one logical session, since masqueradingrelies on connection tracking.

9.3. Configuring IP Masquerade
If you've already read the firewall and accounting chapters, it probably comes as no surprise that theiptables command is used to configure the IP masquerade rules as well.
Masquerading is a special type of packet mangling (the technical term for modifying packets). Youcan masquerade only packets that are received on one interface that will be routed to anotherinterface. To configure a masquerade rule, construct a rule very similar to a firewall forwarding rule,but with special options that tell the kernel to masquerade the packet. The iptables command uses -jMASQUERADE to indicate that packets matching the rule specification should be masqueraded (this isfor a dynamic IP address; if you have a static IP address, use -j SNAT instead).
Let's look at an example. A computing science student at Groucho Marx University has a number ofcomputers at home on a small Ethernet-based LAN. She has chosen to use one of the reservedprivate Internet network addresses for her network. She shares her accommodation with otherstudents, all of whom have an interest in using the Internet. Because the students' finances are verytight, they cannot afford to use a permanent Internet connection, so instead they use a singleInternet connection. They would all like to be able to share the connection to chat on IRC, surf theWeb, and retrieve files by FTP directly to each of their computersIP masquerade is the answer.
The student first configures a Linux host to support the Internet link and to act as a router for theLAN. The IP address she is assigned when she dials up isn't important. She configures the Linuxrouter with IP masquerade and uses one of the private network addresses for her LAN:192.168.1.0. She ensures that each of the hosts on the LAN has a default route pointing at theLinux router.
The following iptables commands are all that are required to make masquerading work in herconfiguration:
# iptables -t nat -P POSTROUTING DROP# iptables -t nat -A POSTROUTING -o ppp0 -j MASQUERADE
Now whenever any of the LAN hosts try to connect to a service on a remote host, their packets willbe automatically masqueraded by the Linux masquerade router. The first rule in each exampleprevents the Linux host from routing any other packets and also adds some security.
To list the masquerade rules you have created, use the -L argument to the iptables command, as we
described earlier while discussing firewalls:
# iptables -t nat -LChain PREROUTING (policy ACCEPT)target prot opt source destination Chain POSTROUTING (policy DROP)target prot opt source destination MASQUERADE all -- anywhere anywhere MASQUERADE

Chain OUTPUT (policy ACCEPT)target prot opt source destination
Masquerade rules appear with a target of MASQUERADE.

9.4. Handling Nameserver Lookups
Handling domain nameserver lookups from the hosts on the LAN with IP masquerading has alwayspresented a problem. There are two ways of accommodating DNS in a masquerade environment. Youcan tell each of the hosts to use the same DNS that the Linux router host does, and let IPmasquerade do its magic on their DNS requests. Alternatively, you can run a caching nameserver onthe Linux host and have each of the hosts on the LAN use the Linux host as their DNS. Although amore aggressive action, this is probably the better option because it reduces the volume of DNStraffic traveling on the Internet link and will be marginally faster for most requests, since they'll beserved from the cache. The downside to this configuration is that it is more complex. The Section5.2.6 in Chapter 5 describes how to configure a caching nameserver.

9.5. More About Network Address Translation
The netfilter software is capable of many different types of NAT. IP masquerade is one simpleapplication of it.
It is possible, for example, to build NAT rules that translate only certain addresses or ranges ofaddresses and leave all others untouched, or to translate addresses into pools of addresses ratherthan just a single address, as masquerade does. You can in fact use the iptables command togenerate NAT rules that map just about anything, with combinations of matches using any of thestandard attributes, such as source address, destination address, protocol type, port number, etc.
Translating the source address of a packet is referred to as Source NAT, or SNAT, in iptables.Translating the destination address of a packet is known as Destination NAT, or DNAT. SNAT and DNAT
are targets that you may use with the iptables command to build more sophisticated rules.

Chapter 10. Important Network FeaturesAfter successfully setting up IP and the resolver (DNS), you then must look at the services you wantto provide over the network. This chapter covers the configuration of a few simple networkapplications, including the inetd and xinetd servers and the programs from the rlogin family. We'llalso deal briefly with the Remote Procedure Call interface, upon which services like the Network FileSystem (NFS) are based. The configuration of NFS, however, is more complex and is not described inthis book.
Of course, we can't cover all network applications in this book. If you want to install one that's notdiscussed here, please refer to the manual pages of the server for details.

10.1. The inetd Super Server
Programs that provide application services via the network are called network daemons. A daemon isa program that opens a port, most commonly a well-known service port, and waits for incomingconnections on it. If one occurs, the daemon creates a child process that accepts the connection,while the parent continues to listen for further requests. This mechanism works well but has a fewdisadvantages; at least one instance of every possible service that you wish to provide must beactive in memory at all times. In addition, the software routines that do the listening and porthandling must be replicated in every network daemon.
To overcome these inefficiencies, most Unix installations run a special network daemon, what youmight consider a "super server." This daemon creates sockets on behalf of a number of services andlistens on all of them simultaneously. When an incoming connection is received on any of thesesockets, the super server accepts the connection and spawns the server specified for this port,passing the socket across to the child to manage. The server then returns to listening.
The most common super server is called inetd, the Internet Daemon. It is started at system boottime and takes the list of services it is to manage from a startup file named /etc/inetd.conf. Inaddition to those servers, there are a number of trivial services performed by inetd itself calledinternal services. They include chargen, which simply generates a string of characters, and daytime,which returns the system's idea of the time of day.
An entry in this file consists of a single line made up of the following fields:
service type protocol wait user server cmdline
Each of the fields is described in the following list:
service
Gives the service name. The service name has to be translated to a port number by looking itup in the /etc/services file. This file will be described later in this chapter in Section 10.4 laterin this chapter.
type
Specifies a socket type, either stream (for connection-oriented protocols) or dgram (fordatagram protocols). TCP-based services should therefore always use stream, while UDP-basedservices should always use dgram.

protocol
Names the transport protocol used by the service. This must be a valid protocol name found inthe protocols file, explained later.
wait
This option applies only to dgram sockets. It can be either wait or nowait. If wait is specified,
inetd executes only one server for the specified port at any time. Otherwise, it immediatelycontinues to listen on the port after executing the server.
This is useful for "single-threaded" servers that read all incoming datagrams until no morearrive, and then exit. Most RPC servers are of this type and should therefore specify wait. The
opposite type, "multithreaded" servers, allows an unlimited number of instances to runconcurrently. These servers should specify nowait.
stream sockets should always use nowait.
user
This is the login ID of the user who will own the process when it is executing. This willfrequently be the root user, but some services may use different accounts. It is a very goodidea to apply the principle of least privilege here, which states that you shouldn't run acommand under a privileged account if the program doesn't require this for proper functioning.For example, the NNTP news server runs as news, while services that may pose a security risk(such as tftp or finger) are often run as nobody.
server
Gives the full pathname of the server program to be executed. Internal services are marked bythe keyword internal.
cmdline
This is the command line to be passed to the server. It starts with the name of the server to beexecuted and can include any arguments that need to be passed to it. If you are using the TCPwrapper, you specify the full pathname to the server here. If not, then you just specify theserver name as you'd like it to appear in a process list. We'll talk about the TCP wrappershortly.
This field is empty for internal services.
A sample inetd.conf file is shown in Example 10-1. The finger service is commented out so that it isnot available. This is often done for security reasons because it can be used by attackers to obtainnames and other details of users on your system.

Example 10-1. A sample /etc/inetd.conf file
# # inetd servicesftp stream tcp nowait root /usr/sbin/ftpd in.ftpd -ltelnet stream tcp nowait root /usr/sbin/telnetd in.telnetd -b/etc/issue#finger stream tcp nowait bin /usr/sbin/fingerd in.fingerd#tftp dgram udp wait nobody /usr/sbin/tftpd in.tftpd#tftp dgram udp wait nobody /usr/sbin/tftpd in.tftpd /boot/diskless#login stream tcp nowait root /usr/sbin/rlogind in.rlogind#shell stream tcp nowait root /usr/sbin/rshd in.rshd#exec stream tcp nowait root /usr/sbin/rexecd in.rexecd## inetd internal services#daytime stream tcp nowait root internaldaytime dgram udp nowait root internaltime stream tcp nowait root internaltime dgram udp nowait root internalecho stream tcp nowait root internalecho dgram udp nowait root internaldiscard stream tcp nowait root internaldiscard dgram udp nowait root internalchargen stream tcp nowait root internalchargen dgram udp nowait root internal
The tftp daemon is shown commented out as well. tftp implements the Trivial File Transfer Protocol(TFTP), which allows someone to transfer any world-readable files from your system withoutpassword checking. This is especially harmful with the /etc/passwd file, and even more so when youdon't use shadow passwords.
tftp is commonly used by diskless clients and X terminals to download their code from a boot server.If you need to run the tftpd daemon for this reason, make sure to limit its scope to those directoriesfrom which clients will retrieve files; you will need to add those directory names to tftpd's commandline. This is shown in the second tftp line in the example.

10.2. The tcpd Access Control Facility
Since opening a computer to network access involves many security risks, applications are designedto guard against several types of attacks. Some security features, however, may be flawed (mostdrastically demonstrated by the RTM Internet worm, which exploited a hole in a number of programs,including old versions of the sendmail mail daemon), or do not distinguish between secure hosts fromwhich requests for a particular service will be accepted and insecure hosts whose requests should berejected. We've already briefly discussed the finger and tftp services. A network administrator wouldwant to limit access to these services to "trusted hosts" only, which is impossible with the usualsetup, for which inetd provides this service either to all clients or not at all.
A useful tool for managing host-specific access is tcpd, often called the daemon "wrapper." For TCPservices you want to monitor or protect, it is invoked instead of the server program. tcpd checkswhether the remote host is allowed to use that service, and only if this succeeds will it execute thereal server program. tcpd also logs the request to the syslog daemon. Note that this does not workwith UDP-based services.
For example, to wrap the finger daemon, you have to change the corresponding line in inetd.conffrom this:
# unwrapped finger daemonfinger stream tcp nowait bin /usr/sbin/fingerd in.fingerd
to this:
# wrap finger daemonfinger stream tcp nowait root /usr/sbin/tcpd in.fingerd
Without adding any access control, this will appear to the client as the usual finger setup, except thatany requests are logged to syslog's auth facility.
Two files called /etc/hosts.allow and /etc/hosts.deny implement access control. They contain entriesthat allow and deny access to certain services and hosts. When tcpd handles a request for a servicesuch as finger from a client host named biff.foobar.com, it scans hosts.allow and hosts.deny (in thisorder) for an entry matching both the service and client host. If a matching entry is found inhosts.allow, access is granted and tcpd doesn't consult the hosts.deny file. If no match is found in thehosts.allow file, but a match is found in hosts.deny, the request is rejected by closing down theconnection. The request is accepted if no match is found at all.
Entries in the access files look like this:
servicelist: hostlist [:shellcmd]
servicelist is a list of service names from /etc/services, or the keyword ALL. To match all services

except finger and tftp, use ALL EXCEPT finger, tftp.
hostlist is a list of hostnames, IP addresses, or the keywords ALL, LOCAL, UNKNOWN, or PARANOID.ALL matches any host, while LOCAL matches hostnames that don't contain a dot.[1] UNKNOWN matchesany hosts whose name or address lookup failed. PARANOID matches any host whose hostname does
not resolve back to its IP address.[2] A name starting with a dot matches all hosts whose domain isequal to this name. For example, .foobar.com matches biff.foobar.com, but notnurks.fredsville.com. A pattern that ends with a dot matches any host whose IP address beginswith the supplied pattern, so 172.16. matches 172.16.32.0, but not 172.15.9.1. A pattern of theform n.n.n.n/m.m.m.m is treated as an IP address and network mask, so we could specify our
previous example as 172.16.0.0/255.255.0.0 instead. Lastly, any pattern beginning with a "/"character allows you to specify a file that is presumed to contain a list of hostname or IP addresspatterns, any of which are allowed to match. So a pattern that looked like /var/access/trustedhostswould cause the tcpd daemon to read that file, testing if any of the lines in it matched the connectinghost.
[1] Usually only local hostnames obtained from lookups in /etc/hosts contain no dots.
[2] While its name suggests it is an extreme measure, the PARANOID keyword is a good default, as it protects you against
mailicious hosts pretending to be someone they are not. Not all tcpd are supplied with PARANOID compiled in; if yours is not,
you need to recompile tcpd to use it.
To deny access to the finger and tftp services to all but the local hosts, put the following in/etc/hosts.deny and leave /etc/hosts.allow empty:
in.tftpd, in.fingerd: ALL EXCEPT LOCAL, .your.domain
The optional shellcmd field may contain a shell command to be invoked when the entry is matched.
This is useful to set up traps that may expose potential attackers. The following example creates alogfile listing the user and host connecting, and if the host is not vlager.vbrew.com, it will appendthe output of a finger to that host:
in.ftpd: ALL EXCEPT LOCAL, .vbrew.com : \ echo "request from %d@%h: >> /var/log/finger.log; \ if [ %h != "vlager.vbrew.com:" ]; then \ finger -l @%h >> /var/log/finger.log \ fi
The %h and %d arguments are expanded by tcpd to the client hostname and service name,
respectively. Please refer to the hosts_access(5) manpage for details.

10.3. The xinetd Alternative
An alternative to the standard inetd has emerged and is now widely accepted. It is considered a moresecure and robust program, and provides protection against some DoS attacks used against inetd.The number of features offered by xinetd also makes it a more appealing alternative. Here is a brieflist of features:
Provides full-featured access control and logging
Limits to the number of servers run at a single time
Offers granular service-binding -services, which can be bound to specific IP addresses
xinetd is now a standard part of most Linux distributions, but if you need to find the latest sourcecode or information, check the main distribution web site http://www.xinetd.org. If you arecompiling, and use IPv6, you should make certain that you use the --with-inet6 option.
The configuration of xinetd is somewhat different, but not more complex than inetd. Rather thanforcing one master configuration file for all services, xinetd can be configured to use a masterconfiguration file, /etc/xinetd.conf, and separate configuration files for each additional serviceconfigured. This, aside from simplifying configuration, allows for more granular configuration of eachservice, leading to xinetd's greater flexibility.
The first file you'll need to configure is /etc/xinetd.conf. A sample file looks like this:
# Sample configuration file for xinetd defaults{ only_from = localhost instances = 60 log_type = SYSLOG authpriv info log_on_success = HOST PID log_on_failure = HOST cps = 25 30} includedir /etc/xinetd.d
There are a number of options that can be configured, the options used above are:
only_from

This specifies the IP addresses or hostnames from which you allow connections. In thisexample, we've restricted connections to the loopback interface only.
instances
This sets the total number of servers that xinetd will run. Having this set to a reasonablenumber can help prevent malicious users from carrying out a DoS attack against your machine.
log_type SYSLOG|FILE
This option allows you to set the type of logging you're planning to use. There are two options,syslog or file. The first, syslog, will send all log information to the system log. The file
directive will send logs to a file you specify. For a list of the additional options under each ofthese, see the xinetd.conf manpage.
log_on_success
With this option, you can set the type of information logged when a user connection issuccessful. Here's a list of some available suboptions:
HOST
This will log the remote host's IP address.
PID
This logs the new server's process ID.
DURATION
Enable this to have the total session time logged.
TRAFFIC
This option may be helpful for administrators concerned with network usage. Enabling this willlog the total number of bytes in/out.
log_on_failure

HOST
This will log the remote host's IP address.
ATTEMPT
This logs all failed attempts to access services.
cps
Another security feature, this option will limit the incoming rate of connections to a service. Itrequires two options: the first is the number of connections per second which are allowed, andthe second is the amount of time in seconds the service will be disabled.
Any of these options can be overridden in the individual service configuration files, which we'reincluding in the /etc/xinetd.d directory. These options set in the master configuration file will serve asdefault values. Configuration of individual services is also this simple. Here's an example of the FTPservice, as configured for xinetd:
service ftp{ socket_type = stream wait = no user = root server = /usr/sbin/vsftpd server_args = /etc/vsftpd/vsftpd.conf log_on_success += DURATION USERID log_on_failure += USERID nice = 10 disable = no}
The first thing you will want to note is that in the xinetd.d directory, the individual services tend to behelpfully named, which makes individual configuration files easier to identify and manage. In thiscase, the file is simply called vsftp, referring to the name of the FTP server we're using.
Taking a look at this example, the first active configuration line defines the name of the service that'sbeing configured. Surprisingly, the service type is not defined by the service directive. The rest of theconfiguration is contained in brackets, much like functions in C. Some of the options used within theservice configurations overlap those found in the defaults section. If an item is defined in the defaultsand then defined again in the individual service configuration, the latter takes priority. There are alarge number of configuration options available and are discussed in detail in the xinetd.confmanpage, but to get a basic service running, we need only a few:

socket_type
This defines the type of socket used by the service. Administrators familiar with inetd willrecognize the following available options, such as stream, dgram, raw, and seqpacket.
wait
This option specifies whether the service is single or dual-threaded. yes means that the service
is single threaded and that xinetd will start the service and then will stop handling requests fornew connections until the current session ends. no means that new session requests can be
processed.
user
Here, you set the name of the user that will run the service.
server
This option is used to specify location of the service that's being run.
server_args
You can use this option to specify any additional options that need to be passed to the server.
nice
This option determines the server priority. Again, this is an option that can be used to limitresources used by servers.
disable
Really a very straightforward option, this determines whether or not the service is enabled.

10.4. The Services and Protocols Files
The port numbers on which certain "standard" services are offered are defined in the AssignedNumbers RFC. To enable server and client programs to convert service names to these numbers, atleast part of the list is kept on each host; it is stored in a file called /etc/services. An entry is madeup like this:
service port/protocol [aliases]
Here, service specifies the service name, port defines the port the service is offered on, and
protocol defines which transport protocol is used. Commonly, the latter field is either udp or tcp. It
is possible for a service to be offered for more than one protocol, as well as offering different serviceson the same port as long as the protocols are different. The aliases field allows you to specify
alternative names for the same service.
Usually, you don't have to change the services file that comes along with the network software onyour Linux system. Nevertheless, we give a small excerpt from that file in Example 10-2.
Example 10-2. A sample /etc/services file
# /etc/services tcpmux 1/tcp # TCP port service multiplexerecho 7/tcpecho 7/udpdiscard 9/tcp sink nulldiscard 9/udp sink nullsystat 11/tcp usersdaytime 13/tcpdaytime 13/udpnetstat 15/tcpqotd 17/tcp quotemsp 18/tcp # message send protocolmsp 18/udp # message send protocolchargen 19/tcp ttytst sourcechargen 19/udp ttytst sourceftp-data 20/tcpftp 21/tcpfsp 21/udp fspdssh 22/tcp # SSH Remote Login Protocolssh 22/udp # SSH Remote Login Protocoltelnet 23/tcp# 24 - privatesmtp 25/tcp mail

# 26 - unassigned
Like the services file, the networking library needs a way to translate protocol namesfor example,those used in the services fileto protocol numbers understood by the IP layer on other hosts. This isdone by looking up the name in the /etc/protocols file. It contains one entry per line, each containinga protocol name, and the associated number. Having to touch this file is even more unlikely thanhaving to meddle with /etc/services. A sample file is given in Example 10-3.
Example 10-3. A sample /etc/protocols file
## Internet (IP) protocols#ip 0 IP # internet protocol, pseudo protocol numbericmp 1 ICMP # internet control message protocoligmp 2 IGMP # internet group multicast protocoltcp 6 TCP # transmission control protocoludp 17 UDP # user datagram protocolraw 255 RAW # RAW IP interface esp 50 ESP # Encap Security Payload for IPv6ah 51 AH # Authentication Header for IPv6skip 57 SKIP # SKIPipv6-icmp 58 IPv6-ICMP # ICMP for IPv6ipv6-nonxt 59 IPv6-NoNxt # No Next Header for IPv6ipv6-opts 60 IPv6-Opts # Destination Options for IPv6rspf 73 RSPF # Radio Shortest Path First.
10.5. Remote Procedure Call
The general mechanism for client-server applications is provided by the Remote Procedure Call (RPC)package. RPC was developed by Sun Microsystems and is a collection of tools and library functions.An important application built on top of RPC is NFS.
An RPC server consists of a collection of procedures that a client can call by sending an RPC requestto the server along with the procedure parameters. The server will invoke the indicated procedure onbehalf of the client, handing back the return value, if there is any. In order to be machine-independent, all data exchanged between client and server is converted to the External DataRepresentation format (XDR) by the sender, and converted back to the machine-local representationby the receiver. RPC relies on standard UDP and TCP sockets to transport the XDR formatted data tothe remote host. Sun has graciously placed RPC in the public domain; it is described in a series ofRFCs.
Sometimes improvements to an RPC application introduce incompatible changes in the procedure callinterface. Of course, simply changing the server would crash all applications that still expect theoriginal behavior. Therefore, RPC programs have version numbers assigned to them, usually startingwith 1, and with each new version of the RPC interface, this counter will be bumped up. Often, aserver may offer several versions simultaneously; clients then indicate by the version number in theirrequests which implementation of the service they want to use.
The communication between RPC servers and clients is somewhat peculiar. An RPC server offers oneor more collections of procedures; each set is called a program and is uniquely identified by aprogram number. A list that maps service names to program numbers is usually kept in /etc/rpc, anexcerpt of which is shown in Example 10-4.
Example 10-4. A sample /etc/rpc file
## /etc/rpc - miscellaneous RPC-based services#portmapper 100000 portmap sunrpcrstatd 100001 rstat rstat_svc rup perfmeterrusersd 100002 rusersnfs 100003 nfsprogypserv 100004 ypprogmountd 100005 mount showmountypbind 100007walld 100008 rwall shutdownyppasswdd 100009 yppasswdbootparam 100026ypupdated 100028 ypupdate
In TCP/IP networks, the authors of RPC faced the problem of mapping program numbers to generic

network services. They designed each server to provide both a TCP and a UDP port for each programand each version. Generally, RPC applications use UDP when sending data and fall back to TCP onlywhen the data to be transferred doesn't fit into a single UDP datagram.
Of course, client programs need to find out to which port a program number maps. Using aconfiguration file for this would be too inflexible; since RPC applications don't use reserved ports,there's no guarantee that a port originally meant to be used by our database application hasn't beentaken by some other process. Therefore, RPC applications pick any available port and register it witha special program called the portmapper daemon. The portmapper acts as a service broker for allRPC servers running on its machine. A client that wishes to contact a service with a given programnumber first queries the portmapper on the server's host, which returns the TCP and UDP portnumbers the service can be reached at.
This method introduces a single point of failure, much like the inetd daemon does for the standardBerkeley services. However, this case is even a little worse because when the portmapper dies, allRPC port information is lost; this usually means that you have to restart all RPC servers manually orreboot the entire machine.
On Linux, the portmapper is called /sbin/portmap, or sometimes /usr/sbin/rpc.portmap. Other thanmaking sure it is started from your network boot scripts, the portmapper doesn't require anyconfiguration.

10.6. Configuring Remote Login and Execution
It's often very useful to execute a command on a remote host and have input or output from thatcommand be read from, or written to, a network connection.
The traditional commands used for executing commands on remote hosts are rlogin, rsh, and rcp. Webriefly discussed the security issues associated with it in Chapter 1 and suggested ssh as areplacement. The ssh package provides replacements called ssh and scp.
Each of these commands spawns a shell on the remote host and allows the user to executecommands. Of course, the client needs to have an account on the remote host where the commandis to be executed. Thus, all these commands use an authentication process. The r commands use asimple username and password exchange between the hosts with no encryption, so anyone listeningcould easily intercept the passwords. The ssh command suite provides a higher level of security: ituses a technique called Public Key Cryptography, which provides authentication and encryptionbetween the hosts to ensure that neither passwords nor session data are easily intercepted by otherhosts.
It is possible to relax authentication checks for certain users even further. For instance, if youfrequently have to log in to other machines on your LAN, you might want to be admitted withouthaving to type your password every time. This was always possible with the r commands, but the sshsuite allows you to do this a little more easily. It's still not a great idea because it means that if anaccount on one machine is breached, access can be gained to all other accounts that user hasconfigured for password-less login, but it is very convenient and people will use it.
Let's talk about removing the r commands and getting ssh to work instead.
10.6.1. Disabling the r Commands
Start by removing the r commands if they're installed. The easiest way to disable the old rcommands is to comment out (or remove) their entries in the /etc/inetd.conf file. The relevantentries will look something like this:
# Shell, login, exec and talk are BSD protocols.shell stream tcp nowait root /usr/sbin/tcpd /usr/sbin/in.rshdlogin stream tcp nowait root /usr/sbin/tcpd /usr/sbin/in.rlogindexec stream tcp nowait root /usr/sbin/tcpd /usr/sbin/in.rexecd
You can comment them by placing a # character at the start of each line, or delete the lines
completely. Remember, you need to restart the inetd daemon for this change to take effect. Ideally,you should remove the daemon programs themselves, too.
10.6.2. Installing and Configuring ssh

OpenSSH is a free version of the ssh suite of programs; the Linux port can be found atftp://ftp.openbsd.org/pub/OpenBSD/OpenSSH/portable/ and in most modern Linux distributions.[3]
We won't describe compilation here; good instructions are included in the source. If you can install itfrom a precompiled package, then it's probably wise to do so.
[3] OpenSSH was developed by the OpenBSD project and is a fine example of the benefit of free software.
There are two parts to an ssh session. There is an ssh client that you need to configure and run onthe local host and an ssh daemon that must be running on the remote host.
10.6.2.1 The ssh daemon
The sshd daemon is the program that listens for network connections from ssh clients, managesauthentication, and executes the requested command. It has one main configuration file called/etc/ssh/sshd_config and a special file containing a key used by the authentication and encryptionprocesses to represent the host end. Each host and each client has its own key.
A utility called ssh-keygen is supplied to generate a random key. This is usually used once atinstallation time to generate the host key, which the system administrator usually stores in a filecalled /etc/ssh/ssh_host_key. Keys can be of any length of 512 bits or greater. By default, ssh-keygen generates keys of 1,024 bits in length, and most people use the default. Using OpenSSH withSSH Version 2, you will need to generate RSA and DSA keys. To generate the keys, you would invokethe ssh-keygen command like this:
# ssh-keygen -t rsa1 -f /etc/openssh/ssh_host_key -N ""# ssh-keygen -t dsa -f /etc/openssh/ssh_host_dsa_key -N ""# ssh-keygen -t rsa -f /etc/openssh/ssh_host_rsa_key -N ""
You will be prompted to enter a passphrase if you omit the -N option. However, host keys must not
use a passphrase, so just press the return key to leave it blank. The program output will looksomething like this:
Generating public/private dsa key pair.Your identification has been saved in sshkey.Your public key has been saved in sshkey.pub.The key fingerprint is:fb:bf:d1:53:08:7a:29:6f:fb:45:96:63:7a:6e:04:22 tb@eskimo 1024
You've probably noticed that three different keys were created. The first one, type rsa1, is used forSSH protocol Version 1, the next two types, rsa and dsa, are used for SSH protocol Version 2. It isrecommended that SSH protocol Version 2 be used in place of SSH protocol Version 1 because ofpotential man-in-the-middle and other attacks against SSH protocol Version 1.
You will find at the end that two files have been created for each key. The first is called the privatekey, which must be kept secret and will be in /etc/openssh/ssh_host_key. The second is called thepublic key and is one that you can share; it will be in /etc/openssh/ssh_host_key.pub.
Armed with the keys for ssh communication, you need to create a configuration file. The ssh suite is

very powerful and the configuration file may contain many options. We'll present a simple example toget you started; you should refer to the ssh documentation to enable other features. The followingcode shows a safe and minimal sshd configuration file. The rest of the configuration options aredetailed in the sshd(8) manpage:
# $OpenBSD: sshd_config,v 1.59 2002/09/25 11:17:16 markus Exp $ #Port 22Protocol 2#ListenAddress 0.0.0.0#ListenAddress :: # HostKeys for protocol version 2HostKey /etc/openssh/ssh_host_rsa_keyHostKey /etc/openssh/ssh_host_dsa_key # Lifetime and size of ephemeral version 1 server key#KeyRegenerationInterval 3600#ServerKeyBits 768 # Authentication: #LoginGraceTime 120#PermitRootLogin yes#StrictModes yes #RSAAuthentication yes#PubkeyAuthentication yes# Change to yes if you don't trust ~/.ssh/known_hosts for# RhostsRSAAuthentication and HostbasedAuthentication#IgnoreUserKnownHosts no # To disable tunneled clear text passwords, change to no here!#PasswordAuthentication yes#PermitEmptyPasswords no # Change to no to disable s/key passwords#ChallengeResponseAuthentication yes #X11Forwarding no#X11DisplayOffset 10#X11UseLocalhost yes#PrintMotd yes#PrintLastLog yes#KeepAlive yes#UseLogin no#UsePrivilegeSeparation yes#PermitUserEnvironment noMaxStartups 10# no default banner path#Banner /some/path#VerifyReverseMapping no

# override default of no subsystemsSubsystem sftp /usr/lib/misc/sftp-server
It's important to make sure the permissions of the configuration files are correct to ensure thatsystem security is maintained. Use the following commands:
# chown -R root:root /etc/ssh# chmod 755 /etc/ssh# chmod 600 /etc/ssh/ssh_host_rsa_key# chmod 600 /etc/ssh/ssh_host_dsa_key# chmod 644 /etc/ssh/sshd_config
The final stage of sshd administration daemon is to run it. Normally you'd create an rc file for it oradd it to an existing one, so that it is automatically executed at boot time. The daemon runsstandalone and doesn't require any entry in the /etc/inetd.conf file. The daemon must be run as theroot user. The syntax is very simple:
/usr/sbin/sshd
The sshd daemon will automatically place itself into the background when being run. You are nowready to accept ssh connections.
10.6.2.2 The ssh client
There are a number of ssh client programs: slogin, scp, and ssh. They each read the sameconfiguration file, usually called /etc/openssh/ssh_config. They each also read configuration files fromthe .ssh directory in the home directory of the user executing them. The most important of these filesis the .ssh/config file, which may contain options that override those specified in the/etc/openssh/ssh_config file, the .ssh/identity file, which contains the user's own private key, and thecorresponding .ssh/identity.pub file, containing the user's public key. Other important files are.ssh/known_hosts and .ssh/authorized_keys; we'll talk about those in the next section, Section10.6.2.3. First, let's create the global configuration file and the user key file.
/etc/ssh/ssh_config is very similar to the server configuration file. Again, there are lots of featuresthat you can configure, but a minimal configuration looks like that presented in Example 10-5. Therest of the configuration options are detailed in the sshd(8) manpage. You can add sections thatmatch specific hosts or groups of hosts. The parameter to the "Host" statement may be either the
full name of a host or a wildcard specification, as we've used in our example, to match all hosts. Wecould create an entry that used, for example, Host *.vbrew.com to match any host in the
vbrew.com domain.
Example 10-5. Example ssh client configuration file
# $OpenBSD: ssh_config,v 1.19 2003/08/13 08:46:31 markus Exp $

# Site-wide defaults for various options # Host *# ForwardAgent no# ForwardX11 no# RhostsRSAAuthentication no# RSAAuthentication yes# PasswordAuthentication yes# HostbasedAuthentication no# BatchMode no# CheckHostIP yes# AddressFamily any# ConnectTimeout 0# StrictHostKeyChecking ask# IdentityFile ~/.ssh/identity# IdentityFile ~/.ssh/id_rsa# IdentityFile ~/.ssh/id_dsa# Port 22# Protocol 2,1# Cipher 3des# Ciphers aes128-cbc,3des-cbc,blowfish-cbc,cast128-cbc,arcfour,aes192-cbc,aes256-cbc# EscapeChar ~
We mentioned in the server configuration section that every host and user has a key. The user's keyis stored in his or her ~/.ssh/indentity file. To generate the key, use the same ssh-keygen commandwe used to generate the host key, except this time you do not need to specify the name of the file inwhich you save the key. The ssh-keygen defaults to the correct location, but it prompts you to entera filename in case you'd like to save it elsewhere. It is sometimes useful to have multiple identityfiles, so ssh allows this. Just as before, ssh-keygen will prompt you to entry a passphrase.Passphrases add yet another level of security and are a good idea. Your passphrase won't be echoedon the screen when you type it.
There is no way to recover a passphrase if you forget it. Make sure it issomething you will remember, but as with all passwords, make it somethingthat isn't obvious, like a proper noun or your name. For a passphrase to betruly effective, it should be between 10 and 30 characters long and not be plainEnglish prose. Try to throw in some unusual characters. If you forget yourpassphrase, you will be forced to generate a new key.
You should ask each of your users to run the ssh-keygen command just once to ensure their key fileis created correctly. The ssh-keygen will create their ~/.ssh/ directories for them with appropriatepermissions and create their private and public keys in .ssh/identity and .ssh/identity.pub,respectively. A sample session should look like this:
$ ssh-keygenKey generation complete.Enter file in which to save the key (/home/maggie/.ssh/identity):
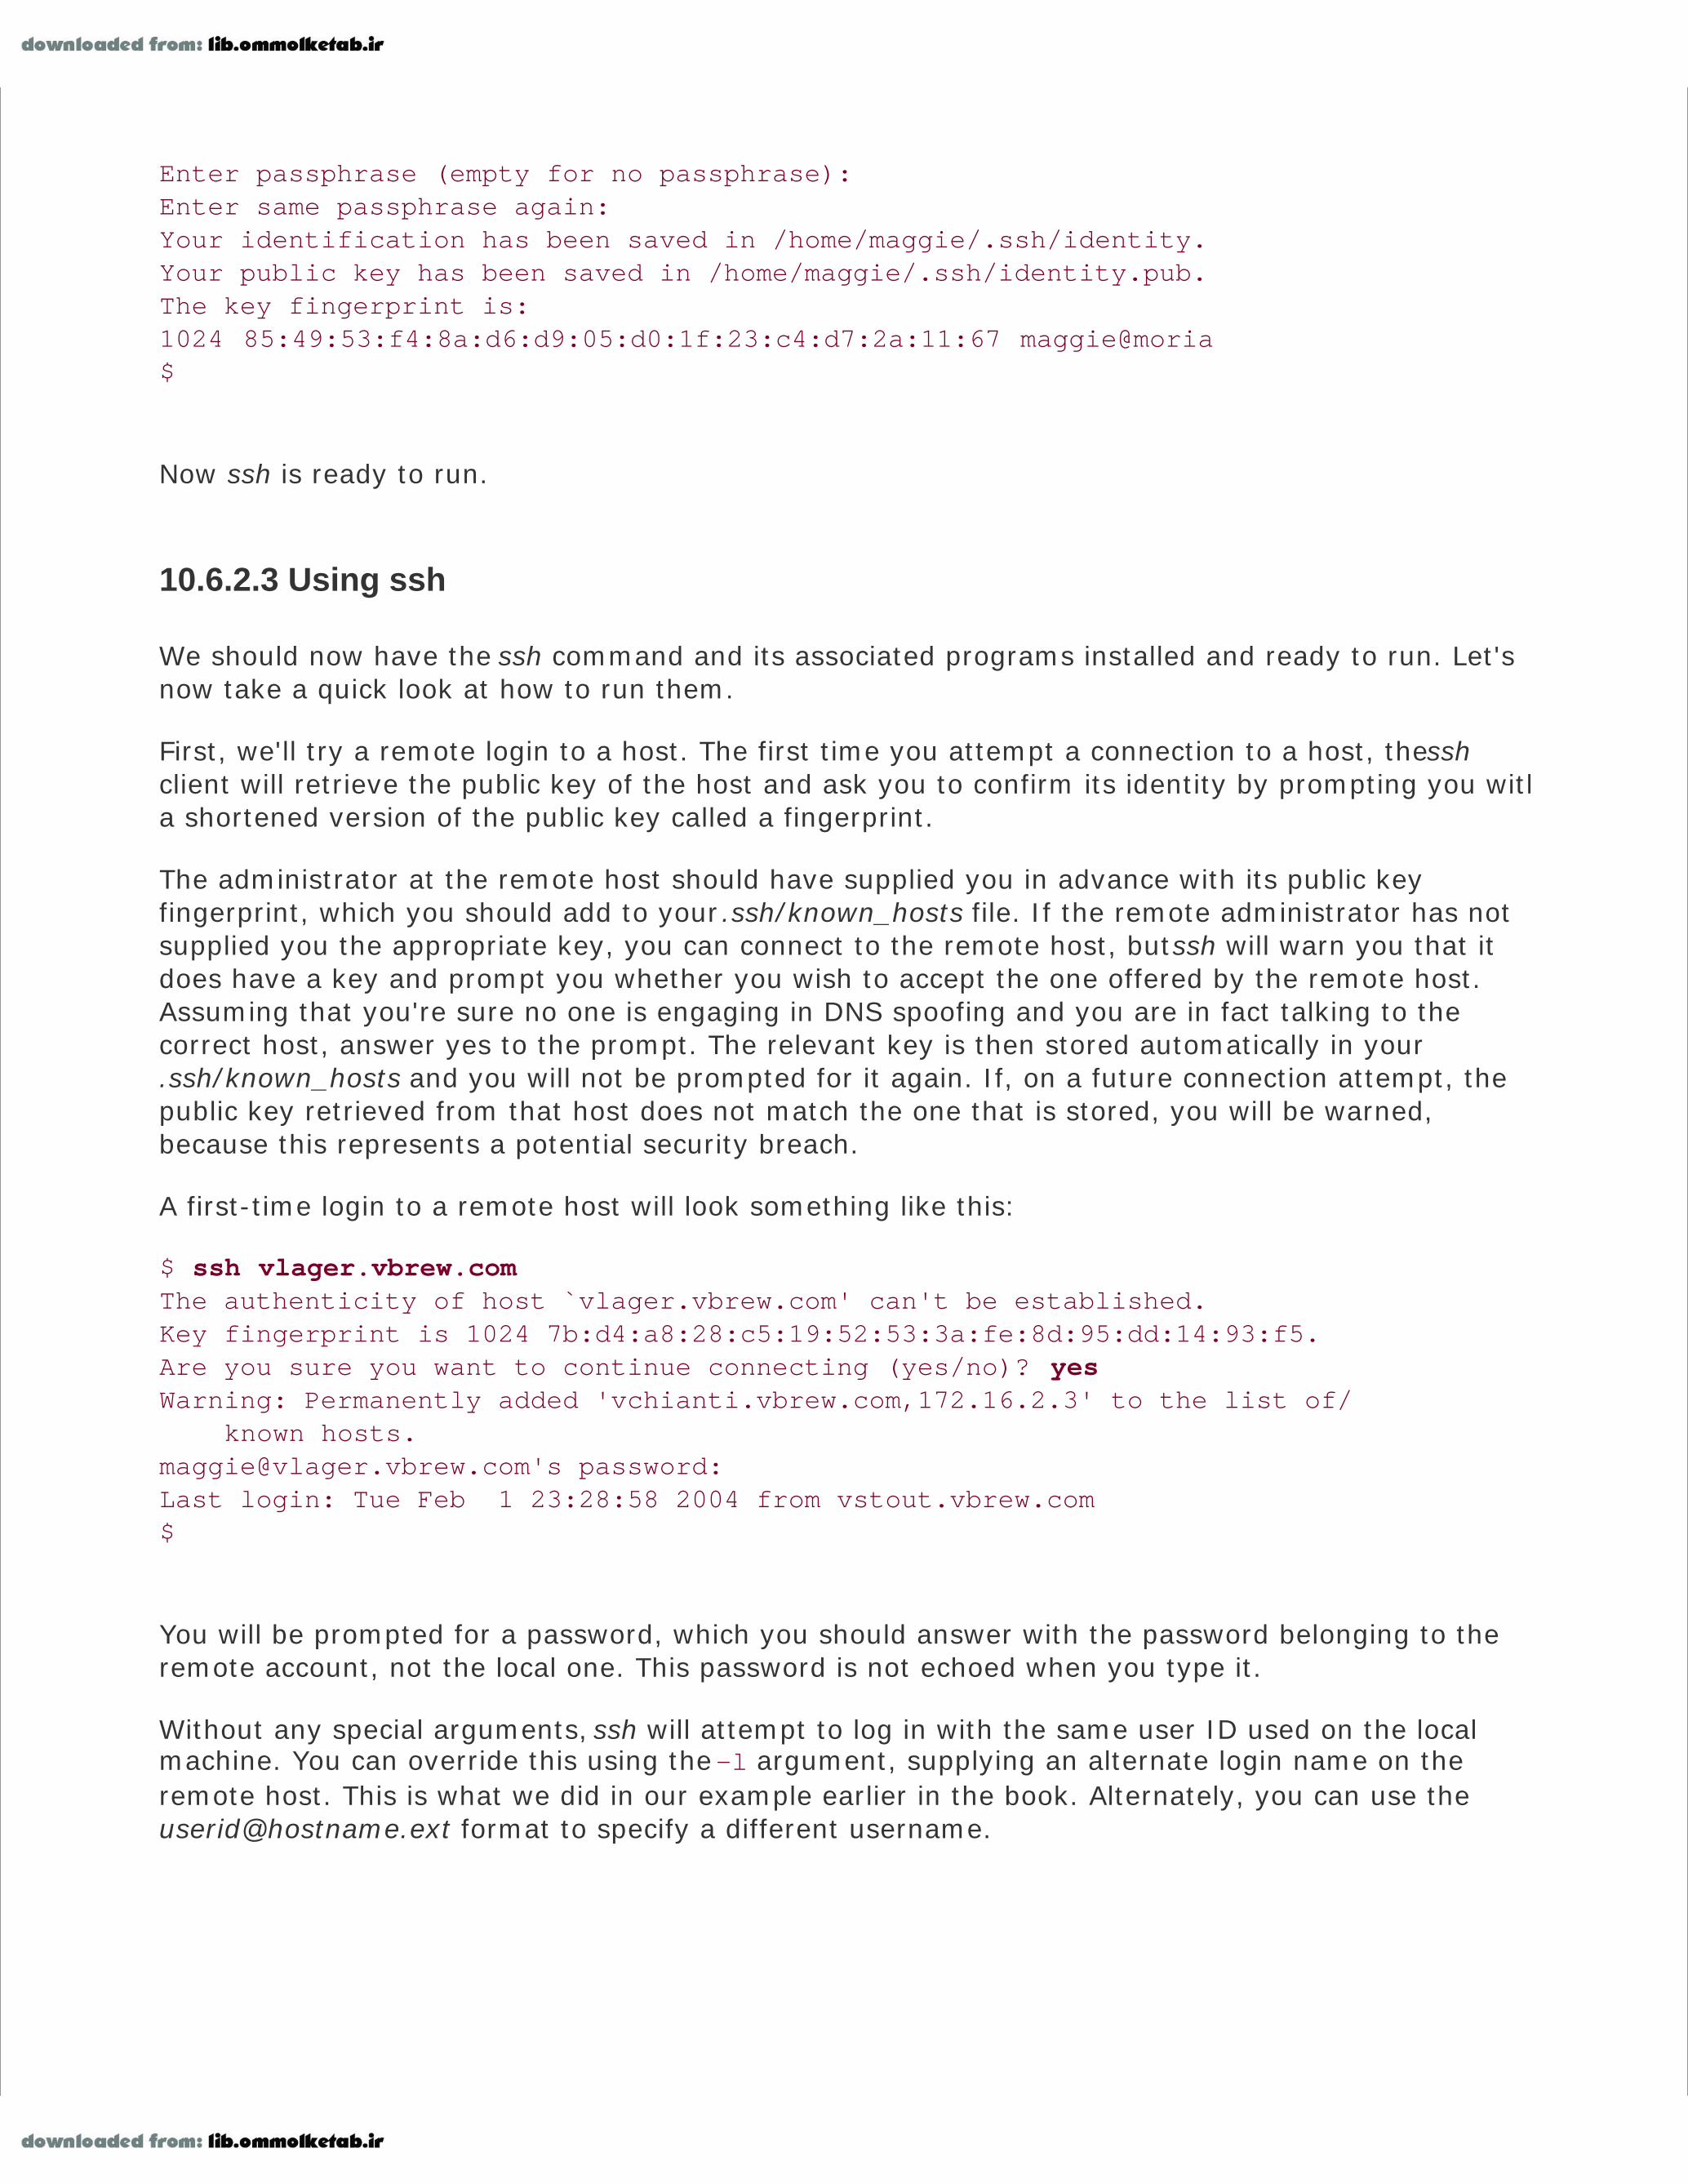
Enter passphrase (empty for no passphrase): Enter same passphrase again: Your identification has been saved in /home/maggie/.ssh/identity.Your public key has been saved in /home/maggie/.ssh/identity.pub.The key fingerprint is:1024 85:49:53:f4:8a:d6:d9:05:d0:1f:23:c4:d7:2a:11:67 maggie@moria$
Now ssh is ready to run.
10.6.2.3 Using ssh
We should now have the ssh command and its associated programs installed and ready to run. Let'snow take a quick look at how to run them.
First, we'll try a remote login to a host. The first time you attempt a connection to a host, the sshclient will retrieve the public key of the host and ask you to confirm its identity by prompting you witha shortened version of the public key called a fingerprint.
The administrator at the remote host should have supplied you in advance with its public keyfingerprint, which you should add to your .ssh/known_hosts file. If the remote administrator has notsupplied you the appropriate key, you can connect to the remote host, but ssh will warn you that itdoes have a key and prompt you whether you wish to accept the one offered by the remote host.Assuming that you're sure no one is engaging in DNS spoofing and you are in fact talking to thecorrect host, answer yes to the prompt. The relevant key is then stored automatically in your.ssh/known_hosts and you will not be prompted for it again. If, on a future connection attempt, thepublic key retrieved from that host does not match the one that is stored, you will be warned,because this represents a potential security breach.
A first-time login to a remote host will look something like this:
$ ssh vlager.vbrew.comThe authenticity of host `vlager.vbrew.com' can't be established.Key fingerprint is 1024 7b:d4:a8:28:c5:19:52:53:3a:fe:8d:95:dd:14:93:f5.Are you sure you want to continue connecting (yes/no)? yesWarning: Permanently added 'vchianti.vbrew.com,172.16.2.3' to the list of/ known [email protected]'s password: Last login: Tue Feb 1 23:28:58 2004 from vstout.vbrew.com$
You will be prompted for a password, which you should answer with the password belonging to theremote account, not the local one. This password is not echoed when you type it.
Without any special arguments, ssh will attempt to log in with the same user ID used on the localmachine. You can override this using the -l argument, supplying an alternate login name on the
remote host. This is what we did in our example earlier in the book. Alternately, you can use [email protected] format to specify a different username.

We can copy files to and from the remote host using the scp program. Its syntax is similar to theconventional cp with the exception that you may specify a hostname before a filename, meaning thatthe file path is on the specified host (It is also possible to use the userid@hostname formatpreviously mentioned). The following example illustrates scp syntax by copying a local file called/tmp/fred to the /home/maggie/ of the remote host vlager.vbrew.com:
$ scp /tmp/fred vlager.vbrew.com:/home/maggie/[email protected]'s password:fred 100% |*****************************| 50165 00:01 ETA
Again, you'll be prompted for a password. The scp command displays useful progress messages bydefault. You can copy a file from a remote host with the same ease; simply specify its hostname andfile path as the source and the local path as the destination. It's even possible to copy a file from aremote host to some other remote host, but it is something you wouldn't normally want to do,because all of the data travels via your host.
You can execute commands on remote hosts using the ssh command. Again, its syntax is verysimple. Let's have our user maggie retrieve the root directory of the remote hostvchianti.vbrew.com. She'd do this with the following:
$ ssh vchianti.vbrew.com ls -CF /[email protected]'s password:bin/ ftp/ mnt/ sbin/ tmp/boot/ home/ opt/ service/ usr/dev/ lib/ proc/ stage3-pentium3-1.4-20030726.tar.bz2 var/etc/ lost+found/ root/
You can place ssh in a command pipeline and pipe program input/output to or from it just like anyother command, except that the input or output is directed to or from the remote host via the sshconnection. Here is an example of how you might use this capability in combination with the tarcommand to copy a whole directory with subdirectories and files from a remote host to the local host:
$ ssh vchianti.vbrew.com "tar cf - /etc/" | tar xvf [email protected]'s password:etc/GNUstepetc/Muttrcetc/Netetc/X11etc/adduser.conf....
Here we surrounded the command we will execute with quotation marks to make it clear what ispassed as an argument to ssh and what is used by the local shell. This command executes the tarcommand on the remote host to archive the /etc/ directory and write the output to standard output.We've piped to an instance of the tar command running on our local host in extract mode readingfrom standard input.
Again, we were prompted for the password. Let's now configure our local ssh client so that it won't

prompt for a password when connecting to the vchianti.vbrew.com host. We mentioned the.ssh/authorized_keys file earlier; this is where it is used. The .ssh/authorized_keys file contains thepublic keys on any remote user accounts that we wish to automatically log in to. You can set upautomatic logins by copying the contents of the .ssh/identity.pub from the remote account into ourlocal .ssh/authorized_keys file. It is vital that the file permissions of .ssh/authorized_keys allow onlythat you read and write it; anyone may steal and use the keys to log in to that remote account. Toensure the permissions are correct, change .ssh/authorized_keys, as shown:
$ chmod 600 ~/.ssh/authorized_keys
The public keys are a long single line of plain text. If you use copy and paste to duplicate the key intoyour local file, be sure to remove any end of line characters that might have been introduced alongthe way. The .ssh/authorized_keys file may contain many such keys, each on a line of its own.
The ssh suite of tools is very powerful, and there are many other useful features and options that youwill be interested in exploring. Please refer to the manpages and other documentation that is suppliedwith the package for more information.

Chapter 11. Administration Issues withElectronic MailElectronic mail transport has been one of the most prominent uses of networking since networkswere devised. Email started as a simple service that copied a file from one machine to another andappended it to the recipient's mailbox file. The concept remains the same, although an ever-growingnet, with its complex routing requirements and its ever increasing load of messages, has made amore elaborate scheme necessary.
Various standards of mail exchange have been devised. Sites on the Internet adhere to one laid outin RFC 822, augmented by some RFCs that describe a machine-independent way of transferring justabout anything, including graphics, sound files, and special characters sets, by email.[1] CCITT hasdefined another standard, X.400. It is still used in some large corporate and governmentenvironments, but is progressively being retired.
[1] Read RFC 1437 if you don't believe this statement!
Quite a number of mail transport programs have been implemented for Unix systems. One of thebest known is sendmail, which was developed by Eric Allman at the University of California atBerkeley. Eric Allman now offers sendmail through a commercial venture, but the program remainsfree software. sendmail is supplied as the standard mail transfer agent (or MTA) in some Linuxdistributions. We describe sendmail configuration in Chapter 12.
sendmail supports a set of configuration files that have to be customized for your system. Apart fromthe information that is required to make the mail subsystem run (such as the local hostname), thereare many parameters that may be tuned. sendmail's main configuration file is very hard tounderstand at first. It looks as if your cat has taken a nap on your keyboard with the Shift keypressed. Luckily, modern configuration techniques take away a lot of the head scratching.
When users retrieve mail on their personal systems, they need another protocol to use to contact themail server. In Chapter 15 we discuss a powerful and increasingly popular type of server called IMAP.
In this chapter, we deal with what email is and what issues administrators have to deal with. Chapter12 provides instructions on setting up sendmail for the first time. The information included shouldhelp smaller sites become operational, but there are several more options and you can spend manyhappy hours in front of your computer configuring the fanciest features.
For more information about issues specific to electronic mail on Linux, please refer to the ElectronicMail HOWTO by Guylhem Aznar. The source distribution of sendmail also contains extensivedocumentation that should answer most questions on setting it up.

11.1. What Is a Mail Message?
A mail message generally consists of a message body, which is the text of the message, and specialadministrative data specifying recipients, transport medium, etc., similar to what you see when youlook at a physical letter's envelope.
This administrative data falls into two categories. In the first category is any data that is specific tothe transport medium, such as the address of sender and recipient. It is therefore called theenvelope. It may be transformed by the transport software as the message is passed along.
The second variety is any data necessary for handling the mail message, which is not particular toany transport mechanism, such as the message's subject line, a list of all recipients, and the date themessage was sent. In many networks, it has become standard to prepend this data to the mailmessage, forming the so-called mail header. It is offset from the mail body by an empty line.[2] Mostmail transport software in the Unix world use a header format outlined in RFC 822. Its originalpurpose was to specify a standard for use on the ARPANET, but since it was designed to beindependent from any environment, it has been easily adapted to other networks, including manyUUCP-based networks.
[2] It is customary to append a signature or .sig to a mail message, usually containing information on the author. It is offset from
the mail message by a line containing "-- ", followed by a space. Netiquette dictates, "Keep it short."
RFC 822 is only the lowest common denominator, however. More recent standards have beenconceived to cope with growing needs such as data encryption, international character set support,and Multipurpose Internet Mail Extensions (MIME), described in RFC 1341 and other RFCs.
In all these standards, the header consists of several lines separated by an end-of-line sequence. Aline is made up of a field name, beginning in column one, and the field itself, offset by a colon andwhitespace. The format and semantics of each field vary depending on the field name. A header fieldcan be continued across a newline if the next line begins with a whitespace character such as tab.Fields can appear in any order.
A typical mail header may look like this:
Return-Path: <[email protected]>X-Original-To: [email protected]: spam@ xtivix.comReceived: from smtp2.oreilly.com (smtp2.oreilly.com [209.58.173.10]) by www.berkeleywireless.net (Postfix) with ESMTP id B05C520DF0A for <spam@ xtivix.com>; Wed, 16 Jul 2003 06:08:44 -0700 (PDT)Received: (from root@localhost) by smtp2.oreilly.com (8.11.2/8.11.2) id h6GD5f920140; Wed, 16 Jul 2003 09:05:41 -0400 (EDT)Date: Wed, 16 Jul 2003 09:05:41 -0400 (EDT)Message-Id: <[email protected]>From: Andy Oram <[email protected]>To: spam@ xtivix.comSubject: Article on IPv6

Usually, all necessary header fields are generated by the mail reader you use, such as elm, Outlook,Evolution, or pine. However, some are optional and may be added by the user. elm, for example,allows you to edit part of the message header. Others are added by the mail transport software. Ifyou look into a local mailbox file, you may see each mail message preceded by a "From" line (note:no colon). This is not an RFC 822 header; it has been inserted by your mail software as aconvenience to programs reading the mailbox. To avoid potential trouble with lines in the messagebody that also begin with "From," it has become standard procedure to escape any such occurrencein the body of a mail message by preceding it with a > character.
This list is a collection of common header fields and their meanings:
From:
This contains the sender's email address and possibly the "real name." Many different formatsare used here, as almost every mailer wants to do this a different way.
To:
This is a list of recipient email addresses. Multiple recipient addresses are separated by acomma.
Cc:
This is a list of email addresses that will receive "carbon copies" of the message. Multiplerecipient addresses are separated by a comma.
Bcc:
This is a list of hidden email addresses that will receive "carbon copies" of the message. Thekey difference between a "Cc:" and a "Bcc:" is that the addresses listed in a "Bcc:" will notappear in the header of the mail messages delivered to any recipient. It's a way of alertingrecipients that you've sent copies of the message to other people without telling the others.Multiple recipient addresses are separated by a comma.
Subject:
Describes the content of the mail in a few words.
Date:
Supplies the date and time the mail was sent.
Reply-To:
Specifies the address that the sender wants the recipient's reply directed to. This may be usefulif you have several accounts, but want to receive the bulk of mail only on the one you use mostfrequently. This field is optional.
Organization:
The organization that owns the machine from which the mail originates. If your machine isowned by you privately, either leave this out, or insert "private" or some complete nonsense.This field is not described by any RFC and is completely optional. Some mail programs supportit directly, many don't.
Message-ID:
A string generated by the mail transport on the originating system. It uniquely identifies thismessage.
Received:
Every site that processes your mail (including the machines of sender and recipient) insertssuch a field into the header, giving its site name, a message ID, time and date it received themessage, which site it is from, and which transport software was used. These lines allow you totrace which route the message took, and you can complain to the person responsible ifsomething went wrong.
X- anything:
No mail-related programs should complain about any header that starts with X-. It is used to
implement additional features that have not yet made it into an RFC, or never will. Forexample, there was once a very large Linux mailing list server that allowed you to specifywhich channel you wanted the mail to go to by adding the string X-Mn-Key: followed by the
channel name.

11.2. How Is Mail Delivered?
Generally, you will compose mail using a program such as mail or mailx, or more sophisticated onessuch as mutt, tkrat, or pine. These programs are called mail user agents (MUAs). If you send a mailmessage, the interface program will in most cases hand it to another program for delivery. This iscalled the mail transport agent (MTA). On most systems the same MTA is used for both local andremote delivery and is usually invoked as /usr/sbin/sendmail, or on non-FSSTND compliant systemsas /usr/lib/sendmail.
Local delivery of mail is, of course, more than just appending the incoming message to the recipient'smailbox. Usually, the local MTA understands aliasing (setting up local recipient addresses pointing toother addresses) and forwarding (redirecting a user's mail to some other destination). Also,messages that cannot be delivered must usually be bouncedthat is, returned to the sender along withsome error message.
For remote delivery, the transport software used depends on the nature of the link. Mail deliveredover a network using TCP/IP commonly uses Simple Mail Transfer Protocol (SMTP), which is describedin RFC 821. SMTP was designed to deliver mail directly to a recipient's machine, negotiating themessage transfer with the remote side's SMTP daemon. Today it is common practice fororganizations to establish special hosts that accept all mail for recipients in the organization and forthat host to manage appropriate delivery to the intended recipient.

11.3. Email Addresses
Email addresses are made up of at least two parts. One part is the name of a mail domain that willultimately translate to either the recipient's host or some host that accepts mail on behalf of therecipient. The other part is some form of unique user identification that may be the login name ofthat user, the real name of that user in "Firstname.Lastname" format, or an arbitrary alias that willbe translated into a user or list of users. Other mail addressing schemes, such as X.400, use a moregeneral set of "attributes" that are used to look up the recipient's host in an X.500 directory server.
How email addresses are interpreted depends greatly on what type of network you use. We'llconcentrate on how TCP/IP networks interpret email addresses.
11.3.1. RFC 822
Internet sites adhere to the RFC 822 standard, which requires the familiar notation [email protected], for which host.domain is the host's fully qualified domain name. The characterseparating the two is properly called a "commercial at" sign, but it helps if you read it as "at." Thisnotation does not specify a route to the destination host. Routing of the mail message is left to themechanisms we'll describe shortly.
11.3.2. Obsolete Mail Formats
Before moving on, let's have a look at the way things used to be. In the original UUCP environment,the prevalent form was path!host!user, for which path described a sequence of hosts the messagehad to travel through before reaching the destination host. This construct is called the bang pathnotation because an exclamation mark is colloquially called a "bang."
Other networks had still different means of addressing. DECnet-based networks, for example, usedtwo colons as an address separator, yielding an address of host::user. The X.400 standard uses anentirely different scheme, describing a recipient by a set of attribute-value pairs, such as country andorganization.
Lastly, on FidoNet, each user was identified by a code such as 2:320/204.9, consisting of fournumbers denoting zone (2 for Europe), net (320 referred to Paris and Banlieue), node (the localhub), and point (the individual user's PC). Fidonet addresses were mapped to RFC 822; the above,for example, was written as [email protected]. Now aren't you glad we dothings with simple domain names today?

11.4. How Does Mail Routing Work?
The process of directing a message to the recipient's host is called routing. Apart from finding a pathfrom the sending site to the destination, it involves error checking and may involve speed and costoptimization.
On the Internet, the main job of directing data to the recipient host (once it is known by its IPaddress) is done by the IP networking layer.

11.5. Mail Routing on the Internet
On the Internet, the destination host's configuration determines whether any specific mail routing isperformed. The default is to deliver the message to the destination by first determining what host themessage should be sent to and then delivering it directly to that host. Most Internet sites want todirect all inbound mail to a highly available mail server that is capable of handling all this traffic andhave it distribute the mail locally. To announce this service, the site publishes a so-called MX recordfor its local domain in its DNS database. MX stands for Mail Exchanger and basically states that theserver host is willing to act as a mail forwarder for all mail addresses in the domain. MX records canalso be used to handle traffic for hosts that are not connected to the Internet themselves. Thesehosts must have their mail passed through a gateway. This concept is discussed in greater detail inChapter 6.
MX records are always assigned a preference. This is a positive integer. If several mail exchangersexist for one host, the mail transport agent will try to transfer the message to the exchanger with thelowest preference value, and only if this fails will it try a host with a higher value. If the local host isitself a mail exchanger for the destination address, it is allowed to forward messages only to MX hostswith a lower preference than its own; this is a safe way of avoiding mail loops. If there is no MXrecord for a domain, or no MX records left that are suitable, the mail transport agent is permitted tosee if the domain has an IP address associated with it and attempt delivery directly to that host.
Suppose that an organization, say Foobar, Inc., wants all its mail handled by its machine mailhub. Itwill then have MX records like this in the DNS database:
green.foobar.com. IN MX 5 mailhub.foobar.com.
This announces mailhub.foobar.com as a mail exchanger for green.foobar.com with a preferenceof 5. A host that wishes to deliver a message to [email protected] checks DNS and finds the MXrecord pointing at mailhub. If there's no MX with a preference smaller than 5, the message isdelivered to mailhub, which then dispatches it to green.
This is a very simple description of how MX records work. For more information on mail routing onthe Internet, refer to RFC 821, RFC 974, and RFC 1123.

Chapter 12. sendmailIt's been said that you aren't a real Unix system administrator until you've edited a sendmail.cf file.It's also been said that you're crazy if you've attempted to do so twice.
Fortunately, you no longer need to directly edit the cryptic sendmail.cf file. The new versions ofsendmail provide a configuration utility that creates the sendmail.cf file for you based on muchsimpler macro files. You do not need to understand the complex syntax of the sendmail.cf file.Instead, you use the macro language to identify the features you wish to include in yourconfiguration and specify some of the parameters that determine how that feature operates. Atraditional Unix utility, called m4, then takes your macro configuration data and mixes it with thedata it reads from template files containing the actual sendmail.cf syntax to produce your sendmail.cffile.
sendmail is an incredibly powerful mail program that is difficult to master. Any program whosedefinitive reference (sendmail, by Bryan Costales with Eric Allman, published by O'Reilly) is 1,200pages long scares most people off. And any program as complex as sendmail cannot be completelycovered in a single chapter. This chapter introduces sendmail and describes how to install, configure,and test it, using a basic configuration for the Virtual Brewery as an example. If the informationpresented here helps make the task of configuring sendmail less daunting for you, we hope you'llgain the confidence to tackle more complex configurations on your own.

12.1. Installing the sendmail Distribution
sendmail is included in prepackaged form in most Linux distributions. Despite this fact, there are somegood reasons to install sendmail from source, especially if you are security conscious. sendmailchanges frequently to fix security problems and to add new features. Closing security holes and usingnew features are good reasons to update the sendmail release on your system. Additionally, compilingsendmail from source gives you more control over the sendmail environment. Subscribe to thesendmail-announce mailing list to receive notices of new sendmail releases, and monitor thehttp://www.sendmail.org/ site to stay informed about potential security threats and the latest sendmaildevelopments.
12.1.1. Downloading sendmail Source Code
Download the sendmail source code distribution and the source code distribution signature file fromhttp://www.sendmail.org/current-release.html , from any of the mirror sites, or fromftp://ftp.sendmail.org/pub/sendmail/ . Here is an example using ftp :
# ftp ftp.sendmail.org
Connected to ftp.sendmail.org (209.246.26.22).220 services.sendmail.org FTP server (Version 6.00LS) ready.
Name (ftp.sendmail.org:craig): anonymous331 Guest login ok, send your email address as password.Password: [email protected] Guest login ok, access restrictions apply.Remote system type is UNIX.Using binary mode to transfer files.ftp> cd /pub/sendmail250 CWD command successful.ftp> get sendmail.8.12.11.tar.gzlocal: sendmail.8.12.11.tar.gz remote: sendmail.8.12.11.tar.gz227 Entering Passive Mode (209,246,26,22,244,234)150 Opening BINARY mode data connection for 'sendmail.8.12.11.tar.gz' (1899112 bytes).226 Transfer complete.1899112 bytes received in 5.7 secs (3.3e+02 Kbytes/sec)ftp> get sendmail.8.12.11.tar.gz.siglocal: sendmail.8.12.11.tar.gz.sig remote: sendmail.8.12.11.tar.gz.sig227 Entering Passive Mode (209,246,26,22,244,237)150 Opening BINARY mode data connection for 'sendmail.8.12.11.tar.gz.sig' (152 bytes).226 Transfer complete.152 bytes received in 0.000949 secs (1.6e+02 Kbytes/sec)
If you do not have the current sendmail PGP keys on your key ring, download the PGP keys needed toverify the signature. Adding the following step to the ftp session downloads the keys for the current
year:

ftp> get PGPKEYSlocal: PGPKEYS remote: PGPKEYS227 Entering Passive Mode (209,246,26,22,244,238)150 Opening BINARY mode data connection for 'PGPKEYS' (61916 bytes).226 Transfer complete.61916 bytes received in 0.338 secs (1.8e+02 Kbytes/sec)ftp> quit221 Goodbye.
If you downloaded new keys, add the PGP keys to your key ring. In the following example, gpg (Gnu
Privacy Guard) is used:
# gpg --import PGPKEYSgpg: key 16F4CCE9: not changedgpg: key 95F61771: public key importedgpg: key 396F0789: not changedgpg: key 678C0A03: not changedgpg: key CC374F2D: not changedgpg: key E35C5635: not changedgpg: key A39BA655: not changedgpg: key D432E19D: not changedgpg: key 12D3461D: not changedgpg: key BF7BA421: not changedgpg: key A00E1563: non exportable signature (class 10) - skippedgpg: key A00E1563: not changedgpg: key 22327A01: not changedgpg: Total number processed: 12gpg: imported: 1 (RSA: 1)gpg: unchanged: 11
Of the twelve exportable keys in the PGPKEYS file, only one is exported to our key ring. The notchanged comment for the other eleven keys shows that they were already installed on the key ring.The first time you import PGPKEYS , all twelve keys will be added to the key ring.
Before using the new key, verify its fingerprint, as in this gpg example:
# gpg --fingerprint 95F61771pub 1024R/95F61771 2003-12-10 Sendmail Signing Key/2004 <[email protected]> Key fingerprint = 46 FE 81 99 48 75 30 B1 3E A9 79 43 BB 78 C1 D4
Compare the displayed fingerprint against Table 12-1 , which contains fingerprints for sendmail signingkeys.
Table 12-1. Sendmail signing key fingerprints

Year Fingerprint
1997 CA AE F2 94 3B 1D 41 3C 94 7B 72 5F AE 0B 6A 11
1998 F9 32 40 A1 3B 3A B6 DE B2 98 6A 70 AF 54 9D 26
1999 25 73 4C 8E 94 B1 E8 EA EA 9B A4 D6 00 51 C3 71
2000 81 8C 58 EA 7A 9D 7C 1B 09 78 AC 5E EB 99 08 5D
2001 59 AF DC 3E A2 7D 29 56 89 FA 25 70 90 0D 7E C1
2002 7B 02 F4 AA FC C0 22 DA 47 3E 2A 9A 9B 35 22 45
2003 C4 73 DF 4A 97 9C 27 A9 EE 4F B2 BD 55 B5 E0 0F
2004 46 FE 81 99 48 75 30 B1 3E A9 79 43 BB 78 C1 D4
If the fingerprint is correct, you can sign, and thus validate, the key. In this gpg example, we sign the
newly imported sendmail key:
# gpg --edit-key 95F61771gpg (GnuPG) 1.0.7; Copyright (C) 2002 Free Software Foundation, Inc.This program comes with ABSOLUTELY NO WARRANTY.This is free software, and you are welcome to redistribute itunder certain conditions. See the file COPYING for details. gpg: checking the trustdbgpg: checking at depth 0 signed=1 ot(-/q/n/m/f/u)=0/0/0/0/0/1gpg: checking at depth 1 signed=1 ot(-/q/n/m/f/u)=1/0/0/0/0/0pub 1024R/95F61771 created: 2003-12-10 expires: never trust: -/q(1). Sendmail Signing Key/2004 <[email protected]> Command> sign pub 1024R/95F61771 created: 2003-12-10 expires: never trust: -/q Fingerprint: 46 FE 81 99 48 75 30 B1 3E A9 79 43 BB 78 C1 D4 Sendmail Signing Key/2004 <[email protected]> How carefully have you verified the key you are about to sign actually belongs to the person named above? If you don't know what to answer, enter "0". (0) I will not answer. (default) (1) I have not checked at all. (2) I have done casual checking. (3) I have done very careful checking. Your selection? 3Are you really sure that you want to sign this keywith your key: "Winslow Henson <[email protected]>" I have checked this key very carefully.
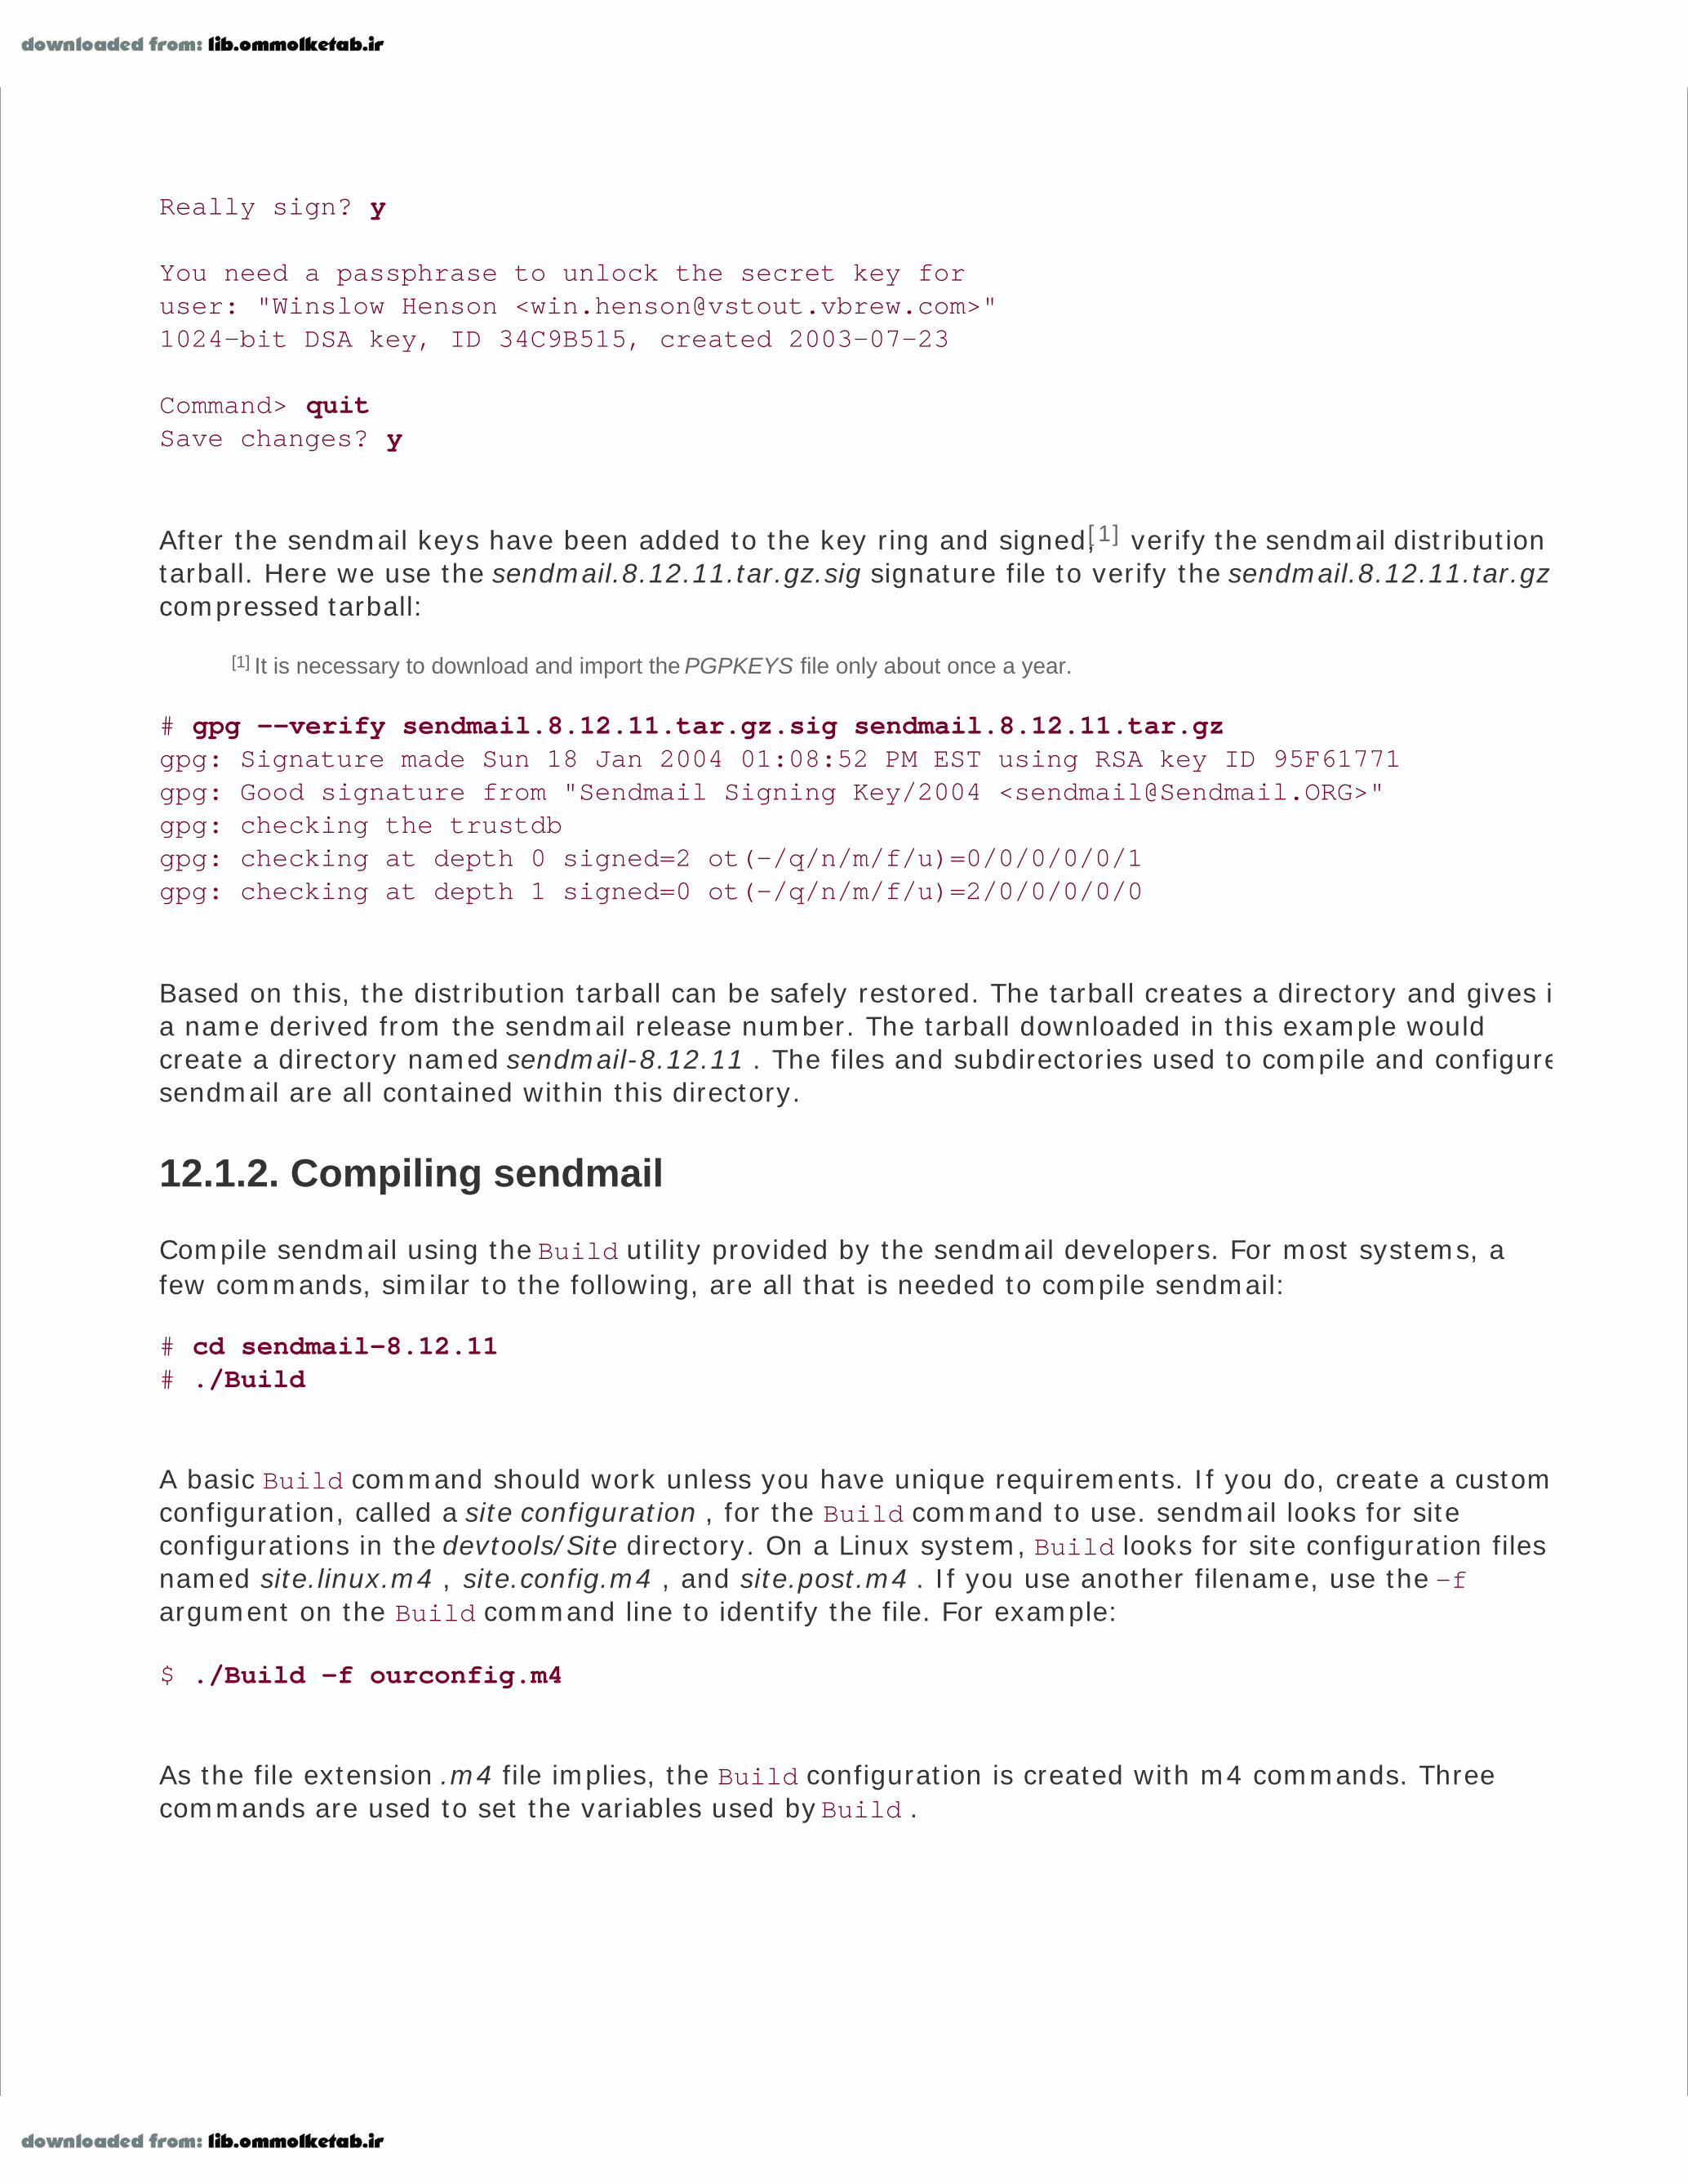
Really sign? y You need a passphrase to unlock the secret key foruser: "Winslow Henson <[email protected]>"1024-bit DSA key, ID 34C9B515, created 2003-07-23 Command> quitSave changes? y
After the sendmail keys have been added to the key ring and signed,[1] verify the sendmail distributiontarball. Here we use the sendmail.8.12.11.tar.gz.sig signature file to verify the sendmail.8.12.11.tar.gzcompressed tarball:
[1] It is necessary to download and import the PGPKEYS file only about once a year.
# gpg --verify sendmail.8.12.11.tar.gz.sig sendmail.8.12.11.tar.gzgpg: Signature made Sun 18 Jan 2004 01:08:52 PM EST using RSA key ID 95F61771gpg: Good signature from "Sendmail Signing Key/2004 <[email protected]>"gpg: checking the trustdbgpg: checking at depth 0 signed=2 ot(-/q/n/m/f/u)=0/0/0/0/0/1gpg: checking at depth 1 signed=0 ot(-/q/n/m/f/u)=2/0/0/0/0/0
Based on this, the distribution tarball can be safely restored. The tarball creates a directory and gives ita name derived from the sendmail release number. The tarball downloaded in this example wouldcreate a directory named sendmail-8.12.11 . The files and subdirectories used to compile and configuresendmail are all contained within this directory.
12.1.2. Compiling sendmail
Compile sendmail using the Build utility provided by the sendmail developers. For most systems, a
few commands, similar to the following, are all that is needed to compile sendmail:
# cd sendmail-8.12.11# ./Build
A basic Build command should work unless you have unique requirements. If you do, create a customconfiguration, called a site configuration , for the Build command to use. sendmail looks for siteconfigurations in the devtools/Site directory. On a Linux system, Build looks for site configuration filesnamed site.linux.m4 , site.config.m4 , and site.post.m4 . If you use another filename, use the -fargument on the Build command line to identify the file. For example:
$ ./Build -f ourconfig.m4
As the file extension .m4 file implies, the Build configuration is created with m4 commands. Threecommands are used to set the variables used by Build .

define
The define command modifies the current value stored in the variable.
APPENDDEF
The APPENDDEF macro appends a value to an existing list of values stored in a variable.
PREPENDDEF
The PREPENDDEF macro prepends a value to an existing list of values stored in a variable.
As an example assume that the devtools/OS/Linux file, which defines Build characteristics for all Linux
systems, puts the manpages in /usr/man :[2]
[2] Notice that m4 uses unbalanced single quotes, i.e., `'.
define(`confMANROOT', `/usr/man/man')
Further assume that our Linux systems stores manpages in /usr/share/man . Adding the following lineto the devtools/Site/site.config.m4 file directs Build to set the manpage path to /usr/share/man :
define(`confMANROOT', `/usr/share/man/man')
Here is another example. Assume you must configure sendmail to read data from an LDAP server.Further, assume that you use the command sendmail -bt -d0.1 to check the sendmail compileroptions and the string LDAPMAP does not appear in the "Compiled with:" list. You need to add LDAP
support by setting LDAP values in the site.config.m4 file and recompiling sendmail as shown below:
# cd devtools/Site# cat >> site.config.m4APPENDDEF(`confMAPDEF', `-DLDAPMAP')APPENDDEF(`confLIBS', `-lldap -llber')Ctrl-D# cd ../../# ./Build -c
Notice the Build command. If you make changes to the siteconfig.m4 file and rerun Build , use the -ccommand-line argument to alert Build of the changes.
Most custom Build configurations are no more complicated than these examples. However, there aremore than 100 variables that can be set for the Build configurationfar too many to cover in one
chapter. See the devtools/README file for a complete list.

12.1.3. Installing the sendmail Binary
Because the sendmail binary is no longer installed as set-user-ID root, you must create a special userID and group ID before installing sendmail. Traditionally, the sendmail binary was set-user-ID root sothat any user could submit mail via the command line and have it written to the queue directory.However, this does not really require a set-user-ID root binary. With the proper directory permissions,a set-group-ID binary works fine, and presents less of a security risk.
Create the smmsp user and group for sendmail to use when it runs as a mail submission program. Dothis using the tools appropriate to your system. Here are the /etc/passwd and /etc/group entries addedto a sample Linux system:
# grep smmsp /etc/passwdsmmsp:x:25:25:Mail Submission:/var/spool/clientmqueue:/sbin/nologin# grep smmsp /etc/groupsmmsp:x:25:
Before installing the freshly compiled sendmail, back up the current sendmail binary, the sendmailutilities, and your current sendmail configuration files. (You never know; you might need to drop backto the old sendmail configuration if the new one doesn't work as anticipated.) After the system isbacked up, install the new sendmail and utilities as follows:
# ./Build install
Running Build install installs sendmail and the utilities, and produces more than 100 lines ofoutput. It should run without error. Notice that Build uses the smmsp user and group when it creates
the /var/spool/clientmqueue directory and when it installs the sendmail binary. A quick check of theownership and permissions for the queue directory and the sendmail binary shows this:
drwxrwx--- 2 smmsp smmsp 4096 Jun 7 16:22 clientmqueue-r-xr-sr-x 1 root smmsp 568701 Jun 7 16:51 /usr/sbin/sendmail
After sendmail is installed, it must be configured. The topic of most of this chapter is how to configuresendmail.

12.2. sendmail Configuration Files
sendmail reads a configuration file (typically called /etc/mail/sendmail.cf, or in older distributions,/etc/sendmail.cf, or even /usr/lib/sendmail.cf ) that is simple for sendmail to parse, but not simplefor a system administrator to read or edit. Fortunately, most sendmail configuration does not involvereading or editing the sendmail.cf file. Most sendmail configuration is macro driven. The macromethod generates configurations to cover most installations, but you always have the option oftuning the resultant sendmail.cf manually.
The m4 macro processor program processes a macro configuration file to generate the sendmail.cffile. For our convenience, we refer to the macro configuration file as the sendmail.mc file throughoutthis chapter. Do not name your configuration file sendmail.mc. Instead, give it a descriptive name.For example, you might name it after the host it was designed forvstout.m4, in our case. Providing aunique name for the configuration file allows you to keep all configuration files in the same directoryand is an administrative convenience.
The configuration process is basically a matter of creating a sendmail.mc file that includes the macrosthat describe your desired configuration, and then processing that sendmail.mc file with m4. Thesendmail.mc file may include basic m4 commands such as define or divert, but the lines in the filethat have the most dramatic effect on the output file are the sendmail macros. The sendmaildevelopers define the macros used in the sendmail.mc file. The m4 macro processor expands themacros into chunks of sendmail.cf syntax. The macro expressions included in the sendmail.mc filebegin with the macro name (written in capital letters), followed by parameters (enclosed in brackets)that are used in the macro expansion. The parameters may be passed literally into the sendmail.cfoutput or may be used to govern the way the macro processing occurs.
Unlike a sendmail.cf file, which may be more than 1,000 lines long, a basic sendmail.mc file is oftenless than 10 lines long, excluding comments.
12.2.1. Comments
Lines in the sendmail.mc file that begin with the # character are not parsed by m4, and, by default,
are output directly into the sendmail.cf file. This is useful if you want to comment on what yourconfiguration is doing in both the sendmail.mc and the sendmail.cf files.
To put comments in the sendmail.mc that are not placed into the sendmail.cf, use either m4 divert ordnl commands. divert(-1) causes all output to cease. divert(0) restores output to the default.
Any lines between these will be discarded. Blocks of comments that should appear only in thesendmail.mc file are usually brackets by divert(-1) and divert(0) commands. To achieve thesame result for a single line, use the dnl command at the beginning of a line that should appear as acomment only in the sendmail.mc file. The dnl command means "delete all characters up to and
including the next newline." Sometimes dnl is added to the end of a macro command line, so thatanything else added to that line is treated as a comment.
Often there are more comments than configuration commands in a sendmail.mc file! The following

sections explain the structure of the sendmail.mc file and the commands used in the file.
12.2.2. Typically Used sendmail.mc Commands
A few commands are used to build most sendmail.mc files. Some of these typically used commandsand the general sequence of these commands in the sendmail.mc are as follows:
VERSIONIDOSTYPEDOMAINFEATUREdefineMAILERLOCAL_*
The commands in this list that are written in uppercase are sendmail macros. By convention, thesendmail developers use uppercase letters for the names of the macros they create. There are moremacros than those shown above. See the file cf/README for a complete list of the sendmail macros.In the list above, everything except the define command is a sendmail macro. The define command,
which is shown in lowercase, is a basic m4 command. All basic m4 commands are written inlowercase letters. There are other basic m4 commands used in sendmail.mc files; in fact you can useany legal m4 command in a sendmail.mc file. However, the commands listed above are the basic setused to show the general order in which commands occur in a sendmail.mc file. We examine each ofthese commands in the following sections.
12.2.2.1 VERSIONID
The VERSIONID macro defines version control information. This macro is optional, but is found in
most of the sendmail m4 files. The command has no required format for the arguments field. Use anyversion control information you desire. Generally this is something compatible with the revisioncontrol system you use. If you don't use a revision control system, put a descriptive comment in thisfield. The VERSIONID macro from a sendmail.mc file on a system that did not use version control
might look something like the following:
VERSIONID(`sendmail.mc, 6/11/2004 18:31 by Win Henson')
Notice that the argument is enclosed in single quotes and that the opening quote is ` and the closingquotes is '. When the argument passed to the sendmail macro contains spaces, special characters orvalues that may be misinterpreted as m4 commands, the argument is enclosed in quotes, and itmust be enclosed using these specific single quotes. This is true for all macros, not just VERSIONID.
12.2.2.2 OSTYPE
The OSTYPE macro is a required part of the macro configuration file. The OSTYPE macro command
loads an m4 source file that defines operating system-specific information, such as file and directorypaths, mailer pathnames, and system-specific mailer arguments. The only argument passed to the
OSTYPE command is the name of the m4 source file that contains the operating system-specificinformation. OSTYPE files are stored in the cf/ostype directory. The command OSTYPE(`linux')
processes the cf/ostype/linux.m4 file.
The sendmail distribution provides more than 40 predefined operating system macro files in thecf/ostype directory, and you can create your own for a specific Linux distribution if you like. SomeLinux distributions, notably the Debian distribution, include their own definition file that is completelyLinux-FHS compliant. When your distribution does this, use its definition instead of the generic-linux.m4 file. The OSTYPE macro should be one of the first commands to appear in the sendmail.mc
file, as many other definitions depend on it.
12.2.2.3 DOMAIN
The DOMAIN macro processes the specified file from the cf/domain directory. A DOMAIN file is useful
when configuring a large number of machines on the same network in a standard way, and typicallyconfigures items such as the name of mail relay hosts or hubs that all hosts on your network use.
To make effective use of the DOMAIN macro, you must create your own macro file containing the
standard definitions you require for your site, and write it into the domain subdirectory. If you savedyour domain macro file as cf/domain/vbrew.m4, you'd invoke it in your sendmail.mc using:
DOMAIN(`vbrew')
The sendmail distribution comes with a number of sample domain macro files that you can use tomodel your own. One is the domain/generic.m4 file shown later in Example 12-3.
12.2.2.4 FEATURE
Use the FEATURE macro to include predefined sendmail features in your configuration. There are a
large number of featuresthe cf/feature directory contains about 50 feature files. In this chapter we'lltalk about only a few of the more commonly used features. You can find full details of all of thefeatures in the cf/README file included in the source package.
To use a feature, include a line in the sendmail.mc that looks like:
FEATURE(name)
where name is the feature name. Some features take an optional parameter in a format like:
FEATURE(name, param)
where param is the parameter to supply.
12.2.2.5 define

Use the m4 define command to set values for internal sendmail.cf macros, options, or classes. Thefirst argument passed to the define is the m4 name of the variable being set and the second field isthe value to which the variable is set. Here is an example of how define is used to set a sendmail.cf
macro:
define(`confDOMAIN_NAME', `vstout.vbrew.com')
The define command shown above places the following in the sendmail.cf file.
Djvstout.vbrew.com
This sets the sendmail.cf macro $j, which holds the full domain name of the sendmail host, tovstout.vbrew.com. Manually setting a value for $j is generally not necessary because, by default,
sendmail obtains the correct name for the local host from the system itself.
Most of the m4 variables default to a reasonable value and thus do not have to be explicitly set in them4 source file. The undefine command sets a variable back to its default. For example:
undefine(`confDOMAIN_NAME')
Resets confDOMAIN_NAME to the default value even if the configuration had previously set it to a
specific hostname.
The list of m4 variables that can be set by define is quite long. The cf/README file lists all of the
variables. The listing includes the m4 variable name, the name of the corresponding sendmail.cfoption, macro, or class, a description of the variable, and the default value that is used if you do notexplicitly define a value for the variable.
Note that the define command is not limited to setting values for sendmail.cf macros, options, andclasses. define is also used to modify values used in the m4 configurations and internal sendmail
values.
12.2.2.6 MAILER
If you want sendmail to transport mail in any way other than by local delivery, use the MAILER macro
to tell it which transports to use. sendmail supports a variety of mail transport protocols; some areessential, some are rarely used, and a few are experimental. The mailer arguments that can be usedwith the MAILER macro are shown in Table 12-2.
Table 12-2. Arguments for the MAILER macro
Argument Purpose
local Adds the local and prog mailers

Argument Purpose
smtp Adds all SMTP mailers: smtp, esmtp, smtp8, dsmtp, and relay
uucp Adds all UUCP mailers: uucp-old (uucp) and uucp-new (suucp)
usenet Adds Usenet news support to sendmail
fax Adds FAX support using HylaFAX software
pop Adds Post Office Protocol (POP) support to sendmail
procmail Adds an interface for procmail
mail11 Adds the DECnet mail11 mailer
phquery Adds the phquery program for CSO phone book
qpage Adds the QuickPage mailer used to send email to a pager
cyrus Adds the cyrus and cyrusbb mailers
Most hosts need only the SMTP transport to send and receive mail among other hosts, and the localmailer to move mail among users on the system. To achieve this, include both MAILER(`local') andMAILER(`smtp') in the macro configuration file. (The local mail transport is included by default, but
is usually specified in the macro configuration file for clarity.)
The MAILER(`local') macro adds the local mailer, which delivers local mail between users of thesystem, and the prog mailer, which sends mail files to programs running on the system. TheMAILER(`smtp') macro includes all of the mailers needed to send SMTP mail over a network. Themailers included in the sendmail.cf file by the MAILER(`smtp') macro are:
smtp
This mailer handles only traditional 7-bit ASCII SMTP mail.
esmtp
This mailer supports Extended SMTP (ESMTP), which understands the ESMTP protocolextensions and the complex message bodies and enhanced data types of MIME mail. This is thedefault mailer used for SMTP mail.
smtp8
This mailer sends 8-bit data to the remote server, even if the remote server does not supportESMTP.

dsmtp
This mailer supports the ESMTP ETRN command that allows the destination system to retrievemail queued on the server.
relay
This mailer is used to relay SMTP mail through another mail server.
Every system that connects to or communicates with the Internet needs the MAILER(`smtp') set of
mailers, and most systems on isolated networks use these mailers because they use TCP/IP on theirenterprise network. Despite the fact that the vast majority of sendmail systems require thesemailers, installing them is not the default. To support SMTP mail, you must add the MAILER(smtp)
macro to your configuration.
12.2.2.7 LOCAL_*
The LOCAL_CONFIG, LOCAL_NET_CONFIG, LOCAL_RULESET, and LOCAL_RULE_n macros allow you to put
sendmail.cf configuration commands directly in the m4 source file. These commands are copied,exactly as written, into the correct part of the sendmail.cf file. The list below describes where themacros place the sendmail.cf configuration commands that you provide.
LOCAL_CONFIG
Marks the start of a block of sendmail.cf commands to be added to the local informationsection of the sendmail.cf file.
LOCAL_NET_CONFIG
Marks the start of a section of rewrite rules that are to be added to the end of ruleset 0, whichis also called ruleset parse.
LOCAL_RULE_ n
Marks the start of a section of rewrite rules to be added to ruleset 0, 1, 2, or 3. The n identifies
the ruleset to which the rewrite rules are to be added.
LOCAL_RULESET
Marks the start of a custom ruleset to be added to the configuration.

These macro mean that everything that can be done in the sendmail.cf file can be done in the m4macro configuration file because not only do you have access to all of the m4 macros, you haveaccess to all of the sendmail.cf commands. Of course, before you can use the sendmail.cf commandsyou need some idea of how they work. The next section briefly covers the sendmail.cf configurationcommands.

12.3. sendmail.cf Configuration Language
There is rarely any need to use sendmail.cf commands in your configuration because the sendmailmacros created by the sendmail developer handle most possible configurations. Yet it is useful toknow something about the sendmail.cf command for those rare occasions when you come across aconfiguration that requires something that the sendmail developers just didn't think of. Table 12-3lists the sendmail.cf configuration commands.
Table 12-3. sendmail.cf configuration commands
Command Syntax Meaning
Version Level [Vlevel/vendor] Specify version level.
Define Macro Dxvalue Set macro x to value.
Define Class Ccword1[ word2] ... Set class c to word1 word2 ....
Define Class Fcfile Load class c from file.
Key File Kname type [argument] Define database name.
Set Option Ooption=value Set option to value.
Trusted Users Tuser1[ user2 ...] Trusted users are user1 user2 ....
Set Precedence Pname=number Set name to precedence number.
Define Mailer Mname, [field=value] Define mailer name.
Define Header H[?mflag ?]name :format Set header format.
Set Ruleset Sn Start ruleset number n.
Define Rule Rlhs rhs comment Rewrite lhs patterns to rhs format.
All of the commands in this table, except the last two, can be used with the LOCAL_CONFIG macro.The LOCAL_CONFIG macro is the one that heads a section of sendmail.cf commands used to define
values for the configuration. These can be sendmail.cf database declarations, macros, or classvalues. Essentially anything except rewrite rulesets. Despite this, several of the sendmail.cfcommands shown in Table 12-3 are simply not needed in the sendmail.mc file, even when you createa special configuration.
There is no real reason to add sendmail.cf O commands to the sendmail.mc configuration because allsendmail.cf options can be set using the define command and m4 variables. Likewise, all necessaryM commands are added to the sendmail.cf file by the m4 MAILER macros, and therefore it is very

unlikely you would use LOCAL_CONFIG to add M commands to your configuration. The T and Pcommands have limited roles. The T command adds usernames to the list of users who are allowed
to send mail under someone else's username. Because of security considerations, you should be verycareful about extending this list, and even if you do, you can use the confTRUSTED_USERS define inthe m4 file, or the FEATURE(use_ct_file) macro and define the usernames in the /etc/mail/trusted-users file. The P command defines mail precedence, and frankly the default sendmail.cf configuration
already has more mail precedence defined you will ever need.
The sendmail.cf commands that most commonly follow the LOCAL_CONFIG macro are D, C, F, and K.All of these can be used to define custom values that are later use, in a custom ruleset. The Dcommand sets the value for a sendmail.cf macro. The C command adds values to a sendmail.cf classfrom the command line. The F command adds values to a sendmail.cf class from a file. The K
command defines a database from which sendmail can obtain values. All of the standard sendmail.cfmacros, classes, and databases can be used through standard m4 macros. D, C, F, or K commands
are added to the sendmail.mc configuration only on those rare occasions when you create your ownprivate macros, classes, or databases.
The H command defines a mail header. All of the standard mail headers are already defined in the
default configuration, and it is unlikely you will ever need to define a new header type. Calling specialheader processing is the most common reason to add a header definition to the configuration. (Seethe cf/cf/knecht.mc file for an example of a header definition that calls special processing, and seeRecipe 6.9 in the sendmail Cookbook [O'Reilly] by Craig Hunt for a good description of how specialheader processing is invoked.) Of course, if you do call special header processing, you must alsowrite the ruleset that performs the processing. The S and R commands used to write custom rulesets
are our next topic.
12.3.1. sendmail.cf R and S Commands
Arguably the most powerful feature of sendmail is the rewrite rule. Rewrite rules determine howsendmail processes a mail message. sendmail passes the addresses from the headers of a mailmessage through collections of rewrite rules called rulesets. In the sendmail.cf file, each ruleset isnamed using an S command, coded as Sn, where n specifies the name or number that is to be
assigned to the current ruleset.
The rules themselves are defined by R commands grouped together as rulesets. Each rule has a left
side and a right side, separated by at least one tab character.[3] When sendmail is processing a mailaddress, it scans through the rewrite rules looking for a match on the left side. If the addressmatches the left side of a rewrite rule, the address is replaced by the right side and processed again.In this manner, the rewrite rules transform a mail address from one form to another. Think of themas being similar to an editor command that replaces all text matching a specified pattern withanother.
[3] Only tabs can separate the left and right side.
A sendmail ruleset therefore looks like this:
Sn
Rlhs rhs
Rlhs2 rhs2

12.3.2. The Left Side
The left side of a rewrite rule specifies the pattern an address must match to be transformed. Thepattern may contain literals, sendmail.cf macros and classes, and the metasymbols described in thefollowing list:
$@
Match exactly zero tokens
$*
Match zero or more tokens
$+
Match one or more tokens
$-
Match exactly one token
$= x
Match any value in class x
$~ x
Match any value not in class x
A token is either a string of characters delimited by an operator or a delimiting operator. Theoperators are defined by the sendmail.cf OperatorChars option, as shown below:
O OperatorChars=.:%@!^/[ ]+
Assume the following address:

This email address contains seven tokens: alana, @, ipa, ., vbrew, ., and com. Three of these tokens,two dots (.), and an @, are operators. The other four tokens are strings. This address would matchthe symbol $+ because it contains more than one token, but it would not match the symbol $-
because it does not contain exactly one token.
When a rule matches an address, the text matched by each of the patterns in the expression isassigned to special variables, called indefinite tokens, which can then be used in the right side. Theonly exception to this is the $@, which matches no tokens and therefore will never generate text to be
used on the right side.
12.3.3. The Right Side
When the left side of a rewrite rule matches an address, the original text is deleted and replaced bythe right side of the rule. Literal values in the right side are copied to the new address verbatim.Righthand side sendmail.cf macros are expanded and copied to the new address. Just as the left sidehas a number of metasymbols used for pattern matching, the right side has a special syntax fortransforming an address, as described in the following list:
$ n
This metasymbol is replaced with the n'th indefinite token from the left side.
$[ name$]
This string is replaced by the canonical form of the hostname supplied.
$( map key $ :default $)
This special syntax returns the result of looking up key in the database named map. If the
lookup is unsuccessful, the value defined for default is returned. If a default is not supplied
and lookup fails, the key value is returned.
$> n
This metasymbol calls ruleset n to process the rest of the line.
A rewrite rule that matches is normally tried repeatedly until it fails to match, then parsing moves onto the next rule. This behavior can be changed by preceding the right side with one of two specialloop control metasymbols:

$@
This metasymbol terminates the ruleset.
$:
This metasymbol terminates this individual rule.
There is also a special right side syntax used to create the mail delivery triple of mailer, host anduser. This syntax is most commonly seen in ruleset 0, which parses the mail delivery address. Thesesymbols are:
$# mailer
This metasymbol causes ruleset evaluation to halt and specifies the mailer that should be usedto transport this message in the next step of its delivery. The special mailer error can beinvoked in this manner to return an error message.
$@ host
This metasymbol specifies the host to which this message will be delivered. If the destinationhost is the local host, this syntax may be omitted from the mail delivery triple. The host may
be a colon-separated list of destination hosts that will be tried in sequence to deliver themessage.
$ :user
This metasymbol specifies the recipient user for the mail message.
12.3.4. A Simple Rule Pattern Example
To better see how the macro substitution patterns operate, consider the following left side:
$* < $+ >
This rule matches "Zero or more tokens, followed by the < character, followed by one or moretokens, followed by the > character."
If this rule were applied to [email protected] or Head Brewer < >, the rule would not match. The
first string would not match because it does not include a < character, and the second would failbecause $+ matches one or more tokens and there are no tokens between the <> characters. In any
case in which a rule does not match, the right side of the rule is not used.

If the rule were applied to Head Brewer < [email protected] >, the rule would match, and on theright side $1 would be substituted with Head Brewer and $2 would be substituted [email protected].
If the rule were applied to < [email protected] > the rule would match because $* matches zero ormore tokens, and on the right side $1 would be substituted with the empty string.
12.3.5. A Complete Rewrite Rule Example
The following example uses the LOCAL_NET_CONFIG macro to declare a local rule and to insert the
rule near the end of ruleset 0. Ruleset 0 resolves a delivery address to a mail delivery triplespecifying the mailer, user, and host. Example 12-1 shows a sample rewrite rule.
Example 12-1. Sample rewrite rule
LOCAL_NET_CONFIGR$*<@$*.$m.>$* $#esmtp $@$2.$m. $:$1<@$2.$m.>$3
The LOCAL_NET_CONFIG macro is used to direct m4 to place the rewrite rule in ruleset 0. The ruleitself is the line beginning with R. Let's look at the rule's left side and the right side in turn.
The left side looks like: $*<@$*.$m.>$*.
< and > are focus characters, inserted by ruleset 3 early on in the address processing, which enclosethe host part of the mail address. All addresses get rewritten with these focus characters. The @ is
literally the @ used in an Internet email address to separate the user part from the host part. Thedots (.) are literally the dots used in domain names. $m is a sendmail.cf macro used to hold the localdomain name. The three remaining items are all $* metasymbols.
This rule matches any mail address that looks like: DestUser<@somehost.ourdomain.>Some Text.
That is, it matches mail for any user at any host within our domain.
Text matched by metasymbols on the left side of a rewrite rule is assigned to indefinite tokens foruse on the right side. In this example, the first $* matches all text from the start of the address untilthe <@ characters. All of this text is assigned to $1 for use on the right side. Similarly, anythingmatching the second $* in this rewrite rule is assigned to $2, and anything matching the last $* isassigned to $3.
When this rule matches an address of any user at any host within our domain, it assigns theusername to $1, the hostname to $2, and any trailing text to $3. The right side is then used to
process these values.
The right side of our example rewrite rule looks like this: $#esmtp $@$2.$m. $:$1<@$2.$m.>$3.
When the right side of our ruleset is processed, each of the metasymbols are interpreted andrelevant substitutions are made.
The $# metasymbol causes this rule to resolve to a specific maileresmtp, in our case.

The $@ metasymbol specifies the target host. In our example, the target host is specified as $2.$m.,
which is the fully qualified domain name of the host in our domain. The FQDN is constructed of thehostname component assigned to $2 from our left side with our domain name (.$m.) appended.
The $: metasymbol specifies the recipient user's address. This is the full email address of therecipient, constructed in this case by $1 < @ $2.$m. > $3user, bracket, at, host, dot, domain, dot,
bracket, trailing text.
Since this rule resolves to a mailer, the message is forwarded to the mailer for delivery. In ourexample, the message would be forwarded to the destination host using the SMTP protocol.

12.4. Creating a sendmail Configuration
Using the sendmail.mc and sendmail.cf information covered so far in this chapter you should be able toread or create a basic sendmail configuration. Let's get started by looking at a sample sendmail.mc file.
The sendmail distribution comes with a large number of sample macro configuration files located in thecf/cf directory. Many are generic configuration files for different operating systems, including the generic-linux.mc file for Linux. Example 12-2 shows the contents of this file.
Example 12-2. The generic-linux.mc file
divert(-1)## Copyright (c) 1998, 1999 Sendmail, Inc. and its suppliers.# All rights reserved.# Copyright (c) 1983 Eric P. Allman. All rights reserved.# Copyright (c) 1988, 1993# The Regents of the University of California. All rights reserved.## By using this file, you agree to the terms and conditions set# forth in the LICENSE file which can be found at the top level of# the sendmail distribution.## ## This is a generic configuration file for Linux.# It has support for local and SMTP mail only. If you want to# customize it, copy it to a name appropriate for your environment# and do the modifications there.# divert(0)dnlVERSIONID(`$Id: ch12.xml,v 1.2 2005/03/03 21:11:44 ellie Exp ellie $') OSTYPE(`linux')dnlDOMAIN(`generic')dnlMAILER(`local')dnlMAILER(`smtp')dnl
A few things are obvious about this configuration file without knowing anything about the file syntax. First,the name sendmail.mc is obviously not sacrosanct. generic-linux.mc works just as well and is clearly amore descriptive name. Second, the configuration file is very short. The bulk of the lines in Example 12-1are comments; only the last five lines are really sendmail configuration commands. Third, the sendmailconfiguration commands are short with a relatively simple syntax.

The five active lines in the generic-linux.mc file are composed of four different macros. The VERSIONID
macro from the generic-linux.mc file is:
VERSIONID(`$Id: ch12.xml,v 1.2 2005/03/03 21:11:44 ellie Exp ellie $')
From this we know that the generic-linux.mc file was last updated in September 1999 by Greg Shapiro,one of the Linux developers.
The OSTYPE( `linux ') command in the generic-linux.mc file loads the cf/ostype/linux.m4 file, which wewill look at shortly. The DOMAIN( `generic ') macro processes the cf/domain/generic.m4 file, which is also
discussed shortly.
Finally, the MAILER( `local ') and MAILER( `smtp ') macros are used to add the local , prog , smtp ,esmtp , smtp8 , dsmtp , and relay mailers to the sendmail.cf configuration.
These five macro lines create the entire generic Linux sendmail configuration. There are, however,additional details to be found in the linux.m4 and generic.m4 file.
12.4.1. The linux.m4 OSTYPE File
The cf/ostype/linux.m4 file is shown in Example 12-3 .
Example 12-3. The linux.m4 OSTYPE file
divert(-1)## Copyright (c) 1998, 1999 Sendmail, Inc. and its suppliers.# All rights reserved.# Copyright (c) 1983 Eric P. Allman. All rights reserved.# Copyright (c) 1988, 1993# The Regents of the University of California. All rights reserved.## By using this file, you agree to the terms and conditions set# forth in the LICENSE file which can be found at the top level of# the sendmail distribution.## divert(0)VERSIONID(`$Id: ch12.xml,v 1.2 2005/03/03 21:11:44 ellie Exp ellie $')define(`confEBINDIR', `/usr/sbin')ifdef(`PROCMAIL_MAILER_PATH',, define(`PROCMAIL_MAILER_PATH', `/usr/bin/procmail'))FEATURE(local_procmail)
The file begins with a block of comments and a VERSIONID macro. It then defines the path to the directorythat holds executable binaries. The path is stored in the m4 variable confEBINDIR . The linux.m4 file setsthat path value to /usr/sbin . Next, if the path to procmail has not yet been defined, it is set to/usr/bin/procmail . The last line in the file is a FEATURE macro that loads the local_procmail feature,

which cause sendmail to use procmail as the local mailer. m4 uses the path defined forPROCMAIL_MAILER_PATH when constructing the local_procmail feature. This is an excellent example of
how a value is first defined and then used in building a configuration. The linux.m4 file is also a goodexample of the type of configuration commands normally found in an OSTYPE file.
12.4.2. The generic.m4 DOMAIN File
The cf/domain/generic.m4 file is a sample DOMAIN file provided by the sendmail developers. It is used by
the generic-linux.mc file shown in Example 12-1 . The generic.m4 file is shown in Example 12-4 .
Example 12-4. The generic.m4 DOMAIN file
divert(-1)## Copyright (c) 1998, 1999 Sendmail, Inc. and its suppliers.# All rights reserved.# Copyright (c) 1983 Eric P. Allman. All rights reserved.# Copyright (c) 1988, 1993# The Regents of the University of California. All rights reserved.## By using this file, you agree to the terms and conditions set# forth in the LICENSE file which can be found at the top level of# the sendmail distribution.## ## The following is a generic domain file. You should be able to# use it anywhere. If you want to customize it, copy it to a file# named with your domain and make the edits; then, copy the appropriate# .mc files and change `DOMAIN(generic)' to reference your updated domain# files.#divert(0)VERSIONID(`$Id: ch12.xml,v 1.2 2005/03/03 21:11:44 ellie Exp ellie $')define(`confFORWARD_PATH', `$z/.forward.$w+$h:$z/.forward+$h:$z/.forward.$w:$z/.forward')dnldefine(`confMAX_HEADERS_LENGTH', `32768')dnlFEATURE(`redirect')dnlFEATURE(`use_cw_file')dnlEXPOSED_USER(`root')
Again the file begins with a large block of comments and a VERSIONID macro. This is followed by a define
that sets the search path sendmail will use when looking for a user's .forward file. This command sets theForwardPath option in the sendmail.cf file. $z , $w , and $h are internal sendmail.cf macros.[4]
[4] See the cf/README file for more information about these sendmail.cf macros and the Sendmail Installation and Operations Guide ,
found in file doc/op.ps , for a full list of all sendmail.cf macros.
The second define sets the maximum length for all headers in a single piece of mail to 32,768 bytes. It

does this by setting the MaxHeadersLength option in the sendmail.cf file.
The next two lines add features to the sendmail configuration. The FEATURE( `redirect ') macro addssupport for the .REDIRECT pseudo-domain. A pseudo-domain is a domain-style extension internally addedto an email address by sendmail to define special handling for the address. The .REDIRECT pseudo-domain
works together with the aliases database to handle mail for people who no longer read mail at your sitebut who still get mail sent to an old address.[5] After enabling this feature, add an alias for each obsoletemailing address in the form:
[5] The aliases database is covered later in this chapter.
old-address new-address .REDIRECT
This returns the following error to the sender telling them to try a new address for the recipient:
551 User not local; please try <new-address>
The FEATURE( `use_cw_file ') command reads /etc/mail/local-host-names and adds the hostnameslisted there to sendmail.cf class $=w . Class $=w contains the names of hosts for which the local computer
will accept local mail. Normally, when a system running sendmail receives mail from the network that isaddressed to another hostname, it assumes that the mail belongs to that host and forwards the mail tothat host if the local host is configured as a relay, or discards the mail if the local host is not configured asa relay. If the system should accept, as local mail, mail that is addressed to another host, the name of theother host is added to class $=w . Any hostname listed in the local-host-names file is added to class $=wwhen the use_cw_file feature is used.
The last line in the generic.m4 file is the EXPOSED_USER macro. The EXPOSED_USER macro adds usernamesto class $=E . The users listed in class $=E are not masqueraded, even when masquerading is enabled.
(Masquerading hides the real hostname in outbound mail and replaces it with the hostname you wish toadvertise to the outside world.) Some usernames, such as root , occur on many systems and are thereforenot unique across a domain. For those usernames, converting the host portion of the address makes itdifficult to sort out where the message really came from and makes replies impossible. The EXPOSED_USER
command in the generic.m4 file prevents that from happening by ensuring that root is not masqueraded.
Given the commands contained in the generic-linux.mc file, the linux.m4 file and the generic.m4 file, thegeneric Linux configuration does the following:
Sets /usr/sbin as the path to executable binaries
Sets the procmail path to /usr/bin/procmail
Uses procmail as the local mailer
Defines the search path for .forward files
Adds support for the .REDIRECT pseudo-domain to the configuration
Loads class $=w from the /etc/local-host-names file
Adds root to class $=E
Adds the local , prog , smtp , esmtp , smtp8 , dsmtp , and relay mailers to the configuration

You can configure sendmail by modifying the configuration provided in your Linux distribution or create acustom configuration by modifying the generic-linux.mc file provided with the sendmail distribution. In thenext section we build a sendmail configuration based on the generic-linux.mc file.
12.4.3. Creating a Sample Linux sendmail Configuration
We begin building our custom configuration by changing to the configuration directory and copying thegeneric-linux.mc configuration file to a working file. Because we are creating the configuration forvstout.vbrew.com , we call the working file vstout.mc .
$ cd sendmail-8.12.11/cf/cf$ cp generic-linux.mc vstout.mc
We are configuring vstout to be a mail server for our group. We want it to:
Accept inbound mail for various clients that plan to store mail on the server. No modifications to them4 configuration are needed to support this because the domain/generic.m4 file used in the Linuxconfiguration already includes the FEATURE( `use_cw_file ') command.
Relay mail for clients in the vbrew.com domain. Implementing this requires no changes to the m4configuration. By default, sendmail configurations support relaying for any domain defined in therelay-domains file. We will see how to configure the relay-domains file later in the chapter when wediscuss sendmail databases.
Rewrite the sender address on outbound mail to a generic format used by everyone at vbrew.com .We will add support for the genericstable database to do this. The contents of the genericstabledatabase is covered in the sendmail databases section of this chapter.
Provide some anti-spam support. We will use the access database for this task.
Be easy to configure with additional security measures. The access database added for its anti-spamcapabilities has many other easily configured features. We will see more about the access database insendmail databases section later in this chapter.
To configure sendmail to do the tasks listed above, we edit the vstout.mc file and add the followingfeatures:
FEATURE(`genericstable')GENERICS_DOMAIN(`vbrew.com')FEATURE(`generics_entire_domain')FEATURE(`access_db')
This first line adds support for the genericstable . The second line defines vbrew.com as the domain towhich the genericstable will be applied. The third line tells sendmail to apply the genericstable to everyhost in the vbrew.com domain. The final line adds support for the access database.
After removing unneeded comments, updating the VERSIONID and adding the new lines, the vstout.mc
configuration file is as shown below in Example 12-5 :

Example 12-5. Sample custom configuration
VERSIONID(`Sample vstout configuration by Craig Hunt')OSTYPE(`linux')dnlDOMAIN(`generic')dnldnl Add support for the genericstableFEATURE(`genericstable')dnl Apply the genericstable to the vbrew.com domainGENERICS_DOMAIN(`vbrew.com')dnl Apply the genericstable to every host in the domainFEATURE(`generics_entire_domain')dnl Add support for the versatile access databaseFEATURE(`access_db')MAILER(`local')dnlMAILER(`smtp')dnl
We now need to build a sendmail.cf file from our master configuration file, install the new sendmail.cf file,and ensure that sendmail reads it.
12.4.4. Building the sendmail.cf File
The sendmail.cf file is normally built in the same cf/cf directory where the master configuration file iscreated. If you're not currently in that directory, change to the cf/cf directory before attempting the build.
Run Build to create the sendmail.cf file from the m4 master configuration file. The Build script is easy touse. Provide the name of the output file you want to create as an argument on the Build command line.
The script replaces the .cf extension of the output file with the extension .mc and uses the macroconfiguration file with that name to create the output file. Thus, putting vstout.cf on the Build command
line means that vstout.mc is used to create vstout.cf . Here is an example:
$ ./Build vstout.cfUsing M4=/usr/bin/m4rm -f vstout.cf/usr/bin/m4 /m4/cf.m4 vstout.mc > vstout.cf || ( rm -f vstout.cf && exit 1 )chmod 444 vstout.cf
Despite the simplicity of the Build command, many administrators never use it to build a sendmail
configuration because the m4 command line used to build a sendmail configuration is also very simple. Them4 command line that would build the vstout.cf file from the vstout.mc file is:
$ m4 ../m4/cf.m4 vstout.mc > vstout.cf
For the average sendmail administrator, the Build script doesn't offer any critical advantages. For most ofus, deciding to use the Build script or the m4 command is primarily a matter of personal preference. It iseven possible to invoke the Makefile directly with a basic make command. Use whatever method you
prefer.
After building the new .cf file, test it thoroughly as described later in this chapter before copying that file to

the location where sendmail expects to find the sendmail.cf configuration file, which is usually/etc/mail/sendmail.cf . In most cases this is simply done with a cp command
# cp vstout.cf /etc/mail/sendmail.cf
However, it can also be done with the Build command, as follows:
# mv vstout.cf sendmail.cf# ./Build install-cfUsing M4=/usr/bin/m4../../devtools/bin/install.sh -c -o root -g bin -m 0444 sendmail.cf /etc/mail/sendmail.cf../../devtools/bin/install.sh -c -o root -g bin -m 0444 submit.cf /etc/mail/submit.cf
The Build install-cf command used above installs two configuration files: the sendmail.cf file, and a
second file named submit.cf . sendmail.cf doesn't exist unless you create it. (In this case we created it asvstout.cf and renamed that file sendmail.cf .) But a full submit.cf file is delivered with the sendmaildistribution, and does not normally need to be created or modified by you. The submit.cf file is the specialconfiguration used by sendmail when it acts as a mail submission program, while sendmail.cf is theconfiguration file used by the sendmail daemon. The Build install-cf command is generally used when
a new sendmail distribution is first installed to ensure that both the sendmail.cf and submit.cf files areinstalled. Other than the initial installation, however, there is generally no need to copy both files at thesame time because it is not usually necessary to create a new submit.cf file when you create a newsendmail.cf file.
Once the configuration is installed, restart sendmail to force it to read the new configuration by sending ita HUP signal. This method of restarting sendmail uses standard sendmail signal processing that is available
on any Linux system:
# kill -HUP `head -1 /var/run/sendmail.pid`
Some Linux systems provide their own tools for managing daemons. For example, some systems can startsendmail with the service command:
# service sendmail startStarting sendmail: [ OK ]
Regardless of how sendmail is restarted, when the daemon starts it reads in the configuration file/etc/mail/sendmail.cf , which now contains the new configuration.

12.5. sendmail Databases
The sample configuration created above uses several sendmail databases. (Here we use the term"database" loosely to include both real databases and flat files.) sendmail databases are an oftenoverlooked component of sendmail configuration. Yet sendmail databases play an important role insendmail configuration. It is in these databases, not in the m4 files or the sendmail.cf file, that day-to-day configuration changes are made. The sendmail databases used in our sample configurationare as follows:
aliases
The aliases database is included in the configuration by default. This database is an essentialcomponent in local mail delivery and in mail forwarding. Nothing needs to be added to theconfiguration to use the aliases database.
local-host-names
The local-host-names file is added to a configuration by the use_cw_file feature. This file isused to define which mail is accepted for local delivery.
relay-domains
The relay-domains file is included in the configuration by default. Therefore, no changes areneeded in the sendmail configuration to use this file. The relay-domains file can authorizerelaying, which, by default, is disabled.
genericstable
The genericstable feature adds support for this database. The genericstable is used to rewritethe email addresses an organization uses internally into the format it wishes to present to theoutside world.
access
The access_db feature adds support for this database. The access database is useful in a widevariety of ways.
Each of these databases, and others not used in the sample configuration, are described in the
following sections.
12.5.1. The aliases Database
Mail aliases are a powerful feature for routing mail on a destination host. For example, it is commonpractice to direct feedback or comments relating to a World Wide Web server to "webmaster." Oftenthere isn't a user known as "webmaster" on the target machine; instead, it is an alias for anotheruser. Another common use of mail aliases is to create mailing lists by directing a single alias to manyrecipients or to use an alias to direct incoming messages to the list server program. Aliases can:
Provide a shorthand or well-known name for mail to be addressed to in order to go to one ormore persons. For example, all systems require aliases for the well-known names Postmasterand MAILER-DAEMON in order to be RFC compliant.
Invoke a program with the mail message as the input to the program. Always be extremelyaware of security when defining aliases that invoke programs or write to programs, sincesendmail sometimes runs with root permissions.
Deliver mail to a file.
Details concerning mail aliases may be found in the aliases(5) manpage. A sample aliases file isshown in Example 12-6.
Example 12-6. Sample aliases file
## The following two aliases must be present to be RFC-compliant.# It is important to resolve them to 'a person' who reads mail routinely.#postmaster: root # required entryMAILER-DAEMON: postmaster # required entry### demonstrate the common types of aliases#usenet: janet # alias for a personadmin: joe,janet # alias for several peoplenewspak-users: :include:/usr/lib/lists/newspak # read recipients from filechangefeed: |/usr/local/lib/gup # alias that invokes programcomplaints: /var/log/complaints # alias writes mail to file#
Whenever you update the /etc/aliases text file, be sure to run the command:
# /usr/bin/newaliases

This command rebuilds the database that sendmail uses internally. The newaliases command is a
symbolic link to the sendmail executable, which behaves exactly as if sendmail was invoked with the-bt command line argument.
The sendmail program consults the aliases database to determine how to handle an incoming mailmessage that has been accepted for local delivery. If the user portion of the delivery address in themail message matches an entry in the aliases database, sendmail redirects the message as describedby the entry. But this happens only if sendmail accepts the mail message for local delivery. The local-host-names file helps sendmail decide which messages should be accepted for local delivery.
12.5.2. The local-host-names File
Inbound mail is either delivered directly to the addressee or relayed to another mail host for delivery.sendmail accepts only mail for local delivery that is addressed to the local host. All other mail isrelayed. The system checks class $=w to decide whether or not it should accept inbound mail for localdelivery. Class $=w is an array that contains all of the names that sendmail considers valid for local
mail delivery.
The use_cw_file feature directs sendmail to load the /etc/mail/local-host-names file into class $=w. Itdoes this by placing the following F command in the sendmail.cf file:
Fw/etc/mail/local-host-names
Once the use_cw_file feature is added to the configuration, sendmail expects to find the local-host-names file and displays a non-fatal error message when it doesn't. If you're not ready to addhostnames to the file, simply create an empty file.
To configure the sendmail server to accept inbound mail for other hosts, simply add the hostnames ofthose hosts to the local-host-names file. The local-host-names file is just a list of hostnamesonehostname to a line. Here is a sample local-host-names file for the vbrew.com domain:
vbrew.comvporter.vbrew.comvale.vbrew.comvlager.vbrew.comvpils.vbrew.comvipa.vbrew.com
The values stored in the local-host-names file are added to the other values in class $=w. The othervalues stored in $=w are all of the hostnames, hostname aliases, and IP addresses assigned to this
host that sendmail was able to determine by probing the various network interfaces. It is possible tolimit the interface probing done by sendmail by adding the following define to the sendmailconfiguration:
define(`confDONT_PROBE_INTERFACES', `true')
The confDONT_PROBE_INTERFACES define is generally only used when probing the interfaces gives
sendmail erroneous information, or when a large number of virtual interfaces are used.

It is also possible to add hostnames to class $=w inside the sendmail configuration file using theLOCAL_DOMAIN macro:
LOCAL_DOMAIN(`vbrew.com')LOCAL_DOMAIN(`vipa.vbrew.com')
However, every time a LOCAL_DOMAIN macro is added to the configuration the sendmail.cf file must
be rebuilt, tested, and moved to the /etc/mail directory. When the local-host-names file is used,there is no need to rebuild sendmail.cf just because the local-host-names file has been edited.
12.5.2.1 The bestmx_is_local feature
The bestmx_is_local feature is another way to accept mail for local delivery that is addressed toanother hostname. It works well if the only reason why hostnames are being added to the local-host-names file is because the local host is the preferred mail exchanger for those hosts. Mail addressed toany system that lists the local host as its preferred mail exchanger is accepted as local mail when thebestmx_is_local feature is used. To use this approach, put the following line in the configuration:
FEATURE(`bestmx_is_local', `vbrew.com')
The great advantage of the bestmx_is_local feature is that it is easythe hostnames of MX clients donot need to be added to the local-host-names file. However, a potential problem with thebestmx_is_local solution is that it increases the processing overhead for each piece of mail. This isnot a problem for a small system, but it could be a problem if the system deals with a high volume ofmail. Another limitation is that bestmx_is_local depends completely on MX records, but it is possibleto have other reasons to accept mail as local mail. The local-host-names file can store anyhostnames that you wish; it is not limited to hosts that define your system as their mail exchanger.
Mail that is not addressed to the local host is relayed. The relay-domains file is one way to configurerelaying.
12.5.3. The relay-domains File
By default, sendmail does not permit relayingeven relaying from other hosts within the local domain.Attempts to relay through a system using the default configuration returns the "Relaying denied"error to the sender. sendmail will, however, relay mail for any domain listed in class $=R, andanything listed in the relay-domains file is added to class $=R. For example, the following commands
extend the relay-domains file to enable relaying for the vbrew.com domain:
# cat >> /etc/mail/relay-domainsvbrew.comCtrl-D
Restart sendmail to ensure that it reads the relay-domains file:

# kill -HUP `head -1 /var/run/sendmail.pid`
Now, hosts within the local domain are allowed to relay through vstout.vbrew.comall without anychanges to the m4 configuration or any need to rebuild the sendmail.cf file. Mail from or to hosts inthe vbrew.com domain is relayed. Mail that is neither from nor to a host in the vbrew.com domainis still blocked from relaying mail.
There are other ways to enable relaying. However, none is as easy as adding the local domain to therelay-domains file, and some are potential security risks. A good alternative is to add the localdomain name to class $=R by using the RELAY_DOMAIN macro. The following lines added to the macro
configuration would have the same effect as the relay-domains file defined above:
dnl RELAY_DOMAIN adds a domain name to class RRELAY_DOMAIN(`vbrew.com')
However, the RELAY_DOMAIN command requires modifying the m4 configuration, and rebuilding and
reinstalling the sendmail.cf file. Using the relay-domains file does not, which makes the relay-domains file simpler to use.
Another good alternative is the relay_entire_domain feature. The following command added to amacro configuration would enable relaying for hosts in the local domain:
dnl A feature that relays mail for the local domainFEATURE(`relay_entire_domain')
The relay_entire_domain feature relays mail from any host in a domain listed in class $=m. Bydefault, class $=m contains the domain name of the server system, which is vbrew.com on a server
named vstout.vbrew.com. This alternative solution works, but is slightly more complex than using therelay-domains file. Additionally, the relay-domains file is very flexible. It is not limited to the localdomain. Any domain can be listed in the relay-domains file and mail from or to any host in thatdomain will be relayed.
There are some techniques for enabling relaying that should be avoided for security reasons. Twosuch alternatives are:
promiscuous_relay
This feature turns on relaying for all hosts. Of course, this includes the local domain so thisfeature would work. However, it would create an open relay for spammers. Avoid thepromiscuous_relay feature even if your host is protected by a firewall.
relay_local_from
This feature enables relaying for mail if the email address in the envelope sender address of themail contains the name of a host in the local domain. Because the envelope sender address can

be faked, spammers can possibly trick your server into relaying spam.
Once the relay-domains file is configured to relay mail to and from the local domain, clients on thelocal network can start sending mail through the server to the outside world. The genericstable,discussed next, allows you to rewrite the sender address on the mail as it passes through the server.
12.5.4. The genericstable Database
To provide support for the genericstable, we added the genericstable feature, the GENERICS_DOMAIN
macro, and the generics_entire_domain feature to our sample sendmail configuration. The followingcommands were added:
FEATURE(`genericstable')GENERICS_DOMAIN(`vbrew.com')FEATURE(`generics_entire_domain')
The genericstable feature adds the code sendmail needs to make use of the genericstable. TheGENERICS_DOMAIN macro adds the value specified on the macro command line to sendmail class $=G.Normally, the values listed in class $=G are interpreted as hostnames, and only exact matches enablegenericstable processing. The generics_entire_domain feature causes sendmail to interpret thevalues in class $=G as domain names, and any host within one of those domains is processed through
the genericstable. Thus the hostname vipa.vbrew.com, because it contains the domain namevbrew.com, will be processed through the genericstable with this configuration.
Each entry in the genericstable contains two fields: the key and the value returned for that key. Thekey field can be either a full email address or a username. The value returned is normally a full emailaddress containing both a username and a hostname. To create the genericstable, first create a textfile that contains the database entries and then run that text file through the makemap command tobuild the genericstable database. For the vstout.vbrew.com server, we created the followinggenericstable:
# cd /etc/mail# cat > genericstablekathy [email protected] [email protected] [email protected] [email protected] [email protected] [email protected]@vpils.vbrew.com [email protected]@vale.vbrew.com [email protected] [email protected]# makemap hash genericstable < genericstable
Given this genericstable, the header sender address [email protected] is rewritten [email protected], which is the value returned by the genericstable for the key win. In this
example, every win account in the entire vbrew.com domain belongs to Winslow Smiley. No matterwhat host in that domain he sends mail from, when the mail passes through this system it is

rewritten into [email protected]. For replies to the rewritten address to work correctly, therewritten hostname must resolve to a host that will accept the mail and that host must have an aliasfor winslow.smiley that delivers the mail to the real win account.
The genericstable mapping can be anything you wish. In this example, we map login names to theuser's real name and the local domain name formatted as firstname.lastname@domain.[6] Of
course, if mail arrives at the server addressed to firstname.lastname@domain, aliases are needed to
deliver the mail to the users' real address. Aliases based on the genericstable entries shown abovecould be appended to the aliases database in the following manner:
[6] The firstname.lastname@domain format is not universally endorsed. See the sendmail FAQ for some reasons why
you might not want to use this address format.
# cd /etc/mail# cat > aliaseskathy.mccafferty: kathywin.strong: craigsara.henson: saradavid.craig: daverebecca.fro: beckyalana.smiley: alanaalana.darling: [email protected]: [email protected]: jayCtrl-D# newaliases
The aliases that map to a username store the mail on the server, where it is read by the user orretrieved by the client using POP or IMAP. The aliases that map to full addresses forward the mail tothe host defined in the full address.
Most of the entries in the sample genericstable (kathy, sara, dave, becky, and jay) are any-to-onemappings that work just like the win entry described above. A more interesting case is the mappingof the username alana. Three people in the vbrew.com domain have this username: Alana Henson,Alana Darling, and Alana Sweet. The complete addresses used in the genericstable keys for AlanaDarling and Alana Henson make it possible for sendmail to do one-to-one mappings for thoseaddresses. The key used for Alana Sweet's entry, however, is just a username. That key matchesany input address that contains the username alana, except for the input [email protected] and [email protected]. When a system handles mail that originatesfrom several hosts, it is possible to have duplicate login names. The fact that the key in thegenericstable can contain a full email address allows you to map these overlapping usernames.
The last database used in the sample Linux sendmail configuration is the access database. Thisdatabase is so versatile that it should probably be included in the configuration of every mail server.
12.5.5. The access Database
The access database offers great flexibility and control for configuring from which hosts or users mailis accepted and for which hosts and users mail is relayed. The access database is a powerfulconfiguration tool for mail relay servers that provides some protection against spam and that

provides much finer control over the relay process than is provided by the relay_domains file. Unlikethe relay_domains file, the access database is not a default part of the sendmail configuration. To usethe access database, we added the access_db feature to our sample Linux sendmail configuration:
FEATURE(`access_db')dnl
The general idea of the access database is simple. When an SMTP connection is made, sendmailcompares information from the envelope header to the information in the access database to see howit should handle the message.
The access database is a collection of rules that describe what action should be taken for messagesfrom or to specific users or hosts. The database has a simple format. Each line in the table containsan access rule. The left side of each rule is a pattern matched against the envelope headerinformation of the mail message. The right side is the action to take if the envelope informationmatches the pattern.
The left pattern can match:
An individual defined by either a full email address ([email protected]) or a username writtenas username@.
A host identified by its hostname or its IP address.
A domain identified by a domain name.
A network identified by the network portion of an IP address.
By default, the pattern is matched against the envelope sender address, and thus the action is takenonly if the mail comes from the specified address. Adding the blacklist_recipient feature to thesendmail configuration applies the pattern match to both source and destination envelope addresses.However, an optional tag field that can be prepended to the left side to provide finer control overwhen the pattern match is applied. Beginning the pattern with an optional tag tells sendmail to limitpattern matching to certain conditions. The three basic tags are:
To:
The action is taken only when mail is being sent to the specified address.
From:
The action is taken only when mail is received from the specified address.
Connect:
The action is taken only when the specified address is the address of the system at the remote

end of the SMTP connection.
There are five basic actions that may be defined on the right side of an access rule. These are:
OK
Accept the mail message.
RELAY
Accept the mail messages for relaying.
REJECT
Reject the mail with a generic message.
DISCARD
Discard the message using the $#discard mailer.
ERROR :dsn:code text
Return an error message using the specified DSN code, the specified SMTP error code, and thespecified text as the message.
An example /etc/mail/access might look like this:
[email protected] REJECTaol.com REJECT207.46.131.30 [email protected] OKlinux.org.au RELAYexample.com ERROR:5.7.1:550 Relaying denied to spammers
This example would reject any email received from [email protected], any host in the domainaol.com and the host 207.46.131.30. The next rule would accept email from [email protected],despite the fact that the domain itself has a reject rule. The fifth rule allows relaying of mail from anyhost in the linux.org.au domain. The last rule rejects mail from example.com with a custom errormessage. The error message includes delivery status notification code 5.7.1, which is a valid code asdefined by RFC 1893, and SMTP error code 550, which is a valid code from RFC 821.
The access database can do much more than shown here. Note that we explicitly said "basic" tags

and "basic" actions because there are several more values that can be used in advancedconfigurations. If you plan to tackle an advanced configuration, see the "More Information" sectionlater in the chapter.
The access database is the last database we used in our sample configuration. There are severalother databases that are not used in our sample Linux sendmail configuration. These are described inthe following section.
12.5.6. Other Databases
Some of the available sendmail databases were not used in our sample configuration either becausetheir use is discouraged or because they focus on outdated technologies. These databases are:
define( `confUSERDB_SPEC' , `path')
The confUSERDB_SPEC option tells sendmail to apply the user database to local addresses after
the aliases database is applied and before the .forward file is applied. The path argument tellssendmail where the database is found. The user database is not widely used because thesendmail developers discourage its use in their responses to questions 3.3 and 3.4 of the FAQ.
FEATURE( `use_ct_file' , `path')
The use_ct_file feature tells sendmail to add trusted usernames from the specified file to theclass $=t. Because users listed in $=t are allowed to send mail using someone else's
username, they present a security risk. There are fewer files to secure against tampering iftrusted users are defined in the macro configuration file using confTRUSTED_USERS, and
because so few users should be trusted, defining them in the macro configuration file is noburden.
FEATURE( `domaintable' , `specification')
The domaintable feature tells sendmail to use the domain table to map one domain name toanother. An optional database specification can be provided to define the database type andpathname, which, by default, are hash type and /etc/mail/domaintable. The domaintable easesthe transition from an old domain name to a new domain name by translating the old name tothe new name on all mail. Because you are rarely in this situation, this database is rarely used.
FEATURE( `uucpdomain' , `specification')
The uucpdomain feature tells sendmail to use the uucpdomain database to map UUCP sitenames to Internet domain names. The optional database specification overrides the defaultdatabase type of hash and the default database path of /etc/mail/uucpdomain. Theuucpdomain database converts email addresses from the .UUCP pseudo-domain into old-

fashioned UUCP bang addresses. The key to the database is the hostname from the .UUCP
pseudo-domain. The value returned for the key is the bang address. It is very unlikely that youwill use this database because even sites that still use UUCP don't often use bang addressesbecause current UUCP mailers handle email addresses that look just like Internet addresses.
FEATURE('bitdomain', 'specification')
The bitdomain feature tells sendmail to use the bitdomain database to map BITNET hostnamesto Internet domain names. BITNET is an outdated IBM mainframe network that you won't use,and therefore you won't use this database.
There are two other databases, mailertable and virtusertable, that, although not included in thesample configuration, are quite useful.
12.5.6.1 The mailertable
The mailertable feature adds support to the sendmail configuration for the mailertable. The syntax ofthe mailertable feature is:
FEATURE(`mailertable', `specification')
The optional database specification is used to override the default database type of hash and thedefault database path is /etc/mail/mailertable.
The mailertable maps domain names to the internal mailer that should handle mail bound for thatdomain. Some mailers are used only if they are referenced in the mailertable. For example, theMAILER(`smtp') command adds the esmtp, relay, smtp, smtp8, and dsmtp mailers to the
configuration. By default, sendmail uses only two of these mailers. The esmtp mailer is used to sendstandard SMTP mail, and the relay mailer is used when mail is relayed through an external server.The other three mailers are unused unless they are reference in a mailertable entry or in a customrewrite rule. (Using the mailertable is much easier than writing your own rewrite rules!)
Let's use the smtp8 mailer as an example. The smtp8 mailer is designed to send 8-bit MIME data tooutdated mail servers that support MIME but cannot understand Extended SMTP. If the domainexample.edu used such a mail server, you could put the following entry in the mailertable to handlethe mail:
.example.edu smtp8:oldserver.example.edu
A mailertable entry contains two fields. The first field is a key containing the host portion of thedelivery address. It can either be a fully qualified hostnameemma.example.eduor just a domainname. To specify a domain name, start the name with a dot, as in the example above. If a domainname is used, it matches every host in the domain.
The second field is the return value. It normally contains the name of the mailer that should handlethe mail and the name of the server to which the mail should be sent. Optionally, a username can bespecified with the server address in the form user@server. Also, the selected mailer can be the

internal error mailer. If the error mailer is used, the value following the mailer name is an errormessage instead of a server name. Here is an example of each of these alternative entries:
.example.edu smtp8:oldserver.example.eduvlite.vbrew.com esmtp:[email protected] error:nohost This host is unavailable
Normally, mail passing through the mailertable is sent to the user to which it is addressed. Forexample, mail to [email protected] is sent through the smtp8 mailer to the serveroldserver.example.edu addressed to the user [email protected]. Adding a username tothe second field, however, changes this normal behavior and routes the mail to an individual insteadof a mail server. For example, mail sent to any user at vlite.vbrew.com is sent instead [email protected]. There, presumably, the mail is handled manually. Finally, mailhandled by the mailertable does not have to be delivered at all. Instead, an error message can bereturned to the sender. Any mail sent to vmead.vbrew.com returns the error message "This host isunavailable" to the sender.
12.5.6.2 The virtusertable
The sendmail virtusertable feature adds support for the virtual user table, where virtual email hostingis configured. Virtual email hosting allows the mail server to accept and deliver mail on behalf of anumber of different domains as though it were a number of separate mail hosts. The virtual usertable maps incoming mail destined for some user@host to some otheruser@otherhost. You can thinkof this as an advanced mail alias featureone that operates using not just the destination user, butalso the destination domain.
To configure the virtusertable feature, add the feature to your m4 macro configuration as shown:
FEATURE(`virtusertable')
By default, the virtusertable source file is /etc/mail/virtusertable. You can override this by supplyingan argument to the macro definition; consult a detailed sendmail reference to learn about whatoptions are available.
The format of the virtual user table is very simple. The left side of each line contains a patternrepresenting the original destination mail address; the right side has a pattern representing the mailaddress that the virtual hosted address will be mapped to. The following example shows threepossible types of entries:
[email protected] [email protected] [email protected]@dairy.org [email protected]@artist.org [email protected]
In this example, we are virtual hosting three domains: bovine.net, dairy.org, and artist.org.
The first entry redirects mail sent to a user in the bovine.net virtual domain to a local user on themachine. The second entry redirects mail to a user in the same virtual domain to a user in another

domain. The third example redirects all mail addressed to any user in the dairly.org virtual domainto a single remote mail address. Finally, the last entry redirects any mail to a user in the artist.orgvirtual domain to the same user in another domain; for example, [email protected] would beredirected to [email protected].

12.6. Testing Your Configuration
Email is an essential service. It is also a service that can be exploited by intruders when it is misconfigured. It isvery important that you thoroughly test your configuration. Fortunately, sendmail provides a relatively easy wayof doing this.
sendmail supports an "address test" mode that allows a full range of tests. In the following examples we specifya destination mail address and a test to apply to that address. sendmail then processes that destination addressdisplaying the output of each ruleset as it proceeds. To place sendmail into address test mode, invoke it with the-bt argument.
The default configuration file used for the address test mode is the /etc/mail/sendmail.cf file. To specify analternate configuration file, use the -C argument. This is important because you will test a new configuration
before moving it to /etc/mail/sendmail.cf . To test the sample Linux sendmail configuration created earlier in thischapter, use the following sendmail command:
# /usr/sbin/sendmail -bt -Cvstout.cfADDRESS TEST MODE (ruleset 3 NOT automatically invoked)Enter <ruleset> <address>>
The > prompt shown above indicates that sendmail is ready to accept a test mode command. While in address
test mode, sendmail accepts a variety of commands that examine the configuration, check settings, and observehow email addresses are process by sendmail. Table 12-4 lists the commands that are available in test mode.
Table 12-4. Sendmail test mode commands
Command Usage
ruleset [,ruleset . . . ] address Process the address through the comma-separated list of rulesets.
=S ruleset Display the contents of the ruleset.
=M Display all of the mailer definitions.
$ v Display the value of macro v .
$= c Display the values in class c .
.D vvalue Set the macro v to value .
.C cvalue Add value to class c .
-d value Set the debug level to value .
/tryflags flags Set the flags used for address processing by /TRy .

Command Usage
/try mailer address Process the address for the mailer.
/parse address Return the mailer/host/user delivery triple for the address.
/canon hostname Canonify hostname .
/mx hostname Lookup the MX records for hostname .
/map mapname key Look up key in the database identified by mapname .
/quit Exit address test mode.
Several commands (=S , =M , $ v , and $= c ) display current sendmail configuration values defined in thesendmail.cf file, and the /map command displays values set in the sendmail database files. The -d command canbe used to change the amount of information displayed. A great many debug levels can be set by -d , but only a
few are useful to the sendmail administrator. See a detailed sendmail reference for valid debug values.
Two commands, .D and .C , are used to set macro and class values in real time. Use these commands to try
alternate configuration settings before rebuilding the entire configuration.
Two commands display the interaction between sendmail and DNS. /canon displays the canonical name returnedby DNS for a given hostname. /mx shows the list of mail exchangers returned by DNS for a given host.
Most of the remaining commands process an email address through sendmail's rewrite rules. /parse displaysthe processing of a delivery address and shows which mailer is used to deliver mail sent to the address. /TRydisplays the processing of addresses for a specific mailer. (The /tryflags command specifies whether the
sender or the recipient address should be processed by the /try command.) Use the ruleset address
command to display the processing of an address through any arbitrary list of rulesets that you wish to test.
First we'll test that sendmail is able to deliver mail to local users on the system. In these tests we expect alladdresses to be rewritten to the local mailer on this machine:
# /usr/sbin/sendmail -bt -Cvstout.cfADDRESS TEST MODE (ruleset 3 NOT automatically invoked)Enter <ruleset> <address>> /parse issacCracked address = $gParsing envelope recipient addresscanonify input: issacCanonify2 input: issacCanonify2 returns: issaccanonify returns: issacparse input: issacParse0 input: issacParse0 returns: issacParseLocal input: issacParseLocal returns: issacParse1 input: issacParse1 returns: $# local $: issacparse returns: $# local $: issac

2 input: issac2 returns: issacEnvToL input: issacEnvToL returns: issacfinal input: issacfinal returns: issacmailer local, user issac
This output shows us how sendmail processes mail addressed to isaac on this system. Each line shows us whatinformation has been supplied to a ruleset or the result obtained from processing by a ruleset. We told sendmailthat we wished to parse the address for delivery. The last line shows us that the system does indeed direct mailto isaac to the local mailer.
Next we'll test mail addressed to our SMTP address: [email protected] . We should be able to producethe same end result as our last example:
> /parse [email protected] address = $gParsing envelope recipient addresscanonify input: isaac @ vstout . vbrew . comCanonify2 input: isaac < @ vstout . vbrew . com >Canonify2 returns: isaac < @ vstout . vbrew . com . >canonify returns: isaac < @ vstout . vbrew . com . >parse input: isaac < @ vstout . vbrew . com . >Parse0 input: isaac < @ vstout . vbrew . com . >Parse0 returns: isaac < @ vstout . vbrew . com . >ParseLocal input: isaac < @ vstout . vbrew . com . >ParseLocal returns: isaac < @ vstout . vbrew . com . >Parse1 input: isaac < @ vstout . vbrew . com . >Parse1 returns: $# local $: isaacparse returns: $# local $: isaac2 input: isaac2 returns: isaacEnvToL input: isaacEnvToL returns: isaacfinal input: isaacfinal returns: isaacmailer local, user isaac
Next we will test that mail addressed to other hosts in the vbrew.com domain is delivered directly to that hostusing SMTP mail:
> /parse [email protected] address = $gParsing envelope recipient addresscanonify input: issac @ vale . vbrew . comCanonify2 input: issac < @ vale . vbrew . com >Canonify2 returns: issac < @ vale . vbrew . com . >canonify returns: issac < @ vale . vbrew . com . >parse input: issac < @ vale . vbrew . com . >

Parse0 input: issac < @ vale . vbrew . com . >Parse0 returns: issac < @ vale . vbrew . com . >ParseLocal input: issac < @ vale . vbrew . com . >ParseLocal returns: issac < @ vale . vbrew . com . >Parse1 input: issac < @ vale . vbrew . com . >MailerToTriple input: < > issac < @ vale . vbrew . com . >MailerToTriple returns: issac < @ vale . vbrew . com . >Parse1 returns: $# esmtp $@ vale . vbrew . com . $: issac < @ vale . vbrew . com . >parse returns: $# esmtp $@ vale . vbrew . com . $: issac < @ vale . vbrew . com . >2 input: issac < @ vale . vbrew . com . >2 returns: issac < @ vale . vbrew . com . >EnvToSMTP input: issac < @ vale . vbrew . com . >PseudoToReal input: issac < @ vale . vbrew . com . >PseudoToReal returns: issac < @ vale . vbrew . com . >MasqSMTP input: issac < @ vale . vbrew . com . >MasqSMTP returns: issac < @ vale . vbrew . com . >EnvToSMTP returns: issac < @ vale . vbrew . com . >final input: issac < @ vale . vbrew . com . >final returns: issac @ vale . vbrew . commailer esmtp, host vale.vbrew.com., user [email protected]
We can see that this test has directed the message to the default SMTP mailer (esmtp ) to be sent to the hostvale.vbrew.com and the user issac on that host.
Our final test checks the genericstable we created for the vstout.cf configuration. We check the mapping of theusername alana for all three people in the vbrew.com domain that have this username. The following test showshow the genericstable maps each variation of this name:
# sendmail -btADDRESS TEST MODE (ruleset 3 NOT automatically invoked)Enter <ruleset> <address>> /tryflags HS> /try esmtp [email protected] header sender address [email protected] for mailer esmtpcanonify input: alana @ vpils . vbrew . comCanonify2 input: alana < @ vpils . vbrew . com >Canonify2 returns: alana < @ vpils . vbrew . com . >canonify returns: alana < @ vpils . vbrew . com . >1 input: alana < @ vpils . vbrew . com . >1 returns: alana < @ vpils . vbrew . com . >HdrFromSMTP input: alana < @ vpils . vbrew . com . >PseudoToReal input: alana < @ vpils . vbrew . com . >PseudoToReal returns: alana < @ vpils . vbrew . com . >MasqSMTP input: alana < @ vpils . vbrew . com . >MasqSMTP returns: alana < @ vpils . vbrew . com . >MasqHdr input: alana < @ vpils . vbrew . com . >canonify input: alana . darling @ vbrew . comCanonify2 input: alana . darling < @ vbrew . com >Canonify2 returns: alana . darling < @ vbrew . com . >canonify returns: alana . darling < @ vbrew . com . >MasqHdr returns: alana . darling < @ vbrew . com . >

HdrFromSMTP returns: alana . darling < @ vbrew . com . >final input: alana . darling < @ vbrew . com . >final returns: alana . darling @ vbrew . comRcode = 0, addr = [email protected]> /try esmtp [email protected] header sender address [email protected] for mailer esmtpcanonify input: alana @ vale . vbrew . comCanonify2 input: alana < @ vale . vbrew . com >Canonify2 returns: alana < @ vale . vbrew . com . >canonify returns: alana < @ vale . vbrew . com . >1 input: alana < @ vale . vbrew . com . >1 returns: alana < @ vale . vbrew . com . >HdrFromSMTP input: alana < @ vale . vbrew . com . >PseudoToReal input: alana < @ vale . vbrew . com . >PseudoToReal returns: alana < @ vale . vbrew . com . >MasqSMTP input: alana < @ vale . vbrew . com . >MasqSMTP returns: alana < @ vale . vbrew . com . >MasqHdr input: alana < @ vale . vbrew . com . >canonify input: alana . henson @ vbrew . comCanonify2 input: alana . henson < @ vbrew . com >Canonify2 returns: alana . henson < @ vbrew . com . >canonify returns: alana . henson < @ vbrew . com . >MasqHdr returns: alana . henson < @ vbrew . com . >HdrFromSMTP returns: alana . henson < @ vbrew . com . >final input: alana . henson < @ vbrew . com . >final returns: alana . henson @ vbrew . comRcode = 0, addr = [email protected]> /try esmtp [email protected] header sender address [email protected] for mailer esmtpcanonify input: alana @ foobar . vbrew . comCanonify2 input: alana < @ foobar . vbrew . com >Canonify2 returns: alana < @ foobar . vbrew . com . >canonify returns: alana < @ foobar . vbrew . com . >1 input: alana < @ foobar . vbrew . com . >1 returns: alana < @ foobar . vbrew . com . >HdrFromSMTP input: alana < @ foobar . vbrew . com . >PseudoToReal input: alana < @ foobar . vbrew . com . >PseudoToReal returns: alana < @ foobar . vbrew . com . >MasqSMTP input: alana < @ foobar . vbrew . com . >MasqSMTP returns: alana < @ foobar . vbrew . com . >MasqHdr input: alana < @ foobar . vbrew . com . >canonify input: alana . smiley @ vbrew . comCanonify2 input: alana . smiley < @ vbrew . com >Canonify2 returns: alana . smiley < @ vbrew . com . >canonify returns: alana . smiley < @ vbrew . com . >MasqHdr returns: alana . smiley < @ vbrew . com . >HdrFromSMTP returns: alana . smiley < @ vbrew . com . >final input: alana . smiley < @ vbrew . com . >final returns: alana . smiley @ vbrew . comRcode = 0, addr = [email protected]> /quit

This test uses the /tryflags command that allows us to specify whether we want to process the header senderaddress (HS ), the header recipient address (hr ), the envelope sender address (ES ), or the envelope recipientaddress (ER ). In this case, we want to see how the header sender address is rewritten. The /TRy command
allows us to specify which mailer the address should be rewritten for and the address to be rewritten.
This test was also successful. The genericstable tests work for Alana Darling, Alana Henson, and Alana Smiley.

12.7. Running sendmail
The sendmail daemon can be run in either of two ways. One way is to have to have it run from theinetd daemon; the alternative, and more commonly used method, is to run sendmail as a standalonedaemon. It is also common for mailer programs to invoke sendmail as a user command to acceptlocally generated mail for delivery.
When running sendmail in standalone mode, place the sendmail command in a startup file so that itruns at boot time. The syntax used is commonly:
/usr/sbin/sendmail -bd -q10m
The -bd argument tells sendmail to run as a daemon. It will fork and run in the background. The -q10m argument tells sendmail to check its queue every ten minutes. You may choose to use a
different time interval to check the queue.
To run sendmail from the inetd network daemon, you'd use an entry such as this:
smtp stream tcp nowait nobody /usr/sbin/sendmail -bs
The -bs argument here tells sendmail to use the SMTP protocol on stdin/stdout, which is required for
use with inetd.
When sendmail is invoked this way, it processes any mail waiting in the queue to be transmitted.When running sendmail from inetd, you must also create a cron job that runs the runq commandperiodically to service the mail spool periodically. A suitable cron table entry would be similar to:
# Run the mail spool every fifteen minutes0,15,30,45 * * * * /usr/bin/runq
In most installations sendmail processes the queue every 15 minutes as shown in our crontabexample. This example uses the runq command. The runq command is usually a symlink to thesendmail binary and is a more convenient form of:
# sendmail -q

12.8. Tips and Tricks
There are a number of things you can do to make managing a sendmail site efficient. A number ofmanagement tools are provided in the sendmail package; let's look at the most important of these.
12.8.1. Managing the Mail Spool
Mail is queued in the /var/spool/mqueue directory before being transmitted. This directory is called the mailspool. The sendmail program provides the mailq command as a means of displaying a formatted list of allspooled mail messages and their status. The /usr/bin/mailq command is a symbolic link to the sendmailexecutable and behaves identically to:
# sendmail -bp
The output of the mailq command displays the message ID, its size, the time it was placed in the queue,who sent it, and a message indicating its current status. The following example shows a mail message stuckin the queue with a problem:
$ mailq Mail Queue (1 request)--Q-ID-- --Size-- -----Q-Time----- ------------Sender/Recipient------------RAA00275 124 Wed Dec 9 17:47 root (host map: lookup (tao.linux.org.au): deferred) [email protected]
This message is still in the mail queue because the destination host IP address could not be resolved.
To force sendmail to immediately process the queue, issue the /usr/bin/runq command. sendmail willprocess the mail queue in the background. The runq command produces no output, but a subsequent mailqcommand will tell you if the queue is clear.
12.8.2. Forcing a Remote Host to Process Its Mail Queue
If you use a temporary dial-up Internet connection with a fixed IP address and rely on an MX host to collectyour mail while you are disconnected, you will find it useful to force the MX host to process its mail queuesoon after you establish your connection.
A small perl program is included with the sendmail distribution that makes this simple for mail hosts thatsupport it. The etrn script has much the same effect on a remote host as the runq command has on thelocal server. If we invoke the command as shown in this example:
# etrn vstout.vbrew.com

we force the host vstout.vbrew.com to process any mail queued for our local machine.
Typically you'd add this command to your PPP startup script so that it is executed soon after your networkconnection is established.
12.8.3. Mail Statistics
sendmail collects data on the volume of mail traffic and some information on the hosts to which it hasdelivered mail. There are two commands available to display this information, mailstats and hoststat .
12.8.3.1 mailstats
The mailstats command displays statistics on the volume of mail processed by sendmail. The time at whichdata collection commenced is printed first, followed by a table with one row for each configured mailer andone showing a summary total of all mail. Each line presents eight items of information, which are describedin Table 12-5 .
Table 12-5. The fields displayed by mailstat
Field Meaning
M The mailer (transport protocol) number
msgsfr The number of messages received from the mailer
bytes_from The Kbytes of mail from the mailer
msgsto The number of messages sent to the mailer
bytes_to The Kbytes of mail sent to the mailer
msgsreg The number of messages rejected
msgsdis The number of messages discarded
Mailer The name of the mailer
A sample of the output of the mailstats command is shown in Example 12-7 .
Example 12-7. Sample output of the mailstats command
# /usr/sbin/mailstatsStatistics from Sun Dec 20 22:47:02 1998 M msgsfr bytes_from msgsto bytes_to msgsrej msgsdis Mailer 0 0 0K 19 515K 0 0 prog 3 33 545K 0 0K 0 0 local 5 88 972K 139 1018K 0 0 esmtp= = = = = = = = = = = = = = = = = = = = = = = = = = = = = = = = = = = = = = = = = = = = = = = = = = = = = = = = = = = T 121 1517K 158 1533K 0 0

This data is collected if the StatusFile option is enabled in the sendmail.cf file and the status file exists.The StatusFile option is defined in the generic Linux configuration and therefore defined in the vstout.cf
file we built from the generic configuration, as shown below:
$ grep StatusFile vstout.cfO StatusFile=/etc/mail/statistics
To restart the statistics collection, make the statistics file zero length and restart sendmail.
12.8.3.2 hoststat
The hoststat command displays information about the status of hosts to which sendmail has attempted todeliver mail. The hoststat command is equivalent to invoking sendmail as:
sendmail -bh
The output presents each host on a line of its own, and for each the time since delivery was attempted to it,and the status message received at that time.
Persistent host status is maintained only if a path for the status directory is defined by theHostStatusDirectory option, which in turn is defined in the m4 macro configuration file byconfHOST_STATUS_DIRECTORY . By default, no path is defined for the host status directory and no persistent
host status is maintained.
Example 12-8 shows the sort of output you can expect from the hoststat command. Note that most of theresults indicate successful delivery. The result for earthlink.net , on the other hand, indicates that deliverywas unsuccessful. The status message can sometimes help determine the cause of the failure. In this case,the connection timed out, probably because the host was down or unreachable at the time delivery wasattempted.
Example 12-8. Sample Output of the hoststat Command
# hoststat -------------- Hostname ---------- How long ago ---------Results--------- mail.telstra.com.au 04:05:41 250 Message accepted for scooter.eye-net.com.au 81+08:32:42 250 OK id=0zTGai-0008S9-0 yarrina.connect.com.a 53+10:46:03 250 LAA09163 Message acce happy.optus.com.au 55+03:34:40 250 Mail accepted mail.zip.com.au 04:05:33 250 RAA23904 Message acce kwanon.research.canon.com.au 44+04:39:10 250 ok 911542267 qp 21186 linux.org.au 83+10:04:11 250 IAA31139 Message acce albert.aapra.org.au 00:00:12 250 VAA21968 Message acce field.medicine.adelaide.edu.au 53+10:46:03 250 ok 910742814 qp 721 copper.fuller.net 65+12:38:00 250 OAA14470 Message acce amsat.org 5+06:49:21 250 UAA07526 Message acce mail.acm.org 53+10:46:17 250 TAA25012 Message acce extmail.bigpond.com 11+04:06:20 250 ok

earthlink.net 45+05:41:09 Deferred: Connection time
The purgestat command flushes the collected host data and is equivalent to invoking sendmail as:
# sendmail -bH
The statistics will continue to grow until you purge them. You might want to periodically run the purgestatcommand to make it easier to search and find recent entries, especially if you have a busy site. You couldput the command into a crontab file so it runs automatically, or just do it yourself occasionally.

12.9. More Information
sendmail is a complex topicmuch too complex to be truly covered by a single chapter. This chaptershould get you started and will help you configure a simple server. However, if you have a complexconfiguration or you want to explore advanced features, you will need more information. Here aresome sources to start you on your quest for knowledge.
The sendmail distribution is delivered with some excellent README files. The README file in thetop-level directory created when the distribution is installed is the place to start. It contains alist of other informational files, such as sendmail/README and cf/README, that providesessential information. (The cf/README file, which covers the sendmail configuration language, isalso available on the Web at http://www.sendmail.org/m4/readme.html.)
The sendmail Installation and Operations Guide is an excellent source of information. It is alsodelivered with the sendmail source code distribution, and can be found in doc/op/op.me ordoc/op/op.ps, depending on your preferred format.
The sendmail web site provides several excellent papers and online documents. The CompilingSendmail documentation, available at http://www.sendmail.org/compiling.html, is an excellentexample.
The sendmail site provides a list of available sendmail books athttp://www.sendmail.org/books.html.
Formal sendmail training is available. Some training classes are listed athttp://www.sendmail.org/classes.html.
Using these resources, you should be able to find out more about sendmail than you will ever need toknow. Go exploring!

Chapter 13. Configuring IPv6 NetworksIPv4 space is becoming scarcer by the day. By 2005, some estimates place the number of worldwideInternet users at over one billion. Given the fact that many of those users will have a cellular phone,a home computer, and possibly a computer at work, the available IP address space becomes criticallytight. China has recently requested IP addresses for each of their students, for a total of nearly 300million addresses. Requests such as these, which cannot be filled, demonstrate this shortage. WhenIANA initially began allotting address space, the Internet was a small and little- known researchnetwork. There was very little demand for addresses and class A address space was freely allocated.However, as the size and importance of the Internet started to grow, the number of availableaddresses diminished, making obtaining a new IP difficult and much more expensive. NAT and CIDRare two separate responses to this scarcity. NAT is an individual solution allowing one site to funnelits users through a single IP address. CIDR allows for a more efficient division of network addressblock. Both solutions, however, have limitations.
With new electronic devices such as PDAs and cellular phones, which all need IP addresses of theirown, the NAT address blocks suddenly do not seem quite as large.
Researchers, realizing the potential IP shortage, have redesigned the IPv4 protocol so that itsupports 128-bits worth of address space. The selected 128-bit address space provides 340 trillionpossible addresses, an exponential increase that we hope will provide adequate addressing into thenear (and far) future. This is, in fact, enough addresses to provide every person on Earth with onebillion addresses.
Not only does IPv6 solve some of the address space logistics, it also addresses some configurationand security issues. In this section, we'll take a look at the current solutions available with Linux andIPv6.

13.1. The IPv4 Problem and Patchwork Solutions
At the beginning, IANA gave requestors an entire class A network space thereby granting requestors16.7 million addressesmany more than necessary. Realizing their error, they began to assign class Bnetworksagain, providing far too many addresses for the average requestor. As the Internet grew, itquickly became clear that allocating class A and class B networks to every requestor did not makesense. Even their later action of assigning class C banks of addresses still squandered address space,as most companies didn't require 254 IP addresses. Since IANA could not revoke currently allocatedaddress space, it became necessary to deal with the remaining space in a way that made sense. Oneof these ways was through the use of Classless Inter-Domain Routing (CIDR).
13.1.1. CIDR
CIDR allows network blocks to be allocated outside of the well-defined class A/B/C ranges. In aneffort to get more mileage from existing class C network blocks, CIDR allows administrators to dividetheir address space into smaller units, which can then be allocated as individual networks. This madeit easier to give IPs to more people because space could be allocated by need, rather than bypredefined size-of-space. For example, a provider with a class C subnet could choose to divide thisnetwork into 32 individual networks, and would use the network addresses and subnet masks todelineate the boundaries. A sample CIDR notation looks like this:
10.10.0.64/29
In this example, the /29 denotes the subnet mask, which means that the first 29 bits of the addressare the subnet. It could also be noted as 255.255.255.248, which gives this network a total of sixusable addresses.
While CIDR does deal with the problem in a quick and easy way, it doesn't actually create more IPaddresses, and it does have some additional disadvantages. First, its efficiency is compromised sinceeach allocated network requires a broadcast IP and a network address IP. So if a provider breaks aclass C block into 32 separate networks, a total of 64 individual IPs are wasted on network andbroadcast IPs. Second, complicated CIDR networks are more prone to configuration errors. A routerwith an improper subnet mask can cause an outage for small networks it serves.
13.1.2. NAT
Network Address Translation (NAT) provides some relief for the IP address space dilemma, andwithout it, we'd currently be well out of usable IP space. NAT provides a many-to-one translation,meaning that many machines can share the same IP address. This also provides some privacy andsecurity for the machines behind the NAT device, since individually identifying them is more difficult.There are also some disadvantages to NATprimarily that some older protocols aren't designed tohandle redirection.

13.2. IPv6 as a Solution
In order to combat the shrinking IP space problem, the concept of IPv6 was born. Future-mindeddesigners chose to have 128 bits of address space, providing for a total of340,282,366,920,938,463,463,374,607,431,768,211,456 (3.4 1,038) addresses or, in more visualterms, 655,570,793,348,866,943,898,599 (6.5 1,023) addresses for every square meter of theearth's surface. This provides a sizable extension over the current 32-bits of address space underIPv4.
13.2.1. IPv6 Addressing
The first noticeable difference between IPv4 and IPv6 is how the addresses are written. A typical IPv6address looks like:
fe80:0010:0000:0000:0000:0000:0000:0001
There are eight sets of four hex values in every IP address. These addresses can be long andcumbersome, which is why a shortening method was developed. A single string of zeroes can bereplaced with the double colon. For example, the previous example could be written in shortenedform as.
fe80:0010::1
However, this can be done only one time in an address in order to avoid ambiguity about what hasbeen removed. Let us consider the following example IP which has separate strings of zeroes:
2001:0000:0000:a080:0000:0000:0000:0001
Since only one string of zeroes can be replaced, the IP can not be shortened to:
2001::a080::1
Generally, the longest string is shortened. In this example, with the longest set replaced, theshortened IP is:
2001:0000:0000:a080::1
Within IPv6, there are several different types of addresses that define the various functions availablewithin the specification:

Link-local address
This address is automatically configured when the IPv6 stack is initialized using the MACaddress from your network card. This kind of address is generally considered a client-only typeof address, and would not be capable of running a server or listening for inbound connections.Link-local addresses always begin with FE8x, FE9x, FEAx, or FEBx, where the x can be replacedwith any hex digit.
Site-local addresses
While a part of the original specification, and still described in various texts, site-localaddresses have been deprecated and are no longer considered to be part of IPv6.
Global unicast address
This address type is Internet routable and is expected to be the outward facing IP on allmachines. This kind of address is currently identified by its starting digits of either 2xxx or3xxx, though this may be expanded in the future as necessary.
13.2.2. IPv6 Advantages
While the most obvious benefit of IPv6 is the dramatically increased address space, there are severalother key advantages that come with it. For example, there are numerous performance gains withIPv6. Packets can be processed more efficiently because option fields in the packet headers areprocessed only when actual options are present; additional performance gains come from havingremoved packet fragmentation. A second advantage is a boost in security through the inclusion ofembedded IPSec. As it will be part of the protocol, implementation of encryption and non-repudiationwill be more natural. Quality of Service (QoS) is another advantage that is developing with IPv6.Enabling this functionality would allow network administrators to prioritize groups of network traffic.This can be critical on networks that handle services like Voice over IP because even small networkdisruptions can make the service less reliable. Finally, advances in address auto-configuration makeon-the-fly networking much easier. Additional benefits will emerge as adoption and researchcontinue. Hopefully, some of these will come with advances in Mobile IP technologies that promise tomake it possible for any device to keep the same IP address regardless of its current networkconnection.
13.2.3. IPv6 Configuration
IPv6 support has come a long way recently and is now supported in nearly all Linux distributions. Ithas been a part of the 2.4 kernel for the last few releases and is included in kernel 2.6.

13.2.3.1 Kernel and system configuration
Enabling IPv6 support in Linux has become much easier now that it is distributed with the kernelsources. Patching is no longer necessary, but you will need to install a set of tools, which will bedescribed later in this section.
If IPv6 support isn't already built into your kernel, it may already be compiled as a module. A quicktest to see whether or not the module is present can be accomplished with the following command:
vlager# modprobe ipv6vlager#
If there is no response the module was most likely successfully loaded. There are several ways toverify that support is enabled. The fastest is by checking the /proc directory:
vlager# ls -l /proc/net/if_inet6-r--r--r-- 1 root root 0 Jul 1 12:12 /proc/net/if_inet6
If you have a compatible version of ifconfig, it can also be used to verify:
vlager# ifconfig eth0 |grep inet6 inet6 addr: fe80::200:ef99:f3df:32ae/10 Scope:Link
If these tests are unsuccessful, you will likely need to recompile your kernel to enable support. Thekernel configuration option for IPv6 in the .config file is:
CONFIG_IPV6=m
By using a "make menuconfig," the option to enable IPv6 under the 2.4 kernel is found under"Network Options" section. Under the 2.6 kernel configuration, it is found under "NetworkSupport/Network Options". It can either be compiled into the kernel or built as a module. If you dobuild as a module, remember that you must modprobe before attempting to configure the interface.
13.2.3.2 Interface configuration
In order to configure the interface for IPv6 usage, you will need to have IPv6 versions of the commonnetwork utilities. With most Linux distributions now supporting IPv6 out of the box, it's likely thatyou'll already have these tools installed. If you're upgrading from an older distribution or using LinuxFrom Scratch, you will probably need to install a package called net-tools, which can be found atvarious places on the Internet. You can find the most recent version by searching for "net-tools" onGoogle or FreshMeat.
To verify that you have compatible versions, a quick check can be done with either ifconfig or netstat.The quick check would look like this:
vlager# /sbin/netstat grep inet6

Before proceeding, you'll also want to make sure you have the various network connectivity checkingtools for IPv6, such as ping6, traceroute6, and tracepath6. They are found in the iputils package and,again, are generally installed by default on most current distributions. You can search your path tosee whether or not these tools are available and install them if necessary. Should you need to findthem, the author has placed them at ftp://ftp.inr.ac.ru/ip-routing.
If everything has gone smoothly, your interface will have been auto-configured using your MACaddress. You can check this by using ifconfig:
vlager# ifconfig eth0eth0 Link encap:Ethernet HWaddr 00:07:E9:DF:32:AE inet addr:10.10.10.19 Bcast:10.10.10.255 Mask:255.255.255.0 inet6 addr: fe80::207:e9ff:fedf:32ae/10 Scope:Link UP BROADCAST RUNNING MULTICAST MTU:1500 Metric:1 RX packets:2272821 errors:0 dropped:0 overruns:0 frame:73 TX packets:478473 errors:0 dropped:0 overruns:0 carrier:0 collisions:4033 txqueuelen:100 RX bytes:516238958 (492.3 Mb) TX bytes:54220361 (51.7 Mb) Interrupt:20 Base address:0x2000 vlager#
The third line in the output displays the link-local address of vlager. It is easy to identify it as suchbecause any address starting with fe80 will always be a link-local type IP address. If you are
concerned about privacy issues in using your MAC as your main IP address, or if you are configuringa server and wish to have an easier IP address, you can configure your own IP address according tothe following example:
vlager# ifconfig eth0 inet6 add 2001:02A0::1/64vlager#
At this point, however, you may not have a global address type to assign, as we've done above. So,your IP may be a link- or site-local address. These will work perfectly for any non-Internet routabletraffic that you want to pass, but if you wish to connect to the rest of the world, you will need to haveeither a connection directly to the IPv6 backbone or an IPv6 tunnel through a tunnel broker, whichwe'll discuss in the next section.
13.2.4. Establishing an IPv6 Connection via a Tunnel Broker
To join the wonderful world of IPv6 you will need a path through which to connect. A tunnel iscurrently the only way to access the IPv6 backbone for most users, as few sites have direct IPv6connectivity. Attempting to route IPv6 traffic directly over IPv4 networks won't get you very far, asthe next-hop router will most likely not know what to do with your seemingly odd traffic. For mostusers, the easiest path to establish a tunnel is through a tunnel broker. There are a number ofdifferent brokers on the Internet who will provide you with your very own IPv6 address space. One ofthe fastest and most popular tunnel brokers is Hurricane Electric (Figure 13-1), which has anautomated IPv6 tunnel request form. They require only that you have a "pingable" IPv4 address that

is constantly connected to the Internet. This is the IPv4 address that they will expect to be the sourceof your tunnel.
Figure 13-1. Obtaining a tunnel from he.net
13.2.4.1 Building your tunnel
Once you have received your IPv6 address space, you're ready to build your tunnel. In order toaccomplish this, you will need to use the additional Link encapsulation interfaces that exist afterinstalling the IPv6 module.
To build your tunnel, you will need to configure both the sit0 and sit1 interfaces. The sit interfaces areconsidered virtual adapters, because they do not directly represent hardware in your system.However, from a software perspective, these will be treated in almost the same way any otherinterface is treated. We will direct and route traffic through them. The sit virtual interfaces allow youto map your IPv4 address to an IPv6 address, and then create an IPv6 interface on your machine.

This process is started by enabling the sit0 interface and assigning it your IPv4 address. For thisexample, 10.10.0.8 is the tunnel broker's IPv4 endpoint, and 2001:FEFE:0F00::4B is vlager's IPv6
tunnel endpoint IP address.
vlager# ifconfig sit0 upvlager# ifconfig sit0 inet6 tunnel ::10.10.0.8
This step enables the sit0 interface and binds it to the tunnel broker's IPv4 address. The next step isto assign your IPv6 address to the sit1 interface. That is accomplished with the following commands:
vlager# ifconfig sit1 upvlager# ifconfig sit1 inet6 add 2001:FEFE:0F00::4B/127
The tunnel should now be operational. However, in order to test, you will need to route IPv6 traffic tothe sit1 interface. This is most easily handled by using route.
vlager$ route -A inet6 add ::/0 dev sit1
This command tells the OS to send all IPv6 traffic to the sit1 device. With the route in place, youshould now be able to verify your IPv6. The connectivity can now be tested by using ping6. In thisexample, we will ping the IPv6 address of the remote side of our newly created tunnel.
vlager# ping6 2001:470:1f00:ffff::3aPING 2001:470:1f00:ffff::3a(2001:470:1f00:ffff::3a) 56 data bytes64 bytes from 2001:470:1f00:ffff::3a: icmp_seq=1 ttl=64 time=26.2 ms64 bytes from 2001:470:1f00:ffff::3a: icmp_seq=2 ttl=64 time=102 ms64 bytes from 2001:470:1f00:ffff::3a: icmp_seq=3 ttl=64 time=143 ms64 bytes from 2001:470:1f00:ffff::3a: icmp_seq=4 ttl=64 time=130 msCtrl-c --- 2001:470:1f00:ffff::3a ping statistics ---4 packets transmitted, 4 received, 0% packet loss, time 3013msrtt min/avg/max/mdev = 26.295/100.590/143.019/45.339 msvlager#
At this point, you now have a system configured to a pubic IPv6 network. Youcan see the whole IPv6 world, and they can see you. It is important to notethat at this point you should verify exactly which services are listening, andthat they are patched and not exploitable. While IPv6 netfilter support is underdevelopment, it may not be stable enough to rely on.
13.2.5. IPv6-Aware Applications
There are currently quite a few IPv6-aware applications that are also commonly in use on the IPv4networks. Among the more popular are the Apache web server and OpenSSH. In this section, we'lldetail common configuration for enabling IPv6 within these applications.

13.2.5.1 Apache web server
Although Apache v1.3 is commonly used due to its stability, it does not support IPv6 without sourcecode modification. Should you absolutely need v1.3 and IPv6 support, IPv6 patches do exist, but theyare unsupported and likely untested. There has been a great deal of discussion about whether toinclude official IPv6 support in the stable v1.3, and the general consensus has been to leave v1.3alone and use v2.0 for the continued support and development of Apache's IPv6 support. The Apacheweb server Versions 2.0 and higher support IPv6 without modification. Therefore, we will focus onthis version in this section.
13.2.5.2 Configuring Apache v2.0.x for IPv6 support
The configuration of Apache with IPv6 is fairly straightforward. The build process requires no specialoptions and can be installed from either source or RPM. One option that can be set at compile timethat may be of interest to IPv6 users is -enable-v4-mapped tag. This is most often the default in prebuilt packages. It enables you to have a line with a general Listen directive such as:
Listen 80
This will bind the web server process to all available IP addresses. Administrators of IPv6 systemsmay find this behavior insecure and inefficient, as unnecessary sockets will be opened for the largenumber of default IPv6 addresses. It is for this reason that you can use -disable-v4-mapped whencompiling and force explicit configuration of listening interfaces. With this option disabled, you canstill have interfaces listen on all ports, but you must specify to do so.
When the server is compiled and installed as you wish, a single change to the configuration file isrequired to enable a listener. This step is very similar to the IPv4 configuration of Apache. To enablea web listener on vlager's IPv6 IP, the following change to the apache.conf file is required:
Listen [fec0:ffff::2]:80
Once Apache is started, it opens up a listener on port 80 on the specified IP. This can be verifiedthrough the use of netstat:
vlager# netstat -auntActive Internet connections (servers and established)Proto Recv-Q Send-Q Local Address Foreign Address Statetcp 0 0 10.10.0.4:22 0.0.0.0:* LISTENtcp 0 0 fec0:ffff::2:80 :::* LISTEN vlager#
The second entry in the table is the IPv6 apache listener, and it is noted in exactly the same formatas the IPv4 addresses.
If you would like to have your Apache server listen on all available IPv6 addresses, a slightly different

configuration option can be used:
Listen [::]:80
This is very similar to the 0.0.0.0 address used to accomplish the same thing in IPv4. To enablelisteners on ports other than 80, either replace the existing port number or add additional Listen
lines. For a more detailed discussion of Apache, please refer to Chapter 14.
13.2.5.3 OpenSSH
The OpenSSH project has been compatible with IPv6 since its early days, and support within theprogram is now considered mature. It is also quite easy to configure. No additional options need tobe passed during compile time, so installing from binary package will cause no problems.
This section assumes that you have OpenSSH operational under IPv4 and know where yourconfiguration files are installed. In our case, the configuration files are installed in /etc/ssh. To add anIPv6 listener, we need to add a line to the sshd_config file:
ListenAddress fec0:ffff::2Port 1022
When OpenSSH is restarted with the -6 command-line option, it will now be listening on our IPv6
address at port 1022.
Accessing IPv6 hosts with the OpenSSH client is also quite easy. It is only necessary to specify the -6
command-line option as follows:
othermachine$ ssh -6 fec0:ffff::2 -p 1022bob@fec0:ffff::2's password:bob@vlager $
That's really all there is to configuring OpenSSH for IPv6 usage. At this point you should have aserver with an OpenSSH IPv6 listener and be able to use ssh to connect to other machines on theIPv6 network. If not, please see the Section 13.2.6, next.
13.2.6. Troubleshooting
As IPv6 networking is often uncharted territory, it is not uncommon for things to go wrong. One ofthe most common mistakes made when dealing with IPv6 initially involves the address notation. Thechange from the period to the colon for subset separation can cause errors, as most administrators'hands are used to reaching for the period. A second notation problem when writing out addressescomes with shortening them. As discussed earlier in the section, when omitting series of zeroes, adouble colon is used. Should you forget the double colon, the machine will generate an errorinforming you that you have entered an incomplete IP address. Here are some examples of incorrectIPv6 notation:

fe80.ffff.0207.3bfe.0ddd.bbfe.023ffe:0001:fefe:52001:fdff::0901::1
If the problem is more severe, and you're not seeing the IPv6 stack at all, you should review yourkernel configuration. If you've compiled support for IPv6 directly into the kernel, check your systemlog and see if you're receiving any errors when it attempts to load. A successful IPv6 installation willyield the following message at boot time:
NET4: Linux TCP/IP 1.0 for NET4.0IP Protocols: ICMP, UDP, TCPIP: routing cache hash table of 4096 buckets, 32KbytesTCP: Hash tables configured (established 32768 bind 65536)NET4 Unix domain sockets 1.0/SMP for Linux NET4.0.IPv6 v0.8 for NET4.0IPv6 over IPv4 tunneling driver
This section shows the network stack initialization, and the last two lines are specific to IPv6. If youdon't see these two lines, or see an error, you need to check your kernel configuration file andperhaps consider building IPv6 as a module.
If you've built IPv6 support as a module, make sure you have it configured to load automatically.There are as many ways to do this as there are Linux distributions, so consult your distribution'sdocumentation for specific details.
When properly loaded, the module should appear when you enter the lsmod command.
vlager# lsmod |grep ipv6Module Size Used by Not taintedipv6 162132 -1
When loading the module, you should also see the following lines in your system log:
Jul 7 16:13:43 deathstar kernel: IPv6 v0.8 for NET4.0Jul 7 16:13:43 deathstar kernel: IPv6 over IPv4 tunneling driver
If you are confident that your IPv6 stack has installed properly, and you are able to send traffic onyour local LAN but cannot send traffic through your IPv6 tunnel, check your IPv4 connectivity. Thefirst step in this process would be double-checking the IPv4 tunnel addresses specified in the sit0configuration. If the configuration is accurate, test the remote IPv4 endpoint. The inability to sendIPv4 traffic to the tunnel endpoint IP will also prevent you from sending any IPv6 traffic.
Other connectivity issues could be the result of a misconfigured firewall. If you have decided to useNetfilter for IPv6, make certain that your firewall rules are accurate by attempting to send traffic bothwith and without your rules enabled. It is possible that there may be problems within Netfilter forIPv6 that prevent certain configurations from working properly.
Chapter 14. Configuring the Apache WebServerOne of the most widely used software packages under Linux currently is the Apache web server.Starting in 1995 as small group of developers, the Apache Software foundation incorporated in 1999to develop and support the Apache HTTP server. With a base of more than 25 million operationalInternet web servers, Apache's HTTP server is known for its flexibility and performance benefits. Inthis section, we will explore the basics of building and configuring an Apache HTTP server andexamine some options that will assist in the security and performance of its operation. In thischapter, we'll be looking at Apache v1.3, which is currently the most widely deployed and supportedversion.

14.1. Apache HTTPD ServerAn Introduction
Apache is in itself just a simple web server. It was designed with the goal of serving web pages.Some commercial web servers have tried to pack many different features into a web server product,but such combination products tend to be open to substantial numbers of security vulnerabilities. Thesimplicity and modular design of the Apache HTTPD server brings a more secure product, and itstrack record especially when compared to other web servers shows it to be a stable and robustproduct.
This is not to say that Apache servers are incapable of providing dynamic content to users. There aremany Apache modules that can be integrated to provide an almost infinite number of new features.Add-on products, such as PHP and mod_perl, can be used to create powerful web applications andgenerate dynamic web content. This chapter, however, will concentrate on the configuration ofApache itself. Here, we will discuss how to build and configure an Apache HTTPD web server and lookat the different options that can be used to build a stable and secure web server.

14.2. Configuring and Building Apache
If your Linux distribution does not currently have Apache, the easiest way to get it is from one of themany Apache mirror sites. A list can be found at the main Apache Software Foundation site,http://www.apache.org. At present, there are two branches of the Apache HTTPD version tree, 1.3and 2.0. The new version tree, v2.0 offers new features and is being actively developed, but is morelikely to be susceptible to bugs and vulnerabilities. In this chapter, we will be using the most recentversion of the 1.3 branch because of its proven reliability and stability. Many of the configurationoptions, however, are similar in both versions.
14.2.1. Getting and Compiling the Software
You have the option of obtaining Apache in either source format or package format. If you areinstalling from package, you will not have the same amount of initial configuration flexibility as youwould building from source. Packages generally come with the most common options pre-built intothe binaries. If you are looking for specific features or options or if you want to build a very minimalversion of the server, you should consider building from source.
Building Apache from source is similar to building other Linux source packages and follows the"configure-make-make install" path. Apache has many options that need to be set at sourceconfiguration time. Among these is the ability to select the modules which you would like to build orhave disabled. Modules are a great way to add or remove functionality to your web server and covera wide range of functionsfrom performance to authentication and security. Table 14-1 shows asample list taken from the Apache documentation of a number of the available modules.
Table 14-1. Apache modules
TypeEnabled or disabled by
defaultFunction
Environment creation
mod_env EnabledSet environment variables for CGI/SSIscripts
mod_setenvif EnabledSet environment variables based on HTTPheaders
mod_unique_id Disabled Generate unique identifiers for request
Content-type decisions
mod_mime EnabledContent type/encoding determination(configured)

TypeEnabled or disabled by
defaultFunction
mod_mime_magic DisabledContent type/encoding determination(automatic)
mod_negotiation EnabledContent selection based on the HTTPAccept* headers
URL mapping
mod_alias Enabled Simple URL translation and redirection
mod_rewrite Disabled Advanced URL translation and redirection
mod_userdir EnabledSelection of resource directories byusername
mod_spelling Disabled Correction of misspelled URLs
Directory handling
mod_dir Enabled Directory and directory default file handling
mod_autoindex Enabled Automated directory index file generation
Access control
mod_access Enabled Access control (user, host, and network)
mod_auth EnabledHTTP basic authentication (user andpassword)
mod_auth_dbm DisabledHTTP basic authentication via UNIX NDBMfiles
mod_auth_db DisabledHTTP basic authentication via Berkeley DBfiles
mod_auth_anon DisabledHTTP basic authentication for anonymous-style users
mod_digest Disabled Digest authentication
HTTP response
mod_headers DisabledArbitrary HTTP response headers(configured)
mod_cern_meta DisabledArbitrary HTTP response headers (CERN-style files)
mod_expires Disabled Expires HTTP responses
mod_asis Enabled Raw HTTP responses
Scripting
mod_include Enabled Server Side Includes (SSI) support

TypeEnabled or disabled by
defaultFunction
mod_cgi Enabled Common Gateway Interface (CGI) support
mod_actions Enabled Map CGI scripts to act as internal "handlers"
Internal contenthandlers
mod_status Enabled Content handler for server runtime status
mod_info Disabled Content handler for configuration summary
Request logging
mod_log_config Enabled Customizable logging of requests
mod_log_agent DisabledSpecialized HTTP User-Agent logging(deprecated)
mod_log_referer DisabledSpecialized HTTP Referrer logging(deprecated
mod_usertrack Disabled Logging of user click-trails via HTTP cookies
Miscellaneous
mod_imap Enabled Server-side image map support
mod_proxy Disabled Caching proxy module (HTTP, HTTPS, FTP)
mod_so Disabled Dynamic Shard Object (DSO) bootstrapping
Experimental
mod_mmap_static DisabledCaching of frequently served pages viammap( )
Developmental
mod_example Disabled Apache API demonstration (developers only)
When you have decided which options to use, you can add them to the configure script as follows. Toenable a module, use:
vlager# ./configure -enable-module=module_name
To disable a default module, you can use the following command:
vlager# ./configure -disable-module=module_name
If you choose to enable or disable any of the default modules, make sure you understand exactlywhat that modules does. Enabling or disabling certain modules can adversely affect performance or

security. More information about the specific modules can be found on the Apache web site.
The next step after configuration is to compile the entire package. Like many other Linux programs,this is accomplished by the make command. After you have compiled, make install will install Apachein the directory you specified via the -prefix= option at configuration time.

14.3. Configuration File Options
When the Apache software has been installed in the directory you have selected, you are ready tobegin configuration of the server. Earlier versions of the Apache server used multiple configurationfiles. However, now only the httpd.conf file is required. It is still quite handy to have multipleconfiguration files (for example, to make version upgrades easier). The include option will allow you
to read additional configuration files from the main httpd.conf file.
Apache comes with a default configuration file that has the most common options set. If you are in ahurry to have your server running, this default configuration should cover the requirements to launchApache. While functional, this configuration is not acceptable to many administrators. To begin fine-tuning the configuration, the first option most administrators choose is selecting the IP address andport information of the server.
14.3.1. Binding Addresses and Ports
Listen and BindAddress are the first two options that you may want to change.
# Listen: Allows you to bind Apache to specific IP addresses and/or# ports, instead of the default. See also the <VirtualHost># directive.##Listen 3000Listen 172.16.0.4:80
This configuration change enables the Apache server to listen only on the specified interface and port.You can also use the BindAddress option to specify the IP address to which the server will bind. With
this option, you are only specifying the IP address, not the port as above.
# BindAddress: You can support virtual hosts with this option. This directive# is used to tell the server which IP address to listen to. It can either# contain "*", an IP address, or a fully qualified Internet domain name.# See also the <VirtualHost> and Listen directives.#BindAddress 172.16.0.4
14.3.2. Logging and Path Configuration Options
When building Apache, you may have specified the installation directory. If so, the installation hasautomatically set the paths for your server root documents and all of your logfiles. If you need tochange this, the following options will be useful:

ServerRoot
The location of the server's main configuration and logfiles
DocumentRoot
The location of your HTML documents, or other web content
By default, Apache will log to a path under its main server root path. If you have a different place onyour system where you collect logs and would like to change the logfile paths, the following optionswill require changes:
CustomLog
The location of your access logfile
ErrorLog
The location of your error logfile
There are also some other useful options that can be set when configuring the logging settings onApache:
HostnameLookups
Tells Apache whether it should look up names for logged IP addresses. It is a good idea toleave this setting turned off, since logging can be slowed if the server is attempting to resolveall names.
LogLevel
This option tells Apache how much information it should save to the logfiles. By default it is setat warn, but possible values are debug, info, notice, warn, error, crit, alert, and emerg.
Each increasing level logs less information.
LogFormat
With this option, administrators can choose which format the logs are written in. Items such as

date, time, and IP address can be rearranged to any format desired. The default settings areusually not changed.
14.3.3. Server Identification Strings
By default, Apache is very friendly and will provide requesting users with a great deal of informationabout itself, including version information, virtual hostname, administrator name, and so on. Securityconscious administrators may wish to disable this information, as it allows attackers a much quickerway of enumerating your server. While it is not a foolproof method of protecting your site, it can slowdown would-be attackers who use automated scanning tools. The following two configuration optionscan help you limit the amount of information your server discloses:
ServerSignature
With this option turned on, the server adds a line to server-generated pages that includes all ofits version information.
ServerTokens
Setting this option to Prod will prevent Apache from ever disclosing its version number.
14.3.4. Performance Configuration
Sites will always have different performance requirements. For many sites, the default settingsprovided with Apache will deliver all the required performance. However, busier sites will need tomake some changes to the configuration to increase performance capabilities. The following optionscan be used in performance tuning a server. More information on Apache performance tuning can befound at the Apache Software Foundation's web site.
Timeout
The number of seconds before Apache will timeout receive and send requests.
KeepAlive
Enable this option if you want persistent connections enabled. It can be set to either on or off.
MaxKeepAliveRequests

Set this option to the number of keep-alive requests that you want the server to allow inpersistent connections. Having a higher value here may increase performance.
KeepAliveTimeout
This is the number of seconds that Apache will wait for a new request from the currentconnected session.
Min/MaxSpareServers
These options are used to create a pool of spare servers that Apache can use when it is busy.Larger sites may wish to increase these numbers from their defaults. However, for each spareserver, more memory is required on the server.
StartServers
This option tells Apache how many servers to start when first launched.
MaxClients
This is the option an administrator can use to limit the number of client sessions to a server.The Apache documentation warns about setting this option too low because it can adverselyaffect availability.
14.3.5. Starting and Stopping Apache with apachectl
If you are feeling confident that your server is configured, and you're ready to run it, you will need touse apachectl, a tool provided with Apache that allows for the safe startup and shutdown of theserver. The available options of apachectl are as follows:
start
Starts the standard HTTP server
startssl
Starts the SSL servers in addition to the regular server

stop
Shuts down the Apache server
restart
Sends a HUP signal to the running server
fullstatus
Prints out a full status of the web server, but requires mod_status
status
Displays a shorter version of the above status screen. Requires mod_status
graceful
Sends a SIGUSR1 to the Apache server
configtest
Inspects the configuration file for errors
While it's not mandatory to start Apache with apachectl, it is the recommended and easiest way to doso. apachectl makes shutting down the server processes quicker and more efficient, as well.

14.4. VirtualHost Configuration Options
One of the more powerful features of Apache is the ability to run multiple web servers on onemachine. This functionality is accomplished using the VirtualHost functionality found within thehttpd.conf file. There are two types of virtual hosts that can be configurednamed virtual hosts and IPvirtual hosts. With named virtual hosts, you can host multiple TLDs on a single IP, while with IPvirtual hosting, you can host only one virtual host per IP address. In this section, we will giveexamples of each, and list some common configuration options.
14.4.1. IP-Based Virtual Hosts
For those who have only one site to host or have multiple IPs for all sites they wish to run, IP-basedvirtual hosting is the best configuration choice. Consider the following example where the VirtualBrewery decides to host a web site for its Virtual Vineyard. The following is the minimum amount ofconfiguration that would need to be added to the httpd.conf file in order to create the new web site.
Listen www.virtualvineyard.com>:80..<VirtualHost www.virtualvineyard.com>ServerAdmin [email protected] /home/www/virtualvineyard.comServerName www.virtualvineyard.comErrorLog /var/www/logs/vvineyard.error_logTransferLog /var/www/logs/vvineyard.access_log</VirtualHost>
You would also want to make sure that www.virtualvinyard.com was added to your /etc/hosts file.This is done because Apache will need to look up an IP address for this domain when it starts. Youcan rely entirely on your DNS, but should your DNS server be unavailable for some reason when theweb server restarts, your web server will fail. Alternately, you can hardcode the IP address of yourserver at the beginning of the configuration in the <VirtualHost> tag. Doing so may seem more
efficient, however, should you wish to change your web server IP address, it will require changingyour Apache configuration file.
In addition to the configuration options listed in the example, any of the options discussed earlier inthe chapter can be added to the VirtualHost groups. This provides you with maximum flexibility foreach of your separate web servers.
14.4.2. Name-Based Virtual Hosting
The configuration of name-based virtual hosting is very similar to the previous example, with the

exception that multiple domains can be hosted on a single IP address. There are two caveats to thisfunctionality. The firstperhaps the biggest drawbackis that SSL can be used only with a single IPaddress. This is not a problem with Apache, but rather with SSL and the way certificates work. Thesecond potential drawback is that some older web browsers, such as those without the HTTP 1.1specification, will not work. This is because name-based virtual hosting relies on the client to informthe server in the HTTP request header of the site they wish to visit. Nearly any browser releasedwithin the past few years, however, will have HTTP 1.1 implemented, so this isn't a problem for mostadministrators.
Proceeding to an example configuration, we will use the same example given earlier in the chapter,except this time the Virtual Brewery has only one public IP address. You will first need to informApache that you are using named virtual hosting, and then provide the detail on your sites as isshown in this example.
NameVirtualHost 172.16.0.199<VirtualHost 172.16.0.199>ServerName www.vbrew.comDocumentRoot /home/www/vbrew.com</VirtualHost><VirtualHost 172.16.0.199>ServerName www.virtualvineyard.comDocumentRoot /home/www/vvineyard.com</VirtualHost>
For the sake of clarity, the additional options were omitted, but any of the previously discussedoptions can be added as necessary.

14.5. Apache and OpenSSL
After having configured and tested your Apache web server configuration, the next thing you may wish todo is configure an SSL page. From protecting web-based email clients, to providing secure e-commercetransactions, there are many reasons why one would use SSL. Within the Apache realm there are twooptions for providing SSL, Apache-SSL and mod_ssl . In this section, we'll focus on the older and morecommonly used mod_ssl .
As with any SSL-based application, certificates are required. These provide the basis on which the trustrelationship between client and server is established. This being said, if you are hosting a site for abusiness, you will likely want to get a certificate signed by a third party, such as Verisign or Thawte. Sincethese certificates are somewhat costly, if you aren't hosting a business, you also have the option ofgenerating your own certificate. The disadvantage of this method is that when clients access your site, anerror will be generated telling them that your certificate is not trusted since it hasn't been signed by a thirdparty. This means that they will be required to click through the error message and decide whether or notthey want to trust your certificate. In this chapter we will provide configuration examples foradministrators generating their own certificates. Alternately, the cacert.org organization offers freecertificates for individuals.
14.5.1. Generating an SSL Certificate
In order to enable an SSL session, you will first need to create a certificate. To do this, you will need tomake sure you have OpenSSL installed. It can be found at http://www.openssl.org , in both source andbinary package format. This package comes installed with many Linux distributions, so you may not haveto install it. Once you have installed or verified the installation of OpenSSL, you can proceed to create therequired SSL certificate.
The first step in this process is to create a certificate signing request. You will need to enter a temporaryPEM pass phrase and some information about your site:
vlager# openssl req -config openssl.cnf -new -out vbrew.csrUsing configuration from openssl.cnfGenerating a 1024 bit RSA private key...............................++++++....++++++writing new private key to 'privkey.pem'Enter PEM pass phrase:Verifying password - Enter PEM pass phrase:-----You are about to be asked to enter information that will be incorporatedinto your certificate request.What you are about to enter is what is called a Distinguished Name or a DN.There are quite a few fields but you can leave some blankFor some fields there will be a default value,If you enter '.', the field will be left blank.-----

Country Name (2 letter code) [AU]:USState or Province Name (full name) [Some-State]:CaliforniaLocality Name (eg, city) [ ]:BerkeleyOrganization Name (eg, company) [Internet Widgits Pty Ltd]: www.vbrew.comOrganizational Unit Name (eg, section) [ ]:Common Name (eg, YOUR name) [ ]:www.vbrew.comEmail Address [ ]:[email protected] enter the following 'extra' attributesto be sent with your certificate requestA challenge password [ ]:An optional company name [ ]:
The next step is to remove the private key PEM pass phrase from your certificate. This will allow the serverto restart without having to input the password. For paranoid administrators, this step can be bypassed,but should your server fail at any point, you will have to manually restart it.
vlager # openssl rsa -in privkey.pem -out vbrew.keyread RSA keyEnter PEM pass phrase:writing RSA key
Having separated the pass phrase, you will now need to self-sign your certificate file. This is accomplishedusing the x509 option with OpenSSL:
apache ssl # openssl x509 -in vbrew.csr -out vbrew.cert -req -signkey vbrew.key -days 365Signature oksubject=/C=US/ST=California/L=Berkeley/O=www.vbrew.com/CN=www.vbrew.com/[email protected] Private key
Once this has been completed, your certificate is ready for use. You should copy the certificate files to yourApache directory so the web server can access them.
14.5.2. Compiling mod_ssl for Apache
If you compiled Apache from source as in the earlier example in the chapter, you will need to patch theApache source and recompile in order to use mod_ssl. If you installed Apache from a binary package foryour Linux distributions, then there's a good chance that it is already compiled in. To see whether youneed to recompile, check which modules are built into Apache by using the following command:
vlager # /var/www/bin/httpd -lCompiled-in modules: http_core.c mod_env.c mod_log_config.c mod_mime.c mod_negotiation.c mod_status.c

mod_include.c mod_autoindex.c mod_dir.c mod_cgi.c mod_asis.c mod_imap.c mod_actions.c mod_userdir.c mod_alias.c mod_access.c mod_auth.c mod_setenvif.c
In this case, mod_ssl is not present, so we will have to download and compile it into our Apache server.Fortunately, this isn't as difficult as it might sound. The source for mod_ssl can be found athttp://www.modssl.org . You will need to unpack it along with the source to OpenSSL. For ease, we haveput all three source trees under the same directory. When you have everything unpacked, you are readyto continue. First, you will need to configure the build of mod_ssl:
vlager # ./configure --with-apache=../apache_1.3.28 --with-openssl=../openssl-0.9.6iConfiguring mod_ssl/2.8.15 for Apache/1.3.28 + Apache location: ../apache_1.3.28 (Version 1.3.28) + Auxiliary patch tool: ./etc/patch/patch (local) + Applying packages to Apache source tree: o Extended API (EAPI) o Distribution Documents o SSL Module Source o SSL Support o SSL Configuration Additions o SSL Module Documentation o AddonsDone: source extension and patches successfully applied.
Now, assuming that you built your OpenSSL from source and it is in line with your Apache sourcedirectory, you can configure and build Apache as follows:
vlager # cd ../apache_1.3.28vlager # SSL_BASE=../openssl-0.9.6i ./configure -prefix=/var/www --enable-module=sslConfiguring for Apache, Version 1.3.28 + using installation path layout: Apache (config.layout)Creating MakefileCreating Configuration.apaci in srcCreating Makefile in src + configured for Linux platform + setting C pre-processor to gcc -E + using "tr [a-z] [A-Z]" to uppercase + checking for system header files + adding selected modules o ssl_module uses ConfigStart/End + SSL interface: mod_ssl/2.8.15

+ SSL interface build type: OBJ + SSL interface compatibility: enabled + SSL interface experimental code: disabled + SSL interface conservative code: disabled + SSL interface vendor extensions: disabled + SSL interface plugin: Built-in SDBM + SSL library path: /root/openssl-0.9.6i + SSL library version: OpenSSL 0.9.6i Feb 19 2003 + SSL library type: source tree only (stand-alone) + enabling Extended API (EAPI) + using system Expat + checking sizeof various data types + doing sanity check on compiler and optionsCreating Makefile in src/supportCreating Makefile in src/regexCreating Makefile in src/os/unixCreating Makefile in src/apCreating Makefile in src/mainCreating Makefile in src/modules/standardCreating Makefile in src/modules/ssl
When the source configuration has completed, you can now rebuild Apache with make install . You canalso repeat the httpd -l command used above to verify that mod_ssl has been compiled into Apache.
14.5.3. Configuration File Changes
Only a few minor changes are required. The easiest way to enable SSL within Apache is by using theVirtual Host directives discussed earlier. However, first, outside of the Virtual Host section, at the end ofyour configuration file, you will need to add the following SSL directives:
SSLRandomSeed startup builtinSSLSessionCache None
Now you need to build your VirtualHost configuration to enable the SSL engine. Again, in the httpd.conffile, add the following lines:
<VirtualHost www.vbrew.com:443>SSLEngine OnSSLCipherSuite ALL:!ADH:!EXPORT56:RC4+RSA:+HIGH:+MEDIUM:!SSLv2:+EXP:+eNULLSSLCertificateFile conf/ssl/vbrew.certSSLCertificateKeyFile conf/ssl/vbrew.key</VirtualHost>
This section enabled the SSLEngine and configured the cipher suites. You can select which you would liketo allow or disallow. The "!" is used for entries that are explicitly disallowed, and the "+" is for those thatare allowed. If you have stored your certificates in any other directory, you will need to make thenecessary changes to the SSLCertificateFile and KeyFile entries. For more information about the optionsavailable with mod_ssl, consult the documentation found on the mod_ssl web site.
14.6. Troubleshooting
As complex as Apache configurations can be, it's not unlikely that there will be problems. This sectionwill address some common errors and resolutions to those problems.
14.6.1. Testing the Configuration File with apachectl
Fortunately for administrators, Apache comes with a configuration checker, which will test changesmade to the configuration before bringing down an operational server. If it finds any errors, it willprovide you with some diagnostic information. Consider the following example:
vlager # ../bin/apachectl configtestSyntax error on line 985 of /var/www/conf/httpd.conf:Invalid command 'SSLEgine', perhaps mis-spelled or defined by a module not included in the server configuration
The configuration testing tool has found an error on line 985, and it appears that the SSLEnginedirective was spelled incorrectly. This configuration checker will catch any syntactical errors, whichcertainly helps. Administrators should always run this before stopping and restarting their servers.
The configtest option won't solve all of your problems, however. Transposed digits in an IP, a
misspelled domain name, or commented out requirements will all pass the test, but cause problemsfor the operational server.
14.6.2. Page Not Found Errors
This is a very general error, and a variety of circumstances can cause it. This is Apache's way oftelling you that it can't find or read the page. If you are getting an error of this nature, first check allof your paths. Remember with Apache, you are operating within a virtual directory environment. Ifyou have links to files outside of this structure, it is likely that the server will not be able to serverthem. Additionally, you should verify the permissions of the files and make sure that the user whoowns the web server process can read them. Files owned by root, or any other user, set to mode 700(read/write/execute user) may cause the server to fail, since it will be unable to read them.
Pathnames, along with domain names, are often misspelled. While configtest may catch some of
them, it is unlikely that it will catch all of them. One typo can cause a whole site to fail. Double-checkeverything if you are having a problem.
14.6.2.1 SSL problems
If your SSL server isn't working, there are a number of things that could have gone wrong. If your

server isn't delivering the pages, you should check the error_log file. It will often provide you with awealth of troubleshooting options. For example, our example web server was not serving up SSLpages, but unencrypted pages were being served without issue. Checking the error_log, we see:
[Wed Aug 6 14:11:33 2003] [error] [client 10.10.0.158] Invalid method in request\x80L\x01\x03
This type of error is quite common. The invalid request is the client trying to negotiate an SSLsession, but for some reason the web server is serving only unencrypted pages on the SSL port. Wecan even verify this by pointing the browser at port 443 and initiating a normal HTTP session. Thereason why this is occurring is that the server does not think it has been told to enable theSSLEngine, or doesn't think it has.
To fix this problem, you need to verify that you have the line in your httpd.conf file:
SSLEngine On
You should also check the Virtual Host entry that you created for the SSL server. If there is an errorwith the IP address or DNS name on which it was told to create the server, the server will create thiskind of error. Consider the following excerpt of our configuration file:
<VirtualHost www.vbrew.cmo:443>SSLEngine OnSSLCipherSuite ALL:!ADH:!EXPORT56:RC4+RSA:+HIGH:+MEDIUM:+LOW:!SSLv2:+EXP:+eNULLSSLCertificateFile conf/ssl/vbrew.certSSLCertificateKeyFile conf/ssl/vbrew.key</VirtualHost>
A typo in the VirtualHost directive has caused the server to try to start for a name in the .cmo ratherthan the .com top-level domain. Of course, Apache doesn't realize this is an error, and is doingexactly what you've asked it to do.
Other SSL-related problems are likely to center on key locations and permissions. Make sure thatyour keys are in a location known to the server and that they can be read by the necessary entities.Also, note that if you are using a self-signed keysome clients may be configured not to accept thecertificate, causing them to fail. If this is the case, either reconfigure your client workstations orpurchase a third-party signed certificate.

Chapter 15. IMAPInternet Message Access Protocol (IMAP) was developed from a need for mobile email access. Manyworkers read mail from a variety of locations (the office, home, hotel rooms, and so on) and wantsuch flexible features as the ability to download headers first and then selectively download mailmessages. The main mail delivery protocols before IMAP, for the Internet, was POP, which offersmore rudimentary mail delivery-only functionality
With IMAP, traveling users can access their email from anywhere and download it or leave it on theserver as desired. POP, on the other hand, does not work well when users access email from manydifferent machines; users end up with their email distributed across many different email clients.IMAP provides users with the ability to remotely manage multiple email boxes, and store or search aswell as archive old messages.

15.1. IMAPAn Introduction
IMAP, fully documented in RFC 3501, was designed to provide a robust, mobile mail delivery andaccess mechanism. For more detail on the protocol and how it functions on the network layer, or foradditional information on the numerous specification options, please consult the RFC documentation.
15.1.1. IMAP and POP
POP and IMAP tend to be grouped together or compared, which is a bit unfair since they aredissimilar in many ways. POP was created as a simple mail delivery vehicle, which it does very well.Users connect to the server and obtain their messages, which are then, ideally, deleted from theserver. IMAP takes an entirely different approach. It acts as the keeper of the messages and providesa framework in which the users can efficiently manipulate the stored messages. While administratorsand users can configure POP to store the messages on the server, it can quickly become inefficientsince a POP client will download all old messages each time the mail is queried. This can get messyquickly, if the user is receiving any quantity of email. For users who do not need any kind ofportability, or receive little email, POP is probably an acceptable choice, but those seeking greaterfunctionality will want to use IMAP.
15.1.2. Which IMAP to Choose?
Once you've decided that IMAP is for you, there are two primary options. The two main flavors areCyrus IMAP and the University of Washington IMAP server. Both follow the RFC specification for IMAPand have their advantages and disadvantages. They also use different mailbox formats and thereforecannot be mixed. One key difference between the two is found in Cyrus IMAP. It does not use/etc/passwd for its mail account database, so the administrator does not have to specially add mailusers to the system password file. This is more secure option for system administrators, becausecreating accounts on systems can be construed as a security risk. However, the ease of configurationand installation of UW IMAP often makes it more appealing. In this chapter, we'll primarily focus onthe two most common IMAP servers: UW IMAP, because of its popularity and ease of installation, andCyrus IMAP, because of its additional security features.
15.1.2.1 Getting an IMAP client
The UW IMAP, as its name suggests, can be found at the University of Washington. Their web site,http://www.washington.edu/imap/, contains various documentation and implementation suggestions,as well as the link to their software repository FTP site. There are a number of different versionsavailable in various forms. For simplicity, the UW IMAP team offers a link a direct link to the mostcurrent version: ftp://ftp.cac.washington.edu/mail/imap.tar.Z.

15.1.2.2 Installing UW-IMAP
Once the server software has been downloaded and decompressed, it can be installed. However,because of UW-IMAP's large portability database, it does not support GNU automake, meaning thatthere isn't a configure script. Instead, a Makefile that relies on user-specified parameters is used.There are many supported operating systems, including a number of Linux distributions. Here's a listof a few of the supported Linuxes distributions:
# ldb Debian Linux# lnx Linux with traditional passwords and crypt( ) in the C library# (see lnp, sl4, sl5, and slx)# lnp Linux with Pluggable Authentication Modules (PAM)# lrh RedHat Linux 7.2# lsu SuSE Linux# sl4 Linux using -lshadow to get the crypt( ) function# sl5 Linux with shadow passwords, no extra libraries# slx Linux using -lcrypt to get the crypt( ) function
The lrh version will probably work on newer Red Hat versions as well. If your distribution isn't listed,try one of the matching generic options. lnp is a good guess for most modern versions of Linux.
If you don't have OpenSSL installed, you will need to edit a part of the Makefile. Find the sectionwhere SSL is being configured, and look for the following line:
SSLTYPE=nopwd
The nopwd option needs to be set to none in order to tell IMAP that you aren't using OpenSSL.
If you have OpenSSL installed but the installer is still failing, the cause is most likely that it is lookingfor OpenSSL in the wrong place. By default, the Makefile searches a predefined path based on yourbuild selection at the beginning of the process. For example, if you have used the lnp option to build
IMAP, it is looking for SSL in the /usr/ssl directory. But if you're using Gentoo Linux, your SSLdirectory is /usr and you will need to search for the SSLPATH option in the Makefile and correct thepath. The same process will need to be followed for the SSLCERTS option, which should be in thesame area of the Makefile.
Having successfully compiled the IMAP server, you should install it in your inetd.conf file (or usexinetd, if appropriate). To use inetd.conf, you need to add the following line:
imap stream tcp nowait root /path/to/imapd imapd
Note that you will need to change the actual path to reflect the location where you installed yourimapd binary.
Most modern Linux systems have a fairly complete /etc/services file, but you should verify that IMAPis present by searching for or, if necessary, adding, the following line:
imap 143/tcpimaps 993/tcp

When these steps have been completed, the installation can be tested with the netstat. If youinstallation is successful, you will see a listener on TCP port 143.
vlager# netstat -aunt Active Internet connections (servers and established)Proto Recv-Q Send-Q Local Address Foreign Address Statetcp 0 0 0.0.0.0:143 0.0.0.0:* LISTENtcp 0 0 0.0.0.0:22 0.0.0.0:* LISTEN
As with any service, it may also be necessary to make adjustments to the firewall to allow the newconnections.
15.1.2.3 IMAP configuration
One of the great joys of UW IMAP is that once it is installed, it is almost always fully functional. Thedefault options, including the use of standard /etc/passwd authentication and the Unix mailboxformat, are considered acceptable by most administrators. If you need more flexibility or features,UW IMAP offers extended configuration options such as anonymous logins, IMAP alert messages,alternate mailbox formats, and the possibility of shared mailboxes, which we'll take a look at in thenext section.
15.1.2.4 Advanced UW IMAP configuration options
There are a number of additional options that can be added to a UW IMAP server, based on yourrequirements. One feature that may be useful is the potential to allow anonymous logins. This can beused as a way to provide information to users without creating specific accounts for them. This hasbeen used at universities as a method of distributing information, or providing read-only access todiscussion lists. To enable this functionality, the only step required is to place a file in your /etcdirectory called anonymous.newsgroups. Once this has been completed, anonymous users will haveaccess to commonly shared mailboxes.
Another potentially useful feature is the ability to create an alert message for IMAP users. Whenenabled, this feature will generate an alert message for any user logging in to check their mail. As themessage is displayed every time a user checks their mail, it should be used only in emergencysituations. It would not be a good place to put a banner or disclaimer. To create the alert message,you need to create a file called imapd.alert. The contents consist of your message.
15.1.2.5 Using alternate mailbox formats
The default mailbox format configured by UW IMAP was selected because it provides the greatestflexibility and compatibility. While these are two definite advantages, they come at a cost ofperformance. The mbx format supported by UW IMAP provides better capabilities for sharedmailboxes, since it supports simultaneous reading and writing.

15.1.2.6 Configuring IMAP to use OpenSSL
IMAP provides many useful conveniences required by users when dealing with their email, but lacksone very important featureencryption. For this reason, IMAP-SSL was developed. When it is installed,an IMAP user with compatible client software can enjoy all the functions of IMAP without worryingabout eavesdropping. In order to install IMAP with SSL support, you will first need to make sure thatyour IMAP server is properly installed and functioning. You will also need a functional OpenSSLinstallation. Most Linux distributions are shipped with OpenSSL, but if for some reason yourdistribution does not have it, please consult the Apache chapter in this book for more information onbuilding OpenSSL.
To begin the configuration process, create digital certificates for your IMAP server to use. This can bedone with the OpenSSL command-line utility. A sample certificate can be created as follows:
vlager# cd /path/to/ssl/certs vlager# openssl req -new -x509 -nodes -out imapd.pem -keyout imapd.pem -days 365 Using configuration from /etc/ssl/openssl.cnfGenerating a 1024 bit RSA private key..............++++++..................................................++++++writing new private key to 'imapd.pem'-----You are about to be asked to enter information that will be incorporatedinto your certificate request.What you are about to enter is what is called a Distinguished Name or a DN.There are quite a few fields but you can leave some blankFor some fields there will be a default value,If you enter '.', the field will be left blank.-----Country Name (2 letter code) [AU]: ..
Common Name (eg, YOUR name) [ ]: mail.virtualbrewery.com Email Address [ ]:vlager # ls -l total 4-rw-r--r-- 1 root root 1925 Nov 17 19:08 imapd.pemvlager #
When creating this certificate, make sure that you've entered the domain name of your mail server inthe common name field. If this is not set, or is set improperly, you will at best get error messageswhen clients try to connect, and at worst have a broken server.
There is a good chance that your IMAP server will need to be recompiled and configured to useOpenSSL. Fortunately, this is a fairly easy process. If you are using Red Hat, SuSE, or any of theother mentioned distributions, substitute them in the command line; otherwise, the followingcommand-line options will work for most other Linux distributions:
vlager# make lnp PASSWDTYPE=pam SSLTYPE=nopwd

If you receive errors regarding OpenSSL, you may need to adjust the path settings. You can do thisby making changes to the SSLDIR, SSLLIB, and SSLINCLUDE path options found in the Makefile. For
most users, this will not be necessary.
After compiling the new IMAP server, copy it from the build directory to the location on your systemwhere your other daemon files are located. Since IMAP-SSL uses a different port from the standardIMAP, you will need to make a change to your inetd.conf file.
imaps stream tcp nowait root /path/to/imapd imapd
If you're using xinetd, you will need to create a file in your /etc/xinetd.d directory, which looks likethis:
service imaps{ socket_type = stream wait = no user = root server = /path/to/imapd log_on_success += DURATION USERID log_on_failure += USERID disable = no}
It is also important, at this point, to make certain that you have an imaps entry in your /etc/servicesfile.
vlager # cat /etc/services |grep imapsimaps 993/tcp # IMAP over SSLimaps 993/udp # IMAP over SSLvlager #
You can now test your server from any number of clients. Make certain that you've specified in theclient configuration that you will be using SSL. In a number of clients, upon connection, you willreceive a message asking you if you wish to trust the certificate. This message will appear only ifyou've generated your own certificate, as we did in the above example. Some administrators,especially if the server is being used for production use, will likely want to purchase a certificate toavoid this.

15.2. Cyrus IMAP
Another option IMAP administrators have is the product from CMU called Cyrus. It is similar to UWIMAP as far as general functionality goesfrom the user standpoint, there will be little difference. Themajority of the differences come on the administrative side. This is also where its benefits can beseen.
15.2.1. Getting Cyrus IMAP
The Cyrus software can be obtained in a number of places, but the most reliable choice, with thelatest source releases, will be the central CMU Cyrus distribution site,http://asg.web.cmu.edu/cyrus/download/. Here, both current and previous releases can bedownloaded. The availability of previous releases could be an advantage for sites with polices againstusing the most recent versions of software.
To begin the installation of the Cyrus server, download and decompress the latest version. You willneed to download both the IMAP and SASL packages.
SASL is the authentication mechanism used by Cyrus IMAP, and will need to be configured andinstalled first. It is easily built using the standard "configure-make" order.
vlager# cd cyrus-sasl-2.1.15 vlager# ./configure loading cache ./config.cachechecking host system type... i686-pc-linux-gnu.creating saslauthd.hConfiguration Complete. Type 'make' to build.
vlager# make make all-recursivemake[1]: Entering directory `/tmp/cyrus-sasl-2.1.15'
Assuming the compile is completed without failure and you've successfully executed the make install,you can now proceed to configuring and installing the Cyrus IMAP server itself.
After decompressing the Cyrus IMAP source, prepare the configuration using the following command:
vlager# ./configure --with-auth=unix
This will prepare Cyrus IMAP to use the Unix passwd/shadow files for user authentication. It is alsopossible to enable Kerberos for authentication at this point.
Next, you will need to create all of the dependency files, and then build and install the package:
vlager# make depend . . . vlager# make all CFLAGS=-O . . . vlager# make install . . .
With that successfully completed, your Cyrus IMAP server is now ready to be configured.
15.2.2. Configuring Cyrus IMAP
You will need to create a user for the Cyrus server to use. It should be something that you can easilyrelate to your Cyrus server, and it also needs to be a part of the mail group.
Once the user is created, you can begin configuring your Cyrus server. The /etc/imapd.conf file is theprimary configuration file for the server. Verify that it looks something like the example below. Youmay need to add some of these lines.
configdirectory: /var/imappartition-default: /var/spool/imapsievedir: /var/imap/sieve# Don't use an everyday user as admin.admins: cyrus roothashimapspool: yesallowanonymouslogin: noallowplaintext: no
15.2.3. Troubleshooting Cyrus IMAP
Building Cyrus IMAP can be somewhat tricky, as it tends to be pickier about files and locations. If theconfigure process is failing, take special note of what exactly is causing the failure. For example,when building Cyrus-SASL, if the build fails with an error complaining about undefined references inthe berkeley_db section, it is likely that you do not have BerkeleyDB installed, or you installed it in a
place where the configure script isn't looking. The path to the installed BerkeleyDB can be set at thecommand line when the configure script is run. This method of tracing the root of the error, andremedying it can solve many problems.
Another common problem when building Cyrus IMAP involves the location of a file called com_err.h.It is expected by Cyrus IMAP to be in the /usr/include directory. However, it often tends to be foundin the /usr/include/et directory. Therefore, it will be necessary to copy this file to the /usr/includedirectory for the installation to proceed.

Chapter 16. SambaThe presence of Microsoft Windows machines in the network environment is often unavoidable for theLinux network administrator, and often interoperability is critical. Fortunately, a group of developershas been hard at work for the last 10 years, and has created one of the most advanced Windows-to-UNIX interoperability packagesSamba. It has, in fact, become so successful and practical that systemadministrators can completely replace Windows servers with Samba servers, keeping all functionality,while adding additional stability.

16.1. SambaAn Introduction
Samba, still actively developed in order to maintain feature compatibility with the ever-changing Microsoft software, provides a framework to allow Linux machines to access Windowsnetwork resources, such as shared drives and printers. Samba not only lets Linux machines access these services, but also allows Linux to offer these same services to Windows machines.With Samba, it's possible to completely replace a Windows-based file server, a Windows print server, and even, with advanced options, replace the Primary Domain Controller (PDC).Recent versions of Samba even allow Active Directory compatibility. The open-source flexibility of Samba means that development will be able to continue, and new features will beintroduced when the Windows architecture changes. More information on Samba can be found in Using Samba , Second Edition (O'Reilly), by Jay Ts, Robert Eckstein, and David Collier-Brown.
16.1.1. SMB, CIFS, and Samba
The underlying technology used in Samba is based on Server Message Blocks (SMB), which was originally developed in the early 80s by Dr. Barry Feigenbaum while he was working atIBM. Initially, IBM was actively involved with the development, but Microsoft soon took charge and heavily continued the development work. In later years, Microsoft renamed the SMBprotocol to Common Internet File System (CIFS), by which it is now known. One sees the terms used interchangeably.
There is little accurate and official documentation about how CIFS functions. Unlike most other network protocols, there is no official RFC documentation, though Microsoft did submitspecifications to the IETF in the 1990s that expired due to numerous inaccuracies and inconsistencies. Newer documentation attempts by Microsoft have not been as helpful to the Sambadevelopment group, due to the licensing restrictions place upon it as well as a general lack of new information.
16.1.2. Obtaining Samba
There are a number of options available for obtaining Samba. Many distributions now come with Samba as a part of their default installation. If this is the case with your distribution, youwill not necessarily need to build from source. Red Hat, Mandrake, and SuSE users may install the package from RPM, available via a number of Samba mirrors. Gentoo users need onlyuse emerge samba to install the package, and Debian users do the same with apt-get . Other users, or those who prefer to do so, can install the Samba package from source. Often thisprovides the greatest amount of flexibility because of the options available at compile time.
16.1.2.1 Building from source
In order to build from source, you will need to obtain the latest source tarball, found at any of the Samba mirrors listed on the main http://www.samba.org site. Once the tarball hasdownloaded, extract it to a directory and build the binaries using the provided configuration file.
vlager# tar xzvf samba-current.tgzvlager# cd samba-3.0.0vlager# cd sourcevlager# ./configure . . . . . . vlager# make . . . vlager# make install
Once the software has compiled and installed, you will need to choose how you wish to have it run at startup. It can be run as an inetd service or as a daemon. Either way is acceptable,but running Samba from inetd may require the update of your /etc/services file. You will need to make sure that the following lines, which define the Samba protocol, are inserted:

netbios-ns 137/tcp # NETBIOS Name Servicenetbios-ns 137/udpnetbios-dgm 138/tcp # NETBIOS Datagram Servicenetbios-dgm 138/udpnetbios-ssn 139/tcp # NETBIOS session servicenetbios-ssn 139/udpmicrosoft-ds 445/tcp Microsoft-DSmicrosoft-ds 445/udp Microsoft-DS
After this has been added or confirmed, you are should add Samba to your inetd.conf file, or to your xinetd configuration. You should also check to verify that your firewall is configured toallow the necessary ports.
Alternately, if you're planning to have Samba run as a daemon process, you will need to add it to your rc startup scripts. This is different for each of the various Linux distributions, so ifyou're unsure of how to do this, check your distribution's documentation.
16.1.3. Getting Started with Samba
Once you've compiled or installed Samba, you now have the potentially lengthy task of configuration ahead of you. The enormous flexibility offered by Samba means that there are anumber of configuration options. Fortunately, for file server functionality, the configuration is fairly straightforward. In this section, we'll cover some of the basic options and discuss how tocreate shared file directories. For additional information, refer to Using Samba (O'Reilly).
16.1.3.1 Basic configuration options
The easiest way to get started configuring Samba is to start with the minimal configuration and add to it. So, to start, we'll just create a workgroup, name our server, and add a simple fileshare.
{global} workgroup = Brewerynetbios name = vlager [share] path = /home/filescomment = Some HomeBrew recipes
You can test your Samba configurations with testparm . It will parse your configuration files and point out any typos or incorrect options you've entered. At this point, it's not too likelythat you'll have any mistakes, but it's still good to get to know how to use the tool.
If everything works, you can start or restart your Samba server and attempt to view your new file share. The smbclient program, which is a part of the Samba package, can be used toview file shares. In this example, we're going to look at the file shares we've just created on vlager (10.10.0.5 )
client# smbclient -L 10.10.0.5Password: Sharename Type Comment --------- ---- ------- share Disk Some HomeBrew recipesclient#

After the successful completion of this step, we're now ready to tackle some more sophisticated configuration options, which will make Samba much more useful.
16.1.3.2 Configuring Samba user accounts
The above configuration is great if you're only interested in having an open file share, but you may have been wondering about access control. In the above example configuration, anyonecan connect to the file share. This is generally not a desirable configuration on a network. It is for that reason that Samba does, in fact, have user authorization functionality.
Staring with the previous configuration file, authentication can be added by adding the following lines:
security = userencrypt passwords = yessmb passwd file = /etc/samba/private/smbpasswdusername map = /etc/samba/smbusers
The first line enables user security. This means that you will need to manage the users file on the Samba server. The second line establishes that the Samba password file will beencrypted. The third and fourth lines provide the path locations for the password and user files. It isn't necessary to have a separate users file, but it is possible with Linux.
When this has been configured, you will now be required to create users on your system. The Samba suite provides smbpasswd to manage user accounts. This isn't required, becauseSamba can reference the users in your /etc/passwd file. However, if there are users from Microsoft environments accessing files on your new Samba server, you will need to have this file.
Creating users is pretty straightforward and is done with the smbpasswd utility.
vlager# smbpasswd -a larryNew SMB password:Retype new SMB password:vlager#
Once the user has been created, it can be tested with either a Windows machine or a Linux machine using smbmount . After entering \\<server.ip> into the Explorer address bar, the
Windows user will be presented with a dialog box, as shown in Figure 16-1 .
Figure 16-1. Windows network login request

For Linux, and other Unixes, smbmount is invoked as follows:
vlager# mount -t smbfs -o username=larry //server.ip /mnt/samba
If everything has been successful, you will now be able to access the shared directory at /mnt/samba .
16.1.4. Additional Samba Options
So far, we've discussed the bare minimum configuration of a Samba server. This is great for those who just want to quickly get something on the network. In order to get a little bit moreout of Samba, we'll now take a look at some additional options.
16.1.4.1 Access control
The Samba server offers some additional security, which can prove very useful in large networks. IP-based access control is available with what are likely very familiar commands:
hosts allow = 10.10.hosts.deny = any
This will allow connections only from the 10.10 network. The Samba IP access control follows the same logic used by tcpwrappers . You can either explicitly allow or deny IP addresses orranges. This option is really convenient because it can be used at the global or the share level, meaning that you can have a list of IP addresses that are either allowed or banned from allof your server's file shares, or you can break it down so that only certain IP addresses have access to certain shared directories. This type of granular access is not even offered byWindows itself!
The Samba server is also flexible as to which interface it will bind to. By default, it will bind to all available interfaces, including loopback. To remove any unwanted access, such as bindingSamba to the external interface of a dual-homed machine, the bind interface can be specified.
bind interfaces only = Trueinterfaces = eth1 10.10.0.4
This will make sure that Samba listens only on the specified interface on the provided IP address. If you are concerned about security, it is best to restrict access at the application level,rather than rely on a firewall to protect you.
Another type of access control offered by Samba is the ability to mark a shared directory as browsable. If it is browsable, it will be immediately visible and users will be able to peruse itscontents. The command to manipulate this feature is:
browsable = yes|no
If you would like to be able to give people access to certain files, perhaps by sending them a URI pointing to a specific file, while not wanting them to be able to see all the files in thedirectory, this option should be set to no . A URI of this kind should look familiar; for example, \\vlager.vbrew.com\recipe\secret.txt would work for Windows users, while for Unix users,one might use smb://vlager.vbrew.com/recipe/secret.txt . In either case, the user would be allowed access to just the secret.txt file only. For most purposes it is set to yes , as the Samba
server tends to be more functional when users can browse the filesystem.
Along the same lines, shared directories can be marked as to whether or not they're publicly available. If a folder is not public, even with a specific URI a user cannot access a file. It isimportant to note, though, that anyone with a Samba account will be able to view folders that are labeled public.

public = yes|no
Having granted viewing rights to a user, the Samba administrator can also choose whether or not shared directories are writable. This is done with the writable command:
writable = yes|no
When this option is set to no , nothing can be written to the directory.
Should you wish to have a fairly open Samba server for something like an open, browsable documentation server, you might wish to enable the Samba guest account. This is easily donewith the guest directive:
guest ok = yes|no
Finally, one of the most useful features of Samba is that it allows access to shared directories to be controlled with user access lists. The easiest way to accomplish this is by using thevalid users option.
valid users = sharon paul charlie pat
You can also simplify this by using an already defined group from your /etc/group file:
valid users = @brewers
The at sign (@ ) tells Samba that the brewers value is the group name. Having controlled access to the point where you're comfortable, you're probably interested in making sure that your
configuration is working. One of the best ways to see what's happening with Samba is through its excellent logging capabilities.
16.1.4.2 Logging with Samba
Using the log functions with Samba is quite simple. There are a number of additional modifiers that can be added to expand on the logging capabilities. The most basic logging can beaccomplished with the following command:
log file = /var/log/samba.log
This will provide basic logging of all Samba transactions to the file specified. However, in some instances, these logfiles can be a bit unwieldy if many machines are accessing the Sambaserver. To make the logging easier to sift through, Samba offers the ability to log by each host that connects. Enabling this functionality requires only the following addition:
log file = /var/log/samba.log.%m
As with most logging functions on Linux, the administrator has the ability to configure how much logging occurs. In Samba, these log levels follow a 0 to 10 scale, starting from light tointensive logging. For most uses, the Samba documentation suggests using log level 2, which provides a good amount of information for debugging, without overdoing it. Levels 3 andhigher are designed for Samba programmers and aren't for normal usage. To specify the log level in your Samba configuration file, add this line:
log level = 2
If you have a fairly busy server, it is likely that your logfiles will grow very quickly. For this reason, Samba offers a maximum size logfile directive.

max log size = 75
This example sets the maximum logfile size to 75 KB. When the logfile reaches this size, it is automatically renamed by adding .old to the file, and a new logfile is created. When the newlogfile reaches 75 KB, the previous .old file is overwritten. If you have logfile retention requirements in your environment, make sure that you have a script that automatically archivesyour Samba logs.
16.1.4.3 Logging with syslog
In addition to its own logging capabilities, Samba, when compiled with the --with-syslog option, will also use the system logger. In situations when administrators have automated log-
watching tools, like swatch , this can be more useful. To have Samba use syslog, just add the following line to your Samba configuration file:
syslog = 2
This will send all of Samba's Level 2 logging detail to the syslogfile. If you're happy with this, and would like to use the syslog exclusively, specify the following in your smb.conf :
syslog only = yes
16.1.5. Printing with Samba
Samba is fully functional as a Windows print server, enabling users to connect and print, and even download relevant print drivers. According to the Samba team, this was one of thebiggest interoperability issues they faced because of complexities with the Windows print job queuing system. There are a number of ways to configure Samba for printing, but the twomost common are the traditional BSD printing, and more recent CUPS.
16.1.5.1 BSD Printing
The older, traditional method of printing is the BSD print system which is based around the RFC 1179 framework. It uses commands such as lpr that most Unix administrators are familiarwith. Samba works well with this environment, and it is easily configured. The basic configuration to enable BSD printing looks like this:
[global]printing = bsdload printers = yes [printers]path = /var/spool/sambaprintable = yespublic = yeswritable = no
At this point, if you're thinking that this seems really simplistic, it is! This is thanks to the fact that Samba makes a great number of assumptions with its default configuration. To see whatthe configuration really looks like, you can use the testparm program:
ticktock samba # testparm -s -v |egrep "(lp|print|port|driver|spool|\[)"Processing section "[printers]"[global] smb ports = 445 139

nt pipe support = Yes nt status support = Yes lpq cache time = 10 load printers = Yes printcap name = /etc/printcap disable spoolss = No enumports command = addprinter command = deleteprinter command = show add printer wizard = Yes os2 driver map = wins support = No printer admin = nt acl support = Yes min print space = 0 max reported print jobs = 0 max print jobs = 1000 printable = No printing = bsd print command = lpr -r -P'%p' %s lpq command = lpq -P'%p' lprm command = lprm -P'%p' %j lppause command = lpresume command = printer name = use client driver = No[printers] path = /var/spool/samba printable = Yes
This is the point at which you can readjust some of the default options that might not be right for your system. One item to consider is whether the lp commands are in your default path.You can also add anything to the lp command lines that you see fit.
A sample /etc/printcap file is also included here. As all systems are different, this configuration file may not work properly for you, but it is provided to give you an idea of the configurationformat. For more detailed information, check the printcap manpages.
# /etc/printcap: printer capability database. /lp|Generic dot-matrix printer entry :lp=/dev/lp1 :sd=/var/spool/lpd/lp :af=/var/log/lp-acct :lf=/var/log/lp-errs :pl#66 :pw#80 :pc#150 :mx#0 :sh

16.1.5.2 Printing with CUPS
The Common Unix Printing System (CUPS) is quickly replacing BSD-style printing in most Linux distributions. There are numerous reasons why CUPS is displacing the status quo, which wewill leave for another discussion. However, no discussion of printing in the Samba environment would be complete without now including a section on CUPS printing.
To introduce printing with CUPS, let's have a look at a simple CUPS configured smb.conf file:
[global]load printers = yesprinting = cupsprintcap name = cups [printers]comment = Brewery Printerspath = /var/spool/sambabrowsable = nopublic = yesguest ok = yeswritable = noprintable = yesprinter admin = root, @wheel
This is all that is required for basic configuration to make Samba work with CUPS, provided that CUPS itself is functional on your system.
The global section establishes that the /etc/printcap file is enumerated with the load printers option, which automatically parses the printcap and enables the printers configured within.
This feature can be both really helpful and a bit frightening for some system administrators. While it makes configuration much easier, it does somewhat reduce the administrators abilityto control what is visible to users. If this option turned off, you must individually create each printer share in the Samba configuration files.
The printing option, which we had previously set to bsd , has been changed to cups . We've also named the printcap cups for clarity.
The next section, printers, is also very similar to the previous example; however, we've now configured a printer administration group. This is a basic option that will allow the groupspecified to have administrative access to the CUPS aspects of the printing.
While not necessary, there are a number of additional options that can be added to a cups-based printer configuration to customize it based on need. For more detail and advancedconfiguration with CUPS and Samba, check the Samba web site at http://www.samba.org and the CUPS web site at http://www.cups.org .
16.1.6. Using SWAT
Samba Web Administration Tool (SWAT) is used to simplify administration and configuration of Samba. For those who like to use a GUI, this is one of the best options because it is writtenby the Samba team and contains all possible configuration options. Other GUI frontend programs will work, but may not be as current.
16.1.6.1 Enabling SWAT
SWAT is basically a web server as well as an administration tool. In order to get it working, you will need to add it to your inetd.conf or xinetd configurations. With xinetd , yourconfiguration for swat should look something like this:
service swat{ port = 901 socket_type = stream

wait = no user = root server = /usr/sbin/swat log_on_failure += USERID disable = no}
You will also need to add the SWAT port to your /etc/services file, if it's not already there.
swat 901/tcp # Samba configuration tool
After you restart your xinetd process, you are ready to use the service, which you would do by pointing your web browser at your Samba server's IP address on port 901.
16.1.6.2 SWAT and SSL
You may have noticed that SWAT doesn't use SSL, which is probably OK if you are using it from only localhost . If you are interested in using it over the network, however, encryption is agood idea. Though SWAT doesn't support encryption, it can be added using the popular SSL tunneling tool called stunnel .
The easiest method to configure this was developed by Markus Krieger. In order to use this method, you will need to have both OpenSSL and stunnel installed. Documentation and sourcecode for stunnel can be found at http://www.stunnel.org . Once both are installed and operational, you will need to generate a private key, which can be done like this:
vlager# /usr/bin/openssl req -new -x509 -days 730 -nodes -config /path/to/stunnel/stunnel.cnf -out /etc/stunnel/stunnel.pem -keyout /etc/stunnel/stunnel.pem
Once you have created your keys, you need to make sure that you remove the original SWAT from your inetd.conf file and send a SIGHUP signal to the daemon, if necessary. You will nolonger be calling the standard SWAT daemon through inetd , so be sure that it has been removed.
stunnel can now be started. You can launch it from the command line or create a small script to launch it automatically. To start stunnel , as root , type:
vlager# stunnel -p /etc/stunnel/stunnel.pem -d 901 -l /path/to/samba/bin/swat swat
16.1.7. Troubleshooting Samba
If you've built your Samba server and everything has worked perfectly the first time, consider yourself a part of the lucky minority. For everyone else, we'll now discuss a few tips on howto track down and fix some common problems.
16.1.7.1 Configuration file woes
When troubleshooting Samba, one important issue to keep in mind is that the default options always take priority. This means that if a default configuration option is set, simplycommenting it out does not change its value. For example, you can try to disable the load printers option by simply commenting it out.
[printers]path = /var/spool/samba#load printers = yes
However, using testparm , you will see that the option is still set to yes .

ticktock samba # testparm -s -v |grep "load printers" load printers = Yes
With Samba, you must always explicitly define the options you wish to have; commenting out will not necessarily guarantee success. If something isn't working as expected, check thisfirst.
As basic as it sounds, you should also check to see whether the smbd and nmbd processes exist. It is not uncommon for something to cause them to fail silently, and you will not realizethey are not running.
16.1.7.2 Account problems
One of the more common login problems with Samba occurs with the root, but can happen with any user on the system. For each Samba user, it is important to remember that a separateSamba password must be created because Samba does not use the Linux /etc/shadow hash. For example, if you try to access a Samba file share as root , the system root password willfail, unless you've already created a Samba password for the root account using the same root password (which is definitely not advised). To correct this issue, a separate account must becreated as follows:
vlager# smbpasswd -a rootNew SMB password:Retype new SMB password:Added user root.

Chapter 17. OpenLDAPOpenLDAP is a freely available, open source LDAP solution designed to compile on a number ofdifferent platforms. Under Linux, it is currently the most widely used and best supported free LDAPproduct available. It offers the performance and expected functionality of many commercial solutions,but offers additional flexibility because the source is available and customizable. In this section, wewill discuss possible uses for an OpenLDAP server as well as describe installation and configuration.

17.1. Understanding LDAP
Before proceeding, a brief explanation of LDAP is required. Lightweight Directory Access Protocol(LDAP) is a directory service that can be used to store almost anything. In this way, it is very similarto a database. However, it is designed to store only small amounts of data, and is optimized for quicksearching of records. A perfect example of an application for which LDAP is suited is a PKIenvironment. This type of environment stores only minimal amount of information and is designed tobe accessed quickly.
The easiest way to explain the structure of LDAP is to imagine it as a tree. Each LDAP directory startswith a root entry. From this entry others branch out, and from each of these branches are morebranches, each with the ability to store a bit of information. A sample LDAP tree is shown in Figure17-1.
Figure 17-1. Sample LDAP tree.
Another critical difference between LDAP and regular databases is that LDAP is designed forinteroperability. LDAP uses predefined schemas, or sets of data that map out specific trees. TheX.500 structure is outlined by RFC 2253 and contains the following entries:
String X.500 AttributeType------------------------------CN commonNameL localityNameST stateOrProvinceNameO organizationNameOU organizationalUnitNameC countryNameSTREET streetAddressDC domainComponentUID userid

Another useful schema is inetOrgPerson. It is designed to represent people within an organizational
structure and contains values such as telephone numbers, addresses, user IDs, and even employeephotos.
17.1.1. Data Naming Conventions
LDAP entries are stored in the directory as Relative Distinguished Names (RDN), and individualentries are referred to by their Distinguished Names (DN). For example, the user Bob Jones mighthave an RDN of:
cn=BobJones
And his DN might look like this:
c=us,st=California,o=VirtualBrewery,ou=Engineering,cn=BobJones
While this section barely scratches the surface of the entirety of LDAP, it serves as the necessarybackground to install and operate OpenLDAP. For a more detailed look at LDAP, consult RFC 2251,"The Lightweight Directory Access Protocol (v3)."

17.2. Obtaining OpenLDAP
The current home of OpenLDAP is http://www.openldap.org . All current stable and beta versions canbe acquired from this site along with an "Issue Tracking" engine, should you encounter any bugs thatyou wish to report.
While the temptation of downloading and using beta versions is always there, because of the promiseof increased functionality, unless you are installing the software on a test server, it is best to use onlyknown stable versions.
Having downloaded and extracted the source archive, it is generally a good idea to briefly review anyREADME files that may be contained within the archive. The five minutes spent reading these files cansave five times the initial time investment should there be any problems during install.
17.2.1. Dependencies
Like many software packages, OpenLDAP is not without its dependencies. With OpenLDAP, you willneed to have the latest version of OpenSSL installed and configured. If you do not yet have thispackage, it can be found at http://www.openssl.org , along with installation instructions.
SASL from Cyrus is also required for OpenLDAP. As defined by its name, Simple Authentication andSecurity Layer (SASL) provides an easy-to-use security framework. Many Linux distributions have thispackage installed by default; however, should you need to install this yourself, it can be found athttp://asg.web.cmu.edu/sasl/sasl-library.html or by using a package search engine such as RPMfind.
OpenLDAP supports Kerberos as an option rather than a requirement. If you are currently usingKerberos in your environment, you will want to make sure that you have it installed on yourOpenLDAP server machine. If you're not currently using Kerberos, it may not be of great value toenable it especially for OpenLDAP. There is a great deal of Kerberos information available on whichyou can base your decision as to whether or not to enable it.
Another optional component is for the OpenLDAP backend database (BDB). In order to use BDB, youwill need something like the BerkeleyDB from Sleepycat Software. This is a very commonly usedpackage that is often installed by default on many Linux distributions. If your system does not havethis installed, you can find it at http://www.sleepycat.com . Alternately, other BDBs exist; forexample, MySQL may be appropriate in your environment. It is important to note that this is a matterof personal preference, and for most users the default OpenLDAP database is acceptable.
17.2.2. Compiling OpenLDAP
Building OpenLDAP is fairly straightforward once you have selected the options you wish to have builtinto the software. A list of available options can be retrieved with the configure program. One optionthat you may wish to enable is -with-tls . This will enable SSL support in OpenLDAP, which we willdiscuss later in this chapter.
vlager# ./configure -with-tls

Copyright 1998-2003 The OpenLDAP Foundation, All Rights Reserved. Restrictions apply, see COPYRIGHT and LICENSE files.Configuring OpenLDAP 2.1.22-Release ...checking host system type... i686-pc-linux-gnuchecking target system type... i686-pc-linux-gnuchecking build system type... i686-pc-linux-gnuchecking for a BSD compatible install... /bin/install -cchecking whether build environment is sane... yeschecking for mawk... nochecking for gawk... gawkchecking whether make sets ${MAKE}... yeschecking for working aclocal... foundchecking for working autoconf... foundchecking for working automake... foundchecking for working autoheader... foundchecking for working makeinfo... foundchecking for gnutar... nochecking for gtar... no..vlager#
After configuring the makefile , the next step is to attempt to compile the package. With mostsoftware, the next step is to run make . However, it is recommended when building OpenLDAP to runa make depend first. The configure script will even remind you of this, should you forget.
When the dependencies have been built, you can now safely issue the make command and wait forthe software to build. Upon completion, you may wish to verify that the build process has completedproperly. Using make test will run a series of checks and inform you of any problems with the build.
Assuming all has gone successfully, you can now become root and install the software automaticallyby using the make install option. By default, OpenLDAP will place its configuration files in/usr/local/etc/openldap . Users of some distributions will choose to have these files placed in/etc/openldap for consistency. The option to do this should be set in the ./configure command line.
17.2.3. Configuring the OpenLDAP Server
If you were watching the installation of the software, you may have noticed that it created twoprograms, slapd and slurpd . These are the two daemons used with an OpenLDAP installation.
The first step in understanding how to configure the OpenLDAP server is to look at its configurationfiles. On our sample host, vlager , we have placed the configuration scripts in the/usr/local/etc/openldap directory. Looking at the slapd.conf file, we see a few places that must becustomized. It will be necessary to update any of the following values to make them consistent withyour site:
include /usr/local/etc/openldap/schema/core.schemainclude /usr/local/etc/openldap/schema/cosine.schemainclude /usr/local/etc/openldap/schema/inetorgperson.schema

database ldbmsuffix "o=vbrew"suffix "dc=ldap,dc=vbrew,dc=com"rootdn "cn=JaneAdmin,o=vbrew"rootpw secretdirectory /usr/local/var/openldap-vbrewdefaultaccess readschemacheck onlastmod on
You should also change the rootpw from secret to something that makes sense to you. This is the
password you will need to use to make changes to your LDAP directory.
With these changes made, you are now ready to run the OpenLDAP server, which we will discuss inthe next section.
17.2.4. Running OpenLDAP
The standalone OpenLDAP server is called slapd and, if you have not changed any of the defaultpaths, it will have installed in /usr/local/libexec/ . This program simply listens on the LDAP port (TCP389) for incoming connections, and then processes the requests accordingly. Since this process runson a reserved port, you will need to start it with root privileges. The quickest way to do this is asfollows:
vlager# su root -c /usr/local/libexec/slapd
To verify that the service has started, you can use netstat to see that it is listening on port 389:
vlager# netstat -aunt | grep 389tcp 0 0 0.0.0.0:389 0.0.0.0:* LISTEN
At this point, you should also verify that the service itself is working by issuing a query to it using theldapsearch command:
vlager# ldapsearch -x -b '' -s base '(objectclass=*)' namingContextsversion: 2 ## filter: (objectclass=*)# requesting: namingContexts# #dn:namingContexts: dc=vbrew,dc=com # search resultsearch: 2

result: 0 Success # numResponses: 2# numEntries: 1vlager#
This query is designed to do a wildcard search on your database; it should therefore retrieveeverything stored within. If your configuration was completed properly, you will see your own domainname in the dc field.
17.2.4.1 Adding entries to your directory
Now that the LDAP server is operational, it makes sense to add some entries. OpenLDAP comes witha utility called ldapadd , which inserts records into your LDAP database. The program only acceptsadditions from LDAP Data Interchange files (LDIF), so in order to add a record, you will need to createthis file. More information about the LDIF file format can be found in RFC 2849. Fortunately, creatingLDIF files is a very easy stepa sample file looks like:
# Organization for Virtual Brewery Corporationdn: dc=vbrew,dc=comobjectClass: dcObjectobjectClass: organizationdc: exampleo: VirtualBrew Corporationdescription: The Virtual Brewery Corporation # Organizational Role for Directory Managerdn: cn=Manager,dc=vbrew,dc=comobjectClass: organizationalRolecn: Managerdescription: Directory Manager dn: dc=ldap,dc=vbrew,dc=comobjectClass: topobjectClass: dcObjectobjectClass: orginizationdc: vbrewo: vbrewdescription: Virtual Brewing Company LDAP Domain dn: o=vbrewobjectClass: topobjectClass: organizationo: vbrewdescription: Virtual Brewery dn: cn=JaneAdmin,o=vbrewobjectClass: organizationalRolecn: JaneAdmindescription: Linux System Admin Guru

dn: ou=Marketing,o=vbrewou: MarketingobjectClass: topobjectClass: organizationalUnitdescription: The Marketing Department dn: ou=Engineering,o=vbrewou: EngineeringobjectClass: topobjectClass: organizationalUnitdescription: Engineering team dn: ou=Brewers,o=vbrewou: BrewersobjectClass: topobjectClass: orginazationalUnitdescription: Brewing team dn: cn=Joe Slick,ou=Marketing,o=vbrewcn: Joe SlickobjectClass: topobjectClass: personobjectClass: organizationalPersonobjectClass: inetOrgPersonmail: [email protected]: Joelasname: Slickou: Marketinguid: 1001postalAddress: 10 Westwood Lanel: Chicagost: ILzipcode: 12394phoneNumber: 312-555-1212 dn: cn=Mary Smith,ou=Engineering,o=vbrewcn: Mary SmithobjectClass: topobjectClass: personobjectClass: organizationalPersonobjectClass: inetOrgPersonmail: [email protected]: Marylasname: Smithou: Engineeringuid: 1002postalAddress: 123 4th Streetl: San Franciscost: CAzipcode: 12312phoneNumber: 415-555-1212

dn: cn=Bill Peris,ou=Brewing,o=vbrewcn: Bill PerisobjectClass: topobjectClass: personobjectClass: organizationalPersonobjectClass: inetOrgPersonmail: [email protected]: Billlasname: Perisou: Brewinguid: 1003postalAddress: 8181 Binary Blvdl: New Yorkst: NYzipcode: 12344phoneNumber: 212-555-1212
Once the LDIF file is ready, it is added to the LDAP directory using the following command:
vlager# ldapadd -x -D "cn=Manager,dc=vbrew,dc=com" -W -f goo.ldifEnter LDAP Password:adding new entry "dc=vbrew,dc=com" adding new entry "cn=Manager,dc=vbrew,dc=com" vlager#
You can search for your new directory entries using the ldapsearch command described earlier.
17.2.5. Using OpenLDAP
There are a number of uses for an LDAP servertoo many to mention. However, authentication isamong the more useful to Linux network administrators. For an administrator of many differentmachines, the task of managing the password and authentication details for a large number of userscan quickly become daunting. An OpenLDAP directory can be used to centrally manage the useraccounts for a group of systems, making it possible for an administrator to enable or disable useraccounts quickly and efficientlya process that, on multiple systems, can be a chore.
The first step in configuring this is to install the LDAP NSS and PAM libraries. Under Linux, NSS andPAM handle authentication and tell the system where to look to verify users. It is necessary to installtwo packages, pam_ldap and nss_ldap , which can be found at http://www.padl.com/OSS in thesoftware subsection. Most distributions have packages for these, and they are often combined andnamed libnss-ldap . If you are installing from source, the building of this software is straightforwardand can be accomplished with the standard configure , make install method. Along with installing thison your LDAP server, you will also need to install these libraries on your client machines.
When these libraries have been installed, you can now start configuring your slapd OpenLDAPprocess. You will need to make a few changes to your slapd.conf file, similar to those which were

covered earlier. The schema section as configured earlier is sufficient; however, you will need to addsome new definitions in the database section.
######################################################################## ldbm database definitions####################################################################### database ldbmsuffix "o=vbrew,dc=com"rootdn "uid=root,ou=Engineering,o=vbrew,dc=com"rootpw secretdirectory /usr/local/etc/openldap/data# Indices to maintainindex objectClass,uid,uidNumber,gidNumber eqindex cn,mail,surname,givenname eq,subinitial
This section will create the directory definitions for the structure in which you will be storing your userdata.
17.2.5.1 Adding access control lists (ACLs)
As this type of directory should not be writable by any anonymous users, it is a good idea to includesome type of access list as well. Fortunately, OpenLDAP makes this type of control quite easy.
# Access control listing - basic# access to dn=".*,ou=Engineering,o=vbrew,dc=com" attr=userPassword by self write by dn="uid=root,ou=Engineering,o=vbrew,dc=com" write by * auth access to dn=".*,o=vbrew,dc=com" by self write by dn="uid=root,ou=Engineering,o=vbrew,dc=com" write by * read access to dn=".*,o=vbrew,dc=com" by * read defaultaccess read
This list does some basic locking down of the directory and makes it more difficult for anyone to writeto the directory. Once this configuration has been completed, you can now safely start (or restart) theOpenLDAP daemon.
17.2.5.2 Migrating to LDAP authentication

You now have your empty directory created awaiting input and queries. For administrators who havehundreds or thousands of user accounts across many machines, the next step, migrating theauthentication data into the directory, may sound like a nightmare. Fortunately, there are toolscreated to assist with this potentially difficult step. The OpenLDAP migration tools fromhttp://www.padl.com/OSS make the task of populating the LDAP database from existing /etc/passwdfiles simple. Each distribution or package will likely place the files in the /usr/share directory, butcheck the documentation in your package for specifics.
In order for these scripts to work properly, you will need to make a few minor changes to one ofthem. The first one to update is migrage_common.ph . Search for the following lines:
#Default DNS domain $DEFAULT_MAIL_DOMAIN = "padl.com"; #Default base $DEFAULT_BASE = "dc=padl,dc=com";
And replace them with the values that are correct for your environment. For our example, this wouldbe:
$DEFAULT_MAIL_DOMAIN = "vbrew.com"; $DEFAULT_BASE = "o=vbrew,dc=com";
Now, verify that your OpenLDAP server is listening and that you've saved the changes to themigration configuration file. When all of this has been completed, you are now ready to executemigrate_all_online.sh , which will begin the process of moving your /etc/passwd entries into yourLDAP directory.
vlager# ./migrate_all_online.shEnter the Name of the X.500 naming context you wish to import into: [o=vbrew, dc=com]Enter the name of your LDAP server [ldap]: vlagerEnter the manager DN: [cn=manager,o=vbrew,dc=com] cn=root,o=vbrew,dc=comEnter the credentials to bind with: password
Importing into o=vbrew,dc=com...Creating naming context entries...Migrating aliases...Migrating groups.....vlager#
At this point, you will now see that all of your /etc/passwd entries have been automatically enteredinto your LDAP directory. You may wish to use the ldapsearch query tool now to see some of yourentries. With your directory service functional and now populated with user entries, you now need toconfigure your clients to query the LDAP server, which we will discuss in the next section.
17.2.5.3 Client LDAP configurations

Linux distributions come configured by default to look at the /etc/passwd file for authentication. Thisdefault option is easily configurable once the nss-ldap and PAM libraries are installed, as describedearlier. The first of the configuration files that need to be changed is the /etc/nsswitch.conf file. Yousimply need to tell the system to query LDAP.
passwd: files ldapgroup: files ldapshadow: files ldap
You might be wondering why we've left the files entry in the configuration. It is strongly
recommended that it be left in so accounts such as root can still have access should somethinghappen to the LDAP server. If you delete this line, and the LDAP server fails, you will be locked out ofall of your systems! This is, of course, where multiple servers come in handy. Replication betweenLDAP servers is possible and a fairly straightforward exercise. For information on building backupOpenLDAP servers, check the OpenLDAP HOWTOs found on the Linux Documentation Project website.
Some Linux distributions (Debian, for example) have the client configuration in /etc/openldap.conf .Be careful not to mistake this for the server configuration files found in /etc/openldap .
The next file you need to modify is the openldap.conf file. Like the other configuration files, thelocation of this will vary between the distributions. This file is very simple and has only a fewconfigurable options. You need to update it to reflect the URI of your LDAP server and your base LDAPinformation.
URI ldap://vlager.vbrew.comBASE o=vbrew,dc=com
You should now attempt an LDAP query on one of your client machines.
client$ ldapsearch -x 'uid=bob'version: 2 ## filter: uid=bob# requesting: ALL# # bob,Engineering,vbrew,comdn: uid=bob,ou=Engineering,o=vbrew,c=comuid: bobcn: bobsn: bobmail: [email protected]: personobjectClass: organizationalPersonobjectClass: inetOrgPersonobjectClass: accountobjectClass: posixAccount

objectClass: topobjectClass: shadowAccountshadowMax: 99999shadowWarning: 7loginShell: /bin/bashuidNumber: 1003gidNumber: 1003homeDirectory: /home/bobgecos: bob # search resultsearch: 2result: 0 Success # numResponses: 2# numEntries: 1 client$
If your query resembled the above entry, you know that your queries are working. Your OpenLDAPserver is now fully populated, can be queried from client machines, and is ready for real use.
17.2.6. Adding SSL to OpenLDAP
As LDAP was designed to be a secure and efficient method of serving up small amounts of data, bydefault it runs in clear text. While this may be acceptable for certain uses, at some point you maywish to add encryption to the data stream. This will help preserve the confidentiality of your directoryinquiries and make it more difficult for attackers to gather information on your network. If you areusing LDAP for any kind of authentication, encryption is highly recommended.
If you configured your OpenLDAP at compile time using the -with-tls option, your server is ready to
use SSL. If not, you will need to rebuild OpenLDAP before continuing.
Adding SSL to OpenLDAP requires only a few simple changes to the OpenLDAP configuration file. Youwill need to tell OpenLDAP which SSL cipher to use and tell it the locations of your SSL certificate andkey files, which you will create later.
TLSCipherSuite HIGH:MEDIUM:+SSLv3TLSCertificateFile /etc/ssl/certs/slapd.pemTLSCertificateKeyFile /etc/ssl/certs/slapd.pem
In this case, we've specified that our OpenSSL certificates will be stored in the /etc/ssl directory. Thiswill vary between the distributions; however, you can choose to store your SSL in certificates anyplace you like. We've also specified the type of cipher to use. Note that there are a number ofdifferent choices available; you can choose whichever you prefer. Since the server now expects to findcertificate files when it is restarted, we will need to create them. Information on how to do this iscovered in previous sections of this book or is available in the OpenSSL documentation.
It is important to realize that this creates a self-signed certificate, as opposed to one that is

purchased from one of the certificate providers. If an LDAP client were to check the validity of yourcertificate, it would likely generate an error, just as a web browser would when it detects a non-third-party signed certificate. However, most LDAP clients do not check certificate validity, so this isn'tlikely to create many issues. If you would like to have a third party certificate, there are numerousvendors who provide them.
Before you restart your server, you should also make sure that your certificates are readable only byyour LDAP server. They should not be accessible or writable by any other user on the system. Youshould also clean up any temporary files, such as those created in the previous step beforecontinuing. When these steps have been taken, you can safely restart your LDAP server.
17.2.6.1 Testing SSL availability
There are a couple of quick tests that can be done to see whether or not the SSL support has beenenabled. The easiest way to test whether or not the server is listening is to use netstat , as we did inthe earlier example.
vlager# netstat -aunt | grep 636tcp 0 0 0.0.0.0:636 0.0.0.0:* LISTEN
Seeing that the server is listening on the LDAP SSL port is a good start. This means that the serverunderstood the request to run SSL and is listening on the correct port. Next, you can choose to seewhether or not the process is actually working. An easy way to do this is to request to see its digitalcertificates. The OpenSSL package comes with a client that can be used to do this.
vlager# openssl s_client -connect vlager:636 -showcerts
The output of this command will display the full technical information about the digital certificate thatyou created at the beginning of this section. If you aren't seeing any output from this command,verify that you've started the service and that something is listening on port 636. If you are stillreceiving no response, check the troubleshooting section found later in this chapter.
17.2.7. LDAP GUI Browsers
For those administrators who prefer a GUI to a command line, there are a number of LDAP browsersavailable for Linux. One of the more functional offerings is from Argonne National Laboratory and is aJava applet available at http://www-unix.mcs.anl.gov/~gawor/ldap/applet/applet.html . As seen inFigure 17-2 , the GUI allows you to easily browse your directories and modify entries. This softwarealso has the advantage of running from any platform, easily and without any installation hassles,provided that Java is available.
Figure 17-2. Java LDAP browser

Another popular and very powerful LDAP frontend for Linux is GQ, illustrated in Figure 17-3 . It uses aGTK+-style interface and gives administrators full control over their directories, allowing them to add,modify, and remove entries, build templates, execute advanced searches and more. GQ can be foundat http://www.biot.com/gq , and requires a Linux GTK+-compatible interface.
Figure 17-3. GQ in browsing mode
17.2.8. Troubleshooting OpenLDAP

Installing and configuring OpenLDAP can be a tricky process, and there are a number of things thatcan go wrong. As with many Linux server processes, the best place to start debugging is the systemlog. There, you should see a line somewhat similar to this one, which should give you an indication asto whether your server has started properly.
Jun 15 11:33:39 vlager slapd[1323]: slapd starting
If you make a typo in the slapd.conf file, the process is often smart enough to just ignore the line andproceed. However, if you happen to make a critical error, as we have in the following example, slapdwill fail to start.
Jul 25 11:45:25 vlager slapd[10872]: /etc/openldap/slapd.conf: line 46: unknown directive "odatabase" outside backend info and database definitions (ignored)Jul 25 11:45:25 vlager slapd[10872]: /etc/openldap/slapd.conf: line 47: suffix line must appear inside a database definition (ignored)Jul 25 11:45:25 vlager slapd[10872]: /etc/openldap/slapd.conf: line 49: rootdn line must appear inside a database definition (ignored)Jul 25 11:45:25 vlager slapd[10872]: /etc/openldap/slapd.conf: line 54: rootpw line must appear inside a database definition (ignored)Jul 25 11:45:25 vlager slapd[10872]: /etc/openldap/slapd.conf: line 57: unknown directive "directory" outside backend info and database definitions (ignored)Jul 25 11:45:25 vlager slapd[10872]: /etc/openldap/slapd.conf: line 59: unknown directive "index" outside backend info and database definitions (ignored)Jul 25 11:45:25 vlager slapd[10873]: backend_startup: 0 databases to startup.Jul 25 11:45:25 vlager slapd[10873]: slapd stopped.Jul 25 11:45:25 vlager slapd[10873]: connections_destroy: nothing to destroy.
In this example, we mistyped the word "database," which is a critical option in the configuration. Asyou can see, the server failed to start, but still provided us with enough information to figure out whatwent wrong.
If you have verified that everything is running on the server, but clients are unable to connect, youshould verify that the LDAP ports 389 and 636 are not being blocked by a firewall. If your server isrunning iptables with a default policy denying any incoming connections, you will need to explicitlyallow these two ports.
Other common issues are caused by missing or incomplete SSL certificates. An indication from thesystem log that something is wrong with the SSL functioning is:
Jul 25 12:02:15 vlager slapd[11135]: main: TLS init def ctx failed: 0Jul 25 12:02:15 vlager slapd[11135]: slapd stopped.Jul 25 12:02:15 vlager slapd[11135]: connections_destroy: nothing to destroy.
The error in this case is very terse; however, the fact that TSL is mentioned indicates a problem withSSL. If you are receiving this error, you should check your certificate paths and permissions. Often,the certificate files cannot be read by the LDAP server because they are set to be readable only by theroot account.
Chapter 18. Wireless NetworkingWireless networking is a promising and increasingly popular technology, offering a wide range ofbenefits compared to traditional wired technology. These advantages range from increasedconvenience to users and decreased deployment cost to ease of network installation. A new wirelessdeployment can save substantial amounts of money since there is no need for additional cables,jacks, or network switches. Adding new users to a network can be as easy as plugging in a wirelesscard and powering up a machine. Wireless networking has also been used to deliver network accessto areas where there is little or no traditional network infrastructure.
Perhaps the biggest impact of wireless networking can be seen within its widespread acceptanceamong consumers. The most obvious example of this popularity can be seen with new laptopsystems, where nearly every unit is shipped with integrated 802.11b or g. The practical benefits haveconsequently insured good sales, allowing manufacturers to lower the equipment costs. At the time ofthis writing, the price of client wireless cards is comparable to that of traditional Ethernet adaptercards.
These benefits, however, do not come without some disadvantages, the most severe of these beingthe security issues.

18.1. History
Wireless LANs are based on spread spectrum technology, initially developed for militarycommunications by the U.S. Army during World War II. Military technicians considered spreadspectrum desirable because it was more resistant to jamming. Other advances at this time allowedan increase in the radio data rate. After 1945, commercial enterprises began to expand on thistechnology, realizing its potential benefits to consumers.
Spread spectrum technology evolved into the beginnings of the modern wireless LAN in 1971 with aUniversity of Hawaii project called AlohNet. This project allowed seven computers around the variousislands to communicate bidirectionally with a central hub on Oahu.
The university research on AlohNet paved the way for the first generation of modern wirelessnetworking gear, which operated at the 901-928 MHz frequency range. Primarily used by themilitary, this phase of wireless development saw only limited consumer use, due to crowding withinthis frequency and the relatively low speed.
From this point, the 2.4 GHz frequency was defined for unlicensed use, so wireless technology beganto emerge in this range and the 802.11 specification was established. This specification evolved intothe widely accepted 802.11b standard, and continues to evolve into faster, more secureimplementations of the technology.

18.2. The Standards
The standards based around wireless networking for PCs are established by the Institute of Electricaland Electronics Engineers (IEEE). LAN/MAN technology has been broadly assigned number 802,which is then broken down into working groups. Some of the most active wireless working groupsinclude 802.15, designed for wireless personal area networks (Bluetooth), 802.16 which definessupport for broadband wireless systems, and finally, 802.11, assigned to wireless LAN technology.Within the 802.11 definition, there are more specific definitions that are assigned letters. Here is a listof the most important 802.11 wireless LAN definitions:
802.11a
This definition provides wireless access on the 5 GHz band. It offers speeds of up to 54 MBps,but has not caught on, perhaps due to relatively higher priced equipment and short range.
802.11b
This is still the standard to which most people refer when talking about wireless networking. Itestablishes 11 MBps speeds on the 2.4 GHz band, and can have a range extending more than500 meters.
802.11g
This standard has been established to provide higher data rates within the 2.4 GHz band andprovides added security with the introduction of WiFi Protected Access, or WPA. 802.11gdevices are now being deployed in place of 802.11b devices and have nearly reachedmainstream acceptance.
802.11i
While still in the development phase, this standard seeks to resolve many of the security issuesthat have plagued 802.11b and provide a more robust system of authentication andencryption. At the time of this writing, the specification has not been finalized.
802.11n
802.11n is being touted as the high-speed answer to current wireless network speedshortcomings. With an operational speed of 100 Mbps, it will roughly double existing wireless

transfer speeds, while maintaining backward compatibility with b and g. At the time of thiswriting, the specification is not complete; however, several vendors have released "pre-n"products, based on the early drafts of the specification.

18.3. 802.11b Security Concerns
When the IEEE created the 802.11b standard, they realized that the open nature of wirelessnetworking required some kind of data integrity and protection mechanism and thus created WiredEquivalent Privacy (WEP). Promised by the standard to provide encryption at the 128-bit level, userswere supposed to be able to enjoy the same levels of privacy found on a traditional wired network.
Hopes for this kind of security, however, were quickly dashed. In a paper called "Weaknesses in theKey Scheduling Algorithm of RC4" by Scott Fluhrer, Itsik Mantin, and Adi Shamir, the weaknesses inthe key generation and implementation of WEP were described in great detail. Although thisdevelopment was a theoretical attack when the paper was written, a student at Rice University,Adam Stubblefield, brought it into reality and created the first WEP attack. Although he has nevermade his tools public, there are now many similar tools for Linux that will allow attackers to breakWEP, making it an untrustworthy security tool.
Still, it should be acknowledged that staging a WEP attack requires a considerable amount of time.The success of the attack relies upon the amount of encrypted data the attacker has captured. Toolssuch as AirSnort require approximately 5 to 10 million encrypted packets. A busy wireless LAN, whichis constantly seeing the maximum amount of traffic, can still take as long as 10 hours to crack. Sincemost networks do not run at capacity for this long, it can be expected that the attack would takeconsiderably longer, stretching out to a few days for smaller networks.
However, for true protection from malicious behavior and eavesdropping, a VPN technology should beused, and wireless networks should never be directly connected to internal, trusted networks.
18.3.1. Hardware
Different manufacturers use a slightly different architecture to provide 802.11b functionality. Thereare two major chipset manufacturers, Hermes and Prism, and within each, hardware manufacturershave made modifications to increase security or speed. For example, the USRobotics equipment,based on the Prism chipset, now offers 802.11b at 22 MBps, but it will not operate at these speedswithout the DLink 802.11b 22 MBps hardware. However, they are interoperable at the 11 MBpsspeed.
18.3.1.1 801.11g versus 802.11b on Linux
Due to new chipsets and manufacturer differences, 802.11g support on Linux has been somewhatdifficult. At the time of writing, support for 802.11g devices under Linux was still emerging and wasnot yet as stable and robust as the 802.11b support. For this reason, this chapter focuses on802.11b drivers and support. Mainstream Linux support for g devices, however, is not far off. Withthe work of groups such as Prism54.org, which is developing g drivers, and Intel's announcementthat it will release drivers for its Centrino chipset, full support is less than a year away.

18.3.1.2 Chipsets
As mentioned, there are two main 802.11b chipsets, Hermes and Prism. While initially Hermes cardswere predominant due to the popularity of Lucent WaveLAN (Orinoco) cards, a majority of cardmakes today use Prism's prism2 chipset. Some well-known Prism cards are those from D-Link,Linksys, and USR. You'll get roughly the same performance with either card, and they areinteroperable when operating within the 802.11b standard, meaning that you can connect a Lucentwireless card to a D-Link access point, and vice versa. A brief listing of major card manufacturers andtheir chipsets follows. If your card is not listed, check your operation manual or the vendor web site.
Hermes chipset cards:
Lucent Orinoco Silver and Gold CardsGateway SoloBuffalo Technologies
Prism 2 Chipset cards:
AddtronBelkinLinksysD-LinkZoomMax
18.3.2. Client Configuration
802.11b networks can be configured to operate in several different modes. The two main typesyou're likely to encounter are infrastructure mode (sometimes referred to as managed mode) andad-hoc. Infrastructure mode is the most common and uses a hub-and-spoke architecture in whichmultiple clients connect to a central access point, as shown in Figure 18-1. The ad-hoc wirelessnetwork mode is a peer-to-peer network, in which clients connect to each other directly, as shown inFigure 18-2. Infrastructure mode deployments are an effective means to replace wires on atraditional network, making them ideal for office environments where wireless clients need access toservers that are connected to the wired network. Ad-hoc networks are beneficial to those who simplywish to transfer files between PCs, or do not require access to any servers outside of the wirelessnetwork.
Figure 18-1. Hub-and-spoke wireless network

Figure 18-2. Ad-hoc (peer-to-peer) wireless network
802.11b networks operate on a predetermined set of frequencies known as a channel. Thespecification allows for 14 separate channels, though in North America users are limited to the first11 and in Europe, the first 13. Only Japanese users have access to the full range of channels. InNorth America, the eleven channel span from 2400 to 2483 MHz, with each channel set to 22 MHzwide. Clearly there is some overlap between the channels, so it is important to conduct a site surveybefore selecting a channel to save future headaches by avoiding possible interference from otherwireless networks.
As it is the most commonly used mode, this section will focus primarily on the infrastructure mode,which works on a hub-and-spoke model. The access point is the hub, and the clients are the spokes.An access point can either be a packaged unit bought from a store, or be built from a Linux machinerunning HostAP, which we'll discuss later.
An 802.11b network utilizes an access point that transmits a signal known as a beacon. This isbasically just a message from the access point informing any nearby clients that it is available forconnections. The beacon contains a limited amount of information that is necessary for the client toconnect. The most important content of the beacon is the ESSID, or the name of the access point.The client, on seeing an access point, sends a request to associate. If the access point allows this, itgrants an associate frame to the client, and they attach. Other types of authentication can also occurat this point. Some access points allow only clients with a prespecified MAC address, and somerequire further authentication. Developers are working on the standard 802.1x in an effort toestablish a good authentication framework. Unfortunately, however, this is unlikely to prove effective,
as there are already known vulnerabilities for it.
18.3.2.1 Drivers
A Linux wireless driver can either be built into your kernel when you compile, or created as a loadablekernel module (LKM). It is recommended that you create a kernel module, since drivers may requirefrequent updates. Building a new module is much easier and less time consuming than rebuilding theentire kernel. Either way, you need to enable the wireless extensions in the kernel configuration.Most distributions now come with this enabled; however, if you are upgrading from scratch, theconfiguration looks like this:
# Loadable module support#CONFIG_MODULES=y# CONFIG_MODVERSIONS is not setCONFIG_KMOD=y
You may also notice that MODVERSIONS has been disabled. Having this option disabled makes it easier
to compile modules separate from the kernel module tree. While not a requirement, this can savetime when trying to patch and recompile kernel modules. Whichever chip architecture your card isusing, if you're using a PC card, or even some PCI cards, pcmcia-cs, the Linux PCMCIA cardmanager, will be able to detect your card and will have the appropriate driver installed for you. Thereare a number of drivers available, but only two are currently and actively maintained.
The Orinico_cs drivers, written by David Gibson, are generally recognized as the best for the Hermescards. They are actively developed and patched, and work with most wireless applications. TheOrinoco_cs drivers have been included in the Linux kernel since Version 2.4.3 and have been a partof the pcmcia-cs since version 3.1.30. The driver included with your distribution may not be ascurrent, so you may wish to upgrade.
Confusingly enough, some prism2 cards are now supported in the Orninoco_cs drivers. That numberis increasing with each new release, so despite the name of the driver, it is beginning to be a solidoption for prism2 users, and may emerge as a standard in the future.
However, should your card not be supported by the Orinoco_cs driver, Prism cards are alsosupported by the linux-wlan-ng driver from Absolute Value Systems. This is the best known andmaintained client driver for this chipset at the moment. It is also included with most Linuxdistributions and supports PCI, USB, and PCMCIA versions of Prism 2.x and 3.0 cards.
Once you have installed the driver of your choice and everything is working, you'll need to install theLinux Wireless Extension Tools, a collection of invaluable configuration tools written by JeanTourrilhes, found at his site: http://www.hpl.hp.com/personal/Jean_Tourrilhes/Linux/Tools.html.
18.3.2.2 Using the Linux Wireless Exension Tools
Linux Wireless Extension Tools are very useful for configuring every aspect of your wirelessnetworking devices. If you need to change any of the default wireless options or want to easilyconfigure ad-hoc networks, you will need to familiarize yourself with these tools. They are also
required for building a Linux access point, which will be discussed later in the chapter.
The toolkit contains the following programs:
iwconfig
This is the primary configuration tool for wireless networking. It will allow you to change allaspects of your configuration, such as the ESSID, channel, frequency, and WEP keying.
iwlist
This program lists the available channels, frequencies, bit rates, and other information for agiven wireless interface.
iwspy
This program collects per node link quality information, and is useful when debuggingconnections.
iwpriv
With this program, you can modify and manipulate parameters specific to your driver. Forexample, if you are using a modified version of the Orinoco_cs driver, iwpriv will allow you toplace the driver into promiscuous mode.
18.3.3. Linux Access Point Configuration
A very useful tool in the Linux wireless arsenal is HostAP, a wireless driver written by Jouni Malinen.It allows prism2 card users to turn their wireless cards and Linux servers into access points. Sincethere are many inexpensive access points on the market, you might be asking yourself why you'dever want to turn a server into an access point. The answer is simply a matter of functionality. Withmost inexpensive dedicated access points, there is little functionality other than simply serving up thewireless network. There is little option for access control and firewalling. This is where Linux providesimmeasurable advantages. With a Linux-based access point, you will be able to take advantage ofNetfilter, RADIUS, MAC authentication, and just about any other type of Linux-based software youmay find useful.
18.3.3.1 Installing the HostAP driver
In order to install HostAP, your system must have the following:

Linux Kernel v2.4.20 or higher (kernel patches for 2.4.19 are included)
Wireless extensions toolkit
Latest HostAP driver, found at http://hostap.epitest.fi/releases
18.3.3.2 Obtaining and building the HostAP driver
While RPM and .deb packages may be available, it's likely that you will have to build HostAP fromscratch in order to have the most recent version of the driver. Untar the source to a workingdirectory. HostAP will also look for the Linux kernel source code in /usr/src/linux. Some distributions,such as Red Hat, place kernel source in /usr/src/linux-2.4. In that case, you should make a symboliclink called linux that points at your kernel source directory. Preparing the source for installation isfairly straightforward and looks like this:
[root@localhost root]# tar xzvf hostap-0.0.1.tar.gzhostap-0.0.1/hostap-0.0.1/COPYINGhostap-0.0.1/ChangeLoghostap-0.0.1/FAQ..hostap-0.0.1/Makefilehostap-0.0.1/READMEhostap-0.0.1/utils/util.hhostap-0.0.1/utils/wireless_copy.h
Unlike many packages, HostAP has no configuration script to run before building the source. You do,however, need to choose which modules you would like to build. HostAP can currently supportPCMCIA, PLX, or PCI devices. USB devices are not compatible, though support may be added in thefuture. For this example, we'll be building the PC Card version.
[root@localhost root]# make pccardgcc -I/usr/src/linux/include -O2 -D_ _KERNEL_ _ -DMODULE -Wall -g -c -I/usr/src/linux/arch/i386/mach-generic -I/usr/src/linux/include/asm/mach-default -fomit-frame-pointer -o driver/modules/hostap_cs.o driver/modules/hostap_cs.cgcc -I/usr/src/linux/include -O2 -D_ _KERNEL_ _ -DMODULE -Wall -g -c -I/usr/src/linux/arch/i386/mach-generic -I/usr/src/linux/include/asm/mach-default -fomit-frame-pointer -o driver/modules/hostap.o driver/modules/hostap.c..Run 'make install_pccard' as root to install hostap_cs.o [root@localhost root]# make pccard_installInstalling hostap_crypt*.o to /lib/modules/2.4.20-8/netmkdir -p /lib/modules/2.4.20-8/net..Installing /etc/pcmcia/hostap_cs.conf[root@localhost hostap-0.0.1]#

After compiling, take note of the hostap_cs.conf file that's now installed in /etc/pcmcia. It is themodule configuration file and tells the module to load when seeing a matching card. The list comeswith configurations for a number of popular cards, but if yours isn't listed, you will need to add it. Thisis an easy process, and entries are generally only three lines long:
card "Compaq WL100 11Mb/s WLAN Card" manfid 0x0138, 0x0002 bind "hostap_cs"
To determine the exact make of your card, this command can be used:
[root@localhost etc]# cardctl identSocket 0: no product info availableSocket 1: product info: "Lucent Technologies", "WaveLAN/IEEE", "Version 01.01", "" manfid: 0x0156, 0x0002 function: 6 (network)[root@localhost etc]#
After these steps, you can either use modprobe to install your device, or reboot, and it willautomatically load. You can check your syslog for the following message, or something similarlyreassuring, to confirm that it has been loaded properly:
hostap_crypt: registered algorithm 'NULL'hostap_cs: hostap_cs.c 0.0.1 2002-10-12 (SSH Communications Security Corp, Jouni Malinen)hostap_cs: (c) Jouni Malinen PCI: Found IRQ 12 for device 00:0b.0hostap_cs: Registered netdevice wlan0prism2_hw_init( )prism2_hw_config: initialized in 17775 iterationswlan0: NIC: id=0x8013 v1.0.0wlan0: PRI: id=0x15 v1.0.7wlan0: STA: id=0x1f v1.3.5wlan0: defaulting to host-based encryption as a workaround for firmware bug in Host AP mode WEPwlan0: LinkStatus=2 (Disconnected)wlan0: Intersil Prism2.5 PCI: mem=0xe7000000, irq=12wlan0: prism2_openwlan0: LinkStatus=2 (Disconnected)
18.3.3.3 Configuring HostAP
As discussed earlier, the iwconfig program is necessary to configure HostAP. First, you have to tellHostAP that you wish to use it in infrastructure mode. This is done with the following command:
vlager# iwconfig wlan0 mode Master
Next, the ESSID must be set. This will be the name of the access point, seen by all of the clients. Inthis example, we'll call ours "pub":
vlager# iwconfig wlan0 essid pub
Then you should set the IP address as follows:
vlager# iwconfig wlan0 10.10.0.1
Selecting a channel is an important step, and as mentioned earlier, a site survey should be conductedto find the least congested channel available:
vlager# iwconfig channel 1
Now, once this has been completed, you can check to make sure that it's all been entered properly.The following command will produce:
vlager# iwconfig wlan0wlan0 IEEE 802.11-DS ESSID:"pub" Nickname:" " Mode:Managed Frequency:2.457GHz Access Point:00:04:5A:0F:19:3D Bit Rate=11Mb/s Tx-Power=15 dBm Sensitivity:1/3 Retry limit:4 RTS thr:off Fragment thr:off Encryption key:off Power Management:off Link Quality:21/92 Signal level:-74 dBm Noise level:-95 dBm Rx invalid nwid:0 Rx invalid crypt:0 Rx invalid frag:2960 Tx excessive retries:1 Invalid misc:0 Missed beacon:0
The configuration of HostAP is complete. You should now be able to configure clients to connect toyour Linux server through the wireless network.
18.3.3.4 Additional options
As you get more comfortable with HostAP, you may wish to configure some additional options, suchas MAC filtering and WEP configurations. It is a good idea to implement one or both of these securitymeasures, since the default configuration results in an open access point that can be sniffed or usedby anyone within range. Using WEP will make sniffing more difficult but not impossible, and will alsomake unauthorized use a more complex process. MAC address filtering provides another good way tokeep out unwanted guests. Again, it is important to note that because of flaws in the 802.11bprotocol, neither of these steps will guarantee a safe and secure computing environment. In order tosecure a wireless installation properly, traditional security methods, like VPNs, should be used. A VPNprovides both confidentiality and authentication, since after all, a client on a wireless LAN should beclassified in the same way as a client from the Internetuntrusted.

Enabling WEP is simple and accomplished through the iwconfig command. You can choose whetheryou wish to use a 40-bit or 104-bit key. A 40-bit WEP key is configured by using 10 hexadecimaldigits:
# iwconfig wlan0 key 1234567890
A 104-bit WEP key is configured with 26 hexadecimal digits, grouped in four, separated by a dash:
# iwconfig wlan0 key 1000-2000-3000-4000-5000-6000-70
Using the following command will confirm your key:
# iwconfig wlan0
It is also important to note that a WEP key can also be configured with an ASCII string. There are anumber of reasons why this method isn't particularly good, but perhaps the most important is thatASCII keys don't always work when entered on the client side. However, should you decide you'd liketo try, ASCII key configuration is accomplished by specifying s: followed by the key in the iwconfigcommand, as follows:
For 40-bit keys, 5 characters, which equate to a 10-digit hexadecimal, are requred:
# iwconfig wlan0 key s:smile
For 104-bit keys, 13 characters, which equate to the 26 hexadecimal digits in the earlier example,are required:
# iwconfig wlan0 key s:passwordtest3
If you wish to disable WEP, it can be done with:
# iwconfig wlan0 key off
HostAP also provides another useful feature that allows clients to be filtered by MAC address. Whilethis method is not a foolproof security mechanism, it will provide you with a certain amount ofprotection from unauthorized users.
There are two basic ways to filter MAC addresses: you can either allow the clients in your list, or youcan deny the clients in your list. Both options are enabled with the iwpriv command. The followingcommand will enable MAC filtering, allowing the clients in the MAC list:
# iwpriv wlan0 maccmd 1
The MAC filtering command maccmd offers the following options:

maccmd 0
Disables MAC filtering
maccmd 1
Enables MAC filtering and allows specified MAC addresses
maccmd 2
Enables MAC filtering and denies specified MAC addresses
maccmd 3
Flushes the MAC filter table
To begin adding MAC addresses to your list, iwpriv is again used as follows:
# iwpriv wlan0 addmac 00:44:00:44:00:44
This command adds the client with the MAC address 00:44:00:44:00:44. Now this user will be
allowed to participate in our wireless network. However, should we decide that we don't want to allowthis MAC at some point in future; it can be removed with the following command:
# iwpriv wlan0 delmac 00:44:00:44:00:44
Now this MAC has been removed, and will no longer be able to associate. If you have a large list ofclient MAC addresses and wish to remove them all, you can flush the MAC access control list byinvoking:
# iwpriv wlan0 maccmd 3
This clears the access control list, and you will need to either disable filtering or re-enter the validMAC addresses you wish to authorize.
18.3.4. Troubleshooting
Because of their wireless nature, 802.11b networks can be much more prone to problems thantraditional wired networks. There are a number of issues you may face when planning a wirelessdeployment.

The first is that of the signal strength. You want to make sure that your signal is strong enough toreach all of your clients, and yet not so strong that you're broadcasting to the world. The signalstrength can be controlled with an antenna, through access point placement and some softwarecontrols. Experiment with different configurations and placements to see what works the best in yourenvironment.
Interference may also be an issue. Many other devices now share the same 2.4 GHz frequency usedby 802.11b. Cordless phones, baby monitor, and microwave ovens may all cause certain amounts ofinterference with your network. Neighboring access points operating on the same channel, or close tothe channel you have selected, can also interfere with your network. While it's not likely that thisparticular issue will cause an outage, there will certainly be performance degradation. It isrecommended, again, that experimentation be conducted prior to any major deployment.
Besides the physical issues, there are a number of software issues that are fairly common. Mostissues are caused by driver or card incompatibility. The best way to avoid these kinds of problems isto know precisely which hardware you're using. Being able to identify your chipset will make findingthe correct driver much easier.
Card identification is accomplished with the cardctl command, or by looking at the system log:
[root@localhost etc]# cardctl identSocket 0: no product info availableSocket 1: product info: "Lucent Technologies", "WaveLAN/IEEE", "Version 01.01", "" manfid: 0x0156, 0x0002 function: 6 (network)[root@localhost etc]#
In this example, we're using the easily identifiable WaveLAN card. Of course, this only works aftersuccessful configuration and module loading.
18.3.5. Bridging Your Networks
Once the HostAP software and drivers have been properly configured, a useful next step is to grantthe client's access to your wired LAN. This is done via bridging, which requires software located athttp://bridge.sourceforge.net. Some distributions have ready-to-install packages containing allnecessary tools and kernel modifications. Red Hat RPMs contain both. Debian users can just enterapt-get install bridge-utils. Check your distribution for specifics.
The bridging software is controlled with a program called brctl. It is the main configuration tool forthe software and has quite a few options. We'll be using only a few of the available choices, but for amore comprehensive listing, check the brctl manpages, which install with the software.
The first step in bridging is to create our virtual bridging interface by typing:
vlager# brctl addbr br0
This command creates an interface on the machine that is used to bridge the two connections. You'll

see it when running ifconfig:
vlager# ifconfig br0br0 Link encap:Ethernet HWaddr 00:00:00:00:00:00 BROADCAST MULTICAST MTU:1500 Metric:1 RX packets:0 errors:0 dropped:0 overruns:0 frame:0 TX packets:0 errors:0 dropped:0 overruns:0 carrier:0 collisions:0 txqueuelen:0 RX bytes:0 (0.0 b) TX bytes:0 (0.0 b)
Additionally, you can tell by looking at the system log whether the bridge has been enabled:
Jan 22 13:17:54 vlager kernel: NET4: Ethernet Bridge 008 for NET4.0
The next step is to add the two interfaces that you wish to bridge. In this example, we'll be bridgingwlan0, our wireless interface, and eth0, our wired Ethernet interface. First, however, it is important
to clear the IP addresses from your interfaces. Since we're bridging the networks at layer two, IPaddresses are not required.
Vlager# ifconfig eth1 0.0.0.0 downVlager# ifconfig wlan0 0.0.0.0 down
Once the IP addresses have been removed, the interfaces can be added to the bridge.
vlager# brctl addif br0 wlan0vlager# brctl addif br0 eth1
The addif option adds interfaces that you'd like to have bridged. If you have another wired or
wireless interface to add to the bridge, do so now in the same way.
The final step in the bridging process is to bring up the interfaces. You can also decide at this pointwhether you wish to assign an IP to your bridging interface. Having an IP makes it possible toremotely manage your server; however, some would argue that not having an IP makes the devicemore secure. For most purposes, however, it is helpful to have a management IP. To enable thebridge, you will need to enable the bridge interface, as well as both hardware interfaces.
vlager# ifconfig br0 10.10.0.1 upvlager# ifconfig wlan0 upvlager# ifconfig eth0 up
With the successful completion of these commands, you will now be able to access your bridge usingthe IP 10.10.0.1. Of course, this address must be one that is accessible from either side of thebridge.
Now you may wish to configure all of this to load at startup. This is done in a different way on justabout every Linux distribution. Check the documentation specific to your distribution regarding themodification and addition to startup scripts.

Appendix A. Example Network: The VirtualBreweryThroughout this book we've used the following example that is a little less complex than GrouchoMarx University and may be closer to the tasks you will actually encounter.
The Virtual Brewery is a small company that brews, as the name suggests, virtual beer. To managetheir business more efficiently, the virtual brewers want to network their computers, which all happento be PCs running the brightest and shiniest production Linux kernel. Figure A-1 shows the networkconfiguration.
Figure A-1. The Virtual Brewery and Virtual Winery subnets
Figure A-2. The Virtual Brewery Network

On the same floor, just across the hall, there's the Virtual Winery, which works closely with thebrewery. The vintners run an Ethernet of their own. Quite naturally, the two companies want to linktheir networks once they are operational. As a first step, they want to set up a gateway host thatforwards datagrams between the two subnets. Later, they also want to have a UUCP link to theoutside world, through which they exchange mail and news. In the long run, they also want to set upPPP connections to connect to offsite locations and to the Internet.
The Virtual Brewery and the Virtual Winery each have a class C subnet of the Brewery's class Bnetwork, and gateway to each other via the host vlager, which also supports the UUCP connection.Figure A-2 shows the configuration.

A.1. Connecting the Virtual Subsidiary Network
The Virtual Brewery grows and opens a branch in another city. The subsidiary runs an Ethernet of itsown using the IP network number 172.16.3.0, which is subnet 3 of the Brewery's class B network.The host vlager acts as the gateway for the Brewery network and will support the PPP link; its peerat the new branch is called vbourbon and has an IP address of 172.16.3.1. This network isillustrated in Figure A-2.

Colophon
Our look is the result of reader comments, our own experimentation, and feedback from distributionchannels. Distinctive covers complement our distinctive approach to technical topics, breathingpersonality and life into potentially dry subjects.
The image on the cover of Linux Network Administrator's Guide, Third Edition, is adapted from a19th-century engraving from Marvels of the New West: A Vivid Portrayal of the Stupendous Marvelsin the Vast Wonderland West of the Missouri River, by William Thayer (The Henry Bill Publishing Co.,Norwich, CT, 1888). The cowboy has long been an American symbol of strength and ruggedindividualism, but the first cowboys, known as vaqueros, were actually from Mexico. In the 1800s,vaqueros drove their cattle north into America to graze. This practice gave ranchers in Texas ideas ofmoving herds away from cold weather, toward water sources, and eventually north to railheads sothat their cattle could be shipped to eastern markets.
Cattle trails started from the southernmost tip of Texas and extended through Colorado, Arkansas,and Wyoming. Cowboys were hired by ranchers to brand and drive the cattle through dangerouscountryside and deliver them safely to railheads. Cattle were often scared by bad weather andstarted stampedes powerful enough to make the ground vibrate. It was the cowboys' responsibility tocalm the herds and round up any cows and steers that had wandered off. One well-known techniquefor calming nervous cattle was singing to them.
American cowboys were a diverse crowd. African-Americans, Indians, Mexicans, and formerConfederate cavalrymen were about as common as the Hollywood, John Wayne stereotype. Cowboyswere usually medium-sized, wiry fellows, and on average about twenty-four years old. They ownedtheir saddles, but not the horses they rode day and night. Cowboys were worked so hard and paid solittle that most of them made only one trail drive before finding another occupation. Althoughcowboys had a large impact on American culture, they were only an important part of the West for ashort time. As more and more ranchers began using barbed wire to fence cattle for branding, fewercowboys were needed. Before long, railroads covered the former Wild West, and cattle herdingturned into an event seen primarily at the rodeo.
Adam Witwer was the production editor and copyeditor for Linux Network Administrator's Guide,Third Edition. Ann Schirmer proofread the text. Matt Hutchinson and Claire Cloutier provided qualitycontrol. Lucie Haskins wrote the index.
Edie Freedman designed the cover of this book. Emma Colby produced the layout with AdobeInDesign CS using Adobe's ITC Garamond font.
David Futato designed the interior layout. The chapter opening images are from Marvels of the NewWest: A Vivid Portrayal of the Stupendous Marvels in the Vast Wonderland West of the Missouri River.This book was converted to FrameMaker 5.5.6 by Julie Hawks with a format conversion tool createdby Erik Ray, Jason McIntosh, Neil Walls, and Mike Sierra that uses Perl and XML technologies. Thetext font is Linotype Birka; the heading font is Adobe Myriad Condensed; and the code font isLucasFont's TheSans Mono Condensed. The illustrations that appear in the book were produced byRobert Romano and Jessamyn Read using Macromedia FreeHand MX and Adobe Photoshop CS. Thetip and warning icons were drawn by Christopher Bing. This colophon was written by Lydia Onofrei.
The online edition of this book was created by the Safari production group (John Chodacki, KenDouglass, and Ellie Cutler) using a set of Frame-to-XML conversion and cleanup tools written and

maintained by Erik Ray, Benn Salter, John Chodacki, Ellie Cutler, and Jeff Liggett.

Index
[SYMBOL] [A] [B] [C] [D] [E] [F] [G] [H] [I] [J] [K] [L] [M] [N] [O] [P] [Q] [R] [S] [T] [U] [V] [W] [X] [Y] [Z]

Index
[SYMBOL] [A] [B] [C] [D] [E] [F] [G] [H] [I] [J] [K] [L] [M] [N] [O] [P] [Q] [R] [S] [T] [U] [V] [W] [X] [Y] [Z]
! (exclamation point) 2nd
! flag (netstat)
" (quotation marks) (ssh)
# (pound sign) [See pound sign]
$ command (sendmail)
$# metasymbol 2nd 3rd
$* metasymbol 2nd 3rd
$+ metasymbol
$- metasymbol
$: metasymbol 2nd 3rd
$= command (sendmail)
$= metasymbol
$@ metasymbol 2nd 3rd 4th 5th
$~ metasymbol
' (single quotation mark)
* (asterisk) 2nd
+ (plus sign) 2nd
, (comma)
- (hyphen) 2nd
- (minus sign) 2nd
. (dot) [See dot]
16450 UART chip
16550 UART chip
-6 option (OpenSSH)
802.11 standard
802.11a standard 2nd
802.11b standard
client configuration
hardware and 2nd
LANs and
laptops and
Linux access point configuration
overview
troubleshooting
802.11g standard
802.11b versus
LANs and
laptops and
overview
802.11i standard
802.11n standard
802.15 working group
802.16 working group

8250 UART chip
: (colon) 2nd 3rd
:: (double-colon) 2nd
; (semicolon)
< (input redirection)
< (less than) sign (sendmail)
= (equal sign)
> (greater than) sign
@ (at sign) [See at sign]
[] (brackets) 2nd
\\> (greater than) sign
Ú (forward slash) 2nd
{} (braces)

Index
[SYMBOL] [A] [B] [C] [D] [E] [F] [G] [H] [I] [J] [K] [L] [M] [N] [O] [P] [Q] [R] [S] [T] [U] [V] [W] [X] [Y] [Z]
A record
address resolution
FQDNs and
as glue record
hostcvt tool and
hostnames and
nslookup and
purpose
type option and
-A subcommand option (iptables)
AAAA record
ABORT keyword (chat)
absolute names 2nd
Absolute Value Systems
ACCEPT target (iptables) 2nd 3rd
access control 2nd 3rd
access control lists (ACLs)
access database 2nd 3rd
access points (wireless networks) 2nd 3rd
access_db feature 2nd
ACLs (access control lists)
action items
Active Directory
active hubs
active-filter option (pppd)
ad-hoc mode
add argument (route)
add-alias command (djbdns)
add-host command (djbdns)
add-ns command (djbdns)
addif option (brctl)
address resolution
A records and
BIND and
defined
of external machines
overview 2nd
Address Resolution Protocol [See ARP]
addresses [See IP addresses MAC addresses]
adsl-setup script
adsl-start script
advanced policy routing
AF_ ROSE socket

AF_ X25 socket
AF_ATMPVC socket
AF_ATMSVC socket
AF_AX25 socket
AF_INET socket
AF_INET6 socket
AF_IPX socket
AF_NETROM socket
AF_UNIX socket
AirSnort tool
Albitz, Paul
alert messages
aliases
canonical hostnames and
CNAME records and
configuring for interfaces
email addresses and
genericstable database and 2nd
hostcvt tool and
hostnames and
aliases database
genericstable database and
overview
sendmail and 2nd
aliases field (services)
ALL EXCEPT keyword
ALL keyword 2nd
Allman, Eric 2nd
ALLMULTI flag (ifconfig)
allmulti option (ifconfig) 2nd
allow-recursion option (named.conf)
allow-transfer option (named.conf)
AlohNet project 2nd
amateur radio 2nd 3rd
anonymous users 2nd
anonymous.newsgroups directory
Apache Software Foundation
Apache web servers
background
configuration file options 2nd
configuring and building
IPv6 and 2nd
OpenSSL and
overview
security considerations
troubleshooting
VirtualHost functionality
Apache-SSL
apache.conf file
apachectl tool 2nd 3rd
--append subcommand option (iptables)
APPENDDEF macro (Build)

Appletalk 2nd
apt-get utility
apt-get utility (Debian) 2nd
Argonne National Laboratory
ARP (Address Resolution Protocol)
ifconfig options and
overview 2nd
proxy 2nd 3rd
arp option (ifconfig) 2nd
ARP tables 2nd
arp tool 2nd 3rd
ARPANET 2nd
ASCII characters 2nd 3rd
asterisk (*) 2nd
asynch map 2nd
asynchronous communications 2nd 3rd
Asynchronous Control Character Map
Asynchronous Transfer Mode (ATM) 2nd 3rd
asyncmap option (pppd)
AT command set
at sign (@)
dot and
group names and
Internet email address and
origin and
SOA record
ATM (Asynchronous Transfer Mode) 2nd 3rd
attacks
ifconfig option and
inetd.conf file and
man-in-the-middle
methods of
named.conf and
system security and
on WEP
xinetd and 2nd
ATTEMPT suboption (xinetd)
ATZ command
auth facility (syslog)
authentication
access points and
chap-secrets file
Cyrus IMAP and
IMAP and
LDAP and
OpenLDAP and 2nd 3rd
PAP and
PPP and 2nd
pppd and 2nd
Samba and
security considerations 2nd 3rd
servers and

ssh daemon and
wireless networks and 2nd
authoritative nameservers
authorization 2nd
authorized_keys file 2nd 3rd
auto_irq parameter (setserial)
autoconfig parameter (setserial)
automake configuration script 2nd
automatic dialing
autonomous systems
AX.25 protocol 2nd 3rd
Aznar, Guylhem

Index
[SYMBOL] [A] [B] [C] [D] [E] [F] [G] [H] [I] [J] [K] [L] [M] [N] [O] [P] [Q] [R] [S] [T] [U] [V] [W] [X] [Y] [Z]
backend database (BDB)
bang path notation
baseband modulation (base)
Bastille Linux
Bcc: field (mail header)
-bd argument (sendmail)
BDB (backend database)
beacons
Beale, Jay
Berkeley Internet Name Domain service [See BIND service]
Berkeley Socket Library
BerkeleyDB 2nd
Bernstein, D.J. 2nd
bestmx_is_local feature
BGP (Border Gateway Protocol)
binary data, XON/XOFF handshake and
BIND (Berkeley Internet Name Domain) service
address resolution and
alternatives to
dig tool 2nd 3rd
hostcvt tool
named.conf file
bind interface
BindAddress option (Apache)
binding
addresses and ports
Samba and
Biro, Ross
bitdomain database
bitdomain feature
BITNET networks
biz top-level domain
blacklist_recipient feature
Bluetooth
BNC connector
BOOTP protocol
Border Gateway Protocol (BGP)
bounced mail
braces {}
brackets [] 2nd
brctl program 2nd 3rd 4th
BREAK (carriage return)
Brewery, Virtual

bridges/bridging
DSL modems and
wireless networks
broadband wireless systems
broadcast address
BROADCAST flag (ifconfig)
broadcast option (ifconfig)
broadcasting
defined
eavesdropping and
Ethernet and 2nd
browsable command (Samba)
-bs argument (sendmail)
BSD print system
BSD remote services 2nd
BSD routed daemon
buffers, UART chips and
bug databases
Bugtraq database
Build utility 2nd
Burgiss, Hal
BUSY message
bytes_from field (mailstats)
bytes_to field (mailstats)

Index
[SYMBOL] [A] [B] [C] [D] [E] [F] [G] [H] [I] [J] [K] [L] [M] [N] [O] [P] [Q] [R] [S] [T] [U] [V] [W] [X] [Y] [Z]
-c argument (Build)
C command (sendmail) 2nd
.C command (sendmail)
-c option (iptables)
cable modems
cacert.org organization
cache option (named.conf)
caching-only servers 2nd 3rd 4th
Callahan, Michael
callout (cua) devices 2nd
/canon command (sendmail)
canonical hostname
A record and
aliases and
defined
SOA record and
card identification
cardctl command
carriage return
case sensitivity 2nd 3rd
Cc: field (mail header)
CCITT
cellular phones
certificates
OpenLDAP and 2nd
OpenSSL and 2nd
SSL and 2nd 3rd
troubleshooting
chains
iptables and 2nd 3rd
packets and
policies for
rules and
Challenge Handshake Authentication Protocol [See CHAP]
channels
defined
HostAP and
iwconfig tool and
troubleshooting and
CHAP (Challenge Handshake Authentication Protocol)
authorization and
chap-secrets file 2nd
mgetty program and

PAP and 2nd
PPP and 2nd
pppd and 2nd
chap-secrets file 2nd 3rd 4th
chargen internal service
chat program 2nd
checksums 2nd 3rd
chipsets 2nd 3rd
choke points
CIDR (Classless Inter-Domain Routing)
address scarcity and
block notation
IP addresses and
notation used
overview
CIFS (Common Internet File System) 2nd
cipher, SSL 2nd
Class A networks
address ranges
IANA and 2nd 3rd
nslookup and
overview
Class B networks
address ranges
IANA and 2nd
overview
subnetting and
Class C networks
address ranges
CIDR and
IANA and
overview
subnetting and
Class D networks
Class E networks
Class F networks
class field (resource record) (DNS master file)
Classless Inter-Domain Routing [See CIDR]
Clear to Send (CTS)
clients
802.11b standard and
certificates and
Ethernet addresses and
listening for
ports and
PPPoE
RPC and 2nd
testing IMAP
ucspi-tcp program
clocal flag (stty)
cmdline field (inetd)
CNAME record

canonical hostname and 2nd
purpose 2nd
coaxial cable and
Collier-Brown, David
collisions
colon (:) 2nd 3rd
com top-level domain
com_err.h file
Comer, Douglas R.
comma (,)
comments
DNS
nsswitch.conf
pppd
r command
sendmail.mc file
Common Internet File System (CIFS) 2nd
Common Unix Printing System (CUPS) 2nd
Common Vulnerabilities and Exposures (CVE) database
communications software 2nd
Compressed SLIP (CSLIP)
confDONT_PROBE_INTERFACES variable (m4)
confEBINDIR variable (m4)
confHOST_STATUS_DIRECTORY variable (m4)
configtest option (apachectl) 2nd
configuration files
Apache web servers 2nd
COPS program
dhcpd.conf file
djbdns resolver and
mgetty program 2nd
named.conf
OpenLDAP and 2nd 3rd 4th
PPPoE clients
printcap file 2nd
remote login and execution
resolver functions and
RPC and
Samba and 2nd 3rd
sendmail 2nd 3rd 4th
testing with apachectl
troubleshooting
xinetd and 2nd
configuration utilities, serial ports and
configure program (OpenLDAP)
confTRUSTED_USERS option (FEATURE)
confUSERDB_SPEC option (define)
connect command
CONNECT message (chat)
connect option (pppd) 2nd
Connect: tag field (sendmail)
connection tracking 2nd

contact field (SOA RR) (DNS master file)
continue option (nsswitch.conf)
control characters
converting binary to hexadecimal
COPS program
Costales, Bryan
country codes
Cox, Alan
cp command 2nd
cps option (xinetd)
cron jobs 2nd
crontab file
crtscts flag (stty) 2nd
crtscts option (pppd) 2nd
crtsdts flag (stty)
cs5 flag (stty)
cs6 flag (stty)
cs7 flag (stty)
cs8 flag (stty)
CSLIP (Compressed SLIP)
cstopb flag (stty)
CTS (Clear to Send)
cua (callout) devices 2nd
CUPS (Common Unix Printing System) 2nd
CustomLog option (Apache)
CVE (Common Vulnerabilities and Exposures) database
cyrus argument (MAILER macro)
Cyrus IMAP 2nd

Index
[SYMBOL] [A] [B] [C] [D] [E] [F] [G] [H] [I] [J] [K] [L] [M] [N] [O] [P] [Q] [R] [S] [T] [U] [V] [W] [X] [Y] [Z]
-d built-in match (iptables)
D command (sendmail) 2nd
-d command (sendmail)
.D command (sendmail)
-d option (arp)
-D subcommand option (iptables)
daemon facility (syslog) 2nd
daemon wrapper
daemons 2nd 3rd
daemontools program 2nd
DARPA (Defense Advanced Research Projects Agency)
Data Carrier Detect (DCD) 2nd
data communications equipment
data terminal equipment
Data Terminal Ready (DTR)
data-only keyword (mgetty)
databases
LDAP and
sendmail
datagrams
broadcasting
congested networks and
hops for
hosts and 2nd
netstat command and
packets as 2nd
routing
subnets and
traceroute and
UDP and
Van Jacobson header compression
Date: field (mail header)
daytime internal service
DCC (Direct Communications Channels)
DCD (Data Carrier Detect) 2nd
DDI (Device Driver Interface)
Debian 2nd 3rd
debug keyword (mgetty)
debugging, PPP and 2nd
DECnet
default route 2nd 3rd
default-lease-time option (DHCP)
defaultroute option (pppd) 2nd

Defense Advanced Research Projects Agency (DARPA)
define command (sendmail)
databases and
lowercase and
overview 2nd
sendmail.cf and
sendmail.mc and
setting maximum headers
del argument (route)
--delete subcommand option (iptables)
--delete-chain subcommand option (iptables)
delimiters
demand dialing 2nd
demand option (pppd)
denial of service attacks 2nd
dependencies, OpenLDAP and
--destination built-in match (iptables)
Destination NAT (DNAT) 2nd 3rd
--destination-port match option (iptables) 2nd
-detach option (pppd) 2nd
/dev directory
device argument (ip-up)
Device Driver Interface (DDI)
device drivers, Net-4 and
dgram sockets
DHCP (Dynamic Host Configuration Protocol)
dhcpcd program 2nd
dhcpd.conf file
dial-up configuration
authorization and
dumb terminals and
IP addresses and
nameservers and
persistent dialing and
proxy ARP and
diald command
dig tool (BIND) 2nd 3rd
Direct Communications Channels (DCC)
direct keyword (mgetty)
directory services
disable configuration option (xinetd)
-disable-v4-mapped tag (IPv6)
DISCARD action (access rule)
discussion lists
Distinguished Names (DN)
divert command (m4) 2nd
djbdns resolver 2nd
DMZ (demilitarized zone) networks
DN (Distinguished Names)
DNAT (Destination NAT) 2nd 3rd
DNAT target (iptables) 2nd
dnl command (m4)

DNS (Domain Name System)
BIND alternatives
IP masquerade and 2nd
name lookups
name resolution and
named.conf file 2nd
nameservers 2nd 3rd
newsgroups
nslookup and
overview
spoofing
useful tools
writing master files
DNS database
master files and
overview
time to live
tools used with
dns option (nsswitch.conf)
dnsip tool
dnswalk tool
DocumentRoot option (Apache)
domain field (resource record) 2nd
DOMAIN file 2nd
DOMAIN macro (sendmail) 2nd 3rd
Domain Name System [See DNS]
domain names 2nd
domain option
pppd
resolv.conf
domain-name-servers command
domainname command
domains
access database and
authoritative servers and
country codes
default
defined
hosting on single IP addresses
hostnames in
in-addr.arpa
mail 2nd 3rd
master files and
relay-domains file and
domaintable feature
dot (.)
absolute names and
at sign and
domain names and
namespace and
dotted decimal notation
dotted quad notation

ARP tables and
ifconfig command and
IP addresses and 2nd 3rd
iptables built-in matches and
netstat command and
pppd and
route command and
double-colon (::) 2nd
down option (ifconfig)
--dport match option (iptables) 2nd
DROP target (iptables) 2nd 3rd
DSA keys
DSL modems 2nd
dsmtp mailer (MAILER macro) 2nd 3rd 4th
--dst built-in match (iptables)
DTR (Data Terminal Ready)
DURATION suboption (xinetd)
Dynamic Host Configuration Protocol (DHCP)

Index
[SYMBOL] [A] [B] [C] [D] [E] [F] [G] [H] [I] [J] [K] [L] [M] [N] [O] [P] [Q] [R] [S] [T] [U] [V] [W] [X] [Y] [Z]
-E subcommand option (iptables)
eavesdropping
ebtables (Ethernet Bridge Tables)
echo flag (stty)
Echo Reply message (ICMP)
Echo Request message (ICMP) 2nd
Echo Request message (PPP)
Echo Response message (PPP)
Eckstein, Robert
edu top-level domain
EGP (External Gateway Protocol)
electronic mail
administration issues with
IMAP and
serial communications and
testing
elm mail reader
email [See electronic mail]
email addresses
$: metasymbol and
access database and
genericstable database and
genericstable feature and
parts of
relay_from_local feature and
-enable-v4-mapped tag (IPv6)
encryption
802.11b standard and
802.11i standard and
eavesdropping and
LDAP and
remote login and
Samba and
ssh daemon and
SWAT and
troubleshooting
wireless Ethernet and
end points, TCP and
envelope 2nd
equal sign (=)
ERROR action (access rule)
error messages
access rules and

Apache web servers and
bounced mail and
certificates and
ICMP and
IPv6 notation and
OpenSSL and
error_log file
ErrorLog option (Apache)
ertrn script
escape characters 2nd
ESMTP (Extended SMTP) 2nd
esmtp mailer (MAILER macro) 2nd 3rd 4th 5th
ESSID 2nd 3rd
Ethernet [See also PPPoE] [See also PPPoE]
ARP and
broadcasting and 2nd 3rd
IP addresses and
IP masquerading and
MAC addresses and 2nd
overview
passive collection of accounting data
PPP and
prevalence of
Ethernet interfaces 2nd
Ethernet snooping
ETRN command (ESMTP)
Evolution mail reader
--exact option (iptables)
exclamation point (!) 2nd
expect strings 2nd
expire field (SOA RR)
EXPOSED_USER macro (generic.m4)
External Data Representation (XDR) format
External Gateway Protocol (EGP)
external routing protocols

Index
[SYMBOL] [A] [B] [C] [D] [E] [F] [G] [H] [I] [J] [K] [L] [M] [N] [O] [P] [Q] [R] [S] [T] [U] [V] [W] [X] [Y] [Z]
-f argument (Build)
-f built-in match (iptables)
F command (sendmail) 2nd
-f option (chat)
-F subcommand option (iptables) 2nd
Fannin, David
fax argument (MAILER macro)
FDDI 2nd
FE8x addresses 2nd
FE9x addresses
FEATURE macro (sendmail)
databases and 2nd
generic.m4 file and
hostnames and
mailers and
overview
pseudo-domains and
usernames and
FEAx addresses
FEBx addresses
Feigenbaum, Barry
FHS (File Hierarchy Standard)
FidoNet
FIFO buffer 2nd
File Hierarchy Standard (FHS)
files option (nsswitch.conf)
files service (nsswitch.conf)
filter table (iptables)
chains for
as default
description
null rule
filtering [See also IP filtering] [See also IP filtering]
defined
hosts and
MAC addresses 2nd
spoofing and
finger daemon
finger service 2nd
fingerprints 2nd 3rd
firewalls
denial of service attacks and
IP accounting and

IP masquerade and
kernel and 2nd 3rd
Linux and
methods of attacks and
NAT and
Net-4 and
overview 2nd
PPPoE and
purpose of
references
Samba and
sample configuration
troubleshooting 2nd
fixed IP addresses
fixed-address option (DHCP)
Fluhrer, Scott
--flush subcommand option (iptables)
focus characters
FORWARD hook point (iptables)
chains and
DROP target and
filter table and 2nd
functionality
MAC match option
mangle table and
null rule
forward slash (Ú) 2nd
ForwardPath option (sendmail.cf)
fourport parameter (setserial)
Fox, Karl
--fqdn argument (hostname)
FQDNs (fully qualified domain names)
adding hosts and
DHCP servers and
email addresses and
hostnames and 2nd
NS record and
FRAD (Frame Relay Access Device)
--fragments built-in match (iptables)
fragmentation 2nd
Frame Relay Access Device (FRAD)
Frame Relay protocol 2nd
frames [See packets]
Free Software Foundation
FreeBSD
From: field (mail header)
From: tag field
fs file
FSSTND (Linux File System Standard Group)
FTP 2nd
fullstatus option (apachectl)
fully qualified domain names [See FQDNs]

Index
[SYMBOL] [A] [B] [C] [D] [E] [F] [G] [H] [I] [J] [K] [L] [M] [N] [O] [P] [Q] [R] [S] [T] [U] [V] [W] [X] [Y] [Z]
G flag (netstat)
gated
defined
metric value and
netstat options and
RIP and
gateways
configuring
hops and
hosts as
IP and
mail routing and
netstat command and
networks and
proxy ARP and
routing through
generic-linux.mc file
generic.m4 file and
modifying
naming of
purpose
generic.m4 file
GENERICS_DOMAIN macro
generics_entire_domain feature
genericstable database 2nd 3rd
genericstable feature 2nd
Gentoo Linux 2nd
getdomainname( ) system call
gethostbyaddr( ) function 2nd
gethostbyname( ) function 2nd
gethostname( ) function
getty program 2nd
Gibson, David
glibc library
global Top-Level Domains (gTLD)
global unicast address
glue records 2nd
GNU General Public License
Gnu Privacy Guard (gpg) 2nd
GNU standard library
gov top-level domain
gpg (Gnu Privacy Guard) 2nd
GQ

graceful option (apachectl)
greater than (>) sign
greater than (\\>) sign
group ID, sendmail and
GTK+-style interface
gTLD (global Top-Level Domains)
guest directive (Samba)
GUI 2nd

Index
[SYMBOL] [A] [B] [C] [D] [E] [F] [G] [H] [I] [J] [K] [L] [M] [N] [O] [P] [Q] [R] [S] [T] [U] [V] [W] [X] [Y] [Z]
H command (sendmail) 2nd
H flag (netstat)
-h option (iptables)
handshakes 2nd 3rd 4th
hardware Ethernet option (DHCP)
hardware field (HINFO RR)
hardware handshaking [See handshakes]
hardware, 802.11b standard and
hash sign [See pound sign]
HDLC (High-Level Data Link Control) 2nd 3rd
help command (nslookup)
--help option (iptables)
Hermes chipsets 2nd 3rd
Hesiod addresses 2nd
hexadecimal characters 2nd
High-Level Data Link Control (HDLC) 2nd 3rd
HINFO record
holdoff option (pppd) 2nd
hook points 2nd 3rd
hops
host field (MX RR)
host keys 2nd
host numbers
-host option (route)
HOST suboption (xinetd) 2nd
host tool
HostAP tool 2nd 3rd
hostap_cs.conf file
hostcvt tool (BIND)
hostlist
hostname
A record and
access database and
canonical 2nd 3rd 4th
chap-secrets file
FEATURE macro and
FQDNs and
genericstable database and
hostlist and
IP addresses and 2nd 3rd
IP masquerade and
localhost 2nd
mapping 2nd

scp program and
setting
uniqueness of
xinetd and
hostname command
hostname option (nslookup)
hostname resolution
defined
local nameservers and
nsswitch.conf and
overview
pppd and
TCP/IP networking and
HostnameLookups option (Apache)
hosts
access database and
adding
broadcasting and
communications and
defined
DHCP lease and
eavesdropping and
filtering and
firewalls and
as gateways 2nd
IP addresses and 2nd 3rd
IP masquerade and 2nd
MAC addresses
mail and 2nd
names for 2nd
ports on
relay-domains file and
remote login to
security and
serial communications and
sizes of
spoofing and
thin Ethernet and
trusted
updating files for
zones and
hosts database
hosts file
backup host table in
configuring gateways and
hostcvt tool and
ifconfig and
nameservers and
writing
hosts.allow file
hosts.deny file
HOSTS.TXT database

hosts: dns files
hoststat command 2nd
HostStatusDirectory option
HTTP 2nd 3rd
httpd -l command
httpd.conf file 2nd 3rd
hub-and-spoke model
hubs, active
Hunt, Craig 2nd
hwaddr argument (arp)
HylaFAX software
hyphen (-) 2nd

Index
[SYMBOL] [A] [B] [C] [D] [E] [F] [G] [H] [I] [J] [K] [L] [M] [N] [O] [P] [Q] [R] [S] [T] [U] [V] [W] [X] [Y] [Z]
-i built-in match (iptables)
-I subcommand option (iptables)
IANA (Internet Assigned Numbers Authority) 2nd 3rd
IBM 2nd 3rd
ICMP (Internet Control Message Protocol)
IP accounting and 2nd
IP filtering and
iptables matches 2nd
netstat options and
TCP/IP and
traceroute and
--icmp-type match option (iptables)
identity file 2nd
identity.pub file 2nd
idle option (pppd)
IEEE (Institute of Electrical and Electronics Engineers) 2nd
IETF (Internet Engineering Task Force) 2nd
if argument (route)
iface argument (ip-up)
ifconfig command
bridging interface and
compatibility considerations
Ethernet interfaces
interface configuration and
IPv6 and 2nd
multicast support
network devices and
overview
PPPoE clients and
IMAP (Internet Message Access Protocol)
aliases and
choosing
Cyrus
email and
POP and 2nd
purpose
imapd.alert file
imapd.conf file
in-addr.arpa domain
--in-interface built-in match (iptables)
include option (Apache)
indefinite tokens
inetd daemon 2nd 3rd

inetd.conf file
disabling r* commands
finger daemon
IMAP and 2nd
overview
Samba in
SWAT and 2nd
inetOrgPerson schema
info top-level domain
infrastructure mode 2nd 3rd
init command
inittab file
INPUT hook point (iptables)
chains and
filter table and 2nd
functionality
MAC match option
mangle table and
input redirection (<)
--insert subcommand option (iptables)
install-cf command (Build)
installing
Apache considerations 2nd
LDAP libraries
sendmail
ssh tools
UW IMAP
instances option (xinetd)
Institute of Electrical and Electronics Engineers (IEEE) 2nd
interfaces [See also loopback interface network interfaces] [See also loopback interface network interfaces]
bind
bridging and 2nd
configuring aliases for
defined
displaying netstat statistics
Ethernet 2nd
GTK+-style
incompatible changes and
IPv6 and 2nd
packet-switching and
packets and
PPP
procmail argument (MAILER) and
promiscuous mode
Samba and
interference
internal keyword (inetd.conf)
internal routing protocols
internal services
International Standards Organization (ISO)
Internet
ARPANET and

dangers of
estimated users
expense of connections
growth of
HOSTS.TXT database
IP masquerade and 2nd 3rd
Linux documentation available
mail routing on
PPP links
prevalence of
RFC 822 and 2nd
security considerations
Internet Assigned Numbers Authority (IANA) 2nd 3rd
Internet Control Message Protocol [See ICMP]
Internet Daemon [See inetd daemon]
Internet Engineering Task Force (IETF) 2nd
Internet Message Access Protocol [See IMAP]
Internet Protocol [See IP]
Internet Protocol Control Protocol (IPCP) 2nd 3rd
internetworking
interoperability [See also Samba] [See also Samba]
interrupts, UART chips and
intranets
IP (Internet Protocol)
choosing gateways
configuration options
Frame Relay and
iptables matches
networks 2nd
overview
tunneling
virtual hosting 2nd 3rd 4th
IP accounting 2nd
IP addresses
access database and
ARP table and
assigning 2nd 3rd
binding
bridging and
choosing 2nd
clearing
DHCP and
DNS and 2nd
dotted quad notation 2nd 3rd
DSL modems and
end points and
finding
fixed
HostAP driver and
hostlist and
hostnames and
ifconfig and

interfaces and
IP accounting by 2nd
IP masquerading and
IPv4 problems
IPv6 and 2nd
looking up
mapping 2nd
MTAs and
NAT and 2nd
nslookup and
pap-secrets file and
Samba and
scarcity of 2nd
TCP/IP and
virtual hosting
xinetd and
IP Alias 2nd
IP filtering
example
IP masquerade and
iptables and 2nd 3rd
overview
IP firewalling 2nd
IP forwarding
IP masquerade
configuring 2nd
example
hostnames and
IP firewalling and
kernel and
nameserver lookups and
NAT and
Net-4 and
overview 2nd
IP Multicast service
ip-up command 2nd 3rd
ip_conntrack_ftp module
ip_nat_ftp.o module
ip_tables.o module
ipchains command 2nd 3rd
ipchains.o module
IPCP (Internet Protocol Control Protocol) 2nd 3rd
ipfwadm interface 2nd
ipfwadm.o module
IPSec
iptables command
built-in matches
concepts
IP accounting and 2nd
IP accounting by service port
IP masquerade and 2nd
netfilter and

OpenLDAP and
options for
overview
resetting counters
rules and 2nd 3rd
security and
subcommands 2nd
using
iputils package
IPv4 standard
addressing and
match options
OpenSSH and
problems with 2nd
tunnel brokers and
IPv6 standard
AAAA record and
addresses with 2nd 3rd
advantages
applications and
configuration
troubleshooting
xinetd and
IPX 2nd
IPXCP
irq option (ifconfig)
irq parameter (setserial)
ISDN, Net-4 and
ISO (International Standards Organization)
ISO-3166
iwconfig tool 2nd 3rd 4th
iwlist program
iwpriv program 2nd 3rd
iwspy program
ixon flag (stty)

Index
[SYMBOL] [A] [B] [C] [D] [E] [F] [G] [H] [I] [J] [K] [L] [M] [N] [O] [P] [Q] [R] [S] [T] [U] [V] [W] [X] [Y] [Z]
-j MASQUERADE option (iptables)
-j option (iptables) 2nd
-j SNAT option (iptables)
Java applets
--jump option (iptables)

Index
[SYMBOL] [A] [B] [C] [D] [E] [F] [G] [H] [I] [J] [K] [L] [M] [N] [O] [P] [Q] [R] [S] [T] [U] [V] [W] [X] [Y] [Z]
K command (sendmail) 2nd
kdebug option (pppd)
KeepAlive option (Apache)
KeepAliveTimeout option (Apache)
Kerberos authentication 2nd 3rd
kermit terminal program
kernel
access control and
ARP tables 2nd
debugging
domainname command
HostAP and
ICMP and
ifconfig command and
initializing
interfaces and
IP accounting and
IP firewall and 2nd 3rd
IP forwarding and
IP masquerade and
IPv6 and 2nd 3rd 4th
loadable kernel module and
location of source code
MTU and
netfilter and
PPP and 2nd
/proc filesystem and
serial ports and 2nd
key ring 2nd 3rd
KeyFile entry (httpd.conf)
keys [See private keys public keys]
Kim, Gene
klogd daemon
known_hosts file 2nd
Krieger, Markus

Index
[SYMBOL] [A] [B] [C] [D] [E] [F] [G] [H] [I] [J] [K] [L] [M] [N] [O] [P] [Q] [R] [S] [T] [U] [V] [W] [X] [Y] [Z]
-l argument (ssh)
-L subcommand option (iptables) 2nd
LANs (Local Area Networks)
IP masquerading and
nameservers and
prevalence of
routing tables and
wireless networking and
LCP (Link Control Protocol)
overview
PPP and
pppd and 2nd
lcp-echo-failure option (pppd)
lcp-echo-interval option (pppd)
LDAP (Lightweight Directory Access Protocol) [See also OpenLDAP] [See also OpenLDAP]
GUI and
overview
sendmail and
LDAP Data Interchange files (LDIF)
ldapadd utility
ldapsearch command 2nd 3rd
LDIF (LDAP Data Interchange files)
less than (<) sign (sendmail)
libc library 2nd
Libes, Don
Lightweight Directory Access Protocol [See LDAP]
line discipline
--line-numbers option (iptables)
Link Control Protocol [See LCP]
link-local address 2nd
Linux
documentation available
getting the code
mailing lists
obtaining
platforms supported
Usenet newsgroups
user groups
Linux Documentation Project
Linux File System Standard Group (FSSTND) 2nd
Linux Journal
Linux Magazine
Linux Standard Base

Linux Systems Labs
Linux Wireless Extension Tools 2nd
linux-wlan-ng driver
linux.m4 file
--list subcommand option (iptables)
Listen option (Apache)
listening
IPv6 cautions 2nd
OpenLDAP and
OpenSSH and
ports and
Samba and
slapd program and
testing
Liu, Cricket
LKM (loadable kernel module)
lnp option (IMAP)
load printers option (printcap)
loadable kernel module (LKM)
loadavg file
Local Area Networks [See LANs]
local argument (MAILER macro)
LOCAL keyword
local mailer (MAILER macro) 2nd
local-host-names file 2nd 3rd
local_addr option
ip-up
pppd
LOCAL_CONFIG macro (sendmail) 2nd 3rd
LOCAL_DOMAIN macro (sendmail)
LOCAL_NET_CONFIG macro (sendmail) 2nd 3rd
LOCAL_RULE_n macro (sendmail)
LOCAL_RULESET macro (sendmail)
localhost hostname 2nd
lock files 2nd
lock keyword (pppd)
log file command (Samba)
log level command (Samba)
log_on_failure option (xinetd)
log_on_success option (xinetd)
log_type option (xinetd)
LogFormat option (Apache)
logins
anonymous
PAP and
pppd and
remote
serial devices and
LogLevel option (Apache)
Longyear, Al
loopback address
loopback interface

defined
example
gated and
IP address and
overview
Samba and
lowercase, sendmail and
lpr command (BSD)
lsmod command

Index
[SYMBOL] [A] [B] [C] [D] [E] [F] [G] [H] [I] [J] [K] [L] [M] [N] [O] [P] [Q] [R] [S] [T] [U] [V] [W] [X] [Y] [Z]
M command (sendmail)
=M command (sendmail)
M command (sendmail)
M field (mailstats)
M flag (netstat)
-M option (iptables)
-m option (iptables) 2nd
m4 macro processor program
Build utility and
hoststat command and
lowercase and
purpose
sendmail.cf file and 2nd
virtusertable feature and
MAC (Media Access Controller) addresses
filtering 2nd
fixed IP addresses and
HostAP and 2nd
iptables and 2nd
IPv6 and 2nd
wireless networks and
--mac-source match option (iptables)
maccmd command 2nd
Mackaras, Paul
mail body
mail domains
mail exchangers 3rd 4th [See also electronic mail] [See also electronic mail]
mail header
composition of
defined
sendmail and
setting maximum length
mail spool 2nd
mail transfer agents (MTAs)
mail transport agents (MTAs) 2nd
mail user agents (MUAs)
mail11 argument (MAILER macro)
mailboxes
alternate formats
IMAP and
transport and 2nd 3rd
Mailer field (mailstats)
MAILER macro (sendmail)

mailers and 2nd
overview 2nd
mailertable database 2nd
mailertable feature 2nd
mailing lists
Linux
PPP and
security and
sendmail-announce
mailq command
mailstats command 2nd
make command 2nd 3rd
make depend command
make install command 2nd
make test command
Makefile
OpenLDAP and
path options for OpenSSL
sendmail and
UW-IMAP and
makemap command
Malinen, Jouni
man-in-the-middle attack
managed mode
Mandrake
mangle table (iptables)
mangling 2nd
Mantin, Itsik
/map command (sendmail)
mapping
addresses
genericstable database and
hostnames 2nd
IP addresses 2nd
RPC and 2nd
MASQUERADE target (iptables) 2nd
master files
domains and
resource records and
writing
--match option (iptables) 2nd
max log size directive (Samba)
max-lease-time option (DHCP)
MaxClients option (Apache)
MaxHeadersLength option (sendmail.cf)
Maximum Receive Unit (MRU) 2nd 3rd
Maximum Transfer Unit (MTU) 2nd 3rd
Maximum Transmission Unit (MTU)
MaxKeepAliveRequests option (Apache)
MaxSpareServers option (Apache)
Media Access Controller addresses [See MAC addresses]
meminfo file

mesg command
Message-ID: field (mail header)
metasymbols
metric option (ifconfig)
metric value 2nd 3rd
mgetty program 2nd 3rd
Microsoft Windows 2nd
migrage_common.ph script
migrate_all_online.sh script
migration tools
mil top-level domain
MIME (Multipurpose Internet Mail Extensions)
minicom program 2nd
minimum field (SOA RR)
MinSpareServers option (Apache)
minus sign (-) 2nd
Mockaptris, Paul
mod_access module (Apache)
mod_actions module (Apache)
mod_alias module (Apache)
mod_asis module (Apache)
mod_auth module (Apache)
mod_auth_anon module (Apache)
mod_auth_db module (Apache)
mod_auth_dbm module (Apache)
mod_autoindex module (Apache)
mod_cern_meta module (Apache)
mod_cgi module (Apache)
mod_digest module (Apache)
mod_dir module (Apache)
mod_env module (Apache)
mod_example module (Apache)
mod_expires module (Apache)
mod_headers module (Apache)
mod_imap module (Apache)
mod_include module (Apache)
mod_info module (Apache)
mod_log_agent module (Apache)
mod_log_config module (Apache)
mod_log_referer module (Apache)
mod_mime module (Apache)
mod_mime_magic module (Apache)
mod_mmap_static module (Apache)
mod_negotiation module (Apache)
mod_proxy module (Apache)
mod_rewrite module (Apache)
mod_setenvif module (Apache)
mod_so module (Apache)
mod_spelling module (Apache)
mod_ssl
mod_status module (Apache)
mod_unique_id module (Apache)

mod_userdir module (Apache)
mod_usertrack module (Apache)
modem keyword (pppd)
modem option (pppd)
modems
abort messages
ATZ command and
demand dialing 2nd
getty program and
mgetty program and
PPP servers and
pppd options and
software for
XOFF characters and
modprobe command 2nd 3rd
--modprobe option (iptables)
MODVERSIONS option (LKM)
MRU (Maximum Receive Unit) 2nd 3rd
mru option (pppd)
msgsdis field (mailstats)
msgsfr field (mailstats)
msgsreg field (mailstats)
msgsto field (mailstats)
--mss match option (iptables)
MTAs (mail transfer agents)
MTAs (mail transport agents) 2nd
MTU (Maximum Transfer Unit) 2nd 3rd
MTU (Maximum Transmission Unit)
mtu option (ifconfig)
MUAs (mail user agents)
multicast addresses
MULTICAST option (ifconfig)
Multipurpose Internet Mail Extensions (MIME)
mutt MUA
/mx command (sendmail)
MX record
bestmx_is_local feature and 2nd
overview
preferences and
querying for
sendmail test mode commands
MySQL BDB
MySQL service

Index
[SYMBOL] [A] [B] [C] [D] [E] [F] [G] [H] [I] [J] [K] [L] [M] [N] [O] [P] [Q] [R] [S] [T] [U] [V] [W] [X] [Y] [Z]
N flag (stty)
-N option
iptables
ssh-keygen
-n option (iptables)
name option
dig
pppd
name resolution, DNS and 2nd
name top-level domain
named program
named.conf file 2nd
nameserver option
dig
resolv.conf
nameservers
DNS and 2nd 3rd
handling lookups 2nd
hosts file and
LANs and
nslookup and
resolv.conf and
root
serial number and
verifying setup of 2nd
namespace 2nd
naming conventions, LDAP and
NAT (Network Address Translation)
address scarcity and
defined
IP addresses and
IP firewalling and
IP masquerade and
iptables and 2nd 3rd
netfilter and
overview 2nd
spoofing and
nat table (iptables) 2nd
NCP (Network Control Protocol)
net directory
-net option (route) 2nd
net top-level domain
Net-2

Net-3
Net-4 2nd
net-tools package 2nd
netfilter kernel module
access control and
backwards compatibility with
firewalls and
IP masquerade and
kernel and
loading
NAT and
overview
packet processing and
netmask option (ifconfig)
netmasks 2nd 3rd 4th 5th
NetRom protocol 2nd
netstat command
Apache web server and
checking interface configuration
checking ports and
IMAP and
IPv6 and
overview
testing SSL availability
Network Address Translation [See NAT]
Network Control Protocol (NCP)
Network File System (NFS)
Network Information Center (NIC) 2nd 3rd
network interface card (NIC)
network interfaces
gated and
scripts and
TCP/IP
network layer
denial of service and
ebtables command and
IP filtering and
protocols 2nd
network numbers 2nd 3rd
networking [See also wireless networks] [See also wireless networks]
access database and
broadcast
choke points
congested
DHCP lease and
email and
gateways and
global village and
history
IP masquerade and
IPv6 and
Linux

perimeter
system maintenance
TCP/IP networks
unauthorized access
networks database
networks file 2nd
--new-chain subcommand option (iptables)
newaliases command
newsgroups
DNS
PPP and
Usenet
NFS (Network File System)
NIC (Network Information Center) 2nd 3rd
NIC (network interface card)
nice configuration option (xinetd)
NIS domain
nmbd process
NO CARRIER message
NOARP flag (ifconfig)
noauth option (pppd)
noipdefault option (pppd)
nopwd option (IMAP)
notfound option (nsswitch.conf)
Novell 2nd
Novell NCP (NetWare Core Protocol)
NS record
as glue record
nslookup and
purpose 2nd
type option and
nslint tool
nslookup tool
NSS library (LDAP) 2nd
nss_ldap package
nsswitch.conf file 2nd
NULL character (ASCII)
--numeric option (iptables)

Index
[SYMBOL] [A] [B] [C] [D] [E] [F] [G] [H] [I] [J] [K] [L] [M] [N] [O] [P] [Q] [R] [S] [T] [U] [V] [W] [X] [Y] [Z]
-o built-in match (iptables)
O command (sendmail) 2nd
octets 2nd
OK action (access rule)
100-baseT
1000-baseT
only_from option (xinetd)
OpenLDAP
compiling
configuring server
dependencies with
GUI browsers
obtaining
overview
running
SSL and
troubleshooting
using
OpenLDAP BDB (backend database)
openldap.conf file
OpenSSH project 2nd 3rd
OpenSSL
Apache web servers and
certificates and
generating SSL certificates 2nd
IMAP and 2nd
OpenLDAP and
security considerations
SWAT and
OperatorChars option (sendmail.cf)
option domain-name option (DHCP)
option domain-name-servers option (DHCP)
option router command
options file
auth option
demand dialing and
mgetty program and
overview
security considerations
org top-level domain
Organization: field (mail header)
origin
origin field (SOA RR)

Orinico_cs drivers 2nd 3rd
OSTYPE command (generic-linux.mc)
OSTYPE file
OSTYPE macro (sendmail)
--out-interface built-in match (iptables)
Outlook mail reader
OUTPUT hook point (iptables)
chains and
filter table and
functionality
iptables and
mangle table and
nat table and

Index
[SYMBOL] [A] [B] [C] [D] [E] [F] [G] [H] [I] [J] [K] [L] [M] [N] [O] [P] [Q] [R] [S] [T] [U] [V] [W] [X] [Y] [Z]
-p built-in match (iptables)
P command (sendmail) 2nd
-P subcommand option (iptables)
Packet Assembler Disassembler (PAD)
packet filtering [See IP filtering]
packet flooding
packet mangling 2nd
packet radio 2nd
packet sniffing
packet-switching
gateways and 2nd
interfaces and
protocols for
support for
packets
chains and
as datagrams 2nd
encapsulation of
Ethernet and
Ethernet maximum size
flow of
fragmenting 2nd
ICMP
interfaces and 2nd
IPv6 and
netfilter subsystem and
rules and
PAD (Packet Assembler Disassembler)
PAM library (LDAP) 2nd
pam_ldap package
PAP (Password Authentication Protocol)
authorization and
CHAP and 2nd
mgetty program and
pap-secrets file 2nd
PPP and 2nd
pppd and 2nd
pap-secrets file 2nd 3rd 4th
PARANOID keyword
parenb flag (stty)
parodd flag (stty)
/parse command (sendmail)
passphrases 2nd 3rd

passwd command
passwd file 2nd 3rd
Password Authentication Protocol [See PAP]
passwords
Cyrus IMAP and
eavesdropping and
login procedure and
PPPoE client and
remote login and
Samba and 2nd
security and
ssh command and 2nd
TFTP and
patch lists
PCI
PCMCIA
pcmcia-cs
PDAs
PDC (Primary Domain Controller)
PEM pass phrase 2nd
perimeter networks
Perkins, Drew
permissions
persist option (pppd)
persistent dialing
PGP keys (sendmail)
PGPKEYS file
phquery argument (MAILER macro)
pid (process ID)
PID suboption (xinetd)
pine MUA 2nd
ping command 2nd
ping flooding
ping6 tool
PKI environment
PLIP 2nd 3rd
plipconfig tool
plus sign (+) 2nd
PLX
point-to-point links
Point-to-Point Protocol [See PPP]
pointopoint option (ifconfig)
--policy subcommand option (iptables)
policy, chains and
POP (Post Office Protocol)
aliases and
IMAP and 2nd 3rd
MAILER macro and
pop argument (MAILER macro)
port field (services)
port parameter (setserial)
portmapper daemon

ports
accounting services by
binding
daemons and
ICMP and
LDAP and
netstat command and
overview 2nd
Samba and 2nd
services and
TCP and
troubleshooting
Post Office Protocol [See POP]
POSTROUTING hook point (iptables)
chains and
functionality
mangle table and
nat table and 2nd
pound sign (#) 2nd 3rd 4th 5th
PPP (Point-to-Point Protocol)
advanced configurations
authentication with
debugging and 2nd
escape characters for
interfaces
interfaces and
IP accounting by service port
IP configuration options
kernel and
Linux and
Net-4 and
overview 2nd
security considerations 2nd
serial communications and
SLIP and
ppp-log file
pppd daemon
as server
authentication and
chap-secrets file and 2nd
chat and
demand dialing
IPCP options and
LCP and
options files
pap-secrets file
persistent dialing and
purpose
running 2nd
security considerations
as server
PPPoE (PPP over Ethernet)

connections used
DSL and
options for
preference field (MX RR)
-prefix= option (make install)
PREPENDDEF macro (Build)
PREROUTING hook point (iptables)
chains and
functionality
MAC match option
mangle table and
nat table and 2nd
Primary Domain Controller (PDC)
primary option (named.conf)
primary servers 2nd 3rd
printcap file 2nd
printing, Samba and
Prism chipsets 2nd 3rd 4th 5th
private keys
defined
ssh clients and
ssh-keygen command and
SWAT and
/proc filesystem (procfs)
ARP tables 2nd
assigning IP addresses 2nd
creating subnets
DHCP and
Ethernet interfaces
gateways and 2nd
hostname resolution
ifconfig command and
installing tools
IP Alias 2nd
loopback interface
netstat command
PPP interface
setting hostnames
traceroute tool and
process ID (pid)
procfs [See /proc filesystem]
procmail argument (MAILER macro)
prog mailer (MAILER macro) 2nd
program numbers
promisc option (ifconfig) 2nd
promiscuous mode
eavesdropping and
ifconfig and 2nd
iptables and
iwpriv program and
promiscuous_relay feature
--protocol built-in match (iptables)

protocol field
inetd
services
protocols [See also specific protocols] [See also specific protocols]
for amateur radio
defined
encryption and
IP accounting by
serial
protocols file
proxy ARP 2nd 3rd 4th
proxy servers 2nd 3rd
proxyarp option (pppd)
ps command
pseudo-domains 2nd
PTR record 2nd 3rd
public command (Samba)
Public Key Cryptography
public keys
authorized_keys file and 2nd
defined
fingerprints
ssh clients and 2nd
ssh-keygen command and
purgestat command

Index
[SYMBOL] [A] [B] [C] [D] [E] [F] [G] [H] [I] [J] [K] [L] [M] [N] [O] [P] [Q] [R] [S] [T] [U] [V] [W] [X] [Y] [Z]
-q10m argument (sendmail)
QoS (Quality of Service) 2nd
qpage argument (MAILER macro)
Quality of Service (QoS) 2nd
querying
dig tool and
DNS servers
host tool and
IP addresses 2nd 3rd
LDAP server and 2nd 3rd
nameservers and 2nd
recursive
for root domain
for root nameservers
servers handling mail
services
QUEUE target (iptables)
QuickPage mailer
/quit command (sendmail)
quotation marks (") (ssh)

Index
[SYMBOL] [A] [B] [C] [D] [E] [F] [G] [H] [I] [J] [K] [L] [M] [N] [O] [P] [Q] [R] [S] [T] [U] [V] [W] [X] [Y] [Z]
R command (sendmail) 2nd 3rd
R configuration command (sendmail)
-R subcommand option (iptables)
random key generator
RARP (Reverse Address Resolution Protocol)
rc.inet1 script
rc.inet2 script
rc.serial script 2nd
rcp command
rdata field (resource record)
RDN (Relative Distinguished Names)
Received: field (mail header)
Red Hat
bridging networks
IMAP and 2nd
kernel source code and
Samba and
yum utility
Redirect message (ICMP) 2nd 3rd
refresh field (SOA RR)
REJECT action (access rule)
REJECT target (iptables)
Relative Distinguished Names (RDN)
RELAY action (access rule)
relay mailer (MAILER macro) 2nd 3rd 4th
relay-domains database
relay-domains file
access database and
configuring 2nd
overview 2nd
RELAY_DOMAIN command
relay_entire_domain feature
relay_local_from feature
remote login
Remote Procedure Call (RPC) 2nd 3rd
remote_addr option
ip-up
pppd
remotename keyword (pppd)
--rename-chain subcommand option (iptables)
--replace subcommand option (iptables)
Reply-To: field (mail header)
Request to Send (RTS)

requested command
reset command
resolv.conf file
DHCP and
dig tool and
nameserver lookups using
PPPoE clients
resolver library 2nd
resolvers
djbdns 2nd
nsswitch.conf and 2nd
pppd and
resolv.conf
resolver library
resource records and
robustness of
resource records (RRs) 2nd
respawn option (mgetty)
restart option (apachectl)
retry field (SOA RR)
return option (nsswitch.conf)
RETURN target (iptables) 2nd
Reverse Address Resolution Protocol (RARP)
rewrite rules
example 2nd
left side 2nd
mailers and
right side 2nd
sendmail and
rexec command 2nd
rexec service (BSD)
RFC 821 2nd 3rd
RFC 822
as common denominator
FidoNet and
header format
Internet and 2nd
RFC 974
RFC 1123
RFC 1179
RFC 1341
RFC 1591
RFC 1700
RFC 1893
RFC 1912
RFC 1918 2nd
RFC 2251
RFC 2253
RFC 2849
RFC 3232
RFC 3501
RING message

RIP (Routing Information Protocol) 2nd
rlogin command 2nd 3rd
rlogin service (BSD) 2nd
Roaring Penguin
root account
cron job output and
LDAP server and
ssh daemon and
troubleshooting Samba
root domain 2nd
root nameservers
root.hint file
rootpw option (slapd.conf)
Rose protocol 2nd
route command
building tables
compatibility considerations
displaying information
Ethernet interfaces and
interface configuration and
PPP links and 2nd
routing
advanced policy
defined
DNAT and
email and
Ethernet interfaces and
fragmentation and
gateways and
ICMP and
IP addresses
IPv6 traffic
PPP links
PPP servers and
protocols for
strictness of rules for
TCP and
Routing Information Protocol (RIP) 2nd
routing tables
initializing
metric value and
netstat command and 2nd
overview
TCP/IP networking and
RPC (Remote Procedure Call) 2nd 3rd
rpc file 2nd
RRs (resource records) 2nd
RS-232 standard 2nd
RSA keys
rsh command 2nd 3rd
RTM Internet worm
RTS (Request to Send)

rules [See also rewrite rules] [See also rewrite rules]
access database and 2nd
IP accounting and
IP masquerade and
iptables and 2nd
mapping addresses
matches for 2nd
sendmail and 2nd
RUNNING flag (ifconfig)
runq command 2nd
Russell, Paul

Index
[SYMBOL] [A] [B] [C] [D] [E] [F] [G] [H] [I] [J] [K] [L] [M] [N] [O] [P] [Q] [R] [S] [T] [U] [V] [W] [X] [Y] [Z]
-s built-in match (iptables)
=S command (sendmail)
S command (sendmail) 2nd 3rd 4th
-s option (arp) 2nd
Samba
access control
CIFS and 2nd 3rd 4th
configuring
interoperability and
logging with
obtaining 2nd
printing with
troubleshooting 2nd
Samba Web Administration Tool (SWAT)
SASL (Simple Authentication and Security Layer) package 2nd 3rd
scp program (ssh) 2nd 3rd
scripts
adsl-setup
adsl-start
chat 2nd
expect
migrage_common.ph
migrate_all_online.sh
pppd and
TCP/IP networking and
search lists
search option (resolv.conf)
secondary servers 2nd 3rd
secrets database
Secure Shell (SSH) 2nd
security
802.11b and
access database and
DNS cache and
enabling relaying and
finger service and
host lookups and
importance of
Internet and
IPv6 and
mail accounts and
passphrases and
PPP and 2nd

relay-domains file and
RTM Internet worm and
Samba and 2nd
sendmail and
ssh command and 2nd
system maintenance and
wireless networking and 2nd
xinetd and
semicolon (;)
send strings 2nd
sendmail
additional information
configuration files
creating a configuration
databases used
downloading source code
installing
overview
running
sendmail.cf
signing key fingerprints
testing configuration
tips and tricks
sendmail mail daemon
sendmail-announce mailing list
sendmail.cf file
building 2nd
configuration language
define command and
editing
generic.m4 file and
LOCAL macro and
mailers and
StatusFile option
tuning
sendmail.mc file
comments
FEATURE macro and
m4 program and
sample
typical commands
serial field (SOA RR)
Serial Line IP (SLIP) 2nd 3rd
serial ports/devices
accessing
configuration utilities
login: prompt
mgetty program and
modem links
PAD and
PPP and 2nd
pppd and

server configuration option (xinetd)
server field (inetd)
Server Message Blocks (SMB) 2nd
server_args configuration option (xinetd)
ServerRoot option (Apache)
servers
Apache configuration options
authentication and
dynamic addresses and
ports and
PPP
pppd as
proxy 2nd 3rd
RPC and
secrets database and
ucspi-tcp program
WAN IP addresses and
web 2nd
ServerSignature option (Apache)
ServerTokens option (Apache)
service field
inetd
services
servicelist
services
accounting by ports
action items
denial of service attacks and
exploiting weaknesses in
finger
internal
port numbers and
portmapper daemon and
query order
security and
services file 2nd
set type command
--set-counters option (iptables)
setserial command
setuid program 2nd 3rd
seyon terminal program
shadow file
shadow passwords 2nd 3rd
Shamir, Adi
Shapiro, Greg
shared directories
shellcmd field (fingerd/tftpd)
SIGHUP signal
signatures 2nd
silent option (pppd)
Simple Authentication and Security Layer (SASL) package 2nd 3rd
Simple Mail Transfer Protocol [See SMTP]

single quotation mark (')
site configuration
site-local address 2nd
site.config.m4 file
site.linux.m4 file
site.post.m4 file
skip_test parameter (setserial)
slapd program
slapd.conf file 2nd 3rd
Sleepycat Software
SLIP (Serial Line IP) 2nd 3rd
slogin program (ssh)
slurpd program
SMB (Server Message Blocks) 2nd
smb.conf file 2nd
smbclient program
smbd process
smbmount utility
smbpasswd utility
smmsp user/group 2nd
SMTP (Simple Mail Transfer Protocol)
Connect: tag field and
firewalls and
IP accounting by service port
MAILER macro and 2nd
remote delivery and
sendmail and 2nd 3rd
smtp mailer (MAILER macro) 2nd 3rd 4th
smtp8 mailer (MAILER macro) 2nd 3rd 4th
SNAT (Source NAT) 2nd 3rd
SNAT target (iptables) 2nd
snooping, Ethernet
SOA record
at sign in
fields in 2nd
nslookup and
purpose
ttl and
type option and
socket library 2nd
socket_type configuration option (xinetd)
sockets 2nd 3rd
software
Apache web servers
bridging
communications 2nd
security considerations
testing networking
troubleshooting wireless networks
software field (HINFO RR)
--source built-in match (iptables)
Source NAT (SNAT) 2nd 3rd

--source-port match option (iptables) 2nd
spaces 2nd 3rd
Spafford, Gene
spd_hi parameter (setserial)
spd_normal parameter (setserial)
spd_vhi parameter (setserial)
Specialized Systems Consultants, Inc. (SSC) 2nd
speed argument (ip-up)
spoofing 2nd
--sport match option (iptables) 2nd
--src built-in match (iptables)
SSC (Specialized Systems Consultants, Inc.) 2nd
ssh client 2nd
ssh command
localhost and
remote hosts and
security and
using
ssh daemon
SSH protocol 2nd
ssh tools 2nd 3rd
ssh-keygen utility 2nd 3rd
ssh_config file
ssh_host_key file
sshd_config file 2nd
SSL
Apache and
certificates and 2nd
named virtual hosting and
OpenLDAP and 2nd
SWAT and
troubleshooting 2nd 3rd
SSLCertificateFile entry (httpd.conf)
SSLCERTS option (Makefile)
SSLDIR option (Makefile)
SSLEngine 2nd
SSLINCLUDE option (Makefile)
SSLLIB option (Makefile)
SSLPATH option (Makefile)
start option (apachectl)
StartServers option (Apache)
startssl option (apachectl)
status option (apachectl)
StatusFile option (sendmail.cf)
stop option (apachectl)
stty command 2nd
Stubblefield, Adam
stunnel tool
subdomains 2nd
Subject: field (mail header)
submit.cf file
subnet masks 2nd

subnetworks 2nd 3rd
subscripts
success option (nsswitch.conf)
Sun Microsystems
Sun, Andrew
super servers
inetd
xinetd
SuSE 2nd 3rd
suucp mailer (MAILER macro)
svscan process 2nd
SWAT (Samba Web Administration Tool)
swatch tool
--syn match option (iptables)
synchronous serial ports 2nd
syslog.conf 2nd
syslogd daemon
system administration
system configuration, IPv6 and 2nd
system log (syslog)
bridging and
card identification and
HostAP driver and
logging with
Samba and
troubleshooting and 2nd

Index
[SYMBOL] [A] [B] [C] [D] [E] [F] [G] [H] [I] [J] [K] [L] [M] [N] [O] [P] [Q] [R] [S] [T] [U] [V] [W] [X] [Y] [Z]
T command (sendmail) 2nd
-t option
arp
iptables
tab character 2nd 3rd
--table option (iptables)
tables
ARP 2nd
iptables and 2nd 3rd 4th
mapping via
tar command
targets
chains and
IP masquerade and
iptables and 2nd 3rd 4th 5th
TCP (Transmission Control Protocol)
distinguishing connections
inetd.conf and
IP accounting and 2nd
IP filtering and
iptables matches 2nd
overview 2nd
ports and
RPC and 2nd
tcpd and
ucspi-tcp program
Van Jacobson header compression
--tcp-flags match option (iptables)
--tcp-option match option (iptables)
TCP/IP networking
ARP tables 2nd
creating subnets
DHCP and
Ethernet interfaces
gateways and 2nd
hostname resolution
ICMP and
ifconfig command and
installing tools
interfaces and
IP addresses 2nd 3rd
IP Alias 2nd
Linux and

loopback interface
netstat command
overview
PPP interface
setting hostnames
SMTP and
socket library for
traceroute tool and
Unix and
tcpd access control facility 2nd
tcpdump tool 2nd
tcpwrappers
teletype devices [See tty devices]
telnet 2nd
10-base2
10-base5
10-baseT
Terminal Node Controller
terminal programs
testparm program 2nd 3rd
TFTP (Trivial File Transfer Protocol) 2nd
tftp daemon
tftp service
Thawte
thick Ethernet 2nd 3rd
thin Ethernet 2nd 3rd
time to live [See ttl]
Timeout option
Apache
chat
tkrat MUA
TLDs (top-level domains) 2nd 3rd
To: field (mail header)
To: tag field
toggle-dtr keyword (mgetty)
Token Ring 2nd
tokens 2nd 3rd
top-level domains (TLDs) 2nd
Torvalds, Linus
Tourrilhes, Jean
Toxen, Bob
tracepath6 tool
traceroute tool
traceroute6 tool
TRAFFIC suboption (xinetd)
Transmission Control Protocol [See TCP]
tree structure
tripwire tool
Trivial File Transfer Protocol (TFTP) 2nd
troubleshooting
802.11b standard
Apache web servers

Cyrus IMAP
IPv6 and
OpenLDAP
Samba 2nd
trusted hosts
/try command (sendmail) 2nd
tryagain option (nsswitch.conf)
/tryflags command (sendmail) 2nd
Ts, Jay
ttl (time to live)
defined
resource records and 2nd
SOA record and
ttl field (resource record)
tty devices
defined
opening
PPP servers and
stty command
tunnels 2nd
twisted pair Ethernet 2nd 3rd
type field
inetd
resource record
type option (dig)

Index
[SYMBOL] [A] [B] [C] [D] [E] [F] [G] [H] [I] [J] [K] [L] [M] [N] [O] [P] [Q] [R] [S] [T] [U] [V] [W] [X] [Y] [Z]
U flag (netstat)
UART chips 2nd
uart parameter (setserial)
ucspi-tcp program
UDP (User Datagram Protocol)
inetd.conf and
IP accounting and 2nd
IP filtering and
iptables matches
overview
ports and
RPC and 2nd
tcpd and
traceroute and
unavail option (nsswitch.conf)
undefine command (m4)
Unix
Berkeley Socket Library
counting and
daemontools program
init command
kermit and
lpr command and
m4 program
networks and
sendmail and
socket library for
TCP/IP and
tty devices and
UNKNOWN keyword
up option (ifconfig)
uppercase
URIs 2nd
Urlichs, Matthias
USB
use_ct_file feature
use_cw_file feature 2nd
usehostname option (pppd)
usenet argument (MAILER macro)
Usenet newsgroups 2nd
user accounts 2nd 3rd
user configuration option (xinetd)
user database

User Datagram Protocol [See UDP]
user field (inetd)
user ID
username
adding to classes
eavesdropping and
FEATURE macro and
genericstable database and
login procedure and
PPP servers and
PPPoE client and
remote login and
uucico program
uucp argument (MAILER macro)
UUCP environment 2nd 3rd 4th
uucpdomain database
uucpdomain feature
UW IMAP

Index
[SYMBOL] [A] [B] [C] [D] [E] [F] [G] [H] [I] [J] [K] [L] [M] [N] [O] [P] [Q] [R] [S] [T] [U] [V] [W] [X] [Y] [Z]
V command (sendmail)
-v option
chat
iptables
-V subcommand option (iptables)
valid users option (Samba)
vampire taps
Van Jacobson header compression 2nd
van Kempen, Fred
/var/lock directory
variables 2nd 3rd
--verbose option (iptables)
Verisign
--version subcommand option (iptables)
VERSIONID macro
generic-linux.mc
generic.m4 2nd
linux.m4
sendmail
versions
OpenLDAP and
RPC and
Virtual Brewery
virtual hosting
virtual terminals 2nd 3rd
VirtualHost functionality (httpd.conf) 2nd 3rd
virtusertable database 2nd 3rd
virtusertable feature
VJ header compression [See Van Jacobson header compression]
Voice over IP
VPNs 2nd
vulnerabilities
BIND and
RTM Internet worm
security considerations and

Index
[SYMBOL] [A] [B] [C] [D] [E] [F] [G] [H] [I] [J] [K] [L] [M] [N] [O] [P] [Q] [R] [S] [T] [U] [V] [W] [X] [Y] [Z]
wait configuration option (xinetd)
wait field (inetd)
WANs, server addresses and
WaveLAN cards 2nd
web browsers 2nd
web servers 2nd [See also Apache web servers] [See also Apache web servers]
WEP (Wired Equivalent Privacy)
attacks on
HostAP and 2nd
iwconfig tool and
whitespace
WiFi Protected Access (WPA)
wildcards 2nd 3rd
Windows (Microsoft) 2nd
Wired Equivalent Privacy [See WEP]
wireless networks
802.11b security concerns
acceptance of
bridging
history 2nd
Linux and
standards
troubleshooting
--with-inet6 option (xinetd)
--with-syslog option (Samba)
-with-tls option (OpenLDAP) 2nd
working groups
World Wide Web 2nd 3rd 4th [See also Internet]
WPA (WiFi Protected Access)
writable command (Samba)

Index
[SYMBOL] [A] [B] [C] [D] [E] [F] [G] [H] [I] [J] [K] [L] [M] [N] [O] [P] [Q] [R] [S] [T] [U] [V] [W] [X] [Y] [Z]
-x option (iptables)
-X subcommand option (iptables)
X terminals
X- field (mail header)
X.11 2nd
X.25 protocol 2nd 3rd
X.400 standard 2nd 3rd
x509 option (OpenSSL)
XDR (External Data Representation) format
xinetd super server
xinetd.conf file 2nd 3rd 4th
XON/XOFF handshaking 2nd

Index
[SYMBOL] [A] [B] [C] [D] [E] [F] [G] [H] [I] [J] [K] [L] [M] [N] [O] [P] [Q] [R] [S] [T] [U] [V] [W] [X] [Y] [Z]
YaST Online Update (YOU) utility
YOU (YaST Online Update) utility
yum utility (Red Hat)

Index
[SYMBOL] [A] [B] [C] [D] [E] [F] [G] [H] [I] [J] [K] [L] [M] [N] [O] [P] [Q] [R] [S] [T] [U] [V] [W] [X] [Y] [Z]
-Z subcommand option (iptables)
--zero subcommand option (iptables)
zeroes, double-colon and 2nd
zone option (named.conf)
zones
domains and
nameservers and
NS records and
RFC 1912
serial numbers and
SOA records and