The Journal of Prosthodontics and Dental Materials
111
THE JOURNAL OF PROSTHODONTICS AND DENTAL MATERIALS Official e-publication of Indian Prosthodontic Society MUMBAI - NAVI MUMBAI BRANCH Volume 1 Issue 1 & 2 January – June & July – December 2020
-
Upload
khangminh22 -
Category
Documents
-
view
0 -
download
0
Transcript of The Journal of Prosthodontics and Dental Materials

THE JOURNAL OF
PROSTHODONTICS AND DENTAL MATERIALS
Official e-publication of Indian Prosthodontic Society
MUMBAI - NAVI MUMBAI BRANCH
Volume 1 Issue 1 & 2 January – June & July – December 2020

Editorial Team
President: Dr. Sharat Shetty Immediate Past President: Dr. Omkar Shetty President Elect: Dr. R. D. Das Secretary: Dr. Saloni Mistry Treasurer: Dr. Parmeet Banga Editor: Dr. Naisargi Shah E.C. Members: Dr. Gaurang Mistry Dr. Anuradha Nemane Dr. Praveen Badwaik Dr. Sankalp Bhandarkar Dr. Sumit Bedia Dr. Anita Gala- Doshi
INDIAN PROSTHODONTIC SOCIETY MUMBAI-NAVI MUMBAI BRANCH EXECUTIVE COUNCIL
Editor: Dr Naisargi Shah Professor and Head, Dept of Prosthodontics, Terna Dental College, Nerul, Navi Mumbai. +91 9819238483 +91 8976876779
: [email protected] Associate Editors: Dr. Praveen Badwaik Dr. Anita Gala Doshi Advisors to Editor: Dr. Suhasini Nagda Dr. Sabita M. Ram Dr. Suresh Meshram Dr. Jyoti Karani Research Editor: Dr. Omkar Shetty Guest Editors: Dr. B. Srinivasan Dr. Nisha Patel Peer Review Board Dr. Milind Karmarkar Dr. Arti Wadkar Dr. Jyoti Tembhurne Dr. Jyoti Nadgere Dr. Sharat Shetty Dr. Ali Tunkiwala Dr. Rathin Das Dr. Saloni Mistry Dr. Gaurang Mistry Dr. Sandeep Gurav Student Editor: Dr. Sayali Raut
THE JOURNAL OF
PROSTHODONTICS AND DENTAL MATERIALS
The Journal of Prosthodontics and Dental Materials is an comprehensive e-journal that will acknowledge latest research and clinical expertise in the field of Prosthodontics, Implantology and Dental Materials. This bi-annual journal is an attempt to impart information and enlighten the practioners, academicians and students all over.

INFORMATION FOR THE AUTHORS The manuscript will be reviewed for possible publication with the understanding
that it is being submitted to JPDM alone at that point in time and has not been published anywhere, simultaneously submitted or already accepted or publication elsewhere. The journal expects that the 'corresponding author' authorised by all the contributors will communicate with the journal for all matters related to the manuscript. The order of naming contributors should be based on the relative contribution of the contributor towards the study and writing the manuscript. Once submitted the order cannot be changed without written consent of all the contributors. Conflicts of interest/competing interests, if any, must be disclosed.
All manuscripts received will be duly acknowledged by e-mail. Submitted manuscripts will initially be reviewed by the Editors. Manuscripts with insufficient originality, serious scientific/technical flaws or lack of a significant message are rejected before proceeding for formal review. Manuscripts that are found suitable for publication in JPDM are sent to two or more expert reviewers. The selection of these reviewers is at the sole discretion of the Editor. The journal follows a double blind review process, wherein the reviewers and the authors are unaware of each other's identity. Every manuscript will be assigned to a member of the editorial team, who based on the comments from the reviewers takes a final decision on the manuscript. The authors will be asked to modify the manuscript if needed. The comments and suggestions received from the reviewers are conveyed to the corresponding author.
Manuscripts (single word document file with) typed in British English should be
sent to the editor via mail at [email protected] Text should be made in MS Word. Size 12 of 'Times New Roman' font with double spacing is recommended for the main text. Title page should be in a separate word file with NAME OF THE ARTICLE, NAME AND DETAILS OF CONTRIBUTORS and NAME, EMAIL & MOBILE NUMBER OF CORRESPONDING AUTHOR. For Headings, Size 16 and 20 can be used. Images, graphs and tables should be included in the main text. References from articles in journals, books and other monographs should be in the formats used by the Vancouver system. References should be numbered consecutively in the order in which they are first mentioned in the text (not in alphabetic order). Scanned image of signed Copyright transfer statement by corresponding author should be attached as a separate file.
THE JOURNAL OF
PROSTHODONTICS AND DENTAL MATERIALS

Title Page/covering letter:
1. The type of manuscript (original article, case report, review article, Letter to editor, Images, etc.) title of the manuscript, running title, names of all authors/ contributors (with their highest academic degrees, designation, and affiliations) and name(s) of department(s) and/ or institution(s) to which the work should be credited. All information that can reveal your institute affiliation should be here. Use doc files.
2. Registration number in case of a clinical trial and where it is registered (name of the registry and its URL)
3. The name, address, e-mail, and telephone number of the corresponding author, who is responsible for communicating with the other authors about revisions and final approval of the proofs, if that information is not included in the manuscript itself.
Number of authors:
a. Original article and Review articles: Maximum of 6 authors. The decision of the editor/ editorial board is final and binding in all situations.
b. Case report, innovations – Maximum of 3 authors. If it is more than 3 authors, justification on the same must be provided in writing by the corresponding author to the editor on the contribution of each author. Prior approval on the same must be obtained by the authors before publication. The decision of the editor/ editorial board is final and binding in all situations.
Manuscript:
The main text of the article, beginning from Abstract until References (including tables) should be in this file. The file must not contain any mention of the authors' names or initials or the institution at which the study was done or acknowledgments. Do not add any header here. Please incorporate images, tables and graphs in the manuscript file along with the appropriate legends. The pages should be numbered consecutively, beginning with the first page of the blinded article file. The font style should be Times New Roman and font size should be 12 for the main text file.
Mandatory plagiarism check would be done before publication of the selected articles, so authors are requested to follow the recommended guidelines for the same.
Submit good quality colour images. The size of the image can be reduced by decreasing the actual height and width of the images (keep up to 1600 x 1200 pixels or 5-6 inches).
The contributors' / copyright transfer form (template provided below) should be attached in the mail.
The e-mail to the Editor should have these files: 1. Title page (word file) 2. Manuscript (includes Images, graphs and tables) (word file) 3. Copyright transfer statement

INDIAN PROSTHODONTIC SOCIETY MUMBAI/NAVI MUMBAI BRANCH MEMBERSHIP FORM
1. IPS Number (Head Office): 2. Membership applied: Student Member (SM)/Life Member(LM)/ Associate Member(AM)/
Honorary Member (HM) 3. Name: __________________________________________________________________________
Surname First name Middle name 4. Address:_________________________________________________________________________
________________________________________________________________________________ ________________________________________________________________________________
5. Contact No. Cell: ___________________________ Landline: ______________________________ 6. Email:___________________________________________________________________________ 7. Date of birth: _____________________________________________________________________ 8. Marital Status: Single / Married _________________ 9. Qualifications: Degree Year College/ University
i) _________ ________ __________________________________ ii) _________ ________ __________________________________ iii) _________ ________ __________________________________ iv) _________ ________ __________________________________
10. State Dental Council Reg No.: __________________________________________________ 11. Membership fee: i) Student -Rs 500/-
ii) Life member- Rs 2950/- (inclusive of GST) iii) PGs from IPS MNM to life member – Rs 2500/-(inclusive of GST) Payment details:
(A) For NEFT/ RTGS (B) For Cheques Name: IPS Mumbai Navi Mumbai Name: IPS Mumbai Navi Mumbai
A/c No.: 50200014529042 Cheque No. _______________________ Type: Saving account Bank: ____________________________ Bank: HDFC Branch: __________________________ Branch: Andheri west IFSC code: HDFC0000114 (send the copy of transaction)
FOR OFFICE USE ONLY IPS Number checked: ________________________ Cheque cleared: _____________________________ Application approved at EC meeting held on: ______________ Membership status: SM/LM/AM/HM Receipt No.: ____________________________ issued on _________________________________ IPS MNM no.: ___________________________ Signed by: ______________________________ _________________________________
Hon. Secretary: Name: Treasurer: Name:
IPS MNM Correspondences: i)Dr Saloni Mehta Mistry, Hon Secretary 9821020083 Email: [email protected] ii) Dr Parmeet Singh Banga, Treasurer 9960433834 iii)Dr Sharat Shetty, President 9820418986 Address: Secretariat Office - B-3 Velentine Apts D/304,Pimplipada,Off Jerry Verghese Compound ,
opp Tarmat . Malad (East ). Mumbai 400097
Recent Photo

From the IPS MNM President's Desk
Greetings to all of you and best wishes on the digital celebrations of all festivals. The recent Covid 19 outbreak has changed our routine dramatically, affecting our lives and work and exposing our inabilities to handle this unprecedented crisis effectively. The virus has also affected the functionalities of all organizations across the world. As we pass through these grave unpredictable pandemic times, there is still a need to build a stronger future for ourselves and next-generation using all our knowledge, ideas, and resources wisely. There has been a paradigm shift already seen in various sectors in their operations, both domestically and internationally. Hence, we, too, need come together and plan with creative and innovative approaches, in spite of many still being hesitant. There should be an alternate global networking platform for students, faculties, and practicing clinicians to achieve their professional goals. Our Branch of Indian Prosthodontic Society Mumbai-Navi Mumbai (IPS MNM) is in its infancy, but its belly is filled with fire to rise high with professional accomplishments. It has earmarked safe yet implicit programs for the year 2020-21 with a very dynamic team for advancing education. We will grab the available opportunities, and my mission as the President is focussed on to
1. Bolster the legacy of the pioneer prosthodontists of the Mumbai region 2. Improve the value delivered to our members 3. Use current technological advances to further our goals 4. Refresh the harmony of academia, practitioners, and the dental industry
The webinars organized witnessed a strong subscription pan-India, and the smiling faces on our monitors reflect interest from the comforts of their homes for the added values, and we do not want to miss this exciting digital opportunity. We are handpicking seldom spoken topics that are very clinically relevant and brought to our doorsteps by the likes of luminaries like Dr. Shankar Iyer, Dr. V Rangarajan, Dr. Ali Tunkiwala, and Dr. Ajit Shetty. There are many in the pipeline taking shape in our planning room now. Our branch needed a voice to reflect the strength of their research, educational pursuits, and exclusive clinical cases. And The Journal of Prosthodontics and Dental Materials (JPDM) is born this year. This official journal of the IPS MNM is released here with great efforts of our enthusiastic editor Dr. Naisargi Shah and her team, and I am sure that it will scale to indexed version soon. We welcome

all our members to contribute to the journal and discover their talent and experience and appropriately express them. We are also not forgetting our student friends as they are the future of our specialty. And in spite of facing the effects of the pandemic, we are not losing sight of this fact and are arranging enough competitive and mentoring events for them. Mini conferences, essay writing, e-poster makings, case presentations, and exclusive lectures through the new ProsthoCoach channel by celebrated teachers are some of them. Our Immediate Past President, Dr. Omkar Shetty, and the team are incessantly working on compiling educational resources of quality for easy access for our students and add value to their momentum of pursuing a post-graduate course. In today's world, websites have become an essential part of any organization for easy accessibility and for lasting expression of their potential. We also made our customized and dynamic website this year to enable quick engagement at your fingertips, which will expose our presence to the world, display all information of our branch, inclusive of our team, our past, current, and future activities, access to journal contents, educational resources, updates, blogs, etc. There will be links to many advertising dental and medical companies, dental suppliers, and dental laboratories, and members can avail of advantages provided by them only to us. My vision is to have a highly resourceful and trustworthy website of our branch with regular contributions from all our members and visited by prosthodontists across the globe for its valued content. Dr. Guarang Mistry and his team should be credited for their immense perseverance and efforts to create this informative website. Besides the names mentioned above, it has been rewarding for me to have an ever-cheerful, tirelessly working, and talented Executive Committee team on-board in the incoming President Dr. Rathin Das, dedicated and dependable Secretary Dr. Saloni Mistry, hardworking treasurer Dr. Parmeet Banga, and other capable and committed members Dr. Anuradha Nemane, Dr. Praveen Badwaik, Dr. Sankalp Bhandarkar, Dr. Sumit Bedia and Dr. Anita Gala-Doshi, to carry out the mission activities of our branch. We have fruitfully met on many occasions, both virtually and physically, with due safeguards to effectively deliberate avenues to move our profession forward and optimistically plan the seamless implementation of our initiatives. We would like to build this vibrant and zealous organization further by increasing our membership, and I wish to invite suggestions from all of you. Come and join us in this exciting and motivating endeavor, and together we will fulfill our dream and grow intellectually and academically. I, on behalf of our branch, would also like to thank the Head Office presided by Dr. J R Patel with Secretary Dr. Rupesh P L for their continuous support, guidance, and encouragement through their wonderful programs and communications. SAMPARK 2020 was a stand-out event. Kudos, HO team. "Nothing in life is to be feared; it is only to be understood. Now is the time to understand more, so
that we may fear less." said Madam Curie. How apt and true in these times. Respectfully submitted,
Dr. Sharat Shetty President, IPS MNM
Advisor's Note
Powered by disruption-contextual education & oral health practice
Recent times have been challenging to the dental profession as a whole and Prosthodontics in particular. We have witnessed a massive slowdown in practice. Both dental surgeons and patients are apprehensive of being infected with Covid-19 disease. We do hear about dental practitioners down with Covid-19 and sometimes with fatal consequences. Disruption and challenges faced by the dental profession are much higher than any other health profession due to closely working in and around the highest aerosol generation areas. Dental institutions had to commence online classes despite various studies and research showing institutions and faculty's unpreparedness. Moreover, our curriculum design does not fully support distance learning. Innovative teaching, learning, or blended learning practices are not prevalent, especially in our country. Though most institutions have quickly adapted to the virtual platforms, few have established centralized 'LEARNING MANAGEMENT SOFTWARE' (LMS). Another challenge is a clinical practice, which is the core of Dentistry as well as Prosthodontic and requires the development of psychomotor skills. Finding a silver lining for dental education during the pandemic is critical. We need to focus on Preventive Therapeutics, better integration with medical practice, greater emphasis on innovative thinking, dealing with safe practices for overcoming clinical challenges for the benefit of all stakeholders.
Dental procedures should change to include expanded case history covering recent travel details, medical conditions of the patient and their family, pretreatment photographs and videos, shorter clinical guidelines, practice by appointment only, little or no waiting time, pre and postoperative workplace sanitization, and all of these at an affordable cost. Clinical acumen, smart communication skills, and strong ethical values will be very crucial. This challenging time will impact our profession in insignificant ways. So, how do we make the most of our learning during the pandemic? Can we leverage our strengths to take full advantage of this disruption?

It has reminded us; we are human first, vulnerable, and can support each other in times of need. Many dental schools & associations are sharing online webinars. There is exquisite talk on how to improve participation & learner's engagement during these online sessions. Group tasks and participation by attendees provide better peer experience and learning opportunities. Faculty development programs need to retool their approach to enhance student engagement with the curriculum. We all have experienced participating in online meetings and conferences. It saves time, but the involvement of participants is questionable. Online classes combined with contact classes will be the trend, and they are here to stay. Hence, we need to innovate methods to maximize student engagement and learning opportunities. During this pandemic, Prosthodontists have had an opportunity to carefully consider the risk versus benefits of immediate versus the deferred procedural treatment and re-visit minimally invasive treatment such as atraumatic restorative techniques, adhesive bridges, removable partial dentures, and use of conventional speed motors to avoid aerosols. Many are including strict infection control protocols aligned with recommendations from the center for infection control of diseases. Here we recall the early eighties during the HIV & AIDS pandemic when the dental profession was declared as high risk demanded strict clinical infection control procedures and practices. Stress on Universal precaution, mandatory special training for dental surgeons for infection control equipment & procedures including biomedical waste management. Importance of history sheets social history with confidentiality, counseling, record-keeping, legal aspects is a few aspects that every dentist had to learn. The protective equipment was not devised with comfort and ease of performing clinical procedures. Once again, we need to consider practicality and feasibility with safety in our PPEs. To summarize, it needs the hour to be compliant with technology, adapts our teaching sessions to engage learners effectively, and maximize learners' participation. Institutions need to have their learning management software. Focus continues to be procedures – skills backed with knowledge and the right attitude. As we get ready to start our clinics for full-fledged oral healthcare, we must understand patients will have varying medical risk factors that affect their susceptibility to aerosolized micro-organisms. Hence let us adapt to the new normal and practice safely. Online patient history, shorter clinical procedures, minimally invasive procedures, and preventive care will help transition until the world sees a proven approved safe vaccine, herd immunity, and effective Covid treatment. We are standing on the threshold of overhauling our curriculum and educational program based on the new normal demand. Dr. Suhasini Nagda Advisor to Editor, JPDM Founder President, IPS MNM

THE JOURNAL OF
PROSTHODONTICS AND DENTAL MATERIALS
The Official e-publication of Indian Prosthodontic Society
MUMBAI - NAVI MUMBAI BRANCH
TABLE OF CONTENT Page No.
EDITORIAL 1-2
REVIEW
1. Effect of different finish line preparations on the marginal and internal adaptation of
cobalt - chromium metal copings fabricated using CAD CAM technology - A Scoping
Review.
Dr. Naisargi Shah, Dr. Praveen Badwaik, Dr. Vidhi H Sheth, Dr. Vishrut Bhatnagar, Dr. Nikhil
Bhanushali, Dr Prashant Patil.
3-9
2. JAW IN A DAY A Fibular Reconstruction of The Mandible.
Dr. Saloni Mistry, Dr. Omkar Shete, Dr. Shalu Shah, Dr. Gauraja Kadam, Dr. Ankita Walke.
10-18
3. Margins in restorative dentistry - a review
Dr. Samruddhi Shinde, Dr. Padmini Chandrasekhar, Dr. Shishir Singh, Dr. Rajesh Podar, Dr.
Roshan Shetty, Dr. Avinash Salgar
19-31
4. The right perspective of practicing prosthodontics in post COVID - 19 era.
Dr. Jayesh Banswani, Dr. Naisargi Shah, Dr. Praveen Badwaik, Dr. Rahul Malu, Dr. Kaveri
Chakrabortty, Dr. Arshad Idrisi.
32-41
5. Magnets in prosthodontics - An Overview
Dr. Hrishikesh Mahapatra, Dr. Sumit Bedia
42-50

6. The implant - abutment connection and its relation to crestal bone - a review
Dr. Rahul Ravi, Dr. Adnan Kheyroolla, Dr. Omkar Shetty, Dr. Rubina Tabassum, Dr. Gaurang
Mistry, Dr. Kunal Mehta.
51-59
ORIGINAL RESEARCH
7. Efficacy of citronella oil as an antifungal agent on denture soft liner.
Dr. Banashree S. Sankeshwari, Dr. Pranav R. Tulle, Dr. Raghavendra V. Adaki, Dr. Dayanand
A. Huddar, Dr. Deepti S. Fulari, Dr. Mokshada M. Badadare.
60-64
8. Evaluation of golden proportion in males and females in chhattisgarh population: a
clinical short study.
Dr. Preeti Tiwari, Dr. Saumya Sharma, Dr. Sanjeev Singh, Dr. Vivek Lath, Dr. Priyabrata Jena
65-71
CLINICAL TIP
9. Steps for disinfection of impression
Dr. Rathin Das
72-73
CASE REPORTS
10. Immediate Functional Loading of Completely Edentulous Arches with a Screw
Retained Definitive Prosthesis on Corticobasal Implants: A Case Report
Dr. Anita Gala Doshi, Dr. Vivek Gaur, Dr. Janani Iyer
74-81
11. Neutral zone: a novel approach for resorbed ridge management-a case series
Dr. Ankita Savaliya, Dr. Janani Iyer, Dr. Jyoti Nadgere.
82-89
12. Smile designing using all ceramic laminates guided through aesthetic pre-evaluative
temporaries: a case report.
Dr. Pinak Rathi, Dr. Janani Iyer, Dr. Jyoti Nadgere
90-95

1
Editorial
"A journey of thousand miles begins with a single step."
Lao Tzu
It is my great pride and pleasure to announce the launch of "Journal of Prosthodontics and Dental Materials" (JPDM), the official publication of the Indian Prosthodontic Society, Mumbai- Navi Mumbai branch. It has long been felt that the ever-burgeoning Prosthodontic community of Mumbai and Navi Mumbai needed an outlet to communicate and showcase their talent and skills. To address this requirement, Branch President, EC members, and seniors mooted the idea of having a Branch journal. It was envisaged that the Journal would provide a holistic, inclusive platform that incubates and articulates branch members' passion for learning, innovating, and collaborating. Our vision of making the Journal the first choice of reference and widespread indexing will only be possible by quality research and clinical work submissions by our branch members. This requires focusing on continuous improvement, embracing new ideas and technology, and leveraging the existing depth of knowledge and experience for evolving paradigms. Just as the idea was being crystallized, the Covid-19 pandemic struck. However, it made our resolve even firmer, and the lack of infrastructure or supportive ecosystem did not deter us from achieving our goal. You will be glad to know that the Journal has already created a buzz and excitement among its members. It has received manuscript submissions from individuals and institutes across India. This is both a recognition and testament of the intent and content of the Journal. The issue covers a broad spectrum of prosthodontics and dental materials, including reviews, original research, case presentations, clinical tips, and much more.

2
I am proud to share that the editorial team has gone beyond the normal in the prevailing difficult times to prioritize the Journal roll out. The articles have been painstakingly reviewed, revised, and edited for publishing. The editorial team meticulously curated all Journal aspects, right from artwork, design, layout, and sequencing. The tremendous support from IPS Head Office President Dr. J R Patel, Secretary Dr. Rupesh P L and Editor Dr. N. Gopi Chander, Branch President Dr. Sharat Shetty, Secretary Dr. Saloni Mistry, and our advisors and senior branch members' Dr. Suhasini Nagda, Dr. Sabita M. Ram and Dr. Suresh Meshram, Dr. Jyoti Karani have been very encouraging and humbling. I would also like to thank my editorial team and my department's staff at Terna Dental College, Navi Mumbai, for their endless enthusiasm and tireless efforts in making this project a resounding success. Finally, I would like to thank all our well-wishers, sponsors, and partners who have supported the Journal in its infancy. I wish that our members (students, faculties, and practitioners) take maximum advantage of this opportunity to showcase their abilities as researchers and clinicians. The JPDM will be published biannually for the benefit of the branch members. Issues 1 and 2 covering the period January to June and July to December 2020 are being launched simultaneously.
Arise, awake, and stop not till the goal is reached Swami Vivekanand
Dr. Naisargi Shah Editor, IPS MNM

The JPDM I Vol 1 I Issue 1 and 2 I 2020 3
THE JOURNAL OF PROSTHODONTICS AND DENTAL MATERIALS
The Official e-publication of Indian Prosthodontic Society MUMBAI - NAVI MUMBAI BRANCH
ABSTRACT Purpose: This scoping review aimed to evaluate the effect of different finish line preparations on the
marginal and internal adaptation of cobalt-chromium metal copings fabricated using computer-aided
designing and computer-aided manufacturing (CAD-CAM) technology.
Material and Methods: The Arksey and O’Malley methodological framework has been followed for
this scoping review. The research question and the PIO criteria were established accordingly. An
electronic search of the PubMed database for articles published from 1st January 2010 to 31st July 2020
was conducted using a combination of MeSH terms and free-text terms.
Results: 9 articles were eventually identified after applying the inclusion and exclusion criteria and were
included in this scoping review. A better overall marginal adaptation was reported in deep chamfer finish
line preparation followed by shoulder and chamfer finish line preparations respectively, whereas a better
overall internal adaptation was reported in shoulder finish line preparation as compared to chamfer and
deep chamfer finish line preparations.
Conclusions: Different finish line preparations and the CAD-CAM method of fabrication seem to
influence the marginal and internal adaptation of single-unit tooth-supported cobalt-chromium metal
copings. A more detailed search of the available literature is required, preferably a systematic review
and meta-analysis, to come to a more definitive conclusion regarding the effect of different finish line
preparations on the marginal and internal adaptation of cobalt-chromium metal copings fabricated using
CAD-CAM technology.
Effect of Different Finish Line Preparations on The Marginal and Internal Adaptation of Cobalt – Chromium
Metal Copings Fabricated Using CAD – CAM Technology – A Scoping Review
Dr Naisargi Shah1, Dr Praveen Badwaik2, Dr Vidhi H Sheth3, Dr Vishrut Bhatnagar4, Dr Nikhil
Bhanushali5, Dr Prashant Patil6
1Professor and Head of Department, 2Professor,
3Post-graduate Student, 4Reader,
6Lecturer,
Department of Prosthodontics, Crown & Bridge, 5Reader
Department of Public Health Dentistry.
T.P.C.T’s Terna Dental College, Navi Mumbai
5Reader, Department of Public Health Dentistry,
T P C T’s Terna Dental College, Navi Mumbai.

Shah N. et al: Finish Line Preparations – A Scoping Review
The JPDM I Vol 1 I Issue 1 and 2 I 2020 4
Key-words: Finish line preparations, chamfer, deep chamfer, shoulder, rounded shoulder, marginal
adaptation, internal adaptation, cobalt-chromium metal copings, CAD-CAM technology
Introduction
The advent of computer-aided designing and computer-aided manufacturing (CAD-CAM)
technology has greatly improved the efficiency and accuracy of prosthetic treatment when compared to
conventional methods.1 One of the most widely used applications of this technology in the dental field
has been in the manufacturing of cobalt-chromium metal copings for fixed dental prosthesis. These are
one of the most widely used materials today due to their high strength, good esthetic results, and
longevity.2
The success of these prostheses greatly depends upon their marginal and internal adaptation,
amongst other factors.3 Marginal adaptation has been considered as the distance between the finish line
preparation and the coping margin. The internal adaptation has been considered as the distance between
the intaglio surface of the coping and the axial and occlusal surface of the prepared tooth. The presence
of discrepancies in this adaptation can lead to increased plaque accumulation, alterations in the
distribution of microflora, and gingival irritation.4 This can further contribute to a higher risk of dental
caries, possibly leading to secondary decay, followed by endodontic complications, leading to eventual
failure of the prosthesis.5,6 Thus, marginal and internal adaptation of cobalt-chromium metal copings is
considered an essential criterion for assessing clinical quality and success of fixed dental restorations.
Various factors can affect the marginal and internal adaptation of these metal copings, one of
them being the finish line preparation. Currently, there is no clear consensus as to which finish line
preparation can provide the best marginal and internal adaptation in the case of cobalt-chromium metal
copings.
Thus, this scoping review aims to evaluate the effect of different finish line preparations on the
marginal and internal adaptation of Cobalt-chromium metal copings fabricated using CAD-CAM
technology. This scoping review was conducted as a part of the pilot search for an ensuing systematic
review.
Methodology
The Arksey and O’Malley methodological framework was followed for this scoping review (Figure 1).7
Figure 1: Arksey and O’Malley methodological framework for conducting a scoping review

Shah N. et al: Finish Line Preparations – A Scoping Review
The JPDM I Vol 1 I Issue 1 and 2 I 2020 5
Stage 1: Identifying the research question
The research question defined for this scoping review was, “Do different finish line preparations
influence the marginal and internal adaptation of cobalt-chromium metal copings fabricated using CAD-
CAM technology?”
The PIO criteria was established based on the research question as follows:
Population: Cobalt-chromium metal copings fabricated using CAD-CAM technology.
Intervention: Different finish line preparations (chamfer, deep chamfer, shoulder, rounded shoulder).
Outcome: Discrepancy in marginal and internal adaptation.
Stage 2: Identifying relevant studies
An electronic search of the PubMed database for articles published from 1st January 2010 to
31st July 2020 was conducted. The search was conducted using a combination of various controlled
vocabulary terms (i.e., MeSH terms) as well as free text terms related to the research question. The
MeSH terms used were Crown, Computer-Aided Design, Tooth preparation, Prosthodontic and Dental
Marginal Adaptation. The free text terms used were cobalt-chromium metal copings, computer-aided
designing, computer-aided manufacturing, CAD-CAM, finish line design, chamfer, deep chamfer,
shoulder, rounded shoulder, internal fit, internal adaptation, marginal fit and marginal adaptation.
Various combinations of the MeSH terms and the free text terms were used to conduct the searches.
Stage 3: Study selection
Articles published from 1st January 2010 to 31st July 2020 were included. Only those studies
evaluating effect of different finish line preparations (chamfer, deep chamfer, shoulder, rounded
shoulder) on the marginal and/or internal adaptation of single-unit tooth-supported cobalt-chromium
metal copings fabricated using CAD-CAM technology were included. Also, articles published in the
English language only were included.
Case reports, case series, finite element analysis, review articles and surveys were excluded from
this scoping review. Studies evaluating single-unit metal-ceramic restorations after ceramic veneering,
multi-unit restorations, all-ceramic restorations, full-metal restorations, implant-supported prosthesis,
partial-coverage restorations, or temporary restorations; or cobalt-chromium metal copings fabricated
by techniques not involving CAD-CAM technology were also excluded. Studies with sample size less
than or equal to 5 were also excluded.
A total of 64 articles were obtained in the searches. 36 articles were excluded after the title and
abstract screening, followed by the further exclusion of 19 articles after full text evaluation. 9 articles
were eventually identified after applying the inclusion and exclusion criteria and were included in this
scoping review (Figure 2).
Stage 4: Charting the data
The data was then extracted from the 9 selected studies and was entered into a Microsoft Excel
spreadsheet (Figure 3). The data items that were extracted and charted were:
1. Author.
2. Year of publication.
3. Study setting.
4. Sample Size.
5. Finish line preparation design.
6. CAD-CAM method used for manufacturing the Cobalt-chromium copings.
7. Method of measurement of marginal and/or internal fit.
8. Marginal and/or internal fit with mean and standard deviation values (in microns).

Shah N. et al: Finish Line Preparations – A Scoping Review
The JPDM I Vol 1 I Issue 1 and 2 I 2020 6
Figure 2: Flow-chart for the search strategy
Figure 3: Study Characteristics
Shah N. et al: Finish Line Preparations – A Scoping Review
The JPDM I Vol 1 I Issue 1 and 2 I 2020 7
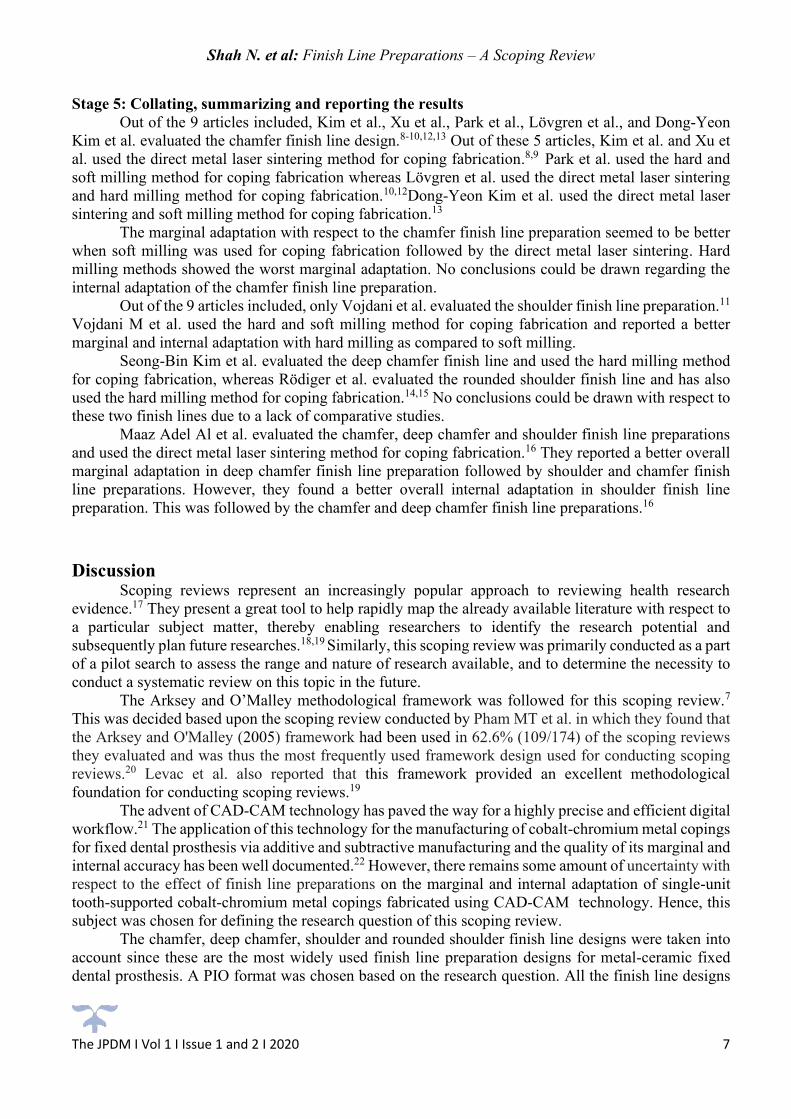
Stage 5: Collating, summarizing and reporting the results
Out of the 9 articles included, Kim et al., Xu et al., Park et al., Lövgren et al., and Dong-Yeon
Kim et al. evaluated the chamfer finish line design.8-10,12,13 Out of these 5 articles, Kim et al. and Xu et
al. used the direct metal laser sintering method for coping fabrication.8,9 Park et al. used the hard and
soft milling method for coping fabrication whereas Lövgren et al. used the direct metal laser sintering
and hard milling method for coping fabrication.10,12Dong-Yeon Kim et al. used the direct metal laser
sintering and soft milling method for coping fabrication.13
The marginal adaptation with respect to the chamfer finish line preparation seemed to be better
when soft milling was used for coping fabrication followed by the direct metal laser sintering. Hard
milling methods showed the worst marginal adaptation. No conclusions could be drawn regarding the
internal adaptation of the chamfer finish line preparation.
Out of the 9 articles included, only Vojdani et al. evaluated the shoulder finish line preparation.11
Vojdani M et al. used the hard and soft milling method for coping fabrication and reported a better
marginal and internal adaptation with hard milling as compared to soft milling.
Seong-Bin Kim et al. evaluated the deep chamfer finish line and used the hard milling method
for coping fabrication, whereas Rödiger et al. evaluated the rounded shoulder finish line and has also
used the hard milling method for coping fabrication.14,15 No conclusions could be drawn with respect to
these two finish lines due to a lack of comparative studies.
Maaz Adel Al et al. evaluated the chamfer, deep chamfer and shoulder finish line preparations
and used the direct metal laser sintering method for coping fabrication.16 They reported a better overall
marginal adaptation in deep chamfer finish line preparation followed by shoulder and chamfer finish
line preparations. However, they found a better overall internal adaptation in shoulder finish line
preparation. This was followed by the chamfer and deep chamfer finish line preparations.16
Discussion
Scoping reviews represent an increasingly popular approach to reviewing health research
evidence.17 They present a great tool to help rapidly map the already available literature with respect to
a particular subject matter, thereby enabling researchers to identify the research potential and
subsequently plan future researches.18,19 Similarly, this scoping review was primarily conducted as a part
of a pilot search to assess the range and nature of research available, and to determine the necessity to
conduct a systematic review on this topic in the future.
The Arksey and O’Malley methodological framework was followed for this scoping review.7
This was decided based upon the scoping review conducted by Pham MT et al. in which they found that
the Arksey and O'Malley (2005) framework had been used in 62.6% (109/174) of the scoping reviews
they evaluated and was thus the most frequently used framework design used for conducting scoping
reviews.20 Levac et al. also reported that this framework provided an excellent methodological
foundation for conducting scoping reviews.19
The advent of CAD-CAM technology has paved the way for a highly precise and efficient digital
workflow.21 The application of this technology for the manufacturing of cobalt-chromium metal copings
for fixed dental prosthesis via additive and subtractive manufacturing and the quality of its marginal and
internal accuracy has been well documented.22 However, there remains some amount of uncertainty with
respect to the effect of finish line preparations on the marginal and internal adaptation of single-unit
tooth-supported cobalt-chromium metal copings fabricated using CAD-CAM technology. Hence, this
subject was chosen for defining the research question of this scoping review.
The chamfer, deep chamfer, shoulder and rounded shoulder finish line designs were taken into
account since these are the most widely used finish line preparation designs for metal-ceramic fixed
dental prosthesis. A PIO format was chosen based on the research question. All the finish line designs

Shah N. et al: Finish Line Preparations – A Scoping Review
The JPDM I Vol 1 I Issue 1 and 2 I 2020 8
were considered in the intervention group, and no comparison group was established to ensure maximum
inclusion of data for this scoping review.
As enlisted in the results, a better marginal adaptation was reported in deep chamfer finish line
preparation followed by shoulder and chamfer finish line preparations respectively. In contrast, a better
internal adaptation was reported in shoulder finish line preparation as compared to chamfer and deep
chamfer finish line preparations.
The limitations of this scoping review are that the search was limited to a single database and a
select few MeSH terms, and free text terms were used in the search, due to which some of the available
literature might have been overlooked.
Despite the limitations, a decent amount of homogenous literature does seem to be available on
this subject. This scoping review also found that the effect of different finish line preparations on the
marginal and internal adaptation can be due to multiple factors that need to be further elaborated. Thus,
a systematic review and meta-analysis needs to be conducted on this subject to come to a more definitive
conclusion.
Conclusion • Finish line preparations and the CAD-CAM method of fabrication seem to influence the marginal
and internal adaptation of single-unit tooth-supported cobalt-chromium metal copings.
• A better overall marginal adaptation was reported in deep chamfer finish line preparation followed
by shoulder and chamfer finish line preparations.
• A better overall internal adaptation was reported in shoulder finish line preparation as compared to
chamfer and deep chamfer finish line preparations.
• The marginal adaptation seemed to be better when soft milling was used for coping fabrication
followed by the direct metal laser sintering and hard milling methods with respect to the chamfer
finish line preparation.
• The marginal and internal adaptation was reportedly better with hard milling as compared to soft
milling with respect to the shoulder finish line preparation.
• A more elaborate search of the available literature is required, preferably a systematic review and
meta-analysis, to come to a more definitive conclusion regarding the effect of different finish line
preparations on the marginal and internal adaptation of cobalt-chromium metal copings fabricated
using CAD-CAM technology.
References:
1. Boitelle P, Mawussi B, Tapie L, Fromentin O. A systematic review of CAD/CAM fit restoration
evaluations. J Oral Rehabil 2014;41(11):853-74.
2. Svanborg P, Hjalmarsson L. A systematic review on the accuracy of manufacturing techniques for
cobalt chromium fixed dental prostheses. Biomater Investig Dent 2020;7(1):31-40.
3. Papadiochou S, Pissiotis AL. Marginal adaptation and CAD-CAM technology: A systematic
review of restorative material and fabrication techniques. J Prosthet Dent 2018;119(4):545-51.
4. Valderhaug J, Birkeland JM. Periodontal conditions in patients 5 years following insertion of fixed
prostheses. Pocket depth and loss of attachment. J Oral Rehabil 1976;3(3):237-43.
5. Valderhaug J, Heloe LA. Oral hygiene in a group of supervised patients with fixed prostheses. J
Periodontol 1977;48(4):221-4.
6. Lang NP, Kiel RA, Anderhalden K. Clinical and microbiological effects of subgingival restorations
with overhanging or clinically perfect margins. J Clin Periodontol 1983;10(6):563-78.
7. Arksey H, O'Malley L. Scoping studies: towards a methodological framework. Int Jour of Soc Res
Method 2005 Feb 1;8(1):19-32.
Shah N. et al: Finish Line Preparations – A Scoping Review
The JPDM I Vol 1 I Issue 1 and 2 I 2020 9
8. Kim KB, Kim JH, Kim WC, Kim HY, Kim JH. Evaluation of the marginal and internal gap of
metal-ceramic crown fabricated with a selective laser sintering technology: two- and three-
dimensional replica techniques. J Adv Prosthodont 2013;5(2):179-86.
9. Xu D, Xiang N, Wei B. The marginal fit of selective laser melting-fabricated metal crowns: an in
vitro study. J Prosthet Dent 2014;112(6):1437-40.
10. Park JK, Kim HY, Kim WC, Kim JH. Evaluation of the fit of metal ceramic restorations fabricated
with a pre-sintered soft alloy. J Prosthet Dent 2016;116(6):909-15.
11. Vojdani M, Torabi K, Atashkar B, Heidari H, Torabi Ardakani M. A Comparison of the Marginal
and Internal Fit of Cobalt-Chromium Copings Fabricated by Two Different CAD/CAM Systems
(CAD/ Milling, CAD/ Ceramill Sintron). J Dent (Shiraz) 2016;17(4):301-8.
12. Lövgren N, Roxner R, Klemendz S, Larsson C. Effect of production method on surface roughness,
marginal and internal fit, and retention of cobalt-chromium single crowns. J Prosthet Dent
2017;118(1):95-101.
13. Kim DY, Kim JH, Kim HY, Kim WC. Comparison and evaluation of marginal and internal gaps
in cobalt-chromium alloy copings fabricated using subtractive and additive manufacturing. J
Prosthodont Res 2018;62(1):56-64.
14. Kim SB, Kim NH, Kim JH, Moon HS. Evaluation of the fit of metal copings fabricated using
stereolithography. J Prosthet Dent 2018;120(5):693-98.
15. Rödiger M, Schneider L, Rinke S. Influence of Material Selection on the Marginal Accuracy of
CAD/CAM-Fabricated Metal- and All-Ceramic Single Crown Copings. Biomed Res Int
2018;2018:2143906.
16. Al Maaz A, Thompson GA, Drago C, An H, Berzins D. Effect of finish line design and metal alloy
on the marginal and internal gaps of selective laser melting printed copings. J Prosthet
Dent2019;122(2):143-51.
17. Davis K, Drey N, Gould D. What are scoping studies? A review of the nursing literature. Int J Nurs
Stud 2009;46(10):1386-400.
18. Peterson J, Pearce PF, Ferguson LA, Langford CA. Understanding scoping reviews: Definition,
purpose, and process. J Am Assoc Nurse Pract 2017;29(1):12-16.
19. Levac D, Colquhoun H, O'Brien KK. Scoping studies: advancing the methodology. Implement Sci
2010 Dec 1;5(1):69.
20. Pham MT, Rajić A, Greig JD, Sargeant JM, Papadopoulos A, McEwen SA. A scoping review of
scoping reviews: advancing the approach and enhancing the consistency. Res Synth
Methods2014;5(4):371-85.
21. Serag M, Nassar TA, Avondoglio D, Weiner S. A Comparative Study of the Accuracy of Dies
Made from Digital Intraoral Scanning vs. Elastic Impressions: An In Vitro Study. J
Prosthodont 2018 Jan;27(1):88-93.
22. Baroudi K, Ibraheem SN. Assessment of chair-side computer-aided designand computer-aided
manufacturing restorations: a review of the literature. J Int Oral Health 2015;7:96-104.

The JPDM I Vol 1 I Issue 1 and 2 I 2020 10
THE JOURNAL OF PROSTHODONTICS AND DENTAL MATERIALS The Official e-publication of Indian Prosthodontic Society
MUMBAI - NAVI MUMBAI BRANCH
Jaw in A Day A Fibular Reconstruction of The Mandible
Dr Saloni Mistry 1, Dr Omkar Shete 2, Dr Shalu Shah3, Dr Gauraja Kadam3, Dr Ankita Walke4
1Professor and HOD, 2Associate Professor,
3Second year Post Graduate Student, 4First year Post Graduate Student.
Y.M.T Dental College and Hospital, Kharghar.
ABSTRACT: The goals in reconstructing mandibular discontinuity defects are to provide architectural
support to restore and preserve lower facial contour and occlusal relationships. Patients with
unrestored mandible have cosmetic disfigurement, compromised function, and difficulty in
socializing.
A wide variety of methods have been reported to reconstruct these defects with osseous grafts
harvested from various donor sites like ilium, radius, metatarsal, scapula, and fibula.
However, each of these donor sites has significant limitations related to the length of available bone
or the reliability of the associated soft tissue.
The advantages of the fibula as a donor site are not limited to the surgical aspect, but with the use of
technology as an adjunct to a surgical procedure in the form of a 3D printed stent; the prosthetically
driven placement of the fibular graft is now possible. Computer-aided design/computer-aided
manufacturing (CAD/CAM) technology has recently opened new frontiers in maxillofacial bone
reconstruction.
The crucial role of a Prosthodontist is to guide the fabrication of surgical stents manually or by 3D
printing, which helps oral surgeons to contour the fibular grafts for favorable functional and
harmonious prosthodontic rehabilitation in terms of occlusion.
This article overviews the metamorphosis of rehabilitation procedures from the conventional free
fibular grafts approach to a novel approach of rehabilitating the mandible with pre osseointegrated
implants using a 3D printed stent.
Introduction Resection of a part or complete mandible is a treatment modality for many pathological conditions. Patients with unrestored mandible have cosmetic disfigurement, compromised function and difficulty in socializing. The microvascular fibula free flap popularized by Hidalgo1 has become one of the most significant advances in reconstructing the maxillofacial region. The

Mistry S. et al : Jaw in A Day: Fibular Reconstruction of Mandible
The JPDM I Vol 1 I Issue1 and 2 I 2020 11
conventional process of rehabilitation demands time and meticulous sequential procedures to be followed. However, with the use of technology as an adjunct to a surgical procedure in the form of 3D printed
stents and virtual planning, the prosthetically driven placement of the graft and implants makes this
approach more accurate, predictable and also considerably decreases the time required.
Rehabilitation goals
A] Choice of graft
The ultimate goal in mandibular reconstruction cases is the restoration of both form and function. We
can achieve this through various surgical techniques, mainly non-vascularized bone grafts (NVBGs)
and vascularized grafts. Direct comparisons of NVBGs and vascularized bone flaps (VBFs) have
shown the superiority of the latter in terms of bony union (69% for NVBGs vs. 96% of VBFs)2 as
well as superior functional and aesthetic scores for diet, speech, and midline symmetry.3 Superiority
of VBGs compared to NVBGs increases significantly in mandibular defects greater than 6 cm or
previously irradiated tissue.2 Vascularized flaps withstand irradiation better. Available options for
VBGs are the fibula, radial forearm, scapula, and iliac crest.4-7
B] Why fibula is the choice of graft?
➢ The use of free vascularized fibula has become the “gold standard” for mandibular
reconstruction since its introduction by Hidalgo in 1989,1 due to various advantages over other
VBGs.
➢ It provides the longest bone segment with 20 to 30 cm long, 14 mm wide with a bicortical
plate, allowing implant placement and osseointegration.
➢ A reasonably long vascular pedicle with large diameter vessels, mainly peroneal artery, and
the segmental blood supply of the bone permits multiple osteotomies.8
➢ The most reliable septocutaneous perforators are located in the middle and distal third of the
fibula.9
➢ We can harvest Soleus muscles with the fibula if additional bulk is required.
➢ We can use proximity of the sural nerve for the reconstruction of the inferior alveolar nerve.
➢ Minimal donor site morbidity and ease of harvesting.
C] Two ways to get there
The complete rehabilitation of the mandible can be carried out in 2 different approaches the
conventional and digital namely, depending on the method followed for the reconstruction.
1. Conventional approach: The conventional approach is completely based on the expertise and
experience of the clinician. It includes simultaneous resection of the mandibular pathology as well as
the harvesting of the fibular graft. This is done based on of manual measurements, making it not
100% accurate. The resection is then followed by the surgical reconstruction of the mandible by
harvesting the fibular graft. Before the placement of implants, the patient has to wait for a period of
3-5 months for the graft to get accepted.
After the acceptance and healing of the graft, we can conduct a second surgery to place the implants;
followed by another waiting period of 3-6 months for the osseointegration of the implants. The

Mistry S. et al : Jaw in A Day: Fibular Reconstruction of Mandible
The JPDM I Vol 1 I Issue1 and 2 I 2020 12
process of fabrication for the prosthesis beings after this, thereby increasing the time frame required
for the complete rehabilitation to 9-12 months.
Drawbacks of a conventional approach
1) Long waiting period till satisfactory function and aesthetics are achieved.
2) Formation of a thick layer of soft tissue post the first surgery hampers the placement
of implants; in such cases “Debulking” of the soft tissue is necessary.
3) Manual measurements used for resection make it difficult to reach the optimal
positioning of implants.
4) Each surgical intervention increases the risk of infection.
A study10 of 56 patients has reported 92% implant success versus only 42.9% prosthetic success. The
reasons proposed by the authors are patient’s poor cooperation (30.4%), tumour recurrence (14.3%),
and surgery-related factors (10.8%) in which the authors include both implant failure and an
unfavorable relationship between the maxilla and the reconstructed mandible. One should consider
that a high implant osseointegration rate is not significant if the functional prosthetic result is bad.10
Thus, from this study, it is inferred that the success of such cases is predicted from the standpoint of
final occlusion achieved and duration needed for the complete reconstruction ,which necessitates the
use of digital methods.
2. Digital approach
3D printing is a rapidly growing technology in the medical field, which can provide adapted solutions.
After resection of malignant tumours, mandibular reconstruction using a free fibular flap and a 3D
printed resection guide is considered to be more accurate than conventional reconstruction. Moreover,
this technique is expected to contribute to shorter surgical times and overall cost savings.
Working a case from the digital stand point begins with a CT – scan of the mandible with the
pathology and a CT-angiography for the fibula. A CT- angiography is done to check for the peroneal
artery’s patency, to be harvested along with the graft. These files are provided in DICOM formats.
After the scan, various software e.g.- Geoform, MAGICS etc are used to convert the DICOM file into
STL format, which is essential for the virtual planning of the case. The files are uploaded onto the
software; the various tools are then used to analyze the extent of the lesion and create a personalized
treatment plan. The accessed pathology is virtually resected by keeping safety margins (Figure 1).11
Following which a resection stent is designed to be used at the time of surgery for the accurate
excision of the pathology (Figure 2).
Figure 1 Figure 2
Figure 1. - Virtual Delineation of The Part to Be Resected

Mistry S. et al : Jaw in A Day: Fibular Reconstruction of Mandible
The JPDM I Vol 1 I Issue1 and 2 I 2020 13
Figure 2 - Virtual Image Of Pathology Resection Stent
Simultaneously the fibula is analyzed for the area to be resected depending on the anatomical
considerations. Those include using the middle portion of the bone, not including the distal end of
the bone to maintain its vascularity. Cases,which include the resection of the anterior section of the
mandible are more difficult to rehabilitate as it entails the reconstruction of the anatomical curvature.
This can be achieved via virtual planning (Figure 3A,3B).
Figure 3 A Figure 3 B
Figure 3 - Virtual Images f The Fibula Sectioning Using The Fibular Stent
3A - Three Segments Aligned
3B - Three Segments Aligned to Achieve the Anterior Curvature of The Mandible.
The cutting planes for the fibula are decided based on the amount of graft needed for the
reconstruction. The angles between these cutting planes act as a guide to achieve the anterior
curvature of the mandible. Along with the angles the resected pieces help us gauge the height, width
and placement of the implants (Figure 4), thereby guiding us to rehabilitate the occlusal harmony
post-surgery. Post the planning two more stents are designed, one for the resection of the fibula and
another for the implant placement (Figure 5A, 5B).
Figure 4 - Virtual Image of Resected Pieces Gauging the Height, Width and Placement Of The
Implants

Mistry S. et al : Jaw in A Day: Fibular Reconstruction of Mandible
The JPDM I Vol 1 I Issue1 and 2 I 2020 14
Figure 5A- Mandibular Resection Stent 5B - Fibular Resection And Carrier Stent
The resection stent has a snap-fit onto the bone, thus making the resection accurate and easy. The
designed stents are then 3D - printed and sterilized by UV radiation and H2O2 plasma. A 3D printed
model of the mandible can also be printed to contour the reconstruction plate (Figure 6).1
Figure 6 – Digital Approach, 3D Printed Implant Placement Stent
On the day of the surgery, two surgical teams simultaneously resect the mandible and harvest the
fibular graft using the previously printed stents, attach the reconstruction plate to the harvested fibular
graft , and attach it to the remnant mandible; implants are placed thereafter using the stent (Figure
7A). Following the implant placement, there is a waiting period of 3-6 months for the graft to get
accepted and implants to Osseointegrate simultaneously. A prosthesis is then fabricated (Figure 7B).
Figure 7A - Mandible with Accepted Graft 7B- Prosthodontic Rehabilitation – The 3D Printed Way
JAW IN A DAY: 13-15
Introduced by Levine in 2013, this approach proposes the complete reconstruction and rehabilitation
of the maxilla and mandible in the same surgical intervention. This technique used digital technology
to plan, design, fabricate and deliver a comprehensive reconstruction for an ablative mandibular
defect using a fibular free flap that included immediate implant placement and a provisionalized fixed

Mistry S. et al : Jaw in A Day: Fibular Reconstruction of Mandible
The JPDM I Vol 1 I Issue1 and 2 I 2020 15
dental prosthesis. As a result, the reconstructive surgeon now has the ability to place dental implants
and deliver a temporary fixed prosthesis on the same day as the jaw resection and free flap
reconstruction, fully restoring the patient surgically and prosthetically to form and function in a single
operation.
Patient Selection - It is crucial to know the pathology and to have a biopsy confirming the diagnosis
to plan the resection with adequate margins, comorbidities that could affect the success of a
microvascular reconstruction, such as vascular or autoimmune disease. ‘Jaw in a Day’ is limited to
using an osseous fibula flap with no significant soft tissue component. To avoid further complications
this technique is currently used for non-cancerous benign lesions.
Radiographic assessment – Maxillofacial CT and a CT angiogram of the bilateral lower extremities,
with resolution scans with image slice of 1mm or less. These help us to plan the surgery, virtually,
allowing us to “work backwards” and have a prosthetically driven approach.
Technique – Imaging of dentition with either Digital impression using an intraoral scanner or laser
scanning of traditional alginate impression is done, which is merged with Maxillofacial and CT
angiogram of lower extremities. These images are imported to the surgical planning software using
DICOM format. Using software systems, virtual surgical planning (VSP) is done. Virtual surgery is
then performed by a biomedical engineer. By identifying the pathology on the model, a resection is
planned with acceptable margins and resection guide is designed. It has predictable holes correlating
to holes for reconstruction plates, which are drilled before resection to ensure their accurate placement
of the bony segment using a reconstruction plate as an index. These resection guide can be tooth-
borne or bone-borne. Tooth borne being more accurate due to the absence of soft tissue between bone
and guide. Following which, the appropriately sized segment of the fibula is chosen ,and the number
and position of implants are planned and incorporated into the same fibular resection cum implant
placement guide. This guide has to be secured with a monocortical screw to prevent movement. Then,
custom reconstruction plates are designed. The design of the plates and cutting guides are finalized
and approved by the surgeon, and the cutting guides and hardware are fabricated and delivered for
surgery. The provisional prosthesis can be designed virtually as well and milled prior to surgery.
Placing dental implants into fibula bone is similar to placing implants in to dense type 1 mandible.
Osteotomies should be slightly overprepared, paying close attention to widening the cortices with the
final drill. Following final drill, the osteotomy site is thoroughly irrigated and inspected for soft tissue
remains.
The implants are then screwed into the bone and hand-torqued to the appropriate value and primary
stability is determined, following which prosthetic abutments with screw retained temporary
cylinders are placed and torqued. While still pedicled to the leg, the fibula/reconstruction
plate/provisional construct is tried into a pre-prepared stereolithic model of the segmental defect site
and checked. Once accurate occlusion is achieved, the prosthesis is luted to provisional cylinders.
Then the whole assembly is transferred to the site and maxillomandibular fixation is carried out to
ensure satisfactory occlusion prior to osteosynthesis of the osseous fibular flap to the jaw.
D] Choice of prosthesis
➢ Fixed Prosthesis- might stimulate the bone but can be more difficult to adapt because of
anatomical conditions, especially a reduced mouth opening. It also requires a high number of
implants, which is not always possible in these patients. It is recommended in case of short
grafts (Figure 8). 16
➢ Removable Prosthesis - necessitate fewer implants. The rehabilitation, follow up and oral
hygiene are easier. The procedure is cheaper. It can also easily compensate for an aesthetic
defect, especially in the anterior part of the mandible.17 However, hyposalivation might lead
Mistry S. et al : Jaw in A Day: Fibular Reconstruction of Mandible
The JPDM I Vol 1 I Issue1 and 2 I 2020 16
to mucosal irritations and the significant decrease of blood vessels in the oral mucosa renders
soft tissues more susceptible to traumas.
➢ The main problem with prosthesis remains the unfavorable implant–crown ratio and axis of
the implants, which is not always the same as an axis of the prosthesis, leading to torque forces
that may endanger implant survival.
➢ Use of image-guided surgery and surgical guides decreases the risk and minimises the
angulation between the prosthetic axis and implant axis and also allows precise planning and
accuracy of the rehabilitation.18,19
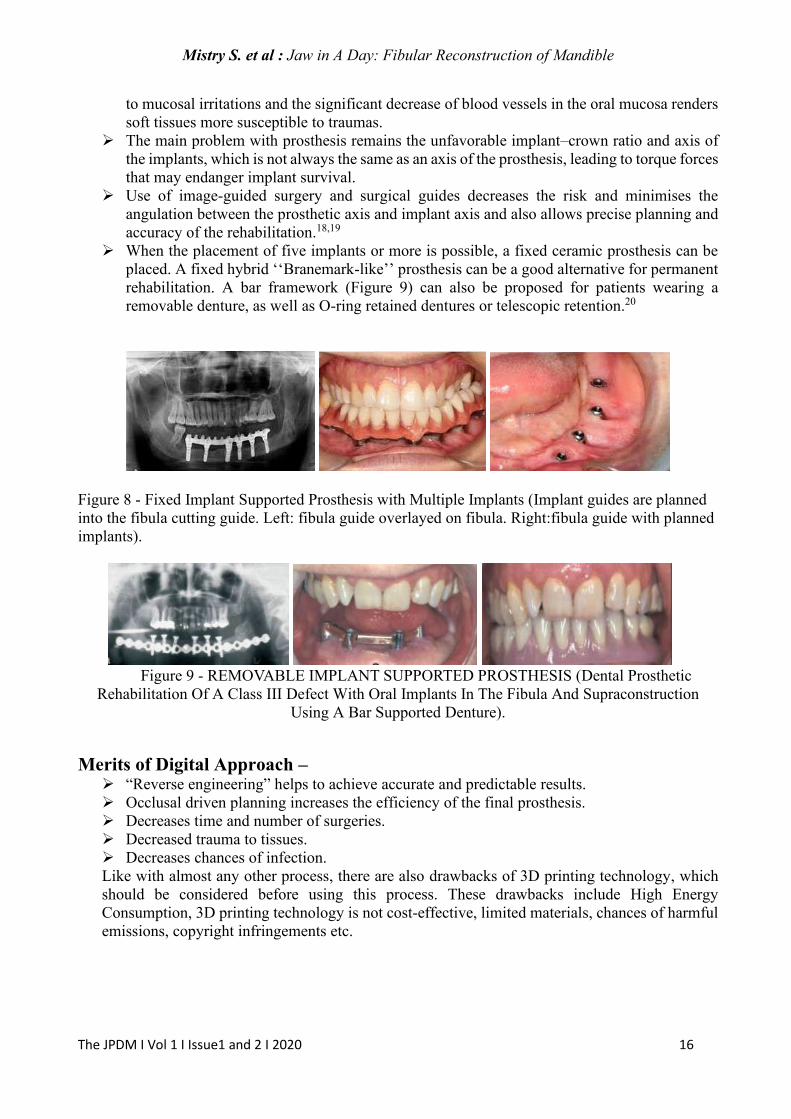
➢ When the placement of five implants or more is possible, a fixed ceramic prosthesis can be
placed. A fixed hybrid ‘‘Branemark-like’’ prosthesis can be a good alternative for permanent
rehabilitation. A bar framework (Figure 9) can also be proposed for patients wearing a
removable denture, as well as O-ring retained dentures or telescopic retention.20
Figure 8 - Fixed Implant Supported Prosthesis with Multiple Implants (Implant guides are planned
into the fibula cutting guide. Left: fibula guide overlayed on fibula. Right:fibula guide with planned
implants).
Figure 9 - REMOVABLE IMPLANT SUPPORTED PROSTHESIS (Dental Prosthetic
Rehabilitation Of A Class III Defect With Oral Implants In The Fibula And Supraconstruction
Using A Bar Supported Denture).
Merits of Digital Approach – ➢ “Reverse engineering” helps to achieve accurate and predictable results.
➢ Occlusal driven planning increases the efficiency of the final prosthesis.
➢ Decreases time and number of surgeries.
➢ Decreased trauma to tissues.
➢ Decreases chances of infection.
Like with almost any other process, there are also drawbacks of 3D printing technology, which
should be considered before using this process. These drawbacks include High Energy
Consumption, 3D printing technology is not cost-effective, limited materials, chances of harmful
emissions, copyright infringements etc.

Mistry S. et al : Jaw in A Day: Fibular Reconstruction of Mandible
The JPDM I Vol 1 I Issue1 and 2 I 2020 17
Future scope The advent of 3D printing has opened many avenues to the field of medical science. Further Use of
this technology will help us evolve our treatment options in the future. The new emerging ideas to be
considered for mandibular rehabilitation includes-
➢ Prefabricated free fibular grafts – introduced by Rohner21 in 2013, includes the prior
osseointegration of the implants in the fibula followed by the resection and reconstruction.
➢ Titanium frameworks – in cases with extensive resection, an alternative to use of fibular grafts
is the use of 3D printed titanium frameworks to hold and give shape to the mandible.
➢ Tissue engineering approaches utilizing collagen-based scaffolds combined with bone
marrow-derived stromal cells and growth factors. Additionally, off-label use of bone
morphogenetic protein-2 (rhBMP-2) in a collagen carrier has been described as a new
alternative to various types of autogenous bone grafting procedures.22
Conclusion Disfigurement of the face, impaired speech and inability to chew are stigmas that are significant in
the social world. Rehabilitation of patients with maxillofacial defects poses a challenge to the able
clinician. Medical imaging and computer-assisted surgery help in improving these surgical
techniques. The digital approach discussed in this article not only overcomes the demerits of the
conventional approach but also proves its own merits in numerous ways to achieve harmonious
occlusion, function and aesthetics. Precise knowledge and the blend of biological principles and
technology is the key to defining success in rehabilitating patients with maxillofacial defects.
References:
1) Hidalgo DA: Fibula free flap: A new method of mandible reconstruction. Plast Reconstr Surg
1989;84:71.
2) Foster RD, Anthony JP, Sharma A, Pogrel MA. Vascularized bone flaps versus non-
vascularized bone grafts for mandibular reconstruction: an outcome analysis of
primary bony union and endosseous implant success. Head Neck 1999;21(1):66-71.
3) King TW, Gallas MT, Robb GL, shalani Z, Miller MJ. Aesthetic and functional
outcomes using osseous or soft-tissue free flaps. J Reconstr Microsurg 2002;18:365-
71.
4) Taylor GI, Townsend P, Corlett R. Superiority of the deep circumflex iliac vessels
as the supply for free groin flaps. Plast Reconstr Surg 1979;64:595-604.
5) Soutar DS, Scheker LR, Tanner NS, Gregor Mc. The radial forearm flap: a versatile
method for intra-oral reconstruction. Br J Plast Surg 1983;36:1-8.
6) Swartz WM, Banis JC, Newton ED, Ramasastry SS, Jones NF, Acland R. The
osteocutaneous scapular flap for mandibular and maxillary reconstruction. Plast
Reconstr Surg 1986;77:530-45.
7) Taylor GI, Miller GD, Ham FJ. The free vascularized bone graft: a clinical extension
of microvascular techniques. Plast Reconstr Surg 1975;55:533-44.
8) Daya M. Peroneal artery perforator chimeric flap: changing the perspective in free
fibula flap use in complex oromandibular reconstruction. J Reconstr Microsurg
2008;24:413-8.
9) Chen ZW, Yan W. The study and clinical application of the osteocutaneous flap of
fibula. Microsurgery 1983;4:11-6.
10) Smolka K, Kraehenbuehl M, Eggensperger N, Hallermann W, Thoren H, Iizuka T,
et al. Fibula free flap reconstruction of the mandible in cancer patients: evaluation of
a combined surgical and prosthodontic treatment concept. Oral Oncol
2008;44(6):571–8.

Mistry S. et al : Jaw in A Day: Fibular Reconstruction of Mandible
The JPDM I Vol 1 I Issue1 and 2 I 2020 18
11) Liu YF, Xu LW, Zhu HY, Liu SSY. Technical procedures for template-guided
surgery for mandibular reconstruction based on digital design and manufacturing
BioMedical Engineering OnLine 2014, 13:63.
12) Cohen A, Laviv A, Berman P, Nashef R, Abu-Tair J. Mandibular reconstruction
using stereolithographic 3-dimensional printing modelling technology. OOOOE
2009 Nov;108(5):661-666.
13) Levine JP, Bae JS, Soares M, Brecht LE, Saadhe PB, Ceradini DJ, Hirsch DL. Jaw in a day:
Total maxillofacial reconstruction using digital technology. Plast Reconstr Surg
2013June;131:1386.
14) Levine JP, Patel A, Saadeh PB, Hirsch DL. Computer-aided design and manufacturing in
craniomaxillofacial surgery: the new state of the art. J Craniofac Surg. 2012;23(1):288-293.
15) Patel A, Harrison P, Cheng A, Bray B, Bell RB. Fibular Reconstruction of the Maxilla and
Mandible with Immediate Implant-Supported Prosthetic Rehabilitation: Jaw in a Day. Oral
Maxillofac Surg Clin North Am 2019;31(3):369-386.
16) Raoul G, Ruhin B, Briki S, Lauwers L, Haurou Patou G, Capet JP, et al.
Microsurgical reconstruction of the jaw with fibular grafts and implants. J Craniofac
Surg 2009;20(6):2105–17.
17) Gürlek A, Miller M, Jacob R, Lively J, Schusterman M. Functional results of dental
restoration with osseointegrated implants after mandible reconstruction. Plast
Reconstr Surg 1998;101(3):650–9.
18) Siessegger M, Schneider BT, Mischkowski RA, Lazar F, Krug B, Klesper B, et al. Use of an
image-guided navigation system in dental implant surgery in anatomically complex operation
sites. J Craniomaxillofac Surg 2001;29(5): 276–81.
19) Valente F, Schiroli G, Sbrenna A. Accuracy of computer-aided implant surgery: a clinical and
radiological study. Int J Oral Maxillofac Implants 2009;24(2):234–42.
20) Wu Y, Huang W, Zhang Z, Zhang Z, Zhang C, Sun J. Clinical outcome of dental implants
placed in fibula-free flaps for orofacial reconstruction. Chin Med J 2008;121(19):1861–5.
21) Rohner D, Bucher P, Hammer B: Prefabricated fibular flaps for reconstruction of defects of
the maxillofacial skeleton: Planning, technique, and long-term experience. Int J Oral
Maxillofac Implants. 2013Sept-oct;28(5):e221-9.
22) Numajiri T, Tsujiko S, Morita D, Nakamura H, Sowa Y. A fixation guide for the accurate
insertion of fibular segments in mandibular reconstruction JPRAS Open 2017;12:1-8.
ACKNOWLEDGMENTS We are very grateful of Dr. Guruprasad Rao (Director, 3D Imaginarium) and his team for their
guidance and Dr. Kartik Bhanushali(4 Quadrant Dental Solution.Pvt.Ltd) for his continuous support.

The JPDM I Vol 1 I Issue 1 and 2 I 2020 19
THE JOURNAL OF PROSTHODONTICS AND DENTAL MATERIALS
The Official e-publication of Indian Prosthodontic Society MUMBAI - NAVI MUMBAI BRANCH
ABSTRACT
Tooth-restoration margins are the most essential and critical link between the tooth structure and the
restoration. Sufficient understanding regarding the margin selection and preparation is of paramount
importance to ensure the restoration longevity and success. Although there are various advances in
regards to the materials in restorative dentistry, selecting the margin type remains a crucial decision.
This paper aims to assertively compile the appropriate margin design, configuration, and location
concerning various restorative materials. Factors determining the periodontal considerations about the
margins and marginal discrepancies are also addressed.
Keywords: Bevelled margins; Flares; Chamfer; Shoulder; Butt joint; Finish lines
Introduction
The ultimate goal of restorative dentistry is to recover biomechanics of the original tooth, prevent further
decay, and restore optimal function. The selection of an appropriate restorative material with its proper
clinical technique is essential for the success of the restorative treatment. An adequate seating and
specific adaption of the restorative material to the preparation margins contribute to its success. This
margin between the restoration and the tooth structure, which is one of the weakest links in the tooth
restoration complex, should be prepared with particular attention to ensuring it transitions with the tooth.
Any gap or interference in this portion of the tooth can lead to harmful effects like difficulty in recording
impression, stress build-up at the margins, increased susceptibility to fracture of the restorative material,
reduced strength and esthetics, and periodontal deterioration.1-3 The marginal design effect is an
underrated factor in the clinical success of the restoration. A greater understanding of the margin design
and placement is essential to achieve maximum results in restorative practice.
Margins In Restorative Dentistry – A Review
Dr Samruddhi Shinde1, Dr Padmini Chandrasekhar2, Dr Shishir Singh3, Dr Rajesh Podar4, Dr Roshan
Shetty 2, Dr Avinash Salgar2
1Post-graduate Student,
2Reader, 3Dean, Professor and Head of Department,
4Professor.
Department of Conservative Dentistry and Endodontics,
Terna Dental College

Shinde S. et al: Margins in restorative dentistry
The JPDM I Vol 1 I Issue 1 and 2 I 2020 20
Ideal requisites for a successful tooth restoration interface: Preparation margins resting on enamel should fulfill all the requirements advocated by Noy4 to possess
enough strength to withstand massive occlusal forces without disrupting tooth structure and the
restoration. It must be smooth enough to allow proper seating of the final restoration and must be located
in an area that is self-cleansing or can facilitate easy plaque removal. The margins' location should be
aesthetically acceptable but must not adversely affect the periodontium's health, and hence, care should
be taken to maintain the biologic width.3 The peripheral extension of a tooth preparation must be easy
to prepare and duplicate, conservative, and provide sufficient strength to the restoring material. The
restoration margin should fit as closely as possible to the finish lines of the preparation to minimize
exposed cement width to prevent microleakage and secondary caries.
Features of peripheral marginal anatomy for various direct and indirect
restorations: Bevels are the extensions placed on the occlusal and the gingival enamel and dentinal walls which can
function to involve the surface defects, aid in the removal of unsupported enamel rods (gingival bevel
in amalgam), mask the restoration margins (for anterior composites), provide enough metal bulk (for
cast metal restorations) and reduce cement dissolution.4-6 Beveling minimizes seating discrepancy by
lowering the marginal metal angle.7 In intracoronal cast restorations, flares are placed on the facial and
the lingual walls, which perform a function similar to that of the bevels.
Skirts are placed as thin extensions on the facial or lingual proximal margins to involve defects, impart
resistance and retention, and increase retention. They are indicated when contacts and contours are to
be changed in the contemplated restoration. In tilted teeth, they allow for the bulk, resistance, and
retention of the occlusal cast material required in building the occlusal table.5
Facial or lingual collar preparation also increases the retention and resistance forms on a weakened
tooth and prevents it from cuspal fracture. A collar can accommodate both alloy and porcelain bulk and
facilitate marginal seating of the castings circumferential tie.
Bevels, flares, skirts, and collars form a part of the circumferential tie.4,5
Various finish lines are used for the extra - coronal cast restorations. Based on the configuration, they
could be
Feather edge (knife-edge), which provides the least strength, is difficult to locate on the cast and
fabricate. However, it offers an excellent marginal seal and is the most conservative type. It is indicated
in full metal crowns and mandibular molars if they are lingually tilted or have convex axial surfaces.
Chamfer type is distinct and assures bulk with little tooth involvement. It is the universally used design
for cast metal restorations and lingual margins of PFM crowns (Class I, II, and III cast material). It is
prepared with a round end tapered diamond bur. This preparation provides a diameter of 0.5 to 1 mm.
Heavy chamfer exhibits a 90° cavosurface angle with a rounded internal angle. It is indicated for all-
ceramic crowns and is prepared with a round end tapered diamond. A bevel is added for use with metal
restorations.
The shoulder provides resistance to masticatory forces, produces space for healthy contours, good
esthetics, and less distortion. However, it is difficult to prepare; the least conservative lacks the sliding
joint fit and has inferior marginal integrity. It is best for all-ceramic crowns and facial margins of PFM
crowns. It is prepared by flat end tapered diamond bur. This preparation has a diameter of 1.5 to 2 mm.
(Fig.1k,2k)
Shinde S. et al: Margins in restorative dentistry
The JPDM I Vol 1 I Issue 1 and 2 I 2020 21
Shoulder with bevel has a bevel created on the marginal end of the unprepared tooth structure. It is
indicated for a proximal box of inlays, onlays, occlusal shoulders of onlays and mandibular three fourth
crowns, facial aspect of PFM crowns, and acrylic facing full cast veneers.
The radial shoulder is a shoulder with a rounded gingivoaxial line angle 90º cavosurface angle and is
indicated for porcelain restorations. It provides lesser stress and good support for porcelain.
The sloped shoulder possesses a 120° sloped shoulder margin. It is indicated on the facial margin of
the metal-ceramic crown. This configuration removes unsupported enamel but provides enough bulk for
thinning of metal framework for esthetic purpose.8
Preparation features specific to various restorations material-wise:
A. Margin configuration for direct restorations:
Amalgam restorations:
The location of the margin for amalgam is determined by its property of high compressive strength and
weak tensile strength. Occlusal margins should be located on smooth surfaces, inclined cuspal planes,
marginal ridges, and crossing ridges. Enamel cavosurface margins of 90°- 110° (butt joint) prevent
enamel fracture and help marginal amalgam tolerate masticatory forces. (Fig.1a,1b,1c,2a,2b,2c) Beveled
occlusal margins are not recommended as masticatory stresses acting on them will lead to elastic
deformation of the tooth, resulting in tensile stress build-up at the amalgam at the bevel leading to
fracture of the restoration. For the same reason, the removal of amalgam flash is also mandatory. For
class II restorations, the finished gingival margins should be located in the gingival sulcus' occlusal
portion. (Fig.1c, 2c) If it is gingival to the CEJ, the gingival cavosurface angle of 90° to the external root
surface is needed. Proximal clearance of 0.5 mm should be given; since it compensates for setting the
amalgam. 20° declination gingivally is given; if the gingival seat is in enamel. The bevel should not be
given if the gingival margin is apical to the CEJ and primary teeth. A recent instrument named "PACE"
(Perfected for Amalgam Cavity Evaluation) guides the attainment of a 110° cavosurface angle, allowing
the clinician to achieve a minimum of 70° amalgam margin angle.9
Glass ionomer restorations:
Glass ionomers show good adhesive property with the tooth structure due to ionic bonding. Advances
like resin-modified GIC has superior properties like marginal adaptation and esthetics for restoring non-
carious cervical lesions.10 Therefore, bevelling of the margins is usually not recommended.
Composite restorations:
Bevelling the enamel margin in composites can be advantageous as it will help remove aprismatic
enamel, increase the area for acid etching and therefore improve bonding, and reduce microleakage.11-
13
In class I, the facial and lingual margins should be extended as needed to remove all carious tooth
structure and should form at least a 90˚ cavosurface margin or more. (Fig.1d,2d)
In class II, facial and lingual margins are placed. All carious structure is removed. No unsupported
enamel rods exist; there is accessibility for the placement and adaptation of the restoration on cavity
margins, and plaque removal from the interdental area is facilitated. Thus, clearance in the proximal box
Shinde S. et al: Margins in restorative dentistry
The JPDM I Vol 1 I Issue 1 and 2 I 2020 22
depends on the individual clinical situation. The gingival floor should be prepared flat and create a 90°
cavosurface margin.5 (Fig.1e,2e)
In slot preparations, the occlusal, facial, and gingival cavosurface margins of 90˚ or greater should be
placed. For a vital asymptomatic extensively carious tooth, bevel placement is not required on occlusal
cavosurface margin unless there are unsupported enamel rods.
In class III and class IV, starburst bevel camouflages the restoration margin; thus, providing superior
esthetics and removal of unsupported and frail enamel structure (Fig1f,2f). Preservation of enamel
margin on the gingival seat is of utmost importance as it is critical for bonding.
Extensive class III and class IV preparations might need additional bevel on the enamel walls for
adequate retention. If the preparation extends gingivally onto the root surface, a 90˚ cavosurface margin
should be provided in class III and class IV preparations. Flame shaped or round diamond instrument
can be used to create a bevel of 45˚ angle to the external surface with a width ranging from 0.5–2 mm.5
For class V restorations, there is no need for enamel bevel for prevention of microleakage.14 In
maxillary incisors, bevel on lingual aspect may be contraindicated if it would cause the restoration
marginal interface to be placed at the incisal contact area.
B. Margin configuration for indirect restorations:
Metal inlay:
According to Marzouk, the margins of inlays should fulfill all requirements for an extension for
prevention.4 Occlusal and gingival marginal bevels and placement of the secondary flare on the
distolingual and distofacial walls result in a 30 to 40˚ marginal metal on the inlay. This seals and protects
the margins and creates a healthy enamel margin of 140–150˚. The desirable metal angle at the inlays'
margins is always 40˚ except at the gingival margins, which in 30˚facilitating burnishable metal and a
lap sliding fit. The gingival bevel should blend with the secondary flare (Fig 1h,2h). Bevelling is
performed by No. 8862 bur. Secondary flare is prepared by No.8862 bur or No.169L bur. It is indicated
in the indirect wax pattern, broad contact areas, wide extension of caries buccolingually, and to
overcome undercuts in the cervical aspect of the facial and lingual proximal walls. It is omitted in the
mesiofacial wall of maxillary premolars and molars as it impacts the resistance form and smile esthetics.
Metal Onlay:
On the practical side, facial and lingual margins should be located gingivally and away from the contact
area to include the facial and the lingual cuspal elements and the grooves. They should be parallel to the
contour of the cusp tips and crests of the adjacent ridges. Whereas, on the non-functional side, the facial
and the lingual margins should be just gingival to the tip and crest of the ridge of the involved cusps and
away from the occlusal contact. Proximal margins will be located similar to that of an inlay margin.
Placing skirts provides a conservative and atraumatic way to increase resistance and retention form. A
slender, flame-shaped, fine-grit diamond instrument is used for giving skirts. For the same intention,
collars are placed on the weakened tooth for a MOD onlay with No. 271 carbide bur at high speed. A
functional cusp bevel provides sufficient metal in zones of heavy occlusal contact. It is prepared with a
round-end tapered diamond at 45˚ with the axial wall and depth of 1.5 mm.15
Posterior maxillary three-quarter crown:
Occlusal finish bevel of 0.5 mm is given along the occlusofacial line angle, extending from the central
groove on the mesial to the central groove on the distal. This provides space for metal on the lingual-

Shinde S. et al: Margins in restorative dentistry
The JPDM I Vol 1 I Issue 1 and 2 I 2020 23
facing incline of the lingual cusp to match the space on the buccal-facing incline created by the occlusal
reduction. No. 171L bur is used to smooth the bevel. Chamfer finish line provides periodontal
preservation, marginal integrity.
Three-quarter crown preparation on a mandibular molar or premolar:
Occlusal finish line must be given on the facial surface, gingival to occlusal contacts. The occlusal
shoulder on the buccal aspect of the buccal cusp(s) knots the grooves and strengthens the nearby Bucco-
occlusal margin.
Seven-eighth crown:
The vertical distobuccal margin is placed slightly mesial to the middle of the buccal surface. Margin
finishing is easy, and hygiene maintenance for patients is also facilitated.
Porcelain fused to metal:
There should be a continuity of the shoulder or the beveled shoulder margin and the chamfer margin in
the interproximal region.8 This is often referred to as a winged preparation.
Ceramic inlay:
Porcelain fracture has been reported as a primary reason for restoration failure.16,17
Butt joints are preferred. Bevels are not placed in ceramic inlays because ceramics tend to fracture at the
margins due to low tensile strength. Placement of margins in enamel and rubber dam isolation during
the luting procedure provides a good survival rate.18
Ceramic Onlay:
Beveled margins are contraindicated because the bulk is needed to prevent fracture. Cavosurface
margins should be 90(Fig 1i,2i). A well-defined heavy chamfer is the recommended margin. Margins
in enamel must be smooth and distinct for a ceramic restoration to fit accurately.8
All-Ceramic crown
A uniform margin thickness circumferentially with a width of 1-1.5 mm is necessitated for better
aesthetics. A butt joint will enable proper stress distribution and thus minimize ceramic fracture due to
tensile stress. The beveled margin is not recommended as it does not support the porcelain. The margin
must be smooth for appropriate fabrication.
Zirconium based crowns:
A 0.8-1mm wide, 360 deep chamfer with no sharp internal line angles is recommended as it allows
room for the zirconium coping and overlying veneering ceramic.
Finishing the margins can be done by finishing grit diamonds followed by a 30-fluted carbide bur and
polishing pastes. Shoulder and chamfer preparations provide adequate accuracy because they offer good
detectability of the finish line for scanning devices in the case of CAD/CAM-fabricated zirconia
copings.19
Laminate veneers:
Veneer interproximal margins should extend into the facial and gingival embrasures without engaging
an undercut and should be located just facial to the proximal contacts.5

Shinde S. et al: Margins in restorative dentistry
The JPDM I Vol 1 I Issue 1 and 2 I 2020 24
Window preparation is recommended for most direct composite veneers, indirectly fabricated veneers
where the canine's outline form is intact, and the patient is canine guided. The incisal edge of the tooth
is preserved. This reduces the accelerated wear of the opposing tooth.
Feather preparation is indicated in patients with a normal overbite and avoids direct contact of ceramic
veneers with their antagonistic tooth structure. The incisal edge of the tooth is prepared Bucco-palatally,
but the incisal length is not reduced. This can cause weak veneer, ceramic chipping, difficulty with the
veneers' seating, marginal discoloration, and poor marginal adaptation.20
For incisal overlap preparation, the butt joint (Fig 1l,2l) is used in worn or defective areas on the
incisal edge's lingual aspect. It provides an increased adaptation of veneer to the lingual margin
providing a 'lap sliding' fit.
Palatal chamfer preparation can be used when the incisal edges are thin buccolingually or when an
increase in crown length is needed. This design increases the surface area for bonding, provides rounded
angles and adequate ceramic thickness.
The gingival extent of the veneer's margin depends on the size of caries, discoloration, and the amount
of tooth structure visible while smiling. If the tooth's cervical portion is discolored, carious, or defective,
a subgingival margin needs to be placed. Margin should be placed at the crest of tissue in a high smile
line, fluorosis stains for esthetic reasons.
Vertical preparation:
A preparation without a finish line is a less-invasive substitute to a horizontal margin, allowing enamel
preservation in the cervical area. It is indicated when periodontally compromised teeth are used as
abutments for fixed prostheses. This is referred to as the biologically oriented preparation technique
(BOPT). A Batt-Bur, which is a round-ended tapered diamond bur with a non-cutting end, is used.21,22
Fig 1. a-l

Shinde S. et al: Margins in restorative dentistry
The JPDM I Vol 1 I Issue 1 and 2 I 2020 25
a) Class I amalgam
b) Class I amalgam palatal extension
c) Class II amalgam
d) Composite
e) Class II composite
f) Starburst bevel
g) Class II composite inlay
h) MOD metal inlay
i) Ceramic onlay
j) Margins for PFM crown
k) All shoulder margins
l) Veneer preparation
Fig 2. a-l
a) Class I amalgam
b) Class I amalgam palatal extension
c) Class II amalgam
d) Composite
e) Class II composite
f) Starburst bevel
g) Class II composite inlay
h) MOD metal inlay
i) Ceramic onlay
j) Margins for PFM crown
k) All shoulder margins
l) Veneer preparation

Shinde S. et al: Margins in restorative dentistry
The JPDM I Vol 1 I Issue 1 and 2 I 2020 26
DIRECT RESTORATIONS
RESTORATION CAVOSURFACE
CONFIGURATION
PURPOSE
AMALGAM
Class I and Class II
Butt joint Prevents enamel fracture, helps
marginal amalgam to tolerate
masticatory forces
Class II 20° gingival bevel Removal of unsupported enamel
rods
COMPOSITES
Class I, II, V, box only and
slot preparations
90˚ cavosurface margins
No occlusal or gingival bevel
Removal of unsupported enamel
rods
Class III
Class IV
45˚ on the facial surface, a
width of 0.5–2 mm
Starburst bevel
Unsupported enamel rods removal,
increase retention by bonding
Conceal restoration margin
GLASS IONOMER
CEMENTS
Bevels not recommended
INDIRECT RESTORATIONS
METAL INLAY The occlusal bevel of width -
1/4th the depth of the
respective wall.
40˚ marginal metal and the
140° occlusal marginal
enamel
Increases the strength of the marginal
enamel and helps seal the margins.

Shinde S. et al: Margins in restorative dentistry
The JPDM I Vol 1 I Issue 1 and 2 I 2020 27
Gingival bevel with 30˚
marginal metal
Burnishable marginal metal
ONLAY Similar to inlay margins,
skirts
Skirts increase the resistance and
retention form
FULL METAL CROWN Chamfer, knife-edge,
shoulder with a bevel of 0.5 to
1 mm
Marginal integrity and structural
durability
ALL CERAMIC Shoulder/ Bevelled shoulder /
Sloped shoulder/90˚ heavy
chamfer margin of 1.5 to 2
mm
Material thickness and material strength
and esthetics
PORCELAIN FUSED TO
METAL
Labially – Shoulder of 1.5 to
2 mm
Lingually – Chamfer of 0.5 to
1 mm (winged preparation)
Marginal integrity and structural
durability, material thickness, material
strength, and esthetics
Effect of tooth preparation margins concerning pulpal health: Immediate changes in dental pulp vary with different types of preparations depending upon remaining
dentin thickness. However, crown preparation of up to 2 mm depth is considered within a safe limit, and
it does not lead to reversible or irreversible pulpitis.23 The crown preparation procedure leads to dentinal
tubules' exposure, which causes minute fluid shifts across dentin due to tactile, thermal, osmotic, or
evaporative stimuli. This permits mechanoreceptors' activation and initiates mild to moderate
inflammatory response in the pulp and odontoblast injury24. Pulpal injuries lead to the release of several
inflammatory mediators that may have direct or indirect effects via modulation of trigeminal sensory
nerve fibers on pulpal vasculature. Vasodilatation and increased blood flow are the two significant
actions seen in the initial phase of pulpal inflammation37 Dentin hypersensitivity following tooth
preparation is a common issue in dentistry.33 The application of dentin bonding agents can control root
sensitivity. An important point to be understood here is that remaining dentin thickness, which is
inversely proportional to the pulpal response tooth preparation near the pulp, should be avoided.25,8
Shinde S. et al: Margins in restorative dentistry
The JPDM I Vol 1 I Issue 1 and 2 I 2020 28
Effect of peripheral marginal anatomy on periodontal health: The margin location can influence periodontal health, esthetics, finishing, and retention of the restoration
and stump shade of the underlying tooth.26 Association between the margin placement, supracrestal fiber
attachment, and location of the sulcus base is majorly vital for gingival health. Margins placed within
biologic width breach the biologic principle leading to alveolar bone resorption, periodontal breakdown,
aggregation of subgingival microflora, and the chronic inflammatory process followed by iatrogenic
periodontal disease and restoration failure.3,27
Supragingival finish line configuration proposed by Orban facilitates predictable impressions, ease in
excess cement removal, convenience to prepare and finish by the operator, optimum periodontal health,
oral hygiene maintenance and proper fitting and should be welcomed favorably in non-esthetic areas.26,28
- 30 So, margins must be placed 1-2 mm supragingival if possible. However, innovations in translucent
restorative materials, adhesive dentistry, and resin cement has allowed supragingival margin placement
in esthetic areas.3,28
Equigingival finish line as suggested by Marcum accredits for marginal finish, esthetics, and
accessibility.31 The success of this configuration is due to the presence of keratinized epithelium.32 They
are placed at the marginal gingiva crest; they are more plaque retentive and impact the periodontium.
Subgingival margins are indicated for esthetic concerns, subgingival caries, cervical erosion, and when
crown-lengthening is not shown.8 They are placed below the marginal gingiva and are at most significant
biologic risk since they may violate the gingival apparatus.33 Mechanical, chemical, rotary gingival
curettage, and surgical methods are employed to expose the subgingival finish line.34 However,
"intracrevicular finish lines" are limited within the gingival sulcus and favor periodontal health and
esthetics.28 Provisional restoration can be placed, and tissue reaction was observed several weeks before
the final restoration placement. Flemmig et al. advocated using 0.12% chlorhexidine gluconate for two
weeks before the tooth preparation procedure. This aids in decreasing gingival inflammation around the
teeth and will ultimately provide a healthy working environment.35 Healthy tissue after this indicates no
violation of the biologic width and that the periodontium will respond well to the final restoration
margins.5
Importance of marginal fit: Well adapted margins to finish lines of preparation provide longevity to the restoration serving marginal
integrity. Configuration of finish line decides the shape and bulk of marginal metal, affects the marginal
adaptation and degree of seating. The junction between a cemented restoration and the tooth is a potential
site for recurrent caries. Metal casting fits within 10 μm, whereas the porcelain margin fits within 50
μm.8 Clinically acceptable marginal gap must be less than 120 μm.36,37 Improperly adapted margins act
as an area of plaque accumulation, increase cement dissolution, and are correlated with the severity of
inflammation.5,6 It may make the tooth surface susceptible to caries. Hence, marginal adaptation is
essential as it may result in biological or mechanical failure of the restoration.6 Finish line configuration
remarkably affects the marginal seal and occlusal seating of the crowns. Shoulder margins provide a
good seat but a wider marginal seal. Chamfer, long chamfer, and feather edge margin permit superior
sealing of the margins regardless of poor seating. However, the finish line does affect the fit of the
cemented crowns. The beveled margin does not show significant superiority in a marginal fit after
cementation.38,39

Shinde S. et al: Margins in restorative dentistry
The JPDM I Vol 1 I Issue 1 and 2 I 2020 29
Marginal discrepancies: Errors like over-extended and under-extended margins, rough, incomplete, non-uniform, J shaped
margins, pseudoshoulders, margins with sharp internal line angles should be avoided for optimum
results.40 Rough, irregular, or "stepped" margins restoration subsequently increases the overall margin
dimension and decreases the restoration's adaptation accuracy. Smooth margins allow the subsequent
steps like tissue displacement, impression making, laboratory communication, die formation, waxing,
and finishing much more straightforward and ultimately result in longer-lasting restorations. Smooth,
accurately placed preparation margins are of great importance in the repairs that are fabricated using
computer-aided design and computer-aided manufacturing (CAD/CAM) process.8
Conclusion: The success of a dental restoration largely depends on the accurate margin placement, adaptation, and
integrity. The restorative margin placed plays an essential role in the long-term prognosis and outcome
of the restoration. Thus, proper knowledge of the gingival and periodontal response to the restoration
from a biomechanical perspective is essential. Though more research is needed, this paper has
highlighted the different tooth margins that work for the broad array of restorative materials in use.
Research is progressing at a fast pace. We need to update the emerging restorative material's knowledge
and their respective margins and adapt as per the latest groundwork.
References: 1. Shetty R, Bhat S, Srivatsa G. Rectifying the tooth preparation errors in all-ceramic restorations.
World J Dent 2010 Oct;1:181-5.
2. Chatterjee U. Margin designs for esthetic restoration: An overview. Journal of Advanced Oral
Research 2012 Jan;3(1):5-9.
3. Shenoy A, Shenoy N, Babannavar R. Periodontal considerations determining the design and
location of margins in restorative dentistry. Journal of Interdisciplinary Dentistry. 2012 Jan
1;2(1):3.
4. Marzouk MA, Simonton AL, Gross RD. Operative dentistry. Modern theory and practice
5. Gopikrishna V. Sturdevant's Art & Science of Operative Dentistry: Second South Asia Edition.
Elsevier Health Sciences; 2018 Sep 3.
6. Hunter AJ, Hunter AR. Gingival margins for crowns: a review and discussion. Part II:
Discrepancies and configurations. The Journal of prosthetic dentistry. 1990 Dec 1;64(6):636-42.
7. Pascoe DF. Analysis of the geometry of finishing lines for full crown restorations. J PROSTHET
DENT 1978;40:157-62.
8. Rosenstiel SF, Contemporary Fixed Prosthodontics, 4th edition, USA, Mosby, 2006, pp 166-201.
9. Arora A, Acharya SR, Ballal V, Sharma P. A self-designed instrument to evaluate cavosurface
angle for class I amalgam cavity preparation: A learning aid. Journal of conservative dentistry: JCD.
2012 Jul;15(3):253.
10. Hussainy SN, Nasim I, Thomas T, Ranjan M. Clinical performance of resin-modified glass ionomer
cement, flowable composite, and polyacid-modified resin composite in noncarious cervical lesions:
One-year follow-up. Journal of conservative dentistry: JCD. 2018 Sep;21(5):510.
11. Sharpe AN. Influence of the crystal orientation in human enamel on its reactivity to acid as shown
by high resolution microradiography. Arch Oral Biol. 1967;12:583-92.
12. Coelho-de-Souza FH, Camacho GB, Demarco FF, Powers J. Influence of restorative technique,
beveling and aging on composite bonding to sectioned incisal edges. J Adhes Dent. 2008;10:113-7
13. Opdam NJM, Roeters JJM, Kuijs R, Burgersdijk RCW. Necessity of bevels for box only Class II
composite restoration. J Prosthet Dent. 1998;80:274-9

Shinde S. et al: Margins in restorative dentistry
The JPDM I Vol 1 I Issue 1 and 2 I 2020 30
14. Effect of Cavosurface Margin Configuration of Class V Cavity Preparations on Microleakage.
9(2):1–8.
15. Shillingburg HT, Hobo S, Whitsett LD, Jacobi R, Brackett SE. Fundamentals of fixed
prosthodontics Third edition
16. Hayashi M, Tsuchitani Y, Kawamura Y, Miura M, Takeshige F, Ebisu S. Eight-year clinical
evaluation of fired ceramic inlays. Oper Dent. 2000;25(6):473–481.
17. van Dijken JW, Hasselrot L, Ormin A, Olofsson AL. Restorations with extensive dentin/enamel-
bonded ceramic coverage. A 5 year follow-up. Eur J Oral Sci. 2001;109(4):222–22
18. Fuzzi M, Rappelli G. Ceramic inlays: clinical assessment and survival rate. J Adhes Dent.
1999;1(1):71–79.
19. Winkelmeyer C, Wolfart S, Marotti J. Analysis of tooth preparations for zirconia-based crowns and
fixed dental prostheses using stereolithography data sets. The Journal of prosthetic dentistry. 2016
Nov 1;116(5):783-9.
20. Chai SY, Bennani V, Aarts JM, Lyons K. Incisal preparation design for ceramic veneers: A critical
review. The Journal of the American Dental Association. 2018 Jan 1;149(1):25-37
21. Agustín-Panadero R, Solá-Ruíz MF, Chust C, Ferreiroa A. Fixed dental prostheses with vertical
tooth preparations without finish lines: A report of two patients. The Journal of Prosthetic Dentistry.
2016 May 1;115(5):520-6.
22. Imburgia M, Canale A, Cortellini D, Maneschi M, Martucci C, Valenti M. Minimally invasive
vertical preparation design for ceramic veneers. Int J Esthet Dent. 2016 Dec 1;11(4):460-71.
23. Ahmed A, Ilyas MS, Chaudhry S, Fahim A, Malik AA, Baig MZ. Morphological changes in dental
pulp with different depths of tooth preparation. J Univ Med Dent Coll. 2017 Jun 3;8(3):23-33.
24. Katoh Y, Suzuki M, Kato C, Shinkai K, Ogawa M, Yamauchi J. Observation of calcium phosphate
powder mixed with an adhesive monomer experimentally developed for direct pulp capping and as
a bonding agent. Dental materials journal. 2010;29(1):15-24.
25. Sorensen JA. A rationale for comparison of plaque‑retaining properties of crown systems. J Prosthet
Dent 1989;62:264‑9.
26. Sarandha DL. Effects of location of gingival finish lines on periodontal integrity. Journal of Nepal
Dental Association| Vol. 2013 Jan;13(1).
27. Nugala B, Kumar BS, Sahitya S, Krishna PM. Biologic width and its importance in periodontal and
restorative dentistry. Journal of conservative dentistry: JCD. 2012 Jan;15(1):12.
28. Newsome P, Owen S. Improving your margins. Int Dent SA. 2009; 11:36-42.
29. Becker CM, Kaldahl WB. Current theories of crown contour, margin placement, and pontic design.
The Journal of prosthetic dentistry. 1981 Mar 1;45(3):268-77.
30. Christensen GJ. Marginal fit of gold inlay castings. Journal of Prosthetic Dentistry. 1966 Mar
1;16(2):297-305.
31. Marcum JS. The effect of crown marginal depth upon gingival tissue. Journal of prosthetic
Dentistry. 1967 May 1;17(5):479-87.
32. Michael F. Margins of complete crowns-Literature review. J Prosthet Dent. 1982;48(4):396–400.
33. Paniz G, Nart J, Gobbato L, Mazzocco F, Stellini E, De Simone G, Bressan E. Clinical Periodontal
Response to Anterior All-Ceramic Crowns with Either Chamfer or Feather-edge Subgingival Tooth
Preparations: Six-Month Results and Patient Perception. International Journal of Periodontics &
Restorative Dentistry. 2017 Jan 1;37(1).
34. Klugman R, Revah A, Kohavi D, Rehany A, Stern N. Finish lines in fixed prosthodontics. Refu'at
ha-peh veha-shinayim (Tel Aviv, Israel: 1969). 1978 Oct;27(4):31.
35. Flemmig TF, Sorensen JA, Newman MG, Nachnani S. Gingival enhancement in fixed
prosthodontics. Part II: Microbiologic findings. J Prosthet Dent 1991;65:365‑72
36. Fransson B, Oilo G, Gjeitanger R: The fit of metal-ceramic crowns, a clinical study. Dent Mater
1985;1:197-199 17.
Shinde S. et al: Margins in restorative dentistry
The JPDM I Vol 1 I Issue 1 and 2 I 2020 31
37. McLean JW, von Fraunhofer JA: The estimation of cement film thickness by an in vivo technique.
Br Dent J 1971;131:107-111
38. Nemane V, Akulwar RS, Meshram S. The effect of various finish line configurations on the
marginal seal and occlusal discrepancy of cast full crowns after cementation-an in-vitro study.
Journal of clinical and diagnostic research: JCDR. 2015 Aug;9(8): ZC18.
39. Halawani SM, Al-Harbi SA. Marginal adaptation of fixed prosthodontics. IJMDC. 2017;1(2):78-
84.
40. Christensen GJ. Marginal fit of gold inlay castings. Journal of Prosthetic Dentistry. 1966 Mar
1;16(2):297-305.

The JPDM I Vol 1 I Issue1 and 2 I 2020 32
THE JOURNAL OF PROSTHODONTICS AND DENTAL MATERIAL The Official e-publication of Indian Prosthodontic Society
MUMBAI - NAVI MUMBAI BRANCH
Introduction The recent spread of severe acute respiratory syndrome coronavirus 2 (SARS-CoV-2) and
its associated coronavirus disease has seized the entire international community and has caused
widespread public health concerns. Despite comprehensive efforts to contain the disease spread, the
outbreak is still on the rise because of the community spread pattern of this infection.1 On 31st
December 2019, 27 cases of pneumonia of unknown etiology were identified in Wuhan City, Hubei
province, in China.2 The causative agent was identified from throat swab samples conducted by the
Chinese Centre for Disease Control and Prevention (CCDC) on 7th January 2020 and was
The Right Perspective of Practicing
Prosthodontics in The Post COVID-19 Era
Dr Jayesh Banswani1, Dr Naisargi Shah2, Dr Praveen Badwaik3, D. Rahul Malu4, Dr Kaveri
Chakrabortty4, Dr Arshad Idrisi4
1Post-Graduate Student, 2Professor and Head of Department,
3Professor, 4Lecturer,
Department of Prosthodontics, Crown & Bridge,
T P C T’s Terna Dental College, Navi Mumbai.
ABSTRACT
The COVID-19 global pandemic continues to have catastrophic health, economic, and social
effects and is significantly affecting the delivery of services in dental care. Initial guidelines
have been provided only for minimal treatment for emergency cases. However, there is a lack
of definitive universal guidelines for performing routine dental procedures. This lack of
guidelines can on the one hand increase the nosocomial infection spread and, on the other hand,
deprive patients in need of the necessary dental visit. Because of the infection risks associated
with aerosol generated procedures, such as the use of high-speed drills, dental care across much
of the world have been essentially on halt since late March 2020. However, Dental operatories
are now gradually and hesitantly beginning to re-open, although there is a substantial disparity
in the guidance being issued on the safety procedures required. This literature overview
describes standard operating protocols that can be followed in prosthodontics to reduce
COVID-19 transmission.
Keywords: SARS-CoV-2; coronavirus; COVID-19; Dental Care; Guidelines; Prosthodontics;
Pandemic.

Banswani J. et al: Practicing Prosthodontics in Post Covid19 Era
The JPDM I Vol 1 I Issue1 and 2 I 2020 33
subsequently named COVID-19 by the World Health Organization (WHO).3 Here in India, the first
confirmed case of the COVID-19 infection on 30th January 2020 was reported in Kerala. On 30th
January 2020, the WHO declared the outbreak of SARS-CoV-2 a Public Health Emergency of
International Concern.4 As we are aware of widespread transmission of SARS-CoV-2 in medical health care
professionals, on similar lines Dental health Care professional those who work in proximity to
patients oropharyngeal region are also at very high risk. Dental professionals could also become
potential carriers of the disease. Dentistry practice involves the use of rotary dental and surgical
instruments, such as air turbine handpieces, ultrasonic scalers, and air-water syringes. These
instruments generate aerosols containing particle droplets of water, saliva, blood, microorganisms,
and other debris. Also, if adequate precautions are not taken, the dental office can potentially
expose patients to cross contamination. According to the CDC recommendation, dental settings
should prioritize urgent and emergency visits only. However, as the pandemic continues to evolve,
dental settings may also need to deliver non-emergency dental care.5
Different branches of dentistry deals with various Dental emergencies, and those related to
the branch of Prosthodontics include repair of broken complete dentures, post denture insertion
adjustment of complete denture, adjustment of Cast partial / interim partial dentures, removal of old
FDPs, provisional or definitive restoration for already prepared teeth/ implant abutments, implant
prosthesis related issues and Peri-implant infections. It is crucial for Prosthodontists to develop
specific protocols to deal better with the current situation of Covid-19 while performing these
procedures.
Therefore, an attempt has been made in this article to discuss challenges faced by the
Prosthodontists and the strategies to overcome them.
Prosthodontic Procedures6
Emergency vs. Non-
Emergency
Clinical condition
Emergency care
Denture adjustments on radiation/oncology patient,
Denture adjustments or repairs when function impeded,
Crown and Fixed dental prosthesis removal,
Suture removal,
Final crown/bridge cementation if the temporary restoration is lost,
broken or causing gingival irritation
Peri-implant infections endangering stability
Elective care Routine complete dentures for complete edentulism, Removable or
fixed prosthodontics including implantology for partial edentulism
and maxillofacial prosthodontics.
Non-emergency care Aesthetic dental procedures like laminate and veneers

Banswani J. et al: Practicing Prosthodontics in Post Covid19 Era
The JPDM I Vol 1 I Issue1 and 2 I 2020 34
Patient screening During the dental visits, pre-screening of patients should be done in order to minimize the exposure
of covid-19. Triaging of patients is done by brief survey and investigating signs and symptoms of
cough, respiratory issues, dyspnea, body temperature of 38°C (100.4°F) or higher, and oxygen
saturation levels below 94%, before dental examination is conducted. If patients show these
symptoms, then an antibody screening tests should be done. Patients who test positive should be
treated in the hospital, with equipment and facility to deal with contagious diseases. Patients
answering ‘no’ to the survey questions and who doesn’t show any signs and symptoms can be
treated, but specific procedures may need to be altered to prevent the risk of covid-19 transmission.
Prosthodontic procedures can be categorized into Two Categories:
1. Non-aerosol generating procedures. (Non-AGP)
2. Aerosol generating procedures (AGP)
1. Non-aerosol generating procedures (Non-AGP) In prosthodontics, Non-aerosol generating procedures include fabrication of complete
dentures, removable partial dentures, implant prosthesis, and maxillofacial prostheses.
Prosthodontists can manage all these Non-AGPs using dental protective equipment, which
include a surgical gown, N95 mask, face shield, double gloves, and plastic disposable covers.
2. Aerosol generating procedures (AGP) Aerosol generating procedures (AGP) involve tooth preparation for crowns and fixed dental
prostheses, Implant osteotomies and its placement. While performing these AGPs, it is
mandatory that the minimum of 90 GSM personal protective equipment (PPE) is used by the
dental surgeon and dental assistant, which includes gloves, gown, head cover, shoe cover, eye
protection including goggles or a disposable/reusable face shield that covers the front and sides
of the face, and an N95 or higher-level respirator.
Hazards of aerosols When performing Tooth preparation with a high-speed handpiece, friction between the tooth
and the rapidly rotating diamond points would create excessive heat. Without a coolant, the heat
could cause damage to hard dental tissue and lead to pathological changes to the dental pulp.
Therefore, to prevent heat gain, it is a universal consensus to use a water coolant when performing
tooth preparation. The water coolant, however, could generate aerosols. When combined with
bodily fluids in the oral cavity, such as blood and saliva, bioaerosols are created. These bioaerosols
are commonly contaminated with bacteria, fungi, and viruses, and have the potential to float in the
air for a considerable amount of time and put the Prosthodontist at an extremely dangerous risk of
inoculating themselves, their dental assistants, other office staff members, and other patients too.
Aerosol Particles are classified based on size: coarse particles are 2.5–10 microns, fine
particles are less than 2.5 microns, and ultrafine particles are less than 0.1 microns. The nose
typically filters air particles above 10 microns. If a particle is less than 10 microns, it can enter the
respiratory system. If it is less than 2.5 microns, it can enter the alveoli.The current scientific
consensus is that most transmission via respiratory secretions happens in the form of small aerosols
rather than large respiratory droplets.Droplets are often heavy enough that they do not travel very
far; instead, they fall from the air after traveling up to six feet.The problem occurs when viral
particles are aerosolized by a cough, sneeze, or dental care. In these instances, particles can
Banswani J. et al: Practicing Prosthodontics in Post Covid19 Era
The JPDM I Vol 1 I Issue1 and 2 I 2020 35
potentially travel across far greater distances, with estimates up to 20 feet, from an infected person,
and then incite secondary infections elsewhere in the environment. Also, the smaller particles of an
aerosol have the potential to penetrate and lodge in the smaller passages of the lungs and thus carry
the greatest potential for transmitting infections.7
Because of these inherent dangers to the operator, team members, and patients, the
Occupational Safety and Health Act (OSHA) have released a report called “Guidance on Preparing
Workplaces for COVID-19.” According to OSHA, occupational risk can be categorized as very
high, high, medium, and lower risk. Procedures that involve aerosol production fall into a very
high-risk category.8
Preventive measures for Aerosol Transmission 1. Prosthodontists should install airborne infection isolation rooms or negative-pressure rooms
for operatory in which procedures involving aerosol will be performed. The airflow must be
planned in a way to facilitate the clearing of the contaminated aerosol within the dental
operatory with adequate provision of ventilation to allow a minimum of 6 ACH (Air
Changes per Hour). Airflow can be managed by introducing additional positive air flow
from less contaminated to a more contaminated zone using pedestal or tabletop fans and
placing exhaust fans to evacuate the contaminated air to the external environment.
2. During aerosol-generating procedures, we should follow four-handed dentistry, extra-oral
suction and rubber dams to minimize droplet spatter and aerosols. The number of Dental
health care practitioners (DHCP) present during the procedure should be limited to only
those essential for patient care and procedure support.
3. The commonly employed air-water syringe should also be used with caution due to its
potential to create droplets with the forcible ejection of air and/or water.
4. Ideally, dental treatment should be provided in individual patient rooms whenever possible.
For dental facilities with open floor plans, to prevent the spread of pathogens, there should
be: At least 6 feet of space between patient chairs should be maintained. Physical barriers
between patient chairs would be an added advantage.
5. Prosthodontist should use an N95 respirator or a respirator that offers a higher level of
protection such as other disposable filtering facepiece respirators (an N/R/P99, or N/R/P100,
R/P95), powered air-purifying respirator (PAPRs), or an air-purifying elastomeric (e.g.,
half-face or full-face) respirator. We should not perform any AGP without a surgical mask
and a full-face shield.
6. Consider using portable air purifiers with HEPA-14 or true HEPA air filtration unit while
the patient is actively undergoing, and immediately following, an aerosol-generating
procedure.Air purifiers with HEPA filtration efficiently capture particles the size of (and far
smaller than) the SARS-CoV-2 virus.
7. To clean and disinfect the dental operatory after each and every patient. We should wait a
minimum of 10 minutes after completion of clinical care and exit of each patient to begin
with cleaning and disinfection of the operatory. This time will allow for droplets to
sufficiently fall from the air after a dental procedure, and then be disinfected properly.
8. Few recent studies have recommended the use of Spraying or Fogging with disinfectants.
Rooms treated by disinfectants applied as fog, mist, or vapor should be empty and sealed off
to avoid human exposure to the potentially harmful treatments. However, it is not the most
effective way of disinfection for environmental surfaces and may pose harm to individuals.
Banswani J. et al: Practicing Prosthodontics in Post Covid19 Era
The JPDM I Vol 1 I Issue1 and 2 I 2020 36
If disinfectants are to be applied, manual surface cleaning with detergent and water using
applied friction (e.g., brushing, scrubbing) must be performed first to ensure physical
removal of organic materials, followed by the use of a cloth or wipe which is soaked in the
disinfectant (Eg. 0.5% to 0.1% sodium hypochlorite or 70% alcohol for sensitive surfaces).
Strategies Recommended in Prosthodontics
I. To reduce droplet / Aerosol generation9
1. During Tooth preparation:
a. Treatment alteration may be considered to incorporate rubber dam application.
b. Design supra-gingival margins for posterior Fixed Dental Prosthesis or use a split-
dam technique.
c. Most widely recommended are the Anti-retraction dental handpiece with specially
designed anti-retraction valves or other anti-reflux designs as an extra preventive
measure for cross-infection. Also, it is recommended to use electric handpieces with
torque of 1:5 for tooth preparation.
d. Clinical micro motor and a contra angled handpiece with latch type burs without
water or irrigation can also be used instead of air turbine handpieces.
2. During Removable Prosthodontics:
a. After contacting the patient, the Prosthodontist should avoid touching other objects
in the dental office. It is recommended to take the help of a dental assistant. Staff
should be educated to use personal protective equipment (PPE).
b. Upon removal from the patient’s mouth, dental prosthesis, impressions, and other
prosthodontics materials (e.g., bite registration) should be thoroughly disinfected by
a disinfectant approved by EPA (Solutions like sodium hypochlorite, 2%
Glutaraldehyde) which are effective against SARS-CoV-2.
3. During impression making:
a. Digital impressions are preferred in order to prevent the spread of infection through
cross-contamination by making impressions and pouring casts.
b. In conventional impressions, salivary suction must be performed with care to avoid
gagging.
c. Select and adjust trays to the right size to avoid cough reflex.
d. For highly sensitive patients, consider applying surface anesthesia on the palate
before impression making or use the triple tray impression technique to reduce
gagging.
e. For impressions of fixed dental prosthesis, Cordless techniques should be preferred
over the conventional Cord technique of gingival displacement.
II. Impression trays
Impression trays should be rinsed thoroughly under running water to remove residual blood
and saliva. Precleaning removes additional bioburden and any adherent impression material.
Consistent with dental infection-control guidelines for semicritical instruments, chrome-plated and
aluminum impression trays can be cleaned, packaged, and heat-sterilized. Single-use, plastic
impression trays provide a disposable alternative to heat sterilization.10

Banswani J. et al: Practicing Prosthodontics in Post Covid19 Era
The JPDM I Vol 1 I Issue1 and 2 I 2020 37
III. Disinfection of impressions
The importance of cross infection control cannot be overemphasized during this
Covid-19 era. In order to avoid the spread of disease, dental impressions require a high level
of disinfection. Impressions should be rinsed thoroughly under running tap water before
disinfection to remove as much bioburden as possible. Impressions must be decontaminated
through chair side disinfection immediately after removal from the patient`s mouth.
Personal protective equipment must be utilized while disinfecting the impressions.10, 11
The proper criterion for impression disinfection involves:
1. The most suitable method (spray or immersion).
2. Appropriate application (time of contact).
3. Periodic check for efficacy.12
The factors to be considered for any disinfection protocol for dental impression are
effectiveness, chemical stability, and efficacy of the disinfectant solution. The disinfection
procedure should not alter the dimensions and surface details of the impression and resultant cast.13
According to the CDC, The most appropriate method for reducing the burden of SARS-CoV-2
is Chemical disinfection.14 Irreversible hydrocolloid impressions can be effectively disinfected
against SARS-CoV-2 and other pathogens with minimal distortion by immersion in a 1% sodium
hypochlorite solution for 10 minutes.10 Rubber-base silicone impressions can be disinfected
adequately by immersion in a 1% sodium hypochlorite solution, chlorine dioxide, or complex
phenol for adequate time. However, the method of disinfection should be verified with the material
manufacturer to prevent distortion of the impression or loosening of the adhesive bond between the
impression tray and the impression material. Phenols with high alcohol content, for example, can
desiccate some impression materials.11Wax rims and wax bites are disinfected using a sodium
hypochlorite spray and a "spray-wipe-spray" technique. Following the second spray, the wax bites
can be enclosed in a sealed plastic bag for the proper contact time. The bites should remain wet with
disinfectant for the time recommended by the manufacturer.10
IV. Alternative Therapy to Aerosol Generating Procedures
1) Resin-bonded Fixed dental prosthesis: Conventional fixed partial dentures can be avoided
since they require extensive tooth preparation that requires a high-speed drill with a copious
amount of water coolant. Instead, bonded restorations should be considered for the
replacement of missing anterior teeth, including first premolars.15,16 The following are types
of lab-made bonded bridges that can be fabricated with minimal or no tooth preparation.
1. Maryland bridge (Metal wings)
2. Fiber-reinforced bridge (Composite resin and splinting fibers)
3. Lithium disilicate bonded bridge
It is recommended to follow minimal tooth preparation for gaining restorative space or
improving the path of insertion using diamond points, under Rubber Dam isolation. Digital
impressions are preferred over conventional impressions. If at all conventional impression is made,
it can be made using elastomeric impression material. Opposing impression can be made using
irreversible hydrocolloid impression material. Disinfection and dispatch of impression is done after

Banswani J. et al: Practicing Prosthodontics in Post Covid19 Era
The JPDM I Vol 1 I Issue1 and 2 I 2020 38
following the above-mentioned guidelines of chemical disinfection. Lab fabricated bonded FDPs
can be made entirely in Lithium disilicate or using composite resin with resin-reinforced splinting
fiber or using metal wings and a bonded ceramic pontic. Proper Bonding protocol should be
followed for these restorations.17
2) Removable Prosthodontics: An effort should be made to manage patients using Non-AGP
procedures as much as possible. If the patient can wait for few months, an interim
removable partial denture could be fabricated instead of a fixed dental prosthesis or
Fabrication of cast partial denture to delay the second stage implant surgery, and definitive
implant prosthesis could also be done. Flexible dentures could be fabricated instead of
acrylic dentures to avoid appointments due to broken dentures. Polymer-based RPDs (like
polyethylene glycol, polymethyl methacrylate, and aryl-ketone polymers,
polyetheretherketone polymer) fabricated using CAD-CAM can be considered as an
alternative to conventional Cast partial dentures made of metal. Also, extra-oral radiographs
should be preferred over intra-oral radiographs to prevent coughing or vomiting reflexes and
consequently, aerosol generation.
V. Strategies Recommended In Implantology
Following the CDC guidelines, we can plan and schedule implant surgeries in select clinical
situations. It is mandatory that the highest level of personal protective equipment (PPE) should be
used. Experience and clinical judgement, apart from thorough interpretation of CBCT data, is
mandatory for carrying out implant placement surgeries during this period.
Traditionally implant site preparations require drilling speeds of 500-2000rpm depending on the
density of bone and the manufacturer’s recommendations. Internal or external irrigation is advised
for preventing heat generation during osteotomy preparation. However, implant site preparations
can also be accomplished in select bone situations at speeds as low as 50-100 rpm without the
copious use of saline for irrigation.18 Slow, intermittent drilling using a sharp set of drill and
following the sequence suggested by the implant manufacturer is essential. It is prudent to choose
implant sites that have lower bone density like D2,D3,D4 bone types.
1. Bone expansion: In cases with a softer bone (D3, D4) and narrow ridges, bone expansion
procedures can be accomplished using expansion screws or convex osteotomes. This may
lead to the thinning of the labial bony wall, which can be augmented by performing a GBR
(Bone grafting) procedure.19
2. Immediate placements: Most immediate implant placements do not require too much
osteotomy site preparation. Apical preparation for achieving primary stability can be
achieved using the same protocol explained above.
3. Indirect Sinus Lifts: Can be performed using concave osteotomes followed by bone
augmentation.20
4. Ridge augmentation and socket grafting procedures can be performed as always.
5. During second stage surgery, Standard surgical protocol can be performed with Blade.
Avoid using tissue punch with the motor. Depending on a case per se, wherever possible, try
and avoid two-stage surgeries.
VI. Guidelines for Lab Procedures

Banswani J. et al: Practicing Prosthodontics in Post Covid19 Era
The JPDM I Vol 1 I Issue1 and 2 I 2020 39
Dental laboratory technicians have a high risk of infection by direct exposure to
contaminated laboratory materials. All impressions, bite registrations, casts, prostheses, or
other items placed in the patient’s mouth should be disinfected before sending them to the
lab or utilizing the Department’s lab. Lab personnel should strictly handle all lab equipment
as well as clinic transfers, including impressions, casts & frameworks using gloves. The
dental office and laboratory must reliably communicate the disinfection status of each case.
If the status is uncertain, the process should be repeated. The same infection control
protocols must be followed in the dental laboratory as in the dental office. Laboratory
surfaces must be disinfected using the disinfectant spray or surface wipes. The dental
laboratory should be fumigated on a regular basis. Dental prostheses should be stored in
diluted mouthwash and not in disinfectants prior to insertion. If a manufacturer’s
recommended contact time is exceeded, there are potential corrosion risks for metal
components. The lathe in a dental laboratory presents unique safety and infection control
risks. Protective barriers must always be worn when working with a lathe. Never use a
polishing lathe, rag wheel, brushes or pumice in the laboratory without first disinfecting the
appliance. Rag wheels should be heat sterilized every day. Pumice must not be used for
more than one case and must be discarded after use. Articulators should be disinfected by
spraying with a hospital-level disinfectant followed by wiping.
Adhering to Standard Precautions, using aseptic technique, following proper
disinfection and sterilization procedures, and wearing appropriate personal protective
equipment can prevent disease transmission from contaminated items entering the dental
laboratory.
VII. General Strategies & Measures
Apart from the detailed guidelines provided by the CDC, IDA, OSHA, DCI, and other
principal bodies, several strategies and measures can be implemented to mitigate the risks of
disease transmission.
Prosthodontists and their staff should regularly use 0.5% Povidone-iodine oral rinse for 15
seconds to decrease the risk of transmission associated with viral shedding from asymptomatic
individuals.This solution serves as an adjunct to personal protective equipment for dental and
surgical specialties during the COVID-19 pandemic.21
Aerosol adjuncts (additional recommendations): All aerosol-generating procedures (AGP)
should be performed in a closed room if available. 1: 100 dilution of 5.25- 6.15%, i.e. 0.01% of
sodium hypochlorite for Dental Unit Waterline, should be used to ensure continuous disinfection
while performing AGP. Freshly prepared sodium hypochlorite solution should be used, and remnant
diluted solution, Hydrogen peroxide should be discarded. Vapor fumigation with 30% hydrogen
peroxide can also be performed.
Avoid overcrowding in waiting rooms by scheduling the appointment with an adequate time
frame between appointments. Also, teledentistry consultations allow clinicians to triage patients and
identify the urgency of each case in order to reduce the need for in-person appointments if the issue
can be resolved virtually.22 Verbal informed consent is obtained and consultation details are
documented in the patient’s electronic dental chart. When an urgent intervention is deemed
necessary, teledentistry also helps clinicians determine whether the intervention can be safely
performed with available equipment. If the intervention requires the use of aerosol generating
procedures, these cases will be referred to hospital-based clinics with higher standard infrastructure.

Banswani J. et al: Practicing Prosthodontics in Post Covid19 Era
The JPDM I Vol 1 I Issue1 and 2 I 2020 40
Follow-up appointments can also be done using teledentistry to minimize contact while
ensuring patient safety and well-being. Maintenance of a small multidisciplinary and multi-
specialty team of essential clinicians and support staff helps reduce risks of spread in the event of
contamination. Last, when onsite intervention is necessary, the use of private operatory rooms
instead of open area operatories, and staggered patient schedule further minimize risks of viral
transmission.23
Conclusion
The impact of COVID-19 on a dental practitioner’s daily practice has been profound.
Prosthodontists are considering safe alternative options to treat their patients during Covid-19. This
article is an overview of the current guidelines issued by specialty bodies and learned societies to
tackle post covid-19 era in the field of prosthodontics. While COVID-19 continues to make its
presence felt in healthcare all over the world, Dental health care personnel will no doubt adapt to
altered guidelines for providing optimum dental care in the crucial fight against the COVID-19
pandemic.
References: 1. Ather A, Patel B, Ruparel NB, Diogenes A, Hargreaves KM. Coronavirus Disease 19
(COVID-19): Implications for Clinical Dental Care. J Endo 2020; 46(5):584-595. 2. Lu H, Stratton CW, Tang Y. Outbreak of Pneumonia of Unknown Etiology in Wuhan
China: the Mystery and the Miracle. J Med Virol 2020; 92(4):401-402.
3. World Health Organization, WHO Director-General’s remarks at the media briefing on
2019-nCoV on 11 February 2020. https://www.who.int/dg/speeches/detail/who-
directorgeneral-s-remarks-at-the-media-briefing-on-2019-ncov-on-11-february-2020.
4. Coronavirus disease (COVID-19) Situation Report – 138 SITUATION IN NUMBERS
total and new cases in last 24 hours. https://www.who.int/docs/default-
source/coronaviruse/situation-reports/20200606-covid-19-sitrep-
138.pdf?sfvrsn=c8abfb17_4
5. Centers for Disease Control and Prevention, Interim Infection Prevention and Control
Guidance for Dental Settings during the COVID-19 Response, Centers for Disease
Control and Prevention, Atlanta, GA, USA, 2019.https://www.cdc.gov/
6. ADA, What Constitutes a Dental Emergency? American Dental Association, Chicago,
IL, USA, 2020.
7. Harrel SK, Molinari J. Aerosols and splatter in dentistry: a brief review of the literature
and infection control implications. J Am Dent Assoc 2004; 135(4):429-37.
8. OSHA-Occupational Safety and Health Act “Guidance on Preparing Workplaces for
COVID 19.”https://www.osha.gov/Publications/OSHA3990.pdf
9. Ge ZY, Yang LM, Xia JJ, Fu XH, Zhang YZ. Possible aerosol transmission of COVID-19 and
special precautions in dentistry. J Zhejiang Univ Sci B 2020; 21(5):361-368. 10. Poulos JG, Antonoff LR. Disinfection of impressions. Methods and effects on accuracy.
N Y State Dent J 1997; 63(6):34-6.
11. Lepe X, Johnson GH. Accuracy of polyether and addition silicone after long-term
immersion disinfection. J Prosthet Dent 1997; 78(3): 245-9.
12. Maillard JY, McDonnell G. Selection and use of disinfectants. In Prac 2012; 34(5):292-
9.

Banswani J. et al: Practicing Prosthodontics in Post Covid19 Era
The JPDM I Vol 1 I Issue1 and 2 I 2020 41
13. Abdullah MA. Surface detail, compressive strength, and dimensional accuracy of
gypsum casts after repeated immersion in hypochlorite solution. J Prosth Dent 2006;
95(6):462-8.
14. Centers for Disease Control and Prevention, Interim Infection Prevention and Control
Recommendations for Patients with Suspected or Confirmed Coronavirus Disease 2019
(COVID- 19) in Healthcare Settings, Centers for Disease Control and Prevention,
Atlanta, GA, USA, 2019, https://www.cdc.gov/coronavirus/2019-ncov/hcp/infection-
controlrecommendations.html.
15. Durey KA, Nixon PJ, Robinson S, Chan MF. Resin bonded bridges: techniques for
success. Br Dent J 2011;211(3):113-8.
16. Lam WYH, Chan RST, Li KY, Tang KT, Lui TT, Botelho MG. Ten-year clinical
evaluation of posterior fixed-movable resin-bonded fixed partial dentures. J Dent2019
;86:118-125.
17. Indian Dental Association ‘Towards Aerosol Free Dentistry’
https://www.ida.org.in/pdf/20200425_TowardsAerosolFreeDentistry.pdf
18. Delgado-Ruiz RA, Velasco Ortega E, Romanos GE, Gerhke S, Newen I, Calvo-Guirado
JL. Slow drilling speeds for single-drill implant bed preparation. Experimental in vitro
study. Clin Oral Investig 2018;22(1):349-359.
19. Starch-Jensen T,Becktor JP. Maxillary Alveolar Ridge Expansion with Split-Crest
Technique Compared with Lateral Ridge Augmentation with Autogenous Bone Block
Graft: a Systematic Review. J Oral Maxillofac Res 2019;10(4):e2.
20. Nedir R, Nurdin N, Vazquez L, Abi Najm S, Bischof M. Osteotome Sinus Floor
Elevation without Grafting: A 10-Year Prospective Study. Clin Implant Dent Relat Res
2016 ;18(3):609-17.
21. Bidra AS, Pelletier JS, Westover JB, Frank S, Brown SM, Tessema B. Rapid In-Vitro
Inactivation of Severe Acute Respiratory Syndrome Coronavirus 2 (SARS-CoV-2)
Using Povidone-Iodine Oral Antiseptic Rinse. J Prosthodont 2020;29(6):529-533.
22. Khan SA, Omar H. Teledentistry in practice: literature review. Telemed J e
Health2013;19:565–567.
23. Wu KY, Wu DT, Nguyen TT, Tran SD. COVID‐19’s Impact on Private Practice and
Academic Dentistry in North America. Oral Dis 2020.
The JPDM I Vol 1 I Issue 1 and 2 I 2020 42
THE JOURNAL OF PROSTHODONTICS AND DENTAL MATERIALS
The Official e-publication of Indian Prosthodontic Society MUMBAI - NAVI MUMBAI BRANCH
ABSTRACT
In Prosthodontics, magnets have created great interest, and their applications are various, primarily as
retentive aids. Magnets are common because their small size and their attractive or repulsive forces
allow them to be positioned within the prosthesis without becoming obtrusive in the mouth.
Conventionally magnets have been used as retentive devices for removable partial dentures, obturators,
and maxillofacial prosthesis. The retentive properties and the rare earth magnets' compactness have
contributed to their widespread use in the last few decades. This article reviews the types of magnetic
devices available, their applications in various fields of Prosthodontics, advantages, and disadvantages
followed by newer magnetic systems.
Keywords: Metals, Rare Earth, Overlay, Implant retained overdentures, Magnetic Phenomena,
Maxillofacial prosthesis
Introduction
For several decades now, magnetic phenomena have been known, and their applications in
diverse fields have been various. In dentistry, magnetism is not new, though it has not been closely
investigated. Its most prevalent use has been in the field of prosthetic dentistry, where both its repulsive
and attractive properties have been used.1
Magnets that have been initially in use were bulky, and questions about their potential toxic
effects were raised. The currently available literature, however, does not display such evidence. The
cause for magnets' popularity is their small size and strong, attractive forces, which facilitates them to
be positioned in the prosthesis without being obtrusive in the mouth. Despite many benefits, including
ease of washing, positioning for both dentist and patient, automatic reseating, and continuous retention,
magnets have a low resistance to corrosion within oral fluids and thus require encapsulation within a
relatively inert alloy such as stainless steel or Titanium. Action with saliva quickly results in corrosion
and loss of magnetism when such casings are breached.2
Brief history The very first documentation of magnets was around 2500-3000 years BC. It was labelled as
Load Stone by the ancients. Their origin is first noted in a large area in Asia Minor called Magnesia,
where the locals called it 'Magnetite'3. In 1953, Freedman initially used a magnet to improve retention
Magnets in Prosthodontics – An Overview
Dr Hrishikesh Mahapatra1, Dr Sumit Bedia2
1Post Graduate student,
2Associate Professor,
Department of Prosthodontics and Crown & Bridge,
Bharati Vidyapeeth Deemed to be University Dental College and Hospital, Navi Mumbai,

Mahapatra H et al: Magnets in Prosthodontics
The JPDM I Vol 1 I Issue 1 and 2 I 2020 43
and seating of complete denture against the alveolar ridges by using mutual repulsion at the time of
closing the jaw.4 In 1956, Nadeau used magnets in combined extraoral and intraoral prosthesis.5 In 1960,
Behrman used the technique of incorporating magnets in the jaw to increase the prosthesis's retention.6
In 1976, Federick used magnets in a sectional denture.7 Magnets were also used in the maxillofacial
prosthesis in eyelid and lip closure at the fabrication of obturators.8
CLASSIFICATION9:
A. Based on Alloys used
• Those comprising cobalt Examples are Alnico, Alnico V, Cobalt-Platinum (Co-Pt), Cobalt-
Samarium (Co5Sm)
• Those not containing cobalt Examples are Neodymium-Iron-Boron (Nd-Fe-B), Samarium Iron
Nitride.
B. Based on the type of magnetism
• Repulsion
• Attraction
C. Based on Capability to retain magnetic properties (intrinsic coercivity or hardness)
• Soft (easy to magnetize or demagnetize but less permanent): Palladium-Cobalt-Nickel (Pd-Co-
Ni) alloy, Palladium-Cobalt (Pd-Co) alloy, Palladium-Cobalt-Chromium (Pd-Co-Cr) alloy,
Palladium-Cobalt-Platinum (Pd-Co-Pt) alloy, Magnetic stainless steels, Permendur (an alloy of
Fe-Co), Chromium-Molybdenum (Cr-Mo) alloy.
• Hard (retain magnetism permanently): Alnico alloys, Co-Pt, Co5Sm, Nd-Fe-B.
D. By the number of magnets in the system
• Single
• Paired
E. Based on Type of surface coating (materials may be stainless steel, Titanium, or palladium)
• Coated
• Uncoated
F. Based on the type of magnetic field
• Open field
• Closed field — Rectangular closed-field sandwich design
— Circular closed-field sandwich design
G. Based on the number of magnets in the system:
• Duo-system open field
• Mono-system open field
• Mono-system closed field
H. Based on the arrangement of the poles
• Reversed poles
• Non reversed poles

Mahapatra H et al: Magnets in Prosthodontics
The JPDM I Vol 1 I Issue 1 and 2 I 2020 44
Commercially Available Magnetic Systems3 Table 1: Few commercially available magnetic systems for use in Prosthodontics
OPEN FIELD SYSTEM CLOSED FIELD SYSTEM
The first magnetic devices to be used were
the open-field type where one magnet each
was placed in the jaw and the denture
Closed-field devices were developed because
of concerns about the potential impact of
magnetic fields on oral tissues
This configuration offered unshielded
magnetic fields inside the oral cavity. This
unshielded, encapsulated magnet uses only
one retention pole and is therefore known as
an open field device.
When a soft ferromagnetic substance (keeper)
connects the two poles of a magnet, the actual
magnetic field is shunted through the keeper,
thereby suppressing the actual magnetic
fields; a greater magnetic force may be
obtained. This attachment form is referred to
as the 'closed field type.
DYNA INNOVADENT
GOLDEN SOLID STATE
MAGNEDENT
SCHINNER
GILLINGS
JACKSONS- Regular and mini
Types of Magnetic Materials Used in Prosthodontics: 1) Rare earth permanent magnets2: a) Samarium-Cobalt Magnets (Sm-Co)
b) Neodymium-Iron-Boron Magnets (Nd-Fe-B)
• Rare elements consist of seventeen elements with atomic numbers 21, 39, and from 57 to
71.
• These elements have a strong affinity for the non-metallic elements, due to which they are
used for producing alloys, which are used in metallurgical industries.
• Made from alloys of rare earth elements, rare earth magnets are strong permanent magnets
producing higher magnetic fields.
• Due to magneto crystalline anisotropy, rare earth magnets can generate high forces relative
to their size. This property enables the preferential alignment of single crystals in one
direction (along the C-axis), which increases the magnetism.
• Another beneficial aspect of rare earth magnet, relative to Alnico magnets, is their very
strong coercivity. Strong coercivity means a superior capacity for these magnets to resist
demagnetization.

Mahapatra H et al: Magnets in Prosthodontics
The JPDM I Vol 1 I Issue 1 and 2 I 2020 45
• Sm-Co can be embedded in heat polymerizing resin when fabricating dentures as its curing
temperature is above 7000C, and their magnetic properties are stable below 2000C.3
• Nd-Fe-B has a curing temperature, which is low about 3000C and magnetic properties
deteriorate above 800C. Therefore, care should be taken not to overheat the magnet.3
2) Soft Ferromagnetic alloys3: a) Palladium Cobalt Magnets (Pd-Co)
b) Palladium Cobalt-Chromium Magnets (Pd-Co-Cr)
c) Palladium Cobalt Nickel Magnets (Pd-Co-Ni)
• Materials of rare earth magnets are too hard to be shaped into a form suitable for each patient.
• To overcome this problem, soft magnets were introduced in 1984 for use in the root face.
Components of The Magnetic System9:
A two-component device is the standard magnetic retention unit: the magnetic retention element
and the keeper element. The magnetic retention element consists of paired magnets, an attached keeper,
and two protective plates covering the paired magnets' faces. The oval shape of the magnetic retention
element is 5 mm long, 3.2 mm wide, and 3 mm high. The keeper element is a detachable, oval-shaped,
magnetizable preferred disk or a cast root cap. The keeper element is prepared with a magnetizable alloy,
which is not a magnet. Still, it acts as a magnet (induced magnet) when it comes in contact with the
element's magnetic retention. The alloy used is Pd-Co-Ni alloy or stainless steel alloy.
Selection of keeper10
• Cement-in keeper: It should be used where available denture space is limited. It is not suitable
for small roots because of the danger of lateral root perforation or for patients with high caries
susceptibility. It is 5 mm long, 3 mm wide, and 1.2 mm thick, and the root face should be large
enough to accommodate a cavity of this size. It is fitted in one appointment.
• Screw-on keeper: It can be used where ample denture space is available or where the root face
is too small for a cement-in keeper to accommodate. As it can be easily removed and replaced,
it is used where the root may require shortening. Its most extensive measurements are 6 mm long
and 4 mm wide and typically covers much of the root face. It is fitted in a single appointment.
• Cement-on keeper: Other than its retention by a soldered-in wire loop, it is comparable to the
screw-on holder. It's hard to remove, but the easiest one to match with all keepers. It is possible
to finish the procedure in minutes. It is the most favored type.
• Cast root cap and dowel keeper: Due to the risk of dental caries, it should be used where
complete root face coverage is needed. It must be cast in a magnetizable alloy, and techniques
are required for cobalt-chromium casting.
Biocompatibility and Their Effects on Tissues
The magnetic intensity of the dental attachment on the magnetic assembly surface is about 0.8
Tesla. The leakage flux in contact with the keeper on the magnet assembly is around 0.01-0.03 Tesla
and about 0.005 Tesla outside the abutment tooth. Thus, there is no influence of the static magnetic field
generated by a dental magnetic attachment on the human body and tissues. However, the potential ways
in which a magnet might result in tissue injury are:
• The physical effects triggered by the ambient steady magnetic fields (magnetism)
• Chemical effects of alloys and their corrosion materials
In 1960, Behran11 studied the physical effects of magnetism on both bone and soft tissues in 450
subjects and concluded that tissues were harmless. It is shown that, as compared to an open field system,
the closed-field system has improved tissue compatibility.

Mahapatra H et al: Magnets in Prosthodontics
The JPDM I Vol 1 I Issue 1 and 2 I 2020 46
Late back in 1979, Tsutsui12 and his colleagues stated that Cobalt-Samarium does not have
harmful chemical effects. Cobalt has also been an essential dietary trace element in remnants. Samarium
salts are not considered toxic.
Nevertheless, Walmsley13 suggests that there is a need to encapsulate the magnets. He also found
that the magnet will contact saliva as the coating wears out, resulting in magnetic corrosion. It was also
shown that the presence of bacteria such as Streptococcus sanguinus increases the corrosion rate. The
lifetime of the magnet will thus be shortened. Coated magnets have also been shown to have little effect
on human dental pulp, gingiva, osteoblasts, or blood flow. Only uncoated magnets have shown that
cytotoxic effects on cells are generated. Oral mucosal fibroblasts are among the most susceptible to the
impact of these rare earth magnets. It is concluded that the magnetic potential produced by intraoral
magnets in the surrounding blood vessels is very negligible (2*10-5V) compared to the resting
membrane potential of cell membranes (60-100V).11
Clinical Applications of Magnets: 1) Magnets in Complete dentures based on Magnetic Repulsion and Attraction
• Magnets have been used because they are small and are easy to incorporate into a denture.
• The first attempt to use magnets to hold dentures involved implanting them into the mouth;
because of their large size and insufficient powers, issues ensued. Improvements in magnetic
materials have allowed magnetic attachments to be smaller and stronger.
• The first recorded use of magnets in prosthetic dentistry involved using the repulsion of like
poles of magnets to maintain and improve the seating of complete dentures. The magnetic
material used was Alnico type that has been discontinued because of the large bulk necessary for
magnetic strength.12
• The use of attractive force retention was reported in the early 1960s.13 This first attempt was
made with Al-Ni-Co V, which was surgically implanted in the mandible of edentulous patients.
Because of the distance between the two magnets, they provided the inadequate force to aid in
retention.
• After that, the smaller and stronger Co-Pt magnets were implanted. Several disadvantages,
including high cost, limited availability, difficult fabrication was associated.
2) Tooth Supported Overdenture retained by magnetic attachments
• The first reported use of magnets for the retention of overdentures took place in the 1960s with
a patient's rehabilitation with a cleft lip and palate.14 Magnetic Co-Pt alloy was used to produce
crowns for three remaining teeth with cast Co-Pt also built into the denture.
• This was soon followed by cementing magnets within the retained roots for the retention of
overdentures.15 A Sm-Co was cemented into a prepared cavity in the root surface, and a similar
magnet was placed in the denture.
• Magnetically retained overdentures are virtually maintenance-free and inexpensive to fabricate,
and the technique lies within every dentist's scope.
• The primary purpose is to preserve the alveolar bone by retaining teeth or/and roots underneath.
Magnetically retained overdentures transfer no detrimental lateral forces to those supporting
elements that help in maintaining a favorable clinical situation.
• An overdenture with a magnetic attachment is a useful choice for an abutment tooth with chronic
periodontal disease because the magnetic attachment dissipates the lateral stress component on
the abutment teeth and improves poor clinical crown-to-root ratios.

Mahapatra H et al: Magnets in Prosthodontics
The JPDM I Vol 1 I Issue 1 and 2 I 2020 47
3) Implant-supported overdenture with Magnetic attachments
• The various problems reported by the complete denture wearers can be eliminated with implant-
supported fixed prostheses or removable overdentures.
• Magnetic attachments used to retain dentures are typically shorter than mechanical attachments,
which is particularly useful for patients with restricted interocclusal space and challenging
aesthetic demands. They can also accommodate a moderate divergence of alignment between 2
or more abutments since they do not depend on the path of insertion.16
• Magnets in Implant retained overdentures are particularly useful for elderly or disabled patients
who may have difficulty in inserting and removing removable prosthesis.
• Various types of attachments have been developed for the use of implant overdenture, including
O-ring, Locator, magnetic attachment, and bar type. The choice of the higher abutment and self-
adjusting type magnet provides significant higher stability and retention of implant overdenture.
Patients' satisfaction is expected to be greater by increased retention and stability of implant
overdenture.17
4) Magnets in Maxillofacial Prosthesis
• Magnets have been effectively used for the retention, maintenance, and stabilization of combined
maxillofacial prostheses, and they are effective for this purpose.
• Magnets in coin form have more advantages in maxillofacial prosthetics than the other forms;
the magnet can be chosen according to the size of the defect and in any diameter that is needed.18
• Cheek plumper, a single unit prosthesis that adds on to the weight of the denture, increases the
mesiodistal width of the prosthesis, thereby making its insertion difficult in patients with limited
mouth opening and can also cause muscle fatigue. Thus, to combat this situation, a detachable
cheek plumper prosthesis using magnets was fabricated in a completely edentulous patient with
sunken cheeks.19
• Robinson used horseshoe magnets for the retention of an upper denture and obturator for a patient
with a complete maxillectomy. A sectional prosthesis can be used for patients with large
maxillary defects. Two magnetic pairs are commonly used for connecting the sections. The
magnets are embedded in the respective contacting surfaces at a depth of 0.5 mm. Because Sm-
Co magnets are small, the obturator can be made hollow to reduce its weight. The size of ferrite
or alnico magnets often prevents the use of a hollow obturator.20
• Magnets are also used in an orbital prosthesis, auricular prosthesis, large and small maxillary
defects, and intra oral-extra oral combination prosthesis.21
Failure of Dental Magnets Corrosion is the key issue connected with the use of magnets as retentive devices. SmCo5 and
Nd-Fe-B magnets are both extremely susceptible to corrosion, particularly in environments containing
chloride. Therefore, before being used in dental applications, magnetic materials must be separated
securely from oral fluids. While some existing magnet assemblies are encapsulated in stainless steel or
Titanium, due to corrosion and lack of retention provided by the attachment, some devices fail in about
18 months of clinical use.22

Mahapatra H et al: Magnets in Prosthodontics
The JPDM I Vol 1 I Issue 1 and 2 I 2020 48
Advantages and disadvantages of magnets: (Table 2)
Table 2: Advantages and Disadvantages of using magnets in Prosthodontic applications
ADVANTAGES DISADVANTAGES
Magnets provide both retention and stability Low corrosion resistance
Magnets allow 24 degrees of abutment
divergence, which allows for easy insertion
and removal of the prosthesis in a non-critical
way
Cytotoxic effects of the leachants
The roots or implants do not need to be
parallel; soft-tissue undercuts may be
engaged
High cost
Potentially pathologic lateral or rotating
forces are eliminated, providing maximum
abutment protection
Short track record
Enables automatic reseating of the denture if
dislodged during chewing
If misaligned placement occurs, then the
orthodontic movement of the root will result
in correct contact being reached
Roots with as little as 3mm of bone support
are adequate for use as abutments with
magnetic appliances
They do not directly induce stress to root
abutments
Newer Magnetic Systems: MAGFIT - New Generation Magnetic Attachment: This is a revolutionary dental magnetic
attachment device made up of a strong but ultra-compact embedded magnet that maintains a prosthesis
on an attractive magnet keeper set on the abutment tooth. It has the following advantages-
• Protection of the abutment tooth from excess stress
• Easy instrumentation and easy maintenance

Mahapatra H et al: Magnets in Prosthodontics
The JPDM I Vol 1 I Issue 1 and 2 I 2020 49
• Superior aesthetics
• Strongest Retention in its class with an ultra-compact size
• No Corrosion
Recommended applications • Natural tooth
• Implant
Conclusion Dentistry is a discipline that is ever-changing. Changes in treatment are needed as new research and
clinical practice expand our understanding. Some decades ago, magnets were only rarely used for dental
purposes. Intraoral magnets have been influencing the course of aesthetics and retention for both
complete and removable partial dentures since the advent of rare earth magnet alloys.
Their advantages include convenience, low cost, self-adjustment, inherent stress breaking, comparative
lateral freedom of movement, and the minimum trauma to the retained root while eliminating the need
for adjustment in services.
Magnetic attachments will offer new possibilities in the field of removable prosthesis retention. Over
the last five years, magnet technology and engineering have improved significantly, and it is now
possible to manufacture much smaller magnets that give the keeper a better position.
These enhancements need long-term clinical studies to evaluate the durability of the upcoming
generation of clinically working magnets. There is no doubt, however, that if magnets are chosen for a
specific clinical situation, they act as a good introduction and can prove to be extremely effective in
many cases.
References: 1. Laird WR, Grant AA. The use of magnetic forces in prosthetic dentistry. Journal of Dentistry, 9,
No. 4, 1981, pp. 328-335.
2. Bhat VS, Shenoy KK, Premkumar P. Magnets in dentistry. Arch Med Health Sci 2013; 1:73-9.
3. Rohit Raghavan et al. Magnets in Complete Dentures. International Journal of Oral Health
Dentistry, July - September 2015;1(3):133-137.
4. Moghadam BK, Scandrett FR. Magnetic retention for overdentures. J Prosthet Dent 1979; 41:26-
9.
5. Nadeau J. Maxillofacial prosthesis with magnetic stabilizers. J Prosthet Dent 1956; 6:114-9.
6. Behrman SJ. The implantation of magnets in the jaw to aid denture retention. J Prosthet Dent
1960; 10:807-41.
7. Federick DR. A magnetically retained interim maxillary obturator. J Prosthet Dent 1976; 36:671-
5.
8. Meenakshi A. et A Meenakshi A. et al. l. Magnets in Prosthodontics. Int J Oral Health Med Res
2015;2(4):81-84.
9. Gillings BR. Magnetic denture retention systems: inexpensive and efficient. International Dental
Journal 1984:34; 184-97.
10. Rassawet RR, Mittal S, Kalra H. Magnets – Role in prosthodontic rehabilitation: A review.
Indian J Dent Sci 2020; 12:168-71.
11. Behrman SJ. The implantation of magnets in the jaw to aid denture retention. J Prosthet Dent
1960; 10:807–41.
12. Tsutsui H, Kinouchi Y, Sasaki H, Shiota M, Ushita T. Studies on the Sm-Co magnet as a dental
material. J Dent Res 1979; 58:1597–606.
13. Walmsley AD. Magnets in Restorative Dentistry. www.priory.com/mags.htm.
Mahapatra H et al: Magnets in Prosthodontics
The JPDM I Vol 1 I Issue 1 and 2 I 2020 50
14. Brewer AA, Robert M. OVERDENTURES. 2nd Ed, The CV Mosby Company: 1980. p. 376-
97.
15. Overdentures with magnetic attachments. Dental clinics of North America. 1990; 34(4):683-709.
16. Ceruti P, Bryant SR, Lee JH, MacEntee MI. Magnet-retained implant-supported overdentures:
review and 1-year clinical report. J Can Dent Assoc 2010, 76: a52.
17. Richard Leesungbok. The change of stability and retention on magnet-retained overdentures
according to abutment height and attachment design. Presented at the 24th Annual Scientific
Meeting of the European Association of Osseointegration, Stockholm, Sweden.
18. Javid N. The use of magnets in a maxillofacial prosthesis. J Prosthet Dent. 1971:25;334-40.
19. Rewari A et Al. Case Report Esthetic Rehabilitation Using Magnet-Retained Cheek Plumper
Prosthesis. Case Reports in Dentistry Volume 2020, 2769873.
20. Robinson JE. Magnets for Retention of a Sectional Intraoral Prosthesis. J Prosthet Dent 13: 1167-
1171, 1963.
21. Bhat V: A close-up on obturators using magnets: Part 11. J Indian Pros Soc Sep 2006:6(3); 148-
53.
22. Highton R, Caputo AA, Kinni M, Matyas J. The interaction of a magnetically retained denture
with osseointegrated implants. J Prosthet Dent 1988; 60:486-490.

The JPDM I Vol 1 I Issue 1 and 2 I 2020 51
THE JOURNAL OF PROSTHODONTICS AND DENTAL MATERIALS
The Official e-publication of Indian Prosthodontic Society
MUMBAI - NAVI MUMBAI BRANCH
The Implant - Abutment Connection and Its Relation to Crestal Bone — A Review
Dr Rahul Ravi1, Dr Adnan Kheyroolla1, Dr Omkar Shetty2, Dr Rubina Tabassum3, Dr Gaurang Mistr4,
Dr Kunal Mehta5
1P.G Student, 2Dean and Professor,
3Professor, 4HOD,
5Associate Professor,
Department of Prosthodontics and Implantology,
D.Y Patil University, School of Dentistry, Navi Mumbai, India
ABSTRACT: Implant therapy offers increased longevity, improved function, bone preservation and quality of life. This
article discusses the literature related to the dynamics in effect when an implant is placed in the bone.
Osseous and soft tissue changes take place around the implant subsequent to their placement. These
changes determine the esthetic outcome of the implant.
Keywords: Implants, osseointegeration, esthetics, implant-abutment connection, platform switching
Introduction Dental implants is a widely accepted device used as a predictable and reliable tool for dental
reconstruction, however, it is still necessary to ensure that the height of the peri-implant crestal bone is
maintained. Directly after insertion of a dental implant, a cascade of biological events occurs during the
bone healing process.1 The change in bone shape and continuity is a result of this bone healing process,
contrary to a possible pathological bone loss.2–5 Osseointegration is considered to be the phenomenon of
direct apposition of bone on an implant surface, which subsequently undergoes structural adaptation in
response to a mechanical load. Over time the shape of crestal bone around the implant changes both
horizontally and vertically.6,7
One of the criteria for the success of dental implant treatment is the amount of crestal bone change.
Albrektsson et al.8 proposed that a dental implant can be considered successful if peri-implant crestal bone
loss is less than 1.5 mm during the first year after implant placement and less than 0.2 mm annually after
that. Numerous theories are put forward to explain the crestal bone loss around implants including,
surgical trauma due to excessive heat and pressure generation while preparing the osteotomy for the
implant and periosteal flap elevation, or secondary to the attachment of prosthetic components due to
occlusal overload and the presence of a micro gap between the implant and the abutment & its positioning
in relation to the crestal bone. Although the success of a dental implant is probably multifactorial and
dependent on some or all of the above factors, this review specifically addresses the relationship of the
implant-abutment connection and its relation to crestal bone changes.

Ravi R. et al. Implant-abutment connection and crestal bone
The JPDM I Vol 1 I Issue 1 and 2 I 2020 52
Implant-Abutment Connections and Micro gaps: In the two-stage implant placement technique, the implant is placed at the bone crest level. After 3-
6 months, a prosthetic abutment is installed on the implant to connect the implant to future prosthetic
restorations (crowns, bridges or dentures). It is postulated that a potential microscopic space exists at the
abutment/implant interface, along the abutment screw threads and at the base of the screw chamber known
as micro gaps. Three main factors are identified as possible causes for the formation of micro gaps:
occlusal load during physiological function9, manufacturing tolerance10 and micromotion between the
implant–abutment connections. Microorganisms occupy this gap and set up a bacterial reservoir, resulting
in an area of inflamed soft tissue facing the fixture abutment junction.11,12 This microbial leakage at the
implant-abutment interface is a chief challenge for the constructing the two-stage implant systems & is a
major contributing factor for peri-implant inflammatory reactions.
Fig 1: Microgaps at the Implant-abutment connection
Microleakage: Many studies have shown that this microscopic space between implant and abutment (micro gap)
facilitates the infiltration of fluids and macromolecules from crevicular fluid and saliva, enabling bacterial
invasion and proliferation,11,13,14 even in patients with good oral hygiene.15–18
On the other hand, bacterial infiltration may also arise during the first stage or the second stage of implant
surgery.19,20 Moreover, findings from several studies have documented that bacterial infiltration may occur
both from an external source to the inner area of an implant, and in reverse.17,21,22 This migration of
bacteria is probably facilitated through the unavoidable presence of micro gaps between the fixture and the
abutment components of the assembled system.
The bacterial contamination may be correlated with gap sizes or misfits. Gap dimensions ranging
from 20μm to 168μm have been reported.23,24 The level of contamination depends not only on the
precision of fit but also on the degree of the applied micromovement and torque. The incidence of loads
and unscrewing of the prosthetic abutment can increase infiltration, whereas optimal adaptation, minimal
micromovement and exceptional prosthetic and occlusal planning are factors which can minimize
microleakage,9,25 but do not seem to prevent it completely.12,26 The presence of a micro gap in close
relation to bone plays a role in developing of peri-implant inflammation and bone loss. Put merely,
bacterial invasion of the micro gaps can interfere with the osseointegration of an implant during the
healing phase of the surgical intervention and cause peri-implantitis. Pathogenic bacterial microflora may
also influence the outcome of guided bone regeneration in the treatment of peri-implantitis.19,27,28

Ravi R. et al. Implant-abutment connection and crestal bone
The JPDM I Vol 1 I Issue 1 and 2 I 2020 53
Broggini et al.29 demonstrated an increase in inflammatory cells in the peri-implant soft tissues at
the level or slightly coronal to the implant–abutment junction due to the bacterial presence, which when
combined with osteoclasts formation results in alveolar bone loss.30 This is in contrast to an implant
system with a lack of implant-abutment interface that shows little evidence of the presence of
inflammatory cells. This infiltration of inflammatory substances is irrespective of the amount of plaque
accumulation.31
Comparison of Microleakage in Different Implant-Abutment Connections: Verdugo CL et al. used external connection implant and conical internal connection (Morse taper)
implants. The results of the study showed that less microleakage was shown by Morse taper connection
implants than external connection implants. A gap of 10 μm was presented by external connection
implants more than Morse taper implants with a gap of 2-3 μm.32
Canullo L et al. conducted a five year follow-up study on humans for different implant connections
under functional loading. The results showed that microbial contamination was seen in all the connections.
Internal Hex and conical connection implants showed less leakage of bacteria at the peri-implant sulcus
and inside the connection than external hexagon implants.33
Do Nascimento C et al., in their in vitro study, used 43 microbial species, which were very
common in the human oral cavity. They evaluated prostheses supported by External Hexagon or Morse
Cone implants under dynamic loading conditions. Results revealed that higher microbial count was found
in External Hexagon implants than Morse Cone implants. Many microbial species including, peri-implant
diseases causing organisms were detected in internal part of External Hex implants. Internal surfaces of
Morse Cone implants showed no colonization of microorganisms, as micro gaps present in conical
connections were much smaller at the implant-abutment interface.34
Baggi L et al. in their study, found that tube-in-tube interface implants were more resistant to
colonization than flat to flat interface.34,35 Contradictory results were obtained by Al-Jadaa A et al. where
they found, implants with a flat-to-flat interface (internal hexagonal) mating surfaces showed the best
performance with regard to leakage under both static and dynamic conditions. This study also proved that
if implants under static conditions were tight and would provide better sealing ability under dynamic
conditions.36
Koutouzis T et al. evaluated microleakage of internal Morse-taper connection and found that there
was minimal penetration of bacteria down to the implant-abutment interface.37
Dynamic loading increases the penetration of bacteria as there was micro movement at the implant-
abutment interface, which causes a pumping effect and leads to detrimental effects on marginal bone
stability.13Contradictory results were obtained by Harder S et al. where conical implant-abutment
connections do not prevent microleakage on a molecular level in even unloaded conditions.25
From the studies mentioned above, it is possible to draw the inference that internal implant-
abutment connections and conical (Morse Taper) implant-abutment connections show lesser microleakage
than external implant-abutment connections. The external connections, of which the external hexagonal
connection is the most common, provides a short and narrow connection with the abutment and provides
for only limited screw engagement and a short fulcrum arm, which together allow for frequent screw
loosening. The instability of the external connection leads to open the micro gaps. Besides, it is often
challenging to seat components on the hex easily and with confidence, especially in the posterior parts of
the mouth, even for an experienced clinician. Minute rotational changes at a single abutment location can
result in the misfit of the superstructure. Increasing the flat-to-flat width and the height of the connection
has reduced these complications but not eliminated them. Internal connections, due to their design, have a
more stable implant-abutment connection resistant to joint- opening forces. Lateral forces are distributed
deep within the implant, and the long internal wall engagement with the implant shields the abutment
screw and buffers vibrations. Internal connections are therefore, less prone to micromovements and
opening of the implant-abutment connection. Conical connections, specifically, have the advantage of the
smallest inherent micro gaps due to frictional fit of the abutment into the implant, virtually removing any

Ravi R. et al. Implant-abutment connection and crestal bone
The JPDM I Vol 1 I Issue 1 and 2 I 2020 54
gap between the two. However, no implant-abutment interface can completely prevent microleakage in
either loaded or unloaded states.
Position of the Implant-Abutment Connection in Relation to Crestal Bone: Numerous studies have shown that bone resorption around the implant neck does not start until the
implant is uncovered and exposed to the oral cavity. It is hypothesized that bacterial contamination of this
micro gap during the second stage surgery results in peri-implant inflammation, leading to bone
remodeling.30 Bone remodeling will progress until the biologic width has been created and stabilized to
seal off the connective tissue from the colonized micro gap. Not only does this width progress apically,
along the vertical axis, but according to studies conducted by Tarnow et al.38 there is also a horizontal
component amounting to 1–1.5 mm.
Fig. 2: Establishment of Biologic Width after second stage implant surgery
So, the position of the implant-abutment connection in relation to the crestal bone determines the amount
of bone loss around an implant. A study by Broggini et al.39 revealed that as the apical position of the
implant-abutment interface was progressively increased, the total number of peri-implant inflammatory
cells was increased in parallel, i.e., the deeper the interface, the greater the magnitude of peri-implant
inflammation. Further, the maximum density of neutrophils adjacent to supracrestal implants was
significantly less than for crestal and subcrestal implants. Moreover, the peri-implant location with
maximum neutrophil density was also dependent upon the depth of the implant-abutment interface. Thus,
for supracrestal implants, this location was near the implant-abutment interface (ie, above the original
bone crest), whereas for subcrestal implants, this location was immediately coronal to the implant-
abutment interface (below the original bone crest).
In parallel with differences in peri-implant inflammatory cell accumulation, the apico-coronal
dimension of connective tissue was also progressively expanded as the depth of the implant-abutment
interface was increased. This primarily reflected increases in the connective tissue compartment apical to
the original alveolar crest (ie, alveolar bone loss). Specifically, there was significantly greater bone loss
associated with subcrestal implants as compared to supracrestal position.
Therefore, this study demonstrated that moving the interface supracrestally, effectively changing
the location of the inflammatory stimulus, also reduces peri-implant bone loss. Thus, minimal
inflammation (and bone change) occurred when the interface was above the original bone crest, whereas
the greatest inflammation (and bone loss) occurred when the interface was below the alveolar crest. These
clinical observations are highly relevant, since the maintenance of crestal bone height appears to be an

Ravi R. et al. Implant-abutment connection and crestal bone
The JPDM I Vol 1 I Issue 1 and 2 I 2020 55
important predictor of soft tissue margins in both natural dentition40,41 and implants.42 These findings have
several important clinical implications relative to limiting inflammation and bone loss around implants.
First, implant design could be either one-part or transmucosal to eliminate the interface. Second, the
interface could be positioned supracrestally. Third, the interface might be made in such a way that
excludes microbes, i.e. a more stable interface with smaller micro gaps. In these scenarios, inflammation
would not be expected to develop near the alveolar crest, consequently reducing the potential for bony
changes. Support for this speculation comes from another animal study in which implants were placed
with the interface approximately 3mm above the original alveolar crest. Bone loss around these implants
was minimal.43 Further, in patients with transmucosal implants placed so that the implant interface was
approximately 3 mm above the original alveolar crest, minimal bone loss was observed over an eight-year
period.44
Platform Switching Concept: Platform switching or platform shifting is a method used to preserve the alveolar bone around
dental implants. The platform switching effect was first observed in the mid-1980s. At the time, larger-
diameter implants were often restored with narrower abutments (Ankylos Dentsply, Friadent, Germany;
Astra-Zeneca, Sweden; Bicon, Boston), as congruent abutments were often still unavailable.45 As it later
turned out, this was a remarkable coincidence. The abutments used with conventional implant types are
generally flush with the implant shoulder in the contact zone. This results in the formation of micro gaps
between the implant and the abutment. The bacterial contamination of these micro gaps adversely affects
the stability of the peri-implant tissues and leads to a reduction of horizontal and vertical marginal bone
levels. If the microcrack is located close to the bone, the creation of the biologic width will occur at the
expense of the bone.13,46 The platform-switching concept requires that this microcrack be placed away
from the implant shoulder and closer toward the axis in order to increase the distance of this microcrack
from the bone.47–49 This generally implies the use of a reduced-diameter abutment. The inward, horizontal
repositioning of the abutment inflammatory cell infiltrate (right) will move the abutment inflammatory
cell infiltrate away from the crestal bone and into a more confined area.
Fig. 3:Soft Tissue Level Implants a
supracrestal IAI
Fig.4: Bone Level Implant have an epicrestal
IAI

Ravi R. et al. Implant-abutment connection and crestal bone
The JPDM I Vol 1 I Issue 1 and 2 I 2020 56
Fig. 5: A comparison of non-platform switched (left)
and platform switched (right) Implant-Abutment Interface
Fig. 6: Platform switching moves the inflammatory cell infiltrate away from the bone
There appear to be two results of the horizontal inward repositioning of the implant-abutment
interface. First, with the increased surface area created by the exposed implant seating surface, there is a
reduction in the amount of crestal bone resorption necessary to expose a minimum amount of implant
surface to which the soft tissue can attach. Second, and perhaps more important, by repositioning the
implant-abutment interface inward and away from the outer edge of the implant and adjacent bone, the
overall effect of the inflammatory cell infiltrate on the surrounding tissue as described by Ericsson et al.7
and Abrahamsson et al.50,51 may be reduced, thus decreasing its resorptive effect on crestal bone. It is
further suggested that platform switching repositions the inflammatory infiltrate further away from crestal
bone and locates it within an approximate ≤90-degree confined area of exposure instead of a ≤180-degree
area of direct exposure to the surrounding hard and soft tissues. As a consequence, the reduced exposure
and confinement of the platform-switched abutment inflammatory cell infiltrate may result in a reduced
inflammatory effect within the surrounding soft tissue and crestal bone.
It is important to note that to benefit from the platform-switching bone preservation technique,
reduced-diameter components, beginning with the healing abutment, must be used from the moment that
the implant is exposed to the oral environment, because the process of biologic width formation begins
immediately following exposure to the oral environment. Thus, whether an implant is placed using a one-
or two-stage surgical procedure, the first component placed on the implant must be of a smaller diameter
if a horizontally repositioned biologic width is to be accomplished. This is important because after crestal

Ravi R. et al. Implant-abutment connection and crestal bone
The JPDM I Vol 1 I Issue 1 and 2 I 2020 57
bone has remodeled to a post-restorative resting position around the top of an implant, it will not return to
its presurgical level if platform-switching principles are implemented at a later time.
Conclusion The long-term predictability of dental implants is now a well-documented fact. Virtually all the major
manufacturers can document success rates greater than 90%, and the more refined systems have achieved
well above that number for more than ten years. A grey area has been the long-term stability of the
abutment and prosthesis. Tremendous progress has been made in this area mainly, due to improved
clinical machining tolerances. The transition to internal connections has been gradual but profound. The
internal connections available today are far more stable, physically stronger, easier to restore, more
amenable to excellent esthetics, and definitely more user-friendly.
References: 1. Terheyden H, Lang NP, Bierbaum S, Stadlinger B. Osseointegration--communication of cells. Clin
Oral Implants Res. 2012 Oct;23(10):1127–35.
2. Cochran DL, Nevins M. Biologic width: a physiologically and politically resilient structure. Int J
Periodontics Restorative Dent. 2012 Aug;32(4):371–3.
3. Hermann JS, Buser D, Schenk RK, Higginbottom FL, Cochran DL. Biologic width around titanium
implants. A physiologically formed and stable dimension over time. Clin Oral Implants Res. 2000
Feb;11(1):1–11.
4. Hermann JS, Cochran DL, Hermann JS, Buser D, Schenk RK, Schoolfield JD. Biologic Width
around one- and two-piece titanium implants. A histometric evaluation of unloaded nonsubmerged
and submerged implants in the canine mandible. Clin Oral Implants Res. 2001;12(6):559–71.
5. Linkevicius T, Apse P. Influence of abutment material on stability of peri-implant tissues: a
systematic review. Int J Oral Maxillofac Implants. 2008 May;23(3):449–56.
6. Ericsson I, Nilner K, Klinge B, Glantz PO. Radiographical and histological characteristics of
submerged and nonsubmerged titanium implants. An experimental study in the Labrador dog. Clin
Oral Implants Res. 1996 Mar;7(1):20–6.
7. Ericsson I, Persson LG, Berglundh T, Marinello CP, Lindhe J, Klinge B. Different types of
inflammatory reactions in peri-implant soft tissues. J Clin Periodontol. 1995 Mar;22(3):255–61.
8. Albrektsson T, Zarb G, Worthington P, Eriksson AR. The long-term efficacy of currently used dental
implants: a review and proposed criteria of success. Int J Oral Maxillofac Implants. 1986
Summer;1(1):11–25.
9. Steinebrunner L, Wolfart S, Bössmann K, Kern M. In vitro evaluation of bacterial leakage along the
implant-abutment interface of different implant systems. Int J Oral Maxillofac Implants. 2005
Nov;20(6):875–81.
10. Shareef N, Levine D. Effect of manufacturing tolerances on the micromotion at the Morse taper
interface in modular hip implants using the finite element technique. Biomaterials. 1996
Mar;17(6):623–30.
11. do Nascimento C, Barbosa RES, Issa JPM, Watanabe E, Ito IY, Albuquerque RF. Bacterial
leakage along the implant–abutment interface of premachined or cast components. Int J Oral
Maxillofac Surg. 2008;37(2):177–80.
12. Teixeira W, Ribeiro RF, Sato S, Pedrazzi V. Microleakage into and from two-stage implants: an in
vitro comparative study. Int J Oral Maxillofac Implants. 2011 Jan;26(1):56–62.
13. Hermann JS, Schoolfield JD, Schenk RK, Buser D, Cochran DL. Influence of the size of the
microgap on crestal bone changes around titanium implants. A histometric evaluation of unloaded
non-submerged implants in the canine mandible. J Periodontol. 2001 Oct;72(10):1372–83.
14. Byrne D, Houston F, Cleary R, Claffey N. The fit of cast and premachined implant abutments. J
Prosthet Dent. 1998 Aug;80(2):184–92.

Ravi R. et al. Implant-abutment connection and crestal bone
The JPDM I Vol 1 I Issue 1 and 2 I 2020 58
15. Jansen VK, Conrads G, Richter EJ. Microbial leakage and marginal fit of the implant-abutment
interface. Int J Oral Maxillofac Implants. 1997 Jul;12(4):527–40.
16. Ricomini Filho AP, Fernandes FS de F, Straioto FG, da Silva WJ, Del Bel Cury AA. Preload loss
and bacterial penetration on different implant-abutment connection systems. Braz Dent J.
2010;21(2):123–9.
17. Rimondini L, Marin C, Brunella F, Fini M. Internal Contamination of a 2-Component Implant
System After Occlusal Loading and Provisionally Luted Reconstruction With or Without a Washer
Device. J Periodontol. 2001;72(12):1652–7.
18. Dias ECL de C e. M, Bisognin EDC, Harari ND, Machado SJ, da Silva CP, Soares GD de A, et al.
Evaluation of implant-abutment microgap and bacterial leakage in five external-hex implant systems:
an in vitro study. Int J Oral Maxillofac Implants. 2012 Mar;27(2):346–51.
19. Quirynen M, Alsaadi G, Pauwels M, Haffajee A, van Steenberghe D, Naert I. Microbiological and
clinical outcomes and patient satisfaction for two treatment options in the edentulous lower jaw after
10 years of function. Clin Oral Implants Res. 2005 Jun;16(3):277–87.
20. Quirynen M, Bollen CM, Eyssen H, van Steenberghe D. Microbial penetration along the implant
components of the Brånemark system. An in vitro study. Clin Oral Implants Res. 1994
Dec;5(4):239–44.
21. Gross M, Abramovich I, Weiss EI. Microleakage at the abutment-implant interface of
osseointegrated implants: a comparative study. Int J Oral Maxillofac Implants. 1999 Jan;14(1):94–
100.
22. Piattelli A, Scarano A, Paolantonio M, Assenza B, Leghissa GC, Di Bonaventura G, et al. Fluids
and microbial penetration in the internal part of cement-retained versus screw-retained implant-
abutment connections. J Periodontol. 2001 Sep;72(9):1146–50.
23. Hamilton A, Judge RB, Palamara JE, Evans C. Evaluation of the fit of CAD/CAM abutments. Int J
Prosthodont. 2013 Jul;26(4):370–80.
24. Sumi T, Braian M, Shimada A, Shibata N, Takeshita K, Vandeweghe S, et al. Characteristics of
implant-CAD/CAM abutment connections of two different internal connection systems. J Oral
Rehabil. 2012 May;39(5):391–8.
25. Harder S, Quabius ES, Ossenkop L, Kern M. Assessment of lipopolysaccharide microleakage at
conical implant-abutment connections. Clin Oral Investig. 2012 Oct;16(5):1377–84.
26. do Nascimento C, Miani PK, Watanabe E, Pedrazzi V, de Albuqerque RF Jr. In vitro evaluation of
bacterial leakage along the implant-abutment interface of an external-hex implant after saliva
incubation. Int J Oral Maxillofac Implants. 2011 Jul;26(4):782–7.
27. Esposito M, Hirsch JM, Lekholm U, Thomsen P. Biological factors contributing to failures of
osseointegrated oral implants. (II). Etiopathogenesis. Eur J Oral Sci. 1998 Jun;106(3):721–64.
28. Quirynen M, Vogels R, Peeters W, van Steenberghe D, Naert I, Haffajee A. Dynamics of initial
subgingival colonization of “pristine” peri-implant pockets. Clin Oral Implants Res. 2005;17(1):25–
37.
29. Broggini N. Periimplant Inflammation Defined by the Implant-abutment Interface. 2003. 42 p.
30. Broggini N, McManus LM, Hermann JS, Medina RU, Oates TW, Schenk RK, et al. Persistent
acute inflammation at the implant-abutment interface. J Dent Res. 2003 Mar;82(3):232–7.
31. Mawhinney J, Connolly E, Claffey N, Moran G, Polyzois I. An in vivo comparison of internal
bacterial colonization in two dental implant systems: Identification of a pathogenic reservoir. Acta
Odontol Scand. 2014;73(3):188–94.
32. Larrucea Verdugo C, Jaramillo Núñez G, Acevedo Avila A, Larrucea San Martín C. Microleakage
of the prosthetic abutment/implant interface with internal and external connection: in vitro study.
Clin Oral Implants Res. 2014 Sep;25(9):1078–83.
33. Canullo L, Penarrocha-Oltra D, Soldini C, Mazzocco F, Penarrocha M, Covani U. Microbiological
assessment of the implant-abutment interface in different connections: cross-sectional study after 5
years of functional loading. Clin Oral Implants Res. 2015 Apr;26(4):426–34.

Ravi R. et al. Implant-abutment connection and crestal bone
The JPDM I Vol 1 I Issue 1 and 2 I 2020 59
34. do Nascimento C, Ikeda LN, Pita MS, Rafael Cândido Pedroso, Pedrazzi V, de Albuquerque
Junior RF, et al. Marginal fit and microbial leakage along the implant-abutment interface of fixed
partial prostheses: An in vitro analysis using Checkerboard DNA-DNA hybridization. J Prosthet
Dent. 2015;114(6):831–8.
35. Baggi L, Di Girolamo M, Mirisola C, Calcaterra R. Microbiological evaluation of bacterial and
mycotic seal in implant systems with different implant-abutment interfaces and closing torque
values. Implant Dent. 2013 Aug;22(4):344–50.
36. Al-Jadaa A, Attin T, Peltomäki T, Heumann C, Schmidlin PR. Impact of Dynamic Loading on the
Implant-abutment Interface Using a Gas-enhanced Permeation Test In Vitro. Open Dent J. 2015 Mar
31;9:112–9.
37. Koutouzis T, Mesia R, Calderon N, Wong F, Wallet S. The Effect of Dynamic Loading on
Bacterial Colonization of the Dental Implant Fixture–Abutment Interface: An In Vitro Study. J Oral
Implantol. 2014;40(4):432–7.
38. Tarnow DP, Cho SC, Wallace SS. The effect of inter-implant distance on the height of inter-
implant bone crest. J Periodontol. 2000 Apr;71(4):546–9.
39. Broggini N, McManus LM, Hermann JS, Medina R, Schenk RK, Buser D, et al. Peri-implant
inflammation defined by the implant-abutment interface. J Dent Res. 2006 May;85(5):473–8.
40. Gargiulo AW, Wentz FM, Orban B. Dimensions and Relations of the Dentogingival Junction in
Humans. J Periodontol. 1961;32(3):261–7.
41. Tarnow DP, Magner AW, Fletcher P. The effect of the distance from the contact point to the crest
of bone on the presence or absence of the interproximal dental papilla. J Periodontol. 1992
Dec;63(12):995–6.
42. Hermann JS, Buser D, Schenk RK, Schoolfield JD, Cochran DL. Biologic Width around one- and
two-piece titanium implants. Clin Oral Implants Res. 2001 Dec;12(6):559–71.
43. Hermann JS, Cochran DL, Nummikoski PV, Buser D. Crestal bone changes around titanium
implants. A radiographic evaluation of unloaded nonsubmerged and submerged implants in the
canine mandible. J Periodontol. 1997 Nov;68(11):1117–30.
44. Buser D, Mericske-Stern R, Dula K, Lang NP. Clinical experience with one-stage, non-submerged
dental implants. Adv Dent Res. 1999 Jun;13:153–61.
45. Hermann F, Lerner H, Palti A. Factors influencing the preservation of the periimplant marginal
bone. Implant Dent. 2007 Jun;16(2):165–75.
46. Maynard JG Jr, Wilson RD. Physiologic dimensions of the periodontium significant to the
restorative dentist. J Periodontol. 1979 Apr;50(4):170–4.
47. Gardner DM. Platform switching as a means to achieving implant esthetics. N Y State Dent J.
2005 Apr;71(3):34–7.
48. Lazzara RJ, Porter SS. Platform switching: a new concept in implant dentistry for controlling
postrestorative crestal bone levels. Int J Periodontics Restorative Dent. 2006 Feb;26(1):9–17.
49. Baumgarten H, Cocchetto R, Testori T, Meltzer A, Porter S. A new implant design for crestal bone
preservation: initial observations and case report. Pract Proced Aesthet Dent. 2005 Nov;17(10):735–
40.
50. Abrahamsson I, Berglundh T, Lindhe J. Soft tissue response to plaque formation at different
implant systems. A comparative study in the dog. Clin Oral Implants Res. 1998 Apr;9(2):73–9.
51. Abrahamsson I, Berglundh T, Lindhe J. The mucosal barrier following abutment dis/reconnection.
An experimental study in dogs. J Clin Periodontol. 1997 Aug;24(8):568–72.

The JPDM I Vol 1 I Issue 1 and 2 I 2020 60
THE JOURNAL OF PROSTHODONTICS AND DENTAL MATERIALS The Official e-publication of Indian Prosthodontic Society
MUMBAI - NAVI MUMBAI BRANCH
Efficacy of citronella oil as an antifungal agent on denture soft liner
Dr Banashree S. Sankeshwari1, Dr Pranav R. Tulle2, Dr Raghavendra V. Adaki3, Dr Dayanand A. Huddar4, Deepti
S. Fulari1, Dr Mokshada M. Badadare5
1Associate Professor,
2Post graduate student,
3Professor and Head,
4Professor, 5Assistant Professor
Department of Prosthodontics
Bharati Vidyapeeth Dental College and Hospital, Sangli.
ABSTRACT Purpose: To investigate the antifungal activity of citronella oil by incorporating in acrylic based soft
liner
Materials and method: Varying concentrations of citronella oil is incorporated in acrylic based soft
liner and its antifungal activity is evaluated at 1 day and 1 week and adherence of Candida albicans to
the soft liner is measured at 1 day, 1 week and 15 days.
Results: Soft liner with citronella oil incorporation showed mean inhibitory zone of 10.5 mm with 400
μl, 19.8 mm with 600 μl and 33 mm with 800 μl after 1 day whereas after 1 week it showed 9.4 mm, 18
mm and 31.2 mm with 400 μl, 600 μl and 800 μl respectively.
On intergroup comparison for adherence test, after 1 day group 2 showed highest mean cell count
whereas group 4 showed least mean cell count. After 7 and 15 days, group 1 showed highest mean cell
count whereas group 4 showed the least mean cell count.
On intragroup comparison for adherence test, the mean cell count had decreased for all the groups
except the control group when measured after 1 day, 7 days and 15 days.
Conclusion: This in-vitro study shows that citronella oil can be used as antifungal agent.
Key-words: Citronella, essential oil, antifungal activity, soft liner
Introduction Denture soft liners are mainly used for therapeutic purpose in patients who are not able to
tolerate denture induced stresses. The most commonly used soft liners are acrylic based or silicone
based which help to absorb the masticatory forces and its distribution.[1] Fungal growth on the surfaces
of soft liners is a common phenomenon due to lack of antifungal property and increased surface
roughness. The fungal growth on the surfaces of liners leads to tissue irritation and mucosal pain. The
colonization and adherence of microorganisms to the surfaces leads to denture stomatitis.1
The etiology of denture stomatitis though is multifactorial; the most commonly associated
microorganism is Candida albicans. Treatment option includes maintenance of oral hygiene, systemic
and topical application of antifungal agents.1 Systemic application has few disadvantages and to
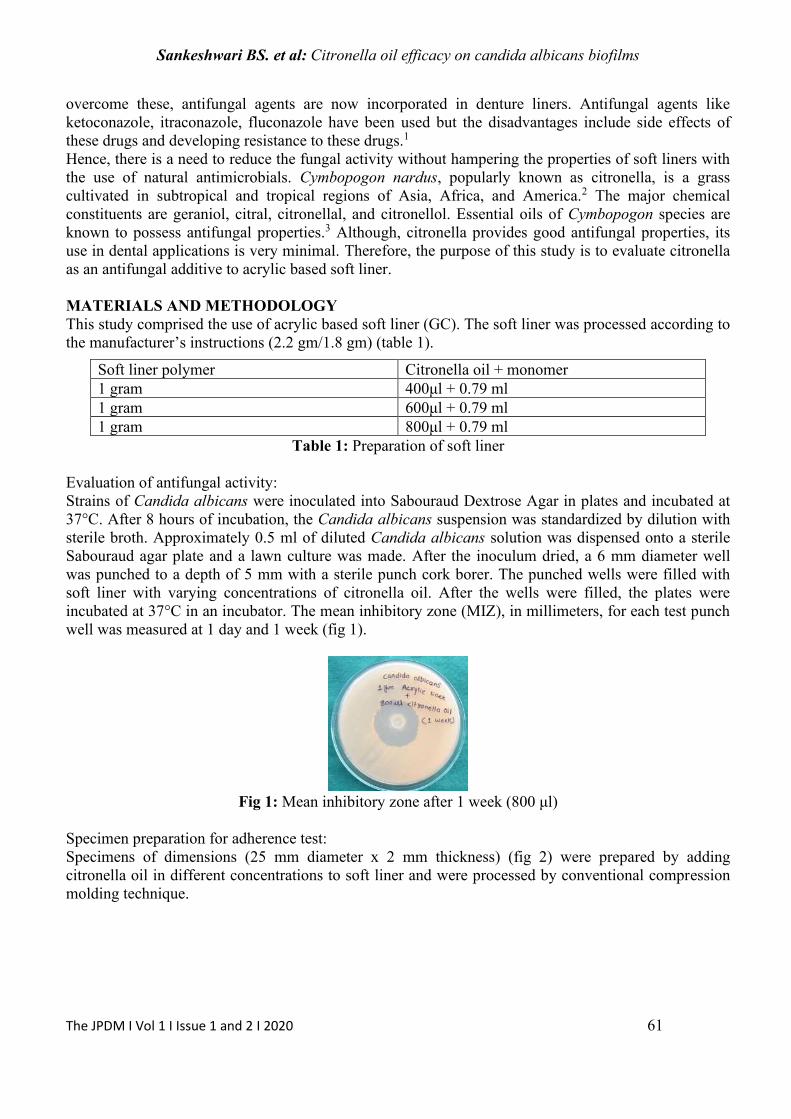
Sankeshwari BS. et al: Citronella oil efficacy on candida albicans biofilms
The JPDM I Vol 1 I Issue 1 and 2 I 2020 61
overcome these, antifungal agents are now incorporated in denture liners. Antifungal agents like
ketoconazole, itraconazole, fluconazole have been used but the disadvantages include side effects of
these drugs and developing resistance to these drugs.1
Hence, there is a need to reduce the fungal activity without hampering the properties of soft liners with
the use of natural antimicrobials. Cymbopogon nardus, popularly known as citronella, is a grass
cultivated in subtropical and tropical regions of Asia, Africa, and America.2 The major chemical
constituents are geraniol, citral, citronellal, and citronellol. Essential oils of Cymbopogon species are
known to possess antifungal properties.3 Although, citronella provides good antifungal properties, its
use in dental applications is very minimal. Therefore, the purpose of this study is to evaluate citronella
as an antifungal additive to acrylic based soft liner.
MATERIALS AND METHODOLOGY
This study comprised the use of acrylic based soft liner (GC). The soft liner was processed according to
the manufacturer’s instructions (2.2 gm/1.8 gm) (table 1).
Table 1: Preparation of soft liner
Evaluation of antifungal activity:
Strains of Candida albicans were inoculated into Sabouraud Dextrose Agar in plates and incubated at
37°C. After 8 hours of incubation, the Candida albicans suspension was standardized by dilution with
sterile broth. Approximately 0.5 ml of diluted Candida albicans solution was dispensed onto a sterile
Sabouraud agar plate and a lawn culture was made. After the inoculum dried, a 6 mm diameter well
was punched to a depth of 5 mm with a sterile punch cork borer. The punched wells were filled with
soft liner with varying concentrations of citronella oil. After the wells were filled, the plates were
incubated at 37°C in an incubator. The mean inhibitory zone (MIZ), in millimeters, for each test punch
well was measured at 1 day and 1 week (fig 1).
Fig 1: Mean inhibitory zone after 1 week (800 μl)
Specimen preparation for adherence test:
Specimens of dimensions (25 mm diameter x 2 mm thickness) (fig 2) were prepared by adding
citronella oil in different concentrations to soft liner and were processed by conventional compression
molding technique.
Soft liner polymer Citronella oil + monomer
1 gram 400μl + 0.79 ml
1 gram 600μl + 0.79 ml
1 gram 800μl + 0.79 ml

Sankeshwari BS. et al: Citronella oil efficacy on candida albicans biofilms
The JPDM I Vol 1 I Issue 1 and 2 I 2020 62
Fig 2: Mold for specimen fabrication
A total of 12 samples were made and randomly divided into 4 groups based on different concentrations
of citronella oil.
Group 1- Control
Group 2- 400 µl
Group 3- 600 µl
Group 4- 800 µl
Total sample size- 3 samples per group
All the specimens were prepared to a uniform size with smooth surfaces by placing polyester film over
them. The prepared specimens were allowed to polymerize for 30 minutes at room temperature.
Adherence test:
The standard strain of Candida albicans was inoculated into 25 ml of Sabouraud Dextrose broth in a
sterile petri dish and incubated at 37°C for 8 hours. After 30 minutes of setting, the disks were retrieved
from the mold, placed in Sabouraud dextrose broth, and incubated at 37°C. At the end of 1 day, 7 days
and 15 days storage in the broth, the disks were washed twice with sterile broth for 1 minute. The
washed disks were dried, and the adherent yeast cells were fixed in methanol and stained with Crystal
violet for 1 minute. Subsequently, the disks were washed with distilled water for 30 seconds and
examined under light microscopy. Adherent yeast cells were quantified at 10 different fields on the
disks and reported as yeast cells per mm2 (fig 3 and 4).
Fig 3: Adherence test after 1 day (Group 1) Fig 4: Adherence test after 15 day (Group 1)
RESULTS
The mean inhibitory zone after 24 hours was 33 mm for 800 μl and least was 10.5 mm for 400 μl
(table 2).
Table 2: Zone of inhibition after 24 hours
Soft liner polymer Citronella oil + monomer Zone of inhibition after 24
hours (in mm)
1 gram 400μl + 0.79 ml 10.5
1 gram 600μl + 0.79 ml 19.8
1 gram 800μl + 0.79 ml 33
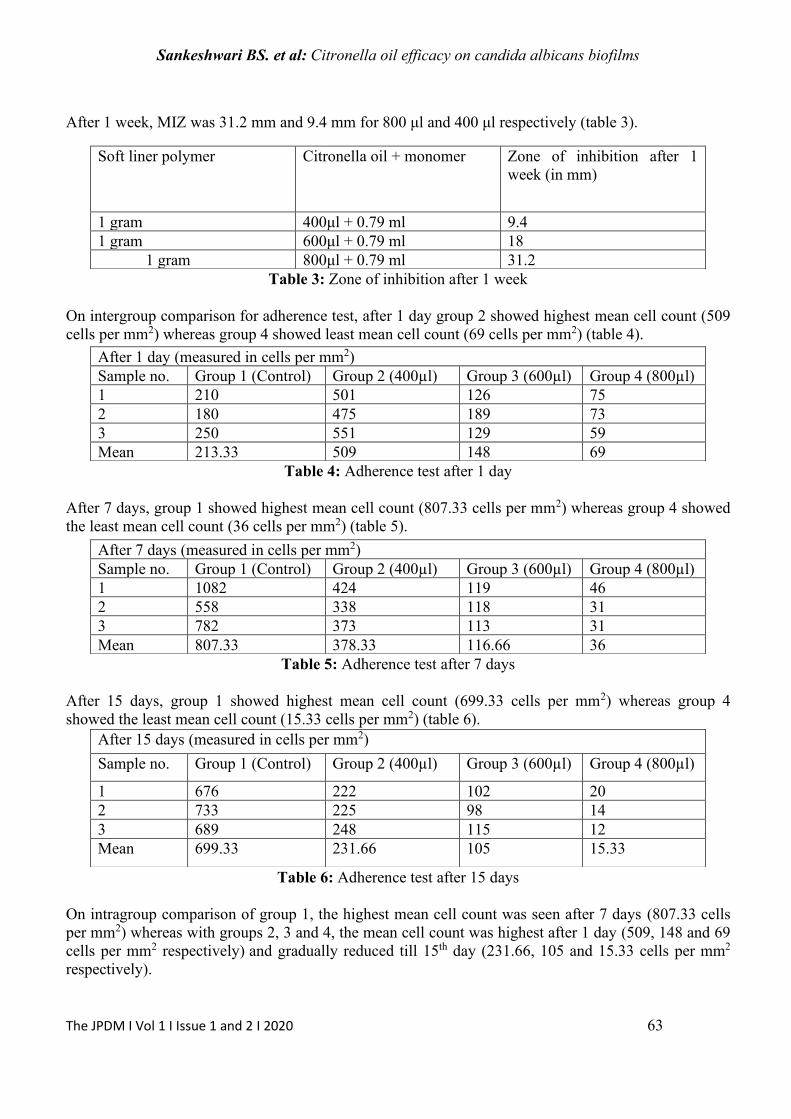
Sankeshwari BS. et al: Citronella oil efficacy on candida albicans biofilms
The JPDM I Vol 1 I Issue 1 and 2 I 2020 63
After 1 week, MIZ was 31.2 mm and 9.4 mm for 800 μl and 400 μl respectively (table 3).
Table 3: Zone of inhibition after 1 week
On intergroup comparison for adherence test, after 1 day group 2 showed highest mean cell count (509
cells per mm2) whereas group 4 showed least mean cell count (69 cells per mm2) (table 4).
Table 4: Adherence test after 1 day
After 7 days, group 1 showed highest mean cell count (807.33 cells per mm2) whereas group 4 showed
the least mean cell count (36 cells per mm2) (table 5).
Table 5: Adherence test after 7 days
After 15 days, group 1 showed highest mean cell count (699.33 cells per mm2) whereas group 4
showed the least mean cell count (15.33 cells per mm2) (table 6).
Table 6: Adherence test after 15 days
On intragroup comparison of group 1, the highest mean cell count was seen after 7 days (807.33 cells
per mm2) whereas with groups 2, 3 and 4, the mean cell count was highest after 1 day (509, 148 and 69
cells per mm2 respectively) and gradually reduced till 15th day (231.66, 105 and 15.33 cells per mm2
respectively).
Soft liner polymer Citronella oil + monomer Zone of inhibition after 1
week (in mm)
1 gram 400μl + 0.79 ml 9.4
1 gram 600μl + 0.79 ml 18
1 gram 800μl + 0.79 ml 31.2
After 1 day (measured in cells per mm2)
Sample no. Group 1 (Control) Group 2 (400µl) Group 3 (600µl) Group 4 (800µl)
1 210 501 126 75
2 180 475 189 73
3 250 551 129 59
Mean 213.33 509 148 69
After 7 days (measured in cells per mm2)
Sample no. Group 1 (Control) Group 2 (400µl) Group 3 (600µl) Group 4 (800µl)
1 1082 424 119 46
2 558 338 118 31
3 782 373 113 31
Mean 807.33 378.33 116.66 36
After 15 days (measured in cells per mm2)
Sample no. Group 1 (Control) Group 2 (400µl) Group 3 (600µl) Group 4 (800µl)
1 676 222 102 20
2 733 225 98 14
3 689 248 115 12
Mean 699.33 231.66 105 15.33

Sankeshwari BS. et al: Citronella oil efficacy on candida albicans biofilms
The JPDM I Vol 1 I Issue 1 and 2 I 2020 64
DISCUSSION
Soft liners do not possess significant antifungal activity by themselves. The antimicrobial effect
of citronella originates from the natural biological activity of its chemical constituent, such as
citronellal. Citronella essential oil is thought to disrupt cell membranes and degrade other organic
structures.4 Hence, when essential oil was incorporated in acrylic liner, there was an increase in the
zone of inhibition as the concentration of oil was increased. There was a decrease in mean inhibitory
zone for all the groups after 1 week as compared to that after 1 day.
On intragroup comparison for adherence test, the mean cell count per mm2 had decreased for all
the groups except the control group when measured after 1 day, 7 days and 15 days respectively.
On intergroup comparison for adherence test, after 1 day- group 2 showed highest cell count as
compared to other groups. After 7 days and 15 days- control group showed highest cell count followed
by group 2, 3 and 4 respectively. Group 4 showed the least cell count after 1, 7 and 15 days indicating
that it had the highest antifungal activity followed by group 3 and group 2 respectively.
CONCLUSION
This study concludes that as the concentration of citronella oil increases, there is an increase in
the mean inhibitory zone (MIZ). However, after a period of 1 week the MIZ is seen to decrease.
Similarly, as the concentration of citronella oil increases, the adherence of Candida albicans cells
decreases when measured after 1, 7 and 15 days.
References: 1. Srivatstava A, Ginjupalli K, Perampalli NU, Bhat N, Ballal M. Evaluation of the properties of a
tissue conditioner containing origanum oil as an antifungal additive. J Prosthet Dent
2013;110(4):313-9.
2. De Toledo L, Ramos M, Spósito L, Castilho E, Pavan F, Lopes É et al. Essential oil of
Cymbopogon nardus (L.) Rendle: a strategy to combat fungal infections caused by Candida
species. Int J Mol Sci 2016;17(8):1252.
3. Ata JP, Manalo MM. In vitro Evaluation of Cymbopogon nardus Essential Oil against Leaf
Disease Fungus of Narra (Pterocarpus indicus Wild). Int J Biol Sci 2014;3(8):56-9.
4. Almeida LD, Paula JF, Almeida RV, Williams DW, Hebling J, Cavalcanti YW. Efficacy of
citronella and cinnamon essential oils on Candida albicans biofilms. Acta Odontol Scand
2016;74(5):393-8.

The JPDM I Vol 1 I Issue 1 and 2 I 2020 65
THE JOURNAL OF PROSTHODONTICS AND DENTAL MATERIALS
The Official e-publication of Indian Prosthodontic Society MUMBAI - NAVI MUMBAI BRANCH
Evaluation of Golden Proportion in Males and Females in Chhattisgarh Region: A Clinical Short
Study Dr Preeti Tiwari1, Dr Saumya Sharma2, Dr Sanjeev Singh3, Dr Gulab.C. Baid4, Dr Vivek Lath4, Dr
Priyabrata Jena5
13rd year PG student, 2 Professor, Head of Department,
3Professor, 4Reader,
5 Senior Lecturer,
Department of Prosthodontics, Crown & Bridge,
MCDRC
ABSTRACT: Purpose: The objective of our work is to evaluate and investigate the occurrence and prevalence of
the much-discussed Golden Proportion provided by Levin on perceived widths of maxillary anterior
teeth among the people of Chhattisgarh region with natural and pleasing smiles by measurements
made on digital images.
Material and method: The material of this study consists of digital photographs taken of subjects
with natural and aesthetic teeth. We took photos of 100 subjects (50 males and 50 females), between
18 and 30 years. Using a computer program, each maxillary tooth was digitally measured. Once the
measurements are recorded, theory was applied and data was compared as well as analysed
statistically.
Results: The Golden Proportion between the lateral and central incisor occurs in a higher proportion
than between the canine and the lateral incisor. The values obtained by analysing the golden
proportion differ slightly from those proposed by Levin and Snow.
Conclusions: Results of the current study have shown that golden proportion in Males and Females in
Chhattisgarh region was not present between the widths of the maxillary anterior teeth in individuals
who had an aesthetic smile.
Keywords: Golden proportion, aesthetic, smile analysis.
Introduction The principles that make up the aesthetics are subtle.1 Methodological analysis has revealed
that principles can be applied to evaluate and alter dental aesthetics with predictability.2 Each principle
can be considered, recognized, assessed and developed individually in aesthetic management.3 Among
the aesthetic principles the proportion can be predicted with a formula that determines the ratio of

Tiwari P. et al: Golden Proportion In Population of Chhattisgarh Region
The JPDM I Vol 1 I Issue 1 and 2 I 2020 66
component from one constituent to next. The Golden Proportion (1.618:1.0) is a mathematically
constant ratio that defines the dimensions between the larger and smaller length. This specific relation
is unique, perfect, ideal and desirable. It has been used from studying beauty to design aesthetic
restorations.4,5 It is also a valuable tool for evaluation of symmetry, dominance and proportion in the
diagnosis of tooth arrangement and aesthetic dental treatment.6 The uncertainty of golden proportion in
aesthetic analysis and in smile design intended this study to evaluate the existence and comparison of
presence of golden proportion in the population of Chhattisgarh region.
Aim To investigate and evaluate the existence of the Golden Proportion between the widths of the
maxillary anterior teeth among males and females in individuals of Chhattisgarh region having an
aesthetic smile with natural permanent dentition with the aid of digital photographs and computer
analysis.
Material and methodology This study was conducted at Maitri College of Dentistry and Research Centre, Durg,
Chhattisgarh. Hundred subjects were taken and were divided into 2 groups Male -50, Female – 50
(mean age 24 years). An inclusion criterion for the study was as follows:
a) Age between 18 and 30 years.
b) Skeletal and Dental Class I relation with well-balanced orthognathic profiles.
c) No crowding, spacing or rotation in anterior teeth.
d) No history of previous orthodontic treatment or anterior restorations.
e) No previous history of trauma to the dentition.
f) Presence of all anterior teeth from canine to canine.
Subjects with any visual abnormalities with hard and soft tissues (crowding, rotations, malformations,
fractures, abnormalities, etc) and teeth posterior to canine during natural smiling were excluded. A
written, informed consent/ approval were obtained from all subjects and the Institutional Review
Board. The subjects were informed that their participation in the survey was completely voluntary. A
frontal photograph was taken of each individual with an aesthetic smile by Digital camera (SONY
Cyber-shot DSC-W810, 20.1 mp) in natural head position. The subject was instructed to sit in an
upright and comfortable position. Lighting and staging were kept constant. The camera was positioned
and adjusted so as to obtain a sharp image of the face, from the tip of the nose to the tip of the chin.
The distance between the camera and the subject was fixed at a working distance of 60 cm. The
camera was stabilized with the help of a tripod, at this fixed distance. The photos were clicked while
patient was smiling with the head in the natural position, so that the bipupilar line was parallel to the
floor

Tiwari P. et al: Golden Proportion In Population of Chhattisgarh Region
The JPDM I Vol 1 I Issue 1 and 2 I 2020 67
.
Figure 1: Operator taking the photograph of volunteer
Figure 2: Digital photograph of a smiling female Figure 3: Digital photograph of a smiling male
The photos were transferred to a computer, and software Adobe Photoshop CS5 (photo editing
software) was used to perform the necessary measurements. Using the software vertical lines were
drawn at the mesio-distal line angles of all the anterior teeth as seen from the frontal view. We
measured the number of pixels per cm, using the zoom function of the program, so that we could
measure the apparent mesio-distal width more accurately. For each patient we measured the width of
each of the 6 crowns: from canine on the right side (r) to the one on the left side(l): Canine(right) [13],
Lateral Incisor (right) [12], Central Incisor (right) [11], Central Incisor (left) [21], Lateral Incisor (left)
[22], Canine (left) [23]. The distance between these lines was measured and used to calculate the
Golden Proportion for both sides by one individual. After obtaining the results, the calculations were
performed corresponding to theories (golden ratio and golden percentage). The resulting data was
analysed with the Microsoft Excel and SPSS 17 programs. For processing the data, the paired samples
T test was used to analyse the differences in the golden number between the left and right side for each
subject’s anterior teeth.
Results
The existence of the Golden Proportion was found to be nearly similar in the left and right side
and for both genders. It was found that the difference in Golden Proportion was statistically
insignificant between females and males for central incisor/lateral incisor and lateral incisor/canine.
For both the genders as well as collectively, a significant difference (p<0.001) from golden proportion
was observed for all the three ratios being evaluated.
Statistical analysis: A master file was created with the data, and it was statistically analysed by using
the Statistical Package for Social Sciences Software Version 17 (SPSS Inc. Released 2008. Chicago:
SPSS Inc). The data was subjected to descriptive analysis for mean, standard deviation, and 95%
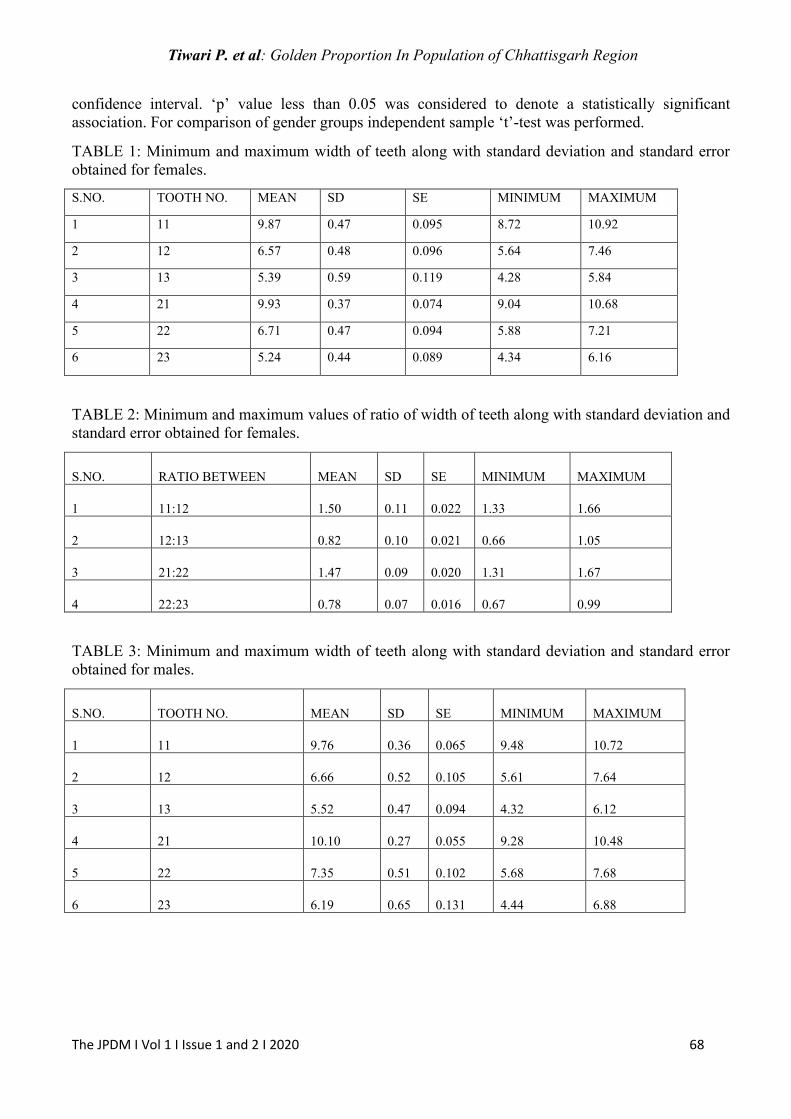
Tiwari P. et al: Golden Proportion In Population of Chhattisgarh Region
The JPDM I Vol 1 I Issue 1 and 2 I 2020 68
confidence interval. ‘p’ value less than 0.05 was considered to denote a statistically significant
association. For comparison of gender groups independent sample ‘t’-test was performed.
TABLE 1: Minimum and maximum width of teeth along with standard deviation and standard error
obtained for females.
S.NO. TOOTH NO. MEAN SD SE MINIMUM MAXIMUM
1 11 9.87 0.47 0.095 8.72 10.92
2 12 6.57 0.48 0.096 5.64 7.46
3 13 5.39 0.59 0.119 4.28 5.84
4 21 9.93 0.37 0.074 9.04 10.68
5 22 6.71 0.47 0.094 5.88 7.21
6 23 5.24 0.44 0.089 4.34 6.16
TABLE 2: Minimum and maximum values of ratio of width of teeth along with standard deviation and
standard error obtained for females.
S.NO. RATIO BETWEEN MEAN SD SE MINIMUM MAXIMUM
1 11:12 1.50 0.11 0.022 1.33 1.66
2 12:13 0.82 0.10 0.021 0.66 1.05
3 21:22 1.47 0.09 0.020 1.31 1.67
4 22:23 0.78 0.07 0.016 0.67 0.99
TABLE 3: Minimum and maximum width of teeth along with standard deviation and standard error
obtained for males.
S.NO. TOOTH NO. MEAN SD SE MINIMUM MAXIMUM
1 11 9.76 0.36 0.065 9.48 10.72
2 12 6.66 0.52 0.105 5.61 7.64
3 13 5.52 0.47 0.094 4.32 6.12
4 21 10.10 0.27 0.055 9.28 10.48
5 22 7.35 0.51 0.102 5.68 7.68
6 23 6.19 0.65 0.131 4.44 6.88

Tiwari P. et al: Golden Proportion In Population of Chhattisgarh Region
The JPDM I Vol 1 I Issue 1 and 2 I 2020 69
TABLE 4: Minimum and maximum values of ratio of width of teeth along with standard deviation and
standard error obtained for males.
S.NO. RATIO BETWEEN MEAN SD SE MINIMUM MAXIMUM
1 11:12 1.51 0.14 0.028 1.25 1.77
2 12:13 0.81 0.08 0.026 0.67 0.91
3 21:22 1.50 0.14 0.028 1.31 1.63
4 22:23 0.81 0.10 0.020 0.64 0.98
TABLE 5: Significance values obtained
S. NO. RATIO BETWEEN TEETH MALES FEMALES P VALUE
1
11:12 1.51 ± 0.14 1.50 ± 0.11 0.875
2
12:13 0.81 ± 0.14 0.82 ± 0.10 0.653
3
21:22 1.50 ± 0.14 1.47 ± 0.10 0.355
4
22:23 0.81 ± 0.10 0.78 ± 0.08 0.179
Discussion Determination of a symmetric or geometrical relation among the anterior teeth is important to
achieve an aesthetic result. Existence of statistically reliable results will help to support these existing
theories. However, the results of this investigation found no reliable relationships in the average
natural dentition. These findings are supported by other investigations.7-9
The Golden Proportion (1.618: 1.0) describes the ratio between the dimensions of a larger and a
smaller length. Many previous pieces of research have used this mathematical proportions in dentistry
like, Levin in 1978 identified the Golden Proportion between the width of central incisor, lateral
incisor and the canine.4 The golden proportion is founded to be a reliable predictor for determining the
width of the maxillary central incisors.10 In 1993, Preston presented that 17% of his study samples had
a golden proportion between the width of the maxillary central and lateral incisors.8
On the other hand, other authors found that the golden proportion did not exist between the
widths of the maxillary anterior teeth.2,9,11
In this study, relative proportions of central and lateral incisors and canines’ dimensions were
recorded according to the golden proportion of 1.618 and no relationship was found. So, the results of
the current study concurred with previous studies, that golden proportion did not exist in the study
sample of Chhattisgarh region, similar to the results of a study carried out by Wolfart et al., 2006, who
reported a width-to-length proportion of 82%. 12
The rule of the Golden Proportion in dentistry is as follows: The width of the maxillary
anterior teeth from the frontal view shows that the visible width of maxillary lateral incisor is 62% of
central incisor and the visible width of canine is 62% of lateral incisor.
Gillen et al.9 found no correlation existing between tooth dimension and Golden Proportion.
Although in their study the values of tooth width were not measured from frontal view as the theory
implies –

Tiwari P. et al: Golden Proportion In Population of Chhattisgarh Region
The JPDM I Vol 1 I Issue 1 and 2 I 2020 70
The Golden percentage was proposed as a simple and objective tool to assess dental aesthetic
measures across the midline, and the regressive proportions.13 The largest study done on the Golden
Proportion involved 376 dental students in Jordan. The authors found that average ratio of the
maxillary central incisor, the lateral incisor, and the canine was 1.53:1:0.8.14 The golden section occurs
in a higher proportion between the Lateral incisor and Central Incisor, than between the Canine and
the Lateral Incisor. The average proportion in our study obtained for canine and lateral incisor is 0.84
in females and 0.81 in males, and for the lateral incisor and central incisor proportion found is 1.51 in
females and 1.45 in males, so, in comparison with this study done by Snow SR13 in 1999, we found a
greater difference between the proportion of teeth studied and the golden proportion. Therefore, these
results do not prove that the Golden Proportion would be the average proportion characteristic for this
group of teeth. The variation of views among the current studies and previous studies could be
explained due to the lack of the standardization of the protocol used to evaluate the gold proportion.
Besides, the differences in racial characteristics might influence such variation.15
Many articles have showed that the Golden Proportion was not seen in a majority of observed
aesthetic smiles. In the current study the existence of the golden proportion was found to be nearly
similar in the left and right side and for both genders. This was also seen in other studies done on
golden proportion.16,17 It is clear from the above mentioned result that individual variations are not
seen in the Golden Proportion as the width of teeth perceived in maxillary anterior region on both
sides are nearly the same unless some malformation or deformity is seen.18,19 Results of the current
study have shown that Golden Proportion was not present between the widths of the maxillary anterior
teeth in individuals who had an aesthetic smile. This may be mainly due to individual variations in
each individual. Genetics also plays a major role in tooth sizes. Change in environment and lifestyle
from childhood also may affect the size of the teeth and development of the facial soft tissues. Many
studies reported that to produce a satisfactory appearance instead of concentrating on a single ratio,
such as the Golden Proportion, other ratios reflecting harmony among tooth lengths should be
considered.7,11,20 Further research on this topic is required to obtain clarity on this matter.
Conclusion Results of the current study have shown that golden proportion was not present between the widths of
the maxillary anterior teeth in individuals who had an aesthetic smile. This may be mainly due to
individual variations in each individual. Genetics also plays a major role in tooth sizes. Esthetics in
dentistry cannot be justified mathematically; individuals should not be standardized in the same way
as suggested by other authors earlier also.
Although we dentists should follow some fundamental guidelines in esthetic treatment planning, it
should be acknowledged that esthetics varies greatly from person-to-person. It is, therefore, important
to consider the dento-facial specificities of each individual and the various natural teeth proportions
during restoration or replacement of the maxillary anterior teeth. In addition, individual cultural
characteristics and perceptions of beauty must be considered.
Change in environment and lifestyle from childhood also may affect the size of the teeth and
development of the facial soft tissues.
Further research on this topic is required to obtain clarity on this matter.
References: 1. Lombardi RE. The principles of visual perception and their clinical application to denture
esthetics. J Prosthet Dent 1973;29:358-82.
2. Ward DH. Proportional smile design using the recurring esthetic dental (red) proportion. Dent
Clin North Am 2001;45:143-54.
3. Morley J, Eubank J. Macroesthetic elements of smile design. J Am Dent Assoc 2001;132:39-45.
4. Levin EI. Dental esthetics and the golden proportion. J Prosthet Dent 1978;40:244-52.

Tiwari P. et al: Golden Proportion In Population of Chhattisgarh Region
The JPDM I Vol 1 I Issue 1 and 2 I 2020 71
5. Snow SR. Esthetic smile analysis of maxillary anterior tooth width: the golden percentage. J
Esthet Dent 1999;11:177-84.
6. Ricketts RM. The biologic significance of the divine proportion and Fibonacci series. Am J
Orthod 1982;81:351-70.
7.Mahshid M, Khoshvaghti A, Varshosaz M, Vallaei N. Evaluation of “golden proportion” in
individuals with esthetic smile. J Esthet Restor Dent 2004;16:185-192.
8.Preston JD. The golden proportion Revisited. J Esthet Dent1993;5:247–251.
9. Gillen RJ, Schwartz RS, Hilton TJ, Evans DB. An analysis of selected normative tooth
proportions. Int J Prosthodont 1994;7:410–417.
10. George S, Bhat V. Inner canthal distance and golden proportion as predictors of maxillary central
incisor width in south Indian population. Indian J Dental Res 2010;21(4):491-495.
11. Rosenstiel SF, Ward DH, Rashid RG. Dentists' preferences of anterior tooth proportion–a web-
based study J Prosthodont 2000;9(3):123-136.
12. Wolfart S, Thormann H, Freitag S, Kern M. Assessment of dental appearance following changes
in incisor proportions. Eur J Oral Sci 2005;113(2):159-165.
13. Snow SR. Esthetic smile analysis of maxillary anterior tooth width: the golden percentage. J
Esthet Dent 1999;11: 177-84.
14. Ali Fayyad M, Jamani KD, Agrabawi J. Geometric and mathematical proportions and their
relations to maxillary anterior teeth. J Contemp Dent Pract 2006;7: 62-70.
15. Hasanreisoglu U, Berksun S, Aras K, Arslan I. An analysis of maxillary anterior teeth: Facial
and dental proportions. J Prosthet Dent 2005;94(6):530–8.
16. Morley J. Smile design--specific considerations. J Calif Dent Assoc 1997;25(9):633-7.
17. Dong J-K, Jin T-H, Cho H-W, Oh S-C. The esthetics of the smile: a review of some recent
studies. Int J Prosthodont 1999;12: 9-19.
18. Bukhary SM, Gill DS, Tredwin CJ, Moles DR (2007) The Influence of Varying Maxillary
Lateral Incisor dimensions on perceived Smile Aesthetics. Br Dent J 2007;203:687-93.
19. Pini NP, de-Marchi LM, Gribel BF, Ubaldini AL, Pascotto RC (2012) Analysis of the golden
proportion and width/height ratios of maxillary anterior dentition in patients with lateral incisor
agenesis. J Esthet Restor Dent 2012;24:402-14.
20. Shrinzad M, Ahmady B. Evaluation of golden proportion of upper anterior teeth in dental
students of Hamedan Dental School-Iran (2003-2004). J Mashhad Dental School 2006;30(3,4): 255-
262.
The JPDM I Vol 1 I Issue 1 and 2 I 2020 72
THE JOURNAL OF PROSTHODONTICS AND DENTAL MATERIALS
The Official e-publication of Indian Prosthodontic Society MUMBAI - NAVI MUMBAI BRANCH
ABSTRACT Dental Impressions can act as a mean for different types of micro-organisms like Hepatitis B, C,
HIV, Mycobacterium, Herpes simplex, MERS-CoV and the recent one SARS-CoV 2, etc. the most
effective way to prevent their spread could be to properly Disinfect them just after taking out of
patient’s mouth. This clinical tip would give an effective way to mange the steps to be followed for
Disinfection of the Impression. It will also provide information of the concentration of usage along
with different available disinfectants.
Keywords: Disinfection, Impression, SARS-CoV 2.
Introduction
In this post COVID-19 era, we should take extra care while handling the impressions from clinic to
laboratory as to prevent the Cross-Infection. Most of the bacterias or Viruses could be inactivated by
various Chemical Disinfectants.1-3 The ideal disinfectants should have these following properties:
• Broad Spectrum Activity
• Act Rapidly
• Non-Corrosive
• Environment Friendly
• Free of Volatile Organic Compounds
• Non-Toxic
• Non-Staining
According to CDC Guidelines, the best method to reduce the viral load from Impressions is
Chemical Disinfection. Various Chemical Disinfectants used are Glutaraldehyde, Sodium
Hypochlorite, Complex Iodophors, Phenols, Chlorhexidine, Alcohols, Quaternary Ammonium
Compounds and Simple Detergents. The second most important point of any disinfectant is the
appropriate application and contact time.4,5 So, the recommended steps for Disinfection of
Impression are as follows
1. Personal protective equipment must be worn.
2. Wash all Impressions thoroughly in running water.
3. Immerse the impression in 5% solution of Sodium Hypochlorite (NaOCl2) for 10 minutes. Ensure
the solution is freshly prepared.
Steps for Disinfection of Impression
Dr. Rathin D. Das1
MDS Prosthodontics Center head at Illusion training and Education Center
Ex Professor and HOD YMT Dental College, Navi Mumbai
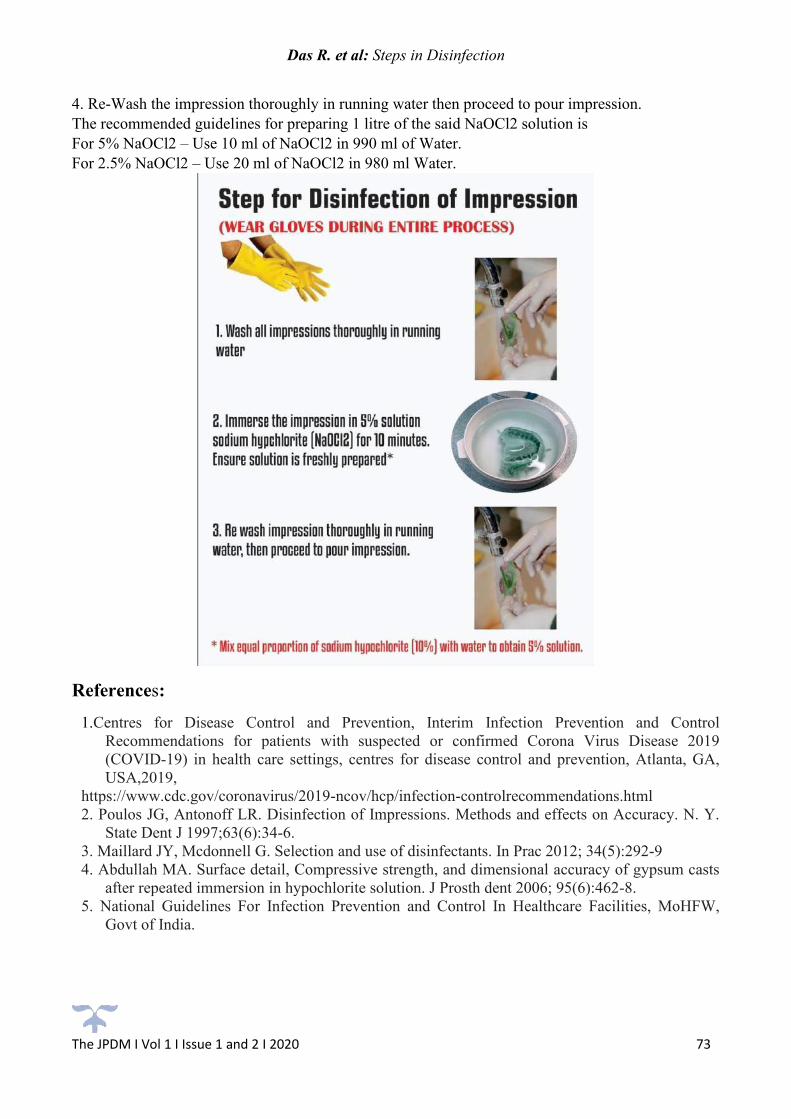
Das R. et al: Steps in Disinfection
The JPDM I Vol 1 I Issue 1 and 2 I 2020 73
4. Re-Wash the impression thoroughly in running water then proceed to pour impression.
The recommended guidelines for preparing 1 litre of the said NaOCl2 solution is
For 5% NaOCl2 – Use 10 ml of NaOCl2 in 990 ml of Water.
For 2.5% NaOCl2 – Use 20 ml of NaOCl2 in 980 ml Water.
References:
1.Centres for Disease Control and Prevention, Interim Infection Prevention and Control
Recommendations for patients with suspected or confirmed Corona Virus Disease 2019
(COVID-19) in health care settings, centres for disease control and prevention, Atlanta, GA,
USA,2019,
https://www.cdc.gov/coronavirus/2019-ncov/hcp/infection-controlrecommendations.html
2. Poulos JG, Antonoff LR. Disinfection of Impressions. Methods and effects on Accuracy. N. Y.
State Dent J 1997;63(6):34-6.
3. Maillard JY, Mcdonnell G. Selection and use of disinfectants. In Prac 2012; 34(5):292-9
4. Abdullah MA. Surface detail, Compressive strength, and dimensional accuracy of gypsum casts
after repeated immersion in hypochlorite solution. J Prosth dent 2006; 95(6):462-8.
5. National Guidelines For Infection Prevention and Control In Healthcare Facilities, MoHFW,
Govt of India.


The JPDM I Vol 1 I Issue 1 and 2 I 2020 74
THE JOURNAL OF PROSTHODONTICS AND DENTAL MATERIALS
The Official e-publication of Indian Prosthodontic Society MUMBAI - NAVI MUMBAI BRANCH
ABSTRACT Conventional implants require osseointegration to be successful, and often this process takes nearly 2-
4 months. If this process is interrupted, it delays the restorative procedures. These implants have
further complications, such as peri-implantitis due to their rough surfaces. Moreover, placing
conventional implants into the atrophic maxilla or mandible requires prior extensive grafting
procedures and sometimes even a sinus lift procedure that can severely contribute to increased
appointments, chances of failures and treatment costs. The technology of Cortico-basal implantology
was developed to overcome these limitations, The Cortico-basal Implant works with the bone
differently compared to the conventional root-form implants. It follows the principles of orthopedic
surgery and traumatology. They also do not require integration into the cancellous bone and are placed
directly into the 2nd and 3rd (distant) cortical bone. Presented here is a case report of a 65- year- old
female where a new and unique smooth- surfaced single-piece cortico-basal implants (with multiunit
abutment) were placed. This enabled us to complete the restoration process within 72 hours using
immediate functional loading protocol. These implants were loaded with definitive screw- retained
prosthesis.
Key Words: Cortico-basal implant; Immediate functional loading; Single- Piece Dental Implants;
Cortical Implantology; Multi-Unit Abutment
Introduction
Current advances in the field of implantology involve aiming to reduce the number of appointments as
well as to simplify dental treatment procedures to increase patient acceptance and to decrease the risk
Immediate Functional Loading of Completely Edentulous Arches with A Screw Retained Definitive Prosthesis on Corticobasal Implants: A Case Report
Dr Anita Gala Doshi1, Dr Vivek Gaur2, Dr Janani Iyer3
1 Private Dental Practice, Prosthodontist,
Mumbai, Maharashtra, India 2 Private Dental Practice,
Etah, Uttar Pradesh, India 3 Reader,
Department of Prosthodontics,
MGM dental college and hospital, Navi Mumbai, Maharashtra, India
5Reader, Department of Public Health Dentistry,
T P C T’s Terna Dental College, Navi Mumbai.

Doshi AG. et al: Immediate Functional Loading of Completely Edentulous Arches
The JPDM I Vol 1 I Issue 1 and 2 I 2020 75
of complications.1-3 This is achieved through immediate loading of dental implants. Immediate
functional loading of oral implants is defined as a situation where the superstructure is attached to the
implants at the time of the surgery or until no more than 72 hours post-surgery and brought in to chewing
function. Immediate loading is desirable if the survival rate of the implant, as well as the outcome of the
treatment, is in accordance with that of conventional loading.4-6 Currently, two approaches towards the
immediate loading of dental implants exist. The first approach is based on the compression screw
principle, where the implant compresses the bone while being inserted into the undersized osteotomy.4,7,8
Lateral condensation of spongy bone is the guiding principle of these implants; Implant stability is
significantly increased by a mechanism that could be regarded as “corticalization” of the spongy bone.
The latter approach involves achieving cortical anchorage of strong and thin body screw implants,
cortico-basal Implants, or basal implants. They are placed into the bone in such a way that the apical
load transmitting threads of the implants are positioned (fixated) directly into the cortical plate distant
(opposite) to the oral cavity.
The basal bone is present throughout our life and is resistant to resorption in the mandible and maxilla
formed by macro trajectories. It is very solid, firm and forms the stress-bearing part of our skeleton.
Implants anchored in this bone, can be loaded (splinted) with fixed tooth restorations immediately. One
of the greatest challenges of restoring missing teeth in the posterior maxilla is due to the jaw bone
resorption that results in deterioration in the quality of the bone post-extraction, thus impeding the
process of implant placement in that region.9 To overcome this, the technology of Cortico-basal implants
is used since; their load transmitting threads are anchored into the native, residual, cortical bone areas.
The Cortico-basal implants not only avoids any additional surgical procedures but also provides a
reliable anchor in cortical bone. This is very helpful even in severely reduced vertical bone heights, and
it can (actually must) be loaded immediately without any waiting period.10-13 The cortical bone provides
excellent retention for these implants. Dental implants anchored in this bone, can be loaded (actually
splinted) with fixed restorations and brought to function immediately.
This paper presents a clinical case for immediate implant loading with a smooth surfaced single-piece
Corticobasal implants (BCES and BCS, Simpladent) with multiunit abutments (BECES® MU) to restore
fully edentulous maxillary and mandibular arches with a definitive screw-retained prosthesis within 72
hours. The protocol is to place six corticobasal implants in the anterior maxilla engaging into the nasal
cortical floor and two corticobasal implants in the posterior maxilla bilaterally engaging the
tuberoterygoid region. In the mandible, it is recommended to use four single-piece corticobasal implants
in the anterior region engaging the lower border (base) of mandible between the mental foramina and
two single-piece corticobasal implants in the distal part of the mandible on both sides engaging the
lingual/vestibular cortical plate.
Case report:
A 65-year-old, healthy female patient with completely edentulous maxillary and mandibular arches
presented to the clinic with a chief complaint of missing teeth in the upper and lower jaw. She expressed
a desire to have her missing teeth replaced with a fixed restorative option. The clinical examination
(Figure 1) showed complete edentulous mandibular and maxillary arches. Radiographic examination
(Figure 2) revealed an atrophic both arches. After discussing the various treatment options with the
patients, such as removable complete dentures or implant supported prosthesis, it was to use a single-
piece immediate loading smooth surface corticobasal implants with multi-unit abutment with screw-
retained prosthesis. Upon obtaining the informed consent of the patient, local anesthesia (lidocaine 2%
with adrenaline 1:100000) was infiltrated. The surgical procedure was performed as per the protocol.14
Following soft tissue cleaning with antiseptic 5% Betadine solution (water-based), a flapless preparation
of osteotomy sites was carried out using the sequential order of calibrated drills recommended by the

Doshi AG. et al: Immediate Functional Loading of Completely Edentulous Arches
The JPDM I Vol 1 I Issue 1 and 2 I 2020 76
manufacturer, cooled with saline solution in external mode at a speed of 27000 rpm. The implant beds
were prepared with the use of a 2.0 mm drill (30 mm long). In the maxilla, two Pterygoid implants of
3.6mm diameter and 23mm and 26mm length were placed on each side. In the anterior region, one
implant 5.5mm in diameter and 14mm in length was placed on each side on the lateral wall of the nose
and two implants of 3.6mm diameter and 17mm length on both sides engaging the floor of the nose. For
the distal mandible, a straight handpiece and for the anterior implants, an angled handpiece 1:1 (blue)
was used to place implants. Two one-piece implants with a diameter of 3.6 mm and a length of 14 mm
were placed with help of an insertion tool (Figure 5) and were anchored into the lingual cortical plate
on both sides, where superior primary stability was achievable. Four Implants with a length of 23 mm
were placed, and anchored in the base of the mandible in the inter-foramina region. The implants were
bent to a favorable position of the internal thread with an angulation adapter (Figures 4, 5 and 6) so that
the screw access holes faced occlusally (Figures 7, 8 and 9). Immediate post-surgery, the final
impressions were made. Open tray multi-unit impression copings were placed onto the BECES® MU
implants, which were then splinted with a low shrinkage self-polymerizing resin. This ensured an
accurate transfer without accidental displacement of the impression copings. An open tray impression
was made with a rigid polyvinyl siloxane material to capture the positions of the implants and the soft
tissues. following this, jaw relation was recorded. A metal framework of Co-Cr-Alloy was fabricated,
and tried on the next day of implant placement (Figure 10). The bite, the vertical and the sagittal
relationship as well as the aesthetic appearance, were checked at this stage. Definitive metal fused to
ceramic prosthesis was screwed in onto the implants day after that is within 72 hours of implant
placement. It was possible to give screw-retained restoration with the advantage of retrievability due to
the use implants with MU abutments. The final tightening of all screws was done at 25N torque with
each implant. (Figure 12, 13). Access holes were blocked with Teflon and filled with composite resin
(Figure 14, 15). Treatment was completed with high patient satisfaction (Figure 16, 17). Following the
principles of corticobasal implantology, occlusion developed was similar to complete denture occlusion,
avoiding anterior contact in centric relation and in lateral excursion. This eliminates anterior patterns of
chewing and thereby, extruding forces on distal implants is avoided. The patient was seen every month
for the first six months, with special consideration to the occlusion and hygiene (the pontics were
relieved from gingival contact and there were open embrasures for purposes of cleaning). Thereafter,
the patient was followed up every six months for clinical and radiographic follow-ups for 3 years
(Figures 11 and 12).
Figure 1. Clinical intra-oral examination Figure 2. Radiographic pre-operative view.

Doshi AG. et al: Immediate Functional Loading of Completely Edentulous Arches
The JPDM I Vol 1 I Issue 1 and 2 I 2020 77
Figure 3: Implant placement Figure 4. Bending of implants
Figure 5. Radiographic view post implant placement
Figure 6. Impression post splinted with pattern resin and before pick-up impression
Figure 7. T base placed for metal trial

Doshi AG. et al: Immediate Functional Loading of Completely Edentulous Arches
The JPDM I Vol 1 I Issue 1 and 2 I 2020 78
Figure 8. Metal try-in
Figure 9. Final prosthesis
Figure 10. Pre and post-operative images
Figure 11. 1-year post-operative radiograph

Doshi AG. et al: Immediate Functional Loading of Completely Edentulous Arches
The JPDM I Vol 1 I Issue 1 and 2 I 2020 79
Figure 12. 3-year post-operative radiograph
Discussion Cortico-basal Implantology is currently the most favored and trending treatment modality in the
field of dentistry owing to the fact that it is a minimally invasive technique. This technique is very
patient- friendly since it aims towards restoring the function and form along with aesthetics in the
edentulous maxilla and mandible. This technique is more advantageous in atrophic jaws where the
entire treatment can be fast-tracked and also avoid grafting, which increases treatment time with
unpredictable results.15-17 The Cortico-basal implant is anchored or engaged cortically by the surgeon
into the dense basal (2nd cortical) bone, and the process of establishing this anchorage has been termed
as “Osseo-fixation”. However, for primary stability, i.e., for the treatment’s success, the macro-
mechanic anchorage (Osseo-fixation) in the 2nd or 3rd cortical is imperative.18 Thereafter, a cross arch
rigid splinting is done with the help of a prosthetic framework within 3 days that can help promote
biological stability / osseointegration after remodeling of the bone within 6 months. Macro retention can
be increased by tilting the implants. Cortico-basal implantology is based on the principle of engaging
the basal bone from the nasal floor, maxillary sinus floor, walls of sinus, septa of sinus, wall of nasal
cavity, palatal bone, crest of alveolar bone, pterygoid bone and zygomatic bone via aggressive threads
that promote enhanced primary stability thus improving functional loading as well as through the smooth
and small peri-mucosal penetration that helps resist infection.
It is reported in the literature that bicortical anchorage, i.e., engagement into the cortical bones on
both the cervical and lateral sides, demonstrated better results when measured by resonance frequency
analysis.19 The inter-foraminal region at the base of the mandible (2nd cortical bone) is accessible with
long implants and lingual cortical engagement is more predictable since the bone is present in the
compressive stress zone. Hence it has a greater predilection towards remodeling thus achieving the
tenting effect. The guidelines involved in keeping a defined and bilateral balanced prosthetic situation
(loading) include that only when a bilaterally identical anterior AFMP-angle (Planas’ Masticatory
Functional Angles) is present, the chewing activity of the patient will be equal on both sides. Only if
balance is present on both the sides of the distal mandible, will the development of a preferred chewing
side be avoided. Otherwise. the side which is balanced during regular chewing, will be preferred sooner
or later.
Peri-implantitis has been defined as a disease that is more severe and is defined as a more profound
inflammatory lesion characterized by a deepened peri-implant pocket and loss of supporting bone
around a functional implant. In analogy to gingivitis and periodontitis affecting the periodontium of
natural teeth, the inflammation and destruction of soft and hard tissues surrounding dental implants is
termed as mucositis and peri-implantitis.20 One of the primary drawbacks or limitations with regard to
the use of conventional rough surface implants is the accompanying peri-implantitis disease, and
currently, no treatment options21 are available to address it. However, this disease usually stops as it
approaches the basal (i.e. resorption resistant) bone areas and since Corticobasal implants being smooth
Doshi AG. et al: Immediate Functional Loading of Completely Edentulous Arches
The JPDM I Vol 1 I Issue 1 and 2 I 2020 80
surface implants are anchored into the basal bone, peri-implantitis cannot occur, which is one of the
major advantages associated with the use of corticobasal implants.
Conclusion
It can be inferred from the results of this case that Cortico-basal implants can be the treatment of choice
that can be successfully selected while treating the atrophic maxilla and mandible. In our case, we
achieved excellent results with regard to the immediate functional loading protocol. Furthermore, it
presents as a good alternative to conventional implantology where applicable, and the protocol is very
patient- oriented and friendly.
References:
1. Berczy K, Laszlo Z, Gondocs G et al. Changes of trends in the size of the dental implants in
recent years Part 1. The role of short implants in dental implantology The literature review.
Fogorv Sz 2016; 109: 136-140.
2. Schlegel D. [Dental implantology--a review of the literature]. Dtsch Zahnarztl Z 1974; 29: 176-
186.
3. Chattman R. Implantology: history and review. Bull Plainfield Dent Soc 1970; 2: 15-19.
4. Cao ZL, Li X, Lin LJ, Chen YH. Immediate or delayed loading protocols for two-implant
mandibular overdentures: A systematic review and meta-analysis of randomized controlled trials.
J Prosthet Dent 2020.
5. Abboud M, Rugova S, Orentlicher G. Immediate Loading: Are Implant Surface and Thread
Design More Important Than Osteotomy Preparation? Compend Contin Educ Dent 2020; 41:
384-386.
6. Gupta G, Gupta DK, Gupta N et al. Immediate Placement, Immediate Loading of Single Implant
in Fresh Extraction Socket. Contemp Clin Dent 2019; 10: 389-393.
7. Baruffaldi A, Baruffaldi A, Baruffaldi M et al. A suggested protocol to increase the accuracy of
prosthetic phases in case of full-arch model-free fully guided computer-aided implant placement
and immediate loading. Oral Maxillofac Surg 2020; 24: 343-351.
8. Levin BP. Immediate implant loading of single and multiple implants: where are we now. Alpha
Omegan 2005; 98: 22-33.
9. Lee SP, Paik KS, Kim MK. Anatomical study of the pyramidal process of the palatine bone in
relation to implant placement in the posterior maxilla. J Oral Rehabil 2001; 28: 125-132.
10. Ihde S, Sipic O. Esthetic Indication for Dental Implant Treatment and Immediate Loading (3).
Case Report and Considerations Regarding the Aspect of the Patient's Right to Self-
Determination in Medical Decision-Making. Ann Maxillofac Surg 2020; 10: 213-216.
11. Ihde S, Sipic O. Functional and Esthetic Indication for Dental Implant Treatment and Immediate
Loading (2) Case Report and Considerations: Typical Attitudes of Dentists (and their Unions)
toward Tooth Extractions and the Prevention of Early, Effective, and Helpful Dental Implant
Treatment in the European Union. Ann Maxillofac Surg 2019; 9: 470-474.
12. Ihde S, Sipic O. Dental Implant Treatment and Immediate Functional Loading (1). Case Report
and Considerations: Extended Treatment Options Using the Strategic Implant(R) and Indications
and Objectives for Comprehensive Dental Implant Treatment. Ann Maxillofac Surg 2019; 9:
465-469.
13. Ihde S, Palka L, Gaur V, Ihde A. Critical Appraisal Regarding the Publication "Implant Survival
between Endo-Osseous Dental Implants in Immediate Loading, Delayed Loading, and Basal
Immediate Loading Dental Implants: A 3-Year Follow-Up" as Published in Ann Maxillofac Surg

Doshi AG. et al: Immediate Functional Loading of Completely Edentulous Arches
The JPDM I Vol 1 I Issue 1 and 2 I 2020 81
2017;7; 237-44, by the Authors R. Gharg (Corresponding Author), Neha Mishra, Mohan
Alexander, Sunil K. Gupta. Ann Maxillofac Surg 2018; 8: 101-107.
14. Gaur V DA, Ihde S, Fernandes G, Lysenko V “Immediate Loading of Implants in the Partially
Edentulous Maxilla: A Case Report of a Novel Technique with Strategic Implants .”. IOSR
Journal of Dental and Medical Sciences (IOSR-JDMS) (2018); 17: : 34-40.
15. Liu Z, Yuan X, Fernandes G et al. The combination of nano-calcium sulfate/platelet rich plasma
gel scaffold with BMP2 gene-modified mesenchymal stem cells promotes bone regeneration in
rat critical-sized calvarial defects. Stem Cell Res Ther 2017; 8: 122.
16. Fernandes G, Yang S. Application of platelet-rich plasma with stem cells in bone and periodontal
tissue engineering. Bone Res 2016; 4: 16036.
17. Fernandes G, Wang C, Yuan X et al. Combination of Controlled Release Platelet-Rich Plasma
Alginate Beads and Bone Morphogenetic Protein-2 Genetically Modified Mesenchymal Stem
Cells for Bone Regeneration. J Periodontol 2016; 87: 470-480.
18. Vivek Gaur AD, Stefan Ihde, Gabriela Fernandes . . Immediate Loading of Edentulous
Mandibular Arch with Screw Retained Final Prosthesis on Strategic Implants® With Single
Piece Multi Unit Abutment Heads: A Case Report. BAOJ Dentistry (2018) 4:.
19. Wang K, Li DH, Guo JF et al. Effects of buccal bi-cortical anchorages on primary stability of
dental implants: a numerical approach of natural frequency analysis. J Oral Rehabil 2009; 36:
284-291.
20. V Sequeira MT, V Abhyankar, G Fernandes. Prevention of Peri-Implantitis: A Narrative Review.
. J Dent Oral Care Med 2018.; 4: 106,.
21. Fernandes G, Vanyo ST, Alsharif SBA et al. Strontium Effects on Human Gingival Fibroblasts. J
Oral Implantol 2019; 45: 274-280.

The JPDM I Vol 1 I Issue 1 and 2 I 2020 82
THE JOURNAL OF PROSTHODONTICS AND DENTAL MATERIALS
The Official e-publication of Indian Prosthodontic Society MUMBAI - NAVI MUMBAI BRANCH
ABSTRACT In complete denture prosthodontics, instability of lower denture is most common problem faced due
to long term edentulism. Various factors affect the stability of the denture, one of them being teeth
placed in proper position. Arrangement of artificial teeth in neutral zone and recording the correct
contour of the polished surface will reduce the interferences of teeth while functional movements.
Correct polished surface recording form favorable angle with cheek, tongue and lip. Teeth placed in
neutral zone enhances stability by equalizing forces exerted by muscles of tongue on one side and
muscles of cheek and lip on the other side. Different techniques and materials are used to record the
Neutral zone. The aim of this article is to understand this technique by practical implication in the
described case series.
Introduction
One of the major difficulties in complete denture wearer patient is the poor stability of the
mandibular denture. Mandibular ridge resorption is 4 times greater than that of maxilla.1–5 The denture
bearing area of maxilla is 24 cm2 and 14 cm2 in mandible.6 Presence of mobile tissues at the floor of
the mouth and tongue on the other side compromises the stability of the mandibular denture.7 The
potential space between the lips and cheeks on one side and tongue on other ;that area or position
where the force between the tongue and cheeks or lips are equal is called as “NEUTRAL ZONE”. It
is also referred as Dead space, Stable Zone, or Zone of Minimal Conflict.8,9
Sir Wilfred Fish in 1933 brought to the notice the importance of polished surface on stability
of the denture. Recording the correct contour of the polished surface and arrangement of artificial teeth
in neutral zone will reduce the interferences of teeth while functional movements and the muscular
forces from both sides will be equalized; which in turn will help in seating the denture in place.10 It is
indicated in patients with resorbed mandibular ridges and compromised neuromuscular control. The
aim is to fabricate a denture which is in harmony with the facial musculature to increase the stability
and retention.9,11
Case Report 1 A female patient aged 57 years reported with the chief complaint of loose mandibular denture. Patient
was wearing the same denture for last 7 years. On examination, hyperactive mentalis muscle activity
Neutral Zone: A Novel Approach for Resorbed Ridge Management - A Case Series
Dr Ankita Savaliya1, Dr Janani Iyer2, Dr Jyoti Nadgere3
1PG Prosthodontics,
2Professor, 3Professor and HOD,
Department of Prosthodontics and Crown and Bridge,
MGM Dental College and Hospital, Navi Mumbai
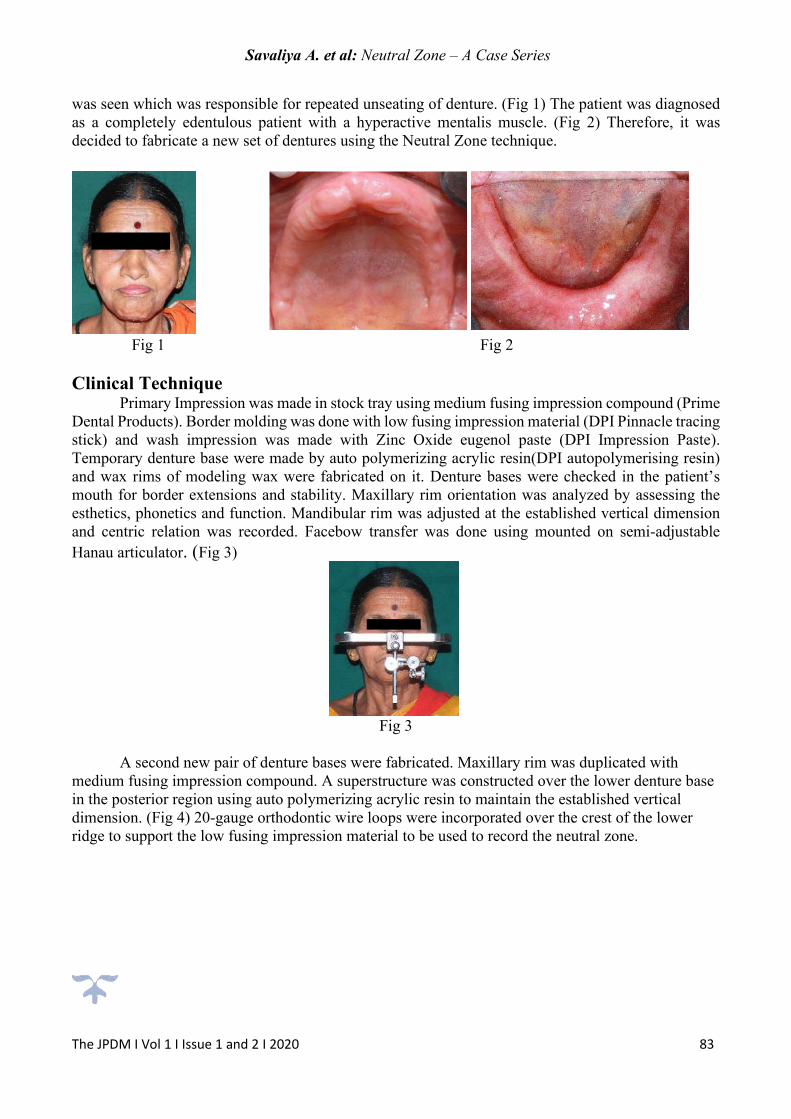
Savaliya A. et al: Neutral Zone – A Case Series
The JPDM I Vol 1 I Issue 1 and 2 I 2020 83
was seen which was responsible for repeated unseating of denture. (Fig 1) The patient was diagnosed
as a completely edentulous patient with a hyperactive mentalis muscle. (Fig 2) Therefore, it was
decided to fabricate a new set of dentures using the Neutral Zone technique.
Fig 1 Fig 2
Clinical Technique Primary Impression was made in stock tray using medium fusing impression compound (Prime
Dental Products). Border molding was done with low fusing impression material (DPI Pinnacle tracing
stick) and wash impression was made with Zinc Oxide eugenol paste (DPI Impression Paste).
Temporary denture base were made by auto polymerizing acrylic resin(DPI autopolymerising resin)
and wax rims of modeling wax were fabricated on it. Denture bases were checked in the patient’s
mouth for border extensions and stability. Maxillary rim orientation was analyzed by assessing the
esthetics, phonetics and function. Mandibular rim was adjusted at the established vertical dimension
and centric relation was recorded. Facebow transfer was done using mounted on semi-adjustable
Hanau articulator. (Fig 3)
Fig 3
A second new pair of denture bases were fabricated. Maxillary rim was duplicated with
medium fusing impression compound. A superstructure was constructed over the lower denture base
in the posterior region using auto polymerizing acrylic resin to maintain the established vertical
dimension. (Fig 4) 20-gauge orthodontic wire loops were incorporated over the crest of the lower
ridge to support the low fusing impression material to be used to record the neutral zone.

Savaliya A. et al: Neutral Zone – A Case Series
The JPDM I Vol 1 I Issue 1 and 2 I 2020 84
Fig 4
Patient was made to sit in an upright position and the duplicated maxillary rim was inserted in
the patient’s mouth. It was reassessed for occlusal plane and lip support. Low fusing impression
compound was tempered in hot water bath and adapted over the lower denture base around the
supporting wire loops and placed in the patient’s mouth.12
Patient was then instructed to perform the following series of actions for 10 minutes:
1. To have a sip of warm water and swallow.
2. Take frequent sips of water.
3. Pout and smile, grin, lick the upper lip and purse the lips (Fig 5).
. Patient is then told to talk aloud, pronounce the vowels and count from 60 to 70.
Fig 5
A wash impression is then made using soft liner(D-Soft tissue conditioner) by repeating all the above
movements (Fig 6).12,13
Fig 6
Neutral zone impression was seated on the master cast. Orientation grooves were carved in the ledge
area of the cast, 2 on the buccal side and one in the lingual area. Boxing of the master cast with boxing
wax was done. A thin layer of Separating media (Sodium alginate) was applied over the cast and

Savaliya A. et al: Neutral Zone – A Case Series
The JPDM I Vol 1 I Issue 1 and 2 I 2020 85
impression plaster was poured to form indexes. Buccally the indexes were separated at the midline for
easy removal. Lingually the index was fabricated in single piece (Fig 7). The indexes were labelled
according to their position and checked for accurate placement. A new denture base was fabricated
over the mandibular master cast. The indexes were seated in position and molted modelling wax was
poured in the space between the indices forming a new occlusal rim. Semi anatomic teeth were selected
according to SPA factor and teeth arrangement was done confining to the space and it was rechecked
by placing the plaster indices in place (Fig 8).14,15 Non balanced(Organic) occlusal scheme was
followed.
Fig 7 Fig 8
Try in was done and centric relation, esthetics and phonetics were verified. Neutral zone verification
was done during try in stage by flowing light body addition silicone (Flexceed light body) on polished
surface of upper and lower trial denture and asked patient to do all the movements. (Fig 9)
Fig 9
After all the movements exposed region of wax were removed and Patients approval was taken.
Denture was processed with heat cure acrylic resin by compression molding technique. After finishing
and polishing denture insertion was done and minor occlusal adjustment were made by selective
grinding technique. Patients follow up was done after 24 hours and minor modification was done (fig
10).
Fig 10
Case Report 2

Savaliya A. et al: Neutral Zone – A Case Series
The JPDM I Vol 1 I Issue 1 and 2 I 2020 86
A female patient aged 56 years reported with the chief complaint of ill-fitting lowered denture. Patient
was wearing the same denture for last 4 years. On examination, mandibular ridge resorption was seen
(Fig 1) Mandibular ridge was narrow in width with reduced height. Patient was diagnosed as
completely edentulous maxillary and mandibular ridges with moderate resorption of mandibular arch
Therefore, it was decided to fabricate a denture using a Neutral Zone technique.
Fig 1
Clinical Technique The primary impression, Final impression and Jaw relation was taken conventionally as described in
the previous case.
Lower mandibular denture base was prepared to record neutral zone same as described previously.
Patient was instructed to do all the movements as described in the previous case (Fig2)
Fig 2
In this case we used Zinc Oxide eugenol paste as a wash impression material to record the neutral
zone. (DPI Impression Paste) (Fig 3)

Savaliya A. et al: Neutral Zone – A Case Series
The JPDM I Vol 1 I Issue 1 and 2 I 2020 87
Fig 3
Teeth arrangement, Try in and denture insertion was done as described in the previous case. (Fig 4)
Non balanced (Organic) occlusion philosophy was chosen for this patient.
Fig 4
Discussion Neutral zone philosophy is well described in the literature to achieve stability and retention in
a severely resorbed cases.16 Various methods that can be used to record the neutral zone are
swallowing, phonetics, sipping of warm water, slicking and pursing upper lip smiling, whistling,
protruding tongue, opening and closing of mouth, blowing air and exercise movement of lip, cheek,
tongue and facial muscle. We used Phonetics and swallowing methods to record neutral zone as it
activates all the muscle involved in. Lott and Levin suggested that reading interesting topic loudly and
rapidly is the ideal method as this causes muscles to be increasingly strained, and saliva secretion
increases which will result in more swallowing action. This will record more natural movements of
muscle as it reduces the patient’s focus on the occlusal rim. Tench proposed the use of thermoplastic
low fusing impression compound material to record neutral zone as it has the advantages of being
easily available, ease of manipulation and low cost.17Low fusing impression compound is most
commonly used to record tissue while functional manipulation as in border molding to record
vestibule; hence we used this material to record neutral zone. Other materials that can be used are
tissue conditioners, modelling wax, light cure resins, silicone and auto-polymerizing acrylic resin.
Modelling wax is initially stable but gets distorted after some time, hence it is not used routinely.15,18
Resin (light cure / acrylic) can be used but it causes irritation due to residual monomer content. Tissue
conditioner, addition silicone (Light body), zinc oxide eugenol paste can be used as a wash impression
material. We used tissue conditioner and zinc oxide eugenol paste as a wash impression material

Savaliya A. et al: Neutral Zone – A Case Series
The JPDM I Vol 1 I Issue 1 and 2 I 2020 88
because of its adequate flow and slow setting time of the material. These materials can be used to
record neutral zone or as materials for wash impressions of neutral zone.19 The material should have a
body; so that it can stay over the denture base with wire as a supporting medium; And sufficient
viscosity so that oral musculature can shape it in proper contour and dimension via the functional
muscle movements. Whichever material is used two factors are mandatory 1) maintain the established
vertical dimension 2) slow setting time; so that the patient gets adequate time to mold it. For index
fabrication silicone, stone, plaster, or modeling plastic impression compound can be used. We used
dental plaster because of its rigidity, ability to record minute detail and ease of manipulation and
availability. Indexing helps in preservation of recorded neutral zone.20–22 Verification of neutral zone
at try in stage is an important step. Impression of an external surface (labial, buccal and lingual)
determine the correct contour, thickness and shape of the polished surface of the denture. Dentist or
the technician has a tendency to wax up the external surface of denture during wax up of the trial
denture. By making an impression of the external surface; the exposed areas need to be cut off or
reduces so as to maintain our neutral zone contour. Zinc oxide eugenol or light body addition silicone
can be used in 2 steps for this procedure. First buccal and labial surface is recorded and secondly
lingual surface is recorded. This procedure has two advantage 1)It forms a ledge lingually in the lower
anterior region; it should be replicated in final denture as tongue sits on this ledge and it keeps the
denture in position.2)External impression fills up the denture spaces and cheeks can easily push the
food towards the occlusal surface; hence reduces or eliminates food accumulation on the buccal aspect.
This technique is contraindicated in patients with long term edentulism as the tongue size increases
results in macroglossia and causes unseating of the lower denture. In severe neuromuscular
incoordination.10,23
Conclusion Atrophic mandibular ridges with poor denture stability and discomfort is the major problem in
complete denture prosthodontics. Neutral zone impression technique is highly effective in such cases.
This impression technique utilizes muscle forces to record the neutral zone. This technique defines the
polished surface of the denture and accurately place the teeth in the stable zone. It increases the stability
of the denture, esthetics and comfort of the patient. The neutral zone technique is also used in patient
with partial glossectomy, motor nerve damage, mandibular resection which have led to atypical
movement and less favorable denture bearing area. This technique requires extra clinical appointment
of the patient and chair side working time. Accurate methodology and material used improves
masticatory efficiency and prognosis of the case.
References: 1. Wical E, Swoope C. Studies of residual ridge resorption. Part I. Use of panoramic radiographs for
evaluation and classification of mandibular resorption. J Prosthet Dent.1974;32(7):7-12.
2. Wical E, Swoope C. Studies of residual ridge resorption. Part II. The relationship of dietary
calcium and phosphorus to residual ridge resorption. J Prosthet Dent.1974;32(7):13-22.
3. Saunders TR, Desjardins RP, Gillis RE. The maxillary complete denture opposing the mandibular
bilateral distal-extension partial denture:Treatment considerations. J Prosthet Dent. 1979;41(2).
4. Ortman LF, Hausmann E. osteopenia and residual ridge resorption. J Prosthet Dent.1989;61(3)
:321 5.
5. Qiufei X, Narhi T, Nevalainen JM, Wolf J, Ainamo A. Oral status and prosthetic factors related to
residual ridge resorption in elderly subjects. ACTA odontol scand.1997;55(24).
6. Klemetti E. A review of residual ridge resorption and bone density.J Prosthet
Dent.1996;75(5):512-514.

Savaliya A. et al: Neutral Zone – A Case Series
The JPDM I Vol 1 I Issue 1 and 2 I 2020 89
7. Morrow RM, Payne SH. The neutral zone in complete denture. J Prosthet Dent.1976;36(4) :356–
67.
8. Cagna DR, Massad JJ, Schiesser J. The neutral zone revisited : From historical concepts to modern
application. J Prosthet Dent. 2009;101(6):405–12.
9. Porwal A, Dds KS. Current status of the neutral zone : A literature review. J Prosthet Dent.
2013;109(2):129–34.
10. Srivastava V, Gupta NK, Tandan A, Kaira LS, Chopra D. The Neutral Zone : Concept and
Technique.Journal of orofacial research.2012;2(1):42–7.
11. Fahmy FM. . A study dentures of the importance zone in complete. J Prosthet Dent.1990;64 :459–
62.
12. Dds LS, Dds FG, Falahi S, Memarian M. Using neutral zone concept in prosthodontic treatment
of a patient with brain surgery : A clinical report. J Prosthodont Res. 2011;55(2):117–20.
13. Porwal A, Satpathy A, Jain P, Ponnanna AA. Association of Neutral Zone Position with Age ,
Gender , and Period of Edentulism.Journal of prosthodontics; 2016:1-8
14. Kelly E.Changes caused by a removable mandibular partial denture opposing a maxillary
complete denture. J Prosthet Dent. 1972;27(2):140–50.
15. Kishor K, Vikram S, Vero N, Ahmed H. Novel registration technique to register neutral zone. J
Oral Biol Craniofacial Res. 2012;2(3):198–202.
16. Gupta KL, Agarwal S. Salvation of a severely resorbed mandibular ridge with a neutral zone
technique.Indian journal of dental research. 2011;22(6):30–2.
17. Ohkubo C, Hanatani S, Hosoi T. Neutral zone approach for denture fabrication for a partial
glossectomy patient : A clinical report. J Prosthet Dent .2000;84(4),3–6.
18. Jain C, Goel R, Kumar P, Singh HP. CASE REPORT Neutral Zone approach for severely atrophic
ridges ; Avenues beyond implants and surgeries – A Case Report. International journal of clinical
dental science.2011;(August)2(3).
19. Suzuki Y, Ohkubo C, Hosoi T. Implant Placement for Mandibular Overdentures using the Neutral
Zone Concept.Prosthodont Res pract.2006;109–12.
20. Wee AG, Cwynar RB, Cheng AC. Utilization of the Neutral Zone Technique for a Maxillofacial
Patient.Journal of prosthodontics. 2000;9(1):2–7.
21. Yeh Y, Pan Y, Chen Y. Neutral zone approach to denture fabrication for a severe mandibular
ridge resorption patient : Systematic review and modern technique. J Dent Sci. 2013;8(4):432–8.
22. Rashid H, Vohra FA, Haidry TZ, Karmani GD. “stabilizing mandibular complete dentures using
the neutral zone impression technique.” J Pak Dent Assoc.2013;22(02):154–159.
23.Beresin V,Schiesser F. The neutral zone in complete dentures. J Prosthet Dent
.2006;(February);95(2):93–100.

The JPDM I Vol 1 I Issue 1 and 2 I 2020 90
THE JOURNAL OF PROSTHODONTICS AND DENTAL MATERIALS
The Official e-publication of Indian Prosthodontic Society MUMBAI - NAVI MUMBAI BRANCH
ABSTRACT Ceramic veneers are indicated in a wide variety of cases, such as correcting malalignment, diastema,
tooth defects and tooth discolouration. Patient esthetics drastically changes even after minor alteration
of shape, shade, size and position of teeth. This can be achieved by using diagnostic wax-up and
aesthetic pre evaluative temporaries. Esthetic pre-evaluative provisional prepared from the diagnostic
wax-up permits the dentist and the patient to evaluate the appearance of the final restorations during
smile and function. This paper describes the esthetic rehabilitation and smile designing of a case which
has multiple spaces in upper anterior teeth.
Introduction The importance of cosmetic smile to the psychosocial well-being of an individual has been
well established.1 In an esthetic conscious society, ‘beautiful smile’ tends to create a perception of
more confident, successful and a good looking individual2. Smile contributes 47% of the overall
dentofacial attractiveness.3 Esthetics and function should be in harmony, creating restorations that are
indistinguishable from its natural counterpart.2
Advent of Lithium di-silicate and bonding protocols led to a conservative approach to correct
the appearance and unusual position of anterior teeth by minimising the amount of tooth preparation.4
All ceramic veneers are preferred when major corrections in colour and form of the tooth is to be done
because of its better strength after bonding, good marginal fit, biocompatibility and high esthetic
value.1,4
The following case focuses on significance of diagnostic wax up, use of Provisionals to guide
the tooth preparation and historically acknowledged smile designing principles.
Case Report A male patient of 38 years reported with spaces between his upper teeth and wanted closure of
those spaces. Patient had square facial form with straight profile. (Fig 1) Extra orally smile line was
observed to be medium with adequate lip support. (Fig 2) Intra orally spaces were seen between all six
maxillary anterior teeth. 11 and 21 were mesiopalatally rotated (fig. 3). Gingiva was firm and resilient
Smile Designing Using All Ceramic Laminates Guided Through Aesthetic Pre-Evaluative Temporaries: A
Case Report
Dr Pinak Rathi1, Dr Janani Iyer2, Dr Jyoti Nadgere3
1PG Student,
2Professor, 3Professor and HOD,
Department of Prosthodontics and Crown and Bridge,
MGM Dental College and Hospital, Navi Mumbai

Rathi P. et al: Smile Designing
The JPDM I Vol 1 I Issue 1 and 2 I 2020 91
with stippling of attached gingiva. Diagnosis was made as tooth size jaw size discrepancy causing
spacing.(Fig 4)
Fig 1 Fig 2
Fig 3. Fig 4.
Treatment options given to the patient were, orthodontic treatment to correct the spacing of teeth or
Smile designing with all ceramic laminates. Patient did not wanted to go for orthodontic correction of
teeth and therefore opted for all ceramic laminates.
Extra oral and intra oral smile analysis was done. After detail case history and clinical
examination, diagnostic impressions were made and facebow transfer was done. Diagnostic wax up
was done by using golden proportion as a guide (Fig 5). A putty index was made using condensation
silicone putty (C-silicon lab putty, ZERMAC). Wax up was transferred in the patients mouth using bis
acryl based provisional restorative material (Protemp; 3M-ESPE, St Paul,MN). These provisionals
were used to analyse patient’s esthetics, phonetics and function (Fig 6). Patient was re-evaluated after
2 weeks for comfort and function. Patient consent was recorded for final treatment. Impressions were
made after doing fine corrections of the provisionals intraorally which was to be used as a guide for
the ceramist. Shade selection was done by using spectrophotometer (VITA Easy Shade) by dividing
each tooth in three quadrants.

Rathi P. et al: Smile Designing
The JPDM I Vol 1 I Issue 1 and 2 I 2020 92
Fig 5 Fig 6 Final tooth Preparation was done using the Aesthetic Pre-evaluative Temporaries (APR) as guide.
Facially, grooves of 0.5 mm depth were made using depth cutting bur in 2 planes. Incisal depth grooves
of 1 mm were made. These grooves were highlighted using carbon pencil. The temporaries were then
removed and only the areas which were highlighted by the carbon pencil were reduced using round
ended tapered fissure bur (Fig 7). Remaining tooth structure was left as it is and thus a conservative
approach was followed. The preparation was extended palatally up to incisal 1/3 rd to make a
wraparound preparation design. Chamfer finish line of 0.5 mm depth was given at the level of marginal
gingiva. Finishing of the preparation was done using yellow banded tapered fissure burs. Chemico-
mechanical method of retraction was followed using double cord technique (MEDIPAK “00”) and
25% aluminium chloride (MEDICEPT) as a homeostatic agent. Retraction cord was placed in mouth
for 4 minutes. (Fig 8) Outer cord was removed from the sulcus and impression was made using a two
stage impression technique by Addition silicone impression material. (GC FLEXCEED)
Fig 7 Fig 8

Rathi P. et al: Smile Designing
The JPDM I Vol 1 I Issue 1 and 2 I 2020 93
Impression was poured in type IV gypsum product (Kallabhai) and dies were prepared. (Fig 9). Wax
pattern was fabricated and Lithium di silicate glass ceramic was pressed. Bisque trial of the laminates
was done to check the marginal fit, shape and contour of the laminate and once found satisfactory the
laminates were stained and glazed and made ready for cementation (Fig 10).
Bonding of laminates to the tooth structure was done with light cure adhesive resin cement by
following the below protocol. Adjacent teeth were isolated using Teflon. Etching the tooth surface was
done with 37% Phosphoric acid (GLUMA) for 20 seconds. Simultaneously etching of laminates was
done using 9.6% hydrofluoric acid (Ultradent) for 20 seconds. Frosty Appearance was seen on drying
the tooth and the laminates. A thin layer of bonding agent (Monobond 3M ESPE) was applied on the
etched tooth surface using applicator tip. Silane coupling agent (Primedent) was coated on the etched
laminate surface. Light cure adhesive resin cement was used to lute the laminates (Variolink
IVOCLAIR). Excess cement was removed and the prosthesis was light cured for 30 seconds each.
Dental floss was passed through each embrasure to remove small chunks of excess cement. The
margins of the laminates were finished and polished using yellow banded burs and polishing cups.
Result was a pleasing smile and patient was satisfied with the enhanced look and confident gesture.
(Fig 11, 12) Patient was recalled after 24 hours and then after 7 days to evaluate dentogingival
components and function.
Fig 9 Fig 10
Fig 11
Fig 12

Rathi P. et al: Smile Designing
The JPDM I Vol 1 I Issue 1 and 2 I 2020 94
Discussion The goal of esthetic rehabilitation is to develop a masticatory system where the teeth and the
supporting structures function in harmony as stated by Dawson.5 An attractive smile is a vital asset of
one’s personality. Manipulation of colour shape, line angles, contour, proportion and position of tooth
can be worked to create a pleasing smile.6–10 An appropriate white and pink balance must be
maintained in designing the smile of a patient. Diastema is a very common occurrence and in adults as it can distort the individual’s pleasing
smile.11 Orthodontic correction of spaces or restorative correction or combination of both can be used
to correct the problem of diastema.11,12 In the present case patient was reluctant for orthodontic
treatment and thus wanted a restorative solution for the problem. Closure of diastema with laminates
can result in increased mesiodistal dimensions of the tooth. Therefore, careful planning with the aid of
diagnostic wax up helps in maintaining the intradental proportions of tooth as well as inter dental
proportion of each tooth.12–14 Along with the aid of anatomic wax up, the esthetics and function was
achieved as desired by the patient.
Amendment of dental esthetic inconsistencies demands cautious examination, perfect
treatment planning and good communication between a prosthodontist and the ceramist.9,15 Anatomic
wax up is one of the most important step in designing the smile of an individual.3,9,16 Every tooth has
a unique anatomy and it must be harmonious with the dentofacial complex.10 Proportions of the central
incisor must be esthetically as well as mathematically correct. Various guidelines are proposed for
establishing the correct proportions of anterior teeth, such as Golden Proportion (Lombardi), Recurring
Esthetic Dental proportion (Ward), M proportion and Chu’s esthetic gauge. These ratios help to
determine the height and width of the teeth with respect to each other. Golden proportion
mathematically divides the tooth in the ratio of 1: 1.618 with its adjacent counterpart. This ratio was
achieved by dividing the anterior tooth into grids digitally and wax up was done taking golden
proportion as a guide.
Corrected provisionals which are also called as Aesthetic Pre-evaluative Temporaries (APR)
are used as guide for tooth preparation.3,9,17 The main goal of this technique is to reduce the actual
tooth structure as conservatively as possible.9,16,17 This helps to maintain the enamel layer of the tooth
and enhances the bonding ability of all ceramic laminates to the tooth structure.8–10,17 These
provisionals also act as a guide for the ceramist in fabrications of laminates.
Shade selection is an important step in smile designing.15 Tooth shade is never monochromatic
and therefore should be recorded by dividing the tooth in three parts horizontally.19 Clinical
spectrophotometer is a reliable device to evaluate the shade accurately.19,20 Not only the shade but also
the various characterisations present on the underlying tooth must be noted down and communicated
to the ceramist for its incorporation in the final prosthesis to give a natural appearance to the smile.19,21
Conclusion The smile we create should be esthetic and functionally sound. It is our duty to deliver the best to our
patients, after careful diagnosis and examination. Aesthetic pre evaluative temporaries provides
conservative tooth reduction and helps in better bonding. Even though utilising APT sounds like a
long and time-consuming procedure, it is not—and it is extremely beneficial to the final outcome.
References:
1. Bhuvaneswaran M. Principles of smile design 2020;1–9.
2. Article R. Anterior Teeth and Smile Designing : A Prospective View 2012;2:117–27.

Rathi P. et al: Smile Designing
The JPDM I Vol 1 I Issue 1 and 2 I 2020 95
3. Navigation A. Digital Smile Design for Computer-assisted Esthetic Rehabilitation 2020;1–22.
4. Series C. Smile Designing with Ceramic Veneers.
5. Drive WI. This ebooks is uploaded by dentalebooks . com This ebooks is uploaded by
dentalebooks.com.
6. Brunton P, Aminian A. Tooth preparation techniques for porcelain laminate veneers.
2000;(March 2014):7–10.
7. Cp L, Wh D, Sl E. Predictable and precise tooth preparation techniques for porcelain laminate
veneers in complex cases. 1999;9(1).
8. Dentistry I. Minimally invasive veneers : current state of the art. 2014;101–7.
9. Garcia PP, Goulart R, Gonzaga CC. Digital smile design and mock-up technique for esthetic
treatment planning with porcelain laminate veneers. 2020;8–11.
10. Hari M, Poovani S. Porcelain laminate veneers : A review. 2017;4:187–90.
11. Huang WJ, Creath CJ. The midline diastema: a review of its etiology and treatment. Pediatr
Dent. 1995;17(3):171–9.
12. Bhoyar A. Esthetic Closure of Diastema by Porcelain Laminate Veneers : A Case Report.
People’s J Sci Res. 2011;4(1):47–50.
13. Raj V. Esthetic paradigms in the interdisciplinary management of maxillary anterior dentition
- A review. J Esthet Restor Dent. 2013;25(5):295–304.
14. Giannetti L, Apponi R. Combined Orthodontic and Restorative Minimally Invasive Approach
to Diastema and Morphology Management in the Esthetic Area. Clinical Multidisciplinary Case
Report with 3-Year Follow-Up. Case Rep Dent. 2020;2020:5–9.
15. Farias-neto A, Maria E, Gomes F, Sánchez-ayala A, Sánchez-ayala A, Soares L, et al. Case
Report Esthetic Rehabilitation of the Smile with No-Prep Porcelain Laminates and Partial
Veneers. 2015;2015.
16. Calamia JR, Levine JB, Lipp M, Cisneros G, Wolff MS. Smile Design and Tre a t m e n t P l
a n n i n g With the Help of a C o m p re h e n s i v e E s t h e t i c Evaluation Form.
2011;55:187–209.
17. Reshad M, Cascione D, Magne P, Angeles L. Diagnostic mock-ups as an objective tool for
predictable outcomes with porcelain laminate veneers in esthetically demanding patients : A
clinical report. 2008;
18. Gu G. Porcelain Laminate Veneers : Minimal Tooth Preparation by Design. 2007;51:419–31.
19. Basavanna R, Gohil C, Shivanna V. Shade selection. Int J Oral Heal Sci. 2013;3(1):26.
20. Thomas MS, David K. esthetic smile design with ceramic veneers. 2014;(1):55–8.
21. Porcelain N, Preparation L, Driven A. Approach Driven by a Diagnostic Mock-up.
2004;(1):7–18.


Dental Chair with Unit
DOSHI MARKETING CORPORATION42, Shah Industrial Estate, Ground Floor, Deonar Village Rd, Deonar, Govandi (E),Mumbai - 400 088. Tel. : 2555 9374 / 2555 9383 Email : [email protected]
Exclusive Range of Dental Equipment Instrument Material
Jenin
Surgi Safe
Discover the Perfect Salutationfor your Dental Clinic
Discover the Perfect Salutationfor your Dental Clinic
Your Trusted Partner In Dentistry
Your Trusted Partner In Dentistry

“Nothing is impossible if you put your mind to it”
EDITOR’S OFFICE: Editor: Dr. Naisargi Shah Dept. of Prosthodontics, Terna Dental College, Navi Mumbai.
Contact us: +91 9819238483 +91 8976876779
Mail ID: [email protected]
Mr. Hemant Khot, Chief Technician And Owner
Contact no: +91 99200 30082, +91 79778 66297
EDITOR’S OFFICE :