T4 TimeSaver.NET Help & User Guide - AvanTax Software
240
T4 TimeSaver.NET Guide
-
Upload
khangminh22 -
Category
Documents
-
view
0 -
download
0
Transcript of T4 TimeSaver.NET Help & User Guide - AvanTax Software

T4 TimeSaver.NET Guide

T4 TimeSaver.NET Guide
2/22/2010
All rights reserved

T4 TimeSaver.NET Guide4
© 2010 ELM Computer Systems Inc.
Table of Contents
Foreword 9
Part I Introduction 11
................................................................................................................................... 111 About T4TimeSaver.NET
.......................................................................................................................................................... 11Version Comparison
................................................................................................................................... 142 About ELM Computer Systems Inc.
................................................................................................................................... 153 Technical Support
................................................................................................................................... 154 Receiving Updates
................................................................................................................................... 155 Requesting System Enhancements
................................................................................................................................... 166 Hardware Requirements
................................................................................................................................... 167 License Agreement
................................................................................................................................... 178 Warranty Information
Part II Getting Started 19
................................................................................................................................... 191 Installation
.......................................................................................................................................................... 22Installing Program Updates
................................................................................................................................... 222 Starting the Program
................................................................................................................................... 233 Registration
................................................................................................................................... 244 User Names and Passwords
................................................................................................................................... 255 Main Menu
.......................................................................................................................................................... 25File Menu
.......................................................................................................................................................... 26Edit Menu
.......................................................................................................................................................... 27View Menu
.......................................................................................................................................................... 28Company Menu
.......................................................................................................................................................... 29Forms Menu
.......................................................................................................................................................... 30Tools Menu
......................................................................................................................................................... 31Common Features
.......................................................................................................................................................... 33Setup Menu
.......................................................................................................................................................... 34Reports Menu
......................................................................................................................................................... 35Common Features
.......................................................................................................................................................... 37Windows Menu
.......................................................................................................................................................... 37Help Menu
................................................................................................................................... 386 Toolbar
................................................................................................................................... 397 Use of Special Keys
................................................................................................................................... 398 Special Icons
................................................................................................................................... 409 Split Screen Options
................................................................................................................................... 4010 Input Conventions
................................................................................................................................... 4111 Getting Help
Part III Working with Databases 44
................................................................................................................................... 441 Convert Database

5Contents
5
© 2010 ELM Computer Systems Inc.
.......................................................................................................................................................... 45Special Instructions for T4 TimeSaver Lite
................................................................................................................................... 452 Creating a Database
................................................................................................................................... 463 Opening a Database
................................................................................................................................... 474 Closing a Database
................................................................................................................................... 475 Backup and Restore a Database
................................................................................................................................... 486 Repair Database
Part IV Company Information 51
................................................................................................................................... 511 Creating a Company
.......................................................................................................................................................... 51General
.......................................................................................................................................................... 52Adjustment Options
......................................................................................................................................................... 54CPP/QPP Adjustment Options
......................................................................................................................................................... 55EI Adjustment Options
......................................................................................................................................................... 55PPIP Adjustment Options
......................................................................................................................................................... 56Transfer Over Remittance
......................................................................................................................................................... 56Other Options
......................................................................................................................................................... 57Lock / Disable Ajdustments (Plus & Enterprise Only)
.......................................................................................................................................................... 57Net Pay
................................................................................................................................... 572 Selecting a Company
................................................................................................................................... 583 Editing Company Information
................................................................................................................................... 584 Deleting a Company
................................................................................................................................... 585 Adjust/Unadjust T4 & RL-1 Slips
................................................................................................................................... 606 Unlock all Companies in Database
Part V Entering Slips 62
................................................................................................................................... 621 Add Slips
................................................................................................................................... 622 Delete Slips
................................................................................................................................... 623 Sorting Slips
................................................................................................................................... 624 Selecting Slips
................................................................................................................................... 625 Entering Data
................................................................................................................................... 636 e-Slip Tab
................................................................................................................................... 637 Overriding Calculated Fields
................................................................................................................................... 648 NR4 Input Window
................................................................................................................................... 669 T4 Input Window
................................................................................................................................... 6910 T4A Input Window
.......................................................................................................................................................... 71Electronic Filing Input Window
................................................................................................................................... 7211 T4ANR Input Window
................................................................................................................................... 7412 T4AP Input Window
................................................................................................................................... 7513 T4ARCA Input Window
................................................................................................................................... 7614 T4PS Input Window
................................................................................................................................... 7715 T5 Input Window
................................................................................................................................... 7916 T1204 Input Window
................................................................................................................................... 8017 T5018 Input Window

T4 TimeSaver.NET Guide6
© 2010 ELM Computer Systems Inc.
................................................................................................................................... 8118 T2202A Input Window
................................................................................................................................... 8319 RL1 Input Window
................................................................................................................................... 8620 RL2 Input Window
................................................................................................................................... 8821 RL3 Input Window
................................................................................................................................... 9022 RL8 Input Window
................................................................................................................................... 9123 RL17 Input Window
................................................................................................................................... 9324 RL25 Input Window
Part VI Adjusting T4 & RL-1 Slips 97
................................................................................................................................... 971 Making Adjustments to T4 and RL-1s
................................................................................................................................... 972 Reversing Adjustments
................................................................................................................................... 973 Setting Adjustment Options
Part VII Entering Summary Form Information 99
................................................................................................................................... 991 NR4 Summary
................................................................................................................................... 1012 T4 Summary
................................................................................................................................... 1033 T4A Summary
................................................................................................................................... 1054 T4ANR Summary
................................................................................................................................... 1075 T4AP Summary
................................................................................................................................... 1086 T4ARCA Summary
................................................................................................................................... 1107 T4PS Summary
................................................................................................................................... 1128 T5 Summary
................................................................................................................................... 1149 T1204 Summary
................................................................................................................................... 11510 T5018 Summary
................................................................................................................................... 11611 T2202A Summary
................................................................................................................................... 11712 RL1 Summary
................................................................................................................................... 12013 RL2 Summary
................................................................................................................................... 12214 RL3 Summary
................................................................................................................................... 12415 RL8 Summary
................................................................................................................................... 12516 RL17 Summary
................................................................................................................................... 12617 RL25 Summary
Part VIII Partnership Forms (Plus & EnterpriseVersions Only) 130
................................................................................................................................... 1311 T5013
................................................................................................................................... 1332 RL15
Part IX Producing Reports 135
................................................................................................................................... 1351 A Note on Using Adobe Reader to Print Reports
................................................................................................................................... 1362 Validating Data
................................................................................................................................... 1373 Printing Slips
7Contents
7
© 2010 ELM Computer Systems Inc.
.......................................................................................................................................................... 140Using Serial (Relevé) Numbers on RL Slips
................................................................................................................................... 1414 Printing Summary Reports
................................................................................................................................... 1445 Printing Adjustment Reports
................................................................................................................................... 1456 Printing Edit List Reports
................................................................................................................................... 1467 Printing Company Summary
................................................................................................................................... 1478 Printing Company Filing Status
Part X Electronic Filing 150
................................................................................................................................... 1501 Electronic Filing Preparation
................................................................................................................................... 1532 Instructions for CRA Returns
.......................................................................................................................................................... 154Internet Filing to CRA
................................................................................................................................... 1563 Instructions for MRQ Returns
.......................................................................................................................................................... 157Using Serial (Relevé) Numbers in Electronic Returns
.......................................................................................................................................................... 158Internet Filing to MRQ
......................................................................................................................................................... 159MRQ Internet Filing Limitations
................................................................................................................................... 1594 Filing on CD or DVD
................................................................................................................................... 1605 Filing on Diskette
Part XI Using Tools to Manipulate Data 162
................................................................................................................................... 1621 Merge Companies
................................................................................................................................... 1622 Transfer Companies
................................................................................................................................... 1633 Global Changes
.......................................................................................................................................................... 163Adjustment Options
.......................................................................................................................................................... 164Contact Information
.......................................................................................................................................................... 164Slip Information
................................................................................................................................... 1654 Import Data
.......................................................................................................................................................... 165Import from Excel File
.......................................................................................................................................................... 168Import from XML File
.......................................................................................................................................................... 168Open Excel Templates
................................................................................................................................... 1685 Import User Information from Last Year's T4 TimeSaver
................................................................................................................................... 1706 Convert Databases
................................................................................................................................... 1717 Remove Slips
................................................................................................................................... 1718 Event Viewer
Part XII Using Setup to Configure T4 TimeSaver.NET 174
................................................................................................................................... 1741 User Settings
.......................................................................................................................................................... 174New Company Defaults Page
.......................................................................................................................................................... 174T4 Adjustment Defaults Page
.......................................................................................................................................................... 175Data Entry Pages
.......................................................................................................................................................... 175Electronic Filing Page
.......................................................................................................................................................... 177Options
................................................................................................................................... 1772 User Administration
................................................................................................................................... 1783 Data File Security
................................................................................................................................... 1794 Contribution Rates and Constants
................................................................................................................................... 1795 File Locations

T4 TimeSaver.NET Guide8
© 2010 ELM Computer Systems Inc.
................................................................................................................................... 1806 Change Authorization Code
................................................................................................................................... 1817 Change Your Password
................................................................................................................................... 1818 Edit Setup Files
.......................................................................................................................................................... 181System Settings
.......................................................................................................................................................... 181Paths
.......................................................................................................................................................... 182User Settings
Part XIII Appendices 184
................................................................................................................................... 1841 Data Backup
................................................................................................................................... 1852 Technical Notes
................................................................................................................................... 1863 Common Problems
................................................................................................................................... 1884 Province/Sate Codes
................................................................................................................................... 1895 Country Codes
................................................................................................................................... 1906 Layout of Import FIles
................................................................................................................................... 1917 Headings for Import Files
.......................................................................................................................................................... 192Headings for Company
.......................................................................................................................................................... 193Headings for NR4
.......................................................................................................................................................... 195Headings for T4 & RL1
.......................................................................................................................................................... 198Headings for T4A
.......................................................................................................................................................... 201Headings for T4A -NR
.......................................................................................................................................................... 203Headings for T4AP
.......................................................................................................................................................... 205Headings for T4ARCA
.......................................................................................................................................................... 206Headings for T4PS
.......................................................................................................................................................... 208Headings for T5 & RL3
.......................................................................................................................................................... 210Headings for T1204
.......................................................................................................................................................... 211Headings for T5018
.......................................................................................................................................................... 212Headings for T2200
.......................................................................................................................................................... 216Headings for T2202A
.......................................................................................................................................................... 218Headings for T5013
.......................................................................................................................................................... 222Headings for RL2
.......................................................................................................................................................... 224Headings for RL8
.......................................................................................................................................................... 225Headings for RL15
.......................................................................................................................................................... 229Headings for RL17
.......................................................................................................................................................... 231Headings for RL25
Index 234
Foreword
ELM Computer Systems Inc. would like to than you forusing T4 TimeSaver.NET.
It is because of our clients, both new and returning, thatthis product has become the superior information return
preparation tool that it is today.
Thank you!
9Foreword
© 2010 ELM Computer Systems Inc.

Part I

Introduction 11
© 2010 ELM Computer Systems Inc.
1 Introduction
1.1 About T4TimeSaver.NET
Since its introduction in 1988, T4 TimeSaver has been used by thousands of Canadian businesseseach year to reliably produce CRA and MRQ information returns. Originally written for MS-DOS, T4TimeSaver was rewritten for the Windows environment in 1997 and subsequently updated to run onthe .NET framework in 2007. If you have need of one of our older versions, all T4 TimeSaver releasesfrom 1997 on are available for download from our website:
www.t4timesaver.com
The T4 TimeSaver development team is committed to providing software for producing Canadianinformation returns that is superior to any other system. With that in mind, this newest version of theT4TimeSaver program, T4 TimeSaver.NET, has been rewritten from the ground up to provide a solidfoundation for ongoing product development and simplify the addition of new product features.
New features in the 2009 version of T4 TimeSaver.NET include:· Introduction of T4 TimeSaver Enterprise version with the following enhanced features:
o enhanced reporting and management functionso event viewero create individual PDFs for recipient slipso email PDF slips to recipiento use import to update existing data
· Database backup and restore· Database repair can backup the database before repairing it· Enhancements to improve usefulness at non-standard screen resolution and dpi settings· New forms added: T2200, T2202A (Basic, Plus & Enterprise only); RL-8 and Quebec Partnership
Schedules A, B, C, D & E (Plus & Enterprise only)· Improved awareness of Windows Regional Settings; as in use of the period as the thousands
separator in place of the comma· Vastly improved performance, especially when electronically filing tens-of-thousands of slips!
For more than 20 years suggestions and requests from our clients have helped us continually improveT4 TimeSaver. (THANK YOU! We sure appreciate your help!) No matter how long you've been usingT4 TimeSaver, please let us know if you have an idea that could improve it. While we do not guaranteethat we will include all suggested improvements in T4 TimeSaver, we promise you that we will carefullyconsider each suggestion you make.
1.1.1 Version Comparison
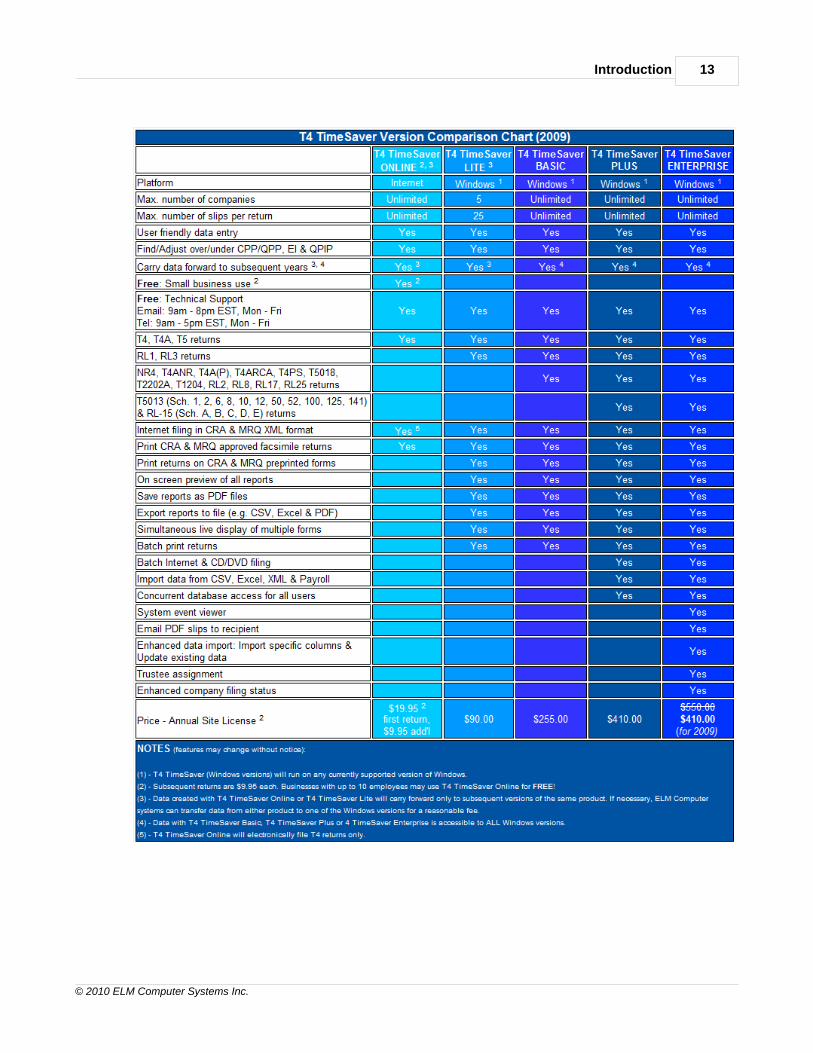
T4 TimeSaver is available in five versions (Online, Lite, Basic, Plus and Enterprise) enabling T4TimeSaver to provide a variety of features that will satisfy the requirements of any firm; no matter howlarge (or how small). Throughout this manual, features that are available only on specific versions ofT4 TimeSaver will be appropriately noted.
T4 TimeSaver Online - Geared toward the smaller business (producing up to 15 slips for 1 or 2companies), T4 TimeSaver Online is our lowest cost solution. Even so, it enables even the smallestbusiness to produce professional T4, T4A and T5 returns. Compatible with any web browser, T4TimeSaver Online lets you work wherever you have Internet access. Because of its intuitive Internetinterface T4 TimeSaver Online is not covered in this manual. If you would like to give T4 TimeSaverOnline a try you can visit the T4 TimeSaver Online website: T4 TimeSaver Online
T4 TimeSaver Lite - Our entry level Windows version, T4 TimeSaver Lite has been designed for firmswith smaller data processing requirements and subsequently not requiring the full versions of T4

T4 TimeSaver.NET Guide12
© 2010 ELM Computer Systems Inc.
TimeSaver. Returns can be prepared for up to five companies, with a maximum of 25 slips of eachtype for each company.
T4 TimeSaver Basic - T4 TimeSaver Basic is the ideal solution for your information return preparationneeds; whether you produce returns for your own organization or for multiple client organizations.Unlimited in the number of returns it can process, T4 TimeSaver Basic can be used to prepare returnsfor even the largest organizations with a minimum of fuss and bother. Databases created with T4TimeSaver Basic are fully accessible by T4 TimeSaver Plus and T4 TimeSaver Enterprise.
T4 TimeSaver Plus - Our most popular package, T4 TimeSaver Plus includes all the features of T4TimeSaver Basic but provides greater flexibility by adding expanded electronic filing, multi-usernetworking, data import and partnership forms. T4 TimeSaver Plus is used by more firms across NorthAmerica than any other T4 TimeSaver version. Databases created with T4 TimeSaver Plus are fullyaccessible by T4 TimeSaver Basic and T4 TimeSaver Enterprise.
T4 TimeSaver Enterprise - T4 TimeSaver Enterprise is an enhanced version of T4 TimeSaver Plusand has been designed to meet the data entry, reporting and management needs of even the largestorganizations. With enhanced reporting and forensic analysis capabilities, T4 TimeSaver Enterprisewill become THE tool of choice for professionals across Canada. For the 2009 tax season, T4TimeSaver Enterprise is available for the same cost as T4 TimeSaver Plus; giving you the chance totest drive its advanced features at a very reasonable price. Databases created with T4 TimeSaverEnterprise are fully accessible by T4 TimeSaver Basic and T4 TimeSaver Plus.
If at any time during the 2009 tax season you find that you require a different version of T4 TimeSaveryou can upgrade or downgrade to a version that better meets your needs. You will be invoiced orrefunded for the price difference, including taxes, between the version you have and the version youare changing to. Shipping charges cannot be refunded on returns. Databases are fully interchangeablebetween T4 TimeSaver Basic, T4 TimeSaver Plus and T4 TimeSaver Enterprise. If you are moving toor from T4 TimeSaver Online or T4 TimeSaver Lite ELM's technicians can import the databases for afee.
Please refer to the following chart to determine which version of T4 TimeSaver will best meet yourneeds.
Introduction 13
© 2010 ELM Computer Systems Inc.

T4 TimeSaver.NET Guide14
© 2010 ELM Computer Systems Inc.
1.2 About ELM Computer Systems Inc.
ELM Computer Systems Inc. was established in 1978 to provide comprehensive InformationTechnology services to small & medium businesses in the Greater Toronto Area. Althoughconcentrating on the GTA, ELM provides reliable remote support and management solutions tobusinesses anywhere in Canada. Our clients include members of the accounting, health, legal andtransportation industries as well as many others. Over the years and through continual training wehave acquired expertise in all aspects of Windows based computing & networking and customsoftware design on systems from handheld to desktop computers. Because our staff has an averageof over 20 years experience we are also often called upon to support older technologies such asNovell and other obsolete software.
Please visit our website to learn more about ELM Computer Systems: www.elmcomputers.com
Here is a sample of the resources available from ELM Computer Systems:
· Onsite and remote support & maintenance of stand-alone computers or entire networks· Consulting services· Custom software
o T4 TimeSaver: The software described in this user guide(www.t4timesaver.com)
o AvanTax: Automobile taxable benefits calculator(www.avantax.ca)
o Handheld data collection for field technicians (www.elmcomputers.com/ELM_Computer_Systems_S100.html)
· ELM Bulletin - Monthly newsletter covering all aspects of business computing(www.elmcomputers.com/ELM_Computer_Systems_Bulletin.html)
If you have any questions about how ELM can help you get the best use out of your computers pleaseuse the contact information provided below.
ELM Computer Systems Inc.502 Gordon Baker RoadNorth York, OntarioL1T 2Z2
Toronto:Toll Free:Fax:
Email:Website:
416 495 1624800 268 3211416 495 0044
Introduction 15
© 2010 ELM Computer Systems Inc.
1.3 Technical Support
As a registered user you may telephone, fax, or e-mail us with your questions about the installationand use of the T4 TimeSaver program.
English Technical Support
English technical support is available by telephone from our Toronto office Monday to Friday from 9amto 5pm ET.English technical support is available by email Monday to Friday from 9am to 8pm ET. Email will beperiodically checked on Saturdays so that emergency situations can be attended to.
English Technical Support Hot Line (GTA):Toll Free:Fax Number:Email:T4 TimeSaver Website:Related Website: AvanTax (automobile taxable benefitscalculator)Corporate Website:
416 495 1624800 268 3211416 495 [email protected]
www.elmcomputers.com
To submit an error log to our technical support team via FTP, select Send Error Log to TechnicalSupport from the Help menu.
French Technical Support
Technical support is available in French from our Montreal office from 9am to 5pm ET.
French Technical Support Hot Line: 514 499 9669
Confidentiality StatementUnder certain support circumstances, the T4 TimeSaver technical support staff may request that youmake your database(s) available to them during the resolution of your technical support issue. Restassured that under no circumstances will data submitted to ELM Computer Systems by its clients beused for any purpose other than the resolution of technical problems encountered in the use of T4TimeSaver. Data will neither be disseminated to third parties nor will it be used in any manner notimmediately related to the resolution of these technical problems.
Please be advised that our technical support staff may not be able to resolve your problem if they arenot able to work with a copy of your data.
1.4 Receiving Updates
If you provided a valid email address with your order, you will receive email notifications whenever asignificant update to T4 TimeSaver is released. Updates will be sent by Canada Post to all clientspurchasing the Update Mailout Service (option 4 on the order form). If you did not purchase the UpdateMailout Service, you can download the updates from our website (T4 TimeSaver) at no cost. Becauseof its size, downloading an update is not recommended for those with dial-up Internet connections.
The Downloads section of the T4 TimeSaver website will give details about all updates to the currentrelease of T4 TimeSaver as well as final releases for all versions of T4 TimeSaver from 1997 onward.Versions of T4 TimeSaver prior to 1997 are no longer available.
1.5 Requesting System Enhancements
We value your suggestions at ELM Computer Systems Inc. and will attempt, as much as possible, toincorporate them into future versions of T4 TimeSaver.

T4 TimeSaver.NET Guide16
© 2010 ELM Computer Systems Inc.
Many of the features now available in T4 TimeSaver are the result of suggestions made by our clients.If there is a form or feature you would like to see added to T4 TimeSaver please call or send us anemail to tell us about it. We will give each suggestion our careful consideration but cannot promisethat every suggestion will be incorporated into a future release of T4 TimeSaver.
To all of you who have provided suggestions over the past 20 years: Thank you for your help in makingT4 TimeSaver the finest tax slip preparation software available in Canada!
1.6 Hardware Requirements
ComputerAny computer with the recommended settings to support a current version of Windows.
Operating System
Any current version of Windows: Windows XPÔ, Windows VistaÔ, Windows 7Ô, Windows 2003Ôor Windows 2008Ô. (T4 TimeSaver may run on older versions of Windows as well but as theseversions are no longer supported by Microsoft they may not be compatible with all aspects of the .NETframework.) T4 TimeSaver will also run in Terminal Server environments but must be installed usingthe proper procedures. (Although we do not recommend it, some of our clients use T4 TimeSaver onNovell networks. Care must be taken to ensure proper path naming conventions as some Novellversions will crash on file or folder names longer than eight characters.)
System MemoryAny system able to support a current version of Windows should be able to run T4 TimeSaver. As a
guideline, Windows XPÔ will offer its best performance with 2Gb of RAM installed while Windows
VistaÔ and Windows 7Ô will run best with at least 3Gb of RAM. We do not recommend using
Windows XPÔ with less than 1Gb of RAM or Windows VistaÔ or Windows 7Ô with less than 2Gb ofRAM. Speak with your IT people if you suspect that your system has insufficient RAM installed.
Disk DrivesA hard disk drive with at least 100 Mb of available disk space is required for installation of the programfiles while leaving sufficient space for data files. An empty data file will typically be larger than 5Mb.Data may be stored on either a hard disk or on removable media. T4 TimeSaver performs best if datais stored on a local hard disk or network share. The software and/or its data files may also be installedon a network file server.
For optimal performance of T4 TimeSaver and other software, ensure that you have sufficient spaceavailable on your hard disk for Windows to maintain paging file (also known as a swap file or virtualmemory). Typically this file is 50% larger than the amount of available RAM installed on your system.(For example, if you have 2Gb of RAM installed the paging file will typically be: 2Gb X 1.5 = 3Gb.)Speak with your IT people if you suspect that your paging file is improperly configured.
You should also ensure that sufficient space is available on the hard disk for any temporary files, suchas print jobs, that are created during normal system operation.
Printer and Other OutputSlips and summaries are generated as PDF files which can be printed on ink jet and laser printers.You may also file most types of returns on diskette, CD, DVD, or via the Internet, significantly reducingyour paper requirements and the labour involved in producing these returns.
1.7 License Agreement
T4 TimeSaver ("program") is owned by ELM Computer Systems Inc. ELM Computer Systems grantsyou, the registered user, a nonexclusive, nontransferable license to use the program. You are
Introduction 17
© 2010 ELM Computer Systems Inc.
expressly prohibited from distributing the program with its authorization code to any third party,regardless of whether such distribution is for profit. All rights, title and interest in and to the program,and all documentation, code and logic which describes and/or comprises the program are vested inELM Computer Systems. Your right to use the program is conditional upon and limited by the termsand conditions of this license. You may not: (a) modify, adapt, translate, reverse engineer, decompile,disassemble, or create derivative works based on the program; or (b) loan, rent, lease or sublicensethe program or any copy, without the prior written consent of ELM. Any violation of these provisions willconstitute an automatic revocation of your license to use the program and will subject you tosubstantial liability under the applicable legislation of the jurisdiction in which the program is beingused. All other trademarks are the property of their respective owners.
You are permitted to use the program on any and all personal computers at your location (i.e. a singlestreet address), with no restriction on the number of users. (T4 TimeSaver Plus and T4 TimeSaverEnterprise versions are required to enable multiple concurrent access to a single database.) Use of theprogram at other locations (i.e. different street addresses) is prohibited unless separate licenses havebeen purchased for each location.
1.8 Warranty Information
We warrant to you for ninety (90) days from the date you received the software package that thepackage contains an accurate reproduction of the program, and the copy of the User Manual isaccurately reproduced. The program itself is excluded from our warranty. To obtain replacement ofthese materials, you must (i) return the inaccurate package or copy of the User Manual to us within thewarranty period, or (ii) first notify us in writing within the warranty period that you have found aninaccuracy and then return the materials to us. This limited warranty only covers the original user of thesoftware package, and we make no other warranties expressed or implied. ANY AND ALLWARRANTIES RELATING HERETO ARE LIMITED IN DURATION TO THIS NINETY-DAYWARRANTY PERIOD. REPLACEMENT OF THE DISK CONTAINING THE PROGRAM OR USERMANUAL IS YOUR EXCLUSIVE REMEDY AND SOLE MEASURE OF RECOVERABLE DAMAGES.
DisclaimerThe Package (The program and the User Manual) is licensed "as is", without warranty of any kind,either express or implied, including but not limited to the implied warranties of merchantability andfitness for a particular purpose, without limitation; all warranties against infringement or the likerespecting the package are hereby disclaimed by us. We do not warrant that any functions containedin this package will meet your requirements or that your use of the package will be uninterrupted orerror-free.
We shall have no liability to you or any third party regarding the package, the User Manual or otherwisein warranty, contract, tort, or otherwise. In no event will we be liable for any direct, incidental, special,indirect, general, or consequential damage or loss of any nature (such as damage to property,damages resulting from delay, claims of third parties, loss of profits, or injury to person) which mayarise in connection with the use of or inability to use this package. This clause shall survive failure ofan exclusive remedy. We specifically disclaim liability for any and all forms generated by the Packagefor submission to CRA or Revenu Québec. It is the users' responsibility to ensure that the proper formsare used and, with respect to the Relevé slips, that the serial numbers on the forms are unique andwithin the range assigned to the user by ELM Computer Systems, Inc.

Part II

Getting Started 19
© 2010 ELM Computer Systems Inc.
2 Getting Started
2.1 Installation
T4 TimeSaver may be installed on any disk drive accessible to your computer. The two installationoptions, Single User and Network Administrator, are described below. If you used T4 TimeSaver in 2008, you may install the program without affecting last year’s database(s), nor will reinstalling thecurrent program affect the current year’s database(s). Despite this we strongly recommend that youensure you have a reliable backup of your data prior to installing any new T4 TimeSaver releasesand/or updates.
For fastest program response and most secure retention of data it is recommended that data files bestored on either a local or network disk drive. Data files can also be stored on many USB flash drivesprovided sufficient space is available.
Before beginning either installation option note that:1. The logon account used for the installation must have local administrator privileges on thecomputer where the installation will take place.2. The logon account must have read/write access to all network resource involved in theinstallation.3. All T4 TimeSaver users must have read/write access to network folders containing T4TimeSaver databases.4. In a Network Administrator installation all T4 TimeSaver users must have read/write access tothe T4 TimeSaver installation folder.
To install T4 TimeSaver from the CD follow these steps1. Copy the original CD media and store the original in a safe place.2. Close all open applications to avoid possible conflicts with the installation program.3. Insert the copied installation CD in an appropriate drive.4. The installation program should start automatically, please follow the steps below if it does not:
a. Click on the Windows Start button, usually in the lower left corner of your display.b. Start the Windows Run dialogue by one of the following methods:
i. In Windows XP - select Run from the Start Menu.ii. In Windows Vista - type Run in the Search box.iii. In any version of Windows - hold down the Windows key (left of the space bar, with theWindows flag logo) at the same time as the letter "R".
c. Type drive:t4netsetup (where "drive" designates the drive containing the installation CD) inthe Run dialogue.d. Click OK to begin installing T4 TimeSaver.
To install T4 TimeSaver from the Internet follow these steps:1. Download the installation package from our website, if your Internet browser give you the choiceto save or run the installation package, please save it to a location you can remember for the nextstep:
T4 TimeSaver Downloads2. Close all open applications to avoid possible conflicts with the installation program. If you closeany security applications prior to installation, please remember to restart them once T4 TimeSaverhas been installed.3. Start the Windows Run dialogue:
a. Click on the Windows Start button, usually in the lower left corner of your display.b. Start the Windows Run dialogue:
i. In Windows XP - select Run from the Start Menu.ii. In Windows Vista - type Run in the Search box.iii. In any version of Windows - hold down the Windows key (left of the space bar, with theWindows flag logo) at the same time as the letter "R".

T4 TimeSaver.NET Guide20
© 2010 ELM Computer Systems Inc.
c. Type location\t4netsetup (where “location” designates the folder where you saved thedownloaded installation package) in the Run dialogue.d. Click OK to begin installing T4 TimeSaver.
Continuing the installationWhen the setup program begins, follow the directions as they appear on your display. Unless you havespecial installation requirements or are installing to a network location you can generally accept thedefault settings.
You will be given the option to install T4 TimeSaver in one of two ways: As either a Workstation orNetwork Administrator installation.
Workstation Installation
Select Workstation from the Select Install Type window if you will install T4 TimeSaver individually oneach workstation. This will install the program on any local hard drive or network drive available to theworkstation and place all support files and resources required by the program on the workstation'shard drive. This is the best option to choose if you do not have a network or will be using T4TimeSaver on a small number of workstations.
Network Administrator Installation
Select Network Administrator from the Select Install Type window if you will install T4 TimeSaveron a network drive for subsequent distribution to each workstation. At each workstation, you will be

Getting Started 21
© 2010 ELM Computer Systems Inc.
required to run T4NETNODE.EXE from the network drive to copy the files needed to run the programonto the workstation. This is the best option to choose if many people will be using T4 TimeSaver oncomputers connected by a network.
Select Installation FolderEnter the destination folder in the Folder field; this is the folder that the T4 TimeSaver executable willbe installed, it should be located on a hard drive that is always available to the workstation. It isrecommended that you not install T4 TimeSaver to a removable storage device.
Click Next to proceed with the installation of T4 TimeSaver
NOTES:1 - Workstation Installation - A Workstation installation will still permit the workstation to access datafiles stored on a network but necessitates that any updates be installed separately on each workstationwhere a Workstation installation has been performed.
2 - Network Administrator Installation - After completing the Network Administrator installation, it willbe necessary to go to each workstation where T4 TimeSaver will be used and run the program T4NETNODE.EXE from the Network Administrator installation folder. This can be done using ActiveDirectory and/or one of a variety of scripting tools. Once T4NETNODE.EXE has completed, the T4TimeSaver icon will appear on the desktop; double clicking this icon will complete the installationprocess and start T4 TimeSaver. (If the workstation is subsequently disconnected from the network,

T4 TimeSaver.NET Guide22
© 2010 ELM Computer Systems Inc.
T4 TimeSaver will still operate but will not be able access the User Profile and any data fileslocated on the network.) The advantage of a Network Administrator installation is that, in most cases,program updates will only need to be installed on the server to have all updates propagate to theworkstation(s). IMPORTANT NOTE - To prevent User Account Control (UAC is a security feature builtinto Windows Vista and Windows 7) from interfering with the T4NETNODE installation follow thesesteps:
1. Right-click on T4NETNODE.EXE (do not double-left-click).2. From the menu, choose the option to "Run as administrator."3. T4NETNODE installation will begin.
3 - Terminal Servers - Using T4 TimeSaver in a Terminal Server environment requires that aWorkstation Installation of T4 TimeSaver be performed from the console of your Terminal Serverusing the appropriate Terminal Server application installation protocols. On most Windows serversTerminal Server applications are installed using "Add or Remove Programs" from the Control Panel.
4 - Databases - Whether have computers on a Workstation Installation, a Network AdministratorInstallation or both; any T4 TimeSaver databases created by one installation can be opened by theother. The only caveat to this is that all T4 TimeSaver installations accessing a given database mustbe at the same revision level; you can see the revision of any T4 TimeSaver installation by selecting About from the Help menu.
2.1.1 Installing Program Updates
From time to time, as a result of user requests, program updates or bug fixes, an updated version T4TimeSaver may be released. Your software license entitles you to download and install these updatesat no additional cost, whenever these updates become available. (Refer to the section ReceivingUpdates for details on how to obtain updates to T4 TimeSaver.)
Whether or not you have already installed T4 TimeSaver the update you receive will contain the fullinstallation package. You can install the update in the same way you first installed T4 TimeSaver, yourdata will not be overwritten and all user settings will be retained. (NOTE: We strongly recommendthat you confirm that a reliable data backup exists and ensure all users have exited the systemprior to installing any updates. Failure to do so will almost certainly result in data corruption orloss.)
If your existing installation is a Network Administrator Install you should only have to install the updateon the server as a Network Administrator installation and all T4NETNODE installations will beautomatically updated the next time they are started. In cases where significant program changes havebeen made it will be necessary to run T4NETNODE on all workstations; you will be informed if this isrequired.
To confirm that the update has installed correctly, click on the Help menu and select About. Adialogue will be displayed showing the current version and its release date, among other information.The version information displayed should indicate the most recent installation.
2.2 Starting the Program
A T4 TimeSaver icon, like the one below, will be automatically created on your desktop. Additionally, aprogram group named T4 TimeSaver will be added to the Start menu, and will contain entries for theT4 TimeSaver 2009 program and its documentation.
T4 TimeSaver 2009
24
15
Getting Started 23
© 2010 ELM Computer Systems Inc.
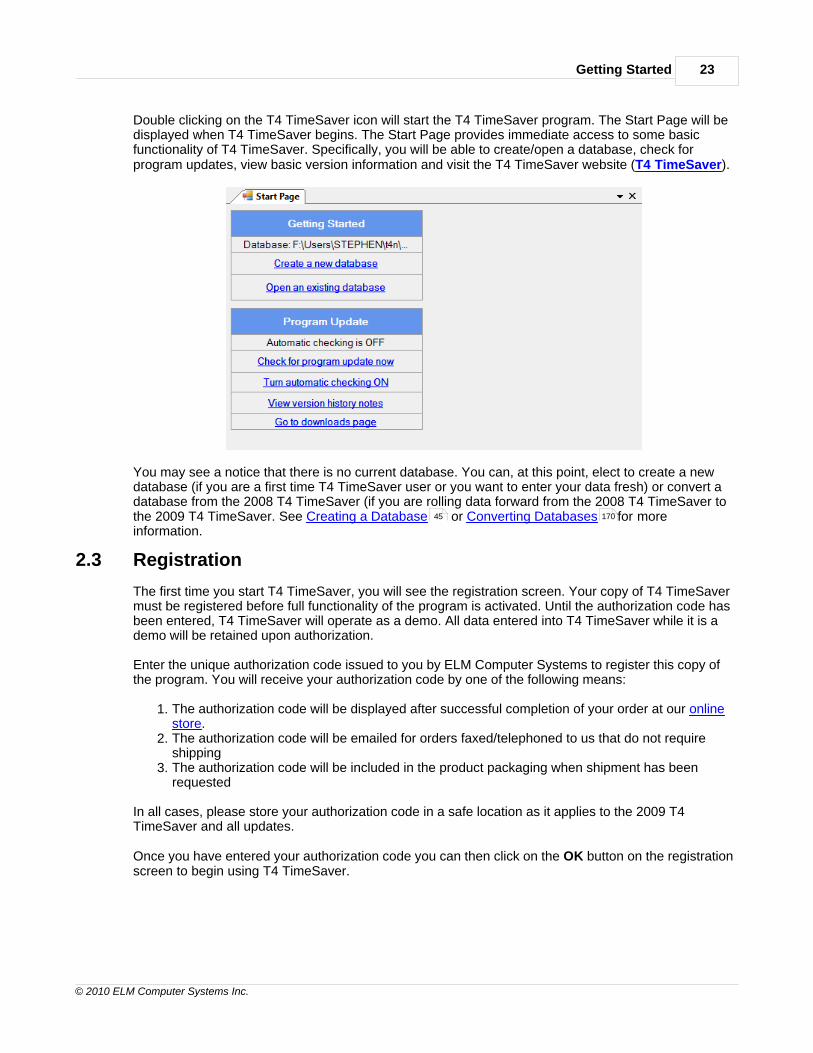
Double clicking on the T4 TimeSaver icon will start the T4 TimeSaver program. The Start Page will bedisplayed when T4 TimeSaver begins. The Start Page provides immediate access to some basicfunctionality of T4 TimeSaver. Specifically, you will be able to create/open a database, check forprogram updates, view basic version information and visit the T4 TimeSaver website (T4 TimeSaver).
You may see a notice that there is no current database. You can, at this point, elect to create a newdatabase (if you are a first time T4 TimeSaver user or you want to enter your data fresh) or convert adatabase from the 2008 T4 TimeSaver (if you are rolling data forward from the 2008 T4 TimeSaver tothe 2009 T4 TimeSaver. See Creating a Database or Converting Databases for moreinformation.
2.3 Registration
The first time you start T4 TimeSaver, you will see the registration screen. Your copy of T4 TimeSavermust be registered before full functionality of the program is activated. Until the authorization code hasbeen entered, T4 TimeSaver will operate as a demo. All data entered into T4 TimeSaver while it is ademo will be retained upon authorization.
Enter the unique authorization code issued to you by ELM Computer Systems to register this copy ofthe program. You will receive your authorization code by one of the following means:
1. The authorization code will be displayed after successful completion of your order at our onlinestore.
2. The authorization code will be emailed for orders faxed/telephoned to us that do not requireshipping
3. The authorization code will be included in the product packaging when shipment has beenrequested
In all cases, please store your authorization code in a safe location as it applies to the 2009 T4TimeSaver and all updates.
Once you have entered your authorization code you can then click on the OK button on the registrationscreen to begin using T4 TimeSaver.
45 170

T4 TimeSaver.NET Guide24
© 2010 ELM Computer Systems Inc.
You may enter data into T4 TimeSaver without registering the program by clicking on the OK buttonwithout entering an authorization code, but you will be unable to produce a return until theauthorization code has been entered. Several functions will also be unavailable until the software isregistered.
The registration screen will be displayed each time you start the program until registration has beencompleted.
T4 TimeSaver is copyright (c) 1987-2009 by ELM Computer Systems Inc. Please refer to the LicenseAgreement for full details of the agreement between ELM Computer Systems Inc. and thepurchaser/users of the package.
2.4 User Names and Passwords
T4 TimeSaver Plus & Enterprise Only
If you purchased either the T4 TimeSaver Plus or T4 TimeSaver Enterprise version license, you will beprompted for a user name and password each time you start the software. You can enter any nameyou wish to use for a username, it is not necessarily your computer or network user name. Under mostcircumstances, there a unique user name should be assigned to each person or workstation using T4TimeSaver.
The first time you enter a new user name, you will be prompted to create the account, enter apassword for the user and to confirm that this is a new user. You can change the password later byselecting the Change Your Password option from the Setup menu. You are not required tocreate a password but it is recommended that you do so in environments where greater data privacy isrequired. Please keep track of your password as it is cumbersome to recover if it is misplaced.
16
181 33

Getting Started 25
© 2010 ELM Computer Systems Inc.
Each user name is associated with a corresponding user profile which contains the settings (currentdatabase, screen layout, print destination & etc.), associated with the user. Each user can establishtheir own preferences and default values by selecting User Settings from the Setup menu.
2.5 Main Menu
The title bar of the main window contains the name of the program and the name of the currentdatabase. Beneath it is the main menu. Each menu item can be accessed by clicking its name or byholding down the ALT key at the same time you depress the underlined letter of the desired menuitem. Each menu has a submenu of functions relating to the menu name. Any menu or submenu itemthat is greyed out is not currently available.
Some menu items lead to options that are not available in all versions of T4 TimeSaver. These menuitems may appear in the menus and if selected, will inform the user that the chosen option is availableonly in a higher version.
2.5.1 File Menu
File Menu
Any menu or submenu item that is greyed out is not currently available.
Open Database - Opens an existing 2008 Original T4 TimeSaver or a 2008 or 2009 T4
177 33

T4 TimeSaver.NET Guide26
© 2010 ELM Computer Systems Inc.
TimeSaver.NET database (if you are opening a 2008 Original T4 TimeSaver or 2008 T4TimeSaver.NET database the Convert Databases dialogue will be displayed)
New Database - Creates a new T4 TimeSaver database
Close Database - Closes the currently open database.
Backup and Restore - Opens a sub-menu by which a database may be either backed up or restored.
Repair Database - Checks currently open database and repairs any damage.
Check Database Integrity - Checks integrity of currently open database.
Repair User Database - Checks database storing user information (user name, session status & etc.)and repairs any damage.
Event Viewer (Enterprise) - Allows the system administrator to view data events of the system.
Print This Form / CTRL + P - Sends currently open form to the default printer.
Exit - Closes all open forms and dialogues and exit T4 TimeSaver.
Once T4 TimeSaver as been used to access one or more databases, a list of recently used databaseswill appear below the Exit menu item.
Some menu items lead to options that are not available in all versions of T4 TimeSaver. These menuitems may appear in the menus and if selected, will inform the user that the chosen option is availableonly in a higher version.
2.5.2 Edit Menu
Edit Menu
Any menu or submenu item that is greyed out is not currently available.
Add Slip / CTRL + A - Adds one slip of the current type to the current return.
Delete Slip / CTRL + D - Deletes the currently open slip.
Select Slip from List / CTRL + S - Displays a list of all slips of the current type from which one maybe selected for display.
List Valid Options / F2 - Lists valid inputs for fields flagged with the icon.
170
Getting Started 27
© 2010 ELM Computer Systems Inc.
Override Calculated Field / F4 - Allows entering custom data into a calculated field.
Revert - Removes changes made to slip after most recent save.
First Slip / CTRL + PgUp - Displays first slip in current sort order.
Previous Slip / PgUp - Displays previous slip in current sort order.
Next Slip / PgDn - Displays next slip in current sort order.
Last Slip / CTRL + PgDn - Displays last slip in current sort order.
Insert Company Address / Shift + F6 - Pastes the address of the current company into the displayedinformation slip.
Copy Employee Information / F7 - Copies employee name and address data from the displayedinformation slip.
Paste Employee Information / Shift + F7 - Pastes employee name and address data into thedisplayed information slip.
Some menu items lead to options that are not available in all versions of T4 TimeSaver. These menuitems may appear in the menus and if selected, will inform the user that the chosen option is availableonly in a higher version.
2.5.3 View Menu
View Menu
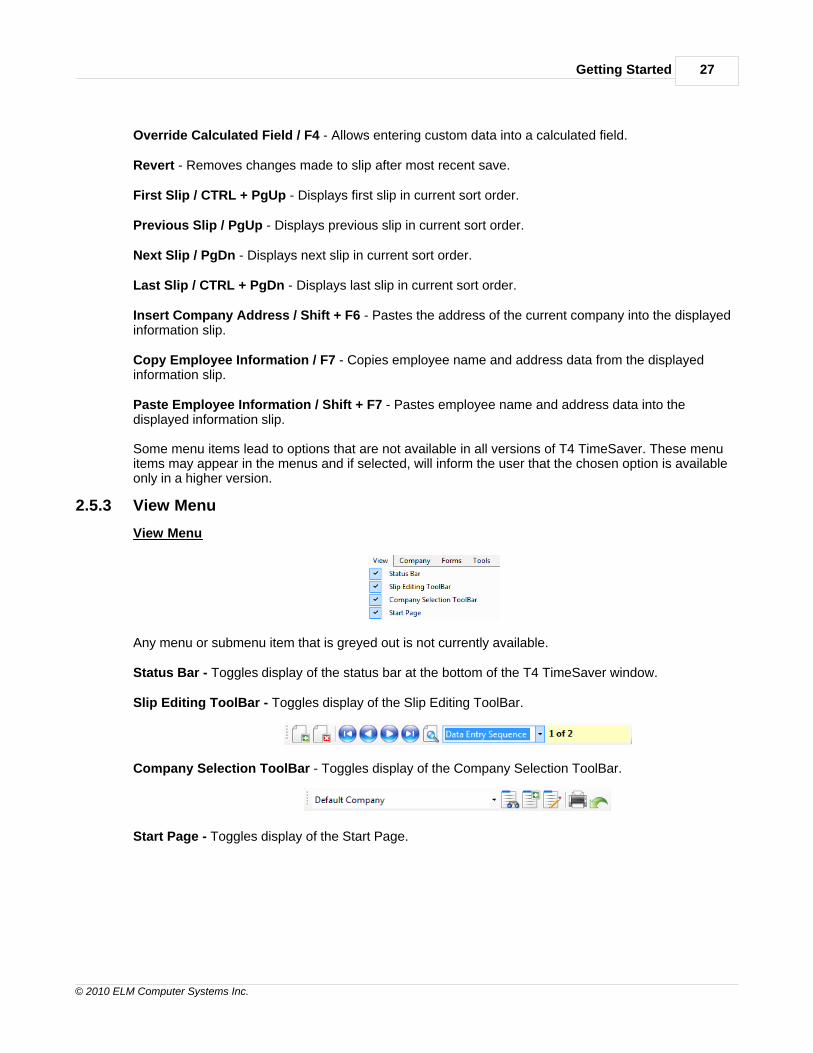
Any menu or submenu item that is greyed out is not currently available.
Status Bar - Toggles display of the status bar at the bottom of the T4 TimeSaver window.
Slip Editing ToolBar - Toggles display of the Slip Editing ToolBar.
Company Selection ToolBar - Toggles display of the Company Selection ToolBar.
Start Page - Toggles display of the Start Page.
T4 TimeSaver.NET Guide28
© 2010 ELM Computer Systems Inc.
Some menu items lead to options that are not available in all versions of T4 TimeSaver. These menuitems may appear in the menus and if selected, will inform the user that the chosen option is availableonly in a higher version.
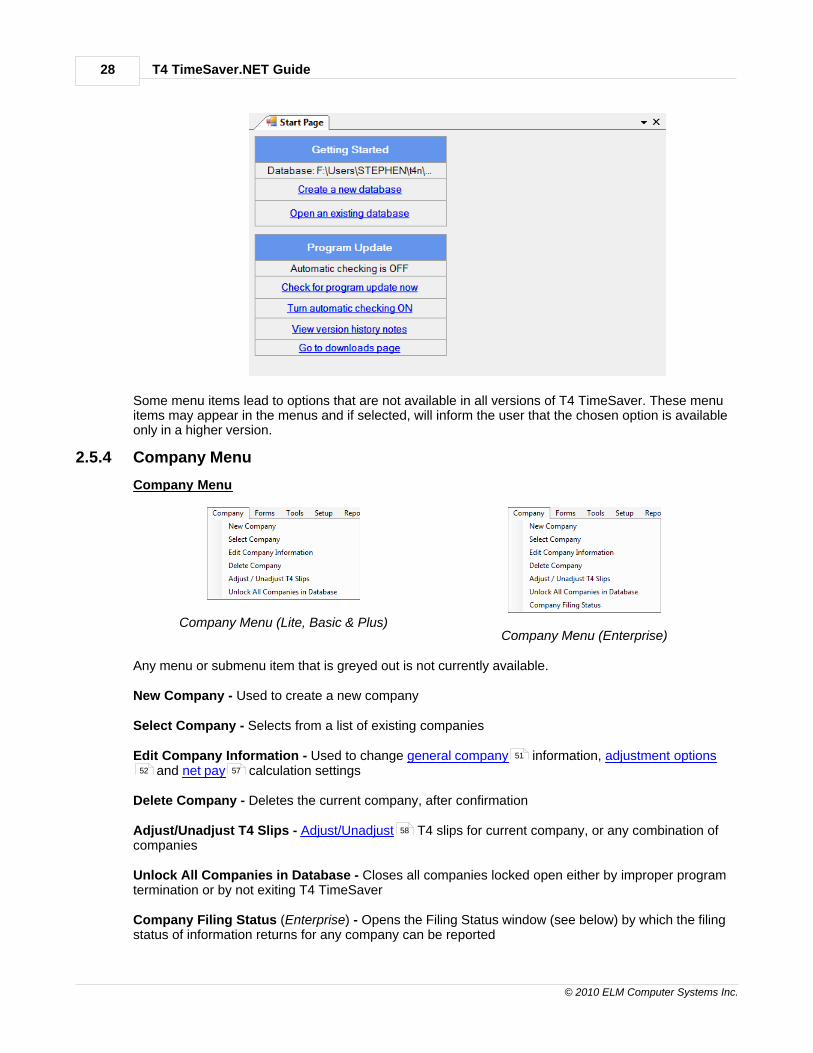
2.5.4 Company Menu
Company Menu
Company Menu (Lite, Basic & Plus)Company Menu (Enterprise)
Any menu or submenu item that is greyed out is not currently available.
New Company - Used to create a new company
Select Company - Selects from a list of existing companies
Edit Company Information - Used to change general company information, adjustment options and net pay calculation settings
Delete Company - Deletes the current company, after confirmation
Adjust/Unadjust T4 Slips - Adjust/Unadjust T4 slips for current company, or any combination ofcompanies
Unlock All Companies in Database - Closes all companies locked open either by improper programtermination or by not exiting T4 TimeSaver
Company Filing Status (Enterprise) - Opens the Filing Status window (see below) by which the filingstatus of information returns for any company can be reported
51
52 57
58
Getting Started 29
© 2010 ELM Computer Systems Inc.
Some menu items lead to options that are not available in all versions of T4 TimeSaver. These menuitems may appear in the menus and if selected, will inform the user that the chosen option is availableonly in a higher version.
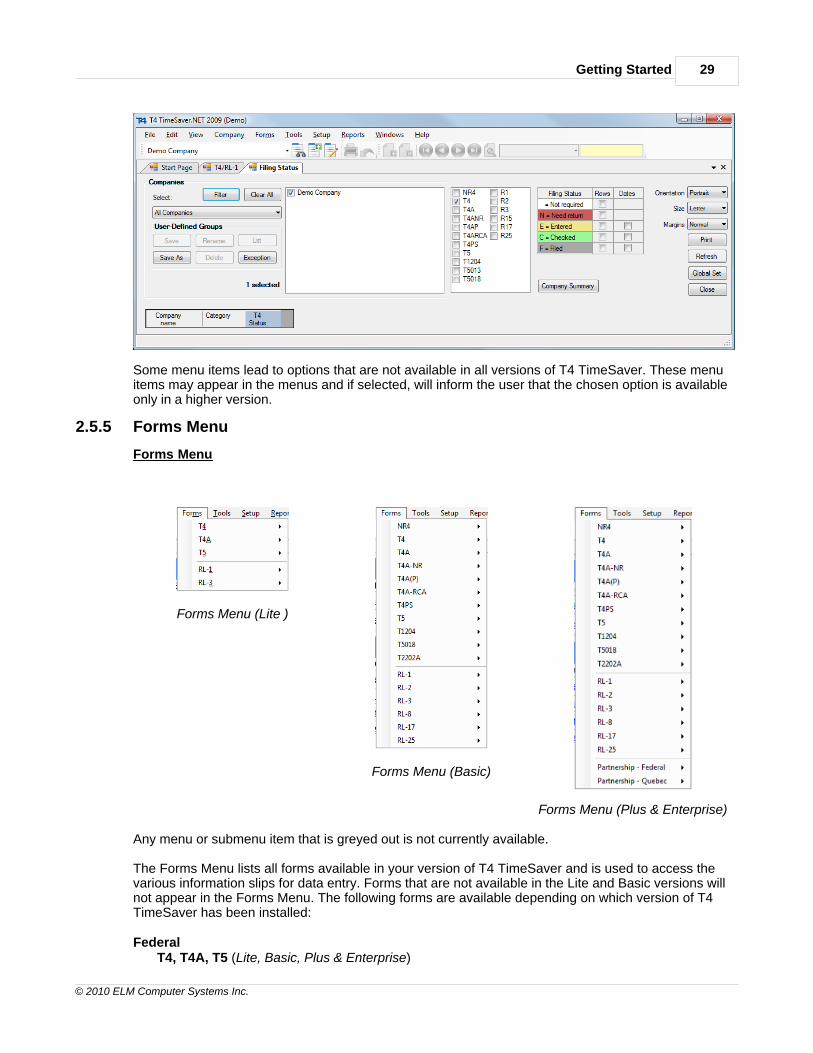
2.5.5 Forms Menu
Forms Menu
Forms Menu (Lite )
Forms Menu (Basic)
Forms Menu (Plus & Enterprise)
Any menu or submenu item that is greyed out is not currently available.
The Forms Menu lists all forms available in your version of T4 TimeSaver and is used to access thevarious information slips for data entry. Forms that are not available in the Lite and Basic versions willnot appear in the Forms Menu. The following forms are available depending on which version of T4TimeSaver has been installed:
FederalT4, T4A, T5 (Lite, Basic, Plus & Enterprise)

T4 TimeSaver.NET Guide30
© 2010 ELM Computer Systems Inc.
NR4, T4A-NR, T4A(P), T4A-RCA), T4PS, T1204, T5018 (Basic, Plus & Enterprise)T5013 + Schedules 1, 2, 6, 8, 10, 12, 50, 52, 100, 125, 141 (Plus & Enterprise)
QuebecRL-1, RL-3 (Lite, Basic, Plus & Enterprise)RL-2, RL-17, RL-25 (Basic, Plus & Enterprise)RL-15 + Schedules A, B, C, D, E (Plus & Enterprise)
2.5.6 Tools Menu
Tools Menu
Tools Menu (Lite, Basic & Plus)Tools Menu (Enterprise)
Any menu or submenu item that is greyed out is not currently available.
Merge Companies - Opens the Merge Companies dialogue
Transfer Companies - Opens the Transfer Companies dialogue
Global Changes - Make global changes to Adjustment Options , Contact Information and SlipInformation
Convert Databases - Converts databases from 2008 Original T4 TimeSaver, 2009 Original T4TimeSaver or 2008 T4 TimeSaver data into 2009 T4 TimeSaver format
Import Data - Allows you to import data into T4 TimeSaver from Excel and XML format files, you canalso use the Open Excel Templates from this menu to access the Excel Templates to help youproperly format an import file
Import User Information from Last Year's T4 TimeSaver - Imports user setup information from2008 T4 TimeSaver into 2009 T4 TimeSaver installation
Remove Slips - Removes slips of any or all types from any or all companies
Event Viewer (Enterprise) - Opens the Event Viewer window (see below) by which significant eventsoccurring during use of T4 TimeSaver can be reported
162
162
52 164
164
44
171

Getting Started 31
© 2010 ELM Computer Systems Inc.
Some menu items lead to options that are not available in all versions of T4 TimeSaver. These menuitems may appear in the menus and if selected, will inform the user that the chosen option is availableonly in a higher version.
2.5.6.1 Common Features
Data Selection Panel
Some tools, such as the Transfer Companies, Remove Slips and Event Viewer tools share acommon data selection panel. This panel enables the user to specify a range of data that will be actedupon by the tool in question.
Filter

T4 TimeSaver.NET Guide32
© 2010 ELM Computer Systems Inc.
The Filter button displays the "Set Company Filter" window which is used to filter the companies thatthe tool will act upon to those of greatest interest to the user. The Filter button will also appear in theFiling Status window. Available filters are:
· Select on filing status - Selects companies by their filing status. It is also possible to limit theseselections to specific date rangeso Not Required - No return is requiredo Need Return - A return is requiredo Entered - A return has been entered into T4 TimeSavero Checked - Data entered has been checkedo Filed - The return has been filed with the CRA and/or the MRQ
· Select on electronic filing status - Selects companies based on whether or not an electronic returnhas been processed. It is also possible to limit this selection to a specific date range.o Processed - The return has been processed for electronic filingo Not Processed - The return has not been processed for electronic filing
· Select on printing status - - Selects companies based on whether or not slips and/or summarieshave been printed. It is also possible to limit this selection to a specific date range.o Slips and Summaries Printed - Slips and Summaries have been printedo Slips and/or Summaries not Printed - Slips and Summaries have not been printed
· Select on company category - Selects companies based on their company category (companycategory is user defined and is entered on the Company Setup screen)
· Select companies with active slips - Selects companies which have at least one active (non-zero)slip of the type specified in the "Filter applies to" selection list
Clear AllClears all flags set through the Filter button.
SelectUsed to choose between

Getting Started 33
© 2010 ELM Computer Systems Inc.
· All Companies - All companies will be included in the tool action· Current Company - Only the current company will be included in the tool action· Most Recently Used - Only the most recently used company will be included in the tool action· Selected Companies - Only selected companies will be included in the tool action
User Defined GroupsAllows the user to define a group of companies (such as all companies under the authority of a specificindividual) and save that group for future activity. The buttons in this section have the followingfunction:
· Save - Saves changes to the current group· Rename - Renames the current group· List - Lists all groups· Save As - Creates a user defined group, prompting the user for a descriptive name· Delete - Deletes the current group· Exception - Lists all companies not currently belonging to any group.
2.5.7 Setup Menu
Setup Menu
Setup Menu (Lite & Basic)
Setup Menu (Plus & Enterprise)
Any menu or submenu item that is greyed out is not currently available.
User Settings - Configures per-user settings for New Company Defaults , T4 Adjustment Defaults, Data Entry , Electronic Filing and other Options
User Administration (Plus & Enterprise) - Opens User Administration dialogue to create, modify ordelete user accounts; manage database access restrictions; and create a default user template
Contribution Rates and Constants - Edit Contribution Rates and Constants used in CPP, QPP,PPIP & EI calculations & adjustments
File Locations - Displays the folders used by T4 TimeSaver for data, output & settings
Change Authorization Code - Used to enter a new or replacement Authorization Code
Change Your Password (Plus & Enterprise) - Changes the current user's password
Edit Setup Files - To be used with T4 TimeSaver technical support to directly edit System Settings, Paths and User Settings
Some menu items lead to options that are not available in all versions of T4 TimeSaver. These menuitems may appear in the menus and if selected, will inform the user that the chosen option is availableonly in a higher version.
174
174 175 150 177
177
179
179
180
181
181
181 182

T4 TimeSaver.NET Guide34
© 2010 ELM Computer Systems Inc.
2.5.8 Reports Menu
Reports Menu
Reports Menu (Lite)
Reports Menu (Basic)
Reports Menu (Plus)
Reports Menu (Enterprise)
Any menu or submenu item that is greyed out is not currently available.
The Reports Menu lists all forms available in both Basic and Plus versions of T4 TimeSaver and isused to prepare the various information slips for printing. The option of whether to print two slips perpage or three slips per letter size page is available only for T4 slips.
Validate Data Before Filing - Federal - Validates entered data against the CRA schema prior toelectronic filing.
Validate Data Before Filing - Quebec - Validates entered data against the Quebec schema prior toelectronic filing.
Company Summary (Basic, Plus & Enterprise) - Validates data against the CRA schema prior toelectronic filing.
Partnership - Federal (Plus & Enterprise) - Prepare Federal Partnership forms for printing.
Partnership - Quebec (Plus & Enterprise) - Prepare Quebec Partnership forms for printing.
E-mail Recipient Slips (Enterprise) - Email recipient copies to recipient's email address.
Company Filing Status (Enterprise) - Opens the Filing Status window by which the filing status ofinformation returns for any company can be reported.
As with the Forms Menu , the following reports are available depending on which version of T4TimeSaver has been installed:
29

Getting Started 35
© 2010 ELM Computer Systems Inc.
Federal
T4, T4A, T5 (Lite, Basic, Plus & Enterprise)
NR4, T4A-NR, T4A(P), T4A-RCA), T4PS, T1204, T5018, T2202A (Basic, Plus & Enterprise)
T5013 + Schedules 1, 2, 6, 8, 10, 12, 50, 52, 100, 125, 141 (Plus & Enterprise)
Quebec
RL-1, RL-3 (Lite, Basic, Plus & Enterprise)
RL-2, RL-8, RL-17, RL-25 (Basic, Plus & Enterprise)
RL-15 + Schedules A, B, C, D, E (Plus & Enterprise)
Some menu items lead to options that are not available in all versions of T4 TimeSaver. These menuitems may appear in the menus and if selected, will inform the user that the chosen option is availableonly in a higher version.
2.5.8.1 Common Features
Data Selection Panel
Most reports share a common data selection panel. This panel enables the user to specify a range ofdata that will be included in the selected report.
Filter

T4 TimeSaver.NET Guide36
© 2010 ELM Computer Systems Inc.
The Filter button displays the "Set Company Filter" window which is used to filter the companiesincluded in the selected report to those of greatest interest to the user. The Filter button will alsoappear in the Filing Status window. Available filters are:
· Select on filing status - Selects companies by their filing status. It is also possible to limit theseselections to specific date rangeso Not Required - No return is requiredo Need Return - A return is requiredo Entered - A return has been entered into T4 TimeSavero Checked - Data entered has been checkedo Filed - The return has been filed with the CRA and/or the MRQ
· Select on electronic filing status - Selects companies based on whether or not an electronic returnhas been processed. It is also possible to limit this selection to a specific date range.o Processed - The return has been processed for electronic filingo Not Processed - The return has not been processed for electronic filing
· Select on printing status - - Selects companies based on whether or not slips and/or summarieshave been printed. It is also possible to limit this selection to a specific date range.o Slips and Summaries Printed - Slips and Summaries have been printedo Slips and/or Summaries not Printed - Slips and Summaries have not been printed
· Select on company category - Selects companies based on their company category (companycategory is user defined and is entered on the Company Setup screen)
· Select companies with active slips - Selects companies which have at least one active (non-zero)slip of the type specified in the "Filter applies to" selection list
Clear AllClears all flags set through the Filter button.
SelectUsed to choose between
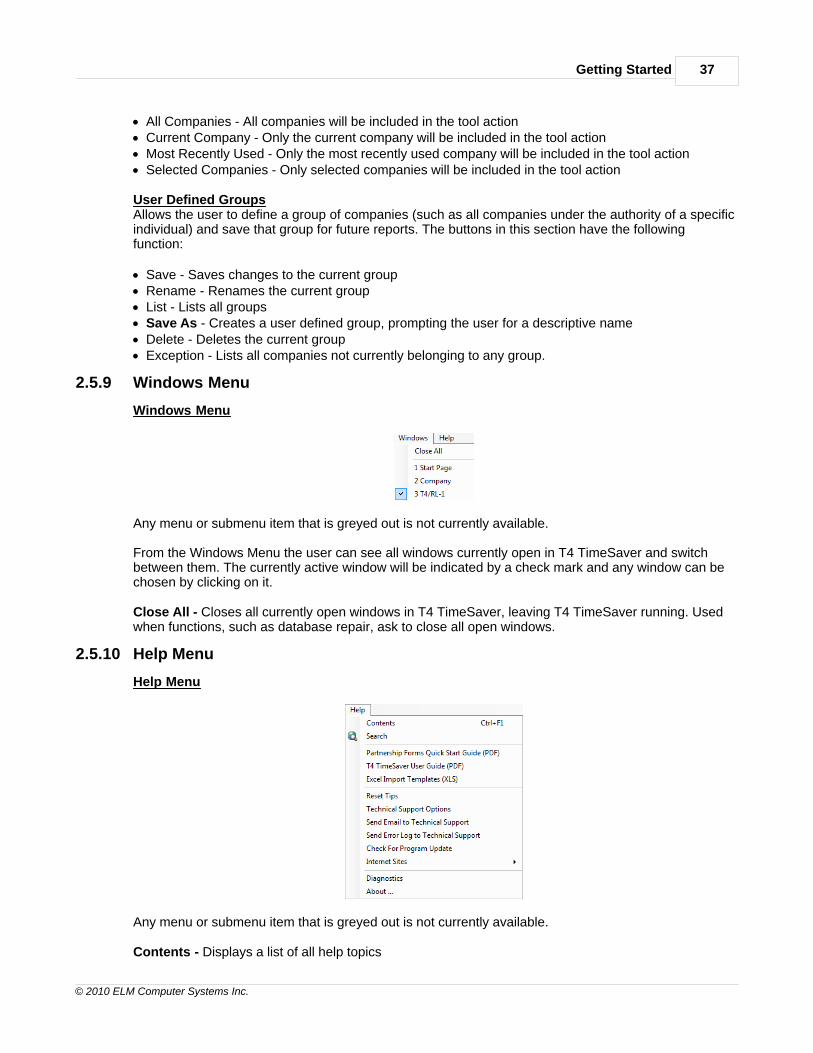
Getting Started 37
© 2010 ELM Computer Systems Inc.
· All Companies - All companies will be included in the tool action· Current Company - Only the current company will be included in the tool action· Most Recently Used - Only the most recently used company will be included in the tool action· Selected Companies - Only selected companies will be included in the tool action
User Defined GroupsAllows the user to define a group of companies (such as all companies under the authority of a specificindividual) and save that group for future reports. The buttons in this section have the followingfunction:
· Save - Saves changes to the current group· Rename - Renames the current group· List - Lists all groups· Save As - Creates a user defined group, prompting the user for a descriptive name· Delete - Deletes the current group· Exception - Lists all companies not currently belonging to any group.
2.5.9 Windows Menu
Windows Menu
Any menu or submenu item that is greyed out is not currently available.
From the Windows Menu the user can see all windows currently open in T4 TimeSaver and switchbetween them. The currently active window will be indicated by a check mark and any window can bechosen by clicking on it.
Close All - Closes all currently open windows in T4 TimeSaver, leaving T4 TimeSaver running. Usedwhen functions, such as database repair, ask to close all open windows.
2.5.10 Help Menu
Help Menu
Any menu or submenu item that is greyed out is not currently available.
Contents - Displays a list of all help topics

T4 TimeSaver.NET Guide38
© 2010 ELM Computer Systems Inc.
Search - Search the help file for specific words or phrases
Partnership Forms Quick Start Guide - Displays a brief guide to processing Partnership forms (Plus& Enterprise)
T4 TimeSaver User Guide - Displays an electronic copy of this document
Excel Import Templates - Opens the included templates for data import (Plus & Enterprise)
Reset Tips - Restores pop-up help settings to the default value of displaying pop-up help whereapplicable
Technical Support Options - Displays various ways by which T4 TimeSaver technical supportmay be contacted
Send Email to Technical Support - Creates a new email to send to T4 TimeSaver technical support(including: Program version, Username, Authorization Code, Program Installation Path and CurrentDatabase), you must be connected to the Internet for the email to be sent
Send Error Log to Technical Support - Sends an error log to T4 TimeSaver technical support
Check For Program Update - Checks the T4 TimeSaver website (www.t4timesaver.com) if anupdate has been posted and prompts for download & installation if one is found
Internet Sites - List a variety of product and tax related websites
Diagnostics - Displays the locations of data, import, output, settings and system files
About - Displays current status of T4 TimeSaver (including: Program version, Authorization Code,Program Installation Path and Current Database)
2.6 Toolbar
The Toolbar appears directly below the main menu and enables quick, single click access to frequentlyused functions. Any item that is greyed out is not currently available.
Company Name - Displays the current company name. Use the drop down box to select from the listof companies.
Select a different company - - Opens the list of companies. Highlight the desired one and clickSelect.
Add a new company - - Opens the Add new company dialog window.
Edit company information - - Opens the Edit company information dialog window.
Print current form - - Opens the Print dialog window for the currently open form.
Revert - - Restores data entry fields to their original values.
15
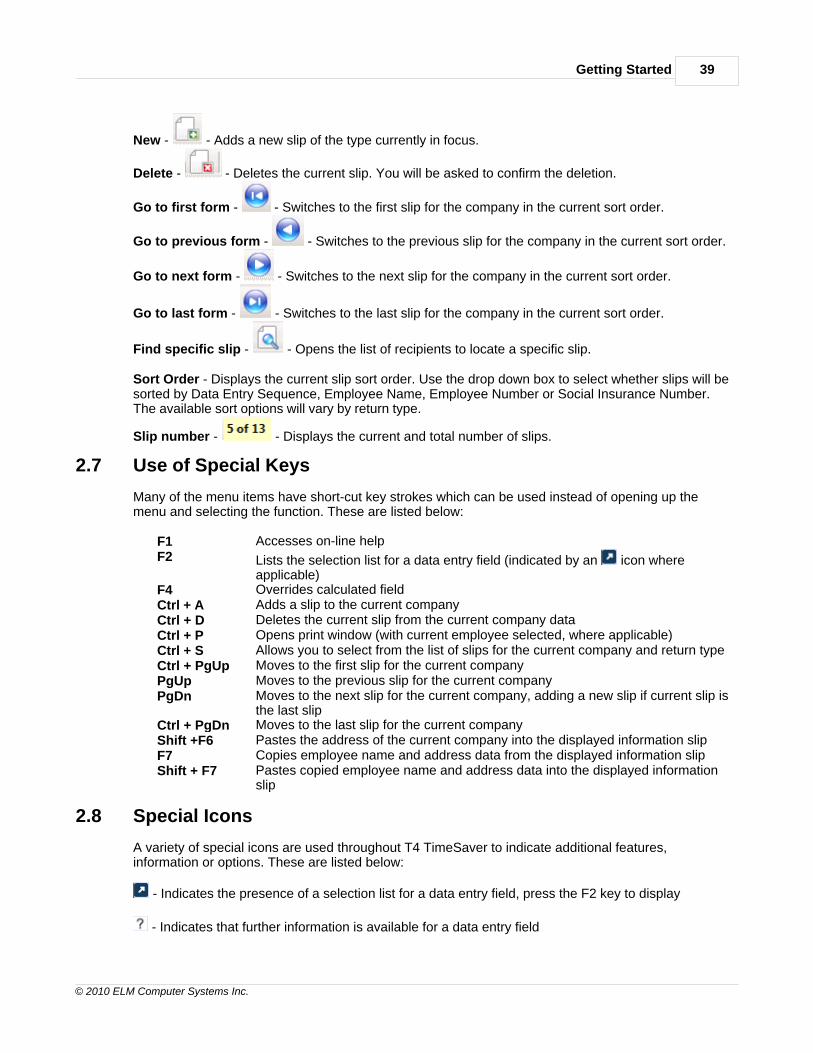
Getting Started 39
© 2010 ELM Computer Systems Inc.
New - - Adds a new slip of the type currently in focus.
Delete - - Deletes the current slip. You will be asked to confirm the deletion.
Go to first form - - Switches to the first slip for the company in the current sort order.
Go to previous form - - Switches to the previous slip for the company in the current sort order.
Go to next form - - Switches to the next slip for the company in the current sort order.
Go to last form - - Switches to the last slip for the company in the current sort order.
Find specific slip - - Opens the list of recipients to locate a specific slip.
Sort Order - Displays the current slip sort order. Use the drop down box to select whether slips will besorted by Data Entry Sequence, Employee Name, Employee Number or Social Insurance Number.The available sort options will vary by return type.
Slip number - - Displays the current and total number of slips.
2.7 Use of Special Keys
Many of the menu items have short-cut key strokes which can be used instead of opening up themenu and selecting the function. These are listed below:
F1 Accesses on-line helpF2 Lists the selection list for a data entry field (indicated by an icon where
applicable)F4 Overrides calculated fieldCtrl + A Adds a slip to the current companyCtrl + D Deletes the current slip from the current company dataCtrl + P Opens print window (with current employee selected, where applicable)Ctrl + S Allows you to select from the list of slips for the current company and return typeCtrl + PgUp Moves to the first slip for the current companyPgUp Moves to the previous slip for the current companyPgDn Moves to the next slip for the current company, adding a new slip if current slip is
the last slipCtrl + PgDn Moves to the last slip for the current companyShift +F6 Pastes the address of the current company into the displayed information slipF7 Copies employee name and address data from the displayed information slipShift + F7 Pastes copied employee name and address data into the displayed information
slip
2.8 Special Icons
A variety of special icons are used throughout T4 TimeSaver to indicate additional features,information or options. These are listed below:
- Indicates the presence of a selection list for a data entry field, press the F2 key to display
- Indicates that further information is available for a data entry field
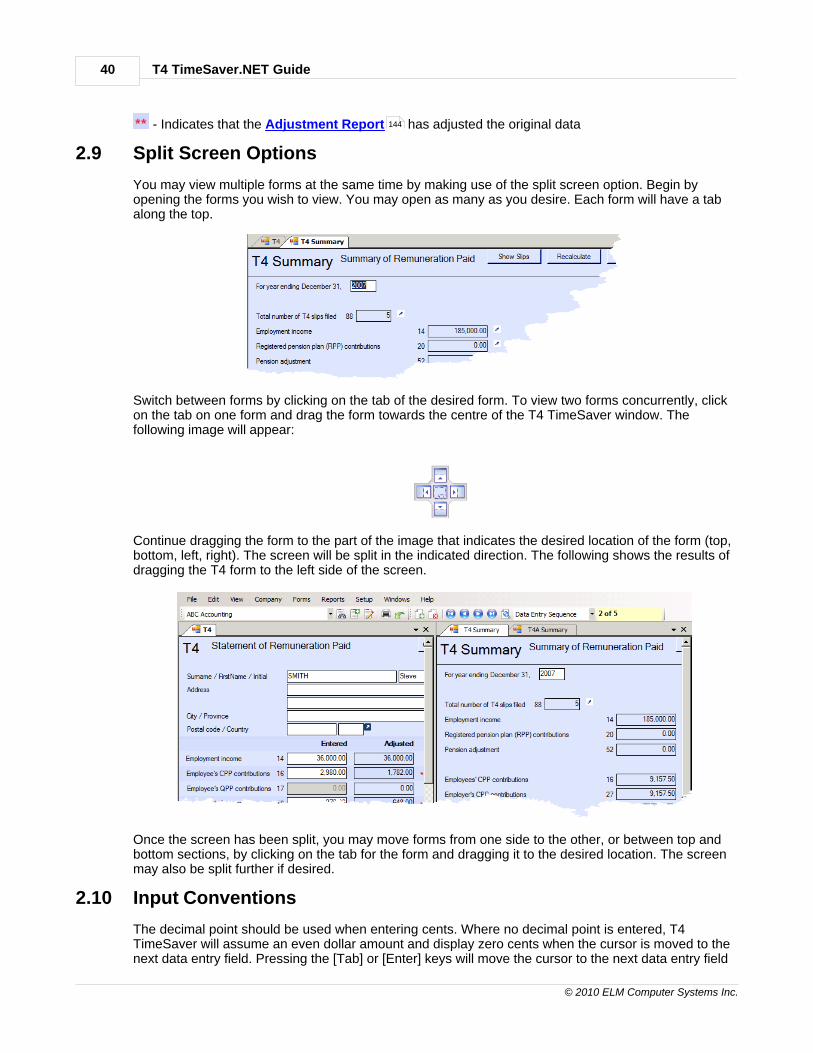
T4 TimeSaver.NET Guide40
© 2010 ELM Computer Systems Inc.
- Indicates that the Adjustment Report has adjusted the original data
2.9 Split Screen Options
You may view multiple forms at the same time by making use of the split screen option. Begin byopening the forms you wish to view. You may open as many as you desire. Each form will have a tabalong the top.
Switch between forms by clicking on the tab of the desired form. To view two forms concurrently, clickon the tab on one form and drag the form towards the centre of the T4 TimeSaver window. Thefollowing image will appear:
Continue dragging the form to the part of the image that indicates the desired location of the form (top,bottom, left, right). The screen will be split in the indicated direction. The following shows the results ofdragging the T4 form to the left side of the screen.
Once the screen has been split, you may move forms from one side to the other, or between top andbottom sections, by clicking on the tab for the form and dragging it to the desired location. The screenmay also be split further if desired.
2.10 Input Conventions
The decimal point should be used when entering cents. Where no decimal point is entered, T4TimeSaver will assume an even dollar amount and display zero cents when the cursor is moved to thenext data entry field. Pressing the [Tab] or [Enter] keys will move the cursor to the next data entry field
144

Getting Started 41
© 2010 ELM Computer Systems Inc.
in sequence.
New data entered into a field will overwrite existing data. You may edit existing data by using the leftand right cursor control keys. as well as the [Backspace], [Delete], [Home] and [End] keys.
You will not find a "Save" button on any of T4 TimeSaver's data entry screens. Data is savedimmediately as it is entered. Once you have competed your data entry on any given form you cansafely close the form by clicking on the "Close" button without losing your data.
2.11 Getting Help
Whenever you require help, press the [F1] key to access the on-line help screens. If context-sensitivehelp is available it will be displayed. Otherwise use the Contents or Search tabs to access the desiredtopic. Links to related topics are provided for your convenience.
You can also access the help files from the Help menu. Selecting Contents or Search opens theHelp to the Contents or Search tabs respectively. The Internet sites submenu lists a number of Internetsites that may prove helpful.
During a technical support session our staff may ask you to supply a copy of your database. To send acopy of your database select Send E-mail to Technical Support from the Help menu. Yourdefault email program will start, at which point the database can be sent as an attachment. (Use the Diagnostics entry of the Help menu to find out where the database is located.) Please restassured that data sent to ELM Computer Systems will be treated with the strictest of confidence andwill not be used for any purpose not related to problem resolution.
To send ELM an error log select Send Error Log to Technical Support from the Help . A logcontaining the details of any problems encountered during the use of T4 TimeSaver will be sent to ourTechnical Support staff for evaluation.
As a registered user you may telephone, fax, or e-mail us with your questions about the installationand use of the T4 TimeSaver program.
English Technical Support
English technical support is available by telephone from our Toronto office Monday to Friday from 9amto 5pm ET.English technical support is available by email from our Toronto office Monday to Friday from 9am to8pm ET. Email will be regularly checked on Saturdays so that emergencies situations can be attendedto.
English Technical Support Hot Line (GTA):Toll Free:Fax Number:Email:T4 TimeSaver Website:Related Website: AvanTax (automobile taxable benefitscalculator)Corporate Website:
416 495 1624800 268 3211416 495 [email protected]
www.elmcomputers.com
To submit an error log to our technical support team via FTP, select Send Error Log to TechnicalSupport from the Help menu.
French Technical Support
Technical support is available in French from our Montreal office from 9am to 5pm ET.
37
37
37
37

T4 TimeSaver.NET Guide42
© 2010 ELM Computer Systems Inc.
French Technical Support Hot Line: 514 499 9669
Confidentiality StatementUnder certain support circumstances, the T4 TimeSaver technical support staff may request that youmake your database(s) available to them during the resolution of your technical support issue. Restassured that under no circumstances will data submitted to ELM Computer Systems by its clients beused for any purpose other than the resolution of technical problems encountered in the use of T4TimeSaver. Data will neither be disseminated to third parties nor will it be used in any manner notimmediately related to the resolution of these technical problems.
Please be advised that our technical support staff may not be able to resolve your problem if they arenot able to work with a copy of your data.

Part III

T4 TimeSaver.NET Guide44
© 2010 ELM Computer Systems Inc.
3 Working with Databases
3.1 Convert Database
T4 TimeSaver Basic, Plus & Enterprise Only
When you open a “T08," (Original T4 TimeSaver), "T08N" or "T09N" (T4 TimeSaver.NET) database,you will be given the option to set all dollar values to zero and to remove any “amended” markers bychecking the initialize fields box. Otherwise, all dollar values will be maintained and amended slips willstill be labeled amended.
Initialize fields (zero amounts, remove "Amended" etc.) - If checked will cause T4 TimeSaver toremove all dollar values during conversion.
Clear 'CPP Exempt' boxes - Removes the 'CPP Exempt' flag from all slips, making them non-exemptClear 'EI Exempt' boxes - Removes the 'EI Exempt' flag from all slips, making them non-exemptClear 'Do not adjust CPP' boxes - Removes the 'Do not adjust CPP' flag from all slips, allowingthem to be adjustedClear 'Do not adjust EI' boxes - Removes the 'Do not adjust EI' flag from all slips, allowing themto be adjusted
Roll forward federal partnership Schedule 8 and Schedule 50 for new year - Copies contents offederal partnership Schedule 8 and Schedule 50 into 2009 database
Source Folder - Location of the database to be converted, if you are unsure of its location you caneither use the Browse button or open the 2008 T4 TimeSaver and use its Setup - > File Locationsmenu to display the database location. Once the source has been specified all 2008 databases in thesource folder will be displayed in the lower half of the display. Any or all databases may be selected forconversion. No change will be made to the original database.
Destination Folder - Location of the converted database. The original database will not be modified inany way, conversion simply copies the original database into the 2009 format and saves it in the
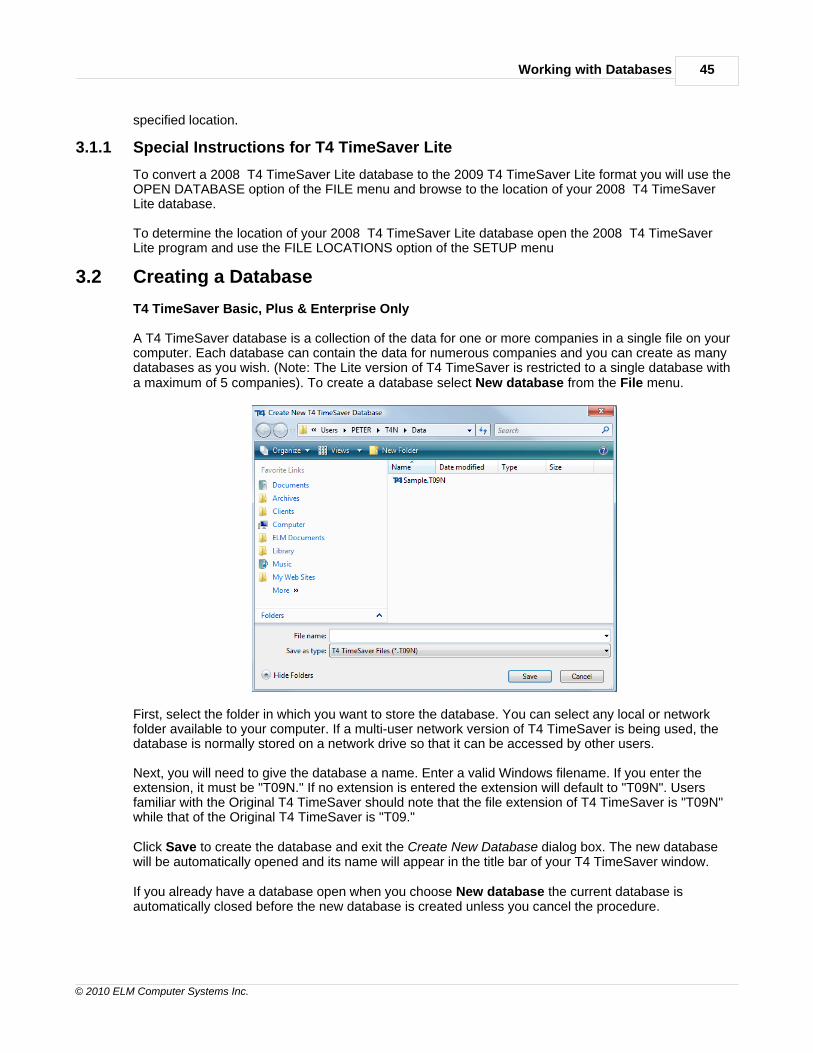
Working with Databases 45
© 2010 ELM Computer Systems Inc.
specified location.
3.1.1 Special Instructions for T4 TimeSaver Lite
To convert a 2008 T4 TimeSaver Lite database to the 2009 T4 TimeSaver Lite format you will use theOPEN DATABASE option of the FILE menu and browse to the location of your 2008 T4 TimeSaverLite database.
To determine the location of your 2008 T4 TimeSaver Lite database open the 2008 T4 TimeSaverLite program and use the FILE LOCATIONS option of the SETUP menu
3.2 Creating a Database
T4 TimeSaver Basic, Plus & Enterprise Only
A T4 TimeSaver database is a collection of the data for one or more companies in a single file on yourcomputer. Each database can contain the data for numerous companies and you can create as manydatabases as you wish. (Note: The Lite version of T4 TimeSaver is restricted to a single database witha maximum of 5 companies). To create a database select New database from the File menu.
First, select the folder in which you want to store the database. You can select any local or networkfolder available to your computer. If a multi-user network version of T4 TimeSaver is being used, thedatabase is normally stored on a network drive so that it can be accessed by other users.
Next, you will need to give the database a name. Enter a valid Windows filename. If you enter theextension, it must be "T09N." If no extension is entered the extension will default to "T09N". Usersfamiliar with the Original T4 TimeSaver should note that the file extension of T4 TimeSaver is "T09N"while that of the Original T4 TimeSaver is "T09."
Click Save to create the database and exit the Create New Database dialog box. The new databasewill be automatically opened and its name will appear in the title bar of your T4 TimeSaver window.
If you already have a database open when you choose New database the current database isautomatically closed before the new database is created unless you cancel the procedure.
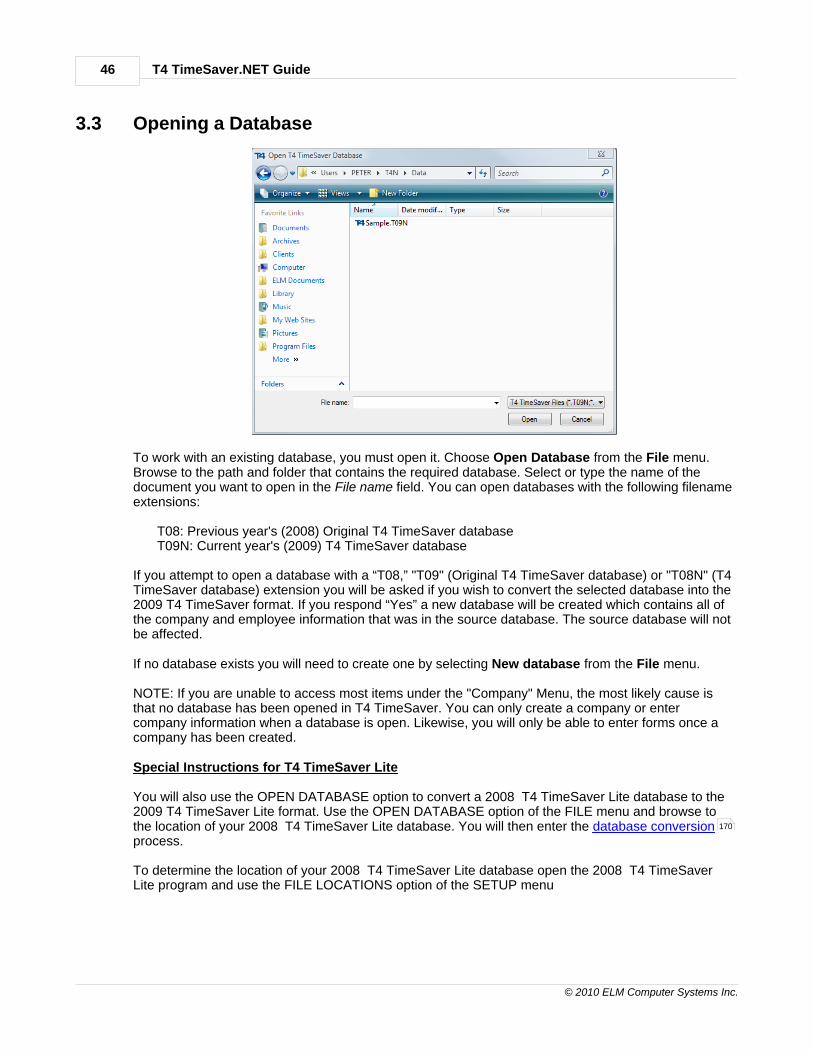
T4 TimeSaver.NET Guide46
© 2010 ELM Computer Systems Inc.
3.3 Opening a Database
To work with an existing database, you must open it. Choose Open Database from the File menu.Browse to the path and folder that contains the required database. Select or type the name of thedocument you want to open in the File name field. You can open databases with the following filenameextensions:
T08: Previous year's (2008) Original T4 TimeSaver databaseT09N: Current year's (2009) T4 TimeSaver database
If you attempt to open a database with a “T08,” "T09" (Original T4 TimeSaver database) or "T08N" (T4TimeSaver database) extension you will be asked if you wish to convert the selected database into the2009 T4 TimeSaver format. If you respond “Yes” a new database will be created which contains all ofthe company and employee information that was in the source database. The source database will notbe affected.
If no database exists you will need to create one by selecting New database from the File menu.
NOTE: If you are unable to access most items under the "Company" Menu, the most likely cause isthat no database has been opened in T4 TimeSaver. You can only create a company or entercompany information when a database is open. Likewise, you will only be able to enter forms once acompany has been created.
Special Instructions for T4 TimeSaver Lite
You will also use the OPEN DATABASE option to convert a 2008 T4 TimeSaver Lite database to the2009 T4 TimeSaver Lite format. Use the OPEN DATABASE option of the FILE menu and browse tothe location of your 2008 T4 TimeSaver Lite database. You will then enter the database conversionprocess.
To determine the location of your 2008 T4 TimeSaver Lite database open the 2008 T4 TimeSaverLite program and use the FILE LOCATIONS option of the SETUP menu
170
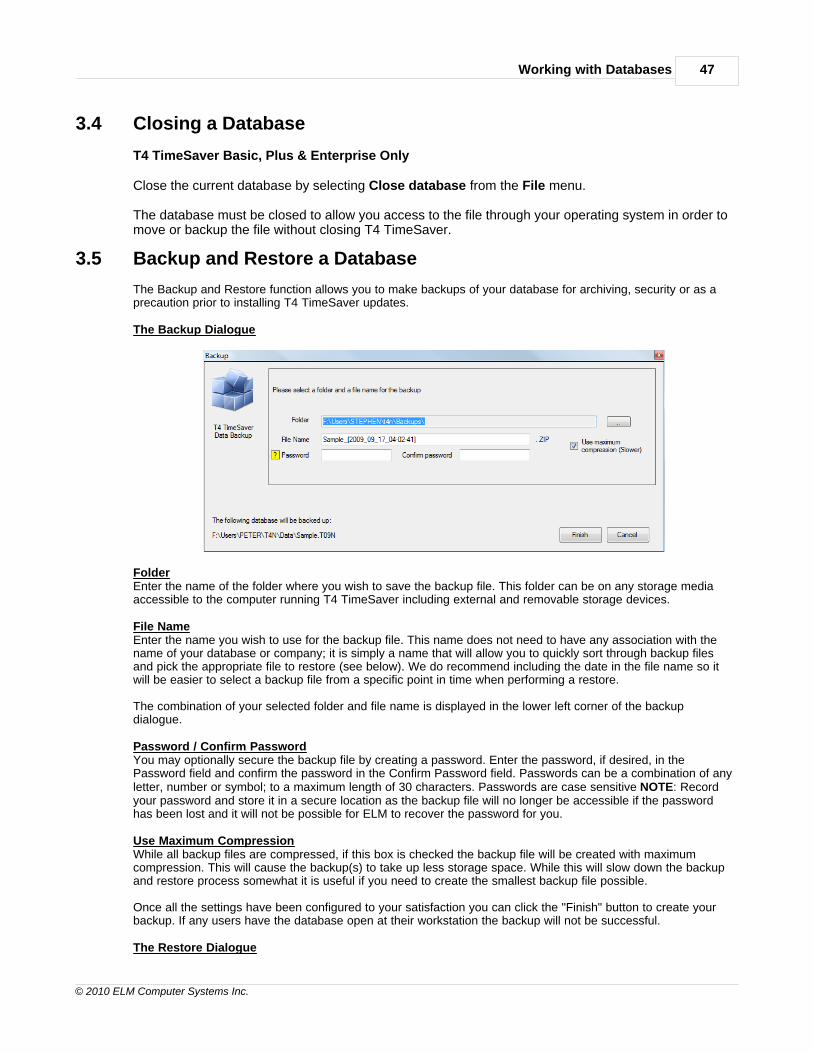
Working with Databases 47
© 2010 ELM Computer Systems Inc.
3.4 Closing a Database
T4 TimeSaver Basic, Plus & Enterprise Only
Close the current database by selecting Close database from the File menu.
The database must be closed to allow you access to the file through your operating system in order tomove or backup the file without closing T4 TimeSaver.
3.5 Backup and Restore a Database
The Backup and Restore function allows you to make backups of your database for archiving, security or as aprecaution prior to installing T4 TimeSaver updates.
The Backup Dialogue
FolderEnter the name of the folder where you wish to save the backup file. This folder can be on any storage mediaaccessible to the computer running T4 TimeSaver including external and removable storage devices.
File NameEnter the name you wish to use for the backup file. This name does not need to have any association with thename of your database or company; it is simply a name that will allow you to quickly sort through backup filesand pick the appropriate file to restore (see below). We do recommend including the date in the file name so itwill be easier to select a backup file from a specific point in time when performing a restore.
The combination of your selected folder and file name is displayed in the lower left corner of the backupdialogue.
Password / Confirm PasswordYou may optionally secure the backup file by creating a password. Enter the password, if desired, in thePassword field and confirm the password in the Confirm Password field. Passwords can be a combination of anyletter, number or symbol; to a maximum length of 30 characters. Passwords are case sensitive NOTE: Recordyour password and store it in a secure location as the backup file will no longer be accessible if the passwordhas been lost and it will not be possible for ELM to recover the password for you.
Use Maximum CompressionWhile all backup files are compressed, if this box is checked the backup file will be created with maximumcompression. This will cause the backup(s) to take up less storage space. While this will slow down the backupand restore process somewhat it is useful if you need to create the smallest backup file possible.
Once all the settings have been configured to your satisfaction you can click the "Finish" button to create yourbackup. If any users have the database open at their workstation the backup will not be successful.
The Restore Dialogue
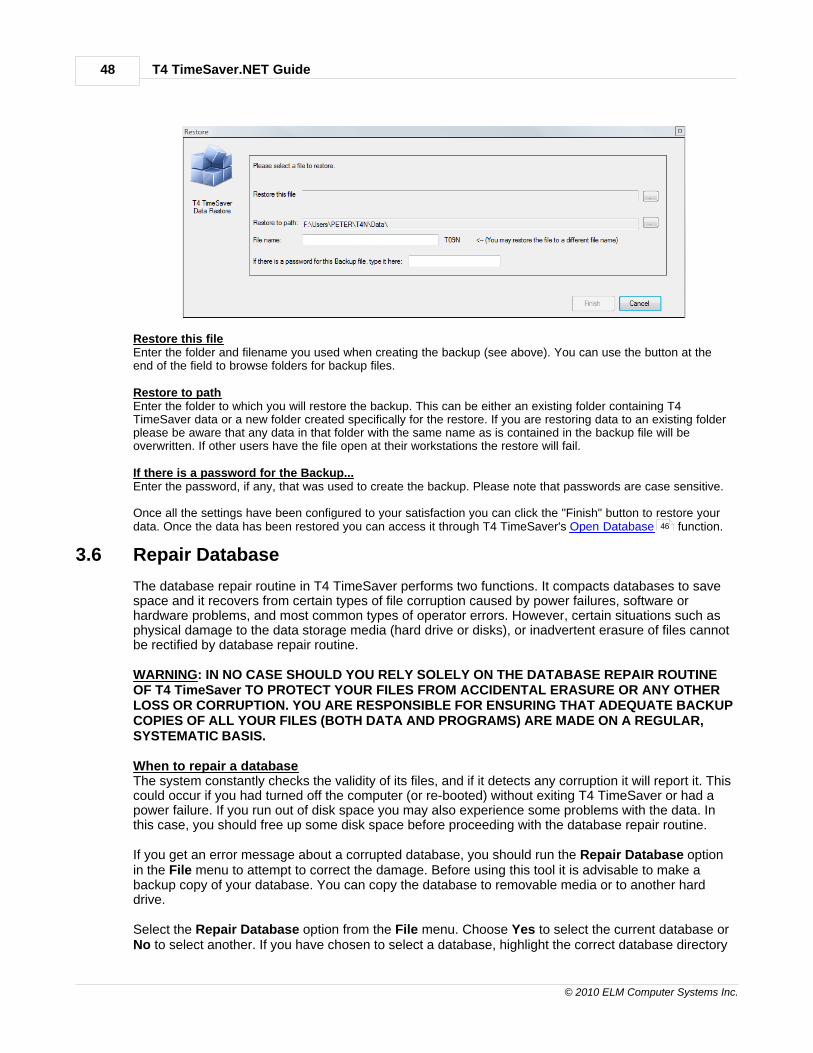
T4 TimeSaver.NET Guide48
© 2010 ELM Computer Systems Inc.
Restore this fileEnter the folder and filename you used when creating the backup (see above). You can use the button at theend of the field to browse folders for backup files.
Restore to pathEnter the folder to which you will restore the backup. This can be either an existing folder containing T4TimeSaver data or a new folder created specifically for the restore. If you are restoring data to an existing folderplease be aware that any data in that folder with the same name as is contained in the backup file will beoverwritten. If other users have the file open at their workstations the restore will fail.
If there is a password for the Backup...Enter the password, if any, that was used to create the backup. Please note that passwords are case sensitive.
Once all the settings have been configured to your satisfaction you can click the "Finish" button to restore yourdata. Once the data has been restored you can access it through T4 TimeSaver's Open Database function.
3.6 Repair Database
The database repair routine in T4 TimeSaver performs two functions. It compacts databases to savespace and it recovers from certain types of file corruption caused by power failures, software orhardware problems, and most common types of operator errors. However, certain situations such asphysical damage to the data storage media (hard drive or disks), or inadvertent erasure of files cannotbe rectified by database repair routine.
WARNING: IN NO CASE SHOULD YOU RELY SOLELY ON THE DATABASE REPAIR ROUTINEOF T4 TimeSaver TO PROTECT YOUR FILES FROM ACCIDENTAL ERASURE OR ANY OTHERLOSS OR CORRUPTION. YOU ARE RESPONSIBLE FOR ENSURING THAT ADEQUATE BACKUPCOPIES OF ALL YOUR FILES (BOTH DATA AND PROGRAMS) ARE MADE ON A REGULAR,SYSTEMATIC BASIS.
When to repair a databaseThe system constantly checks the validity of its files, and if it detects any corruption it will report it. Thiscould occur if you had turned off the computer (or re-booted) without exiting T4 TimeSaver or had apower failure. If you run out of disk space you may also experience some problems with the data. Inthis case, you should free up some disk space before proceeding with the database repair routine.
If you get an error message about a corrupted database, you should run the Repair Database optionin the File menu to attempt to correct the damage. Before using this tool it is advisable to make abackup copy of your database. You can copy the database to removable media or to another harddrive.
Select the Repair Database option from the File menu. Choose Yes to select the current database orNo to select another. If you have chosen to select a database, highlight the correct database directory
46

Working with Databases 49
© 2010 ELM Computer Systems Inc.
and name from the list of available databases and click Open. You will be asked to confirm the nameof database to be repaired. The process will begin as soon as you click Yes. You will be informedwhen the repair is complete. Any data that cannot be fixed will be discarded. You can then open thedatabase again, and continue as usual.

Part IV
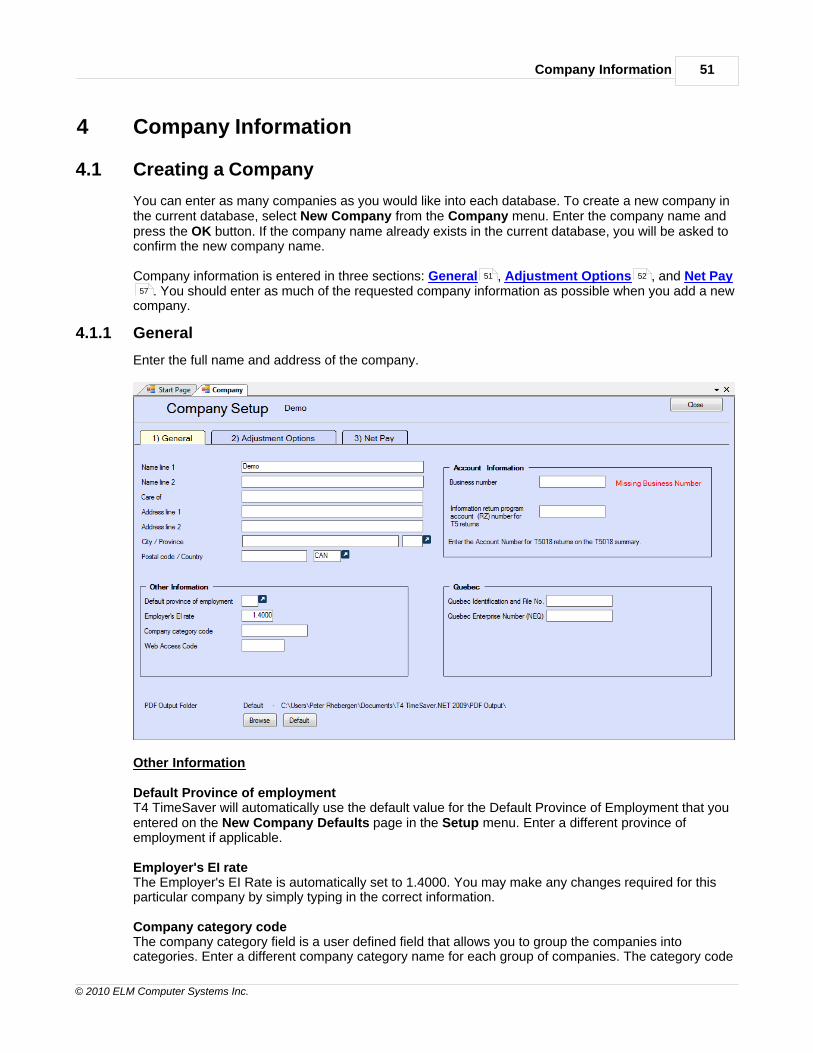
Company Information 51
© 2010 ELM Computer Systems Inc.
4 Company Information
4.1 Creating a Company
You can enter as many companies as you would like into each database. To create a new company inthe current database, select New Company from the Company menu. Enter the company name andpress the OK button. If the company name already exists in the current database, you will be asked toconfirm the new company name.
Company information is entered in three sections: General , Adjustment Options , and Net Pay. You should enter as much of the requested company information as possible when you add a new
company.
4.1.1 General
Enter the full name and address of the company.
Other Information
Default Province of employmentT4 TimeSaver will automatically use the default value for the Default Province of Employment that youentered on the New Company Defaults page in the Setup menu. Enter a different province ofemployment if applicable.
Employer's EI rateThe Employer's EI Rate is automatically set to 1.4000. You may make any changes required for thisparticular company by simply typing in the correct information.
Company category codeThe company category field is a user defined field that allows you to group the companies intocategories. Enter a different company category name for each group of companies. The category code
51 52
57
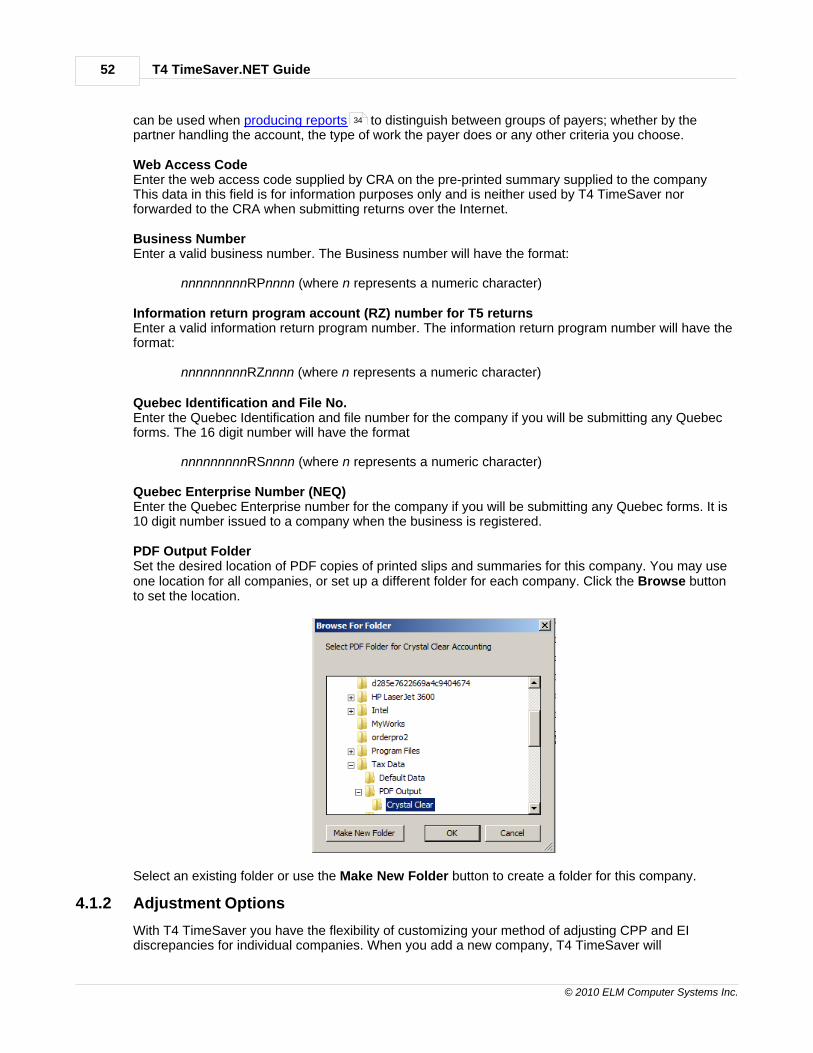
T4 TimeSaver.NET Guide52
© 2010 ELM Computer Systems Inc.
can be used when producing reports to distinguish between groups of payers; whether by thepartner handling the account, the type of work the payer does or any other criteria you choose.
Web Access CodeEnter the web access code supplied by CRA on the pre-printed summary supplied to the companyThis data in this field is for information purposes only and is neither used by T4 TimeSaver norforwarded to the CRA when submitting returns over the Internet.
Business NumberEnter a valid business number. The Business number will have the format:
nnnnnnnnnRPnnnn (where n represents a numeric character)
Information return program account (RZ) number for T5 returnsEnter a valid information return program number. The information return program number will have theformat:
nnnnnnnnnRZnnnn (where n represents a numeric character)
Quebec Identification and File No.Enter the Quebec Identification and file number for the company if you will be submitting any Quebecforms. The 16 digit number will have the format
nnnnnnnnnRSnnnn (where n represents a numeric character)
Quebec Enterprise Number (NEQ)Enter the Quebec Enterprise number for the company if you will be submitting any Quebec forms. It is10 digit number issued to a company when the business is registered.
PDF Output FolderSet the desired location of PDF copies of printed slips and summaries for this company. You may useone location for all companies, or set up a different folder for each company. Click the Browse buttonto set the location.
Select an existing folder or use the Make New Folder button to create a folder for this company.
4.1.2 Adjustment Options
With T4 TimeSaver you have the flexibility of customizing your method of adjusting CPP and EIdiscrepancies for individual companies. When you add a new company, T4 TimeSaver will
34

Company Information 53
© 2010 ELM Computer Systems Inc.
automatically insert the default values that you entered on the T4 Adjustment Defaults page in theSetup menu.
You may make any changes required for this particular company by simply typing in the correctinformation. For further information see Adjusting T4s .
Standard Adjustment Options (Lite & Basic)
If, for a specific company, you have changed the values for the Tax Centre, the Taxation ServicesOffice code, or the Default Province of Employment, in the General section (or any of the options in theAdjustment Options section) pressing the User Defaults button will restore the default values that arestored in the User Settings . You will be asked to confirm your choice.
T4 TimeSaver Plus & Enterprise Only
T4 TimeSaver Plus and Enterprise versions use an enhanced Adjustment Options screen which addsthe following adjustment options:
1 - Lock the adjustment options for the current company 2 - Disable T4/RL-1 adjustments for the current company
97
182
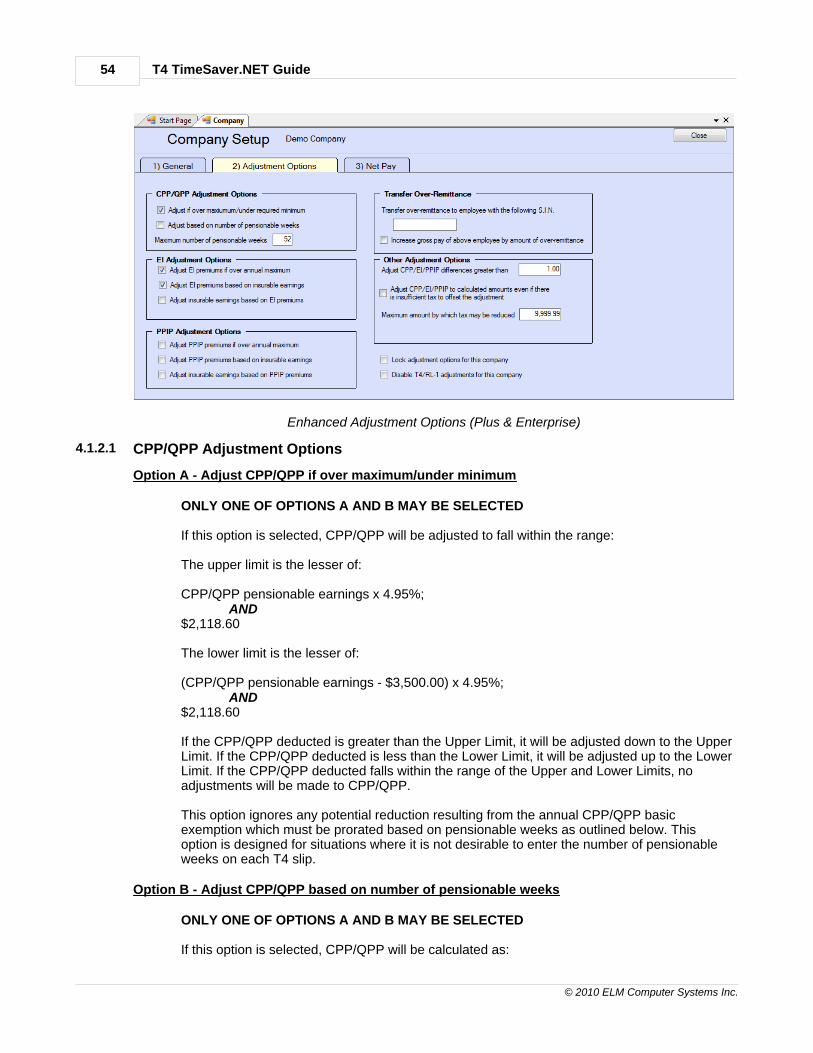
T4 TimeSaver.NET Guide54
© 2010 ELM Computer Systems Inc.
Enhanced Adjustment Options (Plus & Enterprise)
4.1.2.1 CPP/QPP Adjustment Options
Option A - Adjust CPP/QPP if over maximum/under minimum
ONLY ONE OF OPTIONS A AND B MAY BE SELECTED
If this option is selected, CPP/QPP will be adjusted to fall within the range:
The upper limit is the lesser of:
CPP/QPP pensionable earnings x 4.95%;AND
$2,118.60
The lower limit is the lesser of:
(CPP/QPP pensionable earnings - $3,500.00) x 4.95%;AND
$2,118.60
If the CPP/QPP deducted is greater than the Upper Limit, it will be adjusted down to the UpperLimit. If the CPP/QPP deducted is less than the Lower Limit, it will be adjusted up to the LowerLimit. If the CPP/QPP deducted falls within the range of the Upper and Lower Limits, noadjustments will be made to CPP/QPP.
This option ignores any potential reduction resulting from the annual CPP/QPP basicexemption which must be prorated based on pensionable weeks as outlined below. Thisoption is designed for situations where it is not desirable to enter the number of pensionableweeks on each T4 slip.
Option B - Adjust CPP/QPP based on number of pensionable weeks
ONLY ONE OF OPTIONS A AND B MAY BE SELECTED
If this option is selected, CPP/QPP will be calculated as:
Company Information 55
© 2010 ELM Computer Systems Inc.
(CPP/QPP pensionable earnings - prorated deduction) x 4.95%
Where the prorated deduction is calculated as:
(number of pensionable weeks / maximum number of pensionable weeks) x $3,500.00
C - Maximum number of pensionable weeks
This number is the number of weeks in the employer's fiscal year and is used in the abovecalculation to prorate the CPP/QPP basic exemption. The default value is 52 weeks but canbe changed to 53 weeks if required.
4.1.2.2 EI Adjustment Options
Option D - Adjust EI premiums if over annual maximum
THIS OPTION MAY BE SELECTED INDIVIDUALLY OR WITH EITHER OPTION E OR F
If this option is selected, the EI will only be adjusted if it is greater than:
Standard annual maximum of $42,300.00 x 1.73% or $731.79 (for employees whose provinceof employment is not Québec)
ORStandard annual maximum of $42,300.00 x 1.73% or $2,118.60 (for employees whoseprovince of employment is Québec)
Option E - Adjust EI premiums based on Insurable Earnings
ONLY ONE OF OPTIONS E AND F MAY BE SELECTED
If this option is selected, the EI will be calculated as:
EI insurable earnings x 1.73% (for employees whose province of employment is not Québec)OR
EI insurable earnings x 1.38% (for employees whose province of employment is Québec)
Note that if EI insurable earnings are not entered, gross pay will be used.)
Option F - Adjust insurable earnings based on EI premiums
ONLY ONE OF OPTIONS E AND F MAY BE SELECTED
This option assumes the entered amount for EI deducted is correct. When this option isselected, EI insurable earnings will be calculated as the minimum of:
EI deducted / 1.73% [or: EI deducted / 1.38% (for employees whose province of employmentis Québec)]
OR· $42,300.00
OREmployment income
4.1.2.3 PPIP Adjustment Options
Option G - Adjust PPIP premiums if over annual maximum
THIS OPTION MAY BE SELECTED INDIVIDUALLY OR WITH EITHER OPTION H OR I

T4 TimeSaver.NET Guide56
© 2010 ELM Computer Systems Inc.
If this option is selected, the PPIP will only be adjusted if it is greater than:
Standard annual maximum of $62,000.00 x 0.484% or $300.08
Option H - Adjust PPIP premiums based on Insurable Earnings
ONLY ONE OF OPTIONS H AND I MAY BE SELECTED
If this option is selected, the EI will be calculated as:
PPIP insurable earnings x 0.484%
(If PPIP insurable earnings are not entered, gross pay will be used.)
Option I - Adjust insurable earnings based on PPIP deducted
ONLY ONE OF OPTIONS H AND I MAY BE SELECTED
This option assumes the entered amount for PPIP deducted is correct. When this option isselected, PPIP insurable earnings will be calculated as the minimum of:
PPIP deducted / 0.484%OR
$62,000.00OR
Employment income
4.1.2.4 Transfer Over Remittance
Transfer employer’s over remittance of CPP/QPP or EI to the following employeeWhen adjustments reduce total deductions for the company, the employer’s portion of theover-remittance may be transferred to the tax of an owner or shareholder.
If a S.I.N. is entered here, then any net overpayment of CPP/QPP and EI resulting from adjustmentscalculated by the program will be credited to the tax deducted for the T4 of this employee. Thisadjustment will be reflected in the adjusted tax on the Adjustment reports for the particular employee.
Increase the gross pay with over remittanceIf an over remittance is created by the adjustments and you indicate that you want the over remittanceto be transferred to one employee (i.e. an owner or shareholder), you may also increase the gross payof that employee in order to keep the net pay at the same level. If this option is chosen and thetransferee’s CPP/QPP is under the maximum deduction for the year, the CPP/QPP will NOT beadjusted again for this underpayment.
4.1.2.5 Other Options
Adjust CPP/EI/PPIP differences greater than...If an amount is entered in this box, an adjustment to CPP/QPP, EI or PPIP must be greater than thisthreshold in order for the adjustment to be made. If the difference between the calculated amount andthe entered amount for CPP/QPP, EI and PPIP is less than or equal to the threshold, no adjustmentswill be made and the entered amounts for CPP/QPP, EI, PPIP and tax will appear on the T4 slips.
Do you want CPP, EI & PPIP to be adjusted to their calculated amounts even if there isinsufficient tax to cover the difference?If this option is selected, it will adjust CPP/QPP, EI and PPIP to their calculated amounts althoughthere may not be sufficient tax to make up the difference.
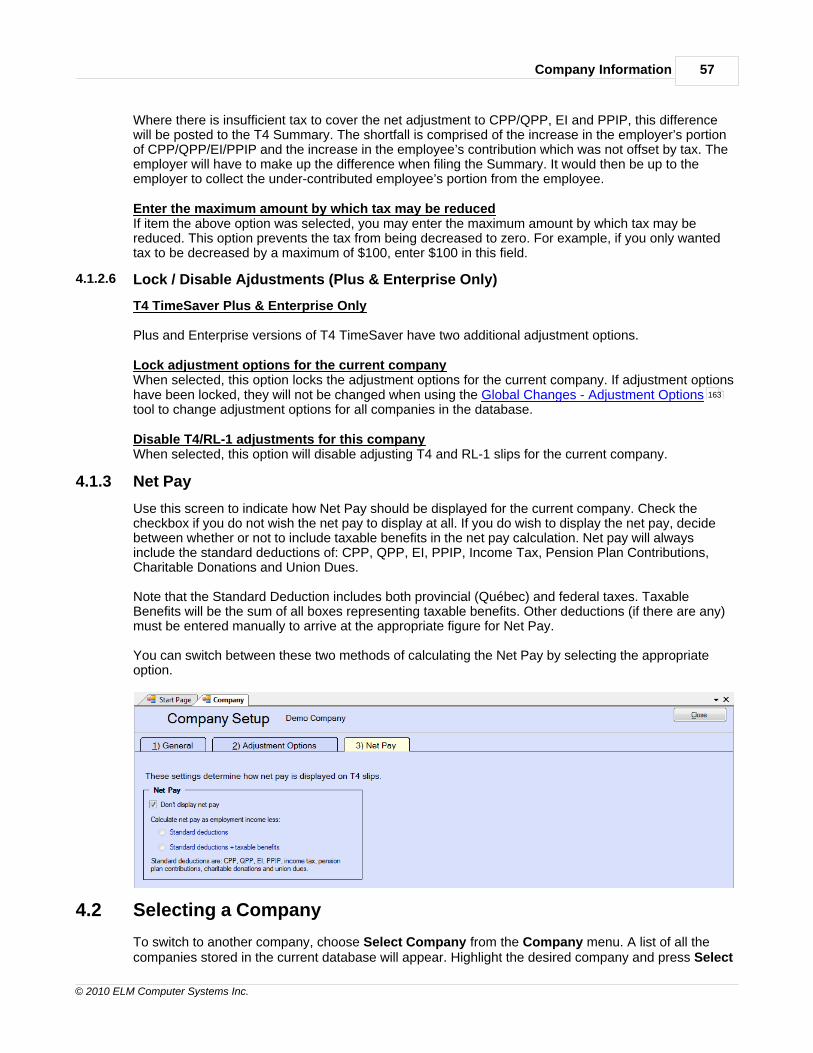
Company Information 57
© 2010 ELM Computer Systems Inc.
Where there is insufficient tax to cover the net adjustment to CPP/QPP, EI and PPIP, this differencewill be posted to the T4 Summary. The shortfall is comprised of the increase in the employer’s portionof CPP/QPP/EI/PPIP and the increase in the employee’s contribution which was not offset by tax. Theemployer will have to make up the difference when filing the Summary. It would then be up to theemployer to collect the under-contributed employee’s portion from the employee.
Enter the maximum amount by which tax may be reducedIf item the above option was selected, you may enter the maximum amount by which tax may bereduced. This option prevents the tax from being decreased to zero. For example, if you only wantedtax to be decreased by a maximum of $100, enter $100 in this field.
4.1.2.6 Lock / Disable Ajdustments (Plus & Enterprise Only)
T4 TimeSaver Plus & Enterprise Only
Plus and Enterprise versions of T4 TimeSaver have two additional adjustment options.
Lock adjustment options for the current companyWhen selected, this option locks the adjustment options for the current company. If adjustment optionshave been locked, they will not be changed when using the Global Changes - Adjustment Optionstool to change adjustment options for all companies in the database.
Disable T4/RL-1 adjustments for this companyWhen selected, this option will disable adjusting T4 and RL-1 slips for the current company.
4.1.3 Net Pay
Use this screen to indicate how Net Pay should be displayed for the current company. Check thecheckbox if you do not wish the net pay to display at all. If you do wish to display the net pay, decidebetween whether or not to include taxable benefits in the net pay calculation. Net pay will alwaysinclude the standard deductions of: CPP, QPP, EI, PPIP, Income Tax, Pension Plan Contributions,Charitable Donations and Union Dues.
Note that the Standard Deduction includes both provincial (Québec) and federal taxes. TaxableBenefits will be the sum of all boxes representing taxable benefits. Other deductions (if there are any)must be entered manually to arrive at the appropriate figure for Net Pay.
You can switch between these two methods of calculating the Net Pay by selecting the appropriateoption.
4.2 Selecting a Company
To switch to another company, choose Select Company from the Company menu. A list of all thecompanies stored in the current database will appear. Highlight the desired company and press Select
163
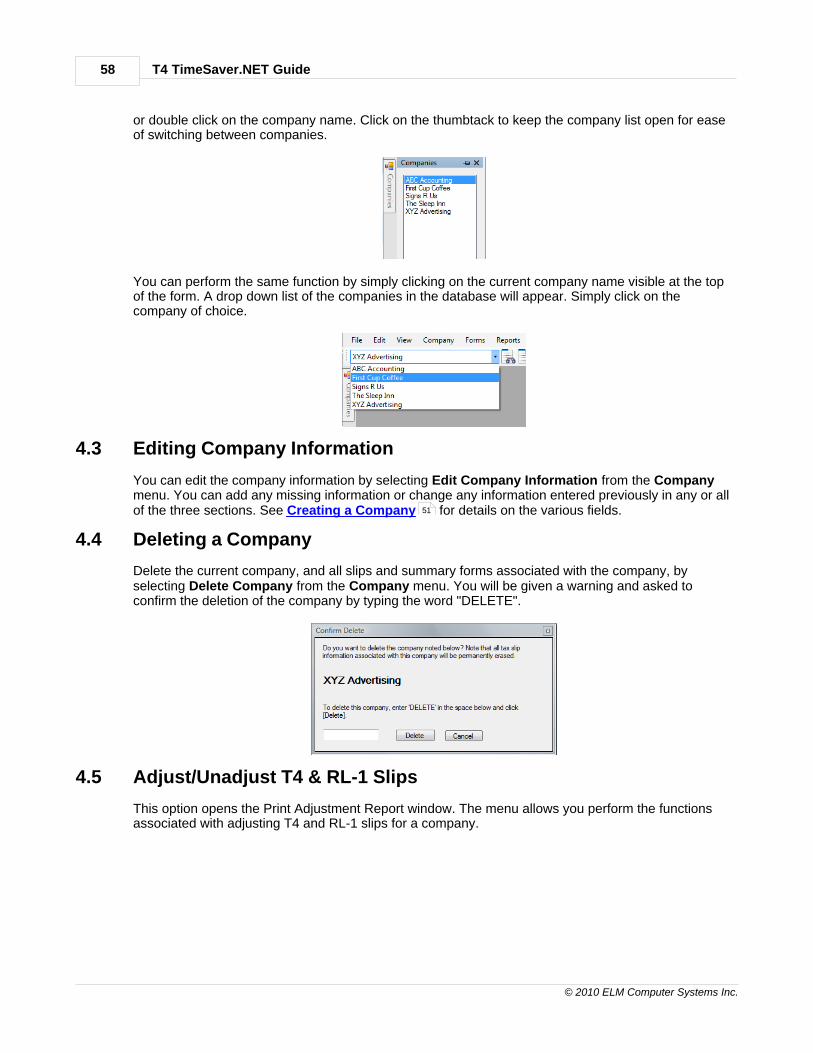
T4 TimeSaver.NET Guide58
© 2010 ELM Computer Systems Inc.
or double click on the company name. Click on the thumbtack to keep the company list open for easeof switching between companies.
You can perform the same function by simply clicking on the current company name visible at the topof the form. A drop down list of the companies in the database will appear. Simply click on thecompany of choice.
4.3 Editing Company Information
You can edit the company information by selecting Edit Company Information from the Companymenu. You can add any missing information or change any information entered previously in any or allof the three sections. See Creating a Company for details on the various fields.
4.4 Deleting a Company
Delete the current company, and all slips and summary forms associated with the company, byselecting Delete Company from the Company menu. You will be given a warning and asked toconfirm the deletion of the company by typing the word "DELETE".
4.5 Adjust/Unadjust T4 & RL-1 Slips
This option opens the Print Adjustment Report window. The menu allows you perform the functionsassociated with adjusting T4 and RL-1 slips for a company.
51
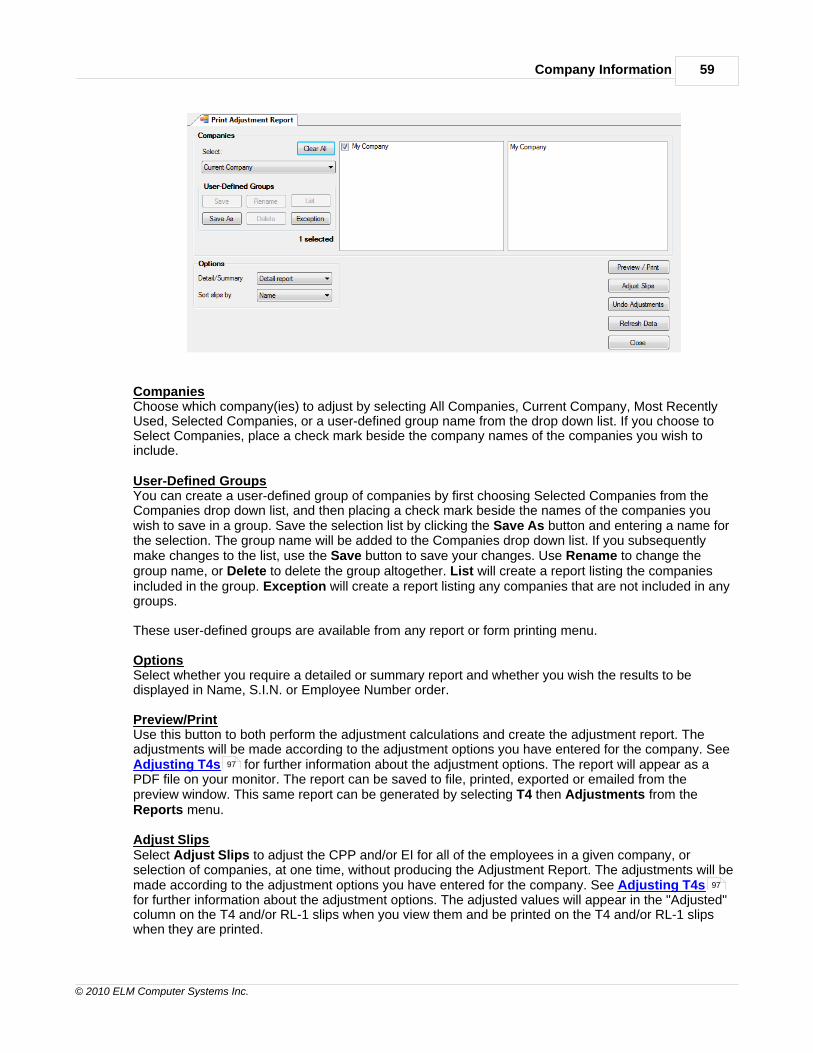
Company Information 59
© 2010 ELM Computer Systems Inc.
CompaniesChoose which company(ies) to adjust by selecting All Companies, Current Company, Most RecentlyUsed, Selected Companies, or a user-defined group name from the drop down list. If you choose toSelect Companies, place a check mark beside the company names of the companies you wish toinclude.
User-Defined GroupsYou can create a user-defined group of companies by first choosing Selected Companies from theCompanies drop down list, and then placing a check mark beside the names of the companies youwish to save in a group. Save the selection list by clicking the Save As button and entering a name forthe selection. The group name will be added to the Companies drop down list. If you subsequentlymake changes to the list, use the Save button to save your changes. Use Rename to change thegroup name, or Delete to delete the group altogether. List will create a report listing the companiesincluded in the group. Exception will create a report listing any companies that are not included in anygroups.
These user-defined groups are available from any report or form printing menu.
OptionsSelect whether you require a detailed or summary report and whether you wish the results to bedisplayed in Name, S.I.N. or Employee Number order.
Preview/PrintUse this button to both perform the adjustment calculations and create the adjustment report. Theadjustments will be made according to the adjustment options you have entered for the company. See Adjusting T4s for further information about the adjustment options. The report will appear as aPDF file on your monitor. The report can be saved to file, printed, exported or emailed from thepreview window. This same report can be generated by selecting T4 then Adjustments from theReports menu.
Adjust SlipsSelect Adjust Slips to adjust the CPP and/or EI for all of the employees in a given company, orselection of companies, at one time, without producing the Adjustment Report. The adjustments will bemade according to the adjustment options you have entered for the company. See Adjusting T4sfor further information about the adjustment options. The adjusted values will appear in the "Adjusted"column on the T4 and/or RL-1 slips when you view them and be printed on the T4 and/or RL-1 slipswhen they are printed.
97
97

T4 TimeSaver.NET Guide60
© 2010 ELM Computer Systems Inc.
Undo AdjustmentsSelect Undo Adjustments to remove the adjustment information from the T4 and/or RL-1 slips whenyou view them and to revert back to the entered values on the T4 and/or RL-1 slips when they areprinted.
Refresh DataUse this button to update any company data that may have changed since the Print Adjustment Reportwindow was opened.
4.6 Unlock all Companies in Database
Select Unlock all Companies in Database from the Company menu. Use this function when an errormessage is displayed stating that a particular company is locked by a user, when that user is not, infact, accessing the company. This would occur if T4 TimeSaver was not exited correctly. You will beasked to confirm the unlock.

Part V
T4 TimeSaver.NET Guide62
© 2010 ELM Computer Systems Inc.
5 Entering Slips
Choose the type of slip you wish to enter by selecting it from the Forms menu. The following are someof the functions you can use:
5.1 Add Slips
This function is used to add a new slip of the type you are currently entering to the active company.Access this function by selecting Add Slip from the Edit menu, clicking on the Add Slip icon in theicon toolbar, or by pressing [Ctrl] + [A]. A blank data entry form will appear in which you may enter theinformation for an individual slip.
After entering data in a box you may press either the Enter or Tab key and the cursor will move to thenext box. The cursor only stops at the boxes that have been checked off on the corresponding DataEntry tab of the Setup menu. (Note: there are Data Entry tabs for the most commonly used formtypes)
You will be warned if the data you have entered is invalid.
5.2 Delete Slips
Select Delete Slip from the Edit menu, click on the Delete Slip icon in the icon toolbar, or press [Ctrl]+ [D]. This function will delete the slip currently displayed on the screen. You will be asked to confirmthe deletion.
If you delete the only slip, the slip window will be closed.
5.3 Sorting Slips
During data entry or review of slip information you can modify the sequence of the slips by selectingthe desired field from the drop down list in the icon toolbar (located to the left of the slip number field).The fields available for sorting will vary by the type of slip. The slip currently being displayed will remainon the screen.
5.4 Selecting Slips
Choose Select slip from list from the Edit menu to display a list of all the recipients for the currentcompany. Clicking on the Find Slip icon in the icon toolbar performs the same function. Select fromthe list by clicking on the desired recipient. The slip for the recipient selected will appear on the screen.
The slips will be listed in the sort order selected in the drop down list in the icon toolbar.
5.5 Entering Data
The data entry screen for each type of slip contains input fields that correspond to the boxes on theprinted forms, plus some control fields required by T4 TimeSaver. Descriptions of some of theseboxes are listed below under the corresponding type of slip. See the guides provided by CRA forinformation about the regulations concerning the contents of any of the particular boxes.
There are a number of features available to make data entry as quick and easy as possible. Manyfields, for example the Province field, have white arrows to the right of the box. This indicates thatthere are a limited number of valid options for this field. Double click in the box or on the arrow toselect from the valid options.
You can insert the company address onto the address fields for an employee by simultaneouslypressing the Shift + F6 keys. If there is more than one slip for an employee you can copy the
175

Entering Slips 63
© 2010 ELM Computer Systems Inc.
Employee information from one slip using the F7 key and then paste it onto another slip using the Shift+ F7 combination of keys.
5.6 e-Slip Tab
T4 TimeSaver Enterprise Only
When using T4 TimeSaver Enterprise you will see an e-Slip tab on many of the information slip dataentry screens. Use the fields on this screen to enter an email address for the slip's recipient. Thisemail address can then be used to email a copy of the slip in electronic format to the recipient; ratherthan collating and mailing paper slips. The slip will be sent to the recipient as a PDF file. You arerequired to obtain the employee's consent before you can distribute slips in electronic format.
Email addressEnter the recipient's email address. When emailed, the PDF slip will be sent to this address. Thecheckbox Recipient consents to receive electronic copy of slip is selected by default for allrecipients of all slip types.
FilenameThe filename field indicates the name of the PDF file as it is stored in your system.
Delivery StatusThe delivery status field indicates whether or not a PDF slip has been emailed to the recipient.
5.7 Overriding Calculated Fields
Some fields on the slips and summaries contain calculated values. If it becomes necessary to edit acalculated field you may do so by pressing the F4 button or double clicking the icon to the right of thefield. The background colour of the field will change to indicate the value is no longer the calculatedvalue and you will be able to enter the desired value.
To return to the calculated value, click the Recalculate button, press F4 again, or double click the iconto the right of the field again. You will be asked to confirm the return to the calculated value.
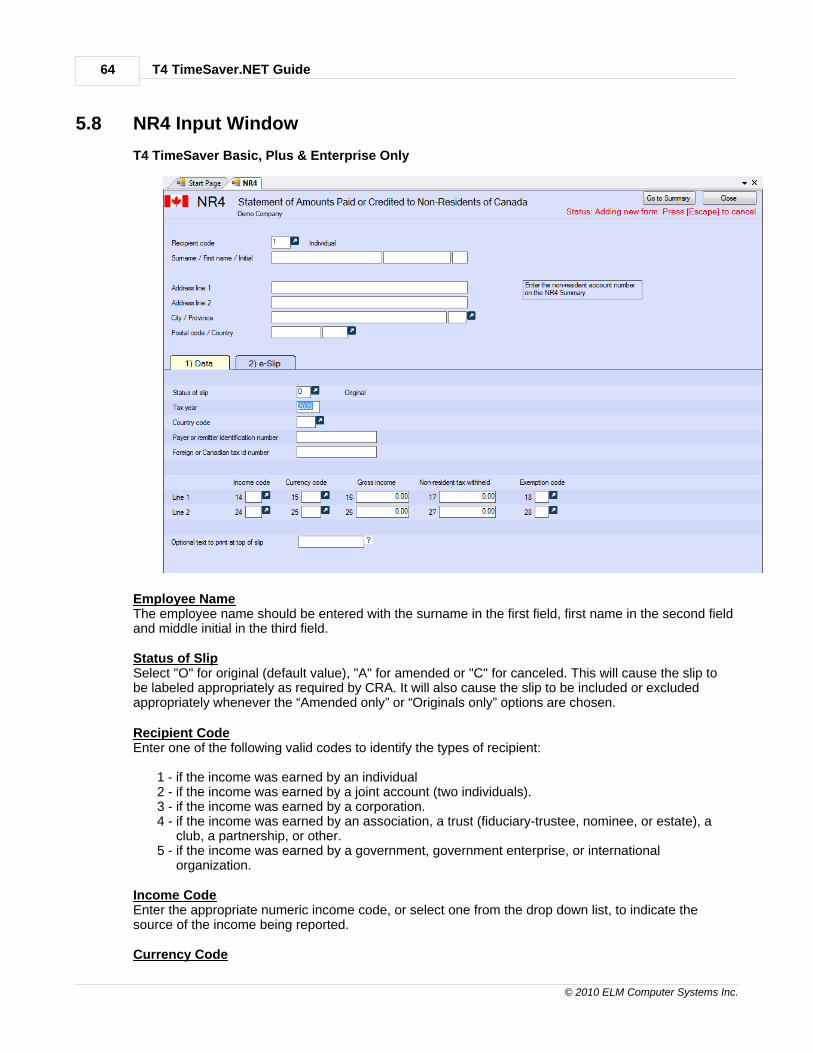
T4 TimeSaver.NET Guide64
© 2010 ELM Computer Systems Inc.
5.8 NR4 Input Window
T4 TimeSaver Basic, Plus & Enterprise Only
Employee NameThe employee name should be entered with the surname in the first field, first name in the second fieldand middle initial in the third field.
Status of SlipSelect "O" for original (default value), "A" for amended or "C" for canceled. This will cause the slip tobe labeled appropriately as required by CRA. It will also cause the slip to be included or excludedappropriately whenever the “Amended only” or “Originals only” options are chosen.
Recipient CodeEnter one of the following valid codes to identify the types of recipient:
1 - if the income was earned by an individual 2 - if the income was earned by a joint account (two individuals).3 - if the income was earned by a corporation.4 - if the income was earned by an association, a trust (fiduciary-trustee, nominee, or estate), a
club, a partnership, or other.5 - if the income was earned by a government, government enterprise, or international
organization.
Income CodeEnter the appropriate numeric income code, or select one from the drop down list, to indicate thesource of the income being reported.
Currency Code
Entering Slips 65
© 2010 ELM Computer Systems Inc.
Gross income and non-resident tax withheld should be reported in Canadian funds. However, if youcannot convert these amounts, CRA will convert both these values to Canadian currency based on thecurrency code entered here and the average annual rate. Ensure that both the gross income and thenon-resident tax withheld are in the same currency and that the appropriate three letter code isselected.
Exemption CodeEnter the applicable exemption code, or select it from the drop down list. See Appendix C in the CRAPublication T4061 Non Resident Withholding Tax Guide.
Optional Text to Print at Top of SlipInformation entered here, to a maximum of 15 characters, will be printed at the top of the slip.
Go To Summary ButtonClick on this button to display the NR4 Summary for the current employer. The data entry screen forthe current slip will remain available via a tab beneath the toolbar.
e-SlipRefer to e-Slip for information on using the e-Slip tab. This feature is available in T4 TimeSaverEnterprise only.
63

T4 TimeSaver.NET Guide66
© 2010 ELM Computer Systems Inc.
5.9 T4 Input Window
Employee NameThe employee name should be entered with the surname in the first field, first name in the second fieldand middle initial in the third field.
Province of EmploymentT4 TimeSaver will automatically insert into Box 10 the code for the province of employment entered inthe General section of the Company Information. You may, of course, override it for a specificemployee.
S.I.N. ValidationT4 TimeSaver will check the validity of the S.I.N. entered and will change the colour of the S.I.N. box tored if the S.I.N. is invalid. You can, however, ignore the warning and continue to enter otherinformation. The formula used to test the value of the S.I.N. is found in the CRA Publication: Formulaefor Federal and Provincial Deductions for Computer Users. When the edit list or detailed adjustment report is printed or displayed, there will be an asterisk besideany invalid S.I.N. values.
CPP Pensionable Weeks

Entering Slips 67
© 2010 ELM Computer Systems Inc.
If you have selected "Adjust based on number of pensionable weeks" for the CPP/QPP AdjustmentOption on the Adjustment Options section of the Company Information , a value must beentered into the input field "CPP Pensionable Weeks". This field will default to 52 or 53 depending onthe value entered under Maximum Number of Pensionable Weeks, but you may override this value forspecific employees.
EI Insurable EarningsA value should only be entered in the EI Insurable earnings box when it is not equal to zero or to thegross pay amount (Box 14). If no amount in entered, Box 24 will be left blank on the printed slip asrequired by CRA.
CPP/QPP, EI and PPIP Exempt BoxesYou may check one or both of the CPP/QPP and EI Exempt boxes as appropriate for the currentemployee.
Do not check the CPP/QPP exempt box if you entered an amount in Box 16 or Box 26. CheckCPP/QPP exempt only if the earnings were exempt for the entire period of employment.
Do not check the EI Exempt box if you entered an amount in Box 18 or Box 24. Check EI exempt onlyif the earnings were exempt, or if they were not eligible for the entire reporting period of employment.
Do not check the PPIP Exempt box if you entered an amount in Box 55 or Box 56. Check PPIPexempt only if the earnings were exempt, or if they were not eligible for the entire reporting period ofemployment.
CPP/QPP, EI and PPIP Do Not Adjust BoxesCheck one or both of these boxes to indicate that this particular slip should not be adjusted when theslips for this company are adjusted. This allows you to adjust some slips while leaving others asentered.
Other IncomeRecord other income in the boxes provided at the bottom of the window. The type code of the incomeshould be indicated in the Box field with the corresponding Amounts directly beside. Press F2 ordouble click the box field to display a list of available codes. See your Tax Guide for a list anddescription of appropriate type codes.
Status of SlipSelect "O" for original (default value), "A" for amended or "C" for canceled. This will cause the slip tobe labeled appropriately as required by CRA. It will also cause the slip to be included or excludedappropriately whenever the “Amended only” or “Originals only” options are chosen.
Optional Text to Print at Top of SlipInformation entered here, to a maximum of 15 characters, will be printed at the top of the slip.
Go To RL-1 ButtonClicking on this button will display the RL-1 slip associated with the displayed slip, if an RL-1 exists.
Adjust ButtonClicking on this button will adjust the displayed slip. The adjustments will be made based on theadjustment options selected for the current company. These adjustments are not reflected in thecorresponding T4 summary, unless all of the slips are adjusted using by Printing AdjustmentReports .
Net Pay ButtonThe employee's net pay is calculated and displayed on the screen as you enter data into each box ofthe T4 and may prove useful as an audit check. It will be calculated in one of the two following ways:
52 164
144
T4 TimeSaver.NET Guide68
© 2010 ELM Computer Systems Inc.
Employment Income - Standard Deductions - Other Deductions
or
Employment Income - Standard Deductions - Taxable Benefits
The Employment Income is the amount entered in Box A. The Standard Deductions are: CPP, QPP,EI, PPIP, Income Tax, Pension Plan Contributions, Charitable Donations and Union Dues. Note thatthe Standard Deduction includes both provincial (Québec) and federal taxes. Taxable Benefits will bethe sum of all boxes representing taxable benefits. Other deductions (if there are any) must be enteredmanually to arrive at the appropriate figure for Net Pay.
You can switch between these two methods of calculating the Net Pay by clicking on the Net Paybutton and then selecting the appropriate option. You can also check the "Don't display net pay" toremove this information from the display.
Go To Summary ButtonClick on this button to display the T4 Summary for the current employer. The data entry screen for thecurrent slip will remain available via a tab beneath the toolbar.
e-SlipRefer to e-Slip for information on using the e-Slip tab. This feature is available in T4 TimeSaverEnterprise only.
57
63

Entering Slips 69
© 2010 ELM Computer Systems Inc.
5.10 T4A Input Window
Recipient NameThe recipient name should be entered with the surname in the first field, first name in the second fieldand middle initial in the third field.
S.I.N. ValidationT4 TimeSaver will check the validity of the S.I.N. entered and will change the colour of the S.I.N. fieldto red if the S.I.N. is invalid. You can, however, ignore the warning and continue to enter otherinformation. The formula used to test the value of the S.I.N. is found in the CRA Publication: Formulaefor Federal and Provincial Deductions for Computer Users.
Status of SlipSelect "O" for original (default value), "A" for amended or "C" for canceled. This will cause the slip tobe labeled appropriately as required by CRA. It will also cause the slip to be included or excludedappropriately whenever the “Amended only” or “Originals only” options are chosen.
FootnotesText footnotes may be entered in the fields provided. These will be printed on paper copies of the T4A.(Footnotes for use with electronic filing submissions may be accessed by clicking on the ElectronicFiling link in the top right corner of the screen.)
Optional Text to Print at Top of SlipInformation entered here, to a maximum of 15 characters, will be printed at the top of the slip.
Go To RL-1 Button

T4 TimeSaver.NET Guide70
© 2010 ELM Computer Systems Inc.
Clicking on this button will display the RL-1 slip associated with the displayed slip, if an RL-1 exists.
Go To Summary ButtonClick on this button to display the T4A Summary for the current employer. The data entry screen forthe current slip will remain available via a tab beneath the toolbar.
e-SlipRefer to e-Slip for information on using the e-Slip tab. This feature is available in T4 TimeSaverEnterprise only.
63

Entering Slips 71
© 2010 ELM Computer Systems Inc.
5.10.1 Electronic Filing Input Window
Information entered on the "Electronic Filing" screen will be used only when filing T4A return(s)electronically; it is not represented on any paper copies of the T4A.

T4 TimeSaver.NET Guide72
© 2010 ELM Computer Systems Inc.
5.11 T4ANR Input Window
T4 TimeSaver Basic, Plus & Enterprise Only
Recipient CodeEnter one of the following valid codes to identify the types of recipient:
1 - if the income was earned by an individual 2 - if the income was earned by a joint account (two individuals).3 - if the income was earned by a corporation.4 - if the income was earned by an association, a trust (fiduciary-trustee, nominee, or estate), a
club, a partnership, or other.5 - if the income was earned by a government, government enterprise, or international
organization.
Employee NameThe employee name should be entered with the surname in the first field, first name in the second fieldand middle initial in the third field.
Status of SlipSelect "O" for original (default value), "A" for amended or "C" for canceled. This will cause the slip tobe labeled appropriately as required by CRA. It will also cause the slip to be included or excludedappropriately whenever the “Amended only” or “Originals only” options are chosen.
Country of ResidenceEnter the appropriate three character country code, or select it from the drop down list, to indicate the
Entering Slips 73
© 2010 ELM Computer Systems Inc.
country of residence of the recipient. See Appendix E for a full list of the standard three charactercountry codes.
Non-Resident’s Service IndustryEnter the four digit numeric code, or select it from the drop down list, indicating the type of serviceindustry.
City/Province where services renderedEnter the city name, leave a space and then type the two character province code for the province inwhich the services were rendered.
Days in CanadaEnter the total number of days the non-resident was in Canada during this calendar year while undercontract with the payer. Include weekends and holidays.
Professional NameUse this box if the professional or operating name is different from the real or legal name of thenon-resident. For example, this box may be used when payments are made to non-residents in theentertainment and athletic professions.
Optional Text to Print at Top of SlipInformation entered here, to a maximum of 15 characters, will appear at the top of the printed slip.
Go To Summary ButtonClick on this button to display the T4A-NR Summary for the current employer. The data entry screenfor the current slip will remain available via a tab beneath the toolbar.
e-SlipRefer to e-Slip for information on using the e-Slip tab. This feature is available in T4 TimeSaverEnterprise only.
63

T4 TimeSaver.NET Guide74
© 2010 ELM Computer Systems Inc.
5.12 T4AP Input Window
T4 TimeSaver Basic, Plus & Enterprise Only
Employee NameThe employee name should be entered with the surname in the first field, first name in the second fieldand middle initial in the third field.
Status of SlipSelect "O" for original (default value), "A" for amended or "C" for canceled. This will cause the slip tobe labeled appropriately as required by CRA. It will also cause the slip to be included or excludedappropriately whenever the “Amended only” or “Originals only” options are chosen.
Optional Text to Print at Top of SlipInformation entered here, to a maximum of 15 characters, will be printed at the top of the slip.
Go To Summary ButtonClick on this button to display the T4A(P) Summary for the current employer. The data entry screen forthe current slip will remain available via a tab beneath the toolbar.
e-SlipRefer to e-Slip for information on using the e-Slip tab. This feature is available in T4 TimeSaverEnterprise only.
63

Entering Slips 75
© 2010 ELM Computer Systems Inc.
5.13 T4ARCA Input Window
T4 TimeSaver Basic, Plus & Enterprise Only
NameThe employee name should be entered with the surname in the first field, first name in the second fieldand middle initial in the third field.
Status of SlipSelect "O" for original (default value), "A" for amended or "C" for canceled. This will cause the slip tobe labeled appropriately as required by CRA. It will also cause the slip to be included or excludedappropriately whenever the “Amended only” or “Originals only” options are chosen.
Go To Summary ButtonClick on this button to display the T4A-RCA Summary for the current employer. The data entry screenfor the current slip will remain available via a tab beneath the toolbar.
e-SlipRefer to e-Slip for information on using the e-Slip tab. This feature is available in T4 TimeSaverEnterprise only.
63
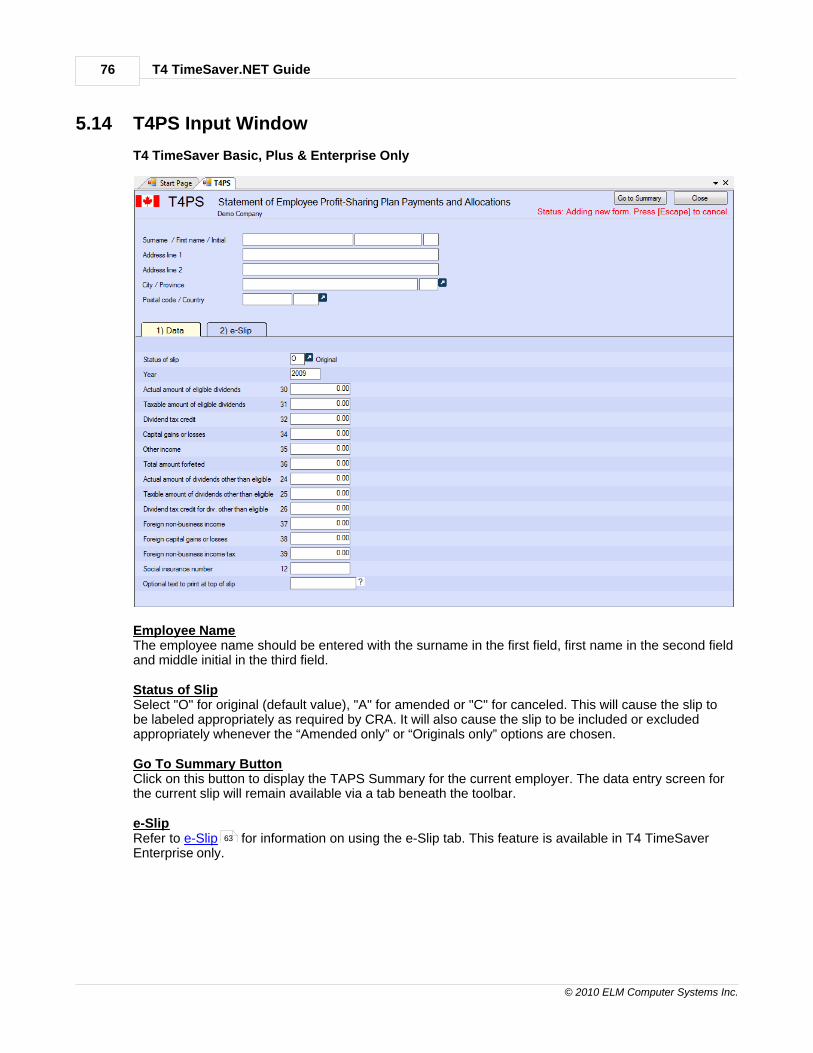
T4 TimeSaver.NET Guide76
© 2010 ELM Computer Systems Inc.
5.14 T4PS Input Window
T4 TimeSaver Basic, Plus & Enterprise Only
Employee NameThe employee name should be entered with the surname in the first field, first name in the second fieldand middle initial in the third field.
Status of SlipSelect "O" for original (default value), "A" for amended or "C" for canceled. This will cause the slip tobe labeled appropriately as required by CRA. It will also cause the slip to be included or excludedappropriately whenever the “Amended only” or “Originals only” options are chosen.
Go To Summary ButtonClick on this button to display the TAPS Summary for the current employer. The data entry screen forthe current slip will remain available via a tab beneath the toolbar.
e-SlipRefer to e-Slip for information on using the e-Slip tab. This feature is available in T4 TimeSaverEnterprise only.
63
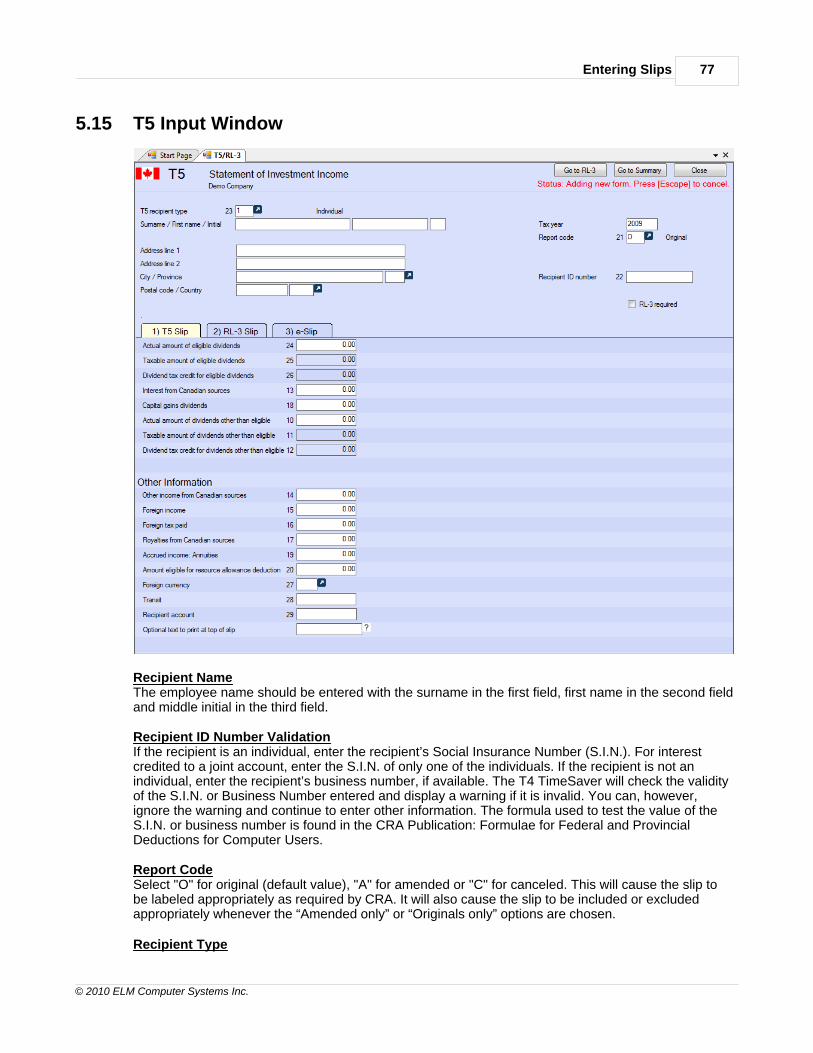
Entering Slips 77
© 2010 ELM Computer Systems Inc.
5.15 T5 Input Window
Recipient NameThe employee name should be entered with the surname in the first field, first name in the second fieldand middle initial in the third field.
Recipient ID Number ValidationIf the recipient is an individual, enter the recipient’s Social Insurance Number (S.I.N.). For interestcredited to a joint account, enter the S.I.N. of only one of the individuals. If the recipient is not anindividual, enter the recipient’s business number, if available. The T4 TimeSaver will check the validityof the S.I.N. or Business Number entered and display a warning if it is invalid. You can, however,ignore the warning and continue to enter other information. The formula used to test the value of theS.I.N. or business number is found in the CRA Publication: Formulae for Federal and ProvincialDeductions for Computer Users.
Report CodeSelect "O" for original (default value), "A" for amended or "C" for canceled. This will cause the slip tobe labeled appropriately as required by CRA. It will also cause the slip to be included or excludedappropriately whenever the “Amended only” or “Originals only” options are chosen.
Recipient Type

T4 TimeSaver.NET Guide78
© 2010 ELM Computer Systems Inc.
Enter one of the following valid codes to identify the type of recipient:
1 - if the investment income was earned by an individual 2 - if the investment income was earned by a joint account (two individuals).3 - if the investment income was earned by a corporation.4 - if the investment income was earned by an association, a trust (fiduciary-trustee, nominee, orestate), a club, a partnership, or other.5 - if the investment income was earned by a government, government enterprise, or internationalorganization.
Eligible and Other than Eligible DividendsEnter the amount of eligible dividends in box 24. Enter the amount of other than eligible dividends inbox 10. The total dividends will be the sum of box 24 and box 10, but does not appear on the form.
Automatic CalculationsFor the eligible dividends, the taxable amount of dividends and the dividend tax credit are calculatedand displayed automatically by the system as follows:
Taxable amount of dividends = (actual dividends) * 1.45Dividend tax credit = (taxable amount of dividends) * 18.9655%
For dividends other than eligible dividends, the taxable amount of dividends and the dividend tax creditare calculated and displayed automatically by the system as follows:
Taxable amount of dividends = (actual dividends) * 1.25Dividend tax credit = (taxable amount of dividends) * 13.3333%
This calculation is suppressed for corporate recipients (recipient type 3).
Foreign CurrencyIf you cannot report amounts in Canadian dollars, identify the foreign currency according to the ISO(International Organization for Standardization) 4217 Codes for the Representation of Currencies andFunds. Enter the appropriate three-letter alphabetical or three-digit numeric codes. If possible, use thealphabetical codes. For example:
USD - United States, dollarDEM - Germany, markDKK - Denmark, kröneESP - Spain, pesetaFRF - France, franc
GBP - United Kingdom, poundHKD - Hong Kong, dollarITL - Italy, lireJPY - Japan, yenSVC - El Salvador, colon
Leave this area blank if you are reporting the amount in Canadian dollars. If you must report amountsin different currencies in respect of the same recipient, use a separate T5 slip for each currency.
Go To RL-3 ButtonClicking on this button will display the RL-3 slip associated with the displayed slip, if an RL-3 exists.
Go To Summary ButtonClick on this button to display the T5 Summary for the current employer. The data entry screen for thecurrent slip will remain available via a tab beneath the toolbar.
e-SlipRefer to e-Slip for information on using the e-Slip tab. This feature is available in T4 TimeSaverEnterprise only.
63

Entering Slips 79
© 2010 ELM Computer Systems Inc.
5.16 T1204 Input Window
T4 TimeSaver Basic, Plus & Enterprise Only
Report CodeSelect "O" for original (default value), "A" for amended or "C" for canceled. This will cause the slip tobe labeled appropriately as required by CRA. It will also cause the slip to be included or excludedappropriately whenever the “Amended only” or “Originals only” options are chosen.
Recipient Type CodeEnter one of the following valid codes to identify the types of recipient:
1 - for an individual, other than a trust;3 - for a corporation; or4 - for a trust or a partnership
Status of SlipSelect "O" for original (default value), "A" for amended or "C" for canceled. This will cause the slip tobe labeled appropriately as required by CRA. It will also cause the slip to be included or excludedappropriately whenever the “Amended only” or “Originals only” options are chosen.
Go To Summary ButtonClick on this button to display the T1204 Summary for the current employer. The data entry screen forthe current slip will remain available via a tab beneath the toolbar.
e-SlipRefer to e-Slip for information on using the e-Slip tab. This feature is available in T4 TimeSaverEnterprise only.
63
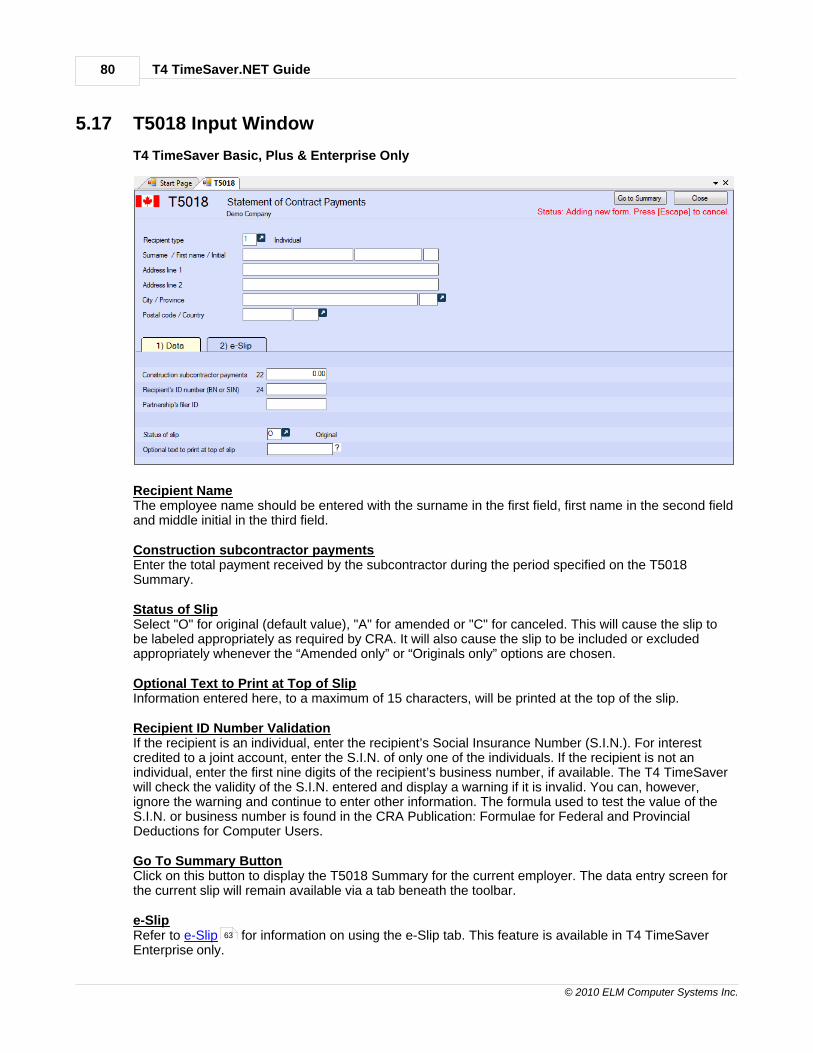
T4 TimeSaver.NET Guide80
© 2010 ELM Computer Systems Inc.
5.17 T5018 Input Window
T4 TimeSaver Basic, Plus & Enterprise Only
Recipient NameThe employee name should be entered with the surname in the first field, first name in the second fieldand middle initial in the third field.
Construction subcontractor paymentsEnter the total payment received by the subcontractor during the period specified on the T5018Summary.
Status of SlipSelect "O" for original (default value), "A" for amended or "C" for canceled. This will cause the slip tobe labeled appropriately as required by CRA. It will also cause the slip to be included or excludedappropriately whenever the “Amended only” or “Originals only” options are chosen.
Optional Text to Print at Top of SlipInformation entered here, to a maximum of 15 characters, will be printed at the top of the slip.
Recipient ID Number ValidationIf the recipient is an individual, enter the recipient’s Social Insurance Number (S.I.N.). For interestcredited to a joint account, enter the S.I.N. of only one of the individuals. If the recipient is not anindividual, enter the first nine digits of the recipient’s business number, if available. The T4 TimeSaverwill check the validity of the S.I.N. entered and display a warning if it is invalid. You can, however,ignore the warning and continue to enter other information. The formula used to test the value of theS.I.N. or business number is found in the CRA Publication: Formulae for Federal and ProvincialDeductions for Computer Users.
Go To Summary ButtonClick on this button to display the T5018 Summary for the current employer. The data entry screen forthe current slip will remain available via a tab beneath the toolbar.
e-SlipRefer to e-Slip for information on using the e-Slip tab. This feature is available in T4 TimeSaverEnterprise only.
63
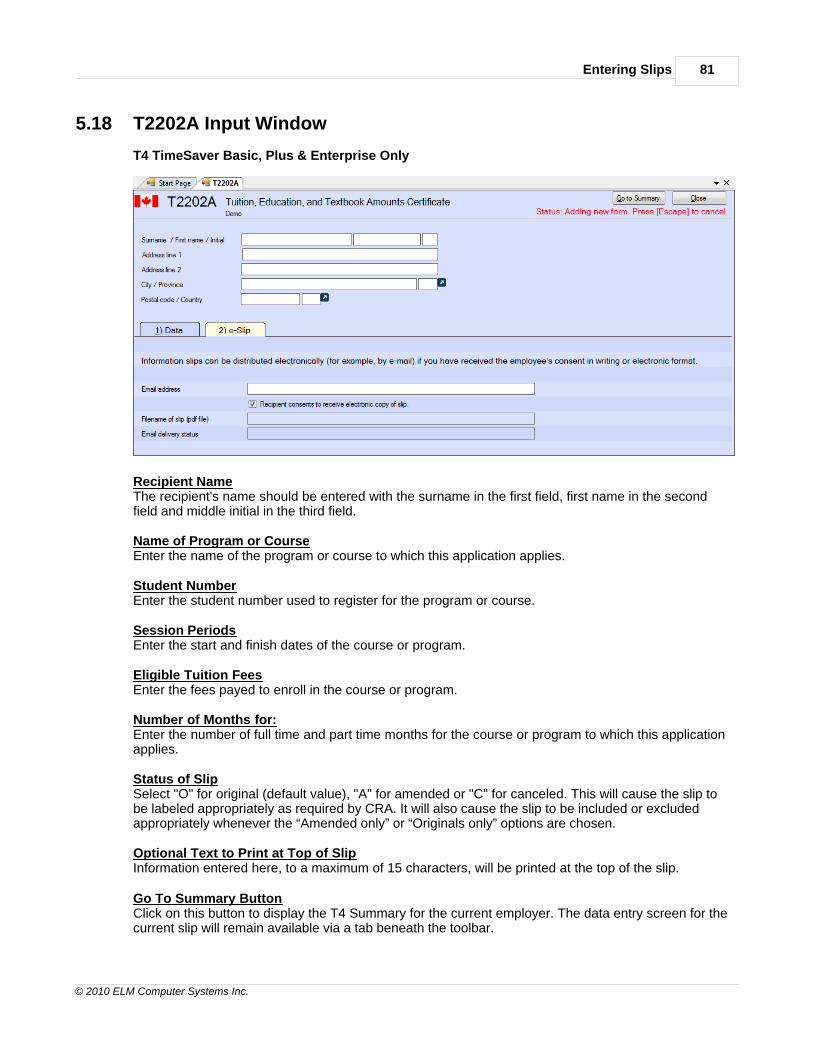
Entering Slips 81
© 2010 ELM Computer Systems Inc.
5.18 T2202A Input Window
T4 TimeSaver Basic, Plus & Enterprise Only
Recipient NameThe recipient's name should be entered with the surname in the first field, first name in the secondfield and middle initial in the third field.
Name of Program or CourseEnter the name of the program or course to which this application applies.
Student NumberEnter the student number used to register for the program or course.
Session PeriodsEnter the start and finish dates of the course or program.
Eligible Tuition FeesEnter the fees payed to enroll in the course or program.
Number of Months for:Enter the number of full time and part time months for the course or program to which this applicationapplies.
Status of SlipSelect "O" for original (default value), "A" for amended or "C" for canceled. This will cause the slip tobe labeled appropriately as required by CRA. It will also cause the slip to be included or excludedappropriately whenever the “Amended only” or “Originals only” options are chosen.
Optional Text to Print at Top of SlipInformation entered here, to a maximum of 15 characters, will be printed at the top of the slip.
Go To Summary ButtonClick on this button to display the T4 Summary for the current employer. The data entry screen for thecurrent slip will remain available via a tab beneath the toolbar.

T4 TimeSaver.NET Guide82
© 2010 ELM Computer Systems Inc.
e-SlipRefer to e-Slip for information on using the e-Slip tab. This feature is available in T4 TimeSaverEnterprise only.
63

Entering Slips 83
© 2010 ELM Computer Systems Inc.
5.19 RL1 Input Window
Employee NameThe employee name should be entered with the surname in the first field, first name in the second fieldand middle initial in the third field.
S.I.N. ValidationT4 TimeSaver will check the validity of the S.I.N. entered and will change the colour of the S.I.N. box tored if the S.I.N. is invalid. You can, however, ignore the warning and continue to enter otherinformation. The formula used to test the value of the S.I.N. is found in the CRA Publication: Formulaefor Federal and Provincial Deductions for Computer Users. When the edit list or detailed adjustment report is printed or displayed, there will be an asterisk besideany invalid S.I.N. values.
Status of SlipSelect "O" for original (default value), "A" for amended or "C" for canceled. This will cause the slip tobe labeled appropriately as required by MRQ. It will also cause the slip to be included or excludedappropriately whenever the “Amended only” or “Originals only” options are chosen. (Note: "Status ofSlip" designations used on the RL-1 differ from the MRQ guidelines. This will be addressed in asubsequent release of T4 TimeSaver but will not result in errors for RL-1 submissions made using thecurrent version of the software.)
T4 TimeSaver.NET Guide84
© 2010 ELM Computer Systems Inc.
Original Relevé NumberAvailable only if Status of Slip is Amended. Enter the number of the original Relevé slip beingamended. This number will be printed on the slip and will enable MRQ to correlate the amended slipwith the original slip. See Using Serial Numbers on Relevé Slips for more information on howRelevé numbers are handled by T4 TimeSaver.
Current Relevé NumberOnce a slip has been printed, the Current Relevé Number field will contain the number that wasprinted in the upper right-hand corner of the Relevé slip. This is the number that the MRQ will use torefer to this slip in any correspondence and is inaccessible to the user. See Using Serial Numbers onRelevé Slips for more information on how Relevé numbers are handled by T4 TimeSaver.
CPP/QPP Pensionable WeeksIf you have selected "Adjust based on number of pensionable weeks" for the CPP/QPP AdjustmentOption on the Adjustment Options section of the Company Information , a value must beentered into the input field "CPP Pensionable Weeks". This field will default to 52 or 53 depending onthe value entered under Maximum Number of Pensionable Weeks, but you may override this value forspecific employees.
QPIP Exempt BoxYou may check QPIP box as appropriate for the current employee.
Do not check the QPIP exempt box if you entered an amount in Box G or Box I. Check QPIP exemptonly if the earnings were exempt for the entire period of employment.
Do Not Adjust QPIP BoxCheck this box to indicate that QPIP on this particular slip should not be adjusted when the slips forthis company are adjusted. This allows you to adjust some slips while leaving others as entered.
Other IncomeRecord other income in the boxes provided at the bottom of the window. The type code of the incomeshould be indicated in the Box field with the corresponding Amounts directly beside. Press F2 ordouble click the box field to display a list of available codes. See your Tax Guide for a list anddescription of appropriate type codes.
Optional Text to Print at Top of SlipInformation entered here, to a maximum of 15 characters, will be printed at the top of the slip.
Go To T4A ButtonClicking on this button will display the T4A slip associated with the displayed slip, if a T4A exists.
Go To T4 ButtonClicking on this button will display the T4 slip associated with the displayed slip, if a T4 exists.
Adjust ButtonClicking on this button will adjust the displayed slip. The adjustments will be made based on theadjustment options selected for the current company. These adjustments are not reflected in thecorresponding RL-1 summary, unless all of the slips are adjusted using by Printing AdjustmentReports .
Net Pay ButtonThe employee's net pay is calculated and displayed on the screen as you enter data into each box ofthe RL-1 and may prove useful as an audit check. It will be calculated in one of the two following ways:
Employment Income - Standard Deductions - Other Deductions
or
140
140
52 164
144

Entering Slips 85
© 2010 ELM Computer Systems Inc.
Employment Income - Standard Deductions - Taxable Benefits
The Employment Income is the amount entered in Box A. The Standard Deductions are: CPP, QPP,EI, PPIP, Income Tax, Pension Plan Contributions, Charitable Donations and Union Dues. Note thatthe Standard Deduction includes both provincial (Québec) and federal taxes. Taxable Benefits will bethe sum of all boxes representing taxable benefits. Other deductions (if there are any) must be enteredmanually to arrive at the appropriate figure for Net Pay.
You can switch between these two methods of calculating the Net Pay by clicking on the Net Paybutton and then selecting the appropriate option. You can also check the "Don't display net pay" toremove this information from the display.
Go To Summary ButtonClick on this button to display the RL-1 Summary for the current employer. The data entry screen forthe current slip will remain available via a tab beneath the toolbar.
e-SlipRefer to e-Slip for information on using the e-Slip tab. This feature is available in T4 TimeSaverEnterprise only.
57
63
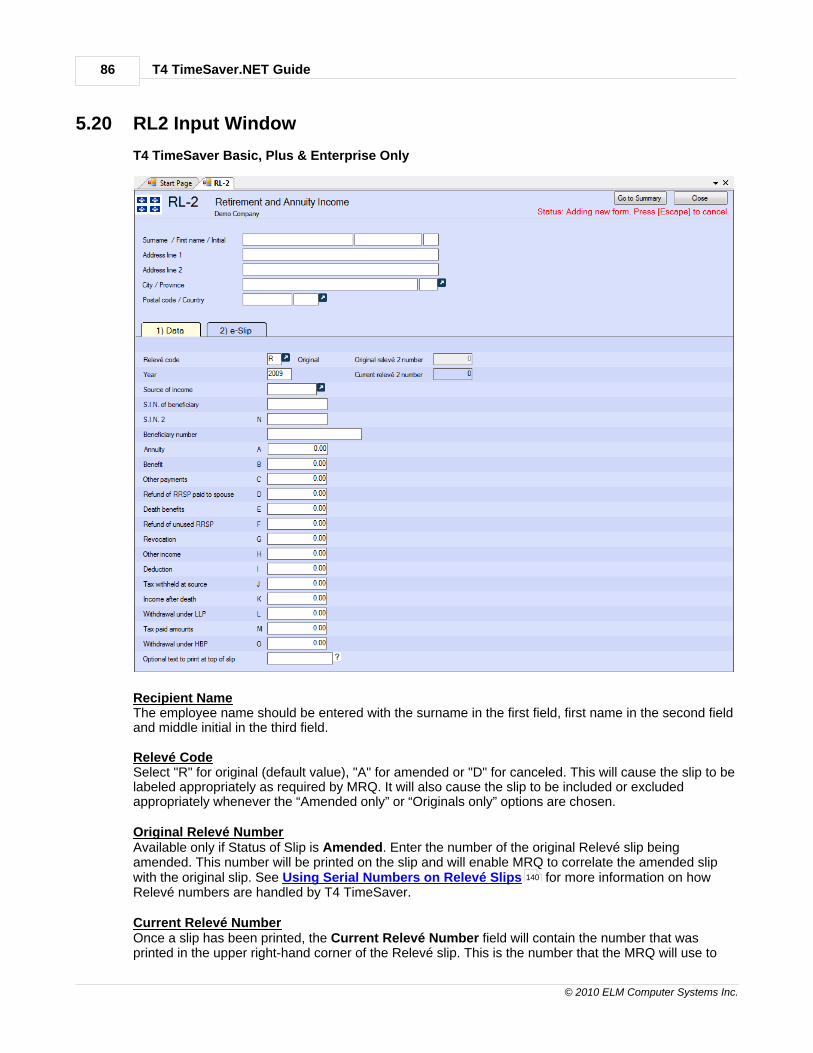
T4 TimeSaver.NET Guide86
© 2010 ELM Computer Systems Inc.
5.20 RL2 Input Window
T4 TimeSaver Basic, Plus & Enterprise Only
Recipient NameThe employee name should be entered with the surname in the first field, first name in the second fieldand middle initial in the third field.
Relevé CodeSelect "R" for original (default value), "A" for amended or "D" for canceled. This will cause the slip to belabeled appropriately as required by MRQ. It will also cause the slip to be included or excludedappropriately whenever the “Amended only” or “Originals only” options are chosen.
Original Relevé NumberAvailable only if Status of Slip is Amended. Enter the number of the original Relevé slip beingamended. This number will be printed on the slip and will enable MRQ to correlate the amended slipwith the original slip. See Using Serial Numbers on Relevé Slips for more information on howRelevé numbers are handled by T4 TimeSaver.
Current Relevé NumberOnce a slip has been printed, the Current Relevé Number field will contain the number that wasprinted in the upper right-hand corner of the Relevé slip. This is the number that the MRQ will use to
140
Entering Slips 87
© 2010 ELM Computer Systems Inc.
refer to this slip in any correspondence and is inaccessible to the user. See Using Serial Numbers onRelevé Slips for more information on how Relevé numbers are handled by T4 TimeSaver.
Source of IncomeDouble clicking on the field or hitting the F2 key to view the complete list of options.
Go To Summary ButtonClick on this button to display the RL-2 Summary for the current employer. The data entry screen forthe current slip will remain available via a tab beneath the toolbar.
e-SlipRefer to e-Slip for information on using the e-Slip tab. This feature is available in T4 TimeSaverEnterprise only.
140
63
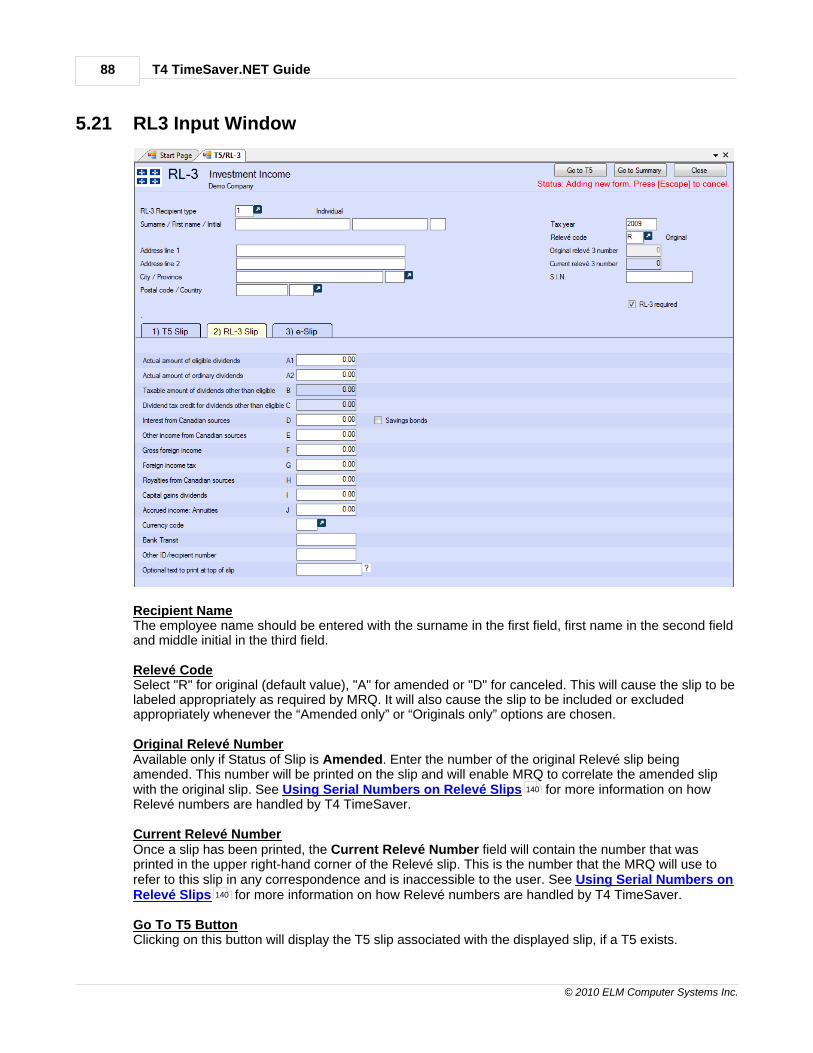
T4 TimeSaver.NET Guide88
© 2010 ELM Computer Systems Inc.
5.21 RL3 Input Window
Recipient NameThe employee name should be entered with the surname in the first field, first name in the second fieldand middle initial in the third field.
Relevé CodeSelect "R" for original (default value), "A" for amended or "D" for canceled. This will cause the slip to belabeled appropriately as required by MRQ. It will also cause the slip to be included or excludedappropriately whenever the “Amended only” or “Originals only” options are chosen.
Original Relevé NumberAvailable only if Status of Slip is Amended. Enter the number of the original Relevé slip beingamended. This number will be printed on the slip and will enable MRQ to correlate the amended slipwith the original slip. See Using Serial Numbers on Relevé Slips for more information on howRelevé numbers are handled by T4 TimeSaver.
Current Relevé NumberOnce a slip has been printed, the Current Relevé Number field will contain the number that wasprinted in the upper right-hand corner of the Relevé slip. This is the number that the MRQ will use torefer to this slip in any correspondence and is inaccessible to the user. See Using Serial Numbers onRelevé Slips for more information on how Relevé numbers are handled by T4 TimeSaver.
Go To T5 ButtonClicking on this button will display the T5 slip associated with the displayed slip, if a T5 exists.
140
140
Entering Slips 89
© 2010 ELM Computer Systems Inc.
Go To Summary ButtonClick on this button to display the RL-3 Summary for the current employer. The data entry screen forthe current slip will remain available via a tab beneath the toolbar.
e-SlipRefer to e-Slip for information on using the e-Slip tab. This feature is available in T4 TimeSaverEnterprise only.
63
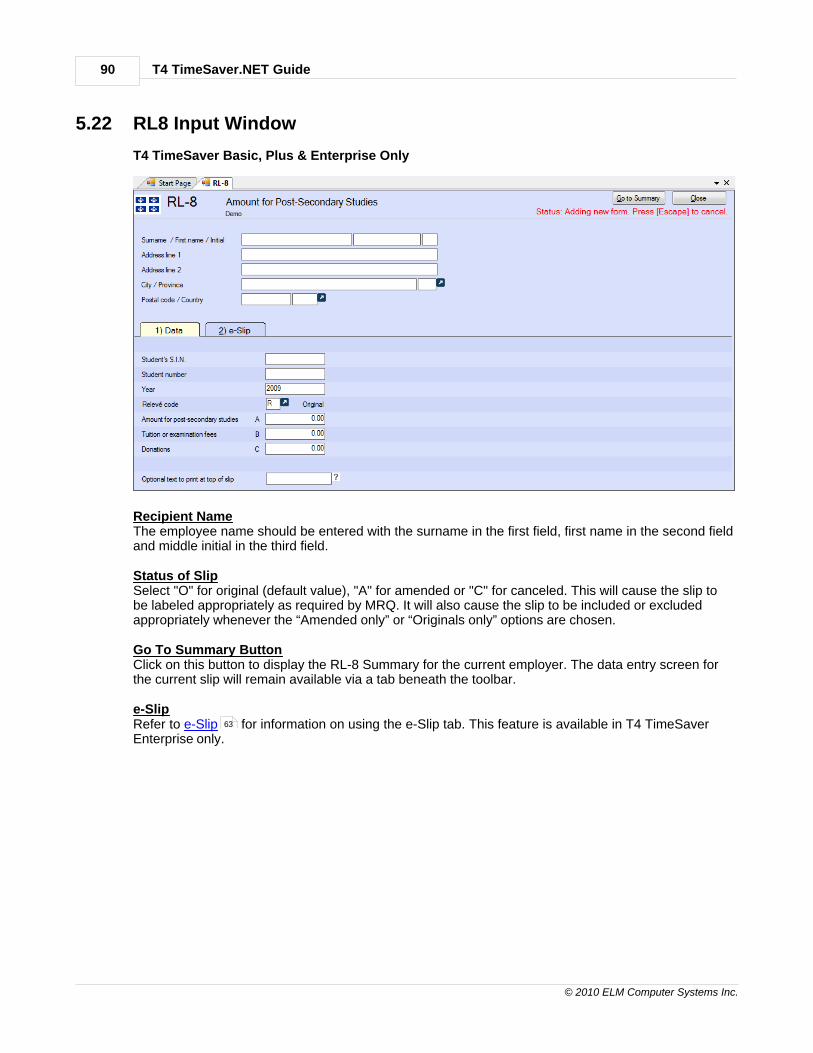
T4 TimeSaver.NET Guide90
© 2010 ELM Computer Systems Inc.
5.22 RL8 Input Window
T4 TimeSaver Basic, Plus & Enterprise Only
Recipient NameThe employee name should be entered with the surname in the first field, first name in the second fieldand middle initial in the third field.
Status of SlipSelect "O" for original (default value), "A" for amended or "C" for canceled. This will cause the slip tobe labeled appropriately as required by MRQ. It will also cause the slip to be included or excludedappropriately whenever the “Amended only” or “Originals only” options are chosen.
Go To Summary ButtonClick on this button to display the RL-8 Summary for the current employer. The data entry screen forthe current slip will remain available via a tab beneath the toolbar.
e-SlipRefer to e-Slip for information on using the e-Slip tab. This feature is available in T4 TimeSaverEnterprise only.
63

Entering Slips 91
© 2010 ELM Computer Systems Inc.
5.23 RL17 Input Window
T4 TimeSaver Basic, Plus & Enterprise Only
NameThe employee name should be entered with the surname in the first field, first name in the second fieldand middle initial in the third field.
Status of SlipSelect "R" for original (default value), "A" for amended or "D" for canceled. This will cause the slip to belabeled appropriately as required by MRQ. It will also cause the slip to be included or excludedappropriately whenever the “Amended only” or “Originals only” options are chosen.
Original Relevé NumberAvailable only if Status of Slip is Amended. Enter the number of the original Relevé slip beingamended. This number will be printed on the slip and will enable MRQ to correlate the amended slipwith the original slip. See Using Serial Numbers on Relevé Slips for more information on howRelevé numbers are handled by T4 TimeSaver.
Current Relevé NumberOnce a slip has been printed, the Current Relevé Number field will contain the number that wasprinted in the upper right-hand corner of the Relevé slip. This is the number that the MRQ will use torefer to this slip in any correspondence and is inaccessible to the user. See Using Serial Numbers onRelevé Slips for more information on how Relevé numbers are handled by T4 TimeSaver.
Go To Summary ButtonClick on this button to display the RL-17 Summary for the current employer. The data entry screen for
140
140
T4 TimeSaver.NET Guide92
© 2010 ELM Computer Systems Inc.
the current slip will remain available via a tab beneath the toolbar.
e-SlipRefer to e-Slip for information on using the e-Slip tab. This feature is available in T4 TimeSaverEnterprise only.
63
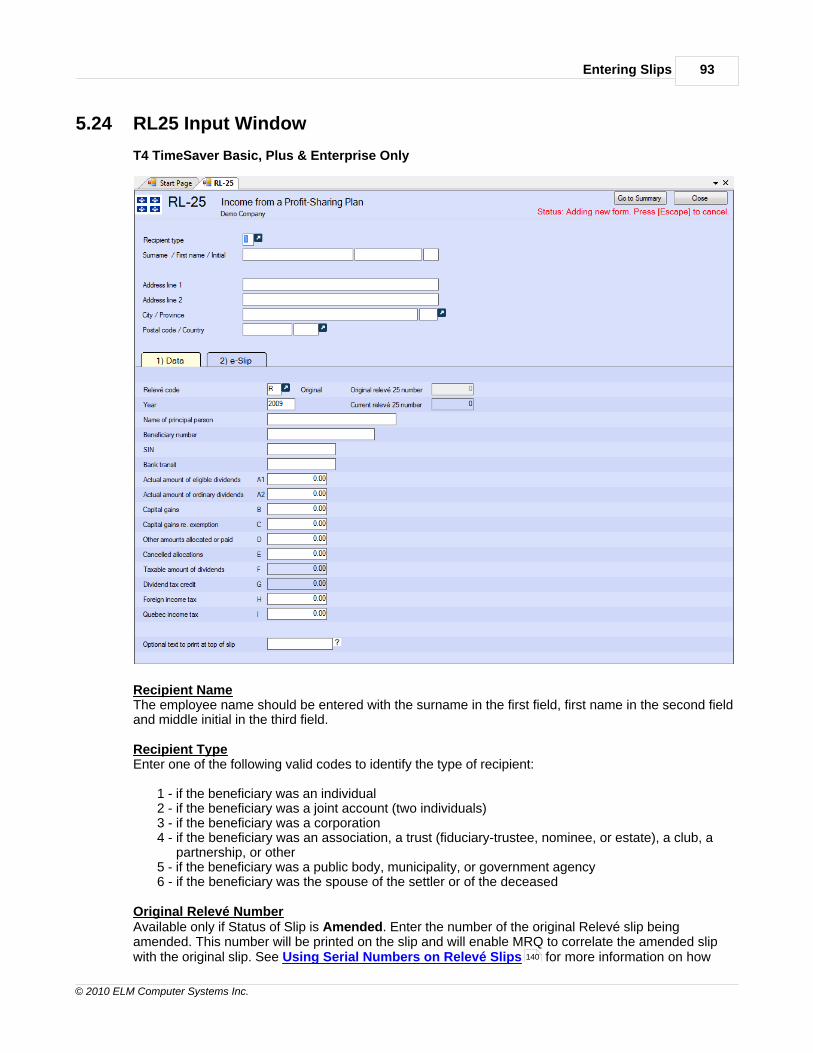
Entering Slips 93
© 2010 ELM Computer Systems Inc.
5.24 RL25 Input Window
T4 TimeSaver Basic, Plus & Enterprise Only
Recipient NameThe employee name should be entered with the surname in the first field, first name in the second fieldand middle initial in the third field.
Recipient TypeEnter one of the following valid codes to identify the type of recipient:
1 - if the beneficiary was an individual 2 - if the beneficiary was a joint account (two individuals)3 - if the beneficiary was a corporation4 - if the beneficiary was an association, a trust (fiduciary-trustee, nominee, or estate), a club, a
partnership, or other5 - if the beneficiary was a public body, municipality, or government agency6 - if the beneficiary was the spouse of the settler or of the deceased
Original Relevé NumberAvailable only if Status of Slip is Amended. Enter the number of the original Relevé slip beingamended. This number will be printed on the slip and will enable MRQ to correlate the amended slipwith the original slip. See Using Serial Numbers on Relevé Slips for more information on how140

T4 TimeSaver.NET Guide94
© 2010 ELM Computer Systems Inc.
Relevé numbers are handled by T4 TimeSaver.
Relevé CodeSelect "R" for original (default value), "A" for amended or "D" for canceled. This will cause the slip to belabeled appropriately as required by MRQ. It will also cause the slip to be included or excludedappropriately whenever the “Amended only” or “Originals only” options are chosen.
Go To Summary ButtonClick on this button to display the RL-25 Summary for the current employer. The data entry screen forthe current slip will remain available via a tab beneath the toolbar.
e-SlipRefer to e-Slip for information on using the e-Slip tab. This feature is available in T4 TimeSaverEnterprise only.
63

Entering Slips 95
© 2010 ELM Computer Systems Inc.

Part VI
Adjusting T4 & RL-1 Slips 97
© 2010 ELM Computer Systems Inc.
6 Adjusting T4 & RL-1 Slips
6.1 Making Adjustments to T4 and RL-1s
There are two methods of adjusting T4 and RL-1 slips. The first method is to adjust only the slip for thecurrent employee by using the Adjust button on the slip data entry form. The adjustments will be madebased on the adjustment options selected for the current company. These adjustments are notreflected in the corresponding T4 or RL-1 summary, unless all of the slips are adjusted.
The second method is to adjust all of the employees for the company at once. To do this, select Adjust/Unadjust T4 Slips from the Company menu. You can skip any individual slips that you maynot want to adjust by checking the Do not adjust CPP-QPP and/or EI box(es). The adjustments willbe made based on the adjustment options selected for the current company. In this case theadjustments are reflected in the corresponding T4 Summary.
An adjustment report can be produced by selecting Adjust/Unadjust T4 Slips from the Companymenu and clicking Adjust Slips + Report, or you can select Adjustments from the T4 submenu ofthe Reports menu. In either case an Adjustment Report window will open. See Printing AdjustmentReports for further details.
6.2 Reversing Adjustments
Reverse the adjustment on an individual adjusted T4 by clicking the Unadjust button on the T4 dataentry form. The adjusted CPP, QPP, EI and tax values will be hidden.
The adjustments on all of the slips for the company can be reversed by selecting Adjust/Unadjust T4Slips from the Company menu and clicking the Undo adjustments button.
6.3 Setting Adjustment Options
The adjustment options for each company are stored with the company profile. Select Edit CompanyInformation from the Company menu and then click the Adjustment Options page. You can makechanges to any of the options and also enter the S.I.N. number of the employee to receive the transferof over remittance of CPP/EI, if you choose.
Use the T4 Adjustment Defaults page in the Setup menu if you want to set default adjustmentoptions for all new companies. These global default adjustment options will then be applied to eachcompany added to the T4 TimeSaver database.
144
174 33

Part VII

Entering Summary Form Information 99
© 2010 ELM Computer Systems Inc.
7 Entering Summary Form Information
7.1 NR4 Summary
T4 TimeSaver Basic, Plus & Enterprise Only
Non-resident Account NumberEnter the account number under which non-resident tax deductions are remitted. This number has tomatch the account number shown on the remittance part of Form NR76, Non-Resident Tax -Statement of Account.
Amounts Reported on Form NR601 or NR602Enter the gross income and the tax withheld.
RemittancesEnter the amount of money already remitted to CRA.
Person to Contact About this ReturnThe default contact information entered on the New Company Defaults page of the User Settings
submenu of Setup menu will appear in this area. If no default information was entered, thesefields will be blank. In either case you can enter or change the information at this time.
174
182 33

T4 TimeSaver.NET Guide100
© 2010 ELM Computer Systems Inc.
CertificationThe default certification information entered on the New Company Defaults tab of the UserSettings submenu of Setup menu will appear in this area. If no default information wasentered, these fields will be blank. In either case you can enter or change the information at this time.Please note that the "Date on summary" field is for display purposes only; in order to print a specifieddate on the summary you must use the "Print this date" option in the "Options" section in the lower leftcorner of the Printing Summary Reports screen.
Filing Status ButtonClicking on the Filing Status button displays a window where the filing status of the current return forthe current company can be selected. Changes made to the filing status apply only to the currentreturn for the current company. Available filing status options are:
· Not Required - A return of this type is not required for the current company· Need Return - A return of this type is required for the current company· Entered - Data has been entered for this return· Checked - Data entered for this return has been checked· Filed - This return has been filed with the CRA and/or MRQ
Recalculate ButtonClick this button to recalculate all calculated values, this will also return all overridden values totheir calculated value.
Go to Slips ButtonClick on this button to display the NR4 slips for the current employer. The data entry screen for thecurrent summary will remain available via a tab beneath the toolbar.
174
182 33
141
63

Entering Summary Form Information 101
© 2010 ELM Computer Systems Inc.
7.2 T4 Summary
RemittancesEnter the amount of money already remitted to CRA.
Amount EnclosedEnter the amount to be enclosed with the T4 Summary form.
Adjustment StatusThe T4 Summary will reflect the adjusted values as long as all of the employees for the company havebeen adjusted. If, however, only some of the slips have been adjusted using the Adjust / Unadjustbutton on the T4 data entry window, the summary will reflect the unadjusted values for all of theemployees. This information will appear in the box on the upper right corner of the T4 Summary dataentry window.
Person to Contact About this ReturnThe default contact information entered on the New Company Defaults page of the User Settings
submenu of Setup menu will appear in this area. If no default information was entered, thesefields will be blank. In either case you can enter or change the information at this time.
CertificationThe default certification information entered on the New Company Defaults tab of the UserSettings submenu of Setup menu will appear in this area. If no default information wasentered, these fields will be blank. In either case you can enter or change the information at this time.Please note that the "Date on summary" field is for display purposes only; in order to print a specifieddate on the summary you must use the "Print this date" option in the "Options" section in the lower leftcorner of the Printing Summary Reports screen.
174
182 33
174
182 33
141

T4 TimeSaver.NET Guide102
© 2010 ELM Computer Systems Inc.
Filing Status ButtonClicking on the Filing Status button displays a window where the filing status of the current return forthe current company can be selected. Changes made to the filing status apply only to the currentreturn for the current company. Available filing status options are:
· Not Required - A return of this type is not required for the current company· Need Return - A return of this type is required for the current company· Entered - Data has been entered for this return· Checked - Data entered for this return has been checked· Filed - This return has been filed with the CRA and/or MRQ
Recalculate ButtonClick this button to recalculate all calculated values, this will also return all overridden values totheir calculated value.
Go to Slips ButtonClick on this button to display the T4 slips for the current employer. The data entry screen for thecurrent summary will remain available via a tab beneath the toolbar.
63

Entering Summary Form Information 103
© 2010 ELM Computer Systems Inc.
7.3 T4A Summary
RemittancesEnter the amount of money already remitted to CRA.
Amount EnclosedEnter the amount to be enclosed with the T4A Summary form.
Person to Contact About this ReturnThe default contact information entered on the New Company Defaults page of the User Settings
submenu of Setup menu will appear in this area. If no default information was entered, thesefields will be blank. In either case you can enter or change the information at this time.
CertificationThe default certification information entered on the New Company Defaults tab of the UserSettings submenu of Setup menu will appear in this area. If no default information wasentered, these fields will be blank. In either case you can enter or change the information at this time.Please note that the "Date on summary" field is for display purposes only; in order to print a specifieddate on the summary you must use the "Print this date" option in the "Options" section in the lower leftcorner of the Printing Summary Reports screen.
Filing Status Button
174
182 33
174
182 33
141

T4 TimeSaver.NET Guide104
© 2010 ELM Computer Systems Inc.
Clicking on the Filing Status button displays a window where the filing status of the current return forthe current company can be selected. Changes made to the filing status apply only to the currentreturn for the current company. Available filing status options are:
· Not Required - A return of this type is not required for the current company· Need Return - A return of this type is required for the current company· Entered - Data has been entered for this return· Checked - Data entered for this return has been checked· Filed - This return has been filed with the CRA and/or MRQ
Recalculate ButtonClick this button to recalculate all calculated values, this will also return all overridden values totheir calculated value.
Go to Slips ButtonClick on this button to display the T4A slips for the current employer. The data entry screen for thecurrent summary will remain available via a tab beneath the toolbar.
63

Entering Summary Form Information 105
© 2010 ELM Computer Systems Inc.
7.4 T4ANR Summary
T4 TimeSaver Basic, Plus & Enterprise Only
RemittancesEnter the amount of money already remitted to CRA.
Amount EnclosedEnter the amount to be enclosed with the T4A Summary form.
Person to Contact About this ReturnThe default contact information entered on the New Company Defaults page of the User Settings
submenu of Setup menu will appear in this area. If no default information was entered, thesefields will be blank. In either case you can enter or change the information at this time.
CertificationThe default certification information entered on the New Company Defaults tab of the UserSettings submenu of Setup menu will appear in this area. If no default information wasentered, these fields will be blank. In either case you can enter or change the information at this time.Please note that the "Date on summary" field is for display purposes only; in order to print a specifieddate on the summary you must use the "Print this date" option in the "Options" section in the lower leftcorner of the Printing Summary Reports screen.
Filing Status ButtonClicking on the Filing Status button displays a window where the filing status of the current return forthe current company can be selected. Changes made to the filing status apply only to the currentreturn for the current company. Available filing status options are:
· Not Required - A return of this type is not required for the current company· Need Return - A return of this type is required for the current company· Entered - Data has been entered for this return· Checked - Data entered for this return has been checked· Filed - This return has been filed with the CRA and/or MRQ
174
182 33
174
182 33
141

T4 TimeSaver.NET Guide106
© 2010 ELM Computer Systems Inc.
Recalculate ButtonClick this button to recalculate all calculated values, this will also return all overridden values totheir calculated value.
Go to Slips ButtonClick on this button to display the T4A-NR slips for the current employer. The data entry screen for thecurrent summary will remain available via a tab beneath the toolbar.
63
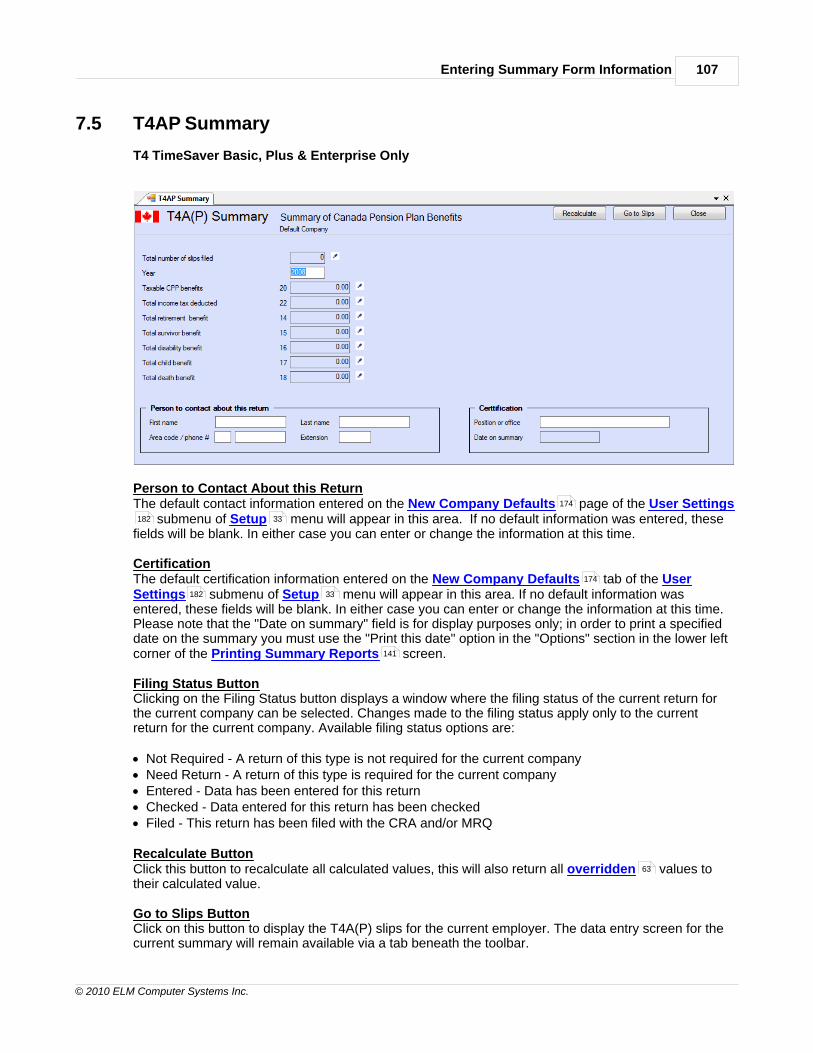
Entering Summary Form Information 107
© 2010 ELM Computer Systems Inc.
7.5 T4AP Summary
T4 TimeSaver Basic, Plus & Enterprise Only
Person to Contact About this ReturnThe default contact information entered on the New Company Defaults page of the User Settings
submenu of Setup menu will appear in this area. If no default information was entered, thesefields will be blank. In either case you can enter or change the information at this time.
CertificationThe default certification information entered on the New Company Defaults tab of the UserSettings submenu of Setup menu will appear in this area. If no default information wasentered, these fields will be blank. In either case you can enter or change the information at this time.Please note that the "Date on summary" field is for display purposes only; in order to print a specifieddate on the summary you must use the "Print this date" option in the "Options" section in the lower leftcorner of the Printing Summary Reports screen.
Filing Status ButtonClicking on the Filing Status button displays a window where the filing status of the current return forthe current company can be selected. Changes made to the filing status apply only to the currentreturn for the current company. Available filing status options are:
· Not Required - A return of this type is not required for the current company· Need Return - A return of this type is required for the current company· Entered - Data has been entered for this return· Checked - Data entered for this return has been checked· Filed - This return has been filed with the CRA and/or MRQ
Recalculate ButtonClick this button to recalculate all calculated values, this will also return all overridden values totheir calculated value.
Go to Slips ButtonClick on this button to display the T4A(P) slips for the current employer. The data entry screen for thecurrent summary will remain available via a tab beneath the toolbar.
174
182 33
174
182 33
141
63
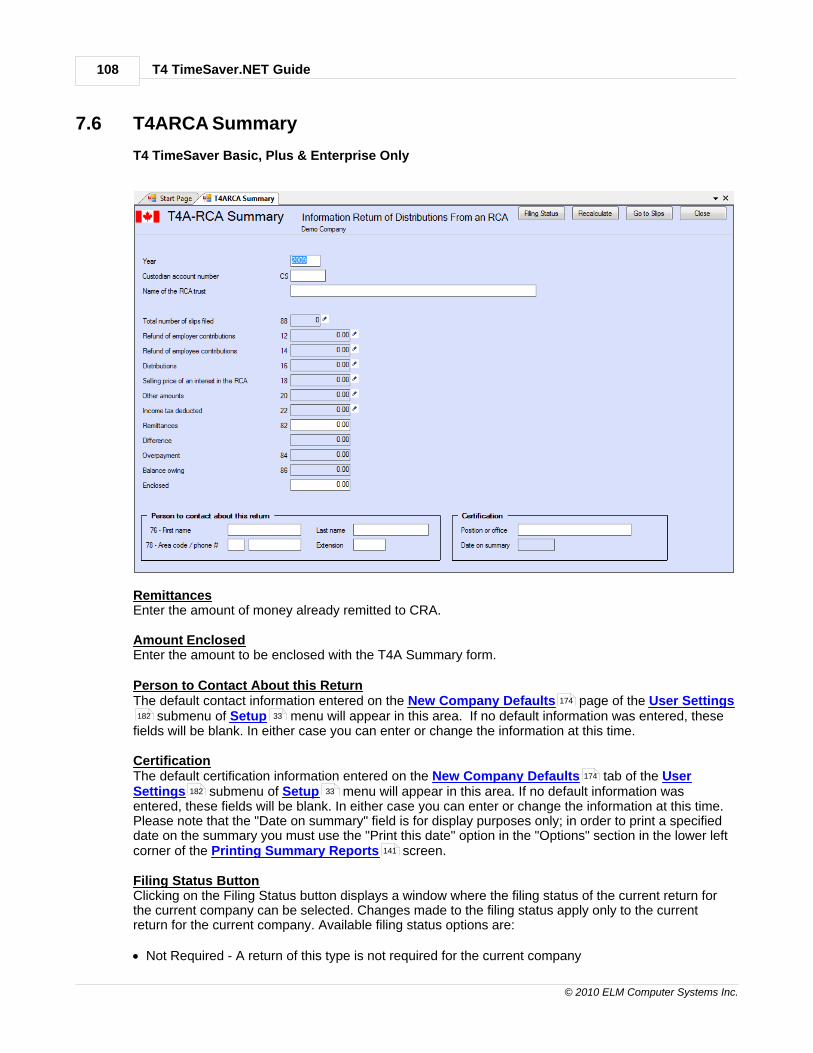
T4 TimeSaver.NET Guide108
© 2010 ELM Computer Systems Inc.
7.6 T4ARCA Summary
T4 TimeSaver Basic, Plus & Enterprise Only
RemittancesEnter the amount of money already remitted to CRA.
Amount EnclosedEnter the amount to be enclosed with the T4A Summary form.
Person to Contact About this ReturnThe default contact information entered on the New Company Defaults page of the User Settings
submenu of Setup menu will appear in this area. If no default information was entered, thesefields will be blank. In either case you can enter or change the information at this time.
CertificationThe default certification information entered on the New Company Defaults tab of the UserSettings submenu of Setup menu will appear in this area. If no default information wasentered, these fields will be blank. In either case you can enter or change the information at this time.Please note that the "Date on summary" field is for display purposes only; in order to print a specifieddate on the summary you must use the "Print this date" option in the "Options" section in the lower leftcorner of the Printing Summary Reports screen.
Filing Status ButtonClicking on the Filing Status button displays a window where the filing status of the current return forthe current company can be selected. Changes made to the filing status apply only to the currentreturn for the current company. Available filing status options are:
· Not Required - A return of this type is not required for the current company
174
182 33
174
182 33
141

Entering Summary Form Information 109
© 2010 ELM Computer Systems Inc.
· Need Return - A return of this type is required for the current company· Entered - Data has been entered for this return· Checked - Data entered for this return has been checked· Filed - This return has been filed with the CRA and/or MRQ
Recalculate ButtonClick this button to recalculate all calculated values, this will also return all overridden values totheir calculated value.
Go to Slips ButtonClick on this button to display the T4A-RCA slips for the current employer. The data entry screen forthe current summary will remain available via a tab beneath the toolbar.
63

T4 TimeSaver.NET Guide110
© 2010 ELM Computer Systems Inc.
7.7 T4PS Summary
T4 TimeSaver Basic, Plus & Enterprise Only
Year EndingEnter the year being reported
T4PS segment formsIf you have created segment forms, enter the number here. Segment forms are not required if you arefiling electronically.
Person to Contact About this ReturnThe default contact information entered on the New Company Defaults page of the User Settings
submenu of Setup menu will appear in this area. If no default information was entered, thesefields will be blank. In either case you can enter or change the information at this time.
CertificationThe default certification information entered on the New Company Defaults tab of the UserSettings submenu of Setup menu will appear in this area. If no default information wasentered, these fields will be blank. In either case you can enter or change the information at this time.Please note that the "Date on summary" field is for display purposes only; in order to print a specifieddate on the summary you must use the "Print this date" option in the "Options" section in the lower leftcorner of the Printing Summary Reports screen.
Filing Status ButtonClicking on the Filing Status button displays a window where the filing status of the current return forthe current company can be selected. Changes made to the filing status apply only to the currentreturn for the current company. Available filing status options are:
· Not Required - A return of this type is not required for the current company· Need Return - A return of this type is required for the current company· Entered - Data has been entered for this return
174
182 33
174
182 33
141

Entering Summary Form Information 111
© 2010 ELM Computer Systems Inc.
· Checked - Data entered for this return has been checked· Filed - This return has been filed with the CRA and/or MRQ
Recalculate ButtonClick this button to recalculate all calculated values, this will also return all overridden values totheir calculated value.
Go to Slips ButtonClick on this button to display the T4APS slips for the current employer. The data entry screen for thecurrent summary will remain available via a tab beneath the toolbar.
63
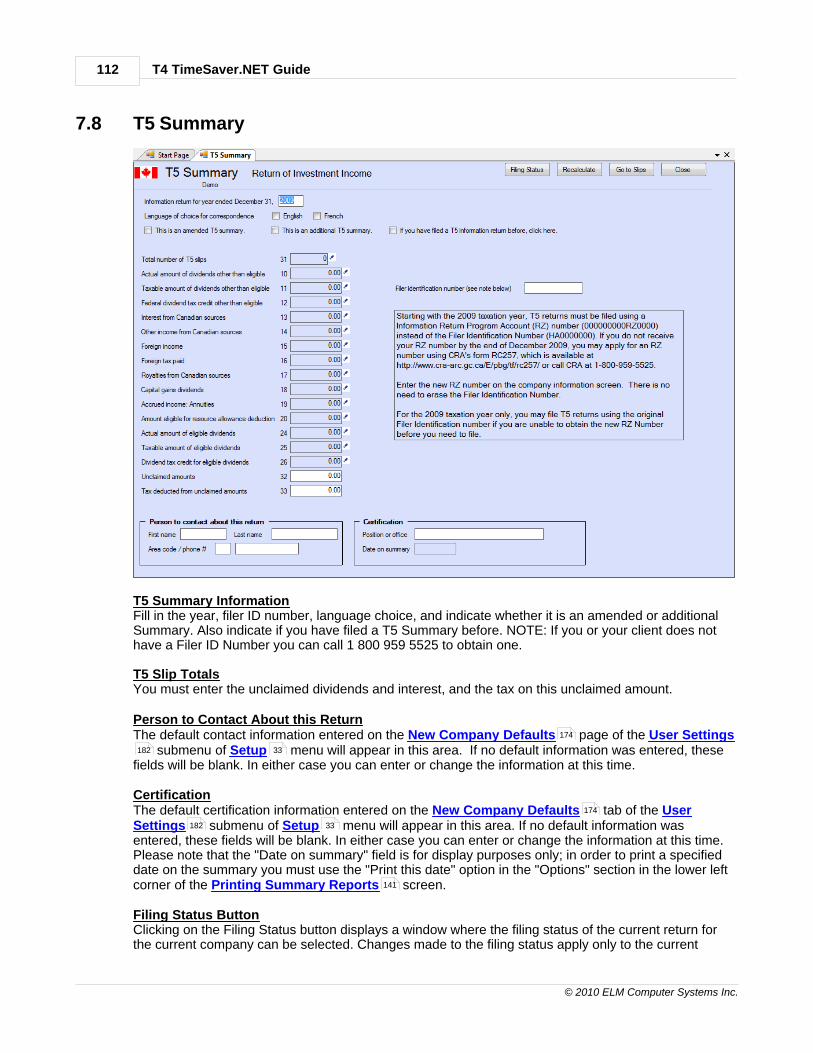
T4 TimeSaver.NET Guide112
© 2010 ELM Computer Systems Inc.
7.8 T5 Summary
T5 Summary InformationFill in the year, filer ID number, language choice, and indicate whether it is an amended or additionalSummary. Also indicate if you have filed a T5 Summary before. NOTE: If you or your client does nothave a Filer ID Number you can call 1 800 959 5525 to obtain one.
T5 Slip TotalsYou must enter the unclaimed dividends and interest, and the tax on this unclaimed amount.
Person to Contact About this ReturnThe default contact information entered on the New Company Defaults page of the User Settings
submenu of Setup menu will appear in this area. If no default information was entered, thesefields will be blank. In either case you can enter or change the information at this time.
CertificationThe default certification information entered on the New Company Defaults tab of the UserSettings submenu of Setup menu will appear in this area. If no default information wasentered, these fields will be blank. In either case you can enter or change the information at this time.Please note that the "Date on summary" field is for display purposes only; in order to print a specifieddate on the summary you must use the "Print this date" option in the "Options" section in the lower leftcorner of the Printing Summary Reports screen.
Filing Status ButtonClicking on the Filing Status button displays a window where the filing status of the current return forthe current company can be selected. Changes made to the filing status apply only to the current
174
182 33
174
182 33
141
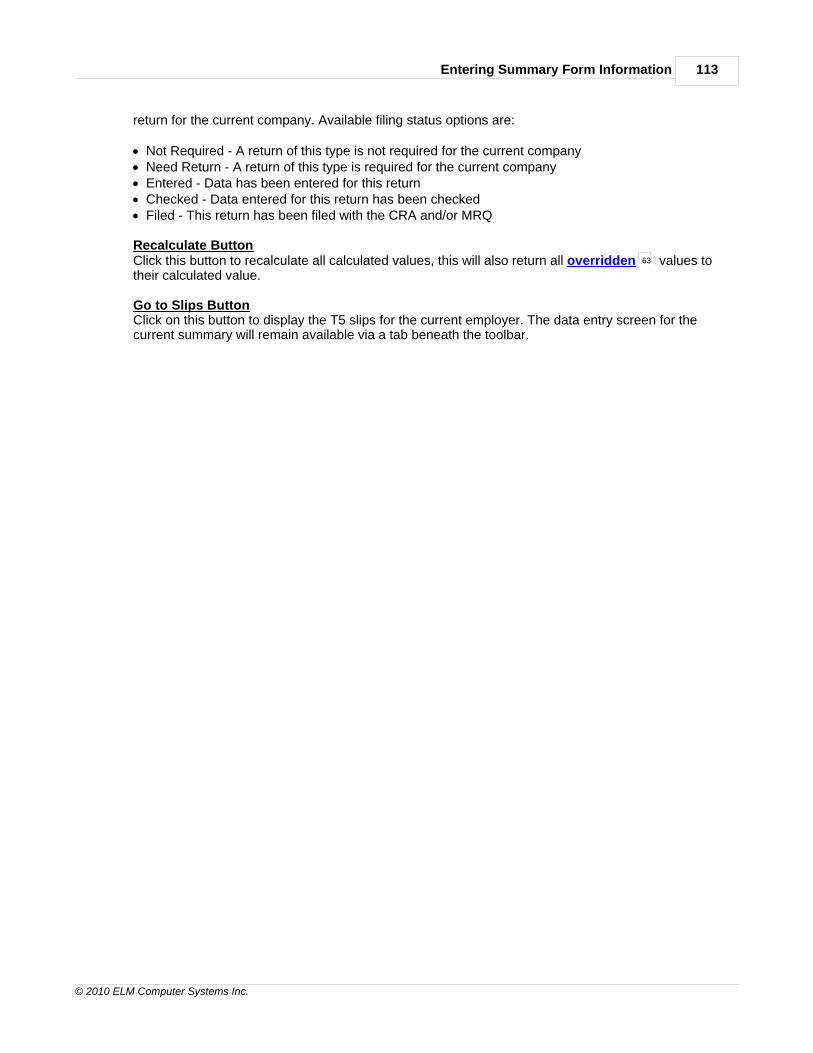
Entering Summary Form Information 113
© 2010 ELM Computer Systems Inc.
return for the current company. Available filing status options are:
· Not Required - A return of this type is not required for the current company· Need Return - A return of this type is required for the current company· Entered - Data has been entered for this return· Checked - Data entered for this return has been checked· Filed - This return has been filed with the CRA and/or MRQ
Recalculate ButtonClick this button to recalculate all calculated values, this will also return all overridden values totheir calculated value.
Go to Slips ButtonClick on this button to display the T5 slips for the current employer. The data entry screen for thecurrent summary will remain available via a tab beneath the toolbar.
63

T4 TimeSaver.NET Guide114
© 2010 ELM Computer Systems Inc.
7.9 T1204 Summary
T4 TimeSaver Basic, Plus & Enterprise Only
Person to Contact About this ReturnThe default contact information entered on the New Company Defaults page of the User Settings
submenu of Setup menu will appear in this area. If no default information was entered, thesefields will be blank. In either case you can enter or change the information at this time.
CertificationThe default certification information entered on the New Company Defaults tab of the UserSettings submenu of Setup menu will appear in this area. If no default information wasentered, these fields will be blank. In either case you can enter or change the information at this time.Please note that the "Date on summary" field is for display purposes only; in order to print a specifieddate on the summary you must use the "Print this date" option in the "Options" section in the lower leftcorner of the Printing Summary Reports screen.
Filing Status ButtonClicking on the Filing Status button displays a window where the filing status of the current return forthe current company can be selected. Changes made to the filing status apply only to the currentreturn for the current company. Available filing status options are:
· Not Required - A return of this type is not required for the current company· Need Return - A return of this type is required for the current company· Entered - Data has been entered for this return· Checked - Data entered for this return has been checked· Filed - This return has been filed with the CRA and/or MRQ
Recalculate ButtonClick this button to recalculate all calculated values, this will also return all overridden values totheir calculated value.
Go to Slips ButtonClick on this button to display the T1204 slips for the current employer. The data entry screen for thecurrent summary will remain available via a tab beneath the toolbar.
174
182 33
174
182 33
141
63
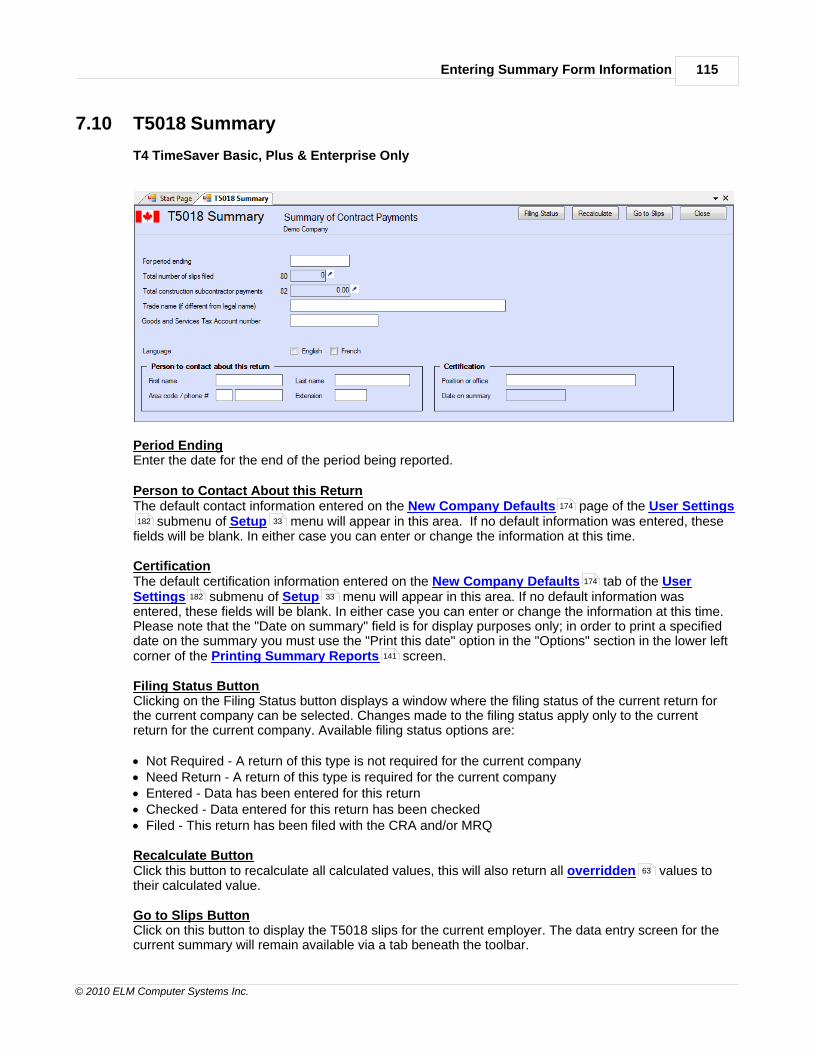
Entering Summary Form Information 115
© 2010 ELM Computer Systems Inc.
7.10 T5018 Summary
T4 TimeSaver Basic, Plus & Enterprise Only
Period EndingEnter the date for the end of the period being reported.
Person to Contact About this ReturnThe default contact information entered on the New Company Defaults page of the User Settings
submenu of Setup menu will appear in this area. If no default information was entered, thesefields will be blank. In either case you can enter or change the information at this time.
CertificationThe default certification information entered on the New Company Defaults tab of the UserSettings submenu of Setup menu will appear in this area. If no default information wasentered, these fields will be blank. In either case you can enter or change the information at this time.Please note that the "Date on summary" field is for display purposes only; in order to print a specifieddate on the summary you must use the "Print this date" option in the "Options" section in the lower leftcorner of the Printing Summary Reports screen.
Filing Status ButtonClicking on the Filing Status button displays a window where the filing status of the current return forthe current company can be selected. Changes made to the filing status apply only to the currentreturn for the current company. Available filing status options are:
· Not Required - A return of this type is not required for the current company· Need Return - A return of this type is required for the current company· Entered - Data has been entered for this return· Checked - Data entered for this return has been checked· Filed - This return has been filed with the CRA and/or MRQ
Recalculate ButtonClick this button to recalculate all calculated values, this will also return all overridden values totheir calculated value.
Go to Slips ButtonClick on this button to display the T5018 slips for the current employer. The data entry screen for thecurrent summary will remain available via a tab beneath the toolbar.
174
182 33
174
182 33
141
63

T4 TimeSaver.NET Guide116
© 2010 ELM Computer Systems Inc.
7.11 T2202A Summary
T4 TimeSaver Basic, Plus & Enterprise Only
Filing Status ButtonClicking on the Filing Status button displays a window where the filing status of the current return forthe current company can be selected. Changes made to the filing status apply only to the currentreturn for the current company. Available filing status options are:
· Not Required - A return of this type is not required for the current company· Need Return - A return of this type is required for the current company· Entered - Data has been entered for this return· Checked - Data entered for this return has been checked· Filed - This return has been filed with the CRA and/or MRQ
Recalculate ButtonClick this button to recalculate all calculated values, this will also return all overridden values totheir calculated value.
Go to Slips ButtonClick on this button to display the T5 slips for the current employer. The data entry screen for thecurrent summary will remain available via a tab beneath the toolbar.
63
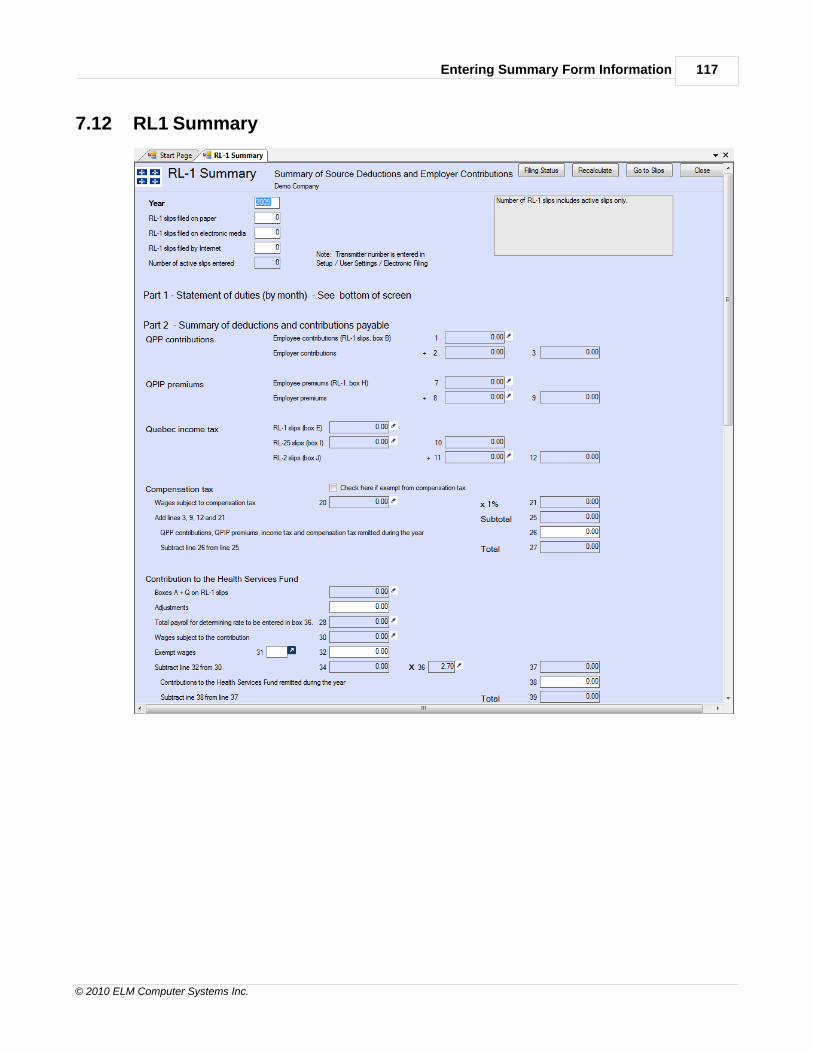
Entering Summary Form Information 117
© 2010 ELM Computer Systems Inc.
7.12 RL1 Summary
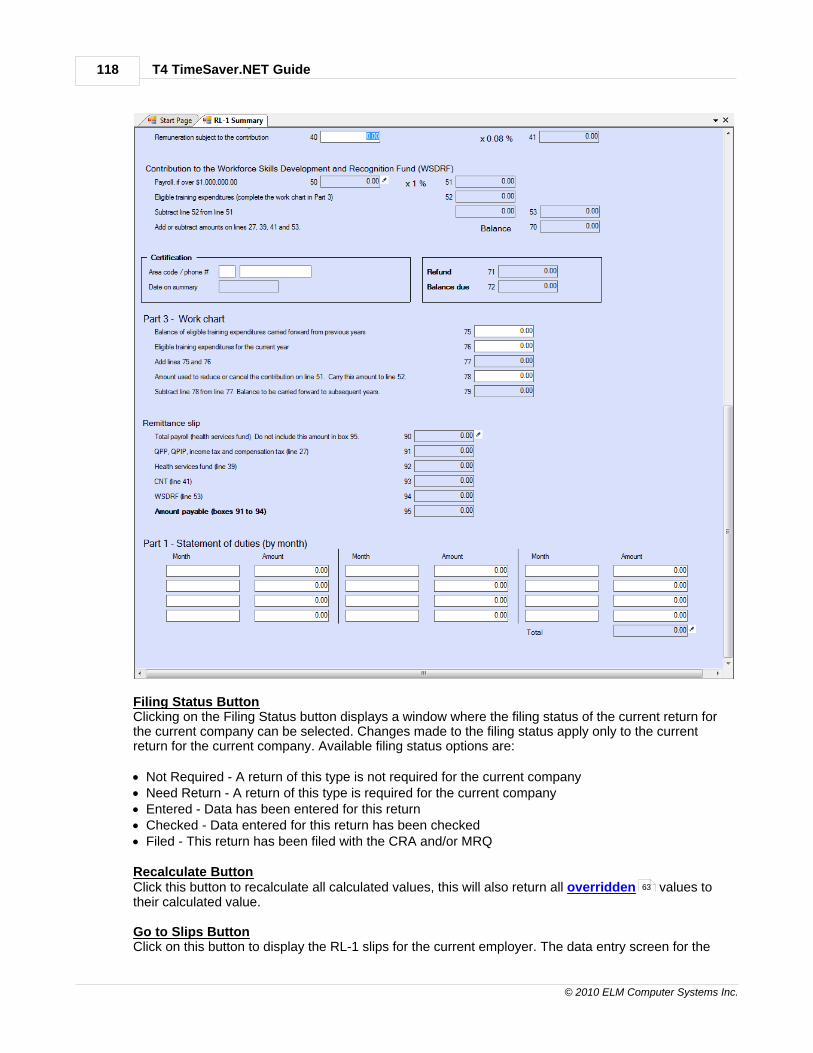
T4 TimeSaver.NET Guide118
© 2010 ELM Computer Systems Inc.
Filing Status ButtonClicking on the Filing Status button displays a window where the filing status of the current return forthe current company can be selected. Changes made to the filing status apply only to the currentreturn for the current company. Available filing status options are:
· Not Required - A return of this type is not required for the current company· Need Return - A return of this type is required for the current company· Entered - Data has been entered for this return· Checked - Data entered for this return has been checked· Filed - This return has been filed with the CRA and/or MRQ
Recalculate ButtonClick this button to recalculate all calculated values, this will also return all overridden values totheir calculated value.
Go to Slips ButtonClick on this button to display the RL-1 slips for the current employer. The data entry screen for the
63

Entering Summary Form Information 119
© 2010 ELM Computer Systems Inc.
current summary will remain available via a tab beneath the toolbar.

T4 TimeSaver.NET Guide120
© 2010 ELM Computer Systems Inc.
7.13 RL2 Summary
T4 TimeSaver Basic, Plus & Enterprise Only
CertificationThe default certification information entered on the New Company Defaults tab of the UserSettings submenu of Setup menu will appear in this area. If no default information wasentered, these fields will be blank. In either case you can enter or change the information at this time.Please note that the "Date on summary" field is for display purposes only; in order to print a specifieddate on the summary you must use the "Print this date" option in the "Options" section in the lower leftcorner of the Printing Summary Reports screen.
Filing Status ButtonClicking on the Filing Status button displays a window where the filing status of the current return forthe current company can be selected. Changes made to the filing status apply only to the currentreturn for the current company. Available filing status options are:
· Not Required - A return of this type is not required for the current company· Need Return - A return of this type is required for the current company· Entered - Data has been entered for this return· Checked - Data entered for this return has been checked· Filed - This return has been filed with the CRA and/or MRQ
Recalculate Button
174
182 33
141

Entering Summary Form Information 121
© 2010 ELM Computer Systems Inc.
Click this button to recalculate all calculated values, this will also return all overridden values totheir calculated value.
Go to Slips ButtonClick on this button to display the RL-2 slips for the current employer. The data entry screen for thecurrent summary will remain available via a tab beneath the toolbar.
63

T4 TimeSaver.NET Guide122
© 2010 ELM Computer Systems Inc.
7.14 RL3 Summary
Identification of FilerThe information entered serves to identify the filer of the return.
CertificationThe default certification information entered on the New Company Defaults tab of the UserSettings submenu of Setup menu will appear in this area. If no default information wasentered, these fields will be blank. In either case you can enter or change the information at this time.Please note that the "Date on summary" field is for display purposes only; in order to print a specifieddate on the summary you must use the "Print this date" option in the "Options" section in the lower leftcorner of the Printing Summary Reports screen.
Filing Status ButtonClicking on the Filing Status button displays a window where the filing status of the current return forthe current company can be selected. Changes made to the filing status apply only to the currentreturn for the current company. Available filing status options are:
· Not Required - A return of this type is not required for the current company· Need Return - A return of this type is required for the current company· Entered - Data has been entered for this return· Checked - Data entered for this return has been checked· Filed - This return has been filed with the CRA and/or MRQ
Recalculate ButtonClick this button to recalculate all calculated values, this will also return all overridden values totheir calculated value.
174
182 33
141
63

Entering Summary Form Information 123
© 2010 ELM Computer Systems Inc.
Go to Slips ButtonClick on this button to display the RL-3 slips for the current employer. The data entry screen for thecurrent summary will remain available via a tab beneath the toolbar.

T4 TimeSaver.NET Guide124
© 2010 ELM Computer Systems Inc.
7.15 RL8 Summary
T4 TimeSaver Basic, Plus & Enterprise Only
Person to contact about this returnThe default contact information entered on the New Company Defaults tab of the User Settings
submenu of Setup menu will appear in this area. If no default information was entered, thesefields will be blank. In either case you can enter or change the information at this time.
CertificationThe default certification information entered on the New Company Defaults tab of the UserSettings submenu of Setup menu will appear in this area. If no default information wasentered, these fields will be blank. In either case you can enter or change the information at this time.Please note that the "Date on summary" field is for display purposes only; in order to print a specifieddate on the summary you must use the "Print this date" option in the "Options" section in the lower leftcorner of the Printing Summary Reports screen.
Filing Status ButtonClicking on the Filing Status button displays a window where the filing status of the current return forthe current company can be selected. Changes made to the filing status apply only to the currentreturn for the current company. Available filing status options are:
· Not Required - A return of this type is not required for the current company· Need Return - A return of this type is required for the current company· Entered - Data has been entered for this return· Checked - Data entered for this return has been checked· Filed - This return has been filed with the CRA and/or MRQ
Recalculate ButtonClick this button to recalculate all calculated values, this will also return all overridden values totheir calculated value.
Go to Slips ButtonClick on this button to display the RL-8 slips for the current employer. The data entry screen for thecurrent summary will remain available via a tab beneath the toolbar.
174
182 33
174
182 33
141
63

Entering Summary Form Information 125
© 2010 ELM Computer Systems Inc.
7.16 RL17 Summary
T4 TimeSaver Basic, Plus & Enterprise Only
Person to Contact About this ReturnThe default contact information entered on the New Company Defaults page of the User Settings
submenu of Setup menu will appear in this area. If no default information was entered, thesefields will be blank. In either case you can enter or change the information at this time.
CertificationThe default certification information entered on the New Company Defaults tab of the UserSettings submenu of Setup menu will appear in this area. If no default information wasentered, these fields will be blank. In either case you can enter or change the information at this time.Please note that the "Date on summary" field is for display purposes only; in order to print a specifieddate on the summary you must use the "Print this date" option in the "Options" section in the lower leftcorner of the Printing Summary Reports screen.
Filing Status ButtonClicking on the Filing Status button displays a window where the filing status of the current return forthe current company can be selected. Changes made to the filing status apply only to the currentreturn for the current company. Available filing status options are:
· Not Required - A return of this type is not required for the current company· Need Return - A return of this type is required for the current company· Entered - Data has been entered for this return· Checked - Data entered for this return has been checked· Filed - This return has been filed with the CRA and/or MRQ
Recalculate ButtonClick this button to recalculate all calculated values, this will also return all overridden values totheir calculated value.
Go to Slips ButtonClick on this button to display the RL-17 slips for the current employer. The data entry screen for thecurrent summary will remain available via a tab beneath the toolbar.
174
182 33
174
182 33
141
63
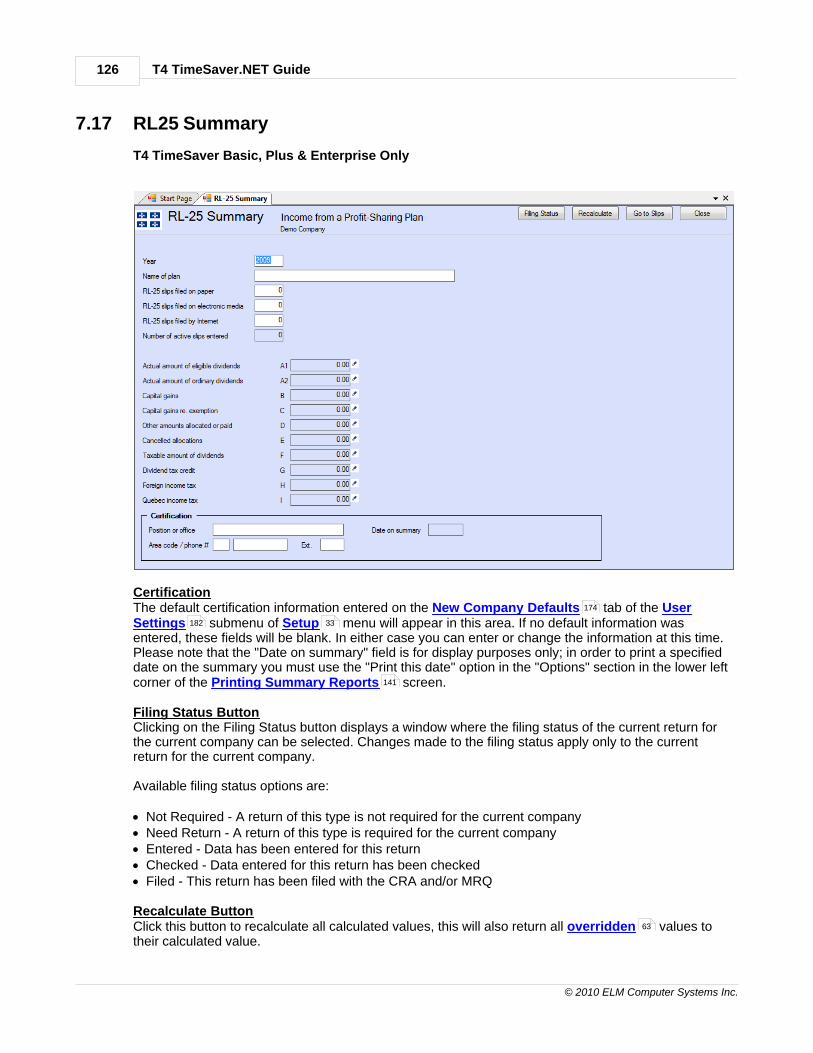
T4 TimeSaver.NET Guide126
© 2010 ELM Computer Systems Inc.
7.17 RL25 Summary
T4 TimeSaver Basic, Plus & Enterprise Only
CertificationThe default certification information entered on the New Company Defaults tab of the UserSettings submenu of Setup menu will appear in this area. If no default information wasentered, these fields will be blank. In either case you can enter or change the information at this time.Please note that the "Date on summary" field is for display purposes only; in order to print a specifieddate on the summary you must use the "Print this date" option in the "Options" section in the lower leftcorner of the Printing Summary Reports screen.
Filing Status ButtonClicking on the Filing Status button displays a window where the filing status of the current return forthe current company can be selected. Changes made to the filing status apply only to the currentreturn for the current company.
Available filing status options are:
· Not Required - A return of this type is not required for the current company· Need Return - A return of this type is required for the current company· Entered - Data has been entered for this return· Checked - Data entered for this return has been checked· Filed - This return has been filed with the CRA and/or MRQ
Recalculate ButtonClick this button to recalculate all calculated values, this will also return all overridden values totheir calculated value.
174
182 33
141
63

Entering Summary Form Information 127
© 2010 ELM Computer Systems Inc.
Go to Slips ButtonClick on this button to display the RL-25 slips for the current employer. The data entry screen for thecurrent summary will remain available via a tab beneath the toolbar.

T4 TimeSaver.NET Guide128
© 2010 ELM Computer Systems Inc.

Part VIII

T4 TimeSaver.NET Guide130
© 2010 ELM Computer Systems Inc.
8 Partnership Forms (Plus & Enterprise Versions Only)
T4 TimeSaver Plus & Enterprise Only
How to Get Data into the Partnership FormsThere are three ways to get data into T4 TimeSaver partnership forms.
a. Convert last year’s T4 TimeSaver databaseb. Import data from an Excel spreadsheetc. Enter the data manually
Converting Partnership Data from a T4 TimeSaver DatabaseConverting partnership data from last year’s T4 TimeSaver database is virtually identical to the wayyou convert other data. The only difference is that you have the option to convert only companieswith partnership data. This is useful if you have already converted your databases prior to theFebruary 10, 2009 release which handled partnership forms.
Importing Partnership Data from ExcelImporting T5013 slips from an Excel spreadsheet is done in the same way as importing other slips. See the T4 TimeSaver User Manual for general instructions about importing data. For informationabout the names of the fields used as headers for T5013 slips, see Headings for T5013 for layoutdetails.
You can import both identification information (names, addresses, etc.) as well as the amountsallocated to the partners for each box. If you import the allocated amounts, the totals will beautomatically summed up to the summary and the boxes on the slips will all be overridden so thatautomatic allocation is suppressed.
If you prefer to enter the totals of the income and expenses on the summary and have T4 TimeSaverallocate the amounts to the partners, you can also do that. Simply do not enter the amounts in thespreadsheet. Then, after the import is complete, enter the total amounts on the summary, andselect the method for calculating the partner’s share (See “Allocating Amounts from the Summary tothe Slips” below).
The boxes in the “Other amounts and information” section of the slips cannot be imported.
Allocating Amounts from the Summary to the Slips
218
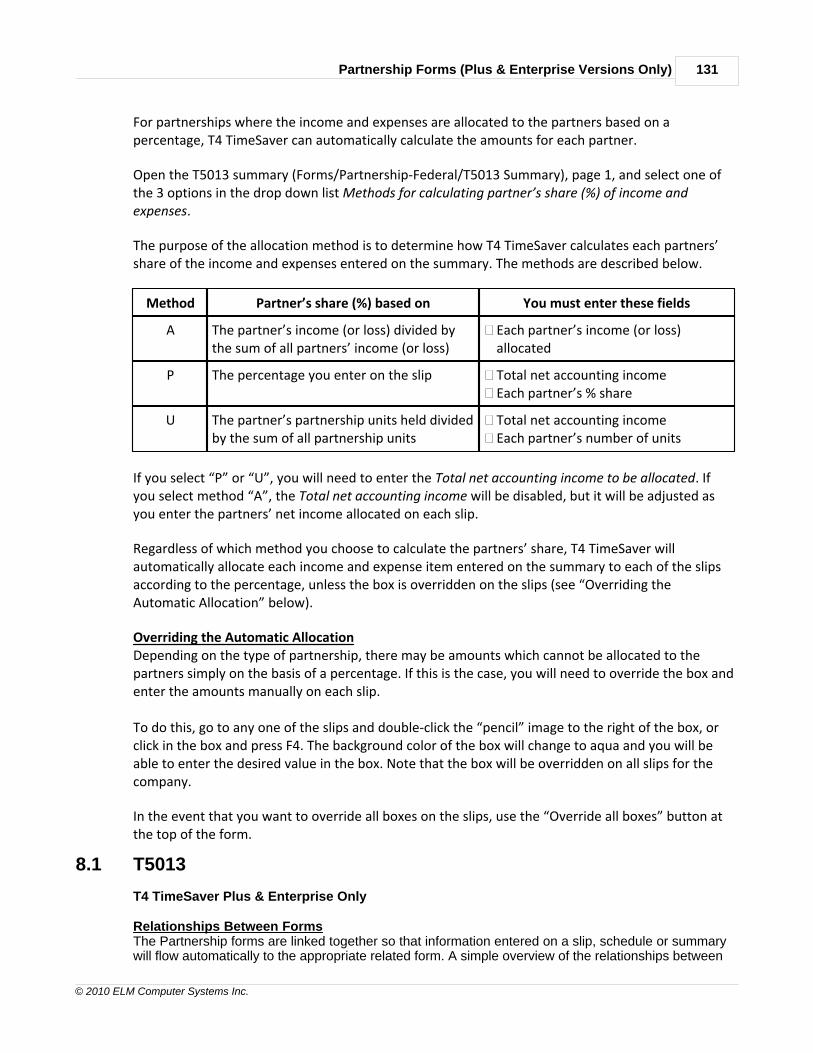
Partnership Forms (Plus & Enterprise Versions Only) 131
© 2010 ELM Computer Systems Inc.
For partnerships where the income and expenses are allocated to the partners based on apercentage, T4 TimeSaver can automatically calculate the amounts for each partner.
Open the T5013 summary (Forms/Partnership-Federal/T5013 Summary), page 1, and select one ofthe 3 options in the drop down list Methods for calculating partner’s share (%) of income andexpenses.
The purpose of the allocation method is to determine how T4 TimeSaver calculates each partners’share of the income and expenses entered on the summary. The methods are described below.
Method Partner’s share (%) based on You must enter these fields
A The partner’s income (or loss) divided bythe sum of all partners’ income (or loss)
Each partner’s income (or loss)allocated
P The percentage you enter on the slip Total net accounting income Each partner’s % share
U The partner’s partnership units held dividedby the sum of all partnership units
Total net accounting income Each partner’s number of units
If you select “P” or “U”, you will need to enter the Total net accounting income to be allocated. Ifyou select method “A”, the Total net accounting income will be disabled, but it will be adjusted asyou enter the partners’ net income allocated on each slip.
Regardless of which method you choose to calculate the partners’ share, T4 TimeSaver willautomatically allocate each income and expense item entered on the summary to each of the slipsaccording to the percentage, unless the box is overridden on the slips (see “Overriding theAutomatic Allocation” below).
Overriding the Automatic AllocationDepending on the type of partnership, there may be amounts which cannot be allocated to thepartners simply on the basis of a percentage. If this is the case, you will need to override the box andenter the amounts manually on each slip.
To do this, go to any one of the slips and double-click the “pencil” image to the right of the box, orclick in the box and press F4. The background color of the box will change to aqua and you will beable to enter the desired value in the box. Note that the box will be overridden on all slips for thecompany.
In the event that you want to override all boxes on the slips, use the “Override all boxes” button atthe top of the form.
8.1 T5013
T4 TimeSaver Plus & Enterprise Only
Relationships Between FormsThe Partnership forms are linked together so that information entered on a slip, schedule or summarywill flow automatically to the appropriate related form. A simple overview of the relationships between
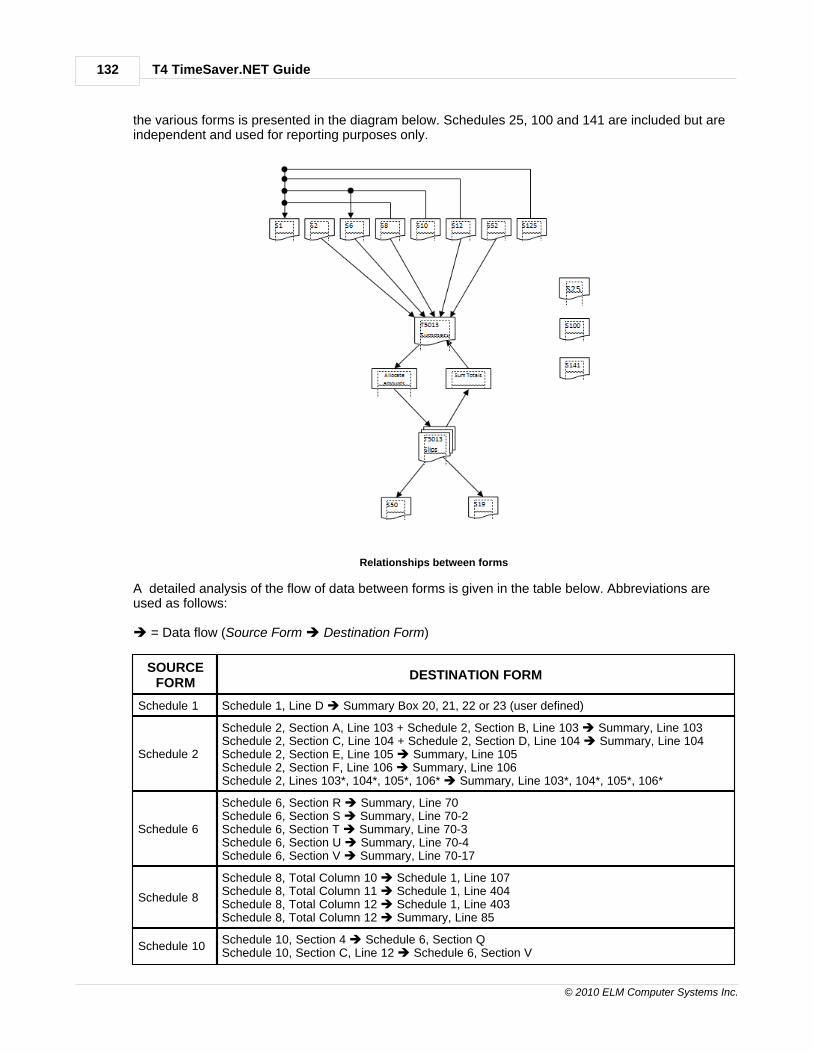
T4 TimeSaver.NET Guide132
© 2010 ELM Computer Systems Inc.
the various forms is presented in the diagram below. Schedules 25, 100 and 141 are included but areindependent and used for reporting purposes only.
Relationships between forms
A detailed analysis of the flow of data between forms is given in the table below. Abbreviations areused as follows:
è = Data flow (Source Form è Destination Form)
SOURCEFORM
DESTINATION FORM
Schedule 1 Schedule 1, Line D è Summary Box 20, 21, 22 or 23 (user defined)
Schedule 2
Schedule 2, Section A, Line 103 + Schedule 2, Section B, Line 103 è Summary, Line 103Schedule 2, Section C, Line 104 + Schedule 2, Section D, Line 104 è Summary, Line 104Schedule 2, Section E, Line 105 è Summary, Line 105Schedule 2, Section F, Line 106 è Summary, Line 106Schedule 2, Lines 103*, 104*, 105*, 106* è Summary, Line 103*, 104*, 105*, 106*
Schedule 6
Schedule 6, Section R è Summary, Line 70Schedule 6, Section S è Summary, Line 70-2Schedule 6, Section T è Summary, Line 70-3Schedule 6, Section U è Summary, Line 70-4Schedule 6, Section V è Summary, Line 70-17
Schedule 8
Schedule 8, Total Column 10 è Schedule 1, Line 107Schedule 8, Total Column 11 è Schedule 1, Line 404Schedule 8, Total Column 12 è Schedule 1, Line 403Schedule 8, Total Column 12 è Summary, Line 85
Schedule 10 Schedule 10, Section 4 è Schedule 6, Section QSchedule 10, Section C, Line 12 è Schedule 6, Section V
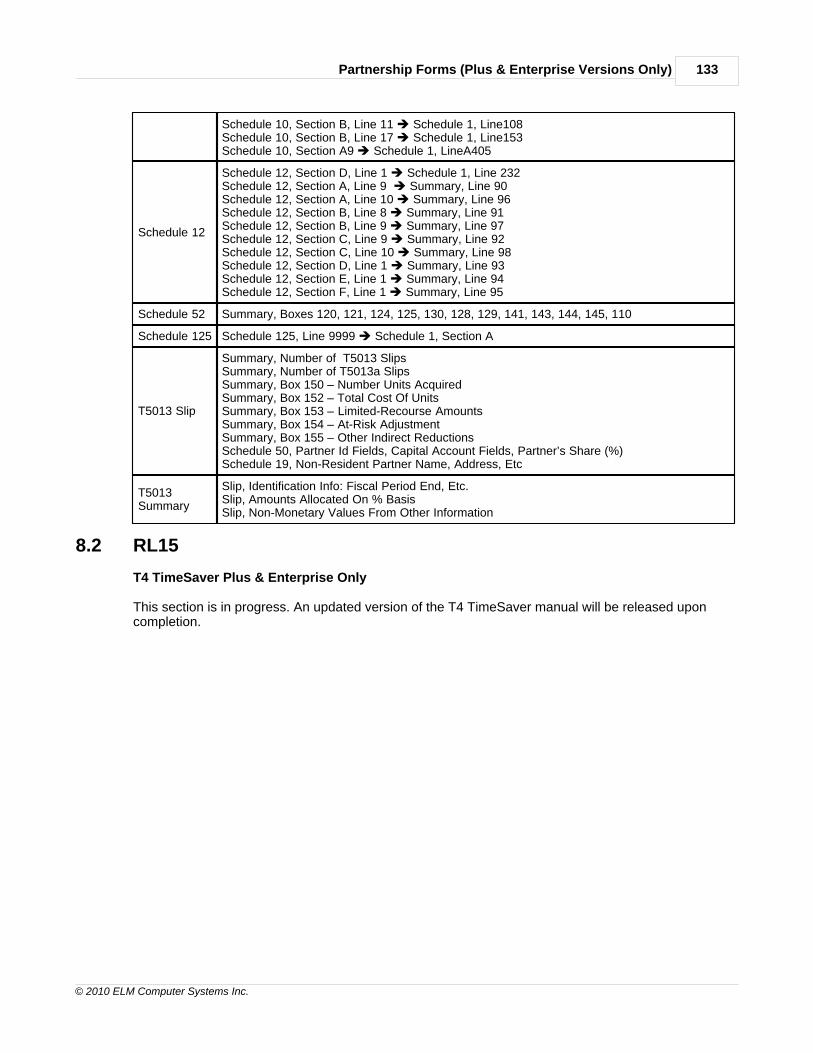
Partnership Forms (Plus & Enterprise Versions Only) 133
© 2010 ELM Computer Systems Inc.
Schedule 10, Section B, Line 11 è Schedule 1, Line108Schedule 10, Section B, Line 17 è Schedule 1, Line153Schedule 10, Section A9 è Schedule 1, LineA405
Schedule 12
Schedule 12, Section D, Line 1 è Schedule 1, Line 232Schedule 12, Section A, Line 9 è Summary, Line 90Schedule 12, Section A, Line 10 è Summary, Line 96Schedule 12, Section B, Line 8 è Summary, Line 91Schedule 12, Section B, Line 9 è Summary, Line 97Schedule 12, Section C, Line 9 è Summary, Line 92Schedule 12, Section C, Line 10 è Summary, Line 98Schedule 12, Section D, Line 1 è Summary, Line 93Schedule 12, Section E, Line 1 è Summary, Line 94Schedule 12, Section F, Line 1 è Summary, Line 95
Schedule 52 Summary, Boxes 120, 121, 124, 125, 130, 128, 129, 141, 143, 144, 145, 110
Schedule 125 Schedule 125, Line 9999 è Schedule 1, Section A
T5013 Slip
Summary, Number of T5013 SlipsSummary, Number of T5013a SlipsSummary, Box 150 – Number Units AcquiredSummary, Box 152 – Total Cost Of UnitsSummary, Box 153 – Limited-Recourse AmountsSummary, Box 154 – At-Risk AdjustmentSummary, Box 155 – Other Indirect ReductionsSchedule 50, Partner Id Fields, Capital Account Fields, Partner’s Share (%)Schedule 19, Non-Resident Partner Name, Address, Etc
T5013Summary
Slip, Identification Info: Fiscal Period End, Etc.Slip, Amounts Allocated On % BasisSlip, Non-Monetary Values From Other Information
8.2 RL15
T4 TimeSaver Plus & Enterprise Only
This section is in progress. An updated version of the T4 TimeSaver manual will be released uponcompletion.

Part IX
Producing Reports 135
© 2010 ELM Computer Systems Inc.
9 Producing Reports
9.1 A Note on Using Adobe Reader to Print Reports
Data Prints Outside of Fields on Pre-Printed FormsWhen using Preview / Print Adobe Reader will be used to print PDF reports. To ensure accurate dataplacement, you must first turn off all scaling options within Adobe Reader. This will allow the printedreports to meet the requirements of the CRA and MRQ. Failure to do so may result in data printingoutside of many fields and cause your submission to be unacceptable by the CRA or MRQ. Scaling isnot a concern when using the Quick Print button to send reports directly to your printer as thisbypasses Adobe Reader.
Follow these steps to turn off scaling in Adobe Reader:
1. Click on the File menu in Adobe Reader2. Click on the Print option3. About 2/3 of the way down there is an option referring to page scaling, ensure that this option is setto "None"4. Data should now fit in the appropriate fields throughout the form
Optimizing Printing SpeedBecause T4 TimeSaver produces all reports as PDF files you may find that printing speed sometimesleaves much to be desired. There is no way to improve printing speed when using the Quick Printoption (as this uses the PDF printer built into T4 TimeSaver) but several may be available throughAdobe Reader (depending on the version installed) when using Preview / Print. Following are severaltips to improve printing speed from Adobe Reader:
1. Print the document as an image. To do this:a. Click on File in Adobe Readerb. Click on Printc. Click on the Advanced button in the lower left of Adobe Reader's print dialogued. Select the option to "Print as image" and click OK.
2. Reduce the print resolution. To do this:a. Click on file in Adobe Readerb. Click on Printc. Click on Properties in the upper right of Adobe Reader's print dialogue, beside the printer named. The actual location will vary from printer to printer but there should be a setting to change print
quality or resolution; ensure that this is set to the lowest setting possible, 300dpi is a goodworking minimum, most modern printers default to 1200dpi or 600 dpi (the amount of data thatthe printer must process is reduced by 75% each time dpi is halved)
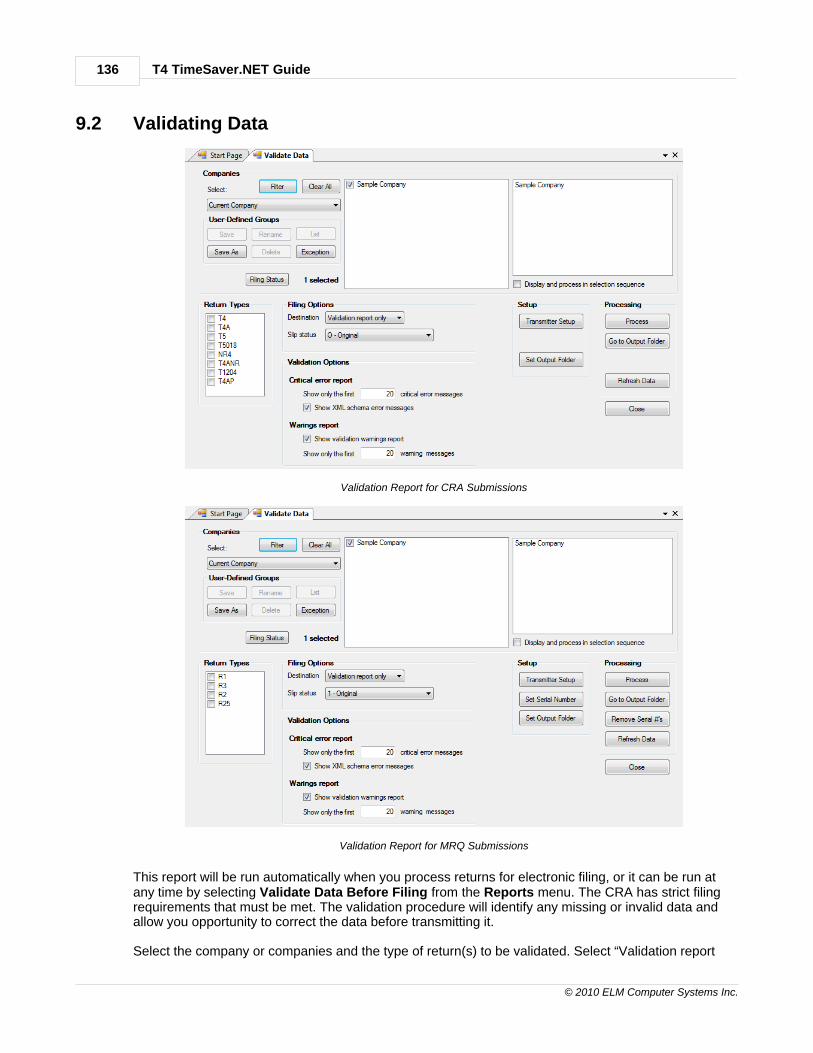
T4 TimeSaver.NET Guide136
© 2010 ELM Computer Systems Inc.
9.2 Validating Data
Validation Report for CRA Submissions
Validation Report for MRQ Submissions
This report will be run automatically when you process returns for electronic filing, or it can be run atany time by selecting Validate Data Before Filing from the Reports menu. The CRA has strict filingrequirements that must be met. The validation procedure will identify any missing or invalid data andallow you opportunity to correct the data before transmitting it.
Select the company or companies and the type of return(s) to be validated. Select “Validation report

Producing Reports 137
© 2010 ELM Computer Systems Inc.
only” to run the validation report on its own, or select a filing method to both validate and create theelectronic filing submission at the same time. If the data fails the validation procedure, the filing will beaborted. See Electronic Filing Preparation for further information regarding the settings in thiswindow.
Click on Process.
The Critical Error Report will be generated. This report will list the location of missing or invalid datathat will cause the data submission to be rejected by the CRA or MRQ
Click the Warnings button to view the missing or invalid data that may need to be corrected but will notcause rejection of the submission by CRA or MRQ. Either report can be printed by clicking the Printbutton.
Refresh DataUse this button to incorporate any additions, deletions or changes made to the company list orchanges made to individual slips since the Validating Data window was opened.
Set Output FolderAllows the user to change the location of the XML submission files. See File Locations for furtherinformation.
Go to Output FolderPressing this button will open the folder that the XML submission files will be stored.
9.3 Printing Slips
Select the desired type of slip from the Reports menu. A list of available reports for that type of slip willappear from which you can select the report you wish to print. The option of whether to print two slipsper page or three slips per page will be available only when selecting from T4 reports.
150
179

T4 TimeSaver.NET Guide138
© 2010 ELM Computer Systems Inc.
Note: T4 slips will report the unadjusted values for each slip unless all slips have beenadjusted. A warning will be given if some slips are adjusted while others are not.
CompaniesSelect one of the options from the drop-down list:
· All Companies - print the slips for all companies in the current database· Current Company - print the slips for only the current company· Most Recently Used - print the slips for companies most recently included in any report· Selected - print the slips for selected companies
The companies that match the selection you have made will be listed in the box on the left. If youchose Selected, click on the box beside each company you wish to select to put a check mark in thebox and to have the company name appear on the list on the right.
SlipsSelect one of the options from the drop-down list:
· All Slips - print all the slips for the selected companies· Original Slips Only - print only the slips that have not been amended for the selected companies· Amended Slips Only - print only the amended slips for the selected companies· Canceled Slips Only - print only the canceled slips for the selected companies· Selected Slips - print only the selected slips for one selected company
When only one company is selected, the slips that match the selection you have made will be listed inthe box on the left. If you chose Selected, click on the box beside each name you wish to select to puta check mark in the box and to have the name appear on the list on the right.

Producing Reports 139
© 2010 ELM Computer Systems Inc.
Include inactive (nil) slipsCheck this box if you want slips to print for recipients who have no dollar values on the slip.
Sort slips byChoose the order in which you wish the slips to print from the given options. The options will change,depending on the type of slip to be printed.
CopiesChoose which copies of the slips you wish to print by checking one or more of the boxes. The optionswill change, depending on the Type of Form you have selected.
OptionsGroup output byChoose to group the slips by copy number or by company.
Print test patternCheck this box if you wish to test alignment settings for the selected form.
French instructions on copy 2-3Check this box to print recipient filing instructions in French. Available only on forms printing three slipsper page.
PDF File OptionsSave PDF filesPrinting forms, either slips or summaries, always creates a PDF file. If Save PDF file is selected, thePDF file will be saved in the indicated file when the Print window is closed. If Save PDF file is notselected, the PDF will be deleted when the Print window is closed. This is a system wide setting, thesetting selected will be used by all users and for all reports. For T4 TimeSaver Plus, only theadministrator may change this selection.
Note: When using Adobe Reader to print PDF reports for submission, you must first turn off all scalingoptions within Adobe Reader to ensure that the printed reports will meet the requirements of the CRAand MRQ. Failure to do so may result in your submission being unacceptable by the CRA or MRQ.Scaling is not a concern when using the Quick Print button to send reports directly to your printer asthis bypasses Adobe Reader.
Save in client foldersThis option is only available when the Group output by option has been set to Company. Select thisoption if you wish to save PDFs in user-assigned client folders. The folder path is stored in thecompany record. If no folder path has been stored for a company included in the print job, or if thefolder is not accessible (eg. it is a network folder and you are not connected to the network), you will beprompted for the folder location even if the Prompt for each client folder option is not selected.
Separate PDFs for each copy numberCheck this box to create a PDF file for each copy or company selected. Leave unchecked to create asingle PDF file. The Separate PDFs for each copy number will be selected automatically if Save inClient folders has been selected.
Prompt for output folderCheck this box to have the program prompt you for the location of the PDF files to be saved. If you areprinting slips for a single company, the folder you choose will be saved and the next time you print theslips for the same company, you will be prompted with the same location. You will be prompted for theoutput folder regardless of whether a folder has been assigned on the company record.
Quick Print

T4 TimeSaver.NET Guide140
© 2010 ELM Computer Systems Inc.
Prints the selected slips to the default printer without previewing the PDF. The default printer is setusing your Windows Control Panel.
Preview/PrintCreates the slips in PDF format and displays them in Adobe Reader or Adobe Acrobat. The PDF fileswill be automatically saved according to the PDF File options selected. Press the Print button fromwithin the Adobe preview program to send the slips to the printer.
Refresh DataUse this button to incorporate any additions, deletions or changes made to the company list orchanges made to individual slips since the Print window was opened.
Adjust MarginsOpens the Adjust Margins dialogue, enabling you to reposition the data printed on pre-printed forms tofit within the provided fields. The unit of measure is inches where 0.10 represents 1/10 of an inch.Positive numbers will move the print to the right (horizontally) or down (vertically). Negative numberswill move the print to the left (horizontally) or up (vertically).
Go to Output FolderPressing this button will open the folder where the PDF files will be stored.
AdvancedUse this button to set advanced print settings.
9.3.1 Using Serial (Relevé) Numbers on RL Slips
Serial number (Relevé numbers) printed on RL-1, RL-2, RL-3, RL-17 and RL-25 slips are assignedsequentially by T4 TimeSaver, from a range supplied to ELM Computer Systems by the MRQ, as slipsare printed. Depending on the slip to be printed, its status and the answers you provide you will seeone or more of the following dialogues:
The screen above will be displayed when you are re-printing slips (whether original or amended),Clicking on "Yes" will cause T4 TimeSaver to calculate a new serial number for the slip(s) beingprinted. Clicking on "No" will cause T4 TimeSaver to print the slip(s) using the serial number alreadyassigned. In the case where no serial number exists, T4 TimeSaver will assign the next serial numberin sequence.
The dialogue above will be displayed when one or more amended slips are included in the slips to be

Producing Reports 141
© 2010 ELM Computer Systems Inc.
printed. If you answer "Yes" at this dialogue, all amended slips printed will be assigned a new serialnumber (as well as any original slip not already assigned a serial number).
The dialogue below will be displayed if amended slips have been printed and you have chosen to re-assign serial numbers to amended slips only:
Answering "Yes" at this dialogue will save the serial number for amended slips in the "Original RelevéNumber" field of the slip's data entry screen.
Many Relevé slips will display two serial numbers:
· The top serial number is associated with the magnetic media submission and is assigned whenyou process the XML output, not when the slips are printed. Setting the starting serial numberdoes not assign the numbers to the slips.
· The bottom serial number is associated with the paper copy and is assigned when the forms areprinted
The procedure to ensure that both serial number print correctly on any paper Relevé slips would be to:
· Enter the slips into T4 TimeSaver· Check for errors in data entry· Process the electronic filing submission file (This assigns the top serial number)· Print the slips – this will assign the bottom serial number. Since the XML processing was done
first, both serial numbers will print
9.4 Printing Summary Reports
To print the Summary Form to be sent with the slips to CRA, select the appropriate type of summaryfrom the list in the Reports menu, and then choose the report from the list of available reports. Adialog box will open which will allow you to select which Summary forms you wish to print and thenumber of copies you wish to print.

T4 TimeSaver.NET Guide142
© 2010 ELM Computer Systems Inc.
Note: The T4 summary will report the unadjusted values for each slip unless all slips have beenadjusted. A warning will be given if some slips are adjusted while others are not.
CompaniesSelect one of the options from the drop-down list:
· All Companies - print the slips for all companies in the current database· Current Company - print the slips for only the current company· Most Recently Used - print the slips for companies most recently included in any report· Selected - print the slips for selected companies
The companies that match the selection you have made will be listed in the box on the left. If youchose Selected, click on the box beside each company you wish to select to put a check mark in thebox and to have the company name appear on the list on the right.
Slips Included in TotalsSelect one of the options from the drop-down list:
· All Slips - print all the slips for the selected companies· Original Slips Only - print only the slips that have not been amended for the selected companies· Amended Slips Only - print only the amended slips for the selected companies· Canceled Slips Only - print only the canceled slips for the selected companies
OptionsGroup output byChoose to group the slips by copy number or by company.
Print this dateCheck this box and enter the desired date to print the date on the summary automatically.

Producing Reports 143
© 2010 ELM Computer Systems Inc.
Print nil summaries alsoCheck this option to print inactive (nil) forms. These are summaries that have all dollar values set tozero. These summaries will not print unless this option is checked.
Print test patternCheck this box if you wish to test alignment settings for the selected form.
French instructions on copy 2-3Check this box to print recipient filing instructions in French. Available only on forms printing three slipsper page.
PDF File OptionsSave PDF filesPrinting forms, either slips or summaries, always creates a PDF file. If Save PDF file is selected, thePDF file will be saved in the indicated file when the Print window is closed. If Save PDF file is notselected, the PDF will be deleted when the Print window is closed. This is a system wide setting, thesetting selected will be used by all users and for all reports. For T4 TimeSaver Plus, only theadministrator may change this selection.
Note: When using Adobe Reader to print PDF reports for submission, you must first turn off all scalingoptions within Adobe Reader to ensure that the printed reports will meet the requirements of the CRAand MRQ. Failure to do so may result in your submission being unacceptable by the CRA or MRQ.Scaling is not a concern when using the Quick Print button to send reports directly to your printer asthis bypasses Adobe Reader.
Save in client foldersThis option is only available when the Group output by option has been set to Company. Select thisoption if you wish to save PDFs in user-assigned client folders. The folder path is stored in thecompany record. If no folder path has been stored for a company included in the print job, or if thefolder is not accessible (eg. it is a network folder and you are not connected to the network), you will beprompted for the folder location even if the Prompt for each client folder option is not selected.
Separate PDFs for each copy numberCheck this box to create a PDF file for each copy or company selected. Leave unchecked to create asingle PDF file. The Separate PDFs for each copy number will be selected automatically if Save inClient folders has been selected.
Prompt for output folderCheck this box to have the program prompt you for the location of the PDF files to be saved. If you areprinting slips for a single company, the folder you choose will be saved and the next time you print theslips for the same company, you will be prompted with the same location. You will be prompted for theoutput folder regardless of whether a folder has been assigned on the company record.
Quick PrintPrints the selected slips to the default printer without previewing the PDF. The default printer is setusing your Windows Control Panel.
Preview/PrintCreates the slips in PDF format and displays them in Adobe Reader or Adobe Acrobat. The PDF fileswill be automatically saved according to the PDF File options selected. Press the Print button fromwithin the Adobe preview program to send the slips to the printer.
Refresh DataUse this button to incorporate any additions, deletions or changes made to the company list orchanges made to individual slips since the Print window was opened.
Adjust Margins

T4 TimeSaver.NET Guide144
© 2010 ELM Computer Systems Inc.
Opens the Adjust Margins dialogue, enabling you to reposition the data printed on pre-printed forms tofit within the provided fields. The unit of measure is inches where 0.10 represents 1/10 of an inch.Positive numbers will move the print to the right (horizontally) or down (vertically). Negative numberswill move the print to the left (horizontally) or up (vertically).
Go to Output FolderPressing this button will open the folder where the PDF files will be stored.
AdvancedUse this button to set advanced print settings.
9.5 Printing Adjustment Reports
A report showing all the adjustments made for each employee can be produced for the T4 slips. Togenerate this report, select T4 from the Reports menu. Then choose Adjustments from this list ofavailable reports. A dialog box will open which will allow you to select the companies for which youwish to print T4 Adjustment Reports. (See the section Setting Adjustment Options for furtherinformation.)
CompaniesSelect one of the options from the drop-down list:
· All Companies - print the slips for all companies in the current database· Current Company - print the slips for only the current company· Most Recently Used - print the slips for companies most recently included in any report· Selected - print the slips for selected companies
The companies that match the selection you have made will be listed in the box on the left. If youchose Selected, click on the box beside each company you wish to select to put a check mark in thebox and to have the company name appear on the list on the right.
OptionsDetail/SummarySelect whether you want a detailed or summary Adjustment Report.
Sort slips byChoose the order in which you wish the slips to print from the given options.
Refresh Data
97

Producing Reports 145
© 2010 ELM Computer Systems Inc.
Use this button to incorporate any additions, deletions or changes made to the company list orchanges made to individual slips since the Printing Adjustment Report window was opened.
9.6 Printing Edit List Reports
A complete edit listing of all the slips can be produced for all types of slips. To generate this report,choose the type of slip from the Reports menu, and then select the corresponding Edit List from thelist of available reports. A dialog box will open which will allow you to select the companies to print anEdit List Report for.
CompaniesSelect one of the options from the drop-down list:
· All Companies - print the slips for all companies in the current database· Current Company - print the slips for only the current company· Most Recently Used - print the slips for companies most recently included in any report· Selected - print the slips for selected companies
The companies that match the selection you have made will be listed in the box on the left. If youchose Selected, click on the box beside each company you wish to select to put a check mark in thebox and to have the company name appear on the list on the right.
FieldsSelect one of the two options listed below:
· All - include all the fields available on the slip (report may print with a very small font to fit alldata)
· Selected - print only those fields which you select
If you chose Selected, click on the box beside each field you wish to include in the report.
OptionsSort slips byChoose the order in which you wish the slips to print from the given options. The options will change,depending on the type of slip to be printed.

T4 TimeSaver.NET Guide146
© 2010 ELM Computer Systems Inc.
LayoutSelect either the Table or Memo style of layout
OrientationSelect whether you wish the report to print in the Portrait or Landscape orientation.
Paper SizeSelect whether you wish the report to print on letter or legal sized paper.
MarginsSelect one of the following margin options:
· Normal (Top and Bottom 1", Left and Right 1")· Narrow (Top and Bottom 0.5", Left and Right 0.5")· Moderate (Top and Bottom 1", Left and Right 0.75")· Wide (Top and Bottom 1", Left and Right 2")
9.7 Printing Company Summary
A Company List is a listing of the companies in the current database with the number of active andinactive slips of each type. Select Company Summary from the Reports menu to generate thisreport. A dialog box will open which will allow you to select which companies to include and otheroptions.
CompaniesSelect one of the options from the drop-down list:
· All Companies - print the slips for all companies in the current database· Current Company - print the slips for only the current company· Most Recently Used - print the slips for companies most recently included in any report· Selected - print the slips for selected companies
The companies that match the selection you have made will be listed in the box on the left. If youchose Selected, click on the box beside each company you wish to select to put a check mark in the

Producing Reports 147
© 2010 ELM Computer Systems Inc.
box and to have the company name appear on the list on the right.
FieldsSelect one of the two options listed below:
· All - include all the fields available on the slip (report may print with a very small font to fit alldata)
· Selected - print only those fields which you select
If you chose Selected, click on the box beside each field you wish to include in the report
Options
Sort companies byChoose the order in which you wish the companies to print - by name or by business number
LayoutSelect either the Table or Memo style of layout
OrientationSelect whether you wish the report to print in the Portrait or Landscape orientation.
Paper SizeSelect whether you wish the report to print on letter or legal sized paper.
MarginsSelect one of the following margin options:
· Normal (Top and Bottom 1", Left and Right 1")· Narrow (Top and Bottom 0.5", Left and Right 0.5")· Moderate (Top and Bottom 1", Left and Right 0.75")· Wide (Top and Bottom 1", Left and Right 2")
9.8 Printing Company Filing Status
T4 TimeSaver Enterprise Only
Company Filing Status
The Filing Status button displays the "Filing Status" selection window which is used to filter data byfiling status. Only selected data will be acted upon by the tool. Any combination of return types orcompanies can be selected. Filing status options are:
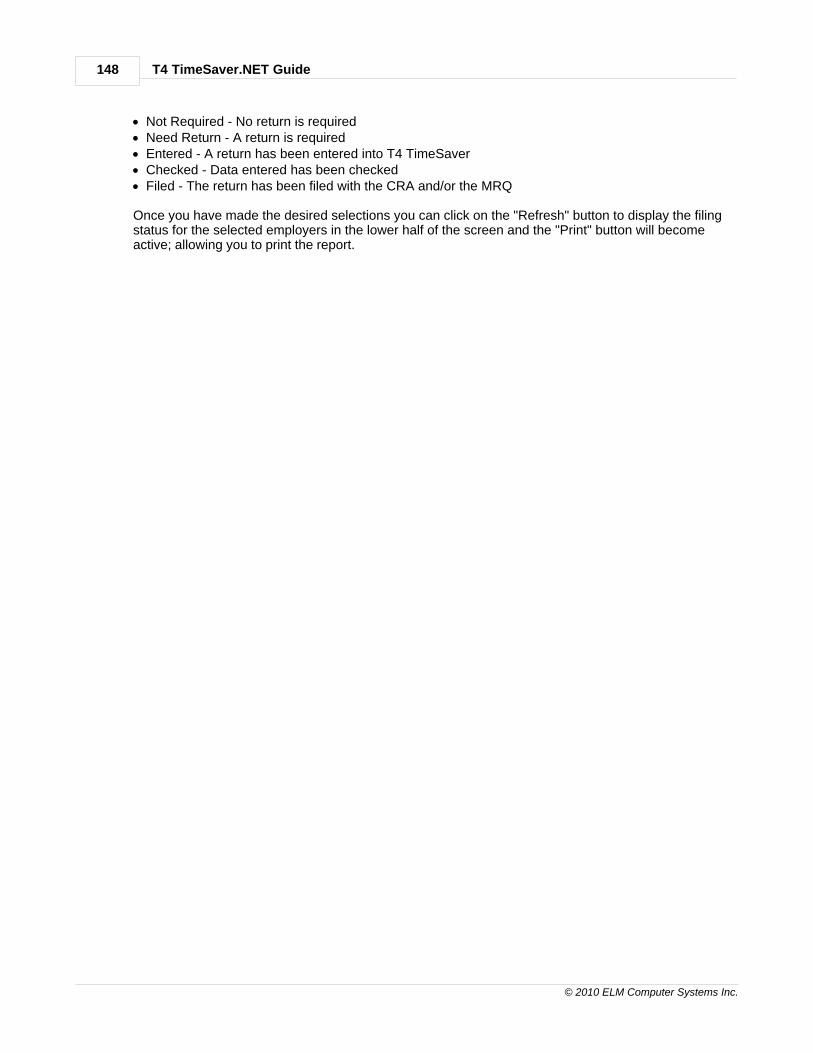
T4 TimeSaver.NET Guide148
© 2010 ELM Computer Systems Inc.
· Not Required - No return is required· Need Return - A return is required· Entered - A return has been entered into T4 TimeSaver· Checked - Data entered has been checked· Filed - The return has been filed with the CRA and/or the MRQ
Once you have made the desired selections you can click on the "Refresh" button to display the filingstatus for the selected employers in the lower half of the screen and the "Print" button will becomeactive; allowing you to print the report.

Part X

T4 TimeSaver.NET Guide150
© 2010 ELM Computer Systems Inc.
10 Electronic Filing
10.1 Electronic Filing Preparation
NOTE: During setup you should complete the Electronic Filing page of the User Setup Optionssubmenu of the Setup menu if you plan to submit returns electronically. Much of the informationrequired by T4 TimeSaver for electronic file processing is contained there.
To access electronic filing, choose the type of slip required from the Reports menu and then ElectronicFiling. The electronic filing dialog box will open and give you a number of options:
CompaniesSelect one of the options from the drop-down list:
· All Companies - print the slips for all companies in the current database· Current Company - print the slips for only the current company· Most Recently Used - print the slips for companies most recently included in any report· Selected - print the slips for selected companies
The companies that match the selection you have made will be listed in the box on the left. If youchose Selected, click on the box beside each company you wish to select to put a check mark in thebox and to have the company name appear on the list on the right.
Note: With T4 TimeSaver Basic, you may only select one company at a time to fileelectronically. Multiple company submissions are allowed only with T4 TimeSaver Plus
Return typesOne type of return will be automatically marked when you open the Electronic Filing dialog box. Youcan include other types of returns by clicking on the checkbox beside the return type name.
Filing Options
Destination

Electronic Filing 151
© 2010 ELM Computer Systems Inc.
Choose the media by which the return(s) will be submitted to the CRA. Your options are: Internet, CD,DVD or Diskette.
· Validation Report Only - data will be checked for consistency with the XML schemas provided byCRA and MRQ; the Validation Report Only option will NOT produce an XML file but will find dataerrors that would cause an XML file to be rejected by the CRA or MRQ
· Internet - data will be validated for consistency with CRA and MRQ requirements and, if noerrors are found, a file will be created on your hard drive (see the sections on Internet Filing toCRA and Internet Filing to MRQ for details)
· CD or DVD - an XML file will be created on your hard drive which you may then copy to theappropriate drive using your own CD or DVD writing software (see the section on CD or DVDFiling for details); if you are filing more than 50 slips you cannot file on CD or DVD
NOTE: You must have access to a CD or DVD writer to successfully use this option.· Diskette (diskette submissions are not accepted by the MRQ) - select the letter of the diskette
drive (either A or B) you wish to send the output to; the submission will automatically be saved tothe blank formatted diskette in the indicated diskette drive (see the section on Diskette Filing
for details on submission); if you are filing more than 50 slips you cannot file on disketteNOTE: You must have access to a diskette drive to successfully use this option.
Regardless of the destination you choose, T4 TimeSaver will validate your data to determine if thereare any Critical or Warning errors. Errors that would result in a rejection of your submission will belisted in a Critical Error report and must be corrected before T4 TimeSaver will generate an XML file.Errors that can be corrected (but would not invalidate the submission if they were not) are displayed ina Data Validation Warnings report. The validation procedure is implemented whenever an electronicfiling submission is processed, but it can also be run independently by selecting the Validation reportonly option.
Note: With T4 TimeSaver Basic you may only select the Internet as a destination for electronicfiling. With T4 TimeSaver Plus you may electronically file by diskette (CRA only), CD, DVD orthe Internet.
Slip StatusEach submission must contain either original returns or amended/canceled returns. Select "Original" toinclude all original returns of the type(s) selected from the selected company(ies) in your submission.Select "Amended and/or Canceled" to include all amended or canceled returns of the type(s) selectedfrom the selected company(ies) in your submission.
Validation OptionsSelect whether you wish to see detailed error messages supplied by the XML schema.
Transmitter SetupPressing this button will allow you access to the information stored on the Electronic Filing pageof the User Settings submenu of Setup menu. You can add missing information or edit existingdata. Clicking on the OK button will return you to the electronic filing dialog box.
ProcessPressing this command button will begin the processing of the electronic filing. A validation report willbe generated and displayed; and can be printed if desired.
154 158
159
160
150
182 33

T4 TimeSaver.NET Guide152
© 2010 ELM Computer Systems Inc.
Validation Report - Critical Errors
Processing of an electronic return will be halted if any Critical Errors are found.Critical Errors are thosethat would cause CRA or MRQ to reject the electronic return. Processing of the electronic return canonly continue if all Critical Errors have been repaired.
Validation Report - Warning Errors
Pressing the Next button in the upper right of the Validation Report (available only if no Critical Errorshave been found) will create the XML file. Once the XML file has been successfully created theInternet Filing dialogue will be displayed:

Electronic Filing 153
© 2010 ELM Computer Systems Inc.
XML Submission FileThe name and location of the XML file to be submitted to the CRA or MRQ
Web Access CodeThe Web Access Code entered for the company or filing entity, this information is presented as aconvenience only and cannot be use by T4 TimeSaver to logon to the filing site
Business NumberThe Business Number entered for the company or filing entity, this information is presented as aconvenience only and cannot be use by T4 TimeSaver to logon to the filing site
Internet Filing PageThe Internet site to which you must logon in order to upload the XML submission file
View XML File in BrowserOpens your default Internet browser to view the contents of the XML submission file
Print Company ListPrints a list of companies included in this XML submission file to keep for your records
Go to Internet Filing PageOpens the Internet filing page in your default browser
CloseCloses this dialogue
There is no need to submit a transmittal report or company list with the federal returns.
10.2 Instructions for CRA Returns
The following instructions are provided here for a convenient reference. For complete details see theCRA website.
1. Electronic filing submissions may be made by Internet or on a media such as a diskette, CD, orDVD. A complete electronic filing submission contains the transmitter identification as well as the slipand summary information for each return. No paper forms are required with the submission.
2. Anyone making an electronic filing submission must have a Transmitter Number. If you do not havea Transmitter Number, contact the CRA at 1-800-665-5164 to be assigned one. If you cannot obtain aTransmitter Number, use the default Transmitter Number of MM000000. You should be assigned aTransmitter Number for the subsequent year which you should use from then on.
3. Any combination of returns totalling over 50 slips are required by CRA to be file their submissionover the Internet. Internet submissions may not exceed 150Mb; if your submissions is larger than150Mb it must either be compressed or split into separate submissions to fall below the 150Mb limit.The CRA encourages all employers who use computerized methods to generate returns to submitthem to the CRA electronically.
4. An electronic filing submission may contain only one diskette, CD or DVD. It may contain more thanone type of return* and it may contain returns for more than one company* (* T4 TimeSaver Plus andEnterprise only). Diskette, CD or DVD submissions cannot contain more than 50 slips. If you havemultiple submissions each submission must be submitted in a separate envelope. Multiple envelopesmay be taped together for simplified mailing. Submissions should be sent to:
Electronic Media Processing UnitOttawa Technology Centre

T4 TimeSaver.NET Guide154
© 2010 ELM Computer Systems Inc.
Canada Revenue Agency875 Heron RoadOttawa ON K1A 1A2
Telephone: 1-800-665-5164
5. Do not send CRA paper copies of any returns that have been filed electronically.
6. If corrections need to be made to a submission that has already been sent to CRA, create anelectronic filing submission of the amended and/or canceled returns and submit it to the ElectronicMedia Processing Unit. Do not send any original returns in the same submission as amended returns.
10.2.1 Internet Filing to CRA
T4 TimeSaver is able to utilize CRA’s URL for Internet filing of returns.
When the Internet filing option is selected as the destination for the Electronic Filing submission anInternet Filing dialog box will appear once the Process button is selected. You will be warned if the filesize exceeds the maximum of 150Mb allowed by CRA for Internet filing. Make note of the informationgiven, and click the Go to Internet Filing Page button to continue. The following web page will beopened:
http://www.cra-arc.gc.ca/esrvc-srvce/rf/thr/ift-tfi/rdy-eng.html
Click the Enter Internet File Transfer (XML) Secure Web Site, which will open the “Disclaimer - InternetFile Transfer (XML)” page. You are encouraged to read all the terms and conditions on this page andyou must click on the "I agree" at the bottom of the page before you can enter the Internet FileTransfer site. Once you click on "I agree" the following webpage will open:
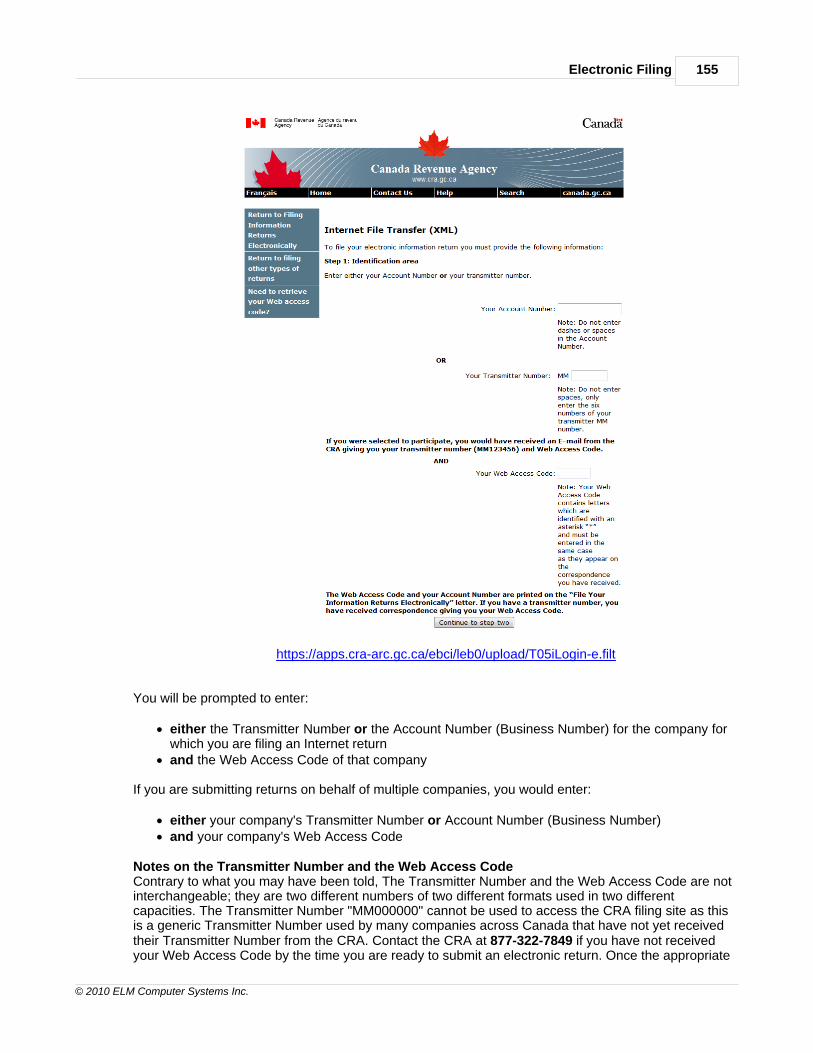
Electronic Filing 155
© 2010 ELM Computer Systems Inc.
https://apps.cra-arc.gc.ca/ebci/leb0/upload/T05iLogin-e.filt
You will be prompted to enter:
· either the Transmitter Number or the Account Number (Business Number) for the company forwhich you are filing an Internet return
· and the Web Access Code of that company
If you are submitting returns on behalf of multiple companies, you would enter:
· either your company's Transmitter Number or Account Number (Business Number)· and your company's Web Access Code
Notes on the Transmitter Number and the Web Access CodeContrary to what you may have been told, The Transmitter Number and the Web Access Code are notinterchangeable; they are two different numbers of two different formats used in two differentcapacities. The Transmitter Number "MM000000" cannot be used to access the CRA filing site as thisis a generic Transmitter Number used by many companies across Canada that have not yet receivedtheir Transmitter Number from the CRA. Contact the CRA at 877-322-7849 if you have not receivedyour Web Access Code by the time you are ready to submit an electronic return. Once the appropriate

T4 TimeSaver.NET Guide156
© 2010 ELM Computer Systems Inc.
information has been entered and validated you will be taken to the following webpage
Here you will be prompted to upload the XML file created by T4 TimeSaver that contains the companydata in XML format to the CRA website. The XML file will be located in T4 TimeSaver's XML Outputfolder. This folder can be located by using the FILE LOCATIONS option under the SETUP menu in T4TimeSaver. T4 TimeSaver saves all XML files in the following format:
COMPANY_NAME_xxx.XML
where “COMPANY_NAME” is the name of the company for which the file has been created with allspace characters replace by an underscore character; “xxx’ is a sequential number applied by T4TimeSaver to ensure that older files are not overwritten, and “XML” is the default file type designatorrequired by CRA. If the submission is for multiple companies, "COMPANY_NAME" will be replaced my"MULTIPLE_COMPANIES."
T4 TimeSaver Plus and Enterprise are able to batch submit returns for multiple companies andmultiple return types over the Internet in a single file which can be no larger than 150Mb in size (if yourfile is larger than 150Mb you can either compress it or split your return into sections). In this case youmust use:
· either your company's Transmitter Number or Account Number (Business Number)· and your company's Web Access Code
to access the CRA website as you are acting as an agent for multiple companies.
T4 TimeSaver Lite and Basic are limited to submitting single returns over the Internet for a singlecompany at a time. As above, the file can be no larger than 150Mb in size. If you are using one ofthese T4 TimeSaver versions to file electronic returns for a significant number of clients it may be inyour best interest to upgrade to the T4 TimeSaver Plus or T4 TimeSaver Enterprise.
10.3 Instructions for MRQ Returns
The following instructions are provided here for convenient reference. For complete details see theMRQ website.
Electronic Filing 157
© 2010 ELM Computer Systems Inc.
1. Electronic filing submissions may be made by Internet or on a media such as a CD or DVD. CD orDVD submissions may not contain more than 50 slips. A complete electronic filing submissioncontains the transmitter identification as well as the slip and summary information for each return. Nopaper forms are required with the submission.
2. Anyone making an electronic filing submission must have a Transmitter Number. If you do not havea Transmitter Number, contact the CRA at 1-800-665-5164 to be assigned one.
3. Returns for employers filing over 500 returns are required by MRQ to be filed electronically. It may be senteither via the Internet or on a CD or DVD, however Internet submissions may not exceed 150Mb. If thetransmission exceeds 150Mb, contact the Division de l’acquisition des données électroniques (866-814-8392) forinformation on how to proceed.
4. An electronic filing submission may contain only one CD or DVD. It may contain a single return typeand it may contain returns for only one company. If you have multiple submissions each submissionmust be submitted in a separate envelope. Multiple envelopes may be taped together for simplifiedmailing. Submissions should be sent to:
Direction générale du traitement et des technologiesRevenu Québec3800, rue de Marly, secteur 2-2-0Québec (Québec) G1X 4A5
Telephone: 418 659-1020 or 1 866 814-8392Fax: 418 646-0713
Email: [email protected]
5. Do not send MRQ paper copies of any returns that have been filed electronically.
6. If corrections need to be made to a submission that has already been sent to MRQ, contact thedepartment above for further information.
10.3.1 Using Serial (Relevé) Numbers in Electronic Returns
The MRQ assigns serial numbers to filers of electronic returns, as opposed to paper returns whereserial numbers are assigned to ELM Computer Systems and re-distributed among T4 TimeSaverusers. You have the option to set the electronic serial number by using the Set Serial Number buttonon the Electronic Filing screen for the Relevé in question; simply click on this button and you will beable to enter the appropriate serial number from the range assigned to you by the MRQ.
Relevé slips will display two serial numbers:
· The top serial number is associated with the magnetic media submission and is assigned whenyou process the XML output, not when the slips are printed. Setting the starting serial numberdoes not assign the numbers to the slips.
· The bottom serial number is associated with the paper copy and is assigned when the forms areprinted
The procedure to ensure that both serial number print correctly on any paper Relevé slips would be to:
· Enter the slips into T4 TimeSaver· Check for errors in data entry· Process the electronic filing submission file (This assigns the top serial number)· Print the slips – this will assign the bottom serial number. Since the XML processing was done
first, both serial numbers will print

T4 TimeSaver.NET Guide158
© 2010 ELM Computer Systems Inc.
10.3.2 Internet Filing to MRQ
T4 TimeSaver is able to utilize MRQ’s URL for Internet filing of Relevé returns.
When the Internet filing option is selected as the destination for the Electronic Filing submission anInternet Filing dialog box will appear once the Process button is selected. You will be warned if the filesize exceeds the maximum of 150Mb allowed by the MRQ for Internet filing. Make note of theinformation given, and click the Go to Internet Filing Page button to continue. The following web pagewill be opened:
http://www.revenu.gouv.qc.ca/en/sepf/services/sgp_rl_Internet/default.aspx
Click the Access to service button, which will open a logon page where you will enter the usernameand password assigned to your firm by the MRQ. Once this information has been entered andvalidated you will be prompted to upload a file containing the company data in XML format to the MRQwebsite.
Here you will be prompted to upload the XML file created by T4 TimeSaver that contains the companydata in XML format to the MRQ website. The XML file will be located in T4 TimeSaver's XML Outputfolder. This folder can be located by using the FILE LOCATIONS option under the SETUP menu in T4TimeSaver. T4 TimeSaver saves all XML files in the following format:
COMPANY_NAME_xxx.XML
where “COMPANY_NAME” is the name of the company for which the file has been created with allspace characters replace by an underscore character; “xxx’ is a sequential number applied by T4

Electronic Filing 159
© 2010 ELM Computer Systems Inc.
TimeSaver to ensure that older files are not overwritten, and “XML” is the default file type designatorrequired by MRQ. If the submission is for multiple companies, "COMPANY_NAME" will be replacedmy "MULTIPLE_COMPANIES."
T4 TimeSaver Plus and Enterprise are able to batch submit returns for multiple companies andmultiple return types over the Internet in a single file which can be no larger than 150Mb in size.
T4 TimeSaver Lite and Basic are limited to submitting single returns over the Internet for a singlecompany at a time. As above, the file can be no larger than 150Mb in size. If you are using one ofthese T4 TimeSaver versions to file electronic returns for a significant number of clients it may be inyour best interest to upgrade to the T4 TimeSaver Plus or T4 TimeSaver Enterprise.
10.3.2.1 MRQ Internet Filing Limitations
The following information is taken from the MRQ document IN-800-V:
4.1.1 OnlineThe combined file size of all transmitted data must not exceed 150 megabytes (150 MB). If thetransmission exceeds this limit, contact the Division de l’acquisition des données électroniques forinformation on how to proceed.
ImportantThe transmission of data whose combined file size is less than 150 MB may still encounter certainproblems for which Revenu Québec is not responsible. These problems may occur if theequipment you use performs poorly, if you have a low-capacity Internet connection or ifyou try to submit the data during the final hours before the deadline.
To send files online, go to our website and click on the Online Services, Forms and Publicationstab, followed by Services. Under Tax Categories, click Filing RL slips and select InternetTransmission of RL Slips, then click onAccess to service. Complete the on-screen form and click Continue. Click Browse, then select yourfile. Before clicking Submit, make sure that you have selected the correct file. You will automaticallyreceive an acknowledgement of receipt along with a reference number, confirming that we havereceived your transmission. We will mail you a validation report for the file once we finish processingyour transmission. You may also contact us to obtain the results of the validation.
4.1.2 Electronic mediaRecord only one file containing one type of RL slip and one type of package per electronicmedium. For example, you would record file A containing original RL-1 slip data on one CD-ROM, fileB containing original RL-2 slip data on another CD-ROM, and file C containing amended RL-1 slip dataon a third CD-ROM. Each record must comply completely with the format described in section 5.Please note that CD-ROMs and DVDs will not be returned to you.
10.4 Filing on CD or DVD
T4 TimeSaver Plus & Enterprise Only
When the CD or DVD option is selected as the destination for the Electronic Filing submission you willbe prompted to enter the Submission Sequence Number. This is a number from 1 to 999 that willidentify the sequence of submissions that you submit to the CRA as a transmitter. Regardless of yourclient, enter "1" for your first submission, "2" for your second, etc. The number you enter will beincluded in the filename so CRA will know that it is a unique submission. Enter the appropriate numberas requested and click the OK button.
If you enter a duplicate number you will be warned that the filename already exists and given theopportunity to keep the sequence number you have entered and overwrite the existing file (if you didnot submit the original and are re-doing the submission) or to change the sequence number (if the

T4 TimeSaver.NET Guide160
© 2010 ELM Computer Systems Inc.
sequence number was entered incorrectly).
You will then be given the path and filename of the file to be sent to CRA. Make careful note of thisinformation.
View XML File in BrowserClick this button to see the file that will be sent to CRA.
Print Company ListThis company list can be used to track which companies have been filed on which submission. Keepthis for your own records, there is no need to send a copy to CRA with your submission.
Creating the submission CD or DVDUsing your own software, burn the indicated file onto a CD or DVD. Label the CD or DVD with yourname and telephone number so that the CRA can contact you if you need to re-file your submission.Provide complete external labeling showing the transmitter's name and telephone number, theTransmitter Number and your submission file name.
10.5 Filing on Diskette
T4 TimeSaver Plus & Enterprise Only
When the Diskette option is selected as the destination for the Electronic Filing submission you will beprompted to enter the destination drive for the submission. Diskette submissions are not accepted bythe MRQ.
Creating the submission disketteOnce you select "Process" T4 TimeSaver will automatically copy the electronic filing submission to thefloppy drive that you indicate. You will be prompted to enter the Submission Sequence Number. This isa number from 1 to 999 that identifies the submission sequence of electronic files you submitted to theCRA as a transmitter. Regardless of your client, enter "1" for your first submission, "2" for your second,etc. The number you enter will be included in the filename so CRA will know that it is a uniquesubmission. Enter the appropriate number as requested and click the OK button. Label the diskettewith the following information:
- The name of the submission file. The file will be named RCTTAXnnn.XML (where n representsthe Submission Sequence Number).- Your firm's name and telephone number so that the CRA can contact you if you need to re-fileyour submission.- Your firm's Transmitter Number.
FilingCourier or mail the Diskette to the following address:
Electronic Media Processing UnitOttawa Technology CentreCanada Revenue Agency875 Heron RoadOttawa ON K1A 1A2

Part XI
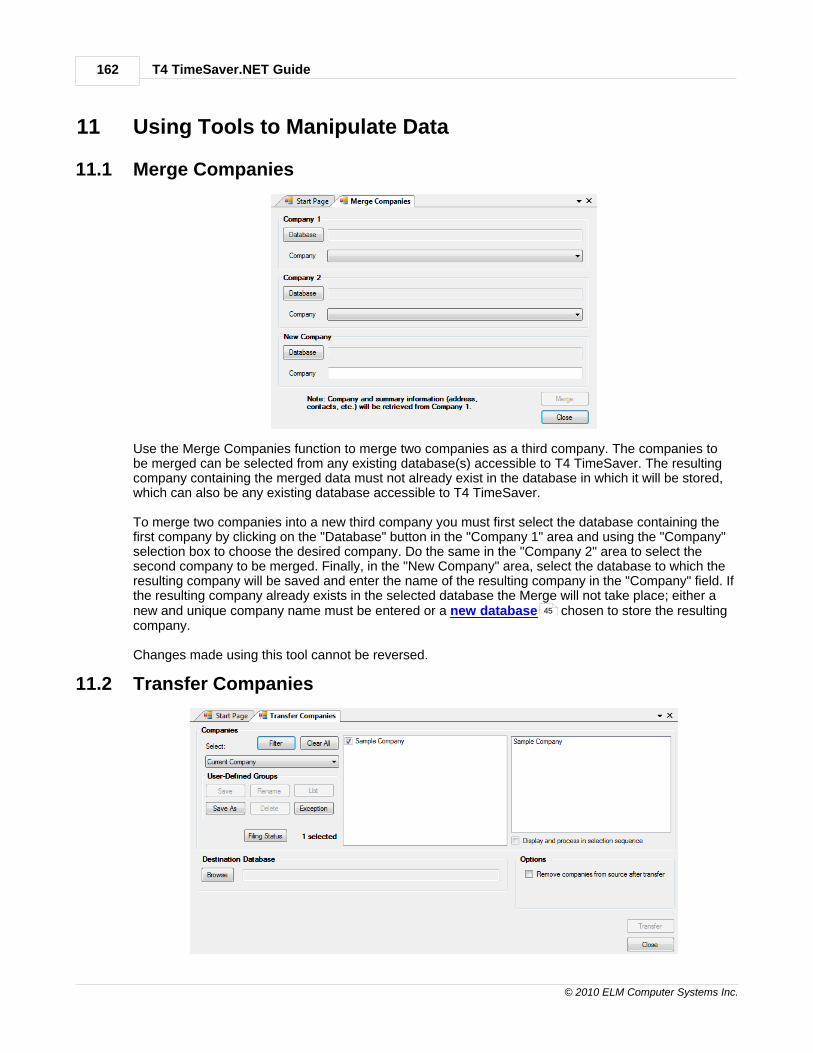
T4 TimeSaver.NET Guide162
© 2010 ELM Computer Systems Inc.
11 Using Tools to Manipulate Data
11.1 Merge Companies
Use the Merge Companies function to merge two companies as a third company. The companies tobe merged can be selected from any existing database(s) accessible to T4 TimeSaver. The resultingcompany containing the merged data must not already exist in the database in which it will be stored,which can also be any existing database accessible to T4 TimeSaver.
To merge two companies into a new third company you must first select the database containing thefirst company by clicking on the "Database" button in the "Company 1" area and using the "Company"selection box to choose the desired company. Do the same in the "Company 2" area to select thesecond company to be merged. Finally, in the "New Company" area, select the database to which theresulting company will be saved and enter the name of the resulting company in the "Company" field. Ifthe resulting company already exists in the selected database the Merge will not take place; either anew and unique company name must be entered or a new database chosen to store the resultingcompany.
Changes made using this tool cannot be reversed.
11.2 Transfer Companies
45

Using Tools to Manipulate Data 163
© 2010 ELM Computer Systems Inc.
Use the Transfer Companies function to transfer one or more companies from the current database toanother database. Set the destination database by selecting any existing database. Indicate whichcompany(ies) you wish to transfer using the Select, Unselect, Select All, and Unselect All buttons. Ascompanies are added to the transfer list they will be displayed in the box on the right.
OptionsRemove companies from source after transferIf this option is checked, information for the transferred companies will exist only in the destinationdatabase; it will be removed from the source database. If this option is not checked, information for thetransferred companies will exist in both the source database and the destination databases.
11.3 Global Changes
11.3.1 Adjustment Options
Use the Global Changes - Adjustment Options tool to modify the adjustment options for any number ofcompanies in the current database. The Adjustment Report must be run again to apply anychanges made to the slips for the companies in question. See the following sections of this guide fordetailed descriptions of each adjustment option.
CPP/QPP Adjustment OptionsEI Adjustment OptionsPPIP Adjustment OptionsTransfer of Over-RemittanceOther Options
Changes made using this tool can not be reversed.
144
54
55
55
56
56

T4 TimeSaver.NET Guide164
© 2010 ELM Computer Systems Inc.
11.3.2 Contact Information
Use the Global Changes - Contact Information tool to modify the contact information on the summariesof any or all return types that exist for any or all companies in the current database. Selectedcompanies will appear in the box on the right. The return types to which the changes will be appliedcan be selected from the table at lower left. Updated contact and certification information can beentered as appropriate in the fields under the headings New Contact Information and NewCertification Information. Clicking on "Apply" will apply the changes to all selected companies andreturn types.
Changes made using this tool can not be reversed.
11.3.3 Slip Information
Use the Global Changes - Slip Information tool to modify the taxation year and/or initialize data on slips
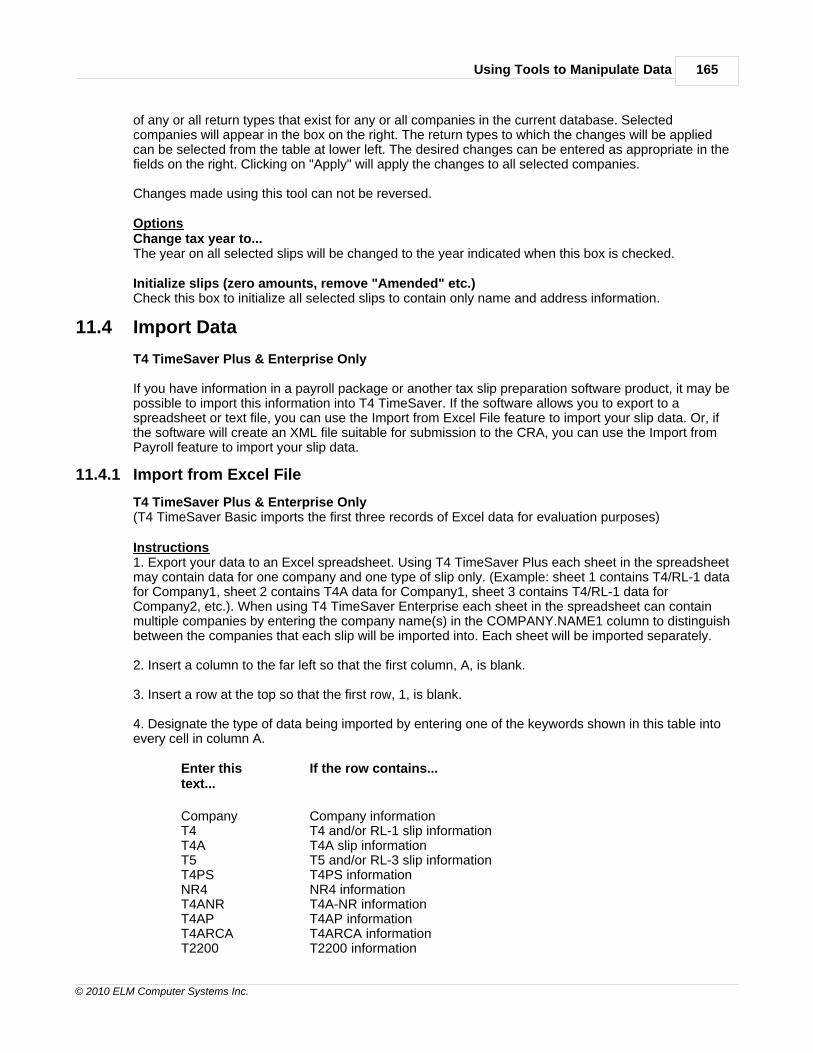
Using Tools to Manipulate Data 165
© 2010 ELM Computer Systems Inc.
of any or all return types that exist for any or all companies in the current database. Selectedcompanies will appear in the box on the right. The return types to which the changes will be appliedcan be selected from the table at lower left. The desired changes can be entered as appropriate in thefields on the right. Clicking on "Apply" will apply the changes to all selected companies.
Changes made using this tool can not be reversed.
OptionsChange tax year to...The year on all selected slips will be changed to the year indicated when this box is checked.
Initialize slips (zero amounts, remove "Amended" etc.)Check this box to initialize all selected slips to contain only name and address information.
11.4 Import Data
T4 TimeSaver Plus & Enterprise Only
If you have information in a payroll package or another tax slip preparation software product, it may bepossible to import this information into T4 TimeSaver. If the software allows you to export to aspreadsheet or text file, you can use the Import from Excel File feature to import your slip data. Or, ifthe software will create an XML file suitable for submission to the CRA, you can use the Import fromPayroll feature to import your slip data.
11.4.1 Import from Excel File
T4 TimeSaver Plus & Enterprise Only(T4 TimeSaver Basic imports the first three records of Excel data for evaluation purposes)
Instructions1. Export your data to an Excel spreadsheet. Using T4 TimeSaver Plus each sheet in the spreadsheetmay contain data for one company and one type of slip only. (Example: sheet 1 contains T4/RL-1 datafor Company1, sheet 2 contains T4A data for Company1, sheet 3 contains T4/RL-1 data forCompany2, etc.). When using T4 TimeSaver Enterprise each sheet in the spreadsheet can containmultiple companies by entering the company name(s) in the COMPANY.NAME1 column to distinguishbetween the companies that each slip will be imported into. Each sheet will be imported separately.
2. Insert a column to the far left so that the first column, A, is blank.
3. Insert a row at the top so that the first row, 1, is blank.
4. Designate the type of data being imported by entering one of the keywords shown in this table intoevery cell in column A.
Enter thistext...
If the row contains...
CompanyT4 T4AT5T4PSNR4T4ANRT4APT4ARCAT2200
Company informationT4 and/or RL-1 slip information T4A slip information T5 and/or RL-3 slip information T4PS information NR4 information T4A-NR information T4AP informationT4ARCA informationT2200 information

T4 TimeSaver.NET Guide166
© 2010 ELM Computer Systems Inc.
T2202AT1204T5013T5018R2R8R15R17R25
T2202A informationT1204 informationT5013 information T5018 information RL-2 information RL-8 informationRL-15 information RL-17 information RL-25 information
5. Complete the first row for each block of information by adding the headings that T4 TimeSaverexpects to find for that type of information. See Headings for Import Files for details aboutheadings for each type of slip information.) For example, the first row for a list of T4 slips might containonly the following headers, which (other than column A) do not need to be in any specific order:
T4 LASTNAME FIRSTNAME ADDRESS1 CITY PROV POSTAL SIN TAXYEAR INCOME TAX CPP EI
6. Make sure that the contents of each column match the headings you just added. For example, if thecity and province are in one column, you need to move the province to the PROV column and the cityto the CITY column. Our sample spread sheet would look something like this:
There is no need to include columns for every heading listed in the appendix, Only include theheadings for which you have data. Additionally, if you have a column of data in your spreadsheet thatyou do not wish to import, you can either delete the column, or give it the heading "NULL". Any columnheaded NULL will be ignored by the import process.
COMPANY.NAME1 - Enterprise OnlyThe COMPANY.NAME1 is an optional field and is used exclusively by T4 TimeSaver Enterprise toenable importing data for multiple payers/employers/companies. To use this field simply enter thename of a company already existing in the T4 TimeSaver database for each slip to be imported to thatcompany and the data will be saved to the appropriate company during import. COMPANY.NAME1 isa text field that can contain up to 30 characters.
7. Save and close the Excel spreadsheet.
8. Start T4 TimeSaver. From the Tools menu, choose Import and then Import from Excel File.
191

Using Tools to Manipulate Data 167
© 2010 ELM Computer Systems Inc.
9. Browse to the location of the Excel file you just created.
10. Indicate which sheet in the spreadsheet you wish to import data from. The Type of data recordsin this sheet field should indicate the correct data type automatically.
11. Enterprise Only - Indicate whether you wish to Import into current company, Import into a newcompany or Import into companies in the Company.Name1 column. If you select Import into anew company, you will be prompted for a new company name. You will need to edit the companyprofile at a later time to complete the data entry for the company information. If you select Import intocompanies in the Company.Name1 column, the data for each slip will be imported into the companyindicated in the Company.Name1 column.
12. Click Import.
What happensT4 TimeSaver adds the slip data to the company you indicated. If there are already slips of this type inthe company, the imported data will be added after the existing slips. A summary for the return will becreated or updated as required. For example, if you have a company with 10 T4 slips and you import alist of 15 more T4 slips, T4 TimeSaver updates the T4 summary with the totals of all 25 slips.
Add/Update Options - Enterprise OnlyT4 TimeSaver Enterprise enables data import at a far more granularly than lower T4 TimeSaverversions. Using T4 TimeSaver Enterprise it is possible to import data into an existing company withoutoverwriting all the data for that company.
Add/Update Option - Add new slips to the databaseData for the slip in question will be added to the data existing in T4 TimeSaver Enterprise as a newslip. If the slip already exists in the T4 TimeSaver database it will be overwritten
Add/Update Option - Update existing slips based on linking fieldThis option will update existing data in the T4 TimeSaver Enterprise by use of the linking field. Thelinking field can be any field that is unique to each recipient; such as SIN. During the import existingdata for the recipients indicated by the linking field will be updated with the data appearing in the importfile. If no existing recipient is found matching the linking field you can use the When linking field is

T4 TimeSaver.NET Guide168
© 2010 ELM Computer Systems Inc.
missing or not found option to either stop processing the import data or skip the record for which nolinking field is found.
11.4.2 Import from XML File
T4 TimeSaver Plus & Enterprise Only
1. Start T4 TimeSaver. From the Tools menu, choose Import and then Import from XML File.
2. Browse to the location of the XML file you wish to import data from. Any XML file meeting theelectronic data submission requirements of the CRA or MRQ may be imported. Some payroll softwaremay have the option to create XML files meeting those requirement; however, we have heard in thepast of clients for whom the import from XML did not work due to inconsistencies between the sourcedata and the requirements of the CRA or MRQ.
3. Indicate whether you wish to Import into current company or Import into a new company. If youselect the latter, you will be prompted for a new company name. You will need to edit the companyprofile at a later time to complete the data entry for the company information.
4. Click Import.
What happensT4 TimeSaver adds the slip data to the company you indicated. If there are already slips of this type inthe company, the imported data will be added after the existing slips. A summary for the return will becreated or updated as required. For example, if you have a company with 10 T4 slips and you import alist of 15 more T4 slips, T4 TimeSaver updates the T4 summary with the totals of all 25 slips.
11.4.3 Open Excel Templates
T4 TimeSaver Plus & Enterprise Only
This menu item opens the Excel import templates using your default spreadsheet editor. Thetemplates were installed with T4 TimeSaver in a subfolder named DB in the same folder where T4TimeSaver was installed. Use the Excel import templates as a guide in creating an import file that canbe used to import data from third party applications into T4 TimeSaver.
Note: Use your spreadsheet editor's "Save As" function to save the spreadsheet containingyour data under a different filename. Failure do this will cause the Excel import template to beoverwritten by the file containing your data; making your import data available to all otherusers of T4 TimeSaver (as well as permanently deleting the Excel templates).
11.5 Import User Information from Last Year's T4 TimeSaver
T4 TimeSaver Plus & Enterprise Only

Using Tools to Manipulate Data 169
© 2010 ELM Computer Systems Inc.
Available only to the System Administrator. The Import User Information from Last Year's T4TimeSaver function allows the system administrator to import 2008 T4 TimeSaver Original and 2008T4 TimeSaver.NET user settings into the 2009 T4 TimeSaver.
The first screen will present a choice between importing 2008 T4 TimeSaver Original or 2008 T4TimeSaver.NET user settings and also gives instructions on how to determine which T4 TimeSaverversion you were using in 2008.
The second screen allows you to specify the location of the file containing the user settings for 2008and also gives instructions on how to determine the location of this file. Once a valid user settings filehas been selected you can click on the "Next" button to complete the import.

T4 TimeSaver.NET Guide170
© 2010 ELM Computer Systems Inc.
11.6 Convert Databases
The Convert Databases function converts “T08" (Original T4 TimeSaver) and “T08N" (T4 TimeSaver)databases into a “T09N" database of the same name. Use this function to maintain the company andemployee data.
OptionsYou can choose to set all dollar values to zero and to remove any “amended” markers by checking thisbox. Otherwise, all dollar values will be maintained and amended slips will still be labeled amended.Check in the appropriate box(es) if you want to clear the CPP exemption fields, the EI exempt fields,the T5013 Details boxes and/or to initialize the partnership forms. Please note that the option to "Rollforward federal partnership Schedule 8 and Schedule 50 for new year" is available only in T4TimeSaver Plus or Enterprise.
Select Source FolderChoose the drive and directory that contains the 2007 databases you wish to convert. T4 TimeSaverwill automatically find and list all the files having a “T08" (Original T4 TimeSaver) or “T08N" (T4TimeSaver) extension. The 2008 database will not be deleted; instead, a new “T09N" database will becreated.
Select Destination DirectoryChoose the drive and directory in which you wish to store the 2009 database. The directory can be theone containing the 2008 database or you can create a new one each year.
Select Data file(s) to be ConvertedHighlight the file(s) you wish to convert. T4 TimeSaver will create a new file with the same name butwith a “T09N" extension in the same directory as the original 2008 database. Only the highlightedfile(s) will be converted when the Convert button is clicked.

Using Tools to Manipulate Data 171
© 2010 ELM Computer Systems Inc.
11.7 Remove Slips
The Remove Slips function allows you to remove all slips of any type for any company in the database.
OptionWhen "Remove inactive slips only" is checked only inactive (non-zero) slips will be removed.
Changes made using this tool cannot be reversed.
11.8 Event Viewer
T4 TimeSaver Enterprise Only

T4 TimeSaver.NET Guide172
© 2010 ELM Computer Systems Inc.
The Event Viewer gives an administrator the tools necessary to prepare detailed reports on significantevents occurring during the use of T4 TimeSaver Enterprise. It is intended to serve as an aid to dataentry analysis and can also assist in forensic analysis of system performance.

Part XII

T4 TimeSaver.NET Guide174
© 2010 ELM Computer Systems Inc.
12 Using Setup to Configure T4 TimeSaver.NET
12.1 User Settings
For the Plus version of T4 TimeSaver, each user may set their own default preferences in a number ofareas, such as New Company, T4 Adjustment, Data Entry and Electronic Filing options. These usersettings are linked to the User Name used when logging in to T4 TimeSaver.
12.1.1 New Company Defaults Page
Complete the New Company Defaults page. This information will be automatically entered into eachnew company you set up. You may override these defaults for individual companies as you set themup.
12.1.2 T4 Adjustment Defaults Page
Complete the T4 Adjustment Defaults page. The information on this page will be copied to the T4Adjustment Options page of the Company Information window for each new company. See furtherinformation in Adjusting T4s regarding how to set the adjustments options to best suit your needs.97

Using Setup to Configure T4 TimeSaver.NET 175
© 2010 ELM Computer Systems Inc.
12.1.3 Data Entry Pages
Each of the data entry pages contains check boxes corresponding to the boxes on the data entry form.As you enter slip information, it may not be necessary for you to enter information into each box assome may be left blank or they may contain a default value. Place a check mark beside the name ofeach box where you want the cursor to stop and remove the check mark from beside any box whereyou do not require the cursor to stop.
The following is a sample of the T4 Data Entry page:
12.1.4 Electronic Filing Page
The Electronic Filing page contains information required by the system to submit information returnson diskette, CD, DVD, or via the Internet. Enter the name and address of the company responsible fortransmitting the electronic filing data and the names and phone numbers for accounting and technicalcontacts. If CRA has assigned a Transmitter Number for federal forms, it should be entered. If you willbe filing any Québec forms, you will need to complete all the fields in the Quebec section. See Electronic Filing Preparation for further information regarding electronic filing.150

T4 TimeSaver.NET Guide176
© 2010 ELM Computer Systems Inc.
You do not have to submit a test file to CRA before filing your returns electronically. We have alreadyreceived approval for the electronic filing format on your behalf.
All data fields on the left half of this screen as (with the exception of "Name line 2" and "Address line2") well as the Transmitter Number must be filled to prevent errors from being reported when anelectronic submission is created. If you also file Relevé returns all of the information in the "Quebec"section must also be entered.
Transmitter InformationEnter the information that describes your company, not the company for whom you will be preparingelectronic returns (unless you are preparing electronic returns for your own company).
Accounting ContactEnter name and contact information for the person capable of responding to accounting relatedinquiries from the CRA for returns submitted by this entity.
Technical ContactEnter name and contact information for the person capable of responding to technical inquiries fromthe CRA for returns submitted by this entity.
Transmitter NumberThe Transmitter Number is supplied by the CRA and is in the format:
MMnnnnnn (where n represents a numeric character)
Enter MM000000 into this field if you have not yet been assigned a Transmitter Number. Please notethat "MM000000" can be used only when you have not already received a Transmitter Number fromthe CRA and cannot be used to log on to the CRA Internet Filing site.

Using Setup to Configure T4 TimeSaver.NET 177
© 2010 ELM Computer Systems Inc.
12.1.5 Options
This feature allows you to personalize your display.
Toolbar Icon SizeSet to small, medium, large, or very large as desired.
ColoursSelect a predefined colour scheme from the list, a preview of the colour scheme will be displayed foryour review. If you select CUSTOM, you must then select both a background colour and band colourby clicking on the appropriate boxes and selecting from the colours displayed.
12.2 User Administration
T4 TimeSaver Plus & Enterprise Only
This feature is only available to the administrator logged in with the user name "ADMIN". Theadministrator is able to change the password for any user, as well as deleting a user accountaltogether.
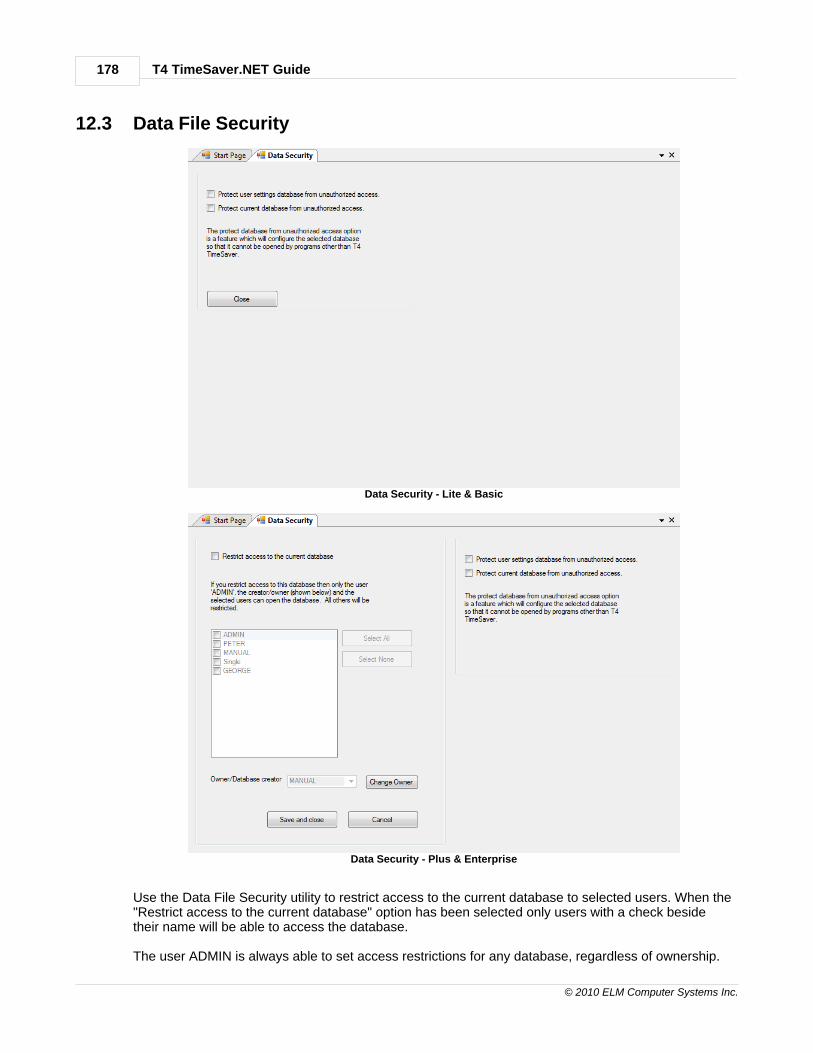
T4 TimeSaver.NET Guide178
© 2010 ELM Computer Systems Inc.
12.3 Data File Security
Data Security - Lite & Basic
Data Security - Plus & Enterprise
Use the Data File Security utility to restrict access to the current database to selected users. When the"Restrict access to the current database" option has been selected only users with a check besidetheir name will be able to access the database.
The user ADMIN is always able to set access restrictions for any database, regardless of ownership.

Using Setup to Configure T4 TimeSaver.NET 179
© 2010 ELM Computer Systems Inc.
The owner of a database, typically its creator, has the ability to set access restrictions for thatdatabase. The ownership of any database can be changed to enable any other user the ability to setaccess restrictions.
12.4 Contribution Rates and Constants
T4 TimeSaver comes set with the rates and constants set by legislation for 2009. Using this utility therates and constants as required to enable preparation of returns using 2010 rates and constants whenT4 TimeSaver 2010 is not yet available (ie: To submit returns after a business closing midway through2010). Click the Defaults button to return all rates and constants to their 2009 legislated values.
This feature is available to any user in the Basic Version and the ADMIN user in the Plus version.
12.5 File Locations
This function displays a list of the folders used to store the files used by T4 TimeSaver. Theadministrator of the Plus version, logged in as "ADMIN", has the ability to allow users to set their owndefault data, PDF reports and/or XML filing folders, or require them to be located in a predeterminedlocation. Removing the check mark in front of one of these options will cause that type of file locationto be set only by the administrator (it would be grayed out to other users).
The PDF File Options are system wide selections to be used for all users and all reports. Theadministrator of the Plus and Enterprise versions, logged in as "ADMIN", has the ability to changethese settings.
When designating locations, including the T4 TimeSaver installation folder, that exist on a network itwill be necessary to ensure that the users have full read/write access to the specified location.
Click the Restore Defaults button restore the folder locations to the default settings.

T4 TimeSaver.NET Guide180
© 2010 ELM Computer Systems Inc.
File Locations - Lite & Basic
File Locations - Plus & Enterprise
T4 TimeSaver Plus and T4 TimeSaver Enterprise add four additional options which enables the userADMIN to give other users the right to modify the default file locations for their own T4 TimeSaversessions. An option that is checked can be modified individually by each user while any option that isnot checked can only be modified by the user ADMIN.
12.6 Change Authorization Code
This feature is available in the Basic version and, in the Plus version, to the administrator logged inwith the user name "ADMIN". Use this feature to remove the current authorization code, allowing youto enter a new one. This would be used, for example, to upgrade from one version of T4 TimeSaver toanother.
Use of this function does not affect the database containing any form data already entered.
Click Yes to delete the existing authorization code and exit the program. The next time T4 TimeSaver
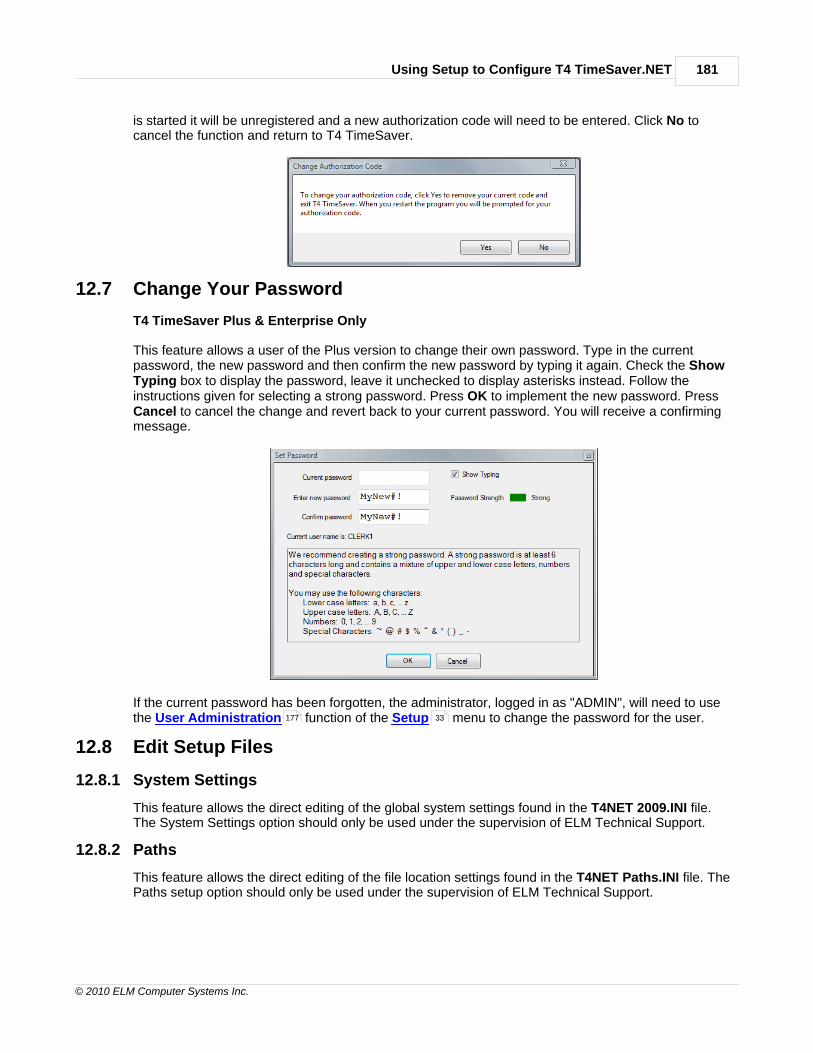
Using Setup to Configure T4 TimeSaver.NET 181
© 2010 ELM Computer Systems Inc.
is started it will be unregistered and a new authorization code will need to be entered. Click No tocancel the function and return to T4 TimeSaver.
12.7 Change Your Password
T4 TimeSaver Plus & Enterprise Only
This feature allows a user of the Plus version to change their own password. Type in the currentpassword, the new password and then confirm the new password by typing it again. Check the ShowTyping box to display the password, leave it unchecked to display asterisks instead. Follow theinstructions given for selecting a strong password. Press OK to implement the new password. PressCancel to cancel the change and revert back to your current password. You will receive a confirmingmessage.
If the current password has been forgotten, the administrator, logged in as "ADMIN", will need to usethe User Administration function of the Setup menu to change the password for the user.
12.8 Edit Setup Files
12.8.1 System Settings
This feature allows the direct editing of the global system settings found in the T4NET 2009.INI file.The System Settings option should only be used under the supervision of ELM Technical Support.
12.8.2 Paths
This feature allows the direct editing of the file location settings found in the T4NET Paths.INI file. ThePaths setup option should only be used under the supervision of ELM Technical Support.
177 33

T4 TimeSaver.NET Guide182
© 2010 ELM Computer Systems Inc.
12.8.3 User Settings
This feature allows the direct editing of the session settings for the current user found in the username.INI file (where username designates the logon name of the current user). The User Settings optionshould only be used under the supervision of ELM Technical Support.

Part XIII

T4 TimeSaver.NET Guide184
© 2010 ELM Computer Systems Inc.
13 Appendices
13.1 Data Backup
Routine backup procedures are essential to protect against data loss or corruption in anycomputerized system. Do not backup your data onto existing backup disks! If you should have a powerfailure while doing the backup, you would lose your previous backup as well.
Backup Data FilesCopy the .T09N database(s) to a CD, DVD, separate hard drive or other data storage device, usingWindows Explorer or other file copying software. The current database name appears in the very topbar of the T4 TimeSaver window. Be sure to close the database before attempting to back it up.
Restoring Data FilesCopy the stored backup of the database back to the working directory using Windows Explorer.

Appendices 185
© 2010 ELM Computer Systems Inc.
13.2 Technical Notes
Data StorageT4 TimeSaver stores the data you enter in MS Access database files having the extension ".t09N".The company information is stored within the database in a table called "Company", one record percompany. There is also a table within the database for each type of slip and Summary form. Data isstored in these tables, one record per employee, and connected to the company information by acompany number assigned by the system.
The file T4NET 2009.INI is stored in the system settings folder and, among other things, stores theauthorization number. There will be additional file(s) containing various user and machine relatedinformation stored in the user settings directory. If you have the single user version of T4 TimeSaverthe file will be named SINGLE.INI. If you have the network version of the program, there will be aseparate file for each user and the files will be named USER.INI, where user is the user name enteredwhen starting T4 TimeSaver.
T4 TimeSaver.NET Guide186
© 2010 ELM Computer Systems Inc.
13.3 Common Problems
1. "I get the message 'Company is locked by user ', but there are no other stations usingthe T4 TimeSaver." or “The user named is not currently using the program.”This problem typically occurs when a database is left open after the program is finished with it. If youare sure that the user being named is not using T4 TimeSaver already and that the company is not inuse at another workstation, you can answer “Yes” and unlock the company. If this does not solve theproblem, select Unlock all companies from the Company menu.
2. "The system is not calculating CPP properly. How do I enter the number of pensionableweeks?"This is one of the most common problems encountered by users of the T4 TimeSaver. Most likely, theproblem stems from a failure to properly set up the adjustment options. Access the company profile byselecting Edit company information from the Company menu. Then select the T4 Adjustment Optionstab. There are two adjustment options involving CPP:
Adjust CPP if over maximum or under minimumAdjust over/under paid CPP to tax based on number of pensionable weeks.
The first option provides only a rough adjustment. It will either adjust CPP up to the minimum or downto the maximum. If it falls in between these two, it will not be changed. This option was implementedfor situations where it is not desirable to enter the number of pensionable weeks on each T4 slip.Because the system does not have the number of weeks available to calculate prorated CPPexemptions (if any), it must assume that there is no exemption. The calculated CPP may therefore behigher when this option is used.
The second option requires you to enter the number of pensionable weeks on each T4 slip, defaultingto the value entered for this option. Thus the program has enough information to calculate proratedexemptions, and a more exact adjustment results.
4. "EI insurable earnings is not printing even when I have entered a value in Box 24."If the EI insurable earnings is equal to gross pay or if it is equal to zero, CRA Taxation asks that the EIinsurable earnings not be printed, leaving Box 24 blank in such cases. This is not a problem with T4TimeSaver and we have checked with CRA Taxation to ensure that the system is functioning properly.
5. “I have installed an update but the new features do not appear to be available orfunctioning”Check the version number of the T4 TimeSaver you are running by selecting About T4TimeSaver fromthe Help menu. Make sure that the revision number and date correspond to the update you haveinstalled. If it is not, the most likely problem is that you have installed the new version of the programinto a different directory than you did the first time. Run the update program again and select theappropriate installation directory. Also, if you are starting the program from an icon on your desktop,make sure that this shortcut is pointing to the correct location. Alternatively, in a network environment,you may have some workstations where the program was installed to a local hard disk. In this case,the update program will have to be installed on the workstation’s local hard disk as well. If none of theprevious suggestions resolve the problem please ensure that all users have exited the T4 TimeSaverand try installing the update once again.
7. “I get the message, ‘Cannot execute external program regedit.exe’ when installing theprogram.”The installation program needs to be able to find the file regedit.exe. It is normally in your Windowsdirectory. The solution is to make sure that regedit.exe is in the Windows directory and that there is apath set to that directory. The path is usually set in the autoexec.bat. See your systems administratorfor help if needed.
8. “My computer hangs when I start up T4 TimeSaver” or “My computer hangs when I start upthe program and enter the user name”
Appendices 187
© 2010 ELM Computer Systems Inc.
This indicates that the file USERYY.MDB is likely damaged. You can delete the files USERYY.MDBand USERYY.BK*. You will then need to set up the user names again. If you have a large number ofusers, you may wish to attempt repairing the USERYY.MDB database. To do this, renameUSERYY.MDB. Then startup T4 TimeSaver. Select Repair Database from the Tools menu and point tothe renamed file. Once it is repaired, you can rename it back to USERYY.MDB. (YY indicates the twodigit year of the program.)
9. “I get the message, ‘The OLE system files are in-use and cannot be updated. Thisinstallation must restart Windows to update OLE before it can continue. Press Yes to restartWindows and continue the installation, or press No to exit the installation.’ when installing theprogram.”This message is typically displayed when you are installing to a network directory on a Novell network(although similar messages may be displayed if you are installing to other network operating systems)and you do not have sufficient rights to modify the contents of the network directory. To resolve theproblem log on to the network as an administrator and run the installation program again.
10. Network Administrator Installation and/or T4NETNODE installation don't appear to beworking properly After a Network Administrator Installation you may encounter unexpected errors or erratic performanceon Windows XP (dependant upon the logon credentials were used for installation) and on WindowsVista and Windows 7 (because of UAC - User Account Control). To prevent either user credentials orUAC from interfering with the T4NETNODE installation follow these steps:
1. Open the folder containing the T4 TimeSaver Network Administrator installation and right-clickon T4NETNODE.EXE2. From the menu, choose the option to "Run as administrator"3. T4NETNODE installation will begin
Other Problemsa) Miscellaneous data problems: · run the Repair Database function found in the File menu on your data.b) Miscellaneous printing problems: · turn both the computer and the printer off, wait a minute, and turn them both on again. · check to see that a printer is connected to your computer and that the cables are snug. . ensure that the most recent printer driver for your operating system has been installed, printer driversare generally available from the printer manufacturer’s website.c) Miscellaneous installation problems . ensure that no other software is running during installation of T4 TimeSaver such as anti-virussoftware or programs that start with Windows . restart your computer to eliminate any potential memory corruption issues.
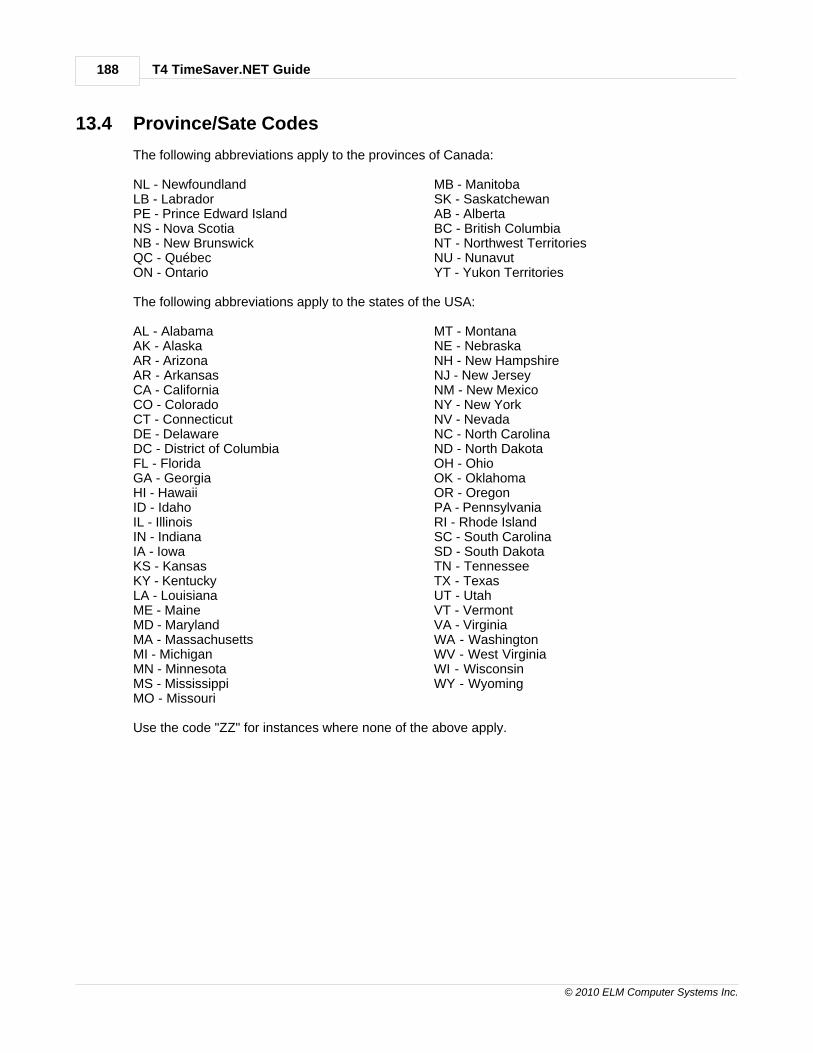
T4 TimeSaver.NET Guide188
© 2010 ELM Computer Systems Inc.
13.4 Province/Sate Codes
The following abbreviations apply to the provinces of Canada:
NL - NewfoundlandLB - LabradorPE - Prince Edward IslandNS - Nova ScotiaNB - New BrunswickQC - QuébecON - Ontario
MB - ManitobaSK - SaskatchewanAB - AlbertaBC - British ColumbiaNT - Northwest TerritoriesNU - NunavutYT - Yukon Territories
The following abbreviations apply to the states of the USA:
AL - AlabamaAK - AlaskaAR - ArizonaAR - ArkansasCA - CaliforniaCO - ColoradoCT - ConnecticutDE - DelawareDC - District of ColumbiaFL - FloridaGA - GeorgiaHI - HawaiiID - IdahoIL - IllinoisIN - IndianaIA - IowaKS - KansasKY - KentuckyLA - LouisianaME - MaineMD - MarylandMA - MassachusettsMI - MichiganMN - MinnesotaMS - MississippiMO - Missouri
MT - MontanaNE - NebraskaNH - New HampshireNJ - New JerseyNM - New MexicoNY - New YorkNV - NevadaNC - North CarolinaND - North DakotaOH - OhioOK - OklahomaOR - OregonPA - PennsylvaniaRI - Rhode IslandSC - South CarolinaSD - South DakotaTN - TennesseeTX - TexasUT - UtahVT - VermontVA - VirginiaWA - WashingtonWV - West VirginiaWI - WisconsinWY - Wyoming
Use the code "ZZ" for instances where none of the above apply.
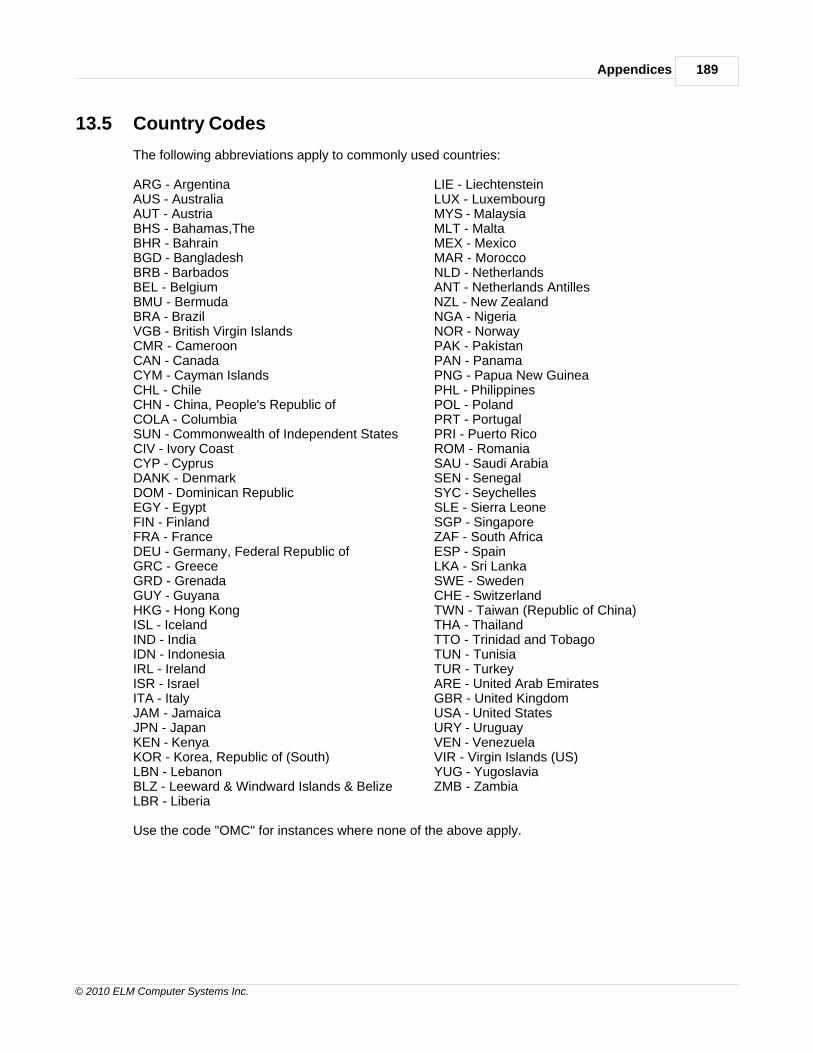
Appendices 189
© 2010 ELM Computer Systems Inc.
13.5 Country Codes
The following abbreviations apply to commonly used countries:
ARG - ArgentinaAUS - AustraliaAUT - AustriaBHS - Bahamas,TheBHR - BahrainBGD - BangladeshBRB - BarbadosBEL - BelgiumBMU - BermudaBRA - BrazilVGB - British Virgin IslandsCMR - CameroonCAN - CanadaCYM - Cayman IslandsCHL - ChileCHN - China, People's Republic ofCOLA - ColumbiaSUN - Commonwealth of Independent StatesCIV - Ivory CoastCYP - CyprusDANK - DenmarkDOM - Dominican RepublicEGY - EgyptFIN - FinlandFRA - FranceDEU - Germany, Federal Republic ofGRC - GreeceGRD - GrenadaGUY - GuyanaHKG - Hong KongISL - IcelandIND - IndiaIDN - IndonesiaIRL - IrelandISR - IsraelITA - ItalyJAM - JamaicaJPN - JapanKEN - KenyaKOR - Korea, Republic of (South)LBN - LebanonBLZ - Leeward & Windward Islands & BelizeLBR - Liberia
LIE - LiechtensteinLUX - LuxembourgMYS - MalaysiaMLT - MaltaMEX - MexicoMAR - MoroccoNLD - NetherlandsANT - Netherlands AntillesNZL - New ZealandNGA - NigeriaNOR - NorwayPAK - PakistanPAN - PanamaPNG - Papua New GuineaPHL - PhilippinesPOL - PolandPRT - PortugalPRI - Puerto RicoROM - RomaniaSAU - Saudi ArabiaSEN - SenegalSYC - SeychellesSLE - Sierra LeoneSGP - SingaporeZAF - South AfricaESP - SpainLKA - Sri LankaSWE - SwedenCHE - SwitzerlandTWN - Taiwan (Republic of China)THA - ThailandTTO - Trinidad and TobagoTUN - TunisiaTUR - TurkeyARE - United Arab EmiratesGBR - United KingdomUSA - United StatesURY - UruguayVEN - VenezuelaVIR - Virgin Islands (US)YUG - YugoslaviaZMB - Zambia
Use the code "OMC" for instances where none of the above apply.
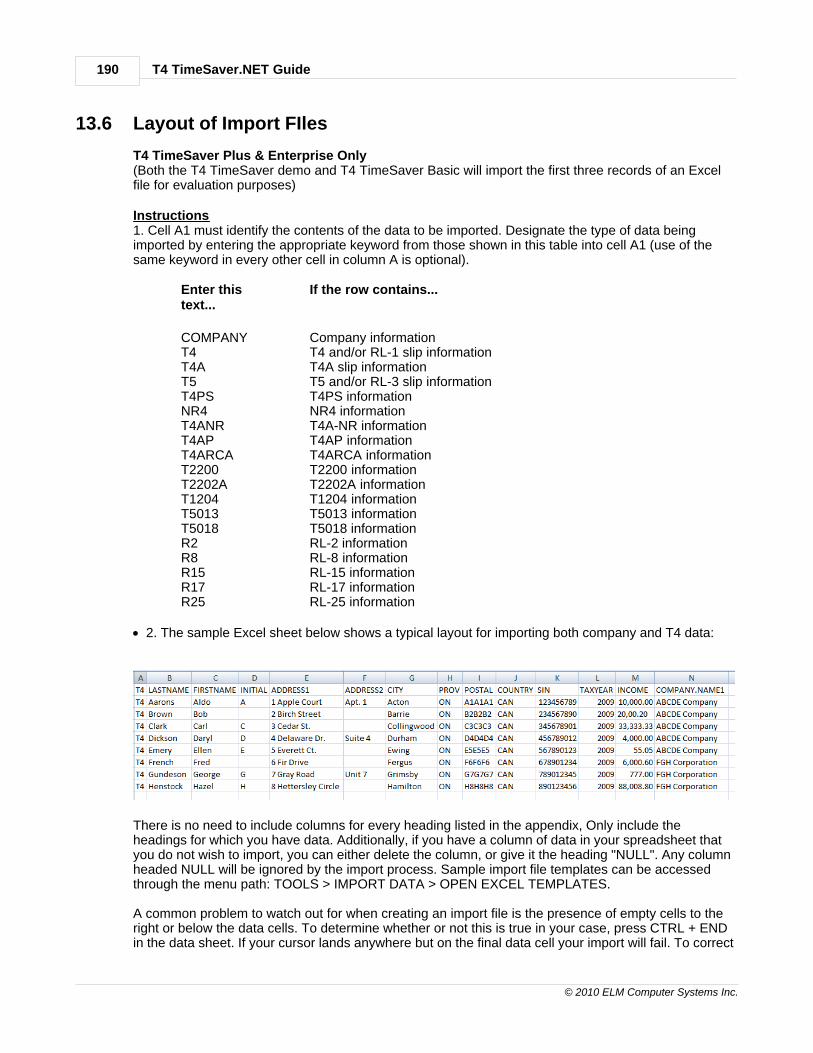
T4 TimeSaver.NET Guide190
© 2010 ELM Computer Systems Inc.
13.6 Layout of Import FIles
T4 TimeSaver Plus & Enterprise Only(Both the T4 TimeSaver demo and T4 TimeSaver Basic will import the first three records of an Excelfile for evaluation purposes)
Instructions1. Cell A1 must identify the contents of the data to be imported. Designate the type of data beingimported by entering the appropriate keyword from those shown in this table into cell A1 (use of thesame keyword in every other cell in column A is optional).
Enter thistext...
If the row contains...
COMPANYT4 T4AT5T4PSNR4T4ANRT4APT4ARCAT2200T2202AT1204T5013T5018R2R8R15R17R25
Company informationT4 and/or RL-1 slip information T4A slip information T5 and/or RL-3 slip information T4PS information NR4 information T4A-NR information T4AP informationT4ARCA informationT2200 informationT2202A informationT1204 informationT5013 information T5018 information RL-2 information RL-8 informationRL-15 information RL-17 information RL-25 information
· 2. The sample Excel sheet below shows a typical layout for importing both company and T4 data:
There is no need to include columns for every heading listed in the appendix, Only include theheadings for which you have data. Additionally, if you have a column of data in your spreadsheet thatyou do not wish to import, you can either delete the column, or give it the heading "NULL". Any columnheaded NULL will be ignored by the import process. Sample import file templates can be accessedthrough the menu path: TOOLS > IMPORT DATA > OPEN EXCEL TEMPLATES.
A common problem to watch out for when creating an import file is the presence of empty cells to theright or below the data cells. To determine whether or not this is true in your case, press CTRL + ENDin the data sheet. If your cursor lands anywhere but on the final data cell your import will fail. To correct

Appendices 191
© 2010 ELM Computer Systems Inc.
this problem, simply copy and paste your data cells into a new sheet and import from that sheet.
COMPANY.NAME1 - Enterprise OnlyThe COMPANY.NAME1 is an optional field and is used exclusively by T4 TimeSaver Enterprise toenable importing data for multiple payers/employers/companies. To use this field simply enter thename of a company already existing in the T4 TimeSaver database for each slip to be imported to thatcompany and the data will be saved to the appropriate company during import. COMPANY.NAME1 isa text field that can contain up to 30 characters.
13.7 Headings for Import Files
T4 TimeSaver Plus & Enterprise Only
Keywords are used as column headings by the import function to identify the information in thecolumn. Generally, each keyword is the name of a field in a TimeSaver table. A special keyword,NULL, can be used to cause the import to ignore a column.
Text fields are alphanumeric fields with a specified maximum size. If the data to be imported exceedsthe maximum size, an error message will be given and the import process will be halted. Generally, thealphanumeric fields may contain letters, numbers, spaces and punctuation. In some cases, they mustbe in upper case (such as province codes, postal codes and country codes). In other fields, mixedcase is acceptable.
Yes/No fields. Acceptable values for Yes are Y, YES, or -1. Acceptable values for No are N, NO or 0.
Currency fields are dollar amounts. They should be formatted with a decimal between the dollars andcents; if there is no decimal, an even dollar amount is assumed. The absolute maximum value that canbe imported into any field is 999,999,999,999.99.
Integer fields are numeric whole numbers from 1 to the limit of the field. They must be entered withoutdecimals or commas; for example, 1234.
Some fields have default values that will be used if the field is not present in the import file. These arelisted in the Comments, Example and Defaults column in bold print.
See Import from Excel File for sample layout.165
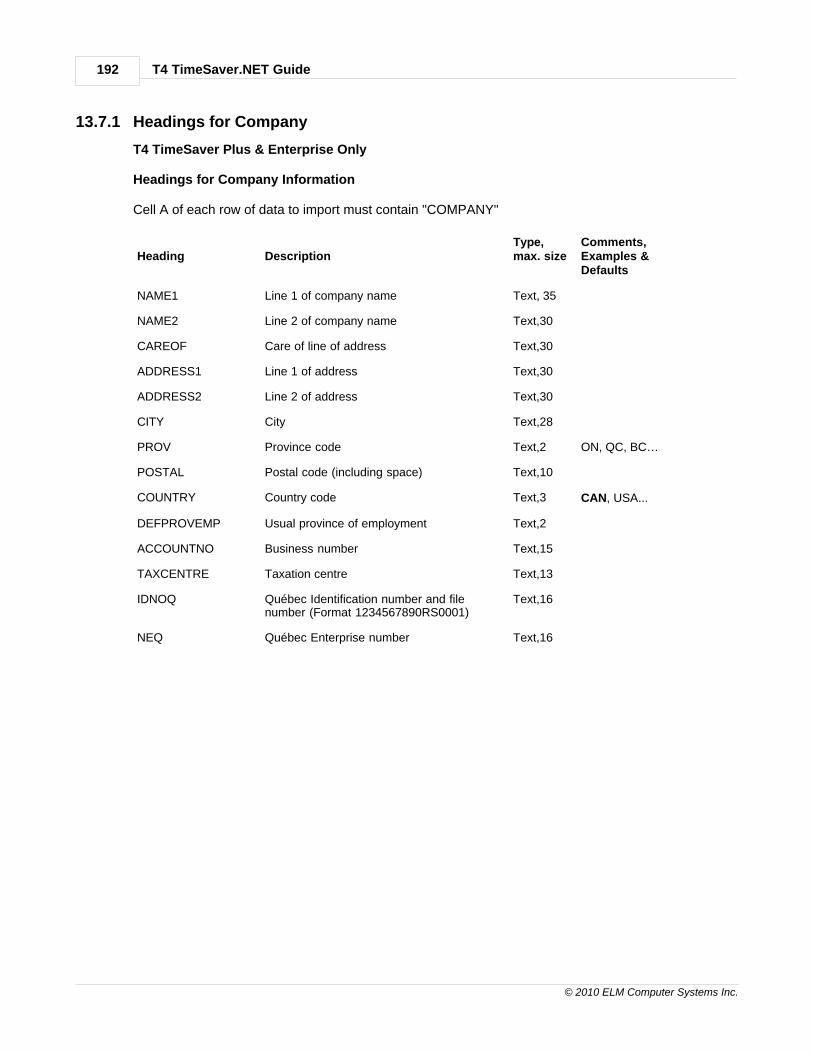
T4 TimeSaver.NET Guide192
© 2010 ELM Computer Systems Inc.
13.7.1 Headings for Company
T4 TimeSaver Plus & Enterprise Only
Headings for Company Information
Cell A of each row of data to import must contain "COMPANY"
Heading DescriptionType,max. size
Comments,Examples &Defaults
NAME1 Line 1 of company name Text, 35
NAME2 Line 2 of company name Text,30
CAREOF Care of line of address Text,30
ADDRESS1 Line 1 of address Text,30
ADDRESS2 Line 2 of address Text,30
CITY City Text,28
PROV Province code Text,2 ON, QC, BC…
POSTAL Postal code (including space) Text,10
COUNTRY Country code Text,3 CAN, USA...
DEFPROVEMP Usual province of employment Text,2
ACCOUNTNO Business number Text,15
TAXCENTRE Taxation centre Text,13
IDNOQ Québec Identification number and filenumber (Format 1234567890RS0001)
Text,16
NEQ Québec Enterprise number Text,16

Appendices 193
© 2010 ELM Computer Systems Inc.
13.7.2 Headings for NR4
T4 TimeSaver Plus & Enterprise Only
Cell A1 must contain "NR4"
Heading Description Type,max. size
Comments,Examples &Defaults
NAME1 Recipient name line 1 (code 3, 4 & 5) Text, 30 Required field
NAME2 Recipient name line 2 (code 3, 4 & 5) Text, 12
LASTNAME1 First recipient last name (code 1 & 2) Text, 30 Required field
FIRSTNAME1 First recipient first name (code 1 & 2) Text, 12
INITIAL1 First recipient middle initial (code 1 & 2) Text, 1
LASTNAME2 Second recipient last name (code 1 & 2) Text, 30
FIRSTNAME2 Second recipient first name (code 1 & 2) Text, 30
INITIAL2 Second recipient middle initial (code 1 & 2) Text, 1
ADDRESS1 Address line 1 Text, 30
ADDRESS2 Address line 2 Text, 30
CITY City Text, 28
PROV Province code Text, 2
POSTAL Postal code (including space) Text, 10
COUNTRY Country, in address Text, 3 CAN, USA, etc.
SLIPSTATUS Status of slip Text, 1 O - Original,
A - Amended or
C - Cancelled
TAXYEAR Year (box 10) Integer,4 2008, 2009, etc.
RECTYPE Recipient Type (box 11) Text, 1 1, 2, 3, 4 or 5
COUNTRYCODE Country code (box 12) Text, 3
PAYERID Payer or remitter Identification Number Text, 20
SIN Foreign Social Security or Insurance No. Text, 20
INCOMECODE1 Income Code (box 14) Text, 2 02, 03, etc.
CURRENCYCODE1 Currency code (box 15) Text, 3 CAD, USD, etc.
INCOME1 Gross Income (box 16) Currency
TAX1 Non-resident tax withheld (box 17) Currency
EXEMPTIONCODE1 Exemption code (box 18) Text, 1 I, C, etc.
INCOMECODE2 Income Code (box 24) Text, 2 02, 03, etc.
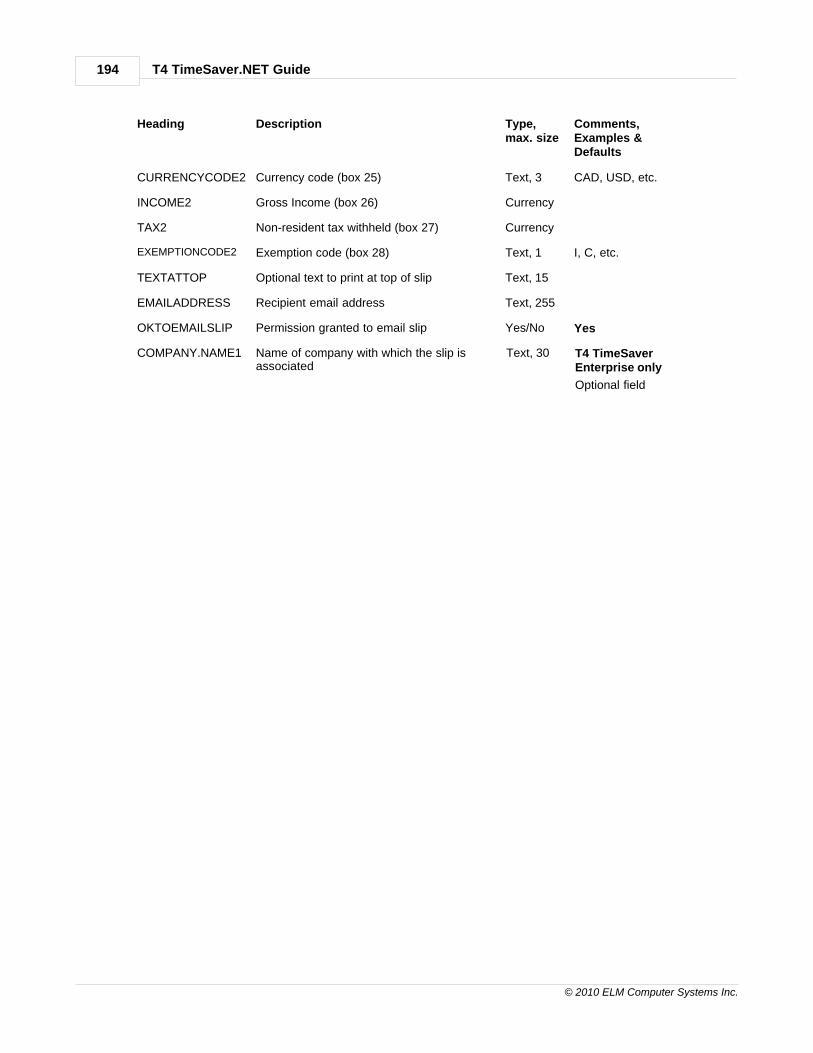
T4 TimeSaver.NET Guide194
© 2010 ELM Computer Systems Inc.
Heading Description Type,max. size
Comments,Examples &Defaults
CURRENCYCODE2 Currency code (box 25) Text, 3 CAD, USD, etc.
INCOME2 Gross Income (box 26) Currency
TAX2 Non-resident tax withheld (box 27) Currency
EXEMPTIONCODE2 Exemption code (box 28) Text, 1 I, C, etc.
TEXTATTOP Optional text to print at top of slip Text, 15
EMAILADDRESS Recipient email address Text, 255
OKTOEMAILSLIP Permission granted to email slip Yes/No Yes
COMPANY.NAME1 Name of company with which the slip isassociated
Text, 30 T4 TimeSaverEnterprise only
Optional field

Appendices 195
© 2010 ELM Computer Systems Inc.
13.7.3 Headings for T4 & RL1
T4 TimeSaver Plus & Enterprise Only
Cell A1 must contain "T4"
Heading Description Type,max. size
Comments,Examples &Defaults
LASTNAME Employee last name Text, 30 Required field
FIRSTNAME Employee first name Text, 12
INITIAL Employee middle initial Text, 1
ADDRESS1 Address line 1 Text, 30
ADDRESS2 Address line 2 Text, 30
CITY City Text, 28
PROV Province code Text, 2
POSTAL Postal code (including space) Text, 10
COUNTRY Country code Text, 3
SIN Social insurance number (box 12) Text, 9
PROVEMP Province of employment (box 10) Text, 2
EMPNUM Employee number, reference number Text, 20
EMPCODE Employment code (box 29) Text, 2
CPPWEEKS Weeks eligible for CPP Numeric, 4 52.00, 52.5, etc.
SLIPSTATUS Status of slip Text, 1 O - Original,
A - Amended or
C - Cancelled
TAXYEAR Taxation year Integer, 4 2009
INCOME Employment income (box 14) Currency
CPP CPP contributions (box 16) Currency
QPP QPP contributions (box 17, B) Currency
EI EI premiums (box 18, C) Currency
RPP Reg. Pension plan contr. (box 20) Currency
TAX Federal income tax deducted (box 22) Currency
EIEARN EI insurable earnings (box 24) Currency
CPPEARN CPP pensionable earnings (box 26) Currency
CPPEXEMPT CPP exempt (box 28) Yes/No
EIEXEMPT EI exempt (box 28) Yes/No
PPIPEXEMPT PPIP exempt (box 28) Yes/No

T4 TimeSaver.NET Guide196
© 2010 ELM Computer Systems Inc.
Heading Description Type,max. size
Comments,Examples &Defaults
NOCPPADJUST Do not adjust CPP Yes/No No
NOEIADJUST Do not adjust EI Yes/No No
NOPPIPADJUST Do not adjust PPIP Yes/No No
UNION Union dues (box 44) Currency
CHARITABLE Charitable donations (box 46) Currency
PENSIONNO RPP/DPSP number (box 50) Text, 7
PENSION Pension adjustment (box 52) Currency
PPIP PPIP premiums (box 55, H) Currency
PPIPEARN PPIP earnings (box 56, I) Currency
OTHERCODE1 Other information code #1 Text, 2
OTHERAMT1 Other information amount #1 Currency
OTHERCODE2 Other information code #2 Text, 2
OTHERAMT2 Other information amount #2 Currency
OTHERCODE3 Other information code #3 Text, 2
OTHERAMT3 Other information amount #3 Currency
OTHERCODE4 Other information code #4 Text, 2
OTHERAMT4 Other information amount #4 Currency
OTHERCODE5 Other information code #5 Text, 2
OTHERAMT5 Other information amount #5 Currency
OTHERCODE6 Other information code #6 Text, 2
OTHERAMT6 Other information amount #6 Currency
NETPAYOTHER Other deductions from Net Pay Currency For net pay calc.
TEXTATTOP Optional text to print at top of slip Text, 15
EMAILADDRESS Recipient email address Text, 255
OKTOEMAILSLIP Permission granted to email slip Yes/No Yes
Additional headings for RL-1 fields:
CODEBOXOR1 Code for Box O Text, 2
SLIPSTATUSR1 Status of slip Text, 1 O - Original,
A - Amended or
C - Cancelled
IDNOQ Recipient Quebec identification number Numeric,10
ISBUSINESS Recipient is business Yes/No No
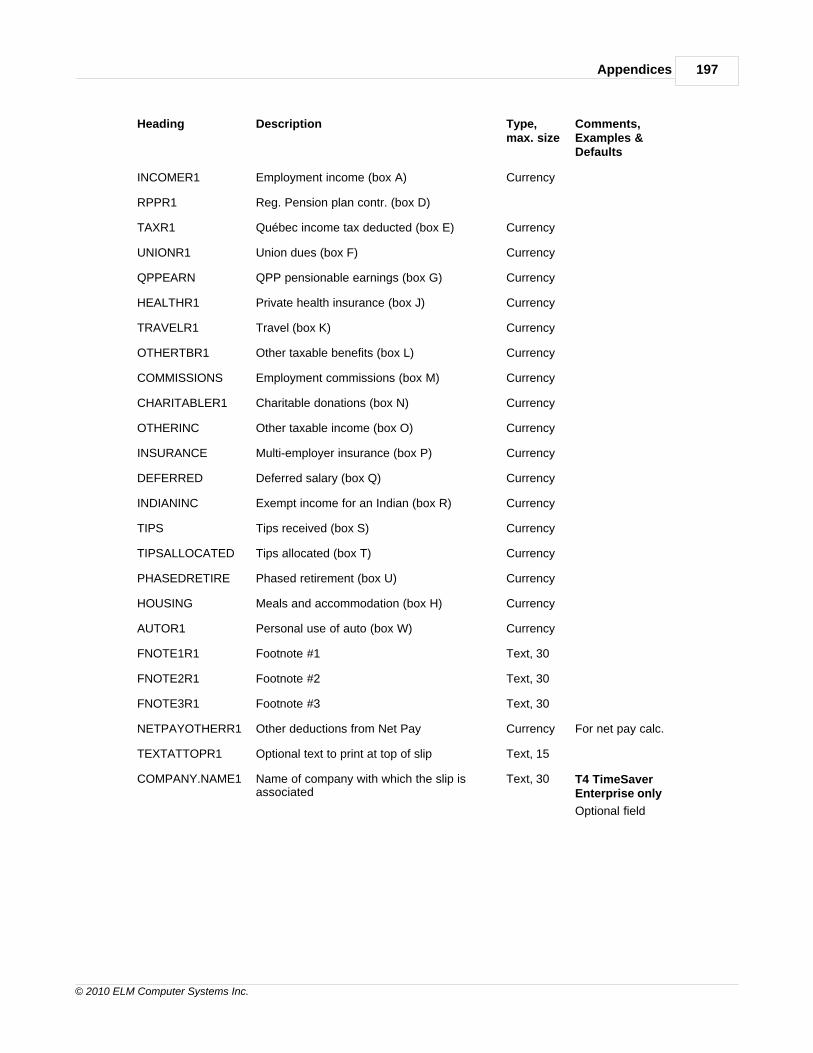
Appendices 197
© 2010 ELM Computer Systems Inc.
Heading Description Type,max. size
Comments,Examples &Defaults
INCOMER1 Employment income (box A) Currency
RPPR1 Reg. Pension plan contr. (box D)
TAXR1 Québec income tax deducted (box E) Currency
UNIONR1 Union dues (box F) Currency
QPPEARN QPP pensionable earnings (box G) Currency
HEALTHR1 Private health insurance (box J) Currency
TRAVELR1 Travel (box K) Currency
OTHERTBR1 Other taxable benefits (box L) Currency
COMMISSIONS Employment commissions (box M) Currency
CHARITABLER1 Charitable donations (box N) Currency
OTHERINC Other taxable income (box O) Currency
INSURANCE Multi-employer insurance (box P) Currency
DEFERRED Deferred salary (box Q) Currency
INDIANINC Exempt income for an Indian (box R) Currency
TIPS Tips received (box S) Currency
TIPSALLOCATED Tips allocated (box T) Currency
PHASEDRETIRE Phased retirement (box U) Currency
HOUSING Meals and accommodation (box H) Currency
AUTOR1 Personal use of auto (box W) Currency
FNOTE1R1 Footnote #1 Text, 30
FNOTE2R1 Footnote #2 Text, 30
FNOTE3R1 Footnote #3 Text, 30
NETPAYOTHERR1 Other deductions from Net Pay Currency For net pay calc.
TEXTATTOPR1 Optional text to print at top of slip Text, 15
COMPANY.NAME1 Name of company with which the slip isassociated
Text, 30 T4 TimeSaverEnterprise only
Optional field
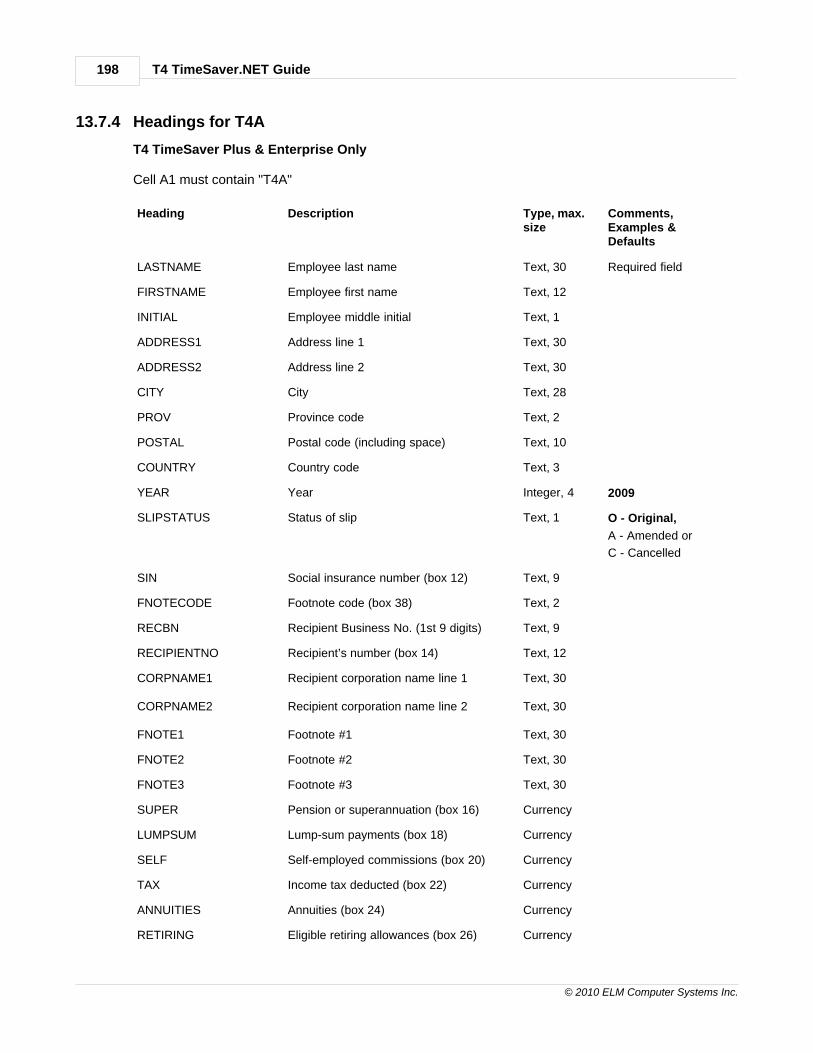
T4 TimeSaver.NET Guide198
© 2010 ELM Computer Systems Inc.
13.7.4 Headings for T4A
T4 TimeSaver Plus & Enterprise Only
Cell A1 must contain "T4A"
Heading Description Type, max.size
Comments,Examples &Defaults
LASTNAME Employee last name Text, 30 Required field
FIRSTNAME Employee first name Text, 12
INITIAL Employee middle initial Text, 1
ADDRESS1 Address line 1 Text, 30
ADDRESS2 Address line 2 Text, 30
CITY City Text, 28
PROV Province code Text, 2
POSTAL Postal code (including space) Text, 10
COUNTRY Country code Text, 3
YEAR Year Integer, 4 2009
SLIPSTATUS Status of slip Text, 1 O - Original,
A - Amended or
C - Cancelled
SIN Social insurance number (box 12) Text, 9
FNOTECODE Footnote code (box 38) Text, 2
RECBN Recipient Business No. (1st 9 digits) Text, 9
RECIPIENTNO Recipient’s number (box 14) Text, 12
CORPNAME1 Recipient corporation name line 1 Text, 30
CORPNAME2 Recipient corporation name line 2 Text, 30
FNOTE1 Footnote #1 Text, 30
FNOTE2 Footnote #2 Text, 30
FNOTE3 Footnote #3 Text, 30
SUPER Pension or superannuation (box 16) Currency
LUMPSUM Lump-sum payments (box 18) Currency
SELF Self-employed commissions (box 20) Currency
TAX Income tax deducted (box 22) Currency
ANNUITIES Annuities (box 24) Currency
RETIRING Eligible retiring allowances (box 26) Currency

Appendices 199
© 2010 ELM Computer Systems Inc.
Heading Description Type, max.size
Comments,Examples &Defaults
RETIRINGNON Non-eligible retiring allowances (box 27) Currency
OTHER Other income (box 28) Currency
PATRONAGE Patronage allocations (box 30) Currency
PAST RPP contributions (past service)(box 32) Currency
PENSION Pension adjustment (box 34) Currency
PENSIONNO Pension plan reg. number (box 36) Text, 19
RESPACCUM RESP accum. income payments (box 40) Currency
RESPED RESP educational assist. pay’ts (box 42) Currency
CHARITABLE Charitable donations (box 46) Currency
TEXTATTOP Optional text to print at top of slip Text, 15
EMAILADDRESS Recipient email address Text, 255
OKTOEMAILSLIP Permission granted to email slip Yes/No Yes
The following fields are for magnetic media filers only. Consult CRA’s magnetic mediaspecifications for details. On printed T4A slips, most of this information is included as footnotes.However, the T4 TimeSaverimport procedure will NOT create footnotes from this information. To importfootnotes that will appear on printed slips, use the headings FNOTE1, FNOTE2 and FNOTE3 above.
BOX16CODE Box 16 code Integer,2 0, 9, 13, 14
BOX18CODE Box 18 code Integer, 2 2, 8, 9, 10, 13,14
BOX24CODE Box 24 code Integer, 2 0, 10, 13, 15
BOX26CODE Box 26 code Integer, 2 0, 14
BOX27CODE Box 27 code Integer, 2 0, 14
BOX28CODE Box 28 code Integer, 2 see Guide
BOX32CODE Box 32 code Integer, 2 see Guide
BOX40CODE Box 40 code Integer, 2 0, 22
FNOTEDESC Footnote description area Text, 60
UNREGPEN Unregistered pension plan Currency
SIPENSION Status Indian-pension or superannuation Currency
LUMPSUMACC Lump-sum pymt. accrued to 12/31/97 Currency
LUMPSUMSI Status Indian - Lump-sum payments Currency
LUMPSUMRPP Lump-sum payments (RPP-not eligible) Currency
LUMPSUMDPSP Lump-sum payments (DPSP-not eligible) Currency
LUMPSUMNONRES Lump-sum pymt. (non-resident services) Currency

T4 TimeSaver.NET Guide200
© 2010 ELM Computer Systems Inc.
Heading Description Type, max.size
Comments,Examples &Defaults
LUMPSUMUNREG Lump-sum pymt. (unreg’d pension ben.) Currency
LUMPSUMNOTRANS Lump-sum pymt. (not eligible for trans.) Currency
DPSPANNUITY Instalment or annuity pymt. under DPSP Currency
IAACANNUITY IAAC annuity Currency
RETIRINGSI Status Indian-eligible retiring allowance Currency
RETIRINGNONSI Status Indian-non-elig. retiring allowance Currency
OTHERSI Status Indian - other income Currency
OTHERDPSP Instalment / annuity under revoked DPSP Currency
BOARDSITE Board and lodging at special work sites Currency
MEDTRAVEL Medical travel Currency
LOANBENEFIT Loan benefit under subsection 80.4(2) Currency
RESEARCH Research Grants Currency
SCHOLARSHIP Scholarships, fellowships, or bursaries Currency
WAGELOSS Income from wage loss plans Currency
DEATHBENEFIT Death benefits Currency
MEDBENEFIT Medical Premium benefit Currency
DISABILITY Disability benefits Currency
GROUPTERMLIFE Group Term Life Insurance Benefit Currency
VETERANSBENEFIT Veteran’s benefits Currency
APPRENTICESHIPINCENTIVE Apprenticeship Incentive Grant Currency
TAXDEFPATDIVIDENDS Tax deferred patronage dividends Currency
RPPPRE1990 RPP (pre-1990 past service) Currency
REGISTEREDDISABILITY Registered disability savings plan Currency
WAGEEARNERPROTECTION Wage earner protection program Currency
VARIABLEPENSION Variable pension benefits Currency
COMPANY.NAME1 Name of company with which the slip isassociated
Text, 30 T4TimeSaverEnterpriseonly
Optionalfield
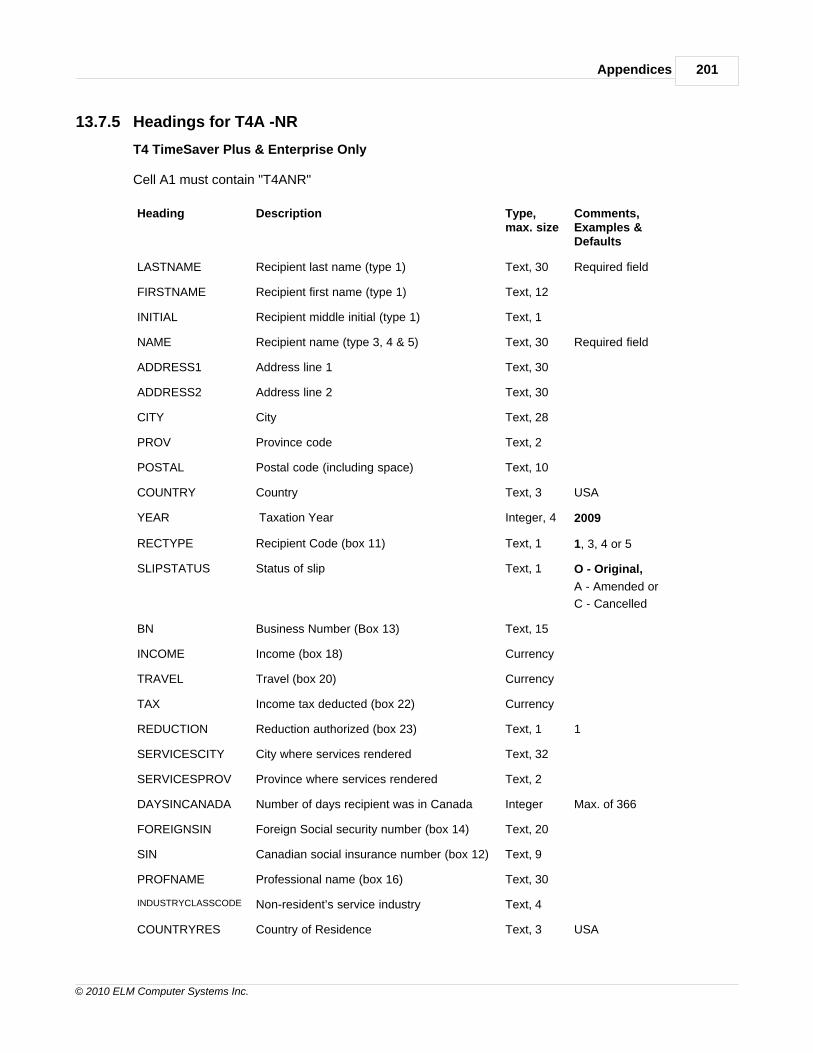
Appendices 201
© 2010 ELM Computer Systems Inc.
13.7.5 Headings for T4A -NR
T4 TimeSaver Plus & Enterprise Only
Cell A1 must contain "T4ANR"
Heading Description Type,max. size
Comments,Examples &Defaults
LASTNAME Recipient last name (type 1) Text, 30 Required field
FIRSTNAME Recipient first name (type 1) Text, 12
INITIAL Recipient middle initial (type 1) Text, 1
NAME Recipient name (type 3, 4 & 5) Text, 30 Required field
ADDRESS1 Address line 1 Text, 30
ADDRESS2 Address line 2 Text, 30
CITY City Text, 28
PROV Province code Text, 2
POSTAL Postal code (including space) Text, 10
COUNTRY Country Text, 3 USA
YEAR Taxation Year Integer, 4 2009
RECTYPE Recipient Code (box 11) Text, 1 1, 3, 4 or 5
SLIPSTATUS Status of slip Text, 1 O - Original,
A - Amended or
C - Cancelled
BN Business Number (Box 13) Text, 15
INCOME Income (box 18) Currency
TRAVEL Travel (box 20) Currency
TAX Income tax deducted (box 22) Currency
REDUCTION Reduction authorized (box 23) Text, 1 1
SERVICESCITY City where services rendered Text, 32
SERVICESPROV Province where services rendered Text, 2
DAYSINCANADA Number of days recipient was in Canada Integer Max. of 366
FOREIGNSIN Foreign Social security number (box 14) Text, 20
SIN Canadian social insurance number (box 12) Text, 9
PROFNAME Professional name (box 16) Text, 30
INDUSTRYCLASSCODE Non-resident’s service industry Text, 4
COUNTRYRES Country of Residence Text, 3 USA
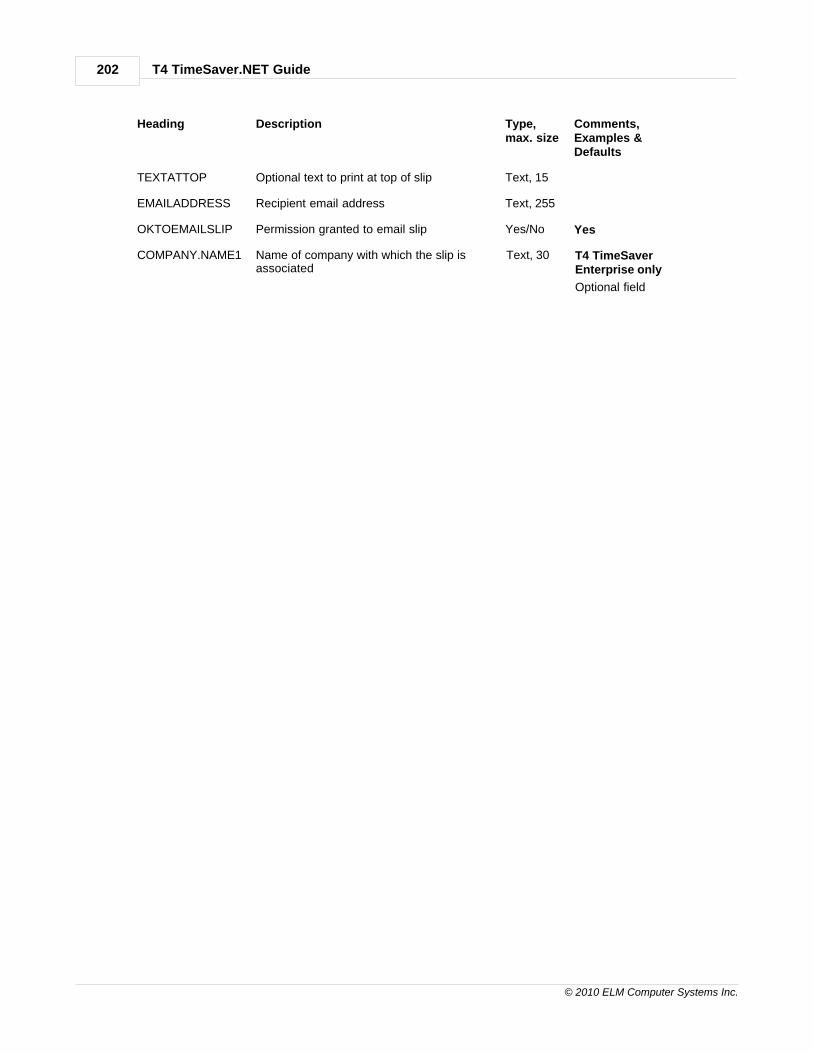
T4 TimeSaver.NET Guide202
© 2010 ELM Computer Systems Inc.
Heading Description Type,max. size
Comments,Examples &Defaults
TEXTATTOP Optional text to print at top of slip Text, 15
EMAILADDRESS Recipient email address Text, 255
OKTOEMAILSLIP Permission granted to email slip Yes/No Yes
COMPANY.NAME1 Name of company with which the slip isassociated
Text, 30 T4 TimeSaverEnterprise only
Optional field

Appendices 203
© 2010 ELM Computer Systems Inc.
13.7.6 Headings for T4AP
T4 TimeSaver Plus & Enterprise Only
Cell A1 must contain "T4AP"
Heading Description Type,max. size
Comments,Examples &Defaults
LASTNAME Recipient last name Text, 30 Required field
FIRSTNAME Recipient first name Text, 12
INITIAL Recipient middle initial Text, 1
ADDRESS1 Address line 1 Text, 30
ADDRESS2 Address line 2 Text, 30
CITY City Text, 28
PROV Province code Text, 2
POSTAL Postal code (including space) Text, 10
COUNTRY Country code Text, 3
YEAR Tax year Interger, 4 2009
SLIPSTATUS Status of slip Text, 1 O - Original,
A - Amended or
C - Cancelled
NUMOFMONTH Number of month (box 21) Integer, 2
EFFECTIVEDATE Effective date (box 13) Date,mmm dd,,yyyy
Aug 03, 2009
TAXABLECPP Taxable CPP benefits (box 20) Currency
INCOMETAX Income tax deducted (box 22) Currency
RETIREMENT Retirement benefit (box 14) Currency
SURVIVOR Survivor benefit (box 15) Currency
DISABILITY Disability benefit (box 16) Currency
CHILD Child benefit (box 17) Currency
DEATH Death benefit (box 18) Currency
BENEFITNUM Benefit number Text, 20
SIN Social insurance number (box 12) Text, 9
TEXTATTOP Optional text to print at top of slip Text, 15
EMAILADDRESS Recipient email address Text, 255
OKTOEMAILSLIP Permission granted to email slip Yes/No Yes
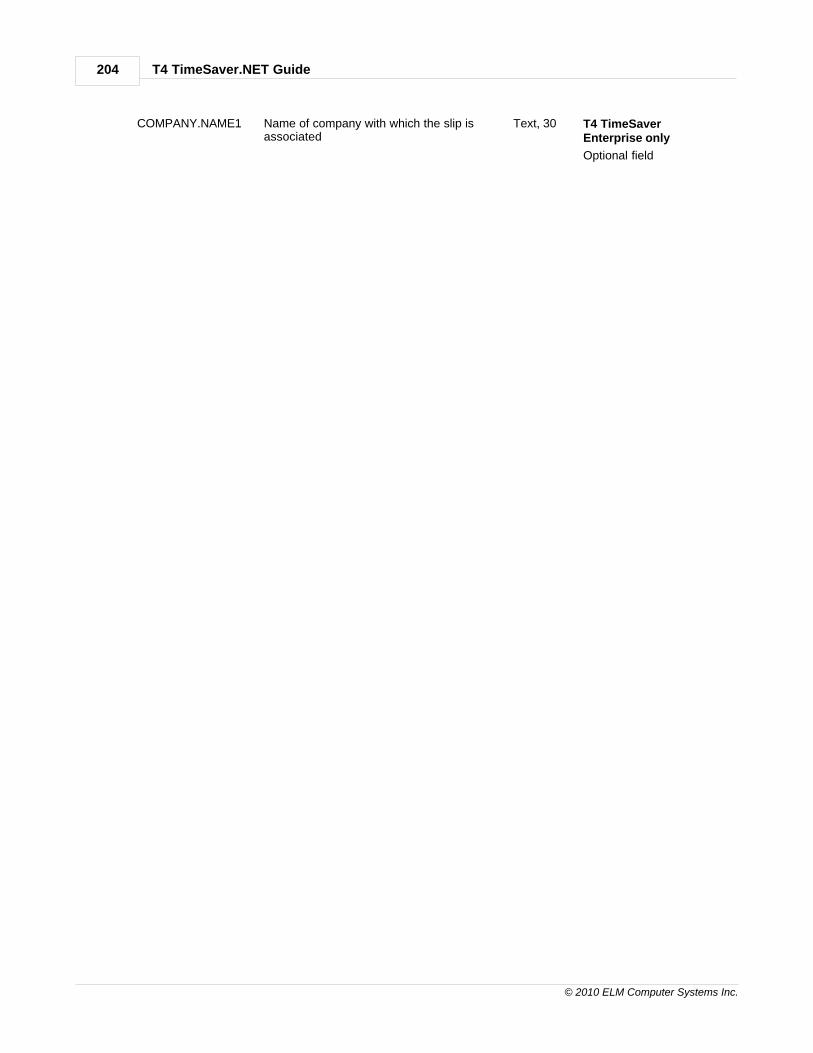
T4 TimeSaver.NET Guide204
© 2010 ELM Computer Systems Inc.
COMPANY.NAME1 Name of company with which the slip isassociated
Text, 30 T4 TimeSaverEnterprise only
Optional field

Appendices 205
© 2010 ELM Computer Systems Inc.
13.7.7 Headings for T4ARCA
T4 TimeSaver Plus & Enterprise Only
Cell A1 must contain "T4ARCA"
Heading Description Type,max. size
Comments,Examples &Defaults
LASTNAME Recipient last name Text, 30 Required field
FIRSTNAME Recipient first name Text, 12
INITIAL Recipient middle initial Text, 1
ADDRESS1 Address line 1 Text, 30
ADDRESS2 Address line 2 Text, 30
CITY City Text, 28
PROV Province code Text, 2
POSTAL Postal code (including space) Text, 10
COUNTRY Country code Text, 3
YEAR Tax year Interger, 4 09
SLIPSTATUS Status of slip Text, 1 O - Original,
A - Amended or
C - Cancelled
REFUNDEMPLOYER Refund of employer contributions (box 12) Currency
REFUNDEMPLOYEE Refund of employee contributions (box 14) Currency
DISTRIBUTIONS Distributions (box 16) Currency
SELLINGPRICE Selling price of an interest in RCA(box 18) Currency
OTHER Other amounts (box 20) Currency
INCOMETAX Income tax deducted (box 22) Currency
SIN Social insurance number (box 24) Text, 9
TEXTATTOP Optional text to print at top of slip Text, 15
EMAILADDRESS Recipient email address Text, 255
OKTOEMAILSLIP Permission granted to email slip Yes/No Yes
COMPANY.NAME1 Name of company with which the slip isassociated
Text, 30 T4 TimeSaverEnterprise only
Optional field
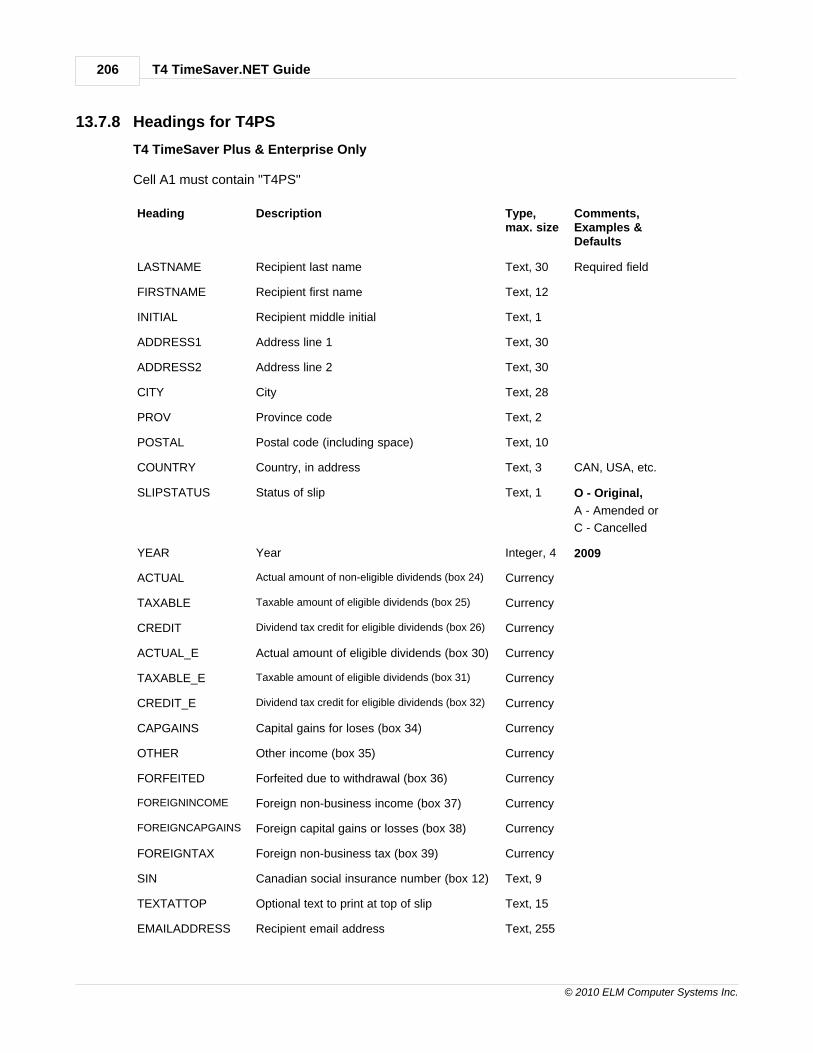
T4 TimeSaver.NET Guide206
© 2010 ELM Computer Systems Inc.
13.7.8 Headings for T4PS
T4 TimeSaver Plus & Enterprise Only
Cell A1 must contain "T4PS"
Heading Description Type,max. size
Comments,Examples &Defaults
LASTNAME Recipient last name Text, 30 Required field
FIRSTNAME Recipient first name Text, 12
INITIAL Recipient middle initial Text, 1
ADDRESS1 Address line 1 Text, 30
ADDRESS2 Address line 2 Text, 30
CITY City Text, 28
PROV Province code Text, 2
POSTAL Postal code (including space) Text, 10
COUNTRY Country, in address Text, 3 CAN, USA, etc.
SLIPSTATUS Status of slip Text, 1 O - Original,
A - Amended or
C - Cancelled
YEAR Year Integer, 4 2009
ACTUAL Actual amount of non-eligible dividends (box 24) Currency
TAXABLE Taxable amount of eligible dividends (box 25) Currency
CREDIT Dividend tax credit for eligible dividends (box 26) Currency
ACTUAL_E Actual amount of eligible dividends (box 30) Currency
TAXABLE_E Taxable amount of eligible dividends (box 31) Currency
CREDIT_E Dividend tax credit for eligible dividends (box 32) Currency
CAPGAINS Capital gains for loses (box 34) Currency
OTHER Other income (box 35) Currency
FORFEITED Forfeited due to withdrawal (box 36) Currency
FOREIGNINCOME Foreign non-business income (box 37) Currency
FOREIGNCAPGAINS Foreign capital gains or losses (box 38) Currency
FOREIGNTAX Foreign non-business tax (box 39) Currency
SIN Canadian social insurance number (box 12) Text, 9
TEXTATTOP Optional text to print at top of slip Text, 15
EMAILADDRESS Recipient email address Text, 255

Appendices 207
© 2010 ELM Computer Systems Inc.
Heading Description Type,max. size
Comments,Examples &Defaults
OKTOEMAILSLIP Permission granted to email slip Yes/No Yes
COMPANY.NAME1 Name of company with which the slip isassociated
Text, 30 T4 TimeSaverEnterprise only
Optional field

T4 TimeSaver.NET Guide208
© 2010 ELM Computer Systems Inc.
13.7.9 Headings for T5 & RL3
T4 TimeSaver Plus & Enterprise Only
Cell A1 must contain "T5"
Heading Description Type,max. size
Comments,Examples &Defaults
NAME1 Recipient name, line 1 (type 3, 4 & 5) Text, 30 Required field
NAME2 Recipient name, line 2 (type 3, 4 & 5) Text, 12
LASTNAME1 First recipient last name (type 1 & 2) Text, 30 Required field
FIRSTNAME1 First recipient first name (type 1 & 2) Text, 12
INITIAL1 First recipient middle initial (type 1 & 2) Text, 1
FIRSTINDIVIDUAL Indicates first entity is individual (R3) Yes/No
LASTNAME2 Second recipient last name (type 2) Text, 30
FIRSTNAME2 Second recipient first name (type 2) Text, 30
INITIAL2 Second recipient middle initial (type 2) Text, 1
SECONDINDIVIDUAL Indicate second entity is individual Yes/No
ADDRESS1 Address line 1 Text, 30
ADDRESS2 Address line 2 Text, 30
CITY City Text, 28
PROV Province code Text, 2
POSTAL Postal code (including space) Text, 10
COUNTRY Country code Text, 3
TAXYEAR Taxation year Integer,4 2009
REPORTCODE Report code (box 21) Text, 1 O - Original,
A - Amended or
C - Cancelled
RECTYPE Recipient type (box 23) Text, 1 1
SIN First recip. SIN/ID # or Business # (box 22) Text, 15
SIN2 Second recip. SIN/ID # (R3) Text, 15
ACTUAL Am’t of non-eligible dividends (box 10) Currency
ACTUAL_E Am’t of eligible dividends (box 24) Currency
INTEREST Interest from Cdn sources (box 13, D) Currency
CAPGAINS Capital gains dividends (box 18, I) Currency
OTHER Other income from Cdn sources (box 14) Currency

Appendices 209
© 2010 ELM Computer Systems Inc.
Heading Description Type,max. size
Comments,Examples &Defaults
FORINC Foreign income (box 15, F) Currency
FORTAX Foreign tax paid (box 16, G) Currency
ROYALTIES Royalties from Cdn sources (box 17, H) Currency
ACCRUED Accrued income: Annuities (box 19, J) Currency
RESOURCE Resource allowance deduction (box 20) Currency
CURRENCY Foreign currency code (box 27) Text, 3
TRANSIT Transit (box 28) Text, 10
ACCOUNTNO Recipient account number (box 29) Text, 16
TEXTATTOP Optional text to print at top of slip Text, 15
EMAILADDRESS Recipient email address Text, 255
OKTOEMAILSLIP Permission granted to email slip Yes/No Yes
Additonal Headings for RL-3 fields:
NEEDR3 Recipient needs RL-3 Yes/No
ISINTERESTSAVINGSBONDS Is interest from Fed. or Québec savings bonds Yes/No
ACCOUNTNOR3 Other ID/Recipient Number RL-3 Text, 16
TEXTATTOPR3 Optional text to print at top of slip Text, 15
COMPANY.NAME1 Name of company with which the slip isassociated
Text, 30 T4 TimeSaverEnterprise only
Optional field

T4 TimeSaver.NET Guide210
© 2010 ELM Computer Systems Inc.
13.7.10 Headings for T1204
T4 TimeSaver Plus & Enterprise Only
Cell A1 must contain "T1204"
Heading Description Type,max. size
Comments,Examples &Defaults
NAME1 Recipient name line 1 Text, 30 Required field
NAME2 Recipient name line 2 Text, 12
ADDRESS1 Address line 1 Text, 30
ADDRESS2 Address line 2 Text, 30
CITY City Text, 28
POSTAL Postal code (including space) Text, 10
PROV Province code Text, 2
COUNTRY Country, in address Text, 3 CAN, USA, etc.
YEAR Year Integer, 4
RECTYPE Recipient type (box 23) Text, 1 1, 3, or 4
SERVICEPAYMENTS Service payments (box 82) Currency
MIXEDPAYMENTS Mixed services payments (box 84) Currency
SIN Social insurance number (box 12) Text, 9
BN Business number (box 61) Text, 15
PARTNERSHIPID Partnership’s filer ID (box 86) Text, 9
LASTNAME Sole proprietor’s last name Text, 20
FIRSTNAME Sole proprietor’s first name Text, 12
INITIAL Sole proprietor’s initial Text, 1
SLIPSTATUS Status of slip Text, 1 O - Original,
A - Amended or
C - Cancelled
TEXTATTOP Optional text to print at top of slip Text, 15
EMAILADDRESS Recipient email address Text, 255
OKTOEMAILSLIP Permission granted to email slip Yes/No Yes
COMPANY.NAME1 Name of company with which the slip isassociated
Text, 30 T4 TimeSaverEnterprise only
Optional field

Appendices 211
© 2010 ELM Computer Systems Inc.
13.7.11 Headings for T5018
T4 TimeSaver Plus & Enterprise Only
Cell A1 must contain "T5018"
Heading Description Type,max. size
Comments,Examples &Defaults
NAME Recipient name Text, 30 Required field
LASTNAME Recipient last name Text, 30 Required field
FIRSTNAME Recipient first name Text, 12
INITIAL Recipient middle initial Text, 1
ADDRESS1 Address line 1 Text, 30
ADDRESS2 Address line 2 Text, 30
CITY City Text, 28
PROV Province code Text, 2
POSTAL Postal code (including space) Text, 10
COUNTRY Country, in address Text, 3 CAN, USA, etc.
PAYMENTS Construction subcontractor payments (box 22) Currency
SIN Recipient’s ID number (BN or SIN) (box 24) Text, 15
SLIPSTATUS Status of slip Text, 1 O - Original,
A - Amended or
C - Cancelled
RECTYPE Recipient type Text, 1 1
PARTNERSHIPID Parnership’s Filer ID Text, 9 1
TEXTATTOP Optional text to print at top of slip Text, 15
EMAILADDRESS Recipient email address Text, 255
OKTOEMAILSLIP Permission granted to email slip Yes/No Yes
COMPANY.NAME1 Name of company with which the slip isassociated
Text, 30 T4 TimeSaverEnterprise only
Optional field

T4 TimeSaver.NET Guide212
© 2010 ELM Computer Systems Inc.
13.7.12 Headings for T2200
T4 TimeSaver Plus & Enterprise Only
Cell A1 must contain "T2200"
Heading Description Type, max.size
Comments,Examples &Defaults
LASTNAME Recipient last name Text, 30 Required field
FIRSTNAME Recipient first name Text, 12
INITIAL Recipient middle initial Text, 1
ADDRESS1 Address line 1 (Home address) Text, 30
ADDRESS2 Address line 2 (Business address) Text, 30
CITY City Text, 6
PROV Province code Text, 2
POSTAL Postal code (including space) Text, 10
COUNTRY Country, in address Text, 3 CAN, USA, etc.
SIN Social insurance number Text, 9
TAXYEAR Taxation year Integer, 4
EMPNUM Employee number Text, 20
JOBTITLE Job title & brief description of duties Text, 100
Q1YES Question 1, "Yes" Yes/No "Yes" checkmarksbox, "No" will not
Q1NO Question 1, "No" Yes/No "Yes" checkmarksbox, "No" will not
Q2YES Question 2, "Yes" Yes/No "Yes" checkmarksbox, "No" will not
Q2NO Question 2, "No" Yes/No "Yes" checkmarksbox, "No" will not
Q2AREA Question 2, "Area of travel" Text, 60
Q3FROM Question 3, "From date" Date,mmm dd,,yyyy
Q3TO Question 3, "To date" Date,mmm dd,,yyyy
Q3BREAK Question 3, "Break in employment" Text, 60
Q4AYES Question 4, "Vehicle allowance, Yes" Yes/No "Yes" checkmarksbox, "No" will not
Q4ANO Question 4, "Vehicle allowance, No" Yes/No "Yes" checkmarks

Appendices 213
© 2010 ELM Computer Systems Inc.
Heading Description Type, max.size
Comments,Examples &Defaults
box, "No" will not
Q4AMTFIXED Question 4, "Fixed allowance amount" Currency
Q4PERKMRATE Question 4, "Per km rate" Currency
Q4AAMTFORKM Question 4, "km amount received" Currency
Q4AMTONT4 Question 4, "Amount rpt. on T4" Currency
Q4BYES Question 4, "Company vehicle, Yes" Yes/No "Yes" checkmarksbox, "No" will not
Q4BNO Question 4, "Company vehicle, No" Yes/No "Yes" checkmarksbox, "No" will not
Q5YES Question 5, "Repayment received, Yes" Yes/No "Yes" checkmarksbox, "No" will not
Q5NO Question 5, "Repayment received, No" Yes/No "Yes" checkmarksbox, "No" will not
Q5AMTPROOF Question 5, "Received on proof of payment" Currency
Q5AMTCHARGED Question 5, "Amount charged to employer" Currency
Q5AMTONT4 Question 5, "Amount rpt. on T4" Currency
Q5TYPEPROOF Question 5, "Exp. type, Proof" Text, 50
Q5TYPECHARGED Question 5, "Exp. type, Charged" Text, 50
Q5TYPEONT4 Question 5, "Exp. type, Rpt. on T4" Text, 50
Q6YES Question 6, "Yes" Yes/No "Yes" checkmarksbox, "No" will not
Q6NO Question 6, "No" Yes/No "Yes" checkmarksbox, "No" will not
Q6TYPEOTHER Question 6, "Other expense description" Text, 50
Q7AYES Question 7, "Commission, Yes" Yes/No "Yes" checkmarksbox, "No" will not
Q7ANO Question 7, "Commission, No" Yes/No "Yes" checkmarksbox, "No" will not
Q7COMMISSION Question 7, "Commissions" Currency
Q7TYPEOFSALES Question 7, "Type of sales" Text, 50
Q7BYES Question 7, "Bus. development acc't, Yes" Yes/No "Yes" checkmarksbox, "No" will not
Q7BNO Question 7, "Bus. development acc't, No" Yes/No "Yes" checkmarksbox, "No" will not
Q7CYES Question 7, "Commission inc. T4, Yes" Yes/No "Yes" checkmarksbox, "No" will not
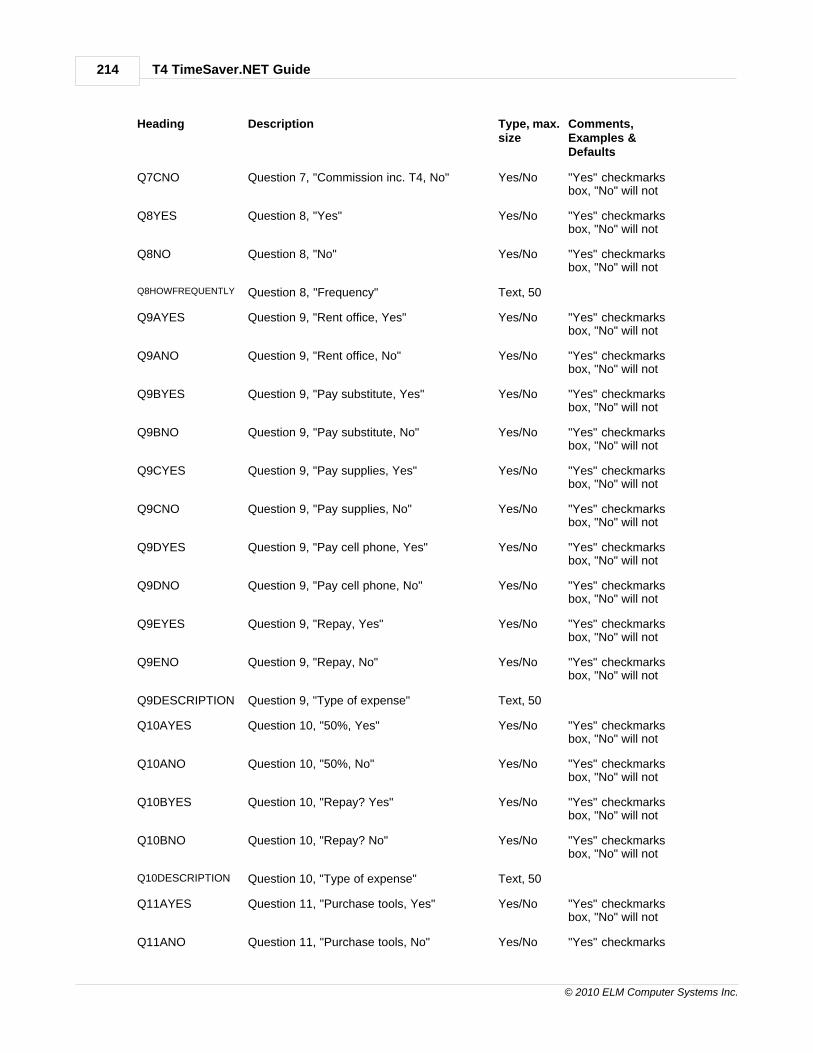
T4 TimeSaver.NET Guide214
© 2010 ELM Computer Systems Inc.
Heading Description Type, max.size
Comments,Examples &Defaults
Q7CNO Question 7, "Commission inc. T4, No" Yes/No "Yes" checkmarksbox, "No" will not
Q8YES Question 8, "Yes" Yes/No "Yes" checkmarksbox, "No" will not
Q8NO Question 8, "No" Yes/No "Yes" checkmarksbox, "No" will not
Q8HOWFREQUENTLY Question 8, "Frequency" Text, 50
Q9AYES Question 9, "Rent office, Yes" Yes/No "Yes" checkmarksbox, "No" will not
Q9ANO Question 9, "Rent office, No" Yes/No "Yes" checkmarksbox, "No" will not
Q9BYES Question 9, "Pay substitute, Yes" Yes/No "Yes" checkmarksbox, "No" will not
Q9BNO Question 9, "Pay substitute, No" Yes/No "Yes" checkmarksbox, "No" will not
Q9CYES Question 9, "Pay supplies, Yes" Yes/No "Yes" checkmarksbox, "No" will not
Q9CNO Question 9, "Pay supplies, No" Yes/No "Yes" checkmarksbox, "No" will not
Q9DYES Question 9, "Pay cell phone, Yes" Yes/No "Yes" checkmarksbox, "No" will not
Q9DNO Question 9, "Pay cell phone, No" Yes/No "Yes" checkmarksbox, "No" will not
Q9EYES Question 9, "Repay, Yes" Yes/No "Yes" checkmarksbox, "No" will not
Q9ENO Question 9, "Repay, No" Yes/No "Yes" checkmarksbox, "No" will not
Q9DESCRIPTION Question 9, "Type of expense" Text, 50
Q10AYES Question 10, "50%, Yes" Yes/No "Yes" checkmarksbox, "No" will not
Q10ANO Question 10, "50%, No" Yes/No "Yes" checkmarksbox, "No" will not
Q10BYES Question 10, "Repay? Yes" Yes/No "Yes" checkmarksbox, "No" will not
Q10BNO Question 10, "Repay? No" Yes/No "Yes" checkmarksbox, "No" will not
Q10DESCRIPTION Question 10, "Type of expense" Text, 50
Q11AYES Question 11, "Purchase tools, Yes" Yes/No "Yes" checkmarksbox, "No" will not
Q11ANO Question 11, "Purchase tools, No" Yes/No "Yes" checkmarks

Appendices 215
© 2010 ELM Computer Systems Inc.
Heading Description Type, max.size
Comments,Examples &Defaults
box, "No" will not
Q11BYES Question 11, "Satisfy, Yes" Yes/No "Yes" checkmarksbox, "No" will not
Q11BNO Question 11, "Satisfy, No" Yes/No "Yes" checkmarksbox, "No" will not
Q12AYES Question 12, "Apprentice, Yes" Yes/No "Yes" checkmarksbox, "No" will not
Q12ANO Question 12, "Apprentice, No" Yes/No "Yes" checkmarksbox, "No" will not
Q12BYES Question 12, "Designation, Yes" Yes/No "Yes" checkmarksbox, "No" will not
Q12BNO Question 12, "Designation, No" Yes/No "Yes" checkmarksbox, "No" will not
Q13AYES Question 13, "Purchase tools, Yes" Yes/No "Yes" checkmarksbox, "No" will not
Q13ANO Question 13, "Purchase tools, No" Yes/No "Yes" checkmarksbox, "No" will not
Q13BYES Question 13, "Satisfy, Yes" Yes/No "Yes" checkmarksbox, "No" will not
Q13BNO Question 13, "Satisfy, No" Yes/No "Yes" checkmarksbox, "No" will not
Q14AYES Question 14, "Forestry, Yes" Yes/No "Yes" checkmarksbox, "No" will not
Q14ANO Question 14, "Forestry, No" Yes/No "Yes" checkmarksbox, "No" will not
Q14BYES Question 14, "Power saw, Yes" Yes/No "Yes" checkmarksbox, "No" will not
Q14BNO Question 14, "Power saw, No" Yes/No "Yes" checkmarksbox, "No" will not
COMPANY.NAME1
Name of company with which the slip isassociated
Text, 30 T4 TimeSaverEnterprise only
Optional field

T4 TimeSaver.NET Guide216
© 2010 ELM Computer Systems Inc.
13.7.13 Headings for T2202A
T4 TimeSaver Plus & Enterprise Only
Cell A1 must contain "T2202A"
Heading Description Type, max.size
Comments,Examples &Defaults
LASTNAME Recipient last name Text, 30 Required field
FIRSTNAME Recipient first name Text, 12
INITIAL Recipient middle initial Text, 1
ADDRESS1 Address line 1 Text, 30
ADDRESS2 Address line 2 Text, 30
CITY City Text, 28
PROV Province code Text, 2
POSTAL Postal code (including space) Text, 10
COUNTRY Country, in address Text, 3 CAN, USA, etc.
SLIPSTATUS Status of slip Text, 1 O - Original,
A - Amended or
C - Cancelled
PROGRAMNAME Name of program of study Text, 50
STUDENTNUMBER Student number Text, 15
FROMYEAR1 From: Year, line 1 Integer, 4
FROMMONTH1 From: Month, line 1 Integer, 2 1, 2, 3…12
TOYEAR1 To: Year, line 1 Integer, 4
TOMONTH1 To: Month, line 1 Integer, 2 1, 2, 3…12
TUITIONFEES1 Eligible tuition fees, line 1 Currency
PARTTIMEMONTHS1 Number of months for: Part-time, line 1 Numeric, 2 1 to 12
FULLTIMEMONTHS1 Number of months for: Full-time, line 1 Numeric, 2 1 to 12
FROMYEAR2 From: Year, line 2 Integer, 4
FROMMONTH2 From: Month, line 2 Integer, 2 1, 2, 3…12
TOYEAR2 To: Year, line 2 Integer, 4
TOMONTH2 To: Month, line 2 Integer, 2 1, 2, 3…12
TUITIONFEES2 Eligible tuition fees, line 2 Currency
PARTTIMEMONTHS2 Number of months for: Part-time, line 2 Numeric, 2 1 to 12
FULLTIMEMONTHS2 Number of months for: Full-time, line 2 Numeric, 2 1 to 12

Appendices 217
© 2010 ELM Computer Systems Inc.
Heading Description Type, max.size
Comments,Examples &Defaults
FROMYEAR3 From: Year, line 3 Integer, 4
FROMMONTH3 From: Month, line 3 Integer, 2 1, 2, 3…12
TOYEAR3 To: Year, line 3 Integer, 4
TOMONTH3 To: Month, line 3 Integer, 2 1, 2, 3…12
TUITIONFEES3 Eligible tuition fees, line 3 Currency
PARTTIMEMONTHS3 Number of months for: Part-time, line 3 Numeric, 2 1 to 12
FULLTIMEMONTHS3 Number of months for: Full-time, line 3 Numeric, 2 1 to 12
FROMYEAR4 From: Year, line 4 Integer, 4
FROMMONTH4 From: Month, line 4 Integer, 2 1, 2, 3…12
TOYEAR4 To: Year, line 4 Integer, 4
TOMONTH4 To: Month, line 4 Integer, 2 1, 2, 3…12
TUITIONFEES4 Eligible tuition fees, line 4 Currency
PARTTIMEMONTHS4 Number of months for: Part-time, line 4 Numeric, 2 1 to 12
FULLTIMEMONTHS4 Number of months for: Full-time, line 4 Numeric, 2 1 to 12
TEXTATTOP Optional text to print at top of slip Text, 15
EMAILADDRESS Recipient email address Text, 255
OKTOEMAILSLIP Permission granted to email slip Yes/No Yes
COMPANY.NAME1
Name of company with which the slip isassociated
Text, 30 T4 TimeSaverEnterprise only
Optional field

T4 TimeSaver.NET Guide218
© 2010 ELM Computer Systems Inc.
13.7.14 Headings for T5013
T4 TimeSaver Plus & Enterprise Only
Cell A1 must contain "T5013"
Heading Description Type, max.size
Comments,Examples &Defaults
Main page fields
NAME1 Recipient name line 1 Text, 50 Required field
NAME2 Recipient name line 2 Text, 12
ADDRESS1 Address line 1 Text, 30
ADDRESS2 Address line 2 Text, 30
CITY City Text, 28
PROV Province code Text, 2
POSTAL Postal code (including space) Text, 10
COUNTRY Country, in address Text, 3 CAN, USA, etc.
TYPEOFSLIP Type of slip (box 5) Text, 1 0 – Original1 – Amended2 – Additional3 – Cancelled4 – Duplicate
COUNTRYCODE Country code (box 7) Text, 3 CAN, USA, etc.
MEMBERCODE Member code (box 8) Text, 1
UNITSOWNED Partnership units held (box 9) Numeric 8 decimals
PARTNERSSHARE Partner’s share, in % (box 10) Numeric 8 decimals
PARTNERID Recipient’s ID (box 11) Text, 16
COMPLEXSHARING Complex sharing arrangements (box 12) Text, 75
(1) Limited partnership income/loss (Boxes 20-27)
LIMITEDFARMING Farming income (box 20) Currency
LIMITEDCAIS Farming income (box 20) Currency
LIMITEDFISHING Fishing income (box 21) Currency
LIMITEDBUSINESS Business income (box 22) Currency
LIMITEDATRISK At risk amount (box 22-1) Currency
LIMITEDADJUSTEDATRISK Adj. at risk amount (box 22-2) Currency
LIMITEDRENTAL Rental income (box 23) Currency
LOSSCARRYFWD Loss carry forward (box 24) Currency
PREVLOSSCARRYFWD Prev. loss carry forward (box 25) Currency
RETURNOFCAPITAL Return of capital (box 27) Currency
A01TEXT1 Generic box # 1 – Province/Country Text, 3
A01TEXT2 Generic box # 1 – Box number Text, 6
A01AMOUNT Generic box # 1 – Amount Currency
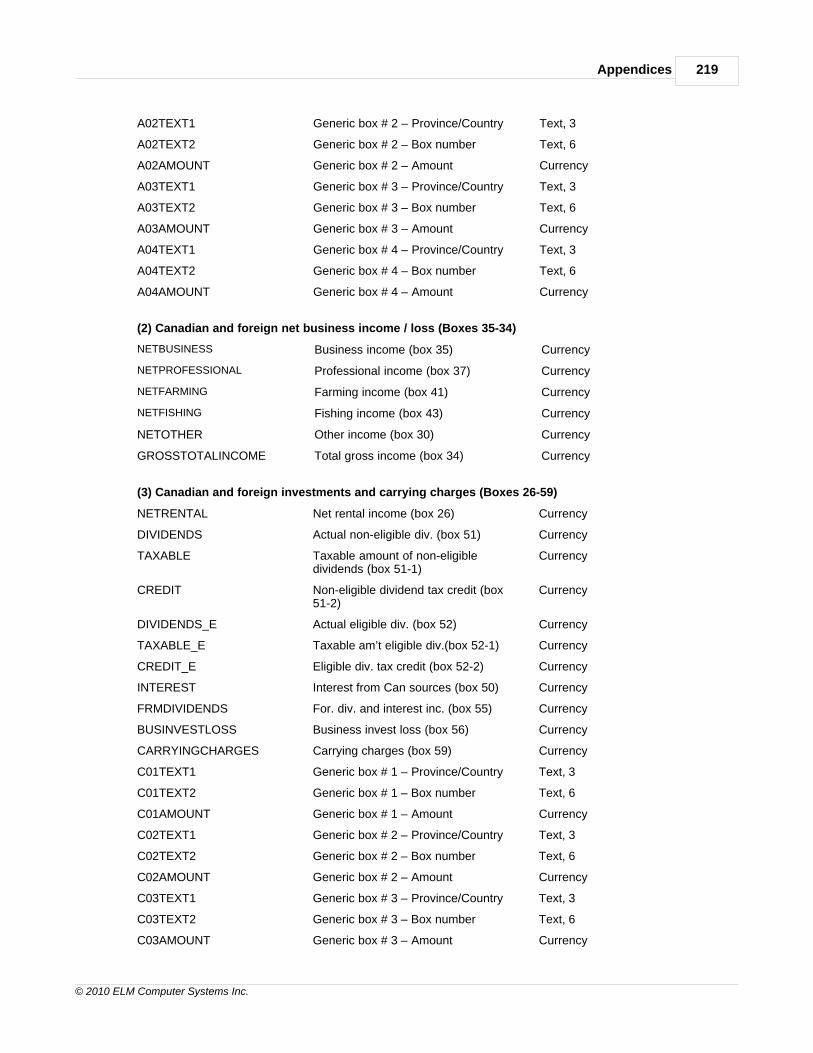
Appendices 219
© 2010 ELM Computer Systems Inc.
A02TEXT1 Generic box # 2 – Province/Country Text, 3
A02TEXT2 Generic box # 2 – Box number Text, 6
A02AMOUNT Generic box # 2 – Amount Currency
A03TEXT1 Generic box # 3 – Province/Country Text, 3
A03TEXT2 Generic box # 3 – Box number Text, 6
A03AMOUNT Generic box # 3 – Amount Currency
A04TEXT1 Generic box # 4 – Province/Country Text, 3
A04TEXT2 Generic box # 4 – Box number Text, 6
A04AMOUNT Generic box # 4 – Amount Currency
(2) Canadian and foreign net business income / loss (Boxes 35-34)
NETBUSINESS Business income (box 35) Currency
NETPROFESSIONAL Professional income (box 37) Currency
NETFARMING Farming income (box 41) Currency
NETFISHING Fishing income (box 43) Currency
NETOTHER Other income (box 30) Currency
GROSSTOTALINCOME Total gross income (box 34) Currency
(3) Canadian and foreign investments and carrying charges (Boxes 26-59)
NETRENTAL Net rental income (box 26) Currency
DIVIDENDS Actual non-eligible div. (box 51) Currency
TAXABLE Taxable amount of non-eligibledividends (box 51-1)
Currency
CREDIT Non-eligible dividend tax credit (box51-2)
Currency
DIVIDENDS_E Actual eligible div. (box 52) Currency
TAXABLE_E Taxable am’t eligible div.(box 52-1) Currency
CREDIT_E Eligible div. tax credit (box 52-2) Currency
INTEREST Interest from Can sources (box 50) Currency
FRMDIVIDENDS For. div. and interest inc. (box 55) Currency
BUSINVESTLOSS Business invest loss (box 56) Currency
CARRYINGCHARGES Carrying charges (box 59) Currency
C01TEXT1 Generic box # 1 – Province/Country Text, 3
C01TEXT2 Generic box # 1 – Box number Text, 6
C01AMOUNT Generic box # 1 – Amount Currency
C02TEXT1 Generic box # 2 – Province/Country Text, 3
C02TEXT2 Generic box # 2 – Box number Text, 6
C02AMOUNT Generic box # 2 – Amount Currency
C03TEXT1 Generic box # 3 – Province/Country Text, 3
C03TEXT2 Generic box # 3 – Box number Text, 6
C03AMOUNT Generic box # 3 – Amount Currency
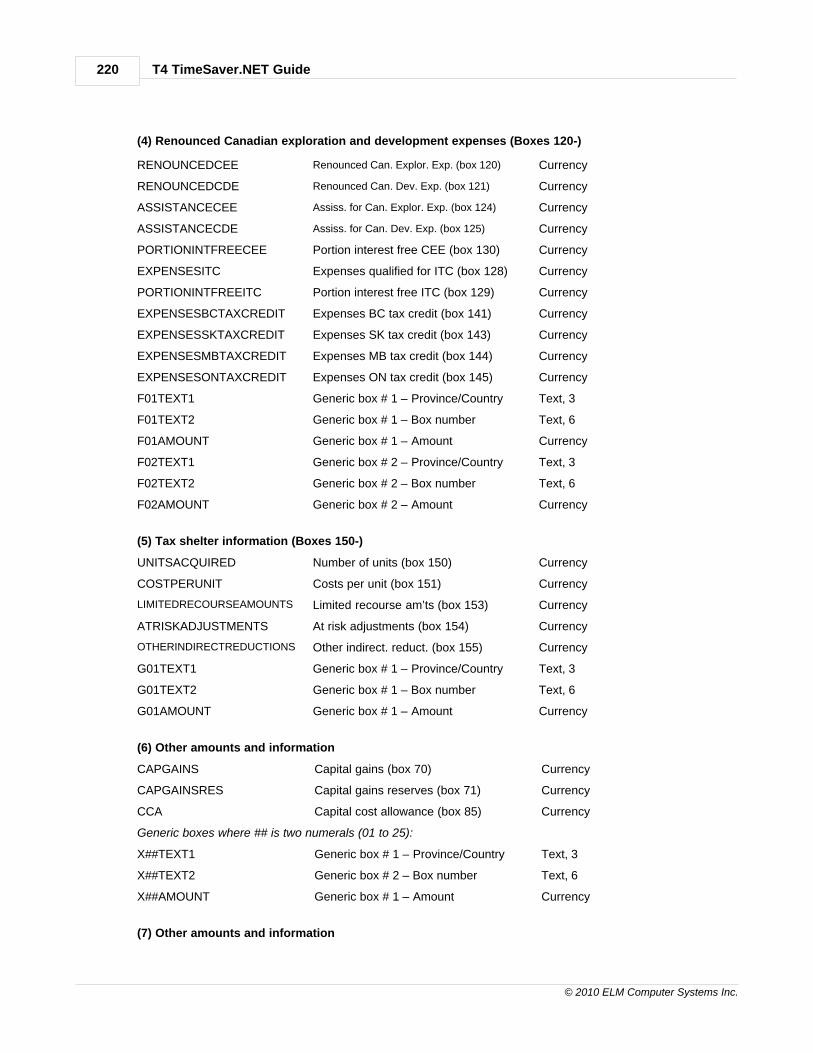
T4 TimeSaver.NET Guide220
© 2010 ELM Computer Systems Inc.
(4) Renounced Canadian exploration and development expenses (Boxes 120-)
RENOUNCEDCEE Renounced Can. Explor. Exp. (box 120) Currency
RENOUNCEDCDE Renounced Can. Dev. Exp. (box 121) Currency
ASSISTANCECEE Assiss. for Can. Explor. Exp. (box 124) Currency
ASSISTANCECDE Assiss. for Can. Dev. Exp. (box 125) Currency
PORTIONINTFREECEE Portion interest free CEE (box 130) Currency
EXPENSESITC Expenses qualified for ITC (box 128) Currency
PORTIONINTFREEITC Portion interest free ITC (box 129) Currency
EXPENSESBCTAXCREDIT Expenses BC tax credit (box 141) Currency
EXPENSESSKTAXCREDIT Expenses SK tax credit (box 143) Currency
EXPENSESMBTAXCREDIT Expenses MB tax credit (box 144) Currency
EXPENSESONTAXCREDIT Expenses ON tax credit (box 145) Currency
F01TEXT1 Generic box # 1 – Province/Country Text, 3
F01TEXT2 Generic box # 1 – Box number Text, 6
F01AMOUNT Generic box # 1 – Amount Currency
F02TEXT1 Generic box # 2 – Province/Country Text, 3
F02TEXT2 Generic box # 2 – Box number Text, 6
F02AMOUNT Generic box # 2 – Amount Currency
(5) Tax shelter information (Boxes 150-)
UNITSACQUIRED Number of units (box 150) Currency
COSTPERUNIT Costs per unit (box 151) Currency
LIMITEDRECOURSEAMOUNTS Limited recourse am’ts (box 153) Currency
ATRISKADJUSTMENTS At risk adjustments (box 154) Currency
OTHERINDIRECTREDUCTIONS Other indirect. reduct. (box 155) Currency
G01TEXT1 Generic box # 1 – Province/Country Text, 3
G01TEXT2 Generic box # 1 – Box number Text, 6
G01AMOUNT Generic box # 1 – Amount Currency
(6) Other amounts and information
CAPGAINS Capital gains (box 70) Currency
CAPGAINSRES Capital gains reserves (box 71) Currency
CCA Capital cost allowance (box 85) Currency
Generic boxes where ## is two numerals (01 to 25):
X##TEXT1 Generic box # 1 – Province/Country Text, 3
X##TEXT2 Generic box # 2 – Box number Text, 6
X##AMOUNT Generic box # 1 – Amount Currency
(7) Other amounts and information

Appendices 221
© 2010 ELM Computer Systems Inc.
Generic large boxes where ## is two numerals (01 to 10):
E##TEXT2 Generic box # 2 – Box number Text, 6
E##TEXT3 Generic box # 3 – Text Text, 65
Additional Headings for T5015 fields:
CAPITALSTART Capital account start of period Currency
CAPITALCONTRIBUTED Capital contribution during period Currency
OTHERADJUSTMENTS Other Adjustments Currency
INCOMEALLOCATED Income allocated during period Currency
DRAWINGS Drawings Currency
CAPITALEND Capital account end of period Currency
RECTYPE Recipient code Text, 1 1 – Individual(other than a trust)2 – Trust3 – Corporation4 – Partnership5 – Nominee oragent
EMAILADDRESS Recipient email address Text, 255
OKTOEMAILSLIP Permission granted to email slip Yes/No Yes
COMPANY.NAME1 Name of company with which the slip isassociated
Text, 30 T4TimeSaverEnterpriseonly
Optionalfield

T4 TimeSaver.NET Guide222
© 2010 ELM Computer Systems Inc.
13.7.15 Headings for RL2
T4 TimeSaver Plus & Enterprise Only
Cell A1 must contain "R2"
Heading Description Type,max. size
Comments,Examples &Defaults
LASTNAME Recipient last name Text, 30 Required field
FIRSTNAME Recipient first name Text, 12
INITIAL Recipient middle initial Text, 1
ADDRESS1 Address line 1 Text, 30
ADDRESS2 Address line 2 Text, 30
CITY City Text, 28
PROV Province code Text, 2
POSTAL Postal code (including space) Text, 10
COUNTRY Country, in address Text, 3 CAN, USA, etc.
SOURCE1 Source of income Text, 6
BENEFICIARYNUM Employer assigned number Text, 20
ANNUITY Life annuity payments amount Currency Box A
BENEFIT RRSP, RRIF, DPSP benefit amount Currency Box B
OTHERPAYMENT Other Payment amount Currency Box C
REFUNDRRSPSPOUSE Refunded RRSP amounts Currency Box D
DEATHBENEFIT Value of benefit at time of death Currency Box E
REFUNDRRSPUNDEDUCTED Amount of refunded excess RRSP Currency Box F
REVOCATION Value of benefit before amendment Currency Box G
OTHERINCOME All other income Currency Box H
DEDUCTION Amount giving entitlement to deduction Currency Box I
TAX Amount of Québec tax held at source Currency Box J
INCOMEAFTERDEATH Income earned after death amount Currency Box K
LIFELONGLEARNING Life Long Learning Plan amount Currency Box L
TAXPAIDAMOUNT Tax paid amount Currency Box M
SIN Social insurance number Text, 9
SIN2 Spouses social insurance number Text, 9 Box N
HOMEBUYER Withdrawal under HBP Currency Box O
REPORTCODE Status of slip Text, 1 R - Original,
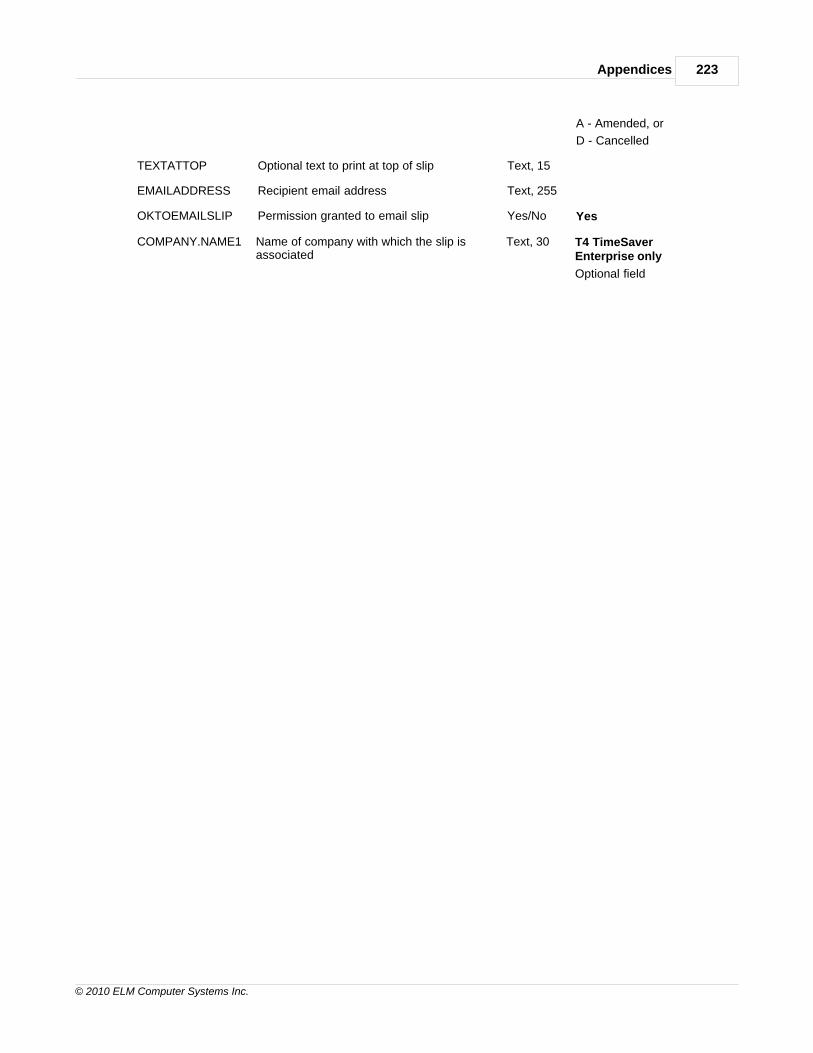
Appendices 223
© 2010 ELM Computer Systems Inc.
A - Amended, or
D - Cancelled
TEXTATTOP Optional text to print at top of slip Text, 15
EMAILADDRESS Recipient email address Text, 255
OKTOEMAILSLIP Permission granted to email slip Yes/No Yes
COMPANY.NAME1 Name of company with which the slip isassociated
Text, 30 T4 TimeSaverEnterprise only
Optional field

T4 TimeSaver.NET Guide224
© 2010 ELM Computer Systems Inc.
13.7.16 Headings for RL8
T4 TimeSaver Plus & Enterprise Only
Cell A1 must contain "R8"
Heading Description Type, max.size
Comments,Examples &Defaults
LASTNAME Recipient last name Text, 30 Required field
FIRSTNAME Recipient first name Text, 12
INITIAL Recipient middle initial Text, 1
ADDRESS1 Address line 1 Text, 30
ADDRESS2 Address line 2 Text, 30
CITY City Text, 28
PROV Province code Text, 2
POSTAL Postal code (including space) Text, 10
COUNTRY Country, in address Text, 3 CAN, USA, etc.
YEAR Year of return Integer, 4 2009
AMOUNTFORSTUDIES Amount for post-secondary studies Currency
TUITIONFEES Tuition or examination fees Currency
DONATIONS Donations Currency
SIN Social Insurance Number Text, 9
STUDENTNUMBER Student number Text, 15
REPORTCODE Status of slip Text, 1 R - Original,
A - Amended, or
D - Cancelled
TEXTATTOP Optional text to print at top of slip Text, 15
EMAILADDRESS Recipient email address Text, 255
OKTOEMAILSLIP Permission granted to email slip Yes/No Yes
COMPANY.NAME1
Name of company with which the slip isassociated
Text, 30 T4 TimeSaverEnterprise only
Optional field

Appendices 225
© 2010 ELM Computer Systems Inc.
13.7.17 Headings for RL15
T4 TimeSaver Plus & Enterprise Only
Cell A1 must contain "R15"
Heading Description Type,max. size
Comments,Examples &Defaults
NAME1 Employee name line 1 Text, 30 Required field
NAME2 Employee name line 2 Text, 12
ADDRESS1 Address line 1 Text, 30
ADDRESS2 Address line 2 Text, 30
CITY City Text, 28
PROV Province code Text, 2
POSTAL Postal code (including space) Text, 10
COUNTRY Country code Text, 3
PARNTERID Partnerships identification number Text, 16
REPORTCODE Status of slip Text, 1 O - Original,
A - Amended or
C - Cancelled
PARTNERSSHARE Partner's share (%) of income / loss Numeric 8 decimals
UNITSOWNED Number of partnership units owned Numeric 8 decimals
MEMBERCODE Partner code Text, 1
RECTYPE Recipient type Text, 1 1
CAPITALSTART Balance at start of fiscal period Currency
CAPITALCONTRIBUTED Capital contributions during fiscal period Currency
OTHERADJUSTMENTS
Other adjustments Currency
INCOMEALLOCATED Income / loss allocated during fiscal period Currency
DRAWINGS Drawings Currency
CAPITALEND Capital account at end of fiscal period Currency
BOX1 Net Canadian & foreign bus. income / loss Currency
BOX2 Net foreign business income / loss Currency
BOX3 Net Canadian & foreign rental income / loss Currency
BOX4 Net foreign rental income / loss Currency
BOX5 Capital cost allowance Currency
BOX6A Actual amount of eligible dividends Currency
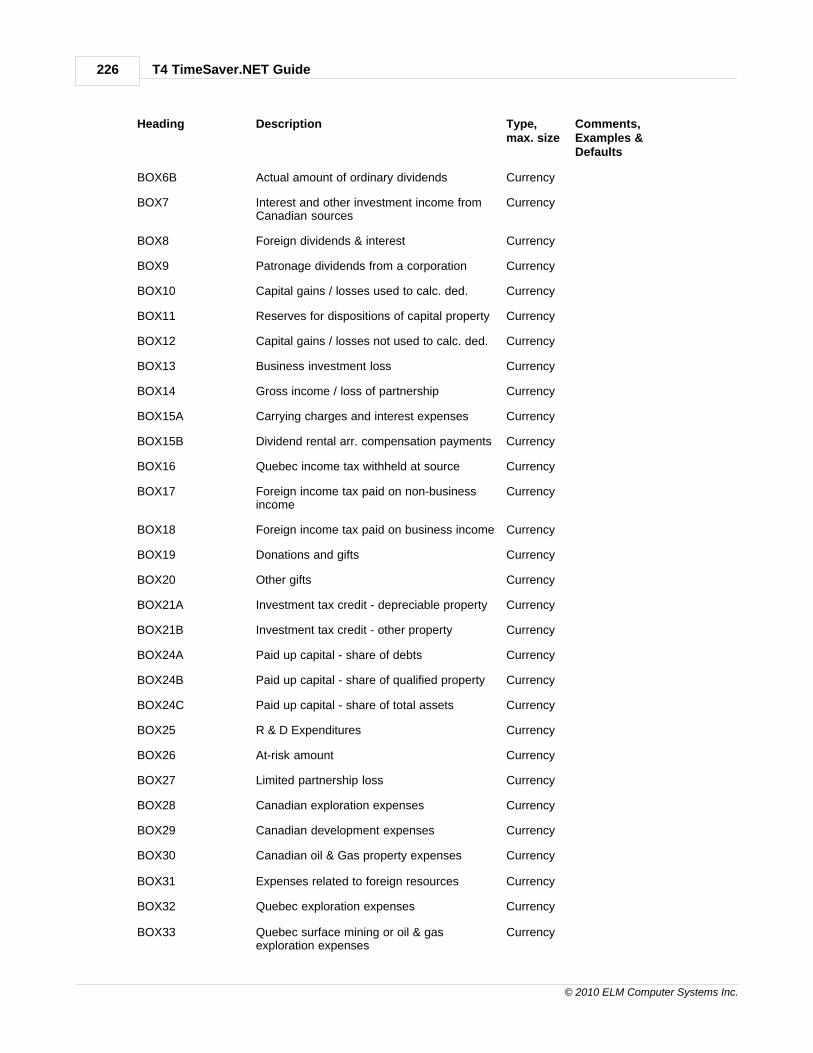
T4 TimeSaver.NET Guide226
© 2010 ELM Computer Systems Inc.
Heading Description Type,max. size
Comments,Examples &Defaults
BOX6B Actual amount of ordinary dividends Currency
BOX7 Interest and other investment income fromCanadian sources
Currency
BOX8 Foreign dividends & interest Currency
BOX9 Patronage dividends from a corporation Currency
BOX10 Capital gains / losses used to calc. ded. Currency
BOX11 Reserves for dispositions of capital property Currency
BOX12 Capital gains / losses not used to calc. ded. Currency
BOX13 Business investment loss Currency
BOX14 Gross income / loss of partnership Currency
BOX15A Carrying charges and interest expenses Currency
BOX15B Dividend rental arr. compensation payments Currency
BOX16 Quebec income tax withheld at source Currency
BOX17 Foreign income tax paid on non-businessincome
Currency
BOX18 Foreign income tax paid on business income Currency
BOX19 Donations and gifts Currency
BOX20 Other gifts Currency
BOX21A Investment tax credit - depreciable property Currency
BOX21B Investment tax credit - other property Currency
BOX24A Paid up capital - share of debts Currency
BOX24B Paid up capital - share of qualified property Currency
BOX24C Paid up capital - share of total assets Currency
BOX25 R & D Expenditures Currency
BOX26 At-risk amount Currency
BOX27 Limited partnership loss Currency
BOX28 Canadian exploration expenses Currency
BOX29 Canadian development expenses Currency
BOX30 Canadian oil & Gas property expenses Currency
BOX31 Expenses related to foreign resources Currency
BOX32 Quebec exploration expenses Currency
BOX33 Quebec surface mining or oil & gasexploration expenses
Currency

Appendices 227
© 2010 ELM Computer Systems Inc.
Heading Description Type,max. size
Comments,Examples &Defaults
BOX34 Exploration expenses incurred in NorthernQuebec
Currency
BOX35_28 Assistance corresponding to box 28 Currency
BOX35_29 Assistance corresponding to box 29 Currency
BOX35_30 Assistance corresponding to box 30 Currency
BOX35_32 Assistance corresponding to box 32 Currency
BOX35_33 Assistance corresponding to box 33 Currency
BOX43 Capital repayment Currency
BOX44 Dividend tax credit Currency
BOX45 Eligible taxable capital gains on resourceproperty
Currency
BOX50 Number units acquired during fiscal period Currency
BOX51 Cost per unit Currency
BOX53 Limited-recourse amount Currency
BOX54 At-risk adjustment Currency
BOX55 Other indirect adjustments Currency
BOX60 Canadian exploration expenses Currency
BOX61 Canadian development expenses Currency
BOX62 Quebec exploration expenses Currency
BOX63 Quebec surface mining or oil & gasexploration expenses
Currency
BOX64 Exploration expenses incurred in NorthernQuebec
Currency
BOX65 Share and security issue expenses Currency
BOX66_60 Assistance - box 60 Currency
BOX66_61 Assistance - box 61 Currency
BOX66_62 Assistance - box 62 Currency
BOX66_63 Assistance - box 63 Currency
BOX66_64 Assistance - box 64 Currency
DETAILS01 Details, line 1 Text, 100
DETAILS02 Details, line 2 Text, 100
DETAILS03 Details, line 3 Text, 100
DETAILS04 Details, line 4 Text, 100
DETAILS05 Details, line 5 Text, 100
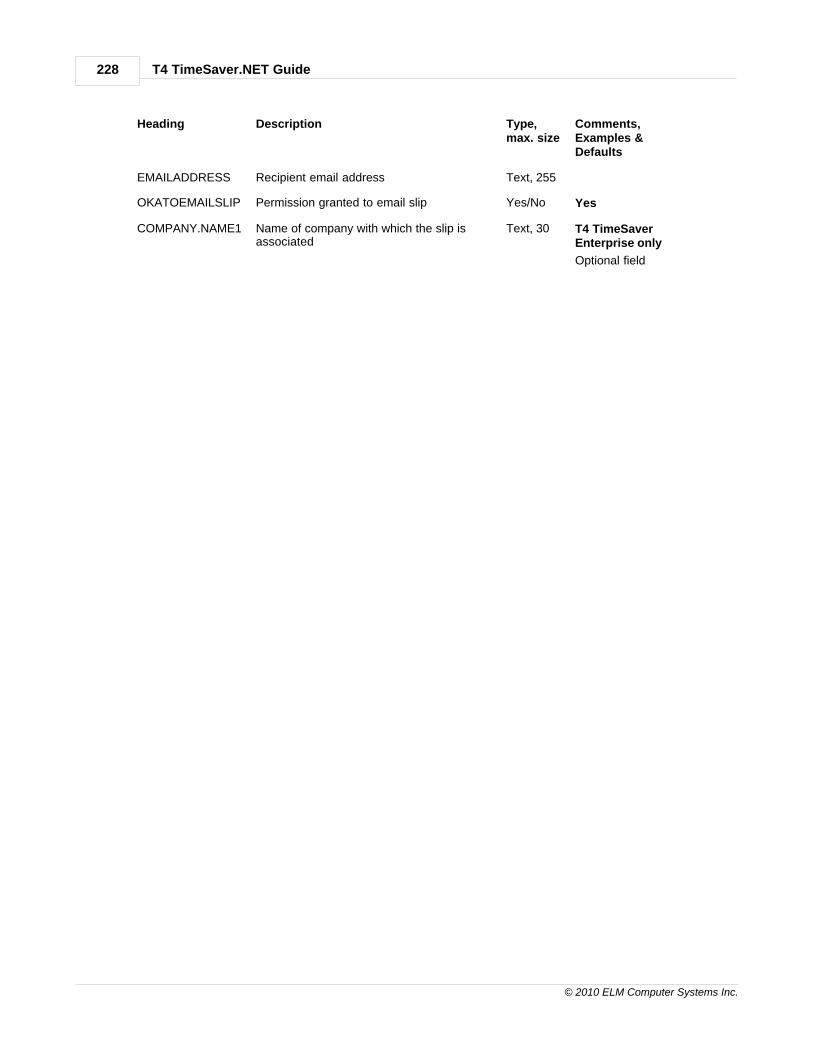
T4 TimeSaver.NET Guide228
© 2010 ELM Computer Systems Inc.
Heading Description Type,max. size
Comments,Examples &Defaults
EMAILADDRESS Recipient email address Text, 255
OKATOEMAILSLIP Permission granted to email slip Yes/No Yes
COMPANY.NAME1 Name of company with which the slip isassociated
Text, 30 T4 TimeSaverEnterprise only
Optional field

Appendices 229
© 2010 ELM Computer Systems Inc.
13.7.18 Headings for RL17
T4 TimeSaver Plus & Enterprise Only
Cell A1 must contain "R17"
Heading Description Type, max.size
Comments,Examples &Defaults
LASTNAME1 First recipient last name Text, 30 Required field
FIRSTNAME1 First recipient first name Text, 12
INITIAL1 First recipient middle initial Text, 1
ADDRESS1 Address line 1 Text, 30
ADDRESS2 Address line 2 Text, 30
CITY City Text, 28
PROV Province code Text, 2
POSTAL Postal code (including space) Text, 10
COUNTRY Country, in address Text, 3 CAN, USA, etc.
YEAR Year Text, 1 2009
SIN Social insurance number Text, 9
REFERENCENUMBER Employer reference number Text, 15
DEDUCTION Total deductions (box A) Currency
INCOMEYEAR Total employment revenue (box B) Currency
INCOMESTAY Total income for stay (box C) Currency
ALLOWANCEYEAR Allowance in year (box D) Currency
ALLOWANCESTAY Allowance for stay (box E) Currency
DAYSOUTSIDE Days outside Canada (box F) Integer
PERIODSOUTSIDE Number of 30 day periods (box G) Integer
DATEDEPARTURE Departure date from Canada (box H) Date
DATERETURN Return date to Canada (box I) Date
FOREIGNCOUNTRY Name of foreign country (box J) Text, 20
SLIPSTATUS Status of slip Text, 1 R - Original,
A - Amended or
D - Cancelled
TEXTATTOP Optional text to print at top of slip Text, 15
EMAILADDRESS Recipient email address Text, 255
OKTOEMAILSLIP Permission granted to email slip Yes/No Yes
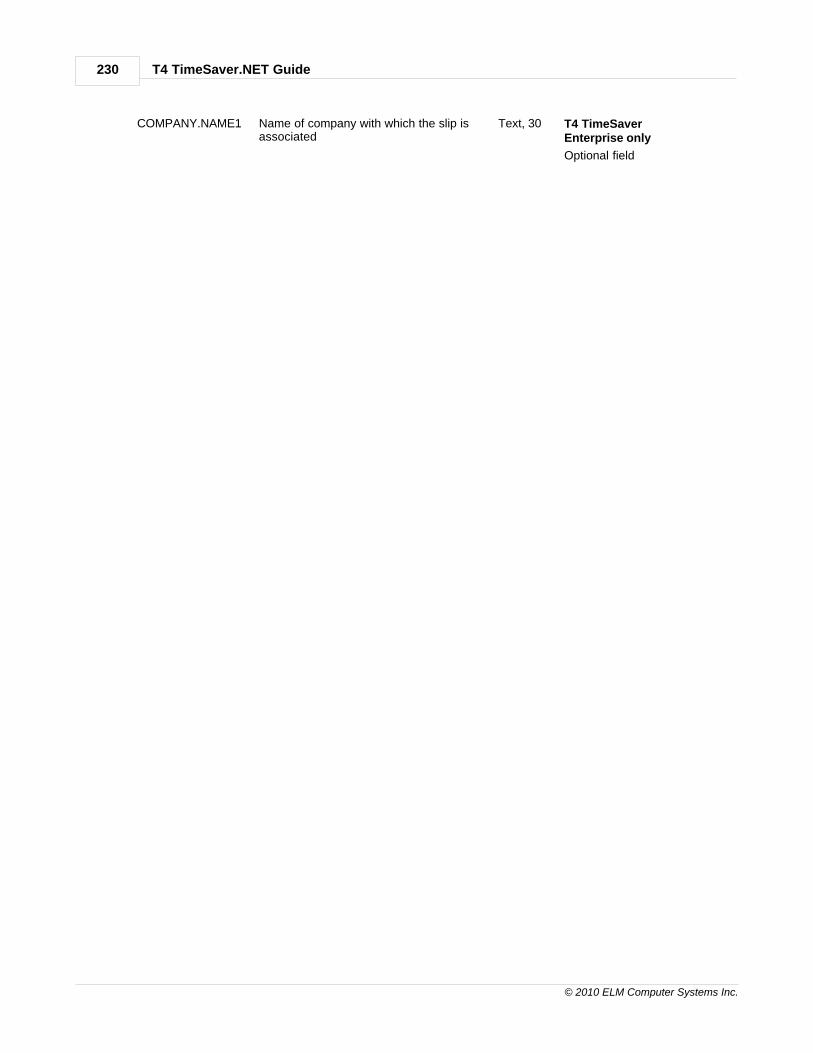
T4 TimeSaver.NET Guide230
© 2010 ELM Computer Systems Inc.
COMPANY.NAME1 Name of company with which the slip isassociated
Text, 30 T4 TimeSaverEnterprise only
Optional field
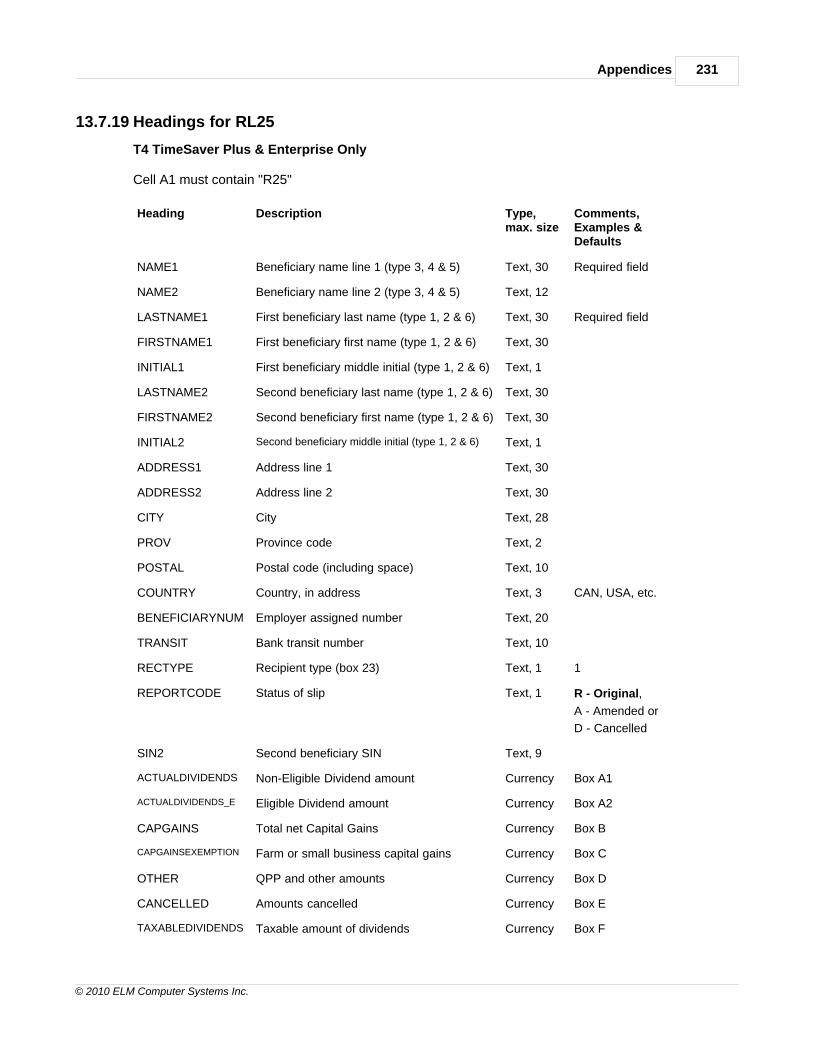
Appendices 231
© 2010 ELM Computer Systems Inc.
13.7.19 Headings for RL25
T4 TimeSaver Plus & Enterprise Only
Cell A1 must contain "R25"
Heading Description Type,max. size
Comments,Examples &Defaults
NAME1 Beneficiary name line 1 (type 3, 4 & 5) Text, 30 Required field
NAME2 Beneficiary name line 2 (type 3, 4 & 5) Text, 12
LASTNAME1 First beneficiary last name (type 1, 2 & 6) Text, 30 Required field
FIRSTNAME1 First beneficiary first name (type 1, 2 & 6) Text, 30
INITIAL1 First beneficiary middle initial (type 1, 2 & 6) Text, 1
LASTNAME2 Second beneficiary last name (type 1, 2 & 6) Text, 30
FIRSTNAME2 Second beneficiary first name (type 1, 2 & 6) Text, 30
INITIAL2 Second beneficiary middle initial (type 1, 2 & 6) Text, 1
ADDRESS1 Address line 1 Text, 30
ADDRESS2 Address line 2 Text, 30
CITY City Text, 28
PROV Province code Text, 2
POSTAL Postal code (including space) Text, 10
COUNTRY Country, in address Text, 3 CAN, USA, etc.
BENEFICIARYNUM Employer assigned number Text, 20
TRANSIT Bank transit number Text, 10
RECTYPE Recipient type (box 23) Text, 1 1
REPORTCODE Status of slip Text, 1 R - Original,
A - Amended or
D - Cancelled
SIN2 Second beneficiary SIN Text, 9
ACTUALDIVIDENDS Non-Eligible Dividend amount Currency Box A1
ACTUALDIVIDENDS_E Eligible Dividend amount Currency Box A2
CAPGAINS Total net Capital Gains Currency Box B
CAPGAINSEXEMPTION Farm or small business capital gains Currency Box C
OTHER QPP and other amounts Currency Box D
CANCELLED Amounts cancelled Currency Box E
TAXABLEDIVIDENDS Taxable amount of dividends Currency Box F
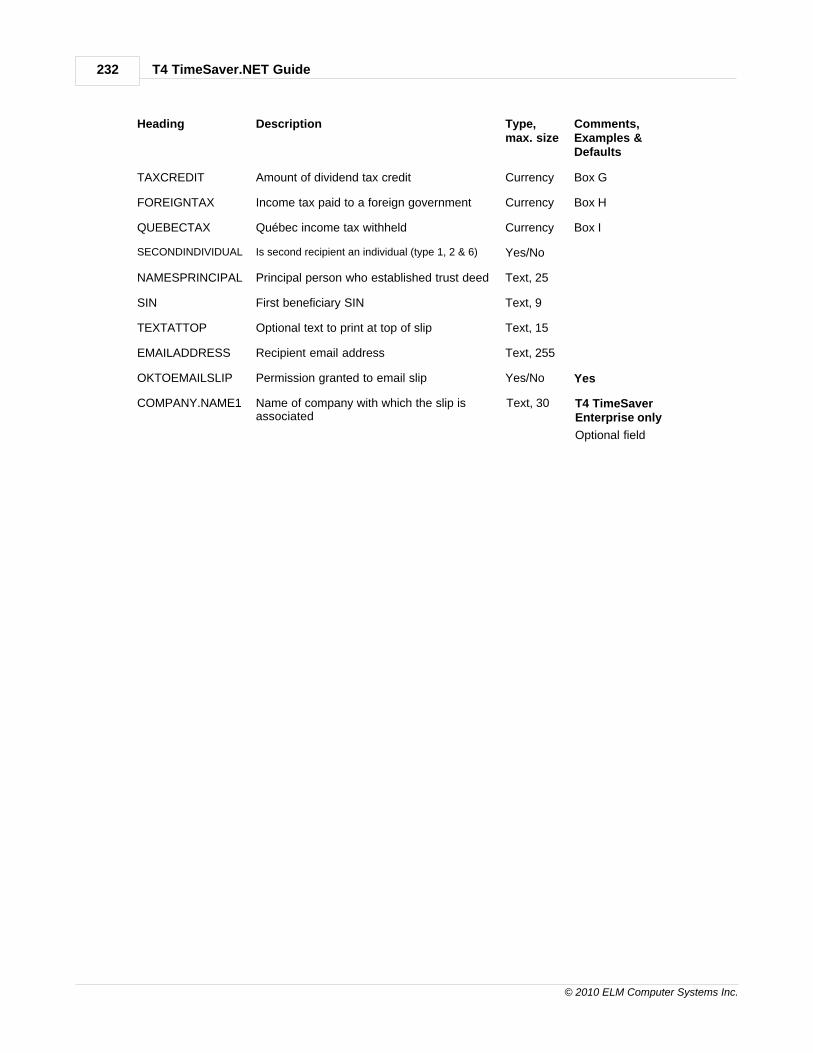
T4 TimeSaver.NET Guide232
© 2010 ELM Computer Systems Inc.
Heading Description Type,max. size
Comments,Examples &Defaults
TAXCREDIT Amount of dividend tax credit Currency Box G
FOREIGNTAX Income tax paid to a foreign government Currency Box H
QUEBECTAX Québec income tax withheld Currency Box I
SECONDINDIVIDUAL Is second recipient an individual (type 1, 2 & 6) Yes/No
NAMESPRINCIPAL Principal person who established trust deed Text, 25
SIN First beneficiary SIN Text, 9
TEXTATTOP Optional text to print at top of slip Text, 15
EMAILADDRESS Recipient email address Text, 255
OKTOEMAILSLIP Permission granted to email slip Yes/No Yes
COMPANY.NAME1 Name of company with which the slip isassociated
Text, 30 T4 TimeSaverEnterprise only
Optional field

Appendices 233
© 2010 ELM Computer Systems Inc.
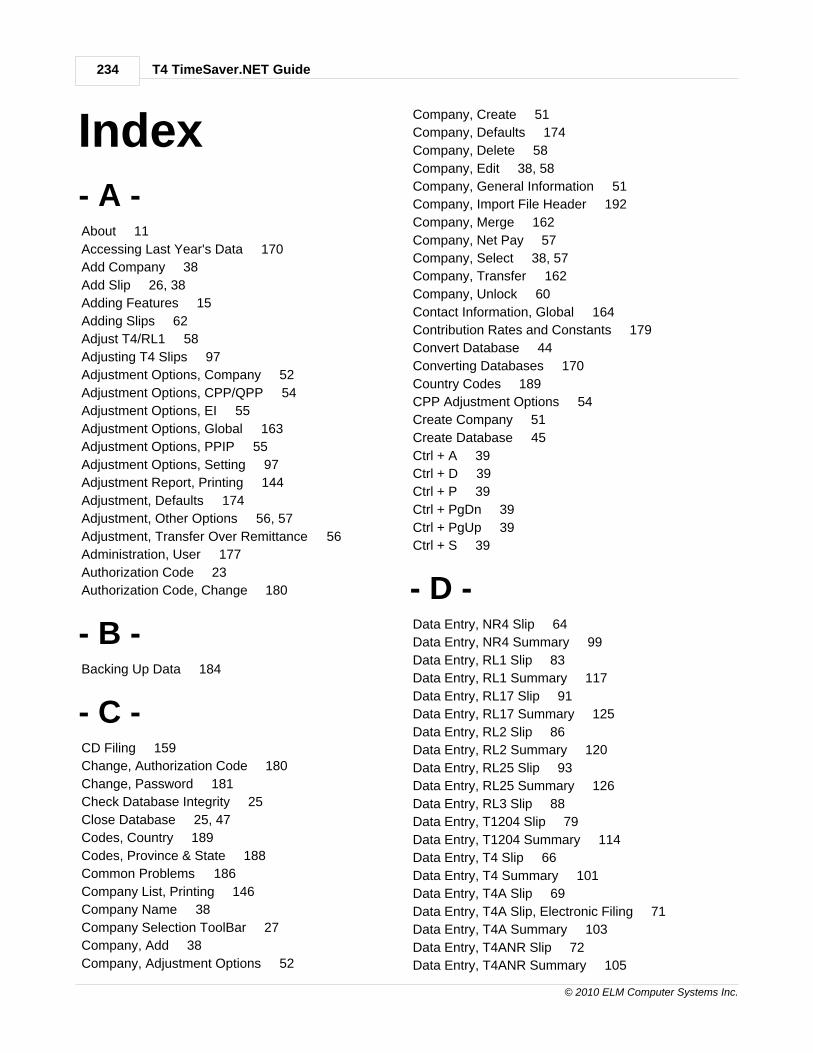
T4 TimeSaver.NET Guide234
© 2010 ELM Computer Systems Inc.
Index- A -About 11
Accessing Last Year's Data 170
Add Company 38
Add Slip 26, 38
Adding Features 15
Adding Slips 62
Adjust T4/RL1 58
Adjusting T4 Slips 97
Adjustment Options, Company 52
Adjustment Options, CPP/QPP 54
Adjustment Options, EI 55
Adjustment Options, Global 163
Adjustment Options, PPIP 55
Adjustment Options, Setting 97
Adjustment Report, Printing 144
Adjustment, Defaults 174
Adjustment, Other Options 56, 57
Adjustment, Transfer Over Remittance 56
Administration, User 177
Authorization Code 23
Authorization Code, Change 180
- B -Backing Up Data 184
- C -CD Filing 159
Change, Authorization Code 180
Change, Password 181
Check Database Integrity 25
Close Database 25, 47
Codes, Country 189
Codes, Province & State 188
Common Problems 186
Company List, Printing 146
Company Name 38
Company Selection ToolBar 27
Company, Add 38
Company, Adjustment Options 52
Company, Create 51
Company, Defaults 174
Company, Delete 58
Company, Edit 38, 58
Company, General Information 51
Company, Import File Header 192
Company, Merge 162
Company, Net Pay 57
Company, Select 38, 57
Company, Transfer 162
Company, Unlock 60
Contact Information, Global 164
Contribution Rates and Constants 179
Convert Database 44
Converting Databases 170
Country Codes 189
CPP Adjustment Options 54
Create Company 51
Create Database 45
Ctrl + A 39
Ctrl + D 39
Ctrl + P 39
Ctrl + PgDn 39
Ctrl + PgUp 39
Ctrl + S 39
- D -Data Entry, NR4 Slip 64
Data Entry, NR4 Summary 99
Data Entry, RL1 Slip 83
Data Entry, RL1 Summary 117
Data Entry, RL17 Slip 91
Data Entry, RL17 Summary 125
Data Entry, RL2 Slip 86
Data Entry, RL2 Summary 120
Data Entry, RL25 Slip 93
Data Entry, RL25 Summary 126
Data Entry, RL3 Slip 88
Data Entry, T1204 Slip 79
Data Entry, T1204 Summary 114
Data Entry, T4 Slip 66
Data Entry, T4 Summary 101
Data Entry, T4A Slip 69
Data Entry, T4A Slip, Electronic Filing 71
Data Entry, T4A Summary 103
Data Entry, T4ANR Slip 72
Data Entry, T4ANR Summary 105

Index 235
© 2010 ELM Computer Systems Inc.
Data Entry, T4AP Slip 74
Data Entry, T4AP Summary 107
Data Entry, T4APS Summary 108
Data Entry, T4ARCA Slip 75
Data Entry, T4PS Slip 76
Data Entry, T4PS Summary 110
Data Entry, T5 Slip 77
Data Entry, T5 Summary 112
Data Entry, T5018 Slip 80
Data Entry, T5018 Summary 115
Data Import, Excel 165
Data Import, XML 168
Data, Backup 184
Data, Entering 40
Data, Field Selection 175
Data, Validating 136
Database, Close 47
Database, Convert 44, 170
Database, Create 45
Database, Open 46
Database, Repair 48
Default, Adjustment 174
Default, New Company 174
Delete Slip 26, 38
Deleting a Company 58
Deleting a Slip 62
Display Options 177
Download 15
DVD Filing 159
- E -Edit Company 38
Edit List, Printing 145
Edit Menu 26
Editing Company Information 58
EI Adjustment Options 55
Electronic Filing 175
Electronic Filing, CD or DVD 159
Electronic Filing, Federal Returns 153
Electronic Filing, Internet 154
Electronic Filing, Perparation 150
Electronic Filing, T4A, Data Entry 71
Entering Data 40
Entering Data in a Slip 62
Excel, Import from 165
Exit 25
- F -F1 39
F2 39
F4 39
Field, Override 39
Field, Override Calculated 63
File Locations 179
File Menu 25
Filing, Electronic 175
First Slip 26, 38
Form, Print 38
- G -General Information, Company 51
Global Adjustment Options 163
Global Contact Information 164
- H -Hardware Requirements 16
Help 39
http://www.elmcomputers.com/services.html 14
- I -Import File Header, Company 192
Import File Header, NR4 193
Import File Header, RL1 195
Import File Header, RL17 229
Import File Header, RL2 222
Import File Header, RL25 231
Import File Header, RL3 208
Import File Header, T1204 210
Import File Header, T4 195
Import File Header, T4A 198
Import File Header, T4ANR 201
Import File Header, T4AP 203
Import File Header, T4ARCA 205
Import File Header, T4PS 206
Import File Header, T5 208
Import File Header, T5018 211
Import Files, Introduction 191
Import, Excel 165
Import, XML 168
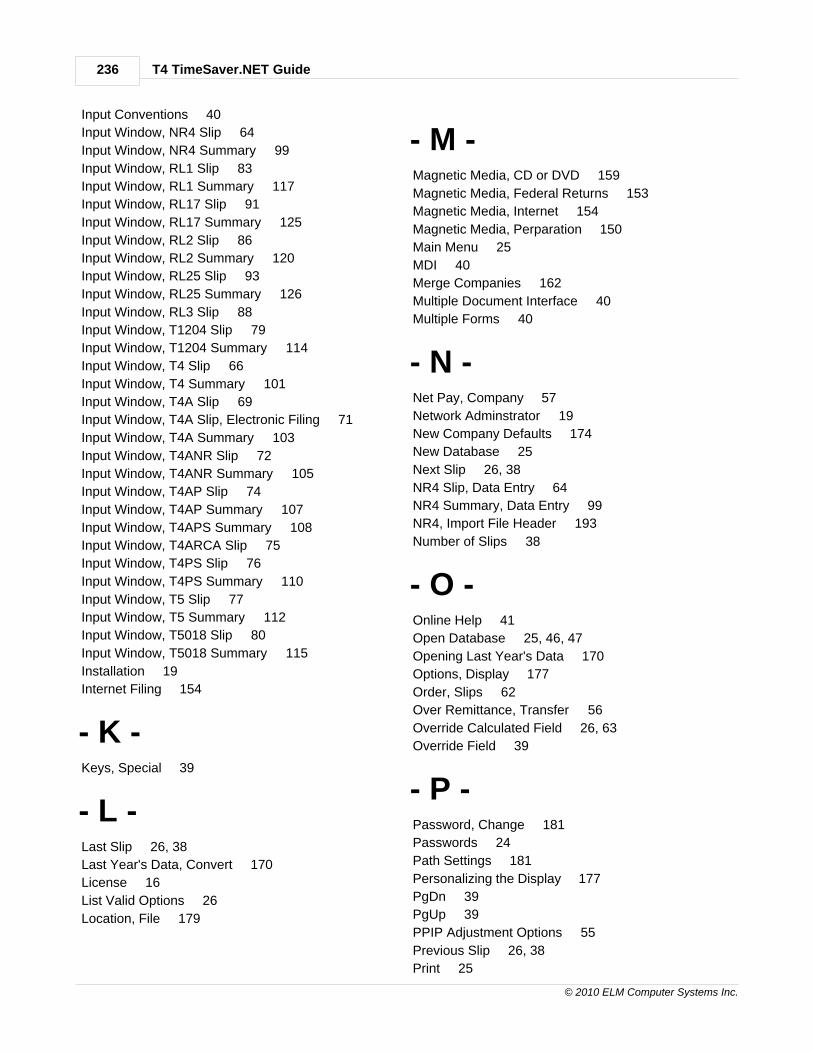
T4 TimeSaver.NET Guide236
© 2010 ELM Computer Systems Inc.
Input Conventions 40
Input Window, NR4 Slip 64
Input Window, NR4 Summary 99
Input Window, RL1 Slip 83
Input Window, RL1 Summary 117
Input Window, RL17 Slip 91
Input Window, RL17 Summary 125
Input Window, RL2 Slip 86
Input Window, RL2 Summary 120
Input Window, RL25 Slip 93
Input Window, RL25 Summary 126
Input Window, RL3 Slip 88
Input Window, T1204 Slip 79
Input Window, T1204 Summary 114
Input Window, T4 Slip 66
Input Window, T4 Summary 101
Input Window, T4A Slip 69
Input Window, T4A Slip, Electronic Filing 71
Input Window, T4A Summary 103
Input Window, T4ANR Slip 72
Input Window, T4ANR Summary 105
Input Window, T4AP Slip 74
Input Window, T4AP Summary 107
Input Window, T4APS Summary 108
Input Window, T4ARCA Slip 75
Input Window, T4PS Slip 76
Input Window, T4PS Summary 110
Input Window, T5 Slip 77
Input Window, T5 Summary 112
Input Window, T5018 Slip 80
Input Window, T5018 Summary 115
Installation 19
Internet Filing 154
- K -Keys, Special 39
- L -Last Slip 26, 38
Last Year's Data, Convert 170
License 16
List Valid Options 26
Location, File 179
- M -Magnetic Media, CD or DVD 159
Magnetic Media, Federal Returns 153
Magnetic Media, Internet 154
Magnetic Media, Perparation 150
Main Menu 25
MDI 40
Merge Companies 162
Multiple Document Interface 40
Multiple Forms 40
- N -Net Pay, Company 57
Network Adminstrator 19
New Company Defaults 174
New Database 25
Next Slip 26, 38
NR4 Slip, Data Entry 64
NR4 Summary, Data Entry 99
NR4, Import File Header 193
Number of Slips 38
- O -Online Help 41
Open Database 25, 46, 47
Opening Last Year's Data 170
Options, Display 177
Order, Slips 62
Over Remittance, Transfer 56
Override Calculated Field 26, 63
Override Field 39
- P -Password, Change 181
Passwords 24
Path Settings 181
Personalizing the Display 177
PgDn 39
PgUp 39
PPIP Adjustment Options 55
Previous Slip 26, 38
Print 25

Index 237
© 2010 ELM Computer Systems Inc.
Print Slip 38
Printing Adjustments 144
Printing Company Lists 146
Printing Edit Lists 145
Printing Slips 137
Printing Summarries 141
Problems, Common 186
Province Codes 188
- Q -QPP Adjustment Options 54
- R -Rates and Constants 179
Registration 23
Removes slips 30
Removing Slips 171
Repair Database 25, 48
Repair User Database 25
Reports, Adjustment 144
Reports, Company List 146
Reports, Data Validation 136
Reports, Edit List 145
Reports, Slips 137
Reports, Summary 141
Reversing T4 Slip Adjustments 97
Revert 26
RL1 Slip, Data Entry 83
RL1 Summary, Data Entry 117
RL1, Adjust 58
RL1, Import File Header 195
RL1, Unadjust 58
RL17 Slip, Data Entry 91
RL17 Summary, Data Entry 125
RL17, Import File Header 229
RL2 Slip, Data Entry 86
RL2 Summary, Data Entry 120
RL2, Import File Header 222
RL25 Slip, Data Entry 93
RL25 Summary, Data Entry 126
RL25, Import File Header 231
RL3 Slip, Data Entry 88
RL3, Import File Header 208
- S -Select Company 38
Select Slip 26
Selecting a Company 57
Selecting a Slip 62
Setting Adjustment Options 97
Settings, Paths 181
Settings, System 181
Settings, User 182
Skip Data Entry Fields 175
Slip Editing ToolBar 27
Slip, Add 62
Slip, Data Entry 62
Slip, Delete 38, 62
Slip, Find 38
Slip, First 38
Slip, Last 38
Slip, New 38
Slip, Next 38
Slip, Number of 38
Slip, Order 38
Slip, Previous 38
Slip, Revert 38
Slip, Select 62
Slip, Sort Order 62
Slips, Printing 137
Slips, Remove 171
Sort Order 38
Sorting Slips 62
Special Keys 39
Split Screen 40
Start Page 27
Starting 22
State Codes 188
Status Bar 27
Suggestions 15
Summaries, Printing 141
Summary, NR4 99
Summary, T4 101
Summary, T4A 103
Summary, T4ANR 105
Summary, T4AP 107
Summry, RL1 117
Summry, RL17 125
Summry, RL2 120
Summry, RL25 126
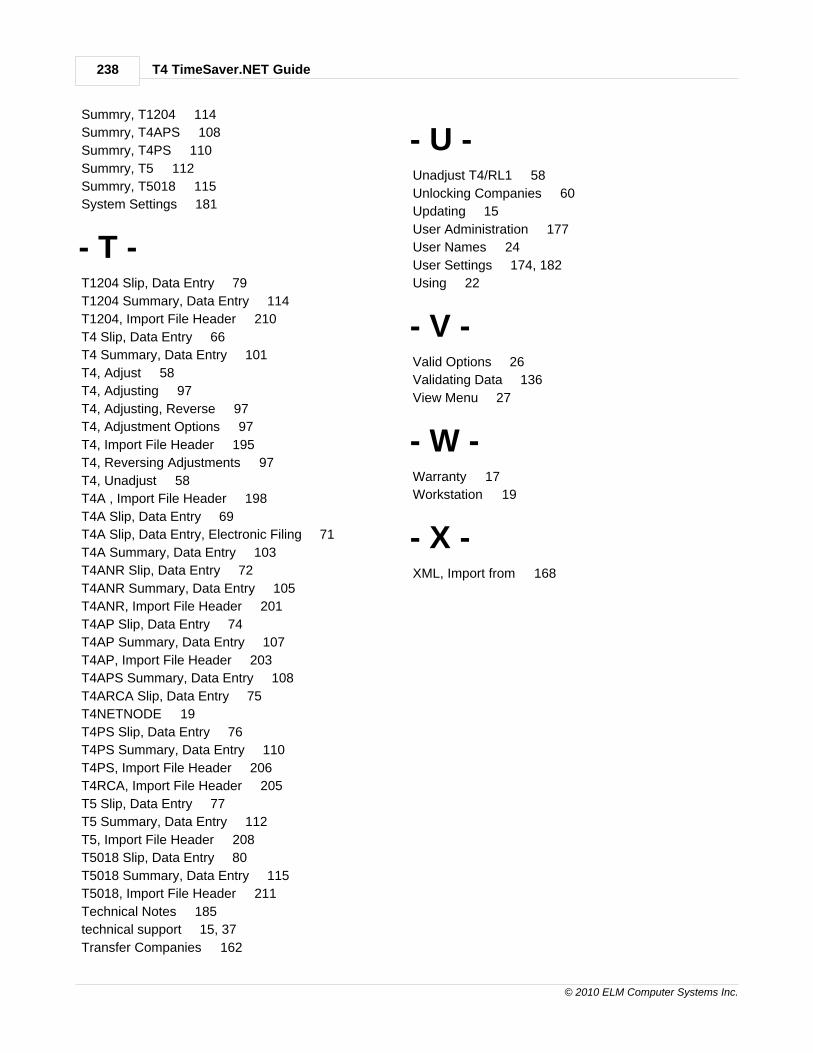
T4 TimeSaver.NET Guide238
© 2010 ELM Computer Systems Inc.
Summry, T1204 114
Summry, T4APS 108
Summry, T4PS 110
Summry, T5 112
Summry, T5018 115
System Settings 181
- T -T1204 Slip, Data Entry 79
T1204 Summary, Data Entry 114
T1204, Import File Header 210
T4 Slip, Data Entry 66
T4 Summary, Data Entry 101
T4, Adjust 58
T4, Adjusting 97
T4, Adjusting, Reverse 97
T4, Adjustment Options 97
T4, Import File Header 195
T4, Reversing Adjustments 97
T4, Unadjust 58
T4A , Import File Header 198
T4A Slip, Data Entry 69
T4A Slip, Data Entry, Electronic Filing 71
T4A Summary, Data Entry 103
T4ANR Slip, Data Entry 72
T4ANR Summary, Data Entry 105
T4ANR, Import File Header 201
T4AP Slip, Data Entry 74
T4AP Summary, Data Entry 107
T4AP, Import File Header 203
T4APS Summary, Data Entry 108
T4ARCA Slip, Data Entry 75
T4NETNODE 19
T4PS Slip, Data Entry 76
T4PS Summary, Data Entry 110
T4PS, Import File Header 206
T4RCA, Import File Header 205
T5 Slip, Data Entry 77
T5 Summary, Data Entry 112
T5, Import File Header 208
T5018 Slip, Data Entry 80
T5018 Summary, Data Entry 115
T5018, Import File Header 211
Technical Notes 185
technical support 15, 37
Transfer Companies 162
- U -Unadjust T4/RL1 58
Unlocking Companies 60
Updating 15
User Administration 177
User Names 24
User Settings 174, 182
Using 22
- V -Valid Options 26
Validating Data 136
View Menu 27
- W -Warranty 17
Workstation 19
- X -XML, Import from 168

239
© 2010 ELM Computer Systems Inc.