DSR 8.2 Software Upgrade Guide - Oracle Help Center
319
Oracle® Communications Diameter Signaling Router DSR Software Upgrade Guide Release 8.2 E88968-01 March 2018
-
Upload
khangminh22 -
Category
Documents
-
view
1 -
download
0
Transcript of DSR 8.2 Software Upgrade Guide - Oracle Help Center

Oracle® Communications
Diameter Signaling Router
DSR Software Upgrade Guide
Release 8.2
E88968-01
March 2018

DSR 8.2 Software Upgrade GuideDSR 8.2 Software Upgrade Guide
Page | 2 E88968-01
Oracle® Communications Diameter Signaling Router, DSR Software Upgrade Guide, Release 8.2
Copyright © 2011, 2018 Oracle and/or its affiliates. All rights reserved.
This software and related documentation are provided under a license agreement containing restrictions on use and disclosure and are protected by intellectual property laws. Except as expressly permitted in your license agreement or allowed by law, you may not use, copy, reproduce, translate, broadcast, modify, license, transmit, distribute, exhibit, perform, publish, or display any part, in any form, or by any means. Reverse engineering, disassembly, or decompilation of this software, unless required by law for interoperability, is prohibited.
The information contained herein is subject to change without notice and is not warranted to be error-free. If you find any errors, please report them to us in writing.
If this is software or related documentation that is delivered to the U.S. Government or anyone licensing it on behalf of the U.S. Government, then the following notice is applicable:
U.S. GOVERNMENT END USERS: Oracle programs, including any operating system, integrated software, any programs installed on the hardware, and/or documentation, delivered to U.S. Government end users are "commercial computer software" pursuant to the applicable Federal Acquisition Regulation and agency-specific supplemental regulations. As such, use, duplication, disclosure, modification, and adaptation of the programs, including any operating system, integrated software, any programs installed on the hardware, and/or documentation, shall be subject to license terms and license restrictions applicable to the programs. No other rights are granted to the U.S. Government.
This software or hardware is developed for general use in a variety of information management applications. It is not developed or intended for use in any inherently dangerous applications, including applications that may create a risk of personal injury. If you use this software or hardware in dangerous applications, then you shall be responsible to take all appropriate fail-safe, backup, redundancy, and other measures to ensure its safe use. Oracle Corporation and its affiliates disclaim any liability for any damages caused by use of this software or hardware in dangerous applications.
Oracle and Java are registered trademarks of Oracle and/or its affiliates. Other names may be trademarks of their respective owners.
Intel and Intel Xeon are trademarks or registered trademarks of Intel Corporation. All SPARC trademarks are used under license and are trademarks or registered trademarks of SPARC International, Inc. AMD, Opteron, the AMD logo, and the AMD Opteron logo are trademarks or registered trademarks of Advanced Micro Devices. UNIX is a registered trademark of The Open Group.
This software or hardware and documentation may provide access to or information about content, products, and services from third parties. Oracle Corporation and its affiliates are not responsible for and expressly disclaim all warranties of any kind with respect to third-party content, products, and services unless otherwise set forth in an applicable agreement between you and Oracle. Oracle Corporation and its affiliates will not be responsible for any loss, costs, or damages incurred due to your access to or use of third-party content, products, or services, except as set forth in an applicable agreement between you and Oracle.
CAUTION: Use only the Upgrade procedure included in the Upgrade Kit.
Before upgrading any system, please access My Oracle Support (MOS) (https://support.oracle.com) and review any Technical Service Bulletins (TSBs) that relate to this upgrade.
My Oracle Support (MOS) (https://support.oracle.com) is your initial point of contact for all product support and training needs. A representative at Customer Access Support (CAS) can assist you with MOS registration.
Call the CAS main number at 1-800-223-1711 (toll-free in the US), or call the Oracle Support hotline for your local country from the list at http://www.oracle.com/us/support/contact/index.html.
See more information on My Oracle Support (MOS).

DSR 8.2 Software Upgrade GuideDSR 8.2 Software Upgrade Guide
Page | 3 E88968-01
Table of Contents
1. Introduction ........................................................................................................................................... 12
1.1 Purpose and Scope ........................................................................................................................ 12
What is Not Covered by this Document .............................................................................. 12 1.1.1
1.2 References ..................................................................................................................................... 12
1.3 Acronyms ........................................................................................................................................ 13
1.4 Terminology .................................................................................................................................... 14
1.5 How to Use this Document ............................................................................................................. 16
1.6 Recommendations .......................................................................................................................... 17
Frequency of Health Checks ............................................................................................... 17 1.6.1
Large Installation Support ................................................................................................... 17 1.6.2
Logging of Upgrade Activities .............................................................................................. 17 1.6.3
1.7 Warnings, Cautions, and Notes ...................................................................................................... 17
Signaling Firewall ................................................................................................................ 17 1.7.1
Obsolete Hardware Check .................................................................................................. 18 1.7.2
NetBackup 7.7 Support ....................................................................................................... 18 1.7.3
Network IDIH Compatibility ................................................................................................. 18 1.7.4
Review Release Notes ........................................................................................................ 18 1.7.5
Upgrade Scenario ............................................................................................................... 19 1.7.6
2. General Description .............................................................................................................................. 19
2.1 Supported Upgrade Paths .............................................................................................................. 19
2.2 Supported Hardware ...................................................................................................................... 20
2.3 Geo-Diverse Site (Active/Standby/Spare PCA Configuration) ....................................................... 21
2.4 Firmware Updates .......................................................................................................................... 21
2.5 TVOE Upgrade ............................................................................................................................... 21
2.6 PMAC (Management Server) Upgrades ........................................................................................ 22
2.7 SDS Upgrade.................................................................................................................................. 22
2.8 Traffic Management during Upgrade .............................................................................................. 22
2.9 RMS Deployments .......................................................................................................................... 22
2.10 Automated Site Upgrade .............................................................................................................. 23
Site Upgrade Execution ..................................................................................................... 25 2.10.1
Minimum Server Availability .............................................................................................. 29 2.10.2
Site Upgrade Options ........................................................................................................ 30 2.10.3
Cancel and Restart Automated Site Upgrade ................................................................... 31 2.10.4
2.11 Automated Server Group Upgrade ............................................................................................... 34
Cancel and Restart the Automated Server Group Upgrade ............................................. 34 2.11.1

DSR 8.2 Software Upgrade GuideDSR 8.2 Software Upgrade Guide
Page | 4 E88968-01
Site Accept ........................................................................................................................ 35 2.11.2
3. Upgrade Planning and Pre-Upgrade Procedures .............................................................................. 36
3.1 Required Materials and Information ............................................................................................... 37
Application ISO Image Files/Media ..................................................................................... 37 3.1.1
Logins, Passwords and Server IP Addresses ..................................................................... 37 3.1.2
3.2 Site Upgrade Methodology Selection ............................................................................................. 41
DA-MP Upgrade Planning ................................................................................................... 44 3.2.1
3.3 Plan Upgrade Maintenance Windows ............................................................................................ 46
Maintenance Window for PMAC and TVOE Upgrades (optional) ....................................... 47 3.3.1
Calculating Maintenance Window Requirements................................................................ 47 3.3.2
Maintenance Window 1 (NOAM Site Upgrades) ................................................................. 47 3.3.3
Maintenance Window 2 and Beyond (SOAM Site Upgrades) ............................................. 48 3.3.4
3.4 Prerequisite Procedures ................................................................................................................. 51
Required Materials Check ................................................................................................... 53 3.4.1
DSR ISO Administration ...................................................................................................... 53 3.4.2
Data Collection – Verification of Global and Site Configuration Data ................................. 59 3.4.3
ISO Link Correction ............................................................................................................. 75 3.4.4
Back Up TKLCConfigData Files .......................................................................................... 77 3.4.5
Full Backup of DB Run Environment at Each Server .......................................................... 78 3.4.6
Upgrade TVOE Hosts at a Site ........................................................................................... 80 3.4.7
IDIH Upgrade Preparation ................................................................................................... 82 3.4.8
Firewall Configuration for Source Release 7.1.x ................................................................. 84 3.4.9
3.5 Software Upgrade Execution Overview .......................................................................................... 84
3.6 Accepting the Upgrade ................................................................................................................... 85
4. NOAM Upgrade Execution ................................................................................................................... 85
4.1 NOAM Pre-Upgrade Checks and Backup ...................................................................................... 86
NOAM Pre-Upgrade Health Checks ................................................................................... 86 4.1.1
NOAM Health Check for Source Release 7.1.x .................................................................. 88 4.1.2
NOAM Health Check for Source Release 7.2, 7.3, 7.4 ....................................................... 91 4.1.3
NOAM Health Check for Source Release 8.0/8.1 and Later ............................................... 94 4.1.4
NOAM Pre-Upgrade Backup ............................................................................................... 97 4.1.5
4.2 Disable Global Provisioning............................................................................................................ 98
4.3 NOAM Upgrade .............................................................................................................................. 98
4.4 Verify NOAM Post Upgrade Status .............................................................................................. 101
4.5 Allow Provisioning (Post NOAM Upgrade) ................................................................................... 103
4.6 SNMP Configuration Update (Post NOAM Upgrade) ................................................................... 103
5. Site Upgrade Execution ...................................................................................................................... 104

DSR 8.2 Software Upgrade GuideDSR 8.2 Software Upgrade Guide
Page | 5 E88968-01
5.1 Site Pre-Upgrade Activities ........................................................................................................... 104
Site Pre-Upgrade Backups ................................................................................................ 105 5.1.1
Site Pre-Upgrade Health Checks ...................................................................................... 108 5.1.2
Site Upgrade Options Check ............................................................................................. 114 5.1.3
Disable Site Provisioning ................................................................................................... 115 5.1.4
5.2 Automated Site Upgrade .............................................................................................................. 116
TVOE Upgrade Check ....................................................................................................... 116 5.2.1
Site Upgrade Pre-Checks .................................................................................................. 116 5.2.2
Initiate Automated Site Upgrade ....................................................................................... 117 5.2.3
Rearrange Automated Site Upgrade Cycles ..................................................................... 121 5.2.4
5.3 Automated Server Group/Manual Upgrade Overview .................................................................. 124
Site Upgrade Planning ...................................................................................................... 126 5.3.1
SOAM Upgrade Overview ................................................................................................. 129 5.3.2
Upgrade SOAMs ............................................................................................................... 130 5.3.3
5.4 Upgrade Iteration 3 ....................................................................................................................... 132
5.5 Upgrade Iteration 4 ....................................................................................................................... 146
5.6 Upgrade Iteration 5 ....................................................................................................................... 154
5.7 Site Post-Upgrade Procedures ..................................................................................................... 156
Allow Site Provisioning ...................................................................................................... 157 5.7.1
Site Post-Upgrade Health Checks..................................................................................... 157 5.7.2
Post-Upgrade Procedures ................................................................................................. 163 5.7.3
6. Backout Procedure Overview ............................................................................................................ 163
6.1 Recovery Procedures ................................................................................................................... 165
6.2 Backout Health Check .................................................................................................................. 166
6.3 Disable Global Provisioning.......................................................................................................... 170
6.4 Perform Emergency Backout ........................................................................................................ 170
Emergency Site Backout ................................................................................................... 170 6.4.1
Emergency NOAM Backout .............................................................................................. 174 6.4.2
6.5 Perform Normal Backout .............................................................................................................. 176
Normal Site Backout .......................................................................................................... 177 6.5.1
Normal NOAM Backout ..................................................................................................... 181 6.5.2
6.6 Backout Single Server .................................................................................................................. 184
6.7 Backout Multiple Servers .............................................................................................................. 190
6.8 Post-Backout Health Check .......................................................................................................... 196
6.9 IDIH Backout................................................................................................................................. 197
Oracle Server Backout ...................................................................................................... 197 6.9.1
Mediation and Application Server Backout ....................................................................... 197 6.9.2

DSR 8.2 Software Upgrade GuideDSR 8.2 Software Upgrade Guide
Page | 6 E88968-01
Appendix A. Post Upgrade Procedures ............................................................................................ 197
A.1. Accept the Upgrade .................................................................................................................... 197
A.2. Undeploy ISO ............................................................................................................................. 200
A.3. Post Upgrade Procedures .......................................................................................................... 201
Appendix B. Increase Maximum Number of Open Files ................................................................. 202
Appendix C. Update NOAM Guest VM Configuration...................................................................... 205
Appendix D. Determine if TVOE Upgrade is Required .................................................................... 207
Appendix E. Add ISO Images to PMAC Image Repository ............................................................. 207
Appendix F. Upgrade Single Server – DSR 8.x ................................................................................ 211
Appendix G. Upgrade Single Server – Pre-DSR 8.x ......................................................................... 217
Appendix H. Upgrade Multiple Servers – Upgrade Administration ............................................... 224
Appendix I. Upgrade Firmware......................................................................................................... 232
Appendix J. TVOE Platform ............................................................................................................... 232
J.1. TVOE Upgrade ........................................................................................................................... 232
J.2. TVOE Guest Shutdown .............................................................................................................. 236
Appendix K. IDIH Upgrade at a Site .................................................................................................. 239
K.1. Upgrade Oracle Guest ............................................................................................................... 240
K.2. Upgrade the Mediation and Application Guests ......................................................................... 242
K.2.1. Non-VEDSR Mediation and Application Guest Upgrade ................................................ 242
K.2.2. VEDSR Mediation and Application Guest Upgrade ........................................................ 245
Appendix L. Alternate Server Upgrade Procedures ........................................................................ 251
L.1. Alternate Pre-Upgrade Backup .................................................................................................. 251
L.2. Server Upgrade Using PMAC .................................................................................................... 253
L.3. Server Upgrade Using platcfg .................................................................................................... 256
L.4. Manual DA-MP (N+0) Upgrade Procedure ................................................................................ 259
L.5. Manual DA-MP (1+1) Upgrade Procedure ................................................................................. 260
L.6. ASG SBR Upgrade Procedure ................................................................................................... 260
L.7. Manual SBR Upgrade Procedure ............................................................................................... 261
Appendix M. Expired Password Workaround Procedure ................................................................ 264
M.1. Inhibit Password Aging ............................................................................................................... 264
M.2. Enable Password Aging ............................................................................................................. 266
M.3. Password Reset ......................................................................................................................... 267
Appendix N. Network IDIH Compatibility Procedures ..................................................................... 268
Appendix O. Recover From a Failed Upgrade .................................................................................. 269
Appendix P. Critical and Major Alarms Analysis ............................................................................. 274
Appendix Q. Additional Backout Steps ............................................................................................ 285
Appendix R. Additional Post-Backout Steps ................................................................................... 288

DSR 8.2 Software Upgrade GuideDSR 8.2 Software Upgrade Guide
Page | 7 E88968-01
Appendix S. Manual Completion of Server Upgrade....................................................................... 290
Appendix T. Identify the DC server ................................................................................................... 294
Appendix U. Limitations of Auto Server Group Upgrade and Automated Site Upgrade ............. 295
Appendix V. Fast Deployment Configuration File Description ...................................................... 297
V.1. Sample FDC Configuration File .................................................................................................. 300
Appendix W. Advanced Health Check Procedure ............................................................................ 307
Appendix X. Workaround to Resolve DB Site Replication Alarms ................................................ 310
Appendix Y. Workaround to Resolve Server HA Switchover Issue ............................................... 311
Appendix Z. Workaround for SNMP Configuration ......................................................................... 312
Appendix AA. Workaround to Resolve Device Deployment Failed Alarm .................................... 316
Appendix BB. Workaround to Resolve syscheck Error for CPU Failure ...................................... 317
Appendix CC. My Oracle Support (MOS) .......................................................................................... 318
List of Tables
Table 1. Acronyms ..................................................................................................................................... 13
Table 2. Terminology ................................................................................................................................. 14
Table 3. Server Selection vs Server Group Function ................................................................................ 28
Table 4. Site Upgrade Availability vs Server Group Function .................................................................... 29
Table 5. Logins, Passwords, and Server IP Addresses ............................................................................. 38
Table 6. Traffic Analysis Checklist ............................................................................................................. 41
Table 7. DA-MP Upgrade Planning Sheet ................................................................................................. 45
Table 8: Prerequisite Procedures Overview .............................................................................................. 52
Table 9. Release Specific Data Collection Procedures ............................................................................. 61
Table 10. TVOE Upgrade Execution Overview.......................................................................................... 80
Table 11. IDIH Upgrade Preparation Overview ......................................................................................... 82
Table 12: NOAM Upgrade Execution Overview......................................................................................... 85
Table 13. Site Upgrade Execution Overview ........................................................................................... 104
Table 14. Non-PCA/PDRA Site Upgrade Plan......................................................................................... 125
Table 15. Two-Site Redundancy PCA Site Upgrade Plan ....................................................................... 125
Table 16. Three-Site Redundancy PCA Site Upgrade Plan .................................................................... 126
Table 17. Site Upgrade Planning Sheet ................................................................................................... 126
Table 18. Site Upgrade Execution Overview ........................................................................................... 128
Table 19. SOAM Upgrade Execution Overview ....................................................................................... 129
Table 20. Iteration 3 Upgrade Execution Overview ................................................................................. 132
Table 21. Iteration 4 Upgrade Execution Overview ................................................................................. 146
Table 22. Iteration 5 Upgrade Execution Overview ................................................................................. 154

DSR 8.2 Software Upgrade GuideDSR 8.2 Software Upgrade Guide
Page | 8 E88968-01
Table 23. Emergency Backout Procedure Overview ............................................................................... 164
Table 24. Normal Backout Procedure Overview ...................................................................................... 164
Table 25. IDIH Upgrade Execution Overview .......................................................................................... 239
Table 26. High Impact Alarms .................................................................................................................. 274
Table 27. Medium Impact Alarms ............................................................................................................ 278
List of Figures
Figure 1. Example Procedure Steps Used in This Document ................................................................... 17
Figure 2. DSR 8.2 Supported Upgrade Paths............................................................................................ 20
Figure 3. Upgrade Perspective of DSR Site Topology .............................................................................. 24
Figure 4. Site Upgrade – NOAM View ....................................................................................................... 25
Figure 5. Site Upgrade – Entire Site View ................................................................................................. 26
Figure 6. Site Upgrade – Site Initiate Screen............................................................................................. 27
Figure 7. Site Upgrade Monitoring ............................................................................................................. 28
Figure 8. Server Group Upgrade Monitoring .............................................................................................. 29
Figure 9. Automated Site Upgrade General Options ................................................................................. 30
Figure 10. Site Upgrade Active Tasks ....................................................................................................... 31
Figure 11. Cancelled Site Upgrade Tasks ................................................................................................. 32
Figure 12. Partially Upgraded Site ............................................................................................................. 32
Figure 13. Restarting Site Upgrade ........................................................................................................... 33
Figure 14. Server Group Upgrade Active Tasks ........................................................................................ 35
Figure 15. Site Accept Button .................................................................................................................... 35
Figure 16. Site Accept Screen ................................................................................................................... 36
Figure 17. Upgrade Maintenance Windows for 3-Tier Upgrade ................................................................ 46
Figure 18. Specialized Fixed Diameter Connections ............................................................................... 296
Figure 19. Specialized Floating Diameter Connections ........................................................................... 297
Figure 20. Specialized Distribution of DSR Features .............................................................................. 297
List of Procedures
Procedure 1. Required Materials Check ................................................................................................. 53
Procedure 2. DSR ISO Administration ................................................................................................... 53
Procedure 3. Verification of Configuration Data ..................................................................................... 59
Procedure 4. Data Collection for Source Release 7.1.x ......................................................................... 62
Procedure 5. Data Collection for Source Release 7.2, 7.3, 7.4 .............................................................. 67
Procedure 6. Data Collection for Source Release 8.0 and Later ........................................................... 71
Procedure 7. ISO Link Correction ........................................................................................................... 75

DSR 8.2 Software Upgrade GuideDSR 8.2 Software Upgrade Guide
Page | 9 E88968-01
Procedure 8. Back Up TKLCConfigData ................................................................................................ 77
Procedure 9. Full Backup of DB Run Environment for Release 7.1.x and Later .................................... 78
Procedure 10. Upgrade TVOE Hosts ....................................................................................................... 81
Procedure 11. IDIH Upgrade Preparation ................................................................................................ 82
Procedure 12. NOAM Pre-Upgrade Health Checks ................................................................................. 87
Procedure 13. NOAM Health Check for Source Release 7.1.x ................................................................ 88
Procedure 14. NOAM Health Check for Source Release 7.2, 7.3, 7.4 ..................................................... 91
Procedure 15. NOAM Health Check for Source Release 8.0/8.1 and Later ............................................ 94
Procedure 16. NOAM Pre-Upgrade Backup ............................................................................................. 97
Procedure 17. Disable Global Provisioning .............................................................................................. 98
Procedure 18. NOAM Upgrade ................................................................................................................. 98
Procedure 19. Verify NOAM Post Upgrade Status ................................................................................. 101
Procedure 20. Allow Provisioning ........................................................................................................... 103
Procedure 21. Site Pre-Upgrade Backups ............................................................................................. 105
Procedure 22. Site Pre-Upgrade Health Check for Release 8.0/8.1 and Later ...................................... 108
Procedure 23. Site Pre-Upgrade Health Check for Release 7.x ............................................................ 111
Procedure 24. Site Upgrade Options Check .......................................................................................... 114
Procedure 25. Disable Site Provisioning ................................................................................................ 115
Procedure 26. Site Upgrade Pre-Checks ............................................................................................... 116
Procedure 27. Automated Site Upgrade ................................................................................................. 117
Procedure 28. Rearrange Automated Site Upgrade Cycles ................................................................... 121
Procedure 29. SOAM Upgrade Pre-Checks ........................................................................................... 130
Procedure 30. Automated SOAM Upgrade (Active/Standby) ................................................................. 131
Procedure 31. Manual SOAM Upgrade (Active/Standby/Spare) ............................................................ 132
Procedure 32. Upgrade Iteration 3 ......................................................................................................... 133
Procedure 33. Upgrade Iteration 4 ......................................................................................................... 147
Procedure 34. Upgrade Iteration 5 ......................................................................................................... 155
Procedure 35. Allow Site Provisioning .................................................................................................... 157
Procedure 36. Site Post-Upgrade Health Check .................................................................................... 158
Procedure 37. Alternate Site Post-Upgrade Health Check .................................................................... 161
Procedure 38. Post-Upgrade Procedures .............................................................................................. 163
Procedure 39. Backout Health Check .................................................................................................... 166
Procedure 40. Disable Global Provisioning ............................................................................................ 170
Procedure 41. Emergency Site Backout ................................................................................................. 171
Procedure 42. Emergency NOAM Backout ............................................................................................ 174
Procedure 43. Normal Site Backout ....................................................................................................... 177
Procedure 44. Normal NOAM Backout ................................................................................................... 181

DSR 8.2 Software Upgrade GuideDSR 8.2 Software Upgrade Guide
Page | 10 E88968-01
Procedure 45. Backout Single Server .................................................................................................... 184
Procedure 46. Backout Multiple Servers ................................................................................................ 190
Procedure 47. Post-Backout Health Check ............................................................................................ 196
Procedure 48. Accept the Upgrade ........................................................................................................ 197
Procedure 49. Undeploy ISO .................................................................................................................. 200
Procedure 50. PCA Post Upgrade Procedure ........................................................................................ 201
Procedure 51. Increase Maximum Number of Open Files ..................................................................... 202
Procedure 52. Update NOAM Guest VM Configuration ......................................................................... 205
Procedure 53. Determine if TVOE Upgrade is Required ........................................................................ 207
Procedure 54. Upgrade Single Server – Upgrade Administration – DSR 8.x ........................................ 211
Procedure 55. Upgrade Single Server – Upgrade Administration – pre DSR 8.x .................................. 217
Procedure 56. Upgrade Multiple Servers – Upgrade Administration ...................................................... 224
Procedure 57. Upgrade TVOE Platform ................................................................................................. 233
Procedure 58. Shutdown TVOE Guests ................................................................................................. 236
Procedure 59. Upgrade Oracle Guest .................................................................................................... 240
Procedure 60. Non-VEDSR Mediation and Application Guest Upgrade ................................................ 242
Procedure 61. VEDSR Mediation and Application Guest Upgrade ........................................................ 245
Procedure 62. Alternate Pre-Upgrade Backup ....................................................................................... 251
Procedure 63. Alternate Server Upgrade using PMAC .......................................................................... 253
Procedure 64. Server Upgrade Using platcfg ......................................................................................... 256
Procedure 65. Manual DA-MP (N+0) Upgrade Procedure ..................................................................... 259
Procedure 66. Manual DA-MP (1+1) Upgrade Procedure ...................................................................... 260
Procedure 67. ASG SBR Upgrade ......................................................................................................... 260
Procedure 68. Manual SBR Upgrade Procedure ................................................................................... 261
Procedure 69. Expired Password Workaround Procedure ..................................................................... 265
Procedure 70. Expired Password Workaround Removal Procedure ..................................................... 266
Procedure 71. Expired Password Reset Procedure ............................................................................... 267
Procedure 72. Enable IDIH 8.2 Compatibility ......................................................................................... 268
Procedure 73. Disable IDIH 8.2 Compatibility ........................................................................................ 268
Procedure 74. Recover from a Failed Upgrade ...................................................................................... 269
Procedure 75. Verify Critical and Major Alarms in the System Before the Upgrade .............................. 274
Procedure 76. Additional Backout Steps for NOAM, SOAM. and SBR Server(s) .................................. 285
Procedure 77. Additional Post Backout Steps for NOAM, SOAM, and SBR Server(s) .......................... 288
Procedure 78. Manual Completion of Server Upgrade........................................................................... 290
Procedure 79. Identify the DC Server ..................................................................................................... 294
Procedure 80. Firewall Check for DNS Port 53 ...................................................................................... 307
Procedure 81. Workaround to Resolve DB Site Replication Alarms ...................................................... 310

DSR 8.2 Software Upgrade GuideDSR 8.2 Software Upgrade Guide
Page | 11 E88968-01
Procedure 82. Resolve the HA Switchover Issue on Affected Server(s)................................................ 311
Procedure 83. Configure or Update SNMP Configuration ...................................................................... 312
Procedure 84. Resolve device deployment failed alarm ........................................................................ 316
Procedure 85. Workaround to Resolve syscheck Error for CPU Failure ................................................ 317

DSR 8.2 Software Upgrade GuideDSR 8.2 Software Upgrade Guide
Page | 12 E88968-01
1. Introduction
1.1 Purpose and Scope
This document describes methods utilized and procedures executed to perform a major upgrade from DSR 7.1.x, 7.2.x, 7.3.x, 7.4.x, 8.0.x, 8.1.x to release 8.2, or an incremental upgrade from an earlier DSR 8.2 release. The upgrade of HP C-Class blades, RMS HP servers, and VE-DSR servers is covered by this document. The audience for this document includes Oracle customers and the following internal groups: Software Development, Quality Assurance, Information Development, and Consulting Services including NPx. This document provides instructions to execute any incremental or major software upgrade.
Note: This document does not cover cloud DSR. Refer to [14] for cloud upgrades.
The DSR 8.2 software release includes all Oracle CGBU Platform Distribution (TPD) software. Any upgrade of TPD required to bring the DSR to release 8.2 occurs automatically as part of the DSR 8.2 software upgrade. The execution of this procedure assumes the DSR 8.2 software load (ISO file, CD-ROM or other form of media) has already been delivered to the customer’s premises. This includes delivery of the software load to the local workstation being used to perform this upgrade.
What is Not Covered by this Document 1.1.1
The following items are beyond the scope of this document. Refer to the specified reference for additional information.
Distribution of DSR software loads. It is recommended to contact MOS for the software loads as described in My Oracle Support (MOS).
Initial installation of DSR software.
Firmware upgrade. Refer to [1] (HP) or [3] (Netra).
PMAC upgrade. Refer to [5].
SDS upgrade. Refer to [8].
1.2 References
[1] DSR 8.2 Cloud Installation Guide
[2] HP Solutions Firmware Upgrade Pack Release Notes
[3] Oracle Firmware Upgrade Pack Upgrade Guide
[4] TVOE 3.5 Upgrade Document
[5] PMAC 6.5 Incremental Upgrade Guide
[6] DSR 7.0/7.1 Software Installation Part 2/2
[7] DSR 7.2/7.3 Software Installation Part 2/2
[8] SDS 8.2 Software Upgrade Guide
[9] Maintenance Window Analysis Tool
[10] Fast Deployment and Configuration Tool
[11] DSR 7.2/7.3 Disaster Recovery Guide
[12] DSR 8.2 Rack Mount Server Disaster Recovery Guide
[13] Oracle Communications DSR Introducing SCTP Datagram Transport Layer Security (DTLS) In DSR 7.1 By Enabling SCTP AUTH Extensions By Default
DSR 8.2 Software Upgrade GuideDSR 8.2 Software Upgrade Guide
Page | 13 E88968-01
[14] DSR 8.2 Cloud Software Upgrade Guide
[15] DSR Alarms and KPIs Reference
[16] Oracle Communications Tekelec Platform 7.5.x Configuration Guide
[17] DSR 8.2 C-Class Software Installation and Configuration Procedure 2/2
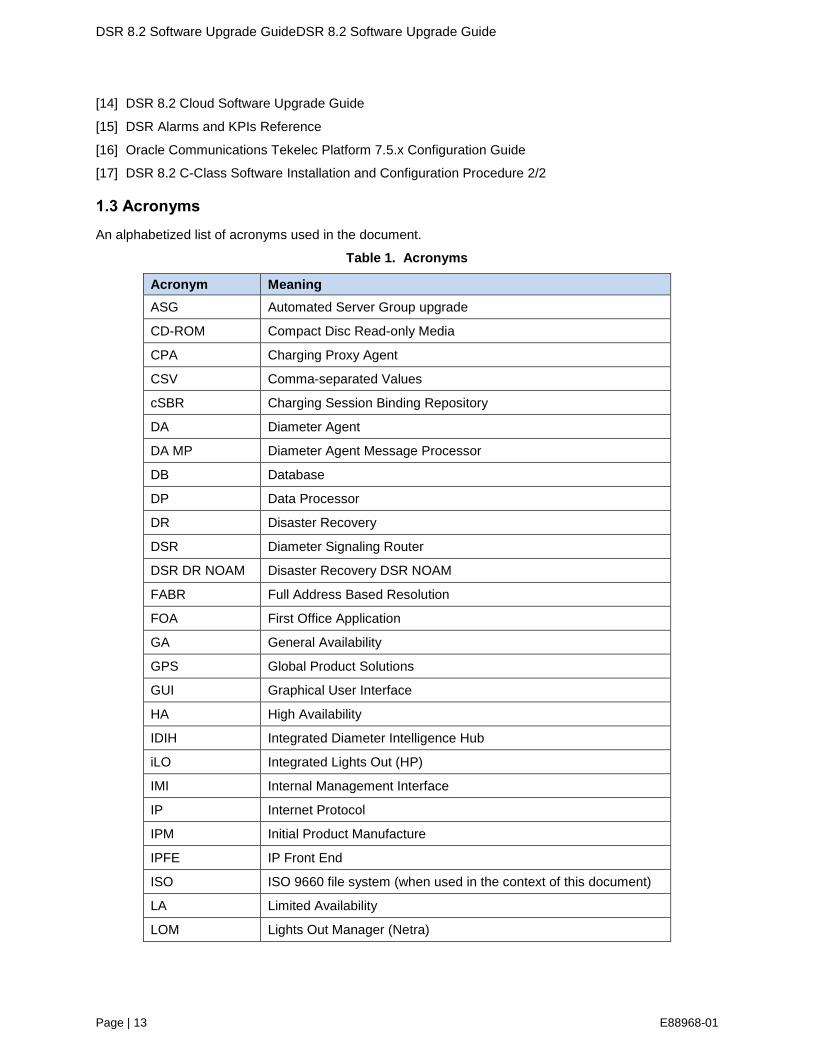
1.3 Acronyms
An alphabetized list of acronyms used in the document.
Table 1. Acronyms
Acronym Meaning
ASG Automated Server Group upgrade
CD-ROM Compact Disc Read-only Media
CPA Charging Proxy Agent
CSV Comma-separated Values
cSBR Charging Session Binding Repository
DA Diameter Agent
DA MP Diameter Agent Message Processor
DB Database
DP Data Processor
DR Disaster Recovery
DSR Diameter Signaling Router
DSR DR NOAM Disaster Recovery DSR NOAM
FABR Full Address Based Resolution
FOA First Office Application
GA General Availability
GPS Global Product Solutions
GUI Graphical User Interface
HA High Availability
IDIH Integrated Diameter Intelligence Hub
iLO Integrated Lights Out (HP)
IMI Internal Management Interface
IP Internet Protocol
IPM Initial Product Manufacture
IPFE IP Front End
ISO ISO 9660 file system (when used in the context of this document)
LA Limited Availability
LOM Lights Out Manager (Netra)

DSR 8.2 Software Upgrade GuideDSR 8.2 Software Upgrade Guide
Page | 14 E88968-01
Acronym Meaning
MOP Method of Procedure
MP Message Processing or Message Processor
MW Maintenance Window
NE Network Element
NOAM Network OAM
OA HP Onboard Administrator
OAM Operations, Administration and Maintenance
OFCS Offline Charging Solution
PCA Policy and Charging Agent (formerly known as PDRA)
PDRA Policy Diameter Routing Agent
PM&C/PMAC Platform Management and Configuration
RMS Rack Mount Server
SBR Session Binding Repository
SDS Subscriber Database Server
SOAM System OAM
TPD Tekelec Platform Distribution
TVOE Tekelec Virtualized Operating Environment
UI User Interface
VIP Virtual IP
VPN Virtual Private Network
XMI External Management Interface
XSI External Signaling Interface
1.4 Terminology
This section describes terminology as it is used within this document.
Table 2. Terminology
Term Definition
1+1 Set up with one active and one standby DA-MP.
Backout The process of converting a single DSR 8.2 server to a prior version. This could be performed due to failure in Single Server Upgrade or the upgrade cannot be accepted for some other reason. Backout is a user initiated process.
Blade (or Managed Blade) Upgrade
Single Server upgrade performed on a blade. This upgrade requires the use of the PMAC GUI.
Enablement The business practice of providing support services (hardware, software, documentation, etc) that enable a 3
rd party entity to install, configuration, and
maintain Oracle products for Oracle customers.

DSR 8.2 Software Upgrade GuideDSR 8.2 Software Upgrade Guide
Page | 15 E88968-01
Term Definition
Geographic Site A Geographic Site is defined as the physical location of a SOAM and its co-located children, as well as its non-preferred spare SOAM(s). In this document, a Geographic Site is designated as GSite.
Health Check Procedure used to determine the health and status of the DSR‘s internal network. This includes status displayed from the DSR GUI and PMAC GUI. This can be observed pre-server upgrade, in-progress server upgrade, and post-server upgrade.
Incremental Upgrade An upgrade within a given DSR release, for example, 8.2.x to 8.2.y.
Major Upgrade An upgrade from one DSR release to another DSR release, for example, DSR 7.2 to DSR 8.2.
Management server Server deployed with HP c-class or RMS used to host PMAC application, to configure Cisco 4948 switches, and to serve other configuration purposes.
Migration Changing policy and resources after upgrade (if required). For example, changing from 1+1 (active/standby) policy to N+ 0 (multiple active) policies.
N+0 Set up with N active DA-MP(s), but no standby DA-MP.
NOAM Network OAM for DSR.
PMAC application PMAC is an application that provides platform-level management functionality for HPC/RMS system, such as the capability to manage and provision platform components of the system so it can host applications.
Primary NOAM Network Element
The network element containing the active and standby NOAM servers in a DSR. If the NOAMs are deployed on a rack-mount server (and often not co-located with any other site), that RMS is considered the primary NOAM network element. If the NOAMs are virtualized on a C-class blade that is part of one of the sites, then the primary NOAM network element and the signaling network element hosting the NOAMs are one and the same.
Release Release is any particular distribution of software that is different from any other distribution.
RMS Diameter site One RMS geographic site implemented as a single Diameter network element.
RMS geographic site Two rack-mount servers that together host 1) a NOAM HA pair; 2) a SOAM HA pair; 3) two DA-MPs in either a 1+1 or N+0 configuration; 4) optional IPFE(s); 5) optional IDIH.
Rollback Automatic recovery procedure that puts a server into its pre-upgrade status. This procedure occurs automatically during upgrade if there is a failure.
Signaling Network Element
Any network element that contains DA-MPs (and possibly other C-level servers), thus carrying out Diameter signaling functions. Each SOAM pair and its associated C-level servers are considered a single signaling network element. And if a signaling network element includes a server that hosts the NOAMs, that signaling network element is also considered to be the primary NOAM network element.
Single Server Upgrade
The process of converting a DSR 7.1.x/7.2/7.3/7.4/8.0/8.1 server from its current release to a newer release.
SOAM System OAM for DSR.

DSR 8.2 Software Upgrade GuideDSR 8.2 Software Upgrade Guide
Page | 16 E88968-01
Term Definition
Software Centric The business practice of delivering an Oracle software product, while relying upon the customer to procure the requisite hardware components. Oracle provides the hardware specifications, but does not provide the hardware, and is not responsible for hardware installation, configuration, or maintenance.
Source release Software release to upgrade from.
Target release Software release to upgrade to.
Topological Site A Topological Site is defined as a SOAM Server Group and all C-level Server Groups that are children of the SOAM. All servers within a server group belong to the server group’s site, regardless of the physical location of the server. Thus, for upgrade, a Topological Site does not correlate to a ‘network element’ or a ‘place’. In this document, a Topological Site is designated as TSite.
UI User Interface. Platcfg UI refers specifically to the Platform Configuration Utility User Interface, which is a text-based user interface.
Upgrade The process of converting an application from its current release on a system to a newer release.
Upgrade Ready State that allows for graceful upgrade of a server without degradation of service. It is a state that a server is required to be in before upgrading. The state is defined by the following attributes:
A backup file is present in /var/TKLC/db/filemgmt.
Not in Accept or Reject state.
1.5 How to Use this Document
When executing the procedures in this document, there are a few key points to ensure you understand procedure convention. These points are:
1. Before beginning a procedure, completely read the instructional text (it displays immediately after the Section heading for each procedure) and all associated procedural WARNINGS or NOTES.
2. Before execution of a STEP within a procedure, completely read the left and right columns including any STEP specific WARNINGS or NOTES.
3. If a procedural STEP fails to execute successfully or fails to receive the desired output, STOP the procedure. It is recommended to contact My Oracle Support (MOS) for assistance, as described in Appendix CC before attempting to continue.
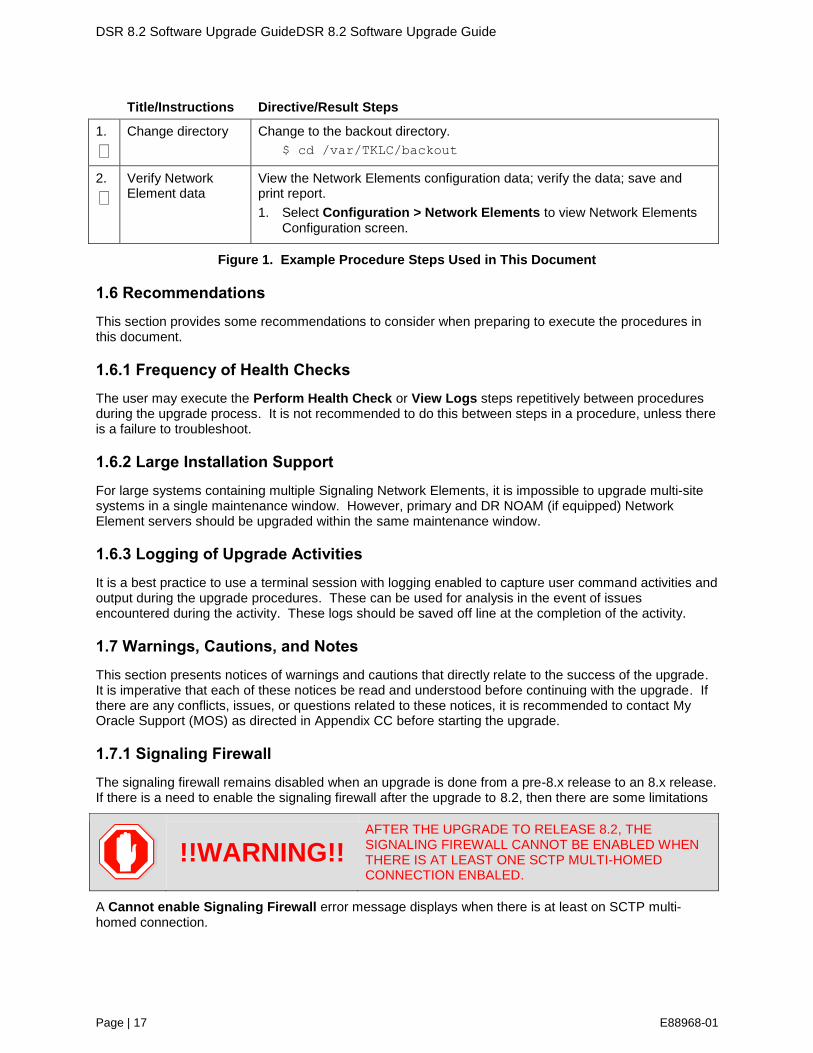
Figure 1 shows an example of a procedural step used in this document.
Each step has a checkbox that the user should check-off to keep track of the progress of the procedure.
Any sub-steps within a step are referred to as step X.Y. The example in Figure 1 shows steps 1 and step 2 and substep 2.1.
The title box describes the operations to be performed during that step.
GUI menu items, action links, and buttons to be clicked on are in bold Arial font.
GUI fields and values to take note of during a step are in bold Arial font.
Each command that the user enters, as well as any response output, is formatted in 10-point
Courier font.
DSR 8.2 Software Upgrade GuideDSR 8.2 Software Upgrade Guide
Page | 17 E88968-01
Title/Instructions Directive/Result Steps
1.
Change directory Change to the backout directory.
$ cd /var/TKLC/backout
2.
Verify Network Element data
View the Network Elements configuration data; verify the data; save and print report.
1. Select Configuration > Network Elements to view Network Elements Configuration screen.
Figure 1. Example Procedure Steps Used in This Document
1.6 Recommendations
This section provides some recommendations to consider when preparing to execute the procedures in this document.
Frequency of Health Checks 1.6.1
The user may execute the Perform Health Check or View Logs steps repetitively between procedures during the upgrade process. It is not recommended to do this between steps in a procedure, unless there is a failure to troubleshoot.
Large Installation Support 1.6.2
For large systems containing multiple Signaling Network Elements, it is impossible to upgrade multi-site systems in a single maintenance window. However, primary and DR NOAM (if equipped) Network Element servers should be upgraded within the same maintenance window.
Logging of Upgrade Activities 1.6.3
It is a best practice to use a terminal session with logging enabled to capture user command activities and output during the upgrade procedures. These can be used for analysis in the event of issues encountered during the activity. These logs should be saved off line at the completion of the activity.
1.7 Warnings, Cautions, and Notes
This section presents notices of warnings and cautions that directly relate to the success of the upgrade. It is imperative that each of these notices be read and understood before continuing with the upgrade. If there are any conflicts, issues, or questions related to these notices, it is recommended to contact My Oracle Support (MOS) as directed in Appendix CC before starting the upgrade.
Signaling Firewall 1.7.1
The signaling firewall remains disabled when an upgrade is done from a pre-8.x release to an 8.x release. If there is a need to enable the signaling firewall after the upgrade to 8.2, then there are some limitations
!!WARNING!! AFTER THE UPGRADE TO RELEASE 8.2, THE SIGNALING FIREWALL CANNOT BE ENABLED WHEN THERE IS AT LEAST ONE SCTP MULTI-HOMED CONNECTION ENBALED.
A Cannot enable Signaling Firewall error message displays when there is at least on SCTP multi-homed connection.

DSR 8.2 Software Upgrade GuideDSR 8.2 Software Upgrade Guide
Page | 18 E88968-01
Also, if the signaling firewall is enabled after the upgrade, the SCTP multi-homed connections cannot be enabled.
A SCTP Multi-homed connections cannot be enabled when Signaling Firewall is administratively enable error message displays.
!!WARNING!! AFTER THE UPGRADE TO RELEASE 8.2, SCTP MULTI-HOMED CONNECTION CANNOT BE ENBALED IF SIGNALING FIREWALL IS ALREADY ENABLED.
Obsolete Hardware Check 1.7.2
Due to the enhanced processing capabilities and requirements of DSR release 8.2, HP Gen6 and Gen7 hardware are NOT supported. All Gen6 and Gen7 blades must be replaced with supported hardware before upgrading to release 8.2.
!!WARNING!! HP GEN6 AND GEN7 HARDWARE ARE NOT SUPPORTED IN DSR 8.2. ALL GEN6 AND GEN7 BLADES MUST BE REPLACED WITH SUPPORTED HARDWARE BEFORE UPGRADING TO 8.2.
NetBackup 7.7 Support 1.7.3
NetBackup 7.7 requires additional disk space that is not available before DSR release 8.2. Thus, the DSR must be upgraded to release 8.2 before upgrading to NetBackup 7.7.
!!WARNING!! Upgrade DSR to release 8.2 before upgrading to NetBackup 7.7.
Network IDIH Compatibility 1.7.4
Upgrading an IDIH site to release 8.2 makes it incompatible for viewing network trace data contained in remote IDIH sites that are running a prior release. The incompatibility is removed once all Network IDIH systems have been upgraded to release 8.2.
To view network traces for a network of IDIH systems where there is a mix of systems running release 8.2 and systems running a prior release, Procedure 72 in Appendix N must be executed to prepare the systems running IDIH release 8.2 to support IDIH systems running the prior release. After executing Procedure 72, network traces should be viewed only from an IDIH system running the prior IDIH release. Viewing a network trace from an IDIH 8.2 results in a visualization that is incomplete because the IDIH 8.2 system fails to retrieve Trace Transaction Records (TTRs) from IDIH systems running the prior IDIH release.
When all IDIH systems have been upgraded to release 8.2, Procedure 73 should be executed on each IDIH system where Procedure 72 was previously executed to ensure that no errors occur when viewing network traces.
Review Release Notes 1.7.5
Before starting the upgrade, it is recommended to review the Release Notes for the DSR 8.2 release to understand the functional differences and possible traffic impacts of the upgrade.

DSR 8.2 Software Upgrade GuideDSR 8.2 Software Upgrade Guide
Page | 19 E88968-01
Upgrade Scenario 1.7.6
Caution
SDS Upgrade
If the customer deployment has both the FABR and PCA features enabled, then upgrade the DSR nodes first before upgrading the SDS nodes.
2. General Description
This document defines the step-by-step actions performed to execute an upgrade of an in-service DSR from the source release to the target release. A major upgrade advances the DSR from the source release to the target release. An incremental upgrade advances the DSR from an earlier DSR 8.2 source release to later version of the same target release.
Note: With any incremental upgrade, the source and target releases must have the same value of x. For example, advancing a DSR from 8.2.0.0.0_82.x.y to 8.2.0.0.0_82.z.k is an incremental upgrade. But, advancing a DSR running a 7.1 release to an 8.2 target release constitutes a major upgrade.
2.1 Supported Upgrade Paths
The supported upgrade paths to a DSR 8.2 target release are shown in Figure 2.
Note: DSR upgrade procedures assume the source and target releases are the GA or LA builds in the upgrade path.
DSR
7.0.1.0.x-b.b.b
DSR
8.2.0.0.x-d.d.d
Major Upgrade from
7.0.1 to 8.2
DSR
7.1.0.0.x-b.b.b
DSR
8.2.0.0.x-d.d.d
Major Upgrade from
7.1 to 8.2
DSR
7.2.0.0.x-b.b.b
DSR
8.2.0.0.x-d.d.d
Major Upgrade from
7.2 to 8.2

DSR 8.2 Software Upgrade GuideDSR 8.2 Software Upgrade Guide
Page | 20 E88968-01
Figure 2. DSR 8.2 Supported Upgrade Paths
2.2 Supported Hardware
If hardware is not provided by Oracle, then all Gen6 and Gen7 blades must be replaced with supported hardware before upgrading to release 8.2.
DSR
7.3.0.0.x-b.b.b
DSR
8.2.0.0.x-d.d.d
Major Upgrade from
7.3 to 8.2
DSR
7.4.0.0.x-b.b.b
DSR
8.2.0.0.x-d.d.d
Major Upgrade from
7.4 to 8.2
DSR
8.0.0.0.x-b.b.b
DSR
8.2.0.0.x-d.d.d
Major Upgrade from
8.0 to 8.2
DSR
8.1.0.0.x-b.b.b
DSR
8.2.0.0.x-d.d.d
Major Upgrade from
8.1 to 8.2
DSR
8.2.0.0.x-b.b.b
DSR
8.2.0.0.y-d.d.d
Incremental Upgrade from
8.2 to 8.2
DSR 8.2 Software Upgrade GuideDSR 8.2 Software Upgrade Guide
Page | 21 E88968-01
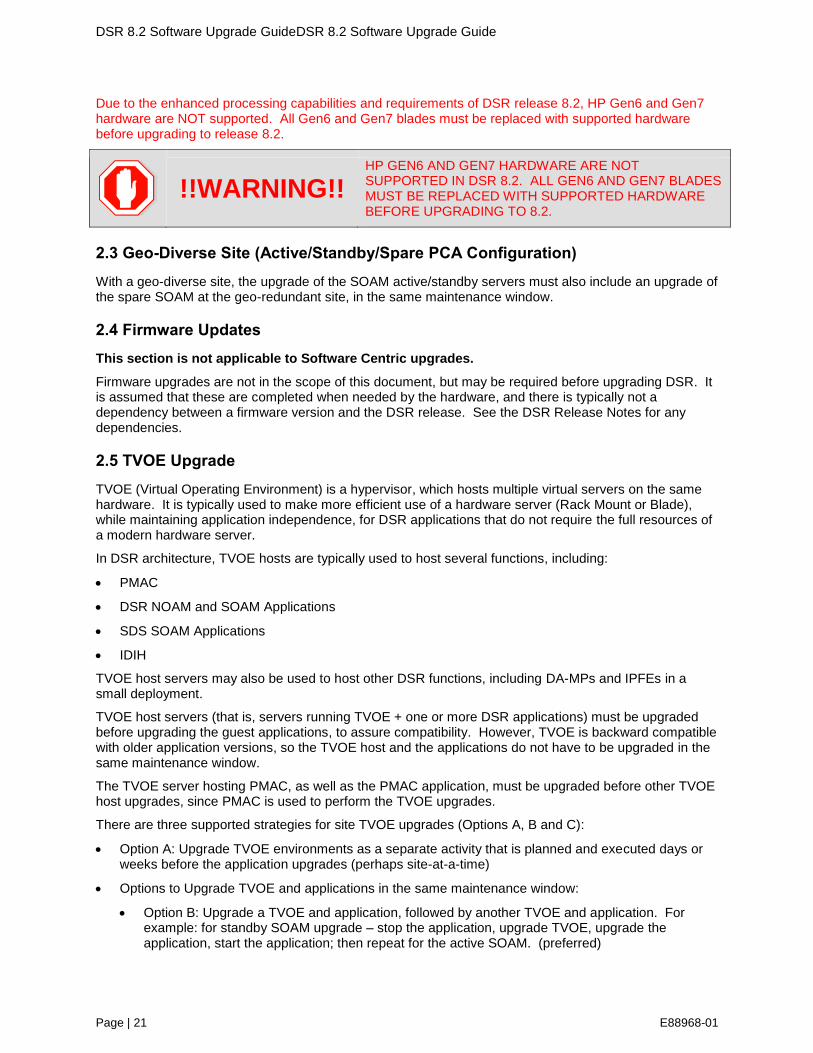
Due to the enhanced processing capabilities and requirements of DSR release 8.2, HP Gen6 and Gen7 hardware are NOT supported. All Gen6 and Gen7 blades must be replaced with supported hardware before upgrading to release 8.2.
!!WARNING!! HP GEN6 AND GEN7 HARDWARE ARE NOT SUPPORTED IN DSR 8.2. ALL GEN6 AND GEN7 BLADES MUST BE REPLACED WITH SUPPORTED HARDWARE BEFORE UPGRADING TO 8.2.
2.3 Geo-Diverse Site (Active/Standby/Spare PCA Configuration)
With a geo-diverse site, the upgrade of the SOAM active/standby servers must also include an upgrade of the spare SOAM at the geo-redundant site, in the same maintenance window.
2.4 Firmware Updates
This section is not applicable to Software Centric upgrades.
Firmware upgrades are not in the scope of this document, but may be required before upgrading DSR. It is assumed that these are completed when needed by the hardware, and there is typically not a dependency between a firmware version and the DSR release. See the DSR Release Notes for any dependencies.
2.5 TVOE Upgrade
TVOE (Virtual Operating Environment) is a hypervisor, which hosts multiple virtual servers on the same hardware. It is typically used to make more efficient use of a hardware server (Rack Mount or Blade), while maintaining application independence, for DSR applications that do not require the full resources of a modern hardware server.
In DSR architecture, TVOE hosts are typically used to host several functions, including:
PMAC
DSR NOAM and SOAM Applications
SDS SOAM Applications
IDIH
TVOE host servers may also be used to host other DSR functions, including DA-MPs and IPFEs in a small deployment.
TVOE host servers (that is, servers running TVOE + one or more DSR applications) must be upgraded before upgrading the guest applications, to assure compatibility. However, TVOE is backward compatible with older application versions, so the TVOE host and the applications do not have to be upgraded in the same maintenance window.
The TVOE server hosting PMAC, as well as the PMAC application, must be upgraded before other TVOE host upgrades, since PMAC is used to perform the TVOE upgrades.
There are three supported strategies for site TVOE upgrades (Options A, B and C):
Option A: Upgrade TVOE environments as a separate activity that is planned and executed days or weeks before the application upgrades (perhaps site-at-a-time)
Options to Upgrade TVOE and applications in the same maintenance window:
Option B: Upgrade a TVOE and application, followed by another TVOE and application. For example: for standby SOAM upgrade – stop the application, upgrade TVOE, upgrade the application, start the application; then repeat for the active SOAM. (preferred)

DSR 8.2 Software Upgrade GuideDSR 8.2 Software Upgrade Guide
Page | 22 E88968-01
Option C: Upgrade multiple TVOE hosts at a site, and then start upgrading the applications (same maintenance window)
Note: TVOE upgrades require a brief shutdown of the guest application(s) on the server.
Note: The TVOE virtual hosts may be hosting NOAM or SOAM applications. These applications are also affected, including a forced switchover if the active NOAM/SOAM is shut down.
The procedure for upgrading TVOE environments in advance of the application upgrades (Option A) is documented in Section 3.4.7.
2.6 PMAC (Management Server) Upgrades
Each site may have a PMAC (Management Server) that provides support for maintenance activities at the site. The upgrade of the PMAC (and the associated TVOE) is documented in a separate procedure (see Ref [5]). PMAC must be upgraded before the other servers at the site are upgraded.
If a PMAC upgrade is required, this activity is directed in Section 3.3.1 of this document.
2.7 SDS Upgrade
It is recommended to upgrade the SDS topology (NOAMs, SOAMs, DPs) before the DSR topology. See [8] for SDS upgrade documentation.
Caution
SDS Upgrade
If the customer deployment has both the FABR and PCA features enabled, then upgrade the DSR nodes first before upgrading the SDS nodes.
2.8 Traffic Management during Upgrade
The upgrade of the NOAM and SOAM servers is not expected to affect traffic processing at the DA-MPs and other traffic-handling servers.
For the upgrade of the DA-MPs and IPFEs, traffic connections are disabled only for the servers being upgraded. The remaining servers continue to service traffic.
!!WARNING!! SCTP Datagram Transport Layer Security Change
Oracle introduced SCTP Datagram Transport Layer Security (DTLS) in DSR 7.1 by enabling SCTP AUTH extensions by default. SCTP AUTH extensions are required for SCTP DTLS. However, there are known impacts with SCTP AUTH extensions as covered by the CVEs referenced in [13]. It is highly recommended that customers upgrading to release 8.2 should prepare clients before the DSR is upgraded. This ensures the DSR-to-Client SCTP connection establish with DTLS with SCTP AUTH extensions enabled.
If customers DO NOT prepare clients to accommodate the DTLS changes, then the SCTP connections to client devices do NOT restore after the DSR is upgraded to DSR 8.2. In the event that the SCTP connections do not re-establish after the upgrade, follow the Disable/Enable DTLS procedure in [7].
2.9 RMS Deployments
All RMS deployments are 3-Tier. In these smaller deployments, the Message Processing (DA-MP and IPFE) servers are also virtualized (deployed on a Hypervisor Host) to reduce the number of servers required.

DSR 8.2 Software Upgrade GuideDSR 8.2 Software Upgrade Guide
Page | 23 E88968-01
When an RMS-based DSR has no geographic redundancy, there is just a single RMS geographic site, functioning as a single RMS Diameter site. The upgrade of this DSR deployment should be done in two maintenance windows: one for the NOAMs, and the second for all remaining servers.
When an RMS-based DSR includes geographic redundancy, there are two RMS geographic sites (but still functioning as a single RMS Diameter site). The primary RMS site contains the NOAM active/standby pair that manages the network element, while the geo-redundant RMS site contains a disaster recovery NOAM pair. Each RMS geographic site includes its own SOAM pair, but only the SOAMs at the primary RMS site are used to manage the signaling network element. The SOAMs at the geo-redundant site are for backup purposes only.
The upgrade of an RMS DSR deployment should be done in three maintenance windows: one for the NOAMs; a second for the SOAMs and MPs (DA-MP and IPFE) at the geo-redundant backup RMS site; and a third for the SOAMs and MPs (DA-MP and IPFE) at the primary RMS site.
2.10 Automated Site Upgrade
In DSR 8.2, there are multiple methods available for upgrading a site. The newest and most efficient way to upgrade a site is the Automated Site Upgrade feature. As the name implies, this feature upgrades an entire site (SOAMs and all C-level servers) with a minimum of user interaction. Once the upgrade is initiated, the upgrade automatically prepares the server(s), performs the upgrade, and sequences to the next server or group of servers until all servers in the site are upgraded. The server upgrades are sequenced in a manner that preserves data integrity and processing capacity.
Automated Site Upgrade can be used to upgrade the DSR servers. However, Automated Site Upgrade cannot be used to upgrade PMAC, TVOE, or IDIH servers at a site.
An important definition with regard to a site upgrade is the site. For the purposes of DSR site upgrade, a site is defined as a SOAM server group plus all subtending servers of that server group, regardless of physical location. To demonstrate this definition, Figure 3 shows three physical locations, labeled TSite 1, TSite 2, and TSite 3. Each site contains a SOAM server group and an MP server group. Each SOAM server group has a spare SOAM that, although physically located at another site, is a member of the site that “owns” the server group. With site upgrade, SOA-Sp is upgraded with the Site 1 SOA server group, and SOB-sp is upgraded with the Site 2 SOB server group. The MP server groups are upgraded in the same maintenance window as their respective site SOAMs. These sites conform to the Topological Site definition of Table 2. Terminology.
With this feature, a site upgrade can be initiated on SO-A SG and all of its children (in this example, MP1 SG) using a minimum of GUI selections. The upgrade performs the following actions:
1. Upgrades SOA-1, SOA-2, and SOA-sp
2. Upgrades the servers in MP1 SG based on an availability setting and HA roles
3. Immediately begins the upgrade of any other server groups which are also children of SO-A SG (not shown). These upgrades begin in parallel with step 2.
Server groups that span sites (for example, SOAMs and SBRs) are upgraded with the server group to which the server belongs. This results in upgrading spare servers that physically reside at another site, but belong to a server group in the SOAM that is targeted for site upgrade.
Note: Automated Site Upgrade does not automatically initiate the upgrade of TSite 2 in parallel with TSite 1. However, the feature does allow the user to initiate Automated Site Upgrade of multiple sites in parallel manually.

DSR 8.2 Software Upgrade GuideDSR 8.2 Software Upgrade Guide
Page | 24 E88968-01
Figure 3. Upgrade Perspective of DSR Site Topology
Caution
Limitations of Automated Site Upgrade and Options
Limitations of automated server upgrade, detailed in Appendix U, also apply for an automated site upgrade, but can be solved by rearranging/adding the upgrade cycles. If you do not want to create a custom upgrade plan by rearranging/adding cycles, then manually upgrade using the method described in section 4.3.
TSITE 1 SO-A SG
SOA-1 SOA-2 SOA-sp
TSITE 2 SO-B_SG
SOB-1 SOB-2 SOB-sp
TSITE 1 TSITE 2
MP1_SG
MP1-1
MP1-2
MP1-3
MP1-4
MP2_SG
MP2-1
MP2-2
MP2-3
MP2-4
TSITE 3
TSITE 3 SO-C_SG
SOC-1 SOC-2 SOC-sp
MP3_SG
MP3-1
MP3-2
MP3-3
MP3-4

DSR 8.2 Software Upgrade GuideDSR 8.2 Software Upgrade Guide
Page | 25 E88968-01
Site Upgrade Execution 2.10.1
With Automated Site Upgrade, the upgrade is initiated from the Administration > Software Management > Upgrade GUI. Upon initial entry to this screen, the user is presented with a tabbed display of the NOAM server group and SOAM sites (Figure 4). When the NOAM server group tab is selected (as shown in Figure 4), this screen is largely unchanged from the upgrade screen of previous releases. The NOAM server group servers are displayed with the usual assortment of buttons. On this screen, Auto Upgrade refers to Automated Server Group upgrade, not Automated Site Upgrade. The site upgrade feature becomes available once a SOAM server group tab is selected. The SOAM server group tabs correspond to the topological sites (TSites).
Figure 4. Site Upgrade – NOAM View
After selecting a SOAM site tab on the Upgrade Administration screen, the site summary screen displays (Figure 5). Just below the row of NOAM and SOAM tabs is a row of links related to the selected SOAM site. The first link on the site summary screen displays the Entire Site view. In the entire site view, all of the server groups for the site are displayed in table form, with each server group populating one row. An upgrade summary of the server groups is provided in the table columns:
The Upgrade Method column shows how the server group is upgraded. The upgrade method is derived from the server group function and the bulk availability option (see Section 2.10.3 for additional details on bulk availability).
The Server Upgrade States column groups the servers by state, indicating the number of servers in the server group that are in each state.
The Server Application Versions column indicates the current application version, indicating the number of servers in the server group that are at each version.

DSR 8.2 Software Upgrade GuideDSR 8.2 Software Upgrade Guide
Page | 26 E88968-01
Figure 5. Site Upgrade – Entire Site View
For a server to be considered Ready for upgrade, the following conditions must hold true:
Server has not been upgraded yet
The FullDBParts and FullRunEnv backup files exist in the filemgmt area
A site is eligible for Automated Site Upgrade when at least one server in the site is upgrade-ready.
Click Site Upgrade from the Entire Site screen to display the Upgrade Site Initiate screen (Figure 6). The Site Initiate screen presents the site upgrade as a series of upgrade cycles. For the upgrade shown in Figure 6, Cycle 1 upgrades the spare and standby SOAMs in parallel.
Note: This scenario assumes default settings for the site upgrade options. These options are described in Section 2.10.3. The specific servers to be upgraded in each cycle are identified in the Servers column of the Site Initiate display. Cycle 1 is an atomic operation, meaning Cycle 2 cannot begin until Cycle 1 is complete. Once the spare and standby SOAMs are in Accept or Reject state, the upgrade sequences to Cycle 2 to upgrade the active SOAM. Cycle 2 is also atomic – Cycle 3 does not begin until Cycle 2 is complete.
Note: IPFE servers require special handling for upgrade, because IPFE servers are clustered into Target Sets and assigned an IP address, it is called Target Set Assignment (TSA). While upgrading IPFE servers, Automated Site Upgrade makes sure there is no service outage for IPFE while upgrade is in progress (that is, IPFE servers in same TSA are not upgraded in same cycle). If IPFE server address is not configured on screen (IPFE -> Configuration -> Options) on active SOAM GUI, that IPFE servers are not included in Upgrade Cycle; therefore, are not considered for upgrade using Automated Site Upgrade.

DSR 8.2 Software Upgrade GuideDSR 8.2 Software Upgrade Guide
Page | 27 E88968-01
Figure 6. Site Upgrade – Site Initiate Screen
Cycles 3 through 5 upgrade all of the C-level servers for the site. These cycles are not atomic.
In Figure 6, Cycle 3 consists of IPFE1, IPFE3, MP1, MP4, and SBR3. Because some servers can take longer to upgrade than others, there may be some overlap in Cycle 3 and Cycle 4. For example, if IPFEs 1 and 3 complete the upgrade before SBR3 is finished (all are in Cycle 3), the upgrade allows IPFEs 2 and 4 to begin, even though they are part of Cycle 4. This is to maximize Maintenance Window efficiency. The primary factor for upgrading the C-level servers is the upgrade method for the server group function (that is, bulk by HA, serial, etc.).
The site upgrade is complete when every server in the site is in the Accept or Reject state.
In selecting the servers that are included with each upgrade cycle, particularly the C-level, consideration is given to the server group function, the upgrade availability option, and the HA designation. Table 3 describes the server selection considerations for each server group function.
Note: The minimum availability option is a central component of the server selections for site upgrade. The effect of this option on server availability is described in detail in Section 2.10.2.

DSR 8.2 Software Upgrade GuideDSR 8.2 Software Upgrade Guide
Page | 28 E88968-01
Table 3. Server Selection vs Server Group Function
SG Function Selection Considerations
DSR (multi-active cluster) (for example, DA-MP)
The selection of servers is based primarily on the minimum server availability option. Servers are divided equally (to the extent possible) among the number of cycles required to enforce minimum availability. For DA-MPs, an additional consideration is given to the MP Leader. The MP with the Leader designation is the last DA-MP to be upgraded to minimize leader changes
1.
DSR (active/standby pair) (for example, DA-MP)
The DA-MP active/standby pair configuration is supported for Automated Site Upgrade starting with release 8.2.
DSR (active/standby pair) (for example, SOAM)
The SOAM upgrade method is dependent on the Site SOAM Upgrade option on the General Options page. See section 2.10.3.
SBR SBRs are always upgraded serially, thus the primary consideration for selection is the HA designation. The upgrade order is spare – spare – standby – active.
IP Front End IPFEs require special treatment during upgrade. The primary consideration is traffic continuity. Regardless of minimum availability, IPFE A1 is never upgraded at the same time as IPFE A2. They are always upgraded serially. The same restriction applies to IPFE B1 and B2.
SS7-IWF SS7-MPs are treated as a multi-active cluster of servers, similar to DA-MPs, even though each server is in a separate server group. The selection of SS7-MPs is based primarily on the minimum server availability option. Servers are divided equally (to the extent possible) among the number of cycles required to enforce minimum availability.
1 In the event of a leader change while upgrades are in progress, the MP leader may not be the last MP to
be upgraded.
To initiate the site upgrade, a target ISO is selected from the ISO options in the Upgrade Settings section of the Site Initiate screen (Figure 6). Once OK is clicked, the upgrade starts, and control returns to the Upgrade Administration screen (Figure 7). With the Entire Site link selected, a summary of the upgrade status for the selected site displays. This summary identifies the server group(s) currently upgrading, the number of servers within each server group that are upgrading, and the number of servers that are pending upgrade. This view can be used to monitor the upgrade status of the overall site. More detailed status is available by selecting the individual server group links. The server group view shows the status of each individual server within the selected server group.
Figure 7. Site Upgrade Monitoring

DSR 8.2 Software Upgrade GuideDSR 8.2 Software Upgrade Guide
Page | 29 E88968-01
When a server group link is selected on the upgrade administration screen, the table rows are populated with the upgrade details of the individual servers within that server group (Figure 8).
Figure 8. Server Group Upgrade Monitoring
Upon completion of a successful upgrade, every server in the site is in the Accept or Reject state. See Section 2.10.4 for a description of cancelling and restarting the Automated Site Upgrade.
Minimum Server Availability 2.10.2
The concept of Minimum Server Availability plays a key role during an upgrade using Automated Site Upgrade. The goal of server availability is to ensure that at least a specified percentage of servers (of any given type) remain in service to process traffic and handle administrative functions while other servers are upgrading.
For example, if the specified minimum availability is 50% and there are eight servers of type X, then four remain in service while four upgrade. However, if there are nine server of type X, then the minimum availability requires that five remain in service while four upgrade. The minimum availability calculation automatically rounds up in the event of a non-zero fractional remainder.
To meet the needs of a wide-ranging customer base, the minimum availability percentage is a user-configurable option. The option allows for settings of 50%, 66%, and 75% minimum availability. There is also a setting of 0% for lab upgrade support. This option is described in detail in Section 2.10.3.
The application of minimum server availability differs for the various server group functions. For some function types, it is a straight calculation of a percentage. However, for others, minimum availability does not apply due to overriding operational considerations. Table 4 describes the application of availability for the various server group functions.
Table 4. Site Upgrade Availability vs Server Group Function
Server Group Function Server Availability
DSR (multi-active cluster)
In a multi-active cluster, the availability percentage applies to all of the servers in the server group. The number of servers required to achieve minimum availability are calculated from the pool of in-service servers.
SBR Availability percentage does not apply to SBR server groups. SBRs are upgraded in a very specific order: spare – spare – standby – active
IP Front End IPFEs require special treatment during upgrade. The primary consideration is traffic continuity. Regardless of minimum availability, IPFE A1 is never upgraded at the same time as IPFE A2. They are always upgraded serially. The same restriction applies to IPFE B1 and B2.

DSR 8.2 Software Upgrade GuideDSR 8.2 Software Upgrade Guide
Page | 30 E88968-01
Server Group Function Server Availability
SS7-IWF Availability percentage applies to all SS7-MPs provisioned in the site. For this function, the SS7-IWF server groups are treated as a multi-active cluster of servers. The number of servers required to achieve minimum availability are calculated from the pool of in-service servers.
When calculating the number of servers required to satisfy the minimum server availability, all servers in the server group (or server group cluster) are considered. Servers that are OOS or otherwise unable to perform their intended function, are included, as are servers that have already been upgraded. For example, consider a DA-MP server group with 10 servers; four have already been upgraded, one is OOS, and five are ready for upgrade. With a 50% minimum availability, only four of the servers that are ready for upgrade, can be upgraded in parallel. The four servers that have already been upgraded count toward the five that are needed to satisfy minimum availability. The OOS server cannot be used to satisfy minimum availability, so one of the upgrade-ready servers must remain in-service for minimum availability, thus leaving four servers to be upgraded together. Upgrading the last server would require an additional upgrade cycle.
Site Upgrade Options 2.10.3
To minimize user interactions, the automated site upgrade makes use of a pair of pre-set options to control certain aspects of the sequence. These options control how many servers remain in service while others are upgrading and are located on the Administration > General Options screen (Figure 9). The default settings for these options maximize the maintenance window usage by upgrading servers in parallel as much as possible.
Figure 9. Automated Site Upgrade General Options
The first option that affects the upgrade sequence is the Site Upgrade SOAM Method. This option determines the sequence in which the SOAMs are upgraded. The default value of 1 considers the OAM HA role of the SOAMs to determine the upgrade order. In this mode, all non-active SOAM servers are upgraded first (in parallel), followed by the active SOAM. This upgrade method requires at most two upgrade cycles to upgrade all of the SOAMs, regardless of how many are present. If there are no spare SOAMs, then this setting has no effect on the SOAM upgrade.
Changing the Site Upgrade SOAM Method setting to 0 causes the standby SOAM and the spare SOAM(s) to be upgraded serially. With this mode, the SOAM upgrade could take as many as four cycles to complete (that is, spare – spare – standby – active). If there are no spare SOAMs, then this setting has no effect on the SOAM upgrade.
Regardless of the SOAM upgrade method, the active SOAM is always upgraded after the standby and spare SOAMs.

DSR 8.2 Software Upgrade GuideDSR 8.2 Software Upgrade Guide
Page | 31 E88968-01
The second option that affects the upgrade sequence is the Site Upgrade Bulk Availability setting. This setting determines the number of C-level servers that remain in service during the upgrade. The default setting of 1 equates to 50% availability, meaning that a minimum of one-half of the servers stay in service during the upgrade. The default setting is the most aggressive setting for upgrading the site, requiring the minimum number of cycles, thus the least amount of time. The settings of 66% and 75% increase the number of servers that remain in service during the upgrade.
Note: Increasing the availability percentage may increase the overall length of the upgrade.
A setting of 0 for the bulk availability option allows all of the DA-MPs to be upgraded at once. This setting is not recommended for live production systems.
The application of minimum server availability varies for the different types of C-level servers. For example, for a multi-active DA-MP server group, the minimum availability applies to all of the DA-MPs within the server group. But for other server types, such as SS7-MP, there is only one server per server group. For this server type, the SS7-MP server groups are treated as a multi-active cluster of servers. The availability percentage applies across all of the SS7-MP server groups. This same setup applies to IPFEs as well. Table 4 defines how the Site Upgrade Bulk Availability setting on the General Options page affects the various server group function types.
The Site Upgrade General Options cannot be changed while a site upgrade is in progress. Attempting to change either option while a site upgrade is in progress results in:
[Error Code xxx] – Option cannot be changed because one or more automated
site upgrades are in progress
Cancel and Restart Automated Site Upgrade 2.10.4
When an Automated Site Upgrade is initiated, several tasks are created to manage the upgrade of the individual server groups as well as the servers within the server groups. These tasks can be monitored and managed using the Active Task screen (Status & Manage > Tasks > Active Tasks).
The main site upgrade controller task is identified by the naming convention <site_name> Site Upgrade. In Figure 10, the main task is task ID 22. This task is controlling the server group upgrade task (task ID 23), which in turn is controlling the server upgrade task (task ID 24).
Figure 10. Site Upgrade Active Tasks
To cancel the site upgrade, select the site upgrade task and click Cancel. A screen requests confirmation of the cancel operation. The status changes from running to completed. The Results Details column updates to display Site upgrade task cancelled by user. All server group upgrade tasks that are under the control of the main site upgrade task immediately transition to completed state. However the site upgrade cancellation has no effect on the individual server upgrade tasks that are in

DSR 8.2 Software Upgrade GuideDSR 8.2 Software Upgrade Guide
Page | 32 E88968-01
progress. These tasks continue until completion. Figure 11 shows the Active Task screen after a site upgrade has been cancelled.
Once the site upgrade task is cancelled, it cannot be restarted. However, a new site upgrade can be started using the Upgrade Administration screen.
Figure 11. Cancelled Site Upgrade Tasks
Figure 12 is representative of a site upgrade that was cancelled before the site was completely upgraded. The servers that were in progress when the upgrade was cancelled continued to upgrade to the target release. These servers are now in the Accept or Reject state. The servers that were pending when the upgrade was cancelled are now in the Ready state, ready to be upgraded.
To restart the upgrade, verify the Entire Site link is selected and click Site Upgrade. The Upgrade Site Initiate screen displays.
Figure 12. Partially Upgraded Site
On the Upgrade Site Initiate screen, the servers that have not yet been upgraded are grouped into the number of cycles that are required to complete the site upgrade. For the upgrade that was cancelled in Figure 11, only a single cycle is needed since the availability requirements can be met by the servers that have already been upgraded. Once an ISO is selected and OK is clicked, the site upgrade continues normally.

DSR 8.2 Software Upgrade GuideDSR 8.2 Software Upgrade Guide
Page | 33 E88968-01
Figure 13. Restarting Site Upgrade

DSR 8.2 Software Upgrade GuideDSR 8.2 Software Upgrade Guide
Page | 34 E88968-01
2.11 Automated Server Group Upgrade
The Automated Server Group (ASG) upgrade feature allows the user to upgrade all of the servers in a server group automatically by specifying a set of controlling parameters.
The purpose of ASG is to simplify and automate segments of the DSR upgrade. The DSR has long supported the ability to select multiple servers for upgrade. In doing so however, it was incumbent on the user to determine ahead of time which servers could be upgraded in parallel, considering traffic impact. If the servers were not carefully chosen, the upgrade could adversely impact system operations.
When a server group is selected for upgrade, ASG upgrades each of the servers serially, or in parallel, or a combination of both, while enforcing minimum service availability. The number of servers in the server group that are upgraded in parallel is user selectable. The procedures in this document provide the detailed steps specifying when to use ASG, as well as the appropriate parameters that should be selected for each server group type.
ASG is the default upgrade method for most server group types associated with the DSR. However, there are some instances in which the manual upgrade method is utilized. In all cases where ASG is used, procedures for a manual upgrade are also provided.
Note: To use ASG on a server group, no servers in that server group can be already upgraded – either by ASG or manually.
DSR continues to support the parallel upgrade of server groups, including any combination of automated and manual upgrade methods.
STOP Limitations of Automated Server Group Upgrade
The limitations of automated site upgrade are detailed in Appendix U.
The Oracle recommendation for any customer whose network aligns with any of the scenarios in Appendix U is that Automated Server Group Upgrade should NOT be used. Use of Auto Server Group Upgrade risks a potential network outage.
Cancel and Restart the Automated Server Group Upgrade 2.11.1
When a server group is upgraded using ASG, each server within that server group is automatically prepared for upgrade, upgraded to the target release, and returned to service on the target release. Once an ASG upgrade is initiated, the task responsible for controlling the sequencing of servers entering upgrade can be manually cancelled from the Status & Manage > Active Tasks screen (Figure 14) if necessary. Once the task is cancelled, it cannot be restarted. However, a new ASG task can be started using the Upgrade Administration screen.
For example, in Figure 14, task ID #1 (SO_SG Server Group Upgrade) is an ASG task, while task ID #2 is the corresponding individual server upgrade task. When the ASG task is selected (highlighted in green), Cancel is enabled. Cancelling the ASG task affects only the ASG task. It has no effect on the individual server upgrade tasks that were started by the ASG task (that is, task ID #2 in Figure 14). Because the ASG task is cancelled, no new server upgrades are initiated by the task.

DSR 8.2 Software Upgrade GuideDSR 8.2 Software Upgrade Guide
Page | 35 E88968-01
Figure 14. Server Group Upgrade Active Tasks
In the event that a server fails upgrade, that server automatically rolls back to the previous release in preparation for backout_restore and fault isolation. Any other servers in that server group that are in the process of upgrading continue to upgrade to completion. However, the ASG task itself is automatically cancelled and no other servers in that server group are upgraded. Cancelling the ASG task provides an opportunity for troubleshooting to correct the problem. Once the problem is corrected, the server group upgrade can be restarted by initiating a new server group upgrade on the upgrade screen.
Site Accept 2.11.2
Before DSR 8.0, the customer was required to ‘Accept’ the upgrade of individual servers in each server group of a site. While the Accept is a relatively quick operation, it could nonetheless be a tedious task for larger sites with numerous servers. Starting in DSR 8.0, a new feature has been added to make the upgrade Accept much easier for all customers, large and small.
The Site Accept button on the upgrade GUI (Figure 15) provides the capability to simultaneously accept the upgrade of some or all servers for a given site. When the button is clicked, a subsequent screen (Figure 16) displays the servers that are ready for the Accept action.
Figure 15. Site Accept Button
A checkbox on the Upgrade Site Accept screen allows for the selective application of the Accept action. However, normal procedure calls for the Accept to be applied to all of the servers at a site only after the upgrade to the new release is stable and the back out option is no longer needed. After verifying that the information presented is accurate, clicking OK results in a screen that requires confirmation of the intended action. Confirming the action causes the server upgrades to be accepted.
The Accept command is issued to the site servers at a rate of approximately one server every second. The command takes approximately 10 seconds per server to complete. As the commands are completed, the server status on the Upgrade Administration screen transitions to Backup Needed.

DSR 8.2 Software Upgrade GuideDSR 8.2 Software Upgrade Guide
Page | 36 E88968-01
Figure 16. Site Accept Screen
3. Upgrade Planning and Pre-Upgrade Procedures
This section contains all information necessary to prepare for and execute an upgrade. The materials required to perform an upgrade are described, as are pre-upgrade procedures that should be run to ensure the system is fully ready for upgrade. Then, the actual procedures for each supported upgrade path are given.
There are overview tables throughout this document that help plan the upgrade and estimate how long it takes to perform various actions. The stated time durations for each step or group of steps are estimates only. Do not use the overview tables to execute any actions on the system. Only the procedures should be used when performing upgrade actions, beginning with Required Materials Check.
Note: While planning for an upgrade, be aware that once an upgrade starts and OAM level servers are on different releases, OAM level provisioning data is not replicated to sites not upgraded yet.
Once servers in the site are upgraded, replication from OAM level serves is restored and upgraded servers start receiving provisioning data.

DSR 8.2 Software Upgrade GuideDSR 8.2 Software Upgrade Guide
Page | 37 E88968-01
STOP Read Section 2.10 Automated Site Upgrade to gather details while planning an upgrad
Note: If the 31149- DB Late Write Nonactive alarm displays, ignore it. This alarm does not have any effect on functionality.
3.1 Required Materials and Information
The following materials and information are needed to execute an upgrade:
Target-release application ISO image file or target-release application media.
The capability of logging into the DSR 7.x/8.x network OAM servers with Administrator privileges.
Note: All logins into the DSR NOAM servers are made using the External Management VIP unless otherwise stated.
User logins, passwords, IP addresses and other administration information. See Table 5.
VPN access to the customer’s network is required if that is the only method to log into the OAM servers.
Direct access to the blades/RMS Integrated Lights Out (iLO)/XMI IP addresses (whichever is applicable) from the workstations directly connected to the DSR servers is required.
Application ISO Image Files/Media 3.1.1
Obtain a copy of the target release ISO image file or media. This file is necessary to perform the DSR application upgrade.
The DSR 8.2 ISO image file name is in the following format:
DSR-8.2.0.0.0_82.xx.0-x86_64.iso
If TVOE is being upgraded, obtain a copy of the TVOE release ISO image file or media. The TVOE ISO image file name is in the following format:
TVOE-3.3.0.0.0_88.xx.0-x86_64.iso
Note: Before the execution of this upgrade procedure it is assumed that the ISO image files have already been delivered to the site by the customer. The ISO image files must reside on the local workstation used to perform the upgrade, and any user performing the upgrade must have access to the ISO image files. If the user performing the upgrade is at a remote location, it is assumed the ISO files are already available before starting the upgrade procedure.
The DSR ISO is deployed as part of the pre-upgrade activities in Section 3.4.
Logins, Passwords and Server IP Addresses 3.1.2
Table 5 identifies the information that is called out in the upgrade procedures, such as server IP addresses and login credentials. For convenience, space is provided in Table 5 for recording the values, or the information can be obtained by other means. This step ensures that the necessary administration information is available before an upgrade.
Consider the sensitivity of the information recorded in this table. While all of the information in the table is required to complete the upgrade, there may be security policies in place that prevent the actual recording of this information in hard-copy form.

DSR 8.2 Software Upgrade GuideDSR 8.2 Software Upgrade Guide
Page | 38 E88968-01
Table 5. Logins, Passwords, and Server IP Addresses
Item Description Recorded Value
Target Release Target DSR Upgrade Release
Credentials GUI Admin Username1
GUI Admin Password
DSR Root Password2
DSR admusr Password2
Blades iLO/LOM Admin Username
Blades iLO/LOM Admin Password
PMAC GUI Admin Username
PMAC GUI Admin Password
PMAC root Password
PMAC pmacftpusr password
OA GUI Username
OA GUI Password
VPN Access Details Customer VPN information (if needed)
NOAM XMI VIP Address3
NOAM 1 XMI IP Address
NOAM 2 XMI IP Address
SOAM XMI VIP address
SOAM 1 XMI IP Address ( Site 1)
SOAM 2 XMI IP Address (Site 1)
PCA (DSR) Spare System OAM&P server – Site 1 Spare in Site 2, XMI IP Address
SOAM 1 XMI IP Address ( Site 2)
SOAM 2 XMI IP Address (Site 2)
PCA (DSR) Spare System OAM&P server – Site 2 Spare in Site 1, XMI IP Address
1 The user must have administrator privileges. This means the user belongs to the admin group in Group
Administration.
2 This is the password for the server login. This is not the same login as the GUI Administrator. The
admusr password is required if recovery procedures are needed. If the admusr password is not the same on all other servers, then all those servers’ admusr passwords must also be recorded; use additional space at the bottom of this table.
3 All logins into the NOAM servers are made using the External Management VIP unless otherwise
stated.

DSR 8.2 Software Upgrade GuideDSR 8.2 Software Upgrade Guide
Page | 39 E88968-01
Item Description Recorded Value
Binding SBR Server Groups
Binding SBR SR1 Server Group Servers (Site 1)
Binding SBR SR2 Server Group Servers (Site 1)
Binding SBR SR3 Server Group Servers (Site 1)
Binding SBR SR4 Server Group Servers (Site 1)
PCA MP Server Group PCA MP Server Group Servers (Site 1)
PCA MP Server Group Servers (Site 1)
IPFE Server Groups (For PCA)
PCA IPFE A1 Server Group Server (Site 1)
PCA IPFE A 2 Server Group Server (Site 1)
PCA IPFE B 1 Server Group Server (Site 1)
PCA IPFE B 2 Server Group Server (Site 1)
Binding SBR Server Groups
Binding SBR SR1 Server Group Servers (Site 2)
Binding SBR SR2 Server Group Servers (Site 2)
Binding SBR SR3 Server Group Servers (Site 2)
Binding SBR SR4 Server Group Servers (Site 2)
PCA MP Server Group PCA MP Server Group Servers (Site 2)
IPFE Server Groups (For PCA)
PCA IPFE A1 Server Group Server (Site 2)
PCA IPFE A 2 Server Group Server (Site 2)
PCA IPFE B 1 Server Group Server (Site 2)
PCA IPFE B 2 Server Group Server (Site 2)
SS7-IWF Server Groups
SS7-IWF Server Group Server
SS7-IWF Server Group Server
SS7-IWF Server Group Server
SS7-IWF Server Group Server
SS7-IWF Server Group Server
SS7-IWF Server Group Server
SS7-IWF Server Group Server
SS7-IWF Server Group Server
iLO/LOM NOAM 1 iLO/LOM IP Address
NOAM 2 iLO/LOM IP Address
SOAM 1 iLO/LOM IP Address
SOAM 2 iLO/LOM IP Address
MP 1 iLO/LOM IP Address
MP 2 iLO/LOM IP Address
MP (n) iLO/LOM IP Address
IPFE MP iLO/LOM IP Address (optional)

DSR 8.2 Software Upgrade GuideDSR 8.2 Software Upgrade Guide
Page | 40 E88968-01
Item Description Recorded Value
IPFE MP iLO/LOM IP Address (optional)
IPFE MP (n) iLO/LOM IP Address (optional)
DA MP iLO/LOM IP Address (optional)
DA MP iLO/LOM IP Address (optional)
DA MP(n) iLO/LOM IP Address (optional)
PMAC PMAC Management IP Address(Site 1)
PMAC PMAC Management IP Address(Site 2)
Software Target Release Number
ISO Image (.iso) file name
Misc4 Miscellaneous additional data
4 As instructed by Oracle CGBU Customer Service.

DSR 8.2 Software Upgrade GuideDSR 8.2 Software Upgrade Guide
Page | 41 E88968-01
3.2 Site Upgrade Methodology Selection
There are three primary methods for upgrading a DSR site: Automated Site Upgrade, Auto Server Group Upgrade, and manual upgrade. The Automated Site Upgrade is the easiest and most efficient site upgrade method. Below mentioned scenarios for Automated Site Upgrade can be solved by rearranging/adding the upgrade cycles. If the user does not want to create a custom upgrade plan by rearranging/adding cycles then in that case manual upgrade method should be used.
The Auto Server Group upgrade incorporates many of the conveniences of Automated Site Upgrade, but allows for more customer control of the upgrade process. Again, Auto Server Group upgrade is not for all customers or all configurations. The manual upgrade method gives maximum control to the customer and can be used for all configurations. A combination of upgrade methods can be utilized to upgrade a given site to maximize efficiency with customer peace-of-mind.
Table 6 is a worksheet for determining which upgrade method meets the needs of the customer while ensuring compatibility with the DSR configuration. Upon completion of the worksheet, a recommended upgrade method is identified.
Table 6. Traffic Analysis Checklist
Criteria Yes No Notes
1. Do any of the site’s DA-MPs have fixed diameter connections to any peer node, similar to this depiction?
Automated Site Upgrade and Automated Server Group upgrade by default do not consider fixed peer connections when selecting servers to upgrade. It is possible that all DA-MPs servicing a given peer (such as DA-MPs 1 and 3) could be upgraded simultaneously using the default plan, thereby isolating the peer. For this reason, the generic upgrade plan generated by Automated Site Upgrade and Auto Server Group Upgrade should be carefully analyzed to ensure all DA-MPs servicing a given peer are not upgraded simultaneously. If the generic plan reports the DA-MPs will be upgraded simultaneously the user must rearrange the upgrade and/or add cycles as necessary to develop a suitable plan.
If yes, proceed to section 5.2.4 to Rearrange or add Cycles for ASU or proceed to step 8 for manual Upgrade.
If no, continue with step 2.
DA
MP1
DA MP2
DA MP3
DA MP4
DA-MP Server Group
Peer 1 Peer 2

DSR 8.2 Software Upgrade GuideDSR 8.2 Software Upgrade Guide
Page | 42 E88968-01
Criteria Yes No Notes
2. If peer nodes are configured using IPFE TSAs, are there any TSAs that are not distributed across all DA-MPs, similar to this depiction?
Automated Site Upgrade and Automated Server Group upgrade by default do not consider non-uniformly distributed TSAs when selecting servers to upgrade. It is possible that all DA-MPs servicing a given TSA (such as DA-MPs 1 and 2) could be upgraded simultaneously, using the default plan, thereby isolating the peer. For this reason, the generic upgrade plan generated by Automated Site Upgrade and Auto Server Group Upgrade should be carefully analyzed to ensure all DA-MPs servicing a given TSA are not upgraded simultaneously. If the generic plan reports the DA-MPs will be upgraded simultaneously the user must rearrange the upgrade and/or add cycles as necessary to develop a suitable plan.
If yes, proceed to section 5.2.4 to Rearrange or add Cycles for ASU or proceed to step 8 for manual Upgrade.
If no, continue with step 3.
3. Do any of the site’s DA-MPs have specialized distribution of DSR features, similar to this depiction?
Automated Site Upgrade and Automated Server Group upgrade by default do not consider non-uniform distribution of features when selecting servers to upgrade. It is possible that all DA-MPs hosting a given feature (such as DCA) could be upgraded simultaneously, using the default plan, thereby eliminating service functionality.
For this reason, the generic upgrade plan generated by Automated Site Upgrade and Auto Server Group Upgrade should be carefully analyzed to `ensure all DA-MPs hosting a given feature are not upgraded simultaneously. If the generic plan reports the DA-MPs will be upgraded simultaneously the user must rearrange the upgrade and/or add cycles as necessary to develop a suitable plan.
If yes, proceed to section 5.2.4 to Rearrange or add Cycles for ASU or proceed to step 8 for manual Upgrade.
If no, continue with step 4.
DA
MP1
DA MP2
DA MP3
DA MP4
DA-MP Server Group
Peer 1 Peer 2
TSA 1 TSA 2
RBAR
PDRA
DA-MP Server Group
DCA Peer
RBAR Peer
RBAR PDRA
RBAR PDRA
DCA Only
DCA Only

DSR 8.2 Software Upgrade GuideDSR 8.2 Software Upgrade Guide
Page | 43 E88968-01
Criteria Yes No Notes
4. Is the DA-MP server group in the active/standby pair (1+1) configuration?
Starting with release 8.2, the DA-MP active/standby pair is supported for Automated Site Upgrade. The site is a candidate for Auto Server Group upgrade.
If yes, proceed to step 7.
If no, continue with step 5.
5. Automated Site Upgrade is a candidate for this system.
Automated Site Upgrade supports 50% minimum server availability by default. A general option allows availability percentage settings of 66% or 75%. Is 50%, 66%, or 75% server availability during upgrade acceptable to the customer?
In general, a higher minimum availability setting increases the time required to upgrade a site. On the other hand, a lower minimum availability may reduce operational redundancy during the upgrade. If none of the minimum availability options are acceptable, Automated Site Upgrade should not be used to upgrade the site.
If yes, continue with step 6.
If no, proceed to step 7.
6. Is the customer comfortable with minimum user intervention (that is, user input) during the upgrade?
Once initiated, Automated Site Upgrade requires no additional user input to complete the upgrade. User control is limited to cancelling the site upgrade task.
If yes, Automated Site Upgrade is the recommended upgrade method.
If no, proceed to step 7.
7. Automated Server Group Upgrade is a candidate for this system. Is the customer comfortable with the level of control afforded by the Automated Server Group upgrade?
Auto Server Group upgrade allows the user to initiate the upgrade of each server group, while the individual servers within the server group upgrade automatically.
If yes, Auto Server Group upgrade is the recommended upgrade method.
If no, proceed to step 8.

DSR 8.2 Software Upgrade GuideDSR 8.2 Software Upgrade Guide
Page | 44 E88968-01
Criteria Yes No Notes
8. A manual upgrade affords the maximum level of control over upgrade sequencing and intermediate observations. With this method, the upgrade of each server is individually initiated, allowing the user to control the level of parallelism and speed of the upgrade.
Note: A site upgrade can include a combination of Automated Server Group upgrade and manual upgrades to improve efficiency. For example, SBRs can be upgraded with Automated Server Group or Manual upgrade, while the DA-MPs may be upgraded manually to control the order of upgrade for traffic continuity.
A manual upgrade is the recommended upgrade method.
DA-MP Upgrade Planning 3.2.1
If a manual upgrade is recommended by the Table 6 worksheet, additional planning is required to ensure a successful upgrade of the DA-MP server group. A manual upgrade is typically required/recommended when the DA-MPs are configured in a way such that an upgrade could result in a traffic outage. Pre-planning the upgrade of the DA-MPs is key to avoiding an outage.
Table 7 is an aid to laying out the sequence of the DA-MP upgrades, taking into consideration configuration and traffic continuity. This worksheet must be completed by the customer and provided to Oracle if Oracle personnel are performing the upgrade. It is highly recommended that the worksheet be completed for customer-driven upgrades as well.
Customer: perform an analysis of the Diameter application and connection configurations to assess any potential traffic loss due to the DA-MP upgrade. Complete the worksheet, specifying the order in which the DA-MPs will be upgraded, and which MPs, if any, can be upgraded in parallel.
The worksheet is divided into four upgrade Cycles. Each cycle represents an upgrade period during which one or more servers are upgraded. Distributing the DA-MPs servers over two or more cycles, takes advantage of parallism, thereby reducing the time required to upgrade the entire server group.
To achieve 50% server availability, half of hostnames would be listed in Cycle 1 while the other half would be listed in Cycle 2, requiring two upgrade cycles. Similarly, 75% availability can be achieved by spreading the hostname over all four cycles.
In all cases, regardless of the number of cycles used to upgrade the DA-MP server group, the DA-MP Leader should be the last server upgraded. Upgrading the DA-MP Leader last minimizes the number of leader changes during the upgrade. The DA-MP Leader is designated on the active SOAM at Diameter > Maintenance > DA-MPs > Peer DA-MP Status, where MP Leader = Yes.
There is some limitation with upgrading DC server in a C-level server group that are upgraded in a group of servers, for example DA-MP and SS7 MP. Make sure the DC server is not upgraded in first upgrade cycle of the C-Level servers.
Identifythe DC server using Appendix T Identify the DC server.
Note: If desired, the DA-MPs can be upgrade serially, in which case, all hostnames would be listed in cycle 1. List the DA-MPs in the order in which they will be upgraded.

DSR 8.2 Software Upgrade GuideDSR 8.2 Software Upgrade Guide
Page | 45 E88968-01
Table 7. DA-MP Upgrade Planning Sheet
Hostnames
Upgrade Cycle 1 or Serial Upgrade
Hostnames
Upgrade Cycle 2
Hostnames
Upgrade Cycle 3
Hostnames
Upgrade Cycle 4
DA-MP Leader:

DSR 8.2 Software Upgrade GuideDSR 8.2 Software Upgrade Guide
Page | 46 E88968-01
3.3 Plan Upgrade Maintenance Windows
This section provides a high-level checklist to aid in tracking individual server upgrades. The servers are grouped by maintenance window, and it is expected that all servers in a group can be successfully upgraded in a single maintenance window. Use this high-level checklist together with the detailed procedures that appear later in this document.
Figure 17. Upgrade Maintenance Windows for 3-Tier Upgrade
!!WARNING!! Mated SOAM sites must be upgraded in separate maintenance windows
N
Maintenance Window 2
Maintenance Window N Maintenance Window 3
Maintenance Window 1
MP1 MP2
SO2
MP6 MP5 MP7 MP3 MP4 MP8 MP9
SO1
SO6
SO5 SO3
SO4
NO2 NO1 DR
NO1
DR NO2

DSR 8.2 Software Upgrade GuideDSR 8.2 Software Upgrade Guide
Page | 47 E88968-01
Maintenance Window for PMAC and TVOE Upgrades (optional) 3.3.1
This document includes steps to upgrade TVOE as an integrated activity with the upgrade of the DSR application. However, it is an option to upgrade TVOE and PMAC (if necessary) as separately planned and executed activities using the following references:
PMAC Upgrade procedure is provided in reference [5].
TVOE host environment upgrade procedures are included in this document and in reference [4].
PMAC and TVOE upgrades are backwards compatible to prior releases of DSR. These upgrades may be done throughout the entire topology, or a site-at-a-time, before upgrading the DSR application.
If PMAC and TVOE are to be upgraded in a separate maintenance window than the DSR application, this activity should be initiated and completed before starting Section 3.6. The procedure for upgrading TVOE is provided in Section 3.4.7. Refer to [5] for PMAC upgrade procedures.
Note: In RMS and VEDSR configurations, the PMAC and DSR servers could be sharing the same TVOE host. Make the customer aware of all servers affected by the TVOE upgrade.
Calculating Maintenance Window Requirements 3.3.2
The number of maintenance windows required for DSR setup and upgrade can be calculated by using the Maintenance Window Analysis Tool (see ref [9]).
This Excel spreadsheet takes setup details as input from the user and accordingly calculates the number of maintenance windows required for upgrade. Complete DSR upgrade maintenance window details and timings can be found in Reference [9]. Please see the instructions tab of the spreadsheet for more information and details.
Maintenance Window 1 (NOAM Site Upgrades) 3.3.3
During the first maintenance window, the NOAM servers are upgraded, and possibly also the PMAC, and the TVOE environments supporting these servers.
Note: PMAC and/or TVOE environments may be upgraded before Maintenance Window 1, as described in Section 2.5.)
Maintenance Window 1
NOAM Sites
Date: ________________
Note: View the NE Name from the DSR NOAM GUI under Configuration -> Network Elements.
*Note: To save time, upgrade PMAC servers outside/ahead of the DSR maintenance window since this activity is seen as non-intrusive to
1. Record the site NE name of the PMAC, DSR NOAM, and the DR provisioning site to upgrade during maintenance window 1 in the space provided:
2. Mark the associated checkbox as each server upgrade is completed.
* DR PMAC (Guest): __________________________________
TVOE for DR NOAM-B: ________________________________
TVOE for DR NOAM-A: ________________________________
* Primary PMAC (Guest): _______________________________
TVOE for Primary NOAM-B: ____________________________
TVOE for Primary NOAM-A: ____________________________
DR Standby NOAM (Guest): ____________________________
DR Active NOAM (Guest): ______________________________
Primary Standby NOAM (Guest): ________________________
Primary Active NOAM (Guest): __________________________

DSR 8.2 Software Upgrade GuideDSR 8.2 Software Upgrade Guide
Page | 48 E88968-01
DSR operation.
Maintenance Window 2 and Beyond (SOAM Site Upgrades) 3.3.4
During maintenance window 2, all servers associated with the first SOAM site are upgraded. All servers associated with the second SOAM site are upgraded during maintenance window 3.
For DSRs configured with multiple mated-pair sites, or DSRs having multiple distinct sites (for example, geo-redundant PCA installations), the following form should be copied and used for the subsequent SOAM site upgrades.
!!WARNING!! It is strongly recommended that mated pair SOAM sites are NOT upgraded in the same maintenance window.
Maintenance Window
SOAM Sites
Date: ________________
Note: For 1+1 configuration, only 2 DA-MP(s) are present, one is active while the other is standby.
*Note: To save time, upgrade PMAC servers outside/ahead of the DSR maintenance window since this activity is seen as non-intrusive to
1. Record the site NE name of the DSR SOAM and the MP(s) to upgrade during maintenance window 2 in the space provided.
2. Mark the associated checkbox as each server upgrade is completed.
SOAM Site: ____________________________________________
* PMAC : ___________________________________________
* TVOE for PMAC: ____________________________________
TVOE for SOAM-B: ___________________________________
TVOE for SOAM-A: ___________________________________
Spare SOAM1 (Guest): _____________________ (If equipped)
Spare SOAM2 (Guest): _____________________ (If equipped)
Standby SOAM (Guest): _______________________________
Active SOAM (Guest): _________________________________

DSR 8.2 Software Upgrade GuideDSR 8.2 Software Upgrade Guide
Page | 49 E88968-01
DSR operation. DA-MP1: ___________________________________________
DA-MP2: ___________________________________________
DA-MP3: ___________________________________________
DA-MP4: ___________________________________________
DA-MP5: ___________________________________________
DA-MP6: ___________________________________________
DA-MP7: ___________________________________________
DA-MP8: ___________________________________________
DA-MP9: ___________________________________________
DA-MP10: __________________________________________
DA-MP11: __________________________________________
DA-MP12: __________________________________________
DA-MP13: __________________________________________
DA-MP14: __________________________________________
DA-MP15: __________________________________________
DA-MP16: __________________________________________
IPFE1: _____________________________________________
IPFE2: _____________________________________________
IPFE3: _____________________________________________
IPFE4: _____________________________________________
SS7-MP1: __________________________________________
SS7-MP2: __________________________________________
SS7-MP3: __________________________________________
SS7-MP4: __________________________________________
SS7-MP5: __________________________________________
SS7-MP6: __________________________________________
SS7-MP7: __________________________________________
SS7-MP8: __________________________________________
Binding Server Group 1
Standby SBR: _______________________________________
Active SBR: _________________________________________
Spare SBR1 (Mate): __________________________________
Spare SBR2 (Mate): _______________________ (If equipped)
Binding Server Group 2
Standby SBR: _______________________________________
Active SBR: _________________________________________

DSR 8.2 Software Upgrade GuideDSR 8.2 Software Upgrade Guide
Page | 50 E88968-01
Spare SBR1 (Mate): __________________________________
Spare SBR2 (Mate): _______________________ (If equipped)
Binding Server Group 3
Standby SBR: _______________________________________
Active SBR: _________________________________________
Spare SBR1 (Mate): __________ ___________________ _____
Spare SBR2 (Mate): _______________________ (If equipped)
Binding Server Group 4
Standby SBR: _______________________________________
Active SBR: _________________________________________
Spare SBR1 (Mate): __________________________________
Spare SBR2 (Mate): _______________________ (If equipped)
Binding Server Group 5
Standby SBR: _______________________________________
Active SBR: _________________________________________
Spare SBR1 (Mate): __________________________________
Spare SBR2 (Mate): _______________________ (If equipped)
Binding Server Group 6
Standby SBR: _______________________________________
Active SBR: _________________________________________
Spare SBR1 (Mate): __________________________________
Spare SBR2 (Mate): _______________________ (If equipped)
Binding Server Group 7
Standby SBR: _______________________________________
Active SBR: _________________________________________
Spare SBR1 (Mate): __________________________________
Spare SBR2 (Mate): _______________________ (If equipped)
Binding Server Group 8
Standby SBR: _______________________________________
Active SBR: _________________________________________
Spare SBR1 (Mate): __________________________________
Spare SBR2 (Mate): _______________________ (If equipped)
Session Server Group 1
Standby SBR: _______________________________________
Active SBR: _________________________________________
Spare SBR1 (Mate): __________________________________
Spare SBR2 (Mate): _______________________ (If equipped)
Session Server Group 2

DSR 8.2 Software Upgrade GuideDSR 8.2 Software Upgrade Guide
Page | 51 E88968-01
Standby SBR: _______________________________________
Active SBR: _________________________________________
Spare SBR1 (Mate): __________________________________
Spare SBR2 (Mate): _______________________ (If equipped)
Session Server Group 3
Standby SBR: _______________________________________
Active SBR: _________________________________________
Spare SBR1 (Mate): __________________________________
Spare SBR2 (Mate): _______________________ (If equipped)
Session Server Group 4
Standby SBR: _______________________________________
Active SBR: _________________________________________
Spare SBR1 (Mate): __________________________________
Spare SBR2 (Mate): _______________________ (If equipped)
Session Server Group 5
Standby SBR: _______________________________________
Active SBR: _________________________________________
Spare SBR1 (Mate): __________________________________
Spare SBR2 (Mate): _______________________ (If equipped)
Session Server Group 6
Standby SBR: _______________________________________
Active SBR: _________________________________________
Spare SBR1 (Mate): __________________________________
Spare SBR2 (Mate): _______________________ (If equipped)
Session Server Group 7
Standby SBR: _______________________________________
Active SBR: _________________________________________
Spare SBR1 (Mate): __________________________________
Spare SBR2 (Mate): _______________________ (If equipped)
Session Server Group 8
Standby SBR: _______________________________________
Active SBR: _________________________________________
Spare SBR1 (Mate): __________________________________
Spare SBR2 (Mate): _______________________ (If equipped)
3.4 Prerequisite Procedures
The pre-upgrade procedures shown in the following table are executed outside a maintenance window, if desired. These steps have no effect on the live system and can save upon maintenance window time, if executed before the start of the maintenance window.

DSR 8.2 Software Upgrade GuideDSR 8.2 Software Upgrade Guide
Page | 52 E88968-01
CAUTION Increase maximum number of open files - Follow Appendix B.
Table 8: Prerequisite Procedures Overview
Procedure
Elapsed Time (hr:min)
Procedure Title This Step Cum.
Procedure 1 0:10-0:30 0:10-0:30 Required Materials Check
Procedure 2 0:15-0:30 0:25-1:00 DSR ISO Administration
Procedure 3 0:20-0:30 0:50-1:30 Verification of Configuration Data
Procedure 4
or
Procedure 5
or
Procedure 6
0:45-1:00
0:15-0:20
0:15-0:20
1:35-2:30
1:05-1:50
1:05-1:50
Data Collection for Source Release 7.1.x
Data Collection for Source Release 7.2, 7.3, 7.4
Data Collection for Source Release 8.0 and Later
Procedure 7 0:05 1:05-6:05 ISO Link Correction
Procedure 8 0:15-0:30 1:20-6:35 Back Up TKLCConfigData Files
Procedure 9 0:10-2:00 1:30-8:35 Full Backup of DB Run Environment for Release 7.1.x and Later
Section 3.4.9 0:05 – 0:10 1:35-8:45 Firewall Configuration for Source Release 7.1.x
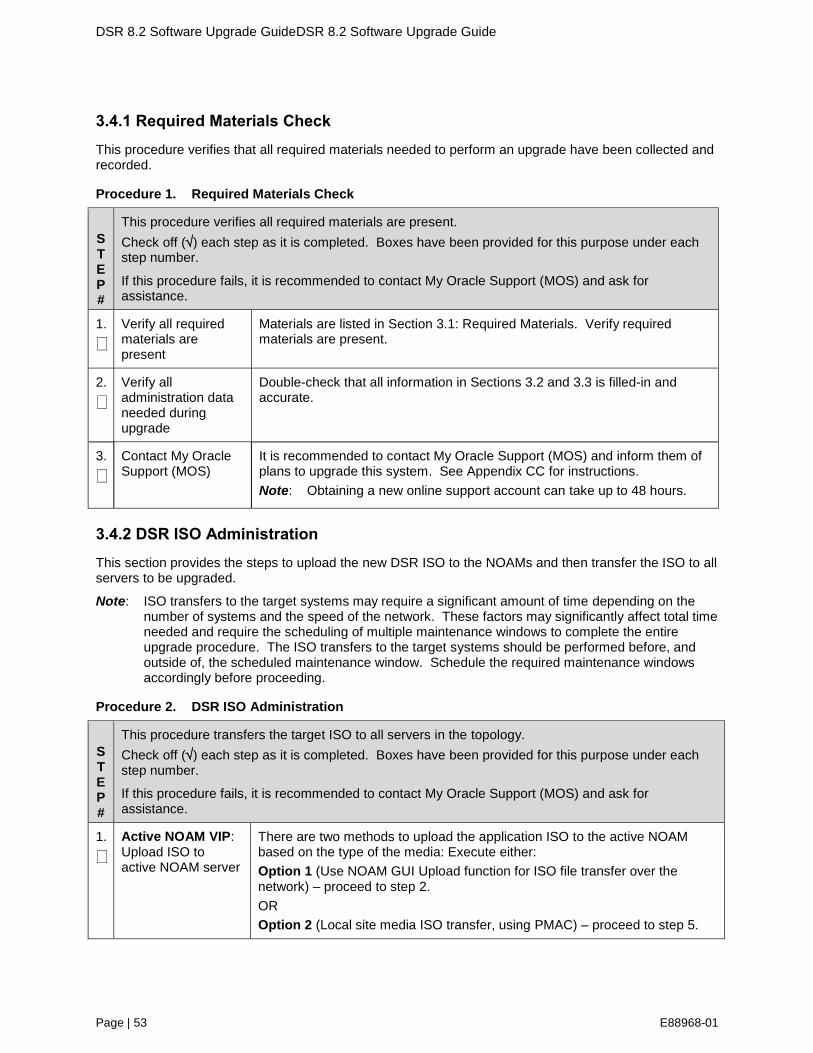
DSR 8.2 Software Upgrade GuideDSR 8.2 Software Upgrade Guide
Page | 53 E88968-01
Required Materials Check 3.4.1
This procedure verifies that all required materials needed to perform an upgrade have been collected and recorded.
Procedure 1. Required Materials Check
S T E P #
This procedure verifies all required materials are present.
Check off () each step as it is completed. Boxes have been provided for this purpose under each step number.
If this procedure fails, it is recommended to contact My Oracle Support (MOS) and ask for assistance.
1.
Verify all required materials are present
Materials are listed in Section 3.1: Required Materials. Verify required materials are present.
2.
Verify all administration data needed during upgrade
Double-check that all information in Sections 3.2 and 3.3 is filled-in and accurate.
3.
Contact My Oracle Support (MOS)
It is recommended to contact My Oracle Support (MOS) and inform them of plans to upgrade this system. See Appendix CC for instructions.
Note: Obtaining a new online support account can take up to 48 hours.
DSR ISO Administration 3.4.2
This section provides the steps to upload the new DSR ISO to the NOAMs and then transfer the ISO to all servers to be upgraded.
Note: ISO transfers to the target systems may require a significant amount of time depending on the number of systems and the speed of the network. These factors may significantly affect total time needed and require the scheduling of multiple maintenance windows to complete the entire upgrade procedure. The ISO transfers to the target systems should be performed before, and outside of, the scheduled maintenance window. Schedule the required maintenance windows accordingly before proceeding.
Procedure 2. DSR ISO Administration
S T E P #
This procedure transfers the target ISO to all servers in the topology.
Check off () each step as it is completed. Boxes have been provided for this purpose under each step number.
If this procedure fails, it is recommended to contact My Oracle Support (MOS) and ask for assistance.
1.
Active NOAM VIP: Upload ISO to active NOAM server
There are two methods to upload the application ISO to the active NOAM based on the type of the media: Execute either:
Option 1 (Use NOAM GUI Upload function for ISO file transfer over the network) – proceed to step 2.
OR
Option 2 (Local site media ISO transfer, using PMAC) – proceed to step 5.

DSR 8.2 Software Upgrade GuideDSR 8.2 Software Upgrade Guide
Page | 54 E88968-01
Procedure 2. DSR ISO Administration
2.
Active NOAM GUI: Undeploy all unneeded ISO images
Remove all unneeded old ISO images from the /var/TKLC/upgrade directory. Keep deployed the ISO image file being used for this upgrade. This saves space in the /var/TKLC/upgrade directory.
1. Navigate to Status & Manage > Files.
2. Select the ISOs to be undeployed and click Undeploy ISO.
3. Click OK to confirm the ISO undeployment.
This launches the ISO un-deployment to the entire topology. This function removes the symlink in /var/TKLC/upgrade to the ISO in the isos directory.
The Tasks option at the top of the Files page displays the status of the undeployment for each server. In addition, an ISO Deployment report can be viewed by selecting the ISO and clicking View ISO Deployment Report.
3.
Active NOAM VIP: Option 1 – Transfer using NOAM GUI
Option 1: Use the NOAM GUI Upload function for ISO file transfer over the network.
Upload the target release ISO image file to the File Management Area of the active NOAM server:
1. Log into the active NOAM GUI.
2. Navigate to Status & Manage > Files.
3. Click the active NOAM tab to display all files stored in the file management storage area of this server.
4. Ensure this is actually the active NOAM server in the network by comparing the hostname in the screen title vs. the hostname in the session banner in the GUI. Verify they are the same and the status is Active in the session banner.
5. Click Upload.
Note: Actual screens may vary from those shown depending on the browser and browser version used.

DSR 8.2 Software Upgrade GuideDSR 8.2 Software Upgrade Guide
Page | 55 E88968-01
Procedure 2. DSR ISO Administration
4.
Active NOAM VIP: Option 1 (continued)
1. Click Browse to select the file to upload.
2. Select the target release ISO image file and click Open.
3. Click Upload.
The ISO file begins uploading to the file management storage area. Wait for the screen to refresh and display the uploaded ISO filename in the files list. This usually takes between 2 to 10 minutes, but more if the network upload speed is slow.

DSR 8.2 Software Upgrade GuideDSR 8.2 Software Upgrade Guide
Page | 56 E88968-01
Procedure 2. DSR ISO Administration
5.
Active NOAM VIP: Option 1 (continued)
1. Wait for the screen to refresh and display the uploaded ISO filename in the files list. This usually takes between 2 to 10 minutes, but more if the network upload speed is slow.
2. To back up the ISO file to the PMAC, SSH to the active NOAM and execute the following command. Refer to [5] for creating space on PMAC if desired space is not available on the PMAC:
1. cd to the directory on the active NOAM where the ISO image is located
$ cd /var/TKLC/db/filemgmt
2. Using sftp, connect to the PMAC management server.
$ sftp pmacftpusr@<pmac_management_network_ip>
$ put <image>.iso
Note: UserId and password should already be recorded in Table 5.
3. After the image transfer is 100% complete, close the connection.
$ quit
6.
PMAC Guest: Option 2 – Transfer using PMAC
OPTION 2 (Local site media ISO transfer using PMAC):
Using a Media containing the application (recommended for slow network connections between the client computer and the DSR frame.
1. Execute Appendix E to load the ISO onto the PMAC server at the site.
2. SSH into the PMAC server and SCP the ISO to the active NOAM using the following commands:
sudo scp -p /var/TKLC/smac/image/repository/
<DSR_ISO_Filename>
admusr@<Active_NOAM_IP>:/var/TKLC/db/filemgmt
7.
Active NOAM CLI: Change Permission of ISO
Log into the active NOAM CLI and execute the following command :
sudo chmod 644
/var/TKLC/db/filemgmt/<DSR_ISO_Filename>
8.
Active NOAM VIP: Using NOAM GUI, deploy ISO to all servers to be upgraded
1. Navigate to Status & Manage > Files.
2. Click the active NOAM server tab.
All files stored in the file management storage area of this server display on the screen.
3. Select the DSR 8.2 ISO, and click View ISO Deployment Report.
4. In the resulting report, determine if the ISO has been deployed to all servers in the system.
5. If the ISO has been deployed to all servers, proceed to the next procedure; otherwise, complete the remaining steps in this procedure.
6. Select the 8.2 DSR ISO in the file list, and click Validate ISO.

DSR 8.2 Software Upgrade GuideDSR 8.2 Software Upgrade Guide
Page | 57 E88968-01
Procedure 2. DSR ISO Administration
7. Click OK on the confirmation screen.
8. Verify the ISO status is valid.
The following message displays for status.
9. If the ISO is not valid, repeat this procedure beginning with step 1. If the ISO fails validation more than once, it is recommended to contact My Oracle Support (MOS).
10. If the ISO is valid, select the ISO, and click Deploy ISO.
11. Click OK on the confirmation screen.
The following message displays for status.

DSR 8.2 Software Upgrade GuideDSR 8.2 Software Upgrade Guide
Page | 58 E88968-01
Procedure 2. DSR ISO Administration
9.
Active NOAM VIP: Monitor ISO deployment
1. The deployment progress can be monitored by viewing the Tasks dropdown options on the Status & Manage > Files screen.
2. Select the target release ISO and click View ISO Deployment Report.
3. Monitor deployment progress until the ISO has been deployed to all servers in the system.
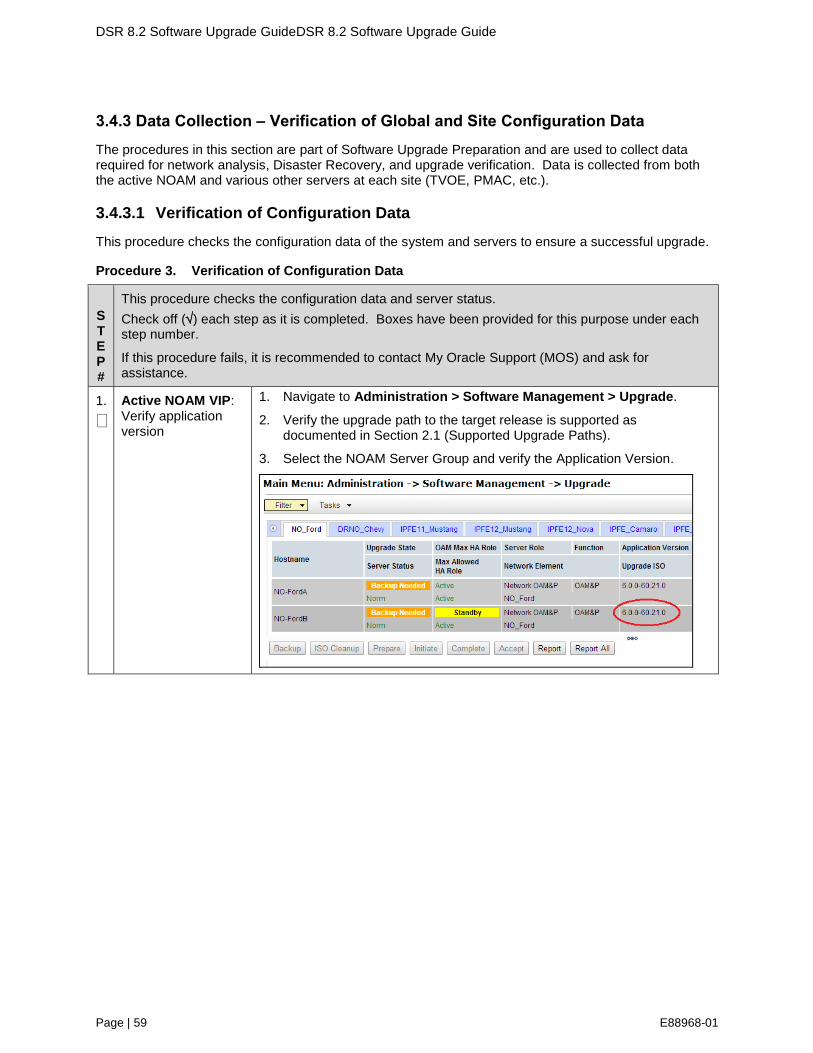
DSR 8.2 Software Upgrade GuideDSR 8.2 Software Upgrade Guide
Page | 59 E88968-01
Data Collection – Verification of Global and Site Configuration Data 3.4.3
The procedures in this section are part of Software Upgrade Preparation and are used to collect data required for network analysis, Disaster Recovery, and upgrade verification. Data is collected from both the active NOAM and various other servers at each site (TVOE, PMAC, etc.).
3.4.3.1 Verification of Configuration Data
This procedure checks the configuration data of the system and servers to ensure a successful upgrade.
Procedure 3. Verification of Configuration Data
S T E P #
This procedure checks the configuration data and server status.
Check off () each step as it is completed. Boxes have been provided for this purpose under each step number.
If this procedure fails, it is recommended to contact My Oracle Support (MOS) and ask for assistance.
1.
Active NOAM VIP: Verify application version
1. Navigate to Administration > Software Management > Upgrade.
2. Verify the upgrade path to the target release is supported as documented in Section 2.1 (Supported Upgrade Paths).
3. Select the NOAM Server Group and verify the Application Version.

DSR 8.2 Software Upgrade GuideDSR 8.2 Software Upgrade Guide
Page | 60 E88968-01
Procedure 3. Verification of Configuration Data
2.
Active NOAM CLI: Check if the setup has customer supplied Apache certificate installed and protected with a passphrase
1. Use the SSH command (on UNIX systems – or putty if running on windows) to log into the active NOAM
ssh admusr@<NOAM_VIP>
password: <enter password>
Answer yes if you are asked to confirm the identity of the server.
2. cd to /etc/httpd/conf.d and open the file named ssl.conf.
3. Locate the line beginning with the phrase SSLCertificateFile.
4. The path that follows SSLCertificateFile is the location of the Apache certificate. If the path is /usr/TKLC/appworks/etc/ssl/server.crt, then the certificate is supplied by Oracle and no further action is required. Continue with the next step.
5. If the path is anything other than /usr/TKLC/appworks/etc/ssl/server.crt, then a customer-supplied Apache certificate is likely installed. Rename the certificate, but note the original certificate pathname for use in Section 5.7.2.
3.
Check if a new firmware release is required for the system
It is recommended to contact My Oracle Support (MOS) by referring to Appendix CC to determine the minimum supported firmware release required for the target DSR release.
Note: New firmware releases for the DSR platform are typically released every 6 months.
Target Firmware Rev: ____________________________
Example: FW rev. 2.2.7
1. Acquire the Firmware Release Notes and Firmware Upgrade Pack procedures for the target Firmware Revision.
2. Use the Firmware Upgrade Pack procedures to determine which specific system components (Switches, OAs, Servers, etc.) may require an upgrade.
3. Plan for additional Maintenance Windows if Firmware Upgrade is required.
Note: Firmware upgrade activity is typically performed before the DSR upgrade.
4.
Check the existing PMAC version and identify if PMAC upgrade is required.
Note: If required, the PMAC upgrade should be performed as a prerequisite to DSR upgrade.
This step applies to all servers that have a PMAC guest (VM) installed.
1. Identify any PMAC servers requiring upgrade.
1. Determine the PMAC version installed by logging into PMAC GUI.
2. Refer to the Release Notes to determine the minimum supported PMAC version required for the target DSR release.
2. If a PMAC upgrade is required, obtain the required PMAC upgrade document [5] and plan for additional Maintenance Windows to execute PMAC upgrades.

DSR 8.2 Software Upgrade GuideDSR 8.2 Software Upgrade Guide
Page | 61 E88968-01
Procedure 3. Verification of Configuration Data
5.
Check the TVOE host server software version
This step is not applicable to software centric installations/upgrades.
This step applies to all RMS and Blade servers that have TVOE installed.
1. Find the target DSR release from Table 5.
2. Refer to the Release Notes to determine the minimum supported TVOE OS version required for the target DSR release.
Required TVOE Release: ________________________
Example: 872-2525-101-2.5.0_82.22.0-TVOE-x86_64.iso
3. Verify the current TVOE HOST OS version for each TVOE hosts by comparing the Product Release field from the appRev command to the Required TVOE Release field shown.
# appRev
Install Time: Thu Nov 6 14:31:08 2014
Product Name: TVOE
Product Release: 2.7.0.0.0_84.20.0
Base Distro Product: TPD
Base Distro Release: 6.7.0.0.1_84.20.0
Base Distro ISO: TPD.install-6.7.0.0.1_84.20.0-
OracleLinux6.5-x86_64.iso
OS: OracleLinux 6.5
Important: If TVOE hosts are not on the correct release, refer to Section 3.3.1 to plan for TVOE host upgrades.
The following data collection procedures collect similar data; however, the collection method varies depending on the source release. Execute only one of the following procedures for the pre-upgrade data collection. Refer to Table 9 for guidance on which procedure to use.
Table 9. Release Specific Data Collection Procedures
If the Source Release is: Use This Pre-Upgrade Data Collection Procedure:
7.1.x Procedure 4 Data Collection for Source Release 7.1.x
7.2 or 7.3 Procedure 5 Data Collection for Source Release 7.2, 7.3, 7.4
8.0 and later Procedure 6 Data Collection for Source Release 8.0 and Later

DSR 8.2 Software Upgrade GuideDSR 8.2 Software Upgrade Guide
Page | 62 E88968-01
3.4.3.2 Data Collection for Source Release 7.1.x
This procedure collects and archives system status data for analysis. Perform this procedure only if the source release is 7.1.x.
Procedure 4. Data Collection for Source Release 7.1.x
S T E P
#
This procedure retrieves and retains system status data for analysis and future use.
Check off () each step as it is completed. Boxes have been provided for this purpose under each step number.
If this procedure fails, it is recommended to contact My Oracle Support (MOS) and ask for assistance.
1.
Active NOAM VIP: Verify IPFE server groups are properly configured
1. Log into the NOAM GUI using the VIP.
2. Navigate to Configuration > Server Groups.
3. Examine each IPFE server group. Verify each IPFE server group is configured with one, and only one, IPFE server.
If any IPFE server group contains more than one IPFE server, DO NOT PROCEED WITH THE UPGRADE. It is recommended to consult with My Oracle Support (MOS) before continuing.
2.
Active NOAM VIP: Alarm check
Check for the presence of Alarm 19901 – CFG-DB Validation Error.
1. Navigate to Alarms & Events > View Active.
2. Click Filter to open the filter selection box.
3. Enter the following values and click Go.
4. If the filter returns no results, the database is consistent; proceed to the next step. Otherwise, do not proceed with the upgrade until the alarm is cleared. It is recommended to consult with My Oracle Support (MOS) for guidance if the alarm does not clear within 60 minutes.

DSR 8.2 Software Upgrade GuideDSR 8.2 Software Upgrade Guide
Page | 63 E88968-01
Procedure 4. Data Collection for Source Release 7.1.x
3.
Active NOAM CLI: Verify NOAM pre-upgrade status
Execute this step on the active DSR NOAM and active DR NOAM servers.
1. Use an SSH client to connect to the active NOAM:
ssh admusr@<NOAM XMI IP address>
password: <enter password>
Note: The static XMI IP address for each server should be available in Table 5.
2. Enter the command:
$ upgradeHealthCheck preUpgradeHealthCheck
This command creates three files in /var/TKLC/db/filemgmt/ UpgradeHealthCheck/ with the filename format:
<NOserver_name>_AlarmStatusReport_<date-time>.xml
<NOserver_name>_ServerStatusReport_<date-time>.xml
<NOserver_name>_ComAgentConnStatusReport_<date-
time>.xml
If the system is PDRA, one additional file is generated:
<NOserver_name>_SBRStatusReport_<date-time>.xml
Note: The FIPS integrity verification test failed message may display when the upgradeHealthCheck command runs. This message can be ignored.
3. If the Server <hostname> needs operator attention before upgrade message displays, inspect the Server Status Report to determine the reason for the message. If the Server <hostname> has no alarm with DB State as Normal and Process state as Kill message displays in the Server Status Report, the alert can be ignored.
Note: If any server status is not as expected, do not proceed with the upgrade. It is recommended to contact My Oracle Support (MOS) for guidance.
4. Keep these reports for future reference. These reports are compared to alarm and status reports after the upgrade is complete.

DSR 8.2 Software Upgrade GuideDSR 8.2 Software Upgrade Guide
Page | 64 E88968-01
Procedure 4. Data Collection for Source Release 7.1.x
4.
Server CLI: Verify uptime for each server in the topology
Starting with the active NOAM, execute this procedure.
1. Use the SSH command (on UNIX systems – or putty if running on windows) to log into the server using the server XMI IP address.
ssh admusr@<target_server_XMI_IP>
password: <enter password>
Answer yes if you are asked to confirm the identity of the server.
2. Execute the uptime command:
[admusr@ipfe-freeport-a1 ~]$ uptime
02:02:49 up 27 days,6:48, 1 user,load
average:0.87,0.99,0.83
3. Record the hostname of any server with an uptime value > 200 days.
4. Inform the customer that a cold reboot is required for all servers with an uptime value > 200 days before beginning any upgrade activity.
Note: This is a required response due to Red Hat Bug 765720. It is recommended to contact My Oracle Support (MOS) if instruction is needed on how to gracefully perform a cold reboot.
5. Repeat steps 1 through 4 for each server in the topology.
5.
Active SOAM CLI: Database consistency check
Check the transport connections tables.
1. Use the SSH command (on UNIX systems – or putty if running on windows) to log into the active NOAM
ssh admusr@<NOAM_VIP>
password: <enter password>
Answer yes if you are asked to confirm the identity of the server.
2. Enter these commands to count the number of entries in the ConnectionAdmin and TransportConnection tables.
iqt –zhp ConnectionAdmin | wc –l
iqt –zhp TransportConnection | wc –l
Sample output:
[admusr@EVO-SO-1 ~]$ iqt -zhp ConnectionAdmin | wc -l
7196
[admusr@EVO-SO-1 ~]$ iqt -zhp TransportConnection |
wc -l
7196
3. If the entry counts match, proceed to step 6.
If the ConnectionAdmin table entry count does not match the TransportConnection table entry count, do not proceed with the upgrade. It is recommended to consult with My Oracle Support (MOS) before continuing.

DSR 8.2 Software Upgrade GuideDSR 8.2 Software Upgrade Guide
Page | 65 E88968-01
Procedure 4. Data Collection for Source Release 7.1.x
6.
Active SOAM CLI: Log SOAM alarm status
1. Use an SSH client to connect to the active SOAM:
ssh <SOAM XMI IP address>
login as: admusr
password: <enter password>
Note: The static XMI IP address for each server should be available in Table 5.
2. Enter the command:
$ upgradeHealthCheck preUpgradeHealthCheckOnSoam
This command creates two files in /var/TKLC/db/filemgmt/ UpgradeHealthCheck/ with the filename format:
<SOserver_name>_AlarmStatusReport_<date-time>.xml
<SOserver_name>_ServerStatusReport_<date-time>.xml
Note: The message FIPS integrity verification test failed may display when the upgradeHealthCheck command runs. This message can be ignored. If the Server <hostname> has no alarm with DB State as Normal and Process state as Kill message displays in the Server Status Report, the alert can be ignored.
3. Verify all peer MPs are available.
4. Note the number of Total Connections Established ______________
5. Keep these reports for future reference. These reports are compared to alarm and status reports after the upgrade is complete.
7.
Active SOAM CLI: Verify PCA status (if equipped)
1. Enter the command:
$ upgradeHealthCheck pcaStatus
This command outputs status to the screen for review.
Note: The FIPS integrity verification test failed message may display when the upgradeHealthCheck command runs. This message can be ignored.
2. Verify Operational Status is Available for all applications.
8.
Repeat for each network element
Repeat steps 5 – 7 for each SOAM site in the topology.
9.
Analyze and plan MP upgrade sequence
From the collected data, analyze system topology and plan for any DA-MP/IPFE/SBR/PCA that are out-of-service during the upgrade sequence.
1. Analyze system topology data gathered in Section 3.4.3.1 and steps 1 through 8 of this procedure.
2. It is recommended to plan for MP upgrades by consulting My Oracle Support (MOS) to assess the impact of out-of-service MP servers
3. Determine the exact sequence in which MP servers are upgraded for each site.

DSR 8.2 Software Upgrade GuideDSR 8.2 Software Upgrade Guide
Page | 66 E88968-01
Procedure 4. Data Collection for Source Release 7.1.x
10.
Firewall check
Firewall configuration for source release 7.1.x
Validate the DNS server before upgrading when the source release for upgrade is 7.1.x.
Firewall configuration for source release 7.2.x
From DSR release 7.2, the DNS feature replaces the /etc/hosts mechanism. If your firewall prohibits the DNS rndc dumpdb traffic from passing between the geo-redundant sites, the DSR software will not work well after upgrading from 7.1.x to 8.2.
To fix this, change the network firewall settings to allow the rndc dumpdb traffic to pass between the geo-redundant sites.

DSR 8.2 Software Upgrade GuideDSR 8.2 Software Upgrade Guide
Page | 67 E88968-01
3.4.3.3 Data Collection for Source Release 7.2, 7.3, 7.4
This procedure collects and archives system status data for analysis. Perform this procedure only if the source release is 7.2, 7.3, or 7.4.
Procedure 5. Data Collection for Source Release 7.2, 7.3, 7.4
S T E P #
This procedure retrieves and retains system status data for analysis and future use.
Check off () each step as it is completed. Boxes have been provided for this purpose under each step number.
If this procedure fails, it is recommended to contact My Oracle Support (MOS) and ask for assistance.
1.
Active NOAM VIP: Run the automated health checks on the active NOAM
1. Navigate to Administration > Software Management > Upgrade.
2. Select the active NOAM.
3. Click Checkup.
4. In the Health check options section, select the Advance Upgrade option.
5. If the ISO Administration procedure has already been performed for the target ISO, select the target release ISO from the Upgrade ISO option. Otherwise, do not select an ISO.
6. Click OK.
Control returns to the Upgrade screen.
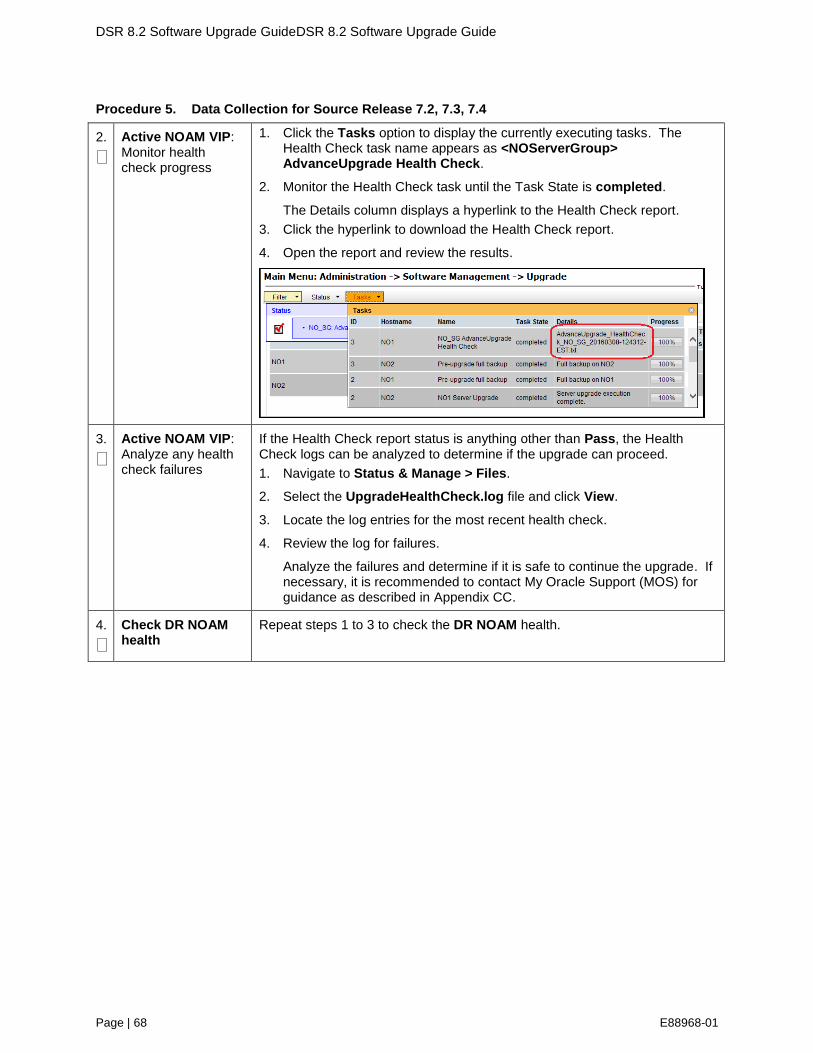
DSR 8.2 Software Upgrade GuideDSR 8.2 Software Upgrade Guide
Page | 68 E88968-01
Procedure 5. Data Collection for Source Release 7.2, 7.3, 7.4
2.
Active NOAM VIP: Monitor health check progress
1. Click the Tasks option to display the currently executing tasks. The Health Check task name appears as <NOServerGroup> AdvanceUpgrade Health Check.
2. Monitor the Health Check task until the Task State is completed.
The Details column displays a hyperlink to the Health Check report.
3. Click the hyperlink to download the Health Check report.
4. Open the report and review the results.
3.
Active NOAM VIP: Analyze any health check failures
If the Health Check report status is anything other than Pass, the Health Check logs can be analyzed to determine if the upgrade can proceed.
1. Navigate to Status & Manage > Files.
2. Select the UpgradeHealthCheck.log file and click View.
3. Locate the log entries for the most recent health check.
4. Review the log for failures.
Analyze the failures and determine if it is safe to continue the upgrade. If necessary, it is recommended to contact My Oracle Support (MOS) for guidance as described in Appendix CC.
4.
Check DR NOAM health
Repeat steps 1 to 3 to check the DR NOAM health.

DSR 8.2 Software Upgrade GuideDSR 8.2 Software Upgrade Guide
Page | 69 E88968-01
Procedure 5. Data Collection for Source Release 7.2, 7.3, 7.4
5.
Active NOAM VIP: Initiate SOAM health check
This procedure runs the automated health checks on the active SOAM.
1. Navigate to Administration > Software Management > Upgrade.
2. Select the SOAM server group tab.
3. Select the active SOAM.
4. Click Checkup.
5. In the Health check options section, select the Advance Upgrade option.
6. For a major upgrade, select the target release ISO from the Upgrade ISO option. Do not select an ISO for an incremental upgrade.
7. Click OK.
Control returns to the Upgrade screen.

DSR 8.2 Software Upgrade GuideDSR 8.2 Software Upgrade Guide
Page | 70 E88968-01
Procedure 5. Data Collection for Source Release 7.2, 7.3, 7.4
6.
Active NOAM VIP: Monitor health check progress
1. Click the Tasks option to display the currently executing tasks. The Health Check task name appears as <SOServerGroup> AdvanceUpgrade Health Check.
2. Monitor the health check task until the Task State is completed. The Details column displays a hyperlink to the Health Check report.
3. Click the hyperlink to download the Health Check report.
4. Open the report and review the results.
7.
Active NOAM VIP: Analyze health check failures
If the Health Check report status is anything other than Pass, the Health Check logs can be analyzed to determine if the upgrade can proceed.
1. Navigate to Status & Manage > Files.
2. Select the active SOAM tab.
3. Select the UpgradeHealthCheck.log file and click View.
4. Locate the log entries for the most recent health check.
5. Review the log for failures.
Analyze the failures and determine if it is safe to continue the upgrade. If necessary, it is recommended to contact My Oracle Support (MOS) for guidance as described in Appendix CC.
If the health check log contains the Unable to execute Health Check on <Active SOAM hostname> message, perform health checks in accordance with Procedure 4.
8.
Analyze and plan MP upgrade sequence
From the collected data, analyze system topology and plan for any DA-MP/IPFE/SBR/PCA which are out-of-service during the upgrade sequence.
1. Analyze system topology data gathered in Section 3.4.3.1 and steps 1 through 6 of this procedure. The Health Check reports from steps 3 and 6 can be found in Status & Manage > Files on the active SOAM.
2. It is recommended to plan for MP upgrades by consulting My Oracle Support (MOS) to assess the impact of out-of-service MP servers
3. Determine the manner in which the MP servers are upgraded: Manually or Automated Server Group Upgrade. If the MPs are upgraded manually, determine the exact sequence in which MP servers are upgraded for each site.

DSR 8.2 Software Upgrade GuideDSR 8.2 Software Upgrade Guide
Page | 71 E88968-01
3.4.3.4 Data Collection for Source Release 8.0 and Later
This procedure collects and archives system status data for analysis. Perform this procedure only if the source release is 8.0 and later.
Procedure 6. Data Collection for Source Release 8.0 and Later
S T E P #
This procedure retrieves and retains system status data for analysis and future use.
Check off () each step as it is completed. Boxes have been provided for this purpose under each step number.
If this procedure fails, it is recommended to contact My Oracle Support (MOS) and ask for assistance.
1.
Active NOAM VIP: Run the automated health checks on the active NOAM
1. Navigate to Administration > Software Management > Upgrade.
2. Select the active NOAM.
3. Click Checkup.
4. In the Health check options section, select the Advance Upgrade option.
5. If the ISO Administration procedure has already been performed for the target ISO, select the target release ISO from the Upgrade ISO option. Otherwise, do not select an ISO.
6. Click OK.
Control returns to the Upgrade screen.

DSR 8.2 Software Upgrade GuideDSR 8.2 Software Upgrade Guide
Page | 72 E88968-01
Procedure 6. Data Collection for Source Release 8.0 and Later
2.
Active NOAM VIP: Monitor health check progress
1. Click the Tasks option to display the currently executing tasks. The Health Check task name appears as AdvanceUpgrade_Health Check_<NOServerGroup>_TimeStamp.txt.
2. Monitor the Health Check task until the Task State is completed.
The Details column displays a hyperlink to the Health Check report.
3. Click the hyperlink to download the Health Check report.
4. Open the report and review the results.
3.
Active NOAM VIP: Analyze any health check failure
If the Health Check report status is anything other than Pass, the Health Check logs can be analyzed to determine if the upgrade can proceed.
1. Navigate to Status & Manage > Files.
2. Click on NOAMP server group tab for which health check was performed.
3. Select the AdvanceUpgrade_Health Check_<NOServerGroup>_TimeStamp.txt and click View.
4. Locate the log entries for the most recent health check.
5. Review the log for failures.
Analyze the failures and determine if it is safe to continue the upgrade. If necessary, it is recommended to contact My Oracle Support (MOS) for guidance as described in Appendix CC.
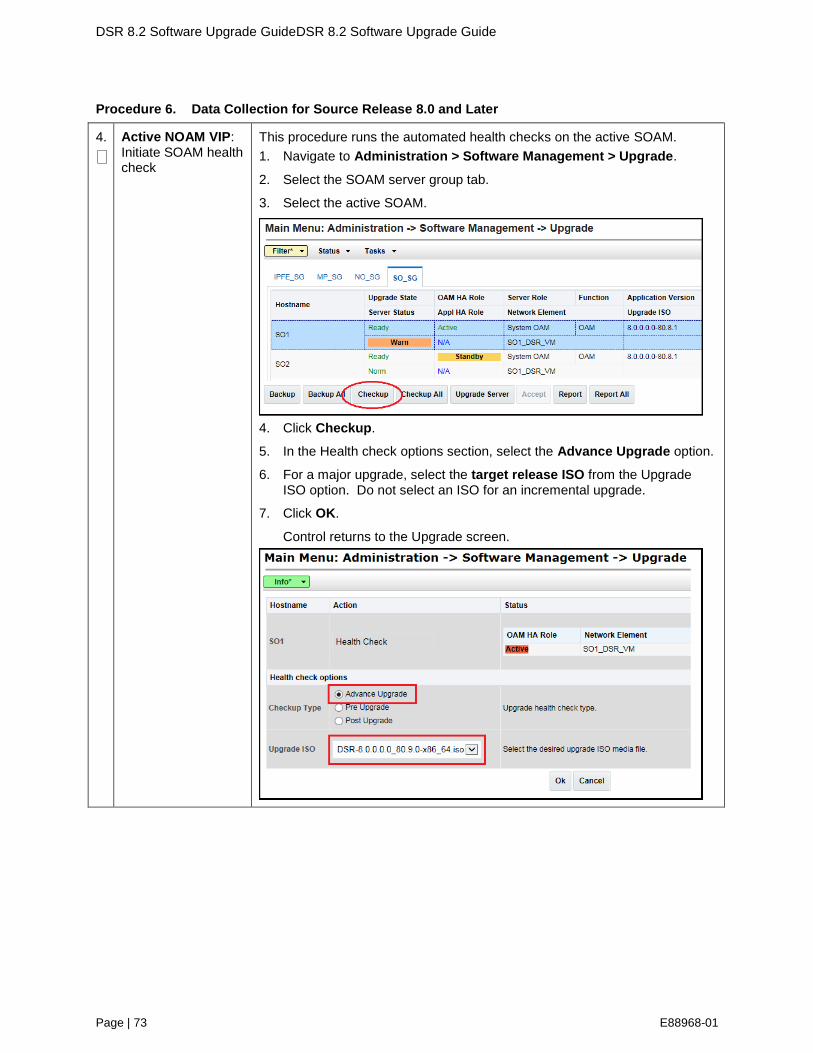
DSR 8.2 Software Upgrade GuideDSR 8.2 Software Upgrade Guide
Page | 73 E88968-01
Procedure 6. Data Collection for Source Release 8.0 and Later
4.
Active NOAM VIP: Initiate SOAM health check
This procedure runs the automated health checks on the active SOAM.
1. Navigate to Administration > Software Management > Upgrade.
2. Select the SOAM server group tab.
3. Select the active SOAM.
4. Click Checkup.
5. In the Health check options section, select the Advance Upgrade option.
6. For a major upgrade, select the target release ISO from the Upgrade ISO option. Do not select an ISO for an incremental upgrade.
7. Click OK.
Control returns to the Upgrade screen.

DSR 8.2 Software Upgrade GuideDSR 8.2 Software Upgrade Guide
Page | 74 E88968-01
Procedure 6. Data Collection for Source Release 8.0 and Later
5.
Active NOAM VIP: Monitor health check progress
1. Click the Tasks option to display the currently executing tasks. The Health Check task name appears as <SOServerGroup> AdvanceUpgrade Health Check.
2. Monitor the Health Check task until the Task State is completed. The Details column displays a hyperlink to the Health Check report.
3. Click the hyperlink to download the Health Check report.
4. Open the report and review the results.
6.
Active NOAM VIP: Analyze health check failure
If the Health Check report status is anything other than Pass, the Health Check logs can be analyzed to determine if the upgrade can proceed.
1. Navigate to Status & Manage > Files.
2. Select the active SOAM tab.
3. Select the UpgradeHealthCheck.log file and click View.
4. Locate the log entries for the most recent health check.
5. Review the log for failures.
Analyze the failures and determine if it is safe to continue the upgrade. If necessary, it is recommended to contact My Oracle Support (MOS) for guidance as described in Appendix CC.
If the health check log contains the Unable to execute Health Check on <Active SOAM hostname> message, perform health checks in accordance with Procedure 4.
7.
Analyze and plan MP upgrade sequence
From the collected data, analyze system topology and plan for any DA-MP/IPFE/SBR/PCA which are out-of-service during the upgrade sequence.
1. Analyze system topology data gathered in Section 3.4.3.1 and steps 1 through 6 of this procedure. The Health Check reports from steps 3 and 6 can be found in Status & Manage > Files on the active SOAM.
2. It is recommended to plan for MP upgrades by consulting My Oracle Support (MOS) to assess the impact of out-of-service MP servers.
3. Determine the manner in which the MP servers are upgraded: Manually or Automated Server Group Upgrade. If the MPs are upgraded manually, determine the exact sequence in which MP servers are upgraded for each site.

DSR 8.2 Software Upgrade GuideDSR 8.2 Software Upgrade Guide
Page | 75 E88968-01
ISO Link Correction 3.4.4
This procedure is required when upgrading from release 7.1, 7.2, 7.3, or 7.4 to DSR 8.2.
In DSR 7.x, the ISO image management was changed to put a symlink in the /var/TKLC/upgrade directory to the actual file in the /var/TKLC/db/filemgmt directory. However, to support the Storage Reclamation feature used in DSR 8.0, in preparation for future Dual Image Upgrade, the symlinks to the ISO image in the /var/TKLC/db/filemgmt/isos directory must be removed and replaced with direct copies of the ISO image in the /var/TKLC/upgrade directory. This must be executed after the application ISO has been deployed but before the software upgrade in Section 3.6. This may be done in a maintenance window before the actual upgrade maintenance window.
This procedure is not required if the source release is 8.x.
!! WARNING!! FAILURE TO PERFORM THIS PROCEDURE MAY CAUSE THE UPGRADE TO FAIL.
Procedure 7. ISO Link Correction
S T E P
#
This procedure performs the ISO symlink correction.
Check off () each step as it is completed. Boxes have been provided for this purpose under each step number.
If this procedure fails, it is recommended to contact My Oracle Support (MOS) and ask for assistance.
1.
Verify this procedure should be run
Is the topology of servers to be upgraded currently running DSR release 7.1, 7.2, 7.3, or 7.4?
Has the DSR 8.2 ISO been deployed?
If Yes, then proceed to step 2.
If No, this procedure is complete.
2.
Active NOAM GUI: Undeploy all unneeded ISO images
Remove all unneeded old ISO images from the /var/TKLC/upgrade directory. Keep deployed the ISO image file being used for this upgrade. This saves space in the /var/TKLC/upgrade directory.
1. Navigate to Status & Manage > Files.
2. Select the ISOs to be undeployed and click Undeploy ISO.
3. Click OK to confirm the ISO undeployment.
This launches the ISO un-deployment to the entire topology. This function removes the symlink in /var/TKLC/upgrade to the ISO in the isos directory.
The Tasks option at the top of the Files page displays the status of the undeployment for each server. In addition, an ISO Deployment report can be viewed by selecting the ISO and clicking View ISO Deployment Report.
3.
Active NOAM CLI: Log into the active NOAM
Use the SSH command (on UNIX systems – or putty if running on Windows) to log into the active NOAM:
ssh admusr@<NOAM_VIP>
4.
Active NOAM CLI: Mount the DSR 8.2 ISO image
The following example uses a DSR ISO image name as an example. Use the appropriate application ISO image name.
$ sudo mount -o loop /var/TKLC/db/filemgmt/isos/DSR-
8.2.0.0.0_82.x.y-x86_64.iso /mnt/upgrade

DSR 8.2 Software Upgrade GuideDSR 8.2 Software Upgrade Guide
Page | 76 E88968-01
Procedure 7. ISO Link Correction
5.
Active NOAM CLI: Copy the script from the mounted ISO to /var/tmp
$ cp /mnt/upgrade/upgrade/bin/changeLinksToFiles.php
/var/tmp
6.
Active NOAM CLI: Unmount the DSR 8.2 ISO image
$ sudo umount /mnt/upgrade
7.
Active NOAM CLI: Verify the script is executable
$ chmod +x /var/tmp/changeLinksToFiles.php
$ ls -l /var/tmp/changeLinksToFiles.php
-r-x------ 1 admusr admgrp 2652 Dec 2 14:07
/var/tmp/changeLinksToFiles.php
In this example, the x is present for admusr, indicating that the script is indeed executable for the user.
8.
Active NOAM CLI: Execute the script to change the symlink into a copy of the ISO image file
Note: Make sure user is admusr and not root. And don't use sudo before of this script.
$ /var/tmp/changeLinksToFiles.php
The script uses SSH to contact all the servers in the topology and convert any link to an ISO images in /var/TKLC/upgrade into a copy of the ISO image file.
Output similar to the following occurs for each server in the entire topology.
$ /var/tmp/changeLinksToFiles.php
server: NO1
hostname alias based on service: no1-internalimi
FIPS integrity verification test failed.
Warning: Permanently added 'no1-internalimi, 192.168.1.11'
(RSA) to the list of known hosts.
found link /var/TKLC/upgrade/DSR-8.2.0.0.0_82.3.0-
x86_64.iso
FIPS integrity verification test failed.
Warning: Permanently added 'no1-internalimi, 192.168.1.11'
(RSA) to the list of known hosts.
Remove command succeeded! host: no1-internalimi, file:
/var/TKLC/upgrade/DSR-8.2.0.0.0_82.3.0-x86_64.iso
FIPS integrity verification test failed.
Warning: Permanently added 'no1-internalimi, 192.168.1.11'
(RSA) to the list of known hosts.
Copy command succeeded! host: no1-internalimi, file:
/var/TKLC/upgrade/DSR-8.2.0.0.0_82.3.0-x86_64.iso
The following expected messages can be ignored:
FIPS integrity verification test failed.
Warning: Permanently added '<host>-internalimi, <ip
address>' (RSA) to the list of known hosts.
If any unexpected failure messages occur, it is recommended to contact My Oracle Support (MOS) for guidance.

DSR 8.2 Software Upgrade GuideDSR 8.2 Software Upgrade Guide
Page | 77 E88968-01
Back Up TKLCConfigData Files 3.4.5
This procedure helps to restore networking and server-related information in some cases. For example, disaster recovery when it needs to be performed on servers in case a server is lost during an upgrade.
Procedure 8. Back Up TKLCConfigData
S T E P #
This procedure backs up the TKLCConfigData file on all servers.
Check off () each step as it is completed. Boxes have been provided for this purpose under each step number.
If this procedure fails, it is recommended to contact My Oracle Support (MOS) and ask for assistance.
1.
Active NOAM GUI: Login
Use the VIP address to access the primary NOAM GUI
2.
Primary DSR NOAM VIP (GUI): Export configuration data for each server
1. Navigate to Configuration > Servers.
2. Select each server in the topology and click Export.
3. Repeat this for all servers.
3.
Primary SDS NOAM Server: Back up TKLCConfig data
1. Access the primary DSR NOAM server command line using ssh or a console.
ssh admusr@<NOAM_VIP>
2. Transfer the TKLCConfigData files for all servers in the /var/TKLC/db/filemgmt directory to a remote location.
$ cd /var/TKLC/db/filemgmt
$ scp TKLCConfigData.<Sever Hostname>.sh
<username>@<remote-server>:<directory>
Example:
scp TKLCConfigData.DSRNO1.sh <username>@<remote-
server>:<directory>
Remember to back up the TKLCConfig data file for all servers.

DSR 8.2 Software Upgrade GuideDSR 8.2 Software Upgrade Guide
Page | 78 E88968-01
Full Backup of DB Run Environment at Each Server 3.4.6
The procedures in this section are part of software upgrade preparation and are used to conduct a full backup of the run environment on each server, to be used in the event of a backout of the new software release. The backup procedure to be executed is dependent on the software release that is running on the active NOAM.
Note: Do not perform this procedure until the ISO deployment is completed for all servers in the topology. Failure to complete the ISO may disrupt ISO deployment/undeployment in the event of a partial backout (for example, backout of one site).
!!WARNING!! If backout is needed, any configuration changes made after
the DB is backed up at each server is lost.
3.4.6.1 Full Backup of DB Run Environment for Release 7.1.x and Later
This procedure backs up the DB run environment when the active NOAM is on release 7.1.x and later.
Procedure 9. Full Backup of DB Run Environment for Release 7.1.x and Later
S T E P #
This procedure (executed from the active NOAM server) conducts a full backup of the run environment on each server, so that each server has the required data to perform a back out.
Check off () each step as it is completed. Boxes have been provided for this purpose under each step number.
If this procedure fails, it is recommended to contact My Oracle Support (MOS) and ask for assistance.
1.
Active NOAM VIP: Start backup of all servers
1. Log into the NOAM GUI using the VIP.
2. Navigate to Administration > Software Management > Upgrade.
3. Click Backup All.

DSR 8.2 Software Upgrade GuideDSR 8.2 Software Upgrade Guide
Page | 79 E88968-01
Procedure 9. Full Backup of DB Run Environment for Release 7.1.x and Later
2.
Active NOAM VIP: Select network elements to backup
The Upgrade Backup All screen displays the various network elements and identifies which servers are ready for backup.
1. In the Action column, mark the Backup checkbox for each network element.
2. Ensure the Exclude option is selected.
3. Click OK.
This initiates a full backup on each eligible server.
3.
Active NOAM VIP: Monitor backup progress
Select each server group tab and verify each server transitions from Backup in Progress to Ready.
4.
ALTERNATIVE METHOD (Optional)
Server CLI: If needed, the alternative backup method can be executed on each individual server instead of using the backupAllHosts script
ALTERNATIVE: A manual backup can be executed on each server individually, rather than using the GUI method. To do this, log into each server in the site individually, and execute this command to generate a full backup on that server manually:
$ sudo /usr/TKLC/appworks/sbin/full_backup
Output similar to the following indicates successful completion:
Success: Full backup of COMCOL run env has
completed.
Archive file
/var/TKLC/db/filemgmt/Backup.dsr.blade01.FullDBParts
. SYSTEM_OAM.20140617_021502.UPG.tar.bz2 written in
/var/TKLC/db/filemgmt.
Archive file
/var/TKLC/db/filemgmt/Backup.dsr.blade01.FullRunEnv.
SYSTEM_OAM.20140617_021502.UPG.tar.bz2 written in
/var/TKLC/db/filemgmt.

DSR 8.2 Software Upgrade GuideDSR 8.2 Software Upgrade Guide
Page | 80 E88968-01
Procedure 9. Full Backup of DB Run Environment for Release 7.1.x and Later
5.
Active NOAM VIP: Verify backup files are present on each server
1. Log into the active NOAM.
2. Navigate to Status & Manage > Files.
3. Click on each server tab.
4. For each server, verify the following 2 files have been created:
Backup.DSR.<server_name>.FullDBParts.NETWORK_OAMP.<t
ime_stamp>.UPG.tar.bz2
Backup.DSR.<server_name>.FullRunEnv.NETWORK_OAMP.<ti
me_stamp>.UPG.tar.bz2
Upgrade TVOE Hosts at a Site 3.4.7
This procedure applies if the TVOE hosts at a site will be upgraded BEFORE the start of the DSR 8.2 upgrade. Performing the TVOE upgrade BEFORE reduces the time required for DSR and IDIH Application Upgrade procedures during the maintenance window. This procedure should be initiated and completed before starting the DSR upgrade procedures in Section 3.6.
Note: If the TVOE hosts are upgraded in the same maintenance windows as the DSR and IDIH servers, then this procedure does not apply.
Precondition: The PMAC application at each site (and the TVOE host running the PMAC virtual server, must be upgraded before performing TVOE host OS upgrade for servers that are managed by this PMAC. Refer to [5] for PMAC upgrade procedures. If any DSR applications are hosted on the same server as the PMAC application, restart the DSR applications after the PMAC upgrade is complete (see Procedure 57 step 5).
Impact: TVOE host upgrades require that the DSR, SDS, or IDIH applications running on the host be shut down for up to 30 minutes during the upgrade.
Note: In RMS and VEDSR configurations, the PMAC and DSR servers could be sharing the same TVOE host. Make the customer aware of all servers affected by the TVOE upgrade.
Table 10. TVOE Upgrade Execution Overview
Procedure
Elapsed Time (hr:min)
Procedure Title Impact This Step Cum.
Procedure 10 60 min per TVOE host*
1:00-16:00 Upgrade TVOE Hosts
DSR and IDIH servers running as virtual guests on the TVOE host are stopped and unable to perform their role while the TVOE host is being upgraded.
*WARNING: Depending on the risk tolerance of the customer, it is possible to execute multiple TVOE Upgrades in parallel. Detailed steps are shown in the procedure on the next page.

DSR 8.2 Software Upgrade GuideDSR 8.2 Software Upgrade Guide
Page | 81 E88968-01
Procedure 10. Upgrade TVOE Hosts
S T E P #
This procedure upgrades the TVOE hosts for a site.
Check off () each step as it is completed. Boxes have been provided for this purpose under each step number.
If this procedure fails, it is recommended to contact My Oracle Support (MOS) and ask for assistance.
1.
Record site Record site to be upgraded ________________________________
2.
Select order of TVOE server upgrades
Record the TVOE hosts to be upgraded, in order:
It is best to upgrade standby servers before active servers to minimize failovers. Otherwise, any order is OK.
_________________________
_________________________
_________________________
_________________________
_________________________
Note: The site PMAC, Software Inventory form, typically lists the TVOE hosts at a site and their versions.
3.
Upload TVOE ISO to PMAC
Execute Appendix E to add the TVOE ISO to the PMAC software inventory.
4.
Determine if there are SDS applications on the TVOE hosts
Log into the TVOE hosts and display the guests.
1. SSH to the TVOE and log in.
If the TVOE version is 2.5.2:
ssh root@<TVOE_ip>
password: <enter password>
If the TVOE version is 2.7 or later:
ssh admusr@<TVOE_ip>
password: <enter password>
2. Execute this command to display all the VM guests running:
If the TVOE version is 2.5.2:
# virsh list --all
If the TVOE version is 2.7 or later:
$ sudo virsh list --all
3. If the application list includes SDS SOAM applications, then make the team aware of possible failovers and expected alarms due to running in simplex mode during the TVOE upgrade.
5.
Upgrade the TVOE hosting a DSR or IDIH server
Upgrade the TVOE host of the first server.
Execute J.2 to shutdown the TVOE host to be upgraded
Execute J.1 to upgrade the TVOE host
Note: This step may cause a failover of the DSR or other active applications on the TVOE.

DSR 8.2 Software Upgrade GuideDSR 8.2 Software Upgrade Guide
Page | 82 E88968-01
Procedure 10. Upgrade TVOE Hosts
6.
Repeat for other TVOE hosts at a site
Repeat step 5 for each TVOE host at the site requiring upgrade.
IDIH Upgrade Preparation 3.4.8
If IDIH is a component of a Network Element, it may be upgraded either before or after the DSR. The order of upgrade does not impact the functionality of either component. However, it should be noted that certain compatibility limitations may exist while the two components are not on the same release.
Note: Please verify the TVOE and PMAC version to make sure that TVOE/PMAC are upgraded prior to upgrade of IDIH guests.
CAUTION If the PMAC is 65.x or higher, then TVOE must be upgraded to 3.5.0.0.0_88.45 or higher; otherwise, IDIH guest creation fails.
The IDIH upgrade procedures are provided in Appendix K and may be performed at any time after Procedure 11.
Table 11. IDIH Upgrade Preparation Overview
Procedure
Elapsed Time (hr:min)
Procedure Title This Step Cumulative
Procedure 11 0:15-0:30 0:15-0:30 IDIH Upgrade Preparation
Procedure 11. IDIH Upgrade Preparation
S T E P #
This procedure prepares the FD configuration scripts that are used to create the Mediation and Application guests.
Check off () each step as it is completed. Boxes have been provided for this purpose under each step number.
If this procedure fails, it is recommended to contact My Oracle Support (MOS) and ask for assistance.
1.
PMAC CLI: Log into the PMAC server as the admusr user
ssh <PMAC IP address>
login as: admusr
password: <enter password>
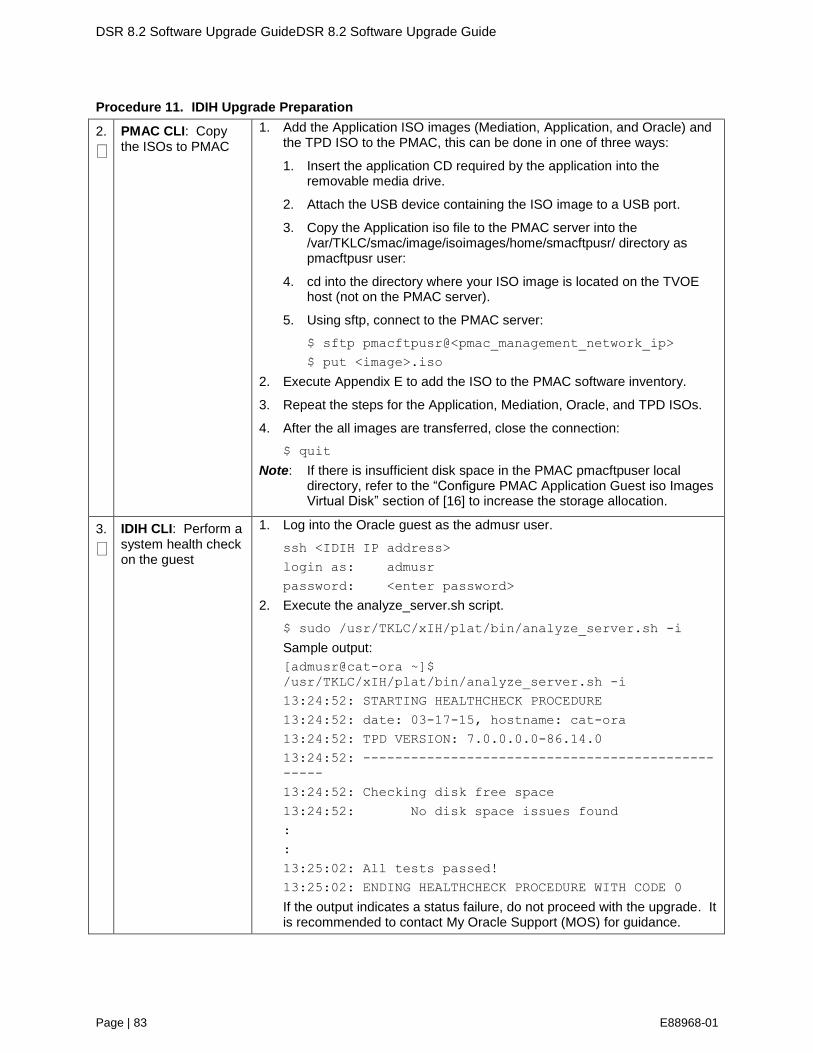
DSR 8.2 Software Upgrade GuideDSR 8.2 Software Upgrade Guide
Page | 83 E88968-01
Procedure 11. IDIH Upgrade Preparation
2.
PMAC CLI: Copy the ISOs to PMAC
1. Add the Application ISO images (Mediation, Application, and Oracle) and the TPD ISO to the PMAC, this can be done in one of three ways:
1. Insert the application CD required by the application into the removable media drive.
2. Attach the USB device containing the ISO image to a USB port.
3. Copy the Application iso file to the PMAC server into the /var/TKLC/smac/image/isoimages/home/smacftpusr/ directory as pmacftpusr user:
4. cd into the directory where your ISO image is located on the TVOE host (not on the PMAC server).
5. Using sftp, connect to the PMAC server:
$ sftp pmacftpusr@<pmac_management_network_ip>
$ put <image>.iso
2. Execute Appendix E to add the ISO to the PMAC software inventory.
3. Repeat the steps for the Application, Mediation, Oracle, and TPD ISOs.
4. After the all images are transferred, close the connection:
$ quit
Note: If there is insufficient disk space in the PMAC pmacftpuser local directory, refer to the “Configure PMAC Application Guest iso Images Virtual Disk” section of [16] to increase the storage allocation.
3.
IDIH CLI: Perform a system health check on the guest
1. Log into the Oracle guest as the admusr user.
ssh <IDIH IP address>
login as: admusr
password: <enter password>
2. Execute the analyze_server.sh script.
$ sudo /usr/TKLC/xIH/plat/bin/analyze_server.sh -i
Sample output:
[admusr@cat-ora ~]$
/usr/TKLC/xIH/plat/bin/analyze_server.sh -i
13:24:52: STARTING HEALTHCHECK PROCEDURE
13:24:52: date: 03-17-15, hostname: cat-ora
13:24:52: TPD VERSION: 7.0.0.0.0-86.14.0
13:24:52: --------------------------------------------
-----
13:24:52: Checking disk free space
13:24:52: No disk space issues found
:
:
13:25:02: All tests passed!
13:25:02: ENDING HEALTHCHECK PROCEDURE WITH CODE 0
If the output indicates a status failure, do not proceed with the upgrade. It is recommended to contact My Oracle Support (MOS) for guidance.

DSR 8.2 Software Upgrade GuideDSR 8.2 Software Upgrade Guide
Page | 84 E88968-01
Firewall Configuration for Source Release 7.1.x 3.4.9
Execute this procedure to validate the DNS server before the upgrade is executed when the source release for the upgrade is 7.1.x.
From DSR release 7.2, the DNS feature replaces the /etc/hosts mechanism. If you have a firewall, which prohibits the DNS rndc dumpdb traffic from passing between the geo-redundant sites, then DSR software may not work well after upgrading from release 7.1.x to release 8.2.
To help solve this, change the network firewall settings to allow the rndc dumpdb traffic to pass between the geo-redundant sites.
3.5 Software Upgrade Execution Overview
It is recommended to contact My Oracle Support (MOS) as described in Appendix CC before executing this upgrade to ensure that the proper media are available for use.
Before upgrade, users must have performed the data collection and system health check instructions in Section 3.4. This check ensures the system to be upgraded is in an upgrade-ready state. Performing the system health check determines which alarms are present in the system and if upgrade can proceed with alarms.
!!WARNING!!
If there are servers in the system which are not in a Normal state, these servers should be brought to the Normal or Application Disabled state before the upgrade process is started. The sequence of upgrade is such that servers providing support services to other servers are upgraded first.
If alarms are present on the server, it is recommended to contact My Oracle Support (MOS) to diagnose those alarms and determine whether they need to be addressed, or if it is safe to proceed with the upgrade.
Please read the following notes on upgrade procedures:
All procedure completion times shown in this document are estimates. Times may vary due to differences in database size, user experience, and user preparation.
The shaded area within response steps must be verified in order to successfully complete that step.
Where possible, command response outputs are shown as accurately as possible. EXCEPTIONS are as follows:
Session banner information such as time and date.
System-specific configuration information such as hardware locations, IP addresses and hostnames.
ANY information marked with XXXX or YYYY where appropriate, instructions are provided to determine what output should be expected in place of XXXX or YYYY.
Aesthetic differences unrelated to functionality such as browser attributes: window size, colors, toolbars, and button layouts.
After completing each step, and at each point where data is recorded from the screen, the technician performing the upgrade must initial each step. A check box is provided. For procedures which are executed multiple times, the check box can be skipped, but the technician must initial each iteration the step is executed. The space on either side of the step number can be used (margin on left side or column on right side).

DSR 8.2 Software Upgrade GuideDSR 8.2 Software Upgrade Guide
Page | 85 E88968-01
Captured data is required for future support reference if a My Oracle Support (MOS) representative is not present during the upgrade.
Answer these questions, and record:
What is the DSR Application version to be upgraded? _____________________________________
What is the DSR Application new version to be applied? ___________________________________
Is this a Major or Incremental Upgrade? ________________________________________________
Are there IPFE servers to upgrade? ___________________________________________________
What DSR applications are running in a TVOE host environment? ___________________________
Is SDS also deployed (co-located) at the DSR site? _______________________________________
Note: SDS does not need to be upgraded at the same time.
Is IDIH also deployed (co-located) at the DSR site? _______________________________________
3.6 Accepting the Upgrade
After the upgrade of ALL servers in the topology has been completed, and following an appropriate soak time, the Post-Upgrade procedures in Section 5.7 are performed in a separate Maintenance Window to finalize the upgrade. Procedure 48 accepts the upgrade and performs a final health check of the system to monitor alarms and server status. Accepting the upgrade is the last step in the upgrade. Once the upgrade is accepted, the upgrade is final and cannot be backed out.
4. NOAM Upgrade Execution
NOAM UPGRADE
The NOAM upgrade section is common to all topologies. This section must be completed before executing the site upgrade procedures.
Procedures for the NOAM upgrade include steps for the upgrade of the Disaster Recovery NOAM (DR NOAM) servers also. If no DR NOAM is present in the customer deployment, then the DR NOAM-related steps can be safely ignored.
Global Provisioning is disabled before upgrading the NOAM servers. Provisioning activities at the NOAM and SOAM servers have certain limitations during the period where the NOAMs are upgraded and the sites are not yet upgraded.
The Elapsed Time mentioned in Table 12 specifies the time with and without TVOE upgrade.
If the TVOE host upgrades are not needed, or were previously performed, then the time estimates without TVOE upgrade apply. All times are estimates.
Table 12: NOAM Upgrade Execution Overview
Procedure
Elapsed Time (hr:min)
Procedure Title Impact This Step Cum
Procedure 12 0:05 0:05 NOAM Pre-Upgrade Health Checks None

DSR 8.2 Software Upgrade GuideDSR 8.2 Software Upgrade Guide
Page | 86 E88968-01
Procedure
Elapsed Time (hr:min)
Procedure Title Impact This Step Cum
Procedure 13
or
Procedure 14
or
Procedure 15
0:30-0:45
0:20-0:30
0:20-0:30
0:35-0:50
0:25-0:35
0:25-0:35
NOAM Health Check for Source Release 7.1.x
NOAM Health Check for Source Release 7.2, 7.3
NOAM Health Check for Source Release 8.0/8.1
None
None
None
Procedure 16 0:05-0:10 0:30-1:15 NOAM Pre-Upgrade Backup None
Procedure 17 0:01-0:05 0:31-1:20 Disable Global Provisioning Global Provisioning Disabled
Procedure 18 0:40-1:20 1:11-2:40 NOAM Upgrade No Traffic Impact
Procedure 19 0:05-0:15 1:17-3:00 Verify NOAM Post Upgrade Status None
Procedure 20 0:05-0:10 1:22-3:10 Allow Provisioning Global Provisioning Enabled
Section 4.6 0:05-0:10 1:27-3:20 SNMP Configuration Update Configuration for SNMP traps
1Note: It is highly recommended that TVOE hosts at a site be upgraded in a MW before the start of the
DSR 8.2 Application upgrade. If TVOE host are to be upgraded during the same MW as the DSR 8.2 Application upgrade, then see Table 10 for additional time estimates associated with TVOE upgrade.
4.1 NOAM Pre-Upgrade Checks and Backup
The procedures in this section perform health checks and backups to prepare the NOAM NE for upgrade. These procedures must be executed on the active NOAM.
Note: If syscheck fails on any server during Pre-Upgrade Checks or in early checks stating that "cpu: FAILURE:: No record in alarm table for FAILURE!", please see Appendix BB : Workaround to Resolve syscheck Error for CPU Failure
Note: These procedures may be executed outside of the maintenance window, but should be executed within 6 to 8 hours.
CAUTION
Increase Maximum Number of Open Files
As the number of servers in the topology grows, so does the need for additional files to handle merging data to the NOAM. This procedure checks the number of files currently in use, and, if necessary, increases the maximum number of open files.
See Appendix B to increase the maximum number of open files.
NOAM Pre-Upgrade Health Checks 4.1.1
This procedure performs the pre-upgrade health checks that are common to all source releases.

DSR 8.2 Software Upgrade GuideDSR 8.2 Software Upgrade Guide
Page | 87 E88968-01
Procedure 12. NOAM Pre-Upgrade Health Checks
S T E P #
This procedure makes a record of the TVOE software versions and verifies that a recent backup exists for all servers.
Check off () each step as it is completed. Boxes have been provided for this purpose under each step number.
If this procedure fails, it is recommended to contact My Oracle Support (MOS) and ask for assistance.
1.
Verify NOAM TVOE host upgrades have been completed before starting DSR upgrade
Important:
Verify the revision level of the TVOE host systems for the NOAM and DR-NOAM servers.
If they are not on the required release, then the optional steps in this procedure to upgrade the TVOE hosts are required.
See Appendix J for the steps to verify the TVOE host revision level. This can also be done from the PMAC Software Inventory screen.
Complete this information:
NOAM-A TVOE Host Rev ______________________________________
NOAM-B TVOE Host Rev ______________________________________
DR-NOAM-A TVOE Host Rev ___________________________________
DR-NOAM-B TVOE Host Rev ___________________________________
Will TVOE Upgrades be performed during the DSR Application Upgrades? ____________________________________________________________
2.
Active NOAM VIP: Verify backups are created for all servers
Verify a recent COMCOL environment backup has been performed.
1. Navigate to Status and Manage > Files.
2. Select each server tab, in turn.
3. Verify the following two files have been created and have a current timestamp:
Backup.DSR.<hostname>.FullRunEnv.NETWORK_OAMP.<times
tamp>.UPG.tar.bz2
Backup.DSR.<hostname>.FullDBParts.NETWORK_OAMP.<time
stamp>.UPG.tar.bz2
See Section 3.4.5 to perform (or repeat) a full backup, if needed.
4. Repeat sub-steps 1 through 3 for each site.

DSR 8.2 Software Upgrade GuideDSR 8.2 Software Upgrade Guide
Page | 88 E88968-01
NOAM Health Check for Source Release 7.1.x 4.1.2
This procedure determines the health and status of the network and servers when the NOAM is on source release 7.1.x. This procedure must be executed on the active NOAM.
Procedure 13. NOAM Health Check for Source Release 7.1.x
S T E P #
This procedure performs a health check of the system before upgrading the NOAMs.
Check off () each step as it is completed. Boxes have been provided for this purpose under each step number.
If this procedure fails, it is recommended to contact My Oracle Support (MOS) and ask for assistance.
1.
Active NOAM VIP: Verify DSR ISO for upgrade has been transferred to all servers
1. Navigate to Status & Manage > Files.
2. Select the target release DSR ISO and click View ISO Deployment Report.
3. Review the report to ensure the ISO is deployed to all servers in the topology.
Sample report:
Deployment report for DSR-8.2.0.0.0_82.4.0-
x86_64.iso:
Deployed on 7/7 servers.
NO1: Deployed
NO2: Deployed
SO1: Deployed
SO2: Deployed
MP1: Deployed
MP2: Deployed
IPFE: Deployed

DSR 8.2 Software Upgrade GuideDSR 8.2 Software Upgrade Guide
Page | 89 E88968-01
Procedure 13. NOAM Health Check for Source Release 7.1.x
2.
Active NOAM CLI: Verify NOAM pre-upgrade status
Execute these commands on the active DSR NOAM and active DR NOAM servers.
1. Use an SSH client to connect to the active NOAM:
ssh <NOAM XMI IP address>
login as: admusr
password: <enter password>
Note: The static XMI IP address for each server should be available in Table 5.
2. Enter the command:
$ upgradeHealthCheck preUpgradeHealthCheck
This command creates two files in /var/TKLC/db/filemgmt/ UpgradeHealthCheck/ with the filename format:
<NOserver_name>_ServerStatusReport_<date-time>.xml
<NOserver_name>_ComAgentConnStatusReport_<date-
time>.xml
If any alarms are present in the system:
<NOserver_name>_AlarmStatusReport_<date-time>.xml
If the system is PDRA, one additional file is generated:
<NOserver_name>_SBRStatusReport_<date-time>.xml
Note: The FIPS integrity verification test failed message may display when the upgradeHealthCheck command runs. This message can be ignored.
3. If the Server <hostname> needs operator attention before upgrade message displays, inspect the Server Status Report to determine the reason for the message. If the Server <hostname> has no alarm with DB State as Normal and Process state as Kill message displays in the Server Status Report, the alert can be ignored.
Note: If any server status is not as expected, do not proceed with the upgrade. It is recommended to contact My Oracle Support (MOS) for guidance.
4. Keep these reports for future reference. These reports are compared to alarm and status reports after the upgrade is complete.
3.
Active NOAM VIP: Export and archive the Diameter configuration data
1. Navigate to Diameter Common > Export.
2. Capture and archive the Diameter data by selecting the ALL option for the Export Application.
3. Verify the requested data is exported by clicking Tasks at the top of the screen.
4. Navigate to Status & Manage > Files and download all the exported files to the client machine, or use the SCP utility to download the files from the active NOAM to the client machine.

DSR 8.2 Software Upgrade GuideDSR 8.2 Software Upgrade Guide
Page | 90 E88968-01
Procedure 13. NOAM Health Check for Source Release 7.1.x
4.
Active SOAM CLI: Pre-upgrade health checks
Execute SOAM pre-upgrade alarm status health checks.
1. Use an SSH client to connect to the active SOAM:
ssh <SOAM XMI IP address>
login as: admusr
password: <enter password>
Note: The static XMI IP address for each server should be available in Table 5.
2. Enter the command:
$ upgradeHealthCheck alarmStatusOnSoam
If any alarms are present in the system, this command creates a file in /var/TKLC/db/filemgmt/ UpgradeHealthCheck/ with the filename format:
<SOserver_name>_AlarmStatusReport_<date-time>.xml
Note: The FIPS integrity verification test failed message may display when the upgradeHealthCheck command runs. This message can be ignored.
3. Keep this report for future reference. This report is compared to alarm and status reports after the upgrade is complete.
5.
Active SOAM CLI: Pre-upgrade health checks
Execute SOAM pre-upgrade DA-MP status health checks.
1. Enter the command:
$ upgradeHealthCheck daMpStatus
This command outputs status to the screen for review.
Note: The FIPS integrity verification test failed message may display when the upgradeHealthCheck command runs. This message can be ignored.
2. Verify all Peer MPs are available.
3. Note the number of Total Connections Established ________________
6.
Active SOAM CLI: Verify PCA status (if equipped)
Execute SOAM pre-upgrade PCA status health checks, if equipped.
1. Enter the command:
$ upgradeHealthCheck pcaStatus
This command outputs status to the screen for review.
Note: The FIPS integrity verification test failed message may display when the upgradeHealthCheck command runs. This message can be ignored.
2. Verify Operational Status is Available for all applications.
7.
Repeat for each network element
Repeat steps 5. – 7. for each SOAM site in the topology.
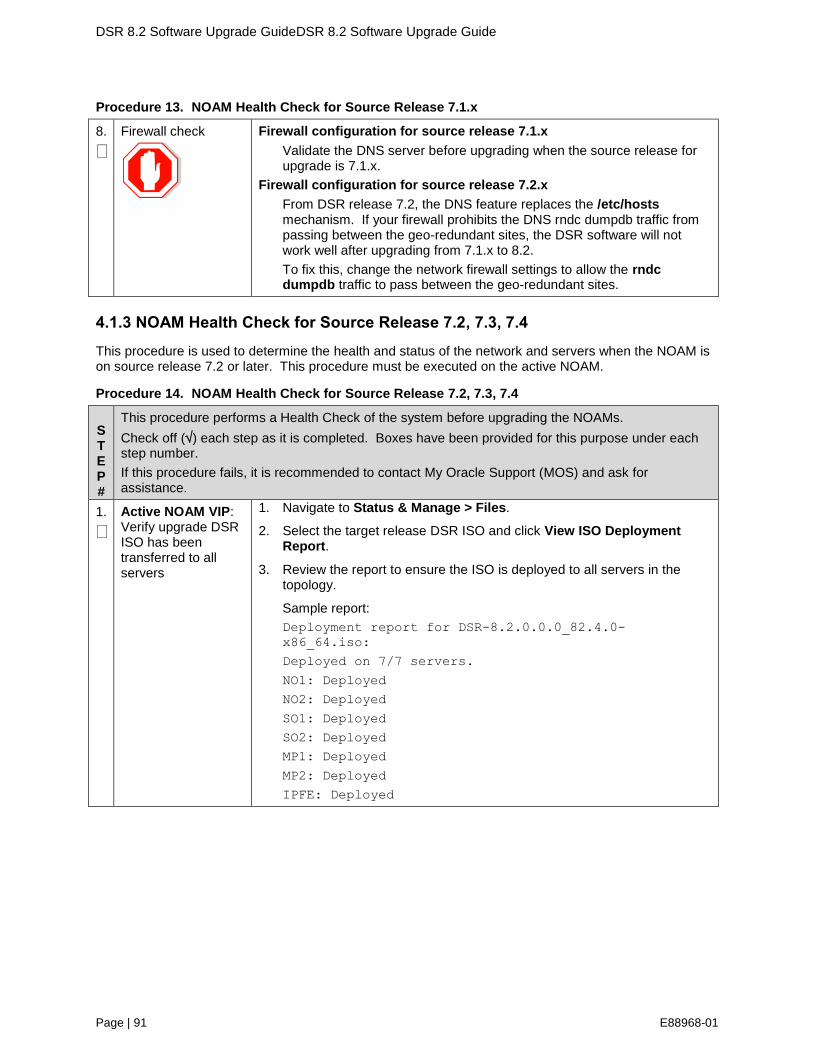
DSR 8.2 Software Upgrade GuideDSR 8.2 Software Upgrade Guide
Page | 91 E88968-01
Procedure 13. NOAM Health Check for Source Release 7.1.x
8.
Firewall check
Firewall configuration for source release 7.1.x
Validate the DNS server before upgrading when the source release for upgrade is 7.1.x.
Firewall configuration for source release 7.2.x
From DSR release 7.2, the DNS feature replaces the /etc/hosts mechanism. If your firewall prohibits the DNS rndc dumpdb traffic from passing between the geo-redundant sites, the DSR software will not work well after upgrading from 7.1.x to 8.2.
To fix this, change the network firewall settings to allow the rndc dumpdb traffic to pass between the geo-redundant sites.
NOAM Health Check for Source Release 7.2, 7.3, 7.4 4.1.3
This procedure is used to determine the health and status of the network and servers when the NOAM is on source release 7.2 or later. This procedure must be executed on the active NOAM.
Procedure 14. NOAM Health Check for Source Release 7.2, 7.3, 7.4
S T E P #
This procedure performs a Health Check of the system before upgrading the NOAMs.
Check off () each step as it is completed. Boxes have been provided for this purpose under each step number.
If this procedure fails, it is recommended to contact My Oracle Support (MOS) and ask for assistance.
1.
Active NOAM VIP: Verify upgrade DSR ISO has been transferred to all servers
1. Navigate to Status & Manage > Files.
2. Select the target release DSR ISO and click View ISO Deployment Report.
3. Review the report to ensure the ISO is deployed to all servers in the topology.
Sample report:
Deployment report for DSR-8.2.0.0.0_82.4.0-
x86_64.iso:
Deployed on 7/7 servers.
NO1: Deployed
NO2: Deployed
SO1: Deployed
SO2: Deployed
MP1: Deployed
MP2: Deployed
IPFE: Deployed

DSR 8.2 Software Upgrade GuideDSR 8.2 Software Upgrade Guide
Page | 92 E88968-01
Procedure 14. NOAM Health Check for Source Release 7.2, 7.3, 7.4
2.
Active NOAM VIP: Export and archive the Diameter configuration data
1. Navigate to Diameter Common > Export.
2. Capture and archive the Diameter data by selecting the ALL option for the Export Application.
3. Verify the requested data is exported by clicking Tasks at the top of the screen.
4. Navigate to Status & Manage > Files and download all the exported files to the client machine, or use the SCP utility to download the files from the active NOAM to the client machine.
3.
Active NOAM VIP: Initiate NOAM health checks
This procedure runs the automated pre-upgrade health checks.
1. Navigate to Administration > Software Management > Upgrade.
2. Select the active NOAM.
3. Click Checkup.
4. Under Health check options, select the Pre Upgrade option.
5. From the Upgrade ISO option, select the target release ISO.
6. Click OK.
Control returns to the Upgrade screen.

DSR 8.2 Software Upgrade GuideDSR 8.2 Software Upgrade Guide
Page | 93 E88968-01
Procedure 14. NOAM Health Check for Source Release 7.2, 7.3, 7.4
4.
Active NOAM VIP: Monitor health check progress for completion
1. Click the Tasks option to display the currently executing tasks. The Health Check task name appears as <NOServerGroup> PreUpgrade Health Check.
2. Monitor the Health Check task until the Task State is completed.
The Details column displays a hyperlink to the Health Check report.
3. Click the hyperlink to download the Health Check report.
4. Open the report and review the results.
5.
Active NOAM VIP: Analyze health check results
Analyze health check report for failures. If the Health Check report status is anything other than Pass, analyze the Health Check logs to determine if the upgrade can proceed.
1. Navigate to Status & Manage > Files.
2. Select the file named UpgradeHealthCheck.log and click View.
3. Locate the log entries for the most recent health check.
4. Review the log for failures.
5. Analyze the failures and determine if it is safe to continue the upgrade. If necessary, it is recommended to contact My Oracle Support (MOS) for guidance as described in Appendix CC.
If the health check log contains the Unable to execute Health Check on <Active NOAM hostname> message, perform health checks in accordance with Procedure 13.

DSR 8.2 Software Upgrade GuideDSR 8.2 Software Upgrade Guide
Page | 94 E88968-01
NOAM Health Check for Source Release 8.0/8.1 and Later 4.1.4
This procedure determines the health and status of the network and servers when the NOAM is on source release 8.0 or later. This procedure must be executed on the active NOAM.
Procedure 15. NOAM Health Check for Source Release 8.0/8.1 and Later
S T E P #
This procedure performs a health check of the system before upgrading the NOAMs.
Check off () each step as it is completed. Boxes have been provided for this purpose under each step number.
If this procedure fails, it is recommended to contact My Oracle Support (MOS) and ask for assistance.
1.
Active NOAM VIP: Verify upgrade DSR ISO has been transferred to all servers
1. Navigate to Status & Manage > Files.
2. Select the target release DSR ISO and click View ISO Deployment Report.
3. Review the report to ensure the ISO is deployed to all servers in the topology.
Sample report:
Deployment report for DSR-8.2.0.0.0_82.4.0-
x86_64.iso:
Deployed on 7/7 servers.
NO1: Deployed
NO2: Deployed
SO1: Deployed
SO2: Deployed
MP1: Deployed
MP2: Deployed
IPFE: Deployed
2.
Active NOAM VIP: Export and archive the Diameter configuration data
1. Navigate to Diameter Common > Export.
2. Capture and archive the Diameter data by selecting the ALL option for the Export Application.
3. Verify the requested data is exported by clicking Tasks at the top of the screen.
4. Navigate to Status & Manage > Files and download all the exported files to the client machine, or use the SCP utility to download the files from the active NOAM to the client machine.

DSR 8.2 Software Upgrade GuideDSR 8.2 Software Upgrade Guide
Page | 95 E88968-01
Procedure 15. NOAM Health Check for Source Release 8.0/8.1 and Later
3.
Active NOAM VIP: Initiate NOAM health checks
This procedure runs the automated pre-upgrade health checks.
1. Navigate to Administration > Software Management > Upgrade.
2. Select the active NOAM.
3. Click Checkup.
4. Under Health Check options, select the Pre Upgrade option.
5. From the Upgrade ISO option, select the target release ISO.
6. Click OK.
Control returns to the Upgrade screen.

DSR 8.2 Software Upgrade GuideDSR 8.2 Software Upgrade Guide
Page | 96 E88968-01
Procedure 15. NOAM Health Check for Source Release 8.0/8.1 and Later
4.
Active NOAM VIP: Monitor health check progress for completion
1. Click the Tasks option to display the currently executing tasks. The Health Check task name appears as <NOServerGroup> PreUpgrade Health Check.
2. Monitor the Health Check task until the Task State is completed.
The Details column displays a hyperlink to the Health Check report.
3. Click the hyperlink to download the Health Check report.
4. Open the report and review the results.
5.
Active NOAM VIP: Analyze health check results
Analyze health check report for failures. If the Health Check report status is anything other than Pass, analyze the Health Check logs to determine if the upgrade can proceed.
1. Navigate to Status & Manage > Files.
2. Select the file named PreUpgrade_HealthCheck_NO_SG_<date_timestamp>.txt and click View.
3. Locate the log entries for the most recent health check.
4. Review the log for failures.
5. Analyze the failures and determine if it is safe to continue the upgrade. If necessary, it is recommended to contact My Oracle Support (MOS) for guidance as described in Appendix CC.
If the health check log contains the Unable to execute Health Check on <Active NOAM hostname> message, perform health checks in accordance with Procedure 13 or Procedure 14.

DSR 8.2 Software Upgrade GuideDSR 8.2 Software Upgrade Guide
Page | 97 E88968-01
NOAM Pre-Upgrade Backup 4.1.5
Procedure 16. NOAM Pre-Upgrade Backup
S T E P #
This procedure backs up the NOAM servers just before the upgrade.
Check off () each step as it is completed. Boxes have been provided for this purpose under each step number.
If this procedure fails, it is recommended to contact My Oracle Support (MOS) and ask for assistance.
1.
Active NOAM VIP: Backup all global configuration databases for NOAM
Important: Required for disaster recovery
1. Navigate to Status & Manage > Database to return to the Database Status screen.
2. Click to highlight the active NOAM server and click Backup.
Note: Backup is only enabled when the active server is selected.
3. Mark the Configuration checkbox.
4. Select the desired compression type. Retain the default selection unless there is a specific reason or direction to change it.
5. Enter Comments (optional).
6. Click OK.
Note: On the Status & Manage >Database screen, the active NOAM server displays the word Active in the OAM Max HA Role column.
2.
Active NOAM VIP: Download/Save database files backups for NOAM
Important: Required for disaster recovery
1. Navigate to Status & Manage > Files.
2. Click on the active NOAM server tab.
3. Select the configuration database backup file and click Download.
4. If a confirmation window displays, click Save.
5. If the Choose File screen displays, select a destination folder on the local workstation to store the backup file. Click Save.
6. If a Download Complete confirmation displays, click Close.

DSR 8.2 Software Upgrade GuideDSR 8.2 Software Upgrade Guide
Page | 98 E88968-01
4.2 Disable Global Provisioning
The following procedure disables provisioning on the NOAM. This step ensures no changes are made to the database while the NOAMs are upgraded. Provisioning is re-enabled once the NOAM upgrade is complete.
Procedure 17. Disable Global Provisioning
S T E P #
This procedure disables provisioning for the NOAM (and DR-NOAM) servers before upgrade.
Check off () each step as it is completed. Boxes have been provided for this purpose under each step number.
If this procedure fails, it is recommended to contact My Oracle Support (MOS) and ask for assistance.
1.
Active NOAM VIP: Disable global provisioning and configuration updates on the entire network
1. Log into the active NOAM GUI using the VIP.
2. Navigate to Status & Manage > Database.
3. Click Disable Provisioning.
4. Confirm the operation by clicking OK on the screen.
5. Verify the button text changes to Enable Provisioning; a yellow information box should also display at the top of the view screen that states:
[Warning Code 002] – Global provisioning has been manually disabled.
The active NOAM server has the following expected alarm:
Alarm ID = 10008 (Provisioning Manually Disabled)
4.3 NOAM Upgrade
This procedure is used to upgrade the NOAM and DR NOAM servers, including the TVOE host if TVOE was not upgraded previously, as recommended in Section 3.4.7 – Upgrade TVOE Hosts at a Site.
Procedure 18. NOAM Upgrade
S T E P #
This procedure upgrades the TVOE host of the NOAM servers (optional) and upgrades NOAM servers.
Check off () each step as it is completed. Boxes have been provided for this purpose under each step number.
If this procedure fails, it is recommended to contact My Oracle Support (MOS) and ask for assistance.
1.
RMS check If the active DSR NOAM or standby DSR NOAM is a guest on RMS servers, perform Appendix C to update the NOAM guest VM configuration.
Note: This step is not applicable to VE-DSR systems.
WARNING: Appendix C is mandatory and also depends on the amount of physical RAM deployed on the server. The appendix can be run on any server type if the physical RAM is available. If the physical RAM is not available then contact My Oracle Support (MOS) and ask for assistance.
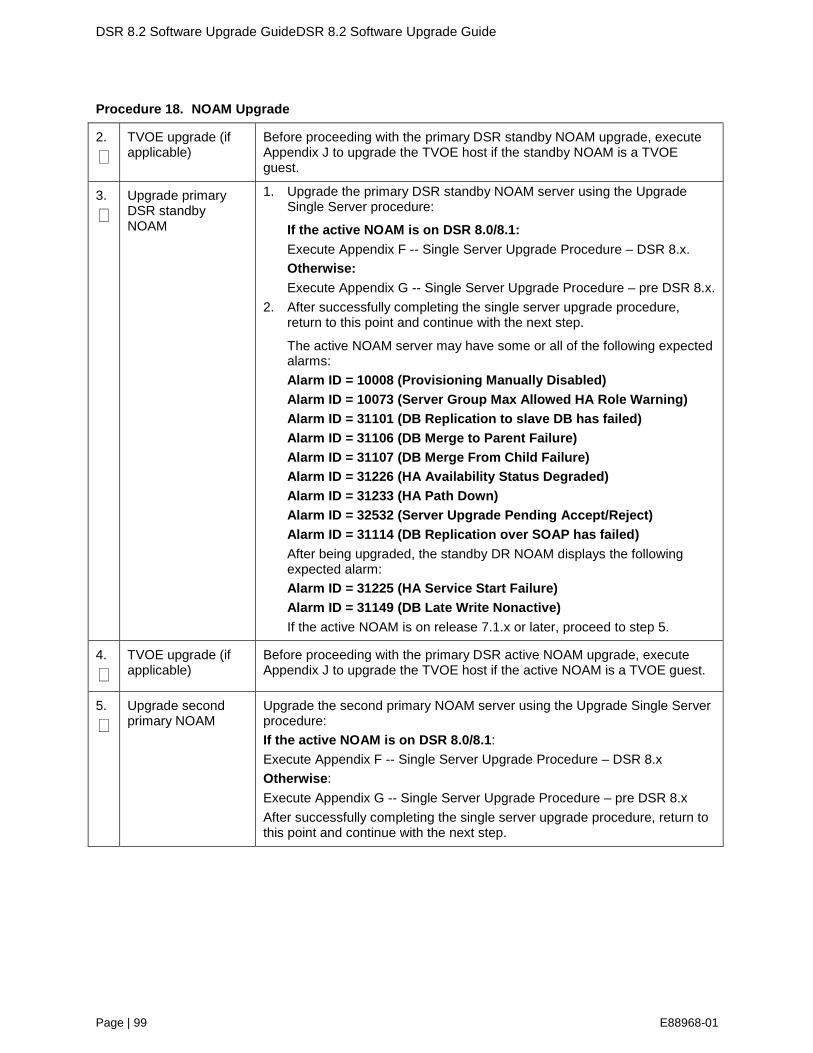
DSR 8.2 Software Upgrade GuideDSR 8.2 Software Upgrade Guide
Page | 99 E88968-01
Procedure 18. NOAM Upgrade
2.
TVOE upgrade (if applicable)
Before proceeding with the primary DSR standby NOAM upgrade, execute Appendix J to upgrade the TVOE host if the standby NOAM is a TVOE guest.
3.
Upgrade primary DSR standby NOAM
1. Upgrade the primary DSR standby NOAM server using the Upgrade Single Server procedure:
If the active NOAM is on DSR 8.0/8.1:
Execute Appendix F -- Single Server Upgrade Procedure – DSR 8.x.
Otherwise:
Execute Appendix G -- Single Server Upgrade Procedure – pre DSR 8.x.
2. After successfully completing the single server upgrade procedure, return to this point and continue with the next step.
The active NOAM server may have some or all of the following expected alarms:
Alarm ID = 10008 (Provisioning Manually Disabled)
Alarm ID = 10073 (Server Group Max Allowed HA Role Warning)
Alarm ID = 31101 (DB Replication to slave DB has failed)
Alarm ID = 31106 (DB Merge to Parent Failure)
Alarm ID = 31107 (DB Merge From Child Failure)
Alarm ID = 31226 (HA Availability Status Degraded)
Alarm ID = 31233 (HA Path Down)
Alarm ID = 32532 (Server Upgrade Pending Accept/Reject)
Alarm ID = 31114 (DB Replication over SOAP has failed)
After being upgraded, the standby DR NOAM displays the following expected alarm:
Alarm ID = 31225 (HA Service Start Failure)
Alarm ID = 31149 (DB Late Write Nonactive)
If the active NOAM is on release 7.1.x or later, proceed to step 5.
4.
TVOE upgrade (if applicable)
Before proceeding with the primary DSR active NOAM upgrade, execute Appendix J to upgrade the TVOE host if the active NOAM is a TVOE guest.
5.
Upgrade second primary NOAM
Upgrade the second primary NOAM server using the Upgrade Single Server procedure:
If the active NOAM is on DSR 8.0/8.1:
Execute Appendix F -- Single Server Upgrade Procedure – DSR 8.x
Otherwise:
Execute Appendix G -- Single Server Upgrade Procedure – pre DSR 8.x
After successfully completing the single server upgrade procedure, return to this point and continue with the next step.

DSR 8.2 Software Upgrade GuideDSR 8.2 Software Upgrade Guide
Page | 100 E88968-01
Procedure 18. NOAM Upgrade
6.
RMS check If the active DSR NOAM or standby DSR NOAM is a guest on RMS servers, perform Appendix C to update the NOAM guest VM configuration.
Note: This step is not applicable to VE-DSR systems.
WARNING: Appendix C is mandatory and also depends on the amount of physical RAM deployed on the server. The appendix can be run on any server type if the physical RAM is available.
7.
TVOE upgrade (if applicable)
Before proceeding with the primary DSR standby NOAM upgrade, execute Appendix J to upgrade the TVOE host if the standby NOAM is a TVOE guest.
8.
Upgrade standby DR NOAM
Upgrade the standby DR NOAM server using the Upgrade Single Server procedure:
Execute Appendix F -- Single Server Upgrade Procedure – DSR 8.x
After successfully completing the procedure in Appendix F, return to this point and continue with the next step.
9.
TVOE upgrade (if applicable)
Before proceeding with the active DR NOAM upgrade, execute Appendix J to upgrade the TVOE host if the active DR NOAM is a TVOE guest.
10.
Upgrade the active DR NOAM server using the Upgrade Single Server procedure
Execute Appendix F -- Single Server Upgrade Procedure – DSR 8.x
After successfully completing the procedure in Appendix F, return to this point and continue with the next procedure per Table 12.

DSR 8.2 Software Upgrade GuideDSR 8.2 Software Upgrade Guide
Page | 101 E88968-01
4.4 Verify NOAM Post Upgrade Status
This procedure determines the validity of the upgrade, as well as the health and status of the network and servers.
Procedure 19. Verify NOAM Post Upgrade Status
S T E P #
This procedure verifies post upgrade status for NOAM upgrade.
Check off () each step as it is completed. Boxes have been provided for this purpose under each step number.
If this procedure fails, it is recommended to contact My Oracle Support (MOS) and ask for assistance.
1.
Active NOAM VIP: Post-upgrade health checks
This procedure runs the automated post-upgrade health checks.
1. Navigate to Administration > Software Management > Upgrade.
2. Select the active NOAM.
3. Click Checkup.
4. Under Health check options, select the Post Upgrade option.
5. Click OK.
Control returns to the Upgrade screen.

DSR 8.2 Software Upgrade GuideDSR 8.2 Software Upgrade Guide
Page | 102 E88968-01
Procedure 19. Verify NOAM Post Upgrade Status
2.
Active NOAM VIP: Monitor health check progress
1. Click the Tasks option to display the currently executing tasks. The Health Check task name appears as <NOServerGroup> PostUpgrade Health Check.
2. Monitor the health check task until the Task State is completed. The Details column displays a hyperlink to the Health Check report.
3. Click the hyperlink to download the Health Check report.
4. Open the report and review the results.
3.
Active NOAM VIP: Analyze health check failures
If the Health Check report status is anything other than Pass, the Health Check logs can be analyzed to determine if the upgrade can proceed.
1. Navigate to Status & Manage > Files.
2. Select the file named UpgradeHealthCheck.log and click View.
3. Locate the log entries for the most recent health check.
4. Review the log for failures.
Analyze the failures and determine if it is safe to continue the upgrade. If necessary, it is recommended to contact My Oracle Support (MOS) for guidance as described in Appendix CC.

DSR 8.2 Software Upgrade GuideDSR 8.2 Software Upgrade Guide
Page | 103 E88968-01
4.5 Allow Provisioning (Post NOAM Upgrade)
The following procedure enables global provisioning for all network elements.
CAUTION Any network-wide provisioning changes made at the NOAM before the upgrade is accepted are lost if the upgrade is backed out.
Procedure 20. Allow Provisioning
S T E P #
This procedure enables provisioning for the NOAM (and DR-NOAM) servers
Check off () each step as it is completed. Boxes have been provided for this purpose under each step number.
If this procedure fails, it is recommended to contact My Oracle Support (MOS) and ask for assistance.
1.
Active NOAM VIP: Enable global provisioning and configuration updates on the entire network
1. Log into the active NOAM GUI using the VIP.
2. Navigate to Status & Manage > Database.
3. Click Enable Provisioning.
4. Confirm the operation by clicking OK on the screen.
5. Verify the button text changes to Disable Provisioning.
Note: After enabling provisioning at the NOAM, the SOAM GUI(s) may display a banner indicating that global provisioning is disabled. This message can be ignored – global provisioning is enabled. This is a display issue only and is corrected when the SOAMs are upgraded.
2.
Active NOAM VIP: Add new network element (if required)
Perform this step only if the addition of a new network element is required at this time.
If a new network element is to be added, start this procedure now. The addition of the new network element requires a separate maintenance window. The servers in the new network element must be installed with the same DSR release as that of the upgraded NOAM(s). Follow the release specific installation procedures from reference [1] to install the software on the new servers and add the new network element under the existing NOAM(s).
Skip the sections of the installation procedure related to installing and configuring the NOAM(s). This adds a new DSR SOAM site under the existing NOAM(s).
4.6 SNMP Configuration Update (Post NOAM Upgrade)
Refer Appendix W. SNMP Configuration to apply SNMP workaround in following cases:
If SNMP is not configured in DSR.
If SNMP is already configured and SNMPv3 is selected as enabled version.
This can be checked by navigating to Administration > Remote Servers >SNMP Trapping screen using GUI session of NOAM server VIP IP address.

DSR 8.2 Software Upgrade GuideDSR 8.2 Software Upgrade Guide
Page | 104 E88968-01
5. Site Upgrade Execution
This section contains the procedures for upgrading an entire site – starting with the pre-upgrade activities, upgrading the SOAMs and C-level servers, and finishing with verifying the upgrade.
To maximize the Maintenance Window usage, the procedures in this section make full use of the parallel upgrade capabilities of the DSR, while ensuring traffic continuity and redundancy to the fullest extent possible. Rearrangement of cycle option is added in Automated Site Upgrade. Please see 5.2.4 Rearrange Automated Site Upgrade Cycles for more details.
CAUTION Read 2.10 Automated Site Upgrade for details.
The Automated Site Upgrade procedures are in Section 5.2. Use the procedures in this section if Automated Site Upgrade was recommended in Section 3.2 Site Upgrade Methodology Selection.
The manual site upgrade procedures are in Section 5.2.4. Use the procedures in this section if Automated Server Group Upgrade or manual upgrade was recommended in Section 3.2 Site Upgrade Methodology Selection.
5.1 Site Pre-Upgrade Activities
SITE UPGRADE: Pre-Upgrade Activities
Use this section to execute pre-upgrade planning, pre-upgrade backups, pre-upgrade health checks, and to disable site provisioning.
This section contains the procedures for site upgrade planning, pre-upgrade backups, health checks, and disabling site provisioning.
Table 13 shows the procedures to be executed for the site upgrade, along with the estimated time to complete each step. Use Table 13 as a guide for determining the order in which the procedures are to be executed.
Table 13. Site Upgrade Execution Overview
Procedure
Elapsed Time (hr:min)
Procedure Title Impact This Step Cum
Procedure 21 0:10-0:20 0:10-0:20 Site Pre-Upgrade Backups None
Procedure 22
or
Procedure 23
0:05-0:10
0:10-0:15
0:15-0:30
0:20-0:35
Site Pre-Upgrade Health Check for Release 8.0/8.1 and Later
Site Pre-Upgrade Health Check for Release 7.x
None
None
Procedure 25 0:01-0:05 0:16-0:45 Disable Site Provisioning Site Provisioning Disabled, No Traffic Impact
Procedure 26 0:05-0:10 0:21-0:55 Site Upgrade Pre-Checks

DSR 8.2 Software Upgrade GuideDSR 8.2 Software Upgrade Guide
Page | 105 E88968-01
Procedure
Elapsed Time (hr:min)
Procedure Title Impact This Step Cum
Procedure 27 2:40-4:00 3:01-4:55 Automated Site Upgrade Traffic is not serviced by servers that are actively upgrading.
Procedure 35 0:02 3:03-4:57 Allow Site Provisioning Site Provisioning Enabled, No Traffic Impact
Procedure 36 0:10-0:15 3:13-5:12 Site Post-Upgrade Health Check None
Site Pre-Upgrade Backups 5.1.1
This procedure is non-intrusive and is used to perform a backup of all servers associated with the SOAM site(s) being upgraded. It is recommended that this procedure be executed no earlier than 36 hours before the start of the upgrade.
Since this backup is to be used in the event of disaster recovery, any site configuration changes made after this backup should be recorded and re-entered after the disaster recovery.
Procedure 62 is an alternate procedure that can be used to back up a site using the command line. Procedure 62 should only be used by direction of My Oracle Support (MOS).
Procedure 21. Site Pre-Upgrade Backups
S T E P #
This procedure conducts a full backup of the Configuration database and run environment on site being upgraded, so that each server has the latest data to perform a back out, if necessary.
Check off () each step as it is completed. Boxes have been provided for this purpose under each step number.
If this procedure fails, it is recommended to contact My Oracle Support (MOS) and ask for assistance.
1.
Active SOAM VIP: Back up site configuration data
Important: Required for disaster recovery
1. Log into the SOAM GUI using the VIP.
2. Navigate to Status & Manage > Database to return to the Database Status screen.
3. Click to highlight the Active SOAM server, and click Backup.
Note: Backup is only enabled when the active server is selected.
4. Mark the Configuration checkbox.
5. Select the desired compression type. Retain the default selection unless there is a specific reason or direction to change it.
6. Enter Comments (optional).
7. Click OK.
Note: The active SOAM can be determined by navigating to Status & Manage > HA and noting which server is currently assigned the VIP in the Active VIPs field. The server having VIP assigned is the Active.

DSR 8.2 Software Upgrade GuideDSR 8.2 Software Upgrade Guide
Page | 106 E88968-01
Procedure 21. Site Pre-Upgrade Backups
2.
Active SOAM VIP: Download/Save database backup files
Important: Required for disaster recovery
1. Navigate to Status & Manage > Files.
2. Click on the active SOAM server tab.
3. Select the configuration database backup file and click Download.
4. If a confirmation window displays, click Save.
5. If the Choose File window displays, select a destination folder on the local workstation to store the backup file. Click Save.
6. If a download complete confirmation displays, click Close.
3.
Active NOAM VIP: Upgrade/Back up DB run environment for site
1. Log into the NOAM GUI using the VIP.
2. Navigate to Administration > Software Management > Upgrade.
3. Click Backup All.

DSR 8.2 Software Upgrade GuideDSR 8.2 Software Upgrade Guide
Page | 107 E88968-01
Procedure 21. Site Pre-Upgrade Backups
4.
Active NOAM VIP: Set backup parameters
The Upgrade Backup All screen displays the various network elements and identifies which servers are ready for backup.
1. In the Action column, mark the Back up checkbox for each network element.
2. Verify the NOAM server group checkbox is NOT marked.
Note: Backing up the NOAM servers at this point overwrites the pre-upgrade backup files needed for backing out the target release. Do NOT back up the NOAM servers.
3. In the Full Backup Options section, verify the Exclude option is selected.
4. Click OK.
This initiates a full backup on each eligible server.
5.
Active NOAM VIP: Monitor tasks for backup completion
1. From the Upgrade screen, click the Tasks option.
2. Monitor the progress of the backups until the network element(s) selected in step 4 are complete.

DSR 8.2 Software Upgrade GuideDSR 8.2 Software Upgrade Guide
Page | 108 E88968-01
Procedure 21. Site Pre-Upgrade Backups
6.
Active NOAM VIP: Verify backup files are present on each server
1. Log into the active NOAM or SOAM GUI.
2. Navigate to Status & Manage > Files.
3. Click on each server tab.
4. For each server, verify the following 2 files have been created:
Backup.DSR.<server_name>.FullDBParts.NETWORK_OAMP.<time_
stamp>.UPG.tar.bz2
Backup.DSR.<server_name>.FullRunEnv.NETWORK_OAMP.<time_s
tamp>.UPG.tar.bz2
5. Repeat sub-steps 1 through 4 for each site being upgraded.
Site Pre-Upgrade Health Checks 5.1.2
This section provides procedures to verify the health of the SOAM site before upgrade. 0 is the primary procedure to be executed when the active NOAM is on release 8.0/8.1 and later. Alternate release-specific procedures are also provided, to be used as directed.
5.1.2.1 Site Pre-Upgrade Health Check for Release 8.0/8.1 and Later
This procedure is used when the NOAMs are on release 8.0/8.1 and later. The procedure is non-intrusive and performs a health check of the site before upgrading.
Note: If syscheck fails on any server during Pre-Upgrade Checks or in early checks stating that "cpu: FAILURE:: No record in alarm table for FAILURE!", please see Appendix BB : Workaround to Resolve syscheck Error for CPU Failure.
Procedure 22. Site Pre-Upgrade Health Check for Release 8.0/8.1 and Later
S T E P #
This procedure performs a health check before upgrading the SOAMs.
Check off () each step as it is completed. Boxes have been provided for this purpose under each step number.
If this procedure fails, it is recommended to contact My Oracle Support (MOS) and ask for assistance.
1.
Active NOAM VIP: Run site health checks (part 1)
Select the SOAM on which health checks are run.
1. Navigate to Administration > Software Management > Upgrade.
2. Select the tab of the site to be upgraded.
3. Select the SOAM server group link.
4. Select the active SOAM.
5. Click Checkup.

DSR 8.2 Software Upgrade GuideDSR 8.2 Software Upgrade Guide
Page | 109 E88968-01
Procedure 22. Site Pre-Upgrade Health Check for Release 8.0/8.1 and Later
2.
Active NOAM VIP: Run site health checks (part 2)
Initiate the health checks.
1. Click Checkup.
2. In the Health check options section, select the Pre Upgrade option.
3. Use the Upgrade ISO option to select the target release ISO.
4. Click OK to initiate the health check.
Control returns to the Upgrade Administration screen.

DSR 8.2 Software Upgrade GuideDSR 8.2 Software Upgrade Guide
Page | 110 E88968-01
Procedure 22. Site Pre-Upgrade Health Check for Release 8.0/8.1 and Later
3.
Active NOAM VIP: Monitor health check progress for completion
1. Click the Tasks option to display the currently executing tasks. The Health Check task name appears as <SOServerGroup> PreUpgrade Health Check.
2. Monitor the Health Check task until the Task State is completed.
The Details column displays a hyperlink to the Health Check report.
3. Click the hyperlink to download the Health Check report.
4. Open the report and review the results.
4.
Active NOAM VIP: Analyze any health check failures
If the Health Check report status is anything other than Pass, the Health Check logs must be analyzed to determine if the upgrade can proceed. The Health Check log is located in the File Management area of the active SOAM. Select the active SOAM tab to see the Health Check log.
1. Navigate to Status & Manage > Files.
2. Select the active SOAM tab.
3. Select the UpgradeHealthCheck.log file and click View.
4. Locate the log entries for the most recent health check.
5. Review the log for failures.
Analyze the failures and determine if it is safe to continue the upgrade. If necessary, it is recommended to contact My Oracle Support (MOS) for guidance as described in Appendix CC.
If the health check log contains the Unable to execute Health Check on <Active SOAM hostname> message, perform an alternate health check procedure in Procedure 23 Site Pre-Upgrade Health Check for Release 7.x.
5.
ACTIVE SOAM VIP: Export and archive the Diameter configuration data on active SOAM GUI
1. Navigate to Diameter Common > Export.
2. Capture and archive the Diameter data by selecting the ALL option for the Export Application.
3. Click OK.
4. Verify the requested data is exported by clicking Tasks at the top of the screen.
5. Click File Management to view the files available for download. Download all of the exported files to the client machine, or use the SCP utility to download the files from the active NOAM to the client machine.
6.
Capture data for each SOAM site
Repeat steps 1. through 5. for each configured SOAM site to be upgraded.

DSR 8.2 Software Upgrade GuideDSR 8.2 Software Upgrade Guide
Page | 111 E88968-01
5.1.2.2 Site Pre-Upgrade Health Check for Release 7.x
This procedure is an alternate health check used when upgrading to release 8.2 and the SOAMs are on release 7.x. The procedure is non-intrusive and performs a health check of the site before upgrading.
Do not perform this procedure unless directed in 0 step 4.
Procedure 23. Site Pre-Upgrade Health Check for Release 7.x
S T E P #
This procedure performs a health check before upgrading the SOAMs.
Check off () each step as it is completed. Boxes have been provided for this purpose under each step number.
If this procedure fails, it is recommended to contact My Oracle Support (MOS) and ask for assistance.
1.
ACTIVE SOAM CLI: Perform health checks. Verify SOAM pre-upgrade status
1. Use an SSH client to connect to the active SOAM:
ssh <SOAM XMI IP address>
login as: admusr
password: <enter password>
Note: The static XMI IP address for each server should be available in Table 5.
2. Enter the command:
$ upgradeHealthCheck preUpgradeHealthCheckOnSoam
This command creates three files in /var/TKLC/db/filemgmt/ UpgradeHealthCheck/ with the filename format:
<SOserver_name>_ServerStatusReport_<date-time>.xml
<SOserver_name>_ComAgentConnStatusReport_<date-
time>.xml
If any alarms are present in the system:
<SOserver_name>_AlarmStatusReport_<date-time>.xml
If the system is PDRA, one additional file is generated:
<SOserver_name>_SBRStatusReport_<date-time>.xml
Note: The FIPS integrity verification test failed message may display when the upgradeHealthCheck command runs. This message can be ignored.
3. If the Server <hostname> needs operator attention before upgrade message displays, inspect the Server Status Report to determine the reason for the message. If the Server <hostname> has no alarm with DB State as Normal and Process state as Kill message displays in the Server Status Report, the alert can be ignored.
Note: If any server status is not as expected, do not proceed with the upgrade. It is recommended to contact My Oracle Support (MOS) for guidance.
4. Keep these reports for future reference. These reports are compared to alarm and status reports after the upgrade is complete.

DSR 8.2 Software Upgrade GuideDSR 8.2 Software Upgrade Guide
Page | 112 E88968-01
Procedure 23. Site Pre-Upgrade Health Check for Release 7.x
2.
ACTIVE SOAM CLI: Capture Diameter maintenance status
Enter the command:
$ upgradeHealthCheck diameterMaintStatus
This command outputs a series of messages, providing Diameter Maintenance status. Capture this output and save for later use.
Note: The output is also captured in /var/TKLC/db/filemgmt/UpgradeHealthCheck.log.
Note: The FIPS integrity verification test failed message may display when the upgradeHealthCheck command runs. This message can be ignored.
3.
ACTIVE SOAM CLI: Capture/View DA-MP status
1. Enter the command:
$ upgradeHealthCheck daMpStatus
This command outputs status to the screen for review.
Note: The FIPS integrity verification test failed message may display when the upgradeHealthCheck command runs. This message can be ignored.
2. Verify all Peer MPs are available.
3. Note the number of Total Connections Established _________________
4.
ACTIVE SOAM VIP: Capture/Export Diameter configuration on active SOAM GUI
1. Navigate to Diameter Common > Export.
2. Capture and archive the Diameter data by selecting the ALL option for the Export Application.
3. Click OK.
4. Verify the requested data is exported by clicking Tasks at the top of the screen.
5. Click File Management to view the files available for download. Download all of the exported files to the client machine, or use the SCP utility to download the files from the active NOAM to the client machine.

DSR 8.2 Software Upgrade GuideDSR 8.2 Software Upgrade Guide
Page | 113 E88968-01
Procedure 23. Site Pre-Upgrade Health Check for Release 7.x
5.
Active SOAM VIP: Capture measurements data
DSR 8.0 introduces Alarm 22077 – Excessive Request Reroute Threshold Exceeded. This alarm indicates the request reroutes due to Answer response and/or Answer timeout has exceeded the configured threshold on a DA-MP server. During the upgrade, this threshold is set to 100%, effectively disabling the alarm. Before upgrading a site, measurement statistics are collected from the DA-MPs to serve as a baseline for post-upgrade comparisons.
1. Navigate to Measurements > Report.
2. Click Go to Export.
3. On the Report Export screen, make the following selections:
Report Scope => <Site SOAM NE>
Report Groups => Diameter Rerouting
Time Interval => Fifteen Minute
Time Range => 1 Day
Export Frequency => Once
Task Name => leave as is
4. Click OK to initiate the export.
5. When the export task is complete, navigate to Status & Manage > Files.
6. Locate the measurements file generated by the export task, and download the file to the local workstation. Save this file for later use in the Post Upgrade Procedures section of this document.
6.
Capture data for each SOAM site
Repeat steps 1 through 5 for each configured SOAM site to be upgraded.

DSR 8.2 Software Upgrade GuideDSR 8.2 Software Upgrade Guide
Page | 114 E88968-01
Site Upgrade Options Check 5.1.3
Automated Site Upgrade provides user-configurable options that control certain upgrade behaviors. These options are found on the active NOAM’s Administration > General Options screen and are described in detail in Section 2.10.3. Before initiating a site upgrade, review these options to verify the current settings are correct, or to modify the settings to meet customer requirements/preferences.
This procedure is applicable only to Automated Site Upgrade. The options have no effect on manual upgrades or Automated Server Group upgrades.
Procedure 24. Site Upgrade Options Check
S T E P #
This procedure is used to review the site upgrade options and make changes as necessary.
Check off () each step as it is completed. Boxes have been provided for this purpose under each step number.
If this procedure fails, it is recommended to contact My Oracle Support (MOS) and ask for assistance.
1.
Active NOAM VIP: View auto site upgrade options
1. Log into the active NOAM GUI.
2. Navigate to Administration > General Options.
3. Scroll down to the Site Upgrade Bulk Availability option.
4. Review the existing value of this option and determine if changes are needed. If the option is changed, click OK to save the change.
5. Scroll down to the Site Upgrade SOAM Method option.
6. Review the existing value of this option and determine if changes are needed. If the option is changed, click OK to save the change.

DSR 8.2 Software Upgrade GuideDSR 8.2 Software Upgrade Guide
Page | 115 E88968-01
Disable Site Provisioning 5.1.4
This procedure disables site provisioning in preparation for upgrading the site.
!!WARNING!! This procedure may only be performed in the maintenance window immediately before the start of the soam site upgrade.
Procedure 25. Disable Site Provisioning
S T E P #
This procedure disables provisioning for the SOAM.
Check off () each step as it is completed. Boxes have been provided for this purpose under each step number.
If this procedure fails, it is recommended to contact My Oracle Support (MOS) and ask for assistance.
1.
Active SOAM VIP: Disable site provisioning
1. Log into the SOAM GUI of the site to be upgraded.
2. Navigate to Status & Manage > Database.
3. Click Disable Provisioning.
4. Confirm the operation by clicking OK on the screen.
5. Verify the button text changes to Enable Provisioning. A yellow information box also displays at the top of the view screen that states:
[Warning Code 004] – Site provisioning has been manually disabled.
The active SOAM server has the following expected alarm:
Alarm ID = 10008 (Provisioning Manually Disabled)
2.
Repeat for each SOAM site
Repeat step 1 for each configured SOAM site to be upgraded.

DSR 8.2 Software Upgrade GuideDSR 8.2 Software Upgrade Guide
Page | 116 E88968-01
5.2 Automated Site Upgrade
CAUTION
If the following procedures must be completed before the start of automated site upgrade:
Procedure 21; (0 or Procedure 23) Procedure 25; Procedure 26
Read section 2.10 for more details about Automated Site Upgrade.
Upgrade cycles are created while using Automated Site Upgrade. Limitations in Appendix U for Automated Site Upgrade can be solved by rearranging/adding the upgrade cycles. If the user does not want to create a custom upgrade plan by rearranging/adding cycles then in that case manual upgrade section 5.3 method should be used.
TVOE Upgrade Check 5.2.1
When using the Automated Site Upgrade feature, it is not possible to upgrade the TVOE hosts with the application, as the application upgrades are performed continuously to completion. Therefore, all TVOE hosts in the target site must be upgraded, if necessary, before initiating the site upgrade sequence. Refer to Section 3.4.7 for TVOE host upgrade procedures. Once the TVOE hosts upgrades are complete, return to this section to continue the site upgrade.
The TVOE version check is especially applicable to VEDSR systems, wherein all of the DSR applications run as guests of a TVOE host. In particular, consideration must be given to spare SBRs, which may be located at a different physical location, but are upgraded with the server group to which the spare SBR belongs.
Site Upgrade Pre-Checks 5.2.2
This procedure verifies the system is prepared for Automated Site Upgrade.
Procedure 26. Site Upgrade Pre-Checks
S T E P #
This procedure verifies traffic status, and verifies that site provisioning is disabled, in preparation for upgrading the site.
Check off () each step as it is completed. Boxes have been provided for this purpose under each step number.
If this procedure fails, it is recommended to contact My Oracle Support (MOS) and ask for assistance.
1.
Active SOAM VIP: View KPIs to verify traffic status
1. Log into the active SOAM GUI using the VIP.
2. Navigate to Status & Manage > KPIs.
3. Inspect KPI reports to verify traffic is at the expected condition.
2.
Active SOAM VIP: Verify site provisioning is disabled
Verify site provisioning was properly disabled in Procedure 25.
In the GUI status bar, where it says Connected using …, check for the message Site Provisioning disabled.
If the message is present, continue with the next procedure per Table 13; otherwise, execute Procedure 25 Disable Site Provisioning

DSR 8.2 Software Upgrade GuideDSR 8.2 Software Upgrade Guide
Page | 117 E88968-01
Initiate Automated Site Upgrade 5.2.3
This procedure initiates the Automated Site Upgrade sequence.
Procedure 27. Automated Site Upgrade
S T E P #
This procedure upgrades an entire site using the Automated Site Upgrade option.
Check off () each step as it is completed. Boxes have been provided for this purpose under each step number.
If this procedure fails, it is recommended to contact My Oracle Support (MOS) and ask for assistance.
1.
Review site upgrade plan and site readiness
Review the site upgrade plan created in Sections 3.2 and 3.3. This step verifies the servers and server groups to upgrade are in the proper state.
1. Log into the NOAM GUI using the VIP.
2. Navigate to Administration > Software Management > Upgrade.
3. Select the SOAM tab of the site to upgrade.
4. Verify the Entire Site link is selected.
The Entire Site screen provides a summary of the server states and upgrade readiness. More detailed server status is available by selecting a specific server group link.
Note: The Site Upgrade option can be used to upgrade an entire site, or a subset of site elements. The servers within the site may be in various states of readiness, including Accept or Reject, Ready, Backup Needed, Failed, or Not Ready. Only the servers in the Ready or Failed state are upgrade eligible.
2.
Active NOAM VIP: Initiate site upgrade
1. Verify no server groups are selected on the upgrade administration screen. The Site Upgrade button is not available if a server group is selected.
2. Click Site Upgrade.
3. Review the upgrade plan as presented on the Site Initiate screen.

DSR 8.2 Software Upgrade GuideDSR 8.2 Software Upgrade Guide
Page | 118 E88968-01
Procedure 27. Automated Site Upgrade
Note: Please review the upgrade plan again and ensure all concerns noted in Table 6, have been addressed with the upgrade plan presented on the screen.
If you need to rearrange the upgrade cycles, see section 5.2.4 on how to do it; otherwise, continue to the next step.
There is some limitation with upgrading the DC server during its server group upgrade, which are upgraded in a group of servers. This is applicable for all of the upgrade options.
For example, DA-MPs, SS7 MPs please make sure that DC server is not getting upgraded in the first upgrade cycle of the C-Level servers and of its server group.
To identify the DC server, use Appendix T Identify the DC server.
If the DC server is showing by default in the first upgrade cycle of its server group, then rearrange the upgrade cycles by using section 5.2.4 so that the DC server is not getting upgraded in the first upgrade cycle of its server group.
In all cases, regardless of the number of cycles used to upgrade the DA-MP server group, the DA-MP Leader should be the last server upgraded.
Upgrading the DA-MP Leader last minimizes the number of leader changes during the upgrade. The DA-MP Leader is designated on the active SOAM at Diameter > Maintenance > DA-MPs > Peer DA-MP Status, where MP Leader = Yes.
4. In the Upgrade Settings section of the form, use the Upgrade ISO options to select the target ISO.
5. Click OK to start the upgrade sequence. Control returns to the Upgrade Administration screen.

DSR 8.2 Software Upgrade GuideDSR 8.2 Software Upgrade Guide
Page | 119 E88968-01
Procedure 27. Automated Site Upgrade
3.
Active NOAM VIP: View the upgrade administration form to monitor upgrade progress
See step 4 for instructions if the upgrade fails, or if execution time exceeds 60 minutes.
Note: If the upgrade processing encounters a problem, it may attempt to ROLL BACK to the original software release. In this case, the upgrade displays as FAILED.
The execution time may be shorter or longer, depending on the point in the upgrade where there was a problem.
With the Entire Site link selected, a summary of the upgrade status for the selected site displays. This summary identifies the server group(s) currently upgrading, the number of servers within each server group that are upgrading, and the number of servers that are pending upgrade. Use this view to monitor the upgrade status of the overall site.
More detailed status is available by selecting the individual server group links. The server group view shows the status of each individual server within the selected server group.
During the upgrade, the servers may have a combination of the following expected alarms.
Note: Not all servers have all alarms:
Alarm ID = 10008 (Provisioning Manually Disabled)
Alarm ID = 10073 (Server Group Max Allowed HA Role Warning)
Alarm ID = 10075 (The server is no longer providing services because application processes have been manually stopped)
Alarm ID = 31101 (DB Replication To Slave Failure)
Alarm ID = 31106 (DB Merge To Parent Failure)
Alarm ID = 31107 (DB Merge From Child Failure)
Alarm ID = 31228 (HA Highly available server failed to receive mate heartbeats) or (Lost Communication with Mate Server)
Alarm ID = 31233 (HA Secondary Path Down)
Alarm ID = 31283 (Highly available server failed to receive mate heartbeats)
Alarm ID = 32515 (Server HA Failover Inhibited)
Alarm ID = 31225 (HA Service Start Failure)
Alarm ID = 31149 (DB Late Write Nonactive)
Alarm ID = 31114 (DB Replication over SOAP has failed)
Note: Do not accept any upgrades at this time.
In the unlikely event that after the upgrade, the Upgrade State of server will be ‘Backout Ready’, and the Status Message will display:
“Server could not restart the application to complete the upgrade.”
Perform Appendix S Manual Completion of Server Upgrade to restore the server to full operational status, then return to this procedure to continue the upgrade.
If the upgrade fails – do not proceed. It is recommended to consult with My Oracle Support (MOS) on the best course of action.

DSR 8.2 Software Upgrade GuideDSR 8.2 Software Upgrade Guide
Page | 120 E88968-01
Procedure 27. Automated Site Upgrade
4.
Server CLI: If the upgrade of a server fails:
If the upgrade of a server fails, access the server command line (using ssh or a console), and collect the following files:
/var/TKLC/log/upgrade/upgrade.log
/var/TKLC/log/upgrade/ugwrap.log
/var/TKLC/log/upgrade/earlyChecks.log
/var/TKLC/log/platcfg/upgrade.log
It is recommended to contact My Oracle Support (MOS) by referring to Appendix CC of this document and provide these files.
When upgrade failure issue is identified and resolved, then Auto Site upgrade can be started again without executing any failed server recovery procedure.
5.
Post upgrade verification
Proceed to Section 5.7 – Site Post-Upgrade Procedures for post upgrade verification procedures.

DSR 8.2 Software Upgrade GuideDSR 8.2 Software Upgrade Guide
Page | 121 E88968-01
Rearrange Automated Site Upgrade Cycles 5.2.4
This procedure provides the details to rearrange the Automated Site Upgrade cycles if required.
Automated Site Upgrade provides an option to rearrange servers in the cycles thus eliminating the risks of a potential network outage. ASU provides the flexibility to user to order the servers within the cycles without breaking the Minimum Availability and DA-MP Leader criteria.
Procedure 28. Rearrange Automated Site Upgrade Cycles
S T E P #
This procedure provides option to rearrange the upgrade cycles for Automated Site Upgrade.
Check off () each step as it is completed. Boxes have been provided for this purpose under each step number.
If this procedure fails, it is recommended to contact My Oracle Support (MOS) and ask for assistance.
1.
Active NOAM VIP: Rearrange the upgrade cycle as needed
Click Rearrange Cycles.
2.
Active NOAM VIP: Rearrange servers in cycles
1. Click Rearrange Cycles on the Upgrade screen to rearrange servers.
Note: Only DA-MPs and SS7-MPs can be re-arranged. Re-arranging SBR and IPFE servers is restricted.
Servers cannot be left in the free pool (The OK button will not be available).
The DA-MP leader must remain in the last MP cycle. Even if not done, the DA-MP leader MP is upgraded in last.
For the DA-MP Active/Standby group, the DA-MP server record is disabled since these servers are not available to add to cycles.

DSR 8.2 Software Upgrade GuideDSR 8.2 Software Upgrade Guide
Page | 122 E88968-01
Procedure 28. Rearrange Automated Site Upgrade Cycles
2. When a server needs to be removed from cycle and needs to be added in an existing cycle or a new cycle, do this:
1. Select the desired server in the list and click Remove from Cycle.
The server Mmves to the Free Pool on the right side.

DSR 8.2 Software Upgrade GuideDSR 8.2 Software Upgrade Guide
Page | 123 E88968-01
Procedure 28. Rearrange Automated Site Upgrade Cycles
2. Add the servers in Free Pool to another existing cycle or new cycle.
The next step describes how to add a new cycle, if required.
If there is no need to add a new cycle, then steps to rearrange the cycle are complete. Return to the section 5.2.3 step that pointed to this procedure.

DSR 8.2 Software Upgrade GuideDSR 8.2 Software Upgrade Guide
Page | 124 E88968-01
Procedure 28. Rearrange Automated Site Upgrade Cycles
3.
Active NOAM VIP: Add new cycle (If required)
1. Click Add Cycle.
After adding new cycle, servers available in free pool can be added in new cycle.
2. Click OK.
5.3 Automated Server Group/Manual Upgrade Overview
This section contains alternative site upgrade procedures that can be used when Automated Site Upgrade does not meet the needs or concerns of the customer. These procedures use a combination of Automated Server Group upgrade and manual server upgrades to upgrade a specific site.
Table 14 details the site upgrade plan for a non-PCA/PDRA site, which divides the upgrade into four cycles. A cycle is defined as the complete upgrade of one or more servers, from initiate upgrade to success or failure. The first two cycles consist of upgrading the SOAMs – the first cycle upgrades the standby SOAM, followed by the second cycle, which upgrades the active SOAM. Cycle 3 cannot begin until cycle 2 is complete. This ensures that the OAM controllers are always upgraded before any C-level servers.
The third cycle begins the upgrade of the C-level servers. In cycle 3, one-half of the DA-MPs, SS7-MPs, and IPFEs are upgraded. This leaves the remaining half of these server functions in-service to process traffic.
The fourth cycle upgrades the second half of the DA-MPs, SS7-MPs, and IPFEs to complete the site upgrade.

DSR 8.2 Software Upgrade GuideDSR 8.2 Software Upgrade Guide
Page | 125 E88968-01
Table 14. Non-PCA/PDRA Site Upgrade Plan
Cycle 1 Cycle 2 Cycle 3 Cycle 4
Standby SOAM Active SOAM
½ DA-MPs ½ DA-MPs
½ SS7-MPs ½ SS7-MPs
½ IPFEs ½ IPFEs
Table 15 details the site upgrade plan for a PCA/PDRA system with two-site redundancy. This upgrade plan is divided into five cycles. The first two cycles consist of upgrading the SOAMs – the first cycle upgrades the standby and spare SOAMs in parallel, followed by the second cycle, which upgrades the Active SOAM. Cycle 3 cannot begin until cycle 2 is complete. This ensures that the OAM controllers are always upgraded before any C-level servers.
The third cycle begins the upgrade of the C-level servers. In cycle 3, one-half of the DA-MPs, SS7-MPs, and IPFEs are upgraded in parallel with all of the spare SBRs. This leaves the remaining server functions in-service to process traffic.
The fourth cycle upgrades the second half of the DA-MPs, SS7-MPs, and IPFEs in parallel with all of the standby SBRs.
The fifth cycle is required to upgrade the active SBR(s), completing the site upgrade.
Table 15. Two-Site Redundancy PCA Site Upgrade Plan
Cycle 1 Cycle 2 Cycle 3 Cycle 4 Cycle 5
Standby SOAM, Spare SOAM
Active SOAM
½ DA-MPs ½ DA-MPs
½ SS7-MPs ½ SS7-MPs
½ IPFEs ½ IPFEs
Spare SBR(s) Standby SBR(s) Active SBR(s)
Table 16 details the site upgrade plan for a PCA/PDRA system with three-site redundancy. This upgrade plan is divided into six cycles.
Note: It is mandatory to follow the mentioned division and execution order of the cycles. This ensures the OAM controllers are always upgraded before any C-level servers.
For C-level servers the division of servers can be planned in different cycles depending on customer requirements, which means SBR and DA-MPs can be upgraded in different cycles. But as mentioned Spare, Standby and Active SBRs should be upgraded in different cycles.
The first two cycles consist of upgrading the SOAMs – the first cycle upgrades the standby and spare SOAMs in parallel, followed by the second cycle, which upgrades the active SOAM. Cycle 3 cannot begin until cycle 2 is complete. This ensures the OAM controllers are always upgraded before any C-level servers.
The third cycle begins the upgrade of the C-level servers. In cycle 3, one-half of the DA-MPs, SS7-MPs, and IPFEs are upgraded in parallel with one spare SBR. This leaves the remaining server functions in-service to process traffic.
The fourth cycle upgrades the second half of the DA-MPs, SS7-MPs, and IPFEs in parallel with the second spare SBR
The fifth cycle upgrades the standby SBR(s), and the sixth cycle is required to upgrade the active SBR(s), completing the site upgrade.

DSR 8.2 Software Upgrade GuideDSR 8.2 Software Upgrade Guide
Page | 126 E88968-01
Table 16. Three-Site Redundancy PCA Site Upgrade Plan
Cycle 1 Cycle 2 Cycle 3 Cycle 4 Cycle 5 Cycle 6
Standby SOAM, Spare SOAM
Active SOAM
½ DA-MPs ½ DA-MPs
½ SS7-MPs ½ SS7-MPs
½ IPFEs ½ IPFEs
Spare SBR(s) Spare SBR(s) Standby SBR(s)
Active SBR(s)
Site Upgrade Planning 5.3.1
The upgrade of the site servers consists of a mixture of automated upgrades using the Automated Server Group upgrade feature, along with manual upgrades that are a little less automated.
There is some limitation with upgrading of DC server in a C-level server group which are upgraded in a group of servers. For example DA-MP, SS7 MP. So, please make sure that DC server is not upgraded in first upgrade cycle of such C-Level servers.
Identification of DC server can be done using Appendix T Identify the DC server.
In all cases, regardless of the number of cycles used to upgrade the DA-MP server group, the DA-MP Leader should be the last server upgraded. Upgrading the DA-MP Leader last minimizes the number of leader changes during the upgrade. The DA-MP Leader is designated on the active SOAM at Diameter > Maintenance > DA-MPs > Peer DA-MP Status, where MP Leader = Yes.
ASG STEPS (Auto Upgrade button) does not provide any liberty to the operator to verify any observations manually during upgrade but in cases, there is need to verify the data replication status between upgrade cycles, plan to use Manual Upgrade to achieve this.
While choosing ASG and Manual upgrade for multi-active MP servers, please see the limitations detailed in Appendix U for Automated Server Group upgrade option.
The Oracle recommendation for any customer whose network aligns with any of the scenarios mentioned inAppendix U, then Automated Server Group should NOT be used. Use of Automated Server Group risks a potential network outage.
Table 17 should be used to plan the upgrade of each site. For the server groups that are upgraded using ASG, the only planning necessary is to record the server group name. ASG automatically selects the individual servers to upgrade. The SS7-MP and IPFE server groups must be upgraded manually since there is only one server per server group. Planning is necessary for these server groups to ensure traffic continuity. Record the hostname of the servers to upgrade in each iteration.
Table 17. Site Upgrade Planning Sheet
Iteration 1 Notes
Standby SOAM Hostname
Spare SOAM Hostname
If a spare SOAM exists, the spare and standby SOAMs are upgraded manually. Otherwise, the SOAMs are upgraded with ASG.

DSR 8.2 Software Upgrade GuideDSR 8.2 Software Upgrade Guide
Page | 127 E88968-01
Iteration 2 Notes
Active SOAM The active SOAM is upgraded in iteration 2, either manually or by ASG.
Iteration 3 Notes
DA-MP Group 1 Manual Upgrade/ASG automatically selects DA-MPs for upgrade
SS7-MP 1 Hostname Manual upgrade
SS7-MP 3 Hostname Manual upgrade
SS7-MP 5 Hostname Manual upgrade
SS7-MP 7 Hostname Manual upgrade
IPFE 1 Hostname Manual upgrade
IPFE 3 Hostname Manual upgrade
Spare SBR(s) Manual Upgrade/ASG automatically selects the spare SBR(s) for upgrade
Iteration 4 Notes
DA-MP Group 2 Manual Upgrade/ASG automatically selects DA-MPs for upgrade
SS7-MP 2 Hostname Manual upgrade
SS7-MP 4 Hostname Manual upgrade
SS7-MP 6 Hostname Manual upgrade
SS7-MP 8 Hostname Manual upgrade
IPFE 2 Hostname Manual upgrade
IPFE 4 Hostname Manual upgrade
Standby SBR(s) Manual Upgrade/ASG automatically selects the standby SBR(s) for upgrade
Iteration 5 Notes
Active SBR(s) Manual Upgrade/ASG automatically selects the active SBR(s) for upgrade

DSR 8.2 Software Upgrade GuideDSR 8.2 Software Upgrade Guide
Page | 128 E88968-01
Table 18 shows the procedures to be executed for the site upgrade, along with the estimated time to complete each step. Use Table 18 as a guide for determining the order in which the procedures are to be executed.
Note: If the TVOE hosts are upgraded during the same Maintenance Window as the application upgrade, refer to Table 10 (Section 3.4.7) for additional time estimates associated with the TVOE upgrade.
Table 18. Site Upgrade Execution Overview
Procedure
Elapsed Time (hr:min)
Procedure Title Impact This Step Cum
Procedure 21 0:10-0:20 0:10-0:20 Site Pre-Upgrade Backups None
Procedure 22
or
Procedure 23
0:05-0:10
0:10-0:15
0:15-0:30
0:20-0:35
Site Pre-Upgrade Health Check for Release 8.0/8.1 and Later
Site Pre-Upgrade Health Check for Release 7.x
None
None
Procedure 25 0:01-0:05 0:16-0:45 Disable Site Provisioning Site Provisioning Disabled, No Traffic Impact
Procedure 29 0:01-0:05 0:17-0:50 SOAM Upgrade Pre-Checks No Traffic Impact
Iteration 1 0:40-1:00 0:57-1:50 Standby SOAM, Spare SOAM (if equipped)
Refer to Section 5.2.4 for details
Iteration 2 0:40-1:00 1:37-2:50 Active SOAM Refer to Section 5.2.4 for details
Iteration 3 0:40-1:00 2:17-3:50 ½ DA-MPs, ½ SS7-MPs, ½ IPFEs, Spare SBR(s)
Refer to Section 5.4 for details
Iteration 4 0:40-1:00 2:57-4:50 ½ DA-MPs, ½ SS7-MPs, ½ IPFEs, Standby SBR(s)
Refer to Section 5.5 for details
Iteration 5 0:00-1:00 2:57-5:50 Active SBR(s) Refer to Section 5.6 for details
Procedure 35 0:02 2:59-5:52 Allow Site Provisioning Site Provisioning Enabled, No Traffic Impact
Procedure 36 0:10-0:15 3:09-6:07 Site Post-Upgrade Health Check
None
5.3.1.1 RMS Notes
RMS-based DSRs are deployed in one of two supported configurations: without geographic redundancy, or with geographic redundancy. In both cases, the RMS-based DSR implements just a single Diameter network element.
When an RMS-based DSR has no geographic redundancy, there is just a single RMS geographic site, functioning as a single RMS Diameter site. The upgrade of this DSR deployment should be done in two maintenance windows: one for the NOAMs, and the second for all remaining servers.
When an RMS-based DSR includes geographic redundancy, there are two RMS geographic sites (but still functioning as a single RMS Diameter site). The primary RMS site contains the NOAM active/standby

DSR 8.2 Software Upgrade GuideDSR 8.2 Software Upgrade Guide
Page | 129 E88968-01
pair that manages the network element, while the geo-redundant RMS site contains a Disaster Recovery NOAM pair. Each RMS geographic site includes its own SOAM pair, but only the SOAMs at the primary RMS site are used to manage the signaling network element. The SOAMs at the geo-redundant site are for backup purposes only. The upgrade of this DSR deployment should be done in three maintenance windows: one for all NOAMs; a second for the SOAMs and DA-MPs at the geo-redundant backup RMS site; and a third for the SOAMs and DA-MPs at the primary RMS site.
5.3.1.2 TVOE Upgrade Check
When using the Automated Server Group Upgrade feature, it is not possible to upgrade the TVOE hosts with the application, as the application upgrades are performed continuously to completion. Therefore, all TVOE hosts associated with the server group must be upgraded, if necessary, before initiating the server group upgrade sequence. Refer to Section 3.4.7 for TVOE host upgrade procedures. Once the TVOE hosts upgrades are complete, return to this section to continue the site upgrade.
Note: For RMS and VEDSR configurations, the TVOE for the server hosting the PMAC may have already been upgraded.
The TVOE version check is especially applicable to VEDSR systems, wherein all of the DSR applications run as guests of a TVOE host. In particular, consideration must be given to spare SOAMs and spare SBRs, which may be located at a different physical location, but is upgraded with the server group to which the spare server belongs.
SOAM Upgrade Overview 5.3.2
This section contains the steps required to perform a major or incremental upgrade of the SOAMs for a DSR site.
TVOE hosts may be upgraded during this procedure, if the TVOE needs to be upgraded. It assumes each of the SOAM servers is running on a TVOE host (that is, it assumes that there are 2 or 3 TVOE hosts to be upgraded at the site.)
It is highly recommended that TVOE hosts at a site be upgraded in a Maintenance Window before the start of the DSR 8.2 Application upgrade. If the TVOE hosts are upgraded with the Application, consideration must be given to the risks and consequences of exceeding the Maintenance Window.
During the site upgrade (SOAMs plus all C-level servers), site provisioning is disabled. Provisioning is re-enabled at the completion of the site upgrade.
For each site in the DSR, the SOAM(s) and associated MPs and IPFEs should be upgraded within a single maintenance window.
Table 19 shows the estimated execution times for the SOAM upgrade. Procedure 30 Automated SOAM Upgrade (Active/Standby) is the recommended procedure for upgrading the SOAMs when there is no spare SOAM. ASG automatically upgrades the standby SOAM, followed by the active SOAM.
If the site does have a spare SOAM, Procedure 31 Manual SOAM Upgrade (Active/Standby/Spare) is the recommended procedure. The manual upgrade procedure upgrades the standby and spare SOAMs in parallel, followed by the active SOAM.
Table 19. SOAM Upgrade Execution Overview
Procedure
Elapsed Time (hr:min)
Procedure Title Impact This Step Cum
Iteration 1 & 2
Procedure 30
or
Procedure 31
1:20-2:40 1:20-2:40
Automated SOAM Upgrade (Active/Standby)
Manual SOAM Upgrade (Active/Standby/Spare)
No traffic impact

DSR 8.2 Software Upgrade GuideDSR 8.2 Software Upgrade Guide
Page | 130 E88968-01
Upgrade SOAMs 5.3.3
!!WARNING!! The following procedures must be completed before the start of soam upgrade:
Procedure 21; (0 or Procedure 23), Procedure 25
This section provides the procedures to upgrade the SOAMs. The SOAMs can be upgraded manually under user control, or automatically using the Automated Server Group Upgrade option. The recommended method for SOAM upgrade depends on the existence of a spare SOAM. If the site includes a spare SOAM, then the SOAMs are upgraded manually so that the spare and standby can be upgraded concurrently. This reduces the time required to upgrade the SOAMs.
Regardless of which SOAM upgrade option is used, Procedure 29 is required to ensure site provisioning is disabled.
If the site does not include a spare SOAM, use the automated SOAM upgrade in Procedure 30.
If the site does include a spare SOAM, use the manual SOAM upgrade in Procedure 31.
Procedure 29. SOAM Upgrade Pre-Checks
S T E P #
This procedure verifies traffic status, and verifies that site provisioning is disabled, in preparation for upgrading the SOAMs.
Check off () each step as it is completed. Boxes have been provided for this purpose under each step number.
If this procedure fails, it is recommended to contact My Oracle Support (MOS) and ask for assistance.
1.
Active SOAM VIP: View KPIs to verify traffic status
1. Log into the active SOAM GUI using the VIP.
2. Navigate to Status & Manage > KPIs.
3. Inspect KPI reports to verify traffic is at the expected condition.
2.
Active SOAM VIP: Verify site provisioning is disabled
Verify site provisioning was properly disabled in Procedure 25.
In the GUI status bar, where it says Connected using …, check for the message Site Provisioning disabled.
If the message is present, continue with the next procedure per Table 13; otherwise, execute Procedure 25 Disable Site Provisioning.

DSR 8.2 Software Upgrade GuideDSR 8.2 Software Upgrade Guide
Page | 131 E88968-01
5.3.3.1 Automated SOAM Upgrade (Active/Standby)
Procedure 30 is the recommended method for upgrading the SOAMs if the site does not include a spare SOAM. If the site has a spare SOAM, upgrade using Procedure 31. Upon completion of this procedure, proceed to Section 5.4 Upgrade Iteration 3.
Procedure 30. Automated SOAM Upgrade (Active/Standby)
S T E P #
This procedure upgrades the SOAM(s) using the Automated Server Group Upgrade option. If necessary, the TVOE on each server that hosts an SOAM guest is also upgraded.
Check off () each step as it is completed. Boxes have been provided for this purpose under each step number.
If this procedure fails, it is recommended to contact My Oracle Support (MOS) and ask for assistance.
1.
Upgrade TVOE host for active and/or standby SOAM servers
If the TVOE host for the active or standby SOAM needs to be upgraded, execute Appendix J to upgrade the TVOE host for the active and/or standby SOAM, as necessary.
Note: In an RMS-based DSR, the SOAM is a guest on a TVOE host that has already been upgraded as part of the NOAM upgrade.
2.
Upgrade SOAM server group
Upgrade the SOAM server group using the Upgrade Multiple Servers procedure with the following options:
Use the Automated Server Group Upgrade option
Select the Serial upgrade mode
Execute Appendix H Upgrade Multiple Servers – Upgrade Administration.
After successfully completing the procedure in Appendix H, return to this point and proceed to Section 5.4 Upgrade Iteration 3.
Note: Once the network element SOAMs are upgraded, if any C-level server is removed from a Server Group and re-added, the server must be restored by way of disaster recovery procedures. The normal replication channel to the C-level server is inhibited due to the difference in release versions.

DSR 8.2 Software Upgrade GuideDSR 8.2 Software Upgrade Guide
Page | 132 E88968-01
5.3.3.2 Manual SOAM Upgrade (Active/Standby/Spare)
Procedure 31 is used to upgrade the SOAM server group if the site includes a spare SOAM. If the SOAM server group was upgraded using Procedure 30, do not execute this procedure; proceed to Section 5.4 Upgrade Iteration 3.
Procedure 31. Manual SOAM Upgrade (Active/Standby/Spare)
S T E P #
This procedure upgrades the SOAM(s) in a DSR, including, if necessary, TVOE on each server that hosts an SOAM guest. This procedure upgrades the SOAMs manually.
Check off () each step as it is completed. Boxes have been provided for this purpose under each step number.
If this procedure fails, it is recommended to contact My Oracle Support (MOS) and ask for assistance.
1.
Upgrade TVOE host for active, standby, and/or spare SOAM servers
If the TVOE host for the active, standby, or spare SOAM needs to be upgraded, execute Appendix J to upgrade the TVOE host for the active, standby, and/or spare SOAM, as necessary.
Note: In an RMS-based DSR, the SOAM is a guest on a TVOE host that has already been upgraded as part of the NOAM upgrade.
2.
Upgrade standby and spare SOAMs in parallel using the Upgrade Multiple Servers procedure
Execute Appendix H Upgrade Multiple Servers – Upgrade Administration.
After successfully completing the procedure in Appendix H, return to this point and continue with the next step.
3.
Upgrade active SOAM using Upgrade Single Server procedure
Execute Appendix F Upgrade Single Server – DSR 8.x.
After successfully completing the procedure in Appendix F, return to this point and proceed to Section 5.4 Upgrade Iteration 3.
Note: Once the network element SOAMs are upgraded, if any C-level server is removed from a server group and re-added, the server must be restored by way of disaster recovery procedures. The normal replication channel to the C-level server is inhibited due to the difference in release versions.
5.4 Upgrade Iteration 3
Upgrade iteration 3 begins the upgrade of the site C-level servers. As shown in Table 17, iteration 3 consists of upgrading the DA-MPs, SS7-MPs, IPFEs, and spare SBR(s), if equipped. The C-level components are upgraded in parallel to maximize Maintenance Window usage.
Table 20 shows the estimated time required to upgrade the C-level servers for iteration 3.
Table 20. Iteration 3 Upgrade Execution Overview
Procedure
Elapsed Time (hr:min)
Procedure Title Impact This Step Cum
Procedure 32 0:40-1:00 0:40-1:00 Upgrade Iteration 3 ½ DA-MPs, ½ SS7-MPs, ½ IPFEs, spare SBR(s) will be offline

DSR 8.2 Software Upgrade GuideDSR 8.2 Software Upgrade Guide
Page | 133 E88968-01
CAUTION ASG does not allow the operator to specify the upgrade order of the DA-MP servers. If a manual upgrade was recommended in section 3.2, do not use ASG to upgrade the DA-MPs in this iteration. Alternate upgrade procedures are provided in L.4.
Procedure 32. Upgrade Iteration 3
S T E P #
This procedure upgrades a portion of the C-level servers for iteration 3.
Check off () each step as it is completed. Boxes have been provided for this purpose under each step number.
If this procedure fails, it is recommended to contact My Oracle Support (MOS) and ask for assistance.
1.
Active NOAM VIP: Select the DA-MP server group to view pre-upgrade status of DA-MPs
1. Log into the NOAM GUI using the VIP.
2. Navigate to Administration > Software Management > Upgrade
3. Select the SOAM tab of the site being upgraded.
4. Select the DA-MP Server Group link.
5. For the DA-MP servers to be upgraded in iteration 3, verify the application version value is the expected source software release version.
2.
Active NOAM VIP: View pre-upgrade status of DA-MP servers
1. If the servers are in Backup Needed state, select the servers and click Backup. The Upgrade State changes to Backup in Progress. When the backup is complete, the Upgrade State changes to Ready.
2. Verify the OAM Max HA Role is in the expected condition (either standby or active). This depends on the server being upgraded.

DSR 8.2 Software Upgrade GuideDSR 8.2 Software Upgrade Guide
Page | 134 E88968-01
Procedure 32. Upgrade Iteration 3
3.
Active NOAM VIP: Verify upgrade status is Ready for the server to be upgraded
This may take a minute if a backup is in progress. Depending on the server being upgraded, new alarms may occur.
The Upgrade Administration screen displays. Navigate to the DA-MP server group of the site being upgraded.
Servers may have a combination of the following expected alarms.
Note: Not all servers have all alarms:
Alarm ID = 10008 (Provisioning Manually Disabled)
Alarm ID = 10073 (Server Group Max Allowed HA Role Warning)
Alarm ID = 10075 (The server is no longer providing services because application processes have been manually stopped)
Alarm ID = 32515 (Server HA Failover Inhibited)
Alarm ID = 31101 (DB Replication to slave DB has failed)
Alarm ID = 31106 (DB Merge to Parent Failure)
Alarm ID = 31107 (DB Merge From Child Failure)
Alarm ID = 31228 (HA Highly available server failed to receive mate heartbeats) or (Lost Communication with Mate Server)
Alarm ID = 31225 (HA Service Start Failure)
Alarm ID = 31149 (DB Late Write Nonactive)
Alarm ID = 31114 (DB Replication over SOAP has failed)
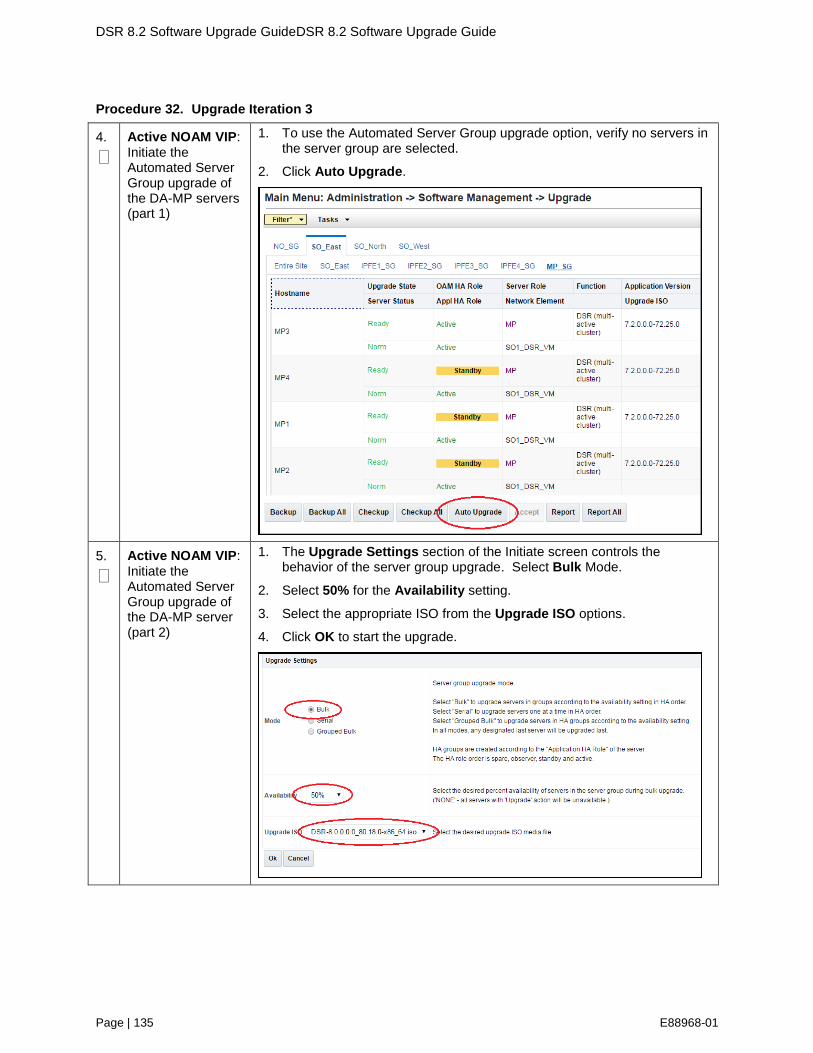
DSR 8.2 Software Upgrade GuideDSR 8.2 Software Upgrade Guide
Page | 135 E88968-01
Procedure 32. Upgrade Iteration 3
4.
Active NOAM VIP: Initiate the Automated Server Group upgrade of the DA-MP servers (part 1)
1. To use the Automated Server Group upgrade option, verify no servers in the server group are selected.
2. Click Auto Upgrade.
5.
Active NOAM VIP: Initiate the Automated Server Group upgrade of the DA-MP server (part 2)
1. The Upgrade Settings section of the Initiate screen controls the behavior of the server group upgrade. Select Bulk Mode.
2. Select 50% for the Availability setting.
3. Select the appropriate ISO from the Upgrade ISO options.
4. Click OK to start the upgrade.
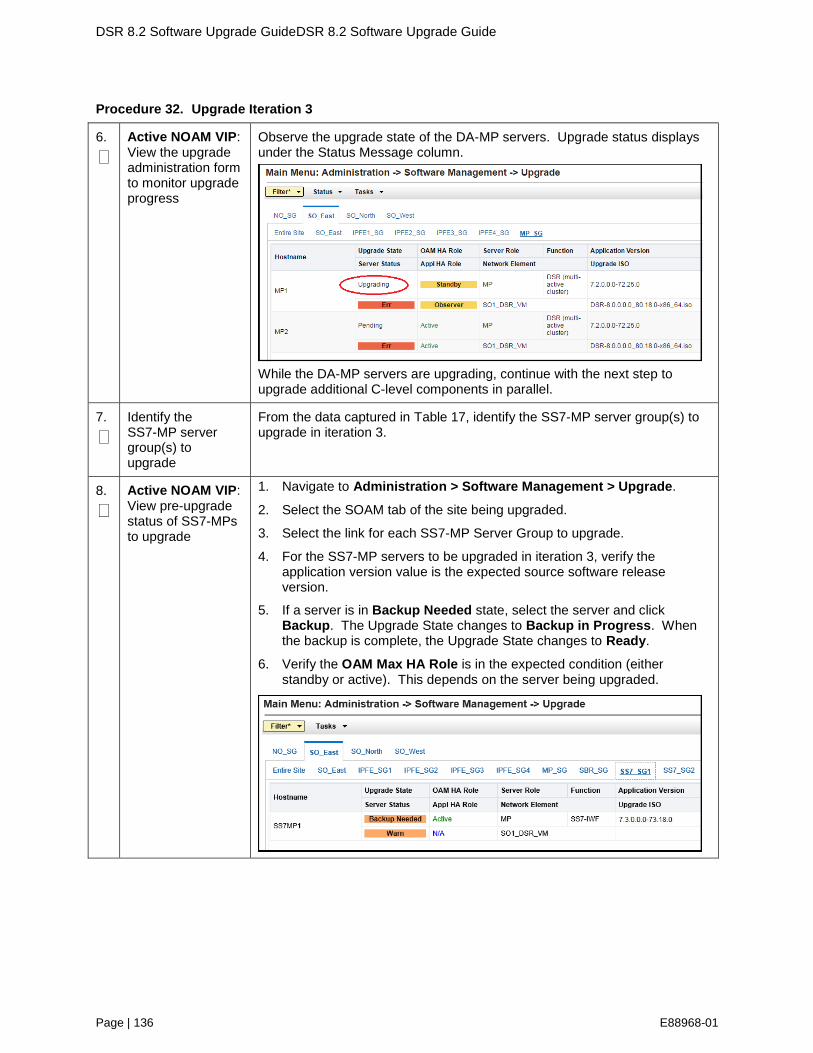
DSR 8.2 Software Upgrade GuideDSR 8.2 Software Upgrade Guide
Page | 136 E88968-01
Procedure 32. Upgrade Iteration 3
6.
Active NOAM VIP: View the upgrade administration form to monitor upgrade progress
Observe the upgrade state of the DA-MP servers. Upgrade status displays under the Status Message column.
While the DA-MP servers are upgrading, continue with the next step to upgrade additional C-level components in parallel.
7.
Identify the SS7-MP server group(s) to upgrade
From the data captured in Table 17, identify the SS7-MP server group(s) to upgrade in iteration 3.
8.
Active NOAM VIP: View pre-upgrade status of SS7-MPs to upgrade
1. Navigate to Administration > Software Management > Upgrade.
2. Select the SOAM tab of the site being upgraded.
3. Select the link for each SS7-MP Server Group to upgrade.
4. For the SS7-MP servers to be upgraded in iteration 3, verify the application version value is the expected source software release version.
5. If a server is in Backup Needed state, select the server and click Backup. The Upgrade State changes to Backup in Progress. When the backup is complete, the Upgrade State changes to Ready.
6. Verify the OAM Max HA Role is in the expected condition (either standby or active). This depends on the server being upgraded.

DSR 8.2 Software Upgrade GuideDSR 8.2 Software Upgrade Guide
Page | 137 E88968-01
Procedure 32. Upgrade Iteration 3
9.
Active NOAM VIP: Verify upgrade status is Ready for the server to be upgraded
This may take a minute if a backup is in progress. Depending on the server being upgraded, new alarms may occur.
The Upgrade Administration screen displays. Navigate to the SS7-MP server group being upgraded.
Servers may have a combination of the following expected alarms.
Note: Not all servers have all alarms:
Alarm ID = 10008 (Provisioning Manually Disabled)
Alarm ID = 10073 (Server Group Max Allowed HA Role Warning)
Alarm ID = 10075 (The server is no longer providing services because application processes have been manually stopped)
Alarm ID = 32515 (Server HA Failover Inhibited)
Alarm ID = 31101 (DB Replication to slave DB has failed)
Alarm ID = 31106 (DB Merge to Parent Failure)
Alarm ID = 31107 (DB Merge From Child Failure)
Alarm ID = 31228 (HA Highly available server failed to receive mate heartbeats) or (Lost Communication with Mate Server)
Alarm ID = 31149 (DB Late Write Nonactive)
Alarm ID = 31114 (DB Replication over SOAP has failed)
10.
Active NOAM VIP: Initiate SS7-MP upgrade (part 1)
Select the Upgrade Server method.
1. From the Upgrade Administration screen, select the server to upgrade.
2. Click Upgrade Server.

DSR 8.2 Software Upgrade GuideDSR 8.2 Software Upgrade Guide
Page | 138 E88968-01
Procedure 32. Upgrade Iteration 3
11.
Active NOAM VIP: Initiate SS7-MP upgrade (part 2)
Select target ISO.
1. On the Upgrade Initiate screen, select the target ISO from the Upgrade ISO options.
2. Click OK to initiate the upgrade.
12.
Active NOAM VIP: View the upgrade administration form to monitor upgrade progress
Observe the upgrade state of the SS7-MP server. Upgrade status is displayed under the Status Message column.
13.
Repeat for each SS7-MP server(s)
Repeat steps 6 through 12 for the next SS7-MP to upgrade per Table 17.
14.
Continue upgrade iteration 3
While the SS7-MP servers are upgrading, continue with the next step to upgrade additional C-level components in parallel.
15.
Identify the IPFE server group(s) to upgrade
From the data captured in Table 17, identify the IPFE server group(s) to upgrade in iteration 3.

DSR 8.2 Software Upgrade GuideDSR 8.2 Software Upgrade Guide
Page | 139 E88968-01
Procedure 32. Upgrade Iteration 3
16.
Active NOAM VIP: View pre-upgrade status of IPFEs
1. Navigate to Administration > Software Management > Upgrade.
2. Select the SOAM tab of the site being upgraded.
3. Select the link for each IPFE server group to upgrade.
4. For the IPFE servers to be upgraded in iteration 3, verify the application version value is the expected source software release version.
5. If a server is in Backup Needed state, select the servers and click Backup. The Upgrade State changes to Backup in Progress. When the backup is complete, the Upgrade State changes to Ready.
6. Verify the OAM Max HA Role is in the expected condition (either standby or active). This depends on the server being upgraded.

DSR 8.2 Software Upgrade GuideDSR 8.2 Software Upgrade Guide
Page | 140 E88968-01
Procedure 32. Upgrade Iteration 3
17.
Active NOAM VIP: Verify upgrade status is Ready for the server to be upgraded
This may take a minute if a backup is in progress. Depending on the server being upgraded, new alarms may occur.
The Upgrade Administration screen displays. Navigate to the IPFE server group being upgraded.
Servers may have a combination of the following expected alarms.
Note: Not all servers have all alarms:
Alarm ID = 10008 (Provisioning Manually Disabled)
Alarm ID = 10073 (Server Group Max Allowed HA Role Warning)
Alarm ID = 10075 (The server is no longer providing services because application processes have been manually stopped)
Alarm ID = 32515 (Server HA Failover Inhibited)
Alarm ID = 31101 (DB Replication to slave DB has failed)
Alarm ID = 31106 (DB Merge to Parent Failure)
Alarm ID = 31107 (DB Merge From Child Failure)
Alarm ID = 31228 (HA Highly available server failed to receive mate heartbeats) or (Lost Communication with Mate Server)
Alarm ID = 31149 (DB Late Write Nonactive)
Alarm ID = 31114 (DB Replication over SOAP has failed)
18.
Active NOAM VIP: Initiate IPFE upgrade (part 1)
Select the Upgrade Server method.
1. From the Upgrade Administration screen, select the server to upgrade.
2. Click Upgrade Server.

DSR 8.2 Software Upgrade GuideDSR 8.2 Software Upgrade Guide
Page | 141 E88968-01
Procedure 32. Upgrade Iteration 3
19.
Active NOAM VIP: Initiate SS7-MP upgrade (part 2)
Select target ISO.
1. On the Upgrade Initiate screen, select the target ISO from the Upgrade ISO options.
2. Click OK to start the upgrade.
20.
Active NOAM VIP: View the upgrade administration form to monitor upgrade progress
Observe the upgrade state of the IPFE server. Upgrade status displays under the Status Message column.
21.
Repeat for each IPFE
Repeat steps 15 through 20 for the next IPFE to upgrade in this iteration per Table 17.
22.
Identify the SBR server group(s) to upgrade
From the data captured in Table 17, identify the SBR server group(s) to upgrade in iteration 3.
ASG (Auto Upgrade), mentioned in next steps, do not allow you to verify any observations during upgrade.
If a manual upgrade was recommended in section 3.2, Table 6, step 8. , do not use ASG to upgrade all the SBR servers from same server group in a single iteration. Alternate upgrade procedures are provided in L.7, Manual SBR Upgrade Procedure.
Spare SBR server(s) need to be upgraded in this iteration.
In the case of Manual Upgrade, ASG steps 23. to 27. need to be skipped.
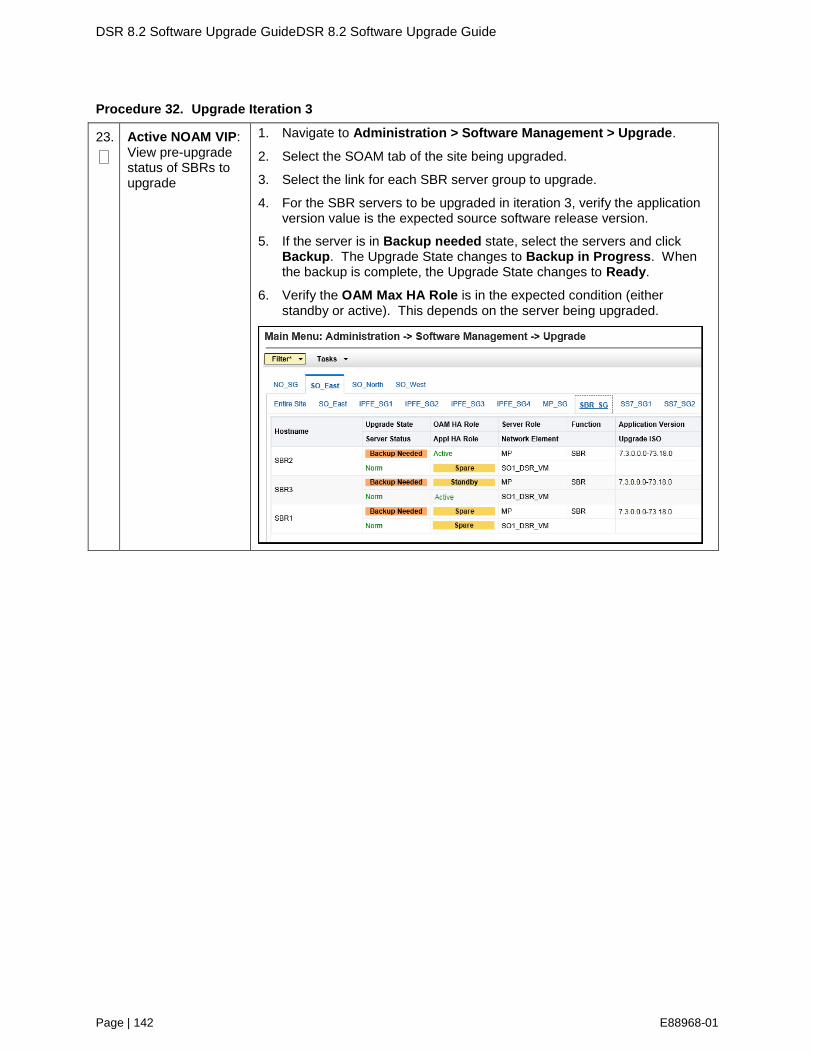
DSR 8.2 Software Upgrade GuideDSR 8.2 Software Upgrade Guide
Page | 142 E88968-01
Procedure 32. Upgrade Iteration 3
23.
Active NOAM VIP: View pre-upgrade status of SBRs to upgrade
1. Navigate to Administration > Software Management > Upgrade.
2. Select the SOAM tab of the site being upgraded.
3. Select the link for each SBR server group to upgrade.
4. For the SBR servers to be upgraded in iteration 3, verify the application version value is the expected source software release version.
5. If the server is in Backup needed state, select the servers and click Backup. The Upgrade State changes to Backup in Progress. When the backup is complete, the Upgrade State changes to Ready.
6. Verify the OAM Max HA Role is in the expected condition (either standby or active). This depends on the server being upgraded.

DSR 8.2 Software Upgrade GuideDSR 8.2 Software Upgrade Guide
Page | 143 E88968-01
Procedure 32. Upgrade Iteration 3
24.
Active NOAM VIP: Verify upgrade status is Ready for the server to be upgraded
This may take a minute if a backup is in progress. Depending on the server being upgraded, new alarms may occur.
The Upgrade Administration screen displays. Navigate to the SBR server group being upgraded.
Servers may have a combination of the following expected alarms.
Note: Not all servers have all alarms:
Alarm ID = 10008 (Provisioning Manually Disabled)
Alarm ID = 10073 (Server Group Max Allowed HA Role Warning)
Alarm ID = 10075 (The server is no longer providing services because application processes have been manually stopped)
Alarm ID = 32515 (Server HA Failover Inhibited)
Alarm ID = 31101 (DB Replication to slave DB has failed)
Alarm ID = 31106 (DB Merge to Parent Failure)
Alarm ID = 31107 (DB Merge From Child Failure)
Alarm ID = 31228 (HA Highly available server failed to receive mate heartbeats) or (Lost Communication with Mate Server)
Alarm ID = 31149 (DB Late Write Nonactive)
Alarm ID = 31114 (DB Replication over SOAP has failed)

DSR 8.2 Software Upgrade GuideDSR 8.2 Software Upgrade Guide
Page | 144 E88968-01
Procedure 32. Upgrade Iteration 3
25.
Active NOAM VIP: Initiate SBR upgrade (part 1)
Select the Auto Upgrade method.
1. To use the Automated Server Group upgrade option, select the SBR server group to upgrade.
2. Verify no servers in the server group are selected.
3. Click Auto Upgrade.
26.
Active NOAM VIP: Initiate SBR upgrade (part 2)
Set upgrade options and start the Automated Server Group Upgrade.
1. The Upgrade Settings section of the Initiate screen controls the behavior of the automated upgrade. Select Serial mode.
2. Select the appropriate ISO from the Upgrade ISO options.
3. Click OK to start the upgrade.

DSR 8.2 Software Upgrade GuideDSR 8.2 Software Upgrade Guide
Page | 145 E88968-01
Procedure 32. Upgrade Iteration 3
27.
Active NOAM VIP: View the upgrade administration form to monitor upgrade progress
Observe the Upgrade State of the SBR server group. Upgrade status displays under the Status Message column (not shown).
28.
Repeat for each SBR server group
Repeat steps 22 through 27 for the next SBR server group to be upgraded per Table 17.
29.
Active NOAM VIP: View the upgrade administration form to monitor upgrade progress
See step 30 for instructions if the upgrade fails, or if execution time exceeds 60 minutes.
Note: If the upgrade processing encounters a problem, it may attempt to ROLL BACK to the original software release. In this case, the Upgrade displays as FAILED.
The execution time may be shorter or longer, depending on the point in the upgrade where there was a problem.
1. Navigate to Administration > Software Management > Upgrade.
2. Select the SOAM tab of the site being upgraded.
3. Sequence through the server group links for the server groups being upgraded. Observe the Upgrade State of the servers of interest. Upgrade status displays under the Status Message column.
During the upgrade, the servers may have a combination of the following expected alarms.
Note: Not all servers have all alarms:
Alarm ID = 10008 (Provisioning Manually Disabled)
Alarm ID = 10073 (Server Group Max Allowed HA Role Warning)
Alarm ID = 10075 (The server is no longer providing services because application processes have been manually stopped)
Alarm ID = 31101 (DB Replication To Slave Failure)
Alarm ID = 31106 (DB Merge To Parent Failure)
Alarm ID = 31107 (DB Merge From Child Failure)
Alarm ID = 31228 (HA Highly available server failed to receive mate heartbeats) or (Lost Communication with Mate Server)
Alarm ID = 31233 (HA Secondary Path Down)
Alarm ID = 31283 (Highly available server failed to receive mate heartbeats)
Alarm ID = 32515 (Server HA Failover Inhibited)

DSR 8.2 Software Upgrade GuideDSR 8.2 Software Upgrade Guide
Page | 146 E88968-01
Procedure 32. Upgrade Iteration 3
Alarm ID = 31149 (DB Late Write Nonactive)
Alarm ID = 31114 (DB Replication over SOAP has failed)
Database (DB) replication failure alarms may display during an Automated Site Upgrade or during an event that resets multiple servers in parallel. The DB on the child servers is not updated until resolved. Refer to Appendix W resolve this issue.
4. Half of the DA-MP and SBR server groups are upgraded in iteration 3. ASG automatically sequences to iteration 4 to upgrade the remaining servers. Periodically monitor these servers for failures.
5. For the SS7-MP and IPFE servers being upgraded, wait for the upgrades to complete. The Status Message column displays Success after approximately 20 to 50 minutes. Do not proceed to iteration 4 until the SS7-MP and IPFE servers have completed upgrade.
Note: Do not accept any upgrades at this time.
If any upgrade fails – do not proceed. It is recommended to consult with My Oracle Support (MOS) on the best course of action. Refer to Appendix O for failed server recovery procedures.
30.
Server CLI: If the upgrade of a server fails
If the upgrade of a server fails, access the server command line (using ssh or a console), and collect the following files:
/var/TKLC/log/upgrade/upgrade.log
/var/TKLC/log/upgrade/ugwrap.log
/var/TKLC/log/upgrade/earlyChecks.log
/var/TKLC/log/platcfg/upgrade.log
It is recommended to contact My Oracle Support (MOS) by referring to Appendix CC of this document and provide these files. Refer to Appendix O for failed server recovery procedures.
5.5 Upgrade Iteration 4
Upgrade iteration 4 continues the upgrade of the site C-level servers. As shown in Table 17, iteration 4 consists of upgrading the second half of the DA-MPs, SS7-MPs, and IPFEs, as well as the standby SBR(s), if equipped.
Table 21 shows the estimated time required to upgrade the C-level servers for iteration 4.
Table 21. Iteration 4 Upgrade Execution Overview
Procedure
Elapsed Time (hr:min)
Procedure Title Impact This Step Cum
Procedure 33 0:40-1:00 Upgrade Iteration 4 ½ DA-MPs, ½ SS7-MPs, ½ IPFEs, Standby SBR(s) will be offline

DSR 8.2 Software Upgrade GuideDSR 8.2 Software Upgrade Guide
Page | 147 E88968-01
Procedure 33. Upgrade Iteration 4
S T E P #
This procedure upgrades a portion of the C-level servers for iteration 4.
Check off () each step as it is completed. Boxes have been provided for this purpose under each step number.
If this procedure fails, it is recommended to contact My Oracle Support (MOS) and ask for assistance.
1.
Identify the SS7-MP server group(s) to upgrade
From the data captured in Table 17, identify the SS7-MP server group(s) to upgrade in iteration 4.
2.
Active NOAM VIP: View pre-upgrade status of SS7-MPs
1. Navigate to Administration > Software Management > Upgrade.
2. Select the SOAM tab of the site to upgrade.
3. Select the link for each SS7-MP server group to be upgraded.
4. For the SS7-MP servers to be upgraded in iteration 4, verify the application version value is the expected source software release version.
5. If a server is in Backup Needed state, select the servers and click Backup. The Upgrade State changes to Backup in Progress. When the backup is complete, the Upgrade State changes to Ready.
6. Verify the OAM Max HA Role is in the expected condition (either standby or active). This depends on the server being upgraded.

DSR 8.2 Software Upgrade GuideDSR 8.2 Software Upgrade Guide
Page | 148 E88968-01
Procedure 33. Upgrade Iteration 4
3.
Active NOAM VIP: Verify upgrade status is Ready for the server to be upgraded
This may take a minute if a backup is in progress. Depending on the server being upgraded, new alarms may occur.
The Upgrade Administration screen displays. Navigate to the SS7-MP server group to upgrade.
Servers may have a combination of the following expected alarms.
Note: Not all servers have all alarms:
Alarm ID = 10008 (Provisioning Manually Disabled)
Alarm ID = 10073 (Server Group Max Allowed HA Role Warning)
Alarm ID = 10075 (The server is no longer providing services because application processes have been manually stopped)
Alarm ID = 32515 (Server HA Failover Inhibited)
Alarm ID = 31101 (DB Replication to slave DB has failed)
Alarm ID = 31106 (DB Merge to Parent Failure)
Alarm ID = 31107 (DB Merge From Child Failure)
Alarm ID = 31228 (HA Highly available server failed to receive mate heartbeats) or (Lost Communication with Mate Server)
Alarm ID = 31149 (DB Late Write Nonactive)
Alarm ID = 31114 (DB Replication over SOAP has failed)
4.
Active NOAM VIP: Initiate SS7-MP upgrade (part 1)
Select the Upgrade Server method.
1. From the Upgrade Administration screen, select the server to upgrade.
2. Click Upgrade Server.

DSR 8.2 Software Upgrade GuideDSR 8.2 Software Upgrade Guide
Page | 149 E88968-01
Procedure 33. Upgrade Iteration 4
5.
Active NOAM VIP: Initiate SS7-MP upgrade (part 2)
Select target ISO.
1. On the Upgrade Initiate screen, select the target ISO from the Upgrade ISO options.
2. Click OK to initiate the upgrade.
6.
Active NOAM VIP: View the upgrade administration form to monitor upgrade progress
Observe the upgrade state of the SS7-MP server. Upgrade status displays under the Status Message column.
7.
Repeat for each SS7-MP
Repeat steps 1 through 6 for the next SS7-MP to be upgraded in this iteration per Table 17.
8.
Continue upgrade iteration 4
While the SS7-MP servers are upgrading, continue with the next step to upgrade additional C-level components in parallel.
9.
Identify the IPFE server group(s) to upgrade
From the data captured in Table 17, identify the IPFE server group(s) to upgrade in iteration 4.

DSR 8.2 Software Upgrade GuideDSR 8.2 Software Upgrade Guide
Page | 150 E88968-01
Procedure 33. Upgrade Iteration 4
10.
Active NOAM VIP: View pre-upgrade status of IPFEs
1. Navigate to Administration > Software Management > Upgrade.
2. Select the SOAM tab of the site being upgraded.
3. Select the link of each IPFE server group to be upgraded.
4. For the IPFE servers to be upgraded in iteration 4, verify the application version value is the expected source software release version.
5. If a server is in Backup Needed state, select the servers and click Backup. The Upgrade State changes to Backup in Progress. When the backup is complete, the Upgrade State changes to Ready.
6. Verify the OAM Max HA Role is in the expected condition (either standby or active). This depends on the server being upgraded.

DSR 8.2 Software Upgrade GuideDSR 8.2 Software Upgrade Guide
Page | 151 E88968-01
Procedure 33. Upgrade Iteration 4
11.
Active NOAM VIP: Verify upgrade status is Ready for the server to be upgraded
This may take a minute if a backup is in progress. Depending on the server being upgraded, new alarms may occur.
The Upgrade Administration screen displays. Navigate to the IPFE server group being upgraded.
Servers may have a combination of the following expected alarms.
Note: Not all servers have all alarms:
Alarm ID = 10008 (Provisioning Manually Disabled)
Alarm ID = 10073 (Server Group Max Allowed HA Role Warning)
Alarm ID = 10075 (The server is no longer providing services because application processes have been manually stopped)
Alarm ID = 32515 (Server HA Failover Inhibited)
Alarm ID = 31101 (DB Replication to slave DB has failed)
Alarm ID = 31106 (DB Merge to Parent Failure)
Alarm ID = 31107 (DB Merge From Child Failure)
Alarm ID = 31228 (HA Highly available server failed to receive mate heartbeats) or (Lost Communication with Mate Server)
Alarm ID = 31149 (DB Late Write Nonactive)
Alarm ID = 31114 (DB Replication over SOAP has failed)
12.
Active NOAM VIP: Initiate IPFE upgrade (part 1)
Select the Upgrade Server method.
1. From the Upgrade Administration screen, select the server to be upgraded.
2. Click Upgrade Server.

DSR 8.2 Software Upgrade GuideDSR 8.2 Software Upgrade Guide
Page | 152 E88968-01
Procedure 33. Upgrade Iteration 4
13.
Active NOAM VIP: Initiate IPFE upgrade (part 2)
Select target ISO.
1. On the Upgrade Initiate screen, select the target ISO from the Upgrade ISO options.
2. Click OK to initiate the upgrade.
14.
Active NOAM VIP: View the upgrade administration form to monitor upgrade progress
Observe the Upgrade State of the IPFE server. Upgrade status displays under the Status Message column.
15.
Repeat for each IPFE
Repeat steps 9. through 14. for the next IPFE to be upgraded per Table 17.
16.
Identify the Standby SBR server(s) to upgrade
From the data captured in Table 17, identify the SBR server (s) to upgrade in iteration 4.
If ASG was used for SBR servers in Upgrade Iteration 3, then standby SBR server(s) are already upgraded and the SBR upgrade iteration steps are not required.
If manual upgrade was recommended in section 3.2, Table 6, step 8. , use alternate upgrade procedures provided in L.7, Manual SBR Upgrade Procedure for standby SBR server (s) upgrade.

DSR 8.2 Software Upgrade GuideDSR 8.2 Software Upgrade Guide
Page | 153 E88968-01
Procedure 33. Upgrade Iteration 4
17.
Active NOAM VIP: View the upgrade administration form to monitor upgrade progress
See step 18. for instructions if the upgrade fails, or if execution time exceeds 60 minutes.
Note: If the upgrade processing encounters a problem, it may attempt to ROLL BACK to the original software release. In this case, the Upgrade displays as FAILED.
The execution time may be shorter or longer, depending on the point in the upgrade where there was a problem.
1. Navigate to Administration > Software Management > Upgrade.
2. Select the SOAM tab of the site being upgraded.
3. Sequence through the server group links for the server groups being upgraded. Observe the upgrade state of the servers of interest. Upgrade status displays under the Status Message column.
During the upgrade, the servers may have a combination of the following expected alarms.
Note: Not all servers have all alarms:
Alarm ID = 10008 (Provisioning Manually Disabled)
Alarm ID = 10073 (Server Group Max Allowed HA Role Warning)
Alarm ID = 10075 (The server is no longer providing services because application processes have been manually stopped)
Alarm ID = 31101 (DB Replication To Slave Failure)
Alarm ID = 31106 (DB Merge To Parent Failure)
Alarm ID = 31107 (DB Merge From Child Failure)
Alarm ID = 31228 (HA Highly available server failed to receive mate heartbeats) or (Lost Communication with Mate Server)
Alarm ID = 31233 (HA Secondary Path Down)
Alarm ID = 31283 (Highly available server failed to receive mate heartbeats)
Alarm ID = 32515 (Server HA Failover Inhibited)
Alarm ID = 31149 (DB Late Write Nonactive)
Alarm ID = 31114 (DB Replication over SOAP has failed)
Database (DB) replication failure alarms may display during an Automated Site Upgrade or during an event that resets multiple servers in parallel. The DB on the child servers is not updated until resolved. Refer to Appendix W to resolve this issue.
4. The SBR server groups being upgraded with ASG upgrade the standby SBR in iteration 4, and automatically sequence to iteration 5. Periodically monitor these servers for failures, if equipped.
5. For the DA-MP, SS7-MP and IPFE servers being upgraded, wait for the upgrades to complete. The Status Message column displays Success after approximately 20 to 50 minutes. Do not proceed to iteration 5 until the DA-MP, SS7-MP and IPFE servers have completed upgrade.
If the system does not have SBRs, the server upgrades are complete. Proceed to Section 5.6 Upgrade Iteration 5.

DSR 8.2 Software Upgrade GuideDSR 8.2 Software Upgrade Guide
Page | 154 E88968-01
Procedure 33. Upgrade Iteration 4
18.
Server CLI: If the upgrade of a server fails:
If the upgrade of a server fails, access the server command line (using ssh or a console), and collect the following files:
/var/TKLC/log/upgrade/upgrade.log
/var/TKLC/log/upgrade/ugwrap.log
/var/TKLC/log/upgrade/earlyChecks.log
/var/TKLC/log/platcfg/upgrade.log
If any upgrade fails – do not proceed. It is recommended to consult with My Oracle Support (MOS) on the best course of action. Refer to Appendix O for failed server recovery procedures.
5.6 Upgrade Iteration 5
Upgrade iteration 5 continues the upgrade of the site C-level servers. As shown in Table 17, iteration 5 consists of upgrading the active SBR(s) if ASG was not used during Upgrade Iteration 3.
Table 22 shows the estimated time required to upgrade the remaining C-level servers for iteration 5.
Table 22. Iteration 5 Upgrade Execution Overview
CAUTION
IF ASG was used for SBR servers in Upgrade Iteration 3, then Active SBR server(s) are already upgraded and Procedure 35 is not required.
If manual upgrade was recommended in section 3.2, Table 6, step 8., use alternate upgrade procedures provided in L.7, Manual SBR Upgrade Procedure for active SBR server(s) upgrade.
Procedure
Elapsed Time (hr:min)
Procedure Title Impact This Step Cum
Procedure 34 0:40-1:00 Upgrade Iteration 5 Standby SBR becomes active; previously active SBR will be offline for upgrade

DSR 8.2 Software Upgrade GuideDSR 8.2 Software Upgrade Guide
Page | 155 E88968-01
Procedure 34. Upgrade Iteration 5
S T E P #
This procedure upgrades the active SBRs.
Check off () each step as it is completed. Boxes have been provided for this purpose under each step number.
If this procedure fails, it is recommended to contact My Oracle Support (MOS) and ask for assistance.
1.
Active NOAM VIP: Iteration 5
At iteration 5, the active SBR is upgraded, causing the standby to become active.
2.
Active NOAM VIP: View the upgrade administration form to monitor upgrade progress
See step 3 for instructions if the upgrade fails, or if execution time exceeds 60 minutes.
Note: If the upgrade processing encounters a problem, it may attempt to ROLL BACK to the original software release. In this case, the Upgrade displays as FAILED.
The execution time may be shorter or longer, depending on the point in the upgrade where there was a problem.
1. Navigate to Administration > Software Management > Upgrade.
2. Select the SOAM tab of the site being upgraded.
3. Sequence through the server group links for the server groups being upgraded. Observe the upgrade state of the servers of interest. Upgrade status displays under the Status Message column.
During the upgrade, the servers may have a combination of the following expected alarms.
Note: Not all servers have all alarms:
Alarm ID = 10008 (Provisioning Manually Disabled)
Alarm ID = 10073 (Server Group Max Allowed HA Role Warning)
Alarm ID = 10075 (The server is no longer providing services because application processes have been manually stopped)
Alarm ID = 31101 (DB Replication To Slave Failure)
Alarm ID = 31106 (DB Merge To Parent Failure)
Alarm ID = 31107 (DB Merge From Child Failure)
Alarm ID = 31228 (HA Highly available server failed to receive mate heartbeats) or (Lost Communication with Mate Server)
Alarm ID = 31233 (HA Secondary Path Down)

DSR 8.2 Software Upgrade GuideDSR 8.2 Software Upgrade Guide
Page | 156 E88968-01
Alarm ID = 31283 (Highly available server failed to receive mate heartbeats)
Alarm ID = 32515 (Server HA Failover Inhibited)
Alarm ID = 31149 (DB Late Write Nonactive)
Alarm ID = 31114 (DB Replication over SOAP has failed)
Database (DB) replication failure alarms may display during an Automated Site Upgrade or during an event that resets multiple servers in parallel. The DB on the child servers is not updated until resolved. Refer to Appendix W to resolve this issue.
Wait for the SBR upgrades to complete. The Status Message column displays Success. This step takes approximately 20 to 50 minutes.
3.
Server CLI: If the upgrade of a server fails
If any upgrade fails – do not proceed. It is recommended to consult with My Oracle Support (MOS) on the best course of action. Refer to Appendix O for failed server recovery procedures.
If the upgrade of a server fails, access the server command line (using ssh or a console), and collect the following files:
/var/TKLC/log/upgrade/upgrade.log
/var/TKLC/log/upgrade/ugwrap.log
/var/TKLC/log/upgrade/earlyChecks.log
/var/TKLC/log/platcfg/upgrade.log
5.7 Site Post-Upgrade Procedures
THE FOLLOWING PROCEDURES MUST BE EXECUTED AT THE COMPLETION OF EACH SOAM SITE UPGRADE:
Procedure 35 Allow Site Provisioning
Procedure 36 Site Post-Upgrade Health Check
AFTER ALL SOAM SITES IN THE TOPOLOGY HAVE COMPLETED UPGRADE, THE UPGRADE MAY BE ACCEPTED USING THE FOLLOWING PROCEDURE:
Procedure 48 Accept the Upgrade
The post-upgrade procedures consist of procedures that are performed after each site upgrades is complete. The final Health Check of the system collects alarm and status information to verify the upgrade did not degrade system operation. After an appropriate soak time, the upgrade is accepted.
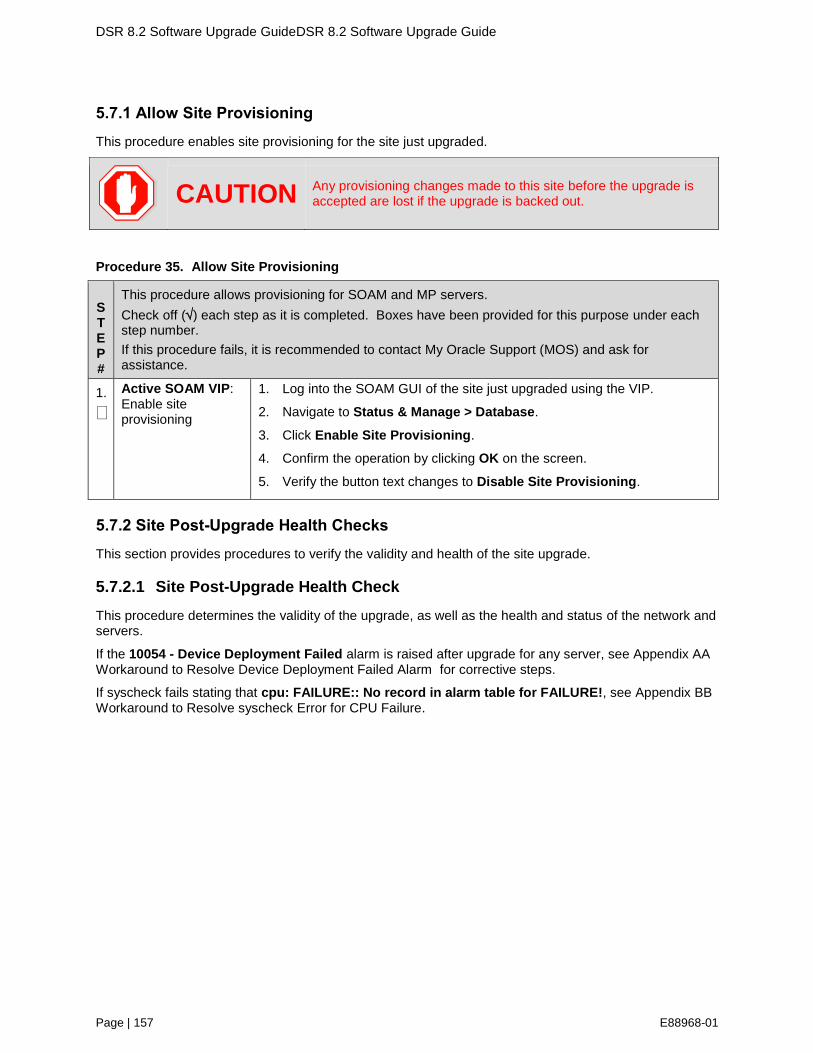
DSR 8.2 Software Upgrade GuideDSR 8.2 Software Upgrade Guide
Page | 157 E88968-01
Allow Site Provisioning 5.7.1
This procedure enables site provisioning for the site just upgraded.
CAUTION Any provisioning changes made to this site before the upgrade is accepted are lost if the upgrade is backed out.
Procedure 35. Allow Site Provisioning
S T E P #
This procedure allows provisioning for SOAM and MP servers.
Check off () each step as it is completed. Boxes have been provided for this purpose under each step number.
If this procedure fails, it is recommended to contact My Oracle Support (MOS) and ask for assistance.
1.
Active SOAM VIP: Enable site provisioning
1. Log into the SOAM GUI of the site just upgraded using the VIP.
2. Navigate to Status & Manage > Database.
3. Click Enable Site Provisioning.
4. Confirm the operation by clicking OK on the screen.
5. Verify the button text changes to Disable Site Provisioning.
Site Post-Upgrade Health Checks 5.7.2
This section provides procedures to verify the validity and health of the site upgrade.
5.7.2.1 Site Post-Upgrade Health Check
This procedure determines the validity of the upgrade, as well as the health and status of the network and servers.
If the 10054 - Device Deployment Failed alarm is raised after upgrade for any server, see Appendix AA Workaround to Resolve Device Deployment Failed Alarm for corrective steps.
If syscheck fails stating that cpu: FAILURE:: No record in alarm table for FAILURE!, see Appendix BB Workaround to Resolve syscheck Error for CPU Failure.

DSR 8.2 Software Upgrade GuideDSR 8.2 Software Upgrade Guide
Page | 158 E88968-01
Procedure 36. Site Post-Upgrade Health Check
S T E P #
This procedure verifies post-upgrade site status.
Check off () each step as it is completed. Boxes have been provided for this purpose under each step number.
If this procedure fails, it is recommended to contact My Oracle Support (MOS) and ask for assistance.
1.
Active NOAM VIP: Run automated post-upgrade health checks
1. Navigate to Administration > Software Management > Upgrade.
2. Select the SOAM tab of the site being upgraded.
3. Select the SOAM server group link for the site being upgraded.
4. Select the active SOAM.
5. Click Checkup.
6. Under Health check options, select Post Upgrade.
7. Click OK.
Control returns to the Upgrade screen.

DSR 8.2 Software Upgrade GuideDSR 8.2 Software Upgrade Guide
Page | 159 E88968-01
Procedure 36. Site Post-Upgrade Health Check
2.
Active NOAM VIP: Monitor health check progress for completion
1. Click the Tasks option to display the currently executing tasks. The Health Check task name appears as <SOServerGroup> PostUpgrade Health Check.
2. Monitor the Health Check task until the Task State is completed. The Details column displays a hyperlink to the Health Check report.
3. Click the hyperlink to download the Health Check report.
4. Open the report and review the results.
3.
Active NOAM VIP: Analyze health check results
Analyze health check report for failures. If the Health Check report status is anything other than Pass, the Health Check logs can be analyzed to determine if the upgrade can proceed.
1. Navigate to Status & Manage > Files.
2. Select the active SOAM tab.
3. Select the UpgradeHealthCheck.log file and click View.
4. Locate the log entries for the most recent health check.
5. Review the log for failures. Analyze the failures and determine if it is safe to continue the upgrade. If necessary, it is recommended to contact My Oracle Support (MOS) for guidance as described in Appendix CC.
If the health check log contains the Unable to execute Health Check on <Active NOAM hostname> message, perform health checks in accordance with Procedure 37 Alternate Site Post-Upgrade Health Check.
Note: The following alarm is expected post upgrade only if MP is configured as active-standby pair:
Alarm ID = 31225 (HA Service Start Failure)

DSR 8.2 Software Upgrade GuideDSR 8.2 Software Upgrade Guide
Page | 160 E88968-01
Procedure 36. Site Post-Upgrade Health Check
4.
Active SOAM VIP: Export and archive the Diameter configuration data
1. Navigate to Diameter Common > Export.
2. Capture and archive the Diameter data by selecting the ALL option for the Export Application.
3. Verify the requested data is exported by clicking Tasks at the top of the screen.
4. Navigate to Status & Manage > Files and download all the exported files to the client machine, or use the SCP utility to download the files from the active NOAM to the client machine.
5. Navigate to Diameter > Maintenance > Applications.
6. Verify Operational Status is Available for all applications.
5.
Active SOAM Server: Check if the setup previously has a customer supplied Apache certificate installed and protected with a passphrase, which was renamed before starting with upgrade.
If the setup had a customer-supplied Apache certificate installed and protected with passphrase before the start of the upgrade (refer to Procedure 3 and rename the certificate back to the original name.
6.
Compare data to the Pre-Upgrade health check to verify if the system has degraded after the second maintenance window.
Verify the health check status of the upgraded site as collected from steps 1 through 4 is the same as the pre-upgrade health checks taken in Section 3.4.2. If system operation is degraded, it is recommended to contact My Oracle Support (MOS).

DSR 8.2 Software Upgrade GuideDSR 8.2 Software Upgrade Guide
Page | 161 E88968-01
5.7.2.2 Alternate Site Post-Upgrade Health Check
This procedure determines the validity of the upgrade, as well as the health and status of the network and servers. This procedure is an alternative to the normal post upgrade health check in Procedure 36.
Procedure 37. Alternate Site Post-Upgrade Health Check
S T E P #
This procedure verifies post-upgrade site status.
Check off () each step as it is completed. Boxes have been provided for this purpose under each step number.
If this procedure fails, it is recommended to contact My Oracle Support (MOS) and ask for assistance.
1.
ACTIVE SOAM CLI: Run/verify SOAM post-upgrade health check status
1. Use an SSH client to connect to the active SOAM:
ssh admusr@<SOAM XMI IP address>
password: <enter password>
Note: The static XMI IP address for each server should be available in Table 5.
2. Enter the command:
$ upgradeHealthCheck postUpgradeHealthCheckOnSoam
This command creates two files in /var/TKLC/db/filemgmt/ UpgradeHealthCheck/ with the filename format:
<SOserver_name>_ServerStatusReport_<date-time>.xml
<SOserver_name>_ComAgentConnStatusReport_<date-
time>.xml
If any alarms are present in the system:
<SOserver_name>_AlarmStatusReport_<date-time>.xml
If the system is PDRA, one additional file is generated:
<SOserver_name>_SBRStatusReport_<date-time>.xml
Note: The FIPS integrity verification test failed message may display when the upgradeHealthCheck command runs. This message can be ignored.
3. If the Server <hostname> needs operator attention before upgrade message displays, inspect the Server Status Report to determine the reason for the message. If the Server <hostname> has no alarm with DB State as Normal and Process state as Kill message displays in the Server Status Report, the alert can be ignored.
Note: If any server status is not as expected, do not proceed with the upgrade. It is recommended to contact My Oracle Support (MOS) for guidance.
4. Keep these reports for future reference. These reports are compared to alarm and status reports after the upgrade is complete.

DSR 8.2 Software Upgrade GuideDSR 8.2 Software Upgrade Guide
Page | 162 E88968-01
Procedure 37. Alternate Site Post-Upgrade Health Check
2.
ACTIVE SOAM CLI: Capture Diameter maintenance status
Enter the command:
$ upgradeHealthCheck diameterMaintStatus
This command displays a series of messages providing Diameter Maintenance status. Capture this output and save for later use.
Note: The output is also captured in /var/TKLC/db/filemgmt/UpgradeHealthCheck.log.
Note: The FIPS integrity verification test failed message may display when the upgradeHealthCheck command runs. This message can be ignored.
3.
ACTIVE SOAM CLI: View DA-MP status
1. Enter the command:
$ upgradeHealthCheck daMpStatus
This command outputs status to the screen for review.
Note: The FIPS integrity verification test failed message may display when the upgradeHealthCheck command runs. This message can be ignored.
2. Verify all peer MPs are available.
3. Note the number of Total Connections Established _______________
4.
Compare data to the pre-upgrade health check to verify if the system has degraded after the second maintenance window
Verify the health check status of the upgraded site as collected in this procedure is the same as the pre-upgrade health checks taken in section 5.1.2. If system operation is degraded, it is recommended to report it to My Oracle Support (MOS).

DSR 8.2 Software Upgrade GuideDSR 8.2 Software Upgrade Guide
Page | 163 E88968-01
Post-Upgrade Procedures 5.7.3
The procedures in this section are executed after the site upgrade is verified to be valid and healthy. These procedures should be executed in the maintenance window.
Procedure 38. Post-Upgrade Procedures
S T E P #
This procedure performs additional actions required after the upgrade is successfully completed.
Check off () each step as it is completed. Boxes have been provided for this purpose under each step number.
If this procedure fails, it is recommended to contact My Oracle Support (MOS) and ask for assistance.
1.
Active SOAM VIP: Enable the signaling firewall for the upgraded site
The firewall enables the DSR to dynamically determine and customize the Linux firewall on each DA-MP server in the DSR signaling node to allow only the essential network traffic pertaining to the active signaling configuration.
There are some limitation related to enabling the signaling firewall in DSR 8.2 releases. See Section 1.7.1 for more details.
1. Navigate to Diameter > Maintenance > Signaling Firewall.
2. Select the Signaling Node that was just upgraded.
3. Click Enable.
4. Click OK to confirm the action.
5. Verify the Admin State changes to Enabled.
Note: There may be a short delay while the firewall is enabled on the site.
6. Backout Procedure Overview
The procedures provided in this section return the individual servers and the overall DSR system to the source release after an upgrade is aborted. The backout procedures support two options for restoring the source release:
Emergency backout
Normal backout
CAUTION DSR Backout
If the customer deployment has both the FABR and PCA features enabled, then first Backout the SDS nodes before the DSR nodes..
The emergency backout overview is provided in Table 23. These procedures back out the target release software in the fastest possible manner, without regard to traffic impact.
The normal backout overview is provided in Table 24. These procedures back out the target release software in a more controlled manner, sustaining traffic to the extent possible.
All backout procedures are executed inside a maintenance window.
The backout procedure times provided in Table 23 and Table 24 are only estimates as the reason to execute a backout has a direct impact on any additional backout preparation that must be done.
Note: While not specifically covered by this procedure, it may be necessary to re-apply patches to the source release after the backout. If patches are applicable to the source release, verify all patches are on-hand before completing the backout procedures.

DSR 8.2 Software Upgrade GuideDSR 8.2 Software Upgrade Guide
Page | 164 E88968-01
Table 23. Emergency Backout Procedure Overview
Procedure
Elapsed Time (hr:min)
Procedure Title Impact This Step Cum
Procedure 39 0:10-0:30 0:10-0:30 Backout Health Check
The reason to execute a backout has a direct impact on any additional backout preparation that must be done. Since all possible reasons cannot be predicted ahead of time, only estimates are given here. Execution time varies.
None
Procedure 40 0:01 0:11-0:31 Disable Global Provisioning Disables global provisioning
Procedure 41 See Note See Note Emergency Site Backout
Note: Execution time of downgrading entire network is approximately equivalent to execution time taken during upgrade.
0:05 (5 minutes) can be subtracted from total time because ISO Administration is not executed during Backout procedures.
All impacts as applicable in upgrade apply in this procedure. Also, backout procedures cause traffic loss.
Procedure 46 See Note See Note Backout Multiple Servers
Note: Execution time of downgrading a single server is approximately equivalent to execution time to upgrade the server.
All impacts as applicable in upgrade apply in this procedure. Also, backout procedures cause traffic loss.
Procedure 42 See Note See Note Emergency NOAM Backout
Note: Execution time of downgrading a single server is approximately equivalent to execution time to upgrade the server.
All impacts as applicable in upgrade apply in this procedure. Also backout procedures cause traffic loss.
Procedure 47 0:01-0:05 Varies Post-Backout Health Check None
Table 24. Normal Backout Procedure Overview
Procedure
Elapsed Time (hr:min)
Procedure Title Impact This Step Cum

DSR 8.2 Software Upgrade GuideDSR 8.2 Software Upgrade Guide
Page | 165 E88968-01
Procedure
Elapsed Time (hr:min)
Procedure Title Impact This Step Cum
Procedure 39 0:10-0:30 0:10-0:30 Backout Health Check
The reason to execute a backout has a direct impact on any additional backout preparation that must be done. Since all possible reasons cannot be predicted ahead of time, only estimates are given here. Execution time varies.
None
Procedure 40 0:01 0:11-0:31 Disable Global Provisioning Disables global provisioning
Procedure 43 See Note See Note Normal Site Backout
Note: Execution time of downgrading entire network is approximately equivalent to execution time taken during upgrade.
0:05 (5 minutes) can be subtracted from total time because ISO Administration is not executed during Backout procedures.
All impacts as applicable in upgrade apply in this procedure. Also, backout procedures cause traffic loss.
Procedure 46 See Note See Note Backout Multiple Servers
Note: Execution time of downgrading a single server is approximately equivalent to execution time to upgrade the server.
All impacts as applicable in upgrade apply in this procedure. Also, backout procedures cause traffic loss.
Procedure 44 See Note See Note Normal NOAM Backout
Note: Execution time of downgrading a single server is approximately equivalent to execution time to upgrade the server.
All impacts as applicable in upgrade apply in this procedure. Also, backout procedures cause traffic loss.
Procedure 47 0:01-0:05 Varies Post-Backout Health Check None
6.1 Recovery Procedures
It is recommended to direct upgrade procedure recovery issues to My Oracle Support (MOS) by referring to Appendix CC of this document. Before executing any of these procedures, it is recommended to contact My Oracle Support (MOS).
Execute this section only if there is a problem and it is desired to revert back to the pre-upgrade version of the software.
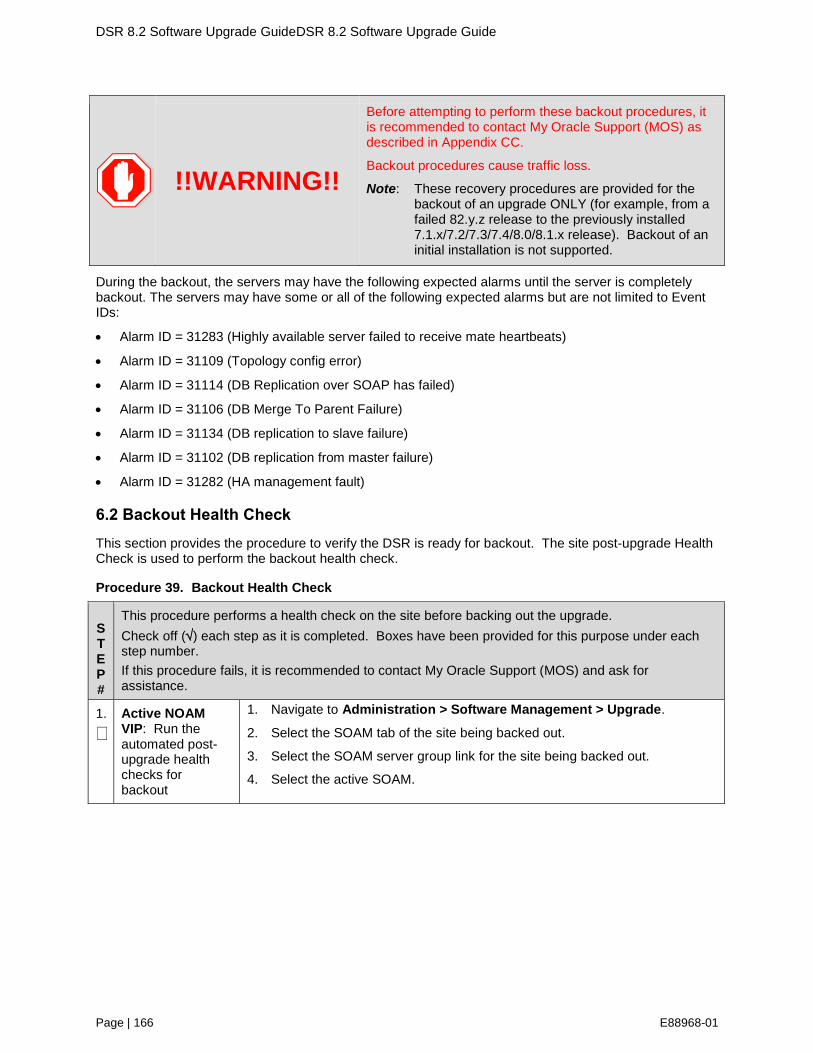
DSR 8.2 Software Upgrade GuideDSR 8.2 Software Upgrade Guide
Page | 166 E88968-01
!!WARNING!!
Before attempting to perform these backout procedures, it is recommended to contact My Oracle Support (MOS) as described in Appendix CC.
Backout procedures cause traffic loss.
Note: These recovery procedures are provided for the backout of an upgrade ONLY (for example, from a failed 82.y.z release to the previously installed 7.1.x/7.2/7.3/7.4/8.0/8.1.x release). Backout of an initial installation is not supported.
During the backout, the servers may have the following expected alarms until the server is completely backout. The servers may have some or all of the following expected alarms but are not limited to Event IDs:
Alarm ID = 31283 (Highly available server failed to receive mate heartbeats)
Alarm ID = 31109 (Topology config error)
Alarm ID = 31114 (DB Replication over SOAP has failed)
Alarm ID = 31106 (DB Merge To Parent Failure)
Alarm ID = 31134 (DB replication to slave failure)
Alarm ID = 31102 (DB replication from master failure)
Alarm ID = 31282 (HA management fault)
6.2 Backout Health Check
This section provides the procedure to verify the DSR is ready for backout. The site post-upgrade Health Check is used to perform the backout health check.
Procedure 39. Backout Health Check
S T E P #
This procedure performs a health check on the site before backing out the upgrade.
Check off () each step as it is completed. Boxes have been provided for this purpose under each step number.
If this procedure fails, it is recommended to contact My Oracle Support (MOS) and ask for assistance.
1.
Active NOAM VIP: Run the automated post-upgrade health checks for backout
1. Navigate to Administration > Software Management > Upgrade.
2. Select the SOAM tab of the site being backed out.
3. Select the SOAM server group link for the site being backed out.
4. Select the active SOAM.

DSR 8.2 Software Upgrade GuideDSR 8.2 Software Upgrade Guide
Page | 167 E88968-01
Procedure 39. Backout Health Check
5. Click Checkup.
6. Under Health check options, click Post Upgrade.
7. Click OK.
Control returns to the Upgrade screen.
2.
Active NOAM VIP: Monitor health check progress for completion
1. Click the Tasks option to display the currently executing tasks. The Health Check task name appears as <SOServerGroup> PostUpgrade Health Check.
2. Monitor the Health Check task until the Task State is completed. The Details column displays a hyperlink to the Health Check report.
3. Click the hyperlink to download the Health Check report.
4. Open the report and review the results.

DSR 8.2 Software Upgrade GuideDSR 8.2 Software Upgrade Guide
Page | 168 E88968-01
Procedure 39. Backout Health Check
3.
Active NOAM VIP: Analyze health check results
Analyze health check report for failures. If the Health Check report status is anything other than Pass, the Health Check logs can be analyzed to determine if the upgrade can proceed.
1. Navigate to Status & Manage > Files.
2. Select the active SOAM tab.
3. Select the PostUpgrade_HealthCheck<SO server Group>-datetime.txt" file and click View.
4. Locate the log entries for the most recent health check.
5. Review the log for failures. Analyze the failures and determine if it is safe to continue the upgrade. If necessary, it is recommended to contact My Oracle Support (MOS) for guidance as described in Appendix CC.
4.
Active NOAM VIP: Identify IP addresses of servers to be backed out
1. Navigate to Administration > Software Management > Upgrade.
2. Select the SOAM tab of the site being backed out.
3. Select each server group link, making note of the application version of each server.
4. Based on the Application Version column, identify all the hostnames that need to be backed out.
5. Navigate to Configuration > Servers.
6. Using the data recorded in Table 5, note the XMI/iLO/LOM IP addresses of all the hostnames to be backed out. These are required to access the server when performing the backout.
The reason to execute a backout has a direct impact on any additional backout preparation that must be done. The backout procedures cause traffic loss. Since all possible reasons cannot be predicted ahead of time, it is recommended to contact My Oracle Support (MOS) as stated in the Warning box.
5.
Active NOAM VIP: Verify backup archive files
1. Navigate to Status & Manage > Files.
2. For each server to be backed out, select the server tab on the Files screen. Verify the two backup archive files, created in section 3.4.5, are present on every server that is to be backed out. These archive files have the format:
Backup.<application>.<server>.FullDBParts.<role>.<date_
time>.UPG.tar.bz2
Backup.
<application>.<server>.FullRunEnv.<role>.<date_time>.UP
G.tar.bz2

DSR 8.2 Software Upgrade GuideDSR 8.2 Software Upgrade Guide
Page | 169 E88968-01
Procedure 39. Backout Health Check
6.
Active NOAM CLI: Verify disk usage
Starting with the active SOAM, log into each server to be backed out to verify the disk usage is within acceptable limits.
1. Use the SSH command (on UNIX systems – or putty if running on windows) to log into the active SOAM.
ssh admusr@<server IP>
password: <enter password>
Answer yes if you are asked to confirm the identity of the server.
2. Enter the command:
[admusr@EVO-NO-1 ~]$ df
Sample output (abridged):
Filesystem 1K-blocks Used Available Use% Mounted on
/dev/mapper/vgroot-plat_root
999320 294772 652120 32% /
tmpfs 12303460 0 12303460 0% /dev/shm
/dev/vda1 245679 41967 190605 19% /boot
/dev/mapper/vgroot-plat_tmp
999320 1548 945344 1% /tmp
/dev/mapper/vgroot-plat_usr
5029504 2962552 1804824 63% /usr
/dev/mapper/vgroot-plat_var
999320 558260 388632 59% /var
/dev/mapper/vgroot-plat_var_tklc
3997376 2917284 870380 78% /var/TKLC
3. Observe the line for the /var and /usr partition. If the Use% column is 70% or less, this procedure is complete. Continue with the back out per
4. Table 23. Emergency Backout Procedure Overview
5. (Emergency) or
6. Table 24 (Normal).
If the Use% of the /var and /usr partition is at 70% or greater, search the partition for files that can be safely deleted. Use extreme caution in selecting files to be deleted. The deletion of critical system files could severely impair the DSR functionality.
7. Repeat sub-steps 1 through 3 for all servers to be backed out.

DSR 8.2 Software Upgrade GuideDSR 8.2 Software Upgrade Guide
Page | 170 E88968-01
6.3 Disable Global Provisioning
The following procedure disables provisioning on the NOAM. This step ensures no changes are made to the database while the NOAMs and sites are backed out. Provisioning is re-enabled once the NOAM upgrade is complete.
Procedure 40. Disable Global Provisioning
S T E P #
This procedure disables provisioning for the NOAM servers, before upgrade.
Check off () each step as it is completed. Boxes have been provided for this purpose under each step number.
If this procedure fails, it is recommended to contact My Oracle Support (MOS) and ask for assistance.
1.
Active NOAM VIP: Disable global provisioning and configuration updates on the entire network
1. Log into the active NOAM GUI using the VIP.
2. Navigate to Status & Manage > Database.
3. Click Disable Provisioning.
4. Confirm the operation by clicking OK on the screen.
5. Verify the button text changes to Enable Provisioning. A yellow information box should also be displayed at the top of the view screen which states:
[Warning Code 002] – Global provisioning has been manually disabled.
The active NOAM server has the following expected alarm:
Alarm ID = 10008 (Provisioning Manually Disabled)
6.4 Perform Emergency Backout
EMERGENCY SITE BACKOUT
Use this section to perform an emergency backout of a DSR upgrade.
The procedures in this section perform a backout of all servers to restore the source release. An emergency backout can only be executed once all necessary corrective setup steps have been taken to prepare for the backout. It is recommended to contact My Oracle Support (MOS), as stated in the warning box in Section 6.1, to verify all corrective setup steps have been taken.
Emergency Site Backout 6.4.1
The procedures in this section back out all servers at a specific site without regard to traffic impact.
!!WARNING!! Executing this procedure results in a total loss of all traffic processed by this DSR. Traffic processed by the mate DSR is not affected.
Note: If another site is to be backed out, follow all procedures in another maintenance window.

DSR 8.2 Software Upgrade GuideDSR 8.2 Software Upgrade Guide
Page | 171 E88968-01
Procedure 41. Emergency Site Backout
S T E P #
This procedure backs out the DSR application software from multiple B- and C-level servers for a specific site. Any server requiring backout can be included: SOAMs, DA-MPs, SS7-MPs, IPFEs, SBRs, and even TVOE hosts.
Check off () each step as it is completed. Boxes have been provided for this purpose under each step number.
If this procedure fails, it is recommended to contact My Oracle Support (MOS) and ask for assistance.
1.
Active NOAM VIP: Identify all servers that require backout (within a site)
1. Log into the NOAM GUI using the VIP.
2. Navigate to Administration >Software Management >Upgrade.
3. Select the SOAM tab of the site being backed out.
4. Select each server group link, making note of the application version of the servers.
5. Identify the servers in the respective server groups with the target release Application Version value. These servers were previously upgraded but now require backout.
6. Make note of these servers. They have been identified for backout.
7. Before initiating the backout procedure, remove all new blades and/or sites configured after upgrade was started.
2.
Active SOAM VIP: Disable site provisioning for the site to be backed out
1. Log into the SOAM GUI using the VIP.
1. Navigate to Status & Manage > Database.
2. Click Disable Provisioning.
3. Confirm the operation by clicking OK on the screen.
4. Verify the button text changes to Enable Provisioning. A yellow information box displays at the top of the view screen which states:
[Warning Code 004] – Site provisioning has been manually disabled.
The active SOAM server has the following expected alarm:
Alarm ID = 10008 (Provisioning Manually Disabled)
!!WARNING!! STEP 4 RESULTS IN A TOTAL LOSS OF ALL TRAFFIC BEING PROCESSED BY THIS DSR
3.
Backout all C-level servers, as applicable
For all configurations:
Backout all C-level servers (IPFEs, SBRs, SBRs, DA-MPs, and SS7-MPs) identified in step 1:
Execute Section 6.7, Backout Multiple Servers.
4.
Additional post backout steps
(SBR servers)
If all of the servers in a particular server group are backed out then
Backout procedure is not completed yet. Some more steps need to be executed for SBR server(s) to revert back the changes done in Appendix Q (Additional Backout Steps) during Backout Single Server procedure.
Please execute Appendix R Additional Post-Backout Steps in such case.

DSR 8.2 Software Upgrade GuideDSR 8.2 Software Upgrade Guide
Page | 172 E88968-01
Procedure 41. Emergency Site Backout
5.
Backout the standby and spare SOAM servers, as applicable
Backout the standby and spare DSR SOAM servers:
If standby and spare SOAM servers are present:
Execute Section 6.7, Backout Multiple Servers.
If only a spare SOAM server is present:
Execute Section 6.6. Backout Single Server.
6.
Backout the active DSR SOAM server
Execute Section 6.6, Backout Single Server.
7.
Additional Post Backout steps
(SOAM servers)
If all of the servers in a particular server group are backed out then
Backout procedure is not completed yet. Some more steps need to be executed for SOAM server(s) to revert back the changes done in Appendix Q (Additional Backout Steps) during Backout Single Server procedure.
Please execute Appendix R Additional Post-Backout Steps in such case.
8.
Active NOAM VIP: Prepare for TVOE backout TVOE, if upgraded previously
If the SOAM is a guest under the same host as a NOAM, do not backout the TVOE at this time. Proceed to step 10.
Otherwise, if the SOAM is a guest of the TVOE software, determine if TVOE backout is required. Unless a TVOE issue is the cause of the backout, it is an option to leave the TVOE upgrade in place to save time. TVOE is backward compatible with all source releases and may remain upgraded. This is a customer decision.
If backout is not required, proceed to step 10.
Execute the following steps to backout the SOAM TVOE server upgraded previously.
Disable all applications running on the TVOE server.
1. Log into the NOAM GUI using VIP.
2. Navigate to Status & Manage > Server.
3. Select all applications running on the current TVOE server.
4. Click Stop.
5. Confirm the operation by clicking OK on the screen.
6. Verify the Appl State for all selected servers changes to Disabled.

DSR 8.2 Software Upgrade GuideDSR 8.2 Software Upgrade Guide
Page | 173 E88968-01
Procedure 41. Emergency Site Backout
9.
TVOE CLI: Back out the TVOE upgrade
1. Log into the TVOE host
ssh admusr@<TVOE IP>
password: <enter password>
2. List the guests running on the current TVOE host:
$ sudo virsh list
Note: The output lists all guests running on the TVOE host.
3. Execute the following command for each guest listed:
$ sudo virsh shutdown <guestname>
Note: Shutting down applications may lead to lost VIP. Wait until all TVOE servers on which SOAM(s) are hosted are successfully backed out.
4. Periodically execute the following command until the command displays no entries. This means that all VMs have been properly shut down:
$ sudo virsh list
5. Backout TVOE on the blade according to reference [4].
10.
TVOE CLI: Start the TVOE guests
1. Log into the TVOE host:
ssh admusr@<TVOE IP>
password: <enter password>
2. Execute the following command to start the TVOE guest shutdown in step 7 (if not already started).
$ sudo virsh start <guestname>
3. Periodically execute the following command until the command displays all the VM guests running.
$ sudo virsh list
11.
Active NOAM VIP: Enable all applications running on the backed out TVOE server
1. Log into the NOAM VIP GUI
2. Navigate to Status & Manage > Server.
3. Select all applications running on the current TVOE server.
4. Click Restart.
5. Confirm the operation by clicking OK on the screen.
6. Verify the Appl State for all selected servers is changed to Enabled.
7. Repeat steps 6 through 8 for another TVOE server hosting a SOAM (as applicable).
12.
Active SOAM VIP: Enable site provisioning
1. Log into the SOAM GUI using the VIP.
2. Navigate to Status & Manage > Database.
3. Click Enable Site Provisioning.
4. Confirm the operation by clicking OK on the screen.
5. Verify the button text changes to Disable Site Provisioning.

DSR 8.2 Software Upgrade GuideDSR 8.2 Software Upgrade Guide
Page | 174 E88968-01
Emergency NOAM Backout 6.4.2
The procedures in this section backout the NOAM servers.
Procedure 42. Emergency NOAM Backout
S T E P #
This procedure is used to perform an emergency backout of the DSR application software from the NOAM servers. This includes the DSR NOAMs, DR NOAMs, and TVOE hosts. This procedure backs out the application software as quickly as possible, without regard to operational impact.
Check off () each step as it is completed. Boxes have been provided for this purpose under each step number.
If this procedure fails, it is recommended to contact My Oracle Support (MOS) and ask for assistance.
1.
Back out the standby DR NOAM server (if equipped)
Execute Section 6.6 Backout Single Server.
2.
Back out the active DR NOAM server (now the standby) (if equipped)
Execute Section 6.6 Backout Single Server.
3.
Back out the standby DSR NOAM server (as applicable)
Execute Section 6.6 Backout Single Server.
4.
Back out the active DSR NOAM server (now the standby)
Execute Section 6.6 Backout Single Server.
5.
Additional Post Backout steps
If all of the servers in a particular server group are backed out then
Backout procedure is not completed yet. Some more steps need to be executed for NOAM server(s) to revert back the changes done in Appendix Q (Additional Backout Steps) during Backout Single Server procedure.
Please execute Appendix R Additional Post-Backout Steps in such case.

DSR 8.2 Software Upgrade GuideDSR 8.2 Software Upgrade Guide
Page | 175 E88968-01
Procedure 42. Emergency NOAM Backout
6.
Active NOAM VIP: Disable applications
If the NOAM is a guest of the TVOE software, determine if TVOE backout is required. Unless a TVOE issue is the cause of the backout, it is an option to leave the TVOE upgrade in place to save time. TVOE is backward compatible with all source releases and may remain upgraded. This is a customer decision.
If a TVOE backout is not required, proceed to step 9.
Execute these steps for each TVOE server upgraded previously.
1. Disable all applications running on the TVOE server.
2. Log into the NOAM GUI using the VIP.
3. Navigate to Status & Manage > Server.
4. Select all applications running on the current TVOE server.
5. Click Stop.
6. Confirm the operation by clicking OK on the screen.
7. Verify the Appl State for all selected servers changes to Disabled.
7.
TVOE CLI: Back out TVOE, if upgraded previously as part of the DSR upgrade
1. Log into the TVOE host:
ssh admusr@<TVOE IP>
password: <enter password>
2. List the guests running on the current TVOE host:
$ sudo virsh list
The output of this command lists all guests running on the TVOE host.
3. Execute this command for each guest listed :
$ sudo virsh shutdown <guestname>
Note: Shutting down applications may lead to lost VIP. Wait until all TVOE servers on which NOAM(s) are hosted are successfully backed out.
4. Periodically execute the following command until the command displays no entries. This means that all VMs have been properly shut down:
$ sudo virsh list
5. Backout TVOE on the blade according to reference [4].
8.
TVOE CLI: Start TVOE guests
1. Log into the TVOE host:
$ ssh admusr@<TVOE IP>
password: <enter password>
2. Execute the following command to start the TVOE guests shutdown in step 6 (if not already started).
$ sudo virsh start <guestname>
3. Periodically execute the following command until the command displays all the VM guests running.
$ sudo virsh list

DSR 8.2 Software Upgrade GuideDSR 8.2 Software Upgrade Guide
Page | 176 E88968-01
Procedure 42. Emergency NOAM Backout
9.
Active NOAM VIP: Enable all applications running on the backed out TVOE server
1. Log into the NOAM VIP GUI
2. Navigate to Status & Manage > Server.
3. Select all applications running on the current TVOE server.
4. Click Restart.
5. Confirm the operation by clicking OK on the screen.
6. Verify the Appl State for all selected servers is changed to Enabled.
7. Repeat steps 5 through 8 for another TVOE server hosting a SOAM (as applicable).
10.
Active NOAM VIP: Enable global provisioning and configuration updates on the entire network
1. Log into the NOAM GUI using the VIP.
2. Navigate to Status & Manage > Database.
3. Click Enable Provisioning.
4. Verify the button text changes to Disable Provisioning.
11.
Active NOAM VIP: Remove Ready state for any backed out server
1. Navigate to Status & Manage > Servers.
2. If any backed-out server Application Status is Disabled, then navigate to the server row and click Restart.
3. Navigate to Administration >Software Management >Upgrade.
4. If any backed-out server shows an Upgrade State of Ready or Success, then select that server and click Complete Upgrade. Otherwise, skip this step.
5. Click OK.
This removes the Forced Standby designation for the backed-out server.
Note: Due to backout being initiated from the command line instead of through the GUI, the following SOAP error may appear in the GUI banner.
SOAP error while clearing upgrade status of
hostname=[frame10311b6] ip=[172.16.1.28]
It is safe to ignore this error message.
6. Verify the Application Version value for servers has been downgraded to the original release version.
6.5 Perform Normal Backout
NORMAL SITE BACKOUT
Use this section to perform a normal backout of a DSR upgrade
The following procedures to perform a normal backout can only be executed once all necessary corrective setup steps have been taken to prepare for the backout. It is recommended to contact My Oracle Support (MOS), as stated in the Warning box in Section 6.1, to verify all corrective setup steps have been taken.

DSR 8.2 Software Upgrade GuideDSR 8.2 Software Upgrade Guide
Page | 177 E88968-01
Normal Site Backout 6.5.1
The procedures in this section backout all servers at a specific site.
Procedure 43. Normal Site Backout
S T E P #
This procedure is used to backout an upgrade of the DSR application software from multiple servers in the network. Any server requiring backout can be included: SOAMs, DA-MPs, SS7-MPs, IPFEs, SBRs, and even TVOE hosts.
Check off () each step as it is completed. Boxes have been provided for this purpose under each step number.
If this procedure fails, it is recommended to contact My Oracle Support (MOS) and ask for assistance.
1.
Active NOAM VIP: Identify all servers that require backout (within a site)
1. Log into the NOAM GUI using the VIP.
2. Navigate to Administration >Software Management > Upgrade.
3. Select the SOAM tab of the site being backed out.
4. Select each server group link, making note of the application version of each server.
5. Identify the servers in the respective Server Groups with the target release Application Version value. These servers were previously upgraded but now require Backout.
6. Make note of these servers. They have been identified for backout.
7. Before initiating the backout procedure, remove all new blades and/or sites configured after upgrade was started.
2.
Active SOAM VIP: Disable site provisioning for the site to be backed out
1. Log into the SOAM GUI using the VIP.
2. Navigate to Status & Manage > Database.
3. Click Disable Provisioning.
4. Confirm the operation by clicking OK on the screen.
5. Verify the button text changes to Enable Provisioning. A yellow information box displays at the top of the view screen which states:
[Warning Code 004] – Site provisioning has been manually disabled.
The active SOAM server has the following expected alarm:
Alarm ID = 10008 (Provisioning Manually Disabled)

DSR 8.2 Software Upgrade GuideDSR 8.2 Software Upgrade Guide
Page | 178 E88968-01
Procedure 43. Normal Site Backout
3.
Back out the first set of C-level servers, as applicable
Note: In a PCA System, the spare SBR server is located at the mated site of the site being backed out.
These servers can be backed out in parallel (as applicable):
Standby DA-MP for 1+1 (active/standby) configuration, or
½ of all DA-MPs for N+0 (multi-active) configuration
Standby SBR(s)
Spare SBR(s)
½ of all SS7-MPs
½ of all IPFEs
Execute 6.6, Backout Single Server for each standby/spare C-level server identified.
!!WARNING!! Failure to comply with step 5 and step 6 may result in the loss of PCA traffic, resulting in service impact.
4.
Active NOAM VIP: Verify standby SBR server status
If the server being backed out is the standby SBR, execute this step. Otherwise, continue with step 6.
1. Navigate to SBR > Maintenance > SBR Status. Open the tab of the server group being upgraded.
2. Do not proceed to step 6 until the Resource HA Role for the standby server has a status of Standby.

DSR 8.2 Software Upgrade GuideDSR 8.2 Software Upgrade Guide
Page | 179 E88968-01
Procedure 43. Normal Site Backout
5.
Active NOAM VIP: Verify bulk download is complete between the active SBR in the server group to the standby and spare SBRs
1. Navigate to Alarm & Event > View History.
2. Export the Event log using the following filter:
Server Group: Choose the SBR group that is in upgrade
Display Filter: Event ID = 31127 – DB Replication Audit Complete
Collection Interval: X hours ending in current time, where X is the time from upgrade completion of the standby and spare servers to the current time.
3. Wait for the following instances of Event 31127:
1 for the Standby Binding SBR server
1 for the Standby Session SBR server
1 for the Spare Binding SBR server
1 for the Spare Session SBR server
1 for the 2nd
Spare Binding SBR server, if equipped
1 for the 2nd
Spare Session SBR server, if equipped
Note: There is an expected loss of traffic depending on size of the bulk download. This must be noted along with events captured.
6.
Back out remaining C-level servers, as applicable
These servers can be backed out in parallel (as applicable)
Active DA-MP for 1+1 (active/standby) configuration, or
½ of all DA-MPs for N+0 (multi-active) configuration
Active SBR(s)
½ of all SS7-MPs
½ of all IPFEs
Execute 6.6, Backout Single Server for each C-level server identified.
7.
Additional Post Backout steps
(For SBR Servers)
If all of the servers in a particular server group are backed out then see below.
Backout procedure is not completed yet. Some more steps need to be executed for SBR server(s) to revert back the changes done in Appendix Q (Additional Backout Steps) during Backout Single Server procedure.
Please execute Appendix R Additional Post-Backout Steps in such case.
8.
Back out the standby DSR SOAM server
Execute Section 6.6 Backout Single Server.
9.
Back out active DSR SOAM server
Execute Section 6.6 Backout Single Server.
10.
Back out spare SOAM server (if applicable)
Note: The spare server is located at the mated site of the site being backed out.
Execute Section 6.6 Backout Single Server.

DSR 8.2 Software Upgrade GuideDSR 8.2 Software Upgrade Guide
Page | 180 E88968-01
Procedure 43. Normal Site Backout
11.
Additional Post Backout steps
(SOAM servers)
If all of the servers in a particular server group are backed out then see below.
Backout procedure is not completed yet. Some more steps need to be executed for SOAM server(s) to revert back the changes done in Appendix Q (Additional Backout Steps) during Backout Single Server procedure.
Please execute Appendix R Additional Post-Backout Steps in such case.
12.
Active NOAM VIP: Disable applications
If the SOAM is a guest under the same host as a NOAM, do not backout the TVOE at this time. Proceed to step 14.
Otherwise, if the SOAM is a guest of the TVOE software, determine if TVOE backout is required. Unless a TVOE issue is the cause of the backout, it is an option to leave the TVOE upgrade in place to save time. TVOE is backward compatible with all source releases and may remain upgraded. This is a customer decision.
If a TVOE backout is not required, proceed to step 14.
Execute these steps for a TVOE server previously upgraded.
1. Disable all applications running on the TVOE server.
2. Log into the NOAM GUI using the VIP.
3. Navigate to Status & Manage > Server.
4. Select all applications running on the current TVOE server.
5. Click Stop.
6. Confirm the operation by clicking OK on the screen.
7. Verify the Appl State for all selected servers changes to Disabled.
13.
TVOE CLI: Back out TVOE, if upgraded previously as part of the DSR upgrade
1. Log into the TVOE host:
ssh admusr@<TVOE IP>
password: <enter password>
2. List the guests running on the current TVOE host:
$ sudo virsh list
The output of this command lists all guests running on the TVOE host.
3. Execute the following command for each guest listed :
$ sudo virsh shutdown <guestname>
Note: Shutting down applications may lead to lost VIP. Wait until all TVOE servers on which NOAM(s) are hosted are successfully backed out.
4. Periodically execute the following command until the command displays no entries. This means that all VMs have been properly shut down :
$ sudo virsh list
Backout TVOE on the blade according to reference [4].

DSR 8.2 Software Upgrade GuideDSR 8.2 Software Upgrade Guide
Page | 181 E88968-01
Procedure 43. Normal Site Backout
14.
TVOE CLI: Start TVOE guests
1. Log into the TVOE host:
$ ssh admusr@<TVOE IP>
password: <enter password>
2. Execute the following command to start the TVOE guests shutdown in step 11 (if not already started).
$ sudo virsh start <guestname>
3. Periodically execute the following command until the command displays all the VM guests running.
$ sudo virsh list
15.
Active NOAM VIP: Enable all applications running on the backed out TVOE server
1. Log into the NOAM VIP GUI
2. Navigate to Status & Manage > Server.
3. Select all applications running on the current TVOE server.
4. Click Restart.
5. Confirm the operation by clicking OK on the screen.
6. Verify the Appl State for all selected servers is changed to Enabled.
7. Repeat steps 10 through 12 for another TVOE server hosting a SOAM (as applicable).
16.
Active SOAM VIP: Enable site provisioning
1. Log into the SOAM GUI using the VIP.
2. Navigate to Status & Manage > Database.
3. Click Enable Site Provisioning.
4. Confirm the operation by clicking OK on the screen.
5. Verify the button text changes to Disable Site Provisioning.
Note: If another site is to be backed out, follow all procedures in Table 24 in another maintenance window.
Normal NOAM Backout 6.5.2
The procedures in this section backout the NOAM servers.
Procedure 44. Normal NOAM Backout
S T E P #
This procedure is used to perform a normal backout of the DSR application software from the NOAM servers. This includes the DSR NOAMs, DR NOAMs, and TVOE hosts.
Check off () each step as it is completed. Boxes have been provided for this purpose under each step number.
If this procedure fails, it is recommended to contact My Oracle Support (MOS) and ask for assistance.
1.
Back out the standby DR NOAM server (if equipped)
Execute Section 6.6 Backout Single Server.

DSR 8.2 Software Upgrade GuideDSR 8.2 Software Upgrade Guide
Page | 182 E88968-01
Procedure 44. Normal NOAM Backout
2.
Back out the active DR NOAM server (now the standby) (if equipped)
Execute Section 6.6 Backout Single Server.
3.
Back out the standby DSR NOAM server (as applicable)
Execute Section 6.6 Backout Single Server.
4.
Back out the active DSR NOAM server (now the standby)
Execute Section 6.6 Backout Single Server.
5.
Additional post backout steps
If all of the servers in a particular server group are backed out then see below.
Backout procedure is not completed yet. Some more steps need to be executed for NOAM server(s) to revert back the changes done in Appendix Q (Additional Backout Steps) during Backout Single Server procedure.
Please execute Appendix R Additional Post-Backout Steps in such case.
6.
Active NOAM VIP: Disable applications
If the NOAM is a guest of the TVOE software, determine if TVOE backout is required. Unless a TVOE issue is the cause of the backout, it is an option to leave the TVOE upgrade in place to save time. TVOE is backward compatible with all source releases and may remain upgraded. This is a customer decision.
If a TVOE backout is not required, proceed to step 9.
Execute the following steps for a TVOE server upgraded previously.
1. Disable all applications running on the TVOE server.
2. Log into the NOAM GUI using the VIP.
3. Navigate to Status & Manage > Server.
4. Select all applications running on the current TVOE server.
5. Click Stop.
6. Confirm the operation by clicking OK on the screen.
7. Verify the Appl State for all selected servers changes to Disabled.

DSR 8.2 Software Upgrade GuideDSR 8.2 Software Upgrade Guide
Page | 183 E88968-01
Procedure 44. Normal NOAM Backout
7.
TVOE CLI: Back out TVOE, if upgraded previously as part of the DSR upgrade
1. Log into the TVOE host:
ssh admusr@<TVOE IP>
password: <enter password>
2. List the guests running on the current TVOE host:
$ sudo virsh list
The output of this command lists all guests running on the TVOE host.
3. Execute this command for each guest listed :
$ sudo virsh shutdown <guestname>
Note: Shutting down applications may lead to lost VIP. Wait until all TVOE servers on which NOAM(s) are hosted are successfully backed out.
4. Periodically execute the following command until the command displays no entries. This means that all VMs have been properly shut down :
$ sudo virsh list
5. Backout TVOE on the blade according to reference [4].
8.
TVOE CLI: Start TVOE guests
1. Log into the TVOE host:
$ ssh admusr@<TVOE IP>
password: <enter password>
2. Execute the following command to start the TVOE guests shutdown in step 6 (if not already started).
$ sudo virsh start <guestname>
3. Periodically execute the following command until the command displays all the VM guests running.
$ sudo virsh list
9.
Active NOAM VIP: Enable all applications running on the backed out TVOE server
1. Log into the NOAM VIP GUI
2. Navigate to Status & Manage > Server.
3. Select all applications running on the current TVOE server.
4. Click Restart.
5. Confirm the operation by clicking OK on the screen.
6. Verify the Appl State for all selected servers is changed to Enabled.
7. Repeat steps 5 through 8 for another TVOE server hosting a SOAM (as applicable).
10.
Active NOAM VIP: Enable global provisioning and configuration updates on the entire network
1. Log into the NOAM GUI using the VIP.
2. Navigate to Status & Manage > Database.
3. Click Enable Provisioning.
4. Verify the button text changes to Disable Provisioning.

DSR 8.2 Software Upgrade GuideDSR 8.2 Software Upgrade Guide
Page | 184 E88968-01
6.6 Backout Single Server
This section provides the procedures to backout the application software on a single server.
CAUTION This procedure is executed as a component of the Emergency Backout Procedure (Section 6.4) or the Normal Backout Procedure (Section 6.5). This procedure should never be executed as a standalone procedure.
Procedure 45. Backout Single Server
S T E P #
This procedure backs out the upgrade of DSR 8.2 application software. Any server requiring back out can be included: NOAMs, SOAMs, DA-MPs, SS7-MPs, IPFEs, SBRs, and even TVOE hosts.
Check off () each step as it is completed. Boxes have been provided for this purpose under each step number.
If this procedure fails, it is recommended to contact My Oracle Support (MOS) and ask for assistance.
1.
Active NOAM VIP: Prepare the server for backout.
1. Navigate to Administration > Software Management > Upgrade.
2. Select the SOAM tab of the site being backed out.
3. Select the server group link containing the server to be backed out.
4. Verify the Upgrade State is Accept or Reject.
Make the server Backout Ready as follows:
5. Navigate to Status & Manage > HA.
6. Click Edit.
7. Select the server to be backed out and choose a Max Allowed HA Role value of Standby (unless it is a Query server, in which case the value should remain set to Observer).
Note: When the active NOAM is the server being backed out, click OK to initiate an HA switchover and cause the GUI session to log out.
8. Click OK.
Note: If the server being backed out is active NOAM and HA switchover doesn’t happen after above step and OAM HA Role of the NOAMP server to be backed out on the HA status screen is still Active. It means you have hit a known issue. Please apply workaround using Appendix Y to have the NOAMP HA switchover.*** Critical *** Do NOT omit this step
9. If the server being backed out is active NOAM then log out of the GUI, clear the browser cache, and log back into the active NOAM using the VIP before continuing. Some GUI forms may exhibit incorrect behaviors if the browser cache is not cleared.
10. Verify the Max Allowed HA Role is set to the desired value for the server on the HA Status screen.
11. Navigate to Status & Manage > Server.
12. Select the server to back out and click Stop.
13. Click OK to confirm the operation and verify the Appl State changes to

DSR 8.2 Software Upgrade GuideDSR 8.2 Software Upgrade Guide
Page | 185 E88968-01
Procedure 45. Backout Single Server
Disabled.
14. Navigate to Administration > Software Management > Upgrade.
15. Select the SOAM tab of the site being backed out.
16. Select the link of the server group containing the server to be backed out. Verify the Upgrade State is now Backout Ready.
Note: It may take a couple of minutes for the status to update.
2.
Server CLI: SSH to server
Use an SSH client to connect to the server (for example, ssh, putty):
ssh admusr@<server address>
password: <enter password>
Note: If direct access to the IMI is not available, or if TVOE is installed on a blade, then access the target server using a connection through the active NOAM. SSH to the active NOAM XMI first. From there, SSH to the target server’s IMI address.
3.
Server CLI: Execute the backout
Execute this command to find the state of the server to be backed out:
$ ha.mystate
In this example output, the HA state is Standby.
If the state of the server is Act, then return to step 1.
Execute the reject command to initiate the backout:
$ sudo /var/TKLC/backout/reject
Note: If back out asks to continue, answer y.
The reject command creates a no-hang-up shell session, so the command continues to execute if the user session is lost.
Sample output of the reject script:

DSR 8.2 Software Upgrade GuideDSR 8.2 Software Upgrade Guide
Page | 186 E88968-01
Procedure 45. Backout Single Server
4.
Backout proceeds Many informational messages display to the terminal screen as the backout proceeds.
After backout is complete, the server automatically reboots.
5.
Server CLI: SSH to server
Use an SSH client to connect to the server (for example, ssh, putty):
ssh admusr@<server address>
password: <enter password>
6.
Server CLI: Restore the full DB run environment
Execute the backout_restore utility to restore the full database run environment:
$ sudo /var/tmp/backout_restore
If asked to proceed, answer y.
Note: In some incremental upgrade scenarios, the backout_restore file is not found in the /var/tmp directory, resulting in the following error message:
/var/tmp/backout_restore: No such file or directory
If this message occurs, copy the file from /usr/TKLC/appworks/sbin to /var/tmp and repeat sub-step 1.
The backout_restore command creates a no-hang-up shell session, so the command continues to execute if the user session is lost.
If the restore was successful, the following displays:
Success: Full restore of COMCOL run env has completed.
Return to the backout procedure document for further
instruction.
If an error is encountered and reported by the utility, it is recommended to consult with My Oracle Support (MOS) by referring to Appendix CC of this document for further instructions.
7.
Server CLI: Verify the backout
1. Examine the output of the following commands to determine if any errors were reported:
$ sudo verifyUpgrade
Note: The verifyUpgrade command detected errors that occurred in the initial upgrade and during the backout. Disregard the initial upgrade errors.
Note: Disregard the TKLCplat.sh error:
[root@NO1 ~]# verifyUpgrade
ERROR: TKLCplat.sh is required by upgrade.sh!

DSR 8.2 Software Upgrade GuideDSR 8.2 Software Upgrade Guide
Page | 187 E88968-01
Procedure 45. Backout Single Server
ERROR: Could not load shell library!
ERROR: LIB: /var/TKLC/log/upgrade/verifyUpgrade/upgrade.sh
ERROR: RC: 1
Also, Disregard following error too
ERROR: Upgrade log (/var/TKLC/log/upgrade/upgrade.log)
reports errors!
ERROR: 1513202476::zip error: Nothing to do!
(/usr/share/tomcat6/webapps/ohw.war)
This command displays the current sw rev on the server:
$ appRev
Install Time: Wed Feb 25 02:52:47 2015
Product Name: DSR
Product Release: 7.1.0.0.0_71.10.0
Base Distro Product: TPD
Base Distro Release: 7.0.0.0.0_86.14.0
Base Distro ISO: TPD.install-7.0.0.0.0_86.14.0-
OracleLinux6.5-x86_64.iso
ISO name: DSR-7.1.0.0.0_71.10.0-x86_64.iso
OS: OracleLinux 6.5
2. Enter this command
$ sudo verifyBackout
The verifyBackout command searches the upgrade log and report all errors found.
3. If the backout was successful (no errors or failures reported), then proceed to step 8.
4. If the backout failed with the following error, this error can be ignored and the backout may continue.
ERROR: Upgrade log (/var/TKLC/log/upgrade/upgrade.log)
reports errors!
ERROR: 1485165801::ERROR: <rpm name>-7.2.14-
7.2.0.0.0_72.23.0: Failure running
command '/usr/TKLC/appworks/bin/eclipseHelp reconfig'
Also, Disregard following error too
ERROR: Upgrade log (/var/TKLC/log/upgrade/upgrade.log)
reports errors!
ERROR: 1513202476::zip error: Nothing to do!
(/usr/share/tomcat6/webapps/ohw.war)
5. If the backout failed with the following error:
ERROR: The upgrade log does not exist!
Examine the upgrade log at /var/TKLC/log/upgrade/upgrade.log for errors that occurred during the backout.
6. If the backout failed due to errors found in the upgrade log, it is recommended to contact My Oracle Support (MOS) by referring to Appendix CC of this document for further instructions.

DSR 8.2 Software Upgrade GuideDSR 8.2 Software Upgrade Guide
Page | 188 E88968-01
Procedure 45. Backout Single Server
8.
Server CLI: Reboot the server
Enter this command to reboot the server:
$ sudo init 6
This step can take several minutes.
9.
Server CLI: Verify OAM services restart (NOAM/SOAM only)
If the server being backed out is a NOAM or SOAM, perform this step; otherwise proceed to step 10.
1. Wait several (approximately 6 minutes) minutes for a reboot to complete before attempting to log back into the server.
2. SSH to the server and log in.
login as: admusr
password: <enter password>
3. Execute the following command to verify the httpd service is running.
$ sudo service httpd status
The expected output displays httpd is running (the process IDs are variable so the list of numbers can be ignored):
httpd <process IDs will be listed here> is running...
If httpd is not running, repeat sub-steps 3 for a few minutes. If httpd is still not running after 3 minutes, then services have failed to restart. It is recommended to contact My Oracle Support (MOS) by referring to Appendix CC of this document for further instructions.
10.
Server CLI: Change the ownership of the id_dsa file
Verify if theid_dsa file has the required ownership:
1. Check the ownership of the file:
ls –ltr /home/awadmin/.ssh/
The file permission should be defined as below:
If the file ownership is set as awadmin awadm, skip step 2 and 3.
2. If the file ownership is not set as awadmin awadm, then change the permission:
sudo chown awadmin:awadm /home/awadmin/.ssh/id_dsa
3. Repeat step 1 to verify.
11.
Active NOAM VIP: Verify server state is correct after back out
1. Navigate to Administration > Software Management > Upgrade to observe the server status.
2. Select the SOAM Server Group tab of the site being backed out.
3. Select the link of the server group containing the server being backed out.
If the server status is Not Ready, proceed to step 12. ; otherwise, proceed to step 13.

DSR 8.2 Software Upgrade GuideDSR 8.2 Software Upgrade Guide
Page | 189 E88968-01
Procedure 45. Backout Single Server
12.
Active NOAM VIP: Change/Correct the Upgrade State on backed out server to Ready
1. Navigate to Status & Manage > HA.
2. Click Edit.
3. Select the backed out server and choose a Max Allowed HA Role value of Active (unless it is a Query server, in which case the value should remain set to Observer).
4. Click OK.
5. Verify the Max Allowed HA Role is set to the desired value for the server on the HA Status screen.
6. Navigate to Status & Manage > Server.
7. Select the server being backed out and click Restart.
8. Click OK to confirm the operation.
9. Verify the Appl State updates to Enabled.
10. Navigate to Administration > Software Management > Upgrade.
11. Select the tab of the server group containing the server to be backed out.
12. Verify the Upgrade State is now Ready.
It may take a couple minutes for the grid to update.
13.
Active NOAM VIP: Verify application version is correct for the backed out server
1. Navigate to Administration > Software Management > Upgrade.
2. Select the SOAM tab of the site being backed out.
3. Select the link of the server group containing the server that was backed out.
4. Verify the Application Version value for this server has been downgraded to the original release version.
14.
Additional Backout steps
Backout procedure is not completed yet. Some more steps need to be executed for NOAM, SOAM and SBR server(s) to support backout for major upgrade paths.
Execute Appendix Q Additional Backout Steps.
The single server backout is now complete.
Return to the overall DSR backout procedure step that directed the execution of this procedure.

DSR 8.2 Software Upgrade GuideDSR 8.2 Software Upgrade Guide
Page | 190 E88968-01
6.7 Backout Multiple Servers
This section provides the procedures to backout the application software on multiple servers.
CAUTION This procedure is executed as a component of the Emergency Backout Procedure (Section 6.4) or the Normal Backout Procedure (Section 6.5). This procedure should never be executed as a standalone procedure.
Procedure 46. Backout Multiple Servers
S T E P #
This procedure backs out the upgrade of DSR 8.2 application software for multiple servers. Any server requiring backout can be included: DA-MPs, SS7-MPs, IPFEs, and SBRs.
Check off () each step as it is completed. Boxes have been provided for this purpose under each step number.
If this procedure fails, it is recommended to contact My Oracle Support (MOS) and ask for assistance.
1.
Active NOAM VIP: Prepare the server for backout
1. Navigate to Administration > Software Management > Upgrade.
2. Select the SOAM Server group tab of the site being backed out.
3. Select the server group link containing the server to be backed out.
4. Verify the Upgrade State is Accept or Reject.
Make the server Backout Ready as follows:
5. Navigate to Status & Manage > HA.
6. Click Edit.
7. Select the server to be backed out and choose a Max Allowed HA Role value as Standby (unless it is a Query server, in which case the value should remain set to Observer).
Note: When the active NOAM is the server being backed out, click OK to initiate an HA switchover and cause the GUI session to log out.
8. Click OK.
9. Verify the Max Allowed HA Role is set to the desired value for the server on the HA Status screen.
10. Navigate to Status & Manage > Server.
11. Select the server to back out and click Stop.
12. Click OK to confirm the operation and verify the Appl State changes to Disabled.
13. Navigate to Administration > Software Management > Upgrade.
14. Select the SOAM Server Group tab of the site being backed out.
15. Select the link of the server group containing the server to be backed out. Verify the Upgrade State is now Backout Ready.
Note: It may take a couple of minutes for the status to update.

DSR 8.2 Software Upgrade GuideDSR 8.2 Software Upgrade Guide
Page | 191 E88968-01
Procedure 46. Backout Multiple Servers
2.
Server CLI: Log into the server(s)
Use an SSH client to connect to the server under backout (for example, ssh, putty):
ssh admusr@<server address>
password: <enter password>
Note: If direct access to the IMI is not available, then access the target server using a connection through the active NOAM. SSH to the active NOAM XMI first. From there, SSH to the target server’s IMI address.
3.
Server CLI: Execute the backout
Determine the state of the server to be backed out. The server role must be either Standby or Spare.
Execute following command to find the server role :
$ ha.mystate
In this example output, the HA state is Standby.
If the state of the server is Act, then return to step 1.
Execute the reject command to initiate the backout:
$ sudo /var/TKLC/backout/reject
Note: If back out asks to continue, answer y.
The reject command creates a no-hang-up shell session, so the command continues to execute if the user session is lost.
Sample output of the reject script:

DSR 8.2 Software Upgrade GuideDSR 8.2 Software Upgrade Guide
Page | 192 E88968-01
Procedure 46. Backout Multiple Servers
4.
Server CLI: Backout proceeds
Many informational messages display to the terminal screen as the backout proceeds.
After backout is complete, the server automatically reboots.
5.
Repeat for each server to be backed out
Repeat steps 1 through 4 for each server to be backed out.
6.
Server CLI: Log into the server
Use an SSH client to connect to the server under backout (for example, ssh, putty):
ssh admusr@<server address>
password: <enter password>
7.
Server CLI: Restore the full DB run environment
Execute the backout_restore utility to restore the full database run environment:
$ sudo /var/tmp/backout_restore
If asked to proceed, answer y.
Note: In some incremental upgrade scenarios, the backout_restore file is not found in the /var/tmp directory, resulting in the following error message:
/var/tmp/backout_restore: No such file or directory
If this message occurs, copy the file from /usr/TKLC/appworks/sbin
to /var/tmp and repeat sub-step backout_restore again.
The backout_restore command creates a no-hang-up shell session, so the command continues to execute if the user session is lost.
If the restore was successful, the following displays:
Success: Full restore of COMCOL run env has completed.
Return to the backout procedure document for further
instruction.
If an error is encountered and reported by the utility, it is recommended to consult with My Oracle Support (MOS) by referring to Appendix CC of this document for further instructions.
8.
Server CLI: Verify the backout
1. Examine the output of the following commands to determine if any errors were reported:
$ sudo verifyUpgrade
Note: The verifyUpgrade command detected errors that occurred in the initial upgrade and during the backout. Disregard the initial upgrade errors.
Note: Disregard the TKLCplat.sh error:
[root@NO1 ~]# verifyUpgrade
ERROR: TKLCplat.sh is required by upgrade.sh!
ERROR: Could not load shell library!
ERROR: LIB:
/var/TKLC/log/upgrade/verifyUpgrade/upgrade.sh
ERROR: RC: 1
Also, Disregard following error too
ERROR: Upgrade log (/var/TKLC/log/upgrade/upgrade.log)

DSR 8.2 Software Upgrade GuideDSR 8.2 Software Upgrade Guide
Page | 193 E88968-01
Procedure 46. Backout Multiple Servers
reports errors!
ERROR: 1513202476::zip error: Nothing to do!
(/usr/share/tomcat6/webapps/ohw.war)
This command displays the current sw rev on the server:
$ appRev
[admusr@E1B581DAMP1 ~]$ appRev
Install Time: Tue Sep 12 06:11:34 2017
Product Name: DSR
Product Release: 8.1.0.0.0_81.20.0
Base Distro Product: TPD
Base Distro Release: 7.4.0.0.0_88.37.0
Base Distro ISO: TPD.install-7.4.0.0.0_88.37.0-
OracleLinux6.8-x86_64.iso
ISO name: DSR-8.1.0.0.0_81.20.0-x86_64.iso
OS: OracleLinux 6.8
2. Enter this command:
$ sudo verifyBackout
The verifyBackout command searches the upgrade log and reports all errors found.
3. If the backout was successful (no errors or failures reported), then proceed to step 9.
4. If the backout failed with the following error, this error can be ignored and the backout may continue.
ERROR: Upgrade log (/var/TKLC/log/upgrade/upgrade.log)
reports errors!
ERROR: 1485165801::ERROR: <rpm name>-7.2.14-
7.2.0.0.0_72.23.0: Failure running
command '/usr/TKLC/appworks/bin/eclipseHelp reconfig'
Also, Disregard following error too
ERROR: Upgrade log (/var/TKLC/log/upgrade/upgrade.log)
reports errors!
ERROR: 1513202476::zip error: Nothing to do!
5. (/usr/share/tomcat6/webapps/ohw.war)If the backout failed with
the following error:
ERROR: The upgrade log does not exist!
Examine the upgrade log at /var/TKLC/log/upgrade/upgrade.log for errors that occurred during the backout.
6. If the backout failed due to errors found in the upgrade log, it is recommended to contact My Oracle Support (MOS) by referring to Appendix CC of this document for further instructions.
9.
Server CLI: Reboot the server
Enter the following command to reboot the server:
$ sudo init 6
This step can take several minutes.

DSR 8.2 Software Upgrade GuideDSR 8.2 Software Upgrade Guide
Page | 194 E88968-01
Procedure 46. Backout Multiple Servers
10.
Server CLI: Verify OAM services restart (NOAM/SOAM only)
If the server being backed out is a NOAM or SOAM, perform this step; otherwise proceed to step 11.
1. Wait several (approximately 6 minutes) minutes for a reboot to complete before attempting to log back into the server.
2. SSH to the server and log in.
login as: admusr
password: <enter password>
3. Execute the following command to verify the httpd service is running.
$ sudo service httpd status
The expected output displays httpd is running (the process IDs are variable so the list of numbers can be ignored):
httpd <process IDs will be listed here> is running...
If httpd is not running, repeat sub-steps 3 and 4 for a few minutes. If httpd is still not running after 3 minutes, then services have failed to restart. It is recommended to contact My Oracle Support (MOS) by referring to Appendix CC of this document for further instructions.
11.
Server CLI: Change the ownership of the id_dsa file
Verify if theid_dsa file has the required ownership:
1. Check the ownership of the file:
ls –ltr /home/awadmin/.ssh/
The file permission should be defined as below:
If the file ownership is set as awadmin awadm, skip step 2 and 3.
2. If the file ownership is not set as awadmin awadm, then change the permission:
sudo chown awadmin:awadm /home/awadmin/.ssh/id_dsa
3. Repeat step 1 to verify.
12.
Additional backout steps
Backout procedure is not completed yet. Execute Appendix Q Additional Backout Steps to back out major upgrade paths.
13.
Repeat for each server backed out
Repeat steps 6. through 12. for each server to be backed out.
14.
Active NOAM VIP: Verify server state is correct after back out
1. Navigate to Administration > Software Management > Upgrade to observe the server upgrade status.
2. If the server status is Not Ready, continue to step 15. ; otherwise, proceed to step 16.

DSR 8.2 Software Upgrade GuideDSR 8.2 Software Upgrade Guide
Page | 195 E88968-01
Procedure 46. Backout Multiple Servers
15.
Active NOAM VIP: Change/Correct the Upgrade State on backed out server to Ready
1. Navigate to Status & Manage > HA.
2. Click Edit.
3. Select the backed out server and choose a Max Allowed HA Role value of Active (unless it is a Query server, in which case the value should remain set to Observer).
4. Click OK.
5. Verify the Max Allowed HA Role is set to the desired value for the server on the HA Status screen.
6. Navigate to Status & Manage > Server.
7. Select the server being backed out and click Restart.
8. Click OK to confirm the operation.
9. Verify the Appl State updates to Enabled.
10. Navigate to Administration > Software Management > Upgrade.
11. Select the tab of the server group containing the server to be backed out.
12. Verify the Upgrade State is now Ready.
It may take a couple minutes for the grid to update.
16.
Active NOAM VIP: Verify application version is correct for the backed out server
1. Navigate to Administration > Software Management > Upgrade.
2. Select the SOAM server group tab of the site being backed out.
3. Select the link of the server group containing the server that was backed out.
4. Verify the Application Version value for this server has been downgraded to the original release version.
The multiple server backout is now complete.

DSR 8.2 Software Upgrade GuideDSR 8.2 Software Upgrade Guide
Page | 196 E88968-01
6.8 Post-Backout Health Check
This procedure is used to determine the health and status of the DSR network and servers following the backout of the entire system.
Procedure 47. Post-Backout Health Check
S T E P #
This procedure performs a basic Health Check of the DSR to verify the health of the system following a backout.
Check off () each step as it is completed. Boxes have been provided for this purpose under each step number.
If this procedure fails, it is recommended to contact My Oracle Support (MOS) and ask for assistance.
1.
Active NOAM VIP: Verify server status is normal
1. Log into the NOAM GUI using the VIP.
2. Navigate to Status & Manage > Server.
3. Verify Server Status is Normal (Norm) for Alarm (Alm), Database (DB) and Processes (Proc).
4. Do not proceed with the upgrade if any server status is not Norm.
5. Do not proceed with the upgrade if there are any Major or Critical alarms.
Refer to Appendix P for details.
Note: It is recommended to troubleshoot if any server status is not Norm. A backout should return the servers to their pre-upgrade status.
2.
Active NOAM VIP: Log all current alarms in the system
1. Navigate to Alarms & Events > View Active.
2. Click Report to generate an Alarms report.
3. Save the report and print the report. Keep these copies for future reference.

DSR 8.2 Software Upgrade GuideDSR 8.2 Software Upgrade Guide
Page | 197 E88968-01
6.9 IDIH Backout
The procedures in this section back out the Oracle, Application, and Mediation servers to the previous release.
Oracle Server Backout 6.9.1
Backout of Oracle Server is not supported after release 7.1.
The Oracle server is backed out using the disaster recovery procedure documented in [11].
Mediation and Application Server Backout 6.9.2
The Mediation and Application servers are backed out using the disaster recovery procedure documented in [11].
Appendix A. Post Upgrade Procedures
Execute the procedures in this section only AFTER the upgrade of ALL servers in the topology is completed.
A.1. Accept the Upgrade
Detailed steps for accepting the upgrade are provided in the procedure. TPD requires that upgrades be accepted or rejected before any subsequent upgrades may be performed. Alarm 32532 Server Upgrade Pending Accept/Reject displays for each server until one of these two actions is performed.
An upgrade should be accepted only after it is determined to be successful as the Accept is final. This frees up file storage but prevents a backout from the previous upgrade.
Note: Once the upgrade is accepted for a server, that server is not allowed to backout to a previous release.
Note: This procedure must be performed in a Maintenance Window.
!!WARNING!!
Upgrade acceptance may only be executed with authorization from the customer.
Be advised that once an upgrade has been accepted, it is not possible to back out to the previous release.
Procedure 48. Accept the Upgrade
S T E P #
This procedure accepts a successful upgrade.
Check off () each step as it is completed. Boxes have been provided for this purpose under each step number.
If this procedure fails, it is recommended to contact My Oracle Support (MOS) and ask for assistance.
1.
It is recommended that this procedure be performed two weeks after the upgrade
Verify the upgraded system has been stable for two weeks or more.
Note: It is not possible to back out after this is procedure is executed.
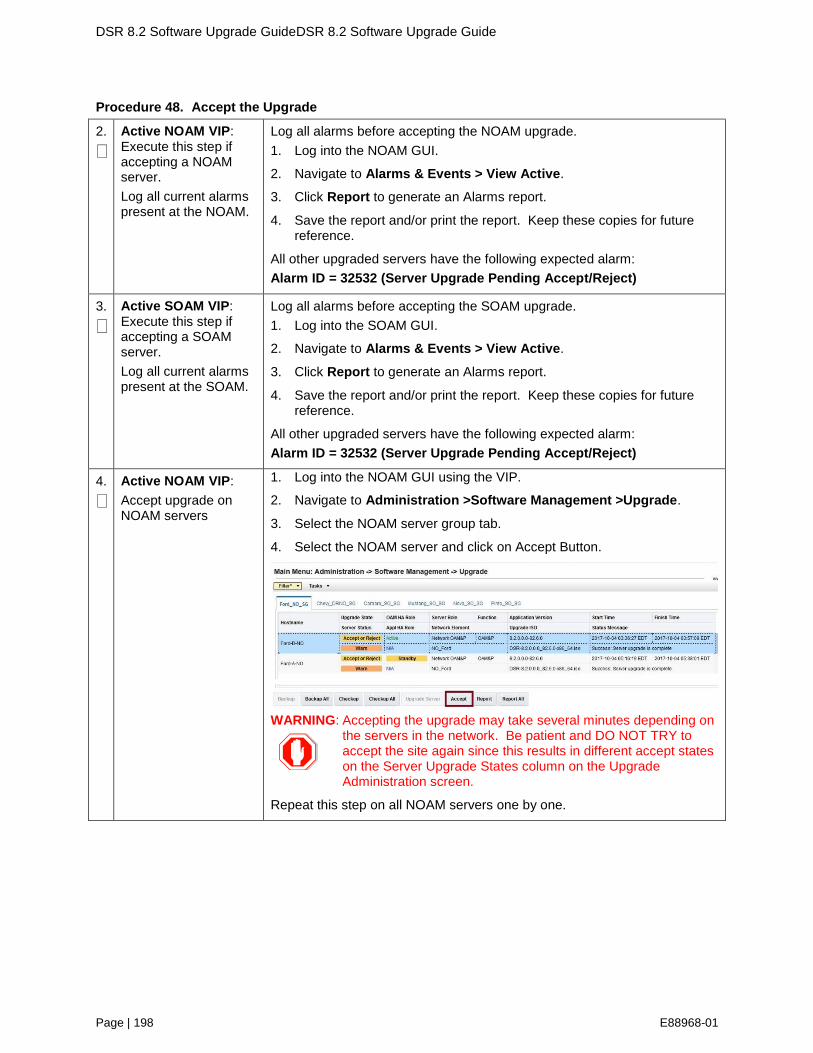
DSR 8.2 Software Upgrade GuideDSR 8.2 Software Upgrade Guide
Page | 198 E88968-01
Procedure 48. Accept the Upgrade
2.
Active NOAM VIP: Execute this step if accepting a NOAM server.
Log all current alarms present at the NOAM.
Log all alarms before accepting the NOAM upgrade.
1. Log into the NOAM GUI.
2. Navigate to Alarms & Events > View Active.
3. Click Report to generate an Alarms report.
4. Save the report and/or print the report. Keep these copies for future reference.
All other upgraded servers have the following expected alarm:
Alarm ID = 32532 (Server Upgrade Pending Accept/Reject)
3.
Active SOAM VIP: Execute this step if accepting a SOAM server.
Log all current alarms present at the SOAM.
Log all alarms before accepting the SOAM upgrade.
1. Log into the SOAM GUI.
2. Navigate to Alarms & Events > View Active.
3. Click Report to generate an Alarms report.
4. Save the report and/or print the report. Keep these copies for future reference.
All other upgraded servers have the following expected alarm:
Alarm ID = 32532 (Server Upgrade Pending Accept/Reject)
4.
Active NOAM VIP:
Accept upgrade on NOAM servers
1. Log into the NOAM GUI using the VIP.
2. Navigate to Administration >Software Management >Upgrade.
3. Select the NOAM server group tab.
4. Select the NOAM server and click on Accept Button.
WARNING: Accepting the upgrade may take several minutes depending on the servers in the network. Be patient and DO NOT TRY to accept the site again since this results in different accept states on the Server Upgrade States column on the Upgrade Administration screen.
Repeat this step on all NOAM servers one by one.

DSR 8.2 Software Upgrade GuideDSR 8.2 Software Upgrade Guide
Page | 199 E88968-01
Procedure 48. Accept the Upgrade
5.
Active NOAM VIP: Accept upgrade for multiple servers
1. Log into the NOAM GUI using the VIP.
2. Navigate to Administration >Software Management >Upgrade.
3. Select the SOAM tab of the site being upgraded.
Note: The Site Accept button accepts the upgrade for every upgraded server at the selected site. This is the most efficient way to accept an upgrade. A manual alternative to this is to select the link of each server group in the site and use the Accept button to accept the upgrade of only the servers in the selected server group.
4. Click Site Accept.
WARNING: If the source release is prior to 7.1, verify that the customer firewall is configured to allow DNS traffic on UDP/TCP port 53, before accepting the upgrade. Refer to Appendix W for more information.
A confirmation screen warns that once the server is accepted it is not able to revert back to the previous image state.
5. Click OK.
WARNING: Accepting the upgrade may take several minutes depending on the servers in the network. Be patient and DO NOT TRY to accept the site again since this results in different accept states om the Server Upgrade States column on the Upgrade Administration screen.
6. Navigate to Alarms & Events > View Active.
As upgrade is accepted on each server, the corresponding Alarm ID – 32532 (Server Upgrade Pending Accept/Reject) should automatically clear and server status transitions to Backup Needed.

DSR 8.2 Software Upgrade GuideDSR 8.2 Software Upgrade Guide
Page | 200 E88968-01
A.2. Undeploy ISO
This procedure is run after the upgrade has been accepted to undeploy all deployed ISOs. When an ISO is undeployed, the ISO is deleted from all servers in the topology except for the active NOAM. On the active NOAM, the ISO remains in the File Management Area.
This procedure can be run at any time after the upgrade has been accepted.
Procedure 49. Undeploy ISO
S T E P #
This procedure undeploy an ISO from the DSR servers.
Check off () each step as it is completed. Boxes have been provided for this purpose under each step number.
If this procedure fails, it is recommended to contact My Oracle Support (MOS) and ask for assistance.
1.
Active NOAM VIP: View the files in the file management area
1. Log into the NOAM GUI using the VIP.
2. Navigate to Status & Manage > Files.
2.
Active NOAM VIP: Start ISO undeploy sequence
1. Select an ISO stored in the isos directory of the File Management Area. The ISO filename has the format:
isos/DSR-8.0.0.0.0_80.12.0-x86_64.iso
2. Click Undeploy ISO.
3. Click OK on the confirmation screen to start the undeploy sequence.
3.
Active NOAM VIP: Monitor the ISO undeploy progress
1. Select the ISO being undeployed in step 2.
2. Click View ISO Deployment Report.
3. If some servers show the ISO as Deployed, click Back on the Files View screen.
4. Periodically repeat sub-steps 1 through 3 until all servers indicate Not Deployed.
4.
Active NOAM VIP: Repeat as necessary
If there are additional ISOs in the File Management Area that need to be undeployed, repeat steps 2 and 3 as necessary.

DSR 8.2 Software Upgrade GuideDSR 8.2 Software Upgrade Guide
Page | 201 E88968-01
A.3. Post Upgrade Procedures
The procedures in this section are executed after the upgrade has been accepted.
Procedure 50. PCA Post Upgrade Procedure
S T E P #
This procedure performs miscellaneous actions that are required to be executed after the upgrade is accepted.
Check off () each step as it is completed. Boxes have been provided for this purpose under each step number.
If this procedure fails, it is recommended to contact My Oracle Support (MOS) and ask for assistance.
1.
Active NOAM CLI: Reset COMCOL compatibility flag
This step is required only if the source release is pre-8.0.
1. Use an SSH client to connect to the active NOAM:
ssh <NOAM XMI IP address>
login as: admusr
password: <enter password>
Note: The static XMI IP address for each server should be available in Table 5.
2. Enter this command to reset the COMCOL backward compatibility flag. Backward compatibility is no longer required when all of the servers in the topology have been upgraded to release 8.0 or later.
$ iset –fvalue=0 LongParam where "name='cm.cm6compat'"
Sample output:
=== changed 1 records ===
3. Verify the changed value:
$ iqt -zp -fvalue LongParam where "name='cm.cm6compat'"
value
0

DSR 8.2 Software Upgrade GuideDSR 8.2 Software Upgrade Guide
Page | 202 E88968-01
Appendix B. Increase Maximum Number of Open Files
This procedure increases the maximum number of files that can be opened for reading and writing. As the number of servers in the topology grows, so does the need for additional files to handle merging data to the NOAM. This procedure checks the number of files currently in use, and, if necessary, increases the maximum number of open files.
Note: This procedure is for one NOAM server. Repeat this procedure for other NOAM servers.
Procedure 51. Increase Maximum Number of Open Files
S T E P #
This procedure checks the number of files currently in use, and, if necessary, increases the maximum number of open files.
Check off () each step as it is completed. Boxes have been provided for this purpose under each step number.
If this procedure fails, it is recommended to contact My Oracle Support (MOS) and ask for assistance.
1.
Active NOAM CLI: Determine the number of files currently open
1. Use an SSH client to connect to the active NOAM.
ssh <NOAM XMI IP address>
login as: admusr
password: <enter password>
Note: The static XMI IP address for each server should be available in Table 5.
2. Enter the following command to retrieve the pid of idbsvc. The pid is highlighted in this sample output:
$ ps -ef | grep -i idbsvc
root 4369 idbsvc Up 03/01
13:03:28 1 idbsvc -M10 -ME204 -D40 -DE820 -W1 -S2
3. The number of open files is output with the ‘lsof’ command. Use the highlighted value from sub-step 2 in place of XXXX in the lsof command.
$ sudo lsof -p XXXX | wc -l
1278
4. Record the number of files currently open (the output of sub-step 3): __________________________
5. Enter the following command to retrieve the pid of tpdProvd. The pid is highlighted in this sample output:
$ ps -ef | grep -i tpdProvd
tpdProvd 347635 1 0 06:09 ? 00:00:11
/usr/TKLC/plat/bin/tpdProvd
6. The number of open files is output with the ‘lsof’ command. Use the highlighted value from sub-step 4 in place of XXXX in the lsof command.
$ sudo lsof -p XXXX | wc –l
1280
7. Record the number of files currently open (the output of sub-step 5): __________________________

DSR 8.2 Software Upgrade GuideDSR 8.2 Software Upgrade Guide
Page | 203 E88968-01
Procedure 51. Increase Maximum Number of Open Files
2.
Active NOAM CLI: Maximum number of open files
Display the maximum number of open files for idbsvc.
1. Use the highlighted value from step 1, sub-step 2 in place of XXXX in the cat command.
$ sudo cat /proc/XXXX/limits | grep -i open
Max open files 32768 32768 files
The output of the cat command displays the maximum number of files that can be open by the idbsvc process. Record both values here:
Soft Limit (1st value): _________ Hard Limit (2
nd value): ____________
Display the maximum number of open files for tpdProvd.
2. Use the highlighted value from step 1, sub-step 4 for tpdProvd in place of XXXX in the cat command.
$ sudo cat /proc/XXXX/limits | grep -i open
Max open files 1024 4096 files
The output of the cat command displays the maximum number of files that can be open by the tpdProvd process. Record both values here:
Soft Limit (1st value): _________ Hard Limit (2
nd value): ____________
3.
Make sure the current number of open files used by idbsvc in in the safe limit
If the number of currently open files (step 1, sub-step 3) of idbsvc is less than the maximum allowed (step 2, sub-step 2 Soft Limit for tpdProvd), this procedure is complete, for example, number of currently open files (used by idbsvc) is less than 1024.
Further steps are not required to be executed on this NOAM server.
If the number of currently open files is more than the maximum allowed (step 2, sub-step 2 Soft Limit for tpdProvd), for example, 1024, go to step 5.
Repeat this procedure (if required) for other NOAM server.
4.
Make sure the current number of open files used by tpdProvd in in the safe limit
If the maximum number of open files value (step 2, sub-step 2 - Soft Limit) for tpdProvd is already set to 32768, this procedure is complete.
Further steps are not required to be executed on this NOAM server.
If maximum value is not already set, then go to step 5.
Repeat this procedure (if required) for other NOAM server.

DSR 8.2 Software Upgrade GuideDSR 8.2 Software Upgrade Guide
Page | 204 E88968-01
Procedure 51. Increase Maximum Number of Open Files
5.
Active NOAM CLI: Increase max number of open files
1. Using a text editor with sudo, edit the file /etc/init/tpdProvd.conf to add these two lines just before the comment line in the file /etc/init/tpdProvd.conf that reads Start the daemon:
# increase open file limit
limit nofile 32768 32768
Insight of file as example:
2. Save the file and close the editor.
Caution: Do not edit any other line in this file. You can back up the file, if required.
6.
Active NOAM CLI: Restart tpdProvd service
1. Enter this command to stop tpdProvd:
$ sudo initctl stop tpdProvd
2. Enter this command to restart tpdProvd:
$ sudo initctl start tpdProvd
Sample output:
tpdProvd start/running, procedd 186743
7.
Active NOAM CLI: Recheck open file maximum limit
1. Enter the following command to retrieve the pid of idbsvc. The pid is highlighted in this sample output:
$ ps –ef | grep -i idbsvc
root 8670 idbsvc Up 03/01
13:03:28 1 idbsvc -M10 -ME204 -D40 -DE820 -W1 -S2
2. Use the highlighted value from sub-step 1in place of XXXX in the cat command.
$ sudo cat /proc/XXXX/limits | grep -i open
Max open files 32768 32768 files
3. Verify the output of sub-step 2 indicates that the max number of open files is 32768. If the value is NOT 32768, it is recommended to contact My Oracle Support (MOS) per Appendix CC.

DSR 8.2 Software Upgrade GuideDSR 8.2 Software Upgrade Guide
Page | 205 E88968-01
Appendix C. Update NOAM Guest VM Configuration
This procedure updates the VM configuration for NOAM guests hosted on an RMS. The new configuration increases the number of virtual CPUs and RAM available to the NOAMs to improve performance in high load conditions. This procedure should be executed only when the NOAM is virtualized on an RMS with no B-level or C-level servers.
Procedure 52. Update NOAM Guest VM Configuration
S T E P #
This procedure modifies the VM configuration for the NOAM guest. This procedure applies only to NOAMs hosted on an RMS.
Check off () each step as it is completed. Boxes have been provided for this purpose under each step number.
If this procedure fails, it is recommended to contact My Oracle Support (MOS) and ask for assistance.
1.
PMAC GUI: Verify the VM configuration
1. Log into the PMAC GUI by navigating to http://<pmac_management_ip>
2. Navigate to Main Menu > VM Management.
3. Select the TVOE host that is hosting the NOAM VM to be upgraded.
4. Select the NOAM VM, which needs to be verified.
5. Make sure NOAM VM already has these values:
Num vCPUs: 12
Memory (MBs): 24,576
If the values are correct, then this procedure is complete.
6. If the values are not correct, then proceed to the next step.
2.
Active NOAM VIP: Log all current alarms for the standby NOAM
When the NOAM guest VM is shut down before updating the configuration, a number of alarms are generated by the event. Thus it is necessary to note any existing alarms for the server before the shutdown.
1. Navigate to Alarms & Events > View Active.
2. Select the Filter option. Select Server = <StbyNOAM> for the Display Filter, where <StbyNOAM> is the hostname of the standby NOAM.
3. Click Go to filter the alarms on the specified criteria.
4. Make note of all alarms that are displayed as a result of the applied filter. These should be the only alarms displayed once the VM is restarted.

DSR 8.2 Software Upgrade GuideDSR 8.2 Software Upgrade Guide
Page | 206 E88968-01
Procedure 52. Update NOAM Guest VM Configuration
3.
PMAC GUI: Edit the NOAM guest VM configuration
1. Log into the PMAC GUI by navigating to http ://<pmac_management_ip>.
2. Navigate to Main Menu > VM Management.
3. Select the TVOE host that is hosting the NOAM VM to be upgraded.
4. Select the NOAM VM to edit.
5. Change the power state of the guest VM from Running to Shutdown and click Change to. Confirm the pop-up and wait for the power state to change to Shutdown. This may take a few moments as this executes a graceful shutdown of the NOAM guest.
6. Click Edit near the bottom of the window.
7. Change the following guest configuration values from the current value to the values presented in bold:
Num vCPUs: 12
Memory (MBs): 24,576
No other configuration values should be changed.
8. Click Save.
The GUI may gray out for a moment while the changes are committed.
4.
PMAC GUI: Change/Modify the guest power state
Change the guest VM power state from Shutdown to On and click Change to. This restarts the VM.
5.
Active NOAM VIP: Monitor current alarms for the standby NOAM
Monitor the alarms for the standby NOAM until the alarm count is down to those that existed before the VM shutdown, as recorded in step 1.
1. Navigate to Alarms & Events > View Active.
2. From the Filter option, select Server = <StbyNOAM> for the Display Filter, where <StbyNOAM> is the hostname of the standby NOAM.
3. Click Go to filter the alarms on the specified criteria.
4. Monitor standby NOAM alarms.

DSR 8.2 Software Upgrade GuideDSR 8.2 Software Upgrade Guide
Page | 207 E88968-01
Appendix D. Determine if TVOE Upgrade is Required
When upgrading a server that exists as a virtual guest on a TVOE host, it is first necessary to determine whether the TVOE host (that is, the bare-metal) server must be upgraded to a newer release of TVOE.
NOAM and SOAM servers are often implemented as TVOE guests in C-class deployments, so the TVOE upgrade check is necessary. DA-MPs are not implemented as TVOE guests in C-class deployments, so the TVOE upgrade check is not necessary when upgrading C-class DA-MPs.
When DSR is deployed in the VEDSR configuration, or on Rack Mounted Servers (RMSs), all servers are virtual guests, and the TVOE upgrade check is always required. However, DA-MPs are often deployed as guests on the same TVOE host as the OAM server(s), and so by the time the DA-MP servers are being upgraded, TVOE has already been upgraded and there is no need to do so again.
Procedure 53. Determine if TVOE Upgrade is Required
S T E P #
This procedure checks if TVOE upgrade is required.
Check off () each step as it is completed. Boxes have been provided for this purpose under each step number.
If this procedure fails, it is recommended to contact My Oracle Support (MOS) and ask for assistance.
1.
TVOE CLI: Determine the version of TVOE already running on the bare-metal server that hosts the virtual guest currently being upgraded
Log into the host server on which TVOE is installed.
Execute the following command to get the current TVOE installed version :
# appRev
Install Time: Thu Aug 14 08:17:52 2014
Product Name: TVOE
Product Release: 2.7.0_84.17.0
Part Number ISO: 872-2290-104
Part Number USB: 872-2290-104
Base Distro Product: TPD
Base Distro Release: 7.0.0_70.6.0
Base Distro ISO: TPD.install-6.7.0_84.17.0-
CentOS6.2-x86_64.iso
OS: CentOS 6.2
2.
Check the TVOE release version required for target DSR release
It is recommended to contact My Oracle Support (MOS) by referring to Appendix CC of this document to determine the appropriate release version.
3.
If the release in step 1 is less than what is required in step 2 then upgrade of TVOE is required
The procedure to upgrade TVOE on the host server is in Appendix J.
Appendix E. Add ISO Images to PMAC Image Repository
If the ISO image is delivered on optical media, or USB device, continue with step 1 of this Appendix; otherwise, if the ISO image was delivered to the PMAC using sftp, continue with step 5.
1. In the PMAC GUI, navigate to Main Menu > VM Management. In the VM Entities list, select the PMAC Guest. On the resulting View VM Guest page, select the Media tab.

DSR 8.2 Software Upgrade GuideDSR 8.2 Software Upgrade Guide
Page | 208 E88968-01
2. Under the Media tab, find the ISO image in the Available Media list, and click Attach.
After a pause, the image displays in the Attached Media list.
3. Navigate to Software -> Manage Software Images.

DSR 8.2 Software Upgrade GuideDSR 8.2 Software Upgrade Guide
Page | 209 E88968-01
4. Click Add Image.
5. Select an image to add.
If the image was transferred to PMAC using sftp, it displays in the list as a local file /var/TKLC/....
If the image was supplied on a CD or a USB drive, it displays as a virtual device (device://...). These devices are assigned in numerical order as CD and USB images become available on the Management Server. The first virtual device is reserved for internal use by TVOE and PMAC; therefore, the ISO image of interest is normally present on the second device, device://dev/sr1. If one or more CD or USB-based images were already present on the Management Server before this procedure was started, choose a correspondingly higher device number. Enter an appropriate image description and click Add New Image.

DSR 8.2 Software Upgrade GuideDSR 8.2 Software Upgrade Guide
Page | 210 E88968-01
The Manage Software Images page is then redisplayed with a new background task entry in the table at the bottom of the page:
6. Wait until the Add Image task finishes. When the task is complete, its text changes color and its Progress column indicates 100%. Make sure the correct image name appears in the Status column:
7. Detach the image from the PMAC guest.
If the image was supplied on CD or USB, return to the PMAC Guest’s Media tab used in step 2, locate the image in the Attached Media list, and click Detach. After a pause, the image removes from the Attached Media list. This releases the virtual device for future use.
8. Remove the CD or USB device from the Management Server.

DSR 8.2 Software Upgrade GuideDSR 8.2 Software Upgrade Guide
Page | 211 E88968-01
Appendix F. Upgrade Single Server – DSR 8.x
This appendix upgrades a single DSR server of any type (NOAM, SOAM, MP, etc.) when the active NOAM is on DSR 8.x.
Note: This procedure may be executed multiple times during the overall upgrade, depending on the number of servers in the DSR and the chosen upgrade methodology. Make multiple copies of Appendix F to mark up, or keep another form of written record of the steps performed.
Procedure 54. Upgrade Single Server – Upgrade Administration – DSR 8.x
S T E P #
This procedure executes the Upgrade Single Server – Upgrade Administration steps for an active NOAM on release 8.0/8.1.
Check off () each step as it is completed. Boxes have been provided for this purpose under each step number.
If this procedure fails, it is recommended to contact My Oracle Support (MOS) and ask for assistance.
1.
Active NOAM VIP: View the pre-upgrade status of servers
1. Log into the NOAM GUI using the VIP.
2. Navigate to Administration > Software Management > Upgrade
3. Select the Network Element of the server to be upgraded (NOAM or site).
The active NOAM server may have some or all of these expected alarms:
Alarm ID = 10008 (Provisioning Manually Disabled)
Alarm ID = 32532 (Server Upgrade Pending Accept/Reject)
Alarm ID = 31149 (DB Late Write Nonactive)

DSR 8.2 Software Upgrade GuideDSR 8.2 Software Upgrade Guide
Page | 212 E88968-01
Procedure 54. Upgrade Single Server – Upgrade Administration – DSR 8.x
2.
Active NOAM VIP: Verify status of server to be upgraded
1. Identify the server to be upgraded (NOAM, SOAM, MP, etc.)
_____________________________________(record hostname)
2. Verify the Application Version value is the expected source software release version.
3. If the server is in the Backup Needed state, select the server and click Backup.
4. On the Upgrade Backup screen, click OK.
The Upgrade State changes to Backup in Progress.
5. Verify the OAM Max HA Role is the expected condition (either standby or active). This depends on the server being upgraded.
6. When the backup is complete, verify the server state changes to Ready.
3.
Active NOAM VIP: Initiate the server upgrade
1. From the Upgrade Administration screen, select the server to be upgraded.
2. Click Upgrade Server.
The Initiate Upgrade form displays.

DSR 8.2 Software Upgrade GuideDSR 8.2 Software Upgrade Guide
Page | 213 E88968-01
Procedure 54. Upgrade Single Server – Upgrade Administration – DSR 8.x
4.
Active NOAM VIP: Select upgrade ISO
Initiate the server upgrade.
1. From the Upgrade Settings – Upgrade ISO options, select the ISO to use in the server upgrade.
Note: When the active NOAM is the server being upgraded, click OK to initiate an HA switchover and cause the GUI session to log out.
Note: If the selected server is the active server in an active/standby pair, the OAM Max HA Role column displays Active with a red background. This is NOT an alarm condition. This indicator is to make the user aware the Make Ready action causes an HA switchover.
2. Click OK.
The upgrade begins and control returns to the Upgrade Administration screen.
*** Critical *** Do NOT omit this step
3. Log out of the GUI, clear the browser cache, and log back into the active NOAM using the VIP before continuing. Some GUI forms may exhibit incorrect behaviors if the browser cache is not cleared.
5.
Active NOAM VIP: View the upgrade administration form to monitor upgrade progress
See step 6 for an optional method of monitoring upgrade progress.
See step 7 for instructions if the upgrade fails.
Note: If the upgrade processing encounters a problem, it may attempt to ROLL BACK to the original software release. In this case, the Upgrade displays as FAILED.
The execution time may be shorter or longer, depending on the point in the upgrade where there was a problem.
1. Observe the upgrade status of the site on the Upgrade Administration screen by selecting the Entire Site link. An upgrade status summary of each server group in the site displays in the Server Upgrade States column.

DSR 8.2 Software Upgrade GuideDSR 8.2 Software Upgrade Guide
Page | 214 E88968-01
Procedure 54. Upgrade Single Server – Upgrade Administration – DSR 8.x
Servers may have a combination of the following expected alarms.
Note: Not all servers have all alarms:
Alarm ID = 10008 (Provisioning Manually Disabled)
Alarm ID = 10075 (The server is no longer providing services because application processes have been manually stopped)
Alarm ID = 10073 (Server Group Max Allowed HA Role Warning)
Alarm ID = 32515 (Server HA Failover Inhibited)
Alarm ID = 31228 (HA Highly available server failed to receive mate heartbeats) or (Lost Communication with Mate Server)
Alarm ID = 31283 (Highly available server failed to receive mate heartbeats)
Alarm ID = 31106 (DB Merge To Parent Failure)
Alarm ID = 31107 (DB Merge From Child Failure)
Alarm ID = 31233 (HA Secondary Path Down)
Alarm ID = 31101 (DB Replication To Slave Failure)
Alarm ID = 31114 (DB Replication over SOAP has failed)
Alarm ID = 31282 (The HA manager (cmha) is impaired by a s/w fault)
Alarm ID = 31225 (HA Service Start Failure)
Alarm ID = 31149 (DB Late Write Nonactive)
2. Wait for the upgrade to complete. The Status Message column displays Success. This step takes approximately 20 to 50 minutes.
In the unlikely event that after the upgrade, the Upgrade State of server will be ‘Backout Ready’ or 'Failed', and the Status Message will display:
“Server could not restart the application to complete the upgrade.”
Perform Appendix S Manual Completion of Server Upgrade to restore the server to full operational status, then return to this step to continue the upgrade.
If the upgrade fails – do not proceed. It is recommended to consult with My Oracle Support (MOS) on the best course of action. Refer to Appendix O for failed server recovery procedures.

DSR 8.2 Software Upgrade GuideDSR 8.2 Software Upgrade Guide
Page | 215 E88968-01
Procedure 54. Upgrade Single Server – Upgrade Administration – DSR 8.x
6.
Server CLI: (Optional) View in-progress status from command line of server
An optional method to view Upgrade progress from the command line:
To view the detailed progress of the upgrade , access the server command line (using SSH or Console), and enter:
$ tail -f /var/TKLC/log/upgrade/upgrade.log
This command displays the upgrade log entries as the events occur. Once the upgrade is complete, the server reboots. It takes a couple of minutes for the DSR application processes to start up.
For example, this command displays the current rev on the server:
[admusr@NO2 ~]$ appRev
Install Time: Thu Dec 15 00:05:46 2016
Product Name: DSR
Product Release: 8.1.0.0.0_80.17.0
Base Distro Product: TPD
Base Distro Release: 7.3.0.0.0_88.30.0
Base Distro ISO: TPD.install-7.3.0.0.0_88.30.0-
OracleLinux6.8-x86_64.iso
ISO name: DSR-8.1.0.0.0_80.17.0-x86_64.iso
OS: OracleLinux 6.8
If the upgrade fails – do not proceed. It is recommended to consult with My Oracle Support (MOS) on the best course of action. Refer to Appendix O for failed server recovery procedures.
7.
Server CLI: If the upgrade fails
If the upgrade of a server fails, access the server command line (using ssh or a console), and collect the following files:
/var/TKLC/log/upgrade/upgrade.log
/var/TKLC/log/upgrade/ugwrap.log
/var/TKLC/log/upgrade/earlyChecks.log
/var/TKLC/log/platcfg/upgrade.log
It is recommended to contact My Oracle Support (MOS) by referring to Appendix CC of this document and provide these files. Refer to Appendix O for failed server recovery procedures.

DSR 8.2 Software Upgrade GuideDSR 8.2 Software Upgrade Guide
Page | 216 E88968-01
Procedure 54. Upgrade Single Server – Upgrade Administration – DSR 8.x
8.
Active NOAM VIP: Verify post upgrade status
1. Navigate to Administration > Software Management > Upgrade.
2. Select the tab of the NOAM or site being upgraded.
3. Verify the Application Version value for this server has been updated to the target software release version.
4. Verify the Upgrade State of the upgraded server is Accept or Reject.
9.
Active NOAM/SOAM VIP: Verify the server was successfully upgraded
View the post-upgrade status of the server:
1. Navigate to Alarm & Events > View Active.
The active NOAM or SOAM server may have some or all the following expected alarms:
Alarm ID = 10008 (Provisioning Manually Disabled)
Alarm ID = 10010 (Stateful database not yet synchronized with mate database)
Alarm ID = 10075 (The server is no longer providing services because application processes have been manually stopped)
Alarm ID = 31000 (Program impaired by S/W Fault)
Alarm ID = 31201 (Process Not Running) for eclipseHelp process
Alarm ID = 31282 (The HA manager (cmha) is impaired by a s/w fault)
Alarm ID = 31114 (DB Replication over SOAP has failed)
The active NOAM or SOAM has these expected alarms until both NOAMs/SOAMs are upgraded:
Alarm ID = 31233 – HA Secondary Path Down
Alarm ID = 32532 (Server Upgrade Pending Accept/Reject)
Alarm ID = 31149 (DB Late Write Nonactive)
Note: Do not accept upgrade at this time. This alarm is OK.

DSR 8.2 Software Upgrade GuideDSR 8.2 Software Upgrade Guide
Page | 217 E88968-01
Appendix G. Upgrade Single Server – Pre-DSR 8.x
This appendix provides the procedure for upgrading a single DSR server when the active NOAM is on DSR 7.x.y. This procedure is used to upgrade the standby NOAM only. The remaining servers are upgraded using Procedure 54.
Procedure 55. Upgrade Single Server – Upgrade Administration – pre DSR 8.x
S T E P #
This procedure executes the Upgrade Single Server – Upgrade Administration steps.
Check off () each step as it is completed. Boxes have been provided for this purpose under each step number.
If this procedure fails, it is recommended to contact My Oracle Support (MOS) and ask for assistance.
1.
Active NOAM VIP: View the pre-upgrade status of servers
1. Log into the NOAM GUI using the VIP.
2. Navigate to Administration > Software Management > Upgrade.
The active NOAM server may have some or all of the following expected alarms:
Alarm ID = 10008 (Provisioning Manually Disabled)
Alarm ID = 32532 (Server Upgrade Pending Accept/Reject)
Alarm ID = 31149 (DB Late Write Nonactive)

DSR 8.2 Software Upgrade GuideDSR 8.2 Software Upgrade Guide
Page | 218 E88968-01
Procedure 55. Upgrade Single Server – Upgrade Administration – pre DSR 8.x
2.
Active NOAM VIP: Verify status of server to be upgraded
1. Identify the server (NOAM, SOAM, MP, etc.) __________________________ (record name)
2. Verify the Application Version value is the expected source software release version.
3. Navigate to Administration > Software Management > Upgrade and select the Server Group of the server to upgrade.
4. If the server is in the Backup Needed state, select the server and click Backup.
5. On the Upgrade Backup screen, click OK.
The Upgrade State changes to Backup in Progress.
6. Verify the OAM Max HA Role is the expected condition (either standby or active). This depends on the server being upgraded.
7. When the backup is complete, verify the server state changes to Ready.
3.
Active NOAM VIP: Initiate the server upgrade (part 1)
1. From the Upgrade Administration screen, select the server to upgrade.
2. Click Upgrade Server.
The Initiate Upgrade form displays on the Administration > Software Management > Upgrade Initiate screen.

DSR 8.2 Software Upgrade GuideDSR 8.2 Software Upgrade Guide
Page | 219 E88968-01
Procedure 55. Upgrade Single Server – Upgrade Administration – pre DSR 8.x
4.
Active NOAM VIP: Initiate the server upgrade (part 2) – Select ISO form
1. From the Upgrade Settings – Upgrade ISO options, select the ISO to use in the server upgrade,
Note: When the active NOAM is the server being upgraded, click OK to initiate an HA switchover and cause the GUI session to log out.
Note: If the selected server is the active server in an active/standby pair, the OAM Max HA Role column displays Active with a red background. This is NOT an alarm condition. This indicator is to make the user aware that the action causes an HA switchover.
2. Click OK.
The upgrade begins and control returns to the Upgrade Administration screen.
*** Critical *** Do NOT omit this step
3. If the server being upgraded is the active NOAM and clicking OK initiated a role change, log out of the GUI, clear the browser cache, and log back into the active NOAM using the VIP before continuing. Some GUI forms may exhibit incorrect behaviors if the browser cache is not cleared.

DSR 8.2 Software Upgrade GuideDSR 8.2 Software Upgrade Guide
Page | 220 E88968-01
Procedure 55. Upgrade Single Server – Upgrade Administration – pre DSR 8.x
5.
Active NOAM VIP: View the upgrade administration form to monitor upgrade progress
If the upgrade processing encounters a problem, it may attempt to ROLL BACK to the original software release. In this case, the Upgrade displays as FAILED.
The execution time may be shorter or longer, depending on the point in the upgrade where there was a problem.
1. Observe the upgrade state of the server of interest. Upgrade status displays under the Status Message column.
Servers may have a combination of the following expected alarms.
Note: Not all servers have all alarms:
Alarm ID = 10008 (Provisioning Manually Disabled)
Alarm ID = 10075 (The server is no longer providing services because application processes have been manually stopped)
Alarm ID = 10073 (Server Group Max Allowed HA Role Warning)
Alarm ID = 32515 (Server HA Failover Inhibited)
Alarm ID = 31228 (HA Highly available server failed to receive mate heartbeats) or (Lost Communication with Mate Server)
Alarm ID = 31283 (Highly available server failed to receive mate heartbeats)
Alarm ID = 31106 (DB Merge To Parent Failure)
Alarm ID = 31107 (DB Merge From Child Failure)
Alarm ID = 31233 (HA Secondary Path Down)
Alarm ID = 31101 (DB Replication To Slave Failure)
Alarm ID = 31104 (DB Replication over SOAP has failed
Alarm ID = 31225 (HA Service Start Failure)
Alarm ID = 31149 (DB Late Write Nonactive)
Alarm ID = 31114 (DB Replication over SOAP has failed)
2. Wait for the upgrade to complete. The Status Message column displays Success. This step takes approximately 20 to 50 minutes.
In the unlikely event that after the upgrade, if the Upgrade State of server is Backout Ready and the Status Message displays Server could not restart the application to complete the upgrade, then perform Appendix S Manual Completion of Server Upgrade to restore the server to full operational status and then return to this step to continue the upgrade.
If the upgrade fails – do not proceed. It is recommended to consult with My Oracle Support (MOS) on the best course of action. Refer to Appendix O for failed server recovery procedures.

DSR 8.2 Software Upgrade GuideDSR 8.2 Software Upgrade Guide
Page | 221 E88968-01
Procedure 55. Upgrade Single Server – Upgrade Administration – pre DSR 8.x
6.
Active NOAM VIP: View the upgrade administration form to monitor upgrade progress
For active NOAM on DSR 8.2 only
This step is for monitoring upgrade status of the formerly active NOAM after a role change. The NOAM that was active when the upgrade was initiated is now the standby NOAM. Monitoring from this point on is from the new active NOAM on DSR 8.2.
See step 7. for an optional method of monitoring upgrade progress.
See step 8. for instructions if the upgrade fails.
Note: If the upgrade processing encounters a problem, it may attempt to ROLL BACK to the original software release. In this case, the Upgrade displays as FAILED.
The execution time may be shorter or longer, depending on the point in the upgrade where there was a problem.
1. Observe the upgrade status of the standby NOAM on the Upgrade Administration screen by selecting the NOAM server group tab.
2. Wait for the upgrade to complete. The Status Message column displays Success. This step takes approximately 20 to 50 minutes.
If the upgrade fails – do not proceed. It is recommended to consult with My Oracle Support (MOS) on the best course of action. Refer to Appendix O for failed server recovery procedures.
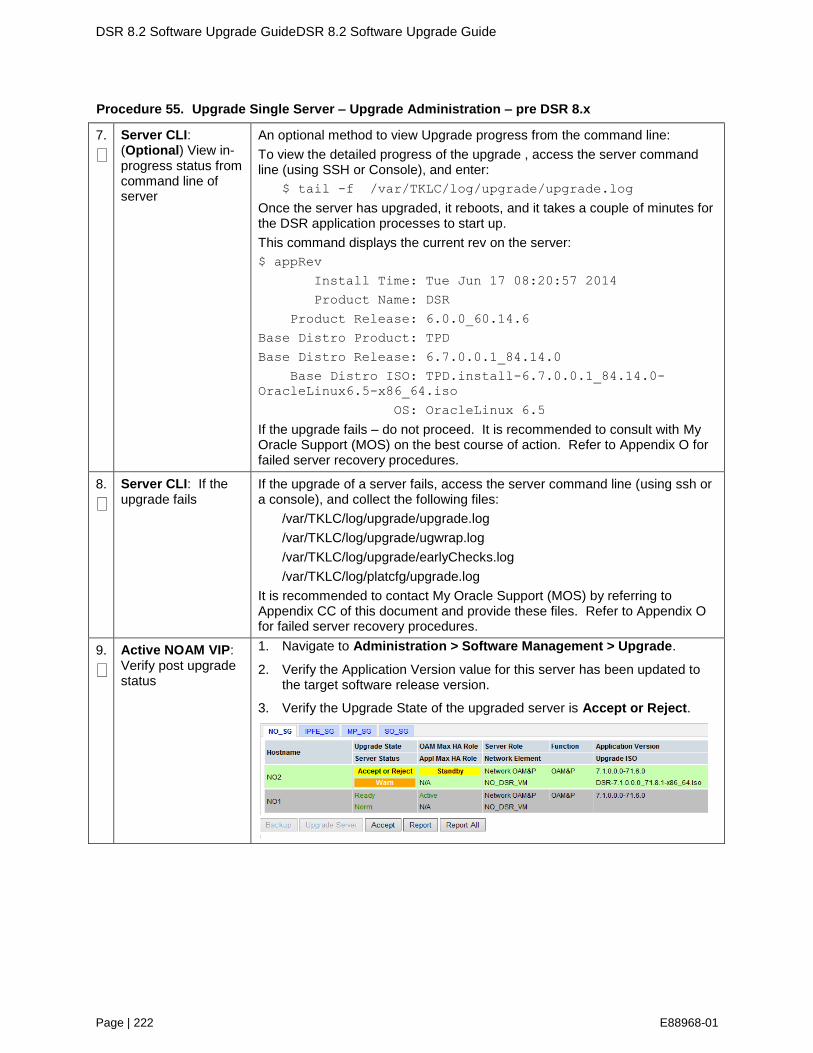
DSR 8.2 Software Upgrade GuideDSR 8.2 Software Upgrade Guide
Page | 222 E88968-01
Procedure 55. Upgrade Single Server – Upgrade Administration – pre DSR 8.x
7.
Server CLI: (Optional) View in-progress status from command line of server
An optional method to view Upgrade progress from the command line:
To view the detailed progress of the upgrade , access the server command line (using SSH or Console), and enter:
$ tail -f /var/TKLC/log/upgrade/upgrade.log
Once the server has upgraded, it reboots, and it takes a couple of minutes for the DSR application processes to start up.
This command displays the current rev on the server:
$ appRev
Install Time: Tue Jun 17 08:20:57 2014
Product Name: DSR
Product Release: 6.0.0_60.14.6
Base Distro Product: TPD
Base Distro Release: 6.7.0.0.1_84.14.0
Base Distro ISO: TPD.install-6.7.0.0.1_84.14.0-
OracleLinux6.5-x86_64.iso
OS: OracleLinux 6.5
If the upgrade fails – do not proceed. It is recommended to consult with My Oracle Support (MOS) on the best course of action. Refer to Appendix O for failed server recovery procedures.
8.
Server CLI: If the upgrade fails
If the upgrade of a server fails, access the server command line (using ssh or a console), and collect the following files:
/var/TKLC/log/upgrade/upgrade.log
/var/TKLC/log/upgrade/ugwrap.log
/var/TKLC/log/upgrade/earlyChecks.log
/var/TKLC/log/platcfg/upgrade.log
It is recommended to contact My Oracle Support (MOS) by referring to Appendix CC of this document and provide these files. Refer to Appendix O for failed server recovery procedures.
9.
Active NOAM VIP: Verify post upgrade status
1. Navigate to Administration > Software Management > Upgrade.
2. Verify the Application Version value for this server has been updated to the target software release version.
3. Verify the Upgrade State of the upgraded server is Accept or Reject.

DSR 8.2 Software Upgrade GuideDSR 8.2 Software Upgrade Guide
Page | 223 E88968-01
Procedure 55. Upgrade Single Server – Upgrade Administration – pre DSR 8.x
10.
Active NOAM/SOAM VIP: Verify the server was successfully upgraded
View the Post-Upgrade Status of the server:
Navigate to Alarm & Events > View Active.
The active NOAM or SOAM server may have some or all the following expected alarms:
Alarm ID = 10008 (Provisioning Manually Disabled)
Alarm ID = 10010 (Stateful database not yet synchronized with mate database)
Alarm ID = 10075 (The server is no longer providing services because application processes have been manually stopped)
Alarm ID = 31000 (Program impaired by S/W Fault)
Alarm ID = 31201 (Process Not Running) for eclipseHelp process
Alarm ID = 31282 (The HA manager (cmha) is impaired by a s/w fault)
Alarm ID = 32532 (Server Upgrade Pending Accept/Reject)
Alarm ID = 31149 (DB Late Write Nonactive)
Alarm ID = 31114 (DB Replication over SOAP has failed)
Note: Do not accept upgrade at this time. This alarm is OK.
The active NOAM or SOAM has the following expected alarm until both NOAMs/SOAMs are upgraded:
Alarm ID = 31233 – HA Secondary Path Down
The single server upgrade is now complete.
Return to the DSR upgrade procedure step that directed the execution of appendix.

DSR 8.2 Software Upgrade GuideDSR 8.2 Software Upgrade Guide
Page | 224 E88968-01
Appendix H. Upgrade Multiple Servers – Upgrade Administration
This Appendix provides the procedure for upgrading multiple servers in parallel.
Note: This procedure is executed multiple times during the overall upgrade depending on the number of servers in the DSR. Make multiple copies of Appendix H to mark up or keep another form of written record of the steps performed.
Procedure 56. Upgrade Multiple Servers – Upgrade Administration
S T E P #
This procedure executes the Upgrade Multiple Servers – Upgrade Administration steps.
Check off () each step as it is completed. Boxes have been provided for this purpose under each step number.
If this procedure fails, it is recommended to contact My Oracle Support (MOS) and ask for assistance.
1.
Active NOAM VIP: View pre-upgrade status of the servers
1. Log into the NOAM GUI using the VIP.
2. Navigate to Administration > Software Management > Upgrade.
The active NOAM server may have some or all of the following expected alarms:
Alarm ID = 10008 (Provisioning Manually Disabled)
Alarm ID = 32532 (Server Upgrade Pending Accept/Reject)
Alarm ID = 31149 (DB Late Write Nonactive)

DSR 8.2 Software Upgrade GuideDSR 8.2 Software Upgrade Guide
Page | 225 E88968-01
Procedure 56. Upgrade Multiple Servers – Upgrade Administration
2.
Active NOAM VIP: Verify status of servers to be upgraded
1. Identify the MP servers to be upgraded in parallel _________________________ (record names)
2. Verify the Application Version value is the expected source software release version for each MP server to be upgraded.
3. Navigate to Administration > Software Management > Upgrade and select the Server Group of the server to upgrade.
4. If the server is in Backup Needed state, select the servers and click Backup.
The Upgrade State changes to Backup in Progress. When the backup is complete, the Upgrade State changes to Ready.
5. Verify the OAM Max HA Role is in the expected condition (either standby or active). This depends on the server being upgraded.

DSR 8.2 Software Upgrade GuideDSR 8.2 Software Upgrade Guide
Page | 226 E88968-01
Procedure 56. Upgrade Multiple Servers – Upgrade Administration
3.
Active NOAM VIP: Verify upgrade status is Ready
The Upgrade Administration form refreshes and the server to upgrade displays Upgrade Status = Ready. This may take a minute.
Depending on the server being upgraded, new alarms may occur.
Servers may have a combination of the following expected alarms.
Note: Not all servers have all alarms:
Alarm ID = 10008 (Provisioning Manually Disabled)
Alarm ID = 10073 (Server Group Max Allowed HA Role Warning)
Alarm ID = 10075 (The server is no longer providing services because application processes have been manually stopped)
Alarm ID = 32515 (Server HA Failover Inhibited)
Alarm ID = 31101 (DB Replication to slave DB has failed)
Alarm ID = 31106 (DB Merge to Parent Failure)
Alarm ID = 31107 (DB Merge From Child Failure)
Alarm ID = 31228 (HA Highly available server failed to receive mate heartbeats) or (Lost Communication with Mate Server)
Alarm ID = 31149 (DB Late Write Nonactive)
Alarm ID = 31114 (DB Replication over SOAP has failed)
4.
Determine upgrade method – manual or automatic
To upgrade multiple servers in parallel using the manual option, execute steps 5. and 6.
To upgrade a server group using the Automated Server Group Upgrade option, proceed to step 7.

DSR 8.2 Software Upgrade GuideDSR 8.2 Software Upgrade Guide
Page | 227 E88968-01
Procedure 56. Upgrade Multiple Servers – Upgrade Administration
5.
Active NOAM VIP: Initiate upgrade (part 1)
1. From the Upgrade Administration screen, select the servers to upgrade.
2. Click Upgrade Server.
The Initiate Upgrade form displays on the Administration > Software Management > Upgrade Initiate screen.
6.
Active NOAM VIP: Initiate upgrade (part 2) – Select ISO form
1. From the Upgrade Settings – Upgrade ISO options, select the ISO to use in the server upgrade.
2. Click OK.
The upgrade begins and control returns to the Upgrade Administration screen.
3. Proceed to step 8. to complete this procedure.

DSR 8.2 Software Upgrade GuideDSR 8.2 Software Upgrade Guide
Page | 228 E88968-01
Procedure 56. Upgrade Multiple Servers – Upgrade Administration
7.
Active NOAM VIP: Initiate (part 1) – Automated Server Group Upgrade option
1. To utilize the Automated Server Group upgrade option, verify no servers in the server group are selected.
2. Click Auto Upgrade.

DSR 8.2 Software Upgrade GuideDSR 8.2 Software Upgrade Guide
Page | 229 E88968-01
Procedure 56. Upgrade Multiple Servers – Upgrade Administration
8.
Active NOAM VIP: Initiate (part 2) – Automated Server Group Upgrade
Note: The settings to be used in this step are specified in the calling procedure.
1. The Upgrade Settings section of the Initiate screen controls the behavior of the automated upgrade. Select the settings that apply to the server type being upgraded.
Bulk: Select this option for active/standby and multi-active server groups. For servers in an active/standby configuration, the standby server is upgraded first, followed by the active. Servers in a multi-active configuration are upgraded in parallel to the extent allowed by the Availability setting.
Serial: Select this option to upgrade multiple servers one at a time.
Grouped Bulk: Select this option for SBR server groups. Grouped bulk always upgrades the spare(s), followed by the standby, followed by the active.
Availability: This setting determines how many servers remain in service while servers in the server group are upgraded. For example, a setting of 50% ensures at least half of the servers in the server group remain in service.
Note: The Serial upgrade mode is available as an alternative to Bulk and Grouped Bulk for a more conservative upgrade scenario. Serial mode upgrades each server in the server group one at a time, and can be used on any server group type.
2. Select the appropriate ISO from the Upgrade ISO options.
3. Click OK to start the upgrade.

DSR 8.2 Software Upgrade GuideDSR 8.2 Software Upgrade Guide
Page | 230 E88968-01
Procedure 56. Upgrade Multiple Servers – Upgrade Administration
9.
Active NOAM VIP: View the upgrade administration form to monitor upgrade progress
See step 10. for an optional method of monitoring upgrade progress.
See step 11. for instructions if the Upgrade fails, or if execution time exceeds 60 minutes.
Note: If the upgrade processing encounters a problem, it may attempt to ROLL BACK to the original software release. In this case, the Upgrade displays as FAILED.
The execution time may be shorter or longer, depending on the point in the upgrade where there was a problem.
1. Observe the upgrade status of the servers of interest. Upgrade status displays under the Status Message column.
During the upgrade, the servers may have a combination of the following expected alarms.
Note: Not all servers have all alarms:
Alarm ID = 10008 (Provisioning Manually Disabled)
Alarm ID = 10073 (Server Group Max Allowed HA Role Warning)
Alarm ID = 10075 (The server is no longer providing services because application processes have been manually stopped)
Alarm ID = 31101 (DB Replication To Slave Failure)
Alarm ID = 31106 (DB Merge To Parent Failure)
Alarm ID = 31107 (DB Merge From Child Failure)
Alarm ID = 31228 (HA Highly available server failed to receive mate heartbeats) or (Lost Communication with Mate Server)
Alarm ID = 31233 (HA Secondary Path Down)
Alarm ID = 31283 (Highly available server failed to receive mate heartbeats)
Alarm ID = 32515 (Server HA Failover Inhibited)
Alarm ID = 31149 (DB Late Write Nonactive)
Alarm ID = 31114 (DB Replication over SOAP has failed)
2. Wait for the upgrade to complete. The Status Message column displays Success. This step takes approximately 20 to 50 minutes.
When an upgraded SOAM becomes active on release 8.x, Alarm 25607 displays to alert the operator to enable the new Signaling Firewall feature. This alarm is active until the firewall is enabled in Procedure 35.
Alarm ID = 25607 (DSR Signaling Firewall is administratively

DSR 8.2 Software Upgrade GuideDSR 8.2 Software Upgrade Guide
Page | 231 E88968-01
Procedure 56. Upgrade Multiple Servers – Upgrade Administration
Disabled)
If the upgrade fails – do not proceed. It is recommended to consult with My Oracle Support (MOS) on the best course of action. Refer to Appendix O for failed server recovery procedures.
10.
Server CLI: (Optional) View in-progress status from command line
Optional method to view upgrade progress from a command line:
To view the detailed progress of the upgrade –
Access the server command line (using ssh or Console), and:
$ tail -f /var/TKLC/log/upgrade/upgrade.log
Once a server is upgraded, it reboots, and it takes a couple of minutes for the DSR application processes to start up.
This command displays the current rev on the upgraded servers:
[admusr@NO1 ~]$ appRev
Install Time: Wed Feb 25 02:52:47 2015
Product Name: DSR
Product Release: 7.1.0.0.0_71.10.0
Base Distro Product: TPD
Base Distro Release: 7.0.0.0.0_86.14.0
Base Distro ISO: TPD.install-7.0.0.0.0_86.14.0-
OracleLinux6.5-x86_64.iso
ISO name: DSR-7.1.0.0.0_71.10.0-x86_64.iso
OS: OracleLinux 6.5
If the upgrade fails – do not proceed. It is recommended to consult with My Oracle Support (MOS) on the best course of action. Refer to Appendix O for failed server recovery procedures.
11.
Server CLI: If upgrade fails
If a server upgrade fails, access the server command line (using ssh or Console), and collect the following files:
/var/TKLC/log/upgrade/upgrade.log
/var/TKLC/log/upgrade/ugwrap.log
/var/TKLC/log/upgrade/earlyChecks.log
/var/TKLC/log/platcfg/upgrade.log
It is recommended to contact My Oracle Support (MOS) by referring to Appendix CC of this document and provide these files. Refer to Appendix O for failed server recovery procedures.
12.
Active NOAM VIP: Verify post upgrade status
1. Navigate to Administration > Software Management > Upgrade.
2. Verify the Application Version value for the servers has been updated to the target software release version.
3. Verify the Status Message indicates success.
4. Verify the Upgrade State of the upgraded servers is Accept or Reject.

DSR 8.2 Software Upgrade GuideDSR 8.2 Software Upgrade Guide
Page | 232 E88968-01
Procedure 56. Upgrade Multiple Servers – Upgrade Administration
13.
Verify the servers were successfully upgraded
View Post-Upgrade Status of the server:
The active SOAM server may have some or all the following expected alarm(s):
Alarm ID = 10008 (Provisioning Manually Disabled)
Alarm ID = 10010 (Stateful database not yet synchronized with mate database)
Alarm ID = 10075 (The server is no longer providing services because application processes have been manually stopped)
Alarm ID = 31000 (Program impaired by S/W Fault)
Alarm ID = 32532 (Server Upgrade Pending Accept/Reject)
Note: Do Not Accept upgrade at this time. This alarm is OK.
The multiple servers upgrade is now complete.
Appendix I. Upgrade Firmware
This section is not applicable to Software Centric installations/upgrades.
Firmware upgrade procedures are not included in this document. It is recommended to contact My Oracle Support (MOS) by referring to Appendix CC of this document for the latest information on firmware upgrades.
Appendix J. TVOE Platform
This Appendix provides procedures for gracefully shutting down TVOE guests and for upgrading TVOE on a host server that supports one or more DSR virtual guests.
If upgrading a DSR server that is deployed as a virtual guest of the TVOE host software, then TVOE itself may have to be upgraded first. Refer to Appendix D to determine if a TVOE upgrade is required.
If the server being upgraded is not virtualized, then this Appendix does not apply.
J.1. TVOE Upgrade
This procedure is used to upgrade the TVOE host of DSR VM guests. The guests of the host must be shutdown before executing this procedure.
CAUTION
Upgrading the TVOE host creates a snapshot of the Logical Volumes (LV) present on the disk. This snapshot is required in case of backout to the previous release.
Upgrading the TVOE shuts down all guests operating in the TVOE environment. Advance planning is required to ensure traffic processing is not adversely affected.
Be aware that snapshot corruption can occur if large-scale changes (such as the deletion or addition of an ISO image) are made on the TVOE host before the Upgrade Accept.

DSR 8.2 Software Upgrade GuideDSR 8.2 Software Upgrade Guide
Page | 233 E88968-01
Procedure 57. Upgrade TVOE Platform
S T E P #
This procedure upgrades TVOE.
Check off () each step as it is completed. Boxes have been provided for this purpose under each step number.
If this procedure fails, it is recommended to contact My Oracle Support (MOS) and ask for assistance.
1.
Upgrade TVOE Upgrade TVOE using the PMAC Aided TVOE Upgrade Procedure from Reference [4].
If the PMAC Aided TVOE Upgrade Procedure is not possible, it is also possible to upgrade TVOE using the alternate procedure provided in Reference [4].
Note: When Reference [4] directs the shut down of the guest VMs, return to this document, execute Appendix J.2, and return to Reference [4].
Note: If the active NOAM is hosted on the TVOE server which is being upgraded, VIP may be lost until TVOE is successfully upgraded.

DSR 8.2 Software Upgrade GuideDSR 8.2 Software Upgrade Guide
Page | 234 E88968-01
Procedure 57. Upgrade TVOE Platform
2.
TVOE Host CLI: Set the tuned profile
For VEDSR only
This step is applicable to the VEDSR configuration only. For all other configurations, continue to step 3.
If the TVOE being upgraded hosts a VEDSR component, set the tuned profile on the upgraded TVOE host.
1. Use the SSH command (on UNIX systems – or putty if running on windows) to log into the TVOE host
ssh admusr@<TVOE host>
password: <enter password>
Answer yes if you are asked to confirm the identity of the server.
2. Check the currently active tuned profile with the tuned-adm command. If
the active profile is tvoe_profile, proceed to the next step. Otherwise, continue with this step to set the tuned profile.
$ sudo tuned-adm active
Current active profile: tvoe_profile
Service tuned: enabled, running
Service ktune: enabled, running
3. Enter this command to set the tuned profile:
$ sudo tuned-adm profile tvoe_profile
Sample output:
Calling '/etc/ktune.d/tunedadm.sh stop': [ OK ]
Reverting to cfq elevator: dm-0 dm-1 dm-10 dm-11 dm-12
dm-1[ OK ]dm-15 dm-16 dm-17 dm-18 dm-19 dm-2 dm-20 dm-
21 dm-22 dm-23 dm-24 dm-25 dm-26 dm-27 dm-28 dm-29 dm-3
dm-30 dm-4 dm-5 dm-6 dm-7 dm-8 dm-9 sda sdb
Stopping tuned: [ OK ]
Switching to profile 'tvoe_profile'
Applying deadline elevator: dm-0 dm-1 dm-10 dm-11 dm-12
dm-[ OK ] dm-15 dm-16 dm-17 dm-18 dm-19 dm-2 dm-20 dm-
21 dm-22 dm-23 dm-24 dm-25 dm-26 dm-27 dm-28 dm-29 dm-3
dm-30 dm-4 dm-5 dm-6 dm-7 dm-8 dm-9 sda sdb
Applying ktune sysctl settings:
/etc/ktune.d/tunedadm.conf: [ OK ]
Calling '/etc/ktune.d/tunedadm.sh start': [ OK ]
Applying sysctl settings from /etc/sysctl.conf
Starting tuned: [ OK ]
4. Verify the tvoe_profile is active.
$ sudo tuned-adm active
Current active profile: tvoe_profile
Service tuned: enabled, running
Service ktune: enabled, running
3.
After completed After the TVOE upgrade is completed on the host server, the application(s) may not start automatically.
Proceed with the next step to restore service.

DSR 8.2 Software Upgrade GuideDSR 8.2 Software Upgrade Guide
Page | 235 E88968-01
Procedure 57. Upgrade TVOE Platform
4.
PMAC GUI: Restart guest VMs following the TVOE upgrade
1. Log into the PMAC GUI by navigating to http ://<pmac_management_ip>.
2. Navigate to Main Menu > VM Management.
3. Display the TVOE guest VMs by expanding the TVOE host that is to be upgraded.
4. Select a guest VM of the TVOE to be upgraded.
5. If the Enable Virtual Watchdog checkbox is not marked:
1. Click Edit.
2. Mark the Enable Virtual Watchdog checkbox.
3. Click Save.
6. Change the power state of the guest VM from Shutdown to On and click Change.
Confirm the pop-up and wait for the power state to change to Running. This may take a few moments as guest VM reboots.
5.
Active DSR NOAM VIP: Enable DSR applications running on upgraded TVOE
1. Log into the DSR NOAM GUI using the VIP.
2. Navigate to Status & Manage > Server.
3. Select all the applications running on upgraded TVOE, excluding the server which is in upgrade Ready state. Verify the Upgrade State from the Administration > Upgrade screen.
4. Click Restart.
5. Confirm the operation by clicking OK.
6. Verify the Appl State for all the selected servers is changed to Enabled.

DSR 8.2 Software Upgrade GuideDSR 8.2 Software Upgrade Guide
Page | 236 E88968-01
Procedure 57. Upgrade TVOE Platform
6.
Active SDS NOAM VIP: Enable SDS applications running on upgraded TVOE
1. Log into the SDS NOAM GUI using the VIP
2. Navigate to Status & Manage > Server.
3. Select all the applications running on upgraded TVOE, excluding the server which is in upgrade Ready state. Verify the Upgrade State from the Administration > Upgrade screen.
4. Click Restart.
5. Confirm the operation by clicking OK.
Verify the Appl State for all the selected servers is changed to Enabled.
J.2. TVOE Guest Shutdown
This procedure gracefully shuts down the guest VMs of a TVOE host. This procedure is required to be performed before upgrading the host TVOE.
Procedure 58. Shutdown TVOE Guests
S T E P #
This procedure upgrades TVOE.
Check off () each step as it is completed. Boxes have been provided for this purpose under each step number.
If this procedure fails, it is recommended to contact My Oracle Support (MOS) and ask for assistance.
1.
PMAC GUI: Display TVOE guest VMs of the TVOE to upgrade
1. Log into the PMAC GUI by navigating to http://<pmac_management_ip>.
2. Navigate to Main Menu > VM Management.
3. Display the TVOE guest VMs by expanding the TVOE host to be upgraded.

DSR 8.2 Software Upgrade GuideDSR 8.2 Software Upgrade Guide
Page | 237 E88968-01
Procedure 58. Shutdown TVOE Guests
2.
Active DSR NOAM VIP: Disable DSR applications
If any DSR applications are guest VMs of the TVOE to be upgraded (as shown in step 1), disable all applications running on the current TVOE.
1. Log into the DSR NOAM GUI using the VIP.
2. Navigate to Status & Manage > Server.
3. Select the virtual servers that are running on the TVOE environment to be upgraded, as identified in step 1.
4. Click Stop.
5. Confirm the operation by clicking OK on the screen.
6. Verify the Appl State for all the selected servers is changed to Disabled.
3.
Active SDS NOAM VIP: Disable SDS applications
For VEDSR only
This step is applicable to the VEDSR configuration only.
If any SDS applications are guest VMs of the TVOE to be upgraded (as shown in step 1, coordinate with the SDS team to shut down the SDS applications.
1. Log into the SDS NOAM GUI using the VIP.
2. Navigate to Status & Manage > Server.
3. Select the virtual servers that are running on the TVOE environment to be upgraded, as identified in step 1.
4. Click Stop.
5. Confirm the operation by clicking OK on the screen.
6. Verify the Appl State for all the selected servers is changed to Disabled.

DSR 8.2 Software Upgrade GuideDSR 8.2 Software Upgrade Guide
Page | 238 E88968-01
Procedure 58. Shutdown TVOE Guests
4.
PMAC GUI: Shut down TVOE guest VMs
1. On the PMAC Virtual Machine Management screen, select a guest VM of the TVOE to be upgraded.
2. Change the power state of the guest VM from Running to Shutdown and click Change. Confirm the pop-up and wait for the power state to change to Shutdown. This may take a few moments as this executes a graceful shutdown of the guest VM.
3. Verify the Current Power State changes to Shut Down.
4. Repeat sub-steps 1 thru 3 for each guest VM shown in step 1.

DSR 8.2 Software Upgrade GuideDSR 8.2 Software Upgrade Guide
Page | 239 E88968-01
Appendix K. IDIH Upgrade at a Site
In IDIH release 7.1 and later, the mediation and application instance data is stored in the Oracle Database. This allows the Application and Mediation servers to be upgraded by performing a fresh installation. Upon completion of the upgrade, the mediation and application guests automatically restore the configuration data from the Oracle database.
Note: Verify the TVOE and PMAC version to make sure the TVOE/PMAC are upgraded before upgrading IDIH guests.
CAUTION If PMAC is version 6.5.x or higher, then TVOE must be upgraded to 3.5.0.0.0_88.45 or higher; otherwise, IDIH guest creation fails.
Table 25 shows the elapsed time estimates for IDIH upgrade.
Table 25. IDIH Upgrade Execution Overview
Procedure
Elapsed Time (hr:min)
Procedure Title Impact This Step Cum
Procedure 59 1:15-1:45 1:15-1:45 Upgrade Oracle Guest None
Procedure 60 0:30-0:45 1:45-2:30 Non-VEDSR Mediation and Application Guest None
Procedure 61 0:30-0:45 1:45-2:30 VEDSR Mediation and Application Guest Upgrade None

DSR 8.2 Software Upgrade GuideDSR 8.2 Software Upgrade Guide
Page | 240 E88968-01
K.1. Upgrade Oracle Guest
The Oracle Guest is upgraded first.
Note: When attempting to repeat an upgrade following a back out, it is not necessary to upgrade the Oracle Guest if the source release is 7.1 or later.
Procedure 59. Upgrade Oracle Guest
S T E P #
This procedure performs the IDIH Oracle Guest upgrade.
Check off () each step as it is completed. Boxes have been provided for this purpose under each step number.
If this procedure fails, it is recommended to contact My Oracle Support (MOS) and ask for assistance.
1.
IDIH CLI: Perform a system health check on the Oracle guest
1. Log into the Oracle guest as the admusr user.
ssh <IDIH IP address>
login as: admusr
password: <enter password>
2. Execute the analyze_server.sh script.
$ sudo /usr/TKLC/xIH/plat/bin/analyze_server.sh -i
Sample output:
[admusr@cat-ora ~]$
/usr/TKLC/xIH/plat/bin/analyze_server.sh -i
13:24:52: STARTING HEALTHCHECK PROCEDURE
13:24:52: date: 03-17-15, hostname: cat-ora
13:24:52: TPD VERSION: 7.0.0.0.0-86.14.0
13:24:52: -------------------------------------------
13:24:52: Checking disk free space
13:24:52: No disk space issues found
:
13:25:02: All tests passed!
13:25:02: ENDING HEALTHCHECK PROCEDURE WITH CODE 0
If the output indicates the following error, ignore the error and continue the upgrade. This error indicates the target release and the running release are the same.
00:47:29: Checking runlevel
00:47:29: >>> Error: Runlevel value "3 4" is
different from "N 4"
If the output indicates any other failure, do not proceed with the upgrade. It is recommended to contact My Oracle Support (MOS) for guidance.

DSR 8.2 Software Upgrade GuideDSR 8.2 Software Upgrade Guide
Page | 241 E88968-01
Procedure 59. Upgrade Oracle Guest
2.
IDIH CLI: Shut down Mediation and Application guests
1. Shut down the Mediation guest by logging in as admusr and running.
$ sudo init 0
2. Shut down the Application guest by logging in as admusr and running.
$ sudo init 0
The active SOAM server may have some or all of the following expected alarms:
Alarm ID = 19800 Communication Agent Connection Down
Alarm ID = 11511 Unable to connect using Comagent to remote DIH server with hostname
Alarm ID = 31149 (DB Late Write Nonactive)
The active NOAM server may have some or all of the following expected alarms:
Alarm ID = 19800 Communication Agent Connection Down
Alarm ID = 31149 (DB Late Write Nonactive)
3.
PMAC GUI: Start the upgrade of the Oracle guest using the PMAC GUI
1. Navigate to the PMAC VM Management menu.
2. Select the Oracle guest and click Upgrade.
3. On the Select Image screen, select the target image from the list of available images.
4. The Oracle iso for a fresh installation and upgrade is different.
When installing IDIH, use the following:
apps iso
mediation iso
oracleGuest iso
When upgrading IDIH, use the following:
apps iso
mediation iso
oracle iso
5. Click Start Software Upgrade to initiate the upgrade.
4.
PMAC GUI: Using the PMAC GUI, monitor the upgrade until it finishes
Navigate to the Task Monitoring menu and wait until the upgrade task finishes. When it finishes, the status is either Success or Failed.
If the upgrade fails, do not proceed with the upgrade. It is recommended to contact My Oracle Support (MOS) for guidance.
5.
IDIH CLI: Perform a system health check on the Oracle guest
Wait a few minute to allow the Oracle guest to stabilize after the reboot, and repeat step 1 to perform the post-upgrade system health check.
Note: The following warnings are expected due to the mediation and app servers being shut down.
Warning: mediation server is not reachable (or ping response exceeds 3 seconds)
Warning: app server is not reachable (or ping response exceeds 3 seconds)

DSR 8.2 Software Upgrade GuideDSR 8.2 Software Upgrade Guide
Page | 242 E88968-01
K.2. Upgrade the Mediation and Application Guests
The Mediation and Application Guest upgrade is similar to the installation procedure. The procedure varies slightly for VEDSR systems so a separate procedure is provided for that configuration.
For non-VEDSR systems, execute Procedure 60 to upgrade the Mediation and Application guests.
Procedure 61 is used to upgrade the Mediation and Application guests for VEDSR systems.
K.2.1. Non-VEDSR Mediation and Application Guest Upgrade
This procedure updates the Mediation and Application guests in a non-VEDSR system.
Procedure 60. Non-VEDSR Mediation and Application Guest Upgrade
S T E P #
This procedure performs the IDIH Mediation and Application server upgrade for a non-VEDSR system.
Check off () each step as it is completed. Boxes have been provided for this purpose under each step number.
If this procedure fails, it is recommended to contact My Oracle Support (MOS) and ask for assistance.
1.
PMAC CLI: Log into the PMAC server
Log into the PMAC server as the admusr user.
ssh <PMAC IP address>
login as: admusr
password: <enter password>
2.
PMAC CLI: Save existing fdc.cfg file
If an fdc.cfg file exists in /var/TKLC/smac/guest-dropin, rename the file to fdc.cfg-old. The contents of the file are referenced in step 4.
3.
PMAC CLI: Copy the fdc.cfg file to the guest
Copy the fdc.cfg file to the pmac guest-dropin directory using the command:
sudo cp /usr/TKLC/smac/html/TPD/mediation-*/fdc.cfg
/var/TKLC/smac/guest-dropin
4.
PMAC CLI: Configure the fdc.cfg file
Edit the fdc.cfg file for the Mediation and Application guest installation.
See Appendix P for a breakdown of the fdc.cfg file parameters. Update the software versions, hostnames, bond interfaces, network addresses, and network vlan information for the Mediation and Application guests being installed. The old fdc.cfg file saved in step 2 can be used as a reference for obtaining the hostnames, bond interfaces, network addresses, and network vlan information. Do not copy the software versions from the old fdc.cfg file.
5.
PMAC CLI: Run the FDC creation script
Run the FDC creation script using the config file created in step 4.
$ cd /var/TKLC/smac/guest-dropin
$ /usr/TKLC/smac/html/TPD/mediation- x.x.x.x.x_x.x.x -
x86_64/fdc.sh fdc.cfg
Note: Rename the fdc.cfg file as desired. Also, note that two files are generated by the fdc shell script. One is for the installation procedure and the other file is used for the upgrade procedure. The upgrade FDC is named upgrade.

DSR 8.2 Software Upgrade GuideDSR 8.2 Software Upgrade Guide
Page | 243 E88968-01
Procedure 60. Non-VEDSR Mediation and Application Guest Upgrade
6.
PMAC CLI: Reset the guest creation timeout
1. Enter the following command to reset the guest creation timeout value.
$ sudo sqlite3 /usr/TKLC/plat/etc/TKLCfd-
config/db/fdcRepo.fdcdb 'update params set value=3000
where name="DEFAULT_CREATE_GUEST_TIMEOUT"';
2. Increase timeout values (workaround to be applied in PMAC before starting the installation):
sudo pmacadm setParam --
paramName=defaultTpdProvdTimeout --paramValue=120
sudo pmacadm setParam --
paramName=guestDiskDeployTimeout --paramValue=50
7.
PMAC GUI: Log into PMAC
1. Using a web browser, navigate to:
<pmac ip address>
2. Login as pmacadmin user.
8.
PMAC GUI: Remove existing Application Server
1. Navigate to Main Menu > VM Management.
2. Select the Application guest.
3. Click Delete.

DSR 8.2 Software Upgrade GuideDSR 8.2 Software Upgrade Guide
Page | 244 E88968-01
Procedure 60. Non-VEDSR Mediation and Application Guest Upgrade
9.
PMAC GUI: Remove existing Mediation Server
1. Navigate to Main Menu > VM Management.
2. Select the Mediation guest.
3. Click Delete.
10.
PMAC CLI: Establish SSH session and login
Use an SSH client to connect to the PMAC:
ssh <PMAC IP address>
login as: admusr
password: <enter password>
11.
PMAC CLI: Reinstall the Mediation and Application servers
The upgrade config file must be used in the following command, or the database is destroyed and all database data is lost.
Execute the following command, using the upgrade file:
sudo fdconfig config --file=hostname-upgrade_xx-xx-
xx.xml
Starting with release 8.0, the installation is archive-based installation. The basic installation procedure is the same. All the changes happened to the fdc xml script file, so make sure you generate the fdc xml script file using the fdc.sh and fdc.cfg. See step 5.
12.
PMAC GUI: Monitor installation
From the PMAC GUI, monitor the IDIH installation on the Task Monitoring page until the installation is complete.
13.
Reconfiguration Reconfigure the system
Note: If upgrading from 7.1 and later, all application server and mediation server configuration is lost. Follow the site configuration steps to re-configure the system.

DSR 8.2 Software Upgrade GuideDSR 8.2 Software Upgrade Guide
Page | 245 E88968-01
K.2.2. VEDSR Mediation and Application Guest Upgrade
This procedure updates the Mediation and Application guests in a VEDSR system. In order to upgrade the guests, the installation fdconfig file is copied and modified before the fdconfig utility is run to recreate the guests.
Procedure 61. VEDSR Mediation and Application Guest Upgrade
S T E P #
This procedure performs the IDIH Mediation and Application server upgrade for a VEDSR system.
Check off () each step as it is completed. Boxes have been provided for this purpose under each step number.
If this procedure fails, it is recommended to contact My Oracle Support (MOS) and ask for assistance.
1.
TVOE Host CLI: Establish SSH session and login
Use an SSH client to connect to the TVOE host:
ssh <TVOE host IP address>
login as: admusr
password: <enter password>
2.
TVOE Host: Note the CPU Pinning allocations
Execute the following commands to allocate CPU sets for EACH (including the PMAC(s)) VM configured:
$ cd /var/TKLC/upgrade
Print the current CPU pinning allocations:
$ sudo ./cpuset.py –show
Note the mapping of cpuset values to Mediation and Application VMs.
For example:

DSR 8.2 Software Upgrade GuideDSR 8.2 Software Upgrade Guide
Page | 246 E88968-01
Procedure 61. VEDSR Mediation and Application Guest Upgrade
3.
PMAC GUI: Log into PMAC
1. Using a web browser, navigate to:
<pmac ip address>
2. Login as pmacadmin user.
4.
PMAC GUI: Remove existing Application Server
1. Navigate to Main Menu > VM Management.
2. Select the Application guest.
3. Click Delete.

DSR 8.2 Software Upgrade GuideDSR 8.2 Software Upgrade Guide
Page | 247 E88968-01
Procedure 61. VEDSR Mediation and Application Guest Upgrade
5.
PMAC GUI: Remove existing Mediation Server
1. Navigate to Main Menu > VM Management
2. Select the Mediation guest.
3. Click Delete.
6.
PMAC CLI: Establish SSH session and login
Use an SSH client to connect to the PMAC:
ssh <PMAC IP address>
login as: admusr
password: <enter password>
7.
PMAC CLI: Create upgrade fdconfig file
An upgrade configuration file is created by copying the installation config file, and modifying the copy to support upgrade.
1. Navigate to /var/TKLC/smac/guest-dropin.
$ cd /var/TKLC/smac/guest-dropin
2. Copy the installation config file to an upgrade config file.
$ sudo cp <hostname>_xx-xx-xx.xml
<hostname>-upgrade_xx-xx-xx.xml
where <hostname>_xx-xx-xx.xml is the config file used during installation.
Note: It is recommended to name the upgrade config file using the pattern specified.
3. If the upgrade Config file was created from the installation Config file, proceed to step 7; otherwise, if the installation config file does not exist in /var/TKLC/smac/guest-dropin, perform step 6 to create the upgrade file from a template.
8.
PMAC CLI: Create upgrade fdconfig file from a template
1. Copy the installation config template to an upgrade config file.
$ sudo cp /usr/TKLC/smac/html/TPD/mediation-
x.x.x.0.0_x.x.x-
x86_64/vedsr_idih_upgrade.xml.template
./<hostname>-upgrade_dd-mm-yy.xml
2. Update the software versions, hostnames, bond interfaces, network addresses, and network VLAN information for the TVOE host and IDIH guests to be upgraded. Refer to Appendix P for a breakdown of the config file parameters.

DSR 8.2 Software Upgrade GuideDSR 8.2 Software Upgrade Guide
Page | 248 E88968-01
Procedure 61. VEDSR Mediation and Application Guest Upgrade
9.
PMAC CLI: Reset the guest creation timeout
Enter the following command to reset the guest creation timeout value.
$ sudo sqlite3 /usr/TKLC/plat/etc/TKLCfd-
config/db/fdcRepo.fdcdb 'update params set
value=3000 where
name="DEFAULT_CREATE_GUEST_TIMEOUT"';
10.
PMAC CLI: Modify the upgrade config file
The Oracle guest stanza must be removed from the newly created upgrade config file. Failure to do so causes the Oracle guest server to be re-installed.
1. Edit the upgrade config file and locate the Oracle guest stanza. The sections to be removed are highlighted in the config file excerpt shown:
<!--REMOVE_FOR_DR_START (DO NOT remove this line! )-->
<!--Oracle Guest Configuration-->
<tvoeguest id="ORA">
<infrastructure>PMAC</infrastructure>
<tvoehost>mgmtsrvrtvoe</tvoehost>
<!--Oracle Guest Profile: Update if
hardware is Gen6 default is Gen8-->
<!--profile>ORA_GEN6</profile-->
<profile>ORA_GEN8</profile>
<postdeploy>
<scriptfile
id="oraHealthcheck">
<filename>/usr/bin/sudo</filename>
<arguments>/usr/TKLC/xIH/plat/bin/ana...
</scriptfile>
</postdeploy>
</scripts>
</tvoeguest>
<!--REMOVE_FOR_DR_END (DO NOT remove this line! )-->
2. In the <infrastructures> section of the upgrade config file, update the tpd, ora, med, and app release numbers to reflect the target release.
Config file excerpt. Update the highlighted values.
<image id="tvoe">
<name>TVOE-3.0.2.0.0_86.28.0-x86_64</name>
</image>

DSR 8.2 Software Upgrade GuideDSR 8.2 Software Upgrade Guide
Page | 249 E88968-01
Procedure 61. VEDSR Mediation and Application Guest Upgrade
11.
PMAC CLI: Reinstall the Mediation and Application servers
The upgrade config file must be used in the following command, or the database is destroyed, and all database data is lost.
Execute the following command, using the upgrade file:
sudo fdconfig config --file=hostname-upgrade_xx-xx-
xx.xml
12.
PMAC GUI: Monitor installation
From the PMAC GUI, monitor the IDIH installation on the Task Monitoring page until the installation is complete.
13.
TVOE Host: Execute the CPU Pinning script
Establish an SSH session to the TVOE Host, login as admusr.
Print the current CPU pinning allocations:
$ cd /var/TKLC/upgrade
$ sudo ./cpuset.py --show
For Example:-
If we DO NOT see None for either cpuset or numa (or both), we first clear the pinning for those VMs using following command:
[admusr@CRV-TVOE-6 upgrade ~]$ sudo ./cpuset.py --
clear=APP
Successful. Domain APP must be restarted for
changes to take affect
Have the mapping of the VMs to cpuset ready which was determined from step 2.
Execute the following to allocate CPU pinning on EACH VM according to the mapping:
$ sudo ./cpuset.py --set=<VM Name> --
cpuset=<cpuset>
Example:
[admusr@CRV-TVOE-6 upgrade ~]$ sudo ./cpuset.py --
set=APP –cpuset=20-21,56-57
Successful. Domain APP must be restarted for changes
to take affect
Note: Execute the CPU pinning script for both the application and mediation server VMs.
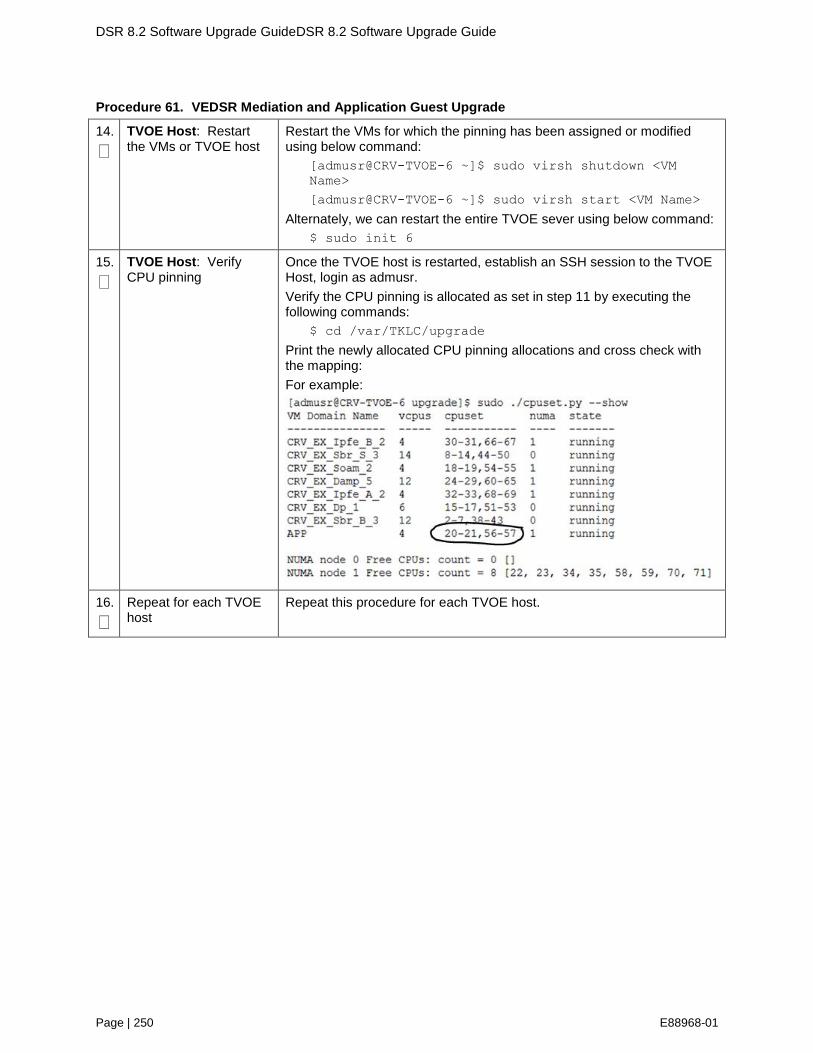
DSR 8.2 Software Upgrade GuideDSR 8.2 Software Upgrade Guide
Page | 250 E88968-01
Procedure 61. VEDSR Mediation and Application Guest Upgrade
14.
TVOE Host: Restart the VMs or TVOE host
Restart the VMs for which the pinning has been assigned or modified using below command:
[admusr@CRV-TVOE-6 ~]$ sudo virsh shutdown <VM
Name>
[admusr@CRV-TVOE-6 ~]$ sudo virsh start <VM Name>
Alternately, we can restart the entire TVOE sever using below command:
$ sudo init 6
15.
TVOE Host: Verify CPU pinning
Once the TVOE host is restarted, establish an SSH session to the TVOE Host, login as admusr.
Verify the CPU pinning is allocated as set in step 11 by executing the following commands:
$ cd /var/TKLC/upgrade
Print the newly allocated CPU pinning allocations and cross check with the mapping:
For example:
16.
Repeat for each TVOE host
Repeat this procedure for each TVOE host.

DSR 8.2 Software Upgrade GuideDSR 8.2 Software Upgrade Guide
Page | 251 E88968-01
Appendix L. Alternate Server Upgrade Procedures
The procedures in this section provide alternative ways of upgrading various server types, using an array of differing methods. All of the procedures in this section are secondary to the upgrade methods provided in Section 3.6 and Section 4.6. These procedures should be used only when directed by My Oracle Support (MOS) or by other procedures within this document.
L.1. Alternate Pre-Upgrade Backup
This procedure is an alternative to the normal pre-upgrade backup provided in Procedure 21. It is recommended that this procedure be executed only under the direction of My Oracle Support (MOS).
Procedure 62. Alternate Pre-Upgrade Backup
S T E P #
This procedure is a manual alternative backup. The procedure conducts a full backup of the Configuration database and run environment on site being upgraded, so that each server has the latest data to perform a backout, if necessary.
Check off () each step as it is completed. Boxes have been provided for this purpose under each step number.
If this procedure fails, it is recommended to contact My Oracle Support (MOS) and ask for assistance.
1.
Active SOAM CLI: Log into the active SOAM
Use the SSH command (on UNIX systems – or putty if running on Windows) to log into the active SOAM:
ssh admusr@<SOAM_VIP>
2.
Active SOAM CLI: Start a screen session
Enter the command:
$ screen
The screen tool creates a no-hang-up shell session, so the command continues to execute if the user session is lost.

DSR 8.2 Software Upgrade GuideDSR 8.2 Software Upgrade Guide
Page | 252 E88968-01
Procedure 62. Alternate Pre-Upgrade Backup
3.
Active SOAM CLI: Execute a backup of all servers managed from the SOAM to be upgraded
Execute the backupAllHosts utility on the active SOAM. This utility remotely accesses each specified server, and runs the backup command for that server.
The --site parameter allows the user to backup all servers associated with a given SOAM site to be upgraded:
WARNING: Failure to include the --site parameter with the backupAllHosts command results in overwriting the NOAM backup file created in Section 3.4.5. Backing out to the previous release is not possible if the file is overwritten.
$ /usr/TKLC/dpi/bin/backupAllHosts --site=<NEName>
where <NEName> is the Network Element Name (NEName) as seen using the following command:
$ iqt NetworkElement
This output displays when executing either of the options:
Do you want to remove the old backup files (if exists
) from all the servers (y/[n])?y
It may take from 10 to 30 minutes for this command to complete, depending upon the number of servers and the data in the database.
Do not proceed until the backup on each server is completed.
Output similar to the following indicates successful completion:
Script Completed. Status:
HOSTNAME | STATUS
--------------------------------------------
HPC3blade02 | PASS
HPC3blade01 | PASS
HPC3blade03 | PASS
HPC3blade04 | PASS
Errors also report to the command line.
Note: There is no progress indication for this command; only the final report when it completes.
4.
Active SOAM CLI: Exit the screen session
# exit
[screen is terminating]
Note: screen -ls is used to show active screen sessions on a server, and screen -dr is used to re-enter a disconnected screen session.
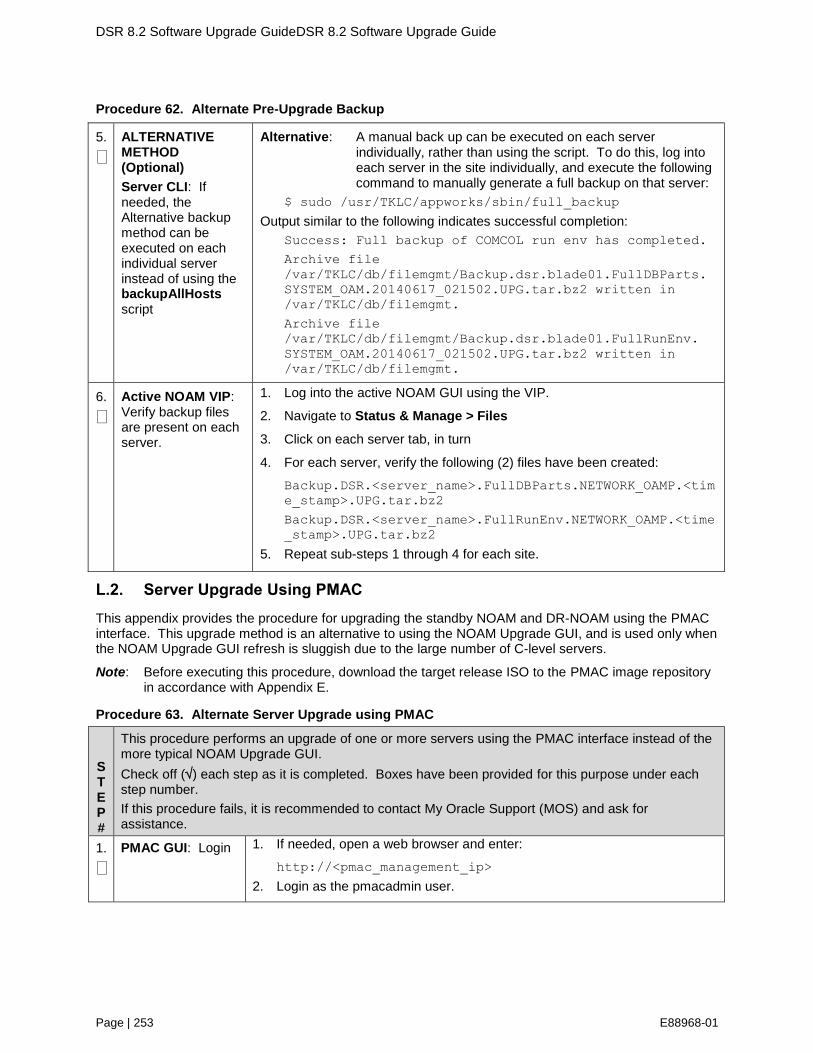
DSR 8.2 Software Upgrade GuideDSR 8.2 Software Upgrade Guide
Page | 253 E88968-01
Procedure 62. Alternate Pre-Upgrade Backup
5.
ALTERNATIVE METHOD (Optional)
Server CLI: If needed, the Alternative backup method can be executed on each individual server instead of using the backupAllHosts script
Alternative: A manual back up can be executed on each server individually, rather than using the script. To do this, log into each server in the site individually, and execute the following command to manually generate a full backup on that server:
$ sudo /usr/TKLC/appworks/sbin/full_backup
Output similar to the following indicates successful completion:
Success: Full backup of COMCOL run env has completed.
Archive file
/var/TKLC/db/filemgmt/Backup.dsr.blade01.FullDBParts.
SYSTEM_OAM.20140617_021502.UPG.tar.bz2 written in
/var/TKLC/db/filemgmt.
Archive file
/var/TKLC/db/filemgmt/Backup.dsr.blade01.FullRunEnv.
SYSTEM_OAM.20140617_021502.UPG.tar.bz2 written in
/var/TKLC/db/filemgmt.
6.
Active NOAM VIP: Verify backup files are present on each server.
1. Log into the active NOAM GUI using the VIP.
2. Navigate to Status & Manage > Files
3. Click on each server tab, in turn
4. For each server, verify the following (2) files have been created:
Backup.DSR.<server_name>.FullDBParts.NETWORK_OAMP.<tim
e_stamp>.UPG.tar.bz2
Backup.DSR.<server_name>.FullRunEnv.NETWORK_OAMP.<time
_stamp>.UPG.tar.bz2
5. Repeat sub-steps 1 through 4 for each site.
L.2. Server Upgrade Using PMAC
This appendix provides the procedure for upgrading the standby NOAM and DR-NOAM using the PMAC interface. This upgrade method is an alternative to using the NOAM Upgrade GUI, and is used only when the NOAM Upgrade GUI refresh is sluggish due to the large number of C-level servers.
Note: Before executing this procedure, download the target release ISO to the PMAC image repository in accordance with Appendix E.
Procedure 63. Alternate Server Upgrade using PMAC
S T E P #
This procedure performs an upgrade of one or more servers using the PMAC interface instead of the more typical NOAM Upgrade GUI.
Check off () each step as it is completed. Boxes have been provided for this purpose under each step number.
If this procedure fails, it is recommended to contact My Oracle Support (MOS) and ask for assistance.
1.
PMAC GUI: Login 1. If needed, open a web browser and enter:
http://<pmac_management_ip>
2. Login as the pmacadmin user.

DSR 8.2 Software Upgrade GuideDSR 8.2 Software Upgrade Guide
Page | 254 E88968-01
Procedure 63. Alternate Server Upgrade using PMAC
2.
PMAC GUI: Navigate to Software Inventory
Navigate to Software > Software Inventory.
3.
PMAC GUI: Select server to be upgraded
1. Select the server(s) to upgrade. If upgrading more than one server at a time, select multiple servers by individually clicking multiple rows. Selected rows are highlighted.
2. Click Upgrade.
Note: Until the target servers are fully discovered by PMAC, the user is unable to start an upgrade on the servers. A server that has not yet been discovered is represented by an empty row on the Software Inventory page (no IP address, hostname, plat name, plat version, etc., displays).
4.
PMAC GUI: Select the target release ISO
1. The left side of the screen displays the servers to upgrade. From the list of upgrade images on the right side of the screen, select the image to install on the selected servers.
2. Click Start Upgrade.

DSR 8.2 Software Upgrade GuideDSR 8.2 Software Upgrade Guide
Page | 255 E88968-01
Procedure 63. Alternate Server Upgrade using PMAC
5.
PMAC GUI: Start the upgrade
Click OK to proceed with the upgrade.
6.
PMAC GUI: Monitor the upgrade
Navigate to Main Menu > Task Monitoring to monitor the progress of the Upgrade background task. A separate task displays for each server being upgraded.
When the task is complete and successful, the text changes color and the Progress column indicates 100%.
The alternate server upgrade procedure is now complete.
Return to the overall DSR upgrade procedure step that directed the execution of Appendix J.2

DSR 8.2 Software Upgrade GuideDSR 8.2 Software Upgrade Guide
Page | 256 E88968-01
L.3. Server Upgrade Using platcfg
The procedure provided in this appendix enables a server to be upgraded using the Platform Configuration (platcfg) utility. This procedure should be used only under the guidance and direction of My Oracle Support (MOS).
Procedure 64. Server Upgrade Using platcfg
S
T
E
P
#
This procedure upgrades a server using the platcfg utility.
Note: All UI displays are sample representations of upgrade screens. The actual display may vary slightly for those shown.
Check off () each step as it is completed. Boxes have been provided for this purpose under each step number.
If this procedure fails, it is recommended to contact My Oracle Support (MOS) and ask for assistance.
1.
Server CLI: Log into the server console to be upgraded
Use the SSH command (on UNIX systems – or putty if running on windows) to log into the server to be upgraded:
ssh admusr@<server IP>
password: <enter password>
Answer yes if you are asked to confirm the identity of the server.
2.
Server CLI: Enter the platcfg menu
Switch to the platcfg user to start the configuration menu.
$ sudo su – platcfg
From the Main Menu, select Maintenance
3.
Server CLI: Select upgrade
From the Maintenance Menu, select Upgrade.

DSR 8.2 Software Upgrade GuideDSR 8.2 Software Upgrade Guide
Page | 257 E88968-01
Procedure 64. Server Upgrade Using platcfg
4.
Server CLI: Select early upgrade checks
From the Upgrade Menu, select Early Upgrade Checks.
5.
Server CLI: Select the upgrade media
1. From the Choose Upgrade Media Menu, select the desired target media. This begins the early upgrade checks in the console window.
Informational messages display as the checks progress. At the end of a successful test, a message similar to this displays:
Running earlyUpgradeChecks() for Upgrade::EarlyPolicy::
TPDEarlyChecks upgrade policy...
Verified server is not pending accept of previous
upgrade
Hardware architectures match
Install products match.
Verified server is alarm free!
Early Upgrade Checks Have Passed!
2. Verify early upgrade checks pass. In case of errors, it is recommended to contact My Oracle Support (MOS).
3. Press q to exit the screen session and return to the platcfg menu.
4. From the Choose Upgrade Media Menu, select Exit.
6.
Server CLI: Initiate the upgrade
From the Upgrade Menu, select Initiate Upgrade.

DSR 8.2 Software Upgrade GuideDSR 8.2 Software Upgrade Guide
Page | 258 E88968-01
Procedure 64. Server Upgrade Using platcfg
7.
Server CLI: Select the upgrade media
The screen displays a message that it is searching for upgrade media. Once the upgrade media is found, an Upgrade Media selection menu displayed similar to the example shown.
From the Choose Upgrade Media Menu, select the desired target media. This begins the server upgrade.
Many informational messages display on the terminal screen as the upgrade proceeds.
After upgrade is complete, the server reboots.
A reboot of the server is required.
The server will be rebooted in 10 seconds
8.
Server CLI: Log into the server to be upgraded
Use the SSH command (on UNIX systems – or putty if running on windows) to log into the server to be upgraded:
ssh admusr@<server IP>
password: <enter password>
Answer yes if you are asked to confirm the identity of the server.
9.
Server CLI: Check for upgrade errors
1. Examine the upgrade logs in the directory /var/TKLC/log/upgrade and verify no errors were reported.
grep -i error /var/TKLC/log/upgrade/upgrade.log
2. Examine the output of the command to determine if any errors were reported.
3. If the upgrade fails, collect the following files:
/var/TKLC/log/upgrade/upgrade.log
/var/TKLC/log/upgrade/ugwrap.log
/var/TKLC/log/upgrade/earlyChecks.log
/var/TKLC/log/platcfg/upgrade.log
4. It is recommended to contact My Oracle Support (MOS) by referring to Appendix CC of this document and provide these files.
10.
Server CLI: Verify the upgrade
1. Check the upgrade log for the upgrade complete message
grep "UPGRADE IS COMPLETE"
/var/TKLC/log/upgrade/upgrade.log
2. Verify the UPGRADE IS COMPLETE message displays. If not, it is recommended to contact My Oracle Support (MOS).
[admusr@NO2 ~]$ grep "UPGRADE IS COMPLETE"
/var/TKLC/log/ upgrade/upgrade.log
1407786220:: UPGRADE IS COMPLETE

DSR 8.2 Software Upgrade GuideDSR 8.2 Software Upgrade Guide
Page | 259 E88968-01
L.4. Manual DA-MP (N+0) Upgrade Procedure
Procedure 65 is used to manually upgrade a multi-active DA-MP Server Group. This procedure is provided as an alternative to the normal DA-MP upgrade procedures in Section 4.6.
Procedure 65 must be executed for all configured DA-MPs of a site, regardless of how the DA-MPs are grouped for upgrade. So if 16 DA-MPs are upgraded four at a time, then Procedure 65 must be executed four distinct times.
Procedure 65. Manual DA-MP (N+0) Upgrade Procedure
S T E P #
This procedure upgrades a multi-active DA-MP servers using the manual upgrade method.
Check off () each step as it is completed. Boxes have been provided for this purpose under each step number.
If this procedure fails, it is recommended to contact My Oracle Support (MOS) and ask for assistance.
1.
Identify all the DA-MPs to be upgraded together
From the data captured in Table 5, identify the DSR (multi-active cluster) server group to be upgraded.
2.
Upgrade DA-MP servers as identified in step 1
Upgrade up to (½) one half (no more than 50%) of the DA-MP servers in parallel using the Upgrade Multiple Servers procedure.
Note: When using the manual server upgrade method, it is recommended that the DA-MP leader be upgraded in the last group of servers to minimize DA-MP leader role changes.
1. Execute Appendix H Upgrade Multiple Servers – Upgrade Administration.
2. After successfully completing the procedure in Appendix H, return to this point and continue with the next step.
3.
Repeat for all servers identified in step 1 of this procedure
Repeat step 2 of this procedure for the remaining DA-MP servers.
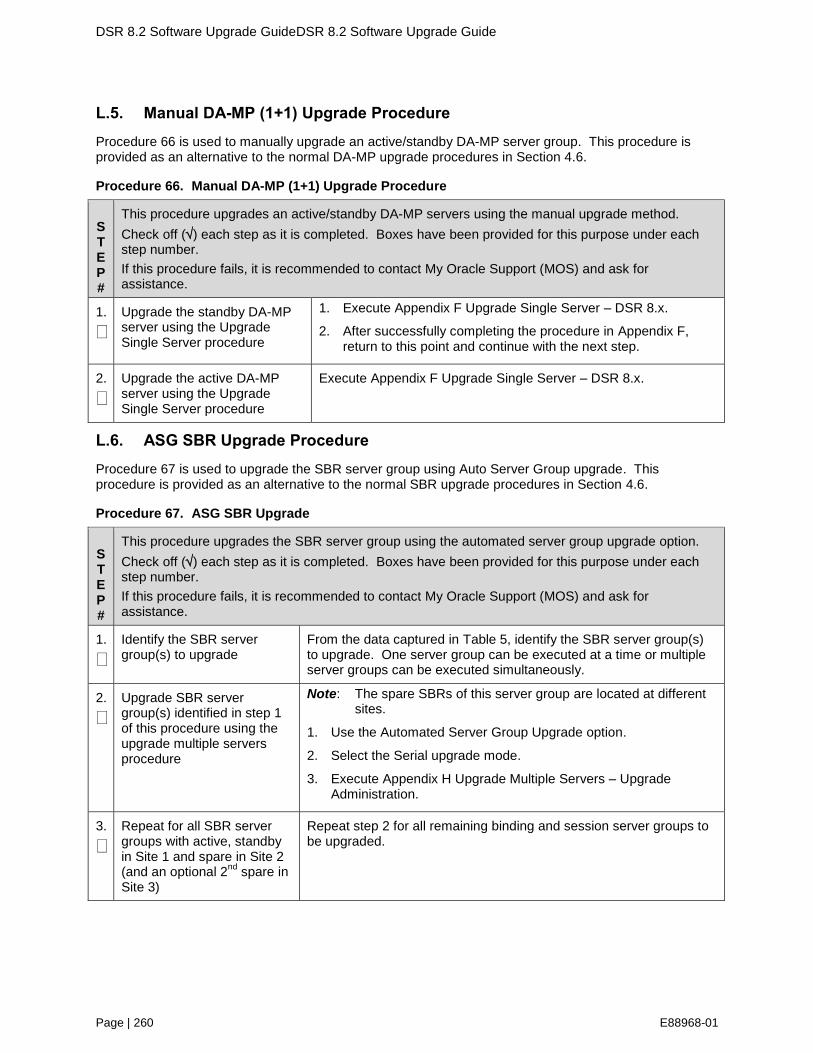
DSR 8.2 Software Upgrade GuideDSR 8.2 Software Upgrade Guide
Page | 260 E88968-01
L.5. Manual DA-MP (1+1) Upgrade Procedure
Procedure 66 is used to manually upgrade an active/standby DA-MP server group. This procedure is provided as an alternative to the normal DA-MP upgrade procedures in Section 4.6.
Procedure 66. Manual DA-MP (1+1) Upgrade Procedure
S T E P #
This procedure upgrades an active/standby DA-MP servers using the manual upgrade method.
Check off () each step as it is completed. Boxes have been provided for this purpose under each step number.
If this procedure fails, it is recommended to contact My Oracle Support (MOS) and ask for assistance.
1.
Upgrade the standby DA-MP server using the Upgrade Single Server procedure
1. Execute Appendix F Upgrade Single Server – DSR 8.x.
2. After successfully completing the procedure in Appendix F, return to this point and continue with the next step.
2.
Upgrade the active DA-MP server using the Upgrade Single Server procedure
Execute Appendix F Upgrade Single Server – DSR 8.x.
L.6. ASG SBR Upgrade Procedure
Procedure 67 is used to upgrade the SBR server group using Auto Server Group upgrade. This procedure is provided as an alternative to the normal SBR upgrade procedures in Section 4.6.
Procedure 67. ASG SBR Upgrade
S T E P #
This procedure upgrades the SBR server group using the automated server group upgrade option.
Check off () each step as it is completed. Boxes have been provided for this purpose under each step number.
If this procedure fails, it is recommended to contact My Oracle Support (MOS) and ask for assistance.
1.
Identify the SBR server group(s) to upgrade
From the data captured in Table 5, identify the SBR server group(s) to upgrade. One server group can be executed at a time or multiple server groups can be executed simultaneously.
2.
Upgrade SBR server group(s) identified in step 1 of this procedure using the upgrade multiple servers procedure
Note: The spare SBRs of this server group are located at different sites.
1. Use the Automated Server Group Upgrade option.
2. Select the Serial upgrade mode.
3. Execute Appendix H Upgrade Multiple Servers – Upgrade Administration.
3.
Repeat for all SBR server groups with active, standby in Site 1 and spare in Site 2 (and an optional 2
nd spare in
Site 3)
Repeat step 2 for all remaining binding and session server groups to be upgraded.

DSR 8.2 Software Upgrade GuideDSR 8.2 Software Upgrade Guide
Page | 261 E88968-01
L.7. Manual SBR Upgrade Procedure
Procedure 68 is used to upgrade the SBR Server Group manually. This procedure is provided as an alternative to the normal SBR upgrade procedures in Section 4.6.
Note: Before upgrading the active SBR, it is imperative that the database audit of the spare and standby servers complete successfully. Failure to comply could result in a loss of session/binding data.
Procedure 68. Manual SBR Upgrade Procedure
S T E P #
This procedure upgrades an SBR server group using the manual upgrade option.
Note: This procedure upgrades all the servers in the server group; however, if it is recommended to upgrade one by one, such as spare, standby, and active in different upgrade iterations, upgrade those servers manually and then return to this procedure.
Check off () each step as it is completed. Boxes have been provided for this purpose under each step number.
If this procedure fails, it is recommended to contact My Oracle Support (MOS) and ask for assistance.
1.
Active NOAM VIP: Identify the active, standby, and spare SBR server group(s) to upgrade
1. From the data captured in Table 5, identify the server group(s) to upgrade. One server group can be executed at a time or multiple server groups can be executed simultaneously.
2. Log into the NOAM GUI using the VIP.
3. Navigate to SBR > Maintenance > SBR Status. Open each server group chosen in sub-step 1. Note which server is active, standby, and spare (as designated by the Resource HA Role) for each server group chosen for upgrade. The following figure provides an example:
GTXA-Session1 – Active
GTXA-Session2 – Standby
BarrA-Session-SP – Spare
Note: SBR servers have two High Availability policies: one for controlling replication of session or binding data, and one for receipt of replicated configuration data from the NOAM and SOAM GUIs. During this upgrade procedure, ONLY the High Availability policy for replication of session or binding data is important. This means that the SBR Status screen MUST be used to determine the High Availability status (active, standby, or spare) of SBR servers. The HA Status screen and the OAM Max HA Role column on the Upgrade screen must NOT be used because they only show the status of the configuration

DSR 8.2 Software Upgrade GuideDSR 8.2 Software Upgrade Guide
Page | 262 E88968-01
Procedure 68. Manual SBR Upgrade Procedure
replication policy.
Because the two High Availability policies run independently, it is possible that a given server might be standby or spare for the session and binding replication policy, but active for the configuration replication policy. When this happens, it is necessary to ignore warnings on the Upgrade screen about selecting what it views as the active server (for the configuration replication policy).
2.
Active NOAM VIP: Upgrade spare SBR server identified in step 1 of this procedure
(If need to be upgraded in this upgrade iteration)
Note: The spare SBRs of this server group are located at different sites.
1. Execute Appendix F Upgrade Single Server – DSR 8.x.
2. After successfully completing the procedure in Appendix F, return to this point to monitor server status.
3. Navigate to SBR > Maintenance > SBR Status. Open the tab of the server group being upgraded.
Note: After executing Appendix F, the spare SBR temporarily disappears from the SBR Status screen. When the server comes back online, it reappears on the screen with a status of Out of Service.
4. Monitor the Resource HA Role status of the spare server. Wait for the status to transition from Out of Service to Spare.
5. If the system is equipped with a second spare SBR server, repeat sub-steps 1 thru 3 for the other spare.
Caution: Do not proceed to step 3 until the Resource HA Role of the spare SBR server returns to Spare.
3.
Upgrade standby SBR server identified in step 1 of this procedure
(If need to be upgraded in this upgrade iteration)
1. Execute Appendix F Upgrade Single Server – DSR 8.x.
2. After successfully completing the procedure in Appendix F, return to this point and continue with the next step.
!!WARNING!! Failure to comply with step 4 and step 5 may result in the loss of PCA traffic, resulting in service impact.
4.
Active NOAM VIP: Verify standby SBR server status
(If need to be upgraded in this upgrade iteration)
1. Navigate to SBR > Maintenance > SBR Status. Open the tab of the server group being upgraded.
Note: After executing Appendix F, the standby SBR temporarily disappears from the SBR Status screen, and the spare server assumes the standby role. When the upgraded server comes back online, it reappears on the screen with a status of Out of Service.
2. Monitor the Resource HA Role status of the upgraded server. Wait for the status to transition from Out of Service to Standby.
Caution: Do not proceed to step 5 until the Resource HA Role of the upgraded server transitions to Standby.

DSR 8.2 Software Upgrade GuideDSR 8.2 Software Upgrade Guide
Page | 263 E88968-01
Procedure 68. Manual SBR Upgrade Procedure
5.
Active NOAM VIP: Verify bulk download from the active SBR to the standby and spare SBRs completes
(If need to be upgraded in this upgrade iteration)
1. Navigate to Alarm & Event > View History.
2. Export the Event log using the following filter:
Server Group: Choose the SBR group that is in upgrade
Display Filter: Event ID = 31127 – DB Replication Audit Complete
Collection Interval: X hours ending in current time,
where X is the time from upgrade completion of the standby and spare servers to the current time.
3. Wait for all instances of Event 31127:
1 for the Standby binding SBR
1 for the Standby session SBR
1 for the Spare binding SBR
1 for the Spare session SBR
1 for the 3rd
site Spare binding SBR (if equipped)
1 for the 3rd
site Spare session SBR (if equipped)
Note: There is an expected loss of traffic depending on size of the bulk download. This must be noted along with events captured.
6.
Active SBR (CLI):
Verify the replication status for DB Replication and pSbrBindingPolicy (Binding SBR)
or pSbrSessionPolicy (Session SBR)
1. Use the SSH command (on UNIX systems – or putty if running on windows) to log into the active SBR of the first non-upgraded site:
ssh admusr@<SBR_XMI_IP>
password: <enter password>
Answer yes if you are asked to confirm the identity of the server.
2. Execute command
irepstat -w
Verify replication is showing as Active for ActStb [DbReplication] policy, pSbrSessionPolicy (for Session SBR), and pSbrBindingPolicy (for Binding SBR).
Do not proceed if replication is not Active for all of the resource.
Example:
7.
Upgrade active SBR server as identified in step 1 of this procedure
(If need to be upgraded in this upgrade iteration)
1. Execute Appendix F Upgrade Single Server – Upgrade Administration – DSR 8.x.
2. After successfully completing the procedure in Appendix F, return to this point and continue with the next step.

DSR 8.2 Software Upgrade GuideDSR 8.2 Software Upgrade Guide
Page | 264 E88968-01
Procedure 68. Manual SBR Upgrade Procedure
8.
Repeat for all SBR server groups with active, standby in Site 1 and spare in Site 2
Repeat this procedure for all remaining binding and session server groups to be upgraded.
Appendix M. Expired Password Workaround Procedure
This appendix provides the procedures to handle password expiration during upgrade. Procedure 69 is a temporary workaround to allow an expired password to be used on a non-upgrade site. This procedure is provided as a workaround when a password expires after the NOAM has been upgraded and before all sites have been upgraded.
The workaround must be removed using Procedure 70 after the site is upgraded. Failure to remove the workaround inhibits password aging on the server.
M.1. Inhibit Password Aging
This procedure enacts a workaround that inhibits password aging on the SOAM. This procedure should be used only when the following conditions apply:
An upgrade is in progress
The NOAMs have been upgraded, but one or more sites have not been upgraded
A login password has expired on a non-upgraded site
Once the workaround is enacted, no passwords expire at that site. Remove the workaround once the site is upgraded.
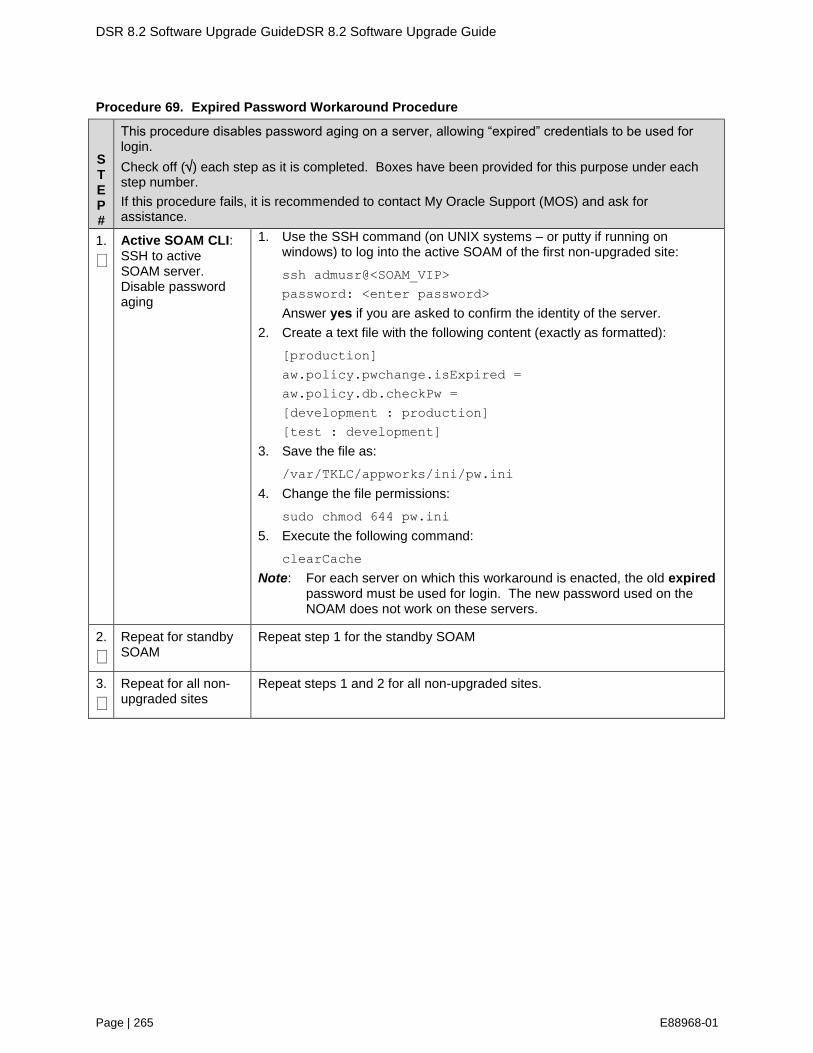
DSR 8.2 Software Upgrade GuideDSR 8.2 Software Upgrade Guide
Page | 265 E88968-01
Procedure 69. Expired Password Workaround Procedure
S T E P #
This procedure disables password aging on a server, allowing “expired” credentials to be used for login.
Check off () each step as it is completed. Boxes have been provided for this purpose under each step number.
If this procedure fails, it is recommended to contact My Oracle Support (MOS) and ask for assistance.
1.
Active SOAM CLI: SSH to active SOAM server. Disable password aging
1. Use the SSH command (on UNIX systems – or putty if running on windows) to log into the active SOAM of the first non-upgraded site:
ssh admusr@<SOAM_VIP>
password: <enter password>
Answer yes if you are asked to confirm the identity of the server.
2. Create a text file with the following content (exactly as formatted):
[production]
aw.policy.pwchange.isExpired =
aw.policy.db.checkPw =
[development : production]
[test : development]
3. Save the file as:
/var/TKLC/appworks/ini/pw.ini
4. Change the file permissions:
sudo chmod 644 pw.ini
5. Execute the following command:
clearCache
Note: For each server on which this workaround is enacted, the old expired password must be used for login. The new password used on the NOAM does not work on these servers.
2.
Repeat for standby SOAM
Repeat step 1 for the standby SOAM
3.
Repeat for all non-upgraded sites
Repeat steps 1 and 2 for all non-upgraded sites.

DSR 8.2 Software Upgrade GuideDSR 8.2 Software Upgrade Guide
Page | 266 E88968-01
M.2. Enable Password Aging
This procedure removes the password expiration workaround that is enabled by Procedure 69.
Procedure 70. Expired Password Workaround Removal Procedure
S T E P #
This procedure removes the password aging workaround and re-enables password aging on a server.
Check off () each step as it is completed. Boxes have been provided for this purpose under each step number.
If this procedure fails, it is recommended to contact My Oracle Support (MOS) and ask for assistance.
1.
Active SOAM CLI: SSH to active SOAM server. Re-enable password aging.
1. Use the SSH command (on UNIX systems – or putty if running on windows) to log into the active SOAM of the first non-upgraded site:
ssh admusr@<SOAM_VIP>
password: <enter password>
Answer yes if you are asked to confirm the identity of the server.
2. Delete the pw.ini file:
$ sudo rm /var/TKLC/appworks/ini/pw.ini
3. Execute this command:
$ sudo clearCache
4. Repeat sub-steps 1 through 3 for the standby SOAM
2.
Repeat for all non-upgraded sites
Repeat this procedure for all non-upgraded sites.

DSR 8.2 Software Upgrade GuideDSR 8.2 Software Upgrade Guide
Page | 267 E88968-01
M.3. Password Reset
Procedure 71 resets the GUI Admin (guiadmin) password on the NOAM. In a backout scenario where the password expired during the upgrade, it is possible for the customer to get locked out due to global provisioning being disabled. When this happens, this procedure can be used to reset the password to gain access to the GUI.
Procedure 71. Expired Password Reset Procedure
S T E P #
This procedure resets the guiadmin password on the NOAM.
Check off () each step as it is completed. Boxes have been provided for this purpose under each step number.
If this procedure fails, it is recommended to contact My Oracle Support (MOS) and ask for assistance.
1.
Active NOAM CLI: SSH to active NOAM server. Reset the password
1. Use the SSH command (on UNIX systems – or putty if running on windows) to log into the active NOAM:
ssh admusr@<NOAM_VIP>
password: <enter password>
Answer yes if you are asked to confirm the identity of the server.
2. Execute the reset command:
$ sudo /usr/TKLC/appworks/sbin/resetPassword guiadmin
3. At the Enter new Password for guiadmin prompt, enter a new password.
4. Attempt to log into the NOAM GUI using the new password. If the login is not successful, it is recommended to contact My Oracle Support (MOS) for guidance.

DSR 8.2 Software Upgrade GuideDSR 8.2 Software Upgrade Guide
Page | 268 E88968-01
Appendix N. Network IDIH Compatibility Procedures
The procedures in this appendix are used to provide IDIH compatibility when upgrading to release 8.2. Procedure 72 is performed on a release 8.2 IDIH to make the trace data viewable on prior release IDIH systems, as described in Section 1.7.4. This procedure must be performed on every IDIH 8.2 system from which trace data is expected.
When all IDIH systems have been upgraded to release 8.2, Procedure 73 must be executed on every IDIH on which Procedure 72 was previously performed.
Procedure 72. Enable IDIH 8.2 Compatibility
S T E P #
This procedure upgrades a server using the platcfg utility.
Note: All UI displays are sample representations of upgrade screens. The actual display may vary slightly for those shown.
Check off () each step as it is completed. Boxes have been provided for this purpose under each step number.
If this procedure fails, it is recommended to contact My Oracle Support (MOS) and ask for assistance.
1.
Appserver CLI: Log into the appserver
Use the SSH command (on UNIX systems – or putty if running on windows) to log into the appserver:
ssh admusr@<server_ip>
password: <enter password>
Answer yes if you are asked to confirm the identity of the server.
2.
Appserver CLI: Change user
Change to the system user tekelec:
sudo su – tekelec
3.
Appserver CLI: Execute command
Execute the following command to enable backward compatibility
apps/ndih7-compat.sh enable
4.
Repeat as needed Repeat this procedure on each IDIH 8.0/8.1 appserver as needed.
Procedure 73. Disable IDIH 8.2 Compatibility
S T E P #
This procedure upgrades a server using the platcfg utility.
Note: All UI displays are sample representations of upgrade screens. The actual display may vary slightly for those shown.
Check off () each step as it is completed. Boxes have been provided for this purpose under each step number.
If this procedure fails, it is recommended to contact My Oracle Support (MOS) and ask for assistance.
1.
Appserver CLI: Log into the appserver
Use the SSH command (on UNIX systems – or putty if running on windows) to log into the appserver:
ssh admusr@<server_ip>
password: <enter password>
Answer yes if you are asked to confirm the identity of the server.

DSR 8.2 Software Upgrade GuideDSR 8.2 Software Upgrade Guide
Page | 269 E88968-01
Procedure 73. Disable IDIH 8.2 Compatibility
2.
Appserver CLI: Change user
Change to the system user tekelec:
sudo su – tekelec
3.
Appserver CLI: Execute command
Execute this command to enable backward compatibility:
apps/ndih7-compat.sh disable
4.
Repeat as needed Repeat this procedure on each IDIH 8.2 appserver as needed.
Appendix O. Recover From a Failed Upgrade
This procedure provides the steps required to recover a server after a failed upgrade. Due to the complexity of the DSR system and the nature of troubleshooting, it is recommended to contact My Oracle Support (MOS) for guidance while executing this procedure.
Procedure 74. Recover from a Failed Upgrade
S T E P #
This procedure provides the basic steps for returning a server to a normal state after an upgrade failure.
Note: The server is returned to the source release by this procedure.
Check off () each step as it is completed. Boxes have been provided for this purpose under each step number.
If this procedure fails, it is recommended to contact My Oracle Support (MOS) and ask for assistance.
1.
Active NOAM VIP: Select affected server group containing the failed server
1. Log into the NOAM GUI using the VIP.
2. Navigate to Administration > Software Management > Upgrade.
3. Select the server group containing the failed server.
If the failed server was upgraded manually, or by using the Upgrade Server option, then skip to step 7 of this procedure.
If the failed server was upgraded using the Auto Upgrade option, then continue with step 2 of this procedure.

DSR 8.2 Software Upgrade GuideDSR 8.2 Software Upgrade Guide
Page | 270 E88968-01
Procedure 74. Recover from a Failed Upgrade
2.
Active NOAM VIP: Navigate to the Active Tasks screen to view active tasks
Navigate to Status & Manage > Tasks > Active Tasks.
3.
Active NOAM VIP: Use the filter to locate the server group upgrade task
1. From the Filter option, enter the following filter values:
Network Element: All
Display Filter: Name Like *Upgrade*
2. Click Go.

DSR 8.2 Software Upgrade GuideDSR 8.2 Software Upgrade Guide
Page | 271 E88968-01
Procedure 74. Recover from a Failed Upgrade
4.
Active NOAM VIP: Identify the upgrade task
In the search results list, locate the Server Group Upgrade task.
1. If not already selected, select the tab displaying the hostname of the active NOAM server.
2. Locate the task for the Server Group Upgrade. It shows a status of paused.
Note: Consider the case of an upgrade cycle where the upgrade of one or more servers in the server group has a status as exception (for example, failed), while the other servers in that server group have upgraded successfully; however, the server group upgrade task still shows as running. In this case, cancel the running (upgrade) task for the server group before reattempting ASU for the same.
Caution: Before clicking Cancel for the server group upgrade task, ensure the upgrade status of the individual servers in that particular server group should have status as completed or exception (that is, failed for some reason).
Make sure you are not cancelling a task with some servers still in running state.
5.
Active NOAM VIP: Cancel the Server Group Upgrade task
1. Click the Server Group Upgrade task to select it.
2. Click Cancel to cancel the task.
3. Click OK on the confirmation screen to confirm the cancellation.

DSR 8.2 Software Upgrade GuideDSR 8.2 Software Upgrade Guide
Page | 272 E88968-01
Procedure 74. Recover from a Failed Upgrade
6.
Active NOAM VIP: Verify the Server Group Upgrade task is cancelled
On the Active Tasks screen, verify the task that was cancelled in step 5 shows a status of completed.
7.
Failed Server CLI: Inspect upgrade log
Log into the failed server to inspect the upgrade log for the cause of the failure.
1. Use an SSH client to connect to the failed server:
ssh <XMI IP address>
login as: admusr
password: <enter password>
Note: The static XMI IP address for each server should be available in Table 5.
2. View or edit the upgrade log at /var/TKLC/log/upgrade/upgrade.log for clues to the cause of the upgrade failure.
3. If the upgrade log contains a message similar to the following, inspect the early upgrade log at /var/TKLC/log/upgrade/earlyChecks.log for additional clues.
1440613685::Early Checks failed for the next upgrade
1440613691::Look at earlyChecks.log for more info
Although outside of the scope of this document, the user is expected to use standard troubleshooting techniques to clear the alarm condition from the failed server.
If troubleshooting assistance is needed, it is recommended to contact My Oracle Support (MOS) as described in Appendix CC.
DO NOT PROCEED TO STEP 2 OF THIS PROCEDURE UNTIL THE ALARM CONDITION HAS BEEN CLEARED!
8.
Failed Server CLI: Verify platform alarms are cleared from the failed server
Use the alarmMgr utility to verify all platform alarms have been cleared from the system.
$ sudo alarmMgr --alarmstatus
Example output:
[admusr@SO2 ~]$ sudo alarmMgr --alarmstatus
SEQ: 2 UPTIME: 827913 BIRTH: 1458738821 TYPE: SET
ALARM:
TKSPLATMI10|tpdNTPDaemonNotSynchronizedWarning|1.3.6.1
.4.1.323.5.3.18.3.1.3.10|32509|Communications|Communic
ations Subsystem Failure
***user troubleshoots alarm and is able to resolve NTP sync issue and clear alarm***
[admusr@SO2 ~]$ sudo alarmMgr --alarmstatus
[admusr@SO2 ~]$
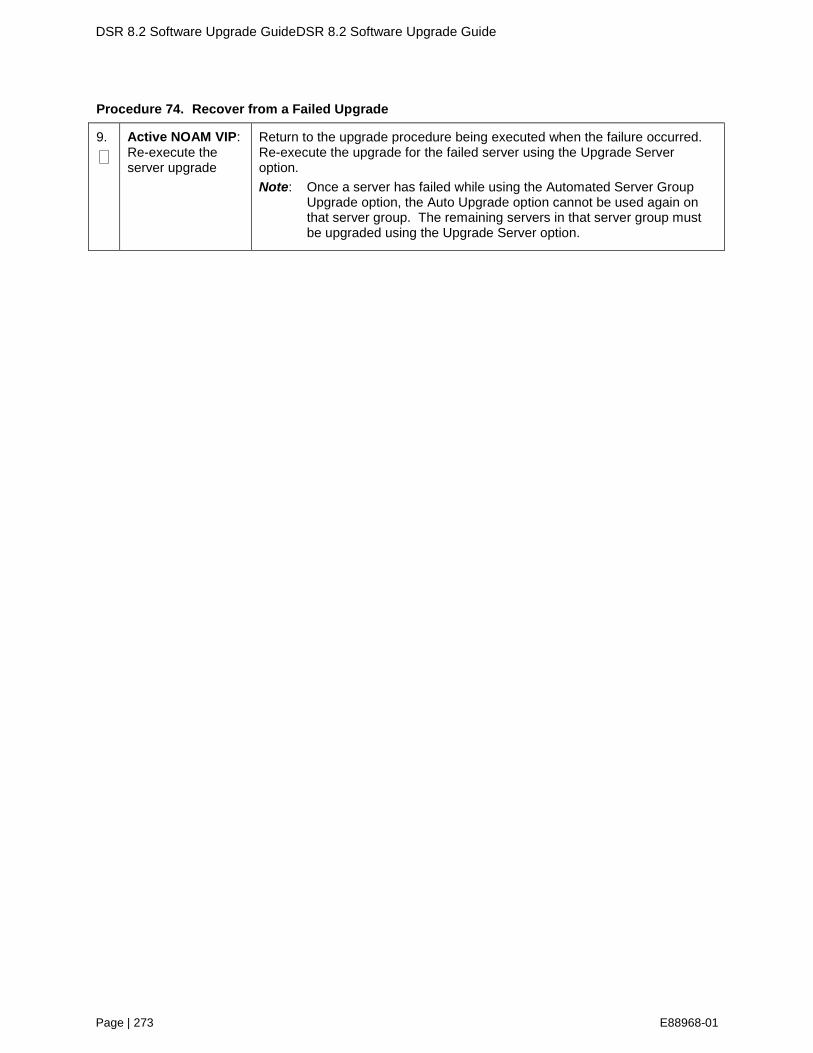
DSR 8.2 Software Upgrade GuideDSR 8.2 Software Upgrade Guide
Page | 273 E88968-01
Procedure 74. Recover from a Failed Upgrade
9.
Active NOAM VIP: Re-execute the server upgrade
Return to the upgrade procedure being executed when the failure occurred. Re-execute the upgrade for the failed server using the Upgrade Server option.
Note: Once a server has failed while using the Automated Server Group Upgrade option, the Auto Upgrade option cannot be used again on that server group. The remaining servers in that server group must be upgraded using the Upgrade Server option.

DSR 8.2 Software Upgrade GuideDSR 8.2 Software Upgrade Guide
Page | 274 E88968-01
Appendix P. Critical and Major Alarms Analysis
This procedure identifies critical and major alarms that should be resolved before proceeding with an upgrade and backout.
Note: During any time of upgrade if the 31149- DB Late Write Nonactive alarm displays,ignore it. This alarm does not have any effect on functionality.
Procedure 75. Verify Critical and Major Alarms in the System Before the Upgrade
S T E P #
This procedure identifies the current alarms in the system before an upgrade can start.
Check off () each step as it is completed. Boxes have been provided for this purpose under each step number.
If this procedure fails, it is recommended to contact My Oracle Support (MOS) and ask for assistance.
1.
Active NOAM VIP: Log/View all current alarms at the NOAM
1. Navigate to Alarms & Events > View Active.
2. Click Report to generate an Alarms report.
3. Save the report and/or print the report.
1.
Analyze the active alarms data
Reference Table 26 and Table 27 for the alarms.
If any alarms listed in the Table 26 and Table 27 display in the system, resolve the alarms before starting the upgrade.
Refer to Reference [15] DSR Alarms and KPIs Reference for specific alarm in-depth details.
Two categories from the alarm list.
High impact alarms
It's almost certain the presence of this alarm ID in the active alarm list should prevent upgrade from continuing. Alarms of this category should be resolved before upgrading.
Medium impact alarms
It's likely/possible the presence of this alarm ID should prevent upgrade from continuing; concurrence needed. Alarms of this category may/mayn't be resolved before upgrading.
Some ideas of inclusion of alarms in the categories include.
Any alarm indicating an actual hardware error, or an impending/potential hardware error, is automatically mentioned in high impact alarm list. Included in this category are all Platform Group alarms (PLAT) of severity Minor, Major, and Critical.
If an alarm ID indicates some sort of (pending) resource exhaustion issue or other threshold crossed condition, it is almost always mentioned in Medium impact alarms. Resource exhaustion states have to be fixed before upgrading.
Table 26. High Impact Alarms
Alarm ID Name
5010 Unknown Linux iptables command error

DSR 8.2 Software Upgrade GuideDSR 8.2 Software Upgrade Guide
Page | 275 E88968-01
Alarm ID Name
5011 System or platform error prohibiting operation
10000 Incompatible database version
10134 Server Upgrade Failed
10200 Remote database initialization in progress
19217 Node isolated - all links down
19805 Communication Agent Failed to Align Connection
19855 Communication Agent Resource Has Multiple Actives
19901 CFG-DB Validation Error
19902 CFG-DB Update Failure
19903 CFG-DB post-update Error
19904 CFG-DB post-update Failure
22223 MpMemCongested
22950 Connection Status Inconsistency Exists
22961 Insufficient Memory for Feature Set
22733 SBR Failed to Free Binding Memory After PCRF Pooling Binding Migration
22734 Policy and Charging Unexpected Stack Event Version
25500 No DA-MP Leader Detected
25510 Multiple DA-MP Leader Detected
31101 Database replication to slave failure
31116 Excessive shared memory
31117 Low disk free
31125 Database durability degraded
31128 ADIC Found Error
31133 DB Replication Switchover Exceeds Threshold
31215 Process resources exceeded
31288 HA Site Configuration Error
32100 Breaker Panel Feed Unavailable
32101 Breaker Panel Breaker Failure
32102 Breaker Panel Monitoring Failure
32103 Power Feed Unavailable
32104 Power Supply 1 Failure
32105 Power Supply 2 Failure
32106 Power Supply 3 Failure
32107 Raid Feed Unavailable
32108 Raid Power 1 Failure

DSR 8.2 Software Upgrade GuideDSR 8.2 Software Upgrade Guide
Page | 276 E88968-01
Alarm ID Name
32109 Raid Power 2 Failure
32110 Raid Power 3 Failure
32111 Device Failure
32112 Device Interface Failure
32113 Uncorrectable ECC memory error
32114 SNMP get failure
32115 TPD NTP Daemon Not Synchronized Failure
32116 TPD Server's Time Has Gone Backwards
32117 TPD NTP Offset Check Failure
32300 Server fan failure
32301 Server internal disk error
32302 Server RAID disk error
32303 Server Platform error
32304 Server file system error
32305 Server Platform process error
32306 Server RAM shortage error
32307 Server swap space shortage failure
32308 Server provisioning network error
32309 Eagle Network A Error
32310 Eagle Network B Error
32311 Sync Network Error
32312 Server disk space shortage error
32313 Server default route network error
32314 Server temperature error
32315 Server mainboard voltage error
32316 Server power feed error
32317 Server disk health test error
32318 Server disk unavailable error
32319 Device error
32320 Device interface error
32321 Correctable ECC memory error
32322 Power Supply A error
32323 Power Supply B error
32324 Breaker panel feed error
32325 Breaker panel breaker error

DSR 8.2 Software Upgrade GuideDSR 8.2 Software Upgrade Guide
Page | 277 E88968-01
Alarm ID Name
32326 Breaker panel monitoring error
32327 Server HA Keepalive error
32328 DRBD is unavailable
32329 DRBD is not replicating
32330 DRBD peer problem
32331 HP disk problem
32332 HP Smart Array controller problem
32333 HP hpacucliStatus utility problem
32334 Multipath device access link problem
32335 Switch link down error
32336 Half Open Socket Limit
32337 Flash Program Failure
32338 Serial Mezzanine Unseated
32339 TPD Max Number Of Running Processes Error
32340 TPD NTP Daemon Not Synchronized Error
32341 TPD NTP Daemon Not Synchronized Error
32342 NTP Offset Check Error
32343 TPD RAID disk
32344 TPD RAID controller problem
32345 Server Upgrade snapshot(s) invalid
32346 OEM hardware management service reports an error
32347 The hwmgmtcliStatus daemon needs intervention
32348 FIPS subsystem problem
32349 File Tampering
32350 Security Process Terminated
32500 Server disk space shortage warning
32501 Server application process error
32502 Server hardware configuration error
32503 Server RAM shortage warning
32504 Software ConfigurationError
32505 Server swap space shortage warning
32506 Server default router not defined
32507 Server temperature warning
32508 Server core file detected
32509 Server NTP Daemon not synchronized

DSR 8.2 Software Upgrade GuideDSR 8.2 Software Upgrade Guide
Page | 278 E88968-01
Alarm ID Name
32510 CMOS battery voltage low
32511 Server disk self test warning
32512 Device warning
32513 Device interface warning
32514 Server reboot watchdog initiated
32515 Server HA failover inhibited
32516 Server HA Active to Standby transition
32517 Server HA Standby to Active transition
32518 Platform Health Check failure
32519 NTP Offset Check failure
32520 NTP Stratum Check failure
32521 SAS Presence Sensor Missing
32522 SAS Drive Missing
32523 DRBD failover busy
32524 HP disk resync
32525 Telco Fan Warning
32526 Telco Temperature Warning
32527 Telco Power Supply Warning
32528 Invalid BIOS value
32529 Server Kernel Dump File Detected
32530 TPD Upgrade Failed
32531 Half Open Socket Warning Limit
32532 Server Upgrade Pending Accept/Reject
32533 TPD Max Number Of Running Processes Warning
32534 TPD NTP Source Is Bad Warning
32535 TPD RAID disk resync
32536 TPD Server Upgrade snapshot(s) warning
32537 FIPS subsystem warning event
32538 Platform Data Collection Error
32539 Server Patch Pending Accept/Reject
32540 CPU Power limit mismatch
Table 27. Medium Impact Alarms
Alarm ID Name
5002 IPFE Address configuration error

DSR 8.2 Software Upgrade GuideDSR 8.2 Software Upgrade Guide
Page | 279 E88968-01
Alarm ID Name
5003 IPFE state sync run error
5004 IPFE IP tables configuration error
5006 Error reading from Ethernet device
5012 Signaling interface heartbeat timeout
5013 Throttling traffic
5100 Traffic overload
5101 CPU Overload
5102 Disk Becoming Full
5103 Memory Overload
10003 Database backup failed
10006 Database restoration failed
10020 Backup failure
10117 Health Check Failed
10118 Health Check Not Run
10121 Server Group Upgrade Cancelled - Validation Failed
10123 Server Group Upgrade Failed
10131 Server Upgrade Cancelled (Validation Failed)
10133 Server Upgrade Failed
10141 Site Upgrade Cancelled (Validation Failed)
10143 Site Upgrade Failed
19200 RSP/Destination unavailable
19202 Linkset unavailable
19204 Preferred route unavailable
19246 Local SCCP subsystem prohibited
19250 SS7 process CPU utilization
19251 Ingress message rate
19252 PDU buffer pool utilization
19253 SCCP stack event queue utilization
19254 M3RL stack event queue utilization
19255 M3RL network management event queue utilization
19256 M3UA stack event queue utilization
19258 SCTP Aggregate Egress queue utilization
19250 SS7 process CPU utilization
19251 Ingress message rate
19252 PDU buffer pool utilization

DSR 8.2 Software Upgrade GuideDSR 8.2 Software Upgrade Guide
Page | 280 E88968-01
Alarm ID Name
19253 SCCP stack event queue utilization
19254 M3RL stack event queue utilization
19255 M3RL network management event queue utilization
19256 M3UA stack event queue utilization
19258 SCTP Aggregate Egress queue utilization
19272 TCAP active dialogue utilization
19273 TCAP active operation utilization
19274 TCAP stack event queue utilization
19276 SCCP Egress Message Rate
19408 Single Transport Egress-Queue Utilization
19800 Communication Agent Connection Down
19803 Communication Agent stack event queue utilization
19806 Communication Agent CommMessage mempool utilization
19807 Communication Agent User Data FIFO Queue Utilization
19808 Communication Agent Connection FIFO Queue utilization
19818 Communication Agent DataEvent Mempool utilization
19820 Communication Agent Routed Service Unavailable
19824 Communication Agent Pending Transaction Utilization
19825 Communication Agent Transaction Failure Rate
19827 SMS stack event queue utilization
19846 Communication Agent Resource Degraded
19847 Communication Agent Resource Unavailable
19848 Communication Agent Resource Error
19860 Communication Agent Configuration Daemon Table Monitoring Failure
19861 Communication Agent Configuration Daemon Script Failure
19862 Communication Agent Ingress Stack Event Rate
19900 Process CPU Utilization
19905 Measurement Initialization Failure
19910 Message Discarded at Test Connection
8000-001 MpEvFsmException_SocketFailure
8000-002 MpEvFsmException_BindFailure
8000-003 MpEvFsmException_OptionFailure
8000-101 MpEvFsmException_ListenFailure
8002-003 MpEvRxException_CpuCongested
8002-004 MpEvRxException_SigEvPoolCongested

DSR 8.2 Software Upgrade GuideDSR 8.2 Software Upgrade Guide
Page | 281 E88968-01
Alarm ID Name
8002-006 MpEvRxException_DstMpCongested
8002-007 MpEvRxException_DrlReqQueueCongested
8002-008 MpEvRxException_DrlAnsQueueCongested
8002-009 MpEvRxException_ComAgentCongested
8002-203 MpEvRxException_RadiusMsgPoolCongested
8006-101 EvFsmException_SocketFailure
8011 EcRate
8013 MpNgnPsStateMismatch
8200 MpRadiusMsgPoolCongested
8201 RclRxTaskQueueCongested
8202 RclItrPoolCongested
8203 RclTxTaskQueueCongested
8204 RclEtrPoolCongested
22016 Peer Node Alarm Aggregation Threshold
22017 Route List Alarm Aggregation Threshold
22056 Connection Admin State Inconsistency Exists
22200 MpCpuCongested
22201 MpRxAllRate
22202 MpDiamMsgPoolCongested
22203 PTR Buffer Pool Utilization
22204 Request Message Queue Utilization
22205 Answer Message Queue Utilization
22206 Reroute Queue Utilization
22207 DclTxTaskQueueCongested
22208 DclTxConnQueueCongested
22214 Message Copy Queue Utilization
22221 Routing MPS Rate
22222 Long Timeout PTR Buffer Pool Utilization
22349 IPFE Conneetion Alarm Aggregation Threshold
22350 Fixed Connection Alarm Aggregation Threshold
22407 Routing attempt failed duto internal database incosistency failure
22500 DSR Application Unavailable
22501 DSR Application Degraded
22502 DSR Application Request Message Queue Utilization
22503 DSR Application Answer Message Queue Utilization

DSR 8.2 Software Upgrade GuideDSR 8.2 Software Upgrade Guide
Page | 282 E88968-01
Alarm ID Name
22504 DSR Application Ingress Message Rate
22607 Routing attempt failed due to DRL queue exhaustion
22608 Database query could not be sent due to DB congestion
22609 Database connection exhausted
22631 FABR DP Response Task Message Queue Utilization
22632 COM Agent Registration Failure
22703 Diameter Message Routing Failure Due to Full DRL Queue
22710 SBR Sessions Threshold Exceeded
22711 SBR Database Error
22712 SBR Communication Error
22717 SBR Alternate Key Creation Failure Rate
22720 Policy SBR To PCA Response Queue Utilization Threshold Exceeded
22721 Policy and Charging Server In Congestion
22722 Policy Binding Sub-resource Unavailable
22723 Policy and Charging Session Sub-resource Unavailable
22724 SBR Memory Utilization Threshold Exceeded
22725 SBR Server In Congestion
22726 SBR Queue Utilization Threshold Exceeded
22727 SBR Initialization Failure
22728 SBR Bindings Threshold Exceeded
22729 PCRF Not Configured
22730 Policy and Charging Configuration Error
22731 Policy and Charging Database Inconsistency
22732 SBR Process CPU Utilization Threshold Exceeded
22737 Configuration Database Not Synced
22740 SBR Reconfiguration Plan Completion Failure
31100 Database replication fault
31102 Database replication from master failure
31103 DB Replication update fault
31104 DB Replication latency over threshold
31106 Database merge to parent failure
31107 Database merge from child failure
31108 Database merge latency over threshold
31113 DB replication manually disabled
31114 DB replication over SOAP has failed

DSR 8.2 Software Upgrade GuideDSR 8.2 Software Upgrade Guide
Page | 283 E88968-01
Alarm ID Name
31118 Database disk store fault
31121 Low disk free early warning
31122 Excessive shared memory early warning
31124 ADIC error
31126 Audit blocked
31130 Network health warning
31131 DB Ousted Throttle Behind
31134 DB Site Replication To Slave Failure
31135 DB Site Replication to Master Failure
31137 DB Site Replication Latency Over Threshold
31146 DB mastership fault
31147 DB upsynclog overrun
31200 Process management fault
31201 Process not running
31202 Unkillable zombie process
31209 Hostname lookup failed
31217 Network Health Warning
31220 HA configuration monitor fault
31113 DB replication manually disabled
31114 DB replication over SOAP has failed
31118 Database disk store fault
31121 Low disk free early warning
31122 Excessive shared memory early warning
31124 ADIC error
31126 Audit blocked
31130 Network health warning
31131 DB Ousted Throttle Behind
31134 DB Site Replication To Slave Failure
31135 DB Site Replication to Master Failure
31137 DB Site Replication Latency Over Threshold
31146 DB mastership fault
31147 DB upsynclog overrun
31200 Process management fault
31201 Process not running
31202 Unkillable zombie process

DSR 8.2 Software Upgrade GuideDSR 8.2 Software Upgrade Guide
Page | 284 E88968-01
Alarm ID Name
31209 Hostname lookup failed
31217 Network Health Warning
31220 HA configuration monitor fault
31221 HA alarm monitor fault
31222 HA not configured
31233 HA Heartbeat transmit failure
31224 HA configuration error
31225 HA service start failure
31226 HA availability status degraded
31228 HA standby offline
31230 Recent alarm processing fault
31231 Platform alarm agent fault
31233 HA Path Down
31234 Untrusted Time Upon Initialization
31234 Untrusted time After Initialization
31236 HA Link Down
31282 HA Management Fault
31283 Lost Communication with server
31322 HA Configuration Error
33000 MAP-to-Diameter Service Registration Failure on DA-MP
33001 Diameter-to-MAP Service Registration Failure on DA-MP
33003 Insufficient memory for DM-IWF
33004 DM-IWF Transaction Response Queue Utilization
33005 DM-IWF PTR Pool Utilization
33007 MD-IWF Error
33050 MD-IWF Ingress Message Rate
33051 MD-IWF Application Degraded or Unavailable
33052 MD-IWF Notified that DM-IWF Service Status is Down
33053 MD-IWF DiamTrans Task Queue Utilization
33054 MD-IWF MapTrans Task Queue Utilization
33055 MD-IWF DAMPInterface Task Queue Utilization
33056 MD-IWF ComAgent Provider Registration Failure on SS7-MP
33057 MD-IWF ComAgent User Registration Failure on SS7-MP
33058 MD-IWF DiamToMap PTR Utilization
33059 MD-IWF MapToDiam PTR Utilization

DSR 8.2 Software Upgrade GuideDSR 8.2 Software Upgrade Guide
Page | 285 E88968-01
Alarm ID Name
33062 Insufficient Memory for MD-IWF
33076 MD-IWF received Diameter Answer from unexpected DA-MP
33103 GLA Communication Agent Error
33105 Routing Attempt failed due to queue exhaustion
33106 GLA Communication Agent Timeout
33120 Policy SBR Binding Sub-Resource Unavailable
33121 GLA pSBR-B Response Task Message Queue Utilization
33301 Update Config Data Failure
33303 U-SBR Event Queue Utilization
33310 U-SBR Sub-resource Unavailable
33312 DCA Script Generation Error
33301 Update Config Data Failure
Appendix Q. Additional Backout Steps
Procedure 76. Additional Backout Steps for NOAM, SOAM. and SBR Server(s)
S T E P #
This procedure provides the details about additional backout steps for NOAM, SOAM and SBR server(s) to support backout for major upgrade release paths.
Check off () each step as it is completed. Boxes have been provided for this purpose under each step number.
If this procedure fails, it is recommended to contact My Oracle Support (MOS) and ask for assistance.
1.
Server CLI: Log into the server (if not already done)
Use the SSH command (on UNIX systems – or putty if running on Windows) to log into the server under backout:
ssh admusr@<server address>
password: <enter password>
Answer yes if you are asked to confirm the identity of the server.
If server is NOAM or SOAM server, execute steps 2. through 5. and if server is SBR server, execute steps 6 to 7.
Please note the hostname of the server on which these steps are executed. Once all the servers in a server group are backed out, additional post-backout steps are executed to revert the changes done in this procedure.

DSR 8.2 Software Upgrade GuideDSR 8.2 Software Upgrade Guide
Page | 286 E88968-01
Procedure 76. Additional Backout Steps for NOAM, SOAM. and SBR Server(s)
2.
Server CLI: Set the resource as optional
For OAM servers only
Note: Make sure the resource being set is in system. Some of the resources shown are introduced in different releases.
If the resource is not in the system, presence check will not result any output records. In this case, skip updating these fields for the resource not in the system.
1. Check for the resource:
iqt -E HaResourceCfg where "name='<resource_name>'"
2. Execute this command:
iset -W -foptional='Yes' HaResourceCfg where
"name='DSROAM_Proc'"
These commands change/update the results of some records.
3.
Server CLI: Restart the HTTPD service
For OAM servers only
Execute this command:
sudo service httpd restart
4.
Active NOAM/SOAM Server CLI: Log into the server (if not already done)
Use the SSH command (on UNIX systems – or putty if running on Windows) to log into the Active NOAM/SOAM server in the same server group, in which server is under backout:
ssh admusr@<server address>
password: <enter password>
Answer yes if you are asked to confirm the identity of the server.
5.
Server CLI: Verify that the replication is working fine.
For OAM servers only
1. Execute this command on an active NOAM/SOAM server in the same server group being backed out:
irepstat
2. Verify the irepstat command displays a replication row for the server
which is being backed out.
Note the replication status is Active before proceeding, if it is Audit, then wait until replication becomes Active.
If this step is missed, data is lost and is unrecoverable.
Example:
Here Ford-B-NO is Active NOAM Server and Ford-A-NO is backed out.
Ford-B-NO A3301.157 Ford-B-NO 09:32:17 [Rw]
Policy 0 ActStb [DbReplication] ----------------------------------------
AA To P0 Ford-A-NO Active 0 0.00 1%R 0.12%cpu 1.88k/s
AA To P1 Chevy-DRNO-B Active 0 0.00 1%R 0.08%cpu 1.89k/s
AB To D0 Camaro-SO-B Active 0 0.00 1%R 0.09%cpu 1.89k/s
AB To D0 Nova-SO-B Active 0 0.00 1%R 0.08%cpu 1.90k/s
AB To D0 Pinto-SO-B Active 0 0.00 1%R 0.10%cpu 1.89k/s
AB To D0 Mustang-SO-B Active 0 0.00 1%R 0.10%cpu 2.14k/s
3. Press q if you want to exit the irepstat command output.
4. Execute irepstat again, if required.

DSR 8.2 Software Upgrade GuideDSR 8.2 Software Upgrade Guide
Page | 287 E88968-01
Procedure 76. Additional Backout Steps for NOAM, SOAM. and SBR Server(s)
6.
Server CLI: Setting the resource as optional
For SBR servers only
Note: Make sure the resource being set is in the system. Some of the resources listed below are introduced in different releases.
If aresource is not in the system, presence check does not result in any output records. In this case, do not update the fields for the resource.
Resource presence can be checked using:-
iqt -E HaResourceCfg where "name='<resource_name>'"
For example:-
iqt -E HaClusterResourceCfg where "resource='uSbrRes'"
Execute this command for Session SBR only:
iset -W -foptional='Yes' HaResourceCfg where
"name='pSbrSBaseRepl'"
iset -W -foptional='Yes' HaClusterResourceCfg where
"resource='uSbrRes'"
iset -W -foptional='Yes' HaClusterResourceCfg where
"resource='pSbrSessionRes'"
Execute this command for Binding SBR only:
iset -W -foptional='Yes' HaResourceCfg where
"name='pSbrBBaseRepl'"
iset -W -foptional='Yes' HaClusterResourceCfg where
"resource='uSbrRes'"
iset -W -foptional='Yes' HaClusterResourceCfg where
"resource='pSbrBindingRes'"
These commands change/update the results of some records.

DSR 8.2 Software Upgrade GuideDSR 8.2 Software Upgrade Guide
Page | 288 E88968-01
Procedure 76. Additional Backout Steps for NOAM, SOAM. and SBR Server(s)
7.
Server CLI: Verify that the replication is working fine
(For SBR servers only)
1. Execute this command on an active SBR server in the same server groupas the server being backed out:
irepstat
2. Verify the irepstat command displays a replication row for the server
which is being backed out.
Note the replication status is Active before proceeding, if it is Audit, then wait until replication becomes Active.
If this step is missed, data is lost and is unrecoverable.
Example:
Here Pinto-SBR-2 is Active SBR Server and Pinto-SBR-1 is backed out.
Also, on Binding SBR, resource will be pSbrBindingPolicy
And on Session SBR, resource will be pSbrSessionPolicy
Pinto-SBR-2 C3783.034 Pinto-SBR-2 13:39:38 [Rw]
Policy 0 ActStb [DbReplication] ----------------------------------------
BC From D0 Pinto-SO-B Active 0 0.10 ^0.10%cpu 67.0/s
CC To P0 Pinto-SBR-1 Active 0 0.10 1%S 0.31%cpu 30.9/s
CC To P1 Mustang-SBR-3 Active 0 0.10 1%S 0.28%cpu 39.6/s
Policy 21 pSbrBindingPolicy [pSbrBBaseRepl] ----------------------------
CC To P0 Pinto-SBR-1 Active 0 0.10 1%S 0.63%cpu 186k/s
CC To P1 Mustang-SBR-3 Active 2 0.13 1%S 0.55%cpu 189k/s
3. Press q if you want to exit the irepstat command output.
4. Execute irepstat again, if required.
Appendix R. Additional Post-Backout Steps
Procedure 77. Additional Post Backout Steps for NOAM, SOAM, and SBR Server(s)
S T E P #
This procedure provides the details about additional post backout steps for NOAM, SOAM and SBR server(s) to support backout for major upgrade release paths.
This procedure is executed only after all servers in the same server group are backed out.
Check off () each step as it is completed. Boxes have been provided for this purpose under each step number.
If this procedure fails, it is recommended to contact My Oracle Support (MOS) and ask for assistance.
1.
Server CLI: Log into the server (if not already done)
Use the SSH command (on UNIX systems – or putty if running on Windows) to log into the server under backout:
ssh admusr@<server address>
password: <enter password>
Answer yes if you are asked to confirm the identity of the server.
If the server is an NOAM or SOAM server, execute step 2.
If the server is an SBR server, execute steps 3.
Note the hostname of the server on which these steps are executed. Once all servers in a server group are backed out, additional post-backout steps are executed to revert the changes done in this procedure.

DSR 8.2 Software Upgrade GuideDSR 8.2 Software Upgrade Guide
Page | 289 E88968-01
Procedure 77. Additional Post Backout Steps for NOAM, SOAM, and SBR Server(s)
2.
Server CLI: Set the resource as optional
For OAM servers only
Note: Make sure the resource getting set is in system. Some of resources shown are introduced in different releases.
If the resource is not in the system, presence check will not result any output records. In this case, skip updating these fields for the resource not in the system.
1. Check for the resource:
iqt -E HaResourceCfg where "name='<resource_name>'"
2. Execute this command:
iset -W -foptional='Yes' HaResourceCfg where
"name='DSROAM_Proc'"
These commands change/update the results of some records.
3.
Server CLI: Setting the resource as optional
For SBR servers only
Note: Make sure the resource being set is in the system. Some of the resources listed below are introduced in different releases.
If aresource is not in the system, presence check does not result in any output records. In this case, do not update the fields for the resource.
Resource presence can be checked using:-
iqt -E HaResourceCfg where "name='<resource_name>'"
For example:-
iqt -E HaClusterResourceCfg where "resource='uSbrRes'"
Execute this command for Session SBR only:
iset -W -foptional='No' HaResourceCfg where
"name='pSbrSBaseRepl'"
iset -W -foptional='No' HaClusterResourceCfg where
"resource='uSbrRes'"
iset -W -foptional='No' HaClusterResourceCfg where
"resource='pSbrSessionRes'"
Execute this command for Binding SBR only:
iset -W -foptional='No' HaResourceCfg where
"name='pSbrBBaseRepl'"
iset -W -foptional='No' HaClusterResourceCfg where
"resource='uSbrRes'"
iset -W -foptional='No' HaClusterResourceCfg where
"resource='pSbrBindingRes'"
These commands change/update the results of some records.
Repeat this procedure for other servers in the server group being backed out.

DSR 8.2 Software Upgrade GuideDSR 8.2 Software Upgrade Guide
Page | 290 E88968-01
Appendix S. Manual Completion of Server Upgrade
Procedure 78. Manual Completion of Server Upgrade
S T E P #
This procedure provides the details about manual completion of server upgrade.
Note: In the unlikely event that after the upgrade, if the Upgrade State of server is Backout Ready and the Status Message displays Server could not restart the application to complete the upgrade, then perform Appendix S Manual Completion of Server Upgrade to restore the server to full operational status and then return to this step to continue the upgrade.
Check off () each step as it is completed. Boxes have been provided for this purpose under each step number.
If this procedure fails, it is recommended to contact My Oracle Support (MOS) and ask for assistance.
1.
NOAMP VIP GUI: Login: Log into the server (if not already done)
If not already done, establish a GUI session on the NOAM server the VIP IP address of the NOAM server.
Open the web browser and enter a URL of:
http://<Primary_NOAM_VIP_IP_Address>
Log into the NOAM GUI as the guiadmin user:

DSR 8.2 Software Upgrade GuideDSR 8.2 Software Upgrade Guide
Page | 291 E88968-01
Procedure 78. Manual Completion of Server Upgrade
2.
NOAMP VIP GUI: Verify server status
1. Navigate to Status and Manage > HA.
2. Locate the server you want to upgrade.
3. Verify the Max Allowed HA Role is Standby.
4. Click Edit.

DSR 8.2 Software Upgrade GuideDSR 8.2 Software Upgrade Guide
Page | 292 E88968-01
Procedure 78. Manual Completion of Server Upgrade
3.
NOAMP VIP GUI: Change role
1. Change the Max Allowed HA Role to Active.
2. Click OK.
4.
NOAMP VIP GUI: Verify change
Verify the Max Allowed HA Role changes to Active.
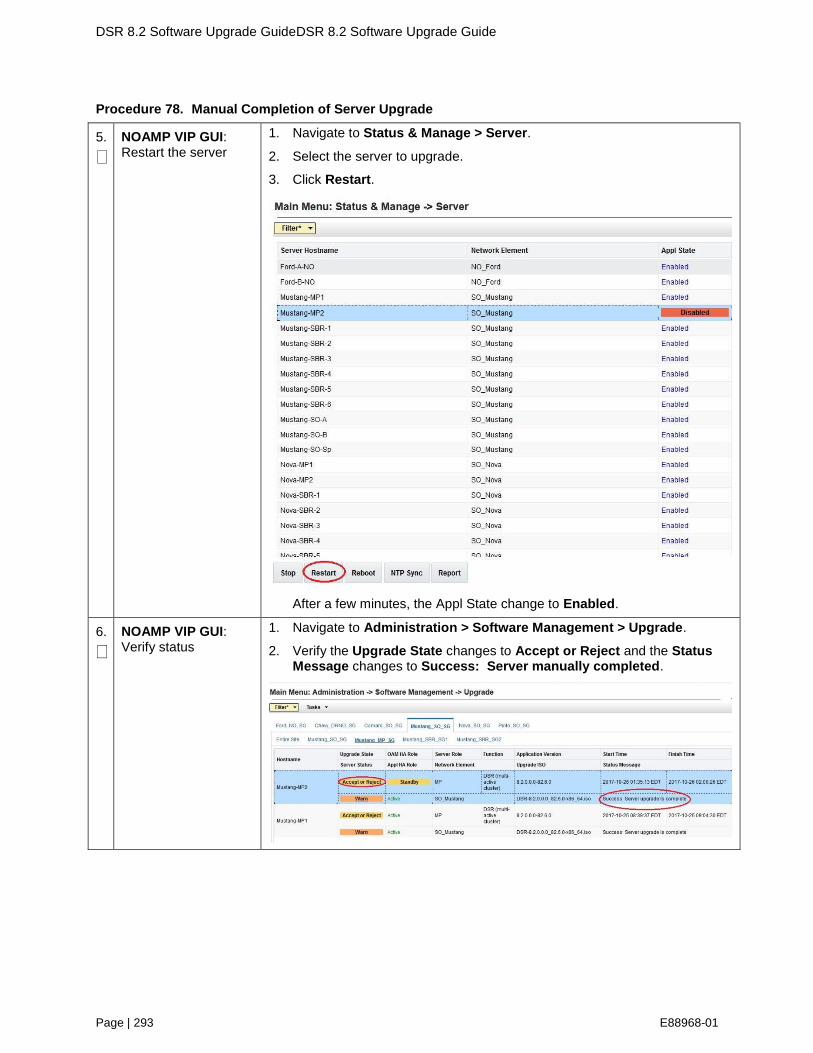
DSR 8.2 Software Upgrade GuideDSR 8.2 Software Upgrade Guide
Page | 293 E88968-01
Procedure 78. Manual Completion of Server Upgrade
5.
NOAMP VIP GUI: Restart the server
1. Navigate to Status & Manage > Server.
2. Select the server to upgrade.
3. Click Restart.
After a few minutes, the Appl State change to Enabled.
6.
NOAMP VIP GUI: Verify status
1. Navigate to Administration > Software Management > Upgrade.
2. Verify the Upgrade State changes to Accept or Reject and the Status Message changes to Success: Server manually completed.

DSR 8.2 Software Upgrade GuideDSR 8.2 Software Upgrade Guide
Page | 294 E88968-01
Appendix T. Identify the DC server
Procedure 79. Identify the DC Server
S T E P #
This procedure provides the details to identify the DC server.
Check off () each step as it is completed. Boxes have been provided for this purpose under each step number.
If this procedure fails, it is recommended to contact My Oracle Support (MOS) and ask for assistance.
1.
NOAMP VIP GUI: Login
Open the web browser and enter a URL of:
http://<Primary_NOAM_VIP_IP_Address>
Log into the NOAM GUI as the guiadmin user:
2.
NOAMP VIP GUI: Select an MP server
1. Navigate to Configuration > Server Groups.
2. Select an MP server from the server group that needs to be upgraded.
3.
Login into MP Server using CLI
SSH to MP server chosen above
1. Use the SSH command (on UNIX systems – or putty if running on windows) to log into the MP server identified in Step 1.
ssh admusr@<MP_SERVER_XMI>
password: <enter password>
2. Answer yes if you are asked to confirm the identity of the server

DSR 8.2 Software Upgrade GuideDSR 8.2 Software Upgrade Guide
Page | 295 E88968-01
Procedure 79. Identify the DC Server
4.
MP Server CLI: Find DC server
Identify the DC server in the server group with this command:
ha.info -d
If the server is the DC server, then output is similar to this:
If the server is not the DC server, then output is similar to this:
Appendix U. Limitations of Auto Server Group Upgrade and Automated Site
Upgrade
For multi-active server groups, such as DA-MP, non-deterministic server selection could possibly result in a network outage during the upgrade. In certain scenarios, customer preferences or requirements can result in configurations in which it is imperative that DA-MP servers must be, or conversely, cannot be, upgraded together. These scenarios are described in this section with the recommendation that customers NOT use ASG if any of these exists in their network.
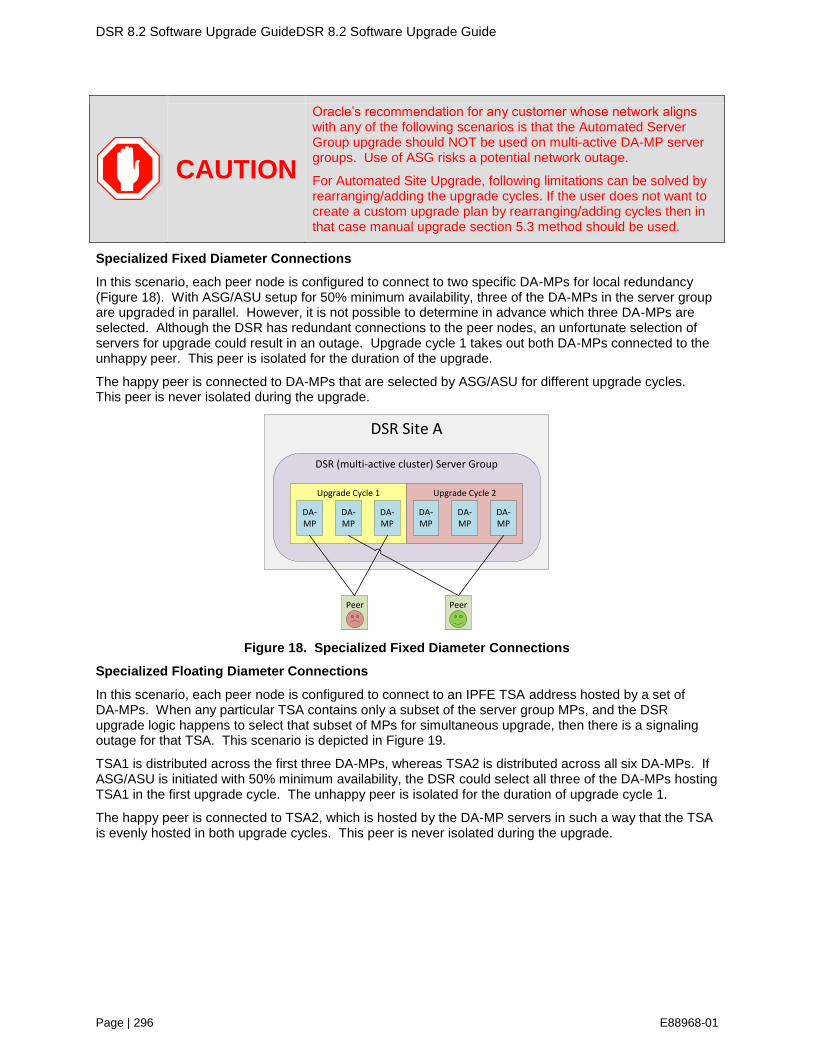
DSR 8.2 Software Upgrade GuideDSR 8.2 Software Upgrade Guide
Page | 296 E88968-01
CAUTION
Oracle’s recommendation for any customer whose network aligns with any of the following scenarios is that the Automated Server Group upgrade should NOT be used on multi-active DA-MP server groups. Use of ASG risks a potential network outage.
For Automated Site Upgrade, following limitations can be solved by rearranging/adding the upgrade cycles. If the user does not want to create a custom upgrade plan by rearranging/adding cycles then in that case manual upgrade section 5.3 method should be used.
Specialized Fixed Diameter Connections
In this scenario, each peer node is configured to connect to two specific DA-MPs for local redundancy (Figure 18). With ASG/ASU setup for 50% minimum availability, three of the DA-MPs in the server group are upgraded in parallel. However, it is not possible to determine in advance which three DA-MPs are selected. Although the DSR has redundant connections to the peer nodes, an unfortunate selection of servers for upgrade could result in an outage. Upgrade cycle 1 takes out both DA-MPs connected to the unhappy peer. This peer is isolated for the duration of the upgrade.
The happy peer is connected to DA-MPs that are selected by ASG/ASU for different upgrade cycles. This peer is never isolated during the upgrade.
Figure 18. Specialized Fixed Diameter Connections
Specialized Floating Diameter Connections
In this scenario, each peer node is configured to connect to an IPFE TSA address hosted by a set of DA-MPs. When any particular TSA contains only a subset of the server group MPs, and the DSR upgrade logic happens to select that subset of MPs for simultaneous upgrade, then there is a signaling outage for that TSA. This scenario is depicted in Figure 19.
TSA1 is distributed across the first three DA-MPs, whereas TSA2 is distributed across all six DA-MPs. If ASG/ASU is initiated with 50% minimum availability, the DSR could select all three of the DA-MPs hosting TSA1 in the first upgrade cycle. The unhappy peer is isolated for the duration of upgrade cycle 1.
The happy peer is connected to TSA2, which is hosted by the DA-MP servers in such a way that the TSA is evenly hosted in both upgrade cycles. This peer is never isolated during the upgrade.
DSR Site A
DSR (multi-active cluster) Server Group
Peer Peer
Upgrade Cycle 1 Upgrade Cycle 2
DA-MP
DA-MP
DA-MP
DA-MP
DA-MP
DA-MP

DSR 8.2 Software Upgrade GuideDSR 8.2 Software Upgrade Guide
Page | 297 E88968-01
Figure 19. Specialized Floating Diameter Connections
Specialized Distribution of DSR Features
In this scenario, the customer has decided to enable P-DRA and RBAR on four DA-MP servers and DCA on two DA-MP servers, consistent with expected traffic load. With ASG setup for 50% minimum availability, the DA-MP server group is upgraded in two cycles. RBAR and P-DRA happen to be hosted by DA-MP servers selected by ASG/ASU to be in different upgrade cycles, albeit unbalanced. The RBAR peer is only marginally happy because during upgrade cycle 1, only 25% of RBAR and P-DRA capacity is available, even though the customer specified 50% availability.
DCA happens to be hosted by DA-MP servers selected by ASG/ASU to be in upgrade cycle 2. The DCA peer is unhappy because DCA is completely unavailable during upgrade cycle 2.
Figure 20. Specialized Distribution of DSR Features
Appendix V. Fast Deployment Configuration File Description
An XML configuration file is the primary source of automated deployment and configuration information for the feature. The configuration defines one or more infrastructures that represent a set of hardware, software and TVOE hosts associated with a PMAC. The file also defines one or more application servers that are to be deployed to a specified infrastructure.
The sections to be modified are identified with a brief description
DSR Site A
DSR (multi-active cluster) Server Group
Peer Peer
Upgrade Cycle 1 Upgrade Cycle 2
DA-MP
DA-MP
DA-MP
DA-MP
DA-MP
DA-MP
IPFE TSA1 IPFE TSA2
DSR Site A
DSR (multi-active cluster) Server Group
DCAPeer
RBARPeer
Upgrade Cycle 1 Upgrade Cycle 2
RBARPDRA
RBAR
PDRA
RBAR
PDRA
RBAR
PDRA
DCAOnly
DCA
Only

DSR 8.2 Software Upgrade GuideDSR 8.2 Software Upgrade Guide
Page | 298 E88968-01
Note: Any sub-element that is not described should not be modified.
More information on the FDC Fast deployment configuration file can be found in [10].
Software Element
The optional software element contains one or more image elements representing deployable ISO images. Each image element has a required id attribute used to uniquely reference that image in the configuration file. The only element that should be modified is the name.
Name defines the ISO version of TVOE, Application, Mediation, Oracle or TPD image. Verify the versions match the version of software that to be installed. If they do not match, modify the configuration file as needed.
Enclosure Element
The enclosure element specifies the enclosure for a set of blade servers.
cabhwid refers to the cabinet identification used at each site.
encid refers to the enclosure identification used at each site.
oa1 refers to the IP Address for the first OA within an enclosure.
oa2 refers to the IP Address for the second OA within an enclosure.
Blade Element
The blade element specifies the blade within an enclosure, on which an IDIH system is installed.
Use the enchwID that has been specified within the PMAC to be IPM’d.
bay is the bay location of the blade to be IPM’d.
type is the hardware type, for example, Gen 6 or Gen 8 blade.
RMS Element
The rms element specifies a rack-mount server in the infrastructure, and provisions it in PMAC if not already present. The rmsOOBIP, rmsname, and cabhwid elements should be modified.
The rmsOOBIP sub-element is the only required sub-element, and it specifies the IP address of the RMS iLO.
The rmsname sub-element specifies the name of the RMS when provisioned in PMAC. The cabhwid sub-element specifies the ID of the cabinet.
TVOE Software Element
The TVOE software stanza should not be added to an IDIH system where the IDIH guest is co-located with a PMAC guest.
Note: Do not IPM the TVOE host when the IDIH guest and PMAC guest are on the same TVOE host.
TVOE Server info Element
A server info element specifies configuration information for TVOE hosts, guests, and native application servers. The only sub elements that should be changed are the TVOE hostname and TVOE ntpserver ipaddress.
The hostname sub element sets the hostname for the TVOE host.
The ntpservers sub element sets NTP servers for the system. It may contain up to five ntpserver sub elements. Each ntpserver element contains name and ipaddress sub elements which are the host name and IP address of the NTP servers.

DSR 8.2 Software Upgrade GuideDSR 8.2 Software Upgrade Guide
Page | 299 E88968-01
TVOE tpdinterface Sub-Element
The tpdinterface sub element specifies the TVOE interface configuration. The only sub elements that should be modified are the device, type, vlandata and vlandid elements.
device contains the name of the TVOE interface device.
type can be either Vlan or Bonding.
vlandata contains a vlanid sub-element with the ID of the vlan.
TVOE tpdbridge Sub-Element
Each tpdbridge sub element specifies the TVOE bridge configuration. The sub elements that should be modified are interfaces, address, and netmask.
interfaces defines the interfaces in the TVOE host bridge.
address defines the IP address of the TVOE host bridge.
netmask defines the network mask for the TVOE host bridge.
TVOE tpdroute Sub-Element
This tpdroute sub element specifies the TVOE route configuration. The only sub element that should be modified is the gateway.
gateway specifies the gateway for the XMI route used by the TVOE host.
Oracle Guest Scripts Element Network
The scripts element defines files that are executed as part of the IPM process. Currently, network configuration of the TVOE guest is not directly supported by the Fast Deployment. Instead, the netAdm script is called with arguments. The only arguments that should be modified are the address, netmask, and gateway.
address defines the IP XMI address of the Oracle guest.
netmask defines the Oracle guest XMI netmask.
gateway defines the XMI default route used by the Oracle guest.
Mediation Guest Scripts Element Network
The scripts element defines files that are executed as part of the IPM process. Currently, network configuration of the TVOE guest is not directly supported by the Fast Deployment. Instead, the netAdm script is called with arguments. The only arguments that should be modified are the address, netmask, and gateway.
address defines the IP XMI and IMI address of the Mediation guest.
netmask defines the Mediation guest XMI and IMI netmask.
gateway defines the XMI default route used by the mediation guest.
Application Guest Scripts Element Network
The scripts element defines files that are executed as part of the IPM process. Currently, network configuration of the TVOE guest is not directly supported by the Fast Deployment. Instead, the netAdm script is called with arguments. The only arguments that should be modified are the address, netmask, and gateway.
address defines the IP XMI address of the Application guest.
netmask defines the Application guest XMI netmask.
gateway defines the XMI default route used by the Application guest.

DSR 8.2 Software Upgrade GuideDSR 8.2 Software Upgrade Guide
Page | 300 E88968-01
V.1. Sample FDC Configuration File
<fdc>
<infrastructures>
<infrastructure name="PMAC">
<!--Software Elements-->
<software>
<image id="tvoe">
<name>872-2525-101-2.5.0_82.12.1-TVOE-x86_64</name>
</image>
<image id="app">
<name>872-2427-102-7.0.0_7.0.0-apps-x86_64</name>
</image>
<image id="med">
<name>872-2427-101-7.0.0_7.0.0-mediation-x86_64</name>
</image>
<image id="ora">
<name>872-2440-104-7.0.0_7.0.0-oracle-x86_64</name>
</image>
<image id="tpd">
<name>TPD.install-7.5.0_82.15.0-CentOS6.4-x86_64</name>
</image>
</software>
<hardware>
<cabinet id="cab1">
<cabid>1</cabid>
</cabinet>
<!--Enclosure Element: Update cabhwid, endid and oa ip's-->
<enclosure id="enc1">
<cabhwid>cab1</cabhwid>
<encid>1401</encid>
<oa1>10.240.71.197</oa1>
<oa2>10.240.71.198</oa2>
</enclosure>
<!--Blade Element: Update enchwid, bay and type-->
<blade id="blade7">
<enchwid>enc1</enchwid>
<bay>7F</bay>
<type>ProLiant BL460c G6</type>
</blade>
<!--Rack Mount Server Element: update rmsOOBIP with ILO IP-->
<rms id="mgmtsrvr">
<rmsOOBIP>10.250.36.27</rmsOOBIP>
<rmsname>d-ray</rmsname>
<cabhwid>cab1</cabhwid>
<rmsuser>root</rmsuser>

DSR 8.2 Software Upgrade GuideDSR 8.2 Software Upgrade Guide
Page | 301 E88968-01
<rmspassword>TklcRoot</rmspassword>
<type>ProLiant DL380 G8</type>
</rms>
</hardware>
<tvoehost id="mgmtsrvrtvoe">
<!--TVOE Hardware Element: Update the name of the tvoe device-->
<!--In this example we are configuring a rms server-->
<hardware>
<rmshwid>mgmtsrvr</rmshwid>
<!--bladehwid>blade7</bladehwid-->
</hardware>
<!--TVOE Software Element-->
<!--Do Not Use this element when the PM&C host co-exist with IDIH-->
<software>
<baseimage>tvoe</baseimage>
</software-->
<server info>
<!--tvoe hostname: Update hostname-->
<hostname>d-ray</hostname>
<!--tvoe ntpservers: Update ip address-->
<ntpservers>
<ntpserver>
<name>ntpserver1</name>
<ipaddress>10.250.32.10</ipaddress>
</ntpserver>
</ntpservers>
</server info>
<tpdnetworking>
<tpdinterfaces>
<!--tvoe xmi interface: Update device and vlanid-->
<tpdinterface id="xmi">
<device>bond0.3</device>
<type>Vlan</type>
<vlandata>
<vlanid>3</vlanid>
</vlandata>
<onboot>yes</onboot>
<bootproto>none</bootproto>
</tpdinterface>
<!--Tvoe imi interface: Update device and vlanid-->
<tpdinterface id="imi">
<device>bond0.4</device>
<type>Vlan</type>
<vlandata>
<vlanid>4</vlanid>

DSR 8.2 Software Upgrade GuideDSR 8.2 Software Upgrade Guide
Page | 302 E88968-01
</vlandata>
<onboot>yes</onboot>
<bootproto>none</bootproto>
</tpdinterface>
</tpdinterfaces>
<tpdbridges>
<!--Tvoe xmi bridge: Update interfaces, ipaddress and netmask-
->
<tpdbridge id="xmibr">
<name>xmi</name>
<!--Make sure this value matches the imi tpdinterface-->
<interfaces>bond0.3</interfaces>
<bootproto>none</bootproto>
<address>10.240.51.39</address>
<netmask>255.255.255.0</netmask>
<onboot>yes</onboot>
</tpdbridge>
<!--Tvoe imi bridge: Update interfaces, ipaddress and netmask-
->
<tpdbridge id="imibr">
<name>imi</name>
<!--Make sure this value matches the imi tpdinterface-->
<interfaces>bond0.4</interfaces>
<bootproto>none</bootproto>
<onboot>yes</onboot>
</tpdbridge>
<tpdbridge id="intbr">
<name>int</name>
<bootproto>none</bootproto>
<onboot>yes</onboot>
</tpdbridge>
</tpdbridges>
<tpdroutes>
<!--Tvoe default gateway address: Update gateway-->
<tpdroute id="default">
<type>default</type>
<device>xmi</device>
<gateway>10.240.30.3</gateway>
</tpdroute>
</tpdroutes>
</tpdnetworking>
<scripts>
<predeploy>
<!--configExt configures external disk-->
<scriptfile id="configExt">
<image>med</image>

DSR 8.2 Software Upgrade GuideDSR 8.2 Software Upgrade Guide
Page | 303 E88968-01
<imagefile>external.pl</imagefile>
<filename>/root/external.pl</filename>
</scriptfile>
</predeploy>
</scripts>
</tvoehost>
</infrastructure>
</infrastructures>
<servers>
<!--Oracle Guest Configuration-->
<tvoeguest id="Oracle">
<infrastructure>PMAC</infrastructure>
<tvoehost>mgmtsrvrtvoe</tvoehost>
<!--Oracle Guest Profile: Update if hardware is Gen6 default is
Gen8-->
<!--profile>ORA_GEN6</profile-->
<profile>ORA_GEN8</profile>
<name>oracle</name>
<software>
<baseimage>tpd</baseimage>
<appimage>ora</appimage>
</software>
<server info>
<!--Oracle guest hostname-->
<hostname>mamie</hostname>
</server info>
<scripts>
<presrvapp>
<scriptfile id="oracleInt">
<filename>/usr/TKLC/plat/bin/netAdm</filename>
<arguments>set --device=int --address=10.254.254.2 --
netmask=255.255.255.224
--onboot=yes --bootproto=none</arguments>
</scriptfile>
<!--Oracle Guest xmi network: Update address and netmask-->
<scriptfile id="oracleXmi">
<filename>/usr/TKLC/plat/bin/netAdm</filename>
<arguments>set --device=xmi --address=10.250.51.184 --
netmask=255.255.255.0
--onboot=yes --bootproto=none</arguments>
</scriptfile>
<!--Oracle Guest xmi default route: Update gateway-->
<scriptfile id="oracleRoute">
<filename>/usr/TKLC/plat/bin/netAdm</filename>

DSR 8.2 Software Upgrade GuideDSR 8.2 Software Upgrade Guide
Page | 304 E88968-01
<arguments>add --route=default --device=xmi --
gateway=10.250.51.1</arguments>
</scriptfile>
</presrvapp>
<postsrvapp>
<!--Oracle Post Server Application Configuration Script-->
<scriptfile id="oracleConfig">
<filename>/opt/xIH/oracle/configureOracle.sh</filename>
<timeout>2700</timeout>
</scriptfile>
</postsrvapp>
</scripts>
</tvoeguest>
<!--Mediation Guest Configuration-->
<tvoeguest id="Mediation">
<infrastructure>PMAC</infrastructure>
<tvoehost>mgmtsrvrtvoe</tvoehost>
<!--Mediation Guest Profile: Update if hardware is Gen6 default is
Gen8-->
<!--profile>MED_GEN6</profile-->
<profile>MED_GEN8</profile>
<name>mediation</name>
<software>
<baseimage>tpd</baseimage>
<appimage>med</appimage>
</software>
<!--Mediation guest hostname-->
<server info>
<hostname>poney</hostname>
</server info>
<scripts>
<presrvapp>
<scriptfile id="medInt">
<filename>/usr/TKLC/plat/bin/netAdm</filename>
<arguments>set --device=int --address=10.254.254.3 --
netmask=255.255.255.224
--onboot=yes --bootproto=none</arguments>
</scriptfile>
<!--Mediation Guest xmi network: Update address and netmask-->
<scriptfile id="medXmi">
<filename>/usr/TKLC/plat/bin/netAdm</filename>
<arguments>set --device=xmi --address=10.250.51.185 --
netmask=255.255.255.0
--onboot=yes --bootproto=none</arguments>
</scriptfile>
<!--Mediation Guest xmi default route: Update gateway-->

DSR 8.2 Software Upgrade GuideDSR 8.2 Software Upgrade Guide
Page | 305 E88968-01
<scriptfile id="medRoute">
<filename>/usr/TKLC/plat/bin/netAdm</filename>
<arguments>add --route=default --device=xmi --
gateway=10.250.51.1</arguments>
</scriptfile>
<!--Mediation Guest imi network: Update address and netmask-->
<scriptfile id="medImi">
<filename>/usr/TKLC/plat/bin/netAdm</filename>
<arguments>set --device=imi --address=192.168.10.55 --
netmask=255.255.255.0
--onboot=yes --bootproto=none</arguments>
</scriptfile>
</presrvapp>
<!--Mediation Post Deploy Database Configuration Script-->
<postdeploy>
<scriptfile id="medConfig">
<filename>/opt/xIH/mediation/xdrDbInstall/install.sh</filen
ame>
</scriptfile>
</postdeploy>
</scripts>
</tvoeguest>
<!--Application Guest Configuration-->
<tvoeguest id="Application">
<infrastructure>PMAC</infrastructure>
<tvoehost>mgmtsrvrtvoe</tvoehost>
<!--Application Guest Profile: Update if hardware is Gen6 default is
Gen8-->
<!--profile>APP_GEN6</profile-->
<profile>APP_GEN8</profile>
<profile>application</profile>
<name>application</name>
<software>
<baseimage>tpd</baseimage>
<appimage>app</appimage>
</software>
<!--Application guest hostname: Update hostname-->
<server info>
<hostname>jesco</hostname>
</server info>
<scripts>
<presrvapp>
<scriptfile id="appInt">
<filename>/usr/TKLC/plat/bin/netAdm</filename>
<arguments>set --device=int --address=10.254.254.4 --
netmask=255.255.255.224

DSR 8.2 Software Upgrade GuideDSR 8.2 Software Upgrade Guide
Page | 306 E88968-01
--onboot=yes --bootproto=none</arguments>
</scriptfile>
<!--Application Guest xmi network: Update address and netmask-
->
<scriptfile id="appXmi">
<filename>/usr/TKLC/plat/bin/netAdm</filename>
<arguments>set --device=xmi --address=10.250.51.186 --
netmask=255.255.255.0
--onboot=yes --bootproto=none</arguments>
</scriptfile>
<!--Application Guest xmi default route: Update gateway-->
<scriptfile id="appRoute">
<filename>/usr/TKLC/plat/bin/netAdm</filename>
<arguments>add --route=default --device=xmi --
gateway=10.250.51.1</arguments>
</scriptfile>
</presrvapp>
<postdeploy>
<!--Sleep allows time for mediation scripts completion-->
<scriptfile id="appSleep">
<filename>/bin/sleep</filename>
<arguments>60</arguments>
</scriptfile>
<!--Application Post Deploy Configuration Script-->
<scriptfile id="appConfig">
<filename>/opt/xIH/apps/install.sh</filename>
<timeout>3000</timeout>
</scriptfile>
</postdeploy>
</scripts>
</tvoeguest>
</servers>
</fdc>

DSR 8.2 Software Upgrade GuideDSR 8.2 Software Upgrade Guide
Page | 307 E88968-01
Appendix W. Advanced Health Check Procedure
Procedure 80. Firewall Check for DNS Port 53
STEP#
This procedure verifies the UDP/TCP port 53 is open between NOAM and each DR-NOAM site, NOAM and each SOAM site, and between MPs and each name server of the file /etc/resolv.conf.
Check off () each step as it is completed. Boxes have been provided for this purpose under each step number.
If this procedure fails, it is recommended to contact My Oracle Support (MOS) and ask for assistance.
1.
Verify if the UDP/TCP port 53 is open between NOAM and each DR-NOAM site
From the command prompt of the server with the alarm:
1. Issue the sudo nmap -sTU -p 53 <DR-NOAM hostname> command.
2. Verify that the customer firewall is configured to allow DNS traffic on UDP/TCP port 53:
[admusr@Icepick-NO-A ~]$ sudo nmap -sTU -p 53
Icepick-DRNOAM-A
Starting Nmap 5.51 ( http://nmap.org ) at 2018-03-02
17:57 EST
Nmap scan report for Icepick-DRNOAM-A
(10.75.202.173)
Host is up (0.00025s latency).
rDNS record for 10.75.202.173: Icepick-DRNOAM-
A.platform.cgbu.us.oracle.com
PORT STATE SERVICE
53/tcp open domain
53/udp open domain
MAC Address: 02:05:39:E0:60:8A (Unknown)
Nmap done: 1 IP address (1 host up) scanned in 5.60
seconds
[admusr@Icepick-NO-A ~]$
If port is reported as any state other than “Open”, then inform the Customer before accepting the upgrade.
Note: If the ports are reported as “Closed” it may be because no services are running on the far end. Check with the Customer if the firewall has been configured to allow DNS traffic on port 53.
If the port is reported as “Filtered” then the port is likely blocked by a Firewall and the upgrade MUST not be accepted until the Customer confirms that their network will allow DNS traffic on port 53.

DSR 8.2 Software Upgrade GuideDSR 8.2 Software Upgrade Guide
Page | 308 E88968-01
2.
Verify if the UDP/TCP port 53 is open between NOAM and each SOAM site
From the command prompt of the server with the alarm:
1. Issue the sudo nmap -sTU -p 53 <SOAM hostname> command.
2. Verify the customer firewall is configured to allow DNS traffic on UDP/TCP port 53:
[admusr@Icepick-NO-A ~]$ sudo nmap -sTU -p 53
Icepick-SO-A
Starting Nmap 5.51 ( http://nmap.org ) at 2018-03-02
17:57 EST
Nmap scan report for Icepick-SO-A (10.75.202.173)
Host is up (0.00025s latency).
rDNS record for 10.75.202.173: Icepick-SO-
A.platform.cgbu.us.oracle.com
PORT STATE SERVICE
53/tcp open domain
53/udp open domain
MAC Address: 02:05:39:E0:60:8A (Unknown)
Nmap done: 1 IP address (1 host up) scanned in 5.60
seconds
3. If port is reported as any state other than “Open” then inform the Customer before accepting the upgrade.
Note: If the ports are reported as “Closed” it may be because no services are running on the far end. Verify with the Customer that the firewall has been configured to allow DNS traffic on port 53.
4. If the port is reported as “Filtered” then the port is likely to be blocked by a firewall and the upgrade MUST not be accepted until the Customer confirms that their network will allow DNS traffic on port 53.

DSR 8.2 Software Upgrade GuideDSR 8.2 Software Upgrade Guide
Page | 309 E88968-01
3.
Verify if the UDP/TCP port 53 is open between MP and each name server of the /etc/resolv.conf file
1. List the contents of the file /etc/resolv.conf using the “sudo cat etc/resolv.conf” command.
2. Verify that the Customer Firewall is configured to allow DNS traffic on UDP/TCP port 53 to the addressed from the file /etc/resolv.conf:
[admusr@Icepick-DAMP-1 ~]$ sudo cat
/etc/resolv.conf (lookups)
domain platform.cgbu.us.oracle.com
nameserver 10.240.50.134
nameserver 10.240.50.133
search platform.cgbu.us.oracle.com 500lab.com
labs.tekelec.com labs.nc.tekelec.com
[admusr@Icepick-DAMP-1 ~]$
[admusr@Icepick-DAMP-1 ~]$ sudo nmap -sTU -p 53
10.240.50.134 10.240.50.133
Starting Nmap 5.51 ( http://nmap.org ) at 2018-03-02
17:46 EST
Nmap scan report for Icepick-SO-B-
imi.platform.cgbu.us.oracle.com (10.240.50.134)
Host is up (0.00022s latency).
PORT STATE SERVICE
53/tcp open domain
53/udp open domain
MAC Address: 02:17:B4:4F:DA:B6 (Unknown)
Nmap scan report for Icepick-SO-A-
imi.platform.cgbu.us.oracle.com (10.240.50.133)
Host is up (0.00025s latency).
PORT STATE SERVICE
53/tcp open domain
53/udp open domain
MAC Address: 02:EE:13:E2:2C:EF (Unknown)
Nmap done: 2 IP addresses (2 hosts up) scanned in
5.66 seconds
[admusr@Icepick-DAMP-1 ~]$
If port is reported as any state other than “Open” then inform the Customer before accepting the upgrade.
Note: If the ports are reported as “Closed” it may be because no services are running on the far end. Verify with the Customer that the firewall has been configured to allow DNS traffic on port 53.
If the port is reported as “Filtered” then the port is likely to be blocked by a Firewall and the upgrade MUST not be accepted until the Customer confirms that their network will allow DNS traffic on port 53.
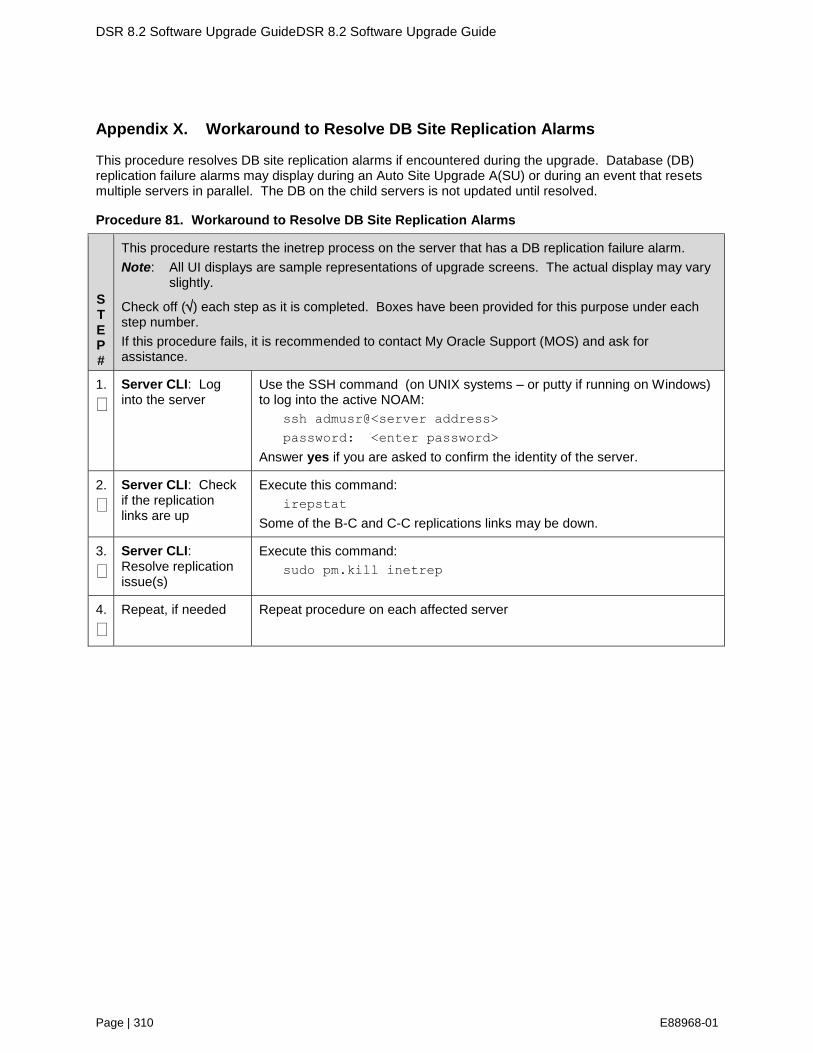
DSR 8.2 Software Upgrade GuideDSR 8.2 Software Upgrade Guide
Page | 310 E88968-01
Appendix X. Workaround to Resolve DB Site Replication Alarms
This procedure resolves DB site replication alarms if encountered during the upgrade. Database (DB) replication failure alarms may display during an Auto Site Upgrade A(SU) or during an event that resets multiple servers in parallel. The DB on the child servers is not updated until resolved.
Procedure 81. Workaround to Resolve DB Site Replication Alarms
S T E P #
This procedure restarts the inetrep process on the server that has a DB replication failure alarm.
Note: All UI displays are sample representations of upgrade screens. The actual display may vary slightly.
Check off () each step as it is completed. Boxes have been provided for this purpose under each step number.
If this procedure fails, it is recommended to contact My Oracle Support (MOS) and ask for assistance.
1.
Server CLI: Log into the server
Use the SSH command (on UNIX systems – or putty if running on Windows) to log into the active NOAM:
ssh admusr@<server address>
password: <enter password>
Answer yes if you are asked to confirm the identity of the server.
2.
Server CLI: Check if the replication links are up
Execute this command:
irepstat
Some of the B-C and C-C replications links may be down.
3.
Server CLI: Resolve replication issue(s)
Execute this command:
sudo pm.kill inetrep
4.
Repeat, if needed Repeat procedure on each affected server
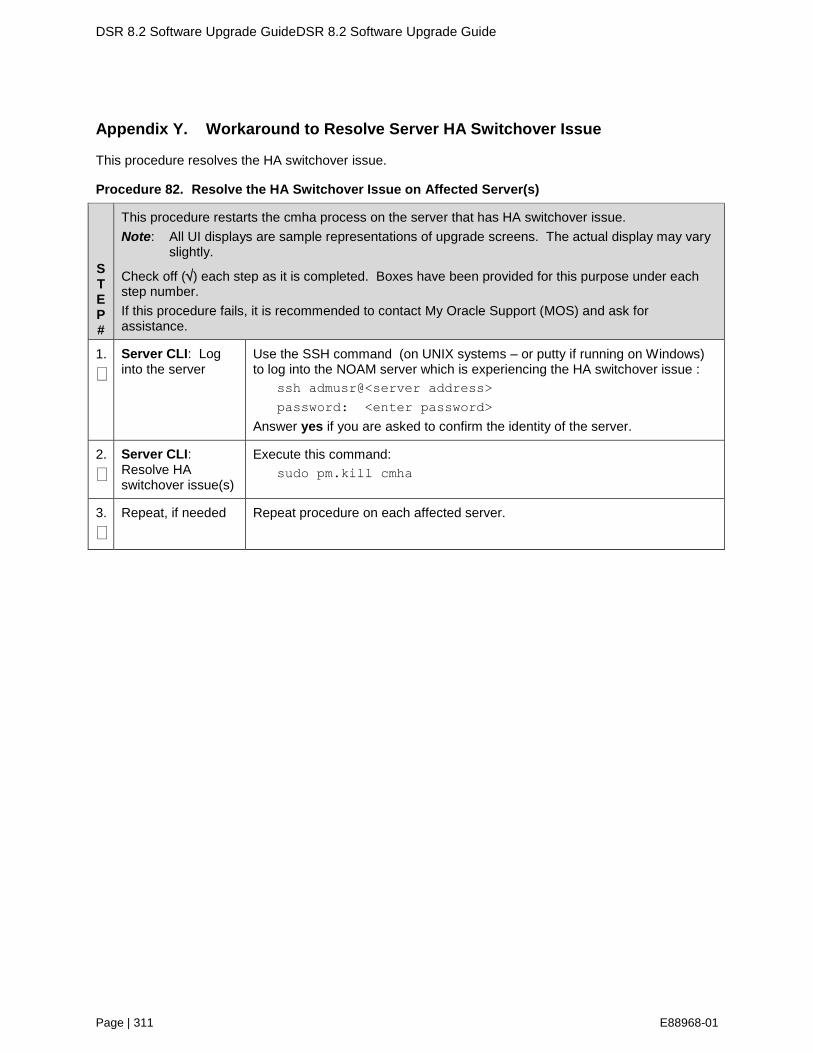
DSR 8.2 Software Upgrade GuideDSR 8.2 Software Upgrade Guide
Page | 311 E88968-01
Appendix Y. Workaround to Resolve Server HA Switchover Issue
This procedure resolves the HA switchover issue.
Procedure 82. Resolve the HA Switchover Issue on Affected Server(s)
S T E P #
This procedure restarts the cmha process on the server that has HA switchover issue.
Note: All UI displays are sample representations of upgrade screens. The actual display may vary slightly.
Check off () each step as it is completed. Boxes have been provided for this purpose under each step number.
If this procedure fails, it is recommended to contact My Oracle Support (MOS) and ask for assistance.
1.
Server CLI: Log into the server
Use the SSH command (on UNIX systems – or putty if running on Windows) to log into the NOAM server which is experiencing the HA switchover issue :
ssh admusr@<server address>
password: <enter password>
Answer yes if you are asked to confirm the identity of the server.
2.
Server CLI: Resolve HA switchover issue(s)
Execute this command:
sudo pm.kill cmha
3.
Repeat, if needed Repeat procedure on each affected server.

DSR 8.2 Software Upgrade GuideDSR 8.2 Software Upgrade Guide
Page | 312 E88968-01
Appendix Z. Workaround for SNMP Configuration
This workaround step should be performed only in the following cases:
If SNMP is not configured.
If SNMP is already configured and SNMPv3 (V3Only) is selected as enabled version.
Procedure 83. Configure or Update SNMP Configuration
S T E P #
This workaround configures or updates the SNMP with SNMPv2c and SNMPv3 as the enabled versions for SNMP Traps configuration, since PMAC does not support SNMPv3.
Check off () each step as it is completed. Boxes have been provided for this purpose under each step number.
If this procedure fails, it is recommended to contact My Oracle Support (MOS) and ask for assistance.
1.
NOAMP VIP GUI: Login
If not already done, establish a GUI session on the NOAM server the VIP IP address of the NOAM server.
Open the web browser and enter a URL of:
http://<Primary_NOAM_VIP_IP_Address>
Log into the NOAM GUI as the guiadmin user:

DSR 8.2 Software Upgrade GuideDSR 8.2 Software Upgrade Guide
Page | 313 E88968-01
Procedure 83. Configure or Update SNMP Configuration
2.
NOAM VIP GUI: Configure/Update system-wide SNMP trap receiver(s)
1. Navigate to Administration > Remote Servers > SNMP Trapping.
2. Select the Server Group tab for SNMP trap configuration:
3. Type the IP address or hostname of the Network Management Station (NMS) where you want to forward traps. This IP should be reachable from the NOAMP’s XMI network. If already configured SNMP with SNMPv3 as enabled version, another server needs to be configured here.
4. Continue to fill in additional secondary, tertiary, etc., Manager IPs in the corresponding slots if desired.
5. Set the Enabled Versions as SNMPv2c and SNMPv3.
Note: In case, enabled versions of already configured SNMP is V3Only, then update the enabled versions as above.
6. Check Traps Enabled checkboxes for the Manager servers being configured.
7. Type the SNMP Community Name.
8. Leave all other fields at their default values.
9. Click OK.

DSR 8.2 Software Upgrade GuideDSR 8.2 Software Upgrade Guide
Page | 314 E88968-01
Procedure 83. Configure or Update SNMP Configuration
3.
PMAC GUI: Login Open web browser and enter:
http://<PMAC_Mgmt_Network_IP>
Login as guiadmin user:

DSR 8.2 Software Upgrade GuideDSR 8.2 Software Upgrade Guide
Page | 315 E88968-01
Procedure 83. Configure or Update SNMP Configuration
4.
PMAC GUI: Update the TVOE host SNMP community string
1. Navigate to Administration->Credentials->SNMP Community String Update.
2. Check the Use Site Specific Read/Write Community String checkbox.
Click Update Servers.
3. Click OK.
4. Execute following command on PMAC CLI.
$ sudo sentry restart
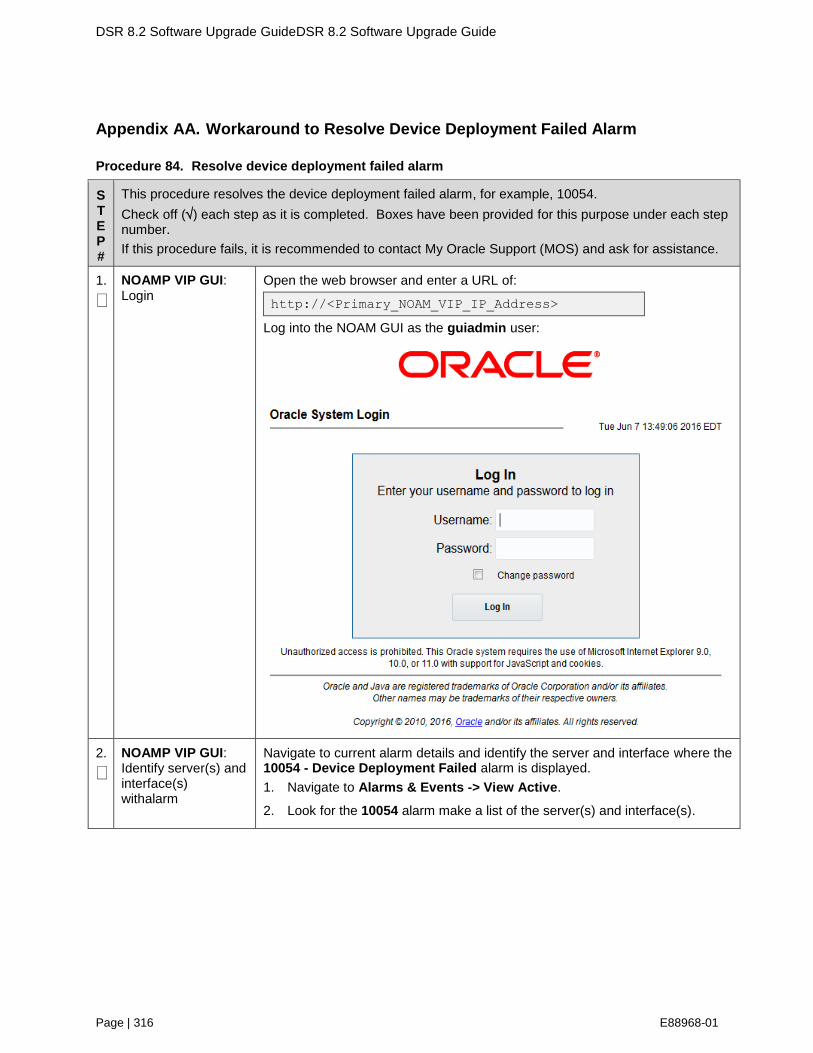
DSR 8.2 Software Upgrade GuideDSR 8.2 Software Upgrade Guide
Page | 316 E88968-01
Appendix AA. Workaround to Resolve Device Deployment Failed Alarm
Procedure 84. Resolve device deployment failed alarm
S T E P #
This procedure resolves the device deployment failed alarm, for example, 10054.
Check off () each step as it is completed. Boxes have been provided for this purpose under each step number.
If this procedure fails, it is recommended to contact My Oracle Support (MOS) and ask for assistance.
1.
NOAMP VIP GUI: Login
Open the web browser and enter a URL of:
http://<Primary_NOAM_VIP_IP_Address>
Log into the NOAM GUI as the guiadmin user:
2.
NOAMP VIP GUI: Identify server(s) and interface(s) withalarm
Navigate to current alarm details and identify the server and interface where the 10054 - Device Deployment Failed alarm is displayed.
1. Navigate to Alarms & Events -> View Active.
2. Look for the 10054 alarm make a list of the server(s) and interface(s).

DSR 8.2 Software Upgrade GuideDSR 8.2 Software Upgrade Guide
Page | 317 E88968-01
Procedure 84. Resolve device deployment failed alarm
3.
NOAMP VIP GUI: Corrective action for alarm 10054
Interfaces like xmi and imi are in locked state and do not allow editing as a corrective action.
For xmi and imi interfaces, first unlock the interface and for other interfaces skip steps (a) to (d) below.
1. Navigate to Configuration -> Networking -> Networks, select the respective “Network element” tab used for the server configuration
2. Click on the Network Name row.
3. Click Unlock. Click on the checkbox to confirm it and click OK.
4. To unlock the network for the particular device, navigate to Configuration > Networking > Devices.
5. Click on the Server tab from the list in Step 2.
6. Select each interface row one by one for which alarm is showing and click Edit.
7. Click OK.
Note: Give some time to system to auto correct the condition to clear the alarm.
Once this step is done, lock the network back again which were unlocked above.
For xmi and imi interfaces, lock the interface back, for other interfaces skip (a) to (d) below.
1. To lock the network for a specific device, navigate to Configuration > Networking > Networks, select the respective Network element tab used for the server configuration.
2. Click the Network Name row.
3. Click Lock. Click on the checkbox to confirm it and click OK.
Appendix BB. Workaround to Resolve syscheck Error for CPU Failure
Procedure 85. Workaround to Resolve syscheck Error for CPU Failure
S T E P #
This procedure is to resolve the syscheck errors for CPU failure.
Check off () each step as it is completed. Boxes have been provided for this purpose under each step number.
If this procedure fails, it is recommended to contact My Oracle Support (MOS) and ask for assistance.
1.
Log into the server using CLI on which syscheck is failing
Use the SSH command (on UNIX systems – or putty if running on windows) to log into the server identified.
ssh admusr@<SERVER_XMI>
password: <enter password>
Answer yes if you are asked to confirm the identity of the server

DSR 8.2 Software Upgrade GuideDSR 8.2 Software Upgrade Guide
Page | 318 E88968-01
Procedure 85. Workaround to Resolve syscheck Error for CPU Failure
2.
Server CLI: Execute workaround
1. Edit the cpu config file.
$ sudo vim
/usr/TKLC/plat/lib/Syscheck/modules/system/cpu/config
2. Comment out the all texts that reads: EXPECTED_CPUS= by putting # at the beginning of the line, for example:
# EXPECTED_CPUS=2
3. Save the cpu config file.
4. Reconfig the syscheck by running these commands:
sudo syscheck --unconfig
sudo syscheck --reconfig
sudo syscheck
CPU related errors do not display.
Appendix CC. My Oracle Support (MOS)
My Oracle Support
MOS (https://support.oracle.com) is your initial point of contact for all product support and training needs. A representative at Customer Access Support (CAS) can assist you with MOS registration.
Call the CAS main number at 1-800-223-1711 (toll-free in the US), or call the Oracle Support hotline for your local country from the list at http://www.oracle.com/us/support/contact/index.html. When calling, make the selections in the sequence shown on the Support telephone menu:
1. Select 2 for New Service Request.
2. Select 3 for Hardware, Networking and Solaris Operating System Support.
3. Select one of the following options:
For technical issues such as creating a new Service Request (SR), select 1.
For non-technical issues such as registration or assistance with MOS, select 2.
You are connected to a live agent who can assist you with MOS registration and opening a support ticket. MOS is available 24 hours a day, 7 days a week, and 365 days a year.
Emergency Response
In the event of a critical service situation, emergency response is offered by the CAS main number at 1-
800-223-1711 (toll-free in the US), or by calling the Oracle Support hotline for your local country from
the list at http://www.oracle.com/us/support/contact/index.html. The emergency response provides immediate coverage, automatic escalation, and other features to ensure that the critical situation is resolved as rapidly as possible.
A critical situation is defined as a problem with the installed equipment that severely affects service, traffic, or maintenance capabilities, and requires immediate corrective action. Critical situations affect service and/or system operation resulting in one or several of these situations:
A total system failure that results in loss of all transaction processing capability
Significant reduction in system capacity or traffic handling capability
Loss of the system’s ability to perform automatic system reconfiguration
Inability to restart a processor or the system

DSR 8.2 Software Upgrade GuideDSR 8.2 Software Upgrade Guide
Page | 319 E88968-01
Corruption of system databases that requires service affecting corrective actions
Loss of access for maintenance or recovery operations
Loss of the system ability to provide any required critical or major trouble notification
Any other problem severely affecting service, capacity/traffic, billing, and maintenance capabilities may be defined as critical by prior discussion and agreement with Oracle.
Locate Product Documentation on the Oracle Help Center
Oracle Communications customer documentation is available on the web at the Oracle Help Center (OHC) site, http://docs.oracle.com. You do not have to register to access these documents. Viewing these files requires Adobe Acrobat Reader, which can be downloaded at http://www.adobe.com.
1. Access the Oracle Help Center site at http://docs.oracle.com.
2. Click Industries.
3. Under the Oracle Communications subheading, click the Oracle Communications documentation link. The Communications Documentation page appears. Most products covered by these documentation sets display under the headings Network Session Delivery and Control Infrastructure or “Platforms.”
4. Click on your Product and then the Release Number. A list of the entire documentation set for the selected product and release displays. To download a file to your location, right-click the PDF link,
select Save target as (or similar command based on your browser), and save to a local folder.