
TIBCO JasperReports Server Upgrade Guide
54
JASPERREPORTS®SERVER UPGRADE GUIDE RELEASE 7.1 http://www.jaspersoft.com
-
Upload
khangminh22 -
Category
Documents
-
view
2 -
download
0
Transcript of TIBCO JasperReports Server Upgrade Guide

Copyright ©2005-2018 TIBCO Software Inc. All Rights Reserved. TIBCO Software Inc.
This is version 0518-JSP71-09 of the TIBCO JasperReports Server Upgrade Guide.
TABLE OF CONTENTS
Chapter 1 Introduction 71.1 Server Upgrade Distributions 81.1.1 About Bundled Apache Ant 8
Chapter 2 Overlay Upgrade 112.1 Introduction to the Overlay Upgrade 112.2 Upgrade Steps Overview 122.3 Plan Your Upgrade 122.4 Back Up Your JasperReports Server Instance 122.5 Unpack the Overlay Upgrade Package 122.6 Check for JDBC Driver (Oracle, SQL Server, DB2) 132.7 Run theOverlay Upgrade 132.8 Rerun the Overlay Upgrade 142.9 Rollback Procedure 142.10 Starting and Logging into JasperReports Server 7.1 152.10.1 Clearing Your Browser Cache 152.10.2 Logging into JasperReports Server 15
2.11 Additional Tasks to Complete the Upgrade 152.11.1 Handling JasperReports Server Customizations 152.11.2 Clearing the Application ServerWork Folder 152.11.3 Clearing the Application Server Temp Folder 162.11.4 Clearing the Repository Cache Database Table 16
2.12 Running Overlay Upgrade a Second Time 16
Chapter 3 Upgrading from 6.4 to 7.1 173.1 Upgrade Steps Overview 173.2 Upgrading with Customizations 173.3 Back Up Your JasperReports Server Instance 183.4 Preparing the JasperReports Server 7.1WAR File Distribution 183.5 Configuring Buildomatic for Your Database and Application Server 183.5.1 Example Buildomatic Configuration 193.5.2 Additional Step when Using JBoss 7 (andOracle, SQL Server, or DB2) 20
3.6 Upgrading to JasperReports Server 7.1 213.6.1 js-upgrade Test Mode 22
TIBCO Software Inc. 3
TIBCO JasperReports Server Upgrade Guide
3.6.2 Output Log Location 223.6.3 Errors 22
3.7 Starting and Logging into JasperReports Server7.1 223.7.1 Clearing Your Browser Cache 223.7.2 Logging into JasperReports Server 22
3.8 Additional Tasks to Complete the Upgrade 233.8.1 Handling JasperReports Server Customizations 233.8.2 Clearing the Application ServerWork Folder 233.8.3 Clearing the Application Server Temp Folder 233.8.4 Clearing the Repository Cache Database Table 23
Chapter 4 Upgrading from 6.0 - 6.3 to 7.1 254.1 Upgrade Steps Overview 254.2 Upgrading with Customizations 264.3 Back Up Your JasperReports Server Instance 264.4 Exporting Current Repository Data 264.4.1 Exporting from the UI 274.4.2 Using Buildomatic Scripts to Export Data 274.4.3 Using the js-export Script to Export Data 27
4.5 Preparing the JasperReports Server 7.1WAR File Distribution 284.6 Configuring Buildomatic for Your Database and Application Server 284.6.1 Example Buildomatic Configuration 284.6.2 Additional Step when Using JBoss 7 (andOracle, SQL Server, or DB2) 30
4.7 Upgrading to JasperReports Server 7.1 314.7.1 js-upgrade Test Mode 314.7.2 Output Log Location 314.7.3 Errors 32
4.8 Starting and Logging into JasperReports Server 7.1 324.8.1 Clearing Your Browser Cache 324.8.2 Logging into JasperReports Server 32
4.9 Additional Tasks to Complete the Upgrade 324.9.1 Handling JasperReports Server Customizations 324.9.2 Clearing the Application ServerWork Folder 334.9.3 Clearing the Application Server Temp Folder 334.9.4 Clearing the Repository Cache Database Table 33
4.10 OldManual Upgrade Steps 33
Chapter 5 Upgrading JasperReports Server 5.6.x or Earlier 355.1 Upgrading from 5.6.x or Earlier 355.2 Best Practices for Upgrading onWindows 35
Chapter 6 Upgrading from the Community Project 376.1 General Procedure 376.2 Backing Up Your JasperReports Server CP Instance 386.2.1 Backing Up Your JasperReports Server CP WAR File 386.2.2 Backing Up Your JasperReports Server Database 38
6.3 Exporting Your CP Repository Data 38
4 TIBCO Software Inc.
6.4 Preparing the JasperReports Server 7.1WAR File Distribution 396.5 Configuring Buildomatic for Your Database and Application Server 396.5.1 Example Buildomatic Configuration 39
6.6 Upgrading to the Commercial Version of JasperReports Server 7.1 406.7 Starting and Logging into JasperReports Server 7.1 416.7.1 Clearing Your Browser Cache 416.7.2 Logging into the Commercial Version of JasperReports Server 7.1 42
6.8 Re-Configuring XML/A Connections (Optional) 426.9 Additional Tasks to Complete the Upgrade 426.9.1 Handling JasperReports Server Customizations 436.9.2 Clearing the Application ServerWork Folder 436.9.3 Clearing the Application Server Temp Folder 436.9.4 Clearing the Repository Cache Database Table 43
Appendix A Planning Your Upgrade 45A.1 Changes in 7.1 That May Affect Your Upgrade 45A.1.1 Changes to the Login Page 45
A.2 Changes in 6.4 That May Affect Your Upgrade 46A.2.1 Removal of the Impala Connector 46
A.3 Changes in 6.2.1 That May Affect Your Upgrade 47A.3.1 Removal of the Impala Connector 47
A.4 Changes in 6.2 That May Affect Your Upgrade 47A.4.1 Renaming of Ad Hoc Templates 47
A.5 Changes in 6.1 That May Affect Your Upgrade 48A.5.1 Changes to Themes 48
Appendix B Working With JDBC Drivers 51B.1 Open Source JDBC Drivers 51B.1.1 PostgreSQL Example 51B.1.2 MySQL Example 52
B.2 Commercial JDBC Drivers 52B.2.1 Oracle Example 53B.2.2 SQL Server Example 53B.2.3 DB2 Example 54
TIBCO Software Inc. 5

TIBCO JasperReports Server Upgrade Guide
6 TIBCO Software Inc.
CHAPTER 1 INTRODUCTIONTIBCO JasperReports® Server builds on TIBCO JasperReports® Library as a comprehensive family of BusinessIntelligence (BI) products, providing robust static and interactive reporting, report server, and data analysiscapabilities. These capabilities are available as either stand-alone products, or as part of an integrated end-to-endBI suite utilizing common metadata and provide shared services, such as security, a repository, and scheduling.The server exposes comprehensive public interfaces enabling seamless integration with other applications andthe capability to easily add custom functionality.
This section describes functionality that can be restricted by the software license for JasperReportsServer. If you don’t see some of the options described in this section, your license may prohibit you fromusing them. To find out what you're licensed to use, or to upgrade your license, contact Jaspersoft.
The heart of the TIBCO Jaspersoft® BI Suite is the server, which provides the ability to:• Easily create new reports based on views designed in an intuitive, web-based, drag and drop Ad Hoc
Editor.• Efficiently and securely manage many reports.• Interact with reports, including sorting, changing formatting, entering parameters, and drilling on data.• Schedule reports for distribution through email and storage in the repository.• Arrange reports and web content to create appealing, data-rich Jaspersoft Dashboards that quickly convey
business trends.
For users interested in multi-dimensional modeling, we offer Jaspersoft® OLAP, which runs as part of the server.
While the Ad Hoc Editor lets users create simple reports, more complex reports can be created outside of theserver. You can either use Jaspersoft® Studio or manually write JRXML code to create a report that can be runin the server. We recommend that you use Jaspersoft Studio unless you have a thorough understanding of theJasperReports file structure.
You can use the following sources of information to learn about JasperReports Server:• Our core documentation describes how to install, administer, and use JasperReports Server and Jaspersoft
Studio. Core documentation is available as PDFs in the doc subdirectory of your JasperReports Serverinstallation. You can also access PDF and HTML versions of these guides online from the Documentationsection of the Jaspersoft Community website.
• Our Ultimate Guides document advanced features and configuration. They also include best practicerecommendations and numerous examples. You can access PDF and HTML versions of these guides onlinefrom the Documentation section of the Jaspersoft Community website.
TIBCO Software Inc. 7
TIBCO JasperReports Server Upgrade Guide
• Our Online Learning Portal lets you learn at your own pace, and covers topics for developers, systemadministrators, business users, and data integration users. The Portal is available online from the ProfessionalServices section of our website.
• Our free samples, which are installed with JasperReports Library, Jaspersoft Studio, and JasperReportsServer, are available and documented online. Please visit our GitHub repository.
• If you have a subscription to our professional support offerings, please contact our Technical Support teamwhen you have questions or run into difficulties. They're available on the web at and through email athttp://support.tibco.com and [email protected].
JasperReports Server is a component of both a community project and commercial offerings. Each integrates thestandard features such as security, scheduling, a web services interface, and much more for running and sharingreports. Commercial editions provide additional features, including Ad Hoc views and reports, advanced charts,dashboards, Domains, auditing, and a multi-organization architecture for hosting large BI deployments.
1.1 Server Upgrade DistributionsThe following distribution packages are available for JasperReports Server.
Distribution Package Description
Overlay Upgrade zip Available only with the Commercial version of JasperReports Server.
Supports upgrade to 7.1.0 from version 6.0 or later.
Supports only the Apache Tomcat application server.
Supports all certified repository databases.
Supports upgrade and rollback of upgrade changes.
Provides assistance with identifying customized files in your environment.
Supports Windows, Linux, Mac, and other platforms.
File name is: TIB_js-jrs_7.1.0_overlay.zip
WAR File Distribution Zip Supports upgrade from version 6.0 or later.
Supports all certified application servers.
Supports all certified repository databases.
Supports Windows, Linux, Mac, and other platforms.
File name is: TIB_js-jrs_7.1.0_bin.zip
1.1.1 About Bundled Apache AntWe recommend Apache Ant version 1.9.4, which is bundled with the Overlay Upgrade ZIP and the War FileDistribution ZIP. The Ant scripts used for upgrade come with Windows and Linux batch scripts pre-configuredto use the bundled version of Apache Ant.
If you want to run your own version of Apache Ant, version 1.8.1 or later is required.
The bundled Apache Ant includes an additional jar This jar (ant-contrib.jar) enables conditional logic in Ant. Ifyou're running your own Ant you should copy the ant-contrib.jar to your <Ant_HOME>/lib folder.
8 TIBCO Software Inc.
Chapter 1 Introduction
On Linux and Solaris, the Ant commands may not be compatible with all shells. If you get errors, use thebash shell explicitly. For more information, see the information on the bash shell in the Troubleshootingappendix of the JasperReports Server Installation Guide.
TIBCO Software Inc. 9

TIBCO JasperReports Server Upgrade Guide
10 TIBCO Software Inc.
CHAPTER 2 OVERLAY UPGRADEThis chapter describes the overlay process for upgrading to JasperReports Server 7.1.0 and contains thefollowing sections:• Introduction to the Overlay Upgrade• Upgrade Steps Overview• Plan Your Upgrade• Back Up Your JasperReports Server Instance• Unpack the Overlay Upgrade Package• Check for JDBC Driver (Oracle, SQL Server, DB2)• Run the Overlay Upgrade• Rerun the Overlay Upgrade• Rollback Procedure• Starting and Logging into JasperReports Server 7.1• Additional Tasks to Complete the Upgrade• Running Overlay Upgrade a Second Time
2.1 Introduction to the Overlay UpgradeThe overlay upgrade procedure is currently available only for the JasperReports Server Commercial editioninstalled with the WAR file and only with the Apache Tomcat application server.
• The overlay upgrade supports only the Apache Tomcat application server.• The overlay upgrade supports only JasperReports Server installations using the WAR file.
The binary installer is not supported.• All certified databases are supported.
The overlay upgrade supports upgrading from JasperReports Server versions 6.0 and later to JasperReports Server7.1.
Although the overlay upgrade does offer a rollback feature, you should always back up your database andapplication before upgrading.
This section uses a 6.4 to 7.1 upgrade as an example.
TIBCO Software Inc. 11
TIBCO JasperReports Server Upgrade Guide
2.2 Upgrade Steps OverviewThese are the general steps used in this section:1. Plan your upgrade.2. Back up your current JasperReports Server instance.
(The overlay tool will automatically back up your war file and ask if you've backed up your database.)3. Download and unpack the new JasperReports Server overlay upgrade 7.1 package zip file.4. Run the upgrade steps.
The overlay upgrade procedure will help you to identify any modifications or extensions you've made to yourJasperReports Server instance.
It's always best practice to back up your application and database before upgrading.
2.3 Plan Your UpgradeSee Appendix A, “Planning Your Upgrade ,” on page 45 to determine if any customizations you've made toyour existing version of JasperReports Server are affected by changes to the updated version.
2.4 Back Up Your JasperReports Server InstanceFirst back up your JasperReports Server WAR file and jasperserver database so you can restore them ifnecessary. Perform these steps from the command line in a Windows or Linux shell.
Back up your JasperReports Server War File:1. Create a folder where you can save your jasperserver-pro war file. For example, C:\JS_BACKUP or
/opt/JS_BACKUP.2. Copy <tomcat>/webapps/jasperserver-pro to <path>/JS_BACKUP
Back up your jasperserver Database:1. Create a folder (if you did not do so in the step above) where you can save your jasperserver database,
For example, C:\JS_BACKUP or /opt/JS_BACKUP.2. Run the following commands for PostgreSQL:
• PostgreSQLcd <path>/JS_BACKUP
pg_dump --username=postgres jasperserver > js-db-dump.sql
2.5 Unpack the Overlay Upgrade PackageThe overlay upgrade package comes in a file named: TIB_js-jrs_7.1.0_overlay.zip.1. Download the overlay upgrade package from TIBCO Jaspersoft Technical Support (http://support.tibco.com)
or contact your sales representative.
12 TIBCO Software Inc.
Chapter 2 Overlay Upgrade
2. Extract all files from TIB_js-jrs_7.1.0_overlay.zip. Create or choose a destination folder, such asC:\JS_OVERLAY on Windows, /home/<user>/JS_OVERLAY on Linux, or /Users/<user>/JS_OVERLAY onMac.
3. The overlay upgrade package unpacks into a folder named:overlay
This document refers to this folder location as:<overlay-folder>
2.6 Check for JDBC Driver (Oracle, SQL Server, DB2)As of version 5.6.1, JasperReports Server uses the TIBCO JDBC drivers for the Oracle, SQL Server, and DB2commercial databases. If you want to use a different JDBC driver, you need to copy it to the correct location. Ifyou use Oracle or DB2, you must also use your existing version of the db.template.properties file. See AppendixB, “Working With JDBC Drivers,” on page 51 for more information.
2.7 Run the Overlay UpgradeThe overlay upgrade works only with the Tomcat application server. It supports all certified JasperReportsServer databases. You can perform the overlay upgrade whether or not you have local customizations.1. Stop the Tomcat application server2. Make sure your database is running3. Run the following commands:
cd <overlay-folder>
overlay install
• You're prompted to specify a path to a working folder:You can accept the default or specify an alternate folderPress enter to accept the default “../overlayWorkspace”
• You are prompted to back up your jasperserver database. If you have already backed up yourdatabase, choose "y" to continue. If you have not yet backed up your database, choose "n" to exit theoverlay and create a backup.
• You are prompted to shutdown your Tomcat instance:You can stop Tomcat now if you have not already done soChoose “y” for yes to continue
• You're prompted to specify a path to your master.properties file:For a 6.4 instance it might be similar to:C:\Jaspersoft\jasperreports-server-6.4\buildomatic\default_master.properties
/opt/jasperreports-server-6.4/buildomatic/default_master.properties
Enter the full path and file name for your default_master.properties file• For final verification, the overlay prompts you for the path to your application server:
If you haven’t moved it, it's located in the path to: <tomcat>Press enter to accept the default if it's correct
• The overlay will begin updating your system:Your jasperserver-pro war file will be automatically backed up
TIBCO Software Inc. 13
TIBCO JasperReports Server Upgrade Guide
Potential customizations in your environment will be analyzed• You're prompted to review the report on customizations if you choose to:
Choose “y” for yes to continue with the upgradeThe jasperserver database will be upgradedThe jasperserver-pro war file will be upgradedThe core data resources will be upgraded in the jasperserver repository database
When the overlay upgrade has finished, start Tomcat, and log in to test the upgraded JasperReports Server.
If upgrade was successful, you'll see BUILD SUCCESSFUL on the command line.
2.8 Rerun the Overlay UpgradeIf you exit the overlay install for any reason, you can re-run the overlay by simply running the samecommand:
overlay install
By default, the overlay runs in resume mode (resumeMode=true) This means your answers to previous promptswill be remembered.
If you want to re-run the overlay “from scratch”, run the following command:overlay install -DresumeMode=false
For more information on the overlay options run:overlay help
2.9 Rollback ProcedureIf you encounter an error with the overlay upgrade, use the following rollback procedure:1. Stop Tomcat.2. Run the following command:
overlay rollback
3. Specify the path to the working folder:The default is ../overlayWorkspace
4. The tool will ask if you've rolled back your JasperReports Server database:The default is no
You're required to manually restore your database .
5. When the tool has finished, restore your database (see below), start Tomcat, and test JasperReports Server.
To restore your JasperReports Server Database:1. Go to the directory location where you saved the backup of your jasperserver database
For example, C:\JS_BACKUP or /opt/JS_BACKUP.2. Run the following commands for PostgreSQL:
cd /opt/JS_BACKUP
14 TIBCO Software Inc.
Chapter 2 Overlay Upgrade
pg_restore --username=postgres jasperserver < js-db-dump.sql
2.10 Starting and Logging into JasperReports Server 7.1Start your application server. Your database should already be running.
2.10.1 Clearing Your Browser CacheBefore you log in, make sure you and your end users clear the browser cache. JavaScript files, which enable theUI elements of JasperReports Server, are typically cached by the browser. Clear the cache to ensure that thenewer files are used.
2.10.2 Logging into JasperReports ServerLog in using the following URL, user IDs, and passwords:
URL: http://localhost:8080/jasperserver-pro
User ID Password Description
superuser <your-password> System-wide administrator
jasperadmin <your-password> Administrator for the default organization
Your JasperReports Server instance has now been upgraded to 7.1. If you have startup or login problems, refer tothe Troubleshooting appendix of the JasperReports Server Installation Guide.
2.11 Additional Tasks to Complete the UpgradePerform these tasks with the application server shutdown.
2.11.1 Handling JasperReports Server CustomizationsIf you made modifications to the original JasperReports Server application, these configurations are typicallyfound in the WEB-INF/applicationContext-*.xml set of files.
You'll need to manually copy configuration changes, like client-specific security classes or LDAP serverconfigurations, from your previous environment and integrate them with your upgraded environment.
2.11.2 Clearing the Application Server Work FolderApplication servers have work folders where JasperReports Server files are compiled and cached and otherobjects are stored. When you update the WAR file or license, the buildomatic deploy-webapp-pro targetshould automatically clear the application server’s work directory, but it’s a good practice to double-check. Apermission problem, or some other problem, could prevent the clearing of the work folder.
TIBCO Software Inc. 15
TIBCO JasperReports Server Upgrade Guide
To clear the work folder in Tomcat:1. Change directory to <tomcat>/work.2. Delete all the files and folders in this directory.
2.11.3 Clearing the Application Server Temp FolderJasperReports Server uses caching to speed operations within the application. Caching files are created andstored in the application server, usually in a temp folder. Clear this temp folder to avoid any post-upgradeconflicts.
To clear the temp folder in Apache Tomcat:1. Change directory to <tomcat>/temp
2. Delete all the files and folders in this directory
2.11.4 Clearing the Repository Cache Database TableIn the jasperserver database, compiled JasperReports Library resources are cached in theJIRepositoryCache table for increased efficiency at runtime. Because the JasperReports Library JAR istypically updated with each new release, old cached items can get out of date and cause errors at runtime. If youencounter errors that mention a JasperReports Library “local class incompatible,” check your repository cachetable. In summary, you can clear your jasperserver database cache table as part of this upgrade processwhether or not there are errors.
To manually clear the repository cache database table, run a SQL command similar to one shownbelow:
update JIRepositoryCache set item_reference = null;
delete from JIRepositoryCache;
2.12 Running Overlay Upgrade a Second TimeIf you run the overlay upgrade a second time, the overlay logic will ask if you want to resume the last run ofthe overlay, so that your previous answers to questions are remembered and reused.
The overlay procedure will ask:“We have detected that overlay install was already run. Do you want to resume last run? Default is 'y' ([y],n):”Choose “y” for yes if you do not want to change any information previously given to the overlayChoose “n” for no if you would like to enter new or different information
One reason for entering “n” for no would be if you did not give a valid path to your default_master.propertiesfile the first time you executed the overlay.
16 TIBCO Software Inc.
CHAPTER 3 UPGRADING FROM 6.4 TO 7.1This chapter describes the recommended procedure for upgrading to JasperReports Server 7.1 from version 6.4.The examples show you how to upgrade using the js-upgrade shell scripts.
This chapter contains the following sections:• Upgrade Steps Overview• Upgrading with Customizations• Back Up Your JasperReports Server Instance• Preparing the JasperReports Server 7.1 WAR File Distribution• Configuring Buildomatic for Your Database and Application Server• Upgrading to JasperReports Server 7.1• Starting and Logging into JasperReports Server7.1• Additional Tasks to Complete the Upgrade• Upgrading from 6.4 to 7.1
3.1 Upgrade Steps OverviewThese are the general steps used in this section:1. Identify your customizations.2. Back up your current JasperReports Server instance.3. Download and set up the new 7.1 JasperReports Server WAR file distribution zip.4. Run the js-upgrade script as described in 3.6, “Upgrading to JasperReports Server 7.1,” on page 21.
If your current instance of JasperReports Server has modifications or extensions, keep track of these and re-integrate them into your 7.1 instance after upgrading.
3.2 Upgrading with Customizations
If your current instance of JasperReports Server has modifications or extensions, keep track of these and re-integrate them into your 7.1 instance after upgrading. See Appendix A, “Planning Your Upgrade ,” onpage 45 to determine if any customizations you've made to your existing version of JasperReports Server areaffected by changes to the updated version.
TIBCO Software Inc. 17
TIBCO JasperReports Server Upgrade Guide
3.3 Back Up Your JasperReports Server InstanceFirst back up your JasperReports Server WAR file and jasperserver database so you can restore them ifnecessary. Perform these steps from the command line in a Windows or Linux shell.
This backup example is for Tomcat with the PostgreSQL or MySQL database. For other databases, consult yourDB administration documentation for backup information.
Back up your JasperReports Server War File:1. Create a folder where you can save your jasperserver-pro war file. For example, C:\JS_BACKUP or
/opt/JS_BACKUP.2. Copy <tomcat>/webapps/jasperserver-pro to <path>/JS_BACKUP
Back up your jasperserver Database:1. Create a folder (if you did not do so in the step above) where you can save your jasperserver database,
For example, C:\JS_BACKUP or /opt/JS_BACKUP.2. Run the following commands for PostgreSQL or MySQL:
• PostgreSQLcd <path>/JS_BACKUP
pg_dump --username=postgres jasperserver > js-db-dump.sql
• MySQLcd <path>/JS_BACKUP
Windows: mysqldump --user=root --password=<password> jasperserver > js-db-dump.sql
Linux: mysqldump --user=root --password=<password> --host=127.0.0.1 jasperserver >js-db-dump.sql
For MySQL, If you receive an error about packet size, see the Troubleshooting appendix of theJasperReports Server Installation Guide.
3.4 Preparing the JasperReports Server 7.1 WAR File DistributionUse the buildomatic js-upgrade scripts included in the 7.1 WAR file distribution ZIP release package to carryout the upgrade. The WAR file distribution comes in a compressed ZIP file named TIB_js-jrs_7.1.0_bin.zip.
Follow these steps to obtain and unpack the WAR file distribution ZIP file:1. Download the WAR file distribution from TIBCO Jaspersoft Technical Support (http://support.tibco.com) or
contact your sales representative.2. Extract all files from TIB_js-jrs_7.1.0_bin.zip. Choose a destination, such as a C:\Jaspersoft folder
on Windows, /home/<user> on Linux, or /Users/<user> on Mac.
After you unpack the WAR File Distribution, the resulting location will be known as:<js-install-7.1>
3.5 Configuring Buildomatic for Your Database and Application ServerThis upgrade procedure uses the js-upgrade-samedb shell script.
18 TIBCO Software Inc.
Chapter 3 Upgrading from 6.4 to 7.1
For Unix, the bash shell is required for the js-upgrade scripts. If you're installing to a non-Linux Unixplatform such as HP-UX, IBM AIX, FreeBSD or Solaris, you need to download and install the bash shell.See the Troubleshooting appendix of the JasperReports Server Installation Guide for more information.
This section shows example configurations for the PostgreSQL, MySQL, and Oracle databases. Other databasesare similar.
3.5.1 Example Buildomatic ConfigurationThe default_master.properties file handles the upgrade configuration. We provide a sample configurationfile for each database. You must specify your database credentials and application server location, and renamethe file to default_master.properties.
3.5.1.1 PostgreSQL Example
To configure default_master.properties for PostgreSQL:1. Locate the postgresql_master.properties sample configuration file.
Database Master Properties File
PostgreSQL <js-install-7.1>/buildomatic/sample_conf/postgresql_master.properties
2. Copy the file to <js-install-7.1>/buildomatic
3. Rename the file default_master.properties4. Edit default_master.properties for your database and application server:
Database Sample Property Values
PostgreSQL appServerType=tomcat (or wildfly, glassfish, etc.)appServerDir=c:\\Apache Software Foundation\\Tomcat 8.0.43 (for example)dbUsername=postgresdbPassword=postgresdbHost=localhost
3.5.1.2 MySQL Example
To configure default_master.properties for MySQL:1. Locate the mysql_master.properties sample configuration file:
Database Master Properties File
MySQL <js-install-7.1>/buildomatic/sample_conf/mysql_master.properties
2. Copy the file to <js-install-7.1>/buildomatic
3. Rename the file default_master.properties4. Edit default_master.properties for your database and application server.
TIBCO Software Inc. 19
TIBCO JasperReports Server Upgrade Guide
Database Sample Property Values
MySQL appServerType=tomcat (or wildfly, glassfish, etc.)appServerDir=c:\\Apache Software Foundation\\Tomcat 8.0.43 (for example)dbUsername=rootdbPassword=passworddbHost=localhost
3.5.1.3 Oracle Example
To configure default_master.properties for Oracle:1. Locate the oracle_master.properties sample configuration file:
Database Master Properties File
Oracle <js-install-7.1>/buildomatic/sample_conf/oracle_master.properties
2. Copy the file to <js-install-7.1>/buildomatic
3. Rename the file to default_master.properties
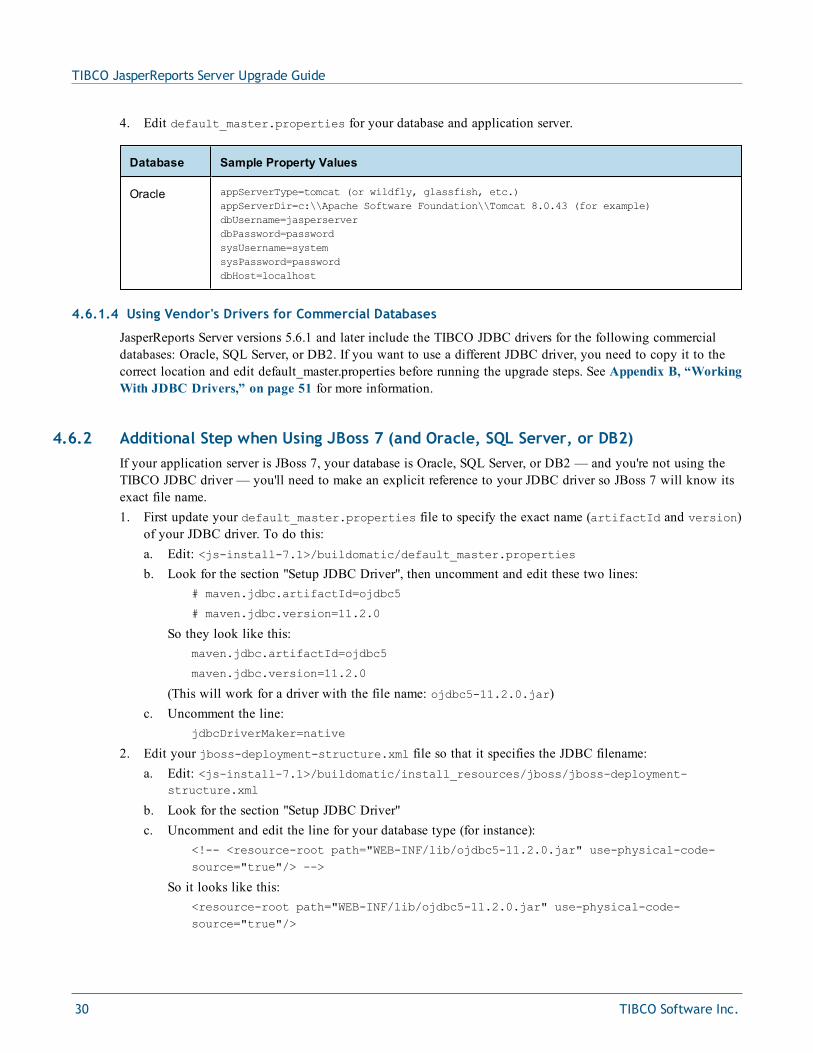
4. Edit default_master.properties for your database and application server.
Database Sample Property Values
Oracle appServerType=tomcat (or wildfly, glassfish, etc.)appServerDir=c:\\Apache Software Foundation\\Tomcat 8.0.43 (for example)dbUsername=jasperserverdbPassword=passwordsysUsername=systemsysPassword=passworddbHost=localhost
3.5.1.4 Using Vendor's Drivers for Commercial Databases
JasperReports Server versions 5.6.1 and later include the TIBCO JDBC drivers for the following commercialdatabases: Oracle, SQL Server, or DB2. If you want to use a different JDBC driver, you need to copy it to thecorrect location and edit default_master.properties before running the upgrade steps. See Appendix B, “WorkingWith JDBC Drivers,” on page 51 for more information.
3.5.2 Additional Step when Using JBoss 7 (and Oracle, SQL Server, or DB2)If your application server is JBoss 7, your database is Oracle, SQL Server, or DB2 — and you're not using theTIBCO JDBC driver — you'll need to make an explicit reference to your JDBC driver so JBoss 7 will know itsexact file name.1. First update your default_master.properties file to specify the exact name (artifactId and version)
of your JDBC driver. To do this:a. Edit: <js-install-7.1>/buildomatic/default_master.propertiesb. Look for the section "Setup JDBC Driver", then uncomment and edit these two lines:
# maven.jdbc.artifactId=ojdbc5
# maven.jdbc.version=11.2.0
20 TIBCO Software Inc.
Chapter 3 Upgrading from 6.4 to 7.1
So they look like this:maven.jdbc.artifactId=ojdbc5
maven.jdbc.version=11.2.0
(This will work for a driver with the file name: ojdbc5-11.2.0.jar)c. Uncomment the line:
jdbcDriverMaker=native
2. Edit your jboss-deployment-structure.xml file so that it specifies the JDBC filename:a. Edit: <js-install-7.1>/buildomatic/install_resources/jboss/jboss-deployment-
structure.xml
b. Look for the section "Setup JDBC Driver"c. Uncomment and edit the line for your database type (for instance):
<!-- <resource-root path="WEB-INF/lib/ojdbc5-11.2.0.jar" use-physical-code-source="true"/> -->
So it looks like this:<resource-root path="WEB-INF/lib/ojdbc5-11.2.0.jar" use-physical-code-source="true"/>
(This will work for a driver with the filename: ojdbc5-11.2.0.jar)
3.6 Upgrading to JasperReports Server 7.1Now that your buildomatic scripts are configured, you can complete the upgrade.
Make sure you've backed up your jasperserver database before proceeding.
Make sure you've backed up your old JasperReports Server WAR file before proceeding.
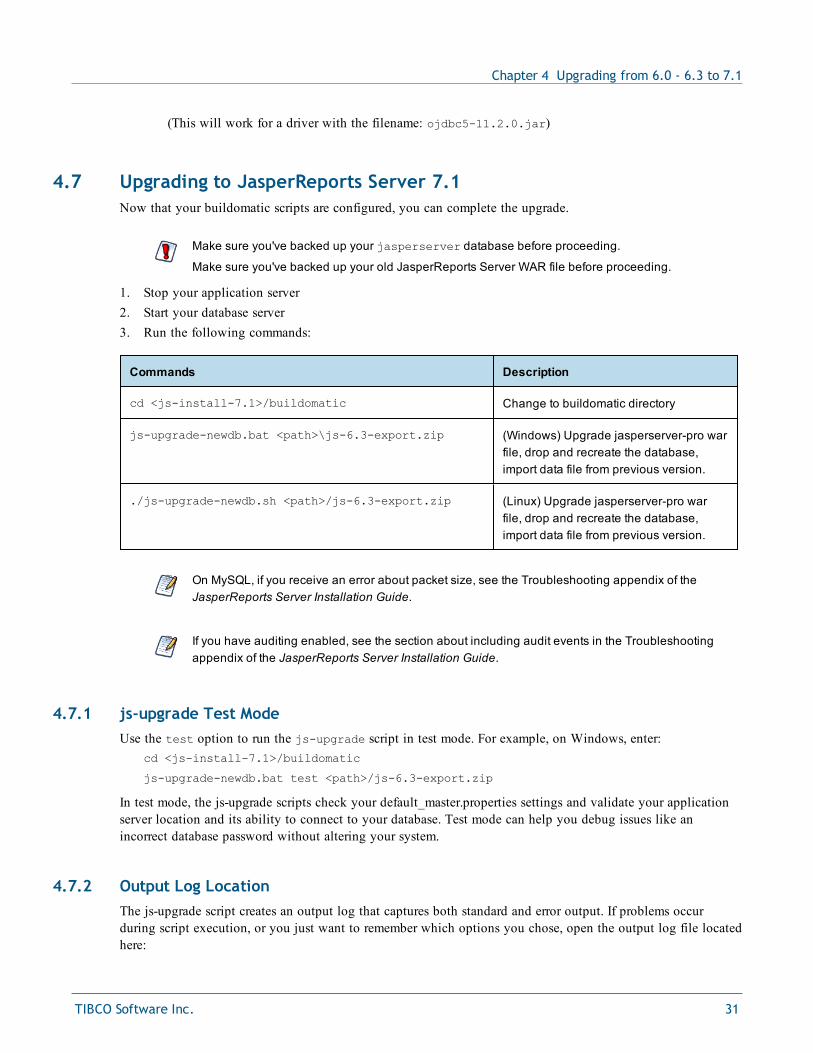
1. Stop your application server2. Start your database server3. Run the following commands:
Commands Description
cd <js-install-7.1>/buildomatic
js-upgrade-samedb.bat (Windows) Upgrade jasperserver-pro war file, upgradejasperserver database to 7.1, add 7.1 repository resourcesinto the database
./js-upgrade-samedb.sh (Linux) Upgrade jasperserver-pro war file, upgradejasperserver database to 7.1, add 7.1 repository resourcesinto the database
TIBCO Software Inc. 21
TIBCO JasperReports Server Upgrade Guide
3.6.1 js-upgrade Test ModeUse the test option to run the js-upgrade script in test mode. For example, on Windows, enter:
cd <js-install-7.1>/buildomatic
js-upgrade-samedb.bat test
In test mode, the js-upgrade scripts check your default_master.properties settings and validate your applicationserver location and its ability to connect to your database. Test mode can help you debug issues like anincorrect database password without altering your system.
3.6.2 Output Log LocationThe js-upgrade script creates an output log that captures both standard and error output. If problems occurduring script execution, or you just want to remember which options you chose, open the output log file locatedhere:
<js-install-7.1>/buildomatic/logs/js-upgrade-<date>-<number>.log
3.6.3 ErrorsIf you encounter errors running the js-upgrade script, first look at the output log to see if you can spot theerrors. For help, refer to the Troubleshooting appendix of the JasperReports Server Installation Guide. Theinformation in this appendix applies to both js-upgrade scripts and js-install scripts.
If you need to modify values in your default_master.properties file, you can simply edit the file. Whenyou run the js-upgrade script again, it uses the new values.
3.7 Starting and Logging into JasperReports Server7.1Start your application server. Your database should already be running.
3.7.1 Clearing Your Browser CacheBefore you log in, make sure you and your end users clear the browser cache. JavaScript files, which enable theUI elements of JasperReports Server, are typically cached by the browser. Clear the cache to ensure that thenewer files are used.
3.7.2 Logging into JasperReports ServerLog in using the following URL, user IDs, and passwords:
URL: http://localhost:8080/jasperserver-pro
User ID Password Description
superuser <your-password> System-wide administrator
jasperadmin <your-password> Administrator for the default organization
22 TIBCO Software Inc.
Chapter 3 Upgrading from 6.4 to 7.1
Your JasperReports Server instance has now been upgraded to 7.1. If you have startup or login problems, refer tothe Troubleshooting appendix of the JasperReports Server Installation Guide.
3.8 Additional Tasks to Complete the UpgradePerform these tasks with the application server shutdown.
3.8.1 Handling JasperReports Server CustomizationsIf you made modifications to the original JasperReports Server application, these configurations are typicallyfound in the WEB-INF/applicationContext-*.xml set of files.
You'll need to manually copy configuration changes, like client-specific security classes or LDAP serverconfigurations, from your previous environment and integrate them with your upgraded environment.
3.8.2 Clearing the Application Server Work FolderApplication servers have work folders where JasperReports Server files are compiled and cached and otherobjects are stored. When you update the WAR file or license, the buildomatic deploy-webapp-pro targetshould automatically clear the application server’s work directory, but it’s a good practice to double-check. Apermission problem, or some other problem, could prevent the clearing of the work folder.
To clear the work folder in Tomcat:1. Change directory to <tomcat>/work.2. Delete all the files and folders in this directory.
3.8.3 Clearing the Application Server Temp FolderJasperReports Server uses caching to speed operations within the application. Caching files are created andstored in the application server, usually in a temp folder. Clear this temp folder to avoid any post-upgradeconflicts. Typically, the temp folder used by an application server corresponds to the path referenced by thejava.io.tmpdir Java system property. For Apache Tomcat the temp folder is <tomcat>/temp.
To clear the temp folder in Apache Tomcat:1. Change directory to <tomcat>/temp
2. Delete all the files and folders in this directory
3.8.4 Clearing the Repository Cache Database TableIn the jasperserver database, compiled JasperReports Library resources are cached in theJIRepositoryCache table for increased efficiency at runtime. Because the JasperReports Library JAR istypically updated with each new release, old cached items can get out of date and cause errors at runtime. If youencounter errors that mention a JasperReports Library “local class incompatible,” check your repository cachetable. In summary, you can clear your jasperserver database cache table as part of this upgrade processwhether or not there are errors.
TIBCO Software Inc. 23
TIBCO JasperReports Server Upgrade Guide
To manually clear the repository cache database table, run a SQL command similar to one shownbelow:
update JIRepositoryCache set item_reference = null;
delete from JIRepositoryCache;
24 TIBCO Software Inc.

CHAPTER 4 UPGRADING FROM 6.0 - 6.3 TO 7.1This chapter describes the recommended procedure for upgrading from the latest version of JasperReports Server6.0 through 6.3.x to JasperReports Server 7.1. If you're upgrading from version 6.4.x to 7.1, we recommend theprocedure in Chapter 3, “Upgrading from 6.4 to 7.1,” on page 17.
If you are upgrading from an earlier version of JasperReports Server, you need to go through an intermediateversion before upgrading to 7.1. See Chapter 5, “Upgrading JasperReports Server 5.6.x or Earlier,” onpage 35 for more information.
This upgrade procedure uses the JasperReports Server WAR File Distribution ZIP release package and theincluded buildomatic scripts. Our examples are for upgrading from version 6.3.
This chapter contains the following sections:• Upgrade Steps Overview• Upgrading with Customizations• Back Up Your JasperReports Server Instance• Exporting Current Repository Data• Preparing the JasperReports Server 7.1 WAR File Distribution• Configuring Buildomatic for Your Database and Application Server• Upgrading to JasperReports Server 7.1• Starting and Logging into JasperReports Server 7.1• Additional Tasks to Complete the Upgrade• Old Manual Upgrade Steps
4.1 Upgrade Steps OverviewThese are the general steps used in this section:1. Plan your upgrade.2. Back up your current JasperReports Server instance.3. Export your existing repository data. For example, export your 6.3 data.4. Download and set up the new 7.1 JasperReports Server WAR file distribution zip.5. Run the js-upgrade script as described in 4.7, “Upgrading to JasperReports Server 7.1,” on page 31.
TIBCO Software Inc. 25
TIBCO JasperReports Server Upgrade Guide
4.2 Upgrading with CustomizationsIf your current instance of JasperReports Server has modifications or extensions, keep track of these and re-integrate them into your 7.1 instance after upgrading. See Appendix A, “Planning Your Upgrade ,” onpage 45 to determine if any customizations you've made to your existing version of JasperReports Server areaffected by changes to the updated version.
4.3 Back Up Your JasperReports Server InstanceFirst back up your JasperReports Server WAR file and jasperserver database so you can restore them ifnecessary. Perform these steps from the command line in a Windows or Linux shell.
This backup example is for Tomcat with the PostgreSQL or MySQL database. For other databases, consult yourDB administration documentation for backup information.
Back up your JasperReports Server War File:1. Create a folder where you can save your jasperserver-pro war file. For example, C:\JS_BACKUP or
/opt/JS_BACKUP.2. Copy <tomcat>/webapps/jasperserver-pro to <path>/JS_BACKUP
Back up your jasperserver Database:1. Create a folder (if you did not do so in the step above) where you can save your jasperserver database,
For example, C:\JS_BACKUP or /opt/JS_BACKUP.2. Run the following commands for PostgreSQL or MySQL:
• PostgreSQLcd <path>/JS_BACKUP
pg_dump --username=postgres jasperserver > js-db-dump.sql
• MySQLcd <path>/JS_BACKUP
Windows: mysqldump --user=root --password=<password> jasperserver > js-db-dump.sql
Linux: mysqldump --user=root --password=<password> --host=127.0.0.1 jasperserver >js-db-dump.sql
For MySQL, If you receive an error about packet size, see the Troubleshooting appendix of theJasperReports Server Installation Guide.
4.4 Exporting Current Repository DataYou need to export your old repository data. Use the JasperReports Server export utility to export using:• the JasperReports Server UI (version 5.0 or later)• the buildomatic scripts (if you originally installed using buildomatic).• the js-export.bat/.sh script found in the <js-install>/buildomatic folder.
26 TIBCO Software Inc.
Chapter 4 Upgrading from 6.0 - 6.3 to 7.1
4.4.1 Exporting from the UIIn JasperReports Server version 5.0, we added import-export functionality to the UI. Administrators who log inwith the superuser account can export all repository data to a file on their machine.
Important: If you have a very large amount of repository data, it might be better to run export from thecommand line instead of from the UI.
Warning: Export from the UI in Release 5.1 has a bug. So, it's best to export from the command line ifupgrading from 5.1. If you do export from the UI with 5.1, you can unpack the resulting export.zip file,edit the index.xml file and change the string “5.0.0 CE” to 5.1.0 PRO”. See the JasperReports ServerAdministrator Guide for details.
To export your 6.3 repository data from the UI do the following:1. Start a web browser on your server (so you can save to the server’s hard disk).1. Log into JasperReports Server using the superuser account.2. Navigate to the Export tab page: Manage > Server Settings > Export.3. Click the Export button to accept the default values4. When you're prompted to save the file, save to a location on the hard disk.
Remember that the export.zip file will need to be accessible from the command line where you run theupgrade commands. So, if you save the zip locally you'll need to upload it to the server where you'rerunning the upgrade commands.
4.4.2 Using Buildomatic Scripts to Export DataIf you configured buildomatic and your default_master.properties file for export as described in theJasperReports Server Administrator Guide, you can use buildomatic to export your repository data. For example,to export 6.3 repository data, use the following commands:1. Navigate to the buildomatic directory:
cd <js-install-6.3>/buildomatic
2. Run buildomatic with the export target:
Windows: js-ant.bat export-everything -DexportFile=js-6.3-export.zip
Linux: ./js-ant export-everything -DexportFile=js-6.3-export.zip
Note the location of this export file so that you can use it during the 7.1 upgrade process.
4.4.3 Using the js-export Script to Export DataTo use the js-export.bat/.sh script, navigate to the buildomatic folder, for example,<js-install-6.3>/buildomatic. If you're using the PostgreSQL database the js-export script should alreadybe configured to run. If you're using a different database, or you've changed database passwords, you may needto update the js-export configuration.
Run the following commands:1. Navigate to the buildomatic directory:
cd <js-install-6.3>/buildomatic
TIBCO Software Inc. 27
TIBCO JasperReports Server Upgrade Guide
2. Run the js-export script:
Windows: js-export.bat --everything --output-zip js-6.3-export.zip
Linux: js-export.sh --everything --output-zip js-6.3-export.zip
Note the location of this export file so that you can use it during the 7.1 upgrade process.
4.5 Preparing the JasperReports Server 7.1 WAR File DistributionUse the buildomatic js-upgrade scripts included in the 7.1 WAR file distribution ZIP release package to carryout the upgrade. The WAR file distribution comes in a compressed ZIP file named TIB_js-jrs_7.1.0_bin.zip.
Follow these steps to obtain and unpack the WAR file distribution ZIP file:1. Download the WAR file distribution from TIBCO Jaspersoft Technical Support (http://support.tibco.com) or
contact your sales representative.2. Extract all files from TIB_js-jrs_7.1.0_bin.zip. Choose a destination, such as a C:\Jaspersoft folder
on Windows, /home/<user> on Linux, or /Users/<user> on Mac.
After you unpack the WAR File Distribution, the resulting location will be known as:<js-install-7.1>
4.6 Configuring Buildomatic for Your Database and Application ServerThis upgrade procedure uses the js-upgrade-newdb shell script.
For Unix, the bash shell is required for the js-upgrade scripts. If you're installing to a non-Linux Unixplatform such as HP-UX, IBM AIX, FreeBSD or Solaris, you need to download and install the bash shell.See the Troubleshooting appendix of the JasperReports Server Installation Guide for more information.
This section shows example configurations for the PostgreSQL, MySQL, and Oracle databases. Other databasesare similar.
4.6.1 Example Buildomatic ConfigurationThe default_master.properties file handles the upgrade configuration. We provide a sample configurationfile for each database. You must specify your database credentials and application server location, and renamethe file to default_master.properties.
4.6.1.1 PostgreSQL Example
To configure default_master.properties for PostgreSQL:1. Locate the postgresql_master.properties sample configuration file.
28 TIBCO Software Inc.
Chapter 4 Upgrading from 6.0 - 6.3 to 7.1
Database Master Properties File
PostgreSQL <js-install-7.1>/buildomatic/sample_conf/postgresql_master.properties
2. Copy the file to <js-install-7.1>/buildomatic
3. Rename the file default_master.properties4. Edit default_master.properties for your database and application server:
Database Sample Property Values
PostgreSQL appServerType=tomcat (or wildfly, glassfish, etc.)appServerDir=c:\\Apache Software Foundation\\Tomcat 8.0.43 (for example)dbUsername=postgresdbPassword=postgresdbHost=localhost
4.6.1.2 MySQL Example
To configure default_master.properties for MySQL:1. Locate the mysql_master.properties sample configuration file:
Database Master Properties File
MySQL <js-install-7.1>/buildomatic/sample_conf/mysql_master.properties
2. Copy the file to <js-install-7.1>/buildomatic
3. Rename the file default_master.properties4. Edit default_master.properties for your database and application server.
Database Sample Property Values
MySQL appServerType=tomcat (or wildfly, glassfish, etc.)appServerDir=c:\\Apache Software Foundation\\Tomcat 8.0.43 (for example)dbUsername=rootdbPassword=passworddbHost=localhost
4.6.1.3 Oracle Example
To configure default_master.properties for Oracle:1. Locate the oracle_master.properties sample configuration file:
Database Master Properties File
Oracle <js-install-7.1>/buildomatic/sample_conf/oracle_master.properties
2. Copy the file to <js-install-7.1>/buildomatic
3. Rename the file to default_master.properties
TIBCO Software Inc. 29
TIBCO JasperReports Server Upgrade Guide
4. Edit default_master.properties for your database and application server.
Database Sample Property Values
Oracle appServerType=tomcat (or wildfly, glassfish, etc.)appServerDir=c:\\Apache Software Foundation\\Tomcat 8.0.43 (for example)dbUsername=jasperserverdbPassword=passwordsysUsername=systemsysPassword=passworddbHost=localhost
4.6.1.4 Using Vendor's Drivers for Commercial Databases
JasperReports Server versions 5.6.1 and later include the TIBCO JDBC drivers for the following commercialdatabases: Oracle, SQL Server, or DB2. If you want to use a different JDBC driver, you need to copy it to thecorrect location and edit default_master.properties before running the upgrade steps. See Appendix B, “WorkingWith JDBC Drivers,” on page 51 for more information.
4.6.2 Additional Step when Using JBoss 7 (and Oracle, SQL Server, or DB2)If your application server is JBoss 7, your database is Oracle, SQL Server, or DB2 — and you're not using theTIBCO JDBC driver — you'll need to make an explicit reference to your JDBC driver so JBoss 7 will know itsexact file name.1. First update your default_master.properties file to specify the exact name (artifactId and version)
of your JDBC driver. To do this:a. Edit: <js-install-7.1>/buildomatic/default_master.propertiesb. Look for the section "Setup JDBC Driver", then uncomment and edit these two lines:
# maven.jdbc.artifactId=ojdbc5
# maven.jdbc.version=11.2.0
So they look like this:maven.jdbc.artifactId=ojdbc5
maven.jdbc.version=11.2.0
(This will work for a driver with the file name: ojdbc5-11.2.0.jar)c. Uncomment the line:
jdbcDriverMaker=native
2. Edit your jboss-deployment-structure.xml file so that it specifies the JDBC filename:a. Edit: <js-install-7.1>/buildomatic/install_resources/jboss/jboss-deployment-
structure.xml
b. Look for the section "Setup JDBC Driver"c. Uncomment and edit the line for your database type (for instance):
<!-- <resource-root path="WEB-INF/lib/ojdbc5-11.2.0.jar" use-physical-code-source="true"/> -->
So it looks like this:<resource-root path="WEB-INF/lib/ojdbc5-11.2.0.jar" use-physical-code-source="true"/>
30 TIBCO Software Inc.
Chapter 4 Upgrading from 6.0 - 6.3 to 7.1
(This will work for a driver with the filename: ojdbc5-11.2.0.jar)
4.7 Upgrading to JasperReports Server 7.1Now that your buildomatic scripts are configured, you can complete the upgrade.
Make sure you've backed up your jasperserver database before proceeding.
Make sure you've backed up your old JasperReports Server WAR file before proceeding.
1. Stop your application server2. Start your database server3. Run the following commands:
Commands Description
cd <js-install-7.1>/buildomatic Change to buildomatic directory
js-upgrade-newdb.bat <path>\js-6.3-export.zip (Windows) Upgrade jasperserver-pro warfile, drop and recreate the database,import data file from previous version.
./js-upgrade-newdb.sh <path>/js-6.3-export.zip (Linux) Upgrade jasperserver-pro warfile, drop and recreate the database,import data file from previous version.
On MySQL, if you receive an error about packet size, see the Troubleshooting appendix of theJasperReports Server Installation Guide.
If you have auditing enabled, see the section about including audit events in the Troubleshootingappendix of the JasperReports Server Installation Guide.
4.7.1 js-upgrade Test ModeUse the test option to run the js-upgrade script in test mode. For example, on Windows, enter:
cd <js-install-7.1>/buildomatic
js-upgrade-newdb.bat test <path>/js-6.3-export.zip
In test mode, the js-upgrade scripts check your default_master.properties settings and validate your applicationserver location and its ability to connect to your database. Test mode can help you debug issues like anincorrect database password without altering your system.
4.7.2 Output Log LocationThe js-upgrade script creates an output log that captures both standard and error output. If problems occurduring script execution, or you just want to remember which options you chose, open the output log file locatedhere:
TIBCO Software Inc. 31
TIBCO JasperReports Server Upgrade Guide
<js-install-7.1>/buildomatic/logs/js-upgrade-<date>-<number>.log
4.7.3 ErrorsIf you encounter errors running the js-upgrade script, first look at the output log to see if you can spot theerrors. For help, refer to the Troubleshooting appendix of the JasperReports Server Installation Guide. Theinformation in this appendix applies to both js-upgrade scripts and js-install scripts.
If you need to modify values in your default_master.properties file, you can simply edit the file. Whenyou run the js-upgrade script again, it uses the new values.
4.8 Starting and Logging into JasperReports Server 7.1Start your application server. Your database should already be running.
4.8.1 Clearing Your Browser CacheBefore you log in, make sure you and your end users clear the browser cache. JavaScript files, which enable theUI elements of JasperReports Server, are typically cached by the browser. Clear the cache to ensure that thenewer files are used.
4.8.2 Logging into JasperReports ServerLog in using the following URL, user IDs, and passwords:
URL: http://localhost:8080/jasperserver-pro
User ID Password Description
superuser <your-password> System-wide administrator
jasperadmin <your-password> Administrator for the default organization
Your JasperReports Server instance has now been upgraded to 7.1. If you have startup or login problems, refer tothe Troubleshooting appendix of the JasperReports Server Installation Guide.
4.9 Additional Tasks to Complete the UpgradePerform these tasks with the application server shutdown.
4.9.1 Handling JasperReports Server CustomizationsIf you made modifications to the original JasperReports Server application, these configurations are typicallyfound in the WEB-INF/applicationContext-*.xml set of files.
You'll need to manually copy configuration changes, like client-specific security classes or LDAP serverconfigurations, from your previous environment and integrate them with your upgraded environment.
32 TIBCO Software Inc.
Chapter 4 Upgrading from 6.0 - 6.3 to 7.1
4.9.2 Clearing the Application Server Work FolderApplication servers have work folders where JasperReports Server files are compiled and cached and otherobjects are stored. When you update the WAR file or license, the buildomatic deploy-webapp-pro targetshould automatically clear the application server’s work directory, but it’s a good practice to double-check. Apermission problem, or some other problem, could prevent the clearing of the work folder.
To clear the work folder in Tomcat:1. Change directory to <tomcat>/work.2. Delete all the files and folders in this directory.
4.9.3 Clearing the Application Server Temp FolderJasperReports Server uses caching to speed operations within the application. Caching files are created andstored in the application server, usually in a temp folder. Clear this temp folder to avoid any post-upgradeconflicts. Typically, the temp folder used by an application server corresponds to the path referenced by thejava.io.tmpdir Java system property. For Apache Tomcat the temp folder is <tomcat>/temp.
To clear the temp folder in Apache Tomcat:1. Change directory to <tomcat>/temp
2. Delete all the files and folders in this directory
4.9.4 Clearing the Repository Cache Database TableIn the jasperserver database, compiled JasperReports Library resources are cached in theJIRepositoryCache table for increased efficiency at runtime. Because the JasperReports Library JAR istypically updated with each new release, old cached items can get out of date and cause errors at runtime. If youencounter errors that mention a JasperReports Library “local class incompatible,” check your repository cachetable. In summary, you can clear your jasperserver database cache table as part of this upgrade processwhether or not there are errors.
To manually clear the repository cache database table, run a SQL command similar to one shownbelow:
update JIRepositoryCache set item_reference = null;
delete from JIRepositoryCache;
4.10 Old Manual Upgrade StepsThis section describes the older, manual upgrade steps used before we implemented the js-upgrade shellscripts in release 4.0. They're provided here mainly as a reference for internal use.
We recommend using the js-upgrade shell scripts described in the beginning of this chapter instead of thesemanual commands.
Commands Description
cd <js-install-7.1>/buildomatic
TIBCO Software Inc. 33
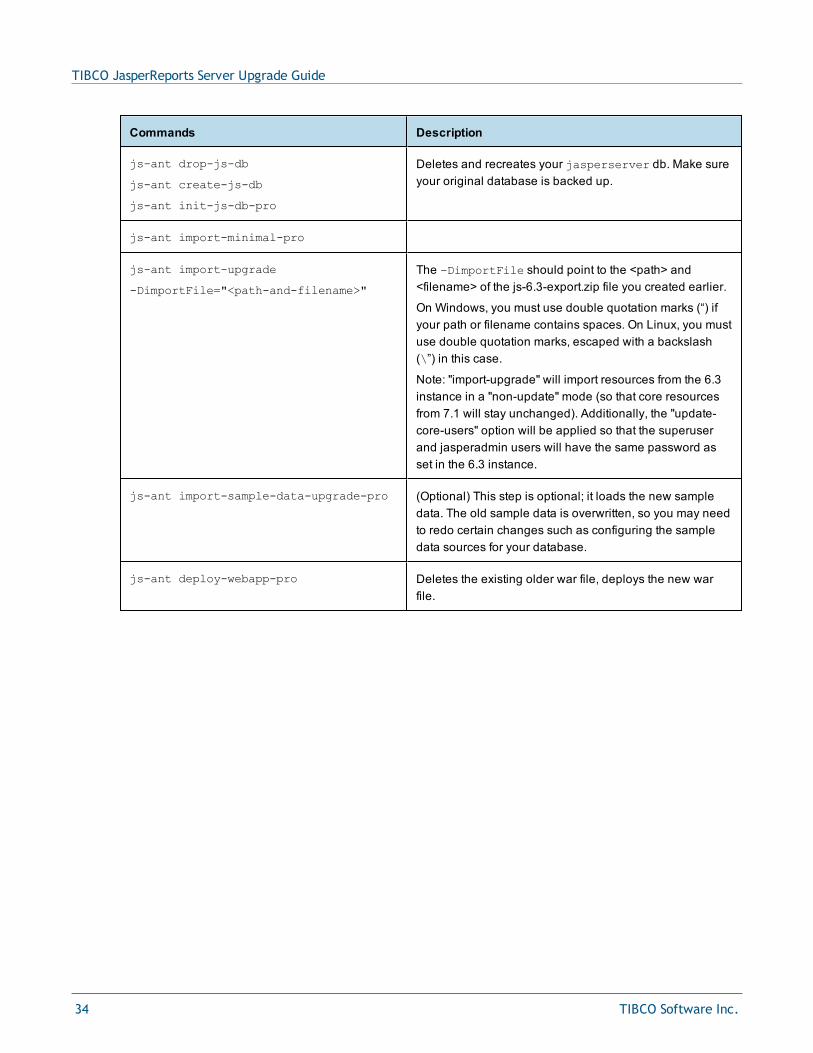
TIBCO JasperReports Server Upgrade Guide
Commands Description
js-ant drop-js-db
js-ant create-js-db
js-ant init-js-db-pro
Deletes and recreates your jasperserver db. Make sureyour original database is backed up.
js-ant import-minimal-pro
js-ant import-upgrade
-DimportFile="<path-and-filename>"
The -DimportFile should point to the <path> and<filename> of the js-6.3-export.zip file you created earlier.
On Windows, you must use double quotation marks (“) ifyour path or filename contains spaces. On Linux, you mustuse double quotation marks, escaped with a backslash(\”) in this case.
Note: "import-upgrade" will import resources from the 6.3instance in a "non-update" mode (so that core resourcesfrom 7.1 will stay unchanged). Additionally, the "update-core-users" option will be applied so that the superuserand jasperadmin users will have the same password asset in the 6.3 instance.
js-ant import-sample-data-upgrade-pro (Optional) This step is optional; it loads the new sampledata. The old sample data is overwritten, so you may needto redo certain changes such as configuring the sampledata sources for your database.
js-ant deploy-webapp-pro Deletes the existing older war file, deploys the new warfile.
34 TIBCO Software Inc.
CHAPTER 5 UPGRADING JASPERREPORTS SERVER 5.6.X OR EARLIER
5.1 Upgrading from 5.6.x or EarlierIf you're running JasperReports Server version 5.6.x or earlier, your upgrade requires multiple steps.
If you're running JasperReports Server 3.7 through 4.2:1. Upgrade to the latest version of 6.3.x.2. Upgrade 6.3.x to the latest version 6.4.x.3. Upgrade 6.4.x to version 7.1.
If you're running JasperReports Server 4.5 through 5.x.x:1. Upgrade to the latest version of 6.4.x.2. Upgrade from 6.4.x to version 7.1.
The steps for the upgrade to 6.3.x or 6.4.x are documented in the JasperServer Installation Guide for thatrelease. Download the JasperReports Server WAR file distribution zip package for the release you want to getthe relevant files and documentation. The Installation Guide is in the docs folder.
You can download the JasperReports Server WAR file distribution zip package from TIBCO JaspersoftTechnical Support (http://support.tibco.com) or contact your sales representative.
If you're running a JasperServer version earlier than 3.7, first upgrade to 3.7.0, then to 6.3.x, then to 7.1.
5.2 Best Practices for Upgrading on WindowsThe two methods for installing JasperReports Server are:1. Installing with the Binary Installer and Bundled Components
The binary installer is an executable that puts all the components in place to run JasperReports Server. Forexample, if you take the default installation choices, you'll get the Apache Tomcat application server, thePostgreSQL database and Java execution environment.But keep in mind that these components are specially configured to run a specific version of JasperReportsServer. This applies to the Windows Start Menu items created to start and stop JasperReports Server.
2. Installing to Pre-existing Components
TIBCO Software Inc. 35
TIBCO JasperReports Server Upgrade Guide
When installing a “Production” instance of JasperReports Server, you may want to install the maincomponents before you install JasperReports Server. This way you have more control over updating andupgrading components like the application server, database, and Java.Once you put these components in place, you have two options for installing JasperReports Server:a. Use the War File ZIP distribution (file name: TIB_js-jrs_7.1.0_bin.zip)
You'll install JasperReports Server to the existing components using the js-install.bat scripts.You'll create a default_master.properties file that specifies the location of the application server anddatabase components.
b. Use the Binary Installer, TIB_js-jrs_7.1.0__installer-windows-x64.exeThe installer will prompt you for the location of the application server and database components.
If you intend to upgrade your Windows installation with future releases of JasperReports Server, we recommendinstalling to pre-existing components. This will reduce any post-upgrade confusion caused by the WindowsStart Menu showing the older version of JasperReports Server.
36 TIBCO Software Inc.
CHAPTER 6 UPGRADING FROM THE COMMUNITY PROJECTIf you're running a Community Project (CP) instance of JasperReports Server and want to upgrade to acommercial version of JasperReports Server, follow the instructions in this chapter.
This upgrade process uses the JasperReports Server commercial WAR File Distribution release package and theincluded buildomatic scripts.
This CP to commercial upgrade procedure is valid only for upgrade within a major JasperReports Serverrelease, for example 6.0 CP to 6.0 commercial.
This chapter contains the following sections:• General Procedure• Backing Up Your JasperReports Server CP Instance• Exporting Your CP Repository Data• Preparing the JasperReports Server 7.1 WAR File Distribution• Configuring Buildomatic for Your Database and Application Server• Upgrading to the Commercial Version of JasperReports Server 7.1• Starting and Logging into JasperReports Server 7.1• Re-Configuring XML/A Connections (Optional)
6.1 General ProcedureThe upgrade procedure consists of the following main steps:1. Back up your JasperReports Server CP instance.2. Export your CP repository data.3. Upgrade your instance to JasperReports Server Commercial.4. Import your CP repository data.
If you customized or extended JasperReports Server CP, you need to keep track of these modifications andintegrate them with your JasperReports Server commercial instance after completing the upgrade.
TIBCO Software Inc. 37
TIBCO JasperReports Server Upgrade Guide
6.2 Backing Up Your JasperReports Server CP InstanceBack up the old JasperReports Server CP WAR file and jasperserver database in case a problem occurs withthe upgrade. Perform these steps from the command line in a Windows or Linux shell.
These instructions assume you have Tomcat application server and the PostgreSQL or MySQL database. Otherapplication servers require a similar procedure. If you have another database, consult your DB administrationdocumentation for back up information.
6.2.1 Backing Up Your JasperReports Server CP WAR FileFor example, for Apache Tomcat, back up the jasperserver directory from the <tomcat>/webapps folder:1. Go to the <tomcat> directory.2. Make a new directory named js-cp-war-backup.3. Copy <tomcat>/webapps/ jasperserver to <tomcat>/js-cp-war-backup.4. Delete the <tomcat>/webapps/jasperserver directory.
6.2.2 Backing Up Your JasperReports Server DatabaseGo to the location where you originally unpacked your CP WAR file distribution zip. (Or create a new localfolder to hold your backup file.)1. Go to the <js-install-cp> directory.2. Run one of the following commands:
• For PostgreSQL on Windows or Linux:cd <js-install-cp>
pg_dump --username=postgres jasperserver > js-db-cp-dump.sql
• For MySQL on Windows:mysqldump --user=root --password=<password> jasperserver > js-db-cp-dump.sql
For MySQL on Linux:mysqldump --user=root --password=<password> --host=127.0.0.1 jasperserver >js-
db-cp-dump.sql
For MySQL, if you receive an error about packet size, see the Troubleshooting appendix of theJasperReports Server Installation Guide.
6.3 Exporting Your CP Repository DataBefore exporting your CP repository data, check to see if you have the default_master.properties file inthis directory.
<js-install-cp>/buildomatic/default_master.properties
This file holds settings specific to your JasperReports Server instance, such as your application server locationand your database type and location. If you don't have this file, see 6.5.1, “Example BuildomaticConfiguration ,” on page 39.
38 TIBCO Software Inc.
Chapter 6 Upgrading from the Community Project
To export your CP repository data:1. Navigate to the buildomatic directory:
cd <js-install-cp>/buildomatic
2. Run buildomatic with the export target:
Windows: js-ant.bat export-everything-ce -DexportFile=js-cp-export.zip
Linux: ./js-ant export-everything-ce -DexportFile=js-cp-export.zip
This operation uses the export option --everything, which collects all your repository data.
Remember the path to your exported file. You need to specify it when you import to your commercialJasperReports Server repository.
6.4 Preparing the JasperReports Server 7.1 WAR File DistributionUse the buildomatic scripts included in the commercial 7.1 WAR file distribution release package for theupgrade. Follow these steps to obtain and unpack the commercial 7.1 WAR file distribution ZIP file:1. The WAR file distribution comes in a compressed ZIP file named TIB_js-jrs_7.1.0_bin.zip. Download
the WAR file distribution from TIBCO Jaspersoft Technical Support (http://support.tibco.com) or contactyour sales representative.
2. Extract all files from TIB_js-jrs_7.1.0_bin.zip. Choose a destination, such as C:\Jaspersoft onWindows, /home/<user> on Linux, or /Applications on Mac OSX.
After you unpack the WAR File Distribution Zip, the resulting location is known as:<js-install-pro>
6.5 Configuring Buildomatic for Your Database and Application ServerThis upgrade procedure uses the buildomatic scripts included with the WAR File Distribution ZIP releasepackage.
6.5.1 Example Buildomatic ConfigurationThe default_master.properties file handles the upgrade configuration. We provide a sample configurationfile for each database. You must specify your database credentials and your application server location, andrename the file to default_master.properties.
6.5.1.1 PostgreSQL Example
This example uses PostgreSQL (the same general logic applies to other databases).1. Copy postgresql_master.properties from:
<js-install-pro>/buildomatic/sample_conf
2. Paste the file to:<js-install-pro>/buildomatic
3. Rename the file to: default_master.properties4. Edit default_master.properties for your database and application server. Sample property values are:
appServerType=tomcat (or wildfly, glassfish, etc.)
TIBCO Software Inc. 39
TIBCO JasperReports Server Upgrade Guide
appServerDir=c:\\Apache Software Foundation\\Tomcat 8.0.43 (for example)
dbUsername=postgres
dbPassword=postgres
dbHost=localhost
6.5.1.2 MySQL Example
This example uses MySQL (the same general logic applies to other databases).1. Copy mysql_master.properties from:
<js-install-pro>/buildomatic/sample_conf
2. Paste the file to:<js-install-pro>/buildomatic
3. Rename the file to: default_master.properties4. Edit default_master.properties for your database and application server. Sample property values are:
appServerType=tomcat (or wildfly, glassfish, etc.)
appServerDir=c:\\Apache Software Foundation\\Tomcat 8.0.43 (for example)
dbUsername=root
dbPassword=password
dbHost=localhost
6.6 Upgrading to the Commercial Version of JasperReports Server 7.1After configuring the default_master.properties file, you can complete the upgrade.
Make sure you've backed up your jasperserver database before proceeding.
Make sure you've backed up your old JasperReports Server WAR file before proceeding.
1. Stop your application server.2. Start your database server.3. Run the following commands:
Commands Description
cd <js-install-pro>/buildomatic
js-ant drop-js-db
js-ant create-js-db
js-ant init-js-db-pro
The first command deletes yourjasperserver db. Make sure it'sbacked up. The other commandsrecreate and initialize the database.
js-ant import-minimal-pro Adds superuser, Themes, anddefault tenant structure.
40 TIBCO Software Inc.
Chapter 6 Upgrading from the Community Project
Commands Description
js-ant import-upgrade -DimportFile=<path>/js-cp-
export.zip -DimportArgs="--include-server-settings"The -DimportFile argumentshould point to thejs-cp-export.zip file you createdearlier.
On Windows, you must use doublequotation marks (“) if your path orfilename contains spaces. On Linux,you must use double quotationmarks escaped with a backslash (\”)in this case.
js-ant import-sample-data-upgrade-pro (Optional) Loads the 7.1 commercialsample data.
js-ant deploy-webapp-cp-to-pro Delete the CP war file, and deploythe commercial (pro) war file.
On MySQL, if you receive an error about packet size, see the Troubleshooting appendix of theJasperReports Server Installation Guide.
6.7 Starting and Logging into JasperReports Server 7.1Before starting the server:1. Set up the JasperReports Server License.
Copy the <js-install-pro>/jasperserver.license file to the C:\Users\<user> directory (Windows7 example)For information about how to set up the license, see the JasperReports Server Installation Guide.
2. Delete any files in the <tomcat>\temp folder.3. Delete any files, directories, or sub-directories in <tomcat>\work\Catalina\localhost.4. Delete any jasperserver*.xml files that might exist in <tomcat>\conf\Catalina\localhost.5. (Optional) Move any existing <tomcat-install>\logs files into a backup directory to clean up old CP
log data.For instructions on clearing directories, see 6.9, “Additional Tasks to Complete the Upgrade,” on page 42.
Now start your Tomcat, JBoss, or GlassFish application server. Your database should already be running.
6.7.1 Clearing Your Browser CacheBefore you log in, make sure you and your end-users clear the Browser cache. JavaScript files, which enable UIelements of JasperReports Server, are typically cached by the browser. Clear the cache to ensure that the newerfiles are used.
TIBCO Software Inc. 41
TIBCO JasperReports Server Upgrade Guide
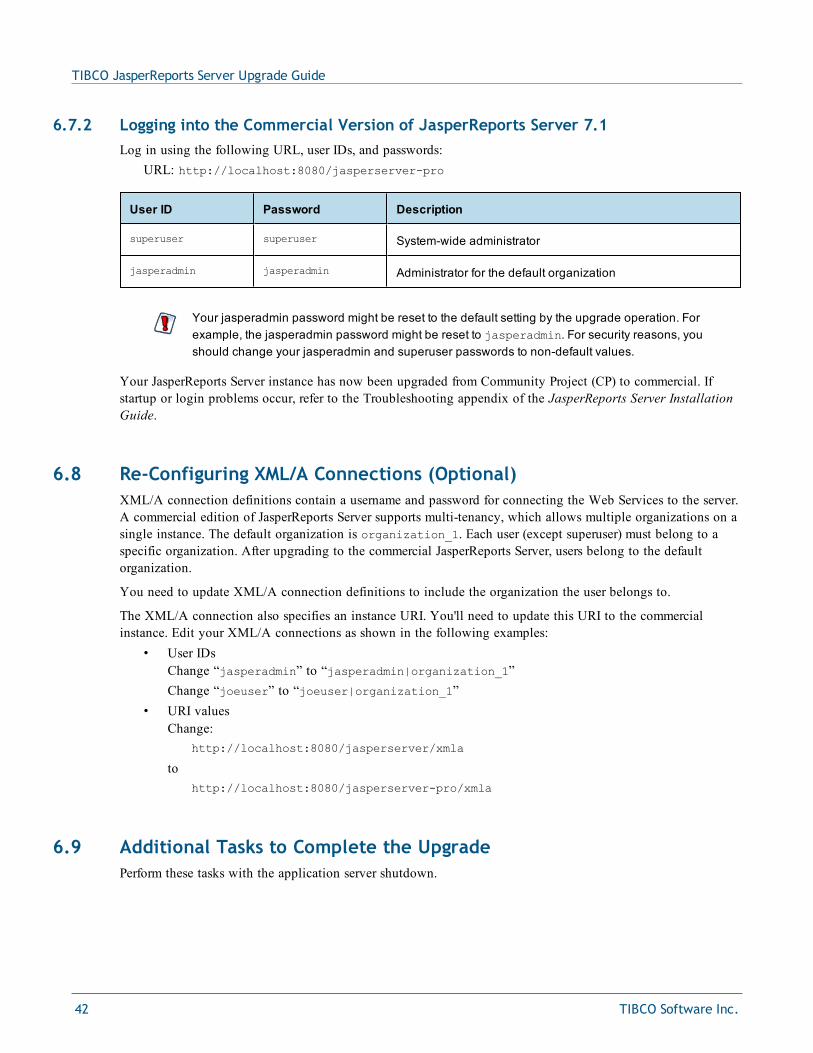
6.7.2 Logging into the Commercial Version of JasperReports Server 7.1Log in using the following URL, user IDs, and passwords:
URL: http://localhost:8080/jasperserver-pro
User ID Password Description
superuser superuser System-wide administrator
jasperadmin jasperadmin Administrator for the default organization
Your jasperadmin password might be reset to the default setting by the upgrade operation. Forexample, the jasperadmin password might be reset to jasperadmin. For security reasons, youshould change your jasperadmin and superuser passwords to non-default values.
Your JasperReports Server instance has now been upgraded from Community Project (CP) to commercial. Ifstartup or login problems occur, refer to the Troubleshooting appendix of the JasperReports Server InstallationGuide.
6.8 Re-Configuring XML/A Connections (Optional)XML/A connection definitions contain a username and password for connecting the Web Services to the server.A commercial edition of JasperReports Server supports multi-tenancy, which allows multiple organizations on asingle instance. The default organization is organization_1. Each user (except superuser) must belong to aspecific organization. After upgrading to the commercial JasperReports Server, users belong to the defaultorganization.
You need to update XML/A connection definitions to include the organization the user belongs to.
The XML/A connection also specifies an instance URI. You'll need to update this URI to the commercialinstance. Edit your XML/A connections as shown in the following examples:
• User IDsChange “jasperadmin” to “jasperadmin|organization_1”Change “joeuser” to “joeuser|organization_1”
• URI valuesChange:
http://localhost:8080/jasperserver/xmla
tohttp://localhost:8080/jasperserver-pro/xmla
6.9 Additional Tasks to Complete the UpgradePerform these tasks with the application server shutdown.
42 TIBCO Software Inc.
Chapter 6 Upgrading from the Community Project
6.9.1 Handling JasperReports Server CustomizationsIf you made modifications to the original JasperReports Server application, these configurations are typicallyfound in the WEB-INF/applicationContext-*.xml set of files.
You'll need to manually copy configuration changes, like client-specific security classes or LDAP serverconfigurations, from your previous environment and integrate them with your upgraded environment.
6.9.2 Clearing the Application Server Work FolderApplication servers have work folders where JasperReports Server files are compiled and cached and otherobjects are stored. When you update the WAR file or license, the buildomatic deploy-webapp-pro targetshould automatically clear the application server’s work directory, but it’s a good practice to double-check. Apermission problem, or some other problem, could prevent the clearing of the work folder.
To clear the work folder in Tomcat:1. Change directory to <tomcat>/work.2. Delete all the files and folders in this directory.
6.9.3 Clearing the Application Server Temp FolderJasperReports Server uses caching to speed operations within the application. Caching files are created andstored in the application server, usually in a temp folder. Clear this temp folder to avoid any post-upgradeconflicts. Typically, the temp folder used by an application server corresponds to the path referenced by thejava.io.tmpdir Java system property. For Apache Tomcat the temp folder is <tomcat>/temp.
To clear the temp folder in Apache Tomcat:1. Change directory to <tomcat>/temp
2. Delete all the files and folders in this directory
6.9.4 Clearing the Repository Cache Database TableIn the jasperserver database, compiled JasperReports Library resources are cached in theJIRepositoryCache table for increased efficiency at runtime. Because the JasperReports Library JAR istypically updated with each new release, old cached items can get out of date and cause errors at runtime. If youencounter errors that mention a JasperReports Library “local class incompatible,” check your repository cachetable. In summary, you can clear your jasperserver database cache table as part of this upgrade processwhether or not there are errors.
To manually clear the repository cache database table, run a SQL command similar to one shownbelow:
update JIRepositoryCache set item_reference = null;
delete from JIRepositoryCache;
TIBCO Software Inc. 43

TIBCO JasperReports Server Upgrade Guide
44 TIBCO Software Inc.
APPENDIX A PLANNING YOUR UPGRADESome of the new and enhanced features in JasperReports Server can affect your deployment, and you shouldplan your upgrade accordingly. Before upgrading make sure to:• Review this information carefully and determine how the changes described affect your deployment.• Back up your current JasperReports Server installation and repository.
The versions and their affected functionality are:• Changes in 7.1 affect customizations to the login page.• Changes in 6.4 affect the Impala community connector.• Changes in 6.2.1 affect the Impala community connector.• Changes in 6.2 affect the default Ad Hoc templates.• Changes in 6.1 affect themes.
Changes are cumulative, so review all topics that affect you. For example, if you're upgrading from 6.1 to 7.1,you may be affected by changes in 6.1, 6.2, 6.2.1, and 6.4.
For versions of the software earlier than 6.1, see earlier versions of the JasperReports Server Upgrade Guide.
This section describes only those changes that can significantly impact your existing deployment. For anoverview of new features, improvements, and bug fixes see the release notes in the root directory of thedistribution. For information on how to use the new features, see the JasperReports Server User Guide or theJasperReports Server Administrator Guide.
This chapter contains the following sections:• Changes in 7.1 That May Affect Your Upgrade• Changes in 6.4 That May Affect Your Upgrade• Changes in 6.2.1 That May Affect Your Upgrade• Changes in 6.2 That May Affect Your Upgrade• Changes in 6.1 That May Affect Your Upgrade
A.1 Changes in 7.1 That May Affect Your Upgrade
A.1.1 Changes to the Login PageThe layout of the login page changed in JasperReports Server 7.1. There were no changes to the CSS classes,but some default values were changed. If you have customized the login page, you should make sure your
TIBCO Software Inc. 45
TIBCO JasperReports Server Upgrade Guide
customizations still have the desired effect in 7.1, and make any necessary changes.
If you have not customized the Login page, this change will not affect you.
A.2 Changes in 6.4 That May Affect Your Upgrade
A.2.1 Removal of the Impala ConnectorJasperReports Server provides new and updated drivers for various databases. In the 6.2 release, the previousconnector for Impala that had been available on the Jaspersoft community website was replaced with two newoptions:• TIBCO Impala JDBC driver (also called Progress)• Simba JDBC driver (Cloudera-endorsed JDBC interface)
By default, the new release supports the new JDBC drivers, and the old Impala connector cannot be used. Youshould update your Impala data sources to use the new drivers. For more information, see the JasperReportsServer Administrator Guide.
If you wish to continue using the Impala connector that was previously available from the community website,modify the install as described below.1. Add the following files to the <js-install>/WEB-INF/lib directory:
• hive-service-0.12.0-cdh5.1.3.jar• zookeeper-3.4.5-cdh5.1.3.jar• avro-1.7.5-cdh5.1.3.jar• commons-compress-1.4.1.jar• hadoop-core-1.2.1.jar• hive-ant-0.12.0-cdh5.1.3.jar• hive-common-0.12.0-cdh5.1.3.jar• hive-exec-0.12.0-cdh5.1.3.jar• hive-jdbc-0.12.0-cdh5.1.3.jar• jasperserver-hive-connector-bugfix-SNAPSHOT.jar• js-hive-datasource-1.2.1-cdh5.jar• paranamer-2.3.jar• parquet-hadoop-bundle-1.2.5-cdh5.1.3.jar• xz-1.0.jar
2. Delete the file applicationContext-HiveDatasource.xml from the <js-install>/WEB-INF directory:
If you do not add the files listed, data sources that use the old Impala connector will cause errors when runningreports that rely on them.
46 TIBCO Software Inc.

Appendix A Planning Your Upgrade
A.3 Changes in 6.2.1 That May Affect Your Upgrade
A.3.1 Removal of the Impala ConnectorJasperReports Server provides new and updated drivers for various databases. In this release, the previousconnector for Impala that was available on the Jaspersoft community website is replaced with two new options:• TIBCO Impala JDBC driver (also called Progress)• Simba JDBC driver (Cloudera-endorsed JDBC interface)
By default, the new release supports the new JDBC drivers, and the old Impala connector cannot be used. Youshould update your Impala data sources to use the new drivers. For more information, see the JasperReportsServer Administrator Guide.
If you wish to continue using the Impala connector from the community website, you must replace thefollowing JAR files in the .../WEB-INF/lib directory:
Replace With This
hive-service-0.13.1.jar hive-service-0.12.0-cdh5.1.3.jar
zookeeper-3.4.6.jar zookeeper-3.4.5-cdh5.1.3.jar
Unless you replace the files listed in the table, data sources that use the old Impala connector will cause errorswhen running reports that rely on them.
A.4 Changes in 6.2 That May Affect Your Upgrade
A.4.1 Renaming of Ad Hoc TemplatesDue to minor changes to Ad Hoc templates in 6.2, the default template files have been renamed, for example,actual_size.510.jrxml has been renamed actual_size.620.jrxml. During upgrade, templates with an earlier versionnumber are overwritten by the new template. If you have customized the default template and kept the same filename, your changes will be overwritten. To avoid this, make a copy of your customized template with a uniquename and upload it to your template directory (by default, Public > Templates) using Add Resource >File > Style Template.
In general, if you want to customize the Ad Hoc templates, we recommend you rename the existing templateand set the new template as a default, rather than overwriting the existing template. See the JasperReportsServer Administrator Guide for more information.
TIBCO Software Inc. 47
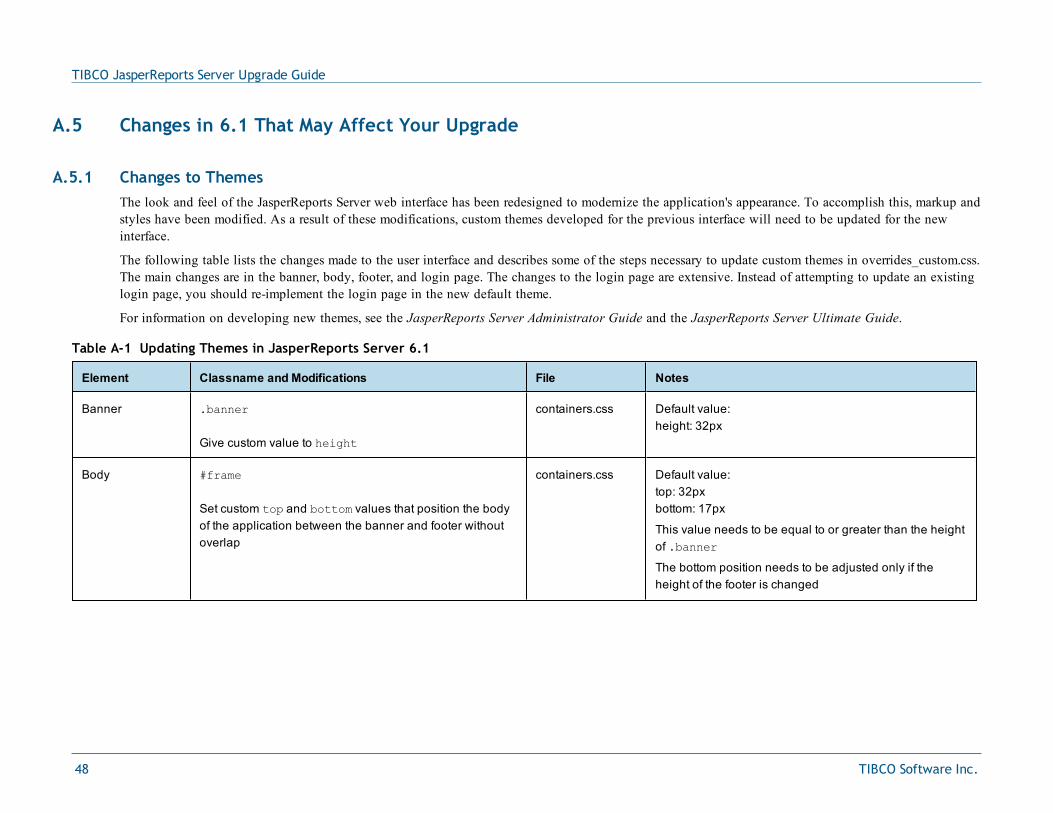
TIBCO JasperReports Server Upgrade Guide
A.5 Changes in 6.1 That May Affect Your Upgrade
A.5.1 Changes to ThemesThe look and feel of the JasperReports Server web interface has been redesigned to modernize the application's appearance. To accomplish this, markup andstyles have been modified. As a result of these modifications, custom themes developed for the previous interface will need to be updated for the newinterface.
The following table lists the changes made to the user interface and describes some of the steps necessary to update custom themes in overrides_custom.css.The main changes are in the banner, body, footer, and login page. The changes to the login page are extensive. Instead of attempting to update an existinglogin page, you should re-implement the login page in the new default theme.
For information on developing new themes, see the JasperReports Server Administrator Guide and the JasperReports Server Ultimate Guide.
Element Classname and Modifications File Notes
Banner .banner
Give custom value to height
containers.css Default value:height: 32px
Body #frame
Set custom top and bottom values that position the bodyof the application between the banner and footer withoutoverlap
containers.css Default value:top: 32pxbottom: 17px
This value needs to be equal to or greater than the heightof .banner
The bottom position needs to be adjusted only if theheight of the footer is changed
Table A-1 Updating Themes in JasperReports Server 6.1
48 TIBCO Software Inc.
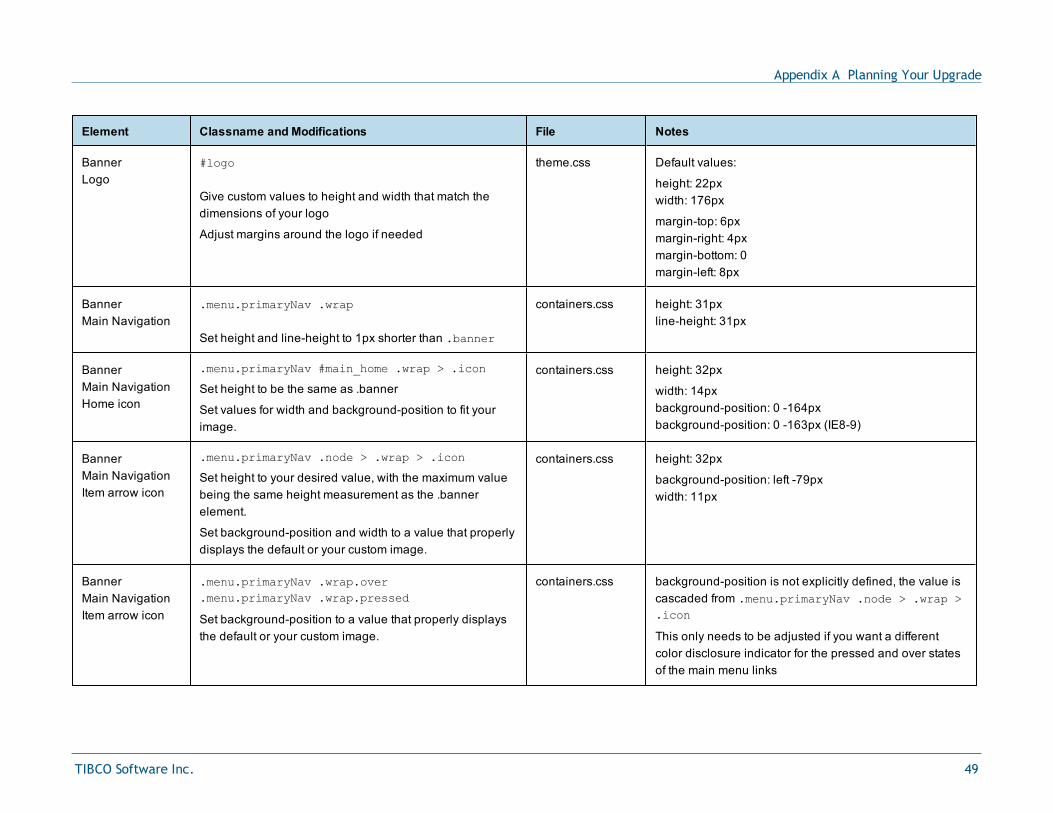
Appendix A Planning Your Upgrade
Element Classname and Modifications File Notes
BannerLogo
#logo
Give custom values to height and width that match thedimensions of your logo
Adjust margins around the logo if needed
theme.css Default values:
height: 22pxwidth: 176px
margin-top: 6pxmargin-right: 4pxmargin-bottom: 0margin-left: 8px
BannerMain Navigation
.menu.primaryNav .wrap
Set height and line-height to 1px shorter than .banner
containers.css height: 31pxline-height: 31px
BannerMain NavigationHome icon
.menu.primaryNav #main_home .wrap > .icon
Set height to be the same as .banner
Set values for width and background-position to fit yourimage.
containers.css height: 32px
width: 14pxbackground-position: 0 -164pxbackground-position: 0 -163px (IE8-9)
BannerMain NavigationItem arrow icon
.menu.primaryNav .node > .wrap > .icon
Set height to your desired value, with the maximum valuebeing the same height measurement as the .bannerelement.
Set background-position and width to a value that properlydisplays the default or your custom image.
containers.css height: 32px
background-position: left -79pxwidth: 11px
BannerMain NavigationItem arrow icon
.menu.primaryNav .wrap.over
.menu.primaryNav .wrap.pressed
Set background-position to a value that properly displaysthe default or your custom image.
containers.css background-position is not explicitly defined, the value iscascaded from .menu.primaryNav .node > .wrap >.icon
This only needs to be adjusted if you want a differentcolor disclosure indicator for the pressed and over statesof the main menu links
TIBCO Software Inc. 49
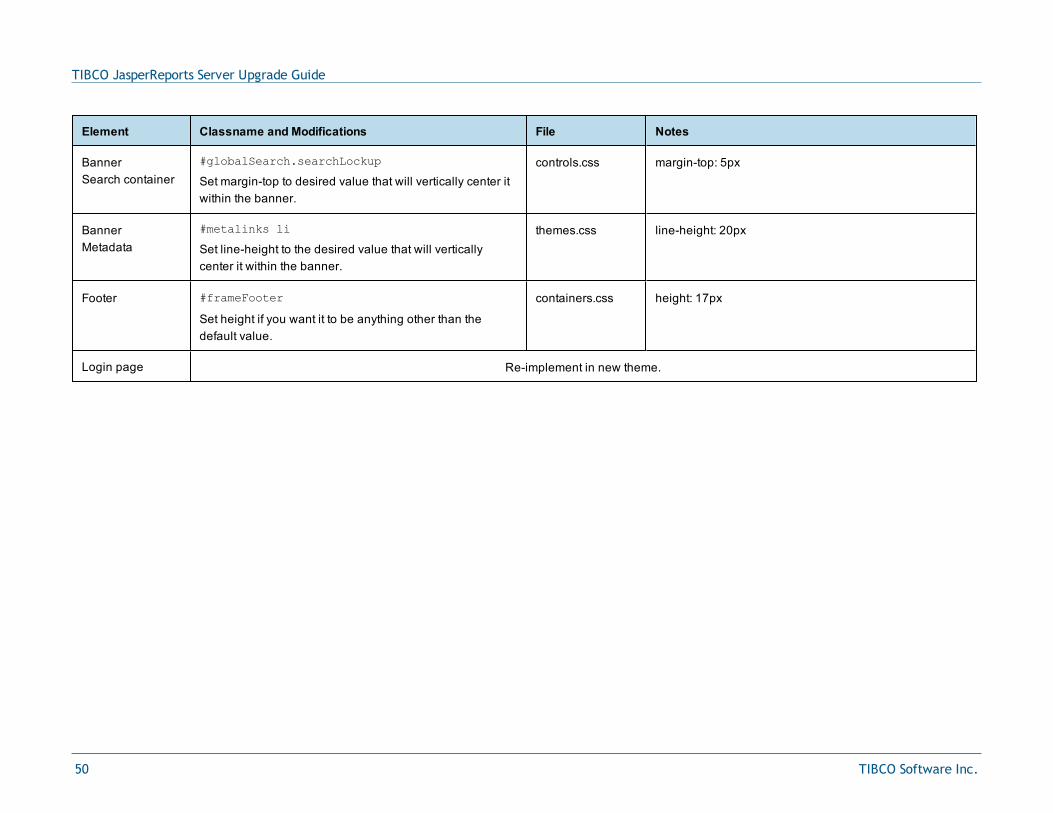
TIBCO JasperReports Server Upgrade Guide
Element Classname and Modifications File Notes
BannerSearch container
#globalSearch.searchLockup
Set margin-top to desired value that will vertically center itwithin the banner.
controls.css margin-top: 5px
BannerMetadata
#metalinks li
Set line-height to the desired value that will verticallycenter it within the banner.
themes.css line-height: 20px
Footer #frameFooter
Set height if you want it to be anything other than thedefault value.
containers.css height: 17px
Login page Re-implement in new theme.
50 TIBCO Software Inc.
APPENDIX B WORKING WITH JDBC DRIVERSThis section describes how to set up your installation to use a driver other than the default driver.
B.1 Open Source JDBC DriversFor open source JDBC drivers, buildomatic is set up to use a single default driver. If you want to use a driverother than the default driver, you can modify the buildomatic property files that determine the default JDBCdriver.
The buildomatic JDBC driver property files are set up to point to a specific driver jar. This allows for multipledriver jar files in the same buildomatic/conf_source/db/<dbType>/jdbc folder. During the installationprocedure only the default driver jar is copied to your application server.
If you want to use a newer JDBC driver version or a different JDBC driver, you can modify the buildomaticproperties seen in your default_master.properties file.
B.1.1 PostgreSQL ExampleThe buildomatic/conf_source/db/postgresql/jdbc folder contains these driver files:
postgresql-9.2-1002.jdbc3.jar
postgresql-9.2-1002.jdbc4.jar
If, for instance, you want to change the default driver used by PostgreSQL from type jdbc4 to jdbc3, edit yourdefault_master.properties file: Overlay upgrade: <overlay-folder>/buildomatic/default_master.properties
Other upgrade: <js-install>/buildomatic/default_master.properties
Uncomment and change: # maven.jdbc.version=9.2-1002.jdbc4
To:maven.jdbc.version=9.2-1002.jdbc3
When you next run a buildomatic command, such as deploy-webapp-pro, the jdbc3 driver will be copied toyour application server.
TIBCO Software Inc. 51

TIBCO JasperReports Server Upgrade Guide
B.1.2 MySQL ExampleThe buildomatic/conf_source/db/mysql/jdbc folder contains this driver file:
mariadb-java-client-1.1.2.jar
If, for instance, you want to use a JDBC driver built and distributed by the MySQL project, such as mysql-connector-java-5.1.30-bin.jar, you first need to download the driver from the MySQL Connector/Jdownload location:
https://dev.mysql.com/downloads/connector/j/
Next, change your buildomatic configuration properties to point to this new driver.
Edit your default_master.properties file: Overlay upgrade: <overlay-folder>/buildomatic/default_master.properties
Other upgrade: <js-install>/buildomatic/default_master.properties
Uncomment and change: # jdbcDriverClass=com.mysql.jdbc.Driver
# maven.jdbc.groupId=mysql
# maven.jdbc.artifactId=mysql-connector-java
# maven.jdbc.version=5.1.30-bin
To: jdbcDriverClass=com.mysql.jdbc.Driver
maven.jdbc.groupId=mysql
maven.jdbc.artifactId=mysql-connector-java
maven.jdbc.version=5.1.30-bin
B.2 Commercial JDBC DriversAs of version 5.6.1, JasperReports Server includes the TIBCO JDBC drivers for the following commercialdatabases. You can connect to these databases using the TIBCO JDBC driver without additional steps. Thedrivers are located in the <js-install>\buildomatic\conf_source\db\<your_database>\jdbc directory, where X.Y isthe version number:• Oracle – TIoracle-X.Y.jar• SQL Server – TIsqlserver-X.Y.jar• DB2 – TIdb2-X.Y.jar
These drivers require a valid JasperReports Server license. The driver is for use by JasperReports Serveronly, and after installation or upgrade, the driver jar must be located under the jasperserver-pro directory,for example <tomcat_home>/tomcat/jasperserver-pro/WEB-INF/lib.
If you're using the default settings for the driver, you don't need to edit default_master.properties.
You can also choose to use the driver supplied by the database vendor as described below. For upgrade, thissection assumes you have already downloaded the jar file for the database you want to use.
52 TIBCO Software Inc.
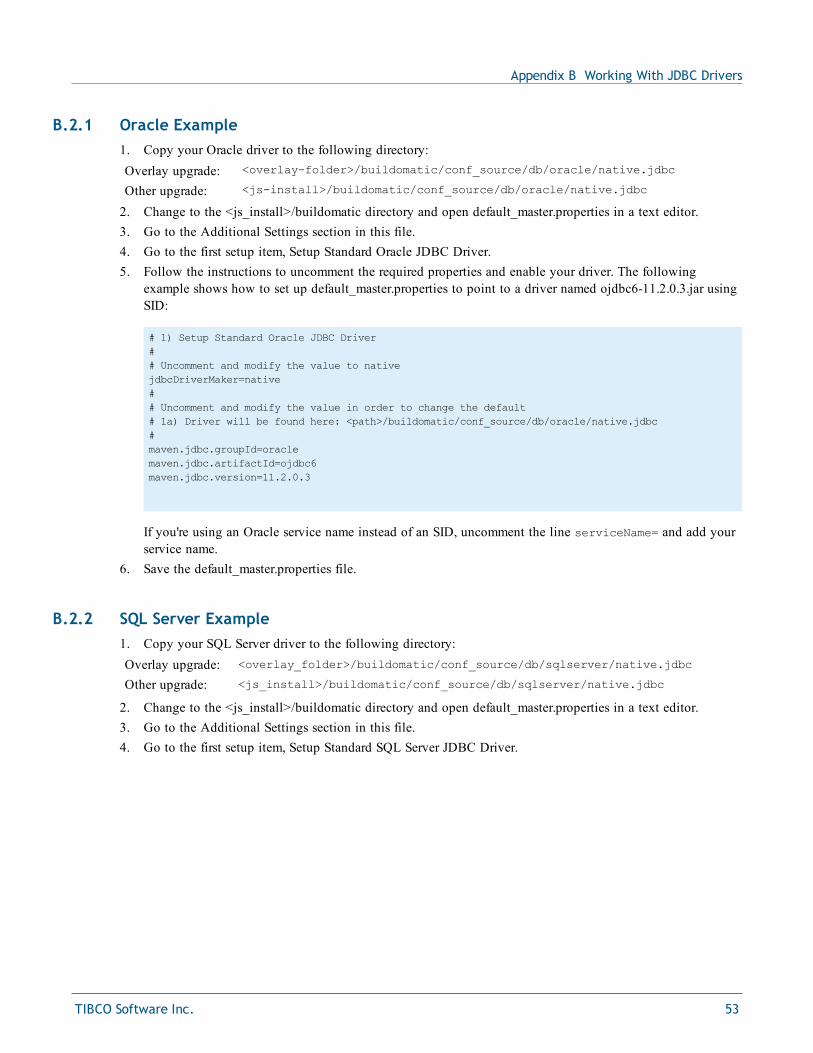
Appendix B Working With JDBC Drivers
B.2.1 Oracle Example1. Copy your Oracle driver to the following directory:Overlay upgrade: <overlay-folder>/buildomatic/conf_source/db/oracle/native.jdbc
Other upgrade: <js-install>/buildomatic/conf_source/db/oracle/native.jdbc
2. Change to the <js_install>/buildomatic directory and open default_master.properties in a text editor.3. Go to the Additional Settings section in this file.4. Go to the first setup item, Setup Standard Oracle JDBC Driver.5. Follow the instructions to uncomment the required properties and enable your driver. The following
example shows how to set up default_master.properties to point to a driver named ojdbc6-11.2.0.3.jar usingSID:
# 1) Setup Standard Oracle JDBC Driver## Uncomment and modify the value to nativejdbcDriverMaker=native## Uncomment and modify the value in order to change the default# 1a) Driver will be found here: <path>/buildomatic/conf_source/db/oracle/native.jdbc#maven.jdbc.groupId=oraclemaven.jdbc.artifactId=ojdbc6maven.jdbc.version=11.2.0.3
If you're using an Oracle service name instead of an SID, uncomment the line serviceName= and add yourservice name.
6. Save the default_master.properties file.
B.2.2 SQL Server Example1. Copy your SQL Server driver to the following directory:Overlay upgrade: <overlay_folder>/buildomatic/conf_source/db/sqlserver/native.jdbc
Other upgrade: <js_install>/buildomatic/conf_source/db/sqlserver/native.jdbc
2. Change to the <js_install>/buildomatic directory and open default_master.properties in a text editor.3. Go to the Additional Settings section in this file.4. Go to the first setup item, Setup Standard SQL Server JDBC Driver.
TIBCO Software Inc. 53
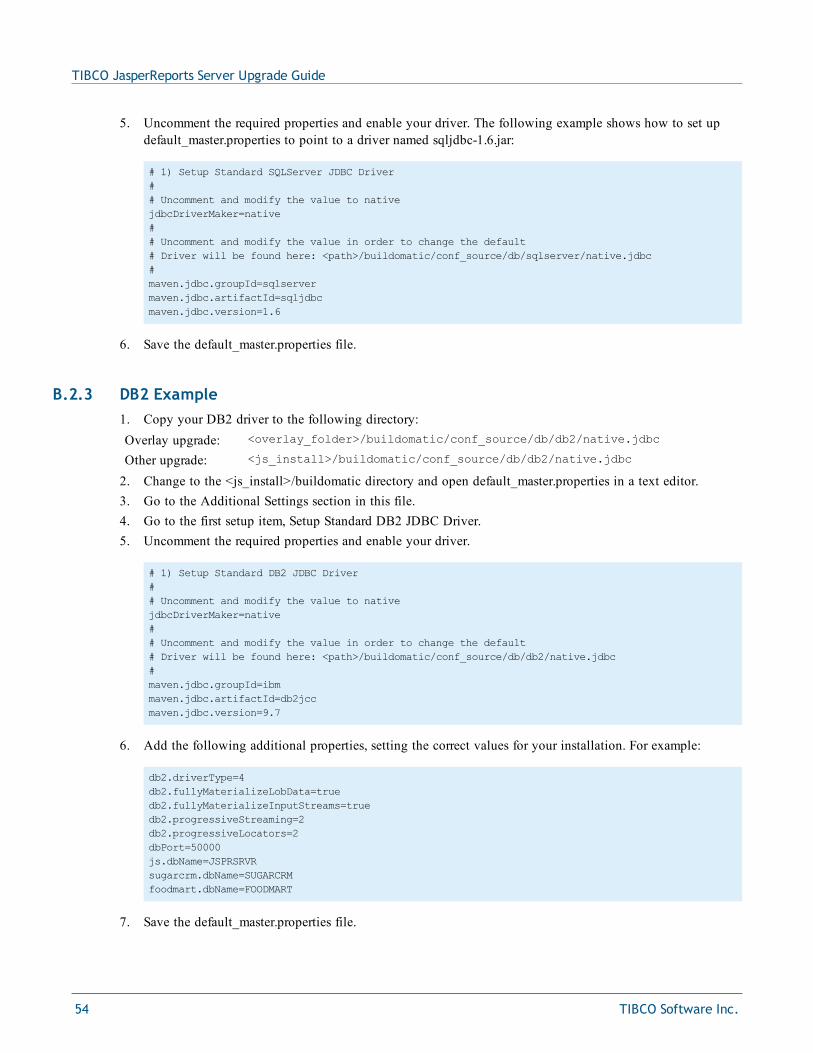
TIBCO JasperReports Server Upgrade Guide
5. Uncomment the required properties and enable your driver. The following example shows how to set updefault_master.properties to point to a driver named sqljdbc-1.6.jar:
# 1) Setup Standard SQLServer JDBC Driver## Uncomment and modify the value to nativejdbcDriverMaker=native## Uncomment and modify the value in order to change the default# Driver will be found here: <path>/buildomatic/conf_source/db/sqlserver/native.jdbc#maven.jdbc.groupId=sqlservermaven.jdbc.artifactId=sqljdbcmaven.jdbc.version=1.6
6. Save the default_master.properties file.
B.2.3 DB2 Example1. Copy your DB2 driver to the following directory:Overlay upgrade: <overlay_folder>/buildomatic/conf_source/db/db2/native.jdbc
Other upgrade: <js_install>/buildomatic/conf_source/db/db2/native.jdbc
2. Change to the <js_install>/buildomatic directory and open default_master.properties in a text editor.3. Go to the Additional Settings section in this file.4. Go to the first setup item, Setup Standard DB2 JDBC Driver.5. Uncomment the required properties and enable your driver.
# 1) Setup Standard DB2 JDBC Driver## Uncomment and modify the value to nativejdbcDriverMaker=native## Uncomment and modify the value in order to change the default# Driver will be found here: <path>/buildomatic/conf_source/db/db2/native.jdbc#maven.jdbc.groupId=ibmmaven.jdbc.artifactId=db2jccmaven.jdbc.version=9.7
6. Add the following additional properties, setting the correct values for your installation. For example:
db2.driverType=4db2.fullyMaterializeLobData=truedb2.fullyMaterializeInputStreams=truedb2.progressiveStreaming=2db2.progressiveLocators=2dbPort=50000js.dbName=JSPRSRVRsugarcrm.dbName=SUGARCRMfoodmart.dbName=FOODMART
7. Save the default_master.properties file.
54 TIBCO Software Inc.