
TIBCO BusinessEvents™ Administration
326
TIBCO BusinessEvents™ Administration Software Release 4.0 May 2010 The Power to Predict ™
-
Upload
khangminh22 -
Category
Documents
-
view
0 -
download
0
Transcript of TIBCO BusinessEvents™ Administration

TIBCO BusinessEvents™
Administration
Software Release 4.0May 2010
The Power to Predict™

Important Information
SOME TIBCO SOFTWARE EMBEDS OR BUNDLES OTHER TIBCO SOFTWARE. USE OF SUCH EMBEDDED OR BUNDLED TIBCO SOFTWARE IS SOLELY TO ENABLE THE FUNCTIONALITY (OR PROVIDE LIMITED ADD-ON FUNCTIONALITY) OF THE LICENSED TIBCO SOFTWARE. THE EMBEDDED OR BUNDLED SOFTWARE IS NOT LICENSED TO BE USED OR ACCESSED BY ANY OTHER TIBCO SOFTWARE OR FOR ANY OTHER PURPOSE.
USE OF TIBCO SOFTWARE AND THIS DOCUMENT IS SUBJECT TO THE TERMS AND CONDITIONS OF A LICENSE AGREEMENT FOUND IN EITHER A SEPARATELY EXECUTED SOFTWARE LICENSE AGREEMENT, OR, IF THERE IS NO SUCH SEPARATE AGREEMENT, THE CLICKWRAP END USER LICENSE AGREEMENT WHICH IS DISPLAYED DURING DOWNLOAD OR INSTALLATION OF THE SOFTWARE (AND WHICH IS DUPLICATED IN LICENSE.PDF) OR IF THERE IS NO SUCH SOFTWARE LICENSE AGREEMENT OR CLICKWRAP END USER LICENSE AGREEMENT, THE LICENSE(S) LOCATED IN THE “LICENSE” FILE(S) OF THE SOFTWARE. USE OF THIS DOCUMENT IS SUBJECT TO THOSE TERMS AND CONDITIONS, AND YOUR USE HEREOF SHALL CONSTITUTE ACCEPTANCE OF AND AN AGREEMENT TO BE BOUND BY THE SAME.
This document contains confidential information that is subject to U.S. and international copyright laws and treaties. No part of this document may be reproduced in any form without the written authorization of TIBCO Software Inc.
TIB, TIBCO, TIBCO Software, TIBCO Adapter, Predictive Business, Information Bus, The Power of Now, The Power to Predict, TIBCO BusinessEvents, TIBCO ActiveSpaces, TIBCO ActiveMatrix BusinessWorks, TIBCO Rendezvous, TIBCO Enterprise Message Service, TIBCO PortalBuilder, TIBCO Administrator, TIBCO Runtime Agent, TIBCO General Interface, and TIBCO Hawk are either registered trademarks or trademarks of TIBCO Software Inc. in the United States and/or other countries.
EJB, Java EE, J2EE, JMS and all Java-based trademarks and logos are trademarks or registered trademarks of Sun Microsystems, Inc. in the U.S. and other countries.
Excerpts from Oracle Coherence documentation are included with permission from Oracle and/or its affiliates. Copyright © 2000, 2006 Oracle and/or its affiliates. All rights reserved.
All other product and company names and marks mentioned in this document are the property of their respective owners and are mentioned for identification purposes only.
THIS SOFTWARE MAY BE AVAILABLE ON MULTIPLE OPERATING SYSTEMS. HOWEVER, NOT ALL OPERATING SYSTEM PLATFORMS FOR A SPECIFIC SOFTWARE VERSION ARE RELEASED AT THE SAME TIME. SEE THE README.TXT FILE FOR THE AVAILABILITY OF THIS SOFTWARE VERSION ON A SPECIFIC OPERATING SYSTEM PLATFORM.
THIS DOCUMENT IS PROVIDED “AS IS” WITHOUT WARRANTY OF ANY KIND, EITHER EXPRESS OR IMPLIED, INCLUDING, BUT NOT LIMITED TO, THE IMPLIED WARRANTIES OF MERCHANTABILITY, FITNESS FOR A PARTICULAR PURPOSE, OR NON-INFRINGEMENT.
THIS DOCUMENT COULD INCLUDE TECHNICAL INACCURACIES OR TYPOGRAPHICAL ERRORS. CHANGES ARE PERIODICALLY ADDED TO THE INFORMATION HEREIN; THESE CHANGES WILL BE INCORPORATED IN NEW EDITIONS OF THIS DOCUMENT. TIBCO SOFTWARE INC. MAY MAKE IMPROVEMENTS AND/OR CHANGES IN THE PRODUCT(S) AND/OR THE PROGRAM(S) DESCRIBED IN THIS DOCUMENT AT ANY TIME.
THE CONTENTS OF THIS DOCUMENT MAY BE MODIFIED AND/OR QUALIFIED, DIRECTLY OR INDIRECTLY, BY OTHER DOCUMENTATION WHICH ACCOMPANIES THIS SOFTWARE, INCLUDING BUT NOT LIMITED TO ANY RELEASE NOTES AND "READ ME" FILES.
This product is covered by U.S. Patent No. 7,472,101.
Copyright © 2004-2010 TIBCO Software Inc. ALL RIGHTS RESERVED.
TIBCO Software Inc. Confidential Information

TIBCO BusinessEvents Administration
| iii
Contents
Figures . . . . . . . . . . . . . . . . . . . . . . . . . . . . . . . . . . . . . . . . . . . . . . . . . . . . . . . . . . . . . . . . . . . . . . . . xi
Tables . . . . . . . . . . . . . . . . . . . . . . . . . . . . . . . . . . . . . . . . . . . . . . . . . . . . . . . . . . . . . . . . . . . . . . . . xiii
Preface . . . . . . . . . . . . . . . . . . . . . . . . . . . . . . . . . . . . . . . . . . . . . . . . . . . . . . . . . . . . . . . . . . . . . . .xvii
Related Documentation . . . . . . . . . . . . . . . . . . . . . . . . . . . . . . . . . . . . . . . . . . . . . . . . . . . . . . . . . . . . . . . . . . . . xviii
TIBCO BusinessEvents Documentation . . . . . . . . . . . . . . . . . . . . . . . . . . . . . . . . . . . . . . . . . . . . . . . . . . . . xviii
TIBCO BusinessEvents Event Stream Processing. . . . . . . . . . . . . . . . . . . . . . . . . . . . . . . . . . . . . . . . . . . . .xix
TIBCO BusinessEvents Decision Manager . . . . . . . . . . . . . . . . . . . . . . . . . . . . . . . . . . . . . . . . . . . . . . . . . .xix
TIBCO BusinessEvents Data Modeling . . . . . . . . . . . . . . . . . . . . . . . . . . . . . . . . . . . . . . . . . . . . . . . . . . . . .xix
TIBCO BusinessEvents Views . . . . . . . . . . . . . . . . . . . . . . . . . . . . . . . . . . . . . . . . . . . . . . . . . . . . . . . . . . . . xx
Other TIBCO Product Documentation . . . . . . . . . . . . . . . . . . . . . . . . . . . . . . . . . . . . . . . . . . . . . . . . . . . . . . xx
Typographical Conventions . . . . . . . . . . . . . . . . . . . . . . . . . . . . . . . . . . . . . . . . . . . . . . . . . . . . . . . . . . . . . . . . . .xxi
How to Contact TIBCO Support. . . . . . . . . . . . . . . . . . . . . . . . . . . . . . . . . . . . . . . . . . . . . . . . . . . . . . . . . . . . . .xxiv
Chapter 1 Administration Overview . . . . . . . . . . . . . . . . . . . . . . . . . . . . . . . . . . . . . . . . . . . . . . . . .1
Introduction . . . . . . . . . . . . . . . . . . . . . . . . . . . . . . . . . . . . . . . . . . . . . . . . . . . . . . . . . . . . . . . . . . . . . . . . . . . . . . . 2
Chapter 2 CDD Configuration Procedures . . . . . . . . . . . . . . . . . . . . . . . . . . . . . . . . . . . . . . . . . . .5
Overview of Cluster Deployment Configuration . . . . . . . . . . . . . . . . . . . . . . . . . . . . . . . . . . . . . . . . . . . . . . . . . . . . 6
Using Agent Class Properties at Different Levels. . . . . . . . . . . . . . . . . . . . . . . . . . . . . . . . . . . . . . . . . . . . . . . 6
Understanding How Entity Objects are Managed . . . . . . . . . . . . . . . . . . . . . . . . . . . . . . . . . . . . . . . . . . . . . . . . . . 7
The Role of the Object Table . . . . . . . . . . . . . . . . . . . . . . . . . . . . . . . . . . . . . . . . . . . . . . . . . . . . . . . . . . . . . . . . . . 8
Starting a Minimum Number (Quorum) of Cache Servers . . . . . . . . . . . . . . . . . . . . . . . . . . . . . . . . . . . . . . . . . . . 10
Task Summary . . . . . . . . . . . . . . . . . . . . . . . . . . . . . . . . . . . . . . . . . . . . . . . . . . . . . . . . . . . . . . . . . . . . . . . . . . . . 11
Cluster Tab . . . . . . . . . . . . . . . . . . . . . . . . . . . . . . . . . . . . . . . . . . . . . . . . . . . . . . . . . . . . . . . . . . . . . . . . . . . 11
Collections Tab . . . . . . . . . . . . . . . . . . . . . . . . . . . . . . . . . . . . . . . . . . . . . . . . . . . . . . . . . . . . . . . . . . . . . . . . 11
Agent Classes Tab . . . . . . . . . . . . . . . . . . . . . . . . . . . . . . . . . . . . . . . . . . . . . . . . . . . . . . . . . . . . . . . . . . . . . 12
Processing Units Tab . . . . . . . . . . . . . . . . . . . . . . . . . . . . . . . . . . . . . . . . . . . . . . . . . . . . . . . . . . . . . . . . . . . 12
Entity Metadata Settings. . . . . . . . . . . . . . . . . . . . . . . . . . . . . . . . . . . . . . . . . . . . . . . . . . . . . . . . . . . . . . . . . 12
Adding a Cluster Deployment Descriptor. . . . . . . . . . . . . . . . . . . . . . . . . . . . . . . . . . . . . . . . . . . . . . . . . . . . . . . . 13
Configuring an In Memory Cluster . . . . . . . . . . . . . . . . . . . . . . . . . . . . . . . . . . . . . . . . . . . . . . . . . . . . . . . . . . . . . 14
Configuring a Cache Manager Cluster — Cluster Tab. . . . . . . . . . . . . . . . . . . . . . . . . . . . . . . . . . . . . . . . . . . . . . 15
Configuring the Collections Tab (All Object Managers) . . . . . . . . . . . . . . . . . . . . . . . . . . . . . . . . . . . . . . . . . . . . . 17

TIBCO BusinessEvents Administration
iv | Contents
Configuring Collections . . . . . . . . . . . . . . . . . . . . . . . . . . . . . . . . . . . . . . . . . . . . . . . . . . . . . . . . . . . . . . . . . 17
Configuring Log Configurations . . . . . . . . . . . . . . . . . . . . . . . . . . . . . . . . . . . . . . . . . . . . . . . . . . . . . . . . . . . 19
Configuring the Agent Classes Tab (All Object Managers) . . . . . . . . . . . . . . . . . . . . . . . . . . . . . . . . . . . . . . . . . . 20
Configuring the Processing Units Tab (All Object Managers) . . . . . . . . . . . . . . . . . . . . . . . . . . . . . . . . . . . . . . . . 23
Entity-Level Configuration for Cache and Backing Store . . . . . . . . . . . . . . . . . . . . . . . . . . . . . . . . . . . . . . . . . . . 25
Metadata Properties for Entities (Events and Concepts) . . . . . . . . . . . . . . . . . . . . . . . . . . . . . . . . . . . . . . . . 25
Chapter 3 Cluster Deployment Descriptor Reference. . . . . . . . . . . . . . . . . . . . . . . . . . . . . . . . . 29
Cluster Tab — General Settings . . . . . . . . . . . . . . . . . . . . . . . . . . . . . . . . . . . . . . . . . . . . . . . . . . . . . . . . . . . . . . 30
Cluster Tab — Cache Manager — Configuration Settings . . . . . . . . . . . . . . . . . . . . . . . . . . . . . . . . . . . . . . . . . . 31
Starting a Minimum Number of Cache Servers . . . . . . . . . . . . . . . . . . . . . . . . . . . . . . . . . . . . . . . . . . . . . . . 31
Cluster Tab — Cache Manager — Backing Store Settings. . . . . . . . . . . . . . . . . . . . . . . . . . . . . . . . . . . . . . . . . . 33
Cluster Tab — Cache Manager — Backing Store Properties . . . . . . . . . . . . . . . . . . . . . . . . . . . . . . . . . . . . . . . . 37
Cluster Tab — Cache Manager — Domain Objects Settings . . . . . . . . . . . . . . . . . . . . . . . . . . . . . . . . . . . . . . . . 41
Default Level Settings . . . . . . . . . . . . . . . . . . . . . . . . . . . . . . . . . . . . . . . . . . . . . . . . . . . . . . . . . . . . . . . . . . 41
Entity Level Object Overrides and Settings . . . . . . . . . . . . . . . . . . . . . . . . . . . . . . . . . . . . . . . . . . . . . . . . . . 44
Cluster Tab — Cache Manager — Coherence Properties . . . . . . . . . . . . . . . . . . . . . . . . . . . . . . . . . . . . . . . . . . 46
Collections Tab — Destinations Settings and Properties . . . . . . . . . . . . . . . . . . . . . . . . . . . . . . . . . . . . . . . . . . . 52
Collections Tab — Log Configurations Overview . . . . . . . . . . . . . . . . . . . . . . . . . . . . . . . . . . . . . . . . . . . . . . . . . 55
Collections Tab — Log Configurations Settings . . . . . . . . . . . . . . . . . . . . . . . . . . . . . . . . . . . . . . . . . . . . . . . . . . 57
Agents Tab Settings and Properties . . . . . . . . . . . . . . . . . . . . . . . . . . . . . . . . . . . . . . . . . . . . . . . . . . . . . . . . . . . 60
Processing Units Tab Settings and Properties . . . . . . . . . . . . . . . . . . . . . . . . . . . . . . . . . . . . . . . . . . . . . . . . . . . 66
Chapter 4 Cluster Configuration for Berkeley DB Manager . . . . . . . . . . . . . . . . . . . . . . . . . . . . 71
Configuring the Cluster Tab for Berkeley DB Manager . . . . . . . . . . . . . . . . . . . . . . . . . . . . . . . . . . . . . . . . . . . . . 72
Cluster Tab — Berkeley DB Manager Settings and Properties. . . . . . . . . . . . . . . . . . . . . . . . . . . . . . . . . . . . . . . 73
Additional Configuration Notes . . . . . . . . . . . . . . . . . . . . . . . . . . . . . . . . . . . . . . . . . . . . . . . . . . . . . . . . . . . 77
Chapter 5 Site Topology Configuration . . . . . . . . . . . . . . . . . . . . . . . . . . . . . . . . . . . . . . . . . . . . 79
Site Topology Overview. . . . . . . . . . . . . . . . . . . . . . . . . . . . . . . . . . . . . . . . . . . . . . . . . . . . . . . . . . . . . . . . . . . . . 80
Project, Master, and Deployed CDD and EAR Files . . . . . . . . . . . . . . . . . . . . . . . . . . . . . . . . . . . . . . . . . . . 80
Limitations in Use of Certain Processing Unit Configurations . . . . . . . . . . . . . . . . . . . . . . . . . . . . . . . . . . . . 81
Configuring the Site Topology . . . . . . . . . . . . . . . . . . . . . . . . . . . . . . . . . . . . . . . . . . . . . . . . . . . . . . . . . . . . . . . . 82
Site Topology Reference. . . . . . . . . . . . . . . . . . . . . . . . . . . . . . . . . . . . . . . . . . . . . . . . . . . . . . . . . . . . . . . . . . . . 84
Site Settings. . . . . . . . . . . . . . . . . . . . . . . . . . . . . . . . . . . . . . . . . . . . . . . . . . . . . . . . . . . . . . . . . . . . . . . . . . 84
Cluster Settings . . . . . . . . . . . . . . . . . . . . . . . . . . . . . . . . . . . . . . . . . . . . . . . . . . . . . . . . . . . . . . . . . . . . . . . 84
Deployment Unit Settings . . . . . . . . . . . . . . . . . . . . . . . . . . . . . . . . . . . . . . . . . . . . . . . . . . . . . . . . . . . . . . . 85
Processing Unit Settings . . . . . . . . . . . . . . . . . . . . . . . . . . . . . . . . . . . . . . . . . . . . . . . . . . . . . . . . . . . . . . . . 86
Host Settings . . . . . . . . . . . . . . . . . . . . . . . . . . . . . . . . . . . . . . . . . . . . . . . . . . . . . . . . . . . . . . . . . . . . . . . . . 87

TIBCO BusinessEvents Administration
Contents | v
Chapter 6 BusinessEvents Monitoring and Management Configuration . . . . . . . . . . . . . . . . . .91
Monitoring and Management Configuration Overview. . . . . . . . . . . . . . . . . . . . . . . . . . . . . . . . . . . . . . . . . . . . . . 92
Task Summary . . . . . . . . . . . . . . . . . . . . . . . . . . . . . . . . . . . . . . . . . . . . . . . . . . . . . . . . . . . . . . . . . . . . . . . . 92
Configuring the Connection between MM Server and the Monitored Cluster . . . . . . . . . . . . . . . . . . . . . . . . . . . . 94
Importing the emonitor Project for CDD Editing. . . . . . . . . . . . . . . . . . . . . . . . . . . . . . . . . . . . . . . . . . . . . . . . . . . 98
Configuring MM Settings in the MM CDD File . . . . . . . . . . . . . . . . . . . . . . . . . . . . . . . . . . . . . . . . . . . . . . . . . . . 100
MM Property Group Reference . . . . . . . . . . . . . . . . . . . . . . . . . . . . . . . . . . . . . . . . . . . . . . . . . . . . . . . . . . . . . . 101
Understanding and Configuring Alerts . . . . . . . . . . . . . . . . . . . . . . . . . . . . . . . . . . . . . . . . . . . . . . . . . . . . . . . . . 106
Understanding Alerts . . . . . . . . . . . . . . . . . . . . . . . . . . . . . . . . . . . . . . . . . . . . . . . . . . . . . . . . . . . . . . . . . . 106
Configuring Alerts . . . . . . . . . . . . . . . . . . . . . . . . . . . . . . . . . . . . . . . . . . . . . . . . . . . . . . . . . . . . . . . . . . . . . 106
Alert Configuration Reference . . . . . . . . . . . . . . . . . . . . . . . . . . . . . . . . . . . . . . . . . . . . . . . . . . . . . . . . . . . . . . . 108
Specifying the Path to an Alert Metric Value (and a Reference Value) . . . . . . . . . . . . . . . . . . . . . . . . . . . . . . . . 110
Specifying the Alert Message . . . . . . . . . . . . . . . . . . . . . . . . . . . . . . . . . . . . . . . . . . . . . . . . . . . . . . . . . . . . 111
Pane Types Reference for Alert Configuration . . . . . . . . . . . . . . . . . . . . . . . . . . . . . . . . . . . . . . . . . . . . . . . . . . 113
Understanding Health Metric Rules . . . . . . . . . . . . . . . . . . . . . . . . . . . . . . . . . . . . . . . . . . . . . . . . . . . . . . . . . . . 115
Cluster Member Paths . . . . . . . . . . . . . . . . . . . . . . . . . . . . . . . . . . . . . . . . . . . . . . . . . . . . . . . . . . . . . . . . . 115
Two Types of Thresholds . . . . . . . . . . . . . . . . . . . . . . . . . . . . . . . . . . . . . . . . . . . . . . . . . . . . . . . . . . . . . . . 116
Health Metric Rule Examples . . . . . . . . . . . . . . . . . . . . . . . . . . . . . . . . . . . . . . . . . . . . . . . . . . . . . . . . . . . . 117
Configuring Health Metric Rules . . . . . . . . . . . . . . . . . . . . . . . . . . . . . . . . . . . . . . . . . . . . . . . . . . . . . . . . . . . . . 120
Health Metric Rule Configuration Reference . . . . . . . . . . . . . . . . . . . . . . . . . . . . . . . . . . . . . . . . . . . . . . . . . . . . 123
Configuring Actions . . . . . . . . . . . . . . . . . . . . . . . . . . . . . . . . . . . . . . . . . . . . . . . . . . . . . . . . . . . . . . . . . . . . . . . 127
Action Configuration Reference. . . . . . . . . . . . . . . . . . . . . . . . . . . . . . . . . . . . . . . . . . . . . . . . . . . . . . . . . . . . . . 128
Configuring MM Console Properties . . . . . . . . . . . . . . . . . . . . . . . . . . . . . . . . . . . . . . . . . . . . . . . . . . . . . . . . . . 130
Chapter 7 Monitoring a BusinessEvents Cluster . . . . . . . . . . . . . . . . . . . . . . . . . . . . . . . . . . . .131
Overview of BusinessEvents Monitoring and Management. . . . . . . . . . . . . . . . . . . . . . . . . . . . . . . . . . . . . . . . . 132
Reference to the Metrics . . . . . . . . . . . . . . . . . . . . . . . . . . . . . . . . . . . . . . . . . . . . . . . . . . . . . . . . . . . . . . . 132
Health Indicators and Alerts . . . . . . . . . . . . . . . . . . . . . . . . . . . . . . . . . . . . . . . . . . . . . . . . . . . . . . . . . . . . . 133
Starting MM Management Server and Using MM Console . . . . . . . . . . . . . . . . . . . . . . . . . . . . . . . . . . . . . . . . . 134
Cluster Explorer . . . . . . . . . . . . . . . . . . . . . . . . . . . . . . . . . . . . . . . . . . . . . . . . . . . . . . . . . . . . . . . . . . . . . . . . . . 136
Inactive Members . . . . . . . . . . . . . . . . . . . . . . . . . . . . . . . . . . . . . . . . . . . . . . . . . . . . . . . . . . . . . . . . . . . . . 137
Working with Cluster Explorer . . . . . . . . . . . . . . . . . . . . . . . . . . . . . . . . . . . . . . . . . . . . . . . . . . . . . . . . . . . 138
Panels and Panes . . . . . . . . . . . . . . . . . . . . . . . . . . . . . . . . . . . . . . . . . . . . . . . . . . . . . . . . . . . . . . . . . . . . . . . . 139
Working with MM Metric Panes . . . . . . . . . . . . . . . . . . . . . . . . . . . . . . . . . . . . . . . . . . . . . . . . . . . . . . . . . . 139
Cluster Overview . . . . . . . . . . . . . . . . . . . . . . . . . . . . . . . . . . . . . . . . . . . . . . . . . . . . . . . . . . . . . . . . . . . . . . . . . 141
Cluster Overview Pane. . . . . . . . . . . . . . . . . . . . . . . . . . . . . . . . . . . . . . . . . . . . . . . . . . . . . . . . . . . . . . . . . 141
System Alerts Pane . . . . . . . . . . . . . . . . . . . . . . . . . . . . . . . . . . . . . . . . . . . . . . . . . . . . . . . . . . . . . . . . . . . 142
Machine Overview . . . . . . . . . . . . . . . . . . . . . . . . . . . . . . . . . . . . . . . . . . . . . . . . . . . . . . . . . . . . . . . . . . . . . . . . 143
Process Overview . . . . . . . . . . . . . . . . . . . . . . . . . . . . . . . . . . . . . . . . . . . . . . . . . . . . . . . . . . . . . . . . . . . . . . . . 144

TIBCO BusinessEvents Administration
vi | Contents
Agent Overview. . . . . . . . . . . . . . . . . . . . . . . . . . . . . . . . . . . . . . . . . . . . . . . . . . . . . . . . . . . . . . . . . . . . . . . . . . 146
Inference Agent Overview. . . . . . . . . . . . . . . . . . . . . . . . . . . . . . . . . . . . . . . . . . . . . . . . . . . . . . . . . . . . . . . . . . 149
Query Agent Overview . . . . . . . . . . . . . . . . . . . . . . . . . . . . . . . . . . . . . . . . . . . . . . . . . . . . . . . . . . . . . . . . . . . . 150
Ontology (Cache Objects) Overview. . . . . . . . . . . . . . . . . . . . . . . . . . . . . . . . . . . . . . . . . . . . . . . . . . . . . . . . . . 151
Chapter 8 Deploying a TIBCO BusinessEvents Project . . . . . . . . . . . . . . . . . . . . . . . . . . . . . . 153
Deployment Overview. . . . . . . . . . . . . . . . . . . . . . . . . . . . . . . . . . . . . . . . . . . . . . . . . . . . . . . . . . . . . . . . . . . . . 154
Starting a BusinessEvents Engine at the Command Line. . . . . . . . . . . . . . . . . . . . . . . . . . . . . . . . . . . . . . . . . . 155
Deployment in a TIBCO Administrator Domain. . . . . . . . . . . . . . . . . . . . . . . . . . . . . . . . . . . . . . . . . . . . . . . . . . 158
Before Deploying a Project in a TIBCO Administrator Domain . . . . . . . . . . . . . . . . . . . . . . . . . . . . . . . . . . 159
Deploying a Project in a TIBCO Administrator Domain . . . . . . . . . . . . . . . . . . . . . . . . . . . . . . . . . . . . . . . . 159
TIBCO Hawk Application Management Interface . . . . . . . . . . . . . . . . . . . . . . . . . . . . . . . . . . . . . . . . . . . . . . . . 163
Chapter 9 Hot Deployment . . . . . . . . . . . . . . . . . . . . . . . . . . . . . . . . . . . . . . . . . . . . . . . . . . . . . 165
Hot Deployment Overview . . . . . . . . . . . . . . . . . . . . . . . . . . . . . . . . . . . . . . . . . . . . . . . . . . . . . . . . . . . . . . . . . 166
Modifications Allowed in Hot Deployment . . . . . . . . . . . . . . . . . . . . . . . . . . . . . . . . . . . . . . . . . . . . . . . . . . 166
How Hot Deployment Occurs. . . . . . . . . . . . . . . . . . . . . . . . . . . . . . . . . . . . . . . . . . . . . . . . . . . . . . . . . . . . 166
Hot Deployment Supported Modifications. . . . . . . . . . . . . . . . . . . . . . . . . . . . . . . . . . . . . . . . . . . . . . . . . . . . . . 167
Enabling and Disabling Hot Deployment. . . . . . . . . . . . . . . . . . . . . . . . . . . . . . . . . . . . . . . . . . . . . . . . . . . . . . . 169
Performing Hot Deployment in a TIBCO Administrator Domain . . . . . . . . . . . . . . . . . . . . . . . . . . . . . . . . . . . . . 171
Modify the Project as Needed and Build the EAR File. . . . . . . . . . . . . . . . . . . . . . . . . . . . . . . . . . . . . . . . . 171
Enable Hot Deployment (As Needed) . . . . . . . . . . . . . . . . . . . . . . . . . . . . . . . . . . . . . . . . . . . . . . . . . . . . . 171
Perform Hot Deployment . . . . . . . . . . . . . . . . . . . . . . . . . . . . . . . . . . . . . . . . . . . . . . . . . . . . . . . . . . . . . . . 171
Performing Hot Deployment Outside a TIBCO Administrator Domain . . . . . . . . . . . . . . . . . . . . . . . . . . . . . . . . 173
Modify the Project as Needed and Build the EAR File. . . . . . . . . . . . . . . . . . . . . . . . . . . . . . . . . . . . . . . . . 173
Enable Hot Deployment (As Needed) . . . . . . . . . . . . . . . . . . . . . . . . . . . . . . . . . . . . . . . . . . . . . . . . . . . . . 173
Add a Property to the Engine Property File . . . . . . . . . . . . . . . . . . . . . . . . . . . . . . . . . . . . . . . . . . . . . . . . . 173
Perform Hot Deployment . . . . . . . . . . . . . . . . . . . . . . . . . . . . . . . . . . . . . . . . . . . . . . . . . . . . . . . . . . . . . . . 173
Chapter 10 Threading Models and Tuning . . . . . . . . . . . . . . . . . . . . . . . . . . . . . . . . . . . . . . . . . 175
Threading Models Overview . . . . . . . . . . . . . . . . . . . . . . . . . . . . . . . . . . . . . . . . . . . . . . . . . . . . . . . . . . . . . . . . 176
Event Preprocessor and Rete Worker Thread Options. . . . . . . . . . . . . . . . . . . . . . . . . . . . . . . . . . . . . . . . . . . . 178
Shared Queue and Threads . . . . . . . . . . . . . . . . . . . . . . . . . . . . . . . . . . . . . . . . . . . . . . . . . . . . . . . . . . . . 178
Caller’s Thread . . . . . . . . . . . . . . . . . . . . . . . . . . . . . . . . . . . . . . . . . . . . . . . . . . . . . . . . . . . . . . . . . . . . . . 179
Dedicated Workers . . . . . . . . . . . . . . . . . . . . . . . . . . . . . . . . . . . . . . . . . . . . . . . . . . . . . . . . . . . . . . . . . . . 180
RTC Options — Single-Threaded or Concurrent . . . . . . . . . . . . . . . . . . . . . . . . . . . . . . . . . . . . . . . . . . . . . . . . 182
Concurrent RTC. . . . . . . . . . . . . . . . . . . . . . . . . . . . . . . . . . . . . . . . . . . . . . . . . . . . . . . . . . . . . . . . . . . . . . 182
Single-Threaded RTC . . . . . . . . . . . . . . . . . . . . . . . . . . . . . . . . . . . . . . . . . . . . . . . . . . . . . . . . . . . . . . . . . 182
Post RTC Options — Cache-aside and Write-behind . . . . . . . . . . . . . . . . . . . . . . . . . . . . . . . . . . . . . . . . . . . . . 184
Cache-aside. . . . . . . . . . . . . . . . . . . . . . . . . . . . . . . . . . . . . . . . . . . . . . . . . . . . . . . . . . . . . . . . . . . . . . . . . 184

TIBCO BusinessEvents Administration
Contents | vii
Write-behind . . . . . . . . . . . . . . . . . . . . . . . . . . . . . . . . . . . . . . . . . . . . . . . . . . . . . . . . . . . . . . . . . . . . . . . . . 186
Chapter 11 Configuring User Authentication . . . . . . . . . . . . . . . . . . . . . . . . . . . . . . . . . . . . . . .189
User Authentication Overview . . . . . . . . . . . . . . . . . . . . . . . . . . . . . . . . . . . . . . . . . . . . . . . . . . . . . . . . . . . . . . . 190
Authentication Options . . . . . . . . . . . . . . . . . . . . . . . . . . . . . . . . . . . . . . . . . . . . . . . . . . . . . . . . . . . . . . . . . 190
Pluggable JAAS Login Module . . . . . . . . . . . . . . . . . . . . . . . . . . . . . . . . . . . . . . . . . . . . . . . . . . . . . . . . . . . 190
Configuring User Authentication . . . . . . . . . . . . . . . . . . . . . . . . . . . . . . . . . . . . . . . . . . . . . . . . . . . . . . . . . . . . . 191
Configuring File-Based Authentication . . . . . . . . . . . . . . . . . . . . . . . . . . . . . . . . . . . . . . . . . . . . . . . . . . . . . 191
Configuring LDAP-Based Authentication . . . . . . . . . . . . . . . . . . . . . . . . . . . . . . . . . . . . . . . . . . . . . . . . . . . 192
Authentication Property Reference . . . . . . . . . . . . . . . . . . . . . . . . . . . . . . . . . . . . . . . . . . . . . . . . . . . . . . . . . . . 193
Chapter 12 Configuring Access Control for a Project . . . . . . . . . . . . . . . . . . . . . . . . . . . . . . . .195
Configuring Access Control—Overview. . . . . . . . . . . . . . . . . . . . . . . . . . . . . . . . . . . . . . . . . . . . . . . . . . . . . . . . 196
Establishing the User Roles . . . . . . . . . . . . . . . . . . . . . . . . . . . . . . . . . . . . . . . . . . . . . . . . . . . . . . . . . . . . . 196
Guidelines for Configuring Access Control . . . . . . . . . . . . . . . . . . . . . . . . . . . . . . . . . . . . . . . . . . . . . . . . . . 196
Structure of the Access Control File . . . . . . . . . . . . . . . . . . . . . . . . . . . . . . . . . . . . . . . . . . . . . . . . . . . . . . . 197
Working with Access Control Files. . . . . . . . . . . . . . . . . . . . . . . . . . . . . . . . . . . . . . . . . . . . . . . . . . . . . . . . . . . . 199
Creating and Modifying an Access Control File . . . . . . . . . . . . . . . . . . . . . . . . . . . . . . . . . . . . . . . . . . . . . . 199
Required Location of Access Control Files. . . . . . . . . . . . . . . . . . . . . . . . . . . . . . . . . . . . . . . . . . . . . . . . . . 199
Specifying and Grouping Decision Project Resources . . . . . . . . . . . . . . . . . . . . . . . . . . . . . . . . . . . . . . . . . 199
Defining Permissions . . . . . . . . . . . . . . . . . . . . . . . . . . . . . . . . . . . . . . . . . . . . . . . . . . . . . . . . . . . . . . . . . . 200
Defining Permissions for Domain Models. . . . . . . . . . . . . . . . . . . . . . . . . . . . . . . . . . . . . . . . . . . . . . . . . . . 201
Resource Types and Corresponding Action Types . . . . . . . . . . . . . . . . . . . . . . . . . . . . . . . . . . . . . . . . . . . . . . . 203
Chapter 13 JDBC Backing Store Configuration . . . . . . . . . . . . . . . . . . . . . . . . . . . . . . . . . . . . .205
JDBC Backing Store Database Setup Overview . . . . . . . . . . . . . . . . . . . . . . . . . . . . . . . . . . . . . . . . . . . . . . . . . 206
Special Cases . . . . . . . . . . . . . . . . . . . . . . . . . . . . . . . . . . . . . . . . . . . . . . . . . . . . . . . . . . . . . . . . . . . . . . . . . . . 207
Names that Exceed the DBMS Maximum Column Length . . . . . . . . . . . . . . . . . . . . . . . . . . . . . . . . . . . . . . 207
String Properties That Exceed the Maximum Database Column Length . . . . . . . . . . . . . . . . . . . . . . . . . . . 208
Ontology Identifiers That Use Database Key Words . . . . . . . . . . . . . . . . . . . . . . . . . . . . . . . . . . . . . . . . . . 208
Resources Required for Setting Up the Database. . . . . . . . . . . . . . . . . . . . . . . . . . . . . . . . . . . . . . . . . . . . . . . . 209
DBMS Software and Installation Requirements . . . . . . . . . . . . . . . . . . . . . . . . . . . . . . . . . . . . . . . . . . . . . . 209
Provided Configuration Resources. . . . . . . . . . . . . . . . . . . . . . . . . . . . . . . . . . . . . . . . . . . . . . . . . . . . . . . . 210
JDBC Backing Store Database Configuration Tasks . . . . . . . . . . . . . . . . . . . . . . . . . . . . . . . . . . . . . . . . . . . . . . 212
Updating an Existing Backing Store Database Schema . . . . . . . . . . . . . . . . . . . . . . . . . . . . . . . . . . . . . . . . . . . 219
What the Schema Update Utility Can and Can’t Handle Automatically . . . . . . . . . . . . . . . . . . . . . . . . . . . . 219
The Procedure . . . . . . . . . . . . . . . . . . . . . . . . . . . . . . . . . . . . . . . . . . . . . . . . . . . . . . . . . . . . . . . . . . . . . . . 221
Backing Store Table Reference . . . . . . . . . . . . . . . . . . . . . . . . . . . . . . . . . . . . . . . . . . . . . . . . . . . . . . . . . . . . . . 223
Primary Tables . . . . . . . . . . . . . . . . . . . . . . . . . . . . . . . . . . . . . . . . . . . . . . . . . . . . . . . . . . . . . . . . . . . . . . . 223
Secondary Tables . . . . . . . . . . . . . . . . . . . . . . . . . . . . . . . . . . . . . . . . . . . . . . . . . . . . . . . . . . . . . . . . . . . . . 223
Reverse Reference Tables . . . . . . . . . . . . . . . . . . . . . . . . . . . . . . . . . . . . . . . . . . . . . . . . . . . . . . . . . . . . . . 224

TIBCO BusinessEvents Administration
viii | Contents
Class-to-Table Mapping . . . . . . . . . . . . . . . . . . . . . . . . . . . . . . . . . . . . . . . . . . . . . . . . . . . . . . . . . . . . . . . . 224
Adding a JDBC Connection Resource to the Studio Project. . . . . . . . . . . . . . . . . . . . . . . . . . . . . . . . . . . . . . . . 225
Configuring Backing Store Properties in the CDD Editor . . . . . . . . . . . . . . . . . . . . . . . . . . . . . . . . . . . . . . . . . . 226
Enabling Backing Store and General Settings. . . . . . . . . . . . . . . . . . . . . . . . . . . . . . . . . . . . . . . . . . . . . . . 226
Database Connection Settings . . . . . . . . . . . . . . . . . . . . . . . . . . . . . . . . . . . . . . . . . . . . . . . . . . . . . . . . . . 226
If a Custom Cache Configuration File is Used. . . . . . . . . . . . . . . . . . . . . . . . . . . . . . . . . . . . . . . . . . . . . . . 227
Specifying Limited Cache Size . . . . . . . . . . . . . . . . . . . . . . . . . . . . . . . . . . . . . . . . . . . . . . . . . . . . . . . . . . 227
Appendix A Setting up an Oracle-Only Backing Store . . . . . . . . . . . . . . . . . . . . . . . . . . . . . . 229
Oracle-Only Backing Store Database Setup Overview. . . . . . . . . . . . . . . . . . . . . . . . . . . . . . . . . . . . . . . . . . . . 230
Oracle-Only Backing Store Requirements . . . . . . . . . . . . . . . . . . . . . . . . . . . . . . . . . . . . . . . . . . . . . . . . . . 230
Before You Begin Database Setup . . . . . . . . . . . . . . . . . . . . . . . . . . . . . . . . . . . . . . . . . . . . . . . . . . . . . . . 230
Oracle-Only Backing Store Database Setup Tasks . . . . . . . . . . . . . . . . . . . . . . . . . . . . . . . . . . . . . . . . . . . 230
Extra Procedure to Handle Long Database Identifier Names . . . . . . . . . . . . . . . . . . . . . . . . . . . . . . . . . . . 231
After You Finish Database Setup. . . . . . . . . . . . . . . . . . . . . . . . . . . . . . . . . . . . . . . . . . . . . . . . . . . . . . . . . 231
Maintaining a Backing Store — If Ontology Object Definitions Change. . . . . . . . . . . . . . . . . . . . . . . . . . . . 231
Resources Required for Setting Up the Oracle Database . . . . . . . . . . . . . . . . . . . . . . . . . . . . . . . . . . . . . . . . . 232
Oracle-Only Backing Store Database Configuration Tasks. . . . . . . . . . . . . . . . . . . . . . . . . . . . . . . . . . . . . . . . . 234
Updating an Existing Oracle Database Schema. . . . . . . . . . . . . . . . . . . . . . . . . . . . . . . . . . . . . . . . . . . . . . . . . 238
Project Configuration for Oracle-Only Backing Store . . . . . . . . . . . . . . . . . . . . . . . . . . . . . . . . . . . . . . . . . . . . . 240
Oracle-Only Backing Store Runtime Behavior . . . . . . . . . . . . . . . . . . . . . . . . . . . . . . . . . . . . . . . . . . . . . . . . . . 241
Handling Deleted Entities . . . . . . . . . . . . . . . . . . . . . . . . . . . . . . . . . . . . . . . . . . . . . . . . . . . . . . . . . . . . . . . . . . 242
Appendix B Determining the Engine Name . . . . . . . . . . . . . . . . . . . . . . . . . . . . . . . . . . . . . . . 243
Appendix C Engine Startup and Shutdown Sequence . . . . . . . . . . . . . . . . . . . . . . . . . . . . . . 245
Startup Sequence . . . . . . . . . . . . . . . . . . . . . . . . . . . . . . . . . . . . . . . . . . . . . . . . . . . . . . . . . . . . . . . . . . . . 245
Shutdown Sequence . . . . . . . . . . . . . . . . . . . . . . . . . . . . . . . . . . . . . . . . . . . . . . . . . . . . . . . . . . . . . . . . . . 246
Appendix D Advanced Caching Topics . . . . . . . . . . . . . . . . . . . . . . . . . . . . . . . . . . . . . . . . . . . 247
Overriding and Extending the Operational Deployment Descriptor . . . . . . . . . . . . . . . . . . . . . . . . . . . . . . . . . . 248
Overriding Element Values in Engine Property Files . . . . . . . . . . . . . . . . . . . . . . . . . . . . . . . . . . . . . . . . . . 248
Defining Additional Elements and System Properties in Override Files . . . . . . . . . . . . . . . . . . . . . . . . . . . 248
Specifying Operational Override File Locations . . . . . . . . . . . . . . . . . . . . . . . . . . . . . . . . . . . . . . . . . . . . . . . . . 250
How the First Tier Override File Default Location is Specified. . . . . . . . . . . . . . . . . . . . . . . . . . . . . . . . . . . 250
How to Specify a Different Location for the First Tier Override File . . . . . . . . . . . . . . . . . . . . . . . . . . . . . . . 251
How a Second Tier Override File Default Location is Specified and Overridden. . . . . . . . . . . . . . . . . . . . . 252
Understanding Entity Caches . . . . . . . . . . . . . . . . . . . . . . . . . . . . . . . . . . . . . . . . . . . . . . . . . . . . . . . . . . . . . . . 253
Entity Cache Names Format . . . . . . . . . . . . . . . . . . . . . . . . . . . . . . . . . . . . . . . . . . . . . . . . . . . . . . . . . . . . 253
Caches for Ontology Objects . . . . . . . . . . . . . . . . . . . . . . . . . . . . . . . . . . . . . . . . . . . . . . . . . . . . . . . . . . . . 254

TIBCO BusinessEvents Administration
Contents | ix
Caches for Internal Entities . . . . . . . . . . . . . . . . . . . . . . . . . . . . . . . . . . . . . . . . . . . . . . . . . . . . . . . . . . . . . 254
Appendix E TIBCO Hawk Microagent Methods . . . . . . . . . . . . . . . . . . . . . . . . . . . . . . . . . . . . .257
TIBCO Hawk Methods Overview . . . . . . . . . . . . . . . . . . . . . . . . . . . . . . . . . . . . . . . . . . . . . . . . . . . . . . . . . . . . . 259
Types of Methods . . . . . . . . . . . . . . . . . . . . . . . . . . . . . . . . . . . . . . . . . . . . . . . . . . . . . . . . . . . . . . . . . . . . . 259
Enabling TIBCO Hawk Microagent . . . . . . . . . . . . . . . . . . . . . . . . . . . . . . . . . . . . . . . . . . . . . . . . . . . . . . . . 259
For More Information . . . . . . . . . . . . . . . . . . . . . . . . . . . . . . . . . . . . . . . . . . . . . . . . . . . . . . . . . . . . . . . . . . 259
activateRuleSet() . . . . . . . . . . . . . . . . . . . . . . . . . . . . . . . . . . . . . . . . . . . . . . . . . . . . . . . . . . . . . . . . . . . . . . . 260
activateTraceRole() . . . . . . . . . . . . . . . . . . . . . . . . . . . . . . . . . . . . . . . . . . . . . . . . . . . . . . . . . . . . . . . . . . . . . . 261
deactivateRuleSet() . . . . . . . . . . . . . . . . . . . . . . . . . . . . . . . . . . . . . . . . . . . . . . . . . . . . . . . . . . . . . . . . . . . . . 262
deactivateTraceRole() . . . . . . . . . . . . . . . . . . . . . . . . . . . . . . . . . . . . . . . . . . . . . . . . . . . . . . . . . . . . . . . . . . . . 263
execute() . . . . . . . . . . . . . . . . . . . . . . . . . . . . . . . . . . . . . . . . . . . . . . . . . . . . . . . . . . . . . . . . . . . . . . . . . . . . . . 264
forceOMCheckpoint() . . . . . . . . . . . . . . . . . . . . . . . . . . . . . . . . . . . . . . . . . . . . . . . . . . . . . . . . . . . . . . . . . . . . 265
getChannels() . . . . . . . . . . . . . . . . . . . . . . . . . . . . . . . . . . . . . . . . . . . . . . . . . . . . . . . . . . . . . . . . . . . . . . . . . . 266
getDestinations() . . . . . . . . . . . . . . . . . . . . . . . . . . . . . . . . . . . . . . . . . . . . . . . . . . . . . . . . . . . . . . . . . . . . . . . . 267
getEvent() . . . . . . . . . . . . . . . . . . . . . . . . . . . . . . . . . . . . . . . . . . . . . . . . . . . . . . . . . . . . . . . . . . . . . . . . . . . . . 268
GetExecInfo() . . . . . . . . . . . . . . . . . . . . . . . . . . . . . . . . . . . . . . . . . . . . . . . . . . . . . . . . . . . . . . . . . . . . . . . . . . 269
getHostInformation() . . . . . . . . . . . . . . . . . . . . . . . . . . . . . . . . . . . . . . . . . . . . . . . . . . . . . . . . . . . . . . . . . . . . . 270
getInstance() . . . . . . . . . . . . . . . . . . . . . . . . . . . . . . . . . . . . . . . . . . . . . . . . . . . . . . . . . . . . . . . . . . . . . . . . . . . 271
getMemoryUsage() . . . . . . . . . . . . . . . . . . . . . . . . . . . . . . . . . . . . . . . . . . . . . . . . . . . . . . . . . . . . . . . . . . . . . . 272
getNumberOfEvents() . . . . . . . . . . . . . . . . . . . . . . . . . . . . . . . . . . . . . . . . . . . . . . . . . . . . . . . . . . . . . . . . . . . . 273
getNumberOfInstances() . . . . . . . . . . . . . . . . . . . . . . . . . . . . . . . . . . . . . . . . . . . . . . . . . . . . . . . . . . . . . . . . . . 274
getOMInfo() . . . . . . . . . . . . . . . . . . . . . . . . . . . . . . . . . . . . . . . . . . . . . . . . . . . . . . . . . . . . . . . . . . . . . . . . . . . . 275
getRuleSet() . . . . . . . . . . . . . . . . . . . . . . . . . . . . . . . . . . . . . . . . . . . . . . . . . . . . . . . . . . . . . . . . . . . . . . . . . . . 276
getRuleSets() . . . . . . . . . . . . . . . . . . . . . . . . . . . . . . . . . . . . . . . . . . . . . . . . . . . . . . . . . . . . . . . . . . . . . . . . . . 277
getScorecard() . . . . . . . . . . . . . . . . . . . . . . . . . . . . . . . . . . . . . . . . . . . . . . . . . . . . . . . . . . . . . . . . . . . . . . . . . 278
getScorecards() . . . . . . . . . . . . . . . . . . . . . . . . . . . . . . . . . . . . . . . . . . . . . . . . . . . . . . . . . . . . . . . . . . . . . . . . 279
getSessionInputDestinations() . . . . . . . . . . . . . . . . . . . . . . . . . . . . . . . . . . . . . . . . . . . . . . . . . . . . . . . . . . . . . 280
getSessions() . . . . . . . . . . . . . . . . . . . . . . . . . . . . . . . . . . . . . . . . . . . . . . . . . . . . . . . . . . . . . . . . . . . . . . . . . . 281
getStatus() . . . . . . . . . . . . . . . . . . . . . . . . . . . . . . . . . . . . . . . . . . . . . . . . . . . . . . . . . . . . . . . . . . . . . . . . . . . . . 282
getTotalNumberRulesFired() . . . . . . . . . . . . . . . . . . . . . . . . . . . . . . . . . . . . . . . . . . . . . . . . . . . . . . . . . . . . . . . 283
getTraceSinks() . . . . . . . . . . . . . . . . . . . . . . . . . . . . . . . . . . . . . . . . . . . . . . . . . . . . . . . . . . . . . . . . . . . . . . . . . 284
reconnectChannels() . . . . . . . . . . . . . . . . . . . . . . . . . . . . . . . . . . . . . . . . . . . . . . . . . . . . . . . . . . . . . . . . . . . . . 285
resetTotalNumberRulesFired() . . . . . . . . . . . . . . . . . . . . . . . . . . . . . . . . . . . . . . . . . . . . . . . . . . . . . . . . . . . . . 286
resumeChannels() . . . . . . . . . . . . . . . . . . . . . . . . . . . . . . . . . . . . . . . . . . . . . . . . . . . . . . . . . . . . . . . . . . . . . . 287
resumeDestinations() . . . . . . . . . . . . . . . . . . . . . . . . . . . . . . . . . . . . . . . . . . . . . . . . . . . . . . . . . . . . . . . . . . . . 288
stopApplicationInstance() . . . . . . . . . . . . . . . . . . . . . . . . . . . . . . . . . . . . . . . . . . . . . . . . . . . . . . . . . . . . . . . . . 289

TIBCO BusinessEvents Administration
x | Contents
suspendChannels() . . . . . . . . . . . . . . . . . . . . . . . . . . . . . . . . . . . . . . . . . . . . . . . . . . . . . . . . . . . . . . . . . . . . . . 290
suspendDestinations() . . . . . . . . . . . . . . . . . . . . . . . . . . . . . . . . . . . . . . . . . . . . . . . . . . . . . . . . . . . . . . . . . . . . 291
Index of Engine Properties . . . . . . . . . . . . . . . . . . . . . . . . . . . . . . . . . . . . . . . . . . . . . . . . . . . . . . 293
Index . . . . . . . . . . . . . . . . . . . . . . . . . . . . . . . . . . . . . . . . . . . . . . . . . . . . . . . . . . . . . . . . . . . . . . . . 295

TIBCO BusinessEvents Administration
Figures | xi
Figures
Figure 1 Use of ObjectTable at Runtime . . . . . . . . . . . . . . . . . . . . . . . . . . . . . . . . . . . . . . . . . . . . . . . . . . . . . 8
Figure 2 Agent threading example — shared threads, concurrent Rete, cache-aside. . . . . . . . . . . . . . . . . 176

TIBCO BusinessEvents Administration
xii | Figures

TIBCO BusinessEvents Administration
Tables | xiii
Tables
Table 1 General Typographical Conventions . . . . . . . . . . . . . . . . . . . . . . . . . . . . . . . . . . . . . . . . . . . . . . . xxi
Table 2 Syntax Typographical Conventions . . . . . . . . . . . . . . . . . . . . . . . . . . . . . . . . . . . . . . . . . . . . . . . . xxii
Table 3 Entity-level metadata properties for events and concepts . . . . . . . . . . . . . . . . . . . . . . . . . . . . . . . 25
Table 4 Cluster Tab —General Settings . . . . . . . . . . . . . . . . . . . . . . . . . . . . . . . . . . . . . . . . . . . . . . . . . . . 30
Table 5 Cluster Tab Reference — Cache Manager — Configuration Settings . . . . . . . . . . . . . . . . . . . . . . 31
Table 6 Cluster Tab Reference — Cache Manager — Backing Store Settings . . . . . . . . . . . . . . . . . . . . . 33
Table 7 Cluster Tab — Cache Manager — Backing Store Properties . . . . . . . . . . . . . . . . . . . . . . . . . . . . 37
Table 8 Cluster Tab — Cache Manager — Domain Object Default Settings . . . . . . . . . . . . . . . . . . . . . . . 41
Table 9 Cluster Tab — Cache Manager — Domain Object Override . . . . . . . . . . . . . . . . . . . . . . . . . . . . . 44
Table 10 Cluster Tab — Cache Manager — Coherence Properties . . . . . . . . . . . . . . . . . . . . . . . . . . . . . . . 46
Table 11 Destination Settings . . . . . . . . . . . . . . . . . . . . . . . . . . . . . . . . . . . . . . . . . . . . . . . . . . . . . . . . . . . . 52
Table 12 Log Configurations Settings . . . . . . . . . . . . . . . . . . . . . . . . . . . . . . . . . . . . . . . . . . . . . . . . . . . . . . 57
Table 13 Agents Tab Settings and Properties . . . . . . . . . . . . . . . . . . . . . . . . . . . . . . . . . . . . . . . . . . . . . . . 60
Table 14 Processing Units Tab Settings and Properties. . . . . . . . . . . . . . . . . . . . . . . . . . . . . . . . . . . . . . . . 66
Table 15 Cluster Tab —Berkeley DB Manager Settings and Properties. . . . . . . . . . . . . . . . . . . . . . . . . . . . 73
Table 16 Site Topology — Site Settings . . . . . . . . . . . . . . . . . . . . . . . . . . . . . . . . . . . . . . . . . . . . . . . . . . . . 84
Table 17 Site Topology — Cluster Settings . . . . . . . . . . . . . . . . . . . . . . . . . . . . . . . . . . . . . . . . . . . . . . . . . 84
Table 18 Site Topology — Deployment Unit Settings . . . . . . . . . . . . . . . . . . . . . . . . . . . . . . . . . . . . . . . . . . 85
Table 19 Site Topology — Processing Unit Settings. . . . . . . . . . . . . . . . . . . . . . . . . . . . . . . . . . . . . . . . . . . 86
Table 20 Site Topology — Host Settings . . . . . . . . . . . . . . . . . . . . . . . . . . . . . . . . . . . . . . . . . . . . . . . . . . . 87
Table 21 MM CDD mm-class Agent Class MM Property Group Properties . . . . . . . . . . . . . . . . . . . . . . . . 101
Table 22 MM CDD mm-class Agent Class Alert Configuration . . . . . . . . . . . . . . . . . . . . . . . . . . . . . . . . . . 108
Table 23 Elements Used to Specify the Path to an Alert Metric Value . . . . . . . . . . . . . . . . . . . . . . . . . . . . 110
Table 24 Alert Message Parameters. . . . . . . . . . . . . . . . . . . . . . . . . . . . . . . . . . . . . . . . . . . . . . . . . . . . . . 112
Table 25 Pane Type Details . . . . . . . . . . . . . . . . . . . . . . . . . . . . . . . . . . . . . . . . . . . . . . . . . . . . . . . . . . . . 113
Table 26 MM CDD mm-class Agent Class Health Metric Rule Configuration. . . . . . . . . . . . . . . . . . . . . . . 123
Table 27 MM CDD mm-class Agent Class Action Configuration . . . . . . . . . . . . . . . . . . . . . . . . . . . . . . . . 128
Table 28 MM Console Configuration Properties . . . . . . . . . . . . . . . . . . . . . . . . . . . . . . . . . . . . . . . . . . . . . 130

TIBCO BusinessEvents Administration
xiv | Tables
Table 29 Cluster-Level Metrics. . . . . . . . . . . . . . . . . . . . . . . . . . . . . . . . . . . . . . . . . . . . . . . . . . . . . . . . . . . 141
Table 30 Machine-Level Metrics. . . . . . . . . . . . . . . . . . . . . . . . . . . . . . . . . . . . . . . . . . . . . . . . . . . . . . . . . . 143
Table 31 Process- Level Metrics . . . . . . . . . . . . . . . . . . . . . . . . . . . . . . . . . . . . . . . . . . . . . . . . . . . . . . . . . 144
Table 32 Agent Overview (Common) Metrics. . . . . . . . . . . . . . . . . . . . . . . . . . . . . . . . . . . . . . . . . . . . . . . . 147
Table 33 Inference Agent Metrics . . . . . . . . . . . . . . . . . . . . . . . . . . . . . . . . . . . . . . . . . . . . . . . . . . . . . . . . 149
Table 34 Query Agent Metrics . . . . . . . . . . . . . . . . . . . . . . . . . . . . . . . . . . . . . . . . . . . . . . . . . . . . . . . . . . . 150
Table 35 Cache Objects Metrics . . . . . . . . . . . . . . . . . . . . . . . . . . . . . . . . . . . . . . . . . . . . . . . . . . . . . . . . . 151
Table 36 BusinessEvents Command Line Engine Startup Options . . . . . . . . . . . . . . . . . . . . . . . . . . . . . . . 155
Table 37 Hot Deployment Supported Modifications . . . . . . . . . . . . . . . . . . . . . . . . . . . . . . . . . . . . . . . . . . . 167
Table 38 Authentication Configuration Properties . . . . . . . . . . . . . . . . . . . . . . . . . . . . . . . . . . . . . . . . . . . . 193
Table 39 Resource Types and Action Types . . . . . . . . . . . . . . . . . . . . . . . . . . . . . . . . . . . . . . . . . . . . . . . . 203
Table 40 Resources Required for JDBC Backing Store Implementation . . . . . . . . . . . . . . . . . . . . . . . . . . . 210
Table 41 Secondary table structure . . . . . . . . . . . . . . . . . . . . . . . . . . . . . . . . . . . . . . . . . . . . . . . . . . . . . . . 223
Table 42 Resources Required for Backing Store Implementation . . . . . . . . . . . . . . . . . . . . . . . . . . . . . . . . 232
Table 43 Internal Entity Caches . . . . . . . . . . . . . . . . . . . . . . . . . . . . . . . . . . . . . . . . . . . . . . . . . . . . . . . . . . 254

TIBCO BusinessEvents Administration
| xv

TIBCO BusinessEvents Administration
xvi |

TIBCO BusinessEvents Administration
| xvii
Preface
TIBCO BusinessEvents™ allows you to abstract and correlate meaningful business information from the events and data flowing through your information systems, and take appropriate actions using business rules. By detecting patterns within the real-time flow of events, BusinessEvents™ can help you to detect and understand unusual activities as well as recognize trends, problems, and opportunities. BusinessEvents publishes this business-critical information in real time to your critical enterprise systems or dashboards. With BusinessEvents you can predict the needs of your customers, make faster decisions, and take faster action.
BusinessEventsThe Power to Predict™
Topics
• Related Documentation, page xviii
• Typographical Conventions, page xxi
• How to Contact TIBCO Support, page xxiv

TIBCO BusinessEvents Administration
xviii | Related Documentation
Related Documentation
This section lists documentation resources you may find useful.
TIBCO BusinessEvents Documentation
• TIBCO BusinessEvents Installation: Read this manual for instructions on site preparation and installation.
• TIBCO BusinessEvents Getting Started: After the product is installed, use this manual to learn the basics of BusinessEvents. This guide provides step-by-step instructions to implement an example project and also explains the main ideas so you gain understanding as well as practical knowledge.
• TIBCO BusinessEvents Architect’s Guide: If you are architecting an application using TIBCO BusinessEvents, read this guide for overview and detailed technical information to guide your work.
• TIBCO BusinessEvents Developer’s Guide: After the architect has designed the system, use this manual to implement the design in BusinessEvents Studio.
• TIBCO BusinessEvents Administration: This book explains how to configure, deploy, monitor, and manage a BusinessEvents application and the data it generates.
• Online References:
— TIBCO BusinessEvents Cache Configuration Guide: This online reference is available from the HTML documentation interface. It provides configuration details for cache-based object management. Cache-based object management is explained in TIBCO BusinessEvents Administration.
— TIBCO BusinessEvents Java API Reference: This online reference is available from the HTML documentation interface. It provides the Javadoc-based documentation for the BusinessEvents API.
— TIBCO BusinessEvents Functions Reference: This online reference is available from the HTML documentation interface. It provides a listing of all functions provided with BusinessEvents, showing the same details as the tooltips available in the BusinessEvents Studio rule editor interface.
• TIBCO BusinessEvents Release Notes: Read the release notes for a list of new and changed features. This document also contains lists of known issues and closed issues for this release.
TIBCO BusinessEvents Administration
Preface | xix
TIBCO BusinessEvents Event Stream Processing
This BusinessEvents add-on is available separately, and includes the BusinessEvents Query Language features and the Pattern Matching Framework.
• TIBCO BusinessEvents Event Stream Processing Installation: Read this brief manual for installation instructions. A compatible version of TIBCO BusinessEvents must be installed first.
• TIBCO BusinessEvents Query Developer’s Guide: This manual explains how to use the object query language to query various aspects of the running system.
• TIBCO BusinessEvents Event Stream Processing Pattern Matcher Developer’s Guide: This manual explains how to use the pattern matcher language and engine to correlate event patterns in a running system.
• TIBCO BusinessEvents Event Stream Processing Release Notes: Read the release notes for a list of new and changed features. This document also contains lists of known issues and closed issues for this release.
TIBCO BusinessEvents Decision Manager
This BusinessEvents add-on is available separately. It incorporates a decision modeling business user interface, and associated runtime.
• TIBCO BusinessEvents Decision Manager Installation: Read this brief manual for installation instructions. A compatible version of TIBCO BusinessEvents must be installed first.
• TIBCO BusinessEvents Decision Manager User’s Guide: This manual explains how business users can use decision tables and other decision artifacts to create business rules. It also covers configuration and administration of Rules Management Server, which is used for authentication, authorization, and approval processes.
• TIBCO BusinessEvents Decision Manager Release Notes: Read the release notes for a list of new and changed features. This document also contains lists of known issues and closed issues for this release.
TIBCO BusinessEvents Data Modeling
This BusinessEvents add-on is available separately. It contains state models and database concept features.
• TIBCO BusinessEvents Data Modeling Installation: Read this brief manual for installation instructions. A compatible version of TIBCO BusinessEvents must be installed first.

TIBCO BusinessEvents Administration
xx | Related Documentation
• TIBCO BusinessEvents Data Modeling Developer’s Guide: This manual explains data modeling add-in features for BusinessEvents. The database concepts feature enables you to model BusinessEvents concepts on Database tables. The state modeler feature enables you to create state machines.
• TIBCO BusinessEvents Data Modeling Release Notes: Read the release notes for a list of new and changed features. This document also contains lists of known issues and closed issues for this release.
TIBCO BusinessEvents Views
This BusinessEvents add-on is available separately. It includes graphical dashboard components for run-time event monitoring.
• TIBCO BusinessEvents Views Installation: Read this manual for instructions on site preparation and installation.
• TIBCO BusinessEvents Views Developer’s Guide: This book explains how to use BusinessEvents BusinessEvents Views to create meaningful metrics that are presented to business users in real-time for proactive decision making.
• TIBCO BusinessEvents Views User’s Guide: This book explains how to monitor metrics in BusinessEvents BusinessEvents Views and how to represent the business processes graphically.
• TIBCO BusinessEvents BusinessEvents Views Release Notes: Read the release notes for a list of new and changed features. This document also contains lists of known issues and closed issues for this release.
Other TIBCO Product Documentation
You may find it useful to refer to the documentation for the following TIBCO products:
• TIBCO ActiveSpaces®
• TIBCO Hawk®
• TIBCO Rendezvous®
• TIBCO Enterprise Message Service™
• TIBCO ActiveMatrix BusinessWorks™

TIBCO BusinessEvents Administration
Preface | xxi
Typographical Conventions
The following typographical conventions are used in this manual.
Table 1 General Typographical Conventions
Convention Use
TIBCO_HOME
ENV_HOME
BE_HOME
Many TIBCO products must be installed within the same home directory. This directory is referenced in documentation as TIBCO_HOME. The value of TIBCO_HOME depends on the operating system. For example, on Windows systems, the default value is C:\tibco.
Other TIBCO products are installed into an installation environment. Incompatible products and multiple instances of the same product are installed into different installation environments. The directory into which such products are installed is referenced in documentation as ENV_HOME. The value of ENV_HOME depends on the operating system. For example, on Windows systems the default value is C:\tibco.
TIBCO BusinessEvents installs into a directory within ENV_HOME. This directory is referenced in documentation as BE_HOME. The value of BE_HOME depends on the operating system. For example on Windows systems, the default value is C:\tibco\TIBCO BusinessEvents\4.0.
code font Code font identifies commands, code examples, filenames, pathnames, and output displayed in a command window. For example:
Use MyCommand to start the foo process.
bold code
font Bold code font is used in the following ways:
• In procedures, to indicate what a user types. For example: Type admin.
• In large code samples, to indicate the parts of the sample that are of particular interest.
• In command syntax, to indicate the default parameter for a command. For example, if no parameter is specified, MyCommand is enabled: MyCommand [enable | disable]

TIBCO BusinessEvents Administration
xxii | Typographical Conventions
italic font Italic font is used in the following ways:
• To indicate a document title. For example: See TIBCO BusinessWorks Concepts.
• To introduce new terms For example: A portal page may contain several portlets. Portlets are mini-applications that run in a portal.
• To indicate a variable in a command or code syntax that you must replace. For example: MyCommand pathname
Key combinations
Key name separated by a plus sign indicate keys pressed simultaneously. For example: Ctrl+C.
Key names separated by a comma and space indicate keys pressed one after the other. For example: Esc, Ctrl+Q.
The note icon indicates information that is of special interest or importance, for example, an additional action required only in certain circumstances.
The tip icon indicates an idea that could be useful, for example, a way to apply the information provided in the current section to achieve a specific result.
The warning icon indicates the potential for a damaging situation, for example, data loss or corruption if certain steps are taken or not taken.
Table 1 General Typographical Conventions (Cont’d)
Convention Use
Table 2 Syntax Typographical Conventions
Convention Use
[ ] An optional item in a command or code syntax.
For example:
MyCommand [optional_parameter] required_parameter
| A logical ’OR’ that separates multiple items of which only one may be chosen.
For example, you can select only one of the following parameters:
MyCommand param1 | param2 | param3

TIBCO BusinessEvents Administration
Preface | xxiii
{ } A logical group of items in a command. Other syntax notations may appear within each logical group.
For example, the following command requires two parameters, which can be either the pair param1 and param2, or the pair param3 and param4.
MyCommand {param1 param2} | {param3 param4}
In the next example, the command requires two parameters. The first parameter can be either param1 or param2 and the second can be either param3 or param4:
MyCommand {param1 | param2} {param3 | param4}
In the next example, the command can accept either two or three parameters. The first parameter must be param1. You can optionally include param2 as the second parameter. And the last parameter is either param3 or param4.
MyCommand param1 [param2] {param3 | param4}
Table 2 Syntax Typographical Conventions
Convention Use

TIBCO BusinessEvents Administration
xxiv | How to Contact TIBCO Support
How to Contact TIBCO Support
For comments or problems with this manual or the software it addresses, please contact TIBCO Support as follows.
• For an overview of TIBCO Support, and information about getting started with TIBCO Support, visit this site:
http://www.tibco.com/services/support
• If you already have a valid maintenance or support contract, visit this site:
https://support.tibco.com
Entry to this site requires a user name and password. If you do not have a user name, you can request one.

TIBCO BusinessEvents Administration
| 1
Chapter 1 Administration Overview
This brief chapter outlines the administration tasks.
Topics
• Introduction, page 2

TIBCO BusinessEvents Administration
2 | Chapter 1 Administration Overview
Introduction
This guide documents what you must do after a BusinessEvents Studio project is ready to 9be prepared for deployment and use.
The main administration tasks and the chapters in which they are documented are as follows:
• Configuring the Cluster Deployment Descriptor (CDD) for cluster settings, object management settings, and deploytime configuration of processing units and agents. In addition some entity metadata settings set various defaults that interact with the CDD settings.
— Chapter 2, CDD Configuration Procedures, page 5
— Chapter 3, Cluster Deployment Descriptor Reference, page 29
— Chapter 4, Cluster Configuration for Berkeley DB Manager, page 71
— Threading Models and Tuning on page 175
• Configuring the Site Topology file that configures the processing units and agents for deployment in Deployment Units (DUs) to hosts.
— Chapter 5, Site Topology Configuration, page 79
• Configuring the BusinessEvents Monitoring and Management component to connect with the Cache Manager cluster to be monitored, and configuring settings such as health level metric thresholds, alerts, and actions.
— Chapter 6, BusinessEvents Monitoring and Management Configuration, page 91
• Monitoring a Cache Based cluster.
— Chapter 7, Monitoring a BusinessEvents Cluster, page 131
• You may wish to deploy at the command line, or using TIBCO Administrator. You may also wish to use the hot-deployment feature.
— Chapter 8, Deploying a TIBCO BusinessEvents Project, page 153
— Chapter 9, Hot Deployment, page 165
• Certain components use authentication (BEMM, TIBCO BusinessEvents Views, TIBCO BusinessEvents Decision Manager) and certain components use authorization (TIBCO BusinessEvents Decision Manager).
— Chapter 11, Configuring User Authentication, page 189
— Chapter 12, Configuring Access Control for a Project, page 195

TIBCO BusinessEvents Administration
Introduction | 3
• Most production systems use Cache Manager with a backing store. The JDBC backing store implementation is the preferred implementation. The legacy Oracle-only backing store implementation is deprecated.
— Chapter 13, JDBC Backing Store Configuration, page 205
— Appendix A, Setting up an Oracle-Only Backing Store, page 229
• Appendixes provide further information that may be useful
— Appendix B, Determining the Engine Name, page 243
— Appendix C, Engine Startup and Shutdown Sequence, page 245
— Appendix D, Advanced Caching Topics, page 247
— Appendix E, TIBCO Hawk Microagent Methods, page 257

TIBCO BusinessEvents Administration
4 | Chapter 1 Administration Overview
TIBCO BusinessEvents Administration
| 5
Chapter 2 CDD Configuration Procedures
This chapter explains how to configure a cluster for deployment, using the Cluster Deployment Descriptor (CDD) editor.
Reference tables for procedures in this manual are provided in Chapter 3, Cluster Deployment Descriptor Reference, on page 29.
Configuration for Berkeley DB Manager (deprecated feature) is provided in Chapter 4, Cluster Configuration for Berkeley DB Manager, on page 71.
Topics
• Overview of Cluster Deployment Configuration, page 6
• Understanding How Entity Objects are Managed, page 7
• The Role of the Object Table, page 8
• Starting a Minimum Number (Quorum) of Cache Servers, page 10
• Task Summary, page 11
• Adding a Cluster Deployment Descriptor, page 13
• Configuring an In Memory Cluster, page 14
• Configuring a Cache Manager Cluster — Cluster Tab, page 15
• Configuring the Collections Tab (All Object Managers), page 17
• Configuring the Agent Classes Tab (All Object Managers), page 20
• Configuring the Processing Units Tab (All Object Managers), page 23
• Entity-Level Configuration for Cache and Backing Store, page 25

TIBCO BusinessEvents Administration
6 | Chapter 2 CDD Configuration Procedures
Overview of Cluster Deployment Configuration
This chapter explains how to configure deploy-time settings for a BusinessEvents cluster. Configuration is done using the Cluster Deployment Descriptor (CDD) editor. Settings are saved in XML, to the CDD file.
This chapter assumes you have read and understood the object management and other deploy-time configuration topics in TIBCO BusinessEvents Architect’s Guide.
Basic settings for all object management (OM) types relate to the following:
• Distribution of project resources among the agent classes.
• Defining which agent classes are deployed in each processing unit.
• Which OM type to use.
— In Memory Manager
— Berkeley DB Manager (deprecated)
— Cache Manager
Processing units configured in the CDD editor are used in the Site Topology editor. You map these logical units to the physical resources in the deployment environment (also known as the deployment topology). See Chapter 5, Site Topology Configuration, on page 79.
Additional settings are used if certain features or add-ons are used only, for example HTTP channel properties and database concepts properties.
Using Agent Class Properties at Different Levels
The scope of a property depends on the property sheet you add it to. Not all properties are valid at all levels. However, properties that include the agent class name, such as Agent.AgentClassName.checkDuplicates, can be used this way. Here is the scope of each level for the AgentClassName properties:
Cluster level Applies to all AgentClassName agents in the cluster.
Processing unit level Applies any AgentClassName agent deployed in the specified processing unit.
Agent class level Again, applies to any AgentClassName agent, in any processing unit.

TIBCO BusinessEvents Administration
Understanding How Entity Objects are Managed | 7
Understanding How Entity Objects are Managed
When you use Cache Manager and a backing store, various options help you manage where entity objects are stored, and how to retrieve them from the backing store at startup to optimize performance and memory management for your system.
Between Backing Store and Cache
Although best performance is obtained when all objects are loaded into the cache, in practice there are often more objects than you can keep in the cache, or want to.
You can configure what objects to preload into cache on startup, and what objects to evict from the cache when not needed in various ways and to various degrees of granularity.
When considering the preload options you must also consider the role of the object table. This is explained in The Role of the Object Table on page 8.
It is also important to start enough cache servers before loading begins to handle the work. See Starting a Minimum Number (Quorum) of Cache Servers on page 10.
Between Cache and Rete Network
Yet another aspect of object management is loading objects from the cache into the Rete network. With Cache OM and Cache Only mode, you must load objects into the Rete network when needed, using various functions.
This is discussed in Chapter 8, Cache Modes and Project Design, in TIBCO BusinessEvents Developer’s Guide.
These data management settings are used with any backing store implementation.
Entity Metadata Settings and CDD Settings
You can configure some object management controls using settings in the entity resources in BusinessEvents Studio.
The entity resource settings are stored in the EAR file. CDD editor settings, however, are stored in the cluster descriptor definition file which is not in the EAR. CDD settings, therefore, override EAR settings. You don’t have to rebuild the EAR file when you make changes in the CDD file (using the editor). You do have to restart the system, however.

TIBCO BusinessEvents Administration
8 | Chapter 2 CDD Configuration Procedures
The Role of the Object Table
Preloading controls are available for entity objects, and for entries (handles) in the object table (objectTable) cache relating to entity objects. This section briefly explains the use of the object table cache at runtime, so you can understand its role and use these controls as needed.
The objectTable cache is a large cache that provides mappings for all entities in the cache. The object table contains the object id and information about the object such as its extId, class name, type, backing store table name and cache name. The object table is used to find the actual object either in the cache or in the backing store. The object table is also written to the backing store.
The object table can grow become very large, up to hundreds of millions of rows in extreme cases. You can preload the cache cluster’s object table at system startup (using the Preload Handles setting, as shown in Cluster Tab — Cache Manager — Domain Objects Settings on page 41, to improve performance.
The following figure shows how the object table in cache is used at runtime.
Figure 1 Use of ObjectTable at Runtime
1. A rule requests an object X to be fetched using its internal ID. The object is not in the Rete network.
1
2
3
Instance.getById(X)
X
X
Legend
Rete network
Cache or DB Table
L1 (Local) Cache
Cache (cluster)
objectTable
Backing Store
4

TIBCO BusinessEvents Administration
The Role of the Object Table | 9
2. The object is not in the local cache.
3. BusinessEvents looks up the ID in the object table and gets its cache name. Its cache table is not found in the cache cluster.
4. BusinessEvents gets the name of the object’s backing store table from the object table, locates the object’s table in the backing store, and returns the object to the calling function.
Note that if the object table is not preloaded with the entry for object X, then an additional processing step is required, to load the object table in the cache for that object’s entry.

TIBCO BusinessEvents Administration
10 | Chapter 2 CDD Configuration Procedures
Starting a Minimum Number (Quorum) of Cache Servers
At system startup, one node in the cache cluster loads objects from the backing store to the cache cluster. Any node in the cluster can perform the preloading.
Before preloading begins, you must ensure that enough cache servers have started to hold the objects from the backing store. The cluster does not start processing incoming data until the required objects have been loaded into the cache.
See Cluster Tab — Cache Manager — Configuration Settings on page 31 for details on specifying the minimum number of cache servers that must start before cache loading begins
After the specified number of servers has started, the processing unit that acquires the lock first performs the cache loading. Any processing unit can acquire the lock. All agents wait until backing store data has finished loading before they start.
Because any node can perform the preloading, set the relevant properties in all nodes in the cluster.
This setting does not affect runtime operation of the deployed application. Deployed applications continue to run even if one or more cache servers fails and the quorum is no longer met. A warning message is written to the log file.

TIBCO BusinessEvents Administration
Task Summary | 11
Task Summary
Tasks are divided between the bottom tabs as explained in this section. The Source tab enables you to view the XML file generated by the editor. It is strongly recommended that you do not manually edit this file. In addition entity metadata settings play a role and are documented in this chapter.
Cluster Tab
At the Cluster tab, you select an Object Manager and configure as needed:
• For In Memory Manager see Configuring an In Memory Cluster, page 14.
• For Berkeley DB Manager see See Chapter 4, Cluster Configuration for Berkeley DB Manager, on page 71.
• For Cache OM, see Configuring a Cache Manager Cluster — Cluster Tab, page 15. This OM is generally used for production deployments. A backing store is also used in most cases.
Collections Tab
At the Collections tab, you can, as desired, group rules, rule functions, and destinations into collections so that they can be easily assigned to agent classes (and processing units in the case of log configurations).
Destinations require additional configuration, which can be done in this tab. (Destinations that are added to agent classes individually can be configured at the Agent Classes tab.)
You also set up log configurations as needed at this tab.
See Configuring the Collections Tab (All Object Managers), page 17.
Do not use Berkeley DB OM for new projects: it is a deprecated feature.
Remember to put rule functions for use at start up into different groups from those used at shut down so you can select them appropriately at the agent classes tab.

TIBCO BusinessEvents Administration
12 | Chapter 2 CDD Configuration Procedures
Agent Classes Tab
At the Agent Classes tab, you define properties for the type of agent or agents you plan to deploy. In Memory Manager and Berkeley DB Manager use only inference agent classes. For cache OM, you configure agent classes for different types of agents: cache agents, inference agents, query agents (if TIBCO BusinessEvents Event Stream Processing add-on is used), and dashboard agents (if TIBCO BusinessEvents Views is used). See Configuring the Agent Classes Tab (All Object Managers), page 20.
The "Monitoring & Management" agent type is used only for the MM server. See Chapter 6, BusinessEvents Monitoring and Management Configuration, on page 91 for details.
Processing Units Tab
In the Processing Units tab, you define which agents to include in the processing unit, and which logging configuration to use. Depending on the OM, you also configure some additional settings. See Configuring the Processing Units Tab (All Object Managers), page 23.
Entity Metadata Settings
Certain entity metadata settings set object loading and other runtime behavior. For this reason they are included in this chapter. See Metadata Properties for Entities (Events and Concepts) on page 25.

TIBCO BusinessEvents Administration
Adding a Cluster Deployment Descriptor | 13
Adding a Cluster Deployment Descriptor
The first step in configuring the CDD is to provide a name, and choose an object manager. The object manager you choose determines many of the configuration choices you make in the CDD editor.
Add the CDD File and Select an Object Manager
1. In Studio Explorer, right click the folder where you want to store the CDD and select New > Cluster Deployment Descriptor. You see the New Cluster Configuration Wizard.
2. In the File name field, type a name for the CDD and click Next. (You can change the name in the editor as desired).
3. At the Object Manager Selection page, select an object manager for the deployment, then click Finish.
Configuration instructions for each object manager are in the following sections:
• Configuring an In Memory Cluster on page 14
• Configuring a Cache Manager Cluster — Cluster Tab on page 15
• Chapter 4, Cluster Configuration for Berkeley DB Manager, page 71Berkeley DB: Configuring the Cluster Tab for Berkeley DB Manager on page 72
Names in the CDD must conform to the NCName datatype. See the following page for more details:
http://www.w3.org/TR/REC-xml-names/#NT-NCName
When you choose an object manager in the wizard, defaults and common properties for that manager are added in the CDD. If you later switch to a different object manager (at the Cluster tab), those defaults and properties remain. You must manually reconfigure the CDD for the object manager you change to — or, if you are just beginning, simply start over, and select the correct object manager in the wizard.

TIBCO BusinessEvents Administration
14 | Chapter 2 CDD Configuration Procedures
Configuring an In Memory Cluster
Use this procedure if you picked In Memory Manager in the second page of the New Cluster Configuration wizard.
For the wizard procedure, see Adding a Cluster Deployment Descriptor on page 13.
1. In the Cluster tab click General. On the right, specify the following:
— The cluster name and message encoding.
— As desired, an Author name, any comment you wish to record. (Version and date are not editable.)
See Cluster Tab — General Settings on page 30 for details.
2. Object Management should be set to In Memory. If not you can right-click and choose Change to ’In Memory Manager’.
See the note in the section Adding a Cluster Deployment Descriptor on page 13 for implications of switching here.
3. Save. No other cluster-level configuration is required for In Memory clusters.
4. Go to Configuring the Collections Tab (All Object Managers) on page 17 to continue configuration.

TIBCO BusinessEvents Administration
Configuring a Cache Manager Cluster — Cluster Tab | 15
Configuring a Cache Manager Cluster — Cluster Tab
Use this procedure if you picked Cache Manager in the second page of the New Cluster Configuration wizard.
For the wizard procedure, see Adding a Cluster Deployment Descriptor on page 13.
If you will use a backing store, you must also add a JDBC connection. This connection is referenced in the cluster settings. See JDBC Connection in TIBCO BusinessEvents Developer’s Guide and also (in this manual) Chapter 13, JDBC Backing Store Configuration, on page 205.
To Configure the Cluster Tab for Cache Manager
See Chapter 3, Cluster Deployment Descriptor Reference, on page 29 for reference tables mentioned in this section.
1. In the Cluster tab click General. On the right, specify the following:
— The cluster name and message encoding.
— As desired, an Author name, any comment you wish to record. (Version and date are not editable.)
See Cluster Tab — General Settings on page 30 for details.
2. If Cache Manager is not already selected, right-click the Object Management node and choose Change to ’Cache Manager’.
A tree of option groups appears on the left. Clicking these displays configuration panels on the right. You may have to add properties to the properties sheet as well.
Cluster Discovery You may want to first configure the properties that define the members of the cluster. You can use either multicast discovery or well-known-address properties, as appropriate. See Cache Cluster Discovery in TIBCO BusinessEvents Architect’s Guide for guidelines about these options.
3. In the browser panel on the left, click Properties. Refer to Cluster Tab — Cache Manager — Coherence Properties on page 46 for details.
If all defaults for cluster discovery are appropriate for your environment, you need only specify the cluster name. Default multicast property values handle cluster member discovery. However, other options are available for use in different circumstances.

TIBCO BusinessEvents Administration
16 | Chapter 2 CDD Configuration Procedures
Backing Store 4. If you are using a backing store do the following:
— Click Backing Store in the tree and complete the fields on the right.
— Click Backing Store > Connection and complete the fields on the right to reference the JDBC connection for the backing store, and the pool settings.
— Add additional properties as needed (if you are using Oracle Strategy).
See Cluster Tab — Cache Manager — Backing Store Settings on page 33 for details.
Domain Objects 5. Click Domain Objects > Default and specify the default object management settings for domain objects (entities): See Cluster Tab — Cache Manager — Domain Objects Settings on page 41.
— In the Mode field select Cache Only, Cache+Memory, or Memory Only.
— Complete the preload option fields to preload the cache from the backing store at startup as desired.
6. As desired, add domain object override settings. These settings override the default settings for domain objects.
a. Select Overrides.
b. Click Add.
c. Select the /uri entry that appears on the left, and configure the settings on the right.
As needed, select entries to be removed and click Remove.
Database
Concepts
7. If you use database concepts, available in the TIBCO BusinessEvents Data Modeling add-on product, select Database Concepts on the left and complete the fields in the configuration panel on the right. See TIBCO BusinessEvents Data Modeling Developer’s Guide for details.
Go to Configuring the Collections Tab (All Object Managers) on page 17 to continue configuration.

TIBCO BusinessEvents Administration
Configuring the Collections Tab (All Object Managers) | 17
Configuring the Collections Tab (All Object Managers)
The purpose of collections is to provide collections of rules, rule functions, and destinations. These collections are a convenience feature used when configuring agent classes.
Two collections are predefined: an all-rules collection and an all-functions collection.
Log Configurations
Also defined at this tab are log configurations. Because they require more explanation, details are provided in Collections Tab — Log Configurations Overview on page 55, and Collections Tab — Log Configurations Settings on page 57
Configuring Collections
The various kinds of collections are configured in the same way, except that destinations and log configurations have additional configuration properties.
Before Defining
Collections
First define the rules, functions, and destinations (project resources) that you will use to configure the collections. (You can add also resources during CDD configuration and return to the CDD editor to continue.) Adding project resources is documented in TIBCO BusinessEvents Developer’s Guide.
Using
References
A collection can have references to items (rules, rule functions, or destinations), and also references to other collections of the same type. References are identified in the groups tree by a reference symbol ( ). This mechanism enables you to reuse collections for more efficient configuration.
To Configure Collections
The procedure is in general the same for rules, destinations, and functions, so in these instructions, the word item is used to refer to the specific rule or rule function or destination.
For the log configurations procedure, see To Add a Log Configuration on page 19

TIBCO BusinessEvents Administration
18 | Chapter 2 CDD Configuration Procedures
1. In the Collections tab do any of the following:
— To add a new collection, select the parent for the collection type, Rules, Destinations, Functions, or Log Configurations as needed, and click Add.
— In the Item Collection field that appears on the right, enter a name for the group and click Add again.
— To add items and item group references to a collection select the item collection and then click Add.
You see the Select Items dialog.
2. In the Select Items dialog do any of the following:
— To add items, in the Items tree click the checkboxes of items you want to add to the group you are defining.
— To add collection references, in the Collection References tree click the checkboxes of collections you want to add (by reference) to the collection you are defining.
When you select a collection on the left, you see details on the right: For example, the path to item you selected, and the names of collections you selected.
3. For function collections only, reorder the functions as needed, so that they execute in the correct order at runtime (that is, at startup or shutdown). Highlight a rule function in the tree on the left, and then click Move Up or Move Down as needed.
4. For destination collections only, configure each destination in turn. Select the destination on the left and complete the settings on the right to define characteristics such as the threading model to use, and the event preprocessor. See Collections Tab — Destinations Settings and Properties on page 52 for information about each setting.
5. Save.
To Update Collections
• To remove an item in a collection or the collection itself, select the item or the group on the left and click Remove.
• To reorder rule functions in a function collection, select a rule function in the tree on the left, then click Move Up or Move down. This is important for startup and shutdown rule functions. Ensure that you put startup and shutdown rule functions into appropriate separate collections.

TIBCO BusinessEvents Administration
Configuring the Collections Tab (All Object Managers) | 19
• You can change the URI (project path) of project resources to match their actual locations. To change the URI of an item, select the item on the left and edit the URI on the right.
Configuring Log Configurations
To Add a Log Configuration
1. In the Collections tab select Log Configurations and click Add.
2. In the Configuration panel, give the log configuration a name.
3. Add the log levels you want to enable in this configuration. See Collections Tab — Log Configurations Overview on page 55 for an explanation of the logging levels, modules, and syntax details and see Collections Tab — Log Configurations Settings on page 57 for details on the fields.
4. If you want to send the log output to files, in the Files area click Enable and configure the fields.
5. If you want to redirect the STDERR and STDOUT streams to files, in the Send to Terminal area click Enable and specify the file names and locations.
6. If you want to use a custom line layout, click Enable and configure the fields.
7. Save.
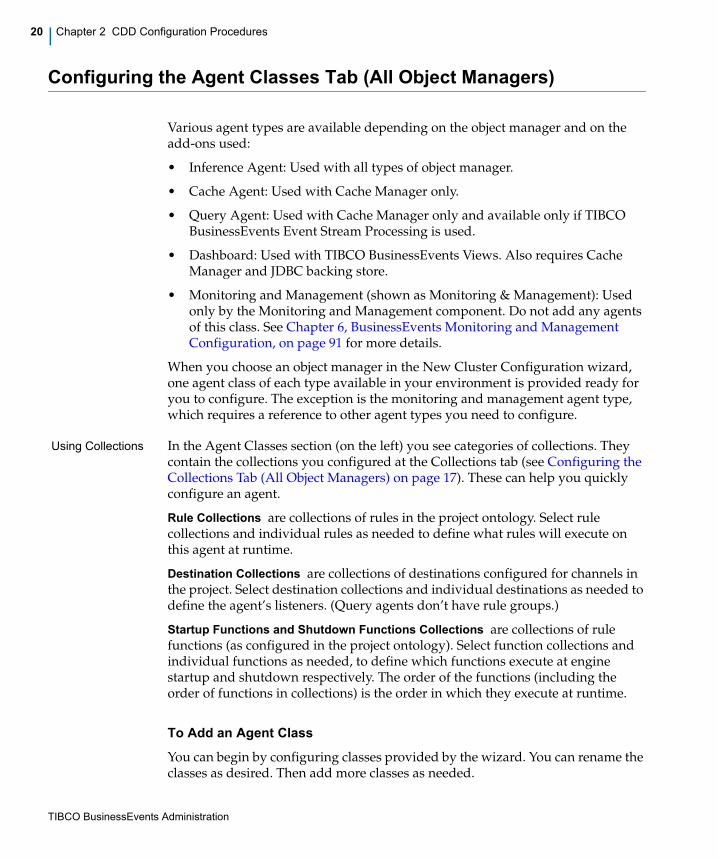
TIBCO BusinessEvents Administration
20 | Chapter 2 CDD Configuration Procedures
Configuring the Agent Classes Tab (All Object Managers)
Various agent types are available depending on the object manager and on the add-ons used:
• Inference Agent: Used with all types of object manager.
• Cache Agent: Used with Cache Manager only.
• Query Agent: Used with Cache Manager only and available only if TIBCO BusinessEvents Event Stream Processing is used.
• Dashboard: Used with TIBCO BusinessEvents Views. Also requires Cache Manager and JDBC backing store.
• Monitoring and Management (shown as Monitoring & Management): Used only by the Monitoring and Management component. Do not add any agents of this class. See Chapter 6, BusinessEvents Monitoring and Management Configuration, on page 91 for more details.
When you choose an object manager in the New Cluster Configuration wizard, one agent class of each type available in your environment is provided ready for you to configure. The exception is the monitoring and management agent type, which requires a reference to other agent types you need to configure.
Using Collections In the Agent Classes section (on the left) you see categories of collections. They contain the collections you configured at the Collections tab (see Configuring the Collections Tab (All Object Managers) on page 17). These can help you quickly configure an agent.
Rule Collections are collections of rules in the project ontology. Select rule collections and individual rules as needed to define what rules will execute on this agent at runtime.
Destination Collections are collections of destinations configured for channels in the project. Select destination collections and individual destinations as needed to define the agent’s listeners. (Query agents don’t have rule groups.)
Startup Functions and Shutdown Functions Collections are collections of rule functions (as configured in the project ontology). Select function collections and individual functions as needed, to define which functions execute at engine startup and shutdown respectively. The order of the functions (including the order of functions in collections) is the order in which they execute at runtime.
To Add an Agent Class
You can begin by configuring classes provided by the wizard. You can rename the classes as desired. Then add more classes as needed.

TIBCO BusinessEvents Administration
Configuring the Agent Classes Tab (All Object Managers) | 21
1. In the Agent Classes tab, click Add Agent.
2. In the New Agent Class dialog enter an Agent Class Name.
3. Select an Agent Class Type from the list. Valid types for your cluster depend on object management type, and whether you use any BusinessEvents add-on products.
— Inference Agent: Used by all types of object manager
— Cache Agent: Used with Cache Manager only.
— Query Agent: Used with Cache Manager only and available only if TIBCO BusinessEvents Event Stream Processing is used.
— Dashboard: Used with Cache manager only and available only if TIBCO BusinessEvents Views is used.
4. Click OK to return to the main page. The new agent name appears on the left.
To Configure an Inference, Cache, Dashboard, or Query Agent Class
1. As needed complete steps in To Add an Agent Class on page 20. Select the Agent Class type Inference.
2. Select the agent name on the left. Appropriate settings for that agent type appear in the Configuration panel. Complete the settings and add any additional properties, as explained in Agents Tab Settings and Properties on page 60.
3. For inference, dashboard, and query agent types, configure the collections you want to use. In the agent tree on the left, click each type of collection in turn and configure as explained next. (In the instructions below, the word item stands in for destination, function, and rule.)
a. Highlight a category of collections (for example Destination Collections).
b. Click Add. You see the Select items dialog.
c. In the upper section of the dialog, select individual project item resources, as desired.
d. In the lower section of the dialog (the Reference Groups section), select item collections you defined earlier, as desired.
e. Click OK. A list of item IDs appears in the box on the right.
4. If you added any individual destinations to the Destination Groups category, highlight their name on the left and configure their settings on the right. See Collections Tab — Destinations Settings and Properties on page 52 for details.

TIBCO BusinessEvents Administration
22 | Chapter 2 CDD Configuration Procedures
(Destinations within destination collections are configured at the Collections tab.)
5. You can do any of the following:
— Click a collection category on the left to see a list of collections and items you selected from that category on the right.
— Expand a category on the left and click a collection reference within it. You see a list of its item IDs and paths, and any collection references within that collection, on the right.
— Edit the project paths for individual items you add here. You would do this If the project location of that item changed.
6. Save.

TIBCO BusinessEvents Administration
Configuring the Processing Units Tab (All Object Managers) | 23
Configuring the Processing Units Tab (All Object Managers)
To configure a processing unit, you add the items you configured earlier, and any additional properties required.
If you don’t find a configuration item you require, click the appropriate tab and add it, then return to Processing Units tab and continue configuration.
Processing units are used in deploytime configuration, in the topology file. One processing unit named default is provided out of the box. You can change this name. It has no significance.
To Add a Processing Unit
See Processing Units Tab Settings and Properties on page 66 for guidelines on the settings and properties.for
1. At the Processing Units tab do the following:
— Select the default processing unit and configure it. You can rename it as needed. However if you will deploy to TIBCO Administrator you must use this name.
— Click Add to add more processing units as needed.
2. In the Name field, enter the name for the processing unit. If you are configuring the default processing unit, do not change the name.
3. In the Log Configuration field, browse to and select one log configuration.
4. Check the Hot Deploy checkbox if you want to enable hot deployment. See Chapter 9, Hot Deployment in TIBCO BusinessEvents Administration for details.
5. If you use TIBCO BusinessEvents Data Modeling, check the Enable DB Concepts checkbox to enable database concept functionality on this processing unit.
6. In the Agents section, click Add and select an agent.

TIBCO BusinessEvents Administration
24 | Chapter 2 CDD Configuration Procedures
7. If needed, assign to each agent a key and a priority.
8. In the Properties section, add any additional configuration properties as required.
Agent Instance Properties and Deployment The agent key identifies an instance of this agent class uniquely at runtime. It is used to retrieve scorecards from the backing store. Scorecards are local to an agent instance. The agent priority also differentiates between deployed instances of an agent class for failover and failback purposes if you use fault tolerance.
Ensure that you deploy a processing unit containing such agent values one time only. Create as many processing units as you need to provide appropriate values in deployed instances of the agent class. See Limitations in Use of Certain Processing Unit Configurations on page 81 for more details.
The Http Properties for a processing unit are used to configure the internal HTTP server, used with the HTTP Channel. See HTTP Channel Configuration Properties in TIBCO BusinessEvents Developer’s Guide.

TIBCO BusinessEvents Administration
Entity-Level Configuration for Cache and Backing Store | 25
Entity-Level Configuration for Cache and Backing Store
You can configure individual concepts and events and their properties as needed for special circumstances. Such configuration is not generally required. However, it is available for advanced tuning or for special situations.
The metadata properties related to preloading are used only if the CDD Cluster setting Preload Enabled is checked. See Understanding How Entity Objects are Managed on page 7 for details.
Metadata Properties for Entities (Events and Concepts)
Metadata properties in an entity’s Metadata section are used to fine-tune backing store behavior. Additional meta properties that may appear are used with BusinessEvents add-ons. Only backing-store metadata properties are documented in this section. In most cases metadata property configuration is not required.
Metadata properties exist both at the entity level, and at the property level.
Table 3 Entity-level metadata properties for events and concepts
FieldGlobal Var?
Description
Backing Store Properties
Note These properties are ignored if the backing store feature has not been configured for the application or if it is configured but disabled in the CDD editor. See Cluster Tab — Cache Manager — Backing Store Settings on page 33.
hasBackingStore Set this field to false to specify entities that are excluded from the backing store.
Possible values are true and false.
Default is true.
Type Name For the Oracle-only (legacy) backing store, you can enter a custom type name, instead of the Oracle type name generated by the backing store scripts. This is useful for giving short or meaningful names to types.

TIBCO BusinessEvents Administration
26 | Chapter 2 CDD Configuration Procedures
Table Name You can enter a custom table name, instead of the name generated by the backing store scripts. This is useful for giving short or meaningful names to types. This setting is used for both the JDBC backing store and the Oracle-only (legacy) backing store. See Set Metadata Properties for Long Identifiers, as Desired on page 213 for more details.
Cache and Preloading Properties
These properties are used only if the application uses a backing store.
Evict From Cache on Update Used only if both of the following are the case:
• Cache-aside strategy for database updates is used
• The property Agent.AgentClassName.cacheTxn.updateCache is set to false.
If set to true: When a rule action changes the value of any of this entity’s properties, then the entity instance is evicted from the cache (updates are saved in the backing store)
Use as needed to improve performance and cache memory management. For example, if an entity is not accessed frequently, it may save memory in the cache if the entity is evicted from cache after it is updated.
Possible values are true and false.
Default is true.
Preload On Recovery If set to true, this object is preloaded from backing store to cache. See Cluster Tab — Cache Manager — Domain Objects Settings on page 41 to understand when this setting is used and how it is overridden.
Possible values are true and false.
Default is false.
Table 3 Entity-level metadata properties for events and concepts
FieldGlobal Var?
Description

TIBCO BusinessEvents Administration
Entity-Level Configuration for Cache and Backing Store | 27
Constant Possible values are true and false.
Default is false.
Check for Version Possible values are true and false.
Default is true.
Is Cache Limited If be.engine.cluster.isCacheLimited is set to true, then you can set this metadata property value to false so that for this entity the cache is not limited.
If be.engine.cluster.isCacheLimited is set to false, then you can set this metadata property value to true, so that for this entity the cache is limited.
There is no entity-level setting for the size of a limited cache. The size is set using this cluster-wide property:
be.engine.limited.cache.back.size.limit
These properties are set in the CDD file. See Cluster Tab — Cache Manager — Backing Store Settings on page 33 for more details.
Possible values are true and false.
Default is true.
Maximum Records to Load On Recovery
Specifies how many objects of this type to load on at system startup. Used only this object is preloaded, based on the effective preload property. See notes for field Preload on Recovery, above.
Overridden by the entity-level CDD setting Preload Fetch Size. See Cluster Tab — Cache Manager — Domain Objects Settings on page 41
0 means load all objects.
Default is 0.
Table 3 Entity-level metadata properties for events and concepts
FieldGlobal Var?
Description

TIBCO BusinessEvents Administration
28 | Chapter 2 CDD Configuration Procedures

TIBCO BusinessEvents Administration
| 29
Chapter 3 Cluster Deployment Descriptor Reference
This chapter provides reference tables for the CDD file settings and related properties.
For configuration procedures, see Chapter 2, CDD Configuration Procedures, on page 5.
Topics
• Cluster Tab — General Settings, page 30
• Cluster Tab — Cache Manager — Configuration Settings, page 31
• Cluster Tab — Cache Manager — Backing Store Settings, page 33
• Cluster Tab — Cache Manager — Backing Store Properties, page 37
• Cluster Tab — Cache Manager — Domain Objects Settings, page 41
• Cluster Tab — Cache Manager — Coherence Properties, page 46
• Collections Tab — Destinations Settings and Properties, page 52
• Collections Tab — Log Configurations Overview, page 55
• Collections Tab — Log Configurations Settings, page 57
• Agents Tab Settings and Properties, page 60
• Processing Units Tab Settings and Properties, page 66
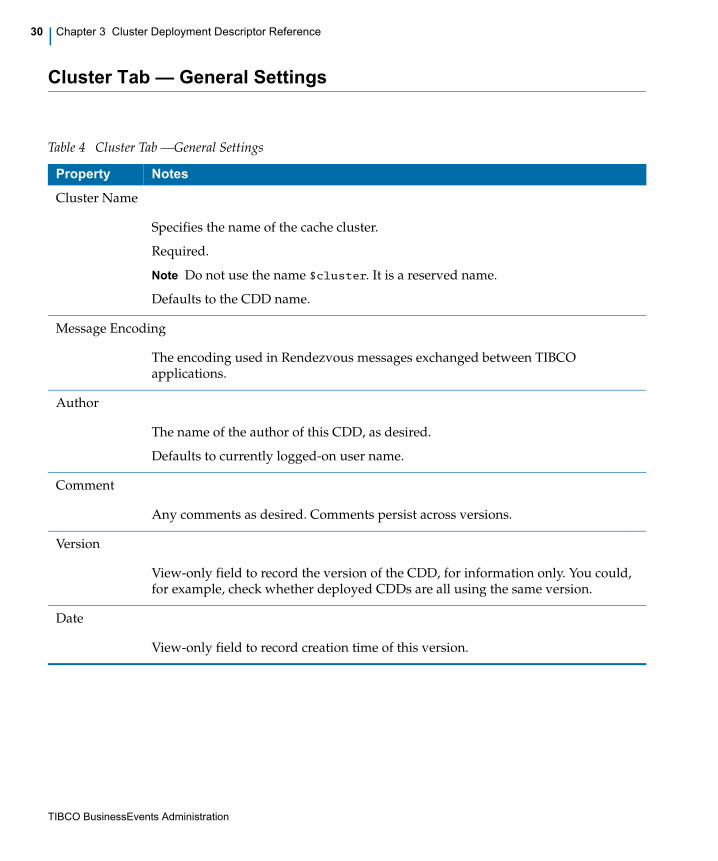
TIBCO BusinessEvents Administration
30 | Chapter 3 Cluster Deployment Descriptor Reference
Cluster Tab — General Settings
Table 4 Cluster Tab —General Settings
Property Notes
Cluster Name
Specifies the name of the cache cluster.
Required.
Note Do not use the name $cluster. It is a reserved name.
Defaults to the CDD name.
Message Encoding
The encoding used in Rendezvous messages exchanged between TIBCO applications.
Author
The name of the author of this CDD, as desired.
Defaults to currently logged-on user name.
Comment
Any comments as desired. Comments persist across versions.
Version
View-only field to record the version of the CDD, for information only. You could, for example, check whether deployed CDDs are all using the same version.
Date
View-only field to record creation time of this version.
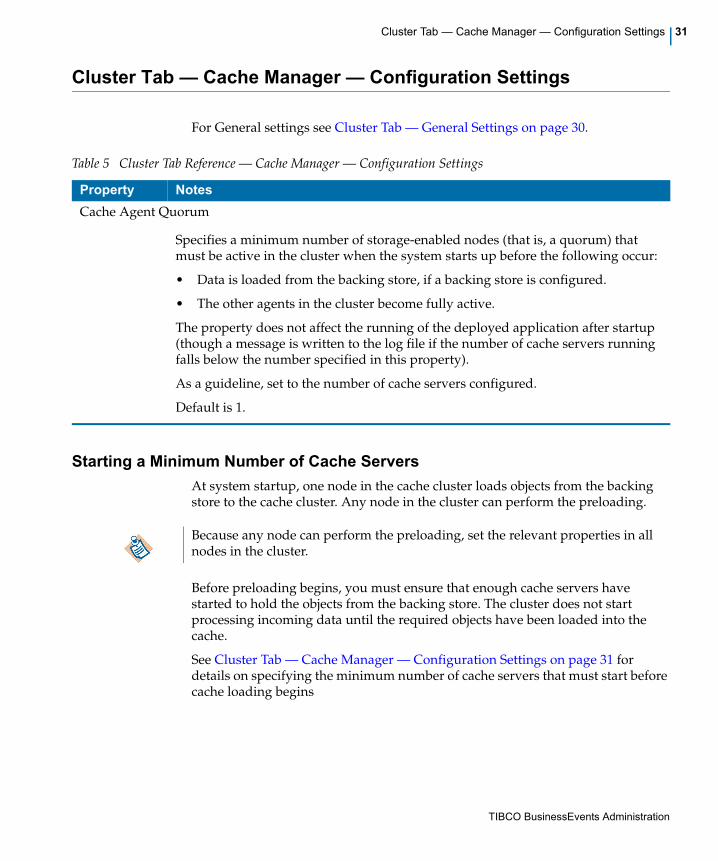
TIBCO BusinessEvents Administration
Cluster Tab — Cache Manager — Configuration Settings | 31
Cluster Tab — Cache Manager — Configuration Settings
For General settings see Cluster Tab — General Settings on page 30.
Starting a Minimum Number of Cache Servers
At system startup, one node in the cache cluster loads objects from the backing store to the cache cluster. Any node in the cluster can perform the preloading.
Before preloading begins, you must ensure that enough cache servers have started to hold the objects from the backing store. The cluster does not start processing incoming data until the required objects have been loaded into the cache.
See Cluster Tab — Cache Manager — Configuration Settings on page 31 for details on specifying the minimum number of cache servers that must start before cache loading begins
Table 5 Cluster Tab Reference — Cache Manager — Configuration Settings
Property Notes
Cache Agent Quorum
Specifies a minimum number of storage-enabled nodes (that is, a quorum) that must be active in the cluster when the system starts up before the following occur:
• Data is loaded from the backing store, if a backing store is configured.
• The other agents in the cluster become fully active.
The property does not affect the running of the deployed application after startup (though a message is written to the log file if the number of cache servers running falls below the number specified in this property).
As a guideline, set to the number of cache servers configured.
Default is 1.
Because any node can perform the preloading, set the relevant properties in all nodes in the cluster.

TIBCO BusinessEvents Administration
32 | Chapter 3 Cluster Deployment Descriptor Reference
After the specified number of servers has started, the processing unit that acquires the lock first performs the cache loading. Any processing unit can acquire the lock. All agents wait until backing store data has finished loading before they start.
This setting does not affect runtime operation of the deployed application. Deployed applications continue to run even if one or more cache servers fails and the quorum is no longer met. A warning message is written to the log file.

TIBCO BusinessEvents Administration
Cluster Tab — Cache Manager — Backing Store Settings | 33
Cluster Tab — Cache Manager — Backing Store Settings
Unless otherwise noted, these settings are used both for the legacy (Oracle Types or Oracle-only) backing store and for the JDBC backing store. See JDBC Backing Store Configuration, page 205 and Appendix A, Setting up an Oracle-Only Backing Store, on page 229 for setup details.
Table 6 Cluster Tab Reference — Cache Manager — Backing Store Settings (Sheet 1 of 4)
Property Notes
Enabled
If checked, the backing store configured for this cluster is enabled.
Note: Individual entities can be set to not use the backing store. See Metadata Properties for Entities (Events and Concepts) on page 25.
If not checked, either the cluster does not have a backing store or the backing store is temporarily disabled.
When this checkbox is not checked the following behavior is used by default:
• The cache-aside database write method is not used.
• An unlimited cache is used.
To override this default behavior, add the following properties to the property sheet and set their values as appropriate:
be.engine.limited.cache.back.size.limit
be.engine.cluster.isCacheLimited
See Cluster Tab — Cache Manager — Backing Store Properties, page 37 for more on these properties.
Default is unchecked.

TIBCO BusinessEvents Administration
34 | Chapter 3 Cluster Deployment Descriptor Reference
Cache Loader Class
Name of the backing store class. Select from the options:
com.tibco.be.jdbcstore.BECoherenceJdbcStore — for JDBC backing store.
com.tibco.be.oracle.BECoherenceOracleStore — for legacy Oracle backing store.
the cache-aside database write method is used, and a limited cache is enabled by default. You can override these by adding the following properties to the property sheet:
be.engine.limited.cache.back.size.limit
be.engine.cluster.isCacheLimited
See Cluster Tab — Cache Manager — Backing Store Properties, page 37 for more on these properties.
Type
Used for JDBC backing store only. Select which of the supported DBMS products to use: oracle or sqlserver.
Default is oracle.
Strategy
Used for JDBC backing store only. If Oracle Database is used, you have the option of using either the internal pooling implementation, or Oracle Database’s implementation. Possible values are as follows:
jdbc Use the internal pooling mechanism.
oracle For Oracle Database only. Use Oracle’s pooling mechanism (see the class OracleConnectionCacheManager in the package oracle.jdbc.pool). When set to oracle then the BusinessEvents pooling property values are used to set their corresponding to Oracle Database properties.
Default is oracle.
Table 6 Cluster Tab Reference — Cache Manager — Backing Store Settings (Sheet 2 of 4)
Property Notes

TIBCO BusinessEvents Administration
Cluster Tab — Cache Manager — Backing Store Settings | 35
Cache Aside
Used only if the Backing Store Enabled checkbox is checked. Ignored otherwise (internally set to false). When JDBC backing store is used, cache-aside is used automatically, and this property is ignored.
If Cache Aside processing is not used, write-behind processing is used:
• Write-behind Writes data to the cache and then to the backing store. One write-behind thread is used for each entity type. See also tangosol.coherence.distributed.threads which is set in the Processing Units tab (see Processing Units Tab Settings and Properties on page 66.
• Cache-aside Writes data to the cache and at the same time to the backing store. User controls are available for the threading and queue size. See Post RTC Options — Cache-aside and Write-behind on page 184.
Enforce Pools
Check this property if you want to enforce connection pool properties.
Default is unchecked.
Backing Store > Connection settings
Try running with default pool values and monitor the behavior. Using more connections improves runtime performance and can also speed up recovery in the event of a failure.Pool settings are used only if Enforce Pools is checked.
URI
Specifies the project path, that is, the path from the project root to the JDBC Connection resource, to define the connection to the backing store. For example:
/SharedResources/JDBC Connection.sharedjdbc
Min Size
Used by JDBC backing store only if Cluster tab > Backing Store > Strategy is set to oracle. Also used by the Oracle-only legacy backing store.
Oracle Strategy If Oracle Database Strategy settings are used, this property corresponds to the OracleConnectionCacheManager class property MinLimit.
Default is 10.
Table 6 Cluster Tab Reference — Cache Manager — Backing Store Settings (Sheet 3 of 4)
Property Notes

TIBCO BusinessEvents Administration
36 | Chapter 3 Cluster Deployment Descriptor Reference
Max Size
Maximum number of JDBC connections in the JDBC connection pool used for the backing store. Connections do not exceed the maximum.
The value of this property overrides the value of the Max Connections setting in the JDBC Connection resource.
Oracle Strategy If Oracle Database Strategy settings are used, this property corresponds to the OracleConnectionCacheManager class property MaxLimit.
Default is 10.
Initial Size
Specifies the initial size of the JDBC connection pool used for the backing store, when it is created on startup. For example:
be.backingstore.dburi.pool.initial.0 10
Oracle Strategy If Oracle Database Strategy settings are used, this property corresponds to the OracleConnectionCacheManager class property InitialLimit.
Default is 10.
Table 6 Cluster Tab Reference — Cache Manager — Backing Store Settings (Sheet 4 of 4)
Property Notes

TIBCO BusinessEvents Administration
Cluster Tab — Cache Manager — Backing Store Properties | 37
Cluster Tab — Cache Manager — Backing Store Properties
Add properties as needed depending on backing store configuration.
Using Oracle Strategy for Connection Pool Properties
If you are using Oracle Database, you can enable explicit Oracle Database pool and connection management. The backing store then uses Oracle’s implementation for pooling resources (Refer to Oracle Database documentation, for the class OracleConnectionCacheManager in the package oracle.jdbc.pool). If you do not enable explicit Oracle Database pool and connection management, the internal BusinessEvents pooling mechanism is used.
Table 7 Cluster Tab — Cache Manager — Backing Store Properties
Property Notes
Database Connection Properties
Aa with the connection settings, these pool properties are used only if Enforce Pools is checked.
be.backingstore.dburi.pool.waitTimeout.0
Used only if Strategy is set to oracle.
Oracle Strategy If Oracle Database Strategy settings are used, this property corresponds to the OracleConnectionCacheManager class property WaitTimeout.
Specifies behavior when a connection is requested and there are already Cluster tab > Connection > Max Size connections active. If the be.backingstore.dburi.pool.waitTimeout.0 value is greater than zero (0), each connection request waits for up to the specified number of seconds. If no connection is returned to the pool before the timeout elapses, a No Database Connection available exception is thrown.
The waitTimeout and inactivityTimeout properties specify wait periods to minimize the creation and destruction of connections (an expensive operation).
Default is 1 second.

TIBCO BusinessEvents Administration
38 | Chapter 3 Cluster Deployment Descriptor Reference
be.backingstore.dburi.pool.inactivityTimeout.0
Used only if be.backingstore.dburi.strategy.0 is set to oracle.
Oracle Strategy If Oracle Database Strategy settings are used, this property corresponds to the OracleConnectionCacheManager class property InactivityTimeout.
Specifies the number of seconds an unused connection remains available (so that other threads can use it). After this period, the connection is closed and removed from the pool.
Default value is 900 seconds.
be.backingstore.readtimeout
Used only if be.backingstore.dburi.strategy.0 is set to oracle.
Oracle Strategy If Oracle Database Strategy settings are used, this property corresponds to the OracleConnectionCacheManager class property ReadTimeout.
Use this property to handle situations where engines running inference agents hang when the JDBC connection to the backing store is slow or intermittent. If no response is received from the database within the specified period, a call is aborted.
Time unit is milliseconds.
A value of 0 (zero) means that no timeout is set.
Default value is 0
be.backingstore.commitSize
Specifies the number of transactions committed at one time. Set this property to the desired number of transactions to suit your needs.
Default is 10.
be.engine.cluster.cleanup
Used by Oracle-Only backing store only.
By default, deleted entities are removed from the Oracle-only backing store automatically at system startup. Set this property to false to disable that behavior.
Default is true.
Table 7 Cluster Tab — Cache Manager — Backing Store Properties
Property Notes

TIBCO BusinessEvents Administration
Cluster Tab — Cache Manager — Backing Store Properties | 39
be.backingstore.dburi.schema.0
Specifies the user whose schema is used for the backing store. This property enables you use to a different schema than the schema of the user specified in the JDBC Connection resource. For example:
be.backingstore.dburi.0 some_user
The JDBC connection resource credentials are always used to connect to the backing store.
The user specified in the JDBC connection resource must have CRUD privileges to the schema of the user specified in the be.backingstore.dburi.schema.0 property.
Default value: If the be.backingstore.dburi.schema.0 property is not specified, the schema of the user specified in the JDBC connection resource is used.
Cache Size Properties
be.engine.cluster.isCacheLimited
If set to true the cache size is limited. Limited caches can be used only when a backing store is used to store entries in excess of the limit.
This property value is internally set to true if the Cluster tab > Object Management > Backing Store checkbox is checked. You can override the setting using this property, if you want to use an unlimited cache size with a backing store.
Ignored otherwise (internally set to false).
Also see notes for be.engine.limited.cache.back.size.limit.
Possible values: true or false.
Default is true if backing store is enabled; false if not
Table 7 Cluster Tab — Cache Manager — Backing Store Properties
Property Notes

TIBCO BusinessEvents Administration
40 | Chapter 3 Cluster Deployment Descriptor Reference
be.engine.limited.cache.back.size.limit
Specifies the size of the limited cache, in number of cache entries for each object type in each agent where local storage is enabled (cache agents, and other agents where the local storage property is explicitly enabled).
A limited cache is used only if a backing store is enabled. (Cluster tab > Object Management > Backing Store > Enabled field).
Default is 10000 (entries per object type)
be.engine.limited.objectTable.back.size.limit
Specifies the maximum size of the object table cache, in number of entries.
Used with limited cache only.
See The Role of the Object Table, page 8 for more details. Also see Cluster Tab — Cache Manager — Domain Objects Settings, page 41.
Default is 100000 entries
Table 7 Cluster Tab — Cache Manager — Backing Store Properties
Property Notes
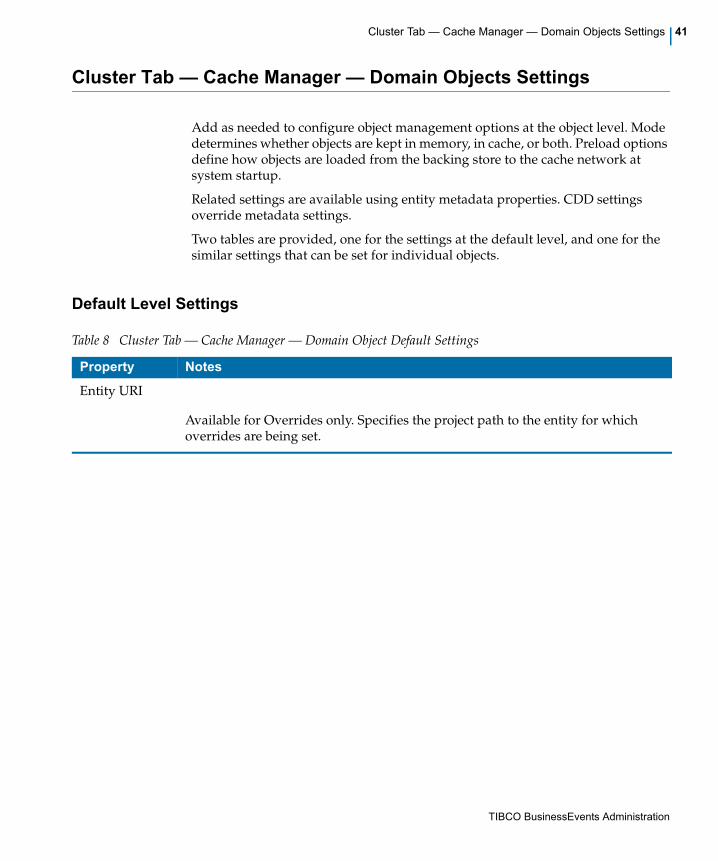
TIBCO BusinessEvents Administration
Cluster Tab — Cache Manager — Domain Objects Settings | 41
Cluster Tab — Cache Manager — Domain Objects Settings
Add as needed to configure object management options at the object level. Mode determines whether objects are kept in memory, in cache, or both. Preload options define how objects are loaded from the backing store to the cache network at system startup.
Related settings are available using entity metadata properties. CDD settings override metadata settings.
Two tables are provided, one for the settings at the default level, and one for the similar settings that can be set for individual objects.
Default Level Settings
Table 8 Cluster Tab — Cache Manager — Domain Object Default Settings
Property Notes
Entity URI
Available for Overrides only. Specifies the project path to the entity for which overrides are being set.

TIBCO BusinessEvents Administration
42 | Chapter 3 Cluster Deployment Descriptor Reference
Mode
With Cache Manager, you can keep memory objects in the cache or Rete network using the following cache modes
Memory Only: Objects are not persisted in the cache. They are kept in the Rete network (working memory) only.
Cache Only: Objects are persisted in the cache. They must be loaded into working memory as needed. This is the most common choice for a cache cluster.
Cache+Memory (also written as Cache Plus Memory): Objects are persisted in the cache. They are also kept current in the Rete network.
Note: Due to issues with concurrency, use Cache Plus Memory only for constants and objects that change infrequently.
Default value depends on the selection made at the New Cluster Deployment Descriptor wizard.
Overrides setting: overrides the default mode for the entities configured.
See Chapter 8, Cache Modes and Project Design in TIBCO BusinessEvents Architect’s Guide to understand the effect of this setting.
Preload Enabled
Preloading settings are used only if a backing store is enabled. Preloading objects and object handles means loading the cache from the backing store at system startup. Objects and handles not preloaded are loaded when needed.
This is the global setting to enable or disable preloading from backing store to cache.
Unchecked: Uncheck to disable all preloading. If unchecked then all other preloading properties and settings including entity metadata settings related to preload are ignored.
Checked: If checked, preloading is enabled. The settings Preload Caches and Preload Handles determine if those preload settings are enabled.
Unchecked by default.
Table 8 Cluster Tab — Cache Manager — Domain Object Default Settings
Property Notes

TIBCO BusinessEvents Administration
Cluster Tab — Cache Manager — Domain Objects Settings | 43
Preload Fetch Size
If object preloading is enabled, this setting specifies the number of entries (objects) to preload for each domain object. Objects are fetched in a non-deterministic manner. Can be overridden at the entity level.
Set to 0 to preload all objects. Set to a number to load that number of objects.
Default is 0, meaning all objects are preloaded (if Preload Enabled is checked).
Preload Caches
Specifies whether objects are loaded into the cache from the backing store on system startup (both normal startup and recovery).
all: All objects are loaded into the cache from the backing store. Lower level settings can override this setting by excluding specified objects.
none: No objects are included. This setting overrides all lower level settings.
Default is all. However the Preload Enabled setting for all individual object settings is unchecked thus disabling all object preloading by default.
Preload Handles
Specifies whether object handles are loaded into the ObjectTable cache. The ObjectTable cache holds references (handles) to the objects themselves. See The Role of the Object Table on page 8 for more detail.
all: All object handles are preloaded. The Overrides settings can override this setting by excluding specified objects’ handles.
none: No object handles are preloaded. This setting overrides all lower level settings.
include: the object-level settings in the Overrides section specify which objects’ preload handles are included.
Default is include.
Table 8 Cluster Tab — Cache Manager — Domain Object Default Settings
Property Notes

TIBCO BusinessEvents Administration
44 | Chapter 3 Cluster Deployment Descriptor Reference
Entity Level Object Overrides and Settings
Table 9 Cluster Tab — Cache Manager — Domain Object Override
Property Notes
Entity URI
Specifies the project path to the entity for which overrides are being set.
Mode
Overrides the Default level setting (see Mode in Table 8.)
Not available for Memory Only.
See Chapter 8, Cache Modes and Project Design in TIBCO BusinessEvents Architect’s Guide to understand the effect of this setting.
Preload Enabled
Ignored unless the Default level settings Preload Enabled and Preload Caches are checked (enabled). If checked then:
Unchecked: If unchecked, this object is not preloaded.
Checked: If checked, this object is preloaded.
This setting overrides the entity metadata setting Preload on Recovery (see Entity-Level Configuration for Cache and Backing Store on page 25).
Unchecked by default.
Preload Fetch Size
If this object will be preloaded, this setting specifies the number of entries (objects) to preload for this domain object. Objects are fetched in a non-deterministic manner.
Overrides the Default level setting.
Also overrides the entity metadata property Metadata Properties for Entities (Events and Concepts) on page 25).
Set to 0 to preload all objects, or set to a number to load that number of objects.
Default is 0, meaning "all"

TIBCO BusinessEvents Administration
Cluster Tab — Cache Manager — Domain Objects Settings | 45
Preload Handles
Ignored if the Default level property Preload Handles is set to none.
If the Default level property Preload Handles is set to all then you can set this property to false to override that setting and exclude this object’s handles from being preloaded.
If the Default level property Preload Handles is set to include then you can set this property to true to preload its handles.
Default is false.
Pre-processor
If this object uses Cache+Memory mode, and Subscribe Cluster is checked, specify a subscription preprocessor. This preprocessor provides locking to ensure data consistency. See Using Locks to Ensure Data Integrity Within and Across Agents in TIBCO BusinessEvents Architect’s Guide for details.
Subscribe Cluster
If this object uses Cache+Memory mode, check this checkbox to subscribe to subscription RTCs, so that changes to this object in one Rete Network are also changed in the Rete networks across all inference agents that use the same mode. See Using Locks to Ensure Data Integrity Within and Across Agents in TIBCO BusinessEvents Architect’s Guide for details.
Table 9 Cluster Tab — Cache Manager — Domain Object Override
Property Notes

TIBCO BusinessEvents Administration
46 | Chapter 3 Cluster Deployment Descriptor Reference
Cluster Tab — Cache Manager — Coherence Properties
Add properties as needed to configure multicast cluster member discovery, or well-known address cluster member configuration. Also define the backup count for cluster objects.
If you are using well-known addresses for cluster member configuration, delete the multicast properties and instead add the well-known address properties.
If you used the Wizard to set the object manager, a property group called coherence contains all the multicast discovery properties and the backup count property.
Groups are for convenience only. You can group properties differently or not at all, as you find convenient.
Table 10 Cluster Tab — Cache Manager — Coherence Properties (Sheet 1 of 6)
Property Notes
Backup Count
tangosol.coherence.distributed.backupcount
The backup count specifies the number of members of the distributed cache service that hold the backup data for each unit of storage in the cache. Recommended values are 0, 1, or 2.
Value of 0 means that in the case of abnormal termination, some portion of the data in the cache will be lost. Value of N means that if up to N cluster nodes terminate at once, the cache data will be preserved.
A backup count of 1 means one server plus one backup, that is, two cache servers (or storage enabled nodes if cache servers are not used).
To maintain the partitioned cache of size M, the total memory usage in the cluster does not depend on the number of cluster nodes and will be in the order of M*(N+1).
Default is 1.

TIBCO BusinessEvents Administration
Cluster Tab — Cache Manager — Coherence Properties | 47
Multicast Discovery Properties
If you will define cluster members using multicast discovery properties, use the properties in this section, instead of those in the section Well-Known Address Properties on page 50.
tangosol.coherence.clusteraddress
Use this setting if multicast discovery is used and if you need a non-default value. Specifies the multicast IP address that the socket will listen to or publish on.
Possible values are addresses between (and including) 224.0.0.0 and 239.255.255.255.
Default value is 224.3.3.1
tangosol.coherence.clusterport
Use this setting if multicast discovery is used and if you need a non-default value. Specifies the port that the socket will listen to or publish on.
Possible values are integers between 1 and 65535.
Default value is 33389
tangosol.coherence.ttl
Specifies the time-to-live setting for the multicast, that is, the maximum number of "hops" a packet can traverse. A hop is defined as a traversal from one network segment to another via a router.
For production use, set this value to the lowest integer value that works. Setting the value too high can use unnecessary bandwidth on other LAN segments and can even cause the operating system or network devices to disable multicast traffic.
On a single-host cluster, set to zero (0). On a simple switched backbone, set to 1. On an advanced backbone with intelligent switching, it may require a value of 2 or more.
Note: A value of 0 is intended to keep packets from leaving the originating machine. However, some operating systems do not implement this correctly, and the packets may in fact be transmitted on the network.
Required for multicast configuration.
Possible values are integers between 0 and 255.
Default value is 4
Table 10 Cluster Tab — Cache Manager — Coherence Properties (Sheet 2 of 6)
Property Notes

TIBCO BusinessEvents Administration
48 | Chapter 3 Cluster Deployment Descriptor Reference
Localhost and Localport Properties
These properties are used by multicast discovery and well-known address configuration when a host has multiple network cards.
You can put default values here. However if you need to use these properties in the case of multiple network cards, add them as Processing Units tab properties.
tangosol.coherence.localhost
Localhost [or was it localport?] can also be used when more than one cluster is running on the same subnet and multicast is used. Even even though they have different cluster names, if they use the same cluster address, you may need to specify this property to avoid conflict.
Specifies the IP address that the socket will listen to or publish on.
Required when a host has multiple network cards, to specify which card’s IP address to use.
Note Also used for well-known address configuration, for the same situation.
You can generally set the value of the localhost property to the value "localhost." However, if localhost is used as the loop back address (127.0.0.1) you must enter a machine name or IP address.
Default value is localhost.
Table 10 Cluster Tab — Cache Manager — Coherence Properties (Sheet 3 of 6)
Property Notes

TIBCO BusinessEvents Administration
Cluster Tab — Cache Manager — Coherence Properties | 49
tangosol.coherence.localport
Specifies the port that the socket will listen to or publish on.
If more than one cluster is running on the same subnet, then even though they have different cluster names and cluster addresses, you may need to specify this property to avoid conflict.
Possible values are 1 to 65535.
Default value is 8088.
Note If a specified port is not available, the object management layer (by default) increments the port number until it finds an available port. Avoid potential conflicts by choosing a number that is not close to a port used by other software in your environment.
You can turn off the auto-incrementing feature. To turn off auto-incrementing, add the following property in the Cluster Tab> Properties section and set the value of the following override option to false:
tangosol.coherence.localport.adjust=false
Table 10 Cluster Tab — Cache Manager — Coherence Properties (Sheet 4 of 6)
Property Notes

TIBCO BusinessEvents Administration
50 | Chapter 3 Cluster Deployment Descriptor Reference
Well-Known Address Properties
If you will define cluster members using well-known addresses, use the properties in this section, instead of those in the section Multicast Discovery Properties on page 47.
Note Provision is made for up to six well known addresses in the provided operational descriptor, using numbers 1–6. If you need more than six, see Overriding and Extending the Operational Deployment Descriptor on page 248 for information about adding more well-known addresses.
tangosol.coherence.wkan
tangosol.coherence.wkan.port
Each "well-known-address," specifies the IP address (the value of the wkan property) and port that the socket will listen to or publish on. Enter all the well known addresses and ports for machines used by the cluster. For port, enter a value between 1 and 65535.
For example:
tangosol.coherence.wka1=host1tangosol.coherence.wka1.port=8088
tangosol.coherence.wka2=host2 tangosol.coherence.wka2.port=8088
Note If multiple processing units (PUs) run on the same host machine, configure with two addresses for the same machine, and use a different port number for each. For example:
tangosol.coherence.wka1 hostname1
tangosol.coherence.wka1.port 8088
tangosol.coherence.wka2 hostname1
tangosol.coherence.wka2.port 8089
Tip An auto-incrementing feature ensures that a different port is used if one specified is already in use.
Other Coherence Properties
These properties are used in special situations.
tangosol.coherence.override
Specifies the location of an Operational Descriptor Override File. A sample value is:
file:/c:/tmp/my_tangosol-coherence-override.xml
Use of an operational descriptor override is not generally required. For details see Appendix D, Advanced Caching Topics, on page 247
Table 10 Cluster Tab — Cache Manager — Coherence Properties (Sheet 5 of 6)
Property Notes

TIBCO BusinessEvents Administration
Cluster Tab — Cache Manager — Coherence Properties | 51
tangosol.coherence.cacheconfig
If you have customized the cache configuration file, specify the file path and name of the customized file. The default file is located in the BE_HOME/lib/ext/coherence.jar file and is called:
coherence-cache-config-jdbc.xml.
If a backing store is used, see If a Custom Cache Configuration File is Used on page 227.
Table 10 Cluster Tab — Cache Manager — Coherence Properties (Sheet 6 of 6)
Property Notes

TIBCO BusinessEvents Administration
52 | Chapter 3 Cluster Deployment Descriptor Reference
Collections Tab — Destinations Settings and Properties
Also available from the Agent Classes Tab.
When you select a destination in the CDD editor, you add deploytime settings and properties as needed (shown below). Doing so creates a destination configuration. Each destination configuration is assigned a unique ID. You can select and configure a destination in two places in the CDD: in the Collections tab, or in the Agent Classes tab.
Table 11 Destination Settings (Sheet 1 of 3)
Property Notes
Destination ID
Uniquely identifies this destination configuration at runtime. Edit as needed to ensure that each destination in the cluster has a unique deployment name.
Default value is destination name.
URI
Project path to the destination (that is path to the destination in the design-time project).
Preprocessor
Specifying a preprocessor is optional. If you specify a preprocessor, also specify worker thread settings.
Select the rule function that has been configured as this event’s preprocessor.
For more detailed information about preprocessors and see Event Preprocessors in TIBCO BusinessEvents Architect’s Guide.

TIBCO BusinessEvents Administration
Collections Tab — Destinations Settings and Properties | 53
Threading Model
If you specified a preprocessor, also specify thread settings. Select one model:
Shared Queue Uses the BusinessEvents system-wide shared queue and threads. See Properties for Shared Queue and Threads Threading Model on page 53.
Caller Uses the thread (and queue size) provided by the channel resource client. There is one thread per destination.
Workers BusinessEvents creates a dedicated thread pool and set of worker threads in each destination. See Thread Count and Queue Size below.
For more information on threading models see TIBCO BusinessEvents Architect’s Guide.
Thread Count
If you specified Workers in the Threading Model setting, specify the number of threads for this destination here.
Queue Size
If you specified Workers in the Threading Model setting, specify the queue size for this destination here.
Properties for Shared Queue and Threads Threading Model
Add to the property sheet as needed.
com.tibco.cep.runtime.scheduler.default.numThreads
Specifies the number of system-wide shared threads.
The default value is the same number as there are processors available to the JVM.
In MM Console, this thread appears with the name $default.be.mt$.
See also notes for com.tibco.cep.runtime.scheduler.queueSize
Default value is 10.
Table 11 Destination Settings (Sheet 2 of 3)
Property Notes

TIBCO BusinessEvents Administration
54 | Chapter 3 Cluster Deployment Descriptor Reference
com.tibco.cep.runtime.scheduler.queueSize
Specifies the queue size for the system-wide shared queue.
For more details, see notes for com.tibco.cep.runtime.scheduler.default.numThreads
If set to 0 (zero), the queue size is unlimited.
By default the queue size is the number of threads multiplied by 128.
Table 11 Destination Settings (Sheet 3 of 3)
Property Notes

TIBCO BusinessEvents Administration
Collections Tab — Log Configurations Overview | 55
Collections Tab — Log Configurations Overview
Each processing unit references a log configuration. The log configurations are defined in the Collections tab. See Configuring the Collections Tab (All Object Managers) on page 17. This section explains more about log configurations.
In a log configuration, you select a level of logging for each module within BusinessEvents runtime software. You can also enable one or more outputs for the log information and configure them.
Levels
A level corresponds to how much logging is filtered out. They are ordered where all is lowest and off is highest:
Syntax
Enabling a lower level automatically enables the higher levels. For example, enabling info automatically enables fatal, error, and warning.
Assign each module to a level using a space-delimited list. The levels are not case sensitive. The syntax is as follows:
Level Description
Off Highest possible rank. Filters out all logging messages (turns logging off for the specified module).
Fatal Logs only severe runtime errors that cause the application to stop running.
Error Also logs runtime errors that might not cause the application to stop running.
Warn Also logs potentially harmful runtime events or situations.
Info Also logs runtime informational events of general interest.
Debug Also logs detailed runtime informational events, for use in identifying issues.
Trace Also logs even more detailed runtime information.
All Lowest possible rank. Turns on all logging including any custom logging levels.

TIBCO BusinessEvents Administration
56 | Chapter 3 Cluster Deployment Descriptor Reference
module1:level module2:level . . .
To assign a certain level of logging to all modules, use an asterisk:
*:info
This syntax means that logging for all modules is at the info logging level.
You can use the asterisk syntax and also specify exceptions that use a different logging level. For example:
*:info driver.tibrv:debug
This syntax means that all modules use logging level info, except the module driver.tibrv which uses debug level.

TIBCO BusinessEvents Administration
Collections Tab — Log Configurations Settings | 57
Collections Tab — Log Configurations Settings
Additional log settings can be added to the processing Unit tab Properties. See Processing Units Tab Settings and Properties on page 66.
Table 12 Log Configurations Settings (Sheet 1 of 3)
Property Notes
Name
Name of this log configuration.
Levels
Space-separated list of levels and modules used in this log configuration. See Syntax on page 55 and other sections in introduction to Collections Tab — Log Configurations Overview on page 55
Default is info
Files Section
Enable
Check the Enable checkbox to enable log files to be written. Configure the settings in this section to specify details. If this checkbox is unchecked, all other properties in this section are ignored.
Directory
Enter the absolute path to the directory in which you want to store the files.
If you do not enter a leading slash, the files are stored relative to the working directory (the directory in which you start the be-engine.exe executable).
Name
Name of the log file.
The default value is the engine name. If no engine name is set, then the default value is cep-engine.log

TIBCO BusinessEvents Administration
58 | Chapter 3 Cluster Deployment Descriptor Reference
Max number
Number of log files to keep. When the Max size setting value is reached, a new log file is created for the next log entries. Files are created up to the Max number setting size. The oldest file is deleted when a new file is added after this value is reached.
Default is 10.
Max size
Maximum size of one log file.
Default is 10000000.
Append
If checked then new entries are added to the end of the file. If not checked, the contents of the file are flushed each time the engine starts.
Send to Terminal Section
Enable
Check the Enable checkbox to enable the redirections specified in this section. If this checkbox is unchecked, all other properties in this section are ignored.
Output redirection
Specify the directory where the STDOUT stream is written.
Error redirection
Specify the directory where the STERR stream is written.
Custom Line Layout Section
Enable
Check the Enable checkbox to enable the custom line layout entries to take effect. Configure the settings in this section to specify details of a custom layout. If this checkbox is unchecked, all other properties in this section are ignored.
Table 12 Log Configurations Settings (Sheet 2 of 3)
Property Notes
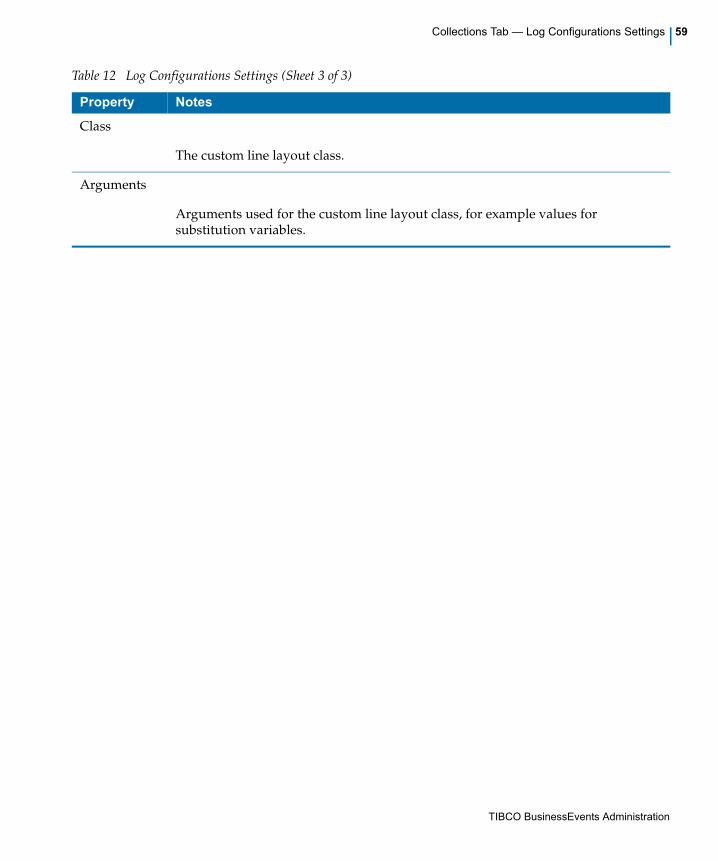
TIBCO BusinessEvents Administration
Collections Tab — Log Configurations Settings | 59
Class
The custom line layout class.
Arguments
Arguments used for the custom line layout class, for example values for substitution variables.
Table 12 Log Configurations Settings (Sheet 3 of 3)
Property Notes

TIBCO BusinessEvents Administration
60 | Chapter 3 Cluster Deployment Descriptor Reference
Agents Tab Settings and Properties
Different sections in the table below deal with different types of agent classes.
See Using Agent Class Properties at Different Levels, page 6 to understand the effect of using agent class properties at the cluster level and at the processing unit level to widen the scope of the property.
Table 13 Agents Tab Settings and Properties (Sheet 1 of 6)
Property Notes
Agent Class Name
Enter a name that is unique across the cluster. Use the NSName standard as in all names in the CDD.
Agent Class Type
Valid types for your custer depend on object management type, and whether you use any BusinessEvents add-on products.
Inference Used with all OM types. This agent class has additional functionality with Cache OM than other OM types.
Cache Used with Cache OM to provide cache storage and other services.
Query Used with queries, part of the TIBCO BusinessEvents Event Stream Processing add-on product.
Dashboard Used with the TIBCO BusinessEvents Views add-on product.
Monitoring & Management Used only by the Monitoring and Management component. See Chapter 6, BusinessEvents Monitoring and Management Configuration, on page 91.

TIBCO BusinessEvents Administration
Agents Tab Settings and Properties | 61
Inference Agent and Query Agent Configuration Settings
Max Size (Local Cache)
Specifies the maximum number of objects (entities) in each agent’s L1Cache (inference agent) or local cache (query agent). The L1 cache is a local cache used by the inference agent for local access to recently used objects. It is used to optimize access to objects.
The query local cache is used in a way similar to the inference agent L1Cache. The query agent’s local cache stores cache data locally for efficient reuse. The local cache listens to and synchronizes the locally stored entity instances with those in the main cache, so that the local cache stays up-to-date.
When the threshold is reached, oldest entities are removed first.
Default is 1024 (unit is objects).
Eviction Time (Local Cache)
be.agent.query.localcache.maxelements
be.agent.query.localcache.evictseconds
Specifies an age limit on the cached entities in seconds. After this period, they are removed from the local cache.
Note Age resets each time an entity is accessed by a query engine.
Default is 900.
BusinessWorks Repo URL (Inference Agents Only)
If this project will integrate with a TIBCO ActiveMatrix BusinessWorks project, enter the Repo URL for the ActiveMatrix BusinessWorks project repo URL here.
Use forward slashes.
See Task A, Add the Repo URL for BusinessWorks to the CDD in Chapter 20, ActiveMatrix BusinessWorks Integration of TIBCO BusinessEvents Developer’s Guide for more details about the value to use.
Concurrent RTC (Inference Agents Only)
If checked, this agent runs concurrent run to completion (RTC) cycles. Use of concurrency features affects project design. See TIBCO BusinessEvents Architect’s Guide for more on this and other concurrency features.
Table 13 Agents Tab Settings and Properties (Sheet 2 of 6)
Property Notes

TIBCO BusinessEvents Administration
62 | Chapter 3 Cluster Deployment Descriptor Reference
tangosol.coherence.distributed.localstorage
Used only for inference agents and query agents. If set to true, the agent is used for storing cache data and in other respects acts like a cache agent, in addition to its other purposes.
Note: Set to true use for test deployments only. Not recommended in production.
Default value is false (internally set to true for cache agents).
Inference Agent Properties
Agent.AgentClassName.maxActive
Specifies the maximum number of active instances of the agent. This value is used to limit the number of active instances in an agent group.
A value of 0 indicates an unlimited number of active instances.
Default is 0.
Agent.AgentClassName.recoveryPageSize
Specifies the number of entries per page to be used while recovering objects from the cache.
For example, if you set the value to 10,000, then the engine loads handles in blocks of 10,000, instead of trying to load them in a single batch. Smaller batch sizes result in slower recovery. Experiment with batch size to establish the best batch size to use for your environment.
A value of 0 means that the objects are recovered in one iteration.
Default is 0.
Agent.AgentClassName.checkDuplicates
By default, BusinessEvents checks if the external IDs (@extId) of entities are unique within the agent. If you want to check for uniqueness of external IDs across the cluster, set this property to true. Performing this check affects performance.
Default is false.
Table 13 Agents Tab Settings and Properties (Sheet 3 of 6)
Property Notes

TIBCO BusinessEvents Administration
Agents Tab Settings and Properties | 63
Agent.AgentClassName.cacheTxn.updateCache
Used only if cache-aside strategy for database updates is used.
If set to true: When a rule action changes the value of any entity’s properties, then the entity instance is evicted from the cache. (Updates are saved in the backing store.)
Note interactions of this CDD property with the metadata property Evict From Cache on Update:
• When this CDD property is set to true, the metadata property Evict From Cache on Update is ignored.
• When this CDD property is set to false, the metadata property Evict From Cache on Update overrides this CDD property.
See also Entity-Level Configuration for Cache and Backing Store on page 25.
Use these settings as needed to improve performance and cache memory management.
Possible values are true and false.
Default is true.
Cache Writer Properties for Use with Cache-Aside (and Recovery)
Used in $CacheWriter thread tuning
Agent.AgentClassName.threadcount
Defines the number of threads performing cache writing jobs.
Tip This property is also used to define the number of Recovery threads (used for recovering Cache Plus Memory entity handles at inference engine startup).
Default value is 2.
Table 13 Agents Tab Settings and Properties (Sheet 4 of 6)
Property Notes

TIBCO BusinessEvents Administration
64 | Chapter 3 Cluster Deployment Descriptor Reference
Database Writer Properties for Use with Cache-aside
Used in $DBWriter thread tuning
Agent.AgentClassName.dbthreadcount
The number of threads performing database writing jobs (applying entity inserts, updates, and deletes to the database).
Used only with cache-aside.
Default is 2.
Agent.AgentClassName.dbOpsQueueSize
The size of the queue (a Java blocking queue) for database writing jobs.
Zero (0) or a negative value means the queue size is unlimited.
Used only with cache-aside.
Default is 8.
Agent.AgentClassName.dbOpsBatchSize
The number of Rete transactions included in a single database transaction.
Used only with cache-aside.
Default is 10.
Query Agent Properties
be.agent.query.localcache.prefetchaggressive
If set to true, then objects required for a query are prefetched while the query is executing.
The prefetch feature improves performance, but CPU and memory usage increases as a result of the aggressive prefetching. You may have to try different values till you find the optimal settings for your environment.
Ensure that the cache size is large enough to accommodate objects that are prefetched.
Default is false.
Table 13 Agents Tab Settings and Properties (Sheet 5 of 6)
Property Notes
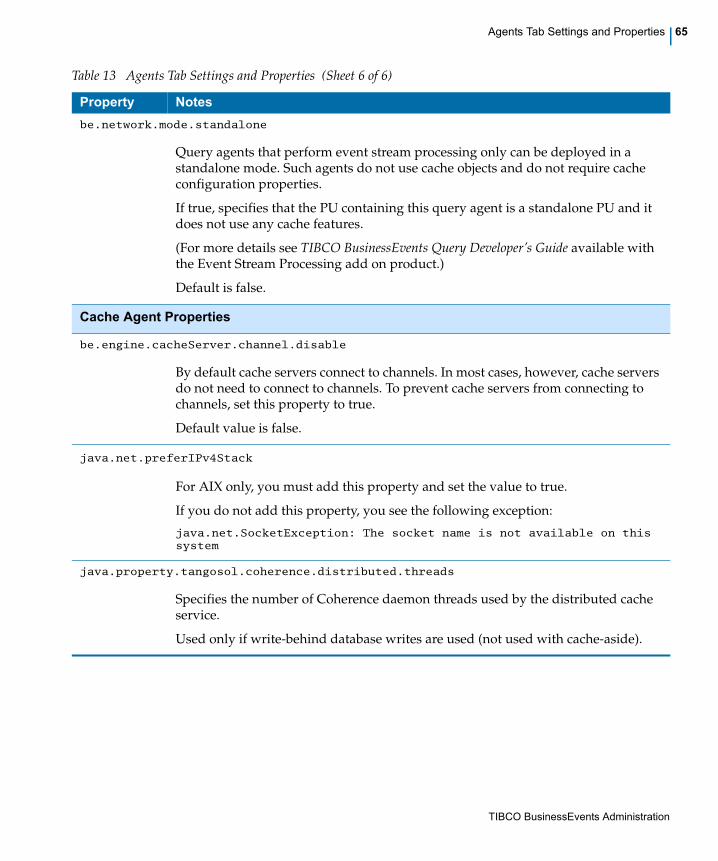
TIBCO BusinessEvents Administration
Agents Tab Settings and Properties | 65
be.network.mode.standalone
Query agents that perform event stream processing only can be deployed in a standalone mode. Such agents do not use cache objects and do not require cache configuration properties.
If true, specifies that the PU containing this query agent is a standalone PU and it does not use any cache features.
(For more details see TIBCO BusinessEvents Query Developer’s Guide available with the Event Stream Processing add on product.)
Default is false.
Cache Agent Properties
be.engine.cacheServer.channel.disable
By default cache servers connect to channels. In most cases, however, cache servers do not need to connect to channels. To prevent cache servers from connecting to channels, set this property to true.
Default value is false.
java.net.preferIPv4Stack
For AIX only, you must add this property and set the value to true.
If you do not add this property, you see the following exception:
java.net.SocketException: The socket name is not available on this
system
java.property.tangosol.coherence.distributed.threads
Specifies the number of Coherence daemon threads used by the distributed cache service.
Used only if write-behind database writes are used (not used with cache-aside).
Table 13 Agents Tab Settings and Properties (Sheet 6 of 6)
Property Notes

TIBCO BusinessEvents Administration
66 | Chapter 3 Cluster Deployment Descriptor Reference
Processing Units Tab Settings and Properties
Table 14 Processing Units Tab Settings and Properties (Sheet 1 of 4)
Property Notes
Name
Enter a name that is unique across the cluster.
Log Configuration
Browse to and select a log configuration, configured at Collections tab.
Hot Deploy
Check the checkbox to enable hot deployment for this processing unit. See Chapter 9, Hot Deployment in TIBCO BusinessEvents Administration for details.
Enable DB Concepts
Check the checkbox to enable database concepts functionality for this processing unit. Available only with TIBCO BusinessEvents Data Modeling add-on software.
Agents Section
Agent
Name of the agent class you selected. Agent classes are defined at the Agent Classes tab.
Key
Specifies a value that uniquely identifies an instance of an agent of this class at deploy time.
Required for recovery of scorecards. Recommended in all cases, for situations that require an agent instance to be uniquely identified.
The value for Key must uniquely identify the agent.
Note: In certain BusinessEvents Monitoring and Management methods, you may be prompted for a session name. For session name you generally put the agent class name. However, if the agent class also has a key, you must instead use the key value. For this reason the key value must uniquely identify the agent.
Default is Coherence node UID.

TIBCO BusinessEvents Administration
Processing Units Tab Settings and Properties | 67
Priority
Specifies the priority of the agent.
The priority indicates the order in which inactive agents become active, and conversely, the order in which active agents become inactive, when new agents join the cluster.
The lower the number, the higher the agent is in the activation priority list. For example, an agent with priority 2 has a higher priority than an agent with a priority of 6.
Ensure that inference agents of the same class in different PUs have different values. This value determines the order of each instance of an agent class for startup, as well as failover and failback in fault tolerance situations.
Default is 10.
tangosol.coherence.log properties
The properties in this section are used to configure the Coherence (cache) log. This log is used only by cache servers, and only if cache-aside strategy for database updates is used.
Standard logging settings are configured in the Log Configuration tab. See Collections Tab — Log Configurations Overview on page 55.
tangosol.coherence.log
Specifies the output device used by the logging system.
Optional.
Possible values are:
• stdout
• stderr
• jdk (Requires JDK 1.4 or later)
• log4j (Requires log4j libraries to be in the classpath)
• A file name
If you specify jdk or log4j you must also perform appropriate configuration of the JDK or Apache log4J logging libraries.
Default is stdout.
Table 14 Processing Units Tab Settings and Properties (Sheet 2 of 4)
Property Notes

TIBCO BusinessEvents Administration
68 | Chapter 3 Cluster Deployment Descriptor Reference
tangosol.coherence.log.level
Specifies which logged messages are output to the log destination.
Optional.
Possible values are:
• 0: Only output without a logging severity level specified will be logged
• 1: All the above plus errors
• 2: All the above plus warnings
• 3: All the above plus informational messages
• 4-9: All the above plus internal debugging messages (the higher the number, the more the messages)
• -1: No messages
Default is 5.
tangosol.coherence.log.limit
Specifies the maximum number of characters that the logger daemon processes from the message queue before discarding all remaining messages in the queue.
The message that causes the total number of characters to exceed the maximum is not truncated.
All discarded messages are summarized by the logging system with a single log entry detailing the number of discarded messages and their total size. When the queue empties, the logger is reset and subsequent messages are again logged.
The purpose of this setting is to avoid a situation where logging can itself prevent recovery from a failing condition, for example by contributing to timing issues.
Logging occurs on a dedicated low-priority thread to further reduce its impact on the critical portions of the system.
Optional.
Possible values are positive integers or zero (0). Zero implies no limit.
Default is 0
Table 14 Processing Units Tab Settings and Properties (Sheet 3 of 4)
Property Notes

TIBCO BusinessEvents Administration
Processing Units Tab Settings and Properties | 69
tangosol.coherence.management properties
You must also specify the following JMX-related properties to enable cluster statistics to appear in the monitored objects table in MM:
tangosol.coherence.management
Default is all
tangosol.coherence.management.remote
Default is true
Table 14 Processing Units Tab Settings and Properties (Sheet 4 of 4)
Property Notes

TIBCO BusinessEvents Administration
70 | Chapter 3 Cluster Deployment Descriptor Reference

TIBCO BusinessEvents Administration
| 71
Chapter 4 Cluster Configuration for Berkeley DB
Manager
This chapter explains how to configure the CDD file for Berkeley DB Manager.
Topics
• Configuring the Cluster Tab for Berkeley DB Manager, page 72
• Cluster Tab — Berkeley DB Manager Settings and Properties, page 73
Berkeley DB manager is deprecated in this release It is recommended that you migrate from Berkeley DB manager (known as Persistence OM in BusinessEvents 3.x) to another object management option. Migration information is provided in TIBCO BusinessEvents Installation.

TIBCO BusinessEvents Administration
72 | Chapter 4 Cluster Configuration for Berkeley DB Manager
Configuring the Cluster Tab for Berkeley DB Manager
This procedure assumes you have picked Berkeley DB manager in the second page of the new cluster configuration wizard (see Adding a Cluster Deployment Descriptor on page 13).
Configure the Cluster Tab of the CDD Editor
1. In the Cluster tab click General. On the right, specify the following:
— The cluster name and message encoding.
— As desired, an Author name, any comment you wish to record. (Version and date are not editable.)
See Cluster Tab — General Settings on page 30 for details.
2. Object Management should be set to Berkeley DB Manager. If not you can right-click and choose Change to ’Berkeley DB Manager’.
See the note in the section Adding a Cluster Deployment Descriptor on page 13 for implications of switching here.
3. In the left panel, click Object Management: [Berkeley DB]. Various options appear on the right. Configure them according to guidelines provided in Cluster Tab — Berkeley DB Manager Settings and Properties on page 73.
4. In the left panel, click Properties and add additional properties (and property groups) as required and provide values. Configure them according to guidelines provided in Cluster Tab — Berkeley DB Manager Settings and Properties on page 73.
Property groups are for your convenience only and have no effect on deployment.
5. Save.
To complete configuration refer to the following sections:
• Configuring the Collections Tab (All Object Managers) on page 17
• Configuring the Agent Classes Tab (All Object Managers) on page 20
• Configuring the Processing Units Tab (All Object Managers) on page 23
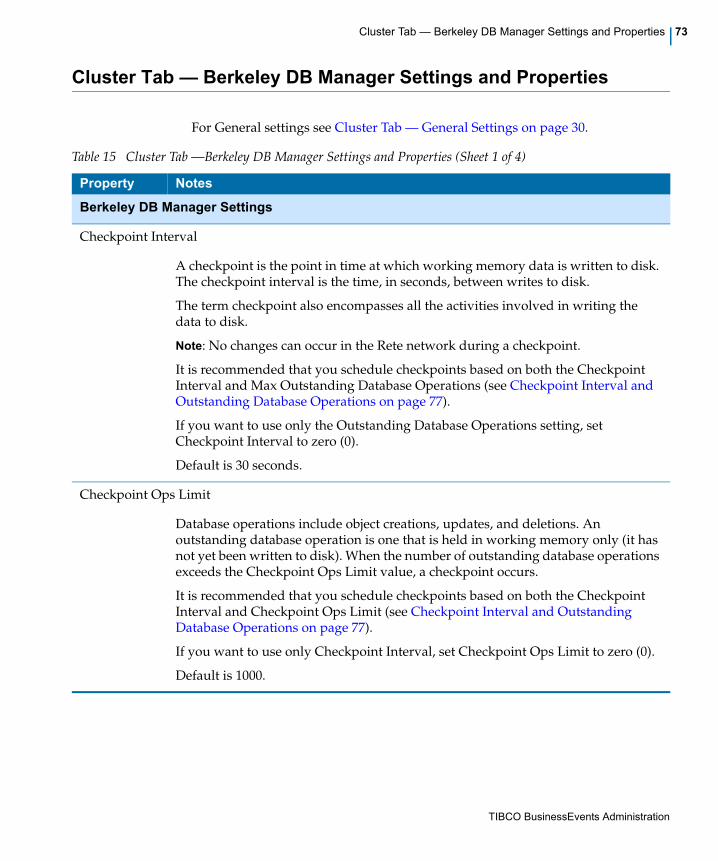
TIBCO BusinessEvents Administration
Cluster Tab — Berkeley DB Manager Settings and Properties | 73
Cluster Tab — Berkeley DB Manager Settings and Properties
For General settings see Cluster Tab — General Settings on page 30.
Table 15 Cluster Tab —Berkeley DB Manager Settings and Properties (Sheet 1 of 4)
Property Notes
Berkeley DB Manager Settings
Checkpoint Interval
A checkpoint is the point in time at which working memory data is written to disk. The checkpoint interval is the time, in seconds, between writes to disk.
The term checkpoint also encompasses all the activities involved in writing the data to disk.
Note: No changes can occur in the Rete network during a checkpoint.
It is recommended that you schedule checkpoints based on both the Checkpoint Interval and Max Outstanding Database Operations (see Checkpoint Interval and Outstanding Database Operations on page 77).
If you want to use only the Outstanding Database Operations setting, set Checkpoint Interval to zero (0).
Default is 30 seconds.
Checkpoint Ops Limit
Database operations include object creations, updates, and deletions. An outstanding database operation is one that is held in working memory only (it has not yet been written to disk). When the number of outstanding database operations exceeds the Checkpoint Ops Limit value, a checkpoint occurs.
It is recommended that you schedule checkpoints based on both the Checkpoint Interval and Checkpoint Ops Limit (see Checkpoint Interval and Outstanding Database Operations on page 77).
If you want to use only Checkpoint Interval, set Checkpoint Ops Limit to zero (0).
Default is 1000.

TIBCO BusinessEvents Administration
74 | Chapter 4 Cluster Configuration for Berkeley DB Manager
Property Cache Size
Defines the maximum number of concept properties that are kept in JVM memory for this agent.
When the persistence layer performs cleanup, the least recently used (LRU) properties are moved to the persistence store, to reduce the number of properties in memory to the specified number.
See Caches Used for Persistence-Based Object Management on page 77.
Default is 10000.
Delete Retracted Objects from Database
When objects are retracted (deleted) from the working memory, they are marked with a retraction flag.
To delete retracted objects from the database, check the Delete Retracted Objects from Database checkbox.
To leave retracted objects the database (flagged with the retraction flag), uncheck the Delete Retracted Objects from Database checkbox.
It is recommended that you delete retracted objects to avoid accumulating large numbers of retracted objects in the database. However, you may want to keep retracted objects in the database, for example for reporting or data mining purposes.
Default is checked.
Do not Recover on Restart
To use the persistence database to recover from unplanned system shutdowns, uncheck this checkbox.
To disable recovery features, check this checkbox. In this case, the persistence database is used as virtual memory only.
When recovery features are disabled, performance improves because the processing required to support the recovery features is not done.
When you check the Do Not Recover on Restart checkbox, data is lost in the event of a system failure.
Default is unchecked.
Table 15 Cluster Tab —Berkeley DB Manager Settings and Properties (Sheet 2 of 4)
Property Notes

TIBCO BusinessEvents Administration
Cluster Tab — Berkeley DB Manager Settings and Properties | 75
Database Environment Directory
Persistence files for the agent are stored under the Database Environment directory on the target machine when the agent is deployed. Enter the file path from the deployed engine to the directory.
Each agent must have its own database environment directory. See Defining the Database Directories for Each Rule Session (Inference Agent) on page 77.
By default (if you do not specify a directory), persistence files are located under the BusinessEvents engine’s working directory, in directories named db/session_name.
Tip: If you can’t determine the location of a deployed application’s persistence files, search for their filenames. The persistence file directory contains one file called je.lck and one or more files called 00000000.jdb, 00000001.jdb, and so on.
Berkeley DB Manager Cluster Level Properties — Add as needed
be.engine.om.berkeleydb.internalcachepercent
Percentage of JVM memory to set aside for use by the persistence layer’s internal cache. This memory is set aside when the engine starts up.
For projects with multiple agents, you can also set be.engine.om.berkeleydb.cacheweight.agent
Default is 20.
be.engine.om.berkeleydb.cacheweight.agent
For projects with multiple agents, you can provide a weight for one or more agents. The weight enables the system to calculate what percentage of the memory set aside using be.engine.om.berkeleydb.internalcachepercent to allocate to each agent.
Default is 1.
The formula is as follows:
Session cache percent = internalcachepercent * (cache.weight.agent / total of all session cacheweight values).
This value is an integer. Any fractional part resulting from the formula is truncated.
For example, if you want to provide a lot of the allocated memory to a certain agent, you can add an entry for that agent providing a higher weight value, and the rest of the agents will be assigned the default weight.
Table 15 Cluster Tab —Berkeley DB Manager Settings and Properties (Sheet 3 of 4)
Property Notes

TIBCO BusinessEvents Administration
76 | Chapter 4 Cluster Configuration for Berkeley DB Manager
be.engine.om.eventcache.defaultmaxsize
Defines the maximum number of events that are kept in JVM memory for an agent.
Sets the default maximum event cache size. This default is used if be.engine.om.eventcache.maxsize.agent is not specified for an agent.
Default is -1 (which means, do not use this setting. See below for default behavior).
If you do not set either of the event cache maximum size properties (be.engine.om.eventcache.defaultmaxsize or be.engine.om.eventcache.maxsize.agent) then the value of the Object Management tab setting is used (see Caches Used for Persistence-Based Object Management on page 77).
Note, however, that the property cache size applies to the number of concept properties. Events store their properties inside the event. The event cache maximum size settings refer to the entire event, not its individual properties.
be.engine.om.eventcache.maxsize.agent
Defines the maximum number of events that are kept in JVM memory for the specified agent.
The default value is provided by the be.engine.om.eventcache.defaultmaxsize property.
When the persistence layer performs cleanup, the least recently used (LRU) events are moved to the persistence store, to reduce the number of events in memory to the specified number.
If your system has sufficient memory, you can improve performance by increasing the number of events kept in memory. When determining how many events to keep in memory, consider the size of the events — some may be quite large. Also consider your other requirements for memory.
be.engine.om.berkeleydb.dbenv
At deploy time, directories are created for each agent (using agent names) under the directory you specify.
Default is ./db
(The period indicates the working directory.)
Table 15 Cluster Tab —Berkeley DB Manager Settings and Properties (Sheet 4 of 4)
Property Notes

TIBCO BusinessEvents Administration
Cluster Tab — Berkeley DB Manager Settings and Properties | 77
Additional Configuration Notes
Some items in the Table 4, Cluster Tab —General Settings table require additional explanation, provided below.
Checkpoint Interval and Outstanding Database Operations
You can schedule checkpoints based on the Checkpoint Interval only, or on the Max Outstanding Database Operations only, or on both settings. It is recommended that you use both settings. When you do so, data is written to disk as follows:
• When the Checkpoint Interval passes (even if fewer than the Max Outstanding Database Operations have occurred).
• When the Max Outstanding Database Operations value is exceeded within the Checkpoint Interval. BusinessEvents then resets the Checkpoint Interval timer.
For example, assume the checkpoint interval is thirty seconds and the number of outstanding database operations is defined as five. Thirty seconds passes with only three outstanding database operations, so BusinessEvents performs a checkpoint. Then ten seconds passes and six database operations occur, so again, BusinessEvents performs a checkpoint. BusinessEvents also resets the checkpoint interval timer.
Caches Used for Persistence-Based Object Management
If your system has sufficient memory, you can improve performance by increasing the number of concept properties kept in memory for this rule session. When determining how many concept properties to keep in memory, consider the size of the properties — some may be quite large. Also consider your other requirements for memory.
Defining the Database Directories for Each Rule Session (Inference Agent)
If your project has multiple rule sessions (or if you will deploy the same
Two caches are used with the Persistence option: a concept property cache and an event cache. The property cache size controls how many concept properties are kept in JVM memory. You define similar settings for the event cache in the be-engine.tra file.
Additional memory management settings also are available. They enable you to control the percentage of JVM memory that is set aside for use by the persistence layer’s internal cache. See Cluster Tab — Berkeley DB Manager Settings and Properties on page 73
TIBCO BusinessEvents Administration
78 | Chapter 4 Cluster Configuration for Berkeley DB Manager
application multiple times on the same machine) you must ensure that each rule session has its own database environment directory. Use one of the following options to set the values at deploy time:
• Create a different global variable for each BAR file, and use the appropriate variable in each BAR’s Database Environment Directory field. At deploy time, set values for the rule sessions in each instance.
• Use the be.engine.om.berkeleydb.dbenv engine property (in be-engine.tra). At deploy time, directories are automatically created for each rule session under the directory you specify. Then do one of the following:
— For TIBCO Administrator deployment, add the property to the Advanced tab and define the directory differently before deploying the project each time.
— For command line deployment, define the property in override property files and specify the appropriate file using -p option at deploy time.

TIBCO BusinessEvents Administration
| 79
Chapter 5 Site Topology Configuration
This section explains how to map project resources to physical ones, in readiness for deployment.
Topics
• Site Topology Overview, page 80
• Configuring the Site Topology, page 82
• Site Topology Reference, page 84

TIBCO BusinessEvents Administration
80 | Chapter 5 Site Topology Configuration
Site Topology Overview
After the project is configured and ready for deployment, you configure physical deployment settings in BusinessEvents Studio using the Site Topology diagram. In this diagram, you assign the processing units and other resources you configured in the CDD editor to physical hosts. It is important to know the details of the physical servers you will deploy to.
Preparation for Site Topology Configuration
Before you begin, configure the CDD file and the EAR file for your project. You will reference the processing units defined in the CDD file when configuring the site topology (see Chapter 2, CDD Configuration Procedures, on page 5).
Summary of Tasks
• Create a new site topology diagram and associate it to a CDD file in the current project.
• Add deployment units (DUs) and connect them to the cluster (the blue bar).
• Add one or more processing unit configurations (PUCs) to each deployment unit. Each PUC references one processing unit, and adds deploy-time information. One processing unit can be used in multiple PUCs. One PUC can be used in multiple DUs according to your deployment plan.
• Add hosts (machines) and connect them to the deployment units. Two or more machines can use the same deployment unit, as long as the information, such as file paths, is valid on those machines.
One machine can have more than one deployment unit, but this is not the usual use case: one deployment unit per host is the normal model.
Project, Master, and Deployed CDD and EAR Files
When you configure the topology file you reference three locations for the CDD and EAR files. The files in each location must be exact copies:
• Project CDD: In the cluster configuration tab, you specify project CDD and EAR files that are locally available to BusinessEvents Studio. They are used for configuring the topology files. If you specify a CDD location in the New Site Topology wizard, it appears in the Project CDD field in the Cluster Configuration tab.

TIBCO BusinessEvents Administration
Site Topology Overview | 81
• Master CDD and EAR files: Also in the cluster configuration tab, you specify the location of the master CDD and EAR files. These copies must be available to the machine where MM is running, for use in deployment.
• In the Deployment Unit settings, you specify where MM will place the deployed CDD and EAR files.
If you are using the same machine to configure the topology and to run MM server, the project and the master files can be in the same location. These two sets of fields are available in case you are configuring the topology on a different machine from the MM server machine.
Limitations in Use of Certain Processing Unit Configurations
In general, you can use one processing unit multiple times to create different processing unit configurations. Similarly you can use one PUC multiple times in different deployment units. However some processing units have deployment-specific settings, as noted next, and cannot be used in this flexible manner.
Instance-Specific Properties
If a processing unit contains agent-instance-specific properties such as agent key and priority settings, you must use that PU in only one PUC, and you must use that PUC in only one DU that is itself used only once in the deployment.
Host-Specific Processing Units
PUs with the property tangosol.coherence.localhost set are host-specific. If a deployment unit contains a PUC based on such a PU, you must link it only to the appropriate host.
Global Variable Overrides
If a PUC contains global-variable overrides, then that PUC is limited in use to the host or hosts in which those override values apply.
All locations specified must already exist. The software does not create directories.

TIBCO BusinessEvents Administration
82 | Chapter 5 Site Topology Configuration
Configuring the Site Topology
Before you begin ensure that you have a valid CDD file. The processing units that you will deploy to the various hosts are defined in the CDD.
To Add a Topology Definition
1. Open the project in BusinessEvents Studio. Select the project root, right-click and select New > Other > TIBCO BusinessEvents > Site Topology.
2. At the New Site Topology Wizard, enter a unique Site Topology name and optional description.
3. Select the Cluster Deployment Descriptor (CDD) that contains the PU definitions and other details you want to use. Only CDD files within the studio project you are configuring are available for selection.
4. Click Finish. You see the topology diagram. You can now configure the diagram.
5. Click the site icon (a globe). In the Site Properties tab you can change the name and description as desired.
6. Click the blue bar, which represents the cluster. In the cluster Properties tab, specify the following:
— The location of the Project CDD, which must be available to the BusinessEvents Studio Explorer.
— The MM server location of the Master CDD and EAR. See Project, Master, and Deployed CDD and EAR Files on page 80 for details. The absolute path must point to the location from which the MM component will deploy the deployment units.
7. Add one or more deployment units. From the Site Topology palette, click the deployment unit icon and then click the canvas. Click again to add more units. Right-click to stop adding units.
8. Click each DU in turn and configure the Properties tab settings. See Deployment Unit Settings on page 85 for details. In each Deployment Unit Properties tab also do the following:
— Click Add and add one or more processing units to the deployment unit.
— Double click each processing unit in turn to display the Processing Unit Configuration property sheet. (You can also click the PU icons shown in the diagram.) See Processing Unit Settings on page 86 for details.

TIBCO BusinessEvents Administration
Configuring the Site Topology | 83
9. Add one or more hosts. From the Site Topology palette, click the Host icon, and then click the canvas. Click again to add more hosts. Right-click to stop adding hosts.
10. Click each host icon in turn and configure the Properties tab. Configure the General, Installation, and Start-PU-Method side tab settings. See Host Settings on page 87 for details.

TIBCO BusinessEvents Administration
84 | Chapter 5 Site Topology Configuration
Site Topology Reference
Site Settings
Cluster Settings
Table 16 Site Topology — Site Settings
Property Notes
Site Name
Site name.
Default is the name of the topology file.
Description
Description of the site, as desired.
Number of Clusters
Read-only field. One cluster per site is supported in this release.
Number of Hosts
Read-only field displaying the number of hosts in this topology.
Table 17 Site Topology — Cluster Settings
Property Notes
Cluster Name
Read-only field displaying to the CDD name specified in the master CDD. This name is set in the Cluster Name field of the CDD editor.
BusinessEvents Version
Read-only field displaying the version of BusinessEvents, as read from the CDD file.

TIBCO BusinessEvents Administration
Site Topology Reference | 85
Deployment Unit Settings
Project CDD
Location and name of the CDD local to BusinessEvents Studio. If BusinessEvents Studio Explorer is running on the same EAR. This is the location used by the MM server. See Project, Master, and Deployed CDD and EAR Files on page 80.
Master CDD
Location and name of the master CDD. This is the location used by the MM server. See Project, Master, and Deployed CDD and EAR Files on page 80.
Master EAR
Location and name of the master EAR. This is the location used by the MM server. See Project, Master, and Deployed CDD and EAR Files on page 80.
Table 17 Site Topology — Cluster Settings (Cont’d)
Property Notes
Table 18 Site Topology — Deployment Unit Settings
Property Notes
Deployment Unit Name
Name of the deployment unit. It can be helpful to include the operating system of the host to which you will deploy this DU in the DU name. If a DU contains any host-specific settings, it’s also a good idea to put the host name in the DU name.
Default value is DU_n where n is a number that increments each time you add a DU to the diagram.
Deployed CDD
Absolute file path where the MM server will deploy the copy of the master CDD used by this DU. See Project, Master, and Deployed CDD and EAR Files on page 80.
Use the correct path for the operating system of the host machines.

TIBCO BusinessEvents Administration
86 | Chapter 5 Site Topology Configuration
Processing Unit Settings
Deployed EAR
Absolute file path where the MM server will deploy the copy of the master EAR used by this DU. See Project, Master, and Deployed CDD and EAR Files on page 80.
Use the correct path for the operating system of the host machines.
Processing Unit Configurations
Displays a list of processing unit configurations. See Configuring the Site Topology on page 82 for the procedure of adding and configuring processing unit configurations.
Table 18 Site Topology — Deployment Unit Settings (Cont’d)
Property Notes
Table 19 Site Topology — Processing Unit Settings
Property Notes
Processing Unit Configuration Name
The name that identifies this configuration of the processing unit specified in the Processing Unit setting (see below).
The processing unit itself is configured in the master CDD.
Use As Engine Name
Check this checkbox to use the value of the Processing Unit Configuration Name field as the engine name.
It is recommended that you use the same setting across all processing units in the cluster.
Processing Unit
Select the processing unit you want to use. Only processing units configured in the master CDD display in the list for selection.
Number of Agents
Displays the number of agents in the selected processing unit.

TIBCO BusinessEvents Administration
Site Topology Reference | 87
Host Settings
JMX Port
JMX port for MM to perform monitoring.
When more than one PU is deployed on the same host (in one DU or multiple DUs), you must ensure the JMX port in each of these PUs is different.
MM passes this JMX Port number to the variable in the command line it composes when starting a BusinessEvents engine:
--propVar jmx_port=portnum
The JMX port number in turn is passed to the following property in the be-engine.tra file:
java.property.com.sun.management.jmxremote.port
However, if you start a BusinessEvents engine from command line outside of MM and you use a different JMX port from the one specified in the topology file then the engine starts as an undefined engine.
Table 19 Site Topology — Processing Unit Settings (Cont’d)
Property Notes
Table 20 Site Topology — Host Settings
Property Notes
General Settings
Host Name
Machine name of the host. Used for remote access.
If you set this value to localhost, then the MM Console can’t access the host remotely. Host name and IP settings are both required.
IP
IP address of the host machine. Used for remote access.

TIBCO BusinessEvents Administration
88 | Chapter 5 Site Topology Configuration
User Name
User name to log onto the host machine.
The login credentials are used for remote deployment and execution, including starting a process unit.
At runtime, a dialog box pops up to authenticate the user, for example when deploying a PU. If you provide a username and password here, then the dialog is prepopulated with these values. You can enter different values as needed.
If you don’t provide the credentials here, then you must provide them at the pop-up dialog.
You can specify a local user or a domain user.
Specify the user as appropriate for the utility you are using. For example, if you use PsTools, you would specify domain\user for domain users
Password
Password of the user referenced in the User Name field. The password is encrypted.
See notes in User Name section.
Operating System
Operating system of the host machine. See the product readme for a list of supported platforms.
Installation Settings
BusinessEvents Version
Version of BusinessEvents installed on the host machine. Not relevant in this release as only 4.0.0 is supported.
BusinessEvents Home
Install location of TIBCO BusinessEvents 4.0.0 on the host machine, for example:
c:/tibco/be/4.0.0
Table 20 Site Topology — Host Settings (Cont’d)
Property Notes
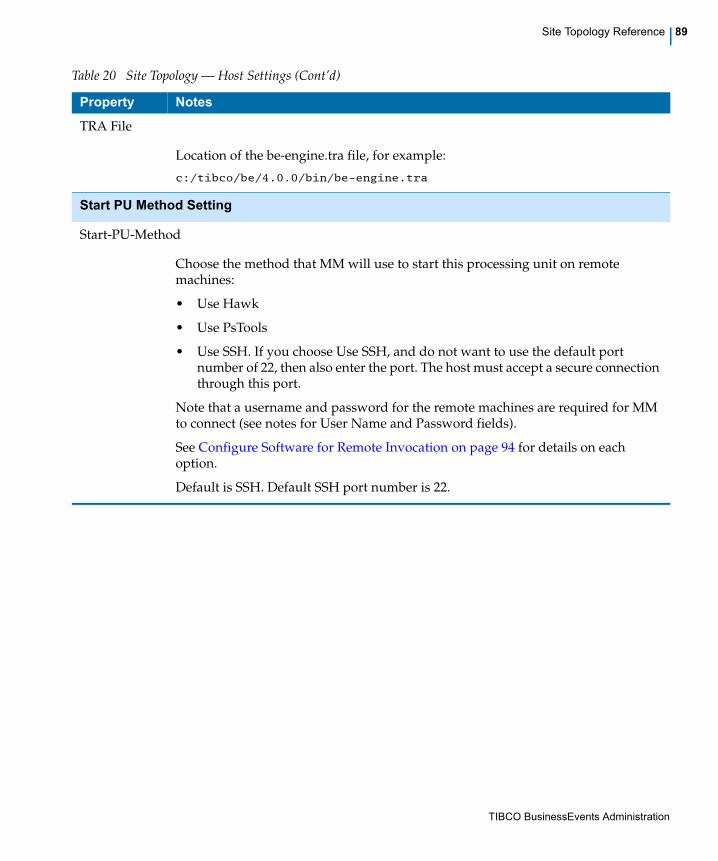
TIBCO BusinessEvents Administration
Site Topology Reference | 89
TRA File
Location of the be-engine.tra file, for example:
c:/tibco/be/4.0.0/bin/be-engine.tra
Start PU Method Setting
Start-PU-Method
Choose the method that MM will use to start this processing unit on remote machines:
• Use Hawk
• Use PsTools
• Use SSH. If you choose Use SSH, and do not want to use the default port number of 22, then also enter the port. The host must accept a secure connection through this port.
Note that a username and password for the remote machines are required for MM to connect (see notes for User Name and Password fields).
See Configure Software for Remote Invocation on page 94 for details on each option.
Default is SSH. Default SSH port number is 22.
Table 20 Site Topology — Host Settings (Cont’d)
Property Notes

TIBCO BusinessEvents Administration
90 | Chapter 5 Site Topology Configuration
TIBCO BusinessEvents Administration
| 91
Chapter 6 BusinessEvents Monitoring and
Management Configuration
This chapter explains how to configure the BusinessEvents Monitoring and Management component metrics as desired. It also explains how to configure the connection between the MM server and the cluster to be monitored and managed.
Topics
• Monitoring and Management Configuration Overview, page 92
• Configuring the Connection between MM Server and the Monitored Cluster, page 94
• Importing the emonitor Project for CDD Editing, page 98
• Configuring MM Settings in the MM CDD File, page 100
• MM Property Group Reference, page 101
• Understanding and Configuring Alerts, page 106
• Alert Configuration Reference, page 108
• Specifying the Path to an Alert Metric Value (and a Reference Value), page 110
• Pane Types Reference for Alert Configuration, page 113
• Understanding Health Metric Rules, page 115
• Configuring Health Metric Rules, page 120
• Health Metric Rule Configuration Reference, page 123
• Configuring Actions, page 127
• Action Configuration Reference, page 128
• Configuring MM Console Properties, page 130

TIBCO BusinessEvents Administration
92 | Chapter 6 BusinessEvents Monitoring and Management Configuration
Monitoring and Management Configuration Overview
The BusinessEvents Monitoring and Management (MM) component provides a management console and dashboard for deployment and for monitoring the status of deployed BusinessEvents engines. Before you use this component you must configure it to suit your needs. Most configuration is done in the CDD file for the emonitor project, the BusinessEvents application that acts as the MM server at runtime.
Task Summary
Two types of configuration are required:
Configuring MM to Connect with the Monitored Cluster
See Configuring the Connection between MM Server and the Monitored Cluster on page 94
Configuring MM Thresholds and Behavior
Various configuration tasks are done using settings in the CDD file for MM. See the following sections:
• Configure emonitor settings
— Configuring MM Settings in the MM CDD File on page 100
• Configure alerts:
— Understanding and Configuring Alerts on page 106
— Configuring Alerts on page 106
— Alert Configuration Reference on page 108
— Specifying the Path to an Alert Metric Value (and a Reference Value) on page 110
— Pane Types Reference for Alert Configuration on page 113
In this release, MM is supported only for deployments that use Cache based object management.

TIBCO BusinessEvents Administration
Monitoring and Management Configuration Overview | 93
• Configure health metric rules:
— Configuring Health Metric Rules on page 120
— Configuring Health Metric Rules on page 120
— Health Metric Rule Configuration Reference on page 123
• Configure actions to take upon triggering of an alert of change in health level:
— Configuring Actions on page 127
— Action Configuration Reference on page 128
• Configure the MM Console properties: See Configuring MM Console Properties on page 130

TIBCO BusinessEvents Administration
94 | Chapter 6 BusinessEvents Monitoring and Management Configuration
Configuring the Connection between MM Server and the Monitored
Cluster
This section explains the steps required to connect the Monitoring and Management software (MM) with a target cluster that is to be monitored and managed. The tasks are arranged in a reasonable order, but a strict order is not required for many of them.
Task A Ensure the Topology File of the Monitored Cluster is Configured
Before you begin configuring MM itself to monitor and manage a cluster, you must specify and configure the topology of that cluster. See Chapter 5, Site Topology Configuration, on page 79 for details. In particular check the following:
• In the Host settings, set the Start-PU-Method value for the host machines.
• In the Cluster settings, set the Master CDD and Master EAR locations. These locations are where the MM Server finds the CDD and EAR for deployment. The master files must be located in the same host where the MM server is running.
• In the Deployment Unit settings, set the location where the MM Server will deploy the CDD and EAR files. This is the location on the machine hosting the deployment unit, as specified in the deployment mapping. The deployment mapping allows the user to specify which deployment units must be deployed to each host listed in the hosts section of the topology file.
Task B Configure Software for Remote Invocation
For secure data exchange and remote invocation between the MM server and the cluster machines you use one or more of the following utilities.
You can use more than one utility. However it is recommended that you choose only one.
• All agents and nodes to be monitored must belong to the same BusinessEvents cluster (that is, have the same cluster name). That cluster must use Cache based object management.
• TIBCO Hawk is required for monitoring machine-level metrics.
In this release the directories specified must all exist. BusinessEvents does not create them if they are not found.

TIBCO BusinessEvents Administration
Configuring the Connection between MM Server and the Monitored Cluster | 95
The utility you use for each client machine is specified in the host configuration section of the topology file. See Start PU Method Setting on page 89.
Ensure that the software you choose is installed and running on all the relevant machines.
TIBCO Hawk
To use TIBCO Hawk® for remote invocations, you must have TIBCO Hawk installed and running on the MM server and on all the client machines that use this method. All machines in the same cluster must use the same TIBCO Hawk domain and use the same transport definitions (server, network, demon port).
Regardless of which software you use for remote invocations, you may wish to use Hawk® for engine-level monitoring. Machine-level monitoring is only available through Hawk. See Install and Configure TIBCO Hawk for Machine Level Metrics on page 95.
PsTools
PsTools is an open source Windows utility that enables execution on remote machines. It is used when MM runs on Windows and the target host also runs on Windows.
To use PsTools you must download it to BE_HOME/mm/bin/pstools.
Client machines, however, can use any OS, and don’t require any software to be installed. They do have to allow remote sessions.
SSH
The SSH utility is available on UNIX machines by default. Download and install on any Windows machine that will use this method. TIBCO has tested with Copssh. Note that OpenSSH for Windows is not supported.
Ensure any client machines that are configured to use SSH have this utility installed and running.
Task C Install and Configure TIBCO Hawk for Machine Level Metrics
If you want to monitor machine level metrics, you must use TIBCO Hawk software. If you use Hawk, you also need to use Rendezvous.
Only SSH enables you to deploy BusinessEvents software to the predefined hosts, as configured in the monitored cluster’s topology file.

TIBCO BusinessEvents Administration
96 | Chapter 6 BusinessEvents Monitoring and Management Configuration
Install TIBCO Hawk and Rendezvous
Install TIBCO Hawk and TIBCO Rendezvous software on the MM server machine, and all client machines in the BusinessEvents cluster whose machine-level metrics you want to monitor.
Configure a Hawk Domain
A Hawk domain specifies a group of TIBCO Hawk agents that acts as a monitoring set. Each machine has a Hawk agent and various micro agents (HMA) that provide useful machine-level metrics to the enterprise monitor.
Configuring a Hawk domain enables machine-level metrics that are made available by Hawk micro agents to be viewed in the Monitoring and Management component. If you do not configure a Hawk domain, the enterprise monitor won't show the machine-level metrics, but it will show all other levels of metrics.
Use the same Hawk domain name and Rendezvous transport for all the monitored processing unit, as they are configured for the emonitor application.
Specify any Non Default Domain Values in the MM CDD File
If you use non-default values, you must specify the Hawk domain name and TIBCO Rendezvous properties in the mm-class agent properties list in the MM.cdd. You can alternatively provide the values in a property file used at the MM server startup. The properties are as follows:
tibco.clientVar.Domain=TIBCO Hawk Domaintibco.clientVar.TIBHawkDaemon=Rendezvous daemon used by Hawktibco.clientVar.TIBHawkNetWork=Rendezvous network used by Hawktibco.clientVar.TIBHawkService=Rendezvous service used by Hawk
Specify Hawk and Rendezvous in the be-mm.tra File
In the BE_HOME\mm\bin\be-mm.tra file, set the tibco.env.HAWK_HOME property and the tibco.env.RV_HOME to point to the TIBCO Hawk and TIBCO Rendezvous installation root directories.
Task D Configure JMX Properties in Monitored Engine TRA Files
The running BusinessEvents engines use JMX MBeans to expose monitoring and management information to the client MM server. You must configure the TRA files for all monitored BusinessEvents engines.
In the current release, JMX with SSL and authentication are not supported.
JMX properties are provided in the shipped BE_HOME/bin/be-engine.tra file but are commented. Uncomment the properties.

TIBCO BusinessEvents Administration
Configuring the Connection between MM Server and the Monitored Cluster | 97
# Un-comment the following JMX management and monitoring Properties for working with
MM
# Set the value of property java.property.com.sun.management.jmxremote.port to
%jmx_port%
# When starting BE-engine from command line using this be-engine.tra file,
# add the option "--propVar jmx_port=[the port number of your choice]"
#
#java.property.com.sun.management.jmxremote.ssl=false
#java.property.com.sun.management.jmxremote.port=%jmx_port%
#java.property.com.sun.management.jmxremote.authenticate=false
To use MM to start BusinessEvents engines, you will need to set property java.property.com.sun.management.jmxremote.port using the variable %jmx_port%. MM reads the JMX port number in the site topology file and passes it to the variable in the command line it composes when starting a BusinessEvents: --propVar jmx_port=portnum. The JMX port number in turn is passed to the java.property.com.sun.management.jmxremote.port property.
Task E Specify the Location of the Monitored Cluster’s Topology File in
MM.cdd
Set the property be.mm.topology.file, located in the mm-class agent properties, within the Agent Classes tab of the CDD editor. This topology file provides the MM server with the necessary information about the cluster it is to monitor at runtime.
The topology file must be located on the same machine as the machine where MM is running. You can move the file from its design-time location as needed.
See Configuring MM Settings in the MM CDD File on page 100 for more details.

TIBCO BusinessEvents Administration
98 | Chapter 6 BusinessEvents Monitoring and Management Configuration
Importing the emonitor Project for CDD Editing
Various features of MM are configured using settings in the MM.cdd file. In order to edit the CDD file you must first import the project that contains it (the emonitor project) into your workspace. You don’t have to copy the files to your workspace when importing.
Whenever you change the MM.cdd file you must restart the BEMM server so that it uses the updated values.
In the MM.cdd file, only change the settings for the mm-class agent, and only edit the file using the Cluster Deployment Descriptor editor in BusinessEvents Studio.
Advanced users may also want to make changes in the emonitor project itself to customize some aspect of the project, but these activities are not documented.
The mm-class is defined using a special kind of agent class (Monitoring & Management) used only in the MM.cdd file. It references the inference and query agents used in the project, and it has a number of settings used to configure alerts, health metric rules, and actions.
To Import the emonitor Project into your Workspace
1. Choose File > Import and select General > Existing Project into Workspace. Click Next.
2. Choose the Select root directory option and browse to the following location:
BE_HOME/mm/
3. Select the emonitor project.
4. As appropriate do one of the following:
— Select Copy projects into workspace to create a copy of the CDD to modify while leaving the original untouched.
— Do not select Copy projects into workspace, in order to edit the original file.
5. Click Finish.
6. Edit and save the CDD file as needed. See Configuring MM Settings in the MM CDD File on page 100.
If Studio Explorer Shows Errors
If you have installed into a non-default location, you may see errors in the Studio Explorer tree after importing the emonitor project into your workspace. To fix the problem, you may need to correct some path issues.

TIBCO BusinessEvents Administration
Importing the emonitor Project for CDD Editing | 99
1. Right-click the project name emonitor and select Properties. In the Properties dialog, select Build Path and select the Custom Functions tab.
2. Delete the incorrect entry for be-mm.jar, and then add the correct entry: Browse to and select the be-mm.jar file in the BE_HOME/mm/lib directory.
3. Click Rebuild Project.

TIBCO BusinessEvents Administration
100 | Chapter 6 BusinessEvents Monitoring and Management Configuration
Configuring MM Settings in the MM CDD File
In the CDD file you configure health metrics and alerts based on the data coming into MM and criteria you define. You can also configure actions to take based on alerts or health level status values. Various other properties are configured here, including the connection to the monitored cluster’s topology file.
This procedure explains what you do at a high level. Read the referenced sections for more detail on each of the configuration tasks.
To Configure MM Features in the emonitor Project CDD mm-class Agent
1. Before you can edit the CDD file you must import the emonitor project into your workspace. See Importing the emonitor Project for CDD Editing on page 98. Then open the MM.cdd in the Cluster Deployment Descriptor editor.
Topology File and
Other Properties
2. Click the Agent Classes tab and select mm-class agent. In the properties sheet, complete the values as explained in MM Property Group Reference on page 101.
Among other things, you specify the topology file you configured using the site topology editor (see Chapter 5, Site Topology Configuration, on page 79). The topology file provides the connection between MM and the cluster it will monitor at runtime. See Configuring the Connection between MM Server and the Monitored Cluster on page 94 for related details.
Alert
Configurations.
3. Expand mm-class > Alert configurations.
4. Modify a provided example or click New to add a new alert configuration. See Understanding and Configuring Alerts on page 106 for a detailed procedure.
Health Metric
Rule
Configurations.
5. Expand mm-class > Health Metric Rule Configurations.
6. Modify a provided example or click New to add a new health metric rule configuration. See Understanding Health Metric Rules on page 115 and Configuring Health Metric Rules on page 120 for more details.
Action
Configurations.
7. Expand mm-class > Action Configurations.
8. Modify a provided example or click New to add a new action configuration. See Configuring Actions on page 127 for a detailed procedure.
9. Save the file.
10. Start the emonitor project using the modified CDD file. This starts the MM server. See Starting MM Management Server and Using MM Console on page 134.

TIBCO BusinessEvents Administration
MM Property Group Reference | 101
MM Property Group Reference
See Configuring MM Settings in the MM CDD File on page 100 for the related procedure.
Table 21 MM CDD mm-class Agent Class MM Property Group Properties
Property Notes
be.mm.topology.file
Fully qualified path to the site topology file for the cluster to be monitored. As shipped, points to the example project Fraud Detection Cache. See Chapter 5, Site Topology Configuration, on page 79.
Note The topology file must be located on the same machine as the machine where the MM server is running.
be.mm.broker.killoldbroker
A broker process enables the MM cluster to retrieve information from the target cluster. If MM stops, the broker terminates after about three minutes.
By default, if MM restarts before the previous broker terminates, it uses that broker. If the previous broker has terminated, however, then MM creates a new broker process, using the target cluster properties in the master CDD that is specified in the topology file.
When set to true, the existing broker process is never reused on startup. For example, if you want to monitor a different cluster when you restart MM (by specifying a different topology file), then you would set this property to true.
Default is false
Email Properties for Actions Feature
Configure the properties needed to send emails in response to alerts or health levels. Required only if you will use the Actions feature. Replace default values for host, email addresses and passwords.
be.mm.email.protocol
Email protocol. Supported protocols are smtp and smtps.
Default value is smtp

TIBCO BusinessEvents Administration
102 | Chapter 6 BusinessEvents Monitoring and Management Configuration
be.mm.email.authentication
Specifies whether the user must authenticate to the email server.
Possible values are true and false. If set to true then also configure the username and password properties.
Default is false.
be.mm.email.host
Specifies the email host.
be.mm.email.from
Specifies the From address.
be.mm.email.username
Specifies the username used to authenticate to the email server.
Used only if be.mm.email.authentication is set to true.
be.mm.email.password
Specifies the password used to authenticate to the email server.
Used only if be.mm.email.authentication is set to true.
Authentication Properties
Authentication is optional. Authentication topics are documented in Chapter 11, Configuring User Authentication, on page 189.
To configure for LDAP authentication, add the properties specified in Chapter 11, Configuring User Authentication, on page 189 and remove the file-based authentication properties or remove their values.
For file based authentication you can share the same file used by other components that also use file based authentication, as desired and appropriate.
be.auth.type
Type of authentication used to authenticate users to the MM console.
Possible values are File and LDAP.
Default value is File
Table 21 MM CDD mm-class Agent Class MM Property Group Properties (Cont’d)
Property Notes
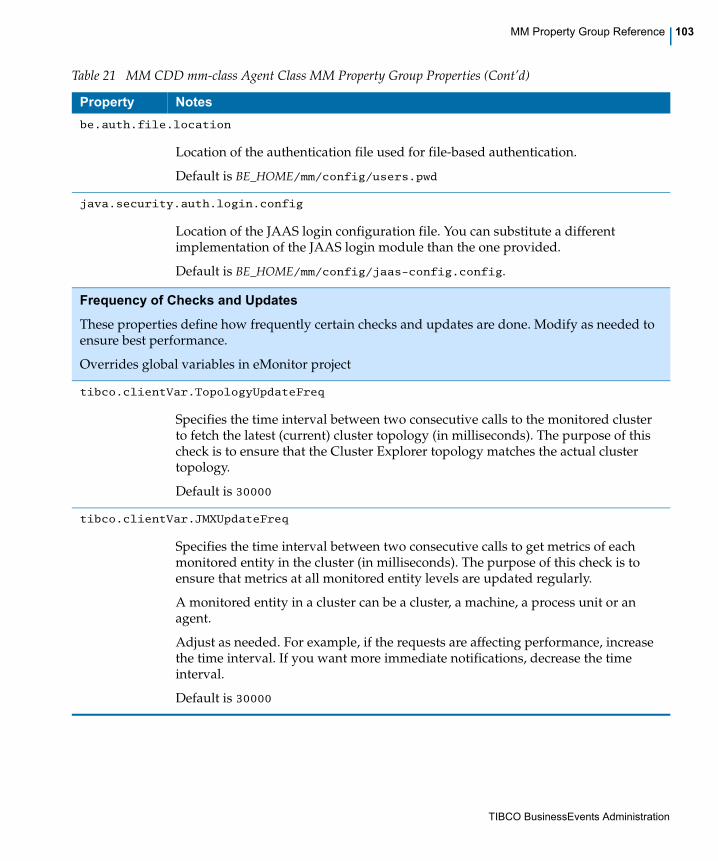
TIBCO BusinessEvents Administration
MM Property Group Reference | 103
be.auth.file.location
Location of the authentication file used for file-based authentication.
Default is BE_HOME/mm/config/users.pwd
java.security.auth.login.config
Location of the JAAS login configuration file. You can substitute a different implementation of the JAAS login module than the one provided.
Default is BE_HOME/mm/config/jaas-config.config.
Frequency of Checks and Updates
These properties define how frequently certain checks and updates are done. Modify as needed to ensure best performance.
Overrides global variables in eMonitor project
tibco.clientVar.TopologyUpdateFreq
Specifies the time interval between two consecutive calls to the monitored cluster to fetch the latest (current) cluster topology (in milliseconds). The purpose of this check is to ensure that the Cluster Explorer topology matches the actual cluster topology.
Default is 30000
tibco.clientVar.JMXUpdateFreq
Specifies the time interval between two consecutive calls to get metrics of each monitored entity in the cluster (in milliseconds). The purpose of this check is to ensure that metrics at all monitored entity levels are updated regularly.
A monitored entity in a cluster can be a cluster, a machine, a process unit or an agent.
Adjust as needed. For example, if the requests are affecting performance, increase the time interval. If you want more immediate notifications, decrease the time interval.
Default is 30000
Table 21 MM CDD mm-class Agent Class MM Property Group Properties (Cont’d)
Property Notes

TIBCO BusinessEvents Administration
104 | Chapter 6 BusinessEvents Monitoring and Management Configuration
tibco.clientVar.HealthCheckFreq
Specifies the time interval between two consecutive two health pings to each machine and process in the monitored cluster (in milliseconds).
This property is used to determine which monitored entities are inactive. Inactive items are indicated in Cluster Explorer. See Inactive Members on page 137 for more details.
Default is 30000
tibco.clientVar.SweepFreq
This setting applies only to unpredefined cluster members. Predefined cluster members (defined in the topology file) are never purged.
The time interval between two sweep checks to physically delete inactive purged cluster members in the discovered topology (in milliseconds).
The SweepFreq property determines how often the system checks for inactive unpredefined cluster members to be purged, and the SweepThreshold property determines for how long an item must remain inactive before it is eligible for purging.
If a user is viewing an inactive cluster member that another user has purged, the cluster member remains visible until the user has finished viewing the details.
Note Do not change unless advised by TIBCO.
Default is 300000 (that is, five minutes)
tibco.clientVar.SweepThreshold
The length of inactivity for a purged cluster member to be qualified for physical deletion (in milliseconds).
Also see notes for Sweepfreq.
Note: Do not change unless advised by TIBCO.
Default is 600000 (that is, ten minutes)
Table 21 MM CDD mm-class Agent Class MM Property Group Properties (Cont’d)
Property Notes
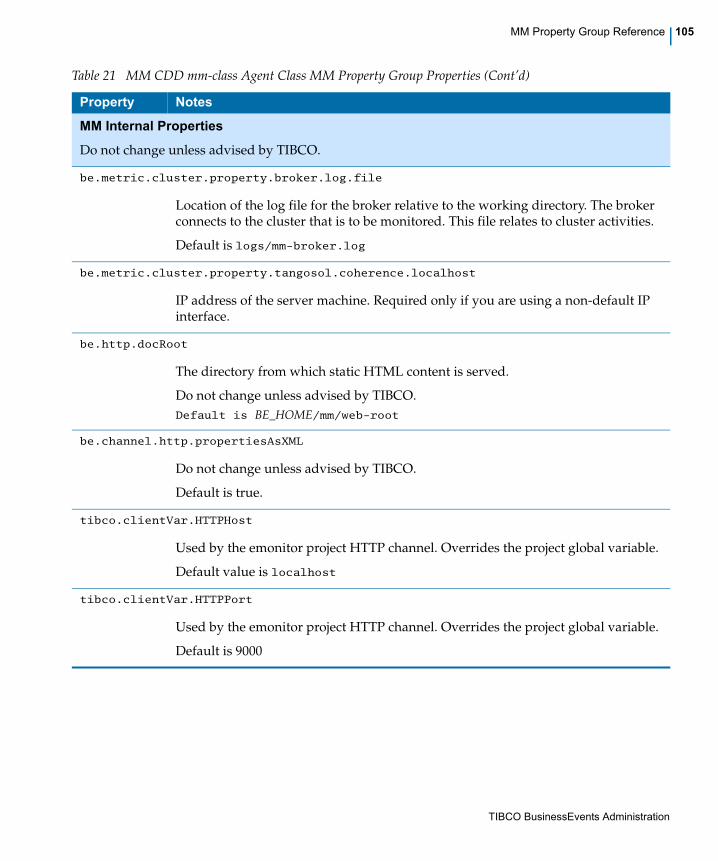
TIBCO BusinessEvents Administration
MM Property Group Reference | 105
MM Internal Properties
Do not change unless advised by TIBCO.
be.metric.cluster.property.broker.log.file
Location of the log file for the broker relative to the working directory. The broker connects to the cluster that is to be monitored. This file relates to cluster activities.
Default is logs/mm-broker.log
be.metric.cluster.property.tangosol.coherence.localhost
IP address of the server machine. Required only if you are using a non-default IP interface.
be.http.docRoot
The directory from which static HTML content is served.
Do not change unless advised by TIBCO.
Default is BE_HOME/mm/web-root
be.channel.http.propertiesAsXML
Do not change unless advised by TIBCO.
Default is true.
tibco.clientVar.HTTPHost
Used by the emonitor project HTTP channel. Overrides the project global variable.
Default value is localhost
tibco.clientVar.HTTPPort
Used by the emonitor project HTTP channel. Overrides the project global variable.
Default is 9000
Table 21 MM CDD mm-class Agent Class MM Property Group Properties (Cont’d)
Property Notes

TIBCO BusinessEvents Administration
106 | Chapter 6 BusinessEvents Monitoring and Management Configuration
Understanding and Configuring Alerts
The MM server can monitor key performance indicators provided in the metric charts and tables, and generate notifications (alerts) when a specified condition is met.
See Panels and Panes on page 139 for some examples of charts and tables.
Understanding Alerts
Alert conditions are met by comparing a specified metric value with a reference value. The reference value can be a constant, or it can be another value in the same pane. As an example of a constant reference, you can configure an alert to trigger when the number of deadlocked threads exceeds a certain number. As an example of a reference that is another value in a pane, you could configure an alert to trigger when Used memory exceeds 95% of Max memory.
Each alert has an alert level (critical, warning, and normal), and a configurable message. Messages use the Java Message Format syntax. You can, as desired, set up three alerts of different severity for the same metric, using different threshold values.
Severity is defined in terms of the following three levels:
• Critical (red bulb icon)
• Warning (yellow bulb icon)
• Normal (green bulb icon)
Alerts are viewable in the System Alerts pane of the Cluster Overview. See Cluster Overview on page 141 for an example.
The presence of alerts can also be used to define the health level value for any monitored entity. See Configuring Health Metric Rules on page 120.
Configuring Alerts
To Configure an Alert
See Alert Configuration Reference on page 108 for more details on the settings referenced in this procedure.
Ensure that condition settings in different alerts do not overlap with each other, so that it is clear which alert to use in all cases.
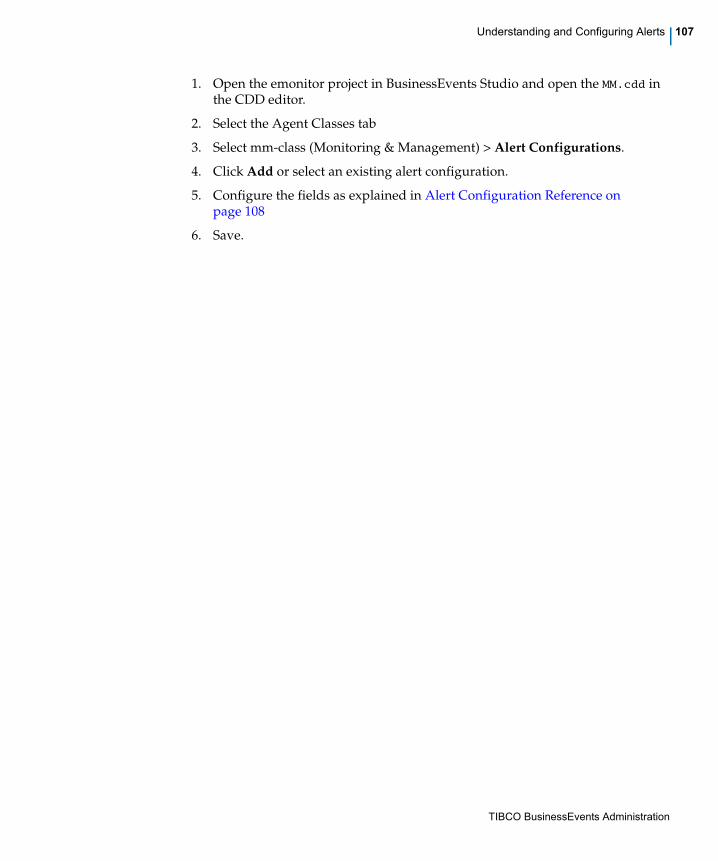
TIBCO BusinessEvents Administration
Understanding and Configuring Alerts | 107
1. Open the emonitor project in BusinessEvents Studio and open the MM.cdd in the CDD editor.
2. Select the Agent Classes tab
3. Select mm-class (Monitoring & Management) > Alert Configurations.
4. Click Add or select an existing alert configuration.
5. Configure the fields as explained in Alert Configuration Reference on page 108
6. Save.

TIBCO BusinessEvents Administration
108 | Chapter 6 BusinessEvents Monitoring and Management Configuration
Alert Configuration Reference
See Understanding and Configuring Alerts on page 106 for the related procedure.
Table 22 MM CDD mm-class Agent Class Alert Configuration
Property Notes
Alert ID
An ID for this alert.
Condition Settings
Ensure that condition settings in different alerts do not overlap with each other, so that it is clear which alert to use in all cases.
Path
Enter the cluster path that defines the scope of this alert. Scope is defined in terms of cluster levels. See Cluster Member Paths on page 115 for details on specifying this value.
Alert Value
A structured path which points to the metric value used for the alert. It can be a series in a chart pane, or a column in a table pane. Elements of the path are as follows:
PaneType/SeriesName/CategoryValue/ValueIndex
See Specifying the Path to an Alert Metric Value (and a Reference Value) on page 110 for details on this setting.
Reference Value
A constant value, or a partial structured path which points to a metric value in the same pane as the metric value specified in the Name field.
The partial path is specified as:
SeriesName/CategoryValue/ValueIndex
It is appended to PaneType part of the path provided in the Name field.
For example, if Name specifies /memory/used
Then Reference might specify max, which is another series name in the pane type memory.

TIBCO BusinessEvents Administration
Alert Configuration Reference | 109
Threshold
Expressed as a percentage. Enter a value between 0 and 100 as desired.
When the value of Name meets or exceeds Threshold percentage of the value of Reference, the alert is triggered.
Projection Properties
Severity
The severity of the alert. Possible values are: critical, warning, and normal.
Message
Message to display when this alert is triggered. The message string can optionally contain variables. For example:
"{0}''s garbage collection time {2} for {1} has crossed 10% of {3}
up time"
See Specifying the Alert Message on page 111 for more details.
Table 22 MM CDD mm-class Agent Class Alert Configuration (Cont’d)
Property Notes

TIBCO BusinessEvents Administration
110 | Chapter 6 BusinessEvents Monitoring and Management Configuration
Specifying the Path to an Alert Metric Value (and a Reference Value)
When you configure an alert, you specify two values to compare, and a threshold:
• The Alert Value This field provides the path to the metric you are interested in being notified about. The path is structured as follows:
PaneType/SeriesName/CategoryValue/ValueIndex
• The Reference Value This field provides a comparison value. It can be a constant (such as a threshold number) or a different metric value on the same pane. Because it is on the same pane, you don’t have to provide the full path. The path for reference is structured as follows
SeriesName/CategoryValue/ValueIndex
The parts of the path shown above are explained in Table 23.
Table 23 Elements Used to Specify the Path to an Alert Metric Value
Path element Notes
Pane Type PaneType/...
The specific pane type for the selected element type. See Table 25, Pane Type Details, on page 113 to find the pane type you want to use.
Series Name PaneType/SeriesName/...
To set an alert on a value in one series of a multi-series chart, specify the series name that appears in the chart in the SeriesName position of the path.
In a table pane or a single series chart pane, use the value $default. For example: gc/$default/*/2"

TIBCO BusinessEvents Administration
Specifying the Path to an Alert Metric Value (and a Reference Value) | 111
Specifying the Alert Message
An alert message can be a simple text string, or it can use parameters. Below are two examples showing parameter-based messages:
"{0}''s garbage collection time {2} for {1} has crossed 10% of {3} up time"
"{0}''s used memory {2} has crossed 95% of {3} max memory at {1,date,short} {1,time,short}"
The message supports the following substitutions (using Java Message Format syntax).
Category Value PaneType/SeriesName/CategoryValue/...
To set an alert on a specific category of information in a chart or table, specify its name in the CategoryValue position of the path.
In a chart, each chart element such as a bar or a line represents a category of information. For example, in the Thread Pool Best Performers chart each thread is a category (shown as a green bar). Use the name that appears for the chart element, or in the tooltip if the full name does not display.
In a table, each row represents a category of information. The value in the first (that is, left-most) column of the row is the name of the category. Use the name of the first column as the category value.
Not used for time-based panes. (See Table 25, Pane Type Details, on page 113 for a listing of which panes are time based.)
To use all category values, you can use an asterisk (*) as a wild card character in the CategoryValue position. For example, "gc/$default/*/2"
If the category value is not found or is defined as "all," then all the categories in the specified series are considered for condition checking.
Value Index ElementTypePath/PaneType/SeriesName/CategoryValue/ValueIndex
A specific item of information in a category.
Only used for tables (not for charts). (See Table 25, Pane Type Details, on page 113 for a listing of which panes use charts and which use tables.)
For tables, use the index of the column from which the value is taken. The first column is ignored. (It is used as the category value). The indexing begins with the second column from the left. The second column index is 0, the third column index is 1, and so on.
Table 23 Elements Used to Specify the Path to an Alert Metric Value
Path element Notes

TIBCO BusinessEvents Administration
112 | Chapter 6 BusinessEvents Monitoring and Management Configuration
Table 24 Alert Message Parameters
Parameter Value
{0} The name of the cluster member that the alert is about.
Specified by the condition/getproperty@path attribute.
{1} The category that the alert is about.
Specified by the PaneType/SeriesName/CategoryValue/... part of the condition/getproperty@name path.
{2} The actual value that is causing the alert to be triggered, as specified in the condition/getproperty@name. See Table 23, Elements Used to Specify the Path to an Alert Metric Value, on page 110.
{3} The reference value, used to calculate whether a metric value is of concern (and the alert is therefore triggered).
Specified by the condition/getproperty@reference attribute.
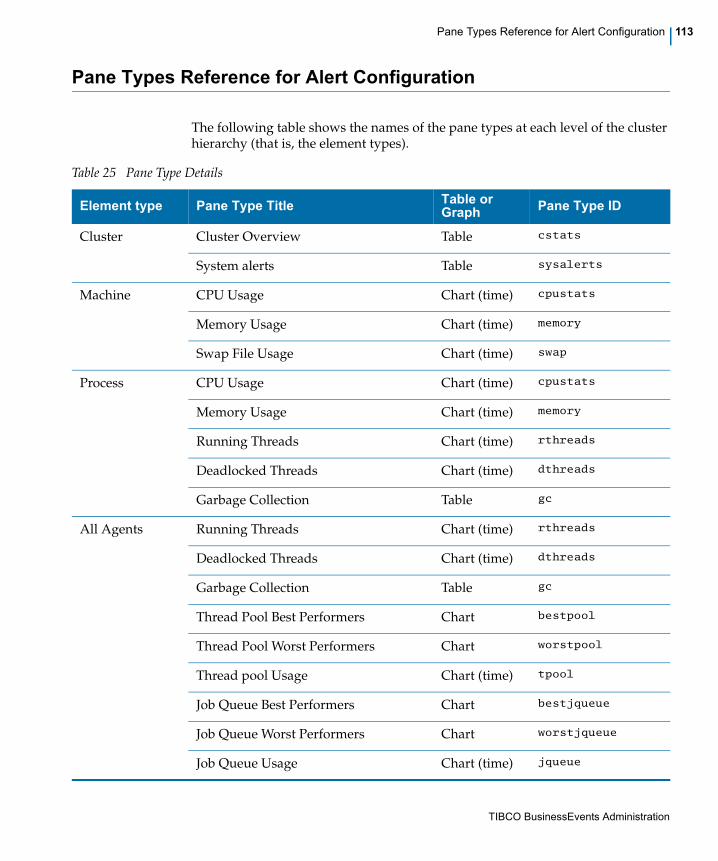
TIBCO BusinessEvents Administration
Pane Types Reference for Alert Configuration | 113
Pane Types Reference for Alert Configuration
The following table shows the names of the pane types at each level of the cluster hierarchy (that is, the element types).
Table 25 Pane Type Details
Element type Pane Type TitleTable or Graph
Pane Type ID
Cluster Cluster Overview Table cstats
System alerts Table sysalerts
Machine CPU Usage Chart (time) cpustats
Memory Usage Chart (time) memory
Swap File Usage Chart (time) swap
Process CPU Usage Chart (time) cpustats
Memory Usage Chart (time) memory
Running Threads Chart (time) rthreads
Deadlocked Threads Chart (time) dthreads
Garbage Collection Table gc
All Agents Running Threads Chart (time) rthreads
Deadlocked Threads Chart (time) dthreads
Garbage Collection Table gc
Thread Pool Best Performers Chart bestpool
Thread Pool Worst Performers Chart worstpool
Thread pool Usage Chart (time) tpool
Job Queue Best Performers Chart bestjqueue
Job Queue Worst Performers Chart worstjqueue
Job Queue Usage Chart (time) jqueue

TIBCO BusinessEvents Administration
114 | Chapter 6 BusinessEvents Monitoring and Management Configuration
Inference Agent Locks Held Chart (time) locks
RTC Statistics Chart (time) rtcstats
Worst Rule Performers Chart worstrules
Best Rule Performers Chart bestrules
Query Agent Entity Count Chart (time) entitystats
Snapshot Query Execution
Query Name, Pending, Accumulated
Table ssqestats
Continuous Query Execution
Query Name, Pending, Accumulated
Table cqestats
Table 25 Pane Type Details (Cont’d)
Element type Pane Type TitleTable or Graph
Pane Type ID

TIBCO BusinessEvents Administration
Understanding Health Metric Rules | 115
Understanding Health Metric Rules
Health metrics are available for cluster members at each level: cluster, machine, process, and agent. The Cluster Overview panel in MM provides a information about the overall health of the cluster, and of each of the cluster members. See Cluster Overview on page 141 for an example.
Health is defined in terms of the following three health levels:
• Critical (red bulb icon)
• Warning (yellow bulb icon)
• Normal (green bulb icon)
The colored bulb icons are currently used only in the overall cluster health metric and in alerts. The use of icons is not configurable.
Health metric thresholds are set in the MM.cdd file, which you edit in BusinessEvents Studio.
Note the following main points:
• You can configure health metrics for none, some, or all types of cluster members as desired.
• When configuring health level thresholds, you don’t have to set thresholds for all three health levels (critical, warning, and normal). Use only the ones that are useful to you.
• When configuring rules for more than one health level for a single member, ensure that the conditions have no overlap, so that it is clear which condition sets the appropriate health level.
Cluster Member Paths
You define the scope of a cluster a metric using a cluster path, for example:
site/cluster/machine/process/inference
A cluster member in this context is a type of cluster node. The path is a hierarchy with specified names for types of cluster node: site, cluster, machine, process. Below the process level, you can specify types of agent:
Path specifying a type of cluster member. Members are specified as follows:
site/cluster
site/cluster/machine
site/cluster/machine/process
site/cluster/machine/process/inference
site/cluster/machine/process/query

TIBCO BusinessEvents Administration
116 | Chapter 6 BusinessEvents Monitoring and Management Configuration
site/cluster/machine/process/cache
site/cluster/machine/process/dashboard
Child Cluster Member Paths
In addition to the above values, when you are constructing a Child Cluster Member path in the Health Metric Rule Configuration panel, you can use a wild card character (*). Specific agent instances cannot be specified.
To reference all agents in the system, use the wildcard character after the process level:
site/cluster/machine/process/*
To reference all agents of a particular type, add the type and then specify the wildcard character:
site/cluster/machine/process/inference/*
Two Types of Thresholds
You can compute health for a cluster member using either of two methods.
Health of Child Cluster Members
One method computes the threshold as a percentage of active (or inactive) specified child cluster members. You can optionally specify that only those child cluster members that are themselves at a certain health level are used when computing the threshold. For example, you could set up a threshold such that the overall cluster health level is set to warning when fifty percent or more agents of any type are at health level "Warning."
Number of Alerts
The other method computes the threshold as a number of alerts of a given severity for the cluster member, during a given time period.
Which Type to Use for Different Cluster Members
In general these are the guidelines for use of these methods:
• Use health of child members to compute overall cluster health and machine level health.
• Use number and frequency of alerts to compute the health of processes and agents.

TIBCO BusinessEvents Administration
Understanding Health Metric Rules | 117
Using Health of Child Members
Thresholds based on the health of child members can use child member health levels or child member activity status (active or inactive), or both. You can also set a threshold value such that the health level of the parent is set only if a minimum percentage of child members satisfies the specified condition.
For example, if you are setting up thresholds for site/cluster/machine, you might select site/cluster/machine/process as the child member type. You might specify that the health level should be set to warning on the machine level if any process unit on that machine has a health level of warning. Or you might set the health level of a machine to critical if any of its process units is inactive.
You can also use different child members when configuring each health level for a parent member, depending on your need.
Using Number and Frequency of Alerts
To define the threshold for a cluster member’s health level using alerts, you define which alert severity level to use, and the frequency of alerts received during a specified time period.
All alerts of a specified severity defined for the cluster member are counted.
MM begins a count after it receives the first alert for the specified cluster member. After the time specified in Range has elapsed, the application counts the number of alerts of the specified severity were received during this period. If the count meets or exceeds the threshold, the health indicator is changed to the specified health level for this rule.
Health Metric Rule Examples
Below are some examples to help you think about the way you want to configure your health metric rules.
Examples Using Child Cluster Member Health Metrics
These examples show how rules can be configured to display a health level indicator on a cluster member based on the health levels its child members.
Note These rules could be set on any parent cluster member of the specified child members. The parent member is not shown in the examples. The scope of the rule is wider for parent members higher in the cluster member hierarchy.
To set the health level to critical if a single inference agent are inactive
• Set Health Level to critical

TIBCO BusinessEvents Administration
118 | Chapter 6 BusinessEvents Monitoring and Management Configuration
• Set Path to site/cluster/machine/process/inference
• Set Threshold to 0
• Add a property called active whose value is false
To set the health level to critical if all agents are inactive
• Set Health Level to critical
• Set Path to site/cluster/machine/process/*
• Set Threshold to 100
• Add a property called active whose value is false
To set the health level to warning if fifty percent of agents are inactive
• Set Health Level to warning.
• Set Path to site/cluster/machine/process/*
• Set Threshold to 50
• Add a property called active whose value is false.
To set the health level to critical if all agents are inactive
• Set Health Level to normal
• Set Path to site/cluster/machine/process/*
• Set Threshold to 100
• Add a property called active whose value is true
To set the health level to warning if thirty percent of inference agents have a
health level of warning
• Set Health Level to warning
• Set Path to site/cluster/machine/process/inference
• Set Threshold to 30
• Add a property called healthLevel whose value is warning

TIBCO BusinessEvents Administration
Understanding Health Metric Rules | 119
Examples Using Alerts
These examples show how rules can be configured to display a health level indicator for a cluster member based on the number of alerts received in a time window. In these examples (unlike the child cluster member examples) the cluster member path is shown. The cluster member path is used in both types of rules but is more relevant to display here.
To Set the health level to warning if one critical alert is received for a cluster
• Set Cluster Member Path to site/cluster
• Set Health Level to warning.
• Set Threshold to 1
• Do not set Range.
• Add a property called severity whose value is critical
To set the health level to warning if 5 or more critical alerts are received
within a window of 5 minutes, for a query agent
• Set Cluster Member Path to site/cluster/process/query
• Set Health Level to warning.
• Set Threshold to 5
• Set Range to 300000
• Add a property called severity whose value is critical

TIBCO BusinessEvents Administration
120 | Chapter 6 BusinessEvents Monitoring and Management Configuration
Configuring Health Metric Rules
Health metric rules have two levels. First you specify the cluster member for which a set of rules will apply. Then you configure the individual rules. You can use either of the following as the basis of the rule:
• A characteristic of the specified member’s child cluster members: either the number that is active or inactive, or their health level.
• The specified cluster member’s number and frequency of alerts at a certain severity.
See Understanding Health Metric Rules on page 115 for more details.
To Set Up a Health Metric Rule
See Health Metric Rule Configuration Reference on page 123 for more details on the settings referenced in this procedure.
1. Open the emonitor project in BusinessEvents Studio and open the MM.cdd in the CDD editor.
2. Select the Agent Classes tab
3. Select mm-class (Monitoring & Management) > Health Metric Rule Configurations.
4. Click Add. You see a configuration panel.
5. In the Cluster Member ID field enter a descriptive name to identify this cluster member.
6. In the Path field, enter a path to identify the cluster member. For example, site/cluster.
7. Click Add. You see fields to define a health metric rule for this cluster member.
8. You can configure health metric rules in two ways. See Two Types of Thresholds on page 116 for advice on which method to use. Go to one of the
Put the most severe health level first Within each clustermember element, the MM server examines the setproperty element that is closest to the top of the file first. When a health metric threshold for a cluster member is met, the application stops and does not process additional thresholds for that member. If you are configuring all three levels, you would put critical first, then warning, and finally normal.

TIBCO BusinessEvents Administration
Configuring Health Metric Rules | 121
following procedures to continue, depending on how you want to configure this rule:
— To Configure a Health Metric Rule Using Child Member Health Status on page 121
— To Configure a Health Metric Using Cluster Member Alerts on page 121
To Configure a Health Metric Rule Using Child Member Health Status
This procedure flows from the procedure To Set Up a Health Metric Rule on page 120. See Health Metric Rule Configuration Reference on page 123 for more details on the properties referenced in this procedure.
1. In the Health Metric Rule ID field, enter a descriptive name to identify this rule.
2. In the Health Level field, select the health level that this rule will indicate.
3. In the Condition Type field, select Child Cluster Member.
4. In the Path field, enter the cluster path of the child cluster member you want to use to compute this health level metric. For example, in computing cluster health you might specify cluster/machine, and for machine health, you might specify cluster/machine/process.
5. In the Threshold field enter the threshold percentage. If the percentage of child cluster members that match the criteria specified meets or exceeds this threshold, then the health level of the parent cluster member is set to the Health Level field value.
6. In the Properties sheet add one or both of the following properties to set the criteria for counting child members:
— To use the number of active or inactive child members, add a property called active. Set the value to false to count only inactive members. Set the value to true to count only active members.
— To use the number of child members at a certain health level, add a property called healthLevel and set the value to one of critical, warning, or normal.
7. Repeat this procedure to configure this cluster member’s thresholds for remaining health levels (critical, warning, or normal), as desired.
To Configure a Health Metric Using Cluster Member Alerts
This procedure flows from the procedure To Set Up a Health Metric Rule on page 120. See Health Metric Rule Configuration Reference on page 123 for more details on the properties referenced in this procedure.

TIBCO BusinessEvents Administration
122 | Chapter 6 BusinessEvents Monitoring and Management Configuration
1. In the Health Metric Rule ID field, enter a descriptive name to identify this rule.
2. In the Health Level field, select the health level that this rule will indicate.
3. In the Condition Type field, select Notification.
4. In the Range field enter a time period in milliseconds. Or enter 0 to specify no time period. If the Threshold number of alerts (of the severity value) is received in the Range period, the health metric is set to the Health Level value. If you specify zero (0) then the health level is changed after receiving the Threshold number without regard to any time window.
5. In the Threshold field enter the threshold number of alerts.
6. In the Properties sheet add a property called severity. As the value specify one of critical, warning, or normal.

TIBCO BusinessEvents Administration
Health Metric Rule Configuration Reference | 123
Health Metric Rule Configuration Reference
See Configuring Health Metric Rules on page 120 for the related procedure.
Table 26 MM CDD mm-class Agent Class Health Metric Rule Configuration
Property Notes
Cluster Member Settings
A cluster member is a level in the cluster member hierarchy. It can be set to the entire cluster, a machine, or a process.
Cluster Member ID
Provide an ID for this cluster member.
Path
Path that defines the scope of this metric. Scope is defined in terms of cluster levels. See Cluster Member Paths on page 115 for details on specifying this value.
Specify a cluster member only once, then specify all the health metric rules for that member in one set.
Health Metric Rule Configuration Settings
For each cluster member you add, you define one or more health metric rules.
Health Metric Rule ID
ID for this health metric rule configuration.
Health Level
From the drop-down list, select one of the following health levels: critical, warning, or normal.
For each cluster member, you can define up to three rules, one for each health level.

TIBCO BusinessEvents Administration
124 | Chapter 6 BusinessEvents Monitoring and Management Configuration
Condition Type
Select the condition type used to compute the cluster member’s health value:
Child Cluster Member Computes the threshold using the health level of specified child cluster members.
Notification Computes the threshold as a number of alerts of a specified severity for the cluster member, during a given time period.
See Two Types of Thresholds on page 116 for more details on this choice.
Path
This field appears if you choose Child Cluster Member in the Condition Type field. Enter the cluster path that defines which child cluster members to use in computing this health metric. For example, in computing cluster health you might specify cluster/machine, and for machine health, you might specify cluster/machine/process.
See Cluster Member Paths on page 115 for more on defining paths.
You can use any child of the cluster member specified in the Cluster Member ID field of the cluster member node. It doesn’t have to be an immediate child, and it doesn’t have to be the same child member in rules you configure for the other health levels for this cluster member.
In addition, you must do the following to complete configuration:
• In the Properties sheet add a property called active and set it to true or false. This defines whether the active or inactive state of the cluster members specified in this path is used in computing the status.
• Optionally, add a property called healthLevel and set it to normal, warning, or critical. When you do this, the Threshold percentage applies only to those specified child members whose health level matches this setting (and that are active or inactive as specified in the active property).
• In the Threshold field specify a percentage.
The health level rule is defined as a percentage (as defined in the Threshold field) of all child cluster members of the specified type that are active or inactive (as specified in the active property) and optionally: that are at the specified health level.
Table 26 MM CDD mm-class Agent Class Health Metric Rule Configuration (Cont’d)
Property Notes

TIBCO BusinessEvents Administration
Health Metric Rule Configuration Reference | 125
Range
This field appears if you choose Notification in the Condition Type field. Enter the number of milliseconds to be used as a range. The Threshold count is reset at the end of each range period.
Threshold
When used for a Child Cluster Members Condition Type Defines a percentage. Enter a value between 0 and 100 as desired. When the number of child cluster members that satisfy the rule criteria meets or exceeds the percentage, the health indicator specified for the health level specified in this rule displays.
When used for a Notification Condition Type Defines a number of alerts. When the number of alerts notification/property@severity alerts for the enclosing clustermember meets or exceeds this value, within the time period specified in the range setting, the health indicator specified for the health level specified in this rule displays. Note If either the Threshold or Range settings is not defined, then a single alert for the cluster member causes the health indicator to change.
Health Metric Rule Configuration Properties
The active and health level properties are used only when computing the health level using child cluster members. You can use both active and healthlevel properties in one rule, although there may be few use cases for using both properties.
active
Used only when the Condition Type is set to Child Cluster Members.
If set to true, then the health metric calculations use only the specified child members that are active.
If set to false, then the health metric calculations use only the specified child members that are inactive.
healthLevel
Used only when the Condition Type is set to Child Cluster Members.
If set, then the health metric calculations use only the specified child members whose health level is as specified in this property.
Table 26 MM CDD mm-class Agent Class Health Metric Rule Configuration (Cont’d)
Property Notes

TIBCO BusinessEvents Administration
126 | Chapter 6 BusinessEvents Monitoring and Management Configuration
severity
Used only when the Condition Type is set to Notification.
Set to the alert severity that you want to use for the health metric rule calculation.
Table 26 MM CDD mm-class Agent Class Health Metric Rule Configuration (Cont’d)
Property Notes

TIBCO BusinessEvents Administration
Configuring Actions | 127
Configuring Actions
The MM server can perform actions when alerts are triggered or when health level indicators change. Actions taken can be either execution of a command or sending an email.
Commands are executed on the machine or machines where the trigger condition occurred.
To Configure an Action
See Action Configuration Reference on page 128 for more details on the settings referenced in this procedure.
1. Open the emonitor project in BusinessEvents Studio and open the MM.cdd in the CDD editor.
2. Select the Agent Classes tab
3. Select mm-class (Monitoring & Management) > Action Configurations.
4. Click Add or select an existing action configuration.
5. Configure the fields as explained in Action Configuration Reference on page 128
6. Save.

TIBCO BusinessEvents Administration
128 | Chapter 6 BusinessEvents Monitoring and Management Configuration
Action Configuration Reference
See Configuring Actions on page 127 for the related procedure.
Table 27 MM CDD mm-class Agent Class Action Configuration
Property Notes
Action ID
An ID for this action.
Trigger Condition
Trigger Condition
Select the type of condition that triggers this action:
Health Level A specified health level of the specified cluster members.
Alert An alert of a specified severity raised on any of the specified cluster members.
Path
Enter a cluster path. This path defines the cluster members whose health level or alerts trigger this action. See Cluster Member Paths on page 115 for details on specifying this value.
Severity or Health Level
If you choose Alert as the trigger condition, in this field specify the alert severity that will trigger the action.
If you choose Health Level as the trigger condition, in this field specify the health level that will trigger the action.
In both cases the possible values are: critical, warning, and normal.

TIBCO BusinessEvents Administration
Action Configuration Reference | 129
Action Settings
Action
Choose a value from the drop-down list:
Execute Command: If you choose this option, enter the command in the Command field.
Send Email: If you choose this option configure the email message in the fields that appear.
Note If you choose Send Email then you must also configure the email properties in the mm-class agent properties. See Configuring MM Settings in the MM CDD File on page 100.
Command
If you choose Execute Command in the Action field, enter a command that is executed when the action is triggered. You can specify a shell script or batch.
In this release, commands are executed on the BEMM server machine.
To, Cc, Subject, Message fields
Complete the email fields to define the message that is sent when the action is triggered. See the note in the Action field.
Table 27 MM CDD mm-class Agent Class Action Configuration (Cont’d)
Property Notes
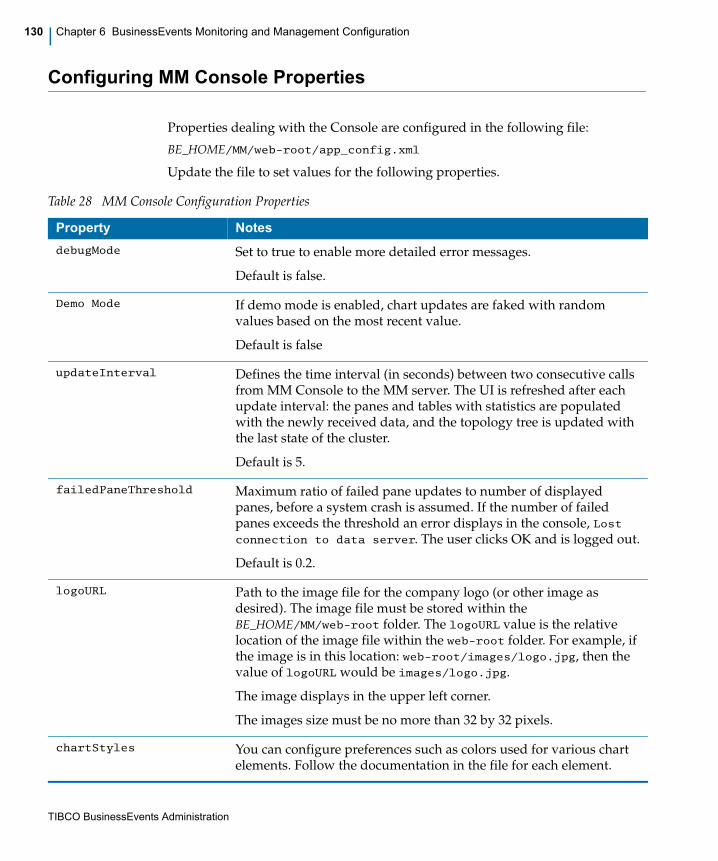
TIBCO BusinessEvents Administration
130 | Chapter 6 BusinessEvents Monitoring and Management Configuration
Configuring MM Console Properties
Properties dealing with the Console are configured in the following file:
BE_HOME/MM/web-root/app_config.xml
Update the file to set values for the following properties.
Table 28 MM Console Configuration Properties
Property Notes
debugMode Set to true to enable more detailed error messages.
Default is false.
Demo Mode If demo mode is enabled, chart updates are faked with random values based on the most recent value.
Default is false
updateInterval Defines the time interval (in seconds) between two consecutive calls from MM Console to the MM server. The UI is refreshed after each update interval: the panes and tables with statistics are populated with the newly received data, and the topology tree is updated with the last state of the cluster.
Default is 5.
failedPaneThreshold Maximum ratio of failed pane updates to number of displayed panes, before a system crash is assumed. If the number of failed panes exceeds the threshold an error displays in the console, Lost connection to data server. The user clicks OK and is logged out.
Default is 0.2.
logoURL Path to the image file for the company logo (or other image as desired). The image file must be stored within the BE_HOME/MM/web-root folder. The logoURL value is the relative location of the image file within the web-root folder. For example, if the image is in this location: web-root/images/logo.jpg, then the value of logoURL would be images/logo.jpg.
The image displays in the upper left corner.
The images size must be no more than 32 by 32 pixels.
chartStyles You can configure preferences such as colors used for various chart elements. Follow the documentation in the file for each element.
TIBCO BusinessEvents Administration
| 131
Chapter 7 Monitoring a BusinessEvents Cluster
This chapter explains how you can monitor the health of a BusinessEvents deployment using the BusinessEvents Monitoring and Management (MM) component and manage the deployment accordingly.
Before you can use the Monitoring and Management component, you must do some configuration, including configuration of health level thresholds, alerts, and actions. See Chapter 6, BusinessEvents Monitoring and Management Configuration, on page 91 for details.
Topics
• Overview of BusinessEvents Monitoring and Management, page 132
• Starting MM Management Server and Using MM Console, page 134
• Cluster Explorer, page 136
• Panels and Panes, page 139
• Cluster Overview, page 141
• Machine Overview, page 143
• Process Overview, page 144
• Agent Overview, page 146
• Inference Agent Overview, page 149
• Query Agent Overview, page 150
• Ontology (Cache Objects) Overview, page 151

TIBCO BusinessEvents Administration
132 | Chapter 7 Monitoring a BusinessEvents Cluster
Overview of BusinessEvents Monitoring and Management
All BusinessEvents cluster members — agents, JVMs (processing units) and machines — generate system metrics. They are made available over the network for use by the Monitoring and Management (MM) web-based user interface.
After the Monitoring and Management component is configured (as explained in Chapter 6, BusinessEvents Monitoring and Management Configuration, on page 91), you start the MM engine (which is a BusinessEvents application). You can then connect to the MM server using MM Console, a browser-based UI. Using MM Console, you can examine all aspects of the cluster, including objects in the cache.
At each level of the cluster hierarchy, various panes display metrics relating to that level graphically. You can rearrange and remove panes, and promote panes of special interest to the cluster overview to create a custom dashboard.
Reference to the Metrics
For each level of the cluster hierarchy, various metrics are provided using charts and tables. Later sections in this chapter provide a reference to the metrics available at each level.
The charts and tables appear in different panes on the panel or panels (tabs) relating to one level of the cluster hierarchy.
The agent level can have two panels. One shows the same information for all types of agents. For inference and query agents, a second panel shows information specific to the agent type. Cache agents do not have a second panel.
Note the following:
Charting Period All charts display data for the previous ten minutes (or less if, for example MM or a JVM has been running less than ten minutes).
Updates Monitoring and Management polls for updates and refreshes the display periodically. The interval is configurable. See the updateInterval property in Configuring MM Console Properties on page 130.
BusinessEvents Monitoring and Management features are available when Cache Manager (cache-based OM) is used. They are not available for in-memory or persistence OM types.

TIBCO BusinessEvents Administration
Overview of BusinessEvents Monitoring and Management | 133
Health Indicators and Alerts
You can configure health indictor thresholds that define whether a value indicates normal functioning, a potential problem (warning), or a critical situation.
You can also configure alerts to bring specific problem situations to the attention of system users.
These health indicators and alerts are shown in the Cluster Overview, providing a dashboard where you can read the health of the entire cluster at a glance.
See Chapter 6, BusinessEvents Monitoring and Management Configuration, on page 91 for configuration details

TIBCO BusinessEvents Administration
134 | Chapter 7 Monitoring a BusinessEvents Cluster
Starting MM Management Server and Using MM Console
After you have completed all the configuration steps explained in BusinessEvents Monitoring and Management Configuration, page 91, and you are ready to use MM, follow the instructions in this section.
To Start MM Management Server
1. Start the agents in the cluster to be monitored in the usual way.
2. Start MM Management Server: At a command prompt, navigate to BE_HOME/mm/bin, and type:
be-mm.exe -c MM.cdd -u default -n mm MM.ear
Type be-mm.exe /help to view usage information.
To Start MM Console
After the Monitoring and Management Server has started, users can log on to MM Console.
1. In a web browser, enter the URL for the console. By default the URL is:
http://localhost:9000/index.html
The hostname and port are configured in the MM.cdd. See MM Internal Properties on page 105 (tibco.clientVar.HTTPPort and tibco.clientVar.HTTPHost).
2. Log in using the user credentials that were configured in the authentication file or other authentication mechanism you configured for BusinessEvents. As shipped, the default credentials are admin/admin.
See Chapter 11, Configuring User Authentication, page 189
You see Cluster Explorer in the left panel, and the Cluster Overview on the right.
The machine running MM must be able to access the monitored cluster through the network. It must be in the same network or have access to the network using multicast.

TIBCO BusinessEvents Administration
Starting MM Management Server and Using MM Console | 135
When the connection to the MM server is lost, all panel contents are grayed out and an error message displays:
ERROR Lost connection to data server. Once the server has come back
online you may login again. [OK]
See Configuring MM Console Properties on page 130 for details about the property, failedPaneThreshold. It determines the maximum ratio of failed pane updates to number of displayed panes before a system failure is assumed.

TIBCO BusinessEvents Administration
136 | Chapter 7 Monitoring a BusinessEvents Cluster
Cluster Explorer
Active and inactive nodes are shown in Cluster Explorer for a quick view of system health.
The Cluster Explorer figure above shows the hierarchy of cluster members. Inactive agents are dimmed.
The structure of the cluster member hierarchy is as follows:
Site
Cluster
Machine (host name)Process (Processing Unit or Deployment Unit or JVM process ID)
Agent (inference agent, query agent, or cache agent, dashboard agent, or mm agent))
Cache Objects
Where:
• Site is the root and has no other purpose in this release.
• Cluster shows the name of the cluster being monitored.
• Machine shows one or more machines within the cluster. They run the cluster processes (process units or engines).
• Process shows each of the JVM processes (BusinessEvents engines) running on a machine. The label for a process that was predefined in the topology file is the process unit ID assigned in the file, concatenated with the process ID enclosed in parentheses. The label for an unpredefined process is the JVM process ID.
• Agent lists all agents of each type running in the JVM process.

TIBCO BusinessEvents Administration
Cluster Explorer | 137
• The Cache Objects panel shows all the objects stored in the cache, without regard to their physical location in the BusinessEvents cluster.
Machines, BusinessEvents engines, and agents are all members of the BusinessEvents cluster.
Inactive Members
Part of cluster health is checking to see that all members are running. When a member becomes inactive, Cluster Explorer and other parts of the MM Console displays a visual indicator.
How Inactive Members Display
In Cluster Explorer, the icons for inactive members display in a dimmed state.
If a machine is inactive, processes and agents on that machine are also marked as inactive. Similarly, if a process is inactive, agents running in that process are also marked as inactive.
When a cluster member is inactive, you can still view the last available data in the panel for that member, but overlaid with a gray panel with the label: "Entity Inactive".
When a cluster member is inactive, and a pane relating to that member has been promoted to the Cluster Overview panel, the pane displays in gray with a message:
The difference in the display inactive member’s promoted pane alerts you to the fact that the member is inactive.

TIBCO BusinessEvents Administration
138 | Chapter 7 Monitoring a BusinessEvents Cluster
How Inactivity is Determined
Inactivity is determined by the unsuccessful return of a health ping. Health pings are set up for machines and processes only. Process pings use JMX. Machine pings use TIBCO Hawk. If TIBCO Hawk is not available, cluster health status is determined using the health status of the processes (BusinessEvents engines) running on each machine.
The property that controls the frequency of the health check ping is tibco.clientVar.healthCheckFreq. See MM Property Group Reference on page 101 for details.
Working with Cluster Explorer
You can do any of the following:
• Expand Cluster Explorer and select the member whose metrics you want to see. Metrics display on the right.
• Click an inactive cluster member to display the last available health metrics for that member.
• Click Purge Inactive to remove inactive members from the explorer. This will only remove unpredefined members that are inactive.
• Click the minimize button in the Cluster Explorer title bar to minimize the explorer pane.
You can also configure health thresholds and alerts at any level of the cluster hierarchy. See Chapter 6, BusinessEvents Monitoring and Management Configuration, on page 91 for all configuration options

TIBCO BusinessEvents Administration
Panels and Panes | 139
Panels and Panes
The figure below shows the Cluster Overview panel (also called a tab) with three panes promoted from a lower level display (as explained below). One of the promoted panes indicates an agent is inactive.
Working with MM Metric Panes
When you navigate to different levels of the cluster hierarchy using Cluster Explorer, appropriate sets of panes display. To learn more about the metrics in the panes, see Reference to the Metrics on page 132.
This section explains how to use the controls in a pane’s button bar. This information applies to panes in general, not just those that display in the cluster overview.
• To enlarge a pane, click the Expand button in the title bar of the pane.

TIBCO BusinessEvents Administration
140 | Chapter 7 Monitoring a BusinessEvents Cluster
• To promote a pane to the Cluster Overview panel (tab), click the Promote button in the title bar of the pane. In this way you can create a custom dashboard. (The pane continues to display in its original location also.)
• To remove a promoted pane from the Cluster Overview tab, click the Demote button.
• To remove a pane from a tab, click the Remove button in the title bar of the pane. The pane is hidden in the Metric Gallery. The Metric Gallery appears as a bar you can click to open:
• To restore a removed pane, click the Metric Gallery bar in the appropriate tab and click Restore Metric. (Not available on the cluster overview tab.)

TIBCO BusinessEvents Administration
Cluster Overview | 141
Cluster Overview
Cluster Overview Pane
The Cluster Overview displays summary information about the health of the cluster.
The overall cluster health is shown in one indicator using the red, yellow, or green icon.
Various other metrics display for each type of item in the cluster: machines, processes, and each type of agent. See Table 29, Cluster-Level Metrics.
Thresholds for normal, warning, and critical health metrics are configurable. See Configuring Health Metric Rules on page 120.
Table 29 Cluster-Level Metrics
Metric Notes
Total Total number of cluster members of this type (machines, processes, agents).
Active Total number of active cluster members.
Inactive Total number of inactive cluster members.
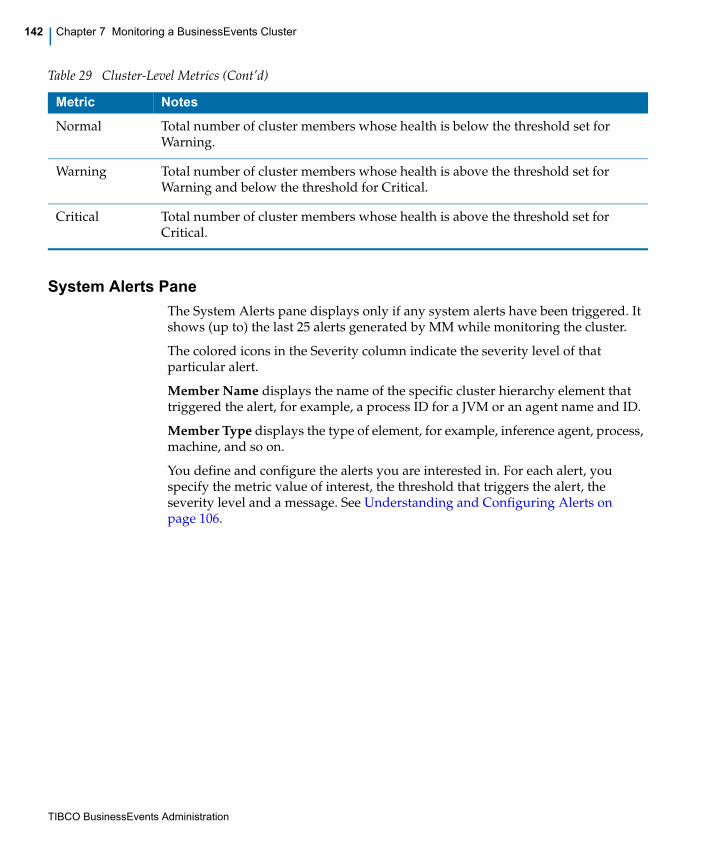
TIBCO BusinessEvents Administration
142 | Chapter 7 Monitoring a BusinessEvents Cluster
System Alerts Pane
The System Alerts pane displays only if any system alerts have been triggered. It shows (up to) the last 25 alerts generated by MM while monitoring the cluster.
The colored icons in the Severity column indicate the severity level of that particular alert.
Member Name displays the name of the specific cluster hierarchy element that triggered the alert, for example, a process ID for a JVM or an agent name and ID.
Member Type displays the type of element, for example, inference agent, process, machine, and so on.
You define and configure the alerts you are interested in. For each alert, you specify the metric value of interest, the threshold that triggers the alert, the severity level and a message. See Understanding and Configuring Alerts on page 106.
Normal Total number of cluster members whose health is below the threshold set for Warning.
Warning Total number of cluster members whose health is above the threshold set for Warning and below the threshold for Critical.
Critical Total number of cluster members whose health is above the threshold set for Critical.
Table 29 Cluster-Level Metrics (Cont’d)
Metric Notes

TIBCO BusinessEvents Administration
Machine Overview | 143
Machine Overview
The Metric Gallery (shown as a gray bar above the panes) holds any panes you remove from the panel to keep your display uncluttered. See Panels and Panes on page 139 for details. Machine level metrics shown are as follows:
Machine level metrics are visible only if a TIBCO Hawk domain has been configured. See Install and Configure TIBCO Hawk for Machine Level Metrics on page 95
Table 30 Machine-Level Metrics
Metric Notes
CPU Usage CPU usage, as a percentage, over time.
Memory Usage
Available memory, in megabytes, over time.
Swap File Usage
Available swap file (page file) usage, in megabytes, over time.

TIBCO BusinessEvents Administration
144 | Chapter 7 Monitoring a BusinessEvents Cluster
Process Overview
Process-level metrics show information at the JVM level, that is at the BusinessEvents engine level. Metrics shown are as follows:
Table 31 Process- Level Metrics
Metric Notes
CPU Usage Percentage of CPU used by this process.
Memory Usage
Max, Committed, and Used memory, in megabytes.
Deadlocked Threads
The number of deadlocked threads in the process.
Running Threads
The number of threads in the process, including system threads.

TIBCO BusinessEvents Administration
Process Overview | 145
Garbage Collection
For each garbage collector running in the process, metrics shown are:
• The total up time of the process
• The number of objects garbage collected
• The cumulative time spent in garbage collection overall.
Table 31 Process- Level Metrics
Metric Notes

TIBCO BusinessEvents Administration
146 | Chapter 7 Monitoring a BusinessEvents Cluster
Agent Overview
The panel common to all agent types shows the agent overview:
Note that the Running Threads, Deadlocked Threads, and Garbage Collection are process-level metrics, shown here to provide a convenient overall view.

TIBCO BusinessEvents Administration
Agent Overview | 147
Table 32 Agent Overview (Common) Metrics
Metric Notes
Running Threads
The number of threads in the process, including system threads.
Deadlocked Threads
The number of deadlocked threads in the process.
Garbage Collection
For each garbage collector running in the process, metrics shown are:
• The total up time of the process
• The number of objects garbage collected
• The cumulative time spent in garbage collection overall.
Thread Pool Best Performers
The BusinessEvents-specific thread pools in the agent, sorted by number of active threads. The fewer running threads in a pool, the better its performance.
(If there are only a few thread pools running in an agent, the best and worst performer charts are a mirror image of each other.)
Thread Pool Worst Performers
The BusinessEvents-specific thread pools in the agent, sorted by number of active threads. The more running threads in a pool, the worse its performance.
(If there are only a few thread pools running in an agent, the best and worst performer charts are a mirror image of each other.)
Thread Pool Usage
Each line represents one thread pool. Usage is in terms of the number of threads in use in each pool. The pane shows a trend of the number of busy (used) threads over time. Four default threads are:
$default.be.mt$: The general thread pool controlled by the property com.tibco.cep.runtime.scheduler.default.numThreads
CacheCluster handles the Agent and other Cache membership and other properties.
CommonScheduledWorkManager: Any Scheduler created with a single thread uses this default thread pool.
CommonWorkManager: Any WorkManager created with a single thread uses this default thread pool.

TIBCO BusinessEvents Administration
148 | Chapter 7 Monitoring a BusinessEvents Cluster
Job Queue Best Performers
The best performing BusinessEvents-specific job queues. Job queue performance is based on how many jobs are pending in the queue. The fewer the number of pending jobs, the better the performance of the queue.
(If there are only a few job queues, the best and worst performer charts are a mirror image of each other.)
Job Queue Worst Performers
The worst performing BusinessEvents-specific job queues. Job queue performance is based on how many jobs are pending in the queue. The larger the number of pending jobs, the worse the performance of the queue.
(If there are only a few job queues, the best and worst performer charts are a mirror image of each other.)
Job Queue Usage
The count of active jobs in the BusinessEvents-specific job queues.
Table 32 Agent Overview (Common) Metrics (Cont’d)
Metric Notes

TIBCO BusinessEvents Administration
Inference Agent Overview | 149
Inference Agent Overview
Shown for inference agents only, the Inference Agent Overview panel shows the following metrics:
Table 33 Inference Agent Metrics
Metric Notes
Locks Held The number of locks held by the agent.
RTC Statistics RTC performance in terms of latency and throughput:
• Latency shows the average time to complete an RTC.
• Throughput shows the number of RTCs completed.
Worst Rule Performers
Rules sorted by average execution time. The longer the execution time, the worse the rule performance.
Best Rule Performers
Rules sorted by average execution time. The shorter the execution time, the better the rule performance.

TIBCO BusinessEvents Administration
150 | Chapter 7 Monitoring a BusinessEvents Cluster
Query Agent Overview
Shown for query agents only, the Query Agent Overview panel shows the following metrics:
Table 34 Query Agent Metrics
Metric Notes
Entity Counts The number of entities in the query agent local cache:
• Local Cache Entity Count: shows the number of entities in the query agent local cache.
• Incoming Entity Count: shows the number of entities arriving into the local cache
Continuous Query Execution
Shows metrics for the first ten continuous queries to be registered (only the first ten are shown, for performance reasons):
• Pending: shows the number of cluster messages received by the query that are pending processing.
• Accumulated: shows the number of real-time cache changes that are pending while the query is still processing continuous query messages.
Snapshot Query Execution
Shows metrics for the first ten snapshot queries to be registered (only the first ten are shown, for performance reasons):
• Pending: shows the number of cluster messages received by the query that are pending processing.
• Accumulated: shows the number of real-time cache changes that are pending while the query is still processing continuous query messages.

TIBCO BusinessEvents Administration
Ontology (Cache Objects) Overview | 151
Ontology (Cache Objects) Overview
The Ontology Overview panel has one large pane, the Cache Objects pane. It shows a list of all the objects currently in the cache. Click the column headers to sort the display. You can use a multiple column sort. The primary sort column displays a number 1, and the arrow indicates the sort order. The secondary sort column displays a number 2 and so on.
The following attributes are shown for each object:
Table 35 Cache Objects Metrics
Metric Notes
Name The class name of the object.
Count The number of instances of the object in the cache.
Gets The number of read operations done on the object.

TIBCO BusinessEvents Administration
152 | Chapter 7 Monitoring a BusinessEvents Cluster
Puts The number of write operations done on the object.
Get Time The average time for a read operation.
Put Time The average time for a write operation.
Hit Ratio The ratio of 'hits' versus 'misses,' where 'hit is defined as a 'read' for an object existing in the cache
Max The maximum number of object instances that can be stored in the cache. This value is specified in the coherence properties.
Min The number of units to which the cache will shrink when it prunes. This is sometimes referred to as a "low water mark" of the cache.
Expiry Delay The time-to-live in milliseconds for cached object instances. This value is specified in the coherence properties.
Table 35 Cache Objects Metrics (Cont’d)
Metric Notes

TIBCO BusinessEvents Administration
| 153
Chapter 8 Deploying a TIBCO BusinessEvents Project
This chapter explains how to deploy using TIBCO Administrator and at the command line.
Deployment is also available using BusinessEvents Monitoring and Management.
Topics
• Deployment Overview, page 154
• Starting a BusinessEvents Engine at the Command Line, page 155
• Deployment in a TIBCO Administrator Domain, page 158
• TIBCO Hawk Application Management Interface, page 163

TIBCO BusinessEvents Administration
154 | Chapter 8 Deploying a TIBCO BusinessEvents Project
Deployment Overview
An EAR file deploys as one BusinessEvents processing unit. A processing unit can contain one or more inference agents, or one or more query agents, or both, or it can be deployed as a cache agent.
Before you can deploy, you must build the EAR file. See Building an Enterprise Archive (EAR) in TIBCO BusinessEvents Developer’s Guide.
When you deploy an EAR, you specify the CDD that contains the configuration settings for the processing unit, and you specify which processing unit class to deploy.
You can deploy in these ways:
• At the command-line. See Starting a BusinessEvents Engine at the Command Line on page 155.
• Using BusinessEvents Monitoring and Management options.
• To a TIBCO Administrator domain. See , Deployment in a TIBCO Administrator Domain, on page 158.
Hot Deployment
You can configure your BusinessEvents engine to allow you to replace the EAR file without shutting down the engine. This is known as a hot deployment. See Hot Deployment on page 165.
For details about deploying BusinessEvents Decision Manager classes (implemented virtual rule functions) see TIBCO BusinessEvents Decision Manager User’s Guide.
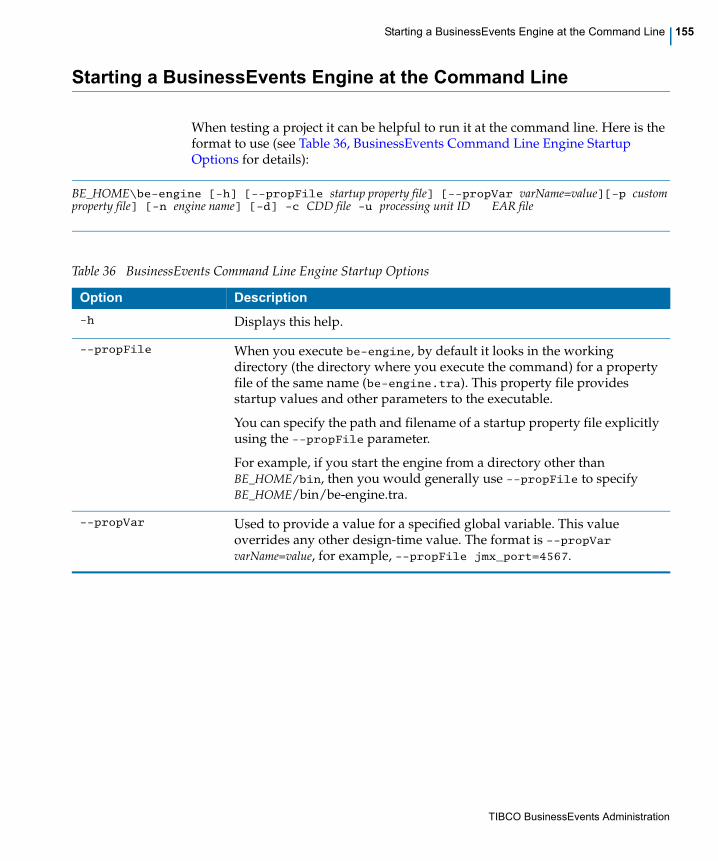
TIBCO BusinessEvents Administration
Starting a BusinessEvents Engine at the Command Line | 155
Starting a BusinessEvents Engine at the Command Line
When testing a project it can be helpful to run it at the command line. Here is the format to use (see Table 36, BusinessEvents Command Line Engine Startup Options for details):
BE_HOME\be-engine [-h] [--propFile startup property file] [--propVar varName=value][-p custom property file] [-n engine name] [-d] -c CDD file -u processing unit ID EAR file
Table 36 BusinessEvents Command Line Engine Startup Options
Option Description
-h Displays this help.
--propFile When you execute be-engine, by default it looks in the working directory (the directory where you execute the command) for a property file of the same name (be-engine.tra). This property file provides startup values and other parameters to the executable.
You can specify the path and filename of a startup property file explicitly using the --propFile parameter.
For example, if you start the engine from a directory other than BE_HOME/bin, then you would generally use --propFile to specify BE_HOME/bin/be-engine.tra.
--propVar Used to provide a value for a specified global variable. This value overrides any other design-time value. The format is --propVar varName=value, for example, --propFile jmx_port=4567.

TIBCO BusinessEvents Administration
156 | Chapter 8 Deploying a TIBCO BusinessEvents Project
-p Allows you to pass one or more supplementary property files to be-engine. Specify the path and filename.
Supplementary property files can be used in addition to be-engine.tra (or alternate file you specified using --propFile).
Supplementary property files typically have a .cfg or .tra extension. Properties are defined as a list of name-value pairs (property=value).
Values in supplementary property files override the values in the startup property file. Values provided at the command line override values in the supplementary property files.
For example, you can override values of global variables in a property file.
If you specify multiple property files that include different values for the same parameters, BusinessEvents uses the value in the left-most file in the command line. For example, consider this command line:
be-engine -p first.cfg -p second.cfg -p third.cfg
If second.cfg and third.cfg set different values for (as an example) tibco.clientVar.BUILDEAR, and first.cfg does not include this parameter, BusinessEvents uses the value in second.cfg. However, if first.cfg also includes a value for tibco.clientVar.BUILDEAR, BusinessEvents uses the value in first.cfg.
Note: If a property name includes spaces, escape them using a back slash.
-n Allows you to provide an alternate name for the BusinessEvents engine.
The name provided here is used in the console and in log files. If you do not provide a name, the host name of the machine is used.
-d Starts the debugger service on the engine for remote debugging.
-c Specify the path and filename for the cluster deployment descriptor (CDD) file you want to use.
BusinessEvents looks first in the file system, and then in the EAR file.
The default is default.cdd.
-u Specify the processing unit ID you want to use for this engine. This ID must exist in the CDD file you reference in the -c option.
The default is default.
Table 36 BusinessEvents Command Line Engine Startup Options (Cont’d)
Option Description

TIBCO BusinessEvents Administration
Starting a BusinessEvents Engine at the Command Line | 157
EAR filename and path Required. Specify the path and filename for the EAR file you want to use.
Table 36 BusinessEvents Command Line Engine Startup Options (Cont’d)
Option Description

TIBCO BusinessEvents Administration
158 | Chapter 8 Deploying a TIBCO BusinessEvents Project
Deployment in a TIBCO Administrator Domain
You can use TIBCO Administrator for deploying and undeploying, starting and stopping BusinessEvents servers, and for setting deploy-time properties.
Within an EAR file, a BAR file contains the compiled agent files. The BAR file appears here in the TIBCO Administrator UI:
Application Management > application_name > Configuration > application_name.bar
The default value of application_name is provided by the name of the enterprise archive resource.
TIBCO Administration Domains
When you install TIBCO Administrator, you are prompted to create an administration domain and to create a username and password. You can use this domain or create another one (using Domain Utility) for your BusinessEvents applications and the hardware they run on. The first time you log in to the TIBCO Administrator user interface, you must use the username and password entered during installation of the TIBCO Administrator software. You can then create additional users and passwords as needed.
If TIBCO Administrator was already installed before you installed BusinessEvents, you may have to contact the person responsible for administering the software to get login credentials for an existing administration domain.
Property Overrides
Properties set in TIBCO Administrator override those set in be-engine.tra and any supplementary property files; which override properties set in the CDD file. Also note that TIBCO Administrator generates a TRA file on deployment and then reads properties from that generated file.
Using AppManage for Scripted Deployment to a Domain
Instead of using the TIBCO Administrator user interface, you can perform scripted deployment to a TIBCO Administrator domain using the AppManage utility. Use of AppManage is not explained in BusinessEvents documentation. See TIBCO Runtime Agent Scripting Deployment User’s Guide for details.

TIBCO BusinessEvents Administration
Deployment in a TIBCO Administrator Domain | 159
Specifying Global Variable Values in TIBCO Administrator
Global variables you define in a project appear automatically in TIBCO Administrator, on the application’s Advanced tab. To navigate to this tab, expand Application Management > Application_Name > Configuration, click the application name in the Configuration Builder panel, and then click Advanced. You see the list of global variables. Provide a value in the Value field. Save and deploy.
Before Deploying a Project in a TIBCO Administrator Domain
1. In the BusinessEvents Studio project, ensure you have done the following prerequisite steps:
— Name the CDD file default.cdd
— Make sure the CDD file is in the root of the project folder.
— Name one of the processing units default.
Note that these names are case sensitive.)
2. Build the EAR — which includes the CDD.
You only place the CDD inside the EAR for deployment using TIBCO Administrator. In all other cases the CDD is outside the project and not included in the EAR.
When you deploy, the processing unit named default starts.
Deploying a Project in a TIBCO Administrator Domain
After you have built the EAR you are ready to deploy.
To Deploy a Project EAR in a TIBCO Administrator Domain
1. As needed, ensure that all the following are started on the machine whose engine properties you want to change:
— TIBCO Administrator service for the administration domain
— TIBCO Hawk service for the administration domain
2. Start the TIBCO Administrator GUI:
— Windows: Start > Programs > TIBCO > TIBCO Administrator Enterprise Edition version > TIBCO Administrator
— Web browser: http://host-name:port/ (where host-name is the machine name and port is the HTTP port specified during installation, 8080 by default)

TIBCO BusinessEvents Administration
160 | Chapter 8 Deploying a TIBCO BusinessEvents Project
3. Select the administration domain for the application and provide the username and password assigned during installation, or other administrator user credentials.
4. If you are deploying a project for the first time, do the following:
a. Click Application Management (in the left panel).
b. Click the New Application button.
c. At the Upload EAR File dialog, click Browse, select the EAR file you want to deploy, and click OK.
d. At the New Application Configuration dialog, set the Application Parameters and Services settings as desired (click Help for details) and click Save. By default, Name is set to the EAR file name and Deployment Name is set to the EAR file name prepended with the domain name.
5. Expand to Application Management > application_name > Configuration.
Setting Engine
Properties
6. As desired, in the Configuration Builder panel, click the BAR name (application_name.bar) and select the Advanced tab. Set properties as desired. Click Save.
7. As desired, in the Configuration Builder panel, click the application name and set values in the Advanced tab, for example, for global variables. Click Save.
When you deploy the BusinessEvents engine using TIBCO Administrator, the property values set on the Advanced tab override values set for the same properties in the engine property (TRA) file.

TIBCO BusinessEvents Administration
Deployment in a TIBCO Administrator Domain | 161
8. As desired, select the machines in the administration domain to which you will deploy the application:
a. In the Configuration Builder panel, click the application name. In the General tab, Target Machines panel, the current machine is available by default.
b. As desired, select Add to Additional Machines to deploy the application to multiple machines. Select the machines to which you will deploy. You can also select the same machine more than one time, if you want to deploy the application more than once on a machine.
c. Click Save.
9. Navigate up to the application’s main Configuration dialog and click the Deploy button.
10. At the Deploy Configuration dialog, configure settings if desired then click OK. The application deploys, and the Configuration dialog displays again.
Do not use the fault tolerance features of TIBCO Administrator. See Chapter 2, CDD Configuration Procedures, on page 5 for more information on fault tolerance.
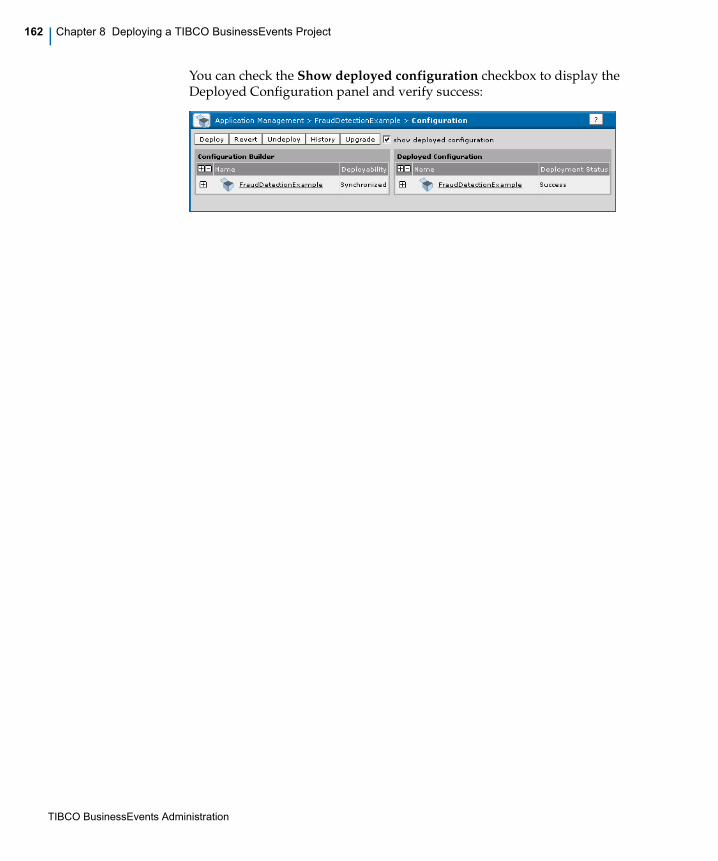
TIBCO BusinessEvents Administration
162 | Chapter 8 Deploying a TIBCO BusinessEvents Project
You can check the Show deployed configuration checkbox to display the Deployed Configuration panel and verify success:

TIBCO BusinessEvents Administration
TIBCO Hawk Application Management Interface | 163
TIBCO Hawk Application Management Interface
TIBCO BusinessEvents includes a set of TIBCO Hawk microagent methods that allow you to manage your TIBCO BusinessEvents deployment using TIBCO Hawk. These functions are listed and described in Appendix E, TIBCO Hawk Microagent Methods, on page 257.

TIBCO BusinessEvents Administration
164 | Chapter 8 Deploying a TIBCO BusinessEvents Project

TIBCO BusinessEvents Administration
| 165
Chapter 9 Hot Deployment
This chapter explains how to use the hot deployment feature to deploy changes to a running application.
Topics
• Hot Deployment Overview, page 166
• Hot Deployment Supported Modifications, page 167
• Enabling and Disabling Hot Deployment, page 169
• Performing Hot Deployment in a TIBCO Administrator Domain, page 171
• Performing Hot Deployment Outside a TIBCO Administrator Domain, page 173

TIBCO BusinessEvents Administration
166 | Chapter 9 Hot Deployment
Hot Deployment Overview
You can make certain changes to a BusinessEvents project and apply them to engine that is running the application, without stopping the application. This is known as hot deployment.
When hot deployment is enabled, the deployed application listens for changes in the EAR file. To enable hot deployment, set the Hot Deployment flag in the CDD editor in BusinessEvents Studio.
Modifications Allowed in Hot Deployment
You can make only certain changes during a hot deployment. They are listed in Table 37, Hot Deployment Supported Modifications. Modifications allowed are also different for each type of object management.
If you attempt to deploy an EAR file that includes unsupported modifications without first stopping the BusinessEvents engine, BusinessEvents rejects the EAR file.
In some cases, if you want to make a change that is not supported by the hot deployment feature, for example, if you want to change an event expiry action for an event definition, you may be able to work around the limitation. For example, instead of changing the event expiry action in the event definition, you may be able to change the rule function used in the currently configured event expiry action.
When hot deployment is enabled, the deployed application listens for changes in the EAR file. Therefore do not use the same instance of the EAR file (that is, the EAR file in the same directory location) for deploying primary and secondary servers. If you do, the hot deployment may occur out of order, and anomalous behavior may occur in the caches.
How Hot Deployment Occurs
Performing hot deployment requires changing the execution code at runtime. This is made possible using the -javaagent option. The -javaagent option is provided in the be-engine.tra file as shipped.
In an active agent, the hot deployment process waits for the current RTC cycle to complete and then injects the changes before the next RTC cycle starts.

TIBCO BusinessEvents Administration
Hot Deployment Supported Modifications | 167
Hot Deployment Supported Modifications
Check marks in Table 37 identify the project modifications that are supported by the BusinessEvents hot deployment feature for In Memory and Persistence object management. For Cache object management, see the note following the table.
When using the hot deployment feature to deploy a project, BusinessEvents ignores changes to global variables.
Table 37 Hot Deployment Supported Modifications
Resource New Modify Delete
Rule*** Yes Yes Yes
Rule Function*** Yes Yes Yes
Simple Event Yes
Time Event Yes
Concept Yes
Channel
Destination
Rule Set*** Yes Yes Yes
Concept View Yes Yes Yes
Score Card Yes
BusinessEvents Archive Yes*
Global Variable Yes
State Machine Yes**
State Machine Transition Yes**
State Machine Timeout Expression Yes**
State Machine Timeout Action Yes**
State Machine Entry Action Yes**

TIBCO BusinessEvents Administration
168 | Chapter 9 Hot Deployment
* The hot deployment feature only supports additions and/or changes to rule sets information in BusinessEvents Archives.
** The hot deployment feature only supports new state machines and state machine components within new concepts.
For Cache object management Hot deployment is available only for rules, rule functions, and rule sets.
State Machine Exit Action Yes**
State Machine Yes**
Table 37 Hot Deployment Supported Modifications (Cont’d)
Resource New Modify Delete
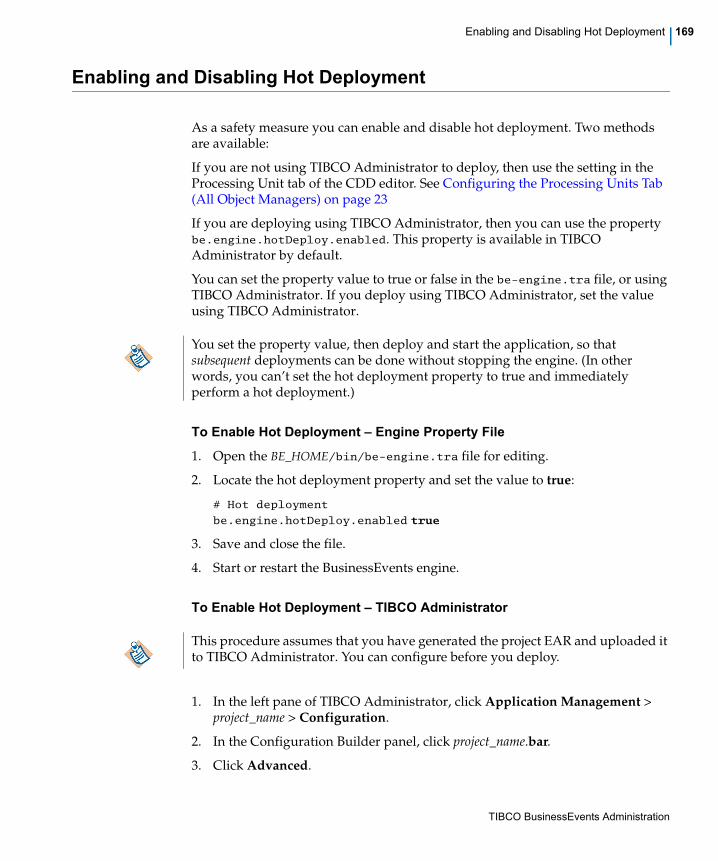
TIBCO BusinessEvents Administration
Enabling and Disabling Hot Deployment | 169
Enabling and Disabling Hot Deployment
As a safety measure you can enable and disable hot deployment. Two methods are available:
If you are not using TIBCO Administrator to deploy, then use the setting in the Processing Unit tab of the CDD editor. See Configuring the Processing Units Tab (All Object Managers) on page 23
If you are deploying using TIBCO Administrator, then you can use the property be.engine.hotDeploy.enabled. This property is available in TIBCO Administrator by default.
You can set the property value to true or false in the be-engine.tra file, or using TIBCO Administrator. If you deploy using TIBCO Administrator, set the value using TIBCO Administrator.
To Enable Hot Deployment – Engine Property File
1. Open the BE_HOME/bin/be-engine.tra file for editing.
2. Locate the hot deployment property and set the value to true:
# Hot deployment
be.engine.hotDeploy.enabled true
3. Save and close the file.
4. Start or restart the BusinessEvents engine.
To Enable Hot Deployment – TIBCO Administrator
1. In the left pane of TIBCO Administrator, click Application Management > project_name > Configuration.
2. In the Configuration Builder panel, click project_name.bar.
3. Click Advanced.
You set the property value, then deploy and start the application, so that subsequent deployments can be done without stopping the engine. (In other words, you can’t set the hot deployment property to true and immediately perform a hot deployment.)
This procedure assumes that you have generated the project EAR and uploaded it to TIBCO Administrator. You can configure before you deploy.

TIBCO BusinessEvents Administration
170 | Chapter 9 Hot Deployment
4. Locate the hot deployment property, be.engine.hotDeploy.enabled.
5. Change the property value to true.
6. Click Save.
7. Deploy and start the BusinessEvents application.
You can now perform hot deployment to the running application. See Performing Hot Deployment in a TIBCO Administrator Domain on page 171 and Performing Hot Deployment Outside a TIBCO Administrator Domain on page 173 for details.
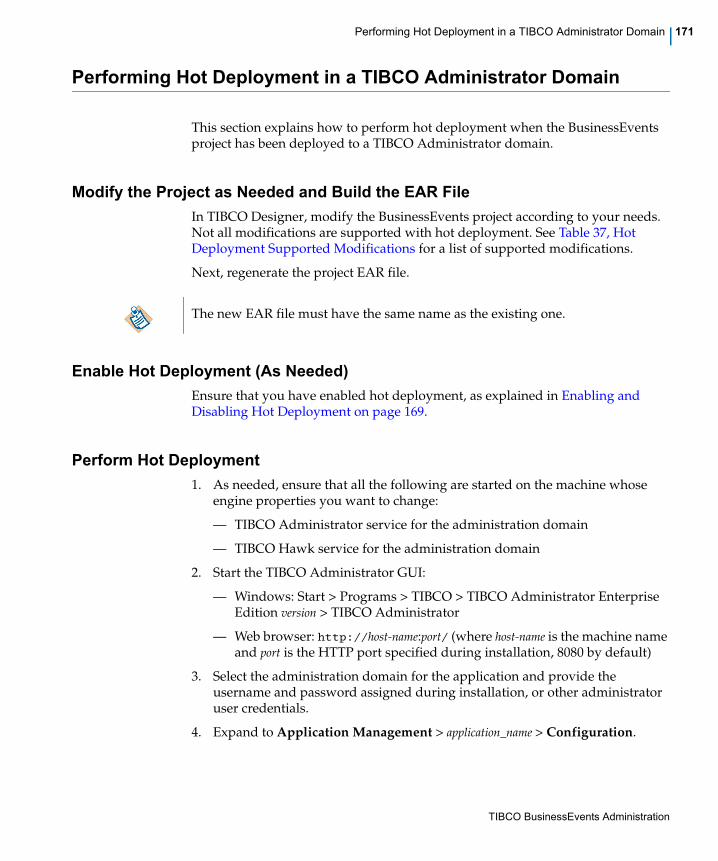
TIBCO BusinessEvents Administration
Performing Hot Deployment in a TIBCO Administrator Domain | 171
Performing Hot Deployment in a TIBCO Administrator Domain
This section explains how to perform hot deployment when the BusinessEvents project has been deployed to a TIBCO Administrator domain.
Modify the Project as Needed and Build the EAR File
In TIBCO Designer, modify the BusinessEvents project according to your needs. Not all modifications are supported with hot deployment. See Table 37, Hot Deployment Supported Modifications for a list of supported modifications.
Next, regenerate the project EAR file.
Enable Hot Deployment (As Needed)
Ensure that you have enabled hot deployment, as explained in Enabling and Disabling Hot Deployment on page 169.
Perform Hot Deployment
1. As needed, ensure that all the following are started on the machine whose engine properties you want to change:
— TIBCO Administrator service for the administration domain
— TIBCO Hawk service for the administration domain
2. Start the TIBCO Administrator GUI:
— Windows: Start > Programs > TIBCO > TIBCO Administrator Enterprise Edition version > TIBCO Administrator
— Web browser: http://host-name:port/ (where host-name is the machine name and port is the HTTP port specified during installation, 8080 by default)
3. Select the administration domain for the application and provide the username and password assigned during installation, or other administrator user credentials.
4. Expand to Application Management > application_name > Configuration.
The new EAR file must have the same name as the existing one.

TIBCO BusinessEvents Administration
172 | Chapter 9 Hot Deployment
5. In the Configuration Builder panel, select the application (at the base of the tree).
6. In the Edit Application Configuration dialog, click Upload New EAR File.
7. At the Upload EAR File dialog, click Browse, select the EAR file you want to deploy, and click OK.
8. Confirm the upload by clicking OK again, then click Save. Verify that the Deployability column displays Deployable.
9. Click Deploy. You see the Deploy Configuration dialog.
10. Uncheck these checkboxes (if they are checked):
— Stop running services before deployment
— Start successfully deployed services
— Force redeployment of all services
(When the Stop running services before deployment checkbox is checked, you see an additional setting, Kill services that haven't stopped after (seconds). It is removed when you uncheck the checkbox.)
11. Click OK. TIBCO Administrator performs the hot deployment of your modified BusinessEvents project.

TIBCO BusinessEvents Administration
Performing Hot Deployment Outside a TIBCO Administrator Domain | 173
Performing Hot Deployment Outside a TIBCO Administrator Domain
This section explains how to perform hot deployment when the BusinessEvents project has been deployed to a TIBCO Administrator domain.
Modify the Project as Needed and Build the EAR File
In TIBCO Designer, modify the BusinessEvents project according to your needs. Not all modifications are supported with hot deployment. See Table 37, Hot Deployment Supported Modifications for a list of supported modifications.
Next, regenerate the project EAR file.
Enable Hot Deployment (As Needed)
Ensure that you have enabled hot deployment, as explained in Enabling and Disabling Hot Deployment on page 169.
Add a Property to the Engine Property File
Add a line to the be-engine.tra file to specify the location of the EAR file:
tibco.repourl location of EAR file
Perform Hot Deployment
Place the modified EAR file in the location specified in the be-engine.tra file:
tibco.repourl location of EAR file
The engine notices the changed file and performs the hot deployment at the next RTC cycle.
The new EAR file must have the same name as the existing one.

TIBCO BusinessEvents Administration
174 | Chapter 9 Hot Deployment

TIBCO BusinessEvents Administration
| 175
Chapter 10 Threading Models and Tuning
This chapter explains the different threading models you can use, and mentions the performance tuning controls available for each. The chapter focuses on Cache OM and backing store threading options.
Topics
• Threading Models Overview, page 176
• Event Preprocessor and Rete Worker Thread Options, page 178
• RTC Options — Single-Threaded or Concurrent, page 182
• Post RTC Options — Cache-aside and Write-behind, page 184

TIBCO BusinessEvents Administration
176 | Chapter 10 Threading Models and Tuning
Threading Models Overview
When you begin to scale up messaging the following are the potential bottlenecks:
• Either messages are coming in too fast into the inference engine(s).
• Or the inference engines are not handing off objects fast enough to the cache agents (if write-behind strategy is used) or to the backing store (if cache-aside strategy is used)
• Or Cache agents are not accepting the objects fast enough.
• Or backing store is not accepting the objects fast enough.
These points are related. You can add more inference engines and more cache servers to address these issues, depending on where the bottlenecks are occurring. Below is a representative example flow for an inference agent. Later sections show more detail for options available at each phase.
Figure 2 Agent threading example — shared threads, concurrent Rete, cache-aside
2
Post RTC Transaction Manager
Event
Preprocessors
RTC
Incoming
Messages
Cache Writer1
Message Manager2
Database (Backing
Store) Writer
3
Incoming Messages
Queue
Event Preprocessor Rule
Function
Rete Network (RTC)
Legend
L1 (Local) Cache
Cache (cluster)
Outgoing Events
Backing Store
L1 Cache
1 3

TIBCO BusinessEvents Administration
Threading Models Overview | 177
• Event preprocessing is multithreaded. For each destination you choose a threading option: shared queue and threads; dedicated worker threads; caller’s threads. These threads are released at the end of the RTC (post-RTC phase uses different threads).
• For the RTC phase, you can choose single or concurrent RTC options.
• For the post-RTC phase, you can choose cache-aside or write-behind thread management. Cache-aside is shown in the diagram above.
• Events can be sent out (and acknowledged) in the event preprocessor. Otherwise they are sent out in the post-RTC phase.
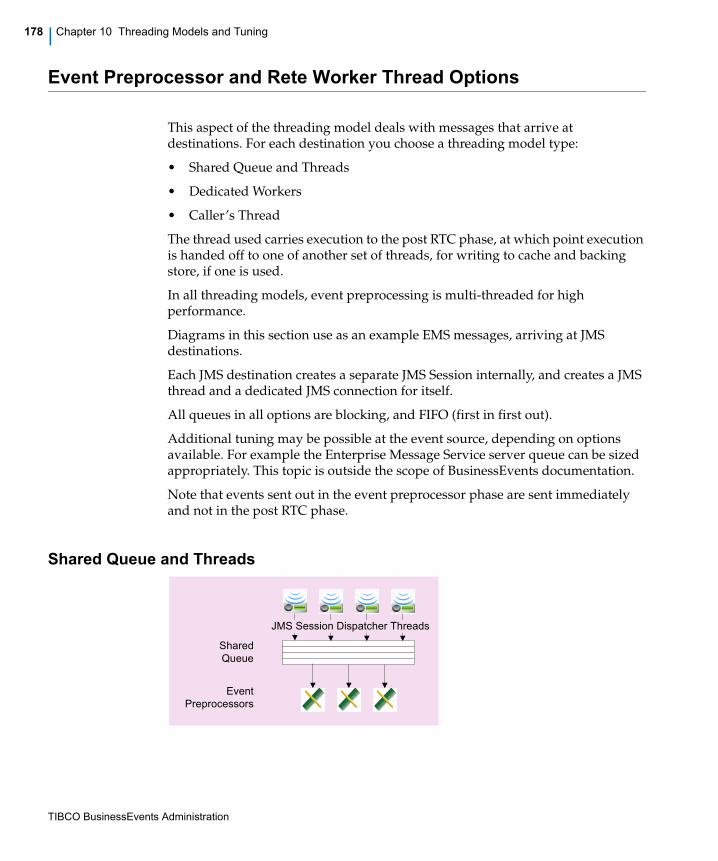
TIBCO BusinessEvents Administration
178 | Chapter 10 Threading Models and Tuning
Event Preprocessor and Rete Worker Thread Options
This aspect of the threading model deals with messages that arrive at destinations. For each destination you choose a threading model type:
• Shared Queue and Threads
• Dedicated Workers
• Caller’s Thread
The thread used carries execution to the post RTC phase, at which point execution is handed off to one of another set of threads, for writing to cache and backing store, if one is used.
In all threading models, event preprocessing is multi-threaded for high performance.
Diagrams in this section use as an example EMS messages, arriving at JMS destinations.
Each JMS destination creates a separate JMS Session internally, and creates a JMS thread and a dedicated JMS connection for itself.
All queues in all options are blocking, and FIFO (first in first out).
Additional tuning may be possible at the event source, depending on options available. For example the Enterprise Message Service server queue can be sized appropriately. This topic is outside the scope of BusinessEvents documentation.
Note that events sent out in the event preprocessor phase are sent immediately and not in the post RTC phase.
Shared Queue and Threads
JMS Session Dispatcher Threads
Event
Preprocessors
Shared
Queue
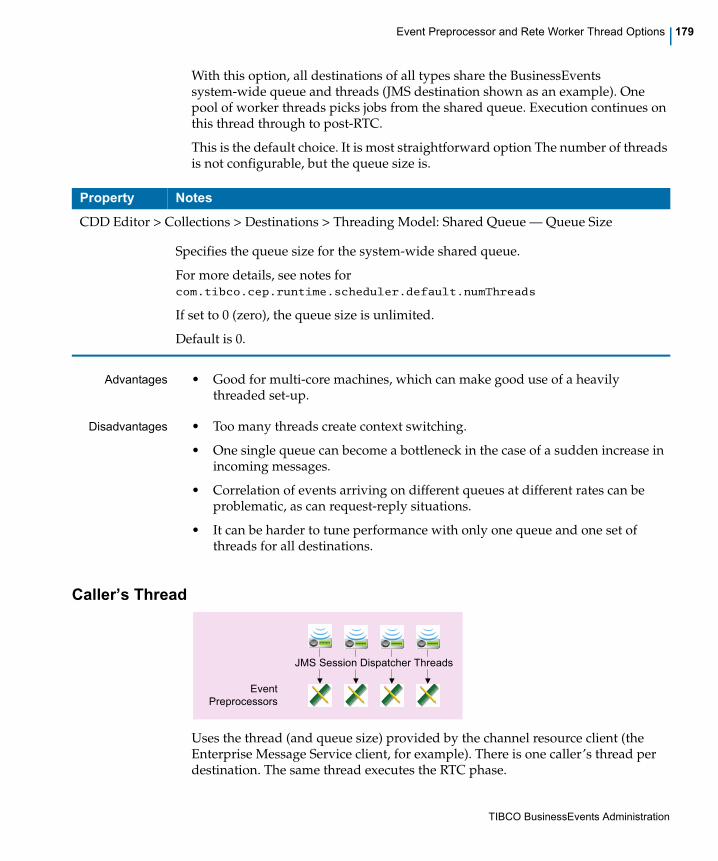
TIBCO BusinessEvents Administration
Event Preprocessor and Rete Worker Thread Options | 179
With this option, all destinations of all types share the BusinessEvents system-wide queue and threads (JMS destination shown as an example). One pool of worker threads picks jobs from the shared queue. Execution continues on this thread through to post-RTC.
This is the default choice. It is most straightforward option The number of threads is not configurable, but the queue size is.
Advantages • Good for multi-core machines, which can make good use of a heavily threaded set-up.
Disadvantages • Too many threads create context switching.
• One single queue can become a bottleneck in the case of a sudden increase in incoming messages.
• Correlation of events arriving on different queues at different rates can be problematic, as can request-reply situations.
• It can be harder to tune performance with only one queue and one set of threads for all destinations.
Caller’s Thread
Uses the thread (and queue size) provided by the channel resource client (the Enterprise Message Service client, for example). There is one caller’s thread per destination. The same thread executes the RTC phase.
Property Notes
CDD Editor > Collections > Destinations > Threading Model: Shared Queue — Queue Size
Specifies the queue size for the system-wide shared queue.
For more details, see notes for com.tibco.cep.runtime.scheduler.default.numThreads
If set to 0 (zero), the queue size is unlimited.
Default is 0.
JMS Session Dispatcher Threads
Event
Preprocessors

TIBCO BusinessEvents Administration
180 | Chapter 10 Threading Models and Tuning
Advantages • The messaging library's thread does the message delivery, pre-processing and the Rete operations, so there is less context switching.
• The messaging system cannot push events faster than the rate at which it can get consumed, so the system is self-throttling.
• Best option for request-reply situations.
Disadvantages • To scale up, many destinations have to be created in order to create that number of caller threads.
• Because each destination creates a JMS session, a session might be under used. On some operating systems, sockets and sessions could be very under-used.
Dedicated Workers
This option is similar to the Shared Queue option except that each destination has a dedicated thread pool and set of worker threads to process messages.
Each destination has its own queue (of a configurable size) and its own set of dedicated worker threads (also configurable).
Advantages • Each destination can be configured differently, to deal with correlation of events arriving at different rates in different destinations, or events that are correlated in different ratios, such as correlation of every tenth event from destination one with every other event from destination two.
JMS Session Dispatcher Threads
Event
Preprocessors
Property Notes
CDD Editor > Collections > Destinations > Threading Model: Workers — Thread count
Specifies the number of dedicated worker threads for each destination
CDD Editor > Collections > Destinations > Threading Model: Workers — Queue size
Specifies the size of the queue used for each destination

TIBCO BusinessEvents Administration
Event Preprocessor and Rete Worker Thread Options | 181
• If you use priority queues in Enterprise Message Service, you can use dedicated queues to service them efficiently.
Disadvantages • More complex to manage multiple queues and sets of threads.

TIBCO BusinessEvents Administration
182 | Chapter 10 Threading Models and Tuning
RTC Options — Single-Threaded or Concurrent
RTC can be set to single-threaded or concurrent.
Concurrent RTC
One RTC executes simultaneously on each thread. All threads fill post RTC queues.
Advantages • Can confer performance benefits, given correctly sized hardware and JVM configuration. Best on large high-capacity, high-performance machines.
Disadvantages • When many smaller CPUs are used, then concurrent agents may give better performance than concurrent RTC.
• Requires the same kind of locking as for mulit-agent concurrency to protect integrity of the data. The cost of locking negates some of the performance benefits of concurrency.
• If you also use concurrent agents, the system can become complex.
Single-Threaded RTC
Each worker thread waits to execute its RTC in turn.
Post RTC Transaction Manager
Event
Preprocessors
Concurrent
RTC
Event
Preprocessors
Single-
threaded RTC
Post RTC Transaction Manager

TIBCO BusinessEvents Administration
RTC Options — Single-Threaded or Concurrent | 183
Advantages • Simpler. Does not require locking (unless concurrent agents are used).
Disadvantages • Less performant than concurrent RTC (depending on hardware used).

TIBCO BusinessEvents Administration
184 | Chapter 10 Threading Models and Tuning
Post RTC Options — Cache-aside and Write-behind
In the post RTC phase, the cache is updated, rule actions are executed, the backing store is updated, and locks (if any) are released. BusinessEvents handles rule actions on a different set of threads in both the write-behind and cache-aside options. However, each option handles writing to cache and to the backing store differently, as shown next.
Cache-aside
With cache-aside, inference agents manage writes to the cache, the local L1 cache, and the backing store, simultaneously in the post RTC phase.
2
Post RTC Transaction Manager
L1 Cache
1 3
Cache Writer1
Message Manager2
Database (Backing
Store) Writer
3
Legend
Queue
L1 (Local) Cache
Cache (cluster)
Outgoing Events
Backing Store
TIBCO BusinessEvents Administration
Post RTC Options — Cache-aside and Write-behind | 185
Tuning Properties for Cache-aside Strategy
Add to the CDD Agent Classes, Processing Units, or Cluster property sheet depending on the scope of the setting. For example to apply the settings to all agents in a cluster, set the property at the cluster level. You can also override the value at a lower level.
Advantages • Provides transaction control, making sure transactions, including deletes, are performed following an RTC.
• Allows batching of Rete transactions (RTCs).
• Provides thread and queue size controls.
• Offers the ability to use the database as the primary storage, and to use cache secondarily, to pass the objects between the Rete network and the database. This strategy is useful in some usage scenarios.
Property Notes
Agent.AgentClassName.threadcount
Defines the number of threads performing cache writing jobs.
Tip This property is also used to define the number of Recovery threads (used for recovering Cache Plus Memory entity handles at inference engine startup).
Default value is 2.
Agent.AgentClassName.dbOpsQueueSize
Defines the size of the Java BlockingQueue for database writing jobs.
Zero (0) or any negative value means the queue size is unlimited.
Default value is 8.
Agent.AgentClassName.dbthreadcount
Defines the number of threads performing database writing jobs.
Default value is 2.
Agent.AgentClassName.dbOpsBatchSize
Defines the number of Rete transactions (RTCs) included in a single database transaction.
Default value is 10.

TIBCO BusinessEvents Administration
186 | Chapter 10 Threading Models and Tuning
Disadvantages • There are really no disadvantages in comparison with write-behind. Cache-aside is a later implementation to offer improved controls based on experiences with the earlier write-behind method.
Write-behind
With write-behind strategy, cache agents handle writes to cache and to the backing store. First the cache agent writes data to the cache and then to the backing store.
For inserts and updates, one write-behind thread is used for each entity type. Deletes are performed by the distributed cache threads (configurable) and they are synchronously deleted from the database.
You can configure a write-delay property to define whether the write is synchronous or asynchronous. Write operations from multiple writers to the cache are batched.
Advantages • Batches writes during the delay period which increases database call efficiency and minimizes network traffic.
• Offloads cache and database work to the cache agent.
Disadvantages • Does not offer transaction controls.
• Can be slower than cache-aside.
• If enough cache agents fail, the cache management layer won’t be able to persist a write that was done previously, resulting in an inconsistent DB (This risk can be minimized by using a short write-behind delay or synchronous writes).
Cache Agent
2
Post RTC Transaction Manager
L1 Cache
put
1
3
Distributed Cache
Service Queue
get,
delete Write-behind
Threads
Distributed Cache
Service Threads
UDP
purge

TIBCO BusinessEvents Administration
Post RTC Options — Cache-aside and Write-behind | 187
Cache Agent Thread tuning
Uses the following cluster-wide property:
java.property.tangosol.coherence.distributed.threads
Specifies the number of Coherence daemon threads used by the distributed cache service. If zero, all relevant tasks are performed on the service thread.

TIBCO BusinessEvents Administration
188 | Chapter 10 Threading Models and Tuning
TIBCO BusinessEvents Administration
| 189
Chapter 11 Configuring User Authentication
This chapter explains how to choose and configure two authentication modules. It also explains how you can use your existing JAAS login module instead of the one provided.
Topics
• User Authentication Overview, page 190
• Configuring User Authentication, page 191
• Authentication Property Reference, page 193

TIBCO BusinessEvents Administration
190 | Chapter 11 Configuring User Authentication
User Authentication Overview
When configuring user authentication, you choose which authentication option you want to use and configure that option. You can also use a different login module if you don’t want to use the module shipped with the product.
Authentication Options
RMS provides two options for user authentication.
File Based Authentication This method authenticates a user against user data stored in a file based repository. This method is not recommended for production purposes.
LDAP Authentication This method authenticates users against a directory server using LDAP as a protocol. RMS can leverage this information to authenticate users. The role information is configured through an LDAP attribute (this is directory server specific) like the nsroledn attribute in Sun Java System Directory Server.
Pluggable JAAS Login Module
Java Authentication and Authorization Service (JAAS) is a pluggable part of the Java security framework. User authentication is performed using a JAAS login module.
You can substitute a different implementation of the JAAS login module than the one provided. To configure the product to use your implementation, specify the location of your JAAS login configuration file using the following property in the be-rms.tra file:
java.property.java.security.auth.login.config
As another option, you may want to add the provided login module to your existing JAAS login configuration file (thus providing multi-stage authentication). If so, specify the location of the file in the above property.

TIBCO BusinessEvents Administration
Configuring User Authentication | 191
Configuring User Authentication
This section explains how to select file-based authentication or LDAP-based authentication, and how to configure each authentication option.
Configuring File-Based Authentication
In file-based authentication, you define a list of user names, passwords, and roles in a file called (by default) users.pwd file. This file is commonly referred to as the password file.
Task A Configure Properties
1. Open the project in BusinessEvents Studio. Open the CDD file in the CDD editor. Locate the be.auth.file.location property for the component you are configuring and enter the location of your password file. The default locations are as follows:
— RMS: Default location is BE_HOME/rms/examples/users.pwd.
— BEMM: In the mm-class agent class, in the mm/auth property group. Default is BE_HOME/mm/config/users.pwd
— BusinessEvents Views: in the dashboard-agent class. No default value is provided.
2. Set be.auth.type to file.
3. As needed, specify the location and name of the password file using the property be.auth.file.location.
See Table 38, Authentication Configuration Properties, on page 193 for details about these properties.
Task B Configure the Password File
1. Open the password file. As shipped, the file is located in BE_HOME/rms/examples/users.pwd.
The name and location are configurable (see Task A).
2. Add each user on a separate line using this format:
Username:password:role,role,role;
For example:
Mark:A31405D272B94E5D12E9A52A665D3BFE:BUSINESS_USER,APPROVER;
James:21232f297a57a5a743894a0e4a801fc3:RULE_ADMINISTRATOR;

TIBCO BusinessEvents Administration
192 | Chapter 11 Configuring User Authentication
Do not use spaces.
Configuring LDAP-Based Authentication
These are summary instructions only. Completing the configuration requires knowledge of the LDAP protocol.
To Configure LDAP-Based Authentication
1. Open the BE_HOME/rms/bin/be-rms.tra file.
2. Set be.auth.type to ldap
3. Specify values for all the LDAP properties shown in Table 38 on page 193.
See Table 38, Authentication Configuration Properties, on page 193 for details about these properties.
You must hash the password with MD5 (Message-Digest 5) hashing algorithm.

TIBCO BusinessEvents Administration
Authentication Property Reference | 193
Authentication Property Reference
Add these to the appropriate CDD file.
Table 38 Authentication Configuration Properties
Property Notes
be.auth.type
Specifies the authentication mechanism. Allowable values are file or ldap.
Default is file.
be.auth.file.location
Specifies the absolute filepath to and name of the password file. This file is used for file-based authentication.
By default the file is stored in BE_HOME/rms/examples (the base location directory in the product as shipped) with filename users.pwd.
For TIBCO BusinessEvents Decision Manager RMS component, see also RMS Server Configuration properties table in TIBCO BusinessEvents Decision Manager User’s Guide for details about the base location property.
be.auth.ldap.host
Specifies the domain name of the host for LDAP authentication.
be.auth.ldap.port
Specifies the port for LDAP authentication.
be.auth.ldap.adminDN
Specifies the base distinguished name (DN) for admin login. For example, cn=Directory Administrators, dc=na, dc=tibco, dc=com.
be.auth.ldap.adminPassword
Specifies the password for the LDAP administrator DN.
be.auth.ldap.baseDN
Specifies the base tree in LDAP under which users can be searched. For example, dc=na, dc=tibco, dc=com.

TIBCO BusinessEvents Administration
194 | Chapter 11 Configuring User Authentication
be.auth.ldap.roleAttr
Specifies the name of the attribute used by the LDAP server for role information of a user. Default value is nsroledn (for Sun Java Directory Server).
java.property.java.security.auth.login.config
Provides the absolute location for the login module configuration used by JAAS. See Pluggable JAAS Login Module on page 190 for more details. The value as shipped is:
BE_HOME/rms/config/security/jaas-config.config
Table 38 Authentication Configuration Properties (Cont’d)
Property Notes

TIBCO BusinessEvents Administration
| 195
Chapter 12 Configuring Access Control for a Project
This chapter describes how the access control system works, the types of resource specifications that are permitted, and how to grant permissions to different users.
In this release, access control is currently used only for RMS projects (available with the TIBCO BusinessEvents Decision Manager add-on).
Topics
• Configuring Access Control—Overview, page 196
• Working with Access Control Files, page 199
• Resource Types and Corresponding Action Types, page 203

TIBCO BusinessEvents Administration
196 | Chapter 12 Configuring Access Control for a Project
Configuring Access Control—Overview
For each RMS project, you set up an access control file. In the access control file, you group the decision project resources as desired, giving each group (or individual resource) an ID, and then you assign permissions to each user role, using those IDs.
Establishing the User Roles
Access is defined using roles. If file-based authentication is used, roles are defined and assigned to users in the password file (by default called users.pwd). If LDAP-based authentication is used, roles are defined and assigned to users in the LDAP directory.
You add one entry element for each user role. See Structure of the Access Control File on page 197 for details.
See User Authentication Overview on page 190 for details.
Guidelines for Configuring Access Control
You can use two general approaches to setting permissions. The general aim is to simplify the setup, minimizing the number of permissions you have to set in the access control file.
Allow everything
and specify
exceptions
One approach is to grant wide permissions using large resource groupings, and then selectively deny permissions within those groupings.
For example, suppose you define two resources as follows:
<resource name="/Concepts/*" id="AllP" type="PROPERTY"/><resource name="/Concepts/Person/CustID" id="CID" type="PROPERTY"/>
The first resource element defines a resource group consisting of all concept properties in the /Concepts project folder. The second element specifies one property in one concept. (The setup details are explained later in the chapter.)
Then you define permissions for using those resources, for a role named CallCenter:
<permission resourceref="#AllP"> <action type="create">ALLOW</action> </permission>
You must use only the roles defined in the password file or LDAP directory (depending on authentication type used) when configuring the access control file.

TIBCO BusinessEvents Administration
Configuring Access Control—Overview | 197
<permission resourceref="#CID"> <action type="create">DENY</action> </permission>
With these settings, you give users with the CallCenter role the create permission for all properties in the /Concepts directory except the custID property.
Deny everything
and specify
exceptions
The other approach is to deny all permissions (which is the default setting for all permissions) and then give permissions to specific resources or groups of resources as needed.
Mixing these
approaches
You can mix these two approaches in one access control file. For example, you can give broad permissions to one project folder, and then specify exceptions within that folder. For another folder you might give permissions selectively.
Structure of the Access Control File
The access control file is an XML file with the following elements:
<acl xmlns:xsi="http://www.w3.org/2001/XMLSchema-instance" xsi:noNamespaceSchemaLocation="ACL.xsd"><resources><resource id="id" type="ResourceType"/><resource id="id" name="ProjectPath" type="ResourceType"/>. . .
</resources>
<entries><entry>
<role name="RoleName"/><permissions>
<permission resourceref="#id"><action type="ActionType">[ALLOW|DENY]</action>
</permission>. . .
</permissions> </entry>. . .
</entries></acl>
An example of an access control file giving full permissions is provided in the credit card application example, located in the following directory:
BE_HOME\rms\examples\CreditCardApplicationthe
CreditCardApplication

TIBCO BusinessEvents Administration
198 | Chapter 12 Configuring Access Control for a Project
The entries element contains one entry for each role. For each role, you define one set of permissions. Each permission has of the following attributes
• The resourceref attribute references a resource ID defined in the resources element. It identifies a resource or set of resources.
• The name attribute specifies the project path to the resource or resources. (The name attribute is not used when you specify permissions for an entire resource type.)
• The resource type attribute specifies what types resources in the specified project path are included in the permission.
• The action type attribute specifies an action type, for example, create.
See Table 39, Resource Types and Action Types, on page 203.
Permissions—ALLOW and DENY
The value of the action element is one of the key words ALLOW or DENY. It determines whether the specified permission is given denied.
DENY is the default value. You only need to set the DENY value explicitly when you have given ALLOW permissions at a higher level, and want to make individual exceptions within that broad scope.
The values ALLOW and DENY are case sensitive. Use all capitals.

TIBCO BusinessEvents Administration
Working with Access Control Files | 199
Working with Access Control Files
Access control settings are created using XML files with the extension .ac. This section explains the elements used to define access control, ways you can add or edit access control files, and where to place the files so they can be used by RMS and Decision Manager.
Examples shipped with the product contain access control files you can use as models.
Creating and Modifying an Access Control File
Use any of the following methods to work with access control files:
• You can create or modify an RMSProject.ac file using any XML editor.
• If your user role has permission to do so, you can also create or modify an access control file in Decision Manager.
• To create an access control file in Decision Manager, select Access > New.
• To modify an existing access control file, select Access > Open.
Required Location of Access Control Files
The access control file for an RMS project must be placed in the project’s config directory and it must be named using the format ProjectName.ac.
See TIBCO BusinessEvents Decision Manager User’s Guide to understand where the project directory or directories are located.
Specifying and Grouping Decision Project Resources
In the resources element, you group the project resources in whatever way supports the permissions you want to set. You give each grouping or individual resource an ID that is used when defining the permissions.
In this release access control is used only by TIBCO BusinessEvents Decision Manager. This section is tailored for use by that component.

TIBCO BusinessEvents Administration
200 | Chapter 12 Configuring Access Control for a Project
Using Resource Type as a Filter
How you specify the resource group is partly determined by the resource type attribute. The resource type can act as a filter. For example, suppose in the name attribute you specify a directory that includes events and concepts. If you set the type attribute to "CONCEPT" then the ID associated with this grouping is used to set permissions only on the concepts in that folder (and its subdirectories).
You could create a second grouping whose type specifies "EVENT" so that you can set permissions on events in that folder branch separately.
Specifying an Individual Resource
To specify an individual resource, provide the project path to the resource in the name attribute. The project path is the folder path to the ontology entity, as seen in the Explorer panel. The example below shows how to specify an ID that is associated with the FirstName property of the Person concept:
<resource name="/Concepts/Person/FirstName" id="FN" type="PROPERTY"/>
Grouping Resources Using Wildcards
You can associate groups of resources with an ID using the wildcard character in the project path. The asterisk (*) is used as the wildcard character. For example:
<resource name="/someFolder/* "id="AllP" type="PROPERTY"/>
Grouping Resources by Resource Type
The broadest resource grouping is provided by setting permissions at the level of resource type. This method groups all resources of that type in the project. To set a resource type resource group, you associate an ID with a resource type, and you do not use the name attribute:
<resource id="ID" type="ResourceType"/>
For example: <resource id="C" type="CONCEPT"/>
See Table 39, Resource Types and Action Types, on page 203 for a list of resource types, and the action types that are valid for each resource type.
Defining Permissions
By default, all permissions are denied. If a certain permission is not explicitly given to a role, then the role does not have the permission. This approach ensures unauthorized users do not accidentally gain access to restricted resources.
TIBCO BusinessEvents Administration
Working with Access Control Files | 201
Permissions are not hierarchical. That is, a create permission does not imply a modify permission or a delete permission. All privileges are mutually exclusive.
For each resource type there is a predefined set of action types such as create, read, modify, and delete (see Table 39, Resource Types and Action Types, on page 203). For each resource ID defined in the resources section, you must grant permission separately for each action type. For example, you would add four permission elements to give a user role permissions to create, read, modify, and delete a specified group of resources of a certain type.
Defining Permissions for Domain Models
In addition to permissions to work with a resource, you can also create permissions to work with that resource’s domain model. Domain models are used only with resources of type PROPERTY.
The method is the same as for permissions to use resources. To specify that the permission is for domain models, and not for the resources themselves, you use the permission type, DOMAINMODEL.
Just as you create a set of permissions of each type that defines what a user role can do with the resource itself, you create a set of resources that defines what a user role can do with the domain model for the resource. For example, the following gives broad permissions for a user to work with all resources of type PROPERTY:
<permission resourceref="#PR"><action type="create">ALLOW</action>
</permission><permission resourceref="#PR">
<action type="modify">ALLOW</action></permission><permission resourceref="#PR">
<action type="delete">ALLOW</action></permission>
DOMAINMODEL
Permission Type
<permission resourceref="#PR" type="DOMAINMODEL"><action type="read">ALLOW</action>
</permission><permission resourceref="#PR" type="DOMAINMODEL">
<action type="create">ALLOW</action></permission><permission resourceref="#PR" type="DOMAINMODEL">
<action type="modify">ALLOW</action></permission><permission resourceref="#PR" type="DOMAINMODEL">
In the Decision Manager application, you cannot create, modify, or delete properties, rules, concepts, or rule functions.

TIBCO BusinessEvents Administration
202 | Chapter 12 Configuring Access Control for a Project
<action type="delete">ALLOW</action></permission>
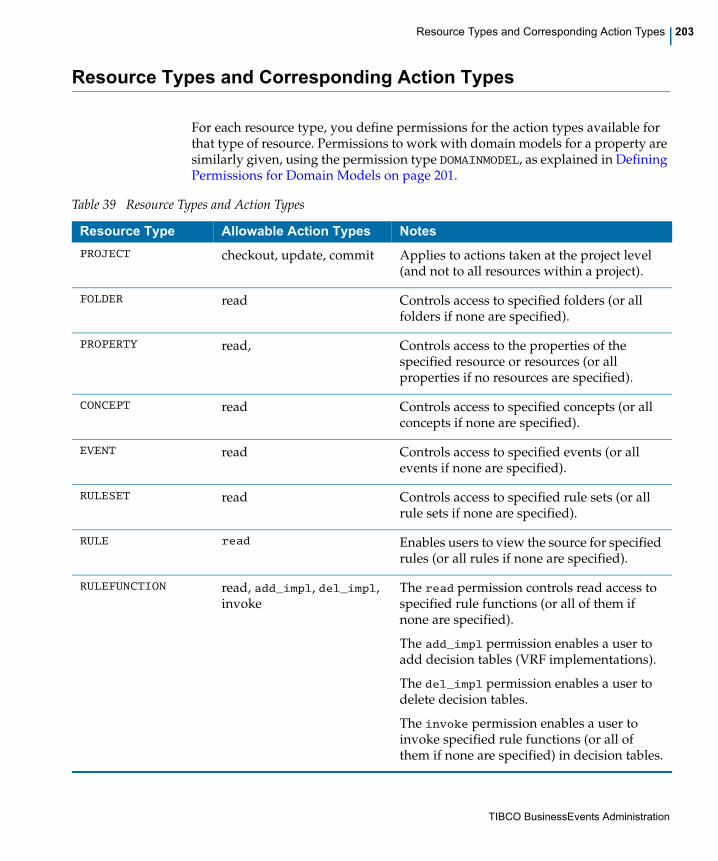
TIBCO BusinessEvents Administration
Resource Types and Corresponding Action Types | 203
Resource Types and Corresponding Action Types
For each resource type, you define permissions for the action types available for that type of resource. Permissions to work with domain models for a property are similarly given, using the permission type DOMAINMODEL, as explained in Defining Permissions for Domain Models on page 201.
Table 39 Resource Types and Action Types
Resource Type Allowable Action Types Notes
PROJECT checkout, update, commit Applies to actions taken at the project level (and not to all resources within a project).
FOLDER read Controls access to specified folders (or all folders if none are specified).
PROPERTY read, Controls access to the properties of the specified resource or resources (or all properties if no resources are specified).
CONCEPT read Controls access to specified concepts (or all concepts if none are specified).
EVENT read Controls access to specified events (or all events if none are specified).
RULESET read Controls access to specified rule sets (or all rule sets if none are specified).
RULE read Enables users to view the source for specified rules (or all rules if none are specified).
RULEFUNCTION read, add_impl, del_impl, invoke
The read permission controls read access to specified rule functions (or all of them if none are specified).
The add_impl permission enables a user to add decision tables (VRF implementations).
The del_impl permission enables a user to delete decision tables.
The invoke permission enables a user to invoke specified rule functions (or all of them if none are specified) in decision tables.

TIBCO BusinessEvents Administration
204 | Chapter 12 Configuring Access Control for a Project
CATALOGFUNCTION invoke Enables a user to invoke specified catalog functions (or all of them if none are specified) in decision tables.
Validation errors are thrown if other functions are written manually.
RULEFUNCTIONIMPL read Controls access to the specified decision tables (or all decision tables if none are specified).
(Other permissions for decision tables are set on the resources used in the decision table.)
DOMAIN Controls access to the specified domain models.
Table 39 Resource Types and Action Types (Cont’d)
Resource Type Allowable Action Types Notes

TIBCO BusinessEvents Administration
| 205
Chapter 13 JDBC Backing Store Configuration
This chapter explains how to use provided utilities that set up the database user and schema for the backing store. It also explains how to update the schema of an existing backing store to keep it aligned with changes in the BusinessEvents project ontology.
After you have finished the database setup, you must configure your BusinessEvents project with backing store settings.
Oracle-Only Backing Store The Oracle-only backing store available in earlier releases is deprecated in this release. It is documented in Appendix A on page 229. Alternatively you can migrate to the JDBC backing store feature. See TIBCO BusinessEvents Installation for details on migration.
For instructions on migrating from a 3.x backing store to the JDBC backing store, see TIBCO BusinessEvents Installation, which has a migration chapter.
Topics
• JDBC Backing Store Database Setup Overview, page 206
• Special Cases, page 207
• Resources Required for Setting Up the Database, page 209
• JDBC Backing Store Database Configuration Tasks, page 212
• Updating an Existing Backing Store Database Schema
• Backing Store Table Reference, page 223
• Adding a JDBC Connection Resource to the Studio Project, page 225
• Configuring Backing Store Properties in the CDD Editor, page 226

TIBCO BusinessEvents Administration
206 | Chapter 13 JDBC Backing Store Configuration
JDBC Backing Store Database Setup Overview
A backing store enables persistent backup of the objects generated and modified at runtime. Use of a backing store enables recovery in the event of a system-wide failure.
The backing store feature requires use of Cache object management. Before you add a backing store, develop your caching solution and test it.
The JDBC backing store feature supports the DBMS products listed in the product readme file (also listed in TIBCO BusinessEvents Installation).
Ease of
Maintenance
The backing store uses relational tables and SQL data types for ease of maintenance. The SQL (DDL) scripts use ANSI SQL type definitions (where supported by the target DBMS product). Because the backing store adheres to SQL standards and a straight-forward structure, standard database tools can be used to view backing store data. See Backing Store Table Reference on page 223 for more on the table structures.
Backing Store
Requirements
Ensure that you have access to a supported database management product and driver, and can create a user with permission to connect to the database and create tables and views. Resources Required for Setting Up the Database on page 209 outlines all the resources you need to set up a backing store.
Database
Location
Instructions in this chapter assume you are working with a local database for testing purposes. Adapt the instructions if you are working with a remote database. For example, in production environments, you might have to ask a database administrator to create a database user for you. You should then be able to run the other SQL scripts yourself, logged on as the user created by the administrator.
Special Cases Certain aspects of a project ontology may require special handling. See the following sections for details on how to handle these issues.:
• Names that Exceed the DBMS Maximum Column Length, page 207
• String Properties That Exceed the Maximum Database Column Length, page 208
• Ontology Identifiers That Use Database Key Words, page 208
After You Finish
Database Setup
After you finish database setup, you must configure various project properties to enable and configure backing store functionality. See Adding a JDBC Connection Resource to the Studio Project on page 225 and Configuring Backing Store Properties in the CDD Editor on page 226 for details.

TIBCO BusinessEvents Administration
Special Cases | 207
Special Cases
This section explains some cases that may require special handling.
Names that Exceed the DBMS Maximum Column Length
Entity names and entity property names are used by backing store scripts to generate database table and column identifiers. (Entity names can be are overridden by the entity metadata property called Table Name.)
DBMSs put different limits on the length of a database identifier name. For example, in Oracle the maximum length is 30 characters, and in SQL Server the limit is 128 characters.
Note that the generated database identifiers are longer than the BusinessEvents identifiers because they contain characters in addition to the BusinessEvents identifier.
You can deal with this potential situation in different ways. One way is to configure project settings before you generate the EAR, and the other is configured by running the be-jdbcdeploy utility without modifying the project first. These are explained next.
Allowing the Utility to Generate Aliases for Long Names
When you run the be-jdbcdeploy utility, it generates short aliases for long names. For every entity, property, or state machine whose database identifier name exceeds the maximum length, an entry is created in the generated yourname.aliases file (For example, acme.aliases). This file has no entries if all names are within the DBMS limit.
You can edit the file to specify different short aliases. If you edit the aliases file, you must then run the be-jdbcdeploy utility again, so that your names are used.
The advantage of allowing the scripts to generate aliases is that it is automatic and you are in no doubt that the names will be of a correct length. However these auto-generated names might make it hard to identify what entity they represent, by simply looking at the table names.
The procedure is explained in Task F, Check the Aliases File and Modify Aliases as Desired, on page 216.

TIBCO BusinessEvents Administration
208 | Chapter 13 JDBC Backing Store Configuration
Providing Short Names in the Project, Before Generating the EAR
You can avoid the problem of long names before you begin to configure the backing store; you can specify short database identifiers using metadata properties.
The advantage of this method is that you can choose meaningful names. The disadvantages are that you may not know ahead of time which entities and entity properties require short names, and that you must also ensure that the metadata names are unique across all entities in the ontology.
If entity names are repeated, table names are appended with dollar ($) characters as necessary, for example, D_ORDER, D_ORDER$, D_ORDER$$ and so on.
The procedure is explained in the section Set Metadata Properties for Long Identifiers, as Desired on page 213, which is part of Task A, As Needed, Set Entity Metadata Properties, on page 213
String Properties That Exceed the Maximum Database Column Length
The default column size for String type attributes is 255 characters. If you expect the data length of an entity property to exceed that value, then before you begin backing store setup, open the editor for each such property and set the metadata Max Length field as needed. The utility changes the data type of String attributes with long lengths to CLOB, as appropriate.
Ontology Identifiers That Use Database Key Words
As well as database names that are too long, ontology terms that are key (reserved) words in your DBMS product must also be mapped to an alias. If errors occur when you run the SQL scripts due to key word clashes, examine the errors and add the appropriate words to the key word mapping file.
A provided file (BE_HOME/bin/dbkeywordmap.xml) ships with some basic mappings: start, end, and schema. You can use it as a model.
Unlike the Aliases file, the key word mapping file is not a project-specific file. It is intended to be generally useful across different projects. However, keyword mappings are also added to the aliases file when you run the SQL scripts, so you can also provide project-specific aliases for the generic mappings, if you want to. See JDBC Backing Store Database Configuration Tasks on page 212 for full details.

TIBCO BusinessEvents Administration
Resources Required for Setting Up the Database | 209
Resources Required for Setting Up the Database
DBMS Software and Installation Requirements
The following sections contain a few relevant notes about the database products. See the product readme file for information about supported database versions.
Minimum User Permissions
By default the BusinessEvents user permissions are set to DBA privileges. At a minimum, the user must be able to create tables and views. For example for an Oracle database you could use the following:
DROP USER BE_ORCL CASCADE;CREATE USER BE_ORCL IDENTIFIED BY BE_ORCL;GRANT CONNECT TO BE_ORCL;GRANT RESOURCE TO BE_ORCL;GRANT CREATE ANY VIEW TO BE_ORCL;GRANT CREATE ANY TABLE TO BE_ORCL;
SQL Server
Here are a few helpful points about SQL Server:
• For non-production purposes, it is convenient to use SQL Server authentication so you can create database users as needed. Select this option when you install Microsoft SQL Server. With Windows Authentication, on the other hand, you may have difficulties creating users without help from others in your enterprise.
• The datetime datatype in SQL Server 2005 has the following range: 1/1/1753 to 12/31/9999.
• Microsoft SQL Server 2008 has added a new data type, datetime2, which has a date range of 0001/01/01 through 9999/12/31. Therefore, if you are using Microsoft SQL Server 2008, then you can manually change the generated SQL script (DDL) for your backing store, and replace any affected columns’ data type from datetime to datetime2.
• Use the SQL Server JDBC driver, sqljdbc4.jar. You can download this driver from:
At time of writing, Oracle Database and Microsoft SQL Server are supported. Any later additions would be noted in the product readme file.

TIBCO BusinessEvents Administration
210 | Chapter 13 JDBC Backing Store Configuration
http://msdn.microsoft.com/en-us/data/aa937724.aspx
Oracle
Here are a few helpful points about Oracle:
• You can download the Oracle JDBC driver from:
http://www.oracle.com/technology/software/tech/java/sqlj_jdbc/htdocs/jdbc_111060.html
— For Oracle Database 10g use ojdbc14.jar
— For Oracle Database 11g use ojdbc6.jar
• Maximum length for an Oracle table name or column name is 30 characters.
Provided Configuration Resources
The table below lists resources required and sections following explain the procedures for setting up backing store tables.
Table 40 Resources Required for JDBC Backing Store Implementation
Resource Default Location and Notes
cep-backingstore.jar BE_HOME/lib
A JAR file required for backing store functionality (for both Oracle and JDBC store features).
Provided Files in BE_HOME/bin
base_types.xml The base_types.xml file is used by the deployment utility. Do not edit this file.
(The base_types.sql file in the same location is used by the Oracle-only backing store and is not needed here.)
be-jdbcdeploy executable
be-jdbcdeploy.tra
Executable and property files used to generate SQL scripts (see Generated SQL Scripts below).
create_tables_oracle.sql
create_tables_sqlserver.sql
Use the appropriate SQL (DDL) script for your DBMS. This script creates the tables that are used to maintain the metadata.
The script drops any existing tables and recreates them.

TIBCO BusinessEvents Administration
Resources Required for Setting Up the Database | 211
dbkeywordmap.xml This file contains mappings to handle words used in the BusinessEvents project that are database reserved words. See Ontology Identifiers That Use Database Key Words on page 208 for details.
initialize_database_oracle.sql
initialize_database_sqlserver.sql
Use the appropriate script for your DBMS.
Note This script drops the user (and therefore all the tables) and adds the user again.
By default the user is called be_user with the password be_user and the user has DBA rights. Edit the script if you want the user to have a different name or different rights.
For SQL Server, this script also creates the default database, with the name be_user and makes it the default database for the user be_user.
Generated SQL Scripts
These scripts are generated when you run the be-jdbcdeploy executable. Provide a value for yourname when you generate the scripts.
They are located in the same directory where you run be-jdbcdeploy.
yourname.sql This SQL (DDL) script creates schema tables and types.
yourname.aliases This script has entries if the database table identifiers are longer than the DBMS maximum character limit. See and Task F, Check the Aliases File and Modify Aliases as Desired, on page 216.
yourname_alter.sql The yourname_alter.sql script is for use in schema migration. See Updating an Existing Backing Store Database Schema on page 219.
yourname_remove.sql For use as needed. This script removes the database schema. You can use it to reset the project.
yourname_cleanup.sql For use as needed. This script truncates the tables.
Table 40 Resources Required for JDBC Backing Store Implementation (Cont’d)
Resource Default Location and Notes

TIBCO BusinessEvents Administration
212 | Chapter 13 JDBC Backing Store Configuration
JDBC Backing Store Database Configuration Tasks
Simple Case
Complex Case
Task B: Prepare the EAR, TRA, and Database Driver Files
Task C: Run the Initialize Database scripts (as system user)
Run the Create Tables SQL Scripts (as be_user)
Task F: Run the Project Schema Script (as be_user)
Setup Done!
Task D: Generate the Project-Specific SQL scripts
Task B: Prepare the EAR, TRA, and Database Driver Files
Task C: Run the Initialize Database scripts (as system user)
Modify
aliases
Task G: Run the Project Schema Script (as BE_User)
Are there key word errors? Task G: Add
keyword aliases
Setup Done!
Do you want to change any aliases?
No
Yes
Yes
Task F: Check the Aliases File
Task E: Generate the Project-Specific SQL scripts
Task A: As Needed, Set Entity and Property Metadata Properties
No
Task D: Run the Create Tables SQL Scripts (as be_user)

TIBCO BusinessEvents Administration
JDBC Backing Store Database Configuration Tasks | 213
Task A As Needed, Set Entity Metadata Properties
You may need to modify your BusinessEvents Studio project before you generate the EAR file. Check the project and, as needed, do the following:
• Set Metadata Properties for Long Identifiers, as Desired
• Set the Maximum Column Length for Long String Values, as Needed
Set Metadata Properties for Long Identifiers, as Desired
You can let the be-jdbcdeploy utility create aliases for long identifiers, or you can set short database identifier names before generating the EAR, using metadata properties. For more details about this choice, see Names that Exceed the DBMS Maximum Column Length on page 207.
To set short database identifiers for affected entities and properties do the following.
1. In BusinessEvents Studio, open the entity editor for each affected item.
2. For an entity name that is too long, in the Metadata section of that entity’s editor, set the Table Name field to the desired value.
3. Save the resource.
Set the Maximum Column Length for Long String Values, as Needed
For properties whose value could be longer than 255 characters, do the following. See String Properties That Exceed the Maximum Database Column Length on page 208 for more details.
1. In BusinessEvents Studio, open the entity editor for each affected item.
2. Right-click the row for each affected property. From the shortcut menu, select Metadata. You see a pop-up dialog.
3. Set the Max Length field to the expected maximum length of a value.
4. Save the resource.
Note that the entity property metadata field Column Name is not used in this release.
It is recommended that you specify table names that start with "D_" to match the standard naming convention.

TIBCO BusinessEvents Administration
214 | Chapter 13 JDBC Backing Store Configuration
Task B Prepare the EAR, be-jdbcdeploy.tra, and Database Driver Files
As desired, you can configure the JDBC Connection resource for your backing store before creating the database, if you know the values to use. After you have created the database, it's a good idea to open your project again and test the connection. If you need to make corrections to the connection, do so and rebuild the EAR before deploying the project. The procedures in this guide assume you will configure the resource after setting up the database.
1. Ensure that you have a valid EAR for your project, with up-to-date ontology definitions. Model information in the EAR will be used to build tables in the database.
2. Ensure that cep-backingstore.jar is located in BE_HOME/lib (or other location in your class path).
3. As needed, copy your JDBC drivers file to BE_HOME/lib/ext (or other location in your class path).
4. Open the be-jdbcdeploy.tra file for editing
a. Specify which type of database you are using. The default value is oracle. Do not change the other configuration properties shown:
# BE base type schema filejava.property.jdbcdeploy.bootstrap.basetype.file %BE_HOME%/bin/base_types.xmljava.property.jdbcdeploy.bootstrap.keyword.file %BE_HOME%/bin/dbkeywordmap.xmljava.property.jdbcdeploy.database.type [oracle | mssql]
b. Also set the environment variables to appropriate values, as needed.
Task C Run the Initialize Database Script as the System User
This script creates the BusinessEvents user and initializes the database.
Running the initialize_databaseYourDBMS.sql script deletes the user before creating it again. Running the create_tables_YourDBMS.sql drops all database tables before creating them again. This means you can run these scripts again during test phases of your project development, without having to take extra cleanup steps.
The first time you run the scripts, you see harmless error or warning messages because there is nothing to delete.
If you are updating the schema for an existing backing store, see Updating an Existing Backing Store Database Schema on page 219.

TIBCO BusinessEvents Administration
JDBC Backing Store Database Configuration Tasks | 215
1. As desired, change the default BusinessEvents user credentials: Open the initialize_databaseYourDBMS.sql script for editing and change the default username and password. The documentation uses the default username (be_user) and password (be_user)
2. Navigate to the location of the scripts (by default in the BE_HOME/bin directory) and open an SQLPlus or OSQL prompt. (For example, open a command window, type SQLPlus then provide the system user credentials.)
3. For SQL Server, type a command like the following at the prompt:
osql -S Your-Server-Name -U system_user -P sys_user_password -n -i initialize_database_sqlserver.sql
For Oracle you would use a command like this:
sqlplus system_user/sys_user_password@SID @ initialize_database_oracle.sql
This script creates the BusinessEvents database user. This user must be used to run the other scripts. You see messages like the following:
DROP USER be_user CASCADE *ERROR at line 1:ORA-01918: user 'BE_USER' does not exist
User created.Grant succeeded.SQL>
Task D Run the Create Tables Scripts as the BusinessEvents User
Next you log on as the BusinessEvents user, be_user by default and run a script to create non-project specific tables.
1. Navigate to the location of the scripts (by default in the BE_HOME/bin directory) and open an SQLPlus or OSQL prompt. (For example, open a command window, type SQLPlus then provide the system user credentials.)
2. For SQL Server, type a command like the following at the prompt:
osql -S Your-Server-Name –d Your-DB-Name -U be_user -P be_user -n -i @create_tables_sqlserver.sql
For Oracle you would use a command like this:
Using your database product, you can configure additional users to access the database, in addition to this user.

TIBCO BusinessEvents Administration
216 | Chapter 13 JDBC Backing Store Configuration
sqlplus be_user/be_user@SID @ create_tables_oracle.sql
Use the credentials defined in the initialize_database_oracle.sql or initialize_database_sqlserver.sql files. By default those are: username be_user, with password be_user.
Task E Generate the Project-Specific SQL Scripts
Open a command window and navigate to BE_HOME\bin. Run be-jdbcdeploy.exe using a command with the following format:
be-jdbcdeploy [-p property file] [-o schema output file] [EAR Path] [-h]
For example:
be-jdbcdeploy -o acme c:/BEProjects/MyEar.ear
The generated scripts appear in the directory where you run the executable. For example, if you provide the schema output filename acme, you would see files called acme.sql, acme.aliases, and acme_remove.sql.
The user-defined part of the database schema is in the schema output file (yourname.sql) as schema definition commands. In Task G you run this script (together with provided scripts) to build the schema in the database.
The options are explained in the following table:
Task F Check the Aliases File and Modify Aliases as Desired
The aliases file contains any table names that are longer than the database maximum length for table names, and auto-generated short aliases for them. (For example, the Oracle limit is 30 characters, and the SQL Server limit is 128 characters.)
It’s a good idea to check the aliases file for entries, even if the BusinessEvents names are not very long. The length of the generated database table names is not easy to predict.
Option Description
-p, /p, -property, or /property
Specifies the property file. If not specified, the default property file is used, that is, be-jdbcdeploy.tra in the current directory.
-o Specifies the schema output filename for deployment.
-h, /h, or /help Displays this help.
TIBCO BusinessEvents Administration
JDBC Backing Store Database Configuration Tasks | 217
Optionally, you can edit the file to provide more meaningful names.
Key word
mapping file
Entries in the key word mapping file are also added to the aliases file so you can replace the key word aliases with project-specific ones, as desired (generally in a second pass). For details see Task H, If Needed — Map Key (Reserved) Words to Aliases, on page 218.
1. Open the yourname.aliases file for editing.
2. Replace any aliases as desired with more meaningful short names. Make sure that each name is unique. It’s a good idea to leave any system generated prefixes or suffixes in place for consistency of names across the database.
3. Perform Task E, Generate the Project-Specific SQL Scripts, on page 216, again. This time, the aliases you created are used.
Task G Run the Project Schema Script (as be_user)
In this step, you log on as the user you created and run a script to create the project related part of the database schema.
The schema combines the definitions in base-types.sql, create-tables.sql, and the generated schema file, yourname.sql (acme.sql as an example).
1. Login to the database server as be_user, password be_user—or whatever username and password you set in the script in Task C).
2. Navigate to the location of the scripts and open an SQLPlus prompt (Oracle) or OSQL prompt (SQL Server). Identify yourself as the BusinessEvents user again.
3. At the SQL prompt, type the following to run the script:
@yourname.sql (for example, @acme.sql )
If there are no errors, your database tables are now configured for use. If there are errors you may need to add some mappings to the key word mapping file.
It is recommended that you keep the aliases file for future reference. If the project ontology changes after the backing store has data in it, you must also update the database schema to match (as explained in Updating an Existing Backing Store Database Schema on page 219). If you modified the generated aliases, you must use the same aliases again when you update the schema, to preserve those columns and their data.

TIBCO BusinessEvents Administration
218 | Chapter 13 JDBC Backing Store Configuration
Task H If Needed — Map Key (Reserved) Words to Aliases
Complete this task only if you saw errors after completing Task G, Run the Project Schema Script (as be_user). Such errors are caused when your project ontology uses terms that are key words (reserved terms) in the DBMS you are using. You must map these terms to an alias in the keyword mapping file.
1. Edit the BE_HOME/dbkeywordmap.xml file to add entries. Below is the format followed by an example:
<keyword name=“dbKeyWord" mapname=“nonDbKeyWord"/>
<keyword name="start" mapname="start_"/>
2. Repeat Task E, Generate the Project-Specific SQL Scripts, on page 216, and tasks following as needed.
Next Step
After you have set up the database, perform project configuration activities as explained in See Adding a JDBC Connection Resource to the Studio Project on page 225 and Configuring Backing Store Properties in the CDD Editor on page 226 for details.
Also, remember to update your schema if your ontology changes. See Updating an Existing Backing Store Database Schema on page 219
0
Providing Project-Specific Key Word Aliases When you repeat Task E, the new key words are added to the yourname.aliases file. You can create project-specific aliases for the key word mappings as desired. Then repeat Task E again and continue.
Note that you must generate the SQL scripts a total of three times if you add keyword mappings to the aliases file — a summary of the whole procedure is as follows:
1. Generate the SQL scripts and run them (as explained in the procedures).
2. Errors occur due to key word clashes, so you add the appropriate key word mapping entries to the key word mapping file.
3. Generate the SQL scripts again.
4. To use project-specific aliases for the keyword mappings (Optional):
a. Edit the aliases file entries for the key word mappings.
b. Generate the SQL scripts again.
5. Run the SQL scripts to create the backing store.
TIBCO BusinessEvents Administration
Updating an Existing Backing Store Database Schema | 219
Updating an Existing Backing Store Database Schema
If you change the project ontology, that is, if you create, alter or delete a concept or an event, you must update the backing store schema so it matches the updated ontology. You must do this before you deploy the updated project.
What the Schema Update Utility Can and Can’t Handle Automatically
You must examine the alter script before you run it. Entries that could result in data loss are commented. Decide what changes to make manually and what changes to make using the script, taking into account the kind of data in the tables. Remove or comment entries for changes you will make manually.
Adds
The schema migration utility handles addition of entity types and attributes. New entity types and attributes are added to the database schema.
Changes (Drop and Add) — Assess individually
The utility handles changes to attributes (entity properties) as DROP and ADD operations. However, DROP operations are commented in the script to avoid data loss.
If a column is empty, or you don’t want to keep the data they contain, you can enable the DROP operation and let the utility handle the change.
If the column contains data that you want to keep, then make the change manually using an appropriate database tool. For example, you can change the data type of a column from string to double without loss of data, as long as all the column values are numeric values.
Entity Deletions
If an entity is deleted from the Studio project, the corresponding tables are not dropped from the database schema. Existing data is not lost. Deleted entities are not mentioned in the alter script. Manually keep track of and delete such tables as needed.

TIBCO BusinessEvents Administration
220 | Chapter 13 JDBC Backing Store Configuration
Attribute Deletions
The schema update utility does handle deletion of entity attributes. SQL statements for deleted attributes are generated but they are commented. Examine the alter script and enable these commands if you want to execute them. Note that existing data is lost when you drop an attribute.
Example Alter Script
Below is an example yourname_alter.sql script.
Property type
change
-- ##### WARNING : Non-alterable Ontology changes found. Please see following errors. Manual schema-migration is required.
--* For Concept Concept1 field PROPERTY_1 type changed from VARCHAR2 to LONG
-- ALTER TABLE D_Concept1 DROP ( Property_1 );
ALTER TABLE D_Concept1 ADD ( Property_1 numeric(19) );
New table DROP TABLE D_Book_rrf;
CREATE TABLE D_Book_rrf (pid numeric(19), propName char varying(255), id$ numeric(19) not null);
New property -- ALTER TABLE D_MyConcept DROP ( FOLDER_1 );
ALTER TABLE D_MyConcept ADD ( Folder_0 char varying(255) );

TIBCO BusinessEvents Administration
Updating an Existing Backing Store Database Schema | 221
The Procedure
To Update an Existing Backing Store Database Schema
1. To prepare for the update, do the following:
— Gracefully shut down the deployed application (all agents and cache servers).
— Back up your existing database.
— Generate the updated EAR file for the modified project.
— If you modified aliases when you created the schema, locate the yourname.aliases file you used. It will help you to modify those aliases in the newly generated file, so they match.
2. Open the be-jdbcdeploy.tra file for editing and set the following properties:
be.jdbc.schemamigration.url=SourceDbURL
be.jdbc.schemamigration.user=username
be.jdbc.schemamigration.pswd=password
— Use the database URL that points to the existing backing store. See Adding a JDBC Connection Resource to the Studio Project on page 225 for example URLs.
— Use the same username and password you used when setting up the backing store. See Task C, Run the Initialize Database Script as the System User, on page 214.
These properties enable the program to compare the schema of the existing database with the ontology in the project EAR file, and generate the alter script.
3. Log on as the user name you specified in Task C, Run the Initialize Database Script as the System User, on page 214.
4. Run the be-jdbcdeploy.exe utility as explained in Task E, Generate the Project-Specific SQL Scripts, on page 216, using the updated EAR file.
5. If any of the new or changed definitions result in entries in the yourname.aliases file, and you want to change the provided aliases, follow instructions in Task F, Check the Aliases File and Modify Aliases as Desired, on page 216. If you modify aliases, remember to generate the scripts again so the modified aliases are used.
You must use the same aliases that you used before. If any were modified when the schema was created, you must modify them the same way when updating the schema. It can be useful to refer to the original aliases file.

TIBCO BusinessEvents Administration
222 | Chapter 13 JDBC Backing Store Configuration
6. Examine the generated yourname_alter.sql script and modify as needed so you only run statements for changes you want to make. See What the Schema Update Utility Can and Can’t Handle Automatically on page 219 for details.
7. Run the yourname_alter.sql script.
Your database tables are now configured for use.

TIBCO BusinessEvents Administration
Backing Store Table Reference | 223
Backing Store Table Reference
Each ontology type in the backing store has its own primary table and zero or more second-level tables. There are only two levels of tables, which makes the database easier to manage and easier to understand.
Primary Tables
Primary tables contain only primitive properties such as the following:
cacheId
time_created$
time_last_modified$
parent$_id$
id$
extId$
state$
And various Value fields
Secondary Tables
Secondary tables are used for complex properties, that is, arrays, properties with history, and concept relationship properties. Each array and history-enabled property has a separate table. Only primitive properties are stored in the primary table.
Table 41 Secondary table structure
property Type Column Description
Array pid$ Parent ID
valPid$ Array index
val Item’s value
History pid$ Parent ID
howMany Number of history items
timeIdx Item’s time stamp

TIBCO BusinessEvents Administration
224 | Chapter 13 JDBC Backing Store Configuration
Reverse Reference Tables
Each concept also has a reverse reference table. This table’s name contains the concept name and ends with the characters _rrf$. It has these columns:
Class-to-Table Mapping
This table contains the mapping between class names and table names, and the mapping between complex property field names and secondary table names.
for example:
'be.gen.Ontology.DeleteVerifyEvent', 'D_DeleteVerifyEvent‘'be.gen.Ontology.Treatment', 'D_Treatment‘‘be.gen.Ontology.Treatment', 'rrf$', 'D_Treatment_rrf$‘'be.gen.Ontology.BaseAlert', 'treatments', 'D_BaseAlert_treatments'
val Item’s value
Array with History pid& Parent ID
valPid$ Array index
howMany Number of history items
timeIdx Item’s time stamp
val Item’s value
Table 41 Secondary table structure
property Type Column Description
Column Description
pid$ Parent ID
valPid$ Array index
id$ Identifier

TIBCO BusinessEvents Administration
Adding a JDBC Connection Resource to the Studio Project | 225
Adding a JDBC Connection Resource to the Studio Project
Add a JDBC Connection resource to your project and configure it to connect to the backing store. Details below use as an example a local instance of Oracle 10g Express Edition database. Adapt the instructions as needed for your database. A reference to the fields is provided in the section JDBC Connection, in TIBCO BusinessEvents Developer’s Guide
1. In BusinessEvents Studio, open your project, and open the folder where you keep shared resources and select New > Other. > TIBCO Shared Resources > JDBC Connection.
2. In the JDBC Driver field, select the driver for your database, for example, oracle.jdbc.OracleDriver. The driver appears in the JDBC Driver field and a Database URL format appears according to the driver you selected. For the Oracle thin driver, the format is:
jdbc:oracle:thin:@<host>:<port#>:<db_instancename>
3. In the Database URL field, configure the provided format. For example:
jdbc:oracle:thin:@localhost:1521:ORCL
where 1521 is the default port, and ORCL is the default instance name for Oracle Database 10g.
4. In the User Name and Password fields, enter the username and password of the database user (see Task C, Run the Initialize Database Script as the System User, on page 214).
5. Click Apply, then click Test Connection. If the database is running and the details are correct, you see a success message. (True only if you add the JDBC driver to the project libraries in BusinessEvents Studio).
6. Save the resource.
7. Rebuild the EAR file.
The value of the CDD Cluster tab > Backing Store > Connection > Max Size field overrides the value of the JDBC Connection Resource Max Connections setting.

TIBCO BusinessEvents Administration
226 | Chapter 13 JDBC Backing Store Configuration
Configuring Backing Store Properties in the CDD Editor
This section summarizes CDD configuration related to use of a backing store. It assumes that you are adding backing store support to an existing project configured for cache OM.
Enabling Backing Store and General Settings
For details on the following, see Cluster Tab — Cache Manager — Backing Store Settings, page 33 and related content in Chapter 2, CDD Configuration Procedures, on page 5:
• Enabling or disabling backing store.
• Selecting a backing store implementation and database product.
• Choosing whether to use Oracle strategy, if you choose the Oracle Database product.
Note that the cache-aside method of database write management is enabled internally for JDBC backing store independently of any setting.
Database Connection Settings
For details on the following, see Chapter 2, CDD Configuration Procedures, on page 5:
• The JDBC connection resource to use.
• Whether to enforce pool settings.
• The max and initial pool settings.
You can also control how data is loaded from the backing store to the cache at startup. See Cluster Tab — Cache Manager — Domain Objects Settings on page 41 for details.
JDBC backing store requires use of cache-aside write management.

TIBCO BusinessEvents Administration
Configuring Backing Store Properties in the CDD Editor | 227
• If Oracle Strategy is used then:
— Min setting is available.
— Max and initial pool settings use Oracle properties.
— Additional properties are available. See Cluster Tab — Cache Manager — Backing Store Settings, page 33 and Cluster Tab — Cache Manager — Backing Store Properties, page 37
If a Custom Cache Configuration File is Used
If you have customized the cache configuration file, coherence-cache-config-jdbc.xml, add the following property to the cluster tab property sheet: tangosol.coherence.cacheconfig and provide the filepath and name of the custom file as the value.
To correctly enable JDBC backing store functionality, you must also update your customized file as follows. Change instances of this string:
com.tibco.be.oracle.BECoherenceOracleStore
To this string:
com.tibco.be.jdbcstore.becoherencejdbstore
In the standard cache configuration file, you would replace six instances.
Specifying Limited Cache Size
When you use a backing store you may want to use a limited size cache. Use of the limited cache properties require backing store to be used.
If you want to limit the size of the cache, set the isCacheLimited property to true.
be.engine.cluster.isCacheLimited=truebe.engine.limited.cache.back.size.limit=10000
You only need to set the size limit if you want to use a size other than the default.
Configuring Exceptions When backing store is enabled, you can configure individual entity types can be set to not use a backing store. To do so use the entity metadata property, hasBackingStore. See Entity-Level Configuration for Cache and Backing Store on page 25.

TIBCO BusinessEvents Administration
228 | Chapter 13 JDBC Backing Store Configuration

TIBCO BusinessEvents Administration
| 229
Appendix A Setting up an Oracle-Only Backing Store
A backing store enables persistent backup of data in the cache. Use of a backing store enables recovery in the event of a system-wide failure.
This appendix covers setting up the backing store database using the Oracle-only backing store feature.
You must also configure backing store settings for the Oracle-only backing store.
Topics
• Oracle-Only Backing Store Database Setup Overview, page 230
• Resources Required for Setting Up the Oracle Database, page 232
• Oracle-Only Backing Store Database Configuration Tasks, page 234
• Updating an Existing Oracle Database Schema, page 238
• Project Configuration for Oracle-Only Backing Store, page 240
• Oracle-Only Backing Store Runtime Behavior, page 241
• Handling Deleted Entities, page 242
If you are setting up a backing store for the first time, it is recommended that you use the current feature, JDBC backing store, which works with more DBMS products. It also has a more human-readable schema. See Chapter 13, JDBC Backing Store Configuration, on page 205.

TIBCO BusinessEvents Administration
230 | Appendix A Setting up an Oracle-Only Backing Store
Oracle-Only Backing Store Database Setup Overview
You can implement an Oracle-only backing store for use with any Cache object management option. At system startup, data is loaded into the cache from the backing store. During regular operation, the cache persists the data that is written to it in the backing store. This happens at the end of each RTC.
If you use a limited-size cache, you generally use a backing store so that data evicted from the cache is not lost.
This overview provides summary information about setting up the database, with references to the sections that provide detailed information.
You must also configure various properties to enable and configure backing store functionality.
Oracle-Only Backing Store Requirements
Backing store functionality has been tested with Oracle 10g Enterprise Edition and Oracle Database 10g Express Edition (see the readme file for specific version information). You can download the Express Edition for development use from the Oracle web site.
Instructions in this chapter assume you are working with a local database for testing. For production deployments, you might have to ask a database administrator to create a database user for you. You should then be able to run the other SQL scripts yourself, logged on as the user created by the administrator.
Before You Begin Database Setup
• Develop your caching solution and test it. See Chapter 2, CDD Configuration Procedures, on page 5.
• Ensure that you have access to a supported database management product and can create a user and tables.
Oracle-Only Backing Store Database Setup Tasks
Backing store configuration tasks for each backing store, and background information are summarized below.
• Resources Required for Setting Up the Oracle Database on page 232 outlines all the resources you need to set up a backing store.

TIBCO BusinessEvents Administration
Oracle-Only Backing Store Database Setup Overview | 231
• Oracle-Only Backing Store Database Configuration Tasks on page 234 explains several tasks you must complete in order to configure the database schema, including generating SQL scripts for your project and running them to create the database user and tables.
Extra Procedure to Handle Long Database Identifier Names
A known limitation in Oracle means that each identifier name cannot exceed 30 characters in length. If you have longer names, remember to complete Task C, Shorten Long Names Using the Aliases File, on page 235, to give an alias to each long identifier name.
Every entity, property, or state machine whose name exceeds 30 characters in length has an entry in the generated yourname.aliases file (For example, acme.aliases). This file has no entries if all names have 30 characters or less.
Note that you must run the be-oradeploy utility again, after updating the yourname.aliases file (as mentioned in the procedure.)
After You Finish Database Setup
You must also configure various properties to enable and configure backing store functionality.
Maintaining a Backing Store — If Ontology Object Definitions Change
If you add, change, or delete ontology object definitions, the backing store schema will no longer match your ontology. You must update the backing store schema so it still matches the ontology. See Updating an Existing Oracle Database Schema on page 238 for details

TIBCO BusinessEvents Administration
232 | Appendix A Setting up an Oracle-Only Backing Store
Resources Required for Setting Up the Oracle Database
The table below lists resources required and sections following explain the procedures for setting up backing store tables.
Table 42 Resources Required for Backing Store Implementation
Resource Default Location and Purpose
Oracle 10G This feature has been tested with Oracle 10g Enterprise Edition and Oracle Database 10g Express Edition (see the readme file for specific version information).
Oracle JDBC Driver
Oracle Thin driver recommended
Oracle JDBC drivers are not provided. Download the client from the Oracle web site or find the drivers in your Oracle Client installation.
Copy the JAR files (for example, ojdbc14.jar) to BE_HOME/lib/ext or elsewhere in your class path. Backing store functionality has been tested with Oracle Thin driver.
be-oracle.jar BE_HOME/lib
A JAR file required for backing store functionality.
be-oradeploy.exe
be-oradeploy.tra
BE_HOME/bin
Executable and property files used to generate SQL scripts (see below).
Provided SQL Scripts
initialize_database.sql
base_types.sql
create_tables.sql
BE_HOME/bin
The initialize_database.sql script drops the user (and therefore all the tables) and adds the user again. By default the user is called be_user with the password be_user and has DBA rights. Edit the script if you want the user to have a different name or different rights.
The base_types.sql script defines the base types, corresponding to the BusinessEvents object data structure.
The create_tables.sql script creates the tables that are used to maintain the metadata. It does not drop any existing tables.

TIBCO BusinessEvents Administration
Resources Required for Setting Up the Oracle Database | 233
Generated SQL Scripts
yourname.sql
yourname.aliases
yourname_remove.sql
yourname_cleanup.sql
yourname_alter.sql
yourname_delete.sql
These scripts are generated when you run the be-oradeploy executable, and they are located in the same directory where you run be-oradeploy.
You provide the value of yourname when you generate the scripts.
The yourname.sql script is executed after the provided scripts are executed, as explained in the procedures below. It creates schema tables and types.
The yourname.aliases script has entries if your project has names longer than 30 characters. You must perform a procedure to provide aliases for long names, and then regenerate the SQL scripts again using the be-oradeploy utility. The procedure is explained in Task C, Shorten Long Names Using the Aliases File.
The yourname_remove.sql script can be used as needed. It removes the database schema. You can use it to reset the project
The yourname_cleanup.sql script can be used as needed. It truncates the tables.
The yourname_alter.sql script is for use in schema migration. Generated only if properties are added to be-oradeploy.tra, to identify the existing database and its user and password. See Updating an Existing Oracle Database Schema on page 238.
The yourname_delete.sql script is for use as needed to delete entities from the backing store that have been deleted from the cache. By default deleted entities are removed from the backing store at system startup. See Handling Deleted Entities on page 242.
Table 42 Resources Required for Backing Store Implementation (Cont’d)
Resource Default Location and Purpose

TIBCO BusinessEvents Administration
234 | Appendix A Setting up an Oracle-Only Backing Store
Oracle-Only Backing Store Database Configuration Tasks
As with any procedure that modifies your data, ensure that you have made backups before you begin.
Task A Prepare Files
1. Open your project in TIBCO Designer, and build the EAR file. Model information in the EAR will be used to build tables in the database.
2. Ensure that be-oracle.jar is located in BE_HOME/lib (or other location in your class path).
3. Copy your JDBC drivers file to BE_HOME/lib/ext (or other location in your class path). These files are part of the Oracle Client software.
Task B Generate the SQL Scripts
Open a command window and navigate to BE_HOME\bin. Run be-oradeploy.exe using a command with the following format:
be-oradeploy [-p property file] [-o Oracle schema output file] [EAR Path] [-h]
For example:
be-oradeploy -o acme c:/BEProjects/MyEar.ear
The options are explained in the following table:
Existing Backing Stores: After Ontology Object Definition Changes
See Updating an Existing Oracle Database Schema on page 238 for the impact of different kinds of changes and how you can update the backing store schema.
If you are not running from the default folder (BE_HOME/bin) or if you are not using the default files, you must provide both the --propFile and the -p parameters, and pass them the fully qualified name of the TRA file. For example:
be-oradeploy --propFile c:\mypath\myfile.tra -p
c:\mypath\myfile.tra
Option Description
-p, /p, -property, or /property
Specifies the property file. If not specified, the default property file is used, that is, be-oradeploy.tra in the current directory. See note above.

TIBCO BusinessEvents Administration
Oracle-Only Backing Store Database Configuration Tasks | 235
In the command window, you see various messages as schema definition commands are created in the generated scripts and the scripts are created.
The generated scripts appear in the directory where you ran the executable. For example, if you provided the schema output filename acme, you would see files called acme.sql, acme.aliases, acme_cleanup.sql, acme.delete.sql and acme_remove.sql.
The user-defined part of the database schema is created in yourname.sql as schema definition commands. In Task E you run this script (together with provided scripts) to build the schema in the database.
Task C Shorten Long Names Using the Aliases File
If the aliases file has entries, do the following to provide short aliases for all names longer than 30 characters (see Extra Procedure to Handle Long Database Identifier Names on page 231 for more details):
1. Open the yourname.aliases file for editing.
2. For each entity, property, and state machine name that exceeds 30 characters in length, provide an alias using a name that is shorter than 30 characters. Ensure the name is unique.
For example, you would modify the following entry:
TABLE.D_NewConceptNewConceptNewConceptNewConcept.alias=
D_NewConceptNewConceptNewConceptNewConcept
With a short name such as:
TABLE.D_NewConceptNewConceptNewConceptNewConcept.alias=
D_NewConceptNewConceptNewCon
3. Perform Task B, Generate the SQL Scripts, again. This time, the aliases you created are used.
Task D Run the Initialize Database Script to Create the Oracle User
-o Specifies the Oracle schema output filename for deployment.
-h, /h, or /help Displays this help.
Option Description
Running the initialize_database.sql script drops all existing backing store tables. If you have data you need to retain, contact TIBCO support for assistance.

TIBCO BusinessEvents Administration
236 | Appendix A Setting up an Oracle-Only Backing Store
In the initialize_database.sql script, the Oracle user is set to be_user, with password be_user. You can edit the script as needed to change these default settings. The documentation uses the default username and password.
1. Login to Oracle Server as the system user.
2. Navigate to the location of the scripts (or copy them all to the BE_HOME/bin directory) and open an SQLPlus prompt. (Open a command window, type SQLPlus then provide the system user credentials.)
3. Type @initialize_database.sql to run the provided script, initialize_database.sql. You see messages like the following:
DROP USER be_user CASCADE
*
ERROR at line 1:
ORA-01918: user 'BE_USER' does not exist
User created.
Grant succeeded.
SQL>
Note that the script assumes that it has been run before. It deletes the user before creating it again. This means you can run the script again without having to take extra steps. This is useful for testing purposes.
Task E Login as the Oracle User and Run SQL Scripts
In this step, you run scripts to create the database schema under the user you created. The schema combines the definitions in base-types.xml, create-tables.sql, and the generated schema output file (acme.sql as an example).
Note that these scripts also perform cleanup before creating the schema. The first time you run the scripts, you see harmless error or warning messages because there is nothing to delete.
1. Login to the Oracle server as be_user, password be_user (or whatever username and password you set in the script in Task D).
2. Navigate to the location of the scripts and open an SQLPlus prompt. Identify yourself as be_user with password be_user.
Using your database product, you can configure additional users to access the database, in addition to this user.

TIBCO BusinessEvents Administration
Oracle-Only Backing Store Database Configuration Tasks | 237
3. At the SQL prompt, type the following to run each script in turn:
a. @base_types.sql
b. @create_tables.sql
c. @yourname.sql (for example, @acme.sql )
Your database tables are now configured for use.

TIBCO BusinessEvents Administration
238 | Appendix A Setting up an Oracle-Only Backing Store
Updating an Existing Oracle Database Schema
If you change the project ontology, that is, if you create, alter or delete a concept or an event, you must update the backing store schema so it matches the updated ontology. You must do this before you deploy the updated project.
Not all changes can be automatically migrated. Manual migration is required for such changes.
What the Schema Migration Utility Can and Can’t Handle Automatically
The migration utility handles the following:
• Addition of entity types and attributes. New entity types and attributes are added to the database schema.
• Deletion of entity types and attributes. Deleted entity types and attributes are dropped from the database schema.
The utility can handle only certain changes to existing entities and attributes, depending on the datatype and on Oracle functionality. The utility does not handle changes to the data type of an existing attribute, for example, changing a String attribute to a number attribute.
To Update an Existing Backing Store Database Schema
Before you begin:
— Gracefully shut down the deployed application (all agents and cache servers).
— Back up your existing database.
1. Generate the updated EAR file for the modified project.
2. Save existing copies of yourname.sql and yourname.aliases so you can compare them with the files you will generate for the changed project.
3. Open the be-oradeploy.tra file for editing and set the following properties:
be.oracle.schemamigration.url=SourceDbURL
be.oracle.schemamigration.user=username
be.oracle.schemamigration.pswd=password
If the utility encounters any change in the schema that cannot be migrated automatically, then the migration script is not generated. In this case, migrate the data and the schema manually. Contact TIBCO support for assistance about handling of specific changes.

TIBCO BusinessEvents Administration
Updating an Existing Oracle Database Schema | 239
Where the username and password are those you set up in Task D, Run the Initialize Database Script to Create the Oracle User, on page 235.
The properties enable the program to compare the schema of the existing database with the schema of the project EAR file, to generate the schema alteration script.
4. Run the be-oradeploy.exe utility as explained inOracle-Only Backing Store Database Configuration Tasks on page 234, Task B, Generate the SQL Scripts, using the updated EAR file.
5. If any of the new or changed definitions result in entries in the yourname.aliases file, follow instructions in Task C, Shorten Long Names Using the Aliases File, on page 235. You must use the same aliases again for entity types (definitions) that used aliases before. Remember to generate the scripts again, as instructed in Task C.
6. Run the newly-generated script yourname_alter.sql script.
Your database tables are now configured for use.

TIBCO BusinessEvents Administration
240 | Appendix A Setting up an Oracle-Only Backing Store
Project Configuration for Oracle-Only Backing Store
Project configuration of an Oracle-Only backing store is similar to project configuration for a JDBC backing store. You must add a JDBC Connection resource with details for your database connection, and configure various settings in the CDD editor. See the following for details:
• Adding a JDBC Connection Resource to the Studio Project, page 225
• Configuring Backing Store Properties in the CDD Editor, page 226

TIBCO BusinessEvents Administration
Oracle-Only Backing Store Runtime Behavior | 241
Oracle-Only Backing Store Runtime Behavior
During regular operation, cache data is written to the backing store by the cache cluster.
With write-behind database writes management, only cache servers write to the backing store. Inference agents and query agents are not involved in writes to the database.
At system startup, the data is loaded into the cache from the backing store, using any one of the nodes (including nodes running inference agents and query agents).
Options to configure these behaviors are explained next.
Reading From the Backing Store at Startup
At system startup, after the minimum number of cache servers have started, the cache is loaded with backing store data. This occurs before the agents begin to process events or execute startup functions.
You can configure the system so that only certain objects are loaded into the cache from the backing store at startup. See Cluster Tab — Cache Manager — Domain Objects Settings on page 41.
Reading From the Backing Store At Runtime
At runtime, if an object is not in working memory it is requested from the cache. If it is not in the cache, the cache server retrieves that object from the backing store.
At runtime, only the cache servers interact with the backing store.
Writing to the Backing Store
After an RTC, data is written to the cache, and then the cache writes the data to the backing store.
Any node in the cluster can load data from the backing store to the cache at startup.

TIBCO BusinessEvents Administration
242 | Appendix A Setting up an Oracle-Only Backing Store
Handling Deleted Entities
When entities are deleted from the cache, they are added to a script that is run at system startup. The script removes the deleted entities from the backing store.
Depending on the number of deleted entities, the cleanup step can make system startup unacceptably slow.
Manual Deletion of Deleted Entities
To deal with slow startup, you can run the yourname_delete.sql script manually, to reduce the number of entities that have to be processed at startup. This script is generated by the be-oradeploy utility. See Generated SQL Scripts on page 233 for a list of scripts generated by the utility.
Disabling Deleted Entity Cleanup at System Startup
You can also disable the cleanup action performed at system startup and perform all cleanup manually, using the deletion script.
Add the following property to the TRA file and set it to false:
be.engine.cluster.cleanup

TIBCO BusinessEvents Administration
| 243
Appendix B Determining the Engine Name
When establishing the engine name, BusinessEvents software searches for a value from one of the settings in the order shown, accepting the first value it finds:
1. The name specified in the Processing Unit Configuration Name field in the cluster topology file. See Chapter 5, Site Topology Configuration, on page 79
2. API setting. If BusinessEvents is started using the public API, and a non-null instance name is provided when getting the RuleServiceProvider with RuleServiceProviderManager.newProvider(String instanceName,
Properties env)—this takes precedence over all other name settings.
3. The engine name set at the command line using the -name option. An engine name set at the command line overrides the engine name property set in the be-engine.tra or supplementary property file (see next).
4. The engine name set by the be.engine.name property. This property can be set in these ways:
— For command-line startup it can be set in a supplementary property file.
— For deployment to a TIBCO Administrator domain, it can be added to the Advanced tab (see Chapter 8, Deploying a TIBCO BusinessEvents Project, on page 153).
5. The name of the TIBCO Hawk microagent instance. This name exists if TIBCO Hawk is enabled at runtime. The microagent name can also be set in the be-engine.tra file using the property Hawk.AMI.DisplayName.
6. The host name.
7. This string: engine.

TIBCO BusinessEvents Administration
244 | Appendix B Determining the Engine Name

TIBCO BusinessEvents Administration
| 245
Appendix C Engine Startup and Shutdown Sequence
This section helps you understand the main actions that occur during engine startup and shutdown (in normal circumstances). In any particular project only some of the actions may be required. For example, a project may have no startup rule functions.
This section assumes cache OM. It provides the main milestones only and focuses on nodes running inference agents.
Startup Sequence
During engine startup the following actions occur:
1. System information displays (in consoles) and is recorded in the log file:
— The property file and EAR file that were used to start the engine.
— The version of the JAR files it is using, and the version of the JAR files that the EAR file was built with.
— If persistence OM is used, the location of the Berkeley DB software it is using, and information about what was recovered from the database.
2. Cache OM with backing store only: Recovery stage. When the minimum number of cache servers is started (as defined by the Cache Agent Quorum CDD setting), the cluster enters the recovery state. Various caches are preloaded from the backing store, according to preload settings. When recovery state ends, the cluster enters Ready state.
3. All inference agents build their Rete networks by evaluating conditions against all Cache Plus Memory objects (if any).
(Cache OM only) Inactive Nodes If all agents in an engine (node) are inactive, then this ends the startup sequence for that engine.
4. Channels start up for outbound traffic (inbound listeners do not start yet).
5. Scorecards are created.
6. Startup functions execute (for example, they initialize values of scorecards).
When Cache OM is used, you must start a node that has storage enabled first. That is, a cache server node, or (in test deployments) an agent node with local storage enabled.
TIBCO BusinessEvents Administration
246 | Appendix C Engine Startup and Shutdown Sequence
7. The first RTC cycle occurs and all rule actions that are eligible to execute now execute. (Scorecards and startup rule functions can cause rules to be eligible to execute. Depending on the state of entities recovered from the backing store, the RTC will take more or less time.) See TIBCO BusinessEvents Architect’s Guide for more details about RTC cycles.
8. The engine startup advisory event is asserted, and its RTC occurs (as needed).
9. Time events (if any) are asserted:
— The clock starts for repeating time events and they are created and asserted at the specified intervals.
— Rule-based time events (recovered or scheduled in a startup action) are asserted after the specified delay. The delay begins when the rule or rule function action executes, so at startup, it is possible for time events to have passed their start time, and they are asserted immediately.
10. Finally, inbound channel listeners activate and accept incoming events and the system is now fully started up.
Shutdown Sequence
During engine shutdown the following main actions occur:
1. Inbound channels and listeners shut down
2. Shutdown rule functions execute
3. An RTC occurs (as needed).
4. Outbound channels shut down.

TIBCO BusinessEvents Administration
| 247
Appendix D Advanced Caching Topics
This appendix provides details about caching topics that are useful only in some circumstances or provide background information for interested readers.
Topics
• Overriding and Extending the Operational Deployment Descriptor, page 248
• Specifying Operational Override File Locations, page 250
• Understanding Entity Caches, page 253

TIBCO BusinessEvents Administration
248 | Appendix D Advanced Caching Topics
Overriding and Extending the Operational Deployment Descriptor
The operational deployment descriptor is called tangosol-coherence.xml. This file is provided in BE_HOME/lib/ext/coherence.jar. In order to configure certain cache-related settings, you may need to override the values of certain elements in the operational deployment descriptor. This is explained in Overriding Element Values in Engine Property Files on page 248.
You may also need to define additional elements, and system properties for existing elements that lack them.
Overriding Element Values in Engine Property Files
BusinessEvents overrides the values of elements in the operational descriptor using their system-property attributes. The system-property attribute values are used in Java command line options, and those options are included in some standard BusinessEvents engine properties.
For example, the system-property attribute assigned to the element <cluster-name> is tangosol.coherence.cluster. BusinessEvents uses this attribute to specify a value for <cluster-name> in the engine property (TRA) files as follows:
java.property.tangosol.coherence.cluster myclustername
System properties are predefined for many operational elements. You can override the value of any element that has a system-property attribute by adding a Java command line option in the engine property files, as shown in the example above.
For detailed documentation of this feature, and a list of elements for which system-property attributes are predefined, see the section "Line Setting Override Feature" in the online reference, TIBCO BusinessEvents Cache Configuration Guide.
Defining Additional Elements and System Properties in Override Files
If there is no system-property attribute for a setting you want to override, or if you need to add more elements than are available in the operational deployment descriptor, you must create an override file (or a series of override files) to contain the system-property attributes and any new elements you require. For example, you might add more elements to provide well-known addresses for the servers in a cache cluster.

TIBCO BusinessEvents Administration
Overriding and Extending the Operational Deployment Descriptor | 249
You can store default values in an override file, and you can also create engine properties (using the system-property attributes) that override those file values. The settings you enter in engine property files override settings in the override file, and settings in the override file override those in the operational descriptor.
Override file elements that also exist in the operational descriptor must use the same structure as the elements in the operational descriptor.
Example: Adding Well Known Address Attributes
You would need to add elements if you use the well-known address method of defining a cache cluster and need more than six well-known addresses. (Six well-known addresses are declared in the default file, tangosol-coherence.xml.) Here is an example definition:
<well-known-addresses>
<socket-address id="1">
<address system-property="tangosol.coherence.wka"></address>
<port system-property="tangosol.coherence.wka.port">8088</port>
</socket-address>
</well-known-addresses>
In the override file, for example, tangosol-coherence-override-prod.xml, you add similar entries to the one provided in tangosol-coherence.xml, each specifying a unique system-property setting. For example:
<well-known-addresses>
<socket-address id="7">
<address system-property="tangosol.coherence.wka7"></address>
<port system-property="tangosol.coherence.wka.port">8089</port>
</socket-address>
<socket-address id="8">
<address system-property="tangosol.coherence.wka8"></address>
<port system-property="tangosol.coherence.wka1.port">8089</port>
</socket-address>
</well-known-addresses>
You can then use the system-property values in engine properties, and (in the case of the example shown) define the well known address values.
TIBCO BusinessEvents Administration
250 | Appendix D Advanced Caching Topics
Specifying Operational Override File Locations
As explained in Overriding and Extending the Operational Deployment Descriptor on page 248, in order to define additional elements or add system properties for existing elements, you use an override file.
You can actually use two or more tiers of override files depending on your needs:
• The first tier settings override and extend the operational deployment descriptor
• The second tier settings override and extend the first tier overrides.
• More tiers can be added as needed, though this is unlikely.
The reason for using multiple tiers is to enable all (or many) nodes to use the first tier overrides, while providing additional second tier overrides to selected nodes. For example, you may want to enable verbose logging on only one or two nodes for diagnostic purposes. To do so you would provide those settings in a second tier override file that you then reference in the selected nodes’ engine property files.
How the First Tier Override File Default Location is Specified
The operational descriptor file, tangosol-coherence.xml (located in BE_HOME/lib/ext/coherence.jar) contains an xml-override property configured to point to a default override file:
<coherence xml-override="{tangosol.coherence.override
/tangosol-coherence-override-{mode}.xml}">
The structure of the property is:
xml-override={property default-property-value}
where property is the name of the override property, and default-property-value is the filepath and name of the file.
How BusinessEvents Uses the Override Property
The object management layer looks for the specified override file in the classpath.
The default location of the file specified by tangosol.coherence.override is a file at the root level of the class path. BusinessEvents uses the first instance of this file that it finds at the root level of the classpath. For example, if you put an instance of this file at the root level of a different JAR file that is located closer to the beginning of the classpath, then that file is used instead of the one in coherence.jar.

TIBCO BusinessEvents Administration
Specifying Operational Override File Locations | 251
If a user overrides the default override location, BusinessEvents looks for the file specified in the same way.
Optional User-Defined Property for Flexibility in the Filename
You can use a user-defined property such as {mode} to define name patterns that provide flexibility. You can place multiple files that use the name pattern in the specified override location. For example, each of the following has a different value for {mode}: tangosol-coherence-override-dev.xml, tangosol-coherence-override-test.xml, and tangosol-coherence-override-prod.xml files. Then you can easily switch between files that have values appropriate for those environments at engine start-up.
You specify the value to use for the user-defined property in your TRA file, or at the command line.
For example, using {mode} as the user defined property, to specify the value in the TRA file, use:
java.property.mode Mode_Value
To override the value at the command line, use
-Dmode Mode_Value
Where (still using the example defined above) the Mode_Value is one of test, prod, or dev.
The default value for {mode} is prod (defined in the tangosol-coherence.xml descriptor). Therefore the default value for the first tier override file is /tangosol-coherence-override-prod.xml.
How to Specify a Different Location for the First Tier Override File
To override the default location of the first tier override file, you provide a value for the tangosol.coherence.override property either at the command line or using an engine property. You can do this one time only, on engine startup. The value and file contents must be the same on all nodes in a cluster.
The value of the property can be a file path or a JAR URL. It must be a location in the classpath.
To specify the override using an engine property, add the property name (specified in the xml-override property) and its value to the TRA files. All nodes in a cache cluster must specify the same file. For example:
java.property.tangosol.coherence.override=file:/c:/tmp/my_tangosol
-coherence-override.xml

TIBCO BusinessEvents Administration
252 | Appendix D Advanced Caching Topics
For URL locations inside any JAR, specify the path as in the following example:
java.property.tangosol.coherence.override=file:/home/jsmith/tmp/cl
ient/lib/coherence.jar!/my_tangosol-coherence.override.xml
You can alternatively specify the override as a system property, that is, a command line parameter at engine start-up. For example,:
-Dtangosol.coherence.override=file:/C:/tmp/my_tc-override.xml
How a Second Tier Override File Default Location is Specified and Overridden
The first tier override file can itself specify the default location and name of a second tier override file, again using the xml-override property:
xml-override={property default-property-value}
You would configure the property using different values, but the mechanism is the same. For example, you might use the property name be.coherence.override. You can also use another user property for part of the filename, if you want to provide that flexibility, for example:
<coherence xml-override="{be.coherence.override
/be-coherence-override-{be.coherence.environment}.xml}"
As explained above, if you want to specify a file of this pattern, for example, be-coherence-override-dev, you could specify the value in the TRA files or at the command line on engine start-up. Here is an example showing how the system property value is defined at the command line:
-Dbe.coherence.environment=dev
Similarly, if you want to specify a different location and filename for the second-tier override file, you would use the be.coherence.override property, for example:
-Dbe.coherence.override=file:C:/tmp/tango-coherence-override.xml

TIBCO BusinessEvents Administration
Understanding Entity Caches | 253
Understanding Entity Caches
This appendix is provided for those who want to understand the internal structures of the caches used in Cache object management. This information is not required for configuration tasks.
For each entity in working memory, a corresponding cache exists in the cache cluster. Internal entities also have caches for various purposes, explained in this section.
Entity Cache Names Format
Each entity cache has a name, which uses the following format:
cache-type.cluster-name.AgentClassName.entity-name
The elements of the above name are explained below
Cache Type (Caching Scheme)
Cache type is the type of caching scheme (as defined by its cache name in the coherence-cache-config.xml descriptor), for example, dist-unlimited-bs.
Cluster Name
Cluster name is the value of the following property:
java.property.tangosol.coherence.cluster
Agent Name
This field of the cache name is blank because BusinessEvents does not support agent-specific entity caches.
All entities are globally scoped and available to all agents.
Entity Name
Two types of entities have caches:
• Internal entities
• Ontology entities
Internal entity names and caches are listed and described in Table 43, Internal Entity Caches, on page 254.

TIBCO BusinessEvents Administration
254 | Appendix D Advanced Caching Topics
The ontology entity field of the entity cache name uses the entity’s generated class name, which is similar to its design-time folder path and name, prefixed by be.gen. For example:
be.gen.Concepts.LargeConcepts.ThisLargeConcept
Caches for Ontology Objects
These caches are used to store the objects of types defined in the ontology of the project.
The types of caches created for ontology objects depend on the caching scheme used. If the dist-unlimited-bs caching scheme is used, then the cache names look like this:
dist-unlimited-bs$foo$$be.gen.Order
Where foo is the cluster name.
Caches for Internal Entities
The following internal caches use a pre-defined scheme in the cache configuration file. Do not change this scheme. This information is provided for reference only.
Table 43 Internal Entity Caches
Entity (Cache) name Purpose of the Cache
Master Maintains the cluster state and is shared by all nodes.
Catalog Maintains a cached copy of all ontology definitions shared by all nodes.
TypeIDs Stores the mapping between type IDs and class names. All ontology objects are tagged with a unique integer ID. Use of IDs avoids the need to serialize and send class name strings between nodes.
ObjectTableIDs Stores the key mapping for all objects in the cluster. The objects themselves are stored in their respective caches.
ObjectTableExtIDs Stores the external key mapping for all objects that have an external ID (extId).
AgentTable Stores all the agents and their respective states across all cluster nodes and identifies the currently active and inactive nodes.
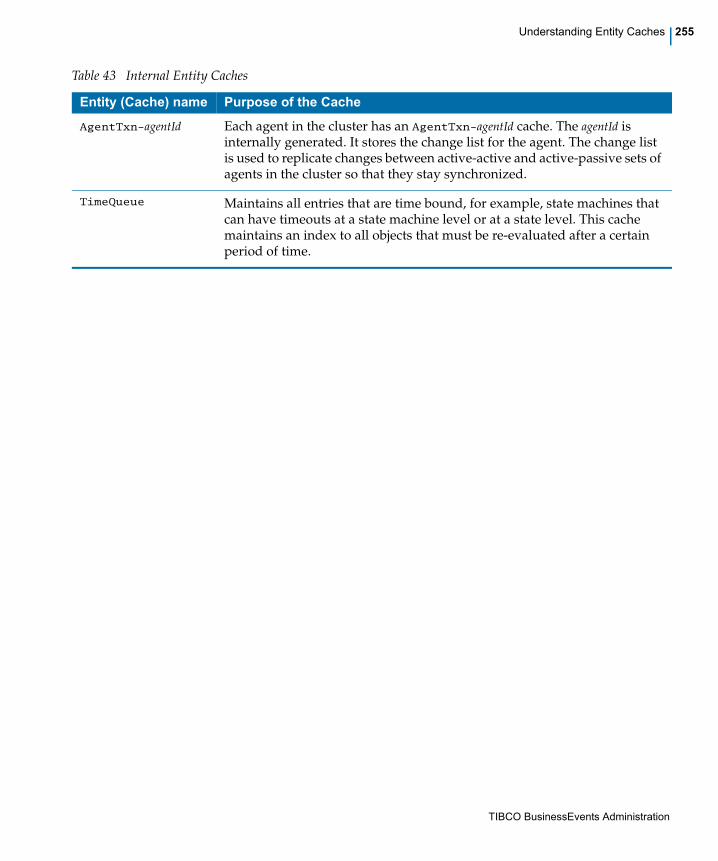
TIBCO BusinessEvents Administration
Understanding Entity Caches | 255
AgentTxn-agentId Each agent in the cluster has an AgentTxn-agentId cache. The agentId is internally generated. It stores the change list for the agent. The change list is used to replicate changes between active-active and active-passive sets of agents in the cluster so that they stay synchronized.
TimeQueue Maintains all entries that are time bound, for example, state machines that can have timeouts at a state machine level or at a state level. This cache maintains an index to all objects that must be re-evaluated after a certain period of time.
Table 43 Internal Entity Caches
Entity (Cache) name Purpose of the Cache

TIBCO BusinessEvents Administration
256 | Appendix D Advanced Caching Topics

TIBCO BusinessEvents User’s Guide
| 257
Appendix E TIBCO Hawk Microagent Methods
TIBCO Administrator is the preferred monitoring and management application for TIBCO BusinessEvents. However, the BusinessEvents engine is instrumented with a TIBCO Hawk microagent that can be used to perform many administrative functions. This appendix describes the microagent methods available for the BusinessEvents engine.
Topics
• TIBCO Hawk Methods Overview, page 259
• activateRuleSet(), page 260
• activateTraceRole(), page 261
• deactivateRuleSet(), page 262
• deactivateTraceRole(), page 263
• execute(), page 264
• forceOMCheckpoint(), page 265
• getChannels(), page 266
• getDestinations(), page 267
• getEvent(), page 268
• GetExecInfo(), page 269
• getHostInformation(), page 270
• getInstance(), page 271
• getMemoryUsage(), page 272
• getNumberOfEvents(), page 273
• getNumberOfInstances(), page 274
• getOMInfo(), page 275
• getRuleSet(), page 276

TIBCO BusinessEvents User’s Guide
258 | Appendix E TIBCO Hawk Microagent Methods
• getRuleSets(), page 277
• getScorecard(), page 278
• getScorecards(), page 279
• getSessionInputDestinations(), page 280
• getSessions(), page 281
• getStatus(), page 282
• getTotalNumberRulesFired(), page 283
• getTraceSinks(), page 284
• reconnectChannels(), page 285
• resetTotalNumberRulesFired(), page 286
• resumeChannels(), page 287
• resumeDestinations(), page 288
• stopApplicationInstance(), page 289
• suspendChannels(), page 290
• suspendDestinations(), page 291

TIBCO BusinessEvents User’s Guide
TIBCO Hawk Methods Overview | 259
TIBCO Hawk Methods Overview
BusinessEvents embeds a TIBCO Hawk microagent whose methods enable you to monitor and manage deployed BusinessEvents applications. You can use TIBCO Hawk or the Hawk Console in TIBCO Administrator.
Types of Methods
The methods documented in this appendix are provided for the following purposes:
• To enable TIBCO Administrator to perform certain actions, for example, GetExecInfo(), stopApplicationInstance(), getHostInformation()
• To provide information about what is happening in the BusinessEvents engine, for example, getRuleSets(), getDestinations(), getTotalNumberRulesFired()
• To make certain changes in the BusinessEvents engine without stopping it, for example, activateRuleSet(), forceOMCheckpoint(), reconnectChannels()
Enabling TIBCO Hawk Microagent
Before using the Hawk methods, you must enable the TIBCO Hawk microagent in the BusinessEvents engine property file, be-engine.tra. To do this, set the Hawk.Enabled property to true and ensure that it is uncommented.
If you are using non-default transport parameters for TIBCO Hawk, you must also set the repo.hawkDaemon, repo.hawkNetwork, and repo.hawkService properties to the values for the transport you are using.
For More Information
TIBCO Administrator Server Configuration Guide has more details on working with microagents and methods using TIBCO Administrator. TIBCO Hawk Methods Reference provides detailed documentation about TIBCO Hawk microagents and methods.

TIBCO BusinessEvents User’s Guide
260 | Appendix E TIBCO Hawk Microagent Methods
activateRuleSet()
Purpose Activate a RuleSet in the Session
Type ACTION
Parameters
Returns
Name Description
Session Name of the Session (optional).
URI URI of the RuleSet.
Type Description
Session Name of the Session (optional).
URI URI of the RuleSet.
Activated Is the RuleSet activated?
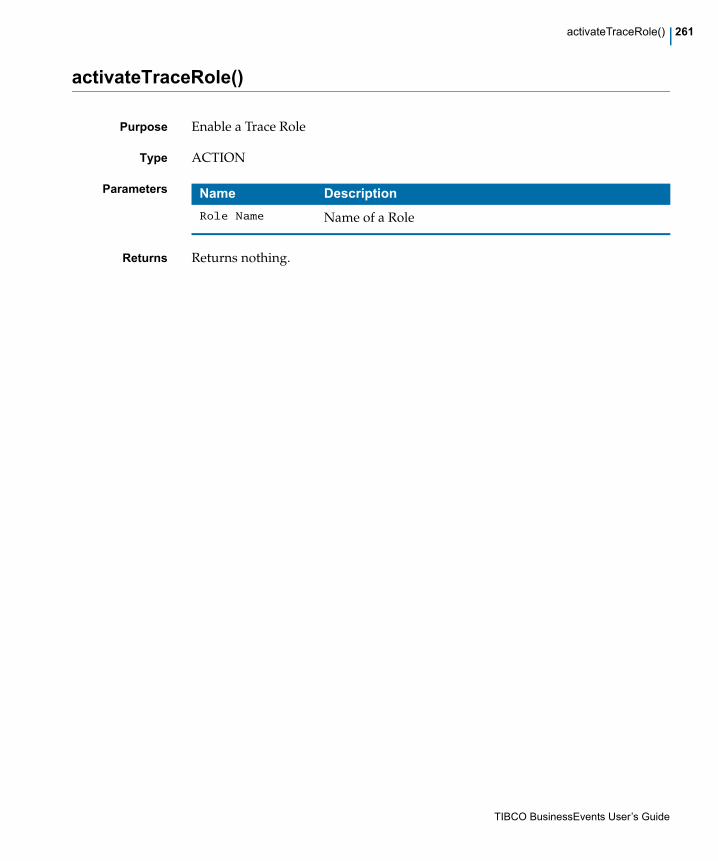
TIBCO BusinessEvents User’s Guide
activateTraceRole() | 261
activateTraceRole()
Purpose Enable a Trace Role
Type ACTION
Parameters
Returns Returns nothing.
Name Description
Role Name Name of a Role

TIBCO BusinessEvents User’s Guide
262 | Appendix E TIBCO Hawk Microagent Methods
deactivateRuleSet()
Purpose Deactivate a RuleSet in the Session
Type ACTION
Parameters
Returns
Name Description
Session Name of the Session
URI URI of the RuleSet
Type Description
Session Name of the Session.
URI URI of the RuleSet.
Deactivated Is the RuleSet deactivated?

TIBCO BusinessEvents User’s Guide
deactivateTraceRole() | 263
deactivateTraceRole()
Purpose Disable a Trace Role
Type ACTION
Parameters
Returns Returns nothing.
Name Description
Role Name Name of a Role
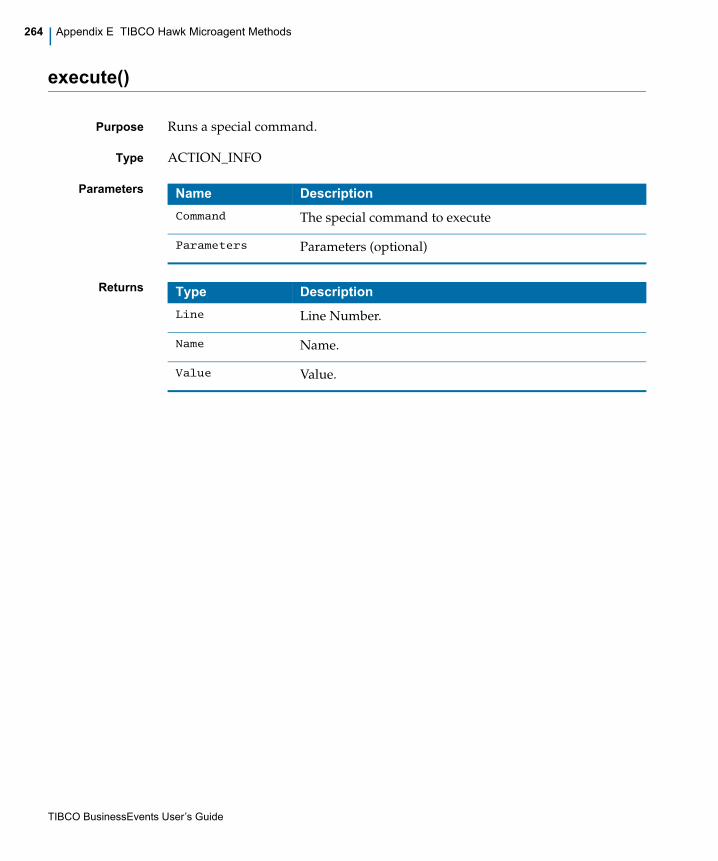
TIBCO BusinessEvents User’s Guide
264 | Appendix E TIBCO Hawk Microagent Methods
execute()
Purpose Runs a special command.
Type ACTION_INFO
Parameters
Returns
Name Description
Command The special command to execute
Parameters Parameters (optional)
Type Description
Line Line Number.
Name Name.
Value Value.

TIBCO BusinessEvents User’s Guide
forceOMCheckpoint() | 265
forceOMCheckpoint()
Purpose Forces a Object Store checkpoint of a Session.
Type ACTION
Parameters
Returns Returns nothing.
Name Description
Session Name of the Session

TIBCO BusinessEvents User’s Guide
266 | Appendix E TIBCO Hawk Microagent Methods
getChannels()
Purpose Retrieves Channel Info.
Type INFO
Parameters
Returns
Name Description
URI URI of the Channel (optional)
Type Description
Line Line Number
URI URI of the Channel.
State Current state of the Channel

TIBCO BusinessEvents User’s Guide
getDestinations() | 267
getDestinations()
Purpose Retrieves Destination Info.
Type INFO
Parameters
Returns
Name Description
Channel URI URI of the Channel (optional).
Destination
NameName of the Destination (optional).
Type Description
Line Line Number.
Channel URI URI of the Channel.
Destination URI URI of the Destination.
Nb in Number of Events in.
Rate in Rate of Events in.
Nb out Number of Events out.
Rate out Rate of Events out.

TIBCO BusinessEvents User’s Guide
268 | Appendix E TIBCO Hawk Microagent Methods
getEvent()
Purpose Retrieves an Event from a Session.
Type INFO
Parameters
Returns
Name Description
Session Name of the Session
Id Id of the Event
External True if using the event’s external Id, false if using the internal Id
Type Description
Line Line number.
Session Name of the Session.
Type Attribute or Property.
Name Name of the Attribute or Property.
Value Value of the Attribute or Property.

TIBCO BusinessEvents User’s Guide
GetExecInfo() | 269
GetExecInfo()
Purpose Gets engine execution information
Type INFO
Parameters No parameters.
Returns Type Description
Status Engine status (ACTIVE, SUSPENDED, STANDBY or STOPPING)
Uptime Elapsed time since RuleSessionProvider was started (milliseconds)
Threads Number of RuleSessions in engine.
Version Project version

TIBCO BusinessEvents User’s Guide
270 | Appendix E TIBCO Hawk Microagent Methods
getHostInformation()
Purpose Gets host information properties.
Type INFO
Parameters
Returns
Name Description
Name Name of host information property to get (optional).
Type Description
Name Property Name
Value Property Value

TIBCO BusinessEvents User’s Guide
getInstance() | 271
getInstance()
Purpose Retrieves an Instance from the Session.
Type INFO
Parameters
Returns
Name Description
Session Name of the Session
Id Id of the Instance.
External True if using the instance’s external Id, false if using the internal Id.
Type Description
Line Line number.
Session Name of the Session.
Type Attribute or Property.
Name Name of the Attribute or Property.
Value Value of the Attribute or Property.

TIBCO BusinessEvents User’s Guide
272 | Appendix E TIBCO Hawk Microagent Methods
getMemoryUsage()
Purpose Gets engine memory usage information.
Type INFO
Parameters No parameters.
Returns Type Description
Max Maximum memory size of the JVM, in bytes.
Free Estimate of the free memory available to the JVM, in bytes.
Used Estimate of the memory used in the JVM, in bytes.
PercentUsed Estimate of the percentage of max memory used.

TIBCO BusinessEvents User’s Guide
getNumberOfEvents() | 273
getNumberOfEvents()
Purpose Get the total number of events existing in a Session.
Type INFO
Parameters
Returns
Name Description
Session Name of the Session
Type Description
Line Line number.
Session Name of the Session.
Number Total Number of Events

TIBCO BusinessEvents User’s Guide
274 | Appendix E TIBCO Hawk Microagent Methods
getNumberOfInstances()
Purpose Get the total number of instances existing in a Session.
Type INFO
Parameters
Returns
Name Description
Session Name of the Session
Type Description
Line Line number.
Session Name of the Session.
Number Total Number of Instances

TIBCO BusinessEvents User’s Guide
getOMInfo() | 275
getOMInfo()
Purpose Retrieves Object Store information of a Session.
Type INFO
Parameters
Returns
Name Description
Session Name of the Session
Type Description
Line Line number.
Session Name of the Session
Property Property name.
Value Property value.

TIBCO BusinessEvents User’s Guide
276 | Appendix E TIBCO Hawk Microagent Methods
getRuleSet()
Purpose Retrieves the Rules of a given RuleSet.
Type INFO
Parameters
Returns
Name Description
Session Name of the Session
URI URI of the RuleSet
Type Description
Line Line Number.
Session Name of the Session.
URI URI of the RuleSet
Rule Name of the Rule
Priority Priority of the rule.

TIBCO BusinessEvents User’s Guide
getRuleSets() | 277
getRuleSets()
Purpose Retrieves a RuleSets from the Session.
Type INFO
Parameters
Returns
Name Description
Session Name of the Session
Type Description
Line Line Number.
Session Name of the Session.
URI URI of the RuleSet.
Activated Is the RuleSet activated.
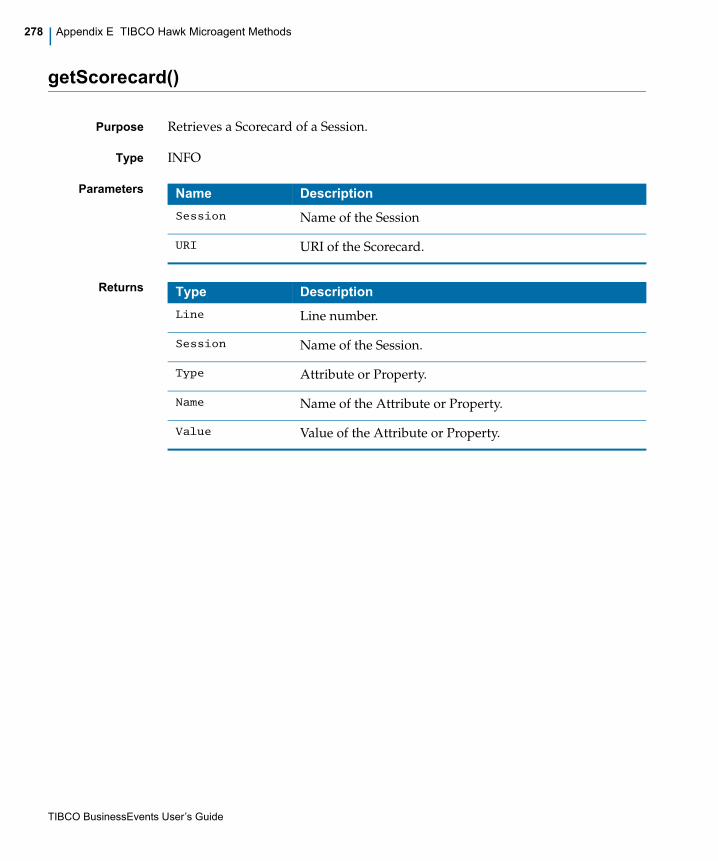
TIBCO BusinessEvents User’s Guide
278 | Appendix E TIBCO Hawk Microagent Methods
getScorecard()
Purpose Retrieves a Scorecard of a Session.
Type INFO
Parameters
Returns
Name Description
Session Name of the Session
URI URI of the Scorecard.
Type Description
Line Line number.
Session Name of the Session.
Type Attribute or Property.
Name Name of the Attribute or Property.
Value Value of the Attribute or Property.

TIBCO BusinessEvents User’s Guide
getScorecards() | 279
getScorecards()
Purpose Retrieves all the Scorecards of a Session.
Type INFO
Parameters
Returns
Name Description
Session Name of the Session
Type Description
Line Line Number.
Session Name of the Session.
Id Id of the Scorecard.
External Id External Id of the Scorecard.
Type Class of the Scorecard.
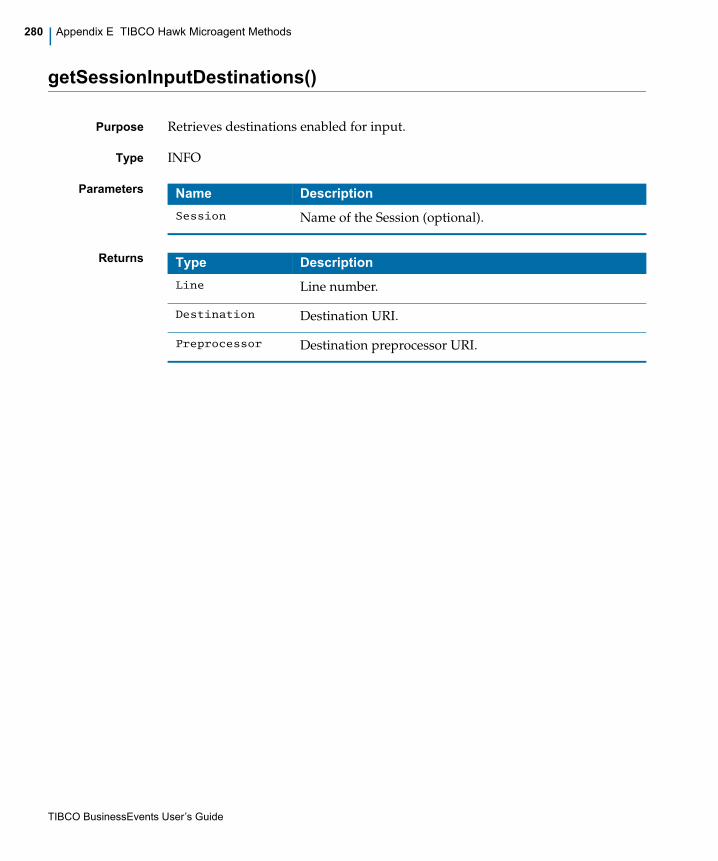
TIBCO BusinessEvents User’s Guide
280 | Appendix E TIBCO Hawk Microagent Methods
getSessionInputDestinations()
Purpose Retrieves destinations enabled for input.
Type INFO
Parameters
Returns
Name Description
Session Name of the Session (optional).
Type Description
Line Line number.
Destination Destination URI.
Preprocessor Destination preprocessor URI.

TIBCO BusinessEvents User’s Guide
getSessions() | 281
getSessions()
Purpose Retrieves session names.
Type INFO
Parameters No parameters.
Returns Type Description
Line Line number.
Session Name of the Session.

TIBCO BusinessEvents User’s Guide
282 | Appendix E TIBCO Hawk Microagent Methods
getStatus()
Purpose Retrieves basic status information about the engine.
Type INFO
Parameters No parameters.
Returns Type Description
Instance ID Instance ID of the application.
Application
NameName of the application.
Uptime Time elapsed since startup.
Process ID Process ID of the application.
Host Name of host machine on which this application is running.

TIBCO BusinessEvents User’s Guide
getTotalNumberRulesFired() | 283
getTotalNumberRulesFired()
Purpose Retrieves the total number of rules fired.
Type INFO
Parameters
Returns
Name Description
Session Name of the Session
Type Description
Line Line Number.
Session Name of the Session.
Number of Rules
FiredTotal number of rules fired since the last reset.

TIBCO BusinessEvents User’s Guide
284 | Appendix E TIBCO Hawk Microagent Methods
getTraceSinks()
Purpose Gets information about trace sinks.
Type INFO
Parameters
Returns
Name Description
Role Name Name of a Role (optional)
Sink Name Name of a Sink (optional)
Type Description
Line Line Number
Instance ID Instance ID of the application
Application
NameName of the application
Sink Name Sink Name
Sink Type Sink Type (for example, fileSink, rvSink)
Description Sink Description (for example, filename=file)
Role Sink Role (for example, error, warn, debug)

TIBCO BusinessEvents User’s Guide
reconnectChannels() | 285
reconnectChannels()
Purpose Restarts all channels or a single channel.
Type ACTION
Parameters
Returns Returns nothing.
Name Description
URI URI of the channel to restart (all channels are restarted if this is empty).

TIBCO BusinessEvents User’s Guide
286 | Appendix E TIBCO Hawk Microagent Methods
resetTotalNumberRulesFired()
Purpose Resets the total number of rules fired to zero.
Type ACTION
Parameters
Returns Returns nothing.
Name Description
Session Name of the Session

TIBCO BusinessEvents User’s Guide
resumeChannels() | 287
resumeChannels()
Purpose Resumes channels.
Type ACTION
Parameters
Returns Returns nothing.
Name Description
URI URI of the Channel to resume (optional).

TIBCO BusinessEvents User’s Guide
288 | Appendix E TIBCO Hawk Microagent Methods
resumeDestinations()
Purpose Resumes Destinations.
Type ACTION
Parameters
Returns Returns nothing.
Name Description
Channel URI URI of the Channel that contains the Destination.
Destination
NameName of the Destination (optional).
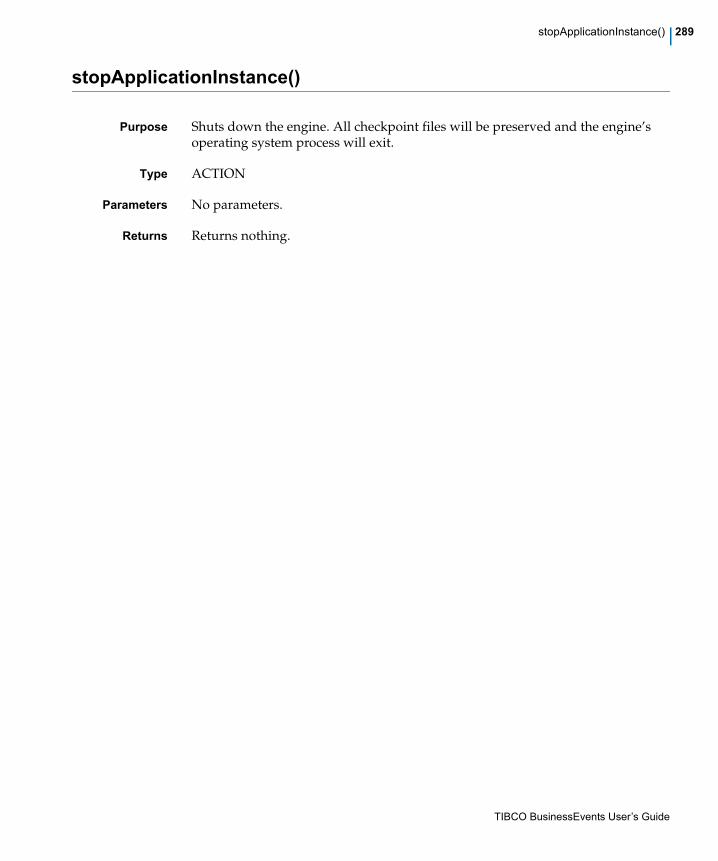
TIBCO BusinessEvents User’s Guide
stopApplicationInstance() | 289
stopApplicationInstance()
Purpose Shuts down the engine. All checkpoint files will be preserved and the engine’s operating system process will exit.
Type ACTION
Parameters No parameters.
Returns Returns nothing.

TIBCO BusinessEvents User’s Guide
290 | Appendix E TIBCO Hawk Microagent Methods
suspendChannels()
Purpose Suspends channels.
Type ACTION
Parameters
Returns Returns nothing.
Name Description
URI URI of the Channel to suspend (optional).
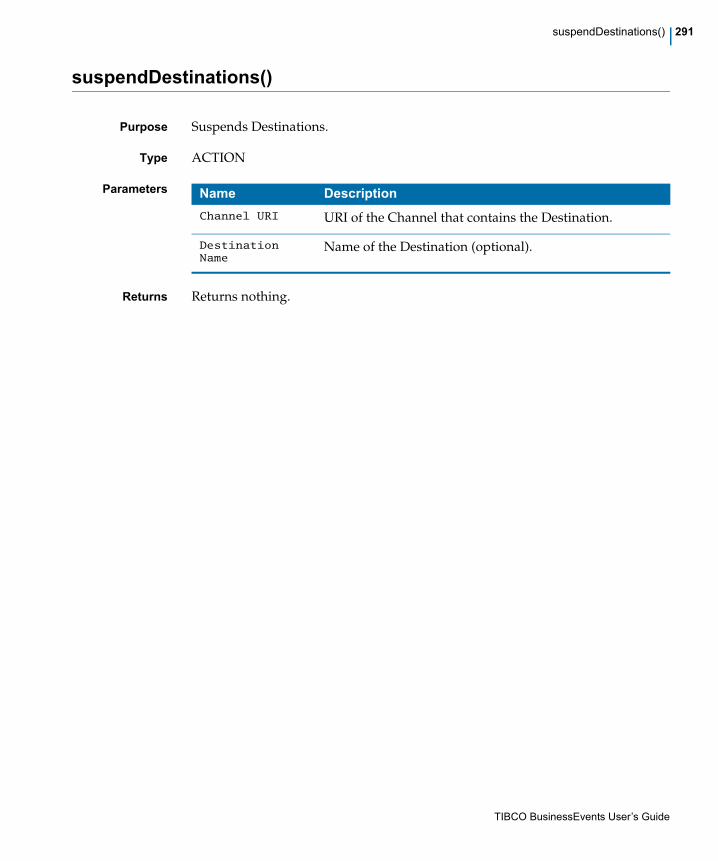
TIBCO BusinessEvents User’s Guide
suspendDestinations() | 291
suspendDestinations()
Purpose Suspends Destinations.
Type ACTION
Parameters
Returns Returns nothing.
Name Description
Channel URI URI of the Channel that contains the Destination.
Destination
NameName of the Destination (optional).

TIBCO BusinessEvents User’s Guide
292 | Appendix E TIBCO Hawk Microagent Methods

TIBCO BusinessEvents Administration
Index of Engine Properties | 293
Index of Engine Properties
A
Agent.AgentClassName.cacheTxn.updateCache 63
Agent.AgentClassName.checkDuplicates 62
Agent.AgentClassName.dbOpsBatchSize 64
Agent.AgentClassName.dbOpsQueueSize 64
Agent.AgentClassName.dbthreadcount 64
Agent.AgentClassName.maxActive 62
Agent.AgentClassName.recoveryPageSize 62
Agent.AgentClassName.threadcount 63
B
be.agent.query.localcache.evictseconds 61
be.agent.query.localcache.maxelements 61
be.agent.query.localcache.prefetchaggressive 64
be.backingstore.commitSize 38
be.backingstore.dburi.pool.inactivityTimeout.0 38
be.backingstore.dburi.pool.waitTimeout.0 37
be.backingstore.dburi.schema.0 (legacy) 39
be.backingstore.readtimeout.0 38
be.engine.cacheServer.channel.disable 65
be.engine.cluster.cleanup 38, 242
be.engine.cluster.isCacheLimited 39
be.engine.hotDeploy.enabled 169, 169
be.engine.limited.cache.back.size.limit 33, 34, 40, 40
be.engine.name 243
be.engine.om.berkeleydb.cacheweight.agent 75, 75
be.engine.om.berkeleydb.dbenv 76
be.engine.om.berkeleydb.internalcachepercent 75
be.engine.om.eventcache.defaultmaxsize 76
be.engine.om.eventcache.maxsize.rule_session 76
be.jdbc.schemamigration.pswd 221
be.jdbc.schemamigration.url 221
be.jdbc.schemamigration.user 221
be.network.mode.standalone 65
be.oracle.schemamigration.pswd 238
be.oracle.schemamigration.url 238
be.oracle.schemamigration.user 238
C
com.tibco.cep.runtime.scheduler.default.numThreads
53
com.tibco.cep.runtime.scheduler.queueSize 53, 54
J
java.property.be.auth.file.location 193
java.property.be.auth.ldap.adminDN 193
java.property.be.auth.ldap.adminPassword 193
java.property.be.auth.ldap.baseDN 193
java.property.be.auth.ldap.roleAttr 194
java.property.java.security.auth.login.config 194
java.property.jdbcdeploy.bootstrap.basetype.file 214
java.property.jdbcdeploy.bootstrap.keyword.file 214
java.property.jdbcdeploy.database.type 214
java.property.mode 251
java.property.tangosol.coherence.distributed.threads
65, 187
java.property.tangosol.coherence.override 251
T
tangosol.coherence.cacheconfig 51, 227
tangosol.coherence.clusteraddress 47
tangosol.coherence.clusterport 47
tangosol.coherence.distributed.backupcount 46
tangosol.coherence.localhost 48
tangosol.coherence.localport 49

TIBCO BusinessEvents Administration
294 | Index of Engine Properties
tangosol.coherence.log 67
tangosol.coherence.log.level 68
tangosol.coherence.log.limit 68
tangosol.coherence.ttl 47
tangosol.coherence.wkan 50
tangosol.coherence.wkan.port 50
tibco.clientVar.HealthCheckFreq 104
tibco.clientVar.JMXUpdateFreq 103
tibco.clientVar.SweepFreq 104
tibco.clientVar.SweepThreshold 104
tibco.clientVar.TopologyUpdateFreq 103
tibco.repourl 173

TIBCO BusinessEvents Administration
| 295
Index
A
Action Configuration Reference 128
Action Configurations. 100
activateRuleSet() 260
activateTraceRole() 261
Add a Property to the Engine Property File 173
Adding a Cluster Deployment Descriptor 13
Adding a JDBC Connection Resource to the Studio
Project 225
Additional Configuration Notes 77
Advantages 179, 180, 180, 182, 183, 185, 186
After You Finish Database Setup 206, 231
Agent Classes Tab 12
Agent Overview 146
Agent.AgentClassName.cacheTxn.updateCache 63
Agent.AgentClassName.checkDuplicates 62
Agent.AgentClassName.dbOpsBatchSize 64
Agent.AgentClassName.dbOpsQueueSize 64
Agent.AgentClassName.dbthreadcount 64
Agent.AgentClassName.maxActive 62
Agent.AgentClassName.recoveryPageSize 62
Agent.AgentClassName.threadcount 63
Agents Tab Settings and Properties 60
Alert Configuration Reference 108
Alert Configurations. 100
Allow everything and specify exceptions 196
application management interface, TIBCO Hawk 163
AppManage 158
Authentication Options 190
Authentication Property Reference 193
B
Backing Store 16
backing store
cache aside 35
cache loader class 34
enabled setting 33
Initial Size (backing store connection pool) 36
Max Size (backing store connection pool) 36
Min Size (backing store connection pool) 35
strategy (for Oracle DB in JDBC backing store) 34
type 34
URI 35
backing store (legacy)
deleted entities cleanup options 38, 242
Backing Store Requirements 206
Backing Store Table Reference 223
base_types.xml 210
BE_HOME xxi
be.agent.query.localcache.prefetchaggressive 64
be.backingstore.commitSize 38
be.backingstore.dburi.pool.inactivityTimeout.0 38
be.backingstore.dburi.pool.waitTimeout.0 37
be.backingstore.dburi.schema.0 (legacy) 39
be.backingstore.readtimeout.0 38
be.engine.cacheServer.channel.disable 65
be.engine.cluster.cleanup 38
be.engine.cluster.cleanup (legacy) 242
be.engine.cluster.isCacheLimited 33, 34, 39
be.engine.limited.cache.back.size.limit 33, 34, 40, 40
be.engine.om.berkeleydb.cacheweight.agent 75, 75
be.engine.om.berkeleydb.dbenv 76
be.engine.om.berkeleydb.internalcachepercent 75
be.engine.om.eventcache.defaultmaxsize 76
be.engine.om.eventcache.maxsize.rule_session 76
be.network.mode.standalone 65
Before Deploying a Project in a TIBCO Administrator
Domain 159
Before You Begin Database Setup 230
be-oradeploy (legacy) 232

TIBCO BusinessEvents Administration
296 | Index
C
Cache Agent Quorum 31
Cache Aside 35
cache clusters
localport auto incrementing feature 49
Cache Loader Class 34
Cache-aside 184
Caches for Internal Entities 254
Caches for Ontology Objects 254
Caches Used for Persistence-Based Object
Management 77
Caller’s Thread 179
checkpoint interval (persistence-based object manage-
ment setting)
recommendations 77
Checkpoint Interval and Outstanding Database
Operations 77
Class-to-Table Mapping 224
Cluster Discovery 15
Cluster Explorer 136
Cluster Member Paths 115
Cluster Overview 141
Cluster Overview Pane 141
Cluster Settings 84
Cluster Tab 11
Cluster Tab — Berkeley DB Manager Settings and
Properties 73
Cluster Tab — Cache Manager — Backing Store
Properties 37
Cluster Tab — Cache Manager — Backing Store
Settings 33
Cluster Tab — Cache Manager — Coherence
Properties 46
Cluster Tab — Cache Manager — Configuration
Settings 31
Cluster Tab — Cache Manager — Domain Objects
Settings 41
Cluster Tab — General Settings 30
Collections Tab 11
Collections Tab — Destinations Settings and
Properties 52
Collections Tab — Log Configurations Overview 55
Collections Tab — Log Configurations Settings 57
com.tibco.cep.runtime.scheduler.default.numThreads
53
com.tibco.cep.runtime.scheduler.queueSize 54
Concurrent RTC 182
Configuring a Cache Manager Cluster — Cluster
Tab 15
Configuring Access Control—Overview 196
Configuring Actions 127
Configuring Alerts 106
Configuring an In Memory Cluster 14
Configuring Backing Store Properties in the CDD
Editor 226
Configuring Collections 17
Configuring File-Based Authentication 191
Configuring Health Metric Rules 120
Configuring LDAP-Based Authentication 192
Configuring Log Configurations 19
Configuring MM Console Properties 130
Configuring MM Settings in the MM CDD File 100
Configuring the Agent Classes Tab (All Object
Managers) 20
Configuring the Cluster Tab for Berkeley DB
Manager 72
Configuring the Collections Tab (All Object
Managers) 17
Configuring the Connection between MM Server and
the Monitored Cluster 94
Configuring the Processing Units Tab (All Object
Managers) 23
Configuring the Site Topology 82
Configuring User Authentication 191
Creating and Modifying an Access Control File 199
customer support xxiv
D
Database Concepts 16
Database Connection Settings 226
Database Location 206
dbkeywordmap.xml (for JDBC backing store) 211
DBMS Software and Installation Requirements 209
deactivateRuleSet() 262
deactivateTraceRole() 263
Dedicated Workers 180
TIBCO BusinessEvents Administration
Index | 297
Default Level Settings 41
Defining Additional Elements and System Properties
in Override Files 248
Defining Permissions 200
Defining Permissions for Domain Models 201
Defining the Database Directories for Each Rule Ses-
sion (Inference Agent) 77
deleted entities (legacy) 38, 242
Deny everything and specify exceptions 197
Deploying a Project in a TIBCO Administrator
Domain 159
deployment
hot 166
in TIBCO Administrator 159
scripted 158
Deployment in a TIBCO Administrator Domain 158
Deployment Overview 154
Deployment Unit Settings 85
deploy-time configuration overview 154
disabling hot deployment 169
Disadvantages 179, 180, 181, 182, 183, 186, 186
Domain Objects 16
DOMAINMODEL Permission Type 201
domains 158
E
EAR files
deploying 159
Ease of Maintenance 206
Enable Hot Deployment (As Needed) 171, 173
Enabled (backing store) 33
Enabling and Disabling Hot Deployment 169
Enabling Backing Store and General Settings 226
enabling hot deployment 169
Enabling TIBCO Hawk Microagent 259
engine name, how determined at runtime 243
engine properties
setting in TIBCO Administrator 160
engine property files
enabling hot deployment in 169
Entity Cache Names Format 253
Entity Level Object Overrides and Settings 44
Entity Metadata Settings 12
Entity-Level Configuration for Cache and Backing
Store 25
ENV_HOME xxi
Establishing the User Roles 196
Event Preprocessor and Rete Worker Thread
Options 178
Example
Adding Well Known Address Attributes 249
Example Alter Script 220
Examples Using Alerts 119
Examples Using Child Cluster Member Health
Metrics 117
execute() 264
Extra Procedure to Handle Long Database Identifier
Names 231
F
For More Information 259
forceOMCheckpoint() 265
G
getChannels() 266
getDestinations() 267
getEvent() 268
GetExecInfo() 269
getHostInformation() 270
getInstance() 271
getMemoryUsage() 272
getNumberOfEvents() 273
getNumberOfInstances() 274
getOMInfo() 275
getRuleSet() 276
getRuleSets() 277
getScorecard() 278
getScorecards() 279
getSessionInputDestinations() 280
getSessions() 281
getStatus() 282

TIBCO BusinessEvents Administration
298 | Index
getTotalNumberRulesFired() 283
getTraceSinks() 284
Guidelines for Configuring Access Control 196
H
Handling Deleted Entities 242
Health Indicators and Alerts 133
Health Metric Rule Configuration Reference 123
Health Metric Rule Configurations. 100
Health Metric Rule Examples 117
Host Settings 87
hot deployment 166
enabling and disabling 169
limited modifications allowed with 166
supported modifications 167
Hot Deployment Overview 166
Hot Deployment Supported Modifications 167
How a Second Tier Override File Default Location is
Specified and Overridden 252
How BusinessEvents Uses the Override Property 250
How Hot Deployment Occurs 166
How the First Tier Override File Default Location is
Specified 250
How to Specify a Different Location for the First Tier
Override File 251
I
If a Custom Cache Configuration File is Used 227
Importing the emonitor Project for CDD Editing 98
Inactive Members 137
Inference Agent Overview 149
Initial Size (backing store connection pool) 36
initialize_database.sql 215
initialize_database.sql (for JDBC backing store) 211
initialize_database.sql (legacy) 236
Introduction 2, 2
J
java.property.be.auth.file.location 193
java.property.be.auth.ldap.adminDN 193
java.property.be.auth.ldap.adminPassword 193
java.property.be.auth.ldap.baseDN 193
java.property.be.auth.ldap.host 193
java.property.be.auth.ldap.port 193
java.property.be.auth.ldap.roleAttr 194
java.property.be.auth.type 193
java.property.java.security.auth.login.config 194
java.property.tangosol.coherence.distributed.threads
187
JDBC Backing Store Database Configuration
Tasks 212
JDBC Backing Store Database Setup Overview 206
K
Key word mapping file 217
L
L1Cache 61
Limitations in Use of Certain Processing Unit
Configurations 81
localhost 49
localport 49
auto incrementing feature 49
M
Machine Overview 143
Maintaining a Backing Store — If Ontology Object
Definitions Change 231
Max Connections, JDBC resource 36, 225
Max Size (backing store connection pool) 36
Metadata Properties for Entities (Events and
Concepts) 25

TIBCO BusinessEvents Administration
Index | 299
microagent, enabling 259
Min Size (backing store connection pool) 35
Minimum User Permissions 209
Mixing these approaches 197
MM Property Group Reference 101
Modifications Allowed in Hot Deployment 166
modifications supported for hot deployment 167
Modify the Project as Needed and Build the EAR
File 171, 173
Monitoring and Management Configuration
Overview 92
N
Names that Exceed the DBMS Maximum Column
Length 207
New property 220
New table 220
O
objectTable cache 8, 8
Ontology (Cache Objects) Overview 151
Ontology Identifiers That Use Database Key
Words 208
Optional User-Defined Property for Flexibility in the
Filename 251
Oracle 210
Oracle-Only Backing Store Database Configuration
Tasks 234
Oracle-Only Backing Store Database Setup
Overview 230
Oracle-Only Backing Store Database Setup Tasks 230
Oracle-Only Backing Store Requirements 230
Oracle-Only Backing Store Runtime Behavior 241
Overriding and Extending the Operational Deploy-
ment Descriptor 248
Overriding Element Values in Engine Property
Files 248
Overview of BusinessEvents Monitoring and
Management 132
Overview of Cluster Deployment Configuration 6
P
Pane Types Reference for Alert Configuration 113
Panels and Panes 139
Perform Hot Deployment 171, 173
Performing Hot Deployment in a TIBCO Administra-
tor Domain 171
Performing Hot Deployment Outside a TIBCO
Administrator Domain 173
Permissions—ALLOW and DENY 198
Pluggable JAAS Login Module 190
port conflicts, avoiding 49
Post RTC Options — Cache-aside and
Write-behind 184
Primary Tables 223
Process Overview 144
Processing Unit Settings 86
Processing Units Tab 12
Processing Units Tab Settings and Properties 66
Project Configuration for Oracle-Only Backing
Store 240
Project, Master, and Deployed CDD and EAR Files 80
Property type change 220
Provided Configuration Resources 210
Q
Query Agent Overview 150
R
Reading From the Backing Store At Runtime 241
Reading From the Backing Store at Startup 241
reconnectChannels() 285
Reference to the Metrics 132
Required Location of Access Control Files 199
resetTotalNumberRulesFired() 286

TIBCO BusinessEvents Administration
300 | Index
Resource Types and Corresponding Action Types 203
Resources Required for Setting Up the Database 209
Resources Required for Setting Up the Oracle
Database 232
resumeChannels() 287
resumeDestinations() 288
Reverse Reference Tables 224
RTC Options — Single-Threaded or Concurrent 182
S
scripted deployment 158
Secondary Tables 223
Setting Engine Properties 160
Shared Queue and Threads 178
Shutdown Sequence 246
Single-Threaded RTC 182
Site Settings 84
Site Topology Overview 80
Site Topology Reference 84
Special Cases 206, 207
Specifying and Grouping Decision Project
Resources 199
Specifying Limited Cache Size 227
Specifying Operational Override File Locations 250
Specifying Permissions
Action Types 203
Specifying Resources 199
Specifying the Alert Message 111
Specifying the Path to an Alert Metric Value (and a
Reference Value) 110
SQL Server 209
Starting a BusinessEvents Engine at the Command
Line 155
Starting a Minimum Number (Quorum) of Cache
Servers 10
Starting a Minimum Number of Cache Servers 31
Starting MM Management Server and Using MM
Console 134
startup actions, deleted entities cleanup (legacy) 38,
242
Startup Sequence 245
startup sequence 245
stopApplicationInstance() 289
Strategy (backing store) 34
String Properties That Exceed the Maximum Database
Column Length 208
Structure of the Access Control File 197
support, contacting xxiv
supported modifications for hot deployment 167
suspendChannels() 290
suspendDestinations() 291
System Alerts Pane 142
T
tangosol.coherence.cacheconfig 51, 227
tangosol.coherence.clusteraddress 47
tangosol.coherence.clusterport 47
tangosol.coherence.distributed.backupcount 46
tangosol.coherence.localhost 48
tangosol.coherence.localport 49
tangosol.coherence.localport.adjust 49
tangosol.coherence.log 67
tangosol.coherence.log.level 68
tangosol.coherence.log.limit 68
tangosol.coherence.ttl 47
tangosol.coherence.wkan 50
tangosol.coherence.wkan.port 50
Task Summary 11, 92
technical support xxiv
The Procedure 221
The Role of the Object Table 8
Threading Models Overview 176
TIBCO administration domains 158
TIBCO Administrator
and server management 158
deployment procedure 159
enabling hot deployment in 169
TIBCO Hawk
application management interface 163
enabling microagent 259
list of methods 257
methods overview 259
TIBCO Hawk Application Management Interface 163
TIBCO Hawk Methods Overview 259
TIBCO BusinessEvents Administration
Index | 301
TIBCO_HOME xxi
Topology File and Other Properties 100
Tuning Properties for Cache-aside Strategy 185
Two Types of Thresholds 116
Type (of backing store) 34
Types of Methods 259
U
Understanding Alerts 106
Understanding and Configuring Alerts 106
Understanding Entity Caches 253
Understanding Health Metric Rules 115
Understanding How Entity Objects are Managed 7
Updating an Existing Backing Store Database
Schema 219
Updating an Existing Oracle Database Schema 238
URI (for backing store) 35
User Authentication Overview 190
Using Agent Class Properties at Different Levels 6
Using Collections 20
W
What the Schema Update Utility Can and Can’t Han-
dle Automatically 219
Working with Access Control Files 199
Working with Cluster Explorer 138
Working with MM Metric Panes 139
Write-behind 186
Writing to the Backing Store 241

TIBCO BusinessEvents Administration
302 | Index