TIBCO® Reward User's Guide
248
TIBCO ® Reward User's Guide Software Release 19.4 November 2019
-
Upload
khangminh22 -
Category
Documents
-
view
2 -
download
0
Transcript of TIBCO® Reward User's Guide

TIBCO® Reward
User's GuideSoftware Release 19.4November 2019

Important Information
SOME TIBCO SOFTWARE EMBEDS OR BUNDLES OTHER TIBCO SOFTWARE. USE OF SUCHEMBEDDED OR BUNDLED TIBCO SOFTWARE IS SOLELY TO ENABLE THE FUNCTIONALITY (ORPROVIDE LIMITED ADD-ON FUNCTIONALITY) OF THE LICENSED TIBCO SOFTWARE. THEEMBEDDED OR BUNDLED SOFTWARE IS NOT LICENSED TO BE USED OR ACCESSED BY ANYOTHER TIBCO SOFTWARE OR FOR ANY OTHER PURPOSE.
USE OF TIBCO SOFTWARE AND THIS DOCUMENT IS SUBJECT TO THE TERMS ANDCONDITIONS OF A LICENSE AGREEMENT FOUND IN EITHER A SEPARATELY EXECUTEDSOFTWARE LICENSE AGREEMENT, OR, IF THERE IS NO SUCH SEPARATE AGREEMENT, THECLICKWRAP END USER LICENSE AGREEMENT WHICH IS DISPLAYED DURING DOWNLOADOR INSTALLATION OF THE SOFTWARE (AND WHICH IS DUPLICATED IN THE LICENSE FILE)OR IF THERE IS NO SUCH SOFTWARE LICENSE AGREEMENT OR CLICKWRAP END USERLICENSE AGREEMENT, THE LICENSE(S) LOCATED IN THE “LICENSE” FILE(S) OF THESOFTWARE. USE OF THIS DOCUMENT IS SUBJECT TO THOSE TERMS AND CONDITIONS, ANDYOUR USE HEREOF SHALL CONSTITUTE ACCEPTANCE OF AND AN AGREEMENT TO BEBOUND BY THE SAME.
ANY SOFTWARE ITEM IDENTIFIED AS THIRD PARTY LIBRARY IS AVAILABLE UNDERSEPARATE SOFTWARE LICENSE TERMS AND IS NOT PART OF A TIBCO PRODUCT. AS SUCH,THESE SOFTWARE ITEMS ARE NOT COVERED BY THE TERMS OF YOUR AGREEMENT WITHTIBCO, INCLUDING ANY TERMS CONCERNING SUPPORT, MAINTENANCE, WARRANTIES,AND INDEMNITIES. DOWNLOAD AND USE OF THESE ITEMS IS SOLELY AT YOUR OWNDISCRETION AND SUBJECT TO THE LICENSE TERMS APPLICABLE TO THEM. BY PROCEEDINGTO DOWNLOAD, INSTALL OR USE ANY OF THESE ITEMS, YOU ACKNOWLEDGE THEFOREGOING DISTINCTIONS BETWEEN THESE ITEMS AND TIBCO PRODUCTS.
This document is subject to U.S. and international copyright laws and treaties. No part of thisdocument may be reproduced in any form without the written authorization of TIBCO Software Inc.
TIBCO, the TIBCO logo, the TIBCO O logo, and Rendezvous are either registered trademarks ortrademarks of TIBCO Software Inc. in the United States and/or other countries.
Java and all Java based trademarks and logos are trademarks or registered trademarks of Oracle and/orits affiliates.
All other product and company names and marks mentioned in this document are the property of theirrespective owners and are mentioned for identification purposes only.
This software may be available on multiple operating systems. However, not all operating systemplatforms for a specific software version are released at the same time. Please see the readme.txt file forthe availability of this software version on a specific operating system platform.
THIS DOCUMENT IS PROVIDED “AS IS” WITHOUT WARRANTY OF ANY KIND, EITHER EXPRESSOR IMPLIED, INCLUDING, BUT NOT LIMITED TO, THE IMPLIED WARRANTIES OFMERCHANTABILITY, FITNESS FOR A PARTICULAR PURPOSE, OR NON-INFRINGEMENT.
THIS DOCUMENT COULD INCLUDE TECHNICAL INACCURACIES OR TYPOGRAPHICALERRORS. CHANGES ARE PERIODICALLY ADDED TO THE INFORMATION HEREIN; THESECHANGES WILL BE INCORPORATED IN NEW EDITIONS OF THIS DOCUMENT. TIBCOSOFTWARE INC. MAY MAKE IMPROVEMENTS AND/OR CHANGES IN THE PRODUCT(S)AND/OR THE PROGRAM(S) DESCRIBED IN THIS DOCUMENT AT ANY TIME.
THE CONTENTS OF THIS DOCUMENT MAY BE MODIFIED AND/OR QUALIFIED, DIRECTLY ORINDIRECTLY, BY OTHER DOCUMENTATION WHICH ACCOMPANIES THIS SOFTWARE,INCLUDING BUT NOT LIMITED TO ANY RELEASE NOTES AND "READ ME" FILES.
This and other products of TIBCO Software Inc. may be covered by registered patents. Please refer toTIBCO's Virtual Patent Marking document (https://www.tibco.com/patents) for details.
Copyright © 2004-2019. TIBCO Software Inc. All Rights Reserved.
2
TIBCO® Reward User's Guide

Contents
TIBCO Documentation and Support Services . . . . . . . . . . . . . . . . . . . . . . . . . . . . . . . . . . . . . . . . . . . . . . . . . . . . . . . 15
TIBCO Reward CRMS Overview . . . . . . . . . . . . . . . . . . . . . . . . . . . . . . . . . . . . . . . . . . . . . . . . . . . . . . . . . . . . . . . . . . . .16
Software as a Service (SaaS) . . . . . . . . . . . . . . . . . . . . . . . . . . . . . . . . . . . . . . . . . . . . . . . . . . . . . . . . . . . . . . . . . . . . . . . . . . . . . . . . . . . . . . . . .16
Features and Benefits . . . . . . . . . . . . . . . . . . . . . . . . . . . . . . . . . . . . . . . . . . . . . . . . . . . . . . . . . . . . . . . . . . . . . . . . . . . . . . . . . . . . . . . . . . . . . . . .16
CRMS User Interface Elements . . . . . . . . . . . . . . . . . . . . . . . . . . . . . . . . . . . . . . . . . . . . . . . . . . . . . . . . . . . . . . . . . . . . 18
User Interface . . . . . . . . . . . . . . . . . . . . . . . . . . . . . . . . . . . . . . . . . . . . . . . . . . . . . . . . . . . . . . . . . . . . . . . . . . . . . . . . . . . . . . . . . . . . . . . . . . . . . . . . 18
CRMS: Navigation . . . . . . . . . . . . . . . . . . . . . . . . . . . . . . . . . . . . . . . . . . . . . . . . . . . . . . . . . . . . . . . . . . . . . . . . . . . . . . . . . . . . . . . . . . . . . . . . . . . .19
Saving Your Work . . . . . . . . . . . . . . . . . . . . . . . . . . . . . . . . . . . . . . . . . . . . . . . . . . . . . . . . . . . . . . . . . . . . . . . . . . . . . . . . . . . . . . . . . . . . . . . 19
CSR . . . . . . . . . . . . . . . . . . . . . . . . . . . . . . . . . . . . . . . . . . . . . . . . . . . . . . . . . . . . . . . . . . . . . . . . . . . . . . . . . . . . . . . . . . . . . .21
CSR: Overview . . . . . . . . . . . . . . . . . . . . . . . . . . . . . . . . . . . . . . . . . . . . . . . . . . . . . . . . . . . . . . . . . . . . . . . . . . . . . . . . . . . . . . . . . . . . . . . . . . . . . . .21
CSR: Roles & Privileges . . . . . . . . . . . . . . . . . . . . . . . . . . . . . . . . . . . . . . . . . . . . . . . . . . . . . . . . . . . . . . . . . . . . . . . . . . . . . . . . . . . . . . . . . . . . . . 22
About Customers . . . . . . . . . . . . . . . . . . . . . . . . . . . . . . . . . . . . . . . . . . . . . . . . . . . . . . . . . . . . . . . . . . . . . . . . . . . . . . . . . . . . . . . . . . . . . . . . . . . . .22
Creating Active Customer Account . . . . . . . . . . . . . . . . . . . . . . . . . . . . . . . . . . . . . . . . . . . . . . . . . . . . . . . . . . . . . . . . . . . . . . . . . . . . . . . . . . . .23
Creating a New Enrolled Customer Account . . . . . . . . . . . . . . . . . . . . . . . . . . . . . . . . . . . . . . . . . . . . . . . . . . . . . . . . . . . . . . . . . . . . . . . . . . .23
Customer: View Details . . . . . . . . . . . . . . . . . . . . . . . . . . . . . . . . . . . . . . . . . . . . . . . . . . . . . . . . . . . . . . . . . . . . . . . . . . . . . . . . . . . . . . . . . . . . . . .23
Customer: Status . . . . . . . . . . . . . . . . . . . . . . . . . . . . . . . . . . . . . . . . . . . . . . . . . . . . . . . . . . . . . . . . . . . . . . . . . . . . . . . . . . . . . . . . . . . . . . . . 24
Customer: Change History . . . . . . . . . . . . . . . . . . . . . . . . . . . . . . . . . . . . . . . . . . . . . . . . . . . . . . . . . . . . . . . . . . . . . . . . . . . . . . . . . . . . . . . 25
Transactions . . . . . . . . . . . . . . . . . . . . . . . . . . . . . . . . . . . . . . . . . . . . . . . . . . . . . . . . . . . . . . . . . . . . . . . . . . . . . . . . . . . . . . . . . . . . . . . . .25
Email . . . . . . . . . . . . . . . . . . . . . . . . . . . . . . . . . . . . . . . . . . . . . . . . . . . . . . . . . . . . . . . . . . . . . . . . . . . . . . . . . . . . . . . . . . . . . . . . . . . . . . . 25
Rewards . . . . . . . . . . . . . . . . . . . . . . . . . . . . . . . . . . . . . . . . . . . . . . . . . . . . . . . . . . . . . . . . . . . . . . . . . . . . . . . . . . . . . . . . . . . . . . . . . . . . 25
Customer: Edit . . . . . . . . . . . . . . . . . . . . . . . . . . . . . . . . . . . . . . . . . . . . . . . . . . . . . . . . . . . . . . . . . . . . . . . . . . . . . . . . . . . . . . . . . . . . . . . . . . . . . . . 25
Promote . . . . . . . . . . . . . . . . . . . . . . . . . . . . . . . . . . . . . . . . . . . . . . . . . . . . . . . . . . . . . . . . . . . . . . . . . . . . . . . . . . . . . . . . . 27
Offers . . . . . . . . . . . . . . . . . . . . . . . . . . . . . . . . . . . . . . . . . . . . . . . . . . . . . . . . . . . . . . . . . . . . . . . . . . . . . . . . . . . . . . . . . . . . . . . . . . . . . . . . . . . . . . . . 27
Offer Lifecycle . . . . . . . . . . . . . . . . . . . . . . . . . . . . . . . . . . . . . . . . . . . . . . . . . . . . . . . . . . . . . . . . . . . . . . . . . . . . . . . . . . . . . . . . . . . . . . . . . . . . . . . . 28
Anatomy of an Offer . . . . . . . . . . . . . . . . . . . . . . . . . . . . . . . . . . . . . . . . . . . . . . . . . . . . . . . . . . . . . . . . . . . . . . . . . . . . . . . . . . . . . . . . . . . . . .28
Prerequisites for Creating an Offer . . . . . . . . . . . . . . . . . . . . . . . . . . . . . . . . . . . . . . . . . . . . . . . . . . . . . . . . . . . . . . . . . . . . . . . . . . . . . . . . . . . 28
Notes on Data Integration requirements . . . . . . . . . . . . . . . . . . . . . . . . . . . . . . . . . . . . . . . . . . . . . . . . . . . . . . . . . . . . . . . . . . . . . . . . . . 29
Offers Page Overview . . . . . . . . . . . . . . . . . . . . . . . . . . . . . . . . . . . . . . . . . . . . . . . . . . . . . . . . . . . . . . . . . . . . . . . . . . . . . . . . . . . . . . . . . . . . . . . .29
Creating an Offer . . . . . . . . . . . . . . . . . . . . . . . . . . . . . . . . . . . . . . . . . . . . . . . . . . . . . . . . . . . . . . . . . . . . . . . . . . . . . . . . . . . . . . . . . . . . . . . . . . . . . 30
Offer Description Page Overview . . . . . . . . . . . . . . . . . . . . . . . . . . . . . . . . . . . . . . . . . . . . . . . . . . . . . . . . . . . . . . . . . . . . . . . . . . . . . . . . . 31
Defining the Description of an Offer . . . . . . . . . . . . . . . . . . . . . . . . . . . . . . . . . . . . . . . . . . . . . . . . . . . . . . . . . . . . . . . . . . . . . . . . . . . . . . .32
Offer Qualification and Award . . . . . . . . . . . . . . . . . . . . . . . . . . . . . . . . . . . . . . . . . . . . . . . . . . . . . . . . . . . . . . . . . . . . . . . . . . . . . . . . . . . . 32
Award . . . . . . . . . . . . . . . . . . . . . . . . . . . . . . . . . . . . . . . . . . . . . . . . . . . . . . . . . . . . . . . . . . . . . . . . . . . . . . . . . . . . . . . . . . . . . . . . . . . . . . . 32
Action Types . . . . . . . . . . . . . . . . . . . . . . . . . . . . . . . . . . . . . . . . . . . . . . . . . . . . . . . . . . . . . . . . . . . . . . . . . . . . . . . . . . . . . . . . . . . . . . . . 33
Actions . . . . . . . . . . . . . . . . . . . . . . . . . . . . . . . . . . . . . . . . . . . . . . . . . . . . . . . . . . . . . . . . . . . . . . . . . . . . . . . . . . . . . . . . . . . . . . . . . . . . . .33
Uploading Offer Qualifying Product Stock Keeping Unit (SKU) as a File . . . . . . . . . . . . . . . . . . . . . . . . . . . . . . . . . . . . . . . 34
3
TIBCO® Reward User's Guide

Attaching Product SKU File to an Offer . . . . . . . . . . . . . . . . . . . . . . . . . . . . . . . . . . . . . . . . . . . . . . . . . . . . . . . . . . . . . . . . . . . . . . .35
Qualification Evaluation Level . . . . . . . . . . . . . . . . . . . . . . . . . . . . . . . . . . . . . . . . . . . . . . . . . . . . . . . . . . . . . . . . . . . . . . . . . . . . . . . .35
Additional Conditions . . . . . . . . . . . . . . . . . . . . . . . . . . . . . . . . . . . . . . . . . . . . . . . . . . . . . . . . . . . . . . . . . . . . . . . . . . . . . . . . . . . . . . . . 38
Basket Targeting . . . . . . . . . . . . . . . . . . . . . . . . . . . . . . . . . . . . . . . . . . . . . . . . . . . . . . . . . . . . . . . . . . . . . . . . . . . . . . . . . . . . . . . . . . . . . . . . . 38
Define Basket Target . . . . . . . . . . . . . . . . . . . . . . . . . . . . . . . . . . . . . . . . . . . . . . . . . . . . . . . . . . . . . . . . . . . . . . . . . . . . . . . . . . . . . . . . 38
Defining the target of an offer by adding basket profiles . . . . . . . . . . . . . . . . . . . . . . . . . . . . . . . . . . . . . . . . . . . . . . . . . . 39
Including and Excluding Basket Profile . . . . . . . . . . . . . . . . . . . . . . . . . . . . . . . . . . . . . . . . . . . . . . . . . . . . . . . . . . . . . . . . . . . . . . . 39
Customer Targeting . . . . . . . . . . . . . . . . . . . . . . . . . . . . . . . . . . . . . . . . . . . . . . . . . . . . . . . . . . . . . . . . . . . . . . . . . . . . . . . . . . . . . . . . . . . . . . 39
Customer Target Definition . . . . . . . . . . . . . . . . . . . . . . . . . . . . . . . . . . . . . . . . . . . . . . . . . . . . . . . . . . . . . . . . . . . . . . . . . . . . . . . . . . .40
Defining the target of an offer by adding customer profile . . . . . . . . . . . . . . . . . . . . . . . . . . . . . . . . . . . . . . . . . . . . . . . . .40
Defining the target of an offer by excluding customer profile . . . . . . . . . . . . . . . . . . . . . . . . . . . . . . . . . . . . . . . . . . . . . . 40
Including and Excluding Customer Profile . . . . . . . . . . . . . . . . . . . . . . . . . . . . . . . . . . . . . . . . . . . . . . . . . . . . . . . . . . . . . . . . . . . . 41
Presentation . . . . . . . . . . . . . . . . . . . . . . . . . . . . . . . . . . . . . . . . . . . . . . . . . . . . . . . . . . . . . . . . . . . . . . . . . . . . . . . . . . . . . . . . . . . . . . . . . . . . . 41
Selecting Image from Product Database . . . . . . . . . . . . . . . . . . . . . . . . . . . . . . . . . . . . . . . . . . . . . . . . . . . . . . . . . . . . . . . . . . . . . 42
Selecting a Local Image . . . . . . . . . . . . . . . . . . . . . . . . . . . . . . . . . . . . . . . . . . . . . . . . . . . . . . . . . . . . . . . . . . . . . . . . . . . . . . . . . . . . . 42
Selecting Existing Offer Image . . . . . . . . . . . . . . . . . . . . . . . . . . . . . . . . . . . . . . . . . . . . . . . . . . . . . . . . . . . . . . . . . . . . . . . . . . . . . . . 42
Schedules and Rules . . . . . . . . . . . . . . . . . . . . . . . . . . . . . . . . . . . . . . . . . . . . . . . . . . . . . . . . . . . . . . . . . . . . . . . . . . . . . . . . . . . . . . . . . . . . 42
Defining Schedules and Rules . . . . . . . . . . . . . . . . . . . . . . . . . . . . . . . . . . . . . . . . . . . . . . . . . . . . . . . . . . . . . . . . . . . . . . . . . . . . . . 43
Summary & Preview . . . . . . . . . . . . . . . . . . . . . . . . . . . . . . . . . . . . . . . . . . . . . . . . . . . . . . . . . . . . . . . . . . . . . . . . . . . . . . . . . . . . . . . . . . . . . 44
Summary & Preview Page Details . . . . . . . . . . . . . . . . . . . . . . . . . . . . . . . . . . . . . . . . . . . . . . . . . . . . . . . . . . . . . . . . . . . . . . . . . . . 44
Using Summary & Preview Page . . . . . . . . . . . . . . . . . . . . . . . . . . . . . . . . . . . . . . . . . . . . . . . . . . . . . . . . . . . . . . . . . . . . . . . . . . . . .45
What's Next . . . . . . . . . . . . . . . . . . . . . . . . . . . . . . . . . . . . . . . . . . . . . . . . . . . . . . . . . . . . . . . . . . . . . . . . . . . . . . . . . . . . . . . . . . . . . . . . . . . . . .45
Change Status . . . . . . . . . . . . . . . . . . . . . . . . . . . . . . . . . . . . . . . . . . . . . . . . . . . . . . . . . . . . . . . . . . . . . . . . . . . . . . . . . . . . . . . . . . . . . . . . . . . . . . .46
Saved to Pending Offer Status . . . . . . . . . . . . . . . . . . . . . . . . . . . . . . . . . . . . . . . . . . . . . . . . . . . . . . . . . . . . . . . . . . . . . . . . . . . . . . . . . . . .46
Offer Status Options . . . . . . . . . . . . . . . . . . . . . . . . . . . . . . . . . . . . . . . . . . . . . . . . . . . . . . . . . . . . . . . . . . . . . . . . . . . . . . . . . . . . . . . . . . . . . 47
Changing Offer Status . . . . . . . . . . . . . . . . . . . . . . . . . . . . . . . . . . . . . . . . . . . . . . . . . . . . . . . . . . . . . . . . . . . . . . . . . . . . . . . . . . . . . . . . . . . 47
Offer Status Details . . . . . . . . . . . . . . . . . . . . . . . . . . . . . . . . . . . . . . . . . . . . . . . . . . . . . . . . . . . . . . . . . . . . . . . . . . . . . . . . . . . . . . . . . . . . . . 47
Cloning an Offer . . . . . . . . . . . . . . . . . . . . . . . . . . . . . . . . . . . . . . . . . . . . . . . . . . . . . . . . . . . . . . . . . . . . . . . . . . . . . . . . . . . . . . . . . . . . . . . . . . . . . .48
Clone Offer Record . . . . . . . . . . . . . . . . . . . . . . . . . . . . . . . . . . . . . . . . . . . . . . . . . . . . . . . . . . . . . . . . . . . . . . . . . . . . . . . . . . . . . . . . . . . . . . 48
Deleting Offer . . . . . . . . . . . . . . . . . . . . . . . . . . . . . . . . . . . . . . . . . . . . . . . . . . . . . . . . . . . . . . . . . . . . . . . . . . . . . . . . . . . . . . . . . . . . . . . . . . . . . . . . 49
Award Options . . . . . . . . . . . . . . . . . . . . . . . . . . . . . . . . . . . . . . . . . . . . . . . . . . . . . . . . . . . . . . . . . . . . . . . . . . . . . . . . . . . . . . . . . . . . . . . . . . . . . . . 49
Award Types . . . . . . . . . . . . . . . . . . . . . . . . . . . . . . . . . . . . . . . . . . . . . . . . . . . . . . . . . . . . . . . . . . . . . . . . . . . . . . . . . . . . . . . . . . . . . . . . . . . . . 49
Criteria for Offering Awards . . . . . . . . . . . . . . . . . . . . . . . . . . . . . . . . . . . . . . . . . . . . . . . . . . . . . . . . . . . . . . . . . . . . . . . . . . . . . . . . . . . . . . 50
Returns . . . . . . . . . . . . . . . . . . . . . . . . . . . . . . . . . . . . . . . . . . . . . . . . . . . . . . . . . . . . . . . . . . . . . . . . . . . . . . . . . . . . . . . . . . . . . . . . . . . . . . . . . . . . . . 51
Loyalty . . . . . . . . . . . . . . . . . . . . . . . . . . . . . . . . . . . . . . . . . . . . . . . . . . . . . . . . . . . . . . . . . . . . . . . . . . . . . . . . . . . . . . . . . . . 53
Refer a Friend . . . . . . . . . . . . . . . . . . . . . . . . . . . . . . . . . . . . . . . . . . . . . . . . . . . . . . . . . . . . . . . . . . . . . . . . . . . . . . . . . . . . . . . . . . . . . . . . . . . . . . . . 53
About Refer a Friend . . . . . . . . . . . . . . . . . . . . . . . . . . . . . . . . . . . . . . . . . . . . . . . . . . . . . . . . . . . . . . . . . . . . . . . . . . . . . . . . . . . . . . . . . . . . . 53
Configuring Refer a Friend . . . . . . . . . . . . . . . . . . . . . . . . . . . . . . . . . . . . . . . . . . . . . . . . . . . . . . . . . . . . . . . . . . . . . . . . . . . . . . . . . . . . . . . 53
Award & Limits Options . . . . . . . . . . . . . . . . . . . . . . . . . . . . . . . . . . . . . . . . . . . . . . . . . . . . . . . . . . . . . . . . . . . . . . . . . . . . . . . . . . . . . . . . . .54
4
TIBCO® Reward User's Guide

Target . . . . . . . . . . . . . . . . . . . . . . . . . . . . . . . . . . . . . . . . . . . . . . . . . . . . . . . . . . . . . . . . . . . . . . . . . . . . . . . . . . . . . . . . . . . . 55
Customer Profiles . . . . . . . . . . . . . . . . . . . . . . . . . . . . . . . . . . . . . . . . . . . . . . . . . . . . . . . . . . . . . . . . . . . . . . . . . . . . . . . . . . . . . . . . . . . . . . . . . . . . 55
About Customer Profiles . . . . . . . . . . . . . . . . . . . . . . . . . . . . . . . . . . . . . . . . . . . . . . . . . . . . . . . . . . . . . . . . . . . . . . . . . . . . . . . . . . . . . . . . . 55
Customer Profile: Dimensions . . . . . . . . . . . . . . . . . . . . . . . . . . . . . . . . . . . . . . . . . . . . . . . . . . . . . . . . . . . . . . . . . . . . . . . . . . . . . . . . . . . . 55
Customer Profile: List Page . . . . . . . . . . . . . . . . . . . . . . . . . . . . . . . . . . . . . . . . . . . . . . . . . . . . . . . . . . . . . . . . . . . . . . . . . . . . . . . . . . . . . . 56
Profiles Page Features . . . . . . . . . . . . . . . . . . . . . . . . . . . . . . . . . . . . . . . . . . . . . . . . . . . . . . . . . . . . . . . . . . . . . . . . . . . . . . . . . . . . . . 56
Customer Profile Editor . . . . . . . . . . . . . . . . . . . . . . . . . . . . . . . . . . . . . . . . . . . . . . . . . . . . . . . . . . . . . . . . . . . . . . . . . . . . . . . . . . . . . . . . . . . . . . . 56
Creating Customer Profile . . . . . . . . . . . . . . . . . . . . . . . . . . . . . . . . . . . . . . . . . . . . . . . . . . . . . . . . . . . . . . . . . . . . . . . . . . . . . . . . . . . . . . . . . . . 57
Existing Customer Profile . . . . . . . . . . . . . . . . . . . . . . . . . . . . . . . . . . . . . . . . . . . . . . . . . . . . . . . . . . . . . . . . . . . . . . . . . . . . . . . . . . . . . . . . . . . . . 58
Editing Customer Profile . . . . . . . . . . . . . . . . . . . . . . . . . . . . . . . . . . . . . . . . . . . . . . . . . . . . . . . . . . . . . . . . . . . . . . . . . . . . . . . . . . . . . . . . . . . . . . 58
Cloning Customer Profile . . . . . . . . . . . . . . . . . . . . . . . . . . . . . . . . . . . . . . . . . . . . . . . . . . . . . . . . . . . . . . . . . . . . . . . . . . . . . . . . . . . . . . . . . . . . . 59
Exporting List . . . . . . . . . . . . . . . . . . . . . . . . . . . . . . . . . . . . . . . . . . . . . . . . . . . . . . . . . . . . . . . . . . . . . . . . . . . . . . . . . . . . . . . . . . . . . . . . . . . . . . . . 60
Export Email File Format . . . . . . . . . . . . . . . . . . . . . . . . . . . . . . . . . . . . . . . . . . . . . . . . . . . . . . . . . . . . . . . . . . . . . . . . . . . . . . . . . . . . . . . . .60
List Export Headers . . . . . . . . . . . . . . . . . . . . . . . . . . . . . . . . . . . . . . . . . . . . . . . . . . . . . . . . . . . . . . . . . . . . . . . . . . . . . . . . . . . . . . . . . . . . . .60
Profile Export Fields with Custom Attributes . . . . . . . . . . . . . . . . . . . . . . . . . . . . . . . . . . . . . . . . . . . . . . . . . . . . . . . . . . . . . . . . . . . . . . 61
Deleting Customer Profile . . . . . . . . . . . . . . . . . . . . . . . . . . . . . . . . . . . . . . . . . . . . . . . . . . . . . . . . . . . . . . . . . . . . . . . . . . . . . . . . . . . . . . . . . . . . 63
Profile Dimensions . . . . . . . . . . . . . . . . . . . . . . . . . . . . . . . . . . . . . . . . . . . . . . . . . . . . . . . . . . . . . . . . . . . . . . . . . . . . . . . . . . . . . . . . . . . . . . . . . . .63
About Profile Dimensions . . . . . . . . . . . . . . . . . . . . . . . . . . . . . . . . . . . . . . . . . . . . . . . . . . . . . . . . . . . . . . . . . . . . . . . . . . . . . . . . . . . . . . . . 63
The Changing Set of Selected Customers . . . . . . . . . . . . . . . . . . . . . . . . . . . . . . . . . . . . . . . . . . . . . . . . . . . . . . . . . . . . . . . . . . . .63
Profile Dimension: Conditions . . . . . . . . . . . . . . . . . . . . . . . . . . . . . . . . . . . . . . . . . . . . . . . . . . . . . . . . . . . . . . . . . . . . . . . . . . . . . . . . . . . . 63
Default Dimension: Customer Type = Registered Customers Only . . . . . . . . . . . . . . . . . . . . . . . . . . . . . . . . . . . . . . . . . . . . 64
Profile Dimension: How to Use . . . . . . . . . . . . . . . . . . . . . . . . . . . . . . . . . . . . . . . . . . . . . . . . . . . . . . . . . . . . . . . . . . . . . . . . . . . . . . . . . . . 64
Profile Dimension: MUST Match . . . . . . . . . . . . . . . . . . . . . . . . . . . . . . . . . . . . . . . . . . . . . . . . . . . . . . . . . . . . . . . . . . . . . . . . . . . . . . . . . .64
Profile Dimension: Definitions . . . . . . . . . . . . . . . . . . . . . . . . . . . . . . . . . . . . . . . . . . . . . . . . . . . . . . . . . . . . . . . . . . . . . . . . . . . . . . . . . . . . 64
Dimension: Activities . . . . . . . . . . . . . . . . . . . . . . . . . . . . . . . . . . . . . . . . . . . . . . . . . . . . . . . . . . . . . . . . . . . . . . . . . . . . . . . . . . . . . . . . 64
Defining Activity Based Conditions . . . . . . . . . . . . . . . . . . . . . . . . . . . . . . . . . . . . . . . . . . . . . . . . . . . . . . . . . . . . . . . . . . . . . . 65
Dimension: Category Interests . . . . . . . . . . . . . . . . . . . . . . . . . . . . . . . . . . . . . . . . . . . . . . . . . . . . . . . . . . . . . . . . . . . . . . . . . . . . . . .65
Targeting Customers in Categories . . . . . . . . . . . . . . . . . . . . . . . . . . . . . . . . . . . . . . . . . . . . . . . . . . . . . . . . . . . . . . . . . . . . . . 65
Dimension: Custom Attributes . . . . . . . . . . . . . . . . . . . . . . . . . . . . . . . . . . . . . . . . . . . . . . . . . . . . . . . . . . . . . . . . . . . . . . . . . . . . . . . 65
Defining Dimension Conditions Based on Custom Attributes . . . . . . . . . . . . . . . . . . . . . . . . . . . . . . . . . . . . . . . . . . . . . 66
Editing a Condition Based on a Custom Attribute . . . . . . . . . . . . . . . . . . . . . . . . . . . . . . . . . . . . . . . . . . . . . . . . . . . . 66
Dimension: Custom Entities . . . . . . . . . . . . . . . . . . . . . . . . . . . . . . . . . . . . . . . . . . . . . . . . . . . . . . . . . . . . . . . . . . . . . . . . . . . . . . . . . 66
Dimension: Custom Questions . . . . . . . . . . . . . . . . . . . . . . . . . . . . . . . . . . . . . . . . . . . . . . . . . . . . . . . . . . . . . . . . . . . . . . . . . . . . . . .67
Setting up Customer Response at Level I . . . . . . . . . . . . . . . . . . . . . . . . . . . . . . . . . . . . . . . . . . . . . . . . . . . . . . . . . . . . . . . .67
Setting up Customer Response at Level II . . . . . . . . . . . . . . . . . . . . . . . . . . . . . . . . . . . . . . . . . . . . . . . . . . . . . . . . . . . . . . . 68
Dimension: Customer Types . . . . . . . . . . . . . . . . . . . . . . . . . . . . . . . . . . . . . . . . . . . . . . . . . . . . . . . . . . . . . . . . . . . . . . . . . . . . . . . . . 69
Dimension: Gender . . . . . . . . . . . . . . . . . . . . . . . . . . . . . . . . . . . . . . . . . . . . . . . . . . . . . . . . . . . . . . . . . . . . . . . . . . . . . . . . . . . . . . . . . .70
Targeting Customers by Gender . . . . . . . . . . . . . . . . . . . . . . . . . . . . . . . . . . . . . . . . . . . . . . . . . . . . . . . . . . . . . . . . . . . . . . . . .70
Dimension: Generic Events . . . . . . . . . . . . . . . . . . . . . . . . . . . . . . . . . . . . . . . . . . . . . . . . . . . . . . . . . . . . . . . . . . . . . . . . . . . . . . . . . . 70
5
TIBCO® Reward User's Guide

Creating a New Generic Event Target Profile . . . . . . . . . . . . . . . . . . . . . . . . . . . . . . . . . . . . . . . . . . . . . . . . . . . . . . . . . . . . 71
Dimension: Geographic . . . . . . . . . . . . . . . . . . . . . . . . . . . . . . . . . . . . . . . . . . . . . . . . . . . . . . . . . . . . . . . . . . . . . . . . . . . . . . . . . . . . . .71
Geographic Targeting Using Postal Code Sets . . . . . . . . . . . . . . . . . . . . . . . . . . . . . . . . . . . . . . . . . . . . . . . . . . . . . . . . . . . 71
Geographic Targeting Using U.S. States . . . . . . . . . . . . . . . . . . . . . . . . . . . . . . . . . . . . . . . . . . . . . . . . . . . . . . . . . . . . . . . . . 71
Geographic Targeting Using Stores . . . . . . . . . . . . . . . . . . . . . . . . . . . . . . . . . . . . . . . . . . . . . . . . . . . . . . . . . . . . . . . . . . . . . .72
Geographic Targeting Using Metro Area . . . . . . . . . . . . . . . . . . . . . . . . . . . . . . . . . . . . . . . . . . . . . . . . . . . . . . . . . . . . . . . . . 72
Geographic Targeting Using Mobile Geolocation . . . . . . . . . . . . . . . . . . . . . . . . . . . . . . . . . . . . . . . . . . . . . . . . . . . . . . . . . 72
Dimension: Lists . . . . . . . . . . . . . . . . . . . . . . . . . . . . . . . . . . . . . . . . . . . . . . . . . . . . . . . . . . . . . . . . . . . . . . . . . . . . . . . . . . . . . . . . . . . . .72
Customer Profile: Adding Target List . . . . . . . . . . . . . . . . . . . . . . . . . . . . . . . . . . . . . . . . . . . . . . . . . . . . . . . . . . . . . . . . . . . . .73
Customer Profile: Removing Target List . . . . . . . . . . . . . . . . . . . . . . . . . . . . . . . . . . . . . . . . . . . . . . . . . . . . . . . . . . . . . . . . . .73
Dimension: Offer Redemptions . . . . . . . . . . . . . . . . . . . . . . . . . . . . . . . . . . . . . . . . . . . . . . . . . . . . . . . . . . . . . . . . . . . . . . . . . . . . . . 73
Dimension: Past Purchases . . . . . . . . . . . . . . . . . . . . . . . . . . . . . . . . . . . . . . . . . . . . . . . . . . . . . . . . . . . . . . . . . . . . . . . . . . . . . . . . . .74
Selecting Customers on Past Purchases . . . . . . . . . . . . . . . . . . . . . . . . . . . . . . . . . . . . . . . . . . . . . . . . . . . . . . . . . . . . . . . . 74
Dimension: Point Activity . . . . . . . . . . . . . . . . . . . . . . . . . . . . . . . . . . . . . . . . . . . . . . . . . . . . . . . . . . . . . . . . . . . . . . . . . . . . . . . . . . . . 75
Dimension: Point Balance . . . . . . . . . . . . . . . . . . . . . . . . . . . . . . . . . . . . . . . . . . . . . . . . . . . . . . . . . . . . . . . . . . . . . . . . . . . . . . . . . . . 75
Targeting Customers According to Their Current Point Balance . . . . . . . . . . . . . . . . . . . . . . . . . . . . . . . . . . . . . . . . . . 75
Dimension: Communications . . . . . . . . . . . . . . . . . . . . . . . . . . . . . . . . . . . . . . . . . . . . . . . . . . . . . . . . . . . . . . . . . . . . . . . . . . . . . . . . .76
Dimension: RFM (Recency, Frequency, Monetary Value) . . . . . . . . . . . . . . . . . . . . . . . . . . . . . . . . . . . . . . . . . . . . . . . . . . . . . 76
Setting Parameters for the Conditions . . . . . . . . . . . . . . . . . . . . . . . . . . . . . . . . . . . . . . . . . . . . . . . . . . . . . . . . . . . . . . . . . . . 77
Disabling a Parameter Setting for a Condition . . . . . . . . . . . . . . . . . . . . . . . . . . . . . . . . . . . . . . . . . . . . . . . . . . . . . . . . . . . .77
Modifying Frequency or Monetary . . . . . . . . . . . . . . . . . . . . . . . . . . . . . . . . . . . . . . . . . . . . . . . . . . . . . . . . . . . . . . . . . . . . . . . 77
Dimension: Tender Types . . . . . . . . . . . . . . . . . . . . . . . . . . . . . . . . . . . . . . . . . . . . . . . . . . . . . . . . . . . . . . . . . . . . . . . . . . . . . . . . . . . . 77
Dimension: Tiers . . . . . . . . . . . . . . . . . . . . . . . . . . . . . . . . . . . . . . . . . . . . . . . . . . . . . . . . . . . . . . . . . . . . . . . . . . . . . . . . . . . . . . . . . . . . 78
Basket Profiles . . . . . . . . . . . . . . . . . . . . . . . . . . . . . . . . . . . . . . . . . . . . . . . . . . . . . . . . . . . . . . . . . . . . . . . . . . . . . . . . . . . . . . . . . . . . . . . . . . . . . . . 78
About Basket Profiles . . . . . . . . . . . . . . . . . . . . . . . . . . . . . . . . . . . . . . . . . . . . . . . . . . . . . . . . . . . . . . . . . . . . . . . . . . . . . . . . . . . . . . . . . . . . 78
Basket Profile List Page . . . . . . . . . . . . . . . . . . . . . . . . . . . . . . . . . . . . . . . . . . . . . . . . . . . . . . . . . . . . . . . . . . . . . . . . . . . . . . . . . . . . . . . . . . 78
Profile Page Features . . . . . . . . . . . . . . . . . . . . . . . . . . . . . . . . . . . . . . . . . . . . . . . . . . . . . . . . . . . . . . . . . . . . . . . . . . . . . . . . . . . . . . . .78
Creating Basket Profile . . . . . . . . . . . . . . . . . . . . . . . . . . . . . . . . . . . . . . . . . . . . . . . . . . . . . . . . . . . . . . . . . . . . . . . . . . . . . . . . . . . . . . . . . 79
Basket Profile Conditions . . . . . . . . . . . . . . . . . . . . . . . . . . . . . . . . . . . . . . . . . . . . . . . . . . . . . . . . . . . . . . . . . . . . . . . . . . . . . . . . . . . . . . . . .81
Creating Products Condition . . . . . . . . . . . . . . . . . . . . . . . . . . . . . . . . . . . . . . . . . . . . . . . . . . . . . . . . . . . . . . . . . . . . . . . . . . . . . . . . . 81
Creating Categories Condition . . . . . . . . . . . . . . . . . . . . . . . . . . . . . . . . . . . . . . . . . . . . . . . . . . . . . . . . . . . . . . . . . . . . . . . . . . . . . . . 81
Creating Brands Condition . . . . . . . . . . . . . . . . . . . . . . . . . . . . . . . . . . . . . . . . . . . . . . . . . . . . . . . . . . . . . . . . . . . . . . . . . . . . . . . . . . .82
Creating Tenders Condition . . . . . . . . . . . . . . . . . . . . . . . . . . . . . . . . . . . . . . . . . . . . . . . . . . . . . . . . . . . . . . . . . . . . . . . . . . . . . . . . . . 82
Creating Quantity/Spend Condition . . . . . . . . . . . . . . . . . . . . . . . . . . . . . . . . . . . . . . . . . . . . . . . . . . . . . . . . . . . . . . . . . . . . . . . . . . 83
Creating Product Custom Attributes Condition . . . . . . . . . . . . . . . . . . . . . . . . . . . . . . . . . . . . . . . . . . . . . . . . . . . . . . . . . . . . . . . .83
Editing Basket Profile . . . . . . . . . . . . . . . . . . . . . . . . . . . . . . . . . . . . . . . . . . . . . . . . . . . . . . . . . . . . . . . . . . . . . . . . . . . . . . . . . . . . . . . . . . . . 83
Cloning Basket Profile . . . . . . . . . . . . . . . . . . . . . . . . . . . . . . . . . . . . . . . . . . . . . . . . . . . . . . . . . . . . . . . . . . . . . . . . . . . . . . . . . . . . . . . . . . . .84
Deleting Basket Profile . . . . . . . . . . . . . . . . . . . . . . . . . . . . . . . . . . . . . . . . . . . . . . . . . . . . . . . . . . . . . . . . . . . . . . . . . . . . . . . . . . . . . . . . . . . 84
Lists . . . . . . . . . . . . . . . . . . . . . . . . . . . . . . . . . . . . . . . . . . . . . . . . . . . . . . . . . . . . . . . . . . . . . . . . . . . . . . . . . . . . . . . . . . . . . . . . . . . . . . . . . . . . . . . . . 84
6
TIBCO® Reward User's Guide

About Target Lists . . . . . . . . . . . . . . . . . . . . . . . . . . . . . . . . . . . . . . . . . . . . . . . . . . . . . . . . . . . . . . . . . . . . . . . . . . . . . . . . . . . . . . . . . . . . . . . .84
Target List Page . . . . . . . . . . . . . . . . . . . . . . . . . . . . . . . . . . . . . . . . . . . . . . . . . . . . . . . . . . . . . . . . . . . . . . . . . . . . . . . . . . . . . . . . . . . . . . . . . 85
Features and Fields . . . . . . . . . . . . . . . . . . . . . . . . . . . . . . . . . . . . . . . . . . . . . . . . . . . . . . . . . . . . . . . . . . . . . . . . . . . . . . . . . . . . . . . . . 85
Create Target List . . . . . . . . . . . . . . . . . . . . . . . . . . . . . . . . . . . . . . . . . . . . . . . . . . . . . . . . . . . . . . . . . . . . . . . . . . . . . . . . . . . . . . . . . . . . . . . . 85
About Target List Imports . . . . . . . . . . . . . . . . . . . . . . . . . . . . . . . . . . . . . . . . . . . . . . . . . . . . . . . . . . . . . . . . . . . . . . . . . . . . . . . . . . . . . . . . .87
Features and Fields . . . . . . . . . . . . . . . . . . . . . . . . . . . . . . . . . . . . . . . . . . . . . . . . . . . . . . . . . . . . . . . . . . . . . . . . . . . . . . . . . . . . . . . . . 87
Creating Target List from File . . . . . . . . . . . . . . . . . . . . . . . . . . . . . . . . . . . . . . . . . . . . . . . . . . . . . . . . . . . . . . . . . . . . . . . . . . . . . . . . . . . . 88
Profile Target List . . . . . . . . . . . . . . . . . . . . . . . . . . . . . . . . . . . . . . . . . . . . . . . . . . . . . . . . . . . . . . . . . . . . . . . . . . . . . . . . . . . . . . . . . . . . . . . . 89
Features and Fields . . . . . . . . . . . . . . . . . . . . . . . . . . . . . . . . . . . . . . . . . . . . . . . . . . . . . . . . . . . . . . . . . . . . . . . . . . . . . . . . . . . . . . . . . 89
Creating Target List from Profile . . . . . . . . . . . . . . . . . . . . . . . . . . . . . . . . . . . . . . . . . . . . . . . . . . . . . . . . . . . . . . . . . . . . . . . . . . . . . . . . . . 90
Target List Details . . . . . . . . . . . . . . . . . . . . . . . . . . . . . . . . . . . . . . . . . . . . . . . . . . . . . . . . . . . . . . . . . . . . . . . . . . . . . . . . . . . . . . . . . . . . . . . .90
Data Validation and Import Settings . . . . . . . . . . . . . . . . . . . . . . . . . . . . . . . . . . . . . . . . . . . . . . . . . . . . . . . . . . . . . . . . . . . . . . . . . .91
Postal Codes . . . . . . . . . . . . . . . . . . . . . . . . . . . . . . . . . . . . . . . . . . . . . . . . . . . . . . . . . . . . . . . . . . . . . . . . . . . . . . . . . . . . . . . . . . . . . . . . . . . . . . . . . 91
Defining Profile Using Postal Code . . . . . . . . . . . . . . . . . . . . . . . . . . . . . . . . . . . . . . . . . . . . . . . . . . . . . . . . . . . . . . . . . . . . . . . . . . . . . . . 92
Fields and Features . . . . . . . . . . . . . . . . . . . . . . . . . . . . . . . . . . . . . . . . . . . . . . . . . . . . . . . . . . . . . . . . . . . . . . . . . . . . . . . . . . . . . . . . . 92
CSV File Example . . . . . . . . . . . . . . . . . . . . . . . . . . . . . . . . . . . . . . . . . . . . . . . . . . . . . . . . . . . . . . . . . . . . . . . . . . . . . . . . . . . . . . . . . . . . . . . 93
Custom Questions . . . . . . . . . . . . . . . . . . . . . . . . . . . . . . . . . . . . . . . . . . . . . . . . . . . . . . . . . . . . . . . . . . . . . . . . . . . . . . . . . . . . . . . . . . . . . . . . . . . 93
Creating Custom Question . . . . . . . . . . . . . . . . . . . . . . . . . . . . . . . . . . . . . . . . . . . . . . . . . . . . . . . . . . . . . . . . . . . . . . . . . . . . . . . . . . . . . . 94
. . . . . . . . . . . . . . . . . . . . . . . . . . . . . . . . . . . . . . . . . . . . . . . . . . . . . . . . . . . . . . . . . . . . . . . . . . . . . . . . . . . . . . . . . . . . . . . . . . . . . . . . . . . . . 95
Setting up a New Questionnaire . . . . . . . . . . . . . . . . . . . . . . . . . . . . . . . . . . . . . . . . . . . . . . . . . . . . . . . . . . . . . . . . . . . . . . . . . . . . . . . . . . 96
Changing an Existing Custom Question . . . . . . . . . . . . . . . . . . . . . . . . . . . . . . . . . . . . . . . . . . . . . . . . . . . . . . . . . . . . . . . . . . . . . . 96
Creating Custom Question . . . . . . . . . . . . . . . . . . . . . . . . . . . . . . . . . . . . . . . . . . . . . . . . . . . . . . . . . . . . . . . . . . . . . . . . . . . . . . . . . . . . . . . 97
Custom Question Details . . . . . . . . . . . . . . . . . . . . . . . . . . . . . . . . . . . . . . . . . . . . . . . . . . . . . . . . . . . . . . . . . . . . . . . . . . . . . . . . . . . . . . . . .97
Editing Custom Question . . . . . . . . . . . . . . . . . . . . . . . . . . . . . . . . . . . . . . . . . . . . . . . . . . . . . . . . . . . . . . . . . . . . . . . . . . . . . . . . . . . . 98
. . . . . . . . . . . . . . . . . . . . . . . . . . . . . . . . . . . . . . . . . . . . . . . . . . . . . . . . . . . . . . . . . . . . . . . . . . . . . . . . . . . . . . . . . . . . . . . . . . . . . . . . .99
Import Custom Questions . . . . . . . . . . . . . . . . . . . . . . . . . . . . . . . . . . . . . . . . . . . . . . . . . . . . . . . . . . . . . . . . . . . . . . . . . . . . . . . . . . . . . . . . 99
Custom Question File Details and Requirements . . . . . . . . . . . . . . . . . . . . . . . . . . . . . . . . . . . . . . . . . . . . . . . . . . . . . . . . . . . . . 99
Sample CSV File (displayed as text) . . . . . . . . . . . . . . . . . . . . . . . . . . . . . . . . . . . . . . . . . . . . . . . . . . . . . . . . . . . . . . . . . . . . . . . . 100
Creating a new Custom Question using Bulk File Upload Process . . . . . . . . . . . . . . . . . . . . . . . . . . . . . . . . . . . . . . . . . . . 100
Changing Existing Custom Questions using Bulk File Upload Process . . . . . . . . . . . . . . . . . . . . . . . . . . . . . . . . . . . . . . . 100
Questionnaire Setup . . . . . . . . . . . . . . . . . . . . . . . . . . . . . . . . . . . . . . . . . . . . . . . . . . . . . . . . . . . . . . . . . . . . . . . . . . . . . . . . . . . . . . . . . . . . 101
Questionnaire Setup Page . . . . . . . . . . . . . . . . . . . . . . . . . . . . . . . . . . . . . . . . . . . . . . . . . . . . . . . . . . . . . . . . . . . . . . . . . . . . . . . . . .101
Creating Questionnaire . . . . . . . . . . . . . . . . . . . . . . . . . . . . . . . . . . . . . . . . . . . . . . . . . . . . . . . . . . . . . . . . . . . . . . . . . . . . . . . . . . . . 102
Mobile Geolocations . . . . . . . . . . . . . . . . . . . . . . . . . . . . . . . . . . . . . . . . . . . . . . . . . . . . . . . . . . . . . . . . . . . . . . . . . . . . . . . . . . . . . . . . . . . . . . . . 103
About Mobile Geolocations . . . . . . . . . . . . . . . . . . . . . . . . . . . . . . . . . . . . . . . . . . . . . . . . . . . . . . . . . . . . . . . . . . . . . . . . . . . . . . . . . . . . . 103
Mobile Geolocation: Use Case . . . . . . . . . . . . . . . . . . . . . . . . . . . . . . . . . . . . . . . . . . . . . . . . . . . . . . . . . . . . . . . . . . . . . . . . . . . . . 103
Creating Mobile Geolocation . . . . . . . . . . . . . . . . . . . . . . . . . . . . . . . . . . . . . . . . . . . . . . . . . . . . . . . . . . . . . . . . . . . . . . . . . . . . . . . . . . .103
Editing Mobile Geolocation . . . . . . . . . . . . . . . . . . . . . . . . . . . . . . . . . . . . . . . . . . . . . . . . . . . . . . . . . . . . . . . . . . . . . . . . . . . . . . . . . . . . . .105
Deleting Mobile Geolocation . . . . . . . . . . . . . . . . . . . . . . . . . . . . . . . . . . . . . . . . . . . . . . . . . . . . . . . . . . . . . . . . . . . . . . . . . . . . . . . . . . . . 105
7
TIBCO® Reward User's Guide

Email . . . . . . . . . . . . . . . . . . . . . . . . . . . . . . . . . . . . . . . . . . . . . . . . . . . . . . . . . . . . . . . . . . . . . . . . . . . . . . . . . . . . . . . . . . . 106
Communications . . . . . . . . . . . . . . . . . . . . . . . . . . . . . . . . . . . . . . . . . . . . . . . . . . . . . . . . . . . . . . . . . . . . . . . . . . . . . . . . . . . . . . . . . . . . . . . . . . . . 106
Lifecycle . . . . . . . . . . . . . . . . . . . . . . . . . . . . . . . . . . . . . . . . . . . . . . . . . . . . . . . . . . . . . . . . . . . . . . . . . . . . . . . . . . . . . . . . . . . . . . . . . . . . . . . .107
Email Communication: List Page . . . . . . . . . . . . . . . . . . . . . . . . . . . . . . . . . . . . . . . . . . . . . . . . . . . . . . . . . . . . . . . . . . . . . . . . . . . . . . . . 107
Features and Fields . . . . . . . . . . . . . . . . . . . . . . . . . . . . . . . . . . . . . . . . . . . . . . . . . . . . . . . . . . . . . . . . . . . . . . . . . . . . . . . . . . . . . . . . 108
Creating Email Communication . . . . . . . . . . . . . . . . . . . . . . . . . . . . . . . . . . . . . . . . . . . . . . . . . . . . . . . . . . . . . . . . . . . . . . . . . . . . . . . . 108
Choose Template . . . . . . . . . . . . . . . . . . . . . . . . . . . . . . . . . . . . . . . . . . . . . . . . . . . . . . . . . . . . . . . . . . . . . . . . . . . . . . . . . . . . . . . . . . . . . . . 110
Properties . . . . . . . . . . . . . . . . . . . . . . . . . . . . . . . . . . . . . . . . . . . . . . . . . . . . . . . . . . . . . . . . . . . . . . . . . . . . . . . . . . . . . . . . . . . . . . . . . . . . . . 110
Schedule . . . . . . . . . . . . . . . . . . . . . . . . . . . . . . . . . . . . . . . . . . . . . . . . . . . . . . . . . . . . . . . . . . . . . . . . . . . . . . . . . . . . . . . . . . . . . . . . . . 111
Geolocation Trigger Events . . . . . . . . . . . . . . . . . . . . . . . . . . . . . . . . . . . . . . . . . . . . . . . . . . . . . . . . . . . . . . . . . . . . . . . . . . . . . . . . . 111
Tracking . . . . . . . . . . . . . . . . . . . . . . . . . . . . . . . . . . . . . . . . . . . . . . . . . . . . . . . . . . . . . . . . . . . . . . . . . . . . . . . . . . . . . . . . . . . . . . . . . . . .111
Communication Properties . . . . . . . . . . . . . . . . . . . . . . . . . . . . . . . . . . . . . . . . . . . . . . . . . . . . . . . . . . . . . . . . . . . . . . . . . . . . . . . . . 112
Target . . . . . . . . . . . . . . . . . . . . . . . . . . . . . . . . . . . . . . . . . . . . . . . . . . . . . . . . . . . . . . . . . . . . . . . . . . . . . . . . . . . . . . . . . . . . . . . . . . . . . . . . . . 113
Fields and Features . . . . . . . . . . . . . . . . . . . . . . . . . . . . . . . . . . . . . . . . . . . . . . . . . . . . . . . . . . . . . . . . . . . . . . . . . . . . . . . . . . . . . . . . 113
Rich Content . . . . . . . . . . . . . . . . . . . . . . . . . . . . . . . . . . . . . . . . . . . . . . . . . . . . . . . . . . . . . . . . . . . . . . . . . . . . . . . . . . . . . . . . . . . . . . . . . . . 114
Fields and Features . . . . . . . . . . . . . . . . . . . . . . . . . . . . . . . . . . . . . . . . . . . . . . . . . . . . . . . . . . . . . . . . . . . . . . . . . . . . . . . . . . . . . . . . 114
Reference Tags . . . . . . . . . . . . . . . . . . . . . . . . . . . . . . . . . . . . . . . . . . . . . . . . . . . . . . . . . . . . . . . . . . . . . . . . . . . . . . . . . . . . . . . . . . . . . . . . 115
Text-only . . . . . . . . . . . . . . . . . . . . . . . . . . . . . . . . . . . . . . . . . . . . . . . . . . . . . . . . . . . . . . . . . . . . . . . . . . . . . . . . . . . . . . . . . . . . . . . . . . . . . . . 118
Fields and Features . . . . . . . . . . . . . . . . . . . . . . . . . . . . . . . . . . . . . . . . . . . . . . . . . . . . . . . . . . . . . . . . . . . . . . . . . . . . . . . . . . . . . . . . 119
Summary . . . . . . . . . . . . . . . . . . . . . . . . . . . . . . . . . . . . . . . . . . . . . . . . . . . . . . . . . . . . . . . . . . . . . . . . . . . . . . . . . . . . . . . . . . . . . . . . . . . . . . .119
Fields and Features . . . . . . . . . . . . . . . . . . . . . . . . . . . . . . . . . . . . . . . . . . . . . . . . . . . . . . . . . . . . . . . . . . . . . . . . . . . . . . . . . . . . . . . . 119
Cloning an Email Communication . . . . . . . . . . . . . . . . . . . . . . . . . . . . . . . . . . . . . . . . . . . . . . . . . . . . . . . . . . . . . . . . . . . . . . . . . . . . . . . 120
Change Status . . . . . . . . . . . . . . . . . . . . . . . . . . . . . . . . . . . . . . . . . . . . . . . . . . . . . . . . . . . . . . . . . . . . . . . . . . . . . . . . . . . . . . . . . . . . . . . . . 120
Status Details . . . . . . . . . . . . . . . . . . . . . . . . . . . . . . . . . . . . . . . . . . . . . . . . . . . . . . . . . . . . . . . . . . . . . . . . . . . . . . . . . . . . . . . . . . . . . . 121
Address Rules . . . . . . . . . . . . . . . . . . . . . . . . . . . . . . . . . . . . . . . . . . . . . . . . . . . . . . . . . . . . . . . . . . . . . . . . . . . . . . . . . . . . . . . . . . . . . . . . . .121
ISP Profiles . . . . . . . . . . . . . . . . . . . . . . . . . . . . . . . . . . . . . . . . . . . . . . . . . . . . . . . . . . . . . . . . . . . . . . . . . . . . . . . . . . . . . . . . . . . . . . . . . . . . .122
Campaigns . . . . . . . . . . . . . . . . . . . . . . . . . . . . . . . . . . . . . . . . . . . . . . . . . . . . . . . . . . . . . . . . . . . . . . . . . . . . . . . . . . . . . . . . . . . . . . . . . . . . . . . . . 123
About Campaigns . . . . . . . . . . . . . . . . . . . . . . . . . . . . . . . . . . . . . . . . . . . . . . . . . . . . . . . . . . . . . . . . . . . . . . . . . . . . . . . . . . . . . . . . . . . . . . 123
Fields and Features of Campaigns . . . . . . . . . . . . . . . . . . . . . . . . . . . . . . . . . . . . . . . . . . . . . . . . . . . . . . . . . . . . . . . . . . . . . . . . . .123
Creating Campaigns . . . . . . . . . . . . . . . . . . . . . . . . . . . . . . . . . . . . . . . . . . . . . . . . . . . . . . . . . . . . . . . . . . . . . . . . . . . . . . . . . . . . . . . . . . .124
Campaign Properties . . . . . . . . . . . . . . . . . . . . . . . . . . . . . . . . . . . . . . . . . . . . . . . . . . . . . . . . . . . . . . . . . . . . . . . . . . . . . . . . . . . . . . . . . . . 125
Fields and Features of Campaign Properties . . . . . . . . . . . . . . . . . . . . . . . . . . . . . . . . . . . . . . . . . . . . . . . . . . . . . . . . . . . . . . . .125
Campaign Details . . . . . . . . . . . . . . . . . . . . . . . . . . . . . . . . . . . . . . . . . . . . . . . . . . . . . . . . . . . . . . . . . . . . . . . . . . . . . . . . . . . . . . . . . . . . . . .125
Fields and Features of Campaign Details . . . . . . . . . . . . . . . . . . . . . . . . . . . . . . . . . . . . . . . . . . . . . . . . . . . . . . . . . . . . . . . . . . . 126
Trigger Events . . . . . . . . . . . . . . . . . . . . . . . . . . . . . . . . . . . . . . . . . . . . . . . . . . . . . . . . . . . . . . . . . . . . . . . . . . . . . . . . . . . . . . . . . . . . . . . . . . . . . . .126
About Trigger Event Response Emails . . . . . . . . . . . . . . . . . . . . . . . . . . . . . . . . . . . . . . . . . . . . . . . . . . . . . . . . . . . . . . . . . . . . . . . . . . .127
Trigger Event Descriptions . . . . . . . . . . . . . . . . . . . . . . . . . . . . . . . . . . . . . . . . . . . . . . . . . . . . . . . . . . . . . . . . . . . . . . . . . . . . . . . . . . . . . . 127
Trigger Event List Page . . . . . . . . . . . . . . . . . . . . . . . . . . . . . . . . . . . . . . . . . . . . . . . . . . . . . . . . . . . . . . . . . . . . . . . . . . . . . . . . . . . . . . . . . 128
Features and Fields of Trigger Events . . . . . . . . . . . . . . . . . . . . . . . . . . . . . . . . . . . . . . . . . . . . . . . . . . . . . . . . . . . . . . . . . . . . . . .128
8
TIBCO® Reward User's Guide

Manage Trigger Event . . . . . . . . . . . . . . . . . . . . . . . . . . . . . . . . . . . . . . . . . . . . . . . . . . . . . . . . . . . . . . . . . . . . . . . . . . . . . . . . . . . . . . . . . . 129
Features and Fields of Manage a Trigger Event Page . . . . . . . . . . . . . . . . . . . . . . . . . . . . . . . . . . . . . . . . . . . . . . . . . . . . . . . 129
Response Email . . . . . . . . . . . . . . . . . . . . . . . . . . . . . . . . . . . . . . . . . . . . . . . . . . . . . . . . . . . . . . . . . . . . . . . . . . . . . . . . . . . . . . . . . . . . . . . . 129
About Response Emails . . . . . . . . . . . . . . . . . . . . . . . . . . . . . . . . . . . . . . . . . . . . . . . . . . . . . . . . . . . . . . . . . . . . . . . . . . . . . . . . . . . . 129
Creating Response Email . . . . . . . . . . . . . . . . . . . . . . . . . . . . . . . . . . . . . . . . . . . . . . . . . . . . . . . . . . . . . . . . . . . . . . . . . . . . . . . . . . 130
Properties . . . . . . . . . . . . . . . . . . . . . . . . . . . . . . . . . . . . . . . . . . . . . . . . . . . . . . . . . . . . . . . . . . . . . . . . . . . . . . . . . . . . . . . . . . . . . 130
Rich Content . . . . . . . . . . . . . . . . . . . . . . . . . . . . . . . . . . . . . . . . . . . . . . . . . . . . . . . . . . . . . . . . . . . . . . . . . . . . . . . . . . . . . . . . . . 131
Text-Only Content . . . . . . . . . . . . . . . . . . . . . . . . . . . . . . . . . . . . . . . . . . . . . . . . . . . . . . . . . . . . . . . . . . . . . . . . . . . . . . . . . . . . . 131
Summary . . . . . . . . . . . . . . . . . . . . . . . . . . . . . . . . . . . . . . . . . . . . . . . . . . . . . . . . . . . . . . . . . . . . . . . . . . . . . . . . . . . . . . . . . . . . . .131
Change Response Email . . . . . . . . . . . . . . . . . . . . . . . . . . . . . . . . . . . . . . . . . . . . . . . . . . . . . . . . . . . . . . . . . . . . . . . . . . . . . . . . . . . 131
Changing the Response Email Assigned to the Trigger Event . . . . . . . . . . . . . . . . . . . . . . . . . . . . . . . . . . . . . . . . . . . 131
Cloning the Response Email, Modifying the Clone, and then Choosing that Response Email . . . . . . . . . . . . 132
Creating a New Response Email and Then Assigning It to the Trigger Event . . . . . . . . . . . . . . . . . . . . . . . . . . . . 133
Stationery . . . . . . . . . . . . . . . . . . . . . . . . . . . . . . . . . . . . . . . . . . . . . . . . . . . . . . . . . . . . . . . . . . . . . . . . . . . . . . . . . . . . . . . . . . . . . . . . . . . . . . . . . . .133
About Stationery . . . . . . . . . . . . . . . . . . . . . . . . . . . . . . . . . . . . . . . . . . . . . . . . . . . . . . . . . . . . . . . . . . . . . . . . . . . . . . . . . . . . . . . . . . . . . . . .133
About Stationery Creation . . . . . . . . . . . . . . . . . . . . . . . . . . . . . . . . . . . . . . . . . . . . . . . . . . . . . . . . . . . . . . . . . . . . . . . . . . . . . . . . . . . . . . .134
Creating Stationery . . . . . . . . . . . . . . . . . . . . . . . . . . . . . . . . . . . . . . . . . . . . . . . . . . . . . . . . . . . . . . . . . . . . . . . . . . . . . . . . . . . . . . . . . . . .134
About Editing Stationery . . . . . . . . . . . . . . . . . . . . . . . . . . . . . . . . . . . . . . . . . . . . . . . . . . . . . . . . . . . . . . . . . . . . . . . . . . . . . . . . . . . . . . . . 136
Stationery Properties . . . . . . . . . . . . . . . . . . . . . . . . . . . . . . . . . . . . . . . . . . . . . . . . . . . . . . . . . . . . . . . . . . . . . . . . . . . . . . . . . . . . . . . . . . . 136
Stationery Rich Content . . . . . . . . . . . . . . . . . . . . . . . . . . . . . . . . . . . . . . . . . . . . . . . . . . . . . . . . . . . . . . . . . . . . . . . . . . . . . . . . . . . . . . . . .137
Stationery Text-Only Content . . . . . . . . . . . . . . . . . . . . . . . . . . . . . . . . . . . . . . . . . . . . . . . . . . . . . . . . . . . . . . . . . . . . . . . . . . . . . . . . . . . .138
Stationery Summary . . . . . . . . . . . . . . . . . . . . . . . . . . . . . . . . . . . . . . . . . . . . . . . . . . . . . . . . . . . . . . . . . . . . . . . . . . . . . . . . . . . . . . . . . . . . 139
Test and Seed Lists . . . . . . . . . . . . . . . . . . . . . . . . . . . . . . . . . . . . . . . . . . . . . . . . . . . . . . . . . . . . . . . . . . . . . . . . . . . . . . . . . . . . . . . . . . . . . . . . . 139
Test & Seed List Requirements . . . . . . . . . . . . . . . . . . . . . . . . . . . . . . . . . . . . . . . . . . . . . . . . . . . . . . . . . . . . . . . . . . . . . . . . . . . . . . . . . .139
Email Communication: Guidelines . . . . . . . . . . . . . . . . . . . . . . . . . . . . . . . . . . . . . . . . . . . . . . . . . . . . . . . . . . . . . . . . . . . . . . . . . . . . . . . . . . .140
Signage . . . . . . . . . . . . . . . . . . . . . . . . . . . . . . . . . . . . . . . . . . . . . . . . . . . . . . . . . . . . . . . . . . . . . . . . . . . . . . . . . . . . . . . . .141
About Signage . . . . . . . . . . . . . . . . . . . . . . . . . . . . . . . . . . . . . . . . . . . . . . . . . . . . . . . . . . . . . . . . . . . . . . . . . . . . . . . . . . . . . . . . . . . . . . . . . . . . . . 141
Signage Widgets . . . . . . . . . . . . . . . . . . . . . . . . . . . . . . . . . . . . . . . . . . . . . . . . . . . . . . . . . . . . . . . . . . . . . . . . . . . . . . . . . . . . . . . . . . . . . . . 141
Features and Fields . . . . . . . . . . . . . . . . . . . . . . . . . . . . . . . . . . . . . . . . . . . . . . . . . . . . . . . . . . . . . . . . . . . . . . . . . . . . . . . . . . . . . . . . . . . . . . . . . 141
About Creating Signage . . . . . . . . . . . . . . . . . . . . . . . . . . . . . . . . . . . . . . . . . . . . . . . . . . . . . . . . . . . . . . . . . . . . . . . . . . . . . . . . . . . . . . . . . . . .142
Signage: Developer's Guide . . . . . . . . . . . . . . . . . . . . . . . . . . . . . . . . . . . . . . . . . . . . . . . . . . . . . . . . . . . . . . . . . . . . . . . . . . . . . . . . . . . . .144
Signage: Example . . . . . . . . . . . . . . . . . . . . . . . . . . . . . . . . . . . . . . . . . . . . . . . . . . . . . . . . . . . . . . . . . . . . . . . . . . . . . . . . . . . . . . . . . . . . . . 145
Embed Tag: Use . . . . . . . . . . . . . . . . . . . . . . . . . . . . . . . . . . . . . . . . . . . . . . . . . . . . . . . . . . . . . . . . . . . . . . . . . . . . . . . . . . . . . . . . . . . . . . . . . . . . 145
Notes on Widget Embed Tags . . . . . . . . . . . . . . . . . . . . . . . . . . . . . . . . . . . . . . . . . . . . . . . . . . . . . . . . . . . . . . . . . . . . . . . . . . . . . . . . . . .146
How the Embed Tag is Processed . . . . . . . . . . . . . . . . . . . . . . . . . . . . . . . . . . . . . . . . . . . . . . . . . . . . . . . . . . . . . . . . . . . . . . . . . . . . . . .146
Server-Side Tags . . . . . . . . . . . . . . . . . . . . . . . . . . . . . . . . . . . . . . . . . . . . . . . . . . . . . . . . . . . . . . . . . . . . . . . . . . . . . . . . . . . . . . . . . . . . . . . 146
Content . . . . . . . . . . . . . . . . . . . . . . . . . . . . . . . . . . . . . . . . . . . . . . . . . . . . . . . . . . . . . . . . . . . . . . . . . . . . . . . . . . . . . . . . . 148
Content Items and Rule Sets . . . . . . . . . . . . . . . . . . . . . . . . . . . . . . . . . . . . . . . . . . . . . . . . . . . . . . . . . . . . . . . . . . . . . . . . . . . . . . . . . . . . . . . . 148
Dynamic Content . . . . . . . . . . . . . . . . . . . . . . . . . . . . . . . . . . . . . . . . . . . . . . . . . . . . . . . . . . . . . . . . . . . . . . . . . . . . . . . . . . . . . . . . . . . . . . . 149
9
TIBCO® Reward User's Guide

Content Items . . . . . . . . . . . . . . . . . . . . . . . . . . . . . . . . . . . . . . . . . . . . . . . . . . . . . . . . . . . . . . . . . . . . . . . . . . . . . . . . . . . . . . . . . . . . . . . . . . . . . . . 151
Content Item: Content . . . . . . . . . . . . . . . . . . . . . . . . . . . . . . . . . . . . . . . . . . . . . . . . . . . . . . . . . . . . . . . . . . . . . . . . . . . . . . . . . . . . . . . . . . 151
Content Item: Properties . . . . . . . . . . . . . . . . . . . . . . . . . . . . . . . . . . . . . . . . . . . . . . . . . . . . . . . . . . . . . . . . . . . . . . . . . . . . . . . . . . . . . . . . 152
Creating a New Content Item . . . . . . . . . . . . . . . . . . . . . . . . . . . . . . . . . . . . . . . . . . . . . . . . . . . . . . . . . . . . . . . . . . . . . . . . . . . . . . . . . . 153
Editing an Existing Content Item . . . . . . . . . . . . . . . . . . . . . . . . . . . . . . . . . . . . . . . . . . . . . . . . . . . . . . . . . . . . . . . . . . . . . . . . . . . . 155
Editing Content Item . . . . . . . . . . . . . . . . . . . . . . . . . . . . . . . . . . . . . . . . . . . . . . . . . . . . . . . . . . . . . . . . . . . . . . . . . . . . . . . . . . . . . . . . . . . 155
Content Item: Rich Content . . . . . . . . . . . . . . . . . . . . . . . . . . . . . . . . . . . . . . . . . . . . . . . . . . . . . . . . . . . . . . . . . . . . . . . . . . . . . . . . . . . . . 155
Content Item: Text-Only . . . . . . . . . . . . . . . . . . . . . . . . . . . . . . . . . . . . . . . . . . . . . . . . . . . . . . . . . . . . . . . . . . . . . . . . . . . . . . . . . . . . . . . . . 157
Deleting Content Item . . . . . . . . . . . . . . . . . . . . . . . . . . . . . . . . . . . . . . . . . . . . . . . . . . . . . . . . . . . . . . . . . . . . . . . . . . . . . . . . . . . . . . . . . . .158
Content Rule Sets . . . . . . . . . . . . . . . . . . . . . . . . . . . . . . . . . . . . . . . . . . . . . . . . . . . . . . . . . . . . . . . . . . . . . . . . . . . . . . . . . . . . . . . . . . . . . . . . . . 159
Content Rule Set: Match Conditions . . . . . . . . . . . . . . . . . . . . . . . . . . . . . . . . . . . . . . . . . . . . . . . . . . . . . . . . . . . . . . . . . . . . . . . . . . . . .159
Match Condition: Define . . . . . . . . . . . . . . . . . . . . . . . . . . . . . . . . . . . . . . . . . . . . . . . . . . . . . . . . . . . . . . . . . . . . . . . . . . . . . . . . . . . . . . . . 161
Defining Match Condition . . . . . . . . . . . . . . . . . . . . . . . . . . . . . . . . . . . . . . . . . . . . . . . . . . . . . . . . . . . . . . . . . . . . . . . . . . . . . . . . . . .162
Content Rule Set: Properties . . . . . . . . . . . . . . . . . . . . . . . . . . . . . . . . . . . . . . . . . . . . . . . . . . . . . . . . . . . . . . . . . . . . . . . . . . . . . . . . . . . .163
About Creating Content Rule Set . . . . . . . . . . . . . . . . . . . . . . . . . . . . . . . . . . . . . . . . . . . . . . . . . . . . . . . . . . . . . . . . . . . . . . . . . . . . . . 163
Editing Content Rule Set . . . . . . . . . . . . . . . . . . . . . . . . . . . . . . . . . . . . . . . . . . . . . . . . . . . . . . . . . . . . . . . . . . . . . . . . . . . . . . . . . . . . . . . .165
Deleting Content Rule Set . . . . . . . . . . . . . . . . . . . . . . . . . . . . . . . . . . . . . . . . . . . . . . . . . . . . . . . . . . . . . . . . . . . . . . . . . . . . . . . . . . . . . . 165
Program Microsites . . . . . . . . . . . . . . . . . . . . . . . . . . . . . . . . . . . . . . . . . . . . . . . . . . . . . . . . . . . . . . . . . . . . . . . . . . . . . . 167
About Offer Showcases . . . . . . . . . . . . . . . . . . . . . . . . . . . . . . . . . . . . . . . . . . . . . . . . . . . . . . . . . . . . . . . . . . . . . . . . . . . . . . . . . . . . . . . . . . . . . 167
About Mobile Microsites . . . . . . . . . . . . . . . . . . . . . . . . . . . . . . . . . . . . . . . . . . . . . . . . . . . . . . . . . . . . . . . . . . . . . . . . . . . . . . . . . . . . . . . . . . . . . 167
Clienteling . . . . . . . . . . . . . . . . . . . . . . . . . . . . . . . . . . . . . . . . . . . . . . . . . . . . . . . . . . . . . . . . . . . . . . . . . . . . . . . . . . . . . . .168
Clienteling: Access . . . . . . . . . . . . . . . . . . . . . . . . . . . . . . . . . . . . . . . . . . . . . . . . . . . . . . . . . . . . . . . . . . . . . . . . . . . . . . . . . . . . . . . . . . . . . . . . . . 168
Clienteling: Creating Users . . . . . . . . . . . . . . . . . . . . . . . . . . . . . . . . . . . . . . . . . . . . . . . . . . . . . . . . . . . . . . . . . . . . . . . . . . . . . . . . . . . . . . . . . . 168
Rewards . . . . . . . . . . . . . . . . . . . . . . . . . . . . . . . . . . . . . . . . . . . . . . . . . . . . . . . . . . . . . . . . . . . . . . . . . . . . . . . . . . . . . . . . 170
Reward Codes . . . . . . . . . . . . . . . . . . . . . . . . . . . . . . . . . . . . . . . . . . . . . . . . . . . . . . . . . . . . . . . . . . . . . . . . . . . . . . . . . . . . . . . . . . . . . . . . . . . . . . 170
Reward Code: Requirements . . . . . . . . . . . . . . . . . . . . . . . . . . . . . . . . . . . . . . . . . . . . . . . . . . . . . . . . . . . . . . . . . . . . . . . . . . . . . . . . . . . 171
Uploading Unique Reward Codes . . . . . . . . . . . . . . . . . . . . . . . . . . . . . . . . . . . . . . . . . . . . . . . . . . . . . . . . . . . . . . . . . . . . . . . . . . . . . . . 172
Defining a Non-Unique Reward Code . . . . . . . . . . . . . . . . . . . . . . . . . . . . . . . . . . . . . . . . . . . . . . . . . . . . . . . . . . . . . . . . . . . . . . . . . . . 173
Setting Up a Reward Code Inventory Alert . . . . . . . . . . . . . . . . . . . . . . . . . . . . . . . . . . . . . . . . . . . . . . . . . . . . . . . . . . . . . . . . . . . . . . .174
Reward Items . . . . . . . . . . . . . . . . . . . . . . . . . . . . . . . . . . . . . . . . . . . . . . . . . . . . . . . . . . . . . . . . . . . . . . . . . . . . . . . . . . . . . . . . . . . . . . . . . . . . . . 174
Creating Reward Item . . . . . . . . . . . . . . . . . . . . . . . . . . . . . . . . . . . . . . . . . . . . . . . . . . . . . . . . . . . . . . . . . . . . . . . . . . . . . . . . . . . . . . . . . 174
Reward Item: File Requirements . . . . . . . . . . . . . . . . . . . . . . . . . . . . . . . . . . . . . . . . . . . . . . . . . . . . . . . . . . . . . . . . . . . . . . . . . . . . . . . . 176
Uploading a Reward File . . . . . . . . . . . . . . . . . . . . . . . . . . . . . . . . . . . . . . . . . . . . . . . . . . . . . . . . . . . . . . . . . . . . . . . . . . . . . . . . . . . . . . . . 177
Reward Catalogs . . . . . . . . . . . . . . . . . . . . . . . . . . . . . . . . . . . . . . . . . . . . . . . . . . . . . . . . . . . . . . . . . . . . . . . . . . . . . . . . . . . . . . . . . . . . . . . . . . . 177
Reward Catalog: Settings . . . . . . . . . . . . . . . . . . . . . . . . . . . . . . . . . . . . . . . . . . . . . . . . . . . . . . . . . . . . . . . . . . . . . . . . . . . . . . . . . . . . . . . 177
Creating a Reward Catalog . . . . . . . . . . . . . . . . . . . . . . . . . . . . . . . . . . . . . . . . . . . . . . . . . . . . . . . . . . . . . . . . . . . . . . . . . . . . . . . . . . . . 177
Reports . . . . . . . . . . . . . . . . . . . . . . . . . . . . . . . . . . . . . . . . . . . . . . . . . . . . . . . . . . . . . . . . . . . . . . . . . . . . . . . . . . . . . . . . .180
About Reports . . . . . . . . . . . . . . . . . . . . . . . . . . . . . . . . . . . . . . . . . . . . . . . . . . . . . . . . . . . . . . . . . . . . . . . . . . . . . . . . . . . . . . . . . . . . . . . . . . . . . . 180
Reports: Parameter Settings . . . . . . . . . . . . . . . . . . . . . . . . . . . . . . . . . . . . . . . . . . . . . . . . . . . . . . . . . . . . . . . . . . . . . . . . . . . . . . . . . . . . 180
10
TIBCO® Reward User's Guide

Reports: Graphic Data Display . . . . . . . . . . . . . . . . . . . . . . . . . . . . . . . . . . . . . . . . . . . . . . . . . . . . . . . . . . . . . . . . . . . . . . . . . . . . . . . . . . 180
Reports: Data Table . . . . . . . . . . . . . . . . . . . . . . . . . . . . . . . . . . . . . . . . . . . . . . . . . . . . . . . . . . . . . . . . . . . . . . . . . . . . . . . . . . . . . . . . . . . . 181
Specifying the Time Period . . . . . . . . . . . . . . . . . . . . . . . . . . . . . . . . . . . . . . . . . . . . . . . . . . . . . . . . . . . . . . . . . . . . . . . . . . . . . . . . . 181
Terminology Used in Reports . . . . . . . . . . . . . . . . . . . . . . . . . . . . . . . . . . . . . . . . . . . . . . . . . . . . . . . . . . . . . . . . . . . . . . . . . . . . . . . 181
Reports: Customer . . . . . . . . . . . . . . . . . . . . . . . . . . . . . . . . . . . . . . . . . . . . . . . . . . . . . . . . . . . . . . . . . . . . . . . . . . . . . . . . . . . . . . . . . . . . . . . . . 182
Sales Performance by Customer States (Time Series Analysis) . . . . . . . . . . . . . . . . . . . . . . . . . . . . . . . . . . . . . . . . . . . . . . . . . . 182
Customer Purchase Activity Report . . . . . . . . . . . . . . . . . . . . . . . . . . . . . . . . . . . . . . . . . . . . . . . . . . . . . . . . . . . . . . . . . . . . . . . . . . . . . 183
Customer Activity by Channel Report . . . . . . . . . . . . . . . . . . . . . . . . . . . . . . . . . . . . . . . . . . . . . . . . . . . . . . . . . . . . . . . . . . . . . . . . . . . 183
Channel Data Listed In Rows . . . . . . . . . . . . . . . . . . . . . . . . . . . . . . . . . . . . . . . . . . . . . . . . . . . . . . . . . . . . . . . . . . . . . . . . . . . . . . .183
Sales Performance Comparison (Time Series Analysis) . . . . . . . . . . . . . . . . . . . . . . . . . . . . . . . . . . . . . . . . . . . . . . . . . . . . . . . . .183
Sales Performance by Customer States . . . . . . . . . . . . . . . . . . . . . . . . . . . . . . . . . . . . . . . . . . . . . . . . . . . . . . . . . . . . . . . . . . . . . . . . . 183
Gender Breakdown Report . . . . . . . . . . . . . . . . . . . . . . . . . . . . . . . . . . . . . . . . . . . . . . . . . . . . . . . . . . . . . . . . . . . . . . . . . . . . . . . . . . . . . .184
Sales Performance by Customer Stated Category Preference . . . . . . . . . . . . . . . . . . . . . . . . . . . . . . . . . . . . . . . . . . . . . . . . . . . .185
Reports: Offer . . . . . . . . . . . . . . . . . . . . . . . . . . . . . . . . . . . . . . . . . . . . . . . . . . . . . . . . . . . . . . . . . . . . . . . . . . . . . . . . . . . . . . . . . . . . . . . . . . . . . . 186
All Offer Performance Report . . . . . . . . . . . . . . . . . . . . . . . . . . . . . . . . . . . . . . . . . . . . . . . . . . . . . . . . . . . . . . . . . . . . . . . . . . . . . . . . . . . 186
Reports: Email . . . . . . . . . . . . . . . . . . . . . . . . . . . . . . . . . . . . . . . . . . . . . . . . . . . . . . . . . . . . . . . . . . . . . . . . . . . . . . . . . . . . . . . . . . . . . . . . . . . . . . 186
Campaign Summary Report . . . . . . . . . . . . . . . . . . . . . . . . . . . . . . . . . . . . . . . . . . . . . . . . . . . . . . . . . . . . . . . . . . . . . . . . . . . . . . . . . . . . 187
Campaign Detail Executive Report . . . . . . . . . . . . . . . . . . . . . . . . . . . . . . . . . . . . . . . . . . . . . . . . . . . . . . . . . . . . . . . . . . . . . . . . . . . . . . 188
Campaign Detail Extended Report . . . . . . . . . . . . . . . . . . . . . . . . . . . . . . . . . . . . . . . . . . . . . . . . . . . . . . . . . . . . . . . . . . . . . . . . . . . . . . 189
Email Performance Executive Report . . . . . . . . . . . . . . . . . . . . . . . . . . . . . . . . . . . . . . . . . . . . . . . . . . . . . . . . . . . . . . . . . . . . . . . . . . . .190
Email Performance Extended Report . . . . . . . . . . . . . . . . . . . . . . . . . . . . . . . . . . . . . . . . . . . . . . . . . . . . . . . . . . . . . . . . . . . . . . . . . . . .191
Clickthrough Analysis by Email . . . . . . . . . . . . . . . . . . . . . . . . . . . . . . . . . . . . . . . . . . . . . . . . . . . . . . . . . . . . . . . . . . . . . . . . . . . . . . . . . .192
Email Performance over Time . . . . . . . . . . . . . . . . . . . . . . . . . . . . . . . . . . . . . . . . . . . . . . . . . . . . . . . . . . . . . . . . . . . . . . . . . . . . . . . . . . . 193
Email Report: Email Bounce Analysis . . . . . . . . . . . . . . . . . . . . . . . . . . . . . . . . . . . . . . . . . . . . . . . . . . . . . . . . . . . . . . . . . . . . . . . . . . .193
List Performance Summary Report . . . . . . . . . . . . . . . . . . . . . . . . . . . . . . . . . . . . . . . . . . . . . . . . . . . . . . . . . . . . . . . . . . . . . . . . . . . . . .196
List Performance Time Series Report . . . . . . . . . . . . . . . . . . . . . . . . . . . . . . . . . . . . . . . . . . . . . . . . . . . . . . . . . . . . . . . . . . . . . . . . . . . 197
Reports: Specialized . . . . . . . . . . . . . . . . . . . . . . . . . . . . . . . . . . . . . . . . . . . . . . . . . . . . . . . . . . . . . . . . . . . . . . . . . . . . . . . . . . . . . . . . . . . . . . . .198
Signup and Membership Report . . . . . . . . . . . . . . . . . . . . . . . . . . . . . . . . . . . . . . . . . . . . . . . . . . . . . . . . . . . . . . . . . . . . . . . . . . . . . . . . .199
Custom Question Detail Report . . . . . . . . . . . . . . . . . . . . . . . . . . . . . . . . . . . . . . . . . . . . . . . . . . . . . . . . . . . . . . . . . . . . . . . . . . . . . . . . . 200
File Import Summary Report . . . . . . . . . . . . . . . . . . . . . . . . . . . . . . . . . . . . . . . . . . . . . . . . . . . . . . . . . . . . . . . . . . . . . . . . . . . . . . . 201
Report: Signage . . . . . . . . . . . . . . . . . . . . . . . . . . . . . . . . . . . . . . . . . . . . . . . . . . . . . . . . . . . . . . . . . . . . . . . . . . . . . . . . . . . . . . . . . . . . . . . . 202
Web Signage Summary Report . . . . . . . . . . . . . . . . . . . . . . . . . . . . . . . . . . . . . . . . . . . . . . . . . . . . . . . . . . . . . . . . . . . . . . . . . . . . .202
Web Signage Detailed Report . . . . . . . . . . . . . . . . . . . . . . . . . . . . . . . . . . . . . . . . . . . . . . . . . . . . . . . . . . . . . . . . . . . . . . . . . . . . . . 202
Report: Activity . . . . . . . . . . . . . . . . . . . . . . . . . . . . . . . . . . . . . . . . . . . . . . . . . . . . . . . . . . . . . . . . . . . . . . . . . . . . . . . . . . . . . . . . . . . . . . . . . 203
Activity Analysis Report . . . . . . . . . . . . . . . . . . . . . . . . . . . . . . . . . . . . . . . . . . . . . . . . . . . . . . . . . . . . . . . . . . . . . . . . . . . . . . . . . . . . 203
Activity Time Series Report . . . . . . . . . . . . . . . . . . . . . . . . . . . . . . . . . . . . . . . . . . . . . . . . . . . . . . . . . . . . . . . . . . . . . . . . . . . . . . . . .204
Report: CSR Activity . . . . . . . . . . . . . . . . . . . . . . . . . . . . . . . . . . . . . . . . . . . . . . . . . . . . . . . . . . . . . . . . . . . . . . . . . . . . . . . . . . . . . . . . . . . .205
CSR Activity Breakdown Report . . . . . . . . . . . . . . . . . . . . . . . . . . . . . . . . . . . . . . . . . . . . . . . . . . . . . . . . . . . . . . . . . . . . . . . . . . . . 205
Point Expiration . . . . . . . . . . . . . . . . . . . . . . . . . . . . . . . . . . . . . . . . . . . . . . . . . . . . . . . . . . . . . . . . . . . . . . . . . . . . . . . . . . . . . . . . . . . . . . . . . . . . . 206
11
TIBCO® Reward User's Guide

Point Expiration Forecast Report . . . . . . . . . . . . . . . . . . . . . . . . . . . . . . . . . . . . . . . . . . . . . . . . . . . . . . . . . . . . . . . . . . . . . . . . . . . . . . . . 206
Reports: Ad-hoc Reporting . . . . . . . . . . . . . . . . . . . . . . . . . . . . . . . . . . . . . . . . . . . . . . . . . . . . . . . . . . . . . . . . . . . . . . . . . . . . . . . . . . . . . . . . . . 207
Configuring Ad-hoc Reporting . . . . . . . . . . . . . . . . . . . . . . . . . . . . . . . . . . . . . . . . . . . . . . . . . . . . . . . . . . . . . . . . . . . . . . . . . . . . . . . . . . .207
Creating Users for Ad-hoc Reporting . . . . . . . . . . . . . . . . . . . . . . . . . . . . . . . . . . . . . . . . . . . . . . . . . . . . . . . . . . . . . . . . . . . . . . . 207
Editing Users for Ad-hoc Reporting . . . . . . . . . . . . . . . . . . . . . . . . . . . . . . . . . . . . . . . . . . . . . . . . . . . . . . . . . . . . . . . . . . . . . . . . . 207
Accessing Ad-hoc Reporting . . . . . . . . . . . . . . . . . . . . . . . . . . . . . . . . . . . . . . . . . . . . . . . . . . . . . . . . . . . . . . . . . . . . . . . . . . . . . . . 208
Admin . . . . . . . . . . . . . . . . . . . . . . . . . . . . . . . . . . . . . . . . . . . . . . . . . . . . . . . . . . . . . . . . . . . . . . . . . . . . . . . . . . . . . . . . . . 209
Main Settings . . . . . . . . . . . . . . . . . . . . . . . . . . . . . . . . . . . . . . . . . . . . . . . . . . . . . . . . . . . . . . . . . . . . . . . . . . . . . . . . . . . . . . . . . . . . . . . . . . . . . . .209
Features and Fields . . . . . . . . . . . . . . . . . . . . . . . . . . . . . . . . . . . . . . . . . . . . . . . . . . . . . . . . . . . . . . . . . . . . . . . . . . . . . . . . . . . . . . . . . . . . .209
Configuration: List Import . . . . . . . . . . . . . . . . . . . . . . . . . . . . . . . . . . . . . . . . . . . . . . . . . . . . . . . . . . . . . . . . . . . . . . . . . . . . . . . . . . . . . . . 210
List Import: Email Opt-In . . . . . . . . . . . . . . . . . . . . . . . . . . . . . . . . . . . . . . . . . . . . . . . . . . . . . . . . . . . . . . . . . . . . . . . . . . . . . . . . . . . .211
Configuration: Points . . . . . . . . . . . . . . . . . . . . . . . . . . . . . . . . . . . . . . . . . . . . . . . . . . . . . . . . . . . . . . . . . . . . . . . . . . . . . . . . . . . . . . . . . . . .211
Configuration: Member Point Limit . . . . . . . . . . . . . . . . . . . . . . . . . . . . . . . . . . . . . . . . . . . . . . . . . . . . . . . . . . . . . . . . . . . . . . . . . . 211
Points: Expiration Options . . . . . . . . . . . . . . . . . . . . . . . . . . . . . . . . . . . . . . . . . . . . . . . . . . . . . . . . . . . . . . . . . . . . . . . . . . . . . . . . . . 212
Configuration: Account Lockout . . . . . . . . . . . . . . . . . . . . . . . . . . . . . . . . . . . . . . . . . . . . . . . . . . . . . . . . . . . . . . . . . . . . . . . . . . . . . . . . . 212
Setting Up Account Lockout Rules . . . . . . . . . . . . . . . . . . . . . . . . . . . . . . . . . . . . . . . . . . . . . . . . . . . . . . . . . . . . . . . . . . . . . . . . . . 212
Lockout Threshold . . . . . . . . . . . . . . . . . . . . . . . . . . . . . . . . . . . . . . . . . . . . . . . . . . . . . . . . . . . . . . . . . . . . . . . . . . . . . . . . . . . . . 213
Lockout Observation Window . . . . . . . . . . . . . . . . . . . . . . . . . . . . . . . . . . . . . . . . . . . . . . . . . . . . . . . . . . . . . . . . . . . . . . . . . . 213
Lockout Duration . . . . . . . . . . . . . . . . . . . . . . . . . . . . . . . . . . . . . . . . . . . . . . . . . . . . . . . . . . . . . . . . . . . . . . . . . . . . . . . . . . . . . . 213
Lockout Messages . . . . . . . . . . . . . . . . . . . . . . . . . . . . . . . . . . . . . . . . . . . . . . . . . . . . . . . . . . . . . . . . . . . . . . . . . . . . . . . . . . . . .213
Account Lockout Rules: Unlocking Accounts . . . . . . . . . . . . . . . . . . . . . . . . . . . . . . . . . . . . . . . . . . . . . . . . . . . . . . . . . . . . . . . . 213
Unlocking Accounts: Business Users . . . . . . . . . . . . . . . . . . . . . . . . . . . . . . . . . . . . . . . . . . . . . . . . . . . . . . . . . . . . . . . . . . .214
Unlocking Accounts: Customer Accounts . . . . . . . . . . . . . . . . . . . . . . . . . . . . . . . . . . . . . . . . . . . . . . . . . . . . . . . . . . . . . . .214
CRMS Users . . . . . . . . . . . . . . . . . . . . . . . . . . . . . . . . . . . . . . . . . . . . . . . . . . . . . . . . . . . . . . . . . . . . . . . . . . . . . . . . . . . . . . . . . . . . . . . . . . . . . . . 214
User: Roles . . . . . . . . . . . . . . . . . . . . . . . . . . . . . . . . . . . . . . . . . . . . . . . . . . . . . . . . . . . . . . . . . . . . . . . . . . . . . . . . . . . . . . . . . . . . . . . . . . . . .214
User: Permissions . . . . . . . . . . . . . . . . . . . . . . . . . . . . . . . . . . . . . . . . . . . . . . . . . . . . . . . . . . . . . . . . . . . . . . . . . . . . . . . . . . . . . . . . . . . . . 215
Creating User . . . . . . . . . . . . . . . . . . . . . . . . . . . . . . . . . . . . . . . . . . . . . . . . . . . . . . . . . . . . . . . . . . . . . . . . . . . . . . . . . . . . . . . . . . . . . . . . . . 220
Creating Users Through File Import . . . . . . . . . . . . . . . . . . . . . . . . . . . . . . . . . . . . . . . . . . . . . . . . . . . . . . . . . . . . . . . . . . . . . . . . .221
Creating Users Through File Import: Associate Stores . . . . . . . . . . . . . . . . . . . . . . . . . . . . . . . . . . . . . . . . . . . . . . . . . . . . . . 221
Creating Users Through File Import: Associate Categories . . . . . . . . . . . . . . . . . . . . . . . . . . . . . . . . . . . . . . . . . . . . . . . . . . 222
Resetting Password . . . . . . . . . . . . . . . . . . . . . . . . . . . . . . . . . . . . . . . . . . . . . . . . . . . . . . . . . . . . . . . . . . . . . . . . . . . . . . . . . . . . . . . . . . . . .223
Partners . . . . . . . . . . . . . . . . . . . . . . . . . . . . . . . . . . . . . . . . . . . . . . . . . . . . . . . . . . . . . . . . . . . . . . . . . . . . . . . . . . . . . . . . . . . . . . . . . . . . . . . . . . . .223
Partner Offers: Create . . . . . . . . . . . . . . . . . . . . . . . . . . . . . . . . . . . . . . . . . . . . . . . . . . . . . . . . . . . . . . . . . . . . . . . . . . . . . . . . . . . . . . . . . 223
Partner Offers: Step 1 - Creating Point Type . . . . . . . . . . . . . . . . . . . . . . . . . . . . . . . . . . . . . . . . . . . . . . . . . . . . . . . . . . . . . . . . .225
Partner Offers: Step 2 - Creating Partner . . . . . . . . . . . . . . . . . . . . . . . . . . . . . . . . . . . . . . . . . . . . . . . . . . . . . . . . . . . . . . . . . . . .225
Partner Offers: Step 3 - Creating Offer . . . . . . . . . . . . . . . . . . . . . . . . . . . . . . . . . . . . . . . . . . . . . . . . . . . . . . . . . . . . . . . . . . . . . . 225
Partner Offers: Step 4 - Targeting Offer . . . . . . . . . . . . . . . . . . . . . . . . . . . . . . . . . . . . . . . . . . . . . . . . . . . . . . . . . . . . . . . . . . . . . 226
Partner Offers: Step 5 - Launching Offer . . . . . . . . . . . . . . . . . . . . . . . . . . . . . . . . . . . . . . . . . . . . . . . . . . . . . . . . . . . . . . . . . . . . 227
Announcement . . . . . . . . . . . . . . . . . . . . . . . . . . . . . . . . . . . . . . . . . . . . . . . . . . . . . . . . . . . . . . . . . . . . . . . . . . . . . . . . . . . . . . . . . . . . . . . . . . . . . 227
12
TIBCO® Reward User's Guide

Creating Announcement . . . . . . . . . . . . . . . . . . . . . . . . . . . . . . . . . . . . . . . . . . . . . . . . . . . . . . . . . . . . . . . . . . . . . . . . . . . . . . . . . . . . . . . 227
Editing Announcement . . . . . . . . . . . . . . . . . . . . . . . . . . . . . . . . . . . . . . . . . . . . . . . . . . . . . . . . . . . . . . . . . . . . . . . . . . . . . . . . . . . . . . . . . .229
Custom Attributes . . . . . . . . . . . . . . . . . . . . . . . . . . . . . . . . . . . . . . . . . . . . . . . . . . . . . . . . . . . . . . . . . . . . . . . . . . . . . . . . . . . . . . . . . . . . . . . . . . 229
Custom Attribute: Constraints . . . . . . . . . . . . . . . . . . . . . . . . . . . . . . . . . . . . . . . . . . . . . . . . . . . . . . . . . . . . . . . . . . . . . . . . . . . . . . . . . . . 229
Using Custom Attribute . . . . . . . . . . . . . . . . . . . . . . . . . . . . . . . . . . . . . . . . . . . . . . . . . . . . . . . . . . . . . . . . . . . . . . . . . . . . . . . . . . . . . . . . . 230
Custom Attribute: Reference Tag Use . . . . . . . . . . . . . . . . . . . . . . . . . . . . . . . . . . . . . . . . . . . . . . . . . . . . . . . . . . . . . . . . . . . . . . . . . . . 230
Custom Attribute: List Page . . . . . . . . . . . . . . . . . . . . . . . . . . . . . . . . . . . . . . . . . . . . . . . . . . . . . . . . . . . . . . . . . . . . . . . . . . . . . . . . . . . . . 231
Custom Attribute: Prerequisites . . . . . . . . . . . . . . . . . . . . . . . . . . . . . . . . . . . . . . . . . . . . . . . . . . . . . . . . . . . . . . . . . . . . . . . . . . . . . . . . . 232
Custom Attribute: Create . . . . . . . . . . . . . . . . . . . . . . . . . . . . . . . . . . . . . . . . . . . . . . . . . . . . . . . . . . . . . . . . . . . . . . . . . . . . . . . . . . . . . . . .232
Creating Custom Attribute . . . . . . . . . . . . . . . . . . . . . . . . . . . . . . . . . . . . . . . . . . . . . . . . . . . . . . . . . . . . . . . . . . . . . . . . . . . . . . . . . . 233
Custom Attribute: Creating Number . . . . . . . . . . . . . . . . . . . . . . . . . . . . . . . . . . . . . . . . . . . . . . . . . . . . . . . . . . . . . . . . . . . . . . . . . . . . . 233
Custom Attribute: Creating Month/Day . . . . . . . . . . . . . . . . . . . . . . . . . . . . . . . . . . . . . . . . . . . . . . . . . . . . . . . . . . . . . . . . . . . . . . . . . . 234
Custom Attribute: Creating Date/Time . . . . . . . . . . . . . . . . . . . . . . . . . . . . . . . . . . . . . . . . . . . . . . . . . . . . . . . . . . . . . . . . . . . . . . . . . . . 234
Custom Attribute: Creating Lookup . . . . . . . . . . . . . . . . . . . . . . . . . . . . . . . . . . . . . . . . . . . . . . . . . . . . . . . . . . . . . . . . . . . . . . . . . . . . . . 235
Custom Attribute: Create Text . . . . . . . . . . . . . . . . . . . . . . . . . . . . . . . . . . . . . . . . . . . . . . . . . . . . . . . . . . . . . . . . . . . . . . . . . . . . . . . . . . . 235
Using a Text Custom Attribute . . . . . . . . . . . . . . . . . . . . . . . . . . . . . . . . . . . . . . . . . . . . . . . . . . . . . . . . . . . . . . . . . . . . . . . . . . . . . . 235
Text Custom Attribute Constraints . . . . . . . . . . . . . . . . . . . . . . . . . . . . . . . . . . . . . . . . . . . . . . . . . . . . . . . . . . . . . . . . . . . . . . . . . . 236
Custom Attribute: Add Customer Data . . . . . . . . . . . . . . . . . . . . . . . . . . . . . . . . . . . . . . . . . . . . . . . . . . . . . . . . . . . . . . . . . . . . . . . . . . .236
Custom Attribute: Add Product Data . . . . . . . . . . . . . . . . . . . . . . . . . . . . . . . . . . . . . . . . . . . . . . . . . . . . . . . . . . . . . . . . . . . . . . . . . . . . .236
Custom Entities . . . . . . . . . . . . . . . . . . . . . . . . . . . . . . . . . . . . . . . . . . . . . . . . . . . . . . . . . . . . . . . . . . . . . . . . . . . . . . . . . . . . . . . . . . . . . . . . . . . . 237
Creating Custom Entity . . . . . . . . . . . . . . . . . . . . . . . . . . . . . . . . . . . . . . . . . . . . . . . . . . . . . . . . . . . . . . . . . . . . . . . . . . . . . . . . . . . . . . . . . 237
Custom Entity: Adding Attributes . . . . . . . . . . . . . . . . . . . . . . . . . . . . . . . . . . . . . . . . . . . . . . . . . . . . . . . . . . . . . . . . . . . . . . . . . . . . . . . . 237
Custom Entity: Lookup Codes . . . . . . . . . . . . . . . . . . . . . . . . . . . . . . . . . . . . . . . . . . . . . . . . . . . . . . . . . . . . . . . . . . . . . . . . . . . . . . . . . . .238
Custom Entity: Adding Attribute Lookup Codes . . . . . . . . . . . . . . . . . . . . . . . . . . . . . . . . . . . . . . . . . . . . . . . . . . . . . . . . . . . . . . . . . . 238
Custom Entity: Delete Attribute Lookup Codes . . . . . . . . . . . . . . . . . . . . . . . . . . . . . . . . . . . . . . . . . . . . . . . . . . . . . . . . . . . . . . . . . . 239
Custom Entity: Importing Keys . . . . . . . . . . . . . . . . . . . . . . . . . . . . . . . . . . . . . . . . . . . . . . . . . . . . . . . . . . . . . . . . . . . . . . . . . . . . . . . . . . 239
Editing Custom Entity . . . . . . . . . . . . . . . . . . . . . . . . . . . . . . . . . . . . . . . . . . . . . . . . . . . . . . . . . . . . . . . . . . . . . . . . . . . . . . . . . . . . . . . . . . . 240
Publishing Custom Entity . . . . . . . . . . . . . . . . . . . . . . . . . . . . . . . . . . . . . . . . . . . . . . . . . . . . . . . . . . . . . . . . . . . . . . . . . . . . . . . . . . . . . . . 240
Deleting Custom Entity . . . . . . . . . . . . . . . . . . . . . . . . . . . . . . . . . . . . . . . . . . . . . . . . . . . . . . . . . . . . . . . . . . . . . . . . . . . . . . . . . . . . . . . . . 240
Custom Entity: Targeting . . . . . . . . . . . . . . . . . . . . . . . . . . . . . . . . . . . . . . . . . . . . . . . . . . . . . . . . . . . . . . . . . . . . . . . . . . . . . . . . . . . . . . . . 240
Custom Entity: Creating a Targeting Dimension . . . . . . . . . . . . . . . . . . . . . . . . . . . . . . . . . . . . . . . . . . . . . . . . . . . . . . . . . . . . . . . . . .241
Customers . . . . . . . . . . . . . . . . . . . . . . . . . . . . . . . . . . . . . . . . . . . . . . . . . . . . . . . . . . . . . . . . . . . . . . . . . . . . . . . . . . . . . . . . . . . . . . . . . . . . . . . . . . 241
Customer: Manage . . . . . . . . . . . . . . . . . . . . . . . . . . . . . . . . . . . . . . . . . . . . . . . . . . . . . . . . . . . . . . . . . . . . . . . . . . . . . . . . . . . . . . . . . . . . . 241
Customer: Details Page . . . . . . . . . . . . . . . . . . . . . . . . . . . . . . . . . . . . . . . . . . . . . . . . . . . . . . . . . . . . . . . . . . . . . . . . . . . . . . . . . . . . . . . . .242
Customer: Merge . . . . . . . . . . . . . . . . . . . . . . . . . . . . . . . . . . . . . . . . . . . . . . . . . . . . . . . . . . . . . . . . . . . . . . . . . . . . . . . . . . . . . . . . . . . . . . . 243
Merging Customer Accounts . . . . . . . . . . . . . . . . . . . . . . . . . . . . . . . . . . . . . . . . . . . . . . . . . . . . . . . . . . . . . . . . . . . . . . . . . . . . . . . 243
Generic Events . . . . . . . . . . . . . . . . . . . . . . . . . . . . . . . . . . . . . . . . . . . . . . . . . . . . . . . . . . . . . . . . . . . . . . . . . . . . . . . . . . . . . . . . . . . . . . . . . . . . . 244
Generic Event: List Page . . . . . . . . . . . . . . . . . . . . . . . . . . . . . . . . . . . . . . . . . . . . . . . . . . . . . . . . . . . . . . . . . . . . . . . . . . . . . . . . . . . . . . . .245
Fields and Features . . . . . . . . . . . . . . . . . . . . . . . . . . . . . . . . . . . . . . . . . . . . . . . . . . . . . . . . . . . . . . . . . . . . . . . . . . . . . . . . . . . . . . . . 245
13
TIBCO® Reward User's Guide

Creating Generic Event . . . . . . . . . . . . . . . . . . . . . . . . . . . . . . . . . . . . . . . . . . . . . . . . . . . . . . . . . . . . . . . . . . . . . . . . . . . . . . . . . . . . . . . . . 246
Targeting Generic Event . . . . . . . . . . . . . . . . . . . . . . . . . . . . . . . . . . . . . . . . . . . . . . . . . . . . . . . . . . . . . . . . . . . . . . . . . . . . . . . . . . . . . . . . 246
Generic Events: Reversing Events . . . . . . . . . . . . . . . . . . . . . . . . . . . . . . . . . . . . . . . . . . . . . . . . . . . . . . . . . . . . . . . . . . . . . . . . . . . . . . 246
Product Taxonomy . . . . . . . . . . . . . . . . . . . . . . . . . . . . . . . . . . . . . . . . . . . . . . . . . . . . . . . . . . . . . . . . . . . . . . . . . . . . . . . . . . . . . . . . . . . . . . . . . . 247
Tiers . . . . . . . . . . . . . . . . . . . . . . . . . . . . . . . . . . . . . . . . . . . . . . . . . . . . . . . . . . . . . . . . . . . . . . . . . . . . . . . . . . . . . . . . . . . . . . . . . . . . . . . . . . . . . . . 247
System Based Tiers . . . . . . . . . . . . . . . . . . . . . . . . . . . . . . . . . . . . . . . . . . . . . . . . . . . . . . . . . . . . . . . . . . . . . . . . . . . . . . . . . . . . . . . . . . . . 247
Editing Tier . . . . . . . . . . . . . . . . . . . . . . . . . . . . . . . . . . . . . . . . . . . . . . . . . . . . . . . . . . . . . . . . . . . . . . . . . . . . . . . . . . . . . . . . . . . . . . . . . . . . 248
Targeting Tier . . . . . . . . . . . . . . . . . . . . . . . . . . . . . . . . . . . . . . . . . . . . . . . . . . . . . . . . . . . . . . . . . . . . . . . . . . . . . . . . . . . . . . . . . . . . . . . . . . .248
14
TIBCO® Reward User's Guide

TIBCO Documentation and Support Services
How to Access TIBCO Documentation
Documentation for TIBCO products is available on the TIBCO Product Documentation website, mainlyin HTML and PDF formats.
The TIBCO Product Documentation website is updated frequently and is more current than any otherdocumentation included with the product. To access the latest documentation, visit https://docs.tibco.com.
Product-Specific Documentation
Documentation for TIBCO Reward is available on the TIBCO Reward Product Documentation page.
The following documents for this product can be found on the TIBCO Documentation site:
● TIBCO® Reward User's Guide
● TIBCO® Reward User's Guide V3
● TIBCO® Reward CSR User's Guide
● TIBCO® Reward Integration Guide
● TIBCO® Reward API Reference Guide
● TIBCO® Reward Analytics User's Guide
● TIBCO® Reward Release Notes
How to Contact TIBCO Support
You can contact TIBCO Support in the following ways:
● For an overview of TIBCO Support, visit http://www.tibco.com/services/support.
● For accessing the Support Knowledge Base and getting personalized content about products you areinterested in, visit the TIBCO Support portal at https://support.tibco.com.
● For creating a Support case, you must have a valid maintenance or support contract with TIBCO.You also need a user name and password to log in to https://support.tibco.com. If you do not have auser name, you can request one by clicking Register on the website.
How to Join TIBCO Community
TIBCO Community is the official channel for TIBCO customers, partners, and employee subject matterexperts to share and access their collective experience. TIBCO Community offers access to Q&A forums,product wikis, and best practices. It also offers access to extensions, adapters, solution accelerators, andtools that extend and enable customers to gain full value from TIBCO products. In addition, users cansubmit and vote on feature requests from within the TIBCO Ideas Portal. For a free registration, go to https://community.tibco.com.
15
TIBCO® Reward User's Guide

TIBCO Reward CRMS Overview
This chapter gives an overview of TIBCO Reward’s Customer Relationship Management Suite (CRMS).
Topics:
● Software as a Service● Features and Benefits
Software as a Service (SaaS)Designed from the ground up as a Software-as-a-Service (SaaS) solution, TIBCO Reward does notlicense its software for installation on corporate servers. Instead, our clients rent the complete solution,including all normally required hardware, storage, application hosting, upgrades, quality assurance,site hosting, and integration. Because TIBCO Reward provides a SaaS solution, rather than a packagedenterprise software application, you do not need to purchase, deploy, and maintain additionalhardware and software. This approach reduces complexity and costs.
TIBCO Reward’s SaaS solution provides your company with a hosted application. This softwaredelivery method provides remote access to the software and its functions as a web-based service. Youcan use the TIBCO Reward solution without the outright purchase of a licensed software application.
Because TIBCO Reward performs the data processing and maintains the database, you do not needextensive knowledge of the software to establish your own TIBCO Reward CRMS and your owncustomer microsite (the loyalty site that your company’s customers use). You can apply strategy andcreativity to your data using this software and service.
Features and BenefitsYou can use TIBCO Reward to build and strengthen customer relationships in several distinct ways,including the following:
● Loyalty programs● Targeted customer email● Campaign management● Relationship marketing
Loyalty Program:
● Rewards customers with points and other retention-oriented incentives● Manages accruals, redemptions, reward catalogs, customer tiers, rule-based promotional offers, and
includes support email and a customer service application● Includes campaign and support email messaging
Email:
● A full email service provider platform for developing and delivering targeted, relevant messages toany address at any time
● Leverages the available customer database for improved targeting and personalization● Includes deliverability reporting, personalization, WYSIWYG editor, event-based messaging,
optimized delivery by ISP, and more
Campaign Management:
● Generates and helps manage highly targeted and automated campaigns based on your transaction,demographic, and preference data
16
TIBCO® Reward User's Guide

● A dynamic customer profiling system triggers messages as customers change their behavior
Relationship Marketing:
● Applies dynamic targeting to promotions and incentives to ensure relevance and avoid fraud
● Includes a collection of smaller applications including site personalization, clubs, refer a friend,hosted account management, questionnaires, and real-time cart integration
For more information about TIBCO Reward’s features and benefits, see our website, https://www.tibco.com/products/tibco-reward.
17
TIBCO® Reward User's Guide
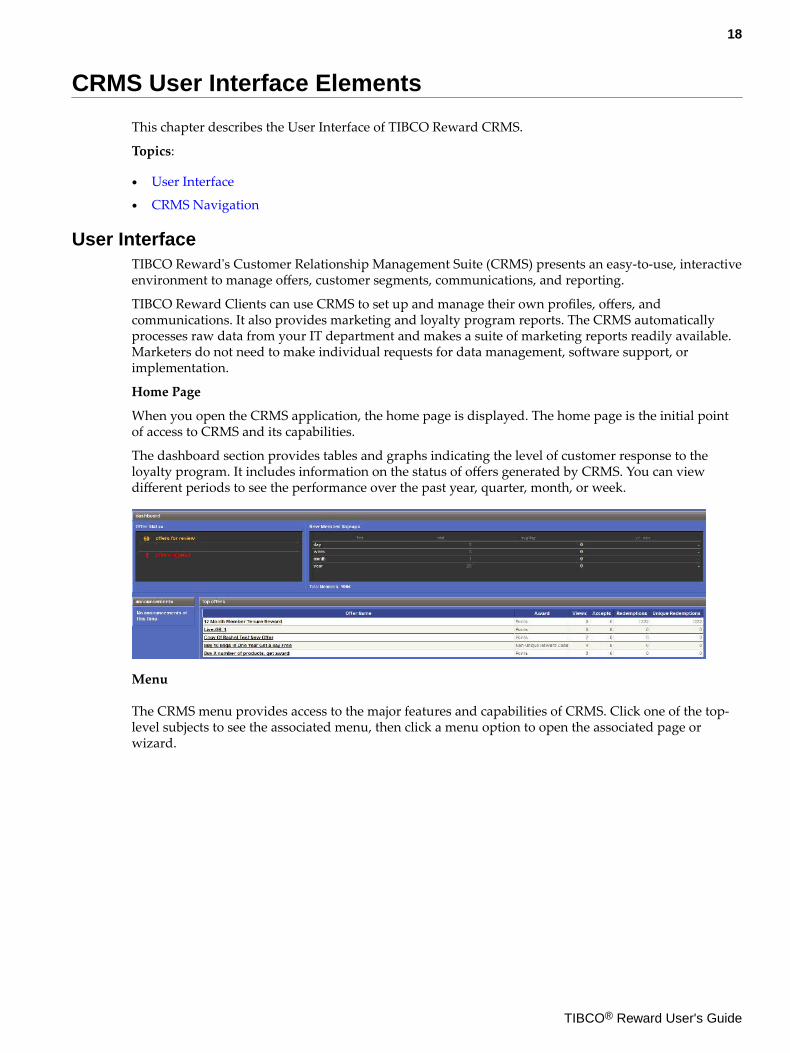
CRMS User Interface Elements
This chapter describes the User Interface of TIBCO Reward CRMS.
Topics:
● User Interface
● CRMS Navigation
User InterfaceTIBCO Reward's Customer Relationship Management Suite (CRMS) presents an easy-to-use, interactiveenvironment to manage offers, customer segments, communications, and reporting.
TIBCO Reward Clients can use CRMS to set up and manage their own profiles, offers, andcommunications. It also provides marketing and loyalty program reports. The CRMS automaticallyprocesses raw data from your IT department and makes a suite of marketing reports readily available.Marketers do not need to make individual requests for data management, software support, orimplementation.
Home Page
When you open the CRMS application, the home page is displayed. The home page is the initial pointof access to CRMS and its capabilities.
The dashboard section provides tables and graphs indicating the level of customer response to theloyalty program. It includes information on the status of offers generated by CRMS. You can viewdifferent periods to see the performance over the past year, quarter, month, or week.
Menu
The CRMS menu provides access to the major features and capabilities of CRMS. Click one of the top-level subjects to see the associated menu, then click a menu option to open the associated page orwizard.
18
TIBCO® Reward User's Guide

CRMS: NavigationWhen you click each major heading (promote, loyalty, email, etc.) on the menu, a drop-down list ofoptions is displayed. Click one of these options to open the associated page.
Sometimes, an option starts a wizard (for example, Create New Offer). When you work with a wizard,CRMS provides a sequence of pages that correspond to the steps for completing a task. After youcomplete each page, you can click Next Step to open the next page and complete the next step.
Clicking a menu option opens a page that displays labeled tabs, each corresponding to a different page.You can navigate from one page to another by clicking the tab for each page.
Each page includes simple controls with which you can perform basic functions. Instructions for usingmany of these controls are embedded in the application.
Standard controls such as the following are displayed on many pages:
The Show drop-down menu:
To filter the items in a list, click the down arrow next to the drop-down menu.
The page number control:
To navigate to another page of listed items in a multipage listing, click the page number.
The Back button:
The Next Step button:
Use these buttons instead of the browser forward and back keys to ensure you do not lose any unsavedwork.
Saving Your WorkTo save your work on the current page, use one of these options:
19
TIBCO® Reward User's Guide

● Click Save to save the information on the current page. The page remains open.
● If you are working with a wizard-driven workflow, click Next Step to save the information on thecurrent page and advance to the next page in the workflow.
● Click Done to save the information on the current page, close the page, and move to the page at thenext higher level in the CRMS user interface hierarchy. If you completed a sub-task, you arereturned to the main task page.
● If you are working with a wizard-driven workflow, you can use the Jump to Step drop-down menuto get to a new destination page in the wizard or workflow sequence that you are currently using. Ifyou use the Jump to Step control, the CRMS saves the data in your current page before opening thepage you selected.
When in doubt about whether you are navigating to a new location, save your work. If you changepages by selecting a new option in the CRMS main menu tab, or a different tab that opens a higher levelpage, you lose any unsaved data on your current page. For example, if you are currently typing datainto a page in a wizard, and you select a new menu tab without first saving you work, you lose yourunsaved work.
20
TIBCO® Reward User's Guide

CSR
This section contains information about the CSR Interface and customer management.
Topics:
● CSR: Overview
● CSR: Roles & Privileges
● About Customers
● Creating Active Customer account
● Creating a New Enrolled Customer Account
● Customer: View Details
● Customer: Edit
CSR: OverviewSelect Support from the CRMS menu to access the Support and Customer Management interface. TheSupport page provides access to all existing customer accounts for creating and managing customers.
The Support page includes the following items:
● Add a New Enrolled Member : Add a new customer account in the Registered and Active state.This new customer is enrolled as a member of the loyalty program. If applicable, password foraccess to a microsite is emailed to the customer.
● Add a New Non-member Customer : Add a new customer in the Unregistered and Active state.This new active customer can be sent an email. If Reward receives transactions identifiable with thiscustomer, they can be used for targeting. This customer is not a member of any loyalty program orclub.
● Search : Find existing customers with available fields that can be used to filter the search results. Atleast one search criterion must be provided. Searches are not case-sensitive.
The available search criteria are:
— Email : searches the beginning of the email address field. Customer accounts that start with thevalue entered are included in the results. For example, searching for “s” [email protected] and [email protected], whereas searching for “sa” [email protected]. Ensure that you use customer's email address to find an individualcustomer.
— First Name : searches the first name field. Customer accounts that start with the value enteredare included in the results. For example, searching for “m” returns any name beginning with"m" (for example, Michael, Miguel, and Mark), whereas searching for “mi” returns only namesbeginning with those two letters (for example, Michael and Miguel).
— Last Name : searches the beginning of the last name field. Customer accounts that start with thevalue entered are included in the results.
— Zip/Postal Code : searches the beginning of the zip/postal code field. Customer accounts thatstart with the value entered are included in the results. For example, searching for “9” returns94111 and 90210, whereas searching for “94” returns 94111.
— Customer ID : The customer’s unique ID within the Reward system.
— Member Status : filters search results according to member status: Any, Enrolled Members, orNon-Member Customers.
— Reset : removes any values entered in the search interface.
21
TIBCO® Reward User's Guide

If your search results are more than 200 entries, only the first 200 are visible. Individual customeraccounts can be accessed by expanding the customer and clicking the View Details link on the left sideof the search result.
CSR: Roles & PrivilegesThe following are the three types of CRMS users who have access to the CSR Support page:
● CRMS Administrators have access to all of the functionality in CRMS, including full rights to all ofthe CSR tools in the Support pages.
● CSR Administrators when logged into CRMS, have access to all of the CSR tools in the SupportPages and to the CSR Report. Only Reports and Support tab are visible to CSR Administrators inthe CRMS. CSR Administrators have privileges to perform the following tasks on enrolled customeraccounts
— View Details
— Adjust Points
— Merge
— Change Status
● CSR Users have access only to a limited set of CSR tools. CSR users do not have access to sensitivecustomer information, nor can they perform certain operations on customers, such as mergingaccounts or transferring points.
CSR users have privileges to perform the following tasks on an enrolled member:
● View Details
● Adjust Points
● Merge
● Change Status
A CSR user can find any existing customer account and display the customer data in the CustomerDetails page. CSR users must occasionally refer certain requests for example, enrolling an unenrolledmember to a CSR administrator.
About CustomersYou can create two basic types of customers in CRMS:
● Active Customers/Unenrolled member/Non-member customer Many companies import lists ofpersons who are automatically defined as active customers, that is, their status is set to Active.Active customers are not members of the loyalty program. They are usually added to the system sothat they can be sent emails or their transaction data can be used for customer data analyses.Customers who are members of the loyalty program are considered "enrolled". Usually, much lessdata is available for active customers than enrolled customers. Active customers can be convertedinto enrolled customers.
● Enrolled Customers are full loyalty program members, and can be engaged in all aspects of theloyalty program. For example, they can accrue points or credit; if opted-in, they can be sent emailand they can be targeted for offers, and so on. You can add a new enrolled member or non-membercustomer by using Add New Customer button in the upper-right corner of the CSR Page . You canalso convert (enroll) an existing active customer into an enrolled customer by using the Enrolloption on the Customer Details page.
Even if you do not currently have a loyalty program, you can still have enrolled customers.
22
TIBCO® Reward User's Guide

Creating Active Customer Account
Procedure
1. Click the Support tab in CRMS to open the CSR tool.
2. Click Add New Customer in the upper-right of the page.
3. Select the Add a New Non-Member Customer option.This opens the New Un-Enrolled Information dialog.
4. Enter information about the new un-enrolled or active customer.
Email Opt-in and Opt-out applies to promotional emails and not targeted offers.
5. Click Create.
Enrolled customers are full loyalty program members. You can convert (enroll) an existing activecustomer into an enrolled customer by using the Enroll option in the Customer Details page for anexisting active customer if you are an Administrator and not CSR Administrator. However, if youdo not currently have a loyalty program, you can still have enrolled customers.
Creating a New Enrolled Customer Account
Procedure
1. Click the Support tab in CRMS to open the CSR tool.
2. Click Add New Customer in the upper right of the page.
3. Select the Add a New Enrolled Member option.This opens the New Enrolled Information dialog.
4. Enter information about the new enrolled customer.
Email Opt-in and Opt-out applies to promotional emails and not targeted offers.
5. Click Create.You can add or edit many details of the enrolled customer’s account on the Customer Details page.
Customer: View DetailsAfter you create the customer account, you can add and change details associated with that accountthrough CSR’s Customer Details page.
From the search result page, clicking on any customer name displays the Customer Details page. TheCustomer Details page displays the following types of information: Latest Transactions, Rewards,Email,Lists, Customer Information including Name, Address, Phone, Email, Member ID, Status,Available Points,Available points in Each Point Group, Tier, Tier Join Date, Tier Expiry Date, MarketingProgram Number,Customer Type, Email Opt-In, Program Join, Shopper Create Date, Current YearLimit, Cards and Change History.
● When an unenrolled customer is created on the basis of a set of customer fields that includecustomer phone number and not the email address, a (false) placeholder email address is generatedfor the customer.
● Many types of data are not provided for unenrolled customers who are not part of the loyaltyprogram. In general, if a category of customer data is not used to support a loyalty programmember, it is not collected and displayed in the customer data displays.
23
TIBCO® Reward User's Guide

Customer: StatusThe Customer Type section of the Customer Details page displays the current status of this customer.Valid customer types include the following:
ActiveThis is an active customer who is not enrolled as a loyalty club member. All accounts importedthrough List Management are automatically created as active customers. Most often, Activecustomers are present in the system so that your company can send email to them and maintain dataabout them as customers. Active customers are not loyalty program members, and cannot accrue anypoints or credits. Active customers can be enrolled or merged into an enrolled customer account.
InactiveWhen an enrolled customer is unenrolled, they become inactive. When a customer is in this inactivestatus, that customer can either be made active or reenrolled. One notable exception is: if the shoppersor customers closed the account by themselves, no CSR user, not even an Administrator, can reactivatethe account.
EnrolledThese customers are full loyalty program members. Loyalty members can accept offers and earnpoints, and can have access to the hosted Reward Account pages. Enrolled members can be merged,have points added to their account, can be unenrolled, and more.
DeactivatedDeactivation changes the customer status to inactive, which effectively puts the customer on “hold”.The customers cannot log into their accounts and cannot accrue any points, although existing pointsremain on the account, which can be reactivated with no loss of data.
Example: A Client might want to use this option to temporarily disable accounts that are not in goodstanding (perhaps because a customer did not pay required dues). After the account is back in goodstanding, the client would reactivate it. Reactivation is the only valid option for a deactivatedcustomer.
MergedWhen an active or an enrolled customer account (1) is merged into an enrolled customer account (2),the status of the account (1) is reset to Merged. Merged customers are effectively inactivatedcustomers. Merged customers can only be reenrolled, which changes their status to enrolled. Foradditional information, see Customer: Merge for more information.
Additional information on the Status section of the Customer Details page includes the following:
Member SinceThe date when the customer associated with the account became a member of your loyalty program.
Available PointsThe number of points currently available to this customer for use.
Pending PointsIf your system is configured to use Point Vesting, this value displays the current balance of pointspending. Otherwise, a zero (0) is commonly displayed here.
Email Opt-InIf the customer has opted to receiving email, this value displays as “Yes”. This can be changed by thecustomers themselves in their Account page (depending on your configuration) or this value can bechanged on the Edit Info screen.
Customer IDThe customer’s unique ID within the Reward system.
24
TIBCO® Reward User's Guide

Loyalty Lab Create DateThis is the date when the customer account was created in the Reward database.
Customer: Change HistoryThis section lists each change or update to the customer account along with the date and time of thechange and the source of the change.
Transactions
This section provides access to customer transaction data. Note that not all transactions are listed.Transactions are included here only if they contributed to the qualification for a loyalty program award.
This display shows the email communications sent to a customer within the last six months. TheReward nightly batch process system populates this list of emails, so it can take up to 24 hours for asent email to be displayed here. It lists only email sent through the Reward Email Communicationssystem; it does not display any email sent through the Trigger Event Response Email system, such asForgot Password or Offer Reminders email.
For each email listed, the information includes the ID, Subject, Date, and Status Columns sorted ondate descending. The values in Status column can be Sent, Hard Bounced, and Soft Bounced.
Rewards
The Rewards section displays information about customers log of awards received or spent.
Customer: EditIn addition to displaying customer information in several categories, the Customer Details pageprovides links to other customer pages where you can add and modify customer data. Depending onthe status of the current customer, the following links are available:
Edit InfoOpens the Customer Information page, which you can use to edit basic name and address field values.
Reset PasswordSends a new password and the associated message to the customer.
Password HistoryThe password history of upto five passwords is stored in TIBCO Reward. If a new password matchesany one of the previous five passwords for the user then the following error message is displayed:Invalid password : New Password should not match with last 5 Passwords.
Password RulesThe following rules are applicable for a password used for logging in to TIBCO Reward:
● Password minimum length is upto 8 characters
● The password must contain all the following letters: upper case character, lower case character,numerical digit, and a special character
● The password cannot contain your first name or last name
Adjust PointsOpens the Adjust Points page. Note that the number of points to be added and the Description textare required. The Reason text is visible to the customer, but not the Internal Note text. Aftersupplying data, click Next. A confirmation message is displayed. If details are correct, click Done.
25
TIBCO® Reward User's Guide

MergeYou can merge current customer account data into another (enrolled) customer account, or mergeanother customer account into the current customer account (if it is for an enrolled customer). Refer toCustomer: Merge for more information.
Change StatusChange status option is available only for enrolled customers. Through this option you can unenrollor deactivate customers. The customer is enrolled as a member of the loyalty program, and all relatedfunctions and options for enrolled customers are supported.
Un-enroll (an existing customer)The customer service representative (CSR) can unenroll (that is, close the account for) a customer whono longer wants to be enrolled in the loyalty program. Unenrolling has the following effects:
● The customer is deactivated (that is, status is changed from active to inactive), and is no longer amember of the loyalty program. In addition, if the email option was set to true, it is changed tofalse.
● The customer no longer accrues points (if applicable) or receives offers.
● The customer cannot sign into My Account anymore.
Manage CardManually adds card data (credit card, loyalty card, membership card, and so on.) to be associated withan enrolled customer. After you select Manage Card from the More Options drop-down list at the topof the Customer Details page, the Manage Card dialog box is displayed. Use this to enter card data. Beaware that this dialog box applies a card number validation test. After a card number is entered, onlythe last four digits of that card's number are displayed.
Deactivate AccountDeactivation changes the customer status to inactive, which effectively puts the customer on “hold”.The customers cannot log into their account and cannot accrue any points, although existing pointsremain on the account, which can be reactivated with no loss of data. Deactivating leaves the EmailOpt-In selection untouched.
Example: A client might want to use this option to temporarily disable accounts that are not in goodstanding (perhaps because a customer did not pay required dues). After the account is back in goodstanding, the client would reactivate it. Reactivation is the only valid option for a deactivated customer.
Your company has the option to use an Admin setting to reset the point balance to 0 (zero) when thecustomer account is deactivated. The alternative is to leave balances unchanged by deactivation.
26
TIBCO® Reward User's Guide

Promote
This section provides information about promotional offers.
Topics:
● Offers
● Offer Lifecycle
● Prerequisites
● Offers Page Overview
● Creating an Offer
● Change Status
● Cloning an Offer
● Deleting Offer
● Award Options
● Returns
OffersYou can use CRMS to create an offer that awards your loyalty program members a predefined awardafter meeting a certain criterion. Another popular offer awards bonus points for signing up for theloyalty program.
The Edit Offer Details wizard helps you create offers. After you finish each step, the wizard simplifiesthe remaining steps by displaying only the options that still make sense for you to use. These optionsare selected based on the choices you have already made.
To create an offer, select Promote > Offers > Create New Offer. (See Creating an Offer for moreinformation.)
To edit an existing offer, select Promote > Offers to open the Offer page. Click the name of the offer youwant to change. This opens the Edit Offer Details wizard, which guides you through defining an offerby completing a sequence of pages.
The steps required to create or edit an offer involve the following offer pages:
● Description
● Qualification & Award
● Basket Targeting
● Customer Targeting
● Presentation
● Schedule & Rules
● Summary and Preview
● What's Next? -- Go to Offers
After completing each page, click Next Step to advance to the next page until the offer is over.
27
TIBCO® Reward User's Guide

Offer LifecycleAn Offer Lifecycle involves creating, defining, and saving an offer record. As the definition of an offerprogresses from a saved record with basic contents to an approved, live offer, the formal status of theoffer changes accordingly.
At any point in the creative process, CRMS users can review and modify a saved offer.
When all requirements are met, the status can be changed from Saved to Pending. If approved, theoffer's status can be reset to make it Live.
Live offers are made available to the targeted customers through the Reward hosted Offer Showcase,your store-site, or the Reward microsite, or both, according to the schedule that you define.
After an offer goes live, all customer responses to the offer are captured, analyzed, and summarized forthe CRMS user. The information is displayed on the Summary & Preview page for both live andcompleted offers.
Anatomy of an OfferThis graphic represents the flow of creating offers in CRMS.
Prerequisites for Creating an OfferCertain types of offers can only be defined if your company has provided the required data to TIBCOReward. For example, if you want to award an offer based on purchases within a category, TIBCOReward must receive a product file that indicates which categories you have defined and whichproducts are in each category.
Prerequisites for any given offer typically depend on the following specifications :
● How you want to qualify a customer● The profiles of your targeted customers● The type of award you want to provide● Whether you want to restrict the offer redemption to specific storesFundamental requirements for setting up offers include the following :
● If you want to create offers that require a purchase, your company must provide Reward with yourtransactions files. Transactions files provide the data necessary to track purchases and give awardsfor purchases.
● If you want to create offers that require the purchase of a specified product or category of product,you must give Reward your product file and your transaction files.
● If you want to restrict redemptions to stores, you must give Reward your store file.● If you want to use the percent off (% off) or monetary unit off (monetary units off) awards, you must
have real-time processes implemented with your e-commerce or POS system.● If you want to create an offer based on an activity or activities, you must set up the activities first in
CRMS. Note however, that the sign-up activity is always available and does not require a setup.
28
TIBCO® Reward User's Guide

Notes on Data Integration requirementsMany types of offers depend on some level of data integration, that is, the collection and processing ofcorporate data for use in the CRMS system.
If your company has already implemented the necessary technology and processing, the dataintegration requirement is not a concern when you create offers. However, if this is not the case, andyou want to build offers that are based on a type of data integration that your company does not yetsupport, please contact your customer service representative to discuss the improvement.
Some types of data integration are more common than others, and some are easier to implement. As arule of thumb, do not assume that your company does not or cannot support some type of dataintegration. The transfer of transaction files is quite common, for example; if your company sellsproducts or services, it might already have set up this processing. In any case, the transfer oftransaction files is relatively easy to set up. Product, catalog, and store file transfers are also quick toarrange.
Offers Page OverviewThe Offers page under the Promote tab provides access to all offer records. The Offers page lists alloffer records that have been defined or are in the process of being defined.
The Offers page includes the following features :
● The Create > New Offer option.● The Current Offers panel, which consists of :
— Standard Navigation Controls (For Example, The Show Filter and The 1 2 3 Page Control)— The complete list of offer records
Each row in the Offers page represents an offer record. Column headings identify the offer record fieldsdisplayed in this list. Click a column heading to sort all of the offers in the list by that field. Followingare the columns of each offer record.
Statusthe current status of the offer record, and to change the status of the offer when appropriate
#the unique Offer record ID number, automatically assigned by CRMS when the record is created
Offer Namethe name of the offer as defined in CRMS, and set up as a hyperlink to the offer record. Click the offername to open the record in the Edit Offer Details wizard.
Awardthe type of award associated with the offer
Startthe date when the offer is or was scheduled to start. This is the field used by default to sort the offerrecords. When you open the Offers page, records are in order by start date, from latest to earliest
Endthe date when the offer is scheduled to end
Cloneyou can clone the associated offer record
Deleteyou can delete the associated offer record
Use the Offers page to:
29
TIBCO® Reward User's Guide

● Create a new offer
● Find an existing offer
● Edit existing offer details
● Change the status of an offer
● Clone an offer record
● Delete an offer
Creating an OfferTo create a new offer, click Promote > Offers and then Create > New Offer on the Offers page. Thiscreates a new offer record and starts the edit offer details wizard.
You can also create a new offer by cloning an existing offer. Cloning is especially useful when you wantto duplicate most of the attributes of the existing offer. Be aware that some offer options have specificdata requirements. To use these options, your company must have already provided certain data files.See Prerequisites for Creating an Offer for more information.
Follow these steps to create a new offer using the Offer Setup wizard:
Procedure
1. Click Promote > Offers.
2. Click Create > New Offer.
This opens the Edit Offer Details wizard.
3. Complete the new offer by using the Edit Offer Details wizard to finish the process.(Fields marked with an asterisk * are required.)
30
TIBCO® Reward User's Guide

The Offer Setup wizard helps you modify an existing offer or set up a new offer.
To use the Offer Setup wizard to work on an existing offer, click an offer name listed in theOffers page.
To create a new, blank offer record and immediately start the editing process, select Promote >Offers > Create New Offer. The Offer Setup wizard automatically opens.
The Offer Setup wizard guides you through the following required steps to create an offer:
● Description
● Qualify & Award
● Basket Targeting
● Customer Targeting
● Presentation
● Schedule & Rules
● Summary & Preview
● What’s Next - Go to Offers
The last step submits the offer for approval by placing it in pending status.
Offer Description Page OverviewThe Offer Description page records the Offer Name and other crucial information used to identify theoffer and its purpose. Some of this description information is displayed to users.
Defining and saving the offer description is the first step in creating a new offer or editing an existingoffer. The Description page opens when you create a new offer, clone an offer, or open an existing offerrecord for editing.
In the Offer Description page, you can describe an offer by recording data in the following fields:
● Offer Name is an internally used name that the customer does not see. It serves to identify anddescribe the offer record in the Offers page; choose a name that is descriptive and unique. Ideally,the new name should indicate the basic type of customer qualification you require and the type ofaward you give. Mentioning the target or date also makes the name more descriptive.
● Headline is the title text for the offer that the customer sees in the Reward-hosted Offer Showcase. Itis also used to describe the offer in the customer's My Account and Shopping List displays. It isalso displayed in email communications and signage that mention this offer.
● Description is the text that is displayed to the customer in the Reward-hosted Offer Showcase andprovides more information about how the offer works. It is also displayed in email communicationsand signage that mention this offer. Use this text to explain the offer to the customer.
● Online Product Page URL to "Buy Now" contains the URL (optional) of the product page where thecustomer can buy the product immediately. This field is part of the Showcase display of the offer,giving the customer the opportunity to act on impulse.
● Terms & Conditions contains rules of the offer, disclaimers, and other legal conditions. This text, ifpresent, is included in the showcase display to the customer. It is also displayed in emailcommunications and signage that mention this offer.
● Internal Note is text used internally in CRMS, and is only displayed on this page.
After finishing work on this page, click Next Step. This saves your work and advances the wizard tothe Qualification & Award page, the next step in the Edit Offer Details workflow.
31
TIBCO® Reward User's Guide

Defining the Description of an Offer
Procedure
1. Start the Edit Offer Details wizard.
When you create a new offer record or edit an existing offer record, the Edit Offer Details wizardstarts automatically, and the Description page opens first. The new offer record contains no dataexcept for a unique offer ID number and a sample offer name.
2. Replace the offer name with a unique, specific name.
3. Enter or edit the Headline text.The headline text is used as the headline for the offer in the offer showcase. It is also displayed inemail communications and signage that mention this offer.
4. Enter or edit the Description field text.
5. Enter a new URL string in the Online Product Page URL to "Buy Now" field.
6. Enter or edit text in the Terms & Conditions field.
7. Enter or edit text in the Internal Note field.
8. Enter a new URL string in the Online Product Page URL to "Buy Now" field. This information canbe provided to customers who can then navigate to the site to purchase the product.
9. Click Next Step.This saves your work and opens the Qualify & Award page.
When you open the Description page, you must review all default and preexisting data.Remove unwanted data and add the new correct data.
Offer Qualification and AwardUse the Qualify & Award page to define the following in an offer record:
AwardThe award given to a targeted customer who qualifies for redemption of an offer.
Qualification ActionHow a targeted customer qualifies for the offer.
Best Award GroupThe number of point-awarding offers a member can earn as the result of a single transaction. Forexample, if a member qualifies for two or more offers that have the "Best Award Group" optionselected, Reward only awards the points from the best of those offers to the member.
Additional ConditionsAre there any additional conditions to qualify for this offer?
Award
In the Award section of the edit offer details page, the pull-down menus used to define awardcharacteristics are the following:
● Award Types● Point Types● Points Amount● Custom Award Text
Award Types
32
TIBCO® Reward User's Guide

● Points
● Points up to member point limit
● Points per Event Value
● Double points
● Triple points
● Points per monetary unit
● Custom points per quantity purchased
● A bonus
● A sweepstakes entry
● % Off on purchase
● Money Off on a Purchase
● Reward code
Action Types
In the Qualification Action section of the Edit Offer Details page, you can use several pull-down menusto specify the requirements to qualify for award.
To receive the award, targeted members should do at least one of the following:
● Must make a transaction
● Perform an activity
● Complete an event
● Complete an event that uses Event Value
● Need not do anything
Actions
Entering different requirements to qualify for the award causes different options to be displayed in theQualification Action section. These subfields further determine the requirements for the awardqualification.
● Must make a transaction - Selecting this option means you want a customer to make a transaction toqualify for the award.
● To complete this answer, select the transaction type:
● Purchase any number of items of any products.
● Purchase any number of items of select products.
● Purchase any number of items in select categories.
● Purchase any number of items of select brands.
● Purchase a number of items of select brands.
● Purchase a number of items of select products - If you choose this option, you must also use theSelect Products procedure to add to the list. Click Add Products to get started.
● Purchase a number of items in select categories - If you choose this option, you must also use theSelect Categories procedure to add to the list. Click Add Categories to get started.
33
TIBCO® Reward User's Guide

To see and select products or categories, your company must already have suppliedTIBCO Reward with a product catalog list. See Prerequisites for Creating an Offer forrelated information.
— Purchase using select tender types.
— Spend a number of monetary units on any products.
— Spend a number of monetary units on select products.
— Spend a number of monetary units in select categories.
— Spend a number of monetary units on select brands.
— Make a daily visit - Evaluate this to determine if the offer qualification is met:
— Each line item in basket
— All basket contents
● Perform an activity - To complete this answer, select Activity from the pull-down menu and enterthe number of times the activity must be performed.
● Complete an event - To complete this answer, select event by clicking Select Event and then enterthe number of times this event must be completed.
● Complete an event that uses event value - To complete this answer, select event by clicking SelectEvent and select the check box to only allow events where event value is within a specific range.
● Need not do anything.
Uploading Offer Qualifying Product Stock Keeping Unit (SKU) as a File
You can upload offer qualifying product SKUs as a file from the CRMS UI, on the offer qualificationpage in order to create an eligible list of products for the offer. Similarly, you can also exclude certainproduct SKUs to create a list which does not qualify for the offer.
A note that states "Only SKUs that exist in your product file may be attached to an offer" is displayedbeside the Upload button.
Following are the important points while uploading a product SKU file:
● The uploaded SKUs reference the existing SKUs in the client's database.
● The uploaded SKUs do not create new products in the client's product file if the SKU uploaded doesnot currently exist in the client's product file.
● When attempting to upload a file that has SKUs that do not exist in the product file, the fileprocesses only the valid SKUs. The number of invalid SKUs appear in a "No Matched" column.
● If a file is uploaded that attempts to attach SKUs that have already been attached to the offer, theduplicates are ignored. The number of duplicate SKUs appear in a "Duplicate" column.
● The "Download" link with mouseover text as "View Report" links to a downloadable report thatdisplays each line that was not successfully matched to the offer in the following format:
" Line [x]: [Product SKU] was not successfully attached to the offer because [reason]"
Where:
[x] = The line number of the SKU attempting to be attached
[Product SKU] = The product SKU number attempting to be attached
[reason] = The reason the attachment failed (for example, "it does not exist in the product file" or "itis already attached to the offer" (that is, a duplicate]
34
TIBCO® Reward User's Guide

Attaching Product SKU File to an Offer
Procedure
1. During the offer creation process, in the Edit Offer Details page, set the value of the pull downmenu To receive this award, targeted members to must make a transaction.
2. Select a transaction type which allows you to define a set of selected products.The Qualification Action panel changes and an Add Products button is displayed. You can includeor exclude the purchases by using a defined set or product attribute value. The Add productsbutton is displayed when you select a defined set of purchases.
3. Click Add Products button.The Select Products modal is displayed.
4. Click Upload SKUs tab, select the file to be uploaded and click Upload.The file gets uploaded and the result is displayed in a table.
5. Click Done.
Qualification Evaluation Level
When you create an offer, you have the option on the Qualify & Award page to either select all basketcontents or each line item in basket for each transaction.
The type of evaluation you choose determines how CRMS calculates the points awarded from atransaction.
The effect depends on the following factors:
● The cost of the items purchased● Redemption limits● Type of award: “points per monetary unit”, points” or something else.Points per Dollar Offer Differences
When you set up a Points per Monetary Unit Offer, differences in point calculation can impact thenumber of points awarded. Under certain circumstances these differences can be significant.
When the system evaluates each line item in basket, the system assigns points for every qualifyingitem in the transaction.
When the system evaluates all basket contents, it still looks at each item in the basket, but points arecalculated on the total of the qualifying items in the transaction.
In this example, all items qualify.
35
TIBCO® Reward User's Guide

Notice that you end up with slightly different point totals. This is because CRMS rounds up to thenearest whole number when calculating points.
When you evaluate at the Basket level, that rounding happens once, on the basket total. When youevaluate at the Line Item level, the rounding happens on every item. While two points is not a bigdifference, it is still a difference of about 3% -- extend that to a million transactions, and it is a 2,000,000point difference.
The point calculation differences are even more pronounced when the items are relatively low-priced.
In this case, the difference is about 33%! This is a big difference.
Points per monetary unit and Redemption limits
If you set up an offer that awards points per monetary unit and that has a redemption limit, each itemin the basket that qualifies for an award counts as a redemption.
Consider the offer "purchase any number of select products" that awards "points per monetary unit",that has a redemption limit of 2, where the qualifying products are Item A & Item B.
36
TIBCO® Reward User's Guide

In this scenario, under basket level evaluation, the system awards 108 points and records a singleredemption against the redemption limit of 2.
If the same offer is configured with line item evaluation, the system awards 29 points and records tworedemptions against the redemption limit of 2. In addition, the system awards the first two qualifyingitems and hence the order in which the items are listed when we import them matters. Note in thefollowing image that if item C and item E are listed first in the transaction, those are the items thatqualify. The difference, if points earned, is 67 points versus 29 points.
Fixed Point Offer Differences
When you set up a Fixed Point Award, whether you choose to evaluate each line item or all basketcontents can make a significant difference in points awarded. A Fixed Points Award configured toevaluate each line item in basket awards points for every qualifying item in the basket.
Offer Use Case
Buy a pair of binoculars and get a flat 300 points, with no redemption limit.
If the offer is configured to evaluate all basket contents, the system awards 300 points if there are oneor more pairs of binoculars in the transaction.
If the offer is configured to evaluate each line item in basket, the system awards 300 points for eachpair of binoculars in the transaction.
37
TIBCO® Reward User's Guide

Assume that the member purchases two pairs of binoculars. In this case, the offer evaluating at the lineitem awards 600 points, while the offer evaluating at the basket level awards 300 points.
Fixed Point Offers with Redemption Limit
Setting a redemption limit of 1 on the Schedule & Rules page in CRMS mitigates this issue.
However, setting a redemption limit of two (or more) results in the following:
● Given an offer that evaluates all basket contents, a member has to complete two independentqualifying transactions. That is, buy at least one pair of binoculars in two separate transactions, toreach the redemption limit for the offer.
● Given an offer that evaluates each line item in basket, a member can make a single transactioncontaining two pairs of binoculars and reach the redemption limit, and earn 600 points.
Implications on the Microsite and in the CSR Tool
Offers configured to evaluate all basket contents display rewards for the entire transaction on themicrosite and in the CSR tool.
Offers configured to evaluate each line item in basket display each item in the transaction and thepoints awarded for that item.
Additional Conditions
Depending on the general option you selected, respond to one of the following:
● To answer the question, "Are there any additional conditions to qualify for this offer?", select one ofthe following:
— No
— Yes, offer must be viewed in Offer Showcase.
— Yes, offer must be accepted in Offer Showcase.
Basket TargetingUse the Basket Targeting page of the Edit Offer Details wizard to specify the basket profiles to target.
Define Basket Target
To define the basket target for this offer, respond to one or both of these questions on the BasketTargeting page:
38
TIBCO® Reward User's Guide

● Which baskets do you want to target this offer to?
To limit targeting to one or more selected basket profiles, refer to the instructions for defining thetarget of an offer by adding basket profiles.
● Should any baskets be excluded from this offer?
To choose one or more basket profiles for exclusion, refer to the instructions for defining the targetof an offer by excluding basket profiles.
When you have completed the target definition, or want to end your targeting session, click Next Step.This saves your work and advances to the next step in the Edit Offer Details workflow, on the OfferPresentation page.
Defining the target of an offer by adding basket profiles
In response to the question, "Which baskets do you want to target this offer to?", follow these instructions:
Procedure
1. Click Target only selected basket profiles.The Targeting page changes to show two options: Add Basket Profiles and a section to include andexclude basket profiles.
2. Add a basket profile, using one of the following options.a) To add a basket profile (previously defined) to the list of target:Click Add Basket Profiles to open the Select Profiles page. The profiles you select with this processare added to the Selected Profiles list.
3. Click Save.
4. If you do not want to add more profiles or exclude profiles, click Next Step.
This saves your work and opens the next page, Customer Targeting in the Edit Offer Details wizard.
Including and Excluding Basket Profile
● If you are not familiar with the purpose and definition of a specific basket profile, use the Target >Basket Profiles page to check the logical filters applied by the profile and other profilecharacteristics.
● The default target for an offer is all baskets.● Excluded basket profiles take precedence over targeted basket profiles, regardless of the order in
which they were created or added.● You can view, create, and edit basket profiles by using the features available in the Target > BasketProfiles page.
● To make all baskets the target for an offer, do not include or exclude any basket profiles
— Respond to the question, Which baskets do you want to target this offer to? by selecting Targetall Baskets.
— Respond to the question, Should any baskets be excluded from this offer? by selecting ExcludeNo Baskets.
Customer TargetingUse the Targeting page of the Edit Offer Details wizard to specify the set of customers who should beinformed about this offer and allowed to redeem this offer.
The Targeting page also provides an estimate of the number of customers in the currently definedtarget for the offer.
39
TIBCO® Reward User's Guide

Customer Target Definition
To make the offer available to all registered customers, use the default settings, All registeredcustomers, and No (that is, no profiles should be excluded); then click Next Step.
To refine the customer target for this offer, defining specific targets who are informed about and eligiblefor this offer, respond to one or both of these questions on the Offer Targeting page:
● Whom do you want to target this offer to?
To limit targeting to one or more selected profiles, refer to the instructions for defining the target ofan offer by adding customer profiles.
● Should anyone be excluded from this offer?
To choose one or more profiles for exclusion, refer to the instructions for defining the target of anoffer by excluding customer profiles.
● Any customers that match the profiles selected for exclusion are excluded from the targeted set ofcustomers, which can include either "All registered customers" or all the profiles you have chosen totarget.
● Unregistered customers should not be targeted for offers that require access to the Showcase.
When you have completed the target definition, or want to end your targeting session, click Next Step.This saves your work and advances to the next step, Offer Presentation page in the Edit Offer Detailsworkflow.
Defining the target of an offer by adding customer profile
In response to the question, Whom do you want to target this offer to?, follow these steps:
Procedure
1. Click Only selected customer profiles or lists.
The Targeting page changes to show two options, Add Customer Profiles and Add Lists.
2. Add a customer profile, using one of the following options.a) To add a customer profile (previously defined) to the list of target:Click Add Customer Profiles to open the Select Customer Profiles page. The profiles you select withthis process are added to the Selected Profiles list.
3. Click Save.
4. If you do not want to add more customer profiles or exclude customer profiles, click Next Step.
This saves your work and opens the next page, Offer Presentation in the Edit Offer Details wizard.
You can select and add customer profiles to build a target and then refine the targetfurther by excluding specific customer profiles from it.
Defining the target of an offer by excluding customer profile
In response to the question, Should anyone be excluded from this offer?, follow these steps:
Procedure
1. Click Yes, exclude from selected customer profiles or lists.
40
TIBCO® Reward User's Guide

The Targeting page changes to show two options, Add Customer Profiles and Add Lists, and alsoan embedded list of any profiles that have already been excluded from this offer. (This is a differentinstance of a Selected Profiles list.)
When you exclude profiles, only the dimensions of those profiles that have CustomerMUST match above criteria selected affects the exclusion calculation. The profile chooserwindow shows you whether a profile has a MUST match dimension defined. Althoughyou can choose to exclude a profile that does not have a MUST match dimension, it has noeffect on the exclusion calculation.
2. Add a customer profile, using one of the following options.a) To add a customer profile (previously defined) to the list of excluded profiles:
Click Add Customer Profiles to open the Select Profiles page.b) To start the process of creating a new profile and adding it to the list of excluded profiles:
Select the check box next to the profile you want to exclude and then click Add Checked.
3. Add a targeted list:a) Click Add Lists to open the Select Lists page.b) Select the check box next to the list you want to exclude and then click Add Checked.
4. Click Save or Next Step after defining profiles and/or lists to exclude.
5. If you do not want to add or exclude more profiles, click Next Step.This saves your work and opens the next page, Offer Presentation, in the Edit Offer Details wizard.
Including and Excluding Customer Profile
● If you are not familiar with the purpose and definition of a specific profile, use the Target >Customer Profiles page to check the logical filters applied by the profile and other profilecharacteristics.
● The default target for an offer is all registered customers.
● If customers must qualify for an offer by performing an activity, the offer's target must include allregistered customers (the default).
● Excluded profiles take precedence over targeted profiles, regardless of the order in which they werecreated or added.
● You can view, create, and edit profiles by using the features available in the Target > CustomerProfiles page.
● To make all registered customers targets for an offer, use the default selections:
— Respond to the question, Whom do you want to target this offer to? by selecting Allregistered customers.
— Respond to the question, Should anyone be excluded from this offer? by selecting No.
PresentationYou can specify an image to be associated with the offer in the Presentation page of the Edit OfferDetails wizard.
This image is displayed in the Offers section of the Customer's microsite.
Select the Display this offer in hosted microsite Offer Showcase and Signage widgets check box.
You can associate a specific image with an offer by using one of the following methods:
● Selecting an existing product image
● Uploading an image.
41
TIBCO® Reward User's Guide

Selecting Image from Product Database
Procedure
1. Type a search keyword into the field and click search to return a list of product images available inthe database.The list is limited to products with that keyword in their name.
2. Click the radio button next to a product in the list to associate the image with your offer.
3. Click Next Step.
This saves your work and opens the next page in the Edit Offer Details workflow, Schedule andRules.
Selecting a Local Image
Procedure
1. Click Browse under Browse and upload new media.
2. Navigate to the image and select it.
3. Click Upload.
The image is uploaded and processed for correct sizing by the system, and is then displayed in thematrix of uploaded graphics at the bottom of the page.
When uploading your own files, you must select images that are:
● Roughly square
● At least 400 pixels by 400 pixels
● In JPEG, PNG, or BMP format.
GIFs are acceptable, but produce lower image quality.
4. Click Next Step.This saves your work and opens the next page, Schedule and Rules in the Edit Offer Detailsworkflow.
Selecting Existing Offer Image
Procedure
1. To select a previously uploaded graphic, select the radio button associated with a displayed image.
2. Click Next Step.This saves your work and opens the next page, Schedule and Rules in the Edit Offer Detailsworkflow.
Schedules and RulesIn the Schedules & Rules page, you can define the following criteria for the offer:
● Redemption limits
● Time-frame to restrict redemptions
● Eligibility date
● Qualification dates
42
TIBCO® Reward User's Guide

● Stores to include or exclude from an offer
Rules defined for the offer
Total redemption limit per member: specifies the number of redemptions of this offer allowed to eachcustomer.
Offer redemption limit time-frame drop-down: This drop-down caters to the use case of creating anoffer that gives limited number of awards each day/week/month for the entire duration of the offer.
The drop-down field is used to setup the time-frame for the redemption limit. The supported values forthe field are per day, per week, per month, and for Offer Duration. By default the redemption limit isone. We can assign any integer as the redemption limit. If we do not specify any limit, it means that wecan redeem the offer n number of times.
The option per month, in the time-frame drop-down box for the redemption limit, does not work forbatch processing. It will work only if RadRacer is installed with TIBCO Reward.
For example, if an offer is created with redemption limit 5, offer eligibility dates set to Jan 1- Dec 312016 and the time-frame is selected as the eligible drop-down values, following scenarios occur:
● Per Day: When per day is selected in the time-frame drop-down box, it implies that "limit 5redemption's per day between Jan 1 - Dec 31 2016".
● Per Week: When per week is selected in the time-frame drop-down box, it implies that "limit 5redemption's per week between Jan 1 - Dec 31 2016".
● Per Month: When per month is selected in the time-frame drop-down box, it implies that "limit 5redemption's per month between Jan 1 - Dec 31 2016".
The option per month, in the time-frame drop-down box for the redemption limit, doesnot work for batch processing. It will work only if RadRacer is installed with TIBCOReward.
● For Offer Duration: When for offer duration is selected in the time-frame drop-down box, it impliesthat "limit 5 redemption's between Jan 1 - Dec 31 2016".
By default, the drop-down box populates for Offer Duration as the value, because this is the defaultbehavior for each offer. You can change default time-frame accordingly.
Restrict redemptions to stores: by default, offers are valid for all store locations. You can select whichstores to include or exclude from an offer. For each store, the list includes a check box, the store number,name, and its City and State/province.
A good practice is to limit redemptions. Specifying a limit prevents you from accidentally awardingcustomers with multiple redemptions. This is especially important when an offer does not require anyactions or purchases.
Defining Schedules and Rules
Procedure
1. Specify how many times a customer can redeem this offer.The default limit is one. Customers can leave this field blank to redeem this offer as many times asthey wish without any limit.
2. Limit the offer redemptions to per day, per week, per month, and for offer duration. The defaultvalue for the field is for offer duration.
The option per month, in the time-frame drop-down box for the redemption limit, doesnot work for batch processing. It will work only if RadRacer is installed with TIBCOReward.
43
TIBCO® Reward User's Guide

3. Define the evaluation and qualification dates.The time zone for the evaluation and qualification dates is the database server time zone.
4. Specify the retail locations where this offer is valid, using the Restrict redemption to stores option.By default, offers are valid for all store locations, so if no retail locations are selected, the offer isvalid in all locations.
5. Click Next Step.
This saves your work and opens the next page, Summary and Preview in the Edit Offer Detailsworkflow.
By default, transactions continue to be evaluated 30 days after the offer completion date tocover any delay in processing. If the transaction is sent after the offer end date and thetransaction qualifies for the award based on the transaction date, the award is still given.(Contact your account manager if you want to change this default.)
Summary & PreviewThe Summary & Preview page has several functions:
● The Summary provides an at-a-glance review of the offer that summarizes progress on thedevelopment and usage of an offer record.
● The Preview displays the offer information in the presentation format used by the Reward hostedOffer Showcase.
The Summary & Preview page checks and validates the offer data you have entered so far, andprovides error messages about missing or invalid data that help you identify the page with theproblem.
● When completed (when no error messages are displayed), click Next Step in the Summary &Preview page to navigate to the What's Next? page.
● In the What's Next? page, select Go to Offers, which advances the offer to pending status.
If the status of an offer is live or completed, CRMS directly opens to the Summary & Preview pagewhen you open that offer.
In such cases, the Summary & Preview page also displays an offer response graph that shows howcustomers have responded to the offer.
Users can change the offer evaluation end date on a live offer by clicking the Edit button on theSchedule section on the Summary & Preview page.
Summary & Preview Page Details
The Summary & Preview page has the following features:
● Standard Edit Offer Details navigation tools options.
● Error report space, where advisory warnings are displayed if the offer requires significantcorrections.
● Summary bars corresponding to each page in the Edit Offer Details sequence. If the page encountersa problem, the bar corresponding to it includes an error message.
— To open and edit each page, click Edit.— To see more summary details, click the down arrow next to Edit.
When an offer record is processed for display in the Summary & Preview page, CRMS performs a set oftests, checks, and validations.
44
TIBCO® Reward User's Guide

This behind-the-scenes processing generates messages and a preview to inform you about anyoutstanding technical problems with the record. A typical problem is a required field that has been leftempty (null). A field that includes invalid data can also trigger an error message.
You must correct any problems reported in the Summary & Preview page before you can change thestatus of an offer from saved to pending.
If CRMS does not report any errors in an offer record in the Summary & Preview page, the technicalrequirements for that record have been satisfied, and the offer record is technically ready to besubmitted for approval.
An offer that meets CRMS technical requirements should be thoroughly reviewed before it is approved.An offer in saved status that passes the tests imposed by the Summary & Preview page is eligible forpending status.
Pending status signals that the offer is ready for a review by the stakeholders responsible for theredemption of the offer as it is defined.
Using Summary & Preview Page
Procedure
1. Review the Summary & Preview page, including each row of summary information, for any errormessages. Each row corresponds to a page in the Edit Offer Details process.
2. If an error message is displayed, click Edit in the first Summary bar corresponding to a page with aproblem. Fix the problem, then, as necessary, click Next Step to proceed to the next page with aproblem, until all problems are resolved.
3. Then click Next Step, or use the Jump to Step control to re-open the Summary & Preview page.
4. If no error messages are displayed, click Next Step.This saves your work and opens the next page, What's Next in the Edit Offer Details workflow.
The What's Next? page includes the Go to Offers option, which effectively submits anoffer for approval. Selecting Go to Offers changes the status of the offer to pending; andthe offer must be in pending status before it can be approved to go live.
What's NextWhen the definition of an offer passes the basic CRMS error tests and is ready for a review, the nextpossible steps are presented in a the What's Next? page.
This page includes two options:
● Create Another Offer : re-opens the Edit Offer Details wizard.
● Go to Offers : submits the offer record and changes its status to pending.
● Go to Offers is a crucial step in the process of creating an offer. You have to use this option to changethe status of an offer from saved to pending. In effect, this option submits a saved offer forapproval.
● Only a CRMS Administrator can approve or deny a pending offer.
Clicking Go to Offers is the last step in defining a new offer. (The next step, approving or denying thepending offer, does not change the editable details of an offer.)
If CRMS does not find any errors in an offer record during the final Summary & Preview step of theoffer creation or offer details editing process, the technical requirements for that record have beensatisfied.
45
TIBCO® Reward User's Guide

The status of an offer indicates how far the offer has progressed in its normal lifecycle, and how it canbe used next.
The current status of each offer is displayed in the Current Offers page, in a control box that isdisplayed in the left-most column:
A successful offer progresses through the following changes in its status:
● Saved : the offer record has been saved, but work on the offer has not been completed.
● Pending : the offer has been submitted for approval. It met the CRMS technical requirements.
● Scheduled : the offer has been approved, and is scheduled to go live. CRMS automatically launchesthe offer and changes its status to "live" when the Offer Qualify start date arrives.
● Live : the approved offer is now live. Customers are currently allowed to qualify for this offer.CRMS automatically ends the offer and changes its status to "completed" at the end of the OfferQualify end date. In a live offer, some data cannot be edited or changed.
● Completed : the offer is no longer live, and the record is maintained for reference and potentialcloning. The time period in which customers were allowed to qualify for this offer has ended.
Change StatusThe current status of each offer is displayed in the offer status control in the left-most column of eachoffer record on the Current Offers page.
Use this control to change the status of an offer record. Clicking the down arrow in the offer statuscontrol box displays a set of currently available options in a drop-down list.
Saved to Pending Offer Status
Procedure
1. Open an offer and navigate to the Summary & Preview page.For an offer in the Edit Offer Details workflow, click Jump to Step pull-down menu and selectSummary & Preview.
If any step in the offer definition process is not complete, the Summary & Preview pagedisplays an error message. See the listing of each step for a message similar to this: "NOTCOMPLETE This step must be completed prior to submission." Click theassociated Edit button and complete the step as required.
2. Click Next Step.The What's Next? page is displayed.
3. Click Go to Offers.The Offers page opens, listing the status of the offer record you just processed. The status of therecord changes from saved to pending.
46
TIBCO® Reward User's Guide

Offer Status Options
If Status is you can select:
pending approve or deny
scheduled unapprove or launch
live complete
inactive saved
Changing Offer StatusYou can use the offer status control box to change the offer status.
Procedure
1. In the Offers page, find the offer whose status you want to change.
2. Click the offer status control box to see a list of your current options for changing the status of thisoffer.
3. Select the appropriate option.The options available in the Status control box change depending on the current status of an offer.
Offer Status DetailsIf the current status is pending, you can either approve or deny the offer:
● Selecting approve changes the offer status to pending.
● Selecting deny changes the offer status to inactive.
If the current status is scheduled, you can either unapprove or launch the offer:
● Selecting unapprove changes the offer status back to pending.
● Selecting launch changes the status to live, depending on your scheduled Offer Qualify dates. Ifthe Offer Evaluation start date is today's date (because you manually reset it), you can select launchto request CRMS to make the offer live immediately.
If, previous to the current date, you had defined the start date as today's date, CRMS would haveautomatically made the offer go live as soon as the current day began.
If the current status is live, then you can complete the offer. Note that CRMS completes the offerautomatically, according to the Offer Qualify end date.
● Selecting complete causes the offer to end immediately. The CRMS changes both the Publish enddate and the Offer Qualify end date to the current date, and changes the status of the offer tocompleted.
Normally, CRMS automatically ends the offer at the close of day on the defined Offer Qualify end date.When CRMS ends an offer, it changes the offer status to completed and automatically preventscustomers from qualifying for offers.
If the current status is inactive, you can change the status to saved, and then use or modify the offersimilar to any other offer in saved status.
For example, suppose you have defined an offer. It has been in "saved" status since the day you startedit, and now you want to show it to an associate to get feedback or approval.
47
TIBCO® Reward User's Guide

From the Edit Offer Details - Summary/Preview page, review all the details with your associate and usethe Preview option to get a sense of how the offer looks and works. After you approve everything, clickNext Step at the top of the page. The Edit Offer Details - What's Next? page opens.
To submit the offer, click Go to Offers. The Offers page opens, and the Status control box shows thatyour offer's status has changed to "Pending". At this point, if you click the Status control, you can"approve" or "deny" your offer. If you approve the offer, CRMS checks the dates you entered for thisoffer, and changes the status to scheduled.
When an offer is scheduled, you can still unapprove it, which sends it back to pending status.
If the scheduled launch date for the offer is the current date or before, and the Offer Publish and OfferQualify Stop Dates are still in the future (as defined in the Schedule step for this offer), you can changethe status to launch to start the offer immediately. The CRMS changes the status to live to signal thatthe offer has gone live.
If the Offer Qualify Start Date is still in the future, then CRMS automatically makes the offer go live andchanges the status to live when the specified date arrives.
At the end of the Offer Qualify Stop Date (that evening), the status changes to completed.
At any time, a CRMS user can click Delete on the Offer record. This changes the status to inactive,and the offer is effectively deleted.
Cloning an offer record creates a copy of the record.
Cloning an Offer
Procedure
1. Find the offer record in the Offers page.
2. Click Clone in the row of the offer you want to clone.
3. This opens the Edit Offer Details wizard.
Clone Offer RecordThe cloned copy of an offer record includes all of the data in the original, with the following exceptions:
● The clone has a new, unique numerical ID. This is a system requirement.
● The clone of a record named "XXX" is automatically renamed "Copy of XXX." (Note that if you makemultiple clones of "XXX", they all are named "Copy of XXX.")
● The Offer Evaluation Start Date is, by default, reset to the date following the day when you createthe clone.
● The Offer Evaluation End Date is, by default, always set to a date three months after the initial OfferEvaluation Start date, so this date is also reset.
● The Current Offer Image, which is normally selected in the Edit Offer Details > Presentation step, istypically left blank in the clone. You must select the image to be associated with the cloned offerrecord.
Here are some tips for using a cloned offer record to create a new offer:
● Start by assigning the cloned copy its own new, unique, descriptive name.
● Start work on a clone with the first page, and update all existing fields to clearly distinguish the newoffer from the source material offer.
● Review every field.
● You must add a new image, because any image associated with the original offer has been deleted.
48
TIBCO® Reward User's Guide

● Check the Publish and Qualify dates; in a clone, these are set to default dates.
Deleting Offer
Procedure
1. In the Current Offers page, click Delete in the row of the offer record you want to delete.This opens a dialog box asking "Are you sure you want to delete this offer?"
2. Click OK.
Result
This automatically changes the status of the offer to inactive. The status of such inactivated recordscan be changed to "saved", and then the record behaves as any other with saved status. The record isnot removed and inactive records are retained. You can change the status of an inactive record to saved,and then the record can be used just as any other in saved status.
Warning! Deleting or modifying a published offer can cause unexpected consequences. ConsultReward account management for your specific needs.
Deleting an offer automatically changes the status of the offer to "inactive."
You cannot delete a live offer until the status is completed or until the Eligibility Evaluation period hasended (that is, the offer has expired).
Award Options
Award TypesYou can use Reward’s CRMS to give the following types of awards to targeted customers:
PointsUse this award type to specify the number of points, which are awarded to qualifying customers, onceper qualification, unless redemptions are limited. (Limiting redemptions is a good practice.) You canmaintain only one set of points. All offers must use the same point system. When you select thisoption, you must specify the number of points to be awarded to the qualifying, targeted member.Enter this information in the Enter Points Amount text-entry box.
Points Up to Member Point LimitUse to create an offer that gives the customer a fixed-point award up to a number of points based onthe member's Point Award Limit. Note that this is only enabled when a Member Point Limit has beenenabled. (This is set up using Admin > Main Settings > Configuration Management > Member PointLimit.
Points Per Event ValueAwards the “number of points that a customer receives for each Event Value” multiplied by the eventvalue. For example:
● Award Type: Points per Event Value
● Number of points that a customer receives for each Event Value: 10
● Event value that is passed to LL via API or file import: 5
● Points awarded: 50 (10x5)
49
TIBCO® Reward User's Guide

Double PointsUse Double Points to award double points to customers on purchases. Double points look at the ratefor your current points program and adds a bonus award based on the current program rate. If thequalifying customer normally receives 1 point per monetary unit according to your current loyaltyprogram rate, selecting Double Points causes that customer to receive 2 points per monetary unit.
Triple PointsUse Triple Points to award triple points to customers on purchases. Triple points looks at the rate foryour current points program and adds a bonus award based on the current program rate.
Points Per monetary unitUse Points Per monetary unit to define an additional, different point-earning rate on customerpurchases for a limited period of time (the offer qualification period). You can use the Custom pointsoption to enter the number of points that a customer receives for each monetary unit spent.
Percentage off (% Off on purchase)Use Percentage off to take a specific percentage, for example 10%, off on the products or categoriesselected. Available only if the customer qualifies by purchasing “a number of monetary units “ or “anumber of items” of selected products or categories.
Monetary Units off (%money Off on a Purchase)Use Monetary Units off to take a specific monetary unit amount, for example, 10 monetary units off,on the products or categories selected. Available only if the customer qualifies by purchasing “anumber of monetary units “ or “a number of items” of selected products or categories.
BonusUse Bonus to specify an award you fulfill offline, such as sending a gift card or a certificate. If youselect this option, a Description field is displayed, and you must enter text to describe the bonus.
Sweepstakes EntryCustomers use Sweepstakes Entry to enter into a contest. Contest entries are provided to the client forthe eventual selection of a winner. If you select this option, a Description field is displayed, for you toenter text describing the sweepstakes entry.
Award options are always limited to those that are still logically viable. For example, as soon as youdecide whether a purchase or an activity qualifies a customer for the offer, CRMS limits the set ofaward options available depending on the qualification type. Thus, if you indicate that no purchase isrequired, the option to award an immediate “Percentage off” purchase discount is no longer available.
The purchase options you select can also change the award options available.
The types of awards that you can offer depend on the qualification and purchase type options that youselect.
If you want to offer a certain type of award, find that award in the table, note the columns containing anX, and refer up to the qualification options and purchase type options that are required.
For example, to offer double points, you must select the following:
● All targeted members who make a purchase as the qualification option
● Any number of items as the purchase type option
Criteria for Offering AwardsThis table indicates which awards you can offer based on the other settings.
50
TIBCO® Reward User's Guide

Qualificationoptions
All targeted members who make apurchase
All targetedmembers whoperform anactivity
All targetedmembers
Purchase typeoptions
Any number ofitems
A number ofitems OR anumber ofmonetary units
Award options
% Off onpurchase
X
money Off on aPurchase
X
Points X X X X
Points UP TOmember PointLimit
X X X X
Bonus X X X X
Points Permonetary unit onpurchase [onselected productsand on productsin selectedcategories]
X
Award options are always limited to those that are still logically viable. For example, as soon as youdecide whether a purchase or an activity qualifies a customer for the offer, CRMS limits the set ofaward options available for you to select from. Thus, if you indicate that no purchase is required, theoption to award an immediate "Percentage off" purchase discount is no longer available, but you canstill choose to give a targeted customer a rebate as an award for completing an activity.
ReturnsWhen CRMS receives a return transaction, the following takes place:
1. The unique identifier that is used by the merchant and included in the transaction file (email,member ID, and so on) is used to identify the program member in the Reward system.
2. After the member is identified, the system looks at all previous transactions by that member to see ifthere is a purchase transaction for an item (SKU) that is the same as the item that is returned.
3. If a matching item or SKU is found, the system looks at all offers that the user and item or SKUcould have qualified for on the date the item was purchased.
4. For a matching offer or award on that date for that item or SKU, the system calculates the rewardbased on the offer or award and generates a reversal for the amount of the reward.
51
TIBCO® Reward User's Guide

5. The return transaction and the reversal amount are then available through the CSR, Microsite, andvarious APIs.
52
TIBCO® Reward User's Guide

Loyalty
Loyalty is a recognition program.
Topics:
● Refer a Friend
Refer a FriendThis section provides information about Refer a Friend functionality.
About Refer a FriendThe Refer a Friend function rewards customers with points for providing referrals to your program.
To present your customers with a new Refer a Friend program, two steps must be completed:
1. Your company must request that a Refer a Friend component be added to their microsite during theinitial Loyalty program setup process. This establishes the basic location for the Refer A Friendcomponent.
2. You must define the details of your Refer a Friend program on the Configure Refer a Friend page.When you set the Refer A Friend status to Enabled, the text intended for customers is displayed onthe Refer a Friend location in your microsite, and the program takes effect.
Configuring Refer a Friend
Procedure
1. Navigate to Loyalty > Refer a Friend.
2. Click Configure Refer a Friend.
3. In the Configure Refer a Friend page, enter the external program name that is displayed as the titleof your Refer A Friend program.
4. In the Description field, enter a description that prompts your customers to refer their friends.
5. In the How it Works field, describe what your customers are rewarded if they refer friends.
6. In the Terms & Conditions text box, describe any rules or legal information about the program.
7. Set the Awards & Limits by selecting the appropriate radio buttons. See Award & Limits Optionsfor more information.
8. Optionally, you can upload an image in the Upload an Image for your Refer a Friend programsection. To do so, click Browse to find the image and then click Upload.
Image Requirements:
● JPG, PNG, BMP, GIF formats
● File size must be less than 1MB
9. Click Done.
10. In the Configure Refer a Friend page, set the Status to Enabled to make the feature available tocustomers.
11. Alternatively, set the Status to Disabled to hide the feature from your customers.
53
TIBCO® Reward User's Guide

• Clicking Disable can cause an existing Refer a Friend site to suddenly be displayedempty.
• If you are currently supporting a Refer a Friend page, and wish to discontinue it forsome time, contact Reward Customer Loyalty Management for assistance.
• As a rule, you should not change this setting from Enabled to Disabled until you haveconsulted Reward Account Management.
Award & Limits OptionsIn the Awards & Limits section, you can specify the types of referral activities for which points areawarded, and the number of points awarded, as follows:
● Referrer gets ___ point for every ___ email address entered
Specify the number of points you give a customer for supplying each email address. For example, youcould specify that "Referrer gets 1 point for every 1 email address entered."
● Referrer gets ___ point for every ___ referred signup
Specify the number of points you give a customer for an email address that turns into an enrolledloyalty club member. For example, you could specify that "Referrer gets 10 points for every 1 referredsignup". If you get an enrolled loyalty customer from a referral, the referral is worth more to you thanan email address.
● Referrer gets ___ point for every ___ referred's first transaction
Specify the number of points you give a customer for referring a friend who enrolled and made a firstpurchase. For example, you could specify that Referrer gets 25 points for every 1 referred's firsttransaction".
Note: Points are accrued for each type of referral that you define and enable, which has a cumulativeeffect. If you give referral points for each of the qualifying referral activities and a referral results inboth a sign-up and a transaction, you award points three times, once for each of the three activities.
● Limit referrer to ____ total referrals
This setting applies a limitation specifically to referrals for email addresses entered.
54
TIBCO® Reward User's Guide

Target
This section provides information about targeting.
Topics:
● Customer Profiles
● Customer Profile Editor
● Creating Customer Profile
● Existing Customer Profile
● Editing Customer Profile
● Cloning Customer Profile
● Exporting List
● Deleting Customer Profile
● Profile Dimensions
● Basket Profiles
● Lists
● Postal Codes
● Custom Questions
● Mobile Geolocations
Customer Profiles
About Customer ProfilesA customer profile defines a segment of the customer population, and each profile is composed of oneor more dimensions specified by the CRMS targeting features. Customer profiles are used to targetoffers and emails to the appropriate customers.
A customer profile applies logical filtering criteria to the customer population. These criteria are basedon demographics, purchasing records, customer surveys, email behavior, and other sources.
Each CRMS customer profile yields a dynamically defined list of customers. The logical conditionsassociated with any given customer profile are applied to customer data that is updated nightly. Thismeans that customer profiles always represent up-to-date results. It also means that using the sameprofile on two different days can yield two different target lists.
Customer Profile: DimensionsA customer profile is defined by a set of dimensions. For each customer profile, you can select thedimensions to use, and then set the parameters for each dimension. One dimension is always selectedby default: Customer Type.
Customer profiles are often composed of multiple dimensions that are used together. You can usemultiple dimensions to define a profile that includes more conditions and represents a more specificsegment.
To understand exactly how any given profile targets customers, you must understand whichdimensions it uses and how these dimensions are defined for that profile.
55
TIBCO® Reward User's Guide

Customer Profile: List PageSelect Target > Customer Profiles to open the Manage Customer Profiles page. The Customer Profilespage provides access to all customer profiles, and helps you create and edit each customer profile.
Profiles Page Features
● Click Create > New Target Customer Profile to start the Create New Target Profile process.
● The Manage Customer Profiles panel includes the following:
— Standard navigation controls (the Show filter and the 1 2 3 page control)
— The complete list of customer profile records.
Each row in the list represents a customer profile record, and displays a few key fields in that record.Click a column heading to sort all of the profiles in the listing by that field.
The following fields are displayed:
# (the unique profile ID number)CRMS assigns a unique ID number to every customer profile record. If two or more profiles names(which are defined by CRMS users) are similar or identical, this number is the unique identifier.
Profile NameThe name of the customer profile as defined in CRMS, and set up as a hyperlink to the customerprofile record. Click the customer profile name to open the record, either to see or edit its details.
AttributesThis column shows abbreviations for the dimensions used to define the profile. For example, if youdefine a customer profile to use gender and category interests as criteria, the abbreviations GND andCAT would be listed as attributes for that profile record.
UpdatedThe date when the customer profile was created or most recently changed. This is the field used bydefault to sort the profile records. When you open the Manage Customer Profiles page, the mostrecently updated customer profile records are displayed first.
The following functions are supported:
● Clone : you can clone the associated customer profile record.
● Export Email : you can generate a CSV list of opted-in customers with valid email addresses thatmeet the logical requirements of the associated customer profile.
● Delete : you can delete the associated customer profile record.
Use the Customer Profiles page to do the following:
● Create a new customer profile
● Clone a customer profile
● Delete a customer profile
● Edit an existing customer profile
● Export an email based on a customer profile.
Customer Profile EditorFrom the Target > Customer Profiles page, click Create > New Target Customer Profile.
This generates a new customer profile record and opens that record in the profile editor.
56
TIBCO® Reward User's Guide

You can also open this editor from the Edit Offer Details wizard of the Offer Targeting page.
When the profile editor opens, it displays the following:
● In the left hand column, a complete list of the dimensions that you can use to define a customerprofile. The dimensions defined for the current customer profile are highlighted with a small greenbutton. Dimensions with a black button are not used in the currently defined profile.
One exception is: the Customer Type dimension is always applied, even though the button remainsblack when the default type, Registered customers only, is selected. Customer Type defines thepopulation that is used as the starting basis. If no other selections are made during the customer profilecreation, registered customers are targeted by default.
● The Profile Name is the unique name for this customer profile that is displayed on the Target >Customer Profiles page.
● The Internal Description for the customer profile summarizes the crucial dimensions of thecustomer profile so that potential users can quickly determine its purpose without opening eachcurrently defined customer profile dimension to see how it is set up.
Creating Customer Profile
57
TIBCO® Reward User's Guide

Procedure
1. Click Create > New Target Customer Profile.When the new page opens, a new customer profile record is created, the Profile Description optionis selected, and the Profile Description configuration panel is open.
2. Specify a name and description for the new customer profile record.a) In the Profile Name field, enter a name that is unique and succinct.b) In the Internal Description field, provide internal notes. (optional).
3. Click Save.
4. Click the name of a profile dimension that you wish to apply with the current customer profile, anddefine the details of that dimension.When you click the name of a dimension, the corresponding dimension configuration panel opens.This panel provides the tools you can use to define the details of the dimension (also known as the"conditions" of the dimension). Each dimension configuration panel provides different tools. Fordetails about the different dimensions, their configuration tools, and how to apply them, refer to Profile Dimensions.
5. After you have defined a dimension, click Save.Warning! Do not click another dimension until you have clicked Save on the current one you areworking on, otherwise you lose any unsaved work on a dimension.
6. Repeat steps 4 and 5 for each dimension you want to define for the profile.
7. When you finish defining all the dimensions for the profile, click Done to save and close the profile.
Do not click Done unless you want to save and close the current profile with all thedimensions in their current state.
Existing Customer ProfileTo open an existing customer profile record for editing, start Target > Customer Profiles page, and clickthe profile name associated with the record. The Profile editor opens, displaying the following:
● In the left-hand column, a complete list of the dimensions you can use to define a profile. Thedimensions defined for the current profile are highlighted with a small green button. Dimensionswith a black button are not used in the currently defined profiles. See Customer Profile: Dimensionsfor detailed information about each listed dimension and how to work with it.
● The Profile Name. This is the unique name for this profile that is displayed on the Target >Customer Profiles page.
● The Internal Description for the profile. This summarizes the crucial dimensions of the profile sothat potential users can quickly determine its purpose without opening each currently definedprofile dimension to see how it is set up.
Editing Customer Profile
Procedure
1. In the Target > Customer Profiles page, click the profile name of the record you want to edit.When the profile record opens, the Profile Description option is selected, and the ProfileDescription configuration panel is open.
2. Change the name or description or both, as appropriate, to reflect the purpose of the customerprofile record.
58
TIBCO® Reward User's Guide

a) In the Profile Name field, enter a name that is unique and succinct.b) In the Internal Description field, provide internal notes (optional).
3. Click Save.
4. Click the name of a targeting dimension that you wish to define for the current profile, and specifythe details of that dimension.When you click the name of a dimension, the corresponding dimension configuration panel isdisplayed. This panel provides the tools you can use to define the details of the dimension (alsoknown as the "conditions" of the dimension). Each dimension configuration panel providesdifferent tools. For details about the different dimensions, their configuration panels and tools, andhow to apply them, see Profile Dimension: Definitions.
5. When you finish defining a dimension, click Save.
The best practice is to click Save after defining each condition associated with adimension, that is, after you complete any subtask in the course of defining a dimension.Do not click another dimension until you have clicked Save, otherwise you lose anyunsaved work on a dimension. Do not click Done unless you want to save and close thecurrent profile with all the dimensions in their current state.
6. Repeat steps 4 and 5 for each dimension you want to define for the profile.
7. When you finish defining all the dimensions for the profile, click Done to save and close the profile.
Result
The Target > Customer Profiles page is displayed again, and the Profile Attributes column reflects anynew or deleted dimensions in the profile you worked on.
Do not click Done until you have finished the process of defining all the dimensions or you want to endthe session in its current state.
Cloning Customer Profile
Procedure
1. Find the profile record in the Target > Customer Profiles page.
2. Click Clone in the row of the desired profile record.
This creates a copy of the original profile. The cloned copy of a profile record includes all of the datain the original record with the following exceptions:
● The clone is assigned a new, unique numerical ID. This is a system requirement.
● The clone of a record named "XXX" is automatically renamed "Copy of XXX". Note, however,that if you make multiple clones of "XXX", they are all named "Copy of XXX."
● The Profile Updated date is, by default, reset to the date when you create the clone.
Here are some tips for using a cloned customer profile record to create a new customer profile:
● Start by assigning the cloned copy its own new, unique, descriptive Profile Name and InternalDescription.
● As you edit a clone, make sure the Internal Description accurately reflects the dimensions andparameters you have defined. Before you click Done, review and update the Profile Name andInternal Description to ensure that they reflect the purpose and contents of the new profile.
● If you must stop working on a profile before it is completely defined, you might want to note itsstatus. Applying even an informal system of version and revision tracking can help you savetime and improve your profiles.
59
TIBCO® Reward User's Guide

Exporting ListEach profile record listed in the Target > Customer Profiles page includes the Export Email option. Youcan use this option to generate a CSV list of opted-in customers with valid email addresses who meetthe logical requirements of the associated profile.
Procedure
1. Select Target > Customer Profiles.This opens a page of existing customer profiles.
2. Click Export Email on the row of the customer profile, from which you want to export email.A message is displayed stating that only profiles that contain at least one parameter with "MUSTMatch" option selected are used. Also, in the dialog is a question asking if you want to continuewith the process.
3. Click OK.The email list is sent to your organization's FTP site.
● You can only export emails from profiles that contain at least one MUST Matchparameter. The MUST Match parameters are used to select the email addresses.
● If you add a new postal code set today and target to that postal code, the emailaddresses corresponding to that postal code set are not included in an export file untilthe next day. Email Export files do not include the results of postal code sets addedwithin the last 24 hours.
● TIBCO Reward supports export files of up to one million records in size. If you suspectthat your export email files for a profile are larger than this size, contact your TIBCOReward Client Services Representative to ensure correct processing.
Export Email File FormatThe Export Email file that you generate has the following format (except that the actual list includes nospaces between values, only commas):
FileExportId, RegistrationDate, LoyaltyLabCreationDate, ShopperStatus, LoyaltyMember,SourceOfChange, ShopperId,
LoyaltyLabShopperId, FirstName, MiddleName, LastName, AddressLine1l, AddressLine2, City, State/Province, PostalCode, Email,
EmailOptIn, PhoneNumber, LoyaltyCardNumber, TierName, TierJoinDate, StatusUpdateDateTime,PointBalance
List Export HeadersThe following table contains the sample shopper data from an exported email list. Sample shopper datais aligned with the Export Field Headers.
Export Field Headers Shopper Data
FileExportId 2701
RegistrationDate 2012-06-05
LoyaltyLabCreationDate 2012-05-13
ShopperStatus A
LoyaltyMember 1
60
TIBCO® Reward User's Guide

Export Field Headers Shopper Data
SourceOfChange Other
ShopperId 20620633
LoyaltyLabShopperId 45442664
FirstName Tom
MiddleName ""
LastName Jones
AddressLine1 1313 Main Street
AddressLine2 ""
City Springfield
State/Province MO
Zip/PostalCode 65802
Email [email protected]
EmailOptIn 1
PhoneNumber 555-5555
LoyaltyCardNumber ""
TierName ""
TierJoinDate 1900-01-01 00:00:00.000
StatusUpdateDateTime 2012-05-13 16:53:31.160
PointBalance .0000
Profile Export Fields with Custom AttributesCustom attributes are extensions to the customer or product record. They are additional data fields thatcan be used to store non-standard data.
The customer attribute data exports in pairs -- custom attribute name followed by the value. Thisformat holds for each of the four types of attributes:
● Data/Time
● Numeric
● Lookup
● Text
The following table shows Custom Attribute Headers and their description for a sample client. (Customattributes and profile data vary based on client customization.)
Custom Attribute Header Description
CustomDateTimeValueLastChangedDateTime The last time a custom date field was changedfor this customer, cumulative across all customdate/time fields.
61
TIBCO® Reward User's Guide

Custom Attribute Header Description
CustomDateTimeName1
CustomDateTimeValue1
to
CustomDateTimeName20
CustomDateTimeValue20
The name of the date/time custom attribute
and
The value of the date/time custom attribute.
CustomNumericValueLastChangedDateTime The last time a custom numeric field waschanged for this customer, cumulative across allcustom numeric fields.
CustomNumericName1
CustomNumericValue1
to
CustomNumericName20
CustomNumericValue20
The name of the numeric custom attribute.
and
the value of the numeric custom attribute for thiscustomer.
CustomLookupValueLastChangedDateTime The last time a custom lookup field was changedfor this customer, cumulative across all customlookup fields.
CustomLookupName1
CustomLookupValue1
to
CustomLookupName20
CustomLookupValue20
The name of the lookup custom attribute
and
the value of the lookup custom attribute.
CustomTextValueLastChangedDateTime The last time a custom text field was changed forthis customer, cumulative across all custom textfields.
CustomTextName1
CustomTextValue1
to
CustomTextName20
CustomTextValue20
The name of the text custom attribute for thiscustomer
and
the value of the text custom attribute for thiscustomer.
Even if the client is not using all attributes, the name and value pair are displayed in the table.
62
TIBCO® Reward User's Guide

Deleting Customer ProfileDeleting a customer profile removes a profile record from the listing in the Target > Customer Profilespage.
Procedure
1. Find the profile record in the Target > Customer Profiles page.
2. Click Delete in the row of the profile record.A dialog box is displayed, which reads, "Are you sure you want to delete this profile?".
3. Click OK to delete the selected record.The customer profile record is no longer displayed in the list on the Target > Customer Profilespage.
Warning! You cannot recover a customer profile that has been deleted.
Profile Dimensions
About Profile DimensionsA profile dimension is a set of logical conditions that is used to filter a customer population fortargeting purpose. Dimensions are used to define a customer profile.
You can use many different types of dimensions, including: Activities, Past Purchases, CategoryInterests, Geographic Location, Gender, Custom Questions, Customers types, Customer Attributes,and Tiers. For details about each dimension and how to use it, see Profile Dimension: Definitions.
When defined and activated, a dimension tests the customer related data made available by transactionfiles, customer profiles, and customer email behavior records. Because this data changes over time, thelist of customers selected by any given dimension also changes over time. The targeted segment isdefined dynamically.
When you define a dimension in CRMS, it serves as a dynamic customer segmentation tool. Whendefined and applied as part of a target profile, a defined dimension can be applied repeatedly to anevolving current customer population base. Each time the dimension defined in a profile is applied, itautomatically selects customers based on the most recent customer data currently available in theReward database.
The Changing Set of Selected Customers
Ultimately, the defined dimension represents a set of related logical conditions used to select sets ofcustomers. Because Reward performs data updates every night, applying the same profile on twodifferent days can yield two different sets of results.
If the set of customers selected by a profile does change after an offer is sent to the initially qualified setof targeted customers, then CRMS sends offers to the customers added to the set on subsequent days,for as long as the offer is open.
Profile Dimension: ConditionsProfiles are composed of one to many dimensions, and they are often composed of multiple dimensionsthat are used in concert with each other. A multidimension profile includes more conditions and hasthe potential to represent a more specific segment.
When setting up a profile, click the name of a dimension you want to use in that profile, and thecorresponding dimension configuration panel is displayed. This panel provides the tools you use todefine the details of the dimension (also known as the "conditions" of the dimension).
63
TIBCO® Reward User's Guide

A dimension can have one or many conditions. Each defined condition constrains the dimension, just aseach dimension constrains the profile.
Default Dimension: Customer Type = Registered Customers Only
To establish the broad customer population that the profile uses as its basis, one dimension is alwaysapplied by default: Customer Types. By default, too, the customer type selection is always set toRegistered Customers Only. Other customer types can be selected.
The customer types dimension is not selected when the default population, Registered CustomersOnly, is selected. However, this default category type does constitute a logical selection that is appliedas a MUST match dimension to filter the population.
Profile Dimension: How to UseWhen you create a new profile or edit an existing target profile, you must select and define thedimensions that this profile uses.
Clicking on a customer profile name in the Target > Customer Profiles page opens that profile andprovides access to the specific dimension settings associated with that profile.
For general information about dimensions and how to use them, see Profile Dimensions.
Click Save frequently when creating or editing profile dimensions. If you are working with a givendimension definition and attempt to open a different dimension without first saving your work, theunsaved work is lost. If you are working on the definition of one condition in a dimension and attemptto open a different condition, your unsaved work on that condition is lost.
Profile Dimension: MUST MatchWhen editing a targeting dimension, you have the option of enabling or disabling MUST Match forthat dimension. When this option is selected, only customers who exactly match the selected profiledimension criteria are included whenever this profile is used. For example, if Recency 1-3 weeks isselected in the RFM sub-tab, and MUST Match is selected, this profile never goes to anyone who didnot make a purchase transaction in the last 1-3 weeks. That is, any other recency and those whoserecency is unknown are not included in this profile.
When this option is not selected, the result depends on where the profile is used. In Offers, the selectedprofile criteria influences the offer score, but does not exclude anyone from receiving the offer.(Remember that offers are scored on relevance.) In email, this check box is treated as though it isselected and all sub-tab criteria are treated as MUST Match.
Each dimension within the profile has its own MUST Match setting. This means checked andunchecked dimensions can be mixed to fine tune offer targeting. For example, setting Recency =1-3weeks as Must match, and gender = male as not MUST match results in only customers with apurchase transaction in the last 1-3 weeks receiving an offer, with men scoring high and women scoringlow. If the same profile is used for email, only male customers with a purchase transaction in the last1-3 weeks receive the email."
Profile Dimension: Definitions
Dimension: Activities
Use this dimension to select customers based on whether they did or did not perform an activity (forexample, a task that can be completed on a website).
If a customer either performed or did not perform a defined activity, you can define the Activity Eventsdimension such that either alternative satisfies a condition. You can use one or many activities to set upone or many conditions for this dimension.
64
TIBCO® Reward User's Guide

You can create a valid Activity Events dimension by setting up one or many requirements. Before youdefine this dimension, review the logical case for targeting customers on the basis of activity events.
Defining Activity Based Conditions
Procedure
1. Select the check box in front of the first activity you want to test for.
When this check box is selected, the default requirement, Performed, is selected and the radiobutton in the Performed column is selected.
● If you want to select customers who performed this activity, leave the Performed buttonselected.
● If you specifically want to select customers who did not perform this activity, select the radiobutton in the Did Not Perform column.
2. If you do want to test for either performance or non-performance of an activity, make sure the checkbox in front of the activity name is not selected.
3. Click Save.
4. Advance to the next activity that you want to use as a condition and repeat steps 1 through 3, untilyou have finished defining the desired behavior with respect to all activities of interest.
5. Select or clear Customer MUST match check box, as appropriate.
6. Click Save.
Dimension: Category Interests
Specify product categories in which the customer has expressed interest (for example, in the survey).Clicking Add Categories brings up the Select Categories dialog box. The categories are derived fromthe product file sent to Reward. This is the same list that customers use to identify their categoryinterests.
Targeting Customers in Categories
Procedure
1. Click Add Categories.The Select Categories dialog box is displayed.
2. Select all of the categories in which the targeted customers should have expressed interest and clickAdd Checked.The Category Interests configuration panel is displayed again with the selected categories listed.
3. Select or clear the Customer MUST match check box, as appropriate.
4. Click Save.
Dimension: Custom Attributes
You can use the Custom Attributes dimension to specify conditions based on the custom attributevalues.
After selecting a custom attribute, you can specify a set or range of values that the dimension uses aslogical matching criteria. If the value stored in the custom attribute field associated with a customermatches the values or logical test that you define, the customer meets a logical condition defined for thedimension.
65
TIBCO® Reward User's Guide

These custom attributes are special fields made available for use within CRMS, although they are notnormally defined in the standard version of the CRMS database.
You can target customers whose custom attributes match the values that you designate. Customattributes can be created within the Admin > Custom Attributes tab. You can target as many of yourcustom attributes as you like, but you can only target each only once within a given profile. Therelationship between each attribute is an AND, which means that customers must match all attributes,and their criteria, to be selected.
Defining Dimension Conditions Based on Custom Attributes
Procedure
1. From the Add a Custom Attribute drop-down menu, choose the attribute you want to use for thecurrent profile.
All the attributes that you have defined are displayed in this menu, with the exception of Lookuptype attributes that have no Lookup codes defined. Also, because you can target each attribute onlyonce within any given profile, after you add an attribute to target to, it is removed from the menu.
When added, each attribute is displayed within its own configuration panel. When you initially addan attribute to target, it is displayed in expanded mode.
2. Configure the values associated with the attribute and click Update to save your changes.To save your work, click Save. Your input is saved and the page is refreshed, displaying theattribute panel in collapsed mode.
3. If you want to define another custom attribute condition, choose another attribute from the Add aCustom Attribute drop-down menu, and repeat step 2.
Editing a Condition Based on a Custom Attribute
Procedure
1. Click Save to save any existing work.
2. Click the Edit button associated with the custom attribute.The collapsed panel is expanded. Only one attribute can be expanded and edited at a time. If youexpand a block while editing another, you lose any input in the one you were previously editing.
3. Configure the values associated with the attribute and click Update to save your changes.
If you attempt to set up a new attribute while editing one, your work is lost. Before addinga new attribute, be sure to click Update or Save.
Refer to Administration: Custom Attributes for more information about Custom Attributes.
Dimension: Custom Entities
You can target customers who match your custom entities by selecting an entity and then choosingfrom its set of entity attributes and setting their values. Custom entities and their associated attributesare initially created during your data integration and implementation phase.
You can target based on as many of your custom entities as you like, but you can only target eachcustom entity once within a given profile. When you select a custom entity, you must also pick one ormore of the entity attributes for that custom entity and configure their values. Each entity attribute canonly be chosen once as well.
The relationship between each custom entity and between each entity attribute is an AND, whichmeans that customers must match all criteria for the custom entities and their attributes to be selected.
66
TIBCO® Reward User's Guide

Choose the custom entity you want to target from the Add a Custom Entity pull-down menu. Note thatbecause you can target each custom entity only once within any given profile, after you add a customentity to target to, it is removed from the Add a Custom Entity menu.
To get started:
Choose the custom entity you want to target from the Add a Custom Entity pull-down menu.
When a custom entity is added, the custom entity name along with an Add an Entity Attribute pull-down menu for its associated attributes is displayed within a "block" on screen (with the exception ofLookup type attributes that have no Lookup codes defined). Choose the entity attribute you want totarget from this pull-down menu.
Also, when you initially add an entity attribute for the custom entity to target, it is displayed inexpanded mode so that you can configure its values. After you have configured the entity attribute,click the Update button to save your changes for that attribute.
If you click Save at the top of the screen, your input is saved and the page is refreshed, displaying thecustom entity with its attributes in collapsed mode.
You can always edit a collapsed custom entity or its attributes by clicking the Edit button. Only onecustom entity or entity attribute can be expanded and edited at a time. Also, be sure to click Update onthe block, or Save, before adding a new entity attribute.
If you add a new entity attribute for a custom entity while editing one, you lose your work.
Dimension: Custom Questions
Your company can survey customers by presenting them with Custom Questions in the My Accountsection. If a customer responded to a custom question, you can define the custom question dimensionsuch that the response satisfies a condition. You can use one or many questions to set up one or manyconditions for this dimension.
You can use this dimension to process customer responses to custom questions in several differentways.
Note the following general guidelines about custom questions:
● You can set up the required responses to one or more questions.● You must set up a required response to at least one question to create a valid dimension. If you do
not define any required response to any question at any level, this dimension has no conditions andserves no purpose.
● You can satisfy the condition associated with any question at two different levels. See details aboutLevel I and Level II.
● For each question, you can set up the required response at either level.
Setting up Customer Response at Level I
To require only some response to a question, the customer can respond to the question in any way.
Procedure
1. Select the check box in front of the question, at the top level.
When this box is selected AND no details about responses are provided, a customer automaticallysatisfies the condition by responding to this question in any way. To verify that no specific customerchoices need to be provided, click Show Answers to see the question response details. If allresponses are checked as Disabled, you have required no specific response. This means that acustomer automatically satisfies the condition if that customer makes any selection in response tothis question.
67
TIBCO® Reward User's Guide

Suppose you want to use this dimension to determine if a customer has children. If customersprovide any response to a custom question regarding the characteristics of their children, this can betaken as an indication that they have children. Any response satisfies the implicit condition(customer has child or children), and specific details are not significant, given your level of interest.
2. Click Save.
3. Proceed to the next question that you want to use as a condition.Note that you can define the required response at either Level I or II.
4. After you have defined the desired responses to the custom questions of interest to you, click Save.
5. Select or clear the Customer MUST match check box, as appropriate.
6. Click Save.
Setting up Customer Response at Level II
To require some specific response to a question, set up one or more possible responses for a customquestion.
Procedure
1. At the right-hand side of the bar containing the custom question, click Show Answers. The questionresponse details are displayed at a lower level.Each possible response of the question is listed. (Multiple option selections are normal in a surveyquestion.)
2. Select the question responses you want to use.a) If an unselected response to a line item is significant and should satisfy the condition, select the
unselected box.
Suppose you want to set up a condition to help determine whether it is appropriate to call a set ofcustomers about a new offer. You can use the Custom Question dimension to determine whetherthe customer has explicitly asked not to be contacted about new offers.
For the sake of this example, assume that one of your custom questions is "How would you like tobe contacted?" and that one of the possible responses is "Do not contact me." (This is a standardquestions-and-response pair among customer questions.)
Your setup for this custom question stipulates the condition that this "Do not contact" response isnot selected. Thus, when the customer has not used this specific method to direct you not to call, thecustomer meets the condition.a) If a selected response to a line item is significant and should satisfy the condition, select Selected
box.
Suppose you want to use this dimension to determine if a customer has children who might useinfant diapers. There is a custom question that surveys customers about the ages of their children,so you select the option labeled "Birth - 2 years." The customers who select this response meet thecondition. Other responses are not of interest, so you do not need to select any response or evenenable the response.a) If any response to a line item should satisfy the condition, you can click Either. The Enable box
might be automatically selected. If you decide that a response to this line item is not a factor,clear the Enable box, or leave a Disable box selected.
3. Click Save.
4. Advance to the next question that you want to use as a condition.Note that you can define the required response at either Level I or II. Refer to the instructions fordefining a required response at Level I.
5. After you have defined the desired responses to the custom questions of interest, click Save.
68
TIBCO® Reward User's Guide

6. Select or clear the Customer MUST match check box, as appropriate.
7. Click Save.
Because all conditions based on custom question responses are linked with the logical ANDoperator, the outcome of this dimension is the set of customers who meet all of your questionresponse requirements. Requiring specific responses to multiple custom questions can yield a verynarrow customer segment. Note also that, if a customer response to a custom question is not strictlyrequired, only a subset of the population might provide any response.
If you set up a condition based on a custom question response that does not make sense, the CRMScannot interpret questions, possible responses, and your application of the dimension logic. So youmust test the logical condition you are defining.
Dimension: Customer Types
You can use this dimension to target the following broad categories of customers:
All CustomersIncludes registered and unregistered customers.
Registered customers onlyCustomers who have enrolled in your loyalty program.
Unregistered customers onlyCustomers who have not enrolled in your loyalty program, but who have provided enoughinformation to be tracked by the Reward system.
Unsubscribed customers onlyLoyalty program members who have opted-out of marketing email. (Note: Should only be used forchanges to contractual terms and conditions, or other legally required email notifications.)
Be aware that the Customer Type selection is always administered as a MUST Match requirement.
To select a customer type:
1. Select one type by clicking the associated radio button.
2. Click Save.
Notes:
● If you click Registered Customers Only, CRMS does not indicate that you have selected a CustomerType. If you click any other option, the normal dimension indicators are activated.
● This dimension is always defined as a MUST Match condition, by default.
● Do not choose Unsubscribed Customers Only unless you have validated that you have a legalrationale for targeting this customer group.
● In general, The Unsubscribed Customers Only (opted-out) customer type dimension should onlybe used to target offers to unsubscribed program members, for example: “sign up for marketingemails and receive 50 points.”
Some dimensions apply logical conditions that require data provided only by registered customers. Thefollowing dimensions only function with registered customers:
● RFM● Categories of Interest● Gender (from Sign up and My Account)*
69
TIBCO® Reward User's Guide

● Customer Questions● Tiers
Gender based targeting can also select unregistered customers identified in files supplied by clients toReward (example, customer or transaction files), if those files include gender data and if appropriateReward system integration has been completed.
Although you can apply the dimensions when customer type is set to All Customers, selecting thatoption does not increase or change the customers selected, because all of the listed dimensions arebased on data provided only by registered customers.
Warning! If you apply any of the profile dimensions when customer type is set to UnregisteredCustomers Only, zero (0) customers are selected by that dimension because the logical result is a nullset.
Dimension: Gender
Use the Gender dimension to select customers according to their gender attribute.
Reward can collect the gender data for a client's customers from different sources: the data filesprovided by the client, the loyalty program sign-up forms, and the data provided by customers in theirMy Account forms.
Gender is commonly determined from sign up or My Account forms by interpreting the salutation data(Mr., Mrs., Miss, Ms., and so on) provided by the customer in the sign-up process. If the salutation isnot defined as a required field, then gender information might not be available for many customers.
If no source of gender data other than the sign-up and My Account forms data has been made availableto TIBCO Reward, only those customers who have indicated their gender in their salutation can meet agender based condition. Note, however, that a gender attribute might be included in customer files ortransaction files provided to TIBCO Reward.
Targeting Customers by Gender
Procedure
1. Select one gender or either, by clicking on the associated radio button.
2. Click Save.
3. Select or clear the Customer MUST match check box, as appropriate.
4. Click Save.
Dimension: Generic Events
The Generic Event targeting provides you flexibility to use a generic event to build a customer profile.For each event added to the profile, you can build profiles that segment customers. For example:
● You can specify how many times a customer performed or did not perform the event in a certaintime frame.
● If the Object is a product, you can target customers who performed the action on any one specificproduct, a group of products, or any product in your product catalog.
● If Event Value is enabled for the event, you must enter a value that is used to further define thetarget profile. For example, for a product review, enter a number that describes the number of starsassigned to the reviewed product.
You can add multiple generic actions to a profile. This can be used, for example, to build a profile ofcustomers who took a specific action on a group of products, or who took two related actions (forexample, reviewed and invited a friend to join your online store and also reviewed a product).
70
TIBCO® Reward User's Guide

Creating a New Generic Event Target Profile
Procedure
1. Click the Target > Customer Profiles tab. The Manage Customer Profiles page is displayed.
2. In the Manage Customer Profiles page, click Create New Target Customer Profile.The Description page is displayed.
3. Provide a name and description for the new profile and click Save.
4. Click Generic Events.The Generic Event Targeting page is displayed.
5. Select a Generic Event Condition from the drop-down menu and click Add.The options that are displayed on the page are determined by the way the event was set up.
6. Select the event occurrence values. (Note that event occurrence values change dynamically based onyour selections.)
7. Enter a numerical event value, if available.
8. If the object is a product, specify whether the event applies to any product or one specific product.
9. Click Save to save your changes, or click Done to save your work and close the session.
After you have created a customer generic event profile, you can associate the profile with an offer,by which you can award points or other awards to customers who exhibit the behavior captured inthe event. You could also include the profile in an email campaign, for example sending customersthank you emails when they take a specific action.
Dimension: Geographic
Use the Geographic dimension to designate the desired geographic location for customers. The DefineGeographic Targeting drop-down menu offers these options for selecting geographic areas:
Geographic Targeting Using Postal Code Sets
Procedure
1. Select Postal Code Sets from the Define Geographic Targeting drop-down menu.
2. The corresponding configuration panel is displayed with a list of postal code sets, stores, ormetropolitan areas.
3. Select or clear the Customer must match check box, as appropriate.
4. Click Save.
Geographic Targeting Using U.S. States
Procedure
1. Select U.S. states from the Define Geographic Targeting drop-down menu.The corresponding configuration panel opens, displaying a drop-down list of U.S. states.
2. Select one or more states from the list of states in the panel under Target customers that have zip/postal code in selected states/provinces.
3. Select or clear the Customer MUST match check box, as appropriate.
4. Click Save.
71
TIBCO® Reward User's Guide

Geographic Targeting Using Stores
Procedure
1. Select Stores from the Define geographic targeting using drop-down list.The corresponding configuration panel opens, displaying a list of stores.
2. Select stores by using check boxes.
3. Select or clear the Customer Must match check box, as appropriate.
4. Click Save.
Geographic Targeting Using Metro Area
Procedure
1. Select Metro Area from the Define geographic targeting using drop-down menu.The corresponding configuration panel opens, displaying metro areas.
2. Select metro areas by using the check boxes.
3. Select or clear the Customer Must match check box, as appropriate.
4. Click Save.
Geographic Targeting Using Mobile Geolocation
You must create mobile geolocations before targeting them.
Procedure
1. Select Mobile Geolocation from the Define Geographic Targeting drop-down menu.
2. Click Add Mobile Geolocations.This displays the Select Mobile Geolocation list.
3. Select the check box next to the appropriate geolocation.
4. Click Add Checked.
5. Click Save.
Dimension: Lists
You can use Lists targeting dimension to target customers who are members of one or more lists. Youcan target to customers who are included in lists already existing in the database or lists imported fromexternal sources. (Refer to Creating Target List for information about creating and importing lists.)
● The lists dimension is only available to clients who are implemented on the realtime enabledplatform. For more information, contact your account manager.
● When targeting multiple lists, customers who are in one or more lists are targeted.
Customer Target List versus Profile Dimension List
The difference between the ability to target an offer directly to one or more lists at the Offer > CustomerTargeting page and the customer profile dimension for lists is the following :
● When setting customer targeting for an offer, you can include any number of customer profiles andlists. The customers are eligible for the offer if they are members of any of the included customerprofiles or lists. This is because the relationship between the lists and/or profiles is an OR statement.
72
TIBCO® Reward User's Guide

● Targeting using the list dimension of a customer profile uses lists in combination with othertargeting dimensions of the profile. The intended target has to be a member of the list and must alsomeet the other profile criteria such as past purchase, and so on. This is because the relationshipbetween customer profile dimensions is an AND statement.
Customer Profile: Adding Target List
Procedure
1. Navigate to Target > Customer Profiles > New/Edit Profile.
2. Select the Lists dimension.The List Targeting page is displayed.
3. Click Add Lists.This opens the List Picker window, which includes lists that have been created or imported.
4. Select the check box next to the lists you want to add. (You can also select Check All.)
5. Click Add Checked.This returns you to the List Targeting page.
6. Click Save, which saves the selected lists, or click Done, which saves the selected lists and returnsyou to the Manage Customer Profiles page.The customer profile to which you added a list dimension is displayed in the list of customerprofiles with LST under the Attributes column.
Customer Profile: Removing Target List
Procedure
1. After adding lists to the customer profile, the lists are displayed in the List Targeting page with aRemove link and Remove All Lists button.
2. You can remove the added lists by clicking Remove next to the appropriate list.
3. You can also select Remove All Lists.
4. Attempting to remove lists opens a dialog, which reads “This action will remove this list.Do you want to continue?”
5. Click OK or Cancel.
Dimension: Offer Redemptions
You can use the Offer Redemptions dimension to target shoppers who are eligible for and haveredeemed, or have not redeemed, an offer in a selected time frame.
The customer profile targeting dimension for offer redemption considers only customers who areeligible for the offers, not all customers.
Using this profile dimension, you can provide additional incentive for customers to make a repeatpurchase within a certain time frame. For example, you could create a "special bonus" offer with doubleor triple points to incent customers to make a second purchase within a determined time period afterredeeming a reward.
Target customers based on the following types of Offer Redemptions conditions:
RedeemedA defined number of times the customer redeemed an offer within a selected time frame.
73
TIBCO® Reward User's Guide

Did Not RedeemA defined time frame during which the customer was eligible for, but did not qualify for or redeem anoffer.
Dimension: Past Purchases
Use the Past Purchases dimension to select customers who have made purchases of specified productsor purchases within specified categories within specified times. You can add multiple selectionrequirements, mixing both product and category purchases.
The logical conditions used in the Past Purchases dimension are based on the data provided to Rewardby your company in its most recent product catalog file. If this file has never been provided, thisdimension cannot function.
For each condition, three dropdown selection boxes are displayed. The default values for each aredisplayed:
Any PurchaseUse this first control to select the number of purchases. Note that zero purchases ("0 purchase") is nota valid response, and that "any purchase" means one or multiple purchases (any number greater thanzero).
In categoriesChange this to of products or of brands, as appropriate.
Use in categories to select customers who have purchased a product or products within a specificcategory or set of categories. Click Add Categories to open the Select Category dialog box, then addone or many categories.
Use of products to select customers who have purchased a specific product (a product with a uniqueSKU) or some selection from a set of products. Click Add Products to open the Select Product dialogbox, then add one or many specific products.
Use of brands to select customers who have purchased a specific brand of products. Click AddBrands to open the Select Brands dialog box, then add one or more brands.
In the last 3 monthsChange this to the time period in which purchases must have been made. The time limitations rangefrom "In the last week" to "In the last 2 years".
Selecting Customers on Past Purchases
Procedure
1. Select the first purchase condition.The first past purchase condition panel is displayed by default, but you can add more by clickingAdd Another Condition.
2. Specify the number of purchases, using the first drop-down list.
3. Select either in categories or of products, using the second drop-down menu.Depending on your selection of in categories or of products, the appropriate list box and relatedcontrols are displayed in the list panel.
4. Specify the time limitation, using the third drop-down menu.
5. In accordance with the setting and changes described in step 3, click either Add Categories or AddProducts or Add Brands to add categories, products, or brands.If you use the Products dialog box, you must manually close it.
6. Click Save after every addition or change.
74
TIBCO® Reward User's Guide

7. To add another condition based on past purchases, click Add Another Condition, and repeat steps2 through 6.
8. Select or clear the Customer MUST match check box, as appropriate.
9. Click Save.
Dimension: Point Activity
You can use the Point Activity dimension to target customers based on points activity (or inactivity)during a time frame. Using this profile dimension, you can encourage additional purchases by targetingcustomers who are approaching a reward threshold.
Additionally, you can incent customers to use points before they expire or restart earning points afterpoints have expired.
Target customers based on the following types of Point Activity conditions:
Points AccruedA defined number of points awarded (accrued) within a selected time frame.
Points RedeemedA defined number of points redeemed (used) within a selected time frame.
Net Points ActivityA defined number of net points (points accrued, minus point redeemed) within a selected time frame.
Points ExpiredA defined number of Point Types or Point Groups that expired within a selected time frame.
Points Set to ExpireA defined number of Point Types or Point Groups that are set to expire within a selected time frame.
Dimension: Point Balance
You can use Point balance dimension to select customers whose current point balance meets yourdefined criteria. You can specify whether a customer point balance number must be:
● Less than or equal to a number.
● Between or equal to two numbers.
● Greater than or equal to a number.
Targeting Customers According to Their Current Point Balance
Procedure
1. Select the Enable Point Balance targeting check box.
2. Make sure that the checkmark is displayed.
3. Select Balance Type:
● Cumulative balance of all point groups
● Monetary Unit points group only
● Votes point group only
4. Select the Balance Evaluation:
● If you select Less than or equal to a number, you must enter that number.
75
TIBCO® Reward User's Guide

● If you select Greater than or equal to a number, you must enter that number.
● If you select Between or equal to two numbers, you must enter two numbers to define a range.
5. Click Save.
Dimension: Communications
You can use prior communication response to target customers based on the response or the lack of aresponse to email communications sent to them. After you have added a targeting condition, you canspecify the criteria to apply against specific emails. To get started, click Add a Condition.
About setting response criteria in a condition
You can select the customers who meet the criteria for the emails you specify using the Select Emailsbutton. You can choose to target by choosing all customers who were sent an email, or you can drill allthe way down to those who were sent, delivered, opened, and clicked one or more emails. As you makechoices in the Select all who were pull-down menus, some choices have more options. These aredenoted by a ">".
About selecting multiple emails in a condition
When you select more than one email using the Select Emails button, the resulting set of customers isthe union of all customers who meet the criteria you specify for the emails that you have selected.
For example, if you select all who were sent two different emails in a single condition, the resulting setincludes all customers who were sent either of the two emails.
About multiple conditions
Only one condition can be edited at a time. To save any changes you make when configuring acondition, click its Update button. To discard any changes made since the last time you clicked Updateor Save, click Cancel. To edit a condition in its "collapsed’ state, click Edit button. When you add andconfigure more than one condition, the resulting set of customers are derived from the intersection ofthe set of customers within each condition.
For example, if you select two different conditions, both of which define all who were sent a singlespecific email, the resulting set only includes customers who were sent both emails.
Selecting emails in a condition
When you select more than one email using the Select Emails button, the resulting set of customers isthe union of all customers who meet the criteria you specify for the emails that you have selected.
For example, if you select all who were sent two different emails in a single condition, the resulting setincludes all customers who were sent either of the two emails.
Multiple conditions
Only one condition can be edited at a time. To save any changes you make when configuring acondition, click Update button. To discard any changes made since the last time you clicked Update orSave, click Cancel. To edit a condition in its "collapsed" state, click Edit button. When you add andconfigure more than one condition, the resulting set of customers are derived from the intersection ofthe set of customers within each condition.
For example, if you select two different conditions, both of which define all who were sent a singlespecific email, the resulting set only includes customers who were sent both emails.
Dimension: RFM (Recency, Frequency, Monetary Value)
RFM (Recency, Frequency, Monetary value) is one of the fundamental segmentation systems applied toretail markets. You can use the RFM dimension to filter customers based on any or all of the followingconditions and your settings for each condition:
Recency
76
TIBCO® Reward User's Guide

Weeks since the customer last purchased (positive transaction)
FrequencyHow often the customer made a transaction within the chosen time frame
Monetary ValueThe net spending of the customer within the chosen time frame
Membership LifespanHow many weeks it has been since the customer enrolled in the loyalty program
Lifetime SpendThe net spending of the customer since enrollment in the loyalty program
Setting Parameters for the Conditions
Procedure
1. For each condition you wish to apply, click Activate.The display area changes from grey to green, indicating this condition is in use. Use the right andleft slider tools to define ranges. Click the blue arrowhead pointer on either slider and drag theslider to the desired setting to define the lower or upper boundary.
2. If appropriate, change the time scale.
3. Click and drag the sliders on either end of the range to set an upper or lower boundary, asappropriate.
4. Click Save.
5. Repeat the process for each condition you wish to apply.
Disabling a Parameter Setting for a Condition
Procedure
1. Click Reset.Your settings are removed and the display area turns from green to gray.
2. Click Save.
Modifying Frequency or Monetary
Procedure
1. In the time frame control drop-down menu, click the down arrow.From the options that are displayed in the list, choose one : last 4 weeks, last 13 weeks, last26 weeks, or last 52 weeks.
2. Click Save.
Dimension: Tender Types
You can use the Tender Types dimension to target customers based on recency, frequency or spendusing a select tender type within a defined period of time. Using this profile dimension, you canencourage customers to make purchases using a certain tender type (like a private label credit card).
Target customers based on the following tender types conditions:
77
TIBCO® Reward User's Guide

Recency with Tender TypesA defined timeframe during which the customer last made a purchase using selected tender types.
Frequency with Tender TypesA defined number of purchases using selected tender types within a selected timeframe.
Monetary Value with Tender TypesA defined monetary spend using selected tender types within a selected timeframe.
Dimension: Tiers
If you have implemented tiers in your loyalty program, you can use this dimension to target customerswho belong to each tier.
Tiers define segments of the loyalty program membership. For example, you can use point accruals asthe criteria for tier membership. Then you can target customers to a tier based on the points they haveaccrued.
Reward evaluates customers for their tier memberships every night. A change in a customer's tier levelmight not take place until 36 to 48 hours after Reward receives the transaction data file that qualifies thecustomer for a tier-change.
Example of Tiers
You can have three tiers: base, silver, and gold. Everyone who signs up is in the base tier. Customerswho accrue 200 points get into silver. Customers who accrue 400 points get into gold. The decision toimplement tiers is one of the basic program design decisions that a company typically considers whensetting up its loyalty program.
Basket Profiles
About Basket ProfilesYou can use basket profile to set up conditions (basket profiles) that must be met for the items in acustomer’s shopping basket to qualify for an offer. If a basket passes, the items in the basket areevaluated for a reward. If the basket does not pass, the items in the basket are not evaluated and noreward is given, even if specific items would otherwise qualify for a reward. You can set up specificconditions that a basket must pass before the items in the basket are evaluated.
Basket Profile List PageSelect Target > Basket Profiles to open the Manage Basket Profiles page. The Manage Basket Profilespage provides access to all basket profiles, and helps you create and edit each basket profile.
Profile Page Features
Clicking Create > New Target Basket Profile starts the Create New Basket Profile process.
The Manage Basket Profiles panel includes:
● Standard navigation controls (the Show filter and the 1 2 3 page control).
● The complete list of basket profile records.
Each row in the list represents a basket profile record, and displays a few key fields in that record. Clicka column heading to sort all of the profiles in the listing by that field.
The following fields are displayed:
78
TIBCO® Reward User's Guide

# (the unique profile ID number)CRMS assigns a unique ID number to every basket profile record. If two or more profiles names(which are defined by CRMS users) are similar or identical, this number is the unique identifier.
Basket Profile NameThe name of the basket profile as defined in the CRMS, and set up as a hyperlink to the basket profilerecord. Click the basket profile name to open the record, either to see or edit its details.
AttributesThis column usually shows abbreviations for the attributes used to define the basket profile.
UpdatedThe date when the basket profile was created or most recently changed. This is the field used bydefault to sort the profile records. When you open the Manage Basket Profiles page, the most recentlyupdated basket profile records are displayed first.
The following functions are supported:
CloneYou can clone the associated basket profile record.
DeleteYou can delete the associated customer profile record.
Creating Basket Profile
79
TIBCO® Reward User's Guide

Procedure
1. Navigate to Target > Basket Profiles.
2. Click Create New Target Basket Profile.This opens the Basket Targeting wizard.
3. In the Basket Profile Name field, enter the basket profile name.
4. In the Internal Description field, provide internal notes (optional).
5. Click Next Step.This opens the Basket Qualification Conditions page.
80
TIBCO® Reward User's Guide

6. From the Add a basket condition to evaluate pull-down menu, select one of the following:
● Products
● Categories
● Brands
● Tenders
● Basket Quantity/Spend
● Product Custom Attributes
7. Click Add.Follow the appropriate steps based on the basket condition you selected as explained in BasketProfile Condition.
Basket Profile ConditionsThe following are the evaluation criteria that determine the basket profile, that you create :
● Products● Categories● Brands● Tenders● Basket Quantity/Spend● Product Custom Attributes
Creating Products Condition
Follow these steps when using Products as the condition to evaluate a basket:
Procedure
1. Complete the following statement by selecting the appropriate values from the pull-down menus:Match baskets that contain (exactly, less than or equal to, greater than or equal to, between or equalto) (quantity) (items, monetary units spend) in selected products.
2. Click Add Products.This opens the Select Products screen.
3. Select a product by selecting the check box next to the products you want to add.
4. Click Add Checked.
5. Close the Select Products screen.The selected products you chose are now displayed in the basket qualification conditions screen forthe basket profile you are creating.
Creating Categories Condition
Follow these steps when using Categories as the condition to evaluate a basket:
Procedure
1. Complete the following statement by selecting the appropriate values from the pull-down menus:Match baskets that contain (exactly, less than or equal to, greater than or equal to, between or equalto) (quantity) (items, monetary units spend) in selected categories.
81
TIBCO® Reward User's Guide

2. Click Add Categories.This opens the Select Categories screen.
3. Select a category by selecting the check box next to the category you want to add.
4. Click Add Checked to add the products.
5. Click Done.The selected categories you chose are now displayed in the basket qualification conditions screenfor the basket profile you are creating.
Creating Brands Condition
Follow these steps when using Brands as the condition to evaluate a basket:
Procedure
1. Complete the following statement by selecting the appropriate values from the pull-down menus:Match baskets that contain (exactly, less than or equal to, greater than or equal to, between or equalto) (quantity) (items, monetary units spend) in selected brands.
2. Click Add Brands.This opens the Select Brands screen.
3. Select brands by selecting the check box next to the brands you want to add.
4. Or, find brands by entering the brand name and clicking Go.
5. Click Add Checked.
6. Click Done.The selected brands you chose are now displayed in the basket qualification conditions screen forthe basket profile you are creating.
Creating Tenders Condition
Follow these steps when using Tenders as the condition to evaluate a basket:
Procedure
1. Complete the following statement by selecting the appropriate values from the pull-down menus:Match baskets that contain (exactly, less than or equal to, greater than or equal to, between or equalto) (quantity) (items, monetary units spend) in selected tenders.
2. Click Add Tender.This opens the Select Tender Types screen.
3. Select tender by selecting the check box next to the tender you want to add.
4. Click Add Checked.
5. Click Done.The selected tenders you chose are now displayed in the basket qualification conditions screen forthe basket profile you are creating.
82
TIBCO® Reward User's Guide

Creating Quantity/Spend Condition
Follow these steps when using Basket Quantity/Spend as the condition to evaluate a basket:
Procedure
1. Complete the following statement by selecting the appropriate values from the pull-down menus:Match baskets that contain (exactly, less than or equal to, greater than or equal to, between or equalto)(quantity) (items, monetary units spend).
2. Click Add.
3. Click Done.The selected basket quantity/spend you chose is now displayed in the basket qualificationconditions screen for the basket profile you are creating.
Creating Product Custom Attributes Condition
Follow these steps when using Custom Attributes as the condition to evaluate a basket:
Procedure
1. Complete the following statement by selecting the appropriate values from the pull-down menus:Match baskets that contain (exactly, less than or equal to, greater than or equal to, between or equalto) (quantity) (items, monetary units spend) in selected attribute.
2. Select a product custom attribute.
3. Select one of the following options in the Select all that are field:
● less than or equal to
● greater than or equal to
● between or equal to
4. Enter a number.
5. Click Add.
6. Click Done.The selected custom attributes you chose are now displayed in the basket qualification conditionsscreen for the basket profile you are creating.
Editing Basket Profile
Procedure
1. In the Target > Basket Profiles page, click the basket profile name of the profile record you want toedit.
2. Change the name or description or both, as appropriate, to reflect the purpose of the profile record.
● In the Name field, enter a name that is unique and succinct.
● In the Internal Description field, provide internal notes (optional).
3. Click Save or Next Step.
4. Change the Basket Qualification Condition as needed.
5. Change evaluation conditions if appropriate.
83
TIBCO® Reward User's Guide

6. After you have made the changes, click Save.
7. Click Done to save and close the profile.The Manage Basket Profiles page is displayed again.
Cloning Basket ProfileCloning a profile record creates a copy of the record.
Procedure
1. Find the profile record in the Target > Basket Profiles page.
2. Click Clone in the row of the desired profile record.
This creates a copy of the original profile. The cloned copy of a profile record includes all of the datain the original with certain exceptions:
● The clone is assigned a new, unique numerical ID. This is a system requirement.
● The clone of a record named "XXX" is automatically renamed "Copy of XXX". Note, however,that if you make multiple clones of "XXX", they are all named "Copy of XXX".
● The Profile Updated date is, by default, reset to the date when you create the clone.
Here are some tips for using a cloned profile record to create a new profile:
● Start by assigning the cloned copy its own new, unique, descriptive profile name and internaldescription.
● As you edit a clone, make sure the Internal Description accurately reflects the dimensions andparameters you have defined. Before you click Done, review and update the profile name andinternal description to ensure that they reflect the purpose and contents of the new profile.
● If you must stop working on a profile before it is completely defined, note its status. Applyingeven an informal system of version and revision tracking can help you save time and improveyour profiles.
Deleting Basket ProfileDeleting a basket profile removes a profile record from the listing in the Target > Manage BasketProfiles page.
Procedure
1. Find the profile record in the Target > Manage Basket Profiles page.
2. Click Delete in the row of the profile record you want to delete.A dialog box is displayed with a prompt "This action will permanently delete basketprofile 'xx'. Do you want to continue?"
3. Click OK to erase the selected record.The basket profile is no longer displayed in the list on the Target > Manage Basket Profiles page.
Warning! You cannot recover a basket profile that has been deleted.
Lists
About Target ListsA target list is a flat file containing a specific set of customers used for targeting email communications.Such lists are composed of customer email addresses that are stored in your Reward customer database.
84
TIBCO® Reward User's Guide

These lists are managed by CRMS, and are listed in the Target > Lists page. A valid target list consistsof a list of valid email addresses, and must contain at least one such address.
Import Lists must be ASCII text files. Other formats can cause imports tofail.
Target lists are used as address lists for emails sent by a CRMS email communication. CRMS target listsare equivalent to the email lists used in e-commerce marketing.
Unlike CRMS profiles, which dynamically define a population segment that can be used to targetcommunications, target lists are static. In CRMS, a target list is still treated as a flat file containing aspecific set of customers, but after it is assigned a unique ID in CRMS, that CRMS list of customerscannot be edited. To change the content of a list, you must use it to create a new list and give it a newname.
Target List PageUse the Target > Lists page to create and work with lists. The Target > Lists page provides a tableincluding all currently defined target lists in CRMS.
Features and Fields
Source File section
● Source File : this is used to specify the path and filename of the customer file to be imported.
File Requirement:
● Lists must be uploaded from a file on your computer.● Lists must be in ASCII text format.
● I Agree check box : this requires you to verify that the customers in the list to be imported meet the"opt-in" requirement.
Import Settings section
If your list is imported successfully, each email address is added to your customer database accordingto the following rules:
● Updates● Import As● Email Opt-InYou can check these rules and change them if they do not suit your purpose. As a rule, it is better tocheck these rules, and change them if necessary, before you start creating a new list by importing.
Email Notification
If you import a file, you can elect to receive notifications when the import has started and when itcompletes. The only requirement is your email address.
You can create a target list in CRMS in different ways. Several of these methods create new lists bysorting and selecting email addresses from existing lists. Existing lists are stored in your Rewardcustomer database, and have already passed tests for data quality (valid format, no duplications, and soon).
During an import, CRMS also checks for matches between imported email addresses and existing emailaddresses within your current Reward customer database. If a match is found, the complete existingrecord is used, which makes additional customer data available. Existing data is not changed.
Create Target ListYou can create a new list by using one of the following methods:
85
TIBCO® Reward User's Guide

From File ImportCreate a list by importing into CRMS a customer list file (for example, a list produced by a third party)so that it can be used and managed as an existing CRMS list.
From ProfileCreate a list by applying a profile to a customer population to generate a new list. This list includesthe customers whose data matched the profile definition.
From Existing ListsCreate a list by working with target lists already saved in CRMS, using one of the following methods:
SubtractionSubtracting one or more Lists from a starting list.
MergeCombining two or more lists.
IntersectionThe intersection of two or more lists.
By Splitting an Existing ListBy dividing up the set of customers in an existing CRMS list into subsets, each of which constitutes anew list.
To help you create new lists based on the existing target lists, CRMS provides wizards to guide youthrough the steps of the list creation processes.
86
TIBCO® Reward User's Guide

About Target List ImportsTo work with a list of customers generated by a source outside CRMS, you must import the list intoCRMS. Importing a target list (that is, uploading a customer list file from your desktop) is consideredone method of creating a CRMS target list. Importing a list file (typically a list that was created outsideCRMS) makes that list available for use within CRMS.
Import lists must be ASCII text files. Other formats may cause imports tofail.
How CRMS processes an imported list
When you import a new target list, CRMS performs standard tests to ensure the quality of the data andthat it meets the rules established in your settings. During an import, CRMS also checks for matchesbetween imported email addresses and existing email addresses within your current Reward customerdatabase. If a match is found, the complete existing record is used, which makes additional customerdata available. The existing data is not changed.
During import, all email addresses are checked for validity. If the number of badly formed addressesexceeds the allowed threshold, your import fails.
Features and Fields
● The Create New List option
87
TIBCO® Reward User's Guide

● The Manage Lists panel
Each row in the Manage Lists table represents a target list, and displays a few key fields of data aboutthat list. These fields are lined up in columns. Click a column heading to sort all of the lists in the tableby that field.
The following list data fields are displayed:
ID (the unique list ID number)CRMS assigns a unique ID number to every list. If two or more list names (which are defined byCRMS users) are similar or identical, this number is the unique identifier.
NameThe name of the list as defined in CRMS. This is set up as a hyperlink to the list properties data: thelist's Name, Source, and Internal Note text fields. Click the list name to open the list properties data,either to see or edit its details.
StatusThe status of each list can be either Ready, In Progress, or Failed. Only lists whose status is Readyare currently available to use. The In Progress indicator should be displayed only for the periodwhen a list is being processed. A list marked as Failed represents a failed attempt at creating a list.Failed lists should be deleted.
ReportingProvides list import details.
CreatedThe date when the list was originally assigned an ID. This date can be different from the date whenthe customer data was last updated.
TotalThe total number of customer records in the list.
Creating Target List from File
Procedure
1. From the Target > Lists page, select Create New List > From File Import.The New List from Import wizard is displayed.
2. Define the List Properties. Enter text in the three fields: Name, Source, and Internal Note.
3. Select the Source File.a) Click Browse.
A standard dialog box is displayed, titled "Choose file", using which you can navigate to thelocation of the list file you want to import.
b) Double-click one list, in .txt file format, from your computer. The dialog box closes.
Your list must contain one or more properly formed email addresses, separated by linebreaks. If the selected file passes the validation checks, its name is displayed again in theSource file text field.
4. Read the text stating, "You must read the following..." and respond. This text concerns therequirement that persons in a list to be imported have opted in. Verify whether the list you areuploading meets the criteria. If it does, select the I Agree check box.
88
TIBCO® Reward User's Guide

If the list includes email addresses from customers that have not provided permission tosend them email, do not select the I Agree check box. Make the necessary changes outsideof the CRMS platform.
5. Verify whether the selected Import Settings (Updates, Import As, Email Opt-In) are correct for yourpurposes.
● If the rules that are displayed do not suit your purposes, you can change them.
● To change the import settings, you can click the linked text, Click here to cancel your file importand change these settings. Note, however, that this closes the current wizard without savingyour data.
6. To receive an email notification when your import has started, and again when it completes, enteran email address.
7. Click Next Step at the top of the page.The CRMS opens the next page of the wizard, titled Request Status, and displays the message,"Your has been scheduled", along with a table of information about this list.
You can copy and save the table of information from this page. Pasting this tableinformation into a document file outside of CRMS helps you retain a record of parametersand specifications you used to create the associated list.
8. Click Done to complete the process.The CRMS processes the list creation information you have provided, opens the Target > Lists page,and displays a new row of information for this list in the Manage Lists table. The Status field for anewly created list is very important, because it indicates whether the list was successfully created.
● If the list creation succeeds, the Status field is gray and displays the word Ready. If this status isdisplayed, the list is ready to use.
● If the list creation fails, the Status field turns red and displays the word Failed. The list creationprocess failed and the list is not available.
● Depending on the complexity of the list creation task processing, the Status field for the new listcan be yellow and might display the label "In Progress" for a few minutes until the processingis completed.
Profile Target ListThis section explains how to create a target list by applying an existing profile to a customerpopulation. The basic procedure is simple: you pick a profile, and CRMS applies the selection criteriadefined in that profile to Reward's most up-to-date customer information database. This process yieldsa list composed of the customers who currently fit the profile.
The first step in creating any target list is to name it and record the properties of the list. Immediatelyafter you click any Create New List option, the first page in each list creation wizard opens, showingthe List Properties panel.
Features and Fields
List Properties section
The List Properties fields are the same for every list creation method.
Source Profile section
Source ProfileClicking this button opens the Select Profile dialog box, using which you can select a profile to createthe new list. After you select the profile from a dialog box, its name is displayed, and a Change
89
TIBCO® Reward User's Guide

Selection button replaces the Select Profile button. You can use the Change Selection button toreopen the Select Profile dialog box, and any profile you then select replaces the existing selection.
Profile Selection dialog boxYou can use this dialog box to select one of the existing profiles from a list of all currently definedprofiles. The selected profile is applied to the current customer data to select the set of customers inthe list. This dialog box includes a Find button and other standard dialog box features.
Creating Target List from Profile
Procedure
1. From the Target > Lists page, select Create New List > From Profile.The New List from the Profile wizard is displayed.
2. Define the List Properties:
Enter text in the three fields:
● Name : create a name for this list. The list name is displayed on the table of lists on the Target >Lists page, in Targeting, and in Reports. Lists must be named.
● Source : use this field to identify where the contents of the list came from; for example, youmight specify a location and file, the list rental, the database, a file containing an SQL search.
● Internal Note : use this field to record any additional information about this list that might helpyou distinguish it from others, or recall its purpose, at a later date. Store notes about whocreated it, its purpose, the profiles or sources and how they were used, its unique content, and soon.
3. Select the Source Profile.a) Click Select Profile. The Select Profile dialog box is displayed.b) Find the profile you want to use. You can re-sort the profiles by profile ID number, name, date of
last update, number of registered or unregistered customers size.c) Click the corresponding Select link. The selected profile name is added to the profile box in the
New List from Profile wizard. The Change Selection button is displayed next to the profileselection box.
4. To change your profile selection, click Change Selection, then repeat the previous step.
5. Click Next Step to save your work and advance to the next step of the wizard. The Request Statussection of the wizard opens, displaying the message, "Your list is being created."
6. Click Done.When the list creation process is completed, the Target > Lists page is displayed again. In theManage Lists table, a row shows information for the list you have just worked on, including thestatus and other standard information.
Target List DetailsAn existing CRMS target list includes a set of unique email addresses with a valid format. These emailaddresses already exist in the Reward customer database, where they serve as a key identifier forcustomer records. Other data can also be associated with a customer record.
Import List Format: You can import the simplest form of target list: a list that is just a .txt file containingone or more properly formed email addresses, separated by line breaks.
For example:
90
TIBCO® Reward User's Guide

You can import, manage, and use such lists using the CRMS Target > Lists page.
Export List Format: When you use the CRMS Target>Lists page to export a target list, you are actuallyexporting CRMS customer records associated with the email addresses.
Here is a row of sample customer data from the exported email list (spaces added)*:
"9900000000000019", "53542359", "2007-01-30T13:50:17", "Dawn","Cristopher", "412 Midland Avenue","Apt 4E", "Emeryville", "CA", "94608", "US", "[email protected]", "5105551234","9876543210000019"
Actual lists include no spaces between values, only commas.
If the database includes any of the identified, customer-record data, this data is included in the exportfile. Missing data values are indicated by the absence of any character or space between the twocommas that indicate the normal location of the data (,,).
If you were to export a list that had no other data than the customer email address (which might well bethe case if you had just imported the list, for example), only the email address would be included ineach record, and commas would indicate that other data was missing.
Data Validation and Import Settings
During import, all email addresses are checked for validity. If the number of badly formed addressesexceeds the allowed threshold, your import fails. If your list is imported successfully, it is processedaccording to the rules specified in Admin > Main Settings > List Import. You can check these rules, andchange them if they do not suit your purpose.
● New List - this drop-down uses the current list as the basis for creating a new list. When you clickthe down arrow, a list of the following options is displayed
— Using split— Using subtraction— Using merge— Using intersection
Selecting any one of these options starts the process of generating a unique new list, using the selectedmethod and starting with the current file as the basis. Each method creates a new list file and initiatesthe New from Existing List wizard, which assists you in the process of populating the new file with anew list.
● Export : you can generate a comma separated value (CSV) file containing the existing Rewardcustomer data for the customers included in this list. The Export function delivers this file to the FTPlocation that your company uses to exchange files with Reward. The default name of the file is"ListExport"_<List Name>_<your CRMS user name> _<date when list file was generated/exported>.See Target Lists for the data format of the exported lists.
● Delete : you can permanently delete the associated list.
Postal CodesA postal code set is a collection of postal codes intended for use in a targeting profile. A postal code setis defined as a set of postal code numbers contained in a file, which is in either Comma Separated Value(.csv) or Tab Delimited (.txt) format.
To upload such a postal code file and assign a name to the set of postal codes it contains, click Target >Postal Codes in CRMS menu. The Manage Postal Code Sets page opens.
Use the Target > Postal Codes page to specify the location and filename of the postal code file you wantto upload.
91
TIBCO® Reward User's Guide

Purpose
The postal code lists that you define with this page become available for use when you define a profilethat uses the Geographic dimension. Instead of using the other options listed in the Geographicdimension to define targets according to geographical locations, you can select a Postal Code set. EachPostal Code set is a file, which you have uploaded using this Target > Postal Code page, that containsyour own predefined set of postal codes. A postal code set is often the best way to set up a very specificset of postal codes for use with CRMS targeting features.
You can use postal code sets to target customers with the specificity of individual five-digit postalcodes.
The use of the postal code targeting in the Geographic dimension often means that you are collectingpostal codes from customer records. Be aware that such data can be collected by using data integration,the microsite, APIs, or the Support tool.
Defining Profile Using Postal Code
Procedure
1. Create or obtain a set of postal codes that identify your specific target by location.
2. Put the postal codes into the proper file format and location, and assign it a descriptive name.(Recommendation: Establish a naming convention for postal code set names, to prevent confusionof files and file-versions.)
3. Upload the file using Target > Postal Codes.
Postal Codes must be uploaded ASCII textfiles.
4. Create a Customer profile.(Recommendation: Assign a name that refers to the postal code set.)
5. Select the Geographic dimension.
6. Choose the Postal Codes sets option.
7. Select the postal code set defined for your specific targeting purpose.
8. Save the dimension and profile.
Fields and Features
Before you use the postal code sets page, the file containing the postal codes must already exist and beaccessible from your PC. TIBCO Reward recommends that you double-check and correct the postalcodes and file format before you upload the file.
To use this page, you provide the following information: the name you are going to assign to the postalcode set, and the address of the file you are going to upload.
• Enter the name to be assigned to the set of postal codes you are going to upload. Including notes isnot possible, so make sure your source files are organized. You can manage the data using assignednotes.
• Enter the path and file name of the postal code file you want to upload:
● Click Browse to open a standard Choose File navigation tool.
● Use this to navigate through your local and network file hierarchies and select the path and filename for the set of postal codes you want.
● Double-click the postal code file, or select it and click Open. The navigation tool closes and the pathand filename are inserted into the File text box.
92
TIBCO® Reward User's Guide

Be sure to click Upload after the path and name of the file are selected.
• When the file has been uploaded, the name you assigned to the set is displayed in the list of CurrentPostal Code Sets, indicating that the upload has been successfully completed.
Upload Notes:
• Your Postal code set file must include postal codes as ASCII text files. Other formats can causeimports to fail.
• At present, five-digit postal codes are supported as the standard.
• Double-check your values and file format before you upload the file.
CSV File ExampleFile title: WealthiestDonorspostalCodes.csv
File content:
You can generate a list of the existing Loyalty program members who have the postal codes in your file,and then use Target>Lists options to edit and add to that customer list.
Custom QuestionsYou can use custom questions to create your own questions and answers for use in targeting profiles.Your customers are presented with these questions during Signup and can change or update theiranswers through their My Account page.
Step 1 - Create your Questions - Click "create a new question". You are asked to write the question,choose an answer type, and write your answer choices.
Step 2 - Create your Questionnaire - After you have created your Questions, collect your Questions intoa Questionnaire by clicking Setup. You can add up to 3 Questions as part of the Standard service.
Step 3 - Enable your Questionnaire - Your Client Services Manager can assist you in enabling yourQuestionnaire if it is ready. After Questionnaires are enabled, you can target profiles based on customerresponses to your questions.
Custom Questions can be included in a questionnaire that is displayed to your customers in theirmicrosite. When enabled, loyalty program members can see your questionnaire and answer itsquestions. The questionnaire can be displayed in the customer sign-up process, or in a customer's MyAccount page, or both, depending on your microsite design decisions.
You can use the Questionnaire section of the Custom Questions page to create and work withquestionnaires by adding, deleting and rearranging custom questions.
Custom Questions: Create
There are two basic ways to create new custom questions: Import and Create.
1. Select Target > Custom Questions and then Create a New Custom Question.
2. Click Import Custom Questions to initiate the bulk file upload process.
You can also create a new custom question by cloning an existing question and then modifying it.Regardless of which method you use to create questions, you use the same procedure to set up aquestionnaire and add a question to it.
When creating custom questions, note:
● All questions included in a questionnaire are displayed on one page (a scrollable view).
● A questionnaire cannot be divided into separate pages.
93
TIBCO® Reward User's Guide

● A maximum of 20 possible responses per question is allowed; that is, the number of possibleresponse choices cannot exceed 20.
Custom Questions are not related to custom attributes.
Creating Custom Question
94
TIBCO® Reward User's Guide

Follow these steps to create a new custom question in CRMS (without uploading a file):
Procedure
1. Select Target > Custom Questions.The Manage Custom Question page opens.
2. Click Create a New Custom Question.The Edit a Question page opens.
3. Enter Question Text.
4. Enter Answer Form (radio button or check box).
5. Enter Answer Layout (List or Column then Rows).
6. Enter Answers.
7. Click Add Another Answer (if needed).
8. Click Done when you have completed your definition of the custom question, including theresponses.The Target > Custom Question page reopens. Verify that the Manage Your Questions list includesyour new question.
If you want the new questions and responses to be displayed in your questionnaire, click the Setupto open the Questionnaire Setup page.
Follow these steps to create a new custom question using the Bulk File Upload process:
Procedure
1. Refer to the sample CSV file and instructions provided on the Target > Import Custom Questionspage.Use Excel or a generic text editor (such as Notepad) to open the sample file.
2. Create a CSV (comma separated values) file that contains your Question and Answer text andformatting instructions.
3. Store the CSV file in a location accessible from your computer.
4. Upload the file by using Target > Custom Questions > Import Custom Questions options to locateand identify the file.If the upload is successful, the upload screen is updated with information confirming the filenameand number of records uploaded.
After importing, your questions and their associated answers are added to the pool of all customquestions. You can edit these questions in CRMS.
You can also use the file upload method to make certain types of changes to existing customquestion records.
To add existing questions to a questionnaire, click Setup to open the Questionnaire Setup page.
95
TIBCO® Reward User's Guide

Setting up a New QuestionnaireAs a general rule, limit the length of your questionnaires to minimize customer abandonment.
Procedure
1. In the Target > Custom Questions page, click Setup to open the Questionnaire Setup page.
2. Use the Questionnaire Setup page to:a) Provide text telling your customers why they should complete the questionnaire. This shows up
as the introductory text on the page in the microsite where custom questions are displayed.b) Add the questions to be displayed to customers.c) Change the order of the questions in the questionnaire.
3. Click Done.The Target > Custom Questions page reopens.
Optional:
● If the questionnaire is enabled, you can click Disable.
Disabling the questionnaire prevents your questionnaire from getting displayed in the micrositebefore it is ready for customers to use and before you have modified any profiles that are basedon your custom questions. When you click Disabled, the button text changes to Enabled, whichis the alternate option.
● If you are using this page for the first time, the only option that is displayed is the Setup option.Clicking Setup enables the questionnaire and makes it accessible to customers.
4. Click Preview.The Preview window opens. Carefully proofread and test your questionnaire. Consider how it isused to define a customer profile.
5. When you are finished with the Preview window, click Close.
6. Modify the question and responses, as necessary, using steps 2 and 3.
7. If you have Disabled the questionnaire. When you are ready to present the questions to livecustomers, click Enable.
Changing an Existing Custom Question
Changing an existing custom question also changes any instances of that question in a questionnaire.When changing a custom question, consider how this change can affect a profile that currently uses thecustom question dimension. If necessary, modify any affected dimension or create and use a newdimension that fits the re-defined questions and questionnaire.
Procedure
1. In the Target > Custom Questions page, in the Manage Your Questions listing, find the Questionyou want to change.
2. Click the Question Name to open the related data in the Edit a Question page.
3. Make the required changes and click Done.For complete details, see Edit a Question page.
You can also use the file upload method to make certain types of changes to existing customquestion records.
96
TIBCO® Reward User's Guide

Creating Custom QuestionUsing these instructions to create a new custom question, complete with formatting and answers. Theseinstructions assume you use the Create a New Custom Question link in the Target > CustomQuestions page.
Procedure
1. Click the Target > Custom Questions tab.The Custom Question page opens.
2. Click the Create a New Custom Question option.The Edit a Question page opens.
3. Use the Edit a Question page to define the custom question and the valid responses.
4. Click Done when you have completed your definition of the custom question,including theresponses.The Target > Custom Questions page reopens. Verify that the Manage Your Questions list includesyour new question. To add new questions and responses to your questionnaire, see CustomQuestion > Questionnaire Setup page.
Custom Question DetailsUse the Edit a Question page to define both a Custom Question and the set of responses to it that acustomer can select from. The Edit a Question page opens when you create a new custom question orwhen you open an existing custom question record to edit it or review it.
Before changing a custom question, consider how your changes can impact any profiles that currentlyuse the custom question dimension. Affected profiles (any currently-used profiles that include a customquestion dimension) should either be retired, replaced, or updated.
If you make changes to an existing custom question that has been added to the questionnaire, thenthose changes are automatically implemented in the questionnaire. (The process of actually updatingthe website shown to customers can take an hour or more.) Open a preview of the questionnaire to seehow the changes are displayed to customers.
You can also use the file upload method to make certain types of changes to existing custom questionrecords.
Fields and Features
Question Text – This is the question as it is displayed to customers in the Target > Custom Questionspage and elsewhere in CRMS. Enter the text that you wish to display to customers. Each question mustbe unique.
Answer Form – Select a format for the responses that customers are able to provide when they answerthe custom question. You have two choices:
● Select all answers that apply using check boxes– When more than one item can beselected as the response, using check boxes is the appropriate choice. Multiple check boxes can beselected at any one time. The customer can select all, some, or none of the check boxes madeavailable in the response.
● Select one answer using radio button – When only one item or another can be selected as theresponse, a radio button is the appropriate choice. Only one radio button can be selected at any onetime. When the customer selects one radio button, any other radio button that was selected isthereby is cleared.
Answer Layout – Whatever answer form you choose, the selected controls can be lined up in differentways. You have two choices for arranging the display of the responses:
97
TIBCO® Reward User's Guide

● List – All responses are listed in order from top to bottom.
● Columns then Rows – Responses are fit into a grid, or matrix, so that many short answers can bedisplayed in less space. Usually better when many check boxes, most of which are associated withshort text strings, are to be presented to the customer.
Answers fields and features:
● Use – Indicates whether the associated Answer is used (presented to customers as a possibleresponse). You can omit a possible answer by clearing the associated Use check box.
● Order – The numbers assigned to answers represent the order in which the answers are displayed inthe questionnaire or wherever else the question is presented. (Answers are listed from top tobottom, based on the order of their numbers, from least to greatest. Skipped numbers do notmatter.)
To change the given order, highlight the number assigned to an answer, then type the numberrepresenting the position where you want this answer to be displayed. Avoid duplicate numbers. Besure to click Update Order after changing any numbers. Then check the new order. If the questions arelisted in the order you want, click Save.
● Answer Text – This is the answer as it is displayed to customers. Enter the text that you wish todisplay to customers as a possible response.
● Delete – Click the Delete link to remove an answer. A confirmation dialog box is displayed. ClickOK to continue with the deletion of the response.
● Add Another Answer button – To add another answer (possible response), click this button. A newrow of Answers fields and features is displayed. Add up to 20 answers for each question.
Editing Custom Question
Procedure
1. In the Target > Custom Questions page, click Create a New > Custom Question.The Edit a Question page opens.
2. In the Question Text field, enter the question that you wish to display to customers.
When framing a question, it is best to consider the purpose to which the answers are put,and how the answers are to be used.
3. Select an answer format. Using check boxes, customers can provide multiple responses. Radiobuttons require customers to provide just one answer.
4. Select an answer layout. Lists are better suited to longer answers; the Columns-then-rows layout isbetter suited to multiple short answers, especially in check box form.
Your Answer form and Answer Layout decisions apply to all answers to the currentquestion.
5. Click Add Another Answer on the bottom of the page to define each possible answer.
6. For each answer, provide the exact text that you want to present to your customers.
7. When you have provided all of the answers you want your customer to see, use the Order field, asnecessary, to specify the order in which the answers are displayed.
8. Click Update Order to verify that the answers are displayed in the correct order.
9. Click Done.
The Target > Custom Questions page is displayed again.
98
TIBCO® Reward User's Guide
When you return to the Target > Custom Questions page, click Setup at the bottom of thepage to add your question and answers to your questionnaire, then click Preview to seehow your questions and answers look and behave when customers see them.
Editing an Existing Custom Question
Procedure
1. In the Target > Custom Questions page, in the Manage Your Questions listing, find the Questionyou want to change.
2. Click the Question Name to open the related custom question data record in the Edit a Questionpage.
3. Make the required changes and click Done.
You can also use the file upload method to make changes to existing questions. However,the file upload method is better suited to making answer format changes to a list ofquestion records that you have already uploaded.
Import Custom QuestionsYou can import Custom Questions from a file on your computer. Each Custom Question record in thefile consists of a question and a predefined set of answers. Answers are set up as the possible responsesfrom which a customer can choose.
After importing, your questions (and their answers) are added to the pool of all custom questions. Youedit and work with uploaded questions exactly as you do with questions added in CRMS, using theCreate a New Custom Question page.
You can also use the file import method to make certain type of changes to existing custom questionrecords.
Imported questions are not automatically added to your questionnaire. As with the questions youcreate in CRMS, you must use the Questionnaire Setup procedure to add questions to a questionnaire.
Custom Question File Details and Requirements
Your Custom Questions file must be a CSV (comma separated value) file. Column headers should notbe specified in the file. Every line in the file represents a question and its associated answers, includingformatting parameters.
Every line must include all the following columns (field values) in this exact order:
1. Question text (required).
2. Question category (optional - leave blank if unspecified).
3. Answer format (required), as follows:
● Specify "single" to set up the format so that the user can select only one answer by clicking aradio button.
● Specify "multiple" to set up the format so that the users can select more than one answer byselecting multiple check boxes.
● If format is unspecified, "multiple" is selected by default.
4. Answer layout (required), as follows:
● Specify "list" to present answers in a list layout.
99
TIBCO® Reward User's Guide

● Select "column" to present answers in a multi-column layout (better for one-word and veryshort answers).
● If unspecified, "list" is selected by default.
5. One or more columns containing the answer choices for this question.
See the sample CSV file for examples or answer records that apply to these requirements.
In text format, each column-value must be followed by a comma. Two commas with no text betweenthem indicate that a value has been omitted.
If a part of question or answer text contains a comma, you must enclose that text in quotation marks toprevent the comma being read as a value separator. Here is a sample: "text, sample"
Sample CSV File (displayed as text)
What are your dietary preferences/restrictions?,Food habits,multiple,list,No restrictions,Ovo-lactarian,Dairy-free,Gluten/Wheat-free,Low carbohydrate,Low calorie,Low sugar,Low fat,Diabetic,Vegetarian,Vegan,Organic,Adjusted for allergies not specified here
What strongly influences your buying decisions of electronicproducts?,,multiple,column,Advertising,Word of mouth,Reviews,Brand recognition,BrandReputation,Conscience factors/Political Correctness, immediate need
How do you prefer to be contacted?,,single,list,Email,Instant Message,Home phone,Cellphone,Mail,Carrier pigeon
Creating a new Custom Question using Bulk File Upload Process
Procedure
1. Refer to the Custom Question File Details and Requirements and sample CSV file, or to theequivalent information provided on the Target > Import Custom Questions page.
2. Use Excel or a generic text editor (such as Notepad) to open the sample file. Use this as a referencewhen you create your own file.
3. Create a CSV file that contains your Question and Answer text and formatting instructions, andstore the CSV file in a location on your computer.
4. Locate and upload the CSV file by using the Browse and Upload options in CRMS Target > ImportCustom Questions page.If the upload is successful, the upload screen is updated with information confirming the filenameand number of records uploaded. If the upload is not successful, use the information in the errormessage to identify and fix the problems, then repeat step 3.
After importing, your questions and their associated answers are added to the pool of all customquestions.
To add a question to a questionnaire, click Setup to open the Questionnaire Setup page.
Changing Existing Custom Questions using Bulk File Upload Process
Procedure
1. Create a CSV file that contains your modified Question records and store the CSV file in a locationon your computer.
100
TIBCO® Reward User's Guide

● The question text is the key data in each record: it must be an exact duplicate of theexisting question text in the record to be changed.
● You can specify different Category, Answer Format, and Answer Layout data in arecord, and when these are uploaded, the changes are implemented. If you leaveblanks where existing Category, Answer Format, and Answer Layout data alreadyexists, the blanks are treated as errors and the upload fails.
● Be aware that you cannot change existing answer-responses with an uploaded file.However, you can upload additional answers.
2. Locate and upload the CSV file by clicking Browse.
If you want to make corrections to an existing custom question record by using the fileupload method, the best practice is to start with an exact copy of the existing record andthen make changes and additions to it.
Notes on uploading and errors:
● The upload fails if the file size exceeds 1 MB.● If one answer record fails, the entire file upload (import) fails. After making repairs to the file,
you repeat the upload process for the entire file.● If the upload fails, an error report is displayed. The report is designed to help locate and identify
any errors at the individual record level. The report identifies a faulty record by number (wherethe first record in the file is number 1, the second is 2, and so on). In many cases, the errorreporting specifies the problem to be solved in the record.
● If you leave blanks where existing Category, Answer Format, and Answer Layout data alreadyexists, the blanks are treated as errors and the upload fails.
Questionnaire SetupTo create a questionnaire, you must have created questions first. The questions available for use in aquestionnaire are listed in the Manage Your Questions list in this Target > Custom Questions page.
Three general steps to setting up a Questionnaire:
● Create a Questionnaire● Choose Questions to include in Questionnaire● Enable the QuestionnaireAfter the questionnaire has been enabled, program members can see and answer your questions duringthe Program Signup process, and later modify their answers on their My Account pages of the programmicrosite.
Questionnaire Setup Page
The Questionnaire Setup page includes the following features:
Preview Questionnaire button (top of page) – Click to see how the Questionnaire looks and behaveswhen it is enabled and presented to customers.
Properties section
Name – By default, the Name assigned to this Questionnaire field is "Sign Up and My AccountQuestionnaire". This text cannot be changed.
At this time, the text in this Name field is not displayed anywhere in the microsite.
Title – Default Title text, such as "Questions" or "Tell Us About Yourself" might be displayed in thisfield, but at the current time this text does not show up as the Title in the microsite. The Title thatactually introduces the questionnaire in the microsite is set during the onboarding process, when your
101
TIBCO® Reward User's Guide

company first defines the components of its Loyalty Program. To change your questionnaire Title,please contact your Reward Client Services Representative.
Description – The description text is displayed near the top of the Questionnaire, just below the Titletext. Use the Description field to tell your customers why they should complete the Questionnaire.
Internal Notes – Use this space to record notes about this questionnaire, its contents, and how it isused. This text is visible only to CRMS users, not to customers.
Questions section
Update Order – After changing the numbers assigned to questions, which you would do to change theorder in which these questions are displayed, you must click this button to reassign these questions tothe new order specified by the numbers. Note that you must also click Save or Done to save the changein order.
Remove Question – On the same line as each Question, at the far right, is a Remove Question link.Click this link to remove the question from the Questionnaire. To see the results, click Update Orderand check the effects.
Choose a question to add [drop-down selector] – Click this drop-down list to see a list of all currentlyavailable custom questions, then click the one you want to add to the questionnaire. The selectedquestion is displayed in the selection box.
Add – Click this button to add the currently selected custom question to the questionnaire. It is addedto the end of the list.
Creating Questionnaire
Procedure
1. Select Target > Custom Questions.
2. In the Target > Custom Questions page, click Setup.The Questionnaire Setup page opens.
3. Provide some Description text.Use the Description field to tell your customers why they should complete the Questionnaire. Makesure that the details you provide here do not disagree with the details of any offer that involves thisquestionnaire.
4. Add text to the Internal Notes space to document how you use these questions and your progresswith respect to the project. Internal Note are only visible to CRMS users and not to customers.
5. Use the Choose a question to add drop-down menu (at the bottom of the page) to select eachquestion to be added to the questionnaire, then click Add.The added question is appended to the end of the list.
6. Click Update Order to change the order of the questions in the questionnaire.
7. Click Preview Questionnaire (at the top of the page) to see a preview version of the questionnaire.The Preview window opens. Carefully proofread and test your questionnaire. Consider how it isused to define a customer profile that includes a custom question dimension.
8. When you are finished with the Preview window, click Close.This returns you to the Questionnaire Setup page.
9. Click Done.The Target > Custom Question page reopens.
10. Modify the question and responses, as necessary.
11. Use the steps 4 through 8 to update the questionnaire.
12. After completing all work associated with the questionnaire, click Enable to make yourquestionnaire go live on the Sign Up and My account pages of the microsite.
102
TIBCO® Reward User's Guide

● After clicking Enable, the button changes to Disable.
● Disabling the questionnaire prevents it from getting displayed in the microsite when itis not ready for customers to use.
● If you are working on a live questionnaire in your microsite, you can disable thequestionnaire so that your work in progress is not exposed to customers.
Mobile Geolocations
About Mobile GeolocationsMarketers use mobile geolocations to define customer profiles based on proximity to store locations.They can issue offers through communication channels that are relevant to the customer profiles. Withthe implementation of a mobile loyalty application on a GPS-enabled smartphone, program memberscan receive location-based messages and calls-to-action when they enable location services and opt-into mobile messaging.
● Beta capabilities enable the configuration of mobile geolocations that can be included in shopperprofile targeting dimensions. Beta capabilities do not currently support delivery of geolocationtargeted offers or messages to a customer’s mobile device.
● Important: Because geolocation features are not complete (beta), if mobile geolocation targetingdimensions are included in a shopper profile, no shoppers qualify for offers or messages that usethe shopper profile.
● Your use of the TIBCO Reward mobile geolocation mapping functionality is subject to yourcompliance with the following policies: Google Terms of Service, Google Maps Terms of Service,Google Maps Legal Notices, and Google Maps Acceptable Use Policy (collectively, the “GooglePolicies”). If you do not agree to comply with the Google Policies, do not activate or use the TIBCOReward mobile geolocation mapping functionality. TIBCO might, at its discretion, terminate orsuspend your access to or use of the TIBCO Reward mobile geolocation mapping functionality ifyour use fails to comply with the Google Policies.
Mobile Geolocation: Use Case
A marketer sets up a shopper profile that includes mobile geolocation targeting with a radius of 50 feetaround each retail store location.
When a shopper comes within the defined radius, offers and messages that use the shopper profile areinstantly delivered:
● On the retailer’s mobile application
● Via SMS and/or email messaging
The shopper visits the nearby retail location and takes advantage of the offer that was just presented ontheir mobile device.
Creating Mobile Geolocation
103
TIBCO® Reward User's Guide

You can use geolocations to define locations that are used to trigger offers and messages when acustomer enters the geolocation. Geolocations are most commonly defined around your existing retaillocations.
Procedure
1. Go to Target > Mobile Geolocations.
2. Click Create New Mobile Geolocation. This opens the Mobile Geolocation Details page.
3. Enter required address fields (marked by an asterisk).
4. Enter a radius value (measured in meters). This defines the area around the geolocation.
5. When a customer enters the area (geofence) they can trigger relevant offers and messages.
6. Click Preview. This opens a map showing the mobile geolocation and fence (set by the radius valueentered).
When creating Mobile Geolocations, you must click Preview before clicking Save orDone.
104
TIBCO® Reward User's Guide

7. Click Save.
8. Click Done.The new geolocation is displayed in the manage mobile geolocations list.
Editing Mobile GeolocationYou can edit a mobile geolocation to correct an error, or when a geolocation needs to be changed suchas when a store moves to a different location within a retail mall. Mobile geolocations in use by shopperprofiles cannot be edited. To edit a mobile geolocation you must first remove from the associatedshopper profile.
Procedure
1. Go to Target > Mobile Geolocations.
2. Click the Geolocation Name of the mobile geolocation that you want to edit.
This opens the geolocation description page.
3. Edit fields.
4. Click Preview. Your changes are displayed in the geolocation description page.
5. Click Save to save the changes to the mobile geolocation, or click Done to save the changes anddisplay the list of mobile geolocations.
Deleting Mobile GeolocationYou can delete a mobile geolocation when one of your retail stores has closed or moved.
Procedure
1. Go to Target > Mobile Geolocations.
2. Click delete next to the mobile geolocation you want to delete. A dialog box is displayed indicating"This action will delete this mobile geolocation. Do you want to continue?"
3. Click OK to delete the mobile geolocation.
105
TIBCO® Reward User's Guide

This section has information about Email features and functionality in CRMS.
Topics:
● Communications
● Campaigns
● Trigger Events
● Stationary
● Test and Seed Lists
● Email Communication Guidelines
CommunicationsAn email communication is a mass mailing that consists of a single email message and the profiles orlists to which it is addressed. The single message can include personalization tags and dynamic fields,that is to say, variations in content that are dynamically selected and inserted into the message,depending on the profile of the recipient. The message can also include rich content, which typicallyconsists of HTML-based page design elements.
Email communications are often sent to a target audience for promotional purposes. Reward provides alarge library of email templates for that frame your content for these purposes. Note, however, thatthere are no restrictions or limitations to the possible uses of an email communication.
Typical email communications include announcements, offers, invitations, newsletters, and postcards.These messages are often sent to promote products, to announce offer s, or to invite customers to takeadvantage of a special event. Email communications can be sent to potential customers, new customers,good customers, high value customers, at risk customers, or any other list you can define.
You can associate email communications with a campaign. This causes the data regarding theassociated email communications to be associated with and tracked by the campaign reports.
CRMS provides a wizard to help you create and edit email communications. After you finish each step,the wizard saves your work and performs basic tests to identify un met requirements.
To create an email communication, select Email > Create New Email Message. See ISP Profiles for moreinformation.
To edit an existing email communication, select Email > Communications to open the EmailCommunications page. Click the name of the email communication you want to change. This opensEdit Email Communications wizard, which guides you through the steps of defining an emailcommunication by completing a sequence of pages.
The Edit Communication wizard guides you through the completion of the following pages:
● Properties
● Targeting
● Offer
● Rich Content
● Text-Only
● Summary
After completing each page, click Next Step to advance to the next page until the offer is finished. Afterreviewing the information on the Summary page and making any necessary corrections, the next step isto change the status of the email communication from saved to submit. At this point, the email
106
TIBCO® Reward User's Guide

communication information is ready for review by your associates or for any formal approval processthat your organization might have defined.
LifecycleProvide Prerequisites
Before you can complete the definition of an email communication, you might need to develop some orall of the following data components:
● Test list and/or Seed list. For more information, see Test & Seed Lists.● A high-quality list or a well-reviewed customer profile that targets receptive customers. (To avoid
common email targeting mistakes, see the Email Communication: List Page.)● Offers and back-up offers that are live and available to your email recipients at the time when the
email communication is being published.Different practical factors can affect the dates when an offer starts and ends. For the purposes ofanalyzing the success of an email communication or a campaign, the dates of the live offers should fitwithin a distinct time frame. When you choose an email communication template, you might want toconsider both practical and analytical constraints.
Define the email communication with the Edit Email Communication wizard
An email communication is configured, designed, and scheduled using the Edit Email Communicationwizard. This is a multi-step process that ensures all elements of the email are properly establishedbefore the email is approved and sent.
When all requirements are met, the status of an email communication can be changed from saved topending. If approved, the status of the email communication status is changed to scheduled. On thedate and time of the scheduled send, the status changes to live and the email is sent. If the email isonly sent once, its status changes to completed. An email set up to send over multiple days stays liveuntil the end of the publish window (that is, until the Pub End date).
If your organization has implemented a formal review process for email communications, you mightdecide that the change to approved status should depend on satisfactory completion of a final reviewor a formal approval process while the email is in pending status. Although the design of CRMSsupports such procedural guidelines, such processes are not required or enforced by CRMS.
Email communications can be sent to either a list of customers, which is static, or to a profile. A profiledynamically generates a revised list every day. On the first publishing date, an email communications issent to the current static list or to the profile-generated list. Thereafter, if sent to a profile, then thecommunication is sent to any customers who have been added to the profile-generated list; and thisincremental mailing occurs every day when the email communication is being published.
Live offers mentioned in an email communication are made available to the targeted customers by linksto the Reward-hosted Offer Showcase, or through at your store-site or through the TIBCO Rewardmicrosite, or both, according to the schedule that you define.
After an email communication is published, delivery data about the email communication is gathered,analyzed, and summarized for the CRMS user. For each live or completed email communication, adashboard display appears in the Email Communication Details Summary page, showing the numberand percentage of emails delivered, opened, clicked and bounced.
This email communication reporting data is calculated on a nightly basis. Please allow up to 24 hoursfor data to be updated.
Email Communication: List PageA Communication is a single email message, including any rich content, and the profiles or lists towhich it is addressed.
The purpose of the Communications page is to provide access to all Communication records and tohelp you create and work with Communications.
107
TIBCO® Reward User's Guide

The Communications page lists all communications that have been defined or are in the process ofbeing defined.
To open the Communications page, select Email > Communications from the CRMS menu.
Features and Fields
The Communications page includes the following features:
● The Create > New Email Communication option, which starts the Create New EmailCommunication process.
Each row in the list represents an email communication and displays a few key fields. These fields arelined up in columns. Click a column heading to sort all of the communications in the list by that field.
The Existing Communications panel displays the following fields:
● Status - You can see the current status of a communication, and also change the status of thecommunication when appropriate.
● # - The unique Communication record ID number, automatically assigned by CRMS when therecord is created.
● Communication Name - The name of the communication as defined by the most recent update. Thename is a hyperlink to the communication record, and it opens the record in the EditCommunication Details wizard.
● Offer Status - If an offer has been defined for this communication, this value reports whether or notthere is a problem with any of the offers. If there is a problem, there will be a hyperlinked Problemvalue in this column. Clicking Problem opens a pop-up window that displays the offers causing theproblem.
The most common problem is that the dates for the offer are not compatible with the dates for theemail. To avoid this, make sure that the offer is live within the publishing window defined by the startand end dates of the email.
● In Campaign - Identifies a campaign to which a communication has been assigned. Shows thedefault value, No, if a communication has not been assigned to any campaign.
● Pub Start - The publish start date of the communication. This is the first date on which the messagecan be sent to the defined recipients. A communication must be in scheduled status for it to be sent,so for an email to be sent on the publish start date, it must be approved on or before the publishstart date. If an email is approved after the publish start date but before the publish end date, it issent as soon as possible after the approval.
● Pub End - The publish end date of the communication. This is the last date on which the message issent to the defined recipients. For one-time message delivery, this date is same as the publish startdate. If the publish end date is different than the publish start date, each day the same message issent to the new recipients who match the targeting definition, and who were not previously sent themessage.
● Open - Displays the open rate of the communication as a percent. Shows n/a if the communicationwas never sent or if there are zero recipients.
● Extract Stats - You can generate a CSV file containing statistics on the responses for this email.● Clone - You can clone the associated communication. All attributes of the original email
communication, including targeting, are cloned to the copy. For details, see Cloning EmailCommunication.
● Delete - You can inactivate the associated communication. The record remains listed, but its status isset to inactive.
Creating Email Communication
108
TIBCO® Reward User's Guide

Use the Edit Communication wizard to create a new email communication (sometimes called an "emailmessage" for short) or to edit the details of an existing email communication. To use the EditCommunication wizard on an existing communication, click an existing communication listed in theCommunication Name column in the Email Communications page.
Procedure
1. Select Email > Communications in the CRMS menu.
2. Click Create New Email Communications.
109
TIBCO® Reward User's Guide

There might be prerequisites for creating your email communication. See Communications fordetails.
The Edit Communication wizard guides you through creating email. You can also create a newemail communication by cloning an existing email communication. Cloning is especially usefulwhen you want to duplicate most of the attributes of the existing email message.
CRMS also sends out another form of email: the Trigger Event Response Email, sometimes calledTrigger Email or Response Email. Response Email responds to trigger events. In general, TriggerEvent Response Emails are used for customer service purposes and not so much for promotionalpurposes, as Email Communications are. However, both are forms of email, and there aresimilarities in the way they are composed, so the two can easily be confused by new CRMS users.
Choose TemplateYou can use the Email Communication Template page to select an email template for your emailmessage from a selection provided by TIBCO Reward. This page also gives you the option to use ablank template and insert your own content.
The first step in creating a new email communication is to choose an email template using the EmailCommunication Template page. To open this Template, select Email > Communications > Create NewEmail Communication.
You cannot go back to this template page after you have clicked Next Step. This means that you cannotswitch to a different email communication template after you have chosen a template to use for anemail communication.
Choose the type of template for your email communication:
● Basic - This tab includes two template options: Blank HTML and Text-Only.
● Newsletters - For communicating articles and other content of interest to your recipients.
● Offers - Designed to present multiple offers; also provides room for several additional messages.Some Offer templates are designed to serve a specific strategic function.
● Invitations - Used to invite customers to store or other events.
● Postcards - Similar in shape and size to a printed postcard, this is the most commonly used formatfor single message emails. Creative elements fit well in the space, and the format leverages thebenefits of a single message-per-email approach. High impact with minimal complication.
PropertiesIf you are editing an existing email communication, the template has already been selected, and thewizard opens with the Properties page; otherwise, for new email message, the wizard opens first withthe Templates page.
You can use the Properties page to define email data under three headings:
● Schedule
● Tracking
● Properties.
Use the Properties page of the Edit Email Communication wizard to establish when the emailcommunication is sent and when it is tracked, and to assign the email a name, subject line, and anyaddress data that remains the same on all emails (the From Name and Address, and the Reply toAddress).
You can also use the Properties page to set up various properties of the email that are useful foradministering, monitoring and assessing an email communication.
110
TIBCO® Reward User's Guide

Schedule
Specify when to send the email by responding to the following question in the Schedule section:
When do you want to send this email?
● When a customer enters a mobile geolocation radius
● Today
● On a specific date
Geolocation Trigger Events
If you click radio button next to When a customer enters a mobile geolocation radius, then you mustspecify Time of day to send this email:
● Today
● On a specific date
● Beta capabilities enable the configuration of mobile geolocations that can be included in shopperprofile targeting dimensions. Beta capabilities do not currently support delivery of geolocationtargeted offers or messages to a customer's mobile device.
● Important: Because geolocation features are not complete (beta), if mobile geolocation targetingdimensions are included in a shopper profile, no shoppers qualify for offers or messages that usethe shopper profile.
Time of the day to send this email
If you choose Today and select As soon as possible from the pull-down menu, each email is sentfrom CRMS as it is built (customized) for each recipient. If you choose a time of day, the set of emailmessages are built in advance of the send time. At the send time, the process of sending the individualemails begins. Depending on the quantity of email, this can take some time. As soon as possibleusually means that sending starts in about 20 minutes. As soon as possible on a future date meansthat sending starts at 12 a.m. Eastern time (9 p.m. Pacific Standard time on the day before the specifieddate.)
Keep evaluating and sending this email?
● If you choose "Yes, once a day until a specific date", the system reevaluates all of yourtarget customer profiles every day to see if someone new matches the targeting profile. Each day,the system sends your email to these new customers, until the date specified.
● Important: If you are editing an existing email communication, the template has already beenselected, and the wizard opens with the properties page. After an email template has been selectedfor an email communication, you cannot switch to a different template.
Tracking
In the Tracking section, you can specify a range of dates (inclusive) when customer clicks on the URLsin an email communication for recording purpose.
Tracking Dates - These start and end dates define a period during which the links in the emails aremonitored. Full tracking results are included in the clickthrough reports. Some tracking data, Opensand Clicks, are summarized in the Email Communication Summary page's Dashboard section, which isdisplayed for live and completed email communications.
If the CRMS user selects the Track all links check box in the Properties section of this page, the reportscover all links in an email; otherwise the reports cover only the links that are marked as trackable.
111
TIBCO® Reward User's Guide

Communication Properties
The following fields are used to assign to the email certain elements that are same on all emailcommunications:
● Email Internal Name - This is the name used to identify a specific email communication record inCRMS. It is displayed in the Communication Name field in the Email Communication page. Usethis field to assign or modify this name. (Although CRMS assigns a name by default, you and yourassociates should always customize this name to make it unique and easily identifiable. TIBCOReward recommends that your organization should develop its own naming convention for thesenames.
● From Name - This is the name that is displayed in the From field in the address lines at the top of anemail communication.*
● From Email Address - This is the name that is displayed in the From Email field in the address linesat the top of an email.*
● Reply Email Address - This is the name that is displayed in the Reply field in the address lines atthe top of an email.*
* Note: Different email systems, and different options available in the same email system, can changethe amount of information and types of information displayed to the email recipient at the beginning ofeach email. Some of these fields might not be displayed on an email recipient's emails, depending onthe system and system settings in use by the individual.
Subject - This is the text that is displayed in the Subject line on email messages sent as part of this emailcommunication.
The following fields are used to set up lists, campaign associations, link tracking, and outgoing emailan internal name, address data that remains the same on all emails (the From Name and Address, andthe Reply to Address), and a subject line:
• Test List - Use this drop-down field to specify which test list to use (optional). For details, see Test &Seed Lists.
• Seed List - Use this drop-down field to specify which seed list to use (optional). For details, see Test &Seed Lists.
• Part of a Campaign - Use this drop-down menu to specify which campaign (if any) this emailcommunication is associated with.
If you associate an email communication with a campaign, all of the tracking data collected for theemail communication is rolled up to the campaign reports. Several email communications can beassociated with a campaign, and the campaign report can provide indications of how well each emailcommunication succeeded in different ways.
TIBCO Reward recommends adding every communication to a campaign, even if there is only onemessage in the campaign. Reporting on control group behavior is currently only available forcommunications in a campaign.
Track All Links - Use this option to track clickthrough on all links contained in your email. This tracksall links in an email and displays the results in clickthrough reports. Some tracking data, Opens andClicks, are also summarized in the Email Communication Summary page's Dashboard section, which isdisplayed for live and completed email communications.
Note that certain links cannot be properly tracked at this time. These include:
● Links with CSS or inline-style information - if your link has the form <a class="classname[etc.] or <a style="color: [etc.] then it does not convert properly.
● Area tags - If your link has the form <area [etc.] then it does not convert properly.● Links with line breaks in the href - While hrefs should not contain line breaks, it is technically
possible for them to occur. These are not converted to tracked links.
112
TIBCO® Reward User's Guide

It is not necessary to name all of your links, but it is recommended if you wish to create clearer, easier toread reports. If you do not name your links, their URLs (some of them long and awkward to decipher)are displayed in reports instead.
To name links, use the "title" property in your links. For example, <a href=http://www.loyaltylab.com title='Loyalty Lab'>Loyalty Lab Link</a> displays 'Loyalty Lab' as thename for this link in reports.
When Track All Links is enabled on a URL that includes personalization, the report shows the linkbefore the tag is resolved.
TIBCO Reward strongly recommends leaving the Track All Links options checked for every singlemessage you send.
Multipart MIME - When this box is selected, each email is sent as a multipart MIME message. Thismeans each recipient is sent in both a text and an HTML version. Their email client displays one or theother, depending on their local preferences.
Checking the multipart MIME box is a good practice, as it improves email delivery rates.
Control Group - Control groups are used in conjunction with Campaigns to determine and reportincremental sales and response. CRMS randomly selects a control group composed of 5% of the targetpopulation, up to maximum of 10,000 email addresses. This control group does not receive the emailmessage, and their behavior with respect to the contents of the email is used as a control for thepurposes of evaluating the email's effectiveness.
Control Groups are only valid for communications targeted to at least 10,000 recipients, and then theymake sense only if you link the email communication to a Campaign. A control group serves largely asa basis for comparing sales information, and you cannot report sales information and sales liftinformation unless you include the communication in a campaign.
Internal Note - Use this space to record notes to yourself and any associates who might work with thisemail communication.
TargetThe Targeting page displays estimated data about the emails in the currently defined target, and youcan also specify profiles to be included and excluded.
Use the Targeting page of the Edit Email Communication wizard to establish to whom the emailcommunication should be sent.
Fields and Features
Target Estimates
The Target Estimates component displays estimates based on your currently defined target. Thisinformation is just an estimate, as both targeting profile populations and list populations are calculatedand updated on a nightly basis. To view all detailed estimates, click More Details to expand the displayand show the following data:
• Included Registered: The number of registered customers that are targeted to receive this email.
• Excluded Registered: The number of registered customers that are excluded, based on profiles or listsset for exclusion.
• Included Unregistered: The number of unregistered customers that are targeted to receive thiscommunication.
• Excluded Unregistered: The number of unregistered customers that are excluded, based on profilesor lists set for exclusion.
• Offer Present: The number of unregistered customers that are removed from the targeted set if theemail includes an offer. This is due to the fact that offers cannot be sent to unregistered customers.
113
TIBCO® Reward User's Guide

• Invalid Email Addresses: If there are malformed or invalid email addresses in the target pool, thoseaddresses are removed from the final Emails to Send estimate.
• Control Group: If there is a Control Group defined for this communication, those customers areremoved from the final Emails to Send estimate.
• Emails to Send: The sum of all the target estimates, this is effectively an estimate of the number ofemails that are sent with the current settings.
To whom do you want to send this communication?
You can choose to target to all registered customers, or choose to limit targeting to one or more selectedProfiles and/or Lists.
To target all registered customers: choose All customers.
To target to selected profiles or lists: choose "Only selected Profiles or Lists". The screenchanges significantly: a list is displayed, and you can select and add profiles and lists to target (that is,to which the email message should be sent). You can also create a new profile and add it to this list.
For information about selecting and adding targeting information, either to add include or excludetargets, which uses the same methods.
Should anyone be excluded from this communication?
When one or more profiles or lists are chosen for exclusion, any customers that match any of thoseprofiles or lists are excluded from the targeted set of customers, which is either "All customers" or theprofiles or lists you have chosen to include.
To exclude profiles or lists: choose Yes, selected Profiles and/or Lists. Then click Exclude Profiles orExclude Lists to launch the appropriate dialog box.
When you exclude profiles, only the dimensions of those profiles that have Customer MUST matchabove criteria selected affects the exclusion calculation. The Profile Chooser window shows youwhether a profile has a MUST match dimension defined. Although you can choose to exclude a profilethat does not have a MUST match dimension, it does not affect the exclusion calculation. Lists alwaysexclude all of their membership.
Rich ContentYou can use the Rich Content page to see and edit the HTML code for the selected email template. Youcan also generate and add several different types of client and customer-specific elements to the emailtemplate.
In the Rich Content page, you can specify the dynamic fields and elements you want to add to an email,and then generate the personalization tag for these. You can then insert the personalization tag for eachdynamic field into your email in the appropriate locations. Your email uses these dynamic fields toextract data from the extensive database of information maintained for your company by TIBCOReward. The appropriate data is extracted and inserted into the email message for each customer,where it displays information selected for that customer.
For example, you can insert such elements as a field displaying the customer's first name, point balance,last award or award date; or elements of one of the offers that you selected in the Offers page of theEmail Communications wizard, including an image; or a URL that links this customer to aquestionnaire or to a refer-a-friend site (assuming you have set up the options to support theseelements).
If you want to customize an email communication, the Rich Content page provides the basic codedisplay and text editing environment that you need.
Fields and Features
Preview [button] - Click this button to see a rendering of the displayed code for this email, as it iscurrently displayed in this Rich Content page. This rendering is displayed in the Email Preview dialog
114
TIBCO® Reward User's Guide

box. Be aware that, without a link to a real email recipient, it is impossible to address much of thecontent, and only a few elements of the template might be displayed.
● Current Personalization and Default Personalization. In the Email Preview dialog box, you can clickCurrent Personalization to get a slightly better sense of how the text is displayed when anindividual customer is associated with the email. Similarly, you can click Default Personalization toget a sense of how the text is displayed when no individual customer is associated with the emailand the default values are displayed.
Field Type - Use this drop-down menu to choose the type of field code you want to generate. By firstselecting the type of field you want to use, you narrow down the list of fields from which you canselect. Your selection of Field Type can also change the other field selections you need to use, asfollows:
● If you choose General, a Default data entry field is displayed in addition to the Fields drop-downmenu. You can use this Default text entry field to specify some default text to be used if specific fielddata is not available for a specific customer.
● If you choose Offers, another (untitled) drop-down selection box is displayed after Fields. From thisselection, choose each piece of Offer data to be generated; for example, the offer headline,description, qualification End date or expiration date.
● If you choose Programs, another (untitled) drop-down selection box is displayed after Fields. Fromthis selection, choose a piece of fundamental main program data to be generated.
● If you choose Trackable URL, both a Name and a URL fields are displayed. Use these to assign aname to the trackable field and the URL for that field, respectively.
Field - Use this drop-down menu to choose the field you want to generate. The Fields displayed are ofthe Field Type you selected.
If you have created a Custom Attribute field that records some unique piece of data about yourcustomers, you can personalize your emails for each customer by adding this unique attribute to eachemail. Although Custom Attribute fields that you define in CRMS are not listed in the standard drop-down menus, they can be added to an email communication.
Generate [button] - Click this button to generate a personalization tag that you can insert into the emailtemplate.
Generated - This field contains the generated personalization tag, which represents the field, defaultdata, program data, or name and URL that you selected. Copy the generated field and paste it into thetemplate in the appropriate location.
● JavaScript is not allowed in email. Email clients do not allow the use of JavaScript within email dueto security concerns. If you copy and paste HTML from a web page, be aware that it can containJavaScript or other tags, such as Flash EMBED and OBJECT tags, that might not render as expectedor can cause failure or rejection of the email.
● Few email clients correctly support CSS in email. It is a good practice to do formatting with inlinestyle definitions and not classes.
Reference TagsTo create email that addresses customers with personalized content and other loyalty-based content,you can include reference tags. Depending on their functions, they can also be called personalizationtags, dynamic fields, or dynamic content tags.
The tags discussed in this topic are those that insert customer-specific data from the Reward databaseinto your email communications. You simply add these pieces of HTML code (sometime called "tags"for short) into the Rich Content page in the Email Communication Wizard, or into the Content ItemRich Content page of the Content Item wizard.
115
TIBCO® Reward User's Guide

Do not modify or add parameters to tags. Modifying tags can result in unexpected consequences. Forexample, adding parameters to the unsubscribe link can make it impossible for a customer tounsubscribe.
See also the Rich Content pages, which provide the means and methods that you use to select andgenerate tags and to paste them directly into the HTML code for an email message or content item.
Field Type Field Description and Comments
General @(s:firstname) First Name
General @(s:lastname) Last Name
General @(s:emailaddress) Email Address
General @(s:streetaddress) Street Address (lines 1 and 2)
General @(s:city) City
General @(s:state) State/Province
General @(s:zip) ZIP/Postal Code
General @(s:retailershopperid) ID of customer from clientsystem
General @(s:shopperid) ID of customer in the Rewardsystem
General @(s:pointbalance) Customer's available pointbalance. If point vesting isenabled, this does not includepending points
General @(s:pendingpoints) Pending points
General @(s:monetary unit balance) Customer's current monetaryunit balance
General @(s:savingtodate) Customer's "Savings to date"
General @(r:companyname) Client company name
General @(r:companyurl) Client company URL
General @(s:lastaward) Customer's last award earned
General @(s:lastawarddate) Date of customer's last award
Offers @(o:description:#) * Offer description
Offers @(o:qualificationstring:#) * Qualification Text
Offers @(o:awardstring:#) * Award Text
116
TIBCO® Reward User's Guide

Field Type Field Description and Comments
Offers @(o:terms:#) * Terms & Conditions
Offers @(o:imageurl75:#) * Image URL 65 x 65
Offers @(o:imageurl65:#) * Image URL 75 x 75
Offers @(o:imageurl264:#) * Image URL 264 x 264
Offers @(o:imageurl400:#) * Image URL 400 x 400
Offers @(o:buyurl:#) * Buy URL
Offers @(o:shopperredemptionli mit:#) * Shopper Redemption Limit
Offers @(o:qualificationstartdate: #) * Qualification Start Date
Offers @(o:qualificationenddate:# ) * Qualification End Date
Offers @(o:expires:#) * Offer expiration
Offers @(o:clickurl:#) * Landing Page URL
Email @(c:fromname) From Name
Tiers @(c:fromemailaddress) From Email Address
Tiers @(c:replyemailaddress) Reply Email Address
Tiers @(c:emailsubjectline) Subject Line
Tiers @(u:unsubscribe) Unsub link URL - goes tounsubscribe.aspx
Tiers @(s:nexttierbenefits) Next Tier Benefits
Tiers @(s:nexttierdescription) Next Tier Description
Tiers @(s:nexttierentryvalue) Amount to Next Tier
Tiers @(s:nexttierheadline) Next Tier Headline
Tiers @(s:nexttiername) Next Tier Name
Tiers @(s:tierbenefits) Current Tier Benefits
Tiers @(s:tierdescription) Current Tier Description
Tiers @(s:tierentryvalue) Current Tier Entry Value
Tiers @(s:tierheadline) Current Tier Headline
117
TIBCO® Reward User's Guide

Field Type Field Description and Comments
Tiers @(s:tierlastevaldate) Current Tier Evaluation Date
Tiers @(s:tiermeasurevalue) Current Tier Balance
Tiers @(s:tiername) Current Tier Name
Tiers @(s:tierresetdate) Tier Reset Date
Awards @(award:count) Count - NOTE: This is nolonger supported.
Awards @(award:date) Date Date
Awards @(award:headline) Headline Headline
Awards @(award:productname)Product Name
Product Name - NOTE: This isno longer supported.
Awards @(award:text) Text Text
URLs @(url:addressbookhelp) Address Book Help - goes tohome.aspx?
P=help_address_book&rgd=
@(RGD)
URLs @(url:bulkunsubscribe) Unsubscribe (no login) - goes to
email_unsubscribe.aspx
URLs @(url:myaccount) My Account - goes tomyaccount.aspx
URLs @(url:myinfo) My Info - goes to s_info.aspx
URLs @(url:myoffers) My Offers - goes toOffers.aspx
URLs @(url:myshoppinglist) My Shopping List - goes toShoppingList.aspx
* In the tag, :# refers to a particular offer slot, defined at the time you create your email within theReward CRM Suite. The pound sign must be replaced with a number between 1 and 6, correspondingto the offer slot of your email. For example, the tag @(o:headline:2) would render the headline for theoffer that is in the number 2 slot within a given email.
Text-onlyIn the Text-Only page, you can see and edit the text only version of your email template. You can alsogenerate and add several different types of client and customer-specific elements to the email template.
Before using the Text-Only page, you might want to click Update from HTML to bring in text from theHTML (Rich Content) version. This option strips out all of the HTML formatting and includes just thetext from your rich content version.
118
TIBCO® Reward User's Guide

In the Text-Only page, you can specify the dynamic fields and elements you want to add to an email,and then generate the code for these -- as appropriate for emails rendered in text-only format. You canthen insert the code for each dynamic field.
Your email uses these dynamic fields to extract data from the extensive database of informationmaintained for your company by TIBCO Reward. The appropriate data is extracted and inserted intothe email message for each customer, where it displays text information selected for that customer.
For example, you can insert such elements as a field displaying the customer's first name, point balance,last award or award date; or text associated with one of the offers that you selected in the Offers page ofthe Email Communications wizard; or a URL that links this customer to a questionnaire or to a refer afriend site (assuming you have set up the options to support these elements). You cannot insert imagesor formatted text.
Fields and Features
Preview [button] - Click this button to see a rendering of the displayed code for this email, as it iscurrently displayed in this Text-Only page. This rendering is displayed in the Email Preview dialogbox. Be aware that, without a link to an individual email recipient, it is impossible to address much ofthe content, and only a few elements of the template are displayed.
In the Email Preview dialog box, you can click Current Personalization to get a slightly better sense ofhow the text is displayed when an individual customer is associated with the email. Similarly, you canyou can click Default Personalization to get a slightly better sense of how the text is displayed when noindividual customer is associated with the email and the default values are displayed.
Field Type - Use this drop-down menu to choose the type of field code you want to generate. Thisnarrows down to a reasonable number the list of fields from which you can select. Your selection ofField Type can also change the other field selections you need to use, as follows:
● If you choose General, a Default data entry field is displayed after the Fields drop-down menu. Usethis Default to supply default text to be used if specific field data is not available for a specificcustomer.
● If you choose Offers, another (untitled) drop-down selection box is displayed after Fields. From thisselection, choose each piece of Offer data to be generated; for example, the offer headline,description, qualification end date or expiration date.
● If you choose Programs, another (untitled) drop-down menu is displayed after Fields. From thisselection, choose a piece of fundamental main program data to be generated.
Field - Use this drop-down menu to choose the field you want to generate. The Fields displayed are ofthe Field Type you selected.
Generate [button] - Click this button to generate personalization tags that you can insert into the emailtemplate.
Generated - This field contains the generated personalization tag, which represents the field, defaultdata, program data, or URL that you selected. Copy the generated field and paste it into the template inthe appropriate location.
SummaryThe Summary page performs several functions:
● Provides an at-a-glance review of the email communication. This review summarizes progress on itsdevelopment and you can see a one-click review of the data entered for each page in the wizard.
● You can see the email communication in either HTML or text-only presentation format.
Fields and Features
Preview
119
TIBCO® Reward User's Guide

Clicking the Preview button displays a preview of the email communication
Send to Test List
Click this button to send copies of the email message to the Test List. (Tests lists are defined using theEmail Test and Seed Lists page.) Be aware that, when you send emails to your test list, the dynamicallyrendered URL Field tags in your email messages do not link correctly in the received emails.
Summary bars (blue bars) corresponding to each page in the Edit Email Communication wizard pagesequence. The bar corresponding to a page might include an error message if there is a problem withthe page.
● To see more page details, click the (down arrow) button to expand the summary display.
● To open and edit each page, click Edit.
Cloning an Email CommunicationCloning an email communication record creates a copy of the record.
Procedure
1. Find the email communication record you want to copy in the Email > Communications page.
2. Click Clone in the row of the communication record that you want. This opens the EditCommunication wizard.The cloned copy of an email communication record includes all of the data in the original, includingthe template selection and the targeting data, with the exceptions noted as follows:
● The clone is assigned a new, unique numerical ID (which is listed in the "#" column). This is asystem requirement.
● The clone of a record named "XXX" is automatically renamed "Copy of XXX."
If you make multiple clones of "XXX," they are all named "Copy of XXX."
● The Pub Start date is, by default, re-set to the date following day when you create the clone.
● The Pub End date is, by default, always reset to a date one week and a day after the initialPublish Start date.
● The status of the new clone is saved.
Tips for using a cloned offer record to create a new offer:
● Check the Pub Start and Pub End dates; in a clone, these are set to default dates.
● Assign the cloned copy its own new, unique, descriptive name.
● Review every field, and update fields to clearly distinguish the new clone from the original. Addan Internal Note to the clone, contrasting it from the original.
Change StatusThe current status of each email communication is displayed in the Existing Communications table onthe Email > Communications page, in the email communication status control that is displayed in theleft-most column:
You also use this control to change the status of an email communication. If you click the down arrowin the offer status control box, the currently available options are displayed in a drop-down list. Select
120
TIBCO® Reward User's Guide

the new status; unless the change is blocked (for example, because some requirement has not been met),the email communication takes on the status you have selected.
Status Details
Depending on the current status of an email communication, the options available to you in the Statuscontrol box change, as indicated in this table:
If Status is you can select:
saved submit
pending approve or deny
scheduled unapprove or launch
live complete
inactive saved
For example, if an email communication is in pending status, then you can either approve or deny theemail communication. An approved offer is automatically published on its specified publish date, andthe status changes to live at that time.
Address RulesThe following rules apply to email communications:
● These characters cannot be the last character:
@ (at sign)
. (period)
● These characters cannot be the first character:
@ (at sign)
# (pound sign)
+ (plus sign)
& (ampersand)
, (comma)
/ (slash)
● Only one "@" (at sign) character is allowed.
● The domain name should end with two or more characters after the last period; for example: ".au"or ".com" or ".net"
● These characters and character combinations are not allowed:
.@
//
@.
..
"
121
TIBCO® Reward User's Guide

--
● There must be a "."' (period) character somewhere in the string following the "@" (at sign) character.
ISP ProfilesThe latest estimate is that 93% of all email traffic is spam, so clients should be very aware of howaggressive ISPs have become at managing and filtering spam.
Email Source Issues
Email collected from any source other than your own website is fraught with peril. If you cannot pass abasic audit on an email address (requesting IP and date of request), you expose yourself to issues if youare ever called out for violation of anti-spam legislation such as the CAN-SPAM act, EU Opt-InDirective, or CASL, and so on. Even if you can, the quality of emails from outside sources issubstantially lower than those collected internally.
In addition, emails collected via sweepstakes, in store events, partner events, and other locales whereproviding the address in order to receive an incentive are of much lower quality.
Why is this important? Because bad addresses cause hard bounces, which are a signal to ISPs that asender is a spammer. If you have not been opting out hard bounces, or soft bounces after a series ofconsecutive bounces, you are behaving like a spammer would, which is noticed by the ISPs spam filteralgorithms very quickly.
In addition, if you are harvesting email from anywhere, for any reason, you are both violating CAN-SPAM, EU Opt-In Directive, or CASL (no opt in) as well as picking up spam trap addresses that areseeded all over the Internet to spot this exact practice.
Personal Whitelists
When a recipient indicates that a sending domain is safe or known, the ISP creates what is known as apersonal whitelist. Future email from that domain is delivered to the inbox. Over time, this improvesoverall delivery, as more and more individuals add you to their safe sender list.
When you first start sending email through Reward, none of your recipients have you added to theirpersonal whitelist. This takes time to overcome, and reduces your inbox delivery and overall open andclickthrough rates.
Basic checks for a clean list
It is important to start emailing on a new IP address with a clean list. Customers that use a clean list seeover 90% of their emails delivered in the In box. While maintaining a clean list is an ongoing effort,there are a few simple steps you can do before you start sending with Reward.
The most basic check is to verify that the list of addresses does not include addresses that start with anyof the following:
● noe (for noemail)
● spam
● nos (for nospam)
● post (for postmaster)
● abuse
● support
● zzz
● xxx
● and potentially a lot of the triple letters.
122
TIBCO® Reward User's Guide

This simple step gives you a better understanding of the quality of your list before you start sendingwith Reward.
Campaigns
About CampaignsYou can use campaigns to define a set of related email communications associated with a marketingcampaign and to track the responses and sales associated with this set of emails.
The results of a campaign are summarized in the campaign dashboard, and details are provided in anextensive set of campaign reports.
Campaign management reporting data is calculated on a nightly basis. You must wait up to 36 hoursfor population data to be updated, after it has reached TIBCO Reward.
To open the Campaigns page, select Email > Campaigns.
Fields and Features of Campaigns
The Campaigns page includes the following features:
● The Create > New Campaign option, which starts the Create New Campaign process.
● The Existing Campaigns panel consists of:
— Standard navigation controls - the Show filter and the 1 2 3 page controls.
— The complete list of existing campaigns.
Each row in the list represents a campaign record and displays a few key fields. These fields are linedup in columns. Click a column heading to sort all the campaigns in the list by that field.
The following campaign fields are displayed:
StatusUse this control to see the current status of a campaign, and to change the status of the campaignwhen appropriate.
#The unique campaign record ID number, automatically assigned by CRMS when the record is created.
Campaign NameThe name of the campaign as defined by the most recent update. The name is a hyperlink to thecampaign record, and opens the record, usually displaying the Email Campaign Details page.
Communication StatusIf an email communication has been associated with this campaign, this value reports whether or notthere is a problem with the email. If the word "problem" is displayed, click the linked campaign namein this row to open the Campaign Summary page, and then address the problem in the email. Forexample, if the offer in the email ends before the campaign starts, you can change the offer or select adifferent offer.
Pub Start, Pub EndThe Pub Start date and Pub End date define the start and end of the campaign. All emailcommunications to be included in a campaign must be published within these start and end dates. Anemail communication that is part of a campaign cannot start before the campaign's Pub Start date orend after the Pub End date.
123
TIBCO® Reward User's Guide

You define the Pub Start and Pub End dates in the Campaign Properties page, in the "Dates" start andend fields. The Campaign Properties page is displayed immediately after you click Create NewCampaign. Note that the Pub Start and Pub End dates might be different than the campaign trackingdates. Sales summaries for a campaign (example, Campaign Summary Reports) show sales data forthe period defined by the tracking dates.
AuthorDisplays the name of the CRMS user who authored the campaign (the user who was logged in).
DeleteUse to inactivate the associated campaign. The record remains listed, but its status is set to inactive.
Creating Campaigns
124
TIBCO® Reward User's Guide

Use a campaign to define a set of related email communications and to track the sales that result fromthese email communications. The results of a campaign are summarized in the campaign dashboard,and details are provided in an extensive set of campaign reports.
Procedure
1. Open the Email > Campaigns page and click the Create > New Campaign link.This opens the Edit Campaign page, which you use to define the name and important dates for thecampaign, along with the notes on the campaign for internal use.
2. After you click Done, you can create email communications to be associated with the campaign.You can also create a new campaign by cloning an existing campaign. Cloning is especially usefulwhen you want to duplicate attributes or features of an existing campaign.
Campaign PropertiesUse the Campaign Properties page to define the name of the campaign and to establish key dates forthe campaign. The date indicate when the email communications that are part of this campaign can besent, and when the campaign formally starts and ends for the purpose of reporting.
Fields and Features of Campaign Properties
The Campaign Properties section includes the following data:
Campaign NameUse this internal name to identify a campaign in CRMS. It is displayed in the Campaign Name field inthe Email > Campaign page. Use this field to assign or modify this name. Although CRMS mightassign a name by default, you and your associates should always customize this name to make itunique and easy to distinguish from others. Clients should develop their own naming conventions forcampaign names. Campaign name example: 2012 Q1WinterCloseOut1 Snowflake.
DatesThese dates are displayed as the Pub Start and Pub End Dates on the initial Email > Communicationpage. All emails to be included in a campaign must be published (sent) within these campaign dates.These dates thus provide an indication of which emails were included in the campaign. To enter adate, click a calendar icon to open the calendar date selector, then click a date to select it. The Pub Startand Pub End dates can be different than the campaign tracking dates, although they are typically setto be the same by default.
Tracking DatesThe tracking dates define the time period for which sales are tracked for this campaign. Sales duringthe campaign tracking period are summarized in the campaign summary reports. To enter a date,click a calendar icon to open the calendar date selector, and then click a date to select it. TheCampaign Summary Report includes summary data for all the campaigns with any tracking dateswithin a specified timeframe, for example, the month of May. (Specify the timeframe when yourequest the report.)
Internal NotesUse the internal notes to record notes about the campaign.
Campaign DetailsThe Campaign Details page provides basic information and status updates about a campaign, includingany email communications currently associated with the campaign. You can add a new emailcommunication directly to the campaign using the Edit Email Communication wizard.
125
TIBCO® Reward User's Guide

The Campaign Details page opens immediately after you successfully complete the CampaignProperties page and click Next Step.
If you have already provided the campaign data required by the Campaign Properties page, theCampaign Details page opens immediately when you click the name of a campaign in the Email >Campaigns page.
Fields and Features of Campaign Details
The Campaign Details page includes the following features, each of which is accessible by clicking adown arrow located on the right edge of the blue summary bar:
• The Dashboard view displays key information and a status update about the campaign that includeresponse and sales data.
• The Properties view presents a quick review of the data you entered in the Properties page. To editthis information, click Edit. For information about the data in this view, refer to Campaign: Properties.
• The Communications view lists the email communications currently associated with the campaign.You can also add a new email communication directly to the campaign. If the communicationssummary bar indicates that you have "No Communications", this campaign is incompletely defined.
To add an email communication to the campaign immediately, click Add a New Communication >Email. This opens the Edit Email Communication wizard. You can use this wizard to create a newemail communication. After you have defined the new email communication, reopen the campaign.
To add an email communication in a separate session, including an existing email communication, youcan create or edit an email by starting from the Email > Communications page. To add an existingemail communication to a campaign, click the email to open it in the Edit Email Communicationswizard. The Email Communication Properties page is displayed. Use the Part of Campaign drop-downmenu (near the bottom of the page). Select the campaign to which the communication should be added,and then click Save.
Confirm that each email communication has been correctly added to the campaign by opening theCommunications view in the Campaign Details page.
Trigger EventsAbout Trigger Events, Response Email, and Stationery
Trigger events, Trigger Event Response Emails (response email or trigger emails), and stationery are thebasic components of a CRMS feature that uses email to deliver customer support messages. These emailmessages are generated in response to trigger events.
Trigger Events
A trigger event is an event that can be addressed with a customer service email.
The trigger event might be a customer registration, a request, a confirmation of the completion of aprocess or arrival at a threshold, an availability or expiration date, a reminder date, or any of severalother events to which a client wants to automatically respond.
For example, the "Forgot Password" response email message is set up and administered by using thetrigger events system. These emails are automatically sent out when the triggering event occurs (acustomer signal that the user forgot his password).
Trigger event response emails are not the same as email communications. Email communications aretypically marketing emails that are sent to a targeted group of customers on dates that you explicitlychoose, often in connection with a campaign. Although some trigger event response email behavesimilar to email communications, these different classes of email are separately managed.
Warning! Avoid disabling a trigger event that is currently enabled. Currently enabled trigger events arecrucial for the smooth and continuous operation of your loyalty system.
126
TIBCO® Reward User's Guide

About Trigger Event Response EmailsUsing CRMS, you can set up a response email to respond to a trigger event. The CRMS provides astandard response email that you can clone, customize, and personalize in several ways. For example,many clients set up their own alternate response email in CRMS by designing their own corporatestationery format and assigning this stationery to their response email.
● All email generated and sent by CRMS includes From and Reply To fields. Before you set up anyemail, define the text to be used in these fields, using the Email > Settings page.
● To change either the response email associated with a trigger event or the stationery associated withsuch a (live) response email, create a clone of the response email associated with the currentlyenabled trigger event, and then work with the clone and test it until it is ready to go live. Thensubstitute it for the current response email without disabling the trigger event.
Warning! Although you can "disable" the trigger event and work on the current response email, thisapproach stops all email responses to this trigger event, which has potentially harmful results.
What is Stationery?
You can use stationery to change elements of a trigger event response email, such as the header andfooter or a graphic element, without touching the content of the email itself. Stationery is used solelywith trigger events. Note that stationery formats are not available as templates in emailcommunications.
Trigger Event DescriptionsThe following email trigger events are available:
WelcomeA new customer has signed up for your program online on the Microsite or through APIs. This emailwelcomes the new customer, and it can include a reiteration of program benefits.
External RegistrationA new customer has signed up for your program at a store or during a transaction. Importingtransaction or shopper files triggers this email, which welcomes the new member. This message caninclude a reiteration of program benefits.
Award EarnedThe customer has earned a new award. This email informs the customer of the award.
New Password RequestThe customer has forgotten their password. This email sends a new random password to thecustomer. The customer can change their password after signing in.
Award ReversedThe customer no longer qualifies for an award previously earned. This email informs the customer ofthe award reversal.
Registered Card ExpiringA member's registered card (credit, loyalty, debit, or other) expires at the end of the month. This emailsuggests to the member, to visit the member portal and update the card information.
Shopper Information UpdatedThe customer has changed one or more elements of their profile. This email confirms the changes andincludes the specific elements changed.
127
TIBCO® Reward User's Guide

Email Address Change RequestedThe customer has requested a change to their email address. This email is sent to the new emailaddress to confirm the change. The email address does not change until the customer clicks on a linkwithin the email.
Friend ReferredA customer has referred a friend to join your program. This email invites the friend to join yourprogram.
Next TierThe customer has changed tiers and now belongs to the next tier up. This email informs the customerof their new tier association.
First ReminderThis email reminds the shopper of an occasion.
Second ReminderThis email reminds the shopper of an occasion.
Trigger Event List PageSelect Email > Trigger Events. Use this page to set up email messages (trigger event response emails)that your customers receive when certain trigger events take place (for example, new password request,new offer available). These response emails are automatically sent out when the triggering event occurs.
The Trigger Events page has the following features:
● You can generate response emails through the standard trigger events.● You can enable or disable specific response emails.● You can view and edit response emails.● You can send a response email to a test list.
CRMS identifies 18 trigger events that are commonly associated with these customer service emails.There is no limit to how many of these trigger events can be enabled or disabled at one time. However,at least one message must be assigned before the event can be enabled.
Features and Fields of Trigger Events
The Trigger Events page includes the following features:
The Edit Address Settings option, labeled Click here to edit your From, To, and Reply email addresssettings. Clicking this link opens the Email Settings page. In this page, you can define the followingemail settings that are displayed, by default, for each email response :
● "From" Email Address● "From" Name● "Reply" Email Address● The Trigger Events panel, which displays a list of all trigger events that have been defined or are in
the process of being defined.
Each row in the Trigger Events list represents a trigger event and displays a few key fields. These fieldsare lined up in columns. Click a column heading to sort all of the trigger events in the list by that field.
The following Trigger Events fields are displayed:
● Enabled/Disabled Status - You can use this control to see the current status of a trigger event, andto change the status of the event when appropriate.
128
TIBCO® Reward User's Guide

Warning! Changing the trigger event status from enabled to disabled has potentially harmfulconsequences.
To enable or disable a trigger event, change the status setting in the drop-down list to the left of eachevent name. When an event takes place, and the event is enabled, the response email assigned to thisevent is sent to the customer. If the event is disabled, no email is sent when the event occurs.
It is a good practice to send the response email, which has been assigned to a trigger event to a test listprior to enabling that trigger event.
● Trigger Event : the name of each trigger event available in CRMS. Click this name to change or viewthe properties of a trigger event. The Manage a Trigger Event page is displayed. You can create anew response email for the event or choose from existing response emails.
Note that some trigger events in this list might no longer be supported. For an updated list of thetrigger events, including information on their current availability and a brief explanation of the purposeof each, refer to Trigger Events.
● Assigned Response Email : this is the response email that the customer receives when the eventtakes place.
● Preview : click this link to preview the email for a trigger event.
● Send to Test List : click this button to automatically send the assigned message to a preselected list.You are not asked to confirm this action.
Manage Trigger EventTo open the Manage a Trigger Event page, click the event name in the Email > Trigger Events page,which displays the current data for that trigger event. Use this page to create, assign, and manageresponse email message content for a trigger event.
Some trigger events in this list might no longer be supported.
For an updated list of the trigger events, including information on their current availability and theirpurpose, refer to Trigger Events.
Features and Fields of Manage a Trigger Event Page
Properties:
● Description : this explains the specified trigger event that triggers the email message you assign.This description might also describe the kind of information included in the response email.
● Event Status : reflects the current status: a reminder indicating whether the event is currentlyenabled or disabled.
Warning! Avoid disabling a trigger event that is currently enabled. Some trigger events are crucial forthe smooth and continuous operation of your loyalty system.
● Bulk Email : includes notes regarding response emails and customers' bulk email settings. Someevents observe these bulk email settings and some do not. This is a reminder that the event responseemail is a service email and not subject to bulk email settings.
Response Email
About Response Emails
A response email is sent in response to a specific trigger event. For example, an "Award Earned" emailresponse might be sent in response to the "Award Earned" trigger event.
129
TIBCO® Reward User's Guide

Using CRMS, you have the option to set up an email to respond to a trigger event. CRMS provides astandard response email that you can clone, customize, and personalize in several ways. For example,many clients set up their own alternate response email in CRMS by designing their own corporatestationery format and assigning this stationery to their response email.
All emails generated and sent by CRMS include From and Reply To fields. Before you set up any email,define the text to be used in these fields through the Email > Settings page.
Creating Response Email
Procedure
1. Select Email > Trigger Events.A list of trigger events is displayed.
2. From the list, select a trigger event that is disabled.The Manage a Trigger Event page is displayed for that trigger event.
3. To modify the email that is used with an enabled trigger event, see trigger event: Change ResponseEmail.
4. In the Responses section of the page, select Create a New > Response Email.The Edit a Trigger Event Response Email wizard is displayed. This wizard guides you through thefollowing steps for response email creation:
● Properties
● Rich Content
● Text-Only Content
● Summary
Properties
The first step in the wizard is the Properties page. You can edit following fields on this page:
Internal Name
This field is required. Assign a name to the email response. This name is used to identify the responseemail and differentiate it from other response emails associated with the same trigger event. OnlyCRMS users see this name. Your customers do not see this name.
Subject
This is the subject line that your customers see in their email in boxes. This field is required. You caninsert the following variables in this field to personalize the subject line for the recipient:
@(s:firstname) - customer's first name
@(s:lastname) - customer's last name
@(s:emailaddress) - customer's email address
@(s:city) - customer's city
@(s:state) - customer's state/province
@(s:zip) - customer's zip/postal code
Internal Notes
Use the Internal Notes field to identify the purpose and unique features of the email for yourself oryour colleagues. Only the CRMS users can see this information. Your customers cannot see this internalnote.
130
TIBCO® Reward User's Guide

Rich Content
In the Rich Content page of the wizard, you can create the email content and edit the HTML version ofyour email.
To preview what your customer sees, click Preview underneath the page heading.
Text-Only Content
In the Text-only Content page of the wizard, you can edit the text version of the email for customerswho have opted to block HTML from their inboxes.
Summary
Summary is the final step in the wizard. You can review the information and content, which youentered at each previous step, and edit that content.
Click the arrow located on the right side of any step of the summary to expand that section and viewthe contents.
Click Edit on any step of the summary to modify the setting for that step.
Change Response Email
The following are some methods to change the response email associated with a trigger event:
● Change the response email that is assigned to the Trigger Event● Clone the response email, modify the clone, then choose that response email● Create a new response email and then assign it to the Trigger Event
● The difference between email communications and response emails are the following:
— Email communications are emails that a marketer sets up, and then they are tied to customertargeting profiles to determine who gets the email (these are generally marketing emails).
— Response emails are emails that a marketer sets up, and then they are tied to trigger events.These are not so much of marketing emails (though they could be), but are basically systemgenerated emails based on whatever the trigger is, such as moving from one tier to another.
● If the trigger event is enabled, the existing response email cannot be edited: you can only change theresponse email for trigger events that are disabled.
● Avoid disabling a trigger event that is currently enabled. Although you can disable the trigger eventand work on the current response email, this approach effectively stops all email responses to thistrigger event, which has potentially harmful results.
Changing the Response Email Assigned to the Trigger Event
Procedure
1. Select Email > Trigger Events.A list of trigger events is displayed.
2. From the list, select a trigger event that is disabled.The Manage a Trigger Event page is displayed for that trigger event.
3. In the Responses section of the page, select a different response email than the one already assignedto the trigger event. (The assigned response email is highlighted and its radio button is selected.)
4. At the top of the page, click Save to save your work or Done to save your work and return to the listof trigger events.
131
TIBCO® Reward User's Guide

The alternate response email is now assigned to the trigger event.
Cloning the Response Email, Modifying the Clone, and then Choosing that Response Email
Procedure
1. Select Email > Trigger Events.
A list of trigger events is displayed.
2. From the list, select a trigger event that is disabled.The Manage a Trigger Event page is displayed for that trigger event.
3. In the Responses section of the page, click Clone on the row of the assigned response email. (Theassigned response email is highlighted and its radio button is selected.)The clone of a record named "XXX" is automatically renamed "Copy of XXX," in the Edit a TriggerResponse Email wizard.
4. The wizard walks you through editing the following aspects of the assigned response email:
● Properties
● Rich Content
● Text-only Content
● Summary
5. In the Properties step, you can edit Internal Name and Subject.
6. Click Next Step to display the Edit Rich Content page.
7. In the Rich Content page, click Generate to generate a personalization tag that you can insert intothe email template.After you click Generate, the values that you selected are displayed in the Generated field.
8. Copy the generated field text and paste it in the template in the appropriate location.
JavaScript is not allowed in the email. Email clients do not allow the use of JavaScriptwithin email due to security concerns. If you copy and paste HTML from a web page, beaware that it can contain JavaScript or other tags, such as Flash EMBED and OBJECT tags,that might not render as expected or can cause failure or rejection of the email.
9. Click Next Step to display the Text-only Content page.
10. In the Text-only Content page, click Generate to generate a personalization tag that you can insertinto the email template.After you click Generate, the values that you selected are displayed in the Generated field.
11. Copy the generated field text and paste it into the template in the appropriate location.
12. Click Next Step to display the Summary page.The Summary page shows the settings entered in the previous steps of the wizard.
13. Click Edit next to any step, and you are directed to that step of the wizard where you can modifysettings.
14. Click Preview to see how your email looks.
15. Click Send to Test List to send a test email to a specified email list.
16. Click Save to save your work. Click Done to save your work and return to the Manage a TriggerEvent page.The cloned email response is displayed in the list of response emails.
17. Select the radio button next to the newly cloned email response.
18. Click Save to save your work or Done.
132
TIBCO® Reward User's Guide

The cloned email response is now assigned to the trigger event.
Creating a New Response Email and Then Assigning It to the Trigger Event
Procedure
1. Create a response email. Refer to Creating Response Email for instructions about how to create aresponse email.The new response email is displayed in the list of response emails in the Manage a Trigger Eventpage.
2. Select the radio button next to the newly created email response.
3. Click Save to save your work or Done.The new email response is now assigned to the trigger event.
Stationery
About StationeryUse stationery to change elements of a trigger event response email, such as the header and footer or agraphic element, without touching the content of the email itself. Stationery is used solely with triggerevents. Stationery is especially useful when you want to change the theme of a response email forevents or holidays without editing the email content itself.
Stationery formats are not available as templates in email communications.
Features and Fields
Select Email > Stationery to access the Stationery page, that includes the following features:
● The Create > New Stationery option, that creates a new stationery and initiates the Edit a Stationerywizard.
● The trigger events stationery panel, that includes a complete list of existing stationery. Each row inthis list represents a stationery definition and displays a few key fields in columns. Click a columnheading to sort all of the stationery definitions in the list by that field.
The following fields are displayed:
NameThe name of the stationery as defined by the most recent update. The name is a hyperlink to thestationery record, and opens the record in the Edit a Stationery wizard.If a stationery name is displayed in gray letters and the stationery record does not open in the Edit aStationery wizard when you click it, this stationery is "live". Live status means that a stationery iscurrently associated with an enabled trigger event response email. You cannot work on stationery inlive status; you can either clone it and work on the cloned stationery, or you can disable all triggerevents with response emails that use this stationery. Disabling all such trigger events changes thestationery status to "assigned" and you can then edit the stationery. To use the modified stationery,you must re-enable the trigger events to use the modified stationery. If you edit a clone, you can assignit to the trigger event response email without disabling the trigger event.
StatusYou can see the current status of a stationery definition.
Live
133
TIBCO® Reward User's Guide

Indicates that the stationery is assigned to a trigger event response email and is currently being used.
AssignedIndicates that the stationery is currently assigned to a trigger event response email.
UnassignedIndicates that the stationery is not currently assigned to a trigger event response email.
Last updateThe date and time stamp applied and maintained by CRMS to indicate when each stationerydefinition was last updated.
PreviewDisplays a preview of the stationery.
CloneUse the clone option to create a duplicate of a stationery record. The cloned copy of a stationeryduplicates all of the data in the original, with certain exceptions.
The clone of a stationery record named "XXX" is automatically renamed "Copy of XXX". If you make aclone of "Copy of XXX", it is named "Copy of Copy of XXX"
The status is "Unassigned".
The Last Update field reflects the date and time when the new clone was created.
DeleteDeletes the stationery.
About Stationery CreationTo create a new stationery, select Email > Stationery > Create New Stationery. This creates a newstationery record and starts the Edit a Stationery wizard. This wizard helps you define the newstationery by guiding you through the completion of the following pages:
● Stationery Properties
● Stationery Rich Content
● Stationery Text-Only Content
● Stationery Summary
You can also create a new stationery by cloning an existing stationery. Cloning is especially useful whenyou want to duplicate most of the elements of the existing stationery. It also provides an alternative toediting an original stationery design that should remain in use (in live status).
Creating Stationery
134
TIBCO® Reward User's Guide

Procedure
1. Select email > stationery.
2. Select create > New Stationery.CRMS creates a new stationery record and starts the Edit Stationery Details wizard. The wizardopens its first page, titled Properties, showing the new stationery record. The new record containsno data except for a unique, CRMS-generated stationery name. Replace this stationery name, whichis just a place holder.
3. Click Next Step and complete the new stationery design by using the Edit a Stationery wizard tofinish the process.
135
TIBCO® Reward User's Guide

About Editing StationeryUse the Edit a Stationery wizard to change the details of an existing, saved stationery or to set up a newstationery.
To use the Edit a Stationery wizard to work on an existing stationery design, click the name of thatstationery in the Email > Stationery page.
To create a new stationery and immediately start the editing process, open the Email > Stationery pageand click Create New Stationery. The wizard opens, ready to start editing the new stationery.
The Edit a Stationery wizard guides you through the process of completing the following requiredsteps:
● Stationery Properties● Stationery Rich Content● Stationery Text-Only Content● Stationery Summary
You can also create a new stationery by cloning an existing stationery. Cloning is especially useful whenyou want to duplicate most of the elements of the existing stationery. You can use cloning to work onthe response emails or stationery associated with trigger events without disabling events.
● To edit stationery that is currently associated with an enabled trigger event, it is a good practice tocreate a clone of the original stationery that requires changes, and then work on that clone. Whenthe clone includes all the changes that you want, switch to the properly modified clone. This is analternative to editing the original itself, which requires you to disable the associated trigger events.Disabling a trigger event can result in undesirable consequences.
● You can minimize downtime by creating a clone of an original stationery that requires changes, andthen working on that clone. This is an alternative to editing the original itself, which requires you todisable the associated trigger events. When the clone includes all the changes that you want to maketo the original, you simply switch to the properly modified clone.
● To switch the response email or the stationery associated with a response email, click the name ofthe trigger event in the Email > Trigger Events page to open the Manage a Trigger Event page. Youcan assign a different response email (if available) or select a different stationery to be used for theresponse email. Be sure to click Save immediately after making any changes.
Stationery PropertiesUse the Stationery Properties page in the Edit a Stationery wizard to record the internal name andinternal notes that identify the stationery and its purpose. Note that this data is used internally:customers never see this data. Defining and saving the name and internal note text is the first step increating a new stationery or editing an existing stationery.
Fields
Use the Properties page to name and describe a stationery by recording data in the following fields:
● Internal Name is an internally used name that the customer does not see. It serves to identify anddescribe the stationery record in the Manage a Trigger Event page, so that you can select the correctstationery to use with a trigger event response email. Choose a name that is descriptive and unique.Ideally, the new name should indicate the purpose of the stationery and why it should be usedrather than another stationery. Replace the CRMS-provided stationery name as soon as possible inthe process of defining the new stationery.
● Internal Note text is used internally in CRMS, and is displayed only on this page. Ideally, the notesshould help distinguish the associated stationery from any other stationery and prevent confusion.If two or more stationery designs have similar names or the names do not indicate the unique
136
TIBCO® Reward User's Guide

purposes of the different stationery designs, you should use the Internal Note field to record thecrucial aspects of a stationery that make it different.
After finishing work on this page, click Next Step. This saves your work and advances the wizard tothe Stationery Rich Content page, the next step in the workflow of the wizard.
When you open the Properties page, always review any default data and preexisting data. Removeunwanted data and add correct new data.
Stationery Rich ContentUse the Stationery Rich Content page in the Create a Stationery wizard to set up the rich content for thecurrent stationery. The rich content established in the stationery affects every response email that usedthis stationery, and every customer can see the results. For this reason, it is a good practice to test thisstationery thoroughly, and to send it to a test list before you make it available to a real customer.
During the normal process of creating a stationery, the Rich Content page opens after you complete theStationery Properties page and click Next Step. You can also navigate to the Rich Content page fromother pages in the Create a Stationery wizard by selecting the page in the drop-down Jump to Stepmenu.
Use the Rich Content page to see and edit the code for the selected stationery. It also generates code forseveral different types of client and customer-specific data and you can also add this code to thestationery. The following are examples of code that can be generated and added to the stationery:
● Company Name
● Company URL
● Point balance
● Monetary Unit balance
● Terms and Conditions
● Customer Service URL
● Return email elements (From Name, From email address, Reply email address)
● URLs that customers commonly want to navigate to, such as the Signup, My Account, My Offers,Main Program, Questionnaire, Refer a Friend, and so on.
Insert the code for each dynamic field into your stationery in the appropriate locations. Your triggerevent response email uses these dynamic fields to extract data from the extensive database ofinformation maintained for your company by Reward. The appropriate data is extracted and insertedinto the stationery for each customer, where it displays information selected for that customer.
Fields and Features
Preview [button]Click to see a rendering of the displayed code for this stationery, as it is currently displayed in thisRich Content page. This rendering is displayed in the Preview dialog box. Be aware that, without alink to a real response email recipient, it is impossible for the preview version to address much of thecontent, and only a few personalized elements of the stationery can be displayed. In the Previewdialog box, you can also select text-only content to get a sense of how the text is displayed when theemail is in the text-only format.
Field TypeUse this drop-down menu to choose the type of field code you want to generate. This narrows downthe list of fields to a reasonable number, from which you can select. Your selection of Field Type mightchange the other field selections available for you to select from.
Field
137
TIBCO® Reward User's Guide

Use this drop-down menu to choose the field you want to generate. The fields displayed are of theField Type you selected.
Generate [button]Click to generate code that you can insert into the stationery.
GeneratedContains the generated code, which represents the field, default data, program data, or name andURL that you selected. Copy the generated field and paste it into the stationery in the appropriatelocation.
JavaScript is not allowed in email, and so is not allowed in the stationery. All modern email clientsdisallow the use of JavaScript within email due to security concerns. If you copy and paste HTML froma web page, be aware that it can contain JavaScript or other tags, such as Flash EMBED and OBJECTtags, that might not render as expected or can cause failure or rejection of the email.
Stationery Text-Only ContentUse the Text-Only Content page to see and edit the text-only code for the selected stationery. This Text-Only Content page addresses the case where the email associated with the stationery is rendered intext-only format by the customer's email viewer.
You can also use the Text-Only Content page to generate and add several different types of client andcustomer specific elements to the stationery. You can specify the dynamic text-only fields and elementsyou want to add to an email, and then generate the code for these. You can then insert the code for eachdynamic field into the appropriate location in your email. Stationery uses dynamic fields to extract datafrom an extensive database and to display text information selected for each customer.
Before using the Text-Only Content page, click the Update from HTML button to bring in text from theHTML (Rich Content) version. The HTML version might contain text-only content.
Fields and Features
Preview [button]Click this button to see a rendering of the displayed code for this stationery, as it is currently displayedin this Text-Only Content page. This rendering is displayed in the Preview dialog. Be aware that,without a link to a real response email recipient, it is impossible for the preview version to addressmuch of the content, and not all personalized elements of the stationery are displayed.
Field TypeUse this drop-down menu to choose the type of field code you want to generate. This narrows downthe list of fields to a reasonable number from which you can select. Your selection of Field Type canchange the other field selections available to you.
FieldUse this drop-down menu to choose the field you want to generate. The fields displayed are of theField Type you selected.
Generate [button]Click to generate code that you can insert into the stationery.
GeneratedThis field contains the generated code, which represents the field, default data, program data, or nameand URL that you selected. Copy the generated field and paste it into the template in the appropriatelocation.
138
TIBCO® Reward User's Guide

JavaScript is not allowed in email, and so is not allowed in the stationery. All modern email clientsdisallow the use of JavaScript within email due to security concerns. If you copy and paste HTML froma web page, be aware that it can contain JavaScript or other tags, such as Flash EMBED and OBJECTtags, that might not render as expected or can cause failure or rejection of the email.
Stationery SummaryThe Stationery Summary page provides instant access to a summary of the state of the stationery. Youcan preview the properties and content currently defined for the stationery.
Features:
Preview - Click Preview to see what your customers see.
Summary bars (blue bars) corresponding to the results of each page in the Edit a Stationery wizardpage sequence.
• To see more page details, click the (down arrow) button at the right end of each bar to expand thesummary display.
To open and edit a page, click Edit.
Test and Seed ListsTest lists and seed lists are collections of email addresses that are used for the purpose of assuring thequality of outgoing emails. Test lists and seed lists are managed under the Email tab of the CRMSmenu.
You use a test list to test the appearance and behavior of an email communication or a trigger eventresponse email. The email communication or trigger event response email is sent to the test list,providing copies of the email for testing and QA purposes before it is sent to customers.
Because many personalizations and variations are possible in email communications, the emails sent toa test list do not represent a comprehensive sampling.
A seed list is added to the normal email address lists of an email communication to assure that aspecific set of email addresses (example, the addresses of the manager and staff working on thecampaign, the associated marketing managers, and the CEO) receives a copy of the email sent.
For email communications sent over multiple days (as in the case where a profile is used as the target),the email is sent to the seed list only on the first day.
Test & Seed List RequirementsTo use a test list or seed list, you must first create the file containing the list, and then find and uploadthe file from the Test and Seed List page.
File uploads must be ASCII text files. Other formats can cause imports tofail.
Follow these steps to add a new test or seed list:
1. Create a list of email addresses conforming to email format requirements, and save it to yourcomputer.
2. Select Email > Test & Seed Lists. This opens the Manage Test & Seed Lists page.
3. In the Name field, type in a descriptive name for your list.
4. Click Browse to find your specific test list or seed list.
5. Click Upload.
139
TIBCO® Reward User's Guide

Email Communication: GuidelinesReputation is Everything
The main algorithms used by ISPs to identify spam are based on the sender's reputation. Reputation ismeasured differently by every ISP, but some basic principles hold for all ISPs:
1. The customer complaint rate is the primary input. That is, every time someone clicks the "This isSpam" button, your reputation takes a hit. As long as complaints are below 0.1%, your reputation issafe. With anything higher, your reputation starts to suffer.
2. It takes time to gain the ISPs trust. Some senders require time before the ISPs allow their mail toreach the inbox. Live mail from Microsoft currently has the most stringent rules about bulk mailingsuntil they trust you.
3. Spam traps are the second most important input. ISPs use abandoned accounts to watch forunsolicited email. As a result, you should not email any address that has not had activity in 90-180days, preferably 90. While this is unfair to legitimate senders (perfectly legitimate addresses cansuddenly become spam traps), it is a standard practice in today's email world.
4. Consistent mailings help maintain reputation. Mailings of similar size and with regular frequencycan help maintain your reputation. Inconsistency can reduce your overall reputation.
5. Overmailing can hurt your reputation. Mailing too frequently can hurt your reputation. Thoughthere is no "magic number", twice a week does not hurt reputation, but four times a week does.
One Bad Message Can Hurt You
It is crucial that you understand this point. Even a single message sent to an old or suspect list can dolasting and substantial damage to your reputation and your ability to deliver.
We want you to have long and productive relationships with your customers. Maintaining a high levelof vigilance regarding email quality greatly improves your short and long term success. If you are indoubt about anything regarding email practices, talk to your client services manager before you sendanother message.
140
TIBCO® Reward User's Guide

Signage
This section provides information about signage.
Topics:
● About Signage
● Features and Fields
● About Creating Signage
● Embed Tag: Use
About SignageUse signage, also known as widgets, to add personalized and dynamically rendered content to awebsite. For example, depending on the customer who opens your website, you might want toincorporate different offer, club, or tier information in your website.
You can embed widgets in almost any web page. After a widget is inserted, it functions as a modularelement in the page, like a spot advertisement, a standard design element, or a regularly occurringfeature. You can insert personalized content into these widgets, so that they address and respond to thecurrent customer browsing your web pages.
Benefits
Web widgets greatly reduce the effort needed to add personalized and dynamic content to a website.Instead of relying on an IT team to build multiple web based applications using APIs, marketers canuse Reward's ready-made signage tools and options. Reward's signage features manage the businesslogic and put control of the payload into the marketers’ hands.
Signage WidgetsMarketers use widgets to work more directly with corporate websites by providing a means of workingwith site components, page elements and features that serve marketing purpose. The benefits of usingReward widgets rather than custom built applications become even more compelling over time, asmarketers become more familiar with the signage features and as the value of the customer loyaltydatabase becomes clearer.
To implement a widget that communicates data about the customer who is currently browsing the webpage, you must link the widget to that customer's records in the Reward customer database. You canaccomplish this by supplying the widget with this current customer email address, which serves as thekey data.
This key data, the current customer's email address, must be dynamically inserted into the client sideEmbed Tag for each widget. Different clients pass along this key user data in different ways: usingcookies, session variables, and so on. Without exception, IT professionals and senior web designersmust be recruited to devise and set up the processes for obtaining and passing this key customer data.This important process is addressed in Embed Tag: Use.
Features and FieldsUse the Signage page to provide access to all signage records and to help you create and work withsignage. The Signage page lists all signage records that have been defined or are in the process of beingdefined.
To open the Signage page, select Signage > Signage from the CRMS menu.
The Signage page includes the following features:
● The Create > New Signage option, which starts the Create Signage process.
141
TIBCO® Reward User's Guide

● The Manage Existing Signage panel which consists of:
— Standard navigation controls – the Show filter and the 1 2 3 page controls.— The Show filter includes a Type filter, using which you can display records of one of the three
main signage types: Offers, Customer Information, and RSS.— The complete list of existing signage.
Each row in the list represents a piece of signage and displays a few key fields. These fields are lined upin columns. Click a column heading to sort all of the signage items in the list by that field.
The following fields are displayed:
StatusYou can see the current status of piece of signage, and change the status of the communication whenappropriate.
#The unique signage record ID number, automatically assigned by CRMS when the record is created.
Signage NameThe name of the piece of signage as defined by the most recent update. The name is a hyperlink to thesignage record, and opens the record in the Edit Signage Details wizard.
TypeThe category of signage as selected at the time the record was created.
ModifiedThe last date on which the signage was changed in any way.
ViewsThe number of times the signage has loaded on a web page in its lifetime.
ClicksThe number of times a link in a piece of signage has been clicked.
Clicks:views %The ratio, expressed as a percentage, of total clicks to total views on the piece of signage, analogous tothe clickthrough rate on email.
Embed TagClicking this link spawns a pop-up window with the embed tag for this piece of signage.
CloneClicking this link creates a copy of the existing signage as a new record.
DeleteThis link is only available for signage in Saved or Paused Status. To delete a piece of Live signage,you must first pause it by changing its status to Pause. Deleting a piece of signage removes itpermanently from CRMS.
Notice that embedding the widget involves modification of the embed tag. You must replace thegeneric text "Email Address of Customer" with the actual email address of the customer currentlyviewing the page.* Your company's IT department and web designer can obtain and insert this datausing cookies, session variables, or other methods.
About Creating Signage
142
TIBCO® Reward User's Guide

Follow these steps to create a new signage using the Signage > Create a New Signage option:
Click Create > New Signage link on the Signage page, which creates a new signage record and startsthe Edit Signage wizard.
This template selection page is displayed for the first time when you open the Edit Signage wizard tocreate a piece of signage. This wizard helps you define the new offer by guiding you through thecompletion of the following pages:
Choose Template
143
TIBCO® Reward User's Guide

This page is displayed only the first time you open the Edit Signage wizard. After you have selected asignage template, you cannot change templates.
PropertiesAfter you have selected a signage template, the Edit Signage wizard is displayed with either this pageor the Summary page.
You can also create a new piece of signage by cloning an existing signage record. Cloning is especiallyuseful when you want to duplicate most of the attributes of the existing signage.
Signage: Developer's GuideUsing Reward Web Signage, sometimes referred to as web widgets, your company can insertpersonalized content into your web pages. The customer-facing loyalty program website is the mostobvious location for widgets, but you can embed them in almost any web page that follows a customerlog-in. After a widget is inserted, it functions as a modular unit, like a spot advertisement, a standarddesign element, or a regularly occurring feature. Unlike other web elements, widgets can grab attentionby displaying the customer's name or other customer-specific data pulled from the Loyalty database.
Widgets are commonly deployed to provide dynamically targeted links to current offers, clubs, andother loyalty program content. Widgets can also be used to record information about the customer.
To see more examples of what signage can do for you, take a quick tour of the signage samples in theReward Backstage area. This area is made available only to Clients and invited guests, and requires auser name and password. After you have logged in, navigate to the Capabilities section for examples ofsignage.
Developing Signage
Marketers can contribute more directly to corporate websites, especially the page elements and featuresthat serve a marketing purpose, by working with signage, also known as widgets. To make widgetsavailable to marketers, however, IT professionals and web designers must help with the set-up.
Marketers must engage their IT staff and website designers in the implementation of Reward signage.Marketers frequently "wade too deep" as they first start to work with signage. Widgets are very usefulbuilding blocks, but they must initially be integrated into a website with the cooperation and expertiseof your company's IT professionals and web specialists.
After the basic implementation work is done, all parties experience a substantial improvement inefficiencies: IT expertise is no longer required for every update to a widget, marketers get a powerfultool for leveraging their loyalty program data, and web design staff get a personalization tool thatimproves the quality of the website. The structured work environment of CRMS brings the differenttalents together into the same loop. The benefits of using Reward widgets rather than custom-builtapplications become more compelling over time, with the growth of the Reward customer database.
Crucial Signage Requirement: Insert Current Customer Email Address in the Embed Tag
A basic requirement for implementing a personalized widget is the email address of the customercurrently browsing the page. This data serves as the key to the customer's information in the Rewardcustomer database. Different Clients pass the ID of the current user in different ways: using cookies,session variables, and so on.
As soon as you know you are using CRMS to develop signage (a widget) for a particular purpose, youshould recruit your IT and Web design staff to set up the method for modifying one line in the clientside Embed Tag, "isc_e = <Email Address of Customer>", such that the address of the customercurrently browsing the page is inserted into the Embed Tag.
The methods used to insert the current customer data vary greatly from one client to another, so it isimpossible for Reward to specify coding that supplies a "one size fits all" solution. However, if your sitealready includes a secure log-in, or maintains a customer's shopping cart, or captures the customer datarequired for electronic billing, it already relies on the use of this data, and your IT staff and web designstaff have already developed some method for harvesting the customer address.
144
TIBCO® Reward User's Guide

Signage: ExampleIn this screen capture, the section titled "Exclusively for" is a widget (a piece of signage) that has beenembedded in an ecommerce web page. The name of the loyalty program member viewing the page(Joann Miller, in this example) is dynamically inserted. The offer is selected for Joann based on multiplecriteria.
Embed Tag: UseAn embed tag is a piece of JavaScript code that is used to embed either widgets (pieces of signage) orweb beacons (tags) in a web page.
A signage (aka widget) embed tag is a unique piece of JavaScript code that is generated by CRMS"Create a New Signage" feature for each widget (that is, for each piece of signage). It is used to embed awidget in an existing web page, and to capture the email address of the customer currently browsingthe page, and register that this customer has opened that page.
The embed tag is used for tracking customers. A unique embed tag is created within CRMS for eachactivity that you define. The tag can be embedded in a web page to capture the email address of thecustomer currently browsing the page, and to register that this customer has opened that page.
Note that both varieties of the embed tag require the email address of the customer browsing thewebsite.
145
TIBCO® Reward User's Guide

Notes on Widget Embed TagsWidgets designed to display more personalized customer information are typically embedded in webpages for loyalty program members.
After the basic content and characteristics of a piece of signage (a widget) is defined in the Create aNew Signage process, CRMS generates the basic embed tag code for the widget. The embed tag is madeavailable in the Summary Page of this process.
The CRMS Signage page provides a link to the embed tag for each widget. To see the basic embed tagcode, click the embed tag link on any row in the Manage Existing Signage table. A new pop-up windowopens, displaying the widget embed tag and its two components.
Each embed tag displays two pieces of code and instructions for inserting both in your web page.
Copy and paste the first piece of code in the location you want this signage to be displayed in your webpage. Copy and paste the second piece of code as close as possible to the </HTML> tag at the bottom ofyour web page.
You must replace the text "Email Address Of Customer" in the second piece of widget embed code withthe email address of the customer currently browsing the page. This modification to the embed tag, theinsertion of the current customer's email address, is the primary subject of this help topic.
How the Embed Tag is ProcessedWhen your HTML page is browsed by a customer, the following happens:
1. The request to serve the page to a user is sent to your web server first.2. Your web server renders the email address of the current user into the widget embed tag.3. Your web server then sends the rendered page to the customer's browser.4. When the widget embed tag (now including a rendered, real email address) is loaded into the
browser, it uses JavaScript to send the rendered email address to our database.5. Our database looks up the customer, based on their email address, and then sends back the
customer's properties (first name, last name, point balance, and so on) to the widget.6. The widget then displays whatever properties you have chosen in your widget design. This can be
the customer's first name, or an accounting of the users loyalty program point earning, balance, andpoint expenditures.
How Do I Get the Address of the Current Customer?
Almost all commerce websites today maintain and display personalized information for their users.This is accomplished in a variety of ways, but most often by using cookies and session variables. Whena customer logs in, the web server for the site often stores information about that user (including theuser's email address) into a cookie. Some sites that maintain more strict security store an encrypted IDfor the customer in the cookie, then use that ID to look up the email address of the customer in aprotected database at run time. In one way or another, almost all pages of a modern commerce web sitehave the ability to retrieve the customer's email address.
Users might not even need to be "logged in" to be recognized; instead, they might be "passivelyrecognized". Amazon.com serves as a good example of this approach: if Jane Q. Doe logs in once, closesher browser, then reopens it later (even weeks later), she is greeted with the message "Hello, Jane Doe!".After receiving this personalized greeting, if you try to do anything that requires a higher level ofsecurity, like editing personal information, you are asked to login formally.
Server-Side TagsSo how does a web page retrieve and display the email address of a customer? Most often, by usingserver side tags. Consider this line of HTML:
<b>Hello, Valued Customer</b>
146
TIBCO® Reward User's Guide

This displays in a web browser, for everyone, as Hello, Valued Customer; not a bad message, but notvery personalized. We can replace the "Valued Customer" text with a server side tag, like this:
<b>Hello, <%=Session['currentCustomerEmailAddress']%></b>
Server side tags are just like using mail merge tags in Microsoft Word or any other word processingprogram. When your web page is requested by a customer, your web server first reads through theentire page's HTML and replaces all server side tags with the data they are requesting. Only then, doesit send the rendered page along to the customer's browser. The exact syntax and method of how theemail address is retrieved depends entirely on how your web site is built. For instance, the example justcited only works in a site that is running Asp.Net and happens to use a session variable called"currentCustomerEmailAddress".
Let Your IT Professionals Do It
If your site already has some personalization, getting the customer's email address into the embed tag isgoing to be relatively easy. However, it is a job for the pros: your IT department and website specialistsknow exactly how to retrieve the current customer's email address and place the requisite server sidetag into your signage embed tag.
Other modifications to the embed tag code are treated as optional here; however, they might not seemoptional to your company's web designers. Be sure to enlist the services of the web page designerresponsible for the page in which any signage widget is embedded. This designer can set up the widgetso that it reflects your corporate design standards and so that the widget and web page respond to anyunrecognized email addresses in a graceful manner.
147
TIBCO® Reward User's Guide

Content
This section provides information about content items.
Topics:
● Content Items & Rule Sets
● Content Items
● Content Rule Sets
Content Items and Rule SetsUsed in concert with CRMS email communication features, you can add "dynamic content" to youremail communications by using content items and content rules sets features.
Dynamic content helps you create emails that deliver more specific, smartly-tailored messages torecipients, messages that are more likely to generate increased sales.
Email marketers use dynamic content technology to solve challenges such as the following:
● Customize updates by state, province or other geographical characteristics.
● Substitute different paragraphs of text or graphics in an email by applying rules based ondemographics or other targeting data.
● Create cross-sell offers based on previous purchases.
● Alert customers to replenish consumable products that must be replaced regularly, or to schedulerecurring services that must be performed at specific intervals, such as oil changes and tune-ups).
Using dynamic content features, your company can define pieces of content to be added to emailcommunications, and also sets of business rules that selectively add these content items into differentcustomer emails. You can define the pieces of content by using the Content Items options. You candefine the selection rules by using the content rule sets options.
Adding a content rule set to an email communication causes specific pieces of content (content items) tobe added to the individually addressed emails. When the individual emails are generated, the emailsystem automatically applies matching rules to select the content. You can use content rule sets todisplay content items based on whether an email recipient is a member of the profiles and/or listsspecified in the rule set.
Content items are chunks of email content. They can include rich content (HTML) or text-only content.You can add a content item directly to an email communication, by selecting it from a drop-downselection box in the Edit Email Communication wizard, or you can add a content item indirectly,through the use of content rule sets and their logic.
To add a content item directly to an email, you can use the Edit Email Communication wizard. (Addinga content item directly to an email is convenient, but it is not a proper example of dynamic content.)
To make a content item available for insertion into an email communication by means of a content ruleset, you must associate the content item with a content rule set. Then, if the email communication issent to a customer identified in the rule set, CRMS inserts the content item into that email.
How do you add a Content Rule Set to an email communication?
To define content items, select Content > Content Items. To define a content rule set, select Content >Content Rule Sets.
When you are constructing an email communication, you can insert a content rule set into the emailmessage, just as you would insert any other type of predefined content. Using the Edit EmailCommunication wizard, you insert a reference tag for the content rule set into the email. If a matchingcondition in the rule set is triggered, then the content item identified by that matching rule is inserted
148
TIBCO® Reward User's Guide

into the email. The content is inserted at the location where you placed the content rule set referencetag.
How is an email communication that uses dynamic content different than other emails?
Email that does not use the full range of dynamic content features define one email communication forone list of recipients (that is, for the entire mailing list). Such email can include one level ofpersonalization, which is very powerful. However, without the extra level of targeting afforded bydynamic content, this single level of personalization is limited to displaying the contents of specific datafields, including the following :
● Customer-related data values from fields that are already in the database
● Email address data that you have already specified (e.g., from name, from address, subject line)
● The existing loyalty-related URLs
● The loyalty-program data, such as the tier or club data you have defined in previous CRMS sessions.
A content item can include the same basic personalization data that is allowed in an email.
As powerful as these personalizations are, they add the same basic set of rich content or text, and thesame set of reference tags, to each email. If you lack content rule sets, you cannot insert different typesof content for different recipients, nor can you insert different images and messages that are targeted atspecific lists and customer profiles. Customer-targeted images, and informational contexts cannot beswitched in and out to appeal to different targets.
Using content rule set features, you can insert variable content (different CRMS content items) whereand how you want, based on the customer targets you choose. You can identify swappable contentitems (such as different images, URLs or paragraphs) and insert them in an email, based on differenttargeting parameters (including lists).
Using multiple content rule sets you can customize a single email to include appeals to several differentcustomer attributes. That is, you can insert different pieces of rule-selected content in multiple locationsin an email. Each inserted element can be based on a different segmentation criteria, so one emailcommunication can effectively target multiple customer traits. The power is equivalent to usingmultiple variables.
Instead of creating a separate email communication for each segment in a emailing list, the contentfeatures let you compose an email that is made up of various targeted content items, depending on therules you define to control the insertion of content items. Each content item can include its ownpersonalization items, of course.
General Procedures
To add a content item directly to an email, you simply use the Edit Email Communication wizard.Depending on the type of content you are adding, you use either the Rich Content or Text-Only Contentpage of the wizard. With the Field Type set to Content Item, you can see and select from all of thecontent items that are currently defined.
To make a content item available for insertion into an email communication by means of a content ruleset, you must specify the rules for using the content item in a content rule set. You do this byassociating the content item with a profile or list identified in the rule set. Then, if the emailcommunication is sent to a customer identified in the rule set, CRMS inserts the corresponding contentitem into that email in an intelligent way.
Dynamic ContentReward’s CRMS Content tab provides wizards to help you create and edit content items and contentrule sets. To put content items and content rule sets into an email, you can use the Email tab'sCommunication features, especially the Edit Email Communication wizard.
To Work with a Content Item
149
TIBCO® Reward User's Guide

To create a content item, select Content > Create New Content Item. For help, see "Create a NewContent Item".
To edit an existing content item, select Content > Content Item to open the Content Item page. Click thename of the content item you want to change. This opens the Edit a Content Item wizard, which guidesyou through the steps of defining or redefining a content item by completing a sequence of pages. Youcan also navigate freely to a specific page to see or change data.
After completing each page, click the Next Step button to advance to the next page until the contentitem is finished. If you have no rich text, skip the Text-Only Content page by clicking Done.
To Work with a Content Rule Set
To create a content rule set, select Content > Create New Content Rule Set. For help, see "Create a NewContent Rule Set".
To edit an existing content rule set, select Content > Content Rule Set. Click the name of the contentrule set you want to change. This opens the Edit a Content Rule Set wizard, which guides you throughthe steps of defining a content rule set by completing a sequence of pages. You can also navigate freelyto a specific page to see or change data.
After completing each page, simply click the Next Step button to advance to the next page until thecontent item is finished. If you have no rich text, skip the Text-Only Content page by clicking Done.
To Work with an Email Communication
1. To add a content rule set to an email communication, select Email > Communications, and thenclick the email whose content you want to modify from the list of existing email communications.The Edit Email Communication wizard is displayed, displaying properties information for thatemail communication. Add or edit information on this page as necessary.
2. Navigate to the Edit Rich content page or the Edit Text-only page of the wizard, depending on thetype of content you need to add. In the Field Type drop-down menu, select Content Rule Sets andSelect. The Select a Content Set window is displayed.
3. Select a content rule set. The tag for the selected content rule set should be displayed in the text boxfollowing the word "Generated:".
4. Copy the tag (using the Edit > Copy menu option from your window frame, or Ctrl+C) and paste itinto the email where you want the content item to be displayed.
5. Click Save inside the CRMS page.
6. For each content rule set you want to insert, repeat steps 3 through 6.
7. Click Done to save your work and exit the Edit Email Communication wizard.
Dynamic Content Planning Tips:
Rather than segmenting your lists and then spending days creating, managing, and sending numerousvariations of your email to the appropriate segments, you can use dynamic content features to create asingle, smarter email communication. As a general rule, the more population segments you target, andthe more specific the variations of your message, the more compelling dynamic content becomes.However, if you do not have content that makes sense for each segment, or you do not have a list thatcan be segmented on specific data, dynamic content might not be the best choice for yourcircumstances.
Effective use of dynamic content requires planning. Before using dynamic content, do the following tobuild an email:
● Assess the feasibility of your initial concept. If solid content is available and you can readilyimplement content rule set logic that accurately targets the same segment as the content, you have agood candidate.
● Develop a plan, including a spreadsheet or equivalent, that identifies all required elements, fromswappable content items to test lists.
150
TIBCO® Reward User's Guide

● You must define rules and content that match. For example, to deliver the "Top Ten list forDemographic A"as content to a recipient if she is a Demographic A customer, you must create a ruleto select Demographic A customers and then assign the "Top Ten list for Demographic A" content tothat rule.
● Before sending your dynamic content messages, preview and test all versions to ensure that eachaudience segment receives messages that are properly rendered and that it makes sense in allpossible contexts. Test the various elements and combinations by sending to the email to a test listthat exercises all results of the content rule sets used in the email.
Deleting Content Items or Content Rule Sets after Reference Tags are in Emails: Use of Defaults
In general, when a content item or content rule set is deleted, or for some other reason is not insertedinto an email, nothing is added to the rendered version of the email that is sent out: no spaces, no linebreaks or line spaces or new paragraphs.
Note the following applications of this rule:
● If you include in an email a rule set that has no matching conditions but the default, every email thatis sent includes the default.
● If you include in an email a content item tag that is subsequently deleted, the item renders as blank.That is, the email is rendered exactly as if no item has ever been added: nothing is added. The sameis true for a content rule set that is deleted after the rule set tag has been added to an email. Nothingis displayed in the email to replace the omitted content.
● If you include in an email a content rule set whose matching conditions have been deleted, thedefault content is supplied. If the default is blank, the email is rendered exactly as if no content rulebeen added. Nothing is added.
Content Items
Content Item: ContentContent item can contain virtually all of the types of information that an email can contain. The onlyexception is that a content item cannot contain other content items or content rule sets. A logical loopthat could not be processed might be created.
A content item is, in most respects, simply a chunk of an email communication that has been defined asa reusable email component and that has been assigned its own reference tag.
What Types of Rich Content Go into a Content Item?
You can use the Rich Content page of the Content Item wizard to create a set of rich content HTMLcode (including links) that you can use as a preassembled component when you are constructing anemail communication. If you intend to insert a content item into an email by applying a content rulesset, the content item should be suitable for use as an interchangeable component that can be replacedby alternative content items. The selection of the content item to be inserted depends on the targetingrules set up in the content rules set.
When you are defining the contents of a content item, you can use the Rich Content page to specify thedynamic fields and specific elements you want to add to an email, and package them in the form of acontent item.
Details
At the most detailed level of processing, the Rich Content page provides assistance by helping youselect or generate the reference tag for a dynamic field or element that you want to include. (These tagsare sometimes also called "personalization tags" because they refer to data that personalizes the email.)You can then insert the reference tag into your content item in the appropriate location. As Rewardgenerates each personalized email in an email communication, it renders these reference tags into
151
TIBCO® Reward User's Guide

personalized data by extracting the referenced data from its extensive database. At this level ofprocessing, specific types of data about your customers and your loyalty program are specified by thereference tags.
For example, you can personalize an email by inserting into a content item fields that display thecustomer's first name, point balance, last award or award date; or by inserting elements of one of theoffers that you selected in the Clubs and Offers page of the Email Communications wizard, includingan image; or by inserting a URL that links the customer to a questionnaire or to a Refer a Friend site.Assuming you have set up the appropriate options in your email communication to support theseelements, the detailed data you specify in a content item can be quite powerful.
If your company has defined custom attributes, you can insert reference tags that pull customer specificvalues from these custom attributes.
The reference tags for custom attributes are not standard items, and cannot be listed with otherreference tags and dynamic fields.
What Happens to a Content Item?
After you complete your definition of a content item, that content item itself is assigned a type ofreference tag, and you can manage it almost like a reference tag for a dynamic field. That is, you canselect it and insert it in an email as if it were an object. Note, however, that the reference tags for contentitems can also be managed on a higher level when you use a content rule set.
If a content item is added to an email, the appropriate data for each recipient is extracted from thedatabase and inserted into that email message. Ultimately, the email displays information selected forthe recipient.
In summary, if you want to customize the rich content in a content item, the Rich Content pageprovides the basic code generation tools, code display, and text editing environment that you need.
Content Item: PropertiesThe Content Item Properties page records the content item name and other crucial information used toreference and identify the content item. This information is for other CRMS users and for CRMS: it isnot displayed to users. Defining and saving the content item description is the first step in creating anew content item or editing an existing content item.
The Properties page is displayed when you create a new content item, clone a content item, or open anexisting content item record for editing.
Fields
You can use the Properties page to describe a content item by recording data in the following fields:
NameIt is the content Item name that is displayed in the main Content Item page.
Reference TagIt is the unique identifier for this content item that is displayed in content rule sets or emails. This isthe text that forms the unique part of a hyperlink to this content. Content item reference tags can onlyuse standard alphanumeric characters and the underscore character: "_". If you supply no referencetag text, CRMS-assigned ID number is used instead, by default. Modifying the content item referencetag for a content item causes existing links to fail. The content is no longer rendered in any emails thatinclude the old tag. This action has no effect within a content rule set, since content rule sets do notuse the reference tag.
Source IDYou can use this optional field to define an alternate name or ID for this content item. This is mostoften used if you have exported content items from another content management system and want toretain a cross reference to the item's old ID. This field is not used in any way by the Reward system.
152
TIBCO® Reward User's Guide

Internal NoteThis text is used internally in CRMS, and is displayed only on this page. The best practice is to use thisspace to record useful information about this content. Such information might include its intendedpurpose, a content summary, how it has been modified (if appropriate), non-obvious characteristicswith potential impact, and so on.
After finishing work on this page, click the Next Step button. This saves your work and advances thewizard to the next page in the workflow.
To define the properties of a content item:
1. Start the Edit Content Item wizard.
When you create a new content item record or edit an existing content item record, the Edit ContentItem wizard starts automatically, and the Properties page is displayed first. A new content itemrecord contains no data except for a unique content item ID number, which is automaticallyassigned by CRMS and cannot be changed.
2. Supply the content item data field values.
3. Click Next Step.
The Edit Rich Content page is displayed.
When you modify an existing content item record, add text to update the notes in the Internal Notefield in the Properties page. Always review all preexisting data. Remove unwanted data and add thecorrect new data.
Creating a New Content Item
153
TIBCO® Reward User's Guide

A content item is a collection of rich content or text-only content that is designed to be inserted into anemail communication, either directly, or according to the logic defined in a control rule set.
Procedure
● Select Content > Create New Content Item.This opens the Edit a Content Item wizard, which guides you through the steps of defining acontent item by completing a sequence of pages.
154
TIBCO® Reward User's Guide

Editing an Existing Content Item
Procedure
1. Select Content > Content Item to open the Content Item page.2. Click the name of the content item you want to change.
This opens the Edit a Content Item wizard, which displays the first page of data for the existingcontent Item. The wizard provides access to each page of data that defines the current content item.
The Edit a Content item wizard guides you through the completion of the following pages:
● Content Item Properties● Content Item Rich Content● Content Item Text-only ContentAfter completing each page, simply click Next Step to advance to the next page until the contentitem is finished. If you have no rich text, skip the Text-Only Content page by clicking Done.
Editing Content Item
Procedure
1. Select Content > Content Items to open the Content Item page.2. Click the name of the content item you want to change.
The Edit a Content Item wizard is displayed, which provides access to each page of data thatdefines the current content item.
3. In the Properties page, modify any of the fields: Name, Reference Tag, Source ID, and/or InternalNote.
4. Click Next Step, which takes you to the Edit Rich Content page.You can use this page to see and edit the HTML code for the selected email template.
5. Select the Field Type and Field you like to include, then click Generate.The generated content is displayed in the Generated field.
6. Copy this generated text and insert it anywhere in your content.
At run time, this tag is replaced by the first name of the customer receiving the communication.7. Click Next Step, which takes you to the Text-only Content page.
You can use this page to see and edit the text only version of your email template.8. Click Save or Done.
Content Item: Rich ContentYou can use the Rich Content page to create content and to see and edit HTML content associated withthe currently selected content item. It also provides a preview of the currently saved rich content. Ifincluded in any given email communication, this content item information is rendered according to thestandards associated with that email.
A content item can contain all types of information that an email can contain. The only exception is thata content item cannot contain other content items or content rule sets. A content item is, in mostrespects, simply a chunk of an email communication that has been defined as a reusable emailcomponent and assigned its own reference tag.
The Rich Content of a Content Item
You can use the Rich Content page to create a set of rich content HTML code (including links) that youcan use as a preassembled component when you are constructing an email communication. If you
155
TIBCO® Reward User's Guide

intend to insert a content item into an email by applying a content rules set, the content item should besuitable for use as an interchangeable component that can be replaced by alternative content items. Theselection of the content item to be inserted depends on the targeting rules set up in the content rule set.
Fields and Features
PreviewClick this button to see a preview of the displayed code for this content item, as it is currentlydisplayed in this Rich Content page. This is displayed in the Preview dialog box.
Current Personalization and Default PersonalizationIn the Preview dialog box, you can click Current Personalization to get a slightly better sense ofhow the text is displayed when an individual customer is associated with the email. Similarly, youcan click Default Personalization to get a sense of how the text is displayed when no individualcustomer is associated with the email and the default values are displayed.
Field TypeUse this drop-down selector to choose the type of field code you want to generate. By first selectingthe type of field you want to use, you can narrow down the list of fields from which you can select.Your selection of Field Type can also change the other field selections you must use, as follows:
● If you choose General, a Default data entry field is displayed in addition to the Field drop-downselector. See the entry on the Default field.
● If you choose Offers, another (untitled) drop-down selection box is displayed after Field. Fromthis selection, choose each piece of offer data to be generated; for example, the offer headline,description, qualification End date or expiration date.
● If you choose Main Program, another (untitled) drop-down selection box is displayed after Field.From this selection, choose a piece of fundamental main program data to be generated.
● If you choose Trackable URL, it is followed by a text entry box labeled "Name", which is followedby another labeled "URL". You can use the Name field to enter a short name that you want tosubstitute for the URL that you copy into the URL field. The name that you enter is displayed onany reports and displays that show trackable URL data. You must supply the URL text and makesure that it is correct. Although CRMS can determine whether the URL satisfies the basicrequirements for a URL string, it cannot validate that an apparently legal string actually refers tothe URL you meant to track.
FieldUse this drop-down selector to choose the field you want to generate. The fields displayed are of theField Type you selected.
For example, if you set Field Type to URLs, the Field drop-down selector list displays reference tagsthat refer to the defined list of loyalty program URLs, and you might see a listing that includesSignup, My Account, and Refer a Friend.
If you have created a custom attribute field that records some unique piece of data about yourcustomers, you can personalize your emails for each customer by adding this unique attribute to eachemail. Although custom attribute fields that you define in CRMS are not listed in the standard drop-down selection boxes, they can be added to an email communication.
DefaultUse this field to specify the default text to be inserted in the email if a customer specific field cannot bepopulated. For example, if the customer's name cannot be provided in an opening address, you mightsubstitute a generic term, so that the opening reads, "Dear Valued Customer," or something noworse.
156
TIBCO® Reward User's Guide

GenerateClick this button to generate a reference tag that you can insert into the email template.
GeneratedThis field contains the generated reference tag, which represents the field, default data, program data,or name and URL that you selected. Copy the generated field and paste it into the template in theappropriate location.
JavaScript is not allowed in email. All modern email clients disallow the use of JavaScript within emaildue to security concerns. If you copy and paste HTML from a web page, be aware that it might containJavaScript or other tags, such as Flash EMBED and OBJECT tags, that might not render as expected orcan cause failure or rejection of the email.
Few email clients correctly support CSS in email. It is a good practice to perform formatting with inlinestyle definitions, not classes.
Content Item: Text-OnlyYou can use the Text-Only Content page to see and edit the text only version of your content item. Youcan also add several different types of client and customer specific elements to the content item.
Before using the Text-Only Content page, you might want to click the Update from HTML button tobring in text from the HTML (Rich Content) version. This option strips out all of the HTML formattingand includes just the text from your rich content version. Note, however, that text imported in this waycan include or omit material in unexpected ways. Such text should be used only as rough draftmaterial; that is, you should review it and revise it to assure that it is of suitable quality.
You can use the Text-Only Content page to specify the dynamic fields and elements you want to add toan email by means of the content item, and then generates the code for these -- as appropriate for emailrendered in text-only format. You can then insert the code for each dynamic field.
Email uses dynamic fields to extract data from the extensive database of information maintained foryour company by Reward. The appropriate data is extracted and inserted into the email message foreach customer, where it displays text information selected for that customer.
For example, you can insert such elements as a field displaying the customer's first name, point balance,last award or award date; or text associated with one of the offers that you selected in the Clubs andOffers page of the Email Communications wizard; or a URL that links this customer to a questionnaireor to a Refer a Friend site (assuming you have set up the options to support these elements). You cannotinsert images or formatted text.
Custom attribute fields that your company has defined can be inserted into an email, but they areoptional. The standard Email Communication wizard does not display these fields or supply you withthe reference tags.
Fields and Features
PreviewClick this button to see a rendering of all of the content items selected as possible candidates for thisemail. You can change a setting to see either the rich content or the text-only version. This rendering isdisplayed in the Preview dialog. Be aware that, without a link to an individual email recipient, it isimpossible to address much of the detailed content, and few data values might be displayed.
In the Email Preview dialog, you can click Current Personalization to get a slightly better sense of howthe text is displayed when an individual customer is associated with the email. Similarly, you can clickDefault Personalization to get a better sense of how the text is displayed when no individual customeris associated with the email and the default values are displayed.
Update from HTML
157
TIBCO® Reward User's Guide

Click this button to strip the text out of the existing Rich Content page and paste it into the text-onlyversion. This does not necessarily yield a perfect text-only version, so you must review the resultscarefully and edit the Text-Only Content page to suit your purpose. However, the convenience ofusing this option to parse out and copy a large quantity of text usually results in a significant saving oftime.
Field TypeUse this dropdown selector to choose the type of field code you want to generate. This narrows downthe list of fields from which you can select, to a reasonable number. Your selection of Field Type canalso change the other field selections you must use, as follows:
● If you choose General, a Default data entry field is displayed after the Field drop-down. Use thisDefault data entry field to supply the default text. The default text is used if specific field data (avalue) is not available for a customer.
● If you choose Main Program, another (untitled) drop-down selection box is displayed after Field.From this selection, choose a piece of fundamental main program data to be generated.
● If you choose Offers, another (untitled) drop-down selection box is displayed after Field. Fromthis selection, choose each piece of offer data to be generated; for example, the offer headline,description, qualification End date or expiration date.
● If you choose Email, another (untitled) drop-down selection box is displayed after Field. From thisselection, choose each piece of offer data to be generated; for example, the offer headline,description, qualification End date or expiration date.
● If you choose Trackable URL, it is followed by a text entry box labeled "Name", which is followedby another label "URL". You use the Name field to enter a short name that you want to substitutefor the URL that you copy into the URL field. The name that you enter is displayed on any reportsand displays that show Trackable URL data. You must supply the URL text and make sure that itis correct. Although CRMS can determine whether the URL satisfies the basic requirements for aURL string, it cannot validate that an apparently legal string actually refers to the URL you meantto track.
FieldUse this drop-down selector to choose the field you want to generate and add to the email. The fieldsdisplayed are of the Field Type you selected.
GenerateClick this button to generate personalization tags that you can insert into the email template.
GeneratedThis field contains the generated reference tag, which represents the field, default data, program data,or URL that you selected. Copy the generated field and paste it into the template in the appropriatelocation, that is, where you want the text to be displayed in the email.
Deleting Content ItemDeleting a record permanently deletes the record. The item is removed from all content rule sets thatuse it, and from all lists that offer it as a selectable option. References to this content item are notautomatically removed from emails. However, all emails that include references to this content itemomit the content. Nothing, not even a character space, replaces the omitted content.
Procedure
1. Find the record you want to delete in the Content Items table in the Content Items page.Use the search and sort options to narrow your choices and put the remaining filtered records inorder. Each row in the page represents a record. Column headings identify the key record fields
158
TIBCO® Reward User's Guide
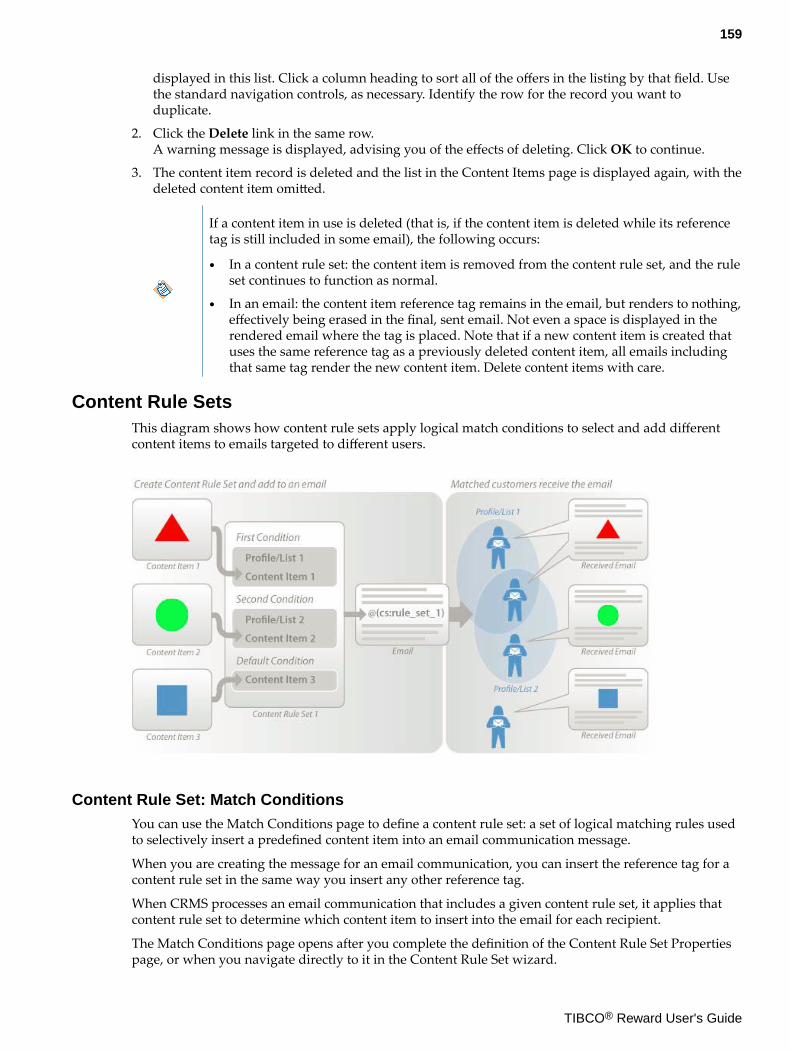
displayed in this list. Click a column heading to sort all of the offers in the listing by that field. Usethe standard navigation controls, as necessary. Identify the row for the record you want toduplicate.
2. Click the Delete link in the same row.A warning message is displayed, advising you of the effects of deleting. Click OK to continue.
3. The content item record is deleted and the list in the Content Items page is displayed again, with thedeleted content item omitted.
If a content item in use is deleted (that is, if the content item is deleted while its referencetag is still included in some email), the following occurs:
● In a content rule set: the content item is removed from the content rule set, and the ruleset continues to function as normal.
● In an email: the content item reference tag remains in the email, but renders to nothing,effectively being erased in the final, sent email. Not even a space is displayed in therendered email where the tag is placed. Note that if a new content item is created thatuses the same reference tag as a previously deleted content item, all emails includingthat same tag render the new content item. Delete content items with care.
Content Rule SetsThis diagram shows how content rule sets apply logical match conditions to select and add differentcontent items to emails targeted to different users.
Content Rule Set: Match ConditionsYou can use the Match Conditions page to define a content rule set: a set of logical matching rules usedto selectively insert a predefined content item into an email communication message.
When you are creating the message for an email communication, you can insert the reference tag for acontent rule set in the same way you insert any other reference tag.
When CRMS processes an email communication that includes a given content rule set, it applies thatcontent rule set to determine which content item to insert into the email for each recipient.
The Match Conditions page opens after you complete the definition of the Content Rule Set Propertiespage, or when you navigate directly to it in the Content Rule Set wizard.
159
TIBCO® Reward User's Guide

Fields and Features
You can use the Match Conditions page to describe a content rule set by using the following controlsand fields:
Add New Match Condition button
Click this button to add another rule (also called a "Match Condition") to the existing rule set. A newMatch Condition box is added to the bottom of your current collection, just before the last (Default)box, which is reserved for remaining customers who do not match any defined match condition.
You can reposition the new match condition by using the "Move Up" and "Move Down" links.
Profile & List controls:
Add Profiles & Lists button
Click this button to add profiles and/or lists to the Match Condition you are defining. The SelectProfiles and Lists window opens, and you can select from displays of all existing profiles and lists.When you click the Add Checked button, the selected items are added to the condition.
The order in which profiles and lists are listed within a condition does not matter. If an email recipientis a member of any of the profiles or lists attached to the condition, there is a match to that condition.
Remove (Profile or List)
If a profile or list is currently associated with the match condition and is displayed in the list box to theright of the Add Profiles & Lists button, a control labeled "Remove" is displayed in the same row, atthe right edge of the box.
To delete the associated profile or list and end its association with the match condition you arecurrently defining, click this Remove link.
Remove All (Profiles and Lists) button
To disassociate all profiles and lists from a match condition and remove their names from the list forthe match condition, click the Remove All button.
Move Up/Move Down
To change the order in which a match condition is processed relative to other match conditions in thesame content rule set, use the Move Up and Move Down controls.
Delete
To delete and permanently remove a match condition from the current content rule set, click theDelete link in the upper right corner of the Match Condition box.
This warning notice is displayed: "This action will remove this condition. Do you want tocontinue?"
Click OK to complete the removal of the entire match condition.
Be aware that if all match conditions are deleted, only the default content is provided. If that content isblank, absolutely nothing is added.
Controlling the evaluation order of match conditions. Match conditions are displayed in the order inwhich they are evaluated, from top to bottom. If a given email recipient is a member of a profile or listassociated with the first condition, that recipient is shown the content item associated with thatcondition. (That is, the associated content item is added to the email for this matching recipient.) If therecipient is not a member of the profiles and lists in the match condition, that recipient is evaluatedagainst the next match condition in turn. If a recipient fails to match any condition, the content definedin the default condition, at the very bottom of the list, is added to the email.
A recipient can match more than one condition. In that case, the content associated with the firstsuccessful match to a condition, and no other, is inserted into that recipient's email. You can adjust the
160
TIBCO® Reward User's Guide

order in which any one condition is evaluated with respect to others by clicking its "Move Down" and"Move Up" links. You can also change the processing of a condition by deleting it, naturally.
Content Item controls:
Choose Content button
Click this button to select the content Item to be associated with the match condition you are currentlydefining. The Select a Content Item window opens in which you can select items from a display of allexisting content items.
It is perfectly OK not to select a content item for a condition. In that case, nothing is rendered at thelocation of the content rule set reference tag in your email. The absence of content can be part of yourdesign, so the lack of content is not considered an error.
Remove (Content Item)
If a content item is currently associated with the match condition, a control labeled "Remove" isdisplayed after the title of the content Item.
Click Remove to remove the associated content item and end its association with the match conditionyou are currently defining. This warning notice is displayed: "This action will remove thecurrent content item in this condition. Do you want to continue?"
Click OK to complete the removal of the content item.
Preview (Content Item)
If a content item is currently associated with the match condition, a Preview link is displayed after thetitle of the content item.
Click this link to see a preview of the content item currently associated with the match condition.
Match Condition: DefineBefore you define a content rule set, ensure the following:
● That you have created the content items and the profiles and/or lists you are going to use with eachmatch condition.
● That your content item and your selection of profiles or lists for each match condition address thesame target.
● That you have a default content item, one that can be inserted into the emails to recipients who donot match any of your defined conditions.
If you specify to omit a content item for a given match condition, nothing is added when there is amatch to that condition. Intentional omissions are a legitimate tactic, and it is perfectly acceptable foryour plan to specify the omission of a content Item. However, while the technology fully supports thetactic, almost all instructions assume that a content item is supplied for each match condition. This is toprevent accidental omissions.
Your plan helps you keep track of the lists and profiles that should be associated with each contentitem, so that the components of content rule set are easy to assemble and check.
If you are defining a new content rule set, the two standard approaches are the following:
● Start by defining the first match condition that should be processed, and then proceed to the othermatch conditions in the order.
● Define the last, default content item first, and then return to the top of the list to work on the firstmatch condition and proceed to the others.
161
TIBCO® Reward User's Guide

If you need to leave a content rule set incomplete for more than a short time, the best practice is to leavenotes about any partially defined match conditions, in addition to your plans for the content rule set asa whole.
Defining Match Condition
The following instructions assume that you are defining a new set of matching conditions for yourcontent rule set. If some match conditions have already been defined, click Add New MatchConditions.
Procedure
1. In the first match condition, click Add Profiles and Lists to open the Select Profiles and Listswindow.
2. Add all of the profiles and lists that are part of the match condition.
● In the Select Profiles and Lists window, click Profiles tab.
● Select all profiles that should be added to the match condition you are currently defining. Eachprofile should be checkmarked.
● Click Add Checked to add the selected profiles.
● In the Select Profiles and Lists window, click Lists tab.
● Select all lists that should be added to the match condition you are currently defining. Each listshould be checkmarked.
● Click Add Checked to add the selected lists.
● Click Done in the Select Profiles and Lists window to close it.
The Select Profiles and Lists window closes and the correct items are displayed in the list for thematch condition.
3. Double check the items displayed in the match condition to verify that the correct profiles and listshave been added to the condition. Correct the list, as necessary:
● If required profiles or lists are not displayed in the condition list, repeat steps 1 through 2 to addthem.
● To delete an associated profile or list and end its association with the match condition, click theRemove link associated with it, on the same row to the right.
● To disassociate all profiles and lists from a match condition and remove their names from the listfor the match condition, click Remove All to the left of the list.
4. Choose the content item to be associated with this match condition.
● Click Choose Content.● The Select a Content Item window opens, displaying all existing content items.
● To find a content item, enter part of its name in the text entry box at the top of the window andclick Go. Content items with matching text strings are displayed.
● To preview a content item, click the Preview link associated with it, on the same row to the right.
Note that, because the preview window lacks a specific associated customer name to use as anindex, most personalization fields are not rendered in the preview.
● Click Select link next to the content item. The Select a Content Item window closes, and theselected item is associated with the match condition.
5. Click Save to save your work.
162
TIBCO® Reward User's Guide

6. If you need to add another match condition to your content rule set, click Add New MatchCondition. A new Match Condition box is displayed at the end of your currently definedconditions, and just before the last default rule.
7. To define another match condition, repeat steps 1 through 6.
8. Use the Move Up and Move Down controls to change the order in which your match conditions areprocessed.
9. Click Done.
The definition of a content rule set is not complete until testing is complete. Your test listfor an email with content rule sets should exercise every variation of all the differentcontent items that your content rule set can insert.
Content Rule Set: PropertiesThe Content Rule Set Properties page records the name and other crucial information used to referenceand identify the content rule set. This information is for other CRMS users and for CRMS: it is notdisplayed to users. Defining and saving the content rule set description is the first step in creating anew content rule set or editing an existing content rule set.
The Properties page is displayed when you create a new content rule set, clone a content rule set, oropen an existing content rule set record for editing.
Fields
Use the Properties page to describe a content rule set by recording data in the following fields:
NameIt is the content rule set name that is listed in the table in the main Content Rule Set page. (Maximumcharacters: 45.)
Reference TagIt is the unique identifier for this content rule set that is displayed in emails. This is the text that formsthe unique part of a reference tag to this content rule set. Content rule set reference tags can only usestandard alphanumeric characters and the underscore character: "_"; no spaces are allowed. If yousupply no reference tag text, CRMS assigned ID number is used instead, by default. Modifying thecontent rule set reference tag causes the existing links to fail: rules are not applied and content is nolonger rendered in any emails that include the old tag. (Maximum characters: 30.)
Internal NoteIt is the text used internally in CRMS, and is only displayed on this page. The best practice is to usethis space to record useful summary information about this content rule set. Such information caninclude its intended purpose, a content summary, how it has been modified (if appropriate), caveats,and so on.
After completing work on this page, click Next Step. This saves your work and advances the wizard tothe next page in the workflow.
About Creating Content Rule Set
163
TIBCO® Reward User's Guide

Create a content rule set to add dynamically selected content to an email communication.
A content rule set establishes a set of matching rules using which you can add specific pieces of contentto the individual emails in an email communication. The selection of content that is added to eachindividual email depends on whether that email's address matches a customer specified in one of thematching rules in the rule set.
How is a Content Rule Set used?
When you are using the Edit a Content Item wizard to construct an email communication, you caninsert a reference tag corresponding to the content rule set into the email message. You paste thereference tag exactly where you want the results of the content rule set to be displayed.
164
TIBCO® Reward User's Guide

When the process of generating the email communication commences, the individual emails arepopulated in two stages:
First, if a matching rule in the rule set is triggered, the content item identified by that matching rule isinserted into the email at the location where you placed the reference tag. Then, if the embeddedcontent item contains any reference tags that are supposed to pull data from the database or fromURLs, the next stage replaces these tags with the appropriate database values, or else with the defaultdata that you specify. This adds another level of personalization. White space is not added.
Test Lists and Content Rule Sets - If you plan to send an email communication to a test list, and if thatemail message incorporates content rule sets, be aware that populating the test emails with theappropriate content might delay your receipt of the email.
Follow these steps to create a content rule set:
Select Content > Content Rule Sets > Create New Content Rule Set.
The Edit a Content Rule Set wizard is displayed, which guides you through the completion of thefollowing pages:
● Content Rule Set Properties
● Content Rule Set Match Conditions
After completing each page, click Next Step to advance to the next page until the content item iscompleted.
● It is a good practice to test the variations made possible by adding content rule sets by sending theemail to an appropriately diversified test list.
● You can also clone an existing content rule set record and modify the duplicate copy of the recordthat this generates. This option is very useful when you want to duplicate much of the data used inan existing content rule set.
Editing Content Rule Set
Procedure
1. Start the Edit a Content Rule Set wizard.When you create a new content rule set record or edit an existing content rule set record, the EditContent Item wizard starts automatically, and the Properties page opens first. A new content ruleset record contains no data.
2. Supply the content rule set data field values.
3. Click Next Step.The Edit Content Rule Set wizard's Match Conditions page is displayed.
If you modify an existing content rule set record, leave an update in the Properties page. Ifyou modify an existing record (such as a clone), always review all existing data.
Deleting Content Rule Set
Procedure
1. Select Content > Content Rule Sets.
2. Click Delete on the row of the content set you want to delete.This opens a dialog warning that deleting a content rule set affects all email communications thatuse this content rule set.
165
TIBCO® Reward User's Guide

3. Click OK.
166
TIBCO® Reward User's Guide

Program Microsites
When customers who are loyalty program members sign in to your company's e-commerce website,they typically find Reward web pages that support them and help them make the most out of theirloyalty program. These loyalty program web pages, which constitute a microsite within your larger site,are tightly integrated with your e-commerce pages. The customer never knows that different elementsare hosted by different groups.
Throughout our documentation, microsite refers to these web elements as the loyalty-customer-facingweb portal. In a few instances, the online help refers to specific parts of this microsite, such as theAccount page and the Offer Showcase, which are the two major components of the microsite.
Changes made in CRMS might take up to one hour to become live on the microsite (Rewards Catalog,Offers, and so on.)
Topics:
● About Offer Showcases
● About Mobile Microsite
About Offer ShowcasesThere can be many variations in the way the microsite is implemented. Most of these variations dependon the design decisions your company makes as it integrates its loyalty program. Some designalternatives might exclude others, so not all loyalty program options show up in your site.
One of these microsite options is called the Offer Showcase. If your site includes this site (which mightbe displayed under a different name), this is where special offers, defined in CRMS and supported bythe loyalty program, are presented to the customer.
When defining an offer in CRMS, you can require loyalty program members to use the Offer Showcaseto take advantage of member-only promotions. This option limits access so that only loyalty memberscan take advantage of these offers.
About Mobile MicrositesThe TIBCO Reward Mobile Microsite add-on is a mobile optimized version of the standard microsite.When a program member accesses the microsite using a mobile device, the member is seamlesslyredirected to the microsite that is optimized for mobile devices. The mobile microsite gives programmembers the ability to check point balances, view offers, update account information, and more fromany device that supports a browser such as a mobile phone or tablet, increasing customer activity andengagement with your loyalty program and brand.
167
TIBCO® Reward User's Guide

Clienteling
The TIBCO Reward clienteling add-on is a browser-based interface that supports a simplified set ofexisting customer service representative functions. The clienteling add-on gives store associates theability to easily sign up new members, look up existing members and check members' point balancesfrom any device that supports an Internet browser such as a tablet, mobile phone, personal computer,or web-enabled Point of Sale (POS).
Refer to User: Roles for more information about clienteling users.
Topics:
● Clienteling: Access
● Clienteling: Creating Users
Clienteling: AccessClienteling users can access the clienteling user interface, which is used to look up and/or enrollcustomers in the loyalty program. Clienteling users do not have access to CRMS or CSR.
For clients who have implemented the clienteling add-on, the following user types can access theclienteling Interface:
● Administrator
● Category Manager
● Clienteling User
● CSR Admin
● CSR User
● Publisher
● Store Manager
The following user types do not have access to the clienteling interface:
● Advanced Reporting User
● API User
● Existing Customer User Types
Clienteling: Creating Users
Procedure
1. Navigate to the Admin > CRMS Users page.
2. Select clienteling user type.
3. Click Add.This opens the Create Clienteling User page.
4. Fill in the following:
● First Name : the first name that is used to identify and greet this clienteling user.
● Last Name : the last name that is used to identify and greet this clienteling user.
● Email Address : this must be a valid email address for this clienteling user. It is this emailaddress that CRMS typically uses to send confirmation emails.
168
TIBCO® Reward User's Guide

● Password : create a unique password for this clienteling user.
● Re-enter Password : confirm the new password.
● Select Stores : associate this clienteling user with selected stores so that the clienteling user’sactions are linked to a selected store for reporting and analytical purposes.
5. Click Done.
You can also add clienteling users through file. Please refer to Create Users via File Import.
169
TIBCO® Reward User's Guide

Rewards
This section explains the Rewards pages in CRMS.
Topics:
● Reward Codes
● Reward Items
● Reward Catalogs
Reward CodesYou can use the reward code functionality to create offers that issue codes as rewards. The two types ofreward codes are:
● Unique Reward Codes● Non-unique Reward Codes
These examples demonstrate the difference between types of reward codes. You can create a non-unique reward code called “FreeShip,” which can be used by multiple customers when they earned freeshipping versus using a unique code such as “123456,” which is issued only to a single customer.
Reward codes can be distributed to members through outbound communications or the offer showcase.
170
TIBCO® Reward User's Guide

Reward Code: RequirementsReward codes must be uploaded from a file on your computer. Your list must contain one or morecodes, separated by line breaks.
Import lists must be ASCII text files. Other formats can cause imports tofail.
Here is a sample file:
090034000001
090034000002
090034000003
171
TIBCO® Reward User's Guide

090034000004
090034000005
Uploading Unique Reward CodesUnique reward codes use an inventory of code values, each of which is unique and issued once to acustomer. If you are using unique reward codes, you must upload your inventory of code values beforeyou issue them as rewards.
Procedure
1. Navigate to Rewards > Reward Codes.
2. Select Create New Unique Reward Code.The Edit Unique Reward Code screen is displayed.
3. Define properties for this unique reward code:
None of these values are visible to end customers.
NameCreate a descriptive name for this reward code. This value is displayed in the grid of codes on theReward Codes landing page.
Reference TagEnter a unique identifier for this code. This value is the primary identifier for this code used by theReward hosted microsite, as well as Reward APIs. Note that this value must be unique among allother reward codes.
Stored ValueCan be None, Monetary units, Monetary units off, % off, or other. Depending on yourintegration with Reward, this value can be passed to you or a third party through the RewardsFile.
Internal NoteUse this space to record notes about the reward code.
Enable Dynamic Expiration Date check boxExpiration can be static (all codes expire on the same day) or dynamic (code expires X days afterthe Award Date or Offer Start Date).
4. Upload unique code values in the Code Inventory section of the screen: Click Browse to find yourunique reward codes file on your computer.
If you have uploaded codes, you see an indication of the remaining inventory, plus thestatus of all prior uploads in the Current Inventory field.
5. Click Upload.
6. You can set an expiration date for the unique code by clicking the calendar and selecting a date.Leave this field empty for no expiration date.
7. Click Next Step.
172
TIBCO® Reward User's Guide

Defining a Non-Unique Reward CodeYou can use non-unique codes to define a single code value that is issued to multiple customers. A non-unique code is issued an unlimited number of times by default. Optionally, you can define a limit byentering a number in the Issue Limit field.
Procedure
1. Navigate to Rewards > Reward Codes.
2. Select Create New Non-Unique Reward Code.The Edit Non-Unique Reward Code screen is displayed.
3. Define properties for this non-unique reward code:
None of these values are visible to end customers.
NameCreate a descriptive name for this reward code. This value is displayed in the grid of codes on theReward Codes landing page.
Reference TagEnter a unique identifier for this code. This value is the primary identifier for this code used by theReward hosted microsite, as well as Reward APIs. Note that this value must be unique among allother reward codes.
Stored ValueCan be None, Monetary units, Monetary units off, % off, or other. Depending on yourintegration with Reward, this value can be passed to you or a third party through the RewardsFile.
Internal NoteUse this space to record notes about the reward code.
Enable Dynamic Expiration Date check boxExpiration can be static (all codes expire on the same day) or dynamic (code expires X days afterthe Award Date or Offer Start Date).
4. In the Code Inventory section of the screen:
● Enter a Code value. Your code can be up to 45 characters in length, and can consist of anycombination of alphanumeric characters. Codes are not case-sensitive.
● Optionally, you define the Issue Limit, which defines the maximum number of times that thiscode can be issued. Leaving this field blank results in this code being issued continually, withno limit.
5. Click Next Step.This opens the Presentation page where you can define the customer facing properties for yourreward code.
173
TIBCO® Reward User's Guide

Setting Up a Reward Code Inventory AlertThe reward code inventory alert sets a threshold for when to notify you that the reward code inventoryis running low. Set the threshold as a percentage of the available reward code inventory.
Procedure
1. Go to CRMS > Admin > Main Settings > Alerts.
2. Enter the email addresses for all alert recipients.
3. In the Reward Code Inventory Threshold Alert section of the page:
● Check When a reward code inventory fall below xx% of available inventory.
● Enter the % of available reward code inventory when an alert should be sent.
4. Click Done.
Reward ItemsThe Reward Items page shows existing rewards. You can also create reward items.
Creating Reward Item
174
TIBCO® Reward User's Guide

Procedure
1. Navigate to Rewards > Reward Items.
2. Click Reward Items > Create New Reward .The Manage Reward Item page is displayed.
3. Fill in the required values in the Properties section:
NameThis is the name used to identify this reward in CRMS. It is displayed as the title of the reward inthe showcase (also known as, the Member Portal). Although CRMS does not require this textstring to be unique, a unique name serves to prevent confusion.
Reward IDYou can use this field to assign an ID to this reward. This ID is for internal use; it is displayed onlyin CRMS. It is not displayed in the showcase. Although CRMS does not require this text string tobe unique ID, using a unique Reward ID is a good practice.
175
TIBCO® Reward User's Guide

Redeem ValueThis is the number of points required to obtain this reward. Enter an integer numerical value. Thisvalue is displayed in the showcase.
Reward CodeYou can use this button to select already created or uploaded reward codes.
DescriptionThis description text is for internal use; it is displayed only in CRMS and not in the showcase.
Internal NoteThis internal note text is for internal use; it is displayed only in CRMS and not in the showcase.
4. Click Select Code.
5. Configure the graphical representation of the reward item in the Presentation section:
Current Reward Image – This image is required. If you do not have an image of the reward item,provide a suitable placeholder image as a substitute. After you have selected the path and file name,click Upload. The image you selected is displayed at the left, immediately beneath the label,"Current Reward Image".
The CRMS provides two ways to identify the image file to display with the reward:
● Select an existing product image: You can use the product name or SKU to search for theproduct image.
Or
● Select from uploaded media: Click Browse to open a standard "Choose File" navigation tool.
Be sure to click Upload after the path and name of the image are selected.
6. When you have completed this page, click Done.You can also create a new reward by cloning an existing reward. This creates a duplicate of thereward, which can be easily modified to define a different award. Cloning is especially useful whenyou want to duplicate most of the attributes of the existing reward.
Reward Item: File RequirementsYour reward items file must be in one of the following formats:
● CSV Comma delimited
● Text Tab delimited
Additionally, your reward items file must include the following columns, in this exact order:
● Reward ID
● Reward Name
● Description (optional)
● Redeem Value
● Image URL
Column headers are optional in the file.
176
TIBCO® Reward User's Guide

Uploading a Reward FileInstead of manually entering your reward items, you can upload a file containing multiple rewarditems.
Procedure
1. Click Reward Items > Upload Rewards File.
2. Click Browse to find reward items file you want to use.
3. Click Upload.
An error message is displayed if you attempt to upload a reward items file that does notcomply with the content and formatting requirements.
4. When you have successfully uploaded the reward file, click Done.
Click Download Sample Files to download sample files that you can use as a formattemplate for your own reward file.
Reward CatalogsYou can use the Reward Catalogs page to load your own reward items into a catalog that is used forreward redemption by customers on their hosted microsite.
Reward Catalog: SettingsThe Reward Catalogs page displays Catalog Settings with the following catalog settings, which definehow catalog items should be sorted:
Redeem Value AscendingYou can arrange all of the reward items in order (left to right, top to bottom) according to theredemption value assigned to the item, with the lowest-valued items displayed first.
Redeem Value DescendingYou can arrange all of the reward items in order (left to right, top to bottom) according to theredemption value assigned to the item, with the highest-valued items displayed first.
Date Modified, Newest FirstYou can arrange all of the reward items in order (left to right, top to bottom) according to theredemption value assigned to the item, with the newest (most recently added) items displayed first.
Date Modified, Oldest FirstYou can arrange all of the reward items in order (left to right, top to bottom) according to theredemption value assigned to the item, with the oldest items (those added longest back in the past)displayed first.
The Manage Existing Reward Catalogs displays the existing reward catalogs, along with their name,reference ID, number of items in the catalog, and the date it was last modified. Click the name of thereward catalog to edit the values for these fields. Additionally, you can clone or delete the rewardcatalog from this page.
Creating a Reward Catalog
177
TIBCO® Reward User's Guide

Procedure
1. Select Reward Catalogs > Create New Reward Catalog.
2. In the Reward Catalog Details page, enter:
NameA name for this catalog.
Reference ID
178
TIBCO® Reward User's Guide

If you intend to access your reward catalogs through Reward APIs, enter an identifier for thiscatalog. This Reference ID must be a unique value among your other reward catalogs.
Internal NoteAdd notes or comments about this catalog.
3. Click Next Step, which displays the Reward Catalog Details page.
4. Click Add Reward Items, which displays the Select Reward Items page.
5. Select the Reward Items check box to be included in the catalog.
6. Click Add Checked.
7. Click Next Step, which displays the Targeting page.
8. Click Save or Done.
179
TIBCO® Reward User's Guide

Reports
This chapter describes reports available in CRMS.
Topics:
● About Reports
● Reports: Customer
● Reports: Offer
● Reports: Email
● Reports: Specialized
● Point Expiration
About ReportsCRMS reports provide access to a specific sets of reports, including the following:
● Customer
● Offer
● Specialized
● Point Expiration
Reports reflect the Reward database, which is typically updated nightly with batch files. If the specifiedperiod for a report (the report time frame) is not yet over, the data in the report might reflect only themost recent nightly update of the database.
Standard Format and General Information
Most reports include three components:
● Report parameter settings
● Graphic data display
● Data table
Reports: Parameter SettingsMost reports include a short section at the top of the page, using which you can adjust some of theparameters of the report. The time period covered by the report is the most common parameter setting,for example. You can use some reports to specify the status of the customers whose data is reported (forexample, Registered, UnRegistered, or All). Changing the report parameters causes graphics to beredrawn and the report data to be revised.
If a report or a line in a report is based on a specified period of time, but that period of time has not yetended, then the current date is used as the end date. This affects values that represent time duration orvalues based on calculations in which duration is a factor.
Reports: Graphic Data DisplayDepending on the types of data represented, the graphic can take the form of a line chart, bar chart, piechart, and so on. Note that the graphic display can have a label or subtitle somewhat different than thename of the report overall. The graphic might in fact illustrate only one aspect of the data madeavailable in the report, using only a small subset of the total data.
180
TIBCO® Reward User's Guide

The graphic data display can be augmented by a short table that supplies supportive details. Be awarethat a longer table—the one that fulfills the primary purpose of the report—might be displayed belowthe table that supports the graphic. Always scroll through the entire report and check for additionaltables and row data.
Reports: Data TableThe table presenting the report data can be extensive and can include linked items that open additionaldetail oriented reports. A data table often includes multiple sections, and can supply sub-total orsummary information at the bottom of a section.
Data tables often include data that is not updated in real time. For example, the membership reportmight be based on the most recent nightly update of the membership count.
Specifying the Time Period
Most reports present information for at least one time period: a week, month, quarter or year, or a timeperiod defined by a set of "custom dates" that you define using calendar date controls. This is alsoknown as the "reporting timeframe". Using a few reports, you can request data for another time periodso that you can compare data for the two different periods.
To specify a custom date range, enter a Start date and an End date.
● The Start date is defaulted to a month earlier than current date.
● The End date is defaulted to today.
When you change the time period covered by a report, the report is reprocessed.
As a rule, you should specify the time period for the report (the "reporting timeframe") as soon as thereport is displayed, to avoid waiting for a default report to be processed.
Using custom dates, you can specify the exact date range that a report should cover. The data displayedon the report is based on the range selected. If you pick the current week, current month, currentquarter, and so on, some of the most recent data might not be available. The delay varies, depending onthe type of data, how it is transmitted and processed, and how your company has set up its datatransfers and processing with TIBCO Reward.
You can sometimes improve the accuracy of a recent, short-term report (for example, the most recentweek) by setting the end date to a date two or more days earlier than the current date.
Terminology Used in Reports
Certain terms are used repeatedly to identify different types of data in the reports. Here are thedefinitions of those terms:
Customer state/provinces – enrollment statusUsually the reports compare data about registered versus unregistered customers (that is, enrolledversus unenrolled customers). Sometimes these reports refer to "anonymous" customer data, that is,transaction file data collected that is not associated with a loyalty program member.
Registered [customer] – EnrolledRegistered as a member of your loyalty program
Unregistered [customer]Current customer for whom a customer database record exists, but who is not currently enrolled as aloyalty member
Unique
181
TIBCO® Reward User's Guide

Refers to different individual customers. For example, the same customer can never be counted twiceif the label refers to a "unique customer".
In some reports, the term "active" refers to customers who made a purchase during the time periodcovered by the report. An active registered customer is a customer who is registered (enrolled in yourloyalty program) and who has completed a transaction during the reporting timeframe.
Customer CountThe quantity of unique (individual) customers in the report timeframe, or in a level of a report, whomeet the stated criteria.
Net TransactionsThe quantity of transactions occurring within a report timeframe or report level. Returns (transactionswith negative value) are counted as negative transaction. Even exchanges (zero value transactions) arenot counted as transaction.
The Net Transactions count can easily be misinterpreted if your POS system does not match item returntransactions to item purchase transactions. For example, if a customer buys multiple items in onetransaction, that counts as one transaction. If the same customer returns just one of the items on asubsequent day, the return transaction might count as one negative transaction. With respect to the nettransaction value, the return of the one item in this scenario effectively cancels the purchase of severalitems. (Note, however, that some POS systems match the purchase and return transactions, whicheliminates this problem.)
Net Monetary Unit SalesThe sum of the monetary unit value of all transactions occurring within a report timeframe or reportlevel.
Average SalesThe ratio of net sales to customer count at the end of each report timeframe or period.
Net Unit SalesThe sum of the unit quantity in all transactions occurring within a report timeframe or report level.
Customer CountQuantity of unique customers making a purchase in each timeframe level.
Reports: CustomerThe Customer Reports page provides access to reports in the following categories:
● Customer Reports
● Tier Reports
For general information about setting up, reading, and using reports, including details about theirstandard format, contents, column and row headings, refer to About Reports.
Sales Performance by Customer States (Time Series Analysis)This report analyzes spending amount and transaction quantity by customer type by individual storeor by all stores combined. The customer type refers to the account status and includes unregistered (notenrolled) customers, registered (enrolled) customers, and total customers (enrolled and not enrolled).
It also provides a good representation of the distribution of business by store, or by all stores combined.Graphical comparison shows spending by customer type over time, and can be used to spot short andlong term trends in spending behavior with variations by customer status.
182
TIBCO® Reward User's Guide

Customer Purchase Activity ReportThis report lists the number of customers who performed a transaction over specified periods of time.
You can use the report to compare customer purchases over two comparable periods of time. Itprovides two graphics and two corresponding sets of customer activity data. You can select or definethe two periods. For each period, the report lists the number of customers who have made a transactionduring two specified periods (usually of the same length of time). You can use this report to comparecustomer numbers for these two similar periods.
The reported numbers refer only to the entire customer transaction, that is, to the checkout, the visitsresulting in a purchase of some kind. There is no differentiation among channels, stores, and so on. Twosets of customer numbers are reported: Anonymous customers (any customer who completed atransaction) and Registered customers (enrolled customers).
Customer Activity by Channel ReportThis report actually provides a Channel Activity report. It shows how many customers are using eachchannel (retails stores, eCommerce site, third party channels, call-center, and so on) during a specifiedperiod of time.
For channel data to be included in this report, your company must be reporting data for the channel toTIBCO Reward.
A pie chart graphically shows the relative proportions of the customers using each channel during thespecified time period. Below the chart, numbers in a table further break down the customer data intoquantities of anonymous and registered (enrolled) customers.
Channel Data Listed In Rows
Each row shows information about a different channel, as defined by your company. The order inwhich channels are listed is normally based on the number of customers, starting with the highestnumber and continuing in descending order.
In each row meant to contain store data, the row displays the store name unless the store ID providedby the retailer is not defined in the TIBCO Reward system. In that case, the display lists stores by the IDprovided by the retailer. If the store ID column is null, the label "Unknown" is displayed.
Sales Performance Comparison (Time Series Analysis)At the top of this report, before the data table, this report features a set of store-oriented graphics thatcan compare the sales performances of two stores over time, or compare the sales average of one storeagainst the sales average of all stores.
This report shows how the spending behavior of customers varies over time by store and customerstatus. It can indicate whether certain stores and/or enrollments are leading to a higher spending levelsover time, or indicate whether sales are shifting based on store attributes or initiatives. The data tablebreaks the numbers down into registered, unregistered, and total customer categories for furtheranalysis.
Sales Performance by Customer StatesThis report presents customer, transaction, sales totals, and sales averages in tabular form for all storesand channels, by customer type (Registered, Unregistered, and Total/Both).
When you first open this report, it also displays, on the first page, a bar chart showing data for your topten sales channels. This bar chart shows the average sales for both registered and unregisteredcustomers at some of your most successful stores and/or channels.
This report is useful when you want to see basic sales figures for registered versus unregisteredcustomers. It also provides sales numbers for your channels, and you can compare channels and their
183
TIBCO® Reward User's Guide

loyalty program enrollment levels. The report helps you to see which loyalty program initiatives lead tohigher spending levels over time, or if sales are shifting from one store to another.
Each report covers a period of time that you specify, either by selecting a standard option (for example,this week, last week, this month, last month, this quarter, last quarter, YTD, and so on) or by usingcalendar controls to specify any range of dates that interests you.
Individual Channel/Store Sales Performance Detail Report
If your site includes store data, and you click the name of an individual store (which is set up as a link),another more detailed level of reporting might be displayed, showing details about the salesperformance of the selected channel or store over smaller segments of time within the specified period.
Rows containing web, catalog, and other channel data do not necessarily have linked names, andcorresponding detail reports for these channels are not necessarily available through this report (SalesPerformance by Customer States).
At the detail report level, unregistered versus registered customer data is displayed in the bar chart,and a table lists data for Unregistered (not enrolled), Registered (enrolled), and Total (both) customers.
Notes on column headings and how values in columns are derived.
Customer CountQuantity of unique customers making a purchase through the specified channel. This number is notmutually exclusive across channels. For example, a customer who buys in two channels shows up inboth columns. This means that the Total column is not the sum of the Channel columns.
Net TransactionsQuantity of transactions occurring within this channel. Returns (transactions with negative value) arecounted as a negative transaction. Even exchanges (zero value transactions) are not counted as atransaction. Net transactions are mutually exclusive across channels.
Net Monetary Unit SalesSum of the monetary unit value of all transactions occurring within this channel.
Average SalesNet sales divided by customer count at the end of each period.
Net Unit SalesSum of the unit quantity in all transactions occurring within this channel.
Notes on Channel data listed in rows
This report includes rows of information about all stores and channels. Stores are listed first, then othercategories (web, catalog, customer-defined). Stores are listed in order by total sales; the store with thehighest total sales for the specified period is listed first; the store with the lowest is last.
In each row containing store data, the row displays the store name unless the store ID provided by theretailer is not defined in the Reward system. In that case, the display lists stores by the ID provided bythe retailer. If the store ID column is null, the label "Unknown" is displayed.
The last row contains the grand totals for all channels.
Gender Breakdown ReportThis report, also known as Total Customer Breakdown by Gender, includes a pie chart depicting thecustomer population, with segments identified as Male, Female, and Unknown (gender not stated).
The data is not broken down into channels, customer types, or any other subcategory other thangender.
184
TIBCO® Reward User's Guide

Sales Performance by Customer Stated Category PreferenceThis report shows sales performance data (net sales, transactions, units) for customers who expressedpreferences for one or more product categories. At their sign up, customers are asked to select theirproduct category preferences. The product categories listed in this report are the same productcategories presented to customers at that time.
This report includes a horizontal bar chart and a data table. The bar chart shows the net sales, withinthe dates selected, for the customers who selected a category preference from one of the top tencategories. The data table provides more types of sales data, and also provides data about thecustomers who did not express a category preference. The data table also contains data for moreproduct categories.
You can select the period of time from which the sales performance data is drawn. You can also selectone of the following options from a drop-down field to select the number of categories included in thereport:
● Top 10 Categories by Total Net Sales (selected by default). Note: The bar chart always shows the topten product categories.
● Top 20 Categories by Total Net Sales
● Top 50 Categories by Total Net Sales
● Top 100 Categories by Total Net Sales
Retailers can use this data to understand what categories their customers are most interested in, andhow sales correspond to a customer’s preferences.
Notes on column headings and how values in columns are derived.
All data is current as of the date the report is run.
CategoriesIt is a list of categories. Note that this includes the catch-all category for customers who did not specifya category preference; this is titled, "No Stated Category Preference."
This list also includes a "Total" category.
The number in each column of the Total row is not the sum of the values in that column. Each rowrefers broadly to a category, but some customers specify preferences for multiple categories, so thecustomer counts do not add up. The sales, transactions, and units in the category rows do not add up tothe corresponding total numbers either, because they reflect the total sales (in any category) associatedwith any customer who purchased within that category.
● Registered (enrolled) Customer Count in each category, as of the date the report is run. Registeredcustomer count is the count of registered customers as of the end date of the selected period.
● Active customers in each category (that is, individual customers who expressed preferences withinthe category within the specified time period).
● Total Net Sales is total net sales in any category, within the dates selected, for the customers whoselected the category preference.
● Net Transactions is net transactions in any category, within the dates selected, for the customers whoselected the category preference.
● Net Units is net units purchased, within the dates selected, by the customers who selected thecategory preference.
Notes on Channel data listed in rows.
Categories
185
TIBCO® Reward User's Guide

The number of listed categories is based on your selection. Categories are sorted by total net sales(high to low) and displayed in a flat list.
No Stated Category PreferenceThis row includes sales data for customers who did not provide category preferences.
TotalTotals of the net sales for all customers (regardless of their category preferences) over the timeselected. This data covers both the customers who did and did not express a category preference. Notethat this is not the sum of data in the above rows (because customers can select more than onecategory and their data can be displayed in more than one row).
Reports: OfferThe sole offer report provided on this page is the All Offer Performance Report.
All Offer Performance ReportThe All Offer Performance Report provides, for each offer made available during the specified timeperiod (the reporting timeframe), a line graph and a table.
This report shows, for every offer open over the selected timeframe, the key metrics used to comparethe performance of offers.
The line graph shows the Views, Accepts, and Total Redeems of all offers published during thespecified time period (the reporting timeframe).
The table provides data describing each offer that was made live during the reporting timeframe. Eachrow includes the Views, Accepts, and Total Redeems, and also the Unique Redeems and theRedemption value of the redeemed offers.
Notes on graph labels, table headings and how values are derived:
ViewsThe number of times the offer has been viewed. If, because of the page design, the customer does notneed to open a separate view page, this number might be low or zero.
AcceptsThe number of times the offer has been accepted (according to click records).
Unique RedeemsThe number of unique customers who have redeemed the offer.
Total RedeemsThe number of times the offer has been redeemed.
Redemption RevenueThe revenue associated with the redemptions.
Ignore the Refer a Friend (RAF) data in this report. The Refer a Friend data is displayed in this reportbecause Refer a Friend is fundamentally a special type of offer, albeit one that has special qualificationlogic and award rules. Note, however, that because of its special characteristics and essential differencesfrom normal offers, Reward does not support the Refer a Friend (RAF) data in this report.
Reports: EmailUnder the Reports tab, CRMS offers the Email Reports page. This Email Reports page provides accessto reports in the following categories:
186
TIBCO® Reward User's Guide

● Campaign Reports
● List Management Reports
This Reports page provides a brief description of each email report, including details about specificfeatures and definitions of each type of data in the report.
Campaign Summary ReportThis report provides information about CRMS campaigns, including the following:
● The campaign’s start and end dates
● The number of people who received the sent emails
● The response to the email campaign
● The quantitative value of the response
The report lists the campaigns that took place during the time period you specify (the reportingtimeframe).
For detailed reports that include data about each campaign, click the name of the campaign under theCampaign Name heading. (Campaign names are set up as links.) The Campaign Detail Report isdisplayed, showing data for the selected campaign.
You can also see campaign detail reports for any campaign by clicking the link to the Campaign DetailExecutive Report. You must know the name of the campaign for which you want details.
Notes on column headings and how values are derived:
Tracking Start DateThis is the tracking start date that was defined for the campaign. This is the first date wheninformation about sales associated with the campaign is tracked. The tracking start and end datesdefine the period for which sales is tracked. It is called the tracked period.
Tracking End DateThis is the tracking end date that was defined for the campaign. This is the last date when informationabout sales associated with the campaign is tracked.
SentSum of the individual emails sent during the tracked period.
RecipientsThe number of unique customers who received an email communication during the campaign'stracked period. This is based on a simple difference calculation: sent emails minus bounced emails.
RespondentsThe number of recipients who made a purchase during the campaign's tracked period.
Response RateA ratio: Respondents divided by Recipients, expressed as a percentage.
Response (Rate) LiftThis equates to the following: (Promoted Group Response Rate - Control Group Response Rate)/Control Group Response Rate; where Control Group Response Rate is the number of customers in thecontrol group who made a purchase during the tracking period divided by the total number ofmembers of the control group). Note that this value is set to "N/A" if one or more communicationswithin the campaign do not have a control group.
187
TIBCO® Reward User's Guide

Tracked SalesSales from the promoted group during the tracked timeframe.
Sales Per RecipientThis equates to the following: Tracked Sales/Recipients.
Sales Per RespondentThis equates to the following: Tracked Sales/Respondents.
Incremental Sales Monetary Units (versus Control Group)This equates to the following: Recipients * (Promoted Group Sales per Recipient – Control Group Salesper control group population). Note: This value is set to "N/A" if one or more of the communicationswithin the campaign does not have a control group.
Duration in DaysThis is the number of days tracked, based on a difference calculation: the end date minus the startdate. Note: If the campaign is still in progress, the current date is used as the end date.
Incremental Sales Monetary Units Per DayThis equates to the following: Incremental Sales Monetary Units/Duration. Note: This value is set to"N/A" if one or more of the communications within the campaign does not have a control group.
Campaign Detail Executive ReportThis report includes data about each email communication associated with a campaign.
To open this report, navigate to the Reports > Email page and click the link to this report. Then selectthe name of the campaign from the drop-down list.
Notes on column headings and how values are derived:
SentSum of individual emails sent during the tracked period.
RecipientsThe number of unique customers who received an email communication during the campaign'stracked period. This is based on a simple difference calculation: sent emails minus bounced emails.
RespondentsThe number of recipients who made a purchase during the campaign's tracked period.
Response RateA ratio: Respondents divided by Recipients, expressed as a percentage.
Response (Rate) LiftThis equates to the following: (Promoted Group Response Rate - Control Group Response Rate)/Control Group Response Rate; where Control Group Response Rate is the numbers of customers inthe control group who made a purchase during the tracking period divided by the total number ofmembers of the control group). Note that this value is set to "N/A" if one or more communicationswithin the campaign do not have a control group.
Tracked SalesSales from promoted group during the tracked timeframe.
Sales Per Recipient
188
TIBCO® Reward User's Guide

This equates to the following: Tracked Sales/Recipients.
Sales Per RespondentThis equates to the following: Tracked Sales/Respondents.
Incremental Sales Monetary Units (vs. Control Group)This equates to the following: Recipients * (Promoted Group Sales per Recipient – Control Group Salesper control group population). Note that this value is set to "N/A" if one or more of thecommunications within the campaign does not have a control group.
Duration in DaysThis is the number of days tracked, based on a difference calculation: the end date minus the startdate. Note: If the campaign is still in progress, the current date is used as the end date.
Incremental Sales Monetary Units Per DayThis equates to the following: Incremental Sales Monetary Units/Duration. Note: This value is set to"N/A" if one or more of the communications within the campaign does not have a control group.
Lack of Control Group Results in "N/A" values.
If even one email communication associated with the campaign is not assigned a control group, allvalues that rely on control group numbers become invalid, and are omitted from the reports for acampaign. They are replaced with the value "N/A". Specifically, values in the following columns areomitted: Response (Rate) Lift, Incremental Sales Monetary Units (versus Control Group), andIncremental Sales Monetary Units Per Day. To see these values, every email communication associatedwith a campaign must have a control group.
Campaign Detail Extended ReportThis report includes data about each email communication associated with a campaign. It provides allof the data supplied by the Campaign Details Executive Report and also provides the following dataabout the control group:
● Control Group Population
● Control Group Respondents
● Control Group Response Rate
● Control Group Tracked Sales
● Sales Per Control Group Member
To open this report, navigate to the Reports > Email page and click the link to this report. Then selectthe name of the campaign from the drop-down list.
Control groups are required for all email communications in a campaign.
If even one email communication associated with the campaign is not assigned a control group, none ofthe values that are based on comparisons with a control group are provided in the reports. They are allreplaced with the value "N/A". To see values in the columns listed, or in the other columns that dependon control group, all email communications associated with a campaign must have a control group.
Columns/values that depend on control group include the control group values and also the following:
● Response (Rate) Lift
● Incremental Sales Monetary Units (versus Control Group)
● Incremental Sales Monetary Units Per Day
189
TIBCO® Reward User's Guide

Email Performance Executive ReportThis report provides information about the success of the email in terms of the numbers of recipientswho received, opened, and used the email. View email delivery, open, click-through rates and otherresults for all emails sent during the reporting timeframe that you specify.
Notes on column headings and how values are derived:
Publish Start DateThe publishing start date for the email communication: the first day that published information aboutthe offer became available to customers.
Publish End DateThe publishing end date for the email communication: the last day that published information aboutthe offer was available to customers.
Quantity SentThe number of emails assigned and sent to a unique address for this email communication.
Delivery RateThe percentage of sent emails that arrived at their addresses. In other words, this is the ratio ofdelivered to sent emails.
Quantity BouncedThe number of unique sent emails that were bounced. The reason can be a hard bounce or a softbounce.
Bounce RateThe percentage of sent emails sent that were not delivered. In other words, this is the ratio of uniquebounced emails to unique sent emails. The reason can be a hard bounce or a soft bounce.
Quantity DeliveredThe number of sent emails that arrived at their address for this email communication.
The Bounce Rate plus the Delivery Rate = 100%.
Opens UniqueThe number of individual emails with a unique address that were opened.
Regarding Open-Related Values in This Report: The embedded image used to track the opening of anemail is not accessible in text-based emails, and some email providers block this image so that the linkassociated with the image is not triggered. The result is that a view (that is, an "open," which is anindividual viewing of an email) is not tracked by the most direct means available, and the opening ofthe email might not be counted. However, if the customer clicks on any trackable link in the email andif the email was not already tracked (that is, counted as a viewed email), Reward assumes that the emailwas in fact opened and viewed, and the email is reported as an opened email.
OpensThe total number of times that recipients of an email communication opened the email, includingrepeated openings of the same unique mail. For example, if the same recipient opens one individualemail thrice, each of these three instances of opening are included in this count.
Unique Open Rate
190
TIBCO® Reward User's Guide

The ratio of individual emails with a unique address that were opened divided by the number of suchemails that were delivered. In other words, this is the ratio of unique opened emails to uniquedelivered emails.
Unique ClicksThe total number of individual emails with a unique address that were delivered and that therecipient interacted with, by clicking at least one tracked link.
Unique Click RateThe ratio of clicked emails to delivered emails. That is, the ratio of emails with which the recipientinteracted by clicking a tracked link divided by the number of emails that were delivered.
Email Performance Extended ReportThis report provides information about the success of the email in terms of the numbers of recipientswho received, opened, and used the email. View email delivery, open, bounce-data, click-through ratesand other results for all emails sent during the reporting timeframe.
This report includes three types of values that are set up as links to additional detail reports:
Notes on column headings and how values are derived
Communication NameThe name of the email communication. All data in the row references this email communication. Thename links to the Email Communication Report.
Publish Start DateThe publishing start date for the email communication: the first day that the published informationabout the offer became available to customers.
Publish End DateThe publishing end date for the email communication: the last day that the published informationabout the offer was available to customers.
Quantity SentThe number of emails assigned and sent to a unique address for this email communication.
Delivery RateThe percentage of sent emails that arrived at their addresses. In other words, this is the ratio ofdelivered to sent emails.
Quantity BouncedThe number of unique sent emails that were bounced. The reason may be a hard bounce or a softbounce.
Bounce RateThe percentage of sent emails sent that were not delivered. In other words, this is the ratio of uniquebounced emails to unique sent emails. The reason may be a hard bounce or a soft bounce.
Quantity DeliveredThe number of sent emails that arrived at their address for this email communication.
The Bounce Rate plus the Delivery Rate = 100%.
Opens Unique
191
TIBCO® Reward User's Guide

The number of individual emails with a unique address that were opened.
OpensThe total number of times that recipients of an email communication opened the email, includingrepeated openings of the same unique email. For example, if the same recipient opens one individualemail three times, each of these three instances of opening are included in this count.
Unique Open RateThe ratio of individual emails with a unique address that were opened divided by the number of suchemails that were delivered. In other words, this is the ratio of unique opened emails to uniquedelivered emails.
Unique ClicksThe total number of individual emails with a unique address that were delivered and that therecipient interacted with, by clicking at least one tracked link.
Unique Click RateThe ratio of clicked emails to delivered emails. That is, the ratio of emails with which the recipientinteracted by clicking a tracked link divided by the number of emails that were delivered.
UnsubscribedThe total number of unique emails to which the recipient responded by unsubscribing (clicking thelink that results in a customer opt-out).
Unsubscribed RateThe rate of unsubscribe requests (generated by clicks from within this email communication) todelivered unique emails.
Clickthrough Analysis by EmailThis report provides the click-through results for all trackable links in an email communication. Youselect the email communication to be the subject of this report, and the resulting report lists thefollowing data for each trackable link:
LinkLink text strings are listed, not necessarily in alphanumeric order. Be aware that you have the optionto assign a name to a link. This name is an alternate to the entire text of the link, and can be shorterand easier to recognize and interpret than the full length link text.
Unique clicksThe number of unique customers who clicked on a link in an email communication.
% (percent) of deliveredThe ratio of clicks on a link to unique emails delivered. More specifically, the total number of clicks onthe link in an email communication as a percentage of the unique emails delivered for thatcommunication.
% (percent) of opensThe ratio of clicks on a link to unique emails opened. More precisely, this is the total number of clickson the link in an email communication expressed as a percentage of the unique emails in thatcommunication that were opened.
192
TIBCO® Reward User's Guide

Email Performance over TimeThis report provides hourly updates about "opens" of an email and clicks on links in the email. For thepurpose of this report, an "open" is an instance of a recipient opening a unique email; any click of atracked link in the email is considered a "click".
This report covers the first three days after the publish start date.
This report includes a line graph and a table; both show unique opens and unique clicks on an hourlybasis for the first three days from the offer publish date. This data is refreshed nightly.
The graph shows when larger numbers of emails are being opened during the first three days.
The table provides supporting numerical detail -- also hourly, and also for the first three days -- forunique opens count, repeated opens and clicks within the same unique email.
Notes on graphics labels, column heading, and how the values are derived
Opens UniqueThe number of individual emails with a unique address that were opened.
OpensThe total number of times that recipients of an email communication opened the email, includingrepeated openings of the same unique mail. For example, if the same recipient opens one individualemail thrice, each of these three instances of opening are included in this count.
Unique ClicksThe total number of individual emails with a unique address that were delivered and that therecipient interacted with, by clicking at least one tracked link
ClicksThe total number of clicks on a tracked link in opened individual emails with a unique address
Email Report: Email Bounce AnalysisThe bounce descriptions used in the Email Bounce Analysis Report are derived from those supplied byBoogieTool.com®; Reward's third party partner, which actually performs the bounce analysis. The toolused to process the bounces is called BoogiePOP Advantage™.
This table contains definitions for the various terms used in the bounce analysis report.
Activity Type Description Examples
Auto Reply (AR) An automatic response fromthe recipient.
“Out Of Office”,
“Vacation Message”
Bounce With No EmailAddress (BN)
BoogiePOP Advantage (the toolused by Reward's third partypartner, which performs thebounce analysis) determinedthat the message was a bounce,but it could not resolve theoriginal email recipient emailaddress. Rare.
193
TIBCO® Reward User's Guide

Activity Type Description Examples
Challenge-Response Message(CR)
A Challenge-Response messageis an automatic response fromthe recipient, requesting thatthe sender confirm that a realperson is sending the message.Generally, confirmation iscompleted manually byclicking on a hyperlink withinthe Challenge-Responsemessage itself.
Feedback Loop Report A feedback loop is a system bywhich the ISP provides thesender a copy of a message thata subscriber has reported asspam – usually by hitting a"Report Spam" button.
General Bounce (GB) The email server could notdeliver your email message, butthe bounce message wasunclear as to what kind ofbounce it was. Most BoogiePOPAdvantage users treat these assoft bounces.
“Subject: Undeliverablemail”
Hard Bounce (HB) The email server could notdeliver your email message.
“550 User Unknown”
Mail Block - General (MB) Indicates that the recipient’semail server is blocking emailfrom your email server.
“550 Message REFUSED bypeer”
Mail Block - Known Spammer(MBKS)
Indicates that the recipient’semail server is blocking theemail from your email serverbecause it believes you are aknown spammer.
“REJECT Known SPAM source”
Mail Block - Spam Detected(MBSD)
Indicates that the recipient’semail server is blocking emailfrom your email server becausethe message seems to havecontent that looks like spam.
“550 Possible spamdetected”
Mail Block - AttachmentDetected (MBAD)
Indicates that the recipient’semail server is blocking emailfrom your email server becausethe email message contained anattachment.
“552 Disapprovedattachment”
194
TIBCO® Reward User's Guide

Activity Type Description Examples
Mail Block - Relay Denied(MBRD)
Indicates that the recipient’semail server is blocking emailfrom your email server.
“551 relaying denied”
Non Bounce (NB) BoogiePOP Advantagedetermined that the messagewas not a bounce. This could bea recipient reply, or might be abounce format that BoogiePOPAdvantage did not recognize.
Soft Bounce - General (SB) The email server is temporarilyunable to deliver your messageto the recipient email address.
“Connection timed out”
Soft Bounce - DNS Failure(SBDF)
The email server is temporarilyunable to deliver your messageto the recipient email addressbecause of a DNS problem.
“Host is unreachable”
Soft Bounce - Mailbox Full(SBMF)
The email server is temporarilyunable to deliver your messageto the recipient email addressbecause the recipient’s emailbox is full.
“Mailbox over quota”
Soft Bounce - Message Size TooLarge (SBMS)
The email server could notdeliver your message to therecipient because the messagesize is too large.
"Exceeded maximum inboundmessage size”
Subscribe Request (SR) Someone is requesting to beadded to your opt-in email list.BoogiePOP Advantage looksfor subscribe requests in thesubject header of the emailmessage, and on the first line ofa text based email message.
Transient Bounce (TB) The email server temporarilycan not deliver your message,but it is still trying.
“Warning: message stillundelivered after 4
hours. Will keep trying
until message is two days
old”
195
TIBCO® Reward User's Guide

Activity Type Description Examples
Unsubscribe Request (UR) Recipient is requesting to beremoved from future emailfrom you. BoogiePOPAdvantage looks forunsubscribe and removerequests in the subject headerof the email message, and onthe first line of a text basedemail message.
List Performance Summary ReportThis report provides data concerning the performance of a selected set of your lists based on sale datafor a specified time period. Specify one time period from which the lists are selected and another timeperiod from which the sales totals are collected. (The two periods can of course overlap or be exactlythe same.)
This report includes a horizontal bar chart and a data table.
The bar chart shows the top ten lists from your selection, rated according to their net sales for thespecified period.
The data table provides a row of data for each list. Each row includes the following data for each list:
List NameThis is the name assigned to the list by CRMS user who created it.
List IDThe CRMS-assigned identification number assigned to each list, which serves to provide a unique IDfor each list.
List Creation DateThe date when the list was created in or introduced into CRMS. Although the list might have existedearlier in another environment, this date refers to the creation of the list with respect to the CRMS listmanagement system.
Customer CountThe total number of customers in each list. More accurately, this is the customer count for each list --based on the customer count when the list was created. Be aware that the names in each list arevalidated for format when they are created, that is, when they are imported into CRMS. This tends toreduce the size of some externally generated lists by a small percentage. Note that the total customercount is the count of all unique customers -- not just those on a list – as of the end of the specifiedperiod.
Active Customer CountThe total number of customers in each list who made a purchase within the sales dates selected.
Total Net Sales Monetary UnitsThe total number of sales monetary units produced as income by active customers in a list within thedates selected. This number accounts for returns.
Net Transactions
196
TIBCO® Reward User's Guide

The total number of net transactions by active customers in a list within the dates selected. Refundsand returns (transactions with negative value) are counted as a negative transaction. Even exchanges(zero value transactions) are not counted as a transaction.
The net transactions count can easily be misinterpreted if your POS system does not match item returntransactions to item purchase transactions. Consider if a customer buys multiple items in onetransaction, that counts as one transaction. If the same customer returns just one of the items on asubsequent day, the return transaction might count as one negative transaction. With respect to the nettransaction value, the return of the one item in this scenario effectively cancels the purchase of severalitems. (Note, however, that some POS systems match the purchase and return transactions, whicheliminates this problem.) Thus, the net transactions value can be skewed towards a conservativemeasure, depending on how your POS system processes returns.
Net UnitsThe total number of net units sold during the dates selected.
The totals on the bottom line are not the totals of the numbers listed directly above in the samecolumns; rather, they are totals of the unique customers, unique active customers, and their relateddata. (Because multiple lists inevitably overlap with each other, a simple total of the listed numberscounts the same customer data multiple times yielding incorrect figures.)
The total value for Net Sales Monetary Units is simply the total sales over the time selected. This valuedoes not apply to list names, list ID and list creation date; it is simply the total sales over the timeselected.
List Performance Time Series ReportThis report provides data showing the performance of a list over time. You select the list and the timeperiod. You can also select the time frames or increments into which the report data is divided; forexample, you can specify that you want a month's worth of data presented in weekly increments.
This report provides a line graph and a data table.
The line graph shows, for the specified time period, the performance of the list in terms of the salesgenerated by the list members, on a weekly basis.
The data table includes a row for each time increment in the report (of a length determined by yourspecification). Each row includes data under the column headings.
Notes on column headings and how values are derived
Registered Customer CountQuantity of unique registered customers (Loyalty Program members) in the list. This customer countis the count of registered customers as of the end date of the period for each row.
Unregistered Customer CountQuantity of unique non-registered customers (non-Loyalty Program members) in the list. Thiscustomer count is the count of non-registered customers as of the end date of the period for each row.
Active Registered Customer CountQuantity of unique registered customers in the list who made a purchase in the timeframe level.
Active Unregistered Customer CountQuantity of unique unregistered customers in the list who made a purchase in the timeframe level.
Net Sales Monetary Units (Registered Customers)Total sales to registered customers in the list, for transactions occurring within the timeframe level.
Net Sales Monetary Units (Unregistered Customers)
197
TIBCO® Reward User's Guide

Total sales to non-registered customers in the list, for transactions occurring within the timeframelevel.
Net Transactions (Registered Customers)Quantity of transactions by registered customers occurring within the timeframe level. Returns(transactions with negative value) are counted as a negative transaction. Even exchanges (zero valuetransactions) are not counted as a transaction.
Net Transactions (Unregistered Customers)Quantity of transactions by non-registered customers occurring within the timeframe level. Returns(transactions with negative value) are counted as a negative transaction. Even exchanges (zero valuetransactions) are not counted as a transaction.
Net Unit Sales (Registered Customers)Sum of the unit quantity in all net transactions by registered customers occurring within thetimeframe level.
Net Unit Sales (Unregistered Customers)Sum of the unit quantity in all net transactions by non-registered customers occurring within thetimeframe level.
Reports: SpecializedThe Specialized Reports page actually includes reports in several categories:
● Specialized Reports
● Signage Reports
● Activity Reports
● CSR Activity Reports
General rules:
Click the name of a report to generate it. You can customize the contents and format of most reports. Assoon as the report opens, select the subject of the report and specify the time periods that you want thereport to cover.
Customer Recency Report
Both the graph and the table in this report show how many customers (both registered and anonymouscustomers) made a purchase every week in the past year. This report shows the most recent purchasemade by your customers.
A registered customer is a customer enrolled in your loyalty program. An anonymous customer is anon-registered customer who performed a transaction.
Anonymous customers cannot be distinguished from one another or from one transaction to the next,so it is possible that individuals who make multiple purchases (without identifying themselves) arecounted multiple times as anonymous customers.
This report does not provide calendar dates.
Points Time Series Report
Also known as the Points Summary Report, this report shows points earnings and redemption dataover time.
This report shows your outstanding points liability, that is, the number of points your company hasawarded that have not been redeemed.
198
TIBCO® Reward User's Guide

To set up this report, select the total report timeframe that the report covers, and the smaller timeincrements (periods) for which data is reported.
For each incremental period of time covered by the report, the following data is provided:
# Customers Earning Points (No Offers)The number of unique customers who earned points outside of an offer (that is, points awarded by themain program, tiers, clubs, or by CSR agents).
Total Points Earned (No Offers)The total number of points earned by unique customers who earned points outside of an offer (that is,points awarded by the main program, tiers, clubs, or by CSR agents).
# Customers Earning Points (Offers)The number of unique customers who earned points through an offer.
Total Points Earned (Offers)The total number of points earned by unique customers who earned points through an offer.
Total Points Used (Awards)The total number of points used (that is, redeemed, spent, burned) by customers in exchange forrewards.
Total Awards Earned (monetary units)The monetary unit value of the total points earned by customers.
Number of Awards EarnedThe number of awarded units earned by customers.
Outstanding PointsThe total number of points earned by customers that currently remain unused or unredeemed (andunexpired, if your company causes points to expire). Note that there is no total shown on the bottomline in the Outstanding Points column; this is because each row shows a running total for the giventime period. Totals for each of these values over the entire report timeframe are also provided (exceptfor the outstanding points values, which already take the form of running totals).
Signup and Membership ReportThis report shows the number of signups and closed accounts for a selected reporting timeframe, andalso the number of currently registered members.
You select the total report timeframe that the report covers, and the time increments (periods) for whichthe data is reported.
Included in the report are two line graphs and a data table. The first report indicates the number of newsignups and account closures per reporting period. The second report indicates the membership overtime.
The data table shows, for each reporting period, the following data:
New Signups (in time period)The number of new loyalty program enrollments during an increment of time.
Closed Accounts (in time period)The number of loyalty program un-enrollments during an increment of time.
Total Active Accounts
199
TIBCO® Reward User's Guide
The number of currently enrolled loyalty program members at the end of a reporting time period.
This report is a good indicator of the effectiveness of recruiting new members. A decline in signupsmight warrant an initiative or drive to sign up more members.
Custom Question Detail ReportThis report shows how customers responded to a selected custom question and provides sales data forcustomers based on their response (including non-response) to that custom question. Sales data issupplied for each category of customers, where the categories are defined as the customers who gavethe same response to the question.
The report includes a bar chart and a data table.
The bar chart shows the percentage of customers who gave one answer or another, or no answer; andthe percentage of total sales (from the population exposed to the question) that came from eachcustomer category.
The numbers returned from customer responses can add up in different ways. Many questions havejust one answer, that is, one alternative. One customer supplies one answer to one such question, andthis counts as one "Unique Customer Response". However, some questions have multiple responses; forexample, any question whose instructions say, "Check all that apply." For questions such as these, onecustomer can supply multiple responses. For these questions, each selected check box or button countsas one "Unique Customer Response".
Notes on custom question data listed in rows
The data table addresses the total population that was asked to respond to the question. Sales data isprovided for the following:
● The total population, including those who answered and those who did not; labeled "Total"● Each group of customers that clicked on a particular response.
● The population subgroup that clicked on any of the possible responses; labeled "Total for anyAnswer".
● The population subgroup that did not click any response; labeled "No Answer".
Notes on column headings and how values in columns are derived:
Unique Customer-RespondersThe number of unique (different) customers responding to the custom question
Net TransactionsThe total number of transactions associated with the unique customers during the specified timeperiod.
Net SalesThe sum of the sales associated with the unique customers during the specified time period.
Net UnitsThe sum of the units sold in transactions associated with the unique customers during the specifiedtime period.
% of total customersThe percentage of the total number of customers asked to respond to this custom question. For theTotal row, this is always 100%.
% of total sales
200
TIBCO® Reward User's Guide

The percentage of total sales associated with the customers asked to respond to this custom question.For the Total row, this is always 100%.
Sales per customerThe net sales figure divided by the number of Unique Customer-Responders.
File Import Summary Report
The File Import Summary Report provides status updates and other useful information about theoutcome of their batch imports or list file uploads. It also provides access to details about each importfile.
To set up this report, use the controls at the top of the report.
● To select a timeframe for the report, choose from the drop-down list of standard options, orcustomize the timeframe by specifying a range of dates. If you change the timeframe, click thebutton labeled View Report to be sure that the report is regenerated.
● Navigate through the report by using the arrow controls. You can also find data by searching forstrings that occur in the report. Use the data entry box in front of the Find control.
● To create another copy of the report with a different format, select a formatting option from theSelect a Format drop-down box, then click Export.
● Click the printer icon to initiate the printing of the current report.
For each file imported within the time period that you specify, the File Import Summary Report lists thefollowing fields:
File Import IDThis is a file ID assigned by the system in accession order. Each new file is assigned the next number,so a higher number indicates a more recent file. Files are listed from highest ID to lowest ID (withinthe specified timeframe for the report).
File NameThe name composed of standard filename elements, including date
Start DateThe start date of the file generation
End DateThe end date of the file generation
File TypeThe type of file that was imported, for example: TransactionImport, StoreImport, ProductImport,and so on
StatusSuccessful or Failed
Details link – Click this link in the File Import Summary Report to see the File Import Details Reportfor the associated file.
The File Import Details Report has two variations:
● If the file import failed, the File Import Details Report lists information in fields titled FailureReason and Suggested Action.
201
TIBCO® Reward User's Guide

● If the file import succeeded, the File Import Details Report lists file data and statistics, including therecord type, the number of records in the file, and the number of records that were successfullytransmitted.
In the case of certain files, a file import can partially succeed (some records are transmitted but othersare not) and the file import is considered a success. In this case this report specifies the number ofrecords successfully transmitted, and the number of records that failed to be transmitted.
Report: Signage
Web Signage Summary Report
For each web signage that you have defined, this report provides data about the usage of the signage,including information about how much it has been viewed and how much it has been used.
You can use this report to create a table of summary usage data about All signages, or just the Live,Paused or Saved signages. The table includes summary data for each signage, and totals for all signagedata listed in the table.
Notes on web signage data listed in rows
The data table lists data for each web signage defined in your system. Each web signage is listed in aseparate row. To see details about a particular piece of web signage, double-click the name of thesignage. The name is set up as a link; clicking opens the Web Signage Detail Report for that signage.
Data totals are displayed for all of the web signage in the current table.
Notes on column headings and how values in columns are derived
ViewsThe number of separate views of a signage (or the total of all views of the listed signage).
CustomersThe number of unique (different) customers who clicked the signage.
Views Per CustomerThe number of separate views of a signage per customer. This is the average number of views percustomer.
Total ClicksThe total number of clicks on the selected signage.
Total Unique ClicksThe total number of customers who clicked on this signage.
Unique Click Through RateA ratio of the customers who clicked on the signage to the number of customers who viewed thesignage.
When you specify the parameters of this report, you can filter your view of the available signage byselecting just the Live, Paused or Saved signages from the drop-down selector box. You might want tocompare the usage of Live signage against the signage that has been put into Paused or Saved modebecause, for example, such signage represents seasonal or otherwise temporary signage that has beenretired or taken out of use.
Web Signage Detailed Report
For a selected piece of web signage and a selected period of time, this report provides data about theusage of the signage.
202
TIBCO® Reward User's Guide
To use this report, you select one piece of web signage from a drop-down list of all signages defined inyour system. Then you specify the time period to be covered by the report.
Notes on web signage data listed in rows
The rows list usage of the selected signage by registered customers, by unregistered customers, and byall (total) customers. Each row includes information about how much the signage has been viewed andhow much it has been used (clicked on) during the specified time period.
Notes on column headings and how values in columns are derived
ViewsThe number of separate views of a signage (or the total of all views of the selected signage)
CustomersThe number of unique (different) customers who clicked the signage
Views Per CustomerThe number of separate views of a signage per customer. This is the average number of views percustomer
Total ClicksThe total number of clicks on the selected signage
Total Unique ClicksThe total number of customers who clicked this signage
Unique Click Through RateA ratio of the customers who clicked the signage to the number of customers who viewed the signage.
Report: ActivityAn activity is a task that can be completed on a web site. The successful completion of an activity can bemonitored over the web, and a customer's completion of an activity can be used to qualify thatcustomer for an offer.
Activity Analysis Report
This report indicates the performance of current and past activities and provides data. For each activity,two rows are displayed: one for customers who performed the activity, and one for customers who didnot.
The data table shows, for each row corresponding to an activity, the following data:
PerformedY (Yes) or N (No). N refers to "Not Performed", which is used to refer to customers who did notperform a specified activity. Be aware that not performing an activity can be selected and used as anactivity-based criterion.
Activity CountThe number of times this activity is completed over a period of time. Be aware that some activities canbe completed multiple times by the same customer. Others can be completed just once by eachcustomer. The activity count is based on instances of the completion of the activity. Multiplecompletions are counted multiple times.
Customer CountThe number of customers who are counted as satisfying the activity-based criterion during a timeperiod, as defined by your report set-up parameters
203
TIBCO® Reward User's Guide

Monetary Units SalesThe total sales over the specified time period to the specified customers.
Unit SalesThe number of separate units sold over a specified time period to the specified customers.
TxnThe transactions over the specified time period performed by the specified customers.
Click the linked name of the activity to open the Activity Time Series Report and see detailed data forthe activity. You have to define all parameters for this more detailed report.
Activity Time Series Report
This report shows the spending of customers who performed (or did not perform) a specified activityover a specified period of time. The report includes both a line graph and a data table.
You can specify data in both the activity and spending categories.
With respect to the activity, select the following:
● The customer activity to be used as a test criteria
● Whether the test checks for performance or non-performance of the selected activity
● The report timeframe for the activity data to be covered in this report
With respect to the spending, select the following:
● The time increment that each row of the report data addresses
● The report timeframe
● Spending data to be covered in this report
You can specify different time periods for an activity and for spending. Always check both specifiedperiods to make sure that you get precisely the results that you need to compare.
The line graph shows, for each incremental period, two types of data:
● The activity count, that is, the number of times the activity was completed. Specifying "notperformed" during the report set up does not change this count.
● The customer count, that is, the number of customers who are counted as satisfying the activity-based criterion during a time period, those who did or did not perform a specific activity, as definedby your report set-up parameters. Specifying "not performed" during the report set up cancompletely change this count.
The data table shows the following data, for each row corresponding to an incremental period:
<Time period> EndingThe end date of your selected incremental reporting period: daily, weekly, monthly, quarterly,annually
Activity CountThe number of times this activity is completed over a period of time. Be aware that some activities canreasonably be completed multiple times by the same customer, and others are completed just once byeach customer. The activity count is based on the completion of the activity. Specifying "notperformed" during the report set up always changes this count to zero (0).
Customer Count
204
TIBCO® Reward User's Guide

The number of customers who are counted as satisfying the activity-based criterion during a timeperiod, as defined by your report set-up parameters.
Monetary Units SalesThe total sales over the specified time period to the specified customers, as defined by your report set-up parameters
Unit SalesThe number of separate units sold over a specified time period to the specified customers, as definedby your report set-up parameters
TxnThe transactions over the specified time period performed by the specified customers, as defined byyour report set-up parameters
Report: CSR Activity
CSR Activity Breakdown Report
For a specified period (the report timeframe), this report provides a data table that lists each customerservice activity for one selected CSR or for all CSRs, along with associated activity-related data.
If you have the privileges to see this report, for example, if you are a CSR administrator, select the user(CSR) whose data you want to see, or you can select All to see data for all CSRs. Click the down arrowat the right of the Users drop-down selection field to see the comprehensive list of CSR users fromwhich you can select.
You can also set the timeframe for the report, the period of time that the report data covers.
The data table shows, for each activity completed by a CSR, the following data:
Date/TimeThe date and time of the CSR activity.
CSR NameThe name of the CSR. Note that the names of all who perform a CSR activity are recorded, regardlessof their assigned role or privileges.
Customer First NameThe first name of the customer whose record is affected by an activity, based on the record data (canbe abbreviated or absent).
Customer Last NameThe last name of the customer whose record is affected by an activity, based on the record data. (canbe abbreviated or absent.)
Customer EmailThe email of the customer whose record is affected by an activity, based on the record data.
Activity IDThe unique, CRMS-assigned identification number for the activity.
ValueFor some -- not all -- activity actions (see next field description), a value is added. For example:
205
TIBCO® Reward User's Guide

● For Deactivate account, the Value column displays an I.
● For Reactivate account, the Value column displays an A.
● For Added customer points, the Value column displays the number of points.
Activity Action NoteThe name of the activity performed by the CSR. Here is a partial list (samples) of possible CSRactivities:
● Deactivate account
● Reactivate account
● Added customer points
● Updated customer info
● Added loyalty card
● Enrolled Customer
● Unenrolled Customer
● Added customer points
● Created customer info
Point Expiration
Point Expiration Forecast ReportReport information and format:
Column Headings
● Customer Email Address
● Point Balance : as the end date selected.
● Potential Points Burned : number of points burned (redeemed or spent) during the conversionprocess. Based on current point balance and current auto-conversion rule or reward catalog items,these are the points that are converted into rewards.
● Potential Award Value : award value as aggregate for the customer. If the monetary units value isnot defined, show N/A.
● Points to be Expired : number of points left after the conversion takes place. Any remaining pointsthat cannot be automatically converted into rewards are expired on the set expiration date.
Row Headings
● Customers
● Total (for all columns except Email Address)
Sort Order
● Based on point balance (high to low)
Notes on Totals:
206
TIBCO® Reward User's Guide

● Totals are aggregate numbers.
● Point balance is the aggregate point outstanding for the retails as of the end date.
● Points burned is how many points were burned for all customers.
● Total award value: aggregate for all customers. If it is not defined for all customers, display N/A.
● Point balance after burning points: how many points are left and are burned out or lost for allcustomers.
Sample Contents:
Customer EmailAddress
PointBalance
PotentialPointsBurned
Potential Awardvalue
Points to be expired/Remaining Points
6000 4000 NA 2000
[email protected] 1000 0 10 monetaryspend
1000
10000 9000 100 monetaryspend
1000
Total 17000 13000 NA 4000
Reports: Ad-hoc ReportingYou can now leverage the power of Jaspersoft reporting in ad-hoc reporting to create robust static andinteractive reports using the advanced data analysis capabilities of Jaspersoft.
Configuring Ad-hoc Reporting
Creating Users for Ad-hoc Reporting
Procedure
1. Navigate to the Admin > CRMS Users page.
2. Select the User Type.
3. Click Add.
4. Select Allow Ad-hoc Reporting in the Create New User page.
5. Click Done.
Editing Users for Ad-hoc Reporting
Procedure
1. Navigate to the Admin > CRMS Users page.
2. Select the user you want to edit.
3. Click Edit.
207
TIBCO® Reward User's Guide

4. Select Allow Ad-hoc Reporting in the Edit User page.
5. Click Done.
Accessing Ad-hoc Reporting
After you have created users with Ad-hoc reporting capabilities, follow these steps to access Ad-hocreporting:
Procedure
1. Navigate to the Reports > Ad-hoc Reports page.
2. This opens the Ad-hoc Reporting user interface.Contact your customer loyalty manager about enabling Ad-hoc reporting functionality.
208
TIBCO® Reward User's Guide

Admin
This section provides information about CRMS administration.
Topics:
● Main Settings
● CRMS Users
● Partners
● Announcement
● Custom Attributes
● Custom Entities
● Customers
● Generic Events
● Product Taxonomy
● Tiers
Main SettingsCRMS administrators can use the Admin > Main Settings page to define, modify, and review severalcategories of high-level information about their Loyalty program, including account information,member point limit, point configuration, list import, and alert settings.
If you are not a CRMS administrator, some or all of the information categories are not available in theMain Settings page.
Features and FieldsThe options and information of the Main Settings page are listed by section.
Manage Account Information Section
Your Information lists the current user name, email address and company. Click Your Information toopen the Edit Your Information page. Use it to edit the name, email address, and the associatedpassword.
Configuration Management Section
You can use Member Point Limit to create an offer that awards either a fixed point award, or a numberof points based on the member's Point Award Limit, whichever is the lowest. You must define themember's Point Award Limit in the transaction import file that you exchange with Reward.
You can use Points Configuration to configure the following:
● You can use Point Vesting Configuration to define an amount of time between when a memberearns a Point award, and when those points become available for them to redeem ("vested"). If pointvesting is enabled, the members are able to view their available points balance, as well as theirpending points balance, in their My Account pages.
● Point Reset Configuration controls what happens to a customer's points when their account isdeactivated, or they are unenrolled.
List Import defines how list records are saved into the system.
You can use Alerts (also known as Customer and Aggregate Threshold Alerts) to define thresholds fora variety of metrics. When a threshold is exceeded, an alert email is sent to an address entered in thissection.
209
TIBCO® Reward User's Guide

● Send alerts to email address(es) - Enter one or more comma-separated email addresses in this field.The best practice is to include the email address of each person responsible for reacting to a checkedthreshold alert.
● Customer Threshold Alerts
The following alerts are triggered when a customer's behavior exceeds entered values:
— Single transaction monetary units : triggered when the monetary unit amount in a singletransaction is greater than this setting.
— Single transaction points awarded : with bonuses and accelerations, a single transaction cangenerate a large point total.
— Single transaction items purchased : you receive an alert when the number of items pertransaction exceeds the specified amount.
— Daily total monetary units : monetary Units spent between 3 A.M. yesterday and 3 A.M. todayPacific time.
— Daily total points : points earned in a day, including bonuses and accelerations, but excludingCSR adjustments.
— Daily total items : a single customer purchases more individual SKUs in a day than this setting.
— Rolling 7 day period total monetary units : a single customer spends more than this setting inthe prior 7 day period.
— Rolling 7 day period total points : earns more points than this setting in the prior 7 day period.
— Rolling 7 day period total line items : triggered if, in the last 7 days, a purchase of a number ofindividual SKUs exceeds the entered amount.
● Aggregate Threshold Alerts
The following aggregate threshold alerts are triggered when overall activity for a day exceeds thechosen value:
— Daily total monetary units : the sum of all monetary units spent between 3 A.M. yesterday and 3A.M. today Pacific time.
— Daily total points awarded: the sum of all points awarded between 3 A.M. yesterday and 3 A.M.today Pacific time.
● Reward Code Inventory Threshold Alert sets a threshold for when to notify that the reward codeinventory is running low. Set the threshold as a percentage of the available inventory.
Configuration: List ImportUse the List Import Settings page, which is accessible through the Admin > Main Settings page, todefine settings that determine how list records are saved into CRMS.
Features and Fields
Allow updates
This feature is not supported at the current time, and changing its settings does not have any effect onexisting records or data.
This control offers two options: existing customer records either will or will not be updated whenimporting a list. Will not is the default setting.
This control only applies to existing customers.
Reward strongly advices that you leave this option set to "WILL NOT" at all times. Contact clientservices before changing this setting, or to resolve any related questions.
Import and create new record as:
210
TIBCO® Reward User's Guide

This control offers two options for importing new customers:Unregistered Customers
If importing as unregistered customers, all new email addresses are added as unregistered customers.If an imported email address already exists in the database, no existing customer record is modified.This means that if an existing customer is currently a member of the loyalty program (registered), andif that existing customer is imported, that customer stays registered.
Registered Customers
If importing as registered customers, all new email addresses are added as registered members. Notethat these new members are treated immediately as such. For example, CRMS sends any enabledWelcome trigger emails to them. If an imported email address already exists in the database, noexisting customer record is modified.
To navigate to the page, click Admin > Main Settings. Then, in the Configuration Managementsection, click List Import. The List Import Settings page opens. Each setting uses a drop-down menu asthe control.
1. Do not change the Allow Updates default setting unless you have been directed to do so by RewardClient Services.
2. To reset the Import and create new record as setting, select the correct value from the drop-downmenu.
3. To reset the Email Opt-in setting, select the correct value from the drop-down menu.
List Import: Email Opt-In
This control offers two options: Opted-In or Opted-Out. List email addresses can either be imported asOpted-In to receive email, or Opted Out. As most users import a list for the express purpose of sendingemails, the default setting is Opted-In.
● Changing the Email opt-in only applies to new customers. The email opt-in value for existingcustomers is not changed.
● Email addresses in Test lists receive test emails, regardless of the email opt-in status of customers inthe test list.
● You are asked to confirm the "opt-in" status every time you import a list with set to "opted-in".Importing or updating the email addresses of customers who have not provided their expressedand verifiable permission to receive your email, and characterizing these addresses as "opted -in",could cause your company to violate anti-spam legislation such as the CAN-SPAM act, EU Opt-InDirective, or CASL, and so on.
● Email addresses are validated when they are imported. The fundamental email addressrequirements and validation rules cannot be changed.
Configuration: Points
Configuration: Member Point Limit
Use Member Point Limit to create an offer that awards either a fixed point award, or a number ofpoints based on the member's Point Award Limit, whichever is the lowest. The member's Point AwardLimit is set in the transaction import file that is exchanged with Reward. You can set limits, percustomer, that determine what the customer gets versus what is earned, as well as when the customercan accept and redeem an offer.
Enabling the Member Point Limit makes a new award type available to you: "Points up to memberpoint limit". Offers that use this award type either award (a) a fixed number of points as specified at thetime of , or (b) the number of points as specified by you, for this customer, in the transaction import file.
211
TIBCO® Reward User's Guide

The loyalty program must be in place for this setting to be valid.
Follow these steps to enable the Member Point Limit:
Before you start this process, the member point limitation transaction data must be imported. Contactthe Reward Data Integration team for details.
1. Select Admin > Main Settings.
2. In the Configuration Management section of the screen, click Member Point Limit.
3. Select the Enable Member Point Limit check box. If the Member Point Limit is disabled after havingbeen enabled, all New, Saved, and/or Pending offers that use it get converted to regular fixed-offers.
4. Click Done.
Points: Expiration Options
Point-expiration examples:
1. Points expire after a predefined period of time has elapsed since the accrual of the points. To do this,a date is set through back-end configuration for every year (or month or quarter) for all points toexpire. To ensure that points for the period have been accumulated and counted correctly, theexpiration usually occurs on the third day after the close of the period. For example, if the points fora given calendar year are supposed to expire at the end of the year, the expiration actually occurs onJanuary 3 of the next year (three days after the year ends).
2. Points expire if the customer is no longer an "active" shopper, that is, if the customer has not made apurchase in a predefined number of months (or days), the customer's points expire.
Points expire if the customer has not used points over a predefined period after earning them. Forexample, if you define the period of time as one year, the points that a customer earns on January 2,2013 expire on January 3, 2014.
Configuration: Account LockoutTIBCO Reward platform detects and prevents unauthorized access to your system by your BusinessUsers (CRMS and reporting users) and/or Customer Accounts (microsite and mobile microsite users)using the Account Lockout feature.
Account lockout rules protect against unauthorized account access by locking out accounts whenincorrect passwords are used. Use the Security Management page to configure if and when accountsare locked out, how long accounts are locked out, and the message that is displayed when an account islocked out.
Setting Up Account Lockout Rules
Procedure
1. Navigate to Admin > Main Settings.This takes you to the Main Settings page.
2. Click Account Lockout Rules in the Security Management section of the Main Settings page.This takes you to the Account Lockout Rules page.
3. Configure your Account Lockout Rules on this page, including:
● Lockout Threshold
● Lockout Observation Window
● Lockout Duration
212
TIBCO® Reward User's Guide

● Lockout Messages
Following is the way you can set these account lockout parameters.
Lockout Threshold
The first step in setting up Account Lockout Rules is to define your Account Lockout Threshold. TheLockout Threshold is the number of incorrect password attempts that causes the account to be lockedout. Setting the Lockout Threshold to Never results in accounts never being locked out, even aftermultiple failed login attempts. The default number of failed login attempts that triggers an accountlockout is four failed login attempts.
Use the Lockout Threshold pull-down list to set the Lockout Threshold by selecting the number offailed login attempts that cause the system to lock out an account.
After setting your Lockout Threshold, proceed to defining your other account lockout rules.
Lockout Observation Window
The Lockout Observation Window is the period of time (in hours) to which the lockout thresholdapplies. The default Lockout Observation Window is one hour.
Use the Lockout Observation Window pull-down list to set the Lockout Observation Window byselecting the number of hours (1 to 24) to observe the login attempts.
Lockout Duration
The Lockout Duration is the period of time (in hours) that the account is locked out after meeting thelockout threshold. The default lockout duration is 24 hours or until the account is unlocked manually.
Use the Lockout Duration pull-down list to set the lockout duration by selecting the number of hours(1 to 24) to lockout the account.
You can also set the account-lockout duration based on the task of manually unlocking the accountrather than unlocking the account after a time period has elapsed: Do this by clicking the UntilManually Unlocked radio button. (Please refer to Account Lockout Rules: Unlocking Accounts formore information.)
Lockout Messages
You must provide Account Lockout messages for business users and customer accounts as part of youraccount lockout configuration. The default lockout message for business users is “Oops! Youraccount is locked. Please contact an administrator.” The default lockout message forcustomer accounts is “Oops! Your account is locked. Please contact customer support.”
You can modify the account lockout messages based on your specific account lockout rules. Forexample, if you set the Lockout Duration to one hour for business users, you can update the message tosay “Your account is locked. Please wait one hour before attempting to login again.If you need immediate access, please contact an administrator.”
You can modify account lockout messages by entering new message text in the Business User AccountLockout Message and Customer Account Lockout Message text boxes.
Account Lockout Rules: Unlocking Accounts
When one of your business user’s accounts has been locked out, they can contact one of your loyaltyprogram administrators to have their account unlocked.
When one of your customer’s accounts has been locked out, they can contact one of your customerservice representatives to have their account unlocked.
213
TIBCO® Reward User's Guide

Unlocking Accounts: Business Users
Use CRMS to unlock business user accounts.
Procedure
1. Navigate to Admin > CRMS Users.This takes you to the CRMS Users page.
2. Locate the locked-out user in the list of CRMS Users. Locked-out users have their Status displayedas “Locked”.
3. Click Edit to the right of the business user’s status.This opens the Edit CRMS User page. For locked accounts, there is an Unlock Account button.
4. Click Unlock Account. This unlocks the business user account.
Unlocking Accounts: Customer Accounts
Use CSR to unlock Customer Accounts.
Procedure
1. Click Support.This takes you to the customer management tool, which is also known as CSR.
2. Search for the locked-out customer account by entering customer-specific criteria and then clickingSearch.
3. Click the arrow to the left of the customer’s first name.
4. Click View Details.The Status for locked-out customers, who are loyalty program members, is displayed as “EnrolledMember – Account Locked”.
5. Click Change Status.This opens a dialog displaying the customer’s account status.
6. Click Unlock Account.
7. Click next, and then click Confirm. This unlocks the customer account.
CRMS UsersThis section explains user administration.
User: RolesCRMS user roles include:
● Administrators have "Super User" privileges. They can create new users and assign privileges. Theyare also authorized to create, publish, approve, and schedule offers and loyalty programs.
● Publishers can only schedule offers. They cannot create users.
● Store Managers can create offers for their store, but the offers must be approved by anAdministrator or Publisher. (Contact Reward's Client Services before attempting to assign this roleto a CRMS user.)
● Category Managers can create offers in their product category, for any store, but the offers must beapproved by an Administrator or Publisher. Contact Reward's Client Services before attempting toassign this role to a CRMS user.
214
TIBCO® Reward User's Guide

● CSR Admins can access certain features under CRMS Reports, Support, and Admin menus. Forexample, under the Reports menu, CSR Admins can only access the CSR Activity Report. A CSRAdministrator can only add CSR Users.
● CSR Users can only access certain features under the CRMS Support menu.
● Clienteling Users can access the Clienteling User Interface, which is used to look up and/or enrollcustomers in the Loyalty Program. Refer to Clienteling for more information. Clienteling users donot have access to CRMS or CSR.
— For clients who have implemented clienteling, the following user types can also access theclienteling interface:
— Administrator
— Publisher
— Store Manager
— Category Manager
— CSR Admin
— CSR User
— The following user types do not have access to the clienteling interface:
— API User
— Advanced Reporting User
— Existing Customer User Types
● API Users are API specialists, who cannot access CRMS.
To add or manage Advanced Reporting Users (also known as Ad Hoc Reporting users), navigate to theAdmin > Advanced Reporting Users page.
User: PermissionsThis table is a quick reference for User Types and their permissions.
SystemAdmin
Publisher
StoreManager
CategoryManager
CSRAdmin
CSRUser
APIUser
ClientelingUser
Promote
CreateOffers
X X X X - - - -
Approve
Offers
X - - - - - - -
ViewOffers
X X X X - - - -
DeleteOffers
X - - - - - - -
215
TIBCO® Reward User's Guide

SystemAdmin
Publisher
StoreManager
CategoryManager
CSRAdmin
CSRUser
APIUser
ClientelingUser
Target CustomerProfiles
X X X X - - - -
BasketProfiles
X X X X - - - -
Lists X X X X - - - -
PostalCodes
X X X X - - - -
CustomQuestions
X X X X - - - -
MobileGeolocations
X X X X - - - -
SystemAdmin
Publisher
StoreManager
CategoryManager
CSRAdmin
CSRUser
APIUser
ClientelingUser
Email CreateCommunications
X X X X - - - -
ApproveCommunications
X - - - - - - -
ViewCommunications
X X X X - - - -
CreateCampaigns
X X X X - - - -
216
TIBCO® Reward User's Guide

ApproveCampaigns
X - - - - - - -
ViewCampaigns
X X X X - - - -
TriggerEvents
X - - - - - - -
Stationery
X - - - - - - -
Test &SeedLists
X X X X - - - -
Settings
X X X X - - - -
SystemAdmin
Publisher
StoreManager
CategoryManager
CSRAdmin
CSRUser
APIUser
ClientelingUser
Signage
Signage
X X X X - - - -
Domains
X - - - - - - -
SystemAdmin
Publisher
StoreManager
CategoryManager
CSRAdmin
CSRUser
APIUser
ClientelingUser
Content
Content
Items
X X X X - - - -
Content Rule
Sets
X X X X - - - -
SystemAdmin
Publisher
StoreManager
CategoryManager
CSRAdmin
CSRUser
APIUser
ClientelingUser
217
TIBCO® Reward User's Guide

Rewards
RewardCodes
X X X X - - - -
Reward Items
X X X X - - - -
RewardCatalogs
X X X X - - - -
SystemAdmin
Publisher
StoreManager
CategoryManager
CSRAdmin
CSRUser
APIUser
ClientelingUser
Reports
Customer
X X X X - - - -
Offer X X X X - - - -
Email X X X X - - - -
Specialized
X X X X X
(CSR
activity
reportonly)
- - -
Point
Expiration
X X X X - - - -
SystemAdmin
Publisher
StoreManager
CategoryManager
CSRAdmin
CSRUser
APIUser
ClientelingUser
Admin MainSettings
X - - - - - - -
CRMSUsers
X - - - X
(view/edit
CSRusers
only)
- - -
218
TIBCO® Reward User's Guide

Partners
X - - - - - - -
Announcement
X - - - - - - -
Activities
X - - - - - - -
CustomAttributes
X - - - - - - -
CustomEntities
X - - - - - - -
GenericEvents
X - - - - - - -
Points X - - - - - - -
Reminders
X - - - - - - -
Product
Taxonomy
X - - - - - - -
Tiers X - - - - - - -
SystemAdmin
Publisher
StoreManager
CategoryManager
CSRAdmin
CSRUser
APIUser
ClientelingUser
Loyalty
Refer AFriend
X - - - - - - -
SystemAdmin
Publisher
StoreManager
CategoryManager
CSRAdmin
CSRUser
APIUser
ClientelingUser
Support/ CSR
Search X X X X X X X X
219
TIBCO® Reward User's Guide

Enroll
Customers
X X X X X X X X
EditInfo
X X X X X X - -
EmailPreferences
X X X X X X - -
AdjustPoints
X X X X X X - -
ResetPassword
X X X X X X - -
Merge X X X X X X - -
ChangeStatus
X X X X X X - -
Manage Cards
X X X X X X - -
CustomerView(microsite)
X X X X X X - -
Creating UserOnly Administrators can add new users to the system, with one exception: a CSR Administrator canadd CSR Users.
Procedure
1. Navigate to Admin > CRMS Users.
2. Select User Type (which are described in User: Roles).
3. Click Add.The Create CRMS User page is displayed.
4. Fill in the following:
First NameThis is the first name that is used to identify and greet this CRMS user in CRMS.
Last NameThis is the last name that is used to identify and greet this CRMS user in CRMS.
220
TIBCO® Reward User's Guide

Email AddressThis must be a valid email address. It is the email address that CRMS typically uses to sendconfirmation email to users. Some CRMS features automatically send email information to confirmthat a task has been completed (for example, files, reports). In such cases, the email addressspecified in the feature is used.
PasswordCreate a unique password.
Re-enter PasswordConfirm the new password.
Send account info to userAs a general rule, you want to select the check box and send any new or changed accountinformation to the user, as a confirmation.
5. Click Done.
● A password can only be changed by an Administrator. A CSR Administrator is limitedto changing the passwords of CSR Users.
● All users can request a new password by clicking Forgot your Password? on the CRMSlogin screen.
When new users are created, if adequate information is provided in the User Creation page, anemail is sent to them with a password for accessing their account. Until they log into the system,their account is marked as In Progress. After they have logged in, their account is then markedActive. Administrators can use the Last Log In column to determine if an account is in use anylonger. Accounts not in use should be deleted.
Creating Users Through File Import
Create users through file import when you need to create large numbers of users (for example, uponinitial set up of your Loyalty Program). Note that Import Lists must be ASCII text files. Other formatscan cause imports to fail.
Procedure
1. Navigate to Admin > CRMS Users.
2. Select Add > Users via file import.The Import Users page is displayed.
3. Browse to find the User file.
4. Click Upload (there is an “upload successful” or “upload failed” message).
5. Click Done.The imported users are displayed in the list of CRMS users.
Creating Users Through File Import: Associate Stores
When creating users through file import, there are two user types you can associate with specific stores:Store Managers and Clienteling Users.
Procedure
1. Navigate to Admin > CRMS Users.
221
TIBCO® Reward User's Guide

2. Select Add > Users via file import.The Import Users page is displayed.
3. Click View Sample File.This opens a CRMSUsersSample.csv file. Use this file as a template for your user import files.
4. In the CRMSUsersSample.csv file template, the fifth column defines the user type. EnterStoreManager or Clienteling User in this column.
5. In the CRMSUsersSample.csv file template, the seventh column defines the stores associated withthe Store Manager or Clienteling User. Enter the RetailerStoreID in this column.
Use the pipe character (|) between store IDs when associating more than one store to aStore Manager or Clienteling User.
6. Save your updated CRMSUsersSample.csv file.
7. Return to the Import Users page, and click Browse to find the file from step-6.
8. Click Upload (there is an “upload successful” or “upload failed” message).
9. In the list of CRMS Users, find one of the Store Managers or Clienteling Users you imported andclick Edit.The stores you associated with the Store Manager or Clienteling User in the seventh column of theimported file are displayed.
Creating Users Through File Import: Associate Categories
When creating Category Managers through file import, you can associate the Category Manager withone or more categories.
Procedure
1. Navigate to Admin > CRMS Users.
2. Select Add > Users via file import.
The Import Users page is displayed.
3. Click View Sample File.This opens a CRMSUsersSample.csv file. Use this file as a template for your user import files.
4. In the CRMSUsersSample.csv file template, the fifth column defines the user type. EnterCategoryManager in this column.
5. In the CRMSUsersSample.csv file template, the eighth column defines the categories associated withthe Category Manager. Enter the CategoryName in this column.
Use the pipe character (|) between category names when associating more than onecategory to a Category Manager.
6. Save your updated CRMSUsersSample.csv file.
7. Return to the Import Users page, and click Browse to find the file from step 6.
8. Click Upload (there is an “upload successful” or “upload failed” message).
9. In the list of CRMS Users, find one of the category managers you imported and click Edit.The categories you associated with the category manager in the eighth column of the imported fileare displayed.
222
TIBCO® Reward User's Guide

Resetting Password
Procedure
1. Navigate to Admin > Users.
2. Click Edit User on the right side of the user.
3. Enter a unique password.
4. Reenter the password to confirm it.
5. Optionally, you can send these new credentials by selecting the Send account info to user checkbox.
PartnersPartner programs can extend the ability to award and redeem points through a client’s partner network.For example, an airline might partner with a rental car agency so that members of the airline's loyaltyprogram can earn frequent flyer miles (or points) when program members rent a car with the partnerrental car agency.
Partners can be set up in CRMS. You can define the generic events that are passed by the partners, howto reward the customer on each generic event, and even bill the partner for costs incurred with thosepartner rewards.
You must configure new partner data integration with TIBCO Reward Account Management beforepartner point transfers take effect.
Partner managers use CRMS to do the following:
● Create a new partner.
● Create new point types specifically for the partner.
● Identify the events for which the partner issues awards.
● Associate a billing rate to each point type (for example, base points = 0.03 monetary spend per point,bonus points = 0.02 monetary units per point) that the partner issues.
Partner Offers: Create
223
TIBCO® Reward User's Guide

In CRMS, you can define the generic events that are passed by the partners, how to reward thecustomer on each generic event, and even bill the partner for costs incurred with those partner rewards.
Here are the general steps to set up Partners:
● Partner Offers: Step 1 - Creating Point Type
● Partner Offers: Step 2 - Creating Partner
● Partner Offers: Step 3 - Creating Offer
● Partner Offers: Step 4 - Targeting Offer
● Partner Offers: Step 5 - Launching Offer
224
TIBCO® Reward User's Guide

Partner Offers: Step 1 - Creating Point Type
Procedure
1. Select Admin > Points > Add New Point Type.The Create Point Type screen is displayed.
2. Enter point type name.
3. Click Done.
4. Continue to add point types that are applicable to the partner.
Partner Offers: Step 2 - Creating Partner
Procedure
1. Select Admin > Partners > Add New Partner.The Edit Partner screen is displayed.
2. Enter partner name.
3. Click Next Step.
4. Click Add Event.The Edit Award Event screen is displayed.
5. Enter the award event name.
6. Enter the description of the event. (The description is not visible to the end user.)
7. Select the Use Event Value check box.
Use Event Value must be selected if you want the partner to dictate how many points toaward.
8. Click Update.The Reference Tag for the partner is automatically populated.
9. Continue to add events that are applicable to the partner’s needs.
10. Click Next Step after you have added events for the partner.The Billing Rules screen is displayed.
In the Billing Rules screen, associate a billing rate to each point type (for example, base points = 0.03monetary spend per point, bonus points = 0.02 monetary units per point) that the partner issues.
11. From the Define billing rules for this point type pulldown menu, select the Point Type you createdin Partner Offers: Step 1 - Creating Point Type.
12. Click Add.This opens point range window.
13. Set the point cost.
14. Click Add Range.
15. Click Update.
Partner Offers: Step 3 - Creating Offer
Procedure
1. Select Promote > Offers > Create New Offer.The Edit Offer Details screen is displayed.
225
TIBCO® Reward User's Guide

2. Enter offer name.
3. Enter headline.
4. Enter description.
This description should match the Internal Description and/or Description Line from thepartner worksheet from the initial data integration setup with Account Management.
5. Click Next Step to continue creating the offer.This displays the Qualify & Award step in the Edit Offer wizard.
6. Set the offer to award Points Per Event Value by selecting from the pull-down menu.
7. Select the point type you created in Partner Offers: Step 1 - Creating Point Type from the pull-downmenu.
8. Enter the number of points to be awarded in the text box.
9. Check Enable Custom Award Text, which displays the Enter Custom Award Value text box.
10. Enter the text as it should be displayed on the customer’s statement.Alternately, you can use custom award text to indicate the location where transactions were madeby following these steps:a) In the Custom Award Value text box, enter @(extdata).b) Enter the Extended Event Data X-path as (/Location){1}.
11. Click Select Event.The Select Generic Events screen is displayed.
12. Select the generic event you created in Partner Offers: Create.
13. Click Next Step, and proceed to targeting the offer.
Partner Offers: Step 4 - Targeting Offer
Procedure
1. Target your offer to All Registered Customers or select a profile from the pull-down menu.
2. Select Yes from the pull-down menu if anyone should be excluded from this offer.(The defaultsetting is No.)
3. Click Next Step to continue creating the offer.This opens the Presentation step in the Edit Offer wizard.
4. Select the offer's Display Rank from the pull-down menu (if necessary).
5. Make sure to clear the Display this offer in hosted microsite Offer Showcase check box.
6. Click Next Step to continue creating the offer.This opens the Schedule & Rules step in the Edit Offer wizard.
7. Set the Total Redemption Limit per Member by entering a value in the text box.
8. Set the Eligibility Dates: The dates in which members can start and stop being eligible to qualify forthis offer.
9. Set the Qualification Period: The length of time a member remains eligible to perform thequalification actions for this offer.
10. Enter store restrictions if there are any.
11. Click Next Step to continue creating the offer.This opens the Summary & Preview step in the Edit Offer wizard.
12. Review the elements of this offer: You can modify any of the offer elements by clicking Edit on thatelement row.
226
TIBCO® Reward User's Guide

13. Click Next Step to save the offer.
Partner Offers: Step 5 - Launching Offer
Procedure
1. Click Go to Offers.This takes you to the Offers main page.
2. Update the status from pending to approved with the Status pull-down menu on the row of theoffer.This automatically changes the offer status to scheduled.
3. Using the Status pull-down menu on the row of the offer, change the status from scheduled tolaunch.The partner offer becomes live.
AnnouncementUse the Admin > Announcements page to create messages for other CRMS users and to manage thesemessages.
Announcements are typically displayed in two complementary ways. The headline for eachannouncement is presented as a hyperlink that is displayed in a high-visibility location in CRMS Homepage. If a CRMS user clicks this headline link, an announcement window is displayed, presenting thefull text of the announcement message along with the headline.
Announcements created with the Admin > Announcement page are commonly used to inform CRMSusers of upcoming merchandising opportunities, such as events and product specials, and to helpcoordinate marketing. Announcements can be used to convey any type of message to CRMS users.
The announcements displayed in the announcement window are presented in memo format. Theyinclude the headline, CRMS name of the person who originally created the announcement, and the datewhen the announcement was originally created. The text follows.
Three Create Announcement options are presented:
● Event
● Category
● Freeform
At this time, there is no difference between the announcements that you produce by using a differentCreate Announcement option. You can use the announcement types as a means of classifyingmessages, but your selection does not impact the display.
Creating Announcement
227
TIBCO® Reward User's Guide

Procedure
1. Navigate to Admin > Announcement.
2. Click the Create a New Announcement option called Freeform.
The Create New Freeform Announcement page opens.
3. Enter the text that you want to be displayed as Headline.This text is displayed as a headline in the Announcements panel on the CRMS Home page (where italso serves as a hyperlink that opens the corresponding Announcement window), in thecorresponding Announcement window along with the announcement text, and in the Headlinescolumn in the Manage Announcements table.
4. Set the Start Date and End Date.These set the range of dates when the announcement is displayed. If you select today's date as thestart date, the announcement is displayed immediately.
The date that is displayed in the announcement window is the date when theannouncement was originally saved. This cannot be changed by editing.
Enter the body text that you want to be displayed as the announcement's text message.
All text is displayed in one paragraph. Paragraph breaks and added line spaces are notincluded in the displayed message.
5. Click Done.
228
TIBCO® Reward User's Guide

Editing Announcement
Procedure
1. Find the announcement you want to change in the Manage Announcements table, then click Edit inthe same row. The Edit Announcement page is displayed, revealing the existing data for the selectedannouncement.
2. Change the headline, name, text or dates that you want to use for the announcement.For details about modifying the individual fields on the page, refer to Creating Announcement.
3. Click Done.The modifications take effect immediately.
Custom AttributesCustom attributes are extensions to the customer or product record (additional data fields) that can beused to store non-standard data. You can use this data in profiles to target customers.
Custom attributes for customers can be used to dynamically insert customer attribute data in emailcommunications by using reference tags.
Use custom attributes to search for products and groups of products according to the criteria importantto you. You can use custom attributes to create product classifications other than those provided byformal product catalog categories and brands.
● For customer targeting, customer custom attributes are available.
● For basket targeting, product custom attributes are available.
Custom attribute fields can be used in many different ways. Some suggestions and examples include:
● Set up a Product Custom Attribute titled "InventoryPushed" and use this attribute to search foritems marked as Closeout, Overstocked, and so on when creating an offer. (Custom attribute forProducts.)
● Collect and use customers' birthdays or anniversaries. (Custom attribute for Customers.)
● Store customer lifetime value (which you recalculate at update regularly) and target customers onthe basis of this value. (Custom attribute for Customers.)
● Store external segment codes, such as PRIZM NE, for use in targeting customers. (Custom attributefor Customers.)
● Search for products by characteristics that are not encoded in their SKUs. Custom attributes canstore characteristics such as a theme or a sub-brand or a quality that links a product to a marketniche. Using product custom attributes, for example, you could characterize an item as WinterCollection, ChecksAndPlaids, and WrinkleResistant-Travel and search for it using any of theseattributes. (Custom attribute for Products.)
Many of these applications of custom attributes require some level of professional services, but theexpense is generally nominal.
Each custom attribute type is configured as one of the five specific data types: Lookup, Numeric, Text,FullDateTime, or DateTimeMonthDayOnly.
Custom Attribute: ConstraintsFollow these rules when using custom attributes:
● You can create up to ten custom attributes for each type.
229
TIBCO® Reward User's Guide

● You cannot delete a custom attribute, after you have created it.● After you have reached your maximum for a given attribute type, you cannot create any more of
that type.● If your company has implemented a non-standard design for its loyalty program, Reward can use
some of the custom attribute slots to help manage your program.
In some cases, Reward can find creative solutions that get around these rules. Please contact RewardClient Services if you need to:
● Use more than your allotted number of custom attributes.● Delete a custom attribute.● Start using a custom attribute for a different purpose.
Using Custom AttributeUse custom attributes to define custom data fields in which you can store additional types of data aboutyour customers and products.
Procedure
1. Indicate whether you want to create a custom attribute for customers or for products.
2. Create your custom attribute by clicking one of the data types.See Custom Attribute: Prerequisites for more details on this process.
3. After the custom attribute is defined, modify the corresponding batch file appropriately:
● Populate the custom attribute for customers by adding the attribute data to your shoppertransaction file,
OR
● Add custom attribute for products by adding the attribute data to your product file. You can alsouse an API to provide or update custom attribute data in real time.
4. After populating the appropriate file with custom attribute values, use your customer customattribute values when targeting offers and communications; or use your product custom attributevalues when selecting or sorting products.
● You can only target to customer custom attributes. You cannot target to productcustom attributes.
● Be sure to work in coordination with your IT department and with Reward whenimplementing a new custom attribute. Your IT Department can help set up theTransaction file format or Product file format so that it conveys the new customattribute data.
● If you use Transaction or Product files in Reward's standardized XML format, thechange in the file format is relatively trivial. However, if the file is in flat file format,Reward needs to change its file transformation processes before files that includecustom attribute data can be processed correctly.
Custom Attribute: Reference Tag UseYou can define a custom attribute for a shopper in CRMS, and then add a custom attribute reference tagto an email communication so that the custom attribute field value for a specific shopper is added to anemail communication. For example, you could define "Shopper Birthday" as a custom attribute for yourshopper, collect birthday data for shoppers, and then insert a custom attribute tag into the email thatwould add a shopper's birthday data into each email.
230
TIBCO® Reward User's Guide

Because you define custom attributes in CRMS (using the Admin > Custom Attributes page), customattribute fields are not listed in the standard drop-down menus. To add a custom attribute tag, youmust know the tag name (the name of the Custom Attribute Definition Reference Tag field that yourorganization defined and uses) to refer to the custom attribute. Usually this is something simple, like"shopperbirthday".
To see the reference tag name assigned to a custom attribute, open the Admin > Custom Attributespage, look in the Manage Custom Attributes table, and find the custom attribute you want to use. Thetable lists the reference tag name for custom attribute.
Custom attribute tags for shoppers are named according to the following convention:
@(shopper:customattrib:<reference_tag_name>)
where: the reference_tag_name maps to the CustomAttributeDefinition ReferenceTag field.
So, if a CRMS user creates a shopper custom attribute with ReferenceTag = “shopperbirthday”, thecorresponding tag would be:
@(shopper:customattrib:shopperbirthday)
● You can substitute "s" for shopper, so the following also works:
● @(s:customattrib:shopperbirthday)
● Make sure there are no spaces within the tag.
● Custom attributes that are supposed to display dates also include specific time data (hours andminutes). Regardless of the data entered, the displayed "date" fields have the following format:MM/DD/YYYY:HH/MM
● Custom attributes that are supposed to display integer numbers actually display numbers with twodecimal digits, regardless of the data originally entered.
Custom Attribute: List PageThe purpose of the Custom Attributes page is to provide access to custom attribute records and to helpyou create and work with custom attributes.
To open the Custom Attributes page, select Admin > Custom Attributes.
The Custom Attributes page includes the following features:
● The Create > New Attribute option, using which you can open a data entry page and define data forany one of the five different types of custom attributes.
● The Manage Custom Attributes panel, which consists of:
— The Show filter, using which you can sort custom attributes by their type, and by theirapplication to either customer or product.
— The 1 2 3 page control, using which you can navigate to any page in the current ManageCustom Attributes panel.
— The complete list of custom attribute records.
The following custom attribute record fields are displayed:
IDCRMS assigns a unique ID number to every custom attribute record. If two or more custom attributenames (which are defined by CRMS users) were similar or identical, this number is the uniqueidentifier.
Name
231
TIBCO® Reward User's Guide
The name of the custom attribute as defined in CRMS, and set up as a hyperlink to the customattribute record. Click the custom attribute name to open the record, either to see or edit its details.
This name string text is the exact text string that must be used, character for character, in XML-formatted transaction files to identify this custom attribute. After a custom attribute has come into use,do not change its name in any way until you have consulted with Reward's Client Services department.Name changes can result in lost and/or corrupted data.
Applies toThe associated data entity modified by the custom attribute: either products or customers.
TypeThe type of the associated custom attribute (one of the five possible types.)
Reference TagThe text string used to create the reference tag for this data field. Enter a text string that is unique withrespect to other reference tags. You can use the specified reference tag string in API calls for customattribute data or to insert the custom attribute data into email or if the custom attribute is beingdisplayed to the customer in the microsite.
After you have started to use the custom attribute, never change the name or reference tag, unless youhave made special arrangements with Reward's Client Services department. If you change this textstring after the associated custom attribute has come into use, any reference tags based on the formerstring fail to function properly.
Last ModifiedThe date when this custom attribute record data was most recently changed. This is the field used bydefault to sort the custom attribute records. When you open the Custom Attributes page, the mostrecently updated custom attribute records are displayed first.
CloneUse it to clone the associated custom attribute record. The clone is assigned a slightly different name,usually called "Copy of <original name>". Because you can define a maximum of ten custom attributesof any given type, take care not to create custom attributes unless you are sure you use them.
Use the Custom Attributes page to:
● Find the name, reference tag, or type specification associated with a custom attribute.
● Open a custom attribute record to see specific details about the custom attribute that are maintainedin that record.
● Create a custom attribute. (This includes updating lists of custom attribute values.)
Custom Attribute: PrerequisitesSetting up the processing and transmission of the custom attribute data involves more effort andcoordination of resources than simply defining the custom attribute in CRMS. If you want to add acustom attribute, contact your IT department for assistance. In some cases, this involves coordinationwith the Reward Account Management department.
If you are going to create profiles that use a custom attribute for targeting purpose, you might want tofigure out how you define and use these profiles during your planning phase: This helps you definesome practical requirements for your custom attribute so that it better serves your specific purpose.
Custom Attribute: CreateCreate a custom attribute to add a new data field to customer records or to product records. You canthen work with the data stored in this field to find, filter, and sort customers or products, respectively.
232
TIBCO® Reward User's Guide

The customer custom attribute data extends the standard customer record data and you can use it totarget customers and extend personalization by using data that is not available in the standard CRMS.
The product custom attribute data extends the standard product record data and you can use it toidentify, select or sort products according to your custom (that is, non-standard for CRMS) productattributes.
You can only target to customer custom attributes. You cannot target to product custom attributes.
Creating Custom Attribute
Procedure
1. Click Admin > Custom Attributes.
2. Select the category of data that you want to modify with a new custom attribute:
● Customer
● Product
● Store
● Reward Item
● Redemption
● Order Tender
● Offer
3. Select one of the custom attribute type options listed after Create New Attribute (number, date/time, month/day, lookup, or text).This creates a new custom attribute record of the selected type and displays the Edit CustomAttribute page.
When you create a custom attribute, you have to define it as one of the following types:
● Numeric
● Month/Day
● Date/Time
● Lookup Code
● Text Custom
You can only create ten custom attributes of one given type in CRMS.
Custom Attribute: Creating Number
Procedure
1. Navigate to the Custom Attributes tab by clicking Admin > Custom Attributes.
2. Create a new number custom attribute by clicking the Number link next to Create a New Attribute.Select Product or Customer, as appropriate.
3. Set the attribute parameters:
● Give the attribute a name.
● Give the attribute a reference tag.
233
TIBCO® Reward User's Guide

● Choose a display format:
— Number: stores and displays whole numbers. (Note that the number 1 is expressed as1.000.)
— Percentage: stores and displays percentages with up to two decimal places.
— Currency: stores and displays the number as currency with the appropriate currencysymbol and format.
● Set an internal note, which is only displayed on this page.
4. Click Save at any time to save the current setting.
5. Click Done to save your work and return to the Custom Attributes tab.
Custom Attribute: Creating Month/DayUse this attribute to store a month/day combination, without a year. This can be used in circumstanceswhere collecting age is not desired, but birthday is desired.
Procedure
1. Navigate to the Custom Attributes tab by selecting Admin > Custom Attributes.
2. Create a new Month/Day custom attribute by clicking the Month/Day link next to Create a NewAttribute. Select Product or Customer, as appropriate.
3. Set the attribute parameters.
4. Give the attribute a name.
5. Set an internal note, which is only displayed on this page.
6. Click Save at any time to save the current setting.
7. Click Done to save your work and return to the Custom Attributes tab.
● You can use a time-sensitive custom attribute, such as Month/Day or Date/Time, totarget an offer to a particular set of customers, based on some time-oriented criteria.For example, if you capture the customer's birthday or anniversary as a Month/Daycustom attribute, you can create a profile that selects customers who have a birthdaythat occurs on the current date, or that is some specified number of days in the future,or that occurs within some range of days in the future. For more information on thesubject of creating a profile dimension that targets a custom attribute, refer to Dimension: Custom Attributes.
● Unless you use a time-sensitive profile with a no-clip offer, a targeted customer can usethe offer outside of the profile-driven timeframe when you present it.
Custom Attribute: Creating Date/TimeIf year is an element of the custom attribute, you must use the date/time attribute instead of month/day.For birthdays or anniversaries, use the month day type.
Procedure
1. Navigate to the Custom Attributes tab by clicking Admin > Custom Attributes.
2. Create a new Month/Day custom attribute by clicking the Day/Time link next to Create a NewAttribute. Select Product or Customer, as appropriate.
3. Set the attribute parameters.
234
TIBCO® Reward User's Guide

● Give the attribute a name.
● Choose a display format, which defines how this attribute is represented within the targetinginterface in profiles.
● Set an internal note, which is only displayed on this page.
4. Click Save at any time to save the current setting.
5. Click Done to save your work and return to the Custom Attributes tab.
Custom Attribute: Creating LookupUse Lookup custom attribute to target to discrete "codes" associated with your customer. To useLookup Custom Attribute for Targeting, it must contain at least one code.
Procedure
1. Navigate to the Custom Attributes tab by selecting Admin > Custom Attributes.
2. Create a new Lookup custom attribute by clicking the Lookup link next to Create a New Attribute.Select Product or Customer, as appropriate.
3. Give the attribute a name.
4. Enter reference tag, which is a unique identifier used when referencing the custom attribute.
5. Set an Internal Note, which is only displayed on this page.
6. Click Save at any time to save the current setting.
Custom Attribute: Create TextUse text custom attribute to work with text-field values, including relatively long strings (up to 1,000characters). For example, you can use a text custom attribute so that a customer can record a message ora long description.
● Text custom attributes are not searchable. This limits their value as customer profiling criteria.Custom attributes of the Lookup code type can include text, and are searchable, so Lookup codesrepresent a better alternative in many cases where an alphanumeric attribute value needs to besearched and sorted.
● Reward limits text custom attributes to 1000 characters per text field within the transaction files.
● Only the first 1,000 characters of the text custom attribute field are displayed in an emailcommunication when the text of the attribute is inserted using the custom attribute tag. Additionalcharacters are not displayed.
Using a Text Custom Attribute
Procedure
1. Navigate to the Custom Attributes tab by clicking Admin > Custom Attributes.
2. Create a new text custom attribute by clicking the Text link. Select Product or Customer, asappropriate.
3. Set the attribute parameters:
● Give the attribute a name.
● Choose a display format, which defines how this attribute is represented within the targetinginterface in profiles.
235
TIBCO® Reward User's Guide

● Set an Internal Note, which is only displayed on this page.
4. Click Save at any time to save the current setting.
5. Click Done to save your work and return to the Custom Attributes tab.
Text Custom Attribute Constraints
● As a general rule, special reserved XML characters, such as apostrophes, ampersands, and greater-than and less-than symbols (,&,’,%,<,>), cannot be used in text custom attributes.
— To work around this constraint, these reserved characters can be “escaped” or contained withina CDATA section.
— Here is an example of an escaped ampersand (&) character: &
— Special reserved XML characters such as apostrophes, ampersands, and greater-than, less-thansymbols can pass without being escaped by turning off the XML validation for text that iscontained with the CDATA brackets.
— Your IT professionals can help you apply these techniques.
● When importing text custom attributes, the maximum length is 1,000 characters.
● If the text length is more than 2,000 characters, the transaction file import fails with the followingreason: “Incorrect file format”
● When a reference tag for a text custom attribute is included in an email, the rendered text that isinserted into the email includes only the first 1,000 characters.
● Input for text custom attributes in the user interface of the customer portal is 1,000 characters.
● Text custom attribute values exported as part of the shopper export only include the first 100characters.
● A given text custom attribute should be populated either through the import or through CRMS userinterface, but not both, because the last used method might overwrite the file.
Custom Attribute: Add Customer DataThese are the prerequisites for data transfer if you are adding a customer custom attribute:
● If you use transaction batch files in XML format to convey data to Reward, your company mustmodify this file, adding the name of the custom attribute field to the XML schema.
● If you use transaction batch files in any non-XML format (flat file format) to convey data to Reward,your company (your IT department, in particular) must work with Reward to adjust the transformprocesses applied to the file so that the custom attribute field can be correctly processed.
● Make sure that your corresponding, in-house file creation processes add the custom attribute data tothe transaction files.
● To use APIs to convey custom attribute data in real time, the API call must use the reference tag ofthe custom attribute.
● Define the reference tag used in API calls when you define the custom attribute data in CRMS.
● If your company wants the custom attribute values included in shopper files or profile-list exportfiles, be sure to request this from Reward.
Custom Attribute: Add Product DataThese are the prerequisites for data transfer if you are adding a product custom attribute:
236
TIBCO® Reward User's Guide

● If you use product batch files in XML format to convey product data to Reward, your companymust modify this file, adding the name of the custom attribute field to the XML schema.
● If you use product batch files in any non-XML format (flat file format) to convey data to Reward,your company (your IT department, in particular) must work with Reward to adjust the transformprocesses applied to the file so that the custom attribute field can be correctly processed.
● Make sure that your corresponding, in-house file creation processes add the custom attribute data tothe product files.
● To use APIs to convey custom attribute data in real time, the API call must use the reference tag ofthe custom attribute.
● Define the reference tag used in API calls when you define the custom attribute data in CRMS.
● Always work in concert with your company's IT department to implement a custom attribute. Acustom attribute must be fully supported by your transaction files or product files. If you useLoyalty API calls, it must also be supported by your API processes. Refer your IT department to theReward Integration Guide for information on the required changes to your files.
Custom EntitiesCustom entities store client definable information. Custom entities differ from custom attributes in thata member can have multiple values stored for a given custom entity, and that each of these can havemultiple custom entity attributes. For example, a customer can own multiple electronic devices: a cellphone, laptop computer, digital camera, and so on. That customer can create a custom entity called"Devices" that is capable of holding values for as many devices as are needed. In this example, thedevice entity might include fields such as type, brand, model, serial number, size, and so on. The"Devices" custom entity and field information can then be used for customer targeting.
Creating Custom Entity
Procedure
1. Select Admin > Custom Entities and then select Create New > Customer Custom Entity.The Add A Customer Custom Entity screen is displayed.
2. Enter a name for the custom entity in the Name field. Each custom entity must have a unique name.
3. Enter a unique identifier for this custom entity in the Reference Tag field. Note that reference tagsonly use alphanumeric characters, underscore and period. The value should be similar to the nameof this custom entity and easily understood.
4. Optionally, you can use the Description field to explain the custom entity to the customer.Description information is viewable by customers.
5. Also optionally, you can use the Internal Note field to record notes about this custom entity andhow it is used. Internal note information is only displayed in CRMS and not to the customers.
6. Click Save.
Custom entities require a custom entity attribute. Add a custom entity attribute to the custom entityas described in Custom Entity: Adding Attributes.
Custom Entity: Adding Attributes
Procedure
1. Click one of the Create New Custom Entity Attribute links from the Manage Custom Fields sectionof the screen:
237
TIBCO® Reward User's Guide

NumberSelect to target numeric values associated with your customers.
Date/timeSelect to target date values associated with your customers. (Note that you can store and displaybut cannot target time.)
LookupSelect to target discrete "Lookup Codes" associated with your customer. Note that to target lookupcodes, the following conditions must be satisfied:
● Lookup codes must be uploaded from a file on your computer.
● Uploads must be ASCII text files. Other formats might cause imports to fail.
TextUse text to describe the custom entity. (Note that a custom entity with the text custom entityattribute cannot be used for targeting.)
2. On the Custom Entity Attribute Properties screen, enter a name and reference tag.
3. In the File field, upload custom entity attribute lookup codes as described in Custom Entity:Adding Attribute Lookup Codes.
Custom Entity: Lookup CodesLookup codes are unique, alphanumeric codes that enable data mapping between a client and Reward.The lookup code is composed of the code (up to 45 alphanumeric characters) and the (optional)description of the code. You can use lookup codes to select from a list of descriptive values to buildtargeting criteria for custom entity attributes.
These are examples of gender lookup codes that can be imported into CRMS for targeting custom entityattributes:
Code Description
M male
F female
D decline to state
Custom Entity: Adding Attribute Lookup Codes
Procedure
1. Select Admin > Custom Entities.
2. Select a saved custom entity with an existing Field Entity Field Code of the lookup type.You can find the type of custom entity attributes in the Manage Custom Entity Attributes section ofthe Edit Customer Properties screen.
3. Download a sample lookup codes file by clicking View Sample Data Format.
4. Modify the lookup codes file so that it has the codes and descriptions you want.
5. Save the file.
238
TIBCO® Reward User's Guide

6. Click Browse to find the lookup code file.Click Upload & Save.
● Lookup codes must be uploaded from a file on your computer.
● Lookup codes must be uploaded as ASCII text files. Other formats can cause imports tofail.
7. Click Save or Done.
Custom Entity: Delete Attribute Lookup CodesTo delete a lookup code, click its Delete link in the Codes field. To delete all codes, click Delete AllCodes.
If you delete a code, it is removed from the list of codes for that custom entity attribute only. If that codeis targeted in a profile, it is also removed from there.
Targeting profiles are updated by Reward on a nightly basis, therefore your deletion might not affectthe targeting behavior of the profile until after the update process has run. All profiles that formerlyused the deleted codes must be edited to re-target them. Exercise great care when deleting lookupcodes.
Custom Entity: Importing KeysUse import keys during data imports to link the data in the import to the correct custom entity attributein CRMS. If two import keys are defined on a custom entity, the data in both fields is used as the uniqueidentifier for the data in each row of the import file and for the custom entity attribute in CRMS.
Procedure
1. Select Admin > Custom Entities.
2. Select a saved custom entity.
3. The three check boxes in the Manage Custom Entity Attributes section of the screen are thefollowing:
Is RequiredWhen selected, the custom entity attribute data is required and cannot be null. One or morecustom entity attributes must be required. Required field values are used in imports to map datato the correct custom entity attributes.
Is Import KeyWhen selected, the data in the custom entity attribute is used as the unique identifier for dataimports. It can only be selected if Is Required is selected.
Is EditableWhen selected, the data in the custom entity attribute can be modified (by import or other means).
4. Select the Is Required check box.
5. Select the Import Key check box.
Is Import Key can only be selected if Is Required is selected.
6. After you have selected the custom entity attributes, click Save or Done.
239
TIBCO® Reward User's Guide

Editing Custom Entity
Procedure
1. Select Admin > Custom Entities.
2. Select the custom entity attribute you want to edit.
3. Modify as you want. (You can add and/or edit custom entity attribute properties, including lookupcodes.)
4. Click Save or Done.
Publishing Custom EntityAfter you have finished creating a custom entity that has at least one custom entity attribute and haveclicked Save or Done, the Publish button is available at the top of the screen.
Procedure
1. Select Admin > Custom Entities.
2. Click the custom entity you want to publish.
3. Click Publish.
● If you get an error message stating “we need to do some setup before you canpublish custom entities,” contact your Account Manager to request custom entitysetup.
● After publishing a custom entity, you cannot edit or delete the custom entity. After acustom entity is published, it can be used for targeting.
Deleting Custom Entity
Procedure
1. Click Delete on the row for the custom entity you want to delete.A dialog is displayed inquiring if you want to continue with the deletion.
2. Click OK.This deletes the custom entity.
Published custom entities cannot be deleted.
Custom Entity: TargetingYou can target customers who match your custom entities by selecting an entity and then choosingfrom its set of entity attributes and setting their values. Custom entities and their associated attributescan be created through the Admin > Custom Entities tab in CRMS user interface. (See Creating CustomEntity for information on how to create custom entities from CRMS user interface.)
● You can target each custom entity once within a given customer profile.
● When you select a custom entity, you need to pick one of the entity attributes for that custom entityand configure its values.
● You can target each entity attribute once within a given customer profile.
240
TIBCO® Reward User's Guide

Custom Entity: Creating a Targeting Dimension
Procedure
1. Open a customer profile by selecting Target > Customer Profiles.
2. Select an existing customer profile or create a new one.
3. After the Profile Description screen is displayed, select Dimension > Custom Entities.
Custom entities are not present in the list of targeting dimensions if there are no publishedcustom entities.
4. After the Custom Entities screen opens, select the custom entity you want to target from the Add aCustom Entity pull-down menu and click Add.
● You can only target a custom entity once within any given profile. After you havetargeted a custom entity in a customer profile, the custom entity is removed from theAdd a Custom Entity pull-down menu for that customer profile.
● When a custom entity is added, the custom entity name along with an Add an EntityAttribute pull-down menu for its associated attributes is displayed within a "conditionblock" on screen.
● Lookup type attributes are not displayed in the Add an Entity Attribute pull-downmenu if they have no lookup codes defined during custom entity creation.
5. Select the entity attribute you want to target from the Add an Entity Attribute pull-down menu.When you initially add an entity attribute, the custom entity is displayed in expanded mode so youcan configure its entity attribute values.
6. After you have configured the entity attribute, click Update to save your changes for that attribute.
● You can always edit a collapsed custom entity targeting dimension or its attributes byclicking its Edit button.
● Only one custom entity or entity attribute targeting dimension can be expanded andedited at a time.
Be sure to click Update on the condition block, or Save, before adding a new entity attribute. If youadd a new entity attribute for a custom entity while editing one, you lose your work.
CustomersThis section explains managing customers.
Customer: ManageTo access the Support and Customer Management, select Support from the CRMS menu. Enter searchcriteria to find a specific customer.
In addition to displaying customer information in several categories, the Customer Details pageprovides links to other customer pages where you can add and modify customer data.
Depending on the status of the current customer, a selection of the following links is made available:
View DetailsClick to view the customer’s transactions, rewards, and award dates.
Edit InfoClick to open the Customer Info page, which you can use to edit basic name and address field values.
241
TIBCO® Reward User's Guide

Email PrefsClick to view the customer’s email preferences. Use to opt-in or opt-out the customer from emailcommunications.
Adjust PointsClick to open the Adjust Points page. The adjustment number of points to be added or removed,Points Type, and the Reason text are required data. After supplying data, click Next. A confirmationmessage is displayed. If details are correct, click Confirm.
Reset PasswordClick to generate a new customer password and send it to the customer in a standardized email.
MergeClick to merge current customer account data into another (enrolled) customer account, or to mergeanother customer account into the current customer account (if it is for an enrolled customer). Refer toCustomer: Merge for complete details.
Change StatusClick to set the selected customer's membership status. You can do the following from this dialog:
● Enroll (an existing customer): this option changes the customer status from Merged or Active orInactive to Enrolled. The customer is enrolled as a member of the loyalty program, and allrelated functions and options for enrolled customers are supported.
● Un-enroll (an existing customer): the support agent can unenroll (that is, close the account for) acustomer who no longer wants to be enrolled in the loyalty program.
Unenrolling a customer has the following effects:
— The customer is deactivated (that is, status is changed from active to inactive), and is nolonger a member of the loyalty program. In addition, if the email option was set to true, thenit is changed to false.
— The customer no longer accrues points (if applicable) or receives offers.
— The customer cannot sign-in to My Account anymore.
● Deactivate Account : deactivation changes the customer status to Inactive, which effectively putsthe customer on “hold”. The customer cannot log into his or her account and cannot accrue anypoints, although existing points remain on the account, which can be reactivated with no loss ofdata. Example: A client might want to use this option to temporarily disable accounts that are notin good standing (perhaps because a customer did not pay required dues). After the account isback in good standing, the client reactivates it. Reactivate is the only valid option for adeactivated customer.
Manage CardsUse this option to manually add card data (credit card, loyalty card, membership card, and so on) tobe associated with an enrolled customer.
Customer: Details PageThe purpose of the Customer Details page is to display information about an individual customer andto help you change data in this customer's account.
The Customer Details page opens when you:
● Save a complete set of data for a customer in either the Create a New Active Customer page or theCreate a New Enrolled Customer page.
242
TIBCO® Reward User's Guide

● Click the View link associated with an existing customer account. Customer accounts are listed inthe main Support page as the result of a customer search.
When an unenrolled customer is created on the basis of a set of customer fields that include thecustomer phone number but not the email address, a (false) placeholder email address is generated forthe customer.
Customer: MergeYou can merge one customer account into another, effectively emptying one account's most significantcustomer data into another account. The account that is merged into another can belong to either anactive or an enrolled customer.
Starting with one customer account selected, you have two merge options:
● You can merge another customer account into the currently selected (enrolled) customer account, or
● You can merge the currently selected customer account into a different (enrolled) customer account.
You can use either options to merge the account of an active (un-enrolled) customer into the receivingaccount of an enrolled customer, but never vice-versa. The merged customer's accrued points andreward-producing transaction accounts, up to the time of the merge, are transferred into the receivingcustomer account, the merged account is zeroed out (emptied), and this emptied account is assignedthe Merged status.
Note that a merge is not a continuing operation, nor does it implement an ongoing merge in any way.Transactions for the merged customer that are processed after the merge are not transferred to, orassociated in any way with, the receiving customer identified during the merge; those transactions areassociated only with the original customer. Neither transactions nor points nor any other attributes ofthe merged customer are automatically merged to another customer after the one time merge operationis completed.
Note that Savings-to-Date and Rewards data values are not transferred or merged into the receivingaccount and that this data is not retained.
A note about the merge is added to the Change History section in the receiving account. All other dataattributes of the receiving account remain the same.
After a Merge: After being merged into another account, the merged account is effectively an inactiveaccount. Although the customer history information has been deleted from the merged customeraccount, the customer's name and address information remain, and you have the option to enroll thiscustomer using the merged customer account. The deleted data cannot all be replaced, although usingthe Merge option again, in reverse, can replace some of it.
Before using the Merge Customer option, you must first select one customer account to be used in themerge process. This customer's data must be currently displayed in the Customer Details page. Ifenrolled, this customer account can be the one from which data is drawn or the one into which data ismerged.
If the current customer is active, you can only merge the current data into another customer account,and the search returns only enrolled customers.
Merging Customer Accounts
Procedure
1. Select customer to be merged in the Customer Details page, and click Merge.The Merge Accounts page is displayed.
2. Select one of the following values for the first field, Merge, from the drop-down menu:a) Current -> into another customer
243
TIBCO® Reward User's Guide

b) Another customer -> into current
Other elements of the page might be instantly redrawn to reflect the merge option you have chosen.If the currently selected customer is active (unenrolled), you cannot merge data into the currentcustomer.
3. Enter text in the Reason field that can be displayed to the customer. This should summarize themerge.
4. Optional: Add an internal note, which is not displayed to the customer, to convey any importantinformation about the merge.
For example, you could use this text field to account for the reason for the merge and anyjustification or authorization for it. To avoid any data loss, you should have a rationale forperforming a merge.
5. Search for the customer. Depending on the merge option you selected in the first step, the accountyou identify with your search belongs to either the receiving customer or the customer beingmerged.
6. Click Next.The Confirmation page opens, displaying the data you just entered.
7. If the data is correct, click Merge Customers.A confirmation dialog is displayed, prompting that the merge cannot be undone, and asking if youwant to continue.
To end the merge process, click Cancel.
8. Click OK to confirm that you want to complete the merge process.The Merge Status confirmation page is displayed.
9. Click Done to finish the merge process and go back to the Customer Detail screen.
Generic EventsYou can use Reward's Generic Events framework to capture non-transaction data about customeractions and behavior. Typical examples of generic events include customer actions such as writing aproduct review, abandoning a product in an online shopping cart, or adding a reward item to awishlist. Reward can collect these events through generic event batch files or real-time generic eventAPI processing.
For example, you might define customers addition to their wishlist as an event. Referring to this event,the basic definition is: Customer X (subject) AddsToWishlist (action) Product Y (object) on date (time).If you define a customer reviewing a product as an event, the event based definition is: Customer X(subject) Reviews (action) Product Y (object) on date (time).
The generic event framework is used to process data about customers' actions and behavior other thanthose normally monitored by Reward. For example, Reward always processes customer salestransactions, so transaction data is not considered a candidate for generic event processing. Similarly,data about customer in a Reward administered microsite page can be captured directly by Reward, sothat data would not be processed with the generic event framework.
What do you do with Event Data?
The data collected from these generic events can be used in CRMS profiles to target email or offers tocustomers.
In addition to collecting data that indicates a type of event has occurred, you can use the generic eventsoptions to define events according to whether very specific numbers occurred. Using this you can targetcustomers based on the occurrence of crucial pieces of numeric data associated with the event. Theseare called "Event Values." You can create more specific targeting rules based on these specific eventvalues.
244
TIBCO® Reward User's Guide

To work with generic event data, you must first collaborate with Reward to set up the data integrationprocesses. Depending on your needs and capabilities, you can transmit event data to Reward by batchfiles or through API.
Generic Event: List PageThe Generic Events page lists all generic events by name.
Navigate to Admin > Generic Events.
This displays the Manage Your Generic Events panel, which has a list of current generic events andtheir definitions.
Click the name of a generic event to see or change the event definition details. You can do the followingin the Generic Events page :
● Define an event for CRMS purposes.
● Manage existing events that have been (or are being) defined.
● Clone or delete an existing event definition.
To work with generic event data, you must first collaborate with Reward to set up the data integrationprocesses. Reward modifies data structures to accommodate the event data that you want to save anduse. Depending on your needs and capabilities, you can transmit event data to Reward by batch files orthrough API.
Fields and Features
The Generic Events page includes the following features:
● The Create New Generic Event Definition option, which starts the Create a New Generic Eventprocess.
● The Manage Your Generic Events panel which consists of:
— Standard navigation controls – the Show filter and the 123 page control.
— The complete list of existing generic events.
Each row in the list represents an event record and displays a few key fields. These fields are lined upin columns. Click a column heading to sort all of the custom questions in the list by that field.
The following generic event fields are displayed:
NameThe name of the event as defined in CRMS, and set up as a hyperlink to CRMS event record. Click theevent name to open the record, either to see or edit its details.
Reference TagA text string that you assign to this event. This tag is used as an internal reference and identifier at thedata processing level. For example, an API refers to this event using this reference tag. Must be uniquewith respect to other reference tags.
UpdateThe date when this event record was last modified. Set by CRMS.
CloneClick this link to generate a duplicate of the associated generic event record. Note that the onlyobvious difference is the renamed reference tag, which is changed to "Copy of <original name>". Besure to change other data as appropriate.
245
TIBCO® Reward User's Guide

DeleteClick this link to delete the entire record for the event.
Creating Generic Event
Procedure
1. Navigate to the Admin > Generic Events page.
2. Click Create New Generic Event Definition.The Create a Generic Event Definition page is displayed.
3. Define the generic event data to be used for customer targeting in the Generic Event Propertiessection of the page. (Fields marked with * are required.)
4. Click Save to save your work on a record.
5. When you finish the definition of an event record, or need to save your work and end a session,click Done.
Targeting Generic EventA generic event must be set up in CRMS before it can be used for targeting.
Procedure
1. Identify the event and its subject (actor), action, object, any event value that you want to use, andthe reversing event (if one should exist).
You can identify one event value in an individual generic event definition.
2. Determine which piece or pieces of event data you use, and how your profile logic tests this data toselect customers.
3. Resolve the generic event data integration issues with Reward. Contact your client servicesrepresentative to get started.
4. Define the event. (Refer to Creating Generic Event)
5. Define a profile that tests the data collected by the event you defined. If you defined a reversingevent, also test that it correctly modifies the event data.
6. Test and confirm that the profile selects the expected customers. Modify the event definition andprofile as necessary.
Generic Events: Reversing EventsIn some cases, the effects of a generic event can be reversed by another generic event. For example, ifyour customers commonly perform an action that is the reverse of another generic event action, youmight want to define and capture a "reversing action" for the event. For example, if you have "Add toFavorites" as a generic event, capture the reverse of that action as a reversing event such as "Removefrom Favorites".
● Define the reversing event first so that it is available for selection when you define the primarygeneric event.
● The identification of a reversing event is a one time, one way process.
● Be aware that reciprocation is not required and is not allowed. This means that you do not define"Add" as the reversing event when defining the "Remove" event.
246
TIBCO® Reward User's Guide

If you believe that customers commonly perform an action on the object that has the effect of reversingthe effect of another event, contact TIBCO Reward's Account Management department for assistance.
Product TaxonomyThe product taxonomy displays the following information:
● The hierarchical structure of your product catalog
● Stock keeping units (SKUs), which serve as product identifiers
● Product categories, which define classification of the product (such as clothing categorized by maleor female)
The product taxonomy is set up based on each client's product file upload. Navigate to Admin >Product Taxonomy to see your imported product taxonomy. After you have uploaded a producttaxonomy file, it can be used for offer setup.
The product taxonomy is read-only, and you cannot modify it through CRMS. It simply displays theresults of the product file upload.
Contact your TIBCO Engage Customer Loyalty Manager for more information about the producttaxonomy.
TiersTiers define a group of customers to which you can target offers. Members of higher tiers generallyreceive more benefits than members of lower tiers. Tiers can be used to incent customers to increasespend, shopping frequency, and so on. For example, customers who spend over 200 monetary unitsachieve silver status; customers who spend over 400 monetary units qualify for the gold tier, and goldtiers members receive more benefits than silver tier members.
Tiers can be set up on the backend during system implementation and modified through profiles in theCRMS user interface. If tiers were implemented in the initial configuration of your loyalty program, youcan use the customer targeting profiles in CRMS to target offers to one or more of the tiers.
● Adding or changing the profiles attached to tiers can have significant effects on your loyaltyprogram. For example, modifying offers and point conversions based on tiers might cause pointdiscrepancies. Tiers are only evaluated once every 24 hours and hence changing the profile, which isattached to a tier, can potentially cause customers to get the wrong point accruals until the tieringprocess runs again.
● Customer Profiles > Dimension > Tiers and Admin > Tiers is not displayed in the user interface, iftiers are not enabled in your initial configuration. Contact your Account Manager for informationabout setting up tiers.
System Based TiersSystem based tiers example
In a system based tier configuration, tiers and their properties are set up during the client onboardingprocess. For example, tiers can be created based on the amount of customer spend, which can earnpoints, during the initial system configuration for base, silver, and gold tiers. Everyone who signs up isin the base tier. Customers who spend over 200 monetary units achieve silver status. Customers whospend over 400 monetary units qualify for the gold tier. Then you can exclusively target offers tocustomers who belong to a specific tier.
Profile based tiers example
After system based tiers are defined on the backend, CRMS users can determine membership in thosetiers through the use of profiles. Additionally, CRMS users can target offers to predefined tiers.
247
TIBCO® Reward User's Guide

● CRMS users cannot remove the tier definition that is configured on the backend; however, it can bemodified through the use of profiles.
● After setting up profile based tiers, system based tier qualification rules also continue to determinetier membership.
● Customers who meet the system based qualifications or the profile based criteria are included in thetier.
Editing TierWarning! Editing the name and properties of an existing tier might cause customer point discrepanciesand is not a good practice.
Procedure
1. Select Admin > Tiers.The Tiers page is displayed, which shows the predefined tier configuration and a list of tiers.
2. Click an existing tier from the Tiers list.The Base Tier page is displayed.
3. In the Properties section, you can change the name of the tier.
4. In the Profiles section, you can determine which profiles qualify for this tier.
Targeting Tier
Procedure
1. Select Target > Customer Profiles.
2. Open an existing customer profile or create one.
3. In the Customer Targeting page, select Dimensions > Tiers.
No tier dimension is displayed if your system is not configured to support tiers.
4. Choose at least one tier by selecting its check box in the list of tiers.The offer is targeted only to the selected tiers.
5. Select or clear the Customer MUST match check box, as appropriate.
6. Click Save or Done.
248
TIBCO® Reward User's Guide