TIBCO® Enterprise Administrator User's Guide
131
TIBCO® Enterprise Administrator User's Guide Version 2.4.1 March 2022 Copyright © 1996-2022. TIBCO Software Inc. All Rights Reserved.
-
Upload
khangminh22 -
Category
Documents
-
view
3 -
download
0
Transcript of TIBCO® Enterprise Administrator User's Guide

TIBCO® Enterprise AdministratorUser's GuideVersion 2.4.1March 2022
Copyright © 1996-2022. TIBCO Software Inc. All Rights Reserved.

TIBCO® Enterprise Administrator User's Guide
2 | Contents
ContentsContents 2
TIBCO Enterprise Administrator Concepts 7TIBCO Enterprise Administrator Architecture 8
Register an Agent with the Server 8
Components of TIBCO Enterprise Administrator 9
Log in to the TIBCO Enterprise Administrator Server Using the Web UI 11
Configuring the TIBCO Enterprise Administrator Server 14Setting Custom Password Policy 15SSL Configuration on the TIBCO Enterprise Administrator: An Overview 16
Configuring SSL: One-Way Authentication 18
Configuring SSL: Two-Way Authentication 19
SSL Properties 20Guidelines to set the tea.http.want.client.auth and tea.http.need.client.auth Parameters 27
Setting SSL Properties on the Agent 28
Logging 32
Agent Management 35Registering an Agent 35Reconnecting an Agent 36Unregistering an Agent 37Registering URL Agents 37Unregistering an URL Agent 38
The Side Navigation Bar 39

TIBCO® Enterprise Administrator User's Guide
3 | Contents
Listing Products in TIBCO Enterprise Administrator 40
Using System Views 42Support for IPv6 Addresses 43Viewing the Installed TIBCO Software and Running TIBCO Processes on a Machine 44Viewing JVM Information from an Agent 47
Working with Multiple Products 50Solutions View 50Search Views 52Operators View 53Creating Custom Search Views 54Creating Custom Operator Views 54Adding Assets to a View at Runtime 55
User Management 56Users 56
Adding Users 56
Importing Users 57
Assigning Users to Groups 58
Assigning Roles to Users 59
Deleting Users 59
Resetting the Password 60
Groups 60Creating a New Group 60
Importing Groups 61
Assigning Roles to Groups 62
Deleting Groups 63
Roles 63Adding Roles 63
Deleting Roles 70
Permissions 70

TIBCO® Enterprise Administrator User's Guide
4 | Contents
Adding Permissions to a User-Defined Role 71
Removing Permissions 71
Viewing Permissions 72
Realms 72Adding Realms 72
Deleting Realms 75
Default Landing Page 76Setting the Landing Page for a User 76Setting the Landing Page for a Group 76
How the Server Picks up a Default Landing Page 77
Clearing the Landing Page for Multiple Groups 78Deleting the Landing Page Set for a Group 78
Registering a Hawk Domain 80
Change Password 84What to do if you forget the super user password? 84
Obfuscating Passwords 86
Introduction to the Shell Commands 88Connecting to the Remote Shell 90
Shell Commands 91Help Command 91Navigation Commands 93Scripting Commands 95
Arrays 95
Running Multiple Commands at Once 95
Pipes 96
Closures 96
Json ComplexType 97
Interactive Mode 97

TIBCO® Enterprise Administrator User's Guide
5 | Contents
Advanced Scripting Commands 98each 98
if 98
sort 99
set 100
get 100
Direct Commands 101The Script File Command 101The Protocol Commands: SFTP and SCP 102Using Position and Named Arguments while Defining TeaParam 104
Python Scripting 107Setting up Python Scripting 107tibco.tea Module 108
The tibco.tea Module 108
Number of Retry Attempts 109
The Object Hierarchy 110
The refresh_() Function 115
A Sample Python Script to Manage Agents 115A Sample Python Script for a Tomcat Agent 117Support for POJOs 118
Supported Scenarios 119
Using POJOs in Python Scripts 120
Limitations of POJO 122
TIBCO Enterprise Administrator Containerization 123
Performance Optimization of the TIBCO Enterprise Administrator Server 124Mapping Jetty Properties to TEA Properties 124
Upgrading the TEA Agents 125
Troubleshooting 126

TIBCO® Enterprise Administrator User's Guide
6 | Contents
TIBCO Documentation and Support Services 128
Legal and Third-Party Notices 130

TIBCO® Enterprise Administrator User's Guide
7 | TIBCO Enterprise Administrator Concepts
TIBCO Enterprise Administrator ConceptsTIBCO® Enterprise Administrator provides a centralized administrative interface to manage and monitor multiple TIBCO products deployed in an enterprise.
You can perform common administrative tasks such as authenticating and configuring runtime artifacts across all TIBCO products within one administrative interface. You can also manage products that do not have a complete administrative interface, providing you a unified and simplified administrative experience.
The following are the salient features of TIBCO Enterprise Administrator:
l Centralized Administration: TIBCO Enterprise Administrator provides a single-point access to multiple products deployed across an enterprise. You can easily manage and monitor runtime artifacts.
l Simple to use: TIBCO Enterprise Administrator is simple to install, develop, use, and maintain.
l Shared Services Model: TIBCO Enterprise Administrator shares common administrative concepts across all products thereby promoting a consistent and reusable shared services model.
l Pluggable and Extensible: As your enterprise evolves, you can add new products to the TIBCO Enterprise Administrator.
l Rich set of APIs: With TIBCO Enterprise Administrator Agent Library, organizations can develop custom TIBCO Enterprise Administrator agents to manage TIBCO and non-TIBCO products and applications. TIBCO products such as TIBCO ActiveMatrix BusinessWorks™ and TIBCO® MDM provide agents for TIBCO Enterprise Administrator. If you have installed the TIBCO Enterprise Administrator SDK variant, you can develop your own agents to expose your product on TIBCO Enterprise Administrator. The SDK variant comes with a set of APIs that is both declarative and extensible. You can develop your own agents and decide what part of your product needs to be rendered on TIBCO Enterprise Administrator.
l Support for Interactive Shell: TIBCO Enterprise Administrator provides a command-line utility called TIBCO Enterprise Administrator Shell. You can use the shell to perform almost all the tasks offered by the web-based GUI.

TIBCO® Enterprise Administrator User's Guide
8 | TIBCO Enterprise Administrator Concepts
TIBCO Enterprise Administrator ArchitectureTIBCO Enterprise Administrator is based on an agent-based architecture. TIBCO Enterprise Administrator comes with the TIBCO Enterprise Administrator server. The TIBCO Enterprise Administrator provides three distinct user interfaces: a web-based GUI, a command-line based shell interface, and a Python scripting interface.
A product being managed using the TIBCO Enterprise Administrator (TEA) must have a product agent registered with the TIBCO Enterprise Administrator server. The following TIBCO Enterprise Administrator agents are included as a part of TIBCO Enterprise Administrator:
l TIBCO® Enterprise Message Service™ : the agent for TIBCO Enterprise Message Service is shipped with TIBCO Enterprise Administrator.
l TIBCO® Security Server: the agent for TIBCO Security Server is shipped with TIBCO Enterprise Administrator.
The following products have developed a TEA agent to manage and monitor their products by using TIBCO Enterprise Administrator:
l TIBCO ActiveMatrix BusinessWorks™
l TIBCO® MDM
l TIBCO® Hawk
l TIBCO® ActiveMatrix Container Edition
l TIBCO BusinessEvents®
To see your product on TIBCO Enterprise Administrator, you must register the agent with the TIBCO Enterprise Administrator server.
Register an Agent with the ServerRegister the agent with the TIBCO Enterprise Administrator server. The steps are listed in the procedure, Registering an Agent.

TIBCO® Enterprise Administrator User's Guide
9 | TIBCO Enterprise Administrator Concepts
Components of TIBCO Enterprise AdministratorThe TIBCO Enterprise Administrator comprises a server, an agent corresponding to a product, a server UI, a shell interface, and python scripts.
The TIBCO Enterprise Administrator has the following components:
The Server
The server is the equivalent of a web server. The server is hosted within a web server and caters to the HTTP requests coming from the browser. The server manages the communication between the browser and agents. The server interacts with the agent to get data about the products registered on the TIBCO Enterprise Administrator. The server is responsible for:
l Collecting data on all the products registered with it
l Maintaining a cache of the data; thereby promoting faster searches
l Hosting all the TIBCO Enterprise Administrator server views
l Responding to auto-registration requests from agents
l Providing details about the machines on which the products are running
l Providing user management features such as granting and revoking a user's permissions
The Agent
An agent is a bridge between the TIBCO Enterprise Administrator server and a product. When an agent is registered with the TIBCO Enterprise Administrator, it discovers the product that must be exposed to the administrator. The agent creates a graph of objects specific to the product that needs to be rendered on the TIBCO Enterprise Administrator server UI. The agent interacts with the server using the REST API. TIBCO Enterprise Administrator agents can run in any of the following ways: standalone, embedded, or hosted. TIBCO Enterprise Administrator comes with an extensible API that helps you develop your own agents for your products. An agent provides the following basic concepts:
l Group: is a container of artifacts. For example, a cluster, domain, and ActiveMatrix environment.
l Process: is any operating system process. For example, a BusinessWorks engine, and ActiveMatrix node.

TIBCO® Enterprise Administrator User's Guide
10 | TIBCO Enterprise Administrator Concepts
l Resource: is a shareable configuration or artifact. For example, a JMS connection, or a port number.
l Application: is any deployable archive. For example, a WAR and DAA.
l Access_Point: is a means of interacting with an application. For example, an ActiveMatrix service endpoint, or an EMS queue.
l Top_level: A special type that represents the root-level object in the tree. There can be only one such instance of the object per agent. This is the only object that cannot have a configuration or state. Note that methods that access objects of this type do not have the key argument that is otherwise required by other concepts.
Web UI
TIBCO Enterprise Administrator provides a default UI to manage and monitor products. You can customize labels and icons on the UI to match the object types of your product. You can add more views to suit your product requirements.
Shell
TIBCO Enterprise Administrator provides a command-line utility called the TIBCO Enterprise Administrator shell. It is a remote shell based on the SSH protocol. The Shell is accessible using any terminal program such as Putty. The scripting language is similar to bash from UNIX, but has important differences. You can use the Shell to perform almost all the tasks offered by the server UI.
Python Scripting
You can use Python scripting to perform any activity you performed using the Web UI. Python scripting is especially useful when you have to repeat a task for multiple users or use control structures to work through some conditions in your environment. Although you can use the Shell utility to use the command-line UI, the Shell UI does not support conditional statements and control structures. Python scripting proves to be useful in such cases.

TIBCO® Enterprise Administrator User's Guide
11 | Log in to the TIBCO Enterprise Administrator Server Using the Web UI
Log in to the TIBCO Enterprise Administrator Server Using the Web UIYou can use the Web UI to connect to the TIBCO Enterprise Administrator server.
Before you beginYou must start the TIBCO Enterprise Administrator server before logging into the Web UI. Open the command prompt and navigate to <TIBCO_HOME>. Run <TIBCO_HOME>\tea\<version>\bin\tea.exe. You must also start the agents for respective products if you want to monitor the product on the Web UI.
Password Policies
Following are the constraints on creating a password:
l The length of the password must be between 1 and 128 characters.
l You cannot reuse the past 5 passwords.
l Your account gets locked after 10 failed attempts. The admin account is the only exception to this rule, but the admin account experiences a lag of 1 second on every login after 10 failed attempts.
l You must reset a password after a lockout because it cannot be changed.
Note: If you want to set custom password policy, refer to Setting Custom Password Policy.
Procedure 1. Open a browser and navigate to the URL http://localhost:8777/tea/, where
localhost is the default hostname and 8777 is the default port number.

TIBCO® Enterprise Administrator User's Guide
12 | Log in to the TIBCO Enterprise Administrator Server Using the Web UI
Note: The default port number and other settings can be changed by modifying the settings in tea.conf file that is available under <TIBCO_CONFIG_HOME>\tibco\cfgmgmt\tea\conf.
2. Enter your Login credentials.
The default username is admin and the default password is admin.
Note: The default timeout for a session is 30 minutes.
Landing Page
Note: To get more help on any of the features, click
. Select Help and click Go to Documentation. This takes you to the TIBCO Enterprise Administrator Documentation.
ResultOn successful authentication, the landing page is displayed. The username with which you have logged in is shown as a menu option in the title pane. The landing page displays cards with information on the general details, users, agents, machines, and products exposed to the TIBCO Enterprise Administrator server. Each of the details appearing on the card can be clicked to see more details. All the products exposed to the server appear as cards. You can click on a product card to see product details.

TIBCO® Enterprise Administrator User's Guide
13 | Log in to the TIBCO Enterprise Administrator Server Using the Web UI
Note: The commonly used options available on the menu are available on the side navigation bar. Commonly used options available on the menu are also visible on the navigation bar, but the procedures in this guide use the options from the menu.

TIBCO® Enterprise Administrator User's Guide
14 | Configuring the TIBCO Enterprise Administrator Server
Configuring the TIBCO Enterprise Administrator ServerAssume that the location of the configuration folder selected during installation is TIBCO_CONFIG_HOME. The default configuration file tea.conf is available under <TIBCO_CONFIG_HOME>\tibco\cfgmgmt\tea\conf.To customize the server configuration, you can add additional properties to this file.
You can modify the following properties:
Property Name Description Default Value
tea.http.port The HTTP port on which the TIBCO Enterprise Administrator server listens to requests.
8777
tea.http.session.timeout The HTTP Session Timeout for the TIBCO Enterprise Administrator server.
1800 seconds
tea.http.buffer-max-size The maximum buffer size (in bytes) of the requests and responses made by the TIBCO Enterprise Administrator server.
52428800 bytes
tea.agents.ping-interval The time interval in which the TIBCO Enterprise Administrator server pings each agent.
15000 ms
tea.auth.timeout The timeout value for fetching the user configuration during login.
60000 ms
tea.agents.request-timeout The timeout value for the requests made to the TIBCO Enterprise Administrator server.
60000 ms
tea.shell.port The port number to connect to the SSH server hosted by the TIBCO Enterprise Administrator server.
2222
tea.shell.timeout The time for which the TIBCO Enterprise Administrator server waits for a response from the shell command.
15000 ms

TIBCO® Enterprise Administrator User's Guide
15 | Configuring the TIBCO Enterprise Administrator Server
Property Name Description Default Value
tea.indexing.interval The time taken for the elements to become available on the server after registration
30000 ms
tea.server.instance.name When there are multiple instances of the server running, you can distinguish the instances by their instance name. The instance name appears under TIBCO Enterprise Administrator in the UI.
tea.storage.remote.enabled When set to true, the internal database is enabled for data sharing.
true
tea.storage.remote.tcpPort Sets the port used by the internal database. 9092
tea.storage.remote.username Use this property only if you plan to use TIBCO Enterprise Administrator from a CONFIG_HOME different from the existing one.
tea.storage.remote.password This property is coupled with tea.storage.remote.username. Use this property only if you plan to use TIBCO Enterprise Administrator from a CONFIG_HOME different from the existing one.
tea.ext.hawk.enabled Set this property to true to enable Hawk server extension.
false
tea.dev.developer-mode Set this property to true to start TIBCO Enterprise Administrator in the developer mode.
false
tea.jvminfo.enabled Set this property to true view the JVM details on the server side.
false
The format supported is HOCON. See http://github.com/typesafehub/config/blob/master/HOCON.md.
Setting Custom Password PolicyThere may be instances where you may need to set a custom password policy. There is a new property that has been added to the tea.tra file to meet this requirement.

TIBCO® Enterprise Administrator User's Guide
16 | Configuring the TIBCO Enterprise Administrator Server
Procedure 1. Open the tea.tra file.
2. Under the TEA variables section, locate tibco.env.TEA_START_PARAMS.
3. Specify the name and the -Dpassword.policy where -Dpassword.policy ="<location_of_custom_password_policy_xml_file>". The following is an example of setting a custom password policy:
name=password.policy -Dpassword.policy="%TEA_CONFIG_HOME%/conf/TEAPasswordPolicy.xml" or C:\tea240\tibco\cfgmgmt\tea\conf\TEAPasswordPolicy.xml or "/home/user/tea_2.4.0/tibco/cfgmgmt/tea/conf/TEAPasswordPolicy.xml"
SSL Configuration on the TIBCO Enterprise Administrator: An OverviewThe TIBCO Enterprise Administrator supports both one-way (server side) and two-way (server side as well as client side) SSL authentication. You can configure SSL between the web browser and the TIBCO Enterprise Administrator as well as between the TIBCO Enterprise Administrator and the agent.
l One-way Authentication - This authentication is also known as server-side authentication. For this type of authentication, the HttpClient residing in an application authenticates the HttpServer residing in another application. The HttpServer is not required to authenticate the HttpClient. On TIBCO Enterprise Administrator, the following factors would be true:
o The HttpClient residing on the TIBCO Enterprise Administrator server verifies the HttpServer residing on the agent.
AND
o The HttpClient residing on the agent verifies the HttpServer residing on the TIBCO Enterprise Administrator server.
So, the HttpServers residing on both the TIBCO Enterprise Administrator server and agent simply trust each others' HttpClients.
l Two-way Authentication - In addition to the server-side authentication used for the

TIBCO® Enterprise Administrator User's Guide
17 | Configuring the TIBCO Enterprise Administrator Server
one-way authentication, the two-way authentication requires client-side authentication too. On TIBCO Enterprise Administrator, the following factors would be true:
o The HttpClient residing on the TIBCO Enterprise Administrator server verifies the HttpServer residing on the agent.
o The HttpClient residing on the agent verifies the HttpServer residing on the TIBCO Enterprise Administrator server.
o The HttpServer residing on the TIBCO Enterprise Administrator server verifies the HttpClient residing on the agent.
o The HttpServer residing on the agent verifies the HttpClient residing on the TIBCO Enterprise Administrator server.
Note: Earlier versions of TIBCO Enterprise Administrator supported only one-way authentication. TIBCO Enterprise Administrator 1.3.0 and above supports two-way authentication. However, you always have the option to implement one-way authentication alone too.
In TIBCO Enterprise Administrator, the web browser (which you use to run the TIBCO Enterprise Administrator web UI) is a client to the TIBCO Enterprise Administrator server. The TIBCO Enterprise Administrator server on the other hand, acts as a client to the agent when it makes a request to the agent, but acts as a server to the agent when the agent requests some information from it. Similarly, the agent acts as a server to the TIBCO Enterprise Administrator server when fulfilling a request from the TIBCO Enterprise Administrator server but acts as a client to the TIBCO Enterprise Administrator server when making a request to the TIBCO Enterprise Administrator server (such as when getting itself registered with the TIBCO Enterprise Administrator server).
The following diagram shows a very high-level overview of authentication in a two-way authentication setup:

TIBCO® Enterprise Administrator User's Guide
18 | Configuring the TIBCO Enterprise Administrator Server
Two-way Authentication
Configuring SSL: One-Way AuthenticationTo configure a one-way SSL authentication, you must set some SSL-related properties in the tea.conf file as well as on the agent.
Procedure 1. Open <TIBCO_CONFIG_HOME>\tibco\cfgmgmt\tea\conf\tea.conf.
2. Add the properties listed in the section, SSL Properties in the tea.conf file.
The following is an example of the tea.conf file with SSL settings:
tea.http.keystore = "/Users/<username>/tea/keystore/httpserversslkeys.jceks" tea.http.truststore = "/Users/<username>/tea/keystore/httpserverssltrusts.jceks" tea.http.keystore-password = "password" tea.http.truststore-password = "password" tea.http.key-manager-password = "password" tea.http.cert-alias = "httpserver" tea.http.want.client.auth = false tea.http.need.client.auth = false

TIBCO® Enterprise Administrator User's Guide
19 | Configuring the TIBCO Enterprise Administrator Server
Note: The TIBCO Enterprise Administrator server supports the keystore formats supported by Java. Therefore, keystore formats such as, jks, jceks, pkcs12 are supported by the TIBCO Enterprise Administrator server. For a detailed list of supported keystore formats, refer to the KeyStore Types documentation on the Oracle Website.
3. Set the same properties on the agent. Refer to the section, "Setting SSL Properties on the agent", in the TIBCO Enterprise Administrator Developer's Guide.
Configuring SSL: Two-Way AuthenticationTwo-way SSL authentication requires you to configure both server-side authentication and client-side authentication. To set up this two-way authentication, you must perform the following steps. You can perform these steps in one of the two ways - either using the keytool (to be run from your <JAVA_HOME>/bin directory) or by running the commands specified on the OpenSSL documentation website, http://wiki.openssl.org/index.php/Command_Line_Utilities.
Procedure 1. Follow the steps outlined in Configuring SSL: One-Way Authentication.
2. Generate the key store and private key for the HttpServer on the TIBCO Enterprise Administrator server and the HttpServer on the agent.
3. Generate a self-signed certificate or obtain a CA-signed certificate for the HttpServer on the TIBCO Enterprise Administrator server and the HttpServer on the agent.
4. Generate the key store and private key for the HttpClient on the TIBCO Enterprise Administrator server and the HttpClient on the agent.
5. Generate a self-signed certificate or obtain a CA-signed certificate for the HttpClient on the TIBCO Enterprise Administrator server and the HttpClient on the agent.
6. Import the agent HttpServer’s certificate into the trust store used by TIBCO Enterprise Administrator server’s HttpClient.
7. Import the TIBCO Enterprise Administrator server’s HttpServer’s certificate into the agent’s HttpClients’ trust store.
8. For the web browser (from where you access the TIBCO Enterprise Administrator UI): Generate a PKCS #12 format certificate that includes a private key for the browser

TIBCO® Enterprise Administrator User's Guide
20 | Configuring the TIBCO Enterprise Administrator Server
and a public key and the browser’s certificate.
9. Import the certificate from the above step into the web browser's trust store. Refer to the browser's documentation for details on importing the certificate into the browser.
ResultOnce the SSL configuration has been set up and is working, the URL to access the TIBCO Enterprise Administrator server from the web UI changes from http://localhost:8777 to https://localhost:8777.
SSL PropertiesWhen configuring SSL on the TIBCO Enterprise Administrator, you must set some properties on both the TIBCO Enterprise Administrator server as well as the agent.
Note: Setting the HttpClient properties on both the agent and the TIBCO Enterprise Administrator server is mandatory only if you want to set up a two-way SSL configuration. Do not set the HttpClient properties if you want to set up a one-way SSL configuration or do not want to set up SSL at all. If you do not set the HttpClient properties on the agent and the TIBCO Enterprise Administrator server, the HttpClients residing on both of them are configured to "Trust All".
To enable SSL on the TIBCO Enterprise Administrator server, set these properties for the HttpServer and HttpClient residing on the TIBCO Enterprise Administrator server:
Property Description
Properties for the HttpServer on the TIBCO Enterprise Administrator server
tea.http.keystore The file name or URL of the key store location.
For example: tea.http.keystore ="/Users/<username>/tea/keystore/httpserversslkeys.jceks"
TIBCO Enterprise Administrator Server Properties

TIBCO® Enterprise Administrator User's Guide
21 | Configuring the TIBCO Enterprise Administrator Server
Property Description
tea.http.keystore-password Password for the key store residing on the TIBCO Enterprise Administrator server. This is the password that was set when the key store was created.
For example: tea.http.keystore-password = "MyPassword"
tea.http.cert-alias Alias for the SSL certificate. The certificate can be identified by this alias in case there are multiple certificates in the trust store.
For example: tea.http.cert-alias = "httpserver"
tea.http.key-manager-password The password for the specific key within the key store. This is the password that was set when the key pair was created.
For example:
tea.http.key-manager-password = "password"
tea.http.truststore The file name or URL of the trust store location.
For example:
tea.http.truststore = "/Users/<username>/tea/keystore/httpserverssltrusts.jceks"
tea.http.truststore-password The password for the trust store.
For example:
tea.http.truststore-password = "password"
tea.http.want.client.auth See section Guidelines to set the tea.http.want.client.auth and tea.http.need.client.auth Parameters below. This property is used for mutual authentication.
For example: tea.http.want.client.auth = true
tea.http.need.client.auth See section Guidelines to set the tea.http.want.client.auth and tea.http.need.client.auth Parameters below. This property is used for mutual authentication.
For example:

TIBCO® Enterprise Administrator User's Guide
22 | Configuring the TIBCO Enterprise Administrator Server
Property Description
tea.http.need.client.auth = true
tea.http.exclude.protocols The property to list the protocols to be excluded. To exclude multiple protocols, use comma as a delimiter.
For example, tea.http.exclude.protocols="SSLv3,TLS1" If the property is not mentioned, the SSLV3 protocol is excluded. If TIBCO Enterprise Administrator server must support all protocols including SSLV3, set the property to be empty.
For example, tea.http.exclude.protocols="".
Attention: When connecting using HTTPS, some versions of the popular browsers may be configured to use SSLv3 as the protocol. If you have problems accessing secured TIBCO Enterprise Administrator server (by default the SSLv3 is disabled) using the browser, follow the browser's user guide to configure that browser to excludeSSLv3 protocol.
Properties for the HttpClient on the TIBCO Enterprise Administrator server
Only required if you want to set up a two-way SSL configuration
tea.http.client.keystore The file name or URL of the key store location.
For example: tea.http.client.keystore = "/Users/<username>/tea/keystore/httpclientsslkeys.jceks"
tea.http.client.keystore-password
The password for the key store residing on the client (agent).
For example: tea.http.client.keystore-password = "password"
tea.http.client.cert-alias Alias for the SSL certificate. The certificate can be identified by this alias in case there are multiple certificates in the trust store
For example: tea.http.client.cert-alias = "httpclient"
tea.http.client.key-manager-password
The password for the specific key within the key store.
For example: tea.http.client.key-manager-password = "password"

TIBCO® Enterprise Administrator User's Guide
23 | Configuring the TIBCO Enterprise Administrator Server
Property Description
tea.http.client.truststore The file name or URL of the trust store location.
For example: tea.http.client.truststore = "/Users/<username>/tea/keystore/httpclientssltrusts.jceks"
tea.http.client.truststore-password
The password for the trust store.
For example: tea.http.client.truststore-password = "password"
tea.http.client.exclude.protocols The property to list the protocols to be excluded. To exclude multiple protocols, use comma as a delimiter.
For example, tea.http.exclude.protocols="SSLv3,TLS1" If the property is not mentioned, the SSLV3 protocol is excluded. If TIBCO Enterprise Administrator server must support all protocols including SSLV3, set the property to be empty.
For example, tea.http.exclude.protocols="".
Attention: When connecting using HTTPS, some versions of the popular browsers may be configured to use SSLv3 as the protocol. If you have problems accessing secured TIBCO Enterprise Administrator server (by default the SSLv3 is disabled) using the browser, follow the browser's user guide to configure that browser to excludeSSLv3 protocol.
Property Description
Properties for the HttpServer on the agent
tea.agent.http.keystore The file name or URL of the key store location.
For example: tea.agent.http.keystore ="/Users/<username>/tea/keystore/httpserversslkeys.jceks"
tea.agent.http.keystore.password Password for the key store residing on the agent. This
Agent PropertiesTo enable SSL on the agent, set the following properties for the HttpServer and HttpClient residing on the agent:

TIBCO® Enterprise Administrator User's Guide
24 | Configuring the TIBCO Enterprise Administrator Server
Property Description
is the password that was set when the key store was created.
For example: tea.agent.http.keystore.password = "MyPassword"
tea.agent.http.cert.alias Alias for the SSL certificate. The certificate can be identified by this alias in case there are multiple certificates in the trust store.
For example: tea.agent.http.cert.alias = "httpserver"
tea.agent.http.keymanager.password The password for the specific key within the key store. This is the password that was set when the key pair was created.
For example:
tea.agent.http.keymanager.password = "password"
tea.agent.http.truststore The file name or URL of the trust store location.
For example:
tea.agent.http.truststore = "/Users/<username>/tea/keystore/httpserverssltrusts.jceks"
tea.agent.http.truststore.password The password for the trust store.
For example:
tea.agent.http.truststore.password = "password"
tea.agent.http.want.client.auth See section Guidelines to set the tea.http.want.client.auth and tea.http.need.client.auth Parameters below. This property is used for mutual authentication.
For example: tea.agent.http.want.client.auth = true
tea.agent.http.need.client.auth See section Guidelines to set the

TIBCO® Enterprise Administrator User's Guide
25 | Configuring the TIBCO Enterprise Administrator Server
Property Description
tea.http.want.client.auth and tea.http.need.client.auth Parameters below. This property is used for mutual authentication.
For example: tea.agent.http.need.client.auth = true
tea.agent.http.exclude.protocols The property to list the protocols to be excluded. To exclude multiple protocols, use comma as a delimiter.
For example, tea.http.exclude.protocols="SSLv3,TLS1" If the property is not set either using system properties or using agent Server API, the SSLV3 protocol is excluded. If TIBCO Enterprise Administrator agent must support all protocols including SSLV3, set the property to be empty.
For example, tea.http.exclude.protocols=""
Attention: When connecting using HTTPS, some versions of the popular browsers may be configured to use SSLv3 as the protocol. If you have problems accessing secured TIBCO Enterprise Administrator server (by default the SSLv3 is disabled) using the browser, follow the browser's user guide to configure that browser to excludeSSLv3 protocol.
Properties for the HttpClient on the Agent
Only required if you want to set up a two-way SSL configuration
tea.agent.http.client.keystore The file name or URL of the key store location.
For example: tea.agent.http.client.keystore = "/Users/<username>/tea/keystore/httpclientsslkeys.jceks"
tea.agent.http.client.keystore.password The password for the key store residing on the client (agent).
For example: tea.agent.http.client.keystore.password =

TIBCO® Enterprise Administrator User's Guide
26 | Configuring the TIBCO Enterprise Administrator Server
Property Description
"password"
tea.agent.http.client.cert.alias Alias for the SSL certificate. The certificate can be identified by this alias in case there are multiple certificates in the trust store.
For example: tea.agent.http.client.cert.alias = "httpclient"
tea.agent.http.client.keymanager.password The password for the specific key within the key store.
For example: tea.agent.http.client.keymanager.password = "password"
tea.agent.http.client.truststore The file name or URL of the trust store location.
For example: tea.agent.http.client.truststore = "/Users/<username>/tea/keystore/httpclientssltrusts.jceks"
tea.agent.http.client.truststore.password The password for the trust store.
For example: tea.agent.http.client.truststore.password = "password"
tea.agent.http.client.exclude.protocols The property to list the protocols to be excluded. To exclude multiple protocols, use comma as a delimiter.
For example, tea.http.exclude.protocols="SSLv3,TLS1" If the property is not set either using system properties or using agent Server API, the SSLV3 protocol is excluded. If TIBCO Enterprise Administrator agent must support all protocols including SSLV3, set the property to be empty.
For example, tea.http.exclude.protocols=""
Attention: When connecting using HTTPS, some versions of the popular browsers may be configured to use SSLv3 as the protocol. If you have problems accessing secured TIBCO Enterprise Administrator

TIBCO® Enterprise Administrator User's Guide
27 | Configuring the TIBCO Enterprise Administrator Server
Property Description
server (by default the SSLv3 is disabled) using the browser, follow the browser's user guide to configure that browser to excludeSSLv3 protocol.
Guidelines to set the tea.http.want.client.auth and tea.http.need.client.auth ParametersHere are some guidelines for setting these parameters depending on the scenario you want to implement:
For this type of authentication...
setting the parameters in this combination...
results in...
Certification-based two-way authentication
http.want.client.auth = true
http.need.client.auth = false
The TEA server asks the client (web browser or agent) to provide its client certificate while handshaking. But the client chooses not to provide authentication information about itself, but the authentication process continues.
So that would mean that the client certification is optional which in turn means that no certificate needs to be generated on the client.
End Result
The authentication process is successful.
http.want.client.auth = false
http.need.client.auth = true
The TEA server asks the client (web browser or agent) to provide its client certificate while handshaking, but the client chooses not to provide authentication information about itself, the authentication process stops.
So that would mean that the client certification is required which in turn means that a keypair and certificate must be generated on the client (agent).

TIBCO® Enterprise Administrator User's Guide
28 | Configuring the TIBCO Enterprise Administrator Server
For this type of authentication...
setting the parameters in this combination...
results in...
End Result
The authentication process fails
http.want.client.auth = true
http.need.client.auth = true
Same as the above case where the client certification is required and a keypair and certificate must be generated on the client (agent).
End Result
The authentication process fails
Certification-based one-way authentication
http.want.client.auth = false
http.need.client.auth = false
Both of the parameters set to 'false' which means that it is a One-way Authentication, where only the client (web browser or agent) verifies the TEA server but the TEA server trusts all the clients without verification.
Do not generate any certificates.
End Result
The authentication process is successful, as long as the user name and password provided by the agent are both correct.
Setting SSL Properties on the AgentTo enable SSL, you must set the SSL system properties on both the TIBCO Enterprise Administrator server and the agent.
Refer to the SSL Properties section for details on the system properties to be set.
Procedure 1. On the agent, you can set the SSL system properties in one of the following ways:
l Set the properties using the API.

TIBCO® Enterprise Administrator User's Guide
29 | Configuring the TIBCO Enterprise Administrator Server
For example,
server.setKeystorePath( “/tea/keystore/httpserversslkeys.jceks” server.setKeyStorePath("/tea/keystore/httpserversslkeys.jceks"); server.setKeyStorePassword("password"); server.setCertAlias("httpserver"); server.setTrustStorePath("/tea/keystore/httpserverssltrusts.jceks"); server.setTrustStorePassword("password"); server.setKeyManagerPassword("password"); server.setWantClientAuth(true); server.setNeedClientAuth(true); server.setHttpClientKeyStorePath("/tea/keystore/httpclientsslkeys.jceks"); server.setHttpClientKeyStorePassword("password"); server.setHttpClientCertAlias("httpclient"); server.setHttpClientTrustStorePath("/tea/keystore/httpclientssltrusts.jceks"); server.setHttpClientTrustStorePassword("password"); server.setHttpClientKeyManagerPassword("password");
l Create an SSLContext and inject it into the TIBCO Enterprise Administrator server using the agent API.
To do so:
a. Create an SSLContext object. Follow the JDK documentation on the Oracle web site for instructions on how to do so.
b. Use the SSLContext API to set the configuration properties into the SSLContext instance. Follow the JDK documentation on the Oracle web site for instructions on how to do so.
c. Inject the SSLContext instance into the TEA agent's HttpServer and HttpClient using one of the following APIs:
public TeaAgentServer(final String name, final String version, final String agentinfo, final int port, final String contextPath, final Boolean enableMetrics, final SSLContext

TIBCO® Enterprise Administrator User's Guide
30 | Configuring the TIBCO Enterprise Administrator Server
sslContextForHttpServer, final SSLContext sslContextForHttpClient)
or
public TeaAgentServer(final String name, final String version, final String agentinfo, final String hostname, final int port, final String contextPath, final Boolean enableMetrics, final SSLContext sslContextForHttpServer, final SSLContext sslContextForHttpClient)
Note: If you choose not to specify the hostname parameter as shown in the first interface above, a default value of localhost is used for the hostname.
An example of using the first API above:
final TeaAgentServer server = new TeaAgentServer("SSLTestAgent","1.1","Agent for SSL test",port,"/ssltestagent",true, sslContextForServer, sslContextForClient);
l Set the properties from the command line using these System.properties when running the agent.
For example,
-Dtea.agent.http.keystore="/Users/<username>/tea/keystore/httpserversslkeys.jceks" -Dtea.agent.http.truststore="/Users/<username>/tea/keystore/httpserverssltrusts.jceks" -Dtea.agent.http.keystore.password="password" -Dtea.agent.http.truststore.password="password" -Dtea.agent.http.keymanager.password="password" -Dtea.agent.http.cert-alias="httpserver" -Dtea.agent.http.want.client.auth=true -Dtea.agent.http.need.client.auth=true -Dtea.agent.http.client.keystore="/Users/<username>/tea/keystore/httpclientsslkeys.jceks"

TIBCO® Enterprise Administrator User's Guide
31 | Configuring the TIBCO Enterprise Administrator Server
-Dtea.agent.http.client.truststore="/Users/<username>/tea/keystore/httpclientssltrusts.jceks" -Dtea.agent.http.client.keystore.password="password" -Dtea.agent.http.client.truststore.password="password" -Dtea.agent.http.client.keymanager.password="password" -Dtea.agent.http.client.cert-alias="httpclient"
2. Start the agent. If you did not set the system properties using the API or create and inject an SSLContext, then make sure to start the agent in SSL mode by setting the properties through the command line as shown in the example in the last bullet item above.

TIBCO® Enterprise Administrator User's Guide
32 | Logging
LoggingThe product does not ship an slf4j adapter along with it. For agent library logging, you must install log4j or logback and configure it. The location of logback.xml or log4j.xml must be placed in the classpath. For server logging, the default location of the log configuration file logging.xml is<TIBCO_CONFIG_HOME>\tibco\cfgmgmt\tea\conf.
Loggers
Changes made to the log configuration file are recognized by the server dynamically; hence avoiding a restart. The following loggers are available:
Loggers Description
com.tibco.security Used to log DSS.
com.tibco.tea.server Used to log DSS .
com.tibco.tea.server.lifecycle Used to log the internal server events associated with start, stop, or restart of the internal components.
com.tibco.tea.server.console Used to log the server startup. Controls the output visible on the server console. Do not change this logger.
com.tibco.tea.server.io Used to log the internal server events associated with reading from or writing to a file.
com.tibco.tea.server.security Used to log the internal server events associated with authentication and authorization.
com.tibco.tea.server.remoting Used to log the internal server events associated with remote agent registration and connectivity.
com.tibco.tea.server.service Used to log the internal server events associated with the execution of service requests on behalf of the user.
com.tibco.tea.server.error Used to log the internal server events associated with business errors encountered while executing service operations on behalf of the user.

TIBCO® Enterprise Administrator User's Guide
33 | Logging
Loggers Description
com.tibco.amx.ra.dbrealm Used for managing realms over Hibernate, JDBC.
com.tibco.amx.ra.dbauth Used for authentications over Hibernate, JDBC.
com.tibco.amx.ra.ldaprealm LDAP realms; do not confuse with LDAP authentication or connection.
com.tibco.amx.ra.ldapauth LDAP authentication; do not confuse with LDAP realm or connection.
com.tibco.amx.ra.trinity Is a generic logger used mostly in configurations. Is useful with -Dcom.tibco.trinity.runtime.core.connector. Use the .debug=true to debug the steps.
com.tibco.amx.ra.keystore Used for a keystore type.
com.tibco.tea.server.ext.hawk Used only for integrating with Hawk. You can see the Hawk Extension messages by configuring this logger.
Log Levels
The default log levels for the loggers is INFO. The following log levels are available:
l TRACE
l DEBUG
l INFO
l WARN
l ERROR
l FATAL
To learn more about the third-party log configuration files, visit the following:
l HOCON (Human-Optimized Config Object Notation): http://github.com/typesafehub/config/blob/master/HOCON.md.
l LOGBACK configuration: http://logback.qos.ch/manual/configuration.html.
Rolling and Triggering Policy
The rolling and triggering policies are available in the<TIBCO_CONFIG_HOME>\tibco\cfgmgmt\tea\conf\logging.xml file. You can change these policies to suit

TIBCO® Enterprise Administrator User's Guide
34 | Logging
your requirement. The following snippet serves as an example:
<rollingPolicy class="ch.qos.logback.core.rolling.FixedWindowRollingPolicy"> <fileNamePattern>${tea.logs}/tea.%i.log.zip</fileNamePattern> <minIndex>1</minIndex> <maxIndex>3</maxIndex> </rollingPolicy> <triggeringPolicy class="ch.qos.logback.core.rolling.SizeBasedTriggeringPolicy"> <maxFileSize>5MB</maxFileSize> </triggeringPolicy>
By default, if the log file reaches 5MB, it is saved as a ZIP file and a new log file is created.

TIBCO® Enterprise Administrator User's Guide
35 | Agent Management
Agent ManagementYou can use the Web UI to register TIBCO Enterprise Administrator agents and URL agents. The URL agents are not TIBCO Enterprise Administrator agents; however they might be a web application that you want to port as TIBCO Enterprise Administrator agent. Every agent that is added to the TIBCO Enterprise Administrator is displayed on the landing page. You can perform basic administrative tasks collectively on these agents such as reconnecting or unregistering agents.
Registering an AgentA product is exposed to the TIBCO Enterprise Administrator through an agent. When you register an agent corresponding to a product, the agent ensures that the product is visible on TIBCO Enterprise Administrator.
Before you beginStart the agent for the corresponding product. As an example, this procedure uses an example of a Tomcat agent.
Procedure 1. Login to TIBCO Enterprise Administrator. The username and the password is admin.
The landing page is displayed.
2. Click the Agents card.
The Agent Management Pane is displayed.
3. By default, the Agents tab is selected. Click Register New.
The Register Agent window is displayed.
4. Provide the following details:
l Agent Name

TIBCO® Enterprise Administrator User's Guide
36 | Agent Management
l Agent URL
l Agent Description
Warning: When registering agents, ensure that the agent IDs do not collide.
5. Click Register.
The agent is visible in the Agents pane. The agent card on the landing page also shows an increase in number for every registered agent.
Attention: Watch out for the following:
a. If there are two agents for the same object type, ensure that they have the same operation name and number. This is to ensure that when you invoke an operation, you can select the agent on which you want to execute the operation from the drop-down list.
b. If the URL used during registration is invalid, the 404-Page not Found error occurs.
c. Ensure that you avoid registering two agents with the same IDs. The TIBCO Enterprise Administrator server does not validate whether two agents have registered with the same ID.
d. Agents built with the higher version of the library cannot be registered with the lower version of the server. For example, an agent built with the 1.3.0 version of the library cannot be registered with the 1.2.0 version of the TIBCO Enterprise Administrator server.
Reconnecting an AgentYou can collectively reconnect agents using TIBCO Enterprise Administrator.
Before you beginEnsure that the TEA server and the Admin agent are running.
Procedure

TIBCO® Enterprise Administrator User's Guide
37 | Agent Management
1. Click the Agents card.
The Agent Management Pane is displayed.
2. From the Agents tab, select the agents you want to reconnect. Click Reconnect.
A confirmation window is displayed.
3. Click Reconnect to confirm.
The agents are reconnected with the server.
Unregistering an AgentYou can collectively unregister agents using the TIBCO Enterprise Administrator.
Before you beginEnsure that the TIBCO Enterprise Administrator server and the agents are running.
Procedure 1. Click the Agents card.
The Agent Management pane is displayed.
2. From the Agents tab, select the agents you want to unregister. Click Unregister.
A confirmation window is displayed.
3. Click Unregister to confirm.
The agents are unregistered from the server.
Registering URL AgentsURL Agents are not TIBCO Enterprise Administrator agents. If you want a web application to be ported on TIBCO Enterprise Administrator, you can register the URL with the server.
Procedure 1. Login to TIBCO Enterprise Administrator. The username and the password is admin.

TIBCO® Enterprise Administrator User's Guide
38 | Agent Management
The landing page is displayed.
2. Click the Agents card.
The Agent Management Pane is displayed.
3. Click URL Agents.
4. Click Register New.
5. Provide the following details:
l Agent Name
l Agent URL
l Agent Description
6. Click Register.
The URL agent is visible in the URL Agents pane.
Unregistering an URL AgentYou can collectively unregister agents using the TIBCO Enterprise Administrator.
Procedure 1. Click the Agents card.
The Agent Management pane is displayed.
2. From the URL Agents tab, select the agents you want to unregister. Click Unregister.
A confirmation window is displayed.
3. Click Unregister to confirm.
The URL agents are unregistered from the server.

TIBCO® Enterprise Administrator User's Guide
39 | The Side Navigation Bar
The Side Navigation BarTIBCO Enterprise Administrator Web UI supports the side navigation bar visible to the left of the page.
The most commonly used menu options are available on the navigation bar. If you do not want to use the main menu, you can manage agents, users, machines, Hawk, and views using the options available on the navigation bar. By default, the side navigation bar is
visible when you log into the Web UI. You can use the icon visible on the left to show or hide the navigation bar.
The Left Navigation Bar

TIBCO® Enterprise Administrator User's Guide
40 | Listing Products in TIBCO Enterprise Administrator
Listing Products in TIBCO Enterprise AdministratorYou can view the products exposed to TIBCO Enterprise Administrator using the Product List menu. This procedure uses an example of the Tomcat agent to drill down into the assets made available by the Tomcat server.
Procedure
1. Click .
A list of products registered with TIBCO Enterprise Administrator are displayed.
2. Select one of the products. This procedure uses the example of Tomcat.
Tomcat details are displayed. The content displayed varies according to the product selected. The menu option changes according to the product selected. Rest of these steps depend on the product selected.
3. Assuming the product selected is Tomcat, click Create to create a server instance. Provide the following details:
l Select Operation Target: select the Agent on which the instance must be created.
l Name: name of the instance.
l HTTP Port: In case of the Tomcat agent example, the default HTTP port is 8082.
l AJP Port: you can leave this empty; a random port number is picked up.
l Shutdown Port: In case of the Tomcat agent example, the default Shutdown port is 9999.

TIBCO® Enterprise Administrator User's Guide
41 | Listing Products in TIBCO Enterprise Administrator
Note: If you are an agent developer, and if you have TIBCO Enterprise Administrator SDK variant installed, some sample agents are available to you at <TIBCO_HOME>\tea\<version>\samples. This procedure uses the sample Tomcat agent. The samples folder is not available in the TIBCO Enterprise Administrator server variant.
4. Click Create.
The server instance is displayed in the Servers pane.
5. Click one of the instances. You have options to start, stop, delete, or change the port of the server.
6. Under the Server details, a list of assets is displayed. Click one of the assets to drill down further. You can start or stop any of these assets.
Product Listing of the Tomcat Agent

TIBCO® Enterprise Administrator User's Guide
42 | Using System Views
Using System ViewsIn addition to the agents, TIBCO Enterprise Administrator also keeps track of the machines on which they are running. TIBCO Enterprise Administrator provides a Machine View that lists all the machines in an enterprise. Agents running on those machines expose the data to TIBCO Enterprise Administrator.
Procedure
1. On the menu, click and select Machines.
The Machine pane lists all the machines in the enterprise. Details such as the status of the machine, operating system, CPU usage, memory, and the number of agents running on it are listed.
Note: The Machines view always shows the CPU/Load column for a Windows machine instance as N/A.
2. Click a machine of your choice.
A detailed report about the machine is displayed. The report lists details about the machine, agents, network interfaces, and operating system processes.
Warning: Warning: If you are viewing a machine that is running a Hawk micro agent on Windows, the Network and System Details are not displayed. Details such as CPU Load, Memory, Usage, Network Interfaces, and so on are not displayed on the Windows platform.
3. For further details, you can drill down on the clickable items displayed in the window. For example, when you click an agent, the Agent Management pane is displayed.
4. Click the arrow next to any of the columns to sort on that column. The up arrow is used to sort in the ascending order and the down arrow is used to sort in the descending order.
The machines are sorted on their names.

TIBCO® Enterprise Administrator User's Guide
43 | Using System Views
5. Click the icon next to a column to group by the column. Notice that not all columns have Filter icons.
a. In the Filter window, enter the Filter condition. For example, to group machines whose names start with "BW", use the condition: Filter by BW.
The machines are now sorted by their names.
Filter By Condition
Note: The server also displays the details of the machines on which a Hawk agent was discovered in the Machine view. These machines are displayed with an asterisk (*) next to them. These machines are detected only if the following criteria are met:
l You have created a Hawk domain. For details on creating a Hawk domain, see Registering a Hawk Domain.
l An agent is running in the Hawk domain.
l You must have one Hawk agent per machine.
Support for IPv6 AddressesStarting with version 2.2.0, TIBCO Enterprise Administrator provides support for IPv6 address format.
By default, the IPv4 address format is the preferred format. To use IPv6 address format you must set system property, java.net.preferIPv6addresses to true. For example, -Djava.net.preferIPv6addresses=true. This property is set to false by default. When this property is set, the IPv6 address format is visible as a column in the Machine View. The property, Machineipaddress visible on the Machine view takes either the IPv4 or the IPv6 format depending on the java.net.preferIPv6addresses property.

TIBCO® Enterprise Administrator User's Guide
44 | Using System Views
If the IPv6 format is enabled, make a note of the following points:
l For TIBCO Enterprise Administrator agents that are older than version 2.2.0 and are registered with TIBCO Enterprise Administrator server version 2.2.0 or greater, the IPv6 Address column in the Machines view in the TEA Web UI is blank. The IPv6 address for the agent's machine is not displayed in the IPv6 Address column. The IPv4 addresses are visible in IPv4 Column.
IPv6 Address in the Network Interfaces Panel of the Machines View
l When registering an agent with a server, use square brackets around the IPv6 address. The following is an example of a URL that uses an IPv6 address format to register a Tomcat agent with the TIBCO Enterprise Administrator server: http://[FEDC:BA98:7654:3210:FEDC:BA98:7654:3210]:8082/tomcatagent
l The default format is IPv4, unless the agent developer enables the IPv6 address format explicitly by setting the java.net.preferIPv6addresses property.
Viewing the Installed TIBCO Software and Running TIBCO Processes on a MachineYou can view the TIBCO_HOME details detected on a machine with a TIBCO Enterprise Administrator agent or a TIBCO Hawk agent running on it. You can drill down every TIBCO_HOME location to see the software installed in the TIBCO_HOME. Constraints: TIBCO Enterprise Administrator detects only those software installations that were performed using TIBCO Universal Installer.

TIBCO® Enterprise Administrator User's Guide
45 | Using System Views
Note: Optionally, TIBCO_HOME location details can be explicitly provided by setting the following system property:
tea.agent.tibcohome-info = tibcoHomeEnvName|tibcoHomeLocation|tibcoHomeConfigLocation" (tibcoHomeConfigLocation is an optional field.) For example, tea.agent.tibcohome-info = mytibcohome|/home/userHome/tibcohome|/home/userHome/tibcohome/tibco
Procedure
1. On the menu, click and select Machines.
2. Click a machine of your choice.
Note: Alternatively, you can click on the Machines card on the landing page.
3. Scroll down to see Software Installation Details.
The Software Installation Details group lists the TIBCO_HOME details detected on the machine provided there is a TIBCO Enterprise Administrator agent or a TIBCO Hawk agent and Product_Info MicroAgent running on it. The following details are displayed:
a. Environment name
b. Location
c. Configuration Location: The configuration location is displayed only if you had specified one during installation.
d. Number of Software
Software Installation Details

TIBCO® Enterprise Administrator User's Guide
46 | Using System Views
Attention: If you started the server as an NT service on boot up, the Software Installation details and the TIBCO Processes are not displayed. To view these details, start the NT service under a particular user by configuring the NT service with user name and password. In this case, you can only see the details of the TIBCO software installed for the configured user.
4. Scroll down to see the TIBCO processes running on the machine.
5. From the Software Installation Details pane, click a TIBCO_HOME name of your choice.
The page that is displayed has three panes: TIBCO_HOME Environment Name, the Installed Software details for that location, and the TIBCO processes running on the TIBCO_HOME.
Note: Any TIBCO process running under TIBCO_HOME gets displayed.
TIBCO Software and Processes Running under a TIBCO_HOME

TIBCO® Enterprise Administrator User's Guide
47 | Using System Views
Note: In case of TIBCO Hawk detected machines, all running TIBCO processes may not be detected due to certain limitations.
Viewing JVM Information from an AgentYou can configure TIBCO Enterprise Administrator to detect JVMs running on a machine on which TIBCO Enterprise Administrator Agent is running. When configured, the Machine View displays the JVM Processes pane. The JVM Processes pane shows process ids with display names (if present) of the JVMs in a drop-down list. By default, the JVM details are not displayed. To view the JVM details, you must configure a property either on the server or on the machines on which the agents are running. When you choose to view the JVM details, the JAR files provided by the server loads on the external JVM. Once loaded on an external JVM, these JAR files cannot be unloaded.
Before you beginTo view the JVM details on the server side, in the tea.conf file, set the tea.jvminfo.enabled to true. To view the JVM details of the machine on which the agents are running, set the tea.agent.jvminfo.enabled to true.
Procedure
1. On the menu, click and select Machines.
Note: Alternatively, you can click on the Machines card on the landing page, or the Machines option on side navigation bar.
2. Click a machine of your choice.
3. Scroll down to see the JVM processes pane. Remember that the JVM information is not displayed if the corresponding JVM returned empty values or if the process ids are empty.
Warning: You might not see the JVM details if you started the server as an NT service on boot up. To avoid this, start the NT service under a

TIBCO® Enterprise Administrator User's Guide
48 | Using System Views
particular user by configuring the NT service with user name and password. In this case, you can only see the details of the TIBCO software installed for the specific user.
4. Click the drop-down list and select a JVM process entry.
5. You are prompted with the following message: Do you want to install cloud op agent jar with an external JVM. Click OK.
The JAR files provided by the server loads on the external JVM. This prompt is displayed only in the beginning of a once for a browser tab.
JVM Processes Drop-Down List
The details of the selected JVM process are displayed.
Note: If there are two agents running on the same machine, one with JVM details enabled and the other with JVM details disabled, the JVM details might or might not be displayed depending on the agent selected by the server to fetch the JVM information. The behavior would be random in this case.
JVM Processes
Attention:

TIBCO® Enterprise Administrator User's Guide
49 | Using System Views
l For the JVM that corresponds to a TIBCO Enterprise Administrator Agent, the information displayed is of that instant in time.
l For rest of the JVMs, the information displayed is as it was captured in time; which is displayed by Agent.Time field's value. The JVM information is periodically collected by the remote JVMs in a file. The interval of collecting the information for all such JVMs is currently set to 60 seconds (not configurable).
l If an agent is running on the same machine as the TIBCO Enterprise Administrator server, the timestamp for that agent won't be instantaneous and updates every 60 seconds.
l If an agent is running on a remote machine, then the timestamp is instantaneous for that agent.

TIBCO® Enterprise Administrator User's Guide
50 | Working with Multiple Products
Working with Multiple ProductsTIBCO Enterprise Administrator oversees a collection of assets in an enterprise. To exercise better control, you can isolate staging environments, business functionality, and organizational group from each other.
The TIBCO Enterprise Administrator server provides a set of views that helps you categorize the assets in an enterprise as per your requirements. You can easily switch from one view to another.
In addition to the available views, you can customize operator and search views depending on the products you want to track. You can create your own operator and search views by using the Manage Views option.
Solutions ViewA Solution is a collection of assets that provides a business functionality. Using this view, you can bring together assets (applications, processes, resources, endpoints) from across products to provide a unified solution.
A solution has a name, status, and contact information as its attributes. You can assign an asset to and unassign an asset from a solution. You can also define custom action by providing scripts for a solution. Using the TIBCO Enterprise Administrator server, you can:
l Create and manage multiple collections.
l Create access-controlled lists on solutions.
l Operate within the context of a Solution to CRUD assets across TIBCO Products.
l Add existing assets to a solution
l Delete existing assets from a solution.
Note: Solutions are displayed on the Solutions menu, only if the agents contribute them. Ensure that the contributing agent is registered with the server.

TIBCO® Enterprise Administrator User's Guide
51 | Working with Multiple Products
Procedure
1. Click and select a solution from the Solutions list.
The Solution pane is displayed. A list of assets is displayed.
Solutions Menu Option
2. Next to the Group by Type field, click ON.
The assets are grouped by type.
Group By Option

TIBCO® Enterprise Administrator User's Guide
52 | Working with Multiple Products
Note: When a TopLevelObject is added as a member of a solution, you cannot see the status of the TopLevelObject.
3. You can select multiple assets in a group to perform administrative tasks on them. For example, in the SampleProductAgentSolution, you can start, stop, delete, or change the port of a server. Similarly, you can get members of a selected node, or delete nodes collectively.
Solutions Detailed View
Search ViewsYou can search for assets that you have permissions to access. The result of the search can be saved in a view that is displayed in the Search Views option.
Before you beginBy default, no search views are created by the TIBCO Enterprise Administrator. Ensure that you create the search views by using the procedure mentioned in Creating Custom Search Views.
Procedure
1. Click . If you have created a list of search views, they are listed in the Search Views option.
2. Click a Search View of your choice.
The saved search is displayed with the results.

TIBCO® Enterprise Administrator User's Guide
53 | Working with Multiple Products
3. You can drill down the assets and collectively perform basic administrative tasks on the assets.
Search Results for the Phrase: Tomcat
Note: After registering an agent with the server, the elements are available only after 30 seconds of registration. To change this setting, open the <TIBCO_CONFIG_HOME>\tibco\cfgmgmt\tea\conf\tea.conf file and change the value in the tea.indexing.interval property. The default value is 30000 milliseconds.
Operators ViewAn operator view can be constructed based on the participating products. You can group together applications, processes, and other assets from various tenant product groups into a manageable "operator view". The view provides you with a single window of visibility into the applications, processes, and other assets that interest you.
Before you beginBy default, there are no operator views created by the TIBCO Enterprise Administrator. Ensure that you create the operator views by using the procedure mentioned in Creating Custom Operator Views.
Procedure

TIBCO® Enterprise Administrator User's Guide
54 | Working with Multiple Products
1. Click . If you have created a list of operator views, they are listed in the Operator Views option.
2. Click an Operator View of your choice.
The Operator View pane lists a set of assets.
3. You can drill down the assets and collectively perform basic administrative tasks on the assets.
Creating Custom Search ViewsAfter fetching the results of a search, TIBCO Enterprise Administrator provides the Save Search option to save search views.
Procedure 1. Click the magnifying glass icon on the upper right corner of the browser window.
2. Enter a string in the Search field. For example, tomcat.
The search result is displayed.
3. Click Save Search.
The Save Search window is displayed.
4. Enter a name and description of the search. Click Save Search.
The Search View is now saved.
5. To verify that the custom search view exists, refresh the browser and click .
Your latest view is displayed in the Search Views option.
Creating Custom Operator ViewsAn operator view can be constructed based on the participating products. You can group together applications, processes, and other assets from various tenant product groups into a manageable "operator view". The view provides you with a single window of visibility into the applications, processes, and other assets that interest you.

TIBCO® Enterprise Administrator User's Guide
55 | Working with Multiple Products
Procedure
1. Click and select Manage Views.
The Operator Views and the Search Views panes are displayed.
2. In the Operator Views pane, click Add.
The Add View window is displayed.
3. Enter a name and description of the view. Click Add View.
The view is now displayed in the Operator Views pane.
4. To verify that the custom operator view is displayed on the Views menu, refresh the
browser and click .
Your latest view is displayed in the Operator Views option.
Adding Assets to a View at RuntimeYou can add assets to an existing operator view or create a new operator with a set of assets at runtime. This helps you focus only on those assets that concern you at that particular time.
In every pane that lists a set of assets, you can click the button to add panels to an operator view of your choice. The button is similar to the Favorites button on a browser. You can add the assets to an existing operator view or create a new operator view with the selected assets.
The Favorites Button

TIBCO® Enterprise Administrator User's Guide
56 | User Management
User ManagementYou can use TIBCO Enterprise Administrator to manage users, groups, roles, permissions, and realms. TIBCO Enterprise Administrator can only manage the roles and permissions exposed by the agent. You cannot add new permissions other than those provided by the agent.
UsersUsers are entities that need access to the system. Each user might need a different level of access to the system.
TIBCO Enterprise Administrator can manage users internally, or can manage users in an external system. Users from external systems are mapped into TIBCO Enterprise Administrator to allow access to the system. The default user provided by TIBCO Enterprise Administrator is admin.
Adding UsersYou can add users to the TIBCO Enterprise Administrator. You cannot add new users to an existing agent.
Procedure 1. Click the Users card.
The User Management pane is displayed.
2. Under Users, click Add.
The New User window is displayed.
3. Provide the Name and a valid Password.
4. Click Next.
5. Add the user to a group, if available.

TIBCO® Enterprise Administrator User's Guide
57 | User Management
6. Click Next.
7. Select the roles to be assigned to the user. You can select multiple roles.
8. Click Finish.
The User pane shows the details of the new user created. Use this page to reset the user's password, add or remove roles, and add or remove the user from a group.
Importing UsersWhile you can add users to the default TEA_DB realm, you cannot add them to the LDAP realm. However, you can import users from the LDAP realm.
Before you beginEnsure that you have added an LDAP realm to the TIBCO Enterprise Administrator before importing users from the realm. To add a realm, follow the procedure in Adding Realms.
Procedure 1. Click the Users card.
The User Management pane is displayed.
2. Under Users, click Import.
The Import User window is displayed.
3. Select Realm and the users to be imported, and click Finish.
Note: The User details page of an imported user only lists the roles and groups for a user. You cannot reset the password for an imported user. You can see the groups the user belongs to, and you can add or remove roles for an imported user.

TIBCO® Enterprise Administrator User's Guide
58 | User Management
Assigning Users to GroupsUsers can be added to groups if they are not the ones imported from the LDAP realm. The default user, admin, cannot be added to groups.
Before you beginEnsure that you have created a group before starting this procedure. For more details on creating groups, see Creating a New Group.
Procedure 1. Click the Users card.
The User Management pane is displayed.
2. Select one or more users. You cannot select a user imported from the LDAP realm.
3. Click Assign to Group.
The Assign to Group window is displayed.
4. Select a group, and click Add.
Caution: Caution: You cannot map the users of a group in the LDAP realm with those in the TEA_DB realm or vice versa.
5. To verify, on the User Management pane, click the user. The user's details are displayed. Verify that the Group pane lists the group that the user was recently added to.
Note: Alternatively, to assign groups to a specific user:
a. Click a user to see the details of the user.
b. From the Groups pane, click Add. The Add Groups window is displayed.
c. Select the group you want to add and click Add. The group gets added to the user.
You can remove groups for a specific user in a similar fashion.

TIBCO® Enterprise Administrator User's Guide
59 | User Management
Assigning Roles to UsersYou can assign roles to users in both the TEA_DB realm and the LDAP realm. When you register an agent, you can see the roles defined by the agent.
You can add new permissions to the role, but you cannot delete the roles defined by the agent. TEA_ADMIN is the default role and can be assigned to other users.
Procedure 1. Click the Users card.
The User Management pane is displayed.
2. Under Users, select one or more users, and click Assign to Roles.
The Assign Roles to Users window is displayed.
3. Select one or more roles to assign. Click Add.
4. To verify that the role has been assigned. Click a user to see the details of the user. On the User details page, you can see the latest role you assigned to the user.
Note: Alternatively, to assign roles to a specific user:
a. Click a user to see the details of the user.
b. From the Roles pane, click Add. The Add Roles window is displayed.
c. Select the role you want to add and click Add. The role gets added to the user.
You can remove roles for a specific user in a similar fashion.
Deleting UsersYou can delete users added to the TEA_DB realm and LDAP realm. You cannot delete users added by the agent.
Procedure 1. Click the Users card.
The User Management pane is displayed.

TIBCO® Enterprise Administrator User's Guide
60 | User Management
2. Under Users, select the users to be deleted.
3. Click Delete.
4. Click Delete Users to confirm deletion.
Resetting the PasswordYou can change passwords of existing users on TIBCO Enterprise Administrator.
Procedure 1. Click the Users card.
The User Management pane is displayed.
2. Under Users, click on the user whose password you want to change.
The User details are displayed.
3. Click Reset Password.
The Reset Password window is displayed.
4. Reset the password for the user.
5. Click Finish to set the new password.
GroupsGroups are logical groupings of the users within an organization. A user can belong to multiple groups and a group can contain multiple users.
Groups provide easier way to control access to users. Instead of specifying the access permissions for each user, it is easier and practical to specify access permissions to the groups to which they belong to. Groups can contain sub-groups.
Creating a New GroupYou can create a new group and assign multiple users and roles to it. You can assign users and roles to multiple groups.

TIBCO® Enterprise Administrator User's Guide
61 | User Management
Procedure 1. Click the Users card.
The User Management pane is displayed.
2. Under Groups, click Add.
The New Group window is displayed.
3. Provide the Name and a valid Description.
You can click Finish at this stage or proceed to add users and roles to a group.
4. (Optional) Click Next.
5. (Optional) Add users to a group.
6. (Optional) Click Next.
7. (Optional) Select the roles to be assigned to the user. You can select multiple roles.
8. Click Finish.
9. To verify, click on the group to view the group details. Ensure that the roles and users selected are displayed in the details.
Importing GroupsYou can import existing groups from the LDAP realm. However, you cannot create new groups in the LDAP realm.
Before you beginEnsure that you have added an LDAP realm to the TIBCO Enterprise Administrator before importing users from the realm. For details on adding a realm, see Adding Realms.
Procedure 1. Click the Users card.
The User Management pane is displayed.
2. Under Groups, click Import.
The Import Groups window is displayed.
3. Select the realm and the groups to be imported from the realm.

TIBCO® Enterprise Administrator User's Guide
62 | User Management
4. Click Finish.
5. Click a group to see the details of the user. On the Groups details page, you can add or remove users, and add or remove roles from a group.
Caution: You cannot map the users of a group in the LDAP realm with those in the TEA_DB realm or vice versa.
Assigning Roles to GroupsYou can assign roles to groups in both the TEA_DB realm and the LDAP realm. When you register an agent, you can see the roles defined by the agent. You can add new permissions to the role, but you cannot delete the roles defined by the agent.
Procedure 1. Click the Users card.
The User Management pane is displayed.
2. Under Groups, select one or more groups, and click Assign to Roles.
The Assign Roles to Groups window is displayed.
3. Select one or more roles to assign. Click Add.
4. To verify that the role has been assigned. Click a group to see the details of the group. On the Group details page, you can see the latest role you assigned to the user.
Note: Alternatively, to assign roles to a specific group, perform the following steps:
a. Click a group to see the details of the group.
b. From the Roles pane, click Add. The Add Roles window is displayed.
c. Select the role you want to add and click Add. The role gets added to the group.
You can remove roles from a specific group in a similar fashion.

TIBCO® Enterprise Administrator User's Guide
63 | User Management
Deleting GroupsYou can delete groups added to the TEA_DB realm and LDAP realm.
Procedure 1. Click the Users card.
The User Management pane is displayed.
2. Under Groups, select the groups to be deleted.
3. Click Delete.
4. Click Delete Groups to confirm deletion.
RolesRole is a mechanism to grant or revoke access to users. A Role is a collection of privileges and are assigned to users and groups. All the privileges in a role get associated to the user or group to which it is assigned.
Adding RolesYou can add new roles to TEA_DB, LDAP realm and to the agents. You can also add permissions to an existing role available in the agent. TEA_ADMIN is the default role.
Agents can contribute roles that are visible in the Roles pane. You cannot delete these roles, but you can add new roles to the TIBCO Enterprise Administrator server.
Procedure 1. From the Home page, select the Users card.
The User Management pane is displayed.
2. Select Roles.

TIBCO® Enterprise Administrator User's Guide
64 | User Management
3. From the Roles pane, click Add.
4. On the New Role window, specify the name of the role, description if any, and the product to which you want to apply the role. Click Next to continue defining the role.
Note: You could exit the wizard by clicking Finish at any stage of the wizard.
The second step of the wizard is to help you add permissions to the role. This pane lists all the entity types in one tab and the instances, if any, in another tab. By default, the Entity Type tab is in focus. If you want to assign entity-based permissions, refer to Setting Entity-Based Permissions on a Role. If you want to assign instance-based permissions, refer to Setting Instance-Based Permissions on a Role.
5. Select the users you want to apply the role to, and click Next.
6. Select the groups you want to assign the role to.
7. Click Finish.
Note: If you upgrade an agent, you can only have additional roles on the same agent. You cannot delete or change the existing role definition.
ResultThe new role is displayed on the Roles details page. The page shows the role definition. You can add or remove the permissions, users, or groups for the role from the Roles details page.
Note: If you had exited the wizard without completing the procedure, you can redefine the role by adding or removing the permissions, users, or groups from this page.
Setting Entity-Based Permissions on a RoleThis is the classic way of assigning permission. Each row represents an entity type and each column represents the type of permission. You can also see the count of permissions selected on the header of the tab.

TIBCO® Enterprise Administrator User's Guide
65 | User Management
Procedure 1. Select the permissions that you want to assign on the entity types.
The permissions you select here apply to all the instances of the selected entity type across all the agents. Rows represent the entity type and column represents the type of the permission.
Entity-Based Permissions
2. Click Next.
The next step of the wizard is to help you add users to the role.
3. To continue adding users to the role, complete the steps mentioned in Adding Users to a Role. You can also click Finish at this stage to exit the wizard.
ResultThe new role is displayed on the Roles details page. The page shows the role definition. You can add or remove the permissions, users, or groups for the role from the Roles details page.

TIBCO® Enterprise Administrator User's Guide
66 | User Management
Note: If you had exited the wizard without completing the procedure, you can redefine the role by adding or removing the permissions, users, or groups from this page.
Setting Instance-Based Permissions on a RoleBy using instance-based permissions, users can now enforce permissions on a particular instance of an entity type.
When you assign instance-based permission to a given agent, you can control whether or not the permission is applicable to the user, group, or role on one or more instances of an entity type. In addition to that, you can also control whether the permission must be assigned to one or multiple instances of an entity type. You can set instance-based permission from the Instances tab of the Add Role wizard. Attention: The Instances tab is not displayed if the agent does not support instance-based permissions.
Procedure 1. Click the Instances tab.
2. From the drop-down box, select the Agent.
This pane below shows instances on which a user can assign permissions in a collapsed tree format.
3. In the Name column, click All servers to view the servers list in a tree structure.
All Servers Tree under Instances

TIBCO® Enterprise Administrator User's Guide
67 | User Management
The tree expands to show a list of servers. Here you can see all the instances in a tree format of a selected agent.
4. Set permissions using one of the following methods:
Action Consequence
Click on the permissions displayed against a row as shown in Setting Permissions for All the Instances in an Entity.
You are setting permissions to all the instances in that entity type of that agent.
Drill down further by selecting a row of a given entity type as shown in Setting Permissions for a Specific Instance in an Entity.
You get to browse through the hierarchy of instances. You get to set permissions for a specific instance in the tree.
Click Next.
Setting Permissions for All the Instances in an Entity

TIBCO® Enterprise Administrator User's Guide
68 | User Management
Setting Permissions for a Specific Instance in an Entity

TIBCO® Enterprise Administrator User's Guide
69 | User Management
Attention: When you select a permission for a child instance, a READ permission for the parent is auto-selected. The next step of the wizard is to help you add users to the role.
5. Click Next.
The next step of the wizard is to help you add users to the role.
6. To continue adding users to the role, complete the steps mentioned in Adding Users to a Role. You can also click Finish at this stage to exit the wizard.
ResultThe new role is displayed on the Roles details page. The page shows the role definition. You can add or remove the permissions, users, or groups for the role from the Roles details page.
Note: If you had exited the wizard without completing the procedure, you can redefine the role by adding or removing the permissions, users, or groups from this page.

TIBCO® Enterprise Administrator User's Guide
70 | User Management
Deleting RolesYou can delete roles added to the TEA_DB realm and LDAP realm. You cannot delete roles added by the agent.
Procedure 1. Click the Users card.
The User Management pane is displayed.
2. Under Roles, select the roles to be deleted.
3. Click Delete.
4. Click Delete Roles to confirm deletion.
PermissionsA string on the basis of which access control is enforced. The agent decides the granularity of the permissions that it provides.
A permission could be as fine-grained as UpdateConfig which is applicable to only one operation, or it could be as coarse-grained as Full Control which applies to the entire system. A Privilege is a collection of permissions that are applicable to an object or a collection of objects.
Other than the permissions contributed by the agent, by default, TIBCO Enterprise Administrator provides two permissions to every agent: read and full_control. Having full_control is not equivalent to a user with the TEA_ADMIN role. A user with the TEA_ADMIN role can access Machine Management and User Management panes that a user with full_control cannot.
Note: You are able to see the read and full_control permissions only if the agent is registered with the TIBCO Enterprise Administrator 1.2 and above.

TIBCO® Enterprise Administrator User's Guide
71 | User Management
Adding Permissions to a User-Defined RoleYou can add new permissions to roles defined by a user. However, you cannot add permissions to agent-defined roles.
Procedure 1. Click the Users card.
The User Management pane is displayed.
2. Under Roles, select a user-defined role.
The Role details are displayed.
3. From the Permissions pane, click Add.
The Add Permission window is displayed.
4. Select the product on which you want to add the permission. A list of available permissions is listed.
5. Select the permissions you want to assign to the role, and select the object type it applies to.
6. Click Add.
Note: If you upgrade an agent, you can only have additional permissions on the same agent. You cannot delete or change the existing permission definition.
Removing PermissionsYou can remove permissions from a role that is defined by the user, but not the permissions contributed by the agent.
Procedure 1. Click the Users card.
The User Management pane is displayed.
2. Under Roles, select a role.

TIBCO® Enterprise Administrator User's Guide
72 | User Management
3. From the Permissions pane, select a permission, and Click Remove.
4. Click Remove Permissions to confirm deletion.
Viewing PermissionsYou can view permissions contributed by an agent.
Procedure 1. Click the Users card.
The User Management pane is displayed.
2. To see a list of permissions, click Permissions.
RealmsA security realm comprises mechanisms for protecting TIBCO Enterprise Administrator resources. It contains users, groups, and their security credentials. Information about users and the groups they belong to, is provided by a realm.
TIBCO Enterprise Administrator supports two kinds of realms: TEA_DB and LDAP. In case of the TEA_DB realm, the user and group information is stored in a file. In case of LDAP realm, the user or group information exists on an LDAP server and is accessed from the TIBCO Enterprise Administrator server.
Adding RealmsYou can add LDAP realms to the TIBCO Enterprise Administrator server. The default realm available is TEA_DB.
Procedure
2. Click the Users card.
The User Management pane is displayed.
3. Under Users, click Realms.

TIBCO® Enterprise Administrator User's Guide
73 | User Management
The Realms pane is displayed.
4. Click Add.
The Register New Realm is displayed.
5. Provide the following general information:
l Name
l Description
l Server URL
l Search Timeout
l BindUserDN
l Bind Password
Note: When specifying BindUserDN, if the CN attribute contains reserved character like comma (,), use escape character backslash (\) in front of reserved characters. Other reserved characters include the semicolon, the plus sign, the backslash, and the left and right angle brackets. For example, if the LDAP user is
CN=John, Smith,CN=Users,DC=trinitytest,DC=com
Then specify BindUserDN as
CN=John\, Smith,CN=Users,DC=trinitytest,DC=com
Adding a Realm: General Information

TIBCO® Enterprise Administrator User's Guide
74 | User Management
6. Click Next. Provide the following group information:
l Group ID Attribute
l Group User Attribute
l Sub-Group Attribute
l Group Search Base DN
l Group Search Expression
Adding a Realm: Group Information
7. Click Next. Provide the following User information:

TIBCO® Enterprise Administrator User's Guide
75 | User Management
l User ID Attribute
l User Search Base DN
l User Search Base Expression
l User Password Attribute
Adding a Realm: User Information
8. Click Finish.
ResultThe realm is added to the TIBCO Enterprise Administrator server.
Deleting RealmsYou can delete realms available in the TIBCO Enterprise Administrator server.
Procedure 1. Click the Users card.
The User Management pane is displayed.
2. Click Realms.
The Realms pane is displayed.
3. Select a realm and click Delete.
4. Click Delete Realms to confirm deletion.

TIBCO® Enterprise Administrator User's Guide
76 | Default Landing Page
Default Landing PageYou can set a default landing page for a user or for a group. To set up a landing page for one or more groups, you must have administrator privileges (TEA_ADMIN role).
Setting the Landing Page for a UserYou can customize the TIBCO Enterprise Administrator UI to set a default landing page.
Procedure 1. Switch to the page that you want as your landing page in the UI.
2. Click and select Set as Start Page.
You get a notification that the landing page is set, but these changes are visible only on your next login.
Warning: If a page of a particular agent does not support notification bars, the notification is not displayed. However, you can see these changes on your next login.
3. Log out and log in to see the changes.
Warning: When you set a default landing page for yourself, currently there is no option to clear that choice. However, you can choose a different page as your landing page.
Setting the Landing Page for a GroupIf you have the TEA_ADMIN privileges, you can assign a landing page for a group of users.
By default, the EVERYONE group is available if there is no group created by the administrator (the user with the TEA_ADMIN privileges.) If you want to assign a landing

TIBCO® Enterprise Administrator User's Guide
77 | Default Landing Page
page to a group, ensure that you have already created the groups by going through the steps in Creating a New Group.
Procedure 1. Switch to the page that you want as your landing page in the UI.
2. Click and select Set Start Page For.
3. To select a group, select Group and pick an appropriate group from the drop-down box.
By default, the EVERYONE group is selected.
Warning: Users must have the permission to access the landing page which is assigned to their group.
4. Click Save.
You get a notification that the landing page is set. These changes are visible to a user, the next time a user from the group logs in using the Web UI.
5. To verify the changes, perform the following steps:
a. Click the User Management icon in the left navigation bar.
b. In the User Management window, select Groups.
c. For the groups you assigned a default landing page, ensure that the START PAGE column shows the link to the selected landing page.
How the Server Picks up a Default Landing PageWhen a default landing page is set for a user and the user belongs to one or more groups, the default landing page is selected, based on certain criteria.
The Order of Selecting a Default Landing PageWhen there is a group setting and a user's setting of a landing page, the priority is worked out in the following manner:
1. The user's setting of the default landing page gets the highest priority.

TIBCO® Enterprise Administrator User's Guide
78 | Default Landing Page
2. If there is no user setting, the group gets the priority.
3. If there is no group setting, all users fall in the EVERYONE group.
4. If you have not set a landing page for the EVERYONE group, the default landing page takes effect.
5. If a user belongs to multiple groups, the default landing page is picked up in the alphabetical order of group names. For example, if the user is in the group A, B, and C, the default landing page of group A is picked up. If none of these groups has a default landing page, the page belonging to the EVERYONE group is picked up.
Clearing the Landing Page for Multiple GroupsYou must have administrator privileges to clear a landing page assigned to a group. You can select multiple groups and delete the landing page set for them by using the Clear Start Page option.
Procedure 1. Click the Users card.
2. In the User Management window, select Groups.
3. Select the appropriate group, and select the Clear start page option.
4. At the prompt, click clearStartPage.
The Start Page link is not displayed for the group. After you clear the landing page, if there is a landing page assigned to the Everyone group, that takes effect now. If not, the default landing page that comes up when you start the server takes effect.
Deleting the Landing Page Set for a GroupYou must have administrator privileges to clear a landing page assigned to a group. You can use this option to clear the landing page of one group at a time.
Procedure 1. Click the Users card.

TIBCO® Enterprise Administrator User's Guide
79 | Default Landing Page
2. In the User Management window, select Groups.
3. Select the appropriate group, and select the (recycle bin icon) next to the Start Page column to delete the landing page associated with the group.
4. At the prompt, click clearStartPage.
The Start Page link is not displayed for the group. If there is a landing page assigned to the Everyone group, that takes effect now. If not, the default landing page that comes up when you start the server takes effect.

TIBCO® Enterprise Administrator User's Guide
80 | Registering a Hawk Domain
Registering a Hawk DomainYou can configure Hawk domains using the TIBCO Enterprise Administrator server. When you configure the Hawk domain, the server detects machines in the domain that has a Hawk Agent installed and running on it.
Before you beginEnable Hawk Management
By default, the Hawk Domains option is not visible in the UI unless you opted for the TIBCO Hawk Agent component during installation. To ensure that the Hawk Domains option is visible, set the tea.ext.hawk.enabled property to true in the<TIBCO_CONFIG_HOME>\tibco\cfgmgmt\tea\conf. file and restart the server.
Change the Hawk Properties in the tea.tra file
Refer to the Configuring Properties to Enable Hawk Integration section of the TIBCO Enterprise Administrator Installation guide to configure the Hawk properties. Ensure that the tibco.env.HAWK_HOME specified in the <TIBCO_HOME>\tea\<version>\bin\tea.tra file points to the HAWK_HOME location. By default, if no transport type is specified, the default transport type is set to TIBCO ActiveSpaces. Depending on the transport type used, ensure that you specify one of the following:
Transport Type Property in The tea.tra File Points to
TIBCO ActiveSpaces tibco.env.AS_HOME TIBCO_ACTIVESPACES_HOME
TIBCO Enterprise Message Service tibco.env.EMS_HOME TIBCO_EMS_HOME
TIBCO Rendezvous tibco.env.RV_HOME TIBCO_RV_HOME
For example, if the transport type is TIBCO Enterprise Message Service, ensure that the tibco.env.EMS_HOME points to TIBCO_EMS_HOME.
Add the Hawk Domain Configuration Properties
Create a Hawk domain configuration properties file to configure the Hawk Domain. You can either use the Hawk properties file available to you or create a new one and specify

TIBCO® Enterprise Administrator User's Guide
81 | Registering a Hawk Domain
it while creating a Hawk domain in TIBCO Enterprise Administrator server. You can use one of the following transport types: TIBCO Rendezvous (hawk_transport=tibrv), TIBCO Enterprise Message Service (hawk_transport=tibems), and TIBCO ActiveSpaces (hawk_transport=tibas). By default, the transport type used by TIBCO Hawk infrastructure is TIBCO ActiveSpaces.
The properties file shown in the example lists the properties to be specified for each transport type.
Specify the properties for the transport type you are using in the hawkdomainconfiguration.properties file:
# Default hawk domain hawk_domain=default # Default transport uses ActiveSpaces hawk_transport=tibas #Default properties when transport is "tibas" # ActiveSpaces discover parameter as_discover_url=tibpgm://8989/ #ActiveSpaces listen parameter #as_listen_url= # # Properties to use to configure Rendezvous as the Hawk Transport # #hawk_transport=tibrv # RV transport parameters #rv_service=7474 #rv_network=; #rv_daemon=tcp:7474 # # Properties to use when using EMS transport (between Agent and Console only) # #hawk_transport=tibems #ems_server_url=tcp://localhost:7222 #ems_username= #ems_password=

TIBCO® Enterprise Administrator User's Guide
82 | Registering a Hawk Domain
Note: To use the hawkdomainconfiguration.properties file from TIBCO Enterprise Administrator Shell, you must first upload the file to the TIBCO Enterprise Administrator server using the sftp/scp commands. For help, use the command, registerhawkdomain --help
Running Instances
Ensure that the TIBCO Hawk Agent and Hawk Microagent (HMA) instances are running. The executable that is used to run the HMA is platform specific. Refer to the TIBCO Hawk Installation, Configuration, and Administration guide.
Procedure 1. Click the Hawk Domains icon in the left navigation bar. The Hawk Domains are
displayed.
2. Click Register.
3. In the Register Hawk Domain window, provide the following details:
l Name: the name of the Hawk domain.
l Description: the description of the Hawk domain.
l Properties: choose the Hawk Domain configuration properties file that you created with the new properties.
4. Click Register Hawk Domain.
Caution: If you are using Enterprise Message Service as the transport type, ensure that the Hawk agent and the TIBCO Enterprise Administrator server points to the same Enterprise Message Service server. To successfully create the Hawk domain, the Enterprise Message Service server must be running.
ResultThe Hawk Domains pane displays all the Hawk domains configured on the server. After configuring the Hawk domain on the server, the server detects the agents in the Hawk domain and displays entries per machine on which a Hawk agent was discovered, in the Machines view. You can register or unregister domains from the Hawk Domains pane.

TIBCO® Enterprise Administrator User's Guide
83 | Registering a Hawk Domain
Note: If the Enterprise Message Service server restarts and the Hawk domain is already added, the TIBCO Enterprise Administrator server automatically reconnects with the Enterprise Message Service server. Similarly, if the Hawk agent is not running, but comes up later, it gets discovered automatically.

TIBCO® Enterprise Administrator User's Guide
84 | Change Password
Change Password
Before you beginFollowing are the constraints on creating a password:
l The length of the password must be between 1 and 128 characters.
l You cannot reuse the past 5 passwords.
l Your account gets locked after 10 failed attempts. The admin account is the only exception to this rule, but the admin account experiences a lag of 1 second on every login after 10 failed attempts.
l You cannot start a password with "OBF:" ("O", "B", and "F" written in uppercase followed by a colon).
l You must reset a password after a lockout because it cannot be changed.
Procedure 1. Click and select Change Password.
The Change Password pane is displayed.
2. Specify Current Password, New Password, and Confirm New Password.
3. Click Finish.
What to do if you forget the super user password?
If you changed the super user password, but cannot recollect it, delete the <TIBCO_CONFIG_HOME>\tibco\cfgmgmt\tea\data folder. Restart TIBCO Enterprise Administrator with a fresh data folder. The user name and password is now reset to admin/admin.

TIBCO® Enterprise Administrator User's Guide
85 | Change Password
Warning: Deleting the data folder might result in losing all the agent configurations and LDAP integration.

TIBCO® Enterprise Administrator User's Guide
86 | Obfuscating Passwords
Obfuscating PasswordsWhen using commands on TEA shell, you can obfuscate passwords. PasswordObfuscation.sh is the tool used to obfuscate passwords and is available under <TEA_HOME>\<version>\bin.
Note: You cannot use the TEA UI or Python scripting to obfuscate passwords.
You cannot use the TEA UI to obfuscate passwords, but you can use the obfuscated password in the TEA UI when you are changing a password or creating a new user. You can also create an obfuscated password for a user that does not exist. Whenever you create the user later, you can use the obfuscated password you had created for the user.
Important: Important: An obfuscated password is complicated; thereby making it difficult for onlookers to memorize it. TIBCO recommends that obfuscated passwords must be kept confidential since not only are they reversible but they can also be used interchangeable with real passwords in shell commands.
Before you beginEnsure that Java is mentioned in the PATH environment variable.
Procedure 1. Open the command prompt and navigate to <TEA_HOME>\<version>\bin.
2. Run the following command:
PasswordObfuscation.sh <user_name> <user_password>
The obfuscation tool takes the user name and password as parameters. If you run the tool without these parameters, you are prompted to enter the user name and password. After providing the password, the tool obfuscates the password and provides a string prefixed with "OBF:". Copy the entire string including "OBF:" to use it as the obfuscated password.

TIBCO® Enterprise Administrator User's Guide
87 | Obfuscating Passwords
Note: The length of the obfuscated password increases with the length of the password that you are obfuscating.
3. To exit the tool, press any key to continue.
Note: When you enter a plain-text password, you cannot start a password with "OBF:" ("O", "B", and "F" written in uppercase followed by a colon).

TIBCO® Enterprise Administrator User's Guide
88 | Introduction to the Shell Commands
Introduction to the Shell CommandsTIBCO Enterprise Administrator provides a set of commands to perform almost all the tasks possible using the user interface.
TIBCO Enterprise Administrator shell is a remote shell based on SSH protocol. The shell only needs an SSH client such as PUTTY or Terminal to connect to the shell. The shell scripting language is similar to bash in Unix.
In addition to these commands, the Shell scripting language offers some features that can help you work better with the command-line interface. Command completion, piping, support for interactive arguments, and support for binding session variables to arguments are some such features.
l Command completion: Commands can be completed by using the Tab key. Commands and arguments passed to path-based commands such as ls, cd, show status, and so on are automatically completed by pressing the Tab key.
l Support for interactive arguments: You can enter a command by entering each argument when being prompted to. For example, the create command takes arg1 and arg2 as parameters. You can pass these arguments in an interactive mode as follows:
create arg1:foo arg2:bar foo bar
l Support for Complex Parameters: In the TIBCO Enterprise Administrator shell, operations that take Complex type parameters can be passed in the JSON format for both the single line mode and the interactive mode.
If the JSON input is in a single line, use single quotes with the JSON String.
removeprivileges '[{"productName":"tomcat", "objectType":"all", "name":"Lifecycle"}]'

TIBCO® Enterprise Administrator User's Guide
89 | Introduction to the Shell Commands
Executed the command 'removeprivileges' successfully.
If the JSON input is in an interactive mode, do not use single quotes with the JSON string.
removeprivileges permissions:[{"productName":"tomcat", "objectType":"all", "name":"Update"}] Executed the command 'removeprivileges' successfully.
l Support for binding session variables to arguments: Consider an operation defined on agent this way:
create(@TeaParam(name="type") String type, @TeaParam(name="name") String name, @TeaParam(name="domain", alias="d") String domain);
In this case, you can invoke the operation in the following manner:
domain = QA-Domain create appspace HR-AppSpace
l Support for piping of commands: You can send the output of one command as an input to the other using pipes (|).
Warning: The number of attempts a user can make to connect to the TIBCO Enterprise Administrator server depends on the configuration file of your shell client. If you want to change the number of attempts available to a user, tweak the NumberOfPasswordPrompts property in the configuration file of your shell client. Changing the MaxAuthRequests property in the tea.conf alone does not help reflect these changes. On Unix-based platforms, look for the NumberOfPasswordPrompts property in /etc/ssh/ssh_config. On Windows, a ssh client tool like PuTTY must have a similar configuration file to provide the number of password attempts.

TIBCO® Enterprise Administrator User's Guide
90 | Introduction to the Shell Commands
Connecting to the Remote ShellThe TIBCO Enterprise Administrator shell is a shell based on remote SSH. You can use a terminal program to connect to the remote shell.
Procedure 1. Use a terminal program of your choice. For example, Putty.
2. Connect to the remote SSH server using the command ssh -p 2222 admin@localhost.
3. Enter admin as the password.
ResultOn successful connection, a banner is displayed.

TIBCO® Enterprise Administrator User's Guide
91 | Shell Commands
Shell CommandsShell commands are quite similar to the bash commands in Unix. Almost all tasks performed on the Web UI can be performed using Shell commands. The shell provides a rich set of navigation, scripting, and help commands.
The default idle timeout for the shell is 15000 milliseconds.
Note: If you are using IPv6 addresses, assuming that the IP address of the machine is 10::4, the syntax of ssh command to be used is:
'ssh -p 2222 admin@10::4
Remember that with IPv6 addresses, ssh -p 2222 admin@[10::4] is not supported.
When working with the Shell commands, after executing a command, an exit code is propagated from the TIBCO Enterprise Administrator server to the agent. When an exception occurs while evaluating a shell command, it results in a non-zero exit code returned by the ssh. You can also create your own exit codes. If an agent throws an exception, you can explicitly set an exit code on the exception.
Caution: Avoid registering two agents with the same ID. The TIBCO Enterprise Administrator server does not validate whether two agents have registered with the same ID.
Help CommandTo get comprehensive help using a command, use the --help option with the command.
Help prints out the following details of the command:
l Description
l Name and description of Arguments

TIBCO® Enterprise Administrator User's Guide
92 | Shell Commands
l Name, description, and aliases for Options
l Syntax for usage
The two modes of using the help command are: cd --help and help cd. The cd --help mode is used to display a detailed description of the command. For example, the following is the output of the command, cd --help:
DESCRIPTION tea:cd Changes the context to the given path SYNTAX tea:cd [path] ARGUMENTS path Target path to which to change the context to.
The help cd mode is used to display a detailed description along with some examples of usage. For example, the following is the output of the command, help cd:
NAME tea:cd Changes the context to the given path SYNTAX tea:cd [path] ARGUMENTS path Target path to which to change the context to. DESCRIPTION Change Directory - change the current working directory to a specific Folder. If directory is not given, the current working directory is not changed. SAMPLES 1. Do cd command in TEA server without argument:

TIBCO® Enterprise Administrator User's Guide
93 | Shell Commands
admin@localhost:/>cd admin@localhost:/> admin@localhost:/>pwd / 2. Do cd command in TEA server with optional argument [path] to change to another path: admin@localhost:/>cd TEA admin@localhost:/TEA> admin@localhost:/TEA>pwd/TEA / 3. Do cd command in TEA server to move up one path: admin@localhost:/TEA>cd .. admin@localhost:/> admin@localhost:/>pwd /
Navigation CommandsNavigating the object hierarchy on the TIBCO Enterprise Administrator server is quite similar to navigating a file system. Commands offered are similar to the basic navigation commands available in Unix. Each object has a path corresponding to it.
The following are some helpful navigation commands:
l ls: lists the members contained in an object.
admin@localhost:/TEA> ls members agents users groups roles realms machines solutions admin@localhost:/TEA> cd members admin@localhost:/TEA/members> ls Machines Solutions

TIBCO® Enterprise Administrator User's Guide
94 | Shell Commands
Groups Users Roles Realms Permissions OperatorViewManager SearchViewManager Agents
l ls <path>: lists the members at the specified path.
admin@localhost:/TEA>ls <path>
where <path> is the path of the target object whose contents are to be listed.
If the path is not specified, it lists the objects under the current object. You can nest the path to subsequent levels. For example, you can list the members contained in the default realm by using the command ls TEA/Access/Realms/default-realm.
l cd: navigates to the TIBCO Enterprise Administrator object at the specified path.
admin@localhost:/>cd <path>
where <path> is the target path to which the context changes.
If a directory is not specified, the current directory is not changed. If you are already in one of the nested directories, the cd command takes you back to the root.
Note: If there are spaces embedded in the path, use an escape sequence of back slash and a space to represent a space. For example, if 'foo bar' is a part of the path, type 'foo\ bar'. This feature works with the autocompletion of the ls, sort, and cd commands.
l pwd: prints the absolute path of the current TIBCO Enterprise Administrator object.
admin@localhost:/TEA>pwd
Note: TIBCO Enterprise Administrator objects are case sensitive.

TIBCO® Enterprise Administrator User's Guide
95 | Shell Commands
Scripting CommandsYou can use advanced scripting constructs to combine multiple commands and write complex scripts.
The Shell commands support the following advanced constructs for scripting:
l Arrays
l Running multiple commands at once
l Pipes
l Closures
l Json ComplexType
ArraysArrays can be passed as arguments to some commands. For example, the echo command takes an array of arguments passed to it and displays them at the command prompt.
echo [ 'a' 'b' 'c'] [a,b,c]
Note: In the web UI, use commas as separators. For example, ['a', 'b', 'c']. In the shell UI, do not use commas as separators. For example, ['a' 'b' 'c'] .
Running Multiple Commands at OnceMultiple commands can be run by separating them with a ';' (semicolon).
admin@localhost:/> cd /TEA;ls members agents users groups roles

TIBCO® Enterprise Administrator User's Guide
96 | Shell Commands
realms machines solutions
Pipes Output of one command can be piped to the input of another command using a '|'.
admin@localhost:> ls TEA/members/Roles | grep a TEA_ADMIN Tomcat Admin Tomcat User
Closures Closures are functions which can be invoked with arguments. You can define and invoke the functions at run time. Curly braces, '{ ' and '} ' are used to enclose a closure definition.
admin@localhost:/TEA> each {ls}{show info $it} Name:TEA Type:tea:2.1:TEA Status:Running Name:Agents Type:tea:2.1:agents Name:Users Type:tea:2.1:users Name:Groups Type:tea:2.1:groups Name:Roles Type:tea:2.1:roles Name:Realms Type:tea:2.1:realms Name:Machines Type:tea:2.1:teaMachines

TIBCO® Enterprise Administrator User's Guide
97 | Shell Commands
Name:Solutions Type:tea:2.1:solutions
Json ComplexTypeIf the definition of TeaParam in a TeaOperation is a user-defined object, ensure that you use a String of the type: Json complexType.
'{"strA":"aa","strB":"bb"}'
Note: Use single quotation marks to wrap the JSON input in the single command mode. In the interactive mode, do not use quotation marks.
Interactive ModeWhen using the command-line interface, you can use the Shell commands in an interactive mode. The interactive mode gives you immediate feedback on every statement.
The Interactive mode is ideally used with commands that need user input. All commands that expect user input, support the interactive mode. When you use the Shell commands in an interactive mode, you are prompted for input at every step. To enable the interactive mode, use the following syntax:
<command> --interactive
For example, the following code snippet shows how to create a user in an interactive mode:
admin@localhost:/TEA/users> createuser --interactive name:user1 password:password groups [[]]:group1 roles [[]]:roles1 User 'user1' created.

TIBCO® Enterprise Administrator User's Guide
98 | Shell Commands
Advanced Scripting CommandsIn addition to the basic scripting commands, the Shell command language supports some advanced constructs that help in scripting. Use these constructs to write complex scripts.
The following is a list of supported constructs:
l each
l if
l sort
l set
l get
each Calls a given function (a closure) on each of the elements in the given array.
Usage: each values function
where
values : can be an array or a closure which evaluates to an array.
function: a closure which must be invoked on each element.
admin@localhost:/> each [Jan Feb Mar] { echo $it} Jan Feb Mar
ifCommand to support conditional execution.
Usage: if {condition} ifTrue [ifFalse]
admin@localhost:/TEA> if {echo 'true'} {ls} {echo 'false'} members

TIBCO® Enterprise Administrator User's Guide
99 | Shell Commands
agents users groups roles realms machines solutions admin@localhost:/TEA>
where
condition: is the condition to meet by the if construct.
ifTrue: is the segment that gets executed when the condition is true.
ifFalse: is the segment that gets executed when the condition is false.
sortSorts the input objects.
Usage: tea:sort [options]
where
[options] can be one of the following:
l --ignore-leading-blanks or -b: ignores leading blanks.
l --numeric-sort or -n: compares according to the string numerical value.
l --unique or -u: displays only the first of an equal run.
l --reverse or -r: reverses the result of comparisons.
l --ignore-case or -f: changes lowercase to uppercase characters.
admin@localhost:/TEA> ls members agents users groups roles realms machines

TIBCO® Enterprise Administrator User's Guide
100 | Shell Commands
solutions admin@localhost:/TEA> ls | sort -r users solutions roles realms members machines groups agents
setSets a particular option in the current session.
Usage: tea:set [options]
where
[options] is --scope. The --scope option specifies the global scope name to be set for the current session.
admin@localhost:/> set --scope TEA Successfully set the current scope to TEA admin@localhost:/>
getGets the current value of a supported option from the current session.
Usage: tea:get [options]
where
[options] is --scope. The --scope option requests for the global scope stored in the current session.
admin@localhost:/> get --scope

TIBCO® Enterprise Administrator User's Guide
101 | Shell Commands
Current scope is: TEA admin@localhost:/>
Direct CommandsThe TIBCO Enterprise Administrator shell supports executing commands directly from the input.
The following code block shows the usage of a direct command.
ssh -p 2222 admin@localhost ls Output TEA
The Script File CommandA script file is equivalent to a batch file where you can list all the commands you want to execute sequentially.
Before using the file, ensure that you have populated it with the commands you want to use. Assume that the content of the script file, script.txt is
'ls
pwd
history'
The following code snippet shows the usage of the command:
ssh -p2222 admin@localhost scriptmode < script.txt Output ls TEA pwd / history

TIBCO® Enterprise Administrator User's Guide
102 | Shell Commands
0 ls 1 pwd 2 history
The Protocol Commands: SFTP and SCPTIBCO Enterprise Administrator server supports the SSH File Transfer Protocol (SFTP) and Secure Copy Protocol (SCP) commands.
l The SFTP command: when you get connected to SFTP using an SFTP-compliant terminal, you can use the help command at the prompt to get the detailed usage of SFTP.
C:\>psftp -P 2222 admin@localhost admin@localhost's password: Remote working directory is / psftp> help ! run a local command bye finish your SFTP session cd change your remote working directory chmod change file permissions and modes close finish your SFTP session but do not quit PSFTP del delete files on the remote server dir list remote files exit finish your SFTP session get download a file from the server to your local machine help give help lcd change local working directory lpwd print local working directory ls list remote files mget download multiple files at once mkdir create directories on the remote server mput upload multiple files at once mv move or rename file(s) on the remote server open connect to a host put upload a file from your local machine to the server pwd print your remote working directory quit finish your SFTP session reget continue downloading files ren move or rename file(s) on the remote server

TIBCO® Enterprise Administrator User's Guide
103 | Shell Commands
reput continue uploading files rm delete files on the remote server rmdir remove directories on the remote server psftp>
The following example is of uploading and downloading a file:
psftp> put /Users/myname/a.txt Uploading /Users/myname/a.txt to /a.txt /Users/myname/a.txt 100% 934 0.9KB/s 00:00 psftp> ls a.txt psftp> get a.txt Fetching /a.txt to a.txt /a.txt
Note: If you are using IPv6 addresses, assuming that the IP address of the machine is 10::4, the syntax of sftp command to be used is:
sftp -P 2222 admin@[10::4]
You can use the above command with or without the square brackets around the IP address.
l The SCP Command: When you get connected to SCP using an SCP-compliant terminal, you can use the help command at the prompt to get the detailed usage of SCP.
C:\>pscp PuTTY Secure Copy client Release 0.63 Usage: pscp [options] [user@]host:source target pscp [options] source [source...] [user@]host:target pscp [options] -ls [user@]host:filespec Options: -V print version information and exit -pgpfp print PGP key fingerprints and exit -p preserve file attributes -q quiet, don't show statistics -r copy directories recursively

TIBCO® Enterprise Administrator User's Guide
104 | Shell Commands
-v show verbose messages -load sessname Load settings from saved session -P port connect to specified port -l user connect with specified username -pw passw login with specified password -1 -2 force use of particular SSH protocol version -4 -6 force use of IPv4 or IPv6 -C enable compression -I key private key file for authentication -noagent disable use of Pageant -agent enable use of Pageant -batch disable all interactive prompts -unsafe allow server-side wildcards (DANGEROUS) -sftp force use of SFTP protocol -scp force use of SCP protocol
The following example is about uploading a file:
C:\>pscp -scp -P 2222 /TEA/a.xml admin@localhost:/a.xml admin@localhost's password: a.xml | 5 kB | 5.0 kB/s | ETA: 00:00:10 | 100% C:\>
Note: If you are using IPv6 addresses, assuming that the IP address of the machine is 10::4, the syntax of scp command to be used is:
scp -P 2222 admin@[10::4]:<filename>
Remember that with IPv6 addresses, scp -P 2222 admin@10::4:<filename> is not supported.
Using Position and Named Arguments while Defining TeaParamThe definition of TeaParam provides four options when it comes to supporting positions and named arguments: position only, position and named arguments without an alias, position and named arguments with an alias, and named argument only.

TIBCO® Enterprise Administrator User's Guide
105 | Shell Commands
The following is the usage of the four ways of defining the positions and named arguments:
l Position only:
TeaParam definition public String testA(@TeaParam(name = "aa", description = "Greetings parameter", alias = "") final long[] greetings) Usage shell> testA [12,15]
l Position and named arguments without an alias:
TeaParam definition public String testA(@TeaParam(name = "aa", description = "Greetings parameter") final long[] greetings) Usage shell> testA [12,15] shell> testA -aa [12,15] shell> testA --aa [12,15]
l Position and named arguments with an alias:
TeaParam definition public String testA(@TeaParam(name = "aa", description = "Greetings parameter", alias="bb") final long[] greetings) Usage shell> testA [12,15] shell> testA -aa [12,15] shell> testA --aa [12,15] shell> testA -bb [12,15] shell> testA --bb [12,15]
l Named argument only:
TeaParam definition public String testA(@TeaParam(name = "aa", description = "Greetings parameter", alias="aa") final long[] greetings) Usage

TIBCO® Enterprise Administrator User's Guide
106 | Shell Commands
shell> testA -aa [12,15] shell> testA --aa [12,15]

TIBCO® Enterprise Administrator User's Guide
107 | Python Scripting
Python ScriptingYou can perform the activities that you perform using the Web UI or the shell commands using Python scripts. For example, you can perform the queries or administrative actions that are exposed by products in their TIBCO Enterprise Administrator agents. In addition to this, you can build scripts with conditional statements and control structure, features that are not supported by the Shell interface.
Setting up Python ScriptingThere are some prerequisites that you must perform before developing your Python scripts.
Before you beginThis section assumes that you have an understanding of the Python language, and common development practices associated with it.
Procedure 1. Install Python.
You can verify the installation by typing python at the command prompt on a Windows machine and python3 in a shell on a UNIX machine.
Caution: TIBCO Enterprise Administrator uses the pip module that is packaged with Python 3.4.1. If you are using an earlier version of Python, install the pip module.
2. Install the requests module needed to make the HTTP calls. At the command prompt, navigate to <PYTHON_HOME>\scripts, and install the module using the following command:pip install requests
3. Enable the Python module for TIBCO Enterprise Administrator by setting the PYTHONPATH environment variable to <TIBCO_HOME>\tea\<version>\python.

TIBCO® Enterprise Administrator User's Guide
108 | Python Scripting
4. You must install the jsonpickle module if you want to use Python scripts in the TIBCO Enterprise Administrator agent for TIBCO Security Server. You must also install this module, if you want Python scripts to support plain old java objects (POJOs). In the case of POJOs, jsonpickle module is needed to serialize and deserialize java objects. Based on the version of Python you are using, you can install the module using the following command:
Python Version Command
2 pip install jsonpickle
3 pip3 install jsonpickle
5. To enable POJO support, you must enable the enable_class_generation property on EnterpriseAdministrator as follows:
import tibco.tea tea =tibco.tea.EnterpriseAdministrator(config={'enable_class_generation':True})
The property is by default set to false, so ensure that you set this to true if you want the Python scripts to support POJO objects. POJO support comes with some supported scenarios and limitations.
6. Ensure that the TIBCO Enterprise Administrator server is running.
tibco.tea ModuleThe tibco.tea module gives you access to the members and functions that can be used to access the TIBCO Enterprise Administrator server, and all products that have agents registered with the server. With the help of this module, you can perform just about any activity that can be performed using the Shell commands or the Web UI.
The tibco.tea ModuleThe tibco.tea module is available as a built-in module. Before using this module, perform the steps specified in the Setting up Python Scripting section. To access the classes and members offered by tibco.tea, from the Python command line, run the following:

TIBCO® Enterprise Administrator User's Guide
109 | Python Scripting
import tibco.tea
You can now create an instance of the Enterprise Administrator by using the following statement:
tea=tibco.tea.EnterpriseAdministrator()
The EnterpriseAdministrator() constructor can also take the following parameters:
l url: The default URL is http://localhost:8777.
l user: The default user is admin.
l pwd: The default password is admin.
The object, tea, in this example refers to an instance of EnterpriseAdministrator. You can use any name for the object, but this example uses tea. This is the root object of the entire object hierarchy. You need this object to perform any activity on TIBCO Enterprise Administrator. After creating this object, you can use this to register agents, create users, view machines, and so on.
Note: After connecting to the TIBCO Enterprise Administrator server for the first time using tibco.tea.EnterpriseAdministrator(), if the session expires, the EnterpriseAdministrator.login() method can be called to login again with the previously used credentials.
The session expires if the user script execution stays idle for a period longer than the value specified in for tea.http.session.timeout in tea.conf. Same is the case while debugging using interactive python shell.
Number of Retry AttemptsYou can modify tibco.tea.EnterpriseAdministrator() to support retry and wait options. Python binding attempts to connect to the server URL till the retry attempts exhaust. It waits for the specified interval (in seconds) between each retry. For example, the following code snippet tries to connect to the server 6 times, waiting 5 seconds between each retry. If the connection is successful, the attempt to retry stops.
import tibco.tea tibco.tea.EnterpriseAdministrator(retry=6, wait=5)

TIBCO® Enterprise Administrator User's Guide
110 | Python Scripting
The Object HierarchyUsing the tea object, created earlier in the example, you can get more information on the object hierarchy. Any reference to the tea object is a dictionary, such as tea.products, tea.agents and so on. Standard functions such as keys(), items(), and values() are available on all reference dictionaries. The standard help() function can be applied to any expression resolving to a TIBCO Enterprise Administrator object, to discover the functions available on that class of object.
tea.products
tea.products is a dictionary with a collection of (name,value) pairs. The tea.products command is used to list the products registered with the server that support Python binding. The following is an example of the product list generated by the command:
>>> tea.products {'TIBCOSecurityServer': <'TIBCOSecurityServer',' :TIBCOSecurityServerAgent:1.0:TIBCOSecurityServer: TIBCOSecurityServer'>, 'EMS ': <'EMS',':EMSAgent:1.0:EMS:EMS'>} >>>
The output shows EMS as the product registered. The command help(tea.products['EMS']) lists the functions supported by the Tomcat product.
>>> help(tea.products['EMS']) Help on EMSAgent_1_0_EMS in module builtins object: EMS = class EMSAgent_1_0_EMS(tibco.tea.TeaObject) | Agent to manage EMS Servers | | Method resolution order: | EMSAgent_1_0_EMS | tibco.tea.TeaObject | object | | Methods defined here: | | registerEmsServer(self, serverName='MyEMSServer', URL='tcp://localhost:7222', | userName='admin', password='', agentId=None)

TIBCO® Enterprise Administrator User's Guide
111 | Python Scripting
| | Register an EMS Server | | Parameters: | serverName -- EMS server name (type str) (default MyEMSServer) | URL -- URL (type str) (default tcp://localhost:7222) | userName -- UserName (type str) (default admin) | password -- Password (type str) (default ) | agentId -- Identifier for the agent (type agentId) (default None) | | Result Type: reference | | ---------------------------------------------------------------------- | Data and other attributes defined here: | | module_ = None | | omitted_operations = [] | | type_descr = {'agentTypeId': 'EMSAgent:1.0', 'concept': 'TOP_LEVEL', '... | | ---------------------------------------------------------------------- | Methods inherited from tibco.tea.TeaObject: | | __init__(self, tea, obj_descr) | | __repr__(self) | | __str__(self) | | refresh_(self) | | ---------------------------------------------------------------------- | Data descriptors inherited from tibco.tea.TeaObject: | | __dict__ | dictionary for instance variables (if defined)

TIBCO® Enterprise Administrator User's Guide
112 | Python Scripting
| | __weakref__ | list of weak references to the object (if defined) >>>
tea.products.keys()
You can use tea.products.keys() to get a list of names of the products registered with the server.
>>> tea.products.keys() dict_keys(['TIBCOSecurityServer', 'EMS'])
tea._products_with_provisional_apis
tea._products_with_provisional_apis is used to list the products registered with the server that have provisional apis. By default, the APIs exposed by the TIBCO Enterprise Administrator server do not support Python binding.
tea. product_with_provisional_api(name)
You can check whether or not a product has provisional apis by using the function, tea.product_with_provisional_api(name). Pass the product name as the parameter to the function. On finding the product in the tea._products_with_provisional_apis dictionary, the function returns the object of the product type along with a message that the Python API for the product is provisional. It is not supported but that is likely to change in future. If the product name is found in tea.products dictionary, the function returns None along with a message indicating that it is available in tea.products dictionary. If not, it prints the warning message that the product with the specified name does not exist.
To support multiple retry attempts, this method also takes retry and wait as parameters as shown in the following code snippet:
tea. product_with_provisional_api(name, retry, wait) where, name: is the name of the product you are looking for

TIBCO® Enterprise Administrator User's Guide
113 | Python Scripting
retry: is the number of retry attempts wait: is the interval to wait between two retry attempts.
if retry > 1, the system searches for the product in provisional products dictionary till the number of retry attempts exhaust. If it finds the product, it returns the product and stops further retry attempts. If the product is not found after the specified retry attempts, an exception with a message is raised.
tea. products_with_provisional_apis()
tea. products_with_provisional_apis() returns a list of names of the products having provisional API, along with a warning message that the Python API for these products are provisional. They are not supported and are likely to change in future.
tea.product()
The tea.product() method is invoked on the EnterpriseAdministrator object, which is tea in this example. The method returns the supported products from the Python dictionary. Takes the three parameters as shown in the code snippet:
tea.product(name, retry, wait) where, name: is the name of the product you are looking for retry: is the number of retry attempts wait: is the interval to wait between two retry attempts.
if retry > 1, the system searches for the product in products dictionary till the number of retry attempts exhaust. If it finds the product, it returns the product and stops further retry attempts. If the product is not found after the specified retry attempts, an exception with a message is raised.
if the retry parameter is not specified, the product() method returns the specified product from the products dictionary if it is available in it. If it is not available in the products dictionary, but it is available in the provisional products dict, None is returned with a proper WARNING message. If it is not available in any dictionary, it returns None and prints a WARNING message.
<Product>.module_ or <Member>.module_
You can use module_ on a product or a member to get the modules of Plain Old Java Object (POJO) objects available on the product or member. module_ is attached to each top level or member object. For example, the following is an example of using module_ on a member:

TIBCO® Enterprise Administrator User's Guide
114 | Python Scripting
tea._products_with_provisional_apis['Tomcat']. members['Server 1'].module_
For products, we can use tea._products_with_provisional_apis['Tomcat'].module_ to retrieve the modules of POJOs on Tomcat. After obtaining the modules of POJO, you can pass a POJO as a parameter to a function in a Python script. For example:
# get an instance of the product as follows - >>>prod = tea._products_with_provisional_apis['Tomcat'] # Module of POJOs is available on that product or member in variable "module_" >>> mod = prod.module_ # Instantiate the POJO class in python as follows >>> person = mod.Person("John Doe", 1) # Invoke the TeaOperation with the python object in the earlier line as TeaParam and consume the POJO response as a Python Object >>> response = prod.hw(person)
When you get an POJO as a return type, you can use the POJO like a regular Python object.
# Use the response as you use the regular python object >>> response.name 'John Doe' >>> response.i 1
tea.agents
You can use tea.agents to access the agents registered with the server. For example, tea.agents.agents.registerAgent(name,url,description) helps you register an agent with the server.
tea.users
You can use tea.users to create users, assign roles, groups to users. For example, you can create users using the tea.users.createUser(self, name, password, groups, roles) command.
tea.machines

TIBCO® Enterprise Administrator User's Guide
115 | Python Scripting
You can use tea.machines to get more information about the machines on which the agents are running.
Caution: Different versions of Python handle i18n characters, such as Chinese and Japanese differently. Python 3 supports i18n characters, so the operations and parameters are visible in Python. If you are using Python 2, the following scenarios take effect:
l If the operation name contains i18n characters, the name is considered invalid. The operation is not visible in Python.
l If the parameter name contains i18n characters, but the operation name is valid, the operation is disabled. An exception occurs when you try to access such an operation.
The refresh_() FunctionThe refresh_() function is available to an instance of EnterpriseAdministrator() that helps get the latest state of the object from the remote server and agent. In this example, tea.refresh_() gets the latest state of the object. The following scenarios call for an explicit refresh:
1. After registering the first agent, the products list gets refreshed automatically, but after registering the second agent, the products list does not refresh. Remember to explicitly refresh the products list of the second agent.
2. After unregistering the agent, the agents dictionary must be refreshed explicitly.
3. Recently updated agents, solutions, products, and dictionaries must be explicitly refreshed before accessing their members, keys, items, and other details.
A Sample Python Script to Manage AgentsThe sample Python script can be used to manage an agent associated with the TIBCO Enterprise Administrator server.
Ensure that before running the sample script, you have followed the steps in Setting up Python Scripting. The following Python script can be used to register, reconnect, or

TIBCO® Enterprise Administrator User's Guide
116 | Python Scripting
unregister an agent.
import tibco.tea import pprint server = tibco.tea.EnterpriseAdministrator() def registerAgent( name, url,description): try: server.agents.registerAgent(name,url,description) print('Agent ' + name + ' registered succesfully') except Exception as e: details=e.args[0] print(details) def unregister(name): try: agent = server.agents.members[name] agent.unregister() print('Agent ' + name + ' unregistered') except KeyError as e: print('Agent "'+ name +'" not found to unregister') def reconnect(name): try: agent = server.agents.members[name] agent.reconnect() print('Agent '+ name + ' reconnected') except KeyError as e: print('Agent "'+ name +'" not found to reconnect') print('-------------------Register Hello World Agent------------------') registerAgent('HelloWorld','http://localhost:1234/helloworldagent','HelloWorldAgent') print('------------------- Register tomcat Agent------------------') registerAgent('tomcat','http://localhost:8082/tomcatagent','tomcat' ) print('-----Reconnect Hello World Agent------') reconnect('HelloWorld') print('-----Unregister Hello World Agent------------') unregister('HelloWorld')
Assuming you have saved this file as AgentManagement.py, you can run it by navigating to the location and running the command, AgentManagement. This yields the following output:
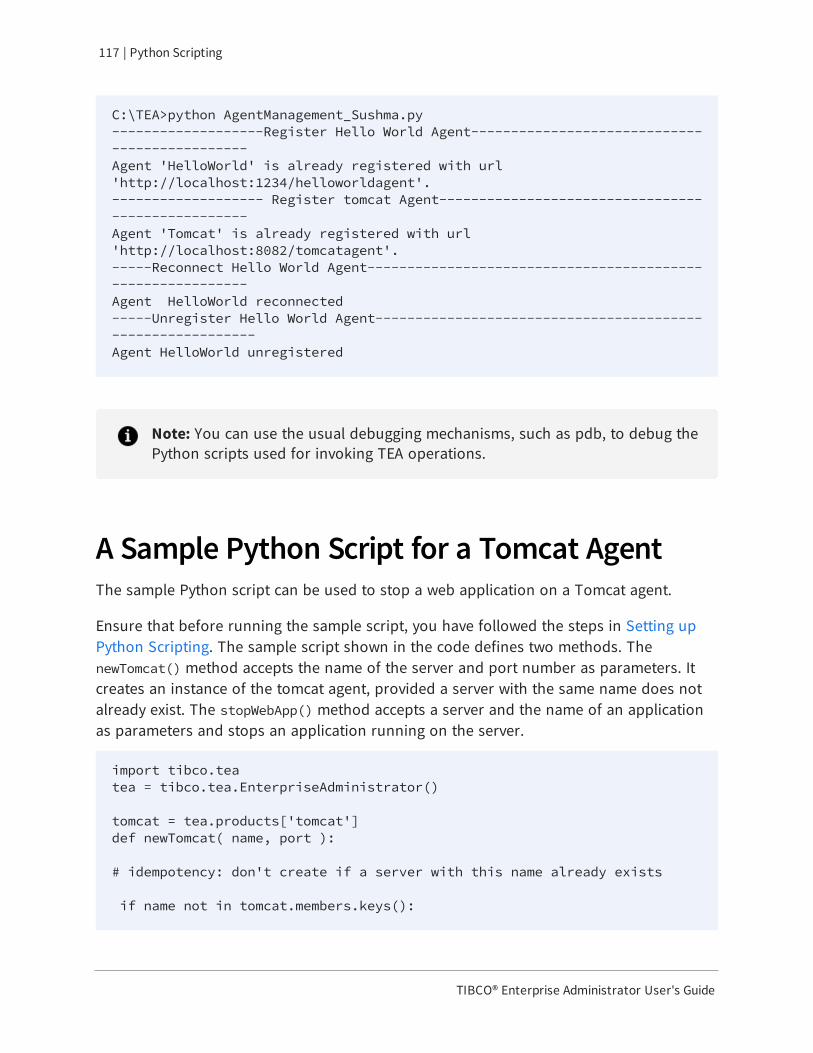
TIBCO® Enterprise Administrator User's Guide
117 | Python Scripting
C:\TEA>python AgentManagement_Sushma.py -------------------Register Hello World Agent---------------------------------------------- Agent 'HelloWorld' is already registered with url 'http://localhost:1234/helloworldagent'. ------------------- Register tomcat Agent-------------------------------------------------- Agent 'Tomcat' is already registered with url 'http://localhost:8082/tomcatagent'. -----Reconnect Hello World Agent----------------------------------------------------------- Agent HelloWorld reconnected -----Unregister Hello World Agent----------------------------------------------------------- Agent HelloWorld unregistered
Note: You can use the usual debugging mechanisms, such as pdb, to debug the Python scripts used for invoking TEA operations.
A Sample Python Script for a Tomcat AgentThe sample Python script can be used to stop a web application on a Tomcat agent.
Ensure that before running the sample script, you have followed the steps in Setting up Python Scripting. The sample script shown in the code defines two methods. The newTomcat() method accepts the name of the server and port number as parameters. It creates an instance of the tomcat agent, provided a server with the same name does not already exist. The stopWebApp() method accepts a server and the name of an application as parameters and stops an application running on the server.
import tibco.tea tea = tibco.tea.EnterpriseAdministrator() tomcat = tea.products['tomcat'] def newTomcat( name, port ): # idempotency: don't create if a server with this name already exists if name not in tomcat.members.keys():

TIBCO® Enterprise Administrator User's Guide
118 | Python Scripting
tomcat.createserver( name, port ) #tomcat.refresh_ print( 'tomcat server '+ name +' created successfully'); server = tomcat.members[ name ] server .start() return server else: print( 'tomcat server '+ name +' already exists'); server = tomcat.members[name] if server.status == 'RUNNING': print('tomcat server instance '+ name + ' is already running'); else: server.start() return server def stopWebapp( server, name ): webapp = server .members[ name ] # idempotency: don't generate an error if the app is already stopped if webapp.status == 'STOPPED': print( 'webapp ' + name + ' already stopped.' ) else: webapp .stop() print( 'webapp ' + name + ' stopped.' ) tomcat1 = newTomcat( 'tomcat1', 8088 ) stopWebapp( tomcat1, 'docs' ) stopWebapp( tomcat1, 'examples' )
Assuming you have saved this file as TomcatManagement.py, you can run it by navigating to the location and running the command, TomcatManagement. This yields the following output:
C:\TEA>TomcatManagement.py tomcat server tomcat1 created successfully webapp docs stopped. webapp examples stopped.
Support for POJOs TeaOperation supports Plain Old Java Object (POJO) as parameters and return types.
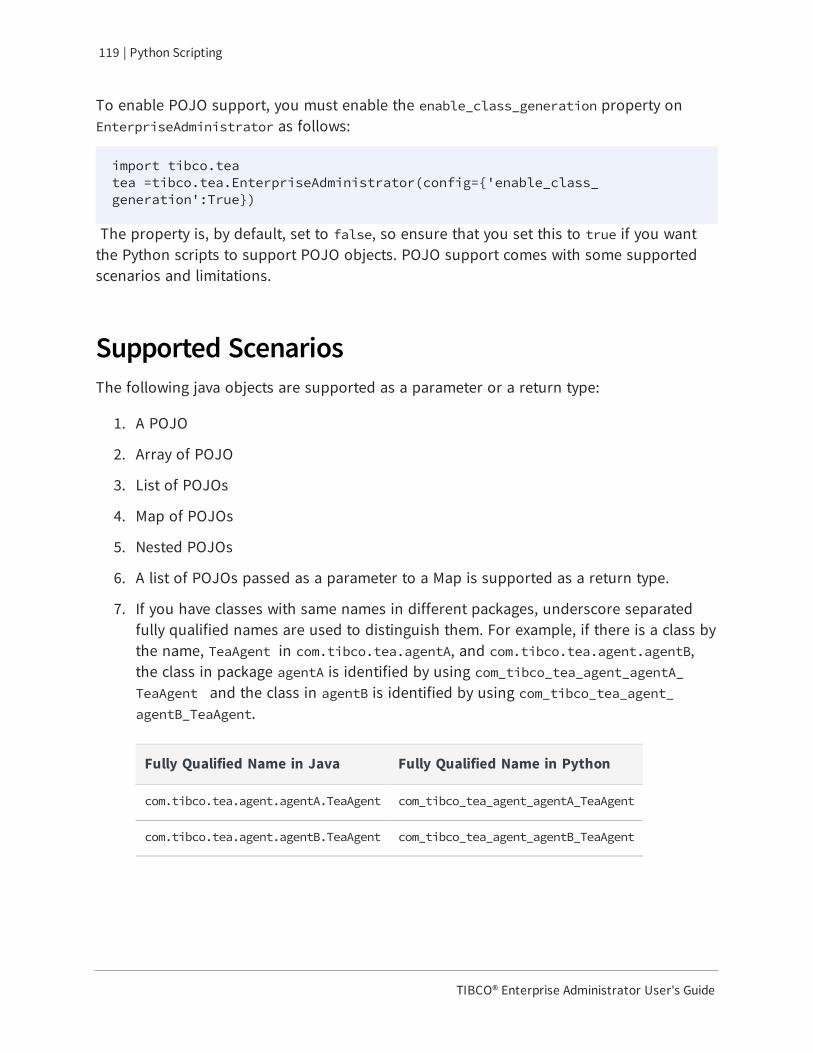
TIBCO® Enterprise Administrator User's Guide
119 | Python Scripting
To enable POJO support, you must enable the enable_class_generation property on EnterpriseAdministrator as follows:
import tibco.tea tea =tibco.tea.EnterpriseAdministrator(config={'enable_class_generation':True})
The property is, by default, set to false, so ensure that you set this to true if you want the Python scripts to support POJO objects. POJO support comes with some supported scenarios and limitations.
Supported ScenariosThe following java objects are supported as a parameter or a return type:
1. A POJO
2. Array of POJO
3. List of POJOs
4. Map of POJOs
5. Nested POJOs
6. A list of POJOs passed as a parameter to a Map is supported as a return type.
7. If you have classes with same names in different packages, underscore separated fully qualified names are used to distinguish them. For example, if there is a class by the name, TeaAgent in com.tibco.tea.agentA, and com.tibco.tea.agent.agentB, the class in package agentA is identified by using com_tibco_tea_agent_agentA_TeaAgent and the class in agentB is identified by using com_tibco_tea_agent_agentB_TeaAgent.
Fully Qualified Name in Java Fully Qualified Name in Python
com.tibco.tea.agent.agentA.TeaAgent com_tibco_tea_agent_agentA_TeaAgent
com.tibco.tea.agent.agentB.TeaAgent com_tibco_tea_agent_agentB_TeaAgent

TIBCO® Enterprise Administrator User's Guide
120 | Python Scripting
Using POJOs in Python Scripts This procedure uses an example of the Person class as the Java object that is used as a TeaParam to TeaOperation and return type of the TeaOperation. POJOs can be used just as you use regular Python objects.
Procedure 1. Install the jsonpickle module. This module must be installed separately using pip.
Refer the Python documentation for more details. You need the jsonpickle module to serialize and deserialize java objects. Based on the version of Python you are using, you can install the module using the following command:
Python Version Command
2 pip install jsonpickle
3 pip3 install jsonpickle
2. Define a POJO. The following example defines a Person class:
package com.tibco.tea.agent; import com.fasterxml.jackson.annotation.JsonPropertyOrder; @JsonPropertyOrder({ "name", "i" }) public class Person { private String name; private int i; public void setName(String name) { this.name = name; } public void setI(int i) { this.i = i; } public String getName() {

TIBCO® Enterprise Administrator User's Guide
121 | Python Scripting
return this.name; } public int getI() { return this.i; } }
3. Define a TeaOperation that takes a POJO as TeaParam and returns a POJO.
@TeaOperation(name = "hw", description = "Send greetings") public Person helloworld( @TeaParam(name = "greetings", description = "Greetings parameter") final Person greetings) throws IOException { return greetings; }
4. Invoke the TeaOperation as follows:
# Import the tibco.tea module and make the connection to the TEA Server >>> import tibco.tea >>> tea = tibco.tea.EnterpriseAdministrator() # First get hold of the product or member of the TeaOperation you want to invoke >>> prod = tea.product_with_provisional_api('HelloWorldTopLevelType') # Module of POJOs is available on that product or member in variable "module_" >>> mod = prod.module_ # Now instantiate the POJO class in python as follows >>> person = mod.Person("John Doe", 1) # Invoke the TeaOperation with the python object in the earlier line as TeaParam and consume the POJO response as a Python Object >>> response = prod.hw(person) # Use the response as you use the normal python object >>> response.name 'John Doe'

TIBCO® Enterprise Administrator User's Guide
122 | Python Scripting
>>> response.i 1
Limitations of POJOThe POJO support comes with some limitations.
The following POJOs are not supported:
1. A Map cannot have a POJO as a key
2. Nested maps
3. Nested lists
4. A List that takes a List of POJOs as a parameter

TIBCO® Enterprise Administrator User's Guide
123 | TIBCO Enterprise Administrator Containerization
TIBCO Enterprise Administrator ContainerizationYou can run TIBCO Enterprise Administrator in a Docker or Kubernetes environment.
A docker container is an executable package that comprises the code and its dependencies needed to help you run the application independent of the platform and computing environment. For more information about Docker concepts, see Docker Documentation.
To containerize TIBCO Enterprise Administrator, follow the procedure listed in <TIBCO_HOME>/tea/<version>/docker/README.md.

TIBCO® Enterprise Administrator User's Guide
124 | Performance Optimization of the TIBCO Enterprise Administrator Server
Performance Optimization of the TIBCO Enterprise Administrator ServerYou can fine-tune the performance of the TEA server by using the following properties in the <TIBCO_HOME>\tea_config\tibco\cfgmgmt\tea\conf\tea.conf file:
Property Default Value Notes
tea.http.buffer-max-size 52428800
tea.http.idle-timeout 60000 ms
tea.http.threadpool.acceptors 1 The value of this property is decided at run time, depending on the available processors.
tea.http.threadpool.selectors 1 The value of this property is decided at run time, depending on the available processors.
tea.http.threadpool.workers 2 This value must be twice as much as the available processors.
tea.http.threadpool.idle-timeout 60000 ms
tea.http.threadpool.session.timeout 1800 ms
Properties in the tea.conf File
Mapping Jetty Properties to TEA PropertiesThe properties listed in the Properties in the tea.conf File table map to the following Jetty properties:
maxThreads = acceptors + selectors + workers
minThreads = acceptors + selectors

TIBCO® Enterprise Administrator User's Guide
125 | Upgrading the TEA Agents
Upgrading the TEA AgentsTo use the TEA agents that were created with an older version of the agent library with a newer version of the TEA server, you must upgrade the TEA agents to use the newer version of the agent library. Follow these steps to upgrade the TEA agent:
Procedure 1. Stop the agent if it is running.
2. Update the agent library version in your CLASSPATH to the new version of the agent library.
3. Start the agent from the agent's bin directory.

TIBCO® Enterprise Administrator User's Guide
126 | Troubleshooting
Troubleshooting
Cannot Recover Password Changed by Super User
If the super user changes the admin/admin password and forgets it later, there is no way of recovering the password.
Solution
Delete the <TIBCO_CONFIG_HOME>\tibco\cfgmgmt\tea\data folder. Restart TIBCO Enterprise Administrator with a fresh data folder. The user name and password is now reset to admin/admin.
Warning: Deleting the data folder might result in losing all the agent configurations and LDAP integration.
Problem Accessing Content from The Backed up data Folder
You have backed up the data folder and after a point in time, you want to go back to the backed up data folder.
Solution
You can start TIBCO Enterprise Administrator with the backed up data folder by using the following option: Start TIBCO Enterprise Administrator with the -data parameter and point to the backed up data folder.
TIBCO Enterprise Administrator Server is Unable to Reach The Agent
Given an agent URL, the TIBCO Enterprise Administrator server resolves the URL to a specific IP address. When you run TIBCO Enterprise Administrator on laptops, they tend to switch between networks based on your location. In such cases, the TIBCO Enterprise Administrator server is unable to reach the agent.
Solution

TIBCO® Enterprise Administrator User's Guide
127 | Troubleshooting
Avoid using hostName of the machine when you construct an instance of TeaAgentServer. Use 0.0.0.0 or localhost if you anticipate agent machine or the TIBCO Enterprise Administrator server machine to switch between networks.
Software Installation Details and TIBCO Processes Not Displayed
When you start the TIBCO Enterprise Administrator as an NT service that is loaded automatically, the Software Installation Details and TIBCO Processes are not displayed in the Machines View. If you start the server as an NT service under SYSTEM user, the Software Installation Details and TIBCO Processes are not displayed.
Solution
Start NT service under a particular user by configuring the NT service with a user name and password. The NT service starts for the specified user and the Software Installation Details and TIBCO Processes are displayed. In this case, the TIBCO Enterprise Administrator service is now tied to a specific user. You can only see the details of the TIBCO software installed for the configured user.

TIBCO® Enterprise Administrator User's Guide
128 | TIBCO Documentation and Support Services
TIBCO Documentation and Support ServicesFor information about this product, you can read the documentation, contact TIBCO Support, and join TIBCO Community.
How to Access TIBCO Documentation
Documentation for TIBCO products is available on the TIBCO Product Documentation website, mainly in HTML and PDF formats.
The TIBCO Product Documentation website is updated frequently and is more current than any other documentation included with the product. To access the latest documentation, visit https://docs.tibco.com.
Product-Specific Documentation
Documentation for TIBCO® Enterprise Administrator is available on the TIBCO® Enterprise Administrator Product Documentation page.
To directly access documentation for this product, double-click the following file:
TIBCO_HOME/release_notes/TIB_tea_2.4.1_docinfo.html where TIBCO_HOME is the top-level directory in which TIBCO products are installed. On Windows, the default TIBCO_HOME is C:\tibco. On UNIX systems, the default TIBCO_HOME is /opt/tibco.
The following documents for this product can be found in the TIBCO Documentation site:
l TIBCO® Enterprise Administrator Release Notes
l TIBCO® Enterprise Administrator Installation Guide
l TIBCO® Enterprise Administrator User's Guide
l TIBCO® Enterprise Administrator Developer's Guide
l TIBCO® Enterprise Administrator Agent for TIBCO Enterprise Message Service™ Guide
l TIBCO® Enterprise Administrator Agent for TIBCO® Security Server Guide

TIBCO® Enterprise Administrator User's Guide
129 | TIBCO Documentation and Support Services
How to Contact TIBCO Support
You can contact TIBCO Support in the following ways:
l For an overview of TIBCO Support, visit http://www.tibco.com/services/support.
l For accessing the Support Knowledge Base and getting personalized content about products you are interested in, visit the TIBCO Support portal at https://support.tibco.com.
l For creating a Support case, you must have a valid maintenance or support contract with TIBCO. You also need a user name and password to log in to https://support.tibco.com. If you do not have a user name, you can request one by clicking Register on the website.
How to Join TIBCO Community
TIBCO Community is the official channel for TIBCO customers, partners, and employee subject matter experts to share and access their collective experience. TIBCO Community offers access to Q&A forums, product wikis, and best practices. It also offers access to extensions, adapters, solution accelerators, and tools that extend and enable customers to gain full value from TIBCO products. In addition, users can submit and vote on feature requests from within the TIBCO Ideas Portal. For a free registration, go to https://community.tibco.com.

TIBCO® Enterprise Administrator User's Guide
130 | Legal and Third-Party Notices
Legal and Third-Party NoticesSOME TIBCO SOFTWARE EMBEDS OR BUNDLES OTHER TIBCO SOFTWARE. USE OF SUCH EMBEDDED OR BUNDLED TIBCO SOFTWARE IS SOLELY TO ENABLE THE FUNCTIONALITY (OR PROVIDE LIMITED ADD-ON FUNCTIONALITY) OF THE LICENSED TIBCO SOFTWARE. THE EMBEDDED OR BUNDLED SOFTWARE IS NOT LICENSED TO BE USED OR ACCESSED BY ANY OTHER TIBCO SOFTWARE OR FOR ANY OTHER PURPOSE.
USE OF TIBCO SOFTWARE AND THIS DOCUMENT IS SUBJECT TO THE TERMS AND CONDITIONS OF A LICENSE AGREEMENT FOUND IN EITHER A SEPARATELY EXECUTED SOFTWARE LICENSE AGREEMENT, OR, IF THERE IS NO SUCH SEPARATE AGREEMENT, THE CLICKWRAP END USER LICENSE AGREEMENT WHICH IS DISPLAYED DURING DOWNLOAD OR INSTALLATION OF THE SOFTWARE (AND WHICH IS DUPLICATED IN THE LICENSE FILE) OR IF THERE IS NO SUCH SOFTWARE LICENSE AGREEMENT OR CLICKWRAP END USER LICENSE AGREEMENT, THE LICENSE(S) LOCATED IN THE “LICENSE” FILE(S) OF THE SOFTWARE. USE OF THIS DOCUMENT IS SUBJECT TO THOSE TERMS AND CONDITIONS, AND YOUR USE HEREOF SHALL CONSTITUTE ACCEPTANCE OF AND AN AGREEMENT TO BE BOUND BY THE SAME.
This document is subject to U.S. and international copyright laws and treaties. No part of this document may be reproduced in any form without the written authorization of TIBCO Software Inc.
TIBCO, the TIBCO logo, the TIBCO O logo are either registered trademarks or trademarks of TIBCO Software Inc. in the United States and/or other countries.
Java and all Java based trademarks and logos are trademarks or registered trademarks of Oracle Corporation and/or its affiliates.
This document includes fonts that are licensed under the SIL Open Font License, Version 1.1, which is available at: https://scripts.sil.org/OFL
Copyright (c) Paul D. Hunt, with Reserved Font Name Source Sans Pro and Source Code Pro.
All other product and company names and marks mentioned in this document are the property of their respective owners and are mentioned for identification purposes only.
This software may be available on multiple operating systems. However, not all operating system platforms for a specific software version are released at the same time. See the readme file for the availability of this software version on a specific operating system platform.
THIS DOCUMENT IS PROVIDED “AS IS” WITHOUT WARRANTY OF ANY KIND, EITHER EXPRESS OR IMPLIED, INCLUDING, BUT NOT LIMITED TO, THE IMPLIED WARRANTIES OF MERCHANTABILITY, FITNESS FOR A PARTICULAR PURPOSE, OR NON-INFRINGEMENT.

TIBCO® Enterprise Administrator User's Guide
131 | Legal and Third-Party Notices
THIS DOCUMENT COULD INCLUDE TECHNICAL INACCURACIES OR TYPOGRAPHICAL ERRORS. CHANGES ARE PERIODICALLY ADDED TO THE INFORMATION HEREIN; THESE CHANGES WILL BE INCORPORATED IN NEW EDITIONS OF THIS DOCUMENT. TIBCO SOFTWARE INC. MAY MAKE IMPROVEMENTS AND/OR CHANGES IN THE PRODUCT(S) AND/OR THE PROGRAM(S) DESCRIBED IN THIS DOCUMENT AT ANY TIME.
THE CONTENTS OF THIS DOCUMENT MAY BE MODIFIED AND/OR QUALIFIED, DIRECTLY OR INDIRECTLY, BY OTHER DOCUMENTATION WHICH ACCOMPANIES THIS SOFTWARE, INCLUDING BUT NOT LIMITED TO ANY RELEASE NOTES AND "READ ME" FILES.
This and other products of TIBCO Software Inc. may be covered by registered patents. Please refer to TIBCO's Virtual Patent Marking document (https://www.tibco.com/patents) for details.
Copyright © 1996-2022. TIBCO Software Inc. All Rights Reserved.