Synergy SIS - Attendance Administrator Guide
101
Volume 01, Edition 01, Revision 04 March 2013 Copyright© 2013 Edupoint Educational Systems, LLC Document Number: SISATAG-010103 Synergy SIS © Attendance Administrator Guide Edupoint Educational Systems, LLC 1955 South Val Vista Road, Ste 210 Mesa, AZ 85204 Phone (877) 899-9111 Fax (800) 338-7646
-
Upload
khangminh22 -
Category
Documents
-
view
1 -
download
0
Transcript of Synergy SIS - Attendance Administrator Guide

Volume 01, Edition 01, Revision 04 March 2013 Copyright© 2013 Edupoint Educational Systems, LLC Document Number: SISATAG-010103
Synergy SIS©
Attendance
Administrator Guide
Edupoint Educational Systems, LLC
1955 South Val Vista Road, Ste 210 Mesa, AZ 85204
Phone (877) 899-9111 Fax (800) 338-7646

Attendance Administrator Guide
Copyright© 2013 Edupoint Educational Systems, LLC
First Edition, June 2009 Second Revision, March 2010 Third Revision, April 2011 Fourth Revision, March 2013 This edition applies to Synergy SIS™ Student Information System software and all subsequent releases and modifications until indicated with new editions or revisions. Edupoint’s Synergy SIS Student Information System software and any form of supporting documentation are proprietary and confidential. Unauthorized reproduction or distribution of the software and any form of supporting documentation is strictly prohibited and may result in severe civil and criminal penalties. Information in this document is provided in connection with Edupoint Educational Systems products. No license to any intellectual property rights is granted by this document. The screens, procedural steps, and sample reports in this manual may be slightly different from the actual software due to modifications in the software based on state requirements and/or school district customization. The data in this document may include the names of individuals, schools, school districts, companies, brands, and products. Any similarities to actual names and data are entirely coincidental. Synergy SIS is a trademark of Edupoint Educational Systems, LLC. * Other names and brands may be claimed as the property of others. Copyright © 2006-2013, Edupoint Educational Systems, LLC. All rights reserved.

Attendance Administrator Guide
Copyright© 2013 Edupoint Educational Systems, LLC 3
TABLE OF CONTENTS
CHAPTER ONE : OVERVIEW ........................................................ 7
Overview of Attendance ................................................................................. 8 Implementation Considerations .................................................................... 13 Sample Attendance Letter ............................................................................ 14
CHAPTER TWO : SETTING UP THE ATTENDANCE CALENDAR ...... 15
Class Periods and Attendance Type ............................................................ 16 Bell Schedule Definition ............................................................................... 17 District Calendar ........................................................................................... 21 School Calendar ........................................................................................... 27
CHAPTER THREE : ADVANCED CALENDAR OPTIONS ................. 35
Period Rotation ............................................................................................ 36 Night and Summer Schools ......................................................................... 41 School Tracks .............................................................................................. 45 Supplemental Instruction Attendance ........................................................... 48 Periods and Attendance Type ...................................................................... 49 Bell Schedule ............................................................................................... 49 District Calendar ........................................................................................... 52 School Calendar ........................................................................................... 53 District Course.............................................................................................. 55 School Course.............................................................................................. 55 Section ......................................................................................................... 56 Supplemental Instruction Setup ................................................................... 57
CHAPTER FOUR : OTHER SETUP OPTIONS ............................... 58
School Attendance Options .......................................................................... 59 Section Attendance Options ......................................................................... 61 Attendance Scanning ................................................................................... 63 Attendance Letters ....................................................................................... 69
CHAPTER FIVE : ATTENDANCE CODES ...................................... 74
District Attendance Codes ............................................................................ 75 School Attendance Codes ............................................................................ 77
CHAPTER SIX : SECURITY ......................................................... 79
Attendance Letter Security ........................................................................... 80 Attendance Verification Security .................................................................. 81 Class Daily Attendance Security .................................................................. 81 Class Period Attendance Security ................................................................ 82 Course Attendance Security ........................................................................ 82

Attendance Administrator Guide
4 Copyright© 2013 Edupoint Educational Systems, LLC
Daily Attendance Security ............................................................................ 84 Mass Change Attendance Security .............................................................. 86 Period Attendance Security .......................................................................... 87 Attendance Sheet Creation Security ............................................................. 90 Bell Schedule Definition Security .................................................................. 91 District Attendance Code Security ................................................................ 92 District Calendar Security ............................................................................. 93 Period Rotation Definition Security ............................................................... 95 School Attendance Code Security ................................................................ 96 School Attendance Options Security ............................................................ 96 School Calendar Security ............................................................................. 97 School Enrollment History Security ............................................................ 100 Supplemental Instruction Setup Security .................................................... 101 Attendance Reports Security ...................................................................... 101

Attendance Administrator Guide
Copyright© 2013 Edupoint Educational Systems, LLC 5
ABOUT THIS GUIDE DOCUMENT HISTORY Date Volume Edition Revision Content
June 2009 1 1 1 Initial release of this document
March 2010 1 1 2 Updated to include changes from the November 2009 release, and the February & March 2010 patches
April 2011 1 1 3 Updated to include changes from the November 2010 release
March 2013 1 1 4 Updated to reflect the March 2013 release of Synergy SIS version 8.0
CONVENTIONS USED IN THIS GUIDE
Bold Text Bold Text - Indicates a button or menu or other text on the screen to click, or text to type.
Tip – Suggests advanced techniques or alternative ways of approaching the subject.
Note – Provides additional information or expands on the topic at hand.
Reference – Refers to another source of information, such as another manual or website
Caution – Warns of potential problems. Take special care when reading these sections.

Attendance Administrator Guide
6 Copyright© 2013 Edupoint Educational Systems, LLC
BEFORE YOU BEGIN Before using any of the Edupoint family of software products, please make sure the computer hardware and software meet the minimum requirements.
Caution: The Edupoint family of software does not support the use of pop-up blockers or third-party toolbars in the browser used to access Synergy SIS. Please disable any pop-up blockers (also known as pop-up ad blockers) and extra toolbars in the browser before logging into any Edupoint product.
A NOTE ABOUT NAVIGATION To indicate how to find screens, this guide uses shorthand like Synergy SIS > Attendance > Class Period Attendance, which means: In the Navigation Tree (also called PAD Tree), click Synergy SIS (if necessary to open it), then Attendance (if necessary to open it), and then Class Period Attendance.
Synergy SIS Navigation Tree
If the Navigation Tree pane itself is not open, click the Tree button.
Tree Button

Chapter One Attendance Administrator Guide
Copyright© 2013 Edupoint Educational Systems, LLC 7
Chapter One: OVERVIEW
This chapter covers: ► Overview of Attendance ► Implementation Considerations ► Sample Attendance Letter

Attendance Administrator Guide Chapter One
8 Copyright© 2013 Edupoint Educational Systems, LLC
OVERVIEW OF ATTENDANCE Attendance may be tracked using either a daily attendance or period attendance model. The daily attendance records the student’s attendance based on the entire school day, where the period attendance records the student’s attendance in each class period. Daily attendance may be taken either once or twice a day. Attendance records for either daily or period attendance track a student’s absences. If nothing is recorded for the day or period, the student is considered present. Attendance in Synergy SIS may be recorded by several methods. The absences can be entered in one of several screens in the Attendance folder. Paper attendance sheets can be generated and then scanned in to the system. Finally, the TEACHERVUE software can be used to enter the absences. The TEACHERVUE software is explained in the Synergy SIS – TEACHERVUE Administrator Guide and the Synergy SIS – TEACHERVUE User Guide. This guide and its companion user guide illustrate the other two methods possible. This guide illustrates how to set up either daily attendance or period attendance tracking. It also covers the configuration needed to use automated attendance dialers and attendance sheet scanners. The unique security options available for the Attendance screens are also outlined. The companion manual to the Administrator Guide, Synergy SIS - Attendance User Guide, illustrates how to enter attendance and print related reports. Synergy SIS > Attendance > Attendance Letter generates letters that can be sent to parents, outlining students’ absences.
Attendance Letter Screen

Chapter One Attendance Administrator Guide
Copyright© 2013 Edupoint Educational Systems, LLC 9
The Attendance Verification screen lists all students with absences recorded for a particular date. This screen can be filtered to show only one or more types of absences. This is primarily used by attendance clerks to review absences entered by teachers and verify the reason for the student’s absence with their parents.
Attendance Verification Screen
The Class Daily Attendance screen allows daily attendance to be recorded for all students in a section. Either one day or five days may be displayed at a time for each section.
Class Daily Attendance Screen
The Class Period Attendance screen allows period attendance to be recorded for all students in a section. Either one day or 5 days may be displayed at a time for each section.
Class Period Attendance Screen

Attendance Administrator Guide Chapter One
10 Copyright© 2013 Edupoint Educational Systems, LLC
The Course Attendance screen lists all sections in which a student is enrolled for the entire year. In the detailed screen of course attendance, attendance may be recorded by section.
Course Attendance Screen
The Daily Attendance screen records daily attendance by month for a specific student.
Daily Attendance Screen

Chapter One Attendance Administrator Guide
Copyright© 2013 Edupoint Educational Systems, LLC 11
The Mass Change Attendance screen gives educators a means to change the absences for all students in a school for a given date.
Mass Change Attendance Screen
The Period Attendance screen records student attendance by period across all periods in the selected date range. It also shows the overall history of the student’s attendance and any attendance letters sent home to the student’s parents.
Period Attendance Screen

Attendance Administrator Guide Chapter One
12 Copyright© 2013 Edupoint Educational Systems, LLC
Synergy SIS > Attendance > Setup > School Enrollment History tracks the total number of active students, the number of enrollments and the total ADM on a day-by-day basis for the entire school year. Its data is also used for the STU603 report.
School Enrollment History Screen

Chapter One Attendance Administrator Guide
Copyright© 2013 Edupoint Educational Systems, LLC 13
IMPLEMENTATION CONSIDERATIONS Prior to implementing the attendance setup in Synergy SIS, the district or school should decide the following issues: How will absences be recorded? Attendance in Synergy SIS may be recorded by several methods. The absences can be entered in one of several screens in the Attendance folder. Paper attendance sheets can be generated and then scanned back into the system. Finally, the TEACHERVUE software can be used to enter the absences. One or all of these methods may be used to record the attendance, but this should be decided prior to setup. How will absences be categorized? Absences may be categorized for reporting and tracking purposes, and for upload to the state system. These codes may be made mandatory for the entire district, or some codes may only be in use at specific schools. While most schools already have a list of codes in use in their prior student information system, this is a good time to review the list for modifications. The previous system may also not have allowed for mandatory or per school codes, and these should be identified. How will parents be notified of a student’s absence? Synergy SIS offers several options to notify parents when a student is absent from school. It can be integrated with an automated attendance dialer. Letters may be generated that can mailed to the parents’ address. Call lists can also be set up for educators to make a personal phone call. The most common scenario is to have teachers record absences using TeacherVUE, but only indicating one type of absences such as Unverified. Attendance clerks then contact parents to determine the reason for the absence, and update the attendance record with the actual type of absence using the Attendance Verification screen. To make the setup process go more smoothly, also gather the following information that will be used during the setup process:
• Will the school use daily or period attendance?
• What are the exact dates and holidays for each school calendar? These calendars must match the calendars defined at the state for each school
• The information about any automated attendance dialers in use
Attendance should be set up in the following order:
1. Calendars and Advanced Calendar Options in Chapters Two and Three
2. Other Setup Options in Chapter Four
3. Attendance Codes in Chapter Five

Attendance Administrator Guide Chapter One
14 Copyright© 2013 Edupoint Educational Systems, LLC
SAMPLE ATTENDANCE LETTER As part of the attendance setup, letters may be defined that can be generated when a student misses a certain number of periods or days. This letter is designed to be sent home to the student’s parents to alert them to the situation. A sample letter is shown below. Multiple letters may be configured in different languages.
Sample Attendance Letter

Chapter Two Attendance Administrator Guide
Copyright© 2013 Edupoint Educational Systems, LLC 15
Chapter Two: SETTING UP THE ATTENDANCE
CALENDAR
This chapter covers: ► Class Periods and Attendance Type ► Bell Schedule Definition ► District Calendar ► School Calendar

Attendance Administrator Guide Chapter Two
16 Copyright© 2013 Edupoint Educational Systems, LLC
To set up the attendance calendar, the tasks should be completed in the order outlined in this chapter.
CLASS PERIODS AND ATTENDANCE TYPE For all schools, the class periods need to be defined even if the school plans to take daily attendance. The periods are the units into which each class day is separated. For example, an elementary school may only have one period the entire day where a high school would have a period for each class. To define the class periods and other attendance-related settings for the school:
1. Change the focus to the school to be configured.
2. Go to Synergy SIS > System > Setup > School Setup.
School Setup Screen
3. Enter the number of the first period in the Start Period box, and the number of the last period in the End Period box. For example, if the school has six periods, the start period might be 1 and the end period would be 6.
4. If the students are assigned a homeroom, indicate the period in which the homeroom is schedule in the Homeroom Period box. If there is not a standard homeroom period, leave this blank.
5. If the homeroom is scheduled for only once a week, select the day of the homeroom in the Homeroom Meeting Day list. For more information about period rotation, see Chapter Three in this guide.
6. Select the School Type.
7. Select the type of attendance used at the school in the School Attendance Type list.
8. Select how attendance is taken in the School Attendance Taken list.
9. Select the School Attendance Reason Type. Regular is for schools that record absences, and Positive is for schools that record attendance.

Chapter Two Attendance Administrator Guide
Copyright© 2013 Edupoint Educational Systems, LLC 17
10. For a school using period attendance, select in the Grade Attendance Calculated list how attendance is calculated.
• By Section calculates attendance based on section. The section containing the attendance events must match a section in which the student is enrolled currently.
• By Grading Definition calculates based on course and section information. The system accumulates attendance by checking the sections that contain attendance events that match any section in which the student is currently enrolled. When a student has switched to a different section mid-year, and the Update Attendance process is run, the student's report card reflects the days absent and days tardy for both sections.
11. Set the Calendar Type to Regular. For night and summer schools, see Chapter Three.
12. Click the Save button at the top of the screen.
These changes need to be made for each school in the district. Many of these options also affect the class scheduling for the school, so coordinate this closely, and review the Synergy SIS – Scheduling Guide for more information.
BELL SCHEDULE DEFINITION Once the number of periods has been defined in the School Setup screen, the start and stop time for each period needs to be identified in the Bell Schedule Definition. Multiple bell schedules may be defined at a school, but only one schedule may be selected for a given day. Bell Schedules are also used to calculate the absence amount submitted to the state for period attendance schools. To set up the bell schedule:
1. Go to Synergy SIS > Attendance > Setup > Bell Schedule Definition.
Bell Schedule Definition Screen
2. Click the Add button at the top of the screen.
Bell Schedule Definition Screen, Adding

Attendance Administrator Guide Chapter Two
18 Copyright© 2013 Edupoint Educational Systems, LLC
3. Enter a code for the bell schedule in the Code field, and give the schedule a name in the Bell Schedule Name box. For example, the default schedule may use a code of DBS and the name of Default Bell Schedule.
Bell Schedule Definition, Code and Name
4. Click the Save button at the top of the screen.
5. The new schedule appears with a line for each period defined in the School Setup screen. The times for each period may be entered manually, or it can automatically be filled in using the Bell Schedule Creation Assistant. To see the creation assistant, click the down arrow in the Bell Schedule Creation Assistant section.
Bell Schedule Definition, Created

Chapter Two Attendance Administrator Guide
Copyright© 2013 Edupoint Educational Systems, LLC 19
6. Enter the time of the first bell in the Start Time of First Period box. The time should be entered in standard clock format with AM or PM following (non-military time). Enter the Total Minutes Per Period and the Passing Time In-Between Periods in the boxes provided.
Bell Schedule Creation Assistant

Attendance Administrator Guide Chapter Two
20 Copyright© 2013 Edupoint Educational Systems, LLC
7. Click the Create Bell Schedule button, and the schedule automatically is filled in.
Bell Schedule Definition, Completed
8. Once the schedule appears, the numbers can be edited directly in the boxes provided. A period may also be deleted from the schedule by clicking on the red X in the Delete column.
9. When the schedule is finished, click the Save button at the top of the screen.
To edit a bell schedule: Edit the numbers in the boxes, and click the Save button at the top of the screen. To delete a schedule, click the Delete button at the top of the screen.

Chapter Two Attendance Administrator Guide
Copyright© 2013 Edupoint Educational Systems, LLC 21
DISTRICT CALENDAR After the bell schedules have been defined, the district-wide calendar can be created. To set up the district calendar:
1. Go to Synergy SIS > System > Setup > District Setup.
District Setup Screen
2. Click the year for which to define a district calendar under the Organization Year Tree section.
District Setup Screen, Adding Extension
3. In the Action... list, select Add Extension to YEAR.
Add Year Extensions Screen
4. Choose the type of extension to add from the Year Extension Link list (Regular, Night, or Summer).
5. Check the box Link Year with All Organizations to add this school year to all schools in the organization tree. Otherwise, each school needs to be linked to this year manually. If setting up an extension that is not in use at all schools such as summer or night school, leave this box unchecked. To add this extension to an individual school, see the chapter on Advanced Calendar Options in this guide.

Attendance Administrator Guide Chapter Two
22 Copyright© 2013 Edupoint Educational Systems, LLC
6. Click the Save button at the top of the screen to save the extension.
District Setup Screen, Extension Created
Note: Multiple extensions may be created for each year. For example, the process above may be used to create a separate calendar for a summer school or night school program.
To change the names of the year extensions or to add other extensions
1. Go to Synergy SIS > System > Setup > Lookup Table Definition.
2. Click the triangle next to Revelation.OrganizationInfo to expand the list of tables.
3. Select the Year Extensions table.
Year Extensions Lookup Table
4. Click the Add button to add a new code.
5. The order in which the values are displayed can be set by entering the order number in the ListOrder column. If the numbers in the ListOrder field are the same or are all blank, the Code is used to sort the list and then the Description.
6. Enter a code for the extension in the Code column. This value must be unique, but it is only used internally to link the tables in the database and is not displayed.
7. Enter the description of the extension type in the Description column.
8. The Other SIS column is used to import data during the conversion process from another student records system. Enter the code used in the old system in this column.
9. If appropriate, a start date and end date may be entered for the code in the Status column to activate or deactivate the code for a particular year. If a code is inactive, it

Chapter Two Attendance Administrator Guide
Copyright© 2013 Edupoint Educational Systems, LLC 23
shows in data already entered but is not available for selection for new transactions in the screen. For example, if a code is no longer valid for transactions at the state beginning FY2008, select 2008 for the end year.
10. The State Code is not needed since these codes are not reported to the state. The checkbox at the top of the table Use Code as the State Code is not used as well.
11. The Alt Code 3 and the Alt Code SIF provide spaces for other codes to be used for reporting or system interoperability purposes.
12. Click the Save button at the top to save the changes.
Once the extension has been created for the year, the district calendar may be defined. The dates defined at the district set the boundaries for the school calendars. The district calendar should be created so that the earliest date from any school defines the initial date of the district calendar, and the latest date from any school sets the last date of the district calendar. To set up the district calendar:
1. Go to Synergy SIS > Attendance > Setup > District Calendar.
District Calendar Screen
2. Select the days of the week on which the district holds classes by checking the boxes under each day of the week, and click the Create Calendar button.
3. The Collect Year Dates screen opens. Select Regular as the Calendar Type.
Collect Year Dates Screen, Populated
4. Enter the beginning date in the Calendar Start Day field and the last day of the calendar in the Calendar End Day field.

Attendance Administrator Guide Chapter Two
24 Copyright© 2013 Edupoint Educational Systems, LLC
5. Click the OK button at the top of the screen to create the district calendar.
6. Once the district calendar has been created, enter district-wide holidays and other non-school days in the calendar. All days off in the district calendar also show in all of the school calendars, so only select days off that are common to all schools in the district. To select a day off, click in the Type column next to the date and select the type of day off from the list. The options available are Holiday, Vacation, Staff Development, Non-School Day or Other. Days can also be marked as Emergency Closure Day (Approved) or (Unapproved), or Supplemental. For more information about supplemental days, see the section on supplemental instruction setup in Chapter Three.
District Calendar Screen, Adding Holidays
7. Click the Save button at the top of the screen to save the holidays added.
Note: Once an initial calendar has been created for the district, calendars for subsequent years may be created by copying the initial calendar. This is done through the New Year Rollover process. For more information about this process, see the Synergy SIS – New Year Rollover Administrator Guide.

Chapter Two Attendance Administrator Guide
Copyright© 2013 Edupoint Educational Systems, LLC 25
The Report Periods tab of the District Calendar is used to define periods for attendance reports. These periods are only used for the reports, so they may match the grading periods, the terms, or whatever other intervals are helpful such as 40th and 100th day. To set these periods at the district level:
1. Click the Report Periods tab of the District Calendar screen.
Report Periods Tab, District Calendar screen
2. Click the Add button to add a report period, and a new blank line appears.
Adding District Report Periods
3. Enter the Order in which the period should be displayed, and a descriptive Name.
4. Enter the Start Date and End Date for the period. The dates must be entered in MM/DD/YY format or they can be selected by clicking on the Calendar button.
5. Click the Add button to add another report period, and continue until all report periods are entered. The dates for each report period cannot overlap.
Completing District Report Periods
6. Click the Save button at the top of the screen to save the changes.

Attendance Administrator Guide Chapter Two
26 Copyright© 2013 Edupoint Educational Systems, LLC
An entire week may also be marked as a holiday such as Winter Break or Spring Break using the advanced options of the District Calendar screen. To set up a special week:
1. Click the Advanced Options tab of the District Calendar screen.
District Calendar Screen, Advanced Options Tab
2. Click the Add button, and a new line is added.
District Calendar Screen, Advanced Options Tab, Adding
3. Enter the beginning date of the week in the Week Date box. The date must be entered in MM/DD/YY format, or it may be selected using the Calendar button.
4. Select the MM/DD/YY from the list. The types of weeks can be customized for each district.
5. To exclude this week from the upload to the state, check the box Exclude From State Reports.
6. To add another week, click the Add button. To delete a week, check the box in X column of the week to remove.
7. Click the Save button at the top of the screen to save the changes.
To customize the Week Type used on the Advanced Options tab:
1. Go to Synergy SIS > System > Setup > Lookup Table Definition.
2. Click the triangle next to K12.AttendanceInfo to expand the list of tables.
3. Select the Week Type table.
Week Type Lookup Table
4. Click the Add button to add a new code.
5. The order in which the values are displayed can be set by entering the order number in the ListOrder column. If the numbers in the ListOrder field are the same or are all blank, the Code is used to sort the list and then the Description.
6. Enter a code for the week type in the Code column. This value must be unique, but it is only used internally to link the tables in the database and is not displayed.

Chapter Two Attendance Administrator Guide
Copyright© 2013 Edupoint Educational Systems, LLC 27
7. Enter the description of the code in the Description column.
8. The Other SIS column is used to import data during the conversion process from another student records system. Enter the code used in the old system in this column.
9. If appropriate, a start date and end date may be entered for the code in the Status column to activate or deactivate the code for a particular year. If a code is inactive, it shows in data already entered but is not available for selection for new transactions in the screen. For example, if a code is no longer valid for transactions at the state beginning FY2008, select 2008 for the end year.
10. The State Code is not needed since these codes are not reported to the state. The checkbox at the top of the table Use Code as the State Code is not used as well.
11. The Alt Code 3 and the Alt Code SIF provide spaces for other codes to be used for reporting or system interoperability purposes.
12. To add another code, click the Add button. To delete a code, check the box in the X column.
13. Click the Save button at the top to save the changes.
SCHOOL CALENDAR After the district calendar has been defined, a school-specific calendar needs to be set up for each of the schools in the district. To set up a school calendar:
1. Set the focus to the school for which the calendar needs to be created.
2. Go to Synergy SIS > Attendance > Setup > School Calendar.
School Calendar Screen

Attendance Administrator Guide Chapter Two
28 Copyright© 2013 Edupoint Educational Systems, LLC
3. Click the Create Calendar button. The Create School Calendar screen opens.
Create School Calendar Screen
4. To use the district calendar, click the check box labeled Use District Calendar. The Calendar Type and Dates used for the District Calendar are shown. If the dates and type are not displayed the district calendar has not been created for the school’s calendar type.
5. To create a school calendar with different dates than the district calendar, select the Start and End Dates for the school calendar. The dates should be entered in the format MM/DD/YY or may be selected by clicking the Calendar button.
Create School Calendar Screen, Populated
6. Choose the Default Bell Schedule created in the Bell Schedule Definition earlier in this chapter from the list.
7. The Rotation Default section is covered in the chapter on Advanced Calendar Options in this guide.
8. Click the OK button at the top of the screen to create the school calendar. When the calendar is created, the default bell schedule is assigned to every day of the calendar.

Chapter Two Attendance Administrator Guide
Copyright© 2013 Edupoint Educational Systems, LLC 29
School Calendar Screen, First Day of the Month Bell Schedule
9. If some days do not follow the default bell schedule, another bell schedule may be defined in the Bell Schedule Definition screen. See the section on the Bell Schedule Definition for instructions on how to create a bell schedule.
10. To assign the special bell schedule to the appropriate days in the school calendar, click in the Bell column next to the date to be modified, and select the special bell schedule. Click Save at the top of the screen to save the changes.
School Calendar Screen, Specifying Bell Schedule
11. To add holidays and vacations specific to the school that are different from the district calendar, click in the Type column and select the type of non-school day. The options available are Holiday, Vacation, Staff Development, Non-School Day or Other. Days can also be marked as Emergency Closure Day (Approved) or (Unapproved), or Supplemental. For more information about supplemental days, see the section on supplemental instruction setup in Chapter Three.

Attendance Administrator Guide Chapter Two
30 Copyright© 2013 Edupoint Educational Systems, LLC
School Calendar Screen, Adding Holidays
12. Click Save at the top of the screen to save the changes.
The steps to create a school calendar must be repeated for every school in the district.
Note: Once the initial calendars have been created for the district and the schools, calendars for subsequent years may be created by copying these initial calendars. This is done through the New Year Rollover process. For more information about this process, see the Synergy SIS – New Year Rollover Administrator Guide.

Chapter Two Attendance Administrator Guide
Copyright© 2013 Edupoint Educational Systems, LLC 31
The Report Periods tab of the School Calendar is used to define periods for attendance reports. These periods are only used for the reports, so they may match the grading periods, the terms, or whatever other intervals are helpful such as 40th and 100th day. As with the calendar, the school report periods can either use those defined at the district or override the periods at the school level. To override these periods at the school level:
1. Click the Report Periods tab of the School Calendar screen.
Report Periods Tab, School Calendar screen
2. The Order and Name of the report periods cannot be changed from the district periods, nor can report periods be added or deleted at the school level. However, the dates may be modified. To set different dates for the report periods at the school, enter the start date in the DateStart column and the end date in the DateEnd column. The dates for each report period cannot overlap. Dates must be entered in MM/DD/YY format or they can be selected by clicking on the Calendar
button.
Overriding District Report Periods
3. Check the Override box next to the periods that have been modified.
4. Click the Save button at the top of the screen to save the changes.

Attendance Administrator Guide Chapter Two
32 Copyright© 2013 Edupoint Educational Systems, LLC
An entire week may also be marked as a holiday such as Winter Break or Spring Break for a school or district. To load any week’s setup at the school level:
1. Click the School Report Periods tab of the School Calendar screen.
School Calendar Screen, School Report Periods Tab
2. Click the button Load District School Weeks, and the weeks configured at the district appears in the School Week Setup section.
School Calendar Screen, School Report Periods Tab, School Week Setup
3. If the school has different weeks off than the district, the district week may be deleted from the school by clicking the box in the X column.
4. To add a week off for the school, click the Add button in the School Week Setup section, and a new line is added.
5. Enter the beginning date of the week in the Week Date box. The date must be entered in MM/DD/YY format, or it may be selected using the Calendar button.
6. Select the Week Type from the list. The types of weeks can be customized for each district. For instructions on how to customize the week type, see the section in this chapter regarding the District Calendar.
7. To exclude this week from the upload to the state, check the box Exclude From State Reports.
8. To add another week, click the Add button. To delete a week, check the box in X column of the week to remove.
9. Click the Save button at the top of the screen to save the changes.

Chapter Two Attendance Administrator Guide
Copyright© 2013 Edupoint Educational Systems, LLC 33
For California schools and districts, Synergy SIS also outlines the P1, P2, and P3 reporting periods used by the state. This information can be found in the State Reporting Periods section at the bottom of the School Report Periods tab of the School Calendar screen.
School Calendar Screen, School Report Periods Tab
For each reporting period, Synergy SIS calculates the Start Date and End Date of the period. It also calculates how many Holidays and other Non-Attendance Days are present in the period. Finally, the number of School Days and Days of Enrollment are tabulated. To see the detail of each period by week, click the Show Detail button.
State Reporting Periods, Detailed Screen
The same information is tabulated for each week. Each week can be removed from the state upload by check the box in the Exclude from State Reporting column.

Attendance Administrator Guide Chapter Two
34 Copyright© 2013 Edupoint Educational Systems, LLC
Holidays may also be customized for each grade level in a school. To add a custom holiday for a grade level:
1. Click the Advanced Options tab of the School Calendar screen.
School Calendar Screen, Advanced Options Tab
2. Click the Add button, and a new line is listed.
School Calendar Screen, Advanced Options Tab, Adding
3. Select the grade level from the Grade list.
4. Enter the date of the non-school day in the Cal Date column. The date must be entered in MM/DD/YY format, or it may be selected using the Calendar button.
5. Select the type of non-school day from the Holiday list.
6. To add another non-school day for a grade, click the Add button again and follow the steps above. To delete a day, check the box in the X column.
7. Click the Save button at the top of the screen to save the changes.

Chapter Three Attendance Administrator Guide
Copyright© 2013 Edupoint Educational Systems, LLC 35
Chapter Three: ADVANCED CALENDAR OPTIONS
This chapter covers: ► Period Rotation ► Night and Summer Schools ► School Tracks ► Supplemental Instruction Attendance
Attendance Administrator Guide Chapter Three
36 Copyright© 2013 Edupoint Educational Systems, LLC
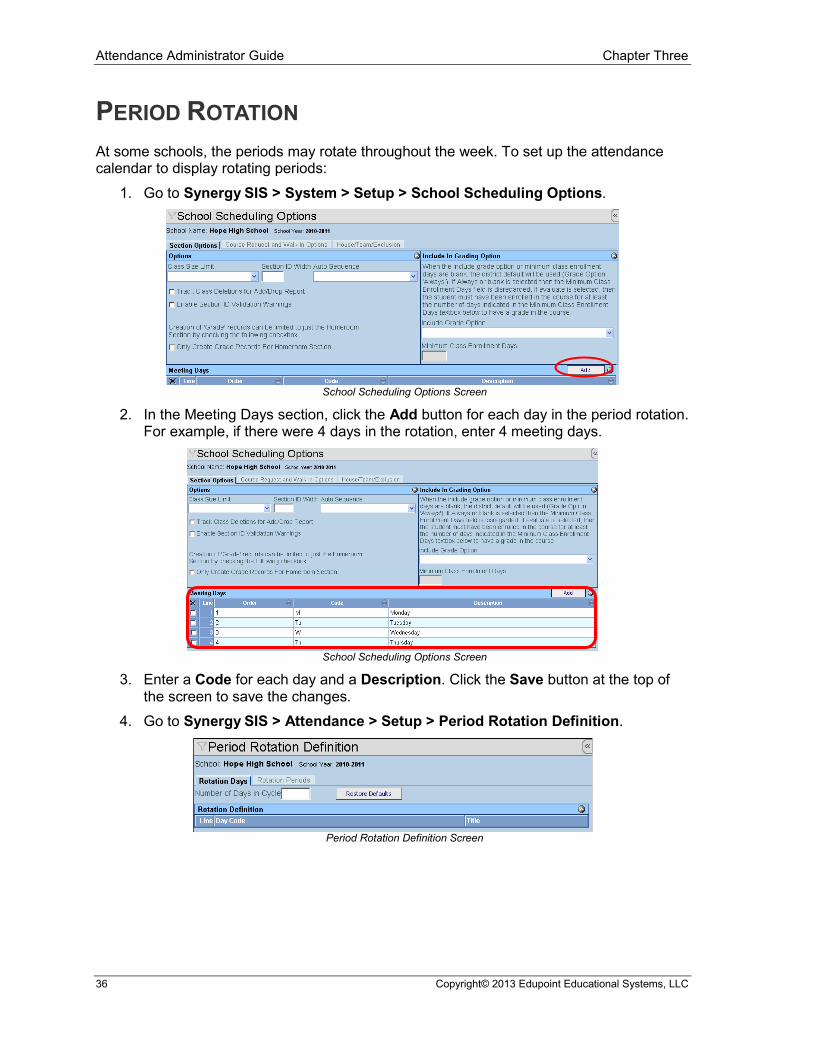
PERIOD ROTATION At some schools, the periods may rotate throughout the week. To set up the attendance calendar to display rotating periods:
1. Go to Synergy SIS > System > Setup > School Scheduling Options.
School Scheduling Options Screen
2. In the Meeting Days section, click the Add button for each day in the period rotation. For example, if there were 4 days in the rotation, enter 4 meeting days.
School Scheduling Options Screen
3. Enter a Code for each day and a Description. Click the Save button at the top of the screen to save the changes.
4. Go to Synergy SIS > Attendance > Setup > Period Rotation Definition.
Period Rotation Definition Screen

Chapter Three Attendance Administrator Guide
Copyright© 2013 Edupoint Educational Systems, LLC 37
5. Enter the number of days used in a full rotation in the Number of Days in Cycle box. For example, if the periods change every other day, the number of days would be 2. Alternatively, if the periods change every day until the 5th day is the same as the 1st day, the number of days would be 4.
Period Rotation Definition Screen, 4 Days in Cycle
6. Click the Save button at the top of the screen, and the Rotation Definition section is automatically filled in with a Day Code for each day in the cycle.
7. Assign the meeting days created in the School Scheduling Options screen to each day in the cycle by selecting it from the Schedule Code list.
8. Click the Save button at the top of the screen.
9. To set up the rotation, click the Rotation Periods tab.
Period Rotation Definition, Rotation Periods Tab
10. To set a non-rotating schedule where each period is at the same time every day in the cycle, click the Set Non-Rotating Default button.
Rotation Periods, Non-Rotating Default

Attendance Administrator Guide Chapter Three
38 Copyright© 2013 Edupoint Educational Systems, LLC
11. To set up a rotating schedule, click the Set Rotating Default button.
Rotation Periods, Rotating Default
12. Either default distribution can then be manually edited to adjust the rotation. Once the schedule is finished, click the Save button at the top of the screen to save the changes.
13. To assign each rotation day a specific date in the school calendar, go to Synergy SIS > Attendance > Setup > School Calendar.
School Calendar Screen

Chapter Three Attendance Administrator Guide
Copyright© 2013 Edupoint Educational Systems, LLC 39
14. To have the rotation automatically assigned to the calendar, with the rotation skipping over the holidays, click the Fill Rotating Days Skipping Over Holidays option and then click the Set Rotation Default button. The meeting day codes from the Period Rotation Definition screen are automatically filled in to the Rot column for each date.
School Calendar, Rotating Days Skipping Holidays
15. To have the rotation automatically assigned to the calendar, with holidays counting as a rotation day, click the Fill Rotating Days Holidays Count As Rotation Day option and then click the Set Rotation Default button. The meeting day codes from the Period Rotation Definition screen are automatically filled in to the Rot column for each date.
School Calendar, Rotating Days Counting Holidays

Attendance Administrator Guide Chapter Three
40 Copyright© 2013 Edupoint Educational Systems, LLC
16. To set up a different rotation for part of the year, click the Customize the Rotation default by date and type button.
School Calendar Screen
17. The Set Default Rotation Calendar screen opens. Select the date to start the new rotation in the Start Date field. The dates should be entered in the format MM/DD/YY or may be selected by clicking the Calendar button. Select the Rotation Code from the list to start the rotation, and select the Rotation Default. The No Fill option clears the rotation. Click OK to fill in the calendar.
Set Default Rotation Calendar Screen
18. Once the rotation has automatically been filled in, it can also be manually edited by clicking in the Rot column and selecting the Day code.
School Calendar Screen, Rotation Column
19. Once all of the rotation days have been filled in, click the Save button at the top of the screen to save the changes.
Chapter Three Attendance Administrator Guide
Copyright© 2013 Edupoint Educational Systems, LLC 41
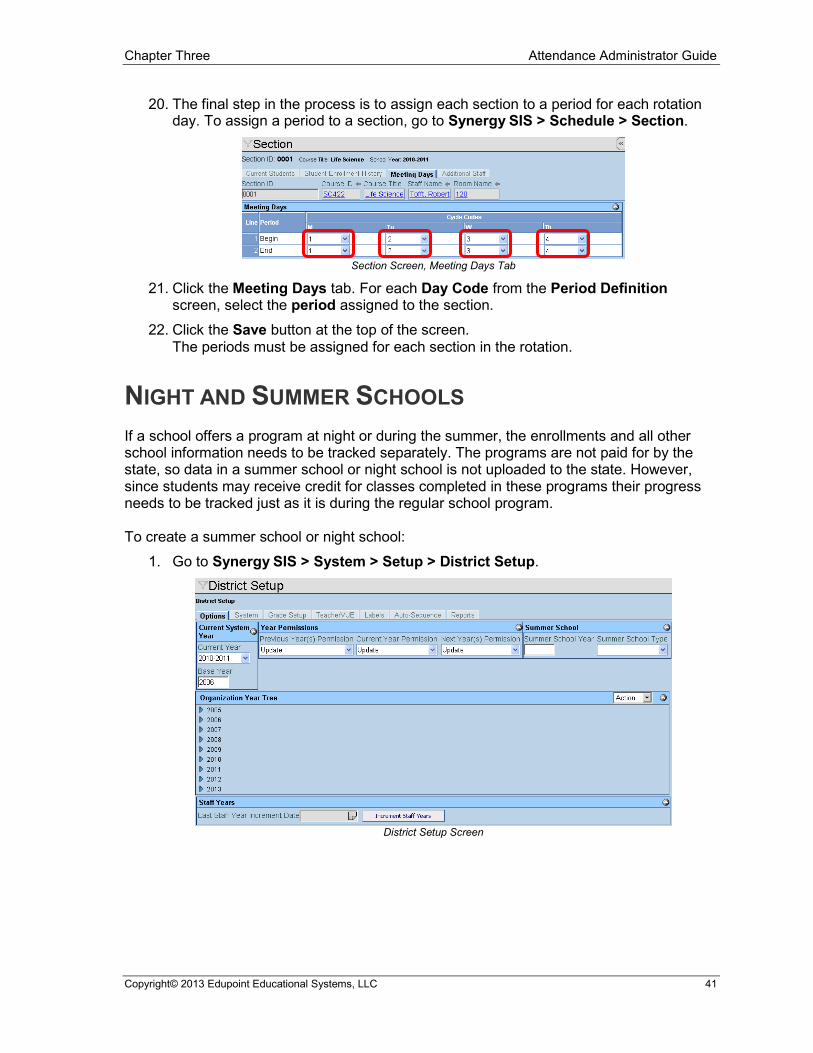
20. The final step in the process is to assign each section to a period for each rotation day. To assign a period to a section, go to Synergy SIS > Schedule > Section.
Section Screen, Meeting Days Tab
21. Click the Meeting Days tab. For each Day Code from the Period Definition screen, select the period assigned to the section.
22. Click the Save button at the top of the screen. The periods must be assigned for each section in the rotation.
NIGHT AND SUMMER SCHOOLS If a school offers a program at night or during the summer, the enrollments and all other school information needs to be tracked separately. The programs are not paid for by the state, so data in a summer school or night school is not uploaded to the state. However, since students may receive credit for classes completed in these programs their progress needs to be tracked just as it is during the regular school program. To create a summer school or night school:
1. Go to Synergy SIS > System > Setup > District Setup.
District Setup Screen
Attendance Administrator Guide Chapter Three
42 Copyright© 2013 Edupoint Educational Systems, LLC
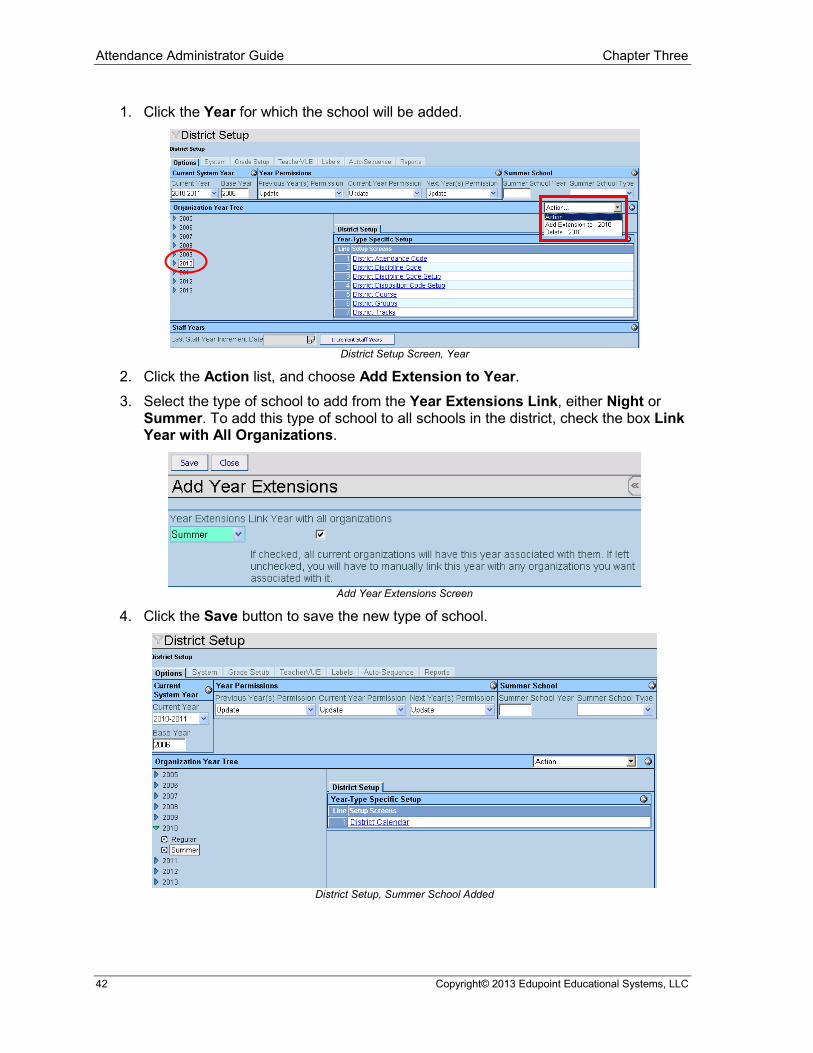
1. Click the Year for which the school will be added.
District Setup Screen, Year
2. Click the Action list, and choose Add Extension to Year. 3. Select the type of school to add from the Year Extensions Link, either Night or
Summer. To add this type of school to all schools in the district, check the box Link Year with All Organizations.
Add Year Extensions Screen
4. Click the Save button to save the new type of school.
District Setup, Summer School Added

Chapter Three Attendance Administrator Guide
Copyright© 2013 Edupoint Educational Systems, LLC 43
If Link Year with All Organizations was not selected when the summer or night school (also referred to as a year extension) was added to the District Setup screen, the extension now needs to be added to each school that uses it. To add the extension to a school:
1. Go to Synergy SIS > System > Setup > Organization.
Organization Screen
2. Expand the tree until the school is visible, and click the school that is administering the program.
Organization Screen, School
3. Click the Years tab.
Organization Screen, Years Tab
4. Click the Add button in the Year Options Grid.
5. The Organization Year Add screen opens. Select the new year and extension that was created in the Organization Year Choices list, and click the Save button.
Organization Year Add Screen
The new extension is now listed on the Years tab. These steps need to be done for each school that is using this new extension.

Attendance Administrator Guide Chapter Three
44 Copyright© 2013 Edupoint Educational Systems, LLC
Organization Screen, Years Tab, New Extension Added
Once the extension has been added to all the schools that plan to use it, it needs to be set up just like a brand new year. The district calendar needs to be set up, each school calendar set up, all of the grading and attendance options, etc. After everything has been configured for the new extension, students need to be withdrawn from their current school (unless the new extension is set up for concurrent enrollment) and enrolled in the new extension. Once an extension has been created, it can be rolled over during the New Year Rollover process so the extension creation process does not have to be repeated every year. See the Synergy SIS – New Year Rollover Administrator Guide for more information. If the extension is a summer school, it also needs to be selected as the summer school program for the district. To designated the summer school at the district level:
1. Go to Synergy SIS > System > Setup > District Setup.
District Setup Screen
2. Enter the year of the active summer school in the Summer School Year field. The year must be entered in 4 digits, such as 2009.
3. Select the Summer School Type from the list. This is generally S-Summer, but N-Night and R-Regular are also options.
4. Click the Save button at the top of the screen to save the changes.

Chapter Three Attendance Administrator Guide
Copyright© 2013 Edupoint Educational Systems, LLC 45
SCHOOL TRACKS If students at the same school have different school calendars, this is referred to as a multi-track school. Each track represents a different school calendar. This is commonly used to juggle limited space in school facilities. To set up tracks at the district level:
1. Go to Synergy SIS > System > Setup > District Tracks.
District Tracks Screen
2. Click the Add button.
District Tracks Screen, Adding
3. Enter the Order number by which to sort the tracks, and enter a Name for the track.
4. If the ID that should be reported to the state is different from the order number of the track, enter the state ID in the Alt State ID column.
5. Click the Save button at the top of the screen.
Once the tracks have been added at the district level, each school that uses the tracks needs to be set up to use the tracks. To set up the schools:
1. Go to Synergy SIS > System > Setup > School Setup.
School Setup Screen
2. Check the boxes in front of each track to be used at the school.
3. Click the Save button at the top of the screen to save the changes.

Attendance Administrator Guide Chapter Three
46 Copyright© 2013 Edupoint Educational Systems, LLC
If tracks are in use at a school, several options may be customized for each track as outlined below. For Arizona, the school calendar must match the calendar submitted to ADE for the track exactly.
1. School Calendar – each track can be set up with different dates for the school calendar. These dates may be set up through Synergy SIS > Attendance > Setup > School Calendar. To customize a track’s calendar, select the track from the list, edit the calendar, and then save the changes. The only type of day that may be different between tracks is the VAC type. All other days off change all calendars, not just the track selected.
School Calendar Screen, Tracks
2. School Reporting Periods – the school reporting periods for each track can also have different dates. These dates are set up on the School Report Periods tab of Synergy SIS > Attendance > Setup > School Calendar. To modify the dates for each track, select the track from the list, edit the dates, and then save the changes.
School Reporting Periods for Tracks
3. Grade Level Calendar – if there are different days off setup for different grades, these dates may also be customized by track. The grade-level holidays are set up on the Advanced Options tab of Synergy SIS > Attendance > Setup > School Calendar. To modify the holidays for each track, select the track from the list, edit the dates, and then save the changes.
Grade Level Calendar Override for Tracks

Chapter Three Attendance Administrator Guide
Copyright© 2013 Edupoint Educational Systems, LLC 47
4. Term Definitions – each track may have different dates for each term. These dates may be customized on Synergy SIS > System > Setup > School Setup. Once tracks are selected for the school, a new section appears under Term Definition where the dates can be entered. More information about Term Definitions can also be found in the Synergy SIS – Scheduling Guide.
Term Definitions for Tracks
5. Grade Reporting Periods – each track may use different dates for each grade reporting period. These dates may be customized in Synergy SIS > Grading > Setup > Grading Setup. More information about Grade Reporting Periods can also be found in the Synergy SIS – Grading Administrator Guide.
Grade Reporting Periods for Tracks
6. Sections – each class section must be assigned to a specific track in multi-track schools. Tracks are assigned manually using Synergy SIS > Schedule > Section, or may be assigned through the Mass Scheduling process. For more information about the Mass Scheduling process, see the Synergy SIS – Scheduling Guide.
Assigning Tracks to Sections
7. Student – each student is assigned to a specific track through the enrollment process. Student enrollments are entered through Synergy SIS > Student > Student. For more information about the student enrollment process, see the Synergy SIS - Student Information Administrator Guide and Synergy SIS - Student Information User Guide. Tracks may also be mass assigned using Synergy SIS > Schedule > Mass Assign Track. For more information about mass assigning tracks, see the Synergy SIS – Scheduling Guide.
Assigning Students to Tracks

Attendance Administrator Guide Chapter Three
48 Copyright© 2013 Edupoint Educational Systems, LLC
SUPPLEMENTAL INSTRUCTION ATTENDANCE Supplemental Instruction is a program specific to California schools and districts. The supplemental instructional classes are scheduled outside of the regular school day, and the attendance that is reported to the state is positive (number of minutes attended) instead of negative (number of absences). Synergy SIS can not only capture the attendance for supplemental instruction programs and submit reported attendance to the state, but it also takes into account the cap for such programs. To configure supplemental attendance, the following steps should be completed in the order listed below:
1. Periods - the number of periods for each school offering supplemental attendance may need to be modified. If the supplemental programs are held either before or after the normal school day during the week, each hour of supplemental programs needs to be added as an extra period. Each period can only capture a maximum of one hour of supplemental attendance time. If the supplemental programs are held on the weekend, the number of periods must be greater or equal to the number of hours offered on the weekends.
2. Attendance Type - each school also needs to be set up to use period attendance so that the supplemental attendance minutes can be entered.
3. Bell Schedule - a separate bell schedule should be set up for supplemental programs that are offered on weekends.
4. District Calendar – if the supplemental programs are offered on weekends, the district calendar needs to be modified to show weekends.
5. School Calendar – if the supplemental programs are offered on weekends, the school calendar needs to be modified to show weekends. The supplemental bell schedule also needs to be identified.
6. District Course – each course that is offered as a supplemental program needs to be added to the District Course screen.
7. School Course – each school needs to opt-in to the supplemental program courses to be used at the school.
8. Section – each section that is used for a supplemental program needs to be identified.
9. Supplemental Programs Setup – the caps for the supplemental programs need to be entered so Synergy SIS can track these caps.

Chapter Three Attendance Administrator Guide
Copyright© 2013 Edupoint Educational Systems, LLC 49
Periods and Attendance Type To modify the number of periods and the attendance type:
1. Go to Synergy SIS > System > Setup > School Setup.
School Setup Screen
2. Enter the new number of periods in the End Period box.
3. Select the School Attendance Type for the school from the list. Most elementary schools are set to Both Period and Daily Attendance, and most middle and high schools just use Period Attendance.
4. Select whether the period attendance is recorded By Section or By Bell Period from the School Attendance Taken list.
5. Click the Save button at the top of the screen to save the changes. These steps need to be repeated for each school.
Bell Schedule To modify the current bell schedule to show supplemental instruction time before or after the current school day:
1. Go to Synergy SIS > Attendance > Setup > Bell Schedule Definition.
Bell Schedule Definition Screen
2. Click the right Scroll button to bring up the default bell schedule.

Attendance Administrator Guide Chapter Three
50 Copyright© 2013 Edupoint Educational Systems, LLC
3. Enter the Start Time, Stop Time, and Passing Time for each period added for supplemental instruction.
Bell Schedule Definition Screen
4. Click the Save button at the top of the screen to save the changes.
To add a new bell schedule for supplemental instruction time on the weekends:
1. Go to Synergy SIS > Attendance > Setup > Bell Schedule Definition.
Bell Schedule Definition Screen
2. Click the Add button, and a new Bell Schedule Definition screen opens.
F Adding a New Bell Schedule
3. Enter a Code for the new definition, and type a descriptive name for the schedule in the Bell Schedule Name field.

Chapter Three Attendance Administrator Guide
Copyright© 2013 Edupoint Educational Systems, LLC 51
4. Click the Save button at the top of the screen, and the new schedule appears with blank times for each bell period.
Bell Schedule Definition, Adding Times
5. Enter the Start Time, Stop Time, and Passing Time for every period that is held for supplemental instructional time on the weekends.
6. Click the Save button at the top of the screen to save the changes.

Attendance Administrator Guide Chapter Three
52 Copyright© 2013 Edupoint Educational Systems, LLC
District Calendar Since most supplemental programs are at the school level, the district calendar should only be modified if all schools are offering supplemental instruction on the same weekend days. To modify the district calendar for supplemental instruction time:
1. Go to Synergy SIS > Attendance > Setup > District Calendar.
District Calendar Screen
2. Check the boxes for Sun or Sat to include weekends in the District Calendar.
3. Click the Save button at the top of the screen.

Chapter Three Attendance Administrator Guide
Copyright© 2013 Edupoint Educational Systems, LLC 53
School Calendar To modify the school calendar for supplemental instruction time:
1. Go to Synergy SIS > Attendance > Setup > School Calendar.
School Calendar Screen
2. Check the box labeled Use Supplemental Calendar. This must be selected even if no weekends are used for supplemental instruction.
School Calendar Screen, Supplemental Calendar
3. Once the box is checked, a new box displays titled Supplemental Bell Default and weekends are displayed in the school calendar. The weekends are highlighted in yellow.
4. Select the default bell schedule for the weekends from the Default Supplemental Bell Schedule list and click the Set Bell Default button.

Attendance Administrator Guide Chapter Three
54 Copyright© 2013 Edupoint Educational Systems, LLC
5. To select the days on which the supplemental instruction is offered, click in the Type column of the date, and select Supplemental from the list.
School Calendar Screen, Adding Supplemental Days
6. Once all the supplemental days have been selected in the calendar, click the Save button at the top of the screen. Each of these days is then automatically assigned the Default Supplemental Bell Schedule.
School Calendar Screen, Supplemental Days Added
7. The bell schedule assigned to each supplemental day may also be changed by clicking in the Bell column and selecting a different bell schedule from the list. Remember to click Save after any changes are made.

Chapter Three Attendance Administrator Guide
Copyright© 2013 Edupoint Educational Systems, LLC 55
District Course If the courses to be used for supplemental instruction are not already in the course catalog, they should be added to Synergy SIS > Course > District Course. For instructions on adding courses, see the Synergy SIS – Scheduling Guide.
District Course Screen
School Course If the courses to be used for supplemental instruction are new, the school needs to opt-in to the courses on Synergy SIS > Course > School Course. For instructions on adding courses, see the Synergy SIS – Scheduling Guide.
School Course Screen

Attendance Administrator Guide Chapter Three
56 Copyright© 2013 Edupoint Educational Systems, LLC
Section Once the school has opted-in to the course, sections need to be created for each class of supplemental instruction. For instructions on adding a section, see the Synergy SIS – Scheduling Guide. To configure a section for supplemental instruction:
1. Go to Synergy SIS > Schedule > Section.
Section Screen
2. Be sure the section is set for attendance by selecting either Include in Attendance or Include in Attendance – No Scan Sheet from the Exclude Attendance list.
3. For the Attendance Type, select Positive.
4. Select the type of supplemental funding used for the class from the Supplemental Funding Category list.
5. Click the Save button at the top of the screen to save the changes. Each section used for supplemental instruction must be modified as outlined above.
The Supplemental Funding Category lookup table is a product-owned lookup table and these values cannot be changed.
Supplemental Funding Cat Lookup Table
Chapter Three Attendance Administrator Guide
Copyright© 2013 Edupoint Educational Systems, LLC 57
Supplemental Instruction Setup To set up the caps on supplemental instruction:
1. Go to Synergy SIS > Attendance > Setup > Supplemental Instruction Setup.
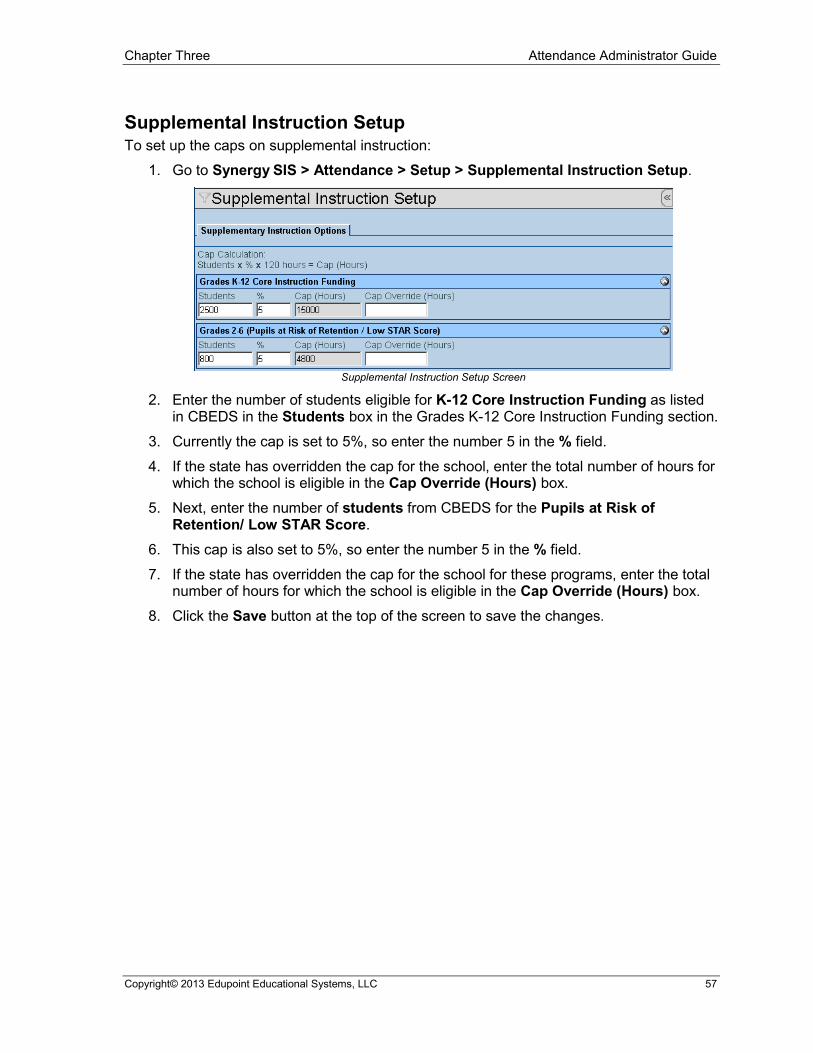
Supplemental Instruction Setup Screen
2. Enter the number of students eligible for K-12 Core Instruction Funding as listed in CBEDS in the Students box in the Grades K-12 Core Instruction Funding section.
3. Currently the cap is set to 5%, so enter the number 5 in the % field.
4. If the state has overridden the cap for the school, enter the total number of hours for which the school is eligible in the Cap Override (Hours) box.
5. Next, enter the number of students from CBEDS for the Pupils at Risk of Retention/ Low STAR Score.
6. This cap is also set to 5%, so enter the number 5 in the % field.
7. If the state has overridden the cap for the school for these programs, enter the total number of hours for which the school is eligible in the Cap Override (Hours) box.
8. Click the Save button at the top of the screen to save the changes.

Attendance Administrator Guide Chapter Four
58 Copyright© 2013 Edupoint Educational Systems, LLC
Chapter Four: OTHER SETUP OPTIONS
This chapter covers: ► School Attendance Options ► Section Attendance Options ► Attendance Scanning ► Attendance Letters

Chapter Four Attendance Administrator Guide
Copyright© 2013 Edupoint Educational Systems, LLC 59
SCHOOL ATTENDANCE OPTIONS Other options that need to be defined for each school are displayed in the School Attendance Options screen. To modify these options:
1. Go to Synergy SIS > Attendance > Setup > School Attendance Options. The screen displayed depends on the School Attendance Type selected on the School Setup screen. For more information about the School Setup screen options for attendance, see the section Class Periods and Attendance Type in Chapter Two.
School Attendance Options Screen, Daily Attendance
2. If the school uses Daily Attendance, select whether attendance is taken once a day or twice a day from the Attendance Type list. If the absence amount should be submitted to the state instead of the number of minutes attended, check the box labeled Use Absence Amount. Enter the starting time for the AM and PM sessions. If the school uses an automated attendance dialer to call parents when a student is absent, select the type of Attendance Dialer (In Touch or PhoneMaster) from the list.
School Attendance Options Screen, Daily Attendance
3. If Twice a Day is selected, enter the starting times for AM and PM Attendance. These times are used to prompt teachers in TeacherVUE when AM or PM attendance is due.
Daily Attendance, Twice a Day Options

Attendance Administrator Guide Chapter Four
60 Copyright© 2013 Edupoint Educational Systems, LLC
4. If the school uses Period Attendance, select how the all-day code is calculated from the All Day Code Calculation list. If Manually is selected, no code is entered in the All Day Code box for attendance unless someone enters it manually. If Calculated is selected, the all-day code is automatically entered if the student is absent for all periods in a day with the same absence reason.
School Attendance Options, Period Attendance
5. The Number of Days in Schedule Cycle is used in the setup of rotating periods. For more information about period rotation, see Chapter Three in this guide. If the school uses an automated attendance dialer to call parents when a student is absent, select the type of Attendance Dialer (In Touch or PhoneMaster) from the list.
6. If the school uses Both Period and Daily Attendance, all of the Daily and Period Attendance options are available. In addition, a list of the grades available at the school is shown. Select the Attendance Type (Period Attendance or Daily Attendance) to be used for each grade.
School Attendance Options Screen, Both Period and Daily Attendance
7. Once all of the settings have been selected, click the Save button at the top of the screen to save the configuration.

Chapter Four Attendance Administrator Guide
Copyright© 2013 Edupoint Educational Systems, LLC 61
SECTION ATTENDANCE OPTIONS If attendance is taken by section, each section must be either included or excluded from attendance. This should be configured when the schedule is created, but it can also be changed later. For more information about creating schedules and sections, see the Synergy SIS – Scheduling Guide. To mark a section for attendance:
1. Go to Synergy SIS > Schedule > Section.
Section Screen
2. Select the attendance type for the section from the Exclude Attendance list. To prohibit the section from taking attendance, select Exclude from Attendance. To take attendance from the section, select Include in Attendance or Include in Attendance – No Scan Sheet. By default, the section is included in attendance.
3. If Include in Attendance – No Scan Sheet is selected, an attendance scan sheet is not created using the Attendance Sheet Creation screen if the school uses scanning sheets for attendance.
4. By default, the Attendance Type is Regular if nothing is selected from the list. Regular attendance means that absences are recorded. If attendance is recorded in minutes for the section instead, as in supplemental instruction or some online school programs, change the Attendance Type to Positive.

Attendance Administrator Guide Chapter Four
62 Copyright© 2013 Edupoint Educational Systems, LLC
5. For daily attendance schools taking attendance twice a day, there is also an additional list titled AM PM for each section. Each section can be set to an AM or PM section, or it can be designated for Both.
Section Screen, Daily Attendance Schools
6. Click the Save button at the top of the screen to save the changes.

Chapter Four Attendance Administrator Guide
Copyright© 2013 Edupoint Educational Systems, LLC 63
ATTENDANCE SCANNING If the school plans to use attendance sheets to record student absences, the attendance sheets can be created and printed through the Attendance Sheet Creation screen. To create and print attendance scanning sheets:
1. Select the form to be used for the attendance sheet on Synergy SIS > Attendance > Setup > School Attendance Code. Select either Attendance 1 Week or Attendance 2 Week in the Attendance Scan Form list, and click the Save button at the top of the screen. The 1 Week form prints spaces for 1 weeks’ worth of attendance, where the 2 week form has spaces for 2 weeks of attendance.
School Attendance Code Screen, Attendance Scan Form
2. Go to Synergy SIS > Attendance > Scanning > Attendance Sheet Creation.
Attendance Sheet Creation Screen
3. Click the Create option at the top to create the sheets, or click the Print option to print the sheets. Usually the Print option should be used, as Create does not allow the sheets to be printed.
4. To print only one sheet for each teacher’s section for each period, check the Combine sections based on staff and period box. To print a sheet for each period of a section, check the box labeled Multiple sheets for sections that meet more than one period.
5. If the Print option is selected, various printing options are also displayed. To print the cumulative absences for each student in each section check the Print Cumulative Absences box. To mark the days the section does not meet so that attendance cannot be taken for those days, check the box Mark Non Attendance Days. To print the student’s Perm ID, Gender, and Grade next to the student’s

Attendance Administrator Guide Chapter Four
64 Copyright© 2013 Edupoint Educational Systems, LLC
name, check the Show Extended Information box. To also list the teacher aides for the section on the scan sheet, check the box labeled Identify Teacher Aides. To print the full name of the teacher instead of the abbreviated name (as entered in the Staff screen), check the Print Teacher Full Name box. Select the Heading to use for each day’s column from the list. The options are Blank, Date, or Meeting Day Code. The Meeting Day Code is the code setup for rotating periods.
Attendance Sheet Creation Screen, Printing Options
6. If printing, the sheets can also be filtered by the teacher name. To set a filter, expand the Filter Options section by clicking the arrow. Select the teacher’s name by clicking on the gray arrow next to the Staff Name field. To enter multiple teachers, enter their ID numbers separated by commas in the Comma-Delimited Sheet ID List field.
Attendance Sheet Creation Screen, Filter Options
7. Enter the beginning date of the sheet in the Start Date box. The dates should be entered in the format MM/DD/YY or may be selected by clicking the Calendar button.
Caution: When selecting the date, be sure that no sheets have already been printed for this date range. If sheets have been printed during this date range, the existing sheets will become invalid and cannot be scanned into Synergy SIS.
8. Next, click the Cumulative Absences tab. On the 2 week form there is a column that displays the total number of absences for each student for the section. Select

Chapter Four Attendance Administrator Guide
Copyright© 2013 Edupoint Educational Systems, LLC 65
the Time Frame to be used in summarizing these absences. The options are Current Date Range (to use the dates selected for the current sheet), Term to Date or Year to Date. Also select the absence types to count in the total by either selecting the Reason Types from the list or checking off the absence reasons. To check all reasons or uncheck all reasons, use the buttons. Clicking in the empty box clears all checkboxes, where clicking in the box with the checkmark checks all reasons.
Attendance Sheet Creation Screen, Cumulative Absences Tab
9. If the sheets will be printed, click the Printing Options tab. To adjust the printing to ensure the information lines up correctly with the pre-printed attendance sheets, enter the Printer Offset values for the horizontal and vertical adjustments. To adjust the sheet right, enter a positive number in the Horizontal box. To move it left, make the number a negative. To adjust it up, enter a negative number in the Vertical box and enter a positive number to shift the sheet downward. To print only the first page so that the printing may be tested while adjustments are made, check the Print First Page Only box.
Attendance Sheet Creation Screen, Printing Options tab
10. To create or print the sheets, click the Execute button.

Attendance Administrator Guide Chapter Four
66 Copyright© 2013 Edupoint Educational Systems, LLC
11. If the sheets are printed, a Message box opens showing the total students included on the sheets. A separate window opens with the sheets themselves in a PDF file. Click OK to close the Message box.
Message Box
12. When printing the PDF File that is generated, be sure to change the Page Handling settings before printing. Change the Page Scaling to None, and uncheck the Auto-Rotate and Center box.
PDF Print Options
Note: Once the attendance sheets have been created and filled in, they are scanned back into the system using the RT Scanning software. For information about installation and operation of the RT Scanning software, see the chapter on scanning in the Synergy SIS – System Administrator Guide.

Chapter Four Attendance Administrator Guide
Copyright© 2013 Edupoint Educational Systems, LLC 67
Attendance 1 Week Sheet

Attendance Administrator Guide Chapter Four
68 Copyright© 2013 Edupoint Educational Systems, LLC
Attendance 2 Week Sheet

Chapter Four Attendance Administrator Guide
Copyright© 2013 Edupoint Educational Systems, LLC 69
ATTENDANCE LETTERS Setting up attendance letters consists of two steps. The first step is creating the letter in Microsoft Word, and the second step is adding the letter to Synergy SIS and defining it as an attendance letter. To create the letter, start a new document in any version of Microsoft Word. Write the letter, and then add the fields to be used when merging the letter with the information from the attendance record. The field names need to be entered as Merge Fields, with the name of the field in Synergy SIS as the merge field name. When entered, the merge fields will appear in the following format:
«FieldName» Common field names to use are Address, City, State, Zip, Parent_Name, Student_Name, ABS (total number of absence days based on the All Day Code), PER1 (1st Period number), and ABS1 (total absences for 1st period).
Attendance Letter

Attendance Administrator Guide Chapter Four
70 Copyright© 2013 Edupoint Educational Systems, LLC
The complete list of fields that can be used in Attendance Letters is:
Field Name Description and Synergy SIS Location SCHOOL_NAME Organization Name – Organization Screen PRINCIPAL Principal Name – Organization Screen SCHOOL_ADDRESS Organization Street Address – Organization Screen SCHOOL_CITYSTZC Organization City, State, & Zip Code – Organization Screen SCHOOL_PHONE Organization Phone Number – Organization Screen PARENT_NAME Parent First & Last Name – Parent Screen ADDR Home Address – Student Screen or Parent Screen CITY Home City – Student Screen or Parent Screen STATE Home State – Student Screen or Parent Screen ZIP Home Zip Code – Student Screen or Parent Screen STUDENT_NAME Student First & Last Name – Student Screen SIS_NUMBER Perm Num – Student Screen LAST_NAME Student Last Name – Student Screen FIRST_NAME Student First Name – Student Screen PRONOUN He or She, depending on Student Gender BEGIN_DATE Begin Date – Attendance Letter Screen END_DATE End Date – Attendance Letter Screen PER1 Number for Period 1 (Period Attendance schools) PER2 Number for Period 1 (Period Attendance schools) PER3 Number for Period 1 (Period Attendance schools) PER4 Number for Period 1 (Period Attendance schools)) PER5 Number for Period 1 (Period Attendance schools) PER6 Number for Period 1 (Period Attendance schools) PER7 Number for Period 1 (Period Attendance schools) PER8 Number for Period 1 (Period Attendance schools)) ABS Total absences by day using the All Day Code ABS1 Total absences for Period 1 (Period Attendance schools) ABS2 Total absences for Period 2 (Period Attendance schools) ABS3 Total absences for Period 3 (Period Attendance schools) ABS4 Total absences for Period 4 (Period Attendance schools) ABS5 Total absences for Period 5 (Period Attendance schools) ABS6 Total absences for Period 6 (Period Attendance schools) ABS7 Total absences for Period 7 (Period Attendance schools) ABS8 Total absences for Period 8 (Period Attendance schools) GRD Grade Level – Student Screen HomeLanguage-Code Home Language – Student Screen
In this instance, period 1 is the first period at the school not period #1. For example, if the school’s period numbers start with 0, period 1 will be 0. For more information about merge letters, see the Synergy SIS - System Administration Guide.

Chapter Four Attendance Administrator Guide
Copyright© 2013 Edupoint Educational Systems, LLC 71
To add the letter to Synergy SIS and define it as an attendance letter:
1. Go to Synergy SIS > System > Setup > Mail Merge Definition.
The Mail Merge Definition Screen
2. Click the Add button at the top of the screen.
3. Enter a Name for the attendance letter, generally the filter used for the letter such as Absence Letter 3 for 3 or more absences.
Adding a Mail Merge Definition
4. In the Type list, click General. 5. Choose the Default Language to be used for the form. It can be set to any
language defined within Synergy SIS.
6. To set this letter as an attendance letter, the letter must be defined as the report name. To select the report name, click the gray arrow next to Report Name.
Find Foreign Key screen
Note: The Mail Merge Definition screen defines the attendance letters at the school level. To set a district level attendance letter, use the Mail Merge District Definition screen.

Attendance Administrator Guide Chapter Four
72 Copyright© 2013 Edupoint Educational Systems, LLC
7. The Find: ReportDef screen appears. To find the attendance letter, enter “EXT” in the Number field and click the Find button. A list of reports appears.
Searching for a Report
8. Select the Letter Extract (EXT801) by clicking on it in the list, and click the Select button at the top of the screen. The name of the report now appears in the Report Name field.
Completed Mail Merge Definition
9. In the Mail Merge Version list, click 1.0.
10. Click the Save button at the top of the screen.
Once the definition has been created, the letter created in the first step needs to be attached to the definition. To attach the letter:
1. Click the Add button in the Mail Merge Documents section
Mail Merge Definition screen

Chapter Four Attendance Administrator Guide
Copyright© 2013 Edupoint Educational Systems, LLC 73
2. Select the document created by click the Browse button and clicking on it.
Uploading a Document
3. Once the document name appears in the box, click the Upload button.
Uploaded Document, Mail Merge Definition screen
4. A new line is added to the Mail Merge Documents grid, with an icon for the attached document and the date and user name of the staff who added the document.
5. Select the language of the document from the Language list.
6. To track which version of the letter is currently in use, enter the Revision name or number.
7. Click the Save button at the top of the screen.
Multiple documents can be attached to one definition, each in a different language. View the existing attached document, click the Word icon in the Document column. To delete a document, click the box in the X column and click the Save button. To delete the entire definition:
1. Delete all attached documents.
2. Click the Delete button at the top of the screen.

Attendance Administrator Guide Chapter Five
74 Copyright© 2013 Edupoint Educational Systems, LLC
Chapter Five: ATTENDANCE CODES
This chapter covers: ► District Attendance Codes ► School Attendance Codes

Chapter Five Attendance Administrator Guide
Copyright© 2013 Edupoint Educational Systems, LLC 75
DISTRICT ATTENDANCE CODES The final step in the configuration of attendance is to define the attendance codes used at the district and at the schools. These codes define what absences are reported to the state, and what category is used for reporting. To set up the district attendance codes:
1. Go to Synergy SIS > Attendance > Setup > District Attendance Code.
District Attendance Code Screen
2. To add a code, click the Add button in the Attendance Reasons section. A new line is added for the new attendance code.
District Attendance Code Screen, Adding
3. Enter the following information for each code:
• Code – enter a code to be used as an abbreviation for the absence reason. It should be descriptive of the reasons, such as UNV for Unverified.
• Title – enter the full description of the reason for the absence.
• Type – select the type of absence. The options are Unverified, Excused, Unexcused, Excused Tardy, Unexcused Tardy, School Activity, Non-Enrollment, or Positive. Positive means the student was NOT absent, and Non-Enrollment indicates the student was not enrolled at the school or in the period for which attendance is being taken. Unverified means the reason for the absence has not been verified with the parents. Excused absences and tardies generally indicate an event that was arranged in advance with the school or some unavoidable event took place such as an illness. Unexcused absences or tardies are generally events that occur with no warning such as the student skipping a class or showing up late for no reason. A School Activity is an authorized activity such as detention or a visit to the nurse. Unless an absence is pre-arranged, generally all absences are marked as unverified until the parents can be contacted to ascertain the reason for the absence. Once the parents have been contacted, the true reason can be entered.
• Apportionment Type Override – If an attendance reason needs to be classified as a type of reason that is contrary to how the reason needs to be uploaded to the state for reporting purposes, this can be overridden by the setting in the Apportionment Type Override. If the attendance reason should

Attendance Administrator Guide Chapter Five
76 Copyright© 2013 Edupoint Educational Systems, LLC
count as a positive type of attendance, select Towards Apportionment. If the attendance reason is a type of absence for state reporting, select Against Apportionment. For example, if a reason needs to be classified as an Excused absence for a report but the state does not consider this an absence, select a type of Excused, but set the Apportionment Type Override to Towards Apportionment.
• Report to State – check this box if this absence should be reported to the state
• Default Dialer – check this box if absences of this type should be sent to the automatic dialer for parent notification
• Default Letter – check this box if absences of this type should generate a letter to be sent home to the parents
• Default Report – check this box if absences of this type should be listed in attendance reports.
• Default TeacherVUE – check this box if this code can be used as an absence reason in the TEACHERVUE software.
• Mandatory – if this code should be used at all schools in the district, check this box.
• SIS Code – if converting data from another student information system, enter the code used in the old system for this absence reason.
4. Click the Save button at the top of the screen to save the code.
5. At the top of the District Attendance Code screen, select the Default Absence Type and the Default Tardy Type. These absence reasons are used unless another reason is selected. Only codes that have been marked as mandatory can be set as the default types.
District Attendance Code Screen, Completed
6. Select the default form to be used for attendance sheet scanning from the Attendance Scan Form list. For more information about attendance scanning, see the section on Attendance Scanning in Chapter Four of this guide.
7. Click the Save button at the top of the screen to save the selections.
To delete an attendance code, click the box in the X column in front of the code and click the Save button at the top of the screen. A code may not be deleted if it is in use at a school or has been used in any attendance records.

Chapter Five Attendance Administrator Guide
Copyright© 2013 Edupoint Educational Systems, LLC 77
SCHOOL ATTENDANCE CODES For the codes that have not been made mandatory at the district level, each school may select which attendance codes may be used at the school. All codes must be entered at the district-level, but schools may select which of these codes can be used. To select the school attendance codes:
1. Go to Synergy SIS > Attendance > Setup > School Attendance Code.
School Attendance Code Screen
2. Mandatory codes are highlighted in yellow and cannot be changed. To select which codes can be used at the school, check the box Used in School in front of each code.
School Attendance Code Screen, Selecting Codes
3. For each code in use at the school, select the following:
• Include Dialer – check this box if absences of this type should be sent to the automatic dialer for parent notification
• Include Letters – check this box if absences of this type should generate a letter to be sent home to the parents
• Include Reports – check this box if absences of this type should be listed in attendance reports.

Attendance Administrator Guide Chapter Five
78 Copyright© 2013 Edupoint Educational Systems, LLC
• Allowed in TeacherVUE – check this box if this code can be used as an absence reason in the TEACHERVUE software.
4. At the top of the School Attendance Code screen, select the Default Absence Type and the Default Tardy Type. These absence reasons are used unless another reason is selected. Only codes that have been marked as mandatory can be set as the default types.
School Attendance Code Screen, Attendance Scanning Options
5. Select the default form to be used for attendance sheet scanning from the Attendance Scan Form list. For more information about attendance scanning, see the section on Attendance Scanning in Chapter Four of this guide.
6. Click the Save button at the top of the screen to save the selections.

Chapter Five Attendance Administrator Guide
Copyright© 2013 Edupoint Educational Systems, LLC 79
Chapter Six: SECURITY
This chapter covers: ► Where security for attendance-related screens is defined

Attendance Administrator Guide Chapter Five
80 Copyright© 2013 Edupoint Educational Systems, LLC
Security for each of the screens discussed throughout this manual is defined in Synergy SIS > System > Security > PAD Security and Synergy SIS > System > Security > Security Definition. How each of these screens work and how security is defined is covered in detail in the Synergy SIS–- Security Administrator Guide. This chapter outlines where the security for each part of each attendance-related screen may be defined in the Security Definition screen.
ATTENDANCE LETTER SECURITY Synergy SIS > Attendance > Attendance Letter has two tabs that may be secured. Part of the Attendance Letters tab can be secured using this security node:
K12.AttendanceInfo.Setup.SchoolAttLetterOpt This option controls all lists on the tab. It does not affect the check boxes or the Cutoff Values grid.
Attendance Letter Screen
The Cutoff Values section is controlled by the node:
K12.AttendanceInfo.Setup.SchoolAttLetterOptThresh The second tab of the Attendance Letter screen, Additional Options, is not controlled by any security node. The following security nodes do not provide a visible change in security on the screens:
• K12.AttendanceInfo.Setup.SchoolAttendLetterUI
• K12.AttendanceInfo.Setup.StuAttLetterHist
• K12.AttendanceInfo.Setup.StudentAttendLetters
• K12.AttendanceInfo.Setup.AttendExtractFields
• K12.AttendanceInfo.Setup.CreateExtract
• K12.AttendanceInfo.Setup.SchoolAttLetterOptExtOpt

Chapter Five Attendance Administrator Guide
Copyright© 2013 Edupoint Educational Systems, LLC 81
ATTENDANCE VERIFICATION SECURITY Synergy SIS > Attendance > Attendance Verification can be secured using:
K12.AttendanceInfo.AttendanceVerificationListGrid
Attendance Verification Screen
The following security nodes do not provide a visible change in security on the screens:
• K12.AttendanceInfo.AttendanceHelper
• K12.AttendanceInfo.AttendanceVerificationListUI
• K12.AttendanceInfo.AttendanceVerificationList
CLASS DAILY ATTENDANCE SECURITY Synergy SIS > Attendance > Class Daily Attendance is not controlled by any security node.
Class Daily Attendance Screen
The following security node does not provide a visible change in security on the screens:
• K12.AttendanceInfo.ClassDailyAttendanceUI

Attendance Administrator Guide Chapter Five
82 Copyright© 2013 Edupoint Educational Systems, LLC
CLASS PERIOD ATTENDANCE SECURITY Synergy SIS > Attendance > Class Period Attendance can be secured using this security node:
K12.AttendanceInfo.ClassPeriodAttendanceGrid
Class Period Attendance Screen
The following security node does not provide a visible change in security on the screens:
• K12.AttendanceInfo.ClassPeriodAttendanceUI
COURSE ATTENDANCE SECURITY Synergy SIS > Attendance > Course Attendance is controlled by the security node:
K12.AttendanceInfo.CrsAttSectionGrid
Course Attendance Screen

Chapter Five Attendance Administrator Guide
Copyright© 2013 Edupoint Educational Systems, LLC 83
The detail screen of Course Attendance is controlled by the security node:
K12.AttendanceInfo.CrsAttendanceGrid
Course Attendance Screen, Detailed
The following security nodes do not provide a visible change in security on the screens:
• K12.AttendanceInfo.CourseStudentAttendanceUI
• K12.AttendanceInfo.CrsAttCrsDetailUI
• K12.AttendanceInfo.CourseAttendanceUI
• K12.AttendanceInfo.CrsAttCourseGrid
• K12.AttendanceInfo.CrsAttCrsDetailGrid
• K12.AttendanceInfo.CrsAttDetailView
• K12.AttendanceInfo.CrsAttendanceReasonTot
• K12.AttendanceInfo.CrsAttendanceTypeTot

Attendance Administrator Guide Chapter Five
84 Copyright© 2013 Edupoint Educational Systems, LLC
DAILY ATTENDANCE SECURITY Synergy SIS > Attendance > Daily Attendance does not have a security node for the Calendar tab, the Days of Activity tab, the Totals tab, or the Daily Entry tab.
Daily Attendance Screen, Calendar Tab
The History tab is controlled by this security node:
K12.AttendanceInfo.DailyAttendanceHistory
Daily Attendance Screen, History Tab

Chapter Five Attendance Administrator Guide
Copyright© 2013 Edupoint Educational Systems, LLC 85
The detail screen of the History tab is controlled by this security node:
K12.AttendanceInfo.DailyAttendanceHistoryDetail
Daily Attendance Screen, History Tab, Detailed Screen
The Attendance Letters tab is controlled by this security node:
K12.AttendanceInfo.AttLetterHistGrid
Daily Attendance Screen, Attendance Letters Tab
The following security nodes do not provide a visible change in security on the screens:
• K12.AttendanceInfo.DailyAttendanceActivityUI
• K12.AttendanceInfo.DailyAttendanceDetailUI
• K12.AttendanceInfo.StudentDailyAttendanceUI
• K12.AttendanceInfo.DailyAttendanceTotals
• K12.AttendanceInfo.StudentDailyAttendance
• K12.AttendanceInfo.StudentDailyAttendanceHold

Attendance Administrator Guide Chapter Five
86 Copyright© 2013 Edupoint Educational Systems, LLC
MASS CHANGE ATTENDANCE SECURITY Synergy SIS > Attendance > Mass Change Attendance has two tabs that may be secured. The Mass Attendance Change tab can be secured using this security node:
K12.AttendanceInfo.MassAttendance
Mass Change Attendance Screen
This security node also controls the Group section of the Student Filter Criteria tab. The rest of the Student Filter Criteria tab is controlled by three separate security nodes, one for each section. The sections and security nodes are:
• Section – K12.AttendanceInfo.MassAttendSectGrid
• Teacher – K12.AttendanceInfo.MassAttendTeacherGrid
• Students – K12.AttendanceInfo.MassAttendStudentGrid
Mass Change Attendance Screen, Student Filter Criteria Tab
The following security nodes do not provide a visible change in security on the screens:
• K12.AttendanceInfo.MassAttendanceUI
• K12.AttendanceInfo.MassAttendGroupGrid

Chapter Five Attendance Administrator Guide
Copyright© 2013 Edupoint Educational Systems, LLC 87
PERIOD ATTENDANCE SECURITY Synergy SIS > Attendance > Period Attendance has several tabs. The Calendar tab is controlled by the following security node:
K12.AttendanceInfo.PeriodAttendanceGrid
Period Attendance Screen, Calendar Tab
If a day of the week is clicked in the Period Attendance Calendar, the Period Attendance Detail screen appears. To control the Period Attendance Notes section, the following security node is used:
K12.AttendanceInfo.PeriodAttendanceDetailNoteGrid
Period Attendance Detail Screen

Attendance Administrator Guide Chapter Five
88 Copyright© 2013 Edupoint Educational Systems, LLC
The Days of Activity tab of the Period Attendance screen is controlled by this security node:
K12.AttendanceInfo.PeriodAttendanceActivityGrid
Period Attendance Screen, Days of Activity Tab
On the History tab of the Period Attendance screen, the filter section is controlled by the following security node:
K12.AttendanceInfo.PeriodAttendanceHistory The Period Attendance History section of the tab is controlled by this security node:
K12.AttendanceInfo.PeriodHistoryGrid
Period Attendance Screen, History Tab

Chapter Five Attendance Administrator Guide
Copyright© 2013 Edupoint Educational Systems, LLC 89
On the Totals tab of the Period Attendance screen, the Period Attendance Reason Totals section is controlled by this security node:
K12.AttendanceInfo.PeriodAttReasonTotals The Period Attendance Type Totals section is controlled by this security node:
K12.AttendanceInfo.PeriodAttTypeTotals
Period Attendance Screen, Totals Tab
The following security nodes do not provide a visible change in security on the screens:
• K12.AttendanceInfo.PeriodAttendanceUI
• K12.AttendanceInfo.StudentAttendanceDetailUI
• K12.AttendanceInfo.PrdAttLetterHistGrid
• K12.AttendanceInfo.StudentAttendancePeriod
• K12.AttendanceInfo.StudentAttendancePeriodHold

Attendance Administrator Guide Chapter Five
90 Copyright© 2013 Edupoint Educational Systems, LLC
ATTENDANCE SHEET CREATION SECURITY Synergy SIS > Attendance > Scanning > Attendance Sheet Creation is not controlled by any security node.
Attendance Sheet Creation Screen
The following security nodes do not provide a visible change in security on the screens:
• K12.AttendanceInfo.Scanning.AttendanceSheetCreationUI
• K12.AttendanceInfo.Scanning.AttendanceScanningUI
• K12.AttendanceInfo.Scanning.AttendanceScanning
• K12.AttendanceInfo.Scanning.AttendanceScanningHold
• K12.AttendanceInfo.Scanning.AttendanceSheetCreation

Chapter Five Attendance Administrator Guide
Copyright© 2013 Edupoint Educational Systems, LLC 91
BELL SCHEDULE DEFINITION SECURITY Synergy SIS > Attendance > Setup > Bell Schedule Definition (which is also Synergy SIS > Schedule > Setup > Bell Schedule Definition) is controlled by these security nodes:
• K12.ScheduleInfo.SchoolYearBellSched controls adding and deleting definitions, and the Code and Bell Schedule Name fields.
• K12.ScheduleInfo.BellScheduleGrid controls the Bell Schedule Definition grid
Bell Schedule Definition Screen
The following security nodes do not provide a visible change in security on the screens:
• K12.ScheduleInfo.BellScheduleUI
• K12.ScheduleInfo.SchoolYearBellSchedPer
• K12.AttendanceInfo.Setup.SchoolYearBellSchedule
• K12.AttendanceInfo.Setup.SchoolYearBellSchedulePer

Attendance Administrator Guide Chapter Five
92 Copyright© 2013 Edupoint Educational Systems, LLC
DISTRICT ATTENDANCE CODE SECURITY On Synergy SIS > Attendance >Setup > District Attendance Code, the Attendance Scanning Options section is controlled by this security node:
K12.AttendanceInfo.Setup.AttendanceReasons Note: This security node also controls the entire School Attendance Code screen.
District Attendance Code Screen
The Attendance Reasons section is controlled by this security node:
K12.AttendanceInfo.Setup.DistrictAttendanceReasons

Chapter Five Attendance Administrator Guide
Copyright© 2013 Edupoint Educational Systems, LLC 93
DISTRICT CALENDAR SECURITY On the District Calendar screen, the entire calendar is controlled by this security node:
K12.AttendanceInfo.Setup.YearDistrictCalendar The security node K12.AttendanceInfo.Setup.YearCreateCalendar controls the creation of a calendar. The security node K12.AttendanceInfo.Setup.AttendanceCalendarOpt controls the selection of the days of the week.
District Calendar Screen
When a change is made to the district calendar after a school calendar has been created, the Attendance Calendar Update screen opens to prompt whether the district calendar changes should be propagated to the school calendars. This screen is controlled by the node:
K12.AttendanceInfo.Setup.AttendanceCalendarUpdateGrid
Attendance Calendar Update Screen

Attendance Administrator Guide Chapter Five
94 Copyright© 2013 Edupoint Educational Systems, LLC
The Report Periods tab of the District Calendar screen is controlled by the following security node:
K12.AttendanceInfo.Setup.DistrictReportingPeriod
District Calendar Screen, Report Periods Tab
The Advanced Options tab of the District Calendar screen is controlled by the following security node:
K12.AttendanceInfo.Setup.AttendanceCalendarWeek
District Calendar Screen, Advanced Options Tab
The following security nodes do not provide a visible change in security on the screens:
• K12.AttendanceInfo.Setup.AttendanceCalendarUpdate
• K12.AttendanceInfo.Setup.AttendanceCalendar

Chapter Five Attendance Administrator Guide
Copyright© 2013 Edupoint Educational Systems, LLC 95
PERIOD ROTATION DEFINITION SECURITY The Rotation Days tab of Synergy SIS > Attendance > Setup > Period Rotation Definition (which is also Synergy SIS > Schedule > Setup > Period Rotation Definition) is controlled by the security node:
K12.ScheduleInfo.RotationDefinitionGrid
Period Rotation Definition Screen, Rotation Days Tab
The Rotation Periods tab is controlled by the security node:
K12.ScheduleInfo.RotationPeriodDefinitionGrid
Period Rotation Definition Screen, Rotation Periods Tab
The following security nodes do not provide a visible change in security on the screens:
• K12.ScheduleInfo.RotationDefinitionUI
• K12.AttendanceInfo.Setup.SchoolYearRotationCycle
• K12.AttendanceInfo.Setup.SchoolYearRotationCyclePer
• K12.ScheduleInfo.SchoolYearRotCycle
• K12.ScheduleInfo.SchoolYearRotCyclePer

Attendance Administrator Guide Chapter Five
96 Copyright© 2013 Edupoint Educational Systems, LLC
SCHOOL ATTENDANCE CODE SECURITY The entire School Attendance Code screen is controlled by this security node:
K12.AttendanceInfo.Setup.AttendanceReasons Note: This security node also controls the Attendance Scanning Options section of the District Attendance Code screen.
School Attendance Code Screen
The following security node does not provide a visible change in security on the screens:
• K12.AttendanceInfo.Setup.SchoolAttendanceReasons
SCHOOL ATTENDANCE OPTIONS SECURITY On the School Attendance Options screen, the only section that is associated with a security node is the Grade Attendance Type Definition grid. This grid is controlled by this security node:
K12.AttendanceInfo.Setup.AttendOptionsGrid
School Attendance Options Screen
The following security node does not provide a visible change in security on the screens:
• K12.AttendanceInfo.Setup.AttendOptionsUI

Chapter Five Attendance Administrator Guide
Copyright© 2013 Edupoint Educational Systems, LLC 97
SCHOOL CALENDAR SECURITY For the School Calendar screen, no one security node controls the entire screen. The node K12.AttendanceInfo.Setup.YearCreateRotationCalendar controls the Customize the Rotation default by date and type button.
School Calendar Screen
When the Create Calendar button is clicked, the Create School Calendar screen appears. This screen is controlled by this security node:
K12.AttendanceInfo.Setup.YearCreateSchoolCalendar
Create School Calendar Screen
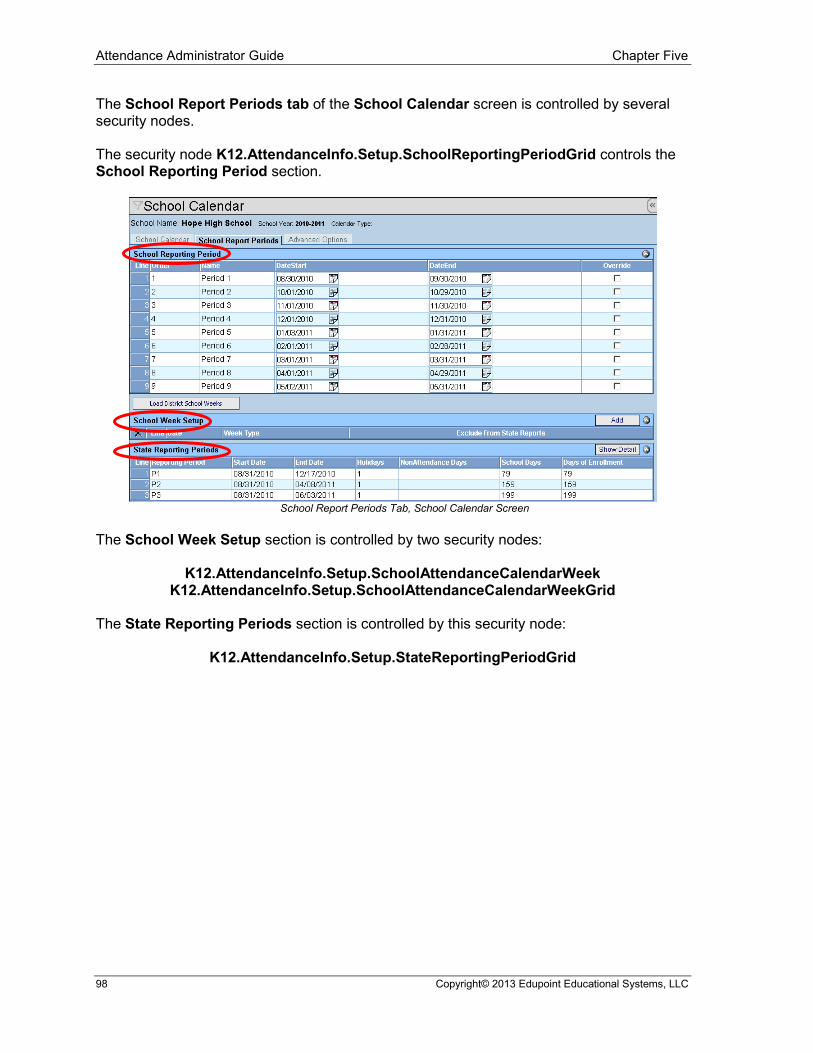
Attendance Administrator Guide Chapter Five
98 Copyright© 2013 Edupoint Educational Systems, LLC
The School Report Periods tab of the School Calendar screen is controlled by several security nodes. The security node K12.AttendanceInfo.Setup.SchoolReportingPeriodGrid controls the School Reporting Period section.
School Report Periods Tab, School Calendar Screen
The School Week Setup section is controlled by two security nodes:
K12.AttendanceInfo.Setup.SchoolAttendanceCalendarWeek K12.AttendanceInfo.Setup.SchoolAttendanceCalendarWeekGrid
The State Reporting Periods section is controlled by this security node:
K12.AttendanceInfo.Setup.StateReportingPeriodGrid

Chapter Five Attendance Administrator Guide
Copyright© 2013 Edupoint Educational Systems, LLC 99
The detail screen of the State Reporting Periods section is controlled by this security node:
K12.AttendanceInfo.Setup.StateReportingPeriodDetailGrid
State Reporting Periods Section, Detailed Screen
The Advanced Options tab of the School Calendar screen is controlled by these security nodes:
K12.AttendanceInfo.Setup.AttendanceCalendarGradeOverrideGrid K12.AttendanceInfo.Setup.AttendanceCalendarGradeOverride
School Calendar Screen, Advanced Options Tab
The following security nodes do not provide a visible change in security on the screens:
• K12.AttendanceInfo.Setup.YearSchoolCalendarUI
• K12.AttendanceInfo.Setup.SchoolAttendanceCalendar
• K12.AttendanceInfo.Setup.SchoolAttendanceCalendarOpt
• K12.AttendanceInfo.Setup.SchoolReportingPeriod
• K12.AttendanceInfo.Setup.SchoolReportingPeriodTrack
• K12.AttendanceInfo.Setup.SchoolAttendanceCalendarTrack
• K12.AttendanceInfo.SchoolYearSectionAbsenceTrack

Attendance Administrator Guide Chapter Five
100 Copyright© 2013 Edupoint Educational Systems, LLC
SCHOOL ENROLLMENT HISTORY SECURITY The School Enrollment History screen is controlled by this security node:
K12.AttendanceInfo.SchoolAttendanceHistoryGrid
School Enrollment History Screen
The detail screen of the School Enrollment History screen is controlled by this security node:
K12.AttendanceInfo.SchoolAttendanceHistoryGradeGrid
School Enrollment History Screen, Detailed Screen
The following security nodes do not provide a visible change in security on the screens:
• K12.AttendanceInfo.SchoolAttendanceHistoryUI
• K12.AttendanceInfo.SchoolAttendanceHistory
• K12.AttendanceInfo.SchoolAttendanceHistoryGrade

Chapter Five Attendance Administrator Guide
Copyright© 2013 Edupoint Educational Systems, LLC 101
SUPPLEMENTAL INSTRUCTION SETUP SECURITY The entire Supplemental Instruction Setup screen is controlled by this security node:
K12.AttendanceInfo.Setup.SupplementalInstructionOptions
Supplemental Instruction Setup Screen
The following security node does not provide a visible change in security on the screens:
• K12.AttendanceInfo.Setup.SupplementalInstructionOptionsUI
ATTENDANCE REPORTS SECURITY While report options are available under the Security Definition screen, it is recommended to use only PAD tree security to control access to reports.