Geospatial Portal Administrator Guide
271
Geospatial Portal Administrator Guide September 2021
-
Upload
khangminh22 -
Category
Documents
-
view
1 -
download
0
Transcript of Geospatial Portal Administrator Guide

Geospatial Portal
Administrator Guide
September 2021

Geospatial Portal
2
Product Documentation Copyright and Terms of Use
Copyright
© 2010-2021 Hexagon AB and/or its subsidiaries and affiliates. All rights reserved. Hexagon has registered trademarks in many countries throughout the world. Visit the Trademarks Page http://www.hexagongeospatial.com/legal/trademarks for information about the countries in which the trademarks are registered. See Product Page and Acknowledgments for more information.
Product Documentation Terms of Use
PLEASE READ THESE TERMS CAREFULLY BEFORE USING HEXAGON GEOSPATIAL’S DOCUMENTATION ("DOCUMENT"). USE OF THIS DOCUMENT INDICATES ACCEPTANCE OF THIS AGREEMENT WITHOUT MODIFICATION. IF YOU DO NOT AGREE TO THE TERMS HEREOF ("TERMS"), DO NOT USE THIS DOCUMENT.
Use Of This Document
All materials in this Document are copyrighted and any unauthorized use may violate worldwide copyright, trademark, and other laws. Subject to the terms of this Agreement, Hexagon Geospatial (a Division of Intergraph Corporation) and Intergraph’s subsidiaries ("Intergraph") hereby authorize you to reproduce this Document solely for your personal, non-commercial use. In consideration of this authorization, you agree to retain all copyright and other proprietary notices contained therein. You may not modify the Materials in any way or reproduce or publicly display, perform, or distribute or otherwise use them for any public or commercial purpose, except as specifically authorized in a separate agreement with Hexagon Geospatial.
The foregoing authorization specifically excludes content or material bearing a copyright notice or attribution of rights of a third party. Except as expressly provided above, nothing contained herein shall be construed as conferring by implication, estoppel or otherwise any license or right under any copyright, patent or trademark of Hexagon Geospatial or Intergraph or any third party.
If you breach any of these Terms, your authorization to use this Document automatically terminates. Upon termination, you will immediately destroy any downloaded or printed Materials in your possession or control.
Geospatial Portal
3
Disclaimers
ALL MATERIALS SUPPLIED HEREUNDER ARE PROVIDED "AS IS", WITHOUT WARRANTY OF ANY KIND, EITHER EXPRESSED OR IMPLIED, INCLUDING, BUT NOT LIMITED TO, ANY IMPLIED WARRANTIES OF MERCHANTABILITY, FITNESS FOR A PARTICULAR PURPOSE, OR NON-INFRINGEMENT. Hexagon Geospatial does not warrant that the content of this Document will be error-free, that defects will be corrected, or that any Hexagon Geospatial Website or the services that make Materials available are free of viruses or other harmful components.
Hexagon Geospatial does not warrant the accuracy and completeness of this Document. Hexagon Geospatial may make changes to this Document at any time without notice.
Limitation Of Liability
IN NO EVENT SHALL HEXAGON GEOSPATIAL BE LIABLE FOR ANY DIRECT, INDIRECT, INCIDENTAL, SPECIAL OR CONSEQUENTIAL DAMAGES, OR DAMAGES FOR LOSS OF PROFITS, REVENUE, DATA OR USE, INCURRED BY YOU OR ANY THIRD PARTY, WHETHER IN AN ACTION IN CONTRACT OR TORT, ARISING FROM YOUR ACCESS TO, OR USE OF, THIS DOCUMENT.
Indemnification
You agree to defend, indemnify, and hold harmless Hexagon Geospatial, its officers, directors, employees, and agents from and against any and all claims, liabilities, damages, losses or expense, including reasonable attorneys' fees and costs, arising out of or in any way connected with your access to or use of this Document.
Use Of Software
Use of software described in this Document is subject to the terms of the end user license agreement that accompanies the software, if any. You may not download or install any software that is accompanied by or includes an end user license agreement unless you have read and accepted the terms of such license agreement. Any such software is the copyrighted work of Hexagon Geospatial, Intergraph or its licensors. Portions of the user interface copyright 2012-2010-2021 Telerik AD.
Links To Third Party Websites
This Document may provide links to third party websites for your convenience and information. Third party websites will be governed by their own terms and conditions. Hexagon Geospatial does not endorse companies or products to which it links.

Geospatial Portal
4
Third party websites are owned and operated by independent parties over which Hexagon Geospatial has no control. Hexagon Geospatial shall not have any liability resulting from your use of the third party website. Any link you make to or from the third party website will be at your own risk and any information you share with the third party website will be subject to the terms of the third party website, including those relating to confidentiality, data privacy, and security.
Trademarks
The trademarks, logos and service marks ("Marks") displayed in this Document are the property of Hexagon Geospatial, Intergraph or other third parties. Users are not permitted to use Marks without the prior written consent of Hexagon Geospatial, Intergraph or the third party that owns the Mark. "Intergraph" is a registered trademark of Intergraph Corporation in the United States and in other countries. Other brands and product names are trademarks of their respective owners.
Find additional trademark information http://www.hexagongeospatial.com/legal/trademarks.
Procedure For Making Claims Of Copyright Infringement
Notifications of claimed copyright infringement should be sent to Hexagon Geospatial by mail at the following address: Intergraph Corporation, Attn: Intergraph Legal Department, P.O. Box 240000, Huntsville, Alabama 35824.
US Government Restricted Right
Materials are provided with "RESTRICTED RIGHTS." Use, duplication, or disclosure of Materials by the U.S. Government is subject to restrictions as set forth in FAR 52.227-14 and DFARS 252.227-7013 et seq. or successor provisions thereto. Use of Materials by the Government constitutes acknowledgment of Hexagon Geospatial or Intergraph’s proprietary rights therein.
International Use
You may not use or export Materials in violation of U.S. export laws and regulations. Hexagon Geospatial makes no representation that Materials are appropriate or available for use in every country, and access to them from territories where their content is illegal is prohibited.
Hexagon Geospatial provides access to Hexagon Geospatial international data and, therefore, may contain references or cross references to Hexagon Geospatial products, programs and services that are not announced in your country. These references do not
Geospatial Portal
5
imply that Hexagon Geospatial intends to announce such products, programs or services in your country.
The Materials are subject to U.S. export control and economic sanctions laws and regulations and you agree to comply strictly with all such laws and regulations. In addition, you represent and warrant that you are not a national of, or otherwise located within, a country subject to U.S. economic sanctions (including without limitation Iran, Syria, Sudan, Cuba, and North Korea) and that you are not otherwise prohibited from receiving or accessing the Materials under U.S. export control and economic sanctions laws and regulations. Hexagon Geospatial makes no representation that the Materials are appropriate or available for use in every country, and access to them from territories where their content is illegal is prohibited. All rights to use the Materials are granted on condition that such rights are forfeited if you fail to comply with the terms of this agreement.
Revisions
Hexagon Geospatial reserves the right to revise these Terms at any time. You are responsible for regularly reviewing these Terms. Your continued use of this Document after the effective date of such changes constitutes your acceptance of and agreement to such changes.
Applicable Law
This Document is created and controlled by Hexagon Geospatial in the State of Alabama. As such, the laws of the State of Alabama will govern these Terms, without giving effect to any principles of conflicts of law. You hereby irrevocably and unconditionally consent to submit to the exclusive jurisdiction of the United States District Court for the Northern District of Alabama, Northeastern Division, or the Circuit Court for Madison County, Alabama for any litigation arising out of or relating to use of this Document (and agree not to commence any litigation relating thereto except in such courts), waive any objection to the laying of venue of any such litigation in such Courts and agree not to plead or claim in any such Courts that such litigation brought therein has been brought in an inconvenient forum. Some jurisdictions do not allow the exclusions or limitations set forth in these Terms. Such exclusions or limitations shall apply in all jurisdictions to the maximum extent allowed by applicable law.
Questions
Contact us https://go.hexagongeospatial.com/contact-us-today with any questions regarding these Terms.

Geospatial Portal
6

Geospatial Portal
7
About Hexagon Hexagon is a global leader in digital reality solutions, combining sensor, software and autonomous technologies. We are putting data to work to boost efficiency, productivity, quality and safety across industrial, manufacturing, infrastructure, public sector, and mobility applications.
Our technologies are shaping production and people-related ecosystems to become increasingly connected and autonomous – ensuring a scalable, sustainable future.
Hexagon's Safety, Infrastructure & Geospatial division improves the performance, efficiency and resilience of vital services. Its Safety & Infrastructure solutions enable smart and safe cities. Its Geospatial software leverages the power of location intelligence.
Hexagon (Nasdaq Stockholm: HEXA B) has approximately 21,000 employees in 50 countries and net sales of approximately 3.8bn EUR. Learn more at hexagon.com https://hexagon.com/ and follow us @HexagonAB https://twitter.com/HexagonAB.
Geospatial Portal
8
Contents
Product Documentation Copyright and Terms of Use ........................................................... 2
Copyright ........................................................................................................................ 2 Product Documentation Terms of Use ............................................................................ 2 Use Of This Document .................................................................................................... 2 Disclaimers ..................................................................................................................... 3 Limitation Of Liability ....................................................................................................... 3 Indemnification................................................................................................................ 3 Use Of Software ............................................................................................................. 3 Links To Third Party Websites ........................................................................................ 3 Trademarks .................................................................................................................... 4 Procedure For Making Claims Of Copyright Infringement ............................................... 4 US Government Restricted Right .................................................................................... 4 International Use ............................................................................................................. 4 Revisions ........................................................................................................................ 5 Applicable Law................................................................................................................ 5 Questions ....................................................................................................................... 5
About Hexagon ......................................................................................................................... 7
Overview ................................................................................................................................. 12
WebGIS eTraining Links ........................................................................................................ 13
Managing Geospatial Portal Instances ................................................................................. 14
Creating Geospatial Portal Instance ................................................................................... 15 Modifying Geospatial Portal Instance .................................................................................. 19 Removing Geospatial Portal Instance ................................................................................. 22 Upgrading Geospatial Portal Instance ................................................................................ 25 Managing Consumer Portal Layout Instance ...................................................................... 27
Creating Consumer Portal Layout Instance ................................................................... 27 Modifying Consumer Portal Layout Instance ................................................................. 28 Removing Consumer Portal Layout Instance ................................................................ 29 Upgrading Consumer Portal Layout Instance ................................................................ 29
Configuring Geospatial Portal with Administration Console .............................................. 30
Appearance ........................................................................................................................ 32 Starting Configuration ......................................................................................................... 34
Updating Starting Workspace with Configuration Portal ................................................ 47 Map Variants Behaviour ..................................................................................................... 54

Geospatial Portal
9
Map Services ...................................................................................................................... 62 Layouts ............................................................................................................................... 64
List of configurable tools and functions ......................................................................... 66 Workflow Manager .............................................................................................................. 71 Details Tab ......................................................................................................................... 73 Configuration Portal ............................................................................................................ 74 Enabling Open Street Map as a Default Map Tile Sources ................................................. 77
Configuring Geospatial Portal - Consumer Instance with Administration Console ................................................................................................................................... 80
Defining Searches for Consumer Portal Layout .................................................................. 81 Assigning Search to Consumer Portal Instance ............................................................ 92 Enabling Coordinate Search ......................................................................................... 95
Setting Consumer Portal Appearance Options ................................................................... 96 Configuring the Starting Map and Map Compositions in Consumer Portal Layout ................................................................................................................................ 99 Configuring Base Maps for Consumer Portal .................................................................... 103 Configuring the View Mode in Consumer Portal................................................................ 106 Setting Map Variant's Behavior ......................................................................................... 108
Advanced Configuration ...................................................................................................... 110
Geospatial Portal Components Location in the System .................................................... 110 Template ..................................................................................................................... 110 Portal Directory ........................................................................................................... 110 Map Folder ................................................................................................................. 110 Portal Cache ............................................................................................................... 111 Images Folder Definition - Library Address ................................................................. 112 Markers Directory ....................................................................................................... 112 Supporting Services .................................................................................................... 112 Web.Config <(<instance folder>\Web.Config )> .......................................................... 112
Web.Config File ................................................................................................................ 114 WebClient Settings ..................................................................................................... 114 Gazetteer Settings ...................................................................................................... 119 Proxy Settings............................................................................................................. 121 Catalogue Settings ..................................................................................................... 122 Quirks ......................................................................................................................... 124
3D Rendering ................................................................................................................... 128 Disabling/Enabling 3D View in Geospatial Portal ........................................................ 128 Adjusting Behaviour of Dynamic Shadows Control ..................................................... 129 Defining Tooltips for Vector Features Displayed in 3D View........................................ 131 How to configure terrain source in Geospatial Portal - Classic .................................... 132
Configuring Printing Feature ............................................................................................. 133 Printing with phantomJS Web Driver ........................................................................... 137 Printing with Chrome driver ......................................................................................... 137

Geospatial Portal
10
Portal Print Service Configuration ............................................................................... 138 Enabling Windows Authentication for Printing ............................................................. 153 Configuring Print Service over HTTPS protocol .......................................................... 155 Printing in Load Balancing Environment...................................................................... 157 Configuring Quick Print in Portal ................................................................................. 157
Defining MaxFeatures Parameter for WFS, WFS-G and LUWS ....................................... 158 Setting matchCase parameter for WFS queries ................................................................ 161 Customizing Width of Live Search Combo ........................................................................ 161 Enabling Google Maps, Bing Maps and Open Street Map in Geospatial Portal ................ 162 Enabling/Disabling Tilted Google Map View in Geospatial Portal ...................................... 166 Defining Rotation for Bitmap Pattern and Graphic Style .................................................... 168 Definition of Analysis Result Downloads ........................................................................... 170 Disabling/Enabling the Long Data Processing Confirmation ............................................. 171 Setting the Scale Denominator for Point Fit ...................................................................... 171 Defining Default Style in Configuration for Display, Highlight and Selection of Features ........................................................................................................................... 173 Adding a Coordinate System ............................................................................................ 179
Modifying the Spatial Reference System list ............................................................... 182 Setting Geospatial Portal to Work with Services that Use Local Coordinate System ....................................................................................................................... 183
Enabling Apply Button on the Settings Tab ....................................................................... 184 Adjusting Behaviour of Feature Info Tool .......................................................................... 186 Configuring Position of Action Column in Data Window and Clipboard ............................. 186 Configuring the Measurements in Geospatial Portal ......................................................... 187 Saving Selections in User Maps ....................................................................................... 188 Defining Simplified Query Panel ....................................................................................... 189 Configuring Capabilities Service ....................................................................................... 190 Changing Splash Screen .................................................................................................. 191 Configuration of Default ERDAS APOLLO Credentials ..................................................... 194 Extended search parameters in ERDAS APOLLO Catalog Search................................... 195 Configuration of "Open with.." feature ............................................................................... 197 Configuring Search Result Panel Options ......................................................................... 199 Creating an Administrator Account in Geospatial Portal .................................................... 200 Authorizing Geospatial Portal Instances ........................................................................... 201 Changing Limit for WMS URL Length ............................................................................... 210 Hostname Configuration ................................................................................................... 210 Configuring Single Sign On for Integrated Systems (STS) ................................................ 212
Configuring Security Token Service in IIS ................................................................... 219 Site Bindings Configuration ......................................................................................... 221 STS Service Configuration .......................................................................................... 223 Membership Provider .................................................................................................. 224 Role Provider for STS ................................................................................................. 225
Advanced Configuration of Consumer Portal .................................................................... 231 Changing the Logo in Consumer Portal ...................................................................... 231

Geospatial Portal
11
Configuring the Template in Consumer Portal Layout ................................................. 232 Configuring the Thumbnails for Map Compositions in Consumer Portal Layout ......................................................................................................................... 239 Preparing Oracle Database to Work with Consumer Portal Search ............................. 240 Restricting Data Display with Scale Bands .................................................................. 242 Map Composition Styles in Consumer Portal .............................................................. 244 Setting Vector Highlight Style in Consumer Portal ...................................................... 246 How to configure terrain source in Geospatial Portal - Consumer ............................... 247
Geospatial Portal Layouts ................................................................................................... 249
HTTP Get Request with KVP ................................................................................................ 253
HTTPS Configuration for Geospatial Portal and Consumer Portal ................................... 253
Configuring Geospatial Portal in a cluster environment ................................................... 258
Technical Limitations & Troubleshooting .......................................................................... 260
Technical Support and Information .................................................................................... 266
Index ...................................................................................................................................... 268
Geospatial Portal
12
S E C T I O N 1
Overview The Geospatial Portal Administrator Guide is intended for implementers and site administrators. Implementers are designated personnel whose main responsibility is to install and customize the system. Site administrators are on-site personnel responsible for running and maintaining the system. This document provides procedures, conceptual information, and technical details needed to perform these tasks.
Geospatial Portal is a next-generation geospatial Web application that provides client-side consumption, viewing, and querying of geospatial data published with SDI and other services. Geospatial Portal uses a modern services-oriented architecture that allows the user to connect to many data sources at the same time. The data from these various sources is merged into a single map view in the Web application. Map navigation and other functionality can be used immediately without waiting for the data to be retrieved by all the servers.
Geospatial Portal is an application that is ready to use immediately after installation due to its default configuration. Thus, you do not have to configure Geospatial Portal to start working with it. All you need to run Geospatial Portal is a URL to the application provided in the Web browser (http://<server_name>/<name_of_instance>).
You can adapt Geospatial Portal to suit your individual needs. All activities associated with the configuration of the Geospatial Portal are carried out on a specially designed Administration Console.
The pictures in this document may appear slightly different from the software depending on your operating system and theme applied for your Geospatial Portal instance.
Geospatial Portal
13
WebGIS eTraining Links Would you prefer to watch a video? Many of our workflows are showcased in short, to-the-point eTraining modules on the Hexagon Geospatial Community https://geospatialcommunity.hexagon.com/s/.
Visit our Community and check out the videos https://geospatialcommunity.hexagon.com/s/webgis?tabset-08ea2=2 for our WebGIS products.
Also on our Community, check out our Licensing videos https://geospatialcommunity.hexagon.com/s/licensing?tabset-20724=2.

Geospatial Portal
14
S E C T I O N 2
Managing Geospatial Portal Instances This section describes the activities performed in the Administration Console that are taken to manage the instances of Geospatial Portal. The Geospatial Portal instance management covers the following workflows:
Creating Geospatial Portal Instance (on page 15)
Modifying Geospatial Portal Instance (on page 19)
Removing Geospatial Portal Instance (on page 22)
Upgrading Geospatial Portal Instance (on page 25)
In order to run the Administration Console:
1. Open the Web browser.
2. In the Web browser address field, provide the http administration address (for example, http://<server_name>/AdminConsole).
3. Press ENTER.
4. Provide the server credentials in case the authentication dialog appears.
5. The Administration Console will be run in the web browser window.
OR
1. Click the Administration Console link provided on the Geospatial Server product Welcome Page.
2. The Administration Console will be run in new web browser tab.

Geospatial Portal
15
Creating Geospatial Portal Instance
In order to create a new Geospatial Portal instance:
1. Run the Administration Console:
a. Open your favorite browser.
b. Write the http administration address (for example, http://<servername>/AdministrationConsole).
c. Press Enter.
d. The following view will appear:
The GeoMedia WebMap options menu and Engines Management options as shown in the picture above, are available only with GeoMedia WebMap installed.
Geospatial Portal
16
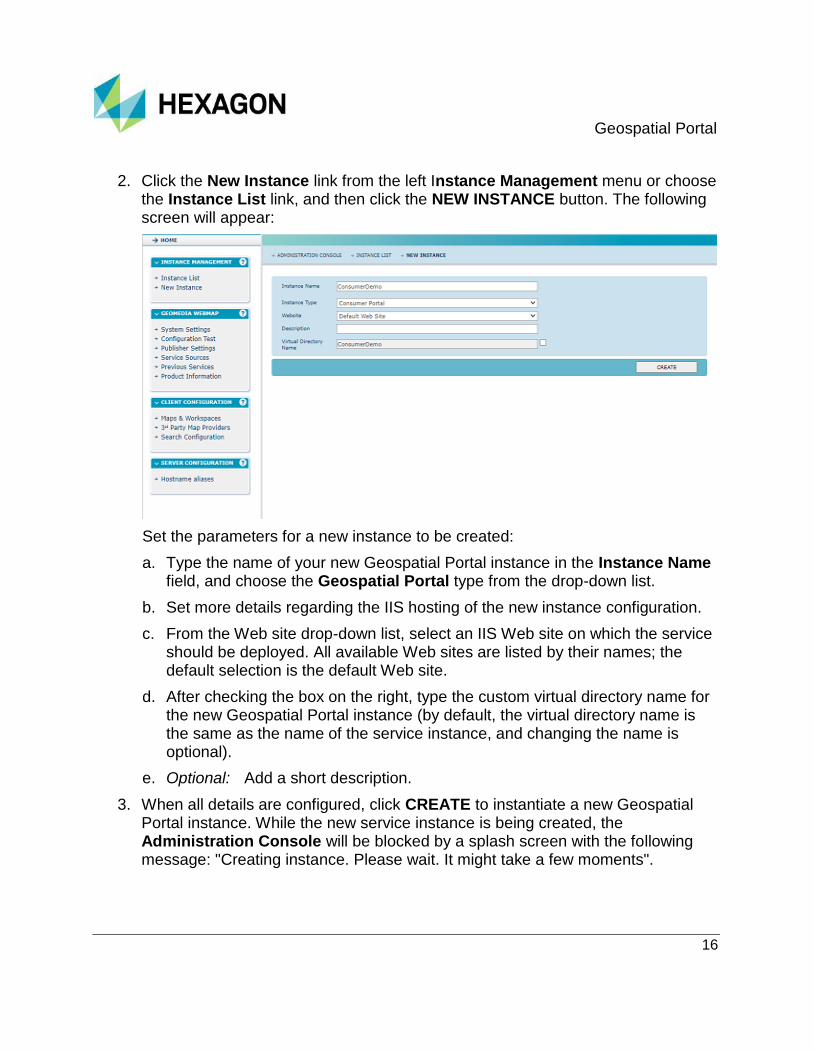
2. Click the New Instance link from the left Instance Management menu or choose the Instance List link, and then click the NEW INSTANCE button. The following screen will appear:
Set the parameters for a new instance to be created:
a. Type the name of your new Geospatial Portal instance in the Instance Name field, and choose the Geospatial Portal type from the drop-down list.
b. Set more details regarding the IIS hosting of the new instance configuration.
c. From the Web site drop-down list, select an IIS Web site on which the service should be deployed. All available Web sites are listed by their names; the default selection is the default Web site.
d. After checking the box on the right, type the custom virtual directory name for the new Geospatial Portal instance (by default, the virtual directory name is the same as the name of the service instance, and changing the name is optional).
e. Optional: Add a short description.
3. When all details are configured, click CREATE to instantiate a new Geospatial Portal instance. While the new service instance is being created, the Administration Console will be blocked by a splash screen with the following message: "Creating instance. Please wait. It might take a few moments".

Geospatial Portal
17
4. After the successful creation of the Geospatial Portal instance, a summary screen will be displayed. In case of an error, the Administration Console will display a summary screen with a message indicating the error.
5. Configure the newly created Geospatial Portal instance:
a. On the Summary screen, click CONFIGURE.
b. Configure the Geospatial Portal components and behavior using the controls available on the particular tabs of the Geospatial Portal Configuration section of the Administration Console. In this section, the following application areas can be configured to suit your individual needs:
Appearance (theme, sidebar region, title, banner)
Starting Configuration
Map Variants Behavior
Map Services (available connectors and predefined list of services) . Map Services can be defined for Geospatial Portal layout only.
Searching Configuration for Geospatial Portal Consumer layout.
For more detailed information about Geospatial Portal configuration, see chapters: Configuring Geospatial Portal with Administration Console (on page 30) and Configuring Geospatial Portal - Consumer Instance with Administration Console (on page 80).
Geospatial Portal
18
6. After the Geospatial Portal instance is configured, click Run Portal to start the Geospatial Portal, and check whether the configuration is in line with expectations.
The Run Portal button is available on each tab of the Geospatial Portal Configuration section except the Details tab. When you are certain that the configuration has been performed properly, close the Administration Console.

Geospatial Portal
19
Modifying Geospatial Portal Instance
In order to change the configuration of an existing Geospatial Portal instance:
1. Run the Administration Console:
a. Open your favorite browser.
b. Write the http administration address (for example, http://<servername>/AdministrationConsole).
c. Click Enter.
d. The following view will appear:
The GeoMedia WebMap options menu and Engines Management options as shown in the picture above are available only with GeoMedia WebMap installed.
2. Click the INSTANCE LIST link.
A list of the instantiated Web services and applications will be displayed.
You can see the following columns: INSTANCE NAME, INSTANCE TYPE, INSTANCE VERSION and ACTION.
Geospatial Portal
20
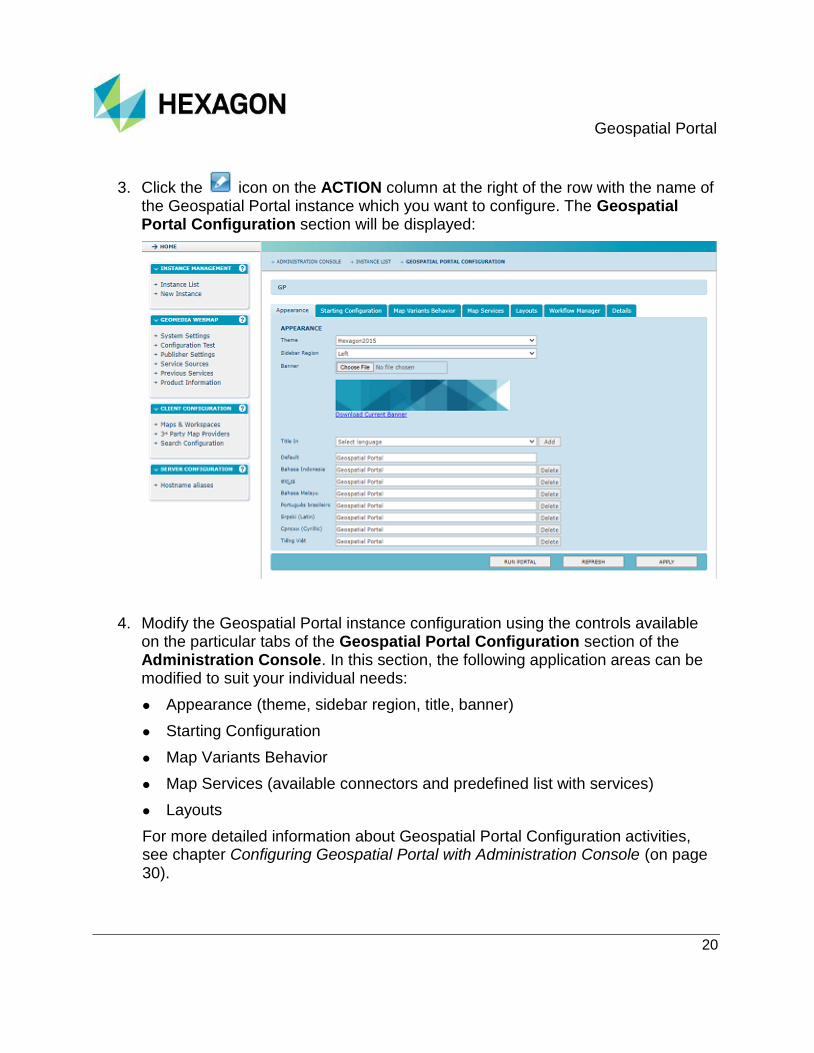
3. Click the icon on the ACTION column at the right of the row with the name of the Geospatial Portal instance which you want to configure. The Geospatial Portal Configuration section will be displayed:
4. Modify the Geospatial Portal instance configuration using the controls available on the particular tabs of the Geospatial Portal Configuration section of the Administration Console. In this section, the following application areas can be modified to suit your individual needs:
Appearance (theme, sidebar region, title, banner)
Starting Configuration
Map Variants Behavior
Map Services (available connectors and predefined list with services)
Layouts
For more detailed information about Geospatial Portal Configuration activities, see chapter Configuring Geospatial Portal with Administration Console (on page 30).

Geospatial Portal
21
5. After the Geospatial Portal instance configuration has been modified, click Run Portal to start the Geospatial Portal, and check whether the configuration is in line with expectations.
The Run Portal button is available on each tab of the Geospatial Portal Configuration section except the Details tab. When you are certain that the configuration has been performed properly, close the Administration Console.

Geospatial Portal
22
Removing Geospatial Portal Instance
In order to remove an existing Geospatial Portal instance:
1. Run the Administration Console:
a. Open your favorite browser.
b. Write the http administration address (for example, http://<servername>/AdministrationConsole).
c. Click Enter.
d. The following view will appear:
The GeoMedia WebMap options menu and Engines Management options as shown in the picture above are available only with GeoMedia WebMap installed.
2. Click the INSTANCE LIST link.
A list of the instantiated Web services and applications will be displayed.
You can see the following columns: INSTANCE NAME, INSTANCE TYPE, INSTANCE VERSION, and ACTION.
Geospatial Portal
23
3. Click the icon in the ACTION column on the right side of the row with the name of the Geospatial Portal instance which you want to remove.
The instance will be removed, and a service with that name will disappear from the list.
There is a possibility to perform the batch operation of instances remove.
In order to remove multiple or all instances:
1. Go to the INSTANCE LIST section.
A list of the instantiated services will be displayed.
2. Enable checkbox next to every instance to be removed OR enable the checkbox in the header to select all instances.
3. Click the REMOVE INSTANCES button.

Geospatial Portal
24
Selected instances will be removed and services with that name will disappear from the list.
Geospatial Portal
25
Upgrading Geospatial Portal Instance
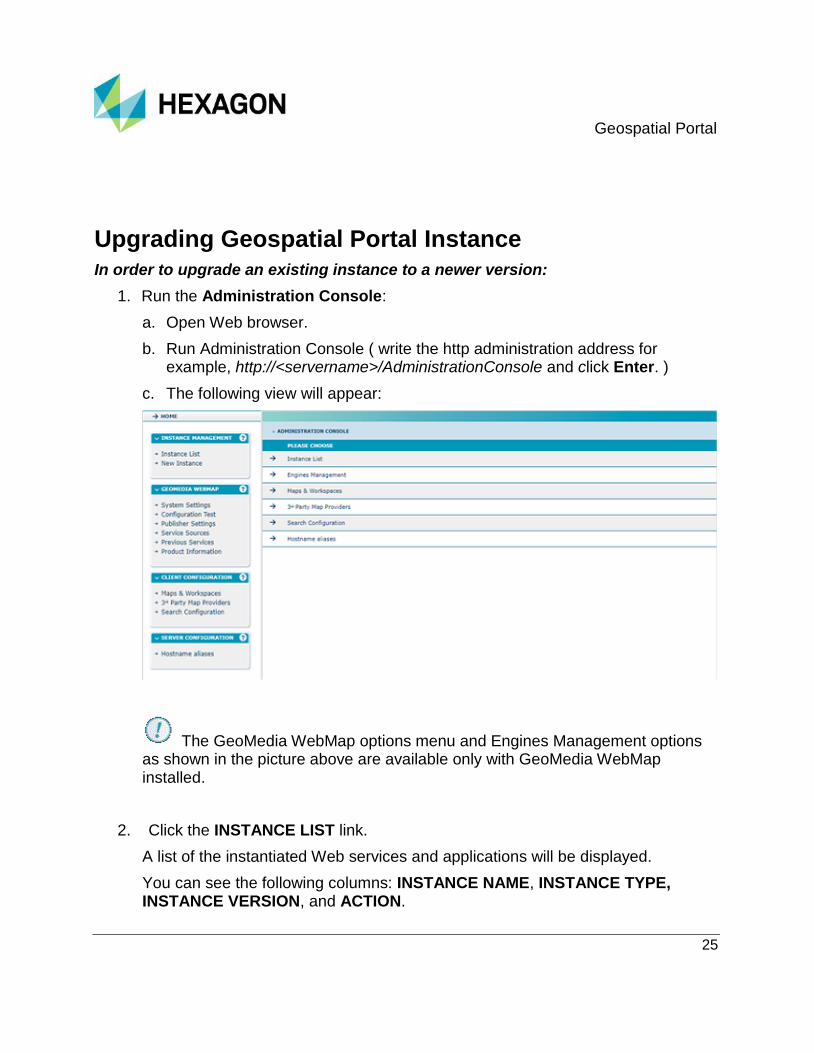
In order to upgrade an existing instance to a newer version:
1. Run the Administration Console:
a. Open Web browser.
b. Run Administration Console ( write the http administration address for example, http://<servername>/AdministrationConsole and click Enter. )
c. The following view will appear:
The GeoMedia WebMap options menu and Engines Management options as shown in the picture above are available only with GeoMedia WebMap installed.
2. Click the INSTANCE LIST link.
A list of the instantiated Web services and applications will be displayed.
You can see the following columns: INSTANCE NAME, INSTANCE TYPE, INSTANCE VERSION, and ACTION.

Geospatial Portal
26
3. For the service instance you want to upgrade click the icon in the INSTANCE VERSION column.
The instance of this service will be upgraded to a newer version.
There is a possibility to perform the batch operation of instances upgrades.
In order to upgrade multiple or all instances:
1. Go to the INSTANCE LIST section.
A list of the services will be displayed.
2. Enable checkbox next to every instance to be upgraded OR enable the checkbox in the header to select all instances.
3. Click the UPGRADE INSTANCES button.

Geospatial Portal
27
Selected instances will be upgraded to a newer versions. Instances that are currently in the most up to date version or instances that cannot be upgraded will be omitted.
Managing Consumer Portal Layout Instance
Creating Consumer Portal Layout Instance
The process of creating Consumer Portal Layout instance is the same as for creating an instance of Geospatial Portal with one exception which is the instance type you chose. To create the instance for Consumer Portal Layout choose Consumer Portal from the Instance Type pull down list. The remaining procedure steps are identical to those for creating Geospatial Portal instance. For more information see: Creating Geospatial Portal Instance (on page 15)

Geospatial Portal
28
Modifying Consumer Portal Layout Instance
In order to change the configuration of an existing Consumer Portal instance:
1. Run the Administration Console:
a. Open your favorite browser.
b. Write the http administration address (for example, http://<servername>/AdminConsole).
c. Click Enter.
d. The Administration Console will run.
2. Click the INSTANCE LIST link.
A list of the instantiated Web services and applications will be displayed.
You can see the following columns: INSTANCE NAME, INSTANCE TYPE, INSTANCE VERSION and ACTION.
3. Click the icon on the ACTION column at the right of the row with the name of the Consumer Portal Layout instance which you want to configure. The Consumer Portal Layout Configuration section will be displayed:
4. Modify the Consumer Portal Layout instance configuration using the controls available on the particular tabs of the Consumer Portal Layout Configuration section of the Administration Console. In this section, the following application areas can be modified to suit your individual needs:
Search Configuration
Starting Configuration
For more detailed information about Consumer Portal Layout activities, see chapter Configuring Consumer Portal Instance with Administration Console
5. After the Consumer Portal Layout instance configuration has been modified, click Run Portal to start the Consumer Portal Layout, and check whether the configuration is in line with expectations.
The Run Portal button is available on each tab of the Consumer Portal Layout Configuration section except the Details tab. When you are certain that the configuration has been performed properly, close the Administration Console.
Geospatial Portal
29
Removing Consumer Portal Layout Instance
To remove the instance of Consumer Portal layout please proceed in the same way as in the case of removing Geospatial Portal or other type of instance. For more information on removing Geospatial Portal instance see Removing Geospatial Portal Instance (on page 22).
Upgrading Consumer Portal Layout Instance
To upgrade the instance of Consumer Portal layout please proceed in the same way as in the case of upgrading Geospatial Portal or other type of instance. For more information on upgrading Geospatial Portal instance see Upgrading Geospatial Portal Instance (on page 25).

Geospatial Portal
30
S E C T I O N 3
Configuring Geospatial Portal with Administration Console Activities associated with the configuration of Geospatial Portal are carried out on a specially designed Administration Console in the Geospatial Portal Configuration section.
Running the Administration Console:
1. Open the web browser.
2. In the web browser address field, provide the http administration address (for example, http://<server_name>/AdminConsole).
3. Press ENTER.
4. Provide the server credentials in case the authentication dialog appears.
5. The Administration Console will be run in the web browser window.
OR
1. Click the Administration Console link provided on the Geospatial Server product Welcome Page.
2. The Administration Console will be run in new web browser tab.
Configuring Geospatial Portal:
To begin the configuration of Geospatial Portal, go to the Geospatial Portal
Configuration section by clicking Configure in the ACTION column for a selected instance. In the Geospatial Portal Configuration section, the administrator can configure such elements as:
Default theme
Banner
Title in several languages
Starting map
Map variants
Available connectors and list of services

Geospatial Portal
31
Sidebar position
Layouts (define toolbars and tools available in particular layouts)
Add custom workflows
The Geospatial Portal Configuration section consists of the following tabs:
Appearance (on page 32)
Starting Configuration (on page 34)
Map Variants Behaviour (on page 54)
Map Services (on page 62)
Layouts (on page 64)
Workflow Manager
Details (see "Details Tab" on page 73)
After setting the desired parameters, you must save changes by clicking APPLY, which writes changes made only in the current tab. To see the changes quickly, the administrator can click RUN PORTAL. The Geospatial Portal will be run immediately in the default Web browser in the default layout (see Starting Configuration (on page 34) for more information about setting the default layout).
To run Geospatial Portal in a different layout, the name of the layout must be provided in the browser address bar, for example: http://<server_name>/<instance_portal_name>/mapWithRibbon.aspx, or click Run This Layout on the Layouts tab (see Layouts (on page 64) for more information about layouts).
Use the REFRESH button to restore all values from the last saved state.
Geospatial Portal
32
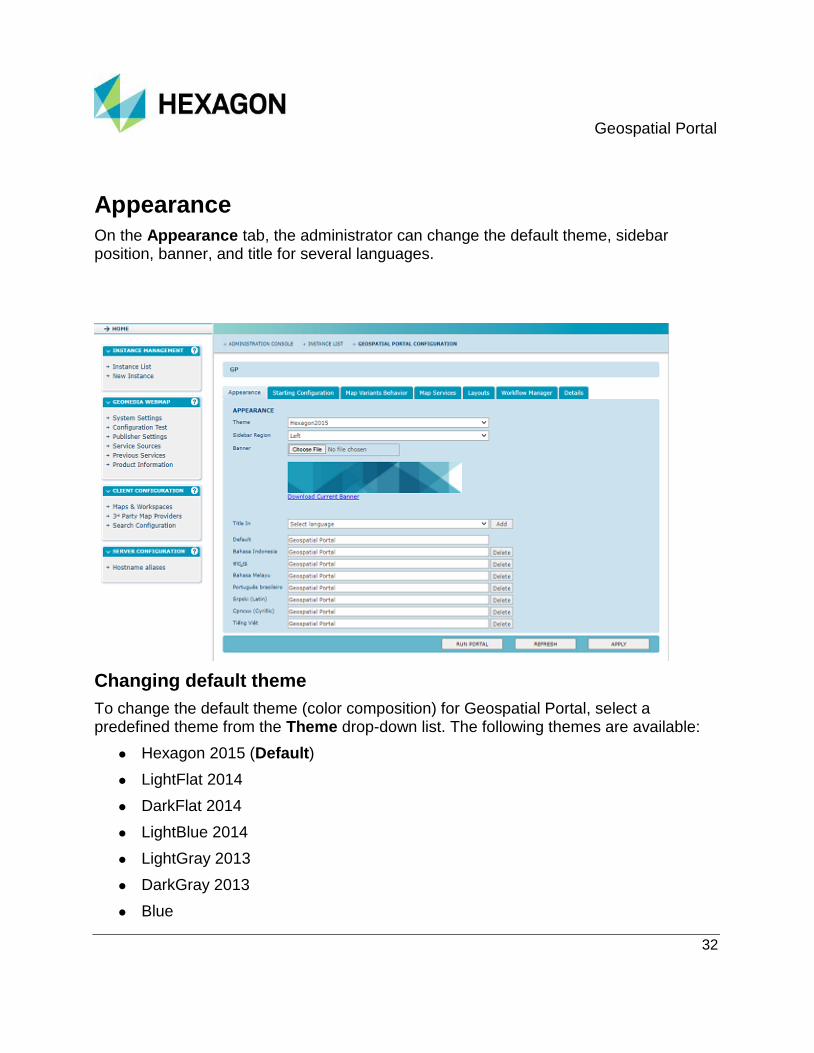
Appearance
On the Appearance tab, the administrator can change the default theme, sidebar position, banner, and title for several languages.
Changing default theme
To change the default theme (color composition) for Geospatial Portal, select a predefined theme from the Theme drop-down list. The following themes are available:
Hexagon 2015 (Default)
LightFlat 2014
DarkFlat 2014
LightBlue 2014
LightGray 2013
DarkGray 2013
Blue

Geospatial Portal
33
Black
DarkGray
Gray
Olive
Purple
Slate
Setting sidebar position
In Geospatial Portal, the sidebar can be positioned on the left or right side in the browser. The side for a sidebar can be changed using the Sidebar Region drop-down list. Two values, Left or Right, are available. This setting is global for the whole instance; this means that changes made are applied for all layouts in which the sidebar is used.
Changing banner
To change the banner for Geospatial Portal, click the Browse button next to the Banner field, and select a graphic file to be used as a banner. The file must be in png, jpg, or gif format. Animated gif, transparent gif, and png graphics are supported. The maximum supported size for the banner file is 2000 x 300 pixels. Inserted graphics are not cropped or stretched in any way.
The preview of the current banner for Geospatial Portal is displayed on the Theme tab under the Banner field, which shows the path for the newly selected banner file.
The administrator can save the current banner to the disk by clicking the Download current banner link.
Setting Geospatial Portal title
The administrator can set an individual title that is displayed over the banner. Also, the title for every language used in Geospatial Portal can be set separately. In case the title for a particular language is not set, the title in the default language is displayed for this language.
In order to set the title for the default language, type a new title in the Default field. To add a title for another language, select the language from the Title In drop-down list and click Add. New field(s) for the chosen language(s) will appear, on which titles for several languages can be provided. Clicking the Delete button next to the field for a particular language will remove the title field; and the default title will be used for this removed language.
Geospatial Portal
34
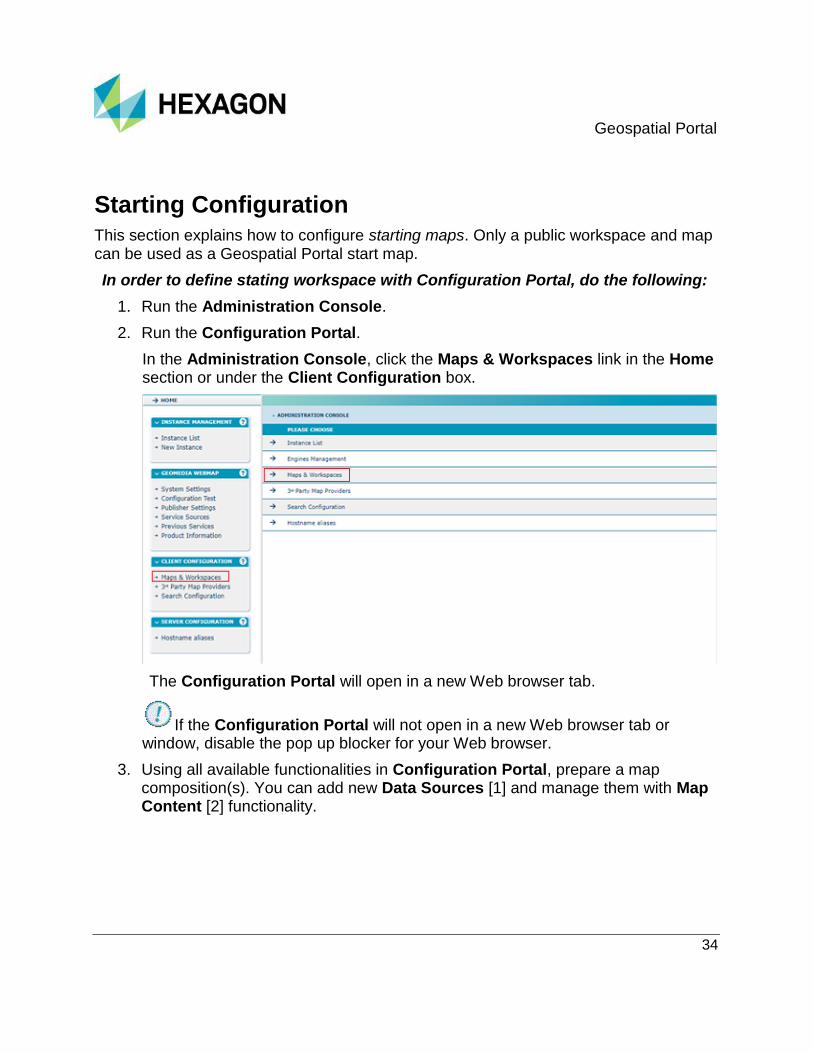
Starting Configuration This section explains how to configure starting maps. Only a public workspace and map can be used as a Geospatial Portal start map.
In order to define stating workspace with Configuration Portal, do the following:
1. Run the Administration Console.
2. Run the Configuration Portal.
In the Administration Console, click the Maps & Workspaces link in the Home section or under the Client Configuration box.
The Configuration Portal will open in a new Web browser tab.
If the Configuration Portal will not open in a new Web browser tab or window, disable the pop up blocker for your Web browser.
3. Using all available functionalities in Configuration Portal, prepare a map composition(s). You can add new Data Sources [1] and manage them with Map Content [2] functionality.

Geospatial Portal
35
For more information on how to use particular tools of Configuration Portal, please refer to the appropriate sections of the Geospatial Portal User Guide.

Geospatial Portal
36
4. Create a workspace with map(s) that will act as your starting workspace. Go to the User maps [3], open the context menu for Workspaces, and select Add > From map [4]. Optionally, you can load a workspace that you prepared and saved earlier. To do this, select the option From gpw file [5].
5. Select the Public option for your workspace and maps that will act as your starting workspace.
All maps in your workspace will represent a map variant in Geospatial Portal and/or map compositions in Consumer Portal Layout.
6. Set the selected workspace for an instance(s).
Open the context menu for the selected workspace [6]. From the context menu, select Set for instance.. > As starting workspace [7].
Geospatial Portal
37
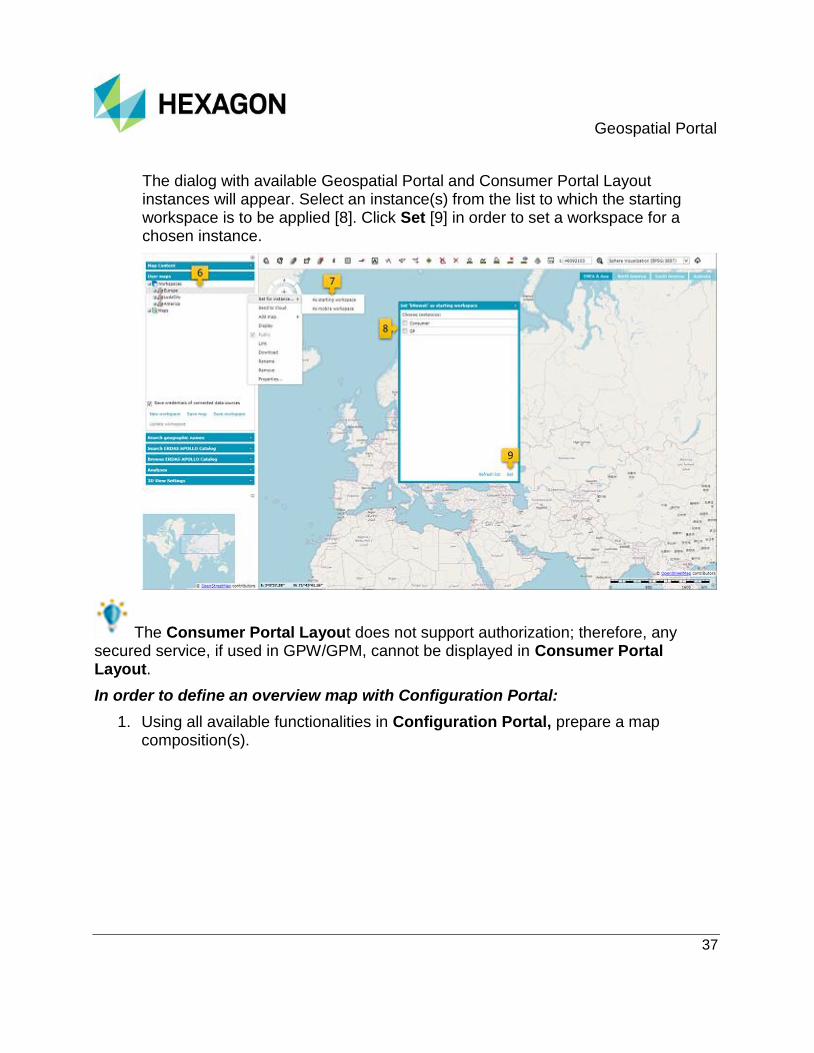
The dialog with available Geospatial Portal and Consumer Portal Layout instances will appear. Select an instance(s) from the list to which the starting workspace is to be applied [8]. Click Set [9] in order to set a workspace for a chosen instance.
The Consumer Portal Layout does not support authorization; therefore, any secured service, if used in GPW/GPM, cannot be displayed in Consumer Portal Layout.
In order to define an overview map with Configuration Portal:
1. Using all available functionalities in Configuration Portal, prepare a map composition(s).

Geospatial Portal
38
You can add new Data Sources [1] and manage them with Map Content [2] functionality.

Geospatial Portal
39
2. Go to the User maps [3], open the context menu for Maps, and select Add > From map [4]. Optionally, you can load maps that you prepared and saved earlier. To do this, select the option From gpm file [5].
3. To set a selected map as an overview map for an instance(s):
Geospatial Portal
40
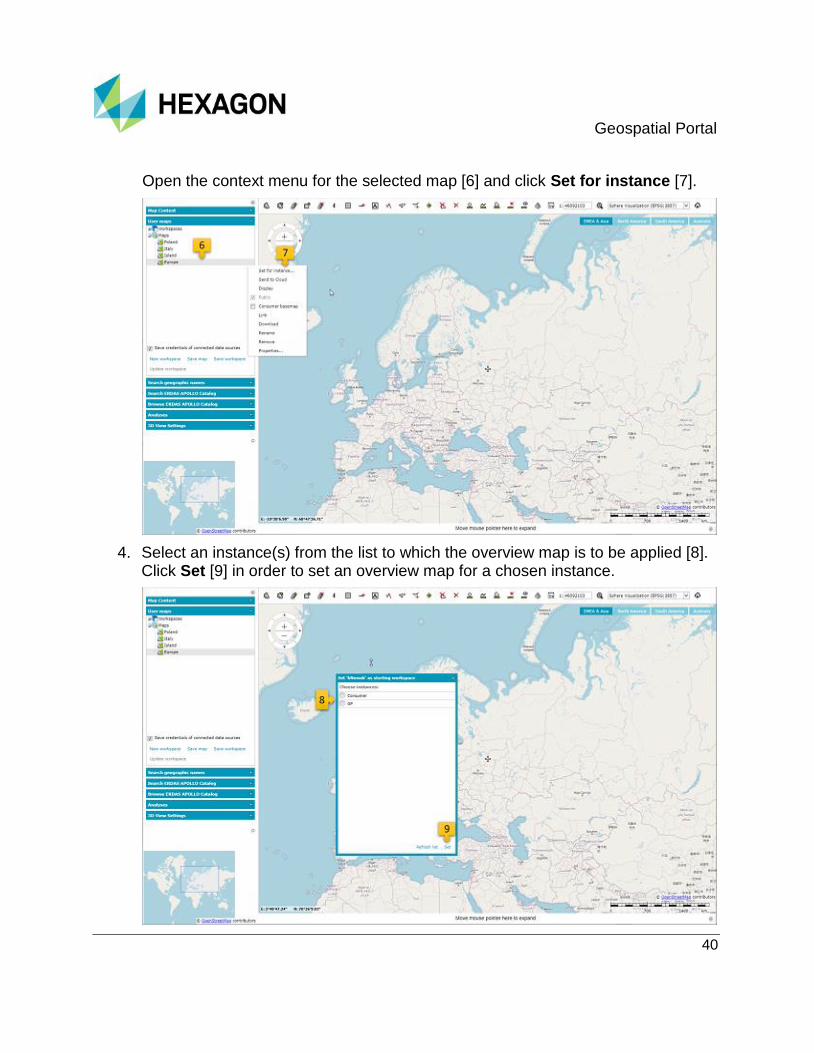
Open the context menu for the selected map [6] and click Set for instance [7].
4. Select an instance(s) from the list to which the overview map is to be applied [8]. Click Set [9] in order to set an overview map for a chosen instance.
Geospatial Portal
41
The starting configuration and overview map for Consumer Portal Layout instances can be defined only by using the Configuration Portal and following the procedure described above. This procedure above can be applied to both Geospatial Portal instances and Consumer Portal Layout instances.
To change starting workspace for selected Geospatial Portal instance:
To change the starting workspace for the selected Geospatial Portal instance, perform the same steps as when creating a new starting configuration (as described above). You can also select a new starting workspace from the existing ones and apply it as follows:
1. Run the Administration Console.
2. Open the Geospatial Portal Configuration section for the selected instance of Geospatial Portal.
3. Go to the Starting Configuration Tab. The Starting Workspace, Mobile Workspace and Overview Map pull-down lists are automatically filled with all workspaces created in Configuration Portal.
4. Select Starting Workspace and/or Overview Map and/or Mobile Workspace from the drop-down list to use them as a starting one(s). The fields Starting Workspace ID and/or Overview Map ID and/or Mobile Workspace ID will be populated automatically.

Geospatial Portal
42

Geospatial Portal
43
You can also insert the Workspace ID directly into the Stating Workspace ID field and/or the Overview Map ID into the OverviewMap ID field and/or the Mobile Workspace ID into the Mobile Workspace ID field if the ID numbers are known.
5. Click APPLY. The new starting maps will be visible after reloading Geospatial Portal.
Mobile devices may not support the display of certain types of data (for example, vector data from services such as WFS or MPS). Thus, the administrator of Geospatial Portal can prepare (with User Maps functionality) separate starting workspaces designed specifically for mobile devices.
To set the starting workspace for mobile devices, select the workspace designed for mobile devices in the Mobile Workspace field, or provide its ID in the Mobile Workspace ID field. Workspaces indicated in those two fields (Mobile Workspace and Mobile Workspace ID) will be available only when Geospatial Portal is run in mobile.aspx layout mode.
Remember that Geospatial Portal detects whether it is being run on a mobile device and switches to the mobile layout automatically. For layouts other than
Geospatial Portal
44
mobile, Geospatial Portal is run with maps defined for workspaces that are indicated in the Starting Workspace field and/or the Starting Workspace ID field.
In case the Mobile Workspace and/or Mobile Workspace ID fields are not filled in, Geospatial Portal will try to load a map on a mobile device from a workspace specified in the Starting Workspace/Starting Workspace ID fields.
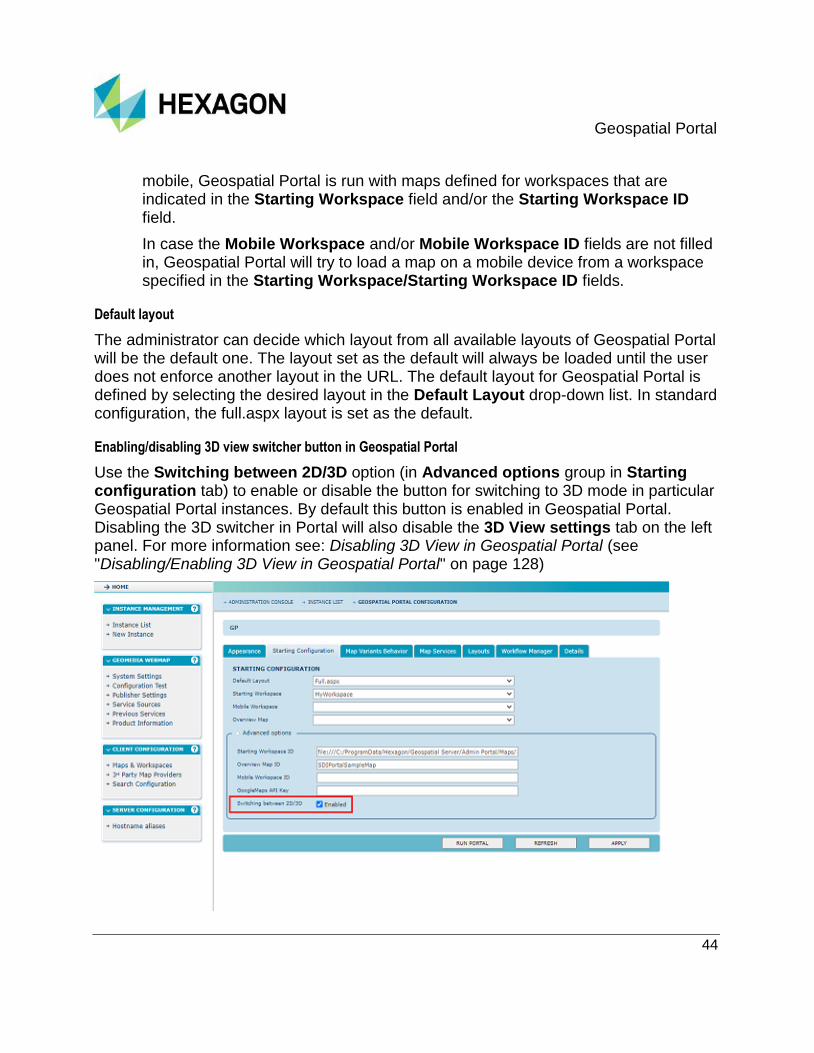
Default layout
The administrator can decide which layout from all available layouts of Geospatial Portal will be the default one. The layout set as the default will always be loaded until the user does not enforce another layout in the URL. The default layout for Geospatial Portal is defined by selecting the desired layout in the Default Layout drop-down list. In standard configuration, the full.aspx layout is set as the default.
Enabling/disabling 3D view switcher button in Geospatial Portal
Use the Switching between 2D/3D option (in Advanced options group in Starting configuration tab) to enable or disable the button for switching to 3D mode in particular Geospatial Portal instances. By default this button is enabled in Geospatial Portal. Disabling the 3D switcher in Portal will also disable the 3D View settings tab on the left panel. For more information see: Disabling 3D View in Geospatial Portal (see "Disabling/Enabling 3D View in Geospatial Portal" on page 128)
Geospatial Portal
45
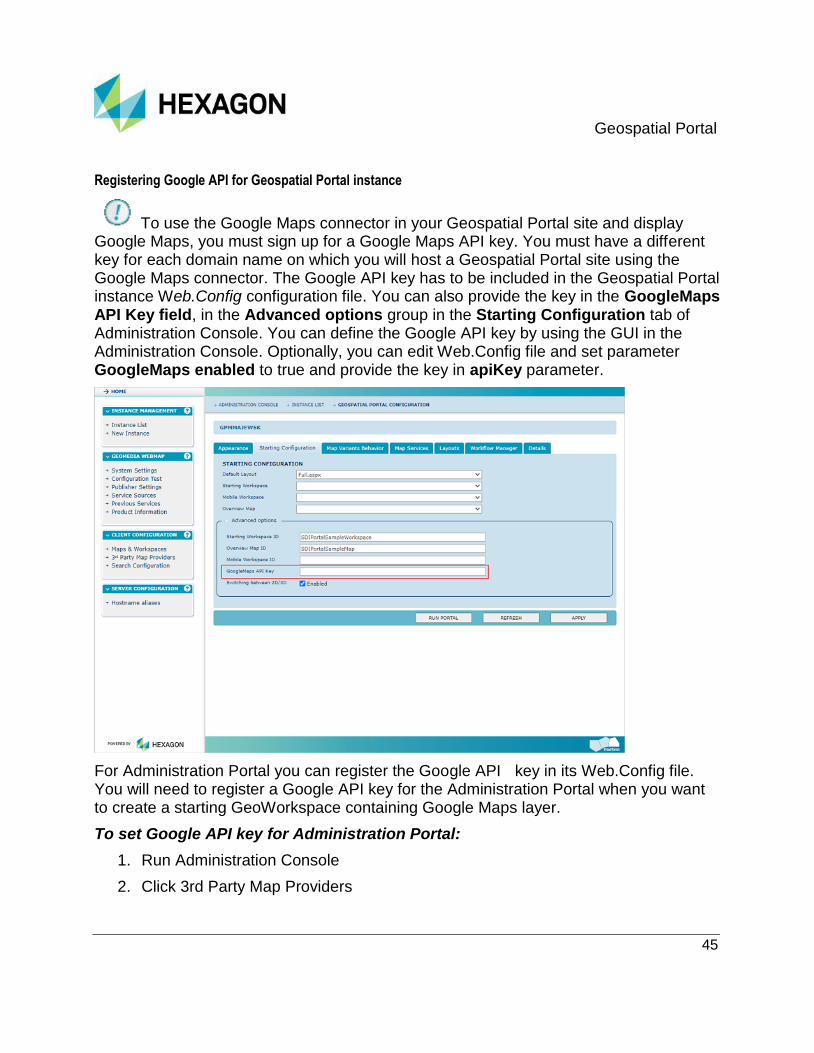
Registering Google API for Geospatial Portal instance
To use the Google Maps connector in your Geospatial Portal site and display Google Maps, you must sign up for a Google Maps API key. You must have a different key for each domain name on which you will host a Geospatial Portal site using the Google Maps connector. The Google API key has to be included in the Geospatial Portal instance Web.Config configuration file. You can also provide the key in the GoogleMaps API Key field, in the Advanced options group in the Starting Configuration tab of Administration Console. You can define the Google API key by using the GUI in the Administration Console. Optionally, you can edit Web.Config file and set parameter GoogleMaps enabled to true and provide the key in apiKey parameter.
For Administration Portal you can register the Google API key in its Web.Config file. You will need to register a Google API key for the Administration Portal when you want to create a starting GeoWorkspace containing Google Maps layer.
To set Google API key for Administration Portal:
1. Run Administration Console
2. Click 3rd Party Map Providers

Geospatial Portal
46
3. Enter the key in the API key for Configuration Portal field, in the Google Maps option group
4. Click Apply.
To use the Google Maps connector, you must also agree to and abide by the Google Maps API Terms of Service found at this location: http://code.google.com/apis/maps/terms.html. Your use may require the purchase of a software license.
The scope of Geospatial Portal & Consumer Portal functionalities related to Google Map is determined by the Google key and results from the permissions granted on the Google account of the user for whom the key was issued.
Geospatial Portal
47
Updating Starting Workspace with Configuration Portal
This topic covers:
Update of map composition in starting workspace.
Change of map variants order in starting workspace.
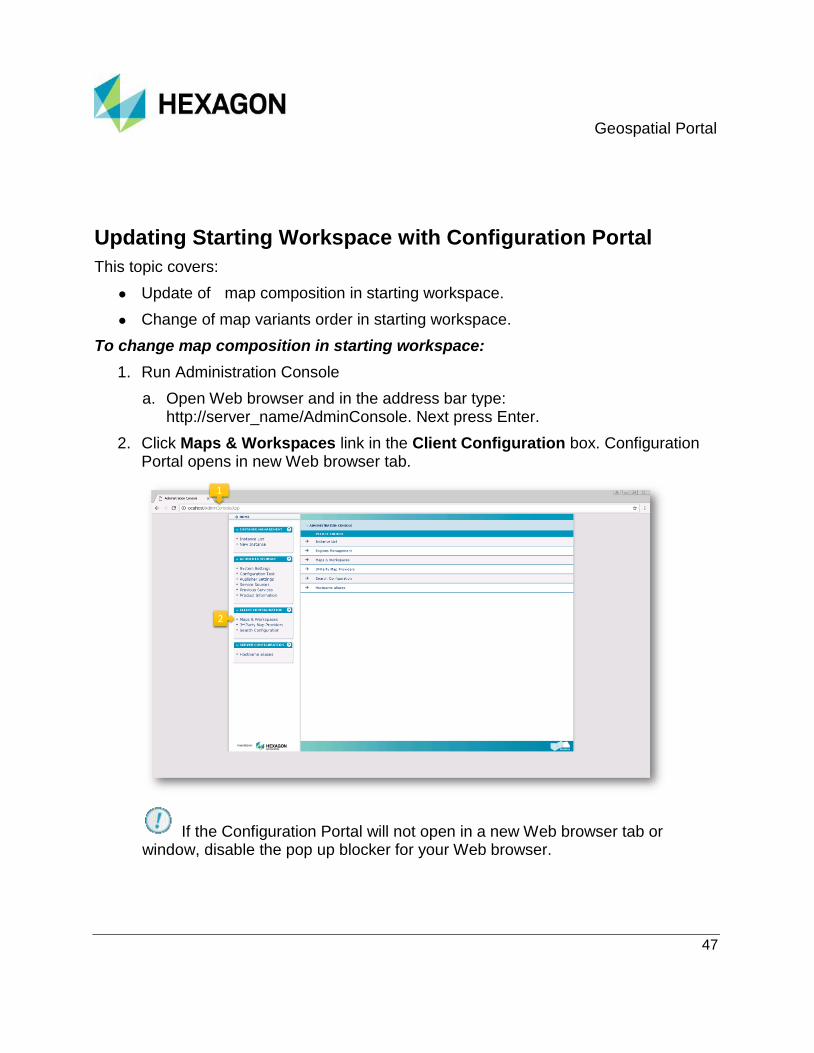
To change map composition in starting workspace:
1. Run Administration Console
a. Open Web browser and in the address bar type: http://server_name/AdminConsole. Next press Enter.
2. Click Maps & Workspaces link in the Client Configuration box. Configuration Portal opens in new Web browser tab.
If the Configuration Portal will not open in a new Web browser tab or window, disable the pop up blocker for your Web browser.

Geospatial Portal
48
In Internet Explorer on the Pop-up blocker notification, click the Options for this site button and select Always allow:
In Chrome, click on the Pop-up blocker notification, select Always allow pop-ups and click Done:
In Mozilla Firefox, click on the Options button on the Pop-up blocker notification and, from the context menu, select Allow pop-ups for:
3. Display the workspace that is your current starting workspace:
a. In the Configuration Portal click User Maps.

Geospatial Portal
49
b. Select your current starting workspace (or the workspace you want to modify) from the list and from its context menu click Display.
Note that the name of the current workspace is in bold text.
4. Adjust your current starting map: For example you can:

Geospatial Portal
50
a. Modify starting map view (bounding box and/or scale).
b. Change particular layer style.

Geospatial Portal
51
c. Alter legend (add/remove layers ; change layers order).

Geospatial Portal
52
5. Click Update workspace button.
6. Close Configuration Portal.
7. Run/reload Portal Web page and check whether the updated map(s) is displayed in accordance within the introduced changes.

Geospatial Portal
53
To change map variants order for starting workspace:
1. Run Administration Console
a. Open Web browser and in the address bar type: http://server_name/AdminConsole. Next press Enter.
2. Click Maps & Workspaces link in the Client Configuration box. Configuration Portal opens in new Web browser tab.
3. Select and expand your current starting workspace.
Geospatial Portal
54
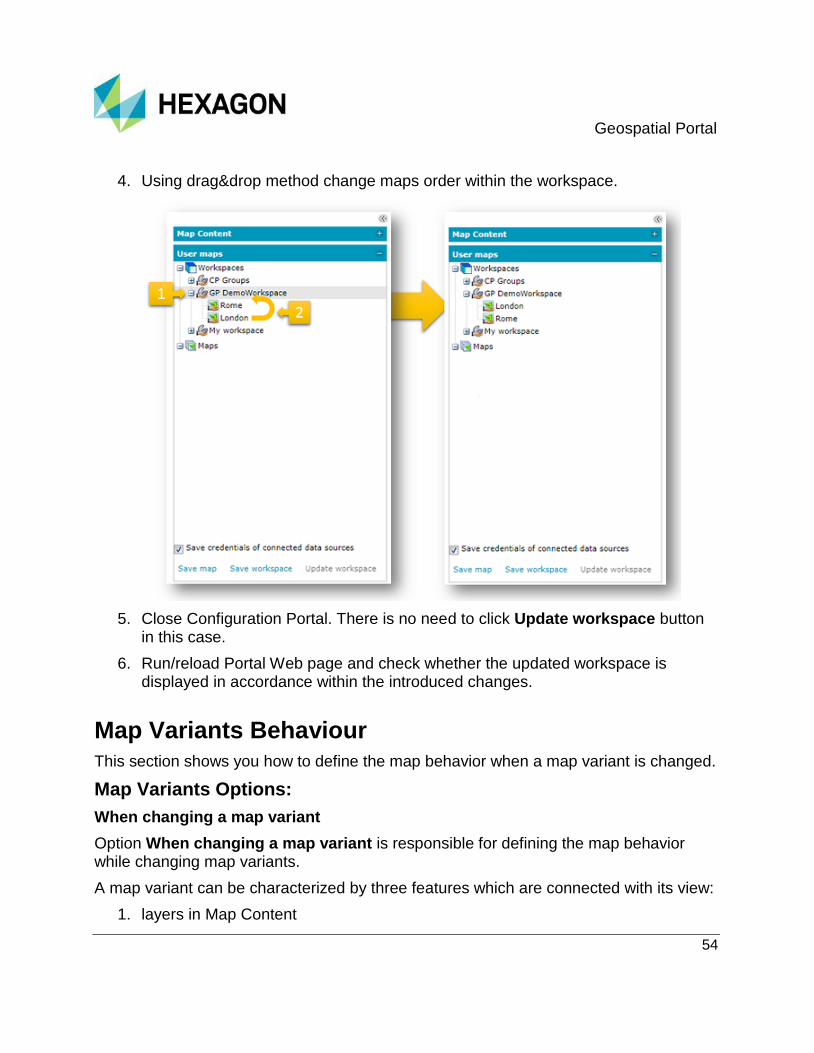
4. Using drag&drop method change maps order within the workspace.
5. Close Configuration Portal. There is no need to click Update workspace button in this case.
6. Run/reload Portal Web page and check whether the updated workspace is displayed in accordance within the introduced changes.
Map Variants Behaviour
This section shows you how to define the map behavior when a map variant is changed.
Map Variants Options:
When changing a map variant
Option When changing a map variant is responsible for defining the map behavior while changing map variants.
A map variant can be characterized by three features which are connected with its view:
1. layers in Map Content

Geospatial Portal
55
2. coordinate system
3. bounding box
Two possible values - Set New Variant’s Map Range and Keep Current Map Range and Map Control are available. Selecting one of these options causes given behavior of layers in Map Content, coordinate system, and bounding box.
Set New Variant’s Map Range - all layers of a given Map Variant will be displayed with the coordinate system and bounding box. This option is useful when different layers should be displayed on different areas. After selecting a given map variant, the coordinate system, bounding box, and layers in Map Content will be changed.
An example of using the Set New Variants Map Range option is shown in the picture below where the map variant CAMPS A characteristics are as follows:
1. layer: CAMPS A
2. coordiante system: Sphere Visualization (EPSG:3857)
3. bounding box area: North France
and CAMPS B map variant characteristics:
1. layer: CAMPS B
2. coordiante system: WGS84 (EPSG:4326)
3. bounding box area: South France

Geospatial Portal
56
changed: layers in Map Content
coordinate system
bounding box
not changed: ----------------------------------------------
Geospatial Portal
57
Keep Current Map Range and Map Control - this option prevents any change of a map range and map control while changing map variants. Suitable coordinate system and bounding box for a given layer of Map Variant will not be changed. Only layers in the Map Content will be changed. The Keep Current Map Range and Map Control option is useful when different layers should be displayed on the same area (the same bounding box and coordinate system).
Geospatial Portal
58
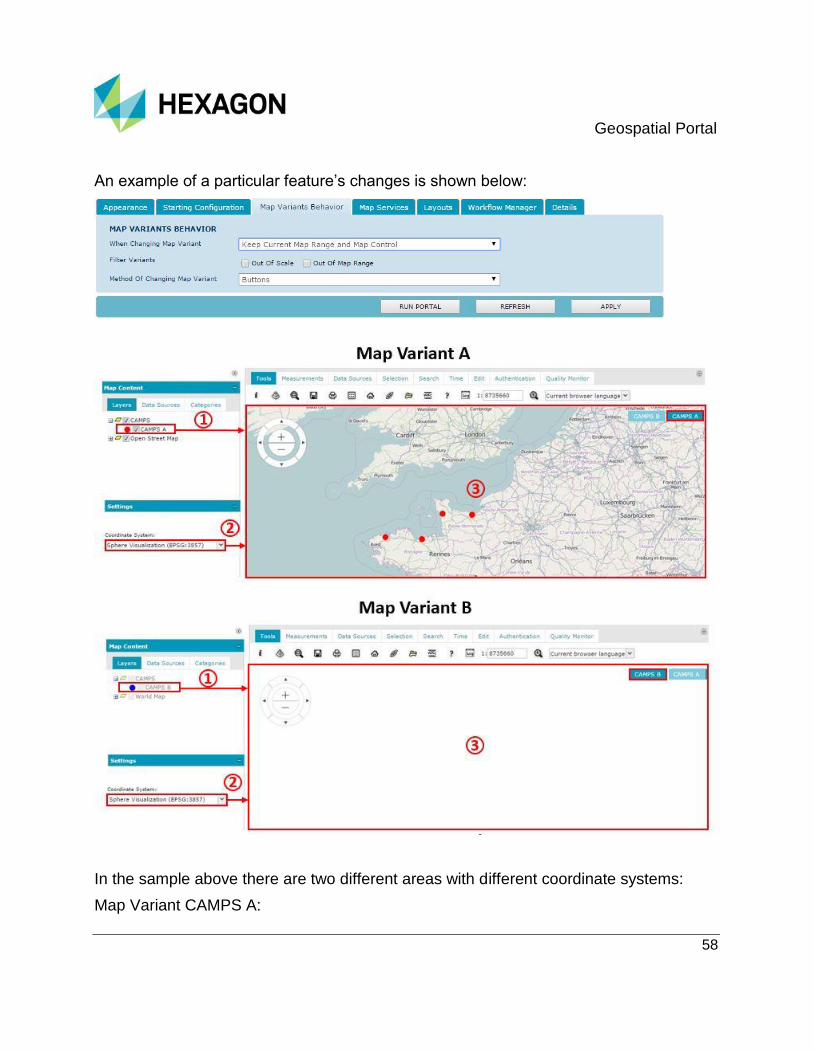
An example of a particular feature’s changes is shown below:
In the sample above there are two different areas with different coordinate systems:
Map Variant CAMPS A:

Geospatial Portal
59
1. layer: CAMPS A
2. coordiante system: Sphere Visualization (EPSG: 3857),
3. bounding box - North France
Map Variant CAMPS B:
1. layer: CAMPS B (doesn’t display because of not changed coordinate system EPSG: 3857)
2. coordiante system:WGS 84 (EPSG: 4326)
3. bounding box: South France
changed: layers in Map Content
not changed: coordinate system
bounding box

Geospatial Portal
60
The Keep Current Map Range and Map Control option is useful when different layers should be displayed on the same area as shown below:
Where map variant characteristics are as follows:
Map Variant CAMPS A:
1. layer: A,
Geospatial Portal
61
2. coordinate system: Sphere Visualization (EPSG: 3857)
3. bounding box – France
Map Variant CAMPS AB:
1. layer: A and B,
2. coordinate system: Sphere Visualization (EPSG: 3857)
3. bounding box – France
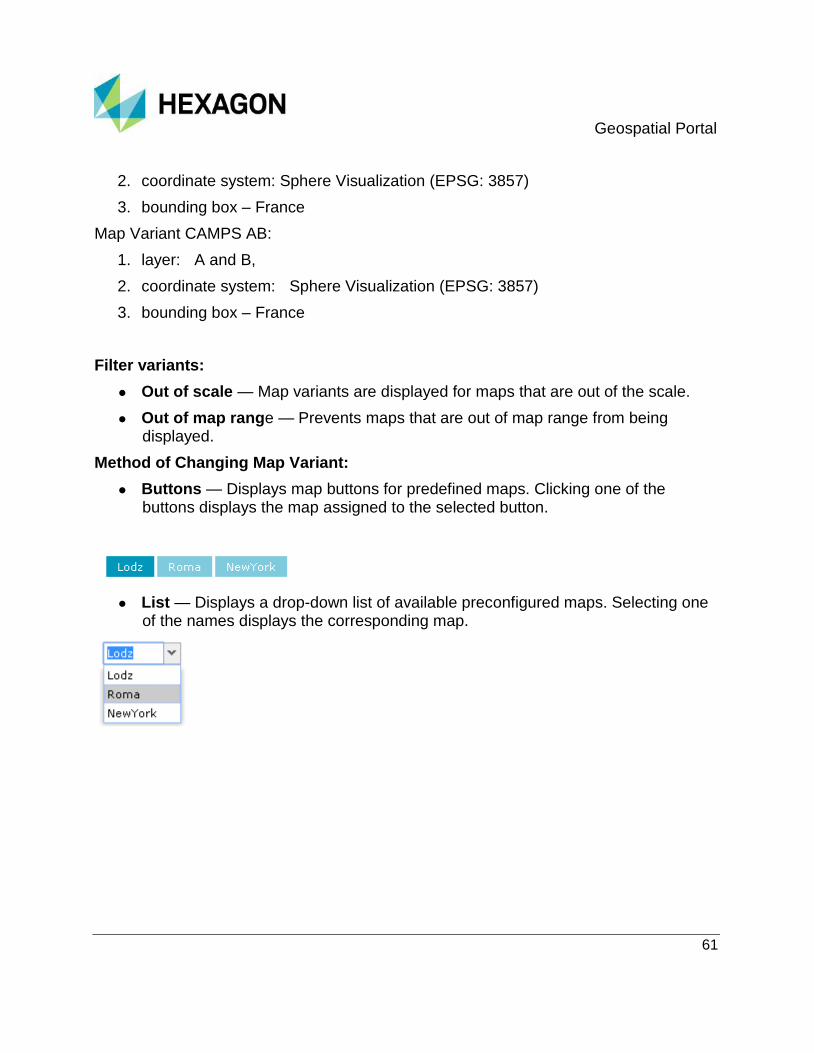
Filter variants:
Out of scale — Map variants are displayed for maps that are out of the scale.
Out of map range — Prevents maps that are out of map range from being displayed.
Method of Changing Map Variant:
Buttons — Displays map buttons for predefined maps. Clicking one of the buttons displays the map assigned to the selected button.
List — Displays a drop-down list of available preconfigured maps. Selecting one of the names displays the corresponding map.
Geospatial Portal
62
Map Services
In this tab, the administrator defines the connectors to the data sources that will be available for users in Geospatial Portal. In order to determine which data source connectors should be accessible, select the desired connector from the Map Service Type drop-down list, and then check or uncheck the Visible check box. Click Apply to save changes for each changed map service.
Geospatial Portal can supply access to the following data sources: ERDAS APOLLO, CSW, GeoRSS, IWS, LUWS, MapPublisher, OpenLS , Personal Storage Service (PSS), Printing, WCTS, WFS, WFS-G, WMS, WMTS, WPS-CT, and 3D Map Tiles. All the connectors listed above are enabled by default. Optionally, data sources such as Bing Maps, Google Maps, ARS, EGIS, mWMS can be added; they are disabled with the default settings. The list of connectors may vary and may be limited according to your purchased license.
The administrator can add, remove, or edit the list of public data sources available for users. In Geospatial Portal, those public services appear in the New Data Source form. The predefined public services are grouped by service types, for example, WMS, WFS, IWS, and CSW.
In order to add a new service to the list, click +Add new record. A new line with a list of services will be added to the table, and the administrator provides the display name and the URL to the service. To remove any service from the list, click the x Delete button next to the entry to be removed. The table with the list of predefined services applies only to the currently selected map service type.
Portal only supports OpenLS location services using SOAP.

Geospatial Portal
63
Services that are attached by default to the portal are defined in the services.xml file, which is located in the folder C:\Program Files\Common Files\Hexagon\Services\Instances\Instance_Name\App_Data. The filename services.xml is placed in the Web.Config file appropriate for the portal instance in the parameter mapServicesListPath="App_Data/services.xml"

Geospatial Portal
64
Layouts
In the Layouts tab, you can decide which toolbars and tools will be available in particular layouts.
Available layouts:
Full.aspx – Provides a full view of Geospatial Portal. This tab lets the administrator set the appearance of Geospatial Portal and decide which options and features are available for users. This is the default layout
MapWithRibbon.apsx – Represents a pure map view with simple embedded control tools.
Map.aspx – Represents a pure map view with a few simple embedded control tools.
Mobile.aspx – Simplified view of Geospatial Portal used for mobile devices. Provides the basic functionality, such as zoom in/out, fit all, where am I? and feature info.
Apollo.aspx – Extended layout providing additional functionality for browsing and searching the ERDAS APOLLO Catalog and advanced image processing.
ApolloPro.aspx - Extended layout providing additional functionality for browsing and searching the ERDAS APOLLO Catalog and advanced image processing. The Geoprocessing functionality is added comparing to apollo.aspx layout.
IWS.aspx – Simple layout providing basic functionality needed for consuming data from ERDAS Essentials sources.
GWMPub.aspx – Represents the view for GeoMedia WebMap Publisher Portal.
GWMPubPro.aspx - Represents the view for GeoMedia WebMap Publisher Portal with additional features such as Search geographic names, Search for meteadata or Analyses.
For the default.aspx, apollo.aspx, IWS.aspx, and GWMPub.aspx/GWMPubPro.aspx layouts, such elements as Map Content, Toolbar, and Sidebar are configurable. For the mapWithRibbon.aspx layout, only elements from Toolbar are accessible and configurable.
map.aspx, mobile.aspx, and IWS.aspx are the most simplified layouts – only a few client tools, such as zoom, fit all, and feature info can be accessible.
To choose a layout for configuration, select the layout from the Change Layout drop-down list. Checking or unchecking the check box next to the given element decides

Geospatial Portal
65
whether the tool or option is available and enabled in Geospatial Portal with the selected layout. The order of appearance for tools can also be set. To change the order of appearance for any tool, drag an element and move it to the new position. Whole toolbars or single tools in toolbars can be enabled/disabled and moved. By default, full.aspx layout is set when the Layouts tab is opened.
In order to see the changes made for a selected layout, click Run This Layout. In a new Web browser tab, Geospatial Portal with the currently chosen (in the Change Layout field) layout will be opened. The Run Portal button opens Geospatial Portal in the default layout. See the Starting Configuration (on page 34) chapter for more details about setting a default layout for Geospatial Portal instance.
Geospatial Portal
66
List of configurable tools and functions
Map Content
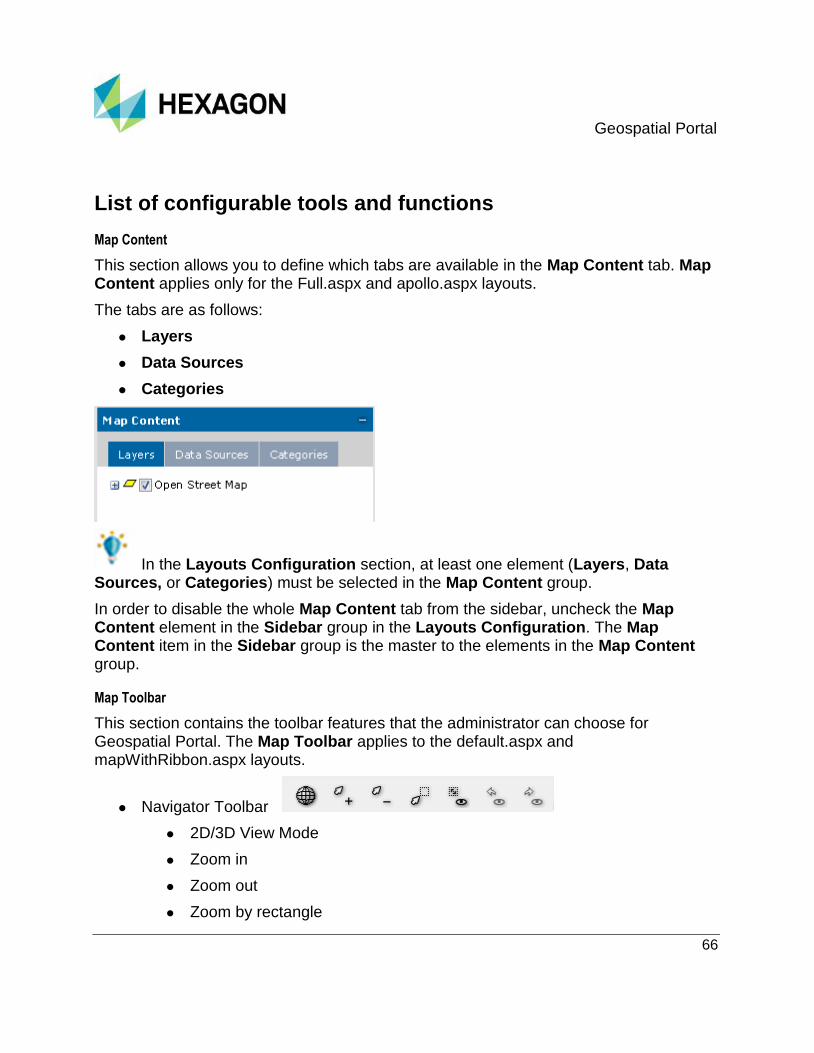
This section allows you to define which tabs are available in the Map Content tab. Map Content applies only for the Full.aspx and apollo.aspx layouts.
The tabs are as follows:
Layers
Data Sources
Categories
In the Layouts Configuration section, at least one element (Layers, Data Sources, or Categories) must be selected in the Map Content group.
In order to disable the whole Map Content tab from the sidebar, uncheck the Map Content element in the Sidebar group in the Layouts Configuration. The Map Content item in the Sidebar group is the master to the elements in the Map Content group.
Map Toolbar
This section contains the toolbar features that the administrator can choose for Geospatial Portal. The Map Toolbar applies to the default.aspx and mapWithRibbon.aspx layouts.
Navigator Toolbar
2D/3D View Mode
Zoom in
Zoom out
Zoom by rectangle

Geospatial Portal
67
Fit all
ToolbarMapZoomHistoryControl
Tools
Feature info
Scale bands configuration
Overview window
User maps
Print map
Data window
Where am I?
Show a link to the map
Dynamic object view
WMC
About
Log
ToolbarMapScaleControl
High Contrast mode
Font Size
Measurements
Show coordinates
Measure distance
Measure area
Clear measures
Show/hide measurements
Geospatial Portal
68
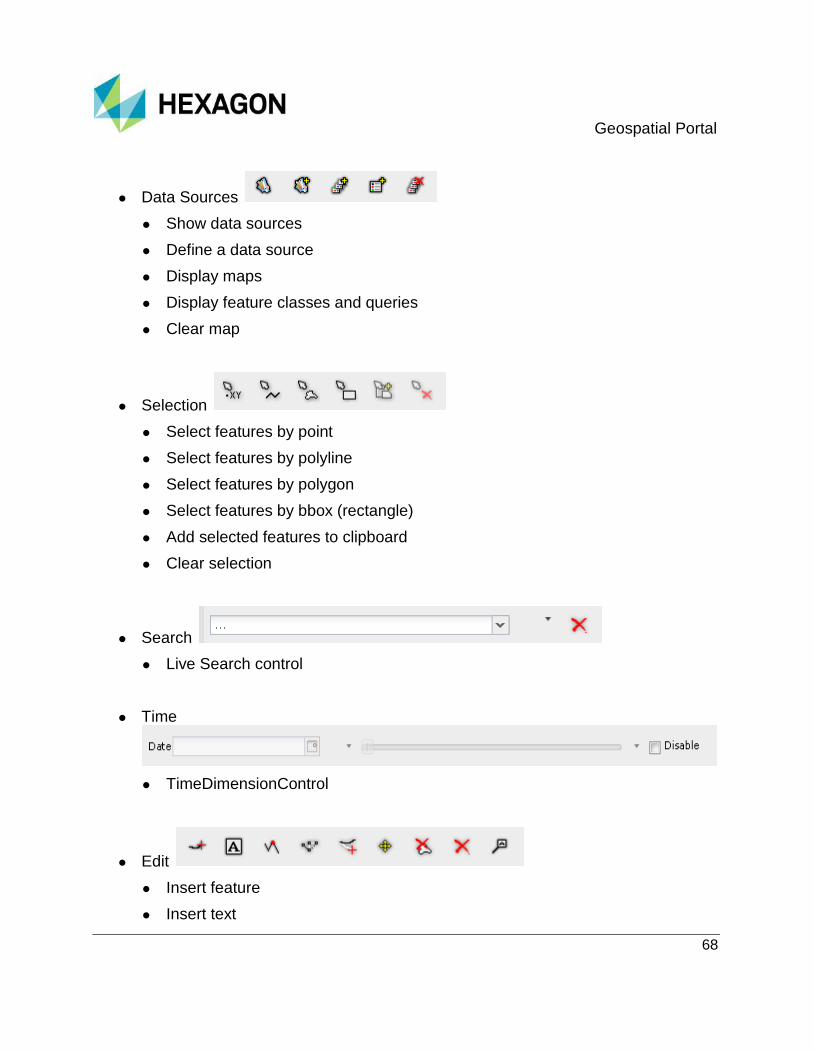
Data Sources
Show data sources
Define a data source
Display maps
Display feature classes and queries
Clear map
Selection
Select features by point
Select features by polyline
Select features by polygon
Select features by bbox (rectangle)
Add selected features to clipboard
Clear selection
Search
Live Search control
Time
TimeDimensionControl
Edit
Insert feature
Insert text

Geospatial Portal
69
Snap
Edit geometry
Continue geometry
Move geometry
Remove part of geometry
Remove selected features from the database
Insert marker/annotation
Authentication
MembershipControl
Quality Monitor
Quality Monitor data window
Sidebar
This section allows you to define which tabs are available in the left pane of Geospatial Portal.
For Full.aspx layout:
Map content
Search geographic names (unavailable for apollo.aspx layout)
Search for data (metadata) (unavailable for apollo.aspx layout)
Analyses
3D Features

Geospatial Portal
70
Settings
For apollo.aspx and apollopro.aspx layout:
Map Content
Search ERDAS APOLLO Catalog
Browse ERDAS APOLLO Catalog
Clip-Zip-Ship
Geoprocessing (only for apollopro.aspx layout)
Analyses
3D Features
Settings

Geospatial Portal
71
Client tools
Applies only to the map.aspx layout, which provides a pure map view only with a few simple embedded control tools:
2D/3D View Mode
Zoom in
Zoom out
Zoom by rectangle
Fit all
Feature info
Workflow Manager
In the Workflow Manager tab, you can connect the GeoMedia Smart Client Workflows to the Geospatial Portal. GeoMedia Smart Client Workflows offer an easy-to-use metalanguage to guide users through workflows. Form-based, task specific workflows for the browser that primarily supported attributive data but also may contain a spatial component. Organizations running Geospatial Portal can now use them together with Workflow Manager to automate business processes. Workflow Manager is a standalone product and a rich toolset that lets you construct highly-focused processes that can be made available in the browser. With the simple configuration defined in XML, you can create your own processes with lists and forms to edit attributive data. Connected to Geospatial Portal GeoMedia Smart Client Workflows can then be run and executed in Geospatial Portal.
In order to configure GeoMedia Smart Client Workflows with Geospatial Portal:
1. Run Administration Console and go to the Geospatial Portal Configuration section.
2. Click the Workflow Manager tab.
Geospatial Portal
72
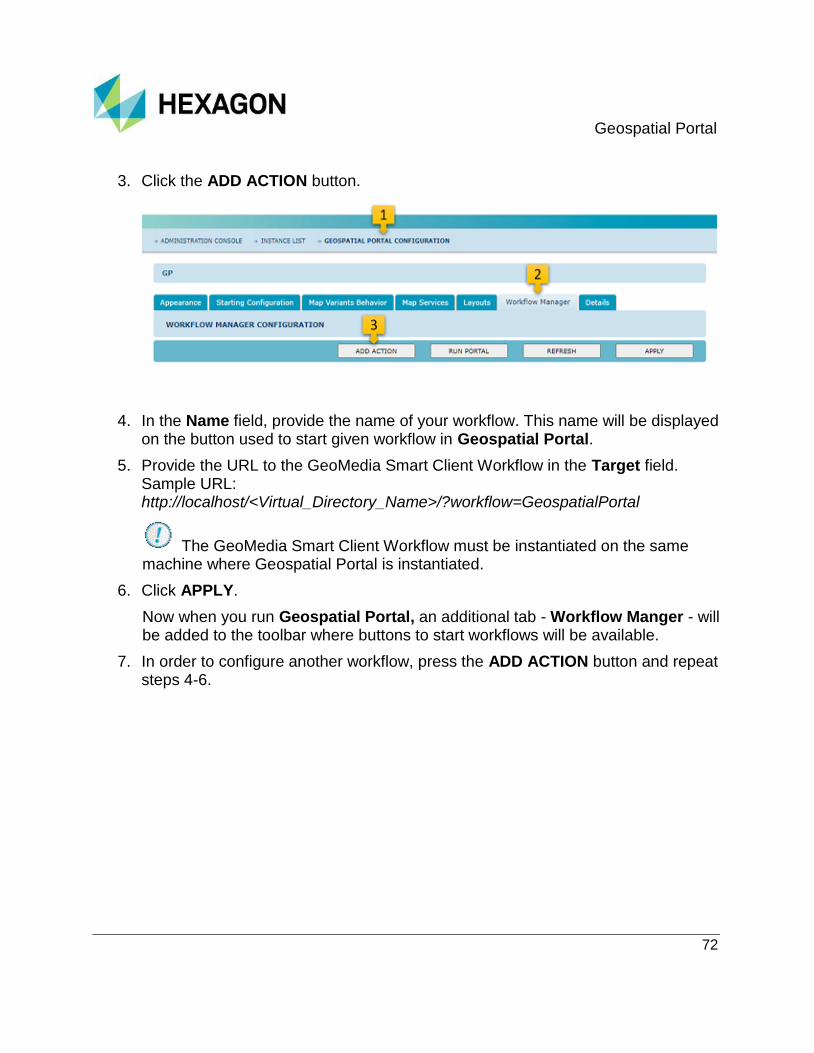
3. Click the ADD ACTION button.
4. In the Name field, provide the name of your workflow. This name will be displayed on the button used to start given workflow in Geospatial Portal.
5. Provide the URL to the GeoMedia Smart Client Workflow in the Target field. Sample URL: http://localhost/<Virtual_Directory_Name>/?workflow=GeospatialPortal
The GeoMedia Smart Client Workflow must be instantiated on the same machine where Geospatial Portal is instantiated.
6. Click APPLY.
Now when you run Geospatial Portal, an additional tab - Workflow Manger - will be added to the toolbar where buttons to start workflows will be available.
7. In order to configure another workflow, press the ADD ACTION button and repeat steps 4-6.

Geospatial Portal
73
8. To remove an already configured workflow, click the Remove button for the given workflow.
To obtain information how to create GeoMedia Smart Client Workflows, please see the GeoMedia Smart Client http://smartclient.intergraph.at/documentation/Main_Page on-line documentation.
Details Tab
On the Details tab, you can obtain details about the Geospatial Portal instance. The following information is listed:
Instance name
Instance type
Description
Web site
Virtual directory name

Geospatial Portal
74
Configuration Portal
The Configuration Portal Layout is a special layout of Geospatial Portal that contains only selected functionalities used for preparing Starting Configuration for Geospatial Portal and Consumer Portal Layout instances and applying them to the selected instances.
With this special Configuration Portal layout you can:
Manage data sources
Define scale bands
Find and apply the SRS used for starting configuration.
Search geographic names
Search and Browse the ERDAS APOLLO Catalog
Perform Analysis
Manage the map content and adjust the map(s) view.
Create the User Maps and Workspaces and apply them directly to the selected Geospatial Portal and/or Consumer Portal Instance.
The Configuration Portal is embedded with the Administration Console.
Running the Configuration Portal:
1. Run the Administration Console.
a. Open your favorite browser.
b. Write the http administration address (for example, http://<servername>/AdministrationConsole).
c. Press Enter.

Geospatial Portal
75
2. In the Administration Console click the Maps & Workspaces link on the Home section or under the Client Configuration box.
3. The Configuration Portal will open in a new Web browser tab.
If the Configuration Portal will not open in a new Web browser tab or window, disable the pop up blocker for your Web browser.
In Internet Explorer on the Pop-up blocker notification, click the Options for this site button and select Always allow:

Geospatial Portal
76
In Chrome, click on the Pop-up blocker notification, select Always allow pop-ups and click Done:
In Mozilla FireFox, click on the Options button on the Pop-up blocker notification and, from the context menu, select Allow pop-ups for:
Defining a starting workspace with Configuration Portal
1. Using all available functionalities in Configuration Portal, prepare a map composition(s).
For more information on how to use particular tools of Configuration Portal, refer to the appropriate sections of the Geospatial Portal User Guide.
2. Go to the User maps tab and create a workspace with map(s) that will act as your starting workspace.
3. Select the Public option for your workspace and maps that will act as your starting workspace.
All maps in your workspace will represent map variants in Geospatial Portal and/or map compositions in Consumer Portal Layout.

Geospatial Portal
77
4. For your workspace, from the context menu, select Set for instance.. > As starting workspace for a non-mobile workspace, or select Set for instance... > As mobile workspace if you want to apply the selected workspace as the starting one for a mobile workspace. The dialog with all available instances for Geospatial Portal and Consumer Portal Layout will appear.
5. Select the instance(s) for which you want set your workspace, and click Set.
Defining an overview map with Configuration Portal:
1. Using all available functionalities in Configuration Portal, prepare a map composition(s).
2. Go to the User maps tab, open the context menu for Maps, and select Add > From map. Optionally, you can load maps that you prepared and saved earlier. To do this, select From gpm file.
3. To set a selected map as an overview map for an instance(s), open the context menu for the selected map and click Set for instance.
4. Select an instance(s) from the list to which the overview map is to be applied. Click Set to set an overview map for the chosen instance.
See also: Starting Configuration (on page 34) topic.
Enabling Open Street Map as a Default Map Tile Sources
You can enable Open Street Map (OSM) as a default map tile source for all Geospatial Portal and Consumer Portal Layout instances.
Before enabling Open Street Map (OSM) as your default map tile source, you must confirm that your use of OSM map tiles will strictly conform to the Tile Usage Policy described at https://operations.osmfoundation.org/policies/tiles/
You can enable the Open Street Map (OSM) as a default map tile source for all Geospatial Portal and Consumer Portal Layout instances during the Geospatial Portal installation process, as described in the Configuring the Administration Console section of the Geospatial Portal Installation Guide, or you can do it later in the Administration Console.

Geospatial Portal
78
Enabling the OpenStreetMap (OSM):
1. Run the Administration Console
a. Open your favorite browser.
b. Write the http administration address (for example, http://<servername>/AdministrationConsole).
c. Press Enter.
2. In the Administration Console, click the 3rd Party Map Providers link on the Home section or under the Client Configuration box.
3. The 3rd Party Map Providers will open.
4. Select the "Yes" option.
By selecting "Yes," you confirm that your use of OSM map tiles will strictly conform to the Tile Usage Policy described at https://operations.osmfoundation.org/policies/tiles/. If you will not or cannot strictly conform the Tile Usage Policy, do not select "Yes".
5. Click Apply.

Geospatial Portal
79
The names and terms of use for other map tile providers are listed in the configuration file of this software for your reference. Open Street Map is open data, licensed under the Open Data Commons Open Database License (ODbL) (http://opendatacommons.org/licenses/odbl/) (http://www.openstreetmap.org/copyright).

Geospatial Portal
80
S E C T I O N 4
Configuring Geospatial Portal - Consumer Instance with Administration Console Most of the activities associated with the configuration of the Geospatial Portal - Consumer are carried out with the Administration Console in the Consumer Portal Configuration section.
To begin the configuration of the Geospatial Portal - Consumer, go to the Consumer
Portal Configuration section by clicking Configure in the ACTION column for a selected Geospatial Portal - Consumer instance. In the Configuration section, the administrator can configure:
Search sources to be used with Geospatial Portal - Consumer Portal
Starting Configuration
Consumer Portal Appearance Options (see "Setting Consumer Portal Appearance Options" on page 96)
Map Compositions Behavior (see "Setting Map Variant's Behavior" on page 108)
The configuration section for Geospatial Portal - Consumer consists of the following tabs:
Searching Configuration - here you can assign (or remove already assigned) searches for Geospatial Portal - Consumer.
Appearance
Starting Configuration - here you can define the view mode (2D/3D) in which the Geospatial Portal - Consumer runs and provide the Google API Key.
Map Composition Behavior
Details - here you can see summary about your instance.
To display Google Maps in Consumer Portal, you must sign up for a Google Maps API key. You must have a different key for each domain name on which you will host a Consumer Portal site using the Google Maps. The Google API key has to be included in the Consumer Portal instance client_config.json file. You can also provide the key in the GoogleMaps API Key field, in the Starting Configuration tab of Administration Console.

Geospatial Portal
81
The scope of Consumer Portal functionalities related to Google Map (e.g. availability of Street View, Google search engines or Google map types availability) is determined by the Google key and results from the permissions granted on the Google account of the user for whom the key was issued.
After setting the desired parameters, you must save changes by clicking APPLY, which writes changes made only in the current tab.
To see the changes quickly, click RUN PORTAL. The Geospatial Portal - Consumer will be run immediately in the default Web browser.
Use the REFRESH button to restore all values from the last saved state.
Defining Searches for Consumer Portal Layout
Consumer Portal gives you the ability to search for objects from the Oracle database or WebMap Publisher Services (WMPS) or Location Utility Web Service (LUWS). For this purpose, the administrator must configure the Search definitions which specify the search service type, database, tables, attributes, and other parameters used for searches. You can create any number of such search definitions. The administrator must then assign created search definitions to the particular instance of the Consumer Portal layout. More than one search definition can be assigned to one instance as well as the same definition can be used by several instances. Users of Consumer Portal can choose the search definition (from those assigned to a given instance) they want to use.
For information on how to prepare your Oracle Database to work with Consumer Portal search see: Preparing Oracle Database to Work with Consumer Portal Search (on page 240)
In order to configure portal search for Oracle Database:
1. Run the Administration Console.
2. In the Administration Console, click the Search Configuration link on the Home section or under the Client Configuration box.

Geospatial Portal
82
The Database Search tab will be opened where you can define search definitions.
3. On the first (DEFINE SEARCH) screen of the Database Search tab type the name of your search definition In the Search name field, and click Add [1]. The name will appear in the Search list [2] and you will be redirected to the next DEFINE SEARCH ITEMS screen. You can always go back to the DEFINE SEARCH screen and define any number of search definitions. The names from the Search list will be visible in the Consumer Portal Layout GUI.

Geospatial Portal
83
To configure Search items for already defined Search (available on the Search list) just select the desired search and move to the next screen - DEFINE SEARCH ITEMS
4. One search definition can allow users to search for different items (types of objects) through multiple tables and/or multiple databases. On the second DEFINE SEARCH ITEMS screen of the Database Search tab define the search items. Here you indicate what kind of objects will be searched. To define search items, type your name in the Search item name field and click Add [3]. Created search item(s) will appear in the Search item list [4] and you will be redirected to the next screen - SELECT SEARCHABLE ATTRIBUTES.
You can always go back to the previous screen and define more search items. To select searchable attributes for already defined search items (available
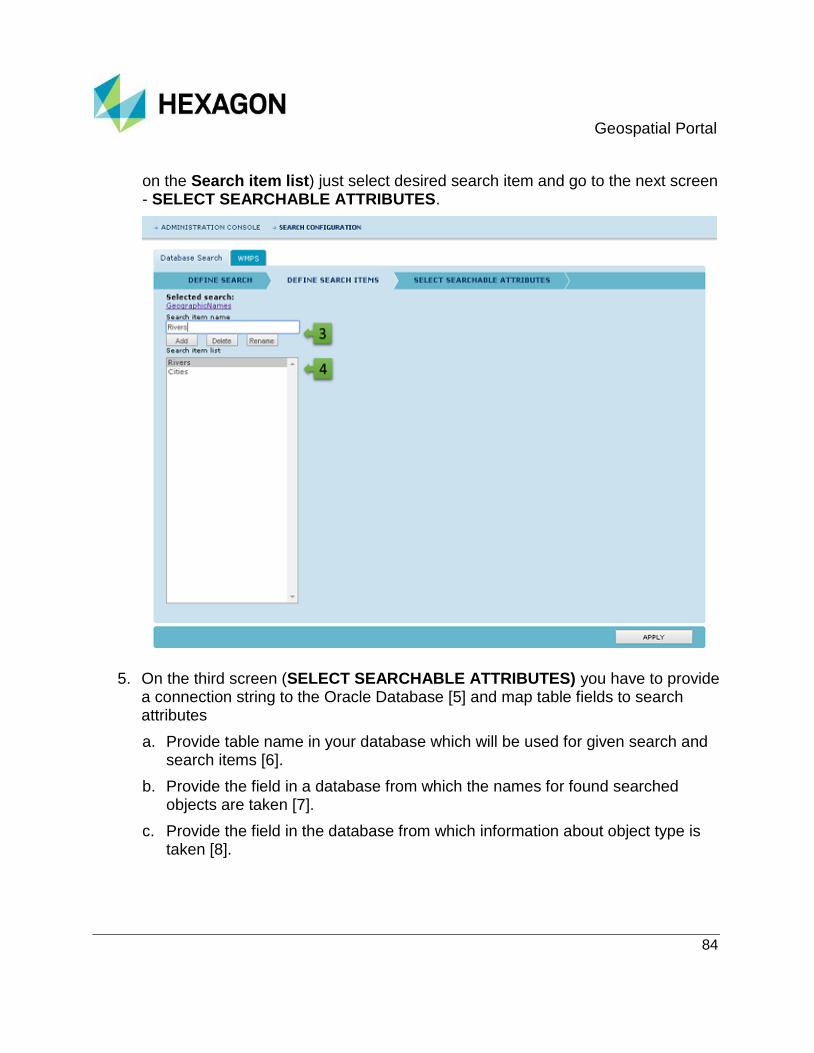
Geospatial Portal
84
on the Search item list) just select desired search item and go to the next screen - SELECT SEARCHABLE ATTRIBUTES.
5. On the third screen (SELECT SEARCHABLE ATTRIBUTES) you have to provide a connection string to the Oracle Database [5] and map table fields to search attributes
a. Provide table name in your database which will be used for given search and search items [6].
b. Provide the field in a database from which the names for found searched objects are taken [7].
c. Provide the field in the database from which information about object type is taken [8].

Geospatial Portal
85
For example in the table with POI (Point of Interest) the type field may determine the types of the objects such as restaurants, museums, hotels, shops etc.
d. Map the fields that specify the geometry for searched objects:
The coordinates used to determine the position of the pin(s) which is displayed on the map after finding the object(s). These are provided in the Centroid X field and the Centroid Y field [9].
Coordinates defining the area to which the map is zoomed after finding the object. These are provided in the following fields: Top, Bottom, Left, and Right [10].
e. Select fields from your database that will be used as searchable attributes [11].

Geospatial Portal
86
6. Click APPLY.
Ensure the 32-bit Oracle client is installed.
Ensure the ODP.NET is published in the client installation problem.
Starting with Oracle Database Client 12c Release 2 there was a change in deployment of the ODP.NET components. The ODP.NET assemblies are no longer published by the installer. This step must be now done manually in order to ensure proper Oracle search configuration in Geospatial Portal - Consumer.
To register ODP.NET components:
1. Create a BAT file (e.g. regasm.bat) anywhere in the file system (e.g. Oracle client installation folder)
2. Use the following set of commands to register the assemblies manually into Global Assembly Cache (GAC):
rem Set path to the Oracle Client home
rem In this example it is
'C:\app\client32\Administrator\product\12.2.0\client_1'
set
Oracle_x86=C:\app\client32\Administrator\product\12.2.0\clie
nt_1
set OraProvCfg_x86=%Oracle_x86%\ODP.NET\bin\4\OraProvCfg.exe
"%OraProvCfg_x86%" /action:gac
/providerpath:%Oracle_x86%\ODP.NET\managed\common\Oracle.Man
agedDataAccess.dll
"%OraProvCfg_x86%" /action:gac
/providerpath:%Oracle_x86%\ODP.NET\managed\PublisherPolicy\4
\Policy.4.121.Oracle.ManagedDataAccess.dll
"%OraProvCfg_x86%" /action:gac
/providerpath:%Oracle_x86%\ODP.NET\managed\PublisherPolicy\4
\Policy.4.122.Oracle.ManagedDataAccess.dll
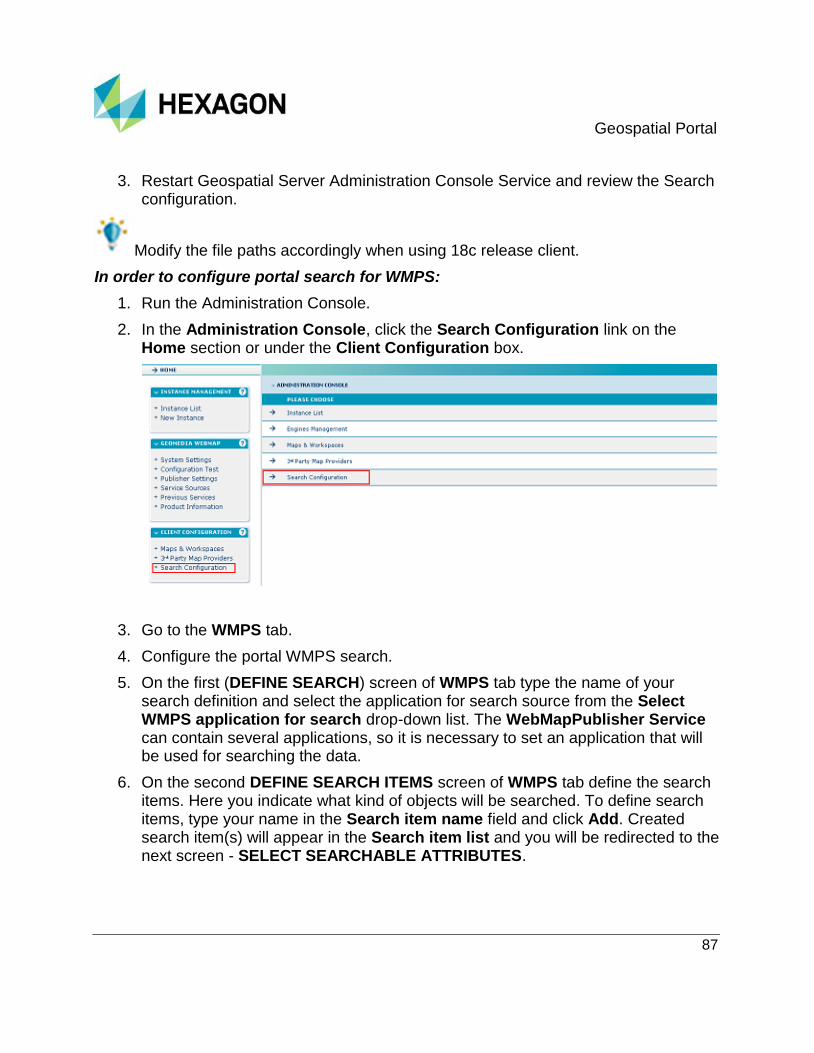
Geospatial Portal
87
3. Restart Geospatial Server Administration Console Service and review the Search configuration.
Modify the file paths accordingly when using 18c release client.
In order to configure portal search for WMPS:
1. Run the Administration Console.
2. In the Administration Console, click the Search Configuration link on the Home section or under the Client Configuration box.
3. Go to the WMPS tab.
4. Configure the portal WMPS search.
5. On the first (DEFINE SEARCH) screen of WMPS tab type the name of your search definition and select the application for search source from the Select WMPS application for search drop-down list. The WebMapPublisher Service can contain several applications, so it is necessary to set an application that will be used for searching the data.
6. On the second DEFINE SEARCH ITEMS screen of WMPS tab define the search items. Here you indicate what kind of objects will be searched. To define search items, type your name in the Search item name field and click Add. Created search item(s) will appear in the Search item list and you will be redirected to the next screen - SELECT SEARCHABLE ATTRIBUTES.
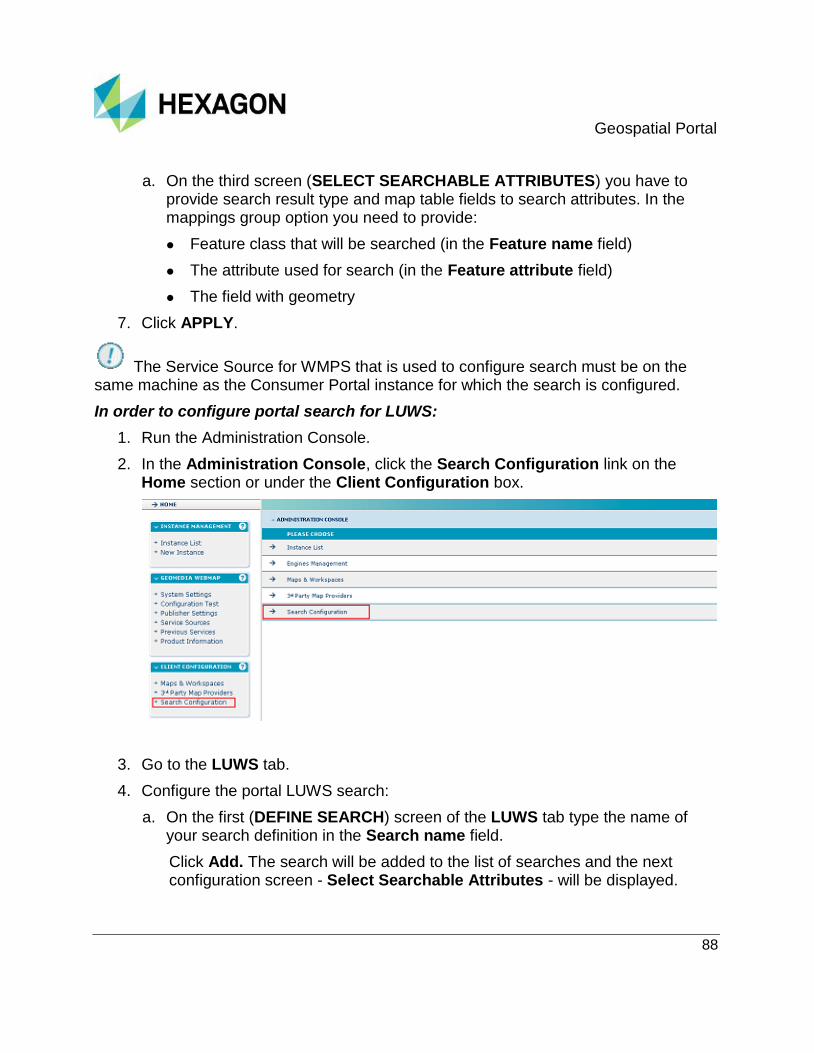
Geospatial Portal
88
a. On the third screen (SELECT SEARCHABLE ATTRIBUTES) you have to provide search result type and map table fields to search attributes. In the mappings group option you need to provide:
Feature class that will be searched (in the Feature name field)
The attribute used for search (in the Feature attribute field)
The field with geometry
7. Click APPLY.
The Service Source for WMPS that is used to configure search must be on the same machine as the Consumer Portal instance for which the search is configured.
In order to configure portal search for LUWS:
1. Run the Administration Console.
2. In the Administration Console, click the Search Configuration link on the Home section or under the Client Configuration box.
3. Go to the LUWS tab.
4. Configure the portal LUWS search:
a. On the first (DEFINE SEARCH) screen of the LUWS tab type the name of your search definition in the Search name field.
Click Add. The search will be added to the list of searches and the next configuration screen - Select Searchable Attributes - will be displayed.
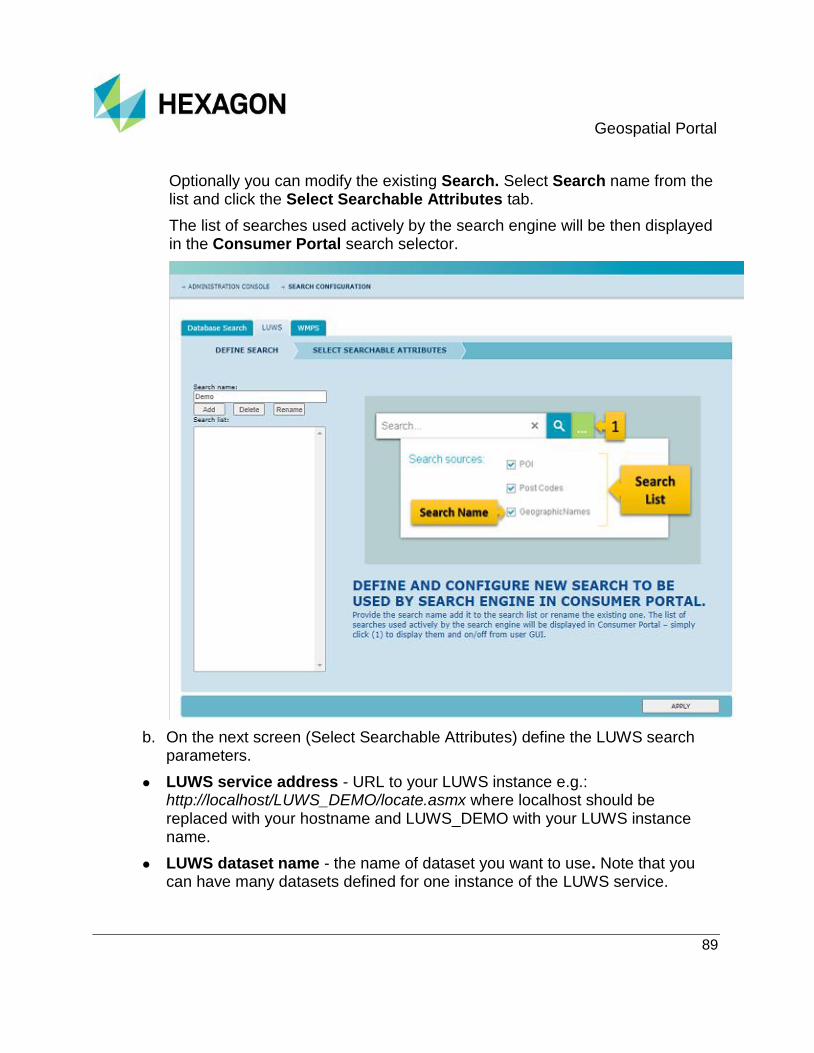
Geospatial Portal
89
Optionally you can modify the existing Search. Select Search name from the list and click the Select Searchable Attributes tab.
The list of searches used actively by the search engine will be then displayed in the Consumer Portal search selector.
b. On the next screen (Select Searchable Attributes) define the LUWS search parameters.
LUWS service address - URL to your LUWS instance e.g.: http://localhost/LUWS_DEMO/locate.asmx where localhost should be replaced with your hostname and LUWS_DEMO with your LUWS instance name.
LUWS dataset name - the name of dataset you want to use. Note that you can have many datasets defined for one instance of the LUWS service.
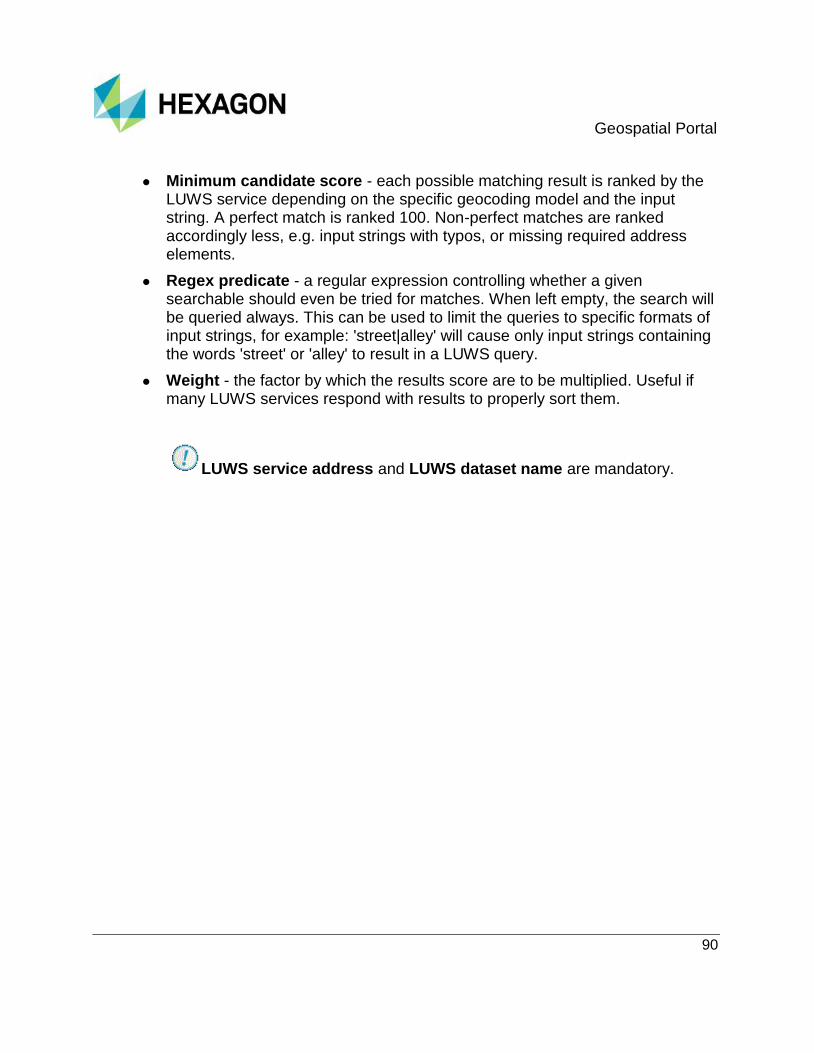
Geospatial Portal
90
Minimum candidate score - each possible matching result is ranked by the LUWS service depending on the specific geocoding model and the input string. A perfect match is ranked 100. Non-perfect matches are ranked accordingly less, e.g. input strings with typos, or missing required address elements.
Regex predicate - a regular expression controlling whether a given searchable should even be tried for matches. When left empty, the search will be queried always. This can be used to limit the queries to specific formats of input strings, for example: 'street|alley' will cause only input strings containing the words 'street' or 'alley' to result in a LUWS query.
Weight - the factor by which the results score are to be multiplied. Useful if many LUWS services respond with results to properly sort them.
LUWS service address and LUWS dataset name are mandatory.
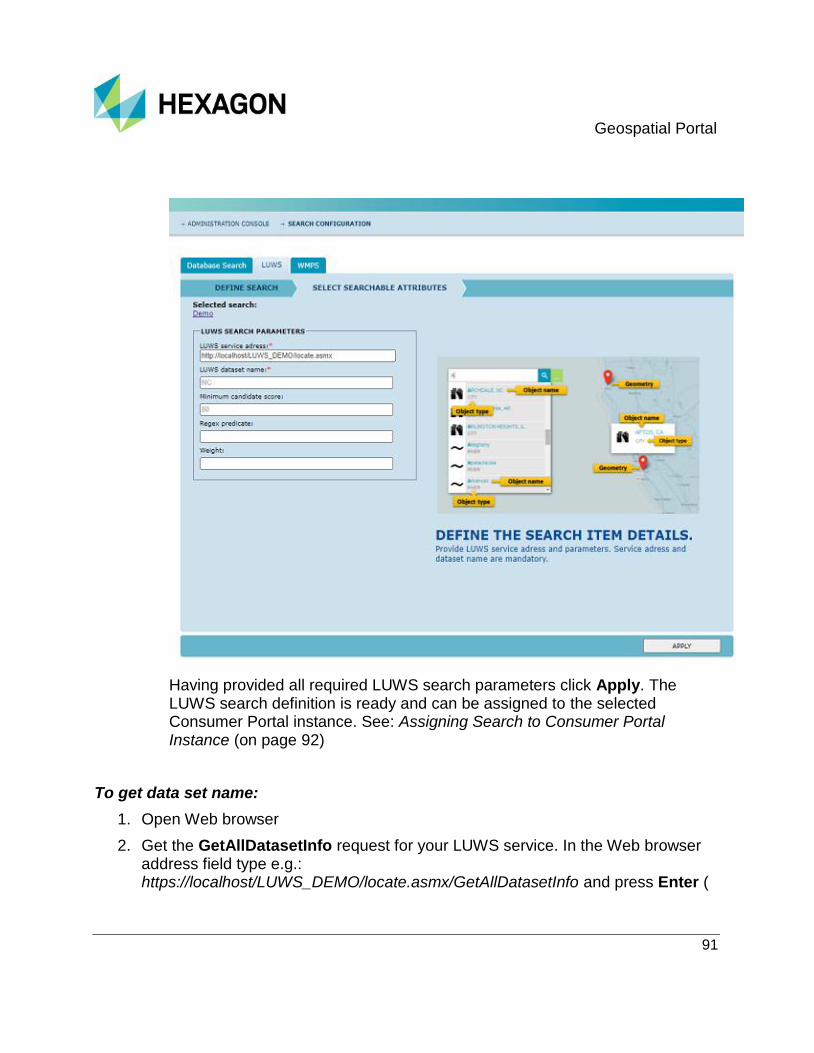
Geospatial Portal
91
Having provided all required LUWS search parameters click Apply. The LUWS search definition is ready and can be assigned to the selected Consumer Portal instance. See: Assigning Search to Consumer Portal Instance (on page 92)
To get data set name:
1. Open Web browser
2. Get the GetAllDatasetInfo request for your LUWS service. In the Web browser address field type e.g.: https://localhost/LUWS_DEMO/locate.asmx/GetAllDatasetInfo and press Enter (
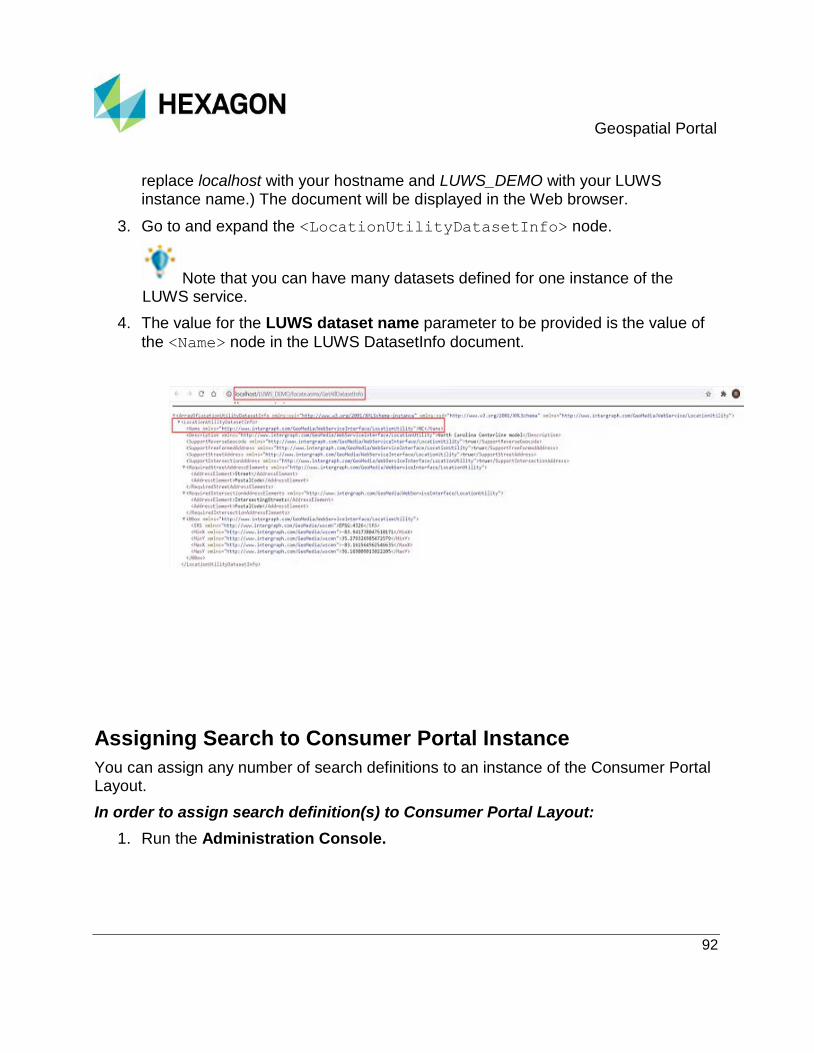
Geospatial Portal
92
replace localhost with your hostname and LUWS_DEMO with your LUWS instance name.) The document will be displayed in the Web browser.
3. Go to and expand the <LocationUtilityDatasetInfo> node.
Note that you can have many datasets defined for one instance of the LUWS service.
4. The value for the LUWS dataset name parameter to be provided is the value of
the <Name> node in the LUWS DatasetInfo document.
Assigning Search to Consumer Portal Instance
You can assign any number of search definitions to an instance of the Consumer Portal Layout.
In order to assign search definition(s) to Consumer Portal Layout:
1. Run the Administration Console.
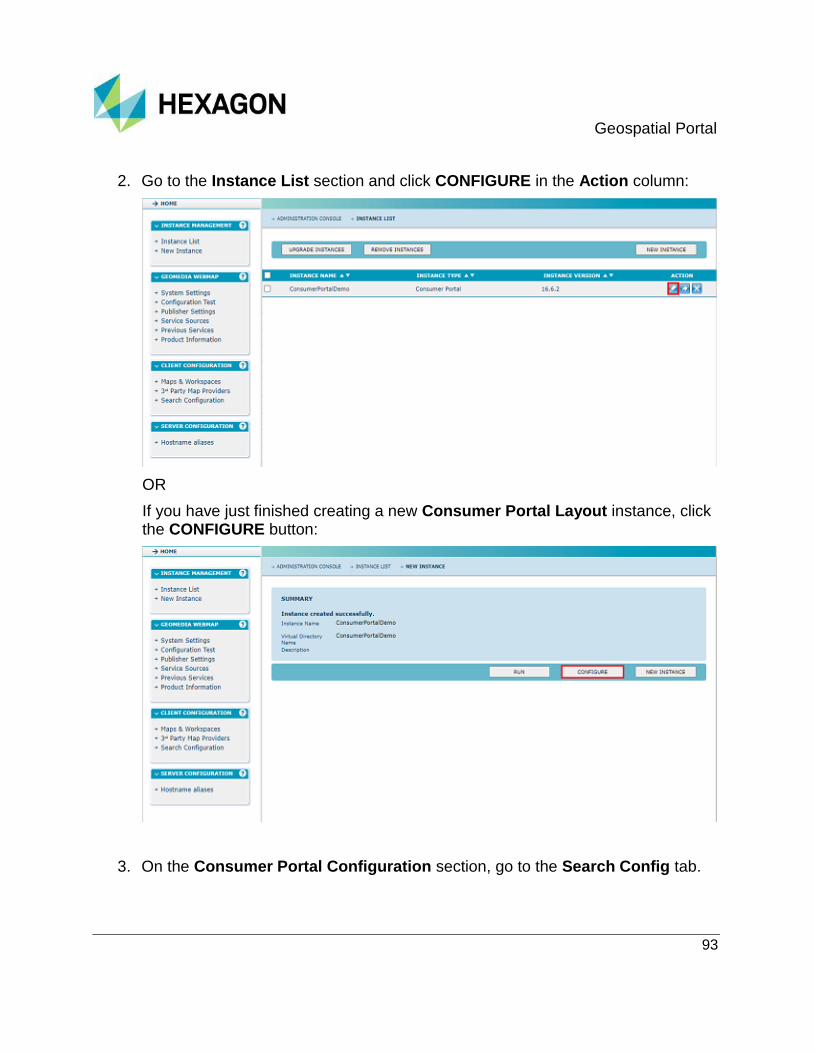
Geospatial Portal
93
2. Go to the Instance List section and click CONFIGURE in the Action column:
OR
If you have just finished creating a new Consumer Portal Layout instance, click the CONFIGURE button:
3. On the Consumer Portal Configuration section, go to the Search Config tab.

Geospatial Portal
94
4. On the Available search sources field, all search definitions on the server are listed. To learn how to configure searches, see Defining Searches for Consumer Portal Layout.
Select the search definition you want to use with your Consumer Portal Layout
instance and click the forward arrow button . Selected search definition(s) will appear on the Chosen search sources list.
5. Click APPLY.
The search GUI controls in Consumer Portal is not visible for users until search sources are applied in the configuration.
In order to remove search definition(s) to Consumer Portal Layout:
1. Go to the Instance List section and click CONFIGURE in the Action column:
2. On the Consumer Portal Configuration section, go to the Search Config tab.
3. On the Chosen search sources field all search definitions applied to your instance are listed.
4. Select the search definition you want to remove from your Consumer Portal
Layout instance and click the back arrow . Selected search definition(s) will be moved to the Available search sources list.

Geospatial Portal
95
5. Click APPLY.
Enabling Coordinate Search
Consumer Portal provides a built-in coordinate search. This feature is by default disabled for each created Consumer Portal instance.
To enable built-in coordinate search in Consumer Portal:
1. Run Administration Console.
2. Open the Instance List.
3. For selected Consumer Portal instance click Configure button to open the Consumer Portal Configuration screen.
4. In the Searching Configuration tab move BuiltIn.CoordinateSearch entry from the Available search sources to the Chosen search sources list.
5. Click Apply.

Geospatial Portal
96
6. Refresh the Consumer Portal page to see the changes. Coordinate search will be present in the searches list in Consumer Portal GUI.
Setting Consumer Portal Appearance Options
In the Appearance tab you can set for the Consumer Portal instance the following display options:
Layout
Show map info
Show Scale Bar

Geospatial Portal
97
Collapse Legend Group
Layout
This option allows choosing the Consumer Portal layout.
Geospatial Portal Consumer offers its users two layouts referred as to Panel layout (legacy) and the Window layout. The scope of Consumer Portal functionality is identical for both layouts. The slight differences concern the user interface and the method of accessing some functions. The Window layout window is characterized by floating windows and dialogs that can be freely arranged by the user. The Panel layout offers the sidebar panel where users can manage Layers and access the Consumer Portal Settings.
The default is the Window layout.
Consumer detects Web browser type (mobile and desktop). The Panel layout is always applied for the Consumer Portal being displayed on tiny screens of mobile devices (using the new Window layout on mobile devices may be a bit uncomfortable for the users).
Map Info
Map Info - if enabled (default setting) the Map Info in Consumer Portal is displayed.
Map info provides a set of information about active map:
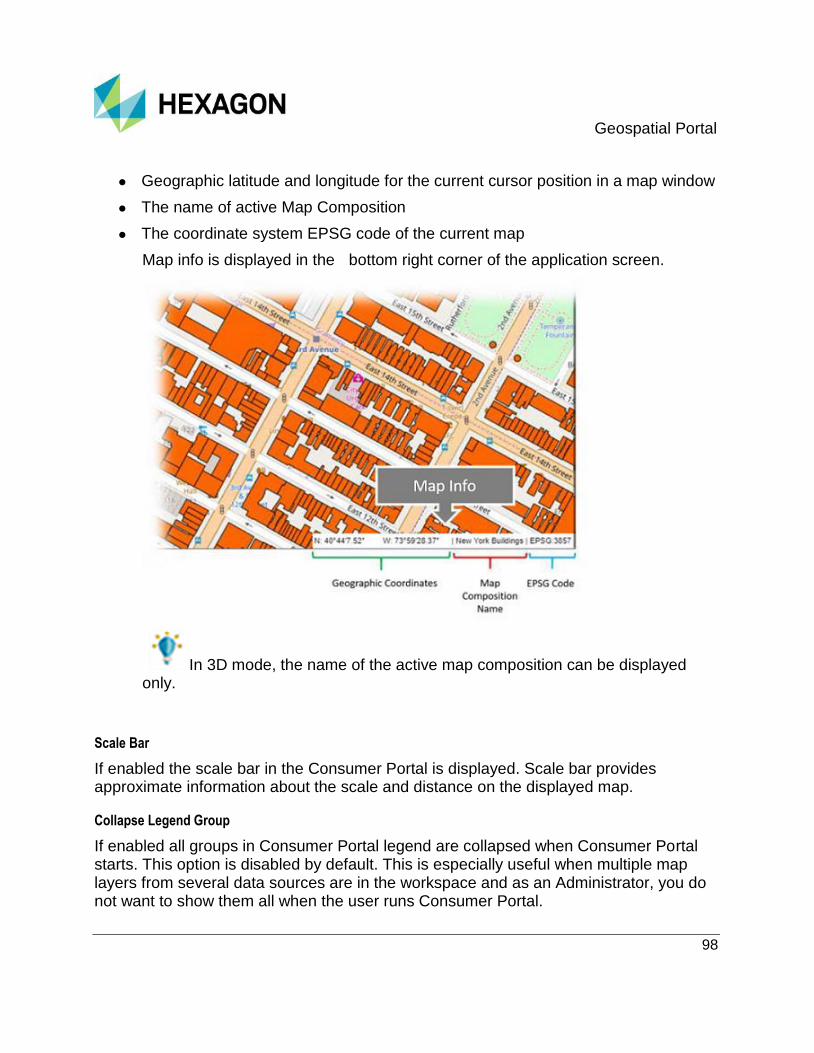
Geospatial Portal
98
Geographic latitude and longitude for the current cursor position in a map window
The name of active Map Composition
The coordinate system EPSG code of the current map
Map info is displayed in the bottom right corner of the application screen.
In 3D mode, the name of the active map composition can be displayed only.
Scale Bar
If enabled the scale bar in the Consumer Portal is displayed. Scale bar provides approximate information about the scale and distance on the displayed map.
Collapse Legend Group
If enabled all groups in Consumer Portal legend are collapsed when Consumer Portal starts. This option is disabled by default. This is especially useful when multiple map layers from several data sources are in the workspace and as an Administrator, you do not want to show them all when the user runs Consumer Portal.

Geospatial Portal
99
The legend changes are stored during one Consumer Portal session. This means that user changes in the active Map Composition legend (layer display on/off, transparency, layer order) are preserved until the session expires, even when other Map Compositions are later displayed and then the previous one (where legend changes were made).
.
Configuring the Starting Map and Map Compositions in Consumer Portal Layout
This section explains how to configure starting maps for Geospatial Portal - Consumer. Only a public workspace and maps can be used as a starting map and predefined maps available in Layers panel of Geospatial Portal - Consumer.
To define starting configuration:
1. Run the Configuration Portal:
In the Administration Console, click the Maps & Workspaces link on the Home section or under the Client Configuration box.
The Configuration Portal will open in a new Web browser tab.

Geospatial Portal
100
If the Configuration Portal will not open in a new Web browser tab or window, disable the pop up blocker for your Web browser.
2. Prepare a map composition(s) in Configuration Portal . You can add new Data Sources [1] and manage them with Map Content [2] functionality.
For more information on how to use particular tools of Configuration Portal, refer to the appropriate sections of the Geospatial Portal User Guide.
3. Create a workspace with map(s) that will act as your starting workspace. Go to the User maps [3], open the context menu for Workspaces, and select Add > From map [4]. Optionally, you can load a workspace that you prepared and saved earlier. To do this, select the option From gpw file [5].

Geospatial Portal
101
4. Select the Public option for your workspace and maps that will act as your starting workspace.
All maps in your workspace will represent a map compositions in Consumer Portal Layout. The first map (placed on top) in your workspaces will be displayed on start. The sequence of maps in the created workspace corresponds to the sequence map compositions on the Layers tab in the Consumer Portal Layout.
5. Set the selected workspace for an instance(s).
Open the context menu for the selected workspace [6]. For your workspace, from the context menu, select Set for instance.. > As starting workspace [7].
The dialog with all available Geospatial Portal and Consumer Portal Layout instances will appear.

Geospatial Portal
102
6. Select the Consumer Portal Layout instance(s) from the list to which the starting workspace is to be applied [8]. Click Set [9] in order to set a workspace for a chosen instance.
By default, the thumbnails for map compositions are not available. See Changing the Tooltips in Consumer Portal Layout topic in Advanced Configuration of Consumer Portal section to obtain help on this topic.
Custom styles for WMPS and its pictograms that are set in Configuration Portal will not be preserved when sending such workspace to Consumer Portal instance. Only pictograms and styles from WMPS service are supported and displayed in Consumer Portal layout.
Handling Locatability in Consumer Portal Feature Info operation for WMS/WMPS
Geospatial Portal supports handling of locatability in Consumer Portal Feature Info operation for WMS/WMPS services. Geospatial Portal allows to set locatability (true/false) for a particular layer. This setting, when set in Administrator Portal, is translated to Consumer Portal starting workspace and carries the behavior of invoked Feature Info in Consumer as shown in the table below:

Geospatial Portal
103
Layer setting in Geospatial (Administrator) Portal
Feature Info for particular layer in Consumer Portal
Is Locatable = True Feature Info Available
Is Locatable = False No Feature Info Available
In order to set isLocatable property for particular layer in Geospatial Portal:
1. Display map layer in Geospatial (Administrator) Portal
2. Click Map Content
3. Open context menu for a particular layer
4. Enable/disable Locatable option
It applies also to map layers that constitute a Consumer Base map.
Configuring Base Maps for Consumer Portal
Administrators can create base maps for a Consumer Portal instance. A base map provides a background of geographical context for the content displayed within a Map Composition. Consumer Portal users can change the base map of the current Map Composition at any time using the base map switcher.
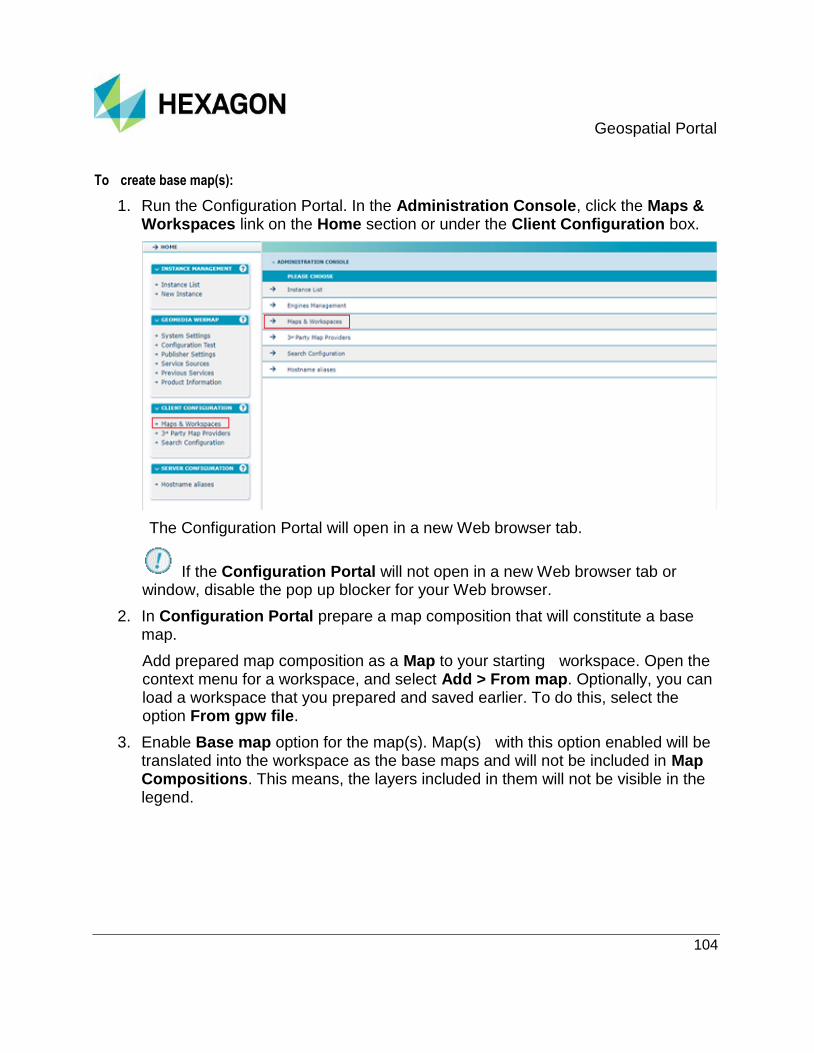
Geospatial Portal
104
To create base map(s):
1. Run the Configuration Portal. In the Administration Console, click the Maps & Workspaces link on the Home section or under the Client Configuration box.
The Configuration Portal will open in a new Web browser tab.
If the Configuration Portal will not open in a new Web browser tab or window, disable the pop up blocker for your Web browser.
2. In Configuration Portal prepare a map composition that will constitute a base map.
Add prepared map composition as a Map to your starting workspace. Open the context menu for a workspace, and select Add > From map. Optionally, you can load a workspace that you prepared and saved earlier. To do this, select the option From gpw file.
3. Enable Base map option for the map(s). Map(s) with this option enabled will be translated into the workspace as the base maps and will not be included in Map Compositions. This means, the layers included in them will not be visible in the legend.

Geospatial Portal
105
All maps with Base map option enabled will be included in Consumer Portal Layout instance. The first base map (from the top) in your workspaces will be displayed on start in Consumer Portal. The order of maps in the base map selector corresponds to the order of maps in Workspace in Administration Portal.
4. Set the workspace for a chosen Consumer Portal instance(s). From the context menu for a Workspace, select Set for instance.. > As starting workspace.
The dialog with all available Geospatial Portal and Consumer Portal Layout instances will appear.Select the Consumer Portal Layout instance(s) from the list to which the starting workspace is to be applied. Click Set in order to set a workspace for a chosen instance.
The base map thumbnails for base map switcher in Consumer Portal GUI are generated automatically on the base of Map Composition thumbnails defined for the Consumer Portal instance. See also: Configuring the Thumbnails for Map Compositions in Consumer Portal Layout (on page 239).
The state of Locatable property for a layer displayed in Administrator Portal translates into later behavior in the Consumer Portal. The Feature Info will be available for a layer when the Locatable option is enabled. If the locatability for a given layer is turned off then the Feature Info cannot be obtained for such layer. It applies also for layers that constitute a Base map.

Geospatial Portal
106
If no base map or only one base map is defined then the base map selector will not appear.
Configuring the View Mode in Consumer Portal
The maps in Consumer Portal Layout can be displayed in both 2D and 3D views. The display mode (2D/3D) setting is global for the entire Consumer Portal Layout instance and consequently for all available map compositions. The display mode (2D / 3D) for the Consumer Portal instance can be set only by the Geospatial Portal administrator in the Administration Console. This mean that the user cannot change the display view in the Web browser where the Consumer Portal Layout is run.
The 3D view in Consumer Portal requires WebGL support for the web browser used. On the Android devices it depends on the browser limitations.
In order to set the display mode for consumer portal instance:
1. Run the Administration Console.
2. Go to the Instance List section and click CONFIGURE in the Action column:
OR
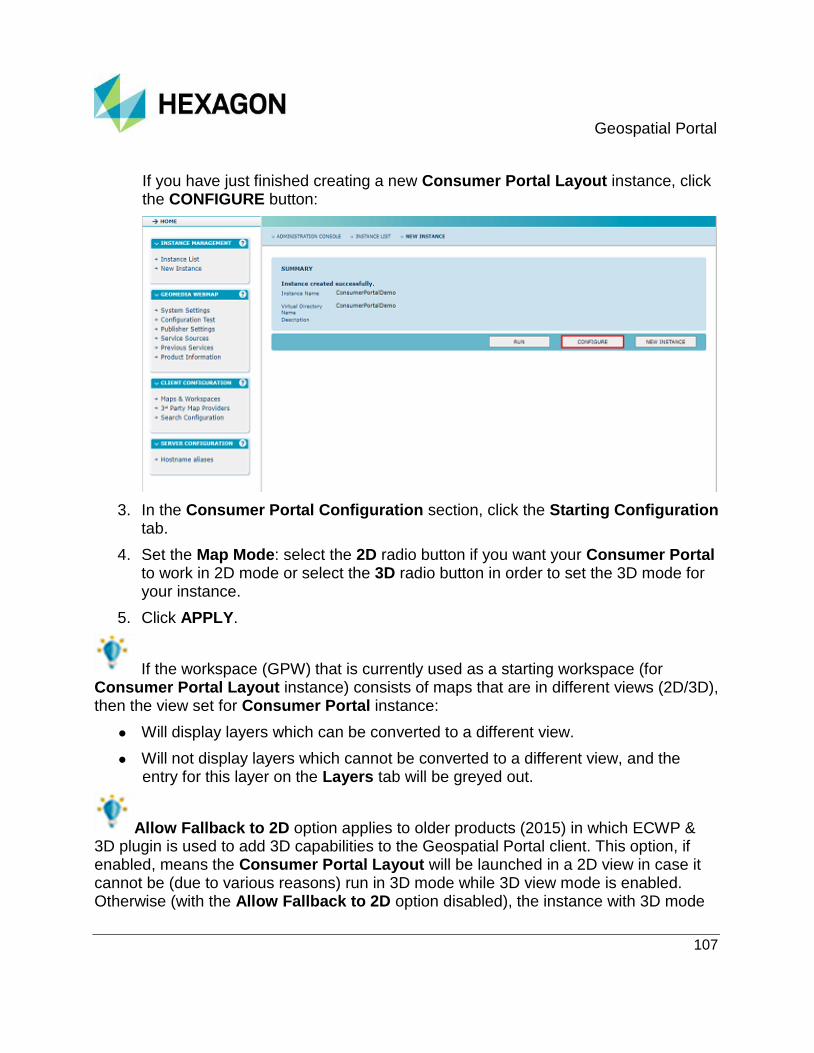
Geospatial Portal
107
If you have just finished creating a new Consumer Portal Layout instance, click the CONFIGURE button:
3. In the Consumer Portal Configuration section, click the Starting Configuration tab.
4. Set the Map Mode: select the 2D radio button if you want your Consumer Portal to work in 2D mode or select the 3D radio button in order to set the 3D mode for your instance.
5. Click APPLY.
If the workspace (GPW) that is currently used as a starting workspace (for Consumer Portal Layout instance) consists of maps that are in different views (2D/3D), then the view set for Consumer Portal instance:
Will display layers which can be converted to a different view.
Will not display layers which cannot be converted to a different view, and the entry for this layer on the Layers tab will be greyed out.
Allow Fallback to 2D option applies to older products (2015) in which ECWP & 3D plugin is used to add 3D capabilities to the Geospatial Portal client. This option, if enabled, means the Consumer Portal Layout will be launched in a 2D view in case it cannot be (due to various reasons) run in 3D mode while 3D view mode is enabled. Otherwise (with the Allow Fallback to 2D option disabled), the instance with 3D mode

Geospatial Portal
108
will not be run. Starting from version 16.6.1, the Allow Fallback to 2D option is no longer available.
Setting Map Variant's Behavior
This topic shows you how to define the map behavior when a map composition is changed. You can now configure map composition settings for Geospatial Portal – Consumer instances.
The “When Changing Map Composition” configuration element available in Administration Console for Consumer instances has two possible settings:
Set New Variant’s Map Range – the Consumer will use the map range defined for the Map Composition to be displayed.
Keep Current Map Range and Map Control – the Consumer retains the current map range when switching between Map Compositions, ignoring of the original range defined for the Map Composition to be displayed.
The latter setting might be useful when providing a different set of layers to be viewed by the user, while they stay in the same area they are viewing.

Geospatial Portal
109
Show Additional Map Switching Options in Map Compositions Panel - with this feature enabled, the users have more ways of switching Map Compositions at their disposal. The additional button switches variants in the opposite way to the "When Changing Map Variant". If the Set New Variant’s Map Range is selected then the additional button will switch and preserve map range position. For option Keep Current Map Range and Map Control enabled, the button will switch and load composition’s map range.

Geospatial Portal
110
S E C T I O N 5
Advanced Configuration Geospatial Portal is an application that is ready to use immediately after installation due to its default configuration. In addition to basic product configuration that can be modified using the Administration Console, you can also aim at exploring advanced configuration available in Web.config file in order to suit the product to your extraordinary needs.
Geospatial Portal Components Location in the System
Template
The Geospatial Portal application is by default installed in the folder C:\Program Files\Hexagon\Geospatial Portal\, which must be located on the server side. The template for the installed Geospatial Portal version will be stored in C:\Program Files\Common Files\Hexagon\Services\Templates. This is a default schema of this application that is copied to a virtual folder issued during Geospatial Portal instance creation. It is possible to choose another location, as described in the Geospatial Portal Installation Guide.
Portal Directory
The working portal application by default is stored in the C:\Program Files\Common Files\Hexagon\Services\Instances\Instance_name folder, which is defined during the Geospatial Portal instance creation. Files from the Geospatial Portal template are copied into this location. The Geospatial Portal virtual directory is also created. It is recommended that you give it the same name as the name of the Geospatial Portal directory. The virtual directory name is used later to access the portal from the Internet: http://hostname/NameOfVirtualDirectory.
This solution allows you to run many parallel operating portals by creating the next portal instances using the Administration Console, which is delivered with Geospatial Portal.
Map Folder
The public maps and the user maps used when working with the portal are stored in the default folder C:\Program Files\Common

Geospatial Portal
111
Files\Hexagon\Services\Instances\<Instance_Name>\App_Data\Maps. The folder for maps can be changed according your needs, and this folder name has to be placed in
the Web.Config file as the value of the mapStorageFolder attribute of the
<webclient> element:
<webclient gpw="d31cc720-b29a-453f-887f-28fac03ede72"
overview="3535d845-6509-4482-97dd-ee2c5068e65e"
mapServicesListPath="App_Data/services.xml" mapStorageFolder="C:\Program Files\Common
Files\Hexagon\Services\Instances\Instance_Name\App_Data\Maps"
authenticationManagerTypeName="Intergraph.WebSolutions.Core.WebCl
ient.Platform.Security.MembershipAuthenticationManager"
theme="Blue">
Portal Cache
The portal cache is located in the folder C:\Program Files\Common Files\Hexagon\Services\Instances\<Instance_Name>l\App_Data\Cache on the server.
Portal logs are stored in the individual folders for each portal instance. A unique folder has to be created for each instance, for example, C:\Cache\Log61023, and the log4net configuration in Web.Config must be updated to output the log file in the new folder, as shown in the <file> element below:
<log4net>
<appender name="RollingLogFileAppender"
type="log4net.Appender.RollingFileAppender">
<file value="C:\Cache\Log61023\log.txt"/>
<appendToFile value="true"/>
<rollingStyle value="Date"/>
<datePattern value="yyyyMMdd"/>
<layout type="log4net.Layout.PatternLayout">
<conversionPattern value="%date [%thread] %-5level %logger
[%property{NDC}] - %message%newline"/>
</layout>
</appender>
<root>
<level value="DEBUG"/>
Geospatial Portal
112
<appender-ref ref="RollingLogFileAppender"/>
</root>
</log4net>
Images Folder Definition - Library Address
You can define default values for the Library address field, which is used in the Style dialog box when defining the graphic style or bitmap pattern fill in the portal. To define a
default value for the Library address field, two attributes in the <webclient> section
must be set: patternDirectory and patternHref.
Markers Directory
Geospatial Portal is delivered with a default set of markers images, but you can easily provide new markers just by placing them in the directory that is provided in the annotation configuration section of the Web.config file. Then, each new directory will appear as a new tab in the Insert marker window. In the same manner, you can modify, rename, or remove the default markers.
The parameter <annotations path=" "> determines the path used in the annotations
and markers control as a source for images which can be:
an http address (for example, http://servername/GeospatialPortalImages/markers/)
server url starting with / (for example, /GeospatialPortalImages/markers/)
application relative path (for example, img/markers)
Supporting Services
Geospatial Portal is delivered with Supporting Services such as Capabilities Service, Print Service, and QualityMonitorService. Files for these services are grouped in folders located in C:\Program Files\Common Files\Hexagon\Services\SupportingServices.
Web.Config <(<instance folder>\Web.Config )>
The Web.Config (see "Web.Config File" on page 114) file where the Geospatial Portal configuration is stored is located in the Geospatial Portal instance folder for example: C:\Program Files\Common Files\Hexagon\Services\Instances\<Instance_Name>.
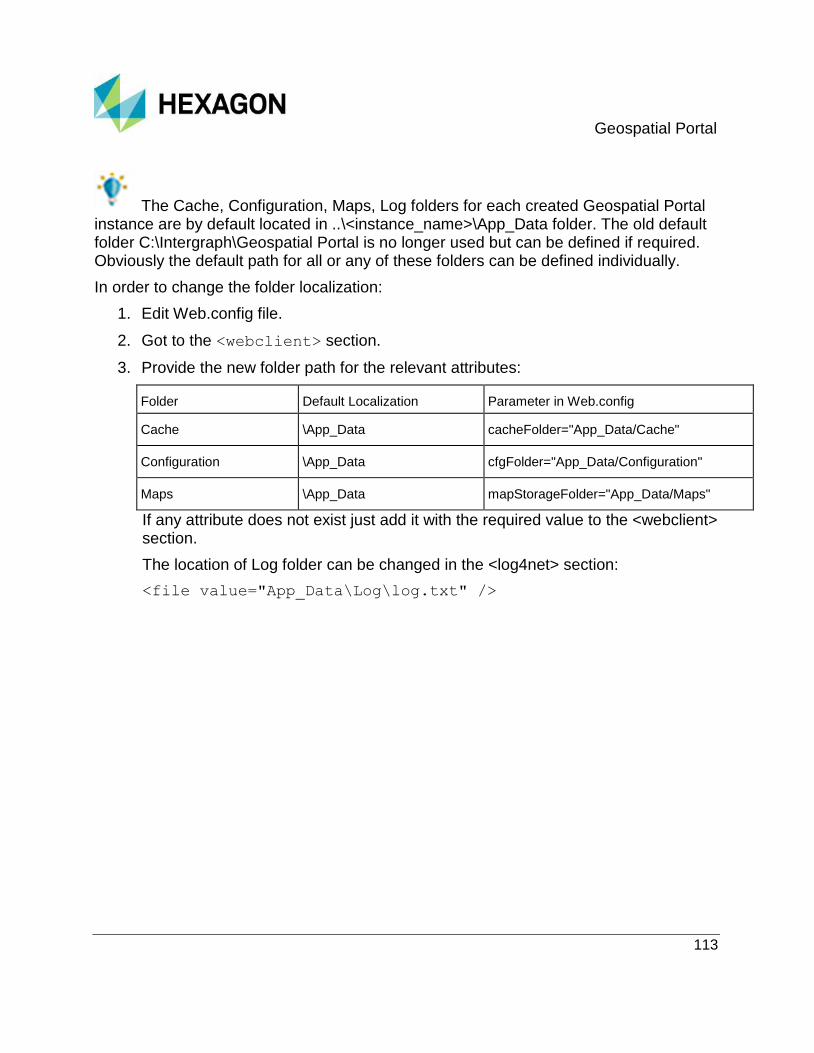
Geospatial Portal
113
The Cache, Configuration, Maps, Log folders for each created Geospatial Portal instance are by default located in ..\<instance_name>\App_Data folder. The old default folder C:\Intergraph\Geospatial Portal is no longer used but can be defined if required. Obviously the default path for all or any of these folders can be defined individually.
In order to change the folder localization:
1. Edit Web.config file.
2. Got to the <webclient> section.
3. Provide the new folder path for the relevant attributes:
Folder Default Localization Parameter in Web.config
Cache \App_Data cacheFolder="App_Data/Cache"
Configuration \App_Data cfgFolder="App_Data/Configuration"
Maps \App_Data mapStorageFolder="App_Data/Maps"
If any attribute does not exist just add it with the required value to the <webclient> section.
The location of Log folder can be changed in the <log4net> section:
<file value="App_Data\Log\log.txt" />
Geospatial Portal
114
Web.Config File The Web.Config file is an xml file where the configuration parameters for each Geospatial Portal instance are stored. The Web.Config file is located in the Geospatial
Portal instance folder, which by default is: C:\Program Files\Common Files\Hexagon\Services\Instances\<instance_name>\
The following application parameter families, along with the standard .NET configuration options, are in the Web.Config file:
WebClient Settings (on page 114)
Gazetteer Settings (on page 119)
Proxy Settings (on page 121)
Catalogue Settings (on page 122)
Quirks (on page 124)
WebClient Settings
The WebClient element attributes are as follows:
clientTraceLevel (client-side debugging), accepted values:
Off (default)
Error
Warning
Info
Verbose
enableCache (the Geospatial Portal application is a browser from the services
point of view, so it is possible to enable the browser cache)
mapServicesListPath (relative path to an xml file with the definition of a predefined list of services)
mapServiceLoadingRequestTimeout (default value 30000, the waiting time for a
response from the service)
mapServiceCacheExpirationTime (in seconds, default value 0 means that the
mechanism is switched off)
Geospatial Portal
115
mapStorageFolder (default value: C:\Program Files\Common
Files\Hexagon\Services\Instances\<Instance_Name>\App_Data\Maps, folder dedicated for UserMaps)
crsConfigPath (path [can contain environmental variables] to the xml file with
configuration data of the coordinate reference systems)
cacheFolder (default value: C:\Program Files\Common
Files\Hexagon\Services\Instances\<Instance_Name>\App_Data\Cache, folder dedicated for the application cache). This folder contains portal’s logs and the browser data which can be used repeatedly, such as Javascript code and CSS stylesheets. Each Geospatial Portal instance has its own cache folder.
GoogleMapsApiKey (http://code.google.com/apis/maps/signup.html)
BingMaps apiKey (http://msdn.microsoft.com/en-us/library/ff428642.aspx)
apiVersion (determines the version of Bing Maps API; accepted values: 8 -default; 7
- deprecated by Microsoft on 30 June, 2017)
gpw (identifier of published GPW (Geospatial Portal Workspace), identifier of GPW, which will be automatically loaded after the start of the Geospatial Portal application)
overview (identifier of published GPM (Geospatial Portal Map)), identifier of GPM,
which will be automatically loaded in the overview window)
theme - existing themes: Hexagon 2015(default), LightFlat2014, DarkFlat2014,
LightBlue2014, LightGray2013, Blue, Black, DarkGray, Gray, Olive, Purple, Slate
authenticationManagerTypeName (value
Intergraph.WebSolutions.Core.WebClient.Platform.Security.MembershipAuthenticationManager is required by Geospatial Portal)
qualityMonitorServiceUrl (URL of the Quality Monitor Service Client interface)
qualityMonitorAdminServiceUrl (URL of the Quality Monitor Service
Administrator interface)
newMapServiceTypes (the list of available connectors to the data sources; each
connector must be separated with a vertical bar "|")
pattern directory (relative path to the virtual directory on a server that is running the application, for example, setting the value "img/patterns" for Geospatial Portal "http://server_name/portal_instance" causes the default value for the Library address to be "http://server_name/portal_instance/img/patterns")
Geospatial Portal
116
patternHref (network address to the virtual directory, for example,
"http://server_name/images" or a relative path to the directory (need not be virtual) to a directory with images on the server)
useCapabilitiesCache (defines whether to use Capabilities Service as a
capabilities documents cache/proxy; two values - True or False are possible)
useExperimentalThematicLegendForWFS (default false, allows you to
disable/enable the possibility of defining thematic maps for WFS) Available for versions prior to 16.00.0400
enableApolloFileLinks (default is false, allows you to enable/disable the
possibility for downloading or automatic opening in associated application the files (being Datasets and/or Business Data search result) directly from the search result panel; applies to apollo.aspx and apollopro.aspx layouts)
outputFormatDefinitions (defines the output format for the download function on the Analyses tab)
outputFormat element attributes:
formatPattern: (required) pattern used to determine the proper definition for the output format; first matching definition is used; if grouping is used, then the first match from the grouping can be used in the format name (as {0})
formatName: (required) name that will be displayed in the user interface for the output format
extension: extension of the file (used if the file download is an operation result)
isDefault: (true|false) if operation supports the default output format, it can be replaced with the definition by setting this attribute to "true"; the first matching definition with this attribute is used as the default
DefaultApolloCredentials - enables the configuration of the default credentials
that are used when connecting to the ERDAS APOLLO coverage services from a workspace or map if no other credentials are supplied: Element attributes are:
mode (Anonymous or Username - type of authentication)
user (if Username is selected, the proper user should be set here)
password (same as above)
enableApolloFileLinks (true|false) if set to "true", enables the hyperlinks for
elements in the Search Result Panel. The file links will be available in the search result panel only for the specific data types, such as Business Objects
Geospatial Portal
117
apolloLiveDelay - defines the delay buffer for all outgoing requests when the Live
mode in Search Result Panel is enabled. The default value is set to 1,5 seconds
myvrPinImage (default "/img/pin.gif"; url (starting with "http://") or the server
relative path to image) - defines the appearance of pins shown for the found geographic names. Applies only to 3D map control
myvrPinFont (default "c://Windows/Fonts/verdena.ttf"; url (starting with "http://"),
client path (starting with "<drive>://") or server relative path to the font) - defines the font for the geographic names search results. Applies only to the 3D map control
settingsRequireConfirmation (true|false) indicates if changing settings is
reflected immediately (value set to "false") or requires the Apply button to be pressed (value set to "true). Value for this parameter by default is set to "false"
zoomScaleDenominatror (integer) defines what scale denominator will be used after selecting the search result. If this attribute is not present or empty, the scale denominator will not change
pointFitScaleDenominator - value of scale denominator to be set after one point
feature selection (if Fit and zoom out settings option is active), there can be many values for different legend item definition ids (default value is idPattern=”” scaleDenominator=10000). Element attributes are:
idPattern: regular expression for legend item definition id
scaleDenominator: denominator value
dynamicShadows - responsible for behavior of Dynamic Shadows control.
Available attributes are:
enableTimeZoneSwitch: specifies wheter to show or hide TimeZone selection combo box (if this is disabled timezone will be set based on user browser and location settings)
timeZoneBasedOnPosition: time zone will be calculated and automatically adjusted based on current position on the map (astronomical time zones based on longitude - may not always be accurate), this setting may also be changed in user interface.
hourSliderStepInMinutes: determines the resolution (in minutes) of hour adjusting slider. Default value is 10.
stepAnimationTime: determines the speed (in miliseconds) at which hour slider animates by one step when animation mode is started.

Geospatial Portal
118
enableLighting:specifies whether lighting should be enabled by default or not (parameter available since Portal in version 16.00.0200; default value is true).
enableShadows:specifies whether shadows should be enabled or disabled on application (default value is false - since Portal in version 16.00.0200)
predefinedSettings: collection containing predefined settings for shadows control with attributes:
- name: to be displayed on the button associated with a given setting
- date: to be used for setting shadows, format is MM/DD HH:MM (ex. "22/03 13:30" - note that minutes will be rounded to half an hour if specified otherwise).
dataWindow: responsible for behavior of the Data Window. Available attributes
are:
actionColumnOnLeftSide: (bool) column with action buttons on the begining (left side) of the Data Window. Default value: true
timeout: (int) time for service response (in miliseconds). Default value: 150000
enabledRowActions: collection containing actions that should be enabled on each row in form:
- <rowAction>: action to be enabled
- name: action name (if name "all" is specified all actions will be enabled, other possible values include: "properties","clipboard", "zoom")
enabledGridActions: collection containing actions that should be enabled on the grid in following form:
- <gridAction>: action to be enabled
- name: action name (if name "all" is specified all actions will be enabled, other possible values include: "removeAllFromDatabase", "removeSelectedFromDatabase", "addSelectedToClipboard", "exportAllToFile", "exportSelectedToFile")
queries - allow to enable/disable the message info window informing that the
process of getting values for attributes when performing analyses can take some time.This behavior of applies to Analyses Panel, Query Window. Available attribute is:

Geospatial Portal
119
displayLongProcessingConfirmation: (True/False) specifies confirmation
window visibility. Default value: true (confirmation window available). This option is available only with version 15.00.02 (EP02 patch) or newer.
forceWebGL (true|false) determines if webGL should be used to display 3D
regardless of whether plugin is present. This flag can be set using Administration Console GUI and is available since Geospatial Portal 15.00.05 (EP05 patch) or newer.
systemOfMeasurement (metric|imperial) indicates which system of measurement will be used (default value is "metric")
enabledUnits (string) indicates what units should be available when doing
measurements. Measurements will use available unit in which values can be
expressed as greater than 1. If user measures area and hectares are disabled available area will be displayed in squared meters until area reaches 1 km2. Available units are: "m, km, ft, yd, mi, m2, km2, ft2, yd2, mi2, are, ha, acre". Base units that cannot be disabled are m, m2 and yd, yd2 for metric and imperial unit system respectively. If units ft, ft2 are defined they are used instead of yd, yd2.
clipZipShip: behavior of Clip-Zip-Ship control. Available attribute is:bufferType:
(round|square). Defines default type of buffer for point geometries. Default value: round.
apolloFullMotionVideoSupport (true|false) - disables the ERDAS APOLLO Full
Motion Video Support (enabled by default). This flag when set to false maintain backward compatibility with ERDAS APOLLO Catalogues prior to 16.01 and is available in Geospatial Portal in version 16 EP01 or newer.
Gazetteer Settings
Global Gazetteers Settings (Multiple Gazetteers + Live Search Gazetteer):
Regular expression conformant to Microsoft .NET Framework Regular Expressions syntax (http://msdn.microsoft.com/en-us/library/hs600312%28v=VS.85%29.aspx) that qualifies that words passed into the gazetteer will not be capitalized. The value

Geospatial Portal
120
"^\W$" that is used in the following example stands for a single non-word character, which can be considered as a way of forcing capitalization on every name.
<add
key="Intergraph.WebSolutions.Core.SDIPortal.WFSG.Gazetteer.
NamesExcludedFromCapitalization"value="^\W$"/>
Number of features taken from gazetteer service.
<add
key="Intergraph.WebSolutions.Core.SDIPortal.WFSG.Gazetteer.
MaxFeatures" value="20"/>
Template of the OGC filter that is used to get gazetteer results. Remember that certain characters (for example, “<”, “>”, “””) must be escaped using XML entity references before they can be embedded as an attribute value.
<add
key="Intergraph.WebSolutions.Core.SDIPortal.WFSG.Gazetteer.F
ilter
Template" value="<ogc:PropertyIsLike
wildCard="*"
singleChar="?"
escapeChar="\"xmlns:ogc="
http://www.opengis.net/ogc"><ogc:Property
Name>{pname}</ogc:PropertyName><ogc:Literal>*
{query}*</ogc:Literal></ogc:PropertyIsLike>"/>
Indication whether to use alternative geographic identifier in Gazetteer.
Possible values:
true: use alternative geographic identifier
false: do not use alternative geographic identifier
regular expression: use alternative identifier only if gid matches regular expression

Geospatial Portal
121
Default behavior is equal to that of regular expression "^\d*$" -> use only if gid is all digits.
<add
key="Intergraph.WebSolutions.Core.SDIPortal.WFSG.Gazetteer.U
seAltGid" value="false"/>
Zoom scale denominator is used to define what scale denominator will be used after selecting the search result. If this attribute is not present or empty, the scale denominator will not change.
<search>
<liveSearch zoomScaleDenominator="20000" />
</search>
This parameter is placed in the <webclient> section.
The Gazetteer search feature is by default turned off in apollo.aspx and apollopro.aspx layouts. Use your Administration Console to turn it on if necessary.
Proxy Settings
A proxy server facilitates the connections between two or more computers to increase both security and privacy within the network. In a typical Geospatial Portal configuration, it is almost always necessary to adjust the proxy setting.
Sample Proxy setting:
<defaultProxy>
<proxy proxyaddress="http://hostname:port" bypassonlocal="True"/>
</defaultProxy>
For more information, see the Microsoft Web site http://msdn.microsoft.com/en-us/library/kd3cf2ex.aspx.

Geospatial Portal
122
Catalogue Settings
Output format that is requested by GetRecordsById operation (some CSW services support the "text/html" value).
<add
key="Intergraph.WebSolutions.Core.SDIPortal.CSW.Metadata.Sea
rch.
ServiceUrl.GetRecordById.OutputFormat" value="text/xml"/>
Encoding that is used to handle CSW responses with no encoding specified.
<add
key="Intergraph.WebSolutions.Core.SDIPortal.CSW.Metadata.
Search.ServiceEncoding" value="UTF-8"/>
Maximum number of results to get from the CSW service.
<add
key="Intergraph.WebSolutions.Core.SDIPortal.CSW.Metadata.Sea
rch.
MaxResults" value="100"/>
Deprecated. Should not be changed.
<add
key="Intergraph.WebSolutions.Core.SDIPortal.CSW.Metadata.
Search.StartPosition" value="1"/>
Coordinate system that is used by CSW services. The coordinate system must be written in “EPSG:####” notation. Note that the OGC Catalogue Service specification points out that WGS 84 is the only valid coordinate system for serving metadata. Therefore, the value “EPSG:4326” should not be changed.

Geospatial Portal
123
<add
key="Intergraph.WebSolutions.Core.SDIPortal.CSW.Metadata.
Search.CSWCRS" value="EPSG:4326"/>

Geospatial Portal
124
Quirks
The section <quirksMode> in the Web.Config file contains several fixes for OGC
services that are not published according to the specification, but which require custom configuration in order to operate in the portal. Custom rules called quirks are provided for different types of services, and they enable the bypassing of the imperfection of services.
serviceQuirk element attributes:
serviceType: (WFS/WFSG/WPS-CT/WCTS/WMTS/IntergraphLUWS) type of the OGC service
urlPattern: url of the OGC service or regular expression for a general pattern
omitCapabilitiesService: force bypassing CapabilitiesService for WMTS services
forceHttpGet: Uses HTTP GET even if HTTP POST endpoint is available. Currently supported in WFS GetFeature operation
forceMultiCurve: boolean. (WFS) When editing/adding curve geometry to APOLLO WFS-T it is wrapped into multicurve geometry.
forceMultiSurface: boolean. (WFS) When editing/adding surface geometry to APOLLO WFS-T it is wrapped into multisurface geometry.
Available serviceQuirks:
<incorrectlySwappedCoordinates>: (WFS/WFSG/WPS-CT/WCTS/WMTS/OpenLS/IntergraphLUWS) - allows Geospatial Portal to operate with the OGC services that respond with the coordinates published in the reverse order (not according to the axes direction for particular CRS)
<expectsIncorrectlySwappedCoordinates> (WFS/WFSG/WPS-CT/WCTS) - allows Geospatial Portal to operate with the OGC services that require requests with the coordinates set in the reverse order (not according to the axes direction for particular CRS)
<expectsIncorrectlySwappedCoordinatesInsert> (WFS-T) - (WARNING: This quirk overrides whatever you set in <expectsIncorrectlySwappedCoordinates>; if you provide both, it will issue a warning in the log file.) Allows Geospatial Portal to insert features into the WFS services that require requests with the coordinates set in the reverse order (not according to the axes direction for particular CRS)
<expectsIncorrectlySwappedCoordinatesEdit> (WFS-T) - (WARNING: This quirk overrides whatever you set in <expectsIncorrectlySwappedCoordinates>; if

Geospatial Portal
125
you provide both, it will issue a warning in the log file.) Allows Geospatial Portal to update features in the WFS services that require requests with the coordinates set in reverse order (not according to the axes direction for particular CRS)
<useDynamicMeterPerUnit> (WMTS only) - allows Geospatial Portal to operate with the WMTS services that return a tiles which are generated with dynamically changed meters per degree on different geographic latitudes (not using constant value from equator)
<replaceCrsNames> (WMTS) - allows Geospatial Portal to replace the given CRS name while parsing
<imageFormat> (WMTS) - allows Geospatial Portal to set default image format for WMTS service during registration. This format will be set as default only if it is available in the WMTS capabilities or if there are no image formats in the WMTS capabilities
<cacheControlHeader> - allows the control of the behavior of the cache-control headers (remove, append, leave unchanged) for WMS services
Possible values:
"Append" - adds headers to each response
"Block" - removes headers from each response
If quirk is not set, the default behavior is to leave the response headers
unchanged. You also need to set the <maxAge> property accordingly. The
<maxAge> parameter determines how much time will have to pass before
another request is made (instead of using cached files). Default value is 30s.
<omitCapabilitiesService> (WMTS only) - makes sure that the Capabilities Service is not used for ERDAS APOLLO WMTS requests; it ensures that the data returned is always up to date. The use of Capabilities Service by ERDAS APOLLO WMTS service when there is a probability of frequent changes in the catalog might result in displaying outdated data in Geospatial Portal.
<limitByMapRange>: boolean. (WFS) - allows to change default value ("true") of WFS layer display mode (limited by map range). In order to disable the default map range limitation fro displayed WFS features set the quirk value to "false".
<excludeVersions> (WMS/WFS) - allows Geospatial Portal to exclude specific map service versions while registering the service in Portal.
Sample:
<serviceQuirk serviceType="WFS" urlPattern="yourWFSurl">
Geospatial Portal
126
<excludeVersions>
<add key="2.0.0" value="true"/>
</excludeVersions>
</serviceQuirk>
serviceQuirk entries:
Each serviceQuirk may contain multiple entries. One entry is provided for each CRS.
The key of the entry is EPSG code for particular CRS, and the value should be set to "true".
Sample 1
Adding features to particular ERDAS APOLLO services such as WFS-T (Transactional) is possible on condition the dedicated service quirk is enabled. This sample shows how to enable the quirk for particular ERDAS APOLLO services:
<serviceQuirk serviceType="WFS" urlPattern="erdas-apollo"
forceMultiCurve="true" forceMultiSurface="true">
</serviceQuirk>
where:
forceMultiCurve="true"> It enables the possibility of adding curve
geometry. This setting causes that the curve type geometry is wrapped into multicurve geometry, what is required by ERDAS APOLLO services.
forceMultiSurface="true"> Use this parameter to enable the ability to add
surface geometry. This setting causes the surface type geometry being wrapped into multisuraface, what is required by ERDAS APOLLO services.
Sample 2:
<serviceQuirk serviceType="WMTS"
urlPattern="http://sample_server_name/sample_service_name/wmtserv
ice.aspx">
<useDynamicMeterPerUnit>
<add key="EPSG:4326" value="true"/>
</useDynamicMeterPerUnit>
<incorrectlySwappedCoordinates>

Geospatial Portal
127
<add key="EPSG:4326" value="true"/>
</incorrectlySwappedCoordinates>
</serviceQuirk>

Geospatial Portal
128
3D Rendering
In addition to 2D viewing capabilities, Geospatial Portal provides a 3D globe that supports the display of a base map and renders other supported data sources properly. The WebGL technology is used to render 3D scenes in Geospatial Portal.
In order to display 3D data (3D Map Tiles and/or 3D Objects) in Geospatial Portal using the WebGL technology the 'Access-Control-Allow-Origin' HTTP Response Header must be set for these services. Be aware that 3D Map Tiles and 3D Objects that do not have this response header, cannot be displayed. For more information on how to add Access-Control-Allow-Origin' HTTP Response Header to 3D services (3D Map Tiles, 3D Objects) please refer to the mTransformer User Guide.
It is also recommended to set the 'Access-Control-Allow-Origin' HTTP Response Header for services such as WMS, WMTS, WFS, and WMPS. This may result in a better response performance when displaying data from those services in the 3D view.
Disabling/Enabling 3D View in Geospatial Portal
The button in navigator used for switching to 3D mode (enabled by default) in particular Portal instances can be disabled. You can do it in Administration Console or by setting parameter in Web.config file.
Administration Console:
1. Run Administration Console.
2. Go to the Instance List.
3. Click Configure button for selected Geospatial Portal instance.
4. Click Starting Configuration tab.
5. Use Switching between 2D/3D option to enable or disable the 3D switcher button.
6. Click Apply.
Web.config file:
1. Edit Portal instance Web.config.

Geospatial Portal
129
2. Go to the <settings3d> section.
3. Set value of disableSwitcher parameter to true in order to disable the 2D/3D
mode switcher in Geospatial Portal. To enable the button set disableSwitcher
parameter to false.
sample: <settings3D disableSwitcher="true">
4. Save Web.config file.
Disabling 3D/2D switcher in navigator also makes the 3D View settings tab inactive in the left panel.
The 3D functionality in Geospatial Portal/GeoMedia WebMap Publisher Portal is enabled by default in Firefox and Google Chrome browsers. In MS Edge 3D is available only if the administrator enables it.
To enable 3D in MS Edge Web browser:
1. Edit Web.config file for Geospatial Portal instance.
2. Go to the <settings3d> section.
3. Set value of enableInEdge parameter to true. Parameter enableInEdge
(bool) determines if 3D view should be available in MS Edge Browser (default is false).
Sample: <settings3D enableInEdge ="true">
4. Save Web.config file.
Adjusting Behaviour of Dynamic Shadows Control
The behavior and availability of particular controls on the 3D Features tab in Geospatial Portal can be customized according to the individual client requirements.
Administrators of Geospatial Portal can:
disable/enable the Timezone pull down list in user interface. If disabled, time zone will be set based on user browser and location settings.

Geospatial Portal
130
decide whether the time zone by default will be calculated and automatically adjusted based on current position on the map.
determine the resolution of the hour slider.
determines the speed (in milliseconds) at which the hour slider animates by one step when animation mode is started.
add buttons to the user interface that will set the predefined setting for shadows control.
In order to configure the behavior of Dynamic Shadows control:
1. On the server where your Geospatial Portal is installed, go to your instance folder. By default, the instances are located in C:\Program Files\Common Files\Hexagon\Services\Instances\<Instance_Name>
2. Edit the Web.config file for your instance.
3. In the Web.config file, find the <webclient> section.
4. In the <webclient> section go to the <dynamicShadows> section and use the
following attributes to configure various options:
enableTimeZoneSwitch: specifies whether to show or hide the Timezone
selection combo box.
timeZoneBasedOnPosition: time zone will be calculated and automatically
adjusted based on the current position on the map (astronomical time zones are based on longitude - may not always be accurate), this setting may also be changed in the user interface by checking/un-checking the Position tracking option.
hourSliderStepInMinutes: determines the resolution (in minutes) of the hour
adjusting slider. Default value is 10.
stepAnimationTime: determines the speed (in milliseconds) at which the hour
slider animates by one step when animation mode is started.
enableLighting: specifies whether lighting should be enabled by default or not
(default value is true) This parameter is available in Portal in version 16.00.0200 or newer.
enableShadows:specifies whether shadows should be enabled or disabled on
application (default value is false since Portal in version 16.00.0200)
<predefinedSetting>: collection containing the predefined settings for shadows
control with attributes:

Geospatial Portal
131
name: to be displayed on the button associated with a given setting
date: to be used for setting shadows, format is MM/DD HH:MM (ex. "22/03 13:30" - note that minutes will be rounded to half an hour if specified otherwise).
Each <predefinedSetting> entry will add a button to the UI with the name defined
in the name attribute. After pressing this button, predefined date and time settings
(set in the attribute date) will be applied.
5. Save the Web.config file.
Defining Tooltips for Vector Features Displayed in 3D View
For vector features served by WFS services the tooltips with feature information can be displayed. Tooltips with information about features can only be displayed in 3D view mode and for objects layer that is placed on top.
The administrator can define the style of displayed tooltip and also can decide which information (served by service attributes) will be presented in the tooltip.
The entire configuration of tooltips for every Geospatial Portal instance is held in pure XML file. This XML file is located in C:\Program Files\Common Files\Hexagon\Services\Instances\<Instance Name Folder>\App_Themes\Templates\Tootips\<Feature_Clas_Name.xml>
One XML file stores tooltip definition for only one feature class. The name of the file must be exactly the same as the feature class name.
Below is the sample XML file with tooltip definition:
<div style="background: #CCCCCC; border: 2px solid #002288">
<table>
<tr>
<td style="font-weight:bold; text-align:right; vertical-align:
top;">Name:</td>
<td>{Name}</td>
</tr>
<tr>
<td style="font-weight:bold; text-align:right; vertical-align:
top;">Population:</td>
<td>{Population}</td>
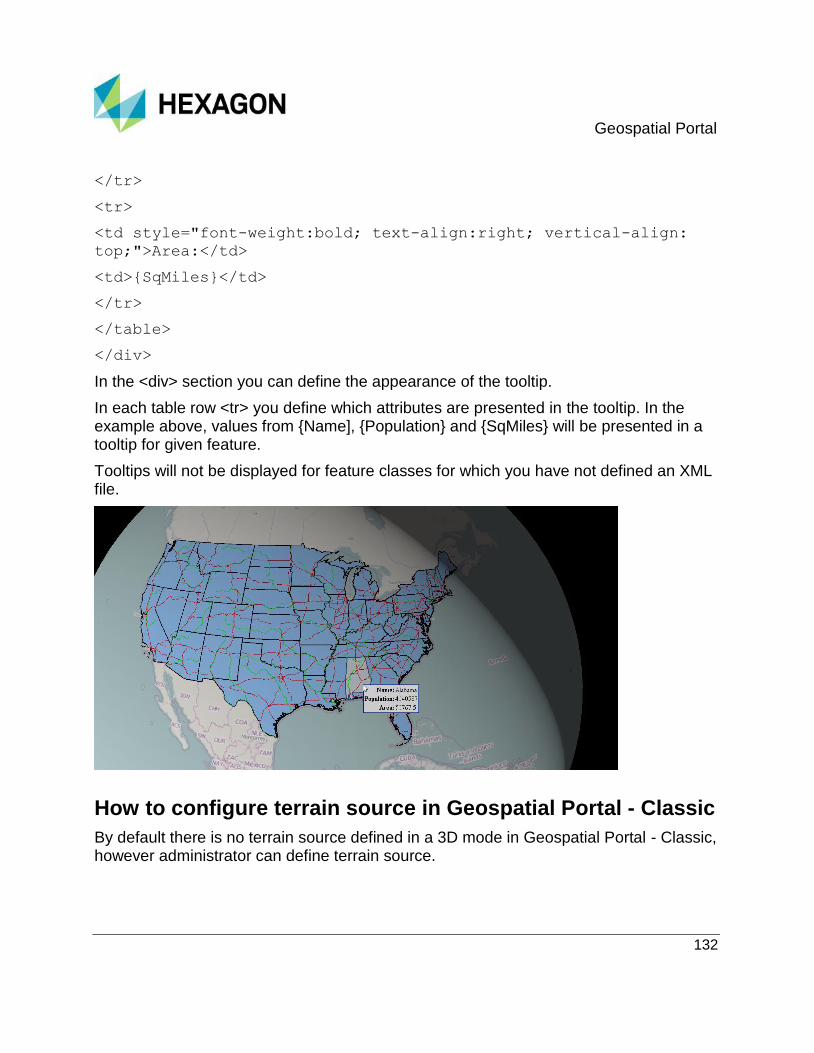
Geospatial Portal
132
</tr>
<tr>
<td style="font-weight:bold; text-align:right; vertical-align:
top;">Area:</td>
<td>{SqMiles}</td>
</tr>
</table>
</div>
In the <div> section you can define the appearance of the tooltip.
In each table row <tr> you define which attributes are presented in the tooltip. In the example above, values from {Name], {Population} and {SqMiles} will be presented in a tooltip for given feature.
Tooltips will not be displayed for feature classes for which you have not defined an XML file.
How to configure terrain source in Geospatial Portal - Classic
By default there is no terrain source defined in a 3D mode in Geospatial Portal - Classic, however administrator can define terrain source.

Geospatial Portal
133
To configure terrain source in Geospatial Portal - Classic:
1. Generate terrain source DEM with mTransformer (see: Appendix D - Generating Terrain Source DEM https://hexagongeospatial.fluidtopics.net/reader/GeaxpiaikruZnCD_2Fpb1Q/Oif~Hx83vH8YSU2AkGsxZA in mTransformer User Guide) or download and use terrain source data from other third-party resources.
2. Publish Virtual Directory in IIS with terrain source data or get a URL to third-party terrain source.
3. Edit Web.Config file for Geospatial Portal - Classic instance.
4. Go to the <myvrMapControl> section.
5. Provide URL to the terrain source in the terrainSource parameter:
<myvrMapControl
earthTilesUrl="http://service.hexagongeospatial.com/globe/"
defaultTerrainTexture="http://service.hexagongeospatial.com/
globe/grid2.png"
defaultMapTexture="http://service.hexagongeospatial.com/glob
e/myvr-default.png"
terrainSource="http://server_name/TerrainSourcs/" />
6. Save Web.config file and reload the Geospatial Portal - Classic page.
Configuring Printing Feature
To print maps in Geospatial Portal, a different mechanisms can be used:
The first printing mechanism in Geospatial Portal uses Web Browser Windows Forms Control, which is the wrapper for Internet Explorer. This is the essential process responsible for printing functionality. This configuration is also required in order to use other print services.
Internet Explorer is required on the server side to provide the printing functionality in Geospatial Portal in case the Web Browser Windows Form Control is to be used. The IE 9 is required on Windows Server 2008 32 bit and Windows Server 64 bit operating systems. The IE 10 is required on Windows Server 2012. On Windows Server 2008 R2 64 bit, the IE 9 or IE 10 Web browser is required.
Geospatial Portal
134
The second mechanism uses a phantomJS Web driver to perform printing in Geospatial Portal. The administrator can decide whether a new phantomJS Web driver or an internal Internet Explorer printing mechanism is used for map printing. These settings are made using the attributes in the Web.config file.
To configure the printing process that uses Web browser Windows Forms Control, you must perform the following operations:
The configuration steps as described below are required for version 16.6.0. Starting from version 16.6.1 the IE engine is set by default and no additional configuration steps are required.
1. In the administrator mode, create a new user account, for example, "printing", on the server where the instance of Geospatial Portal is working. The user must have administrator rights granted.
2. The running of the Geospatial Portal instance must have the application pool set for the newly created user: "printing". In the Administrative Tools, run the Internet Information Services (IIS) Manger, and select (in the Connections tree) Application Pools. Select the AppPool for the newly created user ("printing") In the Application Pools window, select Advanced Settings (in Actions).
3. On the Advanced Settings dialog for Process Model > Identity, select Custom account for the newly created user account: "printing".
4. On the Advanced Settings dialog for .NET Framework Version, select v.4.0 for the newly created user account pool.
5. Turn off Internet Explorer Enhanced Security Configuration for Administrators and Users groups.
(To perform this operation, see: http://technet.microsoft.com/en-us/library/dd883248(WS.10).aspx#applytospecificusers)
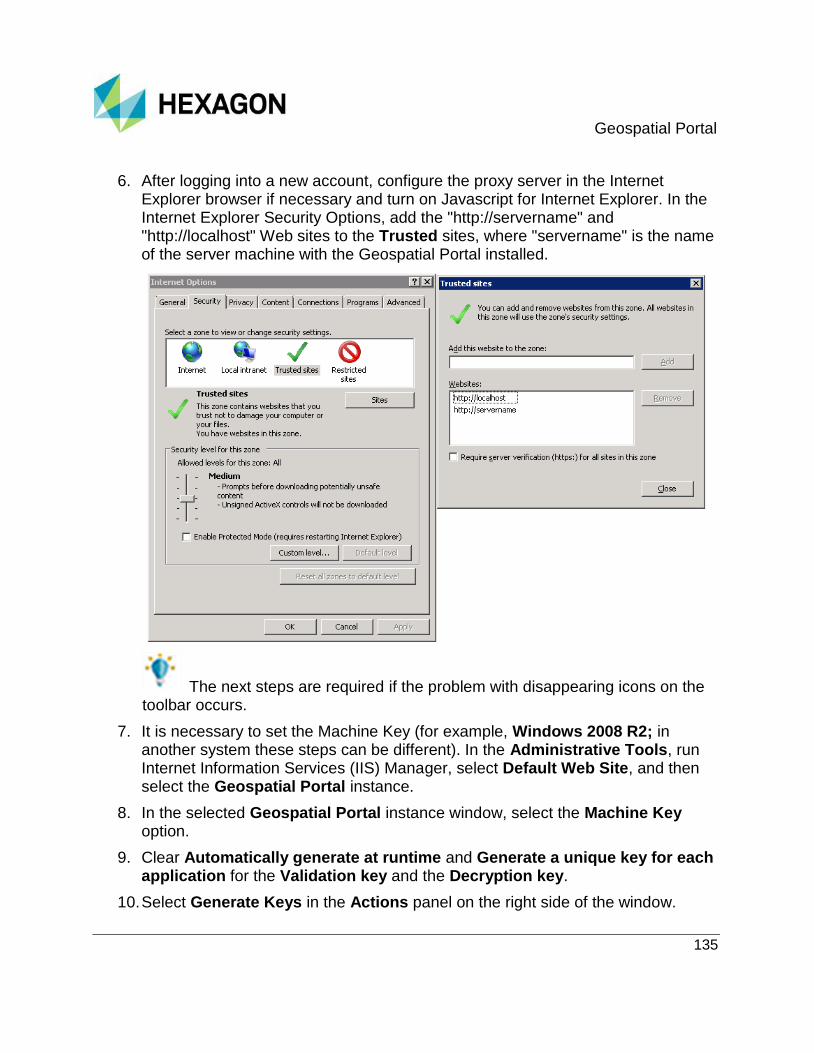
Geospatial Portal
135
6. After logging into a new account, configure the proxy server in the Internet Explorer browser if necessary and turn on Javascript for Internet Explorer. In the Internet Explorer Security Options, add the "http://servername" and "http://localhost" Web sites to the Trusted sites, where "servername" is the name of the server machine with the Geospatial Portal installed.
The next steps are required if the problem with disappearing icons on the toolbar occurs.
7. It is necessary to set the Machine Key (for example, Windows 2008 R2; in another system these steps can be different). In the Administrative Tools, run Internet Information Services (IIS) Manager, select Default Web Site, and then select the Geospatial Portal instance.
8. In the selected Geospatial Portal instance window, select the Machine Key option.
9. Clear Automatically generate at runtime and Generate a unique key for each application for the Validation key and the Decryption key.
10. Select Generate Keys in the Actions panel on the right side of the window.

Geospatial Portal
136
11. Click Apply to accept changes.
12. It is strongly recommended that you clean the Geospatial Portal cache, clean the ASP.Net temporary files, restart the IIS service, and then clear the Web browser cache.
See also Printing with phantomJS Web Driver (on page 137)
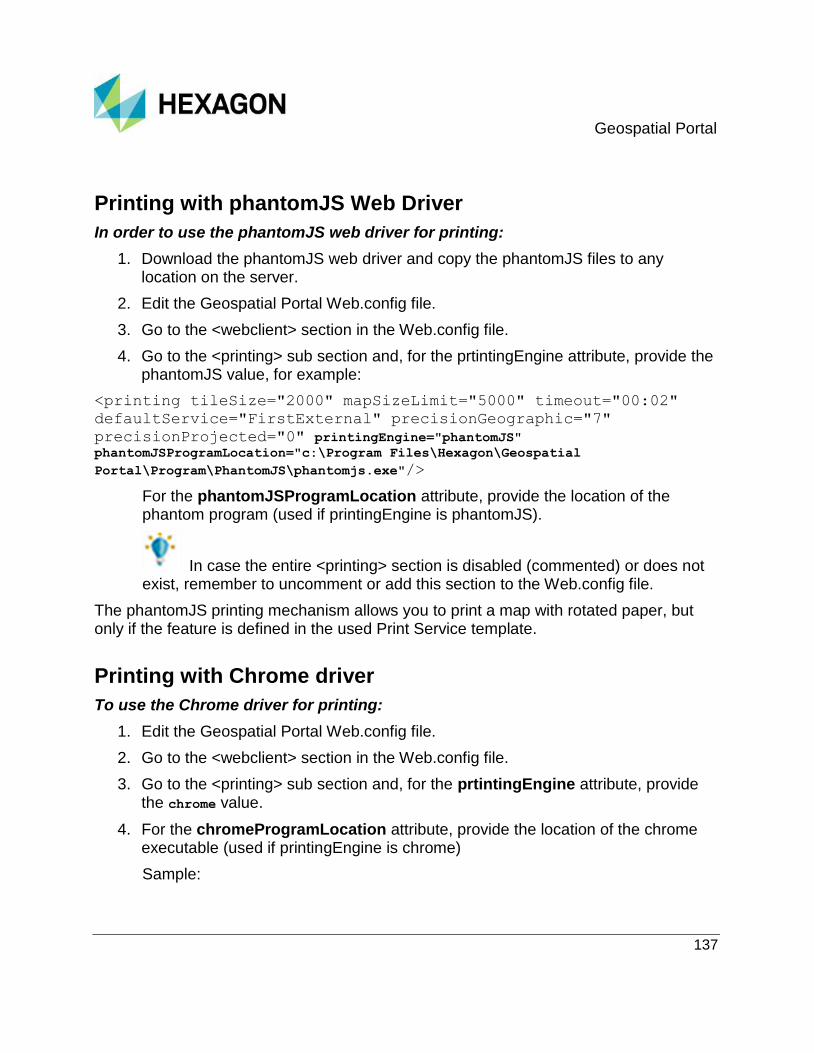
Geospatial Portal
137
Printing with phantomJS Web Driver
In order to use the phantomJS web driver for printing:
1. Download the phantomJS web driver and copy the phantomJS files to any location on the server.
2. Edit the Geospatial Portal Web.config file.
3. Go to the <webclient> section in the Web.config file.
4. Go to the <printing> sub section and, for the prtintingEngine attribute, provide the phantomJS value, for example:
<printing tileSize="2000" mapSizeLimit="5000" timeout="00:02"
defaultService="FirstExternal" precisionGeographic="7"
precisionProjected="0" printingEngine="phantomJS" phantomJSProgramLocation="c:\Program Files\Hexagon\Geospatial
Portal\Program\PhantomJS\phantomjs.exe"/>
For the phantomJSProgramLocation attribute, provide the location of the phantom program (used if printingEngine is phantomJS).
In case the entire <printing> section is disabled (commented) or does not exist, remember to uncomment or add this section to the Web.config file.
The phantomJS printing mechanism allows you to print a map with rotated paper, but only if the feature is defined in the used Print Service template.
Printing with Chrome driver
To use the Chrome driver for printing:
1. Edit the Geospatial Portal Web.config file.
2. Go to the <webclient> section in the Web.config file.
3. Go to the <printing> sub section and, for the prtintingEngine attribute, provide the chrome value.
4. For the chromeProgramLocation attribute, provide the location of the chrome executable (used if printingEngine is chrome)
Sample:

Geospatial Portal
138
<printing tileSize="2000" mapSizeLimit="5000" timeout="00:02"
defaultService="FirstExternal" precisionGeographic="7"
precisionProjected="0" printingEngine="chrome" chromeProgramLocation="C:\Program Files
(x86)\Google\Chrome\Application\chrome.exe"/>
. In case the entire <printing> section is disabled (commented) or does not exist, remember to uncomment or add this section to the Web.config file.
Portal Print Service Configuration
Portal Print Service (delivered with Geospatial Portal) is an extended printing service, compared to Local Print Service. The external printing service uses XAML templates to generate print output. Server-sided printing is performed using a Snapshot Page that is opened in the server-side printing engine. After the snapshot page is fully loaded, the printing engine captures a bitmap. Bitmap is then applied to the template with other controls such as scale bar, legend and custom texts or images.
Installing the Portal Print Service
Requirements
.NET 4 Full Framework has to be installed on the machine
GraphicsMagick 1.3.18-Q16 tool - in order to print the PDF files
Installation
The Portal Print Service is installed with Geospatial Portal. You do not need to take any additional steps in order to install Portal Print Service. Portal Print Service is by default installed in the folder C:\Program Files\Common Files\Hexagon\Services\Supporting Services\PrintService.
Service test
Type http://localhost/printservice/portalprintservice.svc into your
browser address field. The service page will be displayed if the service works properly.

Geospatial Portal
139
Configuring the Print Service
Configuring printing in the PDF format
The GraphicsMagick (http://www.graphicsmagick.org/) tool is required to print graphics in the PDF format.
1. Download and then install GraphicsMagick by running the GraphicsMagick executable file. GraphicsMagick downloads are available at www.graphicsmagick.org/download.html.
2. Provide the path to the GraphicsMagick tool in the <applicationSettings> section of the Print Service Web.Config file.
<setting name="ConverterPath" serializeAs="String">
<value>c:\Program
Files\GraphicsMagick-1.3.18-Q16\gm.exe</value>
</setting>
The Web.Config file for Print Service is located in the folder C:\Program Files\Common Files\Hexagon\Services\Supporting Services\PrintService.
The software was tested with GraphicsMagick version 1.3.18, but should work with newer versions also.
Setting DPI for Print Service
To set DPI value for print service:
1. Edit Web.config file for print service, located by default in C:\Program Files\Common Files\Hexagon\Services\Supporting Services\PrintingService
2. Find the PrintOutputDPI parameter and set the required attribute value.
Sample:
<setting name="PrintOutputDPI" serializeAs="String">
<value>300</value>
</setting>
3. Save Web.config file.

Geospatial Portal
140
Enhancing Portal Print Service templates
Portal Print Service (delivered with Geospatial Portal) extends printing capabilities of the local printing in Geospatial Portal by enhancing template functionality. The enhanced template functionality of Portal Print Service provides an extended list of attributes you can set. The differences between the Local Print Service and Portal Print Service (with default sample template) are shown in the table below:
Local Print Service Portal Print Service
Common Options
Format PNG PDF ; PNG ; XPS ; GIF ; JPEG ; TIFF ; BMP
Template Local ( simple non editable template) Sample landscape template with all data filled ;
Sample portrait template with all data filled ;
Page size A4 ; A3 ; A5 ; A6 ; A7 ; A8 ; A9; A10 ; B4 ; B5 ; B6 ; B7 ; B8 ; B9 ; B10 ; US Letter ; US Legal ; US Executive
A3 ; A4 ; A5
Orientation Portrait ; Landscape Depends on selected template (Landscape or Portrait)
Scale Any Predefined scale selectable from the pull down list
Template Options
DPI 96 ;150 NA
Title No Yes
Overview map No Yes
Display legend No Yes
Coordinate system No Yes
Date No Yes
Details No Yes
Legend (user can decide which map layers appear in the legend)
No Yes

Geospatial Portal
141
If necessary, administrators and developers can customize the Portal Print Service templates as needed.
Portal Print Print Service templates are XAML files that can be modified or extended by editing them with any editor. XAML (Extensible Application Markup Language) is a XML-based markup design language developed by Microsoft and used by Windows Presentation Foundation (WPF) controls. WPF is an interface for building modern, vector-oriented GUIs on Windows systems.
Templates Default Location
The template XAML files must be stored in C:\Program Files\Common Files\Hexagon\Services\Supporting Services\PrintingService\App_Data\Resources\Templates
The printing service automatically reads those file and compiles them into resulting printout image. Should any problems occur while reading the XAML file you find related error message in the service's log file:
C:\Program Files\Common Files\Hexagon\Services\Supporting Services\PrintingService\App_Data\Resources\Logs
Sample templates are provided with the Geospatial Portal.
Basic Template Structure
The printing templates are specific when it comes to the default structure. Each XAML template should have this basic structure as a starting point. Note the custom namespaces definitions such as con, el and tm.
<tm:TemplateControl xmlns="http://schemas.microsoft.com/winfx/2006/xaml/presentation""
xmlns:x="http://schemas.microsoft.com/winfx/2006/xaml""
xmlns:con="clr-namespace:Intergraph.MapPrinting.Converters;assembly=PrintEngine"
xmlns:el="clr-namespace:Intergraph.MapPrinting.Elements;assembly=PrintEngine"
xmlns:sys="clr-namespace:System;assembly=mscorlib"
xmlns:tm="clr-namespace:Intergraph.MapPrinting.Templates;assembly=PrintEngine"
Height="29.7cm"
Width="21cm"
Background="{x:Null}"
TemplateDescription="Custom portrait template"
TemplateName="My Portrait Template"
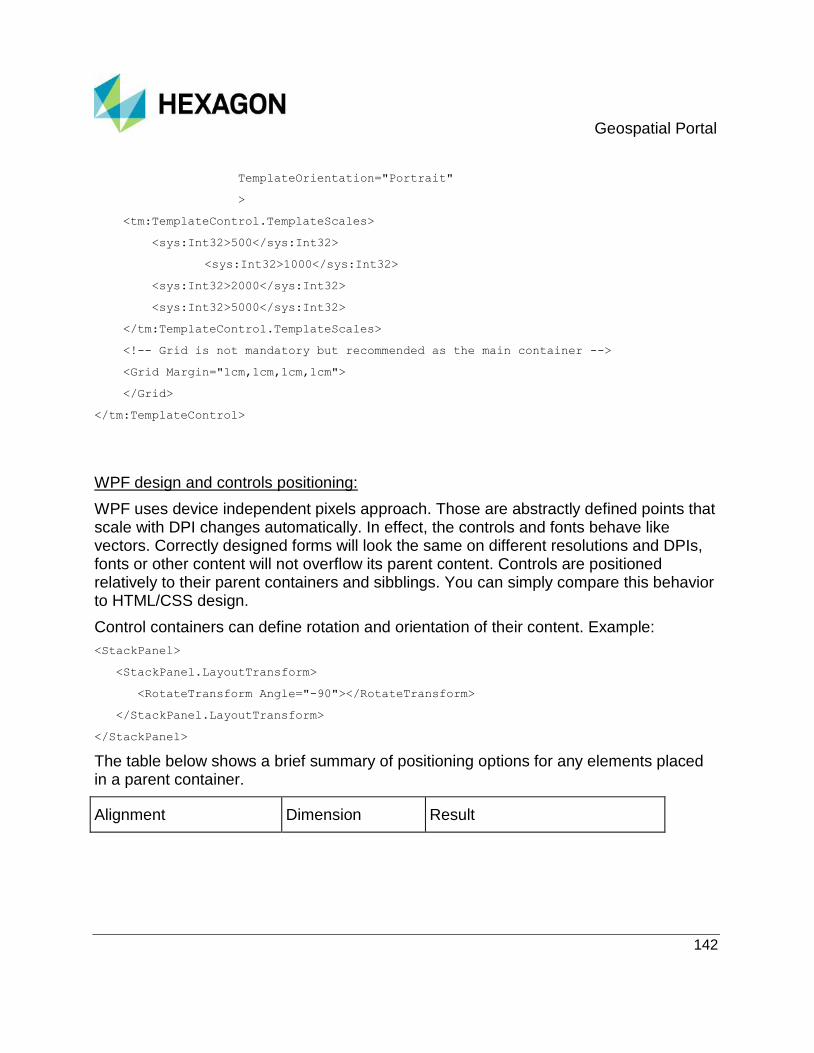
Geospatial Portal
142
TemplateOrientation="Portrait"
>
<tm:TemplateControl.TemplateScales>
<sys:Int32>500</sys:Int32>
<sys:Int32>1000</sys:Int32>
<sys:Int32>2000</sys:Int32>
<sys:Int32>5000</sys:Int32>
</tm:TemplateControl.TemplateScales>
<!-- Grid is not mandatory but recommended as the main container -->
<Grid Margin="1cm,1cm,1cm,1cm">
</Grid>
</tm:TemplateControl>
WPF design and controls positioning:
WPF uses device independent pixels approach. Those are abstractly defined points that scale with DPI changes automatically. In effect, the controls and fonts behave like vectors. Correctly designed forms will look the same on different resolutions and DPIs, fonts or other content will not overflow its parent content. Controls are positioned relatively to their parent containers and sibblings. You can simply compare this behavior to HTML/CSS design.
Control containers can define rotation and orientation of their content. Example:
<StackPanel>
<StackPanel.LayoutTransform>
<RotateTransform Angle="-90"></RotateTransform>
</StackPanel.LayoutTransform>
</StackPanel>
The table below shows a brief summary of positioning options for any elements placed in a parent container.
Alignment Dimension Result

Geospatial Portal
143
HorizontalAlignment="Stretch" (default)
Width="Auto" (default)
Element will stretch to full width of its parent.
Both attributes don’t need to be set explicitly.
HorizontalAlignment="Left"
Width="Auto" (default)
Element will snap to left border of its parent. Width will be set by its content
HorizontalAlignment="Center"
Width="100" Element will center horizontally to its parent. Width is exactly 100.
HorizontalAlignment="Stretch"
Width="100" Illogical state, control cannot stretch and have an absolute width at the same time.
VerticalAlignment="Stretch" (default)
Width="Auto" (default)
Element will stretch to full height of its parent
Both attributes don’t need to be set explicitly.
VerticalAlignment="Top" Height="50" Elemement will snap to top border of its parent and will have absolute height of 50
VerticalAlignment="Stretch" (default)
Height="50" Illogical state, control cannot stretch and have an absolute height at the same time.
You can also use margin and padding same way as in to HTML/CSS defitions:
Margin - defines outer edges of the element
Padding - defines inner space of the element
XML namespaces
Namespaces are used for clear definition (resolution) of classes and other types. Without a namespaces there would be many conflicts and each class would have to have unique name in the whole project scope, incl. external libraries. Every element
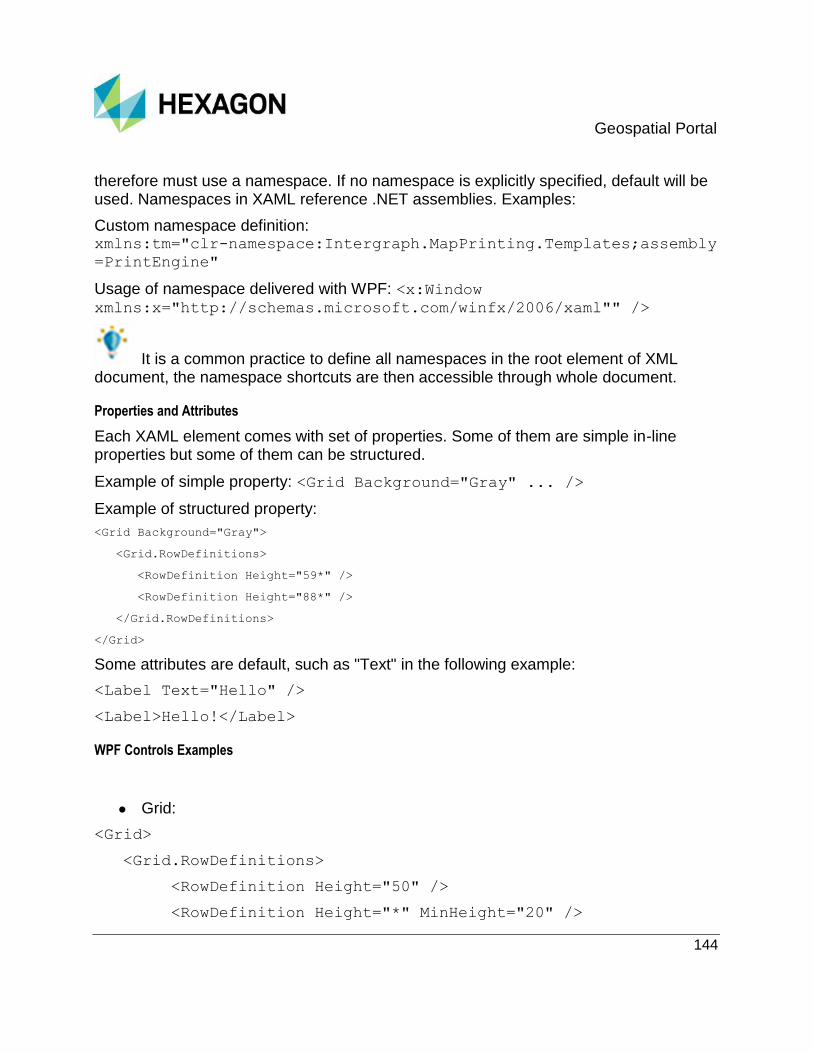
Geospatial Portal
144
therefore must use a namespace. If no namespace is explicitly specified, default will be used. Namespaces in XAML reference .NET assemblies. Examples:
Custom namespace definition: xmlns:tm="clr-namespace:Intergraph.MapPrinting.Templates;assembly
=PrintEngine"
Usage of namespace delivered with WPF: <x:Window xmlns:x="http://schemas.microsoft.com/winfx/2006/xaml"" />
It is a common practice to define all namespaces in the root element of XML document, the namespace shortcuts are then accessible through whole document.
Properties and Attributes
Each XAML element comes with set of properties. Some of them are simple in-line properties but some of them can be structured.
Example of simple property: <Grid Background="Gray" ... />
Example of structured property:
<Grid Background="Gray">
<Grid.RowDefinitions>
<RowDefinition Height="59*" />
<RowDefinition Height="88*" />
</Grid.RowDefinitions>
</Grid>
Some attributes are default, such as "Text" in the following example:
<Label Text="Hello" />
<Label>Hello!</Label>
WPF Controls Examples
Grid:
<Grid>
<Grid.RowDefinitions>
<RowDefinition Height="50" />
<RowDefinition Height="*" MinHeight="20" />

Geospatial Portal
145
</Grid.RowDefinitions>
<Grid.ColumnDefinitions>
<ColumnDefinition Width="*" />
<ColumnDefinition Width="2*" />
<ColumnDefinition Width="*" />
</Grid.ColumnDefinitions>
</Grid>
There will be two rows, one will be exactly 50 points high and the second will use the
rest of the box model. If empty, it will be still 20pts high.
There will be three columns, where the first one will use 25% of the box, second 50% and third 25%.
Use inherited complex properties inside Grid.Row & Grid.Column to position the controls within a Grid. If those properties are not specified the content will be automatically placed to the first row / column. Example
<Image Grid.Row="2" Grid.Column="2" Stretch="Fill"
Source="/images/pic1.png" />
<TextBlock Grid.Row="3" Grid.Column="2">Image Caption</TextBlock>
Canvas:
Used for positioning the elements in absolute coordinates related to canvas corners.
<Canvas Height="400" Width="400" >
<Button Canvas.Top="10" Canvas.Left="10" Content="Button 1" />
<Button Canvas.Top="40" Canvas.Left="20" Content="Button 2" />
</Canvas>
Result:

Geospatial Portal
146
StackPanel:
Used for stacking elements one-after-another horizontally or vertically. Useful e.g. when too many Grid.RowDefinitions would be confusing.
<StackPanel Grid.Column="0" Orientation="Horizontal" Width="30">
<Button Content="Button 1" Margin="2" />
<Button Content="Button 2" Margin="2" />
</StackPanel>
Result:
WrapPanel:
Similar to StackPanel but wraps element to a new line or column if a corner is reached.
<WrapPanel Background="LightBlue" Width="200" Height="100">
<Button Width="200">Button 1</Button>
<Button>Button 2</Button>
<Button>Button 3</Button>
<Button>Button 4</Button>
</WrapPanel>
Result:
TextBlock:
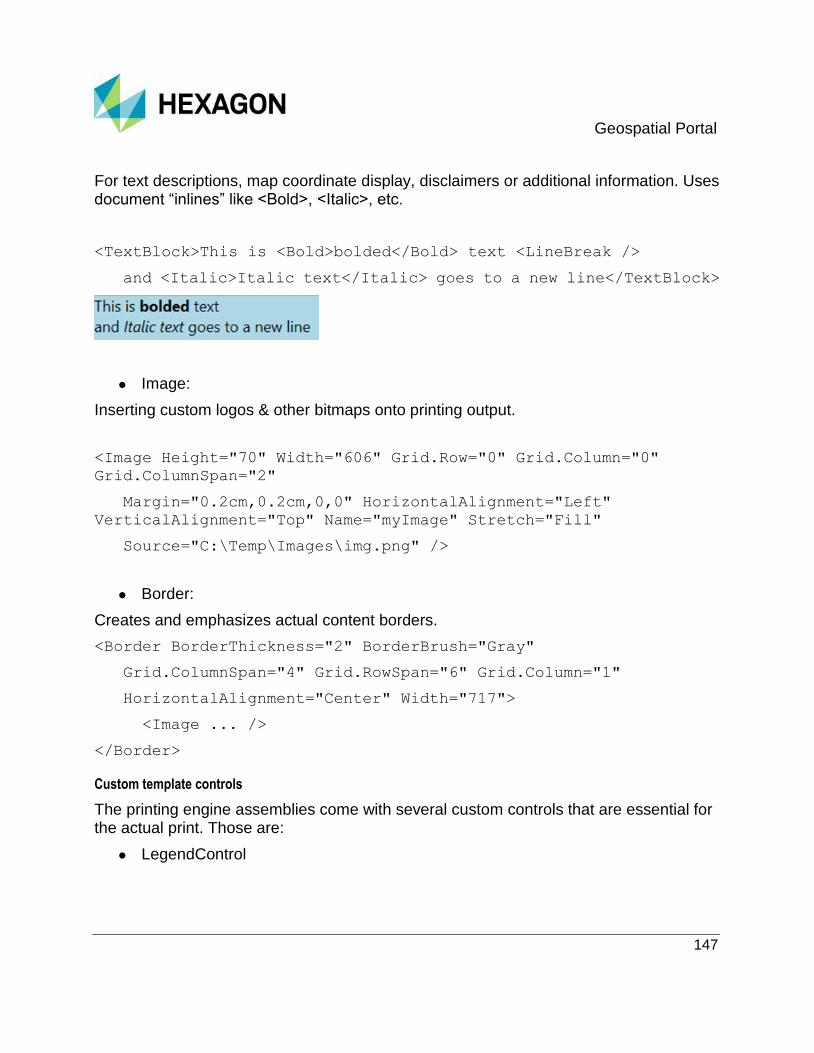
Geospatial Portal
147
For text descriptions, map coordinate display, disclaimers or additional information. Uses document “inlines” like <Bold>, <Italic>, etc.
<TextBlock>This is <Bold>bolded</Bold> text <LineBreak />
and <Italic>Italic text</Italic> goes to a new line</TextBlock>
Image:
Inserting custom logos & other bitmaps onto printing output.
<Image Height="70" Width="606" Grid.Row="0" Grid.Column="0"
Grid.ColumnSpan="2"
Margin="0.2cm,0.2cm,0,0" HorizontalAlignment="Left"
VerticalAlignment="Top" Name="myImage" Stretch="Fill"
Source="C:\Temp\Images\img.png" />
Border:
Creates and emphasizes actual content borders.
<Border BorderThickness="2" BorderBrush="Gray"
Grid.ColumnSpan="4" Grid.RowSpan="6" Grid.Column="1"
HorizontalAlignment="Center" Width="717">
<Image ... />
</Border>
Custom template controls
The printing engine assemblies come with several custom controls that are essential for the actual print. Those are:
LegendControl

Geospatial Portal
148
Use this control to place a legend that was available to the user issuing print in Portal
application. This control comes with property LegendImageSize, a complex property
containing Size element with Height and Width values:
<LegendControl LegendImageSize="10,10" … >
VerticalLegendControl
Same as above but positioned vertically. VerticalLegendControl adds additional property
LegendClipMessage that allows to define a message displayed in situation when
legend does not fit the window and was clipped.
MapControl
Basic control for placing a map. Has no specific properties.
ScaleControl
Control for placing an additional scalebar. Usable properties are:
Segments - number of black-white segments on the scale bar
Units - if used, automatically converts between "Metric" or "Miles"
One scalebar is automatically rendered inside the map control but can be removed if custom snapshot page is developed.
Template Parameters
There are two types of parameters usable in printing templates. One of them are predefined system parameters while others are custom defined by the template developers. The system parameters have their values set during the print page generation or by user input. You can reference and display those values usually using Textblock elements. Binding mechanism is used to dynamically access the parameters during run time.
Available System template parameters initialized by the Printing Engine include:
Map Extents: [xMin], [xMax], [yMin], [yMax]
CRS information: [crsId], [crsName]
Zoom level: ScaleSource
[legendVisibility]
Sample usage of system parameters:

Geospatial Portal
149
<TextBlock FontSize="8pt" Text="{Binding Path=Parameters.[yMax]}"
tm:PrintTemplate.ParameterCategory="System"/>
If the ParameterCategory is not set to “System” then this parameter will be visible in the Template options tab in the Print dialog and this parameter will be used as a user parameter. All parameters marked as "System” (ParameterCategory) will be hidden for user.
Coordinates are rounded to: 0 decimal places (projected CRS) or 7 decimal places (geographic CRS). This can be changed in web.config in <printing> section by new attributes to set precision. (As an example of use we added corners coordinates to default templates).
CRS parameters represents CRS id (i.e. “EPSG:31466”) and CRS name (i.e. “DHDN90/GK Gauss-Krüger Zone 2”).
You can define a new template parameter type “Textarea”. It defines that in the user interface this parameter will be represented by a text area where the user can write multiline text.
Sample user parameter definition:
<TextBlock Grid.Column="4"
Grid.ColumnSpan="2"
Margin="0.1cm,0.1cm,0.1cm,0.1cm"
FontSize="10pt"
Text="{Binding Parameters.[mapTitle]}"
TextAlignment="Center"
tm:PrintTemplate.ParameterDescription="Map
Title"
tm:PrintTemplate.ParameterDefault=""
TextWrapping="Wrap" />
In the sample above in the Print dialog the option “Map Title” will appear.
The value provided in tm:PrintTemplate.ParameterDefault="" will be visible by
default in the Print dialog
System Parameters - set by the user in the Common Options tab:
TemplateDescription – description of the template, not visible anywhere else
TemplateName – custom template name
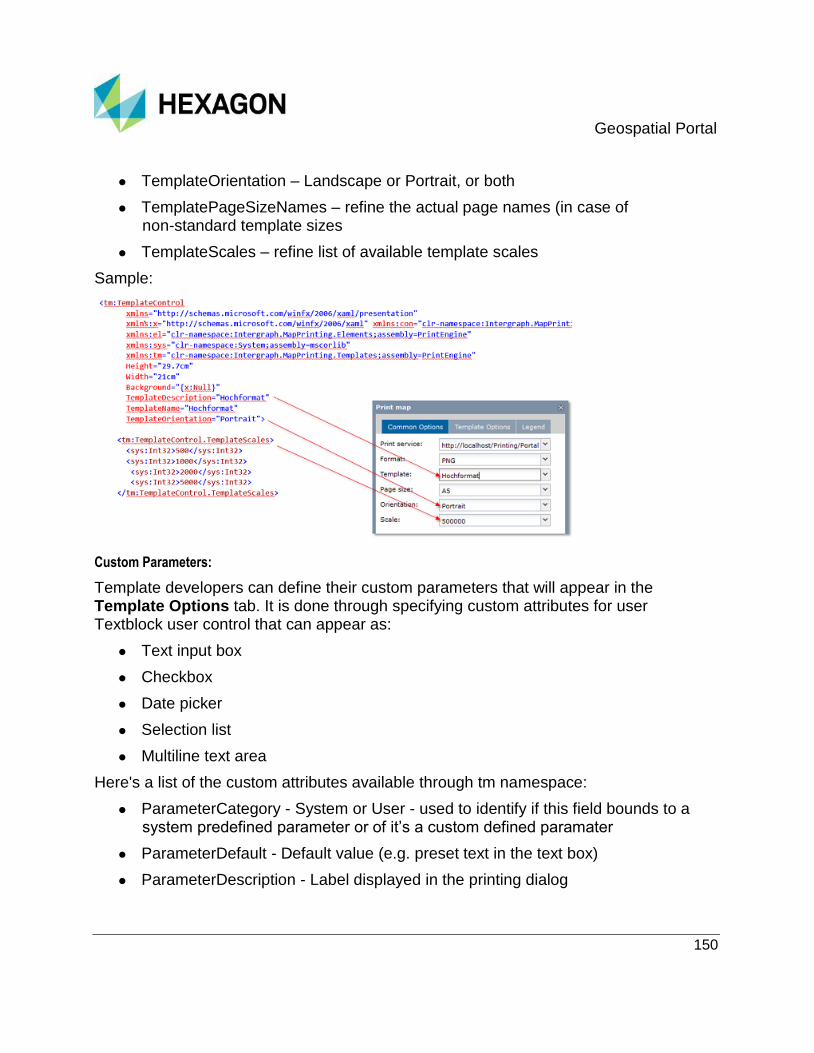
Geospatial Portal
150
TemplateOrientation – Landscape or Portrait, or both
TemplatePageSizeNames – refine the actual page names (in case of non-standard template sizes
TemplateScales – refine list of available template scales
Sample:
Custom Parameters:
Template developers can define their custom parameters that will appear in the Template Options tab. It is done through specifying custom attributes for user Textblock user control that can appear as:
Text input box
Checkbox
Date picker
Selection list
Multiline text area
Here's a list of the custom attributes available through tm namespace:
ParameterCategory - System or User - used to identify if this field bounds to a system predefined parameter or of it’s a custom defined paramater
ParameterDefault - Default value (e.g. preset text in the text box)
ParameterDescription - Label displayed in the printing dialog

Geospatial Portal
151
ParameterType - Text by default; other options are Checkbox, Date, List and Textarea
ParameterValues - list of values for lists
Sample:
The pictures below show more sample print templates with used user and system parameters:
Sample User Parameters:
1. [Scale]
2. [Title]
3. [Details]
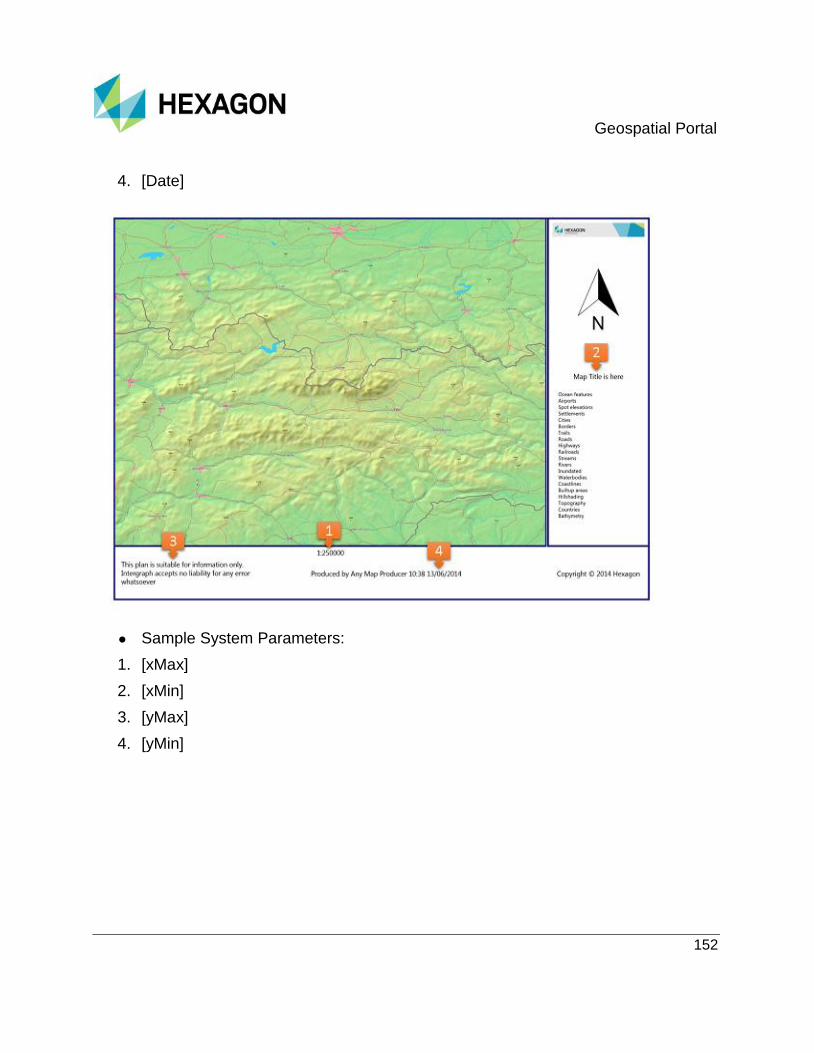
Geospatial Portal
152
4. [Date]
Sample System Parameters:
1. [xMax]
2. [xMin]
3. [yMax]
4. [yMin]

Geospatial Portal
153
5. [legendVisibility]
Enabling Windows Authentication for Printing
To configure Windows Authentication for the Geospatial Portal instance:
In case you are using the Internet Explorer printing engine:
1. Open the Internet Information Services (IIS) Manager.
2. On the Connection tree, select Sites and then select the entry for your Geospatial Portal instance.

Geospatial Portal
154
3. Click the Authentication icon under the IIS section.
4. On the Authentication page, click Enable in the Actions column for Windows Authentication and Basic Authentication.
If access to the .NET Authorization Rules for "All Users" is denied the printing functionality in Geospatial Portal may not work properly. In such a case the access to the .NET Authorization Rules must be enabled for IIS_IUSRS (server user).
In case you are using phantomJS printing engine:
For PhantomJS in version 2.1.1 (recommended) or newer:
1. On the Authentication page, in the Internet Information Services (IIS) Manager, click Enable in the Actions column for Windows Authentication and Basic Authentication.
For PhantomJS in version 1.9.7 or older:

Geospatial Portal
155
1. On the server where the instance of Geospatial Portal is working, create a new user account, for example, call it "printing".
Ensure that the newly created "printing" user has at least Users group privileges.
2. Edit the Web.config file for your Geospatial Portal instance. In the web.client
section, provide userName and password parameters for the newly created
user, as in the example below:
<printing tileSize="2000" mapSizeLimit="5000" timeout="00:02"
defaultService="FirstExternal" precisionGeographic="7"
precisionProjected="0" printingEngine="phantomJS"
phantomJSProgramLocation="c:\Program Files\Hexagon\Geospatial
Portal\Program\PhantomJS\phantomjs.exe" userName="printing"
password="password" />
3. On the Authentication page, in the Intenet Information Services (IIS) Manager, click Enable in the Actions column for Windows Authentication and Basic Authentication.
If access to the .NET Authorization Rules for "All Users" is denied the printing functionality in Geospatial Portal may not work properly. In such a case the access to the .NET Authorization Rules must be enabled for IIS_IUSRS (server user).
Configuring Print Service over HTTPS protocol
To adapt Print Service to work over secured HTTP protocol, perform the following additional steps:
1. Edit WebConfig file for Print Service. The file is by default located in C:\Program Files\Common Files\Hexagon\Services\Supporting Services\PrintingService.
2. Change the <bindings> section:
In <basicHttpBinding> for PrintServerBinding add:
<security mode="Transport">
<transport clientCredentialType="None" />
</security>
Sample:
<system.serviceModel>
<bindings>

Geospatial Portal
156
<basicHttpBinding>
<binding name="PrintServerBinding"
transferMode="Streamed" maxBufferSize="65536"
maxReceivedMessageSize="2147483647">
<readerQuotas maxStringContentLength="2147483647"
maxArrayLength="2147483647" maxBytesPerRead="2147483647"
maxNameTableCharCount="2147483647" />
<security mode="Transport">
<transport clientCredentialType="None" />
</security>
</binding>
</basicHttpBinding>
</bindings>
3. Modify the <behaviors> section:
a. For <behavior name="Intergraph.MapPrinting.PrintService">
change <serviceMetada> tag:
Change <serviceMetadata httpGetEnabled="true /> to <serviceMetadata httpGetEnabled="false" httpGetUrl=""
httpsGetEnabled="true" httpsGetUrl="" />
b. For <behavior name=""> change <serviceMetada> tag:
Change <serviceMetadata httpGetEnabled="true /> to <serviceMetadata httpGetEnabled="false" httpGetUrl=""
httpsGetEnabled="true" httpsGetUrl="" />
Sample:
<behaviors>
<serviceBehaviors>
<behavior name="Intergraph.MapPrinting.PrintService">
<serviceMetadata httpGetEnabled="false" httpGetUrl=""
httpsGetEnabled="true" httpsGetUrl="" />
<serviceDebug
includeExceptionDetailInFaults="true" />
</behavior>

Geospatial Portal
157
<behavior name="">
<serviceMetadata httpGetEnabled="false" httpGetUrl=""
httpsGetEnabled="true" httpsGetUrl="" />
<serviceDebug
includeExceptionDetailInFaults="false" />
</behavior>
</serviceBehaviors>
</behaviors>
4. Save Web.config file.
Printing in Load Balancing Environment
In order to optimize the printing in Geospatial Portal instance running in a load balancing environment:
1. Edit WebConfig file
2. In the <printing> section enable the loadBalancingConfiguration option e.g.
<printing tileSize="2000" mapSizeLimit="5000" timeout="00:02"
defaultService="FirstExternal" precisionGeographic="7"
precisionProjected="0"
printingEngine="internalInternetExplorer"
phantomJSProgramLocation="c:\intergraph\Geospatial
Portal\Program\PhantomJS\phantomjs.exe"
loadBalancingConfiguration="true"/>
Configuring Quick Print in Portal
In order to quickly print the map with no additional configuration nor external print service users can press Ctrl+P key combination on keyboard. Maps are printed using simple Web browser dialog offering typical printing settings. Some Web browsers allow you to adjust and scale the prints. Before using quick print some Geospatial Portal controls such as the banner, left pane or ERDAS APOLLO search result panel may be hidden or shown according to the needs. Note that in most Web browsers you will need to turn on the Print background colors and images option in order to print all the graphics used in controls (e.g. banner image).
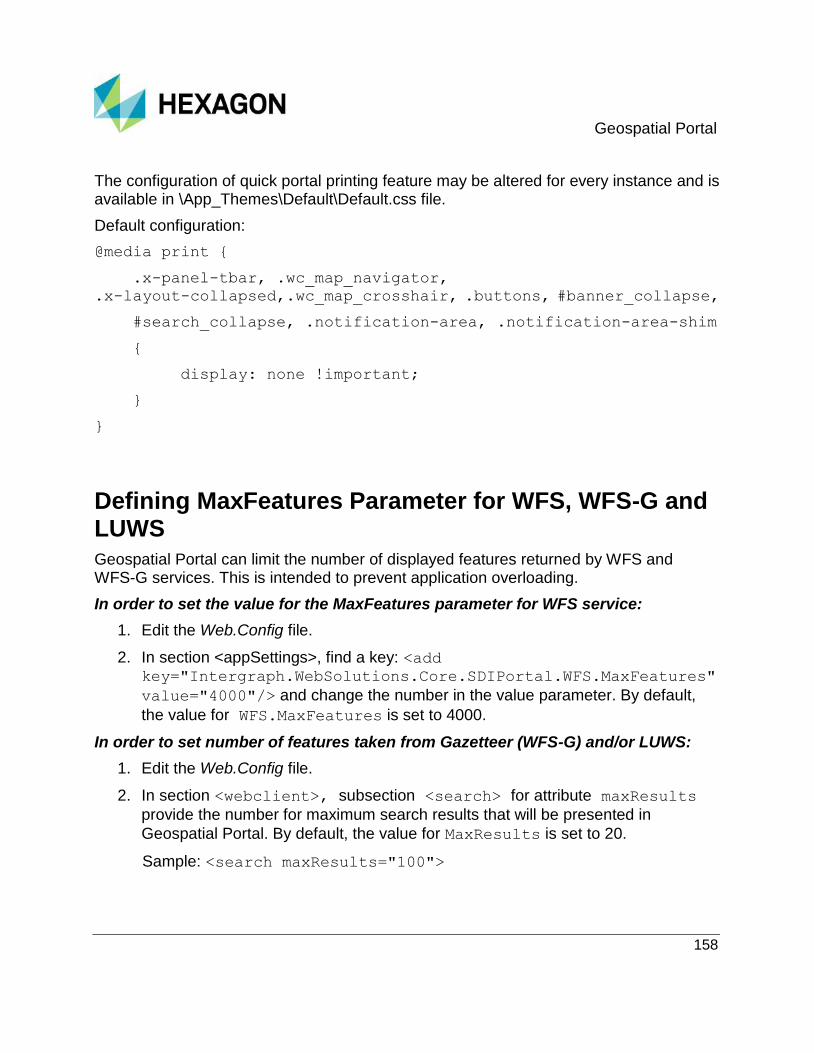
Geospatial Portal
158
The configuration of quick portal printing feature may be altered for every instance and is available in \App_Themes\Default\Default.css file.
Default configuration:
@media print {
.x-panel-tbar, .wc_map_navigator,
.x-layout-collapsed,.wc_map_crosshair, .buttons, #banner_collapse,
#search_collapse, .notification-area, .notification-area-shim
{
display: none !important;
}
}
Defining MaxFeatures Parameter for WFS, WFS-G and LUWS
Geospatial Portal can limit the number of displayed features returned by WFS and WFS-G services. This is intended to prevent application overloading.
In order to set the value for the MaxFeatures parameter for WFS service:
1. Edit the Web.Config file.
2. In section <appSettings>, find a key: <add key="Intergraph.WebSolutions.Core.SDIPortal.WFS.MaxFeatures"
value="4000"/> and change the number in the value parameter. By default,
the value for WFS.MaxFeatures is set to 4000.
In order to set number of features taken from Gazetteer (WFS-G) and/or LUWS:
1. Edit the Web.Config file.
2. In section <webclient>, subsection <search> for attribute maxResults
provide the number for maximum search results that will be presented in
Geospatial Portal. By default, the value for MaxResults is set to 20.
Sample: <search maxResults="100">
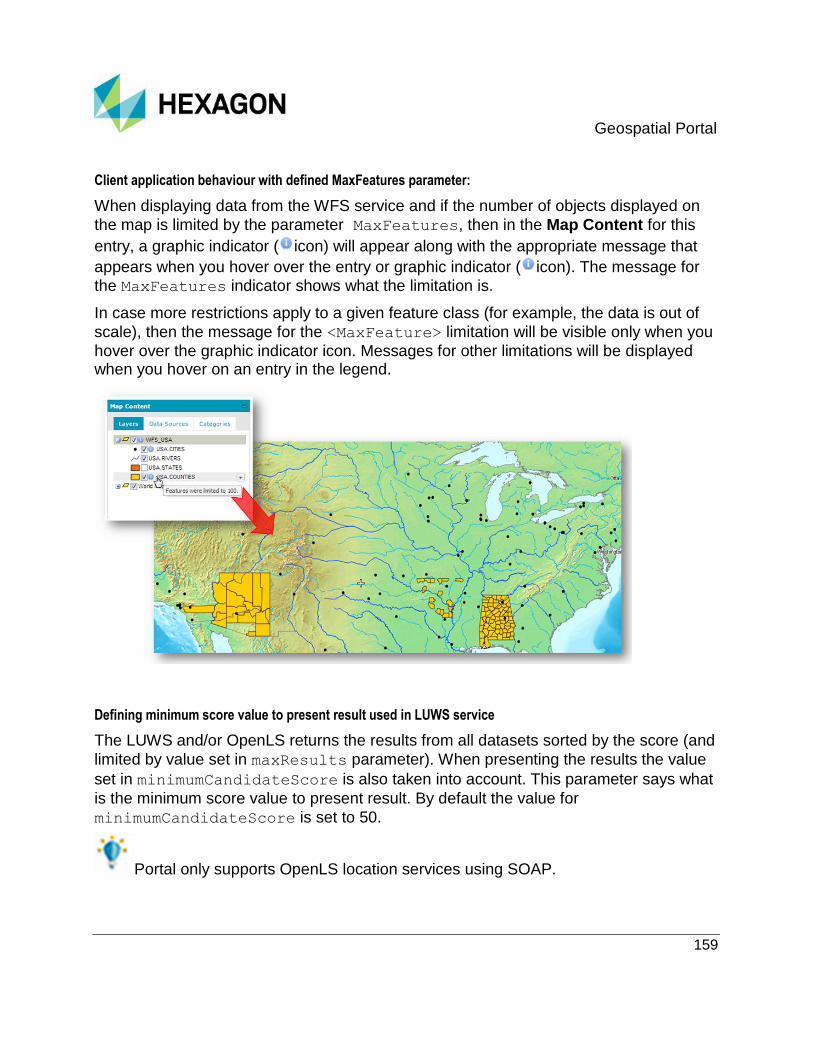
Geospatial Portal
159
Client application behaviour with defined MaxFeatures parameter:
When displaying data from the WFS service and if the number of objects displayed on
the map is limited by the parameter MaxFeatures, then in the Map Content for this
entry, a graphic indicator ( icon) will appear along with the appropriate message that
appears when you hover over the entry or graphic indicator ( icon). The message for
the MaxFeatures indicator shows what the limitation is.
In case more restrictions apply to a given feature class (for example, the data is out of
scale), then the message for the <MaxFeature> limitation will be visible only when you
hover over the graphic indicator icon. Messages for other limitations will be displayed when you hover on an entry in the legend.
Defining minimum score value to present result used in LUWS service
The LUWS and/or OpenLS returns the results from all datasets sorted by the score (and
limited by value set in maxResults parameter). When presenting the results the value
set in minimumCandidateScore is also taken into account. This parameter says what
is the minimum score value to present result. By default the value for
minimumCandidateScore is set to 50.
Portal only supports OpenLS location services using SOAP.

Geospatial Portal
160
In order to change minimum candidate score for LUWS:
1. Edit the Web.Config file.
2. In section <webclient>, subsection <search> for attribute
minimumCandidateScore provide the number for minimum score value to
present result.
Geospatial Portal
161
Setting matchCase parameter for WFS queries
The optional matchCase parameter is used to specify how a filter expression processor performs string comparisons. In Geospatial Portal - Classic and GeoMedia WebMap
Publisher Portal the boolean matchCase parameter default value is "false" (even
when not set in Web.config). The value "false" means that string comparisons are
performed caselessly. A "true" value means that string comparisons will match the
case.
In order to set the value for the matchCase parameter:
1. Edit the Web.Config file.
2. In section <appSettings>, add a key: <add key="Intergraph.GeoMedia.Web.SDI.Common.Tools.MatchCase"
value="true" /> and set/verify its value ("true" or "false").
3. Save Web.Config file.
Customizing Width of Live Search Combo
By default, the width of Live Search control is set to 200px. This may cause navigation between pages with multiple results in some languages difficult. This difficulty was resolved with the option to change the width of the Live Search combo. Administrators can choose to display results wider than the combo. This is especially useful when dealing with long descriptions that tend to overlap. By default, the width of the results list is set to 300px. The minimum width of the result list is larger or equal to the width of the combo box. These settings can be found in the Web.config file for Geospatial Portal - Classic.
In order to set the width of the Live Search combo:
1. Edit the Web.Config file.
2. Go to the <liveSearch> section.
3. Provide the value for width element attribute (in pixels) Sample: <liveSearch hasSearchMenu="true" entryPointCode="selective"
zoomScaleDenominator="20000" width="300" />.
To set the width of the result list in Live Search combo:
1. Edit the Web.Config file.

Geospatial Portal
162
2. Go to the <liveSearch> section.
3. Provide the value for minListWidth element attribute (in pixels) Sample: <liveSearch hasSearchMenu="true" entryPointCode="selective"
zoomScaleDenominator="20000" width="300" minListWidth="400"
/>.
Enabling Google Maps, Bing Maps and Open Street Map in Geospatial Portal
Google and Bing Maps are disabled in Geospatial Portal by default; however, the mechanism for using Google and/or Bing maps is implemented. If necessary, the administrator can enable Google and/or Bing maps in Geospatial Portal, thus users will be able to view Google and/or Bing maps after establishing a connection to these sources.
In order to enable Google Maps in Geospatial Portal:
1. Edit the Web.Config file for Geospatial Portal.
2. In the <webclient> section, add the GoogleMaps parameters with the value for
the enabled parameter set to true:
<GoogleMaps enabled="true" apiKey=""/>
By setting the GoogleMaps enabled attribute to "true", you declare conformance
with the appropriate Google Maps license agreements and terms of use.
For further information refer to:
Google Maps/Earth Additional Terms of Service Web Page (http://www.google.com/help/terms_maps.html)
Google Maps API licensing Web Page (https://developers.google.com/maps/licensing)
3. For the apiKey parameter, provide the API Key for Google Maps.
Google Maps API is enabled only when the enabled parameter is set to "true".
For configuring Google Maps API Key (apiKey attribute), refer to Sign Up for the Google Maps API Web Page (https://developers.google.com/maps/signup).
You can also provide the key in the GoogleMaps API Key field, in the Advanced options group in the Starting Configuration tab of Administration Console. With version 16.6.2 or newer you can define the Google API key by using the Administration Console GUI.
Geospatial Portal
163
In order to enable Bing Maps in Geospatial Portal:
1. Edit the Web.Config file for Geospatial Portal.
2. In the <webclient> section, add the BingMaps parameters:
<BingMaps apiKey=""/>
3. For the apiKey parameter, provide the API Key for Bing Maps.
By providing the Bing Maps API Key (apiKey attribute), you declare conformance with the appropriate Microsoft® Bing™ Maps Platform APIs’ Terms Of Use.
For further information refer to:
Microsoft® Bing™ Maps Platform APIs’ Terms Of Use Web Page
The Bing Maps Platform Web Page (http://www.microsoft.com/maps/)
Getting a Bing Maps Key Web Page (http://msdn.microsoft.com/en-us/library/ff428642.aspx)
The Microsoft® Bing™ Maps Platform API is enabled only when the apiKey is configured.
To use the Google Maps connector in your Geospatial Portal site, you must sign up for a Google Maps API key at this location: http://code.google.com/apis/maps/signup.html. You must have a different key for each domain name on which you will host a Geospatial Portal site using the Google Maps connector, and you must enter the base URL that your site(s) will be hosted on when you request the key from the Google Web site. This key will then have to be included in the portal Web.Config configuration file.
To use the Google Maps connector, you must also agree to and abide by the Google Maps API Terms of Service found at this location: http://code.google.com/apis/maps/terms.html. Your use may require the purchase of a software license.
To use the Microsoft Bing Maps connector in your Geospatial Portal site, you must agree to and abide by the Microsoft Bing Maps licensing and pricing terms found at this location: http://www.microsoft.com/en-us/maps/licensing Your use may require the purchase of a software license.

Geospatial Portal
164
Support Bing Maps API v8 in Portal
Microsoft support for the Bing Maps v7 AJAX control is deprecated since 30 June, 2017. To continue to receive uninterrupted support and to benefit from improved user experience, Microsoft recommends migrating to v8. For more details visit Microsoft documentation.
To set Bing Maps API version:
1. Edit Web.config file for Geospatial Portal.
2. Go to the <webclient> section.
3. In <BingMaps> entry provide API version number for apiVersion parameter.
Sample:
<BingMaps apiKey="" apiVersion="8" />
4. Save changes in Web.config file and reload the Geospatial Portal.
Please consider that migration from the Bing Maps v7 to the Bing Maps v8 may result in limitation of functionality (like ability to print Bing Maps in Portal or to refresh the completion of loading Bing Map tiles in legend) anyway the default Bing Maps API version is 8.
In order to enable Open Street Map in Geospatial Portal:
1. Edit the Web.Config file for Geospatial Portal.
2. In the <webclient> section, provide a tile server for the <OpenStreetMap
OpenStreetMapsTileServer="" /> parameter.
There is a number of providers serving tiles with Open Street Map data rendered. Each of the providers has their own tile usage policy that needs to be verified by the site administrator/owner. Below we have provided examples of tile servers with their tile usage policy linked.
http://{a,b,c}.tile.openstreetmap.org (http://wiki.openstreetmap.org/wiki/Tile_usage_policy)
http://otile{1,2,3}.mqcdn.com/tiles/1.0.0/osm (http://developer.mapquest.com/web/info/terms-of-use)
http://{a,b,c}.tile.opencyclemap.org/cycle (http://thunderforest.com/terms/)

Geospatial Portal
165
http://{a,b,c}.tile2.opencyclemap.org/transport (http://thunderforest.com/terms/)
You can use one of the tile links from the above list. By setting the
OpenStreetMapsTileServer attribute, you declare conformance with the appropriate
tile usage policy terms of use.
Google, Bing Maps, and Open Street Maps are available only in the EPSG:3857 coordinate system.
Google and Bing Maps can be displayed only in 2D view.
Remember to enable Google, Bing Maps, and Open Street Map connectors to allow users to use them. Connectors for Google Maps, Bing Maps, and Open Street Map are disabled by default in the Geospatial Portal configuration. For more information about connectors management, see the Map Services (on page 62) chapter.
In order to have these appear automatically in Geospatial Portal, it is necessary to create a new starting configuration. For more information about creating a starting configuration, see the Starting Configuration (on page 34) chapter.
See also: Enabling OpenStreetMap as a Default Map Tile Sources (see "Enabling Open Street Map as a Default Map Tile Sources" on page 77)

Geospatial Portal
166
Enabling/Disabling Tilted Google Map View in Geospatial Portal
This feature is available for Geospatial Portal with EP05 or newer patch applied.
Google Maps provides 45° perspective imagery at high zoom levels (where available) for Satellite and Hybrid map types. To view a "Satellite" or "Hybrid" Google Map, type in Geospatial Portal. The perspective view is set automatically if you zoom into a location for which such imagery exists. The satellite or hybrid imagery will be replaced with 45° perspective imagery centered on the current location. By default, such views will orient towards north. If you zoom out, you will return to viewing the default satellite or hybrid imagery. When the perspective imagery is being displayed, depending on the specific map content configuration, other layers might not match up with Google Maps as the base map. To mitigate you might want to disable the switching between satellite/hybrid and perspective imagery.
In order to disable the tilt option:
1. Edit the Web.config file for your Geospatial Portal instance (by default the Web.config file is located in %CommonProgramW6432%\Hexagon\Services\Instances\<Geospatial Portal instance> )
2. Go to the <webclient> section
3. Set the "true" value for the parameter tiltDisabled
<GoogleMaps enabled="true" apiKey="" tiltDisabled="true"/>
4. Save changes in the Web.config file and reload the Geospatial Portal
In order to enable the tilt option:
1. Edit the Web.config file for your Geospatial Portal instance (by defult the Web.config file is located in %CommonProgramW6432%\Hexagon\Services\Instances\<Geospatial Portal instance> )
2. Go to the <webclient> section
3. Set the "false" value for the parameter tiltDisabled.
<GoogleMaps enabled="true" apiKey="" tiltDisabled="false"/>

Geospatial Portal
167
4. Save changes in the Web.config file and reload the Geospatial Portal
Sample of Satellite Google Map displayed in Geospatial Portal with perspective view enabled:

Geospatial Portal
168
Sample of Satellite Google Map displayed in Geospatial Portal with perspective view disabled:
Defining Rotation for Bitmap Pattern and Graphic Style
Bitmap patterns used for filling features with an area geometry type and used for point graphic styles, can be rotated by default for specified services, such as the Personal service. To apply rotation, you must add the definition for the rotation in the MapConfig.js file (by default located in C:\Program Files\Common Files\Hexagon\Services\Instances\<instance name>\js).
The definition syntax is as follow:
mapInfo.rotation = {"mapServiceId": {"legendItemDefinitionId":
"attributeId"}};
where:
mapServiceId – service ID in which feature classes should have the pattern and/or
graphic symbol rotated.
legendItemDefinitionId – legend definition ID of a feature class for which the
pattern and/or graphic symbol should be rotated.
attributeId – name of the attribute for the feature class where the values for rotation
are kept.
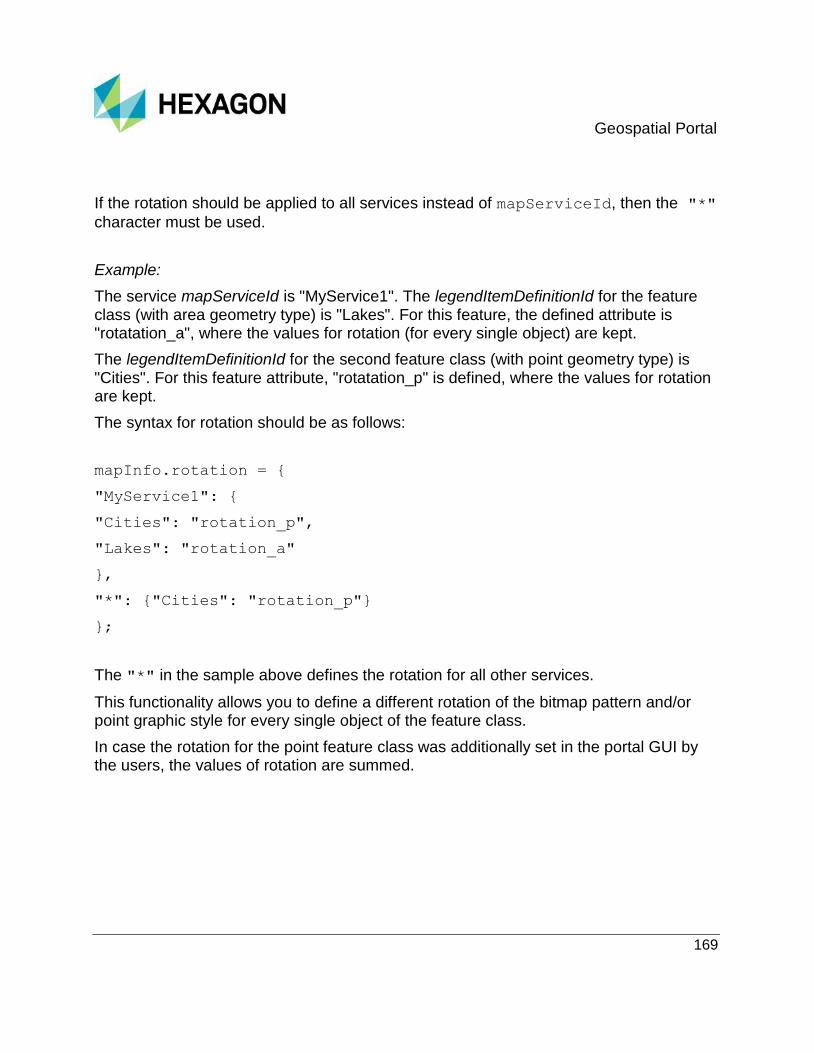
Geospatial Portal
169
If the rotation should be applied to all services instead of mapServiceId, then the "*"
character must be used.
Example:
The service mapServiceId is "MyService1". The legendItemDefinitionId for the feature class (with area geometry type) is "Lakes". For this feature, the defined attribute is "rotatation_a", where the values for rotation (for every single object) are kept.
The legendItemDefinitionId for the second feature class (with point geometry type) is "Cities". For this feature attribute, "rotatation_p" is defined, where the values for rotation are kept.
The syntax for rotation should be as follows:
mapInfo.rotation = {
"MyService1": {
"Cities": "rotation_p",
"Lakes": "rotation_a"
},
"*": {"Cities": "rotation_p"}
};
The "*" in the sample above defines the rotation for all other services.
This functionality allows you to define a different rotation of the bitmap pattern and/or point graphic style for every single object of the feature class.
In case the rotation for the point feature class was additionally set in the portal GUI by the users, the values of rotation are summed.

Geospatial Portal
170
Definition of Analysis Result Downloads
The results of a performed analysis in Geospatial Portal can be downloaded to the vector files such as KML, Shapefile, and GML. The availability of particular formats depends on the Geospatial Portal configuration and the capabilities of the service that serves data for analysis.
Information on which vector formats are supported by the service used for analysis can be obtained by performing a GetCapabilities request.
The definition of output formats for the download function on the Analyses tab is
performed in the Web.Config file for a product in the <webclient> section. The formats
are listed in the <outputFormatDefinitions> tag.
outputFormat element attributes:
formatPattern: (required) pattern is used to determine the proper definition for the output format; first, the matching definition is used; if a grouping is used, then the first match from the grouping can be used in the format name (as {0})
formatName: (required) name that will be displayed in the user interface for the output format
extension: extension of the file (used if the file download is an operation result)
isDefault: (true|false) if the operation supports the default output format, it can be replaced with the definition by setting this attribute to "true"
Definition of DownloadMaxFeatures parameter for WFS
Geospatial Portal can limit the number of downloaded WFS features. The key
"Intergraph.WebSolutions.Core.SDIPortal.WFS.DownloadMaxFeatures" in
the <appSettings> section is responsible for the maximum number of features that
can be downloaded.
The default value for the DownloadMaxFeatures parameter is set to 40000. In case
this key is omitted, the WFS.MxFeatures parameter (see Definition of MaxFeatures
Parameter for WFS and WFS-G (see "Defining MaxFeatures Parameter for WFS, WFS-G and LUWS" on page 158)) will limit the downloads, on the condition that it is enabled.
Geospatial Portal
171
Disabling/Enabling the Long Data Processing Confirmation
In Geospatial Portal (and WebMap Publisher Portal) when performing an attribute type analysis (or predefined queries in WebMap Publisher Portal layout) users can get the values from the service by clicking the [...] button. Before the windows with values to be selected are displayed, the message info dialog appears with a warning that processing may take longer for large datasets and for some datasets it may not give all the possible values. This message is enabled by default but can be disabled by the administrator if required.
This option is available only with Geospatial Portal version 15.00.02 (EP02 patch) or newer.
To disable/enable the confirmation window about processing large datasets:
1. Edit the Web.config file for your Geospatial Portal (or WebMap Publisher Portal).
2. Go to the <webclient> section.
3. In the <queries> subsection for the parameter
displayLongProcessingConfirmation, set the value to false in order to
disable the confirmation window.
OR
In the <queries> subsection for the parameter
displayLongProcessingConfirmation, set value to true in order to enable
the confirmation window.
4. Save the Web.config file.
In case the <queries> subsection is not available, please add it to the
Web.config file in the <webclient> section. If this section is available but the
part of code containing it is commented please uncomment it.
Setting the Scale Denominator for Point Fit
When the user selects one point feature (coming from Web Feature Service or WebMap Publisher Service), the map scale denominator changes to the value defined for a given

Geospatial Portal
172
legend item definition (feature class). The default value is set to 1:10 000 but may be changed if required. There can be many values for different legend item definition IDs.
To set the scale denominator for point fit:
1. Edit the Web.Config file.
2. In the <webclient> section for the <pointFitScaleDenominator/> parameter,
set the following attributes:
idPattern: regular expression for legend item definition id
scaleDenominator: denominator value
Sample:
<ui>
<pointFit>
<pointFitScaleDenominator idPattern="Big_Cities"
scaleDenominator="50000" />
<pointFitScaleDenominator idPattern="Cities"
scaleDenominator="15000" />
</pointFit>
</ui>
The described functionality is applicable only if the Fit and zoom out option for items in the select set (defined on the Settings panel) is active. When the user also selects multiple point features, the behavior for the Fit and zoom out option is applied.

Geospatial Portal
173
Defining Default Style in Configuration for Display, Highlight and Selection of Features
There is a possibility to configure default highlight and selection style for features served by WFS, WMPS and Personal (PSS) services. Also there is a possibility to define default display style for analysis (WFS; WMPS) and predefined queries (WMPS) results. In addition, default style can be set globally or can be based on service layer ID, this means that you can set different default styles for particular feature classes.
All default style definitions are held in the StyleConfig.js file located in the service instance js folder.
The default styles can be defined for all geometry types.
In order to set the default style:
1. Go to the service instance folder.
(by default C:\Intergraph\Services\Instances\<Instance_Name>).
2. Go to the js folder.
3. Edit the StyleConfig.js file.
4. Define required style for “highlight” and/or “select” and or “analysis”.
Example of definition for highlight style (global) in StyleConfig.js:
Sys.Application.Configuration.StyleConfig.definitions = {
"highlight": {
"*": {
type: “CompoundStyle”,
styles: [{
type: “AreaStyle”,
styles: [{
type: 2,
color: "#0000FF",
translucency: 0.5
}, {
type: 3,

Geospatial Portal
174
color: "#FFFF00",
translucency: 0.5
}]
}, {
type: “SimpleLineStye”,
color: "#0000FF",
translucency: 0.5
}, {
type: 1,
color: "#0000FF",
translucency: 0.5
}, {
type: “TextStyle”,
color: "#0000FF"
}]
}
},
The type denotes the feature geometry type where for the parameter value you can provide the numbers or corresponding text as shown below:
Geometry Type: Type parameter value:
SimplePointStyle 1
SimpleLineStyle 2
SimpleFillStyle 3
AreaStyle 4
CompoundStyle 5
TextStyle 6

Geospatial Portal
175
Samples:
Definition for highlight style:
"highlight": {
"*": {
type: 5,
styles: [{
type: 4,
styles: [{
type: 2,
color: "#0000FF",
translucency: 0.5
}, {
type: 3,
color: "#FFFF00",
translucency: 0.5
}]
}, {
type: 2,
color: "#0000FF",
translucency: 0.5
}, {
type: 1,
color: "#0000FF",
translucency: 0.5
}, {
type: 6,
color: "#0000FF"
}]

Geospatial Portal
176
}
},
Definition for select style:
"select": {
"*": {
type: 5,
styles: [{
type: 4,
styles: [{
type: 2,
color: "#FF0000",
translucency: 0.5
}, {
type: 3,
color: "#FFFF00",
translucency: 0.5
}]
}, {
type: 2,
color: "#FF0000",
translucency: 0.5
}, {
type: 1,
color: "#FF0000",
translucency: 0.5
}, {
type: 6,
color: "#FF0000"
}]
Geospatial Portal
177
},
},
Definition for predefined queries (display) style:
"predefinedQuery": {
"*": {
type: 2,
color: "#0000FF",
width: 10,
translucency: 0.5
},
Definition for analysis (display) style:
"analysis": {
"*": {
type: 5,
styles: [{
type: 4,
styles: [{
type: 2,
color: "#008000",
width: 5,
translucency: 0.5
}, {
type: 3,
color: "#0000FF",
translucency: 0.5
}]
}, {
type: 2,

Geospatial Portal
178
color: "#008000",
width: 5,
translucency: 0.5
}, {
type: 1,
color: "#008000",
size: 5,
translucency: 0.5
}, {
type: 6,
color: "#008000"
}]
},
Below is the sample style definitions set for all features (global definition) and set for particular feature classes (States):
Global Definition Definition for Feature Class
"highlight": {
"*": {
type: 4,
color:
"#0000FF",
translucency:
0.5
},
"highlight": {
"States": {
type: 4,
color:
"#0000FF",
translucency:
0.5
},

Geospatial Portal
179
Adding a Coordinate System
You can add an SRS to the Coordinate System list so that the SRS will be always be available on the list when Geospatial Portal is run. To do this, you must prepare a new map configuration and then set this map configuration as a starting map.
Workflow:
1. Run the Administration Console.
2. Run the Configuration Portal.
In the Administration Console, click the Maps & Workspaces link on the Home section or under the Client Configuration box.
The Configuration Portal will open in a new Web browser tab.
If the Configuration Portal will not open in a new Web browser tab or window, disable the pop up blocker for your Web browser.
3. Create a workspace with map(s) that will act as your starting workspace and add all required Coordinate Systems to the list. To add CRS from the Coordinate System pull down list (located on the toolbar) chose Select SRS option. The Spatial Reference Systems dialog box opens and allows you to:
a. Select the SRS from the tree list.
When the SRS is selected, the Enter SRS identifier field is filled with the appropriate value for the EPSG Code.
b. Search for a given SRS. In order to find an SRS, type the EPSG Code into the Enter SRS identifier field and click Search. The search syntax must be as

Geospatial Portal
180
follows: EPSG:nnnn or nnnn, where nnnn is a code number, for example: EPSG:2180 or 2180. When a given SRS is found, the tree will be unfolded, and the appropriate item on the list will be highlighted.
c. Enter a known SRS if you know the EPSG code for the SRS you want to use. When adding a known SRS (by providing the code), the message that a given SRS may not work properly will be displayed.
Having chosen the coordinate system from the list or having provided an EPSG code in the Enter SRS identifier field, click Add to list.

Geospatial Portal
181
4. If required you can modify added CRS by selecting the Properties option from the context menu for selected Workspace. My workspace dialog opens. Here you can modify axes directions for any added CRS or decide whether it is geographic or not.
5. Set your workspace for an instance(s).
For more information about creating starting workspace see Starting Configuration (on page 34)
Information about Coordinate Reference System Mappings
Geospatial Portal uses EPSG codes as Coordinate Reference System identifiers, for example, “EPSG:4326” for WGS 84 and “EPSG:3857” for Popular Visualization Pseudo-Mercator. To be able to display maps coming from services using different CRS identifiers, Geospatial Portal provides a mapping mechanism.
Mapping is needed in situations when a certain Web Map Service publishes data with a Coordinate Reference System that is known to be the same or equivalent to the one defined in a Geospatial Portal workspace, but one in which the identifiers are not the same.
For example, Web Map Service publishes data in the WGS 84 Coordinate Reference System, but uses Unified Resource Name “urn:ogc:def:crs:EPSG::4326” to refer to it. Geospatial Portal uses “EPSG:4326” to refer to WGS 84 CRS and displays data from the service together with data coming from other services published explicitly with the “EPSG:4326” identifier. No additional work by the Geospatial Portal administrator is required to use a mapping between identifiers.
Geospatial Portal
182
Modifying the Spatial Reference System list
The CRSConfig_v2.xml file stores the definitions of Spatial Reference Systems that can be added to the Coordinate System list on the Settings tab in Geospatial Portal.
For Geospatial Portal without EP01 or newer patch applied the definitions are stored in CRSConfig.xml file.
In order to add a coordinate system to the list of predefined coordinate systems in Geospatial Portal:
1. Edit in any text editor the CRSConfig_v2.xml file (or CRSConfig.xml for Geospatial Portal without EP01 or newer patch applied). The CRSConfig_v2.xml file by default is located in the %CommonProgramW6432%\Hexagon\CSFStore\ folder.
2. Find an appropriate category to which the new SRS definition will be added. You can create a new category by adding the <category name="CategoryName">...</category> tags.
3. Add the definition of a given SRS in the appropriate category. Add the <code
name="SRSName" value="EPSGCodeValue">...</code> tags and provide
the following SRS parameters:
axes <axis <dir, label>> – the order of axes; it should contain two <axis> parameters with direction (dir, available values: [east], [north]) and label; order and label will be used by client coordinates control – in lower left corner of map; axes order also determines how Geospatial Portal assigns coordinates: first axis means first coordinate, second axis means second coordinate
south, north, west, east – BBOX of SRS domain, geographic coordinates in DD format
attributes – definition according to the proj4js http://trac.osgeo.org/proj4js/wiki/UserGuide format
isGeographic – specifies whether the SRS is a geographic type SRS or not. Available Boolean values: [true], [false]
unit <name, value> – base unit for SRS (value in meters, degrees or radians)
4. Save the CRSConfig_v2.xml file (or CRSConfig.xml for Geospatial Portal without EP01 or newer patch applied).

Geospatial Portal
183
Sample SRS definition:
<code name="ETRS89 / Poland CS92" value="EPSG:2180">
<axes>
<axis>
<dir>north</dir>
<label>Y</label>
</axis>
<axis>
<dir>east</dir>
<label>X</label>
</axis>
</axes>
<south>49</south>
<north>55.92</north>
<west>14.15</west>
<east>24.14</east>
<attributes>+proj=tmerc +lat_0=0 +lon_0=19 +k=0.9993
+x_0=500000 +y_0=-5300000 +ellps=GRS80 +units=m
+no_defs</attributes>
<isGeographic>false</isGeographic>
<unit>
<name>metre</name>
<value>1</value>
</unit>
</code>
Setting Geospatial Portal to Work with Services that Use Local Coordinate System
Geospatial Portal allows you to work with several coordinate systems whose definitions are stored in the CRSConfig_v2.xml file by default located in the

Geospatial Portal
184
%CommonProgramW6432%\Hexagon\CSFStore folder. For Geospatial Portal without EP01 or newer patch applied the definitions are stored in CRSConfig.xml file located in the %CommonProgramW6432%\Hexagon\CSFStore. However, you can define a specific coordinate system that allows you to work with services (e.g., WMPS; WMS) serving data in untypical CRS's. However, such a coordinate system must be defined for both: the service instance that connects to the portal (e.g., WMPS; WMS) and in the Geospatial Portal instance.
In order to set Geospatial Portal to work with services that serves data in a specific coordinate system:.
1. Ensure that the specific local coordinate system file is located in the CSF folder for a given service instance. If not, copy the CSF file to the service instance (e.g., WMPS ; WMS) CSF folder: C:\Program Files\Common Files\Hexagon\Services\Instances\<Instance Name>\CSF. Once you copy the file, clear the service instance cache. To clear the cache, simply remove the content of the cache folder for a given instance (C:\Program Files\Common Files\Hexagon\Services\Instances\<service_instance>\cache).
Does not apply to Geospatial Portal instance.
2. For a given Geospatial Portal instance (with EP01 or newer patch applied), add the entry in CRSConfig_v2.xml file with a local coordinate system definition (see: Modifying the Spatial Reference System List (CRSConfig.xml). For Geospatial Portal instance (without EP01 or newer patch applied), add the entry in CRSConfig.xml file. The files by default are stored in %CommonProgramW6432%\Hexagon\CSFStore folder.
You can override the localization of CRSConfig_v2.xml or CRSConfig.xml files by altering the crsConfigPath entry in the Geospatial Portal Web.config file.
Enabling Apply Button on the Settings Tab
By default, all settings performed by the user on the Settings panel are applied immediately. If necessary, the Apply button can be added to the Settings panel, and this button will then have to be clicked in order to apply any changes to the settings.
To add the Apply button on the Settings tab:
1. Edit the Web.Config file in any text editor.
Geospatial Portal
185
2. In the <webclient> section, change the value of the
settingsRequireConfirmation parameter to "true."
3. Save your Web.Config file and restart Geospatial Portal.
4. The Apply button will appear on the Settings tab, and from now on, every setting change requires the clicking of Apply.
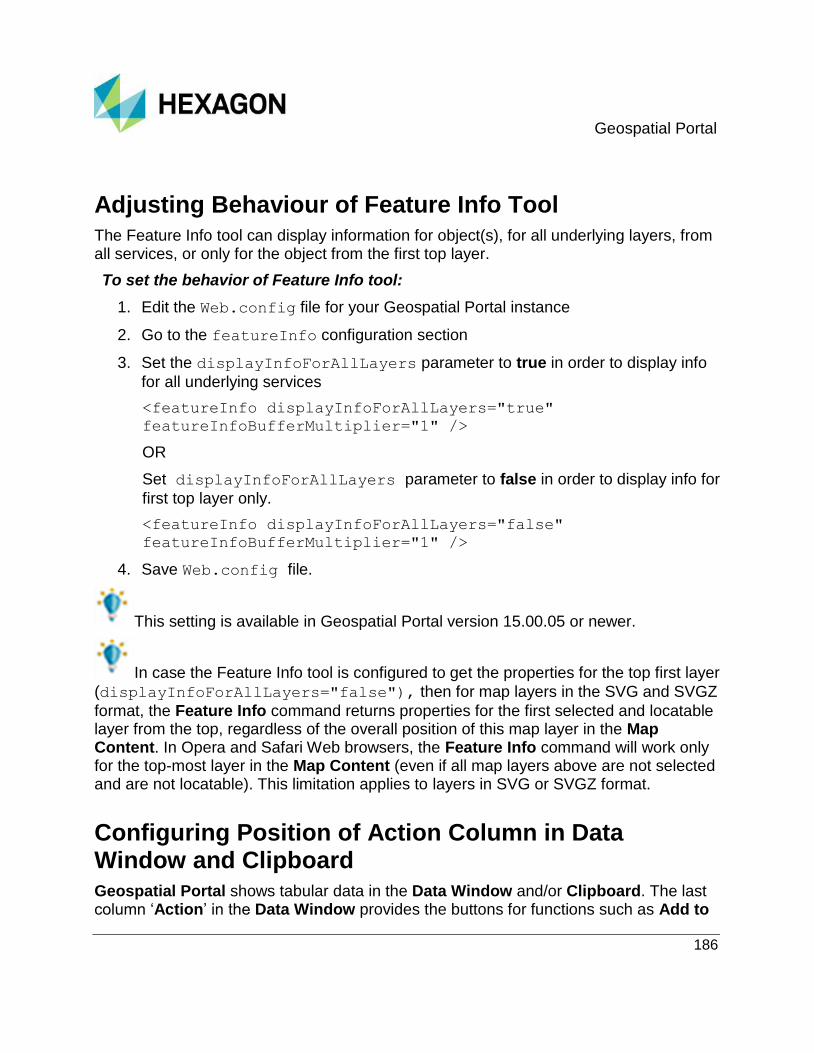
Geospatial Portal
186
Adjusting Behaviour of Feature Info Tool
The Feature Info tool can display information for object(s), for all underlying layers, from all services, or only for the object from the first top layer.
To set the behavior of Feature Info tool:
1. Edit the Web.config file for your Geospatial Portal instance
2. Go to the featureInfo configuration section
3. Set the displayInfoForAllLayers parameter to true in order to display info
for all underlying services
<featureInfo displayInfoForAllLayers="true"
featureInfoBufferMultiplier="1" />
OR
Set displayInfoForAllLayers parameter to false in order to display info for
first top layer only.
<featureInfo displayInfoForAllLayers="false"
featureInfoBufferMultiplier="1" />
4. Save Web.config file.
This setting is available in Geospatial Portal version 15.00.05 or newer.
In case the Feature Info tool is configured to get the properties for the top first layer
(displayInfoForAllLayers="false"), then for map layers in the SVG and SVGZ
format, the Feature Info command returns properties for the first selected and locatable layer from the top, regardless of the overall position of this map layer in the Map Content. In Opera and Safari Web browsers, the Feature Info command will work only for the top-most layer in the Map Content (even if all map layers above are not selected and are not locatable). This limitation applies to layers in SVG or SVGZ format.
Configuring Position of Action Column in Data Window and Clipboard
Geospatial Portal shows tabular data in the Data Window and/or Clipboard. The last column ‘Action’ in the Data Window provides the buttons for functions such as Add to
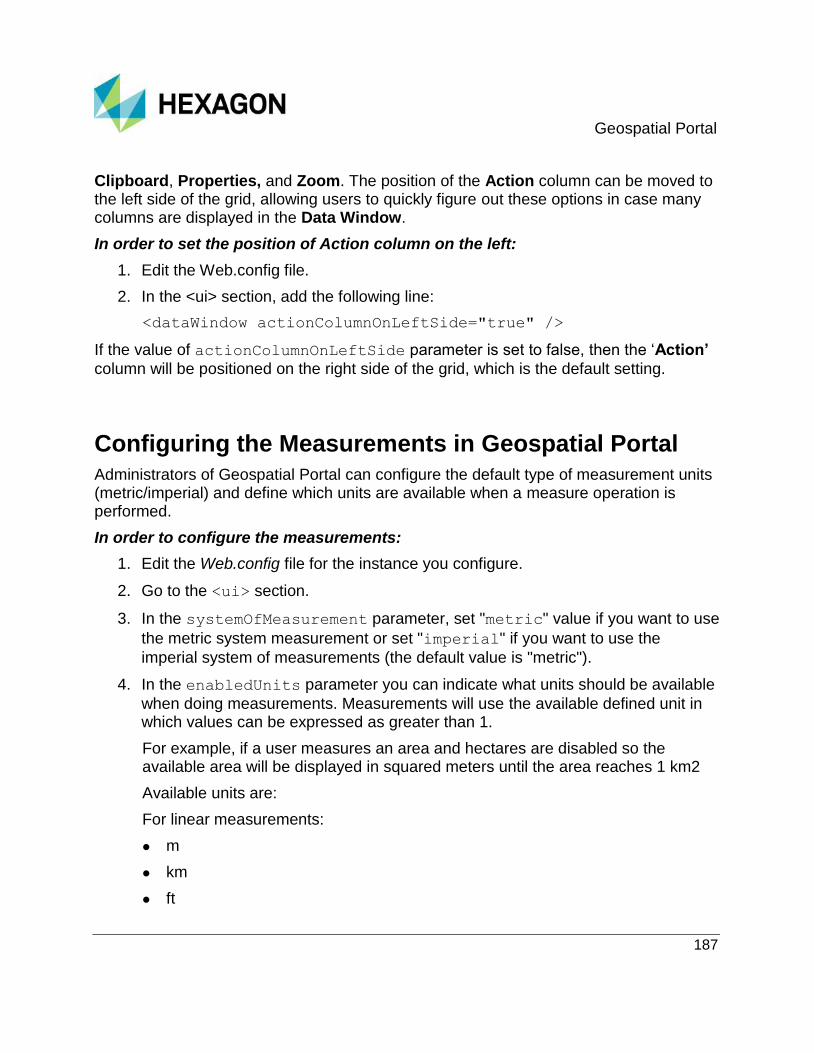
Geospatial Portal
187
Clipboard, Properties, and Zoom. The position of the Action column can be moved to the left side of the grid, allowing users to quickly figure out these options in case many columns are displayed in the Data Window.
In order to set the position of Action column on the left:
1. Edit the Web.config file.
2. In the <ui> section, add the following line:
<dataWindow actionColumnOnLeftSide="true" />
If the value of actionColumnOnLeftSide parameter is set to false, then the ‘Action’
column will be positioned on the right side of the grid, which is the default setting.
Configuring the Measurements in Geospatial Portal
Administrators of Geospatial Portal can configure the default type of measurement units (metric/imperial) and define which units are available when a measure operation is performed.
In order to configure the measurements:
1. Edit the Web.config file for the instance you configure.
2. Go to the <ui> section.
3. In the systemOfMeasurement parameter, set "metric" value if you want to use
the metric system measurement or set "imperial" if you want to use the
imperial system of measurements (the default value is "metric").
4. In the enabledUnits parameter you can indicate what units should be available
when doing measurements. Measurements will use the available defined unit in which values can be expressed as greater than 1.
For example, if a user measures an area and hectares are disabled so the available area will be displayed in squared meters until the area reaches 1 km2
Available units are:
For linear measurements:
m
km
ft

Geospatial Portal
188
yd
mi
For areal measurements:
m2
km2
ft2
yd2
mi2
are
ha
acre
Base units that cannot be disabled are m, m2, and yd, yd2 for metric and imperial unit system respectively. If units ft, ft2 are defined they are used instead of yd, yd2.
Saving Selections in User Maps
Selection of features can be saved in user maps and workspaces. Loading the user map with stored selection (or workspace with such a map) sets selection on those features.
The saveSelection parameter in Portal’s Web.config file determines whether
selections can be saved or not.
To enable saving of selection in user maps:
1. Edit Web.config file for Geospatial Portal.
2. Go to the <webclient> section.
3. In <storage> subsection set the "true" value for the parameter saveSelection
Sample:
<storage>
<userMaps saveSelection="true" />
</storage>
4. Save changes in Web.config file and reload the Geospatial Portal.

Geospatial Portal
189
Defining Simplified Query Panel
Administrator of Geospatial Portal can configure simplified user query interface for simple installations or extensive query interface for sophisticated solutions. Optional simplified query widow provides a flat query selection (without having to pick the source) and eliminates the drop-down menu. Also, the quotation marks are removed from the parameters field. Configuration of query window mode is held in GWMPubPro.aspx and GWMPub.aspx files.
To define the type of query panel:
1. Go to the Geospatial Portal service folder. By default C:\Program Files\Common Files\Hexagon\Services\Instances\<Portal instance name>
2. Edit GWMPub.aspx and/or GWMPubPro.aspx
3. Find <wc_core:SimpleQueryControl /> entry
4. Add/Edit Mode parameter. Provide "WithTreePanel" vale for mode parameter in order to set simplified query window or provide "WithComboBox" value to set default style of query window. (If Mode parameter is not defined then default query window will be set.)
Sample:

Geospatial Portal
190
<wc_core:SimpleQueryControl runat="server"
ID="SimpleQueryPanel" Title="" MapStateId="map"
DataWindowId="ViewPort1_Panel1_Panel2_DataPanel"
DisplayMode="Show" StatusMode="CheckAll" Mode="WithTreePanel"/>
5. Save edited (GWMPub.aspx and/or GWMPubPro.aspx) file(s).
Configuring Capabilities Service
Capabilities Service is a windows type service that acts as a proxy for the requested GetCapabilities documents of OGC type. Its function is to keep the requested GetCapabilities documents in cache for a specified amount of time, which affects the server performance. Capabilities Service is automatically installed on the server during the Geospatial Portal installation process. By default the Capabilities Service is configured and enabled so administrator do not need to carry out additional configuration. With a typical Geospatial Portal server configuration, all Geospatial Portal instances use one Capabilities Service running on the server. Capabilities Service respects OGC version negotiation.
To configure Geospatial Portal instance to use Capabilities Service:
1. Turn on in the Geospatial Portal the use of Capabilities Service:
In the Web.Config file for the Geospatial Portal instance in the <webclient>
section, set True for the useCapabilitiesCache and install.
2. Verify the address parameter to be set to working Capabilities Service:
In the Web.Config file for the Geospatial Portal instance in the <client> section,
in the <endpoint> tag, is provided the URL to the Capabilities Service used in
the address parameter, for example:
<client>
<endpoint
address="http://localhost:22151/CapabilitiesService/service/CapabilitiesServ
ice"
binding="basicHttpBinding"
bindingConfiguration="BasicHttpBinding_ICapabilitiesCache"
contract="CapabilitiesCacheNsp.ICapabilitiesCache"
name="BasicHttpBinding_ICapabilitiesCache" />
</client>

Geospatial Portal
191
By default, there is no need to modify the address parameter because the default Geospatial Portal instance is configured to the Capabilities Service that is installed on the server with Geospatial Portal.
Capabilities Service working configuration
The following Capabilities Service parameters can be set in the CapabilitiesService.exe.config file, in the <appSettings> section:
extensive logging - enable / disable extensive logging by setting the value to true
or false for the key="Ingr.Misc.EnableExtensiveLogging"
time period to cache capabilities document before retrying can be set in
key="Ingr.Misc.MinimumTimeBetweenDownloads" The given values are
in seconds. The default is 900 seconds.
maximum amount of fails of downloading the capabilities can be set in
key="FailsAmountOfCapabilities" . The value cannot be less than one.
amount of skipped registrations for downloading capabilities after fail can be set
in key="SkippedRegistrations. The value cannot be less than one.
The default localization for the CapabilitiesService.exe.config file is C:\Program Files\Common Files\Hexagon\Services\Supporting Services\CapabilitiesService.
The log4net parameters for the Capabilities Service can be set if needed in the logging.xml file, which is stored in C:\Program Files\Common Files\Hexagon\Services\Supporting Services\CapabilitiesService.
To stop / start / restart the Capabilities Service
1. Click Start on Windows Start menu and select Administrative Tools > Services. The Services (Windows) dialog opens.
2. On the list of windows services find Geospatial Server Capabilities Service and select it
3. Click the Stop link on the left to stop the service. In other case when the service is stopped and you want to run the service, click the Start link on the left. To restart working service just click the Restart link.
Changing Splash Screen
The default splash screen consists of:
Splash image (default path is <instance folder>/img/splash.png)
Spinner image (default path is <instance folder>/img/ajax-loader.gif)

Geospatial Portal
192
The text message is shown below the splash image and next to the spinner image.
Information who is license owner is displayed on the Geospatial Portal splash screen.
To change the splash screen:
Change the path to the required image in <instance folder>\App_Themes\Default\Default.css:
background-image: url(../../img/splash.png);
Or place the required image in <instance folder>\img\, naming it splash.png.
Modify the text message in <instance folder>\App_LocalResources\default.aspx.resx:
<data name="SplashText.Text" xml:space="preserve">
<value>Loading application. Please wait...</value>
</data>
Change the path to the required loading indicator in <Instance folder>\default.aspx:
<wc_core:LoadingIndicator runat="server">

Geospatial Portal
193
<Content>
<div id="splash">
<div id="splash_title"><asp:Localize runat="server"
meta:resourcekey="Title" /></div>
<div id="splash_wait"><asp:Localize runat="server"
meta:resourceKey="SplashText" /></div>
<img width="16" height="16" src="img/ajax-loader.gif"
alt="ajax-loader" />
</div>
</Content>
</wc_core:LoadingIndicator>
Or place the desired loading indicator in < Instance folder >\img\, naming it ajax-loader.gif.
Size and position of the splash screen and font used for rendering the text message can be customized using Cascading Style Sheets:
Style - <Instance folder>\App_Themes\Default\Default.css:
.wc_loading_indicator div#splash_title
{
font-family: Verdana, Sans-Serif;
font-size: 10pt;
font-weight: bold;
text-align: right;
width: 480px;
height: 257px;
padding-right: 13px;
padding-top: 45px;
background-image: url(../../img/splash.png);
background-repeat: no-repeat;
}

Geospatial Portal
194
Configuration of Default ERDAS APOLLO Credentials
This functionality applies to apollo.aspx and apollopro.aspx layouts.
The <DefaultApolloCredentials> section in the Geospatial Portal configuration
file (Web.Config) enables the configuration of the default credentials that are used when connecting to the ERDAS APOLLO coverage services from a workspace or map if no other credentials are supplied.
Element attributes are:
mode (Anonymous or Username - type of authentication)
user
password
Sample:
<DefaultApolloCredentials mode="Username" user="James"
password="pass" />
When working with apollo.aspx and apollopro.aspx layouts, the Geospatial Portal for the ERDAS APOLLO catalog and services used in workspaces and/or maps checks the following credentials in order as below:
1. Credentials for the active portal user (provided on the Authentication tab).
2. Credentials saved in a workspace or map (GPW file).
Passwords in GPW and GPM files are stored in the "encryptedPassword" parameter, and the AES Rijndael algorithm is used for encryption. In order to maintain backward compatibility, you can use the "password" parameter containing an unencrypted password. If both parameters ("password" and "encryptedPassword") are present in a loaded GPW file, the "password" parameter (non-secured) take precedence.
3. Credentials for the configured default ERDAS APOLLO user provided in the <DefaultApolloCredentials> section (Web.Config file).
4. If all the above-mentioned credentials failed, then the last attempt to initialize the service anonymously is made.
When any of the above credentials are correct, the service will be initialized and the data displayed on the map and/or data window.

Geospatial Portal
195
Extended search parameters in ERDAS APOLLO Catalog Search
In Geospatial Portal for the apollo.aspx layout, additional search parameters and values for the ERDAS APOLLO Catalog Search can be defined and exposed in the GUI. The additional fields can be added to the Search ERDAS APOLLO Catalog tab on the sidebar. All used queryables are described in the ERDAS APOLLO Catalog.
In order to define queryables described in the catalog:
1. Set the mappings between the ERDAS APOLLO Catalog and the file with a queryables definition. Open the QueryablesApolloMapping.xml file located in the
App_Data folder for a Geospatial Portal instance. In the <queryables> section,
two parameters must be set:
url - The url to the ERDAS APOLLO Catalog which will be connected in Geospatial Portal and used for searches
fileName - The full path and a filename to the xml file with defined queryables
Example:
<queryables>
<queryable
url="http://129.135.186.95"fileName="c:\queryable\queryables
.xml" />
</queryables>
2. Define the required slots in the <slotList> section in the queryables file. Each
slot corresponds to the field which will be added to the Search ERDAS APOLLO Catalog form.
The queryable slot definition must have the following parameters set:
name - queryable id
title - queryable human readable
type - String, int, double or date
Accepted values can be fixed using the 'enum' parameter (comma-separated list of accepted values). Dates should be ISO 8601 encoded, for example: default = "2004-12-22T13:04:59Z".
Below are some queryable sample definitions:
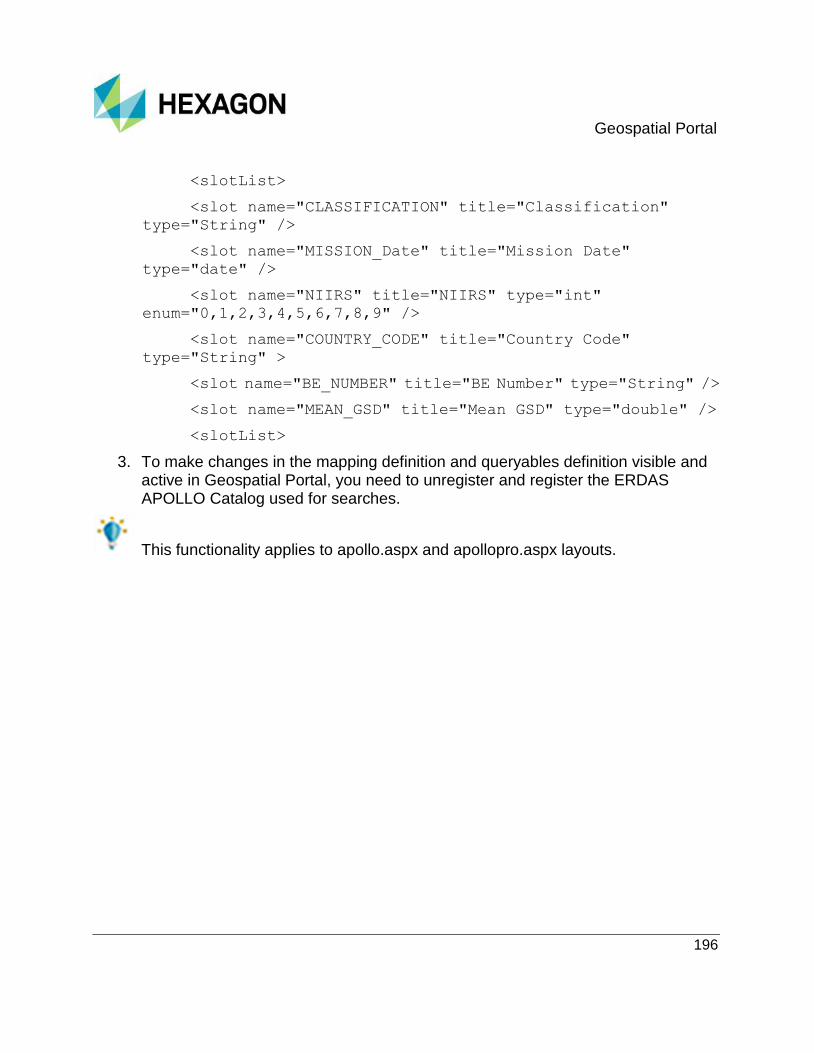
Geospatial Portal
196
<slotList>
<slot name="CLASSIFICATION" title="Classification"
type="String" />
<slot name="MISSION_Date" title="Mission Date"
type="date" />
<slot name="NIIRS" title="NIIRS" type="int"
enum="0,1,2,3,4,5,6,7,8,9" />
<slot name="COUNTRY_CODE" title="Country Code"
type="String" >
<slot name="BE_NUMBER" title="BE Number" type="String" />
<slot name="MEAN_GSD" title="Mean GSD" type="double" />
<slotList>
3. To make changes in the mapping definition and queryables definition visible and active in Geospatial Portal, you need to unregister and register the ERDAS APOLLO Catalog used for searches.
This functionality applies to apollo.aspx and apollopro.aspx layouts.
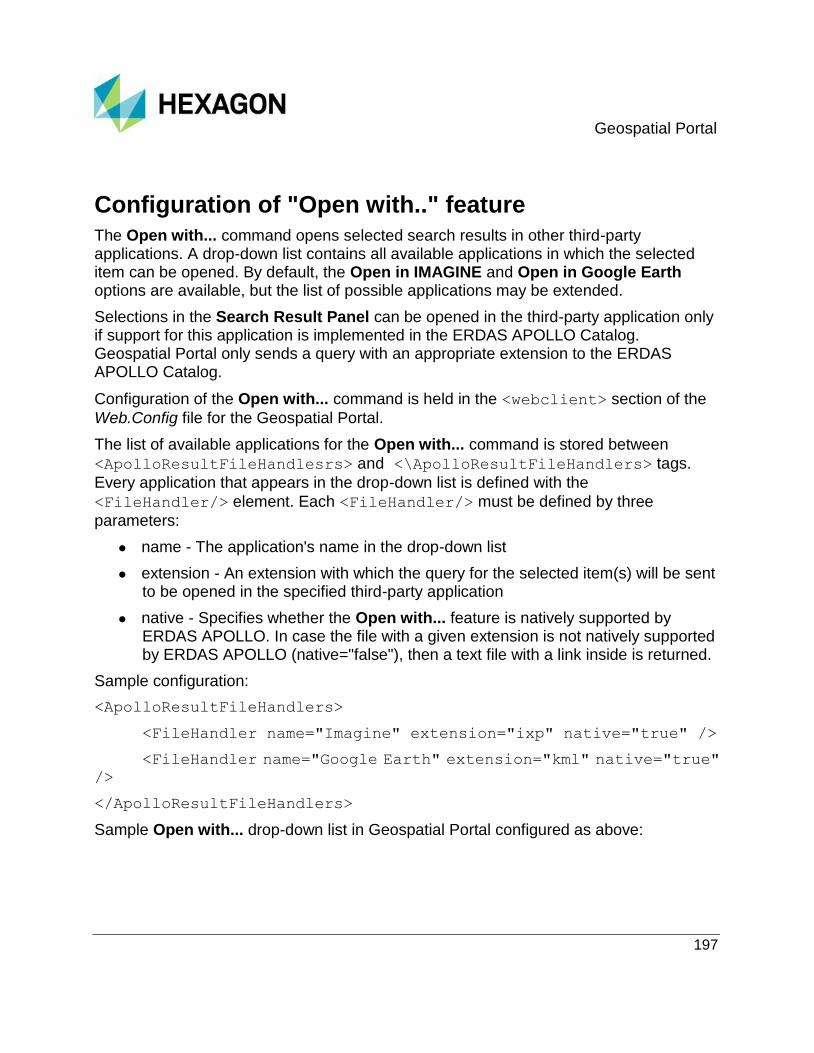
Geospatial Portal
197
Configuration of "Open with.." feature
The Open with... command opens selected search results in other third-party applications. A drop-down list contains all available applications in which the selected item can be opened. By default, the Open in IMAGINE and Open in Google Earth options are available, but the list of possible applications may be extended.
Selections in the Search Result Panel can be opened in the third-party application only if support for this application is implemented in the ERDAS APOLLO Catalog. Geospatial Portal only sends a query with an appropriate extension to the ERDAS APOLLO Catalog.
Configuration of the Open with... command is held in the <webclient> section of the
Web.Config file for the Geospatial Portal.
The list of available applications for the Open with... command is stored between
<ApolloResultFileHandlesrs> and <\ApolloResultFileHandlers> tags.
Every application that appears in the drop-down list is defined with the
<FileHandler/> element. Each <FileHandler/> must be defined by three
parameters:
name - The application's name in the drop-down list
extension - An extension with which the query for the selected item(s) will be sent to be opened in the specified third-party application
native - Specifies whether the Open with... feature is natively supported by ERDAS APOLLO. In case the file with a given extension is not natively supported by ERDAS APOLLO (native="false"), then a text file with a link inside is returned.
Sample configuration:
<ApolloResultFileHandlers>
<FileHandler name="Imagine" extension="ixp" native="true" />
<FileHandler name="Google Earth" extension="kml" native="true"
/>
</ApolloResultFileHandlers>
Sample Open with... drop-down list in Geospatial Portal configured as above:
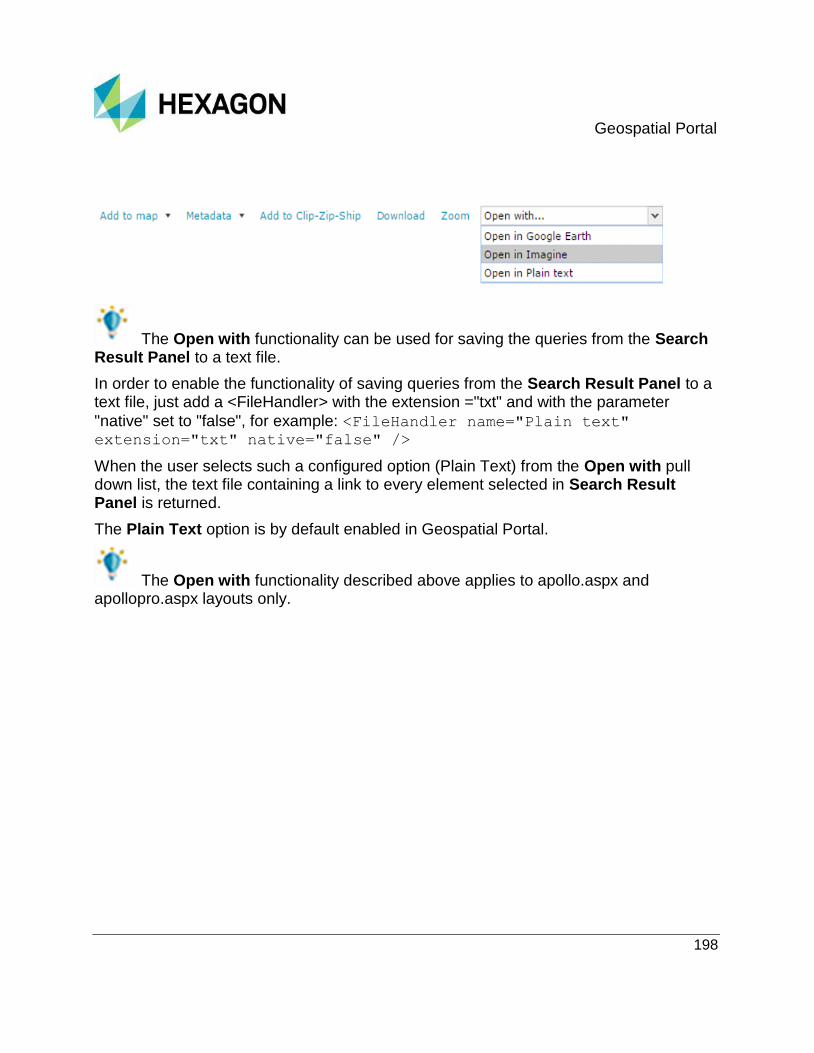
Geospatial Portal
198
The Open with functionality can be used for saving the queries from the Search Result Panel to a text file.
In order to enable the functionality of saving queries from the Search Result Panel to a text file, just add a <FileHandler> with the extension ="txt" and with the parameter
"native" set to "false", for example: <FileHandler name="Plain text" extension="txt" native="false" />
When the user selects such a configured option (Plain Text) from the Open with pull down list, the text file containing a link to every element selected in Search Result Panel is returned.
The Plain Text option is by default enabled in Geospatial Portal.
The Open with functionality described above applies to apollo.aspx and apollopro.aspx layouts only.

Geospatial Portal
199
Configuring Search Result Panel Options
Geospatial Portal administrator can define the paging options in Search Result Panel. The possible paging options and the default number of displayed results on page can be set in the <searchResultPanel> section of the web.config file.
(<searchResultPanel> section is a subsection of <web.client> section in the web.config file.)
In order to set paging options for Search Result Panel:
1. Edit the Web.config file.
2. Go to the <searchResultPanel> section.
3. Set the default page size in searchResultCountOptions using the defaultPageSize parameter. If this parameter is not specified then 10 results on the page will be displayed.
4. In <searchResultCountOptions> add <pagingEntry value=" " /> for every paging limit option. For the value attribute provide actual paging value to be displayed as an option in combo box. Add as many paging entry elements as needed.
5. Save web.config file
Sample configuration:
<searchResultsPanel>
<searchResultsCountOptions defaultPageSize="10">
<pagingEntry value="10" />
<pagingEntry value="25" />
<pagingEntry value="50" />
<pagingEntry value="100" />
<pagingEntry value="250" />
</searchResultsCountOptions>
</searchResultsPanel>
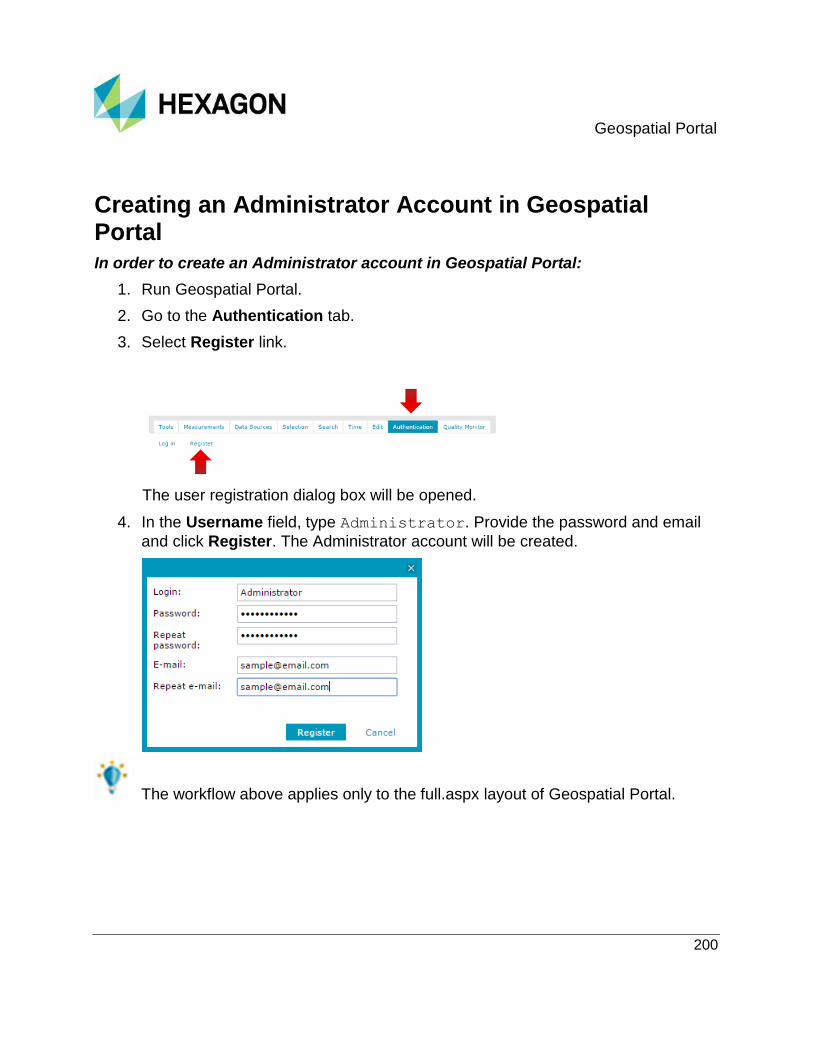
Geospatial Portal
200
Creating an Administrator Account in Geospatial Portal
In order to create an Administrator account in Geospatial Portal:
1. Run Geospatial Portal.
2. Go to the Authentication tab.
3. Select Register link.
The user registration dialog box will be opened.
4. In the Username field, type Administrator. Provide the password and email
and click Register. The Administrator account will be created.
The workflow above applies only to the full.aspx layout of Geospatial Portal.
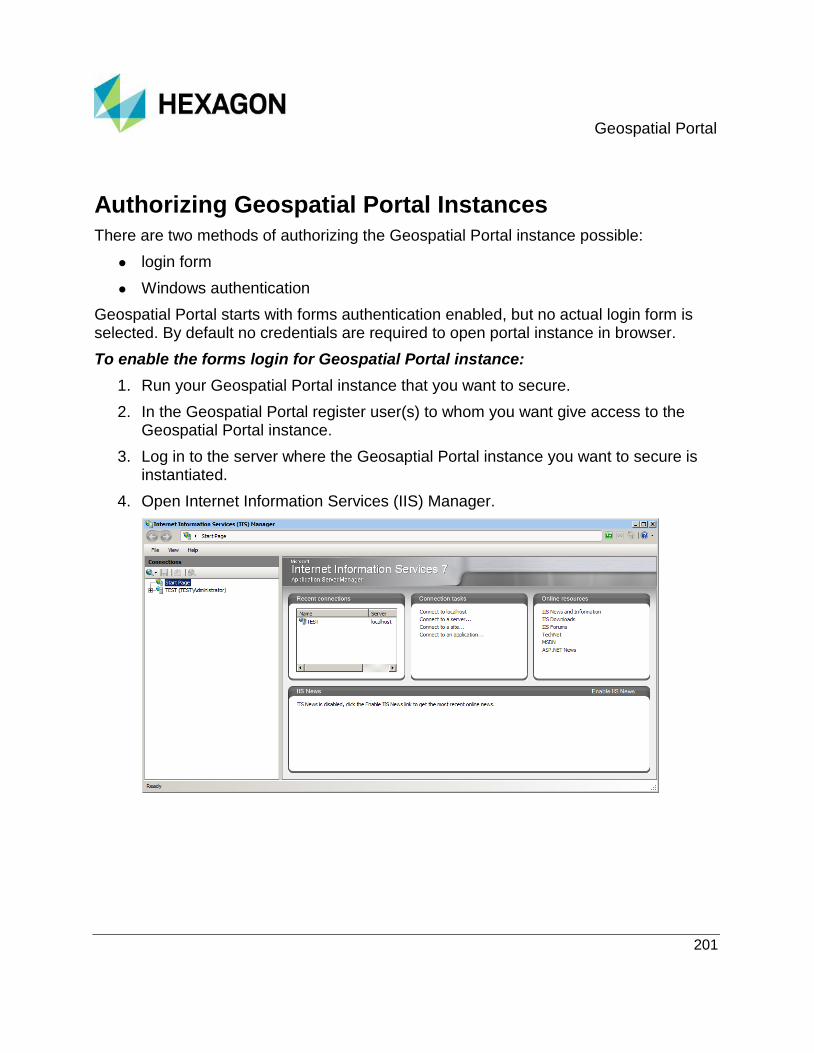
Geospatial Portal
201
Authorizing Geospatial Portal Instances
There are two methods of authorizing the Geospatial Portal instance possible:
login form
Windows authentication
Geospatial Portal starts with forms authentication enabled, but no actual login form is selected. By default no credentials are required to open portal instance in browser.
To enable the forms login for Geospatial Portal instance:
1. Run your Geospatial Portal instance that you want to secure.
2. In the Geospatial Portal register user(s) to whom you want give access to the Geospatial Portal instance.
3. Log in to the server where the Geosaptial Portal instance you want to secure is instantiated.
4. Open Internet Information Services (IIS) Manager.
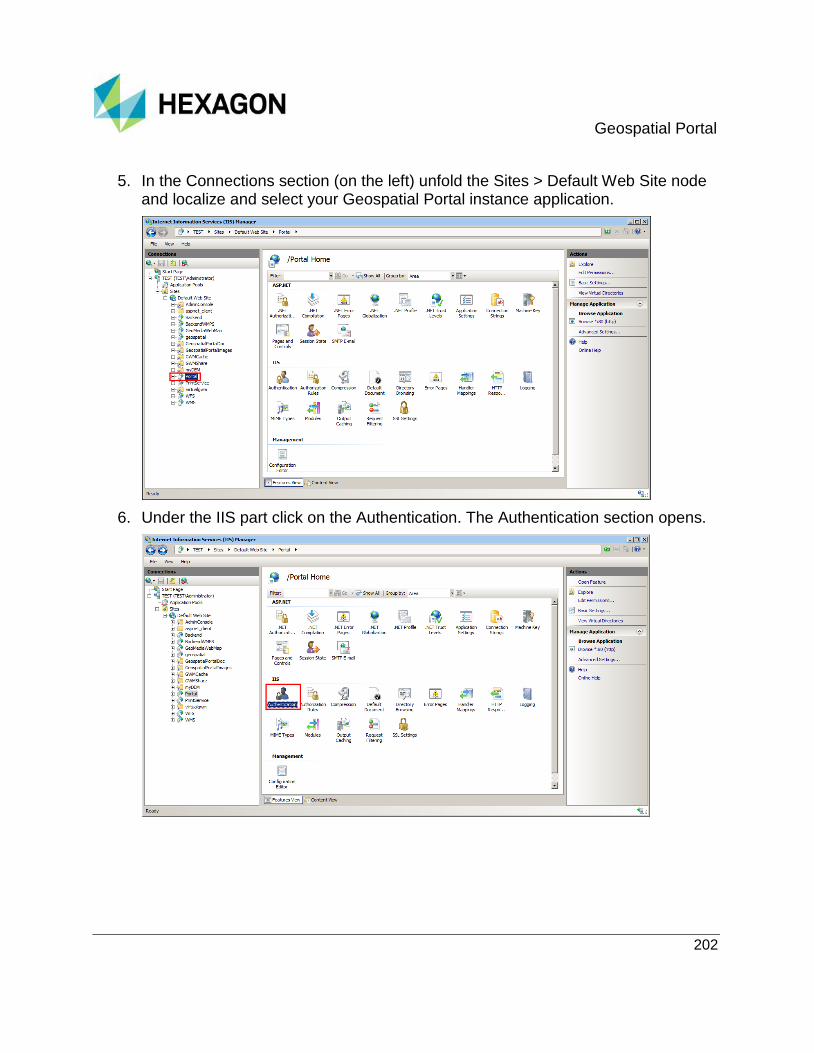
Geospatial Portal
202
5. In the Connections section (on the left) unfold the Sites > Default Web Site node and localize and select your Geospatial Portal instance application.
6. Under the IIS part click on the Authentication. The Authentication section opens.

Geospatial Portal
203
7. Edit Forms Authentication.
8. Change login URL to: “LoginForm.aspx” and confirm.

Geospatial Portal
204
9. Go to Authorization Rules for your Geospatial Portal instance.
10. Remove "Allow All users" rule.

Geospatial Portal
205
11. Add "Allow All users" role again. Ensure that the entry type for rule is "Local" (earlier it was of "Inherited" type)
12. Close the Internet Information (IIS) Manager.
13. Open the Web.config file for your Geospatial Portal instance in any text editor. The Web.config file by default is located in C:\Program Files\Common Files\Hexagon\Services\Instances\<Instance_name> folder.
14. In the <authentication> section, where mode="Forms" add the following:
<authorization>
<deny users="?" />
</authorization>
Sample:
<authentication mode="Forms">
<forms loginUrl="LoginForm.aspx" />

Geospatial Portal
206
</authentication>
<authorization>
<deny users="?" />
</authorization>
15. Ensure that in the <configuration> section under the </system.web> the following is present.
<location path="AdminService">
<system.web>
<authorization>
<allow users="*" />
</authorization>
</system.web>
</location>
If not add this to the web.config in the <configuration> section under the </system.web>
16. Ensure that In the section <system.webServer> in <modules> sub section the
following is present, if not add this:
<add name="RequestTokenValidation"
type="Intergraph.WebSolution.Core.WebClient.Authorization.Re
questAuthorization,
Intergraph.WebSolution.Core.WebClient.Authorization" />
17. Ensure the following code is not present in the Web.config file, otherwise remove this section.
<adminServiceConfiguration>
<userCredentials userName="username" password="password" />
</adminServiceConfiguration>
18. Save the Web.config file.
If access to .NET Authorization Rules for "All Users" is denied the printing functionality in Geospatial Portal may not work properly. In such a case the access to the .NET Authorization Rules must be enabled for IIS_IUSRS (server user).

Geospatial Portal
207
To enable Windows Authentication for Geospatial Portal instance:
1. Log in to the server where the Geosaptial Portal instance you want to secure is instantiated.
2. Open Internet Information Services (IIS) Manager.
3. In the Connections section (on the left) unfold the Sites > Default Web Site node and localize and select your Geospatial Portal instance application.

Geospatial Portal
208
4. Under the IIS part click on the Authentication. The Authentication section opens.
5. Disable Anonymous Authentication and Forms Authentication
6. Enable Windows Authentication
7. Go to Authorization Rules (for your Geospatial Portal instance.)
8. Ensure that the "Allow" rule for "All users" is present, if not add it.

Geospatial Portal
209
9. Close the Internet Information (IIS) Manager
10. Open the Web.config file for your Geospatial Portal instance in any text editor. The Web.config file by default is located in C:\Program Files\Common Files\Hexagon\Services\Instances\<Instance_name> folder.
11. Ensure that in the <configuration> section under the </system.web> the following is present.
<location path="AdminService">
<system.web>
<authorization>
<allow users="*" />
</authorization>
</system.web>
</location>
If not add this to the web.config in the <configuration> section under the </system.web>
12. Ensure that In the section <system.webServer> in <modules> sub section the
following is present, if not add this:
<add name="RequestTokenValidation"
type="Intergraph.WebSolution.Core.WebClient.Authorization.Requ
estAuthorization,
Intergraph.WebSolution.Core.WebClient.Authorization" />
13. Ensure the following code is not present in the Web.config file, otherwise remove this section (even if it is commented)
<!-- <adminServiceConfiguration>-->
<!-- <userCredentials userName="username"
password="password" /> -->
<!-- </adminServiceConfiguration> -->
14. Save the Web.config file.
Windows Authentication method is possible with Geospatial Portal 15.00.02 (EP02) patch or newer.
Geospatial Portal
210
If access to the .NET Authorization Rules for "All Users" is denied the printing functionality in Geospatial Portal may not work properly. In such a case the access to the .NET Authorization Rules must be enabled for IIS_IUSRS (server user).
Changing Limit for WMS URL Length
It is possible to change the maximum length of a URL that Geospatial Portal sends to the WMS when requesting the data using GET method. The length of WMS GET request (does not apply to POST requests) can be changed using the wmsUrlLengthLimit parameter. The parameter wmsUrlLengthLimit is available in <WMSDisplaying> element of portal's Web.config file.
Default value is set to 2000 and the possible range is 2000 : 32000
If SLD_BODY attribute is added to the WMS request and (because of it) length of URL is greater than set in parameter wmsUrlLengthLimit, then this SLD_BODY is extracted and shorter URL is sent to WMS server. In such case layer(s) will be displayed in a "default" style.
The WMS must be tailored to support increased URL length it can receive. For more information see Technical Limitations & Troubleshooting in GeoMedia WebMap Administrator Guide.
Recommended value for the URL length limit is 2000. This value should be handled without any issue by most browsers available on the market. If needed higher value can be set provided that used Web browser can handle it.
Hostname Configuration
Hostname aliases configuration allows users to change a Website name to a specified alias. This hostname alias must be a resolvable name (for example: by mapping to an appropriate name in the hosts file, located in C:\Windows\System32\drivers\etc\). This configuration enables you to set the domain name and port. After setting a hostname alias for a specific Website, all services contained in that Website will have paths with configured hostname aliases.
This functionality is available for Geospatial Portal in version 15.00.04 (EP04) or newer.

Geospatial Portal
211
To configure and enable hostname alias for specific website:
1. Run the Administration Console.
2. Go to the HOSTNAME ALIASES section:
a. Click the Hostname aliases link under the Server Configuration box on the left navigation pane.
3. In the HOSTNAME ALIASES section, all available Websites on the server are shown. Here you can define the hostname alias and port.
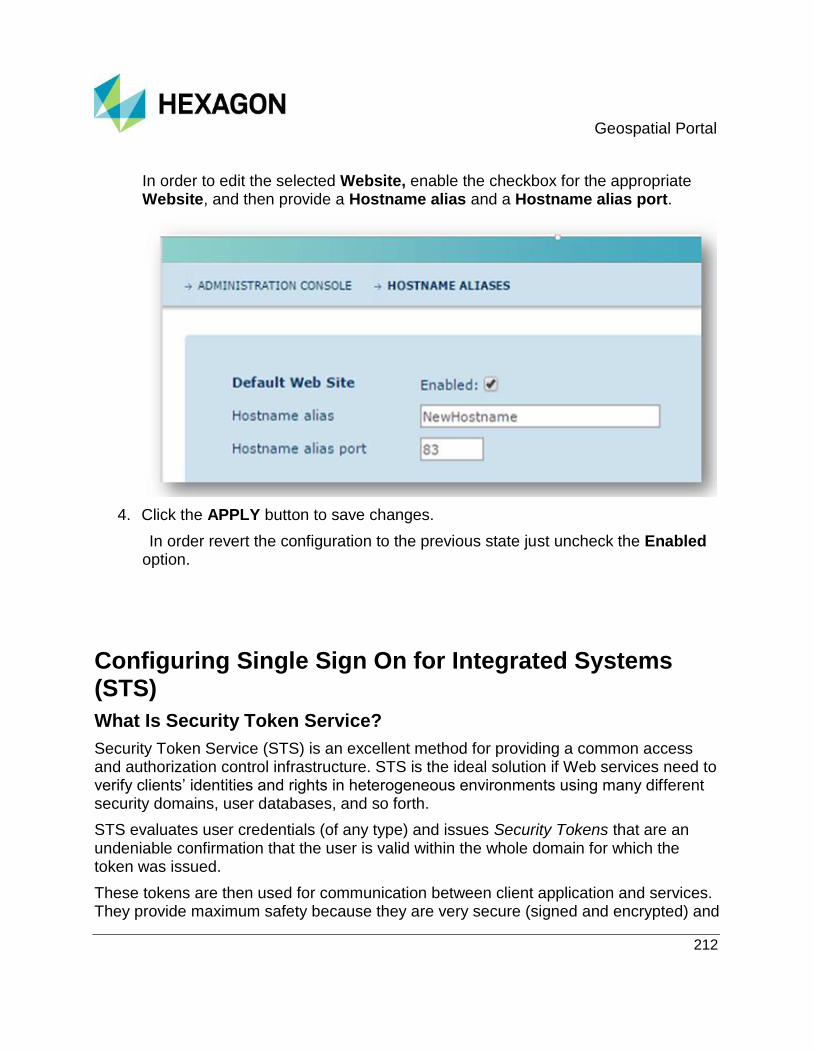
Geospatial Portal
212
In order to edit the selected Website, enable the checkbox for the appropriate Website, and then provide a Hostname alias and a Hostname alias port.
4. Click the APPLY button to save changes.
In order revert the configuration to the previous state just uncheck the Enabled option.
Configuring Single Sign On for Integrated Systems (STS)
What Is Security Token Service?
Security Token Service (STS) is an excellent method for providing a common access and authorization control infrastructure. STS is the ideal solution if Web services need to verify clients’ identities and rights in heterogeneous environments using many different security domains, user databases, and so forth.
STS evaluates user credentials (of any type) and issues Security Tokens that are an undeniable confirmation that the user is valid within the whole domain for which the token was issued.
These tokens are then used for communication between client application and services. They provide maximum safety because they are very secure (signed and encrypted) and

Geospatial Portal
213
do not contain vulnerable user data (such as passwords). Apart from that, Security Tokens contain so-called claims. These claims can store any user data, such as personal information, roles, and permissions that can be used by the services that operate on the token for various purposes.
STS is deployed as a separate Web service that issues tokens over SSL protocol (HTTPS).
Only Geospatial Portal and Geospatial SDI services are designed and have been tested with the use of the Security Token System mechanism, and only those products are supported by the use of STS. The ERDAS APOLLO Catalog does not support the Security Token System mechanism. The correct operation of the STS mechanism with other products and third-party services is not guaranteed.
Installing the STS
Security Token Service is one of the components provided in Geospatial SDI. After installation of Geospatial SDI, you can begin to issue service SDIProSTSService, which initializes in the default location C:\WebMap Publisher Projects\SDIProSTSService.
After installation, you can check whether the Service works properly by typing the following into your Web browser address:
https://domain/SDIProSTSService/Service.svc

Geospatial Portal
214
The Service is not fully functional out of the box. It requires the initial configuration described in the following part of this document. Nevertheless, you can refer to the address above anytime to see if it is working. You should get a standard WCF service Web page if everything is correct.
Certificates
After proper installation, STS needs to be provided with a valid certificate(s). Certificates are used for the following purposes:
Secure https communication (SSL)
Signing tokens
Encrypting tokens (can be turned off)
You can use three different certificates, thus increasing security for each task as well as using one certificate for all tasks.
It is strongly suggested that certificates in the production environment should be valid certificates issued by an existing legitimate certificate center.
Generated certificates should be placed in the following stores of the Local Machine (Computer) account:
My (Personal)
Trusted Root Certification Authorities
Another important item is that a private key of the certificate needs to have the proper access rights applied. Because it will be used by an application running on IIS, its user must have read access (typically IIS_IUSRS, NETWORK SERVICE, or ASPNET – depending on the IIS version). You should double check on which rights are valid for your computer configuration.
In case you do not want to bother with specific rights, setting the read rights for "Everyone" should work, although remember it is not regarded as a safe practice.
To generate a certificate:
1. Open Internet Information Services (IIS) Manager (Start > Administrative Tools > Internet Information Services (IIS) Manager).
2. In the administration panel, select the name of the server:

Geospatial Portal
215
3. In the IIS section, select Server Certificates.
4. In the Action field, select Create Self-Signed Certificate to start the Wizard.
5. On the Create Self-Signed Certificate dialog box, type the name of your certificate in the Specify a friendly name for the certificate field. It is recommended that the certificate name be given as follows:
server_name.domain.com.
6. Click OK to display the Server Certificates.
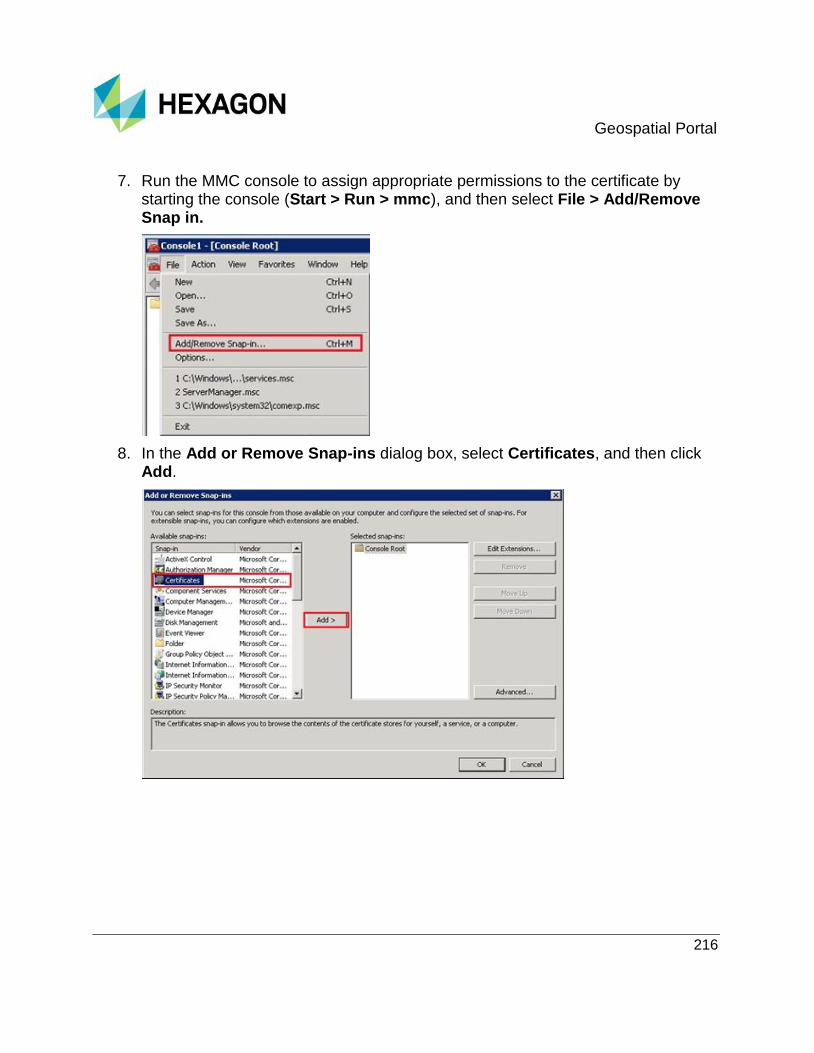
Geospatial Portal
216
7. Run the MMC console to assign appropriate permissions to the certificate by starting the console (Start > Run > mmc), and then select File > Add/Remove Snap in.
8. In the Add or Remove Snap-ins dialog box, select Certificates, and then click Add.

Geospatial Portal
217
9. On the Certificates snap-in dialog box, select Computer account, and then click Next.
10. On the Select Computer dialog box, select Local computer, and then click Finish.
11. On the Add or Remove Snap-ins dialog box, click OK.

Geospatial Portal
218
In the console, the new position Certificates (Local Computer) appears.
12. Select Personal > Certificates, select the generated certificate, and then select All Tasks > Manage Privates Keys from the right-click menu.
13. On the Permissions for server_name.domain.com private keys dialog box, click Add, and then check Full control for the following users:
IIS_IUSRS
NETWORK SERVICE

Geospatial Portal
219
14. The certificate should be included in the Trusted Root Certification Authorities and Trusted People. If it is not, you must manually copy it using Ctrl+C and Ctrl+V.
The above configuration is complete when STS and Geospatial Portal are installed on the same server. If STS and Geospatial Portal are installed on different servers, you must export the certificate from the server where the STS service is installed, and then import it to the server where Geospatial Portal is installed.
Configuring Security Token Service in IIS
After generating a certificate, which ensures protection and confidentiality of data transmitted electronically, you can proceed with the following additional configuration:
Correct authentication settings
Proper configuration of the SSL
To configure Security Token Service:
1. Open Internet Information Services (IIS) Manager.

Geospatial Portal
220
2. In the administration panel, select SDIPROSTSService.
3. On the right side in section IIS, select , and then set the Enabled status for:
Anonymous Authentication
Forms Authentication
Windows Authentication
4. On the right side in section IIS, select , and then click Accept.
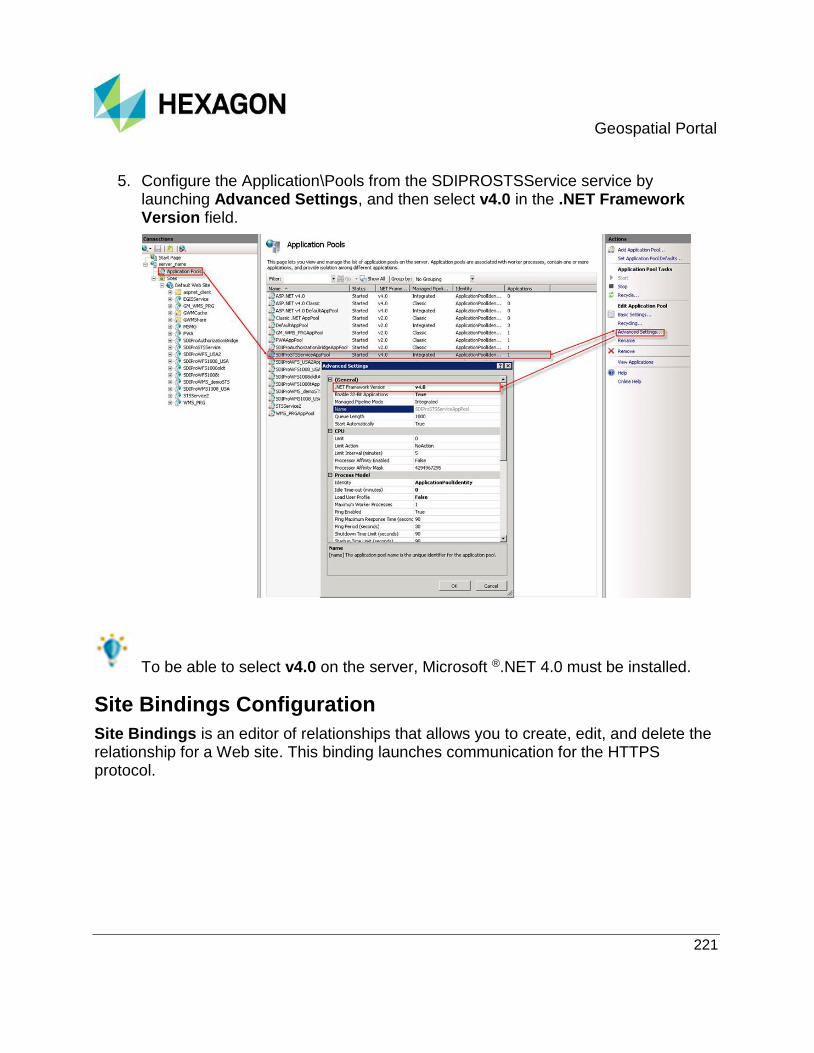
Geospatial Portal
221
5. Configure the Application\Pools from the SDIPROSTSService service by launching Advanced Settings, and then select v4.0 in the .NET Framework Version field.
To be able to select v4.0 on the server, Microsoft ®.NET 4.0 must be installed.
Site Bindings Configuration
Site Bindings is an editor of relationships that allows you to create, edit, and delete the relationship for a Web site. This binding launches communication for the HTTPS protocol.
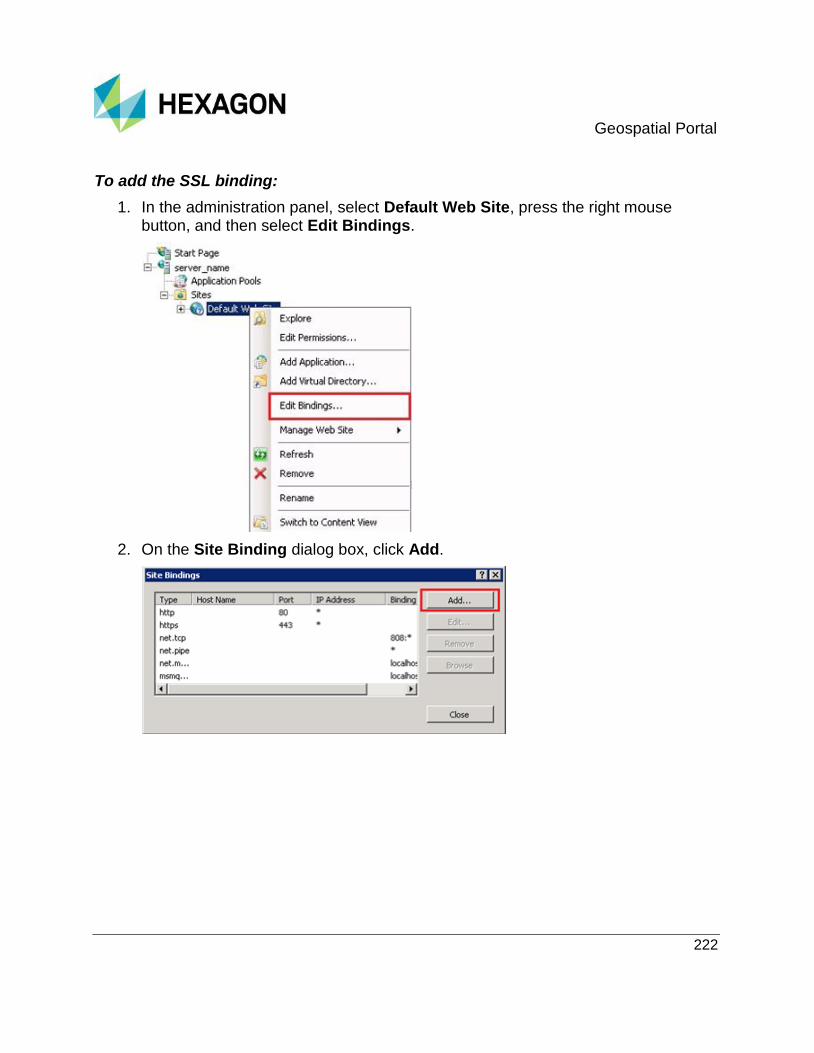
Geospatial Portal
222
To add the SSL binding:
1. In the administration panel, select Default Web Site, press the right mouse button, and then select Edit Bindings.
2. On the Site Binding dialog box, click Add.
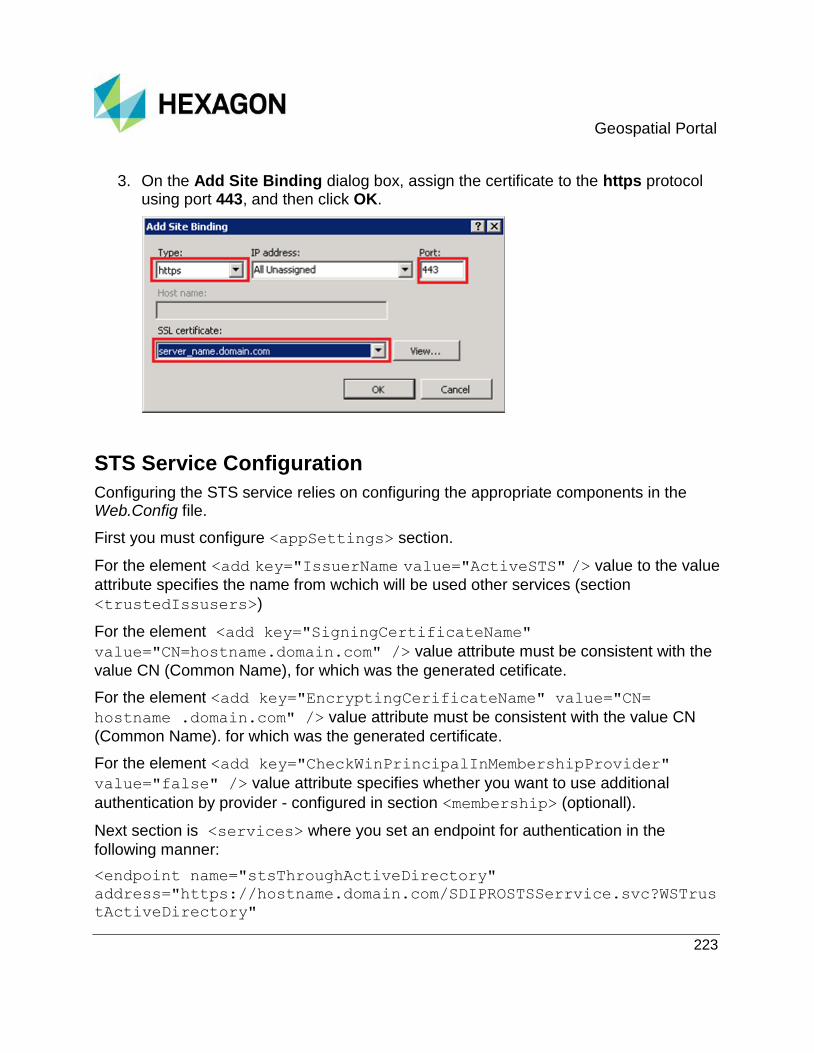
Geospatial Portal
223
3. On the Add Site Binding dialog box, assign the certificate to the https protocol using port 443, and then click OK.
STS Service Configuration
Configuring the STS service relies on configuring the appropriate components in the Web.Config file.
First you must configure <appSettings> section.
For the element <add key="IssuerName value="ActiveSTS" /> value to the value
attribute specifies the name from wchich will be used other services (section
<trustedIssusers>)
For the element <add key="SigningCertificateName"
value="CN=hostname.domain.com" /> value attribute must be consistent with the
value CN (Common Name), for which was the generated cetificate.
For the element <add key="EncryptingCerificateName" value="CN=
hostname .domain.com" /> value attribute must be consistent with the value CN
(Common Name). for which was the generated certificate.
For the element <add key="CheckWinPrincipalInMembershipProvider"
value="false" /> value attribute specifies whether you want to use additional
authentication by provider - configured in section <membership> (optionall).
Next section is <services> where you set an endpoint for authentication in the
following manner:
<endpoint name="stsThroughActiveDirectory"
address="https://hostname.domain.com/SDIPROSTSSerrvice.svc?WSTrus
tActiveDirectory"
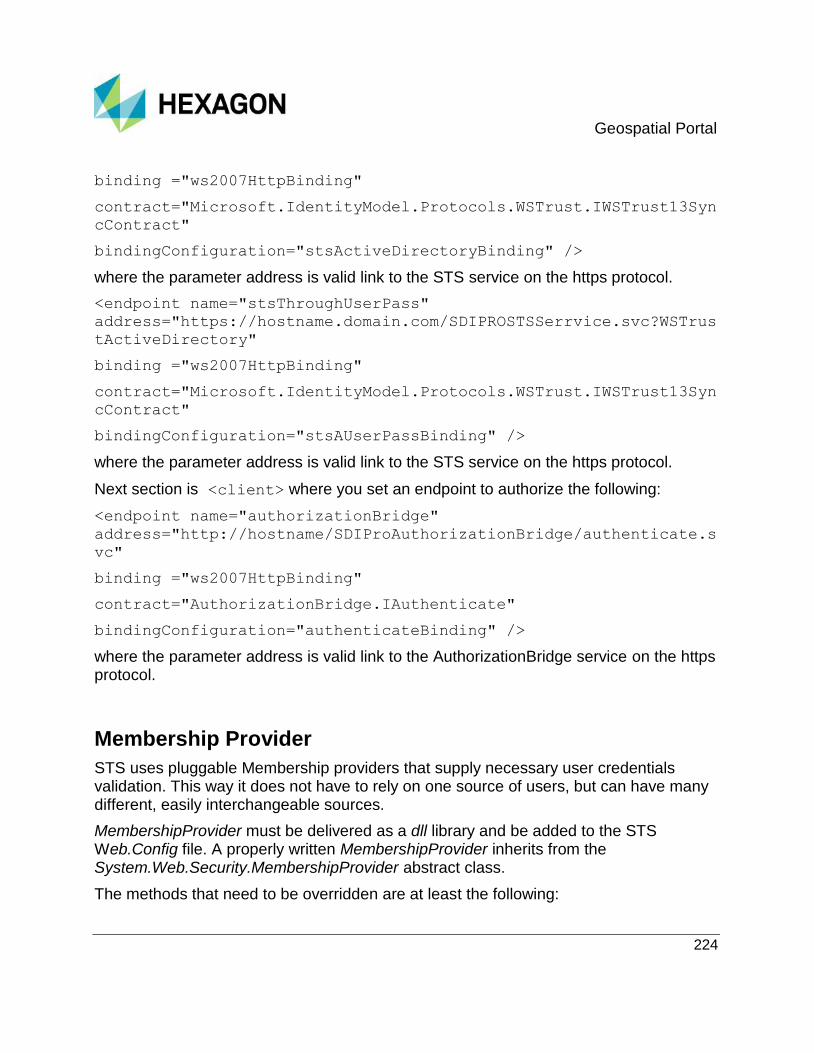
Geospatial Portal
224
binding ="ws2007HttpBinding"
contract="Microsoft.IdentityModel.Protocols.WSTrust.IWSTrust13Syn
cContract"
bindingConfiguration="stsActiveDirectoryBinding" />
where the parameter address is valid link to the STS service on the https protocol.
<endpoint name="stsThroughUserPass"
address="https://hostname.domain.com/SDIPROSTSSerrvice.svc?WSTrus
tActiveDirectory"
binding ="ws2007HttpBinding"
contract="Microsoft.IdentityModel.Protocols.WSTrust.IWSTrust13Syn
cContract"
bindingConfiguration="stsAUserPassBinding" />
where the parameter address is valid link to the STS service on the https protocol.
Next section is <client> where you set an endpoint to authorize the following:
<endpoint name="authorizationBridge"
address="http://hostname/SDIProAuthorizationBridge/authenticate.s
vc"
binding ="ws2007HttpBinding"
contract="AuthorizationBridge.IAuthenticate"
bindingConfiguration="authenticateBinding" />
where the parameter address is valid link to the AuthorizationBridge service on the https protocol.
Membership Provider
STS uses pluggable Membership providers that supply necessary user credentials validation. This way it does not have to rely on one source of users, but can have many different, easily interchangeable sources.
MembershipProvider must be delivered as a dll library and be added to the STS Web.Config file. A properly written MembershipProvider inherits from the System.Web.Security.MembershipProvider abstract class.
The methods that need to be overridden are at least the following:

Geospatial Portal
225
ValidateUser(string user, string pass)
GetUser(string userName, bool isOnline)
It is highly recommended that the following properties have proper values set because they might be used when presenting the provider within the client application user interface:
Name
Description
The compiled dll library must be added to STS in the assemblies section of the Web.Config file.
<assemblies>
<add assembly=Example.Providers, Version=0.0.1, Culture=neutral,
PublicKeyToken=4CB508DEFBEE" />
</assemblies>
Last but not least, MembershipProvider has to be registered in the <system.serviceModel> section in the following way:
<membership defaultProvider="CustomMembershipProvider">
<providers>
<clear />
<add name="CustomMembershipProvider" type=
Example.Providers.MemberProvider, Example.Provider" />
</providers>
</membership>
Role Provider for STS
The functionality of a RoleProvider is connected mainly with supplying STS with roles for a given user. STS refers to this provider to obtain user roles that are later embedded within the Security Token. The RoleProvider must be delivered as a dll library and added to the STS Web.Config file.
A properly written RoleProvider inherits from the System.Web.Security.RoleProvider abstract class.
The method that needs to be overridden is at least the following:
GetRolesForUser(string username)
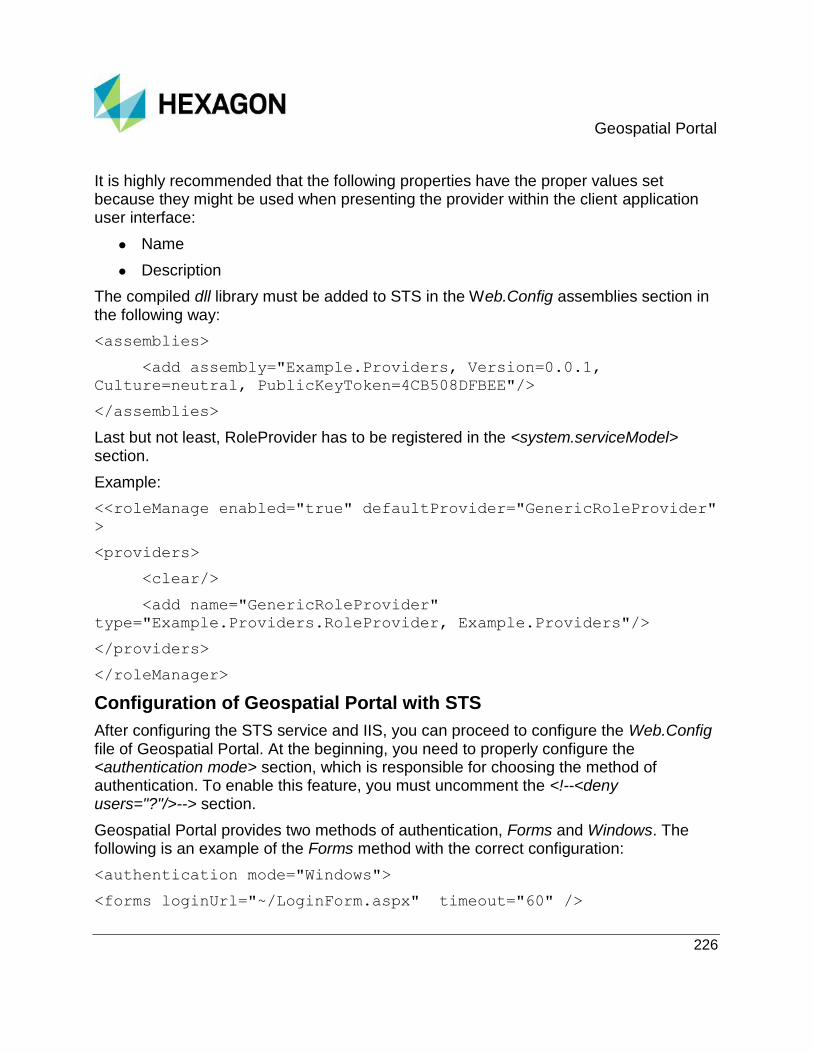
Geospatial Portal
226
It is highly recommended that the following properties have the proper values set because they might be used when presenting the provider within the client application user interface:
Name
Description
The compiled dll library must be added to STS in the Web.Config assemblies section in the following way:
<assemblies>
<add assembly="Example.Providers, Version=0.0.1,
Culture=neutral, PublicKeyToken=4CB508DFBEE"/>
</assemblies>
Last but not least, RoleProvider has to be registered in the <system.serviceModel> section.
Example:
<<roleManage enabled="true" defaultProvider="GenericRoleProvider"
>
<providers>
<clear/>
<add name="GenericRoleProvider"
type="Example.Providers.RoleProvider, Example.Providers"/>
</providers>
</roleManager>
Configuration of Geospatial Portal with STS
After configuring the STS service and IIS, you can proceed to configure the Web.Config file of Geospatial Portal. At the beginning, you need to properly configure the <authentication mode> section, which is responsible for choosing the method of authentication. To enable this feature, you must uncomment the <!--<deny users="?"/>--> section.
Geospatial Portal provides two methods of authentication, Forms and Windows. The following is an example of the Forms method with the correct configuration:
<authentication mode="Windows">
<forms loginUrl="~/LoginForm.aspx" timeout="60" />

Geospatial Portal
227
</authentication>
<authorization>
<!-- Uncomment following line to enable login window -->
<deny users="?" />
</authorization>
<membership defaultProvider="Disk">
<providers>
<add name="Disk"
type="Intergraph.WebSolutions.Core.WebClient.Platform.Security.Di
skMembershipProvider" />
</providers>
</membership>
This displays the Login dialog box. After entering the correct Username and Password, Geospatial Portal will run.
The second method of authentication is Windows. The following is an example of the Windows method with the correct configuration:
<authentication mode="Windows">
<forms loginUrl="~/LoginForm.aspx" timeout="60" />
</authentication>
<authorization>
<!-- Uncomment following line to enable login window -->
<deny users="?" />
</authorization>
<membership defaultProvider="Disk">
<providers>
<add name="Disk"
type="Intergraph.WebSolutions.Core.WebClient.Platform.Security.Di
skMembershipProvider" />
</providers>
</membership>

Geospatial Portal
228
This is responsible for domain authentication. In the domain, authentication does not appear on the Login dialog box. If you have permissions, Geospatial Portal starts automatically; otherwise, the browser displays the error 401 Unauthorized.
In the Web.Config file, you can define only one method (Forms or Windows). You cannot use both methods simultaneously. In case this is necessary, however, you must initialize two instances of Geospatial Portal with the appropriate configuration.
After selecting the authentication method, only the configuration of endpoint addresses and the binding client that are set in the STS configuration need to be performed. For the binding client, you must find the entry in the Web.Config file of Geospatial Portal.
<ws2007HttpBinding>
<binding name="stsActiveDirectoryBinding">
<security mode="TransportWithMessageCredential">
<transport clientCredentialType="None" />
<message clientCredentialType="Windows"
negotialteServiceCredential="true"
establishSecurityContext="true" />
</security>
</bindin>
<binding name="stsUserPassBinding">
<security mode ="TransportWithMessageCredential">
<transport clientCredentialType="None" proxyCredentialType="None"
realm="" />
<message clientCredentialType="UserName"
negotiateServiceCredential="true" algorithmSuite="Default"
establisSecurityContext="true" />
</security>
</binding>
</ws2007HttpBinding>
It is added by default, so you do not have to configure it here. What remains is to configure endpoint addresses for the client application, as in the following example with the correct configuration:

Geospatial Portal
229
.com/SDIPROSTSService/Service.svc/WSTrustActiveDirectory"
binding="ws2007HttpBindin"
bindingConfiguration="stsActiveDirectoryBinding"
contract="Microsoft.IdentityModel.Protocols.WSTrust.IWSTrustChann
elContract"
name="stsThroughActiveDirectory" />
<endpoint
address="https://example.com/SDIPROSTSService/Service.svc/WSTrust
UserPass"
binding="ws2007HttpBinding"
bindingConfiguration="stsUserPassBinding"
contract="Microsoft.IdentityModel.Protocols.WSTrust.IWSTrustChann
elContract" name="stsThroughUserPass" />
In this example, the example.com field provides the name of the server where the service SDIPROSTSService is exposed.

Geospatial Portal
230
Geospatial Portal
231
S E C T I O N 6
Advanced Configuration of Consumer Portal
This sub section describes some advanced Consumer Portal configuration aspects.
Changing the Logo in Consumer Portal
The Consumer Portal administrator can change the default logo in order to adapt the product to the customer requirements.
In order to change the logo graphics:
1. Prepare the custom logo in two versions: first 170 x 70 pixels, second 340 x 140 pixels. Save the logo graphics files, naming them as given below:
logo.png – 170 x 70 pixels
logox2.png – 340 x 140 pixels
The second logo is required for devices with Retina display.
2. Go to the directory where the Consumer Portal instance logo is located.
Example:
“C:\Program Files\Common Files\Hexagon\Services\Instances\<instance name>\resources\style\images”
If the default location of “…\Common Files\Hexagon\” was changed during the installation, the directory should be adjusted accordingly.
3. Replace the existing logo.png and logox2.png with files prepared in the first step.
Advanced logo customization
In case the default logo dimensions are insufficient, it is possible to customize the logo dimensions.
1. First, prepare the logo of your choosing in two versions:
logo.png - custom dimensions
logox2.png - two times larger than logo.png
2. Go to the directory where the Consumer Portal instance logo is located.
Geospatial Portal
232
Example:
“C:\Program Files\Common Files\Hexagon\Services\Instances\<your_instance_name>\resources\style\images”
If the default location of “…\Common Files\Hexagon\” was changed during the installation, the directory should be adjusted accordingly.
3. Replace the existing logo.png and logox2.png with files prepared in the first step.
4. Go to the directory where customization.css is located.
Example:
“C:\Program Files\Common Files\Program Files\Common Files\Hexagon\Services\Instances\<instance name>\resources\style”
If the default location of Portal instances was changed during the installation, the directory should be adjusted accordingly.
5. Edit customization.css and adjust logo dimensions accordingly.
The logo file name and extension can also be located in customization.css file.
Configuring the Template in Consumer Portal Layout
Using Customer Portal, you can configure the way search results are presented to the user. The application comes with default templates for three elements used to present the information – result list, tooltip frame, and detailed view. All these aspects can be configured to take into account services used to obtain results as well as their type. Templates themselves are simple HTML files which can be used to arrange data to your liking.
Basic configuration
Start by creating a new folder in “\resources\templates\” directory and renaming it. The following example uses a folder named “custom_tmpl”.
Example:

Geospatial Portal
233
“C:\Program Files\Common Files\Hexagon\Services\Instances\<InstanceName>\resources\templates\custom_tmpl\”
If the default location of “…\Common Files\Hexagon\” template was changed during the installation, the directory should be adjusted accordingly.
Placing new templates in folders is recommended to help keep the “\templates\” directory ordered and clear.
Inside your folder, create a new *.tmpl file. Note that the filename has to contain the name of the object it corresponds to. This means that the custom template file must have one of the following suffixes:
*.resultlist.tmpl
*.tooltip.tmpl
*.detailed.tmpl
Below are examples of valid template names:
custom.resultlist.tmpl
my_template.tooltip.tmpl
city.detailed.tmpl
None of the following names are valid: resultlist.tmpl, tooltip.tmpl, detailed.tmpl. The suffix must be preceded by the name string of some description. It is advised to use a common prefix for naming templates that correspond to the same object.
You can create a new template only for a single element, all three or any other combination of them. The suffix of a template file must correspond to the name of the element that will use it. Elements that are not defined will use default *.tmpl files.
After creating and properly naming template files, you can proceed to filling the template with content. The *.tmpl file can contain HTML and JavaScript. JavaScript may contain calls to object “data” and the usage of Lo-Dash library using “_” (underscore) variable. Contents of object “data” will change depending on the service being used to obtain it; however, the basic structure and certain fields are common for all services. API documentation for Lo-Dash library can be obtained at the following address: http://lodash.com/docs http://lodash.com/docs
Inside *.tmpl files, JavaScript calls have to be enclosed in <% %> brackets. Please note that in order to display a variable <%= %>, brackets should be used.

Geospatial Portal
234
Example below shows “default.resultlist.tmpl” file, which presents the usage of HTML and the valid JS call inside the template.
<div class="webgis-search-item-icon
webgis-search-result-marker-tooltip-type-<%=data.properties.type.
toLowerCase() %>">
</div>
<span class="webgis-search-item">
<div class="webgis-search-item-title"><%=data.match %></div>
<div
class="webgis-search-item-description"><%=data.properties.type%><
/div>
</span>
This simple example can be easily expanded to accommodate more complex designs and requirements. Cascading Style Sheets can be used with templates to further format and configure the presentation of search results. In the example, JavaScript is used to create a different “div” element for each result type. This way each type can be easily matched with the entry in the “customization.css” file located in the “..\style\” directory.
“C:\Program Files\Common Files\Hexagon\Services\Instances\<InstanceName>\style\customization.css”
If the default location of Customer Portal was changed during the installation, the directory should be adjusted accordingly.
Example below shows how custom styles are added to search results in “customization.css”.
.webgis-search-result-marker-tooltip-type-county {background: #FFF url("../style/Search/Icons/county.png") no-repeat; }
In this particular case, the white background and image are set for the result of type “county”.
By default, the following data type strings are supported:
county
cemetery
church
city

Geospatial Portal
235
firestation
lake
river
road
school
state
street
interstate
imagereference
You can easily add new types or redefine existing ones by modifying the “customization.css” file accordingly.
After preparing template files, they need to be added to the “template.json” file, located in your Consumer Portal instance directory.
Example:
“C:\Program Files\Common Files\Hexagon\Services\Instances\<InstanceName>\resources\templates\template.json”
If the default location of “…\Common Files\Hexagon\” was changed during the installation, the directory should be adjusted accordingly.
Initially, the file contains only default template definitions. In order to add custom templates, the following format should be used (without < > signs):
{
"default":
{
"default":
{
"resultlist": " ../resources/templates/default.resultlist.tmpl",
"tooltip": " ../resources/templates/default.tooltip.tmpl",
"detailed": " ../resources/templates/default.detailed.tmpl"
}

Geospatial Portal
236
},
“<service_name>”
{
“<data.properties.type>”
{
“resultlist”: ”<relative path to template>”,
“tooltip”: ”<relative path to template>”,
“detailed”: ”<relative path to template>”
}
}
}
The document must be a valid *.json file, so elements are comma-delimited and contained within brackets.
Innermost lines contain relative paths to *.tmpl files containing template definitions for a given element. Using the example name of the folder “custom_tmpl” and one of *.tmpl files, the example path to the custom template may look like this:
“../resources/templates/custom_tmpl/custom.resultlist.tmpl”
If the default location of “…\Common Files\Hexagon\” was changed during the installation, the directory should be adjusted accordingly.
Subsequently, <data.properties.type> describes the type of search result that will use defined templates. It can be obtained via JavaScript from the “data.properties.type” variable from within the template file. Each result type can have its own set of templates.
The outermost variable <service_name> corresponds to the type of the service (for
example: “WMPSSearch”,” searchbackend”) that will use templates defined inside.
Example of complete and valid template definition for a specific service is presented below:
{
"default":
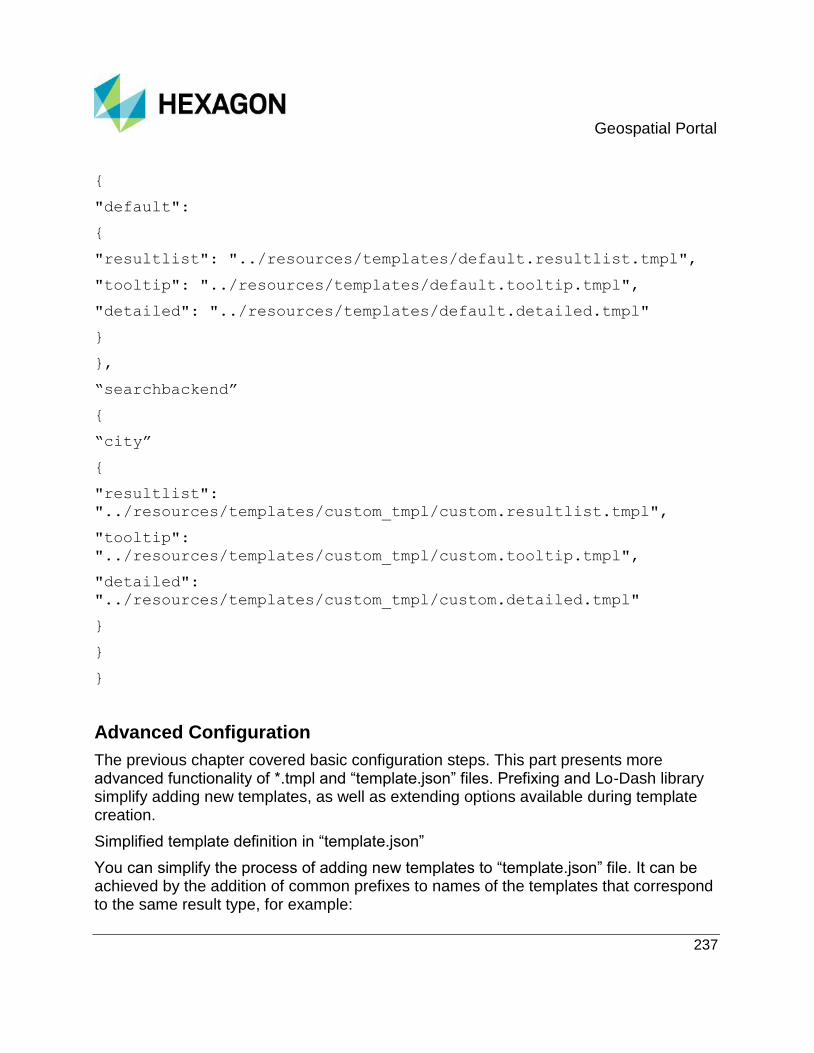
Geospatial Portal
237
{
"default":
{
"resultlist": "../resources/templates/default.resultlist.tmpl",
"tooltip": "../resources/templates/default.tooltip.tmpl",
"detailed": "../resources/templates/default.detailed.tmpl"
}
},
“searchbackend”
{
“city”
{
"resultlist":
"../resources/templates/custom_tmpl/custom.resultlist.tmpl",
"tooltip":
"../resources/templates/custom_tmpl/custom.tooltip.tmpl",
"detailed":
"../resources/templates/custom_tmpl/custom.detailed.tmpl"
}
}
}
Advanced Configuration
The previous chapter covered basic configuration steps. This part presents more advanced functionality of *.tmpl and “template.json” files. Prefixing and Lo-Dash library simplify adding new templates, as well as extending options available during template creation.
Simplified template definition in “template.json”
You can simplify the process of adding new templates to “template.json” file. It can be achieved by the addition of common prefixes to names of the templates that correspond to the same result type, for example:

Geospatial Portal
238
myFeature.resultlist.tmpl
myFeature.tooltip.tmpl
myFeature.detailed.tmpl
custom_city_tmpl.red.resultlist.tmpl
custom_city_tmpl.red.tooltip.tmpl
custom_city_tmpl.red.detailed.tmpl
Both notations presented above will allow simplified definition of templates to be used in the “templates.json” file as prefix is used to group templates.
Using the “default” template configuration as an example, the simplified version would have following structure:
{
"default":
{
"default": "resources/templates/default”
},
…
}
You can clearly see that the relative path to the template files contains only the prefix “default,” as opposed to the full template file name used in the first example (“default.resultlist.tmpl”).
Example of a possible complete definition of custom templates for a specific service may look as follows:
{
"default":
{
"default":
{
"resultlist": "../resources/templates/default.resultlist.tmpl",
"tooltip": "../resources/templates/default.tooltip.tmpl",
"detailed": "../resources/templates/default.detailed.tmpl"

Geospatial Portal
239
}
},
" searchbackend ":
{
"city": "../resources/templates/custom_city_tmpl”,
"county": "../resources/templates/custom_county_tmpl”,
}
}
You can clearly see that it is possible to mix both full and simplified versions of a template definition in a single file.
Advanced template functions
Using Lo-Dash library it is possible to add code to *.tmpl files.
<div class="webgis-search-result-moreinfo
webgis-search-result-moreinfo-type-<%=data.properties.type.toLowe
rCase()%>">
<% _.forOwn(data.properties, function(value, key) { %>
<div class="webgis-search-result-moreinfo-item
webgis-search-result-moreinfo-item-<%=key%>">
<%=value%>
</div>
<%});%>
</div>
The template code above shows the usage of the “_.forOwn” Lo-Dash function to move through all result properties in order to display them. Each property will be enclosed in a separate “div” element with a different class identifier, so they can be separately mapped in the *.css file.
Configuring the Thumbnails for Map Compositions in Consumer Portal Layout
By default, all map compositions in the Consumer Portal Layout have a common thumbnail. Those thumbnails can be customized by administrator.

Geospatial Portal
240
To define own thumbnails for map compositions:
1. Log in to the machine where the Consumer Portal Layout is instantiated
2. Go to your instance folder; by default, the instance files are located in C:\Program Files\Common Files\Hexagon\Services\Instances\<Consumer_Portal_Instance_Name>,
where <Consumer_Portal_Instance_Name> is the name of your instance
3. Go to the \data\compositions folder.
JPEG files with identical names as your map composition names are placed in \<Consumer_Portal_Instance_Name>\data\compositions.
(To learn how to create map a composition, see: the Starting Configuration topic.)
4. Prepare new thumbnail graphics for your map compositions. The recommended image size is 504 x 288 pixels.
5. Replace the JPEG files in the \data\composition folder with JPEG files with new thumbnail graphics.
The file names with new graphics must have exactly the same name as the original files. The original files have exactly the same name as your map composition name.
Preparing Oracle Database to Work with Consumer Portal Search
Consumer Portal supports searching and displaying results from Oracle Database tables. However in order to be used as search source selected table must contain information essential for presentation of its contents in Consumer Portal. For this reason it must have following fields:
Object name field – name that will be displayed in search result box below search field as well as in map tooltip.
Object type field – defines type of the object
By default following object types are supported:
county
cemetery
church

Geospatial Portal
241
city
firestation
lake
river
road
school
state
street
interstate
imagereference
It is possible to use other result types, however additional configuration will be required in order to ensure best presentation of results of custom type. For more details please refer to Configuring the Template in Consumer Layout
Geometry fields
Top
Bottom
Left
Right

Geospatial Portal
242
Easting
Northing
Fields above are used to determine map position for given item. Top, bottom, left and right fields are used to define map bounding box. Easting and northing fields are used to designate exact location of result on the map. Map will be centered on position calculated using this coordinates. Image below shows how fields correspond to results being shown on map.
Restricting Data Display with Scale Bands
You can use scale bands settings to specify the display scale for individual layers in Consumer Portal. Administration Console automatically translates scale range definitions from Administration Portal (Geospatial Portal) to Consumer Portal layout. This is done while sending the workspace (GPW) to the Consumer Portal layout instance.
ScaleBounds are the attribute of the "legends" entries in starting_wsp.json file for
Conusmer Portal instance. LowerBound and UpperBound is the list of pairs (entries)
which define in what ranges of scales the given layer will be displayed. Values of
lowerBound and upperBound are the scale denominators. For example,
{lowerBound:1000, upperBound:250000 means that the layer will be dispalyed

Geospatial Portal
243
from scale 1:0000 till scale 1:250000. LowerBound and UpperBound attributes are optional.
In the sample below, the position of legend with id = "87ee0ea5-aa23-4422-9d8d-26351b36c258" will be visible for scale ranges between 1:30000 – 1:90000 and 1:120000 do 1:240000. It will not be visible in ranges 1:1 - 1:30000, 1:90000 - 1:120000 and above scale 1:240000.
"legends": [
{
"id": "480c616f-3f8a-467b-901b-35b06ee296ca",
"name": "Lodz_",
"entries": [
{
"id": "87ee0ea5-aa23-4422-9d8d-26351b36c258",
"dataset": "85c5e3f8-1ca9-eef0-4917-24d02b056166",
"visible": true,
"opacity": 1.0,
"style": {
"image": {
"singleTile": true
},
"featureInfo": {
"format": "text/html"
}
},
"scaleBoundsEntries": {
"id": "City border",
"entries": [
{
"lowerBound": 30000,
"upperBound": 45000

Geospatial Portal
244
},
{
"lowerBound": 45000,
"upperBound": 60000
},
{
"lowerBound": 60000,
"upperBound": 90000
},
{
"lowerBound": 120000,
"upperBound": 240000
}
]
}
},
Map Composition Styles in Consumer Portal
You can adjust the styles for Map Composition in Consumer Portal. The Map Composition style is defiend in the style.css file located by default in <Consumer Portal instance>/resources/style/
The list of configurable elements and CSS classes responsible for the styling of the map compositions tiles:
Pictogram:
.layer-list-item

Geospatial Portal
245
.legend-icon
Composition style:
.map-composition-item
.selected-composition-item
.webgis-map-compositions-wrap
.webgis-map-composition-icon

Geospatial Portal
246
.webgis-map-composition-label
Setting Vector Highlight Style in Consumer Portal
The feature highlight style for selectable WFS objects can be modified. The highlight
style is defined in the client_config.json file. This file is available for every
Consumer Portal instance.
To set highlight style for WFS features in Consumer Portal:
1. Edit the client_config.json file for your instance. By default the file is
located in C:\Program Files\Common Files\Hexagon\Services\Instances\<Consumer Portal Instance Folder> \data
2. Go to the defaultHighlightStyle section.
3. Set highlight style properties. You can set color and opacity for both: highlight fill and highlight stroke property.
Sample:
"defaultHighlightStyle": {
"fill": {
"color": "#FFFF00",
"opacity": 0.9
},
"stroke": {
"color": "#8B0000",
"opacity": 2

Geospatial Portal
247
}
},
4. Save changes in client_config.json file and restart Consumer Portal.
How to configure terrain source in Geospatial Portal - Consumer
By default there is no terrain source defined for a 3D mode in Geospatial Portal - Consumer, however administrator can define terrain source.
To configure terrain source in Geospatial Portal - Classic:
1. Generate terrain source DEM with mTransformer (see: Appendix D - Generating Terrain Source DEM https://hexagongeospatial.fluidtopics.net/reader/GeaxpiaikruZnCD_2Fpb1Q/Oif~Hx83vH8YSU2AkGsxZA in mTransformer User Guide) or download and use terrain source data from other third-party resources.
2. Publish Virtual Directory in IIS with terrain source data or get a URL to third-party terrain source.
3. Edit client_config.json for Consumer instance. The file is by default located
in C:\Program Files\Common Files\Hexagon\Services\Instances\Consumer\data
4. Provide URL to the terrain source in the "defaultTerrainServiceUrl" parameter:
Sample:
"schema":
"http://www.hexagongeospatial.com/webgis/jsonSchema/v1.0",
"clientConfiguration":
"{7FFB78FD-5F9E-4B0C-819F-4CE8633B32A3}",
"configurations": [
{
"id": "{7FFB78FD-5F9E-4B0C-819F-4CE8633B32A3}",
"use3d": false,
"fallback": true,
"backendUrl": "/backend",
"systemOfMeasurement": "metric",
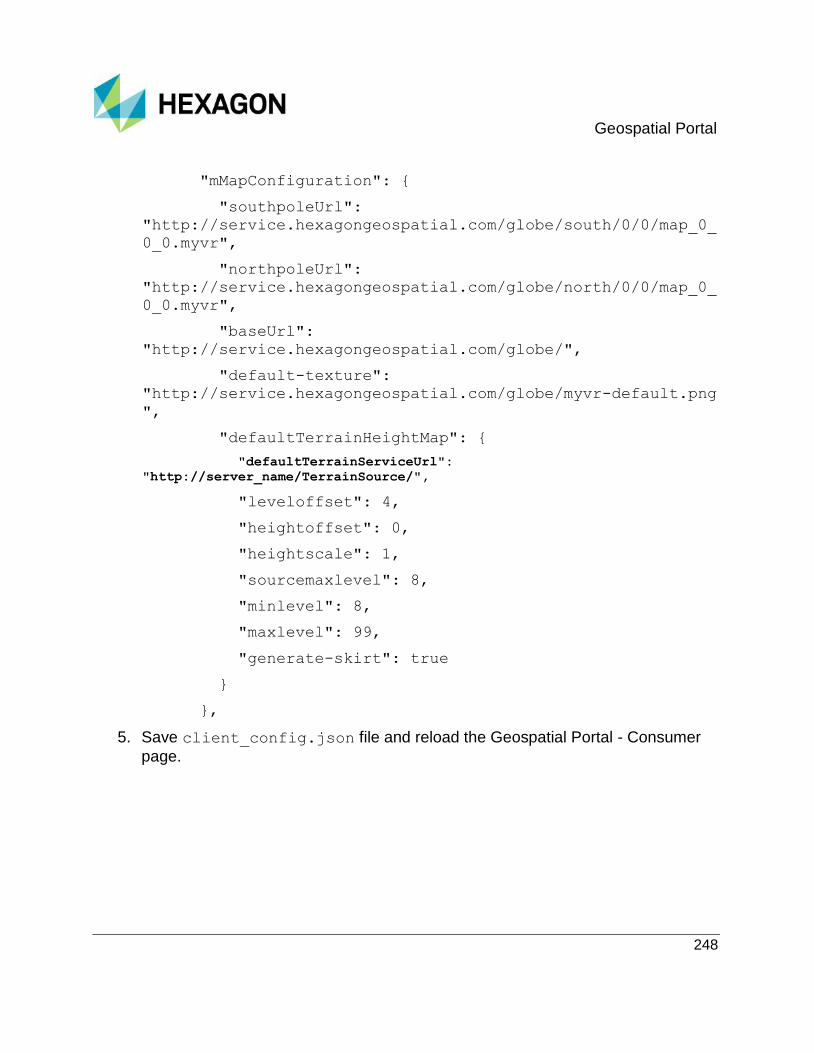
Geospatial Portal
248
"mMapConfiguration": {
"southpoleUrl":
"http://service.hexagongeospatial.com/globe/south/0/0/map_0_
0_0.myvr",
"northpoleUrl":
"http://service.hexagongeospatial.com/globe/north/0/0/map_0_
0_0.myvr",
"baseUrl":
"http://service.hexagongeospatial.com/globe/",
"default-texture":
"http://service.hexagongeospatial.com/globe/myvr-default.png
",
"defaultTerrainHeightMap": {
"defaultTerrainServiceUrl": "http://server_name/TerrainSource/",
"leveloffset": 4,
"heightoffset": 0,
"heightscale": 1,
"sourcemaxlevel": 8,
"minlevel": 8,
"maxlevel": 99,
"generate-skirt": true
}
},
5. Save client_config.json file and reload the Geospatial Portal - Consumer
page.

Geospatial Portal
249
Geospatial Portal Layouts Geospatial Portal is run with the layout set as the default in the Administration Console, but there are several predefined options for viewing the Geospatial Portal application:
full.aspx
mapWithToolbar.aspx
mapWithRibbon.aspx
map.aspx
apollo.aspx
apollopro.aspx
mobile.aspx
IWS.aspx
GWMPub.aspx
GWMPubPro.aspx
To run Geospatial Portal with a different layout than the default, add the appropriate layout name to the URL, for example: http://hostname/instance_name/mapWithRibbon.aspx

Geospatial Portal
250
Portal layout samples:
full.aspx – Typical view of the portal application;
apollopro.aspx – Portal application featuring ERDAS APOLLO functionality;
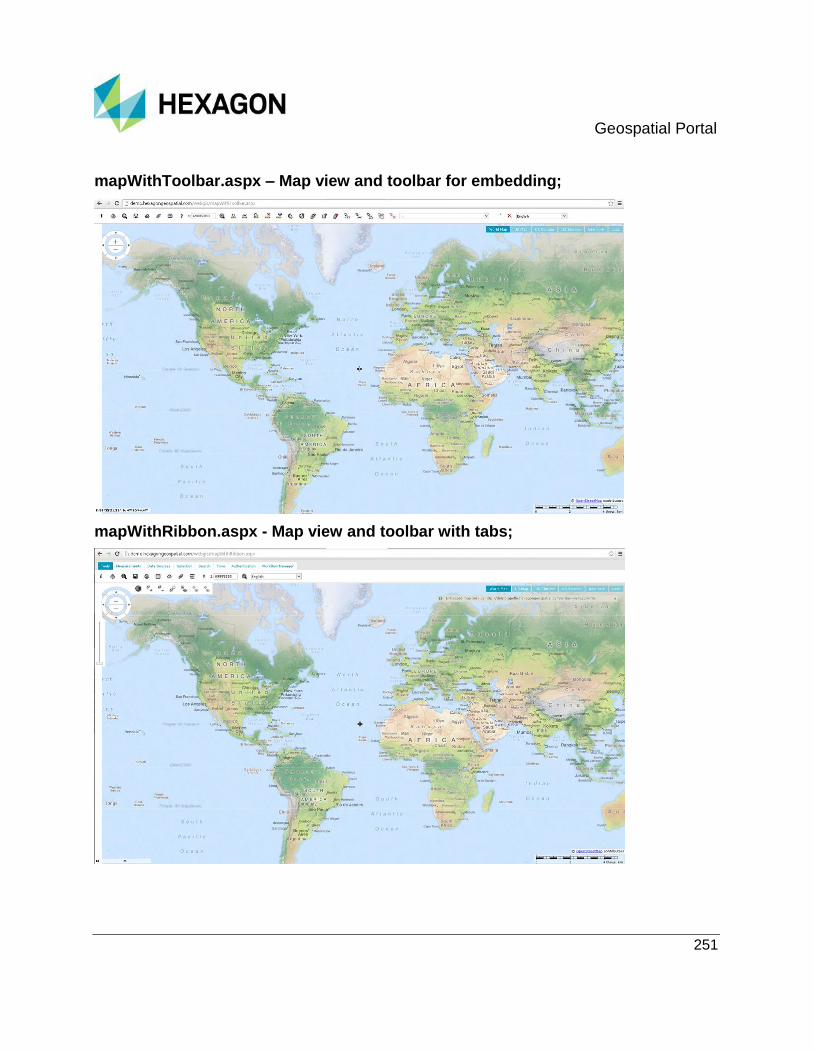
Geospatial Portal
251
mapWithToolbar.aspx – Map view and toolbar for embedding;
mapWithRibbon.aspx - Map view and toolbar with tabs;

Geospatial Portal
252
map.aspx – Pure map control for embedding with only a few simple map controls delivered;

Geospatial Portal
253
HTTP Get Request with KVP Geospatial Portal support some GET parameters, which may be used to modify the initial application state. This may be used either to add initial parameters when embedding the portal or when sharing a link to the portal. Supported GET parameters are:
CRS – Coordinate Reference System
bbox – Bounding Box
variant – Variant Name
gpw – Geospatial Portal Workspace ID
gpm – Geospatial Portal Map ID
navigator – True/false value that indicates whether to show navigator (default=true)
coords – True/false value that indicates whether to show coordinates information (default=true) cross hair – True/false value that indicates whether to show cross hair (default=true)
scalebar – True/false value that indicates whether to show scalebar (default=true)
switcher – True/false value that indicates whether to show variant switcher (default=true)
Example usage of GET parameters: http://PATH_TO_PORTAL/default.aspx?CRS=EPSG%3A4326&bbox=-10,40.01959247648903,46.010971786833856,74.25156739811912&variant=Map
HTTPS Configuration for Geospatial Portal and Consumer Portal To configure Geospatial Portal and/or Geospatial Portal - Consumer to be used over HTTPS perform the following operations:
Internet Information Services (IIS) Manager actions:

Geospatial Portal
254
1. In Internet Information Services (IIS) Manager, click the server name in the left panel and select Server Certificates in the middle.
In Server Certificate press the action "Import ..." and import the certificate.
2. Create a Web Site with https binding. This site you will select in Administration Console when creating new secure service.
Remove http binding
3. Go to the SSL Setings for the site and select the Require SSL checkbox.
Check whether this setting has propagated to the folders and applications of the site (AdminConsole, AdminPortal, App, Backend ).
Administration Console actions:
1. Run Administration Console
2. Go to the System Settings > Miscellaneous
3. Enter correct Root URL (https)
Actions in Web.config file:
1. For Consumer Portal the backend application must operate on a secure site.
Depending on whether the service is to operate as http or as https, you must select the appropriate binding definition variant for "MapPublisherBinding" within it:
<!-- CONFIGURATION FOR HTTPS SCHEMA: -->
<binding name="MapPublisherBinding"
maxReceivedMessageSize="2147483647" sendTimeout="00:10">
<security mode="TransportWithMessageCredential">
<message establishSecurityContext="true"/>
</security>
</binding>
<!-- CONFIGURATION FOR HTTP SCHEMA: -->
<binding name="MapPublisherBinding"
maxReceivedMessageSize="2147483647" sendTimeout="00:10">
<reliableSession ordered="false" />
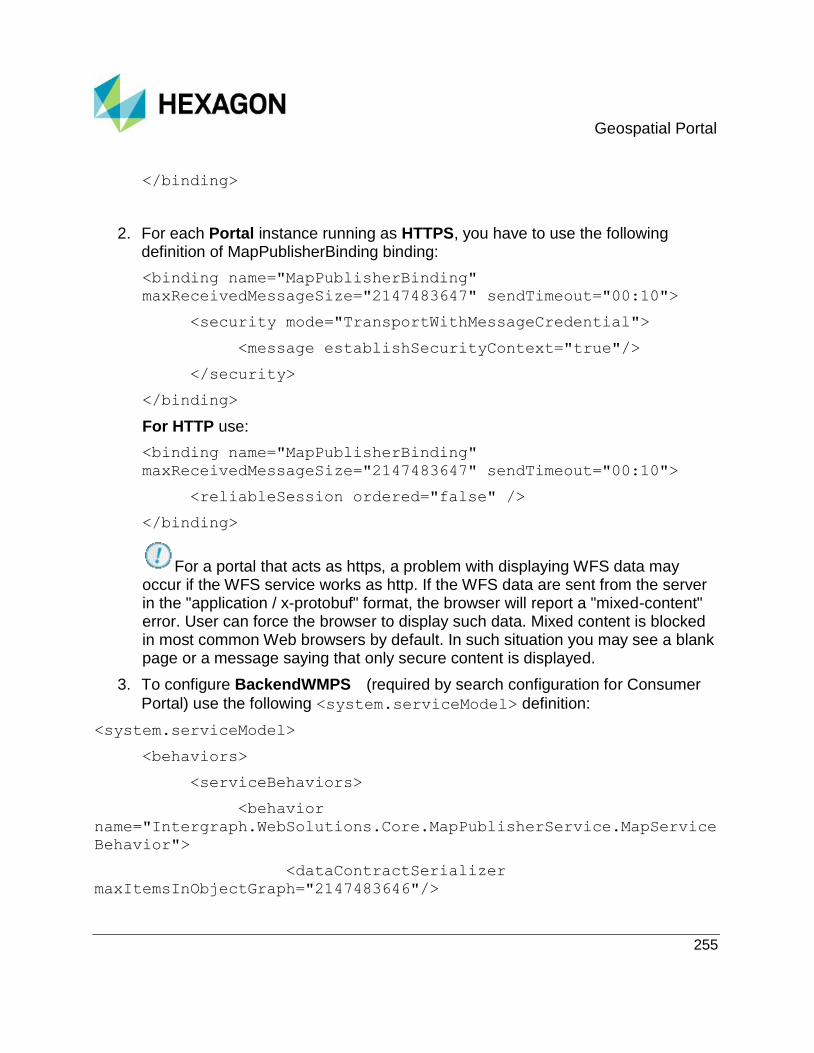
Geospatial Portal
255
</binding>
2. For each Portal instance running as HTTPS, you have to use the following definition of MapPublisherBinding binding:
<binding name="MapPublisherBinding"
maxReceivedMessageSize="2147483647" sendTimeout="00:10">
<security mode="TransportWithMessageCredential">
<message establishSecurityContext="true"/>
</security>
</binding>
For HTTP use:
<binding name="MapPublisherBinding"
maxReceivedMessageSize="2147483647" sendTimeout="00:10">
<reliableSession ordered="false" />
</binding>
For a portal that acts as https, a problem with displaying WFS data may occur if the WFS service works as http. If the WFS data are sent from the server in the "application / x-protobuf" format, the browser will report a "mixed-content" error. User can force the browser to display such data. Mixed content is blocked in most common Web browsers by default. In such situation you may see a blank page or a message saying that only secure content is displayed.
3. To configure BackendWMPS (required by search configuration for Consumer
Portal) use the following <system.serviceModel> definition:
<system.serviceModel>
<behaviors>
<serviceBehaviors>
<behavior
name="Intergraph.WebSolutions.Core.MapPublisherService.MapService
Behavior">
<dataContractSerializer
maxItemsInObjectGraph="2147483646"/>

Geospatial Portal
256
<serviceMetadata httpGetEnabled="false"
httpsGetEnabled="true"/>
<serviceDebug
includeExceptionDetailInFaults="true"/>
</behavior>
</serviceBehaviors>
<endpointBehaviors>
<behavior name="JsonBehavior">
<webHttp defaultOutgoingResponseFormat="Json"/>
</behavior>
</endpointBehaviors>
</behaviors>
<services>
<service
behaviorConfiguration="Intergraph.WebSolutions.Core.MapPublisherS
ervice.MapServiceBehavior"
name="Intergraph.WebSolutions.Core.MapPublisherService.MapService
">
<endpoint address="" binding="wsHttpBinding"
bindingConfiguration="MapPublisherBinding"
contract="Intergraph.WebSolutions.Core.Common.ServiceContracts.Se
rvices.IMapService"
bindingNamespace="http://www.intergraph.com/websolutions/servicec
ontracts"/>
<endpoint address="Stateless"
behaviorConfiguration="JsonBehavior" binding="webHttpBinding"
bindingConfiguration="Stateless"
contract="Intergraph.WebSolutions.Core.Common.ServiceContracts.Se
rvices.IStatelessMapService"
bindingNamespace="http://www.intergraph.com/websolutions/servicec
ontracts"/>
<endpoint address="v1.0/Stateless"
behaviorConfiguration="JsonBehavior" binding="webHttpBinding"
bindingConfiguration="Stateless"
contract="Intergraph.WebSolutions.Core.Common.ServiceContracts.Se

Geospatial Portal
257
rvices.IStatelessMapService10"
bindingNamespace="http://www.hexagon.com/server/webMapPublisher"/
>
</service>
</services>
<bindings>
<wsHttpBinding>
<binding name="MapPublisherBinding"
receiveTimeout="01:00:00" sendTimeout="01:00:00"
maxReceivedMessageSize="2147483647">
<security
mode="TransportWithMessageCredential">
<message
establishSecurityContext="true"/>
</security>
</binding>
</wsHttpBinding>
<webHttpBinding>
<binding name="Stateless" receiveTimeout="01:00:00"
sendTimeout="01:00:00" maxReceivedMessageSize="2147483647">
<security mode="Transport" >
<transport clientCredentialType="None" />
</security>
</binding>
</webHttpBinding>
</bindings>
</system.serviceModel>
To enable a browser to view blocked mixed content:
1. In Internet Explorer:
a. Scroll to the bottom of the screen, and click Show all content.

Geospatial Portal
258
b. The page will refresh and display any mixed content.
2. In Firefox:
a. At the top of the page, to the left of the address bar, click the shield icon.
b. In the pop-up window that appears, click the down arrow next to "Options", and select Disable protection for now.
c. The page will refresh and display any mixed content. The shield icon will be replaced with a warning symbol to indicate that the page is displaying both secure and non-secure items.
3. In Chrome:
a. Click the shield icon on the right side of the address bar.
b. In the icon dialog box, click Load unsafe scripts.
c. The page will refresh and display any mixed content. The URL in the address bar will show https crossed out to indicate that the page is displaying both secure and non-secure items.
Configuring Geospatial Portal in a cluster environment Geospatial Portal provides high performance with a large number of users, but you can also increase the performance and scalability by creating a cluster configuration. The servers in the cluster share the incoming requests from the client users so that your system can handle a higher user volume. A cluster consists of linked computers, each sharing the computational load of processing to improve performance and availability as compared to using a single computer. Clustering is highly configurable and depends on your available hardware. Describing all possible configurations is outside the scope of this topic.
Geospatial Portal
Geospatial Portal is a typical Microsoft ASP.NET Web Application:
it keeps user session state
its configuration is local to where it is deployed
it persists data for the clients in files on the server
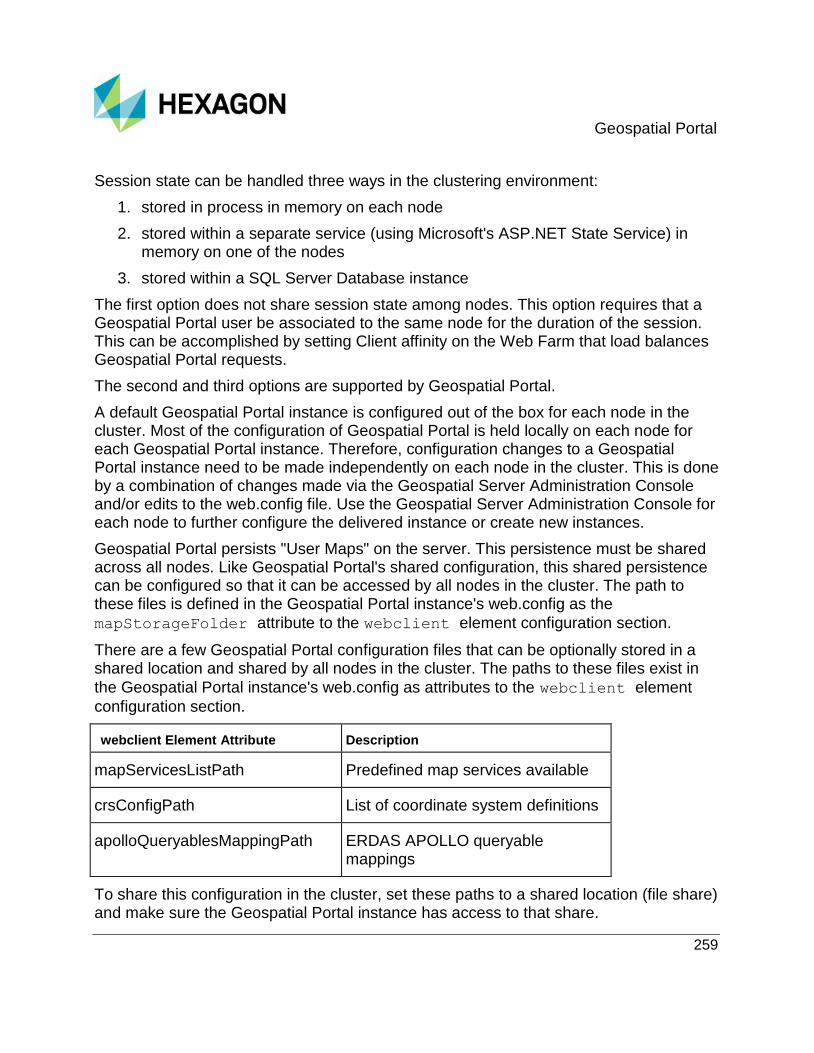
Geospatial Portal
259
Session state can be handled three ways in the clustering environment:
1. stored in process in memory on each node
2. stored within a separate service (using Microsoft's ASP.NET State Service) in memory on one of the nodes
3. stored within a SQL Server Database instance
The first option does not share session state among nodes. This option requires that a Geospatial Portal user be associated to the same node for the duration of the session. This can be accomplished by setting Client affinity on the Web Farm that load balances Geospatial Portal requests.
The second and third options are supported by Geospatial Portal.
A default Geospatial Portal instance is configured out of the box for each node in the cluster. Most of the configuration of Geospatial Portal is held locally on each node for each Geospatial Portal instance. Therefore, configuration changes to a Geospatial Portal instance need to be made independently on each node in the cluster. This is done by a combination of changes made via the Geospatial Server Administration Console and/or edits to the web.config file. Use the Geospatial Server Administration Console for each node to further configure the delivered instance or create new instances.
Geospatial Portal persists "User Maps" on the server. This persistence must be shared across all nodes. Like Geospatial Portal's shared configuration, this shared persistence can be configured so that it can be accessed by all nodes in the cluster. The path to these files is defined in the Geospatial Portal instance's web.config as the
mapStorageFolder attribute to the webclient element configuration section.
There are a few Geospatial Portal configuration files that can be optionally stored in a shared location and shared by all nodes in the cluster. The paths to these files exist in
the Geospatial Portal instance's web.config as attributes to the webclient element
configuration section.
webclient Element Attribute Description
mapServicesListPath Predefined map services available
crsConfigPath List of coordinate system definitions
apolloQueryablesMappingPath ERDAS APOLLO queryable mappings
To share this configuration in the cluster, set these paths to a shared location (file share) and make sure the Geospatial Portal instance has access to that share.

Geospatial Portal
260
Geospatial Server Administration Console
Since the Geospatial Server Administration Console is not cluster aware, changes to Geospatial Portal (and/or SDI service instances) need to be made independently on each node in the cluster.
Since computers that make up the cluster nodes are identical and are virtual machines, another (simpler and recommended) method is to prepare one node and then duplicate it (a little change in network settings may be needed only).
Technical Limitations & Troubleshooting
Supported Browsers
Geospatial Portal can be run in several standard Internet Browsers, including Google Chrome, Internet Explorer, Firefox, and Safari. The Geospatial Portal can be run in other browsers, however it is not guaranteed that all functions will expose the behavior as described in the product documentation. See current WebGIS Release Guide document for the detailed list of browser versions officially supported by this product.
3D Display
Apart from the traditional 2D map display available in Geospatial Portal, you can also view data in 3D. Geospatial Portal displays a base map on a three dimensional globe and renders other supported data sources where appropriate. Geospatial Portal leverages the native support for WebGL in selected browsers.
The 3D functionality in Geospatial Portal/GeoMedia WebMap Publisher Portal is enabled for MS Edge,Firefox and Google Chrome browsers.
3D availability on particular Web browsers:
Geospatial Portal Consumer Portal
WebGL WebGL
Internet Explorer 11 No No
MS Edge Yes* Yes*

Geospatial Portal
261
Chrome Yes Yes
Fire Fox Yes Yes
* 3D functionality in MS Edge is available only if the Geospatial Portal administrator enables it. By default 3D mode is disabled in MS Edge.
For more information about WebGL support for 3D display contact your system administrator.Some Geospatial Portal components are disabled while working in 3D mode. The following functionalities are unavailable on the Toolbar while working with the 3D map control:
Data Edition
Dynamic Object View (this functionality is available only with Full.aspx layout)
Printing (this functionality is not available with ERDAS APOLLO Essentials)
Predefined Queries (this functionality is implemented only in GeoMedia WebMap Publisher Portal layout)
The Navigator buttons Zoom by Rectangle, Previous Map View and Next Map View
The table below show which functionalities of particular sidebar panels are unavailable in 3D mode:
Sidebar panel Functionality available in layouts Functionality limitation
Search Metadata full.aspx Functionality not available.
Analyses full.aspx; apollo.aspx; apollopro.aspx
Spatial filtering is disabled.
Settings full.aspx; apollo.aspx; apollopro.aspx; IWS.aspx; GWMPub.aspx; GWMPubPro.aspx
The settings are not applicable in 3D mode except displaying and changing system of measurements.
Search ERDAS APOLLO apollo.aspx; apollopro.aspx
Spatial filtering is disabled.
Clip-Zip-Ship apollo.aspx; apollopro.aspx
Functionality not available.

Geospatial Portal
262
In the ERDAS APOLLO Search Result Panel (available only for apollo.aspx and apollopro.aspx layouts), the Add to Clip-Zip-Ship button is disabled because the Clip-Zip-Ship panel on the Sidebar is unavailable in 3D mode.
The data coming from WebMap Publisher service in 3D mode can be displayed only in raster format, such as png or jpeg.
Google Maps and Bing Maps can be displayed in 2D view only.
SVG Output Formats
The SVG output format supports only the linear type (all kinds thereof, including the diagonal and at angle) of the gradient fill style due to technical limitations. Any other gradient fill type (circular, rectangular and best fit rectangular) will be converted by the SVG renderer into a solid color fill using the start color as the foreground color
FSM Symbology for Point Features
All the point features with FSM symbol appear on the map without the FSM symbology.
Workaround:
1. Copy the FSM file to the symbols folder for your service instance.
For example, symbol files found in the C:\WebMap Publisher Projects\<YourWebPubServiceSource>\Symbols folder copy to C:\Program Files\Common Files\Hexagon\Services\Instances\<YourWebPubServiceSource>\WMPS\symbols.
2. Restart IIS.
3. Restart GeoMedia WebMap process.
4. Clear caches for Geospatial Portal, ASP.Net, and services.
Session Resume Dialog Box
In case all the following conditions are met:
The operating system is Windows 7

Geospatial Portal
263
Geospatial Portal is running in Internet Explorer 11
User displays data in SVG format
Geospatial Portal session expires
The session resume dialog box will appear in order to work around the defect in Microsoft Internet Explorer (ticket no: REG:116020213659186).
If any of the conditions mentioned above is not met, then the session resuming is done in the background, without user interaction.
This workaround is delivered with Geospatial Portal in version 15.00.05 or newer and is valid till the problem is fixed in MS Internet Explorer 11.
Where Am I? feature on Chrome Web browser
Where Am I? feature in Geospatial Portal running on the Chrome Web browser works only with secured connections (HTTPS). This restriction applies only to the Chrome Web browser starting with version 50 , as the geolocation is no longer supported on non-secured connections. Geolocation requests served at the top level over localhost will still work.
Backward compatibility with ERDAS APOLLO Catalogues prior to 16.01
ERDAS APOLLO introduces Full Motion Video support within patch EP01. This feature requires the ERDAS APOLLO Catalogue in version 16.01 for proper work and may cause issues when older catalogue version is registered.
In order to maintain backward compatibility with ERDAS APOLLO Catalogue prior to 16.01 the apolloFullMotionVideoSupport flag with false value must be added into Portal’s configuration. This setting disables the Full Motion Video Support (enabled by default). In order to disable the Full Motion Video Support ERDAS APOLLO feature in Portal:
1. Edit Web.config file for Portal.
2. Add the apolloFullMotionVideoBSupport="false" entry in
<webclient> section.
3. Save Web.config file.
Google Maps API Errors
When registered Google Maps layer is not displayed in Portal and message that Google Maps API returned an error appears, check error details in Web browser console. Visit https://developers.google.com/maps/documentation/javascript/error-messages

Geospatial Portal
264
https://developers.google.com/maps/documentation/javascript/error-messages site to learn more about Google Maps API error codes, descriptions and possible solutions.
Only one style of dashed line is printed
The dashed line style is always the same in the printout regardless selected line type in Style properties dialog in Portal.
Workaround:
In order to print in Portal any dashed line style for features, phantomJS has to be used as a Web browser printing engine. Using internal Internet Explorer printing engine may result in printing only one type of line regardless selected line type. For more information on printing configuration in Geospatial Portal see Configuring Printing Feature topic in Geospatial Portal Administrator Guide or contact with your Portal administrator.
Geospatial Portal - Consumer and Oracle search with 12c Release 2 and later client versions
Starting with Oracle Database Client 12c Release 2 there was a change in deployment of the ODP.NET components. The ODP.NET assemblies are no longer published by the installer. This step must be now done manually in order to ensure proper Oracle search configuration in Geospatial Portal - Consumer.
To register ODP.NET components:
1. Create a BAT file (e.g. regasm.bat) anywhere in the file system (e.g. Oracle client installation folder)
2. Use the following set of commands to register the assemblies manually into Global Assembly Cache (GAC):
rem Set path to the Oracle Client home
rem In this example it is
'C:\app\client32\Administrator\product\12.2.0\client_1'
set
Oracle_x86=C:\app\client32\Administrator\product\12.2.0\clie
nt_1
set OraProvCfg_x86=%Oracle_x86%\ODP.NET\bin\4\OraProvCfg.exe
"%OraProvCfg_x86%" /action:gac
/providerpath:%Oracle_x86%\ODP.NET\managed\common\Oracle.Man
agedDataAccess.dll
Geospatial Portal
265
"%OraProvCfg_x86%" /action:gac
/providerpath:%Oracle_x86%\ODP.NET\managed\PublisherPolicy\4
\Policy.4.121.Oracle.ManagedDataAccess.dll
"%OraProvCfg_x86%" /action:gac
/providerpath:%Oracle_x86%\ODP.NET\managed\PublisherPolicy\4
\Policy.4.122.Oracle.ManagedDataAccess.dll
3. Restart Geospatial Server Administration Console Service and review the Search configuration.
Modify the file paths accordingly when using 18c release client.

Geospatial Portal
266
Technical Support and Information Hexagon's Geospatial division provides several ways to access information and to contact support, including self-help tools, the Hexagon Geospatial Community, the Hexagon Geospatial Developer Network, and phone support.
Hexagon Geospatial Community
You can find support-related discussion boards and knowledge bases across Hexagon's geospatial products on the Hexagon Geospatial Community https://geospatialcommunity.hexagon.com/s/. Find more information about the community in a Community post https://geospatialcommunity.hexagon.com/s/article/Welcome-to-the-new-Hexagon-Geospatial-Community.
Announcements
Get the latest announcements from Hexagon on what is new or updated on the Community!
Discussions
Discuss topics with other Hexagon's geospatial product pioneers and experts.
Knowledge and Support
Learn more about our products, find answers, get the latest updates, and connect with other Hexagon Geospatial Community members, or get support from our support teams https://www.hexagongeospatial.com/support.
Developer Network
Share technical information with other developers who use Hexagon's geospatial SDKs and M.App Portfolio. To get full access to the Developer Network you need to purchase a Hexagon Geospatial Developer Network (HGDN) Subscription. With HGDN, you get broad access to select Hexagon geospatial development products in one place. You will also get access to powerful toolkits, including currently published APIs and SDKs. You also get access to in-depth resources such as tutorials, collaborative samples, and web-based training.
Find more information about HGDN https://www.hexagongeospatial.com/support/developer-resources/hgdn.

Geospatial Portal
267
Training Portal
As your one-stop shop for learning, here you will find the access to eTraining, written tutorials, product documentation, support and more to help you in your geospatial journey.
Hexagon Geospatial U
Designed for university educators, this community contains thousands of pages of curriculum for various products in our Education portfolios.
Professional Service Team
For support phone numbers or to submit sales inquiries, general questions, and comments, see Hexagon Geospatial Support (https://www.hexagongeospatial.com/support) page.

268
Index
3
3D Rendering • 128
A
About Hexagon • 7
Adding a Coordinate System • 179
Adjusting Behaviour of Dynamic Shadows Control • 129
Adjusting Behaviour of Feature Info Tool • 186
Advanced Configuration • 110
Advanced Configuration of Consumer Portal • 231
Appearance • 32
Assigning Search to Consumer Portal Instance • 92
Authorizing Geospatial Portal Instances • 201
C
Catalogue Settings • 122
Changing Limit for WMS URL Length • 210
Changing Splash Screen • 191
Changing the Logo in Consumer Portal • 231
Configuration of • 197
Configuration of Default ERDAS APOLLO Credentials • 194
Configuration Portal • 74
Configuring Base Maps for Consumer Portal • 103
Configuring Capabilities Service • 190
Configuring Geospatial Portal - Consumer Instance with Administration Console • 80
Configuring Geospatial Portal in a cluster environment • 258
Configuring Geospatial Portal with Administration Console • 30
Configuring Position of Action Column in Data Window and Clipboard • 186
Configuring Print Service over HTTPS protocol • 155
Configuring Printing Feature • 133
Configuring Quick Print in Portal • 157
Configuring Search Result Panel Options • 199
Configuring Single Sign On for Integrated Systems (STS) • 212
Configuring the Measurements in Geospatial Portal • 187
Configuring the Print Service • 139
Configuring the Starting Map and Map Compositions in Consumer Portal Layout • 99
Configuring the Template in Consumer Portal Layout • 232
Configuring the Thumbnails for Map Compositions in Consumer Portal Layout • 239
Configuring the View Mode in Consumer Portal • 106
Creating an Administrator Account in Geospatial Portal • 200
Creating Geospatial Portal Instance • 15
Customizing Width of Live Search Combo • 161

Geospatial Portal
269
D
Defining Default Style in Configuration for Display, Highlight and Selection of Features • 173
Defining MaxFeatures Parameter for WFS, WFS-G and LUWS • 158
Defining Rotation for Bitmap Pattern and Graphic Style • 168
Defining Searches for Consumer Portal Layout • 81
Defining Simplified Query Panel • 189
Defining Tooltips for Vector Features Displayed in 3D View • 131
Definition of Analysis Result Downloads • 170
Details Tab • 73
Disabling/Enabling 3D View in Geospatial Portal • 128
Disabling/Enabling the Long Data Processing Confirmation • 171
E
Enabling Apply Button on the Settings Tab • 184
Enabling Coordinate Search • 95
Enabling Google Maps, Bing Maps and Open Street Map in Geospatial Portal • 162
Enabling Open Street Map as a Default Map Tile Sources • 77
Enabling Windows Authentication for Printing • 153
Enabling/Disabling Tilted Google Map View in Geospatial Portal • 166
Enhancing Portal Print Service templates • 140
Extended search parameters in ERDAS APOLLO Catalog Search • 195
G
Gazetteer Settings • 119
Geospatial Portal Components Location in the System • 110
Geospatial Portal Layouts • 249
H
Hostname Configuration • 210
How to configure terrain source in Geospatial Portal - Classic • 132
How to configure terrain source in Geospatial Portal - Consumer • 247
HTTP Get Request with KVP • 253
HTTPS Configuration for Geospatial Portal and Consumer Portal • 253
I
Installing the Portal Print Service • 138
L
Layouts • 64
List of configurable tools and functions • 66
M
Managing Consumer Portal Layout Instance • 27
Managing Geospatial Portal Instances • 14

Geospatial Portal
270
Map Composition Styles in Consumer Portal • 244
Map Services • 62
Map Variants Behaviour • 54
Modifying Geospatial Portal Instance • 19
Modifying the Spatial Reference System list • 182
O
Overview • 12
P
Portal Print Service Configuration • 138
Preparing Oracle Database to Work with Consumer Portal Search • 240
Printing in Load Balancing Environment • 157
Printing with Chrome driver • 137
Printing with phantomJS Web Driver • 137
Product Documentation Copyright and Terms of Use • 2
Proxy Settings • 121
Q
Quirks • 124
R
Removing Geospatial Portal Instance • 22
Restricting Data Display with Scale Bands • 242
S
Saving Selections in User Maps • 188
Setting Consumer Portal Appearance Options • 96
Setting DPI for Print Service • 139
Setting Geospatial Portal to Work with Services that Use Local Coordinate System • 183
Setting Map Variant's Behavior • 108
Setting matchCase parameter for WFS queries • 161
Setting the Scale Denominator for Point Fit • 171
Setting Vector Highlight Style in Consumer Portal • 246
Starting Configuration • 34
T
Technical Limitations & Troubleshooting • 260
Technical Support and Information • 266
U
Updating Starting Workspace with Configuration Portal • 47
Upgrading Geospatial Portal Instance • 25
W
Web.Config File • 114
WebClient Settings • 114
WebGIS eTraining Links • 13
Workflow Manager • 71

Geospatial Portal
271