SAP Edge Services, cloud edition - Essential ... - SAP Help Portal
Upload
khangminh22Category
view
0download
0
PUBLICSAP Analysis for Microsoft OfficeDocument Version: 2.7 SP6 – 2019-05-16
Administrator Guide
© 2
019
SAP
SE o
r an
SAP affi
liate
com
pany
. All
right
s re
serv
ed.
THE BEST RUN

Content
1 Getting Started. . . . . . . . . . . . . . . . . . . . . . . . . . . . . . . . . . . . . . . . . . . . . . . . . . . . . . . . . . . . . 61.1 What is SAP Analysis for Microsoft Office?. . . . . . . . . . . . . . . . . . . . . . . . . . . . . . . . . . . . . . . . . . . 61.2 Introduction to the Analysis Plug-in. . . . . . . . . . . . . . . . . . . . . . . . . . . . . . . . . . . . . . . . . . . . . . . . 61.3 Introduction to the EPM Plug-in. . . . . . . . . . . . . . . . . . . . . . . . . . . . . . . . . . . . . . . . . . . . . . . . . . . 71.4 Introduction to the Business Planning and Consolidation Plug-in (BPC plug-in). . . . . . . . . . . . . . . . . 9
2 About this Guide. . . . . . . . . . . . . . . . . . . . . . . . . . . . . . . . . . . . . . . . . . . . . . . . . . . . . . . . . . . .102.1 About the documentation set. . . . . . . . . . . . . . . . . . . . . . . . . . . . . . . . . . . . . . . . . . . . . . . . . . . .10
3 Installation. . . . . . . . . . . . . . . . . . . . . . . . . . . . . . . . . . . . . . . . . . . . . . . . . . . . . . . . . . . . . . . . 123.1 System Requirements. . . . . . . . . . . . . . . . . . . . . . . . . . . . . . . . . . . . . . . . . . . . . . . . . . . . . . . . . 123.2 To install SAP Analysis for Microsoft Office. . . . . . . . . . . . . . . . . . . . . . . . . . . . . . . . . . . . . . . . . . .12
Parallel installation of Analysis and other SAP Add-Ins. . . . . . . . . . . . . . . . . . . . . . . . . . . . . . . . 143.3 To install the Analysis BI platform Add-On for Scheduling for the Analysis Plug-in. . . . . . . . . . . . . . . 143.4 To uninstall SAP Analysis for Microsoft Office. . . . . . . . . . . . . . . . . . . . . . . . . . . . . . . . . . . . . . . . . 15
4 Settings. . . . . . . . . . . . . . . . . . . . . . . . . . . . . . . . . . . . . . . . . . . . . . . . . . . . . . . . . . . . . . . . . . 174.1 Maintaining settings in the file system. . . . . . . . . . . . . . . . . . . . . . . . . . . . . . . . . . . . . . . . . . . . . . 174.2 Maintaining settings in Analysis. . . . . . . . . . . . . . . . . . . . . . . . . . . . . . . . . . . . . . . . . . . . . . . . . . 184.3 Settings for the Analysis Add-in. . . . . . . . . . . . . . . . . . . . . . . . . . . . . . . . . . . . . . . . . . . . . . . . . . 204.4 Settings for the Analysis Plug-in. . . . . . . . . . . . . . . . . . . . . . . . . . . . . . . . . . . . . . . . . . . . . . . . . . 25
BoeConfiguration. . . . . . . . . . . . . . . . . . . . . . . . . . . . . . . . . . . . . . . . . . . . . . . . . . . . . . . . . 26DataSourceConfiguration. . . . . . . . . . . . . . . . . . . . . . . . . . . . . . . . . . . . . . . . . . . . . . . . . . . . 27DateTimeConfiguration. . . . . . . . . . . . . . . . . . . . . . . . . . . . . . . . . . . . . . . . . . . . . . . . . . . . . 35DocumentConfiguration. . . . . . . . . . . . . . . . . . . . . . . . . . . . . . . . . . . . . . . . . . . . . . . . . . . . .36FormulaConfiguration. . . . . . . . . . . . . . . . . . . . . . . . . . . . . . . . . . . . . . . . . . . . . . . . . . . . . . 39FormulaEditorConfiguration. . . . . . . . . . . . . . . . . . . . . . . . . . . . . . . . . . . . . . . . . . . . . . . . . . 39GridConfiguration. . . . . . . . . . . . . . . . . . . . . . . . . . . . . . . . . . . . . . . . . . . . . . . . . . . . . . . . . 40HanaConfiguration. . . . . . . . . . . . . . . . . . . . . . . . . . . . . . . . . . . . . . . . . . . . . . . . . . . . . . . . 40NavPaneConfiguration. . . . . . . . . . . . . . . . . . . . . . . . . . . . . . . . . . . . . . . . . . . . . . . . . . . . . . 41NewLinesConfiguration. . . . . . . . . . . . . . . . . . . . . . . . . . . . . . . . . . . . . . . . . . . . . . . . . . . . . 41PaGridConfiguration. . . . . . . . . . . . . . . . . . . . . . . . . . . . . . . . . . . . . . . . . . . . . . . . . . . . . . . 42PlanningConfiguration. . . . . . . . . . . . . . . . . . . . . . . . . . . . . . . . . . . . . . . . . . . . . . . . . . . . . . 43SelectorConfiguration. . . . . . . . . . . . . . . . . . . . . . . . . . . . . . . . . . . . . . . . . . . . . . . . . . . . . . 45TaskPaneConfiguration. . . . . . . . . . . . . . . . . . . . . . . . . . . . . . . . . . . . . . . . . . . . . . . . . . . . . 47UiCommonConfiguration. . . . . . . . . . . . . . . . . . . . . . . . . . . . . . . . . . . . . . . . . . . . . . . . . . . . 48UsageConfiguration. . . . . . . . . . . . . . . . . . . . . . . . . . . . . . . . . . . . . . . . . . . . . . . . . . . . . . . . 51UtilitiesConfiguration. . . . . . . . . . . . . . . . . . . . . . . . . . . . . . . . . . . . . . . . . . . . . . . . . . . . . . . 51
2 P U B L I CAdministrator Guide
Content

VariableConfiguration. . . . . . . . . . . . . . . . . . . . . . . . . . . . . . . . . . . . . . . . . . . . . . . . . . . . . . .57WaterfallChartConfiguration. . . . . . . . . . . . . . . . . . . . . . . . . . . . . . . . . . . . . . . . . . . . . . . . . . 59WorkbookConversionConfiguration. . . . . . . . . . . . . . . . . . . . . . . . . . . . . . . . . . . . . . . . . . . . .60WorkspaceConfiguration. . . . . . . . . . . . . . . . . . . . . . . . . . . . . . . . . . . . . . . . . . . . . . . . . . . . 62
4.5 Settings for the EPM Plug-in. . . . . . . . . . . . . . . . . . . . . . . . . . . . . . . . . . . . . . . . . . . . . . . . . . . . 634.6 Settings for the BPC Plug-in. . . . . . . . . . . . . . . . . . . . . . . . . . . . . . . . . . . . . . . . . . . . . . . . . . . . .634.7 Configuring Files with SAP Setup. . . . . . . . . . . . . . . . . . . . . . . . . . . . . . . . . . . . . . . . . . . . . . . . . 64
5 Administration for the Analysis Plug-In. . . . . . . . . . . . . . . . . . . . . . . . . . . . . . . . . . . . . . . . . . 665.1 Supported BI Platforms. . . . . . . . . . . . . . . . . . . . . . . . . . . . . . . . . . . . . . . . . . . . . . . . . . . . . . . 66
SAP BusinessObjects Business Intelligence Platform. . . . . . . . . . . . . . . . . . . . . . . . . . . . . . . . 66SAP BW . . . . . . . . . . . . . . . . . . . . . . . . . . . . . . . . . . . . . . . . . . . . . . . . . . . . . . . . . . . . . . . . 67SAP BW/4HANA. . . . . . . . . . . . . . . . . . . . . . . . . . . . . . . . . . . . . . . . . . . . . . . . . . . . . . . . . . 69
5.2 Upgrade. . . . . . . . . . . . . . . . . . . . . . . . . . . . . . . . . . . . . . . . . . . . . . . . . . . . . . . . . . . . . . . . . . 70Migrating to Analysis 2.7. . . . . . . . . . . . . . . . . . . . . . . . . . . . . . . . . . . . . . . . . . . . . . . . . . . . .70Using existing Workbooks and Presentations in Analysis 2.7. . . . . . . . . . . . . . . . . . . . . . . . . . . . 71Saving a workbook with 1.x format. . . . . . . . . . . . . . . . . . . . . . . . . . . . . . . . . . . . . . . . . . . . . . 72
5.3 To configure the load behavior of the Analysis Add-In. . . . . . . . . . . . . . . . . . . . . . . . . . . . . . . . . . . 72Configuring the Analysis Add-In Launcher. . . . . . . . . . . . . . . . . . . . . . . . . . . . . . . . . . . . . . . . 73
5.4 Defining connections to SAP BusinessObjects Business Intelligence. . . . . . . . . . . . . . . . . . . . . . . . 75To define a system connection to SAP BusinessObjects Business Intelligence. . . . . . . . . . . . . . . 75Creating and managing BW system connections in SAP BusinessObjects Business Intelligence. . . . . . . . . . . . . . . . . . . . . . . . . . . . . . . . . . . . . . . . . . . . . . . . . . . . . . . . . . . . . . . . . . . . . . 76
5.5 Defining connections to SAP BW. . . . . . . . . . . . . . . . . . . . . . . . . . . . . . . . . . . . . . . . . . . . . . . . . 77To define system connections to SAP BW. . . . . . . . . . . . . . . . . . . . . . . . . . . . . . . . . . . . . . . . . 77To define system connections to SAP BW/4HANA. . . . . . . . . . . . . . . . . . . . . . . . . . . . . . . . . . .78Management of Analysis connections in BW systems (SM04). . . . . . . . . . . . . . . . . . . . . . . . . . 79
5.6 Defining connections to SAP HANA. . . . . . . . . . . . . . . . . . . . . . . . . . . . . . . . . . . . . . . . . . . . . . . 80To create an SAP HANA connection on the BI platform. . . . . . . . . . . . . . . . . . . . . . . . . . . . . . . 82To create a local SAP HANA connection. . . . . . . . . . . . . . . . . . . . . . . . . . . . . . . . . . . . . . . . . . 83Troubleshooting for SAP HANA HTTP connections. . . . . . . . . . . . . . . . . . . . . . . . . . . . . . . . . . 85
5.7 Defining system connections to SAP Analytics Cloud. . . . . . . . . . . . . . . . . . . . . . . . . . . . . . . . . . . 855.8 Providing hyperlinks to Analysis documents. . . . . . . . . . . . . . . . . . . . . . . . . . . . . . . . . . . . . . . . . 86
Using OpenDocument to view Analysis documents. . . . . . . . . . . . . . . . . . . . . . . . . . . . . . . . . . 86Using ICF Services to view Analysis documents. . . . . . . . . . . . . . . . . . . . . . . . . . . . . . . . . . . . 87Using SAP Enterprise Portal iViews to view Analysis documents. . . . . . . . . . . . . . . . . . . . . . . . .88Adding prompts to hyperlinks. . . . . . . . . . . . . . . . . . . . . . . . . . . . . . . . . . . . . . . . . . . . . . . . . 89
5.9 Caching documents. . . . . . . . . . . . . . . . . . . . . . . . . . . . . . . . . . . . . . . . . . . . . . . . . . . . . . . . . . 905.10 Customizing the User Interface . . . . . . . . . . . . . . . . . . . . . . . . . . . . . . . . . . . . . . . . . . . . . . . . . . 925.11 Defining style sets for crosstabs. . . . . . . . . . . . . . . . . . . . . . . . . . . . . . . . . . . . . . . . . . . . . . . . . . 925.12 Query runtime statistics. . . . . . . . . . . . . . . . . . . . . . . . . . . . . . . . . . . . . . . . . . . . . . . . . . . . . . . 925.13 Security. . . . . . . . . . . . . . . . . . . . . . . . . . . . . . . . . . . . . . . . . . . . . . . . . . . . . . . . . . . . . . . . . . .94
Administrator GuideContent P U B L I C 3

User management and authentication. . . . . . . . . . . . . . . . . . . . . . . . . . . . . . . . . . . . . . . . . . . 94Authentication and single sign-on. . . . . . . . . . . . . . . . . . . . . . . . . . . . . . . . . . . . . . . . . . . . . . 94Authorizations. . . . . . . . . . . . . . . . . . . . . . . . . . . . . . . . . . . . . . . . . . . . . . . . . . . . . . . . . . . .95Network and communication security. . . . . . . . . . . . . . . . . . . . . . . . . . . . . . . . . . . . . . . . . . 100Data Storage Security. . . . . . . . . . . . . . . . . . . . . . . . . . . . . . . . . . . . . . . . . . . . . . . . . . . . . . 101Launcher and Scheduling. . . . . . . . . . . . . . . . . . . . . . . . . . . . . . . . . . . . . . . . . . . . . . . . . . . 102VBA. . . . . . . . . . . . . . . . . . . . . . . . . . . . . . . . . . . . . . . . . . . . . . . . . . . . . . . . . . . . . . . . . . 102Security for additional applications. . . . . . . . . . . . . . . . . . . . . . . . . . . . . . . . . . . . . . . . . . . . 103Logging security relevant events. . . . . . . . . . . . . . . . . . . . . . . . . . . . . . . . . . . . . . . . . . . . . . 103General security recommendations. . . . . . . . . . . . . . . . . . . . . . . . . . . . . . . . . . . . . . . . . . . . 104
5.14 Logging. . . . . . . . . . . . . . . . . . . . . . . . . . . . . . . . . . . . . . . . . . . . . . . . . . . . . . . . . . . . . . . . . . 1045.15 Language Recognition and Processing. . . . . . . . . . . . . . . . . . . . . . . . . . . . . . . . . . . . . . . . . . . . 105
Supported languages. . . . . . . . . . . . . . . . . . . . . . . . . . . . . . . . . . . . . . . . . . . . . . . . . . . . . . 1055.16 Lifecycle Management. . . . . . . . . . . . . . . . . . . . . . . . . . . . . . . . . . . . . . . . . . . . . . . . . . . . . . . .106
Lifecycle Management with Business Intelligence Platform. . . . . . . . . . . . . . . . . . . . . . . . . . . .107Life-Cycle Mangement with SAP BW. . . . . . . . . . . . . . . . . . . . . . . . . . . . . . . . . . . . . . . . . . . 107
5.17 Usage Tracking. . . . . . . . . . . . . . . . . . . . . . . . . . . . . . . . . . . . . . . . . . . . . . . . . . . . . . . . . . . . . 108
6 Administration for the EPM Plug-in. . . . . . . . . . . . . . . . . . . . . . . . . . . . . . . . . . . . . . . . . . . . .1096.1 Creating and Configuring Connections. . . . . . . . . . . . . . . . . . . . . . . . . . . . . . . . . . . . . . . . . . . . 109
Creating Local Connections. . . . . . . . . . . . . . . . . . . . . . . . . . . . . . . . . . . . . . . . . . . . . . . . . 109Creating Planning and Consolidation Connections. . . . . . . . . . . . . . . . . . . . . . . . . . . . . . . . . . 132Creating SAP BusinessObjects Enterprise Connections. . . . . . . . . . . . . . . . . . . . . . . . . . . . . . 134Creating the SAP BW (INA Provider) Connection. . . . . . . . . . . . . . . . . . . . . . . . . . . . . . . . . . . 144User Preferences Configuration. . . . . . . . . . . . . . . . . . . . . . . . . . . . . . . . . . . . . . . . . . . . . . . 146
6.2 Deploying the Same Options for Several Users. . . . . . . . . . . . . . . . . . . . . . . . . . . . . . . . . . . . . . . 1466.3 EPM Plug-in for Microsoft Office Technical Log Configuration . . . . . . . . . . . . . . . . . . . . . . . . . . . . 1576.4 EPM Plug-in Report Size Limitations. . . . . . . . . . . . . . . . . . . . . . . . . . . . . . . . . . . . . . . . . . . . . . 1596.5 General Limitations. . . . . . . . . . . . . . . . . . . . . . . . . . . . . . . . . . . . . . . . . . . . . . . . . . . . . . . . . . 160
7 Administration for the BPC Plug-in. . . . . . . . . . . . . . . . . . . . . . . . . . . . . . . . . . . . . . . . . . . . . 1617.1 Embedded Models - Mandatory installation as of version 2.4. . . . . . . . . . . . . . . . . . . . . . . . . . . . . 1617.2 Creating SAP BW Connections. . . . . . . . . . . . . . . . . . . . . . . . . . . . . . . . . . . . . . . . . . . . . . . . . . 161
8 Data Protection and Privacy. . . . . . . . . . . . . . . . . . . . . . . . . . . . . . . . . . . . . . . . . . . . . . . . . . 1638.1 Introduction. . . . . . . . . . . . . . . . . . . . . . . . . . . . . . . . . . . . . . . . . . . . . . . . . . . . . . . . . . . . . . . 1638.2 Glossary. . . . . . . . . . . . . . . . . . . . . . . . . . . . . . . . . . . . . . . . . . . . . . . . . . . . . . . . . . . . . . . . . .1638.3 Read Access Logging. . . . . . . . . . . . . . . . . . . . . . . . . . . . . . . . . . . . . . . . . . . . . . . . . . . . . . . . . 1658.4 Information Report. . . . . . . . . . . . . . . . . . . . . . . . . . . . . . . . . . . . . . . . . . . . . . . . . . . . . . . . . . 1668.5 Deletion of Personal Data. . . . . . . . . . . . . . . . . . . . . . . . . . . . . . . . . . . . . . . . . . . . . . . . . . . . . . 1668.6 Change Log. . . . . . . . . . . . . . . . . . . . . . . . . . . . . . . . . . . . . . . . . . . . . . . . . . . . . . . . . . . . . . . .167
9 Troubleshooting. . . . . . . . . . . . . . . . . . . . . . . . . . . . . . . . . . . . . . . . . . . . . . . . . . . . . . . . . . . 169
4 P U B L I CAdministrator Guide
Content

9.1 Troubleshooting in Analysis. . . . . . . . . . . . . . . . . . . . . . . . . . . . . . . . . . . . . . . . . . . . . . . . . . . . 169Evaluating Client Profiling Results. . . . . . . . . . . . . . . . . . . . . . . . . . . . . . . . . . . . . . . . . . . . . . 171
9.2 End-to-End Tracing. . . . . . . . . . . . . . . . . . . . . . . . . . . . . . . . . . . . . . . . . . . . . . . . . . . . . . . . . . 1749.3 To enable the Analysis Add-In after system crash. . . . . . . . . . . . . . . . . . . . . . . . . . . . . . . . . . . . . 174
Administrator GuideContent P U B L I C 5

1 Getting Started
1.1 What is SAP Analysis for Microsoft Office?
SAP Analysis for Microsoft Office, is a Microsoft Office Add-In that allows multidimensional analysis of OLAP sources. It consists of the following components:
● Analysis Plug-in● Enterprise Performance Management Plug-in● Business Planning and Consolidation Plug-in
The plug-ins include versions for Microsoft Excel and Microsoft PowerPoint. They are installed in one common installation. After the installation, the Analysis plug-in and the Enterprise Performance Management (EPM) plug-in are available as separate tabs in the ribbon. The Business Planning and Consolidation plug-in is available in the interface as a pane named Activity.
In Analysis for Microsoft Excel, you can use the plug-ins in one workbook. The sheet type defines which plug-in is active. The available sheet types are: Analysis, EPM, Neutral and Non-COF. Empty sheets are defined as neutral. If you add a data source into a neutral sheet with one plug-in, the corresponding sheet type is assigned. If you switch within a workbook to a sheet of another type, the respective plug-in is enabled automatically. To reset a sheet to type neutral, you have to remove all inserted data sources from the sheet.
Sheets of type Non-COF are not checked from the Analysis Add-In. It might be useful to assign this type to sheets that do not contain Analysis content to improve the performance.
In Analysis for Microsoft PowerPoint, you can add data sources with the plug-ins into one presentation and define the analysis with the respective plug-in.
The Business Planning and Consolidation plug-in pane can be displayed for each tab in the Ribbon: Analysis and EPM.
1.2 Introduction to the Analysis Plug-inThe Analysis plug-in allows multidimensional analysis of OLAP sources in Microsoft Excel, MS Excel workbook application design, and intuitive creation of BI presentations with MS PowerPoint. The Plug-in is available for the following Microsoft Office versions:
● Microsoft Office 2016 (Excel and PowerPoint)● Microsoft Office 2013 (Excel and PowerPoint)● Microsoft Office 2010 (Excel and PowerPoint)
In Microsoft Excel, Analysis is available in two separate tabs in the ribbon: Analysis and Analysis Design. In Microsoft PowerPoint, it is available in one tab: Analysis.
In the Analysis plug-in, you can use SAP Queries, query views and InfoProvider as data sources. The data is displayed in the workbook in crosstabs. You can insert multiple crosstabs in a workbook with data from
6 P U B L I CAdministrator Guide
Getting Started

different sources and systems. If the workbook will be used by different users, it is also helpful to add info fields with information on the data source and filter status.
Using the design panel, you can analyze the data and change the view on the displayed data. You can add and remove dimensions and measures to be displayed easily with drag and drop. To avoid single refreshes after each step, you can pause the refresh to build a crosstab. After ending the pause, all changes are applied at once.
You can refine your analysis using conditional formatting, filter, prompting, calculations and display hierarchies. You can also add charts to your analysis. If you want to keep a status of your navigation, you can save it as an analysis view. Other users can then reuse your analysis.
For more sophisticated workbook design, the Analysis plug-in contains a dedicated set of functions in Microsoft Excel to access data and meta data of connected BW systems. There are also a number of API functions available that you can use with the Visual Basic Editor, to filter data and set values for BW variables.
You can also plan business data based on the current data in your data source. You can enter the planning data manually and you can enter planning data automatically using planning functions and planning sequences of SAP BW Integrated Planning.
The Analysis plug-in, must be installed on your local machine. You can connect directly to a SAP BW system or you can connect via a to include data sources. You can use the following platforms to store and share workbooks and presentations: SAP BusinessObjects business intelligence platform and SAP BW (SAP BW/4HANA).
NoteMicrosoft Office documents contain free text fields. These text fields are not intended to store personal data without additional technical or organizational measures to safeguard data protection and privacy.
In order to ensure that analytical data which is personal data and which is retrieved from the servers with Analysis functionality, does not get stored in documents, the Analysis workbook property Remove Data Before Saving can be active in those workbooks.
Using the business intelligence platform enables you to save workbooks and presentations with their navigation state in a central management system and to reuse these analysis views in other applications such as SAP Crystal Reports or Analysis, OLAP edition.
To get a first impression of the look and feel of the Plug-in, you can have a look at the Analysis eLearning tutorials. They are available in the SAP Community Network at http://scn.sap.com/docs/DOC-7679 .
1.3 Introduction to the EPM Plug-in
The EPM Plug-in is a plug-in for Microsoft Office Excel and Microsoft Office PowerPoint.
The EPM Plug-in is designed to give access to SAP Business Objects EPM Solutions product data and perform reporting and analysis on this data.
The plug-in permits analysis of data from several EPM solutions at the same time.
For certain data sources, the plug-in also permits to enter data and save it to the database.
Administrator GuideGetting Started P U B L I C 7

You access the various data sources via connections. For more information on connections, see Creating and Configuring Connections [page 109] .
NoteAs a consequence, depending on the connection you use, some EPM features are not supported and therefore the commands are automatically hidden or greyed out.
Data Retrieval
The EPM Plug-in enables you to analyze the data of the following OLAP data sources:
● Microsoft SSAS cubes, including SSAS cubes created with SAP BusinessObjects Financial Consolidation, cube designer.
● SAP NetWeaver BW InfoCubes, including BW InfoCubes created with SAP BusinessObjects Financial Consolidation, cube designer.
● SAP BusinessObjects Profitability and Cost Management models.● SAP BusinessObjects Strategy Management models.● SAP BusinessObjects Planning and Consolidation, version for SAP NetWeaver, models - version 10.0 and
version 10.1.● SAP BusinessObjects Planning and Consolidation, version for the Microsoft platform, models.● SAP HANA analytic views.
Data Input
You can also enter data against the following data sources:
● SAP NetWeaver BW InfoCubes● SAP BusinessObjects Planning and Consolidation, version for SAP NetWeaver, models - version 10.0 and
version 10.1.● SAP BusinessObjects Planning and Consolidation, version for the Microsoft platform, models.
When working with a Planning and Consolidation 10.0, the Data Manager tab is added to the Microsoft Office Excel ribbon. The Data Manager is a Planning and Consolidation module that helps you move data into the system, copy or move data within and across applications, and export data from an application for use in an external tool. In addition, the Data Manager supports mapping and complex transformations of data. The Data Manager also allows you to export transactional and master data from an application within Planning and Consolidation to a file that you can use in an external tool. For more information, see the Data Manager section.
Retrieving Data from 7.5 Data Sources
In replacement of Extended Analytics Analyzer 7.5, you can use the EPM Plug-in 2.1 to retrieve and analyze data that comes from the following 7.5 data sources:
8 P U B L I CAdministrator Guide
Getting Started

● SSAS cubes created with SAP BusinessObjects Financial Consolidation, cube designer.● SAP NetWeaver BW InfoCubes created with SAP BusinessObjects Financial Consolidation, cube designer.● SAP BusinessObjects Planning and Consolidation, version for SAP NetWeaver, models.● SAP BusinessObjects Planning and Consolidation, version for the Microsoft platform, models.
NoteUse local connections (.oqy files) to connect to the data sources though ODBO.
NoteThis note applies to Planning and Consolidation Local connections. When using both plug-ins, Planning and Consolidation Interface for Microsoft Excel 7.5 (on a 7.5 Planning and Consolidation model) and EPM Plug-in 2.1 (on a 10.0 Planning and Consolidation model), uncheck the Load EV Functions option in the User Options of the EPM tab. This prevents conflicts between EV function names.
1.4 Introduction to the Business Planning and Consolidation Plug-in (BPC plug-in)
The BPC plug-in is a component to SAP Analysis for Microsoft Office, as of version 2.3.
The plug-in allows to execute the Microsoft Excel or PowerPoint-related tasks for the activities defined on the web client of SAP Business Planning and Consolidation, as part of the Business Process Flows feature.
NoteThe plug-in supports only SAP Business Planning and Consolidation 10.1 Support Package 10, version for SAP NetWeaver or higher.
BPC Plug-in Interface Areas
The plug-in is available in the interface as a pane named Activity. This pane can be displayed for each tab in the Ribbon: Analysis and EPM.
Administrator GuideGetting Started P U B L I C 9

2 About this Guide
2.1 About the documentation set
The documentation set for SAP Analysis for Microsoft Office, comprises the following guides and online help products:
TipThe guides and tutorials are regulary updated and enhanced. Make sure that you have the latest version by checking the SAP Help Portal and SAP Community Network on a regular basis.
Administrator Guide
The Administrator Guide contains detailed information that a user needs to install, configure and administer Analysis for Microsoft Office. The guide is available on the SAP Help Portal.
User Guide
The User Guide contains the conceptual information, procedures and reference material that a user needs to create and analyze Microsoft Excel workbooks and Microsoft PowerPoint slides with Analysis for Microsoft Office. There are two user guides for Analysis: the Analysis Plug-in User Guide and the EPM Plug-in User Guide. The guides are available on the SAP Help Portal.
Online Help
The online help contains the same information as the User Guide. It is included in the plug-ins. To access context sensitive help, move the mouse cursor to a field in the ribbon and select F1. For dialogs, you can access context sensitive help by selecting F1 when the dialog is open.
What's New Guide
The What's New guide for SAP Analysis for Microsoft Office, provides a complete list of the new and modified features for SAP Analysis since the previous release. The guide is available on the SAP Help Portal.
10 P U B L I CAdministrator Guide
About this Guide

eLearning Tutorials
The tutorials show you how to use SAP Analysis. They give you a quick introduction to different features so that you can learn the basics of working with the Add-In. They also give you a first impression of the look and feel. The tutorials are available in the SAP Community Network at http://scn.sap.com/docs/DOC-7679?refer=product-help .
Administrator GuideAbout this Guide P U B L I C 11

3 Installation
3.1 System Requirements
Before installing Analysis, ensure that the following components are installed on the local machines:
● Microsoft Office 2016, Microsoft Office 2013 or Microsoft Office 2010(Excel and PowerPoint)● Microsoft .NET Framework 4.5 Redistributable Package
If you use the SAP BusinessObjects Business Intelligence 4.1 platform with Analysis, Microsoft .NET Framework 4.5 or higher must be installed on the client PC.
NoteDuring installation, the Analysis setup checks whether Microsoft .NET Framework 4.5 is installed on the PC. If not, it provides a link to download this software. The Analysis setup also checks whether Primary Interop Assemblies are installed. If not, the setup installs this component automatically.
A list of all supported operating systems for SAP Analysis for Microsoft Office, is available in the Product Availability Matrix on SAP Support Portal at http://support.sap.com/pam where you can enter SBOP ANALYSIS OFFICE into the search box and choose the Search in PAM button to retrieve the information.
As data sources Analysis takes the data from a BW system of SAP NetWeaver 7.0 or higher releases, from a BW/4HANA system, from a SAP HANA system and from SAP Analytics Cloud models.
Before users can begin working with Analysis, you have to create at least one connection object to a data source system/platform. For more information about the platforms, see the corresponding guides on SAP Help Portal at http://help.sap.com.
Related Information
To install SAP Analysis for Microsoft Office [page 12]To install the Analysis BI platform Add-On for Scheduling for the Analysis Plug-in [page 14]Supported BI Platforms [page 66]
3.2 To install SAP Analysis for Microsoft Office
Context
Analysis is a component of the SAP Front End installation. You can install Analysis centrally from an installation server or locally from a distribution medium such as DVD.
12 P U B L I CAdministrator Guide
Installation

To install SAP Front End, follow the instructions in the installation steps under “Installation of the SAP Front End” in the SAP Front End Installation Guide on the SAP Help Portal..
For Microsoft Office 2010, Microsoft Office 2013 and Microsoft Office 2016, Analysis consists of the following installable components:
● Analysis plug-in● Enterprise Performance Management plug-in● Business Planning and Consolidation plug-in
Procedure
1. Start the installer file (.exe).The SAP Front-End Installer wizard appears.
2. Select Next >.3. Select the components you want to install, in the component list of the SAP Front End Installer dialog box:
○ The Common Office Framework component is always selected and can not be deselected.If you select Add In is always active, the Add-in is always enabled when you open Microsoft Excel or PowerPoint (load behavior 3).
○ Select Analysis plugin, to install the Analysis plug-in.
NoteWith the installation of Analysis 2.4, the configuration and setting values of the Analysis plug-in are set to the default values.
Changes made in former installations, for example displaying the planning group in the ribbon, are not adopted automatically.
○ Select Enterprise Performance Management plugin, to install the EPM plug-in.○ Select Business Planning and Consolidation plugin, to install the BPC plug-in.
4. Choose Next.The SAP Front End Installer prompts you to confirm or change the target directory for Analysis.
NoteThe default path is C:\Program Files\SAP BusinessObjects\ Analysis.
5. If necessary, change the target directory and choose Next to start the installation.6. In the confirmation screen, choose Done.
Results
The selected components of Analysis for Microsoft Office have now been installed and are ready to use in Microsoft Excel and PowerPoint.
Administrator GuideInstallation P U B L I C 13

NoteBefore users can access Analysis in any Microsoft Excel or Microsoft PowerPoint file, ensure that Analysis has been started once directly in the Windows directory or by choosing the desktop icons.
Related Information
To configure the load behavior of the Analysis Add-In [page 72]
3.2.1 Parallel installation of Analysis and other SAP Add-Ins
If the client PCs have other SAP Add-Ins installed like the SAP Business Explorer, be aware of the following:
● It is possible to install the other Add-Ins and SAP Analysis for Microsoft Office on one machine.● Parallel activation of other Microsoft Excel SAP Add-Ins and Analysis, is not supported. For example, users
cannot work with a Business Explorer Analyzer workbook and an Analysis workbook in parallel in the same Microsoft Excel application. Only one of these Microsoft Excel Add-Ins can be active at any one time.
You can configure the Analysis Add-In Launcher to define the starting behavior of Analysis.
Related Information
Configuring the Analysis Add-In Launcher [page 73]
3.3 To install the Analysis BI platform Add-On for Scheduling for the Analysis Plug-in
Context
After the installation of the Analysis BI platform Add-On, you can schedule Analysis workbooks in the BI Launch Pad and the Central Management Console.
The following prerequisites must be met for the installation:
● Administrative rights● Microsoft .NET Framework 3.5 SP1 or higher
14 P U B L I CAdministrator Guide
Installation

● BI platform 4.1 SP5● Workbooks saved on BI platform with file format .xlsx or .xlsm.● 64-bit operating system● Adaptive Job Server is installed
Procedure
1. Download the BI platform Add-On from SAP Support Portal at http://support.sap.com/swdc .2. Log on to BIP node on Windows (with admin rights).3. Execute setup.exe.
The installer checks if the prerequisites are met.4. Select the setup language.5. Accept the destination folder.
The folder is entered automatically and cannot be changed. The Add-On must be installed in the BusinessObjects folder in the Windows explorer.
6. Select Full Installation for Scheduling Service.7. Log on to BI platform as administrator.
8. After the installation, go to the CMC and choose Servers Core Services .9. Select Properties in the context menu of the Adaptive Job Server.10. In the section Analysis Scheduling Service, enter the path to the BI platform Add-On installation.
For example: C:\Program Files (x86)\SAP BusinessObjects\Analysis Precalculation\BiPrecalculation.exe11. Select Restart Server in the context menu of the Adaptive Job Server.
Results
You can now schedule Analysis workbooks stored on BI platform.
Note that the connection to BI platform and BW / HANA system must be configured as SSO to schedule an Analysis workbook.
3.4 To uninstall SAP Analysis for Microsoft Office
Prerequisites
Before uninstalling, make sure that Analysis is not running.
Administrator GuideInstallation P U B L I C 15

Procedure
1. In the Windows Control Panel, choose Add or Remove Programs.A list of installed applications appears.
2. Select Analysis for Microsoft Office.The SAP Front End Installer dialog box appears.
3. Choose Next.4. In the confirmation screen, choose Done.
Results
Analysis for Microsoft Office is uninstalled and a log file generated.
NoteThe installation and uninstallation of Analysis is done on local machine level. Therefore, nothing is uninstalled on user level. This might cause an error message when a user starts Microsoft Excel for the first time after uninstalling Analysis. This message can be clicked away and will not occur anymore.
For more information, see SAP Note 2279792 .
16 P U B L I CAdministrator Guide
Installation

4 Settings
Context
You can specify settings for the Analysis Add-in, the Analysis Plug-in and the EPM Plug-in. The settings can be predefined for individual users or user groups as default settings.
The settings are stored in the file system of the client PCs.
In former releases (1.x), the settings were specified in the registry. The registry settings cannot be migrated to the file system and have to be specified in the file system again.
Results
You set the default values of the Analysis settings for the users. Users can change the default settings, if required.
Related Information
Maintaining settings in the file system [page 17]Maintaining settings in Analysis [page 18]Settings for the Analysis Add-in [page 20]Settings for the Analysis Plug-in [page 25]Settings for the EPM Plug-in [page 63]Settings for the BPC Plug-in [page 63]Configuring Files with SAP Setup [page 64]
4.1 Maintaining settings in the file system
Context
The Analysis specific settings are stored in the file system. You can change existing settings in the file system of the client PC.
As an administrator, you maintain the settings in three files: Cof_app.config, Ao_app.config and Epm_app.config. The files are located in the file system under C:\ProgramData\SAP\Cof. In these files, you can also define if a user has the rights to change a setting locally.
Administrator GuideSettings P U B L I C 17

Note: If you change settings under C:\ProgramData\SAP\Cof, these changes might be lost when you install a new version of Analysis. Therefore we recommend that you save the file with the changed settings in a different folder. After installing the new version, you can then reuse the saved file.
As a user, you can change the settings in the file system under Users\<UserID>\AppData\Roaming\SAP\Cof. The file names for changing the settings are cof_user_roaming.config, ao_user_roaming.config and epm_user_roaming.config. These files are created automatically if you change a setting in the settings dialog. You can also create the files manually.
Procedure
1. Open the file system.2. Navigate to the folder C:\ProgramData\SAP\Cof and open the file where you want to change the setting.
3. Navigate to the setting you want to edit and make the required changes. To be able to change settings in these files, you need admin rights.The settings are maintained in the settings list below the configSections area.
4. Define if a user should be able to change a setting locally.In the configSections area, each setting has a configuration level defined. The default level is UserRoaming. This means that a user change the setting locally.
If you change the configuration level to PerMachine, the setting can no longer be changed by a user locally.
5. Maintain a setting locally.Navigate to the folder Users\<UserID>\AppData\Roaming\SAP\Cof and open the file where you want to change the setting.
If the setting is not already available in the file, you can copy it from the files under C:\ProgramData\SAP\Cof.
Results
The Analysis settings are modified according to your changes. The changed values are availabe in the corresponding files in the file system and in the Technical Configuration dialog in the Analysis backstage area.
4.2 Maintaining settings in Analysis
Besides maintaining settings directly in the file system, you can modify settings in the Analysis backstage area.
You can find more information about the single settings in chapter Settings in the Analysis Administrator Guide.
1. Open the Technical Configuration dialog.Select File Analysis Adapt Analysis Technical Configuration .
18 P U B L I CAdministrator Guide
Settings

While the dialog with all settings is loaded, you can already start the search for a specific setting and enter the setting name in the search field.
2. Display the settings you want to modify.You have the following options:○ Enter a setting name in the search field.
The search is executed immediately and the settings are displayed accordingly.○ Select the configuration file prefix:
Ao for the Analysis plug-in, Bpc for the BPC plug-in, Cof for the Analysis Add-in and Epm for the EPM plug-in.The setting are displayed according to their assignment in the file system.
3. Specify the settings to be displayed.You have the following options:○ All Settings
All settings are displayed.○ All Settings Deviating from Default Value
The settings that have already been modified are displayed.○ All Settings Containing a Value in File
All settings that contain a value in the corresponding file (e.g. Ao_app.config) are displayed.4. Modify a setting.
Change the default value for the setting. Depending on the type, you can select the check box for boolean values, enter an integer value or enter a text.In the details view, you get the following information per setting:○ Type:
The type can be Bool for boolean values, Int32 for integer value or String for texts.For boolean values, the value is True if the check box is selected.
○ Default:The default value for the setting is displayed.
○ Publish:The value is always True. This means that the setting is public.
○ Loaded From:The path to the configuration file in the file system is displayed.
○ Allowed Configuration Level:The configuration level can be UserRoaming or PerMachine.A user can change settings with configuration level UserRoaming. The changed settings are stored in the file system under Users\<UserID>\AppData\Roaming\SAP\Cof. The file names for the changed settings are cof_user_roaming.config, ao_user_roaming.config, bpc_user_roaming.config and epm_user_roaming.config. These files are created automatically if you change a setting in the Technical Configuration dialog.An administrator can also change settings with configuration level PerMachine. The changed settings are stored in the file system under C:\ProgramData\SAP\Cof. The file names are Cof_app.config, Ao_app.config, Bpc_app.config and Epm_app.config.As an administrator, you can also change the configuration level from UserRoaming to PerMachine for any setting. Then, these settings can no longer be changed by a user.
○ Config Prefix:The prefix of the corresponding configuration file is displayed. The prefix can be Ao for the Analysis plug-in, Bpc for the BPC plug-in, Cof for the Analysis Add-in and Epm for the EPM plug-in.
5. Press OK.The changed setting values are executed.
Administrator GuideSettings P U B L I C 19

The Analysis settings are modified according to your changes. The changed values are availabe in the Technical Configuration dialog and in the corresponding files in the file system.
4.3 Settings for the Analysis Add-in
The following table describes the Analysis Add-in file system settings that you can define. The settings are delivered in the Cof_app.config file.
For more information about maintaining file system settings, see Maintaining settings in the file system [page 17]
ConnectionServiceConfiguration
Setting and Setting Values Setting Description
NcoTraceLevel= 0 (default value), 1, 2, 3or 4 This setting can be used for SAP error handling. Analysis uses the .Net connector (NCO) for calling ABAP RFCs from client. NCO supports logging of RFC traces.
You use this setting to specify the desired level for tracing.
The default value is 0. This means no tracing takes place.
You can change the parameter value to 1, 2, 3or 4.
If you now work with Analysis, log files will be created according to the selected level in the %temp% folder of windows. There you can find a dev_nco_rfc.log file and a number of files "nco_rfc_XXXX_Y.trc". Additionally, there is the Analysis log file "SAPAdvancedAnalysisXLS.log". You can zip all of them to attach them to the message.
UseUnicodeCodepageInNco== True or False (default value)
You use this setting to specify whether a password for an ABAP system may contain special characters such as €.
The default value is False. This means that special character ares not supported.
If you change the parameter value to True, special characters are supported.
You should only set the setting to True if all your ABAP systems use UniCode.
20 P U B L I CAdministrator Guide
Settings

AppBuilderConfiguration
Setting and Setting Values Setting Description
AppBuilderDefaultProfilePath= "" (default value)
You use this setting to specify the path to the default profile that will be applied when Microsoft Excel is started.
The path is set automatically as soon as a user defines a profile in the Customize User Interface dialog and then selects the Default Profile button.
After the installation no path is defined. Therefore the default value is empty ("").
We do not recommend to change the path manually.
AppBuilderUserProfileDirectory= "" (default value)
You use this setting to specify the path to the directory which contains the current user profiles.
The current user is the owner of these profiles and can modify them. Each time, the user creates a new profile in the Customize User Interface dialog, it will be stored in this directory.
After the installation no directory is defined. Therefore the default value is empty ("").
As soon as a user saves the first profile, the path to the directory is set automatically- The path will be something like: C:\Users\<userID>\AppData\Roaming\SAP\Cof\User Interface.
A user can change the path manually to use another specific folder.
AppBuilderCompanyProfileDirectory= "C:\ProgramData\SAP\Cof\User Interface" (default value)
You use this setting to specify the path to the directory which contains the company profiles.
The default value is C:\ProgramData\SAP\Cof\User Interface.
The company profiles are owned by an administrator. The current user is not the owner of these profiles and he won't be able to modify them.
This setting can only be maintained by an administrator in the file system under C:\ProgramData\SAP\Cof.
Administrator GuideSettings P U B L I C 21
Setting and Setting Values Setting Description
AppBuilderReadOnlyProfileDirectories= "path1;path2"
You use this setting to specify a directory or a list of directories where users can share profiles without having to make a copy.
You can enter a single path to a directory or paths to several directories. The paths should then be entered with a semicolon-separated list.
The current user is not the owner of these profiles and he won't be able to modify them.
DPPConfiguration
Setting and Setting Values Setting Description
DPPPopup_enforce= 1 (default value) or any integer value
You use this setting to specify whether the data protection and privacy pop-up should be displayed when Analysis is started.
The data protection pop-up will be displayed when starting Analysis as long as the value for this setting is higher than the value for setting DPPPopup_shown. Therefore, you can also re-enforce that the pop-up is displayed with setting the value for this setting to a higher value than DPPPopup_shown.
The default value is 1. This means that the pop-up will be displayed as the default value for DPPPopup_shown is 0.
For more information on Data Protection and Pricacy, see Introduction [page 163].
22 P U B L I CAdministrator Guide
Settings

Setting and Setting Values Setting Description
DPPPopup_shown= 0 (default value) or any integer value You use this setting to specify whether the data protection and privacy pop-up should be displayed again when Analysis is started.
The data protection pop-up will be displayed again when starting Analysis as long as the value for this setting is lower than the value for setting DPPPopup_enforce. Therefore, you can also re-enforce that the pop-up is displayed with setting the value for this setting to a lower value than DPPPopup_enforce.
The default value is 0. This means that the pop-up will be displayed as the default value for DPPPopup_enforce is 1.
If you select the check box Do not show again in the pop-up, the value is set to 1 and the pop-up will not be displayed when starting Analysis the next time as both settings have the same value.
Administrator GuideSettings P U B L I C 23

OfficeConfiguration
Setting and Setting Values Setting Description
SupportEmbeddedMode= True or False (default value)
You use this setting to specify whether the Analysis Add-in should be supported when the Microsoft Office tools are running in embedded mode (also called automated mode).
The default value is False. This means that the Analysis Add-in is not supported.
If you change the parameter value to True, the Analysis Add-in will be supported.
If you set the setting to True, you can disable the Analysis Plug-in using the setting SupportAutomatedOfficein the Ao_app.config file.
NoteMicrosoft does not support Add-ins if the MS Office tool is running in embedded mode. This is the case if the tool is embedded into a hosting window, for example in another MS Office tool or ABAP GUI, or when the MS Office tool is started with excel.exe –Embedding by Windows.
We do not recommend changing this setting because in many scenarios, for example if the tool is embedded in a hosting window, some issues can occur which cannot be resolved.
SupportConfiguration
Setting and Setting Values Setting Description
clientProfiling= true or false (default value) You use this setting to activate client profiling.
After installation, the default value is False. With a value of True, you can activate this setting.
You can also activate the setting in the Support Settings dialog with setting Enable Client Profiling.
For more information, see Troubleshooting in Analysis [page 169].
24 P U B L I CAdministrator Guide
Settings

VersionConfiguration
Setting and Setting Values Setting Description
MinorVersion= <integer value of the installed version> (default value) or any integer value lower than the installed version
You use this setting to specify the minor version that should be used.
The default value is the integer value of the installed version, for example value 3 for version 2.3.
If you change the value to 1, version 2.1 will be used.
This setting can only be maintained by an administrator in the file system under C:\ProgramData\SAP\Cof.
4.4 Settings for the Analysis Plug-in
The settings for the Analysis Plug-in are delivered in the Ao_app.config file.
In this file, the settings are grouped in the following configuration sections:
● AsymetricReportingConfiguration● BoeConfiguration [page 26]● DataSourceConfiguration [page 27]● DateTimeConfiguration [page 35]● DocumentConfiguration [page 36]● FormulaConfiguration [page 39]● FormulaEditorConfiguration [page 39]● GridConfiguration [page 40]● HanaConfiguration [page 40]● NavPaneConfiguration [page 41]● NewLinesConfiguration [page 41]● PaGridConfiguration [page 42]● PlanningConfiguration [page 43]● SelectorConfiguration [page 45]● TaskPaneConfiguration [page 47]● UiCommonConfiguration [page 48]● UsageConfiguration [page 51]● UtilitiesConfiguration [page 51]● VariableConfiguration [page 57]● WaterfallChartConfiguration [page 59]● WorkbookConversionConfiguration [page 60]● WorkspaceConfiguration [page 62]
For more information about maintaining file system settings, see Maintaining settings in the file system [page 17]
Administrator GuideSettings P U B L I C 25

4.4.1 BoeConfiguration
In the configuration section (configSection) BoeConfiguration, you can find the following settings (section name).
BOESystems
Setting and Setting Values Setting Description
BOESystems This setting contains the configuration to the Business Intelligence Platform. For more information, see To define a system connection to SAP BusinessObjects Business Intelligence [page 75].
DefaultLauncherScheme
Setting and Setting Values Setting Description
DefaultLauncherScheme="" (default value) or https
This setting contains the configuration to the Business Intelligence Platform. For more information, see To define a system connection to SAP BusinessObjects Business Intelligence [page 75].
RetrieveMultilingualTexts
Setting and Setting Values Setting Description
RetrieveMultilingualTexts = true (default value) or false
On the BI platform, the name and description of documents and folders can be translated. You use this setting to specify if the translated texts should be available in Analysis.
The default value is True. This means that the translated names are available in Analysis. Depending on the selected language, you see the original version or a translated version.
If you set the value to False, only the original version is available in Analysis.
26 P U B L I CAdministrator Guide
Settings

TwoFactorAuthenticationCertificate
Setting and Setting Values Setting Description
TwoFactorAuthenticationCertificate = <certificate>
After the first usage of the two-factor authentication, you can see here the selected certificate.
TwoFactorAuthenticationDisabled
Setting and Setting Values Setting Description
TwoFactorAuthenticationDisabled = true or false (default value)
You can use this setting to disable the two factor authentication..
The default value is False. This means that the two-factor authentication is enabled as soon as a URL is available in setting TwoFactorAuthenticationUrl.
If you set the value to True, the two-factor authentication is disabled and you can log on to another BI platform. You have to enter the BI platform and your credentials in the log on dialog.
TwoFactorAuthenticationUrl
Setting and Setting Values Setting Description
TwoFactorAuthenticationUrl = <URL> You can enter the URL of the BI platform that should be used for two-factor authentication (single-sign on).
If you enter a URL of a BI platform, two-factor authentication is used for logon and no logon dialog is displayed after the first usage. For the first usage, the user has to select a client certificate.
If you need to log on to another BI platform, you can disable the two-factor authentication with setting TwoFactorAuthenticationDisabled.
4.4.2 DataSourceConfiguration
In the configuration section (configSection) DataSourceConfiguration, you can find the following settings (section name).
Administrator GuideSettings P U B L I C 27

AllowChangingAccessMode
Setting and Setting Values Setting Description
AllowChangingAccessMode= true or false (default value)
You use this setting to specify whether the access mode for member display should be enabled.
After installation, the default value is False. This means that the access mode is not enabled for the member display definition in the crosstab and for the Filter by Member dialog box.
If you change the parameter value to True, the access mode option is displayed in the menu.
DefaultBWQueryDesigner
Setting and Setting Values Setting Description
DefaultBWQueryDesigner= 0 (default value) or 1 You can access the BEx Query Designer or the BW Modeling Tools directly from Analysis with the ribbon option Call Query Designer. If both designers are available, you can open a drop down list to select one.
You use this setting to specify which designer is opened if the Call Query Designer option is selected in the ribbon without opening the drop down list.
After installation, the default value is 0. This means that the BW Modeling Tools will be opened if the ribbon option Call Query Designer is selected directly.
If you change the parameter value to 1, the BEx Query Designer will be opened if you select Call Query Designer directly.
28 P U B L I CAdministrator Guide
Settings

EnablePreferrredPlatform
Setting and Setting Values Setting Description
EnablePreferredPlatform= true (default value) or false
You use this setting to specify whether a user should be enabled to select a preferred platform in the platform settings dialog box.
After installation, the default value is True . This means that the preferred platform section is visible in the platform settings dialog box and that the user can change the selection.
If you change the parameter value to False, this section is hidden in the platform settings dialog box, and the user cannot change the preferred platform. The user is therefore unable to change the preferred platform defined in the Preferred Platform setting.
EnableResetDataSource
Setting and Setting Values Setting Description
EnableResetDataSource=true (default value) or false
This setting is used in Analysis with minor versions ≤ 3 to specify whether the Call Query Designer icon should be displayed in the ribbon.
As of release 2.4, you customize the ribbon with the Customize User Interface dialog. Therefore, we recommend to use the Customize User Interface dialog to define the options displayed in the ribbon.
NoteWhen switching to a version greater than 3, for example Analysis 2.4, Analysis takes your definition from this setting. If the parameter value for this setting was True, theCall Query Designer icon is displayed in the standard profile for the ribbon. If it was False, it is not displayed.
Administrator GuideSettings P U B L I C 29

IgnoreQueryDesignerVersionCheck
Setting and Setting Values Setting Description
IgnoreQueryDesignerVersionCheck=true or false (default value)
You use this setting to define if the designer version on the machine should be checked.
The default value for this setting is False. This means that the designer version will be checked. The Setting Show 'Launch Designer' in Tools Group in the user settings is only selectable if the correct designer version is installed.
If you change the parameter value to True, the designer version will not be checked and the setting Show 'Launch Designer' in Tools Group is always selectable.
MaxNumberOfParallelThreads
Setting and Setting Values Setting Description
MaxNumberOfParallelThreads= 10 (default value) or any integer value
You use this setting to define the maximum number of parallel threads that Analysis can use to open the SAP HANA data sources of a workbook.
The default value is 10. This means that up to 10 SAP HANA data sources can be opened with parallel threads. You can enter any integer value for this setting.
If you set the value to 1 or lower, no parallel threads will be used. The data sources will be opened sequentially.
NoSystemMessages
Setting and Setting Values Setting Description
NoSystemMessages=true or false (default value) You use this setting to specify whether back-end system messages should be displayed or not.
The default value for this setting is false. This means that back-end system messages will be displayed.
If you change the value to true, back-end system messages will not be displayed.
30 P U B L I CAdministrator Guide
Settings

PreferredPlatform
Setting and Setting Values Setting Description
PreferredPlatform= 0 (default value), 1, 2 or 3 You use this setting to define the preferred platform for your Analysis installation. After installation of Analysis, the default value of this parameter is set to 0. This means that all platforms are enabled.
If you set the parameter value to 1, the SAP BusinessObjects Business Intelligence Platform is enabled. If you set the value to 2, SAP BW is enabled as platform.
With parameter value 3, the SAP BusinessObjects Business Intelligence Platform with compatibility mode is enabled. This means that the workbook is saved as Analysis Workbook (Compatibility Mode). The Analysis Workbook (Compatibility Mode) object corresponds to the Microsoft Excel object used with former BI platform releases.
PromptForCertificate
Setting and Setting Values Setting Description
PromptForCertificate=true or false (default value)
You use this setting to specify whether the certificate should be searched for automatically or entered manually.
The default value for this setting is False. This means that the certificate will be searched fo automatically. If no certificate can be found, you have to enter a user ID and a password.
If you change the parameter value to True, you have to enter the certificate manually.
Administrator GuideSettings P U B L I C 31

RecentListSize
Setting and Setting Values Setting Description
RecentListSize= greater or equal 1, default value = 10 This setting defines the number of entries in the list of last opened data sources in the Insert Data Source dialog box.
You can also define this number in the User Settings in the Settings dialog box. By pressing the Delete Recently Used List button, you can delete the history of the recently used data sources.
RemoveDataBeforeSaving
Setting and Setting Values Setting Description
RemoveDataBeforeSaving=true or false (default value)
You use this setting to define whether the check box Remove Data Before Saving on the Components tab in the design panel is selected as default for new workbooks.
If the check box is selected, it is saved without data. When you reopen the workbook, no data is displayed. To display the data, you have to refresh the data sources manually by choosing Refresh All in the menu.
The default value is False. This means that the check box on the Components tab is not selected as default.
If you change the parameter value to True, the check box is selected as default when you open a new workbook.
32 P U B L I CAdministrator Guide
Settings

ResultSetSizeLimit
Setting and Setting Values Setting Description
ResultSetSizeLimit = -1, n or empty (default) This setting defines the maximum number of crosstab cells that are loaded from the server for one data source. If a data source contains data for more cells than defined here, a message displays.
The standard value for this setting is empty and the maximum number of cells is 500000.
If you set the parameter to a specific number greater than or equal to 0, you define the maximum number of cells with this value.
If you set the parameter to -1, the setting uses the values defined in the BW system. In a BW system, the parameter is set in the RSADMIN table for object BICS_DA_RESULT_SET_LIMIT_MAX.
RfcBundling
Setting and Setting Values Setting Description
RfcBundling= true (default value) or false This setting is recommended when working in an WAN environment to reduce network traffic.
After installation, the default value is True.
SaveAs1xByDefault
Setting and Setting Values Setting Description
SaveAs1xByDefault=true or false (default value) You use this setting to define whether a workbook should be saved by default with 1.x format in Analysis 2.x versions.
The default value is False. This means that the checkbox Save as 1.x format is not selected by default in the saving dialog in Analysis.
If you change the parameter value to True, the checkbox Save as 1.x format is selected by default in the saving dialog in Analysis.
Administrator GuideSettings P U B L I C 33

SubsequentRefreshDefault
Setting and Setting Values Setting Description
SubsequentRefreshDefault= TransactionDataOnly (default value) or LogOffReconnect
You use this setting to specify the default behavior for executing Refresh All.
After the installation, the default value is TransactionDataOnly. This means that for all data sources that are online in a workbook, the transactional data is updated when Refresh All is executed.
If you change the parameter value to LogOffReconnect, executing Refresh All loggs off an reconnects all data sources that are online.
SupportsSaveAs1x
Setting and Setting Values Setting Description
SupportsSaveAs1x=true or false (default value) You use this setting to define whether a workbook could be saved with 1.x format in Analysis 2.x versions.
The default value is False. This means that it is not possible to save a workbook with 1.x format.
If you change the parameter value to True, the checkbox Save as 1.x format is available in the saving dialog in Analysis.
TransferFilterValuesWhileAssigningHierarchy
Setting and Setting Values Setting Description
TransferFilterValuesWhileAssigningHierarchy=true or false (default value)
You use this setting to define whether filter values of a dimension are transferred when a different hierarchy or a flat presentation is assigned to the dimension.
The default value is False. This means that filter values will not be transferred.
If you change the parameter value to True, the filter values will be transferred as far as possible when flat presentation or a different hierarchy is assigned to a dimension.
34 P U B L I CAdministrator Guide
Settings

UseDataSourceDeltaUpdate
Setting and Setting Values Setting Description
UseDataSourceDeltaUpdate= true (default value) or false
You use this setting to specify whether only the delta data or the complete data of a data source should be reloaded and updated in Analysis.
After installation, the default value is True. This means that only the delta data of the data source is updated in Analysis.
If you change the parameter value to False, the complete data of the data source is reloaded to Analysis.
4.4.3 DateTimeConfiguration
In the configuration section (configSection) DateTimeConfiguration, you can find the following settings (section name).
EnableNativeFormatting
Setting and Setting Values Setting Description
EnableNativeFormatting= true or false (default value)
Analysis renders date, date time and time span values with format Text. It does not use the native Microsoft Excel fomats Date and Time.
You use this setting to enable native Microsoft Excel formats for rendering in Analysis.
The default value is False. This means that native Excel formats are not used for rendering..
If you change the value to True, Analysis renders date, date time and time span values as native Microsoft Exel Date and Time formats.
Administrator GuideSettings P U B L I C 35

ShowUtcTimeStampsInDataCells
Setting and Setting Values Setting Description
ShowUtcTimeStampsInDataCells= true or false (default value)
You use this setting to specify whether the UTC timestamps or localized timestamps are displayed in the data cells.
The default value is False. This means that localized timestamps are displayed in the data cells.
If you change the value to True, the UTC timestamps are displayed.
4.4.4 DocumentConfiguration
In the configuration section (configSection) DocumentConfiguration, you can find the following settings (section name).
DefaultWorkbookPath
Setting and Setting Values Setting Description
DefaultWorkbookPath= path to default workbook in directory.
Use this setting to define the path to the default workbook in the directory.
36 P U B L I CAdministrator Guide
Settings

DocumentCacheFolderPath
Setting and Setting Values Setting Description
DocumentCacheFolderPath= "" (default value) You use this setting to overwrite the default cache directory path.
Analysis workbooks are saved to the directory sapaocache which is located beneath the users Temp directory. It is not possible to add the specific workbooks path to Excel's Trusted Location section. This is due to the fact that Microsoft does not allow adding paths to Trusted Location which points to a directory beneath the users Temp directory whenever working with MS Office 2010 or higher.
If you want to overwrite the default cache directory path, you can enter a path here.
EnablePreferredDocumentStorage
Setting and Setting Values Setting Description
EnablePreferredDocumentStorage= true (default value) or false
You use this setting to specify whether a user should be enabled to select a preferred comments storage in the platform options dialog box.
After installation, the default value is True. This means that the Comments Storage section is visible in the platform options dialog box and that the user can change the selection.
If you change the parameter value to False, this section is hidden in the platform options dialog box, and the user cannot change the preferred comments storage. The user is therefore unable to change the comments storage defined in setting PreferredDocumentStorage.
Administrator GuideSettings P U B L I C 37

IsCachingDocuments
Setting and Setting Values Setting Description
IsCachingDocuments= true (default value) or false You use this setting to specify whether caching should be enabled.
After installation, the default value is True . This means that caching is active.
If you change the parameter value to False, the function is disabled and caching cannot be used.
PreferredDocumentStorage
Setting and Setting Values Setting Description
PreferredDocumentStorage= 0, 1 or 2 (default value) You use this setting to define the preferred document storage for comments in Analysis.
After installation of Analysis, the default value of this parameter is set to 2. This means that the preferred document storage is SAP Business Warehouse.
If you set the parameter value to 1, the SAP BusinessObjects Business Intelligence Platform is used as document storage for comments. If you set the value to 0, comments are not stored on platform.
StylesCountPerformanceTreshold
Setting and Setting Values Setting Description
StylesCountPerformanceTreshold= 2000 (default value) or any integer value.
The number of cell styles used in a workbook can decrease the performance in Analysis. You use this setting to specify the number of styles that can be used in workbook before a warning message is displayed.
The default value is 2000. This means that a warning message will appear if more than 2000 celll styles are used in a workbook.
You can enter any integer value for this setting. With value 0, the warning is disabled and no message will be displayed.
38 P U B L I CAdministrator Guide
Settings

4.4.5 FormulaConfiguration
In the configuration section (configSection) FormulaConfiguration, you can find the following settings (section name).
SetFilterComponentApplyToAllDataSources
Setting and Setting Values Setting Description
SetFilterComponentApplyToAllDataSources= true(default value) or false
In Analysis, you can insert a filter component using the ribbon. If your workbook contains more than one data source, the Select Data Source dialog box appears where you can define the data sources for the filter.
You use this setting to specify if the check box Apply filter to all data sources should be selected by default.
After installation, the default value is True. This means that the filter is applied to all data sources.
If you change the parameter value to False, the filter will only be applied to the selected data source.
4.4.6 FormulaEditorConfiguration
In the configuration section (configSection) FormulaEditorConfiguration, you can find the following settings (section name).
FormulaExpressionValidationInterval
Setting and Setting Values Setting Description
FormulaExpressionValidationInterval= 2 (default value)
You can add a new measure based on a free-form calculation to a crosstab. The new measures are defined in the New Calculation dialog box. The formula that you enter in the dialog box is checked on a regular basis.
You use this setting to specify the number of seconds. The default value is 2. This means that the formula is checked two seconds after your last change in the formula editor.
You can enter any integer value for this setting.
Administrator GuideSettings P U B L I C 39

4.4.7 GridConfiguration
In the configuration section (configSection) GridConfiguration, you can find the following settings (section name).
EnableDoubleClick
Setting and Setting Values Setting Description
EnableDoubleClick= true (default value) or false You use this setting to specify whether filtering a member with a double click should be enabled.
After installation, the default value is True. This means you can filter for one member with a double click on the member cell.
If you change the parameter value to False, the function is disabled.
NrOfSingleCellsInContext
Setting and Setting Values Setting Description
NrOfSingleCellsInContext= greater or equal 1, default value = 100
This setting defines the maximum number of crosstab cells that can be selected to execute analysis options, for example filtering. If more cells are selected in a crosstab, the analysis options are disabled.
The default value is 100.
4.4.8 HanaConfiguration
In the configuration section (configSection) HanaConfiguration, you can find the following settings (section name).
40 P U B L I CAdministrator Guide
Settings

HanaHttpConnectionTimeout
Setting and Setting Values Setting Description
HanaHttpConnectionTimeout= -1 (default value) or any integer value.
You use this setting to specify the time Analysis is waiting to get a connection to a HANA HTTP server.
The default value is -1. This means that there is no timeout for connecting to a HANA HTTP server.
You can enter any integer value for this setting to define the time Analysis is waiting to get a connection. The unit is millisecond. If you specify value 60000, for example, Analysis is waiting 60000 milliseconds to establish the connection. If it is not possible to connect to a HANA HTTP server in the defined timeout period, a message is displayed in Analysis.
4.4.9 NavPaneConfiguration
In the configuration section (configSection) NavPaneConfiguration, you can find the following settings (section name).
ShowAllHierarchies
Setting and Setting Values Setting Description
ShowAllHierarchies= true(default value) or false You use this setting to specify whether all time-dependent hierarchies for a dimension should be available in the design panel.
After installation, the default value is True. This means that all hierarchies are available in the design panel.
If you change the parameter value to False, the hierarchies are no longer available in the design panel.
4.4.10 NewLinesConfiguration
In the configuration section (configSection) NewLinesConfiguration, you can find the following settings (section name).
Administrator GuideSettings P U B L I C 41

UseNewLinesLegacyMode
Setting and Setting Values Setting Description
UseNewLinesLegacyMode= true or false (default value)
You use this setting to specify which mode for entering planning data in new lines is used.
After installation, the default value is False. This means that current mode will be used for entering planning data in new lines. This mode is valid for BW systems of type SAP BW/4HANA SP8 or higher and SAP BW 7.50 SP12 or higher. For former BW versions, the legacy mode will be applied automatically.
If you change the parameter value to True, the legacy mode will be used for data sources of all BW systems.
4.4.11 PaGridConfiguration
In Analysis for Microsoft PowerPoint, you can insert data sources as tables. You can use the following settings of the configuration section (configSection) PaGridConfiguration to define default numbers for rows and columns. You can change the number of rows in the Fit Table dialog in Analysis.
ColumnsOfData
Setting and Setting Values Setting Description
ColumnsOfData= 12 (default value) You use this setting to define the default number of columns.
After installation, the default value is 12.
LinesOfData
Setting and Setting Values Setting Description
LinesOfData= 12 (default value) You use this setting to define the default number of rows.
After installation, the default value is 12.
42 P U B L I CAdministrator Guide
Settings
4.4.12 PlanningConfiguration
In the configuration section (configSection) PlanningConfiguration, you can find the following settings (section name).
ActivateFormulaRecognitionOnExistingCells
Setting and Setting Values Setting Description
ActivateFormulaRecognitionOnExistingCells= true (default value) or false
You use this setting to specify whether formulas in input-enabled cells are saved as table design formulas.
The default value is True. This means that the formulas added to input-enabled cells are saved as table design formulas. They are added to the formula section on the design rules tab in the design panel and can be changed there.
If you change the value to False, the formulas are not saved in the design panel.
BicsNewLineFillInitial
Setting and Setting Values Setting Description
BicsNewLineFillInitial= true (default value) or false
You use settings to define how Analysis handles empty cells in new linesthat are used for planning with new member combinations.
The default value is True. This means that Analysis tries to derive missing member values. If a member value cannot be derived, Analysis fills in Not Assigned (Key: #).
If you change the value to False, this behavior is stopped and Analysis does not try to derive missing member values.
For more information on related SAP BW parameters, see SAP Note2508938 .
Administrator GuideSettings P U B L I C 43

InputReadyCellsValueHelpMemberAccessMode
Setting and Setting Values Setting Description
InputReadyCellsValueHelpMemberAccessMode= P
You use this setting to specify the member access mode (value help) for input-ready cells.
The default value is P (Planning).
For more information on the existing modes, see 2180059.
NumberOfNewLines
Setting and Setting Values Setting Description
NumberOfNewLines= 5 (default value) You use this setting to define the default number of new lines.
The default value is 5. This means that 5 new lines will be added to the crosstab.
You can enter any integer value for this setting.
SetEmptiedDoubleDataCellsToValue0
Setting and Setting Values Setting Description
SetEmptiedDoubleDataCellsToValue0= true (default value) or false Note
This setting is deprecated and is planned to be removed with next minor Analysis release > 2.5 as True seems to be the only relevant value.
Please contact the Analysis team, if you need this setting in future.
You use this setting to specify whether empty planning data cells are saved as 0(zero) or with their old value.
The default value is True. This means that empty planning data cells are saved as 0.
If you change the value to False, the empty planning data cells are not saved as 0. The old value remains.
44 P U B L I CAdministrator Guide
Settings

ShowNewLinesOnTop
Setting and Setting Values Setting Description
ShowNewLinesOnTop= true or false (default value) You use this setting to specify whether the new lines should be added to the bottom or to the top of the crosstab.
The default value is False. This means that new lines are added to the bottom of the crosstab.
If you change the value to True, the new lines are added to the top of the crosstab.
4.4.13 SelectorConfiguration
In the configuration section (configSection) SelectorConfiguration, you can find the following settings (section name).
DoSelectorHierarchyExplicitSelection
Setting and Setting Values Setting Description
DoSelectorHierarchyExplicitSelection= true or false (default value)
You use this setting to specify the behavior of the Filter By Member dialog for hierarchies. For hierarchies, the selection of a node means also the selection of its children in the filter dialog box. And vice versa, the selection of all children means also the section of the corresponding node.
This is the behavior for the default value False.
If you change the value to True, the hierarchy selection behaves different. The selection of a node still means the selection of its children. But you can select all children without having selected automatically the corresponding node.
If new children are available in the hierarchy, they are not selected automatically as long as the node is not selected.
Administrator GuideSettings P U B L I C 45

EnableMassDataSelector
Setting and Setting Values Setting Description
EnableMassDataSelector= true (default value) or false
You use this setting to specify whether the filter dialog box for mass data should be enabled.
After installation, the default value is True . This means that the filter dialog box for mass data is opened if the maximum number of members defined in the User settings is reached.
If you change the parameter value to False, the function is disabled and the filter dialog box for mass data is not opened.
EnforceDatePickerForCalendarDayVariable
Setting and Setting Values Setting Description
EnforceDatePickerForCalendarDayVariable= true or false (default value)
You use this setting to specify whether the date picker for any variable of value type calendar / day should be enabled.
After installation, the default value is False. This means that the date picker is not enabled and the dates are displayed in a flat list. Dates that are displayed in a flat list, are fetched from back-end and validated in Analysis. This could take longer than using the date picker.
If you change the parameter value to True, the date picker is enabled. It is shown directly without fetching the date values from back-end. A validation does not take place and it is assumed that the selected date is valid.
46 P U B L I CAdministrator Guide
Settings

FetchMemberLimit
Setting and Setting Values Setting Description
FetchMemberLimit= 1000 (default value) or any integer value
You use this setting to define the maximum number of members displayed in the Filter by Member dialog box for selection. If you filter on a dimension that contains more members than defined here, you only see the currently selected members (but you can search for all members).
The default value is 1000. This means that up to 1000 members will be displayed. You can enter any integer value for this setting.
You can also define the maximum number of members in the user settings in Analysis.
PropagateSelectionInStructures
Setting and Setting Values Setting Description
PropagateSelectionInStructures= true or false (default value)
You use this setting to define the behavior of hierarchical structures in the filter dialog box.
In characteristic hierarchies the selection of a node leads to the selection of all its children and vice versa.
For hierarchical structures, selection of a node is independent to the selection of its children in the filter dialog box.
This is the behavior for the default value False.
If you change the value to True, hierarchical structures will behave like characteristic hierarchies in the filter dialog box.
4.4.14 TaskPaneConfiguration
In the configuration section (configSection) TaskPaneConfiguration, you can find the following settings (section name).
Administrator GuideSettings P U B L I C 47

TaskPaneDockPosition
Setting and Setting Values Setting Description
TaskPaneDockPosition= 1 (default value) You use this setting to define where the design panel should be inserted.
The default value is 1. This means that the design panel is inserted on the right.
You can change the parameter to 2 to insert it on the left, to 3 to insert it on the top, or to 4 to insert it at the bottom.
If you change the parameter to 0, the design panel is freefloating.
TaskPaneHeight
Setting and Setting Values Setting Description
TaskPaneHeight= 975 (default value) You use this setting to define the height of the design panel. The height is only relevant if the design panel is inserted at the top or bottom.
The default value is 975 points.
TaskPaneWidth
Setting and Setting Values Setting Description
TaskPaneWidth= 498 (default value) You use this setting to define the width of the design panel. The width is only relevant if the design panel is inserted on the left or right.
The default value is 498 points.
4.4.15 UiCommonConfiguration
In the configuration section (configSection) UiCommonConfiguration, you can find the following settings (section name).
48 P U B L I CAdministrator Guide
Settings

CheckInfoAreasAuthorization
Setting and Setting Values Setting Description
CheckInfoAreasAuthorization= true or false (default value)
In BW systems, you can define with authorization object S_RS_FOLD if InfoAreas should be displayed in dialogs of the BEx tools. If it is defined in a BW system that the InfoAreas are not displayed, they are still displayed in the Analysis Open Data Source dialog.
You use this setting to specify whether the areas should be displayed in Analysis.
The default value is False. This means that the areas are displayed in Analysis.
If you change the parameter value to True, the areas are no longer displayed in the Analysis Open Data Source dialog.
ForceRefreshConnectionInfo
Setting and Setting Values Setting Description
ForceRefreshConnectionInfo= true or false (default value)
You use this setting to specify whether the SNC (Secure Network Communications) information is read from the launcher file or from the local SAPUILandscape.xml installation.
The default value is False. This means that the SNC information is read from the launcher file.
If you change the parameter value to True, only the SNC information in the local SAPUILandscape.xml is used.
Therefore we do not recommend changing this setting to value True.
Administrator GuideSettings P U B L I C 49

MessagePopupSeverity
Setting and Setting Values Setting Description
MessagePopupSeverity= "" (default value), Error, Warning or Success
You use this setting to specify whether messages should be displayed in a pop-in or in a dialog box, depending on the message severity.
Critical is the most severe category, Success is the least severe. The severity Success corresponds to severity Information in Analysis.
The default value is "". This means that after the installation no value is defined and only messages with severity Critical are displayed in a dialog box. Messages with lower severities (Error, Warning or Success) are displayed in a pop-in dialog.
You can change the parameter value to Error, Warning or Success. If you select a severity, all messages are displayed which have this severity or higher. If you enter Warning, for example, all messages with severity Warning, Error and Critical are displayed in a dialog box. Messages with severity Success are displayed in a pop-in dialog.
ShowSuppressedMessages
Setting and Setting Values Setting Description
ShowSuppressedMessages= true or false (default value)
You use this setting to specify whether messages that are suppressed with API method SAPSuppressMessage should be displayed.
The default value is False. This means that the suppressed messages are not displayed.
If you change the parameter value to True, the messages that are suppressed with API method SAPSuppressMessage will be displayed.
50 P U B L I CAdministrator Guide
Settings

TextKeyDisplay
Setting and Setting Values Setting Description
TextKeyDisplay= Default (default value), TextKey, KeyText, Key or Text
You use this setting to define the member display in the design panel.
The default value is Default. This means that the selection made in the query designer defines the member display.
You can change the parameter value to one of the listed values, for example Key.
4.4.16 UsageConfiguration
In the configuration section (configSection) UsageConfiguration, you can find the following settings (section name).
TrackUsage
Setting and Setting Values Setting Description
TrackUsage= true (default value) or false You use this setting to define whether Usage Tracking for Analysis should be enabled.
After installation, the default value is True. This means that Usage Tracking is active.
If you change the parameter value to False, Usage Tracking for Analysis is deactivated.
You will see more settings in this configuration section in the Ao_app.config file. These settings should not be changed.
4.4.17 UtilitiesConfiguration
In the configuration section (configSection) UtilitiesConfiguration, you can find the following settings (section name).
Administrator GuideSettings P U B L I C 51

AbapTrace
Setting and Setting Values Setting Description
AbapTrace= 1 or 0 (default value) You use this setting to activate the trace tool environment of SAP BW.
The default value is 0, meaning that it is deactivated. With a value of 1, you can activate this setting.
You can also activate the setting in the Support Settings dialog with setting Enable BW Server Tracing.
For more information, see Troubleshooting in Analysis [page 169].
AlwaysDoApplicationSteps
Setting and Setting Values Setting Description
AlwaysDoApplicationSteps= true or false (default value)
You use this setting to specify when the statistics are written in table RSDDSTAT_OLAP.
The default value is False. This means that the statistics are written when Analysis closed. If Analysis is terminated unexpectedly, e.g. by time out on a citrix server, the entries are never written to RSDDSTAT_OLAP.
If you change the parameter value to True, the entries are written after each action executed in Analysis without the need to close Analysis. Note that this might have a negative impact on the performance.
BexAdvancedMode
Setting and Setting Values Setting Description
BexAdvancedMode= true or false (default value) You use this setting to specify whether the 'Use Currency Translation from Query Definition' checkbox should be available in the currency translation dialog for measures.
After installation, the default value is False. This means that the checkbox is not available.
If you change the parameter value to True, the checkbox is displayed in the dialog..
52 P U B L I CAdministrator Guide
Settings

CancelPopupDelay
Setting and Setting Values Setting Description
CancelPopupDelay= 5 seconds (default value) or any integer value
You use this setting to specify after how many seconds the cancel dialog should be displayed when a data update is requested from the server (BW and HANA) and the crosstab is redrawn. This could be inserting a data source or navigating through the data, for example filtering data or adding dimensions to the crosstab.
The default value is 5 seconds. This means that the cancel dialog will appear after 5 seconds. You can enter any integer value for this setting.
If the cancel dialog (Fetching data from server) is displayed, you have two options:
● You press Cancel to cancel the server request.In the following Messages dialog, you can select Restart to go back to the workbook and the data source is active. Or you select Close to go back to the workbook and the data source is offline.
● You do not cancel the server request.The dialog will disappear automatically when the server request is completed.
Profiling
Setting and Setting Values Setting Description
Profiling= true or false (default value) You use this setting to activate the query runtime statistics of SAP BW.
For more information, see Query runtime statistics [page 92].
You can also activate the setting in the Support Settings dialog with setting Enable Workbook Profiling.
For more information, see Troubleshooting in Analysis [page 169].
Administrator GuideSettings P U B L I C 53

ShowConvertToForumulaInToolsGroup
Setting and Setting Values Setting Description
ShowConvertToForumulaInToolsGroup= true (default value) or false
This setting is used in Analysis with minor versions ≤ 3 to specify whether the Convert To Formula icon should be displayed in the ribbon.
As of release 2.4, you customize the ribbon with the Customize User Interface dialog. Therefore, we recommend to use the Customize User Interface dialog to define the options displayed in the ribbon.
NoteWhen switching to a version greater than 3, for example Analysis 2.4, Analysis takes your definition from this setting. If the parameter value for this setting was True, the Convert To Formula icon is displayed in the standard profile for the ribbon. If it was False, it is not displayed.
ShowCreateWebApplicationInToolsGroup
Setting and Setting Values Setting Description
ShowCreateWebApplicationInToolsGroup= true or false (default value)
This setting is used in Analysis with minor versions ≤ 3 to specify whether the Create Web Application icon should be displayed in the ribbon.
As of release 2.4, you customize the ribbon with the Customize User Interface dialog. Therefore, we recommend to use the Customize User Interface dialog to define the options displayed in the ribbon.
NoteWhen switching to a version greater than 3, for example Analysis 2.4, Analysis takes your definition from this setting. If the parameter value for this setting was True, the Create Web Application icon is displayed in the standard profile for the ribbon. If it was False, it is not displayed.
54 P U B L I CAdministrator Guide
Settings

ShowPlanningToolbar
Setting and Setting Values Setting Description
ShowPlanningToolbar= true or false (default value)
This setting is used in Analysis with minor versions ≤ 3 to specify whether the planning group should be displayed in the ribbon.
As of release 2.4, you customize the ribbon with the Customize User Interface dialog. Therefore, we recommend to use the Customize User Interface dialog to define the options displayed in the ribbon.
NoteWhen switching to a version greater than 3, for example Analysis 2.4, Analysis takes your definition from this setting. If the parameter value for this setting was True, the planning group is displayed in the standard profile for the ribbon. If it was False, it is not displayed.
ShowSsoLogonDialog
Setting and Setting Values Setting Description
ShowSsoLogonDialog= true or false (default value) You use this setting to specify whether the Logon dialog box should be displayed when using SSO with the SAP BW platform.
The default value is False. This means that the logon dialog box is not displayed.
If you change the parameter value to True, the logon dialog box is displayed and the user can change the client and the logon language.
You can also enable this setting in the Advanced Settings dialog in Analysis.
Administrator GuideSettings P U B L I C 55

ShowSsoLogonDialogBip
Setting and Setting Values Setting Description
ShowSsoLogonDialogBip= true or false (default value)
You use this setting to specify whether the Logon dialog box should be displayed when using SSO with the BI platform.
The default value is False. This means that the logon dialog box is not displayed.
If you change the parameter value to True, the logon dialog box is displayed and the user can select one of the available BI platforms and change the logon language.
You can also enable this setting in the Advanced Settings dialog in Analysis.
SupportAutomatedOffice
Setting and Setting Values Setting Description
SupportAutomatedOffice= true or false (default value)
You use this setting to specify whether the Analysis Plug-in shoud be supported if the Microsoft Office tools are running in embedded mode (also called automated mode).
The default value is False. This means that the Analysis Plug-in is not supported.
If you change the parameter value to True, the Analysis Plug-in will be supported.
This setting is only evaluated if you set SupportEmbeddedMode in the Cof_app.config file to True.
UndoStackSize
Setting and Setting Values Setting Description
UndoStackSize= 10 (default value) You use this setting to specify the number of steps that can be undone or redone with the Analysis Undo/Redo function.
The default value is 10.
56 P U B L I CAdministrator Guide
Settings

4.4.18 VariableConfiguration
In the configuration section (configSection) VariableConfiguration, you can find the following settings (section name).
DisplayCompoundAsKeys
Setting and Setting Values Setting Description
DisplayCompoundAsKeys= true or false (default value)
You use this setting to define the display of variables in the summary view of the prompting dialog box.
The default value is False. This means that the variables are displayed as display strings.
For compound characteristics, the display string may not be unique. To display compound characteristics with the key instead of the display string, you can set the parameter value to True.
MergeVariables
Setting and Setting Values Setting Description
MergeVariables= true or false (default value) You use this setting to specify whether or not the Merge Variables check box in the Components tab in the design panel is selected when you create a new workbook
After installation, the default value is False. This means that the check box is not selected when you create a new workbook.
You can change this manually by selecting the check box for single workbooks or setting the parameter value to True. The check box is then always selected when you create a new workbook.
Administrator GuideSettings P U B L I C 57
OperatorContainsPattern
Setting and Setting Values Setting Description
OperatorContainsPattern= true or false (default)
You use this setting to define whether the operators Contains Pattern (CP) and Excludes Pattern ( !CP) should be enabled for prompting.
The default value is False. This means that the contains pattern operators cannot be used for prompting.
To enable the contains pattern operators for prompting, you can set the parameter value to True.
PreferLeavesOverNodesInInputString
Setting and Setting Values Setting Description
PreferLeavesOverNodesInInputString= true (default value) or false
You use this setting to define whether an input string should select a leaf or node if both have the same string.
The default value is True. This means that the leaf will be selected.
PromptWhenInsertingDataSource
Setting and Setting Values Setting Description
PromptWhenInsertingDataSource= true (default value) or false
You use this setting to define the behavior of the prompting dialog box when inserting a new data source.
After installation, the default value is True. This means that the prompting dialog box always appears automatically when you insert a data source containing variables.
If you set this parameter to False, the prompts dialog only appears when the data source contains mandatory variables.
58 P U B L I CAdministrator Guide
Settings

ShowDSVariantsForWorkbooksWithOneDS
Setting and Setting Values Setting Description
ShowDSVariantsForWorkbooksWithOneDS= true or false (default value)
You use this setting to specify the mode for the prompting dialog when you open a document from the BW server that contains exactly one data source.
The default value is False. This means that the prompting dialog is opened in document mode.
If you change the parameter value to True, the prompting dialog is opened in data source mode..
4.4.19 WaterfallChartConfiguration
In the configuration section (configSection) WaterfallChartConfiguration, you can find the following settings (section name).
RGBValueColumns
Setting and Setting Values Setting Description
RGBValueColumns= #808080 (default value) You use this setting to define the color for the columns that represent the start and end values.
The default value is #808080. This means that the columns display in grey.
RGBValueNegative
Setting and Setting Values Setting Description
RGBValueNegative= #FF000C (default value) You use this setting to define the color for the negative delta values.
The default value is #FF000C. This means that the negative values display in red.
Administrator GuideSettings P U B L I C 59
RGBValuePositive
Setting and Setting Values Setting Description
RGBValuePositive= #90CE00 (default value) You use this setting to define the color for the positive delta values.
The default value is #90CE00. This means that the positive values display in green.
4.4.20 WorkbookConversionConfiguration
In the configuration section (configSection) WorkbookConversionConfiguration, you can find the following settings (section name).
ConversionType
Setting and Setting Values Setting Description
ConversionType= 0 (default value), 1 or 2 You use this setting to define which objects of a BEx workbook should be converted. The default value for this parameter is 0. This means that all objects are converted.
If you set the parameter value to 1, data sources and crosstabs are converted. If you set the value to 2, only data sources are converted.
60 P U B L I CAdministrator Guide
Settings

EnableAnalysisViewConversion
Setting and Setting Values Setting Description
EnableAnalysisViewConversion= true or false (default value)
You use this setting to define whether the Conversion tab with the Analysis View Migration setting in the settings dialog is displayed.
After installation, the default value is False. Nethertheless, the conversion tab with the Analysis View Migration is visible as long as the setting EnableWorkbookConversion is set to true.
If you change the parameter value to True, the Conversion tab is enabled and the Analysis View Migration is available even if the setting EnableWorkbookConversion is set to false.
EnableWorkbookConversion
Setting and Setting Values Setting Description
EnableWorkbookConversion= true (default value) or false
You use this setting to define whether the conversion of BEx workbooks is enabled. The settings for the BEx workbooks conversion are available on the Conversion tab in the settings dialog.
After installation, the default value is True. This means that conversion tab with the conversion settings and the menu entry for conversion are visible in Analysis.
If you change the parameter value to False, the menu entry and conversion tab are hidden, and the user is not able to convert BEx workbooks. If you enable the setting EnableAnalysisViewConversion, the conversion tab with the conversion settings is visible in Analysis, but the menu entry for BEx workbook conversion is hidden.
Administrator GuideSettings P U B L I C 61

LogType
Setting and Setting Values Setting Description
LogType= 0 (default value), 1 or 2 You use this setting to define whether a log should be created during conversion. The default value for this parameter is 0. This means that no log will be created.
If you set the parameter value to 1, a log is created and displayed on a workbook sheet. If you set the value to 2, a log is created and stored on a hidden workbook sheet.
RefreshType
Setting and Setting Values Setting Description
RefreshType= 0 (default value), 1 or 2 You use this setting to define whether the workbook should be refreshed after conversion. The default value of this parameter is set to 0. This means that the workbook is always refreshed.
If you set the parameter value to 1, the workbook is not refreshed. If you set the value to 2, the workbook is refreshed after conversion if the corresponding properties are selected on the components tab in the design panel.
ShowSaveDialog
Setting and Setting Values Setting Description
ShowSaveDialog= true or false (default value) You use this setting to specify whether the save dialog box should be displayed after a workbook conversion.
The default value is False, meaning that the save dialog box will not display after conversion.
If you change the parameter value to True, the save dialog box will be displayed after conversion.
4.4.21 WorkspaceConfiguration
In the configuration section (configSection) WorkspaceConfiguration, you can find the following settings (section name).
62 P U B L I CAdministrator Guide
Settings

EnableWorkspace
Setting and Setting Values Setting Description
EnableWorkspaces= true (default value) or false You use this setting to define whether the workspace options should be enabled.
After installation, the default value is True. This means that the workspace options are enabled and the menu entries are visible in the ribbon.
If you change the parameter value to False, the menu entries are not displayed in the ribbon, and the user is not able to use the workspace options.
4.5 Settings for the EPM Plug-in
The following table describes the EPM Plug-in file system settings that you can define. The settings are delivered in the Epm_app.config file.
For more information about maintaining file system settings, see Maintaining settings in the file system [page 17]
EPMClientConfiguration
Setting and Setting Values Setting Description
HasToProtectEpmFormattingSheet= true (default value) or false
You use this setting to specify whether EPM formatting sheets can be protected or not.
The default value is True. This means that EPM formatting sheets can be protected.
If you change the parameter value to False, a formatting sheet will never be protected. If an existing workbook with protected formatting sheets is opened, these will immediately be unprotected.
4.6 Settings for the BPC Plug-in
The following table describes the BPC Plug-in file system settings that you can define. The settings are delivered in the Bpc_app.config file.
Administrator GuideSettings P U B L I C 63

For more information about maintaining file system settings, see Maintaining settings in the file system [page 17]
BpcConfiguration
Setting and Setting Values Setting Description
KeepAliveTimeoutInSeconds= 60 (default value) You use this setting to set the keep-alive value. You set the value to the time interval (in seconds) between each request, so that the session stays alive. We recommend that you enter a value below the value of the server timeout. For example, if the server timeout is set to 1200 seconds, enter the value 900 in this setting.
The default value is 60. This means that the time interval between each request is 60 seconds.
LastUsedBpfConnections This setting lists all the latest connections you have used. This setting is filled automatically and you should not change its value.
4.7 Configuring Files with SAP Setup
Context
You can configure files with a setup tool, for example SAP Setup, to keep your settings definition for upcoming installations. Without such files, the settings definition will be overwritten with the default values during a new installation of Analysis.
Procedure
1. Copy or unzip the installer. If you unzipped the installer, go to Setup folder. If you copied the complete installer, you might need to go to CdMirror first and then to the Setup folder.
2. Go to the documentation at SAPSetup\CdMirror\SAP Setup Guide.pdf.3. Use NwCreateInstServer to create a folder e.g. "InstServer".4. In the folder "InstServer", create a folder e.g. "Custom Files" with adapted content, for example
Cof_app.config and Ao_app.config.5. Use InstServer\Setup\NwSapSetupAdmin to configure a package.
64 P U B L I CAdministrator Guide
Settings

a. It already has product COF imported, because it was created from a COF installer.b. Go to package.c. Create package.
d. Select package package configuration On Installation End .
strSrcFile = NwEngine.Variables.ResolveString("%SapSrcDir%\Custom Files\Cof_app.config")
strDstFile = NwEngine.Variables.ResolveString("%ALLUSERSPROFILE%\SAP\Cof\Cof_app.config")
//note: SAPSetup does not know %ProgramData%, but you have to use %ALLUSERSPROFILE% instead.
NwEngine.Shell.CopyFileEx strSrcFile, strDstFile, vbTruee. Select the same for On Update End.
6. If you now use InstServer\SetupAll.exe it will install with the upated files.
Administrator GuideSettings P U B L I C 65

5 Administration for the Analysis Plug-In
5.1 Supported BI Platforms
SAP Analysis supports the following platforms:
● SAP BusinessObjects Business Intelligence Platform XI 4.1 SP5● SAP BW● SAP BW/4HANA
NoteMicrosoft Office documents contain free text fields. These text fields are not intended to store personal data without additional technical or organizational measures to safeguard data protection and privacy.
In order to ensure that analytical data which is personal data and which is retrieved from the servers with Analysis functionality, does not get stored in documents, the Analysis workbook property Remove Data Before Saving can be active in those workbooks.
Users can activate the property Remove Data Before Saving on the Components tab in the design panel.
Administrators can set the file system setting RemoveDataBeforeSaving to true to activate the workbook property Remove Data Before Saving in the design panel by default.
For more details, see chapter Data Protection and Privacy in this guide.
Related Information
SAP BusinessObjects Business Intelligence Platform [page 66]SAP BW [page 67]SAP BW/4HANA [page 69]
5.1.1 SAP BusinessObjects Business Intelligence Platform
SAP Analysis supports SAP BusinessObjects Business Intelligence XI 4.1 SP5 as platform.
If you use the SAP BusinessObjects Business Intelligence 4.1 platform with Analysis, Microsoft .NET Framework 4.5 must be installed on the client PC.
66 P U B L I CAdministrator Guide
Administration for the Analysis Plug-In

Usage with the SAP BusinessObjects BI platform
In the Central Management Console (CMC), you have to define connections to your SAP BW system(s). SAP Analysis receives information about the connections in the CMC and establishes direct access to the defined BW systems for data exchange.
Microsoft Excel workbooks and Microsoft PowerPoint files, created with Analysis, are stored in the repository. As of SAP BusinessObjects Business Intelligence platform 4.1, you can save Analysis objects as Analysis Workbook and Analysis Presentation.
Related Information
Creating and managing BW system connections in SAP BusinessObjects Business Intelligence [page 76]
5.1.2 SAP BW
SAP Analysis supports SAP BW as its platform. Using SAP BW as the platform, the Analysis objects are stored in a BW system.
The following functions of Analysis are supported only when using SAP BW as platform. The functions are available as of the listed releases. However, you might be required to implement additional SAP Notes. For more information, see SAP Note 1739153 .
Function 7.0 EHP1 7.0 EHP2 7.3 7.3 EHP1 7.40 7.50
SAP BW as platform
SP 11 SP 10 SP 05 SP 01
Conversion of BEx Workbooks
SP 11 SP 10 SP 05 SP 01
Launcher SP 12 SP 12 SP 08 SP 05
Variants* SP 12 SP 12 SP 08 SP 05
Workspaces SP 07 SP 03
Caching SP 18 SP 18 SP 14 SP17 SP 13
Grouping Members
SP 06
Launching Query Designer
SP 03 SP 06
Launching BW Modeling Tools
SP 16 SP 05
Planning Data**: New Lines
SP 12
Administrator GuideAdministration for the Analysis Plug-In P U B L I C 67

Function 7.0 EHP1 7.0 EHP2 7.3 7.3 EHP1 7.40 7.50
Planning Data: Upload Data from a file
SP 12
Formula-Optimized Mode
SP 13
*You can also use this function with lower SP levels. For more information, see SAP Note 1694658.
** To use the new planning functions, some parameters in transaction RSADMIN are required. For more information, see SAP Note 2508938 .
Usage with SAP BW
The BW systems have to be defined in the SAPUILandscape.xml file in the Windows directory on your local machine. SAP Analysis receives the list of available BW systems in the SAPUILandscape.xml file and establishes direct access to the defined systems for data exchange.
You can also define systems in the SAPUILandscapeGlobal.xml file in the Windows directory on your local machine. Therefore, the SAPUILandscapeGlobal.xml file must be in the same folder as the SAPUILandscape.xml file and caching must be enabled in the options for SAP GUI.
NoteEnsure that SAP Graphical User Interface (SAP GUI) is installed on each client PC. This application contains the SAP Logon.
Analysis workbooks and presentations are stored in the BW system with object type AAOE (for workbooks) and AAOP (for presentations). With SAP BW, you can store the file formats for Excel (.xls, .xlsx, .xlsm, .xlsb) and PowerPoint (.ppt, .pptx, .pptm).
Local Usage
You can also use SAP Analysis locally, without a platform.
In this case, you can reuse the BW systems defined in the SAPUILandscape.xml file in the Windows directory on your local machine.
Microsoft Excel workbooks and Microsoft PowerPoint presentations, created with Analysis, are stored locally on your client PC or on a fileshare. You can store the file formats for Excel (.xls, .xlsx, .xlsm, .xlsb) and PowerPoint (.ppt, .pptx, .pptm)
68 P U B L I CAdministrator Guide
Administration for the Analysis Plug-In

Related Information
To define system connections to SAP BW [page 77]
5.1.3 SAP BW/4HANA
SAP Analysis supports SAP BW/4HANA as its platform. Using SAP BW/4HANA as the platform, you can connect to SAP BW/4HANA systems and use the data sources for your analysis. The Analysis objects can then be stored in the BW/4HANA system.
The BW/4HANA systems have to be defined in the SAPUILandscape.xml file in the Windows directory on your local machine. SAP Analysis receives the list of available BW/4HANA systems in the SAPUILandscape.xml file and establishes direct access to the defined systems for data exchange.
You can also define systems in the SAPUILandscapeGlobal.xml file in the Windows directory on your local machine. Therefore, the SAPUILandscapeGlobal.xml file must be in the same folder as the SAPUILandscape.xml file and caching must be enabled in the options for SAP GUI.
NoteEnsure that SAP Graphical User Interface (SAP GUI) is installed on each client PC. This application contains the SAP Logon.
Analysis workbooks and presentations are stored in the BW/4HANA system with object type AAOE (for workbooks) and AAOP (for presentations). With SAP BW/4HANA, you can store the file formats for Excel (.xls, .xlsx, .xlsm, .xlsb) and PowerPoint (.ppt, .pptx, .pptm).
The functions available in SAP BW/4HANA differ from the functions in SAP BW. For more information, see the SAP BW/4HANA documentation on the SAP Help Portal at SAP BW/4HANA.
The following functions of Analysis are supported when using SAP BW/4HANA as platform. The functions are available as of the listed releases. However, you might be required to implement additional SAP Notes.
Function SAP BW/4HANA 1.0 7.40 7.50
SAP BW/4HANA as platform SP 08
Launching BW Modeling Tools SP 16 SP 05
Planning Data*: New Lines SP 08
Planning Data: Creating new master data
SP 08
Planning Data: Upload Data from a file
SP 08
Formula-Optimized Mode SP 09 SP 13
Saving Comments SP 08
Administrator GuideAdministration for the Analysis Plug-In P U B L I C 69

* To use the new planning functions, some parameters in transaction RSADMIN are required. For more information, see SAP Note 2508938 .
5.2 Upgrade
5.2.1 Migrating to Analysis 2.7
Context
If you have an earlier version of Analysis installed on your PC and you want to migrate to Analysis 2.7, you can start the Analysis installation file without uninstalling Analysis before.
Procedure
1. Start SapAaoSetup.exe.The SAPSetup installation wizard appears.
2. Select Analysis for Microsoft Office in the component list of the SAP Front End Installer dialog box.3. Choose Next.4. If necessary, change the target directory and choose Next to start the upgrade.5. In the confirmation screen, choose Done.
Results
Analysis 2.7 for Microsoft Office has been installed and is ready to use.
NoteThe following configurations that you defined in 1.x releases, cannot be migrated automatically:
● Settings are maintained in the file system and not in the registry. You have to specify the settings in the file system again.
● SAP HANA platform connections are now implemented as an HTTP connection. The ODBC connections that were used in former releases (1.x), are no longer supported. After creating an HTTP connection, you can change the connection type in a workbook or presentation.
● You can enhance the Analysis tab in the ribbon. The name space for the Analysis tab is now SapExcelAddIn. In 1.x releases the name space for the Analysis tab is SBOP.AdvancedAnalysis.Addin.1. You have to enhance the Analysis ribbon again.You can find more information about enhancing the Analysis ribbon in the User Guide.
70 P U B L I CAdministrator Guide
Administration for the Analysis Plug-In
Related Information
Defining connections to SAP HANA [page 80]Settings [page 17]Customizing the User Interface [page 92]
5.2.2 Using existing Workbooks and Presentations in Analysis 2.7
The usage of existing Analysis workbooks and presentations in Analysis 2.7 depends on the platform you use to store the files.
BW Connections
● SAP NetWeaver server / Local storageYou can open existing workbooks and presentations in Analysis 2.7 and continue analyzing the data of the workbook with Analysis 2.7.
● Storage in SAP BusinessObjects Business IntelligenceYou can open existing workbooks and presentations that are stored on the business intelligence platform in Analysis 2.7 and continue analyzing the data with Analysis 2.7. You can save the changed workbooks and presentations on the BI platform.
● BEx Analyzer workbooksYou can convert BEx Analyzer workbooks to Analysis workbooks. After the conversion, you can open them in Analysis 2.7 and continue your analysis. You can also save them to a platform.
HANA Connections
As of Analysis 2.0, the connection to the SAP HANA platform is implemented as an HTTP connection. The ODBC connections that were used in former releases (1.x), are no longer supported.
You can migrate the connection type in a workbook or presentation. If you open an object containing ODBC connections in Analysis 2.7, the SAP HANA Data Source Migration dialog appears automatically. In the dialog, you can select an existing HTTP connection for each ODBC connection.
Note that the HTTP connection must be created before you can migrate a workbook or presentation.
After assigning the HTTP connection, the migration can be started and you can refresh the corresponding data sources and save the workbook or presentation as 2.x object.
Administrator GuideAdministration for the Analysis Plug-In P U B L I C 71

Related Information
Defining connections to SAP HANA [page 80]
5.2.3 Saving a workbook with 1.x format
You can save workbooks with 1.x format in Analysis 2.7. Then you can open the workbook in a 1.x release. All changes made with functions that are only available as of Analysis 2.0 (for example, Table Design formatting), are deleted if you save workbook as 1.x format.
You can save workbooks with 1.x format on the Business Intelligence platform and on the NetWeaver server.
In order to enable this function in Analysis, the setting SupportsSaveAs1x must be set to true. With the setting SaveAs1xByDefault, you can define whether a workbook should be saved by default with 1.x format in Analysis 2.7.
Note that after saving a workbook in 2.x format, it is no longer possible to save the same workbook to 1.x format. If you want to save a 2.x workbook as 1.x again, you can delete the 2.x version using the context menu in the Save Workbook dialog and then save the workbook in 1.x format.
Related Information
Settings for the Analysis Plug-in [page 25]
5.3 To configure the load behavior of the Analysis Add-In
Context
To enable users to access Analysis in any Microsoft Excel and Microsoft PowerPoint file, you have to set the LoadBehavior parameter to the required value in the registry of the client PCs.
If the Add-In is enabled, it is always active when you start Microsoft Excel or PowerPoint. If it is disabled, it is active only after starting it with the Add-In Launcher in the Start menu, with he desktop shortcut, or following manual activation in the COM Add-In dialog.
NoteBefore users can access Analysis in any Microsoft Excel or Microsoft PowerPoint file, ensure that Analysis has been started once directly in the Windows directory or by choosing the desktop icons.
72 P U B L I CAdministrator Guide
Administration for the Analysis Plug-In
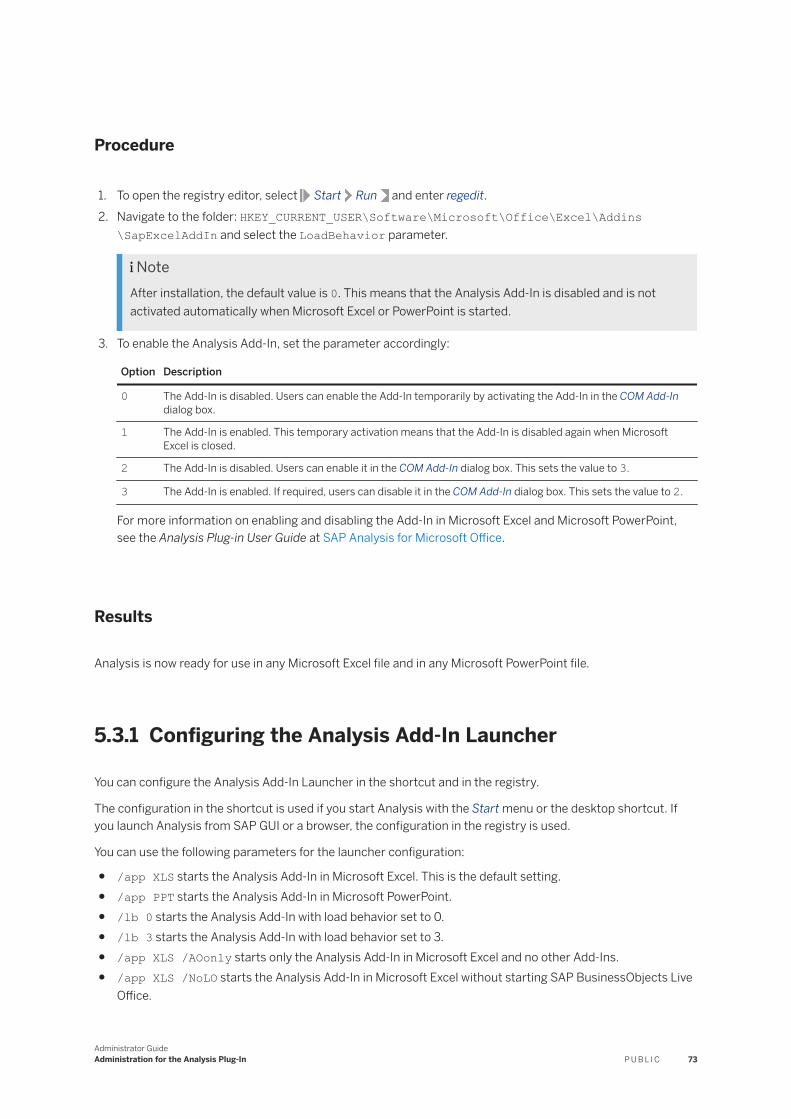
Procedure
1. To open the registry editor, select Start Run and enter regedit.2. Navigate to the folder: HKEY_CURRENT_USER\Software\Microsoft\Office\Excel\Addins
\SapExcelAddIn and select the LoadBehavior parameter.
NoteAfter installation, the default value is 0. This means that the Analysis Add-In is disabled and is not activated automatically when Microsoft Excel or PowerPoint is started.
3. To enable the Analysis Add-In, set the parameter accordingly:
Option Description
0 The Add-In is disabled. Users can enable the Add-In temporarily by activating the Add-In in the COM Add-In dialog box.
1 The Add-In is enabled. This temporary activation means that the Add-In is disabled again when Microsoft Excel is closed.
2 The Add-In is disabled. Users can enable it in the COM Add-In dialog box. This sets the value to 3.
3 The Add-In is enabled. If required, users can disable it in the COM Add-In dialog box. This sets the value to 2.
For more information on enabling and disabling the Add-In in Microsoft Excel and Microsoft PowerPoint, see the Analysis Plug-in User Guide at SAP Analysis for Microsoft Office.
Results
Analysis is now ready for use in any Microsoft Excel file and in any Microsoft PowerPoint file.
5.3.1 Configuring the Analysis Add-In Launcher
You can configure the Analysis Add-In Launcher in the shortcut and in the registry.
The configuration in the shortcut is used if you start Analysis with the Start menu or the desktop shortcut. If you launch Analysis from SAP GUI or a browser, the configuration in the registry is used.
You can use the following parameters for the launcher configuration:
● /app XLS starts the Analysis Add-In in Microsoft Excel. This is the default setting.● /app PPT starts the Analysis Add-In in Microsoft PowerPoint.● /lb 0 starts the Analysis Add-In with load behavior set to 0.● /lb 3 starts the Analysis Add-In with load behavior set to 3.● /app XLS /AOonly starts only the Analysis Add-In in Microsoft Excel and no other Add-Ins.● /app XLS /NoLO starts the Analysis Add-In in Microsoft Excel without starting SAP BusinessObjects Live
Office.
Administrator GuideAdministration for the Analysis Plug-In P U B L I C 73

● /app XLS /UseRunningProcess starts the Analysis Add-In using a Microsoft Excel process that is already running. If no Excel process is running, the Add-In is launched with the default setting.
● /app XLS /CreateProcess starts the Analysis Add-In using a new process if Microsoft Excel 2013 is already running. The default behavior in Microsoft Excel 2013 is to reuse a running process.
● /empty/app XLS starts the Analysis Add-In in Microsoft Excel when an Analysis workbook is launched without opening an additional template workbook.A template workbook is opened in Analysis if a workbook template (*.xltx) is available in the XLSTART folder of Microsoft Excel. Using this parameter, you can avoid that an additional template workbook is opened.Note that the parameter /empty will be ignored if you use the parameter /CreateProcess in the launcher configuration. If you use the parameter /CreateProcess it is not possible to avoid that an additional template workbook is opened.
Shortcut configuration
1. Right-click the Analysis Add-In in the Start menu or in the desktop shortcut and select Properties.2. Add the desired parameters to the path in the Target field on the Shortcut tab.
The path in the target field contains the launcher executable and the optional parameters, for example "C:\Program Files (x86)\SAP BusinessObjects\Office AddIn\BiOfficeLauncher.exe" /app XLS.
Registry configuration
1. To open the registry editor, select Start Run and enter regedit.2. Navigate to the appropriate folder.
For Analysis for Microsoft Excel: HKEY_CLASSES_ROOT\SAP.AO.Xl.Launch\shell\Open\command.For Analysis for Microsoft PowerPoint: HKEY_CLASSES_ROOT\SAP.AO.Ppt.Launch\shell\Open\command.
3. Double-click the Default value and add the desired parameters to the path in the Value Data field..The path in the value data field contains the launcher executable and the optional parameters, for example "C:\Program Files (x86)\SAP BusinessObjects\Office AddIn\BiOfficeLauncher.exe" /app XLS /launchfile "%1".
74 P U B L I CAdministrator Guide
Administration for the Analysis Plug-In

5.4 Defining connections to SAP BusinessObjects Business Intelligence
5.4.1 To define a system connection to SAP BusinessObjects Business Intelligence
Context
The BOESystems setting allows you to define system connections to the business intelligence platform. It is maintained in the file Ao_app.config that is stored in the file system under C:\ProgramData\SAP\Cof.
As administrator, you can define the setting and you can also define if a user should be able to change a setting locally.
As a user, you can change the setting in the file system under Users\<UserID>\AppData\Roaming\SAP\Cof. The file name for changing the settings locally is ao_user_roaming.config.
Users can select the defined system connections from the Web Service URLs list in the Logon to SAP BusinessObjects Enterprise dialog box when opening or saving workbooks.
Procedure
1. Navigate to the folder C:\ProgramData\SAP\Cof and open the file to change the setting.
2. Define the system connections in setting BOESystems.
Example with defined connections to two platform servers:
<BOESystems><
</ArrayOfCoBoeSystemInfo>]]></BOESystems>
a. Enter the required value for the parameter SystemId.b. As Hostname, enter the name of the machine that the business intelligence platform is installed on.c. For the parameters Scheme, Port and SessionServiceUrl, enter the URL values that were defined
during the installation of the business intelligence platform.d. To set this connection to the business intelligence platform as the default connection, enter True for
the Active parameter.
If you enter False for the Active parameter the connection appears as an entry that can be selected by the users in the list of connections in the logon dialog box.
e. For the parameter UseSso, you can specify if the SSO check box in the log-on dialog is checked or not. The value changes if the user selects or deselects the check box.
f. For the parameter LastUsedAuthentication, you can enter an authentication type that is used in the log-on dialog.
g. For the parameter CMSNames, you can enter a system to specify the central management system for the log-on dialog.
3. Save the file with the defined setting.
Results
The Logon to SAP BusinessObjects Enterprise dialog box contains the list with the three configured Web Service URLs that describe the connections to the business intelligence platform servers. The first entry in the settings file is the default connection.
Users can define additional connections to business intelligence platform servers in the logon dialog box. For more information, see the Analysis Plug-in User Guide at SAP Analysis for Microsoft Office.
NoteAfter creating a new connection in the Logon to SAP BusinessObjects Enterprise dialog box and logging on to this business intelligence platform server, Analysis adds this connection to the BOESystems setting and sets it as the default connection. If there is already data from this business intelligence platform server in the BOESystems setting, Analysis changes the diverging parameter values in the BOESystems setting and sets this connection as the default.
5.4.2 Creating and managing BW system connections in SAP BusinessObjects Business Intelligence
Prerequisites
You can use Analysis with SAP BusinessObjects Business Intelligence XI as the central content management system for Analysis workbooks and presentations, and as platform for managing data source connections.
76 P U B L I CAdministrator Guide
Administration for the Analysis Plug-In

Context
Before users can begin working with business data in Analysis, you have to create connections to BW systems so they can add data sources to their Analysis workbooks.
You create new connection objects and manage existing connection objects in the module OLAP Connections in the Central Management Console (CMC) of the business intelligence platform. To create a connection to a BW system, you define a connection to any object of the BW system.
NoteWhen you create a new connection with the module OLAP Connections, you should not use authentication type Pre-defined because the predefined user (and password) is not exposed to local clients such as Analysis.
You can also create an OLAP connection with SAP HANA as provider. With this HANA OLAP connection, you can use Analysis directly on top of a SAP HANA database.
For more information about creating and managing connections in SAP BusinessObjects Business Intelligence Platform , see “Connection settings for SAP BW data sources” in the SAP BusinessObjects Analysis, edition for OLAP Administrator Guide at SAP BusinessObjects Business Intelligence Platform.
You also have to make sure that the client PCs can communicate with the connected BW systems. If the BW system uses a message server the client PCs must specify the service name of the message server in the system services file at <systemdrive>:\WINDOWS\system32\drivers\etc\services. Configure the system services file of each client PC accordingly.
Results
Once you have created BW system connections, these connections appear in the list of connections in the Insert Data Source dialog box in Analysis. Your users can add them to their Analysis workbooks. Users can access all BW objects (InfoProviders, queries and query views) of the connected BW system that they are authorized for by the BW authorization concept.
5.5 Defining connections to SAP BW
5.5.1 To define system connections to SAP BW
Prerequisites
BW systems have to be defined in the SAPUILandscape.xml file in the Windows directory on your local machine. SAP Analysis receives the list of available BW systems in the SAPUILandscape.xml file and establishes direct access to the defined systems for data exchange. The SAP Graphical User Interface (SAP GUI) contains the SAP Logon.
Administrator GuideAdministration for the Analysis Plug-In P U B L I C 77

You can also define systems in the SAPUILandscapeGlobal.xml file in the Windows directory on your local machine. Therefore, the SAPUILandscapeGlobal.xml file must be in the same folder as the SAPUILandscape.xml file and caching must be enabled in the options for SAP GUI.
Context
You can reuse the BW systems defined in SAP Logon on the client PCs. SAP Analysis receives the list of available BW systems in the SAP Logon and establishes direct access to the defined systems for data exchange.
For more information about BW system connections in the SAP Logon file, see SAP Help Portal at SAP GUI.
You also have to make sure that the client PCs can communicate with the connected BW systems. If the BW system uses a message server, the client PCs must specify the service name of the message server in the system services file. Configure the system services file of each client PC accordingly.
Results
Once you have defined the BW system connections, these connections appear in the list of connections in the Insert Data Source dialog box in Analysis. Your users can add them to their Analysis workbooks. Users can access all BW objects (InfoProviders, queries and query views) of the connected BW system that they are authorized for by the BW authorization concept. Users can also save workbooks and presentations in the BW system if SAP BW is used as platform.
5.5.2 To define system connections to SAP BW/4HANA
Prerequisites
SAP BW/4HANA systems have to be defined in the SAPUILandscape.xml file in the Windows directory on your local machine. SAP Analysis receives the list of available BW/4HANA systems in the SAPUILandscape.xml file and establishes direct access to the defined systems for data exchange. The SAP Graphical User Interface (SAP GUI) contains the SAP Logon.
You can also define systems in the SAPUILandscapeGlobal.xml file in the Windows directory on your local machine. Therefore, the SAPUILandscapeGlobal.xml file must be in the same folder as the SAPUILandscape.xml file and caching must be enabled in the options for SAP GUI.
78 P U B L I CAdministrator Guide
Administration for the Analysis Plug-In

Context
You can reuse the BW/4HANA systems defined in SAP Logon on the client PCs. SAP Analysis receives the list of available BW/4HANA systems in the SAP Logon and establishes direct access to the defined systems for data exchange.
For more information about BW/4HANA system connections in the SAP Logon file, see SAP Help Portal at SAP GUI.
You also have to make sure that the client PCs can communicate with the connected BW/4HANA systems. If the BW/4HANA system uses a message server, the client PCs must specify the service name of the message server in the system services file. Configure the system services file of each client PC accordingly.
Results
Once you have defined the BW/4HANA system connections, these connections appear in the list of connections in the Insert Data Source dialog box in Analysis. Your users can add them to their Analysis workbooks. Users can access all BW/4HANA objects of the connected system that they are authorized for by the BW authorization concept. Users can also save workbooks and presentations in the BW/4HANA system used as a platform.
5.5.3 Management of Analysis connections in BW systems (SM04)
You can use transaction SM04 in SAP BW and SAP BW/4HANA systems to check the connections for Analysis. The connections are displayed by users. In general, there will be one connection in SM04 for each workbook with a running data source.
If a workbook is closed, the corresponding connection in SM04 remains open for 60 seconds to be used for a new workbook that might be opened in this period. Reusing connections could save some overhead for connection initialization. Analysis keeps up to two of these idle connections that may be reused. All other idle connections are deleted after a few seconds in SM04.
Additionally, there will be one connection in SM04 fetching the meta data of the RFCs. The connection is started with the first workbook that is opened. It will be kept open for 24 hours after the last workbook was closed.
If you close Microsoft Excel, all connections are deleted immediately in SM04.
ExampleThe following example shows how actions in Analysis with several workbooks are displayed as connections in transaction SM04.
Administrator GuideAdministration for the Analysis Plug-In P U B L I C 79

Actions in Analysis Connections in SM04
1. In workbook A, insert a data source from a BW system. Two new connections are visible in SM04:. Connection A1 is used to retrieve RFC meta data. Connection A2 is used for real RFC calls.
2. In workbook B, insert a data source from a BW system. One new connection is visible in SM04:. Connection B1 is used for real RFC calls.
3. In workbook C, insert a data source from a BW system. One new connection is visible in SM04:. Connection C1 is used for real RFC calls.
4. In workbook D, insert a data source from a BW system. One new connection is visible in SM04:. Connection D1 is used for real RFC calls.
5. Close workbook D. The idle connection D1 will be visible for 60 seconds.
6. Close workbook C. The idle connection C1 will be visible for 60 seconds.
7. Close workbook B. The idle connection B1 is deleted after a few seconds as it would be the third idle connection and only two idle connections are kept for reuse.
8. In workbook E, insert a data source from a BW system. No new connection is visible in SM04 as connection D1 is still available and reused for real RFC calls.
9. Close workbook A. Note that closing workbook A shows a different behavior.
As it was the first workbook with an active Analysis connection, connection A2 will be kept to share its connection context with open and save services for future connections.
Connection A1 will be kept open for 24 hours after the last workbook was closed.
For more information, see SAP Note 1794017
5.6 Defining connections to SAP HANA
If you use SAP Business Warehouse, powered by SAP HANA, you can analyze BW queries, query views and InfoProvider with Analysis. You can connect and use a BW system, powered by SAP HANA, like other BW systems with Analysis.
If you use the SAP HANA appliance software, you can analyze SAP HANA data sources with Analysis. You can use SAP HANA 1.0 as of SP09 or SAP HANA 2.0 as of SP01.
The connection to the SAP HANA platform relies on the http(s) protocol for the communication with the SAP HANA server. You have the following options to connect to SAP HANA platform with an HTTP connection:
80 P U B L I CAdministrator Guide
Administration for the Analysis Plug-In

● You can connect to the SAP HANA platform via SAP BusinessObjects Business Intelligence platform. This connection can be created directly in the CMC of the SAP BusinessObjects BI platform.
● You can create local SAP HANA connections in Analysis. Note that ODBC connections that were used in former releases (1.x), are no longer supported. You can migrate the connection type in a workbook or presentation.
To create an SAP HANA HTTP connection, either on the BI platform or as local connection, the following prerequisites must be met:
● You use one of the following SAP HANA versions:○ SAP HANA Platform 1.0 SP09 or higher
With SAP HANA Platform 1.0 SP09, we recommend that you use Revision 96 or higher.○ SAP HANA Platform 2.0 SP01 or higher
For SAP HANA 2.0, you need to install a seperate SAP HANA plug-in. The plug-in is called SAP HANA EPMMDS.For more information, see SAP Note 2456225 .
● The SAP HANA Info Access Service (InA) with delivery unit HCO_INA_SERVICE is deployed on the SAP HANA platform.You can find more information in chapter Importing the Info Access Service in the SAP HANA Search Developer Guide.
● In the XS Admin Tool, you configured that the SAP HANA InA Service can be accessed with authentication method Basic (in addition to other authentication methods). For more information see SAP Note 2193057
.● The role sap.bc.ina.service.v2.userRole::INA_USER is assigned.
The role is contained in delivery unit HCO_INA_SERVICE. Verify that the following authorizations are selected: Schema _SYS_BIC, Schema _SYS_BI and Schema _SYS_RT. For more information, see SAP Note 2097965 .
● To make sure that your users can only view data in SAP HANA data sources (analytic views and calculation views) that they have authorization for, you have to perform the following activities:1. Copy the role sap.bc.ina.service.v2.userRole::INA_USER.2. In the copied role, remove the Select privilege on schema _SYS_BIC.3. Replace the original role sap.bc.ina.service.v2.userRole::INA_USER by assigning the copied
role to your users.4. Define the detailed privileges for the new copied role as described in SAP Note 1907697
You can use the setting MaxNumberOfParallelThreads to define the maximum number of parallel threads that Analysis can use to open the SAP HANA data sources of a workbook. The default value is 10. This means that up to 10 data sourcers can be opened with parallel threads.
Related Information
Creating and managing BW system connections in SAP BusinessObjects Business Intelligence [page 76]To create an SAP HANA connection on the BI platform [page 82]To create a local SAP HANA connection [page 83]Troubleshooting for SAP HANA HTTP connections [page 85]Using existing Workbooks and Presentations in Analysis 2.7 [page 71]Settings for the Analysis Plug-in [page 25]
Administrator GuideAdministration for the Analysis Plug-In P U B L I C 81

5.6.1 To create an SAP HANA connection on the BI platform
Prerequisites
The MDAS property multidimensional.services.enable.hana.http.connections is set to true on each machine where an MDAS service is running.
The configuration file can be found on Windows under <BI platform install directory>\SAP BusinessObjects Enterprise XI 4.0\java\pjs\services\MDAS\resources\com\businessobjects\multidimensional\services and on Unix under <BI platform install directory>/sap_bobj/enterprise_xi40/java/pjs/services/MDAS/resources/com/businessobjects/multidimensional/services/.
NoteIn order for this change to be effective, it is necessary to restart each instance of the Adaptive Processing Server which contains an MDAS service.
Context
On the BI platform, you can create an HTTP connection to an SAP HANA Server in the central management console.
To create an SAP HANA HTTP connection on the BI platform, you have to use a BI platform 4.1 SP5 or a higher version.
Procedure
1. Log on to the Central Management Console (CMC).2. Select OLAP Connections.3. Select the icon New Connection.4. Enter a name and a description.
The description is optional.5. Select SAP HANA http as provider.6. As Server Information, enter a URL with the following structure: http(s)://<server>:<port>
We recommend to use HTTPS as scheme.
The default HTTP port settings for SAP HANA XS include an SAP HANA instance number: 80<SAP HANA instance>, for example 8001. You can change the default settings, for example, to ensure that standard ports 80 and 443 are used for client access to the SAP HANA XS Web server HTTP (80) or HTTPS (443).
82 P U B L I CAdministrator Guide
Administration for the Analysis Plug-In

For more information, see chapter Maintain Standard HTTP Port Numbers with SAP HANA XS in the SAP HANA Administration Guide.
7. Select the Authentication type:
○ PromptWhen this type is selected for the connection, the end user will be prompted with a dialog box to enter a user ID and password.
○ SSO (single sign-on)With the single sign-on option selected, the user has to sign on once. The authentication method for this connection is SAML 2.0.For more information, see chapters User Authentication and Single-Sign On and Maintaining Single Sign-On for SAP HANA XS Applications in the SAP HANA Administration Guide.
Note that you should not use authentication type Pre-Defined because the predefined user (and password) is not exposed to local clients such as Analysis.
8. Select Save to create the connection.
Associated Universes are ignored for SAP HANA HTTP connections.
Results
The new connection is available in the OLAP Connection list.
You can also edit and delete existing SAP HANA connections in this dialog.
5.6.2 To create a local SAP HANA connection
Context
In Analysis, you can create a local connection to an SAP HANA server. A local SAP HANA connection is created in the Select Data Source dialog.
Procedure
1. Select the cell in the Analysis worksheet.
2. Select Insert Data Source Select Data Source... in the Analysis ribbon.3. Select Skip to go to the local system connections.4. Select Create New SAP HANA Connection... in the context menu in the Description area.
The New SAP HANA Connection dialog box appears.
Administrator GuideAdministration for the Analysis Plug-In P U B L I C 83

5. Enter a description for the new local HANA connection.6. Select a scheme: HTTP or HTTPS
We recommend to use HTTPS.7. Enter a Host Name.8. Enter a Port.
The default HTTP port settings for SAP HANA XS include an SAP HANA instance number: 80<SAP HANA instance>, for example 8001. You can change the default settings, for example, to ensure that standard ports 80 and 443 are used for client access to the SAP HANA XS Web server by HTTP (80) or HTTPS (443).
For more information, see chapter Maintain Standard HTTP Port Numbers with SAP HANA XS in the SAP HANA Administration Guide.
9. Select an Authentication Type:
○ AutomaticThis connection type delegates the authentication process to a browser control. Depending on the server configuration, the browser will use one of the supported authentication methods. In addition to the methods you can select explicitly in Analysis, this connection type supports e.g. identity providers based on SAML standard.
○ BasicWhen this type is selected for the connection, the end user will be prompted with a dialog box to enter a user ID and password.
○ X.509 Client CertificateAuthentication with X.509 Certificates makes use of a Public Key Infrastructure (PKI) to securely authenticate users. In this case, user authentication takes place using the underlying Secure Sockets Layer (SSL) protocol and users do not need to interactively enter a password for logon.
○ KerberosThe Kerberos authentication process involves several systems connected in a network, or a Kerberos realm. Kerberos authentication within a realm works on the basis of “tickets”, which serve to prove the authenticity of client requests. Kerberos authentication makes use of a trusted third party system called Key Distribution Center (KDC).
For more information, see chapters User Authentication and Single-Sign On and Maintaining Single Sign-On for SAP HANA XS Applications in the SAP HANA Administration Guide.
10. Select Create or Create and Logon... to create the connection.
Results
The new connection is available in the Select Data Source dialog.
You can also edit and delete existing local SAP HANA connections in this dialog.
84 P U B L I CAdministrator Guide
Administration for the Analysis Plug-In

5.6.3 Troubleshooting for SAP HANA HTTP connections
Verifying the URL for the SAP HANA HTTP connection
1. Add the server name and port of your connection to test the URL: http(s)://<server>:<port>/sap/bc/ina/service/v2/GetServerInfo
2. Open a browser and paste the URL.3. You will receive one of the following responses:
○ HTTP 404 - not foundThis indicates that the server is not reachable (e.g. down or behind a firewall) or that the SAP HANA Info Access Service (InA) is not deployed.
○ The dialog box to enter user and password is displayed.If you have configured an SSO access, this indicates that the log-on was not successful.
○ A response is returned with a JSON format containing information about the server capabilities.This indicates that the log-on was successful.
Verifying Basic Data Base Access Rights (Index Server)
1. Complete the test URL with server name and port of your connection: http(s)://<server>:<port>/sap/bc/ina/service/v2/GetResponse?Request={%22Metadata%22:{%22Expand%22:[%22Cubes%22]}}
2. Open a browser and paste the URL.3. Check that you receive a response without error.
5.7 Defining system connections to SAP Analytics Cloud
In Analysis, you can create local connections to SAP Analytics Cloud. A local SAP Analytics Cloud connection is created in the Select Data Source dialog.
The connections that you use in Analysis are import data connections. This means that you can import (copy) data and save it in SAP Analytics Cloud. Changes made to the data in the source system don't affect the imported data until and unless the data is imported again either manually or as a scheduled job.
1. Select a cell in the Analysis worksheet.
2. Select Insert Data Source Select Data Source... in the Analysis ribbon.3. Select Skip to go to the local system connections.4. Select Create New SAC Connection... in the context menu in the Description area.
The New SAC Connection dialog box appears.5. Enter a description for the new local SAP Analytics Cloud connection.
Administrator GuideAdministration for the Analysis Plug-In P U B L I C 85

6. Enter the logon URL for the new local SAP Analytics Cloud connection.This is the URL of your SAP Analytics Cloud tenant.
7. Select OK to create the connection.
The new connection is available in the Select Data Source dialog.
You can also edit and delete existing local SAP Analytics Cloud connections in this dialog.
5.8 Providing hyperlinks to Analysis documents
You can provide hyperlinks to Analysis documents (workbooks and presentations) to offer users direct access to related information.
You have the following options to create a hyperlink:
● OpenDocumentThis web application is available for Analysis documents saved on the BI platform 4.2 SP5 or higher.
● ICF ServicesThese services are available for documents saved on a BW server.
● iViewsiViews can be created in the SAP Enterprise Portal for documents saved on a BW server.
You can add variable values for prompts used in the document to the hyperlink URLs.
Related Information
Using OpenDocument to view Analysis documents [page 86]Using ICF Services to view Analysis documents [page 87]Using SAP Enterprise Portal iViews to view Analysis documents [page 88]Adding prompts to hyperlinks [page 89]
5.8.1 Using OpenDocument to view Analysis documents
For Analysis documents saved on the BI platform 4.2 SP5 or higher, you can use the OpenDocument function to create a URL. OpenDocmuent is a web application that processes incoming URL requests for documents and any other viewable object type in the Central Management Server (CMS), and delivers the correct document to the end user in the appropriate viewer.
OpenDocument links are created in the BI Launch Pad.
1. In the BI Launch Pad, go to the Documents tab.2. Select a document.
This could be an Analysis workbook or presentation.
86 P U B L I CAdministrator Guide
Administration for the Analysis Plug-In

3. Choose More Actions Document Link .A dialog box with the OpenDocument URL appears.
4. Copy the OpenDocument link and click OK to close the Document Link dialog box.5. Paste the link to share the document.
You can paste the copied OpenDocument link in an email message to send to recipients or you can add it to another Analysis document.
6. Optional step: You can add values for prompts to the URL.
When a recipient clicks an OpenDocument link in a browser, the BI launch pad logon dialog box appears. After the recipient enters valid logon credentials, the corresponding Analysis application is opened, either Analysis for Microsoft Excel or Analysis for Microsoft PowerPoint, and the document is displayed.
For more information on the syntax of an OpenDocument link and the parameters you should include when creating one, refer to the Viewing Documents Using OpenDocument.
Related Information
Adding prompts to hyperlinks [page 89]
5.8.2 Using ICF Services to view Analysis documents
ICF Services are delivered with SAP BW and SAP BW/4HANA.
ICF services are based on the Internet Communication Framework (ICF) of the SAP Application Server for ABAP. ICF services are HTTP services that are used to execute HTTP request handlers. The BW HTTP services allow you to display or exchange BW data using a URL. Some of these services are implemented as Web services.
You can use these services to create hyperlinks to Analysis documents (workbooks and presentations) that are saved on a BW server. You can also include values for prompts in the URL.
The URL of an ICF Service for an Analysis document has the following structure:
<Protocol>://<Server>:<Port>/sap/bw/analysis?application=<application>&object_type=<type>&object_id=<id>
The value for application can be excel or powerpoint.
The value for object_tpye can be document (for workbooks and presentations), query, query_view or infoprovider.
The value for object_id is the technical name of the object in the BW system.
ExampleICF hyperlink to an Analysis document with variables
<Protocol>://<Server>:<Port>/sap/bw/analysis?application=excel&object_type=document&object_id=test01&var1=05&var2=08
Administrator GuideAdministration for the Analysis Plug-In P U B L I C 87

This example shows a link to the Analysis workbook test01 and variable values for the prompts var1 and var2.
You can include the ICF hyperlink in an email message to send to recipients or you can add it to another Analysis document.
When a user clicks an ICF services link in a browser, the BW logon dialog box appears. After the recipient enters valid logon credentials, the corresponding Analysis application is opened, either Analysis for Microsoft Excel or Analysis for Microsoft PowerPoint, and the document is displayed.
For more information on creating URL with ICF Services, see the SAP BW documentation at Web Services and ICF Services.
Related Information
Adding prompts to hyperlinks [page 89]
5.8.3 Using SAP Enterprise Portal iViews to view Analysis documents
In the SAP Enterprise Portal , you can create iViews to launch and share Analysis documents (workbooks and presentations).
The documents to be included in an iView have to be saved in a BW system and the ICF service sap/bw/analysis needs to be activated in the corresponding BW system.
The package com.sap.ip.bi.bexlauncher contains two iViews as templates for Analysis for Microsoft Excel and Analysis for Microsoft PowerPoint.
The iViews are created in the SAP Enterprise Portal Content Studio:
1. In the Portal Content Studio choose Content Administration Portal Content Administration Portal Content Platform Add-Ons Business Intelligence iViews .
2. Right-Click iViews and choose New iView iView from Template .3. In the Template Selection step, select Analysis for Microsoft Excel and Next.
If you want to include a presentation, select Analysis for Microsoft PowerPoint in this step.4. In the iView Wizard, enter Name and iView-ID and select Next.5. Enter the Application Parameters and select Next.
The parameters OBJECT_TYPE and OBJECT_ID are required.The value for OBJECT_TYPE can be DOCUMENT (for workbook and presentation), QUERY or QUERY_VIEW.The value for OBJECT_ID is the technical name of the object in the BW system.Example how the parameters should be entered: OBJECT_TYPE=DOCUMENT&OBJECT_ID=WB1With these parameters, the iView will launch Analysis with workbook WB1.
6. Select Finish to create the iView.The iView is added to the Business Intelligence area.
88 P U B L I CAdministrator Guide
Administration for the Analysis Plug-In
7. Right-Click the new iView and select Preview.8. Copy the URL.
You can paste the link to share it with other users.9. Optional step: You can add values for prompts to the URL
In the SAP Enterprise Portal Content Sudio, you can change and configure the iView. For example, you change the authorizations with the context menu Open Permissions .
More Information
You can find more information on creating and launching iViews in:
● SAP Enterprise Portal documentation at Creating and Editing iViews.● SAP Note 1799515● SAP Note 1825429
Related Information
Adding prompts to hyperlinks [page 89]
5.8.4 Adding prompts to hyperlinks
You can add prompts (variables) and their values to hyperlinks to Analysis documents.
To add prompts to hyperlinks, use the following syntax rules:
● Each variable name and values pair is one request parameter started with &.● Each parameter is flagged with prefix var.● You can add a single value, multiple values and ranges.
For adding values, you have to follow the syntax rules for entering values: Syntax for Entering ValuesFor multiple values and ranges, you have to use URL encoding according to ASCII character-set. This is %20 for space, for example.
● You can add the data source alias in square brackets.This parameter is optional. It can be used if different values for different data sources should be specified and the variables are not merged in the document.
Examples for prompts in hyperlinks
Example Description
&var0Product=P01 Adding this prompts definition to a URL, the value for prompt 0Product is set to P01.
Administrator GuideAdministration for the Analysis Plug-In P U B L I C 89

Example Description
&var0Product=P01&var0Country=France Adding this prompts definition to a URL, the value for prompt 0Product is set to P01 and the value for prompt 0Country is set to France.
&var[DS_1]0Product=P01 Adding this prompts definition to a URL, the value for prompt 0Product is set to P01 for data source DS_1.
&var[DS_1]0PRODUCT=P01%3B%20P02 Adding this prompts definition to a URL, the value for prompt 0Product is set to P01 and P02 for data source DS_1.
&var[DS_2]0PRODUCT=P03%20-%20P10 Adding this prompts definition to a URL, the value for prompt 0Product is set to the range P03-P10 for data source DS_2.
ExampleOpenDocument link with prompts
<Protocol>://<Server>:<Port>/BOE/OpenDocument/opendoc/openDocument.jsp?sIDType=CUID&iDocID=AQ6Kt6A8a3BOst3dpkPU2Ak&var[DS_1]0PRODUCT=P01%3B%20P02&var[DS_2]0PRODUCT=P03%20-%20P10
This example URL consists of three elements: http://mo-54885826a.mo.sap.corp:8080/BOE/OpenDocument/opendoc/openDocument.jsp?sIDType=CUID&iDocID=AQ6Kt6A8a3BOst3dpkPU2Ak is the OpenDocument link generated for a workbook saved on the BI platform. &var[DS_1]0PRODUCT=P01%3B%20P02 specifies the values P01 and P02 for prompt 0Product for data source DS_1. And &var[DS_2]0PRODUCT=P03%20-%20P10 specifies the value range P03 to P10 for prompt 0Product for data source DS_2.
5.9 Caching documents
Caching allows you to store copies of frequently used documents, Analysis workbooks and presentations, on a local client machine for quick access. In Analysis, caching can be used for documents that are stored on a SAP BW server or on a BI platform. The documents will be cached for each server (BW system) independently.
If you open a document that is already cached, the server provides information about the last change of the document. If the cached version is still valid, the cached version will be opened. If there is an updated version on the server, the cached version will be invalidated and the document is downloaded from the server.
The documents will be stored in the Analysis cache in an encrypted format. This encryption is specific for the current user and machine. This means that only the user that stored the document in the cache will be able to open the document from the cache. Furthermore, the document can only be opened on the same machine. The encryption uses the Microsoft Windows Data Protection (DPAPI) in combination with the Rijndael (AES) algorithm.
90 P U B L I CAdministrator Guide
Administration for the Analysis Plug-In

Caching documents stored on a SAP BW server
The documents can be cached if they are opened from Analysis and if they are launched from a BW system (transactions RAAOE/RAAOP).
To enable caching for documents stored on a SAP BW server, the following prerequisites have to be fulfilled:
● In the BW system(s), you enable document caching.Open report SAP_RSADMIN_MAINTAIN in transaction SA38 and add the object AO_DOC_CACHE_ACTIVE with value X.
● In Analysis, the setting IsCachingDocuments is set to true. This is the default value for the setting.● You use a SAP BW releases listed under SAP BW Server in this guide.
If you use lower release versions, you could check SAP Note 2179379 for correction instructions.
Caching documents stored in a SAP BW/4HANA system
The documents can be cached if they are opened from Analysis and if they are launched from a BW/4HANA system (transactions RAAOE/RAAOP).
Caching for documents stored in a SAP BW/4HANA system is always enabled.
Caching documents stored on a BI platform
The documents can be cached if they are opened from Analysis or if they are launched from the BI platform.
To enable caching for documents stored on a BI platform, the following prerequisites have to be fulfilled:
● In the Central Management Console, the property Enable Caching of Documents is selected. By default, the property is not selected.The property is available in the CMC under Applications Analysis Office Runtime ActionsProperties .
● You use a BI platform with release 4.2 SP3 or higher.
Related Information
SAP BW [page 67]Settings for the Analysis Plug-in [page 25]
Administrator GuideAdministration for the Analysis Plug-In P U B L I C 91

5.10 Customizing the User Interface
You can customize certain user interface areas of Analysis to meet your business needs.
NoteIn Analysis versions less than 2.4, the display of the following commands was specified with file system settings: Convert to Formula, Create Web Application, Launch Query Designer and Planning group.
When switching to Analysis 2.5 from a version less than 4, for example 2.3, Analysis takes the definition from the setting in the file system. If the command was displayed in the 2.3 installation, it will also be displayed in the 2.5 installation.
To see how you can customize user interface areas using profiles, check out this how-to video: https://youtu.be/X1jXGF8NiFs
5.11 Defining style sets for crosstabs
A style set is a selection of Microsoft Excel cell styles that is applied by Analysis to format the cells of a crosstab. Whenever users insert a new crosstab in a workbook, the styles of the current default style set are used to format the crosstab cells. You and your users can change the applied style set in the analysis. With Analysis, the following style sets and their cell styles are installed:
SAP Tradeshow PlusSAP BlueSAP Black&White
By modifying the cell styles of these style sets, you can create own style sets and share them with your users.
SAP standard styles are availabe after the installation of the Add-In. You can modify them in the Styles group on the Home tab of Microsoft Excel.
SAP custom styles are not availabe after the installation of the Add-In, but you can create them in the Styles group on the Home tab of Microsoft Excel.
For more information on creating and sharing styles, see the Analysis Plug-in User Guide at SAP Analysis for Microsoft Office.
5.12 Query runtime statistics
Analysis supports the query runtime statistics of SAP BW. You can activate the query runtime statistics in the Analysis backstage area at File Analysis Troubleshoot or with the file system setting Profiling.
Using the query runtime statistics, you can find out how much time the execution of certain user actions require in Analysis and in the BW analytic engine. The system records the performance-critical parts of the
92 P U B L I CAdministrator Guide
Administration for the Analysis Plug-In

processing (statistics events). It calculates the net times by calculating the runtime of an event using the difference between the start and end times (minus the times for other events called from within the event).
Each Analysis workbook has its own connections to the BW system. When the user closes a workbook, the connection to the BW system is also closed. The first workbook - for which a connection to a BW system is opened - shares its connections with the open services of Analysis. This means that the Insert Data Source dialog box reuses the connection from the first workbook.
The first connection to a BW system in a workbook is the “master” connection. The query runtime statistics for Analysis use the BW system of this master connection as the master system.
With the query runtime statistics activated inAnalysis, all events raised by the BI consumer services client code and by the ABAP server code are written to the statistics tables of the BW system. Analysis also raises a small additional set of events, which facilitates analysis of the other events.
If the Analysis events should be written to the RSDDSTAT_OLAP view (transaction code SE16), which contains the data from the front end and calculation layer events, they need to be in table RSDDSTATEVENTS as well. For more information, see SAP note 1462547.
The table below provides an overview of the Analysis events:
Event ID Long Text Description
20001 Net Application type Type of .NET application (objnm is PIONEER EXCEL for example)
20002 Net Scenario Scenario type of .NET application (refresh for example)
20003 Net Document ID Document ID of a .NET application (only one per session)
20010 Command Describes what the user did in the step.
20200 User at dialog The user waits at a dialog or does actions that return quickly.
Most user actions in Analysis will write an entry with event 20010. The time a user spends on a dialog during execution of the command and not executing another command will be made visible with event 20200. Each start of a statistic session will also contain events 20001, 20002 and 20003.
sYou can check the statistics in the Analysis backstage area at File Analysis Troubleshoot Show Workbook Profiling .
For more information about the query runtime statistics, see the SAP BW documentation on the SAP Help Portal at BI Query Runtime Statistics.
Related Information
Settings for the Analysis Plug-in [page 25]Troubleshooting in Analysis [page 169]
Administrator GuideAdministration for the Analysis Plug-In P U B L I C 93
5.13 Security
5.13.1 User management and authentication
Usage with SAP BW
Using Analysis with SAP BW as platform, you have to configure user accounts in the connected BW systems. These user acounts can also be used for the local usage of Analysis.
For more information, see the SAP NetWeaver Security Guide on the SAP Help Portal at http://help.sap.com.
Usage with SAP BusinessObjects Business Intelligence Platform
Using Analysis with the business intelligence platform, you have to configure user accounts in the connected BW systems as well. You also have to configure user accounts on the business intelligence platform server.
NoteMake sure that the user passwords on the business intelligence platform server have not expired. Analysis needs up-to-date credentials for users logging on to the platform.
For more information, see chapter 'Managing Users and Groups' in the Business Intelligence Platform Administrator Guide.
5.13.2 Authentication and single sign-on
Single Sign-On with SAP BW
With SAP BW as platform, single sign-on works if the following conditions are true:
● Secure Network Communications (SNC) is installed on each client PC. For more information, see SAP Help Portal at Secure Network Communications .
● Each end user has a user account in the connected BW system.
The user signs on once to the client-side Secure Network Communications (SNC) with his/her credentials, and is then able to connect to the BW systems without having to enter the BW user name and password.
The same settings are valid for using Analysis locally.
Single Sign-On with SAP BusinessObjects Business Intelligence platform
You can use two-factor authentication to log on to a BI platform with single sign-on. In Analysis, you can specify the two-factor authentication in the BoeConfiguration settings: TwoFactorAuthenticationCertificate,
94 P U B L I CAdministrator Guide
Administration for the Analysis Plug-In

TwoFactorAuthenticationDisabled and TwoFactorAuthenticationUrl. The two-factor authentication to BI platform is available as of SAP Analysis 2.6 SP1 and SAP BI platform 4.2 SP5.
On the BI platform, you need to configure SSL in Tomcat for SOAP Web Services to use the two-factor authentication. For more information, see the SAP Help Portal at Configuring SSL in Tomcat.
Once users are logged on to SAP BusinessObjects Business Intelligence platform, single sign-on enables users to access SAP systems without having to provide their logon credentials. Single sign-on works if the following conditions are true:
● BusinessObjects Business Intelligence platform is configured correctly for single sign-on. For more information, see “Configuring SAP authentication” in the SAP BusinessObjects Business Intelligence Platform Administratior'Guide at SAP BusinessObjects Business Intelligence Platform.
● In the Central Management Console under OLAP-connections, the parameter Authentications is set to SSO for the BW systems that should be used with single sign-on.
● In the Central Management Console under Users and Groups User List , the BI platform user accounts need to be mapped to the BW user accounts: In the Properties dialog box of a BI platform user, click Assigns Alias... to add the corresponding BW user.
● The SAP BW systems are configured as external authentication system. Proprietary SAP tokens (assertion tickets) are used to provide a mechanism that supports single sign-on for Analysis users connecting to BW systems. For more information, see “Setting up single sign-on to the SAP system” in the SAP BusinessObjects Business Intelligence Platform Administratior'Guide at SAP BusinessObjects Business Intelligence Platform.
With single sign-on, the user signs on once to SAP BusinessObjects Business Intelligence with his/her credentials (when inserting a data source in Analysis), and is then able to connect to the BW systems without having to enter a BW user name and password.
Single Sign-On with SAP HANA data source
To use a local HANA connection, you have to enable SSO.
For more information, see Defining connections to SAP HANA [page 80]
Related Information
BoeConfiguration [page 26]
5.13.3 Authorizations
In Analysis, users can store documents (workbooks and presentations) on the business intelligence platform, on the SAP NetWeaver platform or as a local file. For security reasons, make sure that users do not have administrator rights on the client PCs. Otherwise the users could access other users log files on the client PC for example.
Administrator GuideAdministration for the Analysis Plug-In P U B L I C 95

Authorizations for local files
To store documents locally, you can use a file share and assign authorizations for the file share to manage who should be able to save and open documents.
Authorizations for the SAP BusinessObjects BI platform
To store documents on the business intelligence platform, Analysis uses the SAP BusinessObjects Business Intelligence authorization concept to manage the folders containing Analysis workbooks and PowerPoint files. For more information on configuring the authorizations for these folders, see chapter Setting Rights in the Business Intelligence Platform Administrator Guide at How rights work on BI platform.
Authorizations for the SAP NetWeaver platform
To store documents on the SAP NetWeaver platform, Analysis uses the SAP NetWeaver BW authorization concept for data access management. The authorization object for using SAP NetWeaver as platform is S_RS_AO.
The authorization object S_RS_AO has the following fields:
Authorization Field Short Description and Options
RSAO_OBJID Analysis Client Technical Name
The options are: technical name of an Analysis document, a string ending with * for a namespace (e.g. ZZ*) and a single * to give the authorization for all documents.
RSAO_OBJTY Analysis Client Object Type
The options are: Microsoft Excel, Microsoft PowerPoint, Excel NW Embedded, PowerPoint NW Embedded, Analysis Application, Design Studio Extension and * to select all options.
RSZOWNER Owner (Person Responsible) for a Reporting Component
The options are: User ID for a single user, a group of users (team), the variable $USER and * to authorize all users.
96 P U B L I CAdministrator Guide
Administration for the Analysis Plug-In

Authorization Field Short Description and Options
ACTVT Activity
The options are: Create, Change, Display, Delete and * to select all options.
The authorization options are only related to the Analysis documents and not to the data of the underlying data source. For example, a user who is authorized to change a workbook (option: Change), is not automatically authorized to change the data of the underlying data source in the BW system.
In the BW system, the authorizations are maintained in transaction PFCG Role Maintenance.
A role can contain the authorization for several users, for example for user A and user B. If user A wants to open a workbook in the Role section in the Open Documents dialog in Analysis, he will only see the documents he is authorized to see, even if there are other documents attached to the role and user B.
You can use the variable $User to authorize all users for workbooks they created themselves. The variable $USER is replaced by the corresponding user name during the creation with the authorization check. You can enable the variable $USER with SAP Note 1929782 .
Analysis does not support the concept of favorites. A user can see documents he created in the My Documents section in the Open Documents dialog. And in the Role section in the Open Documents dialog, a user will see the documents he is authorized to see.
For more information, see the SAP BW documentation on the SAP Help Portal at Overview Authorization Objects.
Related Information
Examples: Authorizations for the SAP BW platform [page 97]
5.13.3.1 Examples: Authorizations for the SAP BW platform
The following examples show how you can maintain authorizations on the SAP BW platform (transaction PFCG).
Administrator GuideAdministration for the Analysis Plug-In P U B L I C 97

Authorization with restriction on activity
Authorization Field Value
RSAO_OBJID
(Analysis Client Technical Name)
*
RSAO_OBJTY
(Analysis Client Object Type)
Microsoft Excel
RSZOWNER
(Owner )
*
ACTVT
(Activity)
Create; Display
With these authorization settings, every user can save workbooks with an arbitrary name. All user can find the workbooks in the Open Documents dialog and display them in Analysis.
Authorization with restriction on owner
Authorization Field Value
RSAO_OBJID
(Analysis Client Technical Name)
Z*
RSAO_OBJTY
(Analysis Client Object Type)
Microsoft Excel
RSZOWNER
(Owner )
A
ACTVT
(Activity)
*
Authorization Field Value
RSAO_OBJID
(Analysis Client Technical Name)
X*
RSAO_OBJTY
(Analysis Client Object Type)
Microsoft Excel
RSZOWNER
(Owner )
B
98 P U B L I CAdministrator Guide
Administration for the Analysis Plug-In

Authorization Field Value
ACTVT
(Activity)
*
With these authorization settings, user A can create workbooks starting with an Z (naming convention) and user B can create workbooks with naming convention X*. Both users can also display, change or delete workbooks with these naming conventions.
User A cannot see any workbook with naming convention X* in the Open Documents dialog and user B will not find workbooks with naming convention Z*.
You can use the variable $USER as Owner to avoid to define the authorization for each user separately.
Authorization Field Value
RSAO_OBJID
(Analysis Client Technical Name)
*
RSAO_OBJTY
(Analysis Client Object Type)
Microsoft Excel
RSZOWNER
(Owner )
$USER
ACTVT
(Activity)
*
With these authorization settings, all users have the authorization for workbooks they created themselves. The variable $USER is replaced by the corresponding user name during the creation with the authorization check.
If user A creates the workbook Y2, he will be the owner of the workbook after saving. User A can find the workbook in the Open Documents dialog and display and change it again. User B will not find the workbook as user A is the owner.
Authorization for a team
Authorization Field Value
RSAO_OBJID
(Analysis Client Technical Name)
FC*; PF*
RSAO_OBJTY
(Analysis Client Object Type)
Microsoft Excel
RSZOWNER
(Owner )
A,B,C,D
Administrator GuideAdministration for the Analysis Plug-In P U B L I C 99

Authorization Field Value
ACTVT
(Activity)
*
A team consisting of the users A, B, C and D, has the authorization to create workbooks with naming convention FC* and PF*. The four members of the team can also display, change or delete workbooks with these naming convention.
RecommendationThe naming conventions for the technical names of the workbooks need to be set up as detailed as the organization structure and the different authorization profiles are. So users can only see the workbooks which contain functions they are allowed to execute.
5.13.4 Network and communication security
Your network infrastructure is extremely important in protecting your system. Your network needs to support the communication necessary for your business needs without allowing unauthorized access.
In some scenarios Analysis is enabled to work with HTTP. It is strongly recommended to only use this for temporary testing. In any scenario in which authentication data of real users is involved it is strongly recommended to use encrypted communication only (e.g. HTTPS)
Usage with SAP BW
If you use SAP BW as platform, the client PC communicates directly with the BW server. The BW system provides data access, authorizations for the data and OLAP functions for navigation in the data. The following steps describe the communication sequence:
1. There are two options:○ The user starts Analysis and inserts a data source from the BW system into a new workbook or
presentation.○ The user starts Analysis and opens a workbook or presentation stored in the BW system.
2. The user logs on to the BW system to get the data.
NoteIf single sign-on is activated the user can access the BW system directly.
3. The user navigates in the data.4. The user saves the Analysis workbook or PowerPoint in the BW system.
In steps 2 and 3, Analysis on the client PC requests data from the BW server. This communication is carried out with a synchronous Remote Function Call (RFC) connection. You can protect this RFC connection using Secure Network Communications (SNC). For more information, see SAP Help Portal at Secure Network Communications.
100 P U B L I CAdministrator Guide
Administration for the Analysis Plug-In

Usage with SAP BusinessObjects Business Intelligence / SAP BusinessObjects Enterprise
The following steps describe the communication sequence and provide an overview of the communication channels:
1. There are two options:○ The user opens an existing Analysis workbook or PowerPoint file located on the business intelligence
platform server. S/he has to log on to the business intelligence platform.○ The user starts Analysis and inserts a data source from the BW system into a new workbook or
PowerPoint file. S/he has to log on to business intelligence platform. Analysis receives the defined connections and the system information for the BW system(s) from the business intelligence platform.
2. The user logs on to the BW system to get the data.
NoteIf single sign-on is activated the user can access the BW system directly.
3. The user navigates in the data.4. The user saves the Analysis workbook or PowerPoint file on the business intelligence platform server.
In steps 1 and 4, Analysis on the client PC communicates with the business intelligence platform server for requesting system information and saving the files. This communication is carried out with a Web service connection using HTTP or HTTPS as protocols. To provide better security with the HTTP protocol, the Web service connection should use HTTP POST operations, rather than HTTP GET operations. Configure the Web service connection on the business intelligence platform server accordingly.
You can protect this Web service connection using Secure Sockets Layer (SSL). Analysis uses the standard ports for HTTP and HTTPS, which are configured in your network. For more information about the configuration of the Web service connection on the business intelligence platform server, see “Working with Web Application Container Servers” and “Configuring HTTPS/SSL” in the BusinessObjects Business Intelligence Administrator's Guide at SAP BusinessObjects Business Intelligence Platform.
In steps 2 and 3, Analysis on the client PC requests data from the BW server. This communication is carried out with a synchronous Remote Function Call (RFC) connection. You can protect this RFC connection using Secure Network Communications (SNC). For more information, see SAP Help Portal at Secure Network Communications.
5.13.5 Data Storage Security
Using the business intelligence platform with Analysis, data is stored on the SAP BusinessObjects Business Intelligence server. Access to the Analysis workbooks and PowerPoint files is protected by the authorization concept of the corresponding folders on the business intelligence platform server. For more information on configuring the authorizations for these folders, see “Setting Rights” in the BusinessObjects Business Intelligence Administrator's Guide at SAP BusinessObjects Business Intelligence Platform.
If you use Analysis locally, users store the Analysis workbooks and PowerPoint files with the BW data on a file share or on the client PCs. You can protect the access to the data on the file share with authorizations. To ensure that the locally stored data cannot be viewed by non-authorized users, we advise against giving users administrator rights on the client PCs.
Administrator GuideAdministration for the Analysis Plug-In P U B L I C 101

Locally stored Analysis documents are not protected by SAP Analysis. Protection needs to be provided by the respective device management (access control or encryption, for example).
5.13.6 Launcher and Scheduling
If Analysis is launched from a website, this usually involves the creation of a .sapaox file. This .sapaox file will then contain assertion tickets which allow the authenticated login to the target servers. This can include BW servers as well as BI platform servers.
In order to secure this assertion ticket it is essential that only HTTPS is used, whenever a .sapaox file is generated.
One scenario in which this mechanism is used is starting an Analysis workbook from the BI Launchpad (in the BI platform).
You can find more information about assertion tickets in the SAP NetWeaver Security Guide for Using Logon Tickets with AS ABAP.
Scheduling and Publication
A .sapaox file is also generated when an Analysis workbook is scheduled or published in the BI Platform. Within the BI Platform, the java process is supplied with the user object of the user for which the Analysis workbook is to be executed. From this user object, the Analysis precalculation java service gets the assertion tickets and writes them into the .sapaox file in the windows folder of the node that is configured to execute the Analysis precalculation java service. The service then calls the Analysis precalculation tool which executes with the .sapaox file and uses the content of the .sapaox file to logon to the target servers.
The .sapaox file is stored in this folder on the precalculation node: C:\Program Files (x86)\SAP BusinessObjects\SAP BusinessObjects Enterprise XI 4.0\Data\procSched\MySIA.AdaptiveJobServer\
Due to the usage in this mechanism these folders on the precalculation nodes should be secured appropriately.
5.13.7 VBA
Workbooks can contain VBA code. VBA is a powerful programming language. VBA should only be used if additional technical and organizational measures are in place. You could use trusted location or workbook and macro signatures, for example.
For more information, see the Microsoft Office documentation:
● Description of digital signatures and code signing in workbooks in Excel ● Digitally sign your macro project
102 P U B L I CAdministrator Guide
Administration for the Analysis Plug-In

5.13.8 Security for additional applications
3rd party applications
Analysis uses the Essential Studio of Syncfusion Windows Forms as a UI control library. This application does not need any specific security measures.
SAP applications
As data sources, Analysis takes the data from SAP Business Warehouse and SAP Analytics Cloud.
For more information on security aspects for SAP BW, see SAP Help Portal at Security Guide for Usage Type BI.
For more information on security aspects for SAP Analytics Cloud, see the Security section in the SAP Analytics Cloud documentation on the SAP Help Portal.
If you use the business intelligence platform for Analysis, see “Security Concepts” in the BusinessObjects Business Intelligence at SAP BusinessObjects Business Intelligence Platform.
5.13.9 Logging security relevant events
Security relevant information is stored in the log file if log severity is set to 16 (Debug Information). You can use the log file to help identify any potential unauthorized access to the system. The following events are logged for example:
● successful and unsuccessful logon attempts● start time and end time of a session● missing authorization for BW data or objects● type of Web Service URL to BusinessObjects Business Intelligence / BusinessObjects Enterprise
NoteAccess to person-related data is not logged in Analysis. You cannot track who accessed person-related data on the client. If required, we recommend using the relevant modelling tools in SAP BW instead.
Related Information
Settings for the Analysis Plug-in [page 25]Troubleshooting in Analysis [page 169]
Administrator GuideAdministration for the Analysis Plug-In P U B L I C 103

5.13.10 General security recommendations
The following topics provide an overview of additional security-related information and recommendations.
Virus scanner activation
As users upload Microsoft Excel and Microsoft PowerPoint files from Analysis into the business intelligence platform document repository, we recommend the use of a virus scanning application to protect your business intelligence platform server. You should only allow your users to store the files in a specific folder in the business intelligence platform. Configure a virus scan for this folder, by using a virus scanning application installed on the same server as the business intelligence platform. Whenever a file is added or modified in this folder, the virus scanner automatically scans the file.
5.14 Logging
Analysis uses Apache log4net to record log and trace information. The amount of log and trace information that should be stored is defined in the log.config file.
You can switch on the default logging and tracing as it is required for support messages in the Support Settings dialog.
The log and trace information is stored in .glf files. You can use SAP Snap-In for Microsoft Management Console (MMC) to view these files. SAP MMC provides a graphical user interface to manage the .glf files.
After the installation of Analysis, the log.config file is available under C:\ProgramData\SAP\Cof. This initial file defines that only log information containing error information is recorded. This corresponds to the default support setting for Log Severity: Error. The log files are stored under C:\Users\<user>\AppData\Local\Temp\Sap\Cof and have the name pattern Log_<process_id>.glf.
You can define the amount of stored log information with the level value in the log.config file. The following options are available: DEBUG, INFO, VERBOSE, WARNING, ERROR and FATAL. For more information, see theApache log4net documentation.
You can also record traces to analyze problems in Analysis. The trace recording is enabled if you change the support setting for Log Severity to Support. Then the Support_log.config file under C:\ProgramData\SAP\Cof will be copied to C:\Users\<user>\AppData\Roaming\SAP\Cof with file name log.config overwriting the existing file. The trace files are also stored under C:\Users\<user>\AppData\Local\Temp\Sap\Cof and have the name pattern Trace_<process_id>.glf.
If you change the log.config file under C:\Users\<user>\AppData\Roaming\SAP\Cof manually (for example the value level), the support setting for Log Severity will be changed to Customized.
You can restore the initial state of the log.config file by selecting Error as log severity in the support settings. The log.config file will be deleted under C:\Users\<user>\AppData\Roaming\SAP\Cof\ and the initial file under C:\ProgramData\SAP\Cof will be used again.
104 P U B L I CAdministrator Guide
Administration for the Analysis Plug-In

Related Information
Troubleshooting in Analysis [page 169]
5.15 Language Recognition and Processing
In SAP Analysis for Microsoft Office different text types are displayed in a single user interface.
Analysis receives texts from the connected BW system, such as master data and metadata of the selected data source. These texts are language-dependent and are displayed in the logon language of the BW system. If the user does not enter a logon language in the logon screen when inserting a BW data source, Analysis takes the default language from the user settings in the BW system. This is also the case if you have configured single sign-on.
The language of the Analysis user interface itself ( ribbon texts and menu entries for example) is determined by the Microsoft Office display language. The available Microsoft Office languages are processed in an intuitive algorithm.
NoteIf the Microsoft Office display language is not supported by Analysis, the user interface texts are displayed in English.
ExampleThe followingMicrosoft Office language values are recognized by Analysis and processed as German (LANGUAGE_GERMAN):
1031: // German - Germany3079: // German - Austria5127: // German - Liechtenstein4103: // German - Luxembourg2055: // German - Switzerland
5.15.1 Supported languages
List of supported languages
In the following table you can see the Microsoft Office language values and the corresponding language values in Analysis.
Administrator GuideAdministration for the Analysis Plug-In P U B L I C 105

Microsoft Office Language Value Analysis Language Value Description
1033, 2057, 3081, 10249, 4105, 9225, 15369, 16393, 14345, 6153, 8201, 17417, 5129, 13321, 18441, 7177, 11273, 12297
LANGUAGE_ENGLISH English
1031, 3079, 5127, 4103, 2055 LANGUAGE_GERMAN German
1036, 2060, 11276, 3084, 9228, 12300, 15372, 5132, 13324, 6156, 14348, 58380, 8204, 10252, 4108, 7180
LANGUAGE_FRENCH French
1041 LANGUAGE_JAPANESE Japanese
3082, 1034, 11274, 16394, 13322, 9226, 5130, 7178, 12298, 17418, 4106, 18442, 58378, 2058, 19466, 6154, 15370, 10250, 20490, 21514, 14346, 8202
LANGUAGE_SPANISH Spanish
2052, 4100 LANGUAGE_SIMPLIFIED_CHINESE Simplified Chinese
1028, 3076, 5124 LANGUAGE_TRADITIONAL_CHINESE Traditional Chinese
1040, 2064 LANGUAGE_ITALIAN Italian
1049, 2073 LANGUAGE_RUSSIAN Russian
1043, 2067 LANGUAGE_DUTCH Dutch
1042 LANGUAGE_KOREAN Korean
1046, 2070 LANGUAGE_PORTUGUESE Portuguese
1053 LANGUAGE_SWEDISH Swedish
1045 LANGUAGE_POLISH Polish
1030 LANGUAGE_DANISH Danish
1044, 2068 LANGUAGE_NORWEGIAN Norwegian
1035 LANGUAGE_FINNISH Finnish
1054 LANGUAGE_THAI Thai
1029 LANGUAGE_CZECH Czech
1038 LANGUAGE_HUNGARIAN Hungarian
1051 LANGUAGE_SLOVAK Slovak
1055 LANGUAGE_TURKISH Turkish
5.16 Lifecycle Management
Lifecycle management refers to the set of processes involved in managing information related to a product lifecycle, from design to delivery. It establishes procedures for governing the entire product lifecycle, including phases such as development, production, and testing.
Analysis uses SAP BusinessObjects Business Intelligence or SAP BW as BI platform and thus its lifecycle management modules.
106 P U B L I CAdministrator Guide
Administration for the Analysis Plug-In
Related Information
Lifecycle Management with Business Intelligence Platform [page 107]Life-Cycle Mangement with SAP BW [page 107]
5.16.1 Lifecycle Management with Business Intelligence Platform
Analysis workbooks and presentations are stored in the repository of the business intelligence Platform. With the 4.1 platform, you can save Analysis Workbooks and Analysis Presentations.
In the Central Management Console (CMC) of the business intelligence platform, you have to define connections to your SAP BW system(s). SAP Analysis gets the information of the connections in the CMC and establishes direct access to the defined BW systems for data exchange. The connection contains the fields Name, ID, and CUID. The Name can be maintained by the administrator, the ID is issued by the system and the CUID is constant, even after the connection has been transported.
You can use several business intelligence platform instances in your system landscape, for example one for testing and one for productive use, and you can transport objects from one instance to another. The transport of Analysis objects is based on two entities: transport of the connection defined in CMC and transport of the workbooks and presentations.
After the transport of the connection, you can update it in the target business intelligence platform instance by maintaining the connection information to the associated BW system, for example if you use different BW systems for testing and productive use. The constant CUID ensures that the connection works correctly following the transport.
The transported workbooks and presentations use the connection CUID to read the appropriate connection information, and Analysis builds the connection to the target system or object.
NoteEnsure that the dependent objects on the Analysis workbooks and presentations (InfoProviders, queries, query views) are available in the BW system that is connected to the target business intelligence platform system.
For more information about transporting objects in the business intelligence platform, see the Information platform services Administrator Guide at Promotion Management.
5.16.2 Life-Cycle Mangement with SAP BW
Analysis workbooks and presentations are stored in the SAP Business Warehouse metadata repository. You can store the file fomats .xls, .xlsx, .ppt and .pptx with SAP BW. The authorization object for using SAP BW as platform is S_RS_AO.
Administrator GuideAdministration for the Analysis Plug-In P U B L I C 107

In SAP Business Warehouse, Analysis objects are stored with object type AAOE (for workbooks) and AAOP (for presentations). You can save an Object Name (technical name) and a Long Description (title) with an Analysis object.
Newly created objects are saved as an active version (A-TLOGO object). If you create a new object in a BI Content development system, it is saved as active version and delivery version (D-TLOGO object).
You can use several BW systems in your system landscape, one for testing and one for productive usage for example. You can also transport objects from one system to another. An Analysis object can contain connections to different BW systems. The system of the data source that is first inserted in the workbook or presentation, is the master system. If an object is transported, the connection to the master system will be replaced in the target system. The other connections are unaffected.
NoteYou have to make sure that objects dependent on the Analysis workbooks and presentations (InfoProviders, queries, query views) exist in the target BW system.
For more information about object versioning and transporting objects in SAP BW, see see the SAP BW documentation at Transporting BEx Objects.
5.17 Usage Tracking
The usage of the Analysis plug-in is tracked using SAP Web Analytics. The goal is to get a better and more profound knowledge about which features of Analysis are used by end users and in which environment it is executed (e.g. SAP Analysis version, Microsoft Excel version, Windows version, screen resolution).
The tracking has a clear focus on the product and not on the user. Therefore the tracked data is completely anonymous and does not contain any user or company related information.
You can switch off tracking completely using the file system setting TrackUsage.
Related Information
Settings for the Analysis Plug-in [page 25]
108 P U B L I CAdministrator Guide
Administration for the Analysis Plug-In

6 Administration for the EPM Plug-in
6.1 Creating and Configuring Connections
This section explains how you create connections in the EPM Plug-in for Microsoft Office. You can create three types of connections:
● Local connections● Planning and Consolidation connections● SAP BusinessObjects Enterprise connections
CautionYou cannot create two connections with the same name.
NoteMicrosoft Office documents contain free text fields. These text fields are not intended to store personal data without additional technical or organizational measures to safeguard data protection and privacy.
In order to ensure that analytical data which is personal data and which is retrieved from the servers with EPM add-in functionality, does not get stored in documents, the EPM sheet option Clear Data on the Whole File when Saving it can be selected in those workbooks. This functionality can be used in cases, where personal data from servers needs to be removed before saving.
Users can select the sheet option Clear Data on the Whole File when Saving it in EPM Options Sheet Options Refresh .
Administrators can select the sheet option Clear Data on the Whole File when Saving it, click the Save as Default button in the Sheet Options dialog box, then deploy the EPMXLClientPreference.xml file (located in \Users\[ID]\AppData\Local\EPMOfficeClient) on user's machines.
For more details, see chapter Data Protection and Privacy in this guide.
6.1.1 Creating Local Connections
Creating a Local connection enables you to analyze the data of the following OLAP data sources:
● SSAS cubes created with SAP BusinessObjects Financial Consolidation, cube designer● SAP NetWeaver BW InfoCubes created with SAP BusinessObjects Financial Consolidation, cube designer● SAP BusinessObjects Profitability and Cost Management● SAP BusinessObjects Planning and Consolidation, version for SAP NetWeaver● SAP BusinessObjects Planning and Consolidation, version for the Microsoft platform● SSAS cubes
Administrator GuideAdministration for the EPM Plug-in P U B L I C 109

● SAP NetWeaver Cubes● SAP HANA MDX Provider
6.1.1.1 Configuration Prerequisites for Creating Local Connections
Prerequisites
The connections you create are OQY queries, stored in .oqy files on your local disc.
When creating these connections, you must indicate in which folder these files will be stored.
Procedure
1. Open Microsoft Office Excel or Microsoft Office PowerPoint.2. Select the EPM tab.3. Click the Log On button.
The EPM - Logon dialog box opens.4. Click the browse button next to the Connection area.
The Connection Manager opens.5. Click the Display Local Connections option.6. Click the Local Connection Folder button.
The Local Connection Folder dialog box opens.
110 P U B L I CAdministrator Guide
Administration for the EPM Plug-in

7. Make sure that:
○ the folders listed in this dialog box exist in your Windows Explorer,○ you have Write permission on these folders.
NoteIf you run Windows Terminal Services or Citrix and you want all users to see connections, you must put the .oqy files in a folder every user can read, like C:\Program Files (x86)\Common Files\ODBC\data source. Alternatively, you can add another folder.
6.1.1.2 Creating a Local Connection for Financial Consolidation with SSAS Cubes using XMLA or OLEDB Providers
Procedure
1. Open Microsoft Office Excel or Microsoft Office PowerPoint.2. Select the EPM tab.
3. Select Options User Options .The EPM - User Options dialog box opens.
Administrator GuideAdministration for the EPM Plug-in P U B L I C 111

4. Select the Server Configuration tab.5. In the SAP BusinessObjects Enterprise Server, enter the address of the SAP BusinessObjects Enterprise
platform and click Check Server.
NoteThe correct syntax is the following: http://<server_name><port_number>. You must not enter /BOE/CMC at the end of the URL.
6. If you have access to a dedicated SAP Portal, enter the address of the SAP Portal and click Check Server in the SAP Portal area. A message pops up, indicating if the server has responded.
7. Click Options and enter the two parameters (User Name and Password). Make sure those parameters are written in the exact same way the SAP Portal parameters are.The SAP Portal credentials can now be used to connect to your local connections.
8. Click OK.9. Then select the EPM tab and click the Log On button.
Note
If a connection is already used on the file, select the EPM tab and then Report Actions Manage Connections . The Connection Manager opens.
The EPM - Logon dialog box opens.
112 P U B L I CAdministrator Guide
Administration for the EPM Plug-in
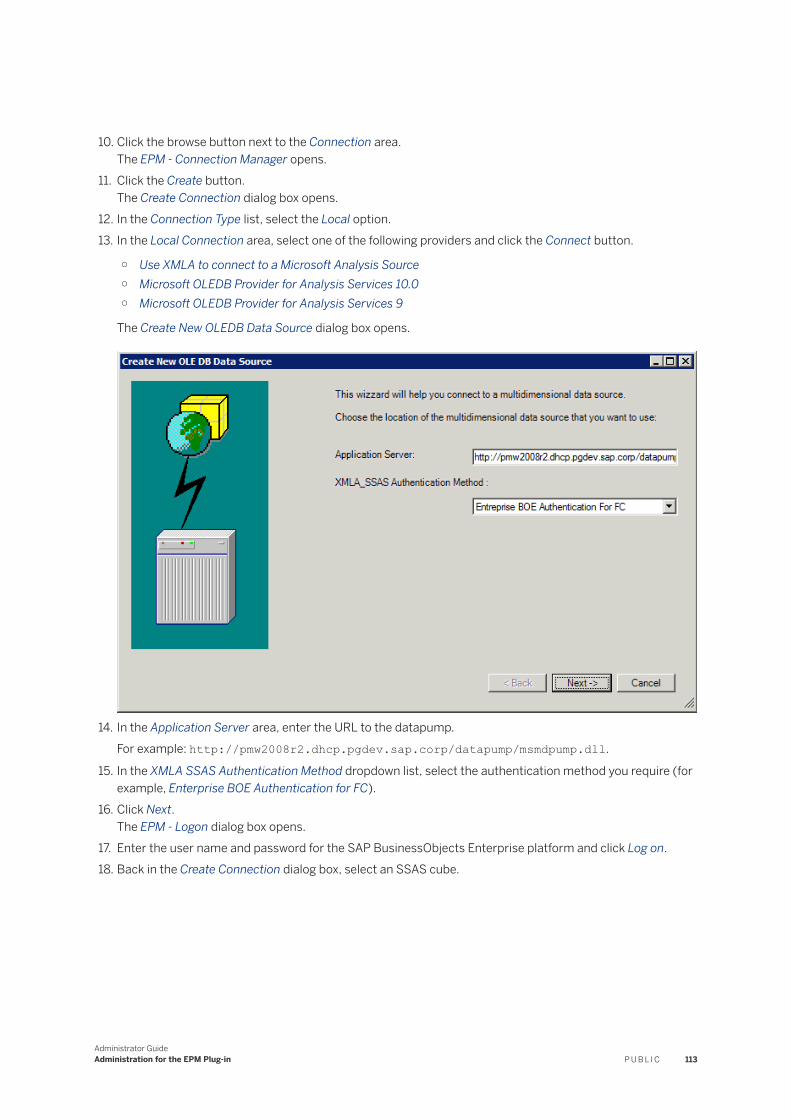
10. Click the browse button next to the Connection area.The EPM - Connection Manager opens.
11. Click the Create button.The Create Connection dialog box opens.
12. In the Connection Type list, select the Local option.13. In the Local Connection area, select one of the following providers and click the Connect button.
○ Use XMLA to connect to a Microsoft Analysis Source○ Microsoft OLEDB Provider for Analysis Services 10.0○ Microsoft OLEDB Provider for Analysis Services 9
The Create New OLEDB Data Source dialog box opens.
14. In the Application Server area, enter the URL to the datapump.For example: http://pmw2008r2.dhcp.pgdev.sap.corp/datapump/msmdpump.dll.
15. In the XMLA SSAS Authentication Method dropdown list, select the authentication method you require (for example, Enterprise BOE Authentication for FC).
16. Click Next.The EPM - Logon dialog box opens.
17. Enter the user name and password for the SAP BusinessObjects Enterprise platform and click Log on.18. Back in the Create Connection dialog box, select an SSAS cube.
Administrator GuideAdministration for the EPM Plug-in P U B L I C 113

19. Enter a name for the connection.The name appears in the Connection Manager list of connections.
NoteIf the data source for which you are creating or editing the local connection is a large volume data source, select the Do not Load Members at Connection option.
114 P U B L I CAdministrator Guide
Administration for the EPM Plug-in

6.1.1.3 Creating a Local Connection for Financial Consolidation with NetWeaver BW Cubes
Procedure
1. Open Microsoft Office Excel or Microsoft Office PowerPoint.2. Select the EPM tab.3. Click Log On.
The EPM - Logon dialog box opens.4. Click the browse button next to the Connection area.
The EPM - Connection Manager opens.5. Click Create.
The Create Connection dialog box opens.
6. In the Connection Type list, select the Local option.
Administrator GuideAdministration for the EPM Plug-in P U B L I C 115

7. In the Local Connection area, select one of the following provider:
○ the SAP BW OLEDB Provider.○ or the BAPI provider for BW NW if you want to connect to a large volume data source. In that case, you
can click the Use Navigation Attribute option if you want to retrieve navigation attributes from your SAP NetWeaver environment.
The Create New OLEDB Data Source dialog box opens.
8. Click Connect.9. In the Application Server field, enter the name of the BW server.10. Depending on the provider you selected at step 7, select the appropriate authentication method in the
MDrmSap.2 Authentication Method or BAPI_Generic Authentication Method dropdown list.11. If you selected a BAPI provider, select one of the following authentication method:
○ SAP BW Authentication Basic○ SAP Enterprise Authentication Basic: use this option if you have access to a dedicated SAP Portal.
NoteYou must enter the address of the SAP Portal in the SAP Portal area of the EPM - User Options dialog box.
12. In the System Number field, enter the system number of your SAP NetWeaver server.13. In the Client field, enter your client number.14. In the Language field, enter the language of your BW system.15. Click Next.
The Logon dialog box opens.16. Enter the user name and password and click Log on.
116 P U B L I CAdministrator Guide
Administration for the EPM Plug-in

17. In the Create Connection dialog box, select the model you want to use.18. Enter a name for the connection.
The name appears in the Connection Manager list of connections.19. Click OK.
6.1.1.4 Creating a Local Connection for Profitability and Cost Management
Prerequisites
When installing the SAP Profitability and Cost Management appplication, you must install the following components:
● Core Components● Connectivity Pack
Procedure
1. Open Microsoft Office Excel or Microsoft Office PowerPoint.2. Select the EPM tab.
3. Select Options User Options .The User Options dialog box opens.
Administrator GuideAdministration for the EPM Plug-in P U B L I C 117

4. In the SAP BusinessObjects Enterprise Server field, enter the address of the SAP BusinessObjects
Enterprise platform and click Check Server.
NoteYou must enter the SAP BusinessObjects Enterprise platform server adress only if you want to authenticate through the BOE platform.
NoteThe correct syntax is the following: http://<server_name><port_number>. Do not enter /BOE/CMC at the end of the URL.
A message pops up, indicating if the server has responded.5. In the SAP Portal field, enter the address of the SAP Portal and click Check Portal.6. Click Options and enter the two parameters (User Name Parameter and Password Parameter). Make sure
those parameters are written in the exact same way the SAP Portal parameters are.The SAP Portal credentials can now be used to connect to your local connections.
7. Click OK.8. Select the EPM tab and click the Log On button.
118 P U B L I CAdministrator Guide
Administration for the EPM Plug-in

Note
If a connection is already used on the file, select the EPM tab and then Report Actions Manage Connections and the Connection Manager opens.
The EPM - Logon dialog box opens.9. Click the browse button next to the Connection area.
The Connection Manager opens.10. Click Create.
The Create Connection dialog box opens.11. Select the Local option.12. Select the Profitability and Cost Management provider from the drop-down menu and click Connect.
The Create New OLEDB Data Source dialog box opens.
13. In the Application Server field, enter the name of your Profitability and Cost Management server.14. In the EPMMDX.4 Authentication Method dropdown list, select the appropriate authentication method.15. Click Next.
The Logon dialog box opens.16. Enter the user name and password and click Logon.17. Back in the Create Connection dialog box, select the model you want to use.18. Specify a connection name and click OK.
NoteIf the data source for which you are creating or editing the local connection is a large volume data source, select the Do not Load Members at Connection option.
Administrator GuideAdministration for the EPM Plug-in P U B L I C 119

6.1.1.5 Creating a Local Connection for Planning and Consolidation for Microsoft
Procedure
1. Open Microsoft Office Excel or Microsoft Office PowerPoint.2. Select the EPM tab.
3. Select Options User Options .The User Options dialog box opens.
4. In the SAP BusinessObjects Enterprise Server, enter the address of the SAP BusinessObjects Enterprise platform and click Check Server.
120 P U B L I CAdministrator Guide
Administration for the EPM Plug-in

NoteYou must enter the SAP BusinessObjects Enterprise platform server adress only if you want to authenticate through the BOE platform.
NoteThe correct syntax is the following: http://<server_name><port_number>. Do not enter /BOE/CMC at the end of the URL.
A message pops up, indicating if the server has responded.5. Click OK.6. Then select the EPM tab and click Log On.
Note
If a connection is already used on the file, select the EPM tab and then Report Actions Manage Connections . The Connection Manager opens.
The EPM - Logon dialog box opens.7. Click the browse button next to the Connection area.
The EPM - Connection Manager opens.
Administrator GuideAdministration for the EPM Plug-in P U B L I C 121

8. Click Create.The Create Connection dialog box opens.
9. In the Connection Type area, select the Local option.10. In the Local Connection area, select the SAP BusinessObjects Planning and Consolidation option and click
Connect.The Create New OLEDB Data Source dialog box opens.
11. In the Application Server field, enter the name of the BW server.12. In the BPCMDX.4 Authentication Method dropdown list, select the appropriate authentication method.13. Click Next.
The following dialog box opens.
122 P U B L I CAdministrator Guide
Administration for the EPM Plug-in

14. Select the data source that you require.15. Click Finish.16. In the Create Connection dialog box, select the model you require.
Administrator GuideAdministration for the EPM Plug-in P U B L I C 123

17. Enter a name for the connection.The name appears in the Connection Manager list of connections.
18. Click OK.
6.1.1.6 Prerequisites for creating a local connection for Planning and Consolidation version for SAP NetWeaver
Prerequisites
Once the BW cube has been generated and before creating a local connection for Planning and Consolidation, version for SAP NetWeaver, from the EPM Plug-in, the following procedure is required.
Procedure
1. Log in to Planning and Consolidation.
124 P U B L I CAdministrator Guide
Administration for the EPM Plug-in

2. In the Launch pane of the window, click Planning and Consolidation Administration.The Planning and Consolidation Administration opens.
3. In the left pane, select Dimensions and Models > Models.4. Select the model for which you want to create a connection.
The following window opens.
Administrator GuideAdministration for the EPM Plug-in P U B L I C 125

5. In the Features Used with the Model section, select the Use as Source of Data for External Applications option.
NoteSelecting this option is creating a virtual provider in the SAP NetWeaver application.
6. Click Save and Close.
NoteThe next steps are not mandatory. They are intended only if you want to verify the creation of the virtual provider in the SAP NetWeaver application.
7. Open the SAP NetWeaver application.8. Execute the RSA1 transaction.
The DataWarehousing Workbench opens.9. In the left pane, expand the environment and click InfoProvider.10. Under this section, you will find the virtual provider that was created during step 5.
NoteThe virtual provider name is suffixed by the letter B. In this example: Consolidation_B, as the provider itself has no suffix.
11. You can now exit the SAP NetWeaver application.
126 P U B L I CAdministrator Guide
Administration for the EPM Plug-in

6.1.1.7 Creating a Local Connection for Planning and Consolidation version for SAP NetWeaver
Procedure
1. Open Microsoft Office Excel or Microsoft Office PowerPoint.2. Select the EPM tab.3. Click Log On.
The EPM - Logon dialog box opens.4. Click the browse button next to the Connection area.
The EPM - Connection Manager opens.5. Click Create.
The Create Connection dialog box opens.6. In the Connection Type area, select the Local option.7. In the Local Connection area, select the SAP BW OLEDB Provider option and click Connect.
The Create New OLEDB Data Source dialog box opens.
8. In the Application Server field, enter the name of the BW server.9. In the MDrmSAP.2 Authentication Method dropdown list, select the appropriate authentication method.10. In the System Number field, enter the system number of your SAP NetWeaver server.11. In the Client field, enter your client number.12. In the Language field, enter the language of your BW system.13. Click Next.
The Logon dialog box opens.
Administrator GuideAdministration for the EPM Plug-in P U B L I C 127

14. Enter the user name and password and click Log on.15. Click Next.
The following dialog box opens.
You can see the list of all the virtual providers that have been created on the SAP NetWeaver server.16. Select the $INFOCUBE data source and click Finish.17. In the Create Connection dialog box, select a cube that contains TQ2_.18. Enter a name for the connection.
The name appears in the Connection Manager list of connections.
128 P U B L I CAdministrator Guide
Administration for the EPM Plug-in

19. Click OK.
6.1.1.8 Creating a Local Connection for the SAP HANA Platform
Prerequisites
Before creating a local connection for the SAP HANA Platform, you must have installed the MDX Provider for SAP HANA.
Procedure
1. Open Microsoft Office Excel or Microsoft Office PowerPoint.2. Select the EPM tab.3. Click Log On.
The EPM - Logon dialog box opens.4. Click the browse button next to the Connection area.
The EPM - Connection Manager opens.
Administrator GuideAdministration for the EPM Plug-in P U B L I C 129

5. Click Create.The Create Connection dialog box opens.
6. In the Connection Type list, select the Local option.7. In the Local connection area, select the SAP HANA MDX Provider and click Connect.
The Create New OLEDB Data Source dialog box opens.
130 P U B L I CAdministrator Guide
Administration for the EPM Plug-in

8. In the Application Server field, enter the name of the SAP HANA server.9. In the SAPNewsDBMDXProvider Authentication Method, select the Other Basic method.10. In the System Number field, enter the system number of your SAP HANA server.11. Click Next.
The Logon dialog box opens.12. Enter the user name and password and click Log on.13. In the Create Connection dialog box, select the model you want to use.14. Enter a name for the connection.
The name appears in the Connection Manager list of connections.
Administrator GuideAdministration for the EPM Plug-in P U B L I C 131

6.1.2 Creating Planning and Consolidation Connections
Creating a Planning and Consolidation connection enables you to enter data on the following models of:
● SAP BusinessObjects Planning and Consolidation, version for the Microsoft platform● SAP BusinessObjects Planning and Consolidation, version for SAP NetWeaver
132 P U B L I CAdministrator Guide
Administration for the EPM Plug-in

6.1.2.1 Creating a Planning and Consolidation Connection for the Microsoft Platform
Procedure
1. Open Microsoft Office Excel, Microsoft Office Word, or Microsoft Office PowerPoint.2. Select the EPM tab.3. Click Log On.
The EPM - Logon dialog box opens.4. Click the browse button next to the Connection area.5. Click Create.
The Create Connection dialog box opens.6. In the Connection Type area, select Planning and Consolidation, version for the Microsoft platform.7. In the Server URL area, enter the Planning and Consolidation server URL. For example: https://
vmw3443:8443/sap/bpc/.
8. Choose one of the following options to connect to the Planning and Consolidation server:
○ Connect directly by clicking Connect. In the login dialog box that opens, enter your User Name and Password and click Logon.
○ Use a single sign-on client certificate. Select the option Client Certificate, then select a certificate that has been generated by your administrator. Note that this is not valid if you connect through a BusinessObjects Enterprise XI platform.
○ For enhanced security, use a single sign-on short-lived certificate by clicking SAP Secure Login Profile. When you select this option, the authentication is managed by SAP Secure Login Client (as part of the SAP Single Sign-On solution). Then, select a client profile. A client profile consists of a user authentication scheme with one or more authentication mechanisms: Kerberos, ADS, LDAP, RSA SecurID, 2-factor authentication (with a password and a one-time password). Then, click connect and enter the user name, password (and one-time password if you are using a 2-factor authentication profile) in the SAP Secure Login Client login dialog box. A short-lived certificate is created on your local machine and as long as the certificate is valid, you can log off and log in again as many times as you want and you will not have to authenticate each time. For more information on SAP Secure Login, see the Secure Login for SAP Single Sign-On Implementation Guide. Note that you need to buy a license to use SAP Single Sign-On.
9. Select an Environment and a Model.10. Click Generate Connection Name or manually enter a connection name.
6.1.2.2 Creating a Planning and Consolidation Connection for SAP NetWeaver
Procedure
1. Open Microsoft Office Excel, Microsoft Office Word, or Microsoft Office PowerPoint.
Administrator GuideAdministration for the EPM Plug-in P U B L I C 133

2. Select the EPM tab.3. Click Log On.
The EPM - Logon dialog box opens.4. Click the browse button next to the Connection area.
The EPM - Connection Manager opens.5. Click Create.
The Create Connection dialog box opens.6. In the Connection Type area, select Planning and Consolidation, version for SAP NetWeaver.7. In the Server URL area, enter the Planning and Consolidation server URL. For example: http://
ldcie2f.wdf.sap.corp:50015/sap/bpc/.
8. Choose one of the following options to connect to the Planning and Consolidation server:
○ Connect directly by clicking Connect. In the login dialog box that opens, enter your User Name and Password and click Logon.
○ Use a single sign-on client certificate. Select the option Client Certificate, then select a certificate that has been generated by your administrator. Note that this is not valid if you connect through a BusinessObjects Enterprise XI platform.
○ If the server does not use any of the protocols that are natively supported by the EPM plug-in (that is: Basic, Client Certificate and Windows), but use a protocol of type saml 2 (that is a protocol that requires html and javascript technologies), select the Web Authentication Protocol option. Note that the option is taken into account only for versions 10.1 and 4 of Planning and Consolidation SAP NetWeaver.
○ For enhanced security, use a single sign-on short-lived certificate by clicking SAP Secure Login Profile. When you select this option, the authentication is managed by SAP Secure Login Client (as part of the SAP Single Sign-On solution). Then, select a client profile. A client profile consists of a user authentication scheme with one or more authentication mechanisms: Kerberos, ADS, LDAP, RSA SecurID, 2-factor authentication (with a password and a one-time password). Then, click connect and enter the user name, password (and one-time password if you are using a 2-factor authentication profile) in the SAP Secure Login Client login dialog box. A short-lived certificate is created on your local machine and as long as the certificate is valid, you can log off and log in again as many times as you want and you will not have to authenticate each time. For more information on SAP Secure Login, see the Secure Login for SAP Single Sign-On Implementation Guide. Note that you need to buy a license to use SAP Single Sign-On.
NoteIf you use the SAP Portal credentials to create your Planning and Consolidation Connection for SAP NetWeaver connection, the authentication is performed directly at the SAP Portal level and not at the Planning and Consolidation server level. Beforehand, you must enter the SAP Portal parameters in the Server Configuration tab of the EPM - User Options dialog box.
9. Select an Environment and a Model.10. Click Generate Connection Name or manually enter a connection name.
6.1.3 Creating SAP BusinessObjects Enterprise ConnectionsCreating an SAP BusinessObjects Enterprise connection enables you to analyze the data of the OLAP data sources below:
134 P U B L I CAdministrator Guide
Administration for the EPM Plug-in

● SSAS cubes created with SAP BusinessObjects Financial Consolidation, cube designer● SAP NetWeaver BW InfoCubes created with SAP BusinessObjects Financial Consolidation, cube designer● SAP BusinessObjects Profitability and Cost Management models● SAP BusinessObjects Planning and Consolidation, version for SAP NetWeaver● SAP BusinessObjects Planning and Consolidation, version for the Microsoft platform● SSAS Cubes● SAP NetWeaver BW Cubes
To create an SAP BusinessObjects Enterprise connections, you must:
● Create an EPM Connection in the EPM Connection Manager in the Central Management Console,● Create a BOE connection in the EPM plug-in.
6.1.3.1 Creating an EPM Connection for Financial Consolidation with SSAS Cubes in the Central Management Console
Prerequisites
● You must install the EPM Connection Manager on the SAP BusinessObjects Enteprise platform before creating an EPM connection.
● Install the Web services. To find out more about the installation procedure, see the SAP BusinessObjects Financial Consolidation Installation documentation.
Procedure
1. Log on to the Central Management Console.2. In the Organize section, click EPM Connections.3. Click New Connection.
The following window opens.
Administrator GuideAdministration for the EPM Plug-in P U B L I C 135

4. Enter a name for the connection.5. In the Source Application field, select the SAP BusinessObjects Financial Consolidation application.6. In the Provider field, select Microsoft Analysis Services 2005 or Microsoft Analysis Services 2008.7. In the Server address field, enter the URL of the datapump located on the SSAS Server.8. In the Server Name field, enter the name of the SSAS server. If you installed it with a named instance, do
not forget to indicate the name of the instance.9. In the Catalog field, select the SSAS database you are going to use.
CautionYou must select a catalog (an SSAS database) that is only created and used by Cube Designer.
NoteWhen creating the EPM connection, a message appears "database not found". This is normal as the database is only created after the first solution is deployed.
10. In the Web services URL field, enter the URL of the SAP BusinessObjects Financial Consolidation Web Services.
11. Click Save.
136 P U B L I CAdministrator Guide
Administration for the EPM Plug-in

Once the connection is created, you must define the appropriate security in the Central Management Console.
The user must be granted the following rights:○ View right on connections,○ Publish right, if you want the user to publish workbooks in the BI launch pad.
6.1.3.2 Creating an EPM Connection for Financial Consolidation with NetWeaver BW Cubes in the Central Management Console
Prerequisites
● You must install the EPM Connection Manager on the SAP BusinessObjects Enteprise platform before creating an EPM connection.
● Install the Web services. To find out more about the installation procedure, see the SAP BusinessObjects Financial Consolidation Installation documentation.
Procedure
1. Log on to the Central Management Console.2. In the Organize section, click EPM Connections.3. Click New Connection.
The following window opens.
Administrator GuideAdministration for the EPM Plug-in P U B L I C 137

4. Enter a name for the connection.5. In the Source Application field, select the SAP BusinessObjects Financial Consolidation application.6. In the Provider field, select ODBO Provider for NetWeaver BW.7. In the Application Server field, enter the URL of the SAP NetWeaver server.8. In the System Number field, enter the system number of your SAP NetWeaver server.9. In the Client field, enter your client number.10. In the Web services URL field, enter the URL of the SAP BusinessObjects Financial Consolidation Web
Services.11. Click Save.
Once the connection is created, you must define the appropriate security in the Central Management Console.
The user must be granted the following rights:○ View right on connections,○ Publish right, if you want the user to publish workbooks in the BI launch pad.
138 P U B L I CAdministrator Guide
Administration for the EPM Plug-in

6.1.3.3 Creating an EPM Connection for Profitability and Cost Management in the Central Management Console
Context
You must install the EPM Connection Manager on the SAP BusinessObjects Enterprise platform before creating an EPM connection.
Procedure
1. Log on to the Central Management Console.2. In the Organize section, click EPM Connections.3. Click New Connection.
The following window opens.
4. Enter a name for the connection.5. In the Source Application field, select the SAP BusinessObjects Profitability and Cost Management
application.6. In the Provider field, select ODBO Provider for PCM.7. In the Server address field, enter the URL of the Profitability and Cost Management application server.8. In the Catalog field, enter EPM.
9. Click Save.
Once the connection is created, you must define the appropriate security in the Central Management Console.
Administrator GuideAdministration for the EPM Plug-in P U B L I C 139

The user must be granted the following rights:○ View right on connections,○ Publish right, if you want the user to publish workbooks in the BI launch pad.
6.1.3.4 Creating an EPM Connection for Planning and Consolidation version for SAP NetWeaver in the Central Management Console
Prerequisites
You must install the EPM Connection Manager on the SAP BusinessObjects Enterprise platform before creating an EPM connection.
Procedure
1. Log on to the Central Management Console.2. In the Organize section, click EPM Connections.3. Click New Connection.
The following window opens.
140 P U B L I CAdministrator Guide
Administration for the EPM Plug-in

4. Enter a name for the connection.5. In the Source Application field, select the SAP BusinessObjects Planning and Consolidation for SAP
NetWeaver application.6. In the Provider field, select ODBO Provider for NetWeaver BW.7. In the Server address field, enter the URL of the SAP NetWeaver server.8. In the System Number field, enter the system number of your SAP NetWeaver server.9. In the Client field, enter your client number.10. Click Save.
Once the connection is created, you must define the appropriate security in the Central Management Console.
The user must be granted the following rights:○ View right on connections,○ Publish right, if you want the user to publish workbooks in the BI launch pad.
Administrator GuideAdministration for the EPM Plug-in P U B L I C 141

6.1.3.5 Creating an EPM Connection for Planning and Consolidation version for Microsoft in the Central Management Console
Context
You must install the EPM Connection Manager on the SAP BusinessObjects Enterprise platform before creating an EPM connection.
Procedure
1. Log on to the Central Management Console.2. In the Organize section, click EPM Connections.3. Click New Connection.
The following window opens.
4. Enter a name for the connection.5. In the Source Application field, select the SAP BusinessObjects Planning and Consolidation for Microsoft
application.6. In the Provider field, select ODBO Provider for BPC MS.
142 P U B L I CAdministrator Guide
Administration for the EPM Plug-in

7. In the Server address field, enter the URL of the Planning and Consolidation application server.8. In the Catalog field, enter the environment you are going to use.9. Click Save.
Once the connection is created, you must define the appropriate security in the Central Management Console.
The user must be granted the following rights:○ View right on connections,○ Publish right, if you want the user to publish workbooks in the BI launch pad.
6.1.3.6 Creating an SAP BusinessObjects Enterprise Connection
Procedure
1. Open the BI launch pad.2. Click the Documents tab.3. Click New > EPM Workbook (or EPM Document or EPM Presentation)
The corresponding Microsoft Office application opens.4. In the EPM - Logon dialog box, click the browse button next to the Connection area.
The EPM - Connection Manager opens.5. Click Create and in the Connection type area, select SAP BusinessObjects Enterprise.6. Select the EPM Connection you want to use. To find out more about the EPM Connection creation, see the
Creating an EPM Connection in the Central Management Console sections of this documentation.The list of Available Cubes/Models opens.
Administrator GuideAdministration for the EPM Plug-in P U B L I C 143

7. Select the cube or model you want to use.8. Enter a Connection Name and click OK.
6.1.4 Creating the SAP BW (INA Provider) Connection
Prerequisites
CautionYou can create a SAP BW (INA Provider) connection only if you installed the EPM Add-in, .Net Framework 4.0 (Version for Large Volume Data Sources and for Microsoft Office 64-bit) (EPM Add-in_NET40.exe setup file).
Procedure
1. Open Microsoft Office Excel or Microsoft Office PowerPoint.2. Select the EPM tab.
144 P U B L I CAdministrator Guide
Administration for the EPM Plug-in

3. Click Log On.The EPM - Logon dialog box opens.
4. Click the browse button next to the Connection area.The EPM - Connection Manager opens.
5. Click Create.The Create Connection dialog box opens.
6. In the Connection Type area, select the SAP BW (INA Provider) option.7. In the Custom System area, enter a System Name and a Server Name.8. Select the BASIC Authentication Method.9. Select the protocol you want to use, enter a Port Number and a Client Number.10. Click Generate Connection Name.11. If you work with SAP Business Planning and Consolidation 10.1, version for SAP NetWeaver or higher, and
you want to make the work status feature available, click Connect, then select an Environment and a Model.
12. Click OK.
Administrator GuideAdministration for the EPM Plug-in P U B L I C 145

6.1.5 User Preferences Configuration
Information about connections and user preferences is stored in different files, which are located in \%userprofile%\AppData\Local\EPMOfficeClient\.
NoteThese files are not deleted when upgrading your version with a patch or support package, or installing a new version.
These files are:
● Connections.xml: contains the list of all the Planning and Consolidation and SAP BusinessObjects Enterprise connections.
● EPMXLClientPreference.XML: contains the user preferences (options and context values).
NoteBy default, the EPMXLClientPreference.xml and Connections.xml files are stored in C:\Users\<user>\AppData\Local\EPMOfficeClient. However, you can now add the key as follows in the FPMXLSilent.dll.config file and set the key to "true": "<add key="ConnectionDefinitionInRoamingUserProfiles" value="true"/>". The EPMXLClientPreference.XML and Connections.xml files will be stored in C:\Users\<user>\AppData\Roaming\EPMOfficeClient.
● .oqy files: contain all the local connections you have created in the EPM plug-in and are stored in the Local Connections folder.
TipThe content of the files can be exported to other machines if you want to deploy the same connections and user preferences for several users.
6.2 Deploying the Same Options for Several Users
If you want to deploy the same options for several users, you can export the content of the EPMXLClientPreference.xml to several machines.
The table below lists the options contained in the EPMXLClientPreference.xml file and the corresponding options in the user interface:
● The user options that are in Options User Options .
● The sheet options that are saved as default options when clicking Save as Default in Options Sheet Options .
● The command display options that are in Options Command Display Options .
NoteSome options are no longer used and are noted as deprecated.
146 P U B L I CAdministrator Guide
Administration for the EPM Plug-in

in .xml on the interface where
RestrictionThis option applies to BPC NetWeaver connections only
ActivateMemberSetMode
Values: True or False (False is the default value)
When set to True, and if the server recognizes the relationship, the server performs the member expansion, not the client. If the server does not recognize the relationship (for example, the Offset relationship), the client performs the expansion.
Setting this option to True improves performance.
CautionWe recommend not to set this option to True before you install Planning and Consolidation for NetWeaver 10.0 Support Package 10.
(no equivalent option in the EPM plug-in interface)
RestrictionThis option applies to BPC NetWeaver connections only
ActivateMemberSetModeForBaseLevel
Values: True or False (False is the default value)
When set to True, and when the Base Level relationship is used, the server performs the expansion of the base level members, not the client.
Setting this option to True improves performance.
CautionWe recommend not to set this option to True before you install Planning and Consolidation for
(no equivalent option in the EPM plug-in interface)
Administrator GuideAdministration for the EPM Plug-in P U B L I C 147

in .xml on the interface where
NetWeaver 10.0 Support Package 10.
AlwaysAutoUpdateCharts
Values: True or FalseRefresh Charts Automatically User Options Navigation
AutoFitColumns
Values: True or FalseAuto Fit Column Width Sheet Options Formatting
AutoFitRefresh (deprecated) (deprecated)
AutomaticRefresh
Values: True or FalseAutomatic Refresh on Context Changes User Options Navigation
AutoUpdateWarning
Values: True or FalseNotify me when updates are available User Options Others
BOEServer
Values: server
SAP BusinessObjects Enterprise Server User Options Server Configuration
CacheValidityDuration
Values: integer
Default value: 0
Enter a number to specify the number of days
Clear Metadata Cache Frequency data entry field
User Options Navigation
CalculateParentsInHierarchy
Values: True or FalseCalculate Parents in Hierarchies Sheet Options Refresh
ClearDataOnSave
Values: True or FalseClear Data in the Whole File when Saving it
Sheet Options Refresh
ClearFormattingBeforeApplyDynFormatting
Values: True or False
Clear Report Format before Applying Dynamic Formatting
Sheet Options Formatting
ColumnAxisTotalsRefresh (deprecated) (deprecated)
CustomExpand/Apply
Values: True or FalseCustom Expand Sheet Options General
CustomExpand/ExpansionType
Values:
● UntilLevel● LevelsRange● OneLevel
Button Define Custom Expand
● Down to Level● From Level to Level● Only Level● Only Base Level
Sheet Options General
148 P U B L I CAdministrator Guide
Administration for the EPM Plug-in

in .xml on the interface where
● BaseLevel
CustomExpand/IncludeMember
Values: True or FalseInclude Member Sheet Options General
DataLinkColor
Values: integer
Default value: 0
Use ARGB color values
Data Link Symbol Color button User Options Others
DeactivateSumbitAndRefresh (deprecated)
Values: True or False
(deprecated)
DefaultForEmptyComment
Values: string
Default Value: ...
Enter the characters that you want to be saved for empty comments.
Empty Comment User Options Others
DefaultLocalMemberRecognitionOn (deprecated)
(deprecated)
DefaultMemberRecognitionOn (deprecated)
(deprecated)
DefaultNotAnEPMSheet (deprecated) (deprecated)
DeferLayoutUpdate
Values: True or FalseDefer Layout Update EPM tab
DisplayCommentsUsingExcel
Values: True or FalseShow as Microsoft Excel Comments Sheet Options General
DisplayDeprecatedFunctions
Values: True or FalseLoad EV Functions User Options Others
DisplayName
Values:
● to display the member captions, enter SoDnCaption
● to display the member captions, enter SoDnFullUniqueName
Display Name options User Options Formatting
DisplayUnrecognizedMembers (deprecated)
(deprecated)
Administrator GuideAdministration for the EPM Plug-in P U B L I C 149

in .xml on the interface where
DoNotStoreModelWarning
Values: True or FalseWarn if Connection or Environment in the Connection is not Stored
User Options Navigation
DoubleClick
Values: True or FalseEnable Double-Click User Options Navigation
EliminateEmptyAndZeroColumns
Values: True or FalseRemove Empty and Zero Values Sheet Options General
Columns
EliminateEmptyAndZeroRows
Values: True or FalseRemove Empty and Zero Values Sheet Options General Rows
EliminateEmptyColumns
Values: True or FalseRemove Empty Sheet Options General
Columns
EliminateEmptyRows
Values: True or FalseRemove EmptyRemove Empty Sheet Options General Rows
EmptyValueReplacement
Values: integer or string
You can also leave a blank. The cells that have no data will be left blank.
Empty Cell Default Value Sheet Options Formatting
ExpandCollapse
Values: True or FalseExpand/Collapse on Single Member User Options Navigation
ExpandToLowerLevel
Values:
● To expand Member and Children, enter SoZiMemberChildren.
● To expand Children, enter SoZiChildren.
● To expand Member and Descendants, enter SoZiMemberDescendants.
● To expand Descendants, enter SoZiDescendants.
Expand Options Sheet Options General
ForceBasicWrite
Values: True or FalseApply only Report Editor Definition for Faster Refresh
Sheet Options Refresh
ForceSymetricQueryWhenNecessary
Values: True or FalseForce Symmetric Refresh for Large Asymmetric Axis
User Options Others
HideEmptyAndZeroColumns Hide Empty and Zero Values Sheet Options General
Columns
150 P U B L I CAdministrator Guide
Administration for the EPM Plug-in

in .xml on the interface where
Values: True or False
HideEmptyAndZeroRows
Values: True or FalseHide Empty and Zero Values Sheet Options General Rows
HideEmptyColumns
Values: True or FalseHide Empty Sheet Options General
Columns
HideEmptyRows
Values: True or FalseHide Empty Sheet Options General
Columns
HideGhostConnect (no equivalent option in the EPM plug-in interface)
HideLinks (no equivalent option in the EPM plug-in interface)
HideMatrixSecurityWarning
Values: True or FalseDisplay Matrix Security Warning
Caution● When set to True, the option
is unchecked.● When set to False, the
option is checked.
User Options Others
HideRefreshWarning
Values: True or FalseDisplay Warning when Process Takes Time
Caution● When set to True, the option
is unchecked.● When set to False, the
option is checked.
User Options Others
HideSubmitWarning
Values: True or FalseDisplay Warning when Saving Data or Comment
Caution● When set to True, the option
is unchecked.● When set to False, the
option is checked.
User Options Others
IntelligentFormatting
Values: True or FalseApply Dynamic Formatting Sheet Options Formatting
IntelligentFormattingSheet
Values: name of the worksheet
Default Formatting Sheet Sheet Options Formatting
Administrator GuideAdministration for the EPM Plug-in P U B L I C 151

in .xml on the interface where
Default value: EPMFormattingSheet
IsNotAnEPMSheet
Values: True or FalseEPM Worksheet
Caution● When set to True, the option
is unchecked.● When set to False, the
option is checked.
Sheet Options General
KeepEliminate
Values: True or FalseKeep/Exclude on Single Member User Options Navigation
KeepFormulaAfterRefresh
Values: True or FalseKeep Formula on Data Sheet Options General
LanguageEdition
Values: ISO 639-1 language codes
For example, en stands for English
Application Language User Options Others
LanguageIsoCode
Values: ISO 639-1 language codes
For example, en stands for English
Data Language User Options Navigation
LinkIsLocal
Values: True or FalseWorkbook Location options User Options Others
LocalAndCustomMemberRecognition
Values: True or FalseActivate Local Member Recognition Sheet Options General
LocalMemberAsCellPosition
Values: True or FalseUse Position in Axis Sheet Options General
MeasureDisplayFormat (deprecated) (deprecated)
MemberLinkColor
Values: integer
Default value: 0
Use ARGB color values
Member Link Symbol Color button User Options Navigation
MemberSelectorPagingSize
Values: integer
Default value: 1000
Members Displayed on Node Expansion in Member Selector
User Options Navigation
152 P U B L I CAdministrator Guide
Administration for the EPM Plug-in

in .xml on the interface where
Enter the maximum number of members to display when expanding a node in the member selector
NoMatchInMasterAxisValueReplacement
Values: text
Default value: #NOMEMBERFOUND
Enter the text to be displayed in the cells when a member is not found for the following reason.
Member not Found Default Value Sheet Options Formatting
NumberFormat
Values: number
Default value: 0.##
Number Format only in Microsoft PowerPoint
Presentation Options
Formatting and Document
Options Formatting
OnTheFlyMemberRecognition
Values: True or FalseActivate Member Recognition Sheet Options General
OverrideEmptyValue
Values: True or FalseSet Default Value in Empty Cell Sheet Options Formatting
OverrideNoMatchInMasterAxisValue
Values: True or FalseSet Default Value when Member not Found in Shared Axis
Sheet Options Formatting
OversizeQueryLimit
Values: integer
Default value: 0
cells entry area User Options Others
PauseRefresh
Values: True or FalseFreeze Data Refresh User Options Navigation
RefreshOnOpen
Values: True or FalseRefresh Data in the Whole File when Opening it
Sheet Options Refresh
RefreshOnlyDataAfterSubmit
Values: True or FalseRefresh only Data on "Save & Refresh Data"
User Options Others
RefreshOnlyExpandedMembers
Values: True or FalseRefresh only Expanded and Inserted Members
User Options Navigation
RemoveWorksheetBeforeGeneration
Values: True or FalseRemove EPM Worksheets Before Generation
User Options Others
ReportLinkColor (deprecated) (deprecated)
Administrator GuideAdministration for the EPM Plug-in P U B L I C 153

in .xml on the interface where
RestoreDynamicOnRefresh (in the <DefaultSheetOptions> section)
Values: True or False
Restore Dynamic Selection on Refresh after Navigation
Sheet Options Refresh
RepeatColumnHeaders
Values: True or FalseRepeat Columns Headers Sheet Options Formatting
RepeatRowHeaders
Values: True or FalseRepeat Row Headers Sheet Options Formatting
RestoreDynamicOnRefresh (not in the DefaultSheetOptions section: deprecated)
RowAxisTotalRefresh (deprecated)
RowHeaderIndentation
Values:
● To indent children, enter SoRhiChildren
● To indent parents, enter SoRhiParents
● To specify no indentation, enter SoRhiNone
Row Header Indentation options Sheet Options Formatting
SheetLocked (do not use) (do not use)
SheetPwd (do not use) (do not use)
SheetProtectionOptions (do not use) (do not use)
ShowDataComments
Values: True or FalseShow Source Data in Comments Sheet Options Refresh
ShowCurrentViewPane
Values: True or FalseDisplay EPM Context Bar User Options Others
ShowCurrentViewVertical
Values: True or FalseDisplay Context inside EPM Pane User Options Others
ShowLocalConnections
Values: True or FalseDisplay Local Connections User Options Others
ShowReportEditionPane
Values: True or FalseDisplay EPM Pane User Options Others
ShowUnrecognizedMemberWarning
Values: True or FalseWarn if Rows and Columns of Unrecognized Members Will be Kept
User Options Navigation
154 P U B L I CAdministrator Guide
Administration for the EPM Plug-in

in .xml on the interface where
SmtpConfiguration/Address Server Address User Options Server
Configuration
SmtpConfiguration/AuthenticationType
Values:
● enter 0 for Anonymous
● enter 1 for Basic
● enter 2 for NTLM
Authentication Type User Options Server
Configuration
SmtpConfiguration/EnableSsl
Values: True or FalseEnable SSL User Options Server
Configuration
SmtpConfiguration/Port Server Port User Options Server
Configuration
SmtpConfiguration/User User Name User Options Server
Configuration
TopMostDialog
Values: True or False
If you enter True, any EPM plug-in dialog box will be displayed on top of any other application window.
(no equivalent option in the EPM plug-in interface)
TotalsAtTheLeft
Values: True or FalseLeft and Right Sheet Options General Totals
Placement
TotalsAtTheTop
Values: True or FalseTop and Bottom Sheet Options General Totals
Placement
UnauthorizedCellsText
Values: text
Enter the text to display in cells containing data that you are not authorized to view.
Default value: #Unauthorized
Unauthorized Cell Text User Options Others
UnrecognizedMemberManagement
Values: True or FalseKeep Rows and Columns of Unrecognized Members
User Options Navigation
UseAsInputForm
Values: True or FalseUse as Input Form Sheet Options General
UseCacheValidityDuration Clear Metadata Cache Frequency User Options Navigation
Administrator GuideAdministration for the EPM Plug-in P U B L I C 155

in .xml on the interface where
Values: True or False
UseCustomDataLinkColor
Values: True or FalseData Link Symbol Color User Options Others
UseCustomMemberLinkColor
Values: True or FalseMember Link Symbol Color User Options Others
UseCustomReportLinkColor (deprecated)
(deprecated)
UseEPMMemberIDInEVFomulas
Values: True or FalseUse EPMMemberID in EPM Formulas User Options Others
UseMetaDataCache
Values: True or FalseActivate Metadata Cache User Options Navigation
VisibilityCollaborationAll
Values: True or FalseAll Buttons Command Display Options
Collaboration Group
VisibilityDataAnalysisAll
Values: True or FalseAll Buttons Command Display Options Data
Analysis Group
VisibilityDataManager
Values: True or FalseAll Buttons Command Display Options Data
Manager Group
VisibilityReportAndAnalysisOpenSave
Values: True or FalseOpen/Save Command Display Options
Reports Group
VisibilitySubmitDataAll
Values: True or FalseAll Buttons Command Display Options Data
Input Group
VisibilityToolsCustomMembers
Values: True or FalseCustom Members Command Display Options Tools
Group
VisibilityToolsOffLineMode
Values: True or FalseOffline Mode Command Display Options Tools
Group
VisibilityToolsQuickLinks
Values: True or FalseQuick Links Command Display Options Tools
Group
VisibilityUndo
Values: True or FalseAll Buttons Command Display Options Undo
Group
VisualizeUnauthorizedCells
Values: True or FalseShow Unauthorized Cell Text Sheet Options Refresh
156 P U B L I CAdministrator Guide
Administration for the EPM Plug-in

in .xml on the interface where
WarmDynamicRefresh
Values: True or FalseWarn if Navigation Will Break Dynamic Selection
User Options Navigation
WarnIfQueryIsTooBig
Values: True or FalseWarn if Report Exceeds User Options Others
6.3 EPM Plug-in for Microsoft Office Technical Log Configuration
You should configure the EPM plug-in technical log in the following file:
C:\ProgramData\SAP\Cof\Log.Config
The log categories are listed below:
Log Category Explanation
FPMXLClient.AnalyzerOne Default for the entry point of the product
FPMXLClient.AnalyzerOne.Automation "Regular" EPMAddIn automation operations
FPMXLClient.AnalyzerOne.EPMExcelClientDMAutomation DataManager EPMAddIn automation operations
FPMXLClient.AnalyzerOne.EPMExcelClientUIMacro EPMAddIn automation operations displaying a UI
FPMXLClient.AnalyzerOne.EVFunctions EPMAddIn Excel function operations
FPMXLClient.AnalyzerOne.ExcelEvents Excel event handling operations
FPMXLClient.AutoUpdate EPMAddIn AutoUpdate operations
FPMXLClient.BOEIntegration BOE communication operations
FPMXLClient.Books BPC Publication operations
FPMXLClient.BPCProxy Communication with BPC MS/NW default category
FPMXLClient.BPCProxy.Datamanager Communication with BPC MS/NW Datamanager operations
FPMXLClient.BPCProxy.Dataservice Communication with BPC MS/NW Dataservice operations
FPMXLClient.BPCProxy.Drillthrough Communication with BPC MS/NW Drillthrough operations
FPMXLClient.BPCProxy.DynamicHierarchy Communication with BPC MS/NW Dynamic hierarchy operations
Administrator GuideAdministration for the EPM Plug-in P U B L I C 157

Log Category Explanation
FPMXLClient.BPCProxy.Filters Communication with BPC MS/NW Filter operations
FPMXLClient.BPCProxy.Metadata Communication with BPC MS/NW Metadata operations
FPMXLClient.BPCProxy.Session Communication with BPC MS/NW Session operations
FPMXLClient.BPCProxy.User Communication with BPC MS/NW User operations
FPMXLClient.BPCProxy.Workstatus Communication with BPC MS/NW Workstatus operations
FPMXLClient.BPF BPF related operations
FPMXLClient.Connection Connection mecanism common operations
FPMXLClient.Connection.ADONET_ODBOConnection Connection mecanism ADO.NET specific operations
FPMXLClient.Connection.BPC10Connection Connection mecanism BPC10 operations
FPMXLClient.Connection.ODBOConnection Connection mecanism ODBO operations
FPMXLClient.Connection.XMLAConnection Connection mecanism XMLA operations
FPMXLClient.Datamanagement Document data handling operations
FPMXLClient.DataManager BPC DataManager operations
FPMXLClient.DataManager.TransformationFile BPC DataManager Transformation/Conversion files operations
FPMXLClient.DynamicCharts.ChartObject Charts related operations
FPMXLClient.EVDRE EVDRE default category
FPMXLClient.EVDRE.Formatting EVDRE formatting related operations
FPMXLClient.EVDRE.Suppress EVDRE suppress related operations
FPMXLClient.FilesManagement Document / File management operations
FPMXLClient.Flash Flash related operations
FPMXLClient.Logon Logon related operations
FPMXLClient.Migration Migration default category
FPMXLClient.Persistence Preference default category
FPMXLClient.Persistence.MetaDataPersistenceManager Cache related operation
FPMXLClient.ReportManagement Report management related operation default category
158 P U B L I CAdministrator Guide
Administration for the EPM Plug-in

Log Category Explanation
FPMXLClient.REST REST connection related operations
FPMXLClient.Ribbon EPM Plugin Office Ribbon related operation
FPMXLClient.UILayer UI default category
FPMXLClient.UILayer.DataManager UI DM related operations
Performance Performance default category
6.4 EPM Plug-in Report Size Limitations
The following Report Size Limitations apply to the EPM plug-in:
● The maximum memory that can be allocated to the Microsoft Excel application is 1.2 GB. This means that the EPM plug-in report size is limited to:○ 200,000 rows and two million cells,○ For 32-bit operating systems, 2 million members for each data source: this amount of 2 million = sum
(for each dimension, number of dimension members * number of hierarchies).● When importing data with the Data Manager, you cannot import more than 30,000 members at the same
time.● The maximum size of a file you can upload or download for the Data Manager is 800 MB. Beyond this size
limit, we suggest that you upload or download files directly on the Planning and Consolidation server, that is without using the EPM plug-in.
● An amount coming from BPC NetWeaver can have a maximum of 13 digits before the comma and seven digits after.
● You cannot have more than 20 EPM plug-in reports in a single Excel sheet.● Cell-based formula parameters cannot exceed 255 characters (this is a Microsoft Excel limitation).● In the Insert Member dialog box, the option at Selected Cell is not supported in a report axis containing
more than 150000 rows.● Performing a multi-selection when the Page-axis option is enabled increases the refresh time of the EPM
plug-in, especially for large reports (since this calculation is performed on the client side and not on the server side.)
● Regarding asymmetric reports:○ The number of dimension members in an axis before applying a remove empty or zero values option
cannot exceed 150,000 rows or columns.○ When the Force Symmetric Refresh for Large Asymmetric Axis option is enabled, the number of
members in each nested dimension in a report axis, when multiplied by themselves and before applying the remove empty or zero values option, cannot exceed 9,223,372,036,854,775,807.
○ If the excluded members feature is used in this report axis, the Force Symmetric Refresh for Large Asymmetric Axis option cannot be used and the limit of 150,000 rows or columns is applied.
Administrator GuideAdministration for the EPM Plug-in P U B L I C 159

6.5 General Limitations
Cell Functions
The following cell functions must be used for on demand data. They must not be used instead of, or as, an EPM report. If a performance issue occurs when using the cell functions, please design an EPM report instead:
● EPMRetreiveData● EPMScaleData● EPMScaleData● EPMSaveData● EPMSaveDataOnly
160 P U B L I CAdministrator Guide
Administration for the EPM Plug-in

7 Administration for the BPC Plug-in
7.1 Embedded Models - Mandatory installation as of version 2.4
When using embedded models, to be able to work with your activities as of version 2.4, you need to install the two following SAP notes on the BW server: 2363387 and 2308662.
7.2 Creating SAP BW Connections
Prerequisites
1. Install either one of the following:○ SAP Business Client 5.0 or 6.0○ SAP Logon 7.4 and above. You must then set the following registry key: [HKEY_LOCAL_MACHINE
\SOFTWARE(\Wow6432Node)\SAP\SAPLogon "LandscapeFormatEnabled"=REG_DWORD:00000001. See SAP note 2220930.
2. Enable the SAP UI Landscape new format. See SAP note 2112449.
NoteFor more information on the SAP UI Landscapce, see http://help.sap.com/saphelp_uiaddon10/helpdata/en/d5/66efdfdd0c47bab00b5031a4e1b580/content.htm?frameset=/en/ec/699e0817fb46a0817b0fa276a249f8/frameset.htm&node_id=840.
Creating an SAP BW connection
1. Select File BPC Open my Activities Open Activity using NetWeaver Connection .2. Enter the following information in the dialog box that opens:
○ A name and optionally a description for the connection you are creating○ How to access the BPC server: choose http or https and add the port number.
Administrator GuideAdministration for the BPC Plug-in P U B L I C 161

The system is already entered. The environment that is taken into account is the last one that you used when connected to the BPC web client. Once connected, you can select another environment from the view My Activities.
162 P U B L I CAdministrator Guide
Administration for the BPC Plug-in

8 Data Protection and Privacy
8.1 Introduction
Data protection is associated with numerous legal requirements and privacy concerns. In addition to compliance with applicable data privacy regulations, it is necessary to consider compliance with industryspecific legislation in different countries. SAP provides specific features and functions to support compliance with regards to relevant legal requirements, including data protection. SAP does not give any advice on whether these features and functions are the best method to support company, industry, regional, or countryspecific requirements. Furthermore, this information does not give any advice or recommendation in regards to additional features that would be required in particular IT environments; decisions related to data protection must be made on a case-by-case basis, under consideration of the given system landscape and the applicable legal requirements.
NoteIn the majority of cases, compliance with applicable data protection and privacy laws will not be covered by a product feature. SAP software supports data protection compliance by providing security features and specific data protection-relevant functions, such as simplified blocking and deletion of personal data. SAP does not provide legal advice in any form. Definitions and other terms used in this document are not taken from any given legal source.
8.2 Glossary
Term Definition
Personal data Any information relating to an identified or identifiable natural person ("data subject"). An identifiable natural person is one who can be identified, directly or indirectly, in particular by reference to an identifier such as a name, an identification number, location data, an online identifier or to one or more factors specific to the physical, physiological, genetic, mental, economic, cultural, or social identity of that natural person.
Purpose A legal, contractual, or in other form justified reason for the processing of personal data. The assumption is that any purpose has an end that is usually already defined when the purpose starts.
Administrator GuideData Protection and Privacy P U B L I C 163

Term Definition
Blocking A method of restricting access to data for which the primary business purpose has ended.
Deletion The irreversible destruction of personal data.
Retention period The period of time between the end of purpose (EoP) for a data set and when this data set is deleted subject to applicable laws. It is a combination of the residence period and the blocking period.
End of purpose (EoP) A method of identifying the point in time for a data set when the processing of personal data is no longer required for the primary business purpose. After the EoP has been reached, the data is blocked and can only be accessed by users with special authorization (e.g. tax auditors).
Sensitive personal data A category of personal data that usually includes the following type of information:
● Special categories of personal data such as data revealing racial or ethnic origin, political opinions, religious or philosophical beliefs, or trade union membership and the processing of genetic data, biometric data, data concerning health or sex life or sexual orientation
● Personal data subject to professional secrecy● Personal data relating to criminal or administrative of
fenses● Personal data concerning insurances and bank or credit
card accounts
Residence period The period of time after the end of purpose (EoP) for a data set during which the data remains in the database and can be used in case of subsequent processes related to the original purpose. At the end of the longest configured residence period, the data is blocked or deleted. The residence period is part of the overall retention period.
Where-used check (WUC) A process designed to ensure data integrity in the case of potential blocking of business partner data. An application's where-used check (WUC) determines if there is any dependent data for a certain business partner in the database. If dependent data exists, this means the data is still required for business activities. Therefore, the blocking of business partners referenced in the data is prevented.
164 P U B L I CAdministrator Guide
Data Protection and Privacy

Term Definition
Consent The action of the data subject confirming that the usage of his or her personal data shall be allowed for a given purpose. A consent functionality allows the storage of a consent record in relation to a specific purpose and shows if a data subject has granted, withdrawn, or denied consent.
8.3 Read Access Logging
Definition
Read Access Logging (RAL) is used to monitor and log read access to sensitive data. This data may be categorized as sensitive by law, by external company policy, or by internal company policy. These common questions might be of interest for an application that uses Read Access Logging:
● Who accessed the data of a given business entity, for example a bank account?● Who accessed personal data, for example of a business partner?● Which employee accessed personal information, for example religion?● Which accounts or business partners were accessed by which users?
These questions can be answered using information about who accessed particular data within a specified time frame. Technically, this means that all remote API and UI infostructures (that access the data) must be enabled for logging.
Use
In SAP Analysis, Read Access Logging (RAL) for data coming from the backend is done on read access on the respective system. Reading of content from the BI Platform such as Analysis workbooks and OLAP Connections is logged by the auditing capabilities of the BI platform.
Administrator GuideData Protection and Privacy P U B L I C 165

8.4 Information Report
Definition
Each person has the right to obtain confirmation as to whether or not personal data concerning him or her are being processed.
Use
Data displayed in Analysis workbooks that are coming from the backend data sources is handled by the respective backend system:
● For more information about how to create an information report in SAP BW, see “Information Report” in the “Data Protection and Privacy” chapter of the SAP BW documentation on SAP Help Portal at https://help.sap.com.
● For more information about data protection in SAP HANA, see “Data Protection in SAP HANA” in the SAP HANA Security Guide on SAP Help Portal at https://help.sap.com.
In addition,workbooks may contain personal data in an unstructured way when entered by the workbook designer directly. It is up to the workboook designer to classify and manage such workbooks to provide an information report, if required.
8.5 Deletion of Personal Data
Definition
● Simplified Blocking and Deletion: In addition to compliance with the general data protection regulation, it is necessary to consider compliance with industryspecific legislation in different countries. A typical potential scenario in certain countries is that personal data shall be deleted after the specified, explicit, and legitimate purpose for the processing of personal data has ended, but only as long as no other retention periods are defined in legislation, for example, retention periods for financial documents. Legal requirements in certain scenarios or countries also often require blocking of data in cases where the specified, explicit, and legitimate purposes for the processing of this data has ended, but the data has to be retained in the database due to other legally defined retention periods. In some scenarios, personal data also includes referenced data. Therefore, the challenge for deletion and blocking is to first handle referenced data and finally other data, such as business partner data.
166 P U B L I CAdministrator Guide
Data Protection and Privacy

● Deletion of personal data: The handling of personal data is subject to applicable laws related to the deletion of such data at the end of purpose (EoP). If there is no longer a legitimate purpose that requires the use of personal data, it must be deleted. When deleting data in a data set, all referenced objects related to that data set must be deleted as well. It is also necessary to consider industryspecific legislation in different countries in addition to general data protection laws. After the expiration of the longest retention period, the data must be deleted.
Use
Data displayed in Analysis workbooks that are coming from the backend data sources is handled by the respective backend system. For example, deleting personal data on the backend system means the data will no longer be exposed to clients such as SAP Analysis.
● For more information about deletion of personal data in SAP BW, see “Deletion of Personal Data” in the “Data Protection and Privacy” chapter of the SAP BW documentation on SAP Help Portal at https://help.sap.com.
● For more information about deletion of personal data in SAP HANA, see “Deletion of Personal Data” in the SAP HANA Security Guide on SAP Help Portal at https://help.sap.com.
In addition, workbooks may contain personal data in an unstructured way when entered by the workbook designer directly. It is up to the workbook designer to either handle these workbooks according to the regulations or not to enter any personal data.
8.6 Change Log
Definition
If any changes are made to sensitive business data or personal data, the system should log details per change request, such as the following:
● User who has changed data● Data and time of the change● The change type (update, insert, deletion, single field documentation)
Use
In Analysis, logging of data modifications in the backend system is done by the respective backend system.
● For more information, see “Log Changes to Personal Data” in the “Data Protection and Privacy” chapter of the SAP BW documentation on SAP Help Portal at https://help.sap.com.
Administrator GuideData Protection and Privacy P U B L I C 167

● For more information, see “Auditing Activity in SAP HANA Systems” in the SAP HANA Security Guide on SAP Help Portal at https://help.sap.com.
Modifying the content of the BI Platform such as Analysis workbooks and OLAP Connections is logged by the auditing capabilities of the BI platform.
For more information, see “Auditing” in the Business Intelligence Platform Administrator Guide on SAP Help Portal at https://help.sap.com.
168 P U B L I CAdministrator Guide
Data Protection and Privacy

9 Troubleshooting
Analysis provides utilities for troubleshooting, such as error messages, log files and traces.
9.1 Troubleshooting in Analysis
You can run Analysis in different troubleshooting modes. After the first Analysis installation, no troubleshooting mode is active.
You can specify the troubleshooting options in the Analysis backstage area: Select File AnalysisTroubleshoot <troubleshooting mode> .
The following troubleshooting modes are available:
● Support ModeIn the Support Mode, the system stores exceptions, error messages and traces. BW Server Tracing for the Analysis plug-in is also active.
● Profiling ModeIn the Profiling Mode, the client profiling is active. BW Server Tracing and Workbook Profiling for the Analysis plug-in are active. The system also stores exceptions and error messages.
● Advanced ModeYou can specify the options for troubleshooting in the Advanced Support and Profiling Mode dialog. There are three tabs in the dialog: General (for all plug-ins), Analysis (for the Analysis plug-in) and EPM (for the EPM plug-in).The options on the three tabs are described later in this chapter.
The Support Mode and the Profiling Mode can be active at the same time.
You can check the statistics under File Analysis Troubleshoot Show Profiling Statistics or Show Workbook Profiling Statistics.
Note that writing profiling statistics may have an influence on the performance. You can select Deactivate in the Troubleshoot area to deactivate all troubleshooting modes if they are no longer needed.
Advanced Mode: General Tab
Log SeverityThe Log Severity defines the amount of log and trace information that is stored. In this area, you can select:
● SupportBy default, the system stores exceptions and error messages. If the check box Support is selected, the system stores exceptions, error messages and traces.The information is stored as .glf files under C:\Users\<user>\AppData\Local\Temp\Sap\Cof.
Administrator GuideTroubleshooting P U B L I C 169

The system can also store messages and traces that are defined in the log.config file under C:\Users\<user>\AppData\Roaming\SAP\Cof. For more information, contact your system administrator.
● ProfilingTo activate the Analysis client profiling, select the Profiling check box. If the setting is activated, Analysis will capture every interaction.You can choose between Standard Profiling and Modified Profiling. With Modified Profiling, EPM performance traces will not be written.You can also activate the client profiling with the file system setting clientProfiling.In the Client Profiling Statistics dialog, the captured interactions are displayed as steps in a tree view and you can navigate to each interaction. You can see the overall processing time per step (in ms), the time the user spent in dialogs, the number of RFC calls per step and the time that was spent for RFC. In section Update UI, you can see if a navigation step has caused (unexpected) RFC calls.At the bottom of the Client Profiling Statistics dialog, you find a summary containing the time that was used on client side for processing (in ms), the number of RFC calls (count) and the time that was used for that (in ms) and the time the user spent in dialogs (in ms).
Advanced Mode: Analysis Tab
Enable BW Server TracingTo activate the SAP BW trace tool environment, select the Enable BW Server Tracing check box.
You can also activate the BW server tracing with the file system setting AbapTrace in the Ao_app.config file.
The trace tool environment (transaction code RSTT in the connected BW system) has special tools to log and play back traces and process automatic regression tests.
For more information about the trace tool environment, see the SAP BW documentation on the SAP Help Portal.
Enable Workbook ProfilingTo activate the SAP BW query runtime statistics, select the Enable Workbook Profiling check box.
You can also activate the workbook profiling with the file system setting Profiling in the Ao_app.config file.
Using the query runtime statistics, you can find out how much time it takes to execute certain user actions in Analysis and the BW analytic engine. The system records the performance-critical parts of the processing (statistics events). It calculates the net times by calculating the runtime of an event using the difference between the start and end times (minus the times for other events called from within the event).
For more information about the query runtime statistics, see section Query runtime statistics in the Analysis Administrator guide.
Enable NCO TracingThis setting may be used for SAP error handling.
Analysis uses the .Net connector (NCO) for calling ABAP RFCs from client. NCO supports logging of RFC traces. You can activate the tracing by selecting Enable NCO Tracing and choosing the desired level (usually 4).
If you now work with Analysis, log files will be created in the %temp% folder of windows. There you can find a dev_nco_rfc.log file and a number of files "nco_rfc_XXXX_Y.trc". Additionally, there are the Analysis log files of type .glf, for example AO_Log_<processID>.glf.. You can zip all of them to attach them to the message.
170 P U B L I CAdministrator Guide
Troubleshooting

Enable CPIC TracingThis setting may be used for SAP error handling. Common Programming Interface - Communication (CPIC) is the communication layer under JRFC (or JCo).
You can activate the tracing by selecting Enable CPIC Tracing and choosing the desired level. You can choose a trace level from 1 to 3, where 3 is the highest and most detailed level of tracing.
If you now work with Analysis, log files will be created in the %temp% folder of windows. There you can find a nco_cpic_XXX.trc file that you can attach to the message.
Show Suppressed MessagesSelect this check box if you want the suppressed messages to be shown.
Advanced Mode: EPM Tab
Display MDX Queries in Trace File for ODBO connectionsSelect this check box to display MDX queries in the trace file for ODBO connections.
Related Information
Query runtime statistics [page 92]
9.1.1 Evaluating Client Profiling Results
After running Analysis in a client profiling mode, you can access the results in the Show Profiling Statistics dialog under File Analysis Troubleshoot .
In the Show Profiling Statistics dialog, the steps are listed per step with numbering, for example Step 4: followed by the results of the fourth step. At the bottom of the dialog, you have the following options to copy or export the results:
● Copy to a New WorkbookTo copy the results to a new workbook, select Copy to a New Workbook in the list and then click the text field Copy to a New Workbook. The results are copied in a new workbook started as separated MS Excel process.
● Copy to ClipboardTo copy the results to clipboard, select Copy to Clipboard in the list and then click the text field Copy to Clipboard.The results are copied to clipboard in HTML format and can be pasted directly in an Excel sheet. Alternatively, you can paste them to Notepad, save the file as .html format and open it in a Browser, for example MS Internet Explorer.
● Export to a File (XML)
Administrator GuideTroubleshooting P U B L I C 171

To export the result to a file, select Export to a File (XML) in the list and then click the text field Export to a File (XML).
Evaluating the results in a table
The results that are copied to a new workbook or a browser, are displayed in a table view. The table can make it easier to analyze the results. Above the table, you can find information about the Analysis version, the creation time of the profiling and latency estimations.
RFC Latency estimation is the minimum time value (duration) of an RFC call in milliseconds within the given results set. This value increases if the network connection between the Analysis and the BW system is slow or the distance is greater. This number multiplied by the number of RFC calls will roughly give the time spent only for network communication. You can use it to compare cases that have a significant difference in this number.
RFC Metadata fully cached has the value TRUE if RFC metadata for queries is cached locally. The number of RFC calls while refreshing the workbook might be reduced due to cached metadata. By default, the metadata cache is available in the local folder %appdata%\SAP AG\SAP BusinessObjects Advanced Analysis\cache folder where each *.cache file represents a BW system that has been cached (by its name).
The steps are grouped with Microsoft Excel grouping functionality according to the step levels. You can use the grouping to collapse and expand the steps to a certain level. The table consists of the following sections:
● LevelAll execution steps have their own hierarchy. The topmost level (0) might come from a user interaction like Refresh All, the subsequent steps that are triggered by the top level are listed as children and have a higher number, e.g. 1, 2, 3, 4...
● DescriptionThe description names the exact action of a step. Steps can have the same step type but each step has a different description. The step type Rendering can have the steps Redisplay Workbook, Request Refresh Formula and Request result sets, for example.
● StepTypeThe step types of each execution step are displayed, including asynchronous or rendering tasks. You can use MS Excel data filtering to get only the steps of a particular type.
● Step TimesThe step times are in milliseconds.The time for a step is the accumulation of the timings of its children and its own execution time. You can find the following times in the table:○ Start Time (relative to Step Root)
This time shows the start time of a step in relation to the step root, this is the sum of all steps from the root step to the current step.
○ Start Time (relative to Last Step)This time shows the start time of a step in relation to the last step, that is the time taken for the last single step.
○ Step Time E2EThis time shows the time take for a step.
○ Gross Time (Step E2E-Dialog Idle Time)The gross time is the actual step time as it is calculated as the difference between Step End-to-End and dialog idling times within the step. Therefore it could be used for performance analysis.
172 P U B L I CAdministrator Guide
Troubleshooting

○ Client Time (GrossTime-RemoteTimes)The client time is the processing time inside the Analysis client.
● BW Remote CallsFor BW Remote Calls, you get information about RFC Count, RFC Time (Sum), RFC Bytes Sent, RFC Bytes Received and System ID.RFC is an SAP protocol used for the communication between Analysis and a BW system. There different categories of RFC calls that can be observed in the profiling results. For more information, see table RFC Step Descriptions.
● HANA or BOC Remote CallsFor HANA or BOC Remote Calls, you get information about HTTP Count and HTTP Time (Sum).
RFC Step Descriptions
RFC Call / Step Description Description
RFC_PING / RFCPING This call is related to the logon to the BW system. There could be up to 3 of these 'Ping' calls.
RSAO_BICS_SESSION_INITIALIZE This call initializes the session by checking the capabilities of the BW system and the compatibility with Analysis, e.g. is it possible to save a workbook to the BW system.
BICS_CONS_SET_GET_SESSION_PROP This call checks the properties of the session for a data source or a set of data sources.
BICS_CONS_CREATE_DATA_AREA This call creates a data area. The data area is the (initially) empty container where the data for all subsequent operations of/from the session is stored.
BICS_PROV_OPEN / BICS_PROV_MASS_OPEN This call adds the data source to the data area created above.
BICS_PROV_GET_INITIAL_STATE / BICS_PROV_MASS_GET_INIT_STATE
This call gets the initial status/definition of the data source to be executed.
BICS_PROV_GET_VARIABLES This call gets the information about the variables that are required to be set for data source execution.
BICS_PROV_GET_RESULT_SET This call fetches the data from the data source to be displayed in the workbook.
RFC_FUNCTION_SEARCH This call can be avoided if proper meta data is available in Analysis. For more information, see SAP Note 1944912
Administrator GuideTroubleshooting P U B L I C 173

9.2 End-to-End Tracing
A single user workflow can involve multiple interactions with different servers. Each of those servers writes tracing information to its own log file. With the SAP Client plug-in, you can see all the tracing information to a particular workflow.
1. Download and install the SAP Client plug-in.You can find the installation file and additional information in SAP note 1435190.
2. Make sure that the Analysis Add-In is enabled.The LoadBehavior parameter should be set to 3.
3. Start the SAP Client plug-in.4. Select the Micorsoft Office application you want to trace, for example Microsoft Excel.5. Press Launch and proceed the steps you want to trace.
The SAP Client plug-in provides you with an XML file containing the traced information.
For more information, see the Trace Analysis chapter in the SAP Solution Manager documentation on the SAP Help Portal.
Related Information
To configure the load behavior of the Analysis Add-In [page 72]
9.3 To enable the Analysis Add-In after system crash
Context
If Microsoft Excel or Microsoft PowerPoint crashes, and you have to close the application, the Analysis Add-In might be disabled by the Microsoft application. If this happens, you have to re-enable the Analysis Add-In in Microsoft Excel or Microsoft PowerPoint.
Procedure
1. Open Analysis for Microsoft Excel or Microsoft PowerPoint.After the system crash the Analysis Add-In is not visible in the menu.
2. Choose File in Microsoft Excel or Microsoft PowerPoint.3. In Microsoft Excel, press Excel Options. In Microsoft PowerPoint, press PowerPoint Options.4. In the Excel Options dialog box and in the PowerPoint Options dialog box in the categories pane, select Add-
Ins.
174 P U B L I CAdministrator Guide
Troubleshooting

5. In the Manage box, select Disabled Items.6. Press Go....7. In the Disabled Items dialog box, select the Analysis Add-In.8. Press Enable.9. In the Manage box, select COM Add-Ins.10. Press Go....11. In the COM Add-Ins dialog box, make sure that Analysis option is activated.12. Press OK.
Results
The Analysis ribbon is available again.
Administrator GuideTroubleshooting P U B L I C 175

Important Disclaimers and Legal Information
HyperlinksSome links are classified by an icon and/or a mouseover text. These links provide additional information.About the icons:
● Links with the icon : You are entering a Web site that is not hosted by SAP. By using such links, you agree (unless expressly stated otherwise in your agreements with SAP) to this:
● The content of the linked-to site is not SAP documentation. You may not infer any product claims against SAP based on this information.● SAP does not agree or disagree with the content on the linked-to site, nor does SAP warrant the availability and correctness. SAP shall not be liable for any
damages caused by the use of such content unless damages have been caused by SAP's gross negligence or willful misconduct.
● Links with the icon : You are leaving the documentation for that particular SAP product or service and are entering a SAP-hosted Web site. By using such links, you agree that (unless expressly stated otherwise in your agreements with SAP) you may not infer any product claims against SAP based on this information.
Beta and Other Experimental FeaturesExperimental features are not part of the officially delivered scope that SAP guarantees for future releases. This means that experimental features may be changed by SAP at any time for any reason without notice. Experimental features are not for productive use. You may not demonstrate, test, examine, evaluate or otherwise use the experimental features in a live operating environment or with data that has not been sufficiently backed up.The purpose of experimental features is to get feedback early on, allowing customers and partners to influence the future product accordingly. By providing your feedback (e.g. in the SAP Community), you accept that intellectual property rights of the contributions or derivative works shall remain the exclusive property of SAP.
Example CodeAny software coding and/or code snippets are examples. They are not for productive use. The example code is only intended to better explain and visualize the syntax and phrasing rules. SAP does not warrant the correctness and completeness of the example code. SAP shall not be liable for errors or damages caused by the use of example code unless damages have been caused by SAP's gross negligence or willful misconduct.
Gender-Related LanguageWe try not to use genderspecific word forms and formulations. As appropriate for context and readability, SAP may use masculine word forms to refer to all genders.
176 P U B L I CAdministrator Guide
Important Disclaimers and Legal Information

Administrator GuideImportant Disclaimers and Legal Information P U B L I C 177

www.sap.com/contactsap
© 2019 SAP SE or an SAP affiliate company. All rights reserved.
No part of this publication may be reproduced or transmitted in any form or for any purpose without the express permission of SAP SE or an SAP affiliate company. The information contained herein may be changed without prior notice.
Some software products marketed by SAP SE and its distributors contain proprietary software components of other software vendors. National product specifications may vary.
These materials are provided by SAP SE or an SAP affiliate company for informational purposes only, without representation or warranty of any kind, and SAP or its affiliated companies shall not be liable for errors or omissions with respect to the materials. The only warranties for SAP or SAP affiliate company products and services are those that are set forth in the express warranty statements accompanying such products and services, if any. Nothing herein should be construed as constituting an additional warranty.
SAP and other SAP products and services mentioned herein as well as their respective logos are trademarks or registered trademarks of SAP SE (or an SAP affiliate company) in Germany and other countries. All other product and service names mentioned are the trademarks of their respective companies.
Please see https://www.sap.com/about/legal/trademark.html for additional trademark information and notices.
THE BEST RUN
Copyright © 2022 FDOKUMEN