Help Desk Manager Administrator Guide - N-able
310
ADMINISTRATOR GUIDE Help Desk Manager Version 12.7.2 Last Updated: Monday, April 20, 2020
-
Upload
khangminh22 -
Category
Documents
-
view
16 -
download
0
Transcript of Help Desk Manager Administrator Guide - N-able

ADMINISTRATOR GUIDE
Help Desk ManagerVersion 12.7.2
Last Updated: Monday, April 20, 2020

© 2020 SolarWinds MSP Canada ULC. All rights reserved.
No part of this document may be reproduced by any means nor modified, decompiled, disassembled,published or distributed, in whole or in part, or translated to any electronic medium or other meanswithout the written consent of SolarWinds MSP Canada ULC ("SolarWinds MSP"). All right, title, and interestin and to the software and documentation are and shall remain the exclusive property of SolarWinds MSPand its respective licensors.
SOLARWINDS MSP DISCLAIMS ALL WARRANTIES, CONDITIONS OR OTHER TERMS, EXPRESS OR IMPLIED,STATUTORY OR OTHERWISE, ON SOFTWARE AND DOCUMENTATION FURNISHED HEREUNDER INCLUDINGWITHOUT LIMITATION THE WARRANTIES OF DESIGN, MERCHANTABILITY OR FITNESS FOR A PARTICULARPURPOSE, AND NONINFRINGEMENT. IN NO EVENT SHALL SOLARWINDS MSP, ITS SUPPLIERS, NOR ITSLICENSORS BE LIABLE FOR ANY DAMAGES, WHETHER ARISING IN TORT, CONTRACT OR ANY OTHER LEGALTHEORY EVEN IF SOLARWINDS MSP HAS BEEN ADVISED OF THE POSSIBILITY OF SUCH DAMAGES.
The SolarWinds MSP and N-CENTRAL marks are the exclusive property of SolarWinds MSP Canada ULC andits affiliates, are registered with the U.S. Patent and Trademark Office, and may be registered or pendingregistration in other countries. All other SolarWinds MSP trademarks, service marks, and logos may becommon law marks, registered or pending registration in the United States or in other countries. All othertrademarks mentioned herein are used for identification purposes only and may be or are trademarks orregistered trademarks of their respective companies.
Feedback
SolarWinds MSP is a market driven organization that places importance on customer, partner and alliancefeedback. All feedback is welcome at the following email address: [email protected].
About SolarWinds MSP
SolarWinds MSP is the global leader in remote monitoring and management software for managed serviceproviders and IT departments. SolarWinds MSP’s award-winning MSP N-central platform andcomplementary toolsets, backed by best-in-class business and technical services, are proven to reduce ITsupport costs, improve network performance and increase productivity through the proactive monitoring,management and optimization of IP-enabled devices and IT infrastructure. SolarWinds MSP is 100%channel-friendly and maintains operations in North America, the U.K., the Netherlands and Australia.
ADMINISTRATOR GUIDE: HELP DESK MANAGER
page 2

Table of Contents
Introduction 22
Key features 22
Modern Authentication for Office 365 e-mail accounts 22
Ticket checklists 23
Request type archive 23
Parent/child service relationships 23
Automated ticketing processing 23
Architecture 23
Ticket processing 24
Evaluate the application 25
System requirements 26
Server hardware and software requirements 26
Hardware 26
Operating system 26
Web browser 27
Server sizing requirements 27
Deployments with fewer than 20 techs 27
Deployments with more than 20 techs 28
Configuring the JVM 28
Database requirements 28
Software 28
Hardware 29
Oracle Java Database Connectivity (JDBC) driver requirements 29
Discovery connector requirements 29
Web server requirements 30
LDAP requirements 30
page 3
Mail server requirements 30
Mobile client requirements 30
Supported protocols 31
Port requirements 31
Help Desk Manager interfaces 31
Databases 31
Email 32
LDAP and Active Directory 32
Firewall port requirements for data traffic 33
Port requirements for Help Desk Manager 33
Help Desk Manager interfaces 33
Databases 33
Email 34
LDAP and Active Directory 34
Configure firewalls for data traffic 35
Get started 36
Set up the database 36
Set up an embedded database 36
Set up an external database 36
Oracle Java Database Connectivity (JDBC) driver requirements 36
Database datatypes 36
Use an embedded PostgreSQL database 37
Create a custom SQL database and account 37
Create the default admin account 37
Create a request type in the Getting Started Wizard 38
Set up the application 39
Setup overview 39
Setup menu options 40
ADMINISTRATOR GUIDE: HELP DESK MANAGER
page 4

Help Desk Manager terms 41
Migrate Help Desk Manager to a new server 41
Access a command line 41
Help Desk Manager directory 42
Both servers are running identical operating systems 42
Original server is running Windows Server and the target server is running Linux or macOS 44
Original server is running Linux or macOS and target server is running Windows Server 45
Configure the general settings 46
Apply the license 47
Configure the general options 47
Configure the server options 47
Enable a listening port 48
Redirect HTTP requests to an HTTPS port 48
Enable a URL port for generated URL links 48
Create a new keystore 49
Configure the authentication settings 49
Configure the authentication method and settings 49
Set up the certificates 50
SSL certificates 51
Apple Push Notification Services certificates 52
Set the time and place 55
Add a new Customer and set the business hours 55
Add calendar events 55
Configure the look and feel 55
Add your company logo 55
Install and apply a new style sheet template 56
Customize the database connection 58
Set the log settings 59
page 5

View the system information 59
Prepare the HDM database 60
Prepare the MySQL time zone tables 60
Enable TCP/IP on SQL Server 61
Create and configure your SQL Server database 61
Configure Microsoft SQL Server 62
Enable TCP/IP on SQL Server 62
Create and configure your SQL Server database 62
Configure MySQL 63
Integrate Apache Tomcat 63
Disable IIS 64
Disable IIS on Windows Server systems 64
Bind IIS to a Windows interface 65
Set up your email accounts 65
Simplify email management – options 66
Configure the email timeout setting 66
Accept email from unknown senders 66
Ignore email received from specific email addresses 66
Configure an outgoing email account 67
Configure an incoming email account 68
Configure an incoming e-mail account for Office 365 68
Verify your Exchange Online account settings 69
Obtain an Azure account 69
Register HDM in Azure as an application 69
Create a new incoming e-mail account for your Office 365 e-mail 71
Apply your email templates 74
Built-in email templates 74
Outgoing email templates 74
ADMINISTRATOR GUIDE: HELP DESK MANAGER
page 6

Incoming email templates 76
Template layout 77
Edit built-in email templates 77
Create new email templates 77
Apply your tags in email templates 79
Set up the tickets 81
Configure ticket options 82
Define request types 87
Set the request types for key personnel 89
Archive a request type 90
Remove a request type from an archive 91
Define status types 91
Create a priority type 91
Create custom ticket fields 92
Verify the custom field 97
Edit the custom field 97
Create tasks 97
Access the task screen 98
Create a new task 98
Add new task elements 99
Create new tickets from task elements 99
Define your techs 100
Create tech accounts 100
Unlock and reset a tech account 103
Assign a backup tech 103
Edit the admin account 104
Request types, tech groups, and ticket assignment 105
Request types 105
page 7

Tech groups 105
Define tech groups 105
Create a tech group 106
Configure tech group levels 106
Assign supported request types 107
Define tech permissions 108
Create a new tech permission set 108
Assign techs to a permission set 108
Define the tech group email notifications 109
Define the default settings for ticket email recipients 109
Request type is not assigned to a tech group 110
Request type is assigned to a tech group 110
Define the ticket routing processes 110
Approvers 110
Approver roles 110
Create action rules for ticket processing 111
Action Rule Info tab 111
Criteria tab 111
Action tab 111
Add an Action Rule 112
Load balance action rules for ticket processing 114
Enter customers 114
Add customer info 114
Create customer groups 115
Define Customer Custom Fields 115
Define clients 115
Manually create a client account 115
Define client options 116
ADMINISTRATOR GUIDE: HELP DESK MANAGER
page 8
Set up client admin roles 116
Add additional client admin permissions 116
Define client custom fields 117
Import Active Directory/LDAP directory connections 119
About LDAP 119
Validate LDAP certificates 119
Synchronize Help Desk Manager user information 120
Import clients 121
Define devices 122
Configure Device information and permission options 122
Deploy N-central remote control links 122
Integrate other tools with HDM 123
Set technician device permissions 124
Define Devicetype, status, warranty, and lease information 124
Device Classes tab 124
Device Status Classes tab 125
Warranty Classes tab 125
Lease Classes tab 125
Define Device custom fields 125
Define an asset custom field 127
Add manufacturers 127
Add a manufacturer 127
Add vendors 127
Add a vendor 127
Define PO custom fields 128
Define the PO custom fields 129
Import Device data 129
Define parts and billing 130
page 9

Apply parts and billing options 130
Perform invoicing 130
Specify a company contact for invoices 130
Generate a PDF invoice or quote from a ticket 130
Define rates and terms 131
Define part custom fields 131
Configure inventory alerts 132
Override default inventory alert recipients 133
Set up the Dashboard 133
Ticket Chart widget 133
Create a ticket chart widget 133
Ticket Chart types 134
Ticket Chart Options 134
View tickets by category and status 135
View a selected ticket 135
Ticket chart performance limitations 135
Ticket Activity widget 136
Ticket Activity options 136
Create a Ticket Activity widget 136
What's New widget 137
Create a What's New widget 137
Export the widget data 137
Start and Stop Help Desk Manager Services 137
Microsoft Windows Server 137
Linux 138
Enable FIPS 140-2 compliant cryptography 139
Network Security Services 139
CA and self-signed certificates 139
ADMINISTRATOR GUIDE: HELP DESK MANAGER
page 10

Before you begin 139
Requirements 140
Enable FIPS in a new deployment 141
Deployment checklist 141
Review the requirements 142
Download Help Desk Manager 12.4.0 or later 142
Install Help Desk Manager in your deployment 142
Install Visual C++ Redistributable Packages for Visual Studio 2013 143
Update the Environment Variables Path setting in your Windows Server operating system 143
Enable FIPS mode on your Apache Tomcat server 144
Stop Help Desk Manager 144
Install the preconfigured Help Desk Manager files for FIPS deployment 144
Edit the etc\hosts file 145
Edit the whd.conf file 145
(Optional) Edit the tomcat_server_template.xml file 146
(Optional) Edit the java.security file 146
(Optional) Edit the pkcs11_nss.cfg file 147
Create a Help Desk Manager server certificate 147
Before you begin 148
Obtain a signed certificate by a trusted CA 148
Create and use a self-signed certificate 149
Complete the installation 152
Set up SolarWinds MSP Integration and email 152
Enable FIPS in an existing deployment 153
Before you begin 153
Deployment checklist 153
Review the requirements 154
Ensure you are running Help Desk Manager 12.4.0 or later 154
page 11

Ensure that the Help Desk Manager hostname is correct 155
Install Visual C++ Redistributable Packages for Visual Studio 2013 155
Update the Environment Variables Path setting in your Windows Server operating system 155
Enable FIPS mode on your Apache Tomcat server 156
Stop Help Desk Manager 156
Install the preconfigured Help Desk Manager files for FIPS deployment 156
Edit the wrapper_template.conf file 157
Edit the etc\hosts file 157
Edit the whd.conf file 158
(Optional) Edit the tomcat_server_template.xml file 158
(Optional) Edit the java.security file 159
(Optional) Edit the pkcs11_nss.cfg file 160
Create a signed Help Desk Manager certificate for your NSS database 161
Before you begin 161
Obtain a signed certificate by a trusted CA 161
Create and use a self-signed certificate 162
Complete the installation 165
Set up your SolarWinds Integration and email 166
Prepare for the database migration 166
Migrate user passwords to FIPS 140-2 cryptography 168
Prepare for the password migration 168
Execute the password migration 169
Notify all users that the migration is completed 169
Configure and manage user authentication 170
Enable HTTPS 170
Configure the HTTPS listening port 171
Configure a URL port 171
Enable listening for HTTPS requests 171
ADMINISTRATOR GUIDE: HELP DESK MANAGER
page 12

Enter the SSL connection port 171
Restart Help Desk Manager 171
Manage keys and certificates in Help Desk Manager 172
Trust certificates signed by CAs 172
Store keys and certificates 172
Generate a keypair and CSR 172
Import a certificate and private key to the keystore 172
Use a default keypair alias and password 173
Replace a self-signed certificate with a CA certificate 173
Add certificate chains 174
Generate a new certificate using Porteclé 174
Create a new keypair 174
Replace a keypair 175
Generate a Certificate Signing Request (CSR) 176
Add a CA to the embedded Java CA cert keystore 177
Import certificates on Windows 178
Import the CA root and chain certificates 178
Import a CA reply certificate 178
Import an existing certificate 179
Create a PKCS#12 keystore from a private key and certificate 180
Export a PKCS#12 keystore from the Microsoft Management Console 180
Import a PKCS#12 file into the keystore 181
Certificate troubleshooting tips 182
Select the CA certs keystore 182
Import certificates in order 182
Use identical keypair and keystore passwords 182
Save your keystore 182
Enable your changes 182
page 13

Prevent certificate warnings 183
Enable HTTP requests 183
Troubleshoot and resolve issues 183
Deploy SSO with CAS 2.0 184
Deploy CAS Server on Apache Tomcat 184
Download 7-Zip 184
Download the CAS Server file 184
Edit the WAR file 184
Download and apply the dependencies 186
Deploy CAS server on Apache Tomcat 187
Complete your CAS server deployment 187
Enable SSL on Help Desk Manager 188
Deploy CAS 2.0 on the Help Desk Manager server 188
Configure a GPO to push the Internet Explorer settings 188
Manage clients 190
Create a client 190
View client information 190
Set up a client-initiated account 191
Assign an existing Device to a client 191
Merge duplicate HDM client accounts into one account 191
Enable clients to re-open closed tickets 192
Manage tickets 193
Ticket flow 193
Create a ticket 196
Create a ticket through the web interface 196
Create a ticket through email 197
Create a quick ticket 197
Configure ticket status types 198
ADMINISTRATOR GUIDE: HELP DESK MANAGER
page 14

Modify a preconfigured status type 199
Creating a new status type 199
Set up an automated reminder for ticket status 200
Enable the client reminder 200
Set up the client reminder interval 201
Select the email recipients for auto-close tickets 201
Configure ticket details 201
Select a request type 202
Improve ticket resolution with ticket types 202
Change ticket relationships 203
Link and unlink incident and problem tickets 204
Add details to tickets with tech notes 204
Add an FAQ to a tech note 204
Create a new tech permission 205
Send email to ticket recipients 205
Escalate and de-escalate tickets 205
Create a ticket checklist 206
Create a ticket checklist template 206
Assign a ticket checklist template to a request type 210
Add a unique checklist from within a ticket 212
View and customize the ticket queue 214
Display a list of tickets 214
Tickets displayed in the Group Tickets view 214
About the ticket queue 215
Sort the ticket queue 216
Customize your view of the ticket queue 216
Search for a Help Desk Manager ticket 216
Perform a basic search 216
page 15

Perform an advanced search 216
Advanced search examples 217
Perform actions on multiple tickets 218
Create a new bulk action 218
Edit a bulk action 218
Apply a bulk action to a group of tickets 219
Update and resolve tickets 219
Ticket information 219
Edit a ticket from the Web Console 219
Update tickets using email 220
Perform actions on multiple tickets 221
Create a new bulk action 221
Apply a bulk action to a group of tickets 222
Resolve a ticket 222
Merge duplicate tickets 223
Create parent/child service relationships 223
Service request tickets 223
Incident and problem tickets 224
Link child tickets to a parent ticket 224
Link incident tickets to a problem ticket 225
Link service request tickets to one service request 225
Remove linked parent tickets from child tickets 225
View parent tickets in child tickets 226
Link sub-child tickets to child tickets 226
Navigate between linked tickets 226
Add notes to parent and child tickets 227
Automate parent/child ticket creation 227
Configure a task with elements 228
ADMINISTRATOR GUIDE: HELP DESK MANAGER
page 16

Link a child ticket to the parent 229
Configure an action rule 230
Create parent/child tickets 230
Create email tickets 230
Update tickets using email 230
Ticket emails to clients 231
Ticket emails to techs 232
Automate ticket workflows 235
How ticket automation works 235
Priority types 235
Action rules 235
Tasks 235
Create an action rule to change ticket priority 236
Configure a task to automate ticket creation 237
Create an action rule to run a task 239
Before you begin 240
Create an action rule to run a task 240
Manage devices 242
Define devices 242
Manually add devices 242
Edit Device properties 243
Create parent and child associations 243
Add Devices as children of a parent Device 244
Remove Devices as children of a parent Device 244
Search Devices 245
Refine your search results 245
Save a query 245
Run a query 245
page 17

Export a report 245
Add purchase orders 246
Add a vendor 246
Add a purchase order 246
Add purchase order line items 246
Import purchase orders 247
Reserve devices 247
Set up Device reservations as a tech 247
Set up Device reservations as a client 248
Reserve an Device as a client 248
Check Devices in and out 248
Remove Devices 248
Report on Devices 249
Import and export data 250
Integrate Help Desk Manager with N-central 250
Use templates to import data 251
TSV templates 251
Data import types 251
Before you begin 252
Download and populate the template 252
Import the template file into Help Desk Manager 254
Create and edit reports 255
Sample reports 255
View, print, or download reports 255
Create and edit reports 256
Create Device reports 256
Create an Device report 256
Create a bar chart Device report 257
ADMINISTRATOR GUIDE: HELP DESK MANAGER
page 18

Create a pie chart Device report 257
Create a table only Device report 258
Create ticket billing reports 259
Create ticket reports 259
Create a bar chart ticket report 260
Create a pie chart ticket report 260
Create a table only ticket report 261
Create report groups 261
Schedule reports 262
Set up parts and billing 263
Add parts to a location 263
Add parts to a ticket 263
Manually add parts 264
Configure inventory alerts 264
Override default inventory alert recipients 264
Enable predefined service time blocks 265
Customize billing statements 265
Manage client feedback 267
Create a survey 267
Set the survey options 267
Create an automatic survey 267
Create a manual survey 268
Disable a survey 268
Create messages 268
Delete messages in bulk 269
View ticket and survey results 269
View ticket details 269
View survey reports 269
page 19

Send email ticket surveys 269
Knowledge-centered support 271
Using Help Desk Manager to build your knowledge store 271
Accessing FAQs in Help Desk Manager 271
Create a new FAQ 272
Set tech permissions for FAQs 273
Access FAQs in the tech user interface 273
Manually create an FAQ 273
Create an FAQ based on a ticket note 274
Search FAQs 275
View or edit an FAQ 276
Link an FAQ to a support ticket 276
Customize your deployment 277
Deployment considerations 277
Memory sizing and JVM options 277
Clear JVM heap memory 277
High availability deployments 279
Monitor deployments on macOS 279
Configure multiple instance, high availability Tomcat deployments 279
Configure multiple instance Tomcat daemons 282
Customize tickets, notes, instructions, and emails with BBCode 285
Apply basic formatting 286
Create your own tags 288
Add clickable links 288
Customize your server settings 290
Unsecured and secured ports for login 290
No redirect to HTTPS 291
URL ports (optional) 291
ADMINISTRATOR GUIDE: HELP DESK MANAGER
page 20

Tomcat server port 291
Mail notification port 291
Java home location 291
IP address 292
Privileged networks 292
Keystore settings (for SSL connections) 292
Memory allocation 293
Database connections 293
Java command line options 293
JVM arguments 294
Connect an iPhone to a standard or hosted installation 309
Connect to a standard installation 309
Connect to a hosted installation 310
page 21

IntroductionHelp Desk Manager by SolarWinds® MSP is a web-based automated ticketing solution that helps youmanage your IT support requests for both internal and external clients. Use Help Desk Manager to createand manage tickets through the web console. It also supports email ticket creation, automatic ticketassignment and escalation, asset management, and incident and problem management.
All help desk processes are managed through the web console. After you set up the application, you canconfigure Help Desk Manager to perform specific tasks. These tasks include routing tickets to a specifichelp desk technician or work group and creating new tickets from email requests or alert messages from asupported monitoring application.
You can run Help Desk Manager on the following operating systems and platforms:
n Microsoft Windows Server
n Red Hat Enterprise Linux
n Fedora
n CentOS
Key featuresHelp Desk Manager provides the following features for managing your enterprise or managed serviceprovider (MSP) help desk operations:
n Modern Authentication for Office 365 e-mail accounts
n Ticket checklists
n Request type archive
n Parent/Child service relationships
n Automated ticket processing
n IT asset management and inventory
Modern Authentication for Office 365 e-mail accounts
You can set up a new incoming e-mail account with Modern Authentication to access Microsoft ExchangeWeb Services (EWS) and your Office 365 e-mail. This authentication method uses Multi-factorAuthentication (MFA), Open Authentication (OAuth) 2.0, and conditional access policies (such as AzureActive Directory Conditional Access) to access your incoming e-mail account. When the configuration iscompleted, all e-mail correspondence transmitted between Office 365 and Help Desk Manager is securefrom unauthorized users.
page 22

Ticket checklists
You can create a ticket checklist to ensure that all ticket tasks are completed before a ticket is closed.Techs can create an ad-hoc checklist from within a ticket or an administrator can create checkliststemplates to automate your ticketing process.
Request type archive
You can archive a request type in the Help Desk Manager Administrator Console. This process archives therequest type and all associated tickets so they are hidden from clients and techs.
Parent/child service relationships
You can link multiple service requests to one parent ticket to address a repeated issue or task (such as on-boarding a new employee or tracking your IT projects). You can also pass notes, attachments, and customfields between parent and child tickets to share data to relevant tasks.
Automated ticketing processing
You can generate help desk tickets manually in the user interface or automatically by emails from anythird-party monitoring tool. You can also create tasks to link a ticket automatically to an existing ticket thattriggers an action rule.
ArchitectureThe following illustration provides a high-level view of Help Desk Manager in a stand-alone installation. Inthis example, Help Desk Manager is installed on a dedicated server with your choice of an embeddedPostgreSQL database or an external database such as MySQL or Microsoft SQL Server.
ADMINISTRATOR GUIDE: HELP DESK MANAGER
page 23

Ticket processingHelp Desk Manager initiates and manages your help desk processes through the Web Console, email, SMS,and built-in procedures. After you configure Help Desk Manager, it automatically routes tickets to theproper technician and updates your customer.
Help Desk Manager accepts email ticket requests and opens a ticket based on the information in the email.You can also update and close tickets using email. If a repair requires spare parts, Help Desk Managerorders the required parts.
Each customer can access a Web console dedicated to their help desk needs. Customers can access all oftheir help desk features through a Web portal, but they cannot access information from other help deskcustomers.
The following illustration provides an overview of Help Desk Manager processes at a high level.
To troubleshoot incoming-email-to-ticket processing, see this KB article.
page 24

Evaluate the applicationFor 14 days after you install your evaluation version of Help Desk Manager, you have unlimited tech seats.If you do not purchase a license after 14 days, Help Desk Manager automatically switches to a one-techlicense. All tech accounts other than the initial admin account become inactive, and the Assets andProcesses tabs in Setup are disabled.
Purchasing and entering a license reactivates the deactivated accounts. After you purchase a license in theCustomer Portal and receive an activation key code, enter the code in the Setup > General > License >License Settings window.
Converting your unlicensed Help Desk Manager version to a licensed version retains all of yourexisting Help Desk Manager settings or files. No additional configuration or installation is required.
ADMINISTRATOR GUIDE: HELP DESK MANAGER
page 25

System requirementsThis section contains the system requirements for Help Desk Manager. For additional information aboutrequirements, see the latest Help Desk Manager Release Notes.
Server hardware and software requirementsHardware
HARDWARE REQUIREMENTS
CPU 64-bit Dual Core 3.0 GHz or faster
RAM 4 GB (up to 10 technicians)
3 GB (more than 20 technicians) plus 1 GB for every 10 additional technicians
See Server sizing requirements for details.
Hard Drive Space 20 GB
Application Ports 8443 (default)
20293 (PostgreSQL)
Operating system
Deprecation notice: Although you can install Help Desk Manager on systems running MicrosoftWindows Server 2012 and 2012 R2 (64-bit), these versions are deprecated and will not be supportedon future Help Desk Manager releases. SolarWinds strongly recommends that you upgrade toWindows Server 2016 or later at your earliest convenience.
OPERATING SYSTEM PLATFORM SUPPORTED VERSIONS
Microsoft® Windows® Server Windows Server 2012 R2 (64-bit)
Windows Server 2016
Windows Server 2019
Microsoft Windows(Trial evaluation only)
Windows 7 (64-bit)
Windows 8.1 (64-bit)
Windows 10 (64-bit)
macOS 10.13 (Sierra)
10.14 (High Sierra)
page 26

OPERATING SYSTEM PLATFORM SUPPORTED VERSIONS
10.15.x (Catalina)
Red Hat® Enterprise Linux(RHEL)
RHEL 6.5 (64-bit)
RHEL 7.0 (64-bit)
CentOS™ CentOS 6.5 (64-bit)
CentOS 7.0 (64-bit)
Fedora™ Fedora 24 (64-bit)
Fedora 25 (64-bit)
Java Platform Open Java Development Kit 11 (OpenJDK 11)
Web browser
Due to frequent web browser updates, check the SolarWinds support website for the latestinformation about compatibility issues between these web browsers and the latest version of HelpDesk Manager.
TYPE SUPPORTED VERSIONS
Google Chrome Latest version
Mozilla Firefox Latest version
Microsoft Internet Explorer (IE) IE 11
Apple Safari Safari 10
Safari 11
Microsoft Edge Edge 38 and later
Server sizing requirementsUse the following sections to determine the requirements for your Help Desk Manager deployment size.
Deployments with fewer than 20 techs
If your deployment will support 20 tech sessions or fewer, you can run Help Desk Manager on a systemwith:
n A supported operating system
n A 32-bit Java Virtual Machine (JVM)
ADMINISTRATOR GUIDE: HELP DESK MANAGER
page 27

n 4GB RAM (up to 3.7GB for the tech sessions, JVM support, operating system, and any additionalservices you need to run on the system)
This configuration supports 10 - 20 tech sessions with no onboard memory issues.
To adjust the maximum memory setting, edit the MAXIMUM_MEMORY option in theWebHelpDesk/conf/whd.conf file.
Deployments with more than 20 techs
If your deployment will support more than 20 tech sessions, SolarWinds recommends installing Help DeskManager on a system running:
n A supported operating system
n A 64-bit JVM
n 3GB RAM for 20 tech sessions plus 1GB RAM for each additional 10 tech sessions
Configuring the JVM
To increase the max heap memory on a JVM, edit the MAXIMUM_MEMORY option in theWebHelpDesk/conf/whd.conf file.
For other operating systems, install your own JVM and then update the JAVA_HOME option in theWebHelpDesk/conf/whd.conf file to point to your Java installation.
Database requirementsHelp Desk Manager uses an embedded PostgreSQL database as its standard database. The following tablelists the supported databases.
SoftwareDATABASE SUPPORTED VERSIONS
PostgreSQL PostgreSQL 9.2
PostgreSQL 9.3.2
PostgreSQL 9.4
PostgreSQL 9.6
MySQL MySQL 5.7
Microsoft SQL Server® SQL Server 2008 R2 SP3
SQL Server 2012 SP2
SQL Server 2014
SQL Server 2016
page 28

DATABASE SUPPORTED VERSIONS
SQL Server 2017
For optimal external database performance, run Help Desk Manager and a supported externaldatabase on separate servers.
Hardware
The following table lists the minimum software and hardware requirements for a server hosting MySQLand SQL Server.
PRODUCT REQUIREMENTS
CPU speed 64-bit Dual Core 3.0 GHz or better
Hard drive space 20 GB
Memory 3 GB plus 1 GB for every additional 10 techs
Oracle Java Database Connectivity (JDBC) driver requirements
Help Desk Manager for macOS includes an embedded Java Virtual Machine (JVM). If you are running anexternal Oracle JVM, Help Desk Manager preserves your Java settings during the installation procedure andcontinues to use the external Oracle JVM.
If you are migrating from an external JVM to the embedded JVM included with Help Desk Manager and youare using a MySQL database, ensure that the new embedded Java directory on your Help Desk Managerserver includes the Oracle Java Database Connectivity (JDBC) driver.
See the Oracle website to download the latest JDBC driver.
Discovery connector requirementsThe following table lists the supported discovery connectors used for asset discovery.
DISCOVERY CONNECTOR SUPPORTED VERSIONS
Absolute Manage (HEAT Lanrev) Absolute Manage 7.3 build 5642
Apple Remote Desktop Remote Desktop 3.8
Casper Casper 9.96
Lansweeper Lansweeper 6.0.100.75
Microsoft System Center Configuration Manager(SCCM)
SCCM 1511 (64-bit)
ADMINISTRATOR GUIDE: HELP DESK MANAGER
page 29

Web server requirementsThe following table lists the supported web server for Help Desk Manager.
PRODUCT VERSION
Apache Tomcat 9.0.31
LDAP requirementsPRODUCT SUPPORTED VERSIONS
Microsoft Active Directory® 1 Active Directory 2012
Active Directory 2012 R2
Open Directory Open Directory 4
OpenLDAP® OpenLDAP 2.4
OpenLDAP 2.4.42
1 Only Active Directory is addressed in this guide. For other LDAP systems, see the Help Desk ManagerInstallation Guide.
Mail server requirementsMAIL SERVER SUPPORTED VERSIONS
Microsoft Exchange Server Exchange Server 2010
Exchange Server 2013 CU7
Exchange Server 2016
Office 365
Mobile client requirementsThe following table lists the supported client operating systems for the SolarWinds mobile adminsoftware.
PLATFORM SUPPORTED OPERATING SYSTEMS
Apple iOS® iOS 10 and later
page 30

Supported protocols
n IMAP
n POP3
n SMTP
Port requirementsHelp Desk Manager provides communication ports for the following resources:
n Help Desk Manager Interfacesn Databasesn Emailsn LDAP/AD
Help Desk Manager interfaces
The following table lists the Help Desk Manager ports for secure and non-secure interface traffic.
PORT TYPE DESCRIPTION
135 TCP Asset Discovery using Windows Management Instrumentation (WMI)
389 TCP Non-secure traffic from the Help Desk Manager server to a designated server(usually a domain controller) for use with the Directory Service tool (LDAP andActive Directory)
443 TCP Secure traffic from the Help Desk Manager Console
8081 TCP Non-secure traffic from the Help Desk Manager Console (Windows and Linux)
8443 TCP Secure traffic from the Help Desk Manager Administrator Console (Windows andLinux)
61616 TCP Help Desk Manager Discovery engine (JMS queue port)
Databases
The following table lists the Help Desk Manager ports for external and embedded databasecommunications.
PORT TYPE DESCRIPTION
1433 TCP Communications with a Microsoft Microsoft SQL external database, including:
n Microsoft SQL Server
n Microsoft Systems Management Server
ADMINISTRATOR GUIDE: HELP DESK MANAGER
page 31

PORT TYPE DESCRIPTION
n Microsoft System Center Configuration Manager (SCCM)
3306 TCP External MySQL database
5432 TCP Communication with an External PostgreSQL database
20293 TCP Communications with an embedded PostgreSQL database
The following table lists the Help Desk Manager ports for email traffic.
PORT TYPE DESCRIPTION
25 TCP Traffic from the Help Desk Manager server to your email server for automatedemail notifications
80 TCP Non-secure connection with Microsoft Exchange Web Services (EWS)
110 TCP Non-secure traffic with the POP3 mail server
143 TCP Non-secure traffic with the Internet Message Access Protocol (IMAP) mail server
443 TCP Secure traffic with EWS
993 TCP Secure traffic with the IMAP mail server
995 TCP Secure traffic with the POP3 mail server
LDAP and Active Directory
The following table lists the Help Desk Manager ports for Lightweight Directory Access Protocol / ActiveDirectory (LDAP / AD).
PORT TYPE DESCRIPTION
389 TCP Traffic from the Help Desk Manager server to a designated server (usually adomain controller) for use with the Directory Service tool (LDAP and ActiveDirectory)
636 TCP Secure traffic from the Help Desk Manager server to a designated server(usually a domain controller) for use with the Directory Service tool (LDAP andActive Directory)
page 32

Firewall port requirements for data traffic
Firewalls between any two points of communication must have the requisite ports open to inbound oroutbound traffic according to the relative direction of the communication traffic.
Port requirements for Help Desk ManagerHelp Desk Manager provides communication ports for the following resources:
n Help Desk Manager Interfacesn Databasesn Emailsn LDAP/AD
Help Desk Manager interfaces
The following table lists the Help Desk Manager ports for secure and non-secure interface traffic.
PORT TYPE DESCRIPTION
80 TCP Non-secure traffic from the Help Desk Manager Console (VA)
135 TCP Asset Discovery using Windows Management Instrumentation (WMI)
389 TCP Non-secure traffic from the Help Desk Manager server to adesignated server (usually a domain controller) for use with theDirectory Service tool (LDAP and Active Directory)
443 TCP Secure traffic from the Help Desk Manager Console
8081 TCP Non-secure traffic from the Help Desk Manager Console (Windowsand Linux)
8443 TCP Secure traffic from the Help Desk Manager Administrator Console(Windows and Linux)
61616 TCP Help Desk Manager Discovery engine (JMS queue port)
Databases
The following table lists the Help Desk Manager ports for external and embedded databasecommunications.
PORT TYPE DESCRIPTION
1433 TCP Communications with a Microsoft Microsoft SQL external database,including:
ADMINISTRATOR GUIDE: HELP DESK MANAGER
page 33

PORT TYPE DESCRIPTION
n Microsoft SQL Server
n Microsoft Systems Management Server
n Microsoft System Center Configuration Manager (SCCM)
n SolarWinds Network Configuration Manager (NCM)
n SolarWinds Network Performance Monitor (NCM)
n SolarWinds Server and Application Monitor (SAM)
3306 TCP External MySQL database
5432 TCP Communication with an External PostgreSQL database
20293 TCP Communications with an embedded PostgreSQL database
The following table lists the Help Desk Manager ports for email traffic.
PORT TYPE DESCRIPTION
25 TCP Traffic from the Help Desk Manager server to your email server forautomated email notifications
80 TCP Non-secure connection with Microsoft Exchange Web Services (EWS)
110 TCP Non-secure traffic with the POP3 mail server
143 TCP Non-secure traffic with the Internet Message Access Protocol (IMAP)mail server
443 TCP Secure traffic with EWS
993 TCP Secure traffic with the IMAP mail server
995 TCP Secure traffic with the POP3 mail server
LDAP and Active Directory
The following table lists the Help Desk Manager ports for Lightweight Directory Access Protocol / ActiveDirectory (LDAP / AD).
PORT TYPE DESCRIPTION
389 TCP Traffic from the Help Desk Manager server to a designated server(usually a domain controller) for use with the Directory Service tool(LDAP and Active Directory)
page 34

PORT TYPE DESCRIPTION
636 TCP Secure traffic from the Help Desk Manager server to a designatedserver (usually a domain controller) for use with the Directory Servicetool (LDAP and Active Directory)
Configure firewalls for data traffic
Firewalls between any two points of communication must have the requisite ports open to inbound oroutbound traffic according to the relative direction of the communication traffic.
ADMINISTRATOR GUIDE: HELP DESK MANAGER
page 35

Get startedThe first time you use Help Desk Manager, the Getting Started wizard opens and assists you with settingup your Help Desk Manager deployment. When completed, you can log in to Help Desk Manager and applyan activation key.
Set up the databaseBefore you install Help Desk Manager, decide whether to use an embedded or external database. HelpDesk Manager comes standard with an embedded PostgreSQL database.
Set up an embedded database
The embedded PostgreSQL database is ideal for small to medium installations, and is configured as part ofthe Help Desk Manager setup in the Help Desk Manager Getting Started Wizard.
Set up an external database
If you use an external database, SolarWinds MSP recommends using Microsoft SQL Server. Be sure toinstall and configure SQL Server before you install Help Desk Manager. You can install SQL Server and HelpDesk Manager on the same server or separate servers. Help Desk Manager can also use a new SQLdatabase instance on an existing SQL Server.
Oracle Java Database Connectivity (JDBC) driver requirements
Help Desk Manager for macOS includes an embedded Java Virtual Machine (JVM). If you are running anexternal Oracle JVM, Help Desk Manager preserves your Java settings during the installation procedure andcontinues to use the external Oracle JVM.
If you are migrating from an external JVM to the embedded JVM included with Help Desk Manager and youare using a MySQL database, ensure that the new embedded Java directory on your Help Desk Managerserver includes the Oracle Java Database Connectivity (JDBC) driver.
See the Oracle website to download the latest JDBC driver.
Database datatypes
The following table provides a reference for mapping data types from other databases to PostgreSQL (andto each other).
HDM POSTGRESQL MYSQL SQL SERVER
PK int4 INT int
currency numeric DECIMAL money
datetime timestamptz DATETIME datetime
page 36

HDM POSTGRESQL MYSQL SQL SERVER
integer int4 INT int
pk bytea BLOB varbinary(max)
data bytea LONGBLOB varbinary(max)
text text TEXT nvarchar(max)
varchar varchar VARCHAR nvarchar
Use an embedded PostgreSQL database
When the Help Desk Manager Getting Started Wizard prompts you to select a database, select UseEmbedded PostgreSQL database (recommended) and click Next.
Create a custom SQL database and account
1. During the installation procedure, select Use Custom SQL database (advanced).
2. Click the Database Type drop-down menu and select the appropriate database.
3. Enter the appropriate information in the remaining fields.
4. Click Test to test the database connection.
If Help Desk Manager connects with the external database, click Next.If Help Desk Manager cannot connect with the external database, check your settings and rerun thetest
If you do not have an account on the selected database:
1. Select Create database and user account if necessary.
2. Enter the database admin account user name.
3. Enter the database admin account password.
4. Click Create.
See Configure the Microsoft SQL Server and MySQL Databases to set up your external database to workwith Help Desk Manager.
Create the default admin accountThe default admin account is a local super user account used to:
n Log in to SolarWinds MSP Help Desk Manager for the first time and configure the application.
n Access all Help Desk Manager settings and accounts.
Administrators with a default admin account can create all user accounts, including additional adminaccounts. The default admin account includes tech account privileges, so you can create and processtickets with tech privileges. Techs can have either Tech or Tech Admin account privileges.
ADMINISTRATOR GUIDE: HELP DESK MANAGER
page 37

1. In the Getting Started wizard, navigate to the Admin Account panel.
2. Complete the fields as required, and click Next.
After you complete the Getting Started Wizard and create your Admin account, the Getting Started Wizardis no longer accessible. To access Help Desk Manager, log in through the Help Desk Manager login page.
If you try to access the Getting Started Wizard, an error message displays with a link to the login page, asshown below.
The default admin account is the only Help Desk Manager account that can view and use the blue Switchto Client account toolbar button.
When you create the default admin account, the Getting Started Wizard automatically links the clientaccount. Additional admin and tech accounts must be specifically configured to link to a client account.
Create a request type in the Getting Started WizardWhen you install Help Desk Manager, in the last step of the Getting Started wizard you can add requesttypes or edit preconfigured request types. This step of the wizard is optional. You might find it easier toadd request types in the Tickets panel after Help Desk Manager is configured.
In most cases, SolarWinds MSP recommends that you bypass this step in the wizard and take time to planthe request types you need.
To bypass this step, click Finish.
page 38

Set up the applicationThis section describes how to set up and configure Help Desk Manager after you install the application.See the following sections for details.
See Setup overview for procedure descriptions, setup menu options, and terms used in Help DeskManager.
Setup overviewThe following steps provide a basic overview of how to set up Help Desk Manager in a typical help deskdeployment.
See the System Requirements for the latest hardware and software requirements.
Some procedures may require you to start and stop Help Desk Manager Services.
1. (Optional) Migrate Help Desk Manager to a new server that includes additional resources to supportthe application, and then relink the application to your existing database.
2. Configure the General settings, such as logging in and activating your Help Desk Manager license,configuring general user interface options, setting up your authentication method, customizing yourdatabase connection, setting up the time zone and local work hours for your employees, andconfiguring the look and feel of the Help Desk Manager console.
Activate your license before your 30-day evaluation period ends. When your evaluationlicense expires, your single admin or tech account remains active, but all advanced featuresare disabled.
3. Prepare the Help Desk Manager database, such as Microsoft SQL Server, MySQL, and ApacheTomcat.
4. Set up your email accounts, such as setting up your inbound and outbound email accounts, applyingemail templates, and applying tags in email templates.
If your in-bound email account is linked to a Microsoft Office 365 account, configure an incomingemail account for Office 365.
5. Set up your tickets, such as defining request types, status types, priority types and alert triggers,custom ticket fields and tasks.
6. Define your techs in your help desk deployment, such as adding each tech, defining your techgroups, and setting up the tech's permissions.
7. Define your clients, such as setting up client administration roles, defining client custom fields,importing Active Directory or LDAP directory connections, and importing clients.
8. Define your assets, including your Device import and permission options, asset types, Device customfields, manufacturer and model information, purchase order custom fields, and import asset data.
9. Define your parts and billing processes for applying parts and billing options, creating invoicing
page 39

options, defining rates and terms, and defining custom fields for your parts.
10. Set up the Dashboard with pie chart, bar graph, and text widgets that display ticket statistical data.
Setup menu options
When you click Setup in the toolbar, the Setup screen displays with a left column menu. Below aredescriptions of each menu option.
MENU OPTION DESCRIPTION
General Defines licensing information, authentication methods, interface appearance,time and Customer, logging, and information about the Help Desk Managersoftware.
Email Defines email options, incoming and outgoing email accounts, and emailtemplates.
Locations Defines companies, locations and rooms location groups and assignedlocations, techs, and group managers, location custom fields, departmentsand department groups, and department custom fields.
Tickets Defines the Help Desk Manager user interface and the fields and informationthey contain, request types (such as facilities and hardware), status types(such as Open and Pending), priority types and alerts (such as Urgent, High,and Low), custom ticket fields, and task names.
Clients Defines the client options, client administration roles, client custom fields,and Active Directory / LDAP connections.
Techs Defines your account information (My Account), all techs configured to useHelp Desk Manager and their assigned tech groups, and tech permissions.
Assets Defines asset types, manufacturers and models, vendors, asset and purchaseorder custom fields. From the Assets settings, you can run and prescheduleasset discoveries to scan connected networks for the assets in your corporatenetwork.
Processes Defines how Help Desk Manager defines, stores, and applies action rules.Action rules apply custom actions triggered by events you define, such asticket routing.
Surveys Defines your survey options and associated text to set up surveys and gatherfeedback from your client users.
Parts and billing Defines your parts and billing options; custom fields; inventory alerts;invoicing options; and billing rates, terms, and tax rates.
Data Import Defines how Help Desk Manager imports data for Customers, clients, Devices,
ADMINISTRATOR GUIDE: HELP DESK MANAGER
page 40

MENU OPTION DESCRIPTION
purchase orders, tickets, and more.
Help Desk Manager terms
The following terms define the roles and objects managed by Help Desk Manager.
n Tickets: Support requests that are opened through and managed within Help Desk Manager.
Tickets can be initiated through email, created in the Help Desk Manager console, or imported fromanother application.
n Clients: End users or customers who can open tickets in Help Desk Manager.
Clients can enter tickets through email or through the Web console.n Techs: Help Desk Manager users who troubleshoot and resolve tickets.
Techs can also enter tickets. For example, when a client calls the IT Help Desk, the tech opens a ticketon the client's behalf. In addition, techs can open tickets that are not associated with a client, such astickets to schedule routine maintenance or system upgrades.
n Admins: Techs with privileges to configure Help Desk Manager.
n Tech Groups: A group of techs with similar skills and expertise.
n Request Types: A classification that identifies the type of support request.
Request types are used to automatically assign tickets to the appropriate tech group.
Migrate Help Desk Manager to a new serverMigrating Help Desk Manager to a different server requires you to move the current Help Desk Managerinstallation settings files to the new server and relink the application to your database.
You can move Help Desk Manager to another server in the following configurations:
n Both servers are running identical operating systemsn Original server is running Windows Server and the target server is running Linux or macOSn Original server is running Linux or macOS and the target server is running Windows Server
Access a command line
Most of the commands in this article must be executed in a command line. The following table describeshow to open a command line in your operating system.
OPERATING SYSTEM STEPS
Windows Server 1. Open a Run dialog box.
2. Enter cmd to open a command line with administrator privileges.
macOS 1. Click Applications >Utilities.
page 41

OPERATING SYSTEM STEPS
2. Double-click Open in Terminal.This option may vary with your distribution.
Linux
(RPM installation)
1. Open the graphical user interface.
2. Click Applications > System.
3. Right click Desktop and click Open in Terminal.
Help Desk Manager directory
In the following procedures, <WebHelpDesk> represents the Help Desk Manager home folder. The defaulthome folders for the supported operating systems are listed below.
If you installed Help Desk Manager in a non-standard directory, replace the following paths with thecorrect locations in all commands.
OPERATING SYSTEM PATH
Windows Server \Program Files\WebHelpDesk
macOS /Library/WebHelpDesk
Linux /usr/local/webhelpdesk
Both servers are running identical operating systems
1. Ensure that both servers are running identical 32-bit or 64-bit operating systems.
2. Log in to Help Desk Manager as an administrator.
3. Click Setup > General > License.
4. Click the padlock next to your license.
5. In the License Settings screen, click Deactivate to deactivate your license.
6. Log out of the Help Desk Manager Administrator Console.
7. Stop Help Desk Manager on the original server.
8. Navigate to the <WebHelpDesk> directory.
OPERATING SYSTEM PATH
Windows Server \Program Files\WebHelpDesk
macOS /Library/WebHelpDesk
Linux /user/local/webhelpdesk
9. Back up the <WebHelpDesk>\conf directory to a safe location.
ADMINISTRATOR GUIDE: HELP DESK MANAGER
page 42

10. If the original server is running Windows Server, copy the \bin\wrapper\conf directory to a safelocation.
11. Install the same Help Desk Manager version on the target server.
12. On the target server, initialize Help Desk Manager using the Getting Started Wizard.When prompted, select Embedded database (the default is PostgreSQL).
13. On the target server, stop Help Desk Manager and the PostgreSQL service.14. On the target sever, rename the \Program Files\WebHelpDesk\PGSQL9 directory to OLD_
PGSQL9.
15. Move the directory to a different location.
16. Copy the program files in the \WebHelpDesk\PGSQL9 directory from the old Help Desk Managerinstallation to \Program Files\WebHelpDesk\ on the target server.
17. On the target server, navigate to the conf directory.a. Windows Server: <WebHelpDesk>\bin\wrapper\confb. Linux and macOS: <WebHelpDesk/conf
18. Copy the conf directory files from the original server to the same location on the target server.
OPERATING SYSTEM FILES
Windows Server keystore.jks
whd.conf
labels\CustomLabels*.properties
bin\wrapper\conf\wrapper_template.conf
LinuxmacOS
keystore.jks
whd.conf
labels/CustomLabels*.properties
19. Start Help Desk Manager on the target server.If the target server domain host name is identical to the original server domain host name, you arefinished.If the target server domain host name is different from the original server domain host name,perform the following steps:
a. Log in to Help Desk Manager as an administrator.b. Click Setup > General > Options.c. In the Server DNS Name field, enter the new server DNS name.d. Click Save.
20. Log in to the Help Desk Manager Administrator Console as an administrator.
21. Click Setup > General > License.
22. Reactive your license.
page 43

Original server is running Windows Server and the target server is runningLinux or macOS
1. Ensure that both servers are running identical 32-bit or 64-bit operating systems.
2. Log in to Help Desk Manager as an administrator.
3. Click Setup > General > License.
4. Click the padlock next to your license.
5. In the License Settings screen, click Deactivate to deactivate your license.
6. Log out of the Help Desk Manager Administrator Console.
7. Start Help Desk Manager on the original server.8. Back up the following directories to a safe location:
n <WebHelpDesk>/conf
n whd\bin\wrapper\conf
9. Install an identical Help Desk Manager version on the target server.
10. Initialize Help Desk Managerusing the Getting Started Wizard.When prompted, select the default PostgreSQL embedded database.
11. Log in to Help Desk Manager using admin/admin credentials.
12. Click Setup > General > Database.
13. Point Help Desk Manager to your original database.If the original server connected to an embedded PostgreSQL database, use port 20293.
14. Start Help Desk Manager on the target server.
15. Navigate to the conf directory on the target server.
OPERATING SYSTEM PATH
Windows Server <WebHelpDesk>\bin\wrapper\conf
LinuxmacOS
<WebHelpDesk>/conf
16. Copy the following files from the original server to the same location on the target server:n keystore.jks
n whd.conf
n labels/CustomLabels*.properties
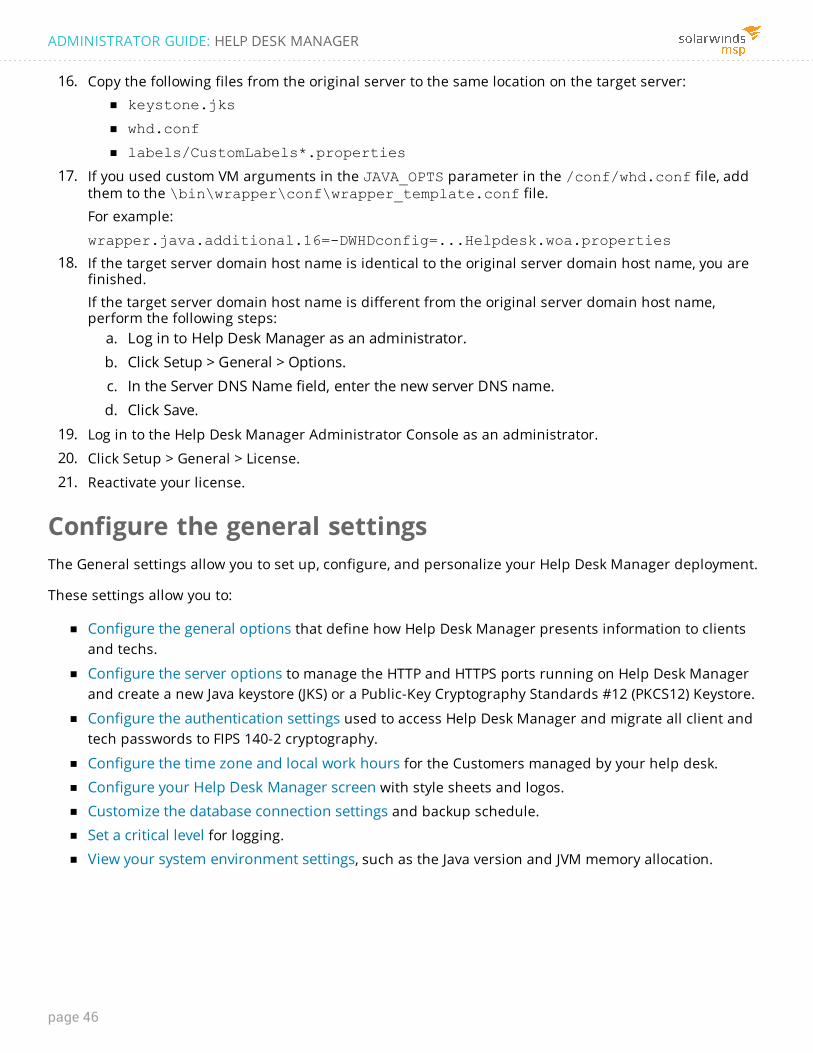
17. If you use custom VM arguments in the \bin\wrapper\conf\wrapper_template.conf file, addthem to the JAVA_OPTS parameter in the /conf/whd.conf file.
For example:
JAVA_OPTS="-Darg1=true -Darg2=true"
ADMINISTRATOR GUIDE: HELP DESK MANAGER
page 44

18. Start Help Desk Manager on the target server.If the target server domain host name is identical to the original server domain host name, you arefinished.If the target server domain host name is different from the original server domain host name,perform the following steps:
a. Log in to Help Desk Manager as an administrator.b. Click Setup > General > Options.c. In the Server DNS Name field, enter the new server DNS name.d. Click Save.
19. Log in to the Help Desk Manager Administrator Console as an administrator.
20. Click Setup > General > License.
21. Reactivate your license.
Original server is running Linux or macOS and target server is running WindowsServer
1. Log in to Help Desk Manager as an administrator.
2. Click Setup > General > License.
3. Click the padlock next to your license.
4. In the License Settings screen, click Deactivate to deactivate your license.
5. Log out of the Help Desk Manager Administrator Console.
6. Stop Help Desk Manager on the original server.
7. Navigate to the <WebHelpDesk> directory.
8. Back up the <WebHelpDesk>/conf directory to a safe location.
9. Install an identical Help Desk Manager version on the target server.
10. Initialize Help Desk Manager using the Getting Started Wizard.When prompted, select the default PostgreSQL embedded database.
11. Log in to Help Desk Manager using admin/admin credentials.
12. Click Setup > General > Database.
13. Point Help Desk Manager to your original database.If the original server used embedded PostgreSQL, use port 20293.
14. Stop Help Desk Manager on the target server.
15. Navigate to the conf directory on the target server.
OPERATING SYSTEM PATH
Windows Server <WebHelpDesk>\bin\wrapper\conf
LinuxmacOS
<WebHelpDesk>/conf
page 45
16. Copy the following files from the original server to the same location on the target server:n keystone.jks
n whd.conf
n labels/CustomLabels*.properties
17. If you used custom VM arguments in the JAVA_OPTS parameter in the /conf/whd.conf file, addthem to the \bin\wrapper\conf\wrapper_template.conf file.
For example:
wrapper.java.additional.16=-DWHDconfig=...Helpdesk.woa.properties
18. If the target server domain host name is identical to the original server domain host name, you arefinished.If the target server domain host name is different from the original server domain host name,perform the following steps:
a. Log in to Help Desk Manager as an administrator.b. Click Setup > General > Options.c. In the Server DNS Name field, enter the new server DNS name.d. Click Save.
19. Log in to the Help Desk Manager Administrator Console as an administrator.
20. Click Setup > General > License.
21. Reactivate your license.
Configure the general settingsThe General settings allow you to set up, configure, and personalize your Help Desk Manager deployment.
These settings allow you to:
n Configure the general options that define how Help Desk Manager presents information to clientsand techs.
n Configure the server options to manage the HTTP and HTTPS ports running on Help Desk Managerand create a new Java keystore (JKS) or a Public-Key Cryptography Standards #12 (PKCS12) Keystore.
n Configure the authentication settings used to access Help Desk Manager and migrate all client andtech passwords to FIPS 140-2 cryptography.
n Configure the time zone and local work hours for the Customers managed by your help desk.
n Configure your Help Desk Manager screen with style sheets and logos.
n Customize the database connection settings and backup schedule.
n Set a critical level for logging.
n View your system environment settings, such as the Java version and JVM memory allocation.
ADMINISTRATOR GUIDE: HELP DESK MANAGER
page 46

Apply the license
Your Help Desk Manager license key determines the number of Tech and Admin seats available. Help DeskManager installs with a fully functional, 14-day trial license. When the trial license expires, Help DeskManager automatically switches to a Free Single User license. To add more Tech and Admin seats, youmust purchase a license key. Following your purchase, you receive your license key.
To apply a purchased license key:
1. In the Licensed To field, click the Lock icon.
2. Copy the license key text and paste it over the existing License Key text.
3. Click Save.
If you are upgrading Help Desk Manager from an existing installation that already has a purchased licensekey, the installation verifies that:
n The upgrade release date precedes your current maintenance contact expiration date.
n The number of licensed technicians is carried through to the new installation. This feature allowsAdmins to seamlessly upgrade to the latest version without entering a new license key.
After you apply a purchased license key, you cannot change the license back to a trial or free single-seatlicense.
Configure the general options
The General Options screen allows you to define how Help Desk Manager presents information to clientsand techs. You can define how much information a client or tech can view, but you cannot filter dashboarddata for administrators.
A basic Help Desk Manager deployment does not require any changes to the default settings. However, youcan customize the general options for your environment. For example, you can force your deployment touse a secure HTTPS port or include direct contact information in your client emails.
Limiting the amount of data displayed in search results or the dashboard can increase systemperformance.
1. In the toolbar, click Setup > General > Options.
2. Complete the fields and selections as required, and then click Save.Click the tooltips for specific information about each option.
3. Click Save.
Configure the server options
Beginning in Help Desk Manager 12.5.1, you can enable HTTPS by configuring the server options located atSetup > General. These options allow you to:
page 47

n Configure the HTTP and HTTPS ports running on Help Desk Manager
n Create a new keystore to store your SSL certificates
n Restart Help Desk Manager
After you configure the ports, Help Desk Manager copies the settings to the whd.conf file in the Help DeskManager home directory. If you decide to update the whd.conf file on your own, the new settings arereflected in the user interface.
Using Keystore Options, you can create a custom Java Keystore (JKS) to share certificates for otherapplications. You can create a new JKS or a Public Key Cryptography Standards #12 (PKCS12) Keystore.
Enable a listening port
Enable the listening port to listen for HTTP or HTTPS requests, and then configure the port number used tomonitor the requests.
After you configure the port, include the port number in URLs that refer to Help Desk Manager. Forexample, if you select port 8081, enter https://localhost:8081 in the web browser.
1. Log in to Help Desk Manager as an administrator.
2. Click Setup > General > Server Options.
3. Click HTTP Enabled to enable the HTTP port.
4. Enter an HTTP Port number between 0 and 6553 to monitor the HTTP request. For example, enter8081 to process non-secure traffic from the Help Desk Manager Console.
5. Click HTTPS Enabled to enable the HTTPS port (if required).
6. Enter an HTTPS Port number between 0 and 65535 to monitor the HTTPS request. For example, enter8443 to process secure traffic from the Help Desk Manager Console.
7. Click Save.
8. Click Restart Help Desk Manager.
Redirect HTTP requests to an HTTPS port
To ensure all incoming requests use a secure connection, enable Redirect HTTP requests to HTTPS. Whenenabled, all incoming requests redirect to a secure HTTPS port.
1. Log in to Help Desk Manager as an administrator.
2. Click Setup > General > Server Options.
3. Click the Redirect HTTP Requests to HTTPS.
4. Click Save.
5. Click Restart Help Desk Manager.
Enable a URL port for generated URL links
Help Desk Manager generates internal URLs to link customer tickets to specific resources, such as an FAQ.For additional security, configure the generated URL links to access a secure port on the Help DeskManager server.
ADMINISTRATOR GUIDE: HELP DESK MANAGER
page 48

For example, you can configure a web server to route requests for default port 80 to the default Help DeskManager port 8081. As a result, all generated URL links use port 8081 to access the Help Desk Managerserver.
1. Log in to Help Desk Manager as an administrator.
2. Click Setup > General > Server Options.
3. If HTTP is enabled, click Custom HTTP Port for Generated URL Links.
4. Enter an HTTP port number between 0 and 65535 for the generated URL link.
The default selection is port 8081.
5. If HTTPS is enabled, click Custom HTTPS Port for Generated URL Links.
6. Enter an HTTPS port number between 0 and 65535 for the generated URL link.
The default selection is port 443.
7. Click Save.
8. Click Restart Help Desk Manager.
Create a new keystore
By default, Help Desk Manager creates a Java KeyStore (JKS) at<helpdeskmanager>/conf/keystore.jks when you install the software. Using Keystore Options, youcan create a custom JKS to share certificates for other applications.
1. In the Path field, enter a path to the keystore file on the server.
Include the file name in the path, such as keystore.jks (for JKS certificates) or keystore.p12(for PKCS12 certificates).
2. Click the Type drop-down menu and selected a keystore file format.
3. Enter a new password for the keystore file.
The current password for the keystore.jks file is changeit. To use the existing password, leavethe field empty.
4. Click Save.
5. Click Restart Help Desk Manager.
Configure the authentication settings
The Authentication settings allow you to configure the authentication methods used to access Help DeskManager.
Configure the authentication method and settings
1. In the toolbar, click Setup and select General > Authentication.
2. Complete the fields and selections in the top portion of the screen as required, then click Save.
See Customize tickets, notes, instructions, and emails with BBCode for details aboutcustomizing your Login Message field text.
The following table describes the authentication methods you can select in the screen.
page 49

AUTHENTICATION METHOD DESCRIPTION
Help Desk Manager Authenticates the user with the user name and password. Usernames and passwords are pulled from the Help Desk Managerdatabase or imported from Active Directory or LDAP connections.
CAS 2.0(Central Authentication Service)
Uses a single sign on (SSO) service URL to authenticate the userprovided by Help Desk Manager. The CAS server sends the userback to Help Desk Manager and attaches a "ticket" to the HelpDesk Manager URL. Help Desk Manager submits the ticket to theCAS validate URL to obtain the user name of the authenticateduser.
See Deploy SSO with CAS 2.0 for information on how to set up CAS2.0 on your Help Desk Manager Tomcat server.
Servlet Authentication(for Apache Tomcat installations)
Provides the authenticated user name to Web applications usingthe HttpServletRequest.getRemoteUser() method.
You can use Windows Authentication Framework LightEdition (WAFFLE) at your own risk for Help Desk Managerservlet authentication. SolarWinds MSP does not supportthis method of SSO.
For information about configuring WAFFLE, see Servlet Single SignOn Security Filter at the GitHub website.
HTTP Header Uses Web servers (such as the Apache HTTP Server) to forwardexternally authenticated user information using HTTP headers.
HTTP Form Value Forwards the authenticated user name through an HTTPname/value pair instead of an HTTP header.
Set up the certificates
Use Certificates to manage SSL and Apple Push Notification Services (APNS) certificates.
When a web browser submits an HTTPS request to Help Desk Manager, the SSL protocol requires theapplication to respond with a certificate to verify the authenticity of the server. The certificate contains apublic key used for encryption and a digital signature from a Certification Authority (CA). The digitalsignature indicates which CA verified the authenticity of the server.
Help Desk Manager stores the certificates in the Java keystore located at<WebHelpDesk>/conf/keystore.jks. You can also store the certificates in a separate Public-KeyCryptography Standards #12 (PKCS12) KeyStore, or Java KeyStore (JKS) that you create in Server Options.
ADMINISTRATOR GUIDE: HELP DESK MANAGER
page 50

APNS certificates enable Help Desk Manager to send notifications to an Apple device running Help DeskManager Mobile and a supported Apple iOS. When enabled, the device receives Short Message Service(SMS) text messages each time a customer ticket is created or updated.
SSL certificates
SSL certificates create a secure connection between Help Desk Manager and an external resource. HelpDesk Manager supports the following SSL certificates:
n Self-signed SSL certificate
n Certificate from a Certificate Authority (CA)
n Public-Key Cryptography Standards (PKCS) #12 certificate
The Certificates page displays all certificates that are currently in the keystore and defined in the .conffile. In this example, the Apache Tomcat SSL certificate is installed in the keystore.
The following table lists some third-party applications used with Help Desk Manager that require an SSLcertificate.
PRODUCT SSL CERTIFICATE FUNCTION
Apache Tomcat Creates a secure connection to the Apache Tomcat web andapplication server.
Microsoft® Exchange Server® Creates a secure connection to the Exchange server used toretrieve incoming Help Desk Manager ticket emails sent fromclients.
PostgreSQL Creates a secure connection to an externalPostgreSQL database.
Upload an SSL certificate
Download the SSL certificate file in CER format from the certificate provider. After you unzip the file,upload the P12 or PFX certificate into Help Desk Manager.
page 51

1. Download the SSL certificate from the third-party software website.
2. Unzip the file.
3. Log in to Help Desk Manager as an administrator.
4. Click Setup > General > Certificates.
5. Under Certificates in the keystore, click Upload, and then click Browse.
6. Navigate to the unzipped file directory.
7. Complete the on-screen prompts to install the SSL certificate.
8. Click Restart to restart the Help Desk Manager server.The SSL certificate is installed on the Help Desk Manager server.
Delete a certificate
1. Select a certificate in the keystore.
2. Click Delete.
3. Follow prompts on your screen to delete the certificate.
Edit an alias
Some resources require the keypair to have a specific alias. For example, the Apache Tomcat web serverrequires its keypair to have a tomcat alias to enable HTTPS. To change the certificate alias, upload thecertificate into the keystore. When you are finished, select the certificate and edit the alias.
If the alias name is empty or incorrect, the resource will not use the correct certificate and create itsown certificate.
1. Locate the alias name required for the certificate.
2. Select a certificate in the keystore.
3. Click Edit Alias.
4. Enter a new name for the certificate, and click Save.The new certificate name displays in the keystore list.
Apple Push Notification Services certificates
APNS requires an APNS Certificate that establishes the communications link between APNS and the Appledevice. This certificate is included with Help Desk Manager.
The APNS panel displays the current APNS Certificate expiration date and allows you to upload a newAPNS Certificate file when the existing file expires.
ADMINISTRATOR GUIDE: HELP DESK MANAGER
page 52

To enable APNS on an Apple device:
1. Set up and register the device with the Help Desk Manager server.
2. Enable SMS on the Apple device.
3. Send a test notification message to the Apple device to verify that APNS is enabled.
Set up and register a device
Install the Help Desk Manager Mobile software and register the Apple device with the Help Desk Managerserver.
1. Locate the following Help Desk Manager server information:n Host name or IP addressn Port number (secure TCP 8443 or non-secure TCP 8081)
2. Download Help Desk Manager Mobile from the Apple iTunes site.
3. Install the software on the Apple device.
4. Complete the online registration form.
5. Log in to Help Desk Manager.
6. Click Setup > Techs > Techs.
7. Click your name in the Tech Name column.
8. In the Account Info tab, scroll down to Mobile Devices Setup and verify that your Apple devicedisplays as a registered device.
page 53

Enable the Short Message Service (SMS)
Enable Help Desk Manager to send SMS text messages to the Apple device.
1. In the Account Info tab, click to enter Edit mode.
2. Scroll down to E-Mail Setup and select the SMS E-Mail Enabled checkbox.Additional options display under the setting.
3. Enter the email address associated with the Apple device.
For example, if the device uses Verizon email, enter [email protected].
Contact your mobile carrier for the proper email format.
4. Select the minimum ticket priority that triggers an SMS e-mail to the Apple device.
5. Select the minimum ticket alert level that triggers an SMS e-mail to the Apple device.
6. (Optional) Select the Repeating check box to continue sending SMS e-mails until the ticket conditionis updated.
7. Click Save.
Send a test notification message
Verify that the Apple device receives APNS notifications from the Help Desk Manager server.
1. Click Setup > General > Certificates in the Help Desk Manager Console.
2. Under Apple Push Notification Services, click Send Test Notification.
3. Verify that you received a notification on your Apple device.APNS is configured for the Apple device.
Upload and install a new APNS certificate
When the APNS certificate expires, download a new APNS Certificate from the SolarWinds Customer Portaland install the certificate using the Help Desk Manager Console.
1. Download an updated APNS certificate.a. Log in to the SolarWinds Customer Portal.b. Click the License Management drop-down menu and select My Downloads.c. Click the Products drop-down menu and select Help Desk Manager.
ADMINISTRATOR GUIDE: HELP DESK MANAGER
page 54

d. Under Additional Downloads, locate the Apple Push Notification (APN) Certificate.e. Click Download.
The file is downloaded to the server.
2. Unzip the file contents to a network share.
3. Click Setup > General > Certificates in the Help Desk Manager Console.
4. Under Upload a new APNS Certificate file, click Browse.
5. Navigate to the unzipped file.
6. Complete the on-screen prompts to complete the upload.
7. Click Restart to restart the Help Desk Manager server.The new APNS certificate is installed and the new APNS certificate expiration date displays in theCertificates page.
Set the time and place
The Time & Place settings configures the time zone and local work hours for the Customers managed byyour help desk. You can also configure calendar events that appear in your Help Desk Manager calendars.
Add a new Customer and set the business hours
1. In the toolbar, click Setup > General > Time and Place.
2. Click New.
3. Complete the fields and selections as required, and then click Save.Click the tooltips for more information.
Add calendar events
1. Click the Calendars tab.
2. Complete the fields and selections as required, and then click Save.Click the tooltips for more information.
Configure the look and feel
The Look and Feel screen allows you to configure your Help Desk Manager screen with style sheets andlogos. By applying a style sheet to your deployment, you can render your Log In screen and the clientinterface with your corporate branding.
Add your company logo
1. Locate a PNG or GIF image file for your logo.
For the classic style sheet (CSS), the image should be 259 x 61 pixels. Otherwise, the imageheight should be 70 pixels or less.
2. Log in to the Help Desk Manager Admin Console as an administrator.
page 55

3. Click Setup > General > Look and Feel.The Look and Feel page displays.
4. Click Clear to remove the default logo.The Add File button displays in the Logo field.
5. Click Add File and select the logo image file.
6. Click Save.Your company logo displays in the Logo field.
Install and apply a new style sheet template
1. Download your style sheet template.
The Help Desk Manager Product Forum on THWACK contains additional CSS templates youcan use in your deployment. Click Content Exchange > CSS Gallery to access the templates.
2. Copy the content of the zipped CSS file into the clipboard.
3. In the Client Style Sheet row, select Custom and click Edit CSS to open the CSS editor.
ADMINISTRATOR GUIDE: HELP DESK MANAGER
page 56

4. Remove any existing content in the editor (if available).
5. Paste the template from the clipboard.
6. Select Replace Default CSS and Compress.
7. Click Update to refresh the panel with parameters from the new template.
8. Review the new style sheet implementation at the bottom of the page.
page 57

9. Adjust the template Header, Help Desk Name, and Button Bar color, size, and spacing parameters tosuit your needs.
10. Click Save to activate the new style sheet.
Customize the database connection
The Database Connection screen allows you to customize your database connection settings and backupschedule.
When you install and run Help Desk Manager for the first time, the application automatically selects theembedded PostgreSQL database and will not prompt you for a database connection or license key. If youdecide to use an external database, update your database connection settings in this screen. When youare finished, click Save and restart Help Desk Manager to enable your new settings.
When required, you can restore the PostgreSQL database using the administrator console andpgAdmin3.
1. In the toolbar, click Setup and select General > Database.
2. Click the Vendor drop-down menu and select the appropriate database for your Help Desk Managerinstallation.If you select PostgreSQL as your primary database, select the Use Embedded Database check box touse the embedded PostgreSQL database included with Help Desk Manager.When you deselect Use Embedded Database, the Database field displays.
3. In the Host field, enter the IP address or DNS name of the server hosting the Help Desk Managerdatabase.
ADMINISTRATOR GUIDE: HELP DESK MANAGER
page 58

4. In the Port field, enter the port number for the database connection.The default ports include:
n 3306 (MySQL)n 1433 (Microsoft SQL Server)n 5432 (PostgreSQL)
5. In the Database field (if available), enter the name of your Help Desk Manager database.
6. In the Username and Password fields, enter the user name and password for your Help DeskManager database connection.
7. In the Backup Schedule row, select the days of the week and time of day when Help Desk Managerwill automatically backup the database.Otherwise, leave this row blank to prevent Help Desk Manager from scheduling a backup.
8. In the Backup Folder row (if available), select or enter the appropriate backup folder path to storeyour database backup files.
9. In the Number of backups drop-down menu (if available), select the total number of backups to storein your database backup file.Help Desk Manager uses first-in, first-out database storage logic. For example, if you choose to savefive backup files and in time save a sixth backup file, the first backup in the series will be deleted.
10. Click Backup Now to back up your new Help Desk Manager database file to your backup folder.
If a Backup command returned exit code 1 error displays, see this KB article fordetails.
11. Click Save.
12. Click Restart Help Desk Manager to enable your new database connection settings.
Set the log settings
Use the Logs page to set a critical level for logging. This is not required for your initial configuration and istypically used for troubleshooting.
1. Click Setup > General Logs.
2. Adjust the log settings as required.
3. Click Save to save your changes.
View the system information
The System Environment screen located at Setup > General > System Information contains informationabout troubleshooting and understanding your server’s configuration.
page 59

Prepare the HDM databaseSolarWinds Help Desk Manager supports the following databases:
n Embedded PostgreSQL
n MySQL
n Microsoft SQL Server Standard or Enterprise Edition
If your Help Desk Manager deployment requires database management features such as failoverclusters, do not use the embedded PostgreSQL database included with Help Desk Manager. Failoverclusters are not available with the embedded PostgreSQL database.
If you choose embedded PostgreSQL as your primary database, Help Desk Manager installs the databaseon the Help Desk Manager server during the installation. No additional configuration is required.
If you choose non-embedded, non-default Microsoft SQL Server or MySQL as your primary database, installthe database engine and management tools on a separate server prior to installing Help Desk Manager.See the Microsoft TechNet or MySQL website for installation instructions.
Install SQL Server or MySQL on a dedicated drive with at least 20 GB of space to accommodate thedatabase engine, management tools, help desk tickets, and ticket file attachments. You can also configureHelp Desk Manager to use a new SQL Server database instance on an existing server running SQL Server.
After you install the MySQL software, prepare the MySQL time zone tables.
After you install the SQL Server software, enable TCP/IP on the SQL server and create and configure yourSQL Server database.
Prepare the MySQL time zone tables
If you choose non-embedded, non-default MySQL as your primary database, install the database andmanually populate your time zone system tables.
You can search for tickets using two new qualifiers: Due Date and First Call Resolution. These qualifiersrely on data located in four MySQL system tables:
n time_zone
n time_zone_name
n time_zone_transition
n time_zone_transition_type
These tables are created when you install MySQL in your deployment, but are not populated by defaultwith data. Help Desk Manager requires this data because Due Date and First Call Resolution qualifier logicis implemented from within the database. If the database is missing time zone data, these qualifiers donot work properly.
page 60

When you install your MySQL database, be sure to manually populate these system tables with time zonedata. See the MySQL website and follow the instructions for MySQL Server time zone support.
You can check the system tables by executing the following query:
SELECT * FROM mysql.time_zone
If the query does not create new table rows, the tables are not populated with data.
Enable TCP/IP on SQL Server
Configure the following settings in the SQL Server Configuration Manager.
SETTING VALUE
TCP/IP Protocol Enabled in SQL Server Network Configuration > Protocols for SQL 20xx
IP Address 127.0.0.1 (if installed on the Help Desk Manager server)
Server IP address (if installed on a separate server)
TCP Port 1433
IPAll
TCP Dynamic Ports Blank
TCP Port 1433
Create and configure your SQL Server database
Configure the following settings in the SQL Server Management Studio for SQL Server to create andconfigure SQL Server to the Help Desk Manager database instance.
SETTING VALUE
SQL Server and WindowsAuthentication Mode
Enabled
Login Name whd
SQL Server Authentication:Password
Enabled and configured
SQL Server Authentication: Enforce password policy
Disabled
SQL Server Authentication: Enforce password expiration
Disabled
ADMINISTRATOR GUIDE: HELP DESK MANAGER
page 61

SETTING VALUE
SQL Server Authentication: User must change passwordat next login
Disabled
Database name whd
Database owner whd
Configure Microsoft SQL Server
To configure SQL Server for your Help Desk Manager deployment, use the SQL Server ConfigurationManager to enable TCP/IP on SQL Server. When completed, use SQL Server Management Studio forSQL Server to create and configure SQL Server to the Help Desk Manager database instance.
Enable TCP/IP on SQL Server
Configure the following settings in the SQL Server Configuration Manager.
SETTING VALUE
TCP/IP Protocol Enabled in SQL Server Network Configuration > Protocols for SQL 20xx
IP Address 127.0.0.1 (if installed on the Help Desk Manager server)
Server IP address (if installed on a separate server)
TCP Port 1433
IPAll
TCP Dynamic Ports Blank
TCP Port 1433
Create and configure your SQL Server database
Configure the following settings in the SQL Server Management Studio for SQL Server to create andconfigure SQL Server to the Help Desk Manager database instance.
SETTING VALUE
SQL Server and WindowsAuthentication Mode
Enabled
Login Name whd
SQL Server Authentication:Password
Enabled and configured
page 62

SETTING VALUE
SQL Server Authentication: Enforce password policy
Disabled
SQL Server Authentication: Enforce password expiration
Disabled
SQL Server Authentication: User must change passwordat next login
Disabled
Database name whd
Database owner whd
Configure MySQL
1. Start MySQL Workbench and connect to the MySQL database server.
2. Create a new schema with the following settings:
n Name: HDMn Collation type: utf8 - utf8_general_ci
3. Open the Configuration > Options File.
4. Configure the following settings:
n Networking - Port: 3306n General - default-storage-engine: InnoDBn Misc - init_connect: SET NAMES utf8
5. Stop and then restart the server.
6. Configure the Users and Privileges settings with the following:
n Login Name: HDMn Password: <your_password>n Limit Connectivity to Hosts Matching: localhost
7. Configure your Schema Privileges.a. Select the HDM user.b. Add a new entry with your host in the Host box.c. In the Schema box, select Selected Schema and HDM and click OK.d. Select all Object, DDL, and Other rights check boxes.
8. Save your changes.
Integrate Apache Tomcat
By default, Help Desk Manager runs on port 8081. If Apache Tomcat is not required and you prefer to runthe application on port 80, perform the following steps:
ADMINISTRATOR GUIDE: HELP DESK MANAGER
page 63

1. Stop Apache.
2. Set the DEFAULT_PORT variable in HelpDeskManager/conf/whd.conf to 80.
3. Restart Help Desk Manager.
Execute:
/usr/local/HelpDeskManager/HDMstart
4. Enable Apache to run on port 80 by allowing it to proxy requests to the Help Desk Manager on port8081.
a. Open the HelpDeskManager/conf/whd.conf file.b. In the file, set the URL_DEFAULT_PORT setting to 80
c. Save the HelpDeskManager/conf/whd.conf file.d. Enable mod_proxy as described in the Apache HTTP Server Version 2.0.
See Apache Module mod_proxy on the Apache Software Foundation site for moreinformation.
e. Add the following lines at the end of your Apache httpd.conf configuration file:
]>ProxyPass /helpdesk http://localhost:8081/helpdeskProxyPassReverse/helpdesk http://localhost:8081/helpdesk
f. Save the file.When completed, the application will appear as if it is running on port 80.
5. Restart your Apache server.
Disable IIS
Help Desk Manager does not integrate with IIS. Help Desk Manager runs on port 8081 by default. To runHelp Desk Manager on port 80, disable IIS on your Windows Server system.
Additionally, if your system is connected to multiple IP addresses and one IP address uses IIS, bind IIS andHelp Desk Manager to separate the IP addresses.
Disable IIS on Windows Server systems
You can disable IIS on Windows Server 2008 systems.
Disable IIS on Windows Server 2008 systems
To run Help Desk Manager on port 80 and disable IIS on Windows Server 2008:
1. Stop Help Desk Manager.2. Go to Startup > Administrative Services > Server Manager.
3. Click Roles.
4. Select IIS, and then click HDM.5. Click Confirm.
6. Open the following file:
\Program Files\Help Desk Manager\conf\whd.conf
page 64

7. Set the DEFAULT_PORT setting to the following:
DEFAULT_PORT= 80
8. Save the following file:
\Program Files\Help Desk Manager\conf\whd.conf
9. Start Help Desk Manager.
Bind IIS to a Windows interface
To specify or Help Desk Manager, edit the \Program Files\HelpDeskManager\conf\whd.conf fileand set the IP_ADDRESS option to the desired IP address.
Bind IIS to an interface on Windows Server 2008
1. Log on with the local Administrator account.
2. Open a command prompt window.
3. Execute the following command:
netsh http add iplisten ipaddress= xxx.xxx.xxx.xxx
4. To check your settings, enter:
netsh show iplisten
5. Restart IIS.
Set up your email accountsYou can set up your email options, templates, and incoming and outgoing mail accounts at Setup > E-Mail.Help Desk Manager supports multiple accounts for receiving and sending email.
Each incoming mail account is associated with a specific request type and an optional tech group.Incoming mail accounts are checked each minute for new messages. Help Desk Manager processes eachmessage, turns the messages into tickets, and then deletes the messages from the incoming mail server.Each incoming mail account is associated with an outgoing mail account (SMTP server) used to deliveroutgoing mail.
If you need to troubleshoot incoming-email-to-ticket processing, see this KB article.
You can define custom greetings in templates associated with a specific status type and an optionalrequest type. You can personalize these templates using tags that provide placeholders for parameters,such as last name, first name, and ticket number.
See the following sections for details:
n Configure an outgoing email accountn Configure an incoming email accountn Configure an incoming email account for Office 365n Apply your email templatesn Apply your tags in email templates
ADMINISTRATOR GUIDE: HELP DESK MANAGER
page 65
Simplify email management – options
You can simplify incoming mail processing by configuring the E-Mail Options screen located at Setup > E-Mail > Options.
Click the tooltips for details on configuring each setting.
Configure the email timeout setting
1. Click Setup > E-Mail > Options.
2. In the Connection Timeout field, enter the number of seconds HDM should wait before timing out ofan incoming or outgoing email account connection.
3. Click Save.
Accept email from unknown senders
In the screen, you can configure Help Desk Manager to accept email from unknown senders in your clientdomains or define and maintain lists of each email recipient for each client. The screen also includesoptions for restricting email formats, senders, and contents.
1. Click Setup > E-Mail > Options.
2. Locate the Incoming Mail section.
3. In the Create Accounts for Unrecognized Senders row, select Only if e-mail matches an AcceptedDomain.
4. In the Accepted Domains field, enter the domain names for your clients, separating each domainname by a comma and then a space.
See Add Accepted Email Domains in Help Desk Manager and the tooltip for details oncompleting this field.
5. Click Save.
The Incoming Mail section provides additional options to filter e-mail. Using the Ignored Senders fields,you can deny email from senders who may be sending SPAM or other unwanted email. The RegularExpression Filters fields allow you to filter out email, based on specific criteria for the subject, body,content, or attachments.
Click the tooltips next to each option for more information about using these filters.
Ignore email received from specific email addresses
If you receive spam email from specific email addresses, you can add these addresses to the IgnoredSenders list in HDM. When you are finished, HDM ignores or blocks email received from these emailaddresses.
page 66

1. Click Setup and select E-Mail > Options.
2. Under Incoming Mail, locate the Ignored Senders field.
3. Add the senders you want to ignore, adding a comma after each entry. Use an asterisk (*) for zero ormore characters.For example:
postmaster@*
You can also use:
*-admin@*
This filter configures HDM to ignore email received from addresses such as:
mailto:[email protected]
4. Click Save.
Configure an outgoing email account
You can define your SMTP server(s) and help desk email address in the Outgoing Mail Options section ofthe E-Mail Options screen.
To prevent HDM from sending nonstop ticket updates, use a real email address. Do not use an alias.
Be sure to delete the sample outgoing server that was installed by default. The sample server mayinterfere with your SMTP server.
1. Click Setup and select E-Mail Outgoing Mail Accounts.
2. Click New.
3. In the SMTP Server field, enter the location of your SMTP server.For example:
smtp.office365.com
4. In the Port field, enter the port of your SMTP server.Use default port 25 unless your SMTP server requires a specific port.
5. Select the SSL checkbox if required by your SMTP server.
6. Click Make Default to configure this account for sending all non-ticket email messages and any ticketmessages for incoming mail accounts linked to the default.Otherwise, leave this field as is.
7. Enter a friendly name that displays in the From address for email sent by this SMTP server.
8. Enter a list of domains used by this account for all outgoing emails.
9. Enter any additional properties sent to the email provider for mail server with special needs.Click the tooltips for a list of supported parameters.
10. Click Save.
ADMINISTRATOR GUIDE: HELP DESK MANAGER
page 67

Configure an incoming email account
You can define the requirements for accepting email and initiating some of the automated emailprocesses in the Incoming E-mail Accounts screen.
If required, you can change the frequency that HDM checks for new email.
1. Click Setup and select E-Mail > Options.
2. Click New.
3. Select Enable E-Mail Tickets to enable Help Desk Manager to create tickets.
4. In the E-Mail Address field, enter the email address used by Help Desk Manager to create newtickets.
To prevent HDM from sending nonstop ticket updates, use a real email address. Do not usean alias.
5. In the Account Type field, select the email protocol used to access the email account.
If you select Exchange or Office 365, verify that Exchange Web Services is enabled on theMicrosoft Exchange server. If the Exchange server does not support this service, enable theIMAP or POP3 protocol on the server.
6. Select the Compatibility Mode check box if you want to enable Help Desk Manager to download thefull email from the email server rather than specific parts of the email.
SolarWinds recommends leaving this check box blank.
7. In the Incoming Mail Server field, enter the email account used to send email to clients.
8. Click the Tech Group drop-down menu and select the tech group that filters the incoming email.
9. Click the Request Type drop-down menu and select the request type that is assigned to ticketscreated from all incoming email.
Ensure that the request type is supported by the selected tech group.
10. Leave the Allow Auto-submitted E-Mail check box and Advanced E-Mail Properties field blank.If your email server fails incoming email tests, you can use these options for troubleshooting.Click the tooltips for more information.
11. Click Save.
If you receive an error when you save your Exchange incoming email account, access yourExchange server and verify that Server Manager > Tools > Exchange Server IIS Manager> EWS > Basic Authentication is set to Enabled. When you are finished, save the incoming mailemail account again.
Configure an incoming e-mail account for Office 365
Beginning in October 2020, Microsoft will disable Basic Authentication for Exchange Web Services (EWS).This API allows you to access your Office 365 email, as well as other Exchange-related items. Thisauthentication method requires a username and password to access your Exchange email.
page 68

If you use Office 365 for your incoming e-mail, create a new incoming e-mail account in HDM and link thisaccount to a Microsoft Azure account. This method uses Modern Authentication, which implements Multi-factor Authentication (MFA), Open Authentication (OAuth) 2.0, and conditional access policies (such asAzure Active Directory Conditional Access) to access Exchange e-mail. This ensures that all e-mailcorrespondence between your Office 365 e-mail account and HDM is safe and secure from unauthorizedaccess.
OAuth is an open-standard authorization protocol used by websites and applications to enableInternet users to access resources without providing a password. MFA is an authentication methodthat grants user access to a resource after they present two or more pieces of evidence (orfactors) to an authentication mechanism—for example, a password and a secret code.
To configure a new incoming e-mail account for Office 365:
1. Verify your Exchange Online account settings.
2. Obtain an Azure account.3. Register HDM as an application in Azure.
4. Create a new incoming e-mail account in HDM for your Office 365 e-mail.
Verify your Exchange Online account settings
Log in to your Exchange account and verify that Multi-factor Authentication for Office 365 is enabled. SeeSet up multi-factor authentication located on the Microsoft Docs website for details.
Obtain an Azure account
See the Microsoft Azure website located at azure.microsoft.com for details.
An Azure administrator account is not required.
Register HDM in Azure as an application
1. Log in to HDM as an administrator.
2. Click Setup > General > Options.
3. In the General Options page, record the server DNS name and assigned port.
For example, record localhost and 8443.4. Open a web browser and navigate to:
https://portal.azure.com/#home
Do not close HDM.
5. On the Home page under Azure services, click Azure Active Directory.
6. In the navigation pane under Manage, click App registrations.
ADMINISTRATOR GUIDE: HELP DESK MANAGER
page 69

7. Click the New registration tab.
8. Under Name, enter a display name for HDM.For example, Help Desk Manager.
9. Under Supported account types, select the Single tenant option.
10. Under Redirect URI (optional), create a redirect URI in the following format using the HDM serverDNS name and port number you retrieved in a previous step:
https://<Server_DNS_Name>:<Port>/helpdesk/oath-redirect
For example:
https://localhost:8443/helpdesk/oauth-redirect
11. Save the application.
12. In the navigation pane, click App registrations.
13. Under Display name, click the Help Desk Manager application.The Help Desk Manager application details display.
14. Record the client and tenant ID values and save them to a text file.
15. In the navigation menu, click API Permissions.
16. Click Add a new permission.
17. Scroll down and click Exchange.
18. Select Delegated permissions, and then maximize EWS.
page 70

19. Under EWS, select:
EWS.AccessAsUser.All
20. Remove any other pre-existing permissions from the remaining permission drop-down menus.When you are finished, you should have one permission.
21. In the navigation menu, click Certificates & Secrets.
22. Under Client secrets, click new client secret.
23. Under Add a client secret, select an expiration date.
24. (Optional) Enter a description.
25. Click Add.
26. At the bottom of the screen, locate the Password with the new client secret code.
27. Copy the client secret code to a text file.
Store this text file in a safe location. This code is unique and cannot be retrieved when youclose the window.
Create a new incoming e-mail account for your Office 365 e-mail
If required, you can change the frequency that HDM checks for new email.
1. In HDM, click Setup > E-Mail > Incoming Mail Accounts.
Do not close Azure.
2. Click New.
3. Select the E-Mail Account tab.
ADMINISTRATOR GUIDE: HELP DESK MANAGER
page 71

4. In the E-Mail Address field, enter the email address used by HDM to create new tickets.
To prevent HDM from sending nonstop ticket updates, use a real email address. Do not usean alias.
5. In the Account Type row, select Exchange/Office 365.
6. For Authentication Mode, select OAuth.
The Incoming Mail Server row displays the Office 365 option with three additional fields.
FIELD DESCRIPTION
Tenant ID The ID number linked to your domain (such as solarwinds.com).
Client ID The ID number that is unique for each registered Azure application (such asHDM).
Client Secret The encrypted password generated by Azure.
7. Locate the text files that include the client ID, tenant ID, and the client secret values you saved fromAzure.
8. Paste the values from your text files into the relevant fields in your new email account.
page 72

9. Click Authorize.You are redirected to the Microsoft Login page.
10. In the Pick an account dialog box, select your Azure account.
11. In the Permissions requested dialog box, review the permission requests from your HDM account.These requests may include:
n Access your mailboxesn Sign you in and read your profile.
12. Click Accept.If the authorization is successful, you are redirected back to the Incoming Mail Accounts page inHDM. Under Client Secret, Authorized displays with a green indicator. The new incoming mailaccount is linked with Azure.
If the authorization is not successful and you receive an error, verify that the redirect URI youentered in Azure includes the correct server DNS and port listed in Setup > General > Options.
13. Click the Outgoing Mail Account drop-down menu and select your outgoing email account.
This account is used to send e-mail for this account. This includes automated replies to e-mailsent to this account, or tickets with a request type that matches what is linked to this account.
14. Click the Tech Group drop-down menu and select the tech group used to filter the available requesttypes below.
New tickets created from this Office 365 email account will be given the selected request type.
15. Click the Request Type drop-down menu and select the request type that is assigned to ticketscreated from all incoming email.
Ensure that the request type is supported by the selected tech group.
ADMINISTRATOR GUIDE: HELP DESK MANAGER
page 73
16. Leave the Allow Auto-submitted E-Mail check box and Advanced E-Mail Properties field blank.
If your email server fails incoming email tests, you can use these options for troubleshooting.
17. Disable your current incoming e-mail account (if applicable).
18. Click Enable E-Mail Tickets.
19. Click Save.The Mailer Daemon begins parsing your Office 365 e-mail to your new incoming e-mail account.
If you receive an error when you save your Exchange incoming email account, access yourExchange server and verify that Server Manager > Tools > Exchange Server IIS Manager> EWS > Basic Authentication is set to Enabled. When you are finished, save the incomingemail account again.
Apply your email templates
Email templates create reusable text for outgoing and incoming email from data in Help Desk Managertickets. These templates implement tags (such as first name, last name, and ticket number) to pullinformation from tickets into emails.
See Apply tags in email templates for a complete list of tags.
You can apply email templates and tags that automate your email processes, such as:
n Ticket update emails
n Action rule emails
n Other general emails that require information from tickets
You can use the built-in templates included with Help Desk Manager or you can create your own customtemplates.
Built-in email templates
Help Desk Manager includes ready-to-use, built-in email templates for ticket-related outgoing andincoming emails. You can use these templates or customize them to fulfill your needs.
For information about using built-in templates, see Edit built-in email templates.
Outgoing email templates
The following table lists the outgoing email templates included with Help Desk Manager.
TEMPLATE DESCRIPTION
SMS Message Creates the body portion of all SMS messages.
page 74

TEMPLATE DESCRIPTION
New AccountMessage
Creates the message sent to a client when you create their Help Desk Manageraccount.
Validate EmailMessage - NewAccount
Creates the message sent to clients when they create a new account.
To enable this template, the Require E-Mail Validation check box must be selected inthe Client Options screen at Setup > Clients > Options.
Validate EmailMessage -ExistingAccount
Creates the message sent to clients when they change their email address on anexisting account.
The Require E-Mail Validation check box must be selected in the Client Options screenat Setup > Clients > Options to enable this template.
Reset/ForgotPasswordMessage
Creates the message sent to clients when they click Forgot Password on the loginscreen or a tech clicks Reset Password in the Client Info panel for a specific client.
To enable this template, the Require E-Mail Validation check box must be selected inthe Client Options screen at Setup > Clients > Options.
UnrecognizedE-mail Reply
Creates the plain-text reply to Help Desk Manager email that does not match a Clientor Tech account.
To enable this template, the Client Can Create Account setting must be set to No orOnly if Client's e-mail matches an Accepted Domain in the Client Options screen atSetup > Clients > Options.
UnauthorizedUpdate E-mailReply
Creates the plain-text reply to email from a Tech who is not authorized to change thestatus of a ticket.
Techs are not authorized if they are not an admin or their assigned tech permissionlocated at Setup > Tech > Tech Permissions is not configured appropriately.
UnauthorizedStatus ChangeE-mail Reply
Creates the plain-text reply to email from a Tech or Client not authorized to change thestatus of a ticket.
Techs are not authorized if they are not an admin or their assigned tech permissionconfigured at Setup > Tech > Tech Permissions is not configured appropriately.
DisabledAccount Reply
Creates the plain-text reply to an email from a client whose Customer is disabled.
Help Desk Manager also uses this template if the Require E-Mail Validation check boxis selected in the Client Options screen at Setup > Clients > Options but clients are notauthenticated with their e-mail address.
Default TicketGreeting
Creates the message greeting in response to tickets where the Status Type andRequest Type do not match any other configured template.
ADMINISTRATOR GUIDE: HELP DESK MANAGER
page 75

TEMPLATE DESCRIPTION
Overdue AssetsMessage
Creates the message greeting in response to clients with one or more checked-outDevices that are overdue.
Closed TicketGreeting
Creates the message greeting when tickets are closed.
Open TicketGreeting
Creates the message greeting when tickets are opened.
Resolved TicketGreeting
Creates the message greeting when tickets are resolved.
Incoming email templates
The following table lists the incoming email templates included with Help Desk Manager.
TEMPLATE DESCRIPTION
Message Body WhenAdding a Client Note
Creates the default message for email opened by clicking the Add Note actionlink in an email from Help Desk Manager.
This setting only addresses client email.
Message Body WhenCanceling a Ticket
The default message for email opened by clicking the Cancel Ticket action linkfrom an email sent by Help Desk Manager.
This setting only addresses client email.
Message Body WhenConfirming a ResolvedTicket
Creates the default message for email opened by clicking the Yes action link inan Help Desk Manager email sent when a Ticket status is changed to Resolved.
This setting only addresses client e-mail.
Message Body WhenRejecting a ResolvedTicket
Creates the default message for email opened by clicking the No action link inan Help Desk Manager email sent when a Ticket status is changed to Resolved.
This setting only addresses client email.
Built-in templates can be edited but cannot be deleted.
You can also define custom email templates associated with a specific status type and a request type.
page 76

Template layout
Each built-in template includes a detailed description of its purpose and the text and tags included withthe template.
Below is an example of a typical email template configuration page for SMS messages.
Edit built-in email templates
Built-in templates are pre-configured and ready to use for your Help Desk Manager deployment. You canmodify the tags and text in the templates so your Help Desk Manager installation is able to send customemails.
If you need to modify a built-in template, you can:
n Modify the information that appears in the resulting email by moving, adding, or removing the textand tags available for that template. See Apply email tags for a complete list of tags available for allemail templates.
n Add a language other than standard English.
n Apply an email footer you have already defined in Setup > Email > Options.
The following procedure describes how to customize an outgoing built-in template called Unrecognized E-Mail Reply.
Help Desk Manager uses this template to send replies received from clients who submitted a requestusing an unrecognized email address. The goal for this example is to have the resulting emails reflect theactual name of the help desk.
1. In the toolbar, click Setup and select Email > Templates.
2. Select the Outgoing Mail tab.
3. In the E-mail Template column select Unrecognized E-mail Reply.
4. In the Subject field, change:
ERROR: Your support request could not be processed.
to
<helpdesk_name> cannot process your request.
5. In the Template field, change the existing default message:
We're sorry. Your e-mail address was not recognized by the help desk, soyour request for support could not be submitted.
to
We're sorry. <helpdesk_name> does not recognize your email address andcannot process your request.
6. Click Save.
Create new email templates
This procedure describes how to create a new outgoing template for emails that Help Desk Manager sendsto clients who opened accepted trouble tickets.
ADMINISTRATOR GUIDE: HELP DESK MANAGER
page 77

1. In the toolbar, click Setup and select Email > Templates.
2. Select the Outgoing tab.
3. Click New to open a blank template.
4. In the Name field, enter a name for the template.For example:
Open Ticket Acknowlegment
5. In the optional Description field, enter a description that indicates when your help desk personnelshould apply this template. Explain the purpose and reason for using this template.
For example,
Use this template for emails sent to clients who opened tickets requiringIT support only - no HR or Facilities requests.
6. In the Template field, enter the customer correspondence to include in the email.
Because the purpose of this template is to acknowledge that the client's new ticket is beingaddressed in your help desk system, include information such as:
n Client name or login IDn Ticket numbern Help Desk namen Help Desk contact person (such as a tech or admin)n How the client can obtain their ticket status
You can automate most of this information using tags, which act as placeholders for informationavailable in your tickets. The blue box at the bottom of the Template field labeled Tags offers apartial list of tags you can use.
See Apply tags in email templates for a complete list of available tags.Below is an example of your completed email template.
7. In the Status Type field, select Open.
Selecting Open addresses an email that is sent when a ticket is opened. If Open is notdisplayed in the drop-down list, another email template might be assigned to this status type.
8. In the Request Types field, select Specific.
page 78
9. Select the appropriate request types.Help Desk Manager includes the following request types:
n Email or Outlookn Facilitiesn Hardwaren HRn IT General or Othern Networkn Phone or Voicemailn Printer or Tonern User Administration
To enable the template to apply to all open ticket greeting emails, select All. The template isapplied to all default and custom-created request types.
10. (Optional) Select the Use Email Footer check box to include the footer as defined in Setup > E-Mail >Options > E-Mail Footer, with this template.When completed, your template is configured with your new selections, as shown below.
11. Click Save.
12. Skip the Other Languages field if you are creating a template in United States English.If your client requires emails in another language, click Add to select the client's language and thendesign your template. When you finish, click Save.
The option lists more than 100 languages, including variants of English and other languages.
Apply your tags in email templates
Tags are placeholders in email templates that auto-populate emails with ticket information for generalaction rule emails. Help Desk Manager replaces these placeholders with their proper values (based onvalues in client tickets) once the email is generated. The tickets contain information types defined in theSetup pages for areas such as tickets, clients, techs, and processes.
The following table provides a list of tags for any type of Help Desk Manager email template. Becausethese tags are hard coded into Help Desk Manager, they cannot be edited.
When you add tags to an email template, use the tag syntax as it is shown in the table below. Thecontent (such as tech, email, and client) must be entered between right and left facing anglebrackets (such as <client>).
TAG INFORMATION PULLED FROM TICKET
<ticket_url> The URL where the ticket resides.
<login_url> The URL for logging in to access a ticket.
<ticket_ID> The Help Desk Manager ticket ID number.
ADMINISTRATOR GUIDE: HELP DESK MANAGER
page 79

TAG INFORMATION PULLED FROM TICKET
<request_type> The ticket request type. A request type defines the trouble area. Forexample, Email/Outlook, Network, Printer/Toner, or User Administration.
<status_type> The ticket status indicating the ticket's state of completion. The ticket statuscan be Open, Closed, Pending, Canceled, or Resolved.
<priority_type> The ticket priority type that determines the ticket due date. The defaultpriorities include Urgent, High, Medium, and Low.
<client> The client's first and last name.
<client_short> The abbreviated version of the client name. Use this tag to minimize space,such as in lists.
<client_phone> The phone number of the client who submitted the ticket.
<client_email> The email address of the client who submitted the ticket.
<assigned _to> The name of the tech assigned to the ticket.
<assigned_to_short> The abbreviated version of the tech name assigned to the ticket.
<tech> The tech's first and last name.
<tech_short> The abbreviated version of the tech's name. Use this tag to minimize space,such as in lists.
<tech_phone> The tech's phone number.
<tech_email> The tech's email address.
<company> The company associated with the ticket.
<Customer> The Customer of an asset in a ticket.
<subject> The subject of the ticket.
<report> The request detail information.
<due_datetime> The estimated ticket completion date and time.
<scheduled_worktime> The scheduled date and time to complete work on the ticket.
<worktime> The time spent working on the ticket.
<first_initial> The first letter of the client's first name.
<last_name> The client's last name.
<last_initial> The first letter of the client's last name.
page 80

TAG INFORMATION PULLED FROM TICKET
<email> The client's email address.
<last_name> The client's last name.
<helpdesk_contact_info> The Help Desk Manager contact information.
<helpdesk_name> The name of the help desk installation.
<custom_x> The ticket custom field, where x represents a custom field ID.
See Apply email templates for information about using tags in templates.
Set up the ticketsClients and techs create tickets, either through the Help Desk Manager user interface or through email,and use tickets to correspond to each other.
The Tickets tab in the left menu defines ticketing functions, such as how tickets are generated, routed,updated, and closed.
These functions include:
n Configure ticket optionsn Define request typesn Define status typesn Set priority types and alertsn Create custom fields for ticketsn Create tasks
When a client or tech creates a ticket, they select a request type that determines which custom fieldsdisplay on the ticket and which techs can be assigned to it. The request type also determines how theticket is routed to a tech.
Each ticket is assigned a status and a priority. The status indicates the ticket's stage of completion (forexample, Open, Acknowledged, Resolved, or Closed) and determines whether time should be countedagainst the ticket while in that stage.
The priority determines the ticket due date. Each priority can be configured with three alert levels to warntechs when a ticket needs attention.
Tasks facilitate how tickets are automatically created. A task contains one or more task elements, each ofwhich provides settings for a new ticket.
When the task runs, a ticket is created for each task element, either sequentially or all at once, dependingon how the task has been configured.
Tasks can be run manually or automatically at given intervals.
ADMINISTRATOR GUIDE: HELP DESK MANAGER
page 81

You can group identical tickets together to troubleshoot and resolve all tickets as one servicerequest. See parent/child service relationships for more information
Configure ticket options
You can configure your ticket contents, generation, and ticket access options on the Options page locatedat Setup > Tickets > Options.
Help Desk Manager categorizes all ticket options into three areas:
n General Options
n Client Options
n Tech Options
To configure your ticket options:
1. In the toolbar, click Setup.
2. Select Tickets > Options.
page 82

3. On the Tickets Options page, review and update settings in the General Options section.
OPTION DESCRIPTION
Use Subject Field Enables clients and techs to view the Subject field about theRequest Detail field.
Default Priority Selects the default priority type assignment for new tickets.
Lookup Clients By Selects the attribute used for looking up clients whenassigning them to tasks and parts.
Attachments Enabled Enables techs and clients to attach files to tickets using theHDM interface or by attaching files to e-mail.Deselect the checkbox to prevent attachments sent by e-mail to be saved with the ticket. Their presence will beindicated in the ticket report.
Room Required Prevents HDM from accepting tickets without an assignedroom.
Room Field Style Enables room selection using a pop-up menu or enteringthe room name in a text field.If you defined all available rooms in your organization,select Pop-up Menu to ensure you can select a valid room.You can define all rooms at Setup > Locations &Departments > Locations & Rooms > [Location] > RoomsEditor.
Enter Work Time As Indicates whether techs can select rooms using a popupmenu or by entering the room in a text field.
Allow Non-User CC Updates Allows ticket updates by e-mail from people who are notHDM users but are Cc or Bcc recipients in the ticket updatee-mail.
ADMINISTRATOR GUIDE: HELP DESK MANAGER
page 83

4. Review and update settings in the Client Options section, including how clients can create ticketsand who can update the priority.
OPTION DESCRIPTION
Client Required Requires a ticket to be assigned to a client before it issaved.
Clients Can Create Tickets Using Enables clients to create tickets using the HDM interface ore-mail.If both options are disabled, clients can only view or updateexisting tickets. All new tickets must be created by a tech.
Client Priority Option Enables all clients and client admins (both location anddepartment) to set up their ticket priority level.If you select None, new tickets are assigned the DefaultPriority setting.
Clients can Cc: E-mail Enables clients to carbon copy e-mail tickets to additional e-mail addresses.
Allow User Lookup Auto completes the Cc: field as you type with suggestedusers from the Help Desk Manager database. The Clientscan Cc: E-mail checkbox must also be selected.This option exposes e-mail addresses to clients. Leave thisoption disabled if client email addresses should be keptsecret. Tech email addresses will be hidden according tothe Show Tech E-Mail Addresses to Clients setting.
Show Tech E-Mail Addresses toClients
Enables tech e-mail addresses to display in the clientinterface and in e-mail sent by Help Desk Manager toclients.
Show Scheduled Date to Clients Enables clients to view the time scheduled for ticket work tobe completed through e-mail or the Help Desk Managerinterface.
Show Estimated Due Date to Clients Enables clients to view the estimated ticket due date andtime in e-mail or the Help Desk Manager interface.
Lock Ticket to Client Location Assigns new tickets to the client and the correspondinglocation where the ticket was created.When selected, the client cannot override this setting byselecting a different location.
Update Ticket Location / Room /Department when Client Changes
Ensures that the location, room, and department is updatedto match the values assigned to the new client (if any) whenthe assigned client changes for any reason. The prioritytype is updated to match the new location.
Include Room Assets in Client AssetList
Presents the client with a list of all assets in their room.Deselect this option to allow the client to view only assetsassigned to them.
page 84

OPTION DESCRIPTION
Ticket Must Use Assigned Asset Restricts clients to choose only their assigned Devices whencreating a ticket.Deselect this option to enable clients to enter modelinformation for an asset that is not on their assigned list.
Asset Number Lookup for Client Enables a client to search for an asset to associate with aticket by entering the asset number in a text field when theysubmit the ticket.This option is based on whether clients can choose an assetbased on the Model Required setting of the request typeselected for a ticket.
Note Collapsing Threshold forClients
Indicates the number of ticket notes displayed to a clientbefore a "More..." link is added at the bottom of the Notesfield.In the Help Desk Managerinterface, the "More..." linkexposes any hidden notes.In an e-mail, the link returns the client to the web interfaceto view the hidden notes.
Auto-Reply to Client Indicates the actions taken by a client to invoke anautomatic e-mail confirmation.This applies to the client (assigned client or Cc client)currently updating the ticket.
Enable Cancellation By Client Indicates under which conditions a Cancel option isavailable to the client in the Help Desk Manager interfaceand e-mail ticket display.
ADMINISTRATOR GUIDE: HELP DESK MANAGER
page 85

5. Review and update settings in the Tech Options section.
OPTION DESCRIPTION
Default Tech Note Visibility Enables tech notes to be visible or hidden to clients bydefault.You can override this setting for each tech note.
Print View Note Visibility Enables which note types are displayed in the Ticket DetailPrint View and Tickets PDF download.
Note and History Sorting Selects the ticket sorting order in the Ticket Details tab.
Default Setting for E-Mail Recipients(No Tech Group)
Selects the default setting for the E-Mail Recipientsattribute of new tickets, which is visible in the Ticket Detailseditor.The E-Mail Recipients setting determines which usersassociated with a ticket receive an e-mail when action ismade by a Tech.
See this KB article for additional details onconfiguring this option.
Default Ticket Editor Button Enables the Save or Save & Email button to display asdefault in the Ticket Details tab.
E-mail Delete Confirmation Sends an e-mail to the assign tech or tech group to confirma ticket deletion.This setting overrides the Tech checkbox in the ticket.
Limit Assigned Tech to Current Level Limits the available techs in the Assigned Tech drop-downmenu on the Ticket Details tab to techs that are in thecurrent ticket tech group level.
When an attempt is made to edit aTicket already being edited inanother session
Selects the action taken when a ticket is edited by morethan one tech at the same time in separate sessions.Select Allow to allow multiple users to edit a ticket at thesame time without any warning.Select Warn to display an alert message when you edit aticket that is being edited.Select Block to allow only one user to edit a ticket at a time.
Enable Ticket E-Mail Overrides Enables three new settings in the Recipients section of theticket editor that provide options for overriding emailsettings elsewhere in HDM.
Automatically Delete ObsoleteCustom Fields
When selected, custom fields rendered obsolete (forexample, by changing the request type of a ticket to onethat doesn't support those custom fields) are removed fromthe ticket, regardless of whether they have a value.
page 86

OPTION DESCRIPTION
Otherwise, the empty obsolete fields are automaticallyremoved. Deleted custom fields that are not empty arenoted in the Ticket History.
6. Click Save.
Define request types
Request types are used to categorize tickets. The request type definition specifies which users can createthis type of ticket and what fields are included on the ticket.
Request types also define what type of issue the customer is experiencing and what action needs to betaken. When a user opens a ticket, they must choose a request type.
Request types can be defined as parent and child types. For example, when a user requests a passwordreset, you can configure the parent type as IT Software Assistance and the child type as Password Reset.You can define the types of tickets your help desk services support in the Request Types screen.
To begin, build your parent types first and then add your corresponding child types. If you build a childtype before you build the parent type, you cannot set the child type as a child.
1. In the toolbar, click Setup and select Tickets > Request Types.
The Request Types window displays current request types.2. Click New.
3. Enter a name to identify this request type.
4. To create a nested request type, select the parent type. Optionally, click to copy values for theremaining fields from the parent type.To create a top-level request type, leave this field blank.
5. Select the tech group that will handle this type of request.If the tech group is not defined, leave this field blank. You can map the request type to a tech groupwhen you define the tech group.
6. Specify the default priority and whether fields are hidden or required.
ADMINISTRATOR GUIDE: HELP DESK MANAGER
page 87

7. In the Detailed Instructions field, enter additional information to be displayed on the ticket. Forexample, you can provide specific instructions for creating this type of ticket, or explain the requesttype's purpose so a client can choose the correct type.
You can apply BBCode formatting to format lists, add emphasis, or include links to supportinginformation. See Customize tickets, notes, instructions, and emails with BBCode for details.
8. Specify whether this type of ticket is listed in the menu displayed to clients. Clear this option fortypes that are selected only by techs (for example, a request type used by techs to schedule anequipment maintenance window).
9. Specify whether the user will be prompted to select an asset or model when they create this type ofticket.
10. Optionally, restrict this ticket type to specific companies, locations, or departments. Only clients ortechs associated with your selections will see this request type. For example, if the request type willbe routed to a facilities maintenance group for a specific location, restrict the type to that location.
11. To include custom fields on this type of ticket, specify which fields to include.
12. Specify whether clients can attach files to this type of ticket, and whether this request type isavailable as a category when techs create an FAQ.
The Attachments Enabled option does not affect whether techs can attach files.
13. Identify the tech who will receive the highest level escalation (after the tech group manager).
14. Select the survey that is sent to clients when this type of ticket is closed, or select None to disablesurveys for this ticket type.
15. Click Save.
page 88

Set the request types for key personnel
You may have request types that require unique restrictions for key personnel, such as techs and HR. Forexample, in the HR department, you may need to have a Reset Password request type in your HRdepartment, which should only be available to the IT helpdesk personnel in the HR department. You canenable these for your personnel.
1. Log in to HDM as an administrator.
2. Click Setup > Companies and Locations > Departments.
3. Click New.
4. Complete the form to add a new department.a. Enter a department name. For example, HR.
b. Enter a phone number.
c. Select the default client admin permissions.
d. Complete the remaining fields as required, and then click Save.5. Under Companies and Locations, click Department Groups.
6. Click New.
7. Complete the Group Name form.a. Enter a group name. For example, Help Desk.
b. Select a group manager.
c. Click Save.8. Click the Assigned Techs tab in the form.
9. Click Edit.
ADMINISTRATOR GUIDE: HELP DESK MANAGER
page 89

10. Select the required technicians, and click Save.The assigned techs display in the form.
11. Click Tickets > Request Types.
12. Click New.
13. Update the new Request Types form.a. In the Request Type field, enter Reset Password.
b. Click the Parent Type drop-down menu and select Helpdesk.
c. In the Departments field, select Specific.
d. In the Selected Departments field, select the HR checkbox.e. Complete the additional fields and selections as required.
14. Click Save.
Archive a request type
Prior to Help Desk Manager 12.6, you could hide a request type from clients by creating a non-existingdepartment and assigning the targeted request type to this department. Another option was to delete therequest type, but this method can corrupt your historically-assigned tickets.
Beginning in Help Desk Manager 12.6, you can archive a request type in the Help Desk ManagerAdministrator Console. After you archive the request type, the request type and all associated tickets arehidden from clients and techs.
When an administrator generates a report, the request type and associated ticket information are includedin the report. However, the archived ticket data does not display in the dashboard widgets.
Use this feature to:
n Purge Help Desk Manager of outdated request types
n Prevent techs from assigning tickets to an archived request type
n Prevent clients from assigning help requests to an archived request type
To archive a request type:
page 90

1. In the toolbar, click Setup and select Tickets > Request Types.The Request Types window displays the current request types.
2. In the Archived column, select the checkbox for the request type you want to archive.
3. Click Save.The request type is no longer available in the Help Desk Manager console options.
Remove a request type from an archive
1. In the toolbar, click Setup and select Tickets > Request Types.The Request Types window displays the current request types.
2. In the Archived column, select the checkbox for the request type you want to remove from anarchive.
You cannot remove a nested request type from an archive if the parent request type isarchived.
3. Click Save.The request type is available in the Help Desk Manager console options.
Define status types
Each ticket is assigned a status from the available status types. The following status types are predefined:
n Open
n Closed
n Canceled
n Resolved
Create a priority type
You can use Help Desk Manager to automate ticket workflows. For example, you can automatically change aticket's priority type.
ADMINISTRATOR GUIDE: HELP DESK MANAGER
page 91

In the following example, a Critical priority type is created. In the next topic, the Critical priority type will beused in an action rule that changes all tickets submitted by the CEO to Critical.
1. Click Setup.
2. Select Tickets > Priority Types and Alerts.
3. Click New.
4. Enter a name, and select a display order and color.
5. (Optional) In the Due Time field, select the time when tickets with this priority should be closed.
6. (Optional) In the Client Reminder Interval field, select the amount of time to elapse before sending(or resending) a reminder to clients.
7. (Optional) In the Alert Repeat Interval field, select the amount of time between reminders to triggeran alert.
8. Click Save.
9. (Optional) In the Alert Level rows, set the conditions (such as time interval, criteria, and emailrecipients) for each Alert Level, beginning with Alert Level 1 and ending with Alert Level 3.
10. Click Save.
Create custom ticket fields
Use the Ticket Custom Fields screen to create custom tickets fields for your request types. After you createyour custom ticket fields, you can attach one or more custom fields to a request type.
When you open a new ticket and select a request type, any custom fields attached to that request typedisplay in the ticket under Custom Fields. The custom field can be hidden, visible, editable, or required fortechs or clients based on your needs.
You can add a pop-up message to the custom field by entering message text in the Info field. When youadd text to this field and click Save, an Information icon displays in the custom field. When a tech orclient (based on your assigned permissions) clicks this icon, the pop-up message displays next to the field.
The icon displays next to each custom field in the Ticket Custom Fields window that is configured with apop-up message.
page 92

The following table lists all custom fields you can add to your tickets. These custom fields display underCustom Fields in the ticket.
FIELD DESCRIPTION
Text Creates a text box for 80 characters and up to 15 lines of text.
For example, you can create a custom text field called Additional Notes and attach thecustom field to any request type so a tech or client can add additional ticketinformation.
Numbers Creates a text box for 80 characters and up to 15 lines of text or numbers.
For example, you can create a custom number field called Toner Cartridges and attachthe custom field to the Printer/Toner request type so the tech or client can indicatehow many toner cartridges are requested.
Currency Creates a text box for 80 characters and up to 15 lines of text or numbers.
For example, you can create a custom currency field called Estimated Cost and attachthe custom field to a Hardware request type. This provides a quick reference for anyhardware costs included with the ticket.
Date Creates a calendar field to add a date to the ticket.
For example, you can create a custom date field called Target Date to identify the datewhen a task in the ticket must be completed.
Date/Time Creates a field with a calendar and time drop-down menus so you can add a date andtime to the ticket.
ADMINISTRATOR GUIDE: HELP DESK MANAGER
page 93
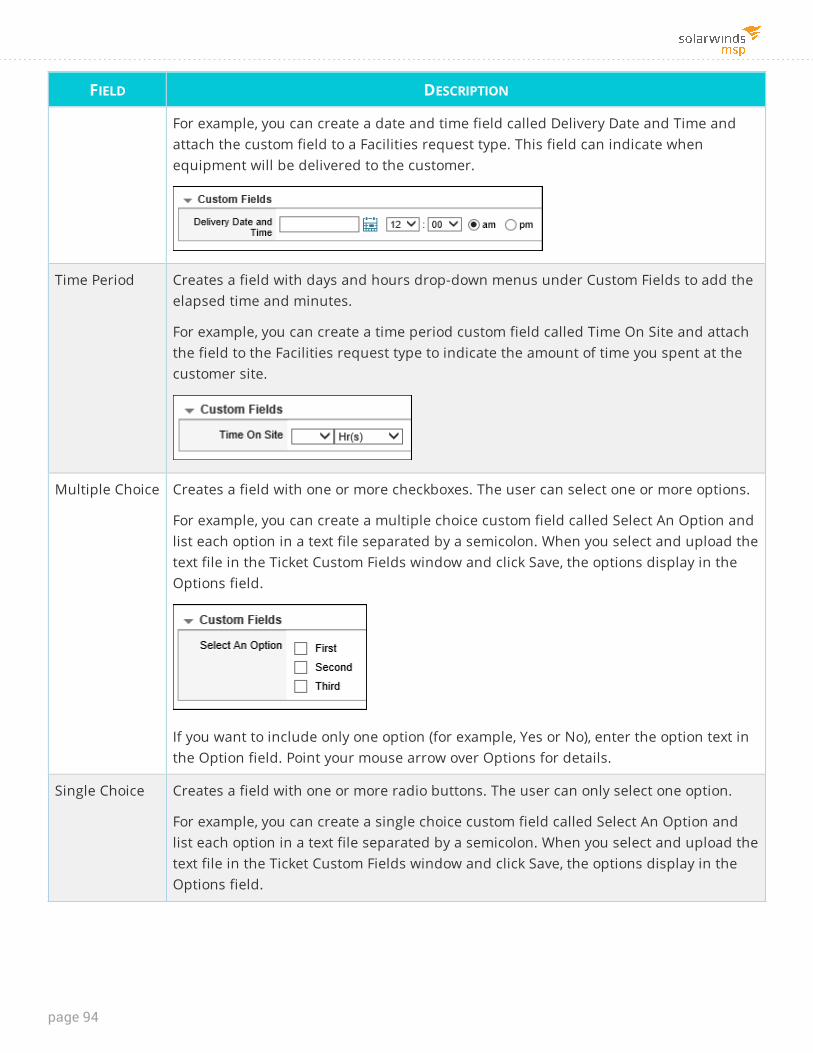
FIELD DESCRIPTION
For example, you can create a date and time field called Delivery Date and Time andattach the custom field to a Facilities request type. This field can indicate whenequipment will be delivered to the customer.
Time Period Creates a field with days and hours drop-down menus under Custom Fields to add theelapsed time and minutes.
For example, you can create a time period custom field called Time On Site and attachthe field to the Facilities request type to indicate the amount of time you spent at thecustomer site.
Multiple Choice Creates a field with one or more checkboxes. The user can select one or more options.
For example, you can create a multiple choice custom field called Select An Option andlist each option in a text file separated by a semicolon. When you select and upload thetext file in the Ticket Custom Fields window and click Save, the options display in theOptions field.
If you want to include only one option (for example, Yes or No), enter the option text inthe Option field. Point your mouse arrow over Options for details.
Single Choice Creates a field with one or more radio buttons. The user can only select one option.
For example, you can create a single choice custom field called Select An Option andlist each option in a text file separated by a semicolon. When you select and upload thetext file in the Ticket Custom Fields window and click Save, the options display in theOptions field.
page 94

FIELD DESCRIPTION
If you want to include one option (for example, Yes or No), enter the option text in theOption field. Point your mouse arrow over Options for details.
Popup Menu Creates a field with one or more options in a drop-down menu. The user can onlyselect one option.
For example, you can create a single choice custom field called Select An Option andlist each option in a text file separated by a semicolon. When you select and upload thetext file in the Ticket Custom Fields window and click Save, the options display in theOptions field.
If you want to include one option (for example, Yes or No), enter the option text in theOption field. Point your mouse arrow over Options for details.
To create a custom ticket field:
1. Click Setup.
2. Select Tickets > Ticket Custom Fields.
3. Click New.The Ticket Custom Fields screen displays the default values for a new custom field.
4. Enter a label to identify this field.
5. To accept the default options, go to step 12. Otherwise, go to step 6.
6. In the Display Order drop-down menu, select this field's position within the Custom Fields section ofa ticket.
ADMINISTRATOR GUIDE: HELP DESK MANAGER
page 95

7. In the Clients and Techs sections, specify whether each group can see or edit the custom field.
Techs with admin accounts can edit all custom fields.
8. Select the Type of input this field will accept.
The remaining fields change based on your selection. Mouse over the selections for details.
9. In the Info field, enter a description, and then select whether the field is searchable or excludedfrom e-mail. Hover over each option for details.
10. Click the Display Order drop-down menu and select the position where this option is listed in theCustom Fields list.For example, to display this selection as the first option in the Custom Fields list, select 1.
11. Select the display options for clients and techs. For example, if this field is a required custom fieldoption for tech and client tickets, select Req'd for both options.
12. Click Save.The Request Types field and an Edit link is displayed on the Ticket Custom Fields screen.
page 96

13. Specify which request types apply to this custom field. Only tickets with the selected request typewill display this field.
a. Click the Edit link. A new tab displays a list of request types.b. Select one or more request types. To display the custom field on all tickets, click Select All
below the list.
c. Click Done to close the tab.14. Click Save.
Verify the custom field
1. Click Tickets > New Ticket.
2. In the Client Info tab, locate and select a client.
3. Click the Ticket Details tab.
4. In the Request Type drop-down menus, choose the request type that includes your custom field.
5. Complete the remaining ticket fields, and click Save.
6. Close and then reopen the ticket.
7. Scroll down to Custom Fields.Start Date displays as the first option because the display order is set to 1.
Edit the custom field
1. Click Setup > Tickets > Ticket Custom Fields.
2. In the Label column, locate and click the custom field you want to edit.
3. Edit the field as required. Click the Help for details.
4. Click Save to save your changes.
Create tasks
Help Desk Manager uses tasks to create tickets. A task contains one or more task elements, and each taskelement provides settings for a new ticket. When the task runs, Help Desk Manager creates a ticket foreach task element, either sequentially or all at once, depending on the configured task.
Tasks can run manually or automatically, at given intervals or based on specific criteria, depending on howyou configure them. Tasks are especially useful for handling repetitive processes.
ADMINISTRATOR GUIDE: HELP DESK MANAGER
page 97

For example, if your HR department has a set of routine onboarding tasks to complete for a new employee,you can create a task called New Employee and define each task element required to help a new employeeget started in their new position.
Related tasks can include:
n Completing tax and insurance forms
n Accessing network resources
n Configuring a new computer system
n Installing and configuring corporate and department-specific software
You can trigger a new task when required—for example, when you on-board a new employee. When yourun the task, Help Desk Manager generates a ticket for each task element. These tickets can be assigned totechs, who ensure each task element is completed.
You can create action rules that automatically trigger your tasks. See Automating parent/childtickets for more information.
To create a new task:
1. Access the task screen.
2. Create a new task.
3. Add new task elements.
4. Create new tickets from task elements.
Access the task screen
You can access the task screen by clicking Setup and selecting Tickets > Tasks.
The following screen displays.
When you create a new task, the task displays in this screen.
Create a new task
To create a new task, click New. The Task Info screen displays.
To create a new task:
1. In the Task Name field, enter a name for the task.For example:
New Employee
2. (Optional) If this task pertains to a specific employee, search for the appropriate client in the ClientLookup box fields and assign a client to the task.Otherwise, leave this box blank.
3. Select the Scheduled check box to schedule this task to run at a specific time interval. Otherwise,leave this check box unchecked.
page 98

4. Select the Shared check box to share this task with other users.
Selecting this check box will also make the task available as an action rule and be visible to othertechs.
5. Click Save.A message displays stating that the task was created successfully. The Task Elements and Historytabs appear in the screen.
Add new task elements
To add new task elements, click Task Elements. In the initial screen, click New. The Task Elements tabscreen displays, as shown below.
To create new task elements:
1. Click the Element Order drop-down menu and select 1 so this task element runs first.
2. (Optional) Select the Link to Parent check box to link this task to a parent ticket and automateparent/child ticket creation.When selected, the task element is inherited from the parent ticket.
3. Select the appropriate selections for Location, Room, and Department.
4. Click the Request Type drop-down menus and select the appropriate request type.For example, for new hire tasks, select HR.
5. In the Subject field, enter a name for this element.
For example, to configure a new computer system for a new hire, you can enter Configure a newcomputer system.
6. In the Request Detail field, enter a description for the element.For example:
Configure a new computer system with Microsoft Office and all requiredcorporate software.
7. In the Tech drop-down menu, select a specific tech for this element (if required).
8. In the Priority drop-down menu, select the appropriate priority for this element.
9. In the Asset No. field, enter an asset number (if required).
10. In the Generate Next Element field, select On Creation to trigger the next element immediately afterthe ticket for this element is created.Otherwise, you can select When Status Equals and select the appropriate selection to trigger thenext element.
11. Click Save.When completed, the Task Elements tab lists a summary of your task.After you create your first task elements, add additional elements to create new task elements foryour task. For example, for the New Employee task, you can create new elements to create an emailaccount, assign a specific desk in a building, and enroll the employee in on-site new hire classes.
Create new tickets from task elements
To create tickets from task elements, click the Task Info tab, Select a task, and click the arrow next to theTask Name field.
ADMINISTRATOR GUIDE: HELP DESK MANAGER
page 99

To select another task, click the left and right arrows at the top right to scroll through all available tasks.
After you execute a task, click Tickets and verify that the task created the appropriate tickets. For example,when you click the Green arrow in the example above, Help Desk Manager creates a new ticket for the task.
Define your techsTechs are users who resolve Help Desk Manager tickets. Permissions specify which tickets a tech canaccess and what actions the tech can perform.
Tech permissions are determined by:
n The type of tech account
n The set of permissions granted to the tech account
Help Desk Manager provides two account types for techs:
n The Admin account type provides unlimited access to all Help Desk Manager functionality. Allpermissions are granted to admins.
n The Tech account type allows limited access to Help Desk Manager functionality based on the tech'spermissions.
Use the Techs tab in Setup to assign your techs to specific support areas (such as , Customers, andClients). When completed, Help Desk Manager will automatically assign tickets to the appropriate techbased on your selections (such as Tech Group, Customers, and Devices).
Create tech accounts
Check out this video (8:58) on setting up a Help Desk Manager account.
Each tech who logs in to Help Desk Manager must have an account. You can use the Techs page to definethe techs who will log in to Help Desk Manager. For each tech, you can define their work schedule,Customer, associated tech group, and business zone.
Beginning in Help Desk Manager 12.5.2, all techs who use LDAP authentication must have a Clientaccount to access their Tech account. This process prevents unauthorized access to an LDAPaccount.
When you create a non-admin tech account, you must specify the tech's supervisor. As a result,SolarWinds MSP recommends creating the supervisors' accounts first.
The Tech Name column includes a list of a techs in your tech group. Some tech names may include anindicator that describes their availability status.
page 100

INDICATOR
STATUS DESCRIPTION
[ C ] Concurrent The tech is assigned to a concurrent license.
[ D ] Deleted The tech account was deleted.
[ I ] Inactive The tech account is inactive.
[ S ] Not onschedule
The tech has a specific work schedule outside the assigned businesszone.
[ V ] Vacation The tech is on vacation.
You can configure all statuses except Concurrent in the Scheduling Setup section of each tech account. Ifthe tech is assigned to a Concurrent license, the tech must wait for an available license to use Help DeskManager.
SolarWinds MSP recommends creating the supervisor before creating the techs who report to thatsupervisor. Using this method, you can assign a supervisor to each tech as you create the tech.
1. In the toolbar, click Setup.
2. Click Techs > Techs.
2. Click New.
3. Enter the tech's name, Help Desk Manager credentials, and contact information. All bold fields arerequired.
For more information about any field, see the tooltips.
4. Specify the account type. For tech accounts, specify the tech's permissions and supervisor.
A supervisor is required for tech accounts, but optional for admin accounts.
ADMINISTRATOR GUIDE: HELP DESK MANAGER
page 101

5. To enable the tech to access the Help Desk Manager client interface, link the tech to a client account.
When the tech account is linked to a client account, the Switch to Client Account icon is availablein the upper-right corner. The tech can click this button to display the interface exactly as theselected client sees it.
Tech accounts can be linked to actual client accounts or a demo client account. If you link to ademo client account with the same user name as the tech, a message warns you that theclient won't be able to log in except as a tech linked to the client account. Because that is theintent, you can ignore the message.
6. Enable user interface enhancements to support the latest web browsers (if desired). When selected,some user interface enhancements required by the latest web browsers is enabled. This includesspeed and standards requirements. See the tooltip for details.
7. Specify the number of notes and history entries to display on a ticket. Additional entries will becollapsed by default.
8. In the Asset Setup section, select the technologies that this tech can use to connect remotely to anasset.
The Assets > Options configuration determines which technologies this section lists.
9. In the E-Mail Setup section, specify the email settings and select the events that generate an email tothis tech.For example, to enable the tech to receive notifications about certain events, select the appropriatenotification checkboxes.
An administrator may force some of these notifications for all techs in a particular Tech Groupby configuring the email notifications at Setup > Techs > Tech Groups [Tech Group] > TechGroup Levels > [Tech Group Level].
page 102
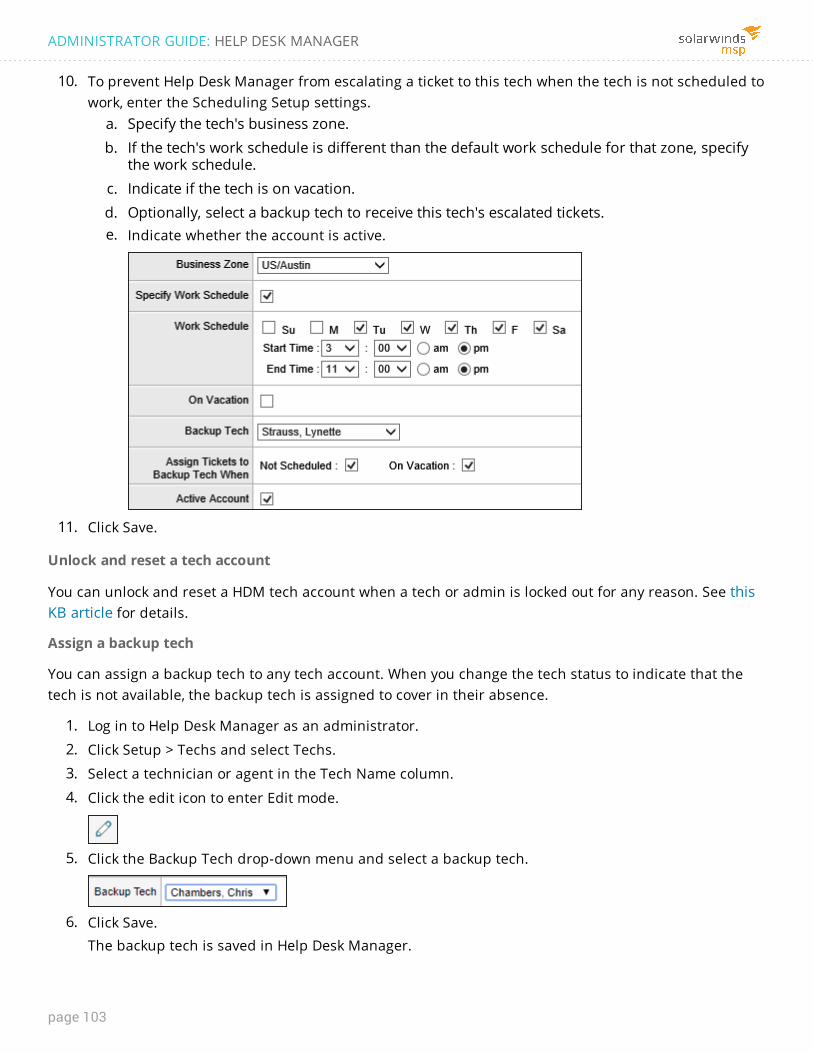
10. To prevent Help Desk Manager from escalating a ticket to this tech when the tech is not scheduled towork, enter the Scheduling Setup settings.
a. Specify the tech's business zone.b. If the tech's work schedule is different than the default work schedule for that zone, specify
the work schedule.c. Indicate if the tech is on vacation.d. Optionally, select a backup tech to receive this tech's escalated tickets.e. Indicate whether the account is active.
11. Click Save.
Unlock and reset a tech account
You can unlock and reset a HDM tech account when a tech or admin is locked out for any reason. See thisKB article for details.
Assign a backup tech
You can assign a backup tech to any tech account. When you change the tech status to indicate that thetech is not available, the backup tech is assigned to cover in their absence.
1. Log in to Help Desk Manager as an administrator.
2. Click Setup > Techs and select Techs.
3. Select a technician or agent in the Tech Name column.
4. Click the edit icon to enter Edit mode.
5. Click the Backup Tech drop-down menu and select a backup tech.
6. Click Save.The backup tech is saved in Help Desk Manager.
ADMINISTRATOR GUIDE: HELP DESK MANAGER
page 103

Edit the admin account
Use the My Account page to update your administrator account contact information, including youridentity and setup for tickets, assets, e-mail, and scheduling. This account is the administrator account youuse to log in to Help Desk Manager.
1. In the toolbar, click Setup and select Techs > My Account.
2. Click the pencil to enter edit mode.
3. Add or update your admin account information as required, then click Save.
Click the tool tips next to each selection for more information.
page 104

Request types, tech groups, and ticket assignment
Request types and tech groups work together to determine how tickets are routed through Help DeskManager and assigned to techs.
Request types
Request types help you organize incoming issues into categories so you can route help desk tickets totechnicians and groups who resolve these issues. They define the basic structure of your help desksystem.
For example, if a client cannot access their email, they can create a ticket and select the defaultEmail/Outlook request type. When they save the ticket, the ticket is routed to the tech or group whospecializes in resolving email issues.
You can use request types to:
n Route tickets to the appropriate tech group or lead tech
n Specify which custom fields a ticket includes
n Initiate an approval process, if needed
n Facilitate reporting
n Configure workflows and action rules
n Display related FAQs to clients
Help Desk Manager includes several default request types to help you get started, but you can create yourown.
Tech groups
Tech groups are designed to be a group of similar request types handled by a group of techs. Tech groupscategorize your technical support personnel based on their skills and knowledge. These groups enableHelp Desk Manager to expedite tickets to the appropriate personnel based on the request type.
When you receive a help desk ticket, Help Desk Manager filters the techs based on the request type, whichdetermines the tech group and tech group level. Next, it looks at the location of the client on the ticket anduses this information to filter out which techs are eligible based on their location group membership. Ifyou configure a tech group level to auto assign a ticket to a level tech, it will automatically assign the ticketto the correct tech group. Otherwise, it will assign the ticket to the tech group manager.
When you install Help Desk Manager, the application includes three default tech groups: General, Network,and System. You can use these tech groups to help you get started, and then create new groups as youplan your tech groups and request types.
Tech groups are optional. Small organizations with just a few techs probably don't need to define techgroups. Without tech groups, each ticket is assigned to the lead tech for the ticket's request type.
Define tech groups
All current tech groups appear in the Tech Groups screen located at Setup > Techs > Tech Groups.
ADMINISTRATOR GUIDE: HELP DESK MANAGER
page 105

In this screen, you can:
n Create a tech group
n Assign tech group levels
n Assign supported request types
Create a tech group
1. In the toolbar, click Setup and select Techs > Tech Groups.
2. Click New.The Tech Group Info page opens.
3. Enter a name to identify the tech group.
4. Select the group's manager.
5. If tickets should be assigned to the manager of the Customer group associated with the ticket(instead of the tech group manager), select When a Ticket's Location.
Tickets are assigned to a group manager when auto-assignment is not enabled on the TechGroup Levels tab, or when auto-assignment is enabled but no techs in the group are available.
6. Click Save.
Configure tech group levels
Group level options specify how tickets are assigned and which techs are members of that level. At leastone level must be configured for each group. Add multiple levels if you want to be able to escalate ticketsto more experienced techs.
If you configure multiple levels, all new tickets are initially assigned to techs in Level 1. Techs inhigher levels receive tickets only if they are escalated.
1. Click the Tech Group Levels tab.
2. Click an existing level to open it, or click Add Level to add a new level.
page 106

3. Specify how Help Desk Manager will assign tickets for this level.a. Select the type of tech Help Desk Manager will assign tickets to.
None Tickets are not automatically assigned to individuals, but belong tothe group level.
A Level Tech Each ticket is assigned to a tech in this level based on the tech'savailability.
Group Manager orLead Tech
All tickets are assigned to the manager or lead tech, who thenreassign them to techs.
b. If you selected A Level Tech, select the assignment algorithm.n Load Balancing assigns each ticket to the tech with the smallest backlog (the lowest
number of assigned tickets).n Round Robin assigns tickets sequentially to all techs in the level, regardless of the tech's
current backlog.
4. Leave the Customer check box unchecked.
5. In the Force E-Mail Notification To row, select who receives email notifications when a ticket iscreated or updated by the REST API or a SolarWinds MSP alert, or updated by a client. Thesenotifications are sent regardless of the email options selected for each tech account.
6. In the Default Selected E-Mail Recipients row, specify who is selected by default to receive an emailwhen a tech clicks Save and E-Mail in a customer ticket.
7. Select the techs assigned to this level.
8. Click Save.
Assign supported request types
1. Click the Request Types Supported tab to display the request types assigned to this tech group.
2. Click Edit to display all request types not assigned to any tech group.
3. Select one or more Request Types for this group to receive, and click Save.
ADMINISTRATOR GUIDE: HELP DESK MANAGER
page 107

Repeat the procedures above as needed to assign tech group levels and supported request types to eachtech group.
Define tech permissions
Permissions determine which tickets techs can access and which actions they can perform. Help DeskManager includes default admin and tech permissions, but you can define other permissions thatcorrespond to roles within your organization.
If your organization is implementing knowledge centered support, consider including the ApprovedFAQ Edit permission in the Default tech permission set. Granting this permission allows tech toupdate or correct FAQs as needed.
A named set of permissions is granted to each non-admin tech account. Help Desk Manager provides adefault set of tech permissions. You can edit the default permissions to meet your organization's needs.
You can also define other permission sets for specific roles within your organization. For example, you candefine a permission set for senior techs to give them additional access (but not the unlimited access of anadmin). Another permission set can be assigned to junior techs to restrict their access.
Create a new tech permission set
This example creates a new permission set called Senior Tech. Techs with this permission set can edit theDue Date and Request Detail fields on a ticket. They can also edit approved FAQs and approve new FAQs.
1. Click Setup and select Techs > Tech Permissions.
2. Click New.
3. In the Permissions tab, enter a name to identify the permission.
4. In Location Permissions, specify whether ticket access is restricted based on the company, locationgroup, department group, or tech group a tech is assigned to.
The tooltips provide more information about each permission.
5. In Ticket Permissions, define what actions a tech can perform within a ticket.
6. In Client Permissions, specify whether a tech can edit, delete, import, or download clients.
7. In Device Permissions, specify whether a tech can view and edit assets and associated elements.
8. In Other Permissions, define the options that enable techs to edit Customers, manage parts, edit andimport FAQs, work with reports and surveys, view hourly billing rates, and create and edit new andexisting FAQs for all categories.
9. Click Save.
Assign techs to a permission set
After defining the permissions, assign techs to the permission set. Each tech can be assigned to only onepermission set. When you assign a tech to a new permission set, the tech is automatically removed fromthe previous permission set. In the following example, assigning Richard Acevedo to the Senior Techpermission set automatically removes him from the Default permission set.
page 108

1. From the tech permissions page, click the Assigned Techs tab.
2. Select the techs who will have these permissions.
3. Click Save.
Define the tech group email notifications
You can enable Help Desk Manager to send an email notification to a tech, level techs, or a group managerwhen a new ticket is created. This notification is sent to one or more recipients when:
n A client creates or updates a ticket using the client user interface or email
n A new ticket is created or updated using the REST API
n A new ticket is created or updated from a SolarWinds Integration alert
All selected recipients receive email notifications regardless of their individual tech preferences for emailnotifications.
1. Click Setup and select Techs > Tech Groups.
2. Click a group in the Group Name column that will receive email alerts when a new ticket is opened.
3. Click the Tech Group Levels tab.
4. Select a tech group level in the Level column.
5. In the Force E-Mail Notification To row, select the people who receive an email notification.
If you select Level Techs, the email is filtered by Location Group and Department Group membership.If the ticket has no Location Group or Department Group or the Ignore Location and Departmentcheck box is selected in the level, then all level members receive an email notification.
6. Select the Send on Ticket Creation Only check box.
7. Click Save.
Define the default settings for ticket email recipients
This setting determines which user (based on request type) associated with a ticket will receive an emailwhen a tech clicks Save & Email in the ticket.
ADMINISTRATOR GUIDE: HELP DESK MANAGER
page 109

Request type is not assigned to a tech group
1. Click Setup > Tickets > Options > Tech Options.
2. Scroll down to the Tech Options group and locate the Default Setting for Email Recipients (No TechGroup) option.
3. Select the check box next to the tech or client assigned to receive ticket email notifications.
4. Click Save.
Request type is assigned to a tech group
1. Click Setup > Techs > Tech Groups.
2. Click the Tech Group Levels tab.
3. Locate the Default Selected E-mail Recipients option.
4. Select the check box next to the user assigned to receive ticket email notifications.
5. Click Save.
Define the ticket routing processesTicket routing processes define when and how to route tickets for certain types of requests, providing acontrolled environment for managing time and cost-sensitive events. This feature enforces your definedsettings, ensuring the right person or team receives the trouble ticket in a timely manner for problemtroubleshooting and resolution.
Approvers
You can add client personnel responsible for approving or denying changes, as well as define the processwork flow and requirements. When you create your SolarWinds MSP Help Desk Manager ticket routingprocesses, you define your action rules.
Approver roles
Clients with approver roles approve ticket assignments based on the location or department associatedwith a given ticket. For example, each location could have a facilities representative and facultyrepresentative location approver role who must approve requests to get a new printer.
You can configure these roles for each location in the Customer Approvers screen located at Setup> Processes > Customer Approvers. If these roles are assigned to an approval process for a Procure Printerrequest type, Help Desk Manager automatically sends approval requests for this request type to theclients-assigned approver roles for the ticket location.
page 110

Create action rules for ticket processing
Action rules create customized processes for unique situations. You can create action rules that definewhen, what, who, and how issues are approved, tracked, assigned, and handled. Action rules create acustomized process for unique use cases.
Action Rule Info tab
Use this tab to add an action rule name so it appears in the Action Rules tab at Setup > Processes > ActionRules. You can also:
n Enable or disable the action rule.
n Specify the priority level when included with multiple action rules.
n Stop associated rules with a lower priority.
n Trigger the action rule based on a set of criteria.
n Trigger an action rule based on keywords in the e-mail subject.
Criteria tab
Use this tab to select the conditions that must occur before a ticket triggers the action rule. For example, toaddress service requests, issues, or problems initiated by the CEO, you can select Client > E-mail > Isequal to > [email protected]. When the ticket meets this condition, Help Desk Manager triggers theaction rule.
Action tab
Use this tab to select the action that executes when the action rule criteria is met.
The Assign To action assigns the ticket to a specific tech or tech group. If you assign the ticket to a techgroup, you can change the assignment algorithm to balance ticket processing during periods of high callvolume. For example, you can select Load Balancing to assign a ticket to a tech within a tech group levelwith the least amount of assigned tickets. You can also select Round Robin to reassign the ticket assignedsequentially to a member of a tech group level. See Load balance action rules for ticket processing fordetails.
The Add Approval Process action assigns the ticket to an approval process that you define at Setup> Processes > Approval Processes. When the action rule is triggered, the ticket is assigned to your selectedapproval process for review. For example, if your company requires approvals for all new corporate assets(such as new computers or laser printers), you can assign this action to an action rule for all servicerequests used for new asset purchases.
The Change Priority action assigns the ticket to a specific status based on the nature of the ticket. Forexample, if your CEO contacts the help desk to request an immediate action, you can create an action rulewith Change Priority set to Critical so it jumps to the top of the ticket queue.
The Change Status action changes the ticket status to another status type based on the action rule.
ADMINISTRATOR GUIDE: HELP DESK MANAGER
page 111

The Run Task action triggers a task that you create in Setup > Tickets > Tasks. For example, you can set up atask called New Employee with task elements that include request types for HR, Facilities, and IT. Theserequest types can include task elements for setting up employee health insurance, setting up a workenvironment, and purchasing a new computer. When a tech creates a ticket to onboard a new employee,the assigned action rule triggers the New Employee task.
The Shared check box in the task must be checked to enable an action rule.
The Modify Ticket action provides options to automatically modify specific information within the ticket,such as Client and Location, Ticket Details, and Tech Note tabs in the ticket. For example, you can create anew action that assigns all new employee on-boarding tickets to a specific tech or request type.
The Send E-mail action sends an email to one or more specific recipients with a predefined subject andmessage to one or more recipients in your organization. For example, when you create a ticket to address aCEO issue, you can add an action to send an email to the director stating that the ticket is being processedand will be resolved as quickly as possible.
Add an Action Rule
1. In the toolbar, click Setup and select Processes > Action Rules.
2. Click New.
3. Select a priority and enter a rule name.
Only one action rule can be executed at a time. The action rule priority determines the triggerorder of all action rules.
4. Select the Cascade check box to trigger all defined actions for a ticket.Do not select Cascade to trigger only the highest priority action.
5. Select the rule triggering options to define when and how often Help Desk Manager applies theaction rule.
6. Click Criteria.
7. Configure the conditions that tickets must match to trigger the action:
n Every condition in the All section must be true. If any condition is false, the action is nottriggered.Help Desk Manager evaluates these conditions using the Boolean AND operator.
n The Any section defines a group of conditions. At least one of these conditions must be true totrigger the action, but they do not all have to be true.Help Desk Manager evaluates these conditions using the Boolean OR operator.
n If both sections include conditions, all conditions in the All section and at least one condition inthe Any section must be true.Help Desk Manager evaluates the two groups with a Boolean AND operator between thegroups:
(all_1 AND all_2) AND (any_1 OR any_2)
n If no conditions are defined in the All section, at least one condition in the Any section must betrue.
page 112

8. Click Actions.
9. Specify the action to take when the conditions are met.
10. Click Save.
ADMINISTRATOR GUIDE: HELP DESK MANAGER
page 113

Load balance action rules for ticket processing
To balance ticket processing during periods of high call volume, you can configure action rules to reassigntickets to assigned techs in another tech group.
When you configure your action rule, select one of the following assignment algorithms to avoid ticket levelerrors:
n Load Balancing. Reassigns tickets specifically to assigned techs in another tech group with the leastamount of ticket backlog.
n Round Robin. Reassigns tickets sequentially to assigned techs in another tech group.
When completed, the action rule automatically assigns tickets that meet the criteria to another tech groupand request type.
1. In the toolbar, click Setup and select Processes > Action Rules.
2. In the Rule Name column, click the action rule you want to modify or click New to create a new ActionRule.
3. Select the appropriate options on the Action Rule Info tab for your new or existing action ruleaccording to your needs.
If you are creating a new rule, enter a name in the Rule Name field.4. Click the Criteria tab.
5. Select the appropriate criteria according to your needs.
6. Click the Actions tab.
7. Click the Assignment Algorithm drop-down menu and select Load Balancing or Round Robin,depending on your help desk requirements.
8. Select any additional options on the Actions tab according to your needs.
9. Click Save.
Enter customersUse the Customers tab to set up and store information about Customer sites.
Help Desk Manager installations typically use Customers to represent individual sites where you provideservices. However, Customers can also be used for different departments within a customer site or astorage place for inventory within Help Desk Manager.
You can use Customer information for setting up access controls for Techs and Clients. See Defining Techsand Adding Clients for information on grouping Techs and Clients using Customer information.
Add customer info
Enter Customer contact and Client permissions information in the Customer Info page.
Add customer contact information into the first 12 fields in the Customer Info tab. This information is forClient reference, so add all the details a Client would need.
page 114

This page also configures how Clients use the Customer information. Interaction capabilities include:
n Whether a Client assigned to the customer can create tickets for this Customer
n Client Admin can report for others
n Whether a Client needs to copy the Admin on updates
You can also add Customer billing and tax rates.
Other features on this page include adding attachments and configuring the color of the customer page.
Create customer groups
Group Customers together that have certain similarities, such as Devices, Clients, and servicing needs, andso on.
Define Customer Custom Fields
Use this page to create Customer custom fields.
Define clientsThe Clients tab options define Help Desk Manager Client users and how they enter information into theapplication. When a new client accesses Help Desk Manager and is accepted by the system, they areautomatically given the access and interaction permissions you defined for each client.
The AD / LDAP Connections option copies and adds client data from Microsoft® Exchange and other mailservers and adds this data to Help Desk Manager. Using this feature streamlines the process to help youavoid manually adding all your clients.
Manually create a client account
If client information is not in a format that can be easily imported, you can manually create each clientaccount. The account information must include the client's name, email, and Help Desk Manager logincredentials, as shown in the example below.
1. In the toolbar, click Clients.
2. Click New Client.
3. Enter the client's name, credentials, and contact information.
Required fields are bold.
4. Update other options as needed. See the tooltips for more information.
5. Click Save.If you selected E-mail Client When Account is Created, Help Desk Manager sends a confirmationemail to the client.
ADMINISTRATOR GUIDE: HELP DESK MANAGER
page 115

Define client options
Client options are general settings that affect all clients who log in to Help Desk Manager. Review theseoptions and update them as needed.
1. In the toolbar, click Setup and select Clients > Options.
2. If you want to allow clients to create accounts from the client interface, change the Client Can CreateAccount setting.
3. If you want to email login information to new clients, select E-Mail Client When Account Is Created.
To change the text of the email that Help Desk Manager sends, choose Setup > E-Mail >Templates and open the New Account Message template.
4. Review and update other settings as needed. See the tooltips for information about each option.
5. Click Save.
Set up client admin roles
You can set up a client admin to open tickets on behalf of other clients for a remote Customer ordepartment. If the client tickets include service requests, incidents, and problem tickets that requireadditional diagnosis and intervention, the client admin can report these issues to management forproblem resolution.
The client admin does not require a user license, but cannot act as a tech within the Help DeskManager deployment.
1. Click Setup and select Clients > Client Admin Roles.
2. Click New.
3. In the Role Name field, enter a name for this role.
4. In the Request Type Supported row, select the appropriate role check boxes.
These request types populate with the Request Types you defined at Tickets > Request Types.
5. Click Save.
Add additional client admin permissions
You can add additional client admin permissions for a specific Customer.
1. Click Setup and select Companies and Customers > Customer & Rooms.
2. Click the appropriate Customer in the Customer Name column.
3. Click the pencil icon in the Customer Info tab to edit the tab preferences.
4. In the Default Client Admin Permissions row, select the appropriate values for the client admin.
If you select Client Admin Can Report for Others, the client admin has the option of creating a ticketand assigning a different client as the originator.
You can override the Default Client Admin Permissions values for each client admin by
page 116

clicking the icon next to each client.
5. Click Save.
Define client custom fields
Use the Client Custom Fields screen to create custom fields in the Client Info tab for each client record.After you create your custom ticket fields, the fields automatically display in each client record. The customfield can be hidden, visible, editable, or required for all clients based on your needs.
You can add a pop-up message to the custom field by entering message text in the Info field. When youadd text to this field and click Save, an Information icon displays in the custom field. When a tech orclient (based on your assigned permissions) clicks this icon, the pop-up message displays next to the field.
The icon displays next to each custom field in the Ticket Custom Fields window that is configured with apop-up message.
The following table lists all custom fields you can add to your client records. These custom fields display inthe Client Info tab for each client.
FIELD DESCRIPTION
Text Creates a text box for 80 characters and up to 15 lines of text in the Client Info tab.
Numbers Creates a text box for 80 characters and up to 15 lines of text or numbers in the ClientInfo tab.
Currency Creates a text box for 80 characters and up to 15 lines of text or numbers in the ClientInfo tab.
ADMINISTRATOR GUIDE: HELP DESK MANAGER
page 117

FIELD DESCRIPTION
Date Creates a calendar field to add a date to the client record (for example, a start date) inthe Client Info tab.
Date/Time Creates a field with a selectable calendar and time drop-down menus in the Client Infotab.
Time Period Creates a field with days and hours drop-down menus in the Client Info tab.
MultipleChoice
Creates a field with one or more checkboxes in the Client Info tab. You can select one ormore options.
If you want to include only one option (for example, Yes or No), enter the option text inthe Option field. Point your mouse arrow over Options for details.
Single Choice Creates a field with one or more radio buttons in the Client Info tab. You can only selectone option.
If you want to include one option (for example, Yes or No), enter the option text in theOption field. Point your mouse arrow over Options for details.
Popup Menu Creates a field with one or more options in a drop-down menu in the Client Info tab.You can only select one option.
page 118

FIELD DESCRIPTION
If you want to include one option (for example, Yes or No), enter the option text in theOption field. Point your mouse arrow over Options for details.
To create a custom ticket field:
1. Click Setup > Clients > Client Custom Fields.
2. Click New.The Client Custom Fields screen displays the default values for a new custom field.
3. Enter a Label to identify this field.
4. On the Display Order drop-down menu, select this field's position within the Custom Fields section ofa ticket.
5. In the Clients and Techs sections, specify whether each group can see or edit the custom field.
Techs with admin accounts can edit all custom fields.
6. Select the Type of input this field will accept.The remaining fields change based on the Type you select.
7. Complete the remaining fields. Point to any field name to display information.
8. Click Save.
Import Active Directory/LDAP directory connections
Use the Active Directory / Lightweight Directory Access Protocol (AD / LDAP) Connections settings todiscover and import client AD / LDAP information from the client’s Microsoft Exchange or LDAP server. AD /LDAP Connections can perform bulk data imports of AD and LDAP directories that speeds up the clientsetup process and greatly reduces manual input errors. You can use the AD/LDAP Connections tosynchronize Help Desk Manager user information with the latest information on your Microsoft Exchangeor LDAP server.
About LDAP
LDAP is a protocol that creates a central user database for single sign-on (SSO), allowing you to accessresources and services in a network. LDAP implementations use self-signed certificates by default. To usea trusted certificate issued by a Certificate Authority (CA), you can import the certificate into your Java keystore.
Validate LDAP certificates
You can establish a secure connection from Help Desk Manager to an LDAP server by selecting theSSL check box. To accept certificates issued by a CA, select the Accept only trusted Certificates check box.When selected, Help Desk Manager verifies the host LDAP certificate against the certificates in your Javakey store. If Help Desk Manager detects a certificate that is not signed by a trusted CA or uploaded to yourJava key store, Help Desk Manager generates a warning in the user interface and does not store the LDAPconnection.
ADMINISTRATOR GUIDE: HELP DESK MANAGER
page 119

The WHDGlobalConfig.properties file contains the name, password, and location of your Java keystore. This file is located in the following directory:
c:\\<HelpDeskManager>\conf
To update these parameters, edit the file with your new settings, save the file, and then restart Help DeskManager. See Keystore Settings (for SSL Connections) for more information.
Synchronize Help Desk Manager user information
When you import your AD/LDAP connections, use the following conventions:
n Ensure the person configuring and using this import is experienced with AD and LDAPadministration.
n Work with a client representative familiar with AD/LDAP and the existing structure. The clientrepresentative must have administrative access to the customer AD/LDAP server.
n If your AD/LDAP directory contains mostly users not using Help Desk Manager, SolarWinds does notrecommend performing a bulk AD/LDAP import.
To connect to a client LDAP server and import or synchronize users:
1. Click Setup.
2. Select Clients > AD / LDAP Connections.
3. To create a new connection, click New.To update an existing connection, click the connection name to open it, and then click to edit.
4. In the Connection Basics tab, select Enabled to enable the connection.
5. Enter the required connection information. See the tooltips for more information.
6. Maximize the Advanced window and review or update the advanced settings.
7. If you want to use bulk synchronization, select Enabled and then specify when the synchronizationshould occur.
To avoid affecting network performance, schedule the synchronization for a time when thenetwork is least busy.
8. Click Save.
9. Click Test Settings to test your settings, and make adjustments if needed.
See LDAP fails to connect when initiating a connection for troubleshooting information.
page 120

10. Map client account fields to attributes in the schema.a. Click the Attribute Mappings tab.b. Specify the AD or LDAP schema being used.c. Locate each client account field that will be populated with information from the AD or
LDAP server. To map each field, enter the associated schema element as instructed by the ADor LDAP administrator.The client's last name, user name, and email must be mapped. If you are using the defaultschema, these fields are mapped automatically. For custom schemas, you must map theseattributes manually.
Any field, including custom fields, can be mapped if the data is available in the schema.
11. Click Save.
Import clients
Use the Import Clients function to import client data into Help Desk Manager. See Import data usingtemplates for information on applying templates.
1. In the toolbar click Setup and select Data Import > Import Clients.The Import Clients screen displays.
2. Click the Sync Based On drop-down menu and select the column in the import file used tosynchronize the import data with existing records.
3. Select the Ignore Blank Fields check box to ignore blank fields in the imported file.If not selected, the blank fields in the import file will clear the corresponding values in the existingrecords.
4. Select the Add New Entities check box to add new entities referred by the import records if they donot exist in the database.
5. Select the Abort Import on First Error check box to stop the import procedure when Help DeskManager encounters an error.If not selected, Help Desk Manager will continue the import if errors appear.
6. In the File Type row, select the appropriate import file format.
7. Click the File Encoding drop-down menu and select the method used to encode the import file.If your import file contains any Unicode characters, select Microsoft Excel, as this file format encodesin UTF-16 format.
8. In the Import Data File row, click Choose File and select the file to use for the import procedure.
The first line of the import file must match the import template. SolarWinds MSP recommendscopying and pasting the template into your data file to ensure that it is identical. The importprocedure will generate an error if the first row of the import file does not match thetemplate.
9. Click Import.The file contents are imported into the Help Desk Manager database.
ADMINISTRATOR GUIDE: HELP DESK MANAGER
page 121

Define devicesDevices are the Client-owned software and hardware that Techs work with. Help Desk Manager tracksDevices by properties such as:
n Customer
n Type
n Status
n Owner
n Serial Number
n Warranty Dates
n Lease Types
n Relationship to Other Devices
n Ticket History
n Purchase Orders
Configure Device information and permission options
Use the Asset Options screen to set the options for Device information import and Device permissions forTechs.
Click the tooltips for details.
Deploy N-central remote control links
Individual Techs can work on tickets for N-central-controlled devices by deploying the HDM N-centralremote control links.
Before you configure and launch the HDM N-central remote control links, configure N-central to integratewith HDM. After you integrate N-central and HDM, you can launch the HDM N-central remote control link.
See Integrating Help Desk Manager with N-central for information about setting up an N-centralintegration configuration.
To deploy the N-central remote control links:
1. Configure access to the HDM N-central remote control feature for a particular device.a. Log in as an administrator.b. Navigate to Setup > Devices > Options.c. In the Options screen, locate the N-central Links Enabled row.
d. Select the N-central Links Enabled check box.e. In the Host field, enter the name of the host on which the N-central server is running.f. In the Port field, enter the port number where the N-central web application is listening.
page 122

The default port number is 80.
g. Select the SSL check box to secure the hyperlinks to the N-central web application.h. Click Save.
The hyperlinks to the N-central server will now appear in the N-central Help Desk. These linkswill appear in tickets next to assets that are synchronized with N-central.
i. Log in to N-central.j. In the user interface, click Device - Network Devices.
k. Locate your device and ensure that it is connected to N-central.l. Close N-central.
2. Configure Administrator access to the HDM N-central remote control feature.a. Log in as an administrator.b. Click Setup and select Techs > My Account.c. Select the Enable N-central Links check box.d. Click Save.
N-central links will now appear in tickets next to assets that are synchronized with N-central.
3. Configure Tech access to the HDM N-central remote control feature.a. Log on as an administrator.b. Click Setup and select Techs > Techs.c. In the Tech Name column, click on the Tech that needs access to the remote control feature.d. In the Account Info tab, click Enable N-central Links.e. Click Save.
N-central links will now appear in tickets next to assets that are synchronized with N-central.
f. Repeat step c through step e for all remaining Techs who require access.
When completed, administrators and Techs can launch the N-central remote control link through a ticket.
1. Click Start and select Tickets > My tickets.
2. Open the ticket you need to resolve.
3. Select the Device Info tab.
4. In the Ticket Devices tab, click the icon for the device you want to remotely control.N-central opens in a new browser tab.
5. Switch to the new browser tab to access the device through N-central.
Integrate other tools with HDM
Device tool links appear in HDM wherever there are references to a Device or to a Client's IP address. Usethe Other Tool Links function to create custom tool hyperlinks.
To select and configure this option:
1. Click Add Link in the Other Tool Links area.
2. Enter the tool name the way you want it to appear in HDM.
ADMINISTRATOR GUIDE: HELP DESK MANAGER
page 123

3. Enter the tool's URL.
4. If you want a new window to open when you click the tool, select Open in New Window.
5. Select an icon to represent the tool.
6. Click Save.
Set technician device permissions
Select which device features Techs can see and edit in the Technician Device Permissions area. Choosepermissions for device features such as:
n Device number
n Model
n Customer
n Client
n Relation
n Status
n Service Contract
n Serial Number
n Version
n Network Address
n Network Name
n MAC Address
n Purchase Order
n Purchase Date
n Audit Date
n Notes
When you are finished configuring Tech Device Permissions, click Save.
Define Devicetype, status, warranty, and lease information
Device type, status, warranty, and lease information are usually included data imports. However, if youhave undefined Device types, you can manually define them on the Types page.
Devices can be associated with clients so techs can easily identify the items for which support isrequested.
Device Classes tab
Use the Device Classes tab to represent any type of classification you choose, such as Software, Hardware,Owned, and Leased.
1. In the toolbar, click Setup > Assets > Types.The Types screen appears.
2. Click the Asset > Classes tab.
3. Click New.4. In the Name field, enter a name for the custom type.
5. In the Custom Fields row, select which of your custom fields should be attributed to the type you arecreating.
6. Click Save.
page 124

Device Status Classes tab
Use the Device Status Classes tab to define Device status. A status can be anything you create, such asDeployed (for equipment in use) or In Storage (for equipment in storage and not in use). Help DeskManager includes predefined Deployed status types.
1. In the toolbar, click Setup and select Assets > Types.
2. Click the Device Status Classes tab.3. Click New.
4. In the Name field, enter a name for the custom type.
5. Select the Retired check box if your custom selection is retired.
6. Click Save.
Warranty Classes tab
Use the Warranty Classes to create and apply warranty classes (from one year to five years) and reflect theappropriate warranty length or type for a particular asset class.
1. In the toolbar, click Setup and select Types.
2. In the toolbar, click Setup and select Types.
3. Click the Warranty Classes tab.4. Click New.
5. In the Warranty Name field, enter the name used to identify the warranty.
6. In the Expiration row, enter the amount of time until expiration.
If there is no expiration, leave the field blank.7. Click Save.
Lease Classes tab
Use the Lease Classes tab to create and apply lease types—from one year to five years—and reflect theappropriate warranty length or type for a particular asset class.
1. In the toolbar, click Setup and select Lease Types.2. Click the Lease Types tab.
3. Click New.
4. In the Lease Name field, enter a name to identify the lease.
5. In the Expiration row, enter the amount of time until expiration.
If there is no expiration, leave this field blank.6. Click Save.
Define Device custom fields
Use Custom Fields to extend the types properties associated with Devices.
Below is an example of the Device Custom Fields screen.
ADMINISTRATOR GUIDE: HELP DESK MANAGER
page 125

FIELD / CHECK BOX DESCRIPTION
Label The custom field name.
Type Select one of the following types using semicolons to delimit multiplechoices in the Options setting:
n Text (up to 255 characters)
n Number (number of integers with up to four decimal places)
n Currency
n Date
n Dateline
n Time Period
n Multiple Choice (adds check boxes)
n Single Choice (adds radio buttons)
n Pop-up menu (adds a single-selection menu)
Width Specifies the number of columns in the custom field text area.
Info Creates a tool tip that helps users complete the custom field.
When the tool tip is created, an Info icon is displayed next to thecustom field. When the user mouses over the Info icon, the tool tippops up.
Display Order Click the drop-down menu and select the custom field order.
Height Specifies the number of rows in the custom field text area
Clients Configures the Client permissions, defining whether the client cansee, edit, or interact with the custom field.
These fields are disabled when the custom field is not visible in theclient interface.
Techs Configures the Tech permissions, defining whether the tech can see,edit, or interact with the custom field.
Administrative users have at least Editable access to all customfields. The Required fields are required for Administrators.
Limit Input to TextBox Width
Ensures the maximum number of characters does not exceed thenumber of characters chosen in the Width option.
Encrypt in database AES-encrypts the data entered in the custom field before it is storedin the database.
page 126

FIELD / CHECK BOX DESCRIPTION
If you select this option after the data is entered, the existing valuesare not encrypted until they are updated.
Searchable Includes the custom field as a search option in the Advanced Searchpage.
Allow full-text search(slower)
Indexes only the first 255 characters in a custom field.
Select this option when the custom field values could exceed 255characters. Applying this option greatly reduces search performance.
Exclude From E-Mail Ensures the custom field is not shown in emails to clients or techs.
Define an asset custom field
1. Click Setup > Assets > AssetCustom Fields.
2. Click New.
3. In the Label field, enter a name for this custom field.
4. Complete the remaining fields, and then click Save.
5. Click Setup > Assets > Types.
6. In the Asset Type Name column, click an asset type.
7. In the Custom Fields row, select Specific.
8. In the Selected Custom Fields row, select the checkbox next to your new asset custom field.
9. Click Save.
Add manufacturers
Use the Manufacturers Info page to add hardware and software and other Device manufacturer contactinformation.
Add a manufacturer
1. Click Setup > Assets > Manufacturers & Models.
2. Complete the fields, and then click Save.
Add vendors
The Vendors page defines contacts for ordering parts or software.
Add a vendor
1. Click Setup > Devices > Vendors.
2. Click New.
3. Complete the fields, and then click Save.
ADMINISTRATOR GUIDE: HELP DESK MANAGER
page 127

Define PO custom fields
Purchase Order (PO) Custom Fields define custom fields and specify view and editing permissions fortechs. Use this screen to extend the types properties associated with purchase orders.
See Managing Devices for information about working with purchase orders.
No client permissions are available in PO custom field because clients never view purchase orders.
Below is an example of the PO Custom Fields screen.
FIELD / CHECK BOX DESCRIPTION
Label The custom field name.
Type Select one of the following types using semicolons to delimit multiplechoices in the Options setting:
n Text (up to 255 characters)
n Number (number of integers with up to four decimal places)
n Currency
n Date
n Dateline
n Time Period
n Multiple Choice (adds check boxes)
n Single Choice (adds radio buttons)
n Pop-up menu (adds a single-selection menu)
Width Specifies the number of columns in the custom field text area.
Info Creates a tool tip that helps users complete the custom field.
When the tool tip is created, an Info icon appears next to the customfield. When the user mouses over the Info icon, the tool tip pops up.
Display Order Click the drop-down menu and select the custom field order.
Height Specifies the number of rows in the custom field text area
Clients Configures the Client permissions, defining whether the client cansee, edit, or interact with the custom field.
These fields are disabled when the custom field is not visible in theclient interface.
Techs Configures the Tech permissions, defining whether the Tech can see,edit, or interact with the custom field.
page 128

FIELD / CHECK BOX DESCRIPTION
Administrative users have at least Editable access to all customfields. The Required fields are required for Administrators.
Limit Input to TextBox Width
Ensures the maximum number of characters allowed does notexceed the number of characters chosen in the Width option.
Encrypt in database AES-encrypts the data entered in the custom field before it is storedin the database.
If you select this option after the data is entered, the existing valuesare not encrypted until they are updated.
Searchable Enables the custom field to appear as a search option in theAdvanced Search page.
Allow full-text search(slower)
Indexes only the first 255 characters in a custom field.
Select this option when the custom field values may exceed 255characters. Applying this option greatly reduces search performance.
Exclude From E-Mail Ensures the custom field does not appear in emails to Clients orTechs.
Define the PO custom fields
1. Click Setup > Devices > PO Custom Fields.
2. Click New.
3. In the Label field, enter a name for this custom field.
4. Complete the remaining fields, and then click Save.
Import Device data
Use the Import Assets screen located at Setup > Data Import > Import Devices to add Device data into HelpDesk Manager.
To ensure a successful data import, use the Devices Import template.
See Import data using templates for information about applying templates.
1. Click Setup and select Data Import > Import Assets.
2. In the Import Devices screen, complete the fields as required.Click the tooltips for additional information.
3. Click Import.The file is imported into Help Desk Manager.
ADMINISTRATOR GUIDE: HELP DESK MANAGER
page 129

Define parts and billingYou can apply parts and billing options in Help Desk Manager to track resources, such as parts, inventory,and billing tickets. When applied, you can:
n Select parts and billing optionsn Set up billing invoicesn Define rates and termsn Define part custom fields
Apply parts and billing options
Parts & Billing Options enable or disable the parts and billing functionality, define the ticket PDF format,and enable or disable service time blocks by Customer. This functionality is enabled by default. Alwaysmake sure this functionality is active when you configure how Help Desk Manager handles parts andbilling.
To enable this feature, click Setup > Parts & Billing > Options and select the Parts & Billing Enabled checkbox in the Parts & Billing Options screen. To disable this feature, clear the check box.
Disabling Parts & Billing hides the main Parts icon, the ticket detail Parts & Billing tab, billing preferences,and the billing reporting options.
Perform invoicing
Set up your company contacts in Help Desk Manager for each billing invoice. When completed, you cangenerate an invoice or quote from a ticket.
Specify a company contact for invoices
1. Click Setup > Parts & Billing > Invoicing Options.
2. In the Invoicing tab, enter the appropriate contact information.Click the tooltips for more information.
3. (Optional) Click the Logo tab.
4. (Optional) Upload a GIF or PNG file containing your company logo.
5. Click Save.
Generate a PDF invoice or quote from a ticket
1. In the toolbar, click Tickets and select Search Tickets.
2. In the Basic Search or Advanced Search tab windows, enter the appropriate search criteria for yourticket, and then click Search.
3. In the search results, click the appropriate ticket number.
4. Click the Parts & Billing tab.
page 130

5. Select the type of PDF you want to generate.
6. Click the PDF icon.
Define rates and terms
You can use the Billing Rates, Terms, and Taxes feature to define billing rates to use in your tickets. Youcan configure specific billing rates to be consistent with the level of delivered service (Level tech) and theapplicable local tax codes.
1. Click Setup and select Parts & Billing > Rates & Terms.
2. Click New.
3. Complete the fields and selections as required, then click Save.Click the tooltips for additional information.
4. Click the Billing Terms tab.
5. Click New.
6. Complete the field and drop-down menu as required, then click Save.Click the tooltips for more information.
7. Click the Tax Rates tab.
8. Click New.
9. Complete the fields and selections as required, then click Save.Click the tooltips for more information.
Define part custom fields
Use the Part Custom Fields screen to create custom part fields. To access this screen, click Setup and selectPart & Billing > Part Custom Fields.
Below is an example of the Part Custom Fields screen.
FIELD / CHECK BOX DESCRIPTION
Label The name of your custom field.
Type Select one of the following types using semicolons to delimit multiple choicesin the Options setting:
n Text (up to 255 characters)
n Number (number of integers with up to four decimal places)
n Currency
n Date
n Dateline
n Time Period
n Multiple Choice (adds check boxes)
n Single Choice (adds radio buttons)
ADMINISTRATOR GUIDE: HELP DESK MANAGER
page 131

FIELD / CHECK BOX DESCRIPTION
n Pop-up menu (adds a single-selection menu)
Width Specifies the number of columns in the custom field text area.
Info Creates a tool tip that helps users complete the custom field.
When the tool tip is created, an Info icon appears next to the custom field.When the user mouses over the Info icon, the tool tip pops up.
Display Order Click the drop-down menu and select the custom field order.
Height Specifies the number of rows in the custom field text area
Clients Configures the Client permissions, defining whether the client can see, edit,or interact with the custom field.
These fields are disabled when the custom field is not visible in the clientinterface.
Techs Configures the Tech permissions, defining whether the Tech can see, edit, orinteract with the custom field.
Administrative users have at least Editable access to all custom fields. TheRequired fields are required for Administrators.
Limit Input to Text BoxWidth
Ensures the maximum number of characters allowed does not exceed thenumber of characters chosen in the Width option.
Encrypt in database AES encrypts the data entered in the custom field before it is stored in thedatabase.
If you select this option after the data is entered, the existing values are notencrypted until they are updated.
Searchable Enables the custom field to appear as a search option in the Advanced Searchpage.
Allow full-text search(slower)
Indexes only the first 255 characters in a custom field.
Select this option when the custom field values may exceed 255 characters.Applying this option greatly reduces search performance.
Exclude From E-Mail Ensures the custom field does not appear in emails to Clients or Techs.
Configure inventory alerts
Configure the frequency and recipients for all email alerts—for example, when your inventory thresholdfalls below your specified level for parts a client regularly requests.
page 132

1. Click Setup > Parts & Billing > Inventory Alerts.
2. In the Inventory Alerts screen, click the first Inventory Alert Interval drop-down menu and select avalue from 0 to 100.
3. Click the second Inventory Alert drop-down menu and select the appropriate alert frequency.
4. In the Default Inventory Alerts Recipients field, enter the email addresses for each recipient who willreceive inventory alerts.
Click the tooltips for more information.
5. Click Save.
Override default inventory alert recipients
1. Click Setup and select Companies and Locations > Locations and Rooms.
2. In the Location Name column, click the appropriate location.
3. Edit the information in the tab windows as required.
4. Click Done.
Set up the DashboardUse the dashboard to create and view pie chart, bar graph, and text widgets that display ticket statisticaldata. These widgets display trends in specific ticket categories (such as Ticket Status and AlertCondition) to help you locate issues that could impact your help desk and corporate operations.
You can configure three types of widgets:
n Ticket Chart
n Ticket Activity
n What's New
Access the widgets from the Widget Drawer. Click Open Widget Drawer in the dashboard to display allavailable widgets.
Ticket Chart widget
The ticket chart widget displays your ticket metrics in pie or bar charts. Each chart type identifies the totalnumber of selections in a specific category.
Widgets can generate a warning message if the data cannot be processed within 15 seconds. See TicketChart performance limitations for details.
Create a ticket chart widget
1. In the toolbar, click Tickets > Dashboard.
2. In the dashboard, click Open Widget Drawer.
3. Select Ticket Chart Widget.A preview of the widget displays.
ADMINISTRATOR GUIDE: HELP DESK MANAGER
page 133

4. Click and drag the widget header to the dashboard.
5. Resize the widget to your desired size. Use the blue snap-to guide to ensure that the widget is sizedcorrectly.
6. Click the drop-down menu icon and select Options.
7. Select your chart options.To import the chart data into a spreadsheet, click the Raw Data icon and copy the data in the windowto an external file. When you are finished, close the window.
8. Click Save.The widget displays in the dashboard with your selected category in the header. When you hoveryour mouse arrow over a pie slice or horizontal bar, a pop-up window displays the total number oftickets.
Select the Hide Headers check box to hide all widget headers.
9. Click Close Widget Drawer.
Ticket Chart types
You can select a pie chart or horizontal bar chart.
The pie chart divides each ticket category into slices that illustrate the numerical proportion of your tickets.You can restrict the chart data by clicking a legend item to remove the category from the chart. Forexample, if you click and remove Closed, the chart only displays Open and Pending ticket information.
Double-click a legend option to remove all categories except your selected category.
The Horizontal Bar chart displays your ticket categories using color-coded bars. Each category includes aseparate bar color and corresponding data value.
Ticket Chart Options
To configure your widget options, click the options drop-down menu. The Ticket Chart Options windowopens, and you can configure all available options to display in the chart.
The window includes a widget preview that displays your data in real time. When a data parameterchanges, Help Desk Manager implements a new database call and updates the chart to reflect thechanges. If your ticket chart options include a complicated request, the chart may require additional timeto process the request.
Select a Category option to filter your ticket data by request type (such as Status). The Query option filtersyour category results through a condition or qualifier that you set up in Advanced Search.
For example, you can set up a query that searches your Help Desk Manager database for all tickets openedwithin the last 30 days and save the query as Opened within 30 days.
To share your query with all techs, select the Shared check box in the tab window. When you select thequery in the Query drop-down menu, an asterisk (*) displays next to the query and indicates the query isshared with all techs.
page 134

When you select this query in the Query menu and Status in the Category menu, the chart previewdisplays the number of tickets by status opened within the last 30 business days. An asterisk (*) displaysnext to the query and indicates the query is shared with all techs.
If you select Horizontal Bar, the Show non-zero items only check box displays. Select this check box todisplay all categories with values greater than zero only.
After you select the chart type and the number of top items to display in the chart, click Save to display thechart in your widget. You can also export the raw data to an external file.
Help Desk Manager refreshes the Ticket Chart widget every 60 seconds.
View tickets by category and status
When you click a pie slice or horizontal bar, Help Desk Manager displays all associated tickets. For example,when you click the Open pie slice, Help Desk Manager displays all open tickets opened within the last 30days with an Open status. The widget title reflects the selected category and category value.
To adjust the number of displayed tickets, click the Items per Page drop-down menu. If you need to searchfor a specific term in the page, press Control + F and enter your search term to highlight it in the page.
View a selected ticket
You can view an individual ticket by clicking a ticket in the window. For example, if you click ticket 12, HelpDesk Manager opens the Search Tickets option and displays ticket number 12 on your screen.
Click to return to the Dashboard. If you click the browser Back arrow, you return to theDashboard main page, but you lose your search results.
Ticket chart performance limitations
The Category drop-down menu in the Ticket Chart Options window include the following categories:
n Alert Level
n Alert Condition
n On-time Status
n First-Call Resolution
These categories may require an extended amount of time to query the Help Desk Manager database,process the results, and display the results in the chart. If these categories cannot be processed within 15seconds, the system times out and displays a warning message.
To minimize this issue, create and save a query in Tickets > Search > Advanced Search to reduce yoursearch results. When you are finished, add the query to your widget options. This method reduces theamount of data processing required by the Help Desk Manager database and prevents a warning.
For example, you can create a query in the Tickets > Search Tickets > Advanced Search tab that locates alltickets created within the last month. When you are finished, save the query with a corresponding name(such as Open within 30 days).
ADMINISTRATOR GUIDE: HELP DESK MANAGER
page 135

To share the query with other techs, select the Shared check box. When you configure your ticket chartoptions, the shared queries displays in the Query drop-down menu with an asterisk (*).
Ticket Activity widget
The ticket activity widget displays the recent changes applied to your tickets. These changes include:
n Tech notes
n Client notes
n Emails
n Assignments
n Escalations
n De-escalations
n Others
Help Desk Manager refreshes this widget every 60 seconds.
Ticket Activity options
You can configure the ticket activity widget by clicking Options in the widget drop-down menu. This opensthe Ticket Activity Options window where you can configure all available options that display in the chart.The window includes a chart preview that shows you how the chart will display in the widget based onyour selected options.
You can select one or more activity types, select a query to narrow your search results, and select thenumber of items that display in the Ticket Activity window. Additionally, you can export the widget data toan external file.
Create a Ticket Activity widget
1. In the toolbar, click Tickets > Dashboard.
2. In the dashboard, click Open Widget Drawer.
3. Select Ticket Activity.A preview of the widget displays.
4. Click and drag the widget header to the dashboard.
5. Resize the widget to your desired size. Use the blue snap-to guide to ensure the widget is sizedcorrectly.
6. Click the drop-down menu icon and select Options.
7. Select the appropriate options in the Ticket Activity Options window, and then click OK.The widget displays in the dashboard.
You can select the Hide Headers check box to hide all widget headers
8. Click Close Widget Drawer.
page 136

What's New widget
The What's New widget lists the new features included with your release. This widget does not include anyconfiguration options.
Create a What's New widget
1. In the toolbar, click Tickets > Dashboard.
2. In the dashboard, click Open Widget Drawer.
3. Select What's New.A preview of the widget displays.
4. Click and drag the widget header to the dashboard.
5. Click Close Widget Drawer.
6. Resize the widget to your desired size. Use the blue snap-to guide to ensure all widgets are the samesize in your dashboard.The widget is resized in the dashboard. No configuration is required.
7. Click Close Widget Drawer.
Export the widget data
1. In the toolbar, click Tickets > Dashboard
2. In the dashboard, select a ticket chart widget to export the data.
3. Click the drop-down menu icon and select Options.
4. Click the Raw Data icon.
5. Copy and save the data to an external file.
Start and Stop Help Desk Manager ServicesWhen you install or update certain features in your Help Desk Manager deployment, you must stop andrestart the Help Desk Manager Services in your operating system to enable these features. The followingsections describe how to start and stop Help Desk Manager Services in each supported operating system.
Make sure you are logged in to your Help Desk Manager system as an Administrator.
Microsoft Windows Server
To Start Help Desk Manager Services, do one of the following:
n Using the Start Menu options, right-click Start Help Desk Manager and select Run as Administrator.
n Navigate to your <helpdeskmanager> directory, right click whd_start.bat, and select Run asAdministrator.
ADMINISTRATOR GUIDE: HELP DESK MANAGER
page 137

n Run the following commands in a command prompt (if Help Desk Manager is installed in the defaultlocation):
cd C:\Program Files\helpdeskmanager
whd start
To Stop Help Desk Manager Services, do one of the following:
n Using the Start Menu options, right-click Stop Help Desk Manager and select Run as Administrator.
n Navigate to your <helpdeskmanager> directory, right-click whd_stop.bat and select Run asAdministrator.
n Run the following commands in a command prompt (if Help Desk Manager is installed in the defaultlocation):
cd C:\Program Files\helpdeskmanager
whd stop
cd /Library/helpdeskmanager
Linux
The following procedures apply to RPM installations.
To Start Help Desk Manager Services, run the following commands in a terminal window:
cd /usr/local/helpdeskmanager/
sudo ./whd start
To Stop Help Desk Manager Services, run the following commands in a terminal window:
cd /usr/local/helpdeskmanager/
sudo ./whd stop
page 138

Enable FIPS 140-2 compliant cryptographyBeginning in Help Desk Manager 12.4.0, you can configure a new or existing Help Desk Managerdeployment for Federal Information Processing Standard (FIPS) 140-2 compliant cryptography. Thiscompliance is required for computer systems installed in U.S. Federal Government agencies andcompanies in a regulated industry (such as healthcare and financial institutions) that share and distributesensitive but unclassified (SBU) information.
If you are enabling FIPS in a new deployment, complete the installation procedures for a new deployment.
If you are enabling FIPS in an existing deployment:
1. Complete the installation procedures for an existing deployment.2. Prepare for the database migration by running the Password Security Migration Tool.3. Migrate all client and tech passwords to FIPS 140-2 cryptography.
Enabling FIPS 140-2 compliant cryptography is optional and is not required to use Help DeskManager.
Network Security ServicesThe FIPS cryptography implements Network Security Services (NSS)—a set of open-source cryptographiclibraries developed by Mozilla that support security-enabled client and server applications. Whenintegrated with NSS, Help Desk Manager can support public-key cryptography standards #11 (PKCS #11)certificates for FIPS compliance.
All connections through SSL to the external tools require a trusted certificate to be imported into theNSS database.
CA and self-signed certificatesAfter you configure FIPS in your deployment, you can obtain and import a signed certificate by a trustedCertificate Authority (for production environments) or a self-signed certificate (for test environments) toyour NSS database to authenticate your Help Desk Manager server identity in a secure HTTPS connection.When completed, your deployment is FIPS 140-2 compliant.
Before you beginEnabling FIPS 140-2 compliant cryptography requires careful planning and coordination with ITmanagement and corporate personnel for a successful implementation. Review the requirements andprocedures in this section to ensure you have the appropriate amount of time, hardware, software, andresources for your deployment.
FIPS 140-2 compliant cryptography is not recommended in a multiple-instance environment.
ADMINISTRATOR GUIDE: HELP DESK MANAGER
page 139

After you enable FIPS 140-2 compliant cryptography in your Help Desk Manager deployment, youcannot revert back to your previous configuration.
RequirementsSolarWinds MSP recommends reviewing the following requirements before you enable FIPS 140-2compliant cryptography in your Help Desk Manager deployment.
COMPONENT REQUIREMENT
Help Desk Manager 12.4.x and later
Hardware system Non-virtualized platform
Operating system Windows Server 2012 (64-bit)
Windows Server 2012 R2 (64-bit)
Windows Server 2016
Windows Server 2019
Database 1 MySQL 5.7
PostgreSQL 9.2 (embedded)
PostgreSQL 9.3.2 (embedded)
PostgreSQL 9.4 (embedded)
PostgreSQL 9.6 (embedded)
SQL Server 2008 R2 SP3 2
SQL Server 2012 SP1 2
SQL Server 2014 2
SQL Server 2016 2
SQL Server 2017 2
LDAP Active Directory 2012
Active Directory 2012 R2
Open Directory 4
OpenLDAP 2.4
OpenLDAP 2.4.42
Mail server and protocols Exchange Server 2010
page 140

COMPONENT REQUIREMENT
Exchange Server 2013 CU7
Exchange Server 2016
Office 365
SMTP v3 3
Asset discovery connections MySQL 5.7
SQL Server 2012 SP1
SQL Server 2014
SQL Server 2016
Windows Management Instrumentation (WMI)
Web browser Google Chrome (Latest version)
Mozilla Firefox (Latest version)
Internet Explorer 9, 10, and 11
SolarWinds MSP Integration SolarWinds MSP Network Configuration Manager
SolarWinds MSP Network Performance Monitor
SolarWinds MSP Server and Application Monitor
1 Single instance only.
2 SSL connections are not supported. Additionally, SolarWinds MSP recommends running the databaseserver on the same physical server running the Help Desk Manager instance.
3 MD5 authentication is not supported.
Enable FIPS in a new deploymentIf you are installing Help Desk Manager for the first time in a new deployment, all cryptographic modulesincorporated in Help Desk Manager 12.4 and later are FIPS 140-2 compliant.
Deployment checklist
Use the following checklist to guide you through the deployment procedures.
1. Review the requirements to ensure your current deployment will support FIPS 140-2 compliantcryptography.
2. Download Help Desk Manager from the Customer Portal.
ADMINISTRATOR GUIDE: HELP DESK MANAGER
page 141
3. Install Help Desk Manager in your deployment.
4. Install Visual C++ Redistributable Packages for Visual Studio 2013 in your deployment.
This software is included with your Help Desk Manager installation package.
5. Update the Environment Variables Path setting in your Windows Server operating system.
6. Enable FIPS mode on your Apache Tomcat server.a. Stop Help Desk Manager.b. Install the preconfigured Help Desk Manager files for FIPS deployment.c. Edit the etc\hosts file.d. Edit the whd.conf file.
If you are installing Help Desk Manager in the default <HelpDeskManager> directory, go to step 7.
If you are installing Help Desk Manager in a separate directory:a. Edit the tomcat_server_template.xml file.b. Edit the java.security file.c. Edit the pkcs11_nss.cfg file.
7. Create a Help Desk Manager server certificate by obtaining a signed certificate by a trusted CA orcreating and using a self-signed certificate.
8. Complete the final installation steps.
9. Set up your SolarWinds MSP Integration and email. If you are using self-signed certificates on theSolarWinds Integration servers or email servers, add these certificates into the Help Desk ManagerNSS database.
Review the requirements
Ensure that your Help Desk Manager deployment meets all component requirements for enablingFIPS 140-2 compliant cryptography.
Download Help Desk Manager 12.4.0 or later
You can download Help Desk Manager from the Customer Portal. This version includes:
n NSS binaries
n An empty NSS database in FIPS mode
n A security provider configuration file
The NSS-related files are stored in your <HelpDeskManager> home directory.
Install Help Desk Manager in your deployment
After you complete the installation steps, a window opens in your default web browser, prompting you toselect a database type. Do not select any database type. Minimize the browser window and go to step 5.
You will continue the Getting Started Wizard in a later step.
page 142

Install Visual C++ Redistributable Packages for Visual Studio 2013
This software is included with your Help Desk Manager 12.4.0 or later installation package.
When you execute the installer, it installs the runtime components required to run C++ applications inMicrosoft® Visual Studio 2013 for a 64-bit environment.
1. Navigate to your <HelpDeskManager> directory,
2. Launch the vcredist_64.exe file.
3. Follow the prompts in the wizard to install the software.
Update the Environment Variables Path setting in your Windows Serveroperating system
The following procedure describes how to edit the Environment Variables settings in your Windows Serveroperating system. When completed, you can run Help Desk Manager commands in a command promptwithout having to change directories in the prompt.
See the Microsoft TechNet website for information about locating the Environment Variables properties inyour operating system
1. Press <Windows> + <Pause>.
2. Click Advanced System Settings.
3. Click the Advanced tab.
4. Click Environment Variables.
5. Under System Variables, select the PATH variable.
ADMINISTRATOR GUIDE: HELP DESK MANAGER
page 143

6. Update the PATH string with the following path to your nss-x64 library:
<HelpDeskManager>\bin\nss-x64\bin\;
<HelpDeskManager>\bin\nss-x64\lib\;
where <HelpDeskManager> is the path to your Help Desk Manager directory.
Below is an example of the system PATH variable.
%SystemRoot%\system32;%SystemRoot%;%SystemRoot%\System32\Wbem;%SYSTEMROOT%\System32\WindowsPowerShell\v1.0\;C:\Program Files\Microsoft SQLServer\110\DTS\Binn\;C:\Program Files (x86)\Microsoft SQLServer\110\Tools\Binn\;C:\Program Files\Microsoft SQLServer\110\Tools\Binn\;C:\Program Files (x86)\Microsoft SQLServer\110\Tools\Binn\ManagementStudio\;C:\Program Files (x86)\MicrosoftSQL Server\110\DTS\Binn\
When you append the path with your nss-x64 library path, the path displays as follows:
C:\Program Files\WebHelpDesk\bin\nss-x64\bin\;C:\ProgramFiles\WebHelpDesk\bin\nss-x64\lib\%SystemRoot%\system32;%SystemRoot%;%SystemRoot%\System32\Wbem;%SYSTEMROOT%\System32\WindowsPowerShell\v1.0\;C:\Program Files\Microsoft SQLServer\110\DTS\Binn\;C:\Program Files (x86)\Microsoft SQLServer\110\Tools\Binn\;C:\Program Files\Microsoft SQLServer\110\Tools\Binn\;C:\Program Files (x86)\Microsoft SQLServer\110\Tools\Binn\ManagementStudio\;C:\Program Files (x86)\MicrosoftSQL Server\110\DTS\Binn\
Enable FIPS mode on your Apache Tomcat server
In the following procedures, <HelpDeskManager> represents the Help Desk Manager home folder onyour system. For example: c:\Program Files\WebHelpDesk.
Stop Help Desk Manager
1. Navigate to the <HelpDeskManager> directory.
2. Right-click whd_stop.bat and select Run as administrator.
Help Desk Manager is stopped.
Install the preconfigured Help Desk Manager files for FIPS deployment
When completed, you can use the drag and drop feature for FIPS configuration.
1. Navigate to the following directory:
<HelpDeskManager>\conf\additional\fips-140-2\HelpDeskManager - cleaninstall
2. Copy all files, including the \bin and \conf directories.
3. Navigate to the <HelpDeskManager> directory.
page 144

4. Paste your copied files into the directory, overwriting all existing files.
If you are prompted to copy the tomcat_server_template.xml file, choose the copy andreplace option.
Edit the etc\hosts file
Edit the hosts file to allow the local domain to be resolved correctly.
1. Determine if you want to define a host name specifically for Help Desk Manager that is differentfrom the real server host name registered in DNS.
If you are using the existing host name, go to Edit the whd.conf file.If you are defining a new host name, go to step 2.
2. Open the following file in a text editor:
C:\Windows\System32\drivers\etc\hosts
3. Add the following string in the file:
127.0.0.1 mywebhelpdesk.mydomain
where mywebhelpdesk.mydomain is the domain name you chose for HelpDeskManager and willbe used for the remaining procedures.
4. Save and close the file.
Edit the whd.conf file
1. Open the following file in a text editor:
<HelpDeskManager>\conf\whd.conf
2. Ensure that the following string is uncommented and includes a port number that is not occupied byanother process:
HTTPS_PORT=443
3. Locate and follow the instructions in the # Privileged networks section to populatePRIVILEGED_NETWORKS= with the IP address or IP address range where the Help Desk Managerhost belongs.
Use a valid IP address and not a loopback address.
For example:
PRIVILEGED_NETWORKS=10.20.30.40
or
PRIVILEGED_NETWORKS=10.20.30.*
4. Add the following WHD_HOST variable:
WHD_HOST=mywebhelpdesk.mydomain
where mywebhelpdesk.mydomain is the domain name you chose for your installation.5. Save and close the file.
ADMINISTRATOR GUIDE: HELP DESK MANAGER
page 145

6. If you are installing Help Desk Manager in the default <HelpDeskManager> directory, go to Create aHelp Desk Manager server certificate.If you are installing Help Desk Manager in another location, edit the following files:
n tomcat_server_template.xml
n java.security
n pkcs11_nss.cfg
(Optional) Edit the tomcat_server_template.xml file
If you are installing Help Desk Manager in the default <HelpDeskManager> directory, go to Create a HelpDesk Manager server certificate.
If you are installing Help Desk Manager in another location, update the path to the nss-x64 in thetomcat_server_template.xml file.
1. Open the following file in a text editor:
<HelpDeskManager>\conf\tomcat_server_template.xml
2. Locate the SSL HTTP/1.1 connector section, as shown below.
<!-- Define a SSL HTTP/1.1 Connector on port @@@WEBHELPDESK_SSL_PORT@@@This connector uses the JSSE configuration, when using APR, theconnector should be using the OpenSSL style configurationdescribed in the APR documentation.@@@WEBHELPDESK_SSL_START@@@......@@@WEBHELPDESK_SSL_STOP@@@ -->
3. Update the path to the nss-x64 in the code.
a. Locate the following path:
c:\\Program Files\\WebHelpDesk\\
b. Replace this path with the path to your Help Desk Manager installation.
Be sure to include the double slashes ( \\ ) as path delimiters.
4. Save and close the file.
(Optional) Edit the java.security file
If you are installing Help Desk Manager in the default <HelpDeskManager> directory, go to Create a HelpDesk Manager server certificate.
If you are installing Help Desk Manager in another directory, update the java.security file with theappropriate path.
1. Navigate to the following directory:
<HelpDeskManager>\bin\jre\lib\security
2. Open the java.security file in a text editor.
page 146

3. In the file, locate the following path:
c:\\Program\ Files\\WebHelpDesk\\
4. Replace this path with the path to your Help Desk Manager installation.
Be sure to include the double slashes ( \\ ) as path delimiters.
Use single slashes for escape spaces. For example: Program\ Files.
(Optional) Edit the pkcs11_nss.cfg file
If you are installing Help Desk Manager in the default <HelpDeskManager> directory, go to Create a HelpDesk Manager server certificate.
If you are installing Help Desk Manager in a different location, perform the following steps:
1. Open the following file in a text editor:
<HelpDeskManager>\bin\nss-x64\config\pkcs11_nss.cfg
2. Locate the following strings:
nssLibraryDirectory = "c:\\Program Files\\WebHelpDesk\\bin\\nss-x64\\lib"
nssSecmodDirectory = "c:\\Program Files\\WebHelpDesk\\bin\\nss-x64\\dbnss"
3. In each string, replace:
c:\\Program Files\\WebHelpDesk
with the path to your Help Desk Manager installation.
Be sure to include the double slashes ( \\ ) as path delimiters.
4. Save and close the file.
Create a Help Desk Manager server certificate
This procedure describes how to obtain a signed certificate by a trusted Certificate Authority (CA) or createand use a self-signed certificate.
Creating a self-signed certificate should only be used in test environments and is not recommendedfor production environments.
To create a Help Desk Manager server certificate, select one of the following options:
n Obtain a signed certificate by a trusted Certificate Authority (CA). This procedure creates a certificatefor a production environment. The certificate is signed by a world-wide trusted CA (such as Verisign®
or Globalsign®) and may require several weeks to certify and receive.
n Create and use a self-signed certificate. This procedure creates a certificate for a test environmentand is not recommended for a production environment. The certificate is signed by yourorganization and is ready to use after you complete the procedure.
If you currently have a signed certificate for your NSS database, you can skip this procedure.
ADMINISTRATOR GUIDE: HELP DESK MANAGER
page 147

Before you begin
If you are running Internet Explorer to access Help Desk Manager, add your Help Desk Manager URL as atrusted site or designate the URL as an Intranet connection in the security settings. This process willprevent the default security settings in Internet Explorer from blocking JavaScript code used for navigatingthrough the Getting Started wizard.
Obtain a signed certificate by a trusted CA
1. Locate and open the copy_paste.txt file located at:<HelpDeskManager>\conf\additional\fips-140-2\WebHelpDesk - clean install
This file contains code for the proceeding steps.2. Generate a certificate sign request using the NSS tools.
a. Open a command prompt window.b. At the prompt, enter:
cd c:\Program Files\WebHelpDesk\bin\nss-x64\bin\
c. Create a certificate signing request.
The default password to your NSS database is P@ssw0rd.
Copy and paste the following code from the copy-paste.txt file to the command promptand execute:
.\certutil -R -s CN=mywebhelpdesk.mydomain, O=My_company, L=My_location, ST=My_state, C=My_country -p My_phone -o "c:\ProgramFiles\WebHelpDesk\bin\nss-x64\dbnss\mycert.req" -d "c:\ProgramFiles\WebHelpDesk\bin\nss-x64\dbnss" -Z SHA256
where mywebhelpdesk.mydomain is your Help Desk Manager domain name and My_location, My_state, and so on is specific to your deployment.
Change the path to mycert.req if you want to use a different location.
3. Send the generated file to a trusted CA (such as Verisign) to validate the certificate identity.The CA validates the certificate, and then sends the validated certificate back to you. This processmay require several weeks to complete.
page 148

4. Import the certificate into your NSS database.a. Open a command prompt window.b. At the prompt, enter:
cd c:\Program Files\WebHelpDesk\bin\nss-x64\bin\
c. Copy and paste the following code from the copy-paste.txt file to the command promptand execute:
.\certutil -A -n tomcat -t "TCu,TCu,TCu" -i "c:\ProgramFiles\WebHelpDesk\bin\nss-x64\dbnss\mycert.crt" -d "c:\ProgramFiles\WebHelpDesk\bin\nss-x64\dbnss"
Change the path to mycert.crt if you want to use a different location.
d. When prompted, enter the password to your NSS database.The default password is:
P@ssw0rd
e. Verify that the certificate is stored in your NSS database.At the prompt, execute:
.\certutil -L -d ../dbnss
5. Go to Complete the installation.
Create and use a self-signed certificate
Perform the following procedure only if you did not obtain a signed certificate by a trusted CertificateAuthority (CA).
The default password to your NSS database is P@ssw0rd.
1. Locate and open the copy-paste.txt file located at<HelpDeskManager>\conf\additional\fips-140-2\.
This file contains code for the proceeding steps.2. Open a command prompt and navigate to:
<HelpDeskManager>\bin\nss-x64\bin\
ADMINISTRATOR GUIDE: HELP DESK MANAGER
page 149

3. Create a certificate signing request.
Copy and paste the following code from the copy-paste.txt file to the command p rompt andexecute:
.\certutil -R -s CN=mywebhelpdesk.mydomain, O=My_company, L=My_location,ST=My_state, C=My_country -p My_phone -o"c:\Program Files\WebHelpDesk\bin\nss-x64\dbnss\mycert.req" -d"c:\Program Files\WebHelpDesk\bin\nss-x64\dbnss" -Z SHA256
where:n mywebhelpdesk.mydomain is the Help Desk Manager domain name you configured for theWHD_HOST variable in the whd.conf file.
n My_location, My_state, and so on is specific to your deployment.n c:\Program Files\WebHelpDesk is the location of your current Help Desk Manager
installation. Adjust this path if yourHelp Desk Manager software is installed in a non-standardlocation.
Change the path to mycert.req if you want to use a different location.
4. Follow the prompts after each .\certutil command line to complete the certificate signingrequest.When prompted for the default NSS database password, enter:
P@ssw0rd
5. Create a certificate called myissuer that will be used as the local CA to sign the tomcat certificate.
Copy and paste the following code from the copy-paste.txt file to the command prompt andexecute:
.\certutil -S -s "CN=My Issuer" -n myissuer -x -t "TCu,TCu,TCu" -d"c:\Program Files\WebHelpDesk\bin\nss-x64\dbnss" -Z SHA256
where c:\Program Files\WebHelpDesk is the location of your current Help Desk Managerinstallation.Adjust this path if your Help Desk Manager software is installed in a non-standard location.
page 150

6. Sign your certificate request.
Copy and paste the following code from the copy-paste.txt file to the command prompt andexecute:
.\certutil -C -i "c:\Program Files\WebHelpDesk\bin\nss-x64\dbnss\mycert.req" -o "c:\Program Files\WebHelpDesk\bin\nss-x64\dbnss\mycert.crt" -c myissuer -d "c:\ProgramFiles\WebHelpDesk\bin\nss-x64\dbnss" -Z SHA256
where c:\Program Files\WebHelpDesk is the location of your current Help Desk Managerinstallation. Adjust this path if your Help Desk Manager software is installed in a non-standardlocation.
Change the path to mycert.crt if you want to use a different location.
When completed, a success message will not appear in the command prompt.7. Import the self-signed certificate into your NSS database.
Change the path to mycert.crt if you want to use a different location.
Copy and paste the following code from the copy-paste.txt file to the command prompt andexecute:
.\certutil -A -n tomcat -t "TCu,TCu,TCu" -i "c:\ProgramFiles\WebHelpDesk\bin\nss-x64\dbnss\mycert.crt" -d "c:\ProgramFiles\WebHelpDesk\bin\nss-x64\dbnss"
where c:\Program Files\WebHelpDesk is the location of your current Help Desk Managerinstallation. Adjust this path if your Help Desk Manager software is installed in a non-standardlocation.When completed, a success message will not appear in the command prompt.
8. Close the command prompt window.
9. Start Help Desk Manager.
Navigate to your <HelpDeskManager> directory, right-click whd.bat start, and select Run asadministrator.
The following steps describe how to import certificates into your Trusted Root CA and TrustedPublishers stores using Internet Explorer 9 or later. If you are using another type of webbrowser, see your web browser documentation for information about importing certificatesinto these stores.
10. Open Internet Explorer and navigate to:
https://mywebhelpdesk.mydomain
where mywebhelpdesk.mydomain is your Help Desk Manager domain name.
A certificate error message displays.
ADMINISTRATOR GUIDE: HELP DESK MANAGER
page 151

11. Import the CA certificate into the Trusted Root CA store of your operating system.a. In your web browser, click Proceed anyway.b. Double-click Certificate error.c. Click View Certificate and select Certification path tab > My Issuer > View Certificate > Install
Certificate.d. Select Local Machine > TRUSTED ROOT CERTIFICATION AUTHORITIES and click Next.e. Click Finish.f. Click OK.
12. Import the server certificate into the Trusted Publishers store.a. In your web browser, click Proceed anyway.b. In your web browser, double-click Certificate error.c. Click View Certificate and select General tab > Install Certificate.d. Select Local Machine > TRUSTED PUBLISHERS and click Next.e. Click Finish.f. Press F5 to refresh the web page.
If Help Desk Manager is not loaded after pressing F5, stop and then restart Help DeskManager.
Complete the installation
1. In the Getting Started Wizard, select the embedded database option.
2. Complete the remaining steps in the Getting Started Wizard.
3. Navigate to your Help Desk Manager URL.
4. Log in to Help Desk Manager using admin as your user name and password.
5. In the toolbar, click Setup and select General > Options.
6. In the Server DNS Name field, enter your Help Desk Manager fully qualified domain name.
7. Set Force HTTPS to Always.
8. Click Save.
9. Update your Help Desk Manager password to a secure password.
10. Activate your Help Desk Manager license.
Set up SolarWinds MSP Integration and email
If you are using self-signed certificates on your SolarWinds Integration servers, email servers, email, orthird-party tools, you will need to add these certificates into the Help Desk Manager NSS database. Belowis an example for the Orion connection.
1. Open a Web browser window and navigate to:
https://ORION_IP_Address:17778/SolarWinds/InformationService/v3/OrionBasic/
page 152

2. Export the certificate into a file in CER format.a. Click the lock icon next to the URL address and select Certificate Information > Details > Copy
to File.b. Follow the prompts in the export wizard, selecting the .der format of the exported
certificate.3. Open a command prompt window.
At the prompt, enter:
cd c:\Program Files\WebHelpDesk\bin\nss-x64\bin\
4. Import the certificate.At the prompt, enter:
certutil -A -t "CT,C,C" -d ..\dbnss -n orion_cert -i c:\<path_to_exported_cert>\previously_exported_cert.cer
Enable FIPS in an existing deploymentIf you are installing Help Desk Manager in an existing deployment, SolarWinds MSP recommends followingthe procedures in this section to upgrade your existing deployment to FIPS 140-2 compliance.
Enabling FIPS 140-2 compliant cryptography in an existing deployment is optional and is notrequired to continue using Help Desk Manager. Your database is still protected from unauthorizedusers, whether or not you use the tool. You can maintain your current deployment configuration ifyou believe that your corporate enterprise is secure and does not require the added security of FIPS140-2 cryptography.
Before you begin
Before you enable FIPS in your existing deployment, verify that:
n Help Desk Manager is installed in your deployment.
n Your database is not connected to Help Desk Manager using an SSL connection.
n Your Help Desk Manager hostname is configured in the General Options screen at Setup > General >Options.
Deployment checklist
Use the following checklist to guide you through the deployment procedures.
1. Review the requirements.
2. Ensure you are running Help Desk Manager 12.4.0 or later. Upgrade the application, if required.
3. Ensure the Help Desk Manager hostname located in the Setup > General > Options > GeneralOptions screen is correct. This hostname will be used throughout this procedure to configure FIPS inyour deployment.
ADMINISTRATOR GUIDE: HELP DESK MANAGER
page 153

4. Install Visual C++ Redistributable Packages for Visual Studio 2013 in your deployment.
This software is included with your Help Desk Manager installation package.
5. Update the Environment Variables Path setting in your Windows Server operating system.
6. Enable FIPS mode on your Apache Tomcat server.a. Stop Help Desk Manager.b. Install the preconfigured Help Desk Manager files for FIPS deployment.c. Edit the wrapper_template.conf file.d. Edit the etc\hosts file.e. Edit the whd.conf file.
If you installed Help Desk Manager in the default <HelpDeskManager> directory, go to the nextstep.If you installed Help Desk Manager in a separate directory:
a. (Optional) Edit the tomcat_server_template.xml file.b. (Optional) Edit the java.security file.c. (Optional) Edit the pkcs11_nss.cfg file.
7. Create a Help Desk Manager server certificate for your NSS database by obtaining a signedcertificate by a trusted CA or creating and using a self-signed certificate.
8. Complete the final installation steps.
9. Set up your SolarWinds MSP Integration and email. If you are using self-signed certificates on theSolarWinds Integration servers or email servers, add these certificates into the Help Desk ManagerNSS database.
Review the requirements
Ensure that your Windows operating system and database software meets the component requirementsfor FIPS 140-2 compliant cryptography.
Help Desk Manager 12.4.0 and later does not support FIPS 140-2 compliance in Windows 32-bit,Apple® OS X, and Linux operating systems.
Ensure you are running Help Desk Manager 12.4.0 or later
The FIPS 140-2 compliant cryptography is only supported in Help Desk Manager 12.4.0 and later.
If you are currently running version 12.4.0 or later, go to the next section. If you are not running Help DeskManager 12.4.0 or later, download the software from the Customer Portal.
This version includes:
n NSS binaries
n An empty NSS database in FIPS mode
n The security provider configuration file
page 154

The NSS-related files are stored in your <HelpDeskManager> home folder.
Ensure that the Help Desk Manager hostname is correct
The Help Desk Manager hostname will be used throughout this procedure to configure FIPS in yourdeployment.
1. Click Setup in the toolbar and select General > Options.
2. In the General Options screen, ensure that the Help Desk Manager Name field contains the correcthostname.
Install Visual C++ Redistributable Packages for Visual Studio 2013
This software is included with your Help Desk Manager 12.4.0 and later installation package. When youexecute the installer, it installs the runtime components required to run C++ applications in Visual Studio2013 for a 64-bit environment.
When you run the installation program, select vcredist_64.exe and install the software in your<HelpDeskManager> directory.
Update the Environment Variables Path setting in your Windows Serveroperating system
The following procedure describes how to edit the Environment Variables settings in your Windows Serveroperating system. When completed, you can run Help Desk Manager commands in a command promptwithout having to change directories in the prompt.
See the Microsoft TechNet website for information about locating the Environment Variables properties inyour operating system
ADMINISTRATOR GUIDE: HELP DESK MANAGER
page 155

1. In your Windows Server operating system, locate and open the Environment Variables properties.
2. In the Environment Variables properties, locate Path in the System Variables.
3. Open the PATH string in Edit mode.
4. Update the PATH string with the following path to your nss-x64 library:
<HelpDeskManager>\bin\nss-x64\bin\;
where <HelpDeskManager> is the path to your Help Desk Manager directory.
Below is an example of the system PATH variable.
%SystemRoot%\system32;%SystemRoot%;%SystemRoot%\System32\Wbem;%SYSTEMROOT%\System32\WindowsPowerShell\v1.0\;C:\Program Files\Microsoft SQLServer\110\DTS\Binn\;C:\Program Files (x86)\Microsoft SQLServer\110\Tools\Binn\;C:\Program Files\Microsoft SQLServer\110\Tools\Binn\;C:\Program Files (x86)\Microsoft SQLServer\110\Tools\Binn\ManagementStudio\;C:\Program Files (x86)\MicrosoftSQL Server\110\DTS\Binn\
When you append the path with your nss-x64 library path, the path displays as follows:
C:\Program Files\WebHelpDesk\bin\nss-x64\bin\;%SystemRoot%\system32;%SystemRoot%;%SystemRoot%\System32\Wbem;%SYSTEMROOT%\System32\WindowsPowerShell\v1.0\;C:\Program Files\MicrosoftSQL Server\110\DTS\Binn\;C:\Program Files (x86)\Microsoft SQLServer\110\Tools\Binn\;C:\Program Files\Microsoft SQLServer\110\Tools\Binn\;C:\Program Files (x86)\Microsoft SQLServer\110\Tools\Binn\ManagementStudio\;C:\Program Files (x86)\MicrosoftSQL Server\110\DTS\Binn\
Enable FIPS mode on your Apache Tomcat server
In the following procedures, <HelpDeskManager> represents the Help Desk Manager home folderon your system. For example: c:\Program Files\WebHelpDesk.
Stop Help Desk Manager
1. Navigate to the <HelpDeskManager> directory.
2. Right-click whd_stop.bat and select Run as administrator.
Help Desk Manager is stopped.
Install the preconfigured Help Desk Manager files for FIPS deployment
When completed, you can use the drag and drop feature for FIPS configuration.
1. Navigate to the following directory:
<WebHelpDesk>\conf\additional\fips-140-2\WebHelpDesk - upgrade
2. Copy all files, including the \bin and \conf directories.
page 156

3. Navigate to the <WebHelpDesk> directory.
4. Paste your copied files into the directory, overwriting all existing files.
If you are prompted to copy the tomcat_server_template.xml file, choose the copy and replaceoption.
Edit the wrapper_template.conf file
1. Open the following file in a text editor:
<WebHelpDesk>\bin\wrapper\conf\wrapper_template.conf
2. Locate the following section:
wrapper.java.additional.1=-XX:MaxPermSize=@@@WHD_MAX_PERM_MEMORY@@@mwrapper.java.additional.2=-Djava.endorsed.dirs=../../../conf/endorsedwrapper.java.additional.3-Dcatalina.base=../../tomcat......wrapper.java.additional.17=-DWHDWebObjectsMonitorDeployment=false
3. Add the following strings in the code:
wrapper.java.additional.XX=-DWHDnss
wrapper.java.additional.XX=-Djavax.net.ssl.keyStore=NONE
wrapper.java.additional.XX=-Djavax.net.ssl.trustStore=NONE
where XX equals the next incremented number in the section.
If you do not have any customizations in this file, you can use section 1 in the copy_paste.txt fileto copy from and paste into your wrapper_template.conf file. The copy_paste.txt file islocated in the following directory:
<HelpDeskManager>\conf\additional\fips-140-2\WebHelpDesk - upgrade\
For example:
# Java Additional Parameterswrapper.java.additional.1=-XX:MaxPermSize=@@@WHD_MAX_PERM_MEMORY@@@mwrapper.java.additional.2=-Djava.endorsed.dirs=../../../conf/endorsed...wrapper.java.additional.17=-DWHDWebObjectsMonitorDeployment=falsewrapper.java.additional.18=-DWHDnss
4. Save and close the file.
Edit the etc\hosts file
Edit the hosts file to allow the local domain to be resolved correctly.
1. Open the following file in a text editor:
C:\Windows\System32\drivers\etc\hosts
ADMINISTRATOR GUIDE: HELP DESK MANAGER
page 157
2. Determine if you want to define a host name specifically for Help Desk Manager that is differentfrom the real server host name registered in DNS.To use the existing host name, go to the next step.To define a new host name, add the following string:
<Help Desk Manager server IP address> mywebhelpdesk.mydomain
where mywebhelpdesk.mydomain is the domain name used for the remaining procedures.3. Add the following string in the file:
127.0.0.1 mywebhelpdesk.mydomain
4. Save and close the file.
Edit the whd.conf file
1. Open the following file in a text editor:
<HelpDeskManager>\conf\whd.conf
2. Ensure that the following string is uncommented and includes a port number that is not occupied byanother process:
HTTPS_PORT=443
If you are upgrading your deployment to FIPS 140-2 compliance, add this string to the file.
3. Locate and follow the instructions in the # Privileged networks section to populatePRIVILEGED_NETWORKS= with the IP address or IP address range where the Help Desk Managerhost belongs.For example:
PRIVILEGED_NETWORKS=12.20.30.40
or
PRIVILEGED_NETWORKS=12.20.30.*
4. Uncomment the following WHD_HOST variable:
WHD_HOST=mywebhelpdesk.mydomain
5. Save and close the file.
6. If you installed Help Desk Manager in the default <HelpDeskManager> directory, go to Create aHelp Desk Manager server certificate.If you installed Help Desk Manager in another location, edit the following files:
n tomcat_server_template.xml
n java.security
n pkcs11_nss.cfg
(Optional) Edit the tomcat_server_template.xml file
1. Open the following file in a text editor:
<HelpDeskManager>\conf\tomcat_server_template.xml
page 158

2. Locate the SSL HTTP/1.1 connector section, as shown below.
<!-- Define a SSL HTTP/1.1 Connector on port @@@WEBHELPDESK_SSL_PORT@@@This connector uses the JSSE configuration, when using APR, theconnector should be using the OpenSSL style configurationdescribed in the APR documentation.@@@WEBHELPDESK_SSL_START@@@......@@@WEBHELPDESK_SSL_STOP@@@ -->
3. Replace the code between
@@@WEBHELPDSK_SSL_START@@@
and
@@@WEBHELPDESK_SSL_STOP@@@
with the code included in the copy_paste.txt file, where c:\\ProgramFiles\\WebHelpDesk\\ is the path to your default HelpDeskManager installation directory.
Be sure to include the double slashes ( \\ ) as path delimiters.
4. If you are installing Help Desk Manager in a non-default location, update the path to the nss-x64 inthe code.
(Optional) Edit the java.security file
1. Open the following file in a text editor:
<HelpDeskManager>\bin\jre\lib\security\java.security
2. Locate the following section:
security.provider.1=sun.security.provider.Sunsecurity.provider.2=sun.security.rsa.SunRsaSignsecurity.provider.3=sun.security.ec.sunECsecurity.provider.4=com.sun.net.ssl.internal.ssl.Providersecurity.provider.5=com.sun.crypto.provider.SunJCEsecurity.provider.6=sun.security.jgss.SunProvidersecurity.provider.7=com.sun.security.sasl.Providersecurity.provider.8=org.jcp.xml.dsig.internal.dom.SMLDSigRIsecurity.provider.9=sun.security.smartcardio.SunPCSCsecurity.provider.10=sun.security.mscapi.SunMSCAPI
3. Remove the following string:
security.provider.4=com.sun.net.ssl.internal.ssl.Provider
ADMINISTRATOR GUIDE: HELP DESK MANAGER
page 159

4. Add the following strings before security.provider.5=com.sun.crypto.provider.SunJCE:
security.provider.XX=sun.security.pkcs11.SunPKCS11 c:\\Program\Files\\WebHelpDesk\\bin\\nss-x64\\config\\pkcs11_nss.cfgsecurity.provider.XX=com.sun.net.ssl.internal.ssl.Provider SunPKCS11-NSScrypto
where XX equals the appropriate string increment number.5. Adjust the increment numbers of each string so they are in sequential order (such as 1, 2, 3, and so
on).When completed, this section should appear exactly as follows:
security.provider.1=sun.security.provider.Sunsecurity.provider.2=sun.security.rsa.SunRsaSignsecurity.provider.3=sun.security.ec.SunECsecurity.provider.4=sun.security.pkcs11.SunPKCS11 c:\\Program\Files\\WebHelpDesk\\bin\\nss-x64\\config\\pkcs11_nss.cfgsecurity.provider.5=com.sun.net.ssl.internal.ssl.Provider SunPKCS11-NSScryptosecurity.provider.6=com.sun.crypto.provider.SunJCEsecurity.provider.7=sun.security.jgss.SunProvidersecurity.provider.8=com.sun.security.sasl.Providersecurity.provider.9=org.jcp.xml.dsig.internal.dom.XMLDSigRIsecurity.provider.10=sun.security.smartcardio.SunPCSCsecurity.provider.11=sun.security.mscapi.SunMSCAPIkeystore.type=PKCS11
6. Locate and comment out the following string:
keystore.type=jks
For example:
# keystore.type=jks
7. Save and close the file.
(Optional) Edit the pkcs11_nss.cfg file
Edit this file only if Help Desk Manager was not installed in the following location:
c:\Program Files\WebHelpDesk
1. Open the following file in a text editor:
<HelpDeskManager>\bin\nss-x64\config\pkcs11_nss.cfg
2. Locate the following strings:
nssLibraryDirectory = "c:\\Program Files\\WebHelpDesk\\bin\\nss-x64\\lib"
nssSecmodDirectory = "c:\\Program Files\\WebHelpDesk\\bin\\nss-x64\\dbnss"
page 160

3. In each string, replace:
c:\\Program Files\\WebHelpDesk
with the path to your Help Desk Manager installation.
Be sure to include the double slashes ( \\ ) as path delimiters.
4. Save and close the file.
Create a signed Help Desk Manager certificate for your NSS database
Create a Help Desk Manager server certificate by obtaining a signed certificate by a trusted CA or creatingand using a self-signed certificate.
If you currently have a signed certificate for your NSS database, you can skip this procedure.
Before you begin
If you are running Internet Explorer to access Help Desk Manager, add your Help Desk Manager URL as atrusted site or designate the URL as an Intranet connection in the security settings. This process willprevent the default security settings in Internet Explorer from blocking JavaScript code used for navigatingthrough the Getting Started wizard.
Obtain a signed certificate by a trusted CA
This procedure creates a certificate for a production environment. The certificate is signed by a world-widetrusted CA (such as Verisign® or Globalsign®) and may require several weeks to certify and receive.
1. Generate a certificate sign request using the NSS tools.a. Open a command prompt window.b. At the prompt, enter:
cd c:\Program Files\WebHelpDesk\bin\nss-x64\bin\
c. Create a certificate signing request.
The default password to your NSS database is P@ssw0rd.
Change the path to mycert.req if you want to use a different location.
At the prompt, execute:
.\certutil -R -s CN=mywebhelpdesk.mydomain, O=My_company, L=My_location, ST=My_state, C=My_country -p My_phone -o "c:\ProgramFiles\WebHelpDesk\bin\nss-x64\dbnss\mycert.req" -d "c:\ProgramFiles\WebHelpDesk\bin\nss-x64\dbnss" -Z SHA256
where mywebhelpdesk.mydomain is your Help Desk Manager domain name and My_location, My_state, and so on is specific to your deployment.
2. Send the generated file to a trusted CA (such as Verisign) to validate the certificate identity.The CA validates the certificate, and then sends the validated certificate back to you. This processmay require several weeks to complete.
ADMINISTRATOR GUIDE: HELP DESK MANAGER
page 161

3. Import the certificate into your NSS database.a. Open a command prompt window.b. At the prompt, enter:
cd c:\Program Files\WebHelpDesk\bin\nss-x64\bin\
c. At the prompt, execute:
Change the path to mycert.crt if you want to use a different location
.\certutil -A -n tomcat -t "TCu,TCu,TCu" -i "c:\ProgramFiles\WebHelpDesk\bin\nss-x64\dbnss\mycert.crt" -d "c:\ProgramFiles\WebHelpDesk\bin\nss-x64\dbnss"
d. When prompted, enter the password to your NSS database.The default password is:
P@ssw0rd
e. When prompted, enter the password for your Help Desk Manager private key.The default password is:
changeit
f. Verify that the certificate is stored in your NSS database.
At the prompt, execute:
.\certutil -L -d ../dbnss
4. Start Help Desk Manager.
Navigate to your <HelpDeskManager> directory, right-click whd_start.bat, and select Run asadministrator.
5. Open a web browser and navigate to:
https://mywebhelpdesk.mydomain:443/helpdesk/
where mywebhelpdesk.mydomain is your Help Desk Manager domain name.
If you configured HTTPS_PORT differently in an earlier step, choose a port other than port443.
6. In the toolbar, click Setup and select General > Options.
7. In the Server DNS Name field, enter your Help Desk Manager domain name.
8. Set Force HTTPS to Always.
9. Click Save.The FIPS configuration is completed. Your Help Desk Manager deployment is running in FIPScompliant security mode. Do not go to the next section.
Create and use a self-signed certificate
This procedure creates a certificate for a test environment and is not recommended for a productionenvironment. The certificate is signed by your organization and is ready to use after you complete theprocedure. Self-signed certificate should only be used in test environments and is not recommended forproduction environments.
page 162

Perform the following procedure only if you did not obtain a signed certificate by a trusted CertificateAuthority (CA).
The default password to your NSS database is P@ssw0rd.
1. Open a command prompt and navigate to:
<HelpDeskManager>\bin\nss-x64\bin\
2. Create a certificate signing request.
Change the path to mycert.req if you want to use a different location.
At the command prompt, execute:
.\certutil -R -s CN=mywebhelpdesk.mydomain, O=My_company, L=My_location,ST=My_state, C=My_country -p My_phone -o "c:\ProgramFiles\WebHelpDesk\bin\nss-x64\dbnss\mycert.req" -d "c:\ProgramFiles\WebHelpDesk\bin\nss-x64\dbnss" -Z SHA256
where:n mywebhelpdesk.mydomain is the Help Desk Manager domain name you configured for theWHD_HOST variable in the whd.conf file.
n My_location, My_state, and so on is specific to your deployment.n c:\Program Files\WebHelpDesk is the location of your current Help Desk Manager
installation. Adjust this path if your Help Desk Manager software is installed in a non-standard location.
3. Follow the prompts after each .\certutil command line to complete the certificate signingrequest.When prompted for the default NSS database password, enter:
P@ssw0rd
4. Create a certificate called myissuer that will be used as the local CA to sign the tomcat certificate.
At the command prompt, execute:
.\certutil -S -s "CN=My Issuer" -n myissuer -x -t "TCu,TCu,TCu" -d"c:\Program Files\WebHelpDesk\bin\nss-x64\dbnss" -Z SHA256
where c:\Program Files\WebHelpDesk is the location of your current Help Desk Managerinstallation. Adjust this path if your Help Desk Manager software is installed in a non-standardlocation.
ADMINISTRATOR GUIDE: HELP DESK MANAGER
page 163
5. Sign your certificate request.
Change the path to mycert.crt if you want to use a different location.
At the command prompt, execute:
.\certutil -C -i "c:\Program Files\WebHelpDesk\bin\nss-x64\dbnss\mycert.req" -o "c:\Program Files\WebHelpDesk\bin\nss-x64\dbnss\mycert.crt" -c myissuer -d "c:\ProgramFiles\WebHelpDesk\bin\nss-x64\dbnss" -Z SHA256
where c:\Program Files\WebHelpDesk is the location of your current Help Desk Managerinstallation. Adjust this path if your Help Desk Manager software is installed in a non-standardlocation.
When completed, a success message will not appear in the command prompt.
6. Import the self-signed certificate into your NSS database.
Change the path to mycert.crt if you want to use a different location.
At the command prompt, execute:
.\certutil -A -n tomcat -t "TCu,TCu,TCu" -i "c:\ProgramFiles\WebHelpDesk\bin\nss-x64\dbnss\mycert.crt" -d "c:\ProgramFiles\WebHelpDesk\bin\nss-x64\dbnss"
where c:\Program Files\WebHelpDesk is the location of your current Help Desk Managerinstallation. Adjust this path if your Help Desk Manager software is installed in a non-standardlocation.
When completed a success message will not appear in the command prompt.
7. Close the command prompt window.
8. Start Help Desk Manager.
Navigate to your <HelpDeskManager> directory, right-click whd.bat start, and select Run asadministrator.Help Desk Manager restarts.
The following steps describe how to import certificates into your Trusted Root CA and TrustedPublishers stores using Internet Explorer 9 or later. If you are using another type of webbrowser, see your web browser documentation for information about importing certificatesinto these stores.
9. Open Internet Explorer and navigate to:
https://mywebhelpdesk.mydomain
where mywebhelpdesk.mydomain is your Help Desk Manager domain name.
A certificate error message displays.
page 164

10. Import the CA certificate into the Trusted Root CA store of your operating system.a. In your web browser, click Proceed anyway.b. Double-click Certificate error.c. Click View Certificate and select Certification path tab > My Issuer > View Certificate > Install
Certificate.d. Select Local Machine > TRUSTED ROOT CERTIFICATION AUTHORITIES and click Next.e. Click Finish.f. Click OK.
11. Import the server certificate into the Trusted Publishers store.a. In your web browser, click Proceed anyway.b. In your web browser, double-click Certificate error.c. Click View Certificate and select General tab > Install Certificate.d. Select Local Machine > TRUSTED PUBLISHERS and click Next.e. Click Finish.f. Press F5 to refresh the web page.g. If Help Desk Manager is not loaded after pressing F5, stop and then restart Help Desk
Manager.12. Log in to Help Desk Manager as an administrator.
13. Open a web browser and navigate to:
https://mywebhelpdesk.mydomain
where mywebhelpdesk.mydomain is your Help Desk Manager domain name.14. In the toolbar, click Setup and select General > Options.
15. In the Server DNS Name field, enter your Help Desk Manager domain name.
16. Set Force HTTPS to Always.
17. Click Save.Your Help Desk Manager system is now in FIPS compliant security mode.
Complete the installation
1. In the Getting Started Wizard, select the embedded database option.
2. Complete the remaining steps in the Getting Started Wizard.
3. Navigate to your Help Desk Manager URL.
4. Log in to Help Desk Manager using admin as your user name and password.
5. In the toolbar, click Setup and select General > Options.
6. In the Server DNS Name field, enter your Help Desk Manager fully qualified domain name.
7. Set Force HTTPS to Always.
8. Click Save.
9. Update your Help Desk Manager password to a secure password.
10. Activate your Help Desk Manager license.
ADMINISTRATOR GUIDE: HELP DESK MANAGER
page 165

Set up your SolarWinds Integration and email
If you are using self-signed certificates on your SolarWinds Integration servers, email servers, email, orthird-party tools, you will need to add these certificates into the Help Desk Manager NSS database.
Below is an example for the Orion connection.
1. Open a Web browser window and navigate to:
https://ORION_IP_Address:17778/SolarWinds/InformationService/v3/OrionBasic/
2. Export the certificate into a file in CER format.a. Click the lock icon next to the URL address and select Certificate Information > Details > Copy
to File.b. Follow the prompts in the export wizard, selecting the .der format of the exported
certificate.3. Open a command prompt window.
At the prompt, enter:
c:\Program Files\WebHelpDesk\bin\nss-x64\bin\
4. Import the certificate.At the prompt, enter:
certutil -A -t "CT,C,C" -d ..\dbnss -n orion_cert -i c:\<path_to_exported_cert>\previously_exported_cert.cer
Prepare for the database migrationAfter you enable FIPS 140-2 cryptography and complete the steps in the Getting Started Wizard, scheduleand implement the appropriate procedures in your organization to prepare all stakeholders for thedatabase migration.
The following illustration provides an overview of the database migration milestones using the PasswordSecurity Migration Tool.
Install Help Desk Manager 12.4.0 or later.
page 166

MILESTONE COMPLETED TASKS
1 Help Desk Manager 12.4.0 or later is installed in your deployment.
You scheduled a date to invalidate all tech and client passwords inyour current Help Desk Manager database stored with weakercryptography and a date to verify system status using the Audit Tool.
2 You configured a FIPS 140-2 cryptography provider in your Help DeskManager deployment.
Help Desk Manager begins using FIPS 140-2 cryptography for userpasswords and a non-FIPS provider for hash attachment links andthird-party connection passwords.
All techs and clients are notified to log in to Help Desk Managerbefore your scheduled date.
3 The Help Desk Manager Admin runs the Password SecurityMigration Tool.
All non-migrated clients and techs using the non-FIPS provider areinvalidated. These users are forced to change their password beforethey can log in and access the application.
ADMINISTRATOR GUIDE: HELP DESK MANAGER
page 167

MILESTONE COMPLETED TASKS
All third-party connection passwords are re-encrypted to AES withthe FIPS provider.
To prepare for the database migration:
1. Schedule the migration.Select a date to invalidate all passwords stored in your current Help Desk Manager database storedwith weaker cryptography and a date to verify your system status.
2. Notify all techs and clients to log in to Help Desk Manager.Ensure that all clients and techs receive confirmation about the planned migration. Provide adeadline date and ample time for all users to proactively log in to Help Desk Manager.If your clients and techs do not log in to Help Desk Manager by the deadline date, they will be forcedto change their password after the migration before they can log in and access Help Desk Manager.
3. Record your existing SolarWinds Integration configuration settings.If you are connected to an external SolarWinds product (such as SolarWinds Network PerformanceMonitor [NPM], SolarWinds Server and Application Monitor [SAM], or SolarWinds NetworkConfiguration Monitor [NCM] ), record your current configuration settings. All external SolarWindsintegration passwords will be updated to FIPS 140-2 cryptography during the database migration.A list of SolarWinds connections display.
a. Click Setup and select SolarWinds Integration > SolarWinds Connection.A list of SolarWinds connections appear.
b. Double-click a connection.c. Record the connection information listed in the screen.d. Click Next.e. Record the filter settings listed on the screen.f. In the SolarWinds Integration menu, click SolarWinds Connection.g. Record the connection settings for any remaining connections.
Migrate user passwords to FIPS 140-2 cryptographyOn a pre-scheduled date, execute the database compliance tool in Help Desk Manager using youradministrator password to ensure that all client and tech account passwords are migrated to FIPS 140-2cryptography. When completed, only the stored client and tech passwords using FIPS 140-2 cryptographyare validated.
Prepare for the password migration
1. Log on to Help Desk Manager as an administrator.
2. Click Setup and select General > Authentication.
3. Scroll down to the Password Security Migration Tool window.
page 168

4. Click Check Password Security.The tool scans all client and tech account passwords in your Help Desk Manager database.If all clients and techs have logged in to Help Desk Manager 12.4.0 or later before the scheduleddate, a message displays stating that your database is now using strong cryptography and is FIPS140-2 compliant.If one or more clients or techs have not logged in to Help Desk Manager before the scheduled date,Help Desk Manager lists the remaining number of client accounts and a list of tech accounts thatrequire a password change. The report will include third-party integration accounts that will bemigrated automatically without user intervention.
5. Decide whether to invalidate all passwords in your database using the weaker cryptography.
If you click No and do not invalidate all passwords, Help Desk Manager will not erase any passwordsfrom your database that are using weaker cryptography.
Execute the password migration1. Click Yes to invalidate all passwords.
The following message displays:
Are you sure you want to erase all passwords that are using weakercryptography?Confirm by entering your Admin password below.
2. Enter your admin password in the appropriate field.
3. Click Yes to invalidate all passwords.When completed, a message displays listing the reset client and tech passwords.All clients who did not update their passwords are forced to create a new password when they log into Help Desk Manager. Additionally, all future client and tech account passwords will be encryptedusing FIPS 140-2 cryptography.
4. Click Save.The migration is completed.
Notify all users that the migration is completed
All remaining users who did not change their passwords during the notification period must navigate tothe Log In page and click Forgot Password to change their password and access Help Desk Manager.
ADMINISTRATOR GUIDE: HELP DESK MANAGER
page 169

Configure and manage user authenticationWhen a browser submits an HTTPS request to Help Desk Manager, the SSL protocol requires theapplication to respond with a certificate to prove the authenticity of the server. The certificate contains apublic key used for encryption and a digital signature from a Certification Authority (CA). The digitalsignature indicates which CA verified the authenticity of the server.
Web browsers currently trust most certificates signed by large CAs such as Verisign®, and you can usecertificates signed by smaller CAs. When a browser does not recognize the CA certificate, the browserprompts you to trust the certificate.
When completed, the browser uses the public key in the certificate to encrypt information it sends to HelpDesk Manager. Help Desk Manager decrypts the information using its private key. Similarly, Help DeskManager uses its private key to encrypt information sent to the browser, and the browser uses the publickey received in the certificate to decrypt it.
For details about setting up HTTPS, see Enabling HTTPS and Configure the server options.
For information on using and troubleshooting keys and certificates, see Working with Keys andCertificates, as well as Certificate Troubleshooting Tips.
Enable HTTPSWhen a browser submits an HTTPS request to Help Desk Manager, the SSL protocol requires Help DeskManager to respond with a certificate to prove the authenticity of the server. Begin your securityconfiguration by enabling HTTPS.
Beginning in Help Desk Manager 12.5.1, you can enable HTTPS in Server Options located at Setup >General > Server Options.
To activate HTTPS in Help Desk Manager:
1. Configure the HTTPS listening port to monitor HTTPS requests.
2. Configure a URL port to monitor URLs generated by Help Desk Manager that point back to theapplication.
3. Enable Help Desk Manager to listen for HTTPS requests.
4. Enter the SSL connection port (if needed).
5. Restart Help Desk Manager.
This procedure requires changes to the whd.conf file. Review the following procedures before youenable HTTPS.
page 170

Configure the HTTPS listening port
Configure the listening port to listen for HTTPS requests. When you are finished, configure the portnumber used to monitor the requests.
1. Open an Explore window.
2. Navigate to:
HelpDeskManager/conf/whd.conf
3. In the whd.conf file locate the Ports section.
4. Enter the port number Help Desk Manager monitors for HTTPS requests, which appears after thefollowing entry:HTTPS_PORTS=
5. Save your changes.
6. Close the whd.conf file.
Configure a URL port
Your deployment may require Help Desk Manager to use a different port in URLs it generates to itself thanthe port the app server itself is actually running on. For example, you can configure a Web server to routerequests for the default port (80) to go to the default Help Desk Manager port (8081). In this example, youcan have Help Desk Manager URLs use port 80 instead of port 8081.
1. In the whd.conf file, locate the URL Ports (optional) section.
2. At the bottom of this section, enter the desired URL port number after the following entry:URL_HTTPS_PORT=
3. Save and close the file.
Enable listening for HTTPS requests
1. In the whd.conf file, locate the HTTPS_PORT entry.
2. Uncomment the entry.
3. Save and close the file.
Enter the SSL connection port
By default, Web browsers use port 443 for SSL connections. If you use a different port, include the portnumber in URLs that refer to Help Desk Manager.
For example, if your whd.conf file contains HTTPS_PORT=8443, connect to Help Desk Manager using thefollowing URL:
https://localhost:8443
Restart Help Desk Manager
After you configure the HTTPS_PORT setting, restart Help Desk Manager. The application creates a new JavaKeyStore at the following location:
ADMINISTRATOR GUIDE: HELP DESK MANAGER
page 171

HelpDeskManager/conf/keystore.jks
The new keystore contains a self-signed certificate.
Manage keys and certificates in Help Desk ManagerWhen a web browser submits an HTTPS request to Help Desk Manager, the SSL protocol requires theapplication to respond with a certificate to verify the authenticity of the server. The certificate contains apublic key used for encryption and a digital signature from a Certification Authority (CA). The digitalsignature indicates which CA verified the authenticity of the server.
Trust certificates signed by CAs
Current Web browsers trust most certificates signed by large CAs (such as Verisign). You can also usecertificates signed by smaller CAs. When a web browser does not recognize the CA, it prompts you toconfirm your trust in the certificate.
After you confirm your trust, the web browser uses the public key in the certificate to encrypt informationsent to Help Desk Manager. Help Desk Manager uses its private key to decrypt the information.Additionally, Help Desk Manager uses its private key to encrypt information sent to the web browser, andthe browser uses the public key received in the certificate to decrypt it.
Store keys and certificates
Help Desk Manager stores its keys and certificates in a Java KeyStore located atHelpDeskManager/conf/keystore.jks. Porteclé (an open-source utility bundled with Help DeskManager) provides a graphical user interface for administering the keystore on the Windows platform.
Generate a keypair and CSR
If you do not have a certificate for your server and are using the Windows platform, use Porteclé togenerate a keypair and a Certificate Signing Request (CSR) to send to the CA. When completed, import theCA Reply certificate.
Import a certificate and private key to the keystore
If you have a certificate, import both the certificate and the primary key into the Java Keystore. Porteclédoes not allow the private key to be imported by itself. You must combine it with its certificate in a Public-Key Cryptography Standards (PKCS) #12 file (such as P12 or PFX). In each case, the keypair must be aliasedas tomcat and both the keypair and the keystore must be protected by the password specified in theKEYSTORE_PASSWORD setting in the whd.conf file.
For more information about working with keys and certificates, see the following resources.
n Use default keypair aliases and passwordsn Add certificate chainsn Replace self-signed certificates with CA certificatesn Generate a new certificate
page 172

n Add a Certificate Authority to an embedded Java CA certificate keystoren Import an existing certificaten Certificate troubleshooting tips
Use a default keypair alias and password
Help Desk Manager uses the Apache Tomcat web server. This server requires a key pair with a tomcatalias.
The default password to both the keypair and keystore is changeit, as shown below.
Tomcat requires identical keystore and keypair passwords. To use your own password, change theKEYSTORE_PASSWORD setting in the whd.conf file located in the HelpDeskManager/conf directory.
Replace a self-signed certificate with a CA certificate
When you create a new keypair using Portecle, it includes a self-signed certificate. To replace the self-signed certificate with a CA-signed certificate, generate a CSR for the keypair and submit the CSR to theCA. The CSR contains the public key and the name of the server in a format defined by the public-keycryptography standards #10 (PKCS10), which is typically given the P10 or CSR file name extension.
After you verify the applicant identity, the CA sends you a certificate you can use to replace the self-signedcertificate in the keypair, as shown below.
ADMINISTRATOR GUIDE: HELP DESK MANAGER
page 173

This CA Reply (or CSR Reply) is typically an X.509 certificate file with a CER, CRT, PEM, or DER extension or aPKCS7 file with a P7B extension.
See Import an existing certificate and Certificate troubleshooting tips for additional information.
Add certificate chains
A trusted Certificate Authority (CA) can delegate to another CA. In this example, the certificate returned bythe delegated CA is signed by the trusted CA, resulting in a certificate chain. Certificate chains can vary inlength. The highest certificate in the chain—known as the root certificate—should be a self-signedcertificate signed by the trusted CA.
Each certificate in the chain must be imported into the keystore so the complete chain can be sent to theweb browser. If the CA Reply does not include the chain certificates, you must add them to the keystorebefore the CA reply.
The certificates must be imported in order of dependency.
To import the certificates:
1. Add the root certificate first.
2. Add the next chained certificate signed by the root certificate.
3. Add the next chained certificate (and so on) down to the CA reply.
Generate a new certificate using Porteclé
To generate a new certificate using Porteclé:
1. Create a new keypair or replace a keypair.
2. Generate a certificate signing request (CSR).3. Import CA chain and root certificates.
4. Import the CA reply certificate.
If you currently have a certificate, see Import an existing certificate.
Create a new keypair
1. Open a File Explore window.
2. Launch the Porteclé batch file from the following directory:
Program Files\HelpDeskManager
3. Click the Files of Type drop-down menu and select:
.jks
page 174
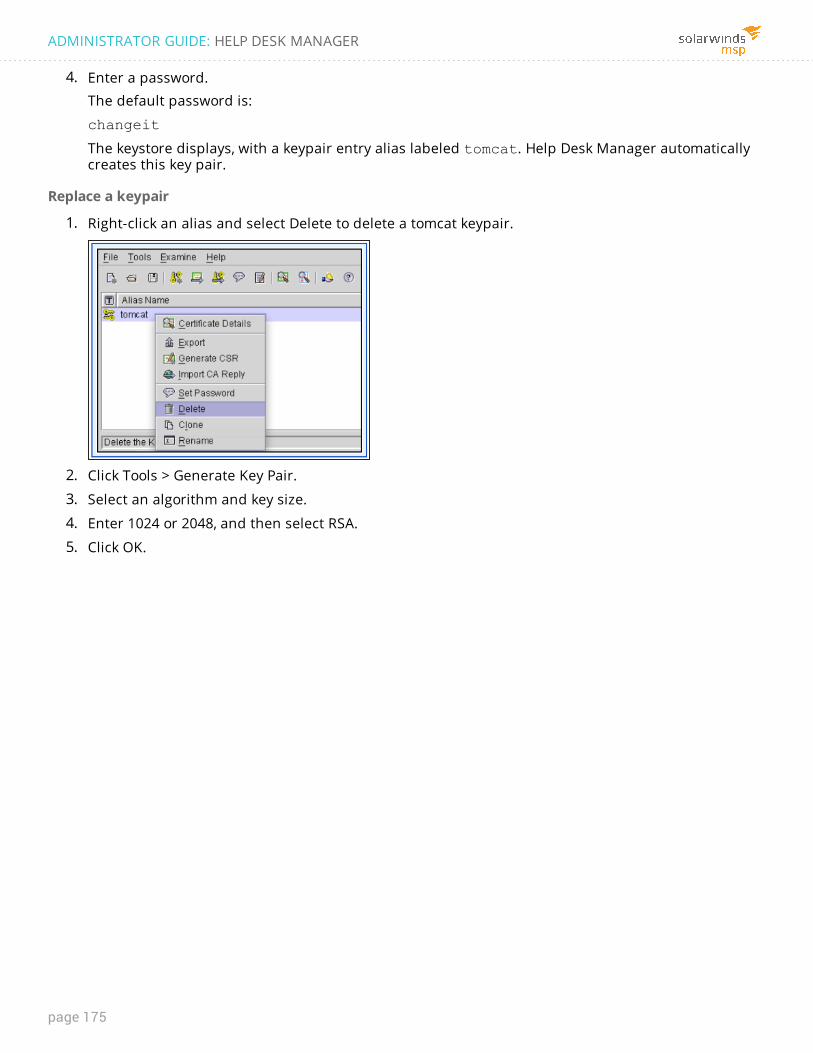
4. Enter a password.The default password is:
changeit
The keystore displays, with a keypair entry alias labeled tomcat. Help Desk Manager automaticallycreates this key pair.
Replace a keypair
1. Right-click an alias and select Delete to delete a tomcat keypair.
2. Click Tools > Generate Key Pair.
3. Select an algorithm and key size.
4. Enter 1024 or 2048, and then select RSA.
5. Click OK.
ADMINISTRATOR GUIDE: HELP DESK MANAGER
page 175

6. Enter the X.509 attributes for your certificate.
a. Select a validity (in days) that matches the number of days your CA certificate will be valid. Thevalidity period is the period you specified when you purchased the certificate from the CA.
Typical validation periods are 6, 12, or 24 months.
b. Enter a common name that matches the site used in the certificate.For example, if Help Desk Manager is hosted at support.example.com, your CN must besupport.example.com.
c. Enter an organization unit that distinguishes this certificate from other certificates for yourorganization.
d. Enter an organization name, which is typically the name of your organization.e. Enter a locality name (such as a city name).f. Enter a state name.
This is the full name of the state, province, region, or territory where your organization islocated.
g. Enter the country where your organization is located.
This should be the two letter ISO 3166 country code for your country.
h. (Optional). Enter a valid email address.This is an optional setting that your CA may use as the email address to send your certificate.
7. Click OK.
8. Enter the keypair alias tomcat, and then click OK.
9. Enter changeit in both fields for the keypair password, and click Enter.
The new keypair aliased by Tomcat appears in the window.
Generate a Certificate Signing Request (CSR)
To use a Certificate Authority (CA) certificate in the Help Desk Manager Administrator Console, create aCertificate Signing Request (CSR).
A CSR is a block of encrypted text that is generated on the server where the certificate is used. The CSRcontains information that will be included in your certificate, such as your organization name, commonname (domain name), locality, and country.
Create a keypair before you generate a CSR.
1. Log in to the Help Desk Manager server.
2. Stop the Help Desk Manager service.3. Navigate to the Help Desk Manager installation folder.
Apple® OS X: /Library/WebHelpDesk
Microsoft® Windows®: \Program Files\WebHelpDesk
Red Hat®/CentOS™/Fedora Linux: /usr/local/webhelpdesk
page 176

4. Run:
portecle.bat
5. Right-click the tomcat keypair and select Generate CSR.
The Generate CSR window displays.6. Enter a name for the CSR to help you remember the domain it validates.
For example:
support.example.com.csr
7. Click Generate.
The file is created.8. Send the file to your CA to request your certificate.
The CA returns an X.509 certificate in DER (*.cer, *.crt), PEM (*.pem, *.cer, *.crt) orPKCS#7 (*.p7b, *.p7c) encoding.
After you generate a CSR, import the CA root and chain certificates.
Add a CA to the embedded Java CA cert keystore
Help Desk Manager does not accept certificates signed by a Certificate Authority (CA) that is not trusted byits Java Virtual Machine (JVM). To import the certificate into the trust store, export the certificate to the CRTfile and import the CA. Run Porteclé as an administrator to import the CA.
ADMINISTRATOR GUIDE: HELP DESK MANAGER
page 177

Import certificates on Windows
1. Open Porteclé at <HelpDeskManager>/portecle.bat.
2. Navigate to File > Open Keystore File.
3. Open the cacerts keystore at <HelpDeskManager>/bin/jre/lib/security/cacerts.
4. When prompted, enter the default password:
changeit
5. Click Tools > Import Trusted Certificates and locate the .crt file.
6. Choose the following file and alias/name:
FileSaveKeystore
7. Restart Help Desk Manager.
Import the CA root and chain certificates
Before you import your certificate into the keystore, check whether the certificate vendor requires you toinclude any other certificates to complete the certificate chain. Also, verify that you created a new keypairand generated a Certificate Signing Request (CSR).
1. Verify if the certificate vendor requires any other certificates to complete the certificate chain.
2. In the toolbar, click Tools and select Import Trusted Certificate.
3. Locate each of the certificates provided by your CA.
4. Import the certificates into the keystore.
Import a CA reply certificate
After you install the required root certificates, right-click the tomcat keypair and click Import CA Reply toimport the CA response from the CA.
page 178

Import certificates with Base64-encoded format
If your certificate is in Base64-encoded format (with a PEM or CER extension) and you import the certificatewith another file, an error may display. If this occurs, copy the certificate text that includes:
------BEGIN CERTIFICATE-----
and ends with:
------END CERTIFICATE-------
After you import your certificate reply, Porteclé reports that the certificate was imported successfully.
Import errors
If you import the CA Reply and Porteclé generates an error stating that the certificate cannot be trusted,the root certificate may not be included. To determine which certificate you need, temporarily import yourCA Reply as a Trusted Certificate (rather than a CA Reply certificate) and examine the certificate details.
Locate the issuer property
Obtain a certificate from your CA that matches the Locate the Issuer property value and import thecertificate into Porteclé as a trusted certificate. After you import this certificate into Porteclé (and any othercertificates needed by its issuer), you can delete your own trusted certificate and re-import it as a CA Replyto your keypair.
Import an existing certificate
To use an existing certificate with Help Desk Manager, import your private key and your certificate chain.
Do not import the certificate using Porteclé’ Tools > Import Trusted Certificate option because it willnot include the private key.
The PKCS#12 standard specifies a keystore format used for transferring private keys and certificates.PKCS#12 files typically use the p12 or PFX extension. If you have your private key and certificate bundled inthis format, you can import it directly into Porteclé.
ADMINISTRATOR GUIDE: HELP DESK MANAGER
page 179
If a PKCS#12 (p12 or PFX) file is not available, use the OpenSSL pkcs12 command to generate the filefrom a private key and a certificate. If your certificate is on a Windows server, export a PKCS#12 file fromthe Microsoft Management Console.
Create a PKCS#12 keystore from a private key and certificate
OpenSSL is an open source software library that provides the pkcs12 command for generating PKCS#12files from a private key and a certificate.
The private key and certificate must be in Privacy Enhanced Mail (PEM) format (for example, base64-encoded with ----BEGIN CERTIFICATE---- and ----END CERTIFICATE---- headers and footers).
Use these OpenSSL commands to create a PKCS#12 file from your private key and certificate:
openssl pkcs12 -export \-in <signed_cert_filename> \-inkey <private_key_filename> \-name ‘tomcat’ \-out keystore.p12
If you have a chain of certificates, combine the certificates into a single file and use it for the input file, asshown below. The order of certificates must be from server certificate to the CA root certificate.
See RFC 2246 section 7.4.2 for more information about this order.
cat <signed_cert_filename> \<intermediate.cert> [<intermediate2.cert>]... \> cert-chain.txt
openssl pkcs12 -export \-in cert-chain.txt \-inkey <private_key_filename> \-name ‘tomcat’ \-out keystore.p12
When prompted, provide a password for the new keystore. This password is required for importing thekeystore into the Help Desk Manager Java keystore.
Export a PKCS#12 keystore from the Microsoft Management Console
To use an existing certificate located on a server running Microsoft Windows:
1. Click Start > Run.
2. In the Run box, execute:
mmc
The Microsoft Management Console displays.3. Select File > Add/Remove Snap-In.
page 180

4. Select Add > Certificates > Add > Computer Account > Local Computer > Finish.
5. Expand Console Root > Certificates > Personal.
Your certificate is displayed.6. Right-click your certificate and select More Actions > Export List.
7. Follow the Certificate Export Wizard prompts to export a Personal Information Exchange – PKCS #12(.pfx) file.
Note the location where you saved the PFX file.
8. Select the option to Include all certificates in the certification path.
9. Import the PKCS#12 file Into the keystore.
Import a PKCS#12 file into the keystore
Portecle is a free software application you can use to import a PKCS#12 file into your keystore. You candownload the application and the user documentation from the Portecle website atportecle.sourceforge.net.
When you import your file, ensure that:
n Your certificate chain is intact in the Help Desk Manager keystore. Double-click the certificateto Inspect the certificate chain and view the certificate details. Use the left and right arrows at thetop of the details panel to navigate through each certificate in the chain.If you do not see the full certificate chain, import the CA certificates first at Tools > Import TrustedCertificate and import your keypair again. Porteclé does not establish trust when a certificate isimported before the certificate that was used to sign it.
n You import the certificate chain in the correct order. Your root certificate is imported first, thenthe next certificate in the chain, and so on until you get to your own certificate.
n Your certificate is aliased as tomcat. The password for your certificate and the keystore must beidentical and match the KEYSTORE_PASSWORD setting in the HelpDeskManager/conf/whd.conffile (changeit by default).
If your keystore contains a default, unsigned Tomcat certificate, delete this certificate before you importyour PKCS#12 file.
To import the contents of a PKCS#12 file into the Help Desk Manager keystore, you can:
n Convert the PKCS#12 keystore to a Java keystore
n Import the keypair containing your certificate
Convert the PKCS#12 keystore to a Java keystore
1. Click File > Open Keystore file.
2. Click Tools > Change Keystore Type > JKS and convert the keystore to a Java keystore.
3. Save the file in Help Desk Manager/conf/keystore.jks to overwrite the existing keystore file.
ADMINISTRATOR GUIDE: HELP DESK MANAGER
page 181

Import the keypair that contains your certificate
1. Open the Help Desk Manager keystore file.
2. Click Tools > Import Keypair.
3. Import the keypair containing your certificate into Porteclé.When prompted, select which keypair in your PKCS#12 keystore to import.
Certificate troubleshooting tips
If you experience issues when importing CA certificates, ensure that your settings are correct and thereare no errors in your procedures.
Select the CA certs keystore
In Porteclé, navigate to Tools > Options and select Use CA Certs Keystore. When completed, Porteclé checksthe built-in Java certificates to establish trust.
Import certificates in order
Porteclé requires you to import all certificates in order, beginning with the most trusted certificate (forexample, root certificate, intermediate certificate issued by the root, the certificate issued by thatcertificate, and so on). If you import a certificate out of order, Porteclé generates an error stating it cannotestablish trust. Confirming trust for any certificate other than the root certificate is not expected.
Additionally, do not import your own certificate using the Tools > Import Trusted Certificates menu option.This option is only for importing root and chain certificates. Instead, right-click your tomcat keypair andselect Import CA Reply.
Use identical keypair and keystore passwords
Ensure that the password set for the keypair and the keystore are identical and match the KEYSTORE_PASSWORD setting in the HelpDeskManager/conf/whd.conf file (the default password is changeit) .To set the keypair password, right-click the tomcat keypair and select Set password. To set the keystorepassword, select Tools > Set Keystore Password.
Save your keystore
Ensure that your keystore is saved to:
HelpDeskManager/conf/keystore.jks
Enable your changes
Restart Help Desk Manager to ensure changes in Porteclé or the whd.conf file are enabled. For Windowssystems, use the Help Desk Manager Start/Stop utilities in the Start menu instead of the Windows Servicespanel. For systems running Windows Server 2008 and later, right-click Run As Administrator.
page 182

Prevent certificate warnings
When the host name in the address used to browse to Help Desk Manager is different from the CommonName (CN) field in your certificate, a certificate warning displays. For example, a certificate warningdisplays if your certificate is for help.mycompany.com and you use localhost as the hostname in yourURL.
Enable HTTP requests
When using HTTPS, ensure that your Setup settings are set correctly. To verify, click Setup and selectOptions. In the General Options screen, ensure that the Force HTTPS setting is set to Always. This settingensures that links pointing to Help Desk Manager use HTTPS.
Troubleshoot and resolve issues
The following table provides resolutions to common certificate issues.
ISSUE RESOLUTION
Portecle says my CA Reply certificate cannot betrusted.
Porteclé does not trust sign your certificate. You mustobtain a root certificate (or chain of certificates) fromyour CA that matches the issuer identity of yourcertificate and import them into Porteclé beforeimporting your own certificate as a CA Reply.
You can determine the issuer of your CA reply byimporting your certificate into Porteclé as a trustedcertificate (instead of a CA reply) and examining thecertificate details. Review the certificate details ofother certificates in your keystore to see if any ofthem match your certificate’s Issuer attribute. If not,obtain a certificate from your CA that does match.
After you import a certificate that matches yourcertificate issuer, as well as any other certificatesneeded to trust those certificates, delete yourtemporarily trusted certificate and re-import it as aCA reply to your keypair.
After importing my certificate, Help DeskManager does not start.
Open your whd.conf file in a text editor and ensurethat:
n You commented out the SSL_PORT setting.
n Your DEFAULT_PORT and HTTPS_PORTsettings are not conflicting with any otherprocesses on the server.
ADMINISTRATOR GUIDE: HELP DESK MANAGER
page 183

ISSUE RESOLUTION
n Your KEYSTORE_PASSWORD setting matchesboth the password of your keystore and thepassword of your keypair. The defaultpassword is changeit.
After importing my certificate, Help DeskManager is OK, but my browser shows a self-signed certificate.
Verify that your private key was generated using theDSA algorithm. DSA keys can fail with many browsers,including Internet Explorer. Try using RSA instead.
Deploy SSO with CAS 2.0The Central Authentication Service (CAS) is a single sign-on (SSO) protocol that enables a user to accessmultiple applications using one set of credentials. This protocol works in conjunction with the CAS server,which handles all the user connections to your Microsoft Exchange and LDAP servers.
You can deploy CAS server into Apache Tomcat or your own Help Desk Manager server.
Deploy CAS Server on Apache Tomcat
Before you deploy single sign-on with CAS 2.0 in your Help Desk Manager deployment, configure the CASmodule for LDAP and Active Directory communications.
Download 7-Zip
The 7-Zip utility is a free open source file archiving utility you can use to complete this procedure.
1. Navigate to the 7-zip website.2. Download and install the 7-Zip archive utility on your system.
Download the CAS Server file
1. Navigate to the Apereo website.2. Click v3.5.1.
3. Scroll down and click cas-server-3.5.1-release.zip to download the ZIP file.
4. Extract the contents of the ZIP file to a local directory.
5. Open the cas-server-3.5.1 directory and click modules.
6. Copy the cas-server-webapp-3.5.1.war file to your local directory.
Edit the WAR file
1. Download the deployerConfigContext.txt file from the SolarWinds Documentation websiteand save the file to your local directory.
2. Open the file in Notepad and copy the content to your clipboard.
3. Right-click the cas-server-webapp-3.5.1.war file and select 7-Zip > Open Archive.
page 184

4. Double-click the WEB-INF directory.
The directory displays.
5. In the archive, right-click the deployerConfigContext.xml file and select Edit.
6. Paste the content in the archive file, overwriting the existing content.
7. In the updated deployerConfigContext.xml file, update the file variables for your deployment.
a. Locate the following parameter. If you are using an SSL connection, use ladps:// in the path.
<property name="url" value="ldap://127.0.0.1:389" />
b. Replace the value variable with the IP address of your LDAP server.c. Locate the following parameter:
<property name="userDn" value="[email protected]" />
d. Replace the value variable with the email address of your LDAP administrator.e. Locate the following parameter:
<property name="password" value="ldap_admin_password" />
f. Replace the value variable with your LDAP admin password.g. Locate the following parameter:
p:filter="sAMAccountName=%u" p:searchBase="DC=yourdomain,DC=com"
h. Ensure that the LDAP p:filter search filter matches your LDAP configuration settings.i. Replace the p:searchBase variable with your domain settings.j. Save and close the file.
8. Download the cas.properties.txt file from the SolarWinds Documentation website and savethe file to your local directory.
9. Open the cas.properties.txt file in Notepad and copy the content to your clipboard.
ADMINISTRATOR GUIDE: HELP DESK MANAGER
page 185

10. In 7-zip, right-click cas.properties and select Edit.
11. Paste the content to the cas.properties.xml file in 7-Zip, overwriting the existing content.
12. In the updated cas.properties.xml file, update the file variables for your deployment.
a. At the top of the file, locate the following parameter:
server.name=http://localhost:8080
b. Replace the server.name variable with the Help Desk Manager server address. For example:
http://whd.example.com
c. Under # Unique CAS node name, locate the following parameter:
host.name=cas01.yourdomain.com
d. Replace yourdomain.com with your domain name.
The host.name parameter is used to generate unique service ticket IDs andSAML artifacts. This is usually set to the specific hostname of the machine running theCAS node. However, it could be any label as long as it is unique in the cluster.
e. Save and close the file.Leave the 7-Zip archive open.
Download and apply the dependencies
1. Navigate to the following links and download the corresponding dependency files in JAR format toyour local directory.
DOWNLOAD LINK DEPENDENCY FILE
CAS Server Support LDAP v3.5.2 cas-server-support-ldap-3.5.2.jar
Commons Pool v1.6 commons-pool-1.6.jar
LDAPTIVE Core v1.0.5 ldaptive-1.0.5.jar
Spring LDAP v1.3.1 release (All) spring-ldap-1.3.1.RELEASE-all.jar
This file needs to be unzipped.
page 186

2. Drag all downloaded dependencies to the archive directory.All new and modified files display in the 7-Zip archive directory.
3. Extract the files to a separate directory.
4. Select all files.
5. Right-click and select 7-Zip > Add to archive.
6. In the Archive name field, enter cas.war and save the archive.
The archive displays in the directory.
7. Close 7-Zip.
Deploy CAS server on Apache Tomcat
1. Stop the Help Desk Manager service.2. Copy the cas.war file to the /bin/webapps directory in your Apache Tomcat deployment.
3. Start the Help Desk Manager service.
4. Verify that the HTTPS port is enabled on Apache Tomcat.
n If the HTTPS port is not enabled, go to Enable SSL on Help Desk Manager in this procedure.n If the HTTPS port is enabled, go to Deploy the Help Desk Manager Server in this procedure.
Complete your CAS server deployment
Configure a Group Policy Object (GPO) to push the appropriate Windows login credentials to your InternetExplorer settings. This process enables authenticated users to access the Help Desk Manager serverwithout having to log in. GPOs define the settings for your Windows server configuration, and GroupPolicies apply these settings.
See Configure a GPO to push Internet Explorer settings for more information.
ADMINISTRATOR GUIDE: HELP DESK MANAGER
page 187

Enable SSL on Help Desk Manager1. On your Help Desk Manager system, open File Explorer and navigate to:
<helpdeskmanager>/conf
2. In the conf directory, open the whd.conf file in Notepad.
3. In the file, comment out the following entry:
HTTPS_PORT=443
4. Save and close the file.
5. Use Porteclé to create a new certificate.
See Generating a New Certificate in Porteclé for more information.6. Insert the certificate to the following location:
/conf/keystore.jks
7. Restart Help Desk Manager.
Deploy CAS 2.0 on the Help Desk Manager server
1. On your Help Desk Manager systrem, click Setup > General > Authentication.
2. Click the Authentication Method drop-down menu and select CAS 2.0.
3. In the CAS login URL field, enter:
https://fqdn:port/cas/login
4. In the CAS validate URL field, enter:
https://fqdn:port/cas/serviceValidate
5. Under Verification certificate, click Upload and select a certificate that uses CAS for signing theresponses.
Select keystore.jks to upload the Help Desk Manager Tomcat certificate.
6. In the Logout URL field, enter:
https://fqdn:port/cas/logout
7. Click Save.You can now log in using CAS 2.0.
Configure a GPO to push the Internet Explorer settings
Configure a Group Policy Object (GPO) to push the appropriate Windows login credentials to your InternetExplorer settings. This process allows authenticated users to access the Help Desk Manager server withouthaving to log in. GPOs define the settings for your Windows server configuration, and Group Policies applythese settings.
1. Log in to the Help Desk Manager domain using the Domain Administrator account.
2. Click Start and select Run.
page 188

3. In the Run field, enter the following command and then click OK:
mmc
The Microsoft Management Console displays.4. In the File menu, click Add/Remove Snap-In > Add.
5. In Available snap-ins, double-click Group Policy Management Editor and then click OK.
6. In Select Group Policy Object, click Browse.
7. In Domains, OUs, and linked Group Policy Objects, click Default Domain Policy, and then click OK.
8. Click Finish, and then click OK.
9. In the Default Domain [yourdomain.com] Policy console tree, expand the following path:
User Configuration, Policies, Windows Settings, Internet ExplorerMaintenance, Connection
10. Double-click Automatic Browser Configuration.
11. Clear the Automatically Detect Configuration Settings check box, and then click OK.
12. In the Default Domain [yourdomain.com] Policy console tree, go to:User Configuration > Policies > Windows Settings, Internet Explorer Maintenance, Security Zones andContent Ratings
13. Click Import the current security zones and privacy settings.
14. When prompted, click Continue and then click Modify Settings.
15. In the Internet Properties dialog box, click the Security tab.
16. Click Local Intranet, and then click Sites.
17. In the Add this website to the zone field, enter:
*.yourdomain.com
18. Click Add.
19. Select the following checkbox: Require server verification (https) for all sites in this zone.
20. Click Close.
21. Click OK.
ADMINISTRATOR GUIDE: HELP DESK MANAGER
page 189

Manage clientsClients typically interact with Help Desk Manager using the Web interface, but they can also be set up towork with Help Desk Manager using email.
n Create a clientn Import clientsn View client informationn Set up a client-initiated accountn Assign an existing asset to a clientn Merge duplicate HDM client accounts into one accountn Enable clients to re-open closed tickets
Create a clientIf client information is not in a format that can be easily imported, you can manually create each clientaccount. The account information must include the client's name, email, and Help Desk Manager logincredentials, as shown in the example below. When you add a new client, the information is saved in theHelp Desk Manager database.
Beginning in Help Desk Manager 12.5.2, all techs who use LDAP authentication must have a Clientaccount to access their Tech account. This process prevents unauthorized access to an LDAPaccount.
SolarWinds MSP recommends allowing clients to create accounts only if their emails match the accepteddomains.
1. In the toolbar, click Clients.
2. Click New Client.
3. Enter the client's name, credentials, and contact information.
Required fields are bold.
4. Update other options as needed. See the tooltips for more information.
5. Click Save.If you selected E-mail Client When Account is Created, Help Desk Manager sends a confirmationemail to the client.
View client information1. In the toolbar, click Clients.
2. In the Client Name column, click a client name.
The Client Info tab appears with the client's information.
page 190

To edit the client's information, click the pencil icon. Update the fields and check boxes as appropriate, andclick Save.
Set up a client-initiated accountYou can enable clients to create their accounts when they first log in to Help Desk Manager.
1. In the toolbar, click Setup and select Client > Options.
2. In the Client Can Create Account row, select Yes.
3. Click Save.
When completed, new clients see the following screen. To create a new account, they can click NewAccount.
Clients must be qualified to set up their own account. To verify, click Setup > Clients > Options. In theClient Options screen, ensure that the options are configured correctly. SolarWinds MSP recommendsrequiring domain matching for new clients.
Assign an existing Device to a clientYou can assign Devices (such as printers and computers) to clients in your Help Desk Manager system.Using this process, a tech can identify and connect to a client Device to diagnose and resolve an incidentor problem.
1. In the toolbar, click Devices.
2. Below the toolbar, click Search Devices.3. Select the Basic Search tab.
4. In the tab window, select or enter the appropriate criteria to locate the Device.To locate the Device using a specific set of conditions, click the Advanced Search tab and enter yoursearch criteria.
5. Click Search.Your results appear in the bottom window.
6. Click an available Device to attach to the client.
7. Click in the Device Basics tab to edit the asset properties.
8. In the Clients field, search and select the client for this Device.
9. Complete the remaining fields as required, then click Save.The asset is assigned to the client.
Merge duplicate HDM client accounts into one accountIf you have two client accounts that use the same email address or user name. you can merge bothaccounts into one using the Bulk Action feature included with HDM.
ADMINISTRATOR GUIDE: HELP DESK MANAGER
page 191

1. Log in to HDM as an Administrator.
2. Select and delete the client accounts you want to remove.a. Click Clients in the toolbar.b. Click the Advance Search tab and search for the client accounts you want to remove.c. Select the results.d. Click + next to Bulk Action located at the bottom of pagee. Select Delete option towards bottom of Bulk Action template.f. Select Apply.
3. Open the Merge Duplicate Clients tool by entering in the following URL in your web browser.
http://[WHD_HOSTNAME]/helpdesk/WebObjects/Helpdesk.woa/wa/DBActions/mergeDuplicateClients
4. Log in to HDM as an Administrator.
5. Click Start, and then click OK.
Enable clients to re-open closed tickets1. Log in to Help Desk Manager as an administrator.
2. Click Setup > Tickets > Status Types.
3. Click Closed in the Status Type Name column.
4. Click the Options tab.
5. Select the Clients Can Reopen Closed Tickets check box.
6. Click Save.
page 192

Manage ticketsHelp Desk Manager uses tickets to manage service requests. These tickets can be initiated through email,created in the application, and imported from another application. Techs, admins, and clients can alsomanage tickets through email or through the application in a web browser.
Using Help Desk Manager, you can:
n Create a ticket using the Help Desk Manager tech interface or email.
n Create a quick ticket for a frequent issue, such as a forgotten password.
n Configure ticket status types to identify the ticket's current stage of completion and indicate whetheraction is needed.
n Configure ticket details such as selecting a request type, improving ticket resolution with ticket types,adding details to tickets with tech notes, and escalating or de-escalating a ticket.
n View and customize the ticket queue to quickly access list of tickets assigned to you or your techgroup.
n Search for a ticket using a basic or advanced search.
n Perform actions on multiple tickets to apply a set of changes to multiple tickets at once.
n Update and resolve tickets by changing ticket information and performing actions on multipletickets.
n Merge tickets and their associated attachments and messages into one ticket.
n Create parent/child service relationships to change a service request to a problem ticket (or parent)and attach related service requests (or children) to the problem ticket for ticket automation.
Ticket flowThe following diagram details the Help Desk Manager ticket assignment logic.
page 193

The illustration includes numbered references for some processes. Listed below are the correspondingpaths in the Help Desk Manager user interface to make any needed changes for each numbered process.
ADMINISTRATOR GUIDE: HELP DESK MANAGER
page 194

NUMBER RELATED PATH IN HELP DESK MANAGER
1 Setup > Techs > Tech Groups > [Group] > Request Types Supported
See Define Tech Groups for more information.
In the Request Types Supported tab, view the supported requesttypes.
2 Setup > Tickets > Request Types > [Request Type] > Lead Technician
See Define Request Types for more information.
3 Setup > Techs >Tech Groups > [Group] Tech Group Levels > Level 1 >Auto Assign Tickets To
See Define Tech Groups for more information.
4 Setup > Techs > Tech Groups > [Group] > Level 1 > Assigned Techs
See Define Tech Groups for more information.
To select e-mail recipients for new tickets, go to:
Setup > Techs > Tech Groups > [Group] > Tech Group Levels > Level 1> Email Recipients of Client Updates
See Define Tech Groups for more information.
5 Setup > Tickets > Request Types > [Request Type] > Lead Technician
If the Tech is marked On Vacation, the ticket is assigned to theBackup Tech in the Tech's profile.
See Define Request Types for more information.
6 Setup > Techs > Tech Groups > [Group] > Tech Group Info > GroupManager
You can use Customer Group Manager instead of the specified Techat:
Setup > Techs > Tech Groups > [Group] > Tech Group Info
If this Tech is marked On Vacation, the ticket is assigned to theBackup Tech in the Tech's profile.
See Define Tech Groups for more information.
7 Setup > Techs > Tech Groups > [Group] > Techs Assigned
See Define Tech Groups for more information.
page 195

NUMBER RELATED PATH IN HELP DESK MANAGER
8 Setup > Techs > Techs > [Technician] > On Vacation
Setup > Techs > Techs > [Technician] > Work Schedule
See Define Techs for more information.
9 Setup > Customers > Customer Groups > [Group] > AssignedLocations tab
10 Setup > Customers > Customer Groups > [Groups] > Assigned Techstab
11 Setup > Customers > Department Groups > [Groups] > AssignedDepartments
To enable departments:
Setup > Customers > Options > Use Departments check box
12 Specify which status types are used in calculating ticket load balanceat:
Setup > Tickets > Status Types > [Status Type] > Use for Load Balancecheck box
See Define Status Types for more information.
Create a ticketClients can create tickets through email or through the Web using the Help Desk Manager client interface.The client interface is what clients see when they log in to the Web Console.
Techs can also create tickets through email or through the Web. In most cases, techs create tickets throughthe Web using the Help Desk Manager tech interface. The tech interface is what techs see by default whenthey log in to the Web Console.
A tech can access the client interface if the tech's profile is associated with a client account.
In addition, admins can define Help Desk Manager tasks (scripts) which will create certain types of ticketsautomatically.
Create a ticket through the web interface
1. In the toolbar, click Tickets.
2. Click New Ticket.
3. If the ticket is to report a client issue, use the Client Lookup box to select the client.
ADMINISTRATOR GUIDE: HELP DESK MANAGER
page 196

4. If the ticket requires a device, click the Device tab and add the Device.5. Click the Ticket Details tab.
6. Select a Request Type.
The Assign To field displays, showing which tech group receives this request based on the Help DeskManager ticket assignment logic. You can override the ticket assignment logic and assign the ticketto yourself.
7. Enter a subject and request details to describe the issue.
8. Specify the Priority.
9. Click one of the following buttons:n Save: saves the ticket.n Save and Send E-Mail: saves the ticket and sends an email to the specified recipients. (The
tech, client, location, and ticket setup options determine who receives email.)
You can launch DameWare MRC from a customer ticket or from the Help Desk Manager Toolbar.
Create a ticket through email
Clients and techs can create tickets by sending an email message to the dedicated help desk emailaddress. Help Desk Manager creates a ticket for each new message received through its dedicated emailaddress.
Organizations can choose to set up help desk email addresses. For example, an organization can have oneemail for HR issues ([email protected]) and another for all other issues ([email protected]). Ticketscreated through the HR address are assigned an HR request type, which routes them to a specific techgroup. Tickets created through the general support address are assigned a general request type. Techgroups who receive general request types must evaluate the ticket and assign the appropriate requesttype to each ticket.
Create a quick ticketUse quick tickets to create identical tickets for repetitive issues, such as a forgotten password. You cancreate a quick ticket template to define the fields in quick tickets.
Techs and admins complete the Client and Location information based on the request type in a quickticket before the ticket is assigned to help desk personnel.
1. In the toolbar, click Tickets.
2. In the Tickets screen, click New Ticket.
3. In the New Ticket screen, locate the Quick Ticket section and click the plus icon to create a ticket.
4. In the Quick Ticket Details screen, complete the fields and drop-down menus for your quick ticket.
5. At the bottom of the ticket, locate the Save Quick Ticket as field.
6. In the field, enter a name for this quick ticket type.
7. Click Shared to allow others to use this quick ticket template.
page 197

8. Click Save.
9. Click Apply.
Configure ticket status typesThe ticket status identifies the ticket's current stage of completion and indicates whether action is needed.
By default, Help Desk Manager includes the following status types. You can modify all preconfigured statustypes and create additional status types.
STATUS DESCRIPTION
Open The issue requires a resolution. This is the default status of a ticket when itis created.
Pending The ticket was received, but it is currently on hold. For example, a statusindicates that a feature request was received but management has not yetdecided if the request will be granted.
This status can also indicate that the assigned tech is waiting for informationfrom a client. You can also create a new status for this purpose.
The Count Time setting for this status type indicates whether the time in thisstatus is included in the ticket's total open time. When this option isdeselected, the time spent in this status will extend the default ticket duedate.
For example, a ticket is initially set to a status that counts time. If the statusis changed to one that doesn't count time for four business hours, and thenis changed back to a status that counts time, then four hours will be addedto the default due date of that ticket.
Resolved The tech has provided a solution and is waiting for the client to confirm theresolution.
By default, when a tech changes a ticket status to Resolved, the clientreceives an email asking if the issue is resolved to their satisfaction. If theclient clicks Yes, the ticket status changes to Closed. If the clients clicks No,the ticket status changes to Open.
Closed The client confirmed that the issue is resolved. You can also configure HelpDesk Manager to automatically close a ticket if the client does not respond tothe confirmation request within the specified time period.
Canceled The client is no longer experiencing the problem, or no longer needs theservice requested in the ticket.
ADMINISTRATOR GUIDE: HELP DESK MANAGER
page 198

You can create a Help Desk Manager to show the total amount of time or the average amount oftime spent in each status.
Modify a preconfigured status type
By default, setting a ticket status to Resolved sends an email asking the client to confirm the resolution.The following example configures the Resolved status to automatically close the ticket if the client does notrespond within three weeks.
1. On the toolbar, click Setup.
2. Select Tickets > Status Types.
3. In the list of status types, click Resolved.By default, the Resolved status type is configured to send an email prompting clients to confirm thattheir issue was resolved.
4. Set Automatically Close Ticket After to 3 Week(s).If a client does not respond to the confirmation email within three weeks, the ticket status isautomatically set to Closed.
5. Click Save.
Creating a new status type
This example creates a new status type called Waiting on Client Response.
1. On the toolbar, click Setup.
2. Select Tickets > Status Types.
3. Click New.
4. Enter a Name and Description.
5. Change the Display Order so that tickets with this status are displayed above Closed, Canceled, orResolved tickets.
6. Clear the Count Time check box.The time spent in this status is not included in the ticket's total open time, and the ticket's due dateis extended by the amount of time spent in this status.
page 199

7. Click Save.The new status type is displayed in the list.
You must click Save on the Status Types tab before you click the Options tab. If you do notclick Save, the information you entered on the Status Types tab is lost.
8. In the list of status types, click Waiting on Client Response.
9. Click Options.
10. In the Client Update Sets Status To field, select Open.When the client updates the ticket, the status automatically changes to Open. This indicates thatinformation has been added to the ticket and the tech can resume work on it.
11. Click Save.
Set up an automated reminder for ticket status
You can set up automated email reminders to clients about ticket status and priority. To begin, enable theclient reminder functionality in the console. When you are finished, set up the client reminder intervalsettings.
Enable the client reminder
1. Click Setup > Tickets > Status Type.
2. Click a status type for the reminder.For example, Pending.
3. In the Status Types tab, select the Client Reminders checkbox.
4. Click Save.
5. Repeat step 1 through step 3 to set up client reminders for the remaining, required status types.
ADMINISTRATOR GUIDE: HELP DESK MANAGER
page 200

Set up the client reminder interval
1. Click Setup > Tickets > Priority Types & Alerts.
2. In the Priority Types column, click a priority type that requires a reminder email.For example, Urgent.
3. In the Priority Types Details page, select the Client Reminder Interval checkbox and select thetargeted interval for the reminder email.For example, once every business day.
4. Click Save.
5. Repeat step 1 through step 3 to set client reminders for the remaining required priority types.
Select the email recipients for auto-close tickets
You can configure Help Desk Manager to respond differently when a ticket auto-closes. For this situation,you can enable the application to send email to the recipients set in the ticket or reset the ticket recipientsto Tech, Client, or Cc.
1. Log in to Help Desk Manager as an administrator.
2. Click Setup > Tickets > Status Types.
3. In the Status Type Name column, click Closed.
4. Click the Options tab.
5. Select the individuals who receive mail when the ticket automatically closes.
Select Use Ticket Settings to send email to the recipients set in the ticket.Select Override and then select Tech, Client, or the Cc field.
6. Click Save.
Configure ticket detailsWhen you click Tickets in the toolbar, you can access My Tickets and Group Tickets under the toolbar if:
n You belong to a group with assigned tickets
n The tickets are directly assigned to you.
page 201

To view the ticket detail page, you can:
n Click Tickets in the toolbar, and then click a ticket number.
n Click My Tickets, and then click a ticket number.
n Click Group Tickets, and then click a ticket number.
n Use the search options to locate the ticket of interest.
To assign a technician to the ticket, select an option in the Assign To field or click the Assigned Tech drop-down menu and select a technician.
To escalate the ticket, click above the Dates tab.
Select a request type
Request types define the issue type and the required action. They also determine custom fields thatpopulate in the ticket, techs who can be assigned to the ticket, and the method used to route the ticket to atech.
Help Desk Manager includes default request types for:
n Email or Outlook
n Facilities
n Hardware
n HR
n IT General or Other
n Network
n Phone or Voicemail
n Printer or Toner
When you create a request type, ensure that all Help Desk Manager request types used for DameWareintegration do not include required custom fields.
Improve ticket resolution with ticket types
Ticket types group multiple tickets together on the same issue as Child tickets of a Parent ticket. Thisallows you to address a Child ticket when you edit the Parent ticket.
Help Desk Manager uses three types of tickets to facilitate this type of ticket resolution: Service, Problem,and Incident.
TICKET TYPE DESCRIPTION EXAMPLE
Service Request A request submitted by a client to Help DeskManager for assistance, such as information,advice, or access to an IT service.
Reset apassword
ADMINISTRATOR GUIDE: HELP DESK MANAGER
page 202

TICKET TYPE DESCRIPTION EXAMPLE
Access a sharednetworkresource
Replace aprinter tonercartridge
Problem Ticket A ticket that provides the root cause forattached Incident and Child tickets.
These tickets are based on an initial ServiceRequest or an automatic trouble ticket froma system integrated with Help DeskManager.
The HR printerhas a paper jam
Incident Ticket A ticket that describes a new occurrence ofan issue currently documented in anexisting Problem ticket.
The Incident ticket can be attached to aProblem ticket. After it is attached, theIncident ticket becomes a Child ticket.Incident tickets are created from a ServiceRequest or an automatic trouble ticket froma system integrated with Help DeskManager.
HR departmentpersonnelreceive an errormessage whenthey send adocument to theHR printer
When a ticket type is set to Problem in the Ticket Details tab, the ticket becomes available in the Problemsdrawer, as shown below.
This capability provides a parent root cause for related tickets. When a ticket is linked to a Problem ticket, itbecomes an Incident ticket. Changing the ticket back to a Service Request removes the link to the Problemticket.
When a Parent ticket is closed, all of its Child tickets close as well. When you view a Parent ticket, you canview notes from Child tickets. When you view an Incident ticket, you can also view the notes from theProblem ticket.
Change ticket relationships
When you create or modify parent and child tickets, the following rules apply:
n Changing the existing ticket type in the Ticket Details > Details pane to another selection removes allexisting ticket relationships, whether they are Parent/Child or Problem/Incident relations.
page 203

n Only Service Requests can have Parent or Child tickets.
n A ticket cannot be linked until it is saved.
Link and unlink incident and problem tickets
Use the Parent-Child feature in Problem tickets to manually link multiple reports of a single issue. TheProblem ticket is considered a Parent and each linked Incident ticket is considered a Child ticket.
Link an Incident ticket to a Problem ticket
1. In the Tickets screen, click a ticket.
2. In the Ticket Details tab, ensure that Incident is the active ticket type.
3. Click the Problems tab.
4. Enter or select a ticket number, request type, status, or search term in any existing Problem ticketsthat you can transform into a Parent ticket.
5. Click Search to find Problem tickets relating to your Incident ticket.
6. In the search results, click View to preview possible Parent tickets.
7. Click Link to assign the Problem ticket as a Child ticket.
Unlink a Problem ticket from an Incident ticket
1. In the Tickets screen, click a Problem ticket.
2. In the Ticket Details tab, ensure that Problem is the active Ticket Type.
3. Scroll down to the Linked Incidents tab.
4. Click the Unlink Problem button.The Parent Problem ticket is no longer linked to the Incident ticket.
Add details to tickets with tech notes
You can add additional information to tickets using tech notes. A ticket can have multiple notes and can beadded by any technician. Tech notes can contain basic HTML tag or Bulletin Board Code (BBCode) tagformatting.
Techs can also add billing rates to tech notes. To enable, click Setup > Parts & Billing > Options and selectthe Parts & Billing Enabled check box. When enabled, Help Desk Manager will track parts, inventory, andbilling on tickets.
Add an FAQ to a tech note
When an FAQ describes the resolution to an issue or provides information associated with a ticket, you canlink the FAQ to the ticket.
1. Open the ticket details page.
2. In the Notes section, click the creation date to open a new note, or click New to add a new note.
3. Click the Link FAQ button.
4. In the FAQ Search dialog box, search for the FAQ.
ADMINISTRATOR GUIDE: HELP DESK MANAGER
page 204

5. Click the Link FAQ button on the right side of the FAQ's row.A link to the FAQ is added to the note.
6. Click Save to save the note.
Create a new tech permission
Administrators can re-assign technicians, change ticket status, and delete tickets. Technicians have variouslevels of access depending on their tech permission set.
1. In the toolbar, click Setup and select Techs > Tech Permissions.
2. In the Tech Permissions screen, click New.
3. In the Permissions screen, enter a name in the Permission Name field for the new permission.
4. Select the permissions for your targeted user.
Click the help icon or click the tooltips for more information about each option.5. Click Save.
Your permissions are saved.
Send email to ticket recipients
When you save a ticket, you can email the ticket to a client, assigned technician, level techs, groupmanager, or other addresses in the ticket Recipients tab using the cc: and bcc: fields. Select the recipientcheck boxes and add cc: or bcc: addresses, and then click Save & Email.
Clicking Save does not generate an email unless the ticket is re-assigned. In this case, the newly-assignedtech receives an email. Click the lock to toggle the ticket privacy setting. When tickets are private, userswithout permission cannot see the tickets.
Escalate and de-escalate tickets
Escalating or de-escalating a ticket moves an assigned ticket to a higher or lower tech group level,respectively.
If a higher tech group level is available, the ticket is escalated to that level. If a ticket still requiresescalation and a higher level tech group is not available, the ticket escalates to the group manager. Iffurther escalation is required, the ticket can be escalated to the lead tech for the request type. When theticket is escalated, it inherits the email settings from the tech group level settings and ticket assignmentstrategy.
When a ticket is escalated or de-escalated, a tool tip provides more information about the escalation or de-escalation, as shown below.
When the assigned tech is reassigned, Help Desk Manager sends escalation or de-escalation emails to thecurrent and former techs assigned to the ticket.
1. In the Tickets page, click the ticket you want to escalate.
2. In the Ticket Details tab, locate the Details tab.
page 205

3. Click Escalate to send the ticket to a higher-level tech group.Click De-escalate to send the ticket to a lower-level tech group.
When you escalate or de-escalate the ticket to the maximum level, the Escalate and De-escalate icons disappear.
4. Click the History tab.
5. Review the ticket assignment history for accuracy.
Create a ticket checklistBeginning in Help Desk Manager 12.6, you can add a checklist to a Help Desk Manager ticket. The checklisthelps a tech assigned to several tickets ensure that all tasks in a ticket are completed before the ticket isclosed.
Administrators can create a ticket checklist template that lists the tasks required for a specific requesttype—for example, on-boarding a new employee. When completed, the administrator can assign thetemplate to the request type, share the template with all techs, and delete the template when necessary.
Techs can apply shared templates to a ticket. If the ticket requires a tech to complete a set of tasks that arenot included in your checklist templates, you can manually add a checklist from within the ticket. Anychanges to a template (such as editing the template, selecting an item, or deselecting an item) arerecorded in the ticket history.
Create a ticket checklist template
When you create a new Help Desk Manager ticket, the ticket may include several child tickets that requiretechs from HR, Facilities, and other areas of your organization to complete service requests. For example,the ticket may include a request type called New Hire that automatically generates child tickets for settingup a workspace, computer systems, and cube for the new employee. To ensure that all tasks arecompleted, you can create a checklist template that includes a checklist items for each service request andapply the ticket to the parent request type.
A checklist template can include up to ten required or not-required checklist items. After you create thechecklist template, assign the template to a request type. When a new ticket is created with the targetedrequest type, the checklist items are pulled from the template and added to the ticket. This process helpsyou ensure that all tasks associated with the parent ticket (such as child tickets) are completed by theassigned techs.
1. Log in to the Help Desk Manager Administrator Console.
2. Click Setup > Tickets > Checklist Templates.
ADMINISTRATOR GUIDE: HELP DESK MANAGER
page 206

3. In the Checklist Templates window, click Create New.
4. In the Checklist Name field, enter a name for the template.
5. (Optional) Enable Select Shared Template With Everyone to share the template with all techs.
page 207
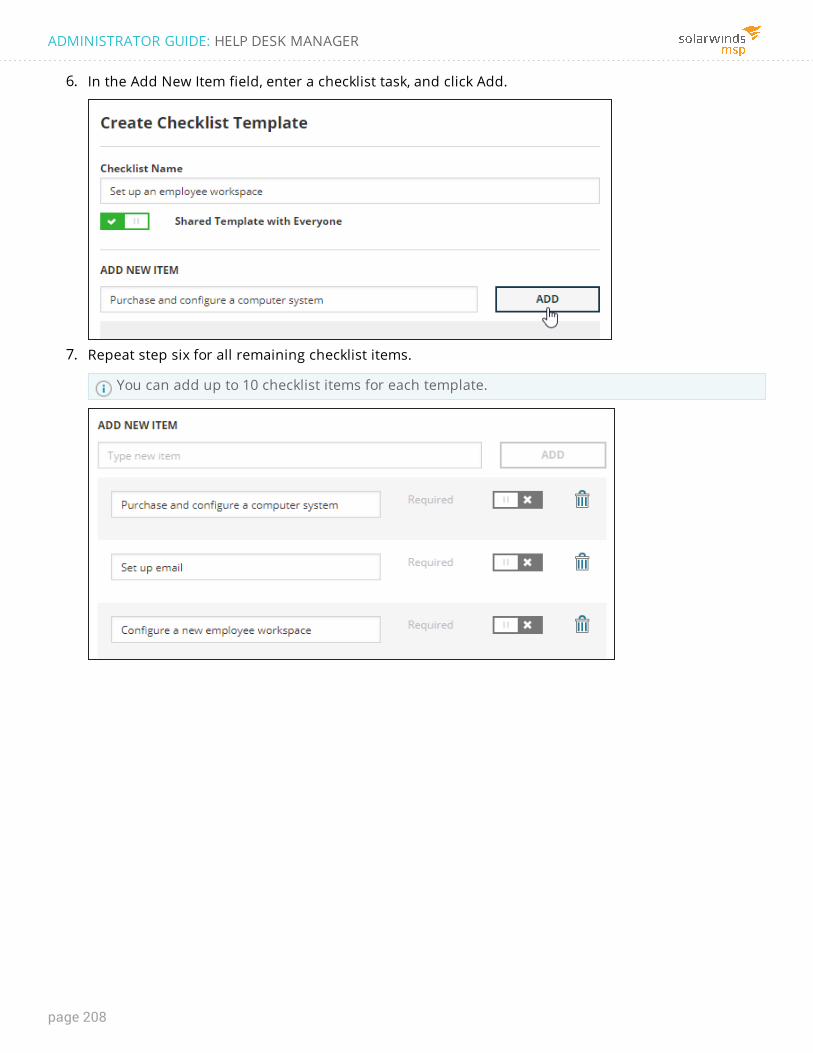
6. In the Add New Item field, enter a checklist task, and click Add.
7. Repeat step six for all remaining checklist items.
You can add up to 10 checklist items for each template.
ADMINISTRATOR GUIDE: HELP DESK MANAGER
page 208

8. (Optional) Select Required next to each checklist item that the tech must complete before the ticketcan be closed.
9. (Optional) Automatically assign the checklist to a request type.
After you create a checklist template, you can assign the template to a request type at anytime.
a. Click Add Another.
b. Assign the checklist template to a request type. For example, Facilities.
The request type displays in the drop-down menu.
page 209
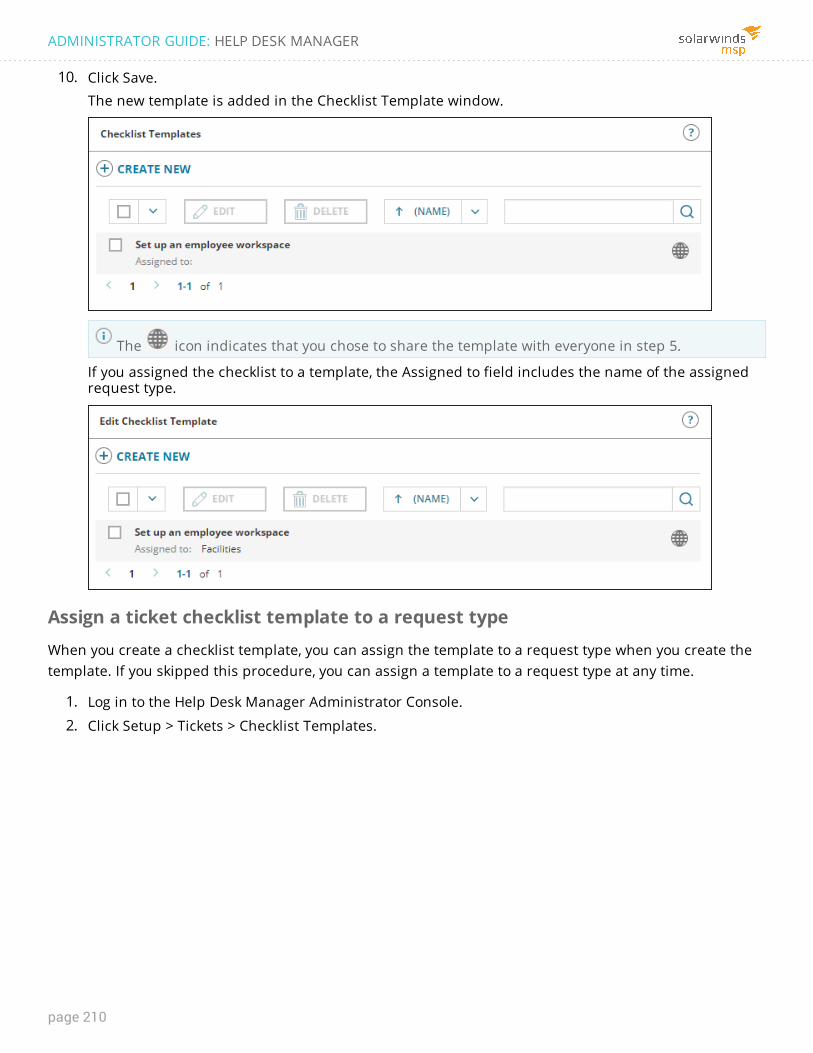
10. Click Save.The new template is added in the Checklist Template window.
The icon indicates that you chose to share the template with everyone in step 5.
If you assigned the checklist to a template, the Assigned to field includes the name of the assignedrequest type.
Assign a ticket checklist template to a request type
When you create a checklist template, you can assign the template to a request type when you create thetemplate. If you skipped this procedure, you can assign a template to a request type at any time.
1. Log in to the Help Desk Manager Administrator Console.
2. Click Setup > Tickets > Checklist Templates.
ADMINISTRATOR GUIDE: HELP DESK MANAGER
page 210

3. In the Create Checklist Template window, select the targeted checklist template, and then click Edit.
The icon indicates that you chose to share the template with everyone in step 5.
4. Click Add Another.
5. Assign the checklist template to a request type. For example, Facilities.
The request type displays in the drop-down menu.
page 211

6. Click Save.The template is assigned to the request type. The Assigned to field includes the request type name.
The icon indicates that the template is shared with everyone.
Add a unique checklist from within a ticket
If a ticket requires a unique list of checklist items that are not included in your checklist templates, you canadd the checklist items to a new or existing ticket.
1. Log in to the Help Desk Manager Administrator Console.
2. Open a new or existing ticket.
3. Click the Ticket Details tab.
4. In the Details section, locate the Checklist field and click Add checklist.
5. In the Add Checklist window, enter a checklist item in the Add New Item field using English lettersand characters.
If you created a checklist template that includes the checklist items you need, click the LoadFrom Template drop-down menu and select a template.
ADMINISTRATOR GUIDE: HELP DESK MANAGER
page 212

6. Click Add.The checklist item displays in the Add Checklist window.
7. (Optional) Enable Required to require this checklist item to be completed before you can close theticket.
8. Repeat step 4 through step 7 to add or remove any additional checklist items. Enable Required foreach checklist that is required to close the ticket.
To populate the window with checklist items from a shared template, click the Load FromTemplate drop-down menu and select the template.
page 213

9. (Optional) Save the checklist as a template.a. Click the Save Checklist as a Template checkbox.b. Enter a template name.
c. Click Save As Template.The template is saved to the Checklist Templates window.
10. Click Save.The checklist items display in the ticket.
View and customize the ticket queueThis section describes how to display a list of tickets and how to customize your view of the ticket queue.Use this material as it is, or copy and revise it to reflect your organization's practices and Help DeskManager configuration.
Display a list of tickets
Use Help Desk Manager to quickly access lists of tickets that are assigned to you or to your tech group.
1. In the toolbar, click Tickets.
2. In the menu bar, select one of the following to display a list of tickets:
OPTION ACTION
My Tickets Displays tickets assigned to you.
Group Tickets Displays tickets assigned to any tech in a tech group you belong to.
Flagged Tickets Displays tickets that you flagged.
Recent Tickets Displays tickets that you recently edited.
Tickets displayed in the Group Tickets view
The Group Tickets view is filtered in the following order:
ADMINISTRATOR GUIDE: HELP DESK MANAGER
page 214

n Tech Group
n Tech Group Level
n Location Group
n Department Group
n Companies
Techs with administrator privileges do not affect the Group Tickets view.
If the Group Tickets view does not display HDM tickets for each tech, ensure that each tech is a member ofeach parameter to view the tickets in those views. Add the tech as a level tech in all tech groups and levels,and any location or department groups and company that the tech should view.
Additionally, go to Setup > Tickets > Status Types and click each status type (such as Open and Resolved) inthe Status Type Name column. In the Status Types tab for each name, ensure that the Include in My/GroupTickets Filter checkbox is selected.
About the ticket queue
The ticket queue provides information about each ticket in the list.
In the first column, you can select tickets for bulk actions, such as merging tickets.
The second column provides color-coded ticket information:
n Blue: New ticket with no tech response
n Purple: Ticket reassigned to a new tech
n Yellow: Ticket with a new client update
n None: Ticket that does not meet any of the categories above
Click the flag column to flag a ticket or to remove an existing flag. Flagging a ticket adds it to your FlaggedTickets queue, which you can access by clicking Flagged Tickets in the toolbar. Use flags to mark ticketsthat require immediate follow-up or special attention. If a ticket is unassigned, the last column displays theAssign to Me icon . You can click the icon to assign the ticket to yourself.
Techs can only see their assigned tickets in the My Tickets view, as well as tickets assigned directly to atech group they belong to in the Group Tickets screen. These two restrictions apply to all accounts,including admin accounts.
See Set up tickets to configure the information in the My Tickets and Group Tickets screens.
Any changes you apply to the column settings do not impact other tech accounts.
page 215

Sort the ticket queue
Click a column heading to sort the list of tickets by the values in that column. Click the column headingagain to reverse the sort order.
Sort the tickets by the Alert Level to ensure you see tickets that require immediate action. Sort byDate to see the oldest tickets first.
Customize your view of the ticket queue
You can customize your view of the ticket queue by creating one or more column sets. Each column setspecifies which columns are displayed and in what order.
1. Display any ticket queue.
2. Click + in the upper-right corner to create a new column set.To edit an existing column set, select the column set and click the edit button.
3. Enter a name to identify the column set.
4. To choose which columns are included, drag column labels into or out of the Selected Columns list.
5. To specify the order of the columns, drag column labels up or down in the list to arrange them.
6. Click Save.
Search for a Help Desk Manager ticketYou can search for a Help Desk Manager ticket using a basic or advanced search.
A basic search locates tickets based on the search criteria you enter in a set of predefined fields. Anadvanced search locates tickets based on any number of search criteria you enter. The search criteria area set of conditions that must be met.
An advanced search may return results that do not populate in a basic search, even if you use thesame query.
Perform a basic search
1. On the top toolbar, click Tickets.
2. On the second toolbar, click Search Tickets.
3. Enter values in one or more fields to define the search criteria.
4. Click Search to display a list of tickets that match your criteria.
When you locate a ticket, you can update it as needed.
Perform an advanced search
1. On the top toolbar, click Tickets.
2. On the second toolbar, click Search Tickets.
ADMINISTRATOR GUIDE: HELP DESK MANAGER
page 216

3. Click the Advanced Search tab.
4. Specify the conditions that the ticket must meet, starting from the left and continuing to the right.Click + in the ALL or ANY section to add additional conditions.
n Every condition specified in the ALL group must be met for a ticket to be found. Theseconditions are evaluated with a Boolean AND operator.
n At least one condition specified in the ANY group must be met for a ticket to be found. Theseconditions are evaluated with a Boolean OR operator.Enter conditions in either or both groups. See the following section for examples of advancedsearches.
5. Save this query so you can run it again.a. Enter a name in the Save Query as field.b. Select Shared to make the query available to other techs.c. Click Save.
6. Click Search to run the query.
Advanced search examples
Advanced searches can help you answer a variety of questions.
The following search example locates tickets assigned to a specific tech that have not been updated withinthe last ten days.
A Date condition that includes 0 business days, business hours, business minutes, and so on doesnot return a result.
The following example locates tickets containing "network outage" in a client note, request details, orsubject.
The following example locates tickets assigned to a tech group with an Urgent priority on escalation levelof two or higher.
page 217

Perform actions on multiple ticketsUse bulk actions to apply a set of changes to multiple tickets at once. For example, you can use a bulkaction to escalate all open, unassigned, urgent priority IT requests for laptop repairs.
Create a new bulk action
Before you can apply a bulk action, you must create the bulk action that defines what change will be madeto the ticket. After you create a bulk action, you can apply it at any time. You can also share the bulk actionso that other techs can apply it.
1. Log on to Help Desk Manager as an administrator.
2. Click Tickets.
3. In the menu bar, select a ticket screen.
4. Scroll down to the bottom of the screen and locate the Bulk Action box.
5. Click [+] next to Bulk Action.
6. In the Bulk Action Details screen, specify values in the fields that you want the bulk action to change.Leave all other fields blank.
7. In the Save Bulk Action as field, enter a name for this bulk action.
8. (Optional) Select Shared to share this bulk action with other users.
9. Click Save.The saved bulk action will be listed in the Bulk Action drop-down menu in the Tickets screen.
Edit a bulk action
1. Log on to Help Desk Manager as an administrator.
2. Click Tickets.
3. In the menu bar, click the appropriate ticket screen.The Ticket screen updates with the tickets for your selected ticket view.
4. Click the Bulk Action drop-down arrow and select the bulk action you want to edit.
5. Click the Pencil icon.
6. Update the appropriate fields in the screen as required.
7. Click Save to save your template.
ADMINISTRATOR GUIDE: HELP DESK MANAGER
page 218

Apply a bulk action to a group of tickets
After you create a bulk action, you can apply it to a selected a group of tickets.
1. In the toolbar, click Tickets.
2. In the menu bar, select a ticket screen, or select Search Tickets and search for the tickets you want tochange.
3. Select the tickets that will be affected by the bulk action.
n To select all tickets on the page, select the check box above the first column.n To select individual tickets, select the check box in the first column of each ticket row.
4. Below the list of tickets, select an option from the Bulk Action drop-down menu.
5. Click Run to apply the bulk action.A message summarizes the changes that will be applied to the selected tickets
6. Click OK.A message states that your action was applied to your selected tickets.
Update and resolve ticketsThis section describes how to update ticket information, perform actions on multiple tickets, and resolvetickets. Use this material as it is, or copy and revise it to reflect your organization's practices and Help DeskManager configuration.
Ticket information
Tickets in Help Desk Manager include information on the following tabs:
n Client Info: identifies the client who requested support. This information is populated automaticallyfrom the client account.
n Asset Info: identifies assets (PCs or servers, for example) that are associated with the client or withthe support request.
n Ticket Details: contains specific information about this request, incident, or problem. This is the tabthat techs update to add notes or change the status.
n Parts and Billing: identifies parts ordered to complete this request and information about billing forthe part.
Edit a ticket from the Web Console
As you work to resolve a ticket, update the ticket frequently so your activity can be tracked. For example,add notes to record activities, track progress, and document the resolution.
1. Search for the ticket you want to edit, or locate it in your
2. Click the ticket number to open it.The Ticket Details tab is displayed.
page 219

3. Select a ticket type.
A service request is a planned request for a new or modified service. When you hire a new employee,you can create service requests for setting up a workspace, purchasing a laptop computer, andassigning a telephone number.
An incident is an unplanned event that causes an interruption or reduction in service. If the newemployee receives a laptop computer and cannot connect to the corporate network, you create aservice request ticket that a tech can later classify as an incident. If you encounter two or moresimilar incidents, you can link the incident tickets to a problem ticket.
A problem identifies the root cause of one or more incidents. If the new employee and several otheremployees cannot log in to the corporate network, you can create a service request ticket that a techcan later classify as a problem. The tech can then link all incident tickets as supporting incidents (orchildren) to the problem ticket.
4. Select the request type that accurately reflects the type of ticket. The ticket is transferred to the techgroup that services the request type you selected. Add a note to explain the reason you changed therequest type.
5. Select the Priority.The priority determines the ticket's due date, and should reflect the severity of the issue and thepeople or affected business functions. Select one of the following:
n Urgent: a failure that severely impacts critical operations.
n High: an issue that degrades response times or affects normal operations.
n Medium: an issue that affects a small number of users or an individual user. A work-around isavailable.
n Low: questions or requests for information.
6. Under Status & Schedule, click the Status drop-down menu and select the ticket status.
A Pending status can impact a ticket due date based on the Count Time setting. If the CountTime checkbox is not selected for this status, the time the ticket is in Pending status is notcounted towards the due time. If the Count Time checkbox is selected, the time a ticket is inPending status is counted towards the due time. As a result, the ticket can be either on timeor past due. See Configure Status Types for details.
7. Add or update the remaining ticket fields.
8. Click Save to save the ticket or Save & Email to save the ticket and send an email to the specifiedrecipients.
To return to the ticket queue, click the arrow icon in the upper-left corner.
Update tickets using email
When a ticket is assigned to you, Help Desk Manager sends you an email. Respond to the email to updatethe ticket.
1. In the Notes section, select the action you want to perform. You can add a note, add a hidden note,or delete the ticket.
ADMINISTRATOR GUIDE: HELP DESK MANAGER
page 220

2. Hold down the Control key and click the ticket number.Help Desk Manager creates an email similar to the following example. In this example, the techchose to add a note that is visible to the client.
3. Verify the options listed in the subject line.
n The Action is based on the action you selected. For example, if you select Add Note, theaction in the Subject is Tech Update.
n The Email Client option defaults to YES. Enter NO if you do not want to email the client. (Thisoption is not case-sensitive.)
4. Enter your note as the body of the email and send the email.
Perform actions on multiple tickets
Use bulk actions to apply a set of changes to multiple tickets at once. For example, you can use a bulkaction to escalate all open, unassigned, urgent priority IT requests for laptop repairs.
Create a new bulk action
Before you can apply a bulk action, you must create the bulk action that defines what change will be madeto the ticket. After you create a bulk action, you can apply it at any time. You can also share the bulk actionso that other techs can apply it.
1. In the toolbar, click Tickets.
2. In the menu bar, select a ticket screen.
3. Scroll to the bottom of the screen and locate the Bulk Action box.
4. Click [+] next to Bulk Action.
page 221

5. On the Bulk Action Details screen, specify values in the fields that you want the bulk action tochange. Leave all other fields blank.
6. In the Save Bulk Action as field, enter a name for this bulk action.
7. (Optional) Select Shared to share this bulk action with other users.
8. Click Save.The saved bulk action will be listed in the Bulk Action drop-down menu in the Tickets screen.
Apply a bulk action to a group of tickets
After you create a bulk action, you can apply it to a selected a group of tickets.
1. In the toolbar, click Tickets.
2. In the menu bar, select a ticket screen, or select Search Tickets and search for the tickets you want tochange.
3. Select the tickets for bulk action.n To select all tickets on the page, select the check box above the first column.n To select individual tickets, select the check box in the first column of each ticket row.
4. Below the list of tickets, select an option from the Bulk Action drop-down menu.
5. Click the Run button to apply the bulk action.A message summarizes the changes that are applied to the selected tickets.
6. Click OK.A message confirms that the changes were applied.
Resolve a ticket
When you have completed all activities required to resolve an issue, edit the ticket:
n Add a note to describe the resolution. Select the Solution check box because this helps other techswhen they search for solutions to similar issues.
n If this resolution would be helpful for other Help Desk Manager users, click Create FAQ to create anFAQ based on the ticket note.
n Change the Status to Resolved.
When you change the status to Resolved, Help Desk Manager sends an email to the client asking them toconfirm that the issue is resolved.
n If the client clicks Yes, Help Desk Manager changes the Status to Closed.
n If the client clicks No, Help Desk Manager reopens the ticket and notifies you.
n If the client does not respond within the specified number of days, Help Desk Manager changes theStatus to Closed.
ADMINISTRATOR GUIDE: HELP DESK MANAGER
page 222

Merge duplicate ticketsYou can merge two or more tickets and their associated attachments and messages into one ticket usingMerge Tickets. For example, if a client submitted three separate tickets for items related to the sameproblem, you can merge the tickets into one single ticket.
1. In the toolbar, click Tickets > Search Tickets.
2. Use the Basic Search and Advanced Search tabs to locate the tickets you want to merge.
3. In the Ticket Results screen, select the check boxes next to the tickets you want to merge.
4. Scroll down to the bottom of the screen and click Merge selected.
5. In the dialog box, click the drop-down menu and select the ticket that hosts all merged tickets.
6. Select Include Attachments to merge all attachments into the selected ticket.
7. Click Merge Tickets.Help Desk Manager combines all selected tickets and their associated notes and attachments to theparent ticket.
Create parent/child service relationshipsBy default, all Help Desk Manager tickets are created as service request tickets. If necessary, a tech canchange a service request to an incident or a problem ticket.
Service request tickets
A service request is a planned request for a new or modified service. When you hire a new employee, youcan create service requests for setting up a workspace, purchasing a laptop computer, and assigning atelephone number.
If you want to track multiple service requests within one ticket, you can create one ticket as the parentservice request and link the remaining service requests as children to the parent ticket. Use this option toview the status of all child service requests within one ticket.
For example, Jessie Burns is setting up a new server room in her department. She decides to purchase 121U rack mount servers and 12 1U rack mount storage systems. She creates a new service request, andindicates that she wants to purchase this computer equipment for his department. She submits separateservice requests for the servers, storage systems, and computer racks, because they are all purchasedfrom separate vendors.
To manage this project, she opens his initial request for computer equipment as the parent servicerequest, clicks the Requests tab, and links the remaining service requests as children to the parent ticket.
The parent ticket displays each service as a linked child ticket. Linking the tickets will help Jessie managehis service requests for new equipment. When all service requests are resolved, Jessie can close theparent service request ticket.
page 223

When you close a parent service request ticket, all child service requests are not closedautomatically.
Incident and problem tickets
An incident is an unplanned event that causes an interruption or reduction in service. If the new employeereceives a laptop computer and cannot connect to the corporate network, you create a service requestticket that a tech can later classify as an incident. If you encounter two or more similar incidents, you canlink the incident tickets to a problem ticket.
A problem identifies the root cause of one or more incidents. If the new employee and several otheremployees cannot log in to the corporate network, you can create a service request ticket that a tech canlater classify as a problem. The tech can then link all incident tickets as supporting incidents (or children)to the problem ticket. This process—known as parent-child service relationships—is used to group identicaltickets together so you can troubleshoot and resolve all tickets as one problem. When the incident ticketsare resolved, you can close all tickets simultaneously by closing the parent ticket. All incident tickets areresolved as a group.
Although linking incident tickets to a problem ticket is not required, it does make managing thesetickets easier. For example, once linked, you can see the status of any incident and navigate to itwithin the properties of the problem ticket. In addition, closing a problem ticket automatically closesall incident tickets, which means that you do not need to close the incident tickets one at a time.
For example, Janet, Ellen, and Bruce submit a service request ticket stating that they cannot access theiremail in Microsoft Outlook. After researching the problem, you discover that your Microsoft Exchangeserver is down and needs to be restarted.
To troubleshoot and resolve all client tickets in one ticket, you can change the request type on one clientticket to Problem and the remaining tickets to Incident. Then link all the incident tickets to the problemticket so they are shown as linked incidents.
When all incidents are resolved, you can close the parent ticket.
When you close a parent problem ticket, all incident tickets are closed automatically.
Link child tickets to a parent ticket
If you have multiple service requests that address the same issue, you can:
n Assign one of the tickets as the parent ticket (for incident and problem tickets)
n Assign a new ticket as the parent ticket (for service request tickets)
For example, if you have multiple incident tickets with a similar problem, change the ticket type in oneticket to Problem and link the remaining Incident tickets to the Problem ticket. If you have multiple ServiceRequest tickets with related tasks, create a new Problem ticket that describes the task and link the relatedService Request tickets to the Problem ticket.
ADMINISTRATOR GUIDE: HELP DESK MANAGER
page 224

Link incident tickets to a problem ticket
1. Open the service request ticket that you want to change to a problem ticket.
2. Click Problem, and click Save.The problem ticket is now the parent of each incident ticket.
3. Open the service request ticket that you want to change to an incident ticket.
4. Click Incident.
5. Within the incident ticket, click the Problems tab.
6. Search for the problem ticket that you want to make the parent of the incident.
7. In the Action column, click Link to make the selected ticket the parent of the current ticket.
8. Save your changes.
9. Repeat steps 3 - 8 for each incident you want to link to the parent.
10. To manage the tickets as a group, open the problem ticket and perform the following actions, asnecessary.
A tech cannot email all Incident ticket recipients from a Problem ticket. However, if a Problemticket is set to Closed, all Incidents tickets are Closed. This action generates a Ticket Closedemail to all Incident ticket recipients.
Link service request tickets to one service request
Perform this procedure to track multiple service requests in one service request ticket. This process canhelp you track all incidents related to a problem in your company, such as a network failure or poweroutage.
1. Create a service request ticket that will be the parent ticket.
2. Open a service request ticket that you want to link to the parent ticket.
3. Within the service request ticket, click the Requests tab.
4. Search for the service request ticket that you want to make the parent ticket.
5. In the Action column, click Link to make the selected ticket the parent of the current ticket.
6. Save your changes.
7. Repeat steps 2 - 6 for each incident you want to link to the parent.
8. Open the parent ticket.
9. Monitor the status of each child ticket until they are resolved. When completed, close the parentticket.
When you close the Problem ticket, the Child tickets are not closed automatically. You must closeeach individual ticket.
Remove linked parent tickets from child tickets
You can remove a linked parent in a child ticket by clicking the Trash icon in the Linked Parent windowpane.
page 225

When you click the icon, a warning message appears at the top of your screen, stating you must save theticket for the ticket relationship changes to take effect. Be sure to click Save to remove the linked parentfrom the ticket. Otherwise, the parent/child relationship remains and any notes you add in the child ticketwill propagate to the linked parent.
View parent tickets in child tickets
To view the linked parent in a child ticket, open the child ticket and locate the Linked Parent box.
Link sub-child tickets to child tickets
You may have a service request that is the sub-child of an existing child ticket. For example, if a usercannot access email, a service technician may suggest re-installing Microsoft Outlook before diagnosing aconnection issue with the Microsoft Exchange server.
In this situation, open the sub-child ticket (for example, reinstalling Microsoft Outlook) and add the childticket as the parent ticket. The child ticket is now in the Linked Parent box. Next, open the child ticket andadd the parent ticket as the linked parent. The parent ticket is now in the Linked Parent box.
If you add a sub-child ticket to an existing parent-linked child ticket, Help Desk Manager generates an errormessage stating that the child and sub-child tickets are both related to each other at the same level.
To correct this issue:
1. Open the child ticket and delete the link in the Linked Parent box.
2. Open the sub-child ticket.
3. In the top right section, click the Problems tab.
4. In the tab window under Request Search, select the appropriate field parameters to locate thetargeted child ticket.A list of related tickets appear, based on your search parameters.
5. In the Search Result window, locate the targeted child ticket.
6. In the Action column, click Link.A dialog box opens at the top of the screen verifying your selection.
7. Click OK.
8. Click Save.The parent ticket is displayed in the Linked Parent box and the sub-child ticket is displayed in theLinked Children box.
Navigate between linked tickets
All linked parent and children tickets appear as hyperlinks within a linked ticket. To navigate betweenlinked parent and child tickets, click the appropriate link in the Linked Parent or Linked Children boxes,respectively.
ADMINISTRATOR GUIDE: HELP DESK MANAGER
page 226

Add notes to parent and child tickets
When you create a service request, you can add notes and attachments that provide additionalinformation to address the request. This process allows your help desk and service technicians to worktogether and solve a customer issue.
For example, if you hire a new employee and create a parent ticket to address linked child service requests(such as purchasing a new computer system and installing software applications), you can add notes andattachments in the parent ticket about specific hardware and software requirements that propagate to thefirst-level service requests and assigned service technicians. If a service technician experiences a problemwith configuring the new employee's computer system, he can add notes and attachments to the servicerequest that appear in the parent ticket (if desired) and associated sub-child tickets.
When you add notes and attachments to parent and child tickets, the following rules apply:
n Parent ticket notes propagate to first-level child tickets. Parent ticket notes do not appear in sub-child tickets.
n Child ticket notes propagate to the linked parent ticket (if desired) or first-level sub-child tickets.
n Propagated notes can be edited in the ticket where the technician created the note.
To create a parent or child ticket note:
1. Locate and open a parent, child, or sub-child ticket.
2. In the Notes tab, click New.
3. In the text editor, enter the text for your note.
4. Select the appropriate check box to process your note.
n Visible to Client: make this note visible to clients of this ticket.n Solution: assign this note as the solution.n Date Override: set a custom time stamp to the note.n (Child and sub-child tickets only) Show in Linked Parent: display the note in the linked parent
ticket.5. Select any additional Work Time, Billing Rate, and Attachments options.
6. Click Save.
If you added a note to a parent ticket, the note is now in the parent ticket and the first-level childtickets.
If you added a note to a child ticket, the note is now in the child ticket, parent ticket (if you selectedShow Linked Parent in step 4), and linked sub-child tickets.To view the attachment, click the link in the note.
7. Click Save to save the ticket changes.
Automate parent/child ticket creation
You can automate the creation of related tickets by configuring tasks that initiate by action rules.
page 227

1. Configure a task with elements. Create a task with one or more related task elements with the Linkto Parent check box selected in each task element.
2. Configure an action rule that executes the task. Create an action rule that runs these tasks andelements when a new ticket is created or modified.
3. Create parent/child tickets. Create child tickets automatically when a ticket matches the criteria in anaction rule.
When a tech creates a new ticket or edits an existing ticket, a child ticket represented by the task elementis created and linked to the new ticket.
Configure a task with elements
Configure a new task that automates your ticket creation process. For example, if you are working with yourHR department to on-board an employee, you can create a task called New Employee and attach thefollowing task elements to the task.
TASK ELEMENTS REQUEST TYPE
Configure a new computer system IT/General
Set up an employee phone and phone number Phone/Voicemail
Configure a new employee workspace Facilities
When you create each task element, ensure that the Link to Parent check box is selected. When completed,the task elements display in the Task Elements tab for the task.
If you select Link to Parent in the Task Elements tab window, your selected task elements are inheritedfrom the parent ticket (for example, location, room, or tech) and Inherit displays in the Request Type andRequest Detail columns. If the inherited elements include a location, room, or tech, Inherit displays in theLocation, Room, and Tech columns, depending on the elements you choose to inherit from the parentticket.
The Generate Next column displays when each task element is triggered. When you arrange your taskelements in a specific order, you can control when the next element is triggered. The On Creation status isselected by default in the Task Elements tab window, which immediately triggers the next element afterthe previous element is triggered. If you select another status in the Generate Next Element row of theTask Elements tab window (such as Open, Pending, Closed, Canceled, or Resolved), your selected statusdisplays in the Generate Next column for your task element.
The following illustration shows a list of task elements that inherit all tasks from the parent ticket. Eachtask triggers at a separate stage, depending on the options you select in the Task Elements tab window.
ADMINISTRATOR GUIDE: HELP DESK MANAGER
page 228

When you configure your task elements, the following rules apply:
n Each task you configure at Setup > Tickets > Tasks can include multiple task elements.
n The Link to Parent check box must be selected in a task element that triggers the execution of thenext task element.
n A linked child ticket with a task element set to Generate Next Element: When Status Equals mustmatch the status setting (such as Closed or Resolved) to trigger the next task element.
n The parent ticket cannot be changed until the linked task elements are completed.
Link a child ticket to the parent
When you click a request type link in the Request Detail column, the Task Elements tab window displays.Selecting the Link To Parent check box displays the Inherited column in the tab window. Using this column,you can select the field data you want to inherit from the parent ticket.
Help Desk Manager only creates one level of child tickets.
The following screen provides an example of a child ticket displaying the Inherited column.
You can use the Inherited column to select the field data you want to inherit from the parent ticket. If youdeselect Link to Parent, all previous selections are removed, and you can edit the child ticket fields asneeded. If you select Link to Parent again, the Inherited check boxes are cleared, and you must select youroptions. The Subject and Request Detail fields are combined with the parent ticket and appended with aspace between both field values.
After you select the Inherited column check boxes, perform the following steps:
1. In the Generate Next Element row, select when your task element is triggered.
2. Click the Element Order drop-down menu and select when this task is triggered in comparison withyour existing task elements.
3. Click Save to save your changes.
4. Navigate to the Task Elements tab window and ensure all tasks are listed in the proper order andgenerate the next element when each task equals a specific status.
Some fields include specific logic used to inherit selected field data from the parent ticket. The followingtable describes the inherited field logic for specific fields in the child ticket.
FIELD INHERITED FIELD LOGIC
Subject
Request Detail
Custom Text
When you select one of these fields, the field is appended to thevalue of the parent ticket.
If any of these fields are empty, the child ticket inherits thecorresponding field value of the parent ticket.
Tech
Request Type
When you select this field, the child ticket inherits the value of theparent ticket, and the Tech drop-down menu is disabled. When you
page 229

FIELD INHERITED FIELD LOGIC
Asset No.
All non-text custom fields
clear this check box, the drop-down menu returns to its preselectedvalue.
Attachments When you select this field, the child ticket inherits all attachmentsfrom the parent ticket.
Configure an action rule
After you create your New Employee task and the associated task elements, create a new action rule thatexecutes the task when a tech creates a ticket that matches the action rule criteria in a ticket.
For example, to execute the New Employee task, you can create a new rule with the following elements:
n Action Rule Info: Create a rule named On-board New Employee and select the Enabled check box.
n Criteria tab: Under Tickets matching ALL of these conditions, you can select Subject | Contains | NewHire.
n In the Actions tab drop-down menus, select Run Task | New Employee.
Only shared tasks display in the drop-down menu.
After you click Save, the new On-board New Employee rule displays in the Action Rules tab.
Create parent/child tickets
When a ticket matches the criteria in an action rule, the action rule executes the task you selected to run.
For example, the On-board New Employee action rule executes the New Employee task and associatedelements when the Subject field in the ticket contains New Hire. When a tech creates and saves a ticketthat matches the action rule criteria, Help Desk Manager executes the On-board New Employee action rule,triggering the New Employee task and associated task elements. When completed, all four tickets arecreated. See Action rules and Create tasks for more information.
Create email ticketsClients and techs can create tickets by sending an email message to the dedicated help desk emailaddress. Help Desk Manager creates a ticket for each new message its dedicated email address receives.
See Setting up email for information about setting up the incoming Help Desk Manager email address thatreceives and responds to email support requests.
See Update and resolve tickets for information about email ticket updates.
Update tickets using email
Clients and techs can update tickets by responding to Help Desk Manager email messages about thetickets.
ADMINISTRATOR GUIDE: HELP DESK MANAGER
page 230

The email content can vary depending on how you set up the client or tech email template. See Applyemail templates for detailed information.
Ticket emails to clients
When a client submits a help request, Help Desk Manager sends the client a copy of the ticket. The clientreceives an email similar to the following example.
To populate the ticket, the client clicks Add Note or the ticket number under Ticket Info. This processcreates a new email addressed to the help desk. When the client sends the email, it updates the ticket.Help Desk Manager responds by sending the client a new email showing the updated ticket.
To cancel the ticket, the client clicks Cancel Ticket.
When the tech resolves and closes the ticket, Help Desk Manager forwards the closed ticket to the client.The Client can edit the subject line in the email to perform the following tasks:
n ConfirmSolution
This option confirms ticket resolution.n RejectSolution
This option reopens the ticket.
You can define what a client can do with their ticket by configuring the Client Options screen located atSetup > Clients > Options. See Define clients for more information about configuring client permissions.
page 231

Ticket emails to techs
When a ticket is assigned to a tech, Help Desk Manager sends the tech an email, as shown below.
The tech can update the ticket by pressing Control and clicking any of the active links in the email. Theselinks include:
n Ticket
In this example, the ticket number is 32340. The number specifies which ticket to update. Ticketnumbers can be different, based on how you define them in Help Desk Manager.
n Action
If you selected the Add Note option, the TechUpdate action appears.n Hidden: [NO|YES|true|false|1|0] (case insensitive).
If you selected the Add Note option (rather than the Add Hidden Note option), this characteristic isset to NO.
ADMINISTRATOR GUIDE: HELP DESK MANAGER
page 232

n EmailClient: [NO|YES|true|false|1|0] (case insensitive)
The default for this example is YES.
In the example, the following characteristics are not defined:
n Reassigned: <[email protected]>
Enter the email address of the tech reassigned to the ticket.n MinutesWorked: <INTEGER>
Enter how much time the Tech has spent working on the ticket. This option works only when theTech is adding a note, so that the email body is not empty
n BillingRate: <BILLING RATE NAME>
Add billing rate information here.
When you press Control and click an active link in the email, Help Desk Manager creates a new emailspecific to the clicked link. In the example above, the tech can add a note that the client can see, add ahidden note, or delete the ticket. The tech can also change the ticket's status.
For example, if the tech selects the Add Note option, Help Desk Manager creates an email, as shown below.
Notice the email's subject. The subject reflects the ticket's defined options:
n Ticket
In this example, the ticket number is 32340. The number specifies which ticket to update. Ticketnumbers can be different, based on how they are defined in Help Desk Manager.
n Action: [Update|Cancel|...?]
If you selected the Add Note option, the TechUpdate action appears. When a tech selects this option,they can perform any of the actions described here, as well as delete the ticket. A tech can also add anote to the body of the ticket, a billing rate, time spent on the ticket, and more. When a client selectsthis option, they can cancel the ticket or add a note to the body of the ticket.
n Hidden: [NO|YES|true|false|1|0]
If you selected Add Note, rather than Add Hidden Note, this option is set to NO. This option is notcase sensitive.
page 233

n EmailClient: [NO|YES|true|false|1|0]
The default for this example is YES. This option is not case sensitive.
In the example, the following characteristics are defined or selected to be defined:
n Reassigned: <[email protected]>
Here, you can enter the email address of the tech reassigned to the ticket.For example:Reassigned: [email protected].
n MinutesWorked: <INTEGER>
Enter how much time the tech spent working on the ticket. This option works only when the tech isadding a note, so that the email body is not empty.For example:MinutesWorked: 45
n BillingRate: <BILLING RATE NAME>
This option defines which billing rate to use and is active only when the tech is adding note and theemail body is not empty. Use the whole billing rate name, including spaces and special characters.This option is not case sensitive.For example:BillingRate: Standard
When you create ticket emails, the following conventions apply:
n Ticket updates can be sent to the any address as long as it passes the Help Desk Manager incomingemail-specific filter.
n Apply the following construct for editing and of the options described above:
FieldName:Valuen Help Desk Manager ignores any spaces before Value.
n Subject edits must be in the order noted above.
n Help Desk Manager validates the user email sender address.
ADMINISTRATOR GUIDE: HELP DESK MANAGER
page 234

Automate ticket workflowsThis section describes how you can set up priority types, action rules, and tasks to automate your ticketworkflows.
n How ticket automation worksn Create an action rule to change ticket priorityn Configure a task to automate ticket creationn Create an action rule to run a task
How ticket automation worksAutomating ticket workflows is based on three principles: priority types, action rules, and tasks and taskelements.
Priority types
Help Desk Manager prioritizes tickets and sends automated email alerts to techs based on how youconfigure your setup parameters. A ticket includes one of the following predefined priority types: Urgent,High, Medium, and Low.
Each priority type includes adjustable alert levels to automatically escalate an email. Help Desk Managerincludes three alert levels, with level 3 as the highest severity. The Not Completed condition is consideredmore important than Not Updated, which is more important than Not Assigned. If alert levels includematching criteria, Help Desk Manager uses the highest severity level.
See Create a priority type for additional information.
Action rules
An action rule defines the action Help Desk Manager automatically performs on tickets based on yourpredefined conditions. For example, you can use an action rule to:
n Assign the ticket to a tech
n Change the priority level of the ticket
n Update the status of a ticket
n Run a task
n Modify a ticket
n Send an email
Tasks
Help Desk Manager uses tasks to create tickets. A task contains one or more task elements, and each taskelement provides settings for a new ticket. When the task runs, Help Desk Manager creates a ticket foreach task element, either sequentially or all at once, depending on the configured task.
page 235

Tasks can run manually or automatically, at given intervals or based on specific criteria, depending on howyou configure them. Tasks are especially useful for handling repetitive processes.
For example, if your HR department has a set of routine onboarding tasks to complete for a new employee,you can create a task called New Employee and define each task element required to help a new employeeget started in their new position.
Related tasks can include:
n Completing tax and insurance forms
n Accessing network resources
n Configuring a new computer system
n Installing and configuring corporate and department-specific software
You can trigger a new task when required—for example, when you on-board a new employee. When yourun the task, Help Desk Manager generates a ticket for each task element. These tickets can be assigned totechs, who ensure each task element is completed.
To automate your Help Desk Manager tickets:
1. Create a priority type.
2. Create an action rule to change the ticket priority.
3. Configure a task to automate ticket creation.
4. Create an action rule to run a task.
Create an action rule to change ticket priorityWhen you created a priority type, you created the Critical priority type.
The following example creates an action rule that selects all tickets submitted by the CEO, changes theticket priority to Critical, and routes the ticket to a group.
1. In the toolbar, click Setup and select Processes > Action Rules.
2. Click New.
3. Select a priority and enter a rule name.
Only one action rule can be executed at a time. The action rule priority determines the triggerorder of all action rules.
4. Select the Cascade check box to trigger all defined actions for a ticket.Do not select Cascade to trigger only the highest priority action.
5. Select the rule triggering options to define when and how often Help Desk Manager applies theaction rule.
6. Click Criteria.
7. Configure the conditions that tickets must match to trigger the action:
ADMINISTRATOR GUIDE: HELP DESK MANAGER
page 236

n Every condition in the All section must be true. If any condition is false, the action is nottriggered.Help Desk Manager evaluates these conditions using the Boolean AND operator.
n The Any section defines a group of conditions. At least one of these conditions must be true totrigger the action, but they do not all have to be true.Help Desk Manager evaluates these conditions using the Boolean OR operator.
n If both sections include conditions, all conditions in the All section and at least one condition inthe Any section must be true.Help Desk Manager evaluates the two groups with a Boolean AND operator between thegroups:
(all_1 AND all_2) AND (any_1 OR any_2)
n If no conditions are defined in the All section, at least one condition in the Any section must betrue.
8. Click Actions.
9. Specify the action to take when the conditions are met.
10. Click Save.
Configure a task to automate ticket creationYou can use Help Desk Manager tasks to automate ticket workflows.
In the following example, a new hire setup task is created. This task contains the following task elements:
n Cubicle setup
n Access to the network
n New hire paperwork
n Email setup
When the action rule runs the task, the task elements become tickets configured with a request type andassociated tech.
1. In the toolbar, click Setup.
2. Select Tickets > Tasks.
3. Click New.
4. Enter a task name.
5. Click Shared.Sharing a task makes it available to other techs and for use in action rules.
A task must be shared before you can configure an action rule to run it.
page 237

6. Click Save.
7. Click Task Elements, and click New.
8. Configure the child ticket to inherit field values from the parent ticket.a. Click Link to Parent.b. Select the Inherit Value check box for one or more fields.
ADMINISTRATOR GUIDE: HELP DESK MANAGER
page 238

9. Select a Request Type, enter a Subject and Request Detail, and click Save.
10. Add your remaining task elements, and click Done.
Next task: Create an action rule to run a task
Create an action rule to run a taskWhen you configure an action rule to run a task, the system creates a ticket for each task element. In thefollowing action rule, the New Hire task creates four tickets when a client submits a ticket with a new hirerequest type.
page 239

Before you begin
n Create a task and task elements
Create an action rule to run a task
1. In the toolbar, click Setup.
2. Select Processes > Action Rule.
3. Enter a rule name.
4. In the Rule Triggering field, select the options to define when and how often Help Desk Managerapplies the action rule.
5. Click Criteria.
6. Create a condition that includes the new hire request type.
7. Click Actions.
ADMINISTRATOR GUIDE: HELP DESK MANAGER
page 240

8. Configure the action to run the new hire task.
9. Click Save.
10. To test the action rule, submit a ticket with the new hire request type.The system creates the parent ticket first, followed by a child ticket for each task element. In thisexample, Ticket #27 is the parent ticket.
11. To view and manage child tickets, open the parent ticket. The parent ticket lists all child tickets, asshown in the example below.In the parent ticket, you can:
n Navigate to the child tickets.n Add a note to the parent that propagates to the child tickets.
Closing the parent ticket does not automatically close the child tickets.
page 241

Manage devicesHelp Desk Manager provides the following options to work with Devices:
n Add devicesn Edit device propertiesn Search devicesn Add purchase ordersn Reserve devicesn Remove devices
Devices can be associated with clients so techs can easily identify the items for which support isrequested.
Each Device is associated with a Model. Models are grouped by manufacturer.
When entering Purchase Orders (see Devices > Purchase Orders), each line item identifies a device modeland vendor.
Define devicesDevices are the Client-owned software and hardware that Techs work with. Help Desk Manager tracksDevices by properties such as:
n Customer
n Type
n Status
n Owner
n Serial Number
n Warranty Dates
n Lease Types
n Relationship to Other Devices
n Ticket History
n Purchase Orders
Manually add devices1. Click Assets and select Search Assets.
2. In the Search Assets lower window, click New Asset.
3. Complete the fields as required.Click the tooltips for additional help.
page 242

4. Click Asset Details and complete the fields as required.Click the tooltips for additional help.
5. Click Save.
Edit Device properties1. In the toolbar, click Assets and select Search Assets.
2. Click the Basic Search tab.
3. Select and/or complete the appropriate fields to locate the asset.For additional search options, click Advanced Search and complete the fields in the window.
4. Click Search.Your search results display in the bottom window.
5. In the No. field, click the asset number icon.
The Device tab windows display.Each tab window provides unique information.
n Device Basics provides general asset information you can edit, including the asset type,model location, and status.
n Device Details provides detailed Device information you can edit, including serial number,version, and IP address.
n Device History provides dates and actions when an asset was removed, modified, or changedstatus, as well as the associated tech. You cannot edit this information.
n Ticket History provides the ticket number, date, status, and problem report associated with theDevice, as well as the associated tech in each instance. This information cannot be edited.
6. In the window, click the Edit icon.
7. Make any changes as required.
8. Click the Asset Details tab.
9. Make any changes as required.
10. Click Save.
Create parent and child associations
In the Device Basics tab, you can link Devices as a parent or as a child of another Device. When you assignparent/child associations to your assets, the following conventions apply:
n A parent Device can have any number of child Devices.
n A child Device cannot be a parent to another Device.
n Removing the parent status orphans all the child Devices for that parent.
n Child Devices can be removed individually from a parent.
n A child Device can have any number of parent Devices.
n Child Devices inherit priorities from the parent objects including Customer, status, and otherproperties.
ADMINISTRATOR GUIDE: HELP DESK MANAGER
page 243

n Parent/child status is set by adding child Devices to a parent Device. You cannot add a parent to achild.
Add Devices as children of a parent Device
1. In the toolbar, click Devices and select Search Assets.
2. Click the Basic Search tab.
3. Select or complete the appropriate field to locate the asset.For additional search options, click Advanced Search and complete the fields in the window.
4. Click Search.
5. In the No. field, click an asset number.
The Device Basics tab windows appears, displaying information about your selected Device.The Child Assets box displays at the bottom of the window.
6. Click the Edit icon at the top of the window.
7. In the Child Devices tabbed box, click Edit.The Device Lookup box displays.
8. Select or enter the search criteria to locate the appropriate Device, and then click Search.The Search Results box appears with a list of assets.
9. Click Link to select one of the listed Devices as a child Device.
10. In the Device Lookup box, click Done.The Device is added as a child Device.
11. Click Save.The asset is saved as a child asset.
Remove Devices as children of a parent Device
1. In the toolbar, click Devices and select Search Devices.2. Click the Basic Search tab.
3. Select or complete the appropriate field to locate the asset.For additional search options, click Advanced Search and complete the fields in the window.
4. Click Search.Your search results appear in the bottom window.
5. In the No. field, click the appropriate asset number icon.
The Device Basics tab windows appears, displaying information about your selected Device.The Child Assets box appears at the bottom of the window.
6. Click the Edit icon at the top of the window.
7. Click the trash can next to the child Device you want to remove.8. Click Save.
page 244

Search DevicesYou can search for Devices in the Basic or Advanced tabs. Basic searching provides a simplified subset ofthe search criteria available in the advanced search mode.
To sort your search results, click the appropriate column header. To download the search results in PDF,TSV, or Excel format, click the appropriate icon.
Refine your search results
Your search results can include a large amount of Device data. To reduce your search results, use theColumn Set drop-down menu and select a column format. Click [+] to add a new column set, or edit theselected column set by clicking the pencil icon.
Save a query
1. Define your search criteria using the same method explained in Search tickets.2. Click the Advanced Search tab.
3. In the Save Query as field, enter an appropriate name.
4. Select the Shared check box to allow other techs to use this search.Depending on your access level, you may not have access to the Shared box.
5. Click Save.
Run a query
Select the query name from the Query menu at the top of the search results display. When selected, thequery runs automatically.
Export a report
After you save a query, you can export all queried asset data to a Microsoft Excel spreadsheet.
Your connections may timeout if you export large quantities of assets (for example, 30,000 assets).To minimize timeouts, export the assets in batches.
1. In the toolbar, click Assets.
2. In the Assets screen perform a basic or advanced search for your targeted assets.
3. Click the checkbox in the top left column to select all Devices.
ADMINISTRATOR GUIDE: HELP DESK MANAGER
page 245

4. In the toolbar, click Excel.The file is saved to our Downloads directory.
5. In the pop-up window, click the Excel spreadsheet to view the report.
Add purchase ordersThe Help Desk Manager purchase orders feature tracks your Device purchases and leases.
This feature is not designed to replace your company’s current accounting or ordering systems.Help Desk Manager does not create purchase orders, but rather stores information about purchaseorders.
Add a vendor
Before you add a new PO, add one or more vendors into the database.
1. In the toolbar, click Setup and select Devices > Vendors.
2. Click New.
3. In the Vendors information screen, complete the fields as required.
4. Click Save.
Add a purchase order
1. In the toolbar, click Devices and select Purchase Orders.
2. In the window, click New or New Purchase Order.
3. In the PO Number field, enter a unique number.
4. In the Order Date field, add the date when the purchase order was entered.
5. In the Invoice Date field, enter the date when the vendor shipped the product. This date is used tocalculate the warranty and lease expiration date.
6. Click the Vendor drop-down men and select the vendor.
7. In the Order Type row, select Lease or Purchase.
8. In the Originator row, enter the last name of the client who created the PO request.
9. In the Deliver To row, enter the last name of the client who receives the purchased items.
10. Click Attachments and add any supporting documentation (if required).
11. In the Notes box, enter any additional information about the purchase order (if required).
12. Click Save.
Add purchase order line items
After you save the purchase order, you can add line items to the purchase order using the line item editor.These line items can include individual parts and their associated costs.
When you add purchase order line items, use the following conventions:
page 246

n Associate specific Devices by providing a valid Device number. If you link a line item to a devicenumber that does not exist or is already linked to another PO, Help Desk Manager generates an errormessage.
n All line items must define a model and may contain part number and price information. Devices canalso be associated to a PO from within the Device detail view.
n Include a “free” line item defined in the PO to link the Device. For example, if you add a new AppleMacintosh Device, you could associate it with the free line item because the computer system lineitem is free (not linked) to any Device number.
1. Select a purchase order.a. Click Devices and select Purchase Orders.b. In the Purchase Order Search window, complete the files with your search information and
click Search.c. In the PO Number column, click the appropriate purchase order number.
2. Click the Pencil to edit the PO.
3. In the Line Item box, complete the appropriate fields as required.Your line items must define a model and may contain part number and price information. Devicescan also be associated to a PO from within the Device detail view.
4. Click New Line Item to add additional line items.
5. When completed, click Save.
Import purchase orders
See Import data for details about importing purchase orders.
Reserve devicesTo ensure that your Devices are available when needed, use the Device reservation feature.
1. In the toolbar, click Devices and select Search Devices.
2. Search and select the Device you want to reserve.
3. Edit the Device.
4. Select the Reservable check box.
5. Click Save.
Set up Device reservations as a tech
1. In the toolbar, click Devices and select Reservations.
2. Click New or New Reservation.
3. In the Client Lookup box, select the client who will check out the Device.
4. In the Reservation Details tab, set the Scheduled Out and Scheduled In dates and times.
5. In the Asset Lookup tab, locate the Device you want to reserve.
ADMINISTRATOR GUIDE: HELP DESK MANAGER
page 247

6. Click the Device you want to reserve.
7. Click Save.
Set up Device reservations as a client
An administrator must provide clients permission to reserve an Device before clients can use the reserveDevice feature.
1. In the toolbar, click Setup and select Devices > Options.
2. In the Asset Options screen, select Clients Can Search Devices.
3. (Optional) If you selected Clients Can Search Devices, select Limit to Assigned and Reservable (ifapplicable).
4. Click Save.
Reserve an Device as a client
1. In the client interface, click Devices.2. Click Search.
3. Locate your Device.
4. Select the Reserve check box.
5. Click Reserve Checked.A calendar window appears, allowing you to select a reservation date or range of dates.To select a reservation date range, click the first day of the reservation, drag the cursor to the lastday of the reservation, and then click Save.To remove a reservation, click the trash can on the reservations page.
Check Devices in and out
Only Techs can check reserved Devices in or out.
1. In the toolbar, click Assets and select Reservations.
2. In the Search screen, complete the fields as required.
3. Click Search to locate your reserved Devices.
4. In the Reservation Details screen, click Check In to check in an Device.Click Check Out to check out an Device.
Remove DevicesIn Help Desk Manager, the default aging interval for all Devices is 90 days. If a node is not provided datawithin the last 90 days, its life cycle status changes from Active(0) to DECOMISSIONED(2).
To update the default aging interval:
1. Locate and open the appropriate configuration file in a text editor.
For Microsoft Windows systems, open the wrapper_template.conf file located at:
page 248

HelpDeskManager\bin\wrapper\conf\wrapper_template.conf
For Linux systems, open the whd.conf file located at:
HelpDeskManager\conf\whd.conf
2. In the file, update the value in the following JAVA_OPTS parameter:
-Dasset.agingInterval=30d
In this example, all Help Desk Manager Devices are decommissioned if not rediscovered within 30days.
3. Save and close the file.
Report on DevicesYou can build real-time reports on multiple Devices based on the features you choose. For more preciseinformation, filter those assets by factors such as:
n Customer
n Manufacturer
n Billing rate
n Warranty expiration date
n Purchase date.
ADMINISTRATOR GUIDE: HELP DESK MANAGER
page 249

Import and export dataThe data import options let you import data in bulk, rather than manually adding individual items. You canimport data using predefined templates. Help Desk Manager provides templates in three formats: Excelspreadsheets, tab-separated variable (TSV) files, and comma-separated variable (CSV) files.
Use template data imports for the following Help Desk Manager selections:
n Customers
n Clients
n Devices
n Purchase Orders
n Tickets
n FAQs
n Parts
n Inventory
See Use templates to import data for details on how to set up and apply Help Desk Manager templates toimport your data.
Integrate Help Desk Manager with N-central
To import device data, you must integrate HDM with N-central.
Integration requires:
n Accessing the HDM API key and adding it to N-central so the two applications can share data
n Configuring N-central so that it can be integrated with Help Desk Manager
To obtain the HDM API key:
1. Log in to Help Desk Manager.
2. In the toolbar, click Setup.
3. Select the Techs tab.
4. Click My Account.
5. Click the Edit icon.
6. Next to the API Key, click Generate.
7. Copy, paste, and save the API Key in a text editor or other document file so it can be used later toconfigure N-central.
Do not modify this value.
8. Click Save.
9. Log out of Help Desk Manager.
page 250

Use templates to import dataYou can import data from files in tab-separate-values (TSV), comma-separated-values (CSV), or Excelformats.
Help Desk Manager uses templates to ensure data files are formatted correctly. The first data row in thefile must match the appropriate template, which you can download from the Setup > Data Import menu.
SolarWinds MSP recommends downloading the appropriate template, importing the template into aMicrosoft Excel spreadsheet, and then entering your data into the spreadsheet. When you are finished,you can convert the Excel file to a TSV or CSV file, and then import the file into Help Desk Manager.
For all but the ticket import format, the import file format matches the TSV downloads formats available foreach entity.
TSV templates
A typical TSV template contains column headings. The following example shows a client TSV template.
When you click Download Template in the Import Clients screen and download the template file, you canre-import the file into the Clients importer template.
Because ticket TSV downloads are typically used for reporting instead of bulk changes, the columns in theticket TSV download match the columns in the selected column set rather than the columns in the ticketimport template.
If you are using an Excel spreadsheet to format the data and your data file contains Unicodecharacters, deselect the MS Excel Unicode (UTF-16) file encoding option—both in Excel and in HelpDesk Manager.
Data import types
You can import several types of data into Help Desk Manager. These include:
n Companies
n Clients
n Assets
n Purchase orders
n Tickets
ADMINISTRATOR GUIDE: HELP DESK MANAGER
page 251

n FAQs
n Inventory
The following table provides an example of the import types and corresponding fields required to import alist of locations into Help Desk Manager:
TYPE OF IMPORT REQUIRED FIELDS
Customer Customer Name
Companies Company Name, Manager Tech Username
Clients Last Name, User Name, E-Mail
Devices Device Type, Manufacturer, Model
Purchase Orders PO Number, Vendor
Tickets Open Date, Request Type
FAQs Category, Question, Answer
Parts Part Number, Manufacturer, Our Cost, Customer Cost
Inventory Part Number, Customer, Count
Before you begin
Define the import types in Help Desk Manager before you download and populate the template. Forexample, if you want to import your customer information, define all customer fields in Help Desk Managerso your template contains all required data fields for your imported data.
Download and populate the template
When you populate your template, use the following conventions:
n To prevent failed imports, do not change the data order or delete columns in any import.
n If the tickets implement request sub-types, enter the type and sub-type in the Type column andseparate the type and sub-type with a semicolon.
n Do not use commas or currency symbols in your template.
The following example describes how to download a template and add your client data using an Excelspreadsheet.
page 252

1. In the toolbar, click Setup > Companies & Locations > Data Import.
2. Under Data Import, click a category.For example, Import Clients.
3. Complete the Import menu options. For this example, the File Type is Microsoft Excel.
Click the tooltips for details about each option.
4. Click Download Template and save the file to a local or network directory.
ADMINISTRATOR GUIDE: HELP DESK MANAGER
page 253

5. Double-click the template.The template fields are parsed to column headers in the Excel spreadsheet.
If any customer headers are missing, go back to Help Desk Manager and enter the missingfields. When you are finished, re-import the template.
6. In row 2, enter the that applies to each column header for the first customer.
All fields highlighted with an asterisk (*) are required fields.
If you are completing the fields for a Ticket template, you can customize the content for theRequest Detail and Notes fields. See Customize tickets, notes, instructions, and emails withBBCode for details.
7. In the remaining rows, enter the information for each remaining customer.
8. Save the spreadsheet.
Import the template file into Help Desk Manager
The following procedure describes how to import your spreadsheet data into Help Desk Manager as anExcel template.
1. Return to the Import Clients page.
2. In the Import Data file field, click Choose File.
3. Locate and select your Excel spreadsheet.
4. Click Import.The customer data is imported into Help Desk Manager.
page 254

Create and edit reportsReports can show statistics and aggregated data (such as totals or averages). They can also represent datagraphically (as bar charts and pie charts) to help you compare groups of tickets or assets.
Reports display information about tickets, assets, and billing. They are useful for showing the total oraverage value of one type of item in relation to a second type of item. Examples include:
n How many tickets did each tech close?
n How many tickets were opened against each asset?n How many assets are checked out in each location?
n What is the average work time per ticket request type?
n How many tickets were opened against each request type?
Reports can be displayed in the web interface or generated in PDF format. You can also create schedulesto automatically run reports and email them to groups of recipients.
From any report, you can click the ticket or asset total to display detailed information about the itemsincluded in that total.
The Reports screen includes a list of predefined reports that focus on device, billing, and ticketinformation. You can also create composite reports that link together a mixture of reports. Each report caninclude charts or tables that display the number of items in possible categories.
Click Reports in the toolbar to access the Reports screen.
Sample reportsUsing sample reports included with Help Desk Manager, you can create asset and ticket reports to helpyou monitor technician performance, customer support needs, and incidence frequency. Using additionalfeatures incorporated into Reports, you can categorize reports into report groups, generate survey results,and schedule automated reports for distribution.
View, print, or download reportsYou can manually run a Help Desk Manager report at any time.
Alternatively, you can create a report schedule to distribute reports at regular intervals.
1. In the toolbar, click Reports.The reports page lists all available reports.
2. Locate the report.
If you created report groups to classify your reports, you can select a report group in the
page 255

upper-right corner to filter the list.
3. Click a button in the right column to run the report.
Displays the report at the bottom of the current Help Desk Manager browser tab.
Displays a printable web view in a new browser tab.
Creates a PDF version of the report that you can download and print or distribute.
Create and edit reportsThe Reports screen includes a list of predefined reports that focus on device, billing, and ticketinformation. You can also create composite reports that link together a mixture of reports. Each reportincludes charts and tables that display the number of items in possible categories.
Click Reports in the toolbar to access the Reports screen.
Help Desk Manager includes three different types of reports:
n Bar charts. Compares Device data, illustrate Device data trends over time, and show therelationships between groups of data. Bar charts can also include a table (if you provide at least onetable metric).
n Pie charts. Compare the number of assets to each other and displays percentages that compriseyour inventory. Pie charts include a table (if you provide at least one table metric).
n Table only. Displays Device data in rows and columns. You can use tables to present simple reportinformation or to help clarify reports containing bar or pie charts.
Create Device reports
Using Reports in Help Desk Manager, you can build real-time reports on multiple Devices based on thefeatures you choose. Device reporting can help you better manage organizational Devices by providing thestatistics you need to make informed decisions.
Use Device Reporting to gather information on various data in your organization, such as:
n Number and types of Devices in your corporate enterprise
n Devices approaching end of warranty or purchased within a specific data range
n Device attributes such as Class, Customer, and Warranty Type
n Number of tickets generated by Device issues
n Overdue, reserved, and reservable Devices
Create an Device report
1. In the toolbar, click Reports.
2. In the Reports screen, click New.
ADMINISTRATOR GUIDE: HELP DESK MANAGER
page 256

3. In the Report Name field, enter a name that identifies the report. This name will appear in the reporttitle.
4. (Optional) Click the Report Group drop-down menu and select a report group. Applying a ReportGroup can make reports easier to find when you have many reports.
If no Report Groups are available, the default report group is Sample Reports. To create a newreport group, save the information currently in the Report Basics tab and see Create reportgroups to learn how to build report groups.
To apply the newly-created Report Group to a report, select the report from the list of Help DeskManager reports, click Edit, and select the Report Group.
5. Click the Report Type drop-down menu and select Device Report.
6. Click Save.
7. Select the type of report to create:
n Bar chartn Pie chartn Table-only
Create a bar chart Device report
1. In the Chart Type row, ensure that Bar Chart is selected.
2. Click the Bar Category drop-down menu and select an option.
For example, if you select Model, the bar chart will include all assets by model.3. Click the Bar Stack Category drop-down menu and select Device Type to specify the data stacked on
each bar.
4. (Optional) To draw the bar stack categories with percentage values, select the Draw as percentagescheck box.
5. Complete the remaining fields as required.Click the tooltips for more information.
6. (Optional) Add a report filter.a. Select the Report Filters tab.b. Click New.c. Click the Filter Attribute drop-down window and select an option.
For example, if you select Model, the report filters all assets by model.
7. In the Report Details window, click Save.
8. Click Run Report to generate the report.
Create a pie chart Device report
1. In the Chart Type row, select Pie Chart.
2. Click the Pie Slice Category drop-down menu and select an option to indicate which data the pieslices represent.For example, if you select Model, the pie slices in the report will represent Devices by model.
page 257

3. For each category, select how many Device types and Customers to show in the chart. Pie chartsdefault to show the top 10 items, unless you specify another number.For the best illustration, keep the number of items shown in the pie chart to 15 items or less. If youneed to add more than 15 items to a pie chart, consider using a bar chart instead.
4. To include a table in the report, select the number of items to include in the table.The default amount of items shown in tables is 100.
5. Complete the remaining fields as required.Click the tooltips for more information.
6. (Optional) Add a report filter.Report filters restrict the tickets included in the report by specifying the attribute values that shouldbe excluded. For example, a Status Type filter could restrict the report to Open or Pending statustypes. Click the Help icon in the Report Filters tab for more information.
7. a. Select the Report Filters tab.b. Click New.c. Click the Filter Attribute drop-down window and select an option.
If your filter attribute is identical to the report category, only the values allowed by the filterappear in the report.For example, if you select Model, the report filters all assets by model.
8. In the Report Details window, click Save.
9. Click Run Report to generate the report.
Create a table only Device report
1. In the Chart Type row, select Table Only.
2. Click the Row Category drop-down menu and select Model to indicate which data appear in the tablerows.
3. Click the Column Category drop-down menu and select an option.For example, if you select Device Type, the table columns in the report will represent Devices bymodel.
4. Complete the remaining fields as required.Click the tooltips for more information.
5. (Optional) Add a report filter.a. Select the Report Filters tab.b. Click New.c. Click the Filter Attribute drop-down window and select an option.
For example, if you select Model, the report filters all assets by model.If your filter attribute is identical to the report category, only the values allowed by the filterappear in the report.
d. Click the Report Details tab.6. In the Report Details window, click Save.
Your changes are saved.7. Click Run Report.
ADMINISTRATOR GUIDE: HELP DESK MANAGER
page 258

Create ticket billing reports
Billing Reports generate a table showing the total work time, parts cost, and labor cost accrued for a set oftickets.
1. In the toolbar, click Reports.
2. Click New.
3. In the Report Name field, enter a name used to identify the report.This name will appear as the report title.
4. (Optional) Click the Report Group drop-down menu and select a report group.
5. Click the Report Type drop-down menu and select Billing Report.
6. Click Save.
7. Click the Category drop-down menu and select the category used to generate the rows in the report.
8. (Optional) Select the Show Filters check box to indicate whether a list of the filters configured for thereport will be included in the report.
9. In the Time Range row, determine the amount of time to include in the report.The time range applies to the date you select in the Date Attribute for Time Range drop-down menu.
10. Click the Date Attribute for Time Range drop-down menu and select a ticket date attribute to usewhen applying the values you select for the Time Range.
11. (Optional). Click the Report Filters tab to add a report filter.
a. Click New.The Report Filters Options appear.
b. Click the Filter Attribute drop-down menu and specify the ticket attribute that will apply to thefilter.
c. In the Filter Type row, select how the values chosen for the filter will be included or excludedfrom the report.Select Inclusive to include tickets with one of the selected values.Select Exclusive to exclude tickets with one of the selected values.
12. Click Save.
13. In the Report Details tab, click Run Reports.
Create ticket reports
A ticket report does not reflect the correct work time because the data is based on ticket totals, andnot the tech. To generate a report with the correct work time, generate a billing report.
1. In the toolbar, click Reports.
2. Click New.
3. In the Report Name field, enter a name used to identify the report. This name will appear in thereport title.
page 259

4. (Optional) Click the Report Group drop-down menu and select a report group. Applying a ReportGroup can make reports easier to find when you have many reports.
5. Click the Report Type drop-down menu and select Ticket Report.The Report Details and Report Filters tabs appear. These tabs define what the report looks like andthe data it contains.
6. Click Save.The Report Details tab window displays.
7. Select the type of report to create:
n Bar Chartn Pie Chartn Table Only
Create a bar chart ticket report
1. In the Chart Type row, select Bar chart.
2. Click the Bar Category drop-down menu and select the appropriate category for your report.
3. Click the Bar Stack Category drop-down menu and select an option to specify the data stacked oneach bar.
4. Complete the remaining fields as required.Click the tooltips for more information.
5. Click Save.
6. (Optional) Click the Report Filters tab to add a report filter.a. Click New.b. The Report Filters Options appear.c. Click the Filter Attribute drop-down menu and select the ticket attribute that will apply to the
filter.d. In the Filter Type row, select how the values chosen for the filter will be included or excluded
from the report.Select Inclusive to include tickets with one of the selected values.Select Exclusive to exclude tickets with one of the selected values.
7. Click Save.
8. In the Report Details window, click Run Report.
Create a pie chart ticket report
1. In the Chart Type row, select Pie Chart.
2. In the Pie Slice Category row:a. Click the drop-down menu and select the appropriate category.b. Click the Show drop-down menu and select the appropriate number of items to appear in the
pie chart.c. Select the Show non-zero items only check box to only display items containing one or more
values.
ADMINISTRATOR GUIDE: HELP DESK MANAGER
page 260

3. Complete the remaining fields as required.Click the tooltips for more information.
4. Click Save.
5. (Optional) Click the Report Filters tab to add a report filter.a. Click New.b. Click the Filter Attribute drop-down menu and specify the ticket attribute that will apply to the
filter.c. In the Filter Type row, select how the values chosen for the filter will be included or excluded
from the report.Select Inclusive to include tickets with one of the selected values.Select Exclusive to exclude tickets with one of the selected values.
6. Click Save.
7. In the Report Details tab window, click Run Report.
Create a table only ticket report
1. In the Chart Type row, select Table Only.The Report Details tab window includes options for creating a table chart.
2. Complete the fields as required.Click the tooltips for more information.
3. (Optional) Add a report filter.a. Click the Report Filters tab.b. Complete the fields as required.
4. Click the Report Details window.
5. Click Save to save the report.
6. Click Run Report.
Create report groupsReport Groups helps you organize your reports and control access to report data.
Report Groups control access to created reports sorted by Tech and Customer Group. This ensures thateach Tech is only presented with reports within their scope of work.
1. In the toolbar, click Reports and select Report Groups.
2. In the Report Groups screen, click New.
3. In the Report Group Name field, enter the appropriate group name.
4. In the Tech Groups and Location Groups rows, select the Tech Groups and Customer Groups thatcan access the reports.
5. Click the Included Reports tab.
6. Select the applicable Reports.
page 261

7. Click the Group Options tab.
8. Click Save.
Schedule reportsUse report schedules to automatically generate one or more reports in PDF format and email them to thespecified recipients via their default outgoing email accounts. Recipients can be clients, techs, or peoplewho do not have Help Desk Manager accounts.
This example schedules two asset reports to be distributed at the beginning of every month.
1. In the toolbar, click Reports and then select Report Schedules.
2. Click New.
3. Enter a name to identify this report schedule.
4. Specify how often the report is distributed and when the distribution begins.
5. (Optional) Update the email message to which the reports will be attached.
See the tooltips for more information about any field.
6. To distribute the report to clients, search for a client and then click the client name.If you defined a connection to an LDAP server, the Search LDAP check box is displayed. Select thisoption to include names from the LDAP directory in the search. Point to the Search LDAP label formore information.
7. To add recipients who are not Help Desk Manager clients and techs, enter their email addresses inthe Other Recipients E-Mails field.
8. To distribute the reports to techs:a. Click the Tech Recipients tab.b. Click Edit.c. Select the techs and click Save.
9. Select the reports to include.a. Click the Included Reports tab.b. Click Edit.c. Select the reports and click Save.
10. Click Done.The new schedule is activated and available in the Report Schedules screen.
ADMINISTRATOR GUIDE: HELP DESK MANAGER
page 262

Set up parts and billingYou can track your parts inventory in one or multiple store locations by part number, manufacturer, andmodel. When parts are deployed to a ticket, Help Desk Manager automatically deducts the part frominventory, allowing you to maintain an accurate parts inventory in your deployment.
You can create an alert that notifies you when your inventory threshold falls below your specifiedlevel for parts a client regularly requests. See Configure inventory alerts for details.
Using additional tools in Help Desk Manager you can:
n Add parts to a Customern Add parts to a ticketn Manually add partsn Enable service time blocksn Customize billing statements
Add parts to a location1. In the toolbar, click Parts.
2. Click the Inventory tab.
3. In the fields and drop-down menus, select your search criteria and click Search.To list all parts, leave all search fields empty and click Search.
4. Click the Storage Location drop-down menu for a specific part and select Customer.
5. In the Add Count field, add the number of available parts.
To reduce the number of available parts, use a negative number. For example, to change thenumber of available parts from 6 to 5, enter -1.
6. Click Save.
When a part inventory reaches zero, the inventory status changes from Available to BackOrdered.
Add parts to a ticket1. In the toolbar, click Tickets.
2. Click the targeted ticket number.
3. Click the Parts and Billing tab.
4. In the Part Search box, enter and select the appropriate information to locate the part.
5. Click Search.The Search Results box displays, displaying the Customer and number of available parts.
page 263

6. In the Inventory column, click the part Customer.The part displays in the Assigned Parts box.To remove defective parts from inventory, enter the number of parts in the DOA field. Help DeskManager removes the cost of the DOA parts from the ticket and list DOA parts in a separate area inyour billing reports.To remove an entire parts line item and return the parts back to inventory, click the trash can.
7. Click Save to save your changes.
Manually add parts1. In the toolbar, click Parts.
2. In the Parts List tab, click New Part.
3. In the Part No. field, enter a part number.
4. Click the Manufacturer drop-down menu and select a manufacturer.
You can add manufacturers and models at Setup > Device >Manufacturers & Models.
For more information about adding manufacturers and models, see Defining device types.5. Click the Model drop-down menu and select a model.
6. In the Description field, enter a description of the item.
7. In the Our Cost and Customer Cost fields, enter the appropriate amounts.
8. Select the Tax Free check box if this item is not applicable to state or local taxes.
9. Click Save.
Configure inventory alertsConfigure the frequency and recipients for all email alerts—for example, when your inventory thresholdfalls below your specified level for parts a client regularly requests.
1. Click Setup > Parts & Billing > Inventory Alerts.
2. In the Inventory Alerts screen, click the first Inventory Alert Interval drop-down menu and select avalue from 0 to 100.
3. Click the second Inventory Alert drop-down menu and select the appropriate alert frequency.
4. In the Default Inventory Alerts Recipients field, enter the email addresses for each recipient who willreceive inventory alerts.
Click the tooltips for more information.
5. Click Save.
Override default inventory alert recipients
1. Click Setup and select Companies and Locations > Locations and Rooms.
2. In the Location Name column, click the appropriate location.
ADMINISTRATOR GUIDE: HELP DESK MANAGER
page 264

3. Edit the information in the tab windows as required.
4. Click Done.
Enable predefined service time blocks1. In the toolbar, click Setup > Parts & Billing > Options.
2. In the Parts & Billing Options screen, select the Enable Customer check box.
3. Select the appropriate option to enable time blocks.
4. Click Save.
For an expired block, the usable value may be lower than the block value depending on how muchtime was used before the block expired.
The amount of service time available for a customer displays within the Ticket Details of a ticketunder the customer pop-up. If the value is negative, it appears in red.
Customize billing statementsYou can customize billing statements by editing the invoice.html file located in the following directory:
HelpDeskManager\\bin\webapps\helpdesk\WEB-INF\lib\whd-web.jar\Resources\Invoice.wo\Invoice.html
For example, if you wanted to remove the signature line, you could remove lines 433 - 438:
<fo:table-row>
<fo:table-cell number-columns-spanned="<webobjectname=LineItemColumnCount></webobject>" padding-top="10mm">
<fo:block font-family="FreeSans, ArialUnicodeMS,sans-serif" font-size="10pt" text-align="right"><webobject name ="SignatureLbl"></webobject>: <fo:leader leader-length="4.0in" leader-pattern="rule" rule-style="solid" color="black"></fo:leader>
</fo:block>
</fo:table-cell>
page 265

</fo:table-row>
After you delete these lines or make any other changes, restart Help Desk Manager to enable yourchanges.
ADMINISTRATOR GUIDE: HELP DESK MANAGER
page 266

Manage client feedbackSurveys provide valuable feedback from your clients. After you close a ticket, you can provide your clientsthe option of completing a survey.
You can link surveys to a specific ticket for a single client, or send surveys as general questionnaires to anumber of clients. The survey is located at the top of the ticket e-mail and in the Help History page of theclient interface.
Create a surveyYou can create an automatic or manual survey that you submit to your clients when a tech closes a ticket.While the survey is optional, the client feedback can help you identify issues with the ticket resolutionprocess and help you improve your help desk operations. When you close the ticket, you can disable asurvey for a specific request type.
1. In the toolbar, click Setup > Surveys > Surveys.
2. In the Surveys screen, click New.
3. In the Survey Name and Description fields, enter the appropriate information for your survey.
4. Complete the remaining fields as required.
Click the tooltips for additional information.
5. Click Save.
Set the survey options
1. In the toolbar, click Setup > Surveys > Options.
2. Complete the remaining fields as required.
Click the tooltips for additional information.
3. Click Save.
Create an automatic survey
1. Click Setup and select Tickets > Request Types.
2. In the Request Types column, click the appropriate request type.
3. In the Request Type screen, click the Survey drop-down menu and select a survey.
4. Click Save to automatically implement the survey.
For example, if you click Hardware in the Request Types screen and select Default Survey in the Surveydrop-down menu, the client automatically receives the default survey for a hardware request type.
See Defining Request Types for information about defining a request type.
page 267

Create a manual survey
You can manually send out surveys to a group of clients by clicking Send Survey in the client search resultsheader. After you submit a survey, you can view but not edit the survey.
1. In the toolbar, click Clients.
2. In the Basic Search or Advanced Search tabs, enter the appropriate information to locate one ormore clients.To list all clients, leave the search fields blank.
Hover your mouse arrow over the selections for tooltips.
3. Click Search.
4. In the search results toolbar, click Send Survey.
5. In the Survey Invitation Mailer screen, click the Survey drop-down menu and select a survey.
6. Edit the survey content (if required).
7. Click Save & Email.
Disable a survey
You can disable a survey for a specific request type so it is not sent to a customer when the ticket is closed.
1. Log in to Help Desk Manager.
2. Click Setup > Tickets > Request Types.
3. Click a request type in the Request Types column.
4. Click the Survey drop-down menu and select None.
5. Click Save.The survey is disabled for the request type.
Create messagesUse this feature to send messages to techs and clients.
1. In the toolbar, click Messages > Create Messages.
2. Click New Message.
3. In the Message screen, complete the fields as required.Click the tooltips for additional information.
4. Click Save.The message is sent to your selected recipients.
ADMINISTRATOR GUIDE: HELP DESK MANAGER
page 268

Delete messages in bulk
1. In the toolbar, click Messages.
2. Click the Create Messages tab.
3. Shift-click the checkbox in the header of the messages search results to select all messages on allpages of the search results.
4. Click Delete.
View ticket and survey resultsYou can examine your survey results from within a ticket. Simply open the targeted ticket and click theSurvey View icon in the ticket screen.
You can also view the survey summary data on both the ticket and general surveys in the Survey Resultsscreen. Survey reports are the only way to view the results of a general (non-ticket) survey.
1. In the toolbar, click Reports and select Survey Results.
2. In the Survey Results screen, select the survey you want to view.
To narrow the spoke of the results, complete the information in the fields and drop-downmenus.
3. When you complete your selections, click Run Report.
View ticket details
1. In the toolbar, click Tickets.
2. In the Tickets screen, click the appropriate ticket number in the No. column.
3. In the top left corner of the ticket, click the Survey View icon.
View survey reports
To view summary data on both ticket and general surveys:
1. In the toolbar, click Reports and select Survey Results.
2. In the Survey Results screen, select the survey you want to view.
You can also complete the information in the fiends and drop-down menus to narrow the scope ofthe results.
3. When you complete your selections, click Run Report.
Send email ticket surveysYou can send a general email ticket survey to one or more clients for each closed ticket. Clients can accesssurveys by replying to the email or by selecting History from the top menu.
You can select a survey in the Setup > Tickets > Request Types screen.
page 269
1. In the toolbar, click Clients.
2. In the Basic Search and Advanced Search tabs, select the appropriate criteria to locate clients whowill receive your survey.
Hover your mouse over Search LDAP for additional information.
3. Click Search.
4. In the generated table, select the appropriate clients to receive the survey.
5. Click Send Survey.
6. In the Survey Invitation Mailer screen, click the Survey drop-down menu and select a survey.
7. Review the survey E-Mail Subject and Message Preview boxes and modify the email message contentas required.
Click the tooltips for more information.
8. Click Save & E-Mail.
9. Click OK to send the survey to your selected clients.
ADMINISTRATOR GUIDE: HELP DESK MANAGER
page 270

Knowledge-centered supportKnowledge-centered support (KCS) is a set of practices that make information available and easilyaccessible to both clients and techs. With KCS, knowledge is considered a fundamental asset of thetechnical support organization. The goals of KCS include:
n Improving efficiency within support organizations
n Making customers self-sufficient
n Reducing support costs while increasing customer satisfaction
When an organization implements KCS, content creation becomes an integral part of the support process.Each tech is responsible for contributing new content and updating or improving existing content.
Using Help Desk Manager to build your knowledge storeWithin Help Desk Manager, you can use FAQs to capture solutions to common problems and make thatinformation available. Techs can quickly create a new FAQ based on a note within a ticket, or they can .
As you increase the amount of useful information in your system, both clients and techs will be more likelyto find the answers they need. Helping clients get answers from FAQs will reduce the number of ticketsopened. Clients are able to provide feedback by rating articles. Use article ratings to recognize and rewarduseful content and to improve content that is incomplete or inaccurate.
By default, only admins can edit approved FAQs. To implement the KCS process, consider includingthe Approved FAQ Edit permission in the Default tech permission set. When techs have thispermission, they can update or correct FAQs as needed.
Accessing FAQs in Help Desk ManagerHelp Desk Manager promotes self resolution by displaying relevant FAQs to clients as they enter servicerequests into the Web portal.
page 271

In addition, clients can search the FAQs that are available to them, view or edit an FAQ, and link an FAQ toa support ticket.
An FAQ can be available to all Help Desk Manager clients, or it can be limited to a specific audience (forexample, only to clients from a certain company).
Create a new FAQTechs can use FAQs to share information and quickly locate resolutions to common problems. Additionally,clients can search the FAQ knowledge base within Help Desk Manager to locate answers to their questions.
Ensure that the tech permissions for FAQs are defined for each tech in Setup > Techs > TechPermissions > Other Permissions.
You can create a new FAQ manually, or you can automatically create an FAQ based on a ticket note. If yourcompany is implementing , use this capability to quickly expand your knowledge base using informationalready captured in case notes.
Beginning in version 12.7, Help Desk Manager includes a new Create FAQ editor. The new editor includes anew interface and provides additional tools for creating and editing your FAQs. The updated editor alsoallows you to drag and drop images into your Mozilla Firefox and Google Chrome web browsers.
ADMINISTRATOR GUIDE: HELP DESK MANAGER
page 272

Before you create a new FAQ, search the knowledge base to determine if an existing FAQ answersthe question. If so, you can link the existing FAQ to the ticket.
Set tech permissions for FAQs
1. Log in to Help Desk Manager as an administrator.
2. Click Setup > Techs > Tech permissions.
3. Click the tech permission name.
4. Scroll down to the Other Permissions tab.
5. Click FAQ Edit.Additional options display.
6. Select FAQs "All" Category Edit to enable tech access to All and Specific FAQ categories. This allowstechs to view FAQs in the Create FAQ page for all requests.
7. Select any additional selections as required. See the tooltips for details.
8. Click Save.
Access FAQs in the tech user interface
1. Log in to the tech user interface.
2. Click FAQs in the toolbar.
3. Click New FAQ in the FAQ toolbar.The Create FAQ page displays.
If you select FAQs "All" Category Edit in Setup, the tech can access All categories in the Create FAQ page.
Category is identical to the ticket request type.
The tech can also edit an FAQ by selecting Specific and clicking the drop-down arrow to select one or morecategories for the FAQ.
When you de-select the FAQ Edit check box, the remaining FAQ permissions are disabled in the OtherPermissions tab.
Additionally, the All and Specific categories in the tech user interface are disabled by default, and the techcannot change the category selection.
Techs can view FAQs assigned to All and Specific categories, but cannot edit these FAQs.
Manually create an FAQ
1. In the toolbar, click FAQs.
2. In the FAQ toolbar, click New FAQ.
page 273

3. In the Create FAQ screen, select the categories for this FAQ.Select All for all categories or Specific for selected categories.
4. If you selected Specific, click the Category drop-down menu and select one or more categories.
This field is populated from the ticket request types. You can add additional request types.See Define request types for more information.
If a parent or child category is disabled, you do not have the appropriate permissions toaccess the category level.
5. Enter the question and answer text for this FAQ.Question and answer text can include HTML links and formatting, as well as Bulletin Board Code(BBC) tags.
6. If you want to link this FAQ to a related FAQ, click . Then search for the FAQ and click Link FAQ.
7. Use the radio buttons to restrict who can view this FAQ or specify what model the FAQ applies to.
8. In the Attachments row, click Add File to add an attachment. You can attach a supporting document,graphic, or spreadsheet.
9. If you have permission to approve FAQs, select the Approved check box to publish the FAQ.Otherwise, notify an approver that the FAQ is ready for review.
FAQs can be approved by all admins and by techs with the Approve FAQs permission.
10. If you want the FAQ to expire, select an expiration date and time.
11. Click Save, and then click Done.
Create an FAQ based on a ticket note
1. Open the ticket and click the Ticket Details tab.
2. In the Date column of the Notes section, click in the note's creation date and time to open the note.
3. In the note editor, click Create FAQ.
4. Click OK at the confirmation dialog to create the FAQ.The following elements are automatically populated with information from the ticket:
TICKET FAQ
Request Detail Question
Note text Answer
Request Type Category
The FAQ is created, but it is not approved. Also, any attachments to the note are not attachedto the FAQ.
5. Search for the FAQ, select it, and click Edit.
ADMINISTRATOR GUIDE: HELP DESK MANAGER
page 274

6. Make the following changes as needed:
n Edit the Question and Answer text to make it appropriate for a general audience. Forexample, remove people's names and company-specific information.
n Use the radio buttons to restrict who can view this FAQ or specify what model the FAQapplies to.
n If the note included an attachment, attach that file to the FAQ.If necessary, first download the attachment from the ticket to your computer, and then attach itto the FAQ.
7. If you have permission to approve FAQs, select the Approved check box to publish the FAQ.Otherwise, notify an approver that the FAQ is ready for review.
FAQs can be approved by all admins and by techs with the Approve FAQs permission.
8. If you want the FAQ to expire, select an expiration date and time.
9. Click Save, and then click Done.
Search FAQs1. Click FAQs in the Help Desk Manager toolbar.
2. Specify the search criteria at the top of the window.
A disabled category in the Category drop-down list indicates you do not have the appropriatepermissions to access the category level.
3. Click Search.The FAQs that meet your search criteria are listed.
You can view any FAQ in the list. Techs with the appropriate permissions can edit FAQs.
n To sort the results list, click a column header.
n You can view any FAQ in the list. Techs with the appropriate permissions can edit FAQs.
A Warning icon in a Category row indicates a category you cannot access based on your currentpermissions.
Some category results may indicate that additional categories are available.
Click Show Details to view the additional categories.
page 275

View or edit an FAQ1. To open an FAQ:
a. Search for an FAQ.b. In the search results, double-click a row. The FAQ opens in read-only mode.
If you do not have the required permissions to view an FAQ, a message displays stating thatthe FAQ is no longer available to you.
2. If you have the required permissions, you can edit the FAQ:a. In the search results, select a row and click the Edit button.b. Update any field. For more information see Create a new FAQ.c. Click Save, and then click Done.
If you do not have the required permissions, a Warning icon displays next to Delete. This warningindicates that you cannot delete the FAQ because it includes categories you cannot access or delete.
Link an FAQ to a support ticketWhen an FAQ describes the resolution to an issue or provides information associated with a ticket, you canlink the FAQ to the ticket.
1. Open the ticket details page.
2. In the Notes section, click the creation date to open a new note, or click New to add a new note.
3. Click the Link FAQ button.
4. In the FAQ Search dialog box, search for the FAQ.
5. Click the Link FAQ button on the right side of the FAQ's row.A link to the FAQ is added to the note.
6. Click Save to save the note.
ADMINISTRATOR GUIDE: HELP DESK MANAGER
page 276

Customize your deploymentThis section contains additional information about customizing your Help Desk Manager deployment.
n Deployment considerationsn Customize tickets, notes, instructions, and emails with BBCoden Customize your server settings
Deployment considerationsWhen you plan your Help Desk Manager deployment, consider adding additional system RAM and JavaVirtual Machine (JVM) heap memory to support the number of techs in your help desk operations. Fillingup the JVM heap memory can degrade your Help Desk Manager performance.
Additionally, consider creating a high availability deployment to protect your Help Desk Manageroperations from a single point of failure.
Memory sizing and JVM options
Use an estimated number of concurrent tech sessions to determine your memory allocation and whichtype of deployment best meets your needs. Use tech sessions rather than client sessions, as Tech sessionsuse much more memory than client sessions.
Help Desk Manager requires additional max heap memory over the Java Virtual Machine default setting. Toimprove application performance, increase the JVM memory and restart Help Desk Manager.
Clear JVM heap memory
Help Desk Manager deployments can fill up the JVM Heap Memory, which can degrade performance. Toavoid this issue, periodically restart Help Desk Manager to clear the heap memory.
See the appropriate procedure to automatically restart the operating system on your system hosting HelpDesk Manager.
n Microsoft Windowsn Linux
Automatically restart macOS
To schedule Help Desk Manager for a nightly restart:
1. Login to your OS as root or admin.
2. Copy the following file to your /Library/LaunchDaemons folder:
/Library/WebHelpDesk/bin/ com.macsdesign.RestartWebHelpDesk.plist
3. Execute the following command:
launchctl load com.macsdesign.RestartWebHelpDesk.plist
page 277

4. Verify that the plist was loaded successfully by executing the following command:
launchctl list
5. To unload the LaunchDaemon, execute the following command:
launchctl unload com.macsdesign.RestartWebHelpDesk.plist
The plist file is configured to restart Help Desk Manager each night at 1 AM. You can change the scheduleby editing the StartCalendarInterval property in the plist. See your Apple OS X documentation fordetails.
When you schedule your nightly restart, the following conventions apply:
n The launch daemon works only with the standard Help Desk Manager Tomcat deployment.WebObjects Monitor deployments use the Monitor tool to configure automatic restarts.
n When scheduling with the Monitor, make sure to clear Is Graceful to force the instances to restart.
Automatically restart Windows
This procedure applies to Windows Server 2012 and later.
1. Log in to the HDM server as an administrator.
2. Locate and open the Task Scheduler.
3. In the Actions column, click Create Basic Task to start the Create a Basic Task Wizard.
4. In the Name field, enter a descriptive task name (such as Restart Help Desk Manager), and click Next.
5. Select Daily, and click Next.
6. Enter the trigger options.a. Select a Start date and time.b. Define how often the restart should occur.c. Click Next.
7. Select Start a program, and click Next.
8. In the Program/script field, enter:
net
9. In the Add arguments field, enter:
stop webhelpdesk
10. Click Next.
11. Review the task name, trigger, and action details, and click Finish.
To create a second scheduled task to restart HDM, repeat the steps listed above.
Schedule the procedure to start at least one minute later than the stop command to ensure that theservice has completely stopped before attempting to restart.
Automatically restart Linux
Create a nightly cron job that calls the stop or start scripts as root or use sudo.
ADMINISTRATOR GUIDE: HELP DESK MANAGER
page 278

You can create the cron job using the following command:
/usr/local/HelpDeskManager/HDM stop /user/local HelpDeskManager/ HDM
High availability deployments
Create a high availability Help Desk Manager by configuring a multi-instance Tomcat deployment on Linuxor Microsoft Windows.
See the following sections for details:
n Monitor deployment on macOSn Configure multiple instance Tomcat deploymentsn Configure multiple instance Tomcat daemons
Monitor deployments on macOS
Apple OS X Server 10.6 and earlier included WebObjects.
1. Install WebObjects.
2. Run the Help Desk Manager installer to extract the application to /Library/WebHelpDesk.
3. Run the following script to configure Help Desk Manager with WebObjects:
sudo /Library/WebHelpDesk/bin/UpdateWebObjectsConfiguration
4. In WebObjects Monitor, add a new application named Helpdesk with the following path:
/Library/WebHelpDesk/bin/webapps/helpdesk/WEB-INF/Helpdesk.woa/Helpdesk
5. In WebObjects Monitor, add a new application named HelpdeskDaemon with the following path:
/Library/WebHelpDesk/bin/webapps/helpdesk/WEB-INF/Helpdesk.woa/Helpdesk
6. In the instance configuration page for HelpdeskDaemon, add the following to the AdditionalArguments setting:
-DWHDDaemonMode=dedicated
Only one Help Desk Manager instance should ever be running as a daemon.
After you start the applications in WebObjects Monitor, connect to Help Desk Manager using the followingURL:
http://localhost/cgi-bin/WebObjects/Helpdesk.woa
Configure multiple instance, high availability Tomcat deployments
Apache Tomcat is an open source software product that creates both a Web and application server foryour enterprise. The software provides a Web container that enables Java servlets and Run pages, whichsupport Java code running along with a Web server. You can run multiple-instance Tomcat deployments onLinux installations.
Before you install Tomcat, perform the following procedures on your Linux server:
page 279

1. Download a supported version of Apache Tomcat from the Apache Tomcat Core 7 website.
See the system requirements to verify the supported Tomcat version for your Help DeskManager version.
2. Unzip the files to a directory you create on your Tomcat server running Linux.
For example: /cluster/apache-tomcat-7.0.90
This location will be referred to as template_tomcat_home_directory in this procedure.
3. In your <template_tomcat_home_directory>/bin directory, add the execution privilege to allscripts using the following command:
chmod 744 template_tomcat_home_directory/bin/*.sh
This command does not apply for Apache Tomcat Core 8.
4. Download the Apache httpd server version for your operating system from the Apache HTTP ServerProject site.
See Compiling and Installing at the Apache HTTP Server Project Website for information aboutinstalling HTTP Server.
5. Install Apache httpd server using yum search and install commands.
6. Install the latest version of SolarWinds MSP Help Desk Manager for Linux from the rpm package.The default installation directory is:
/user/local/helpdeskmanager
This location will be known as <whd_home> in this procedure.
7. Start Help Desk Manager.8. Connect to the appropriate database.
9. Ensure that Help Desk Manager is operating efficiently.
10. Stop Help Desk Manager.
Install multiple tomcat instances
You can create multiple Tomcat instances that point to the <tomcat_home>/webapps directory. TheseTomcat instances run as separate processes with their own long files, port numbers, and resources.
1. Copy the template_tomcat_home_directory instance to /cluster as a Tomcat1 directory.
This directory will be referred to as TOMCAT_1_HOME in this procedure.
2. Add execute privileges to all scripts in the TOMCAT_1_HOME directory.
Execute:
chmod 744 tomcat_1_home/bin/*sh
3. Remove the <TOMCAT_1_HOME>webapps directory.
Execute:
rm -rf TOMCAT_1_HOME/webapps
ADMINISTRATOR GUIDE: HELP DESK MANAGER
page 280

4. Create a webapps soft link in the <TOMCAT_1_HOME> directory pointing to <template_tomcat_home_directory>/webapps.
Execute:
In -s template_tomcate_home_directory/webapps/ webapps
5. Update the TOMCAT_1_HOME/conf/server.xml file to avoid port conflicts.
Update the default values listed below:
<Server port="8005" shutdown="SHUTDOWN">
<Connector port="8080" protocol="HTTP/1.1" connectionTimeout="20000"redirectPort="8443" />
<Engine name="Catalina" defaultHost="localhost" jvmRoute="worker1">
to the following values:
<Server port="8100" shutdown="SHUTDOWN">
<Connector port="8200" protocol="HTTP/1.1" connectionTimeout="20000"redirectPort="8443" />
<Engine name="Catalina" defaultHost="localhost" jvmRoute="worker2">
If these ports are reserved, use another set of ports. SolarWinds MSP recommends having a consistent portnumbering convention to avoid conflicts.
6. Add the following value:
<Connector port="8300" protocol="AJP/1.3" redirectPort="8443"/>
7. Update the TOMCAT_1_HOME logback-config.xml file so it points to a correct log directory.
Execute:
<File>TOMCAT_1_HOME/logs/whd-spring.log</File>
<fileNamePattern>TOMCAT_1_HOME/logs/whd-spring.%d{yyyy-MM-dd}.log</fileNamePattern>
8. Update the catalina.sh script in the TOMCAT_1_HOME/bin directory to accommodate TOMCAT_1_HOME port changes in the server.xml file and modify activemq.broker.port to avoid conflicts.
Update the script as follows:
-Djava.endorsed.dirs=TOMCAT_1_HOME/webapps/endorsed
-DWHDconfig=TOMCAT_1_HOME/webapps/.whd.properties
-Dlogback.configurationFile=TOMCAT_1_HOME/logback-config.xml
-DWHDPort=8200
-DWHDPrivateBaseUrl=http://localhost:8200
-Dactivemq.broker.port=61618
page 281

9. Edit the Apache httpd.conf file, adding a new worker.
Update the default values listed below:
<Proxy balancer://cluster>
BalancerMember http://localhost:8080 loadfactor=1 route=worker1
ProxySet lbmethod=byrequests stickysession=JSESSIONID|jsessionid|wosid
</Proxy>
to the following values:
<Proxy balancer://cluster>
BalancerMember http://localhost:8080 loadfactor=1 route=worker1
BalancerMember http://localhost:8200 loadfactor=1 route=worker2
ProxySet lbmethod=byrequests stickysession=JSESSIONID|jsessionid|wosid
</Proxy>
10. Restart the Apache httpd service and both Tomcat instances.
11. Start Help Desk Manager.
Configure multiple instance Tomcat daemons
You can configure multiple instance Tomcat daemons by editing the tomcat_web_template.xml filelocated at:
<helpdeskmanager>/conf
For multiple-instance Help Desk Manager installations, use the following guidelines:
n Configure one instance to provide either dedicated or background daemon services. Having morethan one instance provide daemon services can result in duplicate tickets and unnecessary use ofsystem resources.
n Set the single daemon instance to either dedicated or background. Set the remaining instance tonone.
n Ensure that all but one instance is running without daemon services.For example:
WHDDaemonMode=none
Configuration options
When you configure your daemon settings, use the following options:
n Dedicated. The Help Desk Manager installation instance functions only as a daemon, and the loginpage is disabled.
n Background. The Help Desk Manager instance functions as a daemon, but users can also log in to it.
n None (default). The Help Desk Manager instance does not execute daemon tasks.
To configure a multiple instance installation, set the memory, the Tomcat deployment descriptor, and theWebObjects daemon mode.
ADMINISTRATOR GUIDE: HELP DESK MANAGER
page 282

You can configure only one Help Desk Manager instance to run as the daemon—either in dedicated orbackground mode. SolarWinds MSP recommends running the instance in background mode so that it canbe restarted when required—on a more frequent basis than the front-end instances—without interferingwith the front-end application.
Memory allocation
Allocate at least 256MB of RAM to your daemon processes. If the Help Desk Manager DaemonModeparameter is set to background, allocate an additional 256MB RAM beyond the amount allocated to otherinstances. This RAM configuration will support the daemon services memory resources in addition tosupporting the application user interface.
See the following sections to set the daemons required for multiple Tomcat instances:
n Set the Tomcat daemonn Set the Tomcat daemon memoryn Set the Web Objects daemon memory
Set the Tomcat daemon
1. Stop Help Desk Manager.2. Open the following file:
HelpDeskManager\conf\tomcat_web_template.xml
3. Set the Help Desk Manager Daemon Mode (near the end of the xml file) setting for the instance typedescribed above.
4. Save the file.
5. Restart Help Desk Manager.
Set the daemon memory
1. Stop Help Desk Manager.2. Open the following file:
HelpDeskManager\conf\whd.conf
3. Change the MAXIMUM_MEMORY setting to:
MAXIMUM_MEMORY=1024
4. Save the whd.conf file.
5. Restart Help Desk Manager.
Set the Web Objects daemon mode
1. Stop Help Desk Manager.
2. Open the wrapper_template.conf file located at:
\HelpDeskManager\bin\wrapper\conf\wrapper_template.conf
page 283

3. Add the following parameter to the end of the # Java Additional Wrappers section:
wrapper.java.additional.14=-DHDMDaemonMode=background
4. Save the file.
5. Restart Help Desk Manager.
SolarWinds MSP recommends creating a separate WebObjects Monitor application calledHelpdeskDaemon for the daemon instance. This naming convention ensures the WebObjects adapterdoes not attempt direct login requests intended for the Helpdesk instance to the daemon instance.
When completed, set the daemon instance application path to:
/Library/HelpDeskManager/bin/webapps/helpdesk/WEB-INF/Helpdesk.woa/Helpdesk
Since the default daemon mode is none, setting the HDMDaemonMode argument for non-daemoninstances is not required.
ADMINISTRATOR GUIDE: HELP DESK MANAGER
page 284

Customize tickets, notes, instructions, and emails withBBCodeHelp Desk Manager supports Bulletin Board Code (BBCode)—a lightweight markup code for formattingtext. BBCode tags use keywords encapsulated with square brackets.
Using BBCode, you can:
n Highlight text in an email
n Configure a clickable link
n Highlight important information in a device note
Help Desk Manager uses its own customizable implementation of BBCode. Below is an example of BBCodeyou can use in a Web page:
[size=20]Title[/size][img]http://www.SolarWinds MSP.com/favicon.ico[/img]<p>Lorem ipsum [b]dolor sit[/b] amet,[url=http://www.HelpDeskManager.com]consectetuer adipiscing[/url] elit. ***sociis natoque [i]penatibus et magnis[/i] dis parturient montes, nasceturridiculus</p>
Below is a list using BBCode.
[list][*]Fusce tellus. Proin in tellus sit amet nibh dignissim sagittis.[*]Sed convallis magna eu sem. Maecenas sollicitudin.[/list][*][color=blue]FAQ link:[/color] [faq id=1][*][u]FAQ link:[/u] <faq id=2>[/list]
This text—a mixture of BBCode and HTML—appears in the following format:
page 285

Help Desk Manager stores transformation rules for tags in the following location:
helpdeskmanager/bin/webapps/helpdesk/WEB-INF/Helpdesk.woa/Contents/Resources/bb_config.xml
The following sections provide addition information about working with BBCode to format custominformation in Help Desk Manager:
n Applying basic formattingn Creating your own tagsn Adding clickable links
Apply basic formatting
Basic markup follows a simple structure:
n Simple tags: [tag]something[/tag]
n Simple parameterized tags: [tag=value]something[/tag]
n Complex parameterized tags: [tag value1="xxx" value2="yyy"]something[/tag]
The following table lists the tags supported by Help Desk Manager:
TAG DESCRIPTION
[i]italics[/i] Formats the text in italics.
[b]bold[/b] Formats the text in bold.
[u]underscored[/u] Underlines the text.
[faq id=number] Provides a link to an existing FAQ.
ADMINISTRATOR GUIDE: HELP DESK MANAGER
page 286

TAG DESCRIPTION
[quote]Text[/quote] Adds a quote to your text.
[quote=Author]Text[/quote] Adds a quote from a specific author.
[code]your code here[/code] Embeds your code in one line of text.
[list][*]First item [*]Second item[/list]
Creates a list using your defined symbols.
Do not add any line breaks between the [list]and [/list] tags.
[img]URL[/img] Adds a hypertext link to an image.
[email]address[/email] Adds a link to an email address.
[email=address]Text[/email] Adds a predefined email address.
[google]key words[/google] Adds Google keywords.
[google=key words]Text[/google] Adds predefined Google keywords.
[color=name]Text[/color] Adds HTML color names.
[size=number of pixels]Text[/size] Defines the text size by specific number of pixels.
The maximum value is 38 pixels.
You can also use the following HTML tags with BBCode tags:
n <li>
n <ul>
n <ol>
n <font>
n <br />
n <p>
n <pre>
n <center>
n <faq>
n <hr>
n <strong>
You can implement BBCode in many areas, such as ticket subjects, request details, notes, and custom fielddescriptions.
page 287

Most ticket fields support BBCode, but some fields (such as secondary email fields in your accountdetails) do not support these fields. Be sure to test the code prior to implementation.
Create your own tags
You can create your own tags in the bb_config.xml file. For example, to use strike-through text, add thefollowing custom tag definition to bb_config.xml:
<!-- S -->
<match name="s">
<regex>(?s)(?i)\[s\](.*?)\[/s\]</regex>
<replace>
<![CDATA[
<strike>$1</strike>
]] >
</replace>
</match>
To apply the formatting, save your changes and restart Help Desk Manager.
Add clickable links
BBCode can detect HTTP and FTP links, emails, and universal naming control (UNC) paths, transformingthem into clickable links. If you add a clickable link to a YouTube or Vimeo video, Help Desk Manager canembed and display the video instead of the link.
You can also disable clickable links as well. In the bb_config.xml file, you can disable embedding videoinstead of displaying a link by locating all rules with a name starting with auto-youtube (or auto-vimeo) andcommenting them out with the following comment tag:
<!-- and -->
When completed, save your changes and restart Help Desk Manager to see the link instead of the video.
Below is an example of a clickable link using BBCode.
ADMINISTRATOR GUIDE: HELP DESK MANAGER
page 288

When you are working on an incident or writing an FAQ, you can refer to other tickets, referencing aspecific ticket or terms like request, case, or problem. To transform these references into clickable linksthat open the referenced tickets, create a rule.
To create a rule linking to other tickets, add the following syntax to the bb_config.xml file:
<match name="TicketLink" alwaysProcess="true">
<regex>(?s)(?i)((?:ticket|incident|case|problem|request)\s*)([0-9]+)</regex>
<replace>
<![CDATA[
<a href="http://HelpDeskManager.com:8081/
helpdesk/WebObjects/Helpdesk.woa/wa/TicketActionsview?ticket=$2">$1$2</a>
]]>
</replace>
</match>
Be sure to replace the URL with the link to your system.
Entering case 22 automatically creates a link to case 22, as shown below.
page 289

Customize your server settingsThe whd.conf server configuration file defines your server options, such as the http and https port, JavaVirtual Machine memory, and server IP address. This file is located at:
HelpDeskManager/conf/whd.conf
When you upgrade Help Desk Manager, the upgrade procedure only replaces the whd.conf.orig filelocated in the same directory. Use this file as a reference for new options available in the upgradedversion. You can copy options into the existing whd.conf file or replace the whd.conf file with thewhd.conf.orig file and edit the file as needed.
If you update the file, restart Help Desk Manager for changes to take effect. On Help Desk Managersystems running Microsoft Windows Server, restart your system using the Start menu option. RestartingWindows Services will not apply your configuration changes.
The following sections explain how to customize and use the default settings in the whd.conf file.
n Help desk portsn Privileged networksn Keystore settings (for SSL connections)n Memory allocationn Database connectionsn Java command line optionsn IP addressn JVM arguments
Unsecured and secured ports for login
Help Desk Manager uses the following unsecured and secure ports for log in:
DEFAULT_PORT=8081HTTPS_PORT=443
ADMINISTRATOR GUIDE: HELP DESK MANAGER
page 290

The Apache Tomcat application server that hosts Help Desk Manager is configured to use non-secure httpon port 8081 by default. To run on a different http port, change the DEFAULT_PORT value. Be sure that thenewly-selected port is available, or Help Desk Manager will not be able to start.
To run the application over https, uncomment the HTTPS_PORT option. To use the standard https port(443), the port must be available or Help Desk Manager will be unable to start. When the applicationsuccessfully starts up on the configured https port, it automatically generates a self-signed certificate at:
HelpDeskManager/conf/keystore.jks
No redirect to HTTPS
NO_REDIRECT=true
When both the DEFAULT_PORT and HTTPS_PORT are enabled, the default behavior is to automaticallyredirect all http requests to https. If this is not the desired behavior, uncomment the NO_REDIRECT=trueoption.
URL ports (optional)
URL_DEFAULT_PORT=8081 URL_HTTPS_PORT=443
In some deployments, Help Desk Manager needs to use a port other than the Tomcat port in URLs itgenerates for external links.
For example, a Tomcat web server can be configured to route requests for the default port (80) to go to thedefault Help Desk Manager port (8081) using a proxy pass. In this case, Help Desk Manager shouldgenerate URLs with port 80, rather than port 8081. Port 8081 could be configured behind a firewall and beunreachable from other systems.
Tomcat server port
TOMCAT_SERVER_PORT=23010
The port that Tomcat monitors for start/stop commands. If you are running multiple Tomcat instances,each instance on the same machine must use a different port.
Mail notification port
#MAIL_NOTIFICATION_PORT=79
Using the command finger nm_notifyuser to send the text finger nm_notifyuser to the MAIL_NOTIFICATION_PORT triggers the email daemon to check for new mail. Deploying this command alsostops automatic email account polling.
The default notification port is 79. To disable the mail notification listener, comment out this setting or setit to -1.
For more information on this port setting, see Request for Comments (RFC) 4146 on the InternetEngineering Task Force (IETF) website at www.ietf.org.
Java home location
JAVA_HOME=<homedirectory>
page 291

All Help Desk Manager installers include a Java JVM as part of the installation package, so a separate Javainstall is not required. While not recommended, it is still possible to use a different JVM by providing thepath to the JRE in this setting. On Windows, the path would be:
JAVA_HOME=C:\Progra~1\Java\jre8
IP address
IP_ADDRESS=
By default, Tomcat listens on the configured DEFAULT_PORT and HTTPS_PORT for all IP addressesassigned to the machine. To limit Tomcat to a specific port, use this setting.
Privileged networks
Privileged networks are networks that allow database updates.
In the whd.conf server configuration file, the PRIVILEGED_NETWORKS= setting identifies networks thatallow database updates. If the database requires an update, browser connections from hosts notbelonging to these privileged networks receive a message indicating an update is in progress.
Use the PRIVILEGED_NETWORKS= setting when installing headless servers.
You can customize the browser message by editing login.msg.applicationUpdateInProgress inthe custom labels file.
To remove the info popup icon on this page, use an empty entry for:
login.msg.applicationUpdateInProgressHelp
The localhost (127.0.0.1) is always permitted to update. However, a Windows server with multiple IPaddresses may not respond to the localhost address. In this example, the IP_ADDRESS option must be setto one of the server IPs, and the PRIVILEGED_NETWORK should also use that same IP.
Keystore settings (for SSL connections)
The keystore settings contain the password Help Desk Manager should use to access the Java keystore. TheJava keystore comprises the certificate used for SSL connections. Both the Java keystore and the certificateinside it (aliased by the name tomcat) must use this password.
The following table lists the keystore settings.
SETTING DESCRIPTION
KEYSTORE_PASSWORD=changeit
If you are using SSL, ensure that thepassword matches the password set whenyou created the new tomcat keypair.
KEYSTORE_FILE= The default keystore file is:
HelpDeskManager/conf/keystore.jks
ADMINISTRATOR GUIDE: HELP DESK MANAGER
page 292

SETTING DESCRIPTION
KEYSTORE_TYPE=JKS The keystore type can be JKS (default) orPKCS12.
Memory allocation
Most Help Desk Manager systems perform well on 3.0 GHz systems with 3GB RAM. However, when youcreate a large number of techs, consider the hardware used and the system configuration. SolarWindsMSP recommends adding 1GB of memory to the Help Desk Manager server for every 10 additional techs.
Database connectionsDATABASE_CONNECTIONS=10
The maximum number of connections made between the Help Desk Manager application and theconfigured database. Larger installations may want to increase this value. One connection for every fivesimultaneous users is a conservative ratio.
Java command line optionsJAVA_OPTS=""
Use this property to override the default options for several Help Desk Manager settings. Place the entireset of arguments between the pair of quotes, and follow the format:
JAVA_OPTS="-Darg1=true -Darg2=true
This property is only effective on Linux servers. For Windows servers, additional JVM arguments must bespecified in the Java Additional Parameters section of the wrapper_template.conf file located at<HelpDeskManager>\bin\wrapper\conf\wrapper_template.conf.
The following table provides a list of the available command-line options.
OPTION DESCRIPTION
-DWHDEmailCheckInterval=60 Sets the number ofseconds between eachemail check.
-DWHDLdapPasswordCacheHours=168 Sets the number ofhours LDAP passwordsare cached in the HelpDesk Managerdatabase.
Enter 0 to disablecaching.
page 293

OPTION DESCRIPTION
-DWHDDashboardEnabled=true Enables the TicketsDashboard option inthe user interface.
Set to false to removethe Tickets > Dashboardtab for all users.
-DWHDsql=false Enables SQL debuglogging to thehelpdesk.log file.
Set to true to enableSQL debug logging tohelpdesk.log
-DWHDDaemonMode=background Describes how thetargeted daemon willrun in this instance.
Set to background torun a daemon as abackground process.
JVM arguments
JVM arguments are flags that are passed to the Java Virtual Machine at the time the application islaunched. On Linux machines, they can be provided through the JAVA_OPTS setting in the whd.conf file.Configure Windows machines located at:
HDM_home>/bin/wrapper/conf/wrapper_template.conf
For example, on a Linux installation, you could disable concurrent request handling and set the Casperrequestor thread count to 6 by setting JAVA_OPTS in the whd.conf file as follows:
JAVA_OPTS=“-DWHDconcurrentRequests=false -DCasper9RequestorThreadCount=6"
The syntax for Windows machines (in wrapper_template.con) is slightly different:
wrapper.java.additional.12=-DWHDconcurrentRequests=false
wrapper.java.additional.13=-DCasper9RequestorThreadCount=6
The number to use for each line depends on your particular configuration. Additionally, if you areadding arguments, you must use -D<argument>.
ADMINISTRATOR GUIDE: HELP DESK MANAGER
page 294

ARGUMENT VALUE DEFAULT DESCRIPTION
activemq.broker.port <port> 61616 Defines port used by ActiveMQ. Needs to be uniqueper instance if you plan to run multiple Help DeskManager instances on a single machine.
Casper9RequestorThreadCount integer 4 Provides number of threads sending REST requests tothe JSS server during asset synchronization usingCasper 9 plug-in.
WHDlog4jConfigOverride true |false
false If true, defines Help Desk Manager does not use thedatabase settings configured at Setup > General >Logs to override the standard configuration of log4j.
whd.smtp.host <host> Defines the default SMTP server host to use whenrunning in hosted mode.
whd.smtp.port <port> Defines the default SMTP server port to use whenrunning in hosted mode.
whd.stdDeploy true |false
false Indicates that Help Desk Manager is running in astandard deployment. Standard deployment is thedefault configuration the Help Desk Manager installerprovides, with an embedded Tomcat deployment at<HDM_home>/bin/tomcat/, the Help Desk Managerapplication at <HDM_home>/bin/webapps/, and theconfiguration files at <HDM_home>/conf/. The HelpDesk Manager start script automatically supplies thisparameter.
org.apache.tomcat.util.http.ServerCookie.ALLOW_HTTP_SEPARATORS_IN_V0
true |false
false Is an essential argument for the Spring servlet. Itallows special characters from whduser_helpdeskcookie to be parsed. The argument is set to true for allstandard deployments where the parameter isprovided automatically by the Help Desk Managerstart script or wrapper_template.conf. The sameargument should also be applied also for non-standarddeployments.
WHDconnections <count>
10 Provides the number of allowed simultaneousconnections to the database. The actual number usedcan be twice this value, and even a few more whencertain background processes are running.
page 295

ARGUMENT VALUE DEFAULT DESCRIPTION
WHDconcurrentRequests true |false
true Indicates whether Help Desk Manager should processrequests sequentially or simultaneously (in separatethreads). There is a known risk of deadlock whenconcurrent requests are enabled and multiple browserwindows are open for a given session. However,disabling concurrent requests can result in degradedperformance when a request is slow to respond – suchas a request to generate a computation-intensivereport.
WHDhosted true |false
false (Hosted) Determines whether Help Desk Managershould run in hosted mode. When running in hostedmode, the Help Desk Manager hosted password mustalso be provided. Hosted mode requires an account IDto be included in the login URL, and disables certainfeatures (e.g., database and log settings).
Only customers who are authorizedhosting providers have access to HelpDesk Manager hosted features.
WHDhostedStandalone true |false
false (Hosted) Determines whether Help Desk Managershould run in hosted standalone mode. When runningin hosted standalone mode, certain features aredisabled (e.g., database and log settings). Unlikeregular hosted mode, only one account is serviced, andthe login URL does not need to include an account ID.Help Desk Manager uses this mode is used when theinstallation with its own database is hosted.
WHDhostedAlertsFeed <url> (Hosted) Optional URL to an RSS feed used to generateMessages in hosted accounts.
WHDhostedSubscriberRange x..y |x..
(Hosted) Provides range of subscriber accounts to beserviced by this hosted instance. If y is omitted, itdefaults to 1000000. Used only when running inhosted mode as a daemon, to enable distribution ofthe hosted daemon load across multiple daemoninstances.
WHDhostName <host> webhelpdesk.com
(Hosted) Identifies host to use in URLs back to HelpDesk Manager.
ADMINISTRATOR GUIDE: HELP DESK MANAGER
page 296

ARGUMENT VALUE DEFAULT DESCRIPTION
WHDsecureHostName <host> secure.webhelpdesk.com
(Hosted) Identifies host to use in HTTPS URLs back toHelp Desk Manager.
WHDdemo true |false
false Determines whether Help Desk Manager should run indemo mode. Running in demo mode, disables certainfeatures such as database and log settings and theability to save Setup menu changes. Also replacesoccurrences of DemoSandbox.woa in URLs with thename of the application as defined in WebObjectsMonitor (plus .woa).
WHDliveDemo true |false
false Determines whether Help Desk Manager should run inlive demo mode. Allows some functionality thatregular demo mode does not, such as changing thelook and feel.
WHDsupport true |false
false Defines whether Help Desk Manager should run as theHelp Desk Manager support application. Whenrunning as the Help Desk Manager supportapplication, clients must provide a license key with anunexpired support license in order to submit a ticket,and the parameters of their support license aredisplayed in the Tech view of their tickets.
TEST true |false
false Determines whether Help Desk Manager should run inTEST mode. Test mode enables certain features thatare helpful during development, e.g., the ability to runindividual daemons manually, by clicking links at thefooter of each web page; the ability to preview e-mailsin the browser when editing a ticket; and the ability toedit help popups by clicking on labels. Test mode alsoprovides some protections like disabling e-mail frombeing sent to clients that are created when bulk-synchronizing with an LDAP connection.
WHDsql true |false
false Enables logging of each SQL statement.
WHDtimeouts true |false
false Designates whether LDAP and asset discoveryconnections timeout when an error occurs whileattempting to establish a connection. Timeoutduration is six daemon intervals.
page 297

ARGUMENT VALUE DEFAULT DESCRIPTION
WHDFingerPort <port>| -1=disabled
79 Prescribes the port on which Help Desk Managerlistens for finger protocol requests, which indicate thatit should begin an EmailDaemon cycle to get new e-mail.
WHDIgnoreClientPassword true |false
false Allows users to log in without providing a validpassword. We probably don't want to document thisfeature for public consumption.
WHDPrivilegedNetworks <list> localhost Provides Classless Inter-Domain Routing (CIDR)-formatted, comma-separated list of addresses ornetworks that determines which browsers havepermission to do one of the following:
n Configure the database connection settings.
n Begin the database schema update process.
n Replace an invalid license key after a versionupdate.
WHDPort <port> 80 if hosted Prescribes the port to use in URLs that refer back toHelp Desk Manager. If -1 is given, the port is takenfrom PREFERENCE.HOST_PORT. If hosted, 80 is usedregardless of this setting.
WHDSecurePort <port> 443 Defines the port to use for HTTPS URLs that refer backto Help Desk Manager. If a standard Tomcatdeployment (see whd.stdDeploy), -1 will be read as443. If not a standard Tomcat deployment, the port istaken from PREFERENCE.HOST_PORT_SSL. If hosted,443 is used regardless of this setting.
WHDLabelsFolder <path> <HDM_home>/conf/labels/Helpdesk.woa/..
(Hosted/Dev) Path to labels folder. Regardless of thissetting, if a standard Tomcat deployment (seewhd.stdDeploy), <HDM_home>/conf/labels will besearched first, and thenHelpdesk.woa/Contents/Resources/labels. Otherwise,the default path will be the folder aboveHelpdesk.woa.
ADMINISTRATOR GUIDE: HELP DESK MANAGER
page 298

ARGUMENT VALUE DEFAULT DESCRIPTION
WHDReportPlugInDir <path> /Helpdesk.woa/../ReportPlugIns
Determines path to the report plugins directory ordirectories. The default path is in the ReportPlugInsdirectory above Helpdesk.woa. Multiple directoriesmay be specified by separating them with the pathseparator character (':'). If the path string begins with aplus sign ('+'), the provided paths will be included inaddition to the default path.
During development, the path may point to a classesfolder containing the unarchived contents of a plugin.Also during development, changes to plugins areautomatically reloaded. (If development mode isn'tdetected automatically, it can be forced with the JVMargumenter.extensions.ERXApplication.developmentMode=true.)
WHDDiscoveryPlugInDir <path> /Helpdesk.woa/../DiscoveryPlugIns
Defines path to the discovery plugins directory. Thedefault path is the DiscoveryPlugIns directory aboveHelpdesk.woa. (See additional notes forWHDReportPlugInDir.)
WHDDashboardPlugInDir <path> /Helpdesk.woa/../DashboardPlugIns
Provides path to the dashboard widget pluginsdirectory. The default path is the DashboardPlugInsdirectory above Helpdesk.woa. (See additional notesfor WHDReportPlugInDir.)
WHDEnableSQLTool true |false
false Prescribes whether the endpoint for querying thedatabase is active. If true, an SQL query tool can beaccessed athttp://localhost:8081/helpdesk/WebObjects/Helpdesk.woa/wa/DBActions/sqlTool
WHDInitSchemaOnly true |false
false If true, then when initializing the database, theapplication stops after creating the schema, beforepopulating the database. This makes it possible tocreate the empty database schema, which can bepossible when migrating data from another databasetype.
WHDDisableImapPartialFetch true |false
false Sets the mail.imap.partialfetch property for IMAPconnections to false, which can be necessary for somemail servers that fail to return attachment dataproperly.
page 299

ARGUMENT VALUE DEFAULT DESCRIPTION
WHDLdapPasswordCacheHours <hours>
168 (1 week) Provides default number of hours for LDAPConnection password caching. Can be overridden inthe settings for individual LDAP Connections.
WHDSkipForeignKeyCheck true |false
false Defines whether the schema update process shouldcheck and repair foreign-key constraints.
WHDSkipPrimaryKeyCheck true |false
false Prescribes whether the schema update process shouldcheck and repair primary-key constraints.
WHDDisableSessionHeartbeat true |false
false Determines whether the application should attempt todetect whether a ticket edit session has beenabandoned by leaving the page. When enabled, theticket editor sends "pulse" requests toHelpdesk.woa/wa/processHeartbeat according to theinterval specified by WHDSecondsBetweenHeartbeat.Each heartbeat request includes the ticket ID, theticket editing session ID (a PK into the ACTIVE_SESSIONtable, not to be confused with the application sessionID itself), and a count that is incremented for eachheartbeat, starting over at 0 whenever the editing pageis refreshed. When the heartbeat request is processed,an ACTIVE_SESSION record indexed by the ticket IDand the editing session ID is updated with the currenttime.
When the amount of time specified byWHDHeartbeatTimeoutSeconds has passed withoutreceiving a heartbeat, the ticket editing session isconsidered to have been abandoned, and editing locksfor the ticket are cleared.
When the heartbeat count reachesWHDHeartbeatWarningCount, a warning message islogged. If the heartbeat count reachesWHDMaxHeartbeatCount, the ticket editor stopssending heartbeats, and the application stopsupdating the ACTIVE_SESSION table when the ticketsare processed.
WHDSecondsBetweenHeartbeat <seconds>
55 Defines the interval at which the ticket editor sendsheartbeat requests toHelpdesk.woa/wa/processHeartbeat. (SeeWHDDisableSessionHeartbeat.)
ADMINISTRATOR GUIDE: HELP DESK MANAGER
page 300

ARGUMENT VALUE DEFAULT DESCRIPTION
WHDHeartbeatTimeoutSeconds <seconds>
120 Identifies the amount of time without receiving aheartbeat until a ticket editing session is considered tohave been abandoned.
WHDHeartbeatWarningCount <integer>
30 Prescribes the number of ticket editor heartbeats untila warning message is logged. (Used fortroubleshooting.)
WHDMaxHeartbeatCount <integer>
10000 Defines the maximum number of heartbeats thatshould be sent from a given ticket editing session.
WHDDatabaseUpdatePassword <password>
<none> If a password is provided, the database update processmay be initiated by sending a GET request toHelpdesk.woa/wa/DBActions/performDatabaseUpdate?password=<password>. When a database updatehas been initiated through this method, subsequentrequests to this URL return progress statistics.
WHDMaxDashboardWidgets <integer>
-1 Maximum number of widgets that a given tech mayconfigure on her dashboard. -1 = unlimited, 0 =disabled.
WHDReportingAppName <applicationname>
(Hosted) If provided, the given application name isused instead of the current application name whengenerating bookmark-able links to specific reports.This was provided so that Macquarie University couldhave an instance with a large amount of memorydedicated for running reports, and have thebookmark-able URLs from the non-reporting instancespoint to the reporting instance.
WHDBcryptRounds <integer>
10 Provides how many rounds of encryption to use whencreating Bcrypt digests. (Eventually, password digestsmay be generated using the more secure Bcryptalgorithm instead of MD5, but for now, Bcrypt is usedonly to generate the version number hash inAppProperties_Generated.java. We can switch toBcrypt for passwords as soon as we upgrade theMobile app to no longer send passwords as MD5digests. All that is required to make the switch in theapplication is to change the order in which digestproviders are configured in MDSDigestString.java.)
page 301

ARGUMENT VALUE DEFAULT DESCRIPTION
WHDEstimatedActiveCustomFields
<integer>
2000 Identifies estimated number of custom fields of anyentity type that are likely to be active. ("Active" customfields are those that are not empty are not marked asdeleted.) Used as a heuristic for optimizing theremoval of inactive custom fields from the database,which is performed each time the application starts upin order to optimize the performance of custom fieldhandling.
WHDUpdateSqlLog <path> If provided, SQL generated for updating the databaseschema is written to the specified file instead of beingcommitted to the database. Useful for generating anupdate script that can be applied to the databasemanually.
WHDAllowAbsoluteManageSQLiteDatabase
true |false
false If true, the Discovery Connection panel for AbsoluteManage allows the user to select the Absolute ManageSQLite database instead of the MySQL database.Disabled by default because Absolute Manage says theSQLite database is subject to change and isn't asupported means of accessing discovered data.
WHDWebObjectsMonitorDeployment
true |false
false If true, the application acts as if deployed fromWebObjects Monitor regardless of whether this is thedetected deployment environment. (When running inWebObjects Monitor, the application does not redirectto the HDM-web application, which runs only as aservlet, and therefore certain functionality is disabled.)
WHDDisableSnapshotRefCounting
true |false
false If true, EOF snapshot-reference counting is disabled.This can prevent errors about EOF snapshots, but itmeans that all records fetched from the database areretained in memory. This is provided fortroubleshooting. It is unlikely to be a viable option forproduction deployments because it is likely to requiretoo much memory.
WHDEnableOutgoingMailHistory
true |false
true Determines whether history should be maintained foremail that is sent. Outgoing e-mail history can beviewed at Setup > E-Mail > Outgoing Mail Accounts > E-Mail History. History entries include binary copies ofthe actual e-mail message, which can result in largeamounts of database usage over time. The E-MailHistory tab provides an option to clear the history.
ADMINISTRATOR GUIDE: HELP DESK MANAGER
page 302

ARGUMENT VALUE DEFAULT DESCRIPTION
WHDEnableScripts true |false
false If true, the application looks in the scripts folder forthe existence of JavaScript files with predefined namesthat corresponding to certain callback actions.Currently, only LoginCallback.js andNewTicketUrlCallback.js are supported.
WHDDisableScriptCache true |false
false Whether scripts should be cached or reloadedwhenever referenced. Should be true only whentesting/troubleshooting.
WHDScriptLogLevel "TRACE" |"DEBUG" |"INFO"|
"WARN" |"ERROR"
"ERROR" Defines the level of detail at which script executionshould be logged.
WHDScriptFolder <path> <whd_home>/conf/scripts
Folder in which to look for scripts.
WHDScriptLogFolder <path> <whd_home>/log/Helpdesk.woa/..
Folder in which script log will be written. Script log isnamed "scripts.log," rolled over up to 5 times in 15MBfiles.
WHDDisableExternalAuth true |false
false If true, SSO is disabled regardless of selection at Setup> General > Authentication > Authentication Method.
WHDUseAppNameForLoginUrl true |false
true (Hosted) If true, the URL used when generating URLsthat refer back to WHD will use the application name(e.g., "HostedHelpdesk") rather than simply using thevalue stored in PREFERENCE.SAVED_LOGIN_URL.Setting this to false allows instances that are speciallyconfigured for things like reporting (e.g.,"OneHelpReporting") to use the application namespecified for general instances (e.g., "OneHelp") whenconstructing links back to WHD in reports, etc.
page 303

ARGUMENT VALUE DEFAULT DESCRIPTION
WHDWebUrl <url> /whd-web Base URL to the whd-web application. Specifying a fullURL could be useful during development in order toredirect to a different port than the one on which theWebObjects application is being served whiledebugging.
WHDPrivateBaseUrl <url> Provides the URL to use for backend communicationbetween helpdesk and whd-web applications. This isconstructed automatically by the WHD start scripts.Typically configured as "http://localhost:<port>" or"https://localhost:<secure_port>," where <port> and<secure_port> are the WHD HTTP ports configured inwhd.conf.
WHDDisableGSW true |false
false If true, then when database connection issues aredetected, the old database connection configurationpanel will be presented instead of redirecting to thenew Getting Started Wizard. (Can be useful duringdevelopment.)
WHDhostedDbHost Deprecated. No longer used. Use whd.db.hostinstead.
WHDhostedDbName Deprecated. No longer used. Use whd.db.nameinstead.
WHDhostedDbUserName Deprecated. No longer used. Use whd.db.usernameinstead.
WHDhostedDbPassword Deprecated. No longer used. Use whd.db.passwordinstead.
(All properties in <whd_home> /conf /.whd.properties>)
Any of the database-connection properties recorded in<whd_home>/conf/.whd.properties can be specifiedas JVM arguments. This can be useful to ensure thatthe application uses the correct parameters in theevent that there is a failure reading the.whd.properties file.
WHDEnterpriseObjectCreationTracing
true |false
false If enabled, MDSGenericRecord records stack traces ofwhere objects are created, which can be used when anIllegalStateException occurs inMDSGenericRecord.willRead() -- which happens whenan attempt is made to access an EO after its editingcontext has been disposed.
ADMINISTRATOR GUIDE: HELP DESK MANAGER
page 304
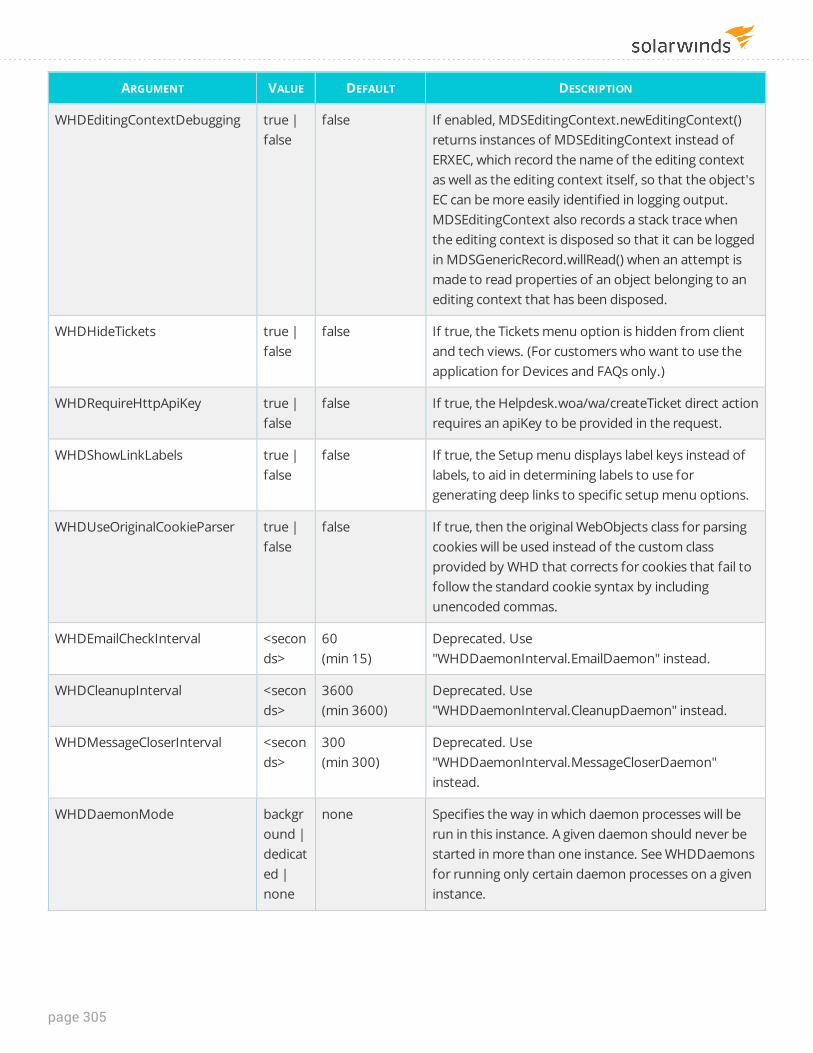
ARGUMENT VALUE DEFAULT DESCRIPTION
WHDEditingContextDebugging true |false
false If enabled, MDSEditingContext.newEditingContext()returns instances of MDSEditingContext instead ofERXEC, which record the name of the editing contextas well as the editing context itself, so that the object'sEC can be more easily identified in logging output.MDSEditingContext also records a stack trace whenthe editing context is disposed so that it can be loggedin MDSGenericRecord.willRead() when an attempt ismade to read properties of an object belonging to anediting context that has been disposed.
WHDHideTickets true |false
false If true, the Tickets menu option is hidden from clientand tech views. (For customers who want to use theapplication for Devices and FAQs only.)
WHDRequireHttpApiKey true |false
false If true, the Helpdesk.woa/wa/createTicket direct actionrequires an apiKey to be provided in the request.
WHDShowLinkLabels true |false
false If true, the Setup menu displays label keys instead oflabels, to aid in determining labels to use forgenerating deep links to specific setup menu options.
WHDUseOriginalCookieParser true |false
false If true, then the original WebObjects class for parsingcookies will be used instead of the custom classprovided by WHD that corrects for cookies that fail tofollow the standard cookie syntax by includingunencoded commas.
WHDEmailCheckInterval <seconds>
60(min 15)
Deprecated. Use"WHDDaemonInterval.EmailDaemon" instead.
WHDCleanupInterval <seconds>
3600(min 3600)
Deprecated. Use"WHDDaemonInterval.CleanupDaemon" instead.
WHDMessageCloserInterval <seconds>
300(min 300)
Deprecated. Use"WHDDaemonInterval.MessageCloserDaemon"instead.
WHDDaemonMode background |dedicated |none
none Specifies the way in which daemon processes will berun in this instance. A given daemon should never bestarted in more than one instance. See WHDDaemonsfor running only certain daemon processes on a giveninstance.
page 305

ARGUMENT VALUE DEFAULT DESCRIPTION
background: Daemons will run as backgroundprocesses.dedicated: Application will ONLY run backgroundprocesses; users will not be able to log in to thisinstance.none: Daemons will not be run in this instance.
WHDDaemons [-]<list> All daemonsenabled
Provides comma-separated list of daemons to start, ifWHDDaemonMode is background or dedicated. If listis preceded by a minus sign, all daemons EXCEPT thosein the list will be started.
WHDDaemonInterval <seconds>
300 / 600(min 60)
Defines the default daemon interval in seconds.Default is 300 seconds (5 mins) for standarddeployments, 600 seconds (10 mins) for hosteddeployments. Most daemons have a minimum intervalof 60 seconds. (DelayedActionDaemon has a 20sdefault and 15s minimum; MessageCloserDaemon hasa default and minimum interval of 5 mins;CleanupDaemon has a default and minimum intervalof 1 hr; and EmailDaemon has a default interval of 60sand a minimum of 15s.)
WHDDaemonInterval.EmailDaemon
<seconds>
60(min 15)
Designates the interval (in seconds) between checksfor incoming ticket e-mail. Default is 60 seconds.Minimum is 15 seconds.
WHDDaemonInterval.LdapSyncDaemon
<seconds>
300 / 600(min 60)
Defines the interval (in seconds) between checks forwhether an LDAP sync is needed. Default is 300seconds (5 mins) for standard deployments, 600seconds (10 mins) for hosted deployments. Minimumis 60 seconds.
WHDDaemonInterval.AlertDaemon
<seconds>
300 / 600(min 60)
Prescribes the interval (in seconds) between checks forwhether ticket alerts need to be sent. (Alerts areconfigured in Setup > Tickets > Priority Types.)
WHDDaemonInterval.TicketCloserDaemon
<seconds>
300 / 600(min 60)
Identifies the interval (in seconds) between checks fortickets that need to be auto-closed. (Auto closure isconfigured for status types in Setup > Tickets > StatusTypes.)
ADMINISTRATOR GUIDE: HELP DESK MANAGER
page 306

ARGUMENT VALUE DEFAULT DESCRIPTION
WHDDaemonInterval.ClientReminderDaemon
<seconds>
300 / 600(min 60)
Designates the interval (in seconds) between checksfor tickets that are due for a reminder to be e-mailedto the client that the ticket is waiting for their reply.Reminders are configured in Setup > Tickets > PriorityTypes.
WHDDaemonInterval.ServiceExpirationDaemon
<seconds>
300 / 600(min 60)
Defines the interval (in seconds) between checks forservice time blocks that have expired. Service blocksare configured in Setup > Parts & Billing.
WHDDaemonInterval.ReportScheduleDaemon
<seconds>
300 / 600(min 60)
Identifies the interval (in seconds) between checks forreports that are due to be e-mailed. Report schedulesare configured at Reports > Report Schedules.
WHDDaemonInterval.AssetReservationDaemon
<seconds>
300 / 600(min 60)
Prescribes the interval (in seconds) between checks forasset reservations that should be checked outautomatically, and for checked-out assets that areoverdue. Reservations are configured at Assets >Reservations.
WHDDaemonInterval.DelayedActionDaemon
<seconds>
20(min 15)
Designates the interval (in seconds) between checksfor e-mail that has been queued for sending in thebackground.
WHDDaemonInterval.ServletPulseDaemon
<seconds>
900(min 60)
Determines the interval (in seconds) betweentriggering of new dummy session. Used only in Tomcatdeployments. (Attempt to work around strangehangups that appear to happen only when runningunder Tomcat, and seem to be prevented by invokinga request that generates a new session.)
WHDDaemonInterval.ApplePushNotificationsDaemon
<seconds>
14400(min 60)
Provides the interval (in seconds) between checks forApple devices that should no longer receive pushnotifications.
WHDDaemonInterval.AssetDiscoveryDaemon
<seconds>
300 / 600(min 60)
Identifies the interval (in seconds) between checks forwhether an Asset Discovery Connection is due to berun.
WHDDaemonInterval.BackupDaemon
<seconds>
300 / 600(min 60)
Designates the interval (in seconds) between checksfor whether a database backup is due.
WHDDaemonInterval.GarbageCollectionDaemon
<seconds>
300 / 600(min 60)
Specifies the interval (in seconds) between Javagarbage collection triggers.
page 307

ARGUMENT VALUE DEFAULT DESCRIPTION
WHDDaemonInterval.CleanupDaemon
<seconds>
3600(min 3600)
Designates the interval (in seconds) between runs ofthe cleanup daemon. The cleanup daemon performsvarious cleanup tasks such as deleting tickets with norequest type; setting the DELETED field to 0 for anytickets for which the value is null; deleting single-usebulk actions that have completed; adding 2000 yearsto any ticket open or close dates prior to the year 100;and removing expired e-mail history entries.
WHDDaemonInterval.MessageCloserDaemon
<seconds>
300(min 300)
Interval in seconds between checks for whether anyMessages are due for closing.
WHDDaemonInterval.AssetAlertDaemon
<seconds>
3600(min 60)
Defines the interval (in seconds) between checks forassets that have alerts due for contract expiration,warranty expiration, and lease expiration.
WHDDaemonInterval.ApprovalReminderDaemon
<seconds>
300(min 60)
Identifies the interval (in seconds) between checks forapproval requests that need reminder e-mails.
WHDDaemonInterval.SurveyReminderDaemon
<seconds>
300 (min 60) Provides the interval (in seconds) between checks forunanswered surveys that need reminder e-mails.
WHDDaemonInterval.InventoryDaemon
<seconds>
300(min 60)
Designates the interval (in seconds) between checksfor inventories that are below the threshold forrequiring alert e-mails.
WHDDaemonInterval.SupportExpirationDaemon
<seconds>
86400(min 60)
Specifies the interval (in seconds) between supportexpiration checks. All admin-level techs receiveexpiration warning emails.
WHDPageCacheSize <#pagescached>
10
(min 2)
Sets the number of pages cached by the WO forbacktracking, can be used for tweaking memoryconsumption.
Use carefully; numbers 0 and 1 cancause issues.
NCENTRAL true |false
false Defines whether the application is running as thestandard Help Desk Manager:
false = Standard
ADMINISTRATOR GUIDE: HELP DESK MANAGER
page 308

ARGUMENT VALUE DEFAULT DESCRIPTION
Help Desk Manager is the default configurationprovided by the WHD installers, with an embeddedTomcat at <HDM_home>/bin/tomcat/, HDMapplication at <HDM_home>/bin/webapps/,configuration files at <HDM_home>/conf/, etc. Thisparameter is NOT provided by the start script (notprovided = false).
true =SolarWinds MSP[[[Undefinedvariable Variables.Help DeskManager]]]
The configuration provided by the Help Desk Managerinstallers, with an embedded Tomcat at <HDM_home>/bin/tomcat/, HDM application at <whd_home>/bin/webapps/, configuration files at <whd_home>/conf/, etc. This parameter is providedautomatically by the HDM start script.
This argument should not be changed on the alreadyinstalled Help Desk Manager. It is provided by theinstaller. The only exception is the HDM running incustom tomcat (single / multi instance), then theargument has to be added manually along with otherarguments.
WHDLogMaxSize Size inMB
15 Presents size of helpdesk.*log files.
WHDLogFileCount <# offiles>
5 Provides count of helpdesk.*log files generated bylog4j.
Connect an iPhone to a standard or hosted installationYou can connect an Apple iPhone to a standard or hosted Help Desk Manager installation.
Connect to a standard installation
1. Navigate to Settings > Server.
2. Make sure the Configuration option is set to Default.
3. Input the DNS name of the server on which Help Desk Manager is installed.
4. Set the appropriate port.
Port 8081 is the default port number, unless it has been changed in the whd.conf file or ServerOptions.
page 309

5. Turn on SSL only if it has been enabled in the whd.conf file or Server Options. If SSL is enabled,make sure the port option matches the SSL port.
Connect to a hosted installation
1. Navigate to Settings > Server.
2. Make sure the Configuration option is set to Hosted.
3. In the Account # field, specify your Subscriber ID number.You can find your ID in the Hosted Help Desk Manager application at Setup > General > Options >Custom Login URL. Your ID is the number at the end of the login URL.
4. Set the Host to:
webhelpdesk.com
5. Set the SSL option to:
On
6. Return to Settings and add the Tech Username and Password to connect with and set upNotifications.
7. Click Done to authenticate the iPhone configured in the Help Desk Manager server.
ADMINISTRATOR GUIDE: HELP DESK MANAGER
page 310