Ingres r3 System Administrator Guide
291
System Administrator Guide r3 P00265-1E Ingre s
-
Upload
khangminh22 -
Category
Documents
-
view
3 -
download
0
Transcript of Ingres r3 System Administrator Guide

System Administrator Guide r3
P00265-1E
Ingres

This documentation and related computer software program (hereinafter referred to as the “Documentation”) is for the end user’s informational purposes only and is subject to change or withdrawal by Computer Associates International, Inc. (“CA”) at any time.
This documentation may not be copied, transferred, reproduced, disclosed or duplicated, in whole or in part, without the prior written consent of CA. This documentation is proprietary information of CA and protected by the copyright laws of the United States and international treaties.
Notwithstanding the foregoing, licensed users may print a reasonable number of copies of this documentation for their own internal use, provided that all CA copyright notices and legends are affixed to each reproduced copy. Only authorized employees, consultants, or agents of the user who are bound by the confidentiality provisions of the license for the software are permitted to have access to such copies.
This right to print copies is limited to the period during which the license for the product remains in full force and effect. Should the license terminate for any reason, it shall be the user’s responsibility to return to CA the reproduced copies or to certify to CA that same have been destroyed.
To the extent permitted by applicable law, CA provides this documentation “as is” without warranty of any kind, including without limitation, any implied warranties of merchantability, fitness for a particular purpose or noninfringement. In no event will CA be liable to the end user or any third party for any loss or damage, direct or indirect, from the use of this documentation, including without limitation, lost profits, business interruption, goodwill, or lost data, even if CA is expressly advised of such loss or damage.
The use of any product referenced in this documentation and this documentation is governed by the end user’s applicable license agreement.
The manufacturer of this documentation is Computer Associates International, Inc.
Provided with “Restricted Rights” as set forth in 48 C.F.R. Section 12.212, 48 C.F.R. Sections 52.227-19(c)(1) and (2) or DFARS Section 252.227-7013(c)(1)(ii) or applicable successor provisions.
2004 Computer Associates International, Inc.
All trademarks, trade names, service marks, and logos referenced herein belong to their respective companies.

Contents iii
Contents
Chapter 1: Introduction Audience .................................................................................... 1-1 Special Considerations ........................................................................ 1-1
Statements and Commands ................................................................ 1-2 Conventions.................................................................................. 1-2
Operating System Differences .............................................................. 1-2 Entering Data from the Keyboard........................................................... 1-3 Terminology.............................................................................. 1-3 Syntax ................................................................................... 1-3
Chapter 2: Overview Installation ................................................................................... 2-1 Architecture.................................................................................. 2-2
DBMS Server ............................................................................. 2-3 Query Execution .......................................................................... 2-3 DBMS Server Facilities .................................................................... 2-4 General Communication Facility ........................................................... 2-5 JDBC Connectivity ........................................................................ 2-6 .NET Data Provider Connectivity........................................................... 2-6 Internet Communications .................................................................. 2-7 Querying and Reporting Tools ............................................................. 2-7 Visual Tools .............................................................................. 2-7 Logging and Locking Systems............................................................. 2-10
Chapter 3: Configuration Accessing Configuration Tools ................................................................. 3-2 Component Configurations .................................................................... 3-3
Adding, Deleting, or Renaming a Server Component Configuration ........................... 3-3
iv System Administrator Guide
Changing Properties for a Component....................................................... 3-3 Configuring Parameters.................................................................... 3-4
Components .................................................................................. 3-5 DBMS Server.............................................................................. 3-6 Data Access Server ........................................................................ 3-8 Communications Server.................................................................... 3-8 Bridge Server ............................................................................. 3-9 Star Server ................................................................................ 3-9 Name Server .............................................................................. 3-9 Recovery Server .......................................................................... 3-10 Internet Communications ................................................................. 3-10 Locking System .......................................................................... 3-11 Logging System .......................................................................... 3-11 Configuring Multiple Log Partitions........................................................ 3-11 Primary Transaction Log and Dual Transaction Log ......................................... 3-12 Archiver Process ......................................................................... 3-12 Remote Command........................................................................ 3-12
Viewing a History of Changes ................................................................. 3-13
Chapter 4: Setting Environment Variables/Logicals Scope ........................................................................................ 4-1 Windows Environment Variables ............................................................... 4-2 UNIX Environment Variables .................................................................. 4-2 VMS Logicals ................................................................................. 4-3 Installation-Wide Environment Variables/Logicals ............................................... 4-3
User-Definable Environment Variables/Logicals ............................................. 4-6 Creating Startup Files.......................................................................... 4-9
Runtime Customization .................................................................... 4-9 General Rules for Startup File and Environment Variable/Logical Syntax ...................... 4-10 Description of Startup Files and Environment Variables/Logicals ............................. 4-11
Changing Installation Locations ............................................................... 4-22 When Installation Locations Do Not Need to Be Changed .................................... 4-22 When Installation Locations Need to Be Changed............................................ 4-23 Changing Location Variables in VMS....................................................... 4-26
Chapter 5: Customization Options Selecting a Character Set ....................................................................... 5-1
Supported Character Sets................................................................... 5-2

Contents v
Additional Character Sets.................................................................. 5-2 Local Collation Sequences ..................................................................... 5-3
Multi-Collation Sequence .................................................................. 5-3 Spanish Collation Sequence ................................................................ 5-4
Archiver Exit Script (acpexit)................................................................... 5-9
Chapter 6: Basic Troubleshooting Determining the Area of Trouble ............................................................... 6-2
Check the Error Log Files .................................................................. 6-2 Find Your Problem Category............................................................... 6-3 Troubleshooting Flow Chart 1.............................................................. 6-4
Problems with Startup, Shutdown, or Configuration ............................................. 6-5 Troubleshooting Flow Chart 2.............................................................. 6-6 Basic Installation Checks on Windows ...................................................... 6-8 Basic Installation Checks on UNIX ......................................................... 6-10 Basic Installation Checks on VMS.......................................................... 6-13 Startup Problems on Machine Reboot ...................................................... 6-17 Shutdown Problems...................................................................... 6-19
Procedures for Checking Individual Processes on Windows...................................... 6-27 Name Server ............................................................................ 6-27 Communications Server Process........................................................... 6-28 Bridge Server ............................................................................ 6-28 ICE Server............................................................................... 6-28 Remote Command Process................................................................ 6-29 Recovery Process ........................................................................ 6-29 Archiver Process ......................................................................... 6-30 DBMS Server Process..................................................................... 6-31 JDBC Server ............................................................................. 6-31 Data Access Server ....................................................................... 6-31
Procedures for Checking Individual Processes on UNIX ......................................... 6-32 Name Server ............................................................................ 6-32 Communications Server Process........................................................... 6-34 Recovery Process ........................................................................ 6-35 Archiver Process ......................................................................... 6-36 DBMS Server Process..................................................................... 6-38 JDBC Server Process...................................................................... 6-39 Data Access Server Process................................................................ 6-39 ICE Server Process ....................................................................... 6-40 Bridge Server Process..................................................................... 6-40 Remote Command Process................................................................ 6-40

vi System Administrator Guide
Procedures for Checking Individual Processes on VMS .......................................... 6-40 Recovery Process ......................................................................... 6-41 Archiver Process ......................................................................... 6-42 Name Server ............................................................................. 6-43 Communications Server Process ........................................................... 6-43 DBMS Server Process ..................................................................... 6-44 JDBC Server.............................................................................. 6-45 Data Access Server ....................................................................... 6-45 Remote Command Process ................................................................ 6-46 Bridge Server Process ..................................................................... 6-46
Problems with Tools Startup .................................................................. 6-47 Troubleshooting Flow Chart 3 ............................................................. 6-47 Database Connection Problems ............................................................ 6-48
Inconsistent Databases and Recovery........................................................... 6-50 Automatic Recovery ...................................................................... 6-51 Inconsistent Database ..................................................................... 6-53
Performance Problems........................................................................ 6-60 Troubleshooting Flow Chart 4 ............................................................. 6-61 Logging System Issues .................................................................... 6-61
Resource and Maintenance Issues.............................................................. 6-66 Operating System Resources............................................................... 6-66
Before Calling Technical Support .............................................................. 6-69 Windows Installations .................................................................... 6-69 UNIX Installations........................................................................ 6-70 VMS Installations......................................................................... 6-71
Chapter 7: Monitoring and Tracing Tools System Utilities ............................................................................... 7-1 Operating System Utilities ..................................................................... 7-3
Windows Diagnostics...................................................................... 7-3 Performance Monitor ...................................................................... 7-3 Event Viewer ............................................................................. 7-3 Registry Editor ............................................................................ 7-4 Task Manager ............................................................................. 7-4 ps ........................................................................................ 7-4 iostat ..................................................................................... 7-5 pstat (BSD)................................................................................ 7-6 Sar (System V) ............................................................................ 7-6 sysdef (System V).......................................................................... 7-7 vmstat.................................................................................... 7-9

Contents vii
help ..................................................................................... 7-9 monitor ................................................................................. 7-10 show.................................................................................... 7-10 sysgen .................................................................................. 7-12
Vendor Utilities.............................................................................. 7-12 Error Messages .............................................................................. 7-12
Error Message Format .................................................................... 7-13 Message Help Files....................................................................... 7-13 Types of Error Messages .................................................................. 7-14 Facility Codes ........................................................................... 7-14
Trace Utilities ............................................................................... 7-23 ODBC Call-level Interface................................................................. 7-23 Set Statement ............................................................................ 7-24 Set Options for Tracing Queries ........................................................... 7-26 Canceling Set Options .................................................................... 7-28 Tracing I/O ............................................................................. 7-29 Tracing User-Server Communications...................................................... 7-31
UNIX Trace Facilities......................................................................... 7-35 Tracing Shell Script Problems in UNIX ..................................................... 7-35
Chapter 8: Managing Your System and Monitoring Performance Visual Manager............................................................................... 8-1
Using Visual Manager ..................................................................... 8-2 Visual Manager Window .................................................................. 8-2 Configuring Parameters ................................................................... 8-4 Defining Message Categories and Notification Levels......................................... 8-4 Setting Preferences for Monitoring Events ................................................... 8-5 Viewing Message Explanations............................................................. 8-6 Monitoring Components................................................................... 8-6 Accessing Visual Tools and Documentation ................................................. 8-7
Visual Performance Monitor ................................................................... 8-7 Using Visual Performance Monitor ......................................................... 8-8 Visual Performance Monitor Window....................................................... 8-9 Working with Visual Performance Monitor Components ..................................... 8-9 Monitoring Components................................................................... 8-9
VCDA ...................................................................................... 8-11 Saving the Current Configuration ......................................................... 8-12 Comparing Configuration Snapshots ...................................................... 8-12

viii System Administrator Guide
Restoring Parameters ..................................................................... 8-13 How VCDA Handles Concatenated config.dat Files.......................................... 8-13
Chapter 9: Analyzing and Recovering Journaled Transactions Journal Analyzer Window ..................................................................... 9-2 Viewing Transactions.......................................................................... 9-3
On the Database Level ..................................................................... 9-3 On the Table Level......................................................................... 9-5 Selecting Transactions or Individual Row Changes ........................................... 9-6
Recovering Transactions or Individual Row Changes ............................................. 9-7 Recovering................................................................................ 9-8 Rules, Constraints, and Integrities........................................................... 9-8 Order of Transactions and Statements Within Transactions .................................... 9-9 Checking Whether Rows Have Changed After the Transaction................................. 9-9 Users of Transactions ..................................................................... 9-10 Number of Rows Affected by Each Individual............................................... 9-10 Recovering Immediately or Generating Scripts .............................................. 9-11
Redoing Transactions or Individual Row Changes............................................... 9-13
Chapter 10: Management Architecture IMA Audience ............................................................................... 10-2 Introduction to IMA .......................................................................... 10-2 Management Information Base ................................................................ 10-3
Data and the Object Model ................................................................ 10-3 Describing IMA .............................................................................. 10-5
IMA Management Protocol................................................................ 10-6 Creating an SQL MIB ......................................................................... 10-8
Registering IMA Tables ................................................................... 10-8 Register Table Examples .................................................................10-12 Removing Table Registrations ............................................................10-17
Querying IMA ..............................................................................10-17 SQL Management Domains ..............................................................10-17 Control Objects..........................................................................10-18 IMA Dbmsinfo Constants ................................................................10-18 Query Examples to IMA Tables ...........................................................10-19
Restrictions .................................................................................10-22

Contents ix
Chapter 11: Installing the High Availability Option for Sun High Availability Clusters .................................................................... 11-1 High Availability Option for Sun Clusters...................................................... 11-2
Configuration Guidelines for System and Data Files ......................................... 11-2 DBMS Server Requirements............................................................... 11-2 Verifying Sun Cluster Software Installation................................................. 11-3 Installing the Package .................................................................... 11-3 Registering the Resource.................................................................. 11-3 Starting and Stopping Ingres .............................................................. 11-6 Clearing a Fault.......................................................................... 11-7 Changing a Resource Property ............................................................ 11-7 Debugging .............................................................................. 11-7 Removing the High Availability Option .................................................... 11-8
Chapter 12: Installing the High Availability Option for Windows High Availability Clusters .................................................................... 12-1 High Availability Option for Windows Cluster Service .......................................... 12-2
Configuration Guidelines for System and Data Files ......................................... 12-2 DBMS Server Requirements............................................................... 12-3 Verifying Windows Cluster Service Installation ............................................. 12-3 Setting Up the High Availability Option.................................................... 12-4 Running the Cluster Setup Utility.......................................................... 12-5 Starting and Stopping Ingres ............................................................. 12-11 Removing the High Availability Option ................................................... 12-13
Appendix A: Environment Variables/Logicals List of Environment Variables/Logicals.........................................................A-1
Index


Introduction 1–1
Chapter
1 Introduction
The System Administrator Guide provides a comprehensive look at Ingres from the perspective of the system administrator. It includes the following topics:
■ Components of an Ingres installation and elements of Ingres architecture
■ How to configure Ingres
■ How to set environment variables and logicals
■ How to implement customization options
■ Discussions of basic troubleshooting techniques
■ A description of monitoring and tracing tools
■ How to manage the system and monitor performance
■ How to analyze and recover journaled transactions
■ System managing and monitoring facilities available in Ingres Management Architecture (IMA)
Ingres environment variables and logicals are listed in an appendix.
Audience The System Administrator Guide is designed for the system administrator who has overall responsibility for the operation of the Ingres installation. The system administrator must have a solid working knowledge of operating system management or be in close contact with the operating system administrator.
Special Considerations This section discusses important issues that must be read before using the guide.
C2 Security Ingres installations can be administered in compliance with the C2 security standard.

Conventions
1–2 System Administrator Guide
Advantage Enterprise Access Compatibility
If you are using an Advantage Enterprise Access product, see your Advantage Enterprise Access documentation for information about syntax that can differ from that described in this guide.
Statements and Commands
This documentation follows the standards described below.
Terminology The distinction in terminology between command and statement is as follows:
■ A command is an operation that you execute at the operating system level. An extended operation invoked by a command is often referred to as a utility.
■ A statement is an operation that you embed within a program or execute interactively.
A statement can be written in Ingres 4GL, a host programming language (such as C) or a database query language (SQL or QUEL).
Query Languages The industry standard query language, SQL, is used as the standard query language throughout this guide.
QUEL commands and system parameters, such as environment variables/logicals, are also included in this guide. For a complete description of available QUEL statements, see the QUEL Reference Guide.
ISO Entry SQL92 Ingres is compliant with ISO Entry SQL92. In addition, numerous vendor extensions are included. For details about the settings required to operate in compliance with ISO Entry SQL92, see the SQL Reference Guide.
Conventions This guide uses the following conventions for consistency and clarity.
Operating System Differences
This guide provides information that is specific to your operating system, as in these examples:
UNIX Information is specific to the UNIX operating system.
VMS
Information is specific to the VMS operating system.

Conventions
Introduction 1–3
The symbol indicates the end of the system-specific text.
If an entire section is system-specific, it is indicated in the section title.
Entering Data from the Keyboard
This guide uses boldface text to represent text that you type exactly as shown; for example:
Type ipm at the operating system prompt.
The guide uses a distinct typeface to indicate text that appears on your screen, such as the following prompt: Enter database name:
Terminology
The documentation observes the following distinction in terminology:
■ A command is an operation that you execute at the operating system level.
■ A statement is an operation that you embed within a program or execute interactively from a terminal monitor.
A statement can be written in Ingres 4GL, a host programming language (such as C), or a database query language (SQL or QUEL).
Syntax
This guide uses the following conventions to describe statement and command syntax specifications:
Convention Usage
Boldface Indicates key words, symbols, or punctuation that you must enter as shown
Italics Represent a variable name for which you must supply an actual value
[ ] (brackets) Indicate an optional item
{ } (braces) Indicate an optional item that you can repeat as many times as appropriate
| (vertical bar) Used between items in a list to indicate that you must choose one of the items

Conventions
1–4 System Administrator Guide
The following example illustrates the syntax conventions: create table tablename (columnname format {, columnname format}) [with_clause]

Overview 2–1
Chapter
2 Overview
The system administrator has all privileges and holds the primary responsibility for installing and maintaining Ingres. The system administrator (often referred to as the installation owner) owns the user ID specified during Ingres installation. Logging in as this user provides permissions that are needed for installation and maintenance.
The system administrator has the following responsibilities:
■ Authorizing users to access Ingres
■ Installing Ingres (and optional components)
■ Defining Ingres variables such as II_DATABASE and II_INSTALLATION
■ Starting, stopping, configuring, and monitoring server(s)
■ Disconnecting or suspending a session connected to a server
■ Shutting down the Ingres installation (or its components)
Installation The system administrator installs and maintains the following principal components or associated family of compatible components:
■ Ingres DBMS Servers (including distributed servers)
■ Internet Communications
■ General Communications (including Name Server, Communications Server, and Data Access Server)
■ Ingres querying and reporting tools
■ Ingres visual tools
■ Logging and locking systems

Architecture
2–2 System Administrator Guide
An Ingres installation also has:
■ Library files and utilities, provided on your release media
■ Configuration files and error log files, created during installation and at runtime by Ingres
■ Databases and their associated files: the checkpoint, journal, dump, and work files, also created by Ingres during installation and at runtime
The locations of these files are selected at installation time, together with the configuration of the Ingres DBMS Server(s) and the logging and locking systems. For the initial installation, default settings are provided by the system whenever possible. (Detailed steps for installing Ingres are provided in the Getting Started guide.)
After the installation is running, you must monitor all of your Ingres servers to ensure that they are running and that they are configured for top performance. If necessary, you can reconfigure selected Ingres parameters as described in the chapter “Configuration.”
Architecture The following list contains elements of the Ingres architecture with which you must be familiar:
■ Ingres DBMS Servers (including distributed servers)
■ General communications (including Name Server, Communications Server, Data Access Server, and Bridge Server)
■ Internet communications
■ Ingres querying and reporting tools (including Report-Writer, Query-By-Forms, Report-By-Forms, and Vision)
■ Ingres visual tools (including Network Utility, Visual DBA, Configuration Manager, Ingres Visual Manager, Import Assistant, Export Assistant, Journal Analyzer, Visual SQL, Visual Performance Monitor, Visual Database Objects Differences Analyzer, and Visual Configuration Differences Analyzer
■ Logging and locking systems
If your installation uses Ingres Net, it includes one or more Communications Servers. The Communications Server is discussed in General Communication Facility in this chapter. For more information on the role of the Communications Server in providing network connectivity, see the Connectivity Guide.

Architecture
Overview 2–3
DBMS Server
The Ingres client-server architecture allows multiple users access to databases through connections to one or more DBMS Server processes. The DBMS Server (iidbms) is a multi-threaded daemon process that performs asynchronous disk input/output. The number of users connected to a server is in practice limited by hardware constraints or operating system limits.
DBMS servers can be configured to fit specific needs. For example, you can:
■ Designate one server to access a particular database, denying other servers access to that database.
■ Configure a server as a “fast commit” server to achieve higher levels of performance. For a discussion of fast commit, see Using the fast_commit and dmf_write_behind Options in the chapter “Configuration.”
■ Specify that two or more servers share a common memory buffer cache.
■ Specify private buffer cache with distributed multi-cache protocol.
Some of the elements of the DBMS Server are described as facilities. For a list of these facilities, their acronyms, and brief descriptions, see DBMS Server Facilities.
Query Execution
Typically, your interaction with Ingres consists of at least two processes: an Ingres tool or application and the DBMS Server process. The Ingres tool program handles screen display and prompts, takes user input and issues a query that is sent to the DBMS Server, where it is formatted, optimized, and executed on behalf of the user. The DBMS Server returns the data to the Ingres tool program.
Because the DBMS Server is a multi-threaded process, it can execute queries for a large number of users, each running an Ingres tool. Even though it is a single process, the DBMS Server can execute queries as multiple “sessions” on behalf of multiple users. The Visual Performance Monitor tool lets you view which sessions are running in the DBMS Server at any moment. For detailed steps about viewing these sessions, see Visual Performance Monitor online help.
Query Environment
When a thread or session executes a query inside the DBMS Server, it does so in a query environment. The query environment consists of:
■ A quantity of resources available from the operating system for use by the session
■ The rules under which the query is executed

Architecture
2–4 System Administrator Guide
These rules reflect which query language is used, which locking strategy is employed, which diagnostic information is also returned, which default behavior Ingres adopts for various query language statements, and so on.
DBMS Server Facilities
The following are DBMS Server facilities, which are configured using DBMS Server configuration parameters. Use this section with the chapters “Configuration” and “Basic Troubleshooting.”
The DBMS Server consists of the these facilities:
Abstract Data Type Facility—Abstract Data Type Facility (ADF) does all the work that involves data types. It manipulates floating-point numbers, character strings, integers, and all the conversions and comparisons between them. This facility can be executed independently from the server so that Ingres tools also use ADF.
This abstract data type facility is also compiled into the Ingres tools such as QBF and the Terminal Monitor. It is used to manipulate Ingres data types in the front-end process before sending them to the DBMS Server.
Compatibility Library Facility—Compatibility Library Facility (CLF) provides the Ingres DBMS Server with a platform independent interface to the operating system. It contains functions that perform services such as disk I/O, memory management, Semaphore manipulation, and context switching (when ingres threading is configured). It also provides low level system communications functions. For example, when a thread in the DBMS is idle, it normally shows up in iimonitor, IPM, or VDBA as having current facility CLF. This indicates that the thread is executing a CLF function to read information from the communications channel that connects the thread to the system process that instigated the database connection associated with this thread.
Data Manipulation Facility—The Data Manipulation Facility (DMF) manages the DBMS Server interface to disk storage. In addition to managing all storage structures (hash, heap, ISAM, B-tree, BLOBs, and so on), DMF uses the logging and locking systems to control transaction processing and to handle concurrency issues. Included within DMF is a “buffer manager” that controls access to a cache (possibly shared) of database pages.
Optimizer Facility—The Optimizer Facility (OPF) selects the optimal plan for implementing queries. It also converts the query tree that comes out of the parser into the query execution plan (QEP). OPF uses a memory pool for its operations.
Note: For more information on optimizing an Ingres database remotely, see the chapter “Using the Query Optimizer” in the Database Administrator Guide.

Architecture
Overview 2–5
Parser Facility—The Parser Facility (PSF) converts queries from text form to internal format. The parser adds data from the system catalogs to the query, such as information about the table structure and keys that the optimizer needs to make a useful query plan.
Query Execution Facility—The Query Execution Facility (QEF) executes query plans and database utilities. It provides internal query services that other facilities use. QEF manages repeat queries, transactions, and cursors.
Query Storage Facility—The Query Storage Facility (QSF) provides shared memory facilities with a temporary or permanent place to store query trees and query plans.
Relation Description Facility—The Relation Description Facility (RDF) is a central caching point for information about tables. RDF is used by Ingres Distributed Option, PSF, and OPF.
System Control Facility—The System Control Facility (SCF) is the central controlling facility that manages sessions on behalf of user (client) requests. It coordinates the actions among the various facilities involved in processing a query, including thread monitoring and switching. SCF is also responsible for managing server-wide access to shared resources, such as operating system semaphores and memory.
General Communication Facility
The General Communication Facility (GCF) manages communication among all the components of Ingres. GCF has five elements whose acronyms you encounter:
Name server—The Name Server (iigcn) keeps track of all DBMS, Star, Data Access, Bridge, ICE, and Communications Servers associated within an installation. There is one Name Server process per installation. The Name Server provides information to user processes that enables a connection to a local DBMS Server. When a process wants to connect to a remote DBMS Server, the Name Server provides information that allows the process to first connect to a Communications Server. The Communications Server establishes communication with the remote DBMS Server.
The Name Server checks regularly (the default is every five minutes) to ensure that all DBMS Servers on its list are functioning. If a server has shut down, the Name Server automatically deletes its registration.
As part of the General Communication Facility services, Ingres provides a Name Server Maintenance Utility, iinamu. This utility allows the system administrator to manually add servers to or delete servers from the list maintained by the Name Server, or to stop and restart the Name Server. For more information about this utility, see the Command Reference Guide.

Architecture
2–6 System Administrator Guide
Communications Server—The Communications Server (iigcc) is a daemon process that provides the network communication element of the Ingres Net product. It monitors outgoing communication from local applications to remote DBMS Servers and incoming communication from remote applications to local DBMS Servers. An installation can have multiple Communications Server processes. For additional information about the Communications Server, see the Connectivity Guide.
Data Access Server—The Data Access Server (iigcd) translates requests from the Ingres JDBC Driver and the Ingres .NET Data Provider into Ingres internal format and forwards the request to the appropriate DBMS Server. For more information on the Data Access Server, see the Connectivity Guide.
Bridge Server—Ingres Enterprise Relational Database Protocol Bridge enables a client application running on one type of local area network to access a DBMS Server running on a different type of network. Ingres Bridge “bridges” a client using one network protocol to a server using another. For more information on Ingres Bridge, see the Connectivity Guide.
General Communications Architecture (GCA)—This is the lowest level GCF Application Program Interface. The GCA maintains communication connections between processes on the same local Ingres installation. The GCA is a subroutine library that is a part of all Ingres tools, DBMS Servers, Star Servers, and the libraries associated with embedded SQL and EQUEL.
JDBC Connectivity
The Ingres JDBC driver is a pure Java implementation of the JDBC 3.0 API released with the Sun Java 2 SDK, version 1.4. The driver supports application, applet, and servlet access to Ingres data sources through the Data Access Server. For additional information on the Data Access Server and Ingres JDBC driver, see the Connectivity Guide.
Note that the JDBC Driver provided in the Ingres 2.6 release continues to be supported in this current release (3). For migration instructions related to the JDBC driver, see the Migration Guide.
.NET Data Provider Connectivity
The Ingres .NET Data Provider enables high-performance native .NET access to Ingres data sources, and delivers Ingres data to the Microsoft .NET Framework. In addition, components and wizards in the provider objects help integrate the Ingres .NET Data Provider with MS Visual Studio .NET to aid in the development of .NET applications that access Ingres data. For additional information on the Ingres .NET Data Provider, see the Connectivity Guide.

Architecture
Overview 2–7
Internet Communications
Ingres Enterprise Relational Database Web Deployment Option provides the foundation for internet-based electronic commerce. Using this component, users can quickly and easily build Web pages with corporate data and deploy database Web applications. For additional information on this product, see the Web Deployment Option User Guide.
Querying and Reporting Tools
Several Ingres querying and reporting tools (such as Report-Writer, Report-By-Forms (RBF), Query-By-Forms (QBF), and Vision) enable users to access Ingres databases. For more information on Ingres querying and reporting tools, see the Character-based Querying and Reporting Tools User Guide.
When a user accesses a database through one of these tools, a process is created and communication is initiated with the database through a DBMS Server. Information about the user connecting to the server is provided by the Name server, which is part of the General Communication Facility.
Visual Tools
The following GUI tools are used to visually start, stop, manage, and monitor the Ingres installation.
Visual Manager
Ingres Visual Manager (IVM) provides a global view into the Ingres installation. It serves as a system console from which you can manage Ingres components and access other utilities. This utility captures events that are occurring in the system and allows them to be filtered for emphasis, based on your preferences. Note that you can access all other Ingres visual tools through IVM. For an overview of IVM tasks, see the chapter “Managing Your System and Monitoring Performance.” For instructions on using IVM screens, see the IVM online help. For information on IVM command line tasks, see the Command Reference Guide.

Architecture
2–8 System Administrator Guide
Visual Performance Monitor
Visual Performance Monitor allows you to monitor information on servers, sessions, and the amount of logging and locking resources being consumed, as well as analyze system performance. For an overview of performance monitoring tasks, see the chapter “Managing Your System and Monitoring Performance.” For instructions on using this tool, see the Visual Performance Monitor online help.
Visual DBA
Visual DBA provides an alternative set of system administration tools. It allows you to perform system administrator functions—including configuring, performance monitoring, backup and recovery, and remote database optimization. For an overview of Visual DBA tasks related to communications see the Connectivity Guide. For instructions on using Visual DBA screens, see the Visual DBA online help. For information on Visual DBA command line tasks, see the Command Reference Guide.
Remote Command Server
The Remote Command Server (RMCMD) must be started in installations where a DBMS server is running in order for certain DBA tasks to be accessible remotely with Visual DBA. The Remote Command Server is started on the server side, not on the Visual DBA client.
DBA tasks are primarily those that do not have an equivalent through an SQL statement, for example, creating or dropping a database, displaying selected portions of the journal for a database, or starting a replication server remotely. By default, only the installation owner is authorized to perform such tasks remotely through Visual DBA.
To allow a user other than the installation owner to execute remote commands, issue the following SQL statements while connected to the iidbdb as the installation owner: grant select,insert,update,delete on remotecmdinview to user grant select,insert,update,delete on remotecmdoutview to user grant select,insert,update,delete on remotecmdview to user grant execute on procedure launchremotecmd to user grant execute on procedure sendrmcmdinput to user grant register, raise on dbevent rmcmdcmdend to user grant register, raise on dbevent rmcmdnewcmd to user grant register, raise on dbevent rmcmdnewinputline to user grant register, raise on dbevent rmcmdnewoutputline to user grant register, raise on dbevent rmcmdstp to user
Note: Grants must not be made directly to the underlying tables.
Architecture
Overview 2–9
Configuration Manager
The Configuration Manager utility provides a GUI interface for configuring the Ingres installation. For additional information, see the chapter “Configuration” and Configuration Manager online help. For information on Configuration Manager command line tasks, see “vcbf” in the Command Reference Guide.
Network Utility
The Network Utility is a stand-alone tool that lets you view and define virtual node (vnode) definitions, which are used to connect to remote Ingres installations through Ingres Net. The Network Utility provides all the same functionality as the virtual nodes toolbar in Visual DBA. The Network Utility also allows you to launch the Database Object Manager, Visual Performance Monitor, and Visual SQL utilities for such installations. For additional information, see the Connectivity Guide and the Network Utility online help.
Import Assistant
The Import Assistant assists you with importing an external text file into an Ingres or Advantage Enterprise Access table. It can be run as a stand-alone utility or from within Visual DBA. For instructions on using the Import Assistant, see the Import Assistant online help.
Export Assistant
The Export Assistant assists you with exporting Ingres or Advantage Enterprise Access table data into external file formats such as CSV, XML or DBF. It can be run as a stand-alone utility or from within Visual DBA. For instructions on using the Export Assistant, see the Export Assistant online help.
Journal Analyzer
The Journal Analyzer utility allows you to view and analyze journaled transactions and individual underlying statements. It also enables you to create recover and redo SQL scripts, which are used to recover or redo individual row operations without redoing or rolling back the whole database or table. For instructions on using the Journal Analyzer, see the chapter “Analyzing and Recovering Journaled Transactions” and the Journal Analyzer online help.

Architecture
2–10 System Administrator Guide
Visual SQL
The Visual SQL utility allows you to enter and execute SQL queries. As part of Visual SQL, the SQL Assistant helps you build SQL queries. Visual SQL can be run as a stand-alone utility or from within Visual DBA. For instructions on using this utility, see the Visual SQL online help.
Visual Configuration Differences Analyzer
The Visual Configuration Differences Analyzer (VCDA) allows you to compare configuration snapshots of an Ingres installation. To learn about the benefits of this tool, refer to the chapter “Managing Your System and Monitoring Performance.” For instructions on using this tool, see the Visual Configuration Differences Analyzer online help.
Visual Database Objects Differences Analyzer
The VCDA allows you to compare the definition of Ingres database objects that are either currently installed or saved in a snapshot file. For instructions on using this tool, see the VCDA online help.
Logging and Locking Systems
The logging and locking systems coordinate the locking, recovery, and journaling of databases. The system is composed of the following components:
■ Lock Manager
■ Logging Facility
■ Recovery process
■ Archiver process
■ Primary and dual transaction log files
■ Other log files
Lock Manager
The locking component controls concurrent access to a database.
UNIX In UNIX, this component makes use of the shared memory segments and semaphore resources that you install when you configure the UNIX kernel.

Architecture
Overview 2–11
Shared memory is allocated to components initially during the installation procedure. The amount of shared memory that your installation requires depends on the logging and DBMS server parameters that you select during the procedure.
Logging Facility
The logging facility implements a circular “write-ahead” transaction log file for the management of transactions within the installation. It ensures that log records are written in a way that makes them accessible to the recovery and archiver processes. The recovery and archiver processes manipulate the data in the transaction log file when certain events occur; for example, after a transaction is committed, the logging facility moves the log buffer, which resides in shared memory, to the transaction log file.
All servers in the installation, as well as the recovery and archiver processes, share the logging facility. Log records written by different servers, or written by several threads in the same server, can be combined with log records written by other servers or threads.
Log records are first copied to in-memory log buffers, which are written to the log file as they fill. Memory log buffers and disk log file blocks are the same length. The number of log buffers is configurable, set according to the performance requirements of the system. The logging system manages multiple asynchronous writes of log buffers to the log file. Once written, a log file block is never rewritten until the file wraps around.
The number of log file blocks corresponds to the size of the log file, and is specified when the log file is created. In a properly tuned system, most log file buffers are completely full of log records when they are written to the log file. However, as all log records associated with a transaction must be forced to the log file at certain times, principally at end transaction time, a small percentage of log file blocks may contain unused space. Server group commit logic is designed to minimize the frequency of log force operations and increase log file space use.
Recovery Process
Each installation has a dmfrcp (data manipulation facility recovery process) that is assigned recovery responsibilities. In normal circumstances, transaction commit and rollback processing are handled within each DBMS server. In the event of a server or system failure, however, the recovery process performs the required recovery, including backing out uncommitted transactions and ensuring that committed transactions are properly reflected on disk.

Architecture
2–12 System Administrator Guide
The recovery process operates in both online and offline modes:
■ Online recovery is performed when a server stops abnormally. In this case, users connected to other servers are generally unaffected by the recovery.
■ Offline recovery is performed when the installation is brought back up after it has stopped abnormally. In this case, the installation remains unavailable until the recovery process completes all required recovery.
The recovery process maintains a history of important actions in its own message log file, named iircp.log. See Recovery Log.
Archiver Process
Each installation has a single archiver process called the dmfacp (data manipulation facility archiver process). The archiver process is responsible for copying the history of operations performed on journaled databases from the transaction log file to the journal files. Journal files contain the subset of transaction log file information associated with a specific database.
Journal files are created (and optionally destroyed) during a checkpoint operation. In the event of a disaster, the database can be rebuilt by restoring the latest checkpoint and applying journal file information. Disaster recovery operations are coordinated by the rollforwarddb command. It can be accessed through the Visual DBA Database menu, DOM window. For more information on disaster recovery using Visual DBA, see the chapter “Basic Troubleshooting.”
The archiver process maintains a history of important actions in its own message log file, iiacp.log. For details, see Archiver Log.
Transaction Recovery
Transaction recovery involves the transaction log file that is used as a write-ahead log, plus journal files maintained on a per-database basis. Log files contain short-term recovery information regarding active databases, while the journal files contain long-term information used for auditing and disaster recovery. While the log file is circular and wraps around, journal files are of configurable length and are retained indefinitely. For more information, see Transaction Log File.
Ingres employs a page-oriented recovery scheme, where changes to pages are reflected in the transaction log file. Recovery information is divided into two types: undo (or rollback) operations and redo (or cache restore) operations.

Architecture
Overview 2–13
Undo or transaction backout recovery is performed by the DBMS Server. For example, when a transaction is aborted, transaction log file information is used to roll back all related updates. The DBMS Server writes the Compensation Log Records (CLRs) to record a history of the actions taken during undo operations.
While undo recovery is transaction-oriented, redo recovery is database-oriented. Redo recovery is performed after a server or an installation fails. Its main purpose is to recover the contents of the DMF cached data pages that are lost when a fast-commit server fails. Redo recovery is performed (in a non-clustered installation) by the recovery process. Redo recovery precedes undo recovery.
Ingres performs both online and offline recovery, as described previously in the Recovery Process section.
Ingres Log Files
Ingres maintains several log files to which it writes information about the installation activities.
Transaction Log File
Each installation has a transaction log file, and an optional dual log file. The log file holds information about all open transactions and is used to recover active databases after a system failure. You have the option to change its size and number of partitions at startup.
UNIX The UNIX log file can be created as a raw partition, or as a number of raw partitions if you choose. For details, see the Getting Started guide.
Error Log
The main error log is a readable text file that you can use for troubleshooting. The error log is maintained in the following file:
Windows %II_SYSTEM%\INGRES\FILES\ERRLOG.LOG
UNIX $II_SYSTEM/ingres/files/errlog.log
VMS
II_SYSTEM:[INGRES.FILES]ERRLOG.LOG
Messages about the installation are appended to this log with the date and time at which the error occurred. This is generally the first place to look when troubleshooting a problem.

Architecture
2–14 System Administrator Guide
The error log contains the following information:
■ Error messages
■ Warning messages
■ Server start up and shutdown messages
The system administrator maintains the error log file. The file continues to grow until manually truncated. The installation must be shut down before truncating or removing the errlog.log file.
Archiver Log
The archiver log contains information about the current archiver process in the following file:
Windows %II_SYSTEM%\INGRES\FILES\IIACP.LOG
UNIX $II_SYSTEM/ingres/files/iiacp.log
VMS
II_SYSTEM:[INGRES.FILES]IIACP.LOG
This file is appended to when the archiver process starts. The log contains the following information:
■ Archiver start up
■ Archiver error messages
■ Archiver warning messages
Recovery Log
The recovery (dmfrcp) log contains information about the current recovery process in the following file:
Windows %II_SYSTEM%\INGRES\FILES\IIRCP.LOG
UNIX $II_SYSTEM/ingres/files/iircp.log
VMS
II_SYSTEM:[INGRES.FILES]IIRCP.LOG

Architecture
Overview 2–15
This file is appended to when the recovery process starts. The log contains the following information:
■ Current logging and locking parameter values
■ Recovery process error messages
■ Recovery process warning messages
■ Recovery operations information
The recovery log must be monitored if you are unable to connect to Ingres and suspect that the DBMS Server is in recovery mode. You can determine the recovery state by looking at the log file header information. To view log file header information in Visual DBA, select the Log Information branch in a Visual Performance Monitor window and click the Header tab.
VMS Cluster Service Process Log
VMS
The cluster service process log (on Ingres Grid Option installations only) maintains information about the cluster service process (CSP). A new version of this file is written each time the CSP is started.
The CSP log file contains information on the following:
■ Archiving and recovery messages
■ Node information
Monitor the CSP log if problems arise with node logging or locking.
Primary Configuration Log Files
Ingres maintains transcripts of various configuration operations. Configuration log files that are useful are given in the table below. These files are in the directory indicated by II_CONFIG:
Log File Name Description
config.log Contains a log of the changes made with the Configuration Manager or Configuration-By-Forms (cbf) utility.
rcpconfig.log Contains log and error information of the last time rcpconfig was run for reconfiguration, shutdown, or initial installation.

Architecture
2–16 System Administrator Guide
Optional Configuration Log Files
Configuration log files that are optionally maintained are given in the table below. These files, if present, are in the II_CONFIG directory (in UNIX, the setting must always be $II_SYSTEM/ingres/files):
Log File Name Description
iilink.log The file contains a log of the last time the iilink command was run. For details on the iilink command, see the Command Reference Guide.
iivdb.log Contains a transcript of the last time verifydb was used to diagnose or attempt recovery of a damaged or inconsistent database. This file is created the first time verifydb is run.
lartool.log Contains a transcript, with any errors, of the last time lartool was used to manually abort or commit a running transaction. This file is created the first time lartool is run.
Other Optional Log Files
Look for the following types of optional log files on your installation:
■ Individual process logs. For the following processes you can set up a separate log file to isolate the error messages relating to that process:
- DBMS - GCC
Do this for a specific troubleshooting purpose. These messages are sent to the errlog.log by default. If you define one of these separate error logs, all messages are sent to both that file and errlog.log.
■ Trace log for tracking messages at a greater level of detail
■ Log for an optional Ingres facility

Architecture
Overview 2–17
These optional log and trace log files can be established by setting the associated Ingres variables:
Log File Name Description
DBMS error log The DBMS Server error log, optionally defined as a separate file.
This log file is established by setting the Ingres variable II_DBMS_LOG to a user file name. All DBMS server errors and messages are sent to errlog.log by default.
GCC error log The GCC error log, for installations using Ingres Net. This is in a user-defined file.
This log file is established by setting II_GCC_LOG to the full name of a file. The error logging level is specified by II_GCC_LOG_LVL.
GCC trace log The GCC trace log is set up for specific troubleshooting efforts. You set II_GCA_LOG to a user file name.
The associated Ingres variable II_GCC_TRACE defines the level of tracing. For details on using a GCC trace, see the chapter “Monitoring and Tracing Tools.”
Star error log The Star error log, optionally defined as a separate file.
This log file is established by setting the Ingres variable II_STAR_LOG to a user file name. All Ingres Distributed Option errors and messages are sent to errlog.log by default.
For more information about these log files, see the chapter “Setting Environment Variables/Logicals” and the appendix “Environment Variables/Logicals.”


Configuration 3–1
Chapter
3 Configuration
This chapter describes the Ingres configuration tools. Using the Configuration Manager (vcbf), or the Configuration-By-Forms (cbf) utility, you can view and set values for the following Ingres server, Internet and system components:
Server Components
■ DBMS
■ JDBC
■ Data Access
■ Communications
■ Bridge
■ Star
■ Name
■ Recovery
■ High Availability
Internet and System Components
■ Internet communication
■ security
■ locking system
■ logging system
■ primary and dual transaction logs
In addition, this chapter introduces the VCDA tool, which lets you take a “snapshot” of the installation’s configuration to help in monitoring, troubleshooting, and restoring configuration parameters.

Accessing Configuration Tools
3–2 System Administrator Guide
Accessing Configuration Tools How you access Configuration Manager, the Configuration-By-Forms utility, and the VCDA depends on the operating system.
Windows To access Configuration Manager, use one of these methods:
■ Click Start on the Windows taskbar and then choose Programs, Computer Associates, Ingres, Configuration Manager.
■ In Ingres Visual Manager (IVM), click the Configuration toolbar button, or choose File, Configure.
■ Right-click the tray toolbar and choose Configuration Manager from the popup menu.
■ Enter vcbf on the command line.
To access the Configuration-By-Forms utility, enter cbf on the command line.
To access VCDA, use one of these methods:
■ Click the VCDA toolbar button in Ingres Visual Manager (IVM).
■ Right-click the tray toolbar and choose VCDA from the popup menu.
■ Enter vcda on the command line.
UNIX Use the following methods to access configuration tools:
■ To access Configuration Manager, enter vcbf on the command line.
■ To access Configuration-By-Forms, enter cbf on the command line.
■ To access VCDA, enter vcda on the command line.
Note: On UNIX platforms that support visual tools, you can access Configuration Manager and VCDA through IVM, as described for the Windows platform.
VMS
Use the following method to access Configuration-By-Forms:
■ Enter cbf on the command line.
For information about using these commands, see the Command Reference Guide.
In Configuration Manager and VCDA, you can access context-sensitive help for any active dialog or window by pressing the F1 key. You can also view detailed information on performing configuration tasks in the Configuration Manager and VCDA online help.

Component Configurations
Configuration 3–3
Component Configurations Configuration Manager allows you to set up the components installed on the system using the Configure page, which is displayed in the left-hand pane in Configuration Manager.
Different configurations are needed for servers that perform different functions. For example, batch jobs can require a completely different DBMS server configuration than that of an online server. If so, create a DBMS server configuration called “batch” and configure it for batch processing.
Adding, Deleting, or Renaming a Server Component Configuration
Configuration Manager lets you add, delete, or rename configurations for the following server components: DBMS, JDBC, Data Access, Communications, Bridge, Name, Recovery and Star. Note that you can only perform these procedures for non-default component configurations, and that you cannot delete configurations for the Name and Recovery Servers.
For detailed steps on performing these procedures, see the following topics in the Procedures section of the Configuration Manager online help:
■ Adding a Server Component Configuration
■ Deleting a Server Component Configuration
■ Changing the Name of a Server Component Configuration
Changing Properties for a Component
Each non-default component configuration has two properties that can be changed, the startup count and the name.
Changing the Startup Count
The startup count for a component represents the number of instances to be initiated when the Ingres installation is started. For example, if you set the startup count to five for the Communications Server, five Communications Servers start at startup time. All components that have a startup count that can be edited are daemon processes (the DBMS Server, Star, GCC, and so on).
You can change the startup count for any component using Configuration Manager or the Configuration-By-Forms utility. For instructions on performing this procedure, see Changing the Startup Count in Configuration Manager online help.

Component Configurations
3–4 System Administrator Guide
Changing the Configuration Name
Changing the configuration name allows you to assign a specific name to each component configuration. Only non-default server components can have their name modified.
For instructions on performing this procedure, see Setting Server Properties in Configuration Manager online help.
Configuring Parameters
This section discusses parameter configuration tasks using VCDA and Configuration Manager.
Taking a Configuration “Snapshot”
Before configuring or editing the system parameters, you must use the VCDA tool to create a “snapshot” file of the current configuration. This snapshot file contains information on the installation’s parameters, config.dat file, vnode definitions, system variables, and user variables.
If you encounter problems with the installation later on, take another snapshot of the configuration and compare it to the earlier snapshot to determine if any configuration changes have contributed to the problem. Also, keep an on-going record of configuration changes by taking a snapshot of the installation each time you change its configuration.
For additional information on using the VCDA, see the chapter “Managing Your System and Monitoring Performance” and the VCDA online help.
Setting and Restoring Parameter and Derived Parameter Values
The Parameters page in Configuration Manager lists the parameters associated with a selected component configuration. For most component configurations, you can edit the value of a parameter, restore the parameter to a value that has been saved in a configuration “snapshot” file, or restore the parameter to its original installation value.
When you select a particular component and click on one of the parameters on the Parameters page, the Edit Value and Restore buttons become enabled. For instructions on editing and restoring parameter values, see Setting and Restoring Component Parameters in the Procedures section of the Configuration Manager online help.

Components
Configuration 3–5
VCDA can be used to restore configuration parameter values saved in a snapshot file. For detailed steps on using this tool, see the VCDA online help.
For several Ingres components (DBMS Server, Star Server, Security, Locking System, Logging System, and Recovery Server) there are a set of parameters that are dependent on, or derived from, other parameters. When a parameter is changed, any parameters derived from that parameter are automatically updated. Derived parameters appear on the Derived page.
Viewing and Recalculating Derived Parameters
By clicking the Derived tab, you can view a list of, as well as recalculate any of the derived parameters. Any derived parameter can be set in “protected” mode. This means that Configuration Manager or the Configuration-By-Forms utility cannot recalculate the derived value. This allows you to set a desired value for the parameter, even though the value is normally derived by the system from other parameters. If protected mode is disabled, the value of the parameter is adjusted whenever new values are set for other parameters on which the derived value is based. The new and old values are shown in the change log.
For detailed steps on performing these procedures, see the following topics in Configuration Manager online help:
■ Recalculating Derived Parameter Values
■ Protecting Derived Parameters
Other Configuration Manager Features
Several Configuration Manager pages show buttons that have specific features based on that particular component. For instance, on the Primary and Dual transaction log pages, the buttons include Reformat, Disable, Erase, and Destroy. Press F1 to receive context-sensitive help for any active dialog or window.
Components The previous section, Component Configurations, explains the various configuration tasks that can be performed using Configuration Manager, Configuration-By-Forms, or the VCDA tool. This section discusses each Ingres component and its configurable parameters.
Components
3–6 System Administrator Guide
DBMS Server
The DBMS Server process manages client access to Ingres databases and processes database queries. Because it unlikely that the default DBMS server configuration suits all users’ requirements, the DBMS Server is usually configured to improve performance in a particular configuration. For a selected DBMS server definition, its buffer caches can be configured as well as other parameters and derived parameters.
For instructions on configuring DBMS server parameters, see the following topics in Configuration Manager online help:
■ Cache Parameters Page, DBMS Server Component
■ Parameters Page, DBMS Server Component
■ Derived Page, DBMS Server Component
Using the fast_commit and dmf_write_behind Options
This section discusses two DBMS server parameter options in more detail.
Fast Commit
The fast_commit option, which is enabled using the Derived Page, DBMS Server Component in Configuration Manager, allows the server to execute commits without actually forcing data pages to the database. This reduces I/O in the server and improves response time.
Without fast commit, all update transactions must do the following when a commit is executed:
■ Force all “log” records for this transaction to disk
■ Force all updated data pages to disk
■ Write a “commit” record to the “log” file and force it to disk
This ensures that the data is actually committed and the data in the database has been written to disk when a system crash occurs immediately following a commit.
With fast commit, a server can perform a commit by writing a commit record to the log file and forcing it to disk. The actual data pages are not written to the database disk until an optimal time to do so is reached. If necessary, the committed transactions can be recovered from the log file that was written to disk.

Components
Configuration 3–7
Fast commit can greatly improve transaction response time and throughput and greatly reduce direct I/O to the database. All update transactions gain some benefit from using fast commit because control is returned to the application while database writes are processed asynchronously. Applications which tend to update the same group of records many times gain a big increase in throughput when using fast commit because writes to the database are delayed until many transactions have actually been committed. This allows the system to write out many updates with very few I/O operations.
However, using fast commit can also increase recovery times. If the system crashes, all committed transactions that have not yet had their data written to the disk must be recovered. To control this recovery time, adjust the consistency point frequency.
Write Behind
The dmf_write_behind option, which is enabled using the Cache Parameters Page, DBMS Server Component in Configuration Manager, allocates server threads that asynchronously write modified data pages to disk. The write behind threads are controlled by the dmf_wb_start and dmf_wb_end thresholds that were defined at server startup time. (Both these thresholds can be changed using the Derived Cache Parameters Page, DBMS Server Component in Configuration Manager.)
By allowing transactions to commit without waiting for data to be flushed to disk, fast commit can significantly improve response time. However, the data page caches of fast commit servers tend to become filled with modified pages. The write behind threads control the number of modified pages by asynchronously writing them to disk.
If write behind threads are not used, a server quickly reaches its modified page limit (specified by dmf_modify_limit). When that happens, transactions begin to do synchronous writes to free up space in the cache, negating some of the benefits of using fast commit. For this reason, if you configure a server with fast commit, you must also specify write behind to get the full performance benefits of fast commit.
For two sessions to have concurrent access to a database using fast commit, each session must access the database through the same DBMS Server or through servers connected to a common buffer. (To be connected to a common buffer, the server must use the cache_sharing parameter.) When a server configured with the fast_commit option opens a database, it locks the database so that no other server (except a server using the same buffer cache) can access the database.
Note that you can use the dmf_write_behind option even if you are not using the fast_commit option; write behind threads can write to the database disk even if fast commit is not specified.

Components
3–8 System Administrator Guide
The number of write behind threads used to configure the DBMS Server depends on the system’s I/O requirements. The number of writes per second each write behind thread can process depends on the speed of the disk drives. You must configure enough write behind threads to keep up with the expected I/O rate to the database.
Generally, a good rule is to allocate a write behind thread for each disk on which the databases are stored. Adding more write behind threads than disk devices does not increase the system’s I/O throughput. A default installation allocates two write behind threads, which is sufficient for most application mixes.
Data Access Server
The Data Access Server enables communication between Java applets/ applications and Ingres. The Data Access Server is the server component of the JDBC Driver, and also provides DBMS Server access for the Ingres .NET Data Provider. Data Access Server parameters include the maximum number of inbound sessions, client connections, connection pooling, pooling timeouts, network port, listen address, and protocol status. Configuration of the Data Access Server is done at installation and rarely requires reconfiguration. For additional information on the Data Access Server’s role in Ingres connectivity, see the Connectivity Guide.
For instructions on configuring Data Access Server parameters, see the following topic in Configuration Manager online help:
■ Parameters Page, Data Access Server Component
Communications Server
The Communications Server enables communication between Ingres installations in heterogeneous environments. Communications Server parameters include the encryption mode, logging level, registry type, number of inbound and outbound sessions, and the logging and error levels. Configuration of the Communications Server is done at installation and rarely requires reconfiguration. However, changes to a protocol and/or the listen address are needed. For information on the Communication Server’s role in Ingres connectivity, see the Connectivity Guide.
For instructions on configuring Communications Server parameters, see the following topics in Configuration Manager online help:
■ Parameters Page, Net Server Component
■ Protocols Page, Net Server Component

Components
Configuration 3–9
Bridge Server
The Ingres Bridge extension enables communication between Ingres clients on one network and servers on a different type of network. The Bridge Server parameters include the number of inbound sessions, the enabling of specific protocols, and a listen address. Reconfiguration of this component is rarely required. For information on the Bridge Server’s role in Ingres connectivity, see the Connectivity Guide.
For instructions on configuring Bridge Server parameters, see the following topics in Configuration Manager online help:
■ Parameters Page, Bridge Server Component ■ Protocols Page, Bridge Server Component
Star Server
Ingres Distributed Option is a distributed extension to the DBMS Server, which allows data from multiple independent databases to be accessed as if it were contained in a single, centralized relational database. In this way, Ingres Distributed Option provides client applications with transparent access to enterprise-wide data.
The server that supports Ingres Distributed Option is the Star Server. Star Server parameters include the number of connections supported by Star Servers, accounting data maintained, and the maximum number of tables that can be kept in the cache at one time.
Distributed recovery can be disabled, meaning that the Star Servers created with this definition do not recover distributed transactions at startup time. This feature is helpful if there is a problem with the installation, but you want it to continue working while the problem is being investigated. Like the DBMS Server, configuration is usually required to provide optimal performance in a given scenario.
For instructions on configuring Star Server parameters, see the Parameters Page, Star Server Component in the Configuration Manager online help.
Name Server
The Name Server keeps track of all DBMS, Star, Advantage Enterprise Access, Bridge, Internet Communications, JDBC, Data Access, and Communications servers in an installation and provides user processes with the information they require to connect to local or remote installations. The Name Server parameters include the time interval for checking for active servers, and session limits. The Name Server rarely needs to be reconfigured.

Components
3–10 System Administrator Guide
For instructions on configuring Name Server parameters, see the following topic in Configuration Manager online help:
■ Parameters Page, Name Server Component
Recovery Server
In the event of a server or system failure, the Recovery Server performs any required recovery, including backing out uncommitted transactions and ensuring that committed transactions are properly reflected on disk. The configurable Recovery Server system parameters include connection limits, consistency points, events, gather write algorithms, server name, thread count, Name Server registration and stack memory allocation.
For instructions on configuring Recovery Server parameters, see the following topic in Configuration Manager online help:
■ Parameters Page, Recovery Server Component
Internet Communications
Ingres Web Deployment Option provides the foundation for internet-based electronic commerce. Using this component, users can quickly and easily build Web pages with corporate data and deploy database Web applications. For additional information on Ingres Web Deployment Option, see the Web Deployment Option User Guide.
Internet communication parameters include setting the full path to the Web server’s Common Gateway Interface (CGI) directory and the full path to the primary HTML document directory. Configuration of this component is usually done at installation time, when the output directories are configured, and rarely requires reconfiguration.
For instructions on configuring Internet communications parameters, see the following topic in Configuration Manager online help:
■ Parameters Page, Internet Communications Component

Components
Configuration 3–11
Locking System
The locking system controls concurrent access to a database. Reconfiguration of this component is often required. The locking system can be configured to set the maximum number of locks that can be obtained per transaction. For detailed information on the locking system, see the Database Administrator Guide.
For instructions on configuring the locking system parameter, see the following topic in Configuration Manager online help:
■ Parameters Page, Locking System Component
Logging System
The logging system implements a circular transaction log file for the management of transactions within the installation. It ensures that log records are written in a way that makes them accessible to the Recovery Server and archiver process. All DBMS and Star Servers in the installation, as well as the archiver process share the logging system. Reconfiguration of the logging system is normally required to provide optimal performance for an installation.
Configurable parameters for the transaction log files include: transfer block size, buffer count, full limit, logging memory status, location, name, and number of partitions.
For instructions on configuring logging parameters, see the following topic in Configuration Manager online help:
■ Parameters Page, Logging System Component
For a detailed explanation of the logging system, see the Database Administrator Guide. For instructions on creating and configuring a raw log file for UNIX platforms, see the Getting Started guide.
Note: Before making changes to the transaction log, Ingres must be shut down using Ingres Visual Manager, Service Manager, or the ingstop command. This ensures all processes are stopped correctly and completely.
Configuring Multiple Log Partitions
Ingres allows both the primary and dual transaction log files to exist on multiple devices (up to 16). Ingres improves logging system performance by allowing it to write to multiple disk devices and, on 32-bit file systems, allowing the total log file size to be greater than 2 GB.
You can configure multiple log partitions using the log_file_parts parameter. When configuring multiple log partitions, keep the following in mind:

Components
3–12 System Administrator Guide
■ All log partitions must be the same size
■ The primary and duel transaction logs must use the same number of partitions
For instructions on configuring multiple log partitions, see the following topic in Configuration Manager online help:
■ Parameters Page, Logging System Component
Primary Transaction Log and Dual Transaction Log
The Transaction Log pages display information about the primary and dual transaction logs. If the Ingres installation is running, the information on these pages is read-only. If it is not running, and no recovery is required from a system failure, these pages allow various operations to be performed on the transaction log files. These operations include editing the log file name, setting the log size per file, and adding, modifying or deleting locations for the primary and dual transaction log files.
For instructions on configuring transaction log parameters, see the following topic in Configuration Manager online help:
■ Primary Log Page, Transaction Log Component
Archiver Process
The archiver process (dmfacp) removes completed transactions from the transaction log file. For journaled tables, the archiver writes any completed transaction to the journal files for the database. Each database has its own journal files containing a record of all the changes made to the database since the last checkpoint was taken. The archiver process “sleeps” until sufficient portions of the transaction log file are ready to be archived or until the last user exits from a database. The archiver process is not configurable.
Remote Command
The Remote Command component allows Visual DBA to execute operating system level commands remotely, such as createdb and destroydb. The Remote Command component is not configurable. For additional information on the Remote Command component, see Remote Command Server in this guide and the Command Reference Guide.

Viewing a History of Changes
Configuration 3–13
Viewing a History of Changes Using the History of Changes page, you can view a list of all the changes to parameters that have been made by Configuration Manager or the Configuration-By-Forms (cbf) utility. The list contains changes beginning with the least recent. Each “CHANGE” line is followed by a list of all modified parameters that were derived because of the user change. Pressing F3 or Ctrl+F (in Configuration Manager) displays a Find dialog for searching for text.


Setting Environment Variables/Logicals 4–1
Chapter
4 Setting Environment Variables/Logicals
Ingres has available a set of logical names through which you can define various file names and other values. The settings of these Ingres environment variables/logicals are used during operations at your installation.
This chapter describes the Ingres environment variables/logicals most commonly defined and how they are set.
For an alphabetical list of the basic Ingres environment variables/logicals, see the appendix “Environment Variables/Logicals.”
Scope Ingres uses the following types of Ingres environment variables/logicals:
Windows ■ Operating system environment variables
■ Ingres environment variables
UNIX ■ UNIX environment variables
■ Installation-wide environment variables
VMS
■ Group-level Ingres logicals
■ User-defined or process-level logicals
Ingres logicals are defined in the appropriate logical name table.
Note: Ingres environment variables in Windows and UNIX are active only when you are using Ingres. Most are set in the Ingres symbol table and are visible only with the user command ingprenv. A small subset of these environment variables can be reset by the user in the local environment as explained in the following sections.

Windows Environment Variables
4–2 System Administrator Guide
Note: When setting, unsetting, or changing environment variables, a backup of the symbol.tbl file, called symbol.bak, is maintained. If the original symbol.tbl file becomes corrupted, you can use the backup symbol table file to restore it. A history of updates to the symbol.tbl file is maintained in the symbol.log file. The symbol.log file will contain information on the types of updates performed as well as some application information. The symbol.bak and symbol.log files are located in the II_CONFIG location or the II_ADMIN location (in the case of NFS Ingres instances).
Windows Environment Variables Windows environment variables are set at the operating system level. These take effect before, during and after Ingres is invoked. II_SYSTEM and PATH are the only environment variables used directly by Ingres. These are set in the user’s environment using the following commands entered at the operating system prompt:
SET environment_variable=value
The Windows environment variables are set using Ingres Visual Manager (IVM). For more information, see the IVM online help topic, Parameters Page, Ingres Installation branch.
Alternatively, you can set Windows environment variables through the Control Panel.
UNIX Environment Variables UNIX environment variables are set at the UNIX operating system level. These are in effect before, during and after Ingres is invoked. II_SYSTEM, PATH, and TERM are the only UNIX environment variables required and used directly by Ingres. These environment variables/logicals are set in each user’s environment using the following UNIX commands entered at the operating system prompt:
C shell:
setenv environment_variable value
Bourne shell:
environment_variable = value; export environment_variable

VMS Logicals
Setting Environment Variables/Logicals 4–3
The environmental variables are typically set in a user’s .login or .profile file, but can also be set in operating system startup scripts such as /etc/login.
VMS Logicals VMS logicals are set in the system or group logical table and are visible with the system command, show logical/system or show logical/group. These are in effect before, during, and after Ingres is invoked. II_SYSTEM is the only VMS logical required and used directly by Ingres. This logical is defined by the system administrator using the following VMS command entered at the operating system prompt:
define [/table_level] logical_name "value"
The value assigned to the Ingres logical must be enclosed in double quotes.
This definition is typically placed in the operation system-wide command procedure for defining site-specific logical names (sys$manager:sylogicals.com).
Installation-Wide Environment Variables/Logicals Ingres environment variables/logicals that are defined at the Ingres system or installation-wide level affect all users in an installation. These are usually defined during the install procedure. However, the system administrator can reset some manually.
Windows UNIX
Use Ingres Visual Manager to view Ingres environment variables and to manually register and deregister them. Additionally, you can use it to override certain environment variables at the user level.
For more information about Ingres Visual Manager, see the chapter “Managing Your System and Monitoring Performance.”
To view variables in Ingres Visual Manager:
1. Select the Ingres Installation branch in Ingres Visual Manager.
2. Select the Parameters tab and select the System subtab, if it is not already selected.
The Ingres parameters that are set at the installation (system) level are displayed.
3. Select the Show Unset Parameters check box to display parameters that are not currently set.

Installation-Wide Environment Variables/Logicals
4–4 System Administrator Guide
If the User subtab is selected, those parameters that can be overridden at the user level are displayed.
Use the Extra subtab to view and edit any extra Ingres environment variables that are added or variables whose names are dynamic.
UNIX
Windows
Alternatively, use the ingsetenv utility to manually register and the ingunset utility to remove an environment variable from the Ingres symbol table. Always use ingsetenv and ingunset to alter the symbol table. Never edit this file directly.
You can display all installation-wide environment variables by typing the ingprenv command at the operating system prompt.
Note: A similar set of system administrator commands are available to set, print, and unset installation-wide Ingres environment variables simultaneously for all clients of an Ingres installation server. These are ingsetall, ingprall, and ingunsetall.
VMS
Ingres logicals (with the exception of II_SYSTEM) are defined in II_CONFIG:config.dat during the install process. These logicals can be redefined locally using the operating system command define/job logical_name "value". However, to update the logical definitions permanently, the II_CONFIG:config.dat file must be manually edited and the logical definitions modified.
To facilitate user access to Ingres tools and logical definitions, add the following access commands to the users’ login.com file when you log into the system.
For users, add:
@II_SYSTEM:[ingres]ingusrdef.com
For database administrators, add:
@II_SYSTEM:[ingres]ingdbadef.com
For the system administrator, add:
@II_SYSTEM:[ingres]ingsysdef.com
The commands in these files provide tools access to all users in a system-level installation and to all users with the appropriate group user identification code (UIC) in a group-level installation. The Ingres logicals contained in II_CONFIG:config.dat are redefined at a job level for each user when one of the above commands is executed.

Installation-Wide Environment Variables/Logicals
Setting Environment Variables/Logicals 4–5
You can display all installation-wide Ingres logicals by typing the following command at the operating system prompt:
show logical [/system|/group|/job] ii*
Examples
To set ING_EDIT for an installation:
Windows
UNIX
Using Ingres Visual Manager, log in as the system administrator. Follow these steps:
1. Select the Ingres Installation branch in Ingres Visual Manager.
2. Select the Parameters tab, and select the System subtab.
The Ingres parameters that are set at the installation (system) level are displayed.
Note: For variables that have a dynamic name, select the Extra tab instead of the System tab.
3. Select the Show Unset Parameters check box to display parameters that are not currently set.
4. Choose ING_EDIT from the Parameters list, and double-click in the value area.
5. Edit the value and press Enter.
Alternatively, click Add and scroll to choose the ING_EDIT variable. Enter the value d:\tools\vi.exe), and click OK.
Alternative methods to set ING_EDIT in a Windows or UNIX system and the method for setting ING_EDIT in a VMS system follow.
Log in as the system administrator, and at the operating system prompt type:
Windows ingsetenv ING_EDIT D:\TOOLS\VI.EXE
UNIX ingsetenv ING_EDIT /usr/bin/vi
VMS
The syntax for defining any Ingres logical is the following command entered at the operating system prompt:
define [/table_level] logical_name "value"
The value assigned to the Ingres logical must be in double quotes.

Installation-Wide Environment Variables/Logicals
4–6 System Administrator Guide
For example, to define the ING_EDIT logical for an installation, log in as the system administrator and at the operating system prompt, type:
DEFINE ING_EDIT "EDT"
User-Definable Environment Variables/Logicals
Some Ingres environment variables/logicals can be set or reset by individual users in their local environment using operating system commands. Those set in a user’s local environment supersede the Ingres environment variables/logicals set system-wide.
UNIX A good place to set user-defined environment variables is the user’s .login (for the C shell) or profile (for the Bourne Shell) file.
VMS
Individual users can define Ingres environment variables at the job or process level with DCL commands, or they can be defined in the user’s login.com file.
One environment variable usually set in the user’s local environment is TERM_INGRES. It specifies the termcap definition to be used by the forms system. It can be redefined locally by entering commands at the operating system prompt as in the following example:
Windows SET TERM_INGRES=IBMPC
UNIX C Shell:
setenv TERM_INGRES vt100f
Bourne Shell:
TERM_INGRES=vt100f export TERM_INGRES
VMS
DEFINE TERM_INGRES "VT100F"
A user can display the values set in their environment with the following command entered at the operating system prompt:
Windows SET
UNIX BSD:
Printenv
System V:
env

Installation-Wide Environment Variables/Logicals
Setting Environment Variables/Logicals 4–7
Locally Resettable
In general, only the following Ingres environment variables/logicals need to be set in your local environment:
Windows II_SYSTEM and PATH
UNIX II_SYSTEM and PATH
VMS
II_SYSTEM
The following Ingres environment variables/logicals can be reset by users in their local operating system shell.
Important! II_TIMEZONE_NAME can be reset for client installations only. Server installations must not reset this logical because it may affect date conversions from the local system time to the internal GMT-based value.
DBNAME_ING DBNAME_SQL_INIT II_4GL_DECIMAL II_ABF_RUNOPT II_AFD_TIMEOUT II_APPLICATION_LANGUAGE II_DATE_CENTURY_BOUNDARY II_DATE_FORMAT II_DBMS_SERVER II_DECIMAL II_DML_DEF II_EMBED_SET II_FRS_KEYFIND II_GC_REMOTE II_GCA_LOG II_GCx_TRACE II_HELP_EDIT II_LANGUAGE II_MONEY_FORMAT II_MONEY_PREC II_NULL_STRING II_PATTERN_MATCH II_PF_NODE II_POST_4GLGEN II_PRINTSCREEN_FILE II_SQL_INIT II_SYSTEM II_TEMPORARY II_TERMCAP_FILE

Installation-Wide Environment Variables/Logicals
4–8 System Administrator Guide
II_TFDIR II_TIMEZONE_NAME II_TM_ON_ERROR II_VNODE_PATH II_WORK IIDLDIR ING_ABFDIR ING_ABFOPT1 ING_EDIT ING_PRINT ING_SET ING_SET_DBNAME ING_SHELL INGRES_KEYS INIT_INGRES TERM TERM_INGRES
Not Locally Resettable
The following Ingres environment variables/logicals must not be reset by users:
II_BIND_SVC_xx II_C_COMPILER II_CHARSETxx II_CHECKPOINT II_CLIENT II_COLLATION II_CONFIG II_CONNECT_RETRIES II_DATABASE II_DBMS_LOG II_DIRECT_IO II_DUMP II_ERSEND II_GCNxx_PORT II_INSTALLATION II_JOURNAL II_LOG_DEVICE II_MSGDIR II_NUM_SLAVES II_TUXEDO_LOC II_TUX_SHARED II_TUX_AS_MAX II_TUX_XN_MAX II_XA_TRACE_FILE ING_SYSTEM_SET

Creating Startup Files
Setting Environment Variables/Logicals 4–9
UNIX These environment variables/logicals must not be visible using the env or printenv command.
Creating Startup Files This section explains the various startup files and Ingres environment variables/logicals that customize the query language runtime environment. It includes a reference chart for both languages (SQL and QUEL). The chart shows the users and programs that are affected by setting Ingres environment variables/logicals or editing certain startup files. The reference chart is followed by sections listing (with examples) each startup file or Ingres environment variable/logical, showing the application and scope of each.
Runtime Customization
Most aspects of the environment in which queries execute can be customized at runtime for a particular session. This can be done by executing one or more set statements to customize the environment before query execution begins.
Here are some examples:
■ Reduce lock conflicts when running read-only queries, as for reports:
set lockmode session where readlock = nolock
■ Display the text of the query as it is executed:
set printqry
A full list of set statements can be found in your query language reference guide.
Customization Levels
Ingres makes customization flexible by permitting most components of the query environment to be set by means of set statements at the start up of individual queries (sessions) by using various Ingres environment variables/logicals and startup files that permit users to control both the target and duration of set statement customization.
Creating Startup Files
4–10 System Administrator Guide
General Rules for Startup File and Environment Variable/Logical Syntax
Keep the following general syntax rules in mind:
■ Set statements in startup files cannot contain more than one set statement per line. Each statement must be on a line by itself.
■ Set statements that are read from a file, but executed only by the single-line terminal monitors, must be terminated with “\g”.
■ Set statements defined directly inside Ingres environment variables/logicals (not written in a file) never contain the string “\g”.
■ Set statements defined directly inside Ingres environment variables/logicals (not written in a file) can contain multiple set statements separated by a semicolon up to a total length of 64 characters.
■ The terminal monitor dayfile cannot contain set statements. It contains informational startup messages only.
■ Ingres environment variables/logicals set with the following commands are global for the Ingres installation, affecting the target of the environment variable/logical for all users in an installation:
Windows ingsetenv
UNIX ingsetenv
VMS
define/system for a system level installation, or define/group for a group level installation
■ Ingres environment variables/logicals set from the local user environment apply only to the user setting them. Other users are not affected. This is the case, for example, when Ingres environment variables/logicals are set interactively, or:
Windows – Through the System icon in the Control Panel
UNIX – From a user’s .login, .profile or .cshrc file
VMS
– Defined at the process level by the individual user with the VMS command define/process

Creating Startup Files
Setting Environment Variables/Logicals 4–11
Description of Startup Files and Environment Variables/Logicals
The following sections contain a description of the startup files and associated Ingres environment variables/logicals.
Dayfile
This name affects all users of the SQL and QUEL single-line terminal monitors.
Dayfile contains text messages only (not set statements), which appear as an informational header whenever the terminal monitors are started up. It is located in:
Windows %II_SYSTEM%\ingres\files
UNIX $II_SYSTEM/ingres/files
VMS
II_SYSTEM:[INGRES.FILES]
The message header can be suppressed with the -d command line flag.
DBNAME_ING
This name applies to the QUEL single-line terminal monitor only. DBNAME_ING points to set statements within a file that are executed whenever this Ingres environment variable takes effect.
DBNAME_ING affects user(s) who connect to the database specified by DBNAME through the QUEL terminal monitor. If set globally with ingsetenv, it affects all users of DBNAME. If set interactively or locally in this user’s .login, .profile, or .cshrc file it affects only this user.
Setting this environment variable is equivalent to a user’s executing \i filename in the QUEL terminal monitor each time they connect to DBNAME.
The syntax for defining this Ingres environment variable is the following command entered at the operating system prompt:
Windows set DBNAME_ING=path_to_file
where DBNAME is the name of the database and must be in uppercase.
For example: set MYDB_ING=d:\usr\george\mystartfile

Creating Startup Files
4–12 System Administrator Guide
UNIX C Shell:
setenv DBNAME_ING path_to_file
For example: setenv MYDB_ING /usr/george/mystartfile
Bourne Shell:
DBNAME_ING=path_to_file export DBNAME_ING
where DBNAME is the name of the database and must be in uppercase.
For example: MYDB_ING=/usr/george/mystartfile export MYDB_ING
The file contains lines in the following format:
set lockmode session where readlock = nolock \g
This file contains the set statements. If you have several set statements, separate the statements with a space. You must end the entire file with “\g”.
DBNAME_SQL_ INIT
This name applies to the SQL single-line terminal monitor only. DBNAME_SQL_INIT points to set statements within a file that are executed whenever this Ingres environment variable/logical takes effect.
DBNAME_SQL_INIT affects user(s) who connect to the database specified by DBNAME through the SQL Terminal Monitor. If set globally, it affects all users of DBNAME. If set interactively or locally, it affects only this user.
Windows Global setting is with ingsetenv, or locally in the user’s environment.
UNIX Global setting is with ingsetenv, or locally in the user’s .login, .profile, or .cshrc file.
VMS
Global setting is with define/system, define/group, or locally with define/process in the user’s login.com file.
Setting this environment variable/logical is equivalent to a user’s executing \i filename in the SQL Terminal Monitor each time they connect to DBNAME.

Creating Startup Files
Setting Environment Variables/Logicals 4–13
The syntax for defining this Ingres environment variable/logical is the following command entered at the operating system prompt:
Windows SET DBNAME_SQL_INIT=path_to_file
For example:
SET MYDB_SQL_INT=c:\user\mystartfile
UNIX C Shell:
setenv DBNAME_SQL_INIT path_to_file
For example: setenv MYDB_SQL_INIT /usr/george/mystartfile
Bourne Shell:
DBNAME_SQL_INIT=path_to_file export DBNAME_SQL_INIT
For example: MYDB_SQL_INIT=/usr/george/mystartfile export MYDB_SQL_INIT
VMS
define DBNAME_SQL_INIT path_to_file
For example:
DEFINE /PROCESS MYDB_SQL_INIT DUA1:[USER.GEORGE]MYSTART.FILE
Where DBNAME is the name of the database and must be in uppercase.
The file contains lines in the following format: set lockmode session where readlock = nolock \g
This file contains the set statements. If you have several set statements, separate the statements with a semicolon (;). You must end the entire file with “\g”.
II_SQL_INIT
This name applies to the SQL single-line Terminal Monitor only. II_SQL_INIT points to set statements within a file that are executed whenever this Ingres environment variable/logical takes effect.

Creating Startup Files
4–14 System Administrator Guide
II_SQL_INIT affects user(s) who connect to the SQL terminal monitor. If set globally, it affects all users. If set interactively or locally, it affects only this user.
Windows Global setting is with ingsetenv, or locally in the user’s environment.
UNIX Global setting is with ingsetenv, or locally in the user’s .login, .profile or .cshrc file.
VMS
Global setting is with define/system, define/group, or locally with define/process in the user’s login.com file.
Setting this environment variable/logical is equivalent to a user’s executing \i filename in the SQL terminal monitor each time they connect to a database.
The syntax for defining this Ingres environment variable/logical is the following command entered at the operating system prompt:
Windows SET II_SQL_INIT=path_to_file
UNIX C Shell:
setenv II_SQL_INIT path_to_file
For example: setenv II_SQL_INIT /usr/george/mystartfile
Bourne Shell:
II_SQL_INIT=path_to_file export II_SQL_INIT
For example: II_SQL_INIT=/usr/george/mystartfile export II_SQL_INIT
VMS
define II_SQL_INIT path_to_file
For example:
DEFINE /PROCESS II_SQL_INIT - DUA1:[USER.GEORGE]MYSTART.FILE
The file contains lines in the following format: set lockmode session where readlock = nolock \g
This file contains the set statements. If you have several set statements, separate the statements with a semicolon (;). You must end the entire file with “\g”.

Creating Startup Files
Setting Environment Variables/Logicals 4–15
ING_SET
This name applies to both SQL and QUEL single-line terminal monitors as well as Ingres tools such as ABF, VIFRED, embedded SQL, QBF, IQUEL, ISQL, and so forth. ING_SET points to set statements that are executed whenever this Ingres environment variable/logical takes effect.
ING_SET affects user(s) who connect to an application, an Ingres tool, or a terminal monitor. If set globally, it affects all users. If set interactively or locally, it affects only this user.
Windows Global setting is with ingsetenv, or locally in the user’s environment.
UNIX Global setting is with ingsetenv, or locally in the user’s .login, .profile, or .cshrc file.
VMS
Global setting is with define/system, define/group, or locally with define/process in the user’s login.com file.
ING_SET is set to a string surrounded by quotes. The string must be 64 characters or less, or it is invalid. The string can contain either:
■ One or more set statements totaling no more than 64 characters
■ The word include followed by the full path name to a file containing any number of set statements
The syntax for defining this Ingres environment variable/logical is the following command entered at the operating system prompt:
Windows SET ING_SET=set-statement {;set statement}
Examples:
SET ING_SET=set lockmode show SET ING_SET=include C:\users\default\mystartfile
UNIX C Shell:
setenv ING_SET 'set-statement {; set-statement}' or: setenv ING_SET 'include path_to_file'
Examples: setenv ING_SET 'set lockmode show' setenv ING_SET 'include /usr/george/mystartfile'

Creating Startup Files
4–16 System Administrator Guide
Bourne Shell:
ING_SET='set-statement {; set-statement}' or: ING_SET='include path_to_file' export ING_SET
Examples: ING_SET='set lockmode show' export ING_SET
ING_SET='include /usr/george/mystartfile' export ING_SET
VMS
define ING_SET "set-statement {;set-statement}" or: define ING_SET "include path_to_file"
Examples: DEFINE /PROCESS ING_SET "SET LOCKMODE SHOW"
DEFINE /PROCESS ING_SET – "INCLUDE DUA1:[USER.GEORGE]MYSTART.FILE"
For the include format, the file specified by path_to_file contains the set statements. If you have several set statements, separate the statements with a semicolon (;). Place each set statement on a separate line in the file. For example: set autocommit on; set lockmode session where readlock=nolock; set result_structure cbtree
ING_SET_ DBNAME
This name applies to both SQL and QUEL single-line terminal monitors as well as Ingres tools such as ABF, VIFRED, embedded SQL, QBF, IQUEL, ISQL, and so forth. ING_SET_DBNAME points to set statements that are executed whenever this Ingres environment variable/logical takes effect.
ING_SET_DBNAME affects user(s) who connect to the database specified by DBNAME through an application, an Ingres tool, or a terminal monitor. If set globally, it affects all users of DBNAME. If set interactively or locally, it affects only this user.
Windows Global setting is with ingsetenv, or locally in the user’s environment.
UNIX Global setting is with ingsetenv, or locally in the user’s .login, .profile or .cshrc file.

Creating Startup Files
Setting Environment Variables/Logicals 4–17
VMS
Global setting is with define/system, define/group, or locally with define/process in the user’s login.com file.
ING_SET_DBNAME is set to a string surrounded by quotes. The string must be 64 characters or less, or it is invalid. The string can contain either:
■ One or more set statements totaling no more than 64 characters
■ The word include followed by the full path name to a file containing any number of set statements
The syntax for defining this Ingres environment variable/logical is the following command entered at the operating system prompt:
Windows SET ING_SET_DBNAME=set-statement {;set statement}
For example: SET ING_SET_MYDB=set lockmode show SET ING_SET_MYDB=include C:\users\default\mystartfile
UNIX C Shell:
setenv ING_SET_DBNAME 'set-statement {; set-statement}' or: setenv ING_SET_DBNAME 'include path_to_file'
For example: setenv ING_SET_MYDB ’set lockmode show’ setenv ING_SET_MYDB ’include /usr/george/mystartfile’
Bourne Shell:
ING_SET_DBNAME='set-statement {; set-statement}' or: ING_SET_DBNAME='include path_to_file' export ING_SET_DBNAME
For example:
ING_SET_MYDB=’set lockmode show’ export ING_SET_MYDB
ING_SET_MYDB=’include /usr/george/mystartfile’ export ING_SET_MYDB
VMS
define ING_SET_DBNAME "set-statement {; set-statement}" or: define ING_SET_DBNAME "include path_to_file"

Creating Startup Files
4–18 System Administrator Guide
Examples: DEFINE /PROCESS ING_SET_MYDB – "SET LOCKMODE SHOW"
DEFINE /PROCESS ING_SET_MYDB – "INCLUDE DUA1:[USER.GEORGE]MYSTART.FILE"
For the include format, the file specified by path_to_file contains the set statements. If you have several set statements, separate the statements with a semicolon (;). Place each set statement on a separate line in the file. For example: set autocommit on; set lockmode session where readlock=nolock; set result_structure cbtree
ING_SYSTEM_ SET
This name applies to both SQL and QUEL single-line terminal monitors as well as Ingres tools such as ABF, VIFRED, embedded SQL, QBF, IQUEL, ISQL, and so forth. ING_SYSTEM_SET points to set statements that are executed whenever this Ingres environment variable/logical takes effect.
ING_SYSTEM_SET affects all users who connect to a DBMS Server through an application, an Ingres tool, or terminal monitor. It is always effective globally and can be set only by a privileged user.
ING_SYSTEM_SET is set to a string surrounded by quotes. The string must be 64 characters or less, or it is invalid. The string can contain either:
■ One or more set statements totaling no more than 64 characters
■ The word include followed by the full path name to a file containing any number of set statements
The syntax for defining this Ingres environment variable/logical is the following command entered at the operating system prompt:
Windows SET ING_SYSTEM_SET=set-statement {;set-statement}
For example: SET ING_SYSTEM_SET=set autocommit on
UNIX C Shell:
setenv ING_SYSTEM_SET 'set-statement {; set-statement}' or: setenv ING_SYSTEM_SET 'include path_to_file'

Creating Startup Files
Setting Environment Variables/Logicals 4–19
For example: setenv ING_SYSTEM_SET ’set autocommit on’ setenv ING_SYSTEM_SET ’include \ /usr/ingres/ourstartfile’
Bourne Shell:
ING_SYSTEM_SET='set-statement {; set-statement}' or: ING_SYSTEM_SET='include path_to_file' export ING_SYSTEM_SET
For example: ING_SYSTEM_SET=’set autocommit on’ export ING_SYSTEM_SET ING_SYSTEM_SET=’include \ /usr/ingres/ourstartfile’ export ING_SYSTEM_SET
VMS
define ING_SYSTEM_SET "set-statement {; set-statement}" or: define ING_SYSTEM_SET "include path_to_file "
For example: DEFINE /SYSTEM ING_SYSTEM_SET – "SET LOCKMODE SHOW"
DEFINE /SYSTEM ING_SYSTEM_SET – "INCLUDE DUA1:[INGRES]OURSTART.FILE"
For the include format, the file specified by path_to_file contains the set statements. If you have several set statements, separate the statements with a semicolon (;). Place each set statement on a separate line in the file. For example: set autocommit on; set lockmode session where readlock=nolock; set result_structure cbtree;
INIT_INGRES
This name applies to the QUEL single-line terminal monitor only. INIT_INGRES points to set statements within a file that are executed whenever this Ingres environment variable/logical takes effect.
INIT_INGRES affects user(s) who connect to the QUEL terminal monitor. If set globally, it affects all users. If set interactively or locally, it affects only this user.
Windows Global setting is with ingsetenv, or locally in the user’s environment.

Creating Startup Files
4–20 System Administrator Guide
UNIX Global setting is with ingsetenv, or locally in the user’s .login, .profile, or .cshrc file.
VMS
Global setting is with define/system, define/group, or locally with define/process in the user’s login.com file.
Setting this environment variable/logical is equivalent to a user’s executing \i filename in the QUEL terminal monitor each time they connect to a database.
The syntax for defining this Ingres environment variable/logical is the following command entered at the operating system prompt:
Windows SET INIT_INGRES=path_to_file
For example: SET INIT_INGRES=c:\user\mystartfile
UNIX C Shell:
setenv INIT_INGRES path_to_file
For example: setenv INIT_INGRES /usr/george/mystartfile
Bourne Shell:
INIT_INGRES=path_to_file export INIT_INGRES
For example: INIT_INGRES=/usr/george/mystartfile export INIT_INGRES
VMS
define INIT_INGRES path_to_file
For example: DEFINE /PROCESS INIT_INGRES – DUA1:[USER.GEORGE]MYSTART.FILE The file contains lines in the following format: set lockmode session where readlock = nolock \g
This file contains the set statements. If you have several set statements, separate the statements with a semicolon (;). You must end the entire file with “\g”.

Creating Startup Files
Setting Environment Variables/Logicals 4–21
Startsql
This name affects the SQL single-line terminal monitor only.
Startsql affects all users of the SQL terminal monitor. It is a customizable file (delivered empty on the release tape). It is located in:
Windows %II_SYSTEM%\ingres\files\startsql
UNIX II_SYSTEM/ingres/files/startsql
VMS
II_SYSTEM:[INGRES.FILES]STARTSQL
Users with permission to edit this file can add statements of the following example: set lockmode session where readlock = nolock \g
Startup
This name affects the QUEL single-line terminal monitor only.
The Ingres environment variable/logical startup affects all users of the QUEL terminal monitor. It is a customizable file (delivered with some macros already defined). It is located in:
Windows %II_SYSTEM%\ingres\files\startup
UNIX II_SYSTEM/ingres/files/startup
VMS
II_SYSTEM:[INGRES.FILES]STARTUP
Users with permission to edit this file can add statements of the such as the following: {DEFINE RET; RETRIEVE}
The result of using this macro startup file is that users typing “RET TABLE1.ALL” has the string “RET” substituted by the string “RETRIEVE” at query execution time. For an explanation of how macros are used and defined, see the QUEL Reference Guide.

Changing Installation Locations
4–22 System Administrator Guide
The quantity of some operating system resources available to each user session is fixed at Ingres DBMS Server start up. These include resources such as the quantities of memory available for parsing, storing and optimizing a query. Default values are used for these resources at installation time. These do not need to be changed unless you are receiving explicit error messages that indicate that these resources are inadequate.
Changing Installation Locations The values of Ingres installation locations II_SYSTEM, II_DATABASE, II_CHECKPOINT, II_JOURNAL, II_DUMP, II_WORK, II_TEMPLATE, and ING_ABFDIR are established at installation time, first by setting II_SYSTEM before installation and running the installation configuration program and responding to prompts for the other locations.
Some of these values can be easily changed, and some require unloading of the installation.
When Installation Locations Do Not Need to Be Changed
Before proceeding to change an existing Ingres installation location, be sure that it is really necessary: ask yourself what needs to be moved, and why. Installation locations do not need to be changed if:
■ The installation needs space for future growth.
■ Existing databases are outgrowing their present disk partitions.
Making Space for Future Growth
Ingres provides the capability of creating new locations and placing any new databases, tables, or indexes in these new locations. If the requirement is space for new tables or databases, you do not need to change existing locations.
Instead, create the necessary new locations for these future tables and databases and use the available location flags of createdb (-d, -c, -j, -b, and -w) to create the data, checkpoint, journal, dump, and work files for the newly created database in some other location. For more information on creating new databases, see the createdb command in the Command Reference Guide.

Changing Installation Locations
Setting Environment Variables/Logicals 4–23
Making Additional Space for Existing Tables
If space is becoming limited on a disk partition containing a particularly large table, you can move the table to a new disk or partition. Use the modify command to relocate and modify to reorganize statements as described in the Database Administrator Guide.
When Installation Locations Need to Be Changed
The preceding information on installation locations applies to any Ingres installation. When you need to change the value of an installation location variable, the procedure depends to some extent on the underlying operating system.
Changing Location Variables in Windows and UNIX
The procedure to change a location variable depends on whether the change requires unloading the database.
Changing Location Variables That Do Not Require Unloading
You can change the ING_ABFDIR location value without unloading the installation.
Changing ING_ABFDIR
To change the installation default for ING_ABFDIR:
1. Shut down Ingres with ingstop
2. Change the value of ING_ABFDIR with the ingsetenv command
3. Restart the installation with ingstart
Note: Application developers who do not want to use the installation default can redefine ING_ABFDIR in their local user environment.
Changing Location Variables Requiring Unloading
You can change the location of the following Ingres installation locations:
■ II_SYSTEM
■ II_DATABASE
■ II_CHECKPOINT

Changing Installation Locations
4–24 System Administrator Guide
■ II_JOURNAL
■ II_DUMP
■ II_WORK
The values of these locations are stored in the configuration file “aaaaaaaa.cnf” of each database at the time it is created and can only be changed by unloading each database, re-installing Ingres and reloading the databases (thus creating a new configuration file).
Changing an Installation Location with Unloading
Windows Follow these steps to change the value of II_SYSTEM, II_DATABASE, II_CHECKPOINT, II_JOURNAL, II_DUMP or II_WORK. "II_SYSTEM" is used as the example location to be changed:
1. Unload each database. Follow the instructions in the Database Administrator Guide.
2. Remove the old installation files by removing everything under the old %II_SYSTEM%\ingres directory and any extended locations.
3. Reinstall Ingres specifying the new value of II_SYSTEM.
4. Recreate each of the databases as described in the Database Administrator Guide.
■ Use the createdb dbname command to recreate a database.
■ Reload each database by appropriately editing and running the reload script.
5. Once you have reinstalled Ingres and recreated the databases in the new location, take new checkpoints of each of the databases. Checkpoints taken in old locations are no longer valid. For instructions on this procedure, see the Database Administrator Guide.
Changing a Location with Unloading
UNIX Follow these steps in UNIX to change the value of II_SYSTEM, II_DATABASE, II_CHECKPOINT, II_JOURNAL II_DUMP, or II_WORK. “II_SYSTEM” is used as the example location being changed:
1. Unload each database. Follow the instructions in the Database Administrator Guide.
2. Remove the old installation files by removing everything under the old II_SYSTEM/ingres directory and any extended locations.

Changing Installation Locations
Setting Environment Variables/Logicals 4–25
3. Set the value of II_SYSTEM and PATH to the desired new values, just as if you were installing Ingres for the first time.
4. Reinstall Ingres.
■ Use the installation medium and follow the instructions in Getting Started for a new (not upgrade) installation.
■ As part of the installation procedure, you are asked to run the program ingbuild. This program prompts you for the new values of Ingres location variables II_DATABASE, II_CHECKPOINT, II_JOURNAL, II_DUMP, and II_WORK.
5. Recreate each of the databases as described in the Database Administrator Guide.
■ Use the createdb dbname command to recreate a database.
■ Reload each database by appropriately editing and running the reload.ing script.
6. Once you have reinstalled Ingres and recreated the databases in the new location, take new checkpoints of each of the databases. Checkpoints taken in old locations are no longer valid. For instructions on this procedure, see the Database Administrator Guide.
Do Not Use Symbolic Links
Ingres does not support or recommend the use of symbolic links to change locations in UNIX. (This is possible with the UNIX ln command, which allows the UNIX system administrator to create symbolic links to new directories so that files are found in another directory even though the values of Ingres installation location variables remain unchanged.)
The following are some common problems that arise from the misuse of symbolic links:
■ Any files to which Ingres writes must reside on a file system that is local to the machine on which the writing process is running. This is necessary because of the operating system’s inability to guarantee network writes. If symbolic links are used, writable directories can mistakenly be mounted from remote machines. This can cause write errors and data corruption.
■ Occasionally Ingres executables reside on NFS file systems that have been exported with the - nosuid option. The permissions appear normal when the ls -l command is issued, but setuid programs fails with permission errors.
■ The rm command does not remove files that are symbolic links. Instead, the symbolic link itself is broken, but the original file remains. This can cause cleanup routines to fail in some circumstances.

Changing Installation Locations
4–26 System Administrator Guide
Changing Location Variables in VMS
The location value ING_ABFDIR can be changed without unloading the installation.
Changing ING_ABFDIR
To change the installation default value for ING_ABFDIR in VMS:
1. Shut down Ingres with ingstop.
2. Change the value with a new define command.
3. Restart the installation with ingstart.
ING_ABFDIR can be redefined in the local user environment for application developers who do not want to use the installation default.
Changing Other Location Variables
Follow these steps in VMS to change the value of II_SYSTEM, user areas, II_DATABASE, II_CHECKPOINT, II_JOURNAL, II_DUMP, or II_WORK:
1. Shut down Ingres with ingstop.
2. Change the value of II_SYSTEM, II_DATABASE, II_CHECKPOINT, II_JOURNAL, II_DUMP, II_WORK or user areas with the define command. Remember to modify any startup or other procedures where these logicals are defined.
3. Restart the installation with ingstart.
For more information about stopping and starting the installation using ingstop and ingstart, see the Command Reference Guide.

Customization Options 5–1
Chapter
5 Customization Options
This chapter describes how to implement the following customization options that are available for your installation:
■ Changing the character set or collation sequence
■ Customizing the Archiver Exit Script
■ Configuring journal files
Selecting a Character Set Ingres supports read-in character sets. This feature allows you to use a character set other than the default character set at your installation.
Windows The default character set is WIN1252.
UNIX The default character set is ISO-8859/1.
VMS
The default character set is DEC Multinational.
A different character set than those listed above can be used. For example, in Thailand, the standard character set is Thai TIS. If you specify the THAI character set during the installation procedure, users at your installation save and retrieve data using this character set.
The installation utility prompts you with a list of currently supported character sets for your platform. It sets the environment variable/logical II_CHARSETxx to the value you have selected, unless the default character set is chosen. If the default character set is chosen, II_CHARSETxx is not set.
Caution! Choose your character set carefully. An installation can use only one character set. Do not change the character set because data in existing databases can be corrupted.
After running the install program, check the value of II_CHARSETxx. If II_CHARSETxx is set incorrectly, you must run the installation program again.

Selecting a Character Set
5–2 System Administrator Guide
Supported Character Sets
Character set support includes the following character sets:
Character Set Description
WIN1252, ISO88592, ISO88591, DECMULTI
WIN character set is the default character set for Windows, ISO character set is the default character set for UNIX, and DEC Multinational is the default character set for VMS
HEBREW DEC Hebrew character set
GREEK Greek ELOT character set
THAI Thai TIS character set
ARABIC Arabic 449+ character set
HPROMAN8 HP Roman-8 (superset of ASCII)
DECMULTI (the default for the VMS platform) and ISO88591 (the default for the UNIX platform) are extended ASCII character sets. They have identical definitions for the 128 7-bit characters. They differ only in the defaults they assign for several of the 128 additional characters in the 8-bit character set.
Additional Character Sets
Depending on your installation, you can have additional character sets available from which to select. These include:
■ ELOT437 (IBM Greek)
■ CHINESES
■ CHINESET
■ KANJIEUC
■ SHIFTJIS
■ KOREAN
■ IBM-PC-Slavic 852 (PC Slavic)
■ ISO-8859/2 Slavic (UNIX Slavic)
For a list of the character sets available on your platform, see the online list selection during installation.

Local Collation Sequences
Customization Options 5–3
Local Collation Sequences A collation sequence determines the sorting order of any given character set. For example, in English, the order of the alphabet is most commonly used to order a list of English words. That is, words beginning with the letter c appear before words beginning with the letter d, which appear before words beginning with the letter e and so on.
Within a computer, if no other collation sequence is enforced, the sequence derived from the machine’s native character set, either ASCII or EBCDIC is used. The sorting order of these character sets derives from the internal numeric representation of each character.
A collation sequence is associated with each database when the database is created. This sequence determines in what order sorted data is returned to users and applications, what is returned when queries use pattern matching and, in some instances, how data is stored internally.
In addition to the sequences derived from ASCII and EBCDIC, two local collation sequences are supported: multi, a sequence derived from the DEC Multinational Character Set, and spanish, a sequence derived from the Spanish language.
If none of the above sequences can adequately fill your needs, you can also write your own local collation sequence.
The following sections provide a description of the multi and spanish sequences and instructions for writing your own collation sequence.
Multi-Collation Sequence
The multi collation sequence is based on the DEC Multinational Character Set. This character set adds several vowels with diacritical marks to the standard 7-bit ASCII character set.
Following are the comparison sequences for the multi sequence that differ from those of ASCII. Some matching rules are also described.
A < À < Á < Â < Ã < Ä < B
C < Ç < D < E < È < É < Ê < Ë
I < Ì < Í < Î < Ï < J
N < Ñ < O
O < Ò < Ó < Ô < Õ < Ö < Œ < P
U < Ù < Ú < Û < Ü < V
Y < Ÿ < Z < Æ< Ø < Å

Local Collation Sequences
5–4 System Administrator Guide
a < à < á < â < ã < ä < b
c < ç < d < e < è < é < ê < ë
i < ì < í < î < ï < j
n < ñ < o
o < ò < ó < ô < õ < ö < œ < p
ss < ß < st
u < ù < ú < û < ü < v
y < ÿ < z < æ < ø < å
Example:
cote < côte < czar < cæsar
Pattern matching rules:
■ Œ, œ, ß are special when pattern match searching is used.
■ Œ matches O_ or O% as well as Œ
■ œ matches o_ or o% as well as œ
■ ß matches s_ or s% as well as ß
Spanish Collation Sequence
The spanish collation sequence is based on the multi sequence but contains additional support for the Spanish letters ll and ch. Listed below are the comparison sequences for the spanish collation sequence that differ from those of ASCII. Some pattern matching rules are also described.
A < À < Á <Â < Ã < Ä < B
CZ < CÅ < Ç < CH < Ch < D < E < È < É < Ê < Ë
I < Ì < Í < Î < Ï < J
LZ < LÅ < LL < LI < M
N < Ñ < O
O < Ò < Ó< Ô < Õ < Ö < Œ < P
U < Ù < Ú < Û < Ü <V
Y < Ÿ < Z <Æ< Ø < Å
a < à < á < â < ã < ä < b
cz < câ < ç < cH < ch < d < e < è < é < ê < ë
i < ì < í < î < ï < j

Local Collation Sequences
Customization Options 5–5
lz < lå < lL < ll < m
n < ñ < o
o < ò < ó < ô < õ < ö < œ < p
ss < ß < st
u < ù < ú < û < ü < v
y < ÿ < z < æ < ø < å
Examples: loop < llama
cote < côte < czar < cæsar < chair
The pattern matching rules are:
■ Œ, œ, ß, Ç, ç are special when pattern match searching is used.
■ Œ matches O_ or O% as well as Œ
■ œ matches o_ or o% as well as œ
■ ß matches s_ or s% as well as ß
■ Ç matches C_ or C% as well as Ç
■ ç matches c_ or c% as well as ç
Implementing a Customized Collation Sequence
If you have special needs that are not met by the available collating sequences, you can write your own collation sequence. This feature allows you to write a collation sequence that has any of the following characteristics:
■ Character skipping—one or more specified characters are ignored for collation
■ One-to-one mapping—a character can be substituted for another or weighted differently for collation
■ Many-to-one mapping—groups of characters can be substituted for a single character or weight value for collation
■ Many-to-many mapping—groups of characters can be substituted for a sequence of characters or weight values for collation
The process consists of the following steps:
1. Write a description file
2. Run the description file through the aducompile utility
3. Test your collation sequence with a small sample database
Local Collation Sequences
5–6 System Administrator Guide
The following sections describe these steps.
Writing the Description File
The description file consists of a list of “instructions” that, taken as a whole, describe the collation sequence. Each instruction must appear on a separate line in the file. The format of each instruction is
value:string
The value determines the numerical weight assigned to string. (Note that the internal numerical weight of each character determines where a character appears in the sort order.)
The string can be any character or character string. An empty string causes a syntax error.
Value can have any of the following formats: char+number Where char can be one or more characters in the character set
and number is any number from 1 to 15
charstring Where charstring is one or more characters in the character set
+number Where number is any integer number from 0 to 32766
+* The * has a special meaning, described below
(empty) If value is not supplied, the instruction is ignored
Each of these formats defines a different result, described in the following sections.
The char+number Format
When you use this value format, you are giving instructions to sort the specified string after the specified character and before the next higher-weighted character in the character set. For example, if you use:
H+1:string1
string1 is mapped as a single character that is ordered immediately after the letter H and before I in a sorted sequence. If you use:
H+2:string2
string2 sorts after string1 and before the letter I.

Local Collation Sequences
Customization Options 5–7
Note that you can specify H+1:string or Hz+1:string and both sorts in the same manner, that is, after H and before I. However, the two examples do not behave the same when pattern matching is applied. To illustrate, using an actual example from the Spanish language, assume that the instruction is:
C+1:CH
This instruction maps CH as a single character that exists between C and D. If you ask for a pattern match using the format C%, instances of CH are not returned. The alternative, Cz+1:CH, maps CH into two characters, C and a virtual character just after z. This causes CH to match as two characters. A pattern match using the format C% finds the instances of CH.
The charstring Format
If your instruction has this value format, the specified string sorts as the equivalent of the specified charstring. For example, if your instruction is:
revenue:tax
The word tax sorts as if it were the word revenue.
The +number Format
This value format gives the specified string the internal numerical weight specified by ‘number’. The number must be between 0 and 32766.
The weighting of a character in this manner is less portable than giving the character a relative weight.
The +* Format
This format causes the specified string to be ignored when collation is performed. For example, if your instruction is:
+*:?
The “?”is ignored whenever collation takes place.
No Value Supplied
When no value is specified (the instruction takes the form: string), the collation compiler ignores the instruction. Use this format to insert comments into your collation sequence. For example:
:This is a comment
Local Collation Sequences
5–8 System Administrator Guide
Using the aducompile Utility
The aducompile utility compiles your description file into a binary file and installs that file as a collation sequence that can be used. You must be the installation owner to use this utility.
Be sure to give your resulting collation file a unique name so that you do not overwrite any existing collation files.
Your new collation sequence is in the location:
Windows %II_SYSTEM%\ingres\files\collation\collation_name
UNIX $II_SYSTEM/ingres/files/collation/collation_name
Note that all system users must have rights to read the new collation file.
VMS
II_SYSTEM:[INGRES.FILES.COLLATION]collation_name
Cautionary Guidelines
Keep the following points in mind as you design and test your customized collation file:
■ Never create a production database with an untested collation sequence.
Always test your collation file on a sample database. Each time that you modify the collation sequence to correct any bugs, you must unload the database, destroy the old database, install the new sequence, create a database with the new sequence, and reload the database.
■ Some collation sequences allow two strings that are different to compare as equal. These sequences are called information loss sequences. An example of this type of sequence is a sequence that ignores case.
Some of the problems that can result from such a sequence are:
− If duplicates are not allowed, the DBMS drops all but one string.
− If duplicates are not allowed, the DBMS does not allow you to add a row to a table if it appears to match an existing row.
− The hash storage structure cannot detect when two equal but different strings are placed in a hashed relation.
− In a query on a hashed table, the “=” operator can only fetch one of the ‘equal’ strings that matches the expression.

Archiver Exit Script (acpexit)
Customization Options 5–9
Because of these problems, we suggest that you do not use information loss sequences and the hash storage structure together.
Archiver Exit Script (acpexit) The Archiver Process Exit command script is executed by the archiver before an error halt. This shell script (acpexit in UNIX or ACPEXIT.COM in VMS) resides in the utility directory. You can use the default script behavior, which sends mail to the installation owner account with the reason for the archiver failure, or, the script allows you to customize certain aspects of archiver recovery.
Because the archiver writes sequentially to the end of journal files, a common problem occurs when the archiver stops as a result of running out of journal disk space. If left unresolved, running an installation without an archiver (and with journaled databases) eventually causes the log file to fill.
To address this concern, whenever the archiver detects an error condition that forces it to stop (including running out of journal disk space) it first executes the archiver exit script. You can modify the script to take action appropriate to your installation. For example, one possible course of action is to delete a reserved file on the journal disk to free up space and restart the archiver.
You can customize the archiver exit script in these respects:
■ The default script sends mail to the installation owner account when archive processing halts, and includes the reason for the failure. You can modify this script to notify the system administrator directly of a situation that needs resolving.
■ You can tailor the script to handle certain resource and environmental problems automatically. For example, if archive processing has stopped because of insufficient disk space, the script can automatically reclaim disk space and resume archive processing.
■ The default script is executed with one or two arguments, described in the following table. You can choose whether to incorporate these arguments if you customize the script.

Archiver Exit Script (acpexit)
5–10 System Administrator Guide
Parameters are described below:
Parameter Description Status
errornumber An error number that describes the reason archive processing has stopped. At the end of the default script is a list of all possible error numbers, with an explanation of the error and, in many cases, the recommended actions to correct the error.
Always passed in default script.
database_name The name of the database that was being processed at the time archiving stopped. The name is provided only if the halt in archive processing was associated with a particular database problem, as opposed to a general system problem.
Sometimes passed in default script.
■ The default script includes examples of processing you can use for your installation. These examples are formatted as comments, and can be included in the script by removing the comment prefixes. For further details, see the Acpexit script. The script is resident on:
UNIX $II_SYSTEM/ingres/files/acpexit
VMS
II_SYSTEM:[INGRES.FILES]ACPEXIT.COM

Basic Troubleshooting 6–1
Chapter
6 Basic Troubleshooting
Troubleshooting is a process of defining and correcting a problem that occurs in an otherwise functioning Ingres installation and includes narrowing down the problem to a well-defined point, identifying the cause of failure, and eliminating it. When troubleshooting, you:
1. Determine the nature of the problem
2. Isolate the problem to a defined area
3. Eliminate the cause, using the following techniques:
■ Correcting user errors
■ Changing the Ingres installation environment
■ Changing the user environment
■ Changing the operating system environment
■ Changing the system configuration
■ Restart the system if needed
This chapter includes references to other Ingres guides and other written or online sources of information that are useful in troubleshooting your system. By following the techniques and procedures in this chapter, you can often solve the problem yourself. If it is still necessary to call your technical support representative, accurately defining the problem contributes to a rapid solution.

Determining the Area of Trouble
6–2 System Administrator Guide
Determining the Area of Trouble This section describes how to first isolate the problem to a specific component of your installation.
Note: VDBA (VDBA) provides an alternative set of system administration tools. It allows you to perform system administrator functions—including configuring, performance monitoring, backup and recovery, and remote database optimization—using a GUI interface. For instructions on performing these functions, see the VDBA online help. Command line instructions are also available. For information on Ingres commands, see the Command Reference Guide.
Check the Error Log Files
This is the first step for working on any Ingres system problem.
■ Check the log files for error messages. The log files are:
– errlog.log—The main DBMS error log and the default log for most programs. Examine this log first.
– iiacp.log—Archiver error log.
– iircp.log—Recovery error log.
The log files are located in the directory indicated by the Ingres environment variable/VMS logical II_CONFIG.
Note: If your system is configured for Ingres Grid Option, each node in the Ingres cluster maintains a separate Archiver and Recovery error log. Each log is distinguished by having _nodename appended to the base log name, where nodename is the Ingres node name for the host machine as returned by iipmhost.
Type the following command at the operating system prompt to display the value for II_CONFIG:
Windows ingprenv
UNIX ingprenv
VMS
set def II_SYSTEM:[INGRES.FILES] or set def II_CONFIG
On VMS, if SCSNODE is set, the log files except errlog.log is named *.LOG_nodename.
■ If indicated, check optional log files for error messages. These include:
II_DBMS_LOG DBMS error log

Determining the Area of Trouble
Basic Troubleshooting 6–3
II_GCCxx_LOG GCC error log
II_GC_LOG GCC trace log
II_STAR_LOG Star error log
The names of optional log files can vary, but all log files end with the extension LOG.
■ For a list of log files, type the following command at the operating system prompt from the directory indicated by $II_CONFIG (UNIX) or II_CONFIG (VMS):
Windows dir *.log
UNIX ls *.log
VMS
dir *.log*
■ Identify the errors associated with your problem. All errors are time stamped.
To check an error log file, find the most recent error message associated with your problem. Read back up the log file from there to the first error relating to that problem. Many error messages cascade from that initial error. This initial error is usually the most important in identifying the problem even though it is not the error that users report.
For example, the following error message merely notifies you that a DBMS server has exited for one of many possible reasons: E_SC0221_SERVER_ERROR_MAX
You must look in the errlog.log for associated DBMS server errors such as “E_DM9300_DM0P_CLOSE_PAGE Buffer still fixed,” a fatal error message. Search the error log for additional errors occurring around the time of the error that was displayed.
For details on error message formats, see Error Messages in the chapter “Monitoring and Tracing Tools.”
Find Your Problem Category
Determine the general category in which your problem lies. The following categories relating to running the Ingres installation are described in this guide:
■ Ingres startup and shutdown
■ Ingres configuration
■ Ingres tools startup

Determining the Area of Trouble
6–4 System Administrator Guide
■ Inconsistent database or recovery
■ Operating system performance
Problems relating to queries and performance are described in the Database Administrator Guide.
Use the information in the error logs to determine which category to check. Error messages always include the first two letters of the facility code that generated the error. See the general flow chart below, which shows the major problem categories and their associated sections in this chapter. See the indicated section and the detailed flow chart, which guides you to individual step-by-step troubleshooting procedures.
Troubleshooting Flow Chart 1
The troubleshooting flow chart in the following illustration shows the major problem categories and refers to detailed flow charts or sections that appear at the head of each major category:

Problems with Startup, Shutdown, or Configuration
Basic Troubleshooting 6–5
Problems with Startup, Shutdown, or Configuration This section is applicable if you encounter a problem while running ingstart or ingbuild.
To use this section:
■ Follow the procedures in Basic Installation Checks on UNIX in this chapter.
■ If needed, see one of the sections under Procedures for Checking Individual Processes on UNIX in this chapter.
■ Follow the procedures in Basic Installation Checks on VMS in this chapter.
■ If needed, see one of the sections under Procedures for Checking Individual Ingres Processes on VMS in this chapter.
■ Follow the procedures in Basic Installation Checks on Windows in this chapter.
■ If needed, see one Procedures for Checking Individual Processes on Windows in this chapter.
■ As a last resort, see Before Calling Technical Support in this chapter.

Problems with Startup, Shutdown, or Configuration
6–6 System Administrator Guide
Troubleshooting Flow Chart 2
Use the following flow chart to isolate a problem with startup, shutdown or configuration of your Ingres installation:

Problems with Startup, Shutdown, or Configuration
Basic Troubleshooting 6–7

Problems with Startup, Shutdown, or Configuration
6–8 System Administrator Guide
Basic Installation Checks on Windows
It is recommended that you first make the following basic installation checks:
1. Check that you are logged in as the installation owner. If not, log off and log in again as this user.
2. Check that all users have II_SYSTEM set by issuing the following command at the operating system prompt:
echo %II_SYSTEM%
All users must have Ingres executables in their path variables. Check that everyone has the full search path to %II_SYSTEM%\ingres\bin.
The installation owner must also include %II_SYSTEM%\ingres\utility.
3. Check that each of the Ingres variables has a valid value.
Ingres environment variables are only used and “seen” by Ingres and can be displayed with the following command entered at the operating system prompt:
ingprenv
If you are in doubt about the function or legal value of a particular environment variable, see the chapter “Setting Environment Variables/Logicals” and the appendix “Environment Variables/Logicals.”
Ingres environment variables denoting installation locations (II_DATABASE, II_CHECKPOINT, II_DUMP, II_JOURNAL, II_LOG_FILE, II_SYSTEM) can not be reset. To change these, you must unload the databases, rerun the installation program, and reload the databases. See Changing Installation Locations in the chapter “Setting Environment Variables/Logicals.”
4. Check the Ingres environment variables that have been set locally, overriding the Ingres installation-level definitions.
Only a small category of Ingres environment variables must be defined in the local user environment: those that permit you to access Ingres, and those that define values that are different for your local environment. They include TERM_INGRES and ING_EDIT.
If you trace the problem to an Ingres environment variable setting, correct the value. For procedures and scenarios for setting these environment variables, see the chapter “Setting Environment Variables/Logicals.” If the installation does not start up, continue with this procedure.
5. Check that all Ingres processes are shut down. If there are processes that continue to run, see Shutdown Problems in this chapter.
Problems with Startup, Shutdown, or Configuration
Basic Troubleshooting 6–9
6. Restart Ingres. Attempt once again to start up the installation by issuing the following command at the operating system prompt:
ingstart
7. If startup problems persist, continue diagnostics in the ingstart section below.
Ingstart on Windows
If you are having ingstart problems, use the following procedure:
1. Determine which Ingres processes are running.
2. Verify that all required Ingres system processes are running. The following processes are the minimum required for a complete installation:
■ iigcn: Name Server process
■ iigcc: Communication Server process (present only on sites with Ingres Net)
■ II_IUSV_nnn: Recovery Server process
■ dmfacp: Archiver process
■ iidbms: DBMS Server process
■ iigcd: Data Access Server process
■ iistar: Distributed Database Server process (present only on sites with Ingres Distributed Option)
■ icesvr: ICE Server process
■ rmcmd: Remote command process
■ iigcb: Bridge Server process (present only on sites with Ingres Bridge)
3. If ingstart does not complete successfully, do the following:
a. Check the output from ingstart. This is saved in the file:
%II_SYSTEM%\ingres\files\ingstart.log
For a complete list of error log files and individual component log files, see Logging and Locking Systems in the chapter “Overview.”
b. Try to determine the reason for startup failure.
A process failed to start. If a process failed to start, continue on to the detailed sections on startup problems for that specific process.

Problems with Startup, Shutdown, or Configuration
6–10 System Administrator Guide
Basic Installation Checks on UNIX
It is recommended that you first do the following basic installation checks:
1. Check that you are logged in as the installation owner by issuing the following command at the operating system prompt:
whoami
If the user ID of the installation owner is not shown, log off and log in again as this user.
2. Check that all users have II_SYSTEM set by issuing the following command at the operating system prompt:
echo $II_SYSTEM / usr/r6 (this varies by system)
■ All users must have Ingres executables in their path variables. Check that everyone has the full search path to $II_SYSTEM/ingres/bin.
■ The installation owner must also include $II_SYSTEM/ingres/utility.
3. Check that each of the Ingres installation variables has a valid value.
Ingres environment variables are only used and “seen” by Ingres and can be displayed with the following command entered at the operating system prompt:
ingprenv
■ If you are in doubt about the function or legal value of a particular environment variable, see the chapter “Setting Environment Variables/Logicals” and the appendix “Environment Variables/Logicals.”
■ Ingres environment variables denoting installation locations (II_DATABASE, II_CHECKPOINT, II_DUMP, II_JOURNAL, II_LOG_FILE, II_SYSTEM) cannot be reset. To change these, you must rerun the installation program, ingbuild, and on UNIX possibly unload and reload your database with unloaddb. For more information, see Changing Installation Locations in the chapter “Setting Environment Variables/Logicals.”
4. Check the Ingres environment variables that have been set locally, overriding the Ingres installation-level definitions. Issue the following commands at the operating system prompt:
BSD:
printenv | grep II printenv | grep ING
System V:
env | grep II env | grep ING

Problems with Startup, Shutdown, or Configuration
Basic Troubleshooting 6–11
Only a small category of Ingres environment variables must be defined in the local user environment: those that permit you to access Ingres, and those that define values that are different for your local environment. They include TERM_INGRES and ING_EDIT.
If you trace the problem to an Ingres environment variable setting, correct the value. For procedures and scenarios for setting these environment variables, see the chapter “Setting Environment Variables/Logicals.” If the installation does not start up, continue with this procedure.
5. If there is more than one Ingres installation on this machine, identify your installation code by typing the following command at the operating system prompt. The installation code is used to distinguish which processes belong to which installation at sites with more than one Ingres installation on the same machine:
ingprenv | grep II_INSTALLATION
The two-letter installation code is displayed (for example, the following code R6):
II_INSTALLATION=R6
Take note of your installation code: ______.
6. Check that all Ingres processes are shut down. If there are processes that continue to run, see Shutdown Problems in this chapter.
7. Restart Ingres: Attempt once again to start up the installation by issuing the following command at the operating system prompt:
ingstart
8. If startup problems persist, continue the diagnostics described in the following ingbuild or ingstart section.
Ingbuild on UNIX
The executable script ingbuild performs all the steps necessary to set up an installation. It checks system resources, installs shared memory and semaphores, configures DBMS server parameters, configures the logging and locking system, and starts all the required processes.

Problems with Startup, Shutdown, or Configuration
6–12 System Administrator Guide
The ingbuild program is located in $II_SYSTEM/ingres/utility. It makes use of numerous shell commands as well as the following Ingres binary and shell executables:
createdb iilink ingstop ingstart ingprenv ingunset sql
One of the last things ingbuild does is call the ingstart script to actually start installation processes. When ingstart is called, it displays the message “Starting the Name Server process (iigcn).” If there are startup problems after this message has displayed, see Ingstart on UNIX in this chapter.
Before you can diagnose a problem with ingbuild, you must identify which subroutine is failing. Use the following procedure:
If you know which routine is failing and it is ingstart or one of the main installation processes (iigcn, iigcc, II_IUSV_nnn, dmfacp or iidbms), see the section below that addresses that executable.
For details on tracing, see Tracing Shell Script Problems in UNIX in the chapter “Monitoring and Tracing Tools.“
Ingstart on UNIX
If you are having ingstart problems, use the following procedure.
1. Display which processes are running by using the csreport and operating system ps commands.
The csreport utility is described in the Ingres System Utilities section and the ps command is described in the section UNIX Operating System Utilities of the chapter “Monitoring and Tracing Tools.”
2. Verify that all required Ingres system processes are running. The following processes (in the order they are started) are the minimum required for a complete installation:
■ iigcn: Name Server process
■ iigcc: Communications Server process (present only on sites with Ingres Net)
■ iidbms (II_IUSV_nnn): Recovery Server process
■ iigcd: Data Access Server process

Problems with Startup, Shutdown, or Configuration
Basic Troubleshooting 6–13
■ dmfacp: Archiver process
■ iidbms: DBMS Server process
■ iislave: DBMS Server asynchronous write daemons—these processes are created at the time of the first database write operation (only present on sites where Ingres does not use OS threads or asynchronous I/O)
■ iistar: Distributed Database Server process (present only on sites with Ingres Distributed Option)
■ icesvr: ICE Server process
■ iigcb: Bridge Server process (present only on sites with Ingres Bridge)
Note the following:
■ If the command ingprenv | grep II_CLIENT shows “II_CLIENT = true”, you need to run only the Name Server and Communications Server processes.
■ In a few special cases Ingres can be run without the Communications Server process. This includes releases that use the streams device driver for interprocess communications. If you are not sure if your release uses the streams device driver, see your Readme file.
3. If ingstart does not complete successfully, try to identify the reason for startup failure. For example:
■ The problem is with ingstart. The ingstart script fails due to results of the checks it makes for sufficient resources and installation settings. If this is the reason for startup failure, correct the deficiency.
■ A process failed to start. If a process failed to start, continue on to the details sections on startup problems for that specific process.
Basic Installation Checks on VMS
It is recommended that you first make the following basic installation checks:
1. Check that you are logged in as the ingres system administrator (ISA) user by issuing the following command at the operating system prompt:
show process
If the ISA is not shown, log off and log in again as the ISA. The ISA is typically ingres if there is only a single installation per machine. For multiple installations, there is a different ISA for each installation.
2. Check that all users have II_SYSTEM set by issuing the following command at the operating system prompt:
show logical II_SYSTEM

Problems with Startup, Shutdown, or Configuration
6–14 System Administrator Guide
3. Check that each of the Ingres installation logicals has a valid value.
Ingres symbols are defined in the files:
■ II_SYSTEM:[INGRES.UTILITY]INGSYSDEF.COM
Defines Ingres system administration, DBA, and user symbols.
■ II_SYSTEM:[INGRES.UTILITY]INGDBADEF.COM
Defines Ingres DBA and user symbols.
■ II_SYSTEM:[INGRES.UTILITY]INGUSRDEF.COM
Defines Ingres user symbols.
If you are in doubt about the function or legal value of a particular logical, see the chapter “Setting Environment Variables/Logicals” and the appendix “Environment Variables/Logicals.”
■ Ingres logicals denoting installation locations (II_DATABASE, II_CHECKPOINT, II_DUMP, II_JOURNAL, II_LOG_FILE, II_SYSTEM) can not be reset. To change these, you must edit II_CONFIG:config.dat, update the existing definition, and execute @ii_system:[ingres]ingsysdef.com. For additional details, see Changing Installation Locations in the chapter “Setting Environment Variables/Logicals.”
4. Check the Ingres logicals that have been set locally, overriding the Ingres installation-level definitions. Issue the following command at the operating system prompt:
show logical *II*, *ING*
This shows which ones have been set at process, job, or group level, overriding the system-level definitions.
Only a small category of Ingres logicals are defined in the local user environment: those that permit you to access Ingres, and those that define values that are different for your local environment. They can include TERM_INGRES and ING_EDIT.
If you trace the problem to an Ingres logical setting, correct the value. For procedures and scenarios for setting these logicals, see the chapter “Setting Environment Variables/Logicals.” If the installation does not start up, continue with this procedure.
5. If there is more than one Ingres installation on this machine, identify your installation code by typing the following command at the operating system prompt. If this is a system-wide Ingres installation, there is no definition for II_INSTALLATION. The installation code is used to distinguish which processes belong to which installation at sites with more than one Ingres installation on the same machine:
show logical II_INSTALLATION

Problems with Startup, Shutdown, or Configuration
Basic Troubleshooting 6–15
The two-letter installation code is displayed (for example, the following code R6):
II_INSTALLATION=R6
Take note of your installation code: ______.
6. Check that all Ingres processes are shut down. If processes continue to run, see Shutdown Problems in this chapter.
7. Restart Ingres. ttempt once again to start up the installation by issuing the following command at the operating system prompt:
ingstart
8. If startup problems persist, continue diagnostics contained in the next section—vmsinstal or ingstart.
VMSINSTAL on VMS
The executable script vmsinstal performs all the steps necessary to set up an installation. It checks system resources, installs shared images, configures DBMS server parameters, configures the logging and locking system, and starts all the required processes.
During the execution of the vmsinstal script, if a problem occurs, do the following:
1. Execute the vmsinstal program with the L option to log the contents of the VMSINSTAL session:
@sys$update:vmsinstal * device_name options L
2. Examine the DCL by issuing the following command at the operating system prompt:
set verify
3. Examine the vmsinstal log for error notifications and attempt to resolve the problem.
4. If the Installation Verification Procedure (IVP) for the DBMS Server fails with the message “ii.node_name.syscheck.gblpages not found in config.dat” after you enter the number of concurrent users that the installation supports, check the value of the account parameter PRCLM (process limit) to ensure that it is not zero. The PRCLM must be a minimum of 15.
5. If the problem persists, see Before Calling Technical Support in this chapter.

Problems with Startup, Shutdown, or Configuration
6–16 System Administrator Guide
Ingstart on VMS
If you are having ingstart problems, use the following procedure:
1. Display the processes that are running by issuing the following command at the operating system prompt:
show system /out = filename search filename "II_", "DMF"
The search command searches the user-specified filename for the process names.
2. Verify that all required Ingres system processes are running. The following processes (in the order they are started) are the minimum required for a complete installation:
■ II_IUSV_nn_ppp—Recovery process
■ DMFACP_nn—Archiver process
■ II_GCN_nn—Name Server process
■ II_GCC_nn_pppp—Communications Server process (present only on sites with Ingres Net)
■ II_DBMS_nn_pppp—DBMS Server process
■ II_STAR_nn_pppp—Distributed Database Server process (present only on sites with Ingres Distributed Option)
■ RMCMD_nn_ppp—Remote Command Server for use with VDBA
■ II_GCB_nn_pppp—Bridge Server process (present only on sites with Ingres Bridge)
Where nn is the optional two-letter installation code, and pppp is the lower two bytes of the process’ process ID.
Note: If you are checking the processes on a client node, only the Name Server and Communications Server processes are displayed when issuing the $ SHOW SYSTEM command.
3. If ingstart does not complete successfully, do the following:
a. Check for error messages in the errlog.log:
II_SYSTEM:[INGRES.FILES] II_CONFIG:errlog.log
For a complete list of error log files and individual component log files, see Logging and Locking Systems in the chapter “Overview.”

Problems with Startup, Shutdown, or Configuration
Basic Troubleshooting 6–17
b. Try to identify the reason for startup failure.
■ The problem is with ingstart. If the ingstart executable fails due to results of the checks it makes for sufficient resources and installation settings, correct the deficiency.
■ A process failed to start. If a process failed to start, continue on to the detail sections on startup problems for that specific process.
Startup Problems on Machine Reboot
This section is applicable if Ingres fails immediately after system reboot.
Checking Startup Problems on Windows
This section is applicable if the Ingres Service fails immediately after system reboot.
1. Check that the “Startup Type” for the “Ingres Intelligent Database” service has been set to “automatic” in the services dialog.
2. Check that the password specified for the “Ingres Intelligent Database” service matches the installation owner user password.
3. Start the service manually.
4. If the service fails to start, run ingstart from the command prompt.
5. If the installation still does not start, contact Technical Support. See Before Calling Technical Support in this chapter.
Checking Startup Problems on UNIX
Use the following procedure on UNIX:
1. The most common cause of startup failure following a reboot is failure to include the startup command ingstart in the boot script for your machine. (The boot file is vendor-specific but can be named “/etc/rc” or “etc/rc.local”.) This is the file from which your machine reads commands that are to be executed immediately after a reboot.
Check that the following line appears there: su userid -c "ii_system/ingres/utility/ingstart ii_system" /dev/console
where userid is the user that owns the installation, and ii_system is the value of II_SYSTEM for your installation.

Problems with Startup, Shutdown, or Configuration
6–18 System Administrator Guide
2. Make sure that /dev/kmem is readable to the user that owns the installation. If this is a security problem for your machine, you can add this user as a member of /dev/kmem’s group and make the /dev/kmem group readable.
Issue the following command at the operating system prompt:
chmod g+w /dev/kmem
The user that owns the installation must be able to read /dev/kmem or the kernel resource checks in ingstart fails.
3. Run ingstart.
4. If the installation still does not start, contact Technical Support. See Before Calling Technical Support in this chapter.
Checking Startup Problems on VMS
Use the following procedure on VMS:
1. Make sure that a real error has occurred. If Ingres is performing startup recovery, see Automatic Recovery for details.
2. Check to see that the Ingres initialization code is called from the VMS startup files. There are two main startup files:
■ SYS$MANAGER:SYLOGIN.COM
SYLOGIN.COM is run when any user logs in. The script to set up Ingres user symbols are defined here.
@II_SYSTEM:[INGRES]ingusrdef.com
If the DBA symbols are also to be known by all users, the ingdbadef.com script can be used instead.
If the system administrator symbols are also to be known by all users, the ingsysdef.com script can be used instead.
Only one script needs to be defined.
An alternative method is to include these in a user’s particular login.com.
■ SYS$MANAGER:SYSTARTUP_VMS.COM
SYSTARTUP_VMS.COM is run when the system is booted. To have Ingres restarted automatically on reboot, add the following line:
@SYS$STARTUP:INGRES_STARTUP.COM
Edit the file SYS$STARTUP:INGRES_STARTUP.COM to ensure it is correct for your environment. A line is added to start each installation, but the line is commented out to prevent accidental errors.
Edit this file to meet your needs.

Problems with Startup, Shutdown, or Configuration
Basic Troubleshooting 6–19
3. Be sure that you have examined all of the log files. Look in these files for possible error messages:
II_CONFIG:ERRLOG.LOG
II_CONFIG:IIACP.LOG (with _nodename name suffix if configured for clusters)
II_CONFIG:IIRCP.LOG (with _nodename name suffix if configured for clusters)
II_CONFIG:II_CSP.LOG_nodename (clustered installations only)
4. Determine if any system logicals have been changed interactively since the last startup of Ingres but the command files have not been updated (use commands such as define/system/exec). Logical names become undefined when VMS is shut down and must be redefined (using the command files) at each boot.
5. Make sure that DECnet and/or TCP/IP is started before either Ingres Cluster Option or Ingres Net is started.
6. Execute the ingstart utility to start up Ingres.
7. If the installation still does not start, contact Technical Support. See Before Calling Technical Support in this chapter.
Shutdown Problems
The ingstop utility brings down all the Ingres processes in the installation. If you have a problem with interactively running ingstop, see this section.
Note: For information about shutting down an Ingres installation that includes an ICE Server, see the chapter “Managing and Monitoring Web Deployment Option” in the Web Deployment Option User Guide.
Checking Shutdown Problems on Windows
1. Check environment variables in the local user environment by entering the following commands at the operating system prompt.
a. Verify that II_SYSTEM is set correctly.
echo %II_SYSTEM%
b. Check that you have the full search path to:
%II_SYSTEM%\ingres\bin
%II_SYSTEM%\ingres\utility
echo %PATH%

Problems with Startup, Shutdown, or Configuration
6–20 System Administrator Guide
2. If you are having problems shutting down a client installation because Ingres believes a Communications Server is running locally when there is none, remove this file:
%II_SYSTEM%\ingres\files\name\clientname\IICOMSVR_clientname
3. Identify whether Ingres is recovering aborted transactions. For details of recovery delays, see Monitoring the Recovery Process in this chapter. Issue the following command at the operating system prompt and examine the output for the word “RECOVER.”
logstat| findstr RECOVER
If Ingres is recovering aborted transactions, wait for this process to finish. Continue reissuing the logstat command and examining the STATUS field. When it reads “ONLINE, ECP DONE,” proceed with normal shutdown.
4. Now shut down the installation by typing the following command:
ingstop
You can also click the Stop toolbar button in Ingres Visual Manager to shut down the installation.
Note: All users must be logged out of Ingres (that is, no sessions running in the server) for ingstop to succeed.
5. Check that all processes are shut down:
If shutdown succeeds, none of the following processes are running on your machine:
iigcn iigcc II_IUSV_nnn dmfacp iidbms iijdbc iigcd iistar icesvr iigcb rmcmd
6. If any of these processes are still running, use one of your operating system utilities to kill it.
7. Remove any shared memory segments that remain allocated to this installation. Execute the following command at the operating system prompt:
ipcclean
8. Your installation is now shut down.

Problems with Startup, Shutdown, or Configuration
Basic Troubleshooting 6–21
Checking Shutdown Problems on UNIX
Use the following procedure on UNIX:
1. Check environment variables in the local user environment by entering the following commands at the operating system prompt.
a. Verify that II_SYSTEM is set correctly:
echo $II_SYSTEM /usr/r6 (this varies system by system)
b. Check that you have the full search path to:
$II_SYSTEM/ingres/bin $II_SYSTEM/ingres/utility
echo $PATH
2. If there is more than one Ingres installation on this machine, identify your installation code by typing the following command at the operating system prompt:
ingprenv | grep II_INSTALLATION
The two-letter installation code is displayed (for example, the code here is JB):
II_INSTALLATION=JB
Take note of your installation code: ______.
3. Identify if you are shutting down a client installation or a full installation by issuing the following command at the operating system prompt:
ingprenv | grep II_CLIENT
If this displays “II_CLIENT=true”, this is a client installation, and only two processes (iigcn, iigcc) are running on this node.
4. If you are having trouble shutting down a client installation because Ingres believes a Communications server is running locally when there is none, remove this file:
$II_SYSTEM/ingres/files/name/clientname/IICOMSVR_clientname
For troubleshooting details see the Connectivity Guide.
5. Identify whether Ingres is recovering aborted transactions. For details on recovery delays, see Monitoring the Recovery Process in this chapter. Issue the following command at the operating system prompt and examine the output for the word “RECOVER”:
logstat | grep RECOVER
If Ingres is recovering aborted transactions, wait for this process to finish. Continue reissuing the logstat command and examining the STATUS field. When it says: “ONLINE, ECP DONE,” proceed with normal shutdown.

Problems with Startup, Shutdown, or Configuration
6–22 System Administrator Guide
6. Now shut down the installation:
ingstop
Note: All users must be logged out of Ingres (that is, no sessions running in the server) for the ingstop script to succeed.
7. Check that all processes are shut down:
a. Display running processes by issuing the following command at the operating system prompt:
BSD:
ps -aux | grep ingres
SYSTEM V:
ps -ef | grep ingres
b. If shutdown succeeds, none of the following processes are running:
iigcn iigcc II_IUSV_nnn dmfacp iidbms iijdbc iigcd iistar icesvr rmcmd iigcb
8. If any of these installation processes are not shut down, note the process ID of the running processes and do the following:
a. Shut them down manually with the operating system command:
kill -QUIT process_id
The process_id is the process ID of the process to stop.
b. If processes are still not shut down, issue the operating system command:
kill -9 process_id
Caution! If your site has more than one Ingres installation, examine the installation code associated with the iidbms process to make sure you are stopping only the processes associated with the installation you need to shut down.

Problems with Startup, Shutdown, or Configuration
Basic Troubleshooting 6–23
9. Check that no shared memory segments remain allocated to this installation. Execute the operating system command:
csreport !Can’t map system segment
The above message indicates that shared segments have been properly removed.
10. If shared memory segments remain for this installation, interactively remove them:
a. To deallocate shared memory resources, issue the operating system command:
ipcclean
b. Use the UNIX command ipcs to verify that the actual segments have been removed:
ipcs
c. If they have not been properly removed, you must delete them manually.
Caution! If your site has more than one Ingres installation, you must take care to only remove shared memory or semaphores for the installation to be shut down. If your machine contains more than one installation, enter the following command from the environment of the installation you need to target:
csreport
The csreport utility displays the shared memory and semaphore segment identifiers for this installation.
To remove the targeted segment(s), use the UNIX command:
ipcrm -mmid or ipcrm -ssid
(where mid is the shared memory segment identifier and sid is the semaphore identifier.)
11. Verify that the following files are not present. If they are still present, you must remove them:
$II_SYSTEM/ingres/files/memory/lockseg.mem $II_SYSTEM/ingres/files/memory/sysseg.mem
12. Your installation is now shut down. For instructions on how to check and restart Ingres, see Basic Installation Checks on UNIX in this chapter.

Problems with Startup, Shutdown, or Configuration
6–24 System Administrator Guide
Checking Shutdown Problems on VMS
Use the following procedure on VMS:
1. Check that you are logged in as the system administrator or another privileged account by issuing the following command at the operating system prompt:
show process
Make sure you have the WORLD and CMKRNL privileges required for stopping Ingres processes by issuing the following command at the operating system prompt:
show process/privilege
A privileged account must not only have the aforementioned VMS privileges but also must have the SERVER_CONTROL privilege authorized in II_CONFIG:CONFIG.DAT.
2. Check that the logical II_SYSTEM is defined by issuing the following command at the operating system prompt:
show logical II_SYSTEM
3. Check to see that users are logged out of Ingres. You can use the utility logstat to determine which databases are open and active and find out whom to notify of the impending shutdown. For additional information, see the Logstat section in the Command Reference Guide.
4. To obtain a list of running processes, use the DCL command:
show system
This command gives you a complete list of all processes that are running on your machine. It displays the process ID (“Pid”), Process Name, and other information. The main processes have the names as shown in Ingstart on VMS in this chapter.
If you use the form show system/full, you can also see the owner of the process. This is helpful if you have group level installations.
5. Identify if there is more than one Ingres installation on this machine.
For a group level installation the two-lettered code is displayed after the process names. For example, the code here is “BE.”
Pid Process Name State Pri I/O CPU Page flts Ph.Mem 236012AD II_DBMS_BE_1E3F HIB 6 86463 0 00:13:53.24 14401 8192
Take note of your installation code: __________
Caution! If your site has more than one Ingres installation, examine the installation code associated with the II_DBMS_nnn process to make sure you are only shutting down processes associated with the installation you need to shut down.

Problems with Startup, Shutdown, or Configuration
Basic Troubleshooting 6–25
6. Use the iinamu utility to find the names of the servers for this installation; iinamu shows you only the servers for the installation in which you currently reside. For example: IINAMU> show ingres INGRES * II_DBMS_BE_1E3F found. IINAMU> show comsvr COMSVR * II_GCC_BE_2B77
7. Shut down servers. See the individual descriptions below.
Note: Ingres can be shut down in several ways. Following are some tips on how each shutdown procedure works to enable you to make a choice as to how to shut down the installation.
■ The ingstop utility shuts down servers in the following order:
Remote Command Server (rmcmd) Star Server DBMS Server Protocol Bridge Server Communications Server Recovery and archiver processes–IUSV and ACP by rcp.config. (If present, the Cluster Server is also shut down.) Name Server
■ The following order also works. This ordering manually shuts down the installation, shutting down the Name Server first:
Name Server Communications Server Star Server DBMS Server Recovery and archiver processes–IUSV and ACP
a. Shutting down the Name Server
When you issue the stop command from iinamu, the Name Server process is stopped. Once this command is issued, no new servers are allowed to register with the Name Server. Therefore, it makes sense to take the Name Server down first for a clean shutdown. Current, active sessions are not affected by this command.
b. Shutting down the DBMS Server
Use iimonitor to stop the DBMS Server. The two commands you can use are:
set server shut
This causes the server to refuse further connections and shuts the server down gracefully, completing all current transactions first, including the iimonitor session.
stop server

Problems with Startup, Shutdown, or Configuration
6–26 System Administrator Guide
This stops the server immediately without waiting for current connected sessions to complete. Use this command instead of the VMS command stop/id.
c. Shutting down the recovery and archiver processes
Take down the recovery and the archiver processes, either quickly or slowly, depending on the method you used to take down the DBMS Server in step b. Use either of the following commands at the operating system prompt:
rcpconfig/shutdown
This causes the processes to refuse all further connections and transaction processing, but allows current transactions to finish. This allows the archiver and recovery processes to shut down cleanly.
rcpconfig/imm_shutdown
This stops all pending transactions and immediately shuts down the recovery and archiver processes. This leaves open transactions in the log file, which requires rollback (and slow startup) when the system is restarted.
d. Writing a DCL command file to take Ingres down
Alternatively, you can write a DCL script that puts the above steps in a command procedure to shut down each of the Ingres processes.
9. After shutting down Ingres, check that all processes are stopped:
a. Issue the following command at the operating system prompt:
show system
Check to be sure that none of the processes listed in the Ingstart on VMS section is shown.
b. If any of these installation processes are not shut down, note the process ID (PID#) of the running process and issue either of the following commands at the operating system prompt:
stop process_name or stop/id=pid#
Note: For serious system problems that require immediate attention, the VMS stop command can be used to stop an Ingres process. This is not recommended because it does not permit the recovery process to back out open transactions or the archiver process to flush the log file to disk.
If this is a cluster installation, remember that these Ingres processes run on each node.
10. Your Ingres installation is now shut down. For information about checking and restarting Ingres, see Basic Installation Checks on VMS in this chapter.

Procedures for Checking Individual Processes on Windows
Basic Troubleshooting 6–27
Procedures for Checking Individual Processes on Windows This section contains procedures for checking the major Ingres processes. They are:
■ Name Server process (iigcn)
■ Communications Server process (iigcc)
■ Recovery process (II_IUSV_nnn)
■ Archiver process (dmfacp)
■ DBMS Server process (iidbms)
■ JDBC Server process (iijdbc)
■ Data Access Server process (iigcd)
■ Bridge Server process (iigcb)
■ ICE Server process (icesvr)
■ Remote Command process (rmcmd)
Name Server
The Name Server process (iigcn) is not running if either of the following occurs:
■ You receive a specific error indicating that the Name Server failed to start.
■ The iigcn.exe does not appear in the process list.
You can verify this by attempting to start the Name Server manually.
The most common causes of Name Server startup failure are:
■ An improper installation environment exists. Be sure to verify the installation environment by performing the Basic Installation Checks on Windows before attempting to start the Name Server.
■ The Name Server fails to start if there is already a Name Server running for this installation.
If you are still having problems, set the following trace to capture additional diagnostic data before calling Technical Support:
ingsetenv II_GC_TRACE 4 ingsetenv II_GC_LOG filename iirun iigcn

Procedures for Checking Individual Processes on Windows
6–28 System Administrator Guide
Communications Server Process
If the Communications Server process (iigcc) does not start, follow this procedure:
1. Verify that you have installed the Ingres Net component.
2. Verify that you have installed the correct protocol drivers.
If you are still having problems, set the following trace to capture additional diagnostic data before calling Technical Support:
ingsetenv II_GC_TRACE 4 ingsetenv II_GC_LOG filename iirun iigcc
Bridge Server
If the Bridge Server process (iigcb) does not start, follow this procedure:
1. Verify that you have installed the Ingres Net component.
2. Verify that you have installed the correct protocol drivers.
If you are still having problems, set the following trace to capture additional diagnostic data before calling Technical Support:
ingsetenv II_GC_TRACE 4 ingsetenv II_GC_LOG filename ingstart -iigcb
ICE Server
The command to start the ICE Server process (icesvr) is ingstart -icesvr. If the ICE Server did not start:
1. Verify that you have installed the Ingres Web Deployment Option component, and that you have configured it correctly using Configuration Manager.
2. Verify that the DBMS Server process iidbms and/or Ingres Net are running. For additional information, see Procedures for Checking Individual Processes on Windows.
3. Issue the following command at the operating system prompt to start the ICE Server:
ingstart –icesvr

Procedures for Checking Individual Processes on Windows
Basic Troubleshooting 6–29
Remote Command Process
You can check for the presence of the Remote Command process (rmcmd) using the Windows Task Manager. View the Processes tab for the existence of the process.
Recovery Process
The Recovery process (II_IUSV_nnn) must be running before a DBMS Server can be started. Failure of the II_IUSV_nnn starting process indicates one of the following:
■ Improper installation configuration. See Problems with Startup, Shutdown, or Configuration in this chapter.
■ Problems with the log file
■ Insufficient shared memory
If the Recovery process does not start, perform the following procedure:
1. Check for the existence of the transaction log by opening the Primary Transaction Log window in Configuration Manager (or the Transaction Log screen in the Configuration-By-Forms (cbf) utility), and noting the directories listed in the Log File Root Locations table in Configuration Manager (or the Primary Transaction Log Locations table in cbf).
2. In the ingres/log directory (located below all other listed directories), look for the file ingres_log.lnn where nn is an integer between 1 and 16.
3. Make the following checks on the transaction log file ingres_log.lnn:
a. Verify that ingres_log.lnn exists at that location by entering the following command at the operating system prompt:
dir
b. If it does not exist, you must create it using the iimklog command, and format it using the rcpconfig -init command.
4. If you corrected a recovery process problem, verify that Ingres starts normally by completing the following steps:
a. Shut down the partially started installation with the ingstop command.
b. Restart the installation with the ingstart command.
5. If you still cannot start the II_IUSV_nnn, you must erase it and recreate and reformat it. This step is done only as a last resort.
Note: This step reinitializes the log file, causing any outstanding transactions to be lost.

Procedures for Checking Individual Processes on Windows
6–30 System Administrator Guide
Archiver Process
The archiver process (dmfacp) does not start unless the II_IUSV_nnn recovery process is running. However, an Ingres installation runs without an archiver process until the log file fills up. The user programs are suspended until any outstanding transactions in the log file are backed out. For more information about Ingres in a recovery state, see Monitoring the Recovery Process in this chapter.
Archiver process (dmfacp) startup errors are likely to result from:
■ Improperly shared memory resource
■ Inability to read the transaction log file
■ Inability to write journal files
Use the following procedure to check archiver process startup problems. Some of these checks are the same as for the recovery process in the previous section.
1. Make the following check on the transaction log file ingres.log:
Verify that ingres.log exists at that location by entering the following command at the operating system prompt:
dir
If it does not exist, you must create it using the iimklog command, and format it using the rcpconfig –init command.
2. Check journal locations by verifying that:
The journal location name points to a valid directory containing subdirectories ingres\jnl\default\dbname.
3. Check that the disk partition containing the journal files is not full. Issue the following command from the operating system prompt:
dir
If the journal partition is 100% full, this makes it impossible to write journals and stalls the archiver. If this is the reason preventing archiver start up, you must either free space on the journal partition or temporarily disable journaling with the alterdb command. For details on alterdb, see the Command Reference Guide.
4. If you corrected a recovery process problem, verify that Ingres starts normally.
a. First, shut down the partially started installation with the ingstop command.
b. Restart the installation with the ingstart command.

Procedures for Checking Individual Processes on Windows
Basic Troubleshooting 6–31
DBMS Server Process
The command to start the DBMS Server process (iidbms) from the ingres login is ingstart -iidbms. If the DBMS Server did not start:
1. Verify that the recovery process II_IUSV_nnn is running. See Procedures for Checking Individual Processes on Windows.
2. Verify that the recovery process II_IUSV_nnn is not in a recovery state. This is a likely situation if there was a sudden shutdown because of a power failure or some other system failure. See the Monitoring the Recovery Process in this chapter.
3. Try to start the DBMS Server. Issue the following command at the operating system prompt:
ingstart -iidbms
4. If you corrected a recovery process problem, verify that Ingres starts normally.
a. First, shut down the partially started installation with the ingstop command.
b. Restart the installation with the ingstart command.
JDBC Server
If the JDBC server process (iijdbc) does not start, follow this procedure:
1. Verify that you have installed the Ingres Net component.
2. Verify that you have installed the correct protocol drivers.
If you are still having problems, set the following trace to capture additional diagnostic data before calling Technical Support:
ingsetenv II_GC_TRACE 4 ingsetenv II_GC_LOG filename ingstart –iijdbc
Data Access Server
If the Data Access Server process (iigcd) does not start, follow this procedure:
1. Verify that you have installed the Ingres Net component
2. Verify that you have installed the correct protocol drivers

Procedures for Checking Individual Processes on UNIX
6–32 System Administrator Guide
If you are still having problems, set the following trace to capture additional diagnostic data before calling Technical Support:
ingsetenv II_GCD_TRACE ingsetenv II_GCD_LOG filename ingstart -iigcd
Procedures for Checking Individual Processes on UNIX This section contains procedures for checking the major Ingres processes. Note that Ingres installation processes on UNIX start up in the following order:
■ Name Server process (iigcn)
■ Communications Server process (iigcc)
■ Recovery process (dmfrcp)
■ Archiver process (dmfacp)
■ DBMS Server process (iidbms)
■ JDBC Server process (iijdbc)
■ Data Access Server process (iigcd)
■ ICE Server process (icesvr)
■ Bridge Server process (iigcb)
■ Remote Command process (rmcmd)
Name Server
The Name Server process (iigcn) is not running if either of the following occurs:
■ You receive a specific error indicating that the Name Server process (iigcn) failed to start.
■ The command ps -aux (BSD) or ps -ef (System V) shows that the iigcn is not running.
You can verify this by attempting to start the Name Server manually.
The most common causes of Name Server startup failure are:
■ An improper installation environment exists. Be sure to verify the installation environment by performing the Basic Installation Checks on UNIX discussed earlier in this chapter before continuing with the following procedure.

Procedures for Checking Individual Processes on UNIX
Basic Troubleshooting 6–33
■ Use of the wrong release or improper installation of TCP/IP. Verify that the operating system and TCP/IP releases are correct for your release before performing the following procedure.
Follow this procedure if the Name Server (iigcn) does not start:
1. Verify that TCP/IP is properly installed by typing the following command at the operating system prompt:
telnet localhost
A loopback login to your machine occurs.
2. Verify that the required TCP daemon process for your operating system is running.
The specific process name is system dependent, but on many UNIX systems, the process is named “inetd” (use your process name in the command below if it is not inetd). Issue the following command at the operating system prompt, or see your operating system manual for your particular TCP/IP implementation:
BSD:
ps -aux | grep inetd
System V:
ps -ef | grep inetd
3. Check that the Ingres environment variable II_GCNxx_PORT is not set (this environment variable contains the TCP port identifier of the Name Server process):
a. Use the ingprenv utility to verify that this environment variable is not set when the Name Server tries to start up.
b. If necessary, use the ingunset command to unset the II_GCNxx_PORT environment variable.
4. If you corrected a Name Server problem, verify that Ingres starts normally:
a. Shut down the partially started installation with the ingstop command.
b. Restart the installation with the ingstart command.
5. If you are still having problems, set the following trace to capture additional diagnostic data before calling Technical Support:
Bourne shell:
II_GC_TRACE=5 II_GC_LOG=stdio (stdio or filename) export II_GC_TRACE II_GC_LOG

Procedures for Checking Individual Processes on UNIX
6–34 System Administrator Guide
C shell:
setenv II_GC_TRACE 5 setenv II_GC_LOG stdio (stdio or filename) iirun iigcn
Communications Server Process
If the Communications Server process (iigcc) did not start, follow this procedure:
1. Verify that no local environment variables are set in the local user environment that contain the string “GCC”. At the operating system prompt type the command:
BSD:
printenv | grep GCC
System V:
env | grep GCC
The Ingres environment variable II_GCNxx_PORT is set in the Ingres symbol table. It is not visible from the UNIX environment using the printenv or env commands, but is visible in the Ingres environment. Verify this by typing ingprenv.
2. Check the value of the Ingres environment variable II_RUN with the following command entered at the operating system prompt:
ingprenv
a. If this machine is running Ingres Net, the value of II_RUN is either “,NET” or “,DBMS, NET”. If the value of the Ingres environment variable II_CLIENT is TRUE, II_RUN is “,NET”. If II_RUN is not set correctly, reset it using the command:
ingsetenv II_RUN ’,DBMS, NET’
b. If this machine is an NFS client (that is, does not run a DBMS Server locally) the value of II_RUN is “,NET”. If II_RUN is not set correctly, reset it using the following command entered at the operating system prompt:
ingsetenv II_RUN ’,NET’
For details on setting environment variables, see the chapter “Setting Environment Variables/Logicals.”

Procedures for Checking Individual Processes on UNIX
Basic Troubleshooting 6–35
3. If you are still having problems, set the following trace to capture diagnostic data and attempt to restart the Communications Server:
Bourne shell:
II_GCC_TRACE=4 II_GCA_LOG=stdio export II_GCC_TRACE II_GCA_LOG iirun iigcc
C shell:
setenv II_GCC_TRACE 4 setenv II_GCA_LOG stdio iirun iigcc
4. If you corrected a Communications Server problem, verify that Ingres starts normally:
a. Shut down the partially started installation with the ingstop command.
b. Restart the installation with the ingstart command.
Recovery Process
The recovery process (dmfrcp) must be running before a DBMS server can be started. Failure of the dmfrcp starting process indicates one of the following:
■ An improper installation configuration exists. For details, see Problems with Startup, Shutdown, or Configuration in this chapter.
■ Problems with the log file
■ Insufficient or previously allocated system semaphores or shared memory
■ If configured for Ingres Grid Option, check that required OS prerequisites are installed and operational (for example, OpenDLM in a Linux environment).
If the recovery process does not start, perform the following procedure:
1. Check that the shared memory resources are properly installed. Use the csreport utility and check that the size, ownership, and permissions of the semaphore and shared memory segments meet the minimum requirements for your port. These are specified in the Getting Started guide.
2. Check for the existence of the transaction log by opening the Primary Transaction Log window in Configuration Manager (or the Transaction Log screen in the Configuration-By-Forms (cbf) utility), and noting the directories listed in the Log File Root Locations table in Configuration Manager (or the Primary Transaction Log Locations table in cbf).
3. In the ingres/log directory (located below all other listed directories), look for the file ingres_log.lnn where nn is an integer between 1 and 16.

Procedures for Checking Individual Processes on UNIX
6–36 System Administrator Guide
4. Make the following checks on the transaction log file ingres_log.lnn:
a. Verify that ingres_log.lnn exists at that location by entering the following command at the operating system prompt:
ls -l
If it does not exist, you must recreate it using the Configuration-By-Forms (cbf) or Configuration Manager (vcbf) utility.
b. Verify that ingres_log.lnn is owned by installation owner.
If it is not, issue the following command at the operating system prompt, where userid is the user ID of the installation owner:
chown userid ingres_log
c. If the transaction log file was created as:
■ An ordinary UNIX file, make sure it has permissions 660 (that is, “-rw-rw----”). If not, issue the following command at the operating system prompt:
chmod 660 ingres_log
■ A raw log, permissions is “crw------”.
Details on configuring a raw log file are in the Getting Started guide.
5. If you corrected a recovery process problem, verify that Ingres starts normally:
a. Shut down the partially started installation with the ingstop command.
b. Restart the installation with the ingstart command.
6. If you still cannot start the II_IUSV_nnn process, you need to completely shut down the Ingres installation, re-run ingbuild, and reconfigure the log file.
Caution! This step must only be done as a last resort. Keep in mind that this reinitializes the log file, and any outstanding transactions are lost.
To shut down the system, complete the following steps:
a. Issue the command ingstop.
b. See the Checking Shutdown Problems on UNIX in this chapter. Work through that section until your Ingres installation has been cleanly shut down.
Archiver Process
The archiver process (dmfacp) does not start unless the recovery (dmfrcp) process is running. However, an Ingres installation runs without an archiver process until the log file fills up. User programs are suspended as outstanding transactions in the log file are backed out. For information about the Ingres recovery state, see Monitoring the Recovery Process in this chapter.

Procedures for Checking Individual Processes on UNIX
Basic Troubleshooting 6–37
Archiver process (dmfacp) startup errors are likely to result from:
■ Improper shared memory resources
■ Inability to read the transaction log file
■ Inability to write journal files
Use the following procedure to check archiver process startup problems. Some of these checks are the same as for the recovery process in the previous section:
1. Check that the shared memory resources are properly installed: Use the csreport utility and check that the size, ownership and permissions of the semaphore and shared memory segments meet the minimum requirements for your port. These are specified in the Getting Started guide.
The command to allocate Ingres shared memory and semaphores (when logged is as the installation owner) is csinstall. You can display them from UNIX with the command ipcs.
2. Make the following checks on the Ingres transaction log file “ingres_log”:
a. Verify that “ingres_log” exists at that location by entering the following command at the operating system prompt:
ls -l
If it does not exist, you must create it by running the ingbuild program.
b. Verify that “ingres_log” is owned by the user that owns the installation.
If not, issue the following command at the operating system prompt, where userid is the user who owns the installation:
chown userid ingres_log
c. If the transaction log file was created as:
– An ordinary UNIX file, make sure it has permissions 660 (that is, “-rw-rw----”). If not, issue the following command at the operating system prompt:
chmod 660 ingres_log
– A raw log, permissions is “crw------”.
(Details on configuring a raw log file are in the Getting Started guide.)
Check that the II_JOURNAL location is a valid location. Issue the following command at the operating system prompt:
infodb | grep ii_journal

Procedures for Checking Individual Processes on UNIX
6–38 System Administrator Guide
3. Check journal locations by verifying that:
■ The journal location name points to a valid directory containing subdirectories “ingres/jnl/default/dbname”
■ The permissions on these directories are:
■ - 755 for the ingres directory - 777 for the default directory
4. Check that the disk partition containing the journal files is not 100% full. Issue the following command at the operating system prompt:
df
If a journal partition is 100% full, it is impossible to write journals and the Archiver stalls. If this is the reason preventing Archiver startup, you must either free space on the journal partition or temporarily disable journaling with the alterdb command. For details on alterdb, see the Command Reference Guide.
5. If you corrected an Archiver process problem, verify that Ingres starts normally:
a. Shut down the partially started installation with the ingstop command.
b. Restart the installation with the ingstart command.
DBMS Server Process
The command to start the DBMS Server process (iidbms) from the installation owner login is ingstart -iidbms. If the DBMS Server did not start:
1. Verify that the recovery process (dmfrcp) is running. See Procedures for Checking Individual Processes on UNIX.
2. Verify that the recovery process is not in a recovery state. See Monitoring the Recovery Process in this chapter. This is a likely situation if there was a sudden shutdown because of a power failure or some other systems failure.
3. Try to start up a DBMS server. Issue the following command at the operating system prompt:
ingstart -iidbms
4. If you corrected a DBMS server problem, verify that Ingres starts normally:
a. Shut down the partially started installation with the ingstop command.
b. Restart the installation with the ingstart command.

Procedures for Checking Individual Processes on UNIX
Basic Troubleshooting 6–39
JDBC Server Process
The command to start the JDBC Server process (iijdbc) from the installation owner login is ingstart -iijdbc. If the JDBC server did not start:
1. Verify that the recovery process (dmfrcp) is running. See Procedures for Checking Individual Processes on UNIX in this chapter.
2. Verify that the recovery process is not in a recovery state. See Monitoring the Recovery Process in this chapter. This is a likely situation if there was a sudden shutdown because of a power failure or some other systems failure.
3. Try to start up a JDBC server. Issue the following command at the operating system prompt:
ingstart -iijdbc
4. If you corrected a JDBC server problem, verify that Ingres starts normally:
a. Shut down the partially started installation with the ingstop command.
b. Restart the installation with the ingstart command.
Data Access Server Process
The command to start the Data Access Server process (iigcd) from the installation owner login is ingstart -iigcd. If the Data Access Server did not start:
1. Verify that the recovery process (dmfrcp) is running. For more information, see Procedures for Checking Individual Processes on UNIX in this chapter.
2. Verify that the recovery process not in a recovery state. For more information, see Monitoring the Recovery Process in this chapter. This is a likely situation if there was a sudden shutdown because of a power failure or some other systems failure.
3. Try to start up a Data Access server. Issue the following command at the operating system prompt:
ingstart -iigcd
4. If you corrected a Data Access server problem, verify that Ingres starts normally:
a. Shut down the partially started installation with the ingstop command.
b. Restart the installation with the ingstart command.

Procedures for Checking Individual Processes on VMS
6–40 System Administrator Guide
ICE Server Process
The command to start the ICE Server process (icesvr) from the installation owner login is ingstart -icesvr. If the ICE Server did not start:
1. Verify that you have installed the Ingres Web Deployment Option component, and that you have configured it correctly using Configuration Manager (vcbf).
2. Verify that the DBMS Server process iidbms and/or Ingres Net are running. For additional information, see Procedures for Checking Individual Processes on UNIX.
3. Issue the following command at the operating system prompt to start the ICE Server:
ingstart -icesvr
Bridge Server Process
If the Bridge Server process (iigcb) did not start, follow this procedure:
1. Verify that you have installed the Ingres Net component.
2. Verify that you have installed the correct protocol drivers.
If you are still having problems, set the following trace to capture additional diagnostic data before calling Technical Support:
ingsetenv II_GC_TRACE 4 ingsetenv II_GC_LOG filename ingstart -iigcb
Remote Command Process
You can check for the presence of the remote command process by entering the following command at the operating system prompt:
ps –ef| grep rmcmd
Procedures for Checking Individual Processes on VMS This section contains procedures for checking the major Ingres processes. Note that Ingres installation processes start up in the following order:
■ Recovery process (II_IUSV_nnn)
■ Archiver process (DMFACP)

Procedures for Checking Individual Processes on VMS
Basic Troubleshooting 6–41
■ Name Server process (II_GCN)
■ Communications Server process (II_GCC_nnn)
■ DBMS Server process (II_DBMS_nnn)
■ JDBC Server process (II_JDBC_nnn)
■ Data Access Server process (II_GCD_nnn)
■ Remote command process (RMCMD_nnn)
■ Bridge Server process (II_GCB_nnn)
Recovery Process
The recovery process (II_IUSVxx_nnn for stand-alone Ingres, or DMFRCPnnn-xx for Ingres Grid Option) must be running before a DBMS server can be started. Failure of the recovery process to start indicates one of the following:
■ Improper installation configuration. For more information, see Basic Installation Checks on VMS in this chapter.
■ Problems with the log file
■ Insufficient system memory (NPAGEDYN sysgen parameter)
If the recovery process does not start, perform the following procedure.
1. Examine the following files for specific reasons for the startup failure:
II_SYSTEM:[INGRES]II_CONFIG:errlog.log II_CONFIG:IIRCP.LOG
(If your system is configured for the Ingres Grid Option, the suffix _nodename is added.)
If configured for Ingres Grid Option, also check II_CONFIG:II_CSP.LOG_nodename, and look for error messages indicating problems.
2. If configured for Ingres Grid Option, check that DECnet is up among all nodes. Ingres uses DECnet to communicate among nodes. Check that you can set host and log into/from all nodes running Ingres.
3. Be sure that the log file location is correctly defined:
a. Check the definition of the II_LOG_FILE logical.
b. Check the II_LOG_FILE location for the existence of the log file:
II_LOG_FILE:[INGRES.LOG]INGRES_LOG.SYSTEM_nodename
4. If you still cannot start the recovery process, contact Technical Support. The problem may be a corrupted log file. For more information, see Before Calling Technical Support in this chapter.

Procedures for Checking Individual Processes on VMS
6–42 System Administrator Guide
Archiver Process
The Archiver process (DMFACP) for stand-alone Ingres or DMFACPxx for Ingres Grid Option) does not start:
■ Unless the recovery process is running; however, an installation runs without an archiver process until the log file fills up. User programs are suspended until the archiver is started.
■ When the recovery system is backing out aborted transactions from a system failure. To determine whether Ingres is in a recovery state, see Monitoring the Recovery Process in this chapter.
Use the procedure below for checking if the Archiver process is encountering a startup error. Archiver process startup errors can occur due to improper memory resources, inability to read the transaction log file, or inability to write journal files.
■ You receive an error indicating that the Archiver process failed to start.
■ The VMS command show system does not list the Archiver process.
Use the following procedure to check Archiver process startup problems:
1. Examine the II_CONFIG:errlog.log startup log file for information.
2. Examine the IIACP.LOG_nodename file for possibly specific reasons for the startup failure. Take note of which databases are referenced in the IIACP.LOG_nodename file.
3. Check that the II_JOURNAL location is a valid location:
a. Check the definition of the II_JOURNAL logical.
b. Check the II_JOURNAL location. Type the following command at the operating system prompt:
directory II_JOURNAL:[INGRES.JNL]
4. Check that the disk containing the journal files is not 100% full. This makes it impossible to write journals and stops the Archiver.
If the journal disk became full as a result of the Archiver writing journal information, an error appears in the errlog.log stating a “device full” condition.
a. After making disk space available, restart the Archiver using the ingstart -dmfacp command.
b. Optionally, modify the acpexit script to take whatever measures are necessary to notify you of this situation as soon as it occurs. For example, you can modify the script so that it sends you mail when the Archiver encounters an error.
5. If the journal files have been corrupted, the errlog.log reports any problems with the Archiver writing information to the journal files.

Procedures for Checking Individual Processes on VMS
Basic Troubleshooting 6–43
If there are corrupted files, or the Archiver process continues to fail, contact Technical Support. For more information, see Before Calling Technical Support in this chapter.
Name Server
Follow this procedure if the Name Server process (II_GCN) is not running, that is, if either of the following occurs:
■ You receive a specific error indicating that the Name Server process failed to start.
■ The VMS command show system does not list the II_GCN process, indicating that the Name Server is not running.
Note: Only a privileged user can start up the Name Server.
Use the following procedure to check the Name Server process problems.
1. Examine the II_CONFIG:errlog.log file for any additional information.
2. To isolate a running Name Server as the problem on failed local connections:
a. Define the logical II_DBMS_SERVER to point to the DBMS Server process name or mailbox.
b. If the connection now succeeds, stop and start the Name Server. For additional information about the iinamu command, see the Command Reference Guide.
3. If the Name Server continues to fail, see Before Calling Technical Support in this chapter.
Communications Server Process
The Communications Server name is II_GCC_nnn, where the nnn is a number related to the server’s process ID. It is an indication that the Communications Server did not start if any of the following occurs:
■ The II_CONFIG:errlog.log file has a notation regarding the failure of the “net server” (Communications Server) process starting.
■ The show system command does not list an II_GCC_nnn process.
■ The utility iinamu does not display a process name when you enter the show comsvr command at the IINAMU> prompt.
Procedures for Checking Individual Processes on VMS
6–44 System Administrator Guide
Use the following procedure if the Communications Server process did not start.
1. Examine the II_CONFIG:errlog.log file for any information regarding Communications Server startup.
2. Make sure that the network protocol software on which the Communications Server executes is started and functioning before attempting to start Ingres Net processes. By default, an attempt is made to open ports for the DECnet and TCP_DEC protocols.
3. If the Communications Server continues to fail to start, contact Technical Support.
DBMS Server Process
Use the following procedure if the DBMS Server process did not start. The server name is II_DBMS_nnn, where the nnn is a number related to the server’s process ID:
1. Examine the II_CONFIG:errlog.log file for any information regarding DBMS Server startup.
Contact Technical Support to examine your authorization string.
2. If there is a DBMS Server startup failure reported in the II_CONFIG:errlog.log, but no error reported in the errlog.log:
a. Check for the existence of any MBAnnn processes on the system that are linked to the IIRUNDBMS.EXE. Examine the MBAnnn process by issuing the following command at the operating system prompt:
show proc/id = pid /cont
where pid is the pid of the MBAnnn process.
b. If the MBAnnn process is linked to the IIRUNDBMS.EXE, free the IIRUNDBMS.EXE by issuing the following command at the operating system prompt:
stop /id = pid
where pid is the pid of the MBAnnn process.
c. Check the errlog.log for any new messages relating to DBMS Server startup failure.
3. Try starting a server manually, using the ingstart -iidbms command.
4. If the DBMS Server continues to fail to start, contact Technical Support.

Procedures for Checking Individual Processes on VMS
Basic Troubleshooting 6–45
JDBC Server
The command to start the JDBC Server process (iijdbc) from the Ingres system administrator account is ingstart -iijdbc. If the JDBC server did not start:
1. Verify that the recovery process II_IUSV_nnn is running. See Procedures for Checking Individual Processes on VMS.
2. Verify that the recovery process II_IUSV_nnn is not in a recovery state. See Monitoring the Recovery Process in this chapter. This is a likely situation if there was a sudden shutdown because of a power failure or some other systems failure.
3. Try to start up a JDBC server. Issue the following command at the operating system prompt:
ingstart -iijdbc
4. If you corrected a JDBC server problem, verify that Ingres starts normally:
a. Shut down the partially started installation with the ingstop command.
b. Restart the installation with the ingstart command.
Data Access Server
The Data Access Server name is II_GCD_nnn, where the nnn is a number related to the server’s process ID. It is an indication that the Data Access Server did not start if any of the following occurs:
1. The II_CONFIG:errlog.log file has a notation regarding the failure of the Data Access Server process.
2. The command show system does not list a II_GCD_nnn process.
3. The utility iinamu does not display a process name when you enter the command show dasrv at the IINAMU> prompt.
Use the following procedure if the Data Access Server process did not start:
1. Verify that you have installed the Ingres Net component.
2. Verify that you have installed the correct protocol drivers and they are functioning properly.
3. Verify the Data Access Server has been properly configured through the Configuration-By-Forms (cbf) utility.
If you are still having problems, set the following trace to capture additional diagnostic data before calling Technical Support:
define II_GCD_TRACE 4 define II_GCD_LOG filename ingstart -iigcd

Procedures for Checking Individual Processes on VMS
6–46 System Administrator Guide
Remote Command Process
The Remote Command Server process name is RMCMD_nnn, where the nnn is a number related to the server's process id. It is an indication that the Remote Command Server did not start if the show system command does not list an RMCMD_nnn process.
Use the following procedure if the RMCMD process did not start:
1. Ensure that the PRCLM for the system administrator is sufficient to start this additional process. This value must be a minimum of 15.
2. Check II_SYSTEM:[ingres.bin]RMCMD.log for errors.
Bridge Server Process
The Bridge Server process name is II_GCB_nnn, where the nnn is a number related to the server’s process ID. It is an indication that the Bridge Server did not start if any of the following occurs:
1. The II_CONFIG:errlog.log file has a notation regarding the failure of the Bridge Server process.
2. The show system command does not list a II_GCB_nnn process.
3. The utility iinamu does not display a process name when you enter the show bridge command at the IINAMU> prompt.
Us the following procedure if the Bridge Server process did not start.
1. Verify that you have installed the Ingres Net component.
2. Verify that you have installed the correct protocol drivers and they are functioning properly.
3. Verify the Bridge Server has been properly configured using the Configuration-By-Forms (cbf) utility. If you are still having problems, set the following trace to capture additional diagnostic data before calling Technical Support:
define II_GC_TRACE 4 define II_GC_LOG filename ingstart -iigcb

Problems with Tools Startup
Basic Troubleshooting 6–47
Problems with Tools Startup Use the procedures in this section if an Ingres tool fails to connect to the DBMS Server or to the database. For example, when starting an application or an Ingres tool program such as SQL, Ingres displays an error message and returns to the operating system prompt.
Troubleshooting Flow Chart 3
The following flow chart helps you isolate a problem when starting an Ingres tool:
Can you connect to theDBMS Server?
Do you get an errormessage and return tothe OS prompt whenattempting to run an Ingres program?
If your program starts but produces no output ("hangs")then see the Performance Problems section.
See DBMS ServerStopped section.
See Database ConnectionProblems section.
Yes
No
No
Yes
DBMS Server Stopped
Once started with ingstart, the DBMS Server process must continue running until the ingstop or iimonitor command is issued to stop it. If the DBMS Server stops running (“dies”) for any other reason, report it to Technical Support along with the associated error log messages and, if possible, the cause of the DBMS Server stopping.
1. Document error log entries associated with the process death. For details on reading the log files, see Check the Error Log Files in this chapter. Save all errors for Technical Support.
2. Isolate the reason your DBMS Server process died.
a. Isolate which operations, application, query, and tables are needed to duplicate the problems. See the copyapp and unloaddb command descriptions in the Command Reference Guide.
b. Save this to make a test case for Technical Support.

Problems with Tools Startup
6–48 System Administrator Guide
3. If the immediate cause cannot be isolated, perform long-term diagnostics with II_DBMS_LOG. This diagnostic tool is especially valuable for fatal DMF errors.
a. Set II_DBMS_LOG to capture a “snapshot” of the DBMS Server when it stops by setting it to the full path name of a file before starting the DBMS Server. For example:
Windows SET II_DBMS_LOG=%II_SYSTEM%\ingres\files\dbms.log
UNIX C shell:
setenv II_DBMS_LOG $II_SYSTEM/ingres/files/dbms_%p.trace
Bourne shell:
II_DBMS_LOG = $II_SYSTEM/ingres/files/dbms_%p.trace export II_DBMS_LOG
At startup, the %p in the II_DBMS_LOG specification is replaced by the Process Identifier (PID) of the server process. This prevents DBMS servers from clobbering each others logs (or the recovery process log)
VMS
define /system/exec II_DBMS_LOG - II_SYSTEM:[INGRES.FILES]DBMS.LOG (for a system level installation)
define/group/exec II_DBMS_LOG - II_SYSTEM:[INGRES.FILES]DBMS.LOG (for a group level installation)
b. When the DBMS Server shuts down, information is dumped to the DBMS log file. You must rename the file before restarting Ingres or the new server overwrites the file. Prepare to send this file along with associated errors from the error log files to Technical Support for analysis.
Database Connection Problems
This section is applicable if you are encountering problems connecting to all or some databases.
No Database Connections
If you cannot connect to any database, use the following procedure:

Problems with Tools Startup
Basic Troubleshooting 6–49
1. Check the errlog.log to see if there are any associated messages. These messages are often more informative than the message displayed on your screen and can quickly identify the source of failure. Check for associate messages in the errlog.log by using their timestamps.
2. Ensure that all your installation’s processes are running. For more information, see Basic Installation Checks on UNIX, Basic Installation Checks on VMS, and Basic Installation Checks on Windows in this chapter.
3. Run logstat to insure that the logging system status is ONLINE and not LOGFULL. If the status is not ONLINE, see Logging System Issues in this chapter.
4. Use iinamu to interrogate the Name Server. (For additional information, see iinamu in the Command Reference Guide.) Type show ingres to verify that the DBMS Server has registered with the Name Server.
5. Use the iimonitor utility to see if you can connect to the DBMS Server. See iimonitor in the Command Reference Guide.
■ If you can connect, at the “IIMONITOR>” prompt type show sessions to examine DBMS server activity.
■ If you cannot connect to the DBMS Server, see Logging System Issues in this chapter.
6. Check the Ingres environment variable/logical II_DBMS_SERVER:
Windows Use ingprenv and your system’s echo command to verify that II_DBMS_SERVER is not set, either in the Ingres symbol table or your local environment.
UNIX Use ingprenv and your system’s env or printenv command to verify that II_DBMS_SERVER is not set, either in the Ingres symbol table or your local environment.
VMS
Use II_DBMS_SERVER to bypass the Name Server process. Issue the following command at the operating system prompt:
define II_DBMS_SERVER II_DBMS_pid
If the use of II_DBMS_SERVER works, restart the Name Server process.
7. If the error condition persists, see Before Calling Technical Support in this chapter.
Individual Database Connection Failure
If you can connect to some databases but not others:
1. Check the errlog.log for database connection error messages. These messages can quickly identify the source of the failure.
2. Check that the database is not exclusively locked by another user.

Inconsistent Databases and Recovery
6–50 System Administrator Guide
3. Check database permissions and ownership. For additional information, see Basic Installation Checks on UNIX, Basic Installation Checks on VMS, and Basic Installation Checks on Windows in this chapter.
Verify that your database still exists and is not being recovered by the recovery system.
4. Type catalogdb and choose “catalog” / “databases” or run VDBA to check if the database is listed.
If the database does not exist, a corresponding error message is sent.
Using VDBA:
5. Select a server and click Connect DOM.
6. Select Database from the drop down menu and choose infodb. Make sure the database is not listed as inconsistent and that the status indicated is “VALID.”
Inconsistent Databases and Recovery An inconsistent database occurs when administrative changes to a database in the transaction log do not agree with information maintained in the database’s configuration file.
The main causes of inconsistent database errors are improper system administration procedures. These include:
■ Initializing the transaction log file with the -force_init_log flag of rcpconfig while the log file still contains open transactions
■ Moving or altering files or installation variables without using the appropriate utility such as ingbuild or unloaddb
■ Improper procedures when recovering Ingres data from operating system backups
Inconsistent database errors can also be caused by hardware problems or software problems. For example, inconsistent database errors can be caused when the transaction log file or the configuration file has been corrupted by a hardware failure. Inconsistent database errors can also be caused by software bugs. In either case, contact Technical Support.
Note: You can also use VDBA for database backup and recovery. For more information, see the Getting Started guide or the online help for VDBA.

Inconsistent Databases and Recovery
Basic Troubleshooting 6–51
Automatic Recovery
Ingres automatically handles the transaction failures that cause most database inconsistencies.
Recovery During Normal Operation
If a user program exits or a transaction is aborted for some other reason, the DBMS Server automatically handles transaction rollback. This does not cause an inconsistent database.
Recovery at Shutdown
At shutdown all users must have exited their sessions; therefore, all transactions are committed. If users exited their sessions abnormally, the DBMS Server aborts any open transactions associated with the aborted sessions. Very long transactions take time to roll back and cause ingstop to seem to hang. The DBMS Server process cannot exit normally until it finishes recovering the aborted transactions.
If transactions are being rolled back on shutdown, allow the DBMS Server to finish this task before shutting down. If you do not, longer delays occur at startup time while the recovery process is performing rollback.
Recovery at Startup
If transactions have been aborted and were not recovered by a normal shutdown, upon restart the recovery process performs recovery. This occurs, for example, if:
■ Processes are forcibly killed from the operating system
■ The machine is rebooted
■ Power to the system is interrupted
As soon as the installation is restarted, the recovery process reads the transaction log file. If there has not been a normal shutdown, the recovery process detects that databases are inconsistent—that is, that Ingres previously exited without completing all the transactions required for system and database consistency. The recovery process proceeds through the transaction log file to back out uncommitted transactions and complete committed fast-commit transactions until the databases are again in a consistent state. While recovery is proceeding, no user interfaces can connect to a database.

Inconsistent Databases and Recovery
6–52 System Administrator Guide
Recovery actions are logged in the file:
Windows %II_SYSTEM%\ingres\files\iircp.log
UNIX $II_SYSTEM/ingres/files/iircp.log
VMS
II_SYSTEM:[INGRES.FILES]IIRCP.LOG
Note: When configured for the Ingres Grid Option, the log name has _nodename appended to the base log name. When the recovery process is complete, the message “Completed aborting transactions” is written to the RCP log file. Restart Ingres with the ingstart command. Users can reconnect to the databases.
Monitoring the Recovery Process
If you are monitoring Ingres startup after a machine reboot, the following messages are displayed: Starting Ingres Name Server… Starting Ingres Communications Server… Starting Ingres Recovery Process…
If the transaction log contained uncommitted transactions when the machine failure occurred, the startup script pauses while the recovery process recovers transactions from the transaction log file. No messages are printed to the screen.
If you are in doubt as to whether recovery is taking place during startup, or to monitor the recovery process, use the following procedure.
Display the recovery process log file by typing the following command at the operating system prompt:
Windows %II_SYSTEM%\ingres\files\iircp.log
UNIX tail -f iircp.log
VMS
II_SYSTEM:[INGRES.FILES]IIRCP.LOG_nodename
If the system is recovering, the recovery actions are logged to the IIRCP.LOG file. This indicates that Ingres is automatically recovering from possible inconsistencies.
Messages are printed to the log file during recovery:
■ The message at the beginning of recovering transactions indicates that transaction recovery has begun.

Inconsistent Databases and Recovery
Basic Troubleshooting 6–53
■ Intermediate messages track recovery progress. As recovery proceeds, progress messages (for example, “Recovered 31 of 130 transactions”) are displayed.
■ When done, the following message is printed: Recovery complete.
You can also use an operating system command to determine whether the recovery process is recovering transactions by checking to see if it is accumulating CPU time.
VMS
On VMS you can issue the following command at the operating system prompt several times: show process/cont/id=xxxx
where xxxx is the process ID of the recovery process.
If the CPU time and disk I/O count taken by the process is increasing, the recovery process is most likely recovering transactions from the log file.
UNIX On UNIX, you can also monitor the files in the database directory of the database you suspect of being the target of the updates that are being backed out. The following command entered at the operating system prompt shows whether data files are being updated:
ls -lt
The file most recently updated is listed first along with the time of last update.
If any of the monitoring techniques above indicate that transaction recovery is taking place, continue to monitor the recovery process until recovery has completed. When the recovery process is complete, CPU time is not accumulated.
After the recovery process has finished, restart the installation with the ingstart command. The ingstart utility first shuts down and brings up all required installation processes. Programs can connect to the databases.
Inconsistent Database
If you receive an “inconsistent database” error after recovery is complete, it means updates and/or modifications were not properly completed or rolled back, and the database is therefore in an inconsistent state.
Following are examples of “inconsistent database” errors that indicate your database has become inconsistent:

Inconsistent Databases and Recovery
6–54 System Administrator Guide
E_DM0100 DB_INCONSISTENT Database is inconsistent E_US0026 Database is inconsistent. Please contact the ingres system manager E_DM9327 BAD_OPEN_COUNT
Diagnosing an Inconsistent Database
Diagnose the cause and extent of an inconsistent database problem before you attempt to recover your database. Knowing the cause of the problem is essential to choosing the proper recovery procedures. Once a database has been rolled forward from a checkpoint, recovered from an operating system backup, or forced consistent, you cannot determine the cause of inconsistency.
1. Read and save the full text of the error messages in errlog.log and iircp.log.
2. Using VDBA, choose infodb from the Database menu to read the database’s configuration file and identify the cause of inconsistency. You can also enter the infodb command at the operating system prompt.
If the configuration file can be opened and read, the cause of the inconsistency is displayed. Save the output of infodb for Technical Support.
If the database’s configuration file, “aaaaaaaa.cnf”, cannot be read, it is corrupted. You need to recover from a backup. See Recovering an Inconsistent Database in this chapter.
3. Review the history of your Ingres installation. Look for improper system administration procedures that have caused the database to become inconsistent. For causes of inconsistent databases, see the table in Preventing Inconsistent Databases in this chapter.
4. If the inconsistent database was not caused by incorrect system administration procedures, hardware failure or known operating system software bugs, report the problem to Technical Support. Be sure to record the information to save for Technical Support as discussed in Before Calling Technical Support in this chapter.
Inconsistent Databases and Recovery
Basic Troubleshooting 6–55
Preventing Inconsistent Databases
This section examines causes of database inconsistencies and discusses how you can avoid the most common errors.
Some common errors are shown in the following table:
Cause Resolution
Recovering a database from an operating system backup which was made while the installation was running
For more information, see Recovering an Inconsistent Database in this chapter.
Changing Ingres installation variables (such as II_SYSTEM, II_DATABASE, II_CHECKPOINT, II_JOURNAL, II_DUMP, or II_WORK) without using proper procedures
This causes an inconsistency between the information stored in the installation variables and those stored in the database configuration file “aaaaaaaa.cnf”.
1. To examine the configuration file of your database, use the VDBA Database, Infodb menu command.
You can also enter the infodb command at the command prompt.
2. Compare the path information for checkpoint, journal, data and dump locations with that defined for these environment variables/logicals as displayed by the following command:
Windows ingprenv
UNIX ingprenv
VMS
show log ii
3. If these values are not the same, the installation logicals have been changed, or the database has been imported from some other Ingres installation. Return the installation logicals to the values displayed by infodb if they have been changed.

Inconsistent Databases and Recovery
6–56 System Administrator Guide
Cause Resolution
4. If you need to change the existing values of Ingres installation variables or import a database from another site, you must use the unloaddb utility, as this creates a new, up-to-date configuration file for the database. For a discussion of Ingres environment variables/logicals that cause an inconsistent database if changed after installation is completed, see the chapter “Setting Environment Variables/Logicals.”
Database inconsistency can occur if you move a database, table, application or some other object by using operating system commands rather than the supported Ingres utilities. If the inconsistency is the result of moving a database from another location or installation without using unloaddb, you must remove the database using destroydb, recreate the database using createdb, and repopulate the database using the unloaddb utility. For details, see the Database Administrator Guide.
A database file can become corrupted from hardware or software failures of various kinds. A data file can be inadvertently deleted by hand, but this is rare because only the user who owns the installation can write to the database directories.
If you are in doubt about whether transactions are being recovered, run the logstat utility and examine the “Status” field. It is marked RECOVER if in the recovery state.
While a recovery is taking place, for example when restarting after a system failure, the recovery process requires time to read through the transaction log file to back out uncommitted transactions and complete fast-commit transactions. To users, the system appears to hang.

Inconsistent Databases and Recovery
Basic Troubleshooting 6–57
Cause Resolution
Keep the following in mind:
■ It takes at least as long to recover aborted transactions as it took to execute them originally.
■ The amount of time required for recovery depends on the number of users and transactions, transaction semantics (whether autocommit is set), and the consistency point interval.
■ While recovery is proceeding, all users are denied access to databases. Any attempt to connect to a database at this point returns an error such as the following:
E_LQ0001_STARTUP gca protocol service request failure.
Database inconsistency can occur if a user or the system administrator attempts to “force” entry into the installation by running rcpconfig with the -force_init_log flag (thus erasing the transaction log file) before the recovery system has finished rolling back the uncommitted transactions during recovery.
After a system failure, monitor recovery and always allow it to proceed until the “Recovery Complete” message appears in iircp.log.
Disabling the logging/recovery system
The DBA can temporarily turn off logging for a database to speed bulk loading of data. If logging has been turned off for this database, a NOLOGGING error message appears in the error log file. Typically this message is: E_DM9050_TRANSACTION_NOLOGGING Database dbname has been updated by a session running with SET NOLOGGING defined.
If the database has become inconsistent, you can check for this error message by typing the following command:
Windows findstr DM9050\ %II_SYSTEM%\ingres\files\errlog.log
UNIX grep DM9050 \ $II_SYSTEM/ingres/files/errlog.log

Inconsistent Databases and Recovery
6–58 System Administrator Guide
Cause Resolution
VMS
search - II_SYSTEM:[INGRES.FILES]ERRLOG.LOG - DM9050
If the NOLOGGING error message appears, logging was disabled on this database. If the NOLOGGING message in the error log was written later than the most recent checkpoint of this database, the database must be restored from the checkpoint. To determine if this is the case, compare the timestamp on the error message in errlog.log with the timestamp in the “checkpoint history” field of the output from the command infodb dbname.
For details on set nologging, see the Database Administrator Guide.
UNIX Use of unsupported hardware configurations on NFS
On systems that include Network File System (NFS) mounts, be aware that Ingres:
■ Supports NFS client installation configurations in which the DBMS Server process and data directories on one node are accessed by application programs executing on another.
■ Does not support running DBMS servers on one node and accessing data directories on another network node using NFS. The configuration can cause undetected write errors that lead to database inconsistency.
To check your configuration, type mount at the operating system prompt. Make sure that the data directories (II_DATABASE, II_CHECKPOINT, II_JOURNAL and II_LOG_FILE) are not NFS-mounted from a remote node.
For a description of the supported NFS client installation procedures, see Getting Started.
Recovering an Inconsistent Database
The recommended method of recovering an inconsistent database is to use rollforwarddb from VDBA. You can also enter this command from the command line. If no Ingres checkpoint exists, you can recover from an operating system backup.

Inconsistent Databases and Recovery
Basic Troubleshooting 6–59
Using a Checkpoint
The recommended way to make your inconsistent database consistent is to use rollforwarddb. It recovers the database from a previous checkpoint and, if journaling was enabled, applies the associated journals. For the full procedure, see the Database Administrator Guide.
Using an Operating System Backup
Ingres does not support nor recommend the use of operating system backups as your primary means of ensuring database recoverability. The Ingres checkpoint and journaling programs provide the secure way to ensure that your data is recoverable.
Caution! Operating system backups must be used only as a last resort, when Ingres checkpoints have been lost or destroyed, and only under the direction of Technical Support.
When No Backup Exists
If you have an inconsistent database for which no checkpoints or operating system backups exist, you can still gain access to that database and attempt to salvage the data using the verifydb utility. The verifydb utility can be used to unset the “inconsistent database” flag in the configuration file “aaaaaaaa.cnf”. This permits access to the database; however, it does nothing to actually make the data consistent. If verifydb is used to force access to a database that is inconsistent, the state of the database remains unknown. Such a database becomes unsupportable by Technical Support. Data can be lost and problems occur weeks or months later. Technical support cannot diagnose the state of such a database because the built-in consistency checks have been overridden.
The format “verifydb -oforce_consistent” does not recover a database. It merely allows access and continued operation to a database that is in an inconsistent state.
If you must use verifydb to gain emergency access to data in an inconsistent database, do so as follows:
1. Save all information for Technical Support as outlined in Before Calling Technical Support in this chapter.
2. Back up the database directory at the operating system level.
3. Run verifydb in report mode by typing the following command at the operating system prompt:
verifydb -mreport -sdbname "dbname" -odbms_catalogs -u$ingres

Performance Problems
6–60 System Administrator Guide
Verifydb output is logged in:
Windows %II_SYSTEM%\ingres\files\iivdb.log
UNIX $II_SYSTEM/ingres/files/iivdb.log
VMS
II_SYSTEM:[INGRES.FILES]IIVDB.LOG
4. To repair inconsistencies in the system catalogs interactively and force the database consistency flag, type the following commands at the operating system prompt:
verifydb -mruninteractive -sdbname "dbname" -oforce_consistent -u$ingres verifydb -mruninteractive -sdbname "dbname" -odbms_catalogs -u$ingres
5. Call Technical Support if additional assistance is required to resolve the inconsistency.
Performance Problems Most performance problems stem from multiple causes. A complete performance analysis must include each item in the Diagnostic Hierarchy section below. But if you need to resolve a specific performance problem quickly, focus your attention on that area. The information in this troubleshooting section is designed to assist you in resolving a performance issue after first isolating which factors are influencing performance.
Use the procedures in this section if an Ingres tool “hangs,” that is, your program seems to start but nothing happens. Other programs such as SQL display header information, but when you issue a command, nothing happens.

Performance Problems
Basic Troubleshooting 6–61
Troubleshooting Flow Chart 4
Use the following flow chart to identify and isolate a system performance problem:
Use the logstatcommand to check the
logging system.Does the status display
"Status: ONLINE,ECPDONE"?
Have you checkedoperating system
resources?
If you are still unable to determine the source of yourperformance problem, see theDatabase Administrator Guide
for performance issues related to query designand locking problems.
See Logging SystemIssues section.
See Operating SystemResources section.
Yes
Yes
No
No
Logging System Issues
Use the following procedure to diagnose a DBMS server that is not responding due to logging system problems.
1. Check the logging system by issuing the following command at the operating system prompt to invoke the logstat utility:
Windows logstat | more
UNIX logstat | more
VMS
define sys$output filename logstat deassign sys$output
You need the CMKRNL privilege to run logstat.
2. If you are unable to start up logstat, the recovery process has probably taken an exclusive lock and is in recovery. See Monitoring the Recovery Process in this chapter.

Performance Problems
6–62 System Administrator Guide
3. If logstat starts up, check the status field. Problem states and their resolutions are described in the following table.
Status Field Description Action
ONLINE, ECPDONE A consistency point is completed. The system is fully functional and online.
The logging system has finished a consistency point. This status flag is present most of the time while the logging system is functioning normally. If this is your status, stop this procedure and review Operating System Resources.
LOGFULL The log file is full. A status of LOGFULL means that the system is suspended from processing new requests because there is no more room in the transaction log file. It remains so until the problem is corrected. Examine the other status field entries.
If ARCHIVE is also indicated, the Archiver is actively processing the log file to free up space. The LOGFULL condition is removed when the Archiver is finished.
CPNEEDED A consistency point is needed.
CPNEEDED means the logging system is about to take a consistency point.
ARCHIVE The Archiver is processing. The status ARCHIVE means the Archiver process is archiving.
START_ARCHIVER The Archiver has stopped. A status of START_ARCHIVER means that the archiver process stopped. Restart the Archiver.
FORCE_ABORT The force-abort- limit has been reached.
If the status is FORCE_ABORT, a transaction came too close to the end of the transaction log file before the oldest was committed to disk, and reached the force-abort-limit. The oldest open transaction is aborted to free space for the new one.
You can use logstat (or ipm) to monitor the force abort. The system frees the FORCE_ABORT status when the abort operation is completed.
RECOVER
The recovery process is performing recovery.
If the status is RECOVER, the logging system is in recovery, a normal mode. Recovery requires some time because Ingres is optimized to commit rather than back out of transactions.

Performance Problems
Basic Troubleshooting 6–63
Caution! If the server is recovering a lengthy transaction, be aware that shutting down the server with iimonitor’s “stop server” (or by killing processes at the operating system level) results in slower recovery. Allow the recovery to proceed normally. You can monitor the progress of the recovery with logstat and iimonitor or the ipm utility.
Many other normal states appear on the status line. For additional information on reading logstat output, see the Logstat section in the Command Reference Guide.
Avoiding Logfull Abort
Here are some hints to avoid log full/abort problems.
Examine the transaction processing strategy errors that caused the log file to fill. Consider the following points:
■ If transactions do many updates or are left open for a long time, you must either commit them more frequently or increase the size of the log file. If the log file size is increased, check the “percentage of logfile written” before a consistency point is taken. For details, see the ipm, logstat, or VDBA output.
■ Avoid continuous transaction errors by:
– Setting autocommit on where applicable
– avoiding application errors that are caused by beginning transactions before they get all the user input required or by failing to use Ingres application timeout features. (Timeout features are discussed in the SQL Reference Guide and Forms-based Application Development Tools User Guide. Also, for a discussion of transaction processing, see the SQL Reference Guide.
■ If you have taken the above precautions but still get log full/abort, the transaction log is sized too small for the types of transactions you need to process. Read the tips in the next section on choosing the correct transaction log file size.
■ Use set log_trace to examine the size and type of log records being written to the log file.
Resizing the Transaction Log
Use one of the following procedures to determine whether you need to resize the Transaction Log and how to resize it.
Determining Whether a Log Requires Resizing
To determine whether a log requires resizing, use one of the following procedures.
Using VDBA’s Performance Monitor, start a monitoring session on the desired node:
Performance Problems
6–64 System Administrator Guide
1. Select the node in the left pane and click the Monitor toolbar button.
2. Select Log Information in the branch.
3. Click the Header tab in the right pane to display log usage.
Or:
Start the Interactive Performance Monitor utility (ipm).
1. Highlight the Log_info menu item and select the Select option.
2. Highlight the Header menu item and select the Select option.
The Log file Diagram shows the percentage use of the Transaction Log.
3. Exit the ipm program.
Or:
Find the current peak transaction load by using the logstat utility to monitor the amount of log file that is in use during your peak hours. This allows you to choose the correct size for your log file. Because requirements change, you must monitor the log file regularly.
1. Enter the logstat command.
2. Find the value under % of log file in use.
3. If the log file needs to be resized, select the new size.
UNIX Use mkrawlog to reconfigure a raw log file.
4. Shut down the Ingres installation by entering the ingstop command.
Resizing the Transaction Log File
1. Shut down the Ingres installation by entering the ingstop command.
2. Start the Configuration-By-Forms (cbf) or Configuration Manager (vcbf) utility.
a. Choose Transaction Log from the menu.
The file name is displayed along with the current size of the Transaction Log.
b. Choose Destroy.
When destroyed, the Transaction Log information table is emptied.
c. Select the Create option.
d. Enter the required Transaction Log file size in megabytes.
The transaction log is created.

Performance Problems
Basic Troubleshooting 6–65
3. Exit cbf or vcbf.
4. Restart the Ingres installation by entering the command ingstart.
For details, see the Getting Started guide.
Caution! Reconfiguring your log file destroys the current contents of the file and leaves an empty, reinitialized log file after the reconfiguration is complete. When Ingres is shut down, all transactions are written to disk; therefore, to prevent inconsistent database problems, reconfigure the log file only after a successful Ingres installation shutdown procedure.
Reestablishing Dual Logging
A failure in one of the two dual log files is most often symptomatic of hardware problems. In the event of such a failure, you must reestablish dual logging at the first opportunity.
To re-establish dual logging after a failure of one of the log files, perform the following procedure.
1. Shut down the installation.
2. Create a new log file in the location of the failed log.
Windows 3. Click Start on the taskbar, and choose Programs, Ingres, Configuration
Manager.
UNIX
VMS
Type cbf or vcbf on the command line to access the Configuration-By-Forms or Configuration Manager utility.
Type cbf on the command line to access the Configuration-By-Forms utility.
4. Select dual transaction log.
5. Select Reformat to reestablish dual logging.
This automatically determines which of the log files is valid and copies the contents of the valid log to the newly created log file. After the copy is complete, both log files are marked valid.
6. Restart the installation with the ingstart command.
7. Check that both log files are enabled. You can check the enabled status using either the Configuration-By-Forms (cbf) or Configuration Manager (vcbf) utility.

Resource and Maintenance Issues
6–66 System Administrator Guide
Resource and Maintenance Issues Good performance requires planning and regular maintenance.
Operating System Resources
Make sure your operating system is configured with sufficient resources for Ingres. Insufficient system resources cause poor performance or prevent Ingres from starting.
The following tools can help you identify operating system resource problems:
■ Review the minimum requirements for a basic Ingres installation given in the Getting Started guide. If your particular environment requires more resources, use the Ingres utilities to verify that there are enough resources:
■ System resources can be monitored by some operating system utilities.
UNIX For syntax details, see the UNIX Utilities section in the chapter “Monitoring and Tracing Tools.”
BSD:
■ pstat utility—to display the status of UNIX system tables and system swap space
■ vmstat utility—to display virtual memory status
System V:
■ sar utility—to display activity of various system resources such as CPU utilization, swapping activity, and disk activity
VMS
For syntax details, see the VMS Utilities section in the “Monitoring and Tracing Tools” chapter:
■ show memory—displays the system memory resources and the amount of non-paged dynamic memory (total, free and in use).
■ show process/id=pid/continuous—displays the amount of page faulting, working set, buffered I/O, and direct I/O the server is doing.
■ show device—indicates if a particular disk drive is out of disk space.
■ show device /files—if there is a problem starting an installation, this command can be used to make sure that an Ingres process is not holding on to a mailbox.
■ The installation utility allows the examination of all Ingres installed images, showing the amount of global pages and sections available and used.

Resource and Maintenance Issues
Basic Troubleshooting 6–67
The following VMS tools are very useful for tracing script problems:
■ set verify—allows you to see the commands used in the installation script or any other VMS command procedure.
■ set watch file/class=major (requires CMEXEC VMS privilege)—allows all the files that are being accessed to be displayed. This assists in diagnosing if a location of a file or library is being incorrectly referenced. Use this command when debugging Ingres processes interactively.
Caution! This is an unsupported VMS command. Use at your own risk.
The displays can be turned off with the following command entered at the operating system prompt:
set watch file/class=none
Checking System Resources
Poor performance indicates a system resource issue. Use the procedure in this section if Ingres seems slow or unresponsive for no apparent reason.
1. Connect to your DBMS Server through Ingres monitors:
a. First display the server_number of your DBMS Server using the iinamu utility:
iinamu IINAMU> show ingres
b. Connect to the DBMS Server monitor by typing the command:
iimonitor server_number
c. To see the DBMS Server sessions, at the iimonitor prompt type:
IIMONITOR> show sessions
d. Check the status of the sessions to determine which one is making excessive use of the server. (You can use VDBA to check session status.)
For syntax details, see the sections iimonitor and iinamu in the Command Reference Guide.
2. If repeated “show sessions” commands in iimonitor show that the query session is continually in a CS_EVENT_WAIT (LOCK) state, the problem involves concurrency and locking.
Alternatively, you can use the VDBA Performance Monitor to check for this problem.
a. Select Servers in the left pane of the Performance Monitor.
b. Select INGRES.
c. Select Sessions in the Servers.

Resource and Maintenance Issues
6–68 System Administrator Guide
3. If the session alternates between CS_EVENT_WAIT and CS_COMPUTABLE, this indicates that the query is processing. However, if the query is taking an excessive amount of time, set up a trace on it. For details, see Trace Utilities in the chapter “Monitoring and Tracing Tools.”
a. Interrupt the query that is running:
■ Interactively, use Ctrl+C and wait.
■ In batch or background mode, use the following command to terminate:
Windows In the Task Manager, highlight:
iidbmst End Process
UNIX kill pid
VMS
stop process/id = pid
where the pid is the process ID of the query.
Caution! The command format “stop proc” must be used only as a last resort. Use of this option can cause more problems than it solves.
b. Issue the command set gep.
c. Rerun the query. This outputs a query execution plan.
Alternatively, start an SQL window on the database in VDBA and click the Display Query Execution Plan button to graphically display the query plan.
It is important to note that interrupting a query requires some time because Ingres is optimized to commit rather than back out of transactions. It takes at least as long to back out of a transaction as to process the transaction normally. The transaction must be fully backed out before sessions can resume and locks are freed.
4. It is useful to note whether the query runs differently when called from other Ingres tools. For example, try issuing the same query from:
■ Interactive SQL
■ Embedded SQL
5. Determine if you can access all of the data in the tables in all components of the query.
a. From the Terminal Monitor type:
select count(*) from tablename
This verifies that Ingres can sequentially access every row in the table and indicates that other access paths (secondary indexes, hash pointers, B-Tree page pointers, and so on) can cause the problem. Queries using restrictive where clauses probably are using these secondary access methods.

Before Calling Technical Support
Basic Troubleshooting 6–69
b. Check for permits that apply to this data by typing the following command from the Terminal Monitor:
help permit tablename
c. Check for restrictions that you have placed on this data through the Knowledge Management Extension features, such as database rules. From the Terminal Monitor enter the following query to determine if a table is subject to restrictions imposed by a database rule:
select * from iirules where table_name = ’tablename’
Alternatively, in the right pane of VDBA’s Database Object Manager (DOM) window:
– Select the Databases branch and the desired database
– Select Tables and the desired table_name
– Select Rules
Write down any error messages you receive when performing the above steps.
Before Calling Technical Support If you have worked through the basic installation checks and the sections addressing the problem, and your installation is still not running normally, call Technical Support.
Windows Installations
Gather as much information as possible before calling Technical Support.
■ Save any relevant errors in the errlog.log
■ Save any relevant errors in the iiacp.log
■ Save any relevant errors in the iircp.log
Have the following information available:
■ Your contact ID.
■ Your exact Ingres release.
■ Your exact operating system release. Obtain this with the VER command.
■ The current Ingres installation environment. Use the following command at the operating system prompt:
ingprenv > filename

Before Calling Technical Support
6–70 System Administrator Guide
■ The current user environment. Use the following command at the operating system prompt:
SET > filename
■ A clear description of what you are trying to do.
■ An indication of whether the failure occurs reproducibly.
UNIX Installations
Gather as much information as possible before calling Technical Support.
■ Save any relevant errors in errlog.log
■ Save any relevant errors in iiacp.log
■ Save any relevant errors in iircp.log
Note: If your system is configured for Ingres Grid Option, separate iiacp.log, iircp.log and iicsp.log files will exist for each node with _nodename appended to the log names. All logs for all nodes must be checked for pertinent errors.
Have the following information available:
■ Your Contact ID.
■ Your exact Ingres release. Obtain this with the following command at the operating system prompt:
cat $II_SYSTEM/ingres/version.rel
■ Your exact operating system release. Obtain this with the following command at the operating system prompt:
uname –a
Or:
cat /etc/motd
■ The current Ingres installation environment. Use the following command at the operating system prompt:
ingprenv > filename
■ The current user environment. Use the command:
BSD:
printenv > filename
System V:
env > filename

Before Calling Technical Support
Basic Troubleshooting 6–71
■ A clear description of what you are trying to do
■ An indication of whether the failure occurs reproducibly
VMS Installations
Gather as much information as possible before calling Technical Support. Please have the following information available:
■ Your Contact ID.
■ Your exact Ingres release including any Ingres patches installed. The following header shows the release number in the format nn/nn:
Ingres Alpha Version nn/nnnn (vax.vms/00)
■ Your exact operating system release including any VMS patches installed.
■ The current Ingres installation environment. To create a file type:
define sys$output filename show logical II* show logical *ING*
deassign sys$output
If you have been unsuccessful in recovering an inconsistent database, it is important to save this additional diagnostic information.
– For the transactions in the transaction log file, type:
logstat
– For the state of the database configuration file, type:
infodb dbname
– For copies of the relevant error log files type:
search ERRLOG.LOG date type IIRCP.LOG
(IIRCP.LOG_NODENAME for each node in the cluster, if configured for Ingres Grid Option) where date is the date the database became inconsistent.
After retrieving all the diagnostic information, type:
deassign sys$output
■ A clear description of what you are trying to do when the problem occurs. This includes commands, queries, and so on.
■ An indication of whether the failure occurs reproducibly.

Before Calling Technical Support
6–72 System Administrator Guide
■ Save the information in your error logs. Save any relevant errors in:
– ERRLOG.LOG
– IIACP.LOG (IIACP.LOG_NODENAME for each node in the cluster, if configured for Ingres Grid Option)
– IICSP.LOG_NODENAME for Ingres Grid Option
■ Save DBMS server parameter settings:
II_CONFIG:CONFIG.DAT
■ A copy of any changes that have been made to II_config:config.dat.
If the Configuration-By-Forms (cbf) utility is used to update the configuration file, a copy of all changes are written to II_CONFIG:CONFIG.LOG.
■ Have Dial-In information available (if allowed).

Monitoring and Tracing Tools 7–1
Chapter
7 Monitoring and Tracing Tools
This chapter describes monitoring and tracing tools that help you troubleshoot the Ingres installation.
A number of support tools are available to help you troubleshoot and maintain your installation. In addition to the standard commands and utilities, the support tools include:
■ Special purpose utilities:
– Ingres system utilities
– Operating system utilities
■ Trace utilities:
– Ingres trace utilities
– Operating system trace utilities
Note: You can use Ingres Visual Manager, Visual Performance Monitor, and VCDA to visually monitor and maintain your installation. For additional information about these tools, see the chapter “Managing Your System and Monitoring PerformanceManaging Your System and Monitoring Performance” and online help.
System Utilities Ingres system utilities monitor aspects of the installation for troubleshooting or other special purposes. The system utilities are not needed for normal operation and are generally used with the help and advice of Technical Support. For more information about system utilities see the Command Reference Guide.

System Utilities
7–2 System Administrator Guide
Day-to-day Ingres commands follow:
Command Name Description
cacheutil Shared Buffer Cache Utility
Lists status information on active shared memory segments; can also be used to deallocate an inactive shared memory buffer cache.
Windows ipcclean Shared Memory
Allocation Deallocates shared memory.
UNIX csinstall, cscleanup, ipcclean csreport
Shared Memory Allocation
Allocates, deallocates, and lists status of UNIX shared memory and semaphore resources. Allocation is based on the value assigned II_LG_MEMSIZE.
iimonitor Server Maintenance Utility
Lists DBMS server information; also allows a privileged user to stop the server or an active session.
iinamu Name Server Utility
Lists current servers; also allows a privileged user to add and delete servers.
VMS
iishowres Show Resources Lists shared memory used by the locking and logging system.
lartool Logging, archiving and recovery tool
Allows the system administrator to manually abort or commit a distributed transaction involved in two-phase commit protocol.
lockstat, logstat
Locking, Logging Status
Display information from the locking or logging system. These functions are replaced by the forms-based ipm utility.
rcpconfig Logging/ Locking Configuration
Manipulate log files or shut down the logging/locking systems (RCP module).
ija Logging, archiving, and recovery tool
Allows the system administrator to manually abort or commit a transaction involved in two-phase commit protocol.

Operating System Utilities
Monitoring and Tracing Tools 7–3
Operating System Utilities All operating systems have a variety of monitoring and troubleshooting tools. The essential operating system utilities that must be a routine part of the troubleshooting toolbox are described in the sections below. These utilities are useful to the system administrator.
Your system has a selection of these utilities, but not all of them are supported. To determine which operating system utilities are supported on your system, detailed information on their use, and output formats of your particular display utilities, see your operating system guides.
Windows The following tools can be found in the Administrative Tools program group. Press F1 to get context-sensitive help for any of the tools.
Windows Diagnostics
The Windows Diagnostics program can help you determine your operating system’s configuration.
Performance Monitor
Performance Monitor is a Windows graphical tool for measuring the performance of your own computer or other computers on a network. On each computer, you can view the behavior of objects such as processors, memory, cache, threads, and processes. Each of these objects has an associated set of counters that provide information on such things as device usage, queue lengths, and delays, as well as information used for throughput and internal congestion measurements.
It provides charting, alerting, and reporting capabilities that reflect current activity along with ongoing logging. You can also open log files at a later time for browsing and charting as if they were reflecting current activity.
Event Viewer
Event Viewer is a tool for monitoring events in your system. You can use Event Viewer to view and manage System, Security, and Application event logs.

Operating System Utilities
7–4 System Administrator Guide
Registry Editor
The Registry Editor program is not displayed as an icon on the desktop. To start the Registry Editor, run REGEDT32.EXE from File Manager or Program Manager, or type start REGEDT32 in a command window. The Registry Editor program has a similar view to the File Manager program.
This program can be used to view the system configuration and environment. For a description of how the information is presented and the capabilities of the utility, see the online help.
Task Manager
The Task Manager enables you to monitor and control your computer and what is running on it. It shows you programs and processes that are running as well as performance.
UNIX This section describes a selection of UNIX operating system utilities related to troubleshooting. For a full description of UNIX options, see your UNIX documentation (or online help).
For a detailed description of these utilities, see the Command Reference Guide.
Note: Not all of these utilities are present on every UNIX system. Some are present only in a BSD or System V environment but not both.
ps
Process Status UNIX utility: Gives virtual memory and cpu information on each active process submitted from your account. Here is a sample ps output: PID TT STAT TIME SL RE PAGEIN SIZE RSS LIM %CPU %MEM COMMAND xx06 p3 s 28:50 13 99 45886 3696 2856 xx 0.0 39.3 iidbms xx94 p3 s 4:24 0 99 2899 720 344 xx 0.0 4.7 dmfrcp xx09 p3 I 0.51 99 99 4488 64 184 xx 0.0 2.5 iislave xx19 p3 I 0.57 99 99 5764 64 17 xx 0.0 2.4 iislave xx96 p3 I 0.04 99 99 1852 696 160 xx 0.0 2.2 dmfacp
The display fields are as follows:
Field Description
PID Process ID field
TT Controlling terminal

Operating System Utilities
Monitoring and Tracing Tools 7–5
Field Description
STAT Process status
Runnability of the process: Runnable (r), Stopped (t), Disk or other short-term wait (d), Sleeping (s), or Idle (i)
Swap status: Swapped out (w) or Loaded in core (blank)
Process priority change: Reduced (n), Increased (>) or No change (blank)
SL Sleep time (seconds blocked)
RE Residency time (seconds in core)
PAGEIN Number of disk I/Os resulting from page references not in core
SIZE Virtual process size
RSS Resident set size
LIM Soft memory limit (setrlimit), else “xx”
%CPU CPU utilization (1 minute decaying average)
%MEM Memory utilization
COMMAND Process name
iostat
I/O Statistics UNIX utility: Returns information about I/O status in the UNIX system. It lists statistics on current I/O activity for each disk device and system CPU utilization percentages. Here is a sample iostat output: tty cpu tin tout us ni sy id 1 18 19 0 3 78
/dev/*dsk/c0d*s*/dev/*dsk/cld*s*/dev/*dsk/c2d*s*/dev/*dsk/c4d*s* bps sps msps bps sps msps bps sps msps bps sps msps 2 0.1 61.7 1 0.0 95.5 1 0.0 60.4 2 0.2 44.3
■ The tin and tout display fields show the number of characters written to/from terminal devices.
■ CPU information includes the % time spent in user mode (us), “niced” user mode (ni), system mode (sy), and idle (id).
■ The disk I/O for each disk device shows the average number of blocks transferred per second (bps), average number of seeks per second (sps), and average time per seek in ms (msps).

Operating System Utilities
7–6 System Administrator Guide
pstat (BSD)
Print Statistics UNIX utility: Useful for examining system tables and system swap space.
■ The command /etc/pstat –s, shows system swap space activity. An example output: 589944 used, 667364 free, 61864 wasted avail (num*size): 316*2048 5*1024 6*512 13*256 21*128 38*64 54*32
For a description of the output units, see your operating system guide or online MAN pages. On some machines output is in bytes (as in this example). On others it is in units equal to the machine’s page size.
■ The command /etc/pstat -T gives a list of used and free slots in various system tables.
A sample output: 1717/3216 files 937/2384 inodes 333/1300 processes 266/325 mfiles 595176/1256780 swap
The pstat utility can be used to give other useful information if the user has knowledge of the UNIX kernel. It can tell you, for example, the state of a running process, which files are open, which operating system locks apply and which processes have which files open.
Sar (System V)
System Activity Reporter UNIX utility: Can be used to list CPU utilization statistics, disk and swapping activity, and other status options. The UNIX sar command samples cumulative activity counters in the operating system and reports on various system activities. Just a few of the reports available that are of use for the system administrator are cpu utilization, disk activity, and swapping activity. See examples below.
There are many other options available, including reports on unused memory pages and disk blocks (swap space); and message and semaphore activity. For the system administrator, sar is an indispensable tool.
■ The command sar -u 5, shows cpu utilization output as in the following sample output: 06:38:26 %usr %sys %wio %idle 06:38:31 1 3 96 0
This output shows the portion of cpu time spent running in user mode, system mode, idle with some process waiting for block I/O, or otherwise idle.
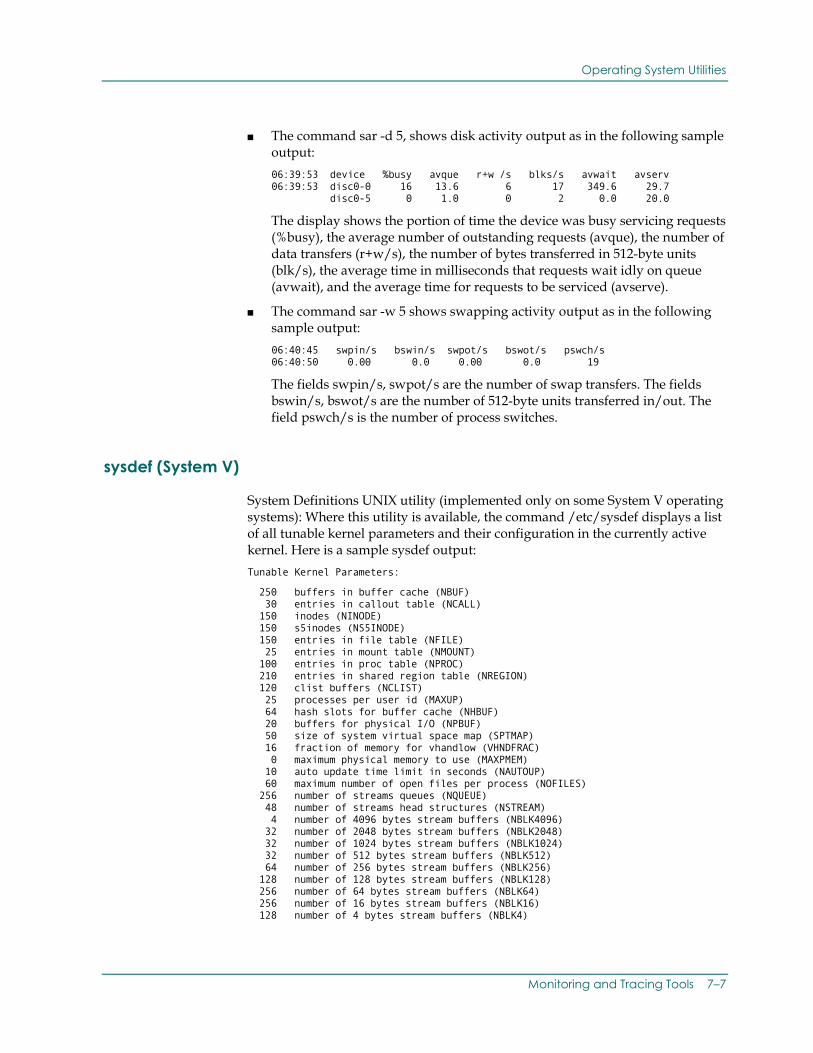
Operating System Utilities
Monitoring and Tracing Tools 7–7
■ The command sar -d 5, shows disk activity output as in the following sample output: 06:39:53 device %busy avque r+w /s blks/s avwait avserv 06:39:53 disc0-0 16 13.6 6 17 349.6 29.7 disc0-5 0 1.0 0 2 0.0 20.0
The display shows the portion of time the device was busy servicing requests (%busy), the average number of outstanding requests (avque), the number of data transfers (r+w/s), the number of bytes transferred in 512-byte units (blk/s), the average time in milliseconds that requests wait idly on queue (avwait), and the average time for requests to be serviced (avserve).
■ The command sar -w 5 shows swapping activity output as in the following sample output: 06:40:45 swpin/s bswin/s swpot/s bswot/s pswch/s 06:40:50 0.00 0.0 0.00 0.0 19
The fields swpin/s, swpot/s are the number of swap transfers. The fields bswin/s, bswot/s are the number of 512-byte units transferred in/out. The field pswch/s is the number of process switches.
sysdef (System V)
System Definitions UNIX utility (implemented only on some System V operating systems): Where this utility is available, the command /etc/sysdef displays a list of all tunable kernel parameters and their configuration in the currently active kernel. Here is a sample sysdef output: Tunable Kernel Parameters:
250 buffers in buffer cache (NBUF) 30 entries in callout table (NCALL) 150 inodes (NINODE) 150 s5inodes (NS5INODE) 150 entries in file table (NFILE) 25 entries in mount table (NMOUNT) 100 entries in proc table (NPROC) 210 entries in shared region table (NREGION) 120 clist buffers (NCLIST) 25 processes per user id (MAXUP) 64 hash slots for buffer cache (NHBUF) 20 buffers for physical I/O (NPBUF) 50 size of system virtual space map (SPTMAP) 16 fraction of memory for vhandlow (VHNDFRAC) 0 maximum physical memory to use (MAXPMEM) 10 auto update time limit in seconds (NAUTOUP) 60 maximum number of open files per process (NOFILES) 256 number of streams queues (NQUEUE) 48 number of streams head structures (NSTREAM) 4 number of 4096 bytes stream buffers (NBLK4096) 32 number of 2048 bytes stream buffers (NBLK2048) 32 number of 1024 bytes stream buffers (NBLK1024) 32 number of 512 bytes stream buffers (NBLK512) 64 number of 256 bytes stream buffers (NBLK256) 128 number of 128 bytes stream buffers (NBLK128) 256 number of 64 bytes stream buffers (NBLK64) 256 number of 16 bytes stream buffers (NBLK16) 128 number of 4 bytes stream buffers (NBLK4)

Operating System Utilities
7–8 System Administrator Guide
2560 maximum size of user’s virtual address space in pages (MAXUMEM) 2560 for package compatibility equal to MAXUMEM (MAXMEM) 25 page stealing low water mark (GPGSLO) 40 page stealing high water mark (GPGSHI) 9 page aging interval (AGEINTERVAL) 1 bdflush run rate (BDFLUSHR) 25 minimum resident memory for avoiding deadlock (MINARMEM) 25 minimum swappable memory for avoiding deadlock (MINASMEM) 1 maximum number of pages swapped out (MAXSC) 1 maximum number of pages saved (MAXFC)
* * Utsname Tunables * 3.2 release (REL) chipmunk node name (NODE) chipmunk system name (SYS) 2 version (VER)
* * Streams Tunables * 87 number of multiplexor links (NMUXLINK) 9 maximum number of pushes allowed (NSTRPUSH) 256 initial number of stream event calls (NSTREVENT) 1 page limit for event cell allocation (MAXSEPGCNT) 4096 maximum stream message size (STRMSGSZ) 1024 max size of ctl part of message (STRCTLSZ) 80 max low priority block usage (STRLOFRAC) 90 max medium priority block usage (STRMEDFRAC)
* * RFS Tunables * 10 entries in server mount table (NSRMOUNT)
* * IPC Messages * 100 entries in msg map (MSGMAP) 2048 max message size (MSGMAX) 4096 max bytes on queue (MSGMNB) 50 message queue identifiers (MSGMNI) 8 message segment size (MSGSSZ) 40 system message headers (MSGTQL) 1024 message segments (MSGSEG) * * IPC Semaphores * 10 entries in semaphore map (SEMMAP) 10 semaphore identifiers (SEMMNI) 60 semaphores in system (SEMMNS) 30 undo structures in system (SEMMNU) 25 max semaphores per id (SEMMSL) 10 max operations per semop call (SEMOPM) 10 max undo entries per process (SEMUME) 32767 semaphore maximum value (SEMVMX) 16384 adjust on exit max value (SEMAEM)

Operating System Utilities
Monitoring and Tracing Tools 7–9
* * IPC Shared Memory * 1048576 max shared memory segment size (SHMMAX) 1 min shared memory segment size (SHMMIN) 100 shared memory identifiers (SHMMNI) 6 max attached shm segments per process (SHMSEG) 512 max in use shared memory (SHMALL) * * File and Record Locking * 100 records configured on system (FLCKREC)
vmstat
Virtual Memory Statistics UNIX utility: Returns virtual memory status information, including process states and paging activity. Here is a sample vmstat output: procs memory page disk faults cpu r b w avm fre di re rd pi po de z0 z1 z2 z3 in sy cs us sy id 1 0 0 2536 456 24 2 1 4 0 0 1 1 0 1 24 475 23 4 6 91 0 0 0 2748 356 24 0 0 0 0 0 2 0 0 3 26 323 29 1 5 95 0 0 0 1044 344 24 0 0 0 0 0 0 0 0 0 16 216 18 0 3 97 0 0 0 2288 344 24 0 0 0 0 0 0 0 0 0 19 334 27 1 4 95 1 0 0 2372 332 24 0 0 4 0 0 0 0 0 1 28 552 40 1 6 93
The procs columns define the process states: in run queue (r), blocked for resources (b), and runnable or short sleeper (w). The memory columns show virtual and real memory status: avm is active virtual pages (belonging to processes active in approximately the last 20 seconds), fre is size of the free list, and di is the number of dirty pages. The page columns show page faults and paging activity. These are expressed in units per second, averaged over 5 seconds: re are page reclaims, rd are page reclaims from the dirty list, and pi, po are pages paged in/out. The de field is anticipated short-term memory shortfall. The disk columns list disk activity, showing the device name and operations per second.
VMS
This section describes a selection of VMS operating system utilities related to troubleshooting.
Note: VMS utilities vary depending on the operating system release. For detailed information on utilities supported by your system, see your operating system guides (or online help).
help
VMS online help facility: Provides information on the specified command. The syntax is help command.

Operating System Utilities
7–10 System Administrator Guide
monitor
VMS monitor utility: Returns dynamic information about VMS system performance for a specified component. Some of the most useful components to monitor are:
■ monitor system—monitors system statistics
■ monitor process/topcpu—monitors the process currently using the most CPU
■ monitor process/topdio—monitors the processes that use the most disk I/O
■ monitor process/topbio—monitors the processes that use the most buffered I/O
■ monitor process/topfault—monitors the processes that cause the most page faults
■ monitor pool—monitors non-paged pool statistics
show
VMS show utility: Returns process and other VMS system status information on a specified component. Qualifiers (/qualifier) are used on certain components, as shown in the examples that follow. Some useful forms of the VMS show command appear in the following list.
■ show system or show system/full—displays status information about current processes. The sample output shows the following: date and time stamp process ID number process name and identification with UIC processing state priority total process I/O cumulative cpu time used cumulative page faults amount of physical memory being used type of process
VAX/VMS V6.0 on node FOO 9-FEB-2001 09:34:17.48 Uptime 13 13:46:12 Pid Process Name State Pri I/O CPU Page flts Ph.Mem 00205374 DMFRCPBE HIB 6 6270 0 00:00:15.71 2756 4280 00202F75 DMFACPBE HIB 5 934 0 00:00:57.09 1115 2302 00204376 II_GCNBE HIB 6 667 0 00:00:03.15 782 1363 00202B77 II_GCC_BE_2B77 HIB 5 142 0 00:00:02.15 664 1549 00205578 II_DBMS_BE_5578 HIB 5 38540 0 00:04:31.58 9390 13903 002002C3 DMFCSPBE HIB 5 71071 0 00:00:22.27 399 173
■ show system /out = filename—outputs to a file. This provides a record of the current status.

Operating System Utilities
Monitoring and Tracing Tools 7–11
■ show process—displays information about a process and subprocesses. This command requires the GROUP privilege to show other processes in the same group or the WORLD privilege to show processes outside your group. If no qualifier is entered, only a basic subset of information is displayed: date and time stamp process terminal user name and UIC node name process name and process identification priority default directory allocated devices
Some of the show process qualifiers you can use are:
/memory—displays the process’ use of dynamic memory areas. This qualifier is allowed only for the current process.
/quotas—displays, for each resource, a quota or a limit. The quota values reflect any quota reductions resulting from subprocess creation. Limit values reflect the resources available to a process at creation.
/priv—displays current privileges for the process.
■ show cluster—monitors and displays cluster activity and performance.
■ show cpu—displays the current state of the processors in a VMS multiprocessing system. This command requires a change of mode to the kernel (CMKRNL) privilege.
The show cpu qualifiers are:
/all—selects all configured processors, active or inactive, as the subject of the display.
/full—produces information from the summary display and also lists the current CPU state, current process (if any), revision levels, and capabilities for each configured processor. The display indicates which processes can execute only on certain processors in the configuration.
■ show device—displays the status of a device on the system. You can use the following show device qualifiers:
/allocate—displays all devices currently allocated to processes.
/file—shows all open files on the device, together with the process name and the process ID that opened the file.
/mounted—displays all devices currently having volumes mounted.
■ show logical /full—displays all logical names in one or more logical name tables, or displays the current equivalence strings assigned to specified logical names, with iterative translations.
■ show memory /full—displays status information on VMS system tables and system swap space.

Vendor Utilities
7–12 System Administrator Guide
■ show symbol—displays the current value of a local or global symbol. Ingres symbols are defined by running the following:
– II_SYSTEM:[INGRES.UTILITY]INGSYSDEF.COM
Defines Ingres system administration, DBA, and user symbols.
– II_SYSTEM:[INGRES.UTILITY]INGDBADEF.COM
Defines Ingres DBA and user symbols.
– II_SYSTEM:[INGRES.UTILITY]INGUSRDEF.COM
Defines Ingres user symbols.
■ show users—displays status information on current users.
■ show working_set—displays the working set limit, quota, and extent assigned to the current process.
sysgen
VMS sysgen utility: Displays system configuration parameters. To run this utility, execute the following command at the operating system prompt: run sys$system:sysgen
For a full description of the system definitions, see your VMS System manual.
Vendor Utilities Many vendors also provide monitor utilities. These often present a more user-friendly interface than the generic utilities mentioned above. Check your operating system documentation for availability of these useful vendor-specific utilities.
Error Messages This section is provided as an aid to understanding error messages that you can encounter while running Ingres.
For the method of checking the error log files, see Check the Error Log Files in the chapter “Basic Troubleshooting.”

Error Messages
Monitoring and Tracing Tools 7–13
Error Message Format
Messages consist of a three-part error code and accompanying message text. The code segment has the format:
E_FCxxxx_msg message text
The message codes are described in the following table:
Message Description
E_ , I_, or W_ E_ (error message), I_(informational message), or W_ (warning message).
FC Two-letter Facility Code. The facility codes are listed in the section Ingres Facility Codes.
xxxx 4-digit hexadecimal number that represents the value returned to the application for use in error handling. The 2-letter facility code combined with the 4-digit hexadecimal number uniquely identifies this error code.
_msg “msg” is an abbreviated message text or decimal number. As a decimal, it is always equivalent in value to the preceding hexadecimal number.
An expanded message text appears on the next line.
Message Help Files
Help is available online to aid in reading error messages.
The error messages are stored in a single file messages.txt in the directory:
Windows %II_SYSTEM%\ingres\files\english\messages\messages.txt
UNIX $II_SYSTEM/ingres/files/english/messages/messages.txt
VMS
II_SYSTEM:[INGRES.FILES.ENGLISH.MESSAGES]MESSAGES.TXT

Error Messages
7–14 System Administrator Guide
Types of Error Messages
Error messages can be fatal or non-fatal.
Non-Fatal Errors
Non-fatal errors are diagnostic indications of user errors, usually in application development. For example, a non-fatal error code is returned when a user attempts to destroy a non-existent table. These errors are not severe and do not halt the user program or Ingres. User applications can choose to print or suppress these errors.
Fatal Errors
Fatal errors are those errors that require correction before Ingres can proceed with the program. All errors, including fatal errors, are recoverable.
Fatal errors occur in the following categories:
■ Ingres tools, such as QBF or ABF
■ Ingres server errors
– Environmental OS/hardware limits and problems
– A command limit is reached, for example, exceeding the maximum number of aggregates in a query
– System software error
To remove the cause of a fatal error, use the troubleshooting techniques in the chapter “Basic Troubleshooting.”
Facility Codes
In the tables below, the Facility Code column shows the two characters that appear in error messages generated by that facility.
For example, the Abstract Data Type Facility has a facility code of AD so error messages generated by this facility have an error message format of: E_ADxxxx_msg
These tables are helpful when interpreting error messages returned from Ingres or from user programs that access Ingres. Error messages often include an explicit reference to which internal Ingres function returned the error. A list of these modules and their functions can help you identify the source of errors requiring troubleshooting.

Error Messages
Monitoring and Tracing Tools 7–15
Primary Components
The facility codes for the primary Ingres components, such as the DBMS Server and General Communications Facility, are shown in the following table:
Facility Code Facility
AD Abstract Data Type Facility (ADF)
DM Data Manipulation Facility (DMF)
DU Database Utility Facility (DUF)
GC All GCF General Communication Facilities, including:
■ Communications Server (GCC)
■ General Communications Area (GCA)
■ Name Server (GCN)
OP Optimizer Facility (OPF)
PS Parser Facility (PSF)
QE Query Execution Facility (QEF)
QS Query Storage Facility (QSF)
RD Relation Description Facility (RDF)
SC System Control Facility (SCF)
US User Errors
Server-Only Components
Server-only components are shown in the following table. The server-only components are mostly DMF routines. The facilities listed in the following table are all subcomponents for Compatibility Library (CL) and do not appear in the facility-code part of an error message. All messages involving these facilities start with E_CL, and usually contain the two-letter facility code in the abbreviated message part of the error text.
Facility Code Name Description Used By
CS Central System Control of server SCF, Utilities
DI Database I/O Access to Database files (different from SI)
DMF, Utilities
JF Journal Files Access to Journal files (different from DI)
DMF, Utilities

Error Messages
7–16 System Administrator Guide
Facility Code Name Description Used By
LG Logging Server logging (transaction log)
DMF
LK Locking DBMS data locking DMF, Utilities
SR Sorting Sorting for queries DMF
TR Tracing DBMS event tracing Server components
Tools-Only Components
The Ingres Tools-only components are shown in the following table:
Facility Code Name Description Used By
AR ABF Runtime Application-By-Forms runtime component
ABF
DY Dynamic Utilities
Dynamic linking ABF
OL 4GL Support Produce Ingres 4GL object code
ABF
PC Process Control
Fork, sleep, exit, and so forth
Tools components
PE Permissions Object access authority Tools components
TE Terminal Driver
Terminal I/O Tools terminal driver
UT Utility Invocation
Compile, link, call, print, and so forth
Tools components
Stream File Management
Ingres components for stream file management are shown in the following table. The facilities listed below are all subcomponents for Compatibility Library (CL ) and do not appear in the facility-code part of an error message. All messages involving these facilities start with E_CL, and usually contain the two-letter facility code in the abbreviated message part of the error text.
Facility Code Name Description Used By
CP Switch protections
Special-purpose file permissions handling
auditdb
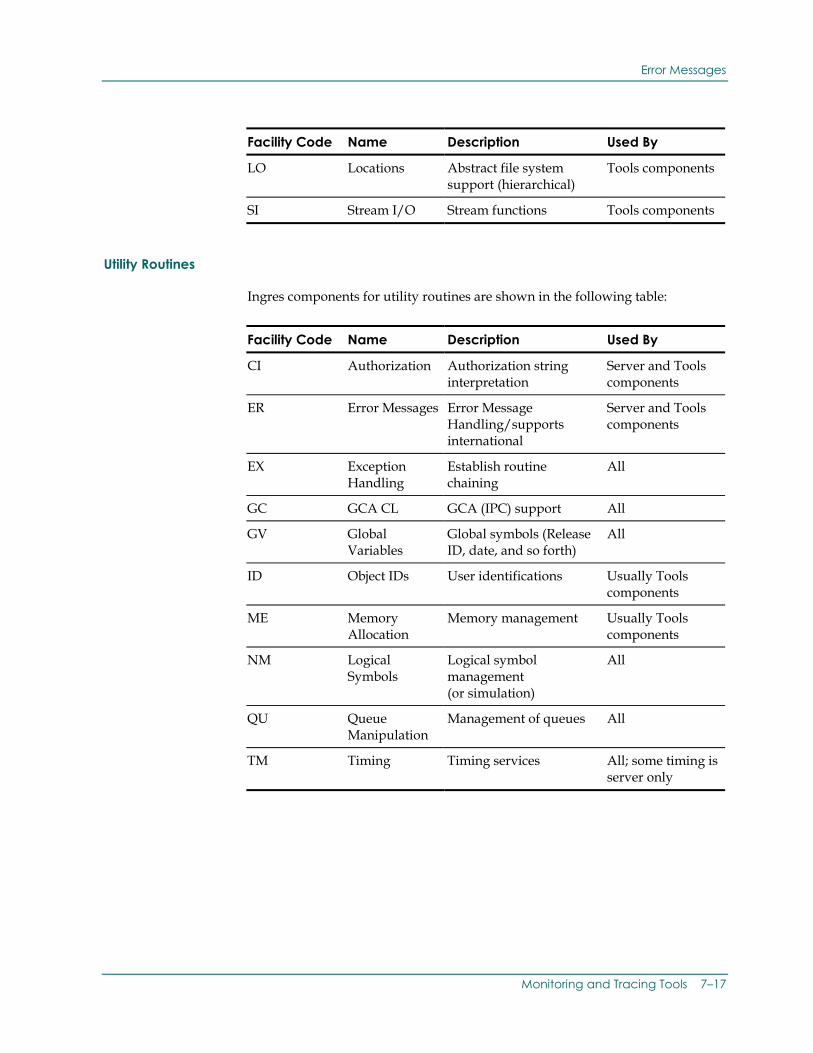
Error Messages
Monitoring and Tracing Tools 7–17
Facility Code Name Description Used By
LO Locations Abstract file system support (hierarchical)
Tools components
SI Stream I/O Stream functions Tools components
Utility Routines
Ingres components for utility routines are shown in the following table:
Facility Code Name Description Used By
CI Authorization Authorization string interpretation
Server and Tools components
ER Error Messages Error Message Handling/supports international
Server and Tools components
EX Exception Handling
Establish routine chaining
All
GC GCA CL GCA (IPC) support All
GV Global Variables
Global symbols (Release ID, date, and so forth)
All
ID Object IDs User identifications Usually Tools components
ME Memory Allocation
Memory management Usually Tools components
NM Logical Symbols
Logical symbol management (or simulation)
All
QU Queue Manipulation
Management of queues All
TM Timing Timing services All; some timing is server only

Error Messages
7–18 System Administrator Guide
Miscellaneous Components
Miscellaneous components are shown in the following table:
Facility Code Name Description Used By
BT Bit Manipulation
Utility routines to test, set, clear bits
All
CM Character Manipulation
Character handling and for Kanji support
All
CV Conversion Convert internal representations All
MH Math Functions (tan, ln, log, exp, and so forth)
All
ST String Handling Utilities for string operations All
Log Files
Ingres maintains log files to which it writes information about the installation activities.
Transaction Log File
Each installation has a transaction log file, and an optional dual log file. The log file holds information about all open transactions and is used to recover active databases after a system failure. Optionally, you can change its size and number of partitions at startup.
UNIX The UNIX log file can be created as a raw partition or a number of raw partitions.
Error Log
The main error log is a readable text file that you can use for troubleshooting. The error log is maintained in the following file:
Windows %II_SYSTEM%\INGRES\FILES\ERRLOG.LOG
UNIX $II_SYSTEM/ingres/files/errlog.log
VMS
II_SYSTEM:[INGRES.FILES]ERRLOG.LOG

Error Messages
Monitoring and Tracing Tools 7–19
Messages about the installation are appended to this log with the date and time at which the error occurred. This is generally the first place to look when troubleshooting a problem.
The error log contains the following information:
■ Error messages
■ Warning messages
■ Archiver shutdown
■ DBMS server start up and shutdown
The system administrator maintains the error log file. The file continues to grow until manually truncated. The installation must be shut down before truncating or removing the errlog.log file.
Archiver Log
The archiver log contains information about the current archiver process in the following file:
Windows %II_SYSTEM%\INGRES\FILES\IIACP.LOG
UNIX $II_SYSTEM/ingres/files/iiacp.log
VMS
II_SYSTEM:[INGRES.FILES]IIACP.LOG
This file is appended to when the archiver process starts. The log contains the following information:
■ archiver start up
■ archiver error messages
■ archiver warning messages
Recovery Log
The recovery (dmfrcp) log contains information about the current recovery process in the following file:
Windows %II_SYSTEM%\INGRES\FILES\IIRCP.LOG
UNIX $II_SYSTEM/ingres/files/iircp.log
VMS
II_SYSTEM:[INGRES.FILES]IIRCP.LOG

Error Messages
7–20 System Administrator Guide
This file is appended to when the recovery process starts. The log contains the following information:
■ Current logging and locking parameter values
■ Recovery process error messages
■ Recovery process warning messages
■ Recovery operations information
The recovery log must be monitored if you are unable to connect to Ingres and suspect that the DBMS Server is in recovery mode.
Cluster Service Process Log
The cluster service process (on Ingres Grid Option installations only) log maintains information about the cluster service process (CSP). A new version of this file is written each time the CSP is started.
The CSP log file contains information on the following:
■ Archiving and recovery messages
■ Node information
You must monitor the CSP log if problems arise with node logging or locking.
Primary Configuration Log Files
Ingres maintains transcripts of various configuration operations. Configuration log files that are useful are given in the table below. These files are in the directory indicated by II_CONFIG:
Log File Name Description
config.log Contains a log of the changes made with the Configuration Manager (vcbf) and Configuration-By-Forms (cbf) utilities.
rcpconfig.log Contains log and error information of the last time rcpconfig was run. This information relates to reconfiguration, shutdown, or initial installation.

Error Messages
Monitoring and Tracing Tools 7–21
Optional Configuration Log Files
Configuration log files that are optionally maintained are given in the following table. These files, if present, are in the directory indicated by II_CONFIG:
Log File Name Description
iilink.log This log is used only in conjunction with the Object Management Extension. The file contains a log of the last time the iilink command was run. For details on the iilink command, see the Object Management Extension User Guide.
iivdb.log Contains a transcript of the last time verifydb was used to diagnose or attempt recovery of a damaged or inconsistent database. This file is created the first time verifydb is run.
lartool.log Contains a transcript, with any errors, of the last time lartool was used to manually abort or commit a running transaction. This file is created the first time lartool is run.
Other Optional Log Files
The following types of optional log files are present on your installation:
■ Individual process logs. For the following processes you can set up a separate log file to isolate the error messages relating to that process:
– DBMS
– GCC
You normally do this only for a specific troubleshooting purpose. The default is that these messages are sent to the errlog.log. If you define one of these separate error logs, all messages are sent to both that file and errlog.log.
■ Trace log for tracking messages at a greater level of detail
■ Log for an optional Ingres facility

Error Messages
7–22 System Administrator Guide
These optional log and trace log files can be established by setting the associated Ingres variables:
Log File Name Description
DBMS error log The DBMS error log, optionally defined as a separate file.
This log file is established by setting the Ingres variable II_DBMS_LOG to a user file name For additional information, see the appendix “Environment Variables/Logicals.” The default is all DBMS server errors and messages are sent to errlog.log.
GCC error log The GCC error log, for installations using Ingres Net. This is in a user-defined file.
This log file is established by setting II_GCCxx_LOG to the full name of a file. The error logging level is specified by II_GCCxx_LOG_LVL. These Ingres environment variables/logicals are listed in the appendix “Environment Variables/Logicals.”
GCC trace log The GCC trace log is set up for specific troubleshooting efforts. You set II_GCA_LOG to a user file name. The associated Ingres variable II_GCC_TRACE defines the level of tracing. These Ingres environment variables/logicals are listed in the appendix “Environment Variables/Logicals.” For details on using a GCC trace, see Tracing User-Server Communications in this chapter.
Star error log The Star error log for installations running Ingres Distributed Option, if defined.
This log file is established by setting the Ingres variable II_STAR_LOG to a user file name. For additional information, see the appendix “Environment Variables/Logicals.” The default is all Distributed Option errors and messages are sent to errlog.log.

Trace Utilities
Monitoring and Tracing Tools 7–23
Trace Utilities Commands are available to trace such things as disk file access, locks, user interface-to-DBMS server communications, query plans of the Ingres Query Optimizer and various types of memory usage. For more information on tracing, see the Database Administrator Guide.
DBMS server tracing is generally enabled by some form of the set command, although some forms of tracing make use of Ingres environment variables/logicals. Set commands used specifically for debugging and troubleshooting are discussed in this document. More general set commands are documented in the SQL Reference Guide.
ODBC Call-level Interface
The Ingres ODBC Call-level Interface (CLI) follows the existing convention of ODBC tracing as performed by the UNIX ODBC Driver Manager and Microsoft ODBC Driver Manager. Registry or configuration files are scanned for trace and trace log settings. Tracing output is similar to what is currently provided by the Ingres ODBC tracing DLL on Windows. Optionally, an application can set standard ODBC tracing using the following Ingres environment variables:
■ II_ODBC_LOG – a string indicating the path and file name of an ODBC trace file. For example, the path and file name of an ODBC trace file for UNIX and Linux is \tmp\odbc.log and for Windows is c:\temp\odbc.log.
■ II_ODBC_TRACE – a positive integer with a value of 1, 3, or 5. A setting of 1 provides standard ODBC tracing and is the most useful for debugging ODBC CLI applications. A setting of 3 includes ODBC function entry calls in the Ingres ODBC driver (as opposed to the ODBC CLI driver manager). A setting of 5 displays information about internal function entries in the Ingres ODBC driver.
If an ODBC application does not use the Ingres ODBC CLI, the ODBC trace settings of 3 and 5 are still recognized, but the setting of 1, which belongs to the driver manager component, is not. However, the existing tracing capability for third-party driver managers is unaffected. In this case, the driver manager tracing is written to the ODBC trace log as specified in the registry (Windows) or odbcinst.ini file (UNIX and Linux), but the detailed tracing information is written to the log file as specified by the II_ODBC_LOG environment variable.

Trace Utilities
7–24 System Administrator Guide
Set Statement
The set statement is used to specify a number of runtime options and has the general format:
set [no]option [additional parameters];
The option is set on or active by set option or set option on (depending on the option). It is turned off by a corresponding set nooption or set option off. Additional parameters are required, depending on the option. For a detailed syntax description of the set statement, see the SQL Reference Guide.
Environment Variables/Logicals Commonly Used with Set
Set statements are executed as part of query language startup procedures at selected levels of scope. A set statement is entered directly at a terminal for temporary settings or executed using an Ingres environment variable/logical to establish a default option setting for all users. Several levels are shown in the following table:
Where Specified Scope of Effect
ING_SYSTEM_SET Executed whenever Ingres is started up, affecting all users
ING_SET Executed whenever any Ingres tool connects to a server
ING_SET_DBNAME Affects only Ingres tools starting up on the specified database
II_EMBED_SET Similar to ING_SET, but diagnostic output is to a file
set statement entered directly
In effect until changed by a subsequent set statement for the option. This occurs by another direct set statement or using any of the Ingres environment variables/logicals above reestablishing the default.
Direct Set Example
One or more set options can be specified using the _SET environment Ingres environment variables/logicals. They can be assigned directly from the operating system shell. Separate multiple set statements by semicolons (up to a limit of 64 characters), as shown in the following example:
Windows SET ING_SET=set nojournaling;set printqry

Trace Utilities
Monitoring and Tracing Tools 7–25
UNIX C shell:
setenv ING_SET "set nojournaling; set printqry"
Bourne shell:
ING_SET = "set nojournaling; set printqry" export ING_SET
VMS
DEFINE ING_SET "SET NOJOURNALING; SET PRINTQRY"
Set Example Using an Include File
Set statements can also be implemented by means of an include statement. The include statement allows you to place the set statements in a file and specify the file name in the setenv (or equivalent) command. Use of the include option also avoids the 64-character line limit. For example:
Windows set ING_SET=include c:\extra\ingres\set.ing
UNIX C shell:
setenv ING_SET "include /extra/ingres/set.ing"
Bourne shell:
ING_SET = "include /extra/ingres/set.ing" export ING_SET
VMS
DEFINE ING_SET - "INCLUDE DUA0:[EXTRA.INGRES]SET.ING"
The file set.ing includes the following statements: set autocommit on; set lockmode on mastertable where level = page, maxlocks = 10;
Set Statements in Startup Files
Set statements are automatically executed as part of query processor start up. Various startup defaults are enabled either by setting an Ingres environment variable/logical (such as ING_SET or II_EMBED_SET described above) or by including these set statements in one of the query processor startup files.

Trace Utilities
7–26 System Administrator Guide
For an alphabetical listing of Ingres environment variables/logicals, see the appendix “Environment Variables/Logicals.”
Set Options for Tracing Queries
Set options of special interest in query troubleshooting include:
[no]printqry: Set query display on or off.
[no]qep: Set query execution plan display on or off.
joinop [no]timeout: Set optimizer timeout on or off.
These are discussed in the following sections.
Set Printqry Option
The command set printqry prints out the query before it is optimized and executed. This is especially useful when evaluating queries for performance tuning or troubleshooting.
Printqry Example with ING_SET
The following command turns query display on:
Windows SET ING_SET=set printqry
UNIX C shell:
setenv ING_SET "set printqry"
Bourne shell:
ING_SET = "set printqry" export ING_SET
VMS
DEFINE ING_SET "SET PRINTQRY"

Trace Utilities
Monitoring and Tracing Tools 7–27
As an example, assume that QBF is started up. The following is displayed: Query Buffer: set Autocommit on Query Parameters: Query Buffer: select cap_value, cap_capability from iidbcapabilities Query Parameters: Query Buffer: select user_name, dba_name from iidbconstants Query Parameters:
Printqry Example with II_EMBED_SET
The following command turns query display on through II_EMBED_SET. This is similar to the ING_SET environment variable/logical. All information is gathered in the client application and printed to the log by the library routines linked to the client application:
Windows SET II_EMBED_SET=printqry
UNIX C shell:
setenv II_EMBED_SET "printqry"
Bourne shell:
II_EMBED_SET = "printqry" export II_EMBED_SET
VMS
DEFINE II_EMBED_SET "PRINTQRY"
The query output with query timings is placed into a file called iiprtqry.log. Here is a sample output: Query text: select * from iirelation Query Send Time: Thu Mar 26 17:20:43 2001 Query Response Time: Thu Mar 26 17:20:44 2001 Response CPU Time: 2630 Qry End CPU Time: 3370
This type of query monitoring can be useful for spotting slow-running queries in applications.
Set QEP Option
Set qep provides a display of the optimizer’s query execution plan (QEP) for the query after it has been optimized but before it is executed.

Trace Utilities
7–28 System Administrator Guide
The following command turns QEP display on as the default ING_SET level:
Windows SET ING_SET=set qep
UNIX C shell:
setenv ING_SET "set qep"
Bourne shell:
ING_SET = "set qep" export ING_SET
VMS
DEFINE ING_SET "SET QEP"
The Ingres Query Optimizer and QEPs are described in detail in the Database Administrator Guide.
Set Joinop Notimeout Option
Set joinop notimeout can be used in tracing query performance. This statement turns the optimizer timeout feature off. With timeout on, the optimizer stops checking for further query execution plans when it believes that the best plan it has found takes less time to execute than the amount of time already spent searching for a plan. If you issue a set joinop notimeout statement, the optimizer continues searching query plans. This option is often used with the set qep option to ensure that the optimizer is picking the best possible query plan.
Canceling Set Options
To cancel any of these options that have been set, you issue the opposite set statement (set nooption to turn an option off or set option in the case of joinop notimeout to restore the default behavior).
The Set Session with On_Error Option
The following set statement enables you to specify how transaction errors are handled in the current session:
set session with on_error = rollback statement| transaction
To direct Ingres to roll back the effects of the entire current transaction if an error occurs, specify rollback transaction. To direct Ingres to roll back only the current statement (the default), specify rollback statement. To determine the current status of transaction error handling, issue the select dbmsinfo(’on_error_state’) statement.

Trace Utilities
Monitoring and Tracing Tools 7–29
Specifying rollback transaction reduces logging overhead, and help performance; the performance gain is offset by the fact that, if an error occurs, the entire transaction is rolled back, not the single statement that caused the error.
The following errors always roll back the current transaction, regardless of the current transaction error-handling setting:
■ Deadlock
■ Forced abort
■ Lock quota exceeded
To determine if a transaction was aborted as the result of a database statement error, issue the statement select dbmsinfo(’on_error_state’). If the error aborted the transaction, this statement returns 0, indicating that the application is currently not in a transaction.
You cannot issue the set session with on_error statement from within a database procedure or multi-statement transaction.
Tracing I/O
The set option io_trace prints out information about disk I/O during the life of each query.
The following command turns I/O trace on as the default ING_SET level:
Windows SET ING_SET=set io_trace
UNIX C shell:
Setenv ING_SET "set io_trace"
Bourne shell:
ING_SET = "set io_trace" export ING_SET
VMS
DEFINE ING_SET "SET IO_TRACE"
For example, given the query: select * from iirelation;

Trace Utilities
7–30 System Administrator Guide
Here is a sample output from the I/O trace. The counts are the number of pages read/written: *************************************************************** I/O READ File: aaaaaaac.t00 (iidbdb, iirel_idx, 13) count:1 *************************************************************** *************************************************************** I/O READ File: aaaaaaab.t00 (iidbdb, iirelation, 0) count:8 *************************************************************** *************************************************************** I/O READ File: aaaaaaab.t00 (iidbdb, iirelation, 8) count:8 *************************************************************** I/O READ File: aaaaaaab.t00 (iidbdb, iirelation, 16) count:7
Tracing Locks
Set lock_trace prints out information about locks within a transaction.
The following command turns lock tracing on as the default ING_SET level:
Windows set ING_SET=set lock_trace
UNIX C shell:
setenv ING_SET "set lock_trace"
Bourne shell:
ING_SET = "set lock_trace"export ING_SET
VMS
DEFINE ING_SET "SET LOCK_TRACE"
Tracing Events
The following features enable your application to display and trace events:
To enable or disable the display of event trace information for an application when it raises an event, use the following command:
set [no]printdbevents
To enable the display of events as they are raised by the application, specify set printdbevents. To disable the display of events, specify set noprintdbevents.
To enable or disable the logging of raised events to the installation log file, use the following statement:
set [no]logdbevents

Trace Utilities
Monitoring and Tracing Tools 7–31
To enable the logging of events as they are raised by the application, specify set logdbevents. To disable the logging of events, specify set nologdbevents.
To enable or disable the display of events as they are received by an application, use the following statement:
set_sql(dbeventdisplay = 1 | 0)
Specify a value of 1 to enable the display of received events, or 0 to disable the display of received events. You can also enable this feature using II_EMBED_SET.
You can create a routine that traps all events returned to an embedded SQL application. To enable/disable an event-handling routine or function, your embedded SQL application must issue the following set_sql statement:
exec sql set_sql(dbeventhandler = event_routine | 0)
To trap events to your event-handling routine, specify event_routine as a pointer to your error-handling function. For information about specifying pointers to functions, see your host language companion guide. In addition to issuing the set_sql statement, you must create the event-handling routine, declare it, and link it with your application.
Tracing User-Server Communications
The General Communication Facility (GCF) is composed of the GCA protocol and three communications programs: the Name Server, Communications Server, and Data Access Server. These are separate processes. You can listen in on the communications between these GCF programs using the following Ingres environment variables/logicals:
■ II_EMBED_SET “printgca”
■ II_GCA_TRACE
■ II_GCN_TRACE
■ II_GCC_TRACE
■ II_GCD_TRACE
■ II_GC_TRACE
■ II_GCCCL_TRACE
■ II_GCA_LOG

Trace Utilities
7–32 System Administrator Guide
Tracing with printgca
You can trace communications occurring in the GCA with the following command:
Windows set II_EMBED_SET=printgca
UNIX C shell:
setenv II_EMBED_SET "printgca" Bourne shell:
II_EMBED_SET = "printgca" export II_EMBED_SET
VMS
DEFINE II_EMBED_SET "PRINTGCA"
This traces all GCA messages passed between Ingres tools and the server. The output is placed into a file called iiprtgca.log.
Here is a sample output: printgca = on session -2 (Thu Mar 26 15:50:32 2001) GCA Service GCA_SEND gca_association_id: 0 gca_message_type: GCA_QUERY gca_data_length: 49 gca_end_of_data: TRUE gca_data_area: GCA_Q_DATA gca_language_id: 2 gca_query_modifier: 0x01 gca_qddata [0]: gca_type: 51: DB_QTXT_TYPE gca_precision: 0 gca_1_value: 29 gca_value: select name, gid from iiuser End of GCA Message
GCA Service: GCA_RECEIVE gca_association_id: 0 gca_message_type: GCA_TDESCR gca_data_length: 55 gca_end_of_data: TRUE gca_data_area: GCA_TD_DATA gca_tsize: 26 gca_result_modifier: 0x01 gca_id_tdscr: 8 gca_1_col_desc: 2 gca_col_desc[0]: gca_attdbv: db_data: 0x00

Trace Utilities
Monitoring and Tracing Tools 7–33
db_length: 24 db_datatype: 20: DB_CHA_TYPE db_prec: 0 gca_1_attname: 4 gca_attname: (4) name gca_col_desc[1] gca_attdbv: db_data: 0x00 db_length: 2 db_datatype: 30: DB_INT_TYPE db_prec: 0 gca_1_attname: 3 gca_attname: (3) gid
End of GCA Message
GCA Service: GCA_RECEIVE gca_association_id: 0 gca_message_type: GCA_TUPLES gca_data_length: 338 gca_end_of_data: TRUE gca_data_area: GCA_TU_DATA not traced End of GCA Message
Using II_GCx_TRACE and II_GCA_LOG
The II_GCx_TRACE and II_GCA_LOG environment variables/logicals can be used for alternative GCA tracing. The following communications can be traced:
Environment Variable/ Logical Item Traced
II_GCA_TRACE General Communications Architecture (GCA)
II_GCN_TRACE Name Server (GCN)
II_GCC_TRACE Communications Server (GCC)
II_GCD_TRACE Data Access Server (GCD)
II_GC_TRACE GCA Compatibility Library
VMS
II_GCCCL_TRACE GCC Compatibility Library (Protocol drivers)
Not all protocol drivers have tracing.
For additional information on trace logs dedicated to the GCN, GCC and GCD processes, see the chapter “Setting Environment Variables/Logicals” and the appendix “Environment Variables/Logicals.”
Here are example formats for setting any of these traces:

Trace Utilities
7–34 System Administrator Guide
Windows SET II_GCA_TRACE=[n] SET II_GCA_LOG=[filename]
UNIX C shell: setenv II_GCA_TRACE [n] setenv II_GCA_LOG [stdio|filename]
Bourne shell:
setenv II_GCA_TRACE [n] export II_GCA_TRACE setenv II_GCA_LOG [stdio|filename] export II_GCA_LOG
VMS
define II_GCA_TRACE [n] define II_GCA_LOG [filename]
II_GCx_TRACE defines the level of GCA tracing, with n = 1 (lowest) through 4 (most detailed). II_GCA_LOG names the destination file of the trace output. If not specified, it defaults to standard output.
Here is an example of level 2 tracing: !GCcm: target_id: 9062 !GCrequest 0: connecting on 9062 !GC_exchange 0: status 00000000 !GC_exchange_sm 0: status 00000000 state 0 !GCsend 0: send 528 !GC_send_comp 0: sent 528 status 00000000 !GC_exchange_sm 0: status 00000000 state 1 !GCreceive 0: want 528 !GC_recv_colmp 0: status 000000 state 0 !GCsend 0: send 65 !GC_send_comp 0: sent 65 status 00000000 !GCreceive 0: want 24

UNIX Trace Facilities
Monitoring and Tracing Tools 7–35
UNIX Trace Facilities This section describes miscellaneous trace facilities of the UNIX operating system that are useful in troubleshooting.
Tracing Shell Script Problems in UNIX
Invoking a Bourne shell with the -x option causes each shell command to be printed before it is executed. This is especially useful for diagnosing problems with installation shell scripts.
To use this trace on the Ingres shutdown script, call the Bourne shell (or Korn shell) with the -x option, passing the name ingstop as the script to be executed:
sh -x ingstop
This option can only be used with UNIX shell scripts, not with binary executables. If you are in doubt as to whether a program or command is a binary or shell script, type:
file program_name
UNIX replies with “commands text,” “ASCII text,” or “executable shell script” if it is an executable shell script. Otherwise the file command returns a message specific to your machine—something like demand paged executable and possibly the designated chip on which it was compiled to run.
UNIX Trace Command
Some UNIX platforms (such as Sun) provide a facility to trace system calls as they are made by a process. To invoke it, enter the following command at the operating system prompt:
trace

UNIX Trace Facilities
7–36 System Administrator Guide
Creating an Ingres Console for Error Monitoring in UNIX
Issuing the following command at a terminal ensures that any new errors that are written to the Ingres error log file are displayed on the terminal screen:
tail -f $II_SYSTEM/ingres/files/errlog.log
Likewise, you can continuously monitor the activities of the Ingres recovery process (dmfrcp) with the command:
tail -f $II_SYSTEM/ingres/files/iircp.log

Managing Your System and Monitoring Performance 8–1
Chapter
8 Managing Your System and Monitoring Performance
Ingres provides three visual tools for managing your system and monitoring performance:
■ Ingres Visual Manager
■ Visual Performance Monitor
■ VCDA
Each tool is described in this chapter. Note that the GUI tools presented in this chapter can be used on Windows platforms, or on UNIX platforms with the MainWin application by Mainsoft. To find out which UNIX platforms are supported, see the Computer Associates technical support web site, http://ca.com.
Visual Manager Ingres Visual Manager (IVM) provides a global view into your Ingres installation. It serves as a system console from which you can manage Ingres components and access other tools and utilities. IVM captures events that are occurring in the system and allows them to be filtered for emphasis, according to the system administrator’s preferences.
IVM allows you to monitor (and start/stop) the different servers in the installation (DBMS, Name, Communications, JDBC, Data Access, Bridge, Star, ICE, and Recovery) as well as Remote Command, the Logging and Locking systems, and the Primary Transaction Log and Archiver process. It shows events occurring in the system both at the installation level and the level of each server. Using IVM, you can also edit the Ingres system and user environment variable settings.

Visual Manager
8–2 System Administrator Guide
Using Visual Manager
Ingres Visual Manager enables you to:
■ View the started and stopped components and servers in the installation as well as the history of start/stop events
■ Start or stop the entire installation or individual components
■ View and edit Ingres system and user environment variables
■ Control how various types of Ingres error log messages are handled
■ Set preferences for event monitoring and notification
■ View and filter events that occurred both at the installation level and the component or server level
■ View statistics on these events
■ View explanations for error log messages
■ Access all Ingres visual tools and online documentation
The following sections explore each of these tasks. For specific instructions on performing these tasks, see the Ingres Visual Manager online help.
Visual Manager Window
The Ingres Visual Manager window contains a list of Ingres components. By selecting any branch of the corresponding tree, you can access information related to the branch, which correspond either to the entire Ingres installation (the root branch), an individual component configuration, or an individual instance of a given configuration.

Visual Manager
Managing Your System and Monitoring Performance 8–3
For example, on the Status page, shown in the following illustration, the Ingres Installation branch is selected, allowing you to view the summary startup status of the components of the installation, the start/stop history of any component in the configuration, and related information such as the output of the last start or stop operation.
On the Parameters page, which appears in the IVM window when Ingres Installation is selected in the left pane, you can set system, user, or extra parameters.
On the Logged Events page, you can view a list of logged events for the Ingres installation and any of its sub-branches. You can also select an event to view its corresponding message text.
The Events Statistics page presents statistics on events that have occurred for the selected component, grouped per event ID, and presented as a numerical count and in graph form.
For more information about these pages, see online help for Ingres Visual Manager.

Visual Manager
8–4 System Administrator Guide
Configuring Parameters
Ingres Visual Manager provides a straightforward way to set system, user and server parameters.
System and User Parameters
The Parameters page contains lists of parameters for system, user, and extra parameters along with their values and descriptions. These parameters correspond to the environment variables described in the chapter “Setting Environment Variables/Logicals” and the appendix “Environment Variables/Logicals.” You can add or unset a parameter and edit its value. You can also choose whether you want to view Ingres parameters that are not currently set.
For more information, see the online help topic, Parameters Page, Ingres Installation branch (Ingres Visual Manager window).
Server Parameters
From IVM, you can access the Configuration Manger utility to configure parameters for each server component in the Ingres installation. To access Configuration Manager, first select the desired server component in the left pane of the Ingres Visual Manager window and click the Configuration Manager toolbar button, or choose File, Configure. For more information, see the online help topic, Configuring Ingres Components in the Ingres Visual Manager online help. For an overview of the Configuration Manager utility, see the chapter “Configuration.”
Defining Message Categories and Notification Levels
Using IVM, you can control how various types of Ingres error log messages are handled. The Define Message Categories and Notification Levels dialog lets you specify which messages in the errlog.log must be discarded, which are displayed normally in IVM, and which trigger a special alert. This dialog also allows you to group messages according to user-defined categories, which can be handled as a group for discard, display or alert.
To access the Define Message Categories and Notification Levels dialog, click the Categories and Notification Levels toolbar button, or choose File, Categories and Notification Levels. For information on using this dialog, see the Ingres Visual Manager online help.

Visual Manager
Managing Your System and Monitoring Performance 8–5
Setting Preferences for Monitoring Events
IVM allows you to set various preferences related to event monitoring. For detailed instructions on setting the preferences listed below, see the Ingres Visual Manager online help.
Event Settings
Using the Preferences dialog in IVM, you can specify the following settings related to event monitoring.
■ Maximum amount of memory used to store events (in megabytes)
■ Maximum number of events stored
■ Maximum number of days that the event is stored before being deleted
■ Only messages that arrived after the last Name Server startup are stored
To access the Preferences dialog, click the Preferences toolbar button, or choose File, Preferences.
Alert Events Notification Settings
When an Alert message is written to the Ingres errlog.log file, IVM indicates the alert through a special icon change in the tray toolbar and in the IVM window tree. IVM also lets you set additional preferences for alert notification using the Preferences dialog. These additional preferences include:
■ Sound – When selected, you are alerted of an event by a sound (beep).
■ Message Box – When selected, you are alerted of an event by a message box if there are unread “Alert” messages.
■ OS Event (for new Events only) – When selected, the full text of all “Alert” messages resulting from new events are logged in the Operating System [Application] Event log in addition to the Ingres errlog.log file. If this option is selected, you can also set preferences for generating specific Operating System events.
To access the Preferences dialog, click the Preferences toolbar button, or choose File, Preferences. For instructions on setting these additional preferences, see the Preferences dialog topic in the Ingres Visual Manager online help.

Visual Manager
8–6 System Administrator Guide
Viewing Message Explanations
IVM allows you to view an explanation for any Ingres message in the errlog.log file. You must first select the desired message on any page or window within IVM that allows you to select messages. View the corresponding explanation by clicking the Message Explanation toolbar button.
For details about the Message Explanation window, see the Ingres Visual Manager online help.
Monitoring Components
You can monitor the following Ingres components using IVM.
Servers
For each of the following server components as well as their instances, you can use Ingres Visual Manager to monitor status, logged events, and event statistics:
■ Bridge Servers
■ DBMS Servers
■ JDBC Servers
■ Data Access Servers
■ Communications Servers
■ Star Servers
■ ICE Servers
■ Name Servers
■ Remote Command
■ Recovery Server—a Recovery Log File page appears in the IVM window
■ Archiver Process—an Archiver Log File page appears in the IVM window
For more information on monitoring server components, see online help for Ingres Visual Manager.
Logging System
The Logged Events page displays a list of the logged events for the Logging System branch, and any of its sub-branches. However, the messages are filtered according to certain preferences you define in the Preferences dialog. For more information, see online help for Ingres Visual Manager.

Visual Performance Monitor
Managing Your System and Monitoring Performance 8–7
Locking System
The Logged Events page displays a list of the logged events for the Locking System. However, the messages are filtered according to certain preferences you define in the Preferences dialog. For more information, see online help for Ingres Visual Manager.
Accessing Visual Tools and Documentation
IVM provides direct access to all Ingres visual tools and online documentation. The only exception is the Ingres Service Manager; that tool’s full functionality is already provided by IVM. You can access Ingres tools and documentation in the following ways:
1. Right click the tray toolbar to display the following menu:
2. Select a tool from the IVM toolbar:
Only the most frequently used tools are accessible from this toolbar. Use the previous menu to access all other tools and the online documentation.
Visual Performance Monitor Visual Performance Monitor can be used as a monitoring tool, a performance analysis tool, and a system management tool. It displays useful information about the servers, sessions, and locking and logging activities on your Ingres installation.

Visual Performance Monitor
8–8 System Administrator Guide
Visual Performance Monitor enables you to:
■ Monitor information on servers, sessions, and the amount of logging and locking resources being consumed
■ Analyze system performance
■ Refresh data in the window from a server
■ Shut down a database server or close a session
■ Monitor replication
Detailed steps for performing these procedures can be found in the Visual Performance Monitor online help. See the following topics:
■ Viewing Performance Information
■ Closing a Session
Using Visual Performance Monitor
Visual Performance Monitor allows you to view and monitor information for various Ingres components such as servers, lock information, log information, databases, active users, and replication.

Visual Performance Monitor
Managing Your System and Monitoring Performance 8–9
Visual Performance Monitor Window
The Visual Performance Monitor window contains a list of categories under which various types of Ingres performance information appears. Under each root object category are branches representing each performance entity. Beneath these branches are sub-branches that pertain to the particular type of performance entity.
Working with Visual Performance Monitor Components
Within Visual Performance Monitor, you can view the servers that are started on an Ingres installation and access monitor information about these servers.
Force Refresh or Shut Down Instances
You can force a refresh of the servers or remove/shut down instances of component configurations. To force refresh, right-click the branch representing the component and choose Force Refresh. To remove or shut down a configuration instance, choose Remove/Shut Down. When a specific server instance has been selected, you are given the opportunity to close or open it.
Background Refresh
You can set up background refreshing, which automatically performs the refresh periodically, based on intervals that you define, through the File Preferences menu command.
Note: The background refresh feature is activated only if View, Activate Background Refresh is chosen.
Monitoring Components
Visual Performance Monitor lets you monitor the following components and aspects of an Ingres installation.
Servers
You can view a list of the servers that are started on an Ingres installation and information about each of these servers. For example, you can view the sessions that are currently active for each server. You can also remove a session or stop a server (if you are a privileged user).

Visual Performance Monitor
8–10 System Administrator Guide
Viewing Other Server Information
In addition to examining servers and their sessions, Visual Performance Monitor provides the following information for a particular server:
■ Lock lists
■ Locks
■ Transactions
■ Locked databases, tables, and pages
■ Other locked resources
■ Network traffic for Net servers
For detailed information on monitoring these types of data, press F1 for context-sensitive help on any active dialog or window.
Shutting Down a Server
The recommended way to shut down servers is to use Ingres Visual Manager. For information about performing this task, see the Stop command (File menu, Ingres Visual Manager) topic in Ingres Visual Manager online help.
You can also shut down a server using Visual Performance Monitor. The “soft” shutdown operation waits for all sessions to end before stopping the server. Close the sessions (or ask the users of those sessions to close them) before shutting down a server.
Lock Information
You can monitor lock information to help determine which lock parameters need to be adjusted. Viewing locking system summaries, lock lists and resources provides you with the information you need to spot conditions when, for example, additional locking system resources need to be added.
Viewing your lock lists is useful for locating transactions that cannot proceed because they are blocked by another transaction.
Log Information
You can view logging system summaries, transaction lists, process, and database lists. Log information can be used to monitor transaction rates, log file activity, processes, and databases in the logging system. This information is useful in determining which logging parameters need to be adjusted.

VCDA
Managing Your System and Monitoring Performance 8–11
Databases
Visual Performance Monitor allows you to view your performance information from a “database” point of view. This means you can access performance information using a database branch, as opposed to the root branches of Visual Performance Monitor.
Active User Information
Visual Performance Monitor allows you to monitor users for whom there are open sessions. You can find out which sessions are open for a particular user, and drill down further to reveal all the related information about those sessions (lock lists, transactions locked, databases locked, and so on).
Replication
You can start, stop, and monitor Replicator servers that are required for the replication scheme that has been defined in a VDBA DOM window. You can set up startup parameters for these servers, send events to these servers, view and manage collisions, and display other miscellaneous replication monitor information.
VCDA VCDA allows you to compare the configurations for an Ingres local installation by taking “snapshots” of its configuration. For example, after you install Ingres and have set up the database schemas, take a snapshot of the configuration. If you encounter problems later on, take another snapshot of the configuration and compare it to the earlier snapshot to see if any configuration changes have contributed to the problem. Keep an on-going record of configuration changes by starting with a snapshot of a new installation that shows all system defaults, and taking a snapshot of the installation each time the configuration is changed.
Note that VCDA compares the configurations of Ingres installations, but not the database object definitions within these installations. To compare database objects, see the Visual Database Objects Differences Analyzer (VDDA) section in the Database Administrator Guide and the Ingres online help.
Specifically, VCDA allows you to:
■ Save a snapshot of the current configuration into a file
■ Compare two saved snapshot files, or the current installation with a saved snapshot

VCDA
8–12 System Administrator Guide
■ Restore selective groups of configuration parameters from a saved snapshot
The following sections explore each of these tasks. For specific instructions on performing these tasks, refer to the VCDA online help.
Saving the Current Configuration
When you take a snapshot of the current configuration for the local installation, VCDA writes the following information to a text file:
■ Main Parameters: the value of II_SYSTEM, II_CLUSTER, II_CONFIG_LOCAL, II_NETBIOS_NAME, hostname, and username
■ All information included in the config.dat file, and in the additional config.dat files pointed to by II_CONFIG_LOCAL (if any)
■ All vnode information, except for password data
■ All Ingres system variables
■ All Ingres user variables
This snapshot can be compared to other snapshots as explained below.
Comparing Configuration Snapshots
VCDA allows you to compare the current configuration of the local installation with a previously saved configuration snapshot. It also allows you to compare two saved snapshots that do not include the current configuration. When you ask to compare two snapshots, VCDA displays the differences it finds in the information described in the previous section. VCDA also indicates, using an icon color, if the difference is due to a parameter that is different in both snapshots, or a parameter that exists in one snapshot but not in the other.
If there are no differences in the main parameters, VCDA displays a green icon and a message. If there are no differences in the other information, VCDA displays only a green icon.
Remote Installations
Although you can only take snapshots of the local installation, you can compare configurations on remote installations (even on different platforms) by making the snapshot file from one machine available to another machine that is running VCDA. The snapshot file is a simple text file that is readable across different platforms.

VCDA
Managing Your System and Monitoring Performance 8–13
Restoring Parameters
In addition to comparing configuration snapshots, VCDA allows you to restore selected groups of configuration parameters from a saved snapshot. The only parameters that VCDA does not restore are the values of II_SYSTEM, the hostname and username.
You restore parameters by first selecting the snapshot file that contains the desired parameters. You can specify the specific parameters you want to restore. If the snapshot file you choose corresponds to a networked installation, you can also specify the value of the corresponding Ingres variables and the content of the relevant additional config.dat file, with an option to create the tree structure if it does not exist.
Note that VCDA automatically creates a backup snapshot file of the current configuration before it restores parameters. If for some reason you do not want to keep the restored parameters, you can select this backup snapshot file to restore the parameters to their previous state.
How VCDA Handles Concatenated config.dat Files
VCDA uses information from the config.dat file, which normally contains parameters that apply to the local hostname only. However, if you want to concatenate the contents of all your config.dat files into a single config.dat file to distribute across multiple environments, VCDA manages this situation as follows:
■ The hostname under which a snapshot is saved shall be saved within the snapshot.
■ If VCDA detects that hostnames other than the snapshot one are managed within the config.dat information of the snapshot, VCDA shall display it.
■ A “hostname mapping” option is available in that situation, so that VCDA can compare the additional hostnames configuration parameters. If this option is not used, the parameters are compared including their “hostname” part, (that is, only parameters that are identical for the same hostname within the two snapshots are considered as identical).


Analyzing and Recovering Journaled Transactions 9–1
Chapter
9 Analyzing and Recovering Journaled Transactions
The Journal Analyzer utility provides a GUI interface with which you can view information from the Ingres DBMS journals. Additionally, this utility allows you to recover and redo transactions—for example, recovering deleted rows, canceling some isolated operations without rolling back the whole database or table.
Within the Journal Analyzer, you can:
■ View past transactions and their begin/end timestamps, duration, LSN, and user, and the number of insert, update, and delete statements within the transaction
■ View tables and rows involved in the transaction
■ View before and after images and corresponding LSN for row changes within the transaction
■ View rolled back transactions
■ View some types of statements, such as create table or create index, inserts, updates, and deletes, and recover or redo journaled insert, update, and delete statements
■ Recover and redo transactions immediately or generate scripts to do it at another time or in another database
■ Recover and redo multiple transactions at one time, allowing, for example, the replaying of whole sequences of journal files on a remote node/database
■ Recover and redo individual row changes
Note: The following releases of Ingres support the Journal Analyzer. To see if this information has changed, visit http://ca.com.
■ Ingres 2.6
■ Ingres r3

Journal Analyzer Window
9–2 System Administrator Guide
Journal Analyzer Window
Windows To start the Journal Analyzer on Windows, click Start on the taskbar and choose Programs, Ingres, Journal Analyzer.
From within Ingres Visual Manager’s right-click popup menu, select Journal Analyzer, or click the Journal Analyzer toolbar button.
UNIX On UNIX systems, type ija at the command prompt.
From within Ingres Visual Manager’s right-click popup menu, select Journal Analyzer, or click the Journal Analyzer toolbar button.
The Journal Analyzer application window appears. In the left-hand pane, you drill down to the desired vnode, database, and (optionally) table. Once a database or table has been selected, the right pane appears as follows:
Use the Filter options to control the quantity and type of transactions that are displayed, based on different criteria such as the transaction date and time, checkpoint number, user, and so on.
Clicking the View button displays transaction information that is currently in the journals. You must click the View button to refresh the data when you change the filter criteria.
To see any recent transactions that are in the transaction log file—but have not yet moved to the journals—click Move Log to Journals. The following sections explain in further detail how transaction information is presented in this pane.

Viewing Transactions
Analyzing and Recovering Journaled Transactions 9–3
Viewing Transactions Based on whether you select a database or table in the navigational pane of the Journal Analyzer, and whether the Group by Transaction option is selected, you see a slightly different interface in the right-hand pane. This section details the transaction information available at the database and table levels.
On the Database Level
When you select a database, you see the journaled transactions within the database that match the criteria defined in the top of the pane. The next step is to determine whether you want to group transactions and view the details for only selected transactions.
Grouping Changes by Transaction
When the Group by Transaction option is selected, a single line of “summary” information is displayed for each transaction in the uppermost list, sorted by transaction number. When one or more of these lines are selected, the detailed information for all selected lines is shown in the lower list. The detail information corresponds to each row of journaled tables altered in the transaction(s), in addition to statements such as create table or alter table that were executed within the transaction.
For example, in the following window, a transaction is selected and the corresponding detail lines are displayed beneath it:

Viewing Transactions
9–4 System Administrator Guide
Although the rows are sorted by transaction number initially, look at (and sort by) transaction end (End column), because it is the time when all changes for the transaction become available to other users. A transaction with a higher number (that is, having started later) than another transaction, can be committed first, in which case the underlying changes become available to other users before those of the other transaction (which had a smaller number because it had started first). For this reason, sort on transaction end (by clicking on the corresponding header).
Viewing Transaction Details
If the Group by Transaction option is not selected, a single list appears, displaying all the individual actions for each transaction, in transaction order:
Even these detail lines provide a summary of information on the individual actions. This list cannot display column names because different tables have different column names. To get the full detail of individual rows that have changed, you must choose a table in the navigational pane. See On the Table Level in this chapter.
For update statements, the “before update” and “after update” images are shown. For inserts and deletes, only one row (the inserted or deleted one) appears. Different colored rows are used to denote the type of statement (in addition to the Action column that displays strings such as begin, end, insert, update, delete, and so on).

Viewing Transactions
Analyzing and Recovering Journaled Transactions 9–5
An icon preceding each line shows you whether the transaction it belongs to was committed or rolled backed, included a partial rollback, or involved changes in non-journaled tables (an exclamation point next to the icon appears in this case).
Tip: You can sort the data by any criteria by simply clicking on the corresponding column header.
On the Table Level
On the table level, the right pane looks and functions similar to the one at the database level, but only the row changes corresponding to the selected table appear. There is no Group by Transaction check box for the table level. At the table level, you can view a history of journaled changes in that table.
As opposed to the database level panes, where more than one table was involved, it is possible here to have the real column names become headers of the results list, which was not possible at the database level because the columns are normally different in each table that was involved in the transaction.

Viewing Transactions
9–6 System Administrator Guide
You can also sort the data on the table level by clicking on a column header. In particular, the following sorts are useful:
■ Commit date—this is the most meaningful criteria for sorting the changes
■ Transaction number—be aware that the transactions are not always committed in the same order
■ LSN—shows you the exact sequence of row changes
For more information on the interface for this utility, see the Journal Analyzer online help topics. The following sections describe how you can use the Journal Analyzer to select, recover (undo), or redo the desired transactions.
Selecting Transactions or Individual Row Changes
After browsing for the transactions or row changes that you want to recover or redo, you can select one or more transactions or individual row changes. If the Group by Transaction check box is selected, and multiple transaction lines are selected, the detail list show the row changes corresponding to all selected transactions. If this option is not selected, you are selecting lines at the table level, which correspond to row changes, not full transactions. The Recover and Redo dialogs proposes (but does not pre-select) the other changes in those transactions of the initial row changes that were selected.
Tip: Select whole transaction(s) associated with the changes to be recovered to ensure transaction integrity. This is the preferred and most common way to recover row changes.
After making your selections, the Recover and Redo buttons are available. If you do select lines corresponding to only part of a transaction, there are other factors to consider. See Recovering Transactions or Individual Row Changes and Redoing Transactions or Individual Row Changes in this chapter.
The Select All button allows you to select all transactions currently displayed in the pane for the selected criteria. This can be useful for example for replaying whole portions of journals on another node/database, through the Redo functionality described in the Redoing Transactions section.

Recovering Transactions or Individual Row Changes
Analyzing and Recovering Journaled Transactions 9–7
Recovering Transactions or Individual Row Changes The Recover dialog is used to create one of two types of “undo scripts”—an internal script that is run immediately or an external script that can be saved and run later.
When you click Recover, the Recover dialog appears as follows:
Initially, the row changes that you selected in the Journal Analyzer are displayed in the lower portion of the Recover dialog. When completing this dialog, consider the factors discussed in the sections that follow. When you are finished with your selections, you have several options including Recover Now and Generate External Scripts. For more information, see Recovering Immediately or Generating Scripts in this chapter.

Recovering Transactions or Individual Row Changes
9–8 System Administrator Guide
Recovering “Whole” Transactions or Individual Rows
If you chose whole transactions in the Journal Analyzer, the Whole Transaction(s) option is selected automatically in the Recover dialog.
If you selected individual row changes that make up only part of a transaction (in the lower portion of the dialog), the Individual Rows option is selected. In this case, you are prompted for confirmation as to whether you want to recover only parts of transactions, and lose transaction integrity. Although the recovery of individual rows is not recommended, it can be useful, for example, if a table has Ingres rules associated with it. The following section describes this in more detail.
Rules, Constraints, and Integrities
If a table has Ingres rules associated with it that results in additional row changes within the same transaction, do not generate undo operations for such dependent changes because it leads to undesirable results. Also, the rules can change between the time of the initial transaction and the time when you want to undo that transaction. Instead, undo only the change in the base table, and let the rules generate the dependent changes.
Journal Analyzer detects the rules, constraints, and integrities that exist in the tables involved in the transaction(s) and displays them on the tabbed pages in the Recover dialog. From this display, you can determine whether some changes in a transaction resulted from rules and if certain constraints cannot be fulfilled. This information helps you determine if you want to use the No Rules option, and possibly disable certain rows within the transaction. You can view the properties for a particular rule, constraint, or integrity by double clicking it. Examine these entities to determine their impact on a restore.
Note: Integrity constraints that are violated are not specifically reported: updates and inserts that violate any integrity constraints are simply not performed.
Scanning Journals to End
The Scan Journals to the End option provides a warning if the tables have been altered since the time of the initial transaction, in which case the rules for these tables have changed.
If there are rules on a table, you have two choices:
■ Disable individual row changes in the undo scripts, by deselecting the corresponding row changes in the Recover dialog. This can be useful, for example, if the current rules cause the desired operation in dependent tables, in which case you must disable the dependent row changes.

Recovering Transactions or Individual Row Changes
Analyzing and Recovering Journaled Transactions 9–9
■ Use the No Rules option to allow you to disable rules while executing the queries. This option allows the reversal of the exact row changes of the initial transaction, regardless of what the rules were at that time, and what they are now. The side effect of this option is that if there are constraints on the corresponding tables, they are not checked if this option is used. This operation must be used very carefully. If the Journal Analyzer previously detected current constraints on those tables, it provides a warning and asks for confirmation before starting the operation.
Order of Transactions and Statements Within Transactions
The order of the undoing of transactions is reverse of the order at commit time of these transactions and cannot be changed. If for some reason you need the order to be different than the usual order, the only way to do this is to recover each transaction separately (by launching the Recover dialog for each transaction individually) in the desired order.
Within each transaction to be recovered, the order of the individual statements can be changed, using the Up and Down buttons in the Recover dialog.
Checking Whether Rows Have Changed After the Transaction
Before proposing to reverse row changes resulting from a transaction, you must take into account the fact that some of these rows have changed after the transaction. The possible cases are as follows:
■ None of these rows have changed and there is no problem.
Or:
■ If a row has changed, usually no row corresponding to the “after image” of the initial change can be found, and therefore the “reverse” statement, which includes a where clause that searches for a row corresponding to such “after image,” fails because no such row is found.
There is an “advanced” exception, in the case where a given row (the same or another one) has the exact same content afterwards as the after image of the initial change: in this case, it is the user’s responsibility to make a decision about taking additional actions.
For this reason, the following features are available:
■ The changes that you have asked to reverse are displayed in the dialog for you to view.
■ By default, the Scan Journals to the End option is selected. It indicates if later changes affected the rows involved in the transaction. If this problem is not an issue, disable the option.

Recovering Transactions or Individual Row Changes
9–10 System Administrator Guide
■ If rows of the transaction to be undone have changed since the transaction, Journal Analyzer prompts you with a warning, asking whether you want to continue.
Users of Transactions
By default, Journal Analyzer proposes to recover transactions by executing reverse transactions under the currently connected user. However, the Impersonate User of Initial Transaction option allows you to impersonate the user under which each transaction had initially been executed.
Note: This option requires that the connected user is the database administrator or has appropriate privileges.
The Impersonate User of Initial Transaction option affects the way the reverse transactions are executed: that is, normally Journal Analyzer recovers multiple transactions by executing the recover statements of all transactions to be undone in a single, global “recover” transaction. This allows, in case of failure at any point in the recover operation, to cancel the whole operation.
However, given that it is not possible to execute in the same transaction different statements under different users, if this option is used, and the initial transactions had not all be executed under the same user, Journal Analyzer must commit (and change the user) before each reverse statement to be executed under a different user than the previous one.
A possible problem in this case is when a reverse statement fails, once other recover statements have already been committed. In this situation, Journal Analyzer proposes to “undo the undo” of the transactions previously undone. However in case of failure of this last operation, you need to manually “repair” this situation (typically by using Journal Analyzer) by completing or canceling the uncompleted operation.
Number of Rows Affected by Each Individual “Reverse Statement”
Journal Analyzer-generated reverse statements for insert and update statements are delete and update statements, with a “where” clause on all columns that can be accepted in a where clause (column types such as “long varchar” cannot).
If you need two identical rows in which all columns can be part of a where clause (SQL does not normally distinguished such rows), the Recover dialog has an option (selected by default) called “Don’t Recover if >1 Row is Affected by an Individual Statement”. Only when this option is explicitly disabled does the recover process work even if more than one row is affected by an individual recover statement.

Recovering Transactions or Individual Row Changes
Analyzing and Recovering Journaled Transactions 9–11
In the case where no row is affected by an individual “recover” statement, Journal Analyzer provides an error anyway, and the recover operation fails. Note that in this case, if the Scan Journals to End option has not been disabled, Journal Analyzer normally warns you that rows involved already have changed since the initial transaction (different warnings appear if journaling has been disabled after the initial transaction or in similar situations).
Recovering Immediately or Generating Scripts
If you want to view the script that is run based on your Recover dialog selections, click the View Recover Script Now button. The following dialog appears:
This dialog gives you the opportunity to see the SQL statements that are executed if you click the Recover Now button. The script only works when executed within Journal Analyzer and must not be used externally. If desired, you can also save the script by clicking Save.

Recovering Transactions or Individual Row Changes
9–12 System Administrator Guide
If you want to generate an external undo SQL script that you can run at another time (possibly on another database), you can do so after you have made your selections in the Recover dialog. By clicking the Generate External Script button, the following dialog appears:
You can make any necessary changes to the script by selecting the Edit Script option. To save or run the script, clicking the corresponding button.
Although external scripts can be very useful, you should be aware of some issues:
■ Binary data cannot be conveniently inserted into an SQL script
■ Floating point numbers can be rounded if inserted into a script in text format
For this reason, the Generate External Script options must be restricted for the Recover and Redo features to when absolutely necessary (that is, typically when executing the scripts on another node and database). In this case:
■ There is an error message if some data types included in rows of the transaction cannot be inserted in the script
■ The user must be aware of the context of possible rules and constraints existing on the target database at the time when the script is executed and accordingly update the script.

Redoing Transactions or Individual Row Changes
Analyzing and Recovering Journaled Transactions 9–13
Redoing Transactions or Individual Row Changes From the Journal Analyzer window, you can also launch the Redo dialog, as follows:
This dialog is useful for the following purposes:
■ For redoing rolled back transactions (that had been rolled back for an unwanted reason for example)
■ For regenerating similar, committed transactions in another database
This dialog is very similar to that of the Recover dialog, however two additional controls allow you to specify a different node and database where to redo the transaction or statement.
All the features described in the Recovering Transactions section for the Recover dialog apply to this dialog and function in the same way—only for redoing transactions. For more information, see that section and the help system.


Management Architecture 10–1
Chapter
10 Management Architecture
The Ingres Management Architecture (IMA) provides the framework to access system data for monitoring and managing installations:
■ Monitoring
The monitoring facilities include the system data currently reported through specialized utilities such as the Ingres Visual Manager, Visual Performance Monitor, Interactive Performance Monitor (ipm), lockstat, logstat, and iimonitor.
■ Managing
Active management operations include stopping servers and manipulating sessions in DBMS and Star servers.
With IMA you can create system management applications using standard SQL tools. With Ingres Net, the IMA provides access to multiple installations, allowing management of complex environments with a single SQL application. The IMA is also designed to be compatible with emerging standard management protocols, such as SNMP (Simple Network Management Protocol), DME (Distributed Management Environment), and CMIP (Common Management Interface Protocol).
IMA provides its services without affecting the underlying operation of the product.
This chapter describes the overall features of IMA, shows examples of how it is used from SQL, and notes restrictions in this release that must be known to application developers.

IMA Audience
10–2 System Administrator Guide
IMA Audience IMA provides the means of creating sophisticated DBMS management applications for users and third-party vendors. These capabilities are of interest to advanced DBAs, system administrators, and developers producing tools for use by DBAs and system administrators. The user of this product must be familiar with Ingres tools such as OpenROAD, Ingres Terminal Monitor, and VDBA as well as have an overall understanding of system monitoring capacities and purposes.
Introduction to IMA With IMA all the installations in an administrative domain can be managed by a collection of pure SQL applications that can be written mainly with OpenROAD:
OpenROADApplication—the monitoring program written in standard SQL.
Tables in DBMS—catalog tables representing the run state of various servers and global parameters from all of the installations of interest.
IMA—provides access to objects defined in the DBMS Server and in other processes.
Server Processes—the DBMS Server and other processes being monitored. With Ingres Net, these can be on different vnode installations.
The following illustration shows the IMA gateway and its connection to an OpenROAD application:

Management Information Base
Management Architecture 10–3
Management Information Base The data in the Management Information Base (IMA) catalog tables form a Management Information Base (MIB). The available data are defined using a simple object model, described in this section. The MIB is made visible to management applications through the IMA facility, which provides SQL access to the data in the MIB.
Data and the Object Model
The MIB is defined as an abstract entity consisting of simply typed management objects:
■ Simply typed means that objects have values that are strings or strings that can be interpreted as integers, and do not represent aggregates, such as structures.
■ Aggregate objects, such as a C language structure, are represented in the MIB by having a separate object type for each element. (This can be compared to having a single table for each potential column in a relational database, with the entire table made visible with a join of all the column tables.)
In the model each object has a name (classid), location, and one or more instances.
Classid
Each data object in the MIB has a name, called the classid, which defines its type and semantics. Classids are strings that form a hierarchical name space by the convention of using periods (.) to separate levels of the tree.
For example, consider the following classid: exp.scf.scs.scb_query
This object name identifies an experimental object, owned by scf, that is scs related, and that is the scb_query. Note that in the current release all objects are under the exp experimental branch of the name space tree.

Management Information Base
10–4 System Administrator Guide
Location
Each data object is located in some place. If it is:
■ Process-specific, the place is a particular server
■ Visible in several different processes in an installation, its place is the vnode in which the installation is located
The place must be local, or remotely accessed using Ingres Net. Installation passwords must be working. The general format of the place string is:
[vnode::] [/@iigcn | /@gca_address]
where the gca_address is the listen address of the server as shown in Configuration Manager (vcbf), Interactive Performance Monitor (ipm) or Name Server Maintenance Utility (iinamu).
Instances
None, one, or more objects of a particular classid can exist in a process or a vnode. Each has a corresponding instance value. This value is always a string, although it is possible in many instances to interpret the string as an integer value.
A table is modeled by having objects with instance values that form a key index.
Data Keys
All data objects in the MIB have simple data types, can have many different instances, and are located either in a server process or in a vnode. Thus, they are always addressed with a three-part key:
{ [vnode_or_server,] classid, instance }

Describing IMA
Management Architecture 10–5
Describing IMA This section discusses a reference model for the IMA and the main features of the IMA implementation.
The reference model for the IMA follows:
The components of the figure are described below, with the current IMA implementation noted:
■ The User Protocol is forms or other appropriate interface.
■ The user protocol is provided by a Management Application program.
■ The application obtains MIB data through an Application Management Protocol, such as SQL (or alternative protocol such as SNMP). The current IMA implementation is SQL-based.
■ A MIB Server process accepts the application management protocol.
■ The MIB server communicates with the managed processes by an Underlying Management Protocol.

Describing IMA
10–6 System Administrator Guide
Thus, managed processes need to talk to only a single protocol, while MIB servers can be provided to support management applications using a variety of protocols.
IMA Management Protocol
The IMA defines its own underlying management protocol for use between servers. The IMA protocol is built on top of the regular GCA protocol. Ingres Net provides IMA management of other installations transparently.
To allow management by other processes, a server:
1. Establishes a GCA listen address
2. Arranges for that listen address to be serviced for management purposes
3. Registers the listen address with the Name Server
Each managed process defines management objects that can be inspected by the GCA code that is handling the management protocol. In addition, the process can manipulate these objects directly, without going through the management protocol.
IMA Server
The IMA Server maintains the SQL MIB data. It uses a non-relational gateway to present the management objects in the domain as SQL tables:
■ For objects internal to the DBMS Server, the IMA Server reads and writes objects directly.
■ Operations on objects that are in other processes are handled using the GCA management protocol.

Describing IMA
Management Architecture 10–7
The following illustration shows the IMA component in the DBMS Server, including the Data Management Facility (DMF), the Enterprise Access facility (GWF), the IMA Facility (IMA GWF), and the IMA’s Management Object (MO) module for handling local objects, as well as the GCF facility for dealing with other managed processes.
In-process calls for localor installation-wide object
GCM message to othermanaged processes in the domain
GWF
DMF
GWF IMA
MO GCF
An Ingres DBMS Server is needed for users to access the MIB data with an SQL application. Without an Ingres DBMS Server, no management data is available to non-privileged users. It is possible for privileged applications to communicate with servers using the GCM directly.
The architecture permits Advantage Enterprise Access products from other management protocols to be written using either SQL or the underlying GCA management protocol directly.

Creating an SQL MIB
10–8 System Administrator Guide
Creating an SQL MIB The IMA’s SQL MIB is the binding of the MIB object space into an SQL name space:
■ Tables containing MIB objects can be registered into any database owned by the $ingres user.
■ The binding itself is done by the IMA, which converts between rows and individual MIB objects.
Registering IMA Tables
IMA tables must be added explicitly by the $ingres user in any database owned by $ingres to define an SQL schema for a MIB database. The SQL register table as import statement is used to register IMA tables. IMA registered tables can be opened only in databases owned by $ingres.
IMA catalogs must be created, if they do not already exist. Only the iidbdb has these catalogs.
Register Table Statement
The register table as import statement has the following syntax:
register table tablename (col_name format [is 'ext_format'] {, col_name format [is 'ext_format']}) as import from 'source' with dbms = ima [, structure = none | [unique] sortkeyed] [, key = (col_name [asc] {, col_name})] [, rows = nnnnnnnn] [, [no]duplicates] [, [no]update] [, [no]journaling] ;

Creating an SQL MIB
Management Architecture 10–9
The table below describes each of the parameters included in the register table as import statement:
Parameter Description Required or Optional
tablename The name of the table. This must follow the standard naming conventions.
Required
col_name The name of the column. This must follow the standard naming conventions.
Required
format The data type for the column. Required
is ‘ext_format’ Specifies the management object being referenced, by extended format string name. This is either:
■ The class ID.
■ A reserved name identifying metadata:
PLACE: Column is any kind of place, char type.
VNODE: Column is vnode places only char type.
SERVER: Column is server places only char type.
CLASSID: Column is the classid name char type.
INSTANCE: Column is the instance value char type.
VALUE: Column is the char value of the {place, classid, instance} object.
PERMISSIONS: Column is the integer management object permission mask for the classid.
Required
as import Indicates that you are registering a gateway product.
Required
from 'source' The source is objects or tables. This parameter is ignored by the IMA.
You must enclose the value of source in single quotation marks.
Required
with Introduces additional information about the table being imported.
Required

Creating an SQL MIB
10–10 System Administrator Guide
Parameter Description Required or Optional
dbms = ima Indicates that you are registering with the IMA.
Required
structure = Specifies whether the table is keyed or not. If omitted, no key is assumed.
For IMA tables the only valid structure is sortkeyed or unique sortkeyed, which must be specified.
Required
key = Specifies the column name(s) to use as keys.
For the IMA flat table, the key must be: ([place,] classid, instance)
For IMA cross-tab tables, the key must contain a column with the index classid, which can be preceded with a column defining the place.
Required if you specified sortkeyed as the key type
rows = nnnnnnnn Specifies the approximate number of rows in the table. If omitted, a default value of 1000 is used.
Optional
[no]duplicates Indicates whether the table can contain duplicate rows. If this parameter is omitted, the default is to allow duplicates.
Optional
[no]update Indicates whether the table can be updated. If this parameter is omitted, the default is noupdate (read-only).
For IMA tables, the flat object table can be updateable. All cross-tab tables must be non-updateable.
Optional
[no]journaling Indicates whether journaling is allowed.
For IMA tables, only nojournaling is allowed.
Optional

Creating an SQL MIB
Management Architecture 10–11
IMA Table Types
There are two types of IMA table, flat object tables and cross-tab tables.
Flat tables have one object instance per row. Only flat object tables can be updated. This is a sample flat object table:
server classid instance value
here::@/1001 exp.table.index 01 01
here::@/1001 exp.table.index 02 02
here::@/1001 exp.table.user 01 gammerl
here::@/1001 exp.table.user 02 dommage
here::@/1001 exp.table.value 01 88
here::@/1001 exp.table.value 01 99
Flat tables must be registered as in the following example: register table ima_mib_objects ( server varchar(64) not null not default is 'SERVER', classid varchar(64) not null not default is 'CLASSID', instance varchar(64) not null not default is 'INSTANCE',value varchar(64) not null not default is 'VALUE', perms integer2 not null not default is 'PERMISSIONS' ) as import from 'objects' with update, dbms = IMA, structure = unique sortkeyed, key = (server, classid, instance);
Cross-tab tables have one object per column, per row. A cross-tab version of the same data as above is much more convenient to query, as shown below:
index user value
01 gammerl 88
02 dommage 99
A cross-tab table has 1…n columns, including at least one that is the index. A place column is optional. If present, it is identified by having an “is clause” of VNODE or SERVER. If it is omitted, the place defaults to the current server. All other columns are assumed to be management object classids, sharing common index instance values.
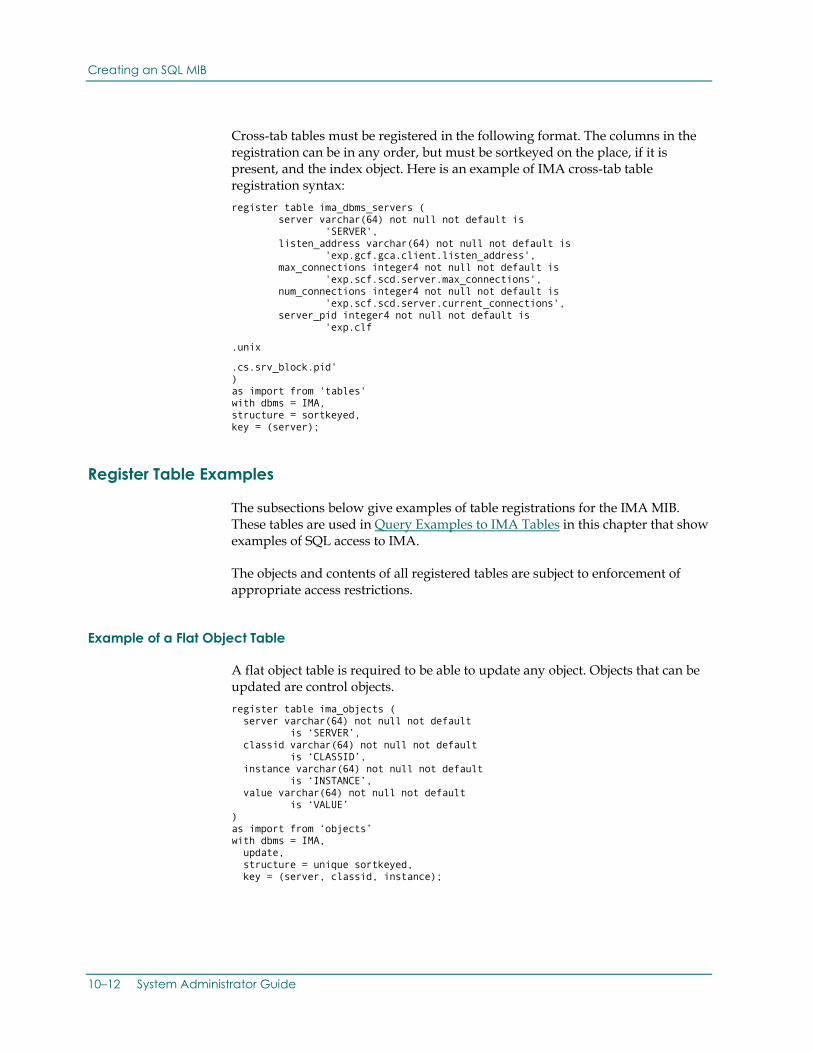
Creating an SQL MIB
10–12 System Administrator Guide
Cross-tab tables must be registered in the following format. The columns in the registration can be in any order, but must be sortkeyed on the place, if it is present, and the index object. Here is an example of IMA cross-tab table registration syntax: register table ima_dbms_servers ( server varchar(64) not null not default is 'SERVER', listen_address varchar(64) not null not default is 'exp.gcf.gca.client.listen_address', max_connections integer4 not null not default is 'exp.scf.scd.server.max_connections', num_connections integer4 not null not default is 'exp.scf.scd.server.current_connections', server_pid integer4 not null not default is 'exp.clf
.unix
.cs.srv_block.pid' ) as import from 'tables' with dbms = IMA, structure = sortkeyed, key = (server);
Register Table Examples
The subsections below give examples of table registrations for the IMA MIB. These tables are used in Query Examples to IMA Tables in this chapter that show examples of SQL access to IMA.
The objects and contents of all registered tables are subject to enforcement of appropriate access restrictions.
Example of a Flat Object Table
A flat object table is required to be able to update any object. Objects that can be updated are control objects. register table ima_objects ( server varchar(64) not null not default is ‘SERVER’, classid varchar(64) not null not default is ‘CLASSID’, instance varchar(64) not null not default is ‘INSTANCE’, value varchar(64) not null not default is ‘VALUE’ ) as import from ‘objects’ with dbms = IMA, update, structure = unique sortkeyed, key = (server, classid, instance);

Creating an SQL MIB
Management Architecture 10–13
Example of an Object Metadata Table
This table provides metadata about the known objects in the domain. Objects appear to be supported by many servers: register table ima_meta ( server varchar(64) not null not default is ‘SERVER’, classid varchar(64) not null not default is ‘exp.glf.mo.meta.classid’, class varchar(64) not null not default is ‘exp.glf.mo.meta.class’, perms i2 not null not default is ‘exp.glf.mo.meta.perms’, size i2 not null not default is ‘exp.glf.mo.meta.size’, xindex varchar(64) not null not default is ‘exp.glf.mo.meta.index’ ) as import from ‘tables’ with dbms = IMA, structure = unique sortkeyed, key = (server, classid);
Examples of Domain Tables
This table shows the domain of servers and vnodes visible to the session: register table ima_session_domain ( domplace varchar(64) not null not default is ‘exp.gwf.gwm.session.dom.index’ ) as import from ‘tables’ with dbms = IMA, structure = unique sortkeyed, key = (domplace);
The following example shows all the servers known to the DBMS in all the vnodes in all the user domains: register table ima_places ( place varchar(64) not null not default is ‘exp.gwf.gwm.places.index’, type i4 not null not default is ’exp.gwf.gwm.places.type’, class varchar(64) not null not default is ‘exp.gwf.gwm.servers.class’, flags i4 not null not default is ‘exp.gwf.gwm.servers.flags’, ) as import from ‘tables’ with dbms = IMA, structure = unique sortkeyed, key = (place);

Creating an SQL MIB
10–14 System Administrator Guide
Example of a Table of SCF Sessions
The following table shows information about SCF-level sessions: register table ima_server_sessions ( server varchar(64) not null not default is 'SERVER', session_id varchar(32) not null not default is 'exp.scf.scs.scb_index', effective_user varchar(20) not null not default is 'exp.scf.scs.scb_euser', real_user varchar(20) not null not default is 'exp.scf.scs.scb_ruser', db_name varchar(12) not null not default is 'exp.scf.scs.scb_database', db_owner varchar(8) not null not default is 'exp.scf.scs.scb_dbowner', db_lock varchar(9) not null not default is 'exp.scf.scs.scb_dblockmode', server_facility varchar(10) not null not default is 'exp.scf.scs.scb_facility_name', session_activity varchar(50) not null not default is 'exp.scf.scs.scb_activity', activity_detail varchar(50) not null not default is 'exp.scf.scs.scb_act_detail', session_query varchar(1000) not null not default is 'exp.scf.scs.scb_query', session_terminal varchar(12) not null not default is 'exp.scf.scs.scb_terminal', session_group varchar(8) not null not default is 'exp.scf.scs.scb_group', session_role varchar(8) not null not default is 'exp.scf.scs.scb_role', server_pid integer4 not null not default is 'exp.scf.scs.scb_pid' ) as import from 'tables' with dbms = IMA, structure = unique sortkeyed, key = (server, session_id)
Examples of Lock Tables
The following tables allow you to determine which sessions are waiting for locks and which locks they are.
Note: Because these lock tables are rapidly changing, they are particularly susceptible to dirty read problems. Fortunately, you are more often going to be looking for the one that is not changing, because a session is stuck on that particular lock. register table ima_locklists ( vnode varchar(64) not null not default is 'VNODE', locklist_id_id integer4 not null not default is 'exp.dmf.lk.llb_id.id_id', locklist_lkb_count integer4 not null not default is 'exp.dmf.lk.llb_lkb_count', locklist_status varchar(50) not null not default is 'exp.dmf.lk.llb_status', locklist_lock_count integer4 not null not default is 'exp.dmf.lk.llb_llkb_count',

Creating an SQL MIB
Management Architecture 10–15
locklist_max_locks integer4 not null not default is 'exp.dmf.lk.llb_max_lkb', locklist_wait_id_id integer4 not null not default is 'exp.dmf.lk.llb_wait_id_id', locklist_type integer4 not null not default is 'exp.dmf.lk.llb_name0', locklist_database integer4 not null not default is 'exp.dmf.lk.llb_name1', locklist_server_pid integer4 not null not default is 'exp.dmf.lk.llb_pid', locklist_session_id varchar(32) not null not default is 'exp.dmf.lk.llb_sid' ) as import from 'tables' with dbms = IMA, structure = unique sortkeyed, key = (vnode, locklist_id_id); register table ima_locks ( vnode varchar(64) not null not default is 'VNODE', lock_id_id integer4 not null not default is 'exp.dmf.lk.lkb_id.id_id', lock_request_mode varchar(10) not null not default is 'exp.dmf.lk.lkb_request_mode', lock_grant_mode varchar(10) not null not default is 'exp.dmf.lk.lkb_grant_mode', lock_state varchar(100) not null not default is 'exp.dmf.lk.lkb_state', lock_attributes varchar(100) not null not default is 'exp.dmf.lk.lkb_attribute', resource_id_id integer4 not null not default is 'exp.dmf.lk.lkb_rsb_id_id', locklist_id_id integer4 not null not default is 'exp.dmf.lk.lkb_llb.id_id' ) as import from 'tables' with dbms = IMA, structure = unique sortkeyed, key = (vnode, lock_id_id);
In the lock table, state 1 == granted, 2 == convert, 3 == waiting: register table ima_resources ( vnode varchar(64) not null not default is 'VNODE', resource_id_id integer4 not null not default is 'exp.dmf.lk.rsb_id.id_id', resource_grant_mode varchar(4) not null not default is 'exp.dmf.lk.rsb_grant_mode', resource_key varchar(50) not null not default is 'exp.dmf.lk.rsb_name', resource_type integer4 not null not default is 'exp.dmf.lk.rsb_name0', resource_database_id integer4 not null not default is 'exp.dmf.lk.rsb_name1', resource_table_id integer4 not null not default is 'exp.dmf.lk.rsb_name2', resource_index_id integer4 not null not default is 'exp.dmf.lk.rsb_name3', resource_page_number integer4 not null not default is 'exp.dmf.lk.rsb_name4' ) as import from 'tables' with dbms = IMA,

Creating an SQL MIB
10–16 System Administrator Guide
structure = unique sortkeyed, key = (vnode, resource_id_id);
Examples of Logging Tables
The following logging tables give a view into the active transactions on the system. Like the locking tables, they are subject to dirty read inconsistency: register table ima_log_processes ( vnode varchar(64) not null not default is 'VNODE', process_id_id integer4 not null not default is 'exp.dmf.lg.lpb_id.id_id', process_id_instance integer4 not null not default is 'exp.dmf.lg.lpb_id.id_instance', process_status varchar(100) not null not default is 'exp.dmf.lg.lpb_status', process_pid integer4 not null not default is 'exp.dmf.lg.lpb_pid' ) as import from 'tables' with dbms = IMA, structure = unique sortkeyed, key = (vnode, process_id_id); register table ima_log_databases ( vnode varchar(64) is 'VNODE', db_id_id integer4 not null not default is 'exp.dmf.lg.ldb_id.id_id', db_id_instance integer4 not null not default is 'exp.dmf.lg.ldb_id.id_instance', db_status varchar(100) not null not default is 'exp.dmf.lg.ldb_status', db_database_id integer4 not null not default is 'exp.dmf.lg.ldb_database_id', db_name varchar(32) not null not default is 'exp.dmf.lg.ldb_db_name', db_owner varchar(32) not null not default is 'exp.dmf.lg.ldb_db_owner' ) as import from 'tables' with dbms = IMA, structure = unique sortkeyed, key = (vnode, db_id_id); register table ima_log_transactions ( vnode varchar(64) not null not default is 'VNODE', tx_id_id integer4 not null not default is 'exp.dmf.lg.lxb_id.id_id', tx_id_instance integer4 not null not default is 'exp.dmf.lg.lxb_id.id_instance', tx_status varchar(100) not null not default is 'exp.dmf.lg.lxb_status', tx_db_id_id integer4 not null not default is tx_db_id_id integer4 not null not default is 'exp.dmf.lg.lxb_db.id_id', tx_db_name varchar(32) not null not default is 'exp.dmf.lg.lxb_db_name', tx_db_owner varchar(32) not null not default is 'exp.dmf.lg.lxb_db_owner', tx_pr_id_id integer4 not null not default is

Querying IMA
Management Architecture 10–17
'exp.dmf.lg.lxb_pr_id_id', tx_wait_reason varchar(30) not null not default is 'exp.dmf.lg.lxb_wait_reason', tx_first_log_address varchar (30) not null not default is 'exp.dmf.lg.lxb_first_lga', tx_last_log_address varchar (30) not null not default is 'exp.dmf.lg.lxb_last_lga', tx_transaction_id varchar(16) not null not default is 'exp.dmf.lg.lxb_tran_id', 'exp.dmf.lg.lxb_tran_id', tx_transaction_high integer4 not null not default is 'exp.dmf.lg.lxb_tran_id.db_high_tran', tx_transaction_low integer4 not null not default is 'exp.dmf.lg.lxb_tran_id.db_low_tran', tx_server_pid integer4 not null not default is 'exp.dmf.lg.lxb_pid', tx_session_id varchar(32) not null not default is 'exp.dmf.lg.lxb_sid', tx_user_name varchar(32) not null not default is 'exp.dmf.lg.lxb_user_name' ) as import from 'tables' with dbms = IMA, structure = unique sortkeyed, key = (vnode, tx_id_id);
Removing Table Registrations
Use the SQL remove table statement to remove the definition of an IMA table. This statement removes all catalog entries for the registered table, including any related views, integrities, and permits.
This statement has the following syntax:
remove table tablename;
where tablename is the table name for a registered IMA file.
Querying IMA Following are examples and descriptions of SQL features specific to IMA SQL applications. The examples show some of the capabilities provided by the IMA.
SQL Management Domains
A management domain consists of the objects in the servers and installations visible to an SQL application through the DBMS Enterprise Access. This domain is session-specific.

Querying IMA
10–18 System Administrator Guide
The domain is initially defined through a table registration. For more information, see Examples of Domain Tables discussed earlier in this chapter. Update queries can add or delete vnodes or servers to or from the domain.
Each vnode or server in the domain must be directly reachable through Ingres Net by the $ingres user in the vnode processing the query.
Control Objects
The MIB defines control objects that can be updated, using the SQL update statement, to produce known effects. The only rows that exist are those objects defined in the MIB, in a flat object table. For more information, see Example of a Flat Object Table in this chapter. They cannot be created or deleted through direct SQL manipulation. Because SQL is providing a view of an abstract MIB, the tables are not granted permissions for inserts and deletes.
For example, to add a new write-behind thread, update the “number of write-behind threads” object, rather than inserting a new row in a table of write-behind threads. Updating the “number of write-behind threads” object adds new objects that are related to the new thread.
IMA Dbmsinfo Constants
There are three new dbmsinfo constants available for use in queries involving IMA tables. Dbmsinfo is a function that returns a string containing information about the current session. This statement has the following syntax:
dbmsinfo('request_name')
where request_name is one of those listed in the table below:
Request Name Response Description
ima_server Returns the IMA current server
ima_session Returns the IMA current session
ima_vnode Returns the IMA current vnode
For further information about using dbmsinfo, see the SQL Reference Guide.

Querying IMA
Management Architecture 10–19
Query Examples to IMA Tables
The following sections provide examples of possible queries to IMA tables, based on the table registrations in the previous sections.
Note: Your actual queries must be based on the IMA models supplied on line.
Example: Controlling Management Domain
Seeing the current domain is the following simple query: select * from ima_session_domain;
The following query produces the ima_objects table that contains all objects that can be updated. For more information, see the table registration in Example of a Flat Object Table in this chapter. select * from ima_objects where classid like ‘exp.gcf.gca.%’;
Rows are added by updating (using the update statement) the ‘exp.gwf.gwm.session.control.add_vnode’ object. The following query adds all the servers in this vnode, expanding from the default of only this DBMS Server: update ima_objects set value = dbmsinfo(‘ima_vnode’) where classid = ‘exp.gwf.gwm.session.control.add_vnode’ and instance = ‘0’ and server = dbmsinfo(‘ima_server’);
The ‘exp.gwf.gwm.session.control.del_vnode’ object can be used to delete rows, and an update with any value to the ‘exp.gwf.gwm.session.control.reset_domain’ object removes all the rows in the domain.
Example: What Are User Sessions Doing?
The following query shows what user sessions are currently doing in all servers in the domain: select * from ima_server_sessions where db_owner != ‘’;This query includes sessions on other nodes of a cluster in a cluster installation.
Example: Who Is Waiting for a Lock?
The following query shows which sessions are waiting for locks: select distinct resource_id_id, lock_id_id, lock_state,

Querying IMA
10–20 System Administrator Guide
ima_locklists.locklist_id_id, locklist_server_pid, locklist_session_id, effective_user, db_name, session_terminal, session_query from ima_locks, ima_locklists, ima_server_sessions where lock_state != 'GRANTED' and ima_locks.locklist_id_id = ima_locklists.locklist_id_id and ima_locklists.locklist_server_pid = ima_server_sessions.server_pid and ima_locklists.locklist_session_id = ima_server_sessions.session_id;
Example: Who Holds Locks?
The following query shows which sessions are holding locks: select distinct lock_id_id, lock_state, ima_locklists.locklist_id_id, locklist_server_pid, locklist_session_id, effective_user, db_name, session_terminal, session_query from ima_locks, ima_locklists, ima_resources, ima_server_sessions where lock_state != 'WAITING' and ima_locks.locklist_id_id = ima_locklists.locklist_id_id and ima_locklists.locklist_server_pid = ima_server_sessions.server_pid and ima_locklists.locklist_session_id = ima_server_sessions.session_id;
Example: Who Is Holding a Lock Others Need?
The following query shows which sessions are holding locks for which other sessions are waiting: select distinct
resource_id_id, lock_id_id, lock_state, ima_locklists.locklist_id_id, locklist_server_pid, locklist_session_id,

Querying IMA
Management Architecture 10–21
effective_user, db_name, session_terminal, session_query from ima_locks, ima_locklists, ima_server_sessions where resource_id_id in ( select distinct ima_resources.resource_id_id from ima_resources where lock_state != 'GRANTED' and ima_locks.locks_id_id = ima_resources.resource_id_id ) and lock_state != 'WAITING' and ima_locks.locklist_id_id = ima_locklists.locklist_id_id and ima_locklists.locklist_server_pid = ima_server_sessions.server_pid and ima_locklists.locklist_session_id = ima_server_sessions.session_id;
Example: Shutting Down a Server
This query marks a server for shutdown when all sessions have exited, including this session (a Windows example is shown): update ima_mib_objects set value = ‘1’ where classid = ‘exp.clf.nt.cs.mon.shutserver’ and instance = ‘0’ and server = dbmsinfo(‘ima_server’);
Example: Monitoring Performance
First the following query is issued for an HP 9000/730 (a quick workstation) in various domains: select count(ima_meta.classid) from ima_meta;
Assume that the following rates are observed for this query:
Domain Rows Seconds Rows/sec
This DBMS 563 2 284
This instance, 1 DBMS 1257 5 251
Other instance, 1 DBMS 1193 28 42

Restrictions
10–22 System Administrator Guide
Also, the following query is issued for the ima_objects table: select count (ima_objects.classid) from ima_objects;
Assume that the following results are observed for this second query:
Domain Rows Seconds Rows/sec
This DBMS 8638 3 1266
This instance, 1 DBMS 17708 14 1265
Other instance, 1 DBMS 17410 54 322
Observe that operations in the local server are reasonably fast, as are operations to other servers in the local vnode. However, operations to other vnodes are notably slower.
This monitoring leads to the conclusion that queries involving scans, especially remote scans, must be avoided whenever possible. In particular, an update operation must always be done with a fully qualified server key or it scans the object space in the domain, which can be noticeably slow.
Restrictions Following is a summary of restrictions on IMA use for the current release:
■ There is limited data type support in table registrations.
– Only integer types, varchar, and char can be specified as data types in the register table statement.
– All columns must be not null not default.
■ The IMA supports full SQL but with the following current restrictions:
– There are no transactions (as there is no locking or lock ownership of the underlying objects). Updates take immediate action and cannot be rolled back.
– All reads are “dirty.” This means that querying the same record can return different (inconsistent) values as the data underlying the record are changed. You are not guaranteed to get consistent results if you select the same object repeatedly.
– Rule triggering is unreliable. Rules are not triggered when the value of an object changes in a way unknown through SQL. This occurs to IMA-related data as the installation operates. Thus, while updates that are performed through SQL can trigger rules, rule integrity cannot be guaranteed for IMA data.

Restrictions
Management Architecture 10–23
■ The group of defined objects supplied with the IMA initial release is subject to change in subsequent releases.
■ A cluster installation is visible to IMA as the installations on each node within a domain. No other special treatment is provided in the current IMA release.


Installing the High Availability Option for Sun 11–1
Chapter
11 Installing the High Availability Option for Sun
This appendix describes the installation and configuration procedures for Ingres High Availability Option in Sun cluster environments.
The information in this chapter is intended for engineers with extensive knowledge of software and hardware in the cluster environment, including cluster concepts such as high availability (HA), global file systems, the resource management object model, resource properties, logical hostnames, shared addresses, failover, and switchover.
High Availability Clusters Failover is the process by which a cluster automatically relocates a data service from a failed primary node to a designated secondary node. If a failover occurs, a brief interruption in service can occur, requiring you to reconnect after the failover has completed. Once reconnected, the physical server on which Ingres is running is transparent to the end user.
The automatic failover feature ensures that transactions are handled by an active node in the cluster if a hardware or software failure occurs.
Note: Any transactions that are in flight at the time of failure are lost.
The Ingres High Availability Option for clusters runs application instances only on a single node. Depending on how the data service has been configured, when the fault monitor detects an error, it either attempts to restart the instance on the same node or to start the instance on another node for failover.
Note: The Ingres High Availability Option is not scalable; that is, it does not provide active instances on multiple nodes.

High Availability Option for Sun Clusters
11–2 System Administrator Guide
High Availability Option for Sun Clusters This chapter refers to specific Sun Cluster administration commands. For additional information about these commands, consult your Sun Cluster documentation.
Configuration Guidelines for System and Data Files
Ingres system files can exist on either the local disks of each cluster node or on the cluster file system. Ingres data and related files must exist on the shared cluster file system. It is recommend that all system, data, and data related files be stored in the clustered file system.
Clustered File Systems
Access to Ingres data does not depend on the type of clustered file system. The clustered file systems must be configured with either Solstice DiskSuite or the VERITAS Volume Manager.
For instructions on creating a global disk group, see the Sun DiskSuite documentation or the VERITAS Volume Manager documentation.
Register the disk group with the cluster using the Sun Cluster administration command scconf.
Configure the disk group as a SUNW.HAStorage Resource Type. This synchronizes actions between HA storage and Ingres High Availability Option. For more information, see the SUNW.HAStorage(5) man page.
DBMS Server Requirements
When using the Ingres High Availability Option, the Ingres DBMS server is installed and configured as a typical installation, provided that the database-related files are installed on the clustered file system. Using a logical hostname simplifies the installation and configuration of the Ingres DBMS Server in the clustered environment. Conversely, each node can be independently configured.
Using a Logical Hostname
To set up a logical hostname, run the script iisuscha. Answer yes to “configure a logical hostname” and enter the logical hostname to be used in the HA cluster. This changes the congfig.dat file by replacing the server name with the logical hostname and sets II_HOSTNAME to the logical hostname. Use this same logical host name when registering the HA option with the Sun cluster.

High Availability Option for Sun Clusters
Installing the High Availability Option for Sun 11–3
Node Independent Configuration
If the variable II_HOSTNAME is not to be used for a logical hostname, each host configuration must be set up in the config.dat file.
The first host on which Ingres is installed does not need additional setup. To add additional hostnames that can be used in the cluster, run the script iisuscha. Answer no to “configure a logical hostname.” Answer yes to “add a HA host” and enter the additional host to be added. This duplicates the entries in config.dat to match the primary server configuration settings.
Each node then has a different DBMS server configuration, which is helpful in an unbalanced cluster. Each time a change is made to the Ingres configuration, the same change must be completed on each individual node.
Verifying Sun Cluster Software Installation
The Sun Cluster packages must be installed and configured on the cluster nodes before installing the Ingres High Availability Option. The installation must be verified by a qualified Sun Cluster Engineer using the following commands:
Command Description scinstall –pv Displays the Sun cluster release and version information. scrgadm –p Displays the Sun cluster configured resource types, resource
groups, and resources. scstat –p Displays the status of the Sun cluster components. scconf –p Displays the cluster configuration.
Installing the Package
The Ingres High Availability Option must be installed on all nodes in the cluster where the Ingres DBMS Server can failover.
Registering the Resource
Once the data service is installed on all nodes in the cluster, the resource must be registered.
All administration must be done as a super user, normally the “root” user.

High Availability Option for Sun Clusters
11–4 System Administrator Guide
Registering the Ingres High Availability Option Type
During the installation of the Ingres High Availability Option, the resource type (CA.ingres_server) for the data service is automatically registered.
If the resource type is not registered, use the following command to register it: # scrgadm –a –t CA.ingres_server –f /opt/CA/AdvatageIngresSCAgent/etc/CA.ingres_server
Flag Description
-t Specifies the predefined resource type name for the CA.ingres_server DBMS High Availability Option.
-f Specifies the pathname of the resource type registration file and is required if the file is not in the well-known directory (usually /usr/cluster/lib/rgm/rtreg).
Registering and Configuring Ingres High Availability Option
After the Ingres High Availability Option package has been installed, perform these steps:
1. Become the super user on a cluster node by using the following command: % su
2. Create a failover resource group to hold the network and application resources by using the following command: # scrgadm –a –g <resource-group> [-h nodelist]
Flag Description
-a Adds the data service resource type.
-g Specifies the name of the resource group. This name can be your choice but must be unique for resource groups within the cluster.
-h Specifies an optional comma-separated list of physical node names or IDs that identify potential masters. The order here determines the order in which the nodes are considered as primary during failover.

High Availability Option for Sun Clusters
Installing the High Availability Option for Sun 11–5
3. Create a Logical Hostname resource in the group using the following command: # scrgadm –a –L –g <resource-group> -l <logical-hostname>
Flag Description
-a Adds the data service resource type.
-L Adds a Logical Hostname resource type.
-g Specifies the name of the resource group. This name can be your choice but must be unique for resource groups with the cluster.
-l Specifies a network resource. The network resource is the logical hostname or shared IP address that clients use to access Ingres for Sun Cluster HA.
4. Create an Ingres resource in the group by using the following Sun Cluster administration command: # scrgadm –a –j <resource-name> -g <resource-group> \
-t CA.ingres_server \
-x II_SYSTEM=<$II_SYSTEM> \
–x II_OWNER=<ingres> \
–x II_HOSTNAME=<logical_host> \
[-x User=<user> -x Pword=<password> \
-x Database=<database>] \
[-x EnvFile=<environmentfile>] \
[-x II_SCHA_TRACE=<level> –x II_SCHA_LOG=<filename>]
Flag Description
-a Adds the data service resource type.
-j Specifies the name of the resource to be added.
-g Specifies the name of the resource group. This name can be your choice but must be unique for resource groups with the cluster.
-t Specifies the predefined resource type name for the CA.ingres_server DBMS High Availability Option.
-x II_SYSTEM Sets the path for the Ingres system directory.
-x II_OWNER Sets the Ingres owner.
-x II_HOSTNAME Sets the logical host name.

High Availability Option for Sun Clusters
11–6 System Administrator Guide
Flag Description
-x User (Optional) Sets the users for secondary monitoring.
-x Pword (Optional) Sets the password for secondary monitoring.
-x Database (Optional) Sets the database for secondary monitoring.
-x EnvFile (Optional) Sets the file used to load additional user specified environment variables.
-x II_SCHA_TRACE (Optional)
Sets the trace level for debugging. Valid levels are 0 for no tracing and 1-9 for debugging information.
-x II_SCHA_LOG (Optional)
Sets the filename for the trace output.
Notes: ■ When a fault occurs in the Ingres services resource that causes a restart,
the whole resource group is restarted. Other resources in the resource group are restarted, even if they did not have a fault. To prevent other resources from being restarted along with the Ingres services, put them in a separate resource group.
■ To override the default values, you can set additional extension properties for the Ingres High Availability Option.
5. Bring the resource group online by using the following command: # scrgadm –Z -g <resource-group>
Flag Description
-Z Enables all resources of the specified resource group.
-g Specifies the name of the resource group. This name can be your choice but must be unique for resource groups within the cluster.
6. Verify that the Ingres High Availability Option resource has come online on one node of the cluster by using the following command: # scstat -g
Starting and Stopping Ingres
When using Ingres in a clustered environment, it cannot be shut down or started by the Ingres user. All starting and stopping must be done through the cluster service.

High Availability Option for Sun Clusters
Installing the High Availability Option for Sun 11–7
If Ingres is shut down while under the control of the High Availability Option, the cluster process sees this as a failure and either tries to restart Ingres on the same node or failover the service to the failover node.
Starting Ingres
To bring Ingres online in a clustered environment, use the following Sun Cluster command: # scrgadm –Z –g <ingres_resource_group>
Note: Do not use the ingstart command to start Ingres in a clustered environment.
Stopping Ingres
To bring Ingres offline, use the following Sun Cluster command: # scrgadm –F –g <ingres_resource_group>
Note: Do not use the ingstop command to stop Ingres in a clustered environment.
Clearing a Fault
If the resource group has a fault, Ingres cannot start. To clear the failure, use the following Sun Cluster command: # scswitch –c –h <host>–j <ingres_resource_name> –f STOP_FAILED
To make sure Ingres is shutdown, use the command: # scrgadm –F –g <ingres_resource_group>
Changing a Resource Property
To change a resource property, use the following command: # scrgadm –c –j <ingres_resource_name> –x <extension_property>=<value>
Debugging
To turn on debugging, set the II_SCHA_TRACE level (0-9) and II_SCHA_LOG file name by following these steps:
Set the debug out file name, “scgradm –c –j <ingres_resource_name> –x II_SCHA_TRACE=path_to_debug_output”

High Availability Option for Sun Clusters
11–8 System Administrator Guide
1. Set the trace level using the following Sun Cluster command: # scrgadm –c –j <ingres_resource_name> –x II_SCHA_TRACE=<0-9>
where
0=none
1=minimal
9=maximum.
2. Set the debug out file name: scgradm –c –j <ingres_resource_name >–x ll_SCHA_TRACE=<path_to_debug_output>
To turn off debugging, set the level to 0 and the path to “”.
Removing the High Availability Option
Follow these steps to remove the Ingres High Availability Option:
1. Bring Ingres offline using the following Sun Cluster command: # scrgadm –F –g <ingres_resource_group>
2. Disable the resource using the following Sun Cluster command: # scswitch –n –j <ingres_resource_name>
3. Remove the resource using the following Sun Cluster command: # scrgadm –r –j <ingres_resource_name>
4. Disable the logical host using the following Sun Cluster command: # scwitch –n –j <logical_hostname>
5. Remove the logical host using the following Sun Cluster command: # scrgadm –r –j <logical_hostname>
6. Remove the resource group using the following Sun Cluster command: # scrgadm –r –g <ingres_resource_group>
7. Remove the resource type (CA.ingres_server) using the following Sun Cluster command: # scrgadm –r –t CA.ingres_server
Note: Do not remove this file if a new Ingres High Availability Option resource group is to be created.

Installing the High Availability Option for Windows 12–1
Chapter
12 Installing the High Availability Option for Windows
This appendix describes the installation and configuration procedures for Ingres High Availability Option in Windows cluster environments.
The information in this chapter is intended for engineers with extensive knowledge of software and hardware in the cluster environment, including cluster concepts such as high availability (HA), cluster disk, resource types, virtual servers, cluster administrator, and failover.
High Availability Clusters Failover is the process by which a cluster automatically relocates a data service from a failed primary node to a designated secondary node. If a failover occurs, a brief interruption in service can occur, requiring you to reconnect after the failover has completed. Once reconnected, the physical server on which Ingres is running is transparent to the end user.
The automatic failover feature ensures that transactions are handled by an active node in the cluster if a hardware or software failure occurs.
Note: Any transactions that are in flight at the time of failure are lost.
The Ingres High Availability Option for Windows Cluster Service runs application instances only on a single node. Depending on how the data service has been configured, when the fault monitor detects an error, it either attempts to restart the instance on the same node or to start the instance on another node for failover.
Note: The Ingres High Availability Option is not scalable; that is, it does not provide active instances on multiple nodes.

High Availability Option for Windows Cluster Service
12–2 System Administrator Guide
High Availability Option for Windows Cluster Service This chapter assumes knowledge of Microsoft Windows 2000 Advanced Server or Datacenter Server, Windows Clustering, and Windows 2000 Cluster Service. It refers to specific Windows Cluster Service commands and procedures. For additional information about these commands, see your Windows Cluster Service documentation.
Configuration Guidelines for System and Data Files
Ingres system files, data, and related files must exist on a cluster disk.
Cluster Disk
A cluster disk is a disk on a shared bus connected to the cluster nodes, which all the cluster nodes can access (though not at the same time).
Access to Ingres data does not depend on the type of clustered disk system (shared external SCSI, SCSI RAID, or SCSI over Fiber Channel).
Physical Disk Resource Type
The cluster service uses the Physical Disk resource type to manage disks that are on a cluster storage device.
Disks must have the same drive letters on all cluster nodes.
To prevent data corruption, only one node at a time can use a cluster disk. Cluster Service normally prevents more than one node from using a disk at the same time. However, there are some circumstances not protected by ordinary cluster safeguards: when you install a new disk, and when you remove a disk from a cluster. For more information, see the Windows 2000 Server documentation.
The Ingres system, data, and related files must exist on a Physical Disk resource type.

High Availability Option for Windows Cluster Service
Installing the High Availability Option for Windows 12–3
Generic Service Resource Type
You use the Generic Service resource type to manage Windows 2000 services as cluster resources.
The Ingres High Availability Option for Windows installs the Ingres Service as a Generic Service resource type. You must specify, during setup, the Physical Disk resource(s) that contain the Ingres data and related files as dependencies of the Ingres Service cluster resource.
DBMS Server Requirements
When using the Ingres High Availability Option, the Ingres DBMS Server (or client-only installation) is installed and configured as a typical installation, if the database-related files are installed on the shared cluster disk system. Using a virtual server name simplifies the installation and configuration of the Ingres DBMS Server in the clustered environment.
Virtual Servers
To access a DBMS server in a non-clustered environment, network clients must connect to a physical server, identified by a network name and IP address. If that server fails, access to the DBMS is impossible.
Windows 2000 Clustering enables the creation of virtual servers, identified by a unique network name and IP address (different from the underlying physical server’s network name and IP address). Unlike a physical server, a virtual server is not associated with a specific computer. If the node hosting the virtual server fails, clients can still access the DBMS using the same server name.
Using a Virtual Server Name
Installing the Ingres High Availability Option modifies the Ingres installation to use the virtual server name. This changes the config.dat file by replacing the server name with the virtual server name and sets II_HOSTNAME to the virtual server name. To automatically reconnect to the server after a failover, network clients must use this virtual server name when connecting to the DBMS Server.
Verifying Windows Cluster Service Installation
The Windows Cluster Service must be installed and configured on the cluster nodes before installing the Ingres High Availability Option. The Cluster Service is a component of Windows Clustering that creates a server cluster and controls all aspects of its operation.

High Availability Option for Windows Cluster Service
12–4 System Administrator Guide
Cluster Administrator
Cluster Administrator is an application used to configure a cluster. It can run on any member of the trusted domain, whether the computer is a node of the cluster or not.
To verify the Windows Cluster Service installation, a system administrator can start Cluster Administrator from the Windows Start menu. Choose Start, Programs, Administrative Tools, Cluster Administrator.
Cluster Command
As an alternative to using Cluster Administrator, you can use the cluster command from the Windows command prompt. Also, the command (cluster.exe) can be called from command scripts.
To verify the installation, a system administrator can use the following commands:
Command Description
cluster /version Displays the cluster version and service pack information.
cluster node Displays the status of all nodes in the cluster.
cluster resource Displays the status of all cluster resources.
Setting Up the High Availability Option
The Ingres High Availability Option must be set up on all nodes in the cluster where the Ingres DBMS Server is allowed to failover. The Cluster Setup utility, wincluster.exe, is automatically installed in the ingres\bin subdirectory when either the Ingres DBMS Server or the Communications Server (client-only option) is installed.
The Cluster Setup utility performs the following functions:
■ Ensuring that Ingres is installed as a service on the cluster node
■ Registering the Ingres Service as a Generic Service cluster resource
■ Creating or updating the cluster group for the DBMS Server or Net server (client-only)
■ Establishing dependencies of the Ingres Service on the required cluster resources (network name and disk)
■ Modifying the existing Ingres installation for Windows Clustering

High Availability Option for Windows Cluster Service
Installing the High Availability Option for Windows 12–5
Running the Cluster Setup Utility
Once the Ingres Server is installed on a single node in the cluster, you must run the Cluster Setup Utility on that node. When the Cluster Setup Utility has run successfully on that node, you can use the Windows Cluster Administrator to move the cluster group containing the Ingres Server to another node. The Cluster Setup Utility must run on each node of the cluster where the Ingres Server is allowed to failover.
All administration must be done as a system administrator.
Starting the Cluster Setup Utility
Start the Cluster Setup Utility either from the Windows Start menu or from the command line.
Note: In the following instructions, D is the drive letter of the physical disk where you installed Ingres and II is the Ingres installation identifier you used.
To start from the Start menu, choose Start, Run, and then type D:\Ingres [II]\ingres\bin\wincluster.exe. Click OK.
To start from the command line, type: cd /d D:\Ingres [II]\ingres\bin
wincluster

High Availability Option for Windows Cluster Service
12–6 System Administrator Guide
The Ingres High Availability Option Setup Wizard appears.
Click Next to continue.

High Availability Option for Windows Cluster Service
Installing the High Availability Option for Windows 12–7
Select an Installation Identifier
Select an existing installation by clicking on the Installation ID of the installation where you are installing the High Availability Option.
Click Next.
A message box appears, asking you to read the instructions in this guide.
Click Yes to continue.

High Availability Option for Windows Cluster Service
12–8 System Administrator Guide
Define the Windows Cluster Service Properties
The Cluster Name is displayed on the next dialog in the wizard.
If you plan to use an existing cluster group, click to expand the Cluster group name list box and select the cluster group name. If not, type a name for the new cluster group.
If you are running the High Availability Setup for the first time, type a new name in the Ingres resource name. If you have already run Cluster Setup (on another node), click to expand the Ingres resource name box and select the name of the Ingres Service that you used when you initially ran the Cluster Setup.
Click Next to continue.

High Availability Option for Windows Cluster Service
Installing the High Availability Option for Windows 12–9
Identify the Windows Cluster Resource Dependencies
The next dialog displays available cluster resources.
Select one or more resources, and then click the Add button ( ) to add them to the Dependencies. Alternatively, you can double-click a resource name to move it to the Dependencies.
For the Ingres Server to properly fail over in the cluster, the Physical Disk resource that contains the Ingres data and related files must be added as a dependency. You can add the Cluster Name for the virtual server, as well.
Click Next to continue.
The last dialog of the Cluster Setup Wizard appears.

High Availability Option for Windows Cluster Service
12–10 System Administrator Guide
Finishing the Setup
To complete the setup of the Ingres High Availability Option, click Finish.
If you want to review or change any of your cluster settings, click Back.
If you want to cancel setup and exit the Cluster Setup Wizard, click Cancel.
When you click Finish, the Cluster Setup Wizard registers the Ingres Service as a generic service cluster resource and adds it to the cluster group you named. In addition, the Cluster Setup modifies the existing Ingres installation for Windows 2000 Cluster Service.
A message box displays when the Cluster Setup Wizard finishes.
Click OK to exit the wizard.

High Availability Option for Windows Cluster Service
Installing the High Availability Option for Windows 12–11
Starting and Stopping Ingres
When using Ingres in a clustered environment, it cannot be shut down or started by the Ingres user. All starting and stopping must be done through the cluster service.
If Ingres is shut down while under the control of the High Availability Option, the cluster service sees this as a failure and either tries to restart Ingres on the same node or fail over the service to the failover node.
Starting Ingres
To bring Ingres online in a clustered environment, use the Windows Cluster Administrator.
To start the Cluster Administrator, choose Start, Settings, Control Panel, Administrative Tools, Cluster Administrator. The Cluster Administrator window is displayed.
Expand the Groups folder and choose the Ingres Group. Right-click the Ingres Service in the resources window, and choose Bring Online.
Alternatively, you can use the following Cluster command: C:> cluster resource <ingres_resource_name> /online /wait:300
To bring the entire Ingres group online, use the following command: C:> cluster group <ingres_resource_group> /online /wait:300

High Availability Option for Windows Cluster Service
12–12 System Administrator Guide
If you omit “/wait:300,” you may see the following message, which indicates that the Ingres service did not reply within the default time period. However, the cluster command executed properly. System error 997 has occurred. Overlapped I/O operation is in progress.
Note: Do not use the ingstart command to start Ingres in a clustered environment.
Stopping Ingres
To take Ingres offline in a clustered environment, use the Windows Cluster Administrator.
In the Cluster Administrator window, expand the Groups folder and choose the Ingres Group.
Right-click the Ingres Service in the resources window, and choose Take Offline.
Alternatively, you can use the following Cluster command: C:> cluster resource <ingres_resource_name> /offline /wait:300
To take the entire Ingres group offline, use the following command: C:> cluster group <ingres_resource_group> /offline /wait:300

High Availability Option for Windows Cluster Service
Installing the High Availability Option for Windows 12–13
If you omit “/wait:300,” you may see the following message, which indicates that the Ingres service did not reply within the default time period. However, the cluster command executed properly. System error 997 has occurred. Overlapped I/O operation is in progress.
Note: Do not use the ingstop command to stop Ingres in a clustered environment.
Removing the High Availability Option
Follow these steps to remove the Ingres High Availability Option using the Windows Cluster Administrator.
1. Take the Ingres resource offline.
In the Cluster Administrator window, expand the Groups folder and choose the Ingres Group.
Right-click the Ingres Service in the resources window, and choose Take Offline.
2. Move the resource group containing the Ingres service to the node where
you originally installed Ingres. In the Cluster Administrator window, expand the Groups folder. Right-click the Ingres Group, and choose Move Group.
3. Uninstall Ingres on the node where you originally installed it.
4. Delete the Ingres resource.
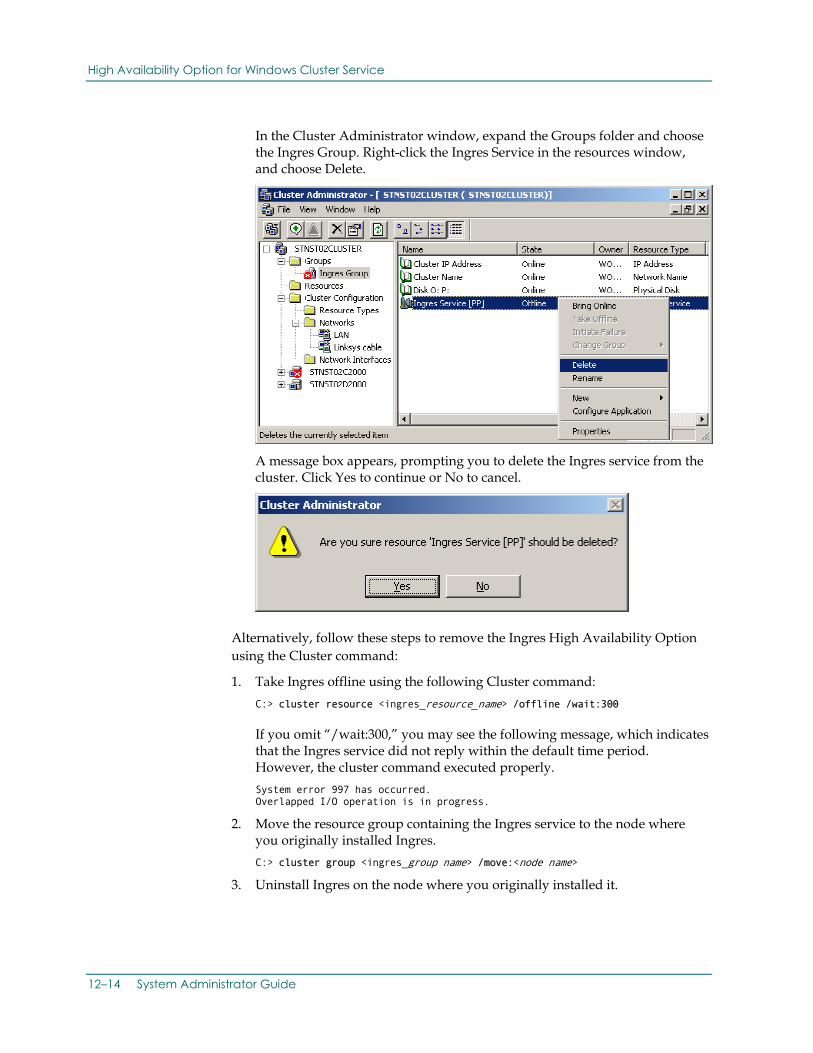
High Availability Option for Windows Cluster Service
12–14 System Administrator Guide
In the Cluster Administrator window, expand the Groups folder and choose the Ingres Group. Right-click the Ingres Service in the resources window, and choose Delete.
A message box appears, prompting you to delete the Ingres service from the cluster. Click Yes to continue or No to cancel.
Alternatively, follow these steps to remove the Ingres High Availability Option using the Cluster command:
1. Take Ingres offline using the following Cluster command: C:> cluster resource <ingres_resource_name> /offline /wait:300
If you omit “/wait:300,” you may see the following message, which indicates that the Ingres service did not reply within the default time period. However, the cluster command executed properly. System error 997 has occurred. Overlapped I/O operation is in progress.
2. Move the resource group containing the Ingres service to the node where you originally installed Ingres. C:> cluster group <ingres_group name> /move:<node name>
3. Uninstall Ingres on the node where you originally installed it.

High Availability Option for Windows Cluster Service
Installing the High Availability Option for Windows 12–15
4. Delete the resource using the following Cluster command: C:> cluster resource <ingres_resource_name> /delete


Environment Variables/Logicals A–1
Appendix
A Environment Variables/Logicals
This appendix alphabetically lists the basic Ingres environment variables/logicals and a description of each. Use this appendix as a reference in conjunction with the chapter “Setting Environment Variables/Logicals,” which describes the Ingres environment variables/logicals most commonly defined and the system level at which they are usually set.
Additional special purpose Ingres environment variables/logicals can be used in your installation, depending on the equipment and configuration.
List of Environment Variables/Logicals The Ingres environment variables/logicals are listed alphabetically in the following table:
Variables/Logical Description
DBNAME_ING Specifies a startup file of set commands to be executed whenever a user opens the specified database (DBNAME) DBNAME_ING can be defined installation-wide or locally.
Windows DBNAME_ING affects any user who connects to the database specified by DBNAME using the QUEL Terminal Monitor.
UNIX DBNAME_ING is effective in all user interfaces, including a terminal monitor.
VMS
The syntax for defining this logical is:
define DBNAME_ING path_to_file
DBNAME_SQL_INIT Specifies a startup file of set commands to be executed whenever a user connects to the database specified by DBNAME using the SQL single-line Terminal Monitor. It can be set installation-wide or locally. For details on using DBNAME_SQL_INIT, see the chapter “Setting Environment Variables/Logicals.”

List of Environment Variables/Logicals
A–2 System Administrator Guide
Variables/Logical Description
DD_RSERVERS Points to the directory hierarchy that is used by the Replicator servers.
Note: DD_RSERVERS is not a required variable. If it is not set, it defaults to the "rep" subdirectory under the Ingres installation directory.
Windows By default, DD_RSERVERS is defined to be %II_SYSTEM%\ingres\rep. To define a different location, use, for example:
set DD_RSERVERS c:\rep2
UNIX By default, DD_RSERVERS is defined to be the $II_SYSTEM/ingres/rep. To define a different location, use, for example:
C Shell:
setenv DD_SERVERS /usr/rep2
Bourne Shell:
DD_RSERVERS=/usr/rep2; export DD_RSERVERS
VMS
By default, DD_RSERVERS is defined to be the II_SYSTEM:[ingres.rep]. To define a different location, use, for example:
define DD_RSERVERS user_disk:[rep2]
The $DD_RSERVERS/servers (DD_SERVERS:[servers] for VMS) directory contains server1 through server10. These directories are used by the Replicator servers during runtime.
If you need your installation to support multiple Replicator configurations and/or multiple source databases, use DD_RSERVERS to access each Replicator environment. For each environment, create a DD_RSERVERS directory with the subdirectory servers. In the servers directory, create subdirectories server1 through serverN where N is the number assigned to the Replicator Server.
II_4GL_DECIMAL Determines the decimal point character for 4GL source input. For example, in France, the decimal point character is a comma. The default value is “.”. Valid values are “.” and “,”.
II_AFD_TIMEOUT Set to the number of seconds before timeout in Vision’s Application Flow Diagram.
When you are using Vision’s Application Flow Diagram, Vision periodically checks for changes made by concurrent developers that affect the diagram. If such a change has been made, Vision notifies you and gives you a chance to update the display.
You can set II_AFD_TIMEOUT to any value greater than 20, or 0 to disable the timeouts. Setting the value to much less than the default of 300 seconds causes Vision to time out and query the database often enough to visibly affect performance.

List of Environment Variables/Logicals
Environment Variables/Logicals A–3
Variables/Logical Description
II_APPLICATION_ LANGUAGE
Set to the language Application-By-Forms uses to translate string constants.
ABF allows you to internationalize your applications by translating the string constants you define for them. When you run the application, it normally uses the constants defined for your default language. You can override this by defining II_APPLICATION_LANGUAGE to the name of another language. For more information, see Forms-based Application Development Tools User Guide.
II_BIND_SVC_xx Set to the bind address for Ingres tools connections to a named Ingres or Advantage Enterprise Access installation.
II_C_COMPILER
VMS
Set to the value of the C compiler in use for ABF. Valid entries are VAX11(VAX/VMS only), DECC, or NONE. II_C_COMPILER is defined at the system or group level.
(Call Technical Support for information about how to change the C compiler used by ABF.)
II_CHARSETxx Set to the type of character set used for string operations. This is set during ingbuild and cannot be changed without corrupting data.
II_CHECKPOINT An area set to the full file specification for the default checkpoint location, ii_checkpoint. It is set by the system administrator during the ingbuild procedure and cannot be changed, even during installation updates. Specific databases can designate alternate locations for checkpoints as a parameter to the createdb command.
II_CLIENT Set to “true” for client installations. Do not change II_CLIENT if it is set.
II_COLLATION Determines the collating sequence for a database when the database is created. Valid entries are “multi” to specify the DEC Multinational Character Sequence or “spanish” to specify the Spanish alphabet’s character sequence. For more information about collation sequences, see Local Collation Sequences in the chapter “Customization Options.” II_COLLATION can be defined at the system level or redefined by the individual user at the process or job level.
II_CONFIG Set to the full file specification of the Ingres files directory during the installation procedure. It cannot be changed.
II_CONNECT_RETRIES Number[d|D] — The number of times an application retries a connection before returning an error. Default = 1. Either flag (d or D) causes a delay before the retry.
II_DATABASE An area set to the full file specification for the default database location, ii_database. It is set by the system administrator during the ingbuild procedure and cannot be changed, even during installation updates. Specific databases can designate alternate locations as a parameter to the createdb command.

List of Environment Variables/Logicals
A–4 System Administrator Guide
Variables/Logical Description
II_DATE_FORMAT Defines the format style for date values. It is defined installation-wide. Default is the US value with an output format of dd-mmm-yyyy. Default legal input formats for US dates include:
mm/dd/yy mm/dd/yyyy dd-mmm-yyyy mm-dd-yyyy yyyy.mm.dd yyyy_mm_dd mmddyy mm-dd mm/dd
If set, it replaces the default format with an alternative format. The following are valid II_DATE_FORMAT settings, showing the alternative output format:
Setting Output Format
US (default) dd-mmm-yyyy
ISO yymmdd
MULTINATIONAL dd/mm/yy
SWEDEN or FINLAND yyyy-mm-dd
GERMAN dd.mm.yy
DMY dd-mmm-yyyy
MDY mmm-dd-yyyy
YMD yyyy-mmm-dd
For example, if the logical’s setting is ISO, the dates are output as yymmdd. If you enter a date using a similar, six-character format, such as mmddyy, the date is interpreted on output as yymmdd. For example, if you enter the date March 9, 1912, as 030912 (mmddyy) and II_DATE_FORMAT is set to ISO, this date is interpreted as Sept. 12, 1903 (030912 as yymmdd). You receive an error message if the date you entered cannot be interpreted as a valid date in the output format.
Note that when using the _date4() function (MULTINATIONAL4), the output format for the year value always returns ‘yyyy’. For more information about valid date input and output formats, see the SQL Reference Guide.

List of Environment Variables/Logicals
Environment Variables/Logicals A–5
Variables/Logical Description
II_DATE_CENTURY_ BOUNDARY
Determines the inferred century for a date that is missing the century on input. Can be set to an integer value in the range of 0 < n < =100. If this environment variable is not set in the user’s environment or if it is set to 0 or 100, the current century is used.
The century is determined by the following calculation: if ( date_year < II_DATE_CENTURY_BOUNDARY ) then (date_year += 2000) else (date_year += 1900) endif For example, if II_DATE_CENTURY_BOUNDARY is 50 and the current year is 1999, an input date of 3/17/51 is treated as March 17, 1951, but a date of 03/17/49 is treated as March 17, 2049.
If the user enters the full four digits for the year into a four-digit year field in the application, the year is accepted as entered, regardless of the II_DATE_CENTURY_BOUNDARY environment variable setting.
II_DBMS_LOG Points to the location of the log file containing DBMS server-specific error messages. It is set installation-wide. The server reads it at startup time, so changing it after startup has no effect on an existing server. Most error messages written to this file are also logged to the installation-wide error log (errlog.log). Some server trace messages and statistics information are written to the II_DBMS_LOG file that are not written to errlog.log. The default, if not set, is:
Windows %II_SYSTEM%\ingres\files\errlog.log
UNIX $II_SYSTEM/ingres/files/errlog.log
VMS
II_SYSTEM:[INGRES.FILES]ERRLOG.LOG
II_DBMS_SERVER Points to the DBMS Server to which the client process automatically connects. It can be set installation-wide or locally. Note that when II_DBMS_SERVER is set, application processes bypass the Name Server. Using II_DBMS_SERVER requires setting II_GC_REMOTE in the DBMS Server installation. For additional information, see the II_GC_REMOTE description in this appendix.
II_DECIMAL Specifies the one character used to separate fractional and non-fractional parts of a number. Default value is the period (.), as in 12.34. Alternatively, the comma (,) can be used, as in 12,34. Only (.) and (,) are allowed. It is set installation-wide.

List of Environment Variables/Logicals
A–6 System Administrator Guide
Variables/Logical Description
II_DIRECT_IO
UNIX
If set, causes disk reads/writes to be done directly to disk, circumventing the UNIX file buffer system. It is only available on some platforms.
II_DML_DEF Defines the default query language for an installation as SQL or QUEL. It is used in installations that support both the SQL and QUEL database languages, in which case one such language can be designated as the default. Applications-By-Forms, Ingres 4GL, and Report-By-Forms are parts of the Ingres tools that use II_DML_DEF. SQL is the default if this is not set. It can be set installation-wide or locally.
II_DUMP An “area” that specifies the default location of the dump log files used in online backup. (For more information on online backup, see the ckpdb description in the Command Reference Guide.) It is defined installation-wide in the ingbuild procedure and cannot be changed.
II_EMBED_SET Allows application programs to set a variety of features. It can be set installation-wide or locally. The acceptable values and the actions they specify are:
errorqry—Prints query that caused error.
savequery—Enables/disables saving of the text of the last query issued. Specify 1 to enable or 0 to disable. To obtain the text of the last query, you must issue the inquire_ingres(:query= querytext) statement. To determine whether saving is enabled, use the inquire_ingres(:status=savequery) statement.
printqry—Prints all query text and timing information to iiprtqry.log file in the current directory.
qryfile—Specifies an alternate text file to which query information is written. The default file name is iiprtqry.log.
printgca—Traces GCA messages to the iiprtgca.log file in the current directory.
gcafile—Specifies an alternate text file to which GCA information is written. The default file name is iiprtgca.log.
printtrace—Enables or disables saving of DBMS trace messages to a text file (specified by tracefile). Specify 1 to enable saving of trace output, or 0 to disable saving.
tracefile—Specifies an alternate text file to which tracepoint information is written. The default file name is iiprttrc.log.
sqlprint—Prints all errors and database procedure messages arising from embedded SQL statement.
eventdisplay—Print events as they return from DBMS.

List of Environment Variables/Logicals
Environment Variables/Logicals A–7
Variables/Logical Description
dbmserror—Makes local (DBMS) error numbers the default error numbers returned to the application in errorno and the SQLCA’s sqlcode.
genericerror—Makes generic error numbers the default error numbers returned to the application in errorno and the SQLCA’s sqlcode.
prefetchrows—Specifies the number of rows to be “prefetched” when retrieving data using cursors. Valid arguments are:
0 (default)—Ingres determines the number of rows to prefetch.
1—Disables prefetching. Each row is fetched individually.
N (positive integer)—Specifies the number of rows to be prefetched.
II_ERSEND
UNIX
Set during the installation procedure to the full path name of the errlog.log file.
II_FRS_KEYFIND Allows users to turn off the keyfind frs function on table fields in read mode.
II_GC_REMOTE Allows or disallows a direct connection between the application process on the client machine and the Ingres DBMS process on the server machine, thus bypassing Name Server processing. The vnode attribute, connection_type, must be set to “direct” to enable direct connections. For additional information on this vnode attribute, see the Connectivity Guide.
II_GC_REMOTE only needs to be set in the DBMS Server installation.
Valid II_GC_REMOTE values are:
ON or ENABLE — Allows direct connections that use the vnode attribute as described above, and rejects direct connections that are attempted using the II_DBMS_SERVER environment variable.
FULL or ALL — Allows both vnode controlled and II_DBMS_SERVER controlled direct connections. You must avoid using this setting because it compromises network security. (No validation occurs to determine whether the client installation has permission to access the server installation.)
If II_GC_REMOTE is not set, or is not set to one of the above values, direct connections are disallowed.
II_GCA_LOG Denotes the output destination for II_GCx_TRACE trace information for all Ingres components. Can be set to stdio or to the full path to a file.

List of Environment Variables/Logicals
A–8 System Administrator Guide
Variables/Logical Description
II_GCx_TRACE Environment variables/logicals for tracing, listed below with the item traced shown to the right:
II_GCA_TRACE—General Communications Architecture (GCA)
II_GCN_TRACE—Name Server (GCN)
II_GCC_TRACE—Communication Server (GCC)
II_GCD_TRACE—Data Access Server (GCD)
II_GC_TRACE—GCA Compatibility Library
II_GCCCL_TRACE—GCC Compatibility Library
These can be set separately to a number from 0 to 4 specifying trace level, with levels 1 through 4 increasing in amount of information traced.
If any of these values are set to non-zero, trace statements for the appropriate items are logged in the II_GCA_LOG file.
II_GCC_LOG Denotes the output destination for the Communications Server (GCC) trace information. Setting this environment variable is preferable to using II_GCA_LOG because it is dedicated to the Communications Server process.
II_GCD_LOG Denotes the output destination for the Data Access Server (GCD) trace information. Setting this environment variable is preferable to using II_GCA_LOG because it is dedicated to the Data Access Server process.
II_GCN_LOG Denotes the output destination for the Name Server (GCN) trace information. Setting this environment variable is preferable to using II_GCA_LOG because it is dedicated to the Name Server process.
II_GCNxx_PORT Contains the connect address of a local installation’s Name Server. Must not be reset.
xx = 2-character code defined by II_INSTALLATION
II_HALF_DUPLEX If set to 0 or undefined, this variable enables Net duplex operation for SNA LU6.2 conversations. If set to 1, the Net half-duplex operation is enabled.
II_HELP_EDIT If set to any value, adds an extra operation, Edit, to menus encountered in help text screens in the forms systems. The Edit operation enables users to edit the help text in the screen with the text editor defined by ING_EDIT. II_HELP_EDIT is usually defined locally by the individual user.
II_INSTALLATION A two-character code used to define a particular installation. This code is set during installation. If you want to change it, rerun ingbuild.

List of Environment Variables/Logicals
Environment Variables/Logicals A–9
Variables/Logical Description
II_JOURNAL Set to the full file specification for the default journal location, ii_journal. The system administrator during the ingbuild procedure sets it and it cannot be changed, even during installation updates. Specific databases can designate alternate locations for journals as a parameter to the createdb command.
II_LANGUAGE Determines what language is used for screen messages, menu items, and prompts. It is defined installation-wide. The default is English.
II_LOG_DEVICE
VMS
Specifies the name of the logging/locking pseudo device to which the logging/locking driver is connected. This value is QAA0: for production installations. For test installations, the value is QxA0:, where x is the first character of the group installation identifier. This logical is defined at the system or group level.
II_MONEY_FORMAT Defines the format of money output. It is set installation-wide. You can change the format by setting II_MONEY_FORMAT to a string with two symbols separated by a colon (:). The symbol to the left of the colon indicates the location of the currency symbol. It must be “L” for a leading currency symbol or a “T” for a trailing currency symbol. To the right of the colon put the currency symbol you want displayed. Currency symbols can contain up to 4 physical characters. Examples follow:
Logical Definition Result
L:$ $100
T:DM 100DM
T: F 100F
II_MONEY_PREC Specifies the number of digits of precision to be used in the default representation of money data. The default is two digits (for decimal currency). Valid choices are 0, 1, and 2. It is set installation-wide.
II_MSGDIR Set to the directory containing error and information messages. Users must not change this setting. (The default file is the II_LANGUAGE setting):
Windows %II_SYSTEM%\ingres\files\english
UNIX $II_SYSTEM/ingres/files/english
VMS
II_SYSTEM:[INGRES.FILES.ENGLISH]
II_NULL_STRING Specifies the string used by a terminal monitor and other Ingres tools to represent the null value. The string consists of one to three characters. The default value is three blanks.

List of Environment Variables/Logicals
A–10 System Administrator Guide
Variables/Logical Description
II_NUM_OF_PROCESSORS Set to the number of processors on the machine. The variable affects processing in the Ingres DBMS, particularly when waiting for mutually exclusive resources; a value larger than 1 causes a more compute-intensive strategy that may result in getting the resource faster; however, this strategy is not generally advisable on single processor machines.
II_NUM_SLAVES
UNIX
Specifies the number of slave processes that a DBMS server creates to do disk operations. The default is two, but systems having applications with high I/O throughput requirements, many disks, or faster disk drives can increase the number of slave processes. The following example allows each new server that is started to have four slaves:
ingsetenv II_NUM_SLAVES 4
Stop and restart DBMS servers to reset the number of slaves. The maximum supported value is 30 and the minimum is 0. Setting this environment variable/logical to 0 degrades performance substantially.
Note: On UNIX implementations that use O/S threads, II_NUM_SLAVES is not set and there are no I/O slaves.
II_OO_TABLE_SIZE Allows you to increase the size of an internal COPYAPP table to support the copying of more application objects than is allowed by the default (4096 objects).
II_PATTERN_MATCH Determines the set of pattern matching characters for QBF and the ABF qualification function. These can be SQL-like, QUEL-like, or not set.
sql—The pattern matching characters used by QBF and the ABF qualification function are % _ [ and ]. The % is equivalent to the QUEL“*” and _ is equivalent to the QUEL “?”.
quel—The pattern matching characters used by QBF and the ABF qualification function are * ? [ and ].
<not set>—If not set, or if it is set to anything other than sql or quel, the QUEL pattern matching characters are used.
II_PATTERN_MATCH can be set installation-wide or locally. The complete word, either sql or quel, must be entered.
Windows The setting for II_PATTERN_MATCH is case-insensitive.
UNIX The setting for II_PATTERN_MATCH is case-sensitive.
VMS
The setting for II_PATTERN_MATCH is case-insensitive.
II_PF_NODE Specifies the vnode name of a remote node to be managed through the Microsoft Windows Performance Monitor.

List of Environment Variables/Logicals
Environment Variables/Logicals A–11
Variables/Logical Description
II_POST_4GLGEN Specifies a command to be translated and executed by the Vision component following successful generation of Ingres 4GL code. The command is passed the full path name of the Ingres 4GL source file just generated. This logical is used only by sites that have installed the Vision product. For more information on this logical, see the Forms-based Application Development Tools User Guide.
II_PRINTSCREEN _FILE Provided for use with the printscreen function. It specifies a default file name for the output file of the printscreen function. This environment variable/logical is usually defined locally by the individual user. If this environment variable/logical is set and no file name is sent to the printscreen function, no prompt is given and this file name is used. If not set, the user is prompted for a file name. If the file name “printer” is specified for II_PRINTSCREEN_FILE, the screen depiction is sent directly to the line printer. For more information, see the Character-based Querying and Reporting Tools User Guide.
II_SQL_INIT Can be set locally to the full path name of a file containing SQL commands. It is usually defined locally by the individual user. When a user with II_SQL_INIT set connects to a terminal monitor, the commands in the named file are processed. For details, see the II_SQL_INIT section in the chapter “Setting Environment Variables/Logicals.”
II_STAR_LOG Points to the location of the log file containing distributed DBMS server-specific error messages. It is set installation-wide. It is read by the server at startup time, so changing it after startup has no effect on an existing server. Most error messages written to this file are also logged to the installation-wide error log (errlog.log). Some server trace messages and statistics information are written to the II_STAR_LOG file that are not written to errlog.log. The default, if not set, is:
Windows %II_SYSTEM%\ingres\files\errlog.log
UNIX $II_SYSTEM/ingres/files/errlog.log
VMS
II_SYSTEM:[INGRES.FILES]ERRLOG.LOG
II_SYSTEM An “area” that specifies the parent directory of the ingres directory, where many components of your installation are located. It must not be changed without reinstalling Ingres.
II_TEMPORARY Specifies the directory where temporary files used by the Ingres tools are created. By default, these files are created in the user’s current directory. II_TEMPORARY can be redefined installation-wide or locally.
II_TERMCAP_FILE Specifies an alternative termcap file to use. This file must be in Ingres termcap file format. It can be redefined installation-wide or locally.

List of Environment Variables/Logicals
A–12 System Administrator Guide
Variables/Logical Description
II_TFDIR Specifies the directory in which the Vision code generator searches for Ingres 4GL template files. This logical is used only by sites that have the Vision component installed.
II_THREAD_TYPE Specifies whether Ingres uses internal threads or OS threads. Valid settings are:
OS (default) = Operating System threads
INTERNAL = Internal threads
This variable can be set during installation. For additional information on setting this variable for your platform, see the Readme file.
II_TIMEZONE_NAME Specifies the world time zone that determines the installation’s location for timing purposes. It is defined during the ingbuild procedure.
II_TM_ON_ERROR Defines the action taken when an error occurs in a terminal monitor. The valid settings are continue (on error) or terminate (on error). If this environment variable/logical is not set, the default action for the (non-forms based) terminal monitor is to continue; the default for Interactive SQL or QUEL (the forms-based terminal monitor) is to terminate. It can be defined installation-wide or locally by the individual user.
II_TUXEDO_LOC Supports Ingres DTP for Tuxedo. Specifies the directory where the shared memory file is to be created. It must be the same for all servers in a group. If II_TUXEDO_LOC is not set, II_TEMPORARY is used.
II_TUX_SHARED If set to USER, the name of the shared memory segment used by Ingres is t<username>.tux; otherwise the name is t1.tux.
II_TUX_AS_MAX The maximum number of application and TMS servers that can be started. The default value is 32. A maximum of II_TUX_AS_MAX servers are permitted to attach to the Ingres shared memory segment.
II_TUX_XN_MAX The total number of transaction entries allocated in the shared memory segment. Each server that attaches the shared memory segment reserves II_XA_SESSION_CACHE_LIMIT transaction entries for its own use. The default value is 1024.

List of Environment Variables/Logicals
Environment Variables/Logicals A–13
Variables/Logical Description
II_VNODE_PATH Names a series of remote virtual nodes to be tried each time a user attempts to connect to the specified vnode. Node names are not specified in full, but rather as strings to be appended to vnode. Commas must separate the strings. For example:
II_MYNODE_PATH=0, 1, 2, 3
Specifies that the remote virtual nodes mynode0, mynode1, mynode2, and mynode3 be tried each time a user attempts to connect to mynode. These must be valid remote virtual nodes defined by the Ingres Network Utility or the Net Management Utility (netutil).
A single connection attempt begins with one of the nodes, chosen at random, and continues until all of the specified nodes have been tried. The number of connection attempts made before an error is returned to the user is determined by the value of II_CONNECT_RETRIES.
II_WORK Specifies a directory that contains temporary files used by Ingres during the execution of certain queries such as sorts, copies, and modifies.
II_XA_TRACE_FILE Specifies a file in which Ingres DTP (Distributed Transaction Processing) logs the events occurring through the TMXA interface, as well as any SQL performed against the Ingres DBMS. The user who starts the application servers must have write access to the file. For additional information about this file, see the Distributed Transaction Processing User Guide.
IIDLDIR Specifies a directory that contains dynamically loaded libraries.
ING_ABFDIR Defines the directory name for the top-level directory to contain Application-By-Forms object libraries and work files. Under this directory, a subdirectory is created for each database that contains ABF applications and, within that subdirectory, another subdirectory is created for each ABF application. The ING_ABFDIR directory level must have read, write, and execute permissions for group, owner, and world. If, however, the application designer redefines ING_ABFDIR to point to a directory of his own, he can optionally restrict permissions on the directory to read, write, execute to owner. It can be redefined installation-wide or locally.
ING_ABFOPT1 The name of a file, used by ABF, in which additional linker options can be placed. These options are not required to run ABF applications but can be required to include libraries, compiled objects, and other capabilities not available in ABF. Users can modify this file. For more information, see the Forms-based Application Development Tools User Guide. The individual user usually defines it at the local level.
ING_EDIT Specifies the default editor invoked by various editor commands. The default for the entire installation is set during the installation procedure. Users can also set this in their local environment.

List of Environment Variables/Logicals
A–14 System Administrator Guide
Variables/Logical Description
Windows You must set ING_EDIT to the full path name of the editor. For example:
c:\tools\vi.exe
UNIX /usr/ucb/vi
VMS
If undefined, the callable EDT editor is called. ING_EDIT can be defined to be:
+EDT—Call the EDT editor
+TPU—Call the TPU editor
+LSE—Call the language sensitive editor.
The “+” symbol indicates that the callable version of the editor is to be used. This avoids creating a new subprocess in which to run the editor and results in much faster start up of the editor when called from a terminal monitor, ABF and other Ingres tools programs. Example:
DEFINE ING_EDIT "+TPU"
No qualifiers can be used. You must specify any non-default editor behavior in an editor startup file. For example, to use the Language Sensitive Editor in Fortran, define the following:
DEFINE ING_EDIT "+LSE" DEFINE LSE$COMMAND - "SYS$LOGIN:LSE_STARTUP.LSE"
ING_PRINT Specifies the default printer command issued by the Print function. The default is PRINT. It is usually defined locally by the individual user.
ING_SET Specifies a quoted string or startup file of set commands to be executed whenever a user connects to the DBMS Server through an application, an Ingres tool, or a single-line terminal monitor. It can be set installation-wide or locally. For details on using ING_SET, see the chapter “Setting Environment Variables/Logicals.”
ING_SET_DBNAME Specifies a quoted string or startup file of set commands to be executed whenever a user connects to the database specified by DBNAME. Affects any user who connects to the specified database through an application, an Ingres tool, or a single-line terminal monitor. It can be set installation-wide or locally. For details on using ING_SET_DBNAME, see the chapter “Setting Environment Variables/Logicals.”
ING_SHELL
UNIX
If defined, contains the path name of the shell used by Ingres Menu and a terminal monitor when the shell operation is invoked.

List of Environment Variables/Logicals
Environment Variables/Logicals A–15
Variables/Logical Description
ING_SYSTEM_SET Specifies a quoted string or startup file of set commands to be executed whenever a user connects to the DBMS Server through an application, an Ingres tool, or a terminal monitor. It is always global. For details on using ING_SYSTEM_SET, see the chapter “Setting Environment Variables/Logicals.”
INGRES_KEYS Specifies a mapping file to customize a user’s keyboard layout for use with forms based programs. For a complete description of the mapping file syntax, see Character-based Querying and Reporting Tools User Guide. This environment variable/logical is usually set in the user’s local environment.
INIT_INGRES Can be set to the full file specification of a file containing QUEL commands. It is usually defined locally by the individual user. When a user with INIT_INGRES set connects to the QUEL Terminal Monitor, the commands in the named file are processed. For details on using INIT_INGRES, see the chapter “Setting Environment Variables/Logicals.”
TERM
UNIX
The terminal description for the terminal upon which you are executing UNIX programs. The TERM environment variable is not used directly, but it becomes the default for TERM_INGRES, if TERM_INGRES is not explicitly set. TERM is used by UNIX programs like vi, which can be called as subsystems from Ingres programs.
TERM_INGRES Contains the terminal designation for the terminal upon which you are executing one of the Ingres forms-based products, such as QBF or VIFRED. For a list of supported values, see Character-based Querying and Reporting Tools User Guide. It is usually defined locally by the individual user.
Windows TERM_INGRES is most conveniently set in the symbol table to IBMPC.
UNIX TERM_INGRES is most conveniently set in a .login or .profile file. TERM_INGRES takes precedence over TERM in defining the terminal type. It allows TERM to be defined differently for use by other UNIX programs such as vi.
VMS
TERM_INGRES is most conveniently set in a LOGIN.COM file.


Index–1
Index
.
.NET Data Provider connectivity, 2-6
[
[ ] (brackets), 1-3
{
{ } (braces), 1-3
|
| (vertical bar), 1-3
A
access commands, adding to login.com file, 4-4
acpexit, 5-9
ACPEXIT.COM, 5-9
acpexit.com, arguments, 5-10
ADF (Abstract Data Type Facility), 2-4, 7-15
aducompile (utility), 5-5, 5-8
alert events, setting, 8-5 OS events, 8-5
archiver process, 5-9
checking, 6-30, 6-36, 6-42 component description, 3-12 described, 2-12 error log, 2-14, 6-2, 7-19 II_ACP (Ingres Clustered Option), 6-42
archiving, 5-9
B
bold typeface, 1-3 menu operations, 1-3
Bridge Server checking, 6-28 configuring the, 3-9 described, 2-6
C
C2 security, 1-1
character set, 5-1
classid, 10-3
cluster service process log, 2-15, 7-20
collation sequence aducompile (utility), 5-8 creating customized, 5-5 described, 5-3 description file, 5-6 local, 5-3 multi, 5-3 pattern matching, 5-3, 5-4, 5-5, 5-7 spanish, 5-4
command, defined, 1-2
Communications Server checking, 6-28, 6-34, 6-43

Index–2 System Administrator Guide
configuring the, 3-8 described, 2-6 facility code, 7-15 II_GCC_nnn, 6-43
comparing configuration parameters, 3-4
components, installation, 2-1
config.dat, 4-4, 6-14
CONFIG.DAT, 6-24, 6-72
config.log, 2-15, 7-20
configuration logs, 2-15, 7-20 name, changing, 3-4 parameters, restoring, 8-13
Configuration Manager accessing, 3-2 changing the configuration name, 3-4 changing the startup count, 3-3 configuration tasks, 3-4 configuring Bridge Server parameters, 3-9 configuring Communications Server parameters, 3-8 configuring Data Access Server parameters, 3-8 configuring DBMS server parameters, 3-6 configuring Internet communications, 3-10 configuring locking system parameters, 3-11 configuring logging system parameters, 3-11 configuring multiple log partitions, 3-11 configuring Name Server parameters, 3-9 configuring Recovery Server parameters, 3-10 configuring Star Server parameters, 3-9 configuring system components, 3-3 configuring transaction log parameters, 3-12 setting parameter values, 3-4
Configuration-By-Forms, accessing, 3-2
configurations, comparing, 8-12
configuring Bridge Server, 3-9 changing parameter values, 3-4 Communications Server, 3-8 Data Access Server, 3-8 DBMS Server, 3-6 Internet communications, 3-10 locking system, 3-11 logging system, 3-11 multiple log partitions, 3-11 Name Server, 3-9 parameters, using IVM, 8-4 protected mode, 3-5
Recovery Server, 3-10 Star Server, 3-9
conventions for describing syntax, 1-3
cscleanup (utility), 7-2
csinstall (utility), 7-2
csreport (utility), 7-2
D
Data Access Server checking, 6-39 configuring the, 3-8 described, 2-6
database events, tracing, 7-30
databases inconsistent, 6-50 new, 4-22
dayfile, 4-10, 4-11
DBMS Server checking, 6-31, 6-38, 6-44, 6-46 configuring the, 3-6 described, 2-3 facilities, 2-4 II_DBMS_nnn, 6-44, 6-46
DBNAME_ING, 4-7, A-1
DBNAME_SQL_INIT, 4-7, 4-12, A-1
DD_RSERVERS, A-2
defining message categories and notification levels, 8-4
diagnostics,Windows, 7-3
direct connections, A-7
DMF (Data Manipulation Facility), 2-4, 7-15
dmf_write_behind option, 3-7
dmfacp, 6-36. See archiver process
DMFACP, 6-42
dmfrcp, 6-35. See also recovery process
DMFRCP, 6-41
dual transaction log editing parameters, 3-12

Index–3
E
environment variables UNIX, 4-1 Windows, 4-2
environment variables/logicals, 4-1 global, 4-10 installation-wide, 4-3 list, A-1 local, 4-10 not resettable, 4-8 resettable, 4-7 scope, 4-1 startup files, 4-9, 4-11 types, 4-1 user-definable, 4-6 Windows, 4-1
errlog.log, 2-13
error messages facility code, 7-14 fatal, 7-14 help, 7-13 Ingres, 7-12 non-fatal, 7-14
errors DBMS error log, 2-17, 7-22 errlog.log, 2-13, 6-2, 7-18 error logs, 6-2 GCC error log, 2-17, 7-22 identifying, 6-3 messages, 6-2 monitoring with Ingres console, 7-36 Star error log, 2-17
events logging Operating System events, 8-5 setting preferences for, 8-5
F
facility Abstract Data Type (ADF), 2-4 Data Manipulation (DMF), 2-4 General Communication (GCF), 2-5 Optimizer (OPF), 2-4 Parser (PSF), 2-5 Query Execution (QEF), 2-5 Query Storage (QSF), 2-5
Relation Description (RDF), 2-5 System Control (SCF), 2-5
facility codes, 7-14
fast_commit option, 3-6
files, startup, 4-9, 4-11
G
GCA (General Communications Architecture) described, 2-6
GCA (General Communications Area) facility code, 7-15
GCF (General Communication Facility), 7-31 Bridge Server, 2-6 Communications Server, 2-6 Data Access Server, 2-6 described, 2-5 facility code, 7-15 General Communications Architecture, 2-6 Name Server, 2-5
H
help (VMS utility), 7-9
High Availability Option for Sun Clusters, 11-1
High Availability Option for Windows, 12-1
History of Changes page, 3-13
I
II_4GL_DECIMAL, 4-7, A-2
II_ABF_RUNOPT, 4-7
II_ACP, 6-42
II_AFD_TIMEOUT, 4-7, A-2
II_APPLICATION_LANGUAGE, 4-7, A-3
II_BIND_SVC_xx, 4-8, A-3
II_C_COMPILER, 4-8, A-3
II_CHARSETxx, 4-8, A-3

Index–4 System Administrator Guide
II_CHECKPOINT, 4-8, 4-24, 4-26, A-3
II_CLIENT, 4-8, A-3
II_COLLATION, 4-8, A-3
II_CONFIG, 4-8, A-3
II_CONNECT_RETRIES, 4-8, A-3
II_DATABASE, 4-8, 4-24, 4-26, A-3
II_DATE_CENTURY_BOUNDARY, 4-7, A-5
II_DATE_FORMAT, 4-7, A-4
II_DBMS_LOG, 4-8, A-5
II_DBMS_nnn, 6-44, 6-46
II_DBMS_SERVER, 4-7, A-5
II_DECIMAL, 4-7, A-5
II_DIRECT_IO, 4-8, A-6
II_DML_DEF, 4-7, A-6
II_DUMP, 4-8, 4-24, 4-26, A-6
II_EMBED_SET, 4-7, 7-24, 7-27, A-6 dbmserror, A-7 errorqry, A-6 eventdisplay, A-6 gcafile, A-6 genericerror, A-7 prefetchrows, A-7 printgca, 7-32, A-6 printqry, A-6 printtrace, A-6 qryfile, A-6 savequery, A-6 sqlprint, A-6 tracefile, A-6
II_ERSEND, 4-8, A-7
II_FRS_KEYFIND, 4-7, A-7
II_GC_REMOTE, 4-7, A-7
II_GCA_LOG, 4-7, 6-35, 7-33, A-7
II_GCC_LOG, A-8
II_GCC_nnn, 6-43
II_GCC_TRACE, 6-35
II_GCD_LOG, A-8
II_GCN, 6-43
II_GCN_LOG, A-8
II_GCNxx_PORT, 4-8, 6-34, A-8
II_GCx_TRACE, 4-7, 7-33, A-8
II_HALF_DUPLEX, A-8
II_HELP_EDIT, 4-7, A-8
II_INSTALLATION, 4-8, A-8
II_JOURNAL, 4-8, 4-24, 4-26, A-9
II_LANGUAGE, 4-7, A-9
II_LOG_DEVICE, 4-8, A-9
II_MONEY_FORMAT, 4-7, A-9
II_MONEY_PREC, 4-7, A-9
II_MSGDIR, 4-8, A-9
II_NULL_STRING, 4-7, A-9
II_NUM_SLAVES, 4-8, A-10
II_OO_TABLE_SIZE, A-10
II_PATTERN_MATCH, 4-7, A-10
II_PF_NODE, 4-7, A-10
II_POST_4GLGEN, 4-7, A-11
II_PRINTSCREEN_FILE, 4-7, A-11
II_RCP, 6-41
II_SQL_INIT, 4-7, 4-13, A-11
II_STAR_LOG, A-11
II_SYSTEM, 4-7, 4-24, 4-26, A-11
II_TEMPORARY, 4-7, A-11
II_TERMCAP_FILE, 4-7, A-11
II_TFDIR, 4-8, A-12
II_THREAD_TYPE, A-12
II_TIMEZONE_NAME, 4-8, A-12
II_TM_ON_ERROR, 4-8, A-12
II_TUX__XN_MAX, A-12
II_TUX_AS_MAX, 4-8, A-12
II_TUX_SHARED, 4-8, A-12
II_TUX_XN_MAX, 4-8
II_TUXEDO_LOC, 4-8, A-12
II_VNODE_PATH, 4-8, A-13
II_WORK, 4-8, 4-26, A-13
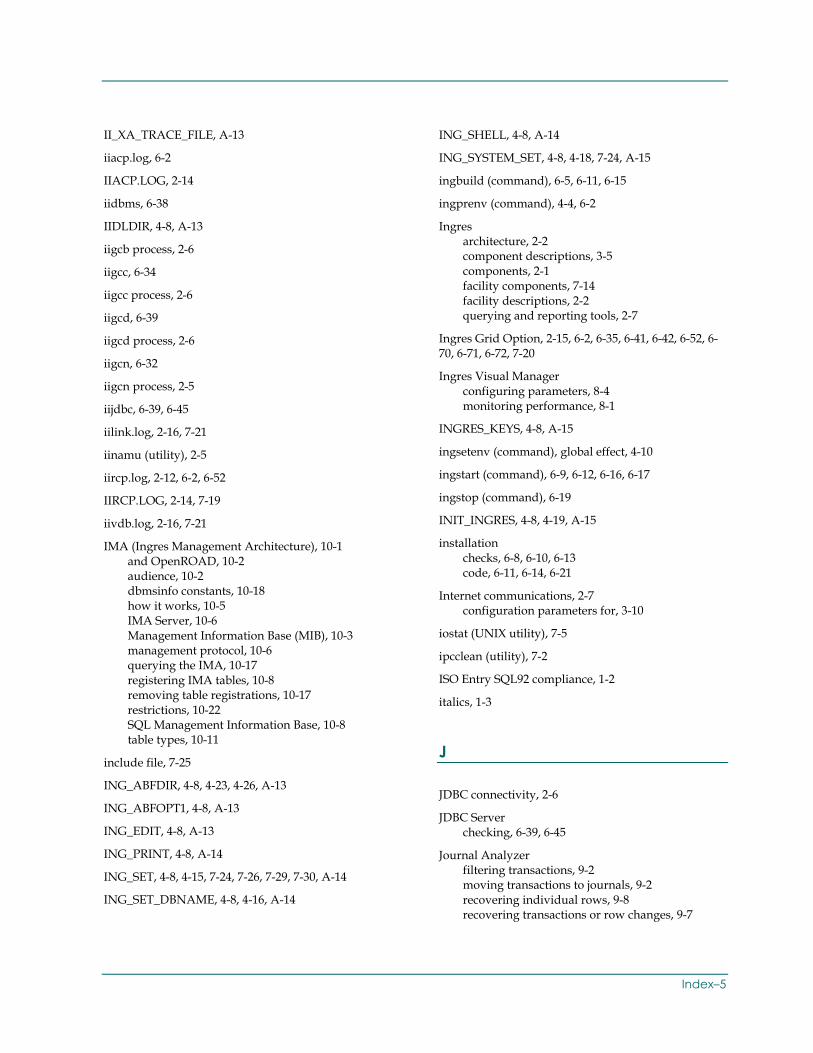
Index–5
II_XA_TRACE_FILE, A-13
iiacp.log, 6-2
IIACP.LOG, 2-14
iidbms, 6-38
IIDLDIR, 4-8, A-13
iigcb process, 2-6
iigcc, 6-34
iigcc process, 2-6
iigcd, 6-39
iigcd process, 2-6
iigcn, 6-32
iigcn process, 2-5
iijdbc, 6-39, 6-45
iilink.log, 2-16, 7-21
iinamu (utility), 2-5
iircp.log, 2-12, 6-2, 6-52
IIRCP.LOG, 2-14, 7-19
iivdb.log, 2-16, 7-21
IMA (Ingres Management Architecture), 10-1 and OpenROAD, 10-2 audience, 10-2 dbmsinfo constants, 10-18 how it works, 10-5 IMA Server, 10-6 Management Information Base (MIB), 10-3 management protocol, 10-6 querying the IMA, 10-17 registering IMA tables, 10-8 removing table registrations, 10-17 restrictions, 10-22 SQL Management Information Base, 10-8 table types, 10-11
include file, 7-25
ING_ABFDIR, 4-8, 4-23, 4-26, A-13
ING_ABFOPT1, 4-8, A-13
ING_EDIT, 4-8, A-13
ING_PRINT, 4-8, A-14
ING_SET, 4-8, 4-15, 7-24, 7-26, 7-29, 7-30, A-14
ING_SET_DBNAME, 4-8, 4-16, A-14
ING_SHELL, 4-8, A-14
ING_SYSTEM_SET, 4-8, 4-18, 7-24, A-15
ingbuild (command), 6-5, 6-11, 6-15
ingprenv (command), 4-4, 6-2
Ingres architecture, 2-2 component descriptions, 3-5 components, 2-1 facility components, 7-14 facility descriptions, 2-2 querying and reporting tools, 2-7
Ingres Grid Option, 2-15, 6-2, 6-35, 6-41, 6-42, 6-52, 6-70, 6-71, 6-72, 7-20
Ingres Visual Manager configuring parameters, 8-4 monitoring performance, 8-1
INGRES_KEYS, 4-8, A-15
ingsetenv (command), global effect, 4-10
ingstart (command), 6-9, 6-12, 6-16, 6-17
ingstop (command), 6-19
INIT_INGRES, 4-8, 4-19, A-15
installation checks, 6-8, 6-10, 6-13 code, 6-11, 6-14, 6-21
Internet communications, 2-7 configuration parameters for, 3-10
iostat (UNIX utility), 7-5
ipcclean (utility), 7-2
ISO Entry SQL92 compliance, 1-2
italics, 1-3
J
JDBC connectivity, 2-6
JDBC Server checking, 6-39, 6-45
Journal Analyzer filtering transactions, 9-2 moving transactions to journals, 9-2 recovering individual rows, 9-8 recovering transactions or row changes, 9-7

Index–6 System Administrator Guide
recovering whole transactions, 9-8 redoing individual rows, 9-8 redoing transactions or row changes, 9-7, 9-13 redoing whole transactions, 9-8 selecting transactions or row changes, 9-6 starting, 9-2 viewing transaction details, 9-4 viewing transactions, 9-2, 9-3 viewing transactions on database level, 9-3 viewing transactions on table level, 9-5
L
lartool.log, 2-16, 7-21
locations changing installation, 4-22 new, 4-22
lock information, viewing, 8-10
locking system component description, 2-2 configuration parameters, 3-11 described, 2-10
lockstat utility, 7-2
log file error logs, 6-2 listing log files, 6-3 log full abort, 6-63 resizing, 6-63
log files archiver, 7-19 configuration, 7-20 error, 7-18 individual process logs, 7-21 recovery process, 7-19
log partitions, configuring multiple, 3-11
log_file_parts (parameter), 3-11
logging cluster service process log, 2-15, 7-20 configuration logs, 2-15 individual process logs, 2-16 log files, 2-13, 7-18 transaction log file, 2-13, 7-18
logging system component description, 2-2 configuration parameters, 3-11 described, 2-10
viewing summaries, 8-10
logicals VMS, 4-1 Windows, 4-1
login.com file, adding access commands to, 4-4
logstat utility problem states, 6-62
M
matching patterns, 5-3, 5-4, 5-5, 5-7
memory cache, 8-9
monitor (VMS utility), 7-10
monitoring active user information, 8-11 components, in Visual Performance Monitor, 8-9 logging system, 8-10
multi collation sequence, 5-3
multiple log partitions, configuring, 3-11
N
Name Server checking, 6-27, 6-32, 6-43 configuring the, 3-9 described, 2-5 facility code, 7-15 II_GCN, 6-43 startup failure, 6-33
O
operating system conventions for different, 1-2
Operating System events, setting, 8-5
OPF (Optimizer Facility), 2-4 facility code, 7-15

Index–7
P
parameters comparing configuration, 3-4 configuring, 3-4 restoring, 8-13 viewing a history of changes, 3-13
patterns, matching, 5-3, 5-4, 5-5, 5-7
performance improving, 6-66 troubleshooting problems, 6-60
permissions, granting for remote commands, 2-8
primary transaction log, editing parameters, 3-12
printgca (command), 7-32
protected mode, configuring, 3-5
ps (UNIX utility), 7-4
PSF (Parser Facility), 2-5 facility code, 7-15
pstat (UNIX utility), 7-6
Q
QEF (Query Execution Facility), 2-5 facility code, 7-15
QSF (Query Storage Facility), 2-5 facility code, 7-15
query environment, 2-3
R
rcpconfig.log, 2-15, 7-20
RDF (Relation Description Facility), 2-5 facility code, 7-15
recovering immediately or generating scripts, 9-11 individual row changes, 9-8 whole transactions, 9-8
recovery automatic, 6-51 dmfrcp process, 2-11
messages, 6-52 monitoring, 6-52 no backup, 6-59 state, 6-62
recovery process checking, 6-29, 6-35, 6-41 error log, 2-14, 6-2, 7-19 II_RCP (Ingres Clustered Option), 6-41
Recovery Server configuring the, 3-10
redoing immediately or generating scripts, 9-11 individual row changes, 9-8, 9-13 transactions, 9-13 whole transactions, 9-8
refreshing data in Visual Performance Monitor windows, 8-9
remote command server (RMCMD), 2-8
remote commands, granting permissions for, 2-8
Replicator servers, monitoring, 8-11
run time customization, 4-9 customization levels, 4-9
S
sar (UNIX utility), 7-6
SCF (System Control Facility), 2-5 facility code, 7-15
security, C2 compliance, 1-1
server Bridge, 2-6 Bridge Server, configuring the, 3-9 Communications, 2-6 Communications Server, configuring the, 3-8 Data Access, 2-6 Data Access Server, configuring the, 3-8 DBMS, 2-3 DBMS Server, configuring the, 3-6 Name, 2-5 Name Server, configuring the, 3-9 Recovery Server, configuring the, 3-10 Star Server, configuring, 3-9
SERVER_CONTROL, 6-24

Index–8 System Administrator Guide
set (statement) cancelling options, 7-28 direct set, 7-24 format, 7-24 in startup files, 4-10, 7-25 in tracing, 7-23 include file, 7-25 io_trace, 7-29 joinop notimeout, 7-28 printqry, 7-26 qep, 7-27
set lock_trace (statement), 7-30
shell script, tracing, 7-35
show (VMS utility), 7-10
shutting down a server, 8-10
spanish collation sequence, 5-4
Star Server, configuring, 3-9
startsql, 4-21
startup, 4-21
startup count, changing, 3-3
startup procedure recovery during, 6-52
statement syntax, 1-3
symbolic links, 4-25
syntax descriptions, 1-3
syntax, conventions for describing, 1-3
sysdef (UNIX utility), 7-7
sysgen (VMS utility), 7-12
system administrator responsibilities, 2-1
system utilities, 7-1
system-level commands, 1-3
T
tables moving, 4-23 new, 4-22
TCP/IP, 6-33
TERM, 4-8, A-15
TERM_INGRES, 4-8, A-15
trace (UNIX command), 7-35
traces GCC trace log, 2-17, 7-22 I/O, 7-29 locks, 7-30 log, 2-16, 7-21 queries, 7-26 setting, 6-35 UNIX operating system, 7-35 user-server communications, 7-31 utilities, 7-23
transaction log file described, 2-13, 7-18
transaction logs primary and dual, 3-12
transactions logging, 2-13, 7-18 recovery, 2-12 resizing log, 6-63
transactions, identifying users of, 9-10
troubleshooting calling technical support, 6-69, 6-71 configuration, 6-5 database connection failure, 6-48 defined, 6-1 error log files, 6-2 flow charts, 6-4, 6-6, 6-47, 6-61 inconsistent database, 6-50 information list for technical support, 6-70, 6-71 Ingres tools startup, 6-47 installation checks, 6-8, 6-10, 6-13 isolating the problem, 6-2 logging system, 6-61 performance, 6-60 reboot problems, 6-17 recovery check, 6-52 resource problems, 6-66 shutdown, 6-5, 6-19 startup, 6-5 symbolic links caveats, 4-25 tools, 7-22
U
UNIX utilities I/O Statistics, 7-5

Index–9
Print Statistics, 7-6 Process Status, 7-4 System Activity Reporter, 7-6 System Definitions, 7-7 Virtual Memory Statistics, 7-9
User Errors facility code, 7-15
users, monitoring active, 8-11
utilities operating system, 7-3 trace, 7-23
V
viewing a history of parameter changes, 3-13
Visual Configuration Differences Analyzer accessing, 3-2 and concatenated config.dat files, 8-13 comparing configurations, 8-12 described, 8-11 restoring parameters, 8-13 taking a snapshot of configuration parameters, 3-4
user tasks, 8-11
Visual Performance Monitor monitoring active users, 8-11 monitoring components, 8-9 refreshing data, 8-9 server shutdown, 8-10 user tasks, 8-8 viewing lock information, 8-10 viewing log information, 8-10
VMS utilities help, 7-9 monitor, 7-10 show, 7-10 sysgen, 7-12
vmstat (UNIX utility), 7-9
W
Windows Diagnostics program, 7-3
Windows Performance Monitor program, 7-3
write behind, 3-7