Genesys Administrator Extension Help
311
This PDF is generated from authoritative online content, and is provided for convenience only. This PDF cannot be used for legal purposes. For authoritative understanding of what is and is not supported, always use the online content. To copy code samples, always use the online content. Genesys Administrator 8.5.0 Genesys Administrator Extension Help 12/29/2021
-
Upload
khangminh22 -
Category
Documents
-
view
5 -
download
0
Transcript of Genesys Administrator Extension Help

This PDF is generated from authoritative online content, andis provided for convenience only. This PDF cannot be usedfor legal purposes. For authoritative understanding of whatis and is not supported, always use the online content. Tocopy code samples, always use the online content.
Genesys Administrator 8.5.0
Genesys Administrator ExtensionHelp
12/29/2021
www.princexml.com
Prince - Non-commercial License
This document was created with Prince, a great way of getting web content onto paper.

Table of ContentsGenesys Administrator Extension Help 4Core Features 6
Login and Password 7Preferences 9User Interface 14Adding Links to the Navigation Bar 17Plug-In Management 21Using the Command Line Console (CLC) 24Bulk Change Sets 40
Agents 47Configuration Manager 54
Accounts 66Access Groups 67Agent Groups 70Users (Persons) 74Roles 79Skills 82Capacity Rules 85
Environment 96Application Templates 97Applications 100Alarm Conditions 110Hosts 116Scripts 123Solutions 128Tenants 134Time Zones 138
Switching 143Agent Logins 144DNs 147DN Groups 153IVRs 156IVR Ports 159Places 162Place Groups 165

Switches 168Switching Offices 172
Routing/eServices 174Audio Resources (Configuration Manager) 175Business Attributes 181Business Attribute Values 184Objective Tables 187Statistical Days 191Statistical Tables 197Transactions 200Voice Prompts 203
Desktop 205Action Codes 206
Voice Platform 209Voice Platform Profiles 210
Outbound 212Calling Lists 213Campaigns 216Campaign Groups 219Fields 224Filters 229Formats 232Table Access 237Treatments 240
System Dashboard 243Solution Deployment 259
Installation Packages 260Deployed IPs 274Solution Definitions 276Deployed Solutions 283Privileges 285
Operational Parameter Management 286Parameters 288Parameter Groups 295Parameter Group Templates 300
Audio Resource Management 307

Genesys Administrator Extension HelpWelcome to the Genesys Administrator Extension Help. This document introduces you to the GUI ofGenesys Administrator Extension and describes concepts and procedures relevant to using thissoftware in your contact center.
About Genesys Administrator ExtensionGenesys Administrator Extension (GAX) introduces the next-generation user interface for Genesysthat reduces both the overall operating costs and the time to deployment, by providing user-friendlyinterfaces that perform complex operations while at the same time preventing user error. Thisproduct is focused on the user experience for both Enterprise and Hosted customers, as well as bysystem administrators and line-of-business users.
The following are quick links to popular chapters and topics:
Core Features
Login and PasswordSetting PreferencesNavigating the User Interface
Configuration and Monitoring
Using the Agents WindowUsing Configuration ManagerSystem Dashboard
Solution Deployment
Installation PackagesSolution DefinitionsPrivileges
Operational Parameter Management
ParametersParameter GroupsParameter Group Templates
Genesys Administrator Extension Help
Genesys Administrator Extension Help 4

Audio Resource Management
Audio Resource Management
Genesys Administrator Extension Help
Genesys Administrator Extension Help 5

Core FeaturesThe pages in this chapter explain the core features of GAX. Select a topic below to learn more:
Login and PasswordThis page explains how to log in to GAX.
Login and Password
PreferencesThis page explains how to set user-leveland system-level preferences.
Preferences
User InterfaceThis page explains how to use the userinterface.
User InterfaceAdding Links to the Navigation Bar
Administration and Other Tasks
Plug-in ManagementCommand Line ConsoleBulk Change Sets
Core Features
Genesys Administrator Extension Help 6

Login and PasswordYour user's first name is displayed in the top Header Bar of the Genesys Administrator Extensionwindow.
You might be configured to set a new password the first time that you log in, or after a systemadministrator has reset your password.
Procedure: Setting a New Password
Steps
1. If you are configured to change your password the first time that you log in, or after your systemadministrator has reset your password, the Change Password dialog box is displayed.
2. Enter a new password in the New Password field.3. Enter the same password in the Confirm Password field.4. Click OK.
Inactivity Timeout
For security purposes, GAX might be configured to lock the application if you have not used thekeyboard or mouse for a specified period of time. If inactivity-timeout occurs, all user input is blockeduntil you provide your login information to unlock the application. This feature ensures that nounauthorized user can access an unattended terminal that is running GAX.
ImportantGAX employs a keep-alive strategy to prevent your session from timing out; thisfeature ensures that GAX maintains your session even if the inactivity-timeout featurelocks the application and requires you to log in.
Core Features Login and Password
Genesys Administrator Extension Help 7

Related Links
• Bulk Change Sets• Adding Links to the Navigation Bar• Login and Password• Plug-In Management• Using the Command Line Console (CLC)
Core Features Login and Password
Genesys Administrator Extension Help 8

PreferencesGenesys Administrator Extension enables you to customize the interface to suit your personalpreferences. These preferences take effect each time that you, or anyone using your logincredentials, logs in to Genesys Administrator Extension from any browser.
To open the Preferences menu, click on your User name in the Header Bar. If configured, the menudisplays the last time that this user account was logged into Genesys Administrator Extension.
ImportantTo use the last login time feature, you must ensure:
• The date and time of the local computer and the Management Framework computer aresynchronized for the last login time to be accurate.
• The following lines are included in the Configuration Server confserv.cfg file (located inthe installation directory of the machine that hosts Configuration Server):• last-login = true
• last-login-synchronization = true
The Preferences menu contains the following options:
• Log Out—Log out of Genesys Administrator Extension.• User Preferences• System Preferences• Set Current Page As Home—Set the currently displayed page as the home page for your User
account. Once set, this page is displayed each time you log in.• Change Password• About—Click this option to view information about your installation. If your user account has the Read
Deployable and Undeployable IPs and SPDs privilege, you can also view information about theConfiguration Server to which you are connected.
• Genesys Administrator
ImportantSettings in the User Preferences menu take precedence over settings in theSystem Preferences menu. For example, if the System Preferences languagesetting is English (US) and the User Preferences language setting is different,Genesys Administrator Extension will use the User Preferences language setting.
Core Features Preferences
Genesys Administrator Extension Help 9

User Preferences
AdvancedIn the Advanced window, you can specify the logging level for Genesys Administrator ExtensionJavaScript logging. You need to set this only if instructed to do so by support personnel. Use the drop-down list to set the level to one of the following:
• Use system settings—Use the same setting specified in the System Preferences menu.• Debug—All (error, warning, info, and debug) logs are generated.• Info—Error, warning, and info logs are generated.• Warning—Only error and warning logs are generated.• Error—Only error logs are generated.• Off—Logging is disabled.
ImportantThese logs can be viewed in the browser console, and should not be confused withTomcat logs.
Configuration ManagerIn the Configuration Manager window, you can set the following display preferences forConfiguration Manager:
• Show DBID—Shows the database ID when viewing details about a configuration object.• Show Recent—On the Configuration Manager homepage, shows a list of recently accessed
configuration objects. This list displays the configuration object type and name (for example, DNs,80708), the Tenant to which the object belongs, and the last accessed date. Hover the mouse cursorover the item to see additional information, such as the specific date and time the object was accessedand its path. You can click on the item to access the object.
• Maximum number of recent items to display—Specifies how many items to display in the ShowRecent list.
LocaleIn the Locale window, you can set the following preferences by selecting the appropriate radiobutton:
Preference (field name) Description
LanguageThe language to use in the GAX user interface. Thedefault is Use system settings. You can add morelanguage options by installing language pack plug-
Core Features Preferences
Genesys Administrator Extension Help 10

Preference (field name) Descriptionins.
ImportantA browser refresh is required for the changes to takeeffect.
Date FormatThe format in which dates are to be displayed inGenesys Administrator Extension. The default isUse system settings.
Start of Week The day on which you consider the week to start.The default is Use system settings.
Number Format The format in which numbers are to be displayed.The default is Use system settings.
Time Zone The time zone in which times are displayed in GAX.The default is Use system settings.
System Preferences
ThrottlingGenesys Administrator Extension enables you to throttle how many simultaneous changes are sent toConfiguration Server. You can optimize these settings to help ensure consistent performance acrossyour Genesys environment.
Change the Bulk Update Batch Size field to specify how many bulk updates for configurationobjects can be executed simultaneously. The default value is 300. A value of 0 indicates that therewill be no throttling of changes for configuration objects (all requested operations will be sent toConfiguration Server without delay). You can enter 0 or any positive integer in this field.
ImportantThe maximum Bulk Update Batch Size for users who are entering from GenesysAdministrator is 300.
Change the Bulk Update Batch Timeout field to specify how long (in seconds) GenesysAdministrator Extension should wait between the execution of bulk-update operations. The defaultvalue is 1. A value of 0 indicates that there will be no delay between bulk-update operations. You canenter any value between 0 and 300 in this field.
Agent ManagementIn the Agent Management menu, you can choose whether the Agents window is displayed usingthe Cloud layout or Premise layout. For more information on the differences between these layouts,see Agents.
Core Features Preferences
Genesys Administrator Extension Help 11

You can also set the following options for the Add Agents window:
• Enforce User Name as E-mail Address—If checked, GAX ensures information entered in the UserName field is in the form of an e-mail address.
• Hide External ID—If checked, GAX hides the External ID field when in the Add Agent window.• Default Access Group—(Optional) The Access Group to which Agents are added when they are
created in the Agents window. By default, this value is blank and Agents are not added to any AccessGroup.
ImportantIf you enter the name of an Access Group that does not exist, GAX cannot assignAgents to the group. You must create the Access Group first.
LocaleIn the Locale menu, you can set the following preferences by selecting the appropriate radio button:
Preference (field name) Description
Language
The language to use in the GAX user interface. Thedefault is English (US). You can add morelanguage options by installing language pack plug-ins.
ImportantA browser refresh is required for the changes to takeeffect.
Date Format The format in which dates are to be displayed inGenesys Administrator Extension.
Start of Week The day on which you consider the week to start,either Sunday or Monday.
Number Format The format in which numbers are to be displayed.Time Zone The time zone in which times are displayed in GAX.
Change Password
You can change your password in the Change Password menu. You must have the Modify UserPassword privilege to change your password.
Genesys Administrator
Click this link to launch the Genesys Administrator application. This link is displayed if you are
Core Features Preferences
Genesys Administrator Extension Help 12

configured to log in to Genesys Administrator, when you log in to Genesys Administrator Extension.
Related Links
• Bulk Change Sets• Adding Links to the Navigation Bar• Login and Password• Plug-In Management• Using the Command Line Console (CLC)
Core Features Preferences
Genesys Administrator Extension Help 13

User InterfaceThe main screen of Genesys Administrator Extension consists of two parts, as follows:
• The header, at the top of the screen, contains the main controls for the user interface.• The workspace, under the header, is where you perform all the tasks in Genesys Administrator
Extension.
ImportantThe workspace displays only those objects and options for which the logged-in userhas role privileges and object permissions to access.
Header
The Header area is located at the top of the main screen of the interface and contains the maincontrols for the Genesys Administrator Extension (GAX) interface.
The Header Bar in Genesys Administrator Extension.
To the right, the Header Bar displays the name of the logged-in user and a link to this Help document.Click on the user name to access the Preferences menu.
To the left, the Header Bar contains the menu options for navigating GAX.
The following fixed headings are always displayed:
• Dashboard• Agents• Configuration• Routing Parameters• Operations
Click the Home button from any page in GAX to return to the home page.
Installing plug-ins will add submenu headings to the fixed headings. For example, installing the ASDplug-in adds Solution Deployment to the Configuration fixed heading. These submenu headingsare listed in alphabetical order. If the plug-in does not specify a menu heading, it is added to theConfiguration fixed heading.
Core Features User Interface
Genesys Administrator Extension Help 14

Users can also add custom links to external websites. For more information, see Adding Links to theNavigation Bar.
ImportantThe available submenu headings are determined by your access permissions and theplug-ins that are installed on your system. For example, the Routing Parameterssubmenu heading does not display if the OPM plug-in is not installed.
Workspace
The workspace, located below the header, is where you perform all tasks in Genesys AdministratorExtension. It displays only those objects and options for which the logged-in user has role privilegesand object permissions to access.
Lists of items in the workspace are organized by Tenant in multi-tenant environments. You can chooseto view all Tenants, your default Tenant, or selected multiple Tenants by clicking Tenant Directory
.
You can sort lists by various criteria by clicking on column heads. You can also quickly findinformation by using the Quick Filter field.
Auditing HistoryFor some objects, you can view an auditing history. Select the object, such as a solution definition, toview information about the object in a new panel. In the object information panel, click the Relatedbutton and select History. The History panel is displayed to the right. It contains information aboutthe change history of the object.
Availability of Menu ItemsMultiple instances of Genesys Administrator Extension might be connected to the same configurationenvironment, to support load balancing and high availability. Each instance of Genesys AdministratorExtension might be configured to use different sets of functional modules. Not all modules might beavailable for every instance of Genesys Administrator Extension that is installed in your Genesysenvironment.
Related Links
• Bulk Change Sets• Adding Links to the Navigation Bar• Login and Password
Core Features User Interface
Genesys Administrator Extension Help 15

• Plug-In Management• Using the Command Line Console (CLC)
Core Features User Interface
Genesys Administrator Extension Help 16

Adding Links to the Navigation BarAdditional links can be added to the Navigation Bar by editing the configuration options of the defaultApplication object.
Adding Custom Links
1. In Configuration Manager, click Applications. The Applications list displays.2. Click the default client Application object in the list to edit the object.
ImportantThe default client Application name is defined in the options for the GAXApplication object, in the General section. It is typically named default, but itmight have another name in your environment.
3. Click the Application Options tab.4. Click Add.5. In the pop-up window, enter the following information:
• Section—You must enter the following: ga_preferences.navigation• Key—You must enter the following: categories• Value—Enter the number of additional category items to add to the Navigation Bar. For example, to
add one category item, set the value to 1.
ImportantIt is possible to enter 0 (zero), if you do not want to add additional category items to the Navigation Bar.
• Click OK.
6. Click Add.7. In the pop-up window, enter the following information:
• Section—You must enter the following: ga_preferences.navigation• Key—You must enter the following: items• Value—Enter the number of additional links to add to the category item that you created in Step 6.
For example, to add one link item, set the value to 1.
Core Features Adding Links to the Navigation Bar
Genesys Administrator Extension Help 17

• Click OK.
Defining Category Items
For each category item, you must create an additional option that defines the parent category, an IDfor the new category item, and a display name. Perform the following steps to define each categoryitem.
1. Click Add.2. In the pop-up window, enter the following information:
• Section—You must enter the following: ga_preferences.navigation_categories_0• Key—You must enter the following: category• Value—Enter the name of the category to add to the Navigation Bar. For example: custom. You can
also specify existing category items. For example, to add a menu item under the Configurationcategory item, enter config.
• Click OK.
3. Click Add.4. In the pop-up window, enter the following information:
• Section—You must enter the following: ga_preferences.navigation_categories_0• Key—You must enter the following: name• Value—Enter an ID for the category to add to the Navigation Bar. For example: custom• Click OK.
5. Click Add.6. In the pop-up window, enter the following information:
• Section—You must enter the following: ga_preferences.navigation_categories_0• Key—You must enter the following: title• Value—Enter the name of the category to add to the Navigation Bar. For example: Custom Links• Click OK.
ImportantRepeat the procedure above for additional category items. You must increment theSection name for each category item. For example, if you want to define threecategory items, the Section names are:
• ga_preferences.navigation_categories_0
• ga_preferences.navigation_categories_1
Core Features Adding Links to the Navigation Bar
Genesys Administrator Extension Help 18

• ga_preferences.navigation_categories_2
Defining Link Items
For each link item, you must create an additional option that defines the parent category, privilege,title, and URL. Perform the following steps to define each link item.
1. Click Add.2. In the pop-up window, enter the following information:
• Section—You must enter the following: ga_preferences.navigation_items_0• Key—You must enter the following: category• Value—Enter the name of the category to which to add this link. For example: custom. You can also
specify existing category items. For example, to add a link item under the Configuration categoryitem, enter config.
• Click OK.
3. Click Add.4. In the pop-up window, enter the following information:
• Section—You must enter the following: ga_preferences.navigation_items_0• Key—You must enter the following: privilege• Value—Enter the name of the privilege that dictates if the item is shown to a user. For example:
CUSTOM_LINK
ImportantRefer to Assigned Privileges to learn more about assigning privileges.
• Click OK.
5. Click Add.6. In the pop-up window, enter the following information:
• Section—You must enter the following: ga_preferences.navigation_items_0• Key—You must enter the following: title• Value—Enter the name of the link item to add to the Navigation Bar. For example: Genesys• Click OK.
Core Features Adding Links to the Navigation Bar
Genesys Administrator Extension Help 19

7. Click Add.8. In the pop-up window, enter the following information:
• Section—You must enter the following: ga_preferences.navigation_items_0• Key—You must enter the following: url• Value—Enter the URL to which the link item points. For example: http://www.genesys.com• Click OK.
ImportantRepeat the procedure above for additional link items. You must increment the Sectionname for each link item. For example, if you want to define three link items, the Section names are:
• ga_preferences.navigation_items_0
• ga_preferences.navigation_items_1
• ga_preferences.navigation_items_2
Related Links
• Bulk Change Sets• Adding Links to the Navigation Bar• Login and Password• Plug-In Management• Using the Command Line Console (CLC)
Core Features Adding Links to the Navigation Bar
Genesys Administrator Extension Help 20

Plug-In ManagementThis panel enables you to view information about the plug-ins that are installed in your environment.It also enables you to modify the settings of those plug-ins.
ImportantPlug-ins can be managed on the local node only when the GAX Application object is oftype:
• Generic Genesys Server (when using Management Framework releases 8.1.0 orlower).
• Generic Administrator Server (when using Management Framework releases 8.1.1 orhigher).
The Administrator Applications panel lists the applications that are installed in your environmentand the host upon which the applications are stored.
Install plug-ins by using the same process as for installing installation packages. For moreinformation, see Uploading Installation Packages.
You can filter the contents of this list in two ways:
• Type the name or partial name of an object in the Quick Filter field.• Click Tenant Filter to open the Tenant filter panel. In this panel, select the check box beside each
Tenant that you want to select. Use the Quick Filter field in this panel to filter the Tenant list.
Click an application to view details in a new panel that opens to the right. The new panel lists thename of the plug-in and its host. Click Related and select Plug-ins to view additional details:
• Name—The name of the plug-in• Version—The version number of the plug-in• Language—The language used by the user interface of the plug-in• Provider—The name of the company or user that provided the plug-in• State—Indicates whether the plug-in is Enabled or Disabled
Click the name of a plug-in to view additional details about the plug-in in a panel that opens to theright. From this panel, you can perform the following actions:
• Enable or disable the plug-in• Modify the settings of the plug-in
Core Features Plug-In Management
Genesys Administrator Extension Help 21
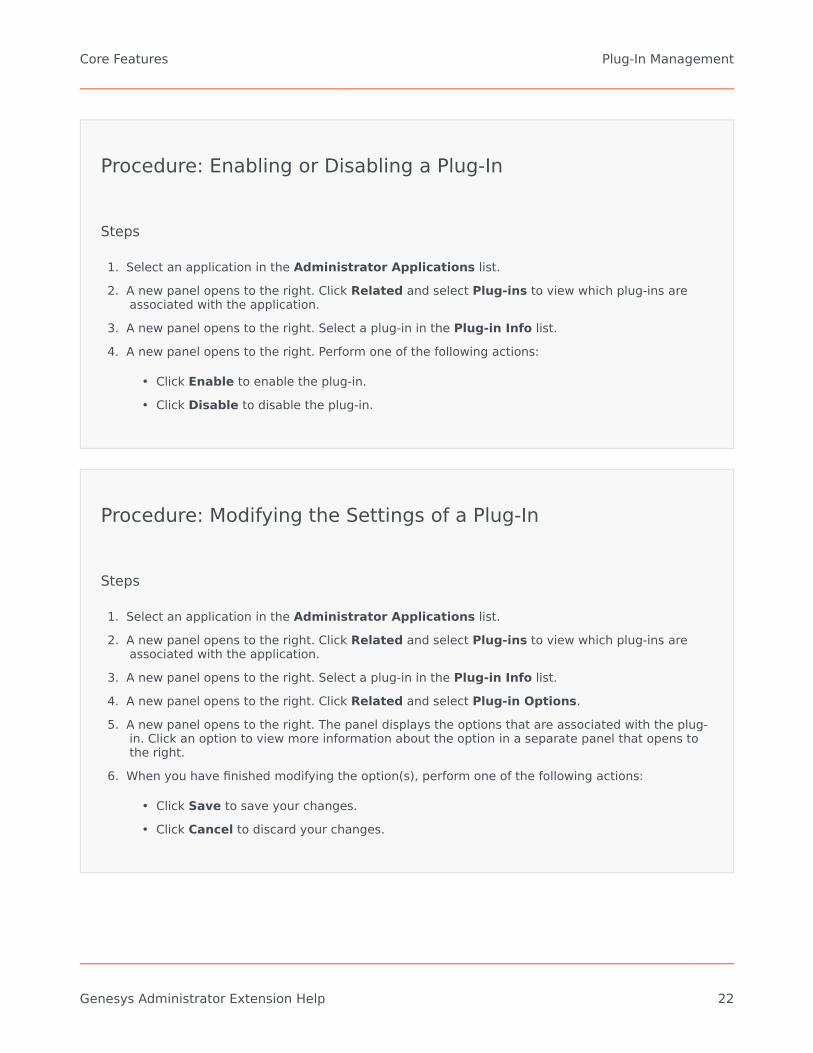
Procedure: Enabling or Disabling a Plug-In
Steps
1. Select an application in the Administrator Applications list.2. A new panel opens to the right. Click Related and select Plug-ins to view which plug-ins are
associated with the application.3. A new panel opens to the right. Select a plug-in in the Plug-in Info list.4. A new panel opens to the right. Perform one of the following actions:
• Click Enable to enable the plug-in.• Click Disable to disable the plug-in.
Procedure: Modifying the Settings of a Plug-In
Steps
1. Select an application in the Administrator Applications list.2. A new panel opens to the right. Click Related and select Plug-ins to view which plug-ins are
associated with the application.3. A new panel opens to the right. Select a plug-in in the Plug-in Info list.4. A new panel opens to the right. Click Related and select Plug-in Options.5. A new panel opens to the right. The panel displays the options that are associated with the plug-
in. Click an option to view more information about the option in a separate panel that opens tothe right.
6. When you have finished modifying the option(s), perform one of the following actions:
• Click Save to save your changes.• Click Cancel to discard your changes.
Core Features Plug-In Management
Genesys Administrator Extension Help 22

ImportantYou can only modify existing options for each plug-in from the Plug-in Managementpanels. You cannot create new options for the plug-ins.
Related Links
• Bulk Change Sets• Adding Links to the Navigation Bar• Login and Password• Plug-In Management• Using the Command Line Console (CLC)
Core Features Plug-In Management
Genesys Administrator Extension Help 23
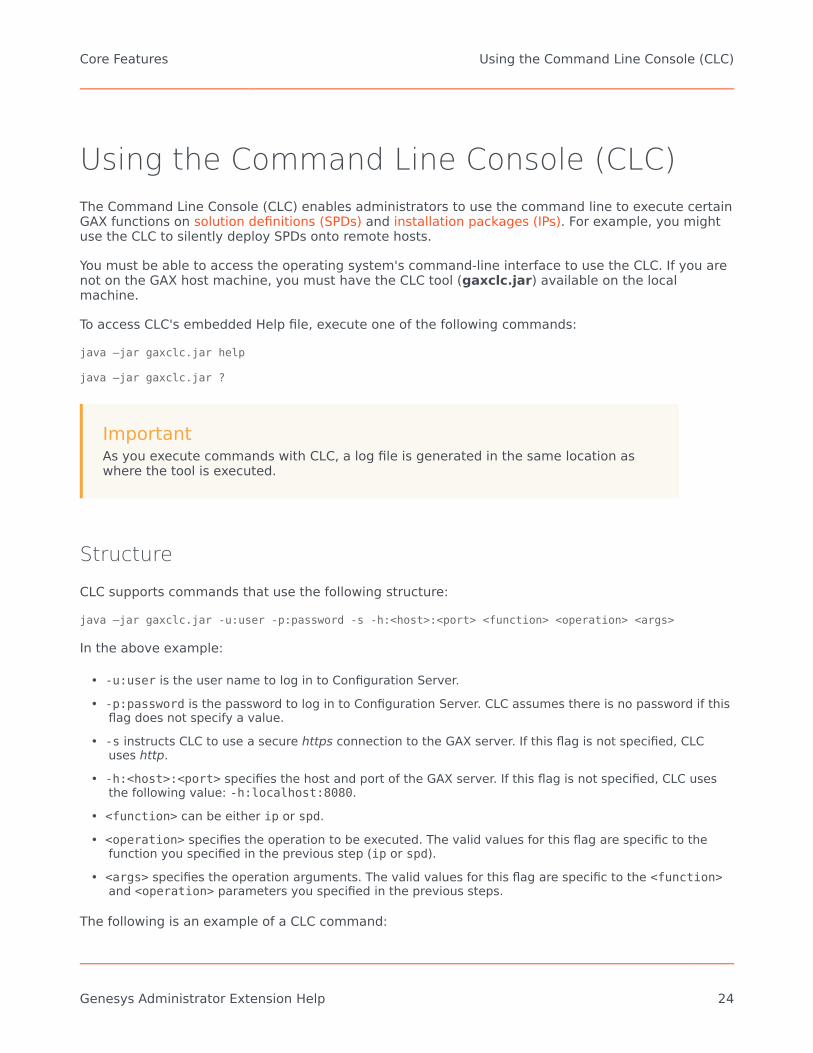
Using the Command Line Console (CLC)The Command Line Console (CLC) enables administrators to use the command line to execute certainGAX functions on solution definitions (SPDs) and installation packages (IPs). For example, you mightuse the CLC to silently deploy SPDs onto remote hosts.
You must be able to access the operating system's command-line interface to use the CLC. If you arenot on the GAX host machine, you must have the CLC tool (gaxclc.jar) available on the localmachine.
To access CLC's embedded Help file, execute one of the following commands:
java –jar gaxclc.jar help
java –jar gaxclc.jar ?
ImportantAs you execute commands with CLC, a log file is generated in the same location aswhere the tool is executed.
Structure
CLC supports commands that use the following structure:
java –jar gaxclc.jar -u:user -p:password -s -h:<host>:<port> <function> <operation> <args>
In the above example:
• -u:user is the user name to log in to Configuration Server.• -p:password is the password to log in to Configuration Server. CLC assumes there is no password if this
flag does not specify a value.• -s instructs CLC to use a secure https connection to the GAX server. If this flag is not specified, CLC
uses http.• -h:<host>:<port> specifies the host and port of the GAX server. If this flag is not specified, CLC uses
the following value: -h:localhost:8080.• <function> can be either ip or spd.• <operation> specifies the operation to be executed. The valid values for this flag are specific to the
function you specified in the previous step (ip or spd).• <args> specifies the operation arguments. The valid values for this flag are specific to the <function>
and <operation> parameters you specified in the previous steps.
The following is an example of a CLC command:
Core Features Using the Command Line Console (CLC)
Genesys Administrator Extension Help 24

java -jar gaxclc.jar -u:default -p:password -h:localhost:8080 spd execute 10054 1 "C:/GAX/input.txt"
SPDs
CLC supports the following operations for SPDs:
• add
• query
• querybyid
• execute
• delete
• encrypt (see execute tab)
add
add
Overview
This operation adds an SPD to the GAX database. If the SPD already exists, as determined by thename and version in the SPD XML, this operation replaces the existing SPD.
If successful, the operation returns the ID of the added SPD.
Formatjava –jar gaxclc.jar -u:user -p:password -s -h:<host>:<port> spd add "file path"
• "file path"—The path to the XML file.
Examplejava -jar gaxclc.jar -u:default -p:password spd add "c:\GAX\newSpd.xml"
query
Core Features Using the Command Line Console (CLC)
Genesys Administrator Extension Help 25

query
Overview
This operation queries all SPDs and displays a table that lists the following for each SPD:
• ID number• Name• Version• Tenant DBID
The following is an example:
10054 gvp 8.1.5 110060 genesysOne 8.1.5 110060 eServices 8.1.5 1
Formatjava –jar gaxclc.jar -u:user -p:password -s -h:<host>:<port> spd query
Examplejava -jar gaxclc.jar -u:default -p:password -s -h:132.45.43.45:443 spd query
querybyid
querybyid
Overview
This operation queries an SPD by its ID. If the SPD does not exist, the operation fails.
If successful, the operation displays a table that lists the following details about the SPD:
• Profile ID• Name
For example:
1 Install
Formatjava –jar gaxclc.jar -u:user -p:password -s -h:<host>:<port> spd query SPDID
Core Features Using the Command Line Console (CLC)
Genesys Administrator Extension Help 26
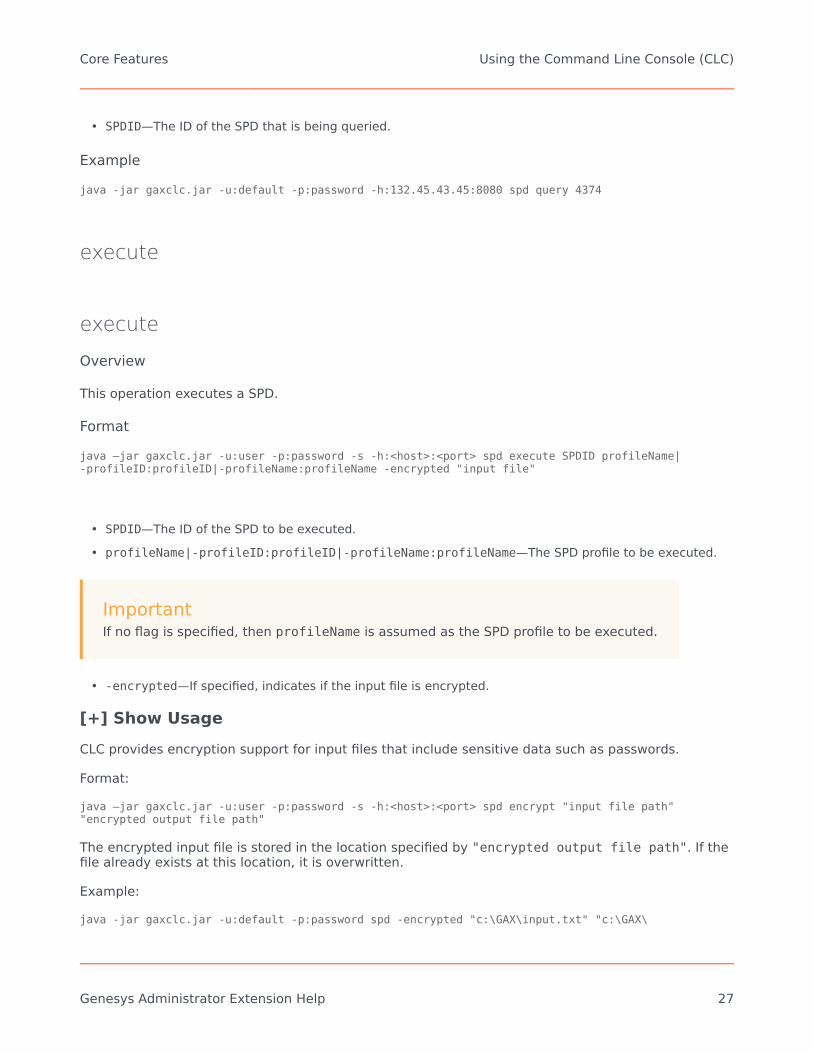
• SPDID—The ID of the SPD that is being queried.
Examplejava -jar gaxclc.jar -u:default -p:password -h:132.45.43.45:8080 spd query 4374
execute
execute
Overview
This operation executes a SPD.
Formatjava –jar gaxclc.jar -u:user -p:password -s -h:<host>:<port> spd execute SPDID profileName|-profileID:profileID|-profileName:profileName -encrypted "input file"
• SPDID—The ID of the SPD to be executed.• profileName|-profileID:profileID|-profileName:profileName—The SPD profile to be executed.
ImportantIf no flag is specified, then profileName is assumed as the SPD profile to be executed.
• -encrypted—If specified, indicates if the input file is encrypted.
[+] Show UsageCLC provides encryption support for input files that include sensitive data such as passwords.
Format:
java –jar gaxclc.jar -u:user -p:password -s -h:<host>:<port> spd encrypt "input file path""encrypted output file path"
The encrypted input file is stored in the location specified by "encrypted output file path". If thefile already exists at this location, it is overwritten.
Example:
java -jar gaxclc.jar -u:default -p:password spd -encrypted "c:\GAX\input.txt" "c:\GAX\
Core Features Using the Command Line Console (CLC)
Genesys Administrator Extension Help 27

encrypted.txt"
java -jar gaxclc.jar -u:default -p:password spd -encrypted "input.txt" "encrypted.txt"
• "input file"—Specifies the input file that contains SPD parameters. If -encrypted is set, the input fileis encrypted.
The input file must be in JSONObject format and include SPD parameters for a specific profile. The filemust be encoded in UTF-8 format.
[+] Show usageThe input file must be in JSONObject format and include SPD parameters for a specific profile. The filemust be encoded in UTF-8 format.
string
The input structure for a string type is described below:
{"Dialog name" : {
"Input name" : "string"}
}
Example
SPD Profile
<profile name="Install"><dialog step="Step1">
<input name="NAME_PARAM1" title="PERSON NAME" default="birit" type="string"required="true">
<description>Please enter the person name</description></input>
</dialog><dialog step="Step2">
<input name="NAME_PARAM2" title="PERSON NAME" default="birit" type="string"required="true">
<description>Please enter the person name</description></input>
</dialog><execution>
<script>log('string test' );
</script></execution>
</profile>
Core Features Using the Command Line Console (CLC)
Genesys Administrator Extension Help 28

Input File for Install Profile
{"Step1" : {
"NAME_PARAM1" : "Kate"},"Step2" : {
"NAME_PARAM2" : "John"}
}
Boolean
The input structure for a boolean type is described below:
{"Dialog name" : {
"Input name" : true/false}
}
Example
SPD Profile
<profile name="Install"><dialog step="Step1">
<input name="STATUS" title="status" type="boolean" required="true"><description>status field</description>
</input></dialog><execution>
<script>log('boolean test');
</script></execution>
</profile>
Input File for Install Profile
{"Step1" : {
"STATUS" : true}
}
Core Features Using the Command Line Console (CLC)
Genesys Administrator Extension Help 29

Integer
The input structure for an integer type is described below:
{"Dialog name" : {
"Input name" : <integer>}
}
Example
SPD Profile
<profile name="Install"><dialog step="Step1">
<input name="NUMBER" title="number" type="integer" required="true"><description>number field</description>
</input></dialog><execution>
<script>log('number test');
</script></execution>
</profile>
Input File for Install Profile
{"Step1" : {
"NUMBER" : 132}
}
Password
The input structure for a password type is described below:
{
Core Features Using the Command Line Console (CLC)
Genesys Administrator Extension Help 30

"Dialog name" : {"Input name" : "password"
}}
ImportantInput files that include sensitive data such as passwords should beencrypted using the SPD encrypt operation.
Example
SPD Profile
<profile name="Install"><dialog step="Step1">
<input name="PASSWORD" title="password" type="password" required="true"><description>password field</description>
</input></dialog><execution>
<script>log('password test');
</script></execution>
</profile>
Input File for Install Profile
{"Step1" : {
"PASSWORD" : "xyz9846gdkjg"}
}
SelectOne
The input structure for a selectOne type with an <objectselect> tag is described bellow:
{"Dialog name" : {
"Input name" : {
Core Features Using the Command Line Console (CLC)
Genesys Administrator Extension Help 31

"objectselect" : {"filter" : [{
"value" : "filter value","name" : "filter name"
}]
}}
}}
ImportantCLC intersects (AND) filters defined in the SPD file and input file for aselectOne input. The filter criteria should be different in an SPD inputfile and filter names should differ in the same filter definition.
Example
SPD Profile
<profile name="Install"><dialog step="Step1">
<input name="APP_OBJ_SELECT_ONE" title="Application Name" hidden="false"type="selectOne" default="">
<description>select application</description><objectselect>
<filter value="CfgApplication" name="type"/></objectselect>
</input></dialog><execution>
<script>log('test select one' );
</script>
</execution>
Input File for Install Profile
{"Step1" : {
"APP_OBJ_SELECT_ONE" : {"objectselect" : {
"filter" : [{"value" : "SIP_lrm26","name" : "name"
}
Core Features Using the Command Line Console (CLC)
Genesys Administrator Extension Help 32

]}
}}
}
SelectMultiple
The input structure for a selectMultiple type with <objectselect> tag is described below:
{"Dialog name" : {
"Input name" : {"objectselect" : {
"filter" : [{"value" : "filter value","name" : "filter name"
}]
}}
}}
Filters defined in an SPD input file are joined in union (OR) and then intersect (AND) with filtersdefined in an SPD file for a selectMultiple input.
Example
SPD Profile
<profile name="Install"><dialog step="Step1">
<input name="APP_OBJ_SELECT_MULTIPLE" title="Application Name" hidden="false"type="selectMultiple" default="">
<description>select application</description><objectselect>
<filter value="CfgApplication" name="type"/></objectselect>
</input></dialog><execution>
<script>log('test select multiple' );
</script>
</execution>
Core Features Using the Command Line Console (CLC)
Genesys Administrator Extension Help 33

Input File for Install Profile
{"Step1" : {
"APP_OBJ_SELECT_MULTIPLE" : {"objectselect" : {
"filter" : [{"value" : "SIP_lrm26","name" : "name"
},{"value" : "SIP_lrm27","name" : "name"
}]
}}
}}
The operation returns two applications named SIP_lrm26 and SIP_lrm27.
Selection Tag
The input structure for a selectOne/selectMultiple/boolean type with <selection> tag is describedbelow:
{"Dialog name" : {
"Input name" : {"selection" : {
"option" : [{"value" : "option value assigned to the input
parameter","name" : "option name is displayed in UI"
}]
}}
}}
CLC selects options defined in the SPD input file. Multiple options can be specified only for theselectMultiple input type.
Example
SPD Profile
<profile name="Install">
Core Features Using the Command Line Console (CLC)
Genesys Administrator Extension Help 34

<dialog step="Application Parameters"><input name="DATA_MODEL" title="Binary Version (32-bit or 64-bit)" default="64"
type="selectOne" required="true"><description>This parameter defines the 32-bit or the 64-bit version of the
binary to be deployed. </description><selection>
<option name="32" value="32"/><option name="64" value="64"/>
</selection></input>
</dialog><execution>
<script>log('test selection support' );
</script>
</execution>
Input File for Install Profile
{"Application Parameters" : {
"DATA_MODEL" : {"selection" : {
"option" : [{"value" : "64","name" : "64"
}]
}}
}}
Important• If the input file does not specify a value for a SPD parameter, the value defined in the
default attribute of the input element will be used.• If an SPD input element has the required attribute set to true, but there is no
corresponding input value that is supplied in either the SPD (as a default) or in the inputfile, then the SPD execution fails.
• If an SPD input element has the readonly attribute value set to true, then the value inthe default attribute value is used for the execution, if defined. If the readonlyattribute value is set to true, required is set to false, and the default attribute is notdefined, then the following logic is used for input value determination:1. For the boolean input type, the input value is set to false.2. For the string and password input types, the input value is set to "".
Core Features Using the Command Line Console (CLC)
Genesys Administrator Extension Help 35

3. For the integer input type, the input is not propagated.
• If a dialog cond attribute value evaluates to false, the dialog is skipped by the CLC tool.Example:<dialog step="Role input" cond="false"><input name="ROLE" title="Role" hidden="false" type="selectOne"
required="true"><description>Please indicate the role</description>
<objectselect><filter value="CfgRole" name="type"/>
</objectselect></input>
</dialog>
Examplejava -jar gaxclc.jar -u:default -p:password -s -h:localhost:8080 spd execute 10054-profileID:1 "C:/GAX/input.txt"
java -jar gaxclc.jar -u:default -p:password -h:localhost:8080 spd execute 10054-profileName:"Install profile" "C:/GAX/input.txt"
java -jar gaxclc.jar -u:default -p:password -s -h:localhost:8080 spd execute 10054 1-encrypted "C:/GAX/encryptedinput.txt"
delete
delete
Overview
This operation deletes an SPD. If SPD does not exist, the operation fails.
Formatjava –jar gaxclc.jar -u:user -p:password -s -h:<host>:<port> spd delete SPDID
• SPDID—The ID of the SPD to be deleted.
Core Features Using the Command Line Console (CLC)
Genesys Administrator Extension Help 36
Examplejava -jar gaxclc.jar -u:default -p:password spd delete 5436
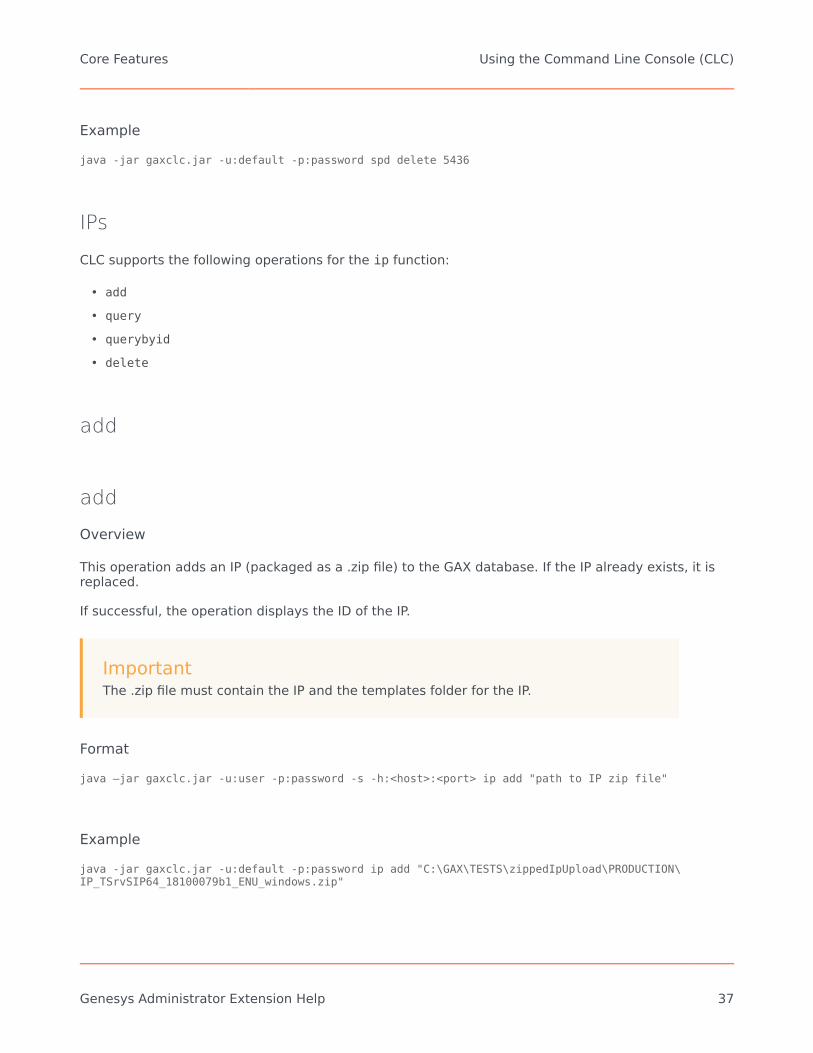
IPs
CLC supports the following operations for the ip function:
• add
• query
• querybyid
• delete
add
add
Overview
This operation adds an IP (packaged as a .zip file) to the GAX database. If the IP already exists, it isreplaced.
If successful, the operation displays the ID of the IP.
ImportantThe .zip file must contain the IP and the templates folder for the IP.
Formatjava –jar gaxclc.jar -u:user -p:password -s -h:<host>:<port> ip add "path to IP zip file"
Examplejava -jar gaxclc.jar -u:default -p:password ip add "C:\GAX\TESTS\zippedIpUpload\PRODUCTION\IP_TSrvSIP64_18100079b1_ENU_windows.zip"
Core Features Using the Command Line Console (CLC)
Genesys Administrator Extension Help 37

query
query
Overview
This operation queries all IPs and displays a table that lists the following details for each IP:
• ID number• Name• Version• OS• Locale• Status
Formatjava –jar gaxclc.jar -u:user -p:password -s -h:<host>:<port> ip query
Examplejava -jar gaxclc.jar -u:default -p:password -s -h:132.45.43.45:443 ip query
querybyid
querybyid
Overview
This operation queries an IP by its ID and displays a table that lists the following details:
• ID number• Name• Version• OS• Locale• Status
Core Features Using the Command Line Console (CLC)
Genesys Administrator Extension Help 38

Formatjava –jar gaxclc.jar -u:user -p:password -s -h:<host>:<port> ip query IPID
• IPID—The ID of the IP to query.
Examplejava -jar gaxclc.jar -u:default -p:password -h:132.45.43.45:8080 ip query 543
delete
delete
Overview
This operation deletes an IP.
Formatjava –jar gaxclc.jar -u:user -p:password -s -h:<host>:<port> ip delete IPID
• IPID—The ID of the IP to delete.
Examplejava -jar gaxclc.jar -u:default -p:password ip delete 547
Related Links
• Bulk Change Sets• Adding Links to the Navigation Bar• Login and Password• Plug-In Management• Using the Command Line Console (CLC)
Core Features Using the Command Line Console (CLC)
Genesys Administrator Extension Help 39

Bulk Change SetsGenesys Administrator Extension allows you to perform bulk changes to users. For example, you cancreate a Bulk Change Set to add or remove multiple users from your system in one action, or to addor remove multiple skills, or both.
Display Options
The Bulk Change Sets panel lists all the Bulk Change Sets in your environment that either have notbeen executed yet or have failed during execution. To see a list of successful Bulk Change Sets, seethe Completed Bulk Changes panel. Configuration Object Management respects tenancypermission settings. You can access only those objects that you have been granted permission toaccess. You can filter the contents of this list in two ways:
• Type the name or partial name of an object in the Quick Filter field.• Click the Tenant Filter button to open the Tenant filter panel. In this panel, click the check box beside
each tenants that you want to select. Use the Quick Filter field in this panel to filter the tenant list.
You can sort the items in the list by clicking a column head. Clicking a columnhead a second time reverses the sort order.
DetailsThe Bulk Change Sets list displays the following information:
• Change Set Name—The name of the Bulk Change Set.• Creator—The name of the user that created the Bulk Change Set.• Creation Date—The date on which the Bulk Change Set was created.• Last Modified Date—The date on which the Bulk Change Set was last modified.• Change Set Status—This can be one of the following:
• Empty—No data has yet been entered in the Bulk Change Set.• Incomplete—Only partial data has been entered in the Bulk Change Set.• Ready to Execute—The Bulk Change Set is ready to be executed.
• Execution—This can be one of the following:• Not Executed—The Bulk Change Set has not been executed yet.• Completed—The Bulk Change Set has been executed.• Failed—The execution of the Bulk Change Set failed.
• Progress—During execution, this field displays a progress bar for the Bulk Change Set.
Core Features Bulk Change Sets
Genesys Administrator Extension Help 40

• Executed by Tenant—Indicates which tenant last executed the Bulk Change Set.• Executed by User—Indicates which user last executed the Bulk Change Set.• Previously Executed Date—Indicates the date and time at which the Bulk Change Set was last
executed.
Click a Bulk Change Set in the list to view more information about the item. The following fields aredisplayed:
• Change Set Name—The name of the Bulk Change Set• Deletions—The objects that will be deleted by the Bulk Change Set• Additions—The objects that will be added by the Bulk Change Set• Updates—The objects that will be updated by the Bulk Change Set
ImportantA Solution Definition file is created when a Bulk Change Set is executed. See theCompleted Bulk Changes panel for instructions on how to download the SolutionDefinition file.
Procedures
You can perform the following actions from the Bulk Change Set panels:
Creating Bulk Change Sets[+] Click here to reveal procedure
Procedure: Creating Bulk Change Sets
Steps
1. In the Bulk Change Sets panel, click +.2. Enter information in the following fields:
• Change Set Name—The name of the Bulk Change Set.
Core Features Bulk Change Sets
Genesys Administrator Extension Help 41

ImportantThe Change Set Name field must be unique in the environment.
• Deletions—Enter any Configuration Object that is to be deleted with the Bulk Change Set. Ifthere are deletions, perform the following actions. Otherwise, move on to the next step.a. Click Add. The New Deletion Item panel appears to the right.b. Click Browse. A list of Configuration Objects appears to the right.c. Objects that appear in the list are determined by the currently selected category. Click
the drop-down menu at the top of the panel to change the category type.d. You can use the Quick Filter or Tenant Filter field to find specific objects. Click the
checkbox beside an object to add the object to the Deletions list.e. The name of the object appears in the New Deletion Item panel. Click OK to add it to
the Deletions list.f. Repeat the steps in this list to add more objects to the Deletions list.
• Additions—Enter any Configuration Object that is to be added with the Bulk Change Set. Ifthere are additions, perform the following actions. Otherwise, move on to the next step.a. Click Add. A new panel appears to the right.b. Click Browse. A list of Configuration Objects appears to the right.c. Select an object type in the Type drop-down menu.d. Click Browse to select an object to use as a template. A panel opens to the right. Click
the checkbox beside an object to select it.
ImportantWhen an object is used as a template, all aspects of the template object are used for theAddition objects, including connections and permissions.
e. Click Next.f. In the Number to Create field, enter the number of objects to create with the template.
The value must be an integer between 1 and 100.g. In the CSV File field, perform the following actions:
• Click Choose File to select a CSV file from which to acquire the new data.• In the window that opens, navigate to the location in which the CSV file is stored.
Select the CSV file to use.
Core Features Bulk Change Sets
Genesys Administrator Extension Help 42

ImportantThe following is an example of an acceptable CSV file format for creating User (Person)objects. Only the employeeid and username fields are mandatory. All other fields areoptional and can be omitted, in which case GAX provides default values that are copiedfrom the template object.employeeid, folderid, tenantdbid, state, lastname, firstname, password, username, skilllevels
bulkuser1,105,1, CFGEnabled, Tamblyn, Ericm, password, bulkuser1, "{skilldbid:102,level:10},{skilldbid:106, level:6}"
bulkuser2,106,2, CFGEnabled, Tamblyn, Ericm, password, bulkuser1,"{skilldbid:102, level:10},{skilldbid:107, level:7}"
• Click Open.
h. Click Finish.
• Updates—Enter any update that is to be performed on Configuration Objects with the BulkChange Set. If there are updates, perform the following actions. Otherwise, move on to thenext step.a. Click Add. The New Update Item panel appears to the right.b. Click Browse. A list of Configuration Objects appears to the right.c. Objects that appear in the list are determined by the currently selected category. Click
the drop-down menu at the top of the panel to change the category type.d. You can use the Quick Filter or Tenant Filter field to find specific objects. Click the
check box beside an object to add it to the Updates list.e. The name of the object appears in the New Update Item panel. Click OK to add it to the
Update list.f. Repeat the steps in this list to add more objects to the Update list.
3. In the Bulk Change Set creation panel, you can reorder the objects within the Deletions,Additions, or Updates lists.
ImportantBulk Change Set actions are executed in the following order : Deletions,Additions, and then Updates.
4. Click Save to save the Bulk Change Set.
Core Features Bulk Change Sets
Genesys Administrator Extension Help 43

ImportantThis action does not execute the Bulk Change Set. To execute the BulkChange set, follow the instructions for executing a Bulk Change Set.
Deleting Bulk Change Sets[+] Click here to reveal procedure
Procedure: Deleting Bulk Change Sets
Steps
1. Click the check box beside each Bulk Change Set that is to be deleted.2. Click Delete.3. A dialog box displays to confirm the action:
• Click OK to continue.• Click Cancel to discard the action.
Executing Bulk Change Sets[+] Click here to reveal procedure
Procedure: Executing Bulk Change Sets
Core Features Bulk Change Sets
Genesys Administrator Extension Help 44
Steps
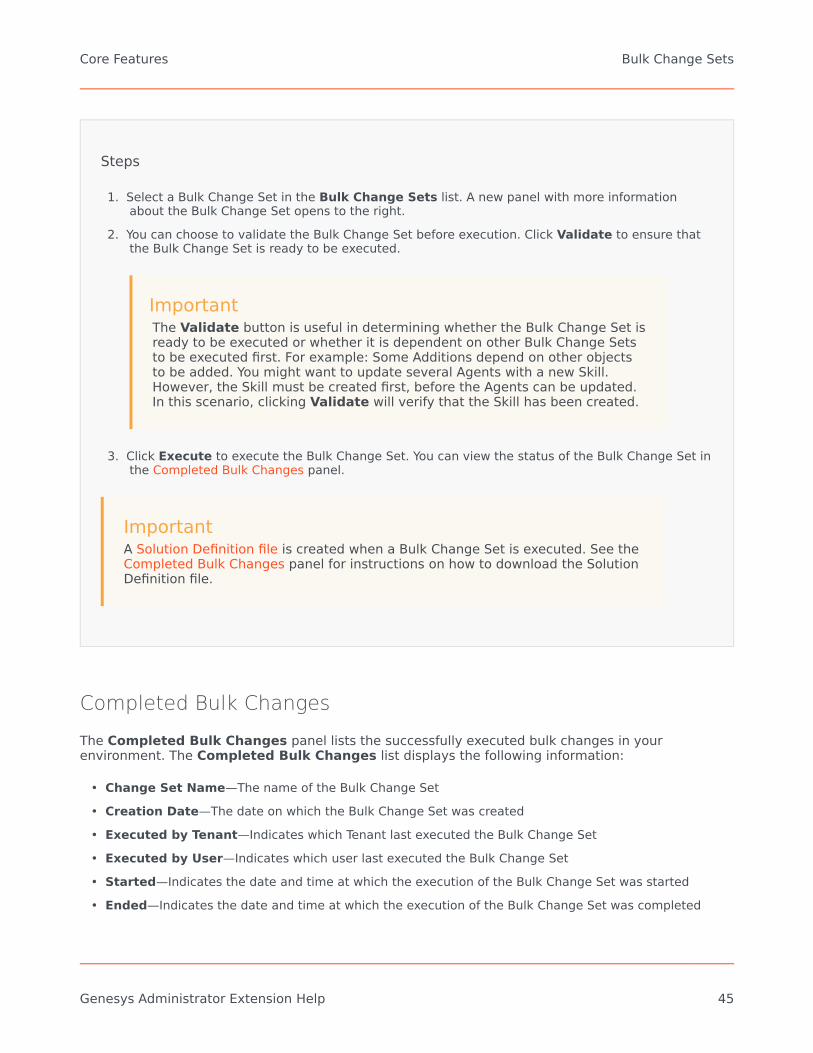
1. Select a Bulk Change Set in the Bulk Change Sets list. A new panel with more informationabout the Bulk Change Set opens to the right.
2. You can choose to validate the Bulk Change Set before execution. Click Validate to ensure thatthe Bulk Change Set is ready to be executed.
ImportantThe Validate button is useful in determining whether the Bulk Change Set isready to be executed or whether it is dependent on other Bulk Change Setsto be executed first. For example: Some Additions depend on other objectsto be added. You might want to update several Agents with a new Skill.However, the Skill must be created first, before the Agents can be updated.In this scenario, clicking Validate will verify that the Skill has been created.
3. Click Execute to execute the Bulk Change Set. You can view the status of the Bulk Change Set inthe Completed Bulk Changes panel.
ImportantA Solution Definition file is created when a Bulk Change Set is executed. See theCompleted Bulk Changes panel for instructions on how to download the SolutionDefinition file.
Completed Bulk Changes
The Completed Bulk Changes panel lists the successfully executed bulk changes in yourenvironment. The Completed Bulk Changes list displays the following information:
• Change Set Name—The name of the Bulk Change Set• Creation Date—The date on which the Bulk Change Set was created• Executed by Tenant—Indicates which Tenant last executed the Bulk Change Set• Executed by User—Indicates which user last executed the Bulk Change Set• Started—Indicates the date and time at which the execution of the Bulk Change Set was started• Ended—Indicates the date and time at which the execution of the Bulk Change Set was completed
Core Features Bulk Change Sets
Genesys Administrator Extension Help 45

To delete records of Bulk Change Sets, click the check box beside each BulkChange Set that is to be deleted, and then click Delete.
ImportantThis action does not delete the Bulk Change Set; it deletes the record of the BulkChange Set.
Click a Bulk Change Set in the list to view more information about the item. The following fields aredisplayed:
• Change Set Name—The name of the Bulk Change Set• Deletions—The objects that were deleted by the Bulk Change Set• Additions—The objects that were added by the Bulk Change Set• Updates—The objects that were updated by the Bulk Change Set
Click Export to download the solution definition file that was used during execution of the BulkChange Set.
Click Delete to delete the record of the Bulk Change Set.
ImportantThis action does not delete the Bulk Change Set; it deletes the record of the BulkChange Set.
Related Links
• Bulk Change Sets• Adding Links to the Navigation Bar• Login and Password• Plug-In Management• Using the Command Line Console (CLC)
Core Features Bulk Change Sets
Genesys Administrator Extension Help 46

AgentsAgents are Users who handle customer interactions directly. The Agents window lists all Agents inyour environment (or Tenant, if you are in a multi-tenant environment). You can only see thoseobjects for which you have access.
You can filter the contents of this list in several ways:
• Click Show Quick Filter and type a search term in the Quick Filter field. The list updates dynamicallyto show items that match the text in the Quick Filter field.
• Click Show Column Filter to show search fields for each column header. Enter a search term in one ofthese fields to quickly search the column for the search term.
• Click the cube icon to open the Tenant Directory window. In this window, click the Tenant that youwant to select. Use the Quick Filter field to filter the Tenant list.
You can sort the items in the list by clicking a column head. Clicking a column head a second timereverses the sort order.
The Agents window has two different modes to serve different users. You can change modes byopening System Preferences, selecting Agent Management, then choosing between Cloud orPremise. You can read more information about these modes by clicking a tab below.
Cloud
Cloud mode provides a simple, effective mechanism for creating and managing agents. Itautomatically provisions some configuration objects, such as DNs and Places, to simplify Agentcreation. Alternatively, if you want greater control over this process, select Premise in the AgentManagement menu.
Creating an Agent
To create a new Agent, click Add.
[+] Show Procedure
Procedure: Creating an AgentPurpose: To create an Agent in the Agents window while using the Cloud mode.
Agents Bulk Change Sets
Genesys Administrator Extension Help 47

Steps
1. Click Add. The Add Agent window appears.2. Enter the following information. For some fields, you can either enter the name of a value or click
Browse to select a value from a list:• User Information
• User Name—The name that this User should use to log into the environment. You mustspecify a value for this property, and that value must be unique within the ConfigurationDatabase.
• First Name—The first name of this User.• Last Name—The last name of this User.• External ID—This setting applies only if your environment is using external
authentication, either LDAP or RADIUS. This may be the user name in the externalauthentication system. For LDAP, it might be a whole, or partial, LDAP URL correspondingto RFC 2255. For more information, refer to the Framework External AuthenticationReference Manual.
ImportantThe External ID field might be hidden if the Hide External ID check box is checked in theSystem Preferences/Agent Management menu.
• Email—The e-mail address of this User.• Password—A password no longer than 64-characters that this User must use to log in to
the environment. You cannot view the existing password.
ImportantPasswords can be subject to format rules. Refer to the Genesys 8.1 Security Deployment Guidefor more information.
• Organization—The folder in which the Person object for this User is stored.• Default Number—The phone number of this User. This field is used to create the
associated DN, Place, and Agent Login objects for this User. GAX uses existing objects, ifavailable.
• Skills• You can add Skills to the Agent by:
• Creating a Skill—Type the name of the new Skill in the Quick Filter field and click +
Agents Bulk Change Sets
Genesys Administrator Extension Help 48

to create the Skill.• Selecting an existing Skill—In the Skills section, select existing Skills from a list to add
to the Agent. To select a Skill, click the check box beside the Skill and enter anumerical value in the Rating field.
ImportantSince Agent Groups might be defined automatically based on a Skill (Virtual Agent Groups), thelist of Agent Groups refreshes if you create a Skill.
• Agent Groups• You can add the Agent to an Agent Group by clicking the check box beside an item in the
list.
3. Click Save.
ImportantWhen adding an Agent in Cloud mode, GAX also makes the followingconfiguration changes:• Create Agent Logins in each Switch, using information that was entered in the
Default Number field.• Create the User object and associate Agent Logins to the User object. Wrap-
up Time for each Agent Login is set to 0.
Other Actions
Once you select an Agent, you can:
• Edit Agent Information—Select an Agent and click Edit to edit Agent information. If you edit theDefault Number field:• If this field is emptied, the Agent is disassociated from the current Place and its Agent Login objects
are emptied.• If a new value is given, the agent is associated with a new Place, DN, and Agent Login that match
the value. New objects are created, if they do not already exist. Existing objects are emptied andnot deleted.
• Copy an Agent—Select an Agent and click Clone to make a copy of the Agent object.• Change State—Select an Agent and click either Enable or Disable to change the state of an Agent.
Agents Bulk Change Sets
Genesys Administrator Extension Help 49
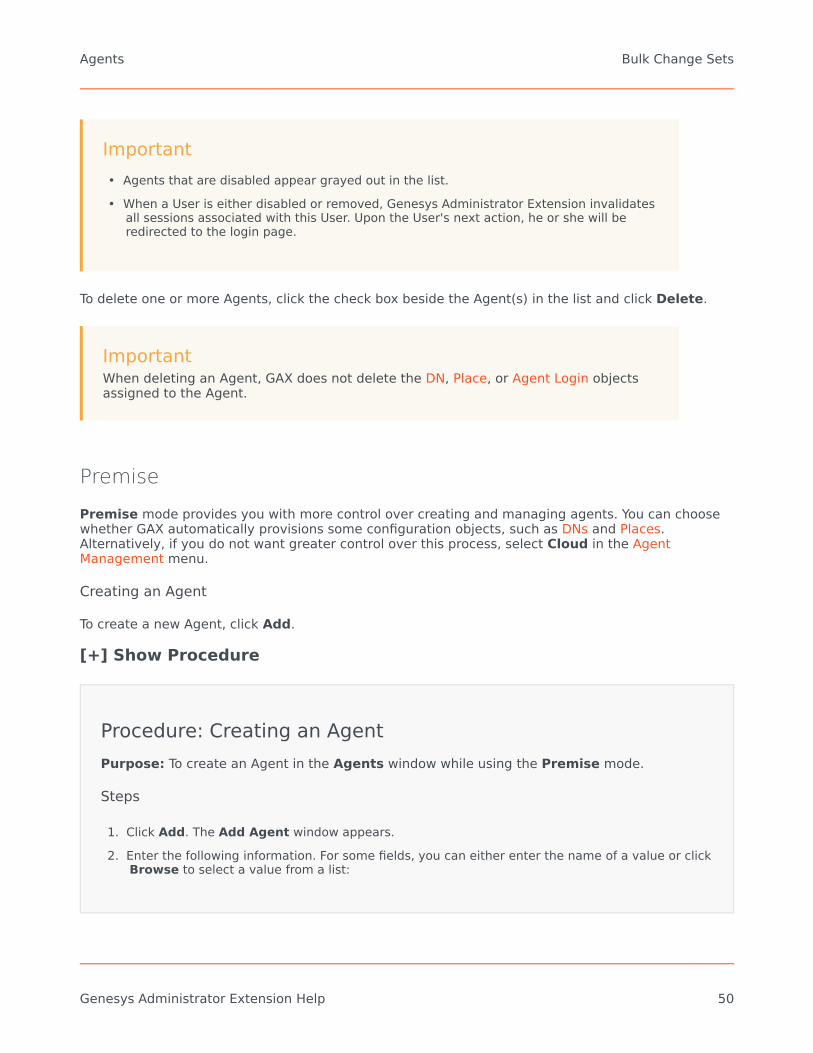
Important• Agents that are disabled appear grayed out in the list.• When a User is either disabled or removed, Genesys Administrator Extension invalidates
all sessions associated with this User. Upon the User's next action, he or she will beredirected to the login page.
To delete one or more Agents, click the check box beside the Agent(s) in the list and click Delete.
ImportantWhen deleting an Agent, GAX does not delete the DN, Place, or Agent Login objectsassigned to the Agent.
Premise
Premise mode provides you with more control over creating and managing agents. You can choosewhether GAX automatically provisions some configuration objects, such as DNs and Places.Alternatively, if you do not want greater control over this process, select Cloud in the AgentManagement menu.
Creating an Agent
To create a new Agent, click Add.
[+] Show Procedure
Procedure: Creating an AgentPurpose: To create an Agent in the Agents window while using the Premise mode.
Steps
1. Click Add. The Add Agent window appears.2. Enter the following information. For some fields, you can either enter the name of a value or click
Browse to select a value from a list:
Agents Bulk Change Sets
Genesys Administrator Extension Help 50

• User Information• User Name—The name that this User should use to log into the environment. You must
specify a value for this property, and that value must be unique within the ConfigurationDatabase.
• First Name—The first name of this User.• Last Name—The last name of this User.• External ID—This setting applies only if your environment is using external
authentication, either LDAP or RADIUS. This may be the user name in the externalauthentication system. For LDAP, it might be a whole, or partial, LDAP URL correspondingto RFC 2255. For more information, refer to the Framework External AuthenticationReference Manual.
ImportantThe External ID field might be hidden if the Hide External ID check box is checked in theSystem Preferences/Agent Management menu.
• Email—The e-mail address of this User.• Password—A password no longer than 64-characters that this User must use to log in to
the environment. You cannot view the existing password.
ImportantPasswords can be subject to format rules. Refer to the Genesys 8.1 Security Deployment Guidefor more information.
• Organization—The folder in which the Person object for this User is stored.• Place—The Place assigned to this Agent. Click Browse to browse a list of Places in your
environment. Once you select a Place, the Number/DN field is visible.• Agent Logins—The Agent Login(s) of this User. Click + to add an Agent Login.• Number/DN—The Number/DN of this User. This field appears once a Place is selected.
Click + to add a DN.
• Add User Skills• You can add Skills to the Agent by:
• Creating a Skill—Type the name of the new Skill in the Quick Filter field and click +to create the Skill.
• Selecting an existing Skill—In the Skills section, select existing Skills from a list to addto the Agent. To select a Skill, click the check box beside the Skill and enter a
Agents Bulk Change Sets
Genesys Administrator Extension Help 51

numerical value in the Rating field.
ImportantSince Agent Groups might be defined automatically based on a Skill (Virtual Agent Groups), thelist of Agent Groups refreshes if you create a Skill.
• Agent Groups• You can add the Agent to an Agent Group by clicking the check box beside an item in the
list.
3. Click Save.
Other Actions
Once you select an Agent, you can:
• Edit Agent Information—Select an Agent and click Edit to edit Agent information.• Copy an Agent—Select an Agent and click Clone to make a copy of the Agent object.• Change State—Select an Agent and click either Enable or Disable to change the state of an Agent.
Important• Agents that are disabled appear grayed out in the list.• When a User is either disabled or removed, Genesys Administrator Extension invalidates
all sessions associated with this User. Upon the User's next action, he or she will beredirected to the login page.
To delete one or more Agents, click the check box beside the Agent(s) in the list and click Delete.
ImportantWhen deleting an Agent, GAX does not delete the DN, Place, or Agent Login objectsassigned to the Agent.
Agents Bulk Change Sets
Genesys Administrator Extension Help 52

Related Links
• Skills• Agent Groups• Agent Groups• Skills• Access Groups
Agents Bulk Change Sets
Genesys Administrator Extension Help 53

Configuration ManagerConfiguration Manager enables you to create and manage system-level configuration objects such asAlarm Conditions, Business Attributes, Hosts, and more.
Overview
Configuration Manager Overview
The Configuration Manager page is a central location for viewing and managing the configurationobjects used by your system. Genesys Administrator Extension can manage objects in single-Tenantand multi-Tenant configurations.
Configuration objects, also known as Configuration Database objects, contain the data that Genesysapplications and solutions require to operate in a particular environment. These objects are allcontained in the Configuration Database.
Configuration Manager lists these objects by type. For example, configuration objects related tooutbound campaigns are listed under the Outbound heading.
Click on a configuration object type to view a list of the related configuration objects on your system.From this list, you can edit or delete the existing configuration objects, or you can create a newconfiguration object.
To view and manage configuration objects for a specific Tenant, click the cube icon and enter thename of the Tenant in the Tenant Directory field. By default, Configuration Manager listsconfiguration objects for the Tenant to which your user account belongs. When viewing objects byTenant, if you choose to create a new object, that object is created in the directory for that Tenant.
ImportantThe Tenant Directory field is not shown in a single-Tenant environment.
Click on a topic below to learn more about Configuration Manager.
Object Hierarchy[+] Click here to reveal sectionIn Genesys Administrator Extension, objects are stored in folders, usually with one object type perfolder.
Configuration Manager Bulk Change Sets
Genesys Administrator Extension Help 54

To help you better manage your configuration environment, you can create a hierarchy by manuallycreating any combination of the following:
• Folders and subfolders—A folder contains objects of one type. For example, for Host objects, you mightchoose to create subfolders that group hosts by location.
• Business Units/Sites—Unlike folders, Business Units and Sites can contain objects of different types. Forexample, all configuration objects related to a specific site for your business can be grouped into a Site,which then contains configuration objects within folders and subfolders.
In addition, the following objects include their parent objects as part of their hierarchy:
• Campaign Groups—Hierarchy includes Campaigns.• IVR Ports—Hierarchy includes IVRs.• Business Attribute Values—Hierarchy includes Business Attributes.• Agent Logins—Hierarchy includes Switches.• DNs—Hierarchy includes Switches.
Genesys Administrator Extension displays a navigation path (a set of breadcrumbs) that shows youwhere the displayed objects reside in your hierarchy. This path appears with all lists of objects, and islocated directly above the list. You can click any element of this path to go quickly to that element.
Some object types might only exist under the root tenant or a Business Unit/Site. If you are viewingobjects by Tenant, you might not see the following objects:
• Alarm Conditions• Application Templates• Applications• Hosts• Solutions• Switching Offices
Importing/Exporting Data[+] Click here to reveal sectionMost configuration objects allow you to import and export data, such as configuration options, byclicking More and selecting Import or Export. Genesys Administrator Extension uses the CFG/CONFfile formats.
Refer to the File Formats tab, above, for more information on acceptable file formats for import.
Required Permissions[+] Click here to reveal sectionThe minimum permissions required to perform a task in Genesys Administrator Extension depend on
Configuration Manager Bulk Change Sets
Genesys Administrator Extension Help 55

the task. For more information about permissions, see the Permissions tab, above.
You must also be granted appropriate Role privileges to perform specific tasks on an object or groupof objects.
Permission Description Prerequisites
Read
• To view a particular object,you must have Readpermission for that object.
• In Configuration Manager, youcan view the object type. Ifyou do not have Readpermission for the object, youcannot see it in ConfigurationManager.
• In list views, you can view thefollowing button: Edit.
• You can click on an object toview its details.
None
Create
• To create an object under aparticular folder, you musthave Create permission forthat folder. The person whocreates an object receivesFull Control permissionsfor that object. Otheraccounts have the sameaccess permissions for anewly created object as theydo for the folder in which theobject is created.
• In list views, you can view thefollowing buttons: New,Clone, and Move To.
• In object detail views, you canview the following buttons:Clone and Move to. You canalso view the following tabs:Options, Permissions, andDependencies.
Read
Update
• To modify a particular object,you must have Updatepermission for that object.
• In list views, you can view thefollowing button: Enable orDisable.
Read
Configuration Manager Bulk Change Sets
Genesys Administrator Extension Help 56
Permission Description Prerequisites
• In object detail views, you canview the following buttons:Enable or Disable, Save,and Apply.
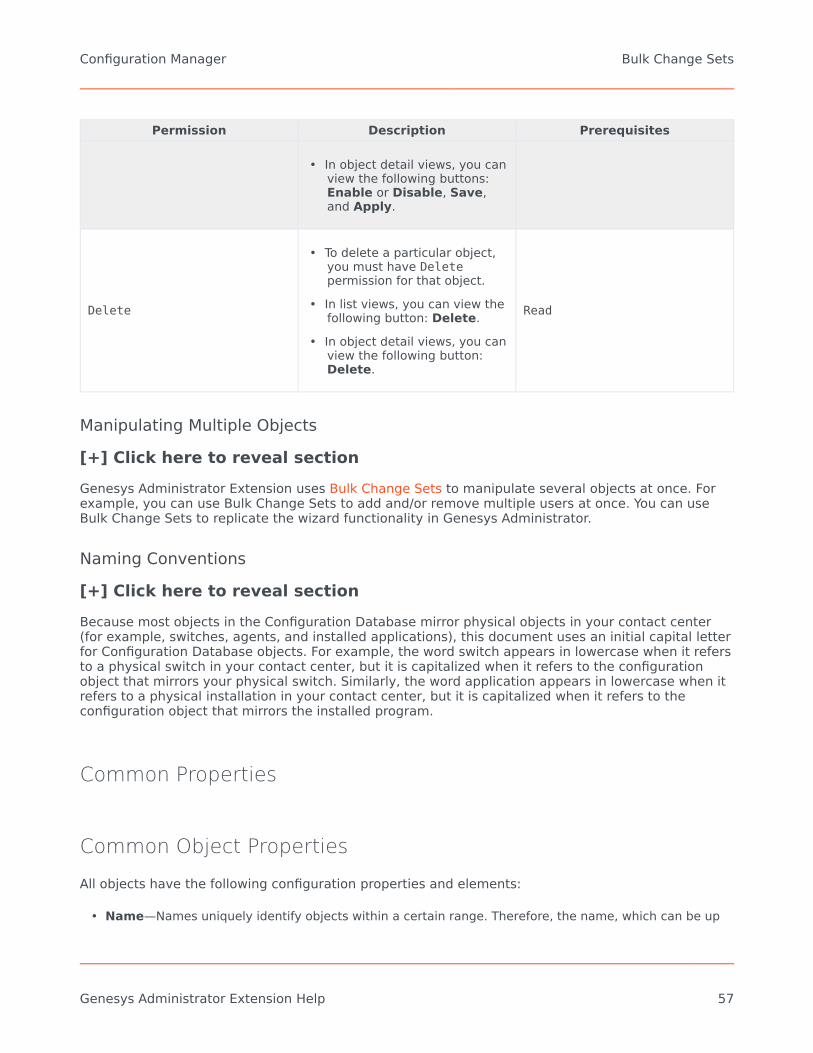
Delete
• To delete a particular object,you must have Deletepermission for that object.
• In list views, you can view thefollowing button: Delete.
• In object detail views, you canview the following button:Delete.
Read
Manipulating Multiple Objects[+] Click here to reveal sectionGenesys Administrator Extension uses Bulk Change Sets to manipulate several objects at once. Forexample, you can use Bulk Change Sets to add and/or remove multiple users at once. You can useBulk Change Sets to replicate the wizard functionality in Genesys Administrator.
Naming Conventions[+] Click here to reveal sectionBecause most objects in the Configuration Database mirror physical objects in your contact center(for example, switches, agents, and installed applications), this document uses an initial capital letterfor Configuration Database objects. For example, the word switch appears in lowercase when it refersto a physical switch in your contact center, but it is capitalized when it refers to the configurationobject that mirrors your physical switch. Similarly, the word application appears in lowercase when itrefers to a physical installation in your contact center, but it is capitalized when it refers to theconfiguration object that mirrors the installed program.
Common Properties
Common Object Properties
All objects have the following configuration properties and elements:
• Name—Names uniquely identify objects within a certain range. Therefore, the name, which can be up
Configuration Manager Bulk Change Sets
Genesys Administrator Extension Help 57

to 255 characters, is a required parameter for most types of objects. The exceptions are:• DNs and Agent Logins—Their unique numbers and codes identify them within a Switch.• IVR Ports—Their unique port numbers identify them within an IVR.
The way you name objects in your environment is important. Consistent and sensible naming conventions make yourconfiguration environment easier to understand and faster to browse, leading to a more maintainable and usable configuration.
ImportantAlthough Genesys Administrator Extension supports the full character set in object names, the use of certaincharacters can cause problems in the behavior of other Genesys applications. Therefore, avoid spaces,dashes, periods, or special characters in object names. Consider using underscores where you might normallyuse spaces or dashes.
The names you set for some types of objects must match the names of the entities that those objectsrepresent elsewhere in an environment. For example, the names of Hosts must match the names givento the computers they represent in the data network environment.
• State Enabled—If checked, indicates that the entity represented by an object is in regular operatingcondition and can be used without any restrictions. If not checked, indicates that the entity representedby an object is being used in a non-production environment. Customer interactions cannot be directedto this target, even if operating information indicates that this object is available.
Disabling a folder or an object that is a parent to other objects also disables all objects within the folder or all child objects of thatparent object.
For example:
• Disabling a Switch disables all DNs and Agent Logins defined within this Switch.• Disabling an Agent Group folder disables all Agent Groups configured within this folder.
However, if you disable a group of objects (for example, an Agent Group), the individual members ofthis group (in this example, Agents) remain enabled.
Permissions
Permissions
The Permissions tab lists the Access Groups and Users that have been configured explicitly withpermissions for this object. When you are setting permissions, it is normally performed with theUser(s) or Access Group(s) for which you want to grant access. This feature improves the manner inwhich permissions are set, and the scope is limited to managing permissions for a single databaseobject.
For additional instructions about granting, modifying, and removing permissions, refer to the Genesys8.1 Security Deployment Guide.
Configuration Manager Bulk Change Sets
Genesys Administrator Extension Help 58

ImportantSome configuration objects, such as Tenants and Folders, are parent objects to one ormore child objects. When you access the Permissions tab for these parent objects,you can use the following additional options to set permissions:
• Propagate check box—If Propagate is checked, the permission is propagated to everychild object under this parent object. If Propagate is not checked, the permission isremoved from every child object under this parent object, unless the permission hasbeen modified in the child object.
• Replace Recursively button—If Replace Recursively is clicked, the permissions ofevery child object are removed and replaced with permissions from the parent object.
You can perform the following actions:
Changing Members[+] Click here to reveal procedure
Procedure: Changing Members
Steps
1. Select an object, and click the Permissions tab.2. Click Add User or Add Access Group.3. A new window appears to enable you to select a User or Access Group. You can find Users or
Access Groups by using one of the following methods:• By Hierarchy—Click Show Hierarchy to see a list of all Users or Access Groups in your
environment, sorted by hierarchy.• By List—Click Show List to see a list of all Users or Access Groups in your environment.• By Quick Filter—Enter the name or partial name of the User or Access Group in the Quick
Filter field.
4. Perform one of the following actions:• Click Save to accept the changes and return to the object list.• Click Apply to accept the changes and remain in the Permissions tab.• Click Cancel to discard the changes.
Configuration Manager Bulk Change Sets
Genesys Administrator Extension Help 59

Changing Access Permissions[+] Click here to reveal procedure
Procedure:
Steps
1. Select an object, and click the Permissions tab.2. You can change any or all of the following options:
Property DescriptionCreate (C) You can create objects of this type.Read (R) You can view details for this object.Update (U) You can change, or modify, this object.Delete (D) You can delete this object.
Execute (X) You can deploy, start, stop, or otherwiseactivate this object.
Read Object Permissions (RP) You can view access permissions granted forthis object.
Change Object Permissions (CP) You can change access permissions grantedfor this object.
3. Perform one of the following actions:• Click Save to accept the changes and return to the object list.• Click Apply to accept the changes and remain in the Permissions tab.• Click Cancel to discard the changes.
Removing Access Permissions[+] Click here to reveal procedure
Procedure:
Configuration Manager Bulk Change Sets
Genesys Administrator Extension Help 60

Steps
1. Select an object, and click the Permissions tab.2. Select an Access Group or User for which to remove permissions.3. Click Remove.4. A dialog box appears to confirm deletion. Perform one of the following actions:
• Click Save to accept the changes and return to the object list.• Click Apply to accept the changes and remain in the Permissions tab.• Click Cancel to discard the changes.
Configuration Options
Configuration Options
ImportantApplication and Application Template objects have an additional tab, ApplicationOptions, to set configuration options specific to these objects. These options arecreated, updated, or deleted in the same manner as regular options.
The Options tab enables you to set configuration options for the object. You can perform thefollowing actions:
Creating an Option[+] Click here to reveal procedure
Procedure: Creating an Option
Configuration Manager Bulk Change Sets
Genesys Administrator Extension Help 61

Steps
1. Select an object, and click the Options tab.2. Click Add.3. Enter information in the Section, Key, and Value fields.4. Click OK.5. Perform one of the following actions:
• Click Save to accept the changes and return to the object list.• Click Apply to accept the changes and remain in the Options tab.• Click Cancel to discard the changes.
Updating an Option[+] Click here to reveal procedure
Procedure: Updating an Option
Steps
1. Select an object, and click the Options tab.2. Select an option.3. Edit information in the Section, Key, and Value fields.4. Click OK.5. Perform one of the following actions:
• Click Save to accept the changes and return to the object list.• Click Apply to accept the changes and remain in the Options tab.• Click Cancel to discard the changes.
Configuration Manager Bulk Change Sets
Genesys Administrator Extension Help 62

Deleting an Option[+] Click here to reveal procedure
Procedure: Deleting an Option
Steps
1. Select an object, and click the Options tab.2. Select an option.3. Click Delete.4. Perform one of the following actions:
• Click Save to accept the changes and return to the object list.• Click Apply to accept the changes and remain in the Options tab.• Click Cancel to discard the changes.
Important• The Section and Key fields are required, and the values for these fields must be unique
in the environment.• You can click More to import or export options. See the Importing/Exporting Data
section in the Overview tab, above, for more information.
Dependencies
Dependencies
The Dependencies tab displays a list of all objects that are dependent on this object, and by whatproperty they are dependent.
For example, consider a scenario in which an Application object, AppA, is running on a Host object,HostA. AppA is dependent on HostA to function, so the Dependencies tab for HostA shows AppA
Configuration Manager Bulk Change Sets
Genesys Administrator Extension Help 63

as a dependent object, with the property being Host.
For all Users and Agents, the Dependencies tab also lists the Roles to which they have beenassigned.
Click any object in the list to view the properties of that dependent object. You can then modify itsproperties or create another object of the same type.
Security
Assigning Security Certificates
Genesys supports the optional use of the Transport Layer Security (TLS) protocol to secure dataexchange between Genesys components. The TLS protocol is implemented using security certificates,which must be configured in the Host objects and the Application objects representing thesecomponents.
ImportantBefore configuring secure data exchange, make sure that certificates are installed onthe host computers on which the Genesys components run, and that the certificateinformation is available to you.
Security certificates are assigned at the Host level, and optionally at the Application and Port levels.The Host certificate is used by Applications and Ports by default, unless the Applications and Portsspecify their own certificates. In this case, those specific certificates override the default Hostcertificate.
For more information about deploying TLS, refer to the Genesys 8.1 Security Deployment Guide.
File Formats
Supported File Formats
The CFG/CONF file format is a plain-text format. The CFG format is for use on Microsoft Windowssystems, and the CONF format on UNIX systems.
Both formats support only the import and export of string options. Other types of configurationoptions are ignored and not imported or exported.
Configuration Manager Bulk Change Sets
Genesys Administrator Extension Help 64

SyntaxThe syntax of the .cfg and .conf files is identical. Each section and option appears on a separate line,with section names in square brackets. Each section is followed by a list of options in that section,with the appropriate values:
[section_name1]option-name1=option_value2...option_nameN=option_valueN
[section_name2]option-nameN+1=option_valueN+1...
ExampleThe following excerpt from a configuration file illustrates the correct syntax in a .cfg or .conf file:
[confserv]port=2520management-port=2521server=dbserverencryption=falseencoding=utf-8
[log]verbose=standardall=stderr
[hca]schema=none
Configuration Manager Bulk Change Sets
Genesys Administrator Extension Help 65

AccountsThe Accounts section of Configuration Manager enables you to configure the following objects:
• Access Groups• Agent Groups• Users (Persons)• Roles• Skills• Capacity Rules
Configuration Manager Accounts
Genesys Administrator Extension Help 66

Access GroupsAccess Groups are groups of Users who need to have the same set of permissions for ConfigurationDatabase objects.
In many cases, users fall into a small number of categories with similar access needs. A team ofagents all performing the same tasks often has identical access needs. Two or three peopleresponsible for maintaining a specific site of the contact center may also have identical access needs.You can greatly simplify access control by adding individuals to Access Groups and then settingpermissions for those groups.
Important• The default user account is not related to Access Groups and, therefore, does not
appear as a member of any Access Group.• For detailed instructions about managing Roles assigned to Access Groups, refer to the
Genesys 8.1 Security Deployment Guide.
Display Options
The Access Groups list shows the Access Groups that are in your environment. It is sorted in ahierarchy by Tenants, configuration units, sites, and folders. To view objects by a particular hierarchy,select the hierarchy type in the drop-down menu above the list.
ImportantAccess Groups that are disabled appears grayed out in the list.
Configuration Manager respects tenancy permission settings. You can access only those objects thatyou have been granted permissions and privileges to access.
You can filter the contents of this list in two ways:
• Type the name or partial name of an object in the Quick Filter field.• Click the cube icon to open the Tenant Directory filter panel. In this panel, click the Tenant that you
want to select. Use the Quick Filter field in this panel to filter the Tenant list.
To select or de-select multiple objects at once, click Select.
Configuration Manager Accounts
Genesys Administrator Extension Help 67

Procedures
To create a new Access Group object, click New. To view or edit details of an existing object, click onthe name of the object, or click the check box beside an object and click Edit. To delete one or moreobjects, click the check box beside the object(s) in the list and click Delete. You can also deleteindividual objects by clicking on the object and then clicking Delete.
ImportantWhen you delete an Access Group, only the Access Group object itself is removedfrom the Configuration Database. Its member objects—Access Group and Userobjects—are not deleted.
Otherwise, select the check box beside one or more objects and click More to perform the followingtasks:
• Clone—Copy an Access Group.• Move To—Move an Access Group to another hierarchical structure.• Enable or disable Access Groups• Create a folder, configuration unit, or site. See Object Hierarchy for more information.
Click on the name of an Access Group to view additional information about the object. You can alsoset options and permissions, and view dependencies.
Procedure: Creating Access Group Objects
Steps
1. Click New.2. Enter the following information. For some fields, you can either enter the name of a value or click
Browse to select a value from a list:• Name—The name of the Access Group. You must specify a value for this property, and that
value must be unique within the Configuration Database (in an enterprise environment) orwithin the Tenant (in a multi-tenant environment).
• Tenant—In a multi-tenant environment, the Tenant to which this object belongs. This value isautomatically set to the Tenant that was specified in the Tenant Directory field in theobject list.
• State Enabled—If selected, indicates that the object is in regular operating condition and
Configuration Manager Accounts
Genesys Administrator Extension Help 68

can be used without any restrictions.
3. Click Apply to save the access group. The Members tab appears.4. In the Members tab, click Add to add a User. In the pop-up window, you can create a new User
object by clicking +.5. Perform one of the following actions after you have added a User to the Access Group:
• Click Save to accept the changes and return to the object list.• Click Apply to accept the changes and remain in the tab.• Click Cancel to discard the changes.
Related Links
• Skills• Agent Groups• Agent Groups• Skills• Access Groups
Configuration Manager Accounts
Genesys Administrator Extension Help 69

Agent GroupsAn Agent Group is a logical grouping of Agents. Agent Groups are typically set up to provideparticular sets of contact-center services.
Display Options
The Agent Groups list shows the Agent Groups that are in your environment. It is sorted in ahierarchy by Tenants, configuration units, sites, and folders. To view objects by a particular hierarchy,select the hierarchy type in the drop-down menu above the list.
ImportantAgent Groups that are disabled appear grayed out in the list.
Configuration Manager respects tenancy permission settings. You can access only those objects thatyou have been granted permissions and privileges to access.
You can filter the contents of this list in two ways:
• Type the name or partial name of an object in the Quick Filter field.• Click the cube icon to open the Tenant Directory filter panel. In this panel, click the Tenant that you
want to select. Use the Quick Filter field in this panel to filter the Tenant list.
To select or de-select multiple objects at once, click Select.
Procedures
To create a new Agent Group object, click New. To view or edit details of an existing object, click onthe name of the object, or click the check box beside an object and click Edit. To delete one or moreobjects, click the check box beside the object(s) in the list and click Delete. You can also deleteindividual objects by clicking on the object and then clicking Delete.
ImportantWhen you delete an Agent Group, only the Agent Group object itself is removed fromthe Configuration Database. Its member Agent objects are not deleted.
Otherwise, select the check box beside one or more objects and click More to perform the following
Configuration Manager Accounts
Genesys Administrator Extension Help 70

tasks:
• Clone—Copy an Agent Group.• Move To—Move an Agent Group to another hierarchical structure.• Enable or disable Agent Groups• Create a folder, configuration unit, or site. See Object Hierarchy for more information.
Click on the name of an Agent Group to view additional information about the object. You can also setoptions and permissions, and view dependencies.
Procedure: Creating Agent Group Objects
Steps
1. Click New.2. Enter the following information. For some fields, you can either enter the name of a value or click
Browse to select a value from a list:• Name—The name of the Agent Group. You must specify a value for this property, and that
value must be unique within the Configuration Database (in an enterprise environment) orwithin the Tenant (in a multi-tenant environment). You cannot change this value as long asthis Agent Group contains at least one User.
• Capacity Table—This field applies only for the Enterprise Routing Solution. It is the CapacityTable associated with this Agent Group. Refer to Enterprise Routing Solution documentationfor more information.
• Quota Table—This field applies only for the Enterprise Routing Solution. It is the Quota Tableassociated with this Agent Group. Refer to Enterprise Routing Solution documentation formore information.
• Cost Contract—The Cost Contract associated with this Agent Group.• Site—The Site containing this Cost Contract.• Script—Enter a valid expression on the Script tab to define the group as a Virtual Agent
Group. The expression must be in Virtual Group Script Language (VGSL) and must define atleast one skill (with optionally, a skill level) in the following format:Skill("SkillName")>SkillLevelExampleSkill("Spanish")>5
• Tenant—In a multi-tenant environment, the Tenant to which this object belongs. This value isautomatically set to the Tenant that was specified in the Tenant Directory field in theobject list.
• State Enabled—If selected, indicates that the object is in regular operating condition andcan be used without any restrictions.
Configuration Manager Accounts
Genesys Administrator Extension Help 71

3. In the Supervisors tab, click Add to add a User. In the pop-up window, you can create a newUser by clicking +.
4. In the Agents tab, click Add to add a User. In the pop-up window, you can create a new User byclicking +.
5. The Origination DNs tab lists DNs from which calls can be routed or diverted to this AgentGroup. You can include DNs of the following types into this list: Routing Point, ExternalRouting Point, Service Number, Routing Queue, ACD Queue, Virtual Queue, or VirtualRouting Point. Click Add to add a DN. In the pop-up window, you can create a new DN objectby clicking +.
6. Perform one of the following actions:• Click Save to accept the changes and return to the object list.• Click Apply to accept the changes and remain in the tab.• Click Cancel to discard the changes.
Virtual Agent Groups
A Virtual Agent Group is similar to an Agent Group except that a Virtual Agent Group has nopermanent members. Instead, an Agent becomes a member of a Virtual Agent Group if that Agentmeets the criteria specified by the script. Agent membership in a Virtual Agent Group can changedynamically based on changes in the Virtual Agent Group criteria or changes in the object propertiesof the Agent. When you click a Virtual Agent Group in Genesys Administrator Extension, you see itscurrent member Agents.
ImportantAlthough you can create and configure them using Genesys Administrator Extension,Virtual Agent Groups are used primarily by Reporting applications. For moreinformation about Virtual Agent Groups, refer to the latest version of the FrameworkStat Server User's Guide.
WarningIf Genesys Administrator Extension finds Virtual Agent Groups (converted from anearlier installation) that contain illegal script expressions or include permanentmembers, Genesys Administrator Extension will display an error message. To preservecorrect functionality of the Virtual Agent Groups, you must address the problemmanually by either correcting the error or converting the Virtual Agent Group to a non-virtual Agent Group by removing the expression from the configuration option script.
Configuration Manager Accounts
Genesys Administrator Extension Help 72

Related Links
• Skills• Agent Groups• Agent Groups• Skills• Access Groups
Configuration Manager Accounts
Genesys Administrator Extension Help 73

Users (Persons)Users are the contact-center personnel, including Agents, who need access to Genesys applications.Agents are Users who handle customer interactions directly.
Genesys Framework requires that every User who needs such access be registered in theConfiguration Database with an appropriate set of permissions.
ImportantTo run a particular application, a User must have Read and Execute permissions forthe object that represents this application in the Configuration Database. New Userscreated in Genesys Administrator Extension receive the same set of defaultpermissions and access privileges that Configuration Server grants.
Display Options
The Persons list shows the Users that are in your environment. It is sorted in a hierarchy by Tenants,configuration units, sites, and folders. To view objects by a particular hierarchy, select the hierarchytype in the drop-down menu above the list. You can quickly distinguish between Users and Agents bylooking at the icon to the left of the object name.
ImportantUsers that are disabled appear grayed out in the list.
Configuration Manager respects tenancy permission settings. You can access only those objects thatyou have been granted permissions and privileges to access.
You can filter the contents of this list in two ways:
• Type the name or partial name of an object in the Quick Filter field.• Click the cube icon to open the Tenant Directory filter panel. In this panel, click the Tenant that you
want to select. Use the Quick Filter field in this panel to filter the Tenant list.
You can sort the items in the list by clicking a column head. Clicking a column head a second timereverses the sort order.
Click Group By to group objects by various criteria.
To select or de-select multiple objects at once, click Select.
Configuration Manager Accounts
Genesys Administrator Extension Help 74

Procedures
To create a new User object, click New. To view or edit details of an existing object, click on the nameof the object, or click the check box beside an object and click Edit. To delete one or more objects,click the check box beside the object(s) in the list and click Delete. You can also delete individualobjects by clicking on the object and then clicking Delete. Otherwise, click More to perform thefollowing tasks:
• Clone—Copy a User.• Move To—Move a User to another hierarchical structure.• Enable or disable Users.
ImportantWhen a User is either disabled or removed, Genesys Administrator Extensioninvalidates all sessions that are associated with this User. Upon the User's nextaction, he or she will be redirected to the login page.
• Create a folder, configuration unit, or site. See Object Hierarchy for more information.
Click on the name of a User to view additional information about the object. You can also set optionsand permissions, and view dependencies.
Procedure: Creating User Objects
Steps
1. Click New.2. Enter the following information. For some fields, you can either enter the name of a value or click
Browse to select a value from a list:• Name—The name that this User should use to log into the environment. You must specify a
value for this property, and that value must be unique within the Configuration Database.• Agent—Indicates whether this User is an Agent. If checked, additional fields appear. Once
you set this flag, you cannot change it.• First Name—The first name of this User.• Last Name—The last name of this User.
Configuration Manager Accounts
Genesys Administrator Extension Help 75

• E-mail Address—The e-mail address of this User.• Employee ID—A code of up to 64-characters that identifies this User within the contact-
center staff. You must specify a value for this property and that value must be unique withinthe Configuration Database (in an enterprise environment), or within the Tenant (in a multi-tenant environment).
• Password—A password no longer than 64-characters that this User must use to log in to theenvironment. You cannot view the existing password. When creating a new user, this field isalways enabled. When editing an existing user, this field is enabled only if Reset Passwordis not selected.
ImportantPasswords can be subject to format rules. Refer to the Genesys 8.1 Security Deployment Guide formore information.
• Confirm Password—Confirmation of the password entered. When creating a new user, thisfield is always enabled. When editing an existing user, this field is enabled only if ForcePassword Reset on Next Login is not selected.
ImportantDo not copy-and-paste the value from the Password field. You must retype the password.
• Force Password Reset on Next Login—A check-box that, if selected, prompts the user toenter a new password upon the next login.
ImportantThe Force Password Reset on Next Login option displays only if Genesys AdministratorExtension connects to Management Framework 8.1.1, or higher. See the Genesys 8.1 SecurityDeployment Guide for more information about resetting passwords.
• External ID—This setting applies only if your environment is using external authentication,either LDAP or RADIUS. This may be the user name in the external authentication system.For LDAP, it might be a whole, or partial, LDAP URL corresponding to RFC 2255. For moreinformation, refer to the Framework External Authentication Reference Manual.
• Tenant—In a multi-tenant environment, the Tenant to which this object belongs. This value isautomatically set to the Tenant that was specified in the Tenant Directory field in theobject list.
• State Enabled—If selected, indicates that the object is in regular operating condition and
Configuration Manager Accounts
Genesys Administrator Extension Help 76

can be used without any restrictions.
3. If Agent is selected, enter the following information. For some fields, you can either enter thename of a value or click Browse to select a value from the following list:• Default Place—The Place assigned to this Agent, by default. This optional parameter applies
to a limited number of configurations, in particular those where a real-time associationbetween a Place and an Agent cannot be established through a telephony login procedure.
• Capacity Rule—The name of the Script of type Capacity Rule that defines the ability of thisAgent to handle multiple interactions. Refer to Reporting documentation for moreinformation.
• Cost Contract—The Cost Contract associated with this Agent.• Site—The Site containing this Cost Contract.
4. In the Member Of tab, click Add to add an Access Group.5. In the Ranks tab, click Add to add a Rank.6. Enter the following information in the pop-up window that displays on your screen:
• Application Type—The type of Application to which a User needs access. Consult themanuals for a GUI application to see if this application is using Ranks to enable or blockcertain functions. If a manual does not contain any references to Ranks, this application doesnot use Ranks, and you do not need to specify the Person's Ranks with respect to thisapplication.
• Application rank—The Rank with respect to Applications of the specified type.
7. If Agent is selected, click Apply to display the following tabs.• In the Skills tab, click Add to add a Skill.• Enter the following information in the pop-up window that displays on your screen:
• Skill—The Skill assigned to this Agent.• Level—The relative measure of the Agent's proficiency in this Skill.
• In the Agent Logins tab, click Add to add an Agent Login.• Enter the following information in the pop-up window that displays on your screen:
• Agent Login—The Agent Login code assigned to this Agent. You cannot assign an AgentLogin to more than one Agent.
• Wrap-up Time—Some switches do not support transfer of information about an agent'spostcall work status through the CTI-link. However, when this operation is supported,consider specifying the wrapup time, in seconds, for the Agent Logins that belong to suchswitches. This specification must match the corresponding switch setting.
8. Click Save.
Configuration Manager Accounts
Genesys Administrator Extension Help 77

ImportantNew Users do not automatically receive Read and Update permissions for their Userobject. You must manually provision these permissions to allow Users to save theiruser preferences in GUI-based programs, such as GAX or Workspace Desktop Edition(formerly known as Interaction Workspace).
Related Links
• Skills• Agent Groups• Agent Groups• Skills• Access Groups
Configuration Manager Accounts
Genesys Administrator Extension Help 78

RolesRoles define what you can do in a given application. In Genesys Administrator Extension, roles andtheir privileges are controlled by the use of Role objects, which are assigned to Users (includingAgents) and Access Groups. Roles are application-specific, and must be defined for each applicationthat supports them.
In a hierarchical multi-Tenant configuration, only those Roles defined in the Environment Tenant canbe used to allow Users to access all screens in Genesys Administrator Extension. Users cannotinclude Genesys Administrator Extension-specific privileges in Roles from other Tenants.
For more information about Roles, refer to the Genesys 8.1 Security Deployment Guide. For a listingof Role Privileges for the Genesys Administrator Extension application, refer to Role Privileges in theGenesys Administrator Extension Deployment Guide.
Display Options
The Roles list shows the Roles that are in your environment. It is sorted in a hierarchy by tenants,configuration units, sites, and folders. To view objects by a particular hierarchy, select the hierarchytype in the drop-down menu above the list.
ImportantRoles that are disabled will appear grayed out in the list.
Configuration Manager respects tenancy permission settings. You can access only those objects thatyou have been granted permissions and privileges to access.
You can filter the contents of this list in two ways:
• Type the name or partial name of an object in the Quick Filter field.• Click the cube icon to open the Tenant Directory filter panel. In this panel, click the Tenant that you
want to select. Use the Quick Filter field in this panel to filter the Tenant list.
You can sort the items in the list by clicking a column head. Clicking a column head a second timereverses the sort order.
To select or de-select multiple objects at once, click Select.
Procedures
To create a new Role object, click New. To view or edit details of an existing object, click on the name
Configuration Manager Accounts
Genesys Administrator Extension Help 79

of the object, or click the check box beside an object and click Edit. To delete one or more objects,click the check box beside the object(s) in the list and click Delete. You can also delete individualobjects by clicking on the object and then clicking Delete. Otherwise, click More to perform thefollowing tasks:
• Clone—Copy a Role.• Move To—Move a Role to another hierarchical structure.• Enable or disable Roles.• Create a folder, configuration unit, or site. See Object Hierarchy for more information.
Click on the name of a Role to view additional information about the object. You can also set optionsand permissions.
Procedure: Creating Role Objects
Steps
1. Click New.2. Enter the following information. For some fields, you can either enter the name of a value or click
Browse to select a value from a list:• Name—The name of this Role. You must specify a value for this property, and that value
must be unique within the Configuration Database (in an enterprise environment) or withinthe Tenant (in a multi-tenant environment).
• Description—A brief description of this Role.• Tenant—In a multi-Tenant environment, the Tenant to which this object belongs. This value is
automatically set to the Tenant that was specified in the Tenant Directory field in theobject list.
• State Enabled—If selected, indicates that the object is in regular operating condition andcan be used without any restrictions.
3. In the Role Members tab, click Add Access Group to add an Access Group, or Add Person toadd a User.
4. In the Assigned Privileges tab, select role privileges to add to this Role object.5. Click Save.
Related Links
• Skills• Agent Groups
Configuration Manager Accounts
Genesys Administrator Extension Help 80
• Agent Groups• Skills• Access Groups
Configuration Manager Accounts
Genesys Administrator Extension Help 81

SkillsSkills are qualities or abilities that Agents possess and that affect the placement of each Agent in acontact center hierarchy. Common Skills include abilities in different languages, particular categoriesof product knowledge, or ability in particular types of sales.
Display Options
The Skills list shows the Skills that are in your environment. It is sorted in a hierarchy by tenants,configuration units, sites, and folders. To view objects by a particular hierarchy, select the hierarchytype in the drop-down menu above the list.
ImportantSkills that are disabled will appear grayed out in the list.
Configuration Manager respects tenancy permission settings. You can access only those objects thatyou have been granted permissions and privileges to access.
You can filter the contents of this list in two ways:
• Type the name or partial name of an object in the Quick Filter field.• Click the cube icon to open the Tenant Directory filter panel. In this panel, click the Tenant that you
want to select. Use the Quick Filter field in this panel to filter the Tenant list.
You can sort the items in the list by clicking a column head. Clicking a column head a second timereverses the sort order.
To select or de-select multiple objects at once, click Select.
Procedures
To create a new Skill object, click New. To view or edit details of an existing object, click on the nameof the object, or click the check box beside an object and click Edit. To delete one or more objects,click the check box beside the object(s) in the list and click Delete. You can also delete individualobjects by clicking on the object and then clicking Delete.
Important
Configuration Manager Accounts
Genesys Administrator Extension Help 82

When you delete a Skill, it is removed from the Configuration Database and from anyAgent to which it is assigned. If you want to remove only the Skill from an Agent towhich it is assigned, but leave it in the Configuration Database and available forassignment to another Agent, remove the Skill from the Agent.
Otherwise, click More to perform the following tasks:
• Clone—Copy a Skill.• Move To—Move a Skill to another hierarchical structure.• Enable or disable Skills.• Create a folder, configuration unit, or site. See Object Hierarchy for more information.
Click on the name of a Skill to view additional information about the object. You can also set optionsand permissions, and view dependencies.
Procedure: Creating Skill Objects
Steps
1. Click New.2. Enter the following information. For some fields, you can either enter the name of a value or click
Browse button to select a value from a list:• Name—The name of this Skill. You must specify a value for this property, and that value
must be unique within the Configuration Database (in an enterprise environment) or withinthe Tenant (in a multi-tenant environment).
• Tenant—In a multi-tenant environment, the Tenant to which this object belongs. This value isautomatically set to the Tenant that was specified in the Tenant Directory field in theobject list.
• State Enabled—If selected, indicates that the object is in regular operating condition andcan be used without any restrictions.
3. Click Save.
Related Links
• Skills• Agent Groups
Configuration Manager Accounts
Genesys Administrator Extension Help 83

• Agent Groups• Skills• Access Groups
Configuration Manager Accounts
Genesys Administrator Extension Help 84
Capacity RulesThe Capacity Rules window enables you to set Capacity Rules for various operations in yourenvironment. For example, you may choose to set Capacity Rules for how many voice interactions oremail interactions, or a combination of both, can be processed at one time.
Click Display Options below to learn more about the list and how it can be sorted or searched; or,click Actions to learn more about possible actions you can perform in this window.
Display Options
The Capacity Rules list displays the Capacity Rules in your environment. The list is organized in ahierarchy, starting with Tenants, configuration units, sites, and folders.
ImportantCapacity rules that are disabled will appear grayed out in the list.
This list respects tenancy permission settings. You can access only those objects that you have beengranted permission to access.
You can filter the contents of this list in two ways:
• Type the name or partial name of an object in the Quick Filter field.• Click Tenant Filter to open the Tenant Filter window. In this window, click the check box beside each
Tenant that you want to select. Use the Quick Filter field in this panel to filter the Tenant list.
You can sort the items in the list by clicking a column head. Clicking a column head a second timereverses the sort order.
Actions
Click a Capacity Rule to view more details about the rule in a new panel that opens to the right. Fromthis panel, you can also edit Access Control. You can perform the following actions:
Creating Capacity Rules[+] Show ProcedureThis short video demonstrates how to create Capacity Rules using GAX. Alternatively, you can refer tothe procedure below the video.
Configuration Manager Accounts
Genesys Administrator Extension Help 85

Link to video
Procedure: Creating Capacity Rules
Steps
1. Click New.2. Enter the following information:
• Capacity Rule Name—The name of the Capacity Rule.
ImportantThe Capacity Rule Name field must be unique in the environment.
• Description—A description of the function of the Capacity Rule.• Tenant and Folder—The Tenant and folder to which this Capacity Rule belongs. Click
Browse to locate the folder in which the script is stored, or type the name of the folder inthe Quick Filter field.
ImportantThe list of displayed folders is based on each Tenant's access settings.
• Media Types—Click New to select which media types will be monitored by this CapacityRule. For more information, see Media Types.
3. Click Save.
Media Types[+] Show ProcedureYou can add one or media types to Capacity Rules to specify how many instances of each media typeare allowed simultaneously.
Configuration Manager Accounts
Genesys Administrator Extension Help 86

Procedure: Adding Media Types to Capacity Rules
Steps
1. Perform one of the following actions:• Click New, and create a new Capacity Rule.• Click an existing Capacity Rule in the Capacity Rules panel.
2. In the Media Types section, click New to add media types to the Capacity Rule. A new panelopens to the right.
3. In the new panel, click the Media Type drop-down menu to select a media type. A new sectioncalled Conditions displays.
4. Set the conditions for the media type.5. Click Save.
Conditions
By default, the maximum value of the media type is 1. You can click the [media type] exceeds 1button to set a new maximum value. For example, if you select Voice as a media type, click Voiceexceeds 1 to open a new panel, and enter a new value in the Maximum Capacity field. Click OK tosave the change.
You can also mix media types for the Capacity Rule. For example, you could set a Capacity Rule thatallows one Voice interaction and one Email interaction (for a total of two simultaneous interactions).Alternately, you could set a Capacity Rule that allows one Voice or one Email interaction, but notboth (for a total of one simultaneous interaction).
Procedure: Adding an and Condition to a Media Type
Steps
1. In the Conditions drop-down menu, click and. A new panel opens to the right that allows you toadd a condition.
2. Click the Media Type drop-down menu, and select a media type.
Configuration Manager Accounts
Genesys Administrator Extension Help 87

3. Enter a value in the Maximum Capacity field.4. Click OK to add the condition.
Procedure: Adding an or Condition to a Media Type
Steps
1. In the Conditions drop-down menu, click or. A new panel opens to the right that allows you toadd a condition.
2. Click the Media Type drop-down menu, and select a media type.3. Enter a value in the Maximum Capacity field.4. Click OK to add the condition.
Validating Capacity Rules[+] Show ProcedureWhen creating a new Capacity Rule or modifying an existing Capacity Rule, you can click Validate toverify whether the Capacity Rule is valid or not. This action ensures that the Capacity Rule isconstructed properly and uses only media types that you can access.
For example, if you create a Capacity Rule that only specifies voice as a media type, but you usecallback as part of a condition, GAX displays an error message after you click Validate that statesyou must add callback as a media type.
Otherwise, if the Capacity Rule is valid, GAX displays a confirmation message after you clickValidate.
Procedure: Validating a Capacity Rule
Configuration Manager Accounts
Genesys Administrator Extension Help 88

Steps
1. Create a new Capacity Rule or modify an existing Capacity Rule.2. Click Validate.3. GAX displays one of the following messages:
• A confirmation message that states the Capacity Rule is valid.• An error message that explains why the Capacity Rule is invalid.
Deleting Capacity Rules[+] Show ProcedureThere are multiple methods to delete a Capacity Rule. Choose a procedure below:
Procedure: Deleting a Single Capacity Rule
Steps
1. Select a Capacity Rule in the Capacity Rules list. More information about the Capacity Rule isdisplayed in a new panel to the right.
2. In the new panel, click Delete.3. A dialog box displays to confirm the action:
• Click OK to continue.• Click Cancel to discard the action.
Procedure: Deleting Multiple Capacity Rules
Configuration Manager Accounts
Genesys Administrator Extension Help 89

Steps
1. In the Capacity Rules list, click the check box of each Capacity Rule that is to be deleted.2. Click Bulk Change, and select Delete from the pop-up list of options.3. A dialog box displays to confirm the action:
• Click OK to continue.• Click Cancel to discard the action.
Copying Capacity Rules[+] Show Procedure
Procedure: Copying Capacity Rules
Steps
1. Select a Capacity Rule to copy. More information about the Capacity Rule is displayed in a newpanel to the right.
2. In the new panel, click Copy. A new panel opens to the right.3. Enter the following information:
• Capacity Rule Name—The name of the Capacity Rule.
ImportantThe Capacity Rule Name field must be unique in the environment.
• Description—A description of the Capacity Rule.• Tenant and Folder—The Tenant and folder to which this Capacity Rule belongs. Click
Browse to locate the folder in which the script is stored, or type the name of the folder inthe Quick Filter field.
Configuration Manager Accounts
Genesys Administrator Extension Help 90

ImportantThe list of displayed folders is based on each tenant's access settings.
• Media Types—Click New to select which media types will be monitored by this CapacityRule. For more information, see Media Types.
4. Click Save.
Enabling or Disabling Capacity Rules[+] Show ProcedureThere are multiple methods to enable or disable a Capacity Rule. Choose a procedure below:
Procedure: Enabling or Disabling a Single Capacity Rule
Steps
1. Select a Capacity Rule. A new panel opens to the right.2. In the new panel, perform one of the following actions:
• If the Capacity Rule is currently enabled, click Disable.• If the Capacity Rule is currently disabled, click Enable.
Procedure: Enabling or Disabling Multiple Capacity Rules
Configuration Manager Accounts
Genesys Administrator Extension Help 91

Steps
1. In the Capacity Rules panel, select the check box beside each Capacity Rule that you want toenable or disable.
2. Click Bulk Change. A pop-up menu displays. Select Enable to enable the selected CapacityRules or Disable to disable the selected Capacity Rules.
3. A dialog box displays to confirm the action:
• Click OK to continue.• Click Cancel to discard the action.
Access Control
The Access Control panel lists the access groups and users that have been configured explicitlywith permissions for this object. When you are setting permissions, it is normally performed with theuser(s) or access group(s) for which you want to grant access. This feature improves the manner inwhich permissions are set, and the scope is limited to managing permissions for a single databaseobject. For additional instructions about granting, modifying, and removing permissions, refer to theGenesys 8.1 Security Deployment Guide. You can perform the following actions:
Creating Access Permissions[+] Show Procedure
Procedure: Creating Access Permissions
Steps
1. Select an object.2. Click Related and select Access Control. The Access Control panel opens.3. Click New. A new panel opens to the right.4. In the Object Type field, select the configuration object type to which this access permission
applies.
Configuration Manager Accounts
Genesys Administrator Extension Help 92

5. In the Configuration Object field, select the configuration object to which this accesspermission applies.
6. In the Access Permissions list, select the access permissions to apply:Property Description
Read (R) You can view details for this object.Create (C) You can create objects of this type.Update (U) You can change, or modify, this object.
Execute (X) You can deploy, start, stop, or otherwiseactivate this object.
Delete (D) You can delete this object.
Read Object Permissions (RP) You can view access permissions granted forthis object.
Change Object Permissions (CP) You can change access permissions grantedfor this object.
7. Perform one of the following actions:• Click Save to accept the changes.• Click Cancel to discard the changes.
Changing Access Permissions[+] Show Procedure
Procedure: Changing Access Permissions
Steps
1. Select an object.2. Click Related and select Access Control. The Access Control panel opens.3. Click an object in the Access Control panel to modify its access permissions. A new panel opens
to the right.4. You can change any or all of the following options:
Configuration Manager Accounts
Genesys Administrator Extension Help 93

Property DescriptionRead (R) You can view details for this object.Create (C) You can create objects of this type.Update (U) You can change, or modify, this object.
Execute (X) You can deploy, start, stop, or otherwiseactivate this object.
Delete (D) You can delete this object.
Read Object Permissions (RP) You can view access permissions granted forthis object.
Change Object Permissions (CP) You can change access permissions grantedfor this object.
5. Perform one of the following actions:• Click Save to accept the changes.• Click Cancel to discard the changes.
Deleting Access Permissions[+] Show Procedure
Procedure: Deleting Access Permissions
Steps
1. Select an object.2. Click Related and select Access Control. The Access Control panel opens.3. Click an object in the Access Control panel to modify its access permissions. A new panel opens
to the right.4. Click Delete.5. A dialog box appears to confirm deletion. Perform one of the following actions:
• Click OK to confirm deletion.• Click Cancel to cancel deletion.
Configuration Manager Accounts
Genesys Administrator Extension Help 94

Related Links
• Skills• Agent Groups• Agent Groups• Skills• Access Groups
Configuration Manager Accounts
Genesys Administrator Extension Help 95

EnvironmentThe Environment section of Configuration Manager enables you to configure the following objects:
• Application Templates• Applications• Alarm Conditions• Hosts• Scripts• Solutions• Tenants• Time Zones• Detection/Reaction Scripts
Configuration Manager Environment
Genesys Administrator Extension Help 96

Application TemplatesAn Application Template is the model you use for registering a new application in the ConfigurationDatabase. An Application Template describes the set of options that applies to an application of aparticular type and version.
Before installing a new Genesys application, an Application Template must be available for thatapplication. You can import the generic Application Template that is supplied with every Genesysapplication, or you can create a new Application Template.
ImportantWhen upgrading previously installed releases of Genesys applications, you mustregister new Application Templates for the new releases, if the Release Notes indicatethat these releases contain new configuration options that are essential for yourenvironment.
Display Options
The Application Templates list shows the Application Templates that are in your environment. It issorted in a hierarchy by Tenants, configuration units, sites, and folders. To view objects by a particularhierarchy, select the hierarchy type in the drop-down menu above the list.
ImportantApplication Templates that are disabled appear grayed out in the list.
Configuration Manager respects tenancy permission settings. You can access only those objects thatyou have been granted permissions and privileges to access.
You can filter the contents of this list in two ways:
• Type the name or partial name of an object in the Quick Filter field.• Click the cube icon to open the Tenant Directory filter panel. In this panel, click the Tenant that you
want to select. Use the Quick Filter field in this panel to filter the Tenant list.
You can sort the items in the list by clicking a column head. Clicking a column head a second timereverses the sort order. You can add or remove columns by clicking Select Columns.
To select or de-select multiple objects at once, click Select.
Configuration Manager Environment
Genesys Administrator Extension Help 97

Procedures
To create a new Application Template object, click New. To view or edit details of an existing object,click on the name of the object, or click the check-box beside an object and click Edit. To delete oneor more objects, click the check-box beside the object(s) in the list and click Delete. You can alsodelete individual objects by clicking on the object and then clicking Delete.
ImportantYou cannot delete an Application Template, if it has already been used to create anApplication.
Otherwise, click More to perform the following tasks:
• Clone—Copy an Application Template• Move To—Move an Application Template to another hierarchical structure.• Enable or disable Application Templates• Create a folder, configuration unit, or site. See Object Hierarchy for more information.• Import Application Template—Import an Application Template.
Click on the name of an Application Template to view additional information about the object. You canalso set permissions, options and application options, and view dependencies.
Procedure: Creating Application Template Objects
Steps
1. Click New.2. Enter the following information. For some fields, you can either enter the name of a value or click
Browse to select a value from a list:• Name—The name of the Application Template. You must specify a value for this property,
and that value must be unique within the Configuration Database. Once you set the value,you cannot change it.
• Type—The type of application to which the Application Template relates. Once you set thevalue, you cannot change it.
• Version—The version of the application to which the Application Template relates. You mustspecify a value for this property. Once you set the value, you cannot change it. Genesys
Configuration Manager Environment
Genesys Administrator Extension Help 98

recommends that you specify the first three digits of the application version.• Tenant—In a multi-tenant environment, the Tenant to which this object belongs. This value is
automatically set to the Tenant that was specified in the Tenant Directory field in theobject list.
• State Enabled—If selected, indicates that the object is in regular operating condition andcan be used without any restrictions.
3. Click Save.
Importing Application TemplatesGenesys provides generic templates for all Genesys applications. You can find the .apd files forApplication Templates, which come with every version of Genesys software, in the Templates folderon a product CD.
To import an Application Template from the .apd file, perform the following procedure.
Procedure: Importing Application Templates
Steps
1. Click More, then select Import Application Template.2. A new window displays. Click Browse to select an Application Template .apd file to import.3. Click OK to upload the Application Template.4. Refer to Creating Application Template Objects to finish creating the Application Template object.
Related Links
• Time Zones• Application Templates• Time Zones• Application Templates• Solutions
Configuration Manager Environment
Genesys Administrator Extension Help 99

ApplicationsApplications are the various Genesys software programs that serve the contact center. There are twotypes of applications: graphical user interface (GUI) applications and daemon applications. Mostdaemon applications are servers to other applications.
You must register each instance of a daemon application separately. Configuration Server does notallow two daemon applications with the same name to be connected at the same time. By contrast,one object in the Configuration Database can represent any number of GUI applications of the sametype and configuration parameters.
Display Options
The Applications list shows the applications that are in your environment. It is sorted in a hierarchyby Tenants, configuration units, sites, and folders. To view objects by a particular hierarchy, select thehierarchy type in the drop-down menu above the list.
ImportantApplications that are disabled appear grayed out in the list.
Configuration Manager respects tenancy permission settings. You can access only those objects thatyou have been granted permissions and privileges to access.
You can filter the contents of this list in two ways:
• Type the name or partial name of an object in the Quick Filter field.• Click the cube icon to open the Tenant Directory filter panel. In this panel, click the Tenant that you
want to select. Use the Quick Filter field in this panel to filter the Tenant list.
You can sort the items in the list by clicking a column head. Clicking a column head a second timereverses the sort order. You can add or remove columns by clicking Select Columns.
To select or de-select multiple objects at once, click Select.
Procedures
To create a new Application object, click New. To view or edit details of an existing object, click on thename of the object, or click the check box beside an object and click Edit. To delete one or moreobjects, click the check box beside the object(s) in the list and click Delete. You can also deleteindividual objects by clicking on the object and then clicking Delete. Otherwise, click More toperform the following tasks:
Configuration Manager Environment
Genesys Administrator Extension Help 100

• Clone—Copy an Application.• Move To—Move an Application to another hierarchical structure.• Enable or disable Applications.• Create a folder, configuration unit, or site. See Object Hierarchy for more information.• Configure Logging
Click on the name of an Application to view additional information about the object. You can also setpermissions, options and application options, and view dependencies.
Creating Application Objects[+] Click to show procedure
Procedure: Creating Application Objects
Steps
1. Click New.2. Enter the following information. For some fields, you can either enter the name of a value or click
Browse to select a value from a list:• Name—The name of the Application. You must specify a value for this property, and that
value must be unique within the Configuration Database. Genesys does not recommend thatyou use symbols (including single and double quotation marks) in Application names; doingso may cause Applications to malfunction.
• Template—The Application Template on which this Application is based. This value is setautomatically when you select the Application Template.
• Type—The type of the Application. This value is set automatically, based on the selectedApplication Template.
• Component Type—Specifies the detailed purpose of this Application object within theconfiguration. Leave this field at its default value (Unknown) unless Application-specificdocumentation directs you to enter a specific value. This field is only displayed for daemonApplications.
• Version—The version of the Application. This value is set automatically, based on theselected Application Template version.
• Is Application Server—This field is checked for all daemon Applications and not checked forall GUI Applications. It is set automatically, based on the Type field.
Configuration Manager Environment
Genesys Administrator Extension Help 101

• Tenant—In a multi-Tenant environment, the Tenant to which this object belongs. This value isautomatically set to the Tenant that was specified in the Tenant Directory field in theobject list.
• State Enabled—If selected, indicates that the object is in regular operating condition andcan be used without any restrictions.
The following fields apply only to daemon Applications, not to GUI Applications:
• Working Directory—The full path to the directory where this Application is installed. Thisfield is mandatory. When creating a new Application, Genesys recommends inserting aperiod (.). The path will be filled in automatically when the new Application is installed andconnects to Configuration Server.
• Command Line—The command line that is used to start this Application, specifying thename of the Application's executable file. This field is mandatory. When creating a newApplication, Genesys recommends inserting a period (.). The command line will be filled inautomatically when the new Application is installed and connects to Configuration Server.
• Command Line Arguments—Additional command-line parameters that are used to startthis Application. When creating a new Application, Genesys recommends leaving this fieldblank. Any arguments will be filled in automatically when the new Application is installed andconnects to Configuration Server.
• Startup Timeout—The time interval, in seconds, during which the Management Layerexpects this Application to start. If the Application has been configured with the autostartconfiguration option set to true, this is also the amount of time that Solution Control Servershould wait to start this Application after initialization or after a system reboot. This field ismandatory.
• Shutdown Timeout—The time interval, in seconds, during which the Management Layerexpects this Application to shut down. This field is mandatory.
• Auto-Restart—Indicates whether the Management Layer automatically restarts theApplication after it shuts down unexpectedly.
• Host—The host computer on which the Application is running.
ImportantTo support specific HA configurations, more than one server can be registered on the same portwithin the same host.
Otherwise, do not assign the port number to any other server on the same host.
• Backup Server—The server that Client Applications contact if the connection to the primaryserver fails. You cannot associate one backup server with more than one primary server. Youmust use the same Application Template for the backup server that you use for the primaryserver, and you must associate the servers with the same user account.
Configuration Manager Environment
Genesys Administrator Extension Help 102

ImportantWhen you designate an Application as a backup server for another server, the Application'sConnections, Tenants, and Switch (for T-Server Applications) are automatically changed to matchthe corresponding values for the primary server. As long as this Application is associated with theprimary server, its Connections are treated as read-only, and they are changed only when youapply changes to the Connections of the primary server.
• Redundancy Type—The type of redundancy with which this Application is running.• Timeout—The amount of time, in seconds, that the client Application waits between
reconnection attempts after a connection failure with the server.• Attempts—The number of attempts to reconnect to this server before trying to connect to
the backup server. This value must be 1 or higher. This property is used only if you specify aBackup Server for this server.
ImportantSetting this parameter to any value other than 1 may not take effect for some types ofApplications.
• Login as SYSTEM—If checked, indicates that this Application logs into Configuration Serveron behalf of the SYSTEM account.
• Login As Account—Identifies the account that applications must use to log in toConfiguration Server. If Login as SYSTEM is checked, this field is disabled. For ConfigurationServer type applications, this field defaults to Environment\default.
ImportantIf you are configuring Configuration Server Proxy, Genesys strongly recommends that you use thedefault value (Environment\default).
• Certificate—The security certificate value. In Windows, select the certificate value from thelist of installed certificates. In UNIX, enter the full path to the<serial_#>_<host_name>_cert.pem file.
• Certificate Description—An optional description of the Certificate.• Certificate Key—The full path to the <serial_#>_<host_name>_priv_key.pem file of the
security certificate key. This field is used only if Genesys Security is deployed on UNIX;otherwise this field is empty.
• Trusted CA—The full path to the ca_cert.pem file of the CA that issued the default securitycertificate. This field is used only if Genesys Security is deployed on UNIX; otherwise this
Configuration Manager Environment
Genesys Administrator Extension Help 103

field is empty.
ImportantRefer to the Genesys 8.1 Security Deployment Guide for more information about deployingGenesys TLS Security.
3. The Connections tab lists the connections that this Application has to other Applications. ClickAdd to add a connection.
4. Enter the following information in the pop-up window that displays on your screen:• Server—The server application that this application connects to as a client when it starts.• Port ID—The port of the server to which the application connects. If you want to use a
secure connection, be sure to select a secure port.• Connection Protocol—The name of the connection control protocol.
ImportantSet the ADDP protocol between Local Control Agent and Solution Control Server in the Options tabof the Host object.
• Local Timeout—This value is required only if you specified addp in Connection Protocol.This value specifies the heartbeat polling interval, measured in seconds, on a client side. Thisindicates how often the client application sends polling signals to the server application. Toenable this functionality, specify any integer as the value.
WarningTo avoid false disconnect states that might occur because of delays in the data network, Genesysrecommends that you set the ADDP timeouts to values greater than 10 seconds.
• Remote Timeout—This value is required only if you specified addp in ConnectionProtocol. This value specifies the heartbeat polling interval measured, in seconds, on aserver side. This indicates how often the server application sends polling signals to the clientapplication. To enable this functionality, specify any integer as the value.
Warning
Configuration Manager Environment
Genesys Administrator Extension Help 104

To avoid false disconnect states that might occur because of delays in the data network, Genesysrecommends that you set the ADDP timeouts to values greater than 10 seconds.
• Trace Mode—The connection trace mode used between a server and its client.• Trace Is Turned Off—Select if you do not want either the client or the server application
to print ADDP-related messages in its log.• Trace On Client Side—Select if you want the client application to print ADDP-related
messages in its log.• Trace On Server Side—Select if you want the server application to print ADDP-related
messages in its log.• Trace On Both Sides—Select if you want both the client and server applications to print
ADDP-related messages in their log.
• Connection Mode—Specifies whether this port is secured or not by Genesys Security usingthe TLS protocol. This field is disabled if the client does not use Genesys Security.
• Transport Protocol Parameters—Any text, usually key=value pairs, separated by asemicolon (;). This property is application-specific. Refer to the documentation for theparticular application to determine the appropriate values for this field, if any.
• Application Parameters—Any text, usually key=value pairs, separated by a semicolon (;).This property is application-specific. Refer to the documentation for the particular applicationto determine the appropriate values for this field, if any.
5. Click Apply to save the information in the Connections tab.6. The Ports tab lists communication ports used by the clients of an application to connect to a
server. To support specific high-availability configurations, more than one server can beregistered on the same port within the same host. Otherwise, do not assign the port number toany other server on the same host. Click Add to add a connection.
7. Enter the following information in the pop-up window that displays on your screen:• Port ID—The identifier of the port.• Communication Port—The port associated with the specified port ID.• Connection Protocol—The protocol used for the connection.• HA Sync—If selected, an HA backup server will use this port to establish a connection to the
primary server.• Listening Mode—The listening mode configured for this port• Certificate—The security certificate value. In Windows, select the certificate value from the
list of installed certificates. In UNIX, enter the full path to the<serial_#>_<host_name>_cert.pem file.
• Description—An optional description of the Certificate.• Certificate Key—The full path to the <serial_#>_<host_name>_priv_key.pem file of the
Configuration Manager Environment
Genesys Administrator Extension Help 105

security certificate key. This field is used only if Genesys Security is deployed on UNIX;otherwise this field is empty.
• Trusted CA—The full path to the ca_cert.pem file of the CA that issued the default securitycertificate. This field is used only if Genesys Security is deployed on UNIX; otherwise thisfield is empty.
ImportantRefer to the Genesys 8.1 Security Deployment Guide for more information about deployingGenesys TLS Security.
• Transport Parameters—Any text, usually key=value pairs, separated by a semicolon (;).This property is application-specific. Refer to the documentation for the particular applicationto determine the appropriate values for this field, if any.
• Application Parameters—Any text, usually key=value pairs, separated by a semicolon (;).This property is application-specific. Refer to the documentation for the particular applicationto determine the appropriate values for this field, if any.
8. Click Apply to save the information in the Ports tab.9. The Tenants tab functional meaning only in a multi-Tenant environment. It specifies a list of
Tenants that this application serves. The information specified in this list does not restrict theaccess privileges of the daemon applications with respect to the configuration data. Click Add toadd a Tenant to this Application object.
ImportantT-Server and High Availability (HA) Proxy applications do not display theTenant property. A T-Server can serve only one Tenant, which is specified inthe T-Server's General properties. An HA Proxy can serve only the sameTenant as the corresponding T-Server, and this Tenant is also specified in theHA Proxy's General properties.
10. Click Save.
Configuring Logging[+] Click to show procedure
Configuration Manager Environment
Genesys Administrator Extension Help 106

Procedure: Configuring Logging
Steps
1. In the Applications list, select one or more Applications.2. Click More and select Configure Logging.3. In the Configuration of Logging window, set the following options:
• The Applications that you selected from the Applications list appears in the Applicationssection. You can select or de-select Applications to include in this procedure.
• In the Log Level section, select one of the following options:• All—All events from the Trace, Interaction, and Standard log levels are logged.• Trace—Generates all log events from the Trace, Interaction, and Standard levels. This
setting might adversely affect application performance. Set this level only when you aretesting new interaction-processing functions or scenarios.
• Interaction—Generates all log events of Interaction and Standard levels. Set this levelonly when you are testing events on a particular interaction.
ImportantInteraction-level records contain the Interaction ID attribute that helps to search for log eventsthat are generated by various applications but related to the same interaction.
WarningUsing the Interaction level generates a higher number of logging events on the network, whichmight may adversely affect the performance of the DBMS, Message Servers, and interaction-processing components.
• Standard—Genesys recommends you permanently enable only a Standard level oflogging during the operation of Solutions in regular production mode. This level reportsevents for significant problems and normal operations of in-service Solutions. An event isreported at the Standard level if it satisfies one of these criteria:• Indicates that an attempt to perform any external operation has failed• Indicates that the latest attempt to perform an external operation that previously
failed has succeeded• Indicates detection of a condition that has a negative impact on operations, actual or
projected
Configuration Manager Environment
Genesys Administrator Extension Help 107

• Indicates that a previously detected condition, which had a negative impact onoperations, no longer exists
• Indicates a security violation of any kind• Indicates a high-level data exchange that cannot be recognized or does not follow the
expected logical sequence• Indicates inability to process an external request• Indicates successful completion of a logical step in an initialization process• Indicates a transition of an Application from one operational mode to another• Indicates that the value of a parameter associated with a configurable threshold has
exceeded that threshold• Indicates that the value of a parameter associated with a configurable threshold that
earlier exceeded the threshold has returned to its normal range.
• None—No logging is performed.
4. In the Log Outputs Adjustment section, you can fine-tune the logging level for the followingoutput types: Network Log Server, Plain Text File, and Console.
5. Perform one of the the following:• If you selected Network Log Server in the previous step, go to the Message Server
section and select the Message Server to receive logs.• If you selected Plain Text File in the previous step, go to the Log File Name section and
specify the log file name to receive logs. You can also specify the following:• Create Segment—If checked, segment the log file into chunks specified by the
Segment Size (MB) field.• Segment Size (MB)—If Create Segment is checked, specify a segment size for the log
file, in megabytes.• Segment Expiration—If checked, segments are deleted after a maximum number of
segments is reached, as defined by Maximum Segments.• Maximum Segments—If Segment Expiration is checked, specify how many segments
to retain before segments beyond this limit are removed.
6. Click OK.
Related Links
• Time Zones• Application Templates• Time Zones• Application Templates
Configuration Manager Environment
Genesys Administrator Extension Help 108

• Solutions
Configuration Manager Environment
Genesys Administrator Extension Help 109

Alarm ConditionsAlarm Conditions specify the events that you might want to know about and manage as soon as theyoccur, such as if a Host or Solution is unresponsive. Genesys software contains predefined AlarmConditions, or you can create your own.
Alarm Conditions work with the following Scripts:
• Alarm Detection Scripts, which identify what system variables the Management Layer must monitor totrigger an alarm.
• Alarm Reaction Scripts, which identify what the Management Layer must do when alarms occur in, orare cleared from, the system. Alarm Reaction Scripts that identify what happens when alarms arecleared are referred to as alarm Clearance Scripts.
To create an Alarm Condition script, see Scripts. To associate Alarm Detection and Alarm ReactionScripts with Alarm Conditions, specify them in the tabs of the Alarm Condition.
Display Options
The Alarm Conditions list shows the Alarm Conditions that are in your environment. It is sorted in ahierarchy by tenants, configuration units, sites, and folders. To view objects by a particular hierarchy,select the hierarchy type in the drop-down menu above the list.
ImportantAlarm Conditions that are disabled will appear grayed out in the list.
Configuration Manager respects tenancy permission settings. You can access only those objects thatyou have been granted permissions and privileges to access.
You can filter the contents of this list in two ways:
• Type the name or partial name of an object in the Quick Filter field.• Click the cube icon to open the Tenant Directory filter panel. In this panel, click the Tenant that you
want to select. Use the Quick Filter field in this panel to filter the Tenant list.
To select or de-select multiple objects at once, click Select.
Procedures
To create a new Alarm Condition object, click New. To view or edit details of an existing object, click
Configuration Manager Environment
Genesys Administrator Extension Help 110

on the name of the object, or click the check box beside an object and click Edit. To delete one ormore objects, click the check box beside the object(s) in the list and click Delete. You can also deleteindividual objects by clicking on the object and then clicking Delete. Otherwise, click More toperform the following tasks:
• Clone—Copy an Alarm Condition.• Move To—Move an Alarm Condition to another hierarchical structure.• Enable or disable Alarm Conditions• Create a folder, configuration unit, or site. See Object Hierarchy for more information.
Click on the name of an Alarm Condition to view additional information about the object. You can alsoset options and permissions.
Procedure: Creating Alarm Condition Objects
Steps
1. Click New.2. Enter the following information. For some fields, you can either enter the name of a value or click
the Browse button to select a value from a list:• Name—The name of the Alarm Condition. You must specify a value for this property and that
value must be unique within the Configuration Database.• Description—A brief description of the Alarm Condition.• Category—The category of the Alarm Condition: Critical, Major, or Minor. You must specify
a value for this property.• Detect Script—The Script that describes the logic applied to detect the alarm.• Cancel Timeout—The amount of time, in seconds, that the Alarm Condition is registered in
the Log Database, unless another event cancels it or a user clears it. When this timeoutexpires, the Alarm Condition is unconditionally cleared.
• Detect Log Event ID—The identifier of the event that triggers the alarm. You must specify avalue for this property.
• Detect Selection—The mode for event selection that the Management Layer uses for AlarmCondition analysis. The modes are as follows:• Select By Any—The specified event from any application results in an alarm.• Select By Application—The specified event from a selected application results in an
alarm. Select this option to display the Application field. Click the Browse icon to selectan item from a list, or type the name or partial name of the item in the Quick Filterfield. The list is populated with Application objects that are stored in Configuration Server.
Configuration Manager Environment
Genesys Administrator Extension Help 111

• Select By Application Type—The specified event from a selected application typeresults in an alarm. Select this option to display the Type field. Click the drop-downbutton to select an item from the list. The list is populated with Application objects thathave defined subtypes.
• Cancel Log Event ID—The identifier of the event that triggers clearance of the alarm. Foralarm clearance, the Management Layer uses the event from the same application(s) asspecified for the detect event for this Alarm Condition.
• Tenant—In a multi-tenant environment, the Tenant to which this object belongs. This value isautomatically set to the Tenant that was specified in the Tenant Directory field in theobject list.
• State Enabled—If selected, indicates that the object is in regular operating condition andcan be used without any restrictions.
3. Click Save.
Once the object has been created, you can edit the object and click the Reaction Scripts orClearance Scripts tabs to assign scripts to the Alarm Condition. See Scripts for more information.
Procedure: Testing Alarm Conditions
Steps
1. In the Alarm Conditions list, click the check box beside one or more Alarm Conditions that youwant to test.
2. Click More and select Activate Alarm.3. The Alarm Condition activates. Go to the System Dashboard to view the Alarm and clear it.
Predefined Alarm Conditions
Genesys provides the predefined Alarm Conditions listed in the following table. If required, you canfurther configure these conditions to meet your requirements.
Alarm Type DescriptionApplication Failure Reports that the specified application has either
Configuration Manager Environment
Genesys Administrator Extension Help 112
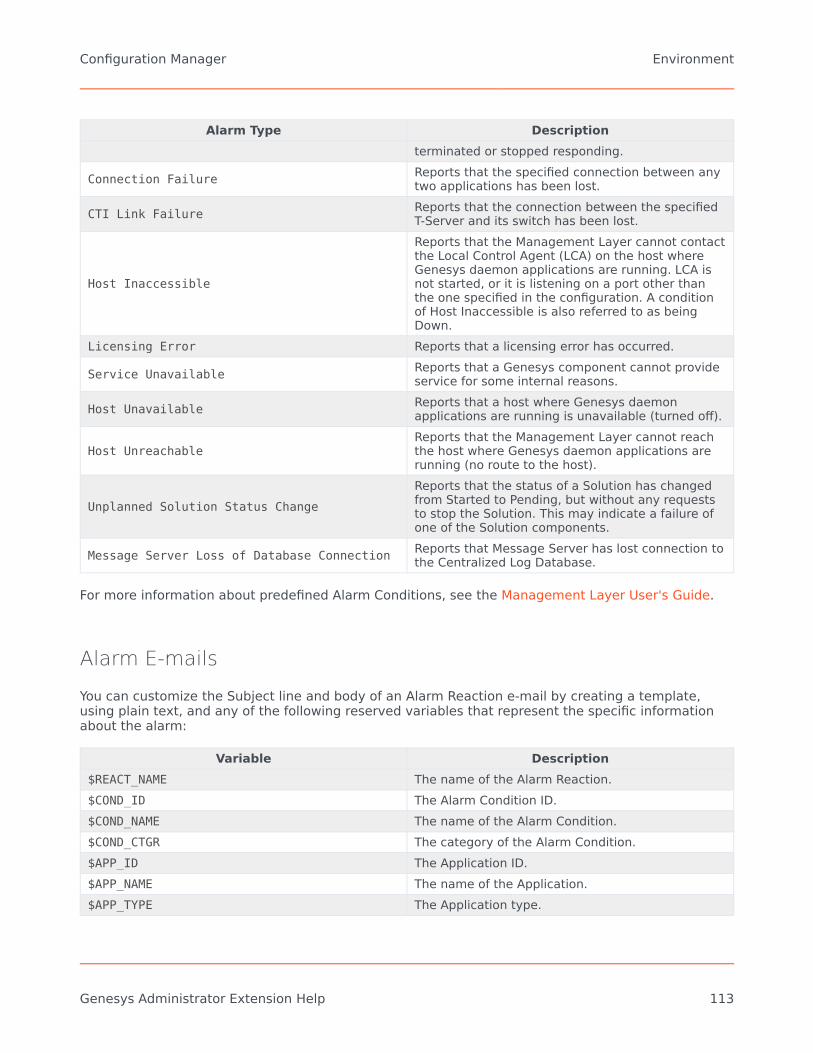
Alarm Type Descriptionterminated or stopped responding.
Connection Failure Reports that the specified connection between anytwo applications has been lost.
CTI Link Failure Reports that the connection between the specifiedT-Server and its switch has been lost.
Host Inaccessible
Reports that the Management Layer cannot contactthe Local Control Agent (LCA) on the host whereGenesys daemon applications are running. LCA isnot started, or it is listening on a port other thanthe one specified in the configuration. A conditionof Host Inaccessible is also referred to as beingDown.
Licensing Error Reports that a licensing error has occurred.
Service Unavailable Reports that a Genesys component cannot provideservice for some internal reasons.
Host Unavailable Reports that a host where Genesys daemonapplications are running is unavailable (turned off).
Host UnreachableReports that the Management Layer cannot reachthe host where Genesys daemon applications arerunning (no route to the host).
Unplanned Solution Status ChangeReports that the status of a Solution has changedfrom Started to Pending, but without any requeststo stop the Solution. This may indicate a failure ofone of the Solution components.
Message Server Loss of Database Connection Reports that Message Server has lost connection tothe Centralized Log Database.
For more information about predefined Alarm Conditions, see the Management Layer User's Guide.
Alarm E-mails
You can customize the Subject line and body of an Alarm Reaction e-mail by creating a template,using plain text, and any of the following reserved variables that represent the specific informationabout the alarm:
Variable Description$REACT_NAME The name of the Alarm Reaction.$COND_ID The Alarm Condition ID.$COND_NAME The name of the Alarm Condition.$COND_CTGR The category of the Alarm Condition.$APP_ID The Application ID.$APP_NAME The name of the Application.$APP_TYPE The Application type.
Configuration Manager Environment
Genesys Administrator Extension Help 113

Variable Description$MSG_ID The Message ID.$MSG_DESCR The text of the Message.$$ The dollar sign character ($).
You can then use this Alarm Reaction script as often as appropriate. For each use, the e-mail text isautomatically customized for the specific situation.
Example
An example Alarm Reaction e-mail uses the following template:
Subject:
$COND_ID detected in $APP_NAME
Message:
CPU Overload has been detected by Genesys Solution Management Layer for Host1.
Alarm Reaction: $REACT_NAME
Alarm Condition:
ID: $COND_ID
NAME: $COND_NAME
Category: $COND_CTGR
Application:
ID: $APP_ID
Name: $APP_NAME
Type: $APP_TYPE
In the following scenario, the system detects that a CPU overload has occurred in the Solution ControlServer, an alarm is triggered, and the following e-mail is sent in response. Note how the variablenames have been replaced with actual values that are appropriate to the alarm scenario.:
Subject:
CPU_overload detected in Solution_Control_Server_760
Message:
CPU Overload has been detected by Genesys Solution Management Layer for Host1.
Alarm Reaction: cpu_overload_mail
Alarm Condition:
ID: 118
NAME: CPU_overload
Configuration Manager Environment
Genesys Administrator Extension Help 114

Category: Major
Application:
ID: 105
Name: Solution_Control_Server_760
Type: SCS
Related Links
• Time Zones• Application Templates• Time Zones• Application Templates• Solutions
Configuration Manager Environment
Genesys Administrator Extension Help 115

HostsHosts are the computers that run the various server applications in the environment.
Register only those hosts on which you will install and run Genesys servers or third-party servers thatyou configure in the Configuration Database.
Display Options
The Hosts list shows the hosts that are in your environment. It is sorted in a hierarchy by Tenants,configuration units, sites, and folders. To view objects by a particular hierarchy, select the hierarchytype in the drop-down menu above the list.
ImportantHosts that are disabled appear grayed out in the list.
Configuration Manager respects tenancy permission settings. You can access only those objects thatyou have been granted permissions and privileges to access.
You can filter the contents of this list in two ways:
• Type the name or partial name of an object in the Quick Filter field.• Click the cube icon to open the Tenant Directory filter panel. In this panel, click the Tenant that you
want to select. Use the Quick Filter field in this panel to filter the Tenant list.
You can sort the items in the list by clicking a column head. Clicking a column head a second timereverses the sort order. You can add or remove columns by clicking Select Columns.
To select or de-select multiple objects at once, click Select.
Procedures
To create a new Host object, click New. To view or edit details of an existing object, click on the nameof the object, or click the check box beside an object and click Edit. To delete one or more objects,click the check-box beside the object(s) in the list and click Delete. You can also delete individualobjects by clicking on the object and then clicking Delete.
Configuration Manager Environment
Genesys Administrator Extension Help 116

ImportantYou can delete a Host only if there are no server applications currently assigned to it.
Otherwise, click More to perform the following tasks:
• Clone—Copy a Host.• Move To—Move a Host to another hierarchical structure.• Enable or disable Hosts.• Create a folder, configuration unit, or site. See Object Hierarchy for more information.• Configure Logging
Click on the name of a Host to view additional information about the object. You can also set optionsand permissions, and view dependencies.
Creating Host Objects[+] Click to show procedure
Procedure: Creating Host Objects
Steps
1. Click New.2. Enter the following information. For some fields, you can either enter the name of a value or click
Browse to select a value from a list:• Name—The name of the host. You must specify a value for this property, and that value
must be unique within the Configuration Database. Because applications use this host nameto establish connections with the servers running on this host, make sure that the nameexactly matches the name of this host in the data network configuration.
ImportantYou cannot change this host name if any server applications are assigned to this host.
Configuration Manager Environment
Genesys Administrator Extension Help 117

• IP Address—The IP address of the host. This value must be unique within the ConfigurationDatabase. Because applications may be using the specified IP address to establishconnections with the servers running on this host, make sure that the value that you enterexactly matches the IP address of this host in the data network configuration.
• OS Type—The type of the operating system of this host. You must specify a value for thisproperty.
• Version—The version of the operating system.• LCA Port—The port number on which Local Control Agent (LCA) for this host is running. The
LCA port must be set to a value between 2000 and 9999, inclusive. When the LCA port isspecified as less than 2000, LCA starts on port number 4999 (the default value).
ImportantDo not change the value of the LCA port if any application has already connected to LCA or ifSolution Control Server (SCS) has already started to control LCA.
• Solution Control Server—The SCS that monitors and controls this host. This property isvalid only if you enable distributed SCS functionality. See the Management Layer User'sGuide for details.
• Certificate—The security certificate value. In Windows, select the certificate value from thelist of installed certificates. In UNIX, enter the full path to the<serial_#>_<host_name>_cert.pem file.
• Certificate Description—An optional description of the Certificate.• Certificate Key—The full path to the <serial_#>_<host_name>_priv_key.pem file of the
security certificate key. This field is used only if Genesys Security is deployed on UNIX;otherwise this field is empty.
• Trusted CA—The full path to the ca_cert.pem file of the CA that issued the default securitycertificate. This field is used only if Genesys Security is deployed on UNIX; otherwise thisfield is empty.
ImportantRefer to the Genesys 8.1 Security Deployment Guide for more information about deployingGenesys TLS Security.
• Tenant—In a multi-tenant environment, the Tenant to which this object belongs. This value isautomatically set to the Tenant that was specified in the Tenant Directory field in theobject list.
• State Enabled—If selected, indicates that the object is in regular operating condition andcan be used without any restrictions.
Configuration Manager Environment
Genesys Administrator Extension Help 118

3. Click Save.
Configuring Logging[+] Click to show procedure
Procedure: Configuring Logging
Steps
1. In the Hosts list, select one or more Hosts.2. Click More and select Configure Logging.3. In the Configuration of Logging window, set the following options:
• The Hosts that you selected from the Hosts list appears in the Hosts section. You can selector de-select Hosts to include in this procedure.
• In the Log Level section, select one of the following options:• All—Generates all log events from the Trace, Interaction, and Standard levels.• Trace—Generates all log events from the Trace, Interaction, and Standard levels. This
setting might adversely affect application performance. Set this level only when you aretesting new interaction-processing functions or scenarios.
• Interaction—Generates all log events of Interaction and Standard levels. Set this levelonly when you are testing events on a particular interaction.
ImportantInteraction-level records contain the Interaction ID attribute that helps to search for log eventsthat are generated by various applications but related to the same interaction.
Configuration Manager Environment
Genesys Administrator Extension Help 119

WarningUsing the Interaction level generates a higher number of logging events on the network, whichmight adversely affect the performance of the DBMS, Message Servers, and interaction-processing components.
• Standard—Genesys recommends you permanently enable only a Standard level oflogging during the operation of Solutions in regular production mode. This level reportsevents for significant problems and normal operations of in-service Solutions. An event isreported at the Standard level if it satisfies one of these criteria:• Indicates that an attempt to perform any external operation has failed• Indicates that the latest attempt to perform an external operation that previously
failed has succeeded• Indicates detection of a condition that has a negative impact on operations, actual or
projected• Indicates that a previously detected condition, which had a negative impact on
operations, no longer exists• Indicates a security violation of any kind• Indicates a high-level data exchange that cannot be recognized or does not follow the
expected logical sequence• Indicates inability to process an external request• Indicates successful completion of a logical step in an initialization process• Indicates a transition of an Application from one operational mode to another• Indicates that the value of a parameter associated with a configurable threshold has
exceeded that threshold• Indicates that the value of a parameter associated with a configurable threshold that
earlier exceeded the threshold has returned to its normal range.
• None—No logging is performed.
4. In the Log Outputs Adjustment section, you can fine-tune the logging level for the followingoutput types: Network Log Server, Plain Text File, and Console.
5. Perform one of the the following:• If you selected Network Log Server in the previous step, go to the Message Server
section and select the Message Server to receive logs.• If you selected Plain Text File in the previous step, go to the Log File Name section and
specify the log file name to receive logs. You can also specify the following:• Create Segment—If checked, segment the log file into chunks specified by the
Segment Size (MB) field.
Configuration Manager Environment
Genesys Administrator Extension Help 120

• Segment Size (MB)—If Create Segment is checked, specify a segment size for the logfile, in megabytes.
• Segment Expiration—If checked, segments are deleted after a maximum number ofsegments is reached, as defined by Maximum Segments.
• Maximum Segments—If Segment Expiration is checked, specify how many segmentsto retain before segments beyond this limit are removed.
6. Click OK.
ADDP
To configure the Advanced Disconnect Detection Protocol (ADDP) protocol between the LCA of a givenhost and SCS, use the Options tab of the Host object. If you are using the Management Layer forapplication failure management, set up ADDP parameters for the host as described.
Procedure: Setting up ADDP Connections
Steps
1. Open the Options tab of the Host.2. Create a section called addp.3. In the addp section, specify the following configuration options:
Option Name Option Value Option Description
addp-timeout Any integer
Sets the ADDP timeout inseconds. If one application inthe connection does notreceive messages from theother application
in the connection within this interval,the first application sends a pollingmessage. If the first application doesnot receive a response to the pollingmessage within this time interval, itinterprets the lack of response as aloss of connection. Therecommended setting for this option
Configuration Manager Environment
Genesys Administrator Extension Help 121

Option Name Option Value Option Description
is 3 seconds for a LAN connection or10 seconds for a WAN connection.
addp-trace local LCA prints ADDP-relatedmessages into its log.
ImportantYou configure ADDP between servers by using the Application's Connections tab.
Check Ports
You can click on the name of a Host to view more information about the host's configuration, as wellas check port information and identify port conflicts. Click Check Ports to display all applications andconfigured ports for the Host object, as well any port conflicts. Ports that are duplicated in multipleapplications are highlighted in the list, as these ports might be in conflict. You can click on anApplication in the Check Ports list to view details about the Application object. Click Export toexport the items in the list to a Microsoft Excel-compatible file.
Related Links
• Time Zones• Application Templates• Time Zones• Application Templates• Solutions
Configuration Manager Environment
Genesys Administrator Extension Help 122

ScriptsScripts identify processing scenarios or treatments that can be applied to customer interactions. Forexample, an Alarm Reaction Script specifies how to react when an Alarm Condition is triggered.
ImportantDepending on the application type, a scenario or treatment itself might be part of theScript object, in which case it is listed in the Options tab of the Script object.
For more information about Scripts, refer to the Management Layer User's Guide or to thedocumentation specific to your product.
Display Options
The Scripts list shows the Scripts that are in your environment. It is sorted in a hierarchy by tenants,configuration units, sites, and folders. To view objects by a particular hierarchy, select the hierarchytype in the drop-down menu above the list.
ImportantScripts that are disabled will appear grayed out in the list.
Configuration Manager respects tenancy permission settings. You can access only those objects thatyou have been granted permissions and privileges to access.
You can filter the contents of this list in two ways:
• Type the name or partial name of an object in the Quick Filter field.• Click the cube icon to open the Tenant Directory filter panel. In this panel, click the Tenant that you
want to select. Use the Quick Filter field in this panel to filter the Tenant list.
You can sort the items in the list by clicking a column head. Clicking a column head a second timereverses the sort order. You can add or remove columns by clicking Select Columns.
To select or de-select multiple objects at once, click Select.
Configuration Manager Environment
Genesys Administrator Extension Help 123

Procedures
To create a new Script object, click New. To view or edit details of an existing object, click on thename of the object, or click the check box beside an object and click Edit. To delete one or moreobjects, click the check box beside the object(s) in the list and click Delete. You can also deleteindividual objects by clicking on the object and then clicking Delete. When you delete a Script, it isremoved from the Configuration Database and from the Alarm Condition with which it is associated.Otherwise, click More to perform the following tasks:
• Clone—Copy a Script.• Move To—Move a Script to another hierarchical structure.• Enable or disable Scripts.• Create a folder, configuration unit, or site. See Object Hierarchy for more information.
Click on the name of a Script to view additional information about the object. You can also set optionsand permissions, and view dependencies.
Creating Script Objects
Procedure: Creating Script ObjectsPurpose: To create Script objects.Prerequisites
You are in the Scripts window of Configuration Manager.
Steps
1. Click New.2. Enter the following information. For some fields, you can either enter the name of a value or click
Browse to select a value from a list:• Name—The name of the Script. You must specify a value for this property, and that value
must be unique within the Configuration Database (in an enterprise environment) or withinthe Tenant (in a multi-tenant environment).
• Script Type—The type of the Script. You must specify a type. Once you set the type, youcannot change it.
• Tenant—In a multi-Tenant environment, the Tenant to which this object belongs. This value isautomatically set to the Tenant that was specified in the Tenant Directory field in theobject list.
Configuration Manager Environment
Genesys Administrator Extension Help 124

• State Enabled—If selected, indicates that the object is in regular operating condition andcan be used without any restrictions.
3. Click Save.
Procedure: Creating Alarm Condition Script ObjectsPurpose: To create Script objects for Alarm Conditions.Prerequisites
You are in the Detection/Reaction Scripts window of Configuration Manager.
Steps
1. Click New.2. Enter the following information. For some fields, you can either enter the name of a value or click
Browse to select a value from a list:• Name—The name of the Script. You must specify a value for this property, and that value
must be unique within the Configuration Database (in an enterprise environment) or withinthe Tenant (in a multi-tenant environment).
• Script Type—The type of the Script. You must specify a type. Once you set the type, youcannot change it.• Alarm Reaction—See the Alarm Scripts tab, above, for more information about Alarm
Reaction scripts.• Alarm Reaction Types—Select what action to take when this Script is triggered. The
available text fields change to show information applicable to your selection.
• Alarm Detection—See the Alarm Scripts tab, above, for more information about optionsyou can set for Alarm Detection scripts.• Detection Types—Select what action to take when this Script is triggered. The
available text fields change to show information applicable to your selection.
• State Enabled—If selected, indicates that the object is in regular operating condition andcan be used without any restrictions.
3. Click Save.
Configuration Manager Environment
Genesys Administrator Extension Help 125

Alarm Scripts
Choose one of the following script types to learn more:
• Alarm Detection Scripts• Alarm Reaction Scripts
Alarm Detection ScriptsAlarm Detection Scripts identify what system variables the Management Layer must monitor totrigger an alarm.
The system variables that the Management Layer can monitor (also called advanced alarm detectionparameters) include:
• Host System Variable Threshold—Enables you to specify the value for an irregular change thatmight occur over a certain interval, in either CPU or memory use, on a given host.
• Application System Variable Threshold—Enables you to specify the value for an irregular changethat might occur over a certain interval in either an application's CPU or memory use.
• Local SNMP Variable Threshold—Enables you to specify the value for an irregular change that mightoccur over a certain interval in any SNMP variable retrieved from the Genesys MIB file.
• Remote SNMP Variable Threshold—Enables you to specify the value for an irregular change thatmight occur over a certain interval in any SNMP variable retrieved from a non-Genesys MIB file.
WarningThe SNMP-related alarm detection capabilities require that you have a GenesysSNMP license for Solution Control Server.
ImportantThe Rising Threshold, which triggers an alarm when crossed only if the value is rising,must be a higher number than the Falling Threshold, which clears the alarm whencrossed only if the value is falling. For example, if the Rising Threshold is 300, theFalling Threshold must be less than 300.
Alarm Reaction ScriptsAlarm Reaction Scripts identify what the Management Layer must do when alarms occur in, or arecleared from, the system.
The Management Layer supports the following types of Alarm Reaction Scripts:
• Shutdown of a specified application.
Configuration Manager Environment
Genesys Administrator Extension Help 126

• Startup of a specified application.• Restart of the application that reported the alarm.• Startup of a specified solution.• Sending an e-mail message with information about the alarm to specified Internet addresses. You can
customize the e-mail with specific details about the alarm.• Switchover of operations from the application that reported the alarm to its backup application, for
applications running in primary mode, backup mode, or regardless of the mode.• Sending an SNMP trap with detailed information about the alarm to a general-purpose network
management system.• Execution of an operating system command.
ImportantFor a description of the OS commands you can specify in an Alarm Reaction Script,refer to the Management Layer User's Guide.
• Changing a configuration option value for the specified application or for the application that reportedthe alarm.
Related Links
• Time Zones• Application Templates• Time Zones• Application Templates• Solutions
Configuration Manager Environment
Genesys Administrator Extension Help 127

SolutionsSolutions are sets of applications that accomplish particular business tasks in contact centers.
Display Options
The Solutions list shows the Solutions that are in your environment. It is sorted in a hierarchy bytenants, configuration units, sites, and folders. To view objects by a particular hierarchy, select thehierarchy type in the drop-down menu above the list.
ImportantSolutions that are disabled will appear grayed out in the list.
Configuration Manager respects tenancy permission settings. You can access only those objects thatyou have been granted permissions and privileges to access.
You can filter the contents of this list in two ways:
• Type the name or partial name of an object in the Quick Filter field.• Click the cube icon to open the Tenant Directory filter panel. In this panel, click the Tenant that you
want to select. Use the Quick Filter field in this panel to filter the Tenant list.
You can sort the items in the list by clicking a column head. Clicking a column head a second timereverses the sort order. You can add or remove columns by clicking Select Columns.
To select or de-select multiple objects at once, click Select.
Procedures
To create a new Solution object, click New. To view or edit details of an existing object, click on thename of the object, or click the check box beside an object and click Edit. To delete one or moreobjects, click the check box beside the object(s) in the list and click Delete. You can also deleteindividual objects by clicking on the object and then clicking Delete. Otherwise, click More toperform the following tasks:
• Clone—Copy a Solution.• Move To—Move a Solution to another hierarchical structure.• Enable or disable Solutions.• Create a folder, configuration unit, or site. See Object Hierarchy for more information.
Configuration Manager Environment
Genesys Administrator Extension Help 128

• Configure Logging
Click on the name of a Solution to view additional information about the object. You can also setoptions and permissions, and view dependencies.
Creating Solution Objects[+] Click to show procedure
Procedure: Creating Solution ObjectsPrerequisites
The Applications exist that will be part of the Solution.
Steps
1. Click New.2. Enter the following information. For some fields, you can either enter the name of a value or click
Browse to select a value from a list:• Name—The name of the Solution. You must specify a value for this property, and that value
must be unique within the Configuration Database.• Assigned to Tenant—In a multi-tenant environment, the Tenant to which this Solution is
assigned.• Solution Type—The type of the Solution. You must specify a value for this property. Once
you set the value, you cannot change it. This value is automatically set, based on the type ofthe imported Solution.
ImportantA Solution of type Default Solution Type or Framework cannot be started and stopped withSolution Control Interface unless they have been created using a solution wizard. See theManagement Layer User's Guide for more information.
• Solution Control Server—The name of the Solution Control Server that controls thisSolution.
• Version—The version of the Solution. You must specify a value for this property.• Tenant—In a multi-tenant environment, the Tenant to which this object belongs. This value is
automatically set to the Tenant that was specified in the Tenant Directory field in theobject list.
Configuration Manager Environment
Genesys Administrator Extension Help 129

• State Enabled—If selected, indicates that the object is in regular operating condition andcan be used without any restrictions.
3. In the Application Definitions tab, click Add to add an Application object to this Solution.
ImportantThe same Solution Control Server must control all Solutions that use thesame Solution component.
4. Enter the following information in the pop-up window that displays on your screen:• Application Type—The type of Application used as a Solution component.• Version—The version of the Application used as a Solution component.• Startup Priority—The default position of the Solution component in the component startup
sequence within the Solution.• Optional—Specifies whether this Solution component is optional.• Click OK.
5. Click Apply to save the information in the Application Definitions tab.6. In the Applications tab, click Add to add an Application to this Solution.
ImportantThe same Solution Control Server must control all Solutions that use thesame Solution component.
7. Enter the following information in the pop-up window that displays on your screen:• Application—The type of Application used as a Solution component.• Startup Priority—The default position of the Solution component in the component startup
sequence within the Solution.• Optional—Specifies whether this Solution component is optional.• Click OK.
8. Click Save.
Configuration Manager Environment
Genesys Administrator Extension Help 130

Configuring Logging[+] Click to show procedure
Procedure: Configuring Logging
Steps
1. In the Solutions list, select one or more Solutions.2. Click More and select Configure Logging.3. In the Configuration of Logging window, set the following options:
• The Solutions that you selected from the Solutions list appears in the Solutions section.You can select or de-select Solutions to include in this procedure.
• In the Log Level section, select one of the following options:• All—All events from the Trace, Interaction, and Standard log levels are logged.• Trace—Generates all log events from the Trace, Interaction, and Standard levels. This
setting might adversely affect application performance. Set this level only when you aretesting new interaction-processing functions or scenarios.
• Interaction—Generates all log events of Interaction and Standard levels. Set this levelonly when you are testing events on a particular interaction.
ImportantInteraction-level records contain the Interaction ID attribute that helps to search for log eventsthat are generated by various applications but related to the same interaction.
WarningUsing the Interaction level generates a higher number of logging events on the network, whichmight adversely affect the performance of the DBMS, Message Servers, and interaction-processing components.
• Standard—Genesys recommends you permanently enable only a Standard level oflogging during the operation of Solutions in regular production mode. This level reportsevents for significant problems and normal operations of in-service Solutions. An event isreported at the Standard level if it satisfies one of these criteria:
Configuration Manager Environment
Genesys Administrator Extension Help 131

• Indicates that an attempt to perform any external operation has failed• Indicates that the latest attempt to perform an external operation that previously
failed has succeeded• Indicates detection of a condition that has a negative impact on operations, actual or
projected• Indicates that a previously detected condition, which had a negative impact on
operations, no longer exists• Indicates a security violation of any kind• Indicates a high-level data exchange that cannot be recognized or does not follow the
expected logical sequence• Indicates inability to process an external request• Indicates successful completion of a logical step in an initialization process• Indicates a transition of an Application from one operational mode to another• Indicates that the value of a parameter associated with a configurable threshold has
exceeded that threshold• Indicates that the value of a parameter associated with a configurable threshold that
earlier exceeded the threshold has returned to its normal range.
• None—No logging is performed.
4. In the Log Outputs Adjustment section, you can fine-tune the logging level for the followingoutput types: Network Log Server, Plain Text File, and Console.
5. Perform one of the the following:• If you selected Network Log Server in the previous step, go to the Message Server
section and select the Message Server to receive logs.• If you selected Plain Text File in the previous step, go to the Log File Name section and
specify the log file name to receive logs. You can also specify the following:• Create Segment—If checked, segment the log file into chunks specified by the
Segment Size (MB) field.• Segment Size (MB)—If Create Segment is checked, specify a segment size for the log
file, in megabytes.• Segment Expiration—If checked, segments are deleted after a maximum number of
segments is reached, as defined by Maximum Segments.• Maximum Segments—If Segment Expiration is checked, specify how many segments
to retain before segments beyond this limit are removed.
6. Click OK.
Configuration Manager Environment
Genesys Administrator Extension Help 132

Related Links
• Time Zones• Application Templates• Time Zones• Application Templates• Solutions
Configuration Manager Environment
Genesys Administrator Extension Help 133

TenantsTenants are businesses whose customer interactions are enabled or enhanced through servicesoffered by a third party, typically a telecommunications service provider. From an architecturalstandpoint, however, most of the hardware and software that Tenants use to enable or enhance thoseinteractions belong to the service provider.
From a functional standpoint, each Tenant in a hierarchical multi-tenant environment is a contactcenter (single or multi-site) completely equipped to process customer interactions. In a hierarchicalmulti-tenant environment, at any given time, Genesys Administrator Extension displays only thosehardware and software resources belonging to a particular Tenant within that environment.
ImportantTo create Tenants, a user must have the appropriate permissions and role privileges tolog in to Genesys Administrator Extension and create Tenants. However, the TenantCreators Access Group must exist for the user to create a Tenant.
Allocation of ResourcesSome of these hardware and software resources are allocated to each Tenant separately (forexample, the telephony extensions and queues of a switching system).
Other resources are shared by the Tenants; these resources process customer interactions for someor all of the Tenants simultaneously (for example, the control and signaling devices of a switchingsystem, and service control points of the public telephone network).
The configuration objects that describe both types of resources are allocated to Tenants accordingly.
Viewing TenantsNormally, the Tenants that are visible depends on which Tenant is selected in the Tenant Directoryof Configuration Manager. When set to Environment, the User is able to see all Tenants. If anotherTenant is selected, the User can view only that Tenant and any existing child Tenants.
If the User is using the Quick Filter field, all Tenants to which the User has access are searched. Ifthe User does not have access to the Environment (root) Tenant, it is not displayed.
Display Options
The Tenants list shows the Tenants that are in your environment.
Configuration Manager Environment
Genesys Administrator Extension Help 134

ImportantTenants that are disabled appear grayed out in the list.
Configuration Manager respects tenancy permission settings. You can access only those objects thatyou have been granted permissions and privileges to access.
You can filter the contents of this list by typing the name or partial name of an object in the QuickFilter field.
Procedures
To create a new Tenant object, click New. To view or edit details of an existing object, click on thename of the object, or click the check box beside an object and click Edit. You must click a Tenant toaccess functions to copy the Tenant, delete the Tenant, or to enable or disable the Tenant.
ImportantWhen you delete a Tenant from the Configuration Database, all of its child Tenants arealso deleted, and recursively, all of their child Tenants.
Click on the name of a Tenant to view additional information about the object. You can also setoptions and permissions, and view dependencies.
Procedure: Creating Tenant Objects
Steps
1. Click New.2. Enter the following information. For some fields, you can either enter the name of a value or click
Browse to select a value from a list:• Name—The name of the Tenant. You must specify a value for this property, and that value
must be unique within the Configuration Database.• Password—A password that must be used to access this Tenant.• Confirm Password—A confirmation of the password.
Configuration Manager Environment
Genesys Administrator Extension Help 135

• Parent Tenant—The parent Tenant of this Tenant. By default, the parent Tenant is the Tenantin which you are creating the new Tenant. If you change this field, the new Tenant will becreated as a new child Tenant under the specified parent Tenant. To subsequently change theparent Tenant, refer to the Structure tab, above.
• Chargeable Number—The account number to which activities for this Tenant are charged,for cost-tracking purposes.
• Default Capacity Rule—The name of the Script of Capacity Rule type that defines theability of this Tenant to handle multiple interactions. For more information, refer to Reportingdocumentation.
• Default Contract—The default cost contract applied to resources of this Tenant. For moreinformation, refer to the Routing Solutions chapter of the Universal Routing 8.0 RoutingApplication Configuration Guide.
• State Enabled—If selected, indicates that the object is in regular operating condition andcan be used without any restrictions.
3. Click Save.
ImportantIf you are not logged in as the default User, or are not a member of theSuperAdministrators Access Group, you must have special permissions and roleprivileges to create a Tenant. Refer to the Genesys 8.1 Security Deployment Guide fordetails about the security requirements for creating a Tenant.
Structure
Hierarchical Multi-Tenant Structure
The structure of a hierarchical multi-tenant structure can contain an unlimited number of levels. Thisconfiguration environment serves the needs of every company in the hierarchy.
In any multi-tenant environment, when you run Genesys Administrator Extension for the first timeafter the Configuration Database initialization, you can only view the Environment Tenant. When youregister a new Tenant in the Configuration Database, the Configuration Layer automatically createsall the folders necessary to support resource allocation and configuration data entry for this Tenant.
Refer to the Genesys 8.1 Security Deployment Guide for information about how permissions areinherited in a hierarchical multi-tenant structure.
Configuration Manager Environment
Genesys Administrator Extension Help 136

Modifying the Hierarchical Multi-Tenant StructureTo rearrange Tenants between parent Tenants in the structure, modify the Parent Tenant field for theTenant object that you want to move.
Related Links
• Time Zones• Application Templates• Time Zones• Application Templates• Solutions
Configuration Manager Environment
Genesys Administrator Extension Help 137

Time ZonesTime Zones are predefined objects that provide Genesys applications with information aboutinternational time zones.
When you first open the list of Time Zone objects, you will see a list of international time zones.
Display Options
The Time Zones list shows the Time Zones that are in your environment. It is sorted in a hierarchyby Tenants, configuration units, sites, and folders. To view objects by a particular hierarchy, select thehierarchy type in the drop-down menu above the list.
ImportantTime Zones that are disabled appear grayed out in the list.
Configuration Manager respects tenancy permission settings. You can access only those objects thatyou have been granted permissions and privileges to access.
You can filter the contents of this list in two ways:
• Type the name or partial name of an object in the Quick Filter field.• Click the cube icon to open the Tenant Directory filter panel. In this panel, click the Tenant that you
want to select. Use the Quick Filter field in this panel to filter the Tenant list.
You can sort the items in the list by clicking a column head. Clicking a column head a second timereverses the sort order. You can add or remove columns by clicking Select Columns.
To select or de-select multiple objects at once, click Select.
Procedures
To create a new Time Zone object, click New. To view or edit details of an existing object, click on thename of the object, or click the check-box beside an object and click Edit. To delete one or moreobjects, click the check-box beside the object(s) in the list and click Delete. You can also deleteindividual objects by clicking on the object and then clicking Delete. Otherwise, click More toperform the following tasks:
• Clone—Copy a Time Zone.• Move To—Move a Time Zone to another hierarchical structure.
Configuration Manager Environment
Genesys Administrator Extension Help 138

• Enable or disable Time Zones.• Create a folder, configuration unit, or site. See Object Hierarchy for more information.
Click on the name of a Time Zone to view additional information about the object. You can also setoptions and permissions, and view dependencies.
Procedure: Creating Time Zone Objects
Steps
1. Click New.2. Enter the following information. For some fields, you can either enter the name of a value or click
Browse to select a value from a list:• Name—The name of the Time Zone. You must specify a value for this property, and that
value must be unique within the Configuration Database (in an enterprise environment) orwithin the Tenant (in a multi-tenant environment).
• Description—A brief description of the Time Zone.• Name in Mozilla—The name of the Time Zone used in the Mozilla Firefox browser. You must
specify a value for this property.• Name in Explorer—The name of the Time Zone used in the Microsoft Internet Explorer
browser. You must specify a value for this property.• DST Observed—Indicates whether Daylight Saving Time (DST) is used.
Note: The following fields display only if the DST Observed check box is selected.
• Daylight Saving Time Type—Select one of the following to define when DST starts andends:• Current Year or Fixed Date (local)—DST begins and ends on a specific date and time.
This setting covers only one year, and must be reset every year.• Start Date—The date at which DST begins.• End Date—The date at which DST ends.• Start Time—The time at which DST begins.• End Time—The time at which DST ends.
• Daylight Saving Time definition (GMT)—DST begins and ends on a specific month/day/time. These settings are carried forward over many years, until changed or DST is nolonger used.• Start Year—The year that DST started to be observed or will start to be observed. If
DST is currently in use, you can also select Not Observed.
Configuration Manager Environment
Genesys Administrator Extension Help 139

• End Year—The year that DST is to be discontinued. If there are no plans todiscontinue DST, select Not Observed.
• Start Month—The month in which DST starts.• End Month—The month in which DST ends.• Start Day Type—Specifies whether the Start Day value is Fixed, in which DST starts
on the same date every year, or Variable, in which you must define the variables tobe used to determine the Start Day.
• End Day Type—Specifies whether the End Day value is Fixed, in which DST ends onthe same date every year, or Variable, in which you must define the variables to beused to determine the End Day.
• (If Start Day Type is set to Fixed) Start Day—The date at which DST begins.• (If End Day Type is set to Fixed) End Day—The date at which DST ends.• (If Start Day Type is set to Variable) Start Week—The week number in which DST
begins.• (If End Day Type is set to Variable) End Week—The week number in which DST
ends.• (If Start Day Type is set to Variable) Start Day of Week—The day of the week in
which DST begins.• (If End Day Type is set to Variable) End Day of Week—The day of the week in
which DST ends.• Start Time—The time at which DST begins.• End Time—The time at which DST ends.
• Tenant—In a multi-tenant environment, the Tenant to which this object belongs. This value isautomatically set to the Tenant that was specified in the Tenant Directory field in theobject list.
• State Enabled—If selected, indicates that the object is in regular operating condition andcan be used without any restrictions.
3. Click Save.
International Time Zones
Genesys Administrator Extension includes the following international time zones:
Abbreviation Time ZoneACT Australia Central TimeAET Australia Eastern Time
Configuration Manager Environment
Genesys Administrator Extension Help 140

Abbreviation Time ZoneAGT Argentina Standard TimeAtlST Atlantic Standard TimeART (Arabic) Egypt Standard TimeAST Alaska Standard TimeBET Brazil Eastern TimeBST Bangladesh Standard TimeCAT Central Africa TimeCNT Canada Newfoundland TimeCST Central Standard TimeCTT China Taiwan TimeEAT Eastern Africa TimeECT European Central TimeEET Eastern European TimeEST Eastern Standard TimeGMT Greenwich Mean TimeHST Hawaii Standard TimeIET Indiana Eastern StandardIST India Standard TimeJST Japan Standard TimeKST Korea Standard TimeMET Middle East TimeMIT Midway Islands TimeMST Mountain Standard TimeNET Near East TimeNST New Zealand Standard TimePLT Pakistan Lahore TimePNT Phoenix Standard TimePRT Puerto Rico and US Virgin Islands TimePST Pacific Standard TimeSST Solomon Standard TimeVST Vietnam Standard Time
Related Links
• Time Zones• Application Templates• Time Zones
Configuration Manager Environment
Genesys Administrator Extension Help 141

• Application Templates• Solutions
Configuration Manager Environment
Genesys Administrator Extension Help 142

SwitchingThe Switching section of Configuration Manager enables you to configure the following objects:
• Agent Logins• DNs• DN Groups• IVRs• IVR Ports• Places• Place Groups• Switches• Switching Offices
Configuration Manager Switching
Genesys Administrator Extension Help 143

Agent LoginsAgent Logins are unique codes defined within a Switch and assigned to agents. They identify whichagent is working at which Place during a particular working session.
The configuration of Agent Logins in the Configuration Database must match exactly theconfiguration of those Agent Logins in the switching system. Before adding or deleting a particularAgent Login, make sure that the same change was made in the database of the switching system.
When you specify Agent Logins as objects in a Switch, they are not associated with any particularagents. For information about how to assign Agent Logins to agents, refer to Creating Agents.
Display Options
The Agent Logins list shows the Agent Logins that are in your environment. It is sorted in ahierarchy by Tenants, configuration units, sites, and folders. To view objects by a particular hierarchy,select the hierarchy type in the drop-down menu above the list.
Important• The Switches list displays when you select Agent Logins in Configuration Manager. To
access the Agent Logins list, you must first select a Switch object and then an AgentLogins folder.
• Agent Logins that are disabled appear grayed out in the list.
Configuration Manager respects tenancy permission settings. You can access only those objects thatyou have been granted permissions and privileges to access.
You can filter the contents of this list in two ways:
• Type the name or partial name of an object in the Quick Filter field.• Click the cube icon to open the Tenant Directory filter panel. In this panel, click the Tenant that you
want to select. Use the Quick Filter field in this panel to filter the Tenant list.
To select or de-select multiple objects at once, click Select.
Procedures
To create a new Agent Login object, click New. To view or edit details of an existing object, click onthe name of the object, or click the check box beside an object and click Edit. To delete one or more
Configuration Manager Switching
Genesys Administrator Extension Help 144
objects, click the check box beside the object(s) in the list and click Delete. You can also deleteindividual objects by clicking on the object and then clicking Delete.
ImportantWhen you delete an Agent Login, the Agent Login is removed from the ConfigurationDatabase and from any Agent to which it is assigned. This might affect theconfiguration of a particular Agent in the contact center. Before deleting an AgentLogin, consider viewing the dependencies tab to identify the Agent to which this Loginis assigned. If you want to remove only the Agent Login from the Agent to which it isassigned, but leave it still existing in the Configuration Database and available forassignment to another Agent, open the User Account for the Agent, remove the AgentLogin from the Agent, and click Save.
Otherwise, select the check box beside one or more objects and click More to perform the followingtasks:
• Clone—Copy an Agent Login.• Move To—Move an Agent Login to another hierarchical structure.• Enable or disable Agent Logins• Create a folder, configuration unit, or site. See Object Hierarchy for more information.
Click on the name of an Agent Login to view additional information about the object. You can also setoptions and permissions, and view dependencies.
Procedure: Creating Agent Login Objects
Steps
1. Click the Switch object in which you wish to create an Agent Login.2. Click the Agent Logins folder in which you wish to create an Agent Login.3. Click New.4. Enter the following information. For some fields, you can either enter the name of a value or click
Browse to select a value from a list:• Code—The Agent Login code. You must specify a value for this property, and that value must
be unique within the Switch. Once you set the value, you cannot change it.• Switch—The Switch to which this Agent Login belongs. This value is automatically set, based
on the Switch being viewed in the Agent Logins list.
Configuration Manager Switching
Genesys Administrator Extension Help 145

• Override—Value to use as the override instead of the Code value for accessing this AgentLogin in certain types of routing. You must specify an override value, and it must be uniquewithin the Switch.
ImportantTo specify a value in the Override field, you must ensure the Use Override check box is checked.
• Switch-specific Type—An integer that corresponds to a combination of switch-specificsettings for this Agent Login. It identifies the device type (for example, Extension, ACDPosition, or Trunk) for each switch (PBX) that T-Server supports. It is unique for each switch/DN/T-Server configuration. In essence, it provides a cross-reference for DN Types between T-Server and PBX. You must specify a value for this property, and it must be 1 or greater. Formore information, refer to the Framework T-Server Deployment Guide for your particular T-Server.
• Password—A security protection key used along with this Agent Login to authenticate a Userfor contact-center activity. You can associate one User with multiple password-protectedAgent Logins.
• Confirm Password—Confirmation of the password entered in the New Password field.• Tenant—In a multi-Tenant environment, the Tenant to which this object belongs. This value is
automatically set to the Tenant that was specified in the Tenant Directory field in theobject list.
• State Enabled—If selected, indicates that the object is in regular operating condition andcan be used without any restrictions.
5. Click Save.
Related Links
• Places• IVRs• IVR Ports• Place Groups• Switching Offices
Configuration Manager Switching
Genesys Administrator Extension Help 146

DNsDNs are communication devices, uniquely identified by their directory numbers (DNs), wherecustomer interactions (for example, telephone calls or e-mails) reside and are handled.
Because most types of DNs represent the actual devices of the telephone system, their specificationin the Configuration Database must always correspond to their Switch settings. Remember thatGenesys Administrator Extension has no way of verifying this correspondence.
As a general rule, changes made to DN configurations in the Configuration Database must alwaysfollow the changes made to DNs within the telephone system, and never the other way around.
Display Options
The DNs list shows the DNs that are in your environment. It is sorted in a hierarchy by Tenants,configuration units, sites, and folders. To view objects by a particular hierarchy, select the hierarchytype in the drop-down menu above the list.
Important• The Switches list displays when you select DNs in Configuration Manager. To access the
DNs list, you must first select a Switch object and then a DN folder.• DNs that are disabled appear grayed out in the list.
Configuration Manager respects tenancy permission settings. You can access only those objects thatyou have been granted permissions and privileges to access.
You can filter the contents of this list in two ways:
• Type the name or partial name of an object in the Quick Filter field.• Click the cube icon to open the Tenant Directory filter panel. In this panel, click the Tenant that you
want to select. Use the Quick Filter field in this panel to filter the Tenant list.
You can sort the items in the list by clicking a column head. Clicking a column head a second timereverses the sort order. You can add or remove columns by clicking Select Columns.
Click Group By to group objects by various criteria.
To select or de-select multiple objects at once, click Select.
Configuration Manager Switching
Genesys Administrator Extension Help 147

Procedures
To create a new DN object, click New. To view or edit details of an existing object, click on the nameof the object, or click the check box beside an object and click Edit. To delete one or more objects,click the check box beside the object(s) in the list and click Delete. You can also delete individualobjects by clicking on the object and then clicking Delete.
ImportantWhen you delete a DN, it is removed from the Configuration Database and from anyDN Group of which it is a member. If you want to remove only the DN from a DN Groupof which it is a member, but leave it still existing in the Configuration Database andavailable for assignment to another DN Group, you must remove it from the DNs tabof the DN Group.
Otherwise, click More to perform the following tasks:
• Clone—Copy a DN.• Move To—Move a DN to another hierarchical structure.• Enable or disable DNs.• Create a folder, configuration unit, or site. See Object Hierarchy for more information.
Click on the name of a DN to view additional information about the object. You can also set optionsand permissions, and view dependencies.
Procedure: Creating DN Objects
Steps
1. Click the Switch object in which you wish to create a DN.2. Click the DN folder in which you wish to create a DN.3. Click New.4. Enter the following information. For some fields, you can either enter the name of a value or click
Browse to select a value from a list:• Number—A directory number assigned to this DN within the Switch. You must specify a
value for this property, and that value must be unique within the Switch for all DN types
Configuration Manager Switching
Genesys Administrator Extension Help 148

except the Destination Label type. Once you set the value, you cannot change it. GenesysAdministrator Extension does not verify the correspondence between the numbers assignedto DNs and the switch's numbering plan defined by the DN Range property of the Switch. If,according to T-Server specifications, such correspondence is important in an environment,make sure that the specified DN Range covers all DN numbers that are defined within theSwitch in question.
• Type—The type of the DN. Once you set the value, you cannot change it.• Switch—The Switch to which this DN belongs. You must specify a value for this property. Once
you set the value, you cannot change it.• Association—An entity permanently associated with this DN (for example, an IVR port
number, channel name, or access number). For DNs of External Routing Point type, thisnumber may be required to substitute for the actual DN directory number and may be usedwhen placing calls to this routing point from another Switch.
• Register—Indicates whether T-Server must register this DN within the Switch. You mustspecify a value for this property. From the drop-down menu, select one of the followingvalues:• False—T-Server should never register the DN in question on the Switch, but process it
locally.• True—T-Server should always register the DN on the Switch during T-Server startup or
reconnection.• On-Demand—T-Server should register the DN only when a T-Server client requests the
registration. Consult T-Server documentation for more information.
WarningThe last two values force T-Server to register this DN regardless of whether it is enabled ordisabled.
• Alias—An alternative name for this DN. You must specify a value for this property if the DN isused as a target in routing instructions. If you specify this value, it must be unique within theConfiguration Database (in an enterprise environment) or within the Tenant (in a multi-tenantenvironment).
• Route Type—The type of routing that applies to this DN. You must specify a value for thisproperty.
• DN Group—The DN Group to which this DN belongs.• Override—Value to use as the override instead of the number or name value for accessing
this DN in certain types of routing. You must specify an override value, and it must be uniquewithin the Switch.
Configuration Manager Switching
Genesys Administrator Extension Help 149

ImportantTo specify a value in the Override field, you must ensure the Use Override check box is checked.
• Login ID—The login identifier used to activate this DN. Some types of switching systemsrequire that the login code used to activate a particular DN be permanently associated withthis DN. In that case, the Login ID may be applicable to the following types of DNs: ACDPosition, Extension, Voice Treatment Port, Voice Mail, or Mixed.
• Switch-specific Type—An integer that corresponds to a combination of switch-specificsettings for this DN. It identifies the device type (for example, Extension, ACD Position, orTrunk) for each switch (PBX) that T-Server supports. It is unique for each switch/DN/T-Serverconfiguration. In essence, it provides a cross-reference for DN Types between T-Server andPBX. You must specify a value for this property, and it must be 1 or greater. For moreinformation, refer to the Framework T-Server Deployment Guide for your particular T-Server.
• Number of Trunks—The number of trunks associated with this DN. It applies only if the Typeproperty has a Network Destination value. The default value is 0.
• Tenant—In a multi-Tenant environment, the Tenant to which this object belongs. This value isautomatically set to the Tenant that was specified in the Tenant Directory field in theobject list.
• State Enabled—If selected, indicates that the object is in regular operating condition andcan be used without any restrictions.
5. Click Save.
DN Types
DN Type Description
Access Resource A Switch access resource to be used in a multi-siteenvironment for external routing.
ACD Position An extension designated for customer interactionsonly.
ACD Queue
A device in a Switch, typically associated with anumber of targets, where customer interactionswait while the control system islooking for an available target.
Call Processing Port An extension connected to a call-processingequipment port.
Chat A Chat address.CoBrowse A Co-Browse address.
Configuration Manager Switching
Genesys Administrator Extension Help 150
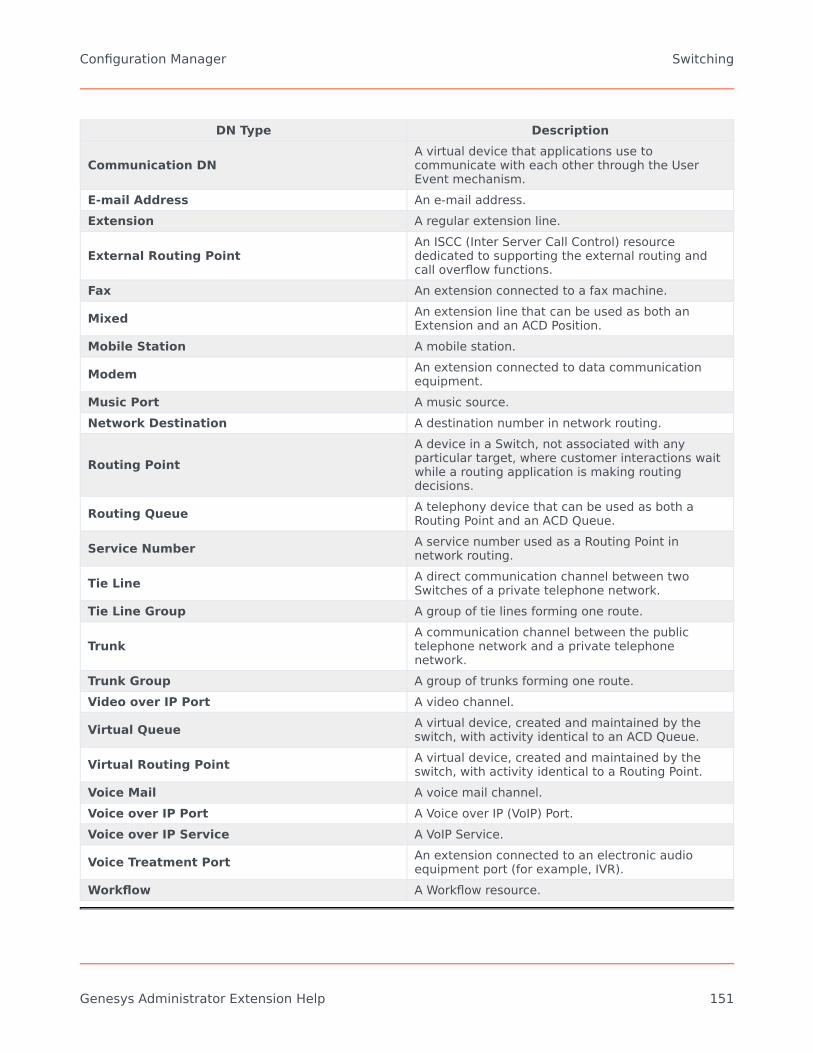
DN Type Description
Communication DNA virtual device that applications use tocommunicate with each other through the UserEvent mechanism.
E-mail Address An e-mail address.Extension A regular extension line.
External Routing PointAn ISCC (Inter Server Call Control) resourcededicated to supporting the external routing andcall overflow functions.
Fax An extension connected to a fax machine.
Mixed An extension line that can be used as both anExtension and an ACD Position.
Mobile Station A mobile station.
Modem An extension connected to data communicationequipment.
Music Port A music source.Network Destination A destination number in network routing.
Routing PointA device in a Switch, not associated with anyparticular target, where customer interactions waitwhile a routing application is making routingdecisions.
Routing Queue A telephony device that can be used as both aRouting Point and an ACD Queue.
Service Number A service number used as a Routing Point innetwork routing.
Tie Line A direct communication channel between twoSwitches of a private telephone network.
Tie Line Group A group of tie lines forming one route.
TrunkA communication channel between the publictelephone network and a private telephonenetwork.
Trunk Group A group of trunks forming one route.Video over IP Port A video channel.
Virtual Queue A virtual device, created and maintained by theswitch, with activity identical to an ACD Queue.
Virtual Routing Point A virtual device, created and maintained by theswitch, with activity identical to a Routing Point.
Voice Mail A voice mail channel.Voice over IP Port A Voice over IP (VoIP) Port.Voice over IP Service A VoIP Service.
Voice Treatment Port An extension connected to an electronic audioequipment port (for example, IVR).
Workflow A Workflow resource.
Configuration Manager Switching
Genesys Administrator Extension Help 151

Related Links
• Places• IVRs• IVR Ports• Place Groups• Switching Offices
Configuration Manager Switching
Genesys Administrator Extension Help 152
DN GroupsDN Groups are logical groupings of DNs. You can use DN Groups in network-level routing algorithmsand in some types of statistics. To determine if you need to set up DN Groups, refer to your solution-specific documentation.
When you are specifying a DN Group, remember that the DNs in each DN Group must have the sametelephony event model.
Although a DN Group can contain DNs that belong to a number of different Switches, you can receivecorrect statistical information about this DN Group only if the reporting applications connect to theservers associated with those Switches.
Display Options
The DN Groups list shows the DN Groups that are in your environment. It is sorted in a hierarchy byTenants, configuration units, sites, and folders. To view objects by a particular hierarchy, select thehierarchy type in the drop-down menu above the list.
ImportantDN Groups that are disabled appear grayed out in the list.
Configuration Manager respects tenancy permission settings. You can access only those objects thatyou have been granted permissions and privileges to access.
You can filter the contents of this list in two ways:
• Type the name or partial name of an object in the Quick Filter field.• Click the cube icon to open the Tenant Directory filter panel. In this panel, click the Tenant that you
want to select. Use the Quick Filter field in this panel to filter the Tenant list.
You can sort the items in the list by clicking a column head. Clicking a column head a second timereverses the sort order. You can add or remove columns by clicking Select Columns.
To select or de-select multiple objects at once, click Select.
Procedures
To create a new DN Group object, click New. To view or edit details of an existing object, click on thename of the object, or click the check box beside an object and click Edit. To delete one or moreobjects, click the check box beside the object(s) in the list and click Delete. You can also delete
Configuration Manager Switching
Genesys Administrator Extension Help 153

individual objects by clicking on the object and then clicking Delete.
ImportantWhen you delete a DN Group, only the DN Group object itself is removed from theConfiguration Database. Its member DN objects are not deleted.
Otherwise, click More to perform the following tasks:
• Clone—Copy a DN Group.• Move To—Move a DN Group to another hierarchical structure.• Enable or disable DN Groups.• Create a folder, configuration unit, or site. See Object Hierarchy for more information.
Click on the name of a DN Group to view additional information about the object. You can also setoptions and permissions.
Procedure: Creating DN Group Objects
Steps
1. Click New.2. Enter the following information. For some fields, you can either enter the name of a value or click
Browse to select a value from a list:• Name—The name of the DN Group. You must specify a value for this property, and that value
must be unique within the Configuration Database (in an enterprise environment) or withinthe Tenant (in a multi-tenant environment). You cannot change this value as long as this DNGroup contains at least one DN.
• Type—The type of the DN Group. Once you set the value, you cannot change it.• Capacity Table—This field applies only for the Enterprise Routing Solution. It is the Capacity
Table associated with this DN Group. Refer to Enterprise Routing Solution documentation formore information.
• Quota Table—This field applies only for the Enterprise Routing Solution. It is the Quota Tableassociated with this DN Group. Refer to Enterprise Routing Solution documentation for moreinformation.
• Tenant—In a multi-Tenant environment, the Tenant to which this object belongs. This value isautomatically set to the Tenant that was specified in the Tenant Directory field in theobject list.
Configuration Manager Switching
Genesys Administrator Extension Help 154

• State Enabled—If selected, indicates that the object is in regular operating condition andcan be used without any restrictions.
3. The Origination DNs tab lists DNs from which calls can be routed or diverted to this AgentGroup. You can include DNs of the following types into this list: Routing Point, ExternalRouting Point, Service Number, Routing Queue, ACD Queue, Virtual Queue, or VirtualRouting Point.
4. In the DNs tab, click Add to add a DN to this DN Group. In the pop-up window, you can create anew DN object by clicking +.
5. Perform one of the following actions after you have added a DN to the DN Group:• Click Save to accept the changes and return to the object list.• Click Apply to accept the changes and remain in the tab.• Click Cancel to discard the changes.
6. Click Save.
DN Group Types
The following are DN Group types and types of DNs that you can include in a group:
DN Group Type Compatible DN TypesACD Queues ACD Queue, Routing Queue, and Virtual QueueNetwork Ports Network Destination
Routing Points Routing Point, External Routing Point, RoutingQueue, and Virtual Routing Point
Service Numbers Service Number
Single PortsExtension, ACD Position, Call Processing Port, MusicPort, Communication DN, E-mail Address, Modem,Fax, Chat, CoBrowse, Voice over IP Port, Video overIP Port, Voice Treatment Port, and Voice Mail
Related Links
• Places• IVRs• IVR Ports• Place Groups• Switching Offices
Configuration Manager Switching
Genesys Administrator Extension Help 155

IVRsIVRs (Interactive Voice Responses) are telephony objects consisting of IVR Ports; they are controlledthrough IVR interface drivers.
When you register a new IVR in the Configuration Database, an IVR Ports folder is automaticallycreated under this IVR.
IVR Ports are telephony objects uniquely identified by the numbers within IVRs at which telephonecalls may reside and be handled.
Display Options
The IVRs list shows the IVRs that are in your environment. It is sorted in a hierarchy by Tenants,configuration units, sites, and folders. To view objects by a particular hierarchy, select the hierarchytype in the drop-down menu above the list.
ImportantIVRs that are disabled appear grayed out in the list.
Configuration Manager respects tenancy permission settings. You can access only those objects thatyou have been granted permissions and privileges to access.
You can filter the contents of this list in two ways:
• Type the name or partial name of an object in the Quick Filter field.• Click the cube icon to open the Tenant Directory filter panel. In this panel, click the Tenant that you
want to select. Use the Quick Filter field in this panel to filter the Tenant list.
You can sort the items in the list by clicking a column head. Clicking a column head a second timereverses the sort order. You can add or remove columns by clicking Select Columns.
To select or de-select multiple objects at once, click Select.
Procedures
To create a new IVR object, click New. To view or edit details of an existing object, click on the nameof the object, or click the check-box beside an object and click Edit. To delete one or more objects,click the check-box beside the object(s) in the list and click Delete. You can also delete individualobjects by clicking on the object and then clicking Delete.
Configuration Manager Switching
Genesys Administrator Extension Help 156

WarningWhen you delete an IVR, this also deletes all IVR Ports specified within the IVR. Theirdeletion might in turn cause modifications in other objects.
Otherwise, click More to perform the following tasks:
• Clone—Copy an IVR.• Move To—Move an IVR to another hierarchical structure.• Enable or disable IVRs.• Create a folder, configuration unit, or site. See Object Hierarchy for more information.
Click on the name of an IVR to view additional information about the object. You can also set optionsand permissions, and view dependencies.
Procedure: Creating IVR Objects
Steps
1. Click New.2. Enter the following information. For some fields, you can either enter the name of a value or click
Browse to select a value from a list:• Name—The name of the IVR. You must specify a value for this property, and that value must
be unique within the Configuration Database (in an enterprise environment) or within theTenant (in a multi-tenant environment).
• Description—A brief description of the IVR.• Type—The type of this IVR. You must specify a value for this property.• Version—The version of the IVR. You must specify a value for this property.• IVR Server—The name of the Application of the IVR Interface Server type that serves this
IVR.• Tenant—In a multi-Tenant environment, the Tenant to which this object belongs. This value is
automatically set to the Tenant that was specified in the Tenant Directory field in theobject list.
• State Enabled—If selected, indicates that the object is in regular operating condition andcan be used without any restrictions.
3. In the IVR Ports tab, click Add to add an IVR Port.
Configuration Manager Switching
Genesys Administrator Extension Help 157

4. Click Save.
ImportantIVR Ports are configured as separate objects. They can be created and configured onlyafter the associated IVR has been created.
Related Links
• Places• IVRs• IVR Ports• Place Groups• Switching Offices
Configuration Manager Switching
Genesys Administrator Extension Help 158

IVR PortsIVR (Interactive Voice Response) Ports are telephony objects uniquely identified by the numberswithin IVRs at which telephone calls may reside and be handled.
When you register a new IVR in the Configuration Database, an IVR Ports folder under this IVR isautomatically created. An IVR Port can, therefore, be created only when the associated IVR is created.
Display Options
The IVR Ports list shows the IVR Ports that are in your environment. It is sorted in a hierarchy byTenants, configuration units, sites, and folders. To view objects by a particular hierarchy, select thehierarchy type in the drop-down menu above the list.
Important• The IVRs list displays when you select IVR Ports in Configuration Manager. To access
the IVR Ports list, you must first select an IVR object and then an IVR Ports folder.• IVR Ports that are disabled appear grayed out in the list.
Configuration Manager respects tenancy permission settings. You can access only those objects thatyou have been granted permissions and privileges to access.
You can filter the contents of this list in two ways:
• Type the name or partial name of an object in the Quick Filter field.• Click the cube icon to open the Tenant Directory filter panel. In this panel, click the Tenant that you
want to select. Use the Quick Filter field in this panel to filter the Tenant list.
You can sort the items in the list by clicking a column head. Clicking a column head a second timereverses the sort order. You can add or remove columns by clicking Select Columns.
To select or de-select multiple objects at once, click Select.
Procedures
To create a new IVR Port object, click New. To view or edit details of an existing object, click on thename of the object, or click the check box beside an object and click Edit. To delete one or moreobjects, click the check box beside the object(s) in the list and click Delete. You can also deleteindividual objects by clicking on the object and then clicking Delete.
Configuration Manager Switching
Genesys Administrator Extension Help 159

WarningWhen you delete an IVR Port, this might affect some objects in the configuration. Tosee associations between an IVR Port and other objects, use the Dependencies tab.
Otherwise, click More to perform the following tasks:
• Clone—Copy an IVR Port.• Move To—Move an IVR Port to another hierarchical structure.• Enable or disable IVR Ports.• Create a folder, configuration unit, or site. See Object Hierarchy for more information.
Click on the name of an IVR Port to view additional information about the object. You can also setoptions and permissions, and view dependencies.
Procedure: Creating IVR Port ObjectsPrerequisites
You have created the IVR with which these Ports are associated.
Steps
1. In the IVRs list, click the IVR object in which you wish to create an IVR Port.2. Click the IVR Ports folder in which you wish to create an IVR Port.3. Click New.4. Enter the following information. For some fields, you can either enter the name of a value or click
Browse button to select a value from a list:• Port Number—The number associated with a channel on an IVR. You must specify a value
for this property, and that value can be equal to 0 (zero) or any positive integer. It must beunique within the IVR with which it is associated.
• Description—A brief description of the IVR Port.• IVR—The IVR to which this IVR Port belongs. This value is automatically set, and you cannot
change it.• Associated DN—The DN associated with this IVR Port.• Associated Switch—The Switch associated with this IVR Port.• Tenant—In a multi-tenant environment, the Tenant to which this object belongs. This value is
automatically set to the Tenant that was specified in the Tenant Directory field in the
Configuration Manager Switching
Genesys Administrator Extension Help 160
object list.• State Enabled—If selected, indicates that the object is in regular operating condition and
can be used without any restrictions.
5. Click Save.
Related Links
• Places• IVRs• IVR Ports• Place Groups• Switching Offices
Configuration Manager Switching
Genesys Administrator Extension Help 161

PlacesA Place is a location that has one or more DNs operated by a single agent.
You configure Places and assign individual DNs to them in order to monitor performance andavailability of Agents, Agent Groups, and Place Groups, and to provide this information to call-processing applications.
A typical Agent Place consists of two DNs: one DN that an Agent uses to take customer calls, and oneDN that the Agent uses to make consultation calls and transfers.
If you are using the multimedia options of the Genesys products, Places may need to be equippedwith DNs of other types, such as an e-mail address.
Display Options
The Places list shows the Places that are in your environment. It is sorted in a hierarchy by Tenants,configuration units, sites, and folders. To view objects by a particular hierarchy, select the hierarchytype in the drop-down menu above the list.
ImportantPlaces that are disabled appear grayed out in the list.
Configuration Manager respects tenancy permission settings. You can access only those objects thatyou have been granted permissions and privileges to access.
You can filter the contents of this list in two ways:
• Type the name or partial name of an object in the Quick Filter field.• Click the cube icon to open the Tenant Directory filter panel. In this panel, click the Tenant that you
want to select. Use the Quick Filter field in this panel to filter the Tenant list.
You can sort the items in the list by clicking a column head. Clicking a column head a second timereverses the sort order.
To select or de-select multiple objects at once, click Select.
Procedures
To create a new Place object, click New. To view or edit details of an existing object, click on thename of the object, or click the check-box beside an object and click Edit. To delete one or more
Configuration Manager Switching
Genesys Administrator Extension Help 162

objects, click the check-box beside the object(s) in the list and click Delete. You can also deleteindividual objects by clicking on the object and then clicking Delete.
ImportantWhen you delete a Place, it is removed from the Configuration Database and from anyPlace Group of which it is a member. If you want to remove the Place from a PlaceGroup of which it is a member, but leave it in the Configuration Database andavailable for membership in another Place Group, remove the Place from the PlaceGroup.
Otherwise, click More to perform the following tasks:
• Clone—Copy a Place.• Move To—Move a Place to another hierarchical structure.• Enable or disable Places.• Create a folder, configuration unit, or site. See Object Hierarchy for more information.
Click on the name of a Place to view additional information about the object. You can also set optionsand permissions, and view dependencies.
Procedure: Creating Place Objects
Steps
1. Click New.2. Enter the following information. For some fields, you can either enter the name of a value or click
Browse to select a value from a list:• Name—The name of this Place. You must specify a value for this property, and that value
must be unique within the Configuration Database (in an enterprise environment) or withinthe Tenant (in a multi-tenant environment).
• Capacity Rule—The Capacity Rule Script associated with this Place.• Cost Contract—The Cost Contract associated with this Place.• Site—The Site with which the Capacity Rule and/or Cost Contract is associated. If the
Capacity Rule or Cost Contract are associated with a Site, this field is set to that Site.• Tenant—In a multi-tenant environment, the Tenant to which this object belongs. This value is
Configuration Manager Switching
Genesys Administrator Extension Help 163

automatically set to the Tenant that was specified in the Tenant Directory field in theobject list.
• State Enabled—If selected, indicates that the object is in regular operating condition andcan be used without any restrictions.
3. In the DNs tab, click Add to add a DN. In the pop-up window, you can create a new object byclicking New.
4. Perform one of the following actions after you have added a DN to the Place:• Click Save to accept the changes and return to the object list.• Click Apply to accept the changes and remain in the tab.• Click Cancel to discard the changes.
5. Click Save.
Related Links
• Places• IVRs• IVR Ports• Place Groups• Switching Offices
Configuration Manager Switching
Genesys Administrator Extension Help 164
Place GroupsPlace Groups are logical groupings of Places. You can group Places if, according to the call-processingalgorithms, the calls must be distributed among a set of Places under the control of applicationsinstead of through the ACD mechanisms of the Switch.
As an example, consider a call-parking service: A Routing application transfers a call to a port that isassigned to a call-parking Place Group; then, while the call is parked, the application attachesinformation about the treatment to be applied to it.
Display Options
The Place Groups list shows the Place Groups that are in your environment. It is sorted in ahierarchy by Tenants, configuration units, sites, and folders. To view objects by a particular hierarchy,select the hierarchy type in the drop-down menu above the list.
ImportantPlace Groups that are disabled appear grayed out in the list.
Configuration Manager respects tenancy permission settings. You can access only those objects thatyou have been granted permissions and privileges to access.
You can filter the contents of this list in two ways:
• Type the name or partial name of an object in the Quick Filter field.• Click the cube icon to open the Tenant Directory filter panel. In this panel, click the Tenant that you
want to select. Use the Quick Filter field in this panel to filter the Tenant list.
You can sort the items in the list by clicking a column head. Clicking a column head a second timereverses the sort order.
To select or de-select multiple objects at once, click Select.
Procedures
To create a new Place Group object, click New. To view or edit details of an existing object, click onthe name of the object, or click the check box beside an object and click Edit. To delete one or moreobjects, click the check box beside the object(s) in the list and click Delete. You can also deleteindividual objects by clicking on the object and then clicking Delete.
Configuration Manager Switching
Genesys Administrator Extension Help 165

ImportantWhen you delete a Place Group, only the Place Group object itself is removed from theConfiguration Database. Its member Place objects are not deleted.
Otherwise, click More to perform the following tasks:
• Clone—Copy a Place Group.• Move To—Move a Place Group to another hierarchical structure.• Enable or disable Place Groups.• Create a folder, configuration unit, or site. See Object Hierarchy for more information.
Click on the name of a Place Group to view additional information about the object. You can also setoptions and permissions, and view dependencies.
Procedure: Creating Place Group Objects
Steps
1. Click New.2. Enter the following information. For some fields, you can either enter the name of a value or click
Browse to select a value from a list:• Name—The name of the Place Group. You must specify a value for this property, and that
value must be unique within the Configuration Database (in an enterprise environment) orwithin the Tenant (in a multi-tenant environment). You cannot change this value as long asthis Place Group contains at least one Place.
• Capacity Table—This field applies only to the Enterprise Routing Solution. It is the CapacityTable associated with this Place Group. Refer to Enterprise Routing Solution documentationfor more information.
• Quota Table—This field applies only to the Enterprise Routing Solution. It is the Quota Tableassociated with this Place Group. Refer to Enterprise Routing Solution documentation formore information.
• Cost Contract—The Cost Contract associated with this Place Group.• Site—The Site containing this Cost Contract.• Tenant—In a multi-Tenant environment, the Tenant to which this object belongs. This value is
automatically set to the Tenant that was specified in the Tenant Directory field in theobject list.
Configuration Manager Switching
Genesys Administrator Extension Help 166
• State Enabled—If selected, indicates that the object is in regular operating condition andcan be used without any restrictions.
3. The Origination DNs tab lists DNs from which calls can be routed or diverted to this PlaceGroup. You can include DNs of the following types into this list: Routing Point, ExternalRouting Point, Service Number, Routing Queue, ACD Queue, Virtual Queue, or VirtualRouting Point. Click Add to add a DN. In the pop-up window, you can create a new DN objectby clicking +.
4. Perform one of the following actions after you have added a DN:• Click Save to accept the changes and return to the object list.• Click Apply to accept the changes and remain in the tab.• Click Cancel to discard the changes.
5. In the Places tab, click Add to add a Place. In the pop-up window, you can create a new Placeobject by clicking +.
6. Perform one of the following actions after you have added a Place to the Place Group:• Click Save to accept the changes and return to the object list.• Click Apply to accept the changes and remain in the tab.• Click Cancel to discard the changes.
7. Click Save.
Related Links
• Places• IVRs• IVR Ports• Place Groups• Switching Offices
Configuration Manager Switching
Genesys Administrator Extension Help 167

SwitchesA Switch is an aggregate of telephony resources within a Switching Office.
Most enterprise-level configurations have a one-to-one match between the Switches and theSwitching Offices. However, there may be instances when it is desirable to partition the office intomore than one Switch or to create a more efficient and secure numbering plan. In that case, youmust define a Switch within a Switching Office.
In the event of the loss of all components at a single site, a Disaster Recovery (DR) strategy isrequired to ensure that there is a minimal disruption in service. The central part of this strategy is theexistence of synchronized switches located at separate sites, and configured with identical sets ofAgent extensions and Agent Logins. An agent can log in to either switch at any time.
The Disaster Recovery strategy implemented by Genesys for Genesys components applies toSwitches of type SIP Switch. To configure Disaster Recovery for Genesys components, at least oneSwitch must exist in the Configuration Database.
For additional information about Disaster Recovery, refer to the SIP Server High-AvailabilityDeployment Guide or the Genesys Administrator 8.1 Help.
Display Options
The Switches list shows the Switches that are in your environment. It is sorted in a hierarchy byTenants, configuration units, sites, and folders. To view objects by a particular hierarchy, select thehierarchy type in the drop-down menu above the list.
ImportantSwitches that are disabled will appear grayed out in the list.
Configuration Manager respects tenancy permission settings. You can access only those objects thatyou have been granted permissions and privileges to access.
You can filter the contents of this list in two ways:
• Type the name or partial name of an object in the Quick Filter field.• Click the cube icon to open the Tenant Directory filter panel. In this panel, click the Tenant that you
want to select. Use the Quick Filter field in this panel to filter the Tenant list.
You can sort the items in the list by clicking a column head. Clicking a column head a second timereverses the sort order.
To select or de-select multiple objects at once, click Select.
Configuration Manager Switching
Genesys Administrator Extension Help 168

Procedures
To create a new Switch object, click New. To view or edit details of an existing object, click on thename of the object, or click the check box beside an object and click Edit. To delete one or moreobjects, click the check box beside the object(s) in the list and click Delete. You can also deleteindividual objects by clicking on the object and then clicking Delete. Otherwise, click More toperform the following tasks:
• Clone—Copy a Switch.• Move To—Move a Switch to another hierarchical structure.• Enable or disable Switches.• Create a folder, configuration unit, or site. See Object Hierarchy for more information.
Click on the name of a Switch to view additional information about the object. You can also setoptions and permissions, and view dependencies.
Procedure: Creating Switch Objects
Steps
1. Click New.2. Enter the following information. For some fields, you can either enter the name of a value or click
Browse to select a value from a list:• Name—The name of the Switch. You must specify a value for this property, and that value
must be unique within this Tenant (in a multi-tenant environment).• Switching Office—The Switching Office to which this Switch belongs. You must specify a
value for this property. Once you set the value, you cannot change it.• Switch Type—The type of Switching Office to which this Switch belongs. This value is set
automatically.• T-Server—The T-Server Application object through which the telephony objects of this Switch
are controlled. Once you establish the association, it cannot be broken as long as thespecified T-Server has at least one client application.
• DN Range—The internal numbering plan of the Switch. Use a hyphen to specify a range ofnumbers, and use commas to specify a series of stand-alone numbers or ranges—forexample, 1100-1179, 1190-1195, 1199. Although this parameter is optional, it may beimportant for T-Server operation with certain types of Switches.
• Tenant—In a multi-Tenant environment, the Tenant to which this object belongs. This value isautomatically set to the Tenant that was specified in the Tenant Directory field in theobject list.
Configuration Manager Switching
Genesys Administrator Extension Help 169

• State Enabled—If selected, indicates that the object is in regular operating condition andcan be used without any restrictions.
3. The Access Codes tab displays a list of Access Codes that are used to place, route, or transfercalls from this Switch to other Switches in a multi-site installation. Depending on the structure ofa numbering plan, you may or may not need access codes to reach DNs that belong to differentSwitches of a multi-site telephone network. Click Add to add an Access Code to this Switch.
4. Enter the following information in the pop-up window that displays on your screen:• Switch—The Switch to which you assign this Access Code.• Code—The prefix used to reach DNs of the Switch specified in the Switch property when
placing or transferring calls from DNs of the Switch to the object for which you areconfiguring. You must specify a value for this property. You must specify an Access Code infull accordance with the numbering plan of the contact center telephone network, and youmust make any changes to the Access Codes only after the corresponding changes havebeen made to the telephone network.
• Target Type—The type of target within the Switch for which you are specifying all routingparameters.
ImportantThe combination of values for the first three properties—Switch, Code, and Target Type—definesthe uniqueness of the Switch Access Codes. You may specify multiple Access Codes with the samecode to the same Switch, provided that they have different target types.
• Route Type—The type of routing for the target specified in the Target Type for this Switch.• DN Source—An informational source that specifies the origination point in routing
instructions.• Destination Source—An informational source that specifies the destination in routing
instructions.• Location Source—An informational source that specifies the location in routing instructions.• DNIS Source—An informational source that specifies the DNIS in routing instructions.• Reason Source—An informational source that specifies the reasons in routing instructions.• Extension Source—An informational source that specifies the extensions in routing
instructions.• Click OK.
5. Click Apply to save the information in the tab.6. The Default Access Codes tab displays a list of Access Codes that can be used by default to
place, route, or transfer calls to this Switch from any other Switches in a multi-site installation.Depending on the structure of a numbering plan, you may or may not need access codes toreach DNs that belong to different Switches of a multi-site telephone network. Click Add to adda Default Access Code to this switch.
Configuration Manager Switching
Genesys Administrator Extension Help 170

7. Enter the following information in the pop-up window that displays on your screen:• Code—The prefix used to reach DNs of the Switch specified in the Switch property when
placing or transferring calls from DNs of the Switch to the object for which you areconfiguring. You must specify a value for this property. You must specify an Access Code infull accordance with the numbering plan of the contact center telephone network, and youmust make any changes to the Access Codes only after the corresponding changes havebeen made to the telephone network.
• Target Type—The type of target within the Switch for which you are specifying all routingparameters.
ImportantThe combination of values for the first three properties—Switch, Code, and Target Type—definesthe uniqueness of the Switch Access Codes. You may specify multiple Access Codes with the samecode to the same Switch, provided that they have different target types.
• Route Type—The type of routing for the target specified in the Target Type for this Switch.• DN Source—An informational source that specifies the origination point in routing
instructions.• Destination Source—An informational source that specifies the destination in routing
instructions.• Location Source—An informational source that specifies the location in routing instructions.• DNIS Source—An informational source that specifies the DNIS in routing instructions.• Reason Source—An informational source that specifies the reasons in routing instructions.• Extension Source—An informational source that specifies the extensions in routing
instructions.• Click OK.
8. Click Save.
Related Links
• Places• IVRs• IVR Ports• Place Groups• Switching Offices
Configuration Manager Switching
Genesys Administrator Extension Help 171

Switching OfficesSwitching Offices are the actual telephone switches that provide telephone service to contactcenters.
You must register a Switching Office before you configure a Switch with DNs and Agent Logins.
Display Options
The Switching Offices list shows the Switching Offices that are in your environment. It is sorted in ahierarchy by Tenants, configuration units, sites, and folders. To view objects by a particular hierarchy,select the hierarchy type in the drop-down menu above the list.
ImportantSwitching Offices that are disabled appear grayed out in the list.
Configuration Manager respects tenancy permission settings. You can access only those objects thatyou have been granted permissions and privileges to access.
You can filter the contents of this list in two ways:
• Type the name or partial name of an object in the Quick Filter field.• Click the cube icon to open the Tenant Directory filter panel. In this panel, click the Tenant that you
want to select. Use the Quick Filter field in this panel to filter the Tenant list.
You can sort the items in the list by clicking a column head. Clicking a column head a second timereverses the sort order. You can add or remove columns by clicking Select Columns.
To select or de-select multiple objects at once, click Select.
Procedures
To create a new Switching Office object, click New. To view or edit details of an existing object, clickon the name of the object, or click the check box beside an object and click Edit. To delete one ormore objects, click the check box beside the object(s) in the list and click Delete. You can also deleteindividual objects by clicking on the object and then clicking Delete. You cannot delete a SwitchingOffice if it has at least one Switch associated with it. Otherwise, click More to perform the followingtasks:
• Clone—Copy a Switching Office.
Configuration Manager Switching
Genesys Administrator Extension Help 172

• Move To—Move a Switching Office to another hierarchical structure.• Enable or disable Switching Offices.• Create a folder, configuration unit, or site. See Object Hierarchy for more information.
Click on the name of a Switching Office to view additional information about the object. You can alsoset options and permissions, and view dependencies.
Procedure: Creating Switching Office Objects
Steps
1. Click New.2. Enter the following information. For some fields, you can either enter the name of a value or click
Browse to select a value from a list:• Name—The name of the Switching Office. You must specify a value for this property, and
that value must be unique within this Switching Office (in either an enterprise or a multi-tenant environment) or within this Tenant (in a multi-tenant environment).
• Switch Type—The type of the Switching Office. You must specify a type. Once you set thetype, you cannot change it.
• Tenant—In a multi-Tenant environment, the Tenant to which this object belongs. This value isautomatically set to the Tenant that was specified in the Tenant Directory field in theobject list.
• State Enabled—If selected, indicates that the object is in regular operating condition andcan be used without any restrictions.
3. Click Save.
Related Links
• Places• IVRs• IVR Ports• Place Groups• Switching Offices
Configuration Manager Switching
Genesys Administrator Extension Help 173

Routing/eServicesThe Routing/eServices section of Configuration Manager enables you to configure the followingobjects:
• Audio Resources• Business Attributes• Business Attribute Values• Objective Tables• Statistical Days• Statistical Tables• Transactions• Voice Prompts
Configuration Manager Routing/eServices
Genesys Administrator Extension Help 174

Audio Resources (Configuration Manager)This window enables you to manage personalities and their associated audio resources(announcements and music files).
You can create Personalities to help you organize which files belong to a particular speaker. Forexample, you might have a personality called John that uses dialog spoken in English by a malespeaker. Or, you might have a personality called Marie that uses dialog spoken in French by a femalespeaker.
You can upload two types of audio resources:
• Announcements—These are files that contain spoken dialog that will be played for customers. Forexample, you might have an announcement file that tells customers about your business hours.
• Music—These are files that play music for customers. For example, you might have a music file thatplays music for customers who are about to be transferred to an Agent.
The Audio Resources window in Genesys Administrator Extension (GAX) is a unified list of yourpersonalities and audio resources. For each audio resource, GAX displays the following:
• A logo to indicate whether the file has been designated as Announcement or Music.• The name of the audio resource.• The Audio Resource ID (ARID).• Additional columns, one for each personality, to indicate which personality is using this audio resource.
Click Show Quick Filter and type the name or partial name of an object in the Quick Filter field.The list updates dynamically to show items that match the text in the Quick Filter field.
Audio Resource Management (ARM) is integrated with Operational Parameters Management (OPM) toallow users to dynamically select personalities and audio resources to be used with a parameterizedstrategy or orchestration application, or a parameterized routing or voice applications.
Access to ARM is based on both role privileges and Tenant access control permissions, as follows:
• User access to screens or certain ARM functionality is managed by role privileges.• Access control permissions define which audio resources can be viewed or modified by an authenticated
user. Access to audio resources is granted by Tenant. Users have access to all audio resources for eachTenant to which they have access.
Click on a tab below to learn more.
Personalities
Configuration Manager Routing/eServices
Genesys Administrator Extension Help 175
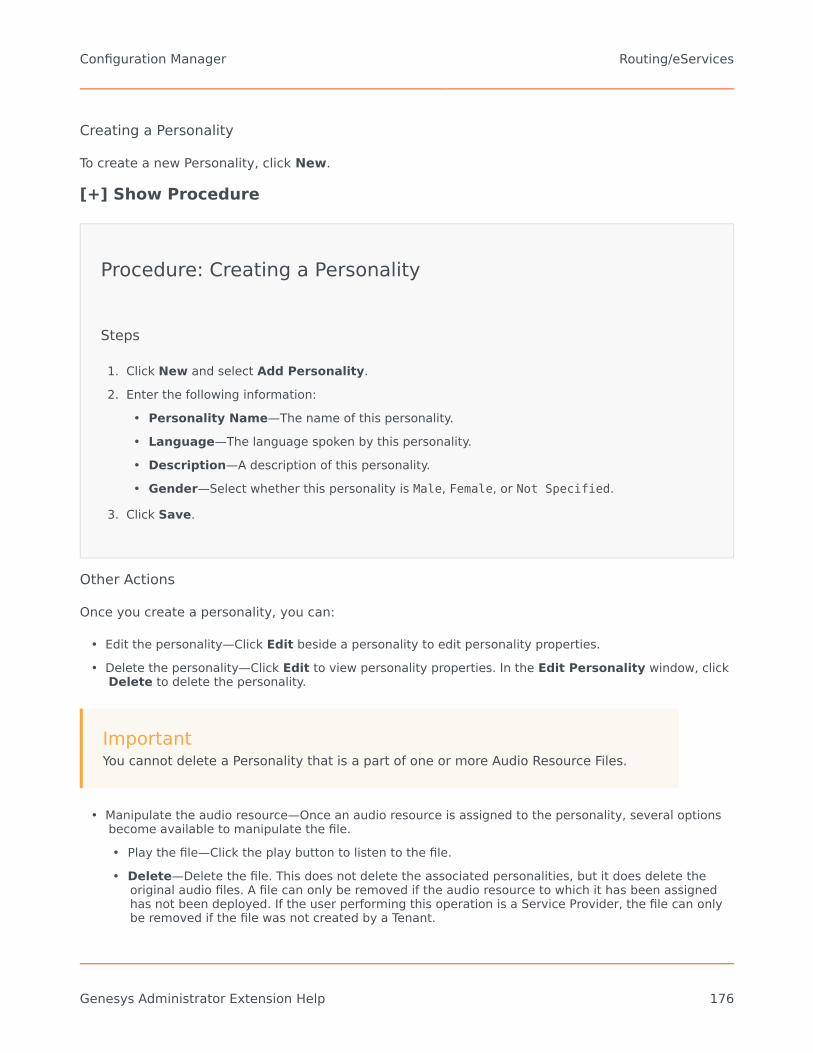
Creating a Personality
To create a new Personality, click New.
[+] Show Procedure
Procedure: Creating a Personality
Steps
1. Click New and select Add Personality.2. Enter the following information:
• Personality Name—The name of this personality.• Language—The language spoken by this personality.• Description—A description of this personality.• Gender—Select whether this personality is Male, Female, or Not Specified.
3. Click Save.
Other Actions
Once you create a personality, you can:
• Edit the personality—Click Edit beside a personality to edit personality properties.• Delete the personality—Click Edit to view personality properties. In the Edit Personality window, click
Delete to delete the personality.
ImportantYou cannot delete a Personality that is a part of one or more Audio Resource Files.
• Manipulate the audio resource—Once an audio resource is assigned to the personality, several optionsbecome available to manipulate the file.• Play the file—Click the play button to listen to the file.• Delete—Delete the file. This does not delete the associated personalities, but it does delete the
original audio files. A file can only be removed if the audio resource to which it has been assignedhas not been deployed. If the user performing this operation is a Service Provider, the file can onlybe removed if the file was not created by a Tenant.
Configuration Manager Routing/eServices
Genesys Administrator Extension Help 176

• Reprocess—Reprocessing recreates an audio resource file from the original audio file that wasuploaded (if it has not been deleted from the database and/or target storage). It also performs anynecessary conversion between audio formats.
• Download—Download the file to your computer.• Encodings—View information about how the file was encoded by GAX. When audio files are
uploaded, GAX automatically encodes them to the following formats: µ-law, A-law, and GSM.
Audio Resources
Creating an Audio Resource
To create an Audio Resource, click New.
[+] Show Procedure
Procedure: Creating an Audio Resource
Steps
1. Click New and select Add Message.2. Enter the following information:
• Name—The name of this audio resource.• Description—A description of this audio resource.• Type—Select whether this audio resource is Music (a music file) or Announcement (an
announcement file).
3. Click Save.
Uploading Audio Resources
[+] Show Procedure
Procedure: Uploading Audio Resources
Configuration Manager Routing/eServices
Genesys Administrator Extension Help 177

Steps
1. Identify which audio resource and personality to assign to the file. Once identified, select orhover over the table cell that is shared by the target audio resource and personality.
2. Click Upload Audio File.3. Your browser opens a dialog box to select an audio resource to upload. Select a file to upload.4. The audio resource is uploaded to GAX and assigned to the personality.
Deleting Audio Resources
[+] Show Procedure
Procedure: Deleting Audio Resources
Steps
1. Click the check box beside the audio resource that you want to delete.2. Click Delete.
Important• If you delete an audio resource, all files that are associated with it are also
deleted.• If you are deleting an audio resource that is being used by Operational
Parameter Management, and this Audio Resource being used by one or moreparameters or Parameter Groups, a message is displayed that indicates thisfact. When this happens, you can either cancel the deletion or force thedeletion.
Other Actions
Once you upload a file, you can select or highlight over the file and choose one of the following
Configuration Manager Routing/eServices
Genesys Administrator Extension Help 178

actions:
• Play the file—Click the play button to listen to the file.• Delete—Delete the file. This does not delete the associated personalities, but it does delete the original
audio files. A file can only be removed if the audio resource to which it has been assigned has not beendeployed. If the user performing this operation is a Service Provider, the file can only be removed if thefile was not created by a Tenant.
• Reprocess—Reprocessing recreates an audio resource file from the original audio file that wasuploaded (if it has not been deleted from the database and/or target storage). It also performs anynecessary conversion between audio formats.
• Download—Download the file to your computer.• Encodings—View information about how the file was encoded by GAX. When audio files are uploaded,
GAX automatically encodes them to the following formats: µ-law, A-law, and GSM.
Sharing Audio Resources
The Environment Tenant (Service Provider) can share audio resources with other Tenants. Deployedaudio resources have the following properties:
• A new audio resource is created for each Tenant.• If the Tenant does not have matching personalities, new personalities are automatically created.• The Personality IDs and Audio Resource IDs match the IDs of the files that are being deployed.• File names are shared through the new audio resource. New files are not created on the file server.
Audio resources provide a mechanism to make the encoded file names visible to other Tenants so thatthey can be used with Operational Parameter Management.
• Only the Environment Tenant can deploy an audio resource to another Tenant. It is not possible for aTenant to re-deploy an audio resource to another Tenant.
• Changes that are made by the Environment Tenant in files of the deployed audio resources arepropagated automatically. This includes adding, updating, and removal of Audio Resource Files ofdeployed audio resources.
Deploying Audio Resources
[+] Show Procedure
Procedure: Deploying Audio Resources
Configuration Manager Routing/eServices
Genesys Administrator Extension Help 179

Steps
You can deploy audio resources by Tenant or by audio resource. Choose one of the methodsbelow:
By Tenant
1. Click Tenant Directory and choose a Tenant to receive the audio resource.2. Click Edit Deployment.3. The Environment Owner Messages displays a list of audio resources in your environment. You
can add or remove audio resources from the Tenant by clicking Add or Remove beside eachaudio resource.
4. Click OK.
By Audio Resource
1. Click the check box beside the audio resource that you want to deploy.2. Click Edit.3. In the Tenants list, select which Tenants to which this audio resource will be deployed. You can
also click Make this message available for all tenants to deploy the resource to all Tenants.4. Click Save.
Related Links
• Voice Prompts• Statistical Tables• Transactions• Audio Resources (Configuration Manager)• Business Attribute Values
Configuration Manager Routing/eServices
Genesys Administrator Extension Help 180

Business AttributesBusiness Attributes are objects that serve as containers of a particular type for Attribute Valueobjects. Instances of this object are available enumerations (classifications), such as Media Type,Service Type, and others.
ImportantBusiness Attribute names and values may be stored using UTF-8. This enables theattributes and their values to be entered and displayed in any language, includingnon-ASCII languages such as Japanese. If required, two or more languages can becombined for a single Business Attribute.
For more information about Business Attributes, refer to the following documents:
• Universal Routing 8.1 Business Process User's Guide• Universal Routing 8.1 Reference Manual• [https://docs.genesys.com/Documentation/ES/8.1.4/IxnProps/BizAttrib Business Attributes topic in
eServices Interaction Properties Reference Manual]
Display Options
The Business Attributes list shows the Business Attributes that are in your environment. It is sortedin a hierarchy by Tenants, configuration units, sites, and folders. To view objects by a particularhierarchy, select the hierarchy type in the drop-down menu above the list.
ImportantBusiness Attributes that are disabled appear grayed out in the list.
Configuration Manager respects tenancy permission settings. You can access only those objects thatyou have been granted permissions and privileges to access.
You can filter the contents of this list in two ways:
• Type the name or partial name of an object in the Quick Filter field.• Click the cube icon to open the Tenant Directory filter panel. In this panel, click the Tenant that you
want to select. Use the Quick Filter field in this panel to filter the Tenant list.
You can sort the items in the list by clicking a column head. Clicking a column head a second time
Configuration Manager Routing/eServices
Genesys Administrator Extension Help 181

reverses the sort order. You can add or remove columns by clicking Select Columns.
To select or de-select multiple objects at once, click Select.
Procedures
To create a new Business Attribute object, click New. To view or edit details of an existing object, clickon the name of the object, or click the check-box beside an object and click Edit. To delete one ormore objects, click the check-box beside the object(s) in the list and click Delete. You can also deleteindividual objects by clicking on the object and then clicking Delete. Otherwise, click More toperform the following tasks:
• Clone—Copy a Business Attribute.• Move To—Move a Business Attribute to another hierarchical structure.• Enable or disable Business Attributes• Create a folder, configuration unit, or site. See Object Hierarchy for more information.
Click on the name of a Business Attribute to view additional information about the object. You canalso set options and permissions.
Procedure: Creating Business Attribute Objects
Steps
1. Click New.2. Enter the following information. For some fields, you can either enter the name of a value or click
Browse to select a value from a list:• Name—The name of the Business Attribute. You must specify a value for this property, and
that value must be unique within the Configuration Database (in an enterprise environment)or within the Tenant (in a multi-tenant environment). Once you set the value, you cannotchange it.
• Display Name—The localized name of the Business Attribute under which this object is to bedisplayed on graphical user interface elements such as dialog boxes. By default, this value isthe same as for the Name property.
• Description—A brief description of the Business Attribute.• Type—The type of the Business Attribute. You must specify a value for this property. Once
you set the value, you cannot change it.• Tenant—In a multi-tenant environment, the Tenant to which this object belongs. This value is
Configuration Manager Routing/eServices
Genesys Administrator Extension Help 182

automatically set to the Tenant that was specified in the Tenant Directory field in theobject list.
• State Enabled—If selected, indicates that the object is in regular operating condition andcan be used without any restrictions.
3. Click Save.
Related Links
• Voice Prompts• Statistical Tables• Transactions• Audio Resources (Configuration Manager)• Business Attribute Values
Configuration Manager Routing/eServices
Genesys Administrator Extension Help 183

Business Attribute ValuesA Business Attribute Value is an object which represents a single value within the range of values fora given Business Attribute object.
Display Options
The Business Attribute Values list shows the Business Attribute Values that are in yourenvironment. It is sorted in a hierarchy by Tenants, configuration units, sites, and folders. To viewobjects by a particular hierarchy, select the hierarchy type in the drop-down menu above the list.
Important• The Business Attributes list displays when you select Business Attribute Values in
Configuration Manager. To access the Business Attribute Values list, you must firstselect a Business Attribute object and then a Business Attribute Value folder.
• Business Attribute Values that are disabled appear grayed out in the list.
Configuration Manager respects tenancy permission settings. You can access only those objects thatyou have been granted permissions and privileges to access.
You can filter the contents of this list in two ways:
• Type the name or partial name of an object in the Quick Filter field.• Click the cube icon to open the Tenant Directory filter panel. In this panel, click the Tenant that you
want to select. Use the Quick Filter field in this panel to filter the Tenant list.
You can sort the items in the list by clicking a column head. Clicking a column head a second timereverses the sort order. You can add or remove columns by clicking Select Columns.
To select or de-select multiple objects at once, click Select.
Procedures
To create a new Business Attribute Value object, click New. To view or edit details of an existingobject, click on the name of the object, or click the check-box beside an object and click Edit. Todelete one or more objects, click the check-box beside the object(s) in the list and click Delete. Youcan also delete individual objects by clicking on the object and then clicking Delete. Otherwise, clickMore to perform the following tasks:
Configuration Manager Routing/eServices
Genesys Administrator Extension Help 184

• Clone—Copy a Business Attribute Value.• Move To—Move a Business Attribute Value to another hierarchical structure.• Enable or disable Business Attribute Values.• Create a folder, configuration unit, or site. See Object Hierarchy for more information.
Click on the name of a Business Attribute Value to view additional information about the object. Youcan also set options and permissions.
Procedure: Creating Business Attribute Value Objects
Steps
1. In the Business Attributes list, click the Business Attribute object in which you wish to create aBusiness Attribute Value.
2. Click the Business Attribute Value folder in which you wish to create a Business Attribute Value.3. Click New.4. Enter the following information. For some fields, you can either enter the name of a value or click
Browse to select a value from a list:• Name—The name of the Business Attribute Value. You must specify a value for this property,
and that value must be unique within the Business Attribute to which this Business AttributeValue belongs. Once you set the value, you cannot change it.
• Display Name—The localized name of the Business Attribute Value under which this objectis to be displayed on graphical user interface elements such as dialog boxes. By default, thisvalue is the same as for the Name property.
• Business Attribute—The Business Attribute to which this Business Attribute Value belongs.You must specify a value for this property. Once you set the value, you cannot change it.
• Description—A brief description of the Business Attribute Value.• Default—If selected, indicates that this value is the default value for the Business Attribute
to which it belongs. After you select this check box for one Business Attribute Value, youcannot select it for any other value that belongs to the same Business Attribute.
• Tenant—In a multi-tenant environment, the Tenant to which this object belongs. This value isautomatically set to the Tenant that was specified in the Tenant Directory field in theobject list.
• State Enabled—If selected, indicates that the object is in regular operating condition andcan be used without any restrictions.
5. Click Save.
Configuration Manager Routing/eServices
Genesys Administrator Extension Help 185

Related Links
• Voice Prompts• Statistical Tables• Transactions• Audio Resources (Configuration Manager)• Business Attribute Values
Configuration Manager Routing/eServices
Genesys Administrator Extension Help 186

Objective TablesObjective Tables are collections of Objective Records that define the correspondence betweeninteraction attributes (such as media type, service type, and customer segment) and serviceobjectives.
If you are using Cost-Based Routing, use a Cost Contract. A Cost Contract is a special type ofObjective Table, and contains the information required for calculating the cost of an interaction to berouted. Cost Contracts contain Objective Records, each of which is associated with an IT Contract. Forinformation about working with Cost Contracts, see the Cost Contracts section in the Procedures tab,below.
Refer to the Universal Routing 8.0 Routing Application Configuration Guide for more informationabout Objective Tables.
Display Options
The Objective Tables list shows the Objective Tables that are in your environment. It is sorted in ahierarchy by Tenants, configuration units, sites, and folders. To view objects by a particular hierarchy,select the hierarchy type in the drop-down menu above the list.
ImportantObjective Tables that are disabled appear grayed out in the list.
Configuration Manager respects tenancy permission settings. You can access only those objects thatyou have been granted permissions and privileges to access.
You can filter the contents of this list in two ways:
• Type the name or partial name of an object in the Quick Filter field.• Click the cube icon to open the Tenant Directory filter panel. In this panel, click the Tenant that you
want to select. Use the Quick Filter field in this panel to filter the Tenant list.
You can sort the items in the list by clicking a column head. Clicking a column head a second timereverses the sort order. You can add or remove columns by clicking Select Columns.
To select or de-select multiple objects at once, click Select.
Procedures
To create a new Objective Table object, click New. To view or edit details of an existing object, click
Configuration Manager Routing/eServices
Genesys Administrator Extension Help 187

on the name of the object, or click the check box beside an object and click Edit. To delete one ormore objects, click the check box beside the object(s) in the list and click Delete. You can also deleteindividual objects by clicking on the object and then clicking Delete. Otherwise, click More toperform the following tasks:
• Clone—Copy an Objective Table.• Move To—Move an Objective Table to another hierarchical structure.• Enable or disable Objective Tables.• Create a folder, configuration unit, or site. See Object Hierarchy for more information.
Click on the name of an Objective Table to view additional information about the object. You can alsoset options and permissions, and view dependencies.
Procedure: Creating Objective Table Objects
Steps
• Objective Table• Cost Contract
Objective Table
1. Click New.2. Enter the following information. For some fields, you can either enter the name of a value or click
Browse to select a value from a list:• Name—The name of the Objective Table. You must specify a value for this property, and that
value must be unique within the Configuration Database (in an enterprise environment) orthe Tenant (in a multi-tenant environment).
• Description—A brief description of the Objective Table.• Type—Select default to create an Objective Table that is not a Cost Contract• Tenant—In a multi-Tenant environment, the Tenant to which this object belongs. This value is
automatically set to the Tenant that was specified in the Tenant Directory field in theobject list.
• State Enabled—If selected, indicates that the object is in regular operating condition andcan be used without any restrictions.
3. Click Save.
Configuration Manager Routing/eServices
Genesys Administrator Extension Help 188

Cost Contract
1. Click New.2. Enter the following information. For some fields, you can either enter the name of a value or click
Browse to select a value from a list:• Name—The name of the Objective Table. You must specify a value for this property, and that
value must be unique within the Configuration Database (in an enterprise environment) orthe Tenant (in a multi-tenant environment).
• Description—A brief description of the Objective Table.• Type—Select Contract to create an Objective Table that is a Cost Contract.• Total Prepaid Cost—The prepaid contract cost, for Volume Rate Contracts only.• Time Zone—The Time Zone for this Cost Contract and the Interaction Types specified in the
General tab.• Start—The date on which to start the Cost Contract.• End—The date on which to end the Cost Contract.
ImportantRefer to the Universal Routing 8.0 Routing Application Configuration Guide for more information.
3. Click Apply to save the Cost Contract. The Objective Records tab displays.4. In the Objective Records tab, click Add.5. Enter the following information in the pop-up window that displays on your screen:
• Media Type—The type of media technology used for information exchange, for examplevoice, e-mail, and fax. The range of Attribute Values for this field is defined within Media TypeBusiness Attribute.
• Service Type—The service that a customer is requesting. The range of Attribute Values forthis field is defined within Service Type Business Attribute.
• Customer Segment—Categorizes a customer based on their revenue potential to theenterprise relative to a business line. The range of Attribute Values for this field is definedwithin Customer Segment Business Attribute.
• Service Objective Goal—Service Objective Goal defined for this Record. For voiceinteractions, this is the target time for the voice call to be answered by a live agent.
• Service Objective Delta—Service Objective Delta defined for this Record. Defines the stepfor Service Objective Goal deviation.
• Click OK.
Configuration Manager Routing/eServices
Genesys Administrator Extension Help 189
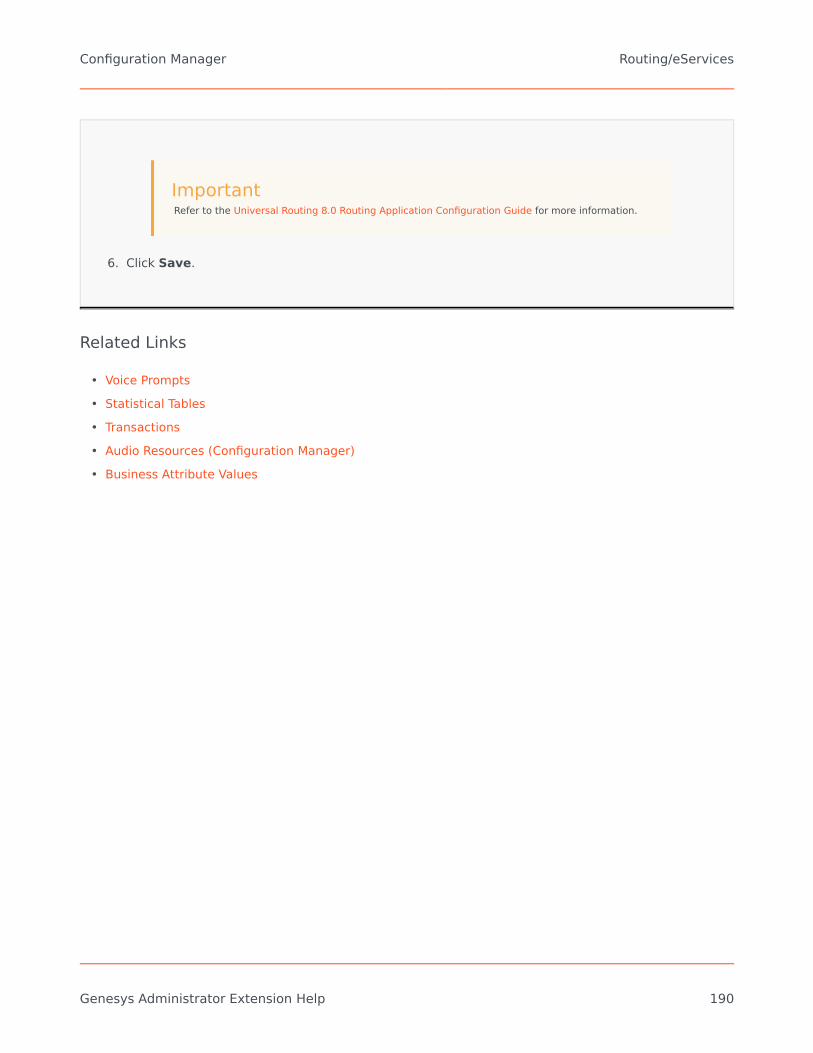
ImportantRefer to the Universal Routing 8.0 Routing Application Configuration Guide for more information.
6. Click Save.
Related Links
• Voice Prompts• Statistical Tables• Transactions• Audio Resources (Configuration Manager)• Business Attribute Values
Configuration Manager Routing/eServices
Genesys Administrator Extension Help 190

Statistical DaysA Statistical Day is a numerically expressed workload that a particular Agent Group is expected tohandle during a particular business day.
If you are using Cost-Based Routing, use a Day Contract. A Day Contract is a special type ofStatistical Day. If you are using Cost-Based Routing, a Day Contract is a Statistical Day that alsoincludes base rates, and penalties for processing a volume over or below the expected workload. DayContracts apply only to Volume Rate IT Contracts. Day Contracts allow the base rate to vary toaccommodate volume fluctuations that may occur on different days of the week, weekends, andexception days such as holidays. Refer to the Universal Routing 8.0 Routing Application ConfigurationGuide for more information about Day Contracts.
Statistical Days represent the definition of a point in time, and is interpreted by the Genesys serverapplications that are designed with these objects and coordinate them with the actual timeline thatthe server is running. Depending on the behavior of the server, the definition is applied to either thelocal time in the server's time zone, or UTC time. The Statistical Day itself does not indicate anyparticular time zone.
Refer to the Universal Routing 8.0 Routing Application Configuration Guide for more informationabout Statistical Days.
Display Options
The Statistical Days list shows the Statistical Days that are in your environment. It is sorted in ahierarchy by Tenants, configuration units, sites, and folders. To view objects by a particular hierarchy,select the hierarchy type in the drop-down menu above the list.
ImportantStatistical Days that are disabled appear grayed out in the list.
Configuration Manager respects tenancy permission settings. You can access only those objects thatyou have been granted permissions and privileges to access.
You can filter the contents of this list in two ways:
• Type the name or partial name of an object in the Quick Filter field.• Click the cube icon to open the Tenant Directory filter panel. In this panel, click the Tenant that you
want to select. Use the Quick Filter field in this panel to filter the Tenant list.
You can sort the items in the list by clicking a column head. Clicking a column head a second timereverses the sort order. You can add or remove columns by clicking Select Columns.
To select or de-select multiple objects at once, click Select.
Configuration Manager Routing/eServices
Genesys Administrator Extension Help 191

Procedures
To create a new Statistical Day object, click New. To view or edit details of an existing object, click onthe name of the object, or click the check-box beside an object and click Edit. To delete one or moreobjects, click the check-box beside the object(s) in the list and click Delete. You can also deleteindividual objects by clicking on the object and then clicking Delete. Otherwise, click More toperform the following tasks:
• Clone—Copy a Statistical Day.• Move To—Move a Statistical Day to another hierarchical structure.• Enable or disable Statistical Days.• Create a folder, configuration unit, or site. See Object Hierarchy for more information.
Click on the name of a Statistical Day to view additional information about the object. You can alsoset options and permissions, and view dependencies.
Procedure: Creating Statistical Day Objects
Steps
To create a Statistical Day object, choose one of the following types:
• Statistical Day• Day Contract
Statistical Day
To create a Statistical Day, perform the following actions:
1. Click New.2. Enter the following information. For some fields, you can either enter the name of a value or click
Browse to select a value from a list:• Name—The name of the Statistical Day. You must specify a value for this property, and that
value must be unique within the Configuration Database (in an enterprise environment) orwithin the Tenant (in a multi-tenant environment).
• Type—Select Default to create a Statistical Day that is not a Day Contract.• Day Type—These fields identify the calendar days to which the statistical values of the
Statistical Day apply. If Date is selected, you can modify the following fields: Year, Month,
Configuration Manager Routing/eServices
Genesys Administrator Extension Help 192

Day. If Day of Week is selected, you can modify the Day of Week field.
ImportantDo not set any properties in the following section when a Statistical Day object is configured foruse in a Statistical Table of the Special Day Table type.
• Start Time—Start time of the Business Day. The value must be a positive number expressedin hours, minutes, and seconds from 00:00:00 AM/PM.
• End Time—End time of the Business Day. The value must be a positive number expressed inhours, minutes, and seconds from 00:00:00 AM/PM.
WarningDo not configure a Business Day that spans midnight as a single day, because it may bemisinterpreted by the Routing Solution. If your Business Day starts on one day and ends on thenext, you must configure it as two days, as follows:The first Business Day starting at the overall start time and ending at 11:59 PM of that day; andThe second Business Day starting at starting at 00:00 AM of the next calendar day and ending at the overall end time.
Example
Assume you wish to track activity from Monday at 8:00 PM to Tuesday at 2:00 AM. You must explicitly create two BusinessDays, as follows:The first Business Day on Monday, starting at 8:00 PM and ending at 11:59 PM; and
The second Business Day on Tuesday, starting at 00:00 AM and ending at 2:00 AM.
• Min Value—A statistical value that represents the minimum expected workload for thewhole day.
• Max Value—A statistical value that represents the maximum expected workload for thewhole day. This value cannot be less than the setting for Statistical Values Minimum.
• Target Value—A statistical value that represents the target workload for the whole day. TheTarget Value cannot be less than the setting for the Statistical Values Minimum or greaterthan the setting for the Statistical Values Maximum. This property is reserved for future use.
• Interval Length (Min)—The Statistical Interval in minutes. This parameter is used to breakup the Statistical Day into smaller time slots that allow a model for load distributionthroughout the day. This value must be a multiple of 5. Once you set the value, you cannotchange it.
• Tenant—In a multi-tenant environment, the Tenant to which this object belongs. This value is
Configuration Manager Routing/eServices
Genesys Administrator Extension Help 193

automatically set to the Tenant that was specified in the Tenant Directory field in theobject list.
• State Enabled—If selected, indicates that the object is in regular operating condition andcan be used without any restrictions.
3. In the Intervals tab, specify the statistical intervals. Refer to the Statistical Intervals tab, above,for more information.
4. Click Save.
Day Contract
To create a Day Contract, perform the following actions:
1. Click New.2. Enter the following information. For some fields, you can either enter the name of a value or click
the Browse button to select a value from a list:• Name—The name of the Statistical Day. You must specify a value for this property, and that
value must be unique within the Configuration Database (in an enterprise environment) orwithin the Tenant (in a multi-tenant environment).
• Type—Select Day Contract to create a Statistical Day that is a Day Contract.• Day Type—These fields identify the calendar days to which the statistical values of the
Statistical Day apply. If Date is selected, you can modify the following fields: Year, Month,Day. If Day of Week is selected, you can modify the Day of Week field.
• Start Time—Start time of the Business Day. The value must be a positive number expressedin hours, minutes, and seconds from 00:00:00 AM/PM.
• End Time—End time of the Business Day. The value must be a positive number expressed inhours, minutes, and seconds from 00:00:00 AM/PM.
• Interval Length (Min)—A list of statistical intervals.• Forecast Allowance (%)—The percentage of the forecasted volume of routed interactions
for this Volume Period that can be over- or underestimated without incurring a penalty. Thisallowance applies throughout the whole day, including intervals. The value must be apositive value.
• Under Forecast Allowance (%)—The percentage of the forecasted volume of routedinteractions for this Volume Period that must be exceeded to avoid a penalty for forecastingtoo high.
• Over Forecast Allowance (%)—The percentage of the forecasted volume of routedinteractions for this Volume Period that cannot be exceeded to avoid a penalty forforecasting too low.
• Flat Rate—If selected, the Flat Rate to be applied during this Volume Period.
3. In the Volume Period tab, click Add. In the pop-up window, enter the following information:• Volume Period—The interval number. The first interval is numbered 1 and is always counted
Configuration Manager Routing/eServices
Genesys Administrator Extension Help 194

from the start time of the Business Day.• Forecasted Volume—The volume of interactions expected within the time period.• Base Rate—The total cost of all interactions expected within the time period.• Penalty For Interaction For Over Forecast—The additional cost, per interaction, for
exceeding the forecasted interaction volume beyond that allowed by the Forecast AllowancePenalty. In effect, this is a penalty for forecasting too low.
• Penalty For Interaction For Under Forecast—The additional cost, per interaction, for notachieving the forecasted interaction volume beyond that allowed by the Forecast AllowancePenalty. In effect, this is a penalty for forecasting too high.
ImportantRefer to the Universal Routing 8.0 Routing Application Configuration Guidefor more information.
4. Click Save.
Statistical Intervals
Use a Statistical Interval to associate each Statistical Interval with certain Statistical Values. For eachinterval, specify values representing the expected load during that interval. The value must benumeric and unique within the statistical field. When you are configuring a Statistical Day object foruse in a Statistical Table of the Capacity Table type, specify:
• Statistical Value 1—A number of agents.• Statistical Value 2—An average handling time.
When you are configuring a Statistical Day object for use in a Statistical Table ofthe Quota Table type, specify:
• Statistical Value 1—A statistical value that represents the minimum expected workload for the interval.• Statistical Value 2—A statistical value that represents the target workload for the interval. This value
cannot be less than the setting for the Statistical Value 1 or greater than the setting for the StatisticalValue 3.
• Statistical Value 3—A statistical value that represents the maximum expected workload for the interval.This value cannot be less than the setting for the Statistical Value 1.
Configuration Manager Routing/eServices
Genesys Administrator Extension Help 195

Related Links
• Voice Prompts• Statistical Tables• Transactions• Audio Resources (Configuration Manager)• Business Attribute Values
Configuration Manager Routing/eServices
Genesys Administrator Extension Help 196

Statistical TablesStatistical Tables are groups of Statistical Days that represent statistically modeled performances ofAgent Groups over a calendar period of up to one year. Call-processing applications can useStatistical Tables to provide load balancing between Agent Groups when the real-time statistics forthose groups are unavailable.
Display Options
The Statistical Tables list shows the Statistical Tables that are in your environment. It is sorted in ahierarchy by Tenants, configuration units, sites, and folders. To view objects by a particular hierarchy,select the hierarchy type in the drop-down menu above the list.
ImportantStatistical Tables that are disabled appear grayed out in the list.
Configuration Manager respects tenancy permission settings. You can access only those objects thatyou have been granted permissions and privileges to access.
You can filter the contents of this list in two ways:
• Type the name or partial name of an object in the Quick Filter field.• Click the cube icon to open the Tenant Directory filter panel. In this panel, click the Tenant that you
want to select. Use the Quick Filter field in this panel to filter the Tenant list.
You can sort the items in the list by clicking a column head. Clicking a column head a second timereverses the sort order. You can add or remove columns by clicking Select Columns.
To select or de-select multiple objects at once, click Select.
Procedures
To create a new Statistical Table object, click New. To view or edit details of an existing object, clickon the name of the object, or click the check-box beside an object and click Edit. To delete one ormore objects, click the check-box beside the object(s) in the list and click Delete. You can also deleteindividual objects by clicking on the object and then clicking Delete. Otherwise, click More toperform the following tasks:
• Clone—Copy a Statistical Table.• Move To—Move a Statistical Table to another hierarchical structure.
Configuration Manager Routing/eServices
Genesys Administrator Extension Help 197

• Enable or disable Statistical Tables.• Create a folder, configuration unit, or site. See Object Hierarchy for more information.
Click on the name of a Statistical Table to view additional information about the object. You can alsoset options and permissions, and view dependencies.
Procedure: Creating Statistical Table Objects
Steps
1. Click New.2. Enter the following information. For some fields, you can either enter the name of a value or click
Browse to select a value from a list:• Name—The name of the Statistical Table. You must specify a value for this property, and that
value must be unique within the Configuration Database (in an enterprise environment) orwithin the Tenant (in a multi-tenant environment).
• Type—The type of Statistical Table. Once you set the value, you cannot change it. The fivetypes of Statistical Tables are:• Capacity Table—The call-processing applications compare the values specified in the
Intervals list of the Statistical Days object.• Quota Table—The call-processing applications compare the Minimum, Maximum, and
Target values specified in the Statistical Days object.• Special Day Table—The call-processing applications can identify certain days (for
example, holidays).• Variable Rate Contract Table—The call-processing applications calculate the interaction
cost based on forecasted volume, and a rate for that volume.• Volume Contract Table—The call-processing applications calculate the interaction cost
based on a predefined call cost or agent cost.
• Tenant—In a multi-tenant environment, the Tenant to which this object belongs. This value isautomatically set to the Tenant that was specified in the Tenant Directory field in theobject list.
• State Enabled—If selected, indicates that the object is in regular operating condition andcan be used without any restrictions.
3. In the Statistical Days tab, click Add to add a Statistical Day. In the pop-up window, you cancreate a new object by clicking New.
4. Click Save.
Configuration Manager Routing/eServices
Genesys Administrator Extension Help 198

Related Links
• Voice Prompts• Statistical Tables• Transactions• Audio Resources (Configuration Manager)• Business Attribute Values
Configuration Manager Routing/eServices
Genesys Administrator Extension Help 199

TransactionsTransactions define how applications calculate customer-defined statistics.
For more information about specifications and use of Transactions, consult the Universal Routingdocumentation.
Display Options
The Transactions list shows the Transactions that are in your environment. It is sorted in a hierarchyby Tenants, configuration units, sites, and folders. To view objects by a particular hierarchy, select thehierarchy type in the drop-down menu above the list.
ImportantTransactions that are disabled appear grayed out in the list.
Configuration Manager respects tenancy permission settings. You can access only those objects thatyou have been granted permissions and privileges to access.
You can filter the contents of this list in two ways:
• Type the name or partial name of an object in the Quick Filter field.• Click the cube icon to open the Tenant Directory filter panel. In this panel, click the Tenant that you
want to select. Use the Quick Filter field in this panel to filter the Tenant list.
You can sort the items in the list by clicking a column head. Clicking a column head a second timereverses the sort order. You can add or remove columns by clicking Select Columns.
To select or de-select multiple objects at once, click Select.
Procedures
To create a new Transaction object, click New. To view or edit details of an existing object, click onthe name of the object, or click the check-box beside an object and click Edit. To delete one or moreobjects, click the check-box beside the object(s) in the list and click Delete. You can also deleteindividual objects by clicking on the object and then clicking Delete. Otherwise, click More toperform the following tasks:
• Clone—Copy a Transaction.• Move To—Move a Transaction to another hierarchical structure.
Configuration Manager Routing/eServices
Genesys Administrator Extension Help 200

• Enable or disable Transactions.• Create a folder, configuration unit, or site. See Object Hierarchy for more information.
Click on the name of a Transaction to view additional information about the object. You can also setoptions and permissions.
Procedure: Creating Transaction Objects
Steps
1. Click New.2. Enter the following information. For some fields, you can either enter the name of a value or click
Browse to select a value from a list:• Name—The name of the Transaction. You must specify a value for this property, and that
value must be unique. A combination of the name and type specified in the Type propertydetermines the uniqueness within the Configuration Database (in an enterprise environment)or within the Tenant (in a multi-tenant environment).
• Alias—An alternative name for this Transaction. If you specify this value, it must be uniquewithin the object type specified in the Type property for the given contact center.
• Transaction Type—The type of this Transaction. You must specify a value for this property.Once you set the value, you cannot change it.
• Recording Period (min.)—A time period, in minutes, indicating how often to report thecurrent status of the Transaction or to record it in the database.
• Format—An application-specific format or script that defines how the Transaction isprocessed.
• Tenant—In a multi-tenant environment, the Tenant to which this object belongs. This value isautomatically set to the Tenant that was specified in the Tenant Directory field in theobject list.
• State Enabled—If selected, indicates that the object is in regular operating condition andcan be used without any restrictions.
3. Click Save.
Related Links
• Voice Prompts• Statistical Tables• Transactions• Audio Resources (Configuration Manager)
Configuration Manager Routing/eServices
Genesys Administrator Extension Help 201

• Business Attribute Values
Configuration Manager Routing/eServices
Genesys Administrator Extension Help 202

Voice PromptsVoice Prompts are call treatment objects that may include a set of actions to be applied to a calledparty.
Display Options
The Voice Prompts list shows the Voice Prompts that are in your environment. It is sorted in ahierarchy by Tenants, configuration units, sites, and folders. To view objects by a particular hierarchy,select the hierarchy type in the drop-down menu above the list.
ImportantVoice Prompts that are disabled appear grayed out in the list.
Configuration Manager respects tenancy permission settings. You can access only those objects thatyou have been granted permissions and privileges to access.
You can filter the contents of this list in two ways:
• Type the name or partial name of an object in the Quick Filter field.• Click the cube icon to open the Tenant Directory filter panel. In this panel, click the Tenant that you
want to select. Use the Quick Filter field in this panel to filter the Tenant list.
You can sort the items in the list by clicking a column head. Clicking a column head a second timereverses the sort order. You can add or remove columns by clicking Select Columns.
To select or de-select multiple objects at once, click Select.
Procedures
To create a new Voice Prompt object, click New. To view or edit details of an existing object, click onthe name of the object, or click the check-box beside an object and click Edit. To delete one or moreobjects, click the check-box beside the object(s) in the list and click Delete. You can also deleteindividual objects by clicking on the object and then clicking Delete. Otherwise, click More toperform the following tasks:
• Clone—Copy a Voice Prompt.• Move To—Move a Voice Prompt to another hierarchical structure.• Enable or disable Voice Prompts.
Configuration Manager Routing/eServices
Genesys Administrator Extension Help 203

• Create a folder, configuration unit, or site. See Object Hierarchy for more information.
Click on the name of a Voice Prompt to view additional information about the object. You can also setoptions and permissions, and view dependencies.
Procedure: Creating Voice Prompt Objects
Steps
1. Click New.2. Enter the following information. For some fields, you can either enter the name of a value or click
Browse to select a value from a list:• Name—The name of the Voice Prompt. You must specify a value for this property, and that
value must be unique within the Configuration Database (in an enterprise environment) orwithin the Tenant (in a multi-tenant environment). Once you set the value, you cannotchange it. If the Voice Prompt is used for a parked-call treatment, this value must correspondto the voice prompt identifier that the switch provides.
• Description—A brief description of the Voice Prompt. For Text-to-Speech synthesis, a parkingplatform or a switch can use this property to generate the Voice Prompt.
• Switch—The Switch to which this Voice Prompt belongs. Once you set the value, you cannotchange it.
• Script—A unique identifier of the Script for this Voice Prompt.• Tenant—In a multi-tenant environment, the Tenant to which this object belongs. This value is
automatically set to the Tenant that was specified in the Tenant Directory field in theobject list.
• State Enabled—If selected, indicates that the object is in regular operating condition andcan be used without any restrictions.
3. Click Save.
Related Links
• Voice Prompts• Statistical Tables• Transactions• Audio Resources (Configuration Manager)• Business Attribute Values
Configuration Manager Routing/eServices
Genesys Administrator Extension Help 204

DesktopThe Desktop section of Configuration Manager enables you to configure the following object:
• Action Codes
Configuration Manager Desktop
Genesys Administrator Extension Help 205

Action CodesAction Codes enable agents to report the business results of customer interactions, as well as toexplain the reasons for certain operations.
After you select an appropriate code from a menu of predefined Action Codes, the code is passedalong with its related request. The code then returns with the event which indicates that the requesthas been successfully processed. Eventually, the code is stored in the reporting database.
You can supplement each Action Code with a number of Subcodes that more precisely characterizethe reasons for a certain action.
Display Options
The Action Codes list shows the Action Codes that are in your environment. It is sorted in ahierarchy by Tenants, configuration units, sites, and folders. To view objects by a particular hierarchy,select the hierarchy type in the drop-down menu above the list.
ImportantAction Codes that are disabled appear grayed out in the list.
Configuration Manager respects tenancy permission settings. You can access only those objects thatyou have been granted permissions and privileges to access.
You can filter the contents of this list in two ways:
• Type the name or partial name of an object in the Quick Filter field.• Click the cube icon to open the Tenant Directory filter panel. In this panel, click the Tenant that you
want to select. Use the Quick Filter field in this panel to filter the Tenant list.
You can sort the items in the list by clicking a column head. Clicking a column head a second timereverses the sort order. You can add or remove columns by clicking Select Columns.
To select or de-select multiple objects at once, click Select.
Procedures
To create a new Action Code object, click New. To view or edit details of an existing object, click onthe name of the object, or click the check-box beside an object and click Edit. To delete one or moreobjects, click the check-box beside the object(s) in the list and click Delete. You can also deleteindividual objects by clicking on the object and then clicking Delete. Otherwise, click More to
Configuration Manager Desktop
Genesys Administrator Extension Help 206

perform the following tasks:
• Clone—Copy an Action Code.• Move To—Move an Action Code to another hierarchical structure.• Enable or disable Action Codes• Create a folder, configuration unit, or site. See Object Hierarchy for more information.
Click on the name of an Action Code to view additional information about the object. You can also setoptions and permissions.
Procedure: Creating Action Code Objects
Steps
1. Click New.2. Enter the following information. For some fields, you can either enter the name of a value or click
Browse to select a value from a list:• Name—The Name of this Action Code. You must specify a value for this property, and that
value must be unique within the Configuration Database (in an enterprise environment) orwithin the Tenant (in a multi-tenant environment).
• Type—The Action Code Type. You must specify a value for this property. Once you set thevalue, you cannot change it. See the Action Code Types tab for more information.
• Code—The Action Code. You must specify a value for this property, and that value must beunique within the Action Code type specified in the Type property.
• Tenant—In a multi-tenant environment, the Tenant to which this object belongs. This value isautomatically set to the Tenant that was specified in the Tenant Directory field in theobject list.
• State Enabled—If selected, indicates that the object is in regular operating condition andcan be used without any restrictions.
3. (Optional) You can also set Subcodes to more precisely characterize the reasons for a certainaction. To set Subcodes, perform the following steps:• Click the Subcodes tab.• Click Add.• Enter the following information:
• Name—The name of the Subcode. You must specify a value for this property, and thatvalue must be unique within the Action Code. Once you set the value, you cannot changeit.
• Code—The Subcode value. You must specify a value for this property, and that value
Configuration Manager Desktop
Genesys Administrator Extension Help 207

must be unique within the Action Code. Once you set the value, you cannot change it.• Perform one of the following actions:
• Click Save to accept the changes and return to the object list.• Click Apply to accept the changes and remain in the tab.• Click Cancel to discard the changes.
4. Click Save.
Action Code Types
The following are types of Action Codes:
Type Description
Busy Off Selected and sent when an agent cancels the MakeBusy function.
Busy On Selected and sent when an agent activates theMake Busy function.
Conference Selected and sent when an agent initiates aconference.
Forward Off Selected and sent when an agent cancels the CallForwarding function.
Forward On Selected and sent when an agent activates the CallForwarding function.
Inbound Call Selected and sent when an agent releases aninbound call.
Internal Call Selected and sent when an agent releases aninternal call.
Login Selected and sent when the agent logs in.Logout Selected and sent when the agent logs out.
Not Ready Selected and sent when the agent’s status changesto Not Ready.
Outbound Call Selected and sent when an agent releases anoutbound call.
Ready Selected and sent when the agent’s status changesto Ready.
Transfer Selected and sent when an agent initiates atransfer.
Configuration Manager Desktop
Genesys Administrator Extension Help 208

Voice PlatformThe Voice Platform section of Configuration Manager enables you to configure the following object:
• Voice Platform Profiles
Configuration Manager Voice Platform
Genesys Administrator Extension Help 209

Voice Platform ProfilesVoice Platform Profiles are voice (VoiceXML), call control (CCXML), announcement, or conferenceapplications that specify the unique service information required as this application executes withinthe Genesys Voice Platform. Each profile contains prerequisites, parameters, and policies for eachtype of service.
Display Options
The Voice Platform Profiles list shows the Voice Platform Profiles that are in your environment. It issorted in a hierarchy by Tenants, configuration units, sites, and folders. To view objects by a particularhierarchy, select the hierarchy type in the drop-down menu above the list.
ImportantVoice Platform Profiles that are disabled appear grayed out in the list.
Configuration Manager respects tenancy permission settings. You can access only those objects thatyou have been granted permissions and privileges to access.
You can filter the contents of this list in two ways:
• Type the name or partial name of an object in the Quick Filter field.• Click the cube icon to open the Tenant Directory filter panel. In this panel, click the Tenant that you
want to select. Use the Quick Filter field in this panel to filter the Tenant list.
You can sort the items in the list by clicking a column head. Clicking a column head a second timereverses the sort order. You can add or remove columns by clicking Select Columns.
To select or de-select multiple objects at once, click Select.
Procedures
To create a new Voice Platform Profile object, click New. To view or edit details of an existing object,click on the name of the object, or click the check-box beside an object and click Edit. To delete oneor more objects, click the check-box beside the object(s) in the list and click Delete. You can alsodelete individual objects by clicking on the object and then clicking Delete. Otherwise, click More toperform the following tasks:
• Clone—Copy a Voice Platform Profile.• Move To—Move a Voice Platform Profile to another hierarchical structure.
Configuration Manager Voice Platform
Genesys Administrator Extension Help 210

• Enable or disable Voice Platform Profiles.• Create a folder, configuration unit, or site. See Object Hierarchy for more information.
Click on the name of a Voice Platform Profile to view additional information about the object. You canalso set options and permissions.
Procedure: Creating Voice Platform Profile Objects
Steps
1. Click New.2. Enter the following information. For some fields, you can either enter the name of a value or click
Browse to select a value from a list:• Name—The name of the Voice Platform Profile. You must specify a value for this property,
and that value must be unique within the Configuration Database (in an enterpriseenvironment) or within the Tenant (in a multi-tenant environment). Once you set the value,you cannot change it.
• Display Name—The name of the Voice Platform Profile as displayed in GVP reports and onthe console.
• Description—A brief description of this Voice Platform Profile.• Tenant—In a multi-tenant environment, the Tenant to which this object belongs. This value is
automatically set to the Tenant that was specified in the Tenant Directory field in theobject list.
• State Enabled—If selected, indicates that the object is in regular operating condition andcan be used without any restrictions.
3. Click Save.
Configuration Manager Voice Platform
Genesys Administrator Extension Help 211

OutboundThe Outbound section of Configuration Manager enables you to configure the following objects:
• Calling Lists• Campaigns• Campaign Groups• Fields• Filters• Formats• Table Accesses• Treatments
Configuration Manager Outbound
Genesys Administrator Extension Help 212

Calling ListsCalling Lists are database tables with records that store a collection of phone numbers and othercustomer and business-related data. Calling Lists are created in Genesys Administrator Extension,and inherit their structure from the assigned format. See Formats in the Outbound ContactDeployment Guide. See additional information about Calling Lists in the Outbound Contact 8.1Reference Manual.
A Calling List must contain Genesys mandatory fields, such as contact_info and contact_info_type,and can also contain user-defined, custom fields. The campaign name, for example, is stored in auser-defined field, which is specified by the campaign_name_field option. A user-defined field mayalso serve as a customer identifier for Do Not Call requests, as an alternative to the DNC restrictionon a customer's phone number.
An unlimited number of Calling Lists can be added to one Campaign, and a Calling List can be addedto or deleted from a running Dialing Session for a Campaign. A Campaign can be assigned to multipleCampaign Groups.
Display Options
The Calling Lists list shows the Calling Lists that are in your environment. It is sorted in a hierarchyby tenants, configuration units, sites, and folders. To view objects by a particular hierarchy, select thehierarchy type in the drop-down menu above the list.
ImportantCalling Lists that are disabled will appear grayed out in the list.
Configuration Manager respects tenancy permission settings. You can access only those objects thatyou have been granted permissions and privileges to access.
You can filter the contents of this list in two ways:
• Type the name or partial name of an object in the Quick Filter field.• Click the cube icon to open the Tenant Directory filter panel. In this panel, click the Tenant that you
want to select. Use the Quick Filter field in this panel to filter the Tenant list.
You can sort the items in the list by clicking a column head. Clicking a column head a second timereverses the sort order. You can add or remove columns by clicking Select Columns.
Click Group By to group objects by various criteria.
To select or de-select multiple objects at once, click Select.
Configuration Manager Outbound
Genesys Administrator Extension Help 213

Procedures
To create a new Calling List object, click New. To view or edit details of an existing object, click on thename of the object, or click the check box beside an object and click Edit. To delete one or moreobjects, click the check box beside the object(s) in the list and click Delete. You can also deleteindividual objects by clicking on the object and then clicking Delete. Otherwise, click More toperform the following tasks:
• Clone—Copy a Calling List.• Move To—Move a Calling List to another hierarchical structure.• Enable or disable Calling Lists.• Create a folder, configuration unit, or site. See Object Hierarchy for more information.
Click on the name of a Calling List to view additional information about the object. You can also setoptions and permissions, and view dependencies.
Procedure: Creating Calling List Objects
Steps
1. Click New.2. Enter the following information. For some fields, you can either enter the name of a value or click
Browse to select a value from a list:• Name—The name of the Calling List. You must specify a value for this property, and that
value must be unique within the Configuration Database (in an enterprise environment) orwithin the Tenant (in a multi-tenant environment).
• Description—A brief description of the Calling List.• Table Access—The Table Access to which the Calling List refers. You must specify a value for
this property.• Log Table Access—The Table Access of the Log Table type. Genesys recommends dedicating
a single Log Table Access to all Calling Lists associated with one campaign.• Filter—The Filter to be applied to this Calling List. If you specify the Filter, associate it with
the same format as the Table Access.• Calling Time From—Not used at the list level at this time. The default is 8:00:00 AM.• Calling Time To—Not used at the list level at this time. The default is 6:00:00 PM.• Script—The Script Property defines the Script Object, which contains all of the attributes that
Configuration Manager Outbound
Genesys Administrator Extension Help 214

are required by Agent Scripting. For more information, see the section, "Attaching ScriptInformation to OCS User Events and Telephony Events" in the Outbound Contact ReferenceManual.
• Maximum Attempts—The maximum number of attempts to call a single record in thisCalling List during one campaign if a Treatment associated with this campaign results in re-dialing a particular record. You must specify a value for this property, and that value must beother than zero. The default value is 10.
• Tenant—In a multi-Tenant environment, the Tenant to which this object belongs. This value isautomatically set to the Tenant that was specified in the Tenant Directory field in theobject list.
• State Enabled—If selected, indicates that the object is in regular operating condition andcan be used without any restrictions.
3. In the Treatments tab, click Add to add a Treatment. In the pop-up window, you can create anew Treatment object by clicking +.
4. In the Campaigns tab, click Add to add a Campaign. In the pop-up window, you can create anew Campaign object by clicking +.
5. In the Formats tab, click Add to add a Format. In the pop-up window, you can create a newFormat object by clicking +.
6. Click Save.
Related Links
• Table Access• Fields• Treatments• Campaign Groups• Campaigns
Configuration Manager Outbound
Genesys Administrator Extension Help 215

CampaignsA Campaign is a flexible master plan that organizes Calling Lists and Agent Groups (or Place Groups)for dialing calls and handling call results. A Campaign can be assigned to multiple Campaign Groups.See additional information in the Outbound Contact Deployment Guide.
Display Options
The Campaigns list shows the Campaigns that are in your environment. It is sorted in a hierarchy byTenants, configuration units, sites, and folders. To view objects by a particular hierarchy, select thehierarchy type in the drop-down menu above the list.
ImportantCampaigns that are disabled appear grayed out in the list.
Configuration Manager respects tenancy permission settings. You can access only those objects thatyou have been granted permissions and privileges to access.
You can filter the contents of this list in two ways:
• Type the name or partial name of an object in the Quick Filter field.• Click the cube icon to open the Tenant Directory filter panel. In this panel, click the Tenant that you
want to select. Use the Quick Filter field in this panel to filter the Tenant list.
You can sort the items in the list by clicking a column head. Clicking a column head a second timereverses the sort order. You can add or remove columns by clicking Select Columns.
To select or de-select multiple objects at once, click Select.
Procedures
To create a new Campaign object, click New. To view or edit details of an existing object, click on thename of the object, or click the check-box beside an object and click Edit. To delete one or moreobjects, click the check-box beside the object(s) in the list and click Delete. You can also deleteindividual objects by clicking on the object and then clicking Delete. Otherwise, click More toperform the following tasks:
• Clone—Copy a Campaign.• Move To—Move a Campaign to another hierarchical structure.
Configuration Manager Outbound
Genesys Administrator Extension Help 216

• Enable or disable Campaigns.• Create a folder, configuration unit, or site. See Object Hierarchy for more information.
Click on the name of an Campaign to view additional information about the object. You can also setoptions and permissions.
Procedure: Creating Campaign Objects
Steps
1. Click New.2. Enter the following information. For some fields, you can either enter the name of a value or click
Browse to select a value from a list:• Name—The name of the Campaign. You must specify a value for this property, and that
value must be unique within the Configuration Database (in an enterprise environment) orwithin the Tenant (in a multi-tenant environment).
• Description—A brief description of the Campaign.• Script—Defines the Script object that contains all of the attributes that are required by Agent
Scripting.• Tenant—In a multi-tenant environment, the Tenant to which this object belongs. This value is
automatically set to the Tenant that was specified in the Tenant Directory field in theobject list.
• State Enabled—If selected, indicates that the object is in regular operating condition andcan be used without any restrictions.
3. In the Calling Lists tab, click Add to add a Calling List. In the pop-up window, you can create anew Calling List object by clicking +.
4. Perform one of the following actions after you have added a Calling List to the Campaign:• Click Save to accept the changes and return to the object list.• Click Apply to accept the changes and remain in the tab.• Click Cancel to discard the changes.
5. Click Save.
Configuration Manager Outbound
Genesys Administrator Extension Help 217

Related Links
• Table Access• Fields• Treatments• Campaign Groups• Campaigns
Configuration Manager Outbound
Genesys Administrator Extension Help 218

Campaign GroupsCampaign Groups are structures for organizing and managing an automated process of makingoutbound calls to the destinations specified in Calling Lists.
Display Options
The Campaign Groups list shows the Campaign Groups that are in your environment. It is sorted ina hierarchy by Tenants, configuration units, sites, and folders. To view objects by a particularhierarchy, select the hierarchy type in the drop-down menu above the list.
Important• The Campaigns list displays when you select Campaign Groups in Configuration
Manager. To access the Campaign Groups list, you must first select a Campaign objectand then a Campaign Groups folder.
• Campaign Groups that are disabled appear grayed out in the list.
Configuration Manager respects tenancy permission settings. You can access only those objects thatyou have been granted permissions and privileges to access.
You can filter the contents of this list in two ways:
• Type the name or partial name of an object in the Quick Filter field.• Click the magnifying glass button to open the Tenant Directory filter panel. In this panel, click the
Tenant that you want to select. Use the Quick Filter field in this panel to filter the Tenant list.
You can sort the items in the list by clicking a column head. Clicking a column head a second timereverses the sort order.
To select or de-select multiple objects at once, click Select.
Procedures
To create a new Campaign Group object, click New. To view or edit details of an existing object, clickon the name of the object, or click the check-box beside an object and click Edit. To delete one ormore objects, click the check-box beside the object(s) in the list and click Delete. You can also deleteindividual objects by clicking on the object and then clicking Delete. Otherwise, click More toperform the following tasks:
Configuration Manager Outbound
Genesys Administrator Extension Help 219

• Clone—Copy a Campaign Group.• Move To—Move a Campaign Group to another hierarchical structure.• Enable or disable Campaign Groups.• Create a folder, configuration unit, or site. See Object Hierarchy for more information.
Click on the name of a Campaign Group to view additional information about the object. You can alsoset options and permissions, and view dependencies.
Procedure: Creating Campaign Group Objects
Steps
1. In the Campaigns list, click the Campaign object in which you wish to create a Campaign Group.2. Click the Campaign Group folder in which you wish to create a Campaign Group.3. Click New.4. Enter the following information. For some fields, you can either enter the name of a value or click
Browse to select a value from a list:• Name—The name of the Campaign Group, in the format [Campaign@CampaignGroup]. This
value is set automatically, based on the content of the fields Campaign and Group.• Description—A brief description of the Campaign Group.• Group Type—The type of Campaign Group, Agent, or Place.• Group—The name of the Agent Group or Place Group that is associated with this Campaign
Group. This value is set automatically and you cannot change it.• Dialing Mode—The name of the Dialing Mode for this Campaign Group.• Voice Transfer Destination—Identifies where calls are to be delivered for handling.
ImportantIn addition to the Voice Transfer Destination DN, any ACD Queue, Virtual Queue, Routing Point, orService Number DN that may be part of a call flow involving this group of agents or places must bespecified as an Origination DN of the Agent Group or Place Group objects. Outbound ContactServer (OCS) needs to monitor these DNs to identify "r;foreign" inbound or outbound calls that aredelivered to agents but were not issued by OCS on behalf of the Campaign Group, or if the ACDQueue DN is configured as an "r;overflow" DN.
• Operation Mode—An operation mode: Manual or Scheduled. This property applies only tothe Preview dialing mode.
Configuration Manager Outbound
Genesys Administrator Extension Help 220
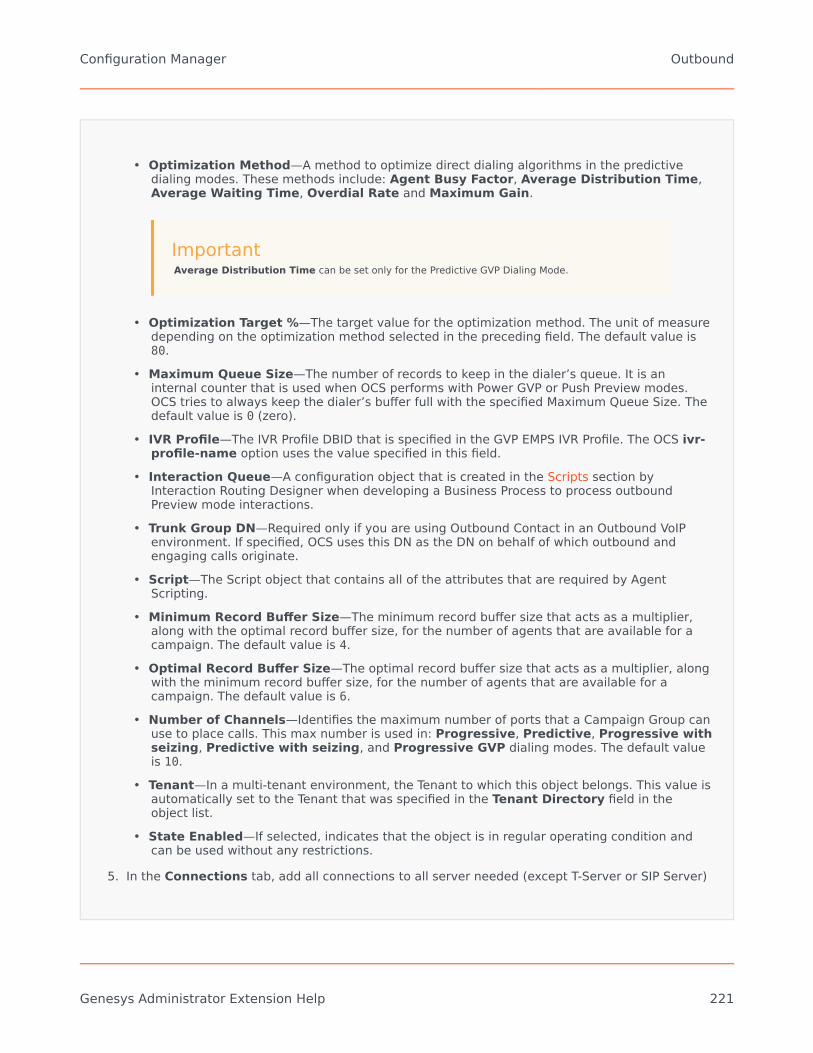
• Optimization Method—A method to optimize direct dialing algorithms in the predictivedialing modes. These methods include: Agent Busy Factor, Average Distribution Time,Average Waiting Time, Overdial Rate and Maximum Gain.
ImportantAverage Distribution Time can be set only for the Predictive GVP Dialing Mode.
• Optimization Target %—The target value for the optimization method. The unit of measuredepending on the optimization method selected in the preceding field. The default value is80.
• Maximum Queue Size—The number of records to keep in the dialer’s queue. It is aninternal counter that is used when OCS performs with Power GVP or Push Preview modes.OCS tries to always keep the dialer’s buffer full with the specified Maximum Queue Size. Thedefault value is 0 (zero).
• IVR Profile—The IVR Profile DBID that is specified in the GVP EMPS IVR Profile. The OCS ivr-profile-name option uses the value specified in this field.
• Interaction Queue—A configuration object that is created in the Scripts section byInteraction Routing Designer when developing a Business Process to process outboundPreview mode interactions.
• Trunk Group DN—Required only if you are using Outbound Contact in an Outbound VoIPenvironment. If specified, OCS uses this DN as the DN on behalf of which outbound andengaging calls originate.
• Script—The Script object that contains all of the attributes that are required by AgentScripting.
• Minimum Record Buffer Size—The minimum record buffer size that acts as a multiplier,along with the optimal record buffer size, for the number of agents that are available for acampaign. The default value is 4.
• Optimal Record Buffer Size—The optimal record buffer size that acts as a multiplier, alongwith the minimum record buffer size, for the number of agents that are available for acampaign. The default value is 6.
• Number of Channels—Identifies the maximum number of ports that a Campaign Group canuse to place calls. This max number is used in: Progressive, Predictive, Progressive withseizing, Predictive with seizing, and Progressive GVP dialing modes. The default valueis 10.
• Tenant—In a multi-tenant environment, the Tenant to which this object belongs. This value isautomatically set to the Tenant that was specified in the Tenant Directory field in theobject list.
• State Enabled—If selected, indicates that the object is in regular operating condition andcan be used without any restrictions.
5. In the Connections tab, add all connections to all server needed (except T-Server or SIP Server)
Configuration Manager Outbound
Genesys Administrator Extension Help 221

to run this Campaign Group. Click Add to add a connection. In the pop-up window, you cancreate a new Application object by clicking +.
6. Click Save.
Dialing Modes
Outbound Contact has many dialing modes which are listed in the table below. You can switchbetween Progressive and Predictive dialing modes at any time, and change the optimized parameter.Changing the dialing mode and optimized parameter in Genesys Administrator Extension istemporary. It lasts only until the Campaign is stopped or you change the setting. To change fromPredictive or Progressive Dialing mode to Preview Dialing mode, the Campaign must be stopped andrestarted. A Preview Only license limits the use of OCS to this one dialing mode. A full license isrequired in order to run Campaigns in all dialing modes.
ImportantThe Campaign needs to be loaded in order to change the dialing mode and optimizedparameter.
The dialing mode is used in conjunction with the values in the Optimization parameters andOptimization Target value fields.
Dialing Mode Description
Power GVPDial calls by issuing call requests. For moreinformation, see the Outbound Contact DeploymentGuide.
PredictiveDials calls from a calling list and predicts agentavailability. Recommended for high-volume, low-value Campaigns.
Predictive GVP
Pacing is based on optimizing agent workloads indeployments where outbound calls first arrive toGVP for self-service. A portion of these outboundcalls (for customers who selected the agent-assisted service option in GVP) is then passed to anagent group. In this dialing mode, it is assumedthat outbound calls passed for agent-assistedservice wait in the queue for some time for thenext available agent.This dialing mode requires SIP Server for placing outbound calls,rather than T-Server, and uses GVP Voice XML applications forself-serviced call processing.
Configuration Manager Outbound
Genesys Administrator Extension Help 222

Dialing Mode Description
ImportantThis dialing mode is supported by OCS starting inrelease 8.1.2.
Predictive with seizingUsed only with the Active Switching Matrix mode.Calls are dialed automatically, similar to Predictivemode.
Preview
Dials calls from a calling list only when an agentpreviews a calling list record and manuallyrequests a call to be dialed. Recommended for low-volume, high-value applications, where individualownership of accounts is the highest priority.
ProgressiveDials calls from a calling list only when an agent isavailable. Recommended for low-volume, high-value Campaigns.
Progressive GVPDials calls from a Calling List when a GVP port isavailable. This dialing mode requires SIP Server forplacing outbound calls, rather than T-Server, anduses Voice XML applications for call processing.
Progressive with seizingUsed only with the Active Switching Matrix mode.Calls are dialed automatically, similar toProgressive mode.
Push Preview Dials calls that are "pushed" to the agent's desktopusing Interaction Server.
Related Links
• Table Access• Fields• Treatments• Campaign Groups• Campaigns
Configuration Manager Outbound
Genesys Administrator Extension Help 223

FieldsA Field object defines a field in a Calling List database table. Fields are single pieces of data (forexample, a phone number) within a record.
There are two types of fields in a Calling List:
• Genesys mandatory fields—These fields must exist in all Calling List tables.• User-defined fields—These custom fields contain business-related data.
Display Options
The Fields list shows the fields that are in your environment. It is sorted in a hierarchy by Tenants,configuration units, sites, and folders. To view objects by a particular hierarchy, select the hierarchytype in the drop-down menu above the list.
ImportantFields that are disabled appear grayed out in the list.
Configuration Manager respects tenancy permission settings. You can access only those objects thatyou have been granted permissions and privileges to access.
You can filter the contents of this list in two ways:
• Type the name or partial name of an object in the Quick Filter field.• Click the magnifying glass button to open the Tenant Directory filter panel. In this panel, click the
Tenant that you want to select. Use the Quick Filter field in this panel to filter the Tenant list.
You can sort the items in the list by clicking a column head. Clicking a column head a second timereverses the sort order. You can add or remove columns by clicking Select Columns.
To select or de-select multiple objects at once, click Select.
Procedures
To create a new Field object, click New. To view or edit details of an existing object, click on the nameof the object, or click the check-box beside an object and click Edit. To delete one or more objects,click the check-box beside the object(s) in the list and click Delete button. You can also deleteindividual objects by clicking on the object and then clicking Delete.
Configuration Manager Outbound
Genesys Administrator Extension Help 224

ImportantYou can delete a Field only if there is no Filter associated with it.
Otherwise, click More to perform the following tasks:
• Clone—Copy a Field.• Move To—Move a Field to another hierarchical structure.• Enable or disable Fields.• Create a folder, configuration unit, or site. See Object Hierarchy for more information.
Click on the name of a Field to view additional information about the object. You can also set optionsand permissions, and view dependencies.
Procedure: Creating Field Objects
Steps
1. Click New.2. Enter the following information. For some fields, you can either enter the name of a value or click
Browse to select a value from a list:• Name—The name of the Field.• Description—A brief description of the Field.• Data Type—The data type for the data stored in this Field.• Length—(Required for char and varchar data types only) The length of the Field in the
database.• Field Type—Outbound business-specific information for this Field.• Default—The default value for the Field. All formats that include the Field use this default
value. The value should be consistent with the data type of the Field. For example, if the datatype is integer, the default value should be an integer value only. When GenesysAdministrator Extension imports records from an ASCII file in which a Field is missing or hasno value, Genesys Administrator Extension populates the Field with this default value—if thecheck box Nullable is not checked. If the Field is nullable, Genesys Administrator Extensionaccepts a blank value.
• Primary Key—This check box indicates whether the Field is a primary key in a database
Configuration Manager Outbound
Genesys Administrator Extension Help 225

table. In Outbound Contact, the only primary key Fields are chain_id and chain_n.• Unique—This check box indicates whether the Field value is unique within the table.• Nullable—The checkbox indicates whether the Field value can be set to NULL.• Tenant—In a multi-tenant environment, the Tenant to which this object belongs. This value is
automatically set to the Tenant that was specified in the Tenant Directory field in theobject list.
• State Enabled—If selected, indicates that the object is in regular operating condition andcan be used without any restrictions.
3. Click Save.
Field Types
Field Type Description
AgentA field containing a login ID of the last agent whohandled an outbound call associated with thisrecord.
ANI A field containing an Automatic NumberIdentification.
Application
A field containing a Genesys application. AnApplication is: any of the executable programs thatare installed and configured during a Frameworkinstallation, and which has a particular functionwithin Framework. Examples: Configuration Server,Solution Control Server (SCS), Message Server,Local Control Agent (LCA).
Call Time A field containing the time of the actual dialingattempt.
Campaign A field containing the campaign with which thisrecord is associated.
ChainA field containing the special ID of records thatshould be linked in a chain. Each record that isassociated with one customer account, forexample, has the same chain ID.
Contact Info A field containing a destination telephone number.
Contact Info Type A field containing the type of telephone number,such as home or work.
Country Code A field containing the country code.Dialing Result A field containing the result of a dialed call.
Configuration Manager Outbound
Genesys Administrator Extension Help 226

Field Type Description
E-mail Subject A field containing the text in the subject line of ane-mail interaction.
E-mail Template ID A field containing the template ID of an emailinteraction.
From A field containing the time a record is scheduled fordialing.
Group A field containing the name of a configurationobject that groups person objects.
Info DigitsA field containing the Information Indicator-Digits,which indicate the originating line type of thecaller.
LATA A field containing the number of the Local Accessand Transport Area.
Media ReferenceA field containing the Configuration Server APIreference to media body to be sent in case oftreatment.
NPA A field containing the number of the NumberingPlan Area.
NPA-NXXA field containing the number of the NumberingPlan Area with an identifier of the specifictelephone company central office serving thatnumber.
Number in ChainA field containing the priority assigned to a givenrecord in the chain. The smallest number isprocessed first.
Number of AttemptsA field containing the number of attempts. (It doesnot include redialing attempts in the event oferrors.)
Record ID A field containing the unique ID number for thecurrent record.
Record Status A field containing the status of the record.Record Type A field containing the type of record.
Scheduled Time A field containing the time of a scheduled personalcallback or a rescheduled call (from a treatment).
State CodeA field containing State or International code, forexample, a U.S. or Canadian postal code such asCA for California.
Switch ID A field containing a configuration database objectthat represents a physical or virtual switch.
Time Zone A field containing the time zone offset of therecord.
To A field containing the time the dialing attemptsshould conclude.
Treatments History A field containing the record of treatments thathave been applied to a customer.
User-Defined Field A user-defined field.
Configuration Manager Outbound
Genesys Administrator Extension Help 227

Related Links
• Table Access• Fields• Treatments• Campaign Groups• Campaigns
Configuration Manager Outbound
Genesys Administrator Extension Help 228

FiltersA Dialing Filter restricts Calling Lists so that only certain numbers are dialed during a Campaign.
ImportantCreating Dialing Filters requires using Enumeration values in place of text values forsome mandatory fields. An Enumeration value is a numeric representation of aGenesys mandatory field value. For more information about Enumeration values, see"Genesys Enumeration Tables" in the Outbound Contact 8.1 Reference Manual.
Display Options
The Filters list shows the filters that are in your environment. It is sorted in a hierarchy by Tenants,configuration units, sites, and folders. To view objects by a particular hierarchy, select the hierarchytype in the drop-down menu above the list.
ImportantFilters that are disabled will appear grayed out in the list.
Configuration Manager respects tenancy permission settings. You can access only those objects thatyou have been granted permissions and privileges to access.
You can filter the contents of this list in two ways:
• Type the name or partial name of an object in the Quick Filter field.• Click the cube icon to open the Tenant Directory filter panel. In this panel, click the Tenant that you
want to select. Use the Quick Filter field in this panel to filter the Tenant list.
You can sort the items in the list by clicking a column head. Clicking a column head a second timereverses the sort order. You can add or remove columns by clicking Select Columns.
To select or de-select multiple objects at once, click Select.
Procedures
To create a new Filter object, click New. To view or edit details of an existing object, click on thename of the object, or click the check-box beside an object and click Edit. To delete one or more
Configuration Manager Outbound
Genesys Administrator Extension Help 229

objects, click the check-box beside the object(s) in the list and click Delete. You can also deleteindividual objects by clicking on the object and then clicking Delete. Otherwise, click More toperform the following tasks:
• Clone—Copy a Filter.• Move To—Move a Filter to another hierarchical structure.• Enable or disable Filters.• Create a folder, configuration unit, or site. See Object Hierarchy for more information.
Click on the name of a Filter to view additional information about the object. You can also set optionsand permissions, and view dependencies.
Procedure: Creating Filter Objects
Steps
1. Click New.2. Enter the following information. For some fields, you can either enter the name of a value or click
Browse to select a value from a list:• Name—The name of the Filter.• Description—A brief description of the Filter.• Format—The format to which this filter is applied. Once it is specified, it cannot be changed.
You assign a Filter object to a Calling List object with the same format.• Tenant—In a multi-tenant environment, the Tenant to which this object belongs. This value is
automatically set to the Tenant that was specified in the Tenant Directory field in theobject list.
• State Enabled—If selected, indicates that the object is in regular operating condition andcan be used without any restrictions.
3. Click Save.
Related Links
• Table Access• Fields• Treatments• Campaign Groups
Configuration Manager Outbound
Genesys Administrator Extension Help 230

• Campaigns
Configuration Manager Outbound
Genesys Administrator Extension Help 231

FormatsA Format is a user-customized template for Calling Lists. It is created in Genesys AdministratorExtension and consists of Fields that form a data structure (for example, a database table); each Fieldhas properties that describe its characteristics. A Calling List must contain Genesys mandatory fieldsand can also contain user-defined custom Fields. See additional information in the Outbound ContactDeployment Guide.
Mandatory Fields are necessary in order to process records properly. They identify each customer andthe status of each customer record. Genesys mandatory fields are described in the Mandatory Fieldstab, below. See additional information in the Outbound Contact Deployment Guide.
Custom/user-defined Fields, typically containing business-related data, can be created and added to aFormat in Genesys Administrator Extension. Custom fields define customer information that isavailable to the agent during a call. See Fields in the Outbound Contact Deployment Guide about howto send customer data to an agent.
After custom/user-defined fields are added, the Format is finished and is ready to be used to createCalling Lists. A Calling List must be created from a Format, and inherits mandatory and custom fieldsfrom the assigned format. Each Calling List can have only one corresponding Format.
When database records are imported into a Calling List, data fills the mandatory and custom fields,conforming to properties established in the finished Format.
Display Options
The Formats list shows the formats that are in your environment. It is sorted in a hierarchy byTenants, configuration units, sites, and folders. To view objects by a particular hierarchy, select thehierarchy type in the drop-down menu above the list.
ImportantFormats that are disabled appear grayed out in the list.
Configuration Manager respects tenancy permission settings. You can access only those objects thatyou have been granted permissions and privileges to access.
You can filter the contents of this list in two ways:
• Type the name or partial name of an object in the Quick Filter field.• Click the magnifying glass button to open the Tenant Directory filter panel. In this panel, click the
Tenant that you want to select. Use the Quick Filter field in this panel to filter the Tenant list.
You can sort the items in the list by clicking a column head. Clicking a column head a second timereverses the sort order. You can add or remove columns by clicking Select Columns.
Configuration Manager Outbound
Genesys Administrator Extension Help 232

To select or de-select multiple objects at once, click Select.
Procedures
To create a new Format object, click New. To view or edit details of an existing object, click on thename of the object, or click the check-box beside an object and click Edit. To delete one or moreobjects, click the check-box beside the object(s) in the list and click Delete. You can also deleteindividual objects by clicking on the object and then clicking Delete. Otherwise, click the Morebutton to perform the following tasks:
• Clone—Copy a Format.• Move To—Move a Format to another hierarchical structure.• Enable or disable Formats.• Create a folder, configuration unit, or site. See Object Hierarchy for more information.
Click on the name of a Format to view additional information about the object. You can also setoptions and permissions, and view dependencies.
Procedure: Creating Format Objects
Steps
1. Click New.2. Enter the following information. For some fields, you can either enter the name of a value or click
Browse to select a value from a list:• Name—The name of the Format.• Description—A brief description of the Format.• Tenant—In a multi-tenant environment, the Tenant to which this object belongs. This value is
automatically set to the Tenant that was specified in the Tenant Directory field in theobject list.
• State Enabled—If selected, indicates that the object is in regular operating condition andcan be used without any restrictions.
3. In the Fields tab, click Add to add a Field. In the pop-up window, you can create a new Fieldobject by clicking +.
4. Perform one of the following actions after you have added a Field to the Format:
Configuration Manager Outbound
Genesys Administrator Extension Help 233

• Click Save to accept the changes and return to the object list.• Click Apply to accept the changes and remain in the tab.• Click Cancel to discard the changes.
5. Click Save.
Mandatory Fields
The following mandatory fields are required in all Calling List Formats. This list is sorted alphabeticallyby field name. Default values for these fields are defined in the Fields objects during configuration.
Field Name Data Type Description
agent_id varchar(32) Login identifier of the agent whohandled the record.
app_id integer Empty, not used at this time.
attempt integer Number of attempts made toreach the customer.
call_result integer
Final outcome of the recordprocessing. See the Call Resultstable in the Defined Constantschapter of the Outbound Contact8.1 Reference Manual.
call_time integerLatest date and time at whichthe record was processed(dialed), in UTC format.
campaign_id integerConfiguration DBID of theOutbound Dialing Campaign, as apart of which the record has beenprocessed.
chain_id integerUnique identification number ofthe chain to which the recordbelongs.
chain_n integer Unique identification number ofthe record within the chain.
contact_info varchar(128)Customer’s contact information;phone number in the voicecampaign.
contact_info_type integerType of the contact information;phone type in the voicecampaign. See the Phone Types
Configuration Manager Outbound
Genesys Administrator Extension Help 234

Field Name Data Type Descriptiontable in the Defined Constantschapter of the Outbound Contact8.1 Reference Manual.
daily_from integerEarliest time of the day at whicha customer can be contacted(seconds since midnight).
daily_till integerLatest time of the day at which acustomer can be contacted(seconds since midnight).
dial_sched_time integer
Date and time for which theprocessing of the record hasbeen scheduled or rescheduled,in UTC format (seconds sincemidnight 01/01/1970).
email_subject varchar(255) Empty, not used at this time.email_template_id integer Empty, not used at this time.group_id integer Empty, not used at this time.media_ref integer Empty, not used at this time.
record_id integer Unique identification number of acalling record.
record_status integer
Current status of the record. Seethe Record Types table in theDefined Constants chapter of theOutbound Contact 8.1 ReferenceManual.
record_type integer
Type of the record. See theRecord Types table in the DefinedConstants chapter of theOutbound Contact 8.1 ReferenceManual.
switch_id integerDBID of the Switch where theagent who handled the recordhad logged in.
treatments varchar(255)Treatments application history.For more information, seeTreatments in the OutboundContact Deployment Guide.
tz_dbid integerConfiguration DBID of the TimeZone object associated with thecalling record.
Related Links
• Table Access• Fields• Treatments
Configuration Manager Outbound
Genesys Administrator Extension Help 235

• Campaign Groups• Campaigns
Configuration Manager Outbound
Genesys Administrator Extension Help 236

Table AccessTable Access objects describe database tables of a specified Format and explain how to access thesetables through Database Access Points (DAPs).
You cannot delete a Table Access object while it is associated with at least one Calling List.
Display Options
The Table Access list shows the Table Access objects that are in your environment. It is sorted in ahierarchy by Tenants, configuration units, sites, and folders. To view objects by a particular hierarchy,select the hierarchy type in the drop-down menu above the list.
ImportantTable Access objects that are disabled appear grayed out in the list.
Configuration Manager respects tenancy permission settings. You can access only those objects thatyou have been granted permissions and privileges to access.
You can filter the contents of this list in two ways:
• Type the name or partial name of an object in the Quick Filter field.• Click the magnifying glass button to open the Tenant Directory filter panel. In this panel, click the
Tenant that you want to select. Use the Quick Filter field in this panel to filter the Tenant list.
You can sort the items in the list by clicking a column head. Clicking a column head a second timereverses the sort order.
To select or de-select multiple objects at once, click Select.
Procedures
To create a new Table Access object, click New. To view or edit details of an existing object, click onthe name of the object, or click the check-box beside an object and click Edit. To delete one or moreobjects, click the check-box beside the object(s) in the list and click Delete. You can also deleteindividual objects by clicking on the object and then clicking Delete. Otherwise, click More toperform the following tasks:
• Clone—Copy a Table Access object.• Move To—Move a Table Access object to another hierarchical structure.
Configuration Manager Outbound
Genesys Administrator Extension Help 237

• Enable or disable Table Access objects.• Create a folder, configuration unit, or site. See Object Hierarchy for more information.
Click on the name of a Table Access object to view additional information about the object. You canalso set options and permissions, and view dependencies.
Procedure: Creating Table Access Objects
Steps
1. Click New.2. Enter the following information. For some fields, you can either enter the name of a value or click
Browse to select a value from a list:• Name—The name of this Table Access object. It can contain up to 254-characters. You must
specify a value for this property, and that value must be unique within the ConfigurationDatabase (in an enterprise environment) or within the Tenant (in a multi-tenantenvironment).
• Description—A brief description of the Table Access object.• Table Type—The type of Table Access object in the database. You must specify a value for
this property. Once you set the value, you cannot change it.• DB Access Point—The Database Access Point through which to access the Table. You must
specify a value for this property. The Database Access Point must serve the Tenant to whichthis Table Access object belongs.
• Format—The Format of this Table. You must specify a value for this property for all Tabletypes except Log Table. Once you set the value, you cannot change it.
• Database Table—The name of this table as specified in the database. You must specify avalue for this property. The name length depends on the DBMS type. Genesys recommendsthat you do not exceed the following vendor-defined limitations:• 18 characters—for DB2 and Informix databases• 128 characters—for Microsoft SQL databases• 30 characters—for Oracle and Sybase databases
• Update Every (seconds)—The number of seconds an application waits before updating thetable data in application memory. This value is required only if the Cacheable check box ischecked.
• Cacheable—Indicates whether the Table Access data is mirrored in application memory.• Tenant—In a multi-tenant environment, the Tenant to which this object belongs. This value is
automatically set to the Tenant that was specified in the Tenant Directory field in theobject list.
Configuration Manager Outbound
Genesys Administrator Extension Help 238
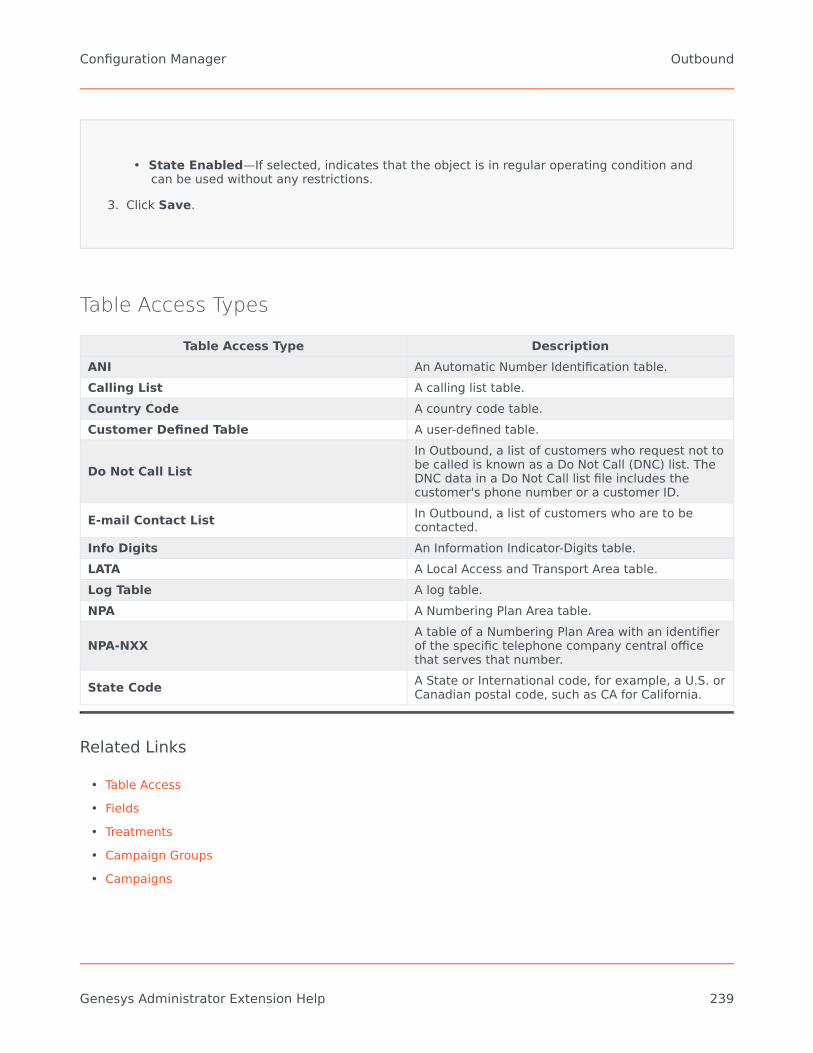
• State Enabled—If selected, indicates that the object is in regular operating condition andcan be used without any restrictions.
3. Click Save.
Table Access Types
Table Access Type DescriptionANI An Automatic Number Identification table.Calling List A calling list table.Country Code A country code table.Customer Defined Table A user-defined table.
Do Not Call ListIn Outbound, a list of customers who request not tobe called is known as a Do Not Call (DNC) list. TheDNC data in a Do Not Call list file includes thecustomer's phone number or a customer ID.
E-mail Contact List In Outbound, a list of customers who are to becontacted.
Info Digits An Information Indicator-Digits table.LATA A Local Access and Transport Area table.Log Table A log table.NPA A Numbering Plan Area table.
NPA-NXXA table of a Numbering Plan Area with an identifierof the specific telephone company central officethat serves that number.
State Code A State or International code, for example, a U.S. orCanadian postal code, such as CA for California.
Related Links
• Table Access• Fields• Treatments• Campaign Groups• Campaigns
Configuration Manager Outbound
Genesys Administrator Extension Help 239

TreatmentsA Treatment defines what Outbound Contact Server (OCS) should do with a call that does not reachthe intended party. For example, the Treatment could instruct OCS to redial a number that returns aBusy call result.
Treatment objects are assigned to Calling List objects. If no Treatments are assigned to a call result,OCS changes the record status to Updated.
You can add or remove Treatments from a Calling List object while a Dialing Session for a Campaign isrunning. However, once a Treatment is in progress, it cannot be interrupted. Changes made to thatTreatment are applied to the next record that receives the call result that prompts the Treatment.
Display Options
The Treatments list shows the Treatments that are in your environment. It is sorted in a hierarchy byTenants, configuration units, sites, and folders. To view objects by a particular hierarchy, select thehierarchy type in the drop-down menu above the list.
ImportantTreatments that are disabled appear grayed out in the list.
Configuration Manager respects tenancy permission settings. You can access only those objects thatyou have been granted permissions and privileges to access.
You can filter the contents of this list in two ways:
• Type the name or partial name of an object in the Quick Filter field.• Click the magnifying glass button to open the Tenant Directory filter panel. In this panel, click the
Tenant that you want to select. Use the Quick Filter field in this panel to filter the Tenant list.
You can sort the items in the list by clicking a column head. Clicking a column head a second timereverses the sort order. You can add or remove columns by clicking Select Columns.
To select or de-select multiple objects at once, click Select.
Procedures
To create a new Treatment object, click New. To view or edit details of an existing object, click on thename of the object, or click the check-box beside an object and click Edit. To delete one or moreobjects, click the check-box beside the object(s) in the list and click Delete. You can also delete
Configuration Manager Outbound
Genesys Administrator Extension Help 240

individual objects by clicking on the object and then clicking Delete. Otherwise, click More toperform the following tasks:
• Clone—Copy a Treatment.• Move To—Move a Treatment to another hierarchical structure.• Enable or disable Treatments.• Create a folder, configuration unit, or site. See Object Hierarchy for more information.
Click on the name of a Treatment to view additional information about the object. You can also setoptions and permissions, and view dependencies.
Procedure: Creating Treatment Objects
Steps
1. Click New.2. Enter the following information. For some fields, you can either enter the name of a value or click
Browse to select a value from a list:• Name—(Required) The name of the Treatment.• Description—(Optional) A brief description of the Treatment.• Call Result—(Required) The call result associated with this Treatment.• Apply to Record—(Required) The action to apply to a Calling List record, based on the call
result.• Apply to Call—(Optional) An alternate way to handle a call when a dialing attempt is
answered or reaches an answering machine or a fax machine.• Destination DN—(Required, if Apply to Call is specified) The DN to which the call is
connected or transferred. If Apply to Callis specified but Destination DN is not, OCSignores the Treatment.
• Number in sequence—(Required) The order in which this treatment is applied in aTreatment sequence. If it is a stand-alone treatment, specify a value of 1.
• Cycle Attempt—(Required with value of greater than 0 (zero), when Apply to Record is setto Next in chain, Next in chain after, and Next in chain at specified date, or Redial)The maximum number of consecutive attempts to execute the Treatment on the record.
• Interval (Days:Hours:Minutes)—(Required when Apply to Record is set to Next inchain, Next in chain after, Redial, or Retry in) A time interval, in minutes, that OCS waitsbetween the first dialing attempt and the first Treatment attempt.
Configuration Manager Outbound
Genesys Administrator Extension Help 241

• Increment (minutes)—(Required when Apply to Record is set to Next in chain, Next inchain after, Redial, or Retry in) The number of minutes added to the previous redial timeinterval.
• Date—(Required when Apply to Record is set to Next in chain at specified date, orRetry at specified date) The date when another Treatment attempt is performed.
• Time—(Required when Apply to Record is set to Next in chain at specified date, orRetry at specified date) The time of day that another Treatment attempt is performed.
• Range (Days:Hours:Minutes)—Reserved for future use.• Tenant—In a multi-tenant environment, the Tenant to which this object belongs. This value is
automatically set to the Tenant that was specified in the Tenant Directory field in theobject list.
• State Enabled—If selected, indicates that the object is in regular operating condition andcan be used without any restrictions.
3. Click Save.
Related Links
• Table Access• Fields• Treatments• Campaign Groups• Campaigns
Configuration Manager Outbound
Genesys Administrator Extension Help 242

System DashboardThe System Dashboard helps you to monitor your contact center. It shows a high-level summary ofthe current operations of your environment, which includes:
• Active Alarms—A summary of active alarms.• Hosts—A summary of the hosts in your environment, and their status.• Applications—A summary of the applications in your environment, and their status.• Solutions—a summary of the solutions in your environment, and their status.
Important• Dashboards are not supported if you are using Internet Explorer 8 or earlier.• GAX must have a connection to Solution Control Server (SCS) for the System Dashboard
to function. See the Add SCS Connection section in the Genesys Administrator ExtensionDeployment Guide for more information.
Click on a tab below to learn more.
Alarms
The Alarms widget shows a list of active Critical, Major and Minor alarms in the system, sorted bypriority. The widget updates automatically when a new alarm is activated.
ImportantAn active alarm is visible only if you have access to the application which generatedthe alarm.
Click the contextual menu (three vertical dots) in the header of the widget to access options specificto this widget. These include:
• Expand to Tab—Expand this widget into a maximized tab to show more information and options.• Edit—Edit the name of this widget.
System Dashboard Outbound
Genesys Administrator Extension Help 243

ImportantFor Genesys Administrator Extension to monitor the system, Management Layercomponents must be deployed in the system, and Genesys Administrator Extensionmust be deployed with connections to the Solution Control Server. For detailedinstructions, see the Management Framework Deployment Guide.
Each Alarm in the list displays one of the following status:
• Critical• Major• Minor• Unknown
Click Expand to Tab to change this widget into a tab. In the Alarms tab, you can perform thefollowing action:
[+] Click to show section
Procedure: Clearing AlarmsPrerequisites
You are using the Alarms tab. If you are using the Alarms widget, click the contextual menu(three dots) and select Expand to Tab.
Steps
1. In the Alarms tab, select the check box beside the Alarm(s) that you want to clear.2. Click More and select Clear.
Troubleshooting Alarms Viewing
If an event that is configured to generate an alarm does not result in an alarm, verify that:
• The corresponding Alarm Condition is configured correctly.• The corresponding log event was generated. To verify this, check whether the log event appears in a
local text file.
System Dashboard Outbound
Genesys Administrator Extension Help 244

• The Application that generates the event is configured to send its log to a network Message Server.• The network log output of the given Application is set to Interaction or Trace if the event is reported at
either Interaction or Trace log-output level.• Message Server is receiving log events that the given Application generated. Check the Message Server
log.• Solution Control Server is connected to Message Server.• Solution Control Server receives alarm messages from Message Server. Check the Solution Control
Server log.• Genesys Administrator Extension is properly connected to Solution Control Server.
Applications
The Applications widget shows a list of the Applications in the system. Applications with a status ofUnknown are shown at the top of the list. This widget updates automatically when the status of anApplication changes. Click the contextual menu (three vertical dots) in the header of the widget toaccess options specific to this widget. These include:
• Expand to Tab—Expand this widget into a maximized tab to show more information and options.• Edit—Edit the name of this widget.
Each Application in the list has a status, which is one of the following:
[+] Click to show sectionStatus Name Description
Initializing
Indicates that an application is performing theinitialization steps, which involve:
• Starting the application.• Reading configuration data from the
Configuration Database.• Checking this data for integrity and
completeness.• Establishing connections with all the resources
according to the given configuration data.At this stage, the application is connected to the LCA (LocalControl Agent) running on its host, but it is not ready to providethe service (for example, to accept client connections).
Started
Assigned from the moment an application iscompletely initialized; that is, when the application:
• Has read and checked its configuration.• Has established connections with all the
System Dashboard Outbound
Genesys Administrator Extension Help 245

Status Name Description
required resources.• Is ready to provide its service.• Is connected to the LCA running on its host.
This status does not necessarily mean that the application isperforming its function. To start working, some applications mayrequire additional solution-specific control operations throughtheir user interfaces. For information, refer to solution-specificdocumentation.
Service UnavailableIndicates that, although an application is running, itcannot provide the service, for some internalreason.
Start Pending
The application is being activated. Solution ControlServer (SCS) has executed the Startup command,but the application has not yet connected to theLCA on its host. This status exists only for theinterval between the command to start theapplication and the LCA report that the applicationis being connected.
StoppedIndicates that an application is installed andconfigured in the system, but it has not started. Inother words, the application either has not beenactivated or has terminated unexpectedly.
Stop Pending
The application is being shut down. The applicationhas accepted the Stop command from SCS, but ithas not yet disconnected from the LCA on its host.This status exists only for the interval between theinstruction to stop the application and its actualtermination. Typically, the Pending stage involvessome application-specific wrap-up functions,closing of all open connections, termination, anddetection of the termination by LCA.
SuspendedIndicates that an application has received a requestto shut down gracefully, has stopped acceptingnew client connections, and has finishedprocessing all current connections and requests.
SuspendingIndicates that an application has received a requestto shut down gracefully and has stopped acceptingnew client connections and requests. It is stillprocessing current connections and requests.
Unknown
Indicates that the Management Layer cannotprovide reliable information about the currentapplication status. In other words, SCS is notconnected to the LCA on the host where theapplication is configured to run. This status doesnot necessarily mean that the application cannotperform its function.
ImportantAll GUI desktop applications are displayed with a
System Dashboard Outbound
Genesys Administrator Extension Help 246

Status Name Description
status of Unknown.
Click Expand to Tab to change this widget into a tab. In the Applications tab, you can perform thefollowing actions:
Start[+] Click to show section
Warning• Application startup through Genesys Administrator Extension does not necessarily mean
that the Application immediately starts performing its function. Applications arecomponents of higher-level structures called Solutions, and most of them functionnormally only as part of the Solutions to which they belong. Genesys recommends thatyou activate single Applications only for maintenance purposes or during onlineupgrades. In normal production mode, always start a complete Solution.
• You cannot start or stop an Application of the Database Access Point type.
Procedure: Starting an ApplicationPrerequisites
You are using the Applications tab. If you are using the Applications widget, click the contextualmenu (three dots) and select Expand to Tab.
Steps
1. In the Applications tab, select the check box beside the Application(s) that you want to start.2. Click More and select Start.
Genesys Administrator Extension notifies Solution Control Server, which uses Local Control Agent toactivate the Application remotely.
Application startup takes some time, depending on:
• The amount of configuration data the Application must read from the Configuration Database.
System Dashboard Outbound
Genesys Administrator Extension Help 247

• The amount of time it takes to check data integrity and completeness.• The number of network connections the Application must set up to other system resources.
While an Application is being initialized, its status changes from Stopped to Pending. When theApplication starts, its status changes from Pending to Running.
In some scenarios, an Application might depend on internal and/or external components to performtheir functions. In these cases, the Application status may change as follows:
• From Stopped to Pending to Initializing and, possibly, to Service Unavailable.• From either Initializing or Service Unavailable to Started only after all the internal and external
components are ready.
Genesys Administrator reports a successful start of an Application only if the Application has reportedeither Started or Service Unavailable status within the configured timeout period.
Important• You can start an Application only if its current status is Stopped.• You can start an Application only if you have Execute permission for the Application
configuration object.• If you install an Application as a Service, it will be started as a Service.
Stop[+] Click to show section
WarningStopping an Application can cause the stoppage of some or all of the runningSolutions to which the Application belongs.
This action is similar to the Graceful Stop command in Genesys Administrator. When you stop anApplication, the Application stops accepting new requests and finishes processing the requests in itsqueue.
You can stop an Application only if:
• Its current status is Started, Service Unavailable, or Pending. You cannot stop an Application gracefully ifits status is Suspending or Suspended.
• You have Execute permission for the Application object.
System Dashboard Outbound
Genesys Administrator Extension Help 248

Procedure: Stopping an ApplicationPrerequisites
You are using the Applications tab. If you are using the Applications widget, click the contextualmenu (three dots) and select Expand to Tab.
Steps
1. In the Applications tab, select the check box beside the Application(s) that you want to stop.2. Click More and select Stop.
Genesys Administrator Extension notifies Solution Control Server, which uses Local Control Agent toterminate the Application remotely.
Support of Graceful Shutdown
If you are not sure if an Application supports graceful shutdown, you can use the configuration optionsuspending-wait-timeout to configure a timeout. Doing so will ensure that the Application shutsdown gracefully if it supports graceful shutdown; otherwise, it will be stopped ungracefully. Refer tothe Framework Configuration Options Reference Manual for more information about this configurationoption.
Force Stop[+] Click to show section
WarningStopping an Application can cause the stoppage of some or all of the runningSolutions to which the Application belongs.
When you stop an Application abruptly (ungracefully), the Application immediately stops processingall requests, both new and current. You can only stop an Application if:
• Its current status is Started, Service Unavailable, Pending, Suspending, or Suspended.• You have Execute permission for the Application.
System Dashboard Outbound
Genesys Administrator Extension Help 249

Procedure: Using Force Stop on an ApplicationPrerequisites
You are using the Applications tab. If you are using the Applications widget, click the contextualmenu (three dots) and select Expand to Tab.
Steps
1. In the Applications tab, select the check box beside the Application(s) that you want to stop.2. Click More and select Force Stop.
Genesys Administrator Extension notifies Solution Control Server, which uses Local Control Agent toterminate the Application remotely.
Switch Mode[+] Click to show sectionThis action manually switches over from a Backup object to a Primary object.
To perform a manual switchover, you must:
• Have an appropriate license for the Management Layer to provide switchover. If no license is present,this option is disabled.
• Have Execute permission for that Application.
ImportantManual switchover is not be possible for Applications of the following types:
• Configuration Server• Database Server• Database Access Point• Solution Control Server
System Dashboard Outbound
Genesys Administrator Extension Help 250

Procedure: Using Switch Mode on an ApplicationPrerequisites
You are using the Applications tab. If you are using the Applications widget, click the contextualmenu (three dots) and select Expand to Tab.
Steps
1. In the Applications tab, select the check box beside the Application(s) you want to manuallyswitch from Backup to Primary.
2. Click More and select Switch Mode.
TipYou can also start and stop applications by clicking on the status name in theApplications tab. For example, if an application has a status of Started and you clickthe status name, the application attempts to stop. Likewise, if an application has astatus of Stopped and you click the status name, the application attempts to start.
Hosts
The Hosts widget shows a list of Hosts in your environment. This list updates automatically when thestatus of a Host changes. Click the contextual menu (three vertical dots) in the header of the widgetto access options specific to this widget. These include:
• Expand to Tab—Expand this widget into a maximized tab to show more information and options.• Edit—Edit the name of this widget.
Each Host in the list has a status, which is one of the following:
[+] Click to show sectionStatus Name Description
Up
Indicates that Solution Control Server (SCS) hassuccessfully connected to Local Control Agent(LCA) running on the given host and that it,therefore, can control and monitor all applicationslocated on this host.
Down Indicates that SCS cannot connect to LCA running
System Dashboard Outbound
Genesys Administrator Extension Help 251

Status Name Descriptionon the given host, or that it has lost a previouslyestablished connection. This status indicates one ofthe following:
• LCA has not started on the given host, hasterminated, or has stopped responding.
• LCA is not configured correctly in theConfiguration Database.
If you cannot identify a problem, refer to the Management LayerTroubleshooter in Framework Solution Control Interface Help forassistance.
UnavailableIndicates that SCS cannot connect to LCA runningon the given host, or that it has lost a previouslyestablished connection because the host is notstarted or has failed.
Unreachable
Indicates that SCS cannot connect to LCA runningon the given host, or that it has lost a previouslyestablished connection because of a networkconnectivity problem between SCS and the host.Specifically, there is no route to the host.
Unknown
Indicates one of two situations:
• In a Distributed SCS configuration, the SCS towhich Genesys Administrator is connectedcannot connect to, or has lost a previouslyestablished connection with, anotherdistributed SCS that is assigned to the givenhost.
• Genesys Administrator Extension cannotconnect to, or has lost its connection with, SCSon the given host. In this case, GenesysAdministrator Extension will show all hosts witha Unknown status.
Click Expand to Tab to change this widget into a tab. In the Hosts tab, you can perform the followingaction:
View Host Statistics[+] Click to show sectionClick the graph icon beside a Host to view statistics about that Host. In the Host Informationwindow, you can view information in the following tabs:
• Hosts• Processes
System Dashboard Outbound
Genesys Administrator Extension Help 252

• Services• Charts
Hosts
The Host tab displays information about CPU and memory usage in tabular format. Real-timeinformation for each CPU is broken down as follows:
• User Time (%)• Kernel Time (%)• Non-Idle Time (%)
The tab also displays basic real-time memory information, in kilobytes:
• Used Virtual Memory• Total Virtual Memory
Processes
The Processes tab displays all processes running on the host. For each process, the Processes tabdisplays the following:
• Name• PID (process identifier)• CPU Usage (%)• Mem Usage (MB)• Priority
Services
ImportantThis tab is only displayed for Windows-based hosts.
The Services tab displays programs installed to run as Windows Services on the selected host. Thistab only displays information about host computers running a Genesys-supported Windows operatingsystem.
For each service, the Services tab indicates:
• Name—the actual name of the program installed as a Windows Service.• Display Name—the service name of the program, as it appears in the Services window.• State—the current state of the service.
System Dashboard Outbound
Genesys Administrator Extension Help 253

• Win32 Exit Code—the error code reported for an error occurring during a service startup or shutdown.• Svc Exit Code—the service-specific error code reported for an error occurring during a service startup
or shutdown.• Checkpoint—the operation progress indicator that the service uses during a lengthy operation.• Wait Hint—the interval, in milliseconds, during which the current operational step should be
completed.
See the documentation for your Microsoft Windows operating system for more information.
Charts
The Charts tab displays a graph of memory and processor usage on the host.
Solutions
The Solutions widget shows a list of Solutions in your environment. This list updates automaticallywhen the status of a Solution changes. Click the contextual menu (three vertical dots) in the headerof the widget to access options specific to this widget. These include:
• Expand to Tab—Expand this widget into a maximized tab to show more information and options.• Edit—Edit the name of this widget.
Each Solution in the list has a status, which is one of the following:
[+] Click to show sectionStatus Name Description
Start PendingIndicates that a request to start the solution wassent by SCS, but there are some applications thatstill need to be started in the solution.
Started
Indicates that a solution is ready to perform itsmajor function; that is, all mandatory solutioncomponents have reported Started status.This status does not necessarily mean that the solution isactually performing its function. To start working, some solutionsmight require additional solution-specific control operationsthrough their user interfaces. For information, refer to solution-specific documentation.
Stop PendingIndicates that a request to stop the solution wassent by SCS, but there are some applications thatstill need to be stopped in the solution.
Stopped
Indicates that one or more of the solution’smandatory components do not have Started status;therefore, the solution cannot perform its function.Stopped status can indicate that a solution eitherhas not been activated, or has failed because oneof its mandatory components is unavailable.
System Dashboard Outbound
Genesys Administrator Extension Help 254

Status Name Description
UnknownIndicates that the Management Layer cannotprovide reliable information about the solutionstatus. This status does not necessarily mean thatthe solution is unable to perform its function.
Click Expand to Tab to change this widget into a tab. In the Solutions tab, you can perform thefollowing actions:
Start[+] Click to show section
ImportantYou can start a Solution of type Default Solution Type or Framework from GenesysAdministrator Extension only if the Solution was created using a Solution Wizard.
Procedure: Starting a SolutionPrerequisites
You are using the Solutions tab. If you are using the Solutions widget, click the contextualmenu (three dots) and select Expand to Tab.
Steps
1. In the Solutions widget, select the check box beside the Solution(s) that you want to start.2. Click More and select Start.
Genesys Administrator Extension sends the Startup command for each Solution to Solution ControlServer (SCS). SCS starts Solutions in the order in which it reads their configuration from ConfigurationServer and processes each Startup command as it would for a Solution that was started individually.
ImportantComplete Solution startup can take some time. The amount of time varies, dependingon the number and location of Solution components and the time required to initialize
System Dashboard Outbound
Genesys Administrator Extension Help 255

each component.
SCS checks the status of all the Solution's mandatory components that are configured to becontrolled by the Management Layer.
Genesys Administrator Extension reports the successful start of a Solution after all these componentshave reported a status of Started within the configured timeout. When the Solution starts, its statuschanges from Stopped to Started.
Important• You can start a Solution only if you have Execute permission for the Solution
configuration object in the Configuration Layer.• Because a number of Solutions can share the same applications, some Solution
components may have a status of Started before you start the Solution.• In redundant configurations, both primary and backup Solution components start
simultaneously; they are assigned runtime redundancy modes according to theirconfiguration.
Stop[+] Click to show section
ImportantYou can stop a Solution of Default Solution Type or Framework from GenesysAdministrator Extension only if the Solution was created using a Solution Wizard.
This action is similar to the Graceful Stop command in Genesys Administrator. When you stop aSolution gracefully, all of the Applications making up the Solution stop accepting new requests andfinish processing those requests that each currently has in its queue.
You can stop a Solution gracefully only if you have Execute permission for the Solution object.
Procedure: Using Stop on a Solution
System Dashboard Outbound
Genesys Administrator Extension Help 256

Prerequisites
You are using the Solutions tab. If you are using the Solutions widget, click the contextualmenu (three dots) and select Expand to Tab.
Steps
1. In the Solutions widget, select the check box beside the Solution(s) that you want to stop.2. Click More and select Stop.
Genesys Administrator sends the Stop command for each Solution to Solution Control Server (SCS).SCS uses Local Control Agents (LCA) to deactivate the Solution components in the reverse order fromthe component-startup order. (The component-startup order is defined in the Solution configurationobject.)
Important• Because a number of Solutions can share the same Applications, some Solution
components may continue to have a status of Started after you stop the Solution,whether gracefully or ungracefully.
• In redundant configurations, both primary and backup Solution components stopsimultaneously.
Force Stop[+] Click to show section
ImportantYou can stop a Solution of type Default Solution Type or Framework from GenesysAdministrator Extension only if the Solution was created using a Solution Wizard.
When you stop a Solution ungracefully, the Solution stops abruptly, and all of its compositeapplications immediately stop processing, both new and current.
You can stop a Solution in this way only if you have Execute permission for the Solution object.
System Dashboard Outbound
Genesys Administrator Extension Help 257

Procedure: Using Force Stop on a SolutionPrerequisites
You are using the Solutions tab. If you are using the Solutions widget, click the contextualmenu (three dots) and select Expand to Tab.
Steps
1. In the Solutions widget, select the check box beside the Solution(s) that you want to stop.2. Click More and select Force Stop.
Genesys Administrator Extension sends the Stop command for each Solution to SCS, which uses LocalControl Agents (LCA) to deactivate the Solution components in reverse order from the componentstartup. (The component-startup order is defined in the Solution configuration object.)
Important*Because a number of Solutions can share the same applications, some Solutioncomponents may continue to have a status of Started after you stop the Solution,whether gracefully or ungracefully.
• In redundant configurations, both primary and backup Solution components stopsimultaneously.
TipYou can also start and stop solutions by clicking on the status name in the Solutionstab. For example, if a solution has a status of Started and you click the status name,the solution attempts to stop. Likewise, if a solution has a status of Stopped and youclick the status name, the solution attempts to start.
System Dashboard Outbound
Genesys Administrator Extension Help 258

Solution DeploymentSolution Deployment enables the user to fully deploy solution definitions and installation packages(IPs) to local and remote locations. This includes installation and configuration of all necessaryapplications and updates to existing multi-tenant applications, where appropriate.
A solution definition consists of an XML file that dictates the steps to install, upgrade, or configure IPsand system configurations to deploy a solution successfully.
Solution Deployment includes the following sections:
Installation PackagesThese pages explain how to manageinstallation packages (IPs).
Installation packagesView Deployed IPs
Solution DefinitionsThese pages explain how to managesolution definitions.
Solution definitionsView a list of deployed solutions
PrivilegesThis page explains how to manageprivileges.
Privileges
Solution Deployment Outbound
Genesys Administrator Extension Help 259

Installation PackagesThis panel enables you to manage installation packages (IPs) by uploading IPs to a repository in GAXand deploying the IPs to hosts.
The Installation Packages panel on the left of the screen displays a list of IPs that you havepermission to see in your environment. The list is sorted by groups. You can expand a group to see itslist of IPs.
ImportantInstallation packages are stored in the database and not on the local file system.
Solution Deployment respects tenancy permission settings. You can access only those objects thatyou have been granted permission to access.
You can filter the contents of this list in two ways:
• Type the name or partial name of an object in the Quick Filter field.• Click the cube icon to open the Tenant Directory filter panel. In this panel, click the Tenant that you
want to select. Use the Quick Filter field in this panel to filter the Tenant list.
You can sort the items in the list by clicking a column head. Clicking a column head a second timereverses the sort order.
Display
The Installation Packages panel list displays the following information:
• Name—The name of the IP.• Version—The version number of the IP.• Locale ID—Indicates the language used by the plug-in.• Operating System—The operating system and bit version that are required by the IP.• Status—Indicates the current status of the IP. For example, a status of Complete indicates that the IP
deployed successfully.• Update Time—A timestamp that indicates when the IP was last updated.
Click an IP to reveal more details in a panel that opens to the right. This paneldisplays the following information about the IP:
• Name—The name of the IP.
Solution Deployment Installation Packages
Genesys Administrator Extension Help 260

• Nickname—The nickname for the IP.• Description—An optional description of the IP; this can be modified, as required.• Version—The version number of the IP.• Locale ID—Indicates the language used by the plug-in.• Operating System—The operating system that is required by the IP.• Status—Indicates the current status of the IP For example, a status of Complete indicates that the IP
deployed successfully.• Update Time—A timestamp that indicates when the IP was last updated.• Group—The group to which this IP belongs. If you change the group name, the IP is relocated to that
group. If the group name you enter does not exist, it will be created. These actions take effectimmediately in the Installation Packages list.
Procedures
You can perform the following actions from this panel:
• Upload Installation Packages—Upload an IP to the repository.• Copy to Tenants—Copy the IP to tenant(s).• Deploy—Deploy the IP to host(s).• Download—Download a copy of the IP.• Delete—Delete the IP.
Upload Installation Packages[+] Click to show procedure
Procedure: Uploading Installation Packages
Steps
1. In the Installation Packages panel, click +. A new panel called Software Installation Wizardopens to the right.
2. In the Software Installation Wizard panel, select a method for importing the IP:
Solution Deployment Installation Packages
Genesys Administrator Extension Help 261

ImportantIf your installation package contains two or more templates, you must use the Installation PackageUpload (includes templates) procedure.
• Installation Package Upload (includes templates)—Upload a file containing an installationpackage and its associated templates. These files are typically provided by GenesysCustomer Care.
• Installation Package Upload (template uploaded separately)—Upload an installation packageand its associated template.
• UNC Path to Mounted CD or Directory—Upload an IP stored on a mounted CD or networkdirectory.
• UNC Path to an Existing Administrator Repository—Upload an IP from an existing GenesysAdministrator repository.
• UNC Path to Zipped IPs through Support—Upload a .zip file provided by Genesys CustomerCare that is stored on a mounted CD or network directory. This file contains an installationpackage and its associated templates.
3. The file(s) upload from your file system to Genesys Administrator Extension, and a progress bardisplays to show the upload progress. The progress of the upload also displays in the Statuscolumn in the Installation Packages panel.
ImportantWhen you upload a plug-in, GAX uses the template file (.tpl) to create anApplication Template and extracts the default options for the plug-in. GAX storesthese options in the database and merges them with the core GAX Applicationobject upon deployment. During this merge, only new options areadded—existing key value pairs are not overwritten.
Installation Package Upload (includes templates)
1. In the Software Installation Wizard panel, select Installation Package Upload (includestemplates) and click Next.
2. The panel updates. Click Choose File to select the file to upload.3. Click Finish.4. The file begins uploading from your file system to Genesys Administrator Extension. When the
upload is complete, the IP will be displayed in the Installation Packages list.
Solution Deployment Installation Packages
Genesys Administrator Extension Help 262

Installation Package Upload (template uploaded separately)
1. In the Software Installation Wizard panel, select Installation Package Upload (templateuploaded separately) and click Next.
2. The panel updates and displays three boxes: Upload a package, Upload an XML template,and Upload an APD template. Click Choose File.• Upload a package—A file that contains the installation package.• Upload an XML template—The XML template file for this installation package. This is the
template that is referenced by the installation package description file. This file should notbe modified from the version in the template directory.
• Upload an APD template—The APD template file for this installation package. This is thetemplate that is referenced by the installation package description file. This file should notbe modified from the version in the template directory.
The panel updates.3. Click Finish.4. The file begins uploading from your file system to Genesys Administrator Extension. When the
upload is complete, the IP will be displayed in the Installation Packages list.
UNC Path to Mounted CD or Directory
1. In the Software Installation Wizard panel, select UNC Path to Mounted CD or Directory.2. In the text field, type the path for where the IP is stored.3. Click Next to open the path.4. The panel updates to display the IP(s) found at the specified location. Click the check box(es)
beside the IP(s) to upload.5. Click Finish.6. The panel updates to display a progress bar for the upload process. You can click Close at any
time to close the panel without interrupting the upload procedure. The status of the IP uploadwill be displayed in the Installation Packages list.
UNC Path to an Existing Administrator Repository
1. In the Software Installation Wizard panel, select UNC Path to an Existing AdministratorRepository.
Solution Deployment Installation Packages
Genesys Administrator Extension Help 263

2. In the text field, type the path for the existing Genesys Administrator repository.3. Click Next to open the path.4. The panel updates to display the IP(s) found at the specified location. Click the check box(es)
beside the IP(s) to upload.5. Click Finish.6. The panel updates to display a progress bar for the upload process. You can click Close at any
time to close the panel without interrupting the upload procedure. The status of the IP uploadwill be displayed in the Installation Packages list.
UNC Path to Zipped IPs through Support
1. In the Software Installation Wizard panel, select UNC Path to Zipped IPs throughSupport.
2. In the text field, type the path for where the IP is stored.3. Click Next.4. The panel updates to display the IP(s) found at the specified location. Click the check box(es)
beside the IP(s) to upload.5. Click Finish.6. The panel updates to display a progress bar for the upload process. You can click Close at any
time to close the panel without interrupting the upload procedure. The status of the IP uploadwill be displayed in the Installation Packages list.
Important• A green progress bar represents a successful upload of the installation package. A
red progress bar represents a failed upload of the installation package. You canreview which step failed in the Status field in the Installation Packages list.
• You cannot upload an IP to the repository if a version of the IP already exists in therepository. You must have the Replace IPs and SPDs privilege enabled tooverwrite an IP in the repository.
Copy Installation Packages to Tenants[+] Click to show procedure
Solution Deployment Installation Packages
Genesys Administrator Extension Help 264

Procedure: Copying Installation Packages to Tenants
Steps
1. Click the name of an installation package to select it. A new panel opens to the right.2. In the Installation Package details panel, click Related and select Copy to Tenants. A new
panel called Copy to Tenants opens to the right.3. In the Copy to Tenants panel, type the name of a Tenant in the Quick Filter field, or click
Browse to browse a list of Tenants in your environment. A new panel called Tenants opens tothe right.
4. Click the check box beside each Tenant that is to receive the IP. The name of the Tenant willappear in the Copy to Tenants panel, in the Targeted Tenants section.
5. Click Next at the bottom of the Copy to Tenants panel.6. Click Finish to copy the IP to the Tenant(s).
Deploy Installation Packages[+] Click to show procedure
Procedure: Deploying Installation Packages
Steps
1. Click the name of an installation package to select it. A new panel opens to the right.2. In the Installation Package details panel, click Related and select Install. A new panel called IP
Deployment Wizard opens to the right.3. Follow the steps in the Deployment Wizard. Click the Deployment Wizard tab, above, for more
information.
Solution Deployment Installation Packages
Genesys Administrator Extension Help 265

Important• You cannot upload an IP to the repository if a version of the IP already exists in the
repository. You must have the Replace IPs and SPDs privilege enabled tooverwrite an IP in the repository.
• IP deployment does not require the use of an SPD file.
Download Installation Packages[+] Click to show procedure
Procedure: Downloading Installation Packages
Steps
1. Click the name of an installation package to select it. A new panel opens to the right.2. Click Download. Genesys Administrator Extension initiates the download procedure in your
browser.
Delete Installation Packages[+] Click to show procedure
Procedure: Deleting Installation Packages
Solution Deployment Installation Packages
Genesys Administrator Extension Help 266

Steps
1. Click the name of an installation package to select it. A new panel opens to the right.2. In the Installation Package details panel, click Delete.3. A dialog box appears to confirm deletion. Perform one of the following actions:
• Click OK to delete the IP permanently.• Click Cancel to cancel deletion of the IP.
ImportantThis action is available only if the user has the Delete IPs and SPDs privilege.
Important• If the component metadata XML file contains questions that must be answered during
the installation of an IP, the user is prompted to answer those questions duringinstallation.
• IP deployment does not require the use of an SPD file.
Deployment Wizard
The Automated Deployment Wizard deploys an installation package (IP) or solution definition tothe specified hosts and installs and configures the service as directed by the Service PackageDefinition.
Before You Begin
While you are using the Automated Deployment Wizard, take note of the following:
• Most of the fields in the Wizard are auto-complete fields. You can enter only part of the value in thefield, and then you are presented with a list of all entries that contain the text that you entered; youcan then select the appropriate item.
• The Wizard verifies the IPs, based on the operating system of the intended hosts. When you are
Solution Deployment Installation Packages
Genesys Administrator Extension Help 267

selecting hosts, make sure that you select those that are running the required operating system.• If an IP is already installed on a host, by default the Wizard will reinstall the IP. All parameters entered
during the previous deployment are saved by Genesys Administrator Extension and automaticallyprepopulated in the Wizard.
• When upgrading an existing IP, the IP's permissions and connections are updated to the new Applicationobject.
Items That Can Be Merged
For scenarios in which the existing IP and the new IP have conflicting values, the existing IP's valuesare maintained. If the existing IP does not contain a value, the value of the new IP is used. Thefollowing values are available to be merged:
• options• annex• connections• ports• timeout• autorestart• commandlinearguments• commandline• state• shutdowntimeout• attempts• redundancytype• isprimary• startuptimeout
Plug-ins are installed using the same procedures as IPs, but take note of the following:
• The plug-in install profile automatically fetches GAX Application objects for selected Host objects.• Plug-in options are merged into the affected GAX Application objects.• Some input fields do not appear, such as those relating to Application Object, App Port, and Tenant
Object.
Procedures
The following are possible scenarios that you may perform by using the Automated DeploymentWizard:
Solution Deployment Installation Packages
Genesys Administrator Extension Help 268

• Installing an Installation Package• Upgrading an Installation Package• Rollback an Installation Package
Installing an Installation Package[+] Click to show procedure
Procedure: Installing an Installation Package
Steps
1. In the Installation Packages panel, select the IP to use for the install.2. A new panel with additional information about the IP appears to the right. Click Related and
select Install.3. The Automated Deployment Wizard panel displays to the right. Click Next.4. The panel updates to show the Host set selection list. Select the host to receive the IP. Click
Next.5. The panel updates to show the Application Parameters list. In the GAX Application object
for host field, select the Genesys Administrator Extension Application object.6. Click Next.7. The panel updates to display the Installation Parameters (silent.ini) list. You can set the
target installation path in the field.8. Click Next.9. The panel updates to display the Deployment report. Review the settings, and perform one of
the following actions:• Click Finish to install the IP.• Click Previous to return to a previous panel and modify settings.
10. The panel updates to display a progress bar of the deployment. This information also displays inthe Deployed IPs panel.
ImportantIf a deployment fails, you can review a log of the deployment by selecting the IPfrom the Deployed IPs panel. A new panel displays with additional information
Solution Deployment Installation Packages
Genesys Administrator Extension Help 269

about the IP. Click Deployment Action Log.
Upgrading an Installation Package[+] Click to show procedure
Procedure: Upgrading an Installation Package
Steps
1. In the Deployed IPs panel, select the IP to use for the upgrade.2. A new panel with additional information about the IP appears to the right. Click Deploy
Profile:upgrade to (version number).3. The Automated Deployment Wizard panel displays to the right. Click Next.4. The panel updates to show the Host set selection list. Select the host to receive the IP. By
default, the host that received the previous version of the IP is already selected. Click Next.5. The panel updates to show the Application Parameters list. Values from the previous version
of the IP deployment may be displayed in the following fields:• Existing Application Object—This field is automatically generated by Genesys
Administrator Extension for each host to which an IP is targeted. This is the Applicationobject in Configuration Server for which Genesys Administrator Extension will updateconnections.
• Tenant Object—This is the Tenant that is set on an IP Application object. Click Browse toselect a Tenant from a list.
• App port—Specify a port number for the Application object to use.• Primary Configuration Server—Click Browse to select the Primary Configuration Server to
use. This field defaults to a Genesys Administrator Extension Application object.• Backup Configuration Server—Click Browse to select the Backup Configuration Server to
use. This field defaults to a Genesys Administrator Extension Application object.• Skip IP Re-install—Choose one of the following options:
• True—Reinstall the IP only if the Application object does not exist in Configuration Server.
Solution Deployment Installation Packages
Genesys Administrator Extension Help 270

• False—Always reinstall the IP.
6. Click Next.7. The panel updates to display the Silent.ini Parameters list. These values are prepopulated
from the previous version of the IP, but the settings can be modified, if necessary.8. The panel updates to display the Deployment Summary report. Review the settings, and
perform one of the following actions:• Click Finish to upgrade the IP.• Click Previous to return to a previous panel and modify settings.
9. The panel updates to display a progress bar of the upgrade deployment. This information alsodisplays in the Deployed IPs panel.
ImportantIf a deployment fails, you can review a log of the deployment by selecting the IPfrom the Deployed IPs panel. A new panel displays with additional informationabout the IP. Click Deployment Action Log.
Rolling Back an Installation Package[+] Click to show procedure
Procedure: Rolling Back an Installation Package
Steps
1. In the Deployed IPs panel, select the IP to roll back.2. A new panel with additional information about the IP appears to the right. Click Deploy
Profile:rollback to (version number)n.3. The Automated Deployment Wizard panel displays to the right. Click Next.4. The panel updates to show the Host set selection list. Select the host to receive the IP. By
default, the host that previously received the IP is already selected. Click Next.
Solution Deployment Installation Packages
Genesys Administrator Extension Help 271

5. The panel updates to show the Application Parameters list. Values from the previous IPdeployment may be displayed in the following fields:• Existing Application Object—This field is automatically generated by Genesys
Administrator Extension for each host to which an IP is targeted. This is the Applicationobject in Configuration Server for which Genesys Administrator Extension will updateconnections.
• Tenant Object—The Tenant that is set on an IP Application object. Click Browse to select aTenant from a list.
• App port—Specify a port number for the Application object to use.• Primary Configuration Server—Click Browse to select the Primary Configuration Server to
use. This field defaults to a Genesys Administrator Extension Application object.• Backup Configuration Server—Click Browse to select the Backup Configuration Server to
use. This field defaults to a Genesys Administrator Extension Application object.• Skip IP Re-install—Choose one of the following options:
• True—Reinstall the IP only if the Application object does not exist in Configuration Server.• False—Always reinstall the IP.
6. Click Next.7. The panel updates to display the Silent.ini Parameters list. These values are prepopulated
from the previous deployment of the IP, but the settings can be modified, if necessary.8. The panel updates to display the Deployment Summary report. Review the settings, and
perform one of the following actions:• Click Finish to roll back the IP.• Click Previous to return to a previous panel and modify settings.
9. The panel updates to display a progress bar of the deployment. This information also displays inthe Deployed IPs panel.
ImportantIf a deployment fails, you can review a log of the deployment by selecting the IPfrom the Deployed IPs panel. A new panel displays with additional informationabout the IP. Click Deployment Action Log.
Related Links
• Deployed IPs• Deployed IPs
Solution Deployment Installation Packages
Genesys Administrator Extension Help 272

• Installation Packages• Installation Packages
Solution Deployment Installation Packages
Genesys Administrator Extension Help 273

Deployed IPsThe Deployed IPs panel displays a list of Installation Packages (IPs) that have been deployed andthat you have the required role privileges to view. This list provides the following information abouteach deployed IP:
• Name—The name of the IP.• Version—A version number that is assigned by the person who deployed the IP.• Current—Indicates the IP is the latest successful deployment for the tenant.• Profile—The profile type of the IP.• State—Indicates whether the deployment succeeded or failed.• Ended—The date and time at which the deployment of the IP finished.
Tenancy Permission SettingsSolution Deployment respects tenancy permission settings. You can access only those objects thatyou have been granted permission to access.
You can filter the contents of this list in two ways:
• Type the name or partial name of an object in the Quick Filter field.• Click the Tenant Filter button to open the Tenant filter panel. In this panel, click the check box(es)
beside the tenants that you want to select. Use the Quick Filter field in this panel to filter the tenantlist.
You can sort the IPs in the list by clicking a column head. Clicking a column head a second timereverses the sort order.
Other ActionsTo view additional information, click an IP in the list. A new panel opens to the right. The followingactions are available:
• To remove a deployment instance from the list, click Delete. This does not delete the IP from thedatabase; it just removes the corresponding history item from the list that is displayed in this screen.
• To redeploy an already deployed IP or restart a previously run deployment, click Redeploy. Thislaunches the deployment wizard and populates its fields with the values that were used to deploy theIP. You can alter these values, as required. You will have to provide your credentials for the deployment;these values are not populated.
• To export a file that contains the properties, summary, and actions of an IP for auditing purposes, selectan IP and click Export.
• View the change history of the deployment in the Deployment Log panel by clicking the Relatedbutton and selecting Deployment Log.
Solution Deployment Deployed IPs
Genesys Administrator Extension Help 274

Some IPs might have additional versions available that allow you to upgrade or roll back the currentlydeployed IP. If so, you will see additional buttons called Deploy Profile:upgrade to (versionnumber) and/or Deploy Profile:rollback to (version number). Clicking these buttons willactivate the deployment wizard to complete the action.
During a deployment, the Actions panel is displayed to the right of the Deployed IPs list. Duringthe deployment, actions are listed as they are completed. After the deployment is complete, you canview the list in its entirety by scrolling through it.
Related Links
• Deployed IPs• Deployed IPs• Installation Packages• Installation Packages
Solution Deployment Deployed IPs
Genesys Administrator Extension Help 275

Solution DefinitionsA solution definition is an XML file that describes what is being deployed, how the deployment is tobe executed, as well as any necessary pre- and post-installation procedures.
TipThe Hosted Provider Edition software CD includes four Service Package Definitions foruse by Genesys Administrator Extension. They are for the basic deployment of fourservices: eServices, Inbound Voice, Outbound Voice, and Workforce Management.These files are located in the following folder: \service\asd\spdFiles\
This screen displays a list of all solution definition files for which you have the required role privilegesto view. To refresh the list at any time, click Refresh. Click a solution definition in the list, and theDetails panel is displayed to the right of the list. Actions that are available for each solutiondefinition are applied from the Details panel.
You can filter the contents of this list in several ways:
• Type the name or partial name of an object in the Quick Filter field.• Click Tenant Filter to open the Tenant Filter panel. In this panel, click the check box(es) beside the
tenants that you want to select. Use the Quick Filter field in this panel to filter the tenant list.• You can sort the solution definitions in the list by clicking on a column head. Clicking a column head a
second time reverses the sort order.
Display
A solution definition file defines the Genesys component installation packages (IPs) that are requiredto provide the service, and how they are to be deployed and configured. The IPs that are deployed aspart of the solution are the actual software that provide the solution. When you select a solutiondefinition, a new panel is displayed to the right an displays additional information:
• Name—The name of the solution definition.• Version—The version of the solution definition• Description—An optional description of the solution definition; this can be modified, as required.• Notes—An optional field for notes about the solution definition; this can be modified, as required.• Deployable—Indicates whether the solution definition can be deployed.
Solution Deployment Solution Definitions
Genesys Administrator Extension Help 276

ImportantWhen you are creating a solution definition file, you must give it a unique name andversion number. Genesys Administrator Extension will not allow you to import asolution definition if its name or version number is the same as an existing one.Likewise, if you modify a solution definition that is already uploaded, you mustincrement the version number.
The IP Availability area is where you verify that the IPs have been uploaded into the IP repository.
Prerequisites
Before you start deploying a Solution Package by using Genesys Administrator Extension, make surethat you have performed the following tasks:
• Install the latest version of Local Control Agent (LCA) on the target hosts. This also installs andconfigures the Genesys Deployment Agent on each host. Refer to the Framework Deployment Guide forinstructions.
• Install Java SDK on the target hosts to enable them to process the deployment instructions.• Upload the necessary IPs into the IP Repository.
Refer to the Genesys Administrator Extension Deployment Guide for a completelist of prerequisites required for Genesys Administrator Extension and SolutionDeployment.
Procedures
You can perform the following actions:
• Create Solution Definitions• Modify Solution Definitions• Copy Solution Definitions to Tenants• Deploy Solution Definitions• Download Solution Definitions• Delete Solution Definitions• View the History of Solution Definitions
Solution Deployment Solution Definitions
Genesys Administrator Extension Help 277

Create Solution Definitions[+] Click to show procedure
Procedure: Creating Solution DefinitionsPrerequisites
Before you create a solution definition file by using Genesys Administrator Extension, you mustperform the following tasks:
• Prepare the solution definition file.• Upload all of the Genesys-component installation packages (IPs) that are required to provide the
solutions into an IP repository to which Genesys Administrator Extension has access.
ImportantWhen you create a solution definition file, you must give it a unique name andversion number. Genesys Administrator Extension will not allow you to a importa solution definition if its name or version number is the same as the name orversion number of an existing one. Likewise, if you modify a solution definitionthat is already uploaded, you must increment the version number.
Steps
1. In the Solution Definitions List screen, click +.2. In the Upload Solution Definition area that is displayed to the right of the Solution
Definition List, click Browse to browse to and select the solution definition for this solutiondefinition file.
3. Click Upload. The name of the solution definition file, as defined in the solution definition, isdisplayed in the list.
4. To verify that the solution definition file can be deployed, perform the following steps:a. In the list of solution definition files, click the solution definition file that you imported in the
previous steps.b. Verify that the solution definition file can be deployed by selecting Check IP Availability
from the Related menu.c. The required IPs that were found in the IP repository and those that are missing are displayed
in the IP Availability area that is displayed. Missing IPs must be uploaded to the IPrepository before this solution definition file can be deployed. When all IPs are found, thesolution definition file is complete and can be marked as Deployable.
Solution Deployment Solution Definitions
Genesys Administrator Extension Help 278

5. If there are no missing IPs, in the Properties area of the Details panel, check the Deployablecheck box.
6. Click Save to save your changes or Cancel to leave the solution definition file unchanged.
Modify Solution Definitions[+] Click to show procedure
Procedure: Modifying Solution Definitions
Steps
1. In the Solution Definition List screen, select the solution definition that you want to modify.2. In the Properties area that is displayed to the right of the Solution Definition List, modify the
following fields, as required:• Description• Notes• Deployable
3. Click Save to save your changes or Cancel to leave the solution definition unchanged.
Copy Solution Definitions to Tenants[+] Click to show procedure
Procedure: Copying Solution Definitions to Tenants
Solution Deployment Solution Definitions
Genesys Administrator Extension Help 279

Steps
1. Click the name of a solution definition to select it. A new panel opens to the right.2. In the new panel, click Related and select Copy to Tenants. A new panel called Copy to
Tenants opens to the right.3. In the Copy to Tenants panel, type the name of a Tenant in the Quick Filter field, or click
Browse to browse a list of tenants in your environment. A new panel called Tenants opens tothe right.
4. Click the check box beside each tenant that is to receive the solution definition. The name of theTenant appears in the Copy to Tenants panel, in the Targeted Tenants section.
5. Click Next at the bottom of the Copy to Tenants panel.6. Click Finish to copy the solution definition to the tenant(s).
Deploy Solution DefinitionsDeploying a solution installs and configures the solution at a local or remote location, as directed bythe solution definition.
[+] Click to show procedure
Procedure: Deploying Solution Definitions
Steps
1. In the Solution Definition List screen, select the solution definition file that you want to deploy.2. In the Properties area that is displayed to the right of the Solution Definition List, click
Related and select Install or Deploy Profile.3. Follow the steps in the Deployment Wizard.
ImportantThe Deploy Profile type varies, depending on the profile specified in thesolution definition file. For example, profile name="upgrade" would produce a
Solution Deployment Solution Definitions
Genesys Administrator Extension Help 280

Deploy Profile: upgrade button.
Download Solution Definitions[+] Click to show procedure
Procedure: Downloading Solution Definitions
Steps
1. Select the solution package for which you want to export the solution definition. A new panelopens to the right.
2. Click Download. Genesys Administrator Extension initiates the download procedure in yourbrowser.
Delete Solution DefinitionsWhen you delete a solution definition file, the solution definition file is not deleted from the database,nor are the IPs deleted from the IP repository.
[+] Click to show procedure
Procedure: Deleting Solution Definitions
Steps
1. In the Solution Definition List screen, select the solution definition file that you want to delete.
Solution Deployment Solution Definitions
Genesys Administrator Extension Help 281

2. In the Properties area that is displayed to the right of the Solution Definition List, clickDelete.
3. In the Confirm Deletion dialog box, do one of the following:• To remove the solution definition file from the database, click OK.• To keep the solution definition file and not remove it from the database, click Cancel.
View the History of Solution DefinitionsSolution packages might change over time. They might be upgraded (up-versioned) to include bothminor and major changes in the solution definition. New solutions might be added, removed, orretired. Genesys Administrator Extension enables you to generate reports to track these changes.
[+] Click to show procedure
Procedure: View the History of Solution Definitions
Steps
1. Select a solution from the Deployed Solution List.2. Click Related and select History. The History panel is displayed to the right of the Deployed
Solutions List. You can filter reports by one or more of the following criteria: Time, User,Tenant, and Change.
Related Links
• Deployed Solutions• Solution Definitions• Deployed Solutions• Solution Definitions
Solution Deployment Solution Definitions
Genesys Administrator Extension Help 282

Deployed SolutionsThe Deployed Solutions screen displays a list of solution packages that have been deployed andthat you have the required role privileges to view. The Deployed Solution List table provides thefollowing information about each deployed solution:
• Name—The name of the solution package.• Version—A version number that is assigned by the person who deployed the solution.• Progress—A graphical indicator of the progress of each deployment.• Current—Indicates the solution package is the latest successful deployment for the tenant.• Profile—The profile type of the solution.• State—Indicates whether the deployment succeeded or failed.• Deployed by Tenant—The name of the tenant that deployed the solution.• Deployed by User—The login name of the person who deployed the solution.• Started—The date and time at which the deployment of the solution was started.• Ended—The date and time at which the deployment of the solution finished.• Key—The tenant that received the deployed solution.
Tenancy Permission SettingsSolution Deployment respects tenancy permission settings. You can access only those objects thatyou have been granted permission to access.
You can filter the contents of this list in two ways:
• Type the name or partial name of an object in the Quick Filter field.• Click the Tenant Filter button to open the Tenant filter panel. In this panel, click the check box(es)
beside the tenants that you want to select. Use the Quick Filter field in this panel to filter the tenantlist.
Sort the solutions in the list by clicking a column head. Clicking a column head a second timereverses the sort order.
Other ActionsThe Deployed Solutions screen also features the following actions:
• To refresh the list at any time, click Refresh.• To view deployment information for a deployment instance, click a solution definition file in the list.
Deployment information for that deployment instance is displayed to the right of the list.• To remove a deployment instance from the list, click Delete. This does not delete the solution definition
file from the database; it just removes the corresponding history item from the list that is displayed in
Solution Deployment Deployed Solutions
Genesys Administrator Extension Help 283

this screen.• To redeploy an already deployed solution definition file or to restart a previously run deployment, click
Redeploy. This launches the deployment wizard and populates its fields with the values that wereused to deploy the solution definition file. You can alter these values, as required. You will have toprovide your credentials for the deployment; these values are not populated.
• To export a file that contains the properties, summary, and actions of a deployed solution for auditingpurposes, select a Deployed Solution and click Export.
• View the change history of the Deployment in the Deployment Log panel by clicking the Relatedbutton and selecting Deployment Log.
During a deployment, the Actions panel is displayed to the right of the Deployed Solution List.During the deployment, actions are listed as they are completed. After the deployment is complete,you can view the list in its entirety by scrolling through it.
ImportantYou cannot use the Redeploy button to redeploy a solution definition that has beendeleted.
Related Links
• Deployed Solutions• Solution Definitions• Deployed Solutions• Solution Definitions
Solution Deployment Deployed Solutions
Genesys Administrator Extension Help 284

PrivilegesThe Privileges section displays a list of all privileges that are stored in Genesys AdministratorExtension (GAX). It is sorted in a hierarchy by application and privilege grouping.
You can sort the items in the list by clicking a column head. Clicking a column head a second timereverses the sort order. You can add or remove columns by clicking the Select Columns button.
The Privileges section contains the following information:
• Display Name—The name of the privilege• Since Version—The first version of the installation package that uses this privilege• Prerequisite—Any other privilege that might be required
Roles and their privileges define what you can do in a given application. In GAX, roles and theirprivileges are controlled by the use of Role objects, which are assigned to Users (including Agents)and Access Groups.
For a sectioning of role privileges for GAX, refer to the Genesys Administrator Extension DeploymentGuide. For more information about role privileges specifically, and role-based access control ingeneral, refer to the Genesys 8.1 Security Deployment Guide.
Privileges are imported into GAX during the upload of an installation package (IP). All privilegesdefined in the metadata of the IP are imported into the GAX database. Privileges are defined as "task"elements in the metadata XML of the IP.
Click Browse to add privileges from the Privileges panel. To remove a privilege from the AssignedPrivileges list, highlight the item, and click Remove.
Solution Deployment Privileges
Genesys Administrator Extension Help 285
Operational Parameter ManagementOperational Parameter Management (OPM) enables the creation of parameters (called OperationalParameters) that are stored in the Configuration Database as part of Transaction objects. OperationalParameters can be used in parameterized Routing Strategies and other applications that are capableof reading Transaction objects, in which the values of the parameters are defined at runtime andintegrated into the call flow.
In the case of Universal Routing Server type routing, Operational Parameter Management proceeds asfollows—however, OPM also works in a similar way with other routing types, such as voiceapplications and Genesys Orchestration:
• The Service Provider defines the Operational Parameter by specifying its type and a name by which it isreferenced in a strategy, voice application, or other routing strategy.
• The Service Provider groups Operational Parameters into a Parameter Group Template. One OperationalParameter can be associated with one or more templates.
• The Service Provider deploys Parameter Group Templates to Tenants, at which time each ParameterGroup Template becomes a Parameter Group for the Tenant. One Parameter Group Template can bedeployed to more than one Tenant. Each Parameter Group in a Tenant is unique.
• The Tenant administrator, or a user with the appropriate permissions and role privileges, enters valuesfor the Operational Parameters in the Parameter Group, enabling control of active strategies. GenesysAdministrator Extension stores those values in the Configuration Database as part of a Transactionobject.
• The Universal Routing Server Application executes a Routing Strategy, which reads the values of theOperational Parameters in the Parameter Groups with which it is associated, and integrates them intothe call flow.
Operational Parameter Management respects tenancy permission settings. You can access only thoseobjects that you have been granted permission to access.
This chapter includes the following sections:
ParametersThis page explains how to manageoperational parameters.
Parameters
Parameter GroupsThis page explains how to manageparameter groups.
Parameter groups
Operational Parameter Management Privileges
Genesys Administrator Extension Help 286

Parameter Group TemplatesThis page explains how to manageparameter group templates.
Parameter Group Templates
Operational Parameter Management Privileges
Genesys Administrator Extension Help 287

ParametersOperational Parameters are parameters used to customize Routing Strategies. In OperationalParameter Management, the Service Provider defines Operational Parameters and groups them intoParameter Group Templates. Tenants to whom the Parameter Group Templates are subsequentlydeployed customize the values of the Operational Parameters, which are then read by a RoutingStrategy and incorporated into the call flow.
Display
This screen displays a list of all defined Operational Parameters for which you have the required roleprivileges to view. To refresh the list at any time, click Refresh. Click an Operational Parameter in thelist. Its properties, including its type, is displayed to the right of the list. You can filter the contents ofthis list in several ways:
• Type the name or partial name of the Parameter, Key, Type, or Tenant in the Quick Filter field.• Click the Tenant Filter button (the icon with the circle and horizontal bar) to open the Tenant filter
panel. In this panel, click the checkbox(es) beside the tenants that you want to select. Use the QuickFilter field in this panel to filter the tenant list.
• You can sort the Parameter in the list by clicking on a column head. Clicking a column head a secondtime reverses the sort order.
Properties
Properties of Operational ParametersProperty Description
Display Name The name of the parameter. It must be unique inthe system.
Key Name
The name of the parameter as it would be enteredin the Annex/Options tab of the Transaction objectin Genesys Administrator. If this field is left blank,the name that is displayed under Display Name isused.
Type The parameter.
Object Type
This field appears only for parameters of TypeConfiguration Object, and specifies the type ofconfiguration object. Optionally, whenConfiguration Object is selected, you can check thecheckbox named Multiple Types to select multipleconfiguration objects to add to this parameter. Ifthe checkbox named Global is checked, a separatepanel will open to allow you to select which tenantswill receive the parameter.
Operational Parameter Management Parameters
Genesys Administrator Extension Help 288
Property Description
DN TypeThis field appears only for parameters of TypeConfiguration Object and Object Type DN, andspecifies the type of DN.
Custom ListCustom Value
These properties apply only to parameters of typeCustom List and specify the members of theCustom List. Define the list, as follows:
• To add an item to the list, enter it in the CustomValue edit box, and click Add.
• To modify an item in the list, select the value,make the change, and click OK.
ImportantIf you want the display value of an item in the CustomList to be different from the actual value stored in thetransaction object, enter that information in the Keyfield.
• To remove an item from the list, select it, andclick Delete.
• To reorder the items in the list, select an item inthe list and use the Up and Down arrow buttonsto move it up or down in the list.
• For integers, dates, and times, you can defineminimum and/or maximum values (limits).
Mandatory
Specifies whether the parameter is mandatory oroptional. If checked, a value must be entered forthis parameter before it is saved. If not checked,the parameter is considered optional and can besaved without a value. This property can bemodified later (for example, to change amandatory parameter to an optional parameter).
GlobalIf checked, this parameter is unique in the entiresystem and is shared across all tenants. Its actualvalue must be defined at the time of creation, andcan be changed only by the Service Provider.
Value
If this parameter is Global, this is the actual valueof the parameter and cannot be changed. A defaultvalue can be set that is not propagated to deployedParameter Group instances. Providing of a defaultvalue is optional.
Help Text Optional text describing the parameter or providingadditional information.
Types
The Operational Parameter type appears in the Type field of the properties of a parameter.
Operational Parameter Management Parameters
Genesys Administrator Extension Help 289
Type DescriptionAudio Resource The ARID of an Audio Resource.Boolean True or false only.
Configuration Object
The type of a configuration object, which isspecified in the Object Type field of the parameter'sproperties. Optionally, when Configuration Object isselected, you can check the checkbox namedMultiple Types to select multiple configurationobjects to add to this parameter. If the checkboxnamed Global is checked, a separate panel willopen to allow you to select which tenants willreceive the parameter. The following types aresupported:
• Agent Group• DN• Person (more often referred to as User)• Place• Place Group• Skill• Stat Server• Transaction
Custom ListValid values are limited to the values that arespecified in a user-defined list, specified in theCustom List/Custom Value field of the properties ofthe parameter.
Date A date value, in the format yyyy-mm-dd.
Integer A 0 (zero), negative, or positive number with nodecimal value.
PersonalityThe name of a Personality, given by the PersonalityIdentifier value that is specified in the list ofPersonalities.
Schedule Enables users to configure date and time ranges.
String A string of characters, both alphanumeric andsymbols.
Time A time value, in the format hh:mm.
Schedule Parameter[+] Click to show sectionThe Schedule parameter enables users to specify a series of date and time ranges for parametergroups. For example, the Schedule parameter can specify opening and closing hours for each Tenant.
Operational Parameter Management Parameters
Genesys Administrator Extension Help 290

Procedure:
Steps
1. On the Parameter List panel, click +.2. On the + panel that is displayed to the right of the Parameter List panel, define the properties
of the new parameter.3. In the Type field, select Schedule. A new section called Schedule appears below the Type
field.4. In the Schedule section, click Add.5. In the Date panel that appears to the right, select the Schedule type. You can select Date, to
select a specific date, or you can select Day of Week, to select a day of the week.
If you select Date:
a. You must select the Year, Month, Day, and Time Zone (optional) to apply the Scheduleparameter. If you do not select a Time Zone, the system's local time zone will be used.
b. The Time Ranges field is optional. This field graphically represents the time range for theSchedule parameter, based on a 24-hour clock. If the Time Ranges field is empty, theSchedule parameter will apply to the entire day.
c. To specify a time range, move your mouse cursor to the time for which you want thisSchedule parameter to begin.
d. Click and drag the mouse cursor to the end time for this Schedule parameter. A box willappear to visually display the times for which this Schedule parameter will apply.
e. Click the Save button.
If you select Day of Week:
a. You must select the Day of Week and Time Zone (optional) to apply the Scheduleparameter. If you do not select a Time Zone, the system's local time zone will be used.
b. The Time Ranges field is optional. This field graphically represents the time range for theSchedule parameter, based on a 24-hour clock. If the Time Ranges field is empty, theSchedule parameter will apply to the entire day.
c. To specify a time range, move your mouse cursor to the time for which you want thisSchedule parameter to begin.
d. Click and drag the mouse cursor to the end time for this Schedule parameter. A box willappear to visually display the times for which this Schedule parameter will apply.
e. Click Save.
6. In the + panel, do one of the following:
Operational Parameter Management Parameters
Genesys Administrator Extension Help 291

• To save the new parameter, click Save.• To cancel the new parameter and not save it in the database, click Cancel.
Procedures
You can perform the following tasks in this screen:
• Define new parameters• Modify parameters• Delete parameters
Defining ParametersNormally, the Service Provider defines new operational parameters. Tenant administrators can alsodefine their own, but these can be added only to Parameter Group Templates in the same tenant.
[+] Click to show procedure
Procedure: Defining Parameters
Steps
1. On the Parameter List panel, click +.2. On the + panel that is displayed to the right of the Parameter List panel, define the properties
of the new parameter.3. Do one of the following:
a. To save the new parameter, click Save.b. To cancel the new parameter and not save it in the database, click Cancel.
Modifying Parameters[+] Click to show procedure
Operational Parameter Management Parameters
Genesys Administrator Extension Help 292

Procedure: Modifying Parameters
Steps
ImportantFollow the instructions in this topic to modify any property of an OperationalParameter except Value. To set or change the actual value of an OperationalParameter in a Parameter Group, see the topic Setting and Modifying Values inParameter Groups in the Procedures tab of the Parameter Groups page.
When you modify an Operational Parameter, the changes are propagated to any ParameterGroup Templates that contain the modified parameter. However, the changes are notpropagated to any deployed Parameter Groups.
1. On the Parameter List panel, select the parameter that you want to modify.2. On the <parameter name> panel that is displayed to the right of the Parameter List panel,
modify the properties of the parameter, as required.3. Click Save to save your changes, or click Cancel to leave the parameter unchanged.
Deleting ParametersYou can delete only Operational Parameters that are not assigned to Parameter Group Templates.
[+] Click to show procedure
Procedure: Deleting Parameters
Steps
1. On the Parameter List panel, select the parameter that you want to delete.2. On the <parameter name> panel that is displayed to the right of the Parameter List panel,
click Delete.
Operational Parameter Management Parameters
Genesys Administrator Extension Help 293

3. In the Confirm Deletion dialog box, do one of the following:a. To remove the Operational Parameter from the database, click OK.b. To keep the Operational Parameter and not remove it from the database, click Cancel.
Related Links
• Parameter Groups• Parameter Group Templates• Parameters• Parameter Groups• Parameter Group Templates
Operational Parameter Management Parameters
Genesys Administrator Extension Help 294

Parameter GroupsParameter Groups are sets of Operational Parameters that are associated with a Routing Strategy.They are deployed as Parameter Group Templates by the Service Provider to the Tenant. The Tenantadministrator then assigns values to the Operational Parameters in the Parameter Group. When theURS application executes a Routing Strategy, the values of the Operational Parameters in theassociated Parameter Group are incorporated into the call flow.
Access to each Parameter Group is based on the access control settings of the ConfigurationTransaction object. The following are general guidelines:
• If a user has Update permission to the Transactions folder, where the related Configuration Transactionobject will be saved, the user can create a new Parameter Group.
• If a user has Read permission to the related Configuration Transaction object, the user can view theParameter Group.
• If a user has Update permission to the related Configuration Transaction object, the user can save theParameter Group.
• If a user has Delete permission to the related Configuration Transaction object, the user can delete theParameter Group.
It is possible to modify values of Parameter Groups from applications other than GAX (for example,Genesys Administrator or the Configuration Layer). When this occurs, a message appears on theParameter Group details panel to alert you that the Parameter Group is out of synchronization. Youare asked to choose a value from one of the following options:
• Value from Database—The value stored in the Genesys Administrator Extension database will beused.
• Value from Transaction Object—The external value will be used.
Click the Save button to synchronize the Parameter Group.
Display
This screen displays a list of all Parameter Groups for which the tenant that is associated with thelogged-in user is associated, and for which you have the required role privileges to view. To refreshthe list at any time, click Refresh. You can filter the contents of this list in several ways:
• Type the name or partial name of an object in the Quick Filter field.• Click the Tenant Filter button to open the Tenant filter panel. In this panel, click the checkbox(es)
beside the tenants that you want to select. Use the Quick Filter field in this panel to filter the tenantlist.
• You can sort the Parameter Groups in the list by clicking on a column head. Clicking a column head asecond time reverses the sort order.
Operational Parameter Management Parameter Groups
Genesys Administrator Extension Help 295

Click on the name of a Parameter Group to display more information about theParameter Group in a new panel that opens to the right. Users can click AccessControl to change the permissions for the Parameter Group, provided that theyhave Update permission for the object.
Procedures
You can perform the following tasks in this screen:
• Set or modify the values of the Operational Parameters in the Parameter Group• Change the template that a Parameter Group uses to another Template as its basis• Delete a Parameter Group
Set or Modify ValuesThe Operational Values in Parameter Groups might be assigned default values. It is the responsibilityof the Tenant administrator, or someone with the appropriate role privileges, to assign values tothese Operational Parameters that are applicable to the Tenant.
[+] Click to show procedure
Procedure: Setting and Modifying Values in Parameter Groups
Steps
1. On the Parameter Group List screen, select the Parameter Group that you want to modify.2. On the Parameters panel that is displayed to the right of the Parameters Group List screen,
enter or modify values for each of the Operational Parameters, as required.3. Click Save to save the changes, or click Cancel to cancel the changes and leave the Parameter
Group unchanged.
ImportantIt is possible to modify values of Parameter Groups from applications other thanGAX (for example, Genesys Administrator or the Configuration Layer). When thisoccurs, a message appears on the Parameter Group details panel to alert you
Operational Parameter Management Parameter Groups
Genesys Administrator Extension Help 296

that the Parameter Group is out of synchronization. You are asked to choose avalue from one of the following options:
• Value from Database——The value stored in the Genesys AdministratorExtension database will be used.
• Value from Transaction Object—The external value will be used.
Click Save to synchronize the Parameter Group.
Change the TemplateYou can change the Parameters that are associated with a Parameter Group and which designatedapplications the group uses. This cannot be done directly in the Parameter Group, nor in theParameter Group Template that was used to deploy the Parameter Group.
[+] Click to show procedure
Procedure: Changing the Template of a Parameter Group
Steps
1. Create a new Parameter Group Template by copying the current Parameter Group Template ofthe Parameter Group that you want to change. Select the Parameter Group Template.
2. In the <Parameter Group name> panel that is displayed to the right, click Change Template.3. In the Change Template panel that is displayed to the right, select the new Parameter Group
Template from the Targeted Parameter Group Template field.4. Click Next.5. Review the Summary in the Change Template panel.6. Click Finish.7. Click Close.
If the existing parameters and/or the designated applications are in the new Parameter GroupTemplate that you want to change them to, then they will be reused. The following content is
Operational Parameter Management Parameter Groups
Genesys Administrator Extension Help 297

removed from the changed Parameter Group:
• Parameters that are not in the new Parameter Group Template to which you want to change• Designated Applications that are not in the new Parameter Group Template to which you want to
change
The transaction object that represents the Parameter Group is updated with new parameterset.
Delete a Parameter GroupWhen you delete a Parameter Group from the database, the Parameter Group Template and itsOperational Parameters are not removed from the database. Likewise, the Routing Strategy withwhich it is associated is not deleted. The main impact of this action is that when URS executes thisRouting Strategy for this Tenant, the Operational Parameter values in the Group will not beincorporated in the call flow.
[+] Click to show procedure
Procedure: Deleting a Parameter Group
Steps
1. On the Parameter Group List screen, select the Parameter Group that you want to delete.2. On the <Parameter Group name> panel that is displayed to the right of the Parameter Group List
panel, click Delete.3. In the Confirm Deletion dialog box, do one of the following:
a. To remove the Parameter Group from the database, click OK.b. To keep the Parameter Group and not remove it from the database, click Cancel.
Related Links
• Parameter Groups• Parameter Group Templates• Parameters
Operational Parameter Management Parameter Groups
Genesys Administrator Extension Help 298

• Parameter Groups• Parameter Group Templates
Operational Parameter Management Parameter Groups
Genesys Administrator Extension Help 299

Parameter Group TemplatesParameter Group Templates are sets of Operational Parameters that can be deployed to one or moreTenants, and are defined by the Service Provider. A parameter can be grouped into more than oneGroup Template. You can also group sets of parameters into sections within a Parameter GroupTemplate to enable you to create Parameter Group Sections within your parameter groups.
Display
This screen displays a list of all defined Parameter Group Templates for which you have the requiredrole privileges to view. To refresh the list at any time, click Refresh. Click a Parameter GroupTemplate in the list, and its properties are displayed to the right of the list. You can filter the contentsof this list in two ways:
• Type the name or partial name of an object in the Quick Filter field. The list dynamically updates toshow items that match the text in the Quick Filter field.
• Click Tenant Filter to open the Tenant filter panel. In this panel, click the checkbox(es) besidethe tenants that you want to select. Use the Quick Filter field in this panel to filter the tenant list.
• You can sort the Parameter Group Templates in the list by clicking on a column head. Clicking acolumn head a second time reverses the sort order.
Properties
Properties of Parameter Group TemplatesProperty Description
Name The name of the Parameter Group Template. Itmust be unique in the system.
Description Optional text describing the Parameter GroupTemplate or providing additional information.
Parameters
A list of Operational Parameters that have beenadded to the Parameter Group Template. TheSection(s) to which this Parameter Group Templatebelongs is also displayed here.
ImportantSections can be deleted. Deleting a section onlydeletes the section grouping, and does not delete theset of parameters previously within that section.
Used (Read-only) Used to deploy a parameter group.
Operational Parameter Management Parameter Group Templates
Genesys Administrator Extension Help 300

Procedures
You can perform the following tasks in this screen:
• Create Parameter Group Templates• Modify Parameter Group Templates• Delete Parameter Group Templates• Manage the list of Operational Parameters in a Parameter Group Template• Distribute Parameter Group Templates• Associate applications• Determine where a Parameter Group Template is used and then change the Parameter Group Template
that a Parameter Group uses to a different Parameter Group Template• View the change history of the Parameter Group Template in the History panel by clicking Related and
selecting History
Create Parameter Group TemplatesThe Service Provider creates Parameter Group Templates, and assigns Operational Parameters tothem.
[+] Click to show procedure
Procedure: Creating Parameter Group Templates
Steps
1. On the Parameter Group Template List panel, click +.2. On the + panel that is displayed to the right of the Parameter Group Template List panel,
enter the properties (including adding parameters) of the new template.3. Optionally, you can click Add Sectionto add the Parameter Group Template to a section in the
Parameter Group Template list. A new panel opens to the right. Perform the actions below:• In the new panel, type the name for the new section in the Name field.• Type the key name for the new section in the Key Name field.
Operational Parameter Management Parameter Group Templates
Genesys Administrator Extension Help 301

ImportantThese fields must be unique in the Parameter Group Template.
4. Click Save to save the new Parameter Group Template, or click Cancel to cancel the newtemplate and not save it in the database.
Modify Parameter Group TemplatesChanges that you make to a Parameter Group Template are not propagated to Parameter Groups thatuse that template.
[+] Click to show procedure
Procedure: Modifying Parameter Group Templates
Steps
1. On the Parameter Group Template List panel, select the Parameter Group Template that youwant to modify.
2. On the <Parameter Group Template name> panel that is displayed to the right of theParameter Group Template List panel, modify the properties of the Parameter GroupTemplate, as required.
3. When you are finished modifying the Parameter Group Template, click Save to save yourchanges, or click Cancel to cancel your changes and leave the Parameter Group Templateunchanged.
Delete Parameter Group TemplatesYou cannot delete a Parameter Group Template that is currently deployed.
[+] Click to show procedure
Operational Parameter Management Parameter Group Templates
Genesys Administrator Extension Help 302

Procedure: Deleting Parameter Group Templates
Steps
1. On the Parameter Group Template List panel, select the Parameter Group Template that youwant to delete.
2. On the <Parameter Group Template name> panel that is displayed to the right of the ParameterGroup Template List panel, click Delete.
3. In the Confirm Deletion dialog box, do one of the following:a. To remove the Parameter Group Template from the database, click OK.b. To keep the Parameter Group Template and not remove it from the database, click Cancel.
Manage the list of ParametersIn a Parameter Group Template, you can manage the list of Operational Parameters in the followingways:
[+] Adding Operational Parameters to a Parameter Group Template
Procedure: Adding Operational Parameters to a ParameterGroup Template
Steps
1. Select the Parameter Group Template to which the Operational Parameter is to be added in thelist of Parameter Group Templates.
2. In the Parameters list, click Add.3. In the Parameters panel that is displayed to the right, select the Operational Parameter(s) that
you want to add. The selected Operational Parameter(s) are now displayed in the Parameterslist.
4. Click Save.
Operational Parameter Management Parameter Group Templates
Genesys Administrator Extension Help 303

[+] Change the order of the Operational Parameters in the list ofSelected Parameters
Procedure: Change the order of the Operational Parameters inthe list of Selected Parameters
Steps
To change the order of Operational Parameters in a Parameter Group Template:
1. Select the Parameter Group Template in which the order of Operational Parameters is to bechanged.
2. In the Parameters list, select a parameter that you want to move, and click the up or downarrow to change its order in the list. You can also drag the parameter and drop it into a newposition in the order.
3. Click Save.
[+] Removing Operational Parameters from a Parameter GroupTemplate
Procedure: Removing Operational Parameters from aParameter Group Template
Steps
1. Select the Parameter Group Template from which the Operational Parameter is to be removed.2. In the Parameters list, select a parameter that you want to remove and click Remove.3. Click Save.
Operational Parameter Management Parameter Group Templates
Genesys Administrator Extension Help 304

Distribute Parameter Group TemplatesThe Service Provider deploys Parameter Group Templates to Tenants. At this point, the ParameterGroup Template becomes a Parameter Group and is associated with a Routing Strategy.
[+] Click to show procedure
Procedure: Distributing Parameter Group Templates
Steps
1. On the Parameter Group Template List panel, select the Parameter Group Template that youwant to deploy.
2. On the <Parameter Group Template name> panel that is displayed to the right of theParameter Group Template List panel, click Deploy.
3. In the Parameter Group Deployment panel, provide the following information:a. Parameter Group Name — The name that is assigned to this Parameter Group.b. Tenant — The tenant to which this Parameter Group belongs.c. Application — The Routing Strategy that will be used by this tenant and is associated with
this Parameter Group. Click Search to select from a list of Routing Strategies.
4. Click Next.5. In the Tenant panel, select the name of the tenant(s) to which you want to deploy the Parameter
Group.6. Click Next.7. In the Parameter Group Deployment panel, specify the application(s) that you want to enable
on this parameter group by clicking Add.8. In the Designated Applications panel, select the name of the application(s) that you want to
add.9. Click Next.
10. Preview the deployment in the Summary. If you are satisfied with the deployment, click Finish.To make changes, click Previous.
11. Click Close.
Important
Operational Parameter Management Parameter Group Templates
Genesys Administrator Extension Help 305

You can modify a Parameter Group Template after it has been deployed. Forexample, you can add, remove, re-order, and/or modify the parameters in analready deployed Parameter Group Template. Once saved, you can synchronizethe changes and all Parameter Groups of the Parameter Group Template will beupdated to the current structure.
Related Links
• Parameter Groups• Parameter Group Templates• Parameters• Parameter Groups• Parameter Group Templates
Operational Parameter Management Parameter Group Templates
Genesys Administrator Extension Help 306

Audio Resource ManagementAudio Resource Management (ARM) enables you to manage personalities and their associated audioresources (announcements and music files).
You can create Personalities to help you organize which files belong to a particular speaker. Forexample, you might have a personality called John that uses dialog spoken in English by a malespeaker. Or, you might have a personality called Marie that uses dialog spoken in French by a femalespeaker.
You can upload two types of audio resources:
• Announcements—These are files that contain spoken dialog that will be played for customers. Forexample, you might have an announcement file that tells customers about your business hours.
• Music—These are files that play music for customers. For example, you might have a music file thatplays music for customers who are about to be transferred to an Agent.
The Audio Resources window in Genesys Administrator Extension (GAX) is a unified list of yourpersonalities and audio resources. For each audio resource, GAX displays the following:
• A logo to indicate whether the file has been designated as Announcement or Music.• The name of the audio resource.• The Audio Resource ID (ARID).• Additional columns, one for each personality, to indicate which personality is using this audio resource.
Click Show Quick Filter and type the name or partial name of an object in the Quick Filter field.The list updates dynamically to show items that match the text in the Quick Filter field.
ARM is integrated with Operational Parameters Management (OPM) to allow users to dynamicallyselect personalities and audio resources to be used with a parameterized strategy or orchestrationapplication, or a parameterized routing or voice applications.
Access to ARM is based on both role privileges and Tenant access control permissions, as follows:
• User access to screens or certain ARM functionality is managed by role privileges.• Access control permissions define which audio resources can be viewed or modified by an authenticated
user. Access to audio resources is granted by Tenant. Users have access to all audio resources for eachTenant to which they have access.
For Service Providers, see Audio Resources (Configuration Manager) for information on how to shareresources with Tenants.
Click on a tab below to learn more.
Personalities
Audio Resource Management Parameter Group Templates
Genesys Administrator Extension Help 307

Creating a Personality
To create a new Personality, click New.
[+] Show Procedure
Procedure: Creating a Personality
Steps
1. Click New and select Add Personality.2. Enter the following information:
• Personality Name—The name of this personality.• Language—The language spoken by this personality.• Description—A description of this personality.• Gender—Select whether this personality is Male, Female, or Not Specified.
3. Click Save.
Uploading Audio Resources
[+] Show Procedure
Procedure: Uploading Audio Resources
Steps
1. Identify which audio resource and personality to assign to the file. Once identified, select orhover over the table cell that is shared by the target audio resource and personality.
2. Click Upload Audio File.3. Your browser opens a dialog box to select an audio resource to upload. Select a file to upload.4. The audio resource is uploaded to GAX and assigned to the personality.
Audio Resource Management Parameter Group Templates
Genesys Administrator Extension Help 308

Other Actions
Once you create a personality, you can:
• Edit the personality—Click Edit beside a personality to edit personality properties.• Delete the personality—Click Edit to view personality properties. In the Edit Personality window, click
Delete to delete the personality.
ImportantYou cannot delete a Personality that is a part of one or more Audio Resource Files.
• Manipulate the audio resource—Once an audio resource is assigned to the personality, several optionsbecome available to manipulate the file.• Play the file—Click the play button to listen to the file.• Delete—Delete the file. This does not delete the associated personalities, but it does delete the
original audio files. A file can only be removed if the audio resource to which it has been assignedhas not been deployed. If the user performing this operation is a Service Provider, the file can onlybe removed if the file was not created by a Tenant.
• Reprocess—Reprocessing recreates an audio resource file from the original audio file that wasuploaded (if it has not been deleted from the database and/or target storage). It also performs anynecessary conversion between audio formats.
• Download—Download the file to your computer.• Encodings—View information about how the file was encoded by GAX. When audio files are
uploaded, GAX automatically encodes them to the following formats: µ-law, A-law, and GSM.
Audio Resources
Creating an Audio Resource
To create an Audio Resource, click New.
[+] Show Procedure
Procedure: Creating an Audio Resource
Audio Resource Management Parameter Group Templates
Genesys Administrator Extension Help 309

Steps
1. Click New and select Add Message.2. Enter the following information:
• Name—The name of this audio resource.• Description—A description of this audio resource.• Type—Select whether this audio resource is Music (a music file) or Announcement (an
announcement file).
3. Click Save.
Uploading Audio Resources
[+] Show Procedure
Procedure: Uploading Audio Resources
Steps
1. Identify which audio resource and personality to assign to the file. Once identified, select orhover over the table cell that is shared by the target audio resource and personality.
2. Click Upload Audio File.3. Your browser opens a dialog box to select an audio resource to upload. Select a file to upload.4. The audio resource is uploaded to GAX and assigned to the personality.
Deleting Audio Resources
[+] Show Procedure
Procedure: Deleting Audio Resources
Audio Resource Management Parameter Group Templates
Genesys Administrator Extension Help 310

Steps
1. Click the check box beside the audio resource that you want to delete.2. Click Delete.
Important• If you delete an audio resource, all files that are associated with it are also
deleted.• If you are deleting an audio resource that is being used by Operational
Parameter Management, and this Audio Resource being used by one or moreparameters or Parameter Groups, a message is displayed that indicates thisfact. When this happens, you can only cancel the deletion—you cannot forcethe deletion.
Other Actions
Once you upload a file, you can select or highlight over the file and choose one of the followingactions:
• Play the file—Click the play button to listen to the file.• Delete—Delete the file. This does not delete the associated personalities, but it does delete the original
audio files. A file can only be removed if the audio resource to which it has been assigned has not beendeployed. If the user performing this operation is a Service Provider, the file can only be removed if thefile was not created by a Tenant.
• Reprocess—Reprocessing recreates an audio resource file from the original audio file that wasuploaded (if it has not been deleted from the database and/or target storage). It also performs anynecessary conversion between audio formats.
• Download—Download the file to your computer.• Encodings—View information about how the file was encoded by GAX. When audio files are uploaded,
GAX automatically encodes them to the following formats: µ-law, A-law, and GSM.
Audio Resource Management Parameter Group Templates
Genesys Administrator Extension Help 311