Administrator User Guide - SCI Gateway
236
SCI Store Administrator User Guide For SCI Store Release 8.3 30/09/2013 SCI-DPUG-009 © 2013 NHS National Services Scotland
-
Upload
khangminh22 -
Category
Documents
-
view
0 -
download
0
Transcript of Administrator User Guide - SCI Gateway

SCI Store
Administrator User Guide
For SCI Store Release 8.3
30/09/2013
SCI-DPUG-009
© 2013 NHS National Services Scotland

SCI Store 8.3 Administration Guide
10/10/2013 13:55:19 1
1 Introduction ...................................................................................................................... 5
1.1 Purpose ................................................................................................................................................. 5 1.2 Intended Audience .............................................................................................................................. 5 1.3 Scope ..................................................................................................................................................... 5
2 Interfaces ........................................................................................................................... 6
2.1 Overview .............................................................................................................................................. 6 2.2 Create New Interface .......................................................................................................................... 6 2.3 Amend Existing Interface Service ..................................................................................................... 8 2.4 Configure Interface Service................................................................................................................ 9
2.4.1 “File To Database” Service ............................................................................................................. 9 2.4.2 “Splitter From Database” Service ................................................................................................. 11 2.4.3 “Translator From Database” Service ............................................................................................ 11
2.5 Configure a Manual Document Upload interface .......................................................................... 13 2.5.1 Create / Amend a Manual Document Upload Interface ................................................................. 13 2.5.2 Configure a Manual Document Upload Source.............................................................................. 14
2.6 Configure Notification Services Interfaces ..................................................................................... 15 2.6.1 Notification Generation Interfaces ................................................................................................. 15 2.6.2 Notification Maintenance Interface ................................................................................................ 16
2.7 Store Notification Windows Service ................................................................................................ 18 2.8 Home Page Administration Tab ...................................................................................................... 18
2.8.1 Interface Management tab .............................................................................................................. 18 2.8.2 User Customisation for Interfaces tab ............................................................................................ 19 2.8.3 Notification Creation tab ................................................................................................................ 21 2.8.4 Notification Consumption tab ......................................................................................................... 22
2.9 Patient Matching ............................................................................................................................... 22 2.9.1 Overview ......................................................................................................................................... 22 2.9.2 Method ............................................................................................................................................ 23 2.9.3 Configuration .................................................................................................................................. 23 2.9.4 Screens ............................................................................................................................................ 23 2.9.5 Match Group Status ........................................................................................................................ 26
2.10 Schemes and Reference Codes ......................................................................................................... 26 2.10.1 Overview ..................................................................................................................................... 26 2.10.2 Why Use National Code Schemes? ............................................................................................. 26 2.10.3 Known Reference Code Issues .................................................................................................... 27 2.10.4 SCI Store Reference data............................................................................................................ 27 2.10.5 SCI Store Considerations for configuring reference data .......................................................... 27 2.10.6 Notable Exceptions to Reference Code Translation/Confirmation ............................................ 28 2.10.7 Understanding Interface Files and Reference Codes ................................................................. 28 2.10.8 Applying Code scheme Uniqueness ............................................................................................ 29 2.10.9 Implementing Reference Code Translation / Confirmation ........................................................ 30
2.10.9.1 Scenario 1 .................................................................................................................................. 30 2.10.9.2 Scenario 2 .................................................................................................................................. 31 2.10.9.3 Scenario 3 .................................................................................................................................. 32
2.10.10 Creating / Maintaining a Scheme ............................................................................................... 34 2.10.11 Existing Reference Data Schemes Types .................................................................................... 35 2.10.12 Creating / Maintaining Scheme Mapping .................................................................................. 35 2.10.13 Creating / Maintaining Scheme Grouping ................................................................................. 36 2.10.14 Applying a Mapping Group to an Interface ............................................................................... 37
2.11 Exceptions for Reference Code Translation / Confirmation ......................................................... 39 2.11.1 HCP Reference Data .................................................................................................................. 39
2.11.1.1 Result Sets and Test Results ....................................................................................................... 40 2.11.1.2 Create Exceptions ...................................................................................................................... 40 2.11.1.3 Audit Mapping ........................................................................................................................... 40
2.12 Reference Data Upload Service ........................................................................................................ 44 2.13 Remote Data Sources ........................................................................................................................ 45 2.14 ID Format .......................................................................................................................................... 47
2.14.1.1 Examples.................................................................................................................................... 51 2.15 “File To Database” Audit & Parse From DB Search ..................................................................... 53

SCI Store 8.3 Administration Guide
10/10/2013 13:55:19 2
2.16 “Doc To DB” Search ......................................................................................................................... 53
3 System Settings ............................................................................................................... 54
3.1 Add New System Setting ................................................................................................................... 54 3.2 Amend an Existing System Setting .................................................................................................. 55 3.3 Viewing a list of All System Settings ................................................................................................ 55
4 CHI Lookup Admin........................................................................................................ 57
5 Security ............................................................................................................................ 59
5.1 Users ................................................................................................................................................... 60 5.1.1 Module Permissions ........................................................................................................................ 65 5.1.2 View Permissions ............................................................................................................................ 65 5.1.3 Change Password ........................................................................................................................... 67 5.1.4 Maintain Questions ......................................................................................................................... 67 5.1.5 RestrictLocalAdmin System Setting ................................................................................................ 69
5.2 User Roles .......................................................................................................................................... 69 5.3 Data Restrictions ............................................................................................................................... 73 5.4 Field Permissions ............................................................................................................................... 74 5.5 Module Permissions .......................................................................................................................... 77
5.5.1 Module Permission Templates ........................................................................................................ 77 5.5.2 User/Role/Group Module Permissions ........................................................................................... 80 5.5.3 Module Permission Restrictions ..................................................................................................... 81
5.6 Remote Data Source Profiles ............................................................................................................ 82 5.7 Permission Groups ............................................................................................................................ 85 5.8 Base Location ..................................................................................................................................... 88 5.9 Timed Access Templates ................................................................................................................... 90 5.10 Login Reasons .................................................................................................................................... 92
6 Patient maintenance ....................................................................................................... 94
6.1 Maintain Patient Consent Flag ........................................................................................................ 94 6.2 Break Glass ........................................................................................................................................ 96 6.3 Break Glass Search ........................................................................................................................... 99 6.4 Break Glass Maintenance ............................................................................................................... 101
7 Manage Duplicates (Manual and Automated Merging) ........................................... 102
7.1 Scheduling Considerations ............................................................................................................. 102 7.2 Scheduling Guidance ...................................................................................................................... 102 7.3 Manual Process Vs Automated Process ........................................................................................ 102
7.3.1 Manual Searching ......................................................................................................................... 102 7.3.2 Creating an Automated Search ..................................................................................................... 103 7.3.3 Scheduling an Automated Search ................................................................................................. 104 7.3.4 Working with Scheduled Searches ................................................................................................ 105
7.4 Performing the Merge/Unmerge .................................................................................................... 107 7.5 Find Merges ..................................................................................................................................... 108 7.6 Flagging Duplicate Patients ............................................................................................................ 110 7.7 Find Duplicate Patient Requests .................................................................................................... 110
7.7.1 Duplicate Patient Request Details ................................................................................................ 112
8 Store Maintenance plan ............................................................................................... 114
9 Statistics ......................................................................................................................... 115
10 Patient Information Status Maintenance................................................................ 117
10.1 Patient Information Status Update search .................................................................................... 117 10.2 Update Information Status ............................................................................................................. 117
10.2.1 Identifiers ................................................................................................................................. 118 10.2.2 Names ....................................................................................................................................... 119 10.2.3 Telecoms ................................................................................................................................... 120 10.2.4 Result Reports........................................................................................................................... 120

SCI Store 8.3 Administration Guide
10/10/2013 13:55:19 3
10.3 Notification Events .......................................................................................................................... 121
11 eBIz Audit .................................................................................................................. 122
12 Orphan Doc. Cleanup ............................................................................................... 123
13 Cumulative reporting ............................................................................................... 124
13.1 Cumulative system settings ............................................................................................................ 124 13.2 Setting up a Cumulative Grouping ................................................................................................ 125
13.2.1 ‘Edit’......................................................................................................................................... 126 13.2.2 ‘Delete’ ..................................................................................................................................... 126
13.3 Maintaining a Cumulative Source ................................................................................................. 126 13.3.1 ‘Delete’ ..................................................................................................................................... 127
13.4 Cumulative Report Profile Templates ........................................................................................... 128 13.5 Granting Cumulative Permissions ................................................................................................. 128
14 Automatic CHI Lookup ............................................................................................ 130
14.1 System Settings & CHI Admin Configuration ............................................................................. 130 14.1.1 Amend Service Definition Screen ............................................................................................. 130 14.1.2 Interface Patient Match Rules Screen ...................................................................................... 131 14.1.3 CHI Patient Match Rules Screen .............................................................................................. 132 14.1.4 Redundant CHI Numbers ......................................................................................................... 133
15 Anonymous Patients ................................................................................................. 134
15.1 Receiving Anonymous Patients ...................................................................................................... 134 15.2 Displaying Anonymous Patients ....................................................................................................... 135 15.3 Requesting Anonymous Patients ....................................................................................................... 136
16 Notification Services ................................................................................................. 137
16.1 NS Message Audit ........................................................................................................................... 137 16.2 Treatment Log Subscription Search.............................................................................................. 138
16.2.1 Add Treatment Log Subscription .............................................................................................. 139 16.2.2 Generating Treatment Log Events ............................................................................................ 141
16.3 Patient Subscription Search ........................................................................................................... 142 16.3.1 Add Patient Subscription .......................................................................................................... 143
16.4 Result Subscription Search ............................................................................................................ 145 16.4.1 Add Result Subscription ........................................................................................................... 146
17 Messaging Services.................................................................................................... 149
17.1 Message Delivery Service................................................................................................................ 152 17.2 Message Recipient Service .............................................................................................................. 159
18 Enable Demographic Feeds ...................................................................................... 164
19 Report Profiles .......................................................................................................... 166
19.1 Creating a New Profile .................................................................................................................... 167 19.1.1 Adding a Result Set Group to a Profile .................................................................................... 168 19.1.2 Adding a new Investigation Match (Search and Select) ........................................................... 170 19.1.3 Deleting a Result Set from the Current Profile ........................................................................ 173 19.1.4 Deleting an Investigation Match for the Current Result Set..................................................... 174 19.1.5 Deleting an entire Report Profile ............................................................................................. 175
19.2 Amending Existing Profile Details ................................................................................................. 176 19.2.1 Amending an existing Result Set within a Profile ..................................................................... 177
20 Treatment Log ........................................................................................................... 178
20.1 Find Treatment Log ........................................................................................................................ 178 20.2 Treatment Log Details .................................................................................................................... 179
21 Gateway GUID Stylesheet Maintenance ................................................................ 182

SCI Store 8.3 Administration Guide
10/10/2013 13:55:19 4
21.1 GUID Stylesheet Association Maintenance ................................................................................... 182 21.2 Add GUID Stylesheet Association ................................................................................................. 183
22 Administration Reports ............................................................................................ 187
22.1 Organisation Test Report ............................................................................................................... 187 22.2 Audit Report .................................................................................................................................... 191 22.3 User Audit Reports ......................................................................................................................... 192
22.3.1 Overview ................................................................................................................................... 192 22.3.2 Results Audit Report ................................................................................................................. 193 22.3.3 Document Audit Report ............................................................................................................ 194
Appendix A: SCI Store Registry and System Settings .................................................. 196
SCI Store Registry Settings .................................................................................................................... 196 SCI Store Mandatory Fields Registry Settings .................................................................................. 198 SCI Store User System Settings ............................................................................................................ 199 SCI Store SysEng System Settings ...................................................................................................... 217
Appendix B: Module Permissions ................................................................................ 219
Appendix C: SCI Store Performance Counters ......................................................... 226
Appendix D: SCI Store Direct Page Access ............................................................... 230
Appendix E: Security Settings ............................................................................................ 231
Encrypting Web.Config ............................................................................................................................... 231 Ensure the user running the utility is a local administrator ...................................................................... 232 Ensure the Web.Config is read write ......................................................................................................... 232 Decide on what section to encrypt/decrypt ................................................................................................ 232 Decide on what command line parameters to use...................................................................................... 233 Decide on what type of encryption to apply ............................................................................................... 233 Examples of encryption / decrypting a web.config .................................................................................... 234
Document control ............................................................................................................. 235

SCI Store 8.3 Administration Guide
10/10/2013 13:55:19 5
1 Introduction
1.1 Purpose
This document provides a comprehensive guide to the administration functions within SCI Store 6.0.
1.2 Intended Audience
This document should be read those who fulfil the role of local SCI Store System Administrator.
Note: End users that require a description of the End User features, such as the Find Patient or Find Result, should refer to the following document: “SCI Store - End User Guide”
1.3 Scope
The rest of this document is organised into the following sections:
Section 2: Interfaces
Section 3: Administration
Section 4: Administration reports
SCI Store 8.3 Administration Guide
10/10/2013 13:55:19 6
2 Interfaces
2.1 Overview
The configuration and management of interfaces in SCI Store are integrated into the web front end of the application. An automatic background service checks to see which interfaces are waiting to be run, then starts them. The flexible patient matching model allows each interface to have its own patient matching algorithm if required.
2.2 Create New Interface
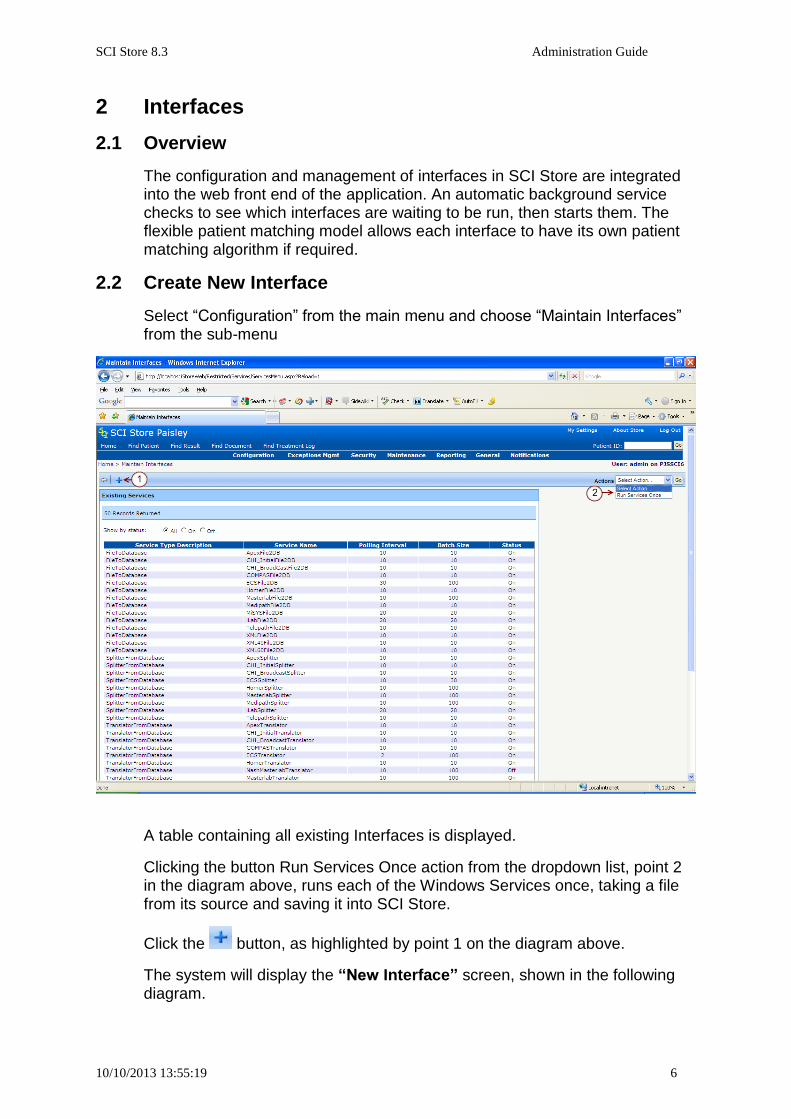
Select “Configuration” from the main menu and choose “Maintain Interfaces” from the sub-menu
A table containing all existing Interfaces is displayed.
Clicking the button Run Services Once action from the dropdown list, point 2 in the diagram above, runs each of the Windows Services once, taking a file from its source and saving it into SCI Store.
Click the button, as highlighted by point 1 on the diagram above.
The system will display the “New Interface” screen, shown in the following diagram.

SCI Store 8.3 Administration Guide
10/10/2013 13:55:19 7
Mandatory fields must be completed; these are identified using a red asterix, as shown in point 3 of the diagram below.
Select the Service Type from the drop down menu. (This describes what type of interface is being run).
Enter the Service Name, for example, 1-Telepath.
Enter a polling interval value in seconds
For servers that run many interfaces simultaneously, the processing needs to be managed to ensure that each interface gets an adequate amount of processing time. The Polling Interval manages this by dictating the time period between the interface checking for new files available for processing.
Enter batch size quantity (number of records)
The Batch Size signifies how many records are processed before the processor is released e.g. 50 records.
To switch the service on, set the status radio button to “on”
To assign a Match Patient algorithm to the interface an option should be selected from the drop down list.

SCI Store 8.3 Administration Guide
10/10/2013 13:55:19 8
Note: The Mapping Group should also be assigned in the same way.
Click the Save icon (point 1 on the diagram above) and then click on the return icon (point 2 on the diagram above) to be returned to the main Configure menu.
2.3 Amend Existing Interface Service
From the Maintain Interfaces screen a service can be amended by clicking on the relevant service. This will open the Amend Interface screen. Mandatory fields are highlighted using a red asterix (point 1 diagram below).
The Service ID is filled automatically by the system. This is a unique identifier for the service.
The Service Type can be selected from a drop down menu; it describes what type of interface is being run.
Where there is the case that the server runs many interfaces simultaneously the processing needs to be managed to ensure that each interface gets an adequate amount of processing time. In order to do this the Polling Interval can be set (in seconds) to dictate the time period between the interface checking for new files available for processing.

SCI Store 8.3 Administration Guide
10/10/2013 13:55:19 9
The Batch Size (number of records) determines how many records are processed before the processor is released.
The interface can be switched on and off by changing the Status.
To assign a patient matching algorithm to the interface an option should be selected from the drop down list.
Click the Save icon to record the entry (point 2, diagram above). Click the Return to Interfaces icon (point 3, diagram above) to be returned to the main Configure menu.
2.4 Configure Interface Service
This section explains how to configure the following interface services:
FileToDatabase
SplitterFromDatabase
TranslatorFromDatabase
To configure the interface, select the interface and then press the Configure button (point 4 on the previous diagram). This will display the configuration screen.
Note: the configuration screen displayed depends on the type of interface selected.
2.4.1 “File To Database” Service

SCI Store 8.3 Administration Guide
10/10/2013 13:55:19 10
To configure the FileToDatabase service, the following information needs to be set:
Source System – which lab/PAS system the service is processing e.g. Telepath, Masterlab, Apex, MiSys, COMPAS, Homer.
Source Path – the location of the files that the service is processing
File Pattern – the type of files that the service is processing. For example, if the service is processing “.txt” files, “*.txt” should be entered, Telepath files (tlp files) are denoted by “*.tlp” whilst Apex files (df files) are denoted by “*.df”. Entering “*.*” will process all file types.
Requires Splitting – do the files that are sent from the source system need to be split into individual files in order to be processed? Note – if splitting is not required then it is not necessary to create a SplitterFromDatabase service.
Delete After Splitting – do the initial bulk files need to be deleted after they were split into individual files?
Archive Directory – location of the directory where the processed files are archived after processing (Optional).
Exception Archive Directory – location of the directory where files that have created an exception during processing are archived (Optional).
Clicking on the Test Process button or action in the dropdown list, points 1 and 2 on the previous diagram, will test that the interface has been set up correctly.
Selecting the Set Default Values action from the dropdown list, point 2 on the previous diagram, will reset the default values for the page.

SCI Store 8.3 Administration Guide
10/10/2013 13:55:19 11
2.4.2 “Splitter From Database” Service
To configure a SplitterFromDatabase service, the following information needs to be set:
Split All File Types? – Not currently available
Source System - which lab/PAS system the service is processing e.g. Telepath, Masterlab, Apex, MiSys, COMPAS, Homer.
Select File to Database Service – this value will be populated with the value of the Source Path field configured in the FiletoDatabase service created previously. If more than 1 appropriate FiletoDatabase service exists, the correct Source Path must be selected from the drop-down list.
Delete After Parse? Does the file need to be deleted after it has been processed?
Clicking on the Test Process button or action in the dropdown list, points 1 and 2 on the previous diagram, will test that the interface has been set up correctly.
2.4.3 “Translator From Database” Service
All relevant information for the interface needs to be entered on the configuration screen.

SCI Store 8.3 Administration Guide
10/10/2013 13:55:19 12
Options than can be configured include:
choose the Source System that will feed data into SCI Store
choose the Interface Type (i.e. is it feeding in results, demographics or ECS information)
updating CHI Number, Patient Identifiers, Name, Address, Postcode or Source System fields
updating the GP, Consultant, GP Practice, Ward or Hospital fields
allowing the translator to Identify Anonymous patients. When the checkbox is checked an Anonymous Translator dropdown list becomes available. An appropriate translator should be selected from the list to proceed. If the checkbox is unchecked no anonymous patients will be processed. Please note an additional translator for use with Anonymous patients must be setup prior to checking the Identify Anonymous checkbox, see section 3.17.1 for setting up Anonymous Translator.
seeding records within files (i.e. When these records come down initially, they will have a flag set in the database that denotes that the record has been untouched by another system – this is predominantly of use to CHI/Demographics downloads. Security can then be set-up to hide/show patients on this basis.)

SCI Store 8.3 Administration Guide
10/10/2013 13:55:19 13
applying an ID Format Group to the interface (see 2.8)
applying a Demographic or Result parsing date to the interface. Files being fed into Store will be checked against the parsing date chosen to decide whether the data they contain should become the current information for the patient or should be inserted directly into historical information.
If the date on the file is greater than or equal to the transaction date held within SCI Store for this patient, then the data on file becomes the current information.
If the date on file is less than the transaction date held within SCI Store for this patient, then the data on file becomes historical information.
Clicking on the Test Process button or action in the dropdown list, points 1 and 2 on the previous diagram, will test that the interface has been set up correctly.
2.5 Configure a Manual Document Upload interface
2.5.1 Create / Amend a Manual Document Upload Interface
To create a Manual Document Upload interface follow the instructions in section 2.2. When selecting ‘Manual Document Upload’ from the drop down list on the New Interface screen the display will alter as shown below:
Only the Service Name and Status are configurable for a Manual Document Upload; Batch Size and Polling Interval are not applicable as a Manual Document Upload is not executed as part of the Store windows service and is only used on an ad-hoc basis.
To amend a Manual Document Upload interface follow the instructions in section 2.3, and the Amend Interface screen is displayed as below:

SCI Store 8.3 Administration Guide
10/10/2013 13:55:19 14
2.5.2 Configure a Manual Document Upload Source
To configure a Manual Document Upload service, select the interface in the
Services menu and press the Configure button ‘ ’; the Amend Manual Document Upload screen is displayed as below:
The Manual Document Upload is configured as follows:
Document Source: Name for the Manual Document Upload source specifying the origin of the uploaded documents. It will be included in search options for Documents Exception Management.
Document Extension: The valid file extension(s) for this interface.
Document Size Limit: The maximum file size that can be uploaded in KB.
SCI Store 8.3 Administration Guide
10/10/2013 13:55:19 15
Allow Future Attestation Date: Determines if a future attestation date is allowed (Yes / No)
Document Storage: The options available for document storage
o Local SCI Store: document is stored in the local Store database
o Remote SCI Store DB: Stores the document in a separate SCI Store database. On selecting this option a text box is made available to enter the DSN of the remote SCI Store database. E.g. user id=dbuser;password=dbpwd;initial catalog=Storedb;data source=storeserver;Connect Timeout=30
o File Server: Stores the document in a specified file store. On selecting this option a text box is made available to enter the Remote File URL. E.g. \\OtherServer\RemoteDocs\
For further details on the configurable aspects of document upload interfaces in SCI Store see document ‘Installation and Configuration Guide – SCI Store Clinical Documents Interface’
2.6 Configure Notification Services Interfaces
2.6.1 Notification Generation Interfaces
The generation of Notifications is controlled via the following interface types
PatientNotificationGeneration
ResultNotificationGeneration
TreatmentLogNotificationGeneration
The three generation interface types are all fairly similar and control their relevant notification types. Only one instance of each of these can be created.
Each interface can be configured with a polling interval and batch size. The polling interval will control how often the interface will execute, with the batch size controlling the number of events that are processed with each execution.

SCI Store 8.3 Administration Guide
10/10/2013 13:55:19 16
Switching these interfaces off will suspend the notification generation for the relevant notification type.
NB – To try and ensure that no duplicate notifications are produced the batch size may be expanded during the execution of the interface. The interface will get the first X events based on the date. It will then use the latest date returned to select the events to process. This ensures that all results that have the same creation date are executed in the same batch.
2.6.2 Notification Maintenance Interface
The maintenance and clean up of the notification services tables is handles by a new NotificationMaintenanceTask interface type.
This interface type can be configured to delete processed events and consumed notifications after X days. Multiple instances of this interface type can be created, and each can be configured to run only between certain times of day.
Each instance can is configured with a polling interval and batch size. The polling interval will control how often the interface will execute. The batch size controls the number of events/notifications that are deleted in each execution.

SCI Store 8.3 Administration Guide
10/10/2013 13:55:19 17
Each instance can then be configured to delete combinations of the following items:
Patient Events
Result Events
Treatment Log Events
Notification History Messages
When an item is selected, a value must be supplied to define the number of days (X days) to keep the events/notifications. Events older than X days are deleted in batches the size of the batch size configured earlier.

SCI Store 8.3 Administration Guide
10/10/2013 13:55:19 18
2.7 Store Notification Windows Service
This new windows service is used to execute the new Patient, Result and Treatment log notification generation interfaces that have been introduced in version 8.0.
The Store Notification windows service can be installed on locally on the same server as the Store application, or remotely on another server with access to the Store database. This configuration may lighten the load on the existing Store server, however further performance analysis is required to prove this is the case.
When installing the windows service it is important to ensure that SCI Store registry settings are installed and that the connection string contained within it is correct.
2.8 Home Page Administration Tab
Interfaces and Notification Services can be monitored via the home page administration tab.
2.8.1 Interface Management tab
Interfaces can be monitored via the Administration tab on the Home Page
The above screen will only be displayed for users with Administrator permissions. It displays details on each interface that the administrator wishes to monitor. The information displayed includes:
Status – This displays a traffic light icon. A green light signifies that this interface is working as expected. An amber or red light warns the administrator that their

SCI Store 8.3 Administration Guide
10/10/2013 13:55:19 19
may be an issue with this interface (i.e. no files have entered Store from this interface for a set period of time).
Source System – External system supplying the files
Name – Interface name
Date of Last Successful Message – date and time that the last file for this interface was processed into Store
Files processed successfully – the number of files successfully processed into Store for this interface within the configured time frame
File not processed - the number of files that failed to be processed into Store for this interface within the configured time frame
Files causing system errors – the number of files that failed to be processed into Store due to system errors
Files causing data errors - the number of files that failed to be processed into Store due to errors in the data
The information displayed on this page is dependent on the Interface Configuration values contained within the User Customisation page. The setup of this page is detailed in the next section.
2.8.2 User Customisation for Interfaces tab
To access the page displayed below click on the My Settings hyperlink within the navigation toolbar at the top of the page. This takes the user to the “Manage My Information” page where clicking on the User Customisation hyperlink will display the page shown below.

SCI Store 8.3 Administration Guide
10/10/2013 13:55:19 20
This page allows the user to setup specific home page customisation. If the user has administrator permissions, Interface Configuration options for the home page will be displayed along with the General Configuration options.
The Specify Configuration for all Interfaces Combined section contains a single setting. This setting allows the administrator to set up the specific time frame within which they wish to monitor the status of the files being passed into Store for all interfaces.
This time frame relates to the following columns on the Administration Tab:
Processed Successfully
Not Processed
System Errors
Data Errors If this time frame is set to zero it signifies that the administrator does not wish to monitor interfaces and therefore the Administration tab on the Home Page will display the message No Data to Display.
The Specify Configuration for each Interface separately section allows the following:
Hide or Show individual interface details within the Administration tab on the Home Page
Set a specific time frame (i.e. number of minutes) for when the traffic lights icon on the Administration tab displays red, amber or green for each interface

SCI Store 8.3 Administration Guide
10/10/2013 13:55:19 21
2.8.3 Notification Creation tab
The Notification Creation tab monitors the generation of notifications for each notification type (Patient, Result or Treatment Log)
It details the number of un-processed events and the number of minutes since the last event was processed, both broken down by notification type
It also displays the status of the notification generation interfaces. If no interface is configured for a particular type then no status message will be displayed.
The values that control the colour of the traffic lights are defined in the following system settings. More information on these system settings is contained in Appendix A
NSManagementAmberEventCount
NSManagementRedEventCount
NSManagementAmberEventMinutes
NSManagementRedEventMinutes

SCI Store 8.3 Administration Guide
10/10/2013 13:55:19 22
2.8.4 Notification Consumption tab
The notification consumption tab monitors the consumption of notification messages by web services users. It displays the number of un-consumed notifications per user per notification type. It also displays the number of minutes since the last notification was consumed per user per notification type.
The values that control the colour of the traffic lights are defined in the following system settings. More information on these system settings is contained in Appendix A
NSUnConsumedAmber
NSUnConsumedRed
NSMinsSinceConsumptionAmber
NSMinsSinceConsumptionRed
2.9 Patient Matching
2.9.1 Overview
The SCI Store database is a repository of Patient Demographic and Results information. Its value is achieved by ensuring that Result information is attached to the correct Patient information.

SCI Store 8.3 Administration Guide
10/10/2013 13:55:19 23
Different Labs handle data differently and as such require a flexible method for matching patients to results. SCI Store allows modification of this method on an interface-by-interface basis by defining a batch of rules.
From Version 2.2 on, Patient demographics can be retrieved from the Community Health Index (CHI) via a web service. This is configurable on an interface-by-interface basis and is achieved by modifying the existing patient matching rules.
2.9.2 Method
When an interface picks up new or amended information from a PAS or LAB system this information is ‘patient matched’ before being included into SCI Store. This involves comparing the message data with information already in Store, via a set of pre-defined rules, to determine the action to take. The actions can be one of the following: - inserts, updates, add aliases, exceptions or ‘no action’.
2.9.3 Configuration
To achieve the best matching between Patient Information and Results Information it is important to understand exactly how the Patient Matching algorithm works. For further information, see the SCI Store Patient Matching Reference Guide.
2.9.4 Screens
To set-up a Patient Matching algorithm you must first add a new interface and provide a name for the matching algorithm and then amend it to set up the matching rules. From the Configuration menu, select Local Patient Matching. This action will display the screen below, and then select the New
Match icon on the toolbar.

SCI Store 8.3 Administration Guide
10/10/2013 13:55:19 24
Once New Match has been selected, the following screen is displayed. Enter the interface name (point 1 below) and click Save (point 2 below). This will create a new patient match group. The remainder of the screen will now be enabled allowing the match group to be setup, see diagram on the following page.

SCI Store 8.3 Administration Guide
10/10/2013 13:55:19 25
Any number of Patient Matching rules can be entered. The interface will check the first rule entered (the first one at the top of the rules grid). If this is not satisfied it moves to the next one, and so forth, down through all rules. There is a default rule automatically created which has no matches and inserts the record.
Each Patient Matching criteria can be switched between match and no-match, whilst the PAS/CRN option can be set at either ID Value only or ID Type and Value and the Surname option can be switched between Surname Text and Surname Soundex. Once the permutation has been set-up a Patient Action needs to be selected. For example, if there is a match on CHI and Surname only then the patient action could be ‘Add Alias’.
Pressing Add will add the rule to the grid (point 1, diagram above). Once a rule has been added only the action code can be modified, however it can only be removed (point 1 above) or moved up and down the order (point 2 above).
When an interface is created these Patient Matching algorithms appear in a drop down menu to allow the interface to be associated with a matching rule.
To amend a Patient Matching algorithm, simply select the appropriate algorithm as shown on the previous page and then add and remove matching rules as appropriate.

SCI Store 8.3 Administration Guide
10/10/2013 13:55:19 26
Some source systems only accept numbers in a certain format, in order for the interface to accommodate these formats they are entered in the Valid ID Format box (point 3, diagram above).
[Note: For Automatic CHI Lookup configuration, please refer to section 3.16]
[Note: For further details on Patient Matching, see the SCI Store Data Matching Guide document.]
2.9.5 Match Group Status
Patient Matching Groups can be assigned a Status of either Active or Inactive (point 4, diagram above). Groups that are set as Inactive will no longer be displayed in the Match Patient drop down on the Amend Interface page. Only Active groups will be displayed.
Matching Groups can only be set to inactive if they are not currently in use by an interface.
2.10 Schemes and Reference Codes
2.10.1 Overview
This section provides detailed information about:
Schemes and Reference Code Translation (mapping) ;and
Reference Code Confirmation (matching)
SCI Store receives its data from many disparate systems. These systems send interface files to SCI Store with reference code data relating to Healthcare Professional codes and Result codes etc. Some source systems already provide their codes in a national context which can be passed in to SCI Store and beyond via SCI Store Web Services. These codes are already of a national context and have the same meaning across all Scottish NHS sites. This means that:
A mechanism is required in SCI Store to define what code scheme is used for incoming
codes.
A sort order for both incoming and display codes must be defined. This is to ensure that that the codes are sorted in the correct order.
2.10.2 Why Use National Code Schemes?
Healthcare Professionals (Doctors, Consultants etc.) can be nationally understood where a General Medical Council (GMC) Code is supplied – a GMC Code is unique and has meaning to exactly identify a specific Healthcare Professional in the Scottish NHS.
Similarly Test Codes can be provided in a National context using National Code Schemes such as the SNOMED scheme (there are presently no ‘national’ Result code schemes within SCI Store, they would have to be manually created).

SCI Store 8.3 Administration Guide
10/10/2013 13:55:19 27
With HCPs the idea is that the best match can be accomplished in the first instance using HCP Code (GMC Code) if the scheme is the national GMC Code.
However for a local scheme the match will be based on a combination of the HCP Code, Full Name and Scheme.
2.10.3 Known Reference Code Issues
The HCP Codes should be unique e.g. A GMC Code will uniquely identify a health care professional.
However the various other systems may provide a code local from their system which may inadvertently match an unrelated GMC Code or other Local code.
This has meant that incorrect matches have resulted in the wrong HCP being attached to an imported record with the wrong HCP being displayed against the record in SCI Store.
Similarly result codes may have different meanings between the source systems, however they may all use the same codes.
These codes may be viewed in individual results or grouped via the Cumulative Report. Grouping can only safely be achieved when codes all have the same meaning within SCI Store.
2.10.4 SCI Store Reference data
Health Care Professional Codes (GMC Codes) are inserted to SCI Store from two routes.
The first route is the upload of reference data files which contain the current list of all known GPs and Consultants.
This is the trusted method of getting codes and names correctly in to SCI Store.
The second route is via the interface files sent by the many Pas and Lab systems etc.
SCI Store compares the submitted HCP and either finds a matching entry or inserts a new entry based on the details from the file.
There are no trusted mechanisms for inserting Result codes in to SCI Store, the codes are all introduced from interface files.
2.10.5 SCI Store Considerations for configuring reference data
Do other Scottish NHS systems request data from your SCI Store?
Do third-party applications request data from your SCI Store?

SCI Store 8.3 Administration Guide
10/10/2013 13:55:19 28
Do your users expect to be able to query your SCI Store and find all information pertinent to a single Healthcare Professional using the HCP name which will often display the accompanying HCP Code?
Do your users expect to see all results displayed using a national or otherwise defined code scheme?
Do your users expect all results viewed in Cumulative Reporting to be correctly grouped by code?
If the answer to all of the above questions is ‘No’ then this functionality and system set up are not required. However, data integrity of the SCI Store will not be optimal. Incorrect reference code assignment will be likely. This will lead to unsound inferences being drawn from the data displayed on screen, similarly if the data is used by other Scottish NHS systems or 3rd Parties at a later stage it will be of a questionable quality for their use.
If the answer to any of the above questions is ‘Yes’ then you must begin to consider the data being submitted from the source systems which feed in to your instance of SCI Store.
[Note: A Scheme Group is now mandatory against each service translator to correctly identify the incoming HCP codes.]
2.10.6 Notable Exceptions to Reference Code Translation/Confirmation
The best match can be accomplished using HCP Code (GMC Code), Full Name and Scheme.
ADT files (typically Homer and HelixPMS (formerly Compas) source systems) only provide an HCP Code.
ADT files are always expected to be National GMC Codes and have been coded thus. Therefore if an interface is only for ADT files then HCP codes do not need to be considered, however the organization must still be tackled as the patient will move between wards and hospitals.
2.10.7 Understanding Interface Files and Reference Codes
File Types
Demographic Files
Result Files
ADT Files (Admission / Discharge / Transfer between Scottish NHS Organisations / Departments / Wards)
Files which are submitted in to SCI Store will contain either Demographic information, Result information or a combination of both.

SCI Store 8.3 Administration Guide
10/10/2013 13:55:19 29
Demographic information usually contains reference codes for some or all of the following areas:
Healthcare Professional (Distinctly identified as a GP role)
Healthcare Professional (Distinctly identified as a Consultant role)
GP Practice
Ward
Hospital
Result information will provide the following areas:
Healthcare Professional Codes (Not Distinctly identified with a role)
Result Codes and Data
The interface files provide the HCP Codes and Result Codes but do not presently provide an indication of the associated code schemes.
An investigation is therefore required to check some of the codes provided and establish if they conform to any known schemes.
This may also be achieved by contacting the support team for the source system and asking directly about the schemes supplied. For example,
Are the HCP Codes supplied from the GMC Code scheme or only local to the context of the source system?
Are the Result Codes from a specified code scheme or only local to the context of the source system?
2.10.8 Applying Code scheme Uniqueness
SCI Store introduced Scheme Management functionality to specifically address the requirement to capture incoming Result code scheme data (scheme type and version).
This is a data capture requirement which allows other Scottish NHS systems and 3rd Party Systems to understand the codes which are being received following responses to web service requests.
Understanding that there are accidental code matches leads to the need to identify the scheme which gives the code some context.
The notion of a scheme for HCP identification is a SCI Store requirement to address the many different HCP codes submitted by the various source systems. This is primarily used to consolidate the incoming data to the national GMC Code scheme.
The use of GMC Codes is of benefit to SCI Store in that all data is correctly assigned to a single unique Healthcare Professional.

SCI Store 8.3 Administration Guide
10/10/2013 13:55:19 30
Identifying the correct HCP will ensure that all results and patients are correctly identified to the correct clinician.
This will ensure that all searches in SCI Store by the Clinician will return all the expected records. This also ensures that the data passed on to other Scottish NHS systems and 3rd Party Systems will conform to the GMC Code which has a national context.
2.10.9 Implementing Reference Code Translation / Confirmation
Having identified the code schemes in your interface files you can consider what steps if any are required to record the scheme code information against incoming interface files.
The next consideration is to deal with incoming code schemes which do not have a national context, in other words local code schemes from a source system which have no meaning beyond the system which supplied them. For example:
GMC codes are generally a number in the following range ‘0000001’ to ‘9999999’, up to 7 characters long where front padded with leading zeros.
A system provides an HCP code of ‘SMITH1’, is not sending a GMC code.
In this case to ensure that the interface file loads the record against the correct HCP a scheme would be created which contained ‘SMITH1’. The translation would then be created between ‘SMITH1’ and ‘0001234’.
In practice this would be required for all incoming HCP codes received from this interface.
Below are some example scenarios that can be applied to HCPs and Results:
2.10.9.1 Scenario 1
Data to be Translated
Incoming Scheme
Display Scheme
Comments
GP and / or Consultant
GMC Codes
GMC Codes
This will ensure that the known GMC Code list in SCI Store is used. No duplicates HCPs will be created.
Actions required: Step 1
Menu Option - Scheme Code Maintenance (No new schemes required)
Step 2
Menu Option - Scheme Mapping Maintenance (No code translation is required) N.B. This is specific to HCP processing at present
Step 3
Menu Option - Scheme Grouping Maintenance
Update an existing scheme group OR

SCI Store 8.3 Administration Guide
10/10/2013 13:55:19 31
Add a new Scheme Group Name – something relevant to either the interface or the use of the new scheme group.
Select ‘GP’ and / or ‘Consultant’ from the ‘Input Area’ drop down list.
Select ‘HCP Lookup’ from the ‘Input Scheme’ drop down list.
Select ‘HCP Lookup’ from the ‘Display Scheme’ drop down list.
Click the Add Button. Step 4
Menu Option – Interfaces – Maintain Services
Select the appropriate Service Translator
Select the Scheme Group from the ‘Mapping Group’ drop down list.
Click ‘Save’ from the ‘Amend Service Definition’ screen.
Click ‘Exit’ from the ‘Amend Service Definition’ screen. 2.10.9.2 Scenario 2
Data to be Translated
Incoming Scheme
Display Scheme
Comments
GP and / or Consultant
Non national GMC Code
GMC Codes
This will ensure that the known GMC Code list in SCI Store is used. All records will be correctly inserted against the correct HCP in SCI Store. No duplicates HCPs will be created.
Actions required: Step 1
Menu Option - Scheme Code Maintenance
A new Scheme should be defined (if not already created)
The Non national GMC Codes must be added to this Scheme Step 2
Menu Option - Scheme Mapping Maintenance
Select the new/existing Non national GMC Code scheme from the ‘From Scheme’ drop down list.
Click the ‘Add Mapping’ button.
Select the HCP Lookup scheme as the ‘To’ scheme.
Use the search boxes against each scheme to define the translation ‘From’ and ‘To’
Click ‘Add’
The translation will show the ‘From Code’ (Code expected in the interface file) and the ‘To Code’ (GMC Code equivalent)
Step 3
Menu Option - Scheme Grouping Maintenance
Update an existing scheme group OR
Add a new Scheme Group Name – something relevant to either the interface or the use of the new scheme group.
Select ‘GP’ and / or ‘Consultant’ from the ‘Input Area’ drop down list.

SCI Store 8.3 Administration Guide
10/10/2013 13:55:19 32
Select the Non national GMC Code scheme created in Step 1 from the ‘Input Scheme’ drop down list.
Select ‘HCP Lookup’ from the ‘Display Scheme’ drop down list.
Click the Add Button. Step 4
Menu Option – Interfaces – Maintain Services
Select the appropriate Service Translator
Select the Scheme Group from the ‘Mapping Group’ drop down list.
Click the ‘Code Type’ button and enable the ‘GP’ and / or ‘Consultant’
Click ‘Exit’ from the ‘Code Type’ screen
Click ‘Save’ from the ‘Amend Service Definition’ screen.
Click ‘Exit’ from the ‘Amend Service Definition’ screen. 2.10.9.3 Scenario 3
Data to be Translated
Incoming Scheme
Display Scheme
Comments
Biochemistry Investigations
Local Biochemistry Result Codes
National Scheme e.g. SNOMED / Local Display Scheme
This will ensure that the known SNOMED list in SCI Store is used. All records will populate both the Local Code and SNOMED values in the database. Both Local & Display schemes will be output via Web Services
Actions required: Step 1
Menu Option - Scheme Code Maintenance
A new National/Display Scheme should be defined (if not already created)
The National/Display Investigation Codes must be added to this Scheme
Step 2
Menu Option - Scheme Code Maintenance
A new Local Biochemistry Investigation Scheme should be defined (if not already created)
The Local Biochemistry Investigation Codes must be added to this Scheme
Step 3
Menu Option - Scheme Mapping Maintenance
Select the new/existing Local Biochemistry Investigations Code

SCI Store 8.3 Administration Guide
10/10/2013 13:55:19 33
scheme from the ‘From Scheme’ drop down list.
Click the ‘Add Mapping’ button.
Select the National/Display Investigation Codes scheme as the ‘To’ scheme.
Use the search boxes against each scheme to define the code translation ‘From’ and ‘To’
Click ‘Add’
The translation will show the ‘From Code’ (Code expected in the interface file) and the ‘To Code’ (National/Display code equivalent)
Step 4 –
Menu Option - Scheme Grouping Maintenance
Update an existing scheme group OR
Add a new Scheme Group Name – something relevant to either the interface or the use of the new scheme group.
Select ‘Investigations: Biochemistry’ from the ‘Input Area’ drop down list.
Select the Local Biochemistry Investigation Scheme created in Step 1 from the ‘Input Scheme’ drop down list.
Select National/Display Investigation Codes scheme from the ‘Display Scheme’ drop down list.
Click the Add Button. Step 5 –
Menu Option – Interfaces – Maintain Services
Select the appropriate Service Translator
Select the Scheme Group from the ‘Mapping Group’ drop down list.
Click the ‘Code Type’ button and enable the Investigations: Biochemistry
Click ‘Exit’ from the ‘Code Type’ screen
Click ‘Save’ from the ‘Amend Service Definition’ screen.
Click ‘Exit’ from the ‘Amend Service Definition’ screen.
Note: Mappings between Local Result Codes and National/Display Result codes can be configured in several different ways
Multiple Local Code Schemes can be set up, e.g. one for each for each discipline, as above, and mapped to a National scheme specific to that discipline.
Multiple Local Code Schemes can be set up, e.g. one for each discipline, and mapped to a single National Scheme that contains all codes for all disciplines e.g. SNOMED.
If the Local Result Codes from all disciplines are from a common source and there is no duplication then a single Local Scheme and single National Scheme can be used.

SCI Store 8.3 Administration Guide
10/10/2013 13:55:19 34
In each situation the Mapping Group would have to contain entries for each Input Area (e.g. Investigations: Biochemistry, Investigations: Haematology, GP) that was to be mapped by the interface.
2.10.10 Creating / Maintaining a Scheme
To maintain scheme codes, select:
General Admin
Scheme Code Maintenance
The scheme code maintenance screen will be displayed:
Clicking on a scheme description takes you to the following screen. Codes can be entered and saved here.
The following details must be included:
Code A unique code identifying the scheme
Description A meaningful description / name
Display Order Display order if viewed on another screen/report
Click ‘Add’ to save the record.

SCI Store 8.3 Administration Guide
10/10/2013 13:55:19 35
2.10.11 Existing Reference Data Schemes Types
There are currently existing scheme types which point to the code schemes known within SCI Store.
Note: There are no existing scheme types relating to results.
A new Scheme Lookup type has been added to SCI Store relating to trusted HCP Codes. This augments the existing GP Lookup type and Consultant Lookup type which are effectively sub sets of the new HCP Lookup Type.
The scheme types are:
HCP Lookup (This looks at all Healthcare Professionals known to SCI Store)
GP Lookup superseded by the New HCP Lookup for all schemes
Consultant Lookup superseded by the New HCP Lookup for all schemes
GP Practice Lookup (This looks at all GP Practices known to SCI Store)
Organisations Lookup (This looks at all Organisations known to SCI Store)
User Defined (This allows you to enter any non national codes) 2.10.12 Creating / Maintaining Scheme Mapping
General
Scheme Mapping Maintenance

SCI Store 8.3 Administration Guide
10/10/2013 13:55:19 36
Click ‘Add Mapping’
2.10.13 Creating / Maintaining Scheme Grouping
General
Scheme Grouping Maintenance

SCI Store 8.3 Administration Guide
10/10/2013 13:55:19 37
The scheme grouping is then applied to one or more appropriate interfaces. The scheme group is then used to provide translation codes and descriptions for the input or incoming codes.
2.10.14 Applying a Mapping Group to an Interface
Mapping groups are added to Translator from Database interfaces
Configuration
Maintain Interfaces

SCI Store 8.3 Administration Guide
10/10/2013 13:55:19 38
Assigning a Mapping Code group will ensure the scheme information is stored against the files brought in to store.
Mapping codes for the various disciplines can be achieved by clicking the ‘Map’ button.

SCI Store 8.3 Administration Guide
10/10/2013 13:55:19 39
All the mappings which have been set up for the group can then be seen. Only those mappings which are enabled will be used during the import of the file. The codes from the interface files will be used to query the relevant Input Scheme codes. A corresponding Display Scheme code will then be assigned as the record is brought in to store.
2.11 Exceptions for Reference Code Translation / Confirmation
2.11.1 HCP Reference Data
When a code is not found in a Local manually created scheme the file will fail during parsing and create an exception for the file. These mapping exceptions can be viewed by navigating to
Exception Mgmt
Parsed Files
Search for the file which has failed to load in to SCI Store and click on it to view the exception record.
The missing code should be stated in the ‘Status Description’ field.
SCI Store 8.3 Administration Guide
10/10/2013 13:55:19 40
Click on the ‘Add Mapping’ button which will take you to the ‘Scheme Code Maintenance’ screen where you can select the appropriate scheme and add the missing code(s).
The missing translation(s) will also require to be added.
Administration
General
Scheme Mapping Maintenance
The exception will be cleared by re-submitting the file. 2.11.1.1 Result Sets and Test Results
The processing of Result Set and Test Result mapping exceptions is controlled via the system setting ResultMappingMethod.
This system setting has 2 possible values – Create Exceptions and Audit Mapping
2.11.1.2 Create Exceptions
With the ResultMappingMethod system setting set to “Create Exceptions” the Result Mapping will work similarly to the HCP Reference Data detailed above.
When a file is being parsed and a Local code is not found in the defined Local Code Scheme for the interface then the parsing will fail with a Mapping Exception. To resolve first navigate to:
Exception Mgmt
Parsed Files
Search for the file which has failed to load in to SCI Store and click on it to view the exception record.
The missing code should be stated in the ‘Status Description’ field.
Click on the ‘Add Mapping’ button which will take you to the ‘Scheme Code Maintenance’ screen where you can select the appropriate scheme and add the missing code(s).
2.11.1.3 Audit Mapping
When the ResultMappingMethod system setting is set to “Audit Mapping” files should always parse successfully even when a Local Code is not found in the defined Local Code Scheme.
Under this scenario all mapping failures are audited and can be viewed via the Mapping Audit Report page. From this page users can view the mapping

SCI Store 8.3 Administration Guide
10/10/2013 13:55:19 41
failures, navigate through the mapping functionality to add the missing mapping, then navigate back to the parsed file and re-parse it.
The Mapping Audit screen is accessible from:
Exception Management
Mapping Audit Report
The screen above shows the search criteria of date range, discipline and mapping type (Result Set or Test Result). The search results contain details of the time parsed, report, patient, mapping type, Code, code description, from scheme and to scheme.
Clicking on a row will take the user to the Manage Scheme Codes field, where they can enter the missing code into the Local Scheme code list.

SCI Store 8.3 Administration Guide
10/10/2013 13:55:19 42
Once the code is added the user can navigate to the Maintain Scheme Mappings page by clicking the “Add Scheme Mapping” button. Here they are able to configure the From and To scheme mapping.

SCI Store 8.3 Administration Guide
10/10/2013 13:55:19 43
Using the exit button the user can navigate back up to the Mapping Audit Report page. From there they can then click the Parse Time to navigate to the Parsed Message Page.

SCI Store 8.3 Administration Guide
10/10/2013 13:55:19 44
From here the user is able to re-parse the file by clicking on the “Flag as New (Automatic)”. Once the file has been re-parsed the mapping issues that were fixed should no longer appear in the Mapping Audit Report.
2.12 Reference Data Upload Service
National Reference File data (e.g. GPs, Consultants, Practices, Locations, Specialty and Facility) can be uploaded into SCI Store by creating two services of type “ReferenceFileToDatabase” and “ReferenceTranslatorFromDatabase”
These services are created in a similar way to the “FileToDatabase” and TranslatorFromDatabase services (see sections xxx & xxx). When the status of these services is switched “on”, they will be executed as part of the Store Windows Service. When creating these types of service the polling interval is replaced with a time band. The time band allows the user to schedule the processing of the reference file upload files at a time of there choosing. The configuration of the “ReferenceFileToDatabase” service allows the user to define the location of the root directory which will contain the reference files for upload. This service will load the reference files from the root directory into table in the database ready for further processing.

SCI Store 8.3 Administration Guide
10/10/2013 13:55:19 45
The configuration of the “ReferenceTranslatorFromDatabase” service allows the user to define the names of the reference files being uploaded. This service will process the files fed in via the “ReferenceFileToDatabase” service and update the relevant Reference File tables in SCI Store. If a files being uploaded does not match with any of the defined file names then it will fail to upload. The administrator will be able to monitor the success or failure of reference file uploads via the Exceptions Management module.
2.13 Remote Data Sources
Remote Data Source configuration is accessed from the General menu option. This option allows administrators to set-up connections to external data sources (typically other instances of SCI Store or CHI). These remote data sources can be used to find information on patients and results from external systems.
Since these external systems are not limited to SCI Store, the generic term of Search Provider is used to denote a source that can provide information on patients and or results/documents.
To add a new provider, click the Add New Remote Data Source button. To edit (or delete) an existing source simply click on the appropriate row. The add/edit provider screen is as shown below:

SCI Store 8.3 Administration Guide
10/10/2013 13:55:19 46
The following information is required:
Name: a description of the service (e.g. “RAH Full Access”, or “Restricted Inverclyde Store”)
Provider Type: This is the provider that will be used to fulfil the request and is dependent on what it is connecting to (e.g. the CHI System, a Store 2.3 Web Service, a Store 4.1 Web Service)
Site Protocol: whether the connection uses standard http or secure https
Address: Address of the server (I.P. or name that will be resolved to an ip)
Service Name: The root directory of the web service path.
Service Path: Full path to the service including the extension
Timeout: The length of time (in seconds) that the web service will search for
Username: Username that will be used be all users using this search provider
Password: Password to allow access to the service.
Site Code: This is a unique code that will identify the site. It is used by web services to specify a site for remote access on some web service calls. This code is optional and can be up to 20 characters in length. If specified it must be unique.
Once this information is entered, click Save and then Exit.
Note: Currently only locations with a valid “Site Code” and Provider Type “Store60Provider” will be made available for remote web service access. This is up and above the two fixed interfaces of “Local” and “CHI”.
The Remote Data Sources defined are used by Remote Data Source Profiles (see section 3.3.9). These profiles will be set up to allow access to different combinations of Remote Data Sources. Users and/or Permission Groups can then be assigned their relevant profile (see sections 3.3.1 & 3.3.10).

SCI Store 8.3 Administration Guide
10/10/2013 13:55:19 47
For simplicity and to ease administration, there is now only one user per provider. However, you should create a new instance of the same provider/service for each different security role. For example:
3 different connections to the same (remote) instance of SCI Store may exist, as demonstrated below:
“Raigmore Full Access” – username – FullRemote
“Raigmore Normal” – username – RemoteUser
“Raigmore Restricted” – username – RemoteRestricted
The administrator of the remote SCI Store (i.e. Raigmore) would then set up the appropriate users with the appropriate permission sets. The local administrator would then set appropriate providers to the relevant users (see 3.4.5 for further details on assigning users to search providers).
Note: For SCI Store access it is important to ensure that the user type defined on the remote location is correctly defined.
Remote User Type – To be used when accessing a remote location for the purpose of displaying the information in the SCI Store web application.
Web service User Type – To be used when accessing a remote location for the purpose of passing the information to other web services (e.g. Allowing a local third part web service user pass through access to remote locations)
2.14 ID Format
The ID Format page provides the facility to set-up an ID Format group (using regular expressions) that can be applied to the Services in Store and will allow the CRN and Index parts of patient identifiers to be split or combined as required.
To create an ID Format Group, select ID Format from the Interfaces menu. The following page will be displayed:

SCI Store 8.3 Administration Guide
10/10/2013 13:55:19 48
Click Add new ID Format Rule Group.

SCI Store 8.3 Administration Guide
10/10/2013 13:55:19 49
Name the Group and then click Save to add a rule.

SCI Store 8.3 Administration Guide
10/10/2013 13:55:19 50
To create a rule the following information is required:
PAS Format – is the regular expression that must match the provided CRN number format exactly.
If this is matched, ID Type (string expression) will be set in the database appropriately.
ID Value – is another regular expression that will typically extract the numeric part of the CRN number (typical value = \d{6} i.e. the 6 numbers that make up the PAS Format entry)
Comment – is non functional, used to describe the purpose of the entry.

SCI Store 8.3 Administration Guide
10/10/2013 13:55:19 51
Once this has been entered, click Update to save the rule. To amend the content of a rule or, to move it up and down the hierarchy, click Edit, make
the changes and click Update. Once the rules have been set-up, click Save to save the rule to the database.
The rules then need to be applied to the Interfaces that feed into Store as required. To do this select the Interfaces menu and click Configure. Select the appropriate Translator service form the list and click Configure. Select the group from the ID Format Group drop-down list and click Save then Exit.
2.14.1.1 Examples
Example 1
PAS Format - ^RCH\d{6} (Matches RCH at the beginning of the CRN followed by 6 digits)
ID Type – RCH (the string expression that will be entered into the ID Type column)
ID Value - \d{6} (how the ID number will be displayed in Store – in this example 6 digits only)

SCI Store 8.3 Administration Guide
10/10/2013 13:55:19 52
So if a patient with a CRN of RCH999999 entered Store and matched this rule, their CRN number would be displayed in Store in the IDs table as follows:
ID Value – 999999
ID Scheme – CRN
ID Type - RCH Example 2
PAS Format - ^ABC\d{5} (Matches ABC at the beginning of the CRN followed by 6 digits)
ID Type – ABC (the string expression that will be entered into the ID Type column)
ID Value - \d{5} (how the ID number will be displayed in Store – in this example 5 digits only)
This means that if a patient with a CRN of ABC11111 entered Store and matched this rule, their CRN number would be displayed in Store in the IDs table as follows:
ID Value – 11111
ID Scheme – CRN
ID Type – ABC Example 3
PAS Format - \d{6} (Matches 6 digits)
ID Type – RCH (the string expression that will be entered into the ID Type column)
ID Value - RCH\d{6} (how the ID number will be displayed in Store – in this example RCH is added to the 6 digits)
This means that if a patient with a CRN of 999999 entered Store and matched this rule, their CRN number would be displayed in Store in the IDs table as follows:
ID Value – RCH999999
ID Scheme – CRN
ID Type - RCH
Example 4
PAS Format - \d{5} (Matches 5 digits)
ID Type – ABC (the string expression that will be entered into the ID Type column)
ID Value - ABC\d{5} (how the ID number will be displayed in Store – in this example ABC is added to the 5 digits)

SCI Store 8.3 Administration Guide
10/10/2013 13:55:19 53
This means that if a patient with a CRN of 11111 entered Store and matched this rule, their CRN number would be displayed in Store in the IDs table as follows:
ID Value – ABC11111
ID Scheme – CRN
ID Type - ABC
2.15 “File To Database” Audit & Parse From DB Search
These screens allow the user to search for and display the messages that have been processed by the various FileToDatabase, SplitterFromDatabase and TranslatorFromDatabase services that have been set-up in SCI Store.
For further information, see:
SCI Store – Exceptions Management Guide
Exceptions Management Overview
2.16 “Doc To DB” Search
This screen allows the user to search for and display any messages processed by the DocumentToDatabase services set-up in SCI Store.
For further information, see:
DocumentToDatabase User Guide

SCI Store 8.3 Administration Guide
10/10/2013 13:55:19 54
3 System Settings
3.1 Add New System Setting
On clicking the System Settings menu item from the General admin menu the screen shown below is displayed.
This page shows a list of the System Settings that are currently configured for this SCI Store.
To create a new setting, click the Add New System Setting button from the toolbar. The following screen will then be displayed:

SCI Store 8.3 Administration Guide
10/10/2013 13:55:19 55
Then select the name of the setting in the Setting Type drop down list – if a default value has been supplied it will appear in the Setting Value text box, this can be edited if appropriate. Additionally, a description of what functionality the Setting Type provides will be displayed. E.g.
Only settings currently not in use will be available in the drop down list
3.2 Amend an Existing System Setting
To amend an existing setting, click the desired System Setting from the list on the System Settings page.
Edit the setting value appropriately and click Save. If successful the following message will be displayed:
“System setting has been successfully saved”
Settings can also be deleted by using the Delete button. Click the Return to Previous Page icon in the toolbar to return to the Add System Setting screen.
[Note: if configuring a DocumentToDatabase interface, the settings “DTDBinaryReadPath” and DTDBinaryWritePath must be created.]
3.3 Viewing a list of All System Settings
To view a list of all System settings that can be configured click the View List of System Settings button from the toolbar on the System Settings page.

SCI Store 8.3 Administration Guide
10/10/2013 13:55:19 56
The following page will be displayed showing a list of all system settings, their types, range, and default values.

SCI Store 8.3 Administration Guide
10/10/2013 13:55:19 57
4 CHI Lookup Admin
The CHI Lookup service enables users to search for and download patient records into SCI Store.
The lookup service is set up via the Interface Configuration menu by simply creating an interface of type “CHILookup”.
The CHI Admin page is shown below:
The fields on this screen relate to the following:
Origin Code – The code of the institution or system attempting to gain access
Operator Number – The name of the account that is used to access the system. The number differentiates between whether the account is for a particular system or an institution.
User ID – Helps identify logon to CHI Web Service. Needs to be the same for each transaction.
Client Operator Number – Identity of the individual within the client system.

SCI Store 8.3 Administration Guide
10/10/2013 13:55:19 58
CHI – The password of the account used to gain access.
The other fields on the screen are mandatory and form part of the standard SCI Store message. However, they are not interpreted by the CHI Web Service and therefore can be populated with anything that is meaningful.

SCI Store 8.3 Administration Guide
10/10/2013 13:55:19 59
5 Security
The security model in SCI Store allows total flexibility of access to data. Access can be restricted at various levels right down to a particular field on a particular row. The framework is provided for the trust to decide exactly what level of security to provide in keeping with local policies. Obviously the more complex the security model is the more time and effort is required to administer it. A pragmatic approach should be adopted.
Key aspects of the security model are as follows:
User – A user needs to be created for each person using the system. The user is associated with all the aspects of security described below. You assign which module permissions, view permissions, roles, permission groups, security permissions, default views, initial document views, HCP Code and Base Location that are applicable to that particular user.
Data Restrictions – To restrict access to particular pieces of information or record sets, Data Restrictions are used. A “Data Restriction” consists of a set of Field Permissions. Each of the permissions contains specific access rights for the fields or records within a table. The administrator specifies which table, and fields / group of records they wish to control access to.
Permission Groups - A “Permission Group” is a combination of permissions and settings (View and Module Permissions, Groups and Password Expiry), which can then be used as a template to be applied to user accounts. So for example, a Permission Group called “Consultant” can be created that will hold a combination of the various permissions that can be created in Store and can be applied to each consultant so that they have the same security settings.
Roles – A Role is a combination is Data Restrictions and Permission Groups. More than one user may be associated with a User account, but only one Role is utilised when a user logs in (if applicable).
Field Permissions – This option restricts the fields that the user can view in certain records. For example, it would be possible to hide certain fields such as Date of Birth from certain users or user groups, or, to restrict the types of tests that a user could see.
Module Permissions – This restricts the menu options and that the user can access when they log in. It can be set-up per user and each menu option is configurable. For ease of use, templates can be created and copied for users with the same access rights. If no module permissions are set when a user is created, default permissions are given: View/Configure Home Page; View Patients, Results, Documents, CHI information and change password.
View Permissions - This option restricts the user to viewing records of a particular type, simply, “what patients is the user allowed to see?” For example, it is possible to restrict a user to viewing the patient records that belong to a certain GP, GP Practice, Consultant or Ward, or indeed any combination of these. In addition, each of these categories has been broken-down into “Registered” and “Requesting” sub-categories, “Requesting” being the professional or location that

SCI Store 8.3 Administration Guide
10/10/2013 13:55:19 60
requested a particular set of test results. Consequently, it is possible to allow users to view additional records that they may not otherwise have seen.
Base Locations – A Base Location is the location of a particular sub-set of users, for example a GP Practice or a Ward. All users must be assigned a base location in order to access SCI Store. This functionality is also used for administering StoreToStore searches. For further information see the SCI Store – Remote Store Administration Guide.
Remote Profiles –remote profiles contain different combinations of remote data sources that can be attached to group permissions, individual users or a roles. Remote Profiles allows centrally controlled permission across StoreToStore to allow access to different remote data sources. See section 3.3.9 for more detail on remote data source profile configuration.
5.1 Users
On selecting the Security menu then selecting the Users menu item, the initial screen shown overleaf is displayed.
From here it is possible to search for an existing user or to add a new user to the system. To search for an existing user, enter one or more of the following criteria and click Search, or simply click the Search button (which will return all users):
User Name

SCI Store 8.3 Administration Guide
10/10/2013 13:55:19 61
Friendly Name (User account alias)
Forename
Surname
Email Address
Job Type (e.g. Consultant, SHO, Nurse etc.)
Base Location (Where the user is based)
In SCI Store version 2.2, the concept of “Global” and “Local” Administrators was introduced. A “Global” administrator is someone who can manage all the user accounts in the database whereas a “Local” administrator only has access to accounts that belong to the same base location (local area).
None of the fields on this screen are mandatory, however, if a Local Administrator is accessing this page, the only value in the Base Location drop-down list is the location that they belong to, whereas a Global Administrator will see all the base locations within the drop-down list.
In order to add a new user, click the Add icon, at which point the screen shown overleaf will be displayed.

SCI Store 8.3 Administration Guide
10/10/2013 13:55:19 62
From this screen it is possible to:
Add new users to the system
View the Patient records viewed by the user
View the Patient results viewed by the user
View the Documents viewed by the user
Set up User permissions for the Menu bar options
Set up User permissions restricting access to certain individual permission groups
Set the active status of the account
Set the time period the account is active for
Set the remote profile for the user

SCI Store 8.3 Administration Guide
10/10/2013 13:55:19 63
Delete a user account
Control the Patients a user has access to
Assign a Permission Group(s) to a user account
Assign a Security Permission(s) to a user account
Assign a Role(s) to a user account
Force the user to change their password the next time they login
Select the initial patient view, i.e. what is displayed when a user first views a patient record (Results, Documents or ECS)
To add a new user:
Enter User Name (maximum 10 characters, no duplicate usernames are allowed), then select a Base Location from the drop-down list (if no “custom” Base Locations have been created – see section 3.3.11, the default value of “Local Store” should be used)
Enter a Friendly Name (user account alias).
Enter a Password.
The minimum password complexity requirements are:
- Shall not be the same as, or contain, the account username;
- Shall contain characters from three of the following four categories:
- uppercase alphabetic characters (A-Z); - lowercase alphabetic characters (a-z); - numerals (0-9); - non-alphanumeric characters, for example: ! $ # %.
- Shall be at least 8 characters long.
Passwords must be changed at intervals of not more than 3 months (90 days). The “PasswordExpiry” system setting allows the administrator to define this interval, the default value is 30 days. SCI Store will force users to change passwords when this defined interval has elapsed.
A new password cannot be the same as the previous 12 passwords and cannot have been used in the previous 12 months.
Note: “Enforce Password Change” functionality only relates to users of type “Local & Roles Only”.
The following fields are now also required when creating a user account; Title, Forename, Surname, email Address, Contact Number and Job Type. The email Address must be entered in standard Internet email format, for example;

SCI Store 8.3 Administration Guide
10/10/2013 13:55:19 64
Enter a valid date in the Valid From and Valid To text boxes. However, just using either date is sufficient in order to set-up an account.
To enable the account check the Account Active check box, to disable it leave the checkbox clear.
If the Password Expires checkbox is checked then the user must change the password after the number of days specified in the System Settings page (See section 3.1).
If the User must change password at next login checkbox is checked, then the user must change their password the next time that they login to SCI Store.
The User Session Timeout defines the time period that a user can leave the system idle before being automatically logged out. If this is left blank the default defined by the DefaultSessionTimeout system setting will be used when the user logs in.
If the User is to be a “Global Administrator” i.e. someone that is able to maintain all user accounts in the system, the Global Administrator checkbox should be checked.
If the User is to be a “Local Administrator” i.e. someone that maintains user accounts that belong to their Base Location, the Publish Contact Details checkbox should be checked. As well as marking the user as a “Local Administrator” (if Global User is unchecked), if this checkbox is selected, the contact details for this account will be available via the Offline Support functionality (see SCI Store End User Guide – section 2.2).
Initial Patient View has a default of “Results”.
Remote Data Source Profiles can be associated with the user. The user will have access to all those remote data sources that have been allowed in the remote profile selected.
Enforce Login Reasons checkbox defines whether the user must select from the list of Login Reasons before they are granted access to the application after correctly entering their username and password credentials. (see section 3.3.13)
On creation of a user account, Permission Groups can also be applied. These will limit the access that the user has to the database. (For instructions on creating and editing these groups see Group Permissions in Section 3..3.10) The list box on the left, Available Groups, contains all permission groups in the system. Select one and use the direction button to move it to the Selected User Groups list box, and vice versa to remove a group. Clicking on the button with double direction arrows will either add or remove all of the groups.
This page facilitates the assignment of Security Permissions (a combination of Data Restriction permissions and settings including View and Module Permissions, Permission Groups, Password Expiry) that can be applied to the

SCI Store 8.3 Administration Guide
10/10/2013 13:55:19 65
user’s account. Select one and use the direction button to move it to the Selected Data Restrictions list box, and vice versa to remove a Data Restriction. Clicking on the button with double direction arrows will either add or remove all of the Data Restrictions. Please note that there are no default Data Restrictions within SCI Store and therefore need to be set-up.
Note. The permissions in the Data Restrictions will be combined with any previous set of permissions that have been applied to that user account.
Role Associations can also be applied to the user account. A Role acts as a combination of both Permission Groups and Security Permissions; it gives a User the ability to login in with a different set of security permissions to their default user account. (See section 3.3.2 – User Roles)
Once all details have been added or modified, click the Save button to complete the process. The status of the operation will be displayed at the bottom of the form.
To modify an existing user, click the Search button and then select the user that needs to be amended. The previous screen (where new users were added) will then be displayed.
Once the amendments have been made, save the changes by pressing the Save button.
5.1.1 Module Permissions
See Section 3.4.4 for more details.
5.1.2 View Permissions
View Permissions determine the patient records that a user is entitled to see and can be set-up either on an individual basis or on a group basis using the Permission Groups functionality.
In order to set-up a View Permission, firstly click the View Permissions button which in turn will display the View Permissions menu page (as displayed over the page).

SCI Store 8.3 Administration Guide
10/10/2013 13:55:19 66
From here, click on the required View Permission type (GP, Consultant, GP Practice, Hospital or Ward) to display screen like the one shown below.
In this example, the list on the left-hand side contains all the GPs that are currently in the SCI Store database. To create a view permission, select the appropriate GP from the left-hand list and click the appropriate Add> button depending on whether the GP selected is the registered GP for that patient or is a GP that has requested tests for that patient. The other permission types take the same format.

SCI Store 8.3 Administration Guide
10/10/2013 13:55:19 67
Note. A multiple selection can be made by holding down the Ctrl button and then selecting the fields to be added to the permission.
5.1.3 Change Password
Click on the Change Password button to display the following screen. From here, a user’s password can be amended, as per the rules governing the creation of passwords in SCI Store:
- Shall not be the same as, or contain, the account username; - Shall contain characters from three of the following four categories:
- uppercase alphabetic characters (A-Z); - lowercase alphabetic characters (a-z); - numerals (0-9); - non-alphanumeric characters, for example: ! $ # %.
- Shall be at least 8 characters long.
The system will lock a user’s account if the user fails to change the password 21 days after the due date.
5.1.4 Maintain Questions
Security questions need to be saved against a user account to allow the Password Reset functionality to be utilised (see SCI Store End User Guide – section 2.3).
To set-up the 3 initial security questions:

SCI Store 8.3 Administration Guide
10/10/2013 13:55:19 68
Create a new user account as described above
Once created, search for the user account on the User Search screen
Select the user account
Click Maintain Questions
As no questions have been set, the AskUserQuestions screen will be displayed (See below). Select 3 different questions and enter each answer (Note: An exact match is required for each answer when using the Password Reset functionality). Click Save.
It is also possible for users to define their initial security questions. This can be done by setting the value of the “SetUserQuestions” system setting to “True” (see section 3.1) – the AskUserQuestions screen (above) will then be displayed when the user logs in if they have no questions defined against their account. Once the questions have been defined, each user can manage their questions as described below.
Once the initial security questions have been set-up, any answers that were given can be amended whilst questions can be added or removed to/from the list of questions for that particular user. Consequently, clicking Maintain Questions will display the following screen (Maintain User Questions) that will allow a user’s security questions to be managed.

SCI Store 8.3 Administration Guide
10/10/2013 13:55:19 69
To add a new question, select a question from the drop-down list and enter the appropriate answer, click Add New Question.
To edit an answer, click Edit in the appropriate row – the Response cell in the table will be enabled – the answer can then be amended. Click Update once the answer has been changed.
To delete a question, simply click Delete in the appropriate row. This action will not be allowed if there are only 3 questions in the list.
Users are also able to manage their own security questions by accessing this screen via the Maintain Questions option on the Home menu
5.1.5 RestrictLocalAdmin System Setting
Local administrators can be restricted to administering passwords for the users in their base location via the “RestrictLocalAdmin” system setting. If this is set to true, when the administrator clicks on a username returned on the User Search screen, the Change Password screen (see section 3.3.1.3) will be displayed instead of the User Admin screen.
5.2 User Roles
On selecting the Security menu then selecting the Role Administration menu item, the following Role Administration search screen is displayed.

SCI Store 8.3 Administration Guide
10/10/2013 13:55:19 70
From this screen it is possible to search for an existing Role or Add a new
Role. When the button is clicked then the page overleaf is displayed.
To add a new Role the following information can be specified: (fields are not mandatory unless specified)
Role name – mandatory field with a maximum of 10 characters
Valid From & Valid To – dates specifying the period during which the Role is valid. These fields are ‘Date Picker’ controls allowing you to select the date from a drop-down calendar style control. Dates may also be entered by keyboard and will be auto formatted in dd/mm/yyyy format.
Role Status – mandatory field
Default Patient View –specifies the default view when the user navigates to the Patient Detail view for a specific patient in the application.
Time Access Template – specifies which Time Access template is enforced for this Role
Enforce Login Reason – checkbox which specifies whether the User must select a Login Reason when they login using the Role
Permission Groups – Multi-select tool which allows zero to many Permission Groups to be applied to the Role

SCI Store 8.3 Administration Guide
10/10/2013 13:55:19 71
Security Restrictions – Multi-select tool which allows zero to may Data Restrictions to be applied to the Role. When updating a Role Module Permissions and View Permissions buttons are also available.
Role Session Timeout - defines the time period in minutes that a user using this role can leave the system idle before being automatically logged out. If this is left blank the default defined by the DefaultSessionTimeout system setting will be used when the user logs in under this role.
Remote Profiles – Dropdown list of all the active remote profiles which can be selected.
Once all details have been added or modified, click the Save button to complete the process. The outcome of the process will be displayed in a message as below.
On saving a new Role the Delete button will become available.
To delete a Role search for and select a Role on the Role Administration screen. The page below will be displayed.

SCI Store 8.3 Administration Guide
10/10/2013 13:55:19 72
To delete the Role click the Delete button. There are certain conditions under which a Role may not be deleted.
The Role is currently assigned to a user or users.
The Role has in the past been used by a user or users, even if it is not currently assigned to any users.
On successfully deleting a Role, all controls on the page will be disabled with
only the back button left enabled as shown below.

SCI Store 8.3 Administration Guide
10/10/2013 13:55:19 73
At any time on the Role Maintenance page the Back button may be clicked to cancel whatever changes are pending and the user will be returned to the Role Administration search screen.
5.3 Data Restrictions
On selecting the Security menu then selecting the Data Restrictions menu item, the following screen is displayed.
From this screen it is possible to search for a data restriction as well as access the screen shown overleaf that allows a new data restriction to be added. Data Restrictions are made up of individual Field Permissions and are used to link User accounts with Field Permissions (see 3.3.4).
To add a new Data Restriction:
Click on the Add Restriction icon on the toolbar
The screen below will appear
Enter a name for the permission into the Data Restriction text box.
Click on the Save icon.
The screen on the following page will be displayed.
The Available Restrictions list box contains a list of all previously created Field Permissions. Select any or all of the available permissions and using the directional buttons move them to the Selected Restrictions list box. All field permissions selected will be applied to this group.
To save the new Group hit the Save button
To Delete an existing group hit the Delete button

SCI Store 8.3 Administration Guide
10/10/2013 13:55:19 74
To modify an existing Restriction, click on the Search button on the initial Data Restrictions screen, then select the group that is to be modified. The following screen will then be displayed to allow the details of an existing Restriction to be amended.
Once the modifications have been made click Save and then Exit.
5.4 Field Permissions
On selecting the Security menu then selecting the Field permissions menu item, the initial screen shown over the page is displayed.
This screen acts as a menu for two main options: to create a new permission and to amend or delete an existing one. To create a new permission, first select a table to create permission for and then click the Create Permission button. The following screen will then be displayed.

SCI Store 8.3 Administration Guide
10/10/2013 13:55:19 75
If a ‘blanket’ hide of a particular field is required, for example, all dates of birth, then the appropriate field(s) from the ‘Fields in Table’ list should be selected. If however, the restriction is more selective, for example, a particular ID number, then the appropriate field should be chosen from the Row Restriction drop-down list. These restrictions can then be created using operators such as ‘Like’, >, <, <>, >= and <=.
To create a new permission:
Enter a name for the permission in the Permission Name text box.
Select the field(s) to be hidden or select the row(s) that are to be restricted.
Select the records to be hidden.
Press save to complete the addition. Note. A multiple selection can be made by holding down the Ctrl button and then selecting the fields to be added to the permission.
To modify an existing permission, check the Permission List radio button as shown in the screenshot on the previous page. The following screen is then displayed. From here select the existing permission to be edited or deleted.

SCI Store 8.3 Administration Guide
10/10/2013 13:55:19 76
Note. You cannot delete a permission if it is currently in use by a Group.
If an existing permission is to be amended, the following screen will be displayed, in order to change the permission simply add or remove fields and then click Save.
To create a field level permission on the Document Upload functionality, a permission needs to be created on the t_PatientDocumentSearch and must be named as follows:

SCI Store 8.3 Administration Guide
10/10/2013 13:55:19 77
HideHighlySensitiveDocument
To create this permission, follow the steps outlined above to create a row restriction set Sensitivity = ‘h’. This permission can then be applied to a group(s). Note – the name of the group is not important.
[Note: For further information on document security, please refer to the SCI Store Security Reference Guide.]
5.5 Module Permissions
Module permission can be used to control user access to certain functions and menu options within SCI Store. Module Permissions can be configured against a User, User Role or Permission Group.
Where a User has been assigned one or more Permission Groups the user is given a combination of the User and all associated Permission Group Module Permissions at log in.
5.5.1 Module Permission Templates
Module Permissions can be configured against individual Users, User Roles and Permission Groups, but can also be configured as Module Permission Templates that can then be applied to a User, User Roles and Permission Groups.
By selecting the Security menu and then selecting the Module Permissions Templates menu, the following screen is displayed.

SCI Store 8.3 Administration Guide
10/10/2013 13:55:19 78
This page displays a list of Module Permission Templates that are currently available within the system. For here a user is able to create a new Template, edit the permissions of an existing Template or delete an existing Template. Templates which have been “greyed out” are core templates and cannot be deleted or edited.
To add a new permission template simply click the icon in the toolbar.
To modify the Module Permissions for an existing template, select the appropriate row in the grid. The page shown below will then be displayed.

SCI Store 8.3 Administration Guide
10/10/2013 13:55:19 79
This page displays some read only information at the top detailing the template that you are editing. It then contains a category drop-down list and a check-box list of permissions associated to the selected category.
By default all new templates will not have any module permissions assigned to them, so all check-boxes will be de-selected. To grant permission to a particular Module Permission simply click on the check-box or text of the desired permission so that the check-box becomes checked.
The permissions displayed can be changed by selecting a different category. To show all Module Permissions select “Show All..” from the category drop
down. To save a Module Permission configuration simply click the icon in the toolbar. A message will be displayed telling you whether the save has been successful.

SCI Store 8.3 Administration Guide
10/10/2013 13:55:19 80
5.5.2 User/Role/Group Module Permissions
Module Permissions for Users, User Roles, and Permission Groups can be configured by going via the relevant User/Role/Group configuration screen.
For example, to edit a users’ module permissions select Users from the Security menu, search for the user and click through to the Amend Existing User page. From here simply click the Module Permission button to take you to the Module Permission configuration page for that user.

SCI Store 8.3 Administration Guide
10/10/2013 13:55:19 81
Similar to the template configuration page the page displays some read-only information at the top detailing the User/User Role/Group that you are configuring. It also has the category and check-box lists seen previously.
Additionally the user will have the ability to apply Module Permission Templates to Users, Roles and Groups. To apply a pre-defined template simply select the appropriate template from the drop down list and click Apply. The Module Permissions check-box list will then be configured to match the Module Permissions of the Permission Template.
To save the permissions to the User, Role, or Group simply click the icon in the toolbar.
5.5.3 Module Permission Restrictions
If the user that is attempting to edit the Module Permissions of a User, User Role, Group or Template is only configured as a Local Administrator then they will only be able grant access to Module Permissions that they have access to themselves. I.e. they will not be able to grant more permissions than they have.
In these cases, when a Module Permission configuration page is loaded the permissions that the current user does not have access to will be highlighted in red and a message will be displayed above the check-box list.

SCI Store 8.3 Administration Guide
10/10/2013 13:55:19 82
A list of all Module Permissions, and a description of their function, is available in appendix B.
5.6 Remote Data Source Profiles
Remote Data Source Profile maintenance allows the administrator to set up profiles containing the various combinations of remote data sources required by a site. These profiles can then be attached to the relevant Users and/or Groups (see sections 3.3.1 & 3.3.10).
On selecting the Security menu and then selecting the Remote Data Source Profile Maintenance menu, the following screen is displayed.

SCI Store 8.3 Administration Guide
10/10/2013 13:55:19 83
Click the Search button and a list of the remote profiles in SCI Store will be displayed, alternatively enter the profile name for the criteria in order to return a sub-set of remote profiles. Selecting the appropriate remote profile will then display a screen similar to the one shown below (Note: how to define a Remote Data Source is described in section 2.11).
To add a new Remote Profile click on button on the Remote Data Source Profile Maintenance screen. The following screen will be displayed

SCI Store 8.3 Administration Guide
10/10/2013 13:55:19 84
Enter Profile Name
Select if the profile is ACTIVE or INACTIVE
To apply a remote data source to a remote profile, click “Allowed Access” radio button. To remove the Web Service against the remote
profile click on “Not Allowed Access” radio button. Click Save to apply the change.
Click on to Exit and go back to the Find Remote Profiles Screen.
To delete a Remote Profile click on the Delete icon.

SCI Store 8.3 Administration Guide
10/10/2013 13:55:19 85
There are certain conditions under which a Remote Profile may not be deleted.
o The Remote Profile is currently assigned to a user or users.
o The Remote Profile is currently assigned to a group or groups.
o The Remote Profile is currently assigned to a role or roles.
5.7 Permission Groups
A ‘Permission Group’ is a combination of permissions and settings (View and Module Permissions, Groups, Password Expiry), which can then be used as a template to be applied to user accounts.
To create a ‘Permission Group’, select Security and then Permission Groups from the Administration menu – the following screen is then displayed:

SCI Store 8.3 Administration Guide
10/10/2013 13:55:19 86
Click Add Group
The following screen will be displayed
Enter a Permission Group Name
Click on the Save icon
The screen below displays Available Remote Profiles as a dropdown. The selected Remote Data Source Profile will be applied to this group.
The screen below displays Available Data Restrictions. Selecting any or all of the available restrictions and using the directional buttons will move them to the Selected Restrictions list box. All restrictions selected will be applied to this group.
Click Save, and then Exit.

SCI Store 8.3 Administration Guide
10/10/2013 13:55:19 87
In order to add View and Module Permissions to the template, click Search to find the template just created and then select is by clicking the left-mouse button over the appropriate entry in the returned list. The screen will then be displayed as follows:
In order to add a View Permission, click View Permissions and select the required GP(s), Consultant(s), GP Practice(s), Ward(s) or Hospital(s) (see 3.3.1.2).
In order to add Module Permission, click Module Permissions. The following screen will then be shown:

SCI Store 8.3 Administration Guide
10/10/2013 13:55:19 88
From here, either a Module Permission template can be applied or the Module Permissions can be created to suit requirements.
5.8 Base Location
Base Location refers to the location of a particular sub-set of users; for example, it may be the name of a GP Practice or department. A Local Administrator would be associated with that base location and would be responsible for managing that set of users.
To create a Base Location, select Administration >> Security >> Base Locations.

SCI Store 8.3 Administration Guide
10/10/2013 13:55:19 89
Note. A default base location of “Local Store” will be available.
Click Add Base Location.
The fields are:
Field Type Description
Code Integer Unique Code for the Base Location.
Name Alpha-Numeric Descriptive name, to identify the Base Location.
Address (4 lines) Alpha-Numeric Address of the Base Location.
Postcode Alpha-Numeric Postcode of the Base

SCI Store 8.3 Administration Guide
10/10/2013 13:55:19 90
Location.
Telephone Number Alpha-Numeric Telephone number for the Base Location.
Fax Number Alpha-Numeric Fax number for the Base Location.
Contact Name Alpha-Numeric Name of main contact with the Base Location. Typically this would be the Administrator for this Base Location.
LHCC Alpha-Numeric Local Health Care Co-operative.
All fields are optional except for Code and Name. Click Save.
“Base Location has been saved” message will be displayed.
To delete a Base Location, select the base location to be deleted from the list
and click on the Delete icon.
If the Base Location has any users assigned to it then the Delete will fail with the following error message:
“This Base Location cannot be deleted. All users currently assigned to this Base Location must be either deleted or moved from this Base Location.”
If no user is assigned to the Base Location then “Base Location deleted” message will be displayed.
For further information on Base Location functionality see the SCI Store Remote Administration Guide.
5.9 Timed Access Templates
Timed Access Templates allow an administrator to limit the days of the week, and hours of the day during which an individual User or User Role is active.
On selecting the Security menu then selecting the Timed Access Templates menu item, the following page is displayed.

SCI Store 8.3 Administration Guide
10/10/2013 13:55:19 91
Any existing templates will be displayed in a grid below the ‘Add New Template’ fields.
To add a new template enter a name and description and click ‘Add’, on doing so the following page is displayed
This page allows the user to create Time Access Bands for the template just created.
Zero-to-many time bands may be created (zero time bands would mean that any User or Role assigned that template would be inactive), and more than one time band per day can be created.
To create a time band select a day from the dropdown list, and using the up or down buttons select a ‘Time From’ and a ‘Time To’ for the time band.
Users will be prevented from creating a time band which overlaps an exiting time band or time bands where the ‘To’ time is prior to the ‘From’ time.
As time bands are created they are displayed in the grid and ordered by day of the week as below

SCI Store 8.3 Administration Guide
10/10/2013 13:55:19 92
In the example above the template effectively allows access from 21:00 on Friday night to 08:00 on Monday morning (i.e. the weekend).
To delete a time band click on the ‘Delete’ link on the grid for the time band you wish to remove. The user will receive a confirmation prompt before the time band is deleted.
To delete a Time Access Template select the Timed Access Templates menu item under the Security menu item.
Click the Delete link in the grid next to the template you wish to delete.
A template cannot be deleted if it is assigned to a User or Role.
5.10 Login Reasons
A User or User logging in as a Role can be forced to select a Login Reason after they enter their username and password details.
This list of Login Reasons is maintained and configured by selecting the Login Reason Maintenance menu item from the General menu item; this displays the Login Reason Maintenance page below.

SCI Store 8.3 Administration Guide
10/10/2013 13:55:19 93
Login Reasons can be created by entering text in the Login Reason field and clicking on the ‘Add’ link.
On doing this the newly created Login Reason is displayed in the grid along with any other already created Login Reasons.
Note: No Login Reasons are created by default.
To delete a Login Reason click the delete link beside the Login Reason you wish to remove. A confirmation prompt will appear before the Login Reason is deleted.

SCI Store 8.3 Administration Guide
10/10/2013 13:55:19 94
6 Patient maintenance
6.1 Maintain Patient Consent Flag
Granted via the Module Permissions screen and part of the Maintain Patient toolset, the Maintain Patient Consent Flag allows the administrator to restrict/allow patient details shown on screen.
The Maintain Patient option is only automatically assigned to module permissions when applying the ALLOW ALL template.
The Maintain Patient screen (shown overleaf) is accessible through the Maintain Patient Icon on the Patient Details page.
The Maintain Patient Screen:

SCI Store 8.3 Administration Guide
10/10/2013 13:55:19 95
Checking/Un-checking the Patient Consent Given checkbox will have the effect of limiting the restricting/allowing what patient details are shown on screen. If this is un-checked (restricted), a page similar to that shown below will be displayed.
Example shows: Patient details restricted (Consent Flag set to NO):

SCI Store 8.3 Administration Guide
10/10/2013 13:55:19 96
Patient details are restricted to Name, CHI, and Date of Birth. To access this Patient Details a user must Break Glass.
6.2 Break Glass
Controlled by module permissions, this option allows users of the application to override a Patient’s “Consent”. This functionality maybe used in situations such as medical emergencies. To break glass on a patient click the padlock icon on the patient details screen

SCI Store 8.3 Administration Guide
10/10/2013 13:55:19 97
Users accessing this functionality must select a type and supply a reason before “breaking glass” on a particular patient.

SCI Store 8.3 Administration Guide
10/10/2013 13:55:19 98
The user will then be able to view the information held against that patient.
Note: Breaking Glass on a patient does not over-ride a users Field / Row restrictions

SCI Store 8.3 Administration Guide
10/10/2013 13:55:19 99
6.3 Break Glass Search
A “break glass instance” is rigorously audited; the username, break glass reason, event time and patient details are audited. This audit can be accessed via the Report->Break Glass Search menu option. The purpose of this screen is to provide administrators with a facility to search for occurrences of a break glass situation.
The default search range when the page is loaded is one month. Clicking on the search button performs a search, whilst clicking on the clear button, clears existing search criteria and results and restores the default search criteria.
This screen is shown below.
When performing a search the following rules should be applied:
- Period start and end dates must be provided.
- Where the period start and end dates span more than one year a username must be provided.

SCI Store 8.3 Administration Guide
10/10/2013 13:55:19 100
Clicking the details link displays the reason the user gave for breaking glass

SCI Store 8.3 Administration Guide
10/10/2013 13:55:19 101
6.4 Break Glass Maintenance
Accessed from the General->Break Glass Maintenance menu option this page allows an administrator to define “Break glass Types”. “Break glass Types” can be added or removed. The “types” are used in the break glass page itself

SCI Store 8.3 Administration Guide
10/10/2013 13:55:19 102
7 Manage Duplicates (Manual and Automated Merging)
Accessed via the Maintenance menu, the Manage Duplicates facility allows the user to search for duplicate records in SCI Store using a range of data (see over the page). So for example, it is possible to search for all the patients with the same forename and surname in order to determine if there are any duplicate records in the database. If any are found, the multiple records can then be merged into 1 single record.
7.1 Scheduling Considerations
The Automated job will run one query against the database for each candidate on the candidate list. This may have an impact upon database performance if the candidate list is not a manageable size.
A manageable size may be viewed as the number of candidates which can be reviewed and amended in a reasonable time by the user when the automated search has completed. For example a search with hundreds of candidates would require a lengthy time to process against the database - if each candidate returned a list of duplicates then the user would have to spend an inordinate amount of time reviewing the results.
The automated searches are run using the ‘Store Maintenance Plan’ functionality. This functionality is not ‘ON’ by default therefore the administrator must add a new string value registry key under SCI\Store14 called ‘MaintenancePlanSetting’, it should be given the value ‘1’. This will enable the Maintenance Plan functionality.
7.2 Scheduling Guidance
Users creating and scheduling searches should be aware of two points:
The larger the search the longer the search will take and the greater impact it will have on the database processing.
A large search run during peak times of day may diminish the response times for all users, it is recommended that a suitable window be established by the administrator which can be used when scheduling search jobs.
7.3 Manual Process Vs Automated Process
7.3.1 Manual Searching
The manual search utilises the original logic and code of the Find Duplicates page, this takes the search criteria and does an immediate search based upon the criteria entered.
The page shares some of the screen controls between both functions, primarily the Candidate Filter section and Match Criteria section. It should be noted that the ‘count’ button does not apply directly to the manual process as it is used to determine the size of the candidate list for the automated search.
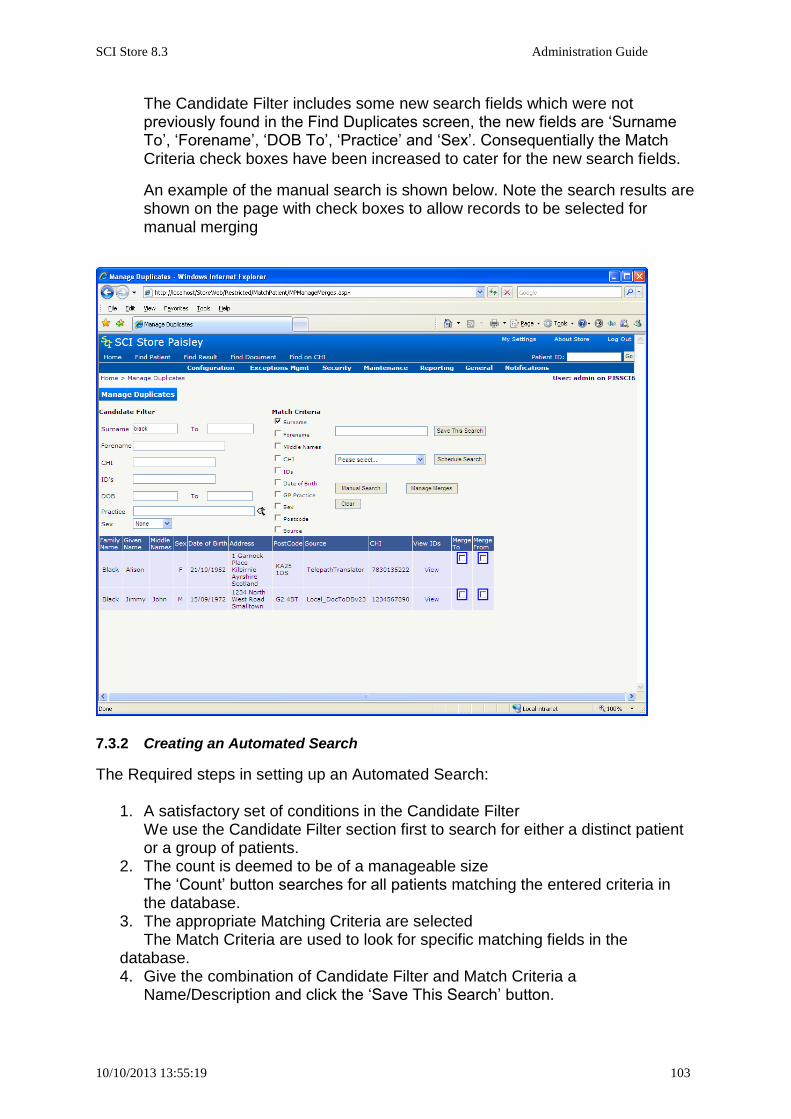
SCI Store 8.3 Administration Guide
10/10/2013 13:55:19 103
The Candidate Filter includes some new search fields which were not previously found in the Find Duplicates screen, the new fields are ‘Surname To’, ‘Forename’, ‘DOB To’, ‘Practice’ and ‘Sex’. Consequentially the Match Criteria check boxes have been increased to cater for the new search fields.
An example of the manual search is shown below. Note the search results are shown on the page with check boxes to allow records to be selected for manual merging
7.3.2 Creating an Automated Search
The Required steps in setting up an Automated Search:
1. A satisfactory set of conditions in the Candidate Filter We use the Candidate Filter section first to search for either a distinct patient or a group of patients.
2. The count is deemed to be of a manageable size The ‘Count’ button searches for all patients matching the entered criteria in the database.
3. The appropriate Matching Criteria are selected The Match Criteria are used to look for specific matching fields in the
database. 4. Give the combination of Candidate Filter and Match Criteria a
Name/Description and click the ‘Save This Search’ button.

SCI Store 8.3 Administration Guide
10/10/2013 13:55:19 104
7.3.3 Scheduling an Automated Search
A saved named search is a pre-requisite for scheduling a search. The search is selected from the drop down list and the ‘Schedule Search’ button is clicked.
The date and time can be modified before submission. When the submit button is clicked the number of candidates are checked against the system setting ‘AutoMergeMaxCandidates' which holds the preferred maximum candidate list size, the default is set to 50.
A warning message is displayed when the candidate list size exceeds the system setting to ensure that the user is aware of the size of the candidate list in light of the recommendations and considerations sections.

SCI Store 8.3 Administration Guide
10/10/2013 13:55:19 105
The automated search uses the patients from the Candidate Filter – these patients become the candidate list. The automated search runs each patient from the candidate list against the database with the selected Match criteria
7.3.4 Working with Scheduled Searches
The scheduled searches can be setup to run at any date and time in the present or future, once the search is saved it can be maintained from the new screen ‘MPAmendMerges’ which is accessed by clicking the ‘Manage Merges’ button.
The initial state of this screen shows no records, prompting the user to search against either the search name, dates or batch ID. The user can leave all fields blank and click the ‘Click Here To Search’ link button to bring back all the records.
The scheduled searches can not be accessed until the scheduled job has actually ran as shown in the screen shot below, note the description and action links within the grid table are greyed out.
Each automated search is setup as a scheduled Maintenance Plan Item. The searches can be amended and deleted from the Store Maintenance Plan before the scheduled item has run.

SCI Store 8.3 Administration Guide
10/10/2013 13:55:19 106
The Store Services which run the Interfaces/Services also run any Maintenance Plan items. This will automatically run the scheduled searches at the date and time specified. Scheduled searches which have been run will become enabled
When the Maintenance Plan item runs it generates an individual query for each member of the candidate list, each set of results is then analysed to establish the parent.
As the job runs it whittles down the candidate list, removing candidates from the search who have already been returned as duplicates.
Clicking on the Description will allow the results of the automated search to be displayed.

SCI Store 8.3 Administration Guide
10/10/2013 13:55:19 107
The remaining candidates are shown on the left hand side with a count of the number of children identified. Clicking on the child count shows the patients on the right hand side.
The user can check the details of each patient by hovering over the right hand side patients name and viewing the tooltip.
The option to merge a record is exercised by checking the check box. The parent record is highlighted by the selected radio button. A parent record always forms part of the merge and so does not require a check box; the user can change the selected parent if required.
The user must click the ‘Save Changes’ button to ensure that all changes are saved.
7.4 Performing the Merge/Unmerge
Each automated search can be merged and unmerged only once, the results can be viewed via the Audit Report.
A merge reason must be provided when the merge or unmerge action has been selected.
The record is now updated providing a ‘View’ link button and the ‘unmerge’ action which basically acts as the undo.

SCI Store 8.3 Administration Guide
10/10/2013 13:55:19 108
The report contains all the required information on the merge and looks as follows:
7.5 Find Merges
Accessed from the Maintenance menu, the Find Merges menu allows the user to search for merged records in SCI Store. If any are found, then multiple records can be unmerged from a single parent record.
Enter the search criteria and click Search.
To unmerge a patient, click on the appropriate patient. This will display the following screen:

SCI Store 8.3 Administration Guide
10/10/2013 13:55:19 109
When the Unmerge box is checked the Proceed with Unmerge button will be displayed, clicking on this button will result in the two patient records being unmerged and returned to the state they were in prior to the original merge.
Clicking on the Merge Audit button will display the following screen:

SCI Store 8.3 Administration Guide
10/10/2013 13:55:19 110
The Merge Audit screen displays an audit trail of merge/unmerge transactions for the patient chosen.
Clicking on the Preview button will allow the user to print off a copy of the Merge Audit details for a patient.
7.6 Flagging Duplicate Patients
General end-users can flag duplicate patients via the Find Patient screen; to do this they must have the Flag Duplicate Patients module permission.
The number of patients allowed to be flagged as duplicates is defined by the MaximumDuplicatePatients system setting, the default of which is 5. A lower and upper range between 2 and 10 exists. This system setting can be controlled by the SCI Store administrator.
Further information on Flagging Duplicate Patients can be found in the SCI Store – End User Guide.doc
7.7 Find Duplicate Patient Requests
Accessed from the Maintenance menu, the Find Duplicate Patient Requests page allows an administrator to search for duplicate patient requests that have been submitted by end users. An administrator must have the Search Duplicate Patient Requests module permission to access this screen.

SCI Store 8.3 Administration Guide
10/10/2013 13:55:19 111
When first loaded the following defaults are applied to the search criteria (these are highlighted by point 1 of the following diagram):
Request Date: Date range covering the last 30 days.
Request Status: Defaults to Outstanding The default search criteria can be amended. To perform a search, enter at minimum the mandatory search criteria and click the Search button.
To view additional details relating to the request click on any row in the search results (point 2 in the diagram below) to be directed to the Duplicate Patient Request Details page.
Some rules are applied to the Request Date search criteria:
Date range cannot be greater than 365 days.
Dates cannot be greater than today’s date.
If dates span a date range that is greater than 30 days a warning message will be displayed informing the user that Wide-Ranging Search Criteria has been specified which may have adverse effects on the system. The user can opt to continue with the search by clicking on OK. Clicking on Cancel will end the search. The following diagram shows the warning message.
If the rules above are broken or mandatory fields are not completed, an error message will be displayed as shown below.

SCI Store 8.3 Administration Guide
10/10/2013 13:55:19 112
7.7.1 Duplicate Patient Request Details
Full details of a duplicate patient request can be viewed by selecting an entry returned from the Find Duplicate Requests search results screen. This will redirect the user to the Duplicate Patient Request Details page. The details page is broken into three sections:
Request Details (point 1, diagram below): Overview of the request
Completion Details (point 2, diagram below): Current status of the request.
Duplicate Patients (point 3, diagram below): Lists of patients flagged as duplicates for a particular request.
Clicking on any row in the Duplicate Patients section will redirect users to the Patient Details screen for the selected patient (point 4, in the diagram above). From this screen a user can update the status of a request either by clicking
on the icon on the toolbar (point 5, in the diagram above) or by selecting the Process action from the toolbar (point 6, in the diagram above). Only users that have been granted the module permission Process Duplicate Patient Requests will be able to perform these actions.
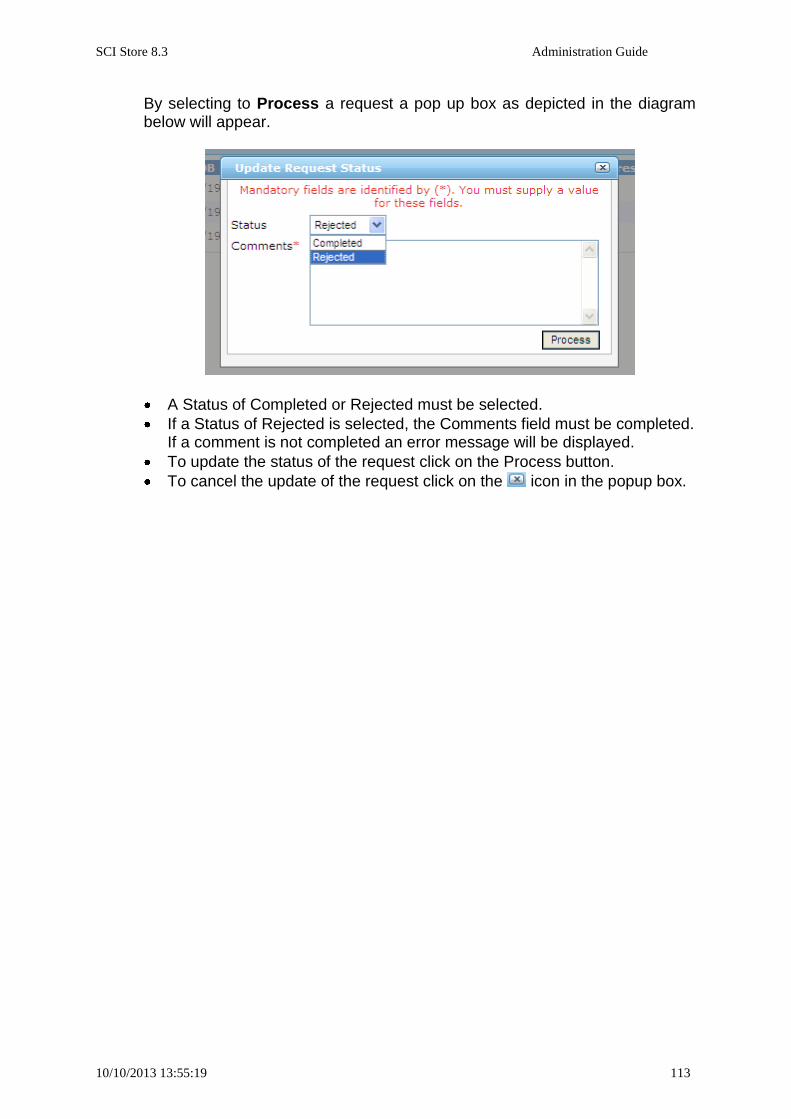
SCI Store 8.3 Administration Guide
10/10/2013 13:55:19 113
By selecting to Process a request a pop up box as depicted in the diagram below will appear.
A Status of Completed or Rejected must be selected.
If a Status of Rejected is selected, the Comments field must be completed. If a comment is not completed an error message will be displayed.
To update the status of the request click on the Process button.
To cancel the update of the request click on the icon in the popup box.

SCI Store 8.3 Administration Guide
10/10/2013 13:55:19 114
8 Store Maintenance plan
Accessed from the Maintenance menu, the Store Maintenance menu provides the functionality for administrators to automate the maintenance of the components that together provide the results reporting for the end user.
For further information, see:
Exceptions Management Overview
SCI Store – Store Maintenance Administration Guide

SCI Store 8.3 Administration Guide
10/10/2013 13:55:19 115
9 Statistics
As the name suggests, the Statistics screen provides a range of statistics with regards to Patient records, Test Results, User accounts and Interfaces. To access this screen, select Statistics from the Reporting menu, the following screen will then be displayed:
From here a full list of the available statistics is displayed. At present these are:
Patients created/updated by month or by day
Results created by discipline by month or by day
Access details of users (when last accessed, numbers of patients/results accessed) by month or by day
Interface details (no of messages, errors and exceptions per interface) by month or by day
In order to access the required set of statistics, click on the appropriate link.

SCI Store 8.3 Administration Guide
10/10/2013 13:55:19 116
From here, enter the appropriate criteria and click Search. The required statistics will then be displayed on screen.

SCI Store 8.3 Administration Guide
10/10/2013 13:55:19 117
10 Patient Information Status Maintenance
The Patient Information Status Update option is found on the Maintenance menu and allows the user to search for patients and update the status of Ids, Names, Telecoms and Result Reports associated with them.
This functionality was introduced to allow administrators to delete or hide information against a patient that may have been added erroneously, e.g. a wrong patient identifier.
Users will initially be able to set the information to have a status of one of the f values below. Each value has a related flag that determines if information set to that status will be actively used in patient matching and also visible in the front end.
Status Active for matching
Active Active
Retired Active
Deleted Inactive
The values above are data driven and more values can be added manually. Please contact the SCI Store Support team for information on how to add more Status values
10.1 Patient Information Status Update search
Enter the search criteria and click Search.
To display the Update Information Status page, click on the appropriate patient.
10.2 Update Information Status
The Update Information Status page shows the basic patient demographics, along with a tabbed list of the relevant patient information.

SCI Store 8.3 Administration Guide
10/10/2013 13:55:19 118
10.2.1 Identifiers
The IDs tab displays a list of patient identifiers associated to the selected patient and all patients merged to that patient.
The current CHI number of the patient is not displayed and so cannot be updated. If a patient has been merged the CHI numbers of the secondary patients in the merge will be displayed and can have their status changed.
To edit the status of an ID, click on the Edit Status link on the desired row. A popup will be displayed that will display details of the selected ID and a drop down allowing the status to be changes.
IDs that have previously been set to an inactive status cannot have their status changed. In these cases the Edit Status link will be disabled
A dialogue will be displayed to confirm the status change.

SCI Store 8.3 Administration Guide
10/10/2013 13:55:19 119
An ID that is set to an “inactive” will no longer be visible against the patient in the front end and will also not be used during the patient matching process.
If a new/updated record is fed in to Store containing that ID, a new entry will be created for the ID, with the original remaining with its existing status.
NB If secondary CHI is set to an “Inactive” status it will be removed from the basic demographics of the secondary patient. If the patients are subsequently unmerged then the chi will not be restored as the secondary patients CHI number
10.2.2 Names
The Names tab displays a list of all previous and attached names associated to the selected patient and the patients merged to it.
Similar to the IDs, names that have previously been set to an inactive status will be visible but cannot have their status changed. To change the status of a name, click the Edit Status link on the relevant row.
A popup will be displayed that will contain details of the selected Name and a drop down allowing the status to be changed.
A dialogue popup will be displayed to confirm the status change.

SCI Store 8.3 Administration Guide
10/10/2013 13:55:19 120
A Name that is set to an “inactive” will no longer be visible against the patient in the front end and will also not be used during the patient matching process.
If a new/updated record is fed in to Store containing that Name, a new entry will be created for the Name, with the original remaining with its existing status
10.2.3 Telecoms
The Telecoms tab displays a list of all Telecoms associated to the selected patient and the patients merged to it.
Similar to the IDs, Telecoms that have previously been set to an inactive status will be visible but cannot have their status changed. To change the status of a Telecom, click the Edit Status link on the relevant row.
A popup will be displayed that will contain details of the selected Telecom and a drop down allowing the status to be changed.
A dialogue popup will be displayed to confirm the status change.
If a new/updated record is fed in to Store containing that Telecom, a new entry will be created for the Telecom, with the original remaining with its existing status.
10.2.4 Result Reports
The Results tab displays a list of all Result Reports associated with the selected patient and the patients merged to it.
Similar to the above, Results that have previously been set to an inactive status will be visible but cannot have their status changed. To change the status of a Result, click the Edit Status link on the relevant row.
A popup will be displayed that will contain details of the selected Result Report and a drop down allowing the status to be changed.

SCI Store 8.3 Administration Guide
10/10/2013 13:55:19 121
Changing the status of a result report will affect all investigations attached to that report. A warning is given in the confirmation dialogue.
Result reports behave slightly differently to the demographics above when an update is fed in after the status of a result report has been changed.
The status of the result report will be re-set back to the original “Active” value and an entry will automatically be entered into the status audit table.
10.3 Notification Events
Updating the status of Patient Information will result in Notification Events being raised.
In all cases a Patient Event will be raised. Within this patient event, the Patient Process Events field will contain information relating to the status update. The Patient Process Events will hold information of the updated ID, Name or Telecom, including the new status.
In the case of a Result Report status update, the Patient Process Events field will contain the relevant Report Identifier and Store ID, along with the new Status. Result Notification events will also be created for the affected result report.

SCI Store 8.3 Administration Guide
10/10/2013 13:55:19 122
11 eBIz Audit
The eBiz Audit option provides the functionality to re-send XML messages to the appropriate eBiz queue. So for example, if a record comes into SCI Store from the COMPAS system but for whatever reason does not make it into the correct eBiz queue, this screen facilitates the re-sending of this message to eBiz.
To re-send a message to eBiz, enter the appropriate search criteria and click Search.
When the results have been returned, clicking the SendToEBiz button will re-send these messages to the appropriate eBiz queue.
This functionality is only available if the System Setting ‘PersisteBiz’ has been created as described in section 3.1.

SCI Store 8.3 Administration Guide
10/10/2013 13:55:19 123
12 Orphan Doc. Cleanup
If a document is processed unsuccessfully, the XML file that contains the metadata is processed but the document itself is not and as a result is left in the document folder. The Orphan Doc. Cleanup screen provides the mechanism to delete these documents so that the document folder can be maintained.
For further information see the DocumentToDatabase user guide.

SCI Store 8.3 Administration Guide
10/10/2013 13:55:19 124
13 Cumulative reporting
13.1 Cumulative system settings
See Administration Section ### (3.1) for the steps required to implement the system settings.
There are 9 system settings for cumulative reporting:
'CumulativeDefaultOrderDesc'
The requested default OrderBy is sample date Descending. If this requires to be changed to Ascending then set this to FALSE.
'CumulativeDefaultView'
Legitimate values are either ‘Dates on X-axis’ or ‘Dates on Y-axis’.
‘Dates on Y-axis’ shows dates down the vertical axis and results along the horizontal axis. ‘Dates on X-axis’ shows results down the vertical axis and dates along the horizontal axis.
'CumulativeReportDays'
This represents the number of days back from todays date to be searched against. Search range is inclusive of ‘From’ and ‘To’ dates
'CumulativeDiscoveredDates'
The setting ‘CumulativeReportDays’ will restrict the results against a date range. Setting ‘CumulativeDiscoveredDates’ to ‘TRUE’ will automatically populate the dates from the earliest found to the most recent, this is particularly useful when testing the cumulative reporting functionality.
'CumulativeNoOfColumns'
This represents the number of columns displayed horizontally across the page.
'CumulativeNoOfRows'
This represents the number of rows displayed vertically down the page.
'CumulativeTextLength'
This represents the length of a text result within the report grid, anything less than or equal to the length is displayed in the grid - anything greater than the value is represented by a notepad icon with a link to the results.
N.B. Not Table results

SCI Store 8.3 Administration Guide
10/10/2013 13:55:19 125
'CumulativeShowDescription'
The data grid will default the column / row headers with Codes, setting this to TRUE will populate the description instead.
‘CumulativeRestrictedDate’
This setting represents the earliest date that can be used in the cumulative search criteria. During setup of the page the ‘From’ and ‘To’ date fields will have their minimum value set to the value of this setting.
If the date in this setting is later than the dates calculated by the ‘CumulativeReportDays’ or ‘CumulativeDiscoveredDates’ then the date field will be populated with the date set in the ‘CumulativeRestrictedDate’ setting.
13.2 Setting up a Cumulative Grouping
A Cumulative Grouping will be used when filtering and grouping records to be viewed via the Cumulative Report screen.
Cumulative Groupings are accessed via:
General
Cumulative Sources menu

SCI Store 8.3 Administration Guide
10/10/2013 13:55:19 126
Enter an appropriate Cumulative Grouping Name in the text box which reflects the intended use of the new grouping.
Click the Add New button, the screen will be refreshed and the new Cumulative Source added to the grid.
On the far right of the new row there are options to either ‘Edit’ or ‘Delete’ the selected Cumulative Source.
13.2.1 ‘Edit’
‘Edit’ will expose the Cumulative Source in a text box for edit, the far right of the row will now contain ‘Update’ and ‘Cancel’ options.
13.2.2 ‘Delete’
Delete will prompt the user to confirm or cancel the requested choice.
13.3 Maintaining a Cumulative Source
Click on the Cumulative Grouping Name to show the ‘Maintain Group’ for the selected Group

SCI Store 8.3 Administration Guide
10/10/2013 13:55:19 127
Select an item from the drop down list which has the default value ‘Please select an Interface …’
The drop down list will be populated with all the Services \ Interfaces set up against the SCI Store e.g. ‘Telepath’ or ‘Masterlab’.
Select an Interface and click the ‘Add New’ button, the interface is now associated with the Group.
Many similar interfaces can be added to a group. The interfaces added can be deleted if required.
13.3.1 ‘Delete’
Delete will prompt the user to confirm or cancel the requested choice.
Click Exit button to return to the ‘Maintain Cumulative Sources’ screen.

SCI Store 8.3 Administration Guide
10/10/2013 13:55:19 128
13.4 Cumulative Report Profile Templates
Cumulative Reporting can now be run using Report Profile Templates to filter the results to show only specific Result Sets (e.g. FBC, Lipids). See section 3.20 for details on how to configure Report Profile Templates.
13.5 Granting Cumulative Permissions
Security is present for Cumulative Sources, Cumulative Reporting and Cumulative Report Templates separately.
These are controlled by the module permissions ‘General Admin’ from the Administration category, and ‘Cumulative Report’ and ‘Cumulative Report Profile Templates’ from the Results Category.
See section # (formerly 3.4.4.) for details on how to configure a users’ Module Permissions.

SCI Store 8.3 Administration Guide
10/10/2013 13:55:19 129

SCI Store 8.3 Administration Guide
10/10/2013 13:55:19 130
14 Automatic CHI Lookup
The Automatic CHI Lookup functionality relates to individual interfaces. When a file containing patient demographics is transferred into Store a search for the patient details on CHI will be triggered. If a match for the incoming patient demographics is found on the National CHI Database, the CHI demographics will be saved to Store.
14.1 System Settings & CHI Admin Configuration
To enable Automatic CHI Lookup for an interface the following configuration is required:
CHICertificatPath – This system setting sets the default filepath location of the SSL certificate required to access the CHI web services.
CHIWebServiceURL – This system setting sets the default URL for the CHI web services.
CHI Admin Configuration - define and configure the connection to the National CHI database via the CHI Admin Screen (see Section 3.3 for details).
14.1.1 Amend Service Definition Screen
The CHI Demographics checkbox must be ticked as displayed on the screen above.
When this checkbox is ticked the Enforce CHI Demographics Match checkbox is displayed.
If the Enforce CHI Demographics Match checkbox is ticked and the patient matching rule being applied involves a CHI Search, then the patient demographics will only be saved to Store if a successful match on CHI is found for the incoming patient details. If no match is found on CHI an exception will be raised.
If the Enforce CHI Demographics Match checkbox is unchecked, then the incoming patient demographics will be saved to Store regardless of whether a match is found on CHI or not.

SCI Store 8.3 Administration Guide
10/10/2013 13:55:19 131
14.1.2 Interface Patient Match Rules Screen
The patient matching rules applied here relate to finding a match for the incoming patient details with an existing patient on SCI Store.
The C/D (CHI Demographics) setting should be enabled for each individual patient matching rule that is required to search the CHI to find the patient demographics.
If the Populate missing CHI numbers checkbox is ticked, then any file not containing a CHI number will automatically perform a CHI Search for whichever patient matching rule is matched.
If a CHI match is found for the patient, all the demographics on Store for the patient will be updated (not just the CHI number).

SCI Store 8.3 Administration Guide
10/10/2013 13:55:19 132
14.1.3 CHI Patient Match Rules Screen
When an interface uses Automatic CHI Lookup, a CHI matching rule must also be assigned.
The patient matching rules applied on this screen relate to finding a match for the incoming patient details with an existing patient on the CHI. These matching rules are used to populate the search criteria used by the CHI’s patient search functionality to find a match.
The CHI’s patient search functionality will not always return an exact match in relation to the search criteria applied therefore a further check is made within Store to ensure that the patient returned is an exact match.
If an exact match is found, the CHI demographics will be saved to Store as the current demographics for this patient. The demographics on the incoming file will also be saved as historical demographics for this patient.
If no exact match is found, and the Enforce CHI Demographics Match rule is switched on for this interface, a CHI Match error will be raised and no demographics will be saved to Store.
If the CHI demographics fail to match against any of these rules and Enforce CHI Demographics Match is switched off for this interface, no CHI Match error is raised. The demographics on the incoming file will be saved to Store.

SCI Store 8.3 Administration Guide
10/10/2013 13:55:19 133
14.1.4 Redundant CHI Numbers
If the Automatic CHI Lookup facility is invoked by a patient matching rule and the incoming file contains patient details that include a redundant CHI number the following logic will apply:
If a match on CHI is found, the current CHI number will be returned
If the invoked SCI Store matching rule matches on CHI Number it will use the current CHI number
Both current and redundant will be stored as IDs against the patient in SCI Store

SCI Store 8.3 Administration Guide
10/10/2013 13:55:19 134
15 Anonymous Patients
There is a requirement within SCI Store to be able to receive, display and output Anonymous Patients. Only designated users will have the ability to view these patients once they are in SCI Store.
15.1 Receiving Anonymous Patients
Before a SCI Store can receive Anonymous Patients an Anonymous Translator must be setup (see section 2.1.3.3 TranslatorFromDatabase Service for setting up translators). This translator will contain any matching rules etc specific to anonymous patients. On the Amend Interface screen setup the Service Type, Name, Polling Interval and Batch Size as required. As shown below the Status radio button must be set to Off. Select the relevant Match Patient rule (currently anonymous patients only match on CRN.)
Once this screen has been setup open the Amend Translator From Database screen by clicking on the Configure button. The source system for this anonymous translator should match the source system of the translator it will be used with. The identify anonymous checkbox must remain unchecked on the anonymous translator.
The anonymous translator should be associated with an existing translator that has already been setup. For example if a Translator has previously been setup to handle Masterlab files, this translator can be updated to additionally handle Anonymous Patients via Masterlab files.
To allow an existing translator to handle Anonymous Patients open the relevant translator and open the Amend Translator From Database screen as shown below.

SCI Store 8.3 Administration Guide
10/10/2013 13:55:19 135
The identify anonymous checkbox should be checked which will display an Anonymous Translator dropdown list. The relevant anonymous translator should be selected from the list. Click on Save to save these changes.
Once this has been setup the system is ready for receiving anonymous patients.
15.2 Displaying Anonymous Patients
To allow Anonymous Patients to be displayed within a system the System Setting ShowAnonymous must be set to True. By default this is set to False. See section 3.1 for more information on System Settings.
Once this system setting has been set; users with the ViewAnonymous module permission will be able to search for Anonymous Patients via the Find Patient screen using the Advanced Search Criteria (see user guide for more information.) Unless both the System Setting and Module permission have been set to True and Allow respectively no anonymous patients can be searched on via the Find Patient screen. (See section 3.4.3 for more information on Module Permissions.) No results associated to an anonymous patient will be returned via the Find Result screen.
Note: If the System Setting is set to False and the Module Permissions is set to Allow users will not be able to search on Anonymous Patients via the Find Patient screen as the System Setting will override the Module Permission.

SCI Store 8.3 Administration Guide
10/10/2013 13:55:19 136
15.3 Requesting Anonymous Patients
To allow web service users to get anonymous patients the user account must have the module permission View Anonymous Patients set to Allow.
Please note the value of the ShowAnonymous system setting has no effect on Web Services.
To request anonymous patients through Notification Services web service users should create a result subscription to receive notifications from the relevant Requesting Organisation (Location). The process for subscribing to Notification Services is described in the Store Notification Services User Guide.doc.
For web service users accessing Anonymous Patients via 4.1 Web Services the following rules will apply:
FindPatient will include an IncludeAnonymousPatients flag. Where this is set to “True” and the web service user has been given permissions to view anonymous patients then both anonymous and non-anonymous patients will be returned.
GetPatient will return results for anonymous patients if the Module Permission is set to Allow. A SOAP Exception will be returned if Module Permissions is set to Restrict.
FindResult will return results where the Module Permission is set to Allow and the IncludeAnonymousPatients flag is set to “True”.
GetResult will return results for anonymous patients if the Module Permission is set to Allow. A SOAP Exception will be returned if Module Permissions is set to Restrict.
For web service users accessing Anonymous Patients via 2.3 Web Services the following rules will apply:
FindPatient and FindResult, will not return Anonymous Patients
GetPatient will raise a SOAP Exception if a request is made for an Anonymous Patient.
GetResult will return results if the Module Permission is set to Allow. A SOAP Exception will be returned if Module Permissions is set to Restrict.

SCI Store 8.3 Administration Guide
10/10/2013 13:55:19 137
16 Notification Services
SCI Store Notification Services allows web service users to register an interest in Patients, Results or Treatment Logs and be informed of any changes which meet these interests. The functionality is split into two distinct functional areas.
Subscription Management. Manages subscriptions to Patients, Results and Treatment Logs. These subscriptions detail interest criteria e.g. a user can show an interest in all Patients with a particular Consultant, or a user can register an interest in all Treatment Log entries from a particular site.
Patient and Result subscriptions are added by the user via Web Services, or by an administrator in the front end, depending on the users’ Subscription Maintenance Mode. The Treatment Log subscriptions can only be added by an administrator user in the front end.
Notifications. Notifications inform user when an event, which matches the users subscriptions, occurs in SCI Store. These Notifications are stored in a database table, for later pick up by the user via Web Services.
The events that SCI Store creates notifications for are
Patient Demographics added/edited in SCI Store
Patient Merge/Unmerge
Patient consent change
Test Report added/edited in SCI Store
Treatment Log added/edited in SCI Store
To monitor Notifications and Subscriptions through the SCI Store Web Front-end users should click on the Notifications admin menu. Four options will be displayed; these are described in more detail below.
16.1 NS Message Audit
Enter a valid Subscriber Name in the username box,
Select either Outstanding or Consumed from the Message Status dropdown list.
Select Period Start and Period End dates
Click on the Search button
A list of either Outstanding or Consumed notification messages will be displayed, depending on the option selected.
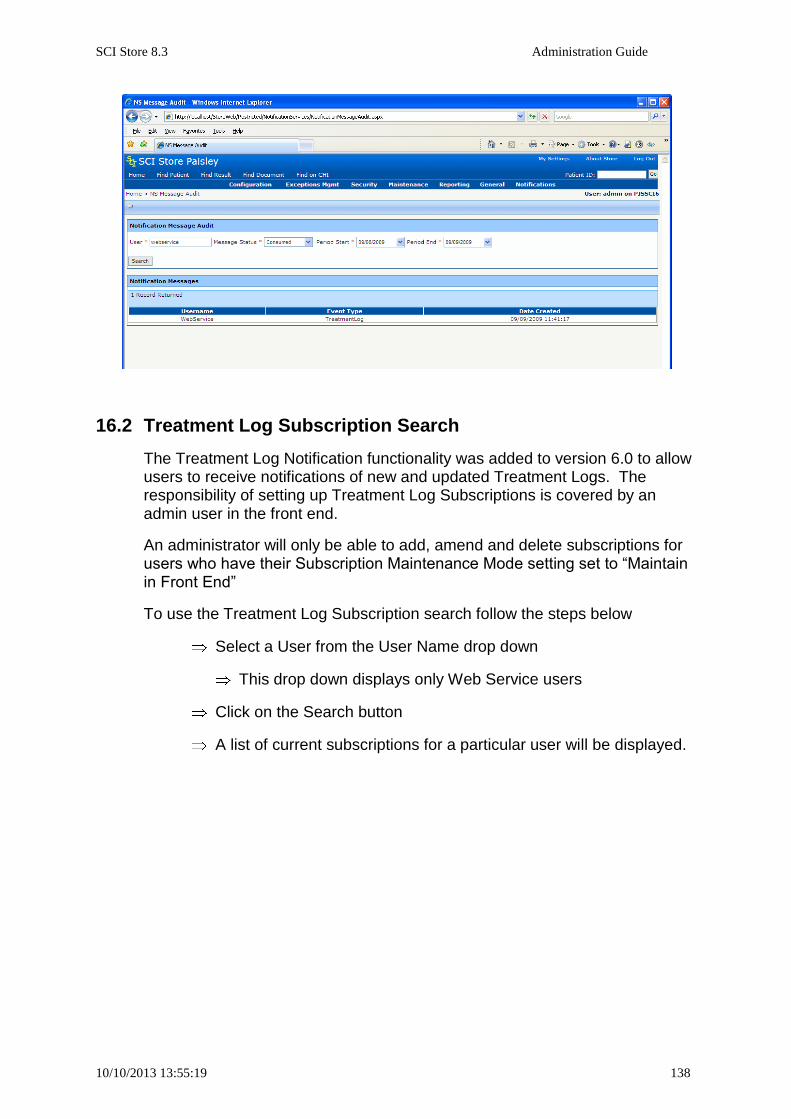
SCI Store 8.3 Administration Guide
10/10/2013 13:55:19 138
16.2 Treatment Log Subscription Search
The Treatment Log Notification functionality was added to version 6.0 to allow users to receive notifications of new and updated Treatment Logs. The responsibility of setting up Treatment Log Subscriptions is covered by an admin user in the front end.
An administrator will only be able to add, amend and delete subscriptions for users who have their Subscription Maintenance Mode setting set to “Maintain in Front End”
To use the Treatment Log Subscription search follow the steps below
Select a User from the User Name drop down
This drop down displays only Web Service users
Click on the Search button
A list of current subscriptions for a particular user will be displayed.

SCI Store 8.3 Administration Guide
10/10/2013 13:55:19 139
16.2.1 Add Treatment Log Subscription
Treatment Log Subscriptions are added from the Treatment Log Subscription Search page, which is found in the Notifications admin menu.
To create a new Treatment Log Subscription
Select the user from the User drop down
If the user Subscription Maintenance Mode = “Maintain in Front
End” the button will be displayed
Click the in the toolbar to navigate to the Add Treatment Log
page

SCI Store 8.3 Administration Guide
10/10/2013 13:55:19 140
From here users can configure Treatment Log Subscriptions with at least one of the following criteria
o Site (e.g. Hospital, GP Practice)
o Specialty (e.g. Cardiology, General Medicine)
o Patient Type (Inpatient, Outpatient or Day Case)
To select a Site
o Type a key-word in the Site field and click search
o A list of possible matches will be displayed
o Select a site by double clicking on it
When the criteria are selected, click the icon to save the subscription. This will return to the list of Treatment Log subscriptions and display a message if the save was successful.
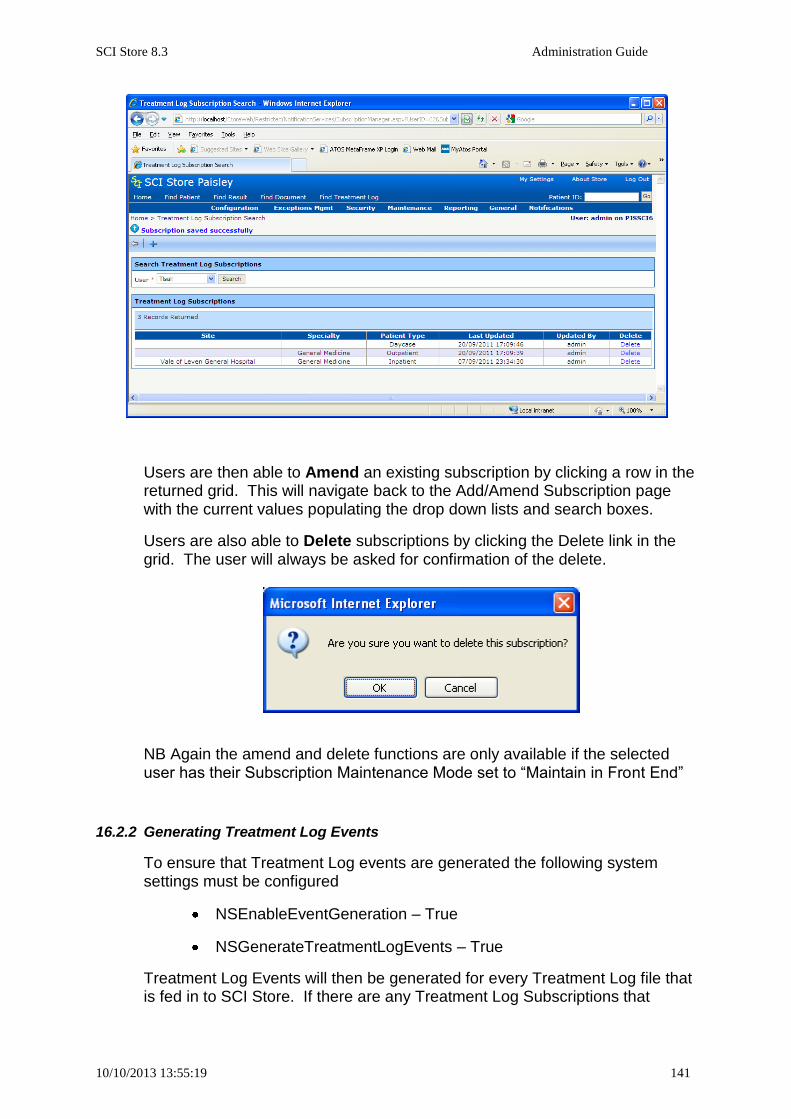
SCI Store 8.3 Administration Guide
10/10/2013 13:55:19 141
Users are then able to Amend an existing subscription by clicking a row in the returned grid. This will navigate back to the Add/Amend Subscription page with the current values populating the drop down lists and search boxes.
Users are also able to Delete subscriptions by clicking the Delete link in the grid. The user will always be asked for confirmation of the delete.
NB Again the amend and delete functions are only available if the selected user has their Subscription Maintenance Mode set to “Maintain in Front End”
16.2.2 Generating Treatment Log Events
To ensure that Treatment Log events are generated the following system settings must be configured
NSEnableEventGeneration – True
NSGenerateTreatmentLogEvents – True
Treatment Log Events will then be generated for every Treatment Log file that is fed in to SCI Store. If there are any Treatment Log Subscriptions that

SCI Store 8.3 Administration Guide
10/10/2013 13:55:19 142
match the Treatment Log Event details a notification will be created for that User and sent to the Notification table. From there the user can pick it up via the Get Notifications Web Service.
In the case of an update to an existing Treatment Log, two events will be created – one for the Treatment Log as it was before the update and one as it is after the update. This is to ensure that users still get a notification when the Treatment Log changes from what the user has originally subscribed to. This should allow them to update their system/records accordingly.
16.3 Patient Subscription Search
The Patient Subscription Search page allows an administrative user to search, add, amend and delete Patient Subscriptions.
An administrator will only be able to add, amend and delete subscriptions for users who have their Subscription Maintenance Mode setting set to “Maintain in Front End”
To use the Patient Subscription search follow the steps below
Select a User from the User Name drop down
This drop down displays only Web Service users
Select the Subscription Type
Enter criteria as required
Only criteria that is part of the selected Subscription Type will be enabled
Click on the Search button
A list of current subscriptions for the selected criteria will be displayed.

SCI Store 8.3 Administration Guide
10/10/2013 13:55:19 143
16.3.1 Add Patient Subscription
Patient Subscriptions are added from the Patient Subscription Search page, which is found in the Notifications admin menu.
To create a new Patient Subscription
Select the user from the User drop down
If the user Subscription Maintenance Mode = “Maintain in Front
End” the button will be displayed
Click the in the toolbar to navigate to the Add Patient Subscription page
From here users can configure Patient Subscriptions as one of the following types
o All Patients (creates a “global” subscription)
o CHI
o PatientID
o GP Practice
o Consultant
o Ward
o CHI and GP Practice

SCI Store 8.3 Administration Guide
10/10/2013 13:55:19 144
On selecting one of the subscription types, further criteria controls will be displayed e.g
o Textbox to enter CHI or Patient ID
o Search box to search for the desired GP Practice, Consultant or Ward
When the criteria has been entered, click the icon to save the subscription. This will return to the list of Patient subscriptions and display a message if the save was successful.
Users are then able to Amend an existing subscription by clicking a row in the returned grid. This will navigate back to the Add/Amend Subscription page with the current values populating the drop down lists and search boxes.

SCI Store 8.3 Administration Guide
10/10/2013 13:55:19 145
Users are also able to Delete subscriptions by clicking the Delete link in the grid. The user will always be asked for confirmation of the delete.
NB Again the amend and delete functions are only available if the selected user has their Subscription Maintenance Mode set to “Maintain in Front End”
16.4 Result Subscription Search
The Result Subscription Search page allows an administrative user to search, add, amend and delete Result Subscriptions.
An administrator will only be able to add, amend and delete subscriptions for users who have their Subscription Maintenance Mode setting set to “Maintain in Front End”
To use the Result Subscription search follow the steps below
Select a User from the User Name drop down
This drop down displays only Web Service users
Select the Subscription Type
Enter criteria as required
Only criteria that is part of the selected Subscription Type will be enabled
Click on the Search button
A list of current subscriptions for the selected criteria will be displayed.

SCI Store 8.3 Administration Guide
10/10/2013 13:55:19 146
16.4.1 Add Result Subscription
Result Subscriptions are added from the Result Subscription Search page, which is found in the Notifications admin menu.
To create a new Result Subscription
Select the user from the User drop down
If the user Subscription Maintenance Mode = “Maintain in Front
End” the button will be displayed
Click the in the toolbar to navigate to the Add Result Subscription page
From here users can configure Result Subscriptions as one of the following types
o All Results (creates a “global” subscription)
o PatientID
o Discipline
o Investigation
o Requesting HCP
o Requesting Organisation

SCI Store 8.3 Administration Guide
10/10/2013 13:55:19 147
On selecting one of the subscription types, further criteria controls will be displayed e.g
o Textbox to enter Patient ID
o Drop down list to select discipline
o Search box to search for the desired Requesting HCP or Organisation
When the criteria has been entered, click the icon to save the subscription. This will return to the list of Result subscriptions and display a message if the save was successful.

SCI Store 8.3 Administration Guide
10/10/2013 13:55:19 148
Users are then able to Amend an existing subscription by clicking a row in the returned grid. This will navigate back to the Add/Amend Subscription page with the current values populating the drop down lists and search boxes.
Users are also able to Delete subscriptions by clicking the Delete link in the grid. The user will always be asked for confirmation of the delete.
NB Again the amend and delete functions are only available if the selected user has their Subscription Maintenance Mode set to “Maintain in Front End”

SCI Store 8.3 Administration Guide
10/10/2013 13:55:19 149
17 Messaging Services
SCI Store has traditionally supported the Scottish XML standard as endorsed by the IOWG for interfacing with externals systems. This standard format was promoted as the solution for connected systems that would provide a common mechanism for interoperability for key clinical datasets. The one disadvantage with this standard was that each system had to write bespoke interfaces based on the NHS Scotland XML Standard when they already had interfaces supporting the HL7 format. Over the years more and more clinical systems began to support HL7 2.x format out of the box. These systems do not have the ability to develop new interfaces and in reality some require a set of standard data that is readily available in HL7 format. There are potential cost savings to be made by providing native support for HL7 on some clinical data sets.
The messaging services were created to allow communication via other non web service means and formats (tcpip, ftp and non xml i.e. HL7).
SCI Store has two generic messaging services that are designed to control the sending and receiving of different system to system messages. Installation of these services is via individual msi files contained within a release. The detail on the functionality and configuration is contained in separate sections below.
a) SCI Store Message Delivery Service
b) SCI Store Message Recipient Service
HL7 Demographics Segment Definition The delivery and recipient services can deliver HL7 formatted demographics via both services. Detailed below are the segment definitions for the demographic fields that will be contained in the HL7 messages.
PID Segment Patient Identifier List (PID3) The PID 3 segment will contain a list of patient identifiers from SCI Store (0, 1 or many): The format of the NHS and CHI are as follows: <number>^^^NHS^NH <number>^^^CHI^NH
All numbers shall have the assigning authority and the type identified.
NOTE:
If two CHI numbers exist for a patient then the master CHI will be the first CHI in the list.
The setting IncludeStorePatientIdentifier will be used to decide whether to include the internal Store identifier as part of the patient identifiers list.

SCI Store 8.3 Administration Guide
10/10/2013 13:55:19 150
Patient Name(PID5) The PID 5 segment will contain the current patient name only
PID-5 will contain the Patient Surname PID-5.2 will contain the Patient Forename PID-5.3 will contain the Patient Middle Name PID-5.7 will contain a Name Type value of “L” Patient Date of Birth(PID7) The PID 7 segment will contain the date of birth in “YYYYMMDD” format Patient Sex(PID8) The PID 8 segment will contain the Patient Sex value, this will be either:
M - Male F - Female U - Unknown Patient Address Segment(PID11) The PID 11 segment contains the current patient address only.
PID-11 will contain Address Line 1 PID-11.2 will contain Address Line 2 PID-11.3 will contain Address Line 3 PID-11.4 will contain Address Line 4 PID-11.5 will contain the Postcode
The patient address values in SCI Store are held as address lines with no specific address information being held in a specific line. Therefore the Patient Address Street or City values could potentially exist in any of the Address Line values. Patient Home Telecoms Segment(PID13) The PID 13 segment will contain a list of patient home telecoms info. PID-13 will contain the home telephone number (e.g. Area Code & Telephone Number) The patient telecom information held in SCI Store may or may not contain a Telecom Mode value that identifies the type of number (e.g. Home, Business). For the purposes of this interface, PID-13 will contain a list of all telephone numbers that do not have a Telecom Mode value of “Business”. Patient Business Telecoms Segment(PID14) The PID 14 segment will contain a list of patient business telecoms info.

SCI Store 8.3 Administration Guide
10/10/2013 13:55:19 151
PID-14 will contain the business telephone number (e.g. Area Code & Telephone Number) ** The patient telecom information held in SCI Store may or may not contain a Telecom Mode value that identifies the type of number (e.g. Home, Business). For the purposes of this interface, PID-14 will contain a list of all telephone numbers that have a Telecom Mode value of “Business”. Other PID Segments
For the purposes of this interface, all other PID Segments will be blank.
PV1 Segment For the purposes of this interface a Patient Visit (PV1) segment will be populated.
The PV1-2 ‘Patient Class’ field will contain a value of ‘N’ for not applicable.
The PV1-8 ‘Referring Doctor’ field will exist with a blank value.

SCI Store 8.3 Administration Guide
10/10/2013 13:55:19 152
17.1 Message Delivery Service
Overview
The delivery agent service is a standalone application that runs as a windows service on an installed server that has.net framework 2 present. The purpose of this application is to deliver system to system messages to a set of defined channels configured in the app.config.
Currently supported message types for this service is HL7 demographics messages. Messages are generated using SCI Store notification services. SCI Store web services will be used to retrieve information from Store and deliver to a remote system. If a notification is available for the system then the service will construct the message to deliver. The delivery agent acts as a tcpip sockets client sending HL7 messages to an HL7 tcpip listener. Each channel will delivery up to a max number of items within a particular delivery attempt.
Note: A future release may integrate this utility into Store for better exception management. At this time all errors will be logged to the Store event log.
Note: WS 8.1 is required as a prerequisite for the delivery service to work for HL7 messages
Delivery Agent Configuration Elements
The following elements will be defined for the windows service. There are two types of elements to configure
a) Application wide configuration: These elements are define for the deliver agent as a whole and are configured only once.
b) Delivery Channels: One set of configuration elements will be defined per delivery channel.
Validation
The configuration elements will be checked during service start-up. If not correct then the service will fail to start with an error in the event log that signifies what failure occurred. On a new installation this is usually config errors.
Item Details
Application Configuration Elements
Defined once for the installation of the delivery agent.
These elements will be checked during service start-up.
If not present then the service will stop with an error in the event log
Web Service URL StoreWebServiceURL
URL of SCI Store web services (one instance)
HL7 Delivery System Details
SendingApplication (“SCIStore”)
SendingFacility (“GoldenJ”)

SCI Store 8.3 Administration Guide
10/10/2013 13:55:19 153
Retry Settings RetryIntervals
These settings will be a collection of retry periods. These settings are used during the delivery process to control the timeframe between attempting to deliver to a channel (in minutes). It is expected that when a channel is down then we don’t want to continually try and send to the channel all the time. These settings allow us to gradually increase the time between retry attempts. When the channel is available then the retry is set back to default.
<RetryIntervals>
<Interval ID=1 Minutes=1>
<Interval ID=2 Minutes=2>
<Interval ID=3 Minutes=5>
<Interval ID=4 Minutes=10>
<Interval ID=5 Minutes=30>
<Interval ID=6 Minutes=60>
</RetryIntervals>
fault 60)
(Note: while six period have been detailed here, there should not be any practical limit)
Delivery Channels
A delivery channel will be defined for each system that the delivery agent will deliver to.
All are mandatory.
Windows service start-up will load and check each item prior to processing.
If not present or incorrect format then the service will stop with an error in the event log.
ChannelKey ChannelKey
Each channel requires Unique name defined across all the channels configured.
Channel Type ChannelType(Channel Type . Currently HL7V2 only supported)
Receiving System ReceivingApplication (“Aware”)

SCI Store 8.3 Administration Guide
10/10/2013 13:55:19 154
ReceivingFacility (“GoldenJ”)
Message Format MessageFormatVersion
Will be used in conjunction with the ChannelType to determine individual aspects to deliver. HL7 can be 2.1,2.2,2.3,2.3.1,2.4,2.5,2.5.1 or 2.6
(Since the application will deliver only HL7 we can use this to detail HL7 version in the messages being delivered directly)
WEB Service Account details
Login details for web service access
StoreLoginUserID
StoreLoginPassword
StoreUser Credentials
RemoteSystem code
RemoteName
RemoteUserID
Tcip Delivery Channel
Destination Host
Destination Port
Timeout: Timeout of how long to wait before we decide that the host is unavailable or not listening.
Message Limit MessageLimit:
(Default=30, 0 = all available)
This will define the number of message to send in a given delivery attempt.
Delivery Gap ChannelDeliveryGap
(default to 30 )
This will be the gap between channel delivery attempts in seconds
Include Store Patient Identifier
IncludeStorePatientIdentifier
True/False (Default false)
This setting will decide whether Store identifiers are included as part of the patient identifier list.

SCI Store 8.3 Administration Guide
10/10/2013 13:55:19 155
When sending some message type(s) some systems may not have the facility to match on patient information and therefore require a central identifier to match. In this case we can provide the store identifier as the central id for matching.
Following are HL7 Specific settings
HL7 Message Framing
HL7Startframe = \x0b
HL7Containing = MSH
HL7EndFrame = \x1c\x0d
HL7 Message format
Following are in quotes. The quote is not part of the value
HL7SegmentTerminator = “\x0d”
(Valid
<cr> = \x0d,
<cr><lf> = \x0d\x0a
<lf> =\x0a
)
HL7FieldSeperator= \x7c (“|”)
HL7ComponentSeperator= \x5e (“^”)
HL7RepetitionSeperator= \x7e (“~”)
HL7EscapeSeperator= \x5c (“\”)
HL7SubComponentSeperator = \x26 (“&”)
HL7 Details SupportedHL7Events:
Default (A04)
Certain systems only support specific HL7 event types. This section will be used to decide what event to deliver to a specific destination.
This element will be a collection of Events that the channel want delivered to it. If not in this collection then it will not be delivered. This allows us in this release to deliver A04 for systems that only support the update but do not support other event types.
HL7 Ack Mode HL7AckMode
Commit

SCI Store 8.3 Administration Guide
10/10/2013 13:55:19 156
Application
Never
(default Commit)

SCI Store 8.3 Administration Guide
10/10/2013 13:55:19 157
Process to deliver HL7 demographics to Aware The following steps will define the process for delivery of notification to a remote HL7 server. As a pre-requisite for this process it is assumed that Store has been configured with a valid web user that is receiving the correct notifications, the protocols defined with the remote system have been agreed and setup within the channel configuration. The peek feature of WS 8.1 is used in the notification retrieval to maintain the notification during failure to deliver a message to the remote system.
1. For each channel access the notifications web method for patient notifications using the peek mechanism and check if any notifications for the user.
2. If a notification exists for the channel then we need to generate a suitable HL7 message for delivery. (Use shared code from HL7 query service). Note: We will only generate the message if it is configured for that channel.
3. Deliver message to remote channel. 4. If delivery is a success (ACK Accept = AA or CA in acknowledgement
message) then we remove the notification from the queue by performing another getNotification without the peek.
5. If delivery NOT a success due to ACK Error or ACK Reject then we will log the error to the event log remove the notification from the queue by performing another getNotification without the peek.
6. If delivery NOT a success due to channel unavailable then we will cycle to the next channel as per delivery logic below.
Delivery Logic
The delivery application does not run at 100% capacity all the time. The service controls how often a channel attempts a delivery and how to handle the situation when the channel is unavailable. To control the delivery attempts there are two elements are used. Each channel configuration has an element that defines a gap between delivery attempts (seconds) for a channel(ChannelDeliveryGap).
Additionally there is a collection of minutes between channel unavailability attempts based on the retry attempt number(RetryIntervals). The minutes between attempts will typically increase as each attempt fails.
The outgoing interface from Store will cycle round each channel and attempt to deliver messages(max configured).
When a delivery cycle has been completed the next delivery time will be calculated by taking the current time and adding then channel delivery gap time.
There are certain conditions that will affect the delivery process
Server for a channel is unavailable to transmit message
Store Web Services are unavailable

SCI Store 8.3 Administration Guide
10/10/2013 13:55:19 158
Server for a channel is unavailable to transmit message
During a delivery attempt, if the channel is unavailable then the channel delivery attempt is aborted. In this situation the number of attempts to deliver to that channel will be preserved internally. The next attempt delivery time for the channel will be calculated by getting the gap for the designated delivery attempt and adding this to the current time to determine the next delivery attempt time. These setting are mainlined in memory only. When the service is started delivery attempt will revert to zero.
No notification messages will be lost during this situation.
Store Web Services are unavailable
During a delivery attempt, if Store Services are unavailable then the channel delivery attempt is aborted. In this situation no more attempts will be made to deliver messages. The unavailability of the services will be logged. The deliver agent will wait in 5 minute intervals before checking services. When services are available again a message will be logged to that effect and channel delivery will continue as normal. The configuration element “Store services availability attempts” will be used to determine how many checks are made before the service is aborted.
No notification messages will be lost during this situation.
HL7 Message Content
Supported HL7 Message Events The following HL7 messages can be generated from a notification
A04 – Register patient Examples of all these messages type(s) are included in an appendix of this document. These are directly equivalent to the standard event type generated during a patient notification event type
A04 – Register Patient Patient details in the format of an HL7 A04 will be generated and send to the delivery channel for standard demographics changes.
Detailed below are the patient demographic fields that will be contained in the Patient Identifier Segment (PID) of the A04 message.
MSH Message Header PID Patient Identification PV1 Patient Visit

SCI Store 8.3 Administration Guide
10/10/2013 13:55:19 159
17.2 Message Recipient Service
Overview
The recipient agent fulfils 2 purposes
a) Receive incoming messages
b) Process HL7 Query messages
Recipient Agent Configuration Elements
The following elements will be defined for the windows service. There are two types of elements to configure
a) Application wide configuration: These elements are define for the recipient agent as a whole and are configured only once.
b) Recipient Channels: One set of configuration elements will be defined per recipient channel.
Validation
The configuration elements will be checked during service start-up. If not correct then the service will fail to start with an error in the event log that signifies what failure occurred.
Item Details
Application Configuration Elements
Defined once for the installation of the delivery agent. All elements are mandatory and require a value unless otherwise specified.
Web Service URL StoreWebServiceURL:
URL of SCI Store web services V8.1 (one instance)
Tcip Socket Details RemoteIP :
Host to listen on
RemotePort:
Port to listen on
ReceiveTimeout:
This is the timeout (seconds) for a message failure if the end of frame has not been received within a specified timeout
HL7 Recipient System Details
ReceivingApplication (“SCIStore”)
ReceivingFacility (“GoldenJ”)

SCI Store 8.3 Administration Guide
10/10/2013 13:55:19 160
HL7 Message Framing
StartFrameProtocol = \x0b
ContainingProtocol = MSH
EndFrameProtocol = \x1c\x0d
Recipient Channels
A recipient channel will be defined for each system that the recipient agent will receive messages from.
ChannelKey ChannelKey
Each channel requires Unique name defined across all the channels configured.
Channel Type ChannelType(Channel Type . Currently HL7V2 only supported)
Channel Details SendingApplication (“Aware”)
SendingFacility (“GoldenJ”)
The values for Sending Application and Sending Facility must be unique within the list of channels (the application and facility could appear multiple times but not together in different channels).
It will be possible to define a channel with either a blank Sending Application or a blank Sending Facility. While this is allowed this should be used with caution and is only included to backwardly support existing functionality.
WEB Service Account details
Login details for web service access
StoreLoginUserID
StoreLoginPassword
StoreUser Credentials
RemoteSystem code
RemoteName

SCI Store 8.3 Administration Guide
10/10/2013 13:55:19 161
RemoteUserID
HL7 Ack Mode HL7AckMode
Commit
Application
Never
Note: The receiving systems does not currently support MSH segment definition (field 15 and 16 for acknowledgement)
File delivery location
FileDeliveryLocation
Path to deliver messages to when the messages are determined as incoming messages (i.e. non HL7 query messages)
Process to receive HL7 messages The following steps will define the process for receipt of messages from a remote HL7 client. As a pre-requisite for this process it is assumed that Store has been configured with a valid web user that has access to correct information (i.e. Demographics for HL7 via HL7 query request) The protocols defined with the remote system have been agreed and setup within the channel configuration. Any errors will be included in the response to the sending application as per standard acknowledgement processing below.
1. Accept incoming message and process until end of frame received. 2. Parse message to determine HL7 message type. 3. If not a valid message type (first line basic check) returns a reject response
message. 4. If message type is a query message type A19 in MSH-9 (QRY^A19) then
process this as per standard HL7 query service. This will respond with a QRY response.
5. If message type is an ACK message in MSH-9 (e.g. ACK^A04) then do nothing.
6. If valid HL7 message and not query message then we assume it’s an incoming file for delivery. In this case we should place the incoming message in the designated directory with a suitable unique filename. (Note: if an error occurs during this process then an Error ACK will be generated with a suitable error text)
7. If all OK return ACK success message

SCI Store 8.3 Administration Guide
10/10/2013 13:55:19 162
Acknowledgement message For all situations except the QRY response we will response with an acknowledge message based on the ack mode for the channel. Acknowledgment messages contain the following HL7 interface segments: NOTE: Single characters responses are not supported at this time. MSH — Message header segment MSA — Message acknowledgment segment The MSH segment in the response is constructed anew following standard message rules. The following rules apply.
MSH-7-date/time of message and MSH-10-message controlID refer to the response message; they are not echoes of the fields in the initial message.
MSH-5-receiving application, MSH6-receiving facility and MSH-11 processing ID contain codes that are copied from MSH-3-sending application, MSH-4 sending facility and MSH11-processing ID in the initiating message.
MSH-9-MessageType ^TriggerEventStandard protocol is to respons with MessageType “ACK” and the TriggerEvent from the originating message. So an message being received with MSH-9 of ADT^A04 will be acknowledged with ACK^A04
In all the responses described above, the following values are put in the MSA segment
Field Notes
MSA-1-acknowledgment code
As described below.
MSA-2-message control ID
MSH-10-message control ID from MSH segment of incoming message.
MSA-4-expected sequence number
N/A
ERR segment fields See examples
The receiving application then passes the response message back to the responding system.
Response acknowledgement Codes
HL7 acknowledgment messages may contain one of three status codes from the receiving
System Accept, Error or Reject.
Each channel has an element “Ack Mode” that defines how the message is acknowledged. Valid values for this are defined in the table below.

SCI Store 8.3 Administration Guide
10/10/2013 13:55:19 163
The following are valid acknowledgement message types
a) The message was successfully, generating the functional response message with a success acknolwledgement code
b) send an error response, providing error information in functional segments to be included in the response message with a value an error success acknolwledgement code
c) fail to process (reject) the message for reasons unrelated to its content or format (system down, internal error, etc.). For most such problems it is likely that the responding system will be able to accept the same message at a later time. The sending application is responsible to decide on-specific basis whether the message should be automatically sent again. The response message contains a value with a reject acknolwledgement code
New conditions to check
Store web services unavailable(REJECT)
Unable to save file(REJECT) Existing conditions
Duplicate patient found(ERROR)
No patient found(ERROR) Ack Mode
Value Details
Never No Acknowledge message is generated.
Application If this has a value of “Application” then values are
AA – Application Accept AE – Application Error AR – Application Reject
Commit If this has a value of “Commit” then values are
CA — Accept acknowledgment: Commit Accept CE — Accept acknowledgment: Commit Error CR — Accept acknowledgment: Commit Reject

SCI Store 8.3 Administration Guide
10/10/2013 13:55:19 164
18 Enable Demographic Feeds
Enabling demographic feeds for a translator is done from the Amend Translator From Database Service Definition screen. To get to this screen, click on the Configuration menu and choose Maintain Interfaces. Click on the chosen interface and click the Configure button. On the Amend Translator page, check the checkbox labelled Enable for Demographic Feeds.
When the Enable for Demographic Feeds checkbox is checked, any information sent via this interface relating to patient demographic inserts, updates and merges will be picked up by active DemogFeed interfaces and passed to the appropriate Clearspan Queue.
ClearSpan is an enterprise application integration (EAI) server that allows applications running across the enterprise to exchange information.
When enabled for a translator, one of the following demographic feed entries will be generated:
- ReplicatePatientRequest entry (for patient inserts and updates)
- CombinePatientRequest entry (for patient merge & unmerge
transactions).

SCI Store 8.3 Administration Guide
10/10/2013 13:55:19 165
External Applications monitor specific Clearspan queues at regular intervals and consume the entries that have been fed into the queue via this process.

SCI Store 8.3 Administration Guide
10/10/2013 13:55:19 166
19 Report Profiles
Organisational Reports in SCI Store are constructed using the ‘Report Profiles’ functions found under the ‘General Menu’.
These profiles allow users to produce reports detailing tests filtered on Result set and Discipline. The profiles can also be used on the Cumulative Reporting page to restrict the results returned to the defined Result Sets and Disciplines.
The user defines a profile by selecting the desired discipline or disciplines to be reported on. One or more result sets can then be grouped together and associated with a Report profile.
Investigations descriptions may differ from system to system so the user is able to group several Investigation descriptions together so they appear as a single investigation type (e.g. FBC and Full Blood Count) and associated with a specified Result set.
The main profile screen is shown below.
Report profiles are made up of Disciplines and Result Sets. The diagram below illustrates this.

SCI Store 8.3 Administration Guide
10/10/2013 13:55:19 167
A profile can be made up of one or more Disciplines, together with one or more Results Sets. On the ‘Existing Profiles Screen’ shown above users can view, edit, delete or create new report profiles.
19.1 Creating a New Profile
To create a new Report Profile:
Click the blue plus (+) button on the toolbar at the top left hand corner of the screen.
The user is then forwarded to the Add New Profile Screen shown below.

SCI Store 8.3 Administration Guide
10/10/2013 13:55:19 168
Enter a profile name in the box provided (e.g. ‘New Report Profile’)
Select a Report Type – Lab Report for Organisation Lab reports or Cumulative Report to use in the Cumulative Report search criteria.
Select one or more Disciplines from the popup box on the screen.
Click the ‘Save’ button to create the new profile. You are then automatically forwarded to the ‘Edit Profile’ Screen. Clicking the back arrow button on the toolbar will return the user to the ‘Existing Profiles’ screen.
The new profile should now be visible in the Profiles list.
This profile cannot yet be used within a report as it has no associated Result Sets. We must add at least one before the profile can be used.
19.1.1 Adding a Result Set Group to a Profile
To add a result set group to a profile,
Click on the profile of interest from the Existing Profiles Screen. You will then be forwarded to the ‘Edit Profile’ screen shown below
Click on the blue plus button on the toolbar and you will be forwarded to the ‘Add Result Set Group screen shown below.

SCI Store 8.3 Administration Guide
10/10/2013 13:55:19 169
On the ‘Add Result Set Group’ screen, give the new result set a Description (e.g. ‘New Result Set A’) and a value for Repeat Days and Display Order.
For Cumulative Report profile types the ‘Repeat Test Days’ and ‘Display Order’ fields are irrelevant and will be hidden
For Lab Reports:
i. ‘Repeat Test Days’ can be blank, or a numeric value which must be a positive whole number. This value signifies the number of days between tests for a patient before it is regarded as a repeat test.
ii. Enter ‘Display Order’ value. This is also a numeric field which must be a positive whole number, and determines the order in which this result set will be listed on the final report.
Click the ‘Save’ button.
Result Sets contain a number of sub elements called ‘Investigation Matches’. These are the actual test investigation descriptions held in the SCI Store database which will be grouped together under this Result Set.
In the ‘Edit Result Set’ screen shown below, we now add the required investigation matches using the ‘Select Investigations’ button.

SCI Store 8.3 Administration Guide
10/10/2013 13:55:19 170
19.1.2 Adding a new Investigation Match (Search and Select)
Clicking the ‘Select Result Sets’ button displays the Investigation Selection popup screen. This screen allows you to search and select the required investigation type.
In order to search for an investigation description type, simply type part of its name, and click the ‘Search’ button. To select the required investigation description, click on it in the list, then press the ‘Select’ button.

SCI Store 8.3 Administration Guide
10/10/2013 13:55:19 171
A message will appear in the background indicating the successful addition; the selection screen will stay visible allowing the user to select another Investigation.
Close the Investigation matches popup by clicking on the small ‘x’ in the top-right hand corner.
To continue adding other investigations to this result set the popup can be reopened by clicking the ‘Select Investigations’ button.
Click the ‘Save’ button to save the completed result set.

SCI Store 8.3 Administration Guide
10/10/2013 13:55:19 172
Any changes you wish to make to the ResultSet definition can also be made in this screen by altering the required details and clicking the ‘Save’ button’
A message denoting the success of the save operation will be displayed in the top-left corner.
Clicking on the ‘back’ button will return the user to the Report Profile details page.

SCI Store 8.3 Administration Guide
10/10/2013 13:55:19 173
To add another result set to this profile, simply press the blue plus button on the toolbar again, and repeat steps 3 to 8 above.
19.1.3 Deleting a Result Set from the Current Profile
(Note: a Result Set can only be deleted from a Profile if the Result Set has no underlying Investigation Matches.)
Click the blue ‘Delete’ link on the right side of the Result Set you want to delete.
The following confirmation box will appear:-
Press ‘OK’ to confirm the delete operation.
If the Result Set still contains underlying investigation matches, you will not be allowed to delete it directly. These investigations matches must be deleted prior to attempting to delete the entire Result Set. If this is the case, a warning will appear at the top of the screen, just under the main menu as shown below.
After deleting the required Result Set, a success message will be displayed and the grid refreshed showing that the Result Set has been deleted.

SCI Store 8.3 Administration Guide
10/10/2013 13:55:19 174
19.1.4 Deleting an Investigation Match for the Current Result Set
Navigate into the Result Set from which you wish to delete an investigation match.
From the ‘Edit Result Set’ screen, click the ‘Delete’ link of the investigation match you wish to delete as shown below.
You will then be presented with a confirmation box asking if you intend to delete the investigation match selected.
Click ‘OK’ to delete the match from the current Result Set. Clicking the cancel button will cancel to delete operation.

SCI Store 8.3 Administration Guide
10/10/2013 13:55:19 175
A message will be displayed indicating the success of the delete operation. The grid will be refreshed to show the investigation Match has been deleted.
19.1.5 Deleting an entire Report Profile
(Note: An entire Profile can only be deleted if it has no underlying Result Sets attached to it.)
From the main Profile screen shown below, click the ‘Delete’ link of the profile you wish to delete.
You will then be presented with a confirmation box asking if you intend to delete the selected Profile from the system.

SCI Store 8.3 Administration Guide
10/10/2013 13:55:19 176
Click the ‘OK’ button to delete the selected Profile. A message will be displayed denoting the success of the delete operation; if the delete was successful the grid will be refreshed to show this.
If the Profile is not empty, (i.e. It still has underlying Result Sets) a warning will appear under the main menu as shown in the screen below. Pressing the ‘Cancel’ button will cancel to delete operation entirely.
Any underlying Result Sets must be deleted from a Profile, before the Profile itself can be deleted.
19.2 Amending Existing Profile Details
Amending the details of an existing Profile (i.e. Profile Name and Disciplines) can be accomplished from the ‘Edit Profile’ screen below.
From the ‘Edit Existing Profile’ page, change the Profile name and selected Disciplines as required.
Click the ‘Save’ button to update the Profile record with your changes.
Any change to the Profiles Result Set collection is done by clicking on the required Result Set and editing this separately, as detailed below.

SCI Store 8.3 Administration Guide
10/10/2013 13:55:19 177
19.2.1 Amending an existing Result Set within a Profile
Amending the details of a Profiles’ Result Set is a simple process carried out from the ‘Edit Existing Profile’ screen.
Click on the required Result Set from the ‘Edit Existing Profile’ screen shown above
In the ‘Edit Result Set’ screen, make any changes to the Result Set Name, Repeat Test Days, or Display order as required. A Result Set Name must be unique with the Profile.
If changes to the Result Sets’ investigation matches are required, add or delete these from the list via the ‘Select Investigations’ button or ‘DELETE’ link, respectively.
Click the ‘Save’ button to update the Result Set details in the database as shown above.

SCI Store 8.3 Administration Guide
10/10/2013 13:55:19 178
20 Treatment Log
The Treatment Log area of the SCI Store Web Front-end should only be made available to SCI Store administrators. General users should not be given access to this area of the application at this point in time.
20.1 Find Treatment Log
This provides administrators with the facility to search for Treatment Log records held in SCI Store. To access this screen a user should be given the Find and View Treatment Logs module permission, located in the Treatment Log category.
To perform a search, enter the required criteria and click the Search button. By default the Request State and Request Status fields default to Open and Outstanding. In addition to these fields at least one other search criteria must be completed, otherwise the user will be presented with an error message.
As shown by points 1 and 2 in the diagram on the following page, Scheduled Treatment Date will only be enabled when Request State is set to ‘Open’. Otherwise these fields will be disabled.
A list of treatment log entries will be returned in the search results grid shown in point 3 in the following diagram.

SCI Store 8.3 Administration Guide
10/10/2013 13:55:19 179
Additional treatment log details can be displayed by clicking on any of the fields in the grid (point 4 on the diagram above), apart from the Name field.
Further patient information can be viewed by clicking on the Name field (point 5 on the diagram above).
20.2 Treatment Log Details
The treatment log details page is accessed by clicking through from the Find Treatment Log page. Users will only be able to access this page if they have the Find and View Treatment Logs module permission, located in the Treatment Log category.
This page displays detailed information relating to a particular treatment log record. It is split into the sections which are highlighted on the following diagram. These sections are general patient information (point 1 on the diagram), treatment log summary information (point 2), attendance request details (point 3), additional treatment request information (point 4) and treatment outcome information (point 5).
Attendance Request Details, Treatment Request and Treatment Request Outcome sections can be shown or hidden by clicking on the arrows for the particular section. These are highlighted by point 8 on the diagram.
From this page an administrator can Manually Close a treatment log record. Only users with the Action Treatment Logs module permission will be able to perform this action.
An administrator may choose to Manually Close a treatment log record if the record has not been closed automatically by an external source system. Only records that do have the request state of Open and request status of Outstanding can be closed in this manner.

SCI Store 8.3 Administration Guide
10/10/2013 13:55:19 180
This action can be performed by clicking on the Manually Close icon on the toolbar or by selecting the Manually Close action on the toolbar, as highlighted by points 6 and 7 on the diagram above.
When this action is performed a popup box will be displayed which is shown in the diagram below.
A treatment log record can be manually closed by completing the mandatory fields and clicking the Close Request button (point 6, diagram above). If the mandatory fields are not completed the error message shown in point 1 in the diagram above will be displayed.
The rules for manually closing a treatment log record are:
Closure Date and Request Status must be completed (points 2 and 3 in the diagram above).
Closure Date cannot be earlier than the records Request Date and cannot be later than today’s date.

SCI Store 8.3 Administration Guide
10/10/2013 13:55:19 181
If the Request Status of Completed is selected a Closure Comment must be completed, otherwise no Closure Comment is required.
To exit the Manually Close Request popup box without closing the treatment log record, click on the as indicated by point 5 of the diagram.

SCI Store 8.3 Administration Guide
10/10/2013 13:55:19 182
21 Gateway GUID Stylesheet Maintenance
As part of the changes made to the Gateway to SCI Store Documents interface made in Version 7.0, Gateway will now supply a unique style sheet identifier (GUID) that Store will use to associate the style sheet with the correct document.
The Gateway GUID Stylesheet Maintenance area of the SCI Store Web Front-end should only be made available to SCI Store administrators. This will be reachable from the ‘General’ Menu.
21.1 GUID Stylesheet Association Maintenance
This screen will display all the existing associations of GUIDs and corresponding Stylesheets previously created. It will initially be sorted on Date of Association and then on GUID, and has the following columns.
GUID
Stylesheet
Date of Association
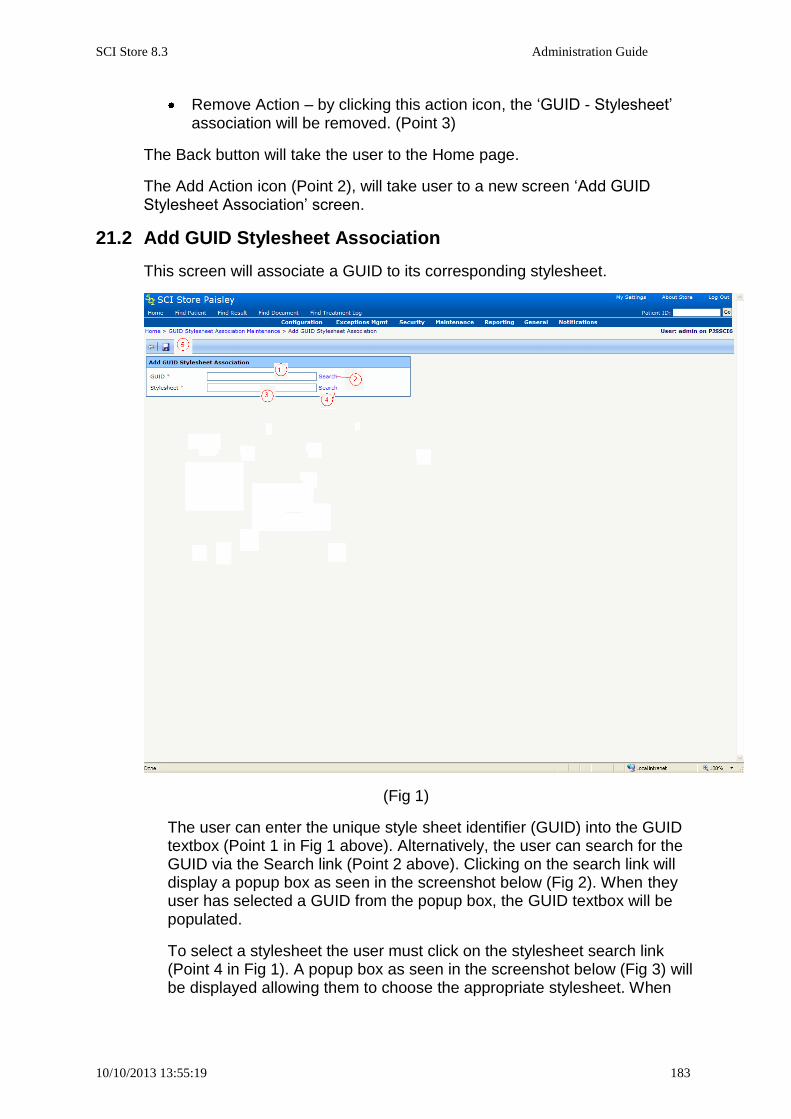
SCI Store 8.3 Administration Guide
10/10/2013 13:55:19 183
Remove Action – by clicking this action icon, the ‘GUID - Stylesheet’ association will be removed. (Point 3)
The Back button will take the user to the Home page.
The Add Action icon (Point 2), will take user to a new screen ‘Add GUID Stylesheet Association’ screen.
21.2 Add GUID Stylesheet Association
This screen will associate a GUID to its corresponding stylesheet.
(Fig 1)
The user can enter the unique style sheet identifier (GUID) into the GUID textbox (Point 1 in Fig 1 above). Alternatively, the user can search for the GUID via the Search link (Point 2 above). Clicking on the search link will display a popup box as seen in the screenshot below (Fig 2). When they user has selected a GUID from the popup box, the GUID textbox will be populated.
To select a stylesheet the user must click on the stylesheet search link (Point 4 in Fig 1). A popup box as seen in the screenshot below (Fig 3) will be displayed allowing them to choose the appropriate stylesheet. When

SCI Store 8.3 Administration Guide
10/10/2013 13:55:19 184
they have selected a stylesheet from the popup box, the stylesheet textbox (Point 3 in Fig 1) will be populated.
(fig 2)
Documents uploaded into SCI Store from Gateway may contain GUIDs which are not yet associated with any stylesheets.These not associated GUIDs will be displayed at Point 2 above. If all the documents containing GUIDs are already associated with stylesheets, then ‘All GUIDs are already associated!’ text will be displayed instead of a list.
The user can refine the search for a GUID by typing in part of name in the GUID text box (Point1 1 Fig 2) and clicking the Search button (Point 3 Fig 2).
The user can select a GUID from the list displayed and click the Select button (Point 4, Fig 2) this will fill up the GUID textbox with the selected GUID name.

SCI Store 8.3 Administration Guide
10/10/2013 13:55:19 185
The user can close the popup box by clicking on the button of popup box.
(fig 3)
A list of stylesheets will be displayed at Point 2 of fig 3. The stylesheets used by documents are stored at a location defined by the system setting called "DocumentStylesheetLocation". This location contains all the stylesheets used by documents. If there are no stylesheet in this folder then ‘No Stylesheet in folder’ text will be displayed instead of a list.
The user can search for the stylesheet by typing in part of the name in the Stylsheet text box (Point 1 Fig 3) and clicking on the search button (Point 3 Fig 3).
The user can select a stylesheet from the list (Point 2, Fig 3) and clicking on the Select button (Point 4, Fig 3) will populate the Stylesheet textbox in point 3 fig 1 with the selected stylesheet name.

SCI Store 8.3 Administration Guide
10/10/2013 13:55:19 186
The user can close the popup box by clicking on the button of popup box.
After selecting the stylesheet and associated GUID, the user can save the association by clicking on the ‘Save’ action button (point 5 fig 1). GUID and Stylesheet are both mandatory. If the user tries to save when either
or both are not provided, then the error message Mandatory fields are identified by (*). You must supply a value for these fields. will be displayed. If the user tries to associate a GUID which has already been associated, then
the error message GUID is already associated with stylesheet.To add reassociate remove the old association first. will be displayed. To associate this GUID with another stylesheet, the user must first delete the existing association from the ‘GUID Stylesheet Association Maintenance’ screen and then create the new association.

SCI Store 8.3 Administration Guide
10/10/2013 13:55:19 187
22 Administration Reports
22.1 Organisation Test Report
Accessed from the Reporting Menu, the Organisation Test Report functionality allows the user to generate exportable reports that detail the number of tests requested by each GP Practice.
The content of this report is defined via Report Profiles. These profiles contain the specified Disciplines and Result set information that the report will be run against. (See section 3.20 for more details on Report Profiles)
The Organisation test Report screen allows the user to select from the predefined Report Profiles and specify start and end dates for the reporting period on which information is to be summarised. The page is shown below.
The user generates a report by selecting an entry from the ‘Profile’ drop-down list, selecting which format they require (GP Practice or GP Practice Repeat Tests) and then entering dates for the reporting period the user wishes to view.
‘Profile’, ‘Date From’ and ‘Date To’ are mandatory fields and the following message is displayed if any of them are not entered.

SCI Store 8.3 Administration Guide
10/10/2013 13:55:19 188
If no data is available for the Profile within the date range selected then a message will be displayed as shown below.
If there is data for the selected options then this will be presented in the manner shown below.

SCI Store 8.3 Administration Guide
10/10/2013 13:55:19 189
Clicking on the report navigation buttons highlighted below will allow the user to step through the pages of the generated report. The user is also able to
enter a valid page number in the field highlighted, clicking on the button will then navigate to corresponding page of the report.
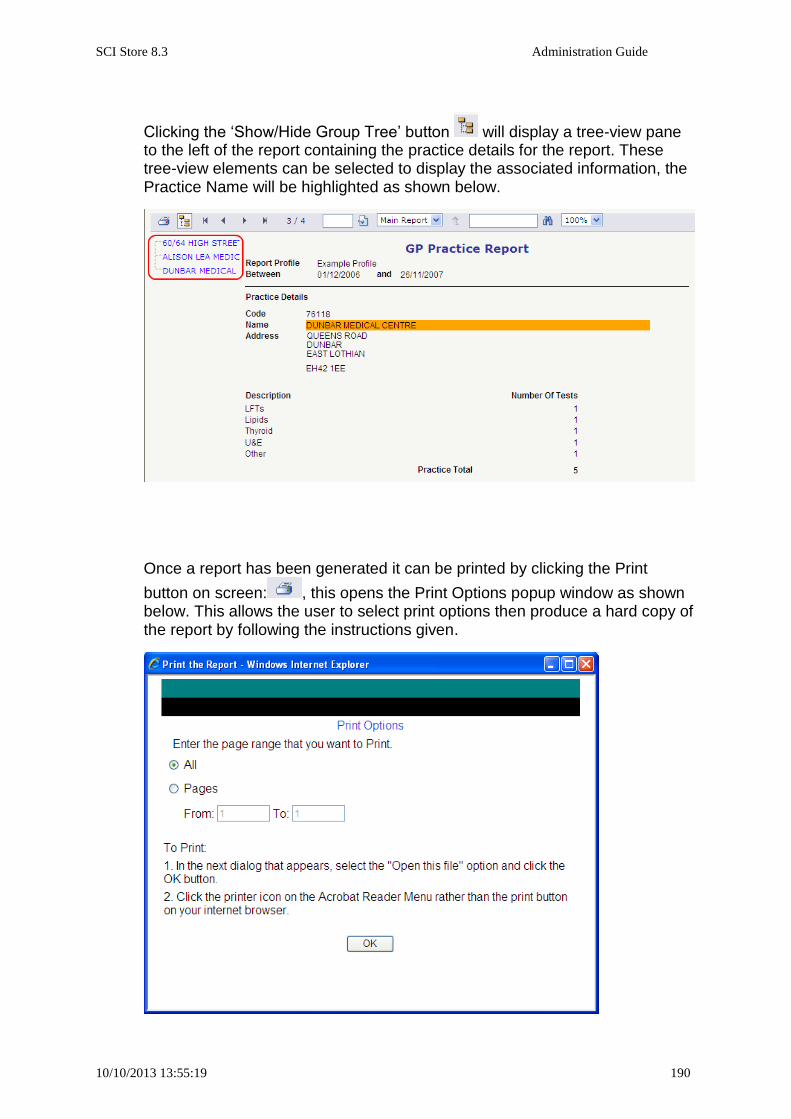
SCI Store 8.3 Administration Guide
10/10/2013 13:55:19 190
Clicking the ‘Show/Hide Group Tree’ button will display a tree-view pane to the left of the report containing the practice details for the report. These tree-view elements can be selected to display the associated information, the Practice Name will be highlighted as shown below.
Once a report has been generated it can be printed by clicking the Print
button on screen: , this opens the Print Options popup window as shown below. This allows the user to select print options then produce a hard copy of the report by following the instructions given.

SCI Store 8.3 Administration Guide
10/10/2013 13:55:19 191
Once a report has been generated, it can also be exported to a spreadsheet application as a comma separated file by clicking the ‘Export’ button. A File Download popup will appear as shown below.
The user can now choose to save the file to disk or open it directly in their default spreadsheet application, in this case Microsoft Office Excel.
The Report criteria and generated report can be cleared by clicking the ‘Clear’ button.
22.2 Audit Report
Accessed from the Reporting menu, the Audit Report functionality provides the ability to monitor unusual patterns of user access to SCI Store in order to satisfy some of the requirements set out in the E-Results Access Protocol document (Section 11 – AUDIT Mechanisms) that outlines “best practice” requirements for safe and secure access to laboratory result information.
The queries that can be run on this page monitor:
Repeated unsuccessful access attempts
Wrongly submitted passwords (3 times) that generate a “Lockout”

SCI Store 8.3 Administration Guide
10/10/2013 13:55:19 192
Long periods worked by an individual outside normal working hours
Casual browser (users that have accessed a certain number of patients in a day)
Each of these textboxes can be amended in the page itself so that different searches can be conducted. However, it is worth noting that the textboxes that define what constitutes an unsuccessful login, a lockout, abnormal hours and a casual browser can have their default values defined via a system setting so that regular queries can be run more easily.
22.3 User Audit Reports
22.3.1 Overview
A Results Audit report and a Document Audit report are both available from the reporting menu. These can be run to provide a list of all Results or Documents that have been viewed by a user (or all users) across a specified date range.

SCI Store 8.3 Administration Guide
10/10/2013 13:55:19 193
22.3.2 Results Audit Report
To view a report detailing results viewed by a specific user (or all users), firstly access the Results Audit Report screen from the Reporting Menu to open the following screen.
The date fields are mandatory. The Period End field will default with the present date and the Period Start will default to the present date minus one month. However, these can be modified to whatever date range is required.
The User Name field is optional, but should be populated if audit info for a specific user is required. If no user name is supplied, then maximum date difference between Period Start and Period End is one month.
The clear button will return the screen to the default setup as shown in the above screen shot. The search is invoked by the ‘Report’ button producing a display similar to the following:

SCI Store 8.3 Administration Guide
10/10/2013 13:55:19 194
22.3.3 Document Audit Report
To view a report detailing documents viewed by a specific user (or by all users), firstly access the Document Audit Report screen from the Reporting Menu to open the following screen.
The date fields are mandatory. The Period End field will default with the present date and the Period Start will default to the present date minus one month. However, these can be modified to whatever date range is required.
The User Name field is optional, but should be populated if audit info for a specific user is required. If no user name is supplied, then maximum date difference between Period Start and Period End is one month.
The Patient Consent, Sensitivity, Category and Sub-Category fields can be changed to further filter the search.
The clear button will return the screen to the default setup as shown in the above screen shot. The search is invoked by the ‘Report’ button producing a display similar to the following:

SCI Store 8.3 Administration Guide
10/10/2013 13:55:19 195

SCI Store 8.3 Administration Guide
10/10/2013 13:55:19 196
Appendix A: SCI Store Registry and System Settings SCI Store Registry Settings
Setting Name Value Functionality
CacheSystemSettings 0/1 (default 1 if not present)
Enables or disables the caching of the system setting values. Note: This is to be used for testing only and should never be set to 0.
ConnectionString user id= idvalue;password=password;initial catalog=databasename;data source=servername;Connect Timeout=30
Defines the database connection string
ECSMode 0/1 Disables/Enables ECS application.
ECSchemaValidation 0/1 Enables or disables the schema validation during upload of ECS Practice files.
ECSSequenceCheck 0/1 Enables/disables sequence number checking on ECS Interface.
LogLevel 1 = Error
2 = Error, Warning
3 = Error, Warning, Information
Every other value defaults it to 1
Determines which kinds of messages are displayed in Windows Event Viewer.
NotificationProcessingMode 0 – Will run normal file processing services, maintenance plan and notification services.
1 – Will only run notification services.
2 – will only run normal file processing services and maintenance plan.
The default value is 0
This new registry setting can be checked by the windows service. This setting will determine whether to run all services or only the store notification services. This will allow an instance of the Store Windows Service to be installed on another box for the purpose of solely

SCI Store 8.3 Administration Guide
10/10/2013 13:55:19 197
This was added in build 7.1.1103
running the notification services.
SchemaFolder Location of Schemas folder
Location of Web Service and Document upload verification schemas
XsltFolder Location of the WebFE folder
Location of stylesheets for user admin and system settings screen

SCI Store 8.3 Administration Guide
10/10/2013 13:55:19 198
SCI Store Mandatory Fields Registry Settings
Setting Name Value Functionality FindPatient Mandatory – Yes/No
Default conditions are: – equals begins contains soundex (can only be applied to surname field) Index equals (can only be applied to Identifier field) Index contains (can only be applied to Identifier field)
The following fields can be made mandatory:
- Forenames - Surname - Identifier - Have Results
Default condition defines what will be listed as default in the appropriate drop-down list. The only applicable fields are :-
- Surname - Forenames - Identifier
Default values are only available for the following field: -
- Have Results (Yes/No)
-

SCI Store 8.3 Administration Guide
10/10/2013 13:55:19 199
SCI Store User System Settings
Setting Name
Functionality Value
AdvancedCounterStatsInterval Most windows counters have no impact on resources. Other advanced counters should only be generated if required. This system setting determines whether these advanced SCI Store windows counters are calculated as part of the file upload process. This setting is used to determine how often the advanced counters are calculated. A value of how many minutes between calculations is defined in this setting. If the system setting has a zero value then the counters are not calculated. See counters appendix for full details on what counters are affected. Default value = 0 Range between 0 and 2000 Implemented in build 6.0.1017
Integer
AllowLocalUserCreation Allows control of the user maintenance features in the application. Default value = ‘True’ Implemented in build 5.0.0913 for IAMS user management functionality.
Boolean
AllowSimultaneousLogins Allows administrator to set number of multiple Logins permitted by the same user account. When set to ZERO disables Simultaneous Logins. Default value = 3
Integer

SCI Store 8.3 Administration Guide
10/10/2013 13:55:19 200
Range between 0 and 5 Revised implementation in build 6.1.1042
AuditCasualBrowser Sets default value for Casual Browser query in Audit Report screen
Integer
AuditFailedLogon Sets default value for Failed Login query in the Audit Report screen
Integer
AuditLockout Sets the default value for the Lockout query in the Audit Report screen
Integer
AuditLongPeriods Sets the default value for the Long working hours query in the Audit Report screen
Integer
AuditSearchResults Audits all search results returned.(Find patient Screen) Default setting is ‘FALSE’
Boolean
AutoMergeMaxCandidates Specifies the maximum number of candidates that should be included in a search using the new AutoMerge functionality. The default value of this setting is 50.
Integer
BreakglassWarning Sets the default value for the breakglass warning message displayed to the user
String
BusinessReportsTimeout This setting controls how business report timeouts are processed in the system. Takes an integer value which represents the number of seconds. This has a default value of 600 seconds(10 minutes) The lower range is 30 and the upper range is 1800.
Integer
BypassCriticalXMLValidation When set to TRUE will bypass xml response validation against schema. The default setting is TRUE. Note: The default setting was changed from ‘false to true in build 5.1.0937
Boolean
CHICertificatPath Sets the default filepath location of String

SCI Store 8.3 Administration Guide
10/10/2013 13:55:19 201
the SSL certificate required to access the CHI Webservices
CHIProcessDeceased If set to True, deceased patients will be processed by the CHIInitial Download service
Boolean
CHIWebServiceURL Sets the default URL for the CHI webservices
String
CloseLogin This setting determines whether to show the confirmation before logout Default value is ‘False’ Added in Build 7.1.1103
Boolean
CumulativeDataPoints This setting has a range between 2 and 10 and a default value of 6 Added in build 6.1.1102
Integer
CumulativeDefaultOrderDesc The requested default OrderBy is Descending. If this requires to be changed to Ascending, then set this to FALSE
Boolean
CumulativeDefaultView Legitimate values are either ‘Dates on X-Axis’ or ‘Dates on Y-Axis’. Dates on X-Axis shows results down the vertical axis and dates along the horizontal axis. Dates on Y-Axis shows results along the horizontal axis and dates down the vertical axis. Default is ‘Dates on X-Axis’. These values were modified in Build 5.0.0913 (Changed from ;A’ and ‘B’
List
CumulativeDiscoveredDates If set to TRUE this setting will override the CumulativeReportDays setting and return all results for the patient being viewed. Default setting is FALSE.
Boolean
CumulativeEnforceLocalDisplay When set to TRUE shows LOCAL codes – set to FALSE to see BOUNDED List values also. The default setting is TRUE.
Boolean

SCI Store 8.3 Administration Guide
10/10/2013 13:55:19 202
CumulativeReportDays This represents the number of days back from todays to be searched against. E.g search range is inclusive from: today – CumulativeReportDays to: today
Integer
CumulativeRestrictedDate Restricts cumulative reporting to work only on reports dated after this date. This has no default setting. Implemented in build 5.0.0913
Date / Time
CumulativeShowDescription The datagrid will show the column / row headers with Codes as default, set as TRUE to show the description instead.
Boolean
CumulativeTextLength This represents the length of a text result N.B. Not Table results – anything less than or equal to is displayed in the grid – anything greater than the value is represented by a notepad icon.
Integer
DefaultSessionTimeout Defines the default session timeout in minutes for a users/roles. Who have not had a timeout explicitly set against their user account. This overrides the session timeout set in the web.config. This setting has a range between 5 and 60 (mins and a default value of 20(mins) Implemented in build 4.1.0844
Integer
DefaultDocumentsDisplayRange The default Documents Display Range used on the Patient Documents filter. If a user does not have a Documents Display Range configured this default value will be used Default setting is ‘30’ days Implemented in build 8.1.1201
List
DefaultResultsDisplayRange Allows the System Administrator to set a global value for the ‘Processed Range’ dropdown on the ‘Results’ Tab ‘Filter By’ section on the ‘Patient Details’ page.
List

SCI Store 8.3 Administration Guide
10/10/2013 13:55:19 203
Default setting is ‘30’ days (Default value amended to 30 in build 8.1.1201) Introduced in Build 6.1.1037
DocumentSearchLimit Limits the number of records returned by Document searches Default setting is 1000 Introduced in Build 3.0.0714
Integer
DocumentStylesheetLocation Defines the folder where the stylesheet files for documents are stored. Default Setting is ‘C:\’ Introduced in Build 6.1.1102
String
DocUpload23_UseClinicalIndexValidation
When set to TRUE document metadata will be parsed using the 2_3 schema. The default setting is TRUE. Note – the default was amended to True for release 3.0.0647 of Store
Boolean
DTDFileUploadLimit The maximum filesize (in kilobytes) that can be uploaded using the DTD Interface. The default setting is 5000
Integer
EbizServer Defines where eBiz is running for use with WS Subscription Services
String
ECSSchemaValidationFolder Defines the location of the folder containing the ECS Schemas, for validation purposes. The default value is: - “C:\Program Files\SCI\SCIStore\StoreWS\Schemas” Added in build 8.0.1104
String
ECSSchemaValidationV1 Applies inbound schema validation to the version 1 ECS XML files. The default setting is ‘False’.
Boolean

SCI Store 8.3 Administration Guide
10/10/2013 13:55:19 204
Added in build 8.0.1104 ECSSchemaValidationV2 Applies inbound schema validation
to the version 2 ECS XML files. The default setting is ‘False’. Added in build 8.0.1104
Boolean
ECSSchemaValidationV3 Applies inbound schema validation to the version 3 ECS XML files. The default setting is ‘True’. Added in build 8.0.1104
Boolean
ECSWSOutboundSchemaValidationV10
Enable outbound web service validation for the ECS Schema Version 1.0 (all WS versions). The default setting is ‘False’ Added – Build 8.1.1201
Boolean
ECSWSOutboundSchemaValidationV20
Enable outbound web service validation for the ECS Schema Version 2.0 (all WS versions). The default setting is ‘False’ Added – Build 8.1.1201
Boolean
ECSWSOutboundSchemaValidationV21
Enable outbound web service validation for the ECS Schema Version 2.1 (all WS versions). The default setting is ‘False’ Added – Build 8.1.1201
Boolean
ECSWSOutboundSchemaValidationV30
Enable outbound web service validation for the ECS Schema Version 3.0 (all WS versions). The default setting is ‘False’ Added – Build 8.1.1201
Boolean
ECSWSOutboundSchemaValidationV31
Enable outbound web service validation for the ECS Schema Version 3.1 (all WS versions). The default setting is ‘False’
Boolean

SCI Store 8.3 Administration Guide
10/10/2013 13:55:19 205
Added – Build 8.2.1202
EnableAutomaticIAMUserProvisioning
Controls whether the consumption of IAM requests allows automatic provisioning of users or whether it is the responsibility of the local admin to finalise user creation. Default setting is ‘False’ Implemented in build 5.0.0913 for IAMS user management functionality.
Boolean
EnableSecurityLogging This setting enables the logging of security issues found in Store. This will log when data restrictions are not being applied. Default Setting is ‘False’ Implemented in Build 6.0.1001 – for use of testing for errors in the security related stored procedures.
Boolean
EnableWindowsServiceDBMonitor
This setting will enable a db connection monitor in the windows service. The purpose of this monitor is to check the db connection at regular intervals and stop the windows services tasks until a connection is re-established. The default setting is ‘False’ Introduced in Build 5.0.0909
Boolean
ExceptionManagementSearchLimit
Limits the number of records returned by Exception Management searches Default value of 1000 Introduced in Build 3.0.0714
Integer
FindDocumentsSortOrder Allows the System Administrator to define a default sort order for Find Documents search results Ascending or Descending order can be set for individual columns. Implemented in Build 5.1.0929
List
FindPatientsSortOrder Allows the System Administrator to List

SCI Store 8.3 Administration Guide
10/10/2013 13:55:19 206
define a default sort order for Find Patients search results. Ascending or Descending order can be set for individual columns. Implemented in Build 5.0.0909 ‘Deceased Ascending’ and ‘Deceased Descending’ added in build 6.0.1009.
FindResultsSortOrder Allows the System Administrator to define a default sort order for Find Results search results Ascending or Descending order can be set for individual columns. Implemented in Build 5.0.0909
List
FindPatientMaxRequests This defines the maximum number
of locations that can be requested for the FindPatient and Locate Patient web methods. Range between 1 and 20 Default value – 5 Implemented in Build 8.3.1301
Integer
GetPatientsDocumentListMaxRequests
This defines the maximum number of patients that can be requested for the ‘GetPatientsDocumentList’ web method. Range between 1 and 20 Default value – 5 Implemented in Build 8.3.1301
Integer
GetPatientsResultListMaxRequests
This defines the maximum number of patients that can be requested for the ‘GetPatientsResultList’ web method. Range between 1 and 20
Integer

SCI Store 8.3 Administration Guide
10/10/2013 13:55:19 207
Default value – 5 Implemented in Build 8.3.1301
InsertACSC Disables/enable CHI registration functionality
Boolean
InterfaceStatusViewState This setting controls which interfaces are displayed by their status on the homepage interface admin tab and the services menu. There are 3 possible settings: - ‘View All’, ‘Status On Only’ and ‘Status Off Only’ The default for this setting is ‘View All’ Implemented in build 4.1.0844
List
LabelPrintTemplateName Defines the name of the Template to be used when printing multiple labels. This has a default value of ‘SCI_Patient’. Implemented in Build 4.1.0823.
String
LastAccessesCount While displaying Last Accesses Summary for Patients/Documents/Results, restricts the Last Accesses Summary displayed to the last x users Default value of 5 Allowable range between 3 and 8 Implemented in Build 6.0.1033
Integer
LoginMessage Allows a message to be displayed on the login screen for all users Replaced former RegistrySetting of the same name in Build 3.0.0708
String
MaximumDuplicatePatients
Determines the maximum number of patients allowed to be flagged as duplicate at any one time by a user The default for this setting is ‘5’
Integer
MaintenancePlan Disables/Enables scheduler and maintenance plans
Boolean
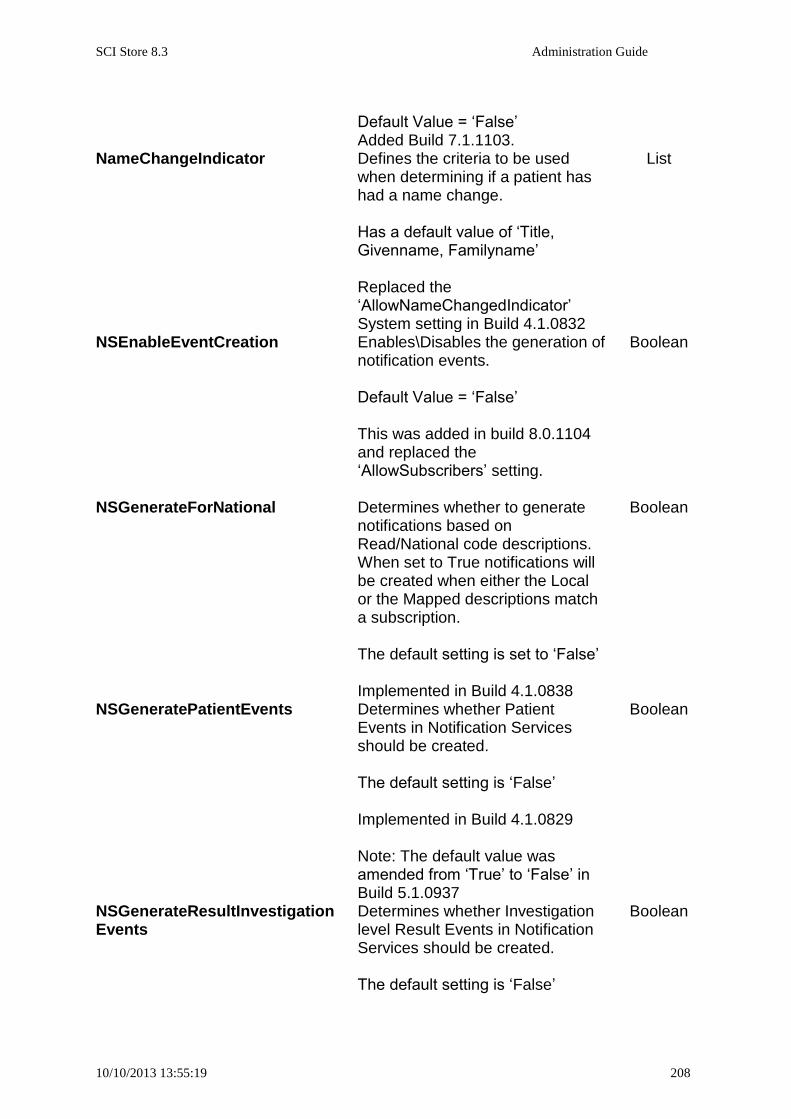
SCI Store 8.3 Administration Guide
10/10/2013 13:55:19 208
Default Value = ‘False’ Added Build 7.1.1103.
NameChangeIndicator Defines the criteria to be used when determining if a patient has had a name change. Has a default value of ‘Title, Givenname, Familyname’ Replaced the ‘AllowNameChangedIndicator’ System setting in Build 4.1.0832
List
NSEnableEventCreation Enables\Disables the generation of notification events. Default Value = ‘False’ This was added in build 8.0.1104 and replaced the ‘AllowSubscribers’ setting.
Boolean
NSGenerateForNational Determines whether to generate notifications based on Read/National code descriptions. When set to True notifications will be created when either the Local or the Mapped descriptions match a subscription. The default setting is set to ‘False’ Implemented in Build 4.1.0838
Boolean
NSGeneratePatientEvents Determines whether Patient Events in Notification Services should be created. The default setting is ‘False’ Implemented in Build 4.1.0829 Note: The default value was amended from ‘True’ to ‘False’ in Build 5.1.0937
Boolean
NSGenerateResultInvestigationEvents
Determines whether Investigation level Result Events in Notification Services should be created. The default setting is ‘False’
Boolean

SCI Store 8.3 Administration Guide
10/10/2013 13:55:19 209
Implemented in Build 4.1.0829 Note: The default value was amended from ‘True’ to ‘False’ in Build 5.1.0937
NSGenerateResultMasterEvents Determines whether Result Events in Notification Services should be created. The default setting is ‘False’ Implemented in Build 4.1.0829 Note: The default value was amended from ‘True’ to ‘False’ in Build 5.1.0937
Boolean
NSGenerateTreatmentLogEvents
This setting controls whether or not to create Treatment Log Notification Services events when processing a Treatment Log file. The default setting is ‘True’ Implemented in Build 5.1.0937
Boolean
NSManagementAmberEventCount
The number of unprocessed NS Events that must exist before an amber light is shown in the management console. Default Value of 500 Range between 100 and 10000 Implemented in Build 8.0.1104
Integer
NSManagementAmberEventMinutes
The time in minutes since the last event was processed before an amber light is shown in the management console.
Default Value of 10 Range between 1 and 100 Implemented in Build 8.0.1104
Integer
NSManagementDataCacheTime The time in minutes that the Notification Services Management data will be held in cache. Default Value of 5
Integer
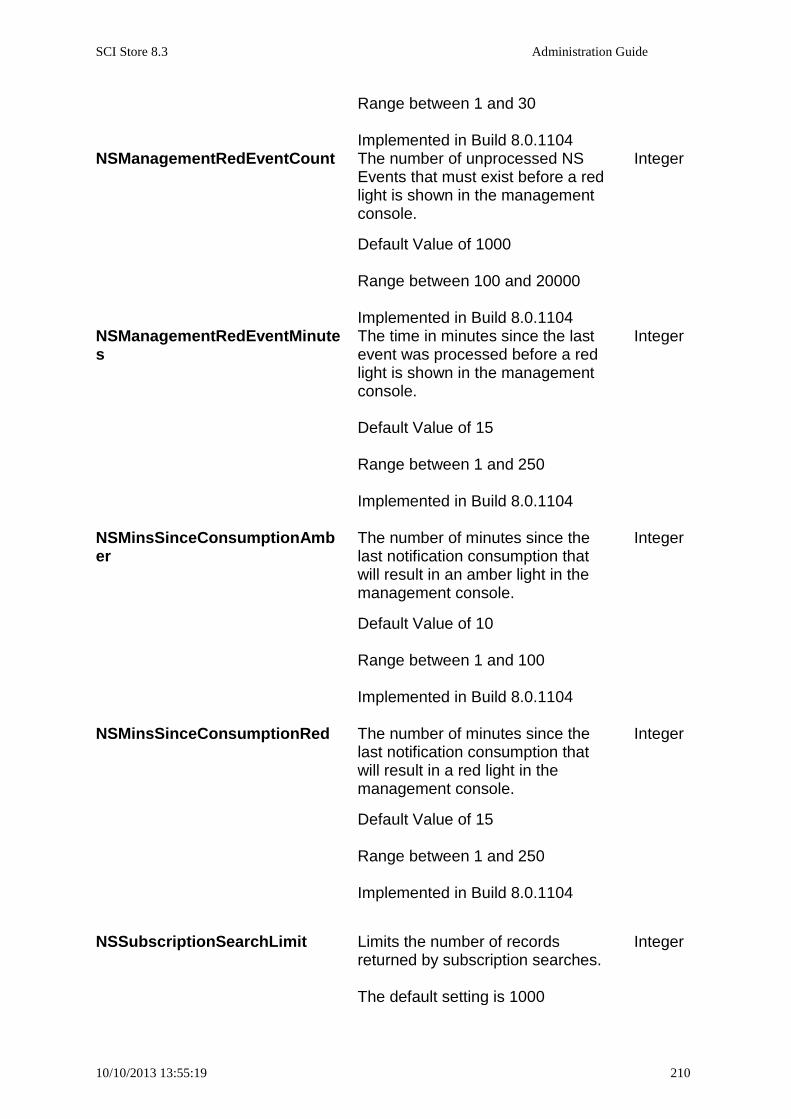
SCI Store 8.3 Administration Guide
10/10/2013 13:55:19 210
Range between 1 and 30 Implemented in Build 8.0.1104
NSManagementRedEventCount The number of unprocessed NS Events that must exist before a red light is shown in the management console.
Default Value of 1000 Range between 100 and 20000 Implemented in Build 8.0.1104
Integer
NSManagementRedEventMinutes
The time in minutes since the last event was processed before a red light is shown in the management console. Default Value of 15 Range between 1 and 250 Implemented in Build 8.0.1104
Integer
NSMinsSinceConsumptionAmber
The number of minutes since the last notification consumption that will result in an amber light in the management console.
Default Value of 10 Range between 1 and 100 Implemented in Build 8.0.1104
Integer
NSMinsSinceConsumptionRed The number of minutes since the last notification consumption that will result in a red light in the management console.
Default Value of 15 Range between 1 and 250 Implemented in Build 8.0.1104
Integer
NSSubscriptionSearchLimit Limits the number of records returned by subscription searches. The default setting is 1000
Integer

SCI Store 8.3 Administration Guide
10/10/2013 13:55:19 211
Implemented in Build 8.0.1104
NSUnConsumedAmber The number of unconsumed notifications for a user that will result in an amber light in the management console.
Default Value of 100 Range between 1 and 1000 Implemented in Build 8.0.1104
Integer
NSUnConsumedRed The number of unconsumed notifications for a user that will result in a red light in the management console. Default Value of 200 Range between 1 and 1000 Implemented in Build 8.0.1104
Integer
NumberUserNotes Defines the number of notes displayed on the Document metadata screen. The default setting is 3.
Integer
OrphanDocumentsOver Sets the number of days that is used as the search criteria in the Orphan documents search screen – e.g. if 10 is entered the search will look for documents that are over 10 days old.
Integer
PandemicOutbreak ECS Pandemic outbreak flag, setting to true removes all data view restrictions from ECS The default setting is ‘False’ Implemented in Build 5.0.0905
Boolean
PasswordExpiry Globally sets how long passwords are valid before they expire. Default value of 30 Range between 1 and 90
Integer

SCI Store 8.3 Administration Guide
10/10/2013 13:55:19 212
Revised implementation in build 6.1.1042
PatientSearchLimit Limits the number of records returned by Patient searches. Default value of 1000 Introduced in Build 3.0.0714
Integer
PersistEbiz Disables/enables eBiz Audit functionality. If set to True, messages that did not get into a e-biz queue can be sent via the front end.
Boolean
PrintPreviewMessage Message displayed in Print Preview header
String
RecentViewRangeDays Defines the number of days that the Recently Viewed tabs on the Homepage will return when selected. Currently only implemented against the Recently Viewed Patients tab. Default value of 30 Range between 1 and 250 Added in build 8.2.1202
Integer
RestrictLocalAdmin When set to true the local admin user will only be able to perform minimal admin for
Boolean
ResultDays Determines a value to be used to populate the ‘Processed In The Last’ filter on the ‘Results Tab’ on the ‘Patient Details’ screen. Has no default value and will accept only Integer values in the Range 1 – 999. When created, the ‘Processed In The Last’ filter will be pre-populated with the value of the System Setting and the associated drop down list will be pre-populated with a value of ‘Days’ Implemented in Build 4.1.0823.
Integer
ResultDisplay Disables/enables test reports grouped by sample
List

SCI Store 8.3 Administration Guide
10/10/2013 13:55:19 213
Available Values are : - ‘Group by sample’ and ‘Ungroup by sample’ Default is ‘Group by sample’
ResultMappingMethod This setting controls how ResultSet and Test Result mappings are processed in the system.
The Administrator will have the option to stop incoming reports from entering the system by generating an exception (legacy mechanism) or auditing the failure to audit tables in order to allow the failure to be resolved later using a mapping audit report.
There are 2 available settings: -
AuditMapping – files are parsed and ‘set’ and ‘test’ mapping failures are audited to the database.
CreateExceptions - Create parse exception when mapping fails for result sets and test results.
The default setting is : CreateExceptions
List
SearchSecondaryProvider This determines default data source search order for Web Service 2.3 find patient. If set to TRUE then a search will be made to Local database, If no Local records returned CHI will be searched (if configured) - Setting to FALSE will search Local only. Implemented in Build 3.0.0644 Note: Description changed to above in Build 3.1.0735
Boolean
ServiceProcessMode This setting controls how Store service tasks are processed in the system. This is currently to be used for TESTING only and should not be implemented unless approved by SCI Store implementation. The setting values are as follows: -
List

SCI Store 8.3 Administration Guide
10/10/2013 13:55:19 214
‘All tasks in one thread (including planned maintenance)’ – all tasks including planned maintenance will be run in a single thread. ‘All service tasks in one thread – planned maintenance in a separate thread’ - all service tasks will be run in one thread. The planned maintenance task will be run in a separate thread. ‘Tasks will run in separate thread based on task type (Parser type included fileupload and doctodb)’ service tasks are run in separate threads based on ‘task’ type. File upload and doc to db will run in same thread. ‘Tasks will run in separate thread based on task type (Separate thread for fileuploadparser and doctodb)’ service tasks are run in separate threads based on ‘task’ type. File upload and doc to db will run in separate threads.
ServiceTimerInterval This setting sets the sleep time for the windows service (in seconds). Default value – 10 seconds Range between 10 and 100 Added Build 7.1.1103
Integer
SetUserQuestions Forces new users to register password reset questions
Boolean
ShowAllContacts When set to TRUE all administrator contact details will be shown for users.
Boolean
ShowAnonymous Disables/enables Anonymous Patient Search functionality. Note: This enables the visibility of the anonymous search checkbox
Boolean

SCI Store 8.3 Administration Guide
10/10/2013 13:55:19 215
on the ‘Find Patient’ screen – which allows the user to search for NASH patient details. This is used to globally enable/disable all users from seeing the ‘Anonymous Search’ checkbox. It should be noted that it works in tandem with the ‘View Anonymous Patients’ module permission – which is granted on an individual basis to users.
ShowDeceasedIndicator Allows administrators to configure the display of the ‘Deceased’ column when the ‘Find Patient’ search screen results are displayed. When set to ‘True’ the column will be displayed. When set to ‘False’ it will not be displayed. The default setting is ‘True’. Implemented in build 6.0.1013 of Store.
Boolean
ShowLabelPrintButton When set to TRUE will show the PrintLabel button on the Patient Details form. The default setting is FALSE.
Boolean
ShowRemoteDataSources Disables/enables Remote Data Source functionality. Note: The default setting was revised to ‘True’ in build 6.0.0949
Boolean
ShowServiceName Shows the ‘Service Name’ column on the patient details demographic tabs. The default setting is ‘False’ Note: - this System setting works globally, but individual users must be granted the 'Show Service Name Column' module permission from the ‘Patient’ category section of the Module Permissions screen.
Boolean

SCI Store 8.3 Administration Guide
10/10/2013 13:55:19 216
Before the ‘Service Name’ column will be visible. Implemented in Build 5.0.0909
SystemNameSCI SCI Store identifier. The value of this setting is displayed on the login screen and in the menu bar in the application. The default Setting is ‘SCI Store’.
String
SystemMessageBody Message displayed on homepage String SystemIdentifier Identifies the location of Store e.g.
PJSSCI6 String
UnmergeAll Permits/prevents the unmerging of external merge transactions (e.g. from COMPAS)
Boolean
WebserviceTokenTimeout This setting sets the timeout value for the SCI Store Web Services (in minutes). Default value – 10 mins Range between 5 and 30 mins Added Build 7.1.1103
Integer

SCI Store 8.3 Administration Guide
10/10/2013 13:55:19 217
SCI Store SysEng System Settings
The following list summarises the non user-configurable system settings available for SCI Store – i.e. these are ‘hidden’ from the user view and should only be configured by SCI Store Support Team members.
Setting Name Value Functionality
version_no
Holds the current version number of Store. This is loaded by the database create / upgrade scripts. String
DefaultSessionTimeout
Defines the default session timeout for a user. This overrides the session timeout set in the web.config The range is between 5 and 60 mins with a default of 20 mins This was introduced in Build 4.1.0835 Integer
DBTransIsolationLevelReadUncommitted
Implements dirty read or isolation level 0 locking which means that no shared locks are issued and no exclusive
Boolean

SCI Store 8.3 Administration Guide
10/10/2013 13:55:19 218
locks are honoured. This is the least restrictive of the four isolation levels.
DevelopmentOnly
Used by developers to assist development process. Note: the name of this setting was changed from ‘Enable22’ in build 4.1.0844. Boolean
ECSLocationMode
This setting determines the area where ECS is installed. It will therefore change CHI text labels accordingly. The available values are: - Scotland, Northern Ireland. Implemented in build 6.1.1042 List

SCI Store 8.3 Administration Guide
10/10/2013 13:55:19 219
Appendix B: Module Permissions
Below is a list of all module permissions available in SCI Store/ECS
Category Display Name Detailed Description
Patient Find and View Patients
Allow access to the Find Patient Search and Patient Details Screen. Also controls to the FindPatient and GetPatient Web Services
Patient View Patient ECS Details
Allow user to view the patient ECS tab
Patient View Patient Telecoms
Allows user to view the patient telecoms tab in the front end
Patient View Patient Treeview
Allows user to view the patient treeview tab in the front end
Patient View Patient Names
Allows user to view patient names tab in the front end
Patient View Patient ADTs
Allows user to view patient Admission, Discharge and Transfers. Alos controls access to FindADT and GetADT Web Services
Patient View Patient Addresses
Allow user to view patient addresses tab in the front end
Patient View Patient History
Allow user to view the patient update history
Patient View Patient IDs
Allows user to view the patients IDs tab in the front end
Patient Find on CHI - Save to Store
Allow user to save details retrieved from the Find on CHI search into the local Store and to refresh patient demographics from CHI.
Patient Find on CHI - Test Match
Allow user to perform a test patient match on patient details retrieved from the CHI search
Patient Maintain Patient Consent
Allow user to change the Consent flag for a patient
Patient Break Glass Allow user to Breakglass to override the patient consent flag. This also allows the user to Breakglass via the Web Services
Patient Point in Time View
Allow user to see a point in time view of a patient
Patient View Anonymous Patients
Allow user to view anonymous patients (i.e. patients added via NASH)
Patient Show Service Name Column
Shows the service name of the Service that added/amended the demographics details
Patient Flag Duplicate Patients
Allows a user to flag a patient as being a duplicate

SCI Store 8.3 Administration Guide
10/10/2013 13:55:19 220
Patient Search Duplicate Patient Requests
Allows a user to search duplicate patient requests
Patient Process Duplicate Patient Requests
Allows a user to process / action duplicate patient requests
Patient Manual Document Upload
Allows a user upload documents against a patient from the SCI Store web front-end.
Patient View UCPN Allows a user to view the UCPN tab on the patient details page
Results Find Result Search
Allow access to the Find Result search. Also controls access to the FindResult Web Service.
Results View Results Allow user to view Patient Results
Results View Results History
Allows user to view historical versions of a result report
Results View and Add Result Notes
Allow user to view and add result notes
Results Cumulative Report
Allow access to the Cumulative Report page
Results Cumulative Report Profile Templates
Allow the user to use the Report Profile Templates on the Cumulative Report screen
Results Ad Hoc Cumulative Report
Allows access to the Ad Hoc Cumulative Report page
Results Recently Requested Results
Allows a user to set up a list of healthcare professionals in Requestor Groups and view a list of results requested by those Requestor Groups.
Documents Find Document Search
Allow access to the Find Document search. Also controls access to the FindDocument, GetDocument and GetDocumentStylesheet Web Services
Documents View Documents
Allow user to search for and view documents. Also controls access to the document notes and audit pages
Documents Retire Document
Allow user to retire documents
Configuration Maintain User Questions
Allow user to Maintain their user security questions. If the user is an administrator this will also allow them to edit other users questions
Configuration Code Scheme Configuration
Allow access to the Mapping Audit Report, Scheme Code Maintenance and Manage Scheme Code Pages
Configuration Code Scheme Group Configuration
Allow access to the Scheme Group Definition and Maintenance Pages
Configuration View User Customisation Page
Allow user to view the user customisation page

SCI Store 8.3 Administration Guide
10/10/2013 13:55:19 221
Configuration View and Edit System Settings
Allows user to view and edit the system settings
Configuration Add/Edit Scheme and Code Mappings
Allows user to add and edit scheme code mappings
Configuration Store Interface Configuration
Allow access to the interface definition and amendment screens
Configuration Patient Matching Rule Configuration
Allow user to configure patient matching rules
Configuration ID Format Configuration
Allow user to configure ID Format rules
Configuration Break Glass Maintenance
Allow user to create and amend Breakglass Types. Allows web service user access to GetBreakGlassTypes Web Service
Configuration Cumulative Sources Configuration
Allow user to create and amend interface groupings for Cumulative Reports
Configuration GUID Stylesheet Association Maintenance
Allows access to the GUID Stylesheet association pages.
Security User Configuration
Covers user configuration, User Questions, Password Reset, User History, User Results History, User Document History and View Permissions
Security Add User Allow user to create new User accounts
Security Update User Allow user to update existing user accounts
Security Delete User Allow user to delete existing user accounts
Security Change Password
Allow users to change their password
Security Data Restrictions Configuration
Allow user to configure Data Restrictions
Security Permission Group Configuration
Allow access to the Permission Group Configuration pages
Security Field Permissions Configuration
Allow user to configure Field Permissions

SCI Store 8.3 Administration Guide
10/10/2013 13:55:19 222
Security Module Permissions Configuration
Allow user to configure Module Permissions. Also allows user to create and amend Module Permission Templates
Security Remote Data Source User Configuration
Allow user to set user access to Remote Data Sources
Security Base Location Configuration
Allow user to configure Base Locations
Security User Session Admin
Allow access to the User Session Admin page
Security Role Configuration
Allow access to the Role Administration page
Security Timed Access Template Configuration
Allow access to the Timed Access Template configuration page
Security Administration Password Common Words
Allows a user to set up a list of words which are not allowed in passwords
Reporting and Auditing
Break Glass Summary
Allow access to the Breakglass Summary page
Reporting and Auditing
Break Glass Search
Allow access to the Breakglass search and Breakglass details pages. Also controls access to the BreakglassAudit Web Service
Reporting and Auditing
ECS Missing Files Report
Allow access to the ECS Missing Files Report
Reporting and Auditing
ECS Practice Files Report
Allow access to the ECS Practice Files Report
Reporting and Auditing
EBIZ Audit Allow access to the EBIZ Audit functionality
Reporting and Auditing
ECS Access Report
Allow access to the ECS Access Report functionality
Reporting and Auditing
Document Audit Report
Allow access to the Document Audit report page
Reporting and Auditing
Maintain Patient Audit
Allow access to the Maintain Patient Audit page. Also controls access to the FindPatientConsentAudit Web Service

SCI Store 8.3 Administration Guide
10/10/2013 13:55:19 223
Reporting and Auditing
Notification Services Subscription Manager
Allow access to the Notification Services Subscription Manager
Reporting and Auditing
Notification Services Message Audit
Allow access to the Notification Services Message Audit page
Reporting and Auditing
Patient Search Audit
Allow access to the Patient Search Audit page
Reporting and Auditing
Patient Information Status Audit Report
Allows access to the Patient Information Status Audit Report Page.
Reporting and Auditing
ECS Cross Border Report
Allow access to the ECS Cross Border Report
Reporting and Auditing
ECS Report Selection
Allow access to the ECS Weekly, Monthly and Annual Report screen
Reporting and Auditing
ECS Admin Access Report
Allow access to the ECS Admin Access Report
Reporting and Auditing
Organisation Test Report
Allow access to the Organisation Test Report page
Reporting and Auditing
Report Profiles Configuration
Allow user to create/amend/delete Lab Report Profiles
Reporting and Auditing
ECS GP Consent Audit Report
Allow access to the ECS GP Consent Audit page
Reporting and Auditing
Locked User Account Audit Report
Allow access to the Locked User Account Audit page
Reporting and Auditing
Failed Login Audit Report
Allow access to the Failed Login Audit page
Reporting and Auditing
Casual Browser Audit Report
Allow access to the Casual Browser Audit page
Reporting and Auditing
Extended Login Audit Report
Allow access to the Extended Login Audit page
Reporting and Auditing
View Statistics Allow access to the statistic pages. This includes Patient Statistics, Result Statistics, User Statistics and Interface
Reporting and Auditing
View Audit Report
Allow access to the user Audit Report
Reporting and Auditing
View User Audit on Patient and Result Pages
Allow user to view user audit information on the Patient and Results pages

SCI Store 8.3 Administration Guide
10/10/2013 13:55:19 224
Reporting and Auditing
ECS Outbound Schema Validation Report
Allows access to the ECS outbound schema validation report
Web Services Remote Data Source Configuration
Allow user to configure Remote Data Sources
Web Services Provider Save to Store
Allow user to save patient details retreived from the CHI system into the local Store
Web Services Notification Access
Allow user to Create/Amend/Delete subscriptions and Get Notifications
Web Services Generic Data Access
Allow access to the FindHCP, GetHCP and GetInterfaceStatus Web services
Web Services Message Queue Access
Allow access to the MessageQueueCount, MessageQueuePeek, and MessageQueueDelete Web Services
Exceptions Management
Uploaded Files Allow access to the Uploaded Files exceptions management functionality
Exceptions Management
Parsed Files Allow access to the Parsed Files exceptions management functionality
Exceptions Management
Document to Database Search
Allow access to the Document Upload exceptions management functionality
Exceptions Management
ACSC Registration Search
Allow access to the ACSC Registration search page
Exceptions Management
View the Store Parse Log
Allow user to view the store parse log
Store Maintenance
Find Merges Search
Allow access to the Find Merges search. Also allows access to the Find Merges Web Service
Store Maintenance
Find and Merge Duplicate Patients
Allows a user to search for and merge duplicate patients. Also controls access to the MergePatient and UnmergePatient Web Services
Store Maintenance
Maintenance Plan Configuration
Allow access to the Store Maintenance Functionality
Store Maintenance
Orphan Document Clean-up
Allow access to the Orphan Document Cleanup page

SCI Store 8.3 Administration Guide
10/10/2013 13:55:19 225
Store Maintenance
Job Type and Login Reason Maintenance
Allow user ability to create and amend the list of Job Types and Login Reasons
Store Maintenance
Patient Information Status Maintenance
Allows a user to search for a patient and update the status on patient result reports and certain demographic items.
Store Maintenance
Search Duplicate patient Requests
Allows a user to search on duplicate patient requests
Store Maintenance
Process Duplicate Patient Requests
Allows a user to process / action duplicate patient requests
Treatment Log Action treatment logs
Allows a user to perform updates on outstanding Treatment Logs via the web application
Treatment Log Find and View Treatment Logs
Allows a user to search for and view Treatment Log entries via the web application. Also controls access to FindTreatmentLog and GetTreatmentLog Web Services.

SCI Store 8.3 Administration Guide
10/10/2013 13:55:19 226
Appendix C: SCI Store Performance Counters
The following table details the performance counters available in the system. These counters can be used to query and log the ongoing performance of particular areas of the application.
Counter Name Functionality "# active windows service tasks" This counter will signify the current
number of threads that the windows service is currently running with.
"# total upload actions performed by windows service"
This will count the total number of “file upload” actions the windows service has performed since the windows services was started
"# total split actions performed by windows service"
This will count the total number of ”file split” actions the windows service has performed since the windows services was started
"# total parse actions performed by windows service"
This will count the total number of “file parse” actions the windows service has performed since the windows services was started
"# total non functional actions performed by windows service"
This will count the total number of “non functional” actions the windows service has performed since the windows services was started. Non functional services are services that have been deprecated from the system but the code still tries to execute the service. This counter is there for debug purposes only.
"# total Document Upload actions performed by windows service"
This will count the total number of “document upload” actions the windows service has performed since the windows services was started
"# service uploaded files/sec" This will detail the number of actions per second for “file upload” actions the windows service has performed since the windows services was started
"# service split files/sec" This will detail the number of actions per second for “file split” actions the windows service has performed since the windows services was started
"# service parsed files/sec" This will detail the number of actions per second for “file parse” actions the windows service has performed since the windows services was started
"# service documents uploaded and parsed/sec" This will detail the number of actions per

SCI Store 8.3 Administration Guide
10/10/2013 13:55:19 227
second for “document upload” actions the windows service has performed since the windows services was started
"# service upload files average time" This will detail the average time in seconds that it takes to perform a “file upload” action. This value is calculated since the windows services was started
"# service split files average time" This will detail the average time in seconds that it takes to perform a “file split” action. This value is calculated since the windows services was started
"# service parsed files average time" This will detail the average time in seconds that it takes to perform a “file parse” action. This value is calculated since the windows services was started
"# service document upload average time" This will detail the average time in seconds that it takes to perform a “document upload” action. This value is calculated since the windows services was started
"# Average time (secs) for last 100 Compas records"
This will detail the average time in seconds that it takes to perform the last 100 Compas records Note: This is an advanced counter and will only be updated calculated every x minutes if the AdvancedCounterStatsInterval system setting has a non zero value.
"# Average time (secs) for last 100 Homer records"
This will detail the average time in seconds that it takes to perform the last 100 Homer records Note: This is an advanced counter and will only be updated calculated every x minutes if the AdvancedCounterStatsInterval system setting has a non zero value.
"# Average time (secs) for last 100 iLab records"
This will detail the average time in seconds that it takes to perform the last 100 iLab records Note: This is an advanced counter and will only be updated calculated every x minutes if the AdvancedCounterStatsInterval system setting has a non zero value.
"# Average time (secs) for last 100 MasterLab records"
This will detail the average time in seconds that it takes to perform the last 100 MasterLab records

SCI Store 8.3 Administration Guide
10/10/2013 13:55:19 228
Note: This is an advanced counter and will only be updated calculated every x minutes if the AdvancedCounterStatsInterval system setting has a non zero value.
"# Average time (secs) for last 100 Medipath records"
This will detail the average time in seconds that it takes to perform the last 100 Medipath records Note: This is an advanced counter and will only be updated calculated every x minutes if the AdvancedCounterStatsInterval system setting has a non zero value.
"# Average time (secs) for last 100 Telepath records"
This will detail the average time in seconds that it takes to perform the last 100 Telepath records Note: This is an advanced counter and will only be updated calculated every x minutes if the AdvancedCounterStatsInterval system setting has a non zero value.
"# Average time (secs) for last 100 XML41 records"
This will detail the average time in seconds that it takes to perform the last 100 XML41 records Note: This is an advanced counter and will only be updated calculated every x minutes if the AdvancedCounterStatsInterval system setting has a non zero value.
"# Average time (secs) for last 100 XML60 records"
This will detail the average time in seconds that it takes to perform the last 100 XML60 records Note: This is an advanced counter and will only be updated calculated every x minutes if the AdvancedCounterStatsInterval system setting has a non zero value.

SCI Store 8.3 Administration Guide
10/10/2013 13:55:19 229

SCI Store 8.3 Administration Guide
10/10/2013 13:55:19 230
Appendix D: SCI Store Direct Page Access The following table give details of pages that will support bookmarks or direct page access.
Note: If the user is not currently logged in then they will be prompted to login prior to being redirected to the selected page. In order to use these pages an understanding of the URL format is required
In the pages highlighted below the examples give a sample path to SCI Store as http://StoreURL/StoreWeb/. Replace this with the actual path for the desired instance of Store.
Page Name Functionality HomePage Default path:
http://StoreURL/StoreWeb/ Restricted/Home/home.aspx
Find Patient
Default path: http://StoreURL/StoreWeb/Restricted/patient/findpatient.aspx?patientidentifier=1234567890 Using a querystring on patientIdentifier performs an identifier search across the patient repository. If a single patient is found with this identifier then an automatic redirect is performed to the patient details page for that patient. If more than one instance is found then the findPatient form is presented with all patients with that identifier. This allows the user to select the correct patient.
Patient Details
Default path: http://StoreURL/StoreWeb/ Restricted/Patient/PatientDetails.aspx?ClassIdx=141 ClassIdx = Internal patientid This will automatically display full details for a patient with the specified internal id via the querystring. Note: Only implement when internal id’s are not liable to change.
Find Result Default path: http://StoreURL/StoreWeb/Restricted/results/findresult.aspx This will display the findresult form
Find Documents
Default path: http://StoreURL/StoreWeb/Restricted/results/findresult.aspx This will display the finddocument form

SCI Store 8.3 Administration Guide
10/10/2013 13:55:19 231
Appendix E: Security Settings
Encrypting Web.Config
The web.config can sometime contain sensitive information that if exposed would be a security risk. This file should not be available to non admins but there is the potential that someone may have direct access to the file inadvertently.
The following section provides a recommended method of encrypting these setting to ensure that if someone got access to the web.config they would not be able to determine the real values for this sensitive data.
Examples of where sensitive information is in the web.config
Document upload requires impersonation that has a user id and password in clear text
Gateway recipient web services has various settings that expose user id and passwords
The utility within the .Net framework that provide this functionality is:-
aspnet_regiis.exe
It resides in the .net framework directory. For V2.0 of the framework this is
C:\WINDOWS\Microsoft.NET\Framework\v2.0.50727
When running this utility you should setup a batch file so that this directory is included in the dos path to allow easier access.
This utility will allow various setting to be applied. For the purpose of this document only the ability to encrypt and decrypt a section of the web.config will be discussed.
Note: This utility is provided as part of the .Net framework. When a section is encrypted the application does not require to be modified. The methods within the application that access these values will automatically decrypt them without any coding by the developer.
Before we run the utility we need to establish certain aspect on what we want to do:-
a) Ensure that the user running the utility is a local administrator
b) Ensure that the web.config is read/write before attempting to apply the encryption.
c) Decide on what section of the web.config we want to encrypt/decrypt.
d) Decide on which of the two command line parameters for encryption/decryption that we will use
e) Decide on what type of encryption to apply

SCI Store 8.3 Administration Guide
10/10/2013 13:55:19 232
Ensure the user running the utility is a local administrator
This utility is a command line utility that can only be run by a local machine administrator on the machine where the web.config resides. Ensure that you have local admin rights prior to running the utility. Ensure the Web.Config is read write
The aspnet_regiis.exe utility will modify the web.config when encrypting/decryping the specified section. Ensure that the file can be modified (is not read only).
Decide on what section to encrypt/decrypt
The section that is to be encrypted / decrypted must already exist in the web.config before running the utility. Ensure that this is available and that the path to the section is known. This is generally an xpath command that is specified relative to the configuration node.
The layout of a web.config can vary. An cut down example of this layout is as follows:-
<?xml version="1.0"?> <configuration> <configSections> ....... </configSections> <appSettings> ...... </appSettings> <system.web> <identity /> </system.web> </configuration>
Here we see that the root node is <configuration>. Under the root node there are other nodes <configSections> and <system.web>.
The format and layout of a web.config will vary for each application. A node with the same name may appear at various locations in the hierarchy. What is important is to understand that each node is a potential section that can be encrypted and where it appears in the hierarchy of the web.config file.
When deciding what section to encrypt we must determine the correct reference. (the reference does not include the configuration node as this is the root node).
If we wanted to encrypt the <appSettings> section above the reference would be “appSettings”.
If we wanted to encrypt the <identity> section above the reference would be “system.web/identity”

SCI Store 8.3 Administration Guide
10/10/2013 13:55:19 233
Decide on what command line parameters to use
There are two methods that will allow a section to be encrypted
a) Specify the path where the web.config files exists
If the encryption parameter is –pef or – pdf then the full path of the directory that contains the web.config file should be specified. The web.config itself should nor be specified. An example is include below
aspnet_regiis.exe -pef "system.web/identity" "C:\SCI Store\SourceCode\StoreWeb" -prov "DataProtectionConfigurationProvider"
b) Specify the web application name in IIS of the web application.
If the encryption parameter is –pe or – pd then the iis application name should be specified. The utility will use this to determine the location of the web.config. An example is include below
aspnet_regiis.exe -pe "system.web/identity" -app "/StoreWeb" -prov "DataProtectionConfigurationProvider"
Decide on what type of encryption to apply
There are two standard types of encryption to use RSAProtectedConfigurationProvider and DataProtectionConfigurationProvider.
Only DataProtectionConfigurationProvider has been tested in SCI Store and is the only method supported. Ensure that the “-prov DataProtectionConfigurationProvider” parameter is included in the encryption command line to ensure this method is used. If not specified the RSAProtectedConfigurationProvider method will be used as this is the default.

SCI Store 8.3 Administration Guide
10/10/2013 13:55:19 234
Examples of encryption / decrypting a web.config
The following are examples of encrypting the StoreWeb application for the identity impersonate section. Only the specified parameters have been tested and are supported. The section name should be change relative to the requirements.
This example uses the pef and pdf to encrypt and decrypt using full path to the web.config files. The pef is used to encrypt and pdf to decrypt. The –prov is not required when decrypting. In the following examples “system.web/identity” relates to the section in the web.config where we setup identity impersonation. Used in the application for document upload. “appsettings” is used in the Gateway recipient web services to define settings within the application. This section includes sensitive information. The utility will encrypt the full section.
aspnet_regiis.exe -pef "system.web/identity" "C:\SCI Store\SourceCode\StoreWeb" -prov "DataProtectionConfigurationProvider"
aspnet_regiis.exe -pdf "system.web/identity" "C:\SCI Store\SourceCode\StoreWeb"
aspnet_regiis.exe -pef "appSettings" "C:\SCI Store\SourceCode\RecipientWebServices\SCIStore.RecipientWebServices" -prov "DataProtectionConfigurationProvider"
aspnet_regiis.exe -pdf "appSettings" "C:\SCI Store\SourceCode\RecipientWebServices\SCIStore.RecipientWebServices"
This example uses the pe and pd to encrypt and decrypt using the iis application name. The pe is used to encrypt and pd to decrypt. The –app is used to specify the application name. This must already be a valid application in iis. The –prov is not required when decrypting.
aspnet_regiis.exe -pe "system.web/identity" -app "/StoreWeb" -prov "DataProtectionConfigurationProvider"
aspnet_regiis.exe -pd "system.web/identity" -app "/StoreWeb"

SCI Store 8.3 Administration Guide
10/10/2013 13:55:19 235
Document control
Document Name: SCI Store – Administration Guide
Document Version: 8.3
Document Number: SCI-DPUG-009
Location: Linwood
Filename: SCI Store - Administration Guide.doc
Format: Microsoft Office Word 2003
Owner: Campbell Roberts
Change Authority Campbell Roberts
Status Draft
Distribution: http://www.sci.scot.nhs.uk/products/store/
Comments: Final version for version 8.3.1301 of SCI Store