VoiceGenie 7.2.2 Installation Guide - Genesys Documentation
176
VoiceGenie 7.2.2 Installation Guide
-
Upload
khangminh22 -
Category
Documents
-
view
3 -
download
0
Transcript of VoiceGenie 7.2.2 Installation Guide - Genesys Documentation

VoiceGenie 7.2.2
Installation Guide

The information contained herein is proprietary and confidential and cannot be disclosed or duplicated without the prior written consent of Genesys Telecommunications Laboratories, Inc. Copyright © 2000–2009 Genesys Telecommunications Laboratories, Inc. All rights reserved.
About Genesys Genesys Telecommunications Laboratories, Inc., a subsidiary of Alcatel-Lucent, is 100% focused on software for call centers. Genesys recognizes that better interactions drive better business and build company reputations. Customer service solutions from Genesys deliver on this promise for Global 2000 enterprises, government organizations, and telecommunications service providers across 80 countries, directing more than 100 million customer interactions every day. Sophisticated routing and reporting across voice, e-mail, and web channels ensure that customers are quickly connected to the best available resource—the first time. Genesys offers solutions for customer service, help desks, order desks, collections, outbound telesales and service, and workforce management. Visit www.genesyslab.com for more information. Each product has its own documentation for online viewing at the Genesys Technical Support website or on the Documentation Library DVD, which is available from Genesys upon request. For more information, contact your sales representative.
Notice Although reasonable effort is made to ensure that the information in this document is complete and accurate at the time of release, Genesys Telecommunications Laboratories, Inc., cannot assume responsibility for any existing errors. Changes and/or corrections to the information contained in this document may be incorporated in future versions.
Your Responsibility for Your System’s Security You are responsible for the security of your system. Product administration to prevent unauthorized use is your responsibility. Your system administrator should read all documents provided with this product to fully understand the features available that reduce your risk of incurring charges for unlicensed use of Genesys products.
Trademarks Genesys, the Genesys logo, and T-Server are registered trademarks of Genesys Telecommunications Laboratories, Inc. All other trademarks and trade names referred to in this document are the property of other companies. The Crystal monospace font is used by permission of Software Renovation Corporation, www.SoftwareRenovation.com.
Technical Support from VARs If you have purchased support from a value-added reseller (VAR), please contact the VAR for technical support.
Technical Support from Genesys If you have purchased support directly from Genesys, please contact Genesys Technical Support at the following regional numbers:
Region Telephone E-Mail
North America and Latin America +888-369-5555 or +506-674-6767 [email protected]
Europe, Middle East, and Africa +44-(0)-127-645-7002 [email protected]
Asia Pacific +61-7-3368-6868 [email protected]
Japan +81-3-6361-8950 [email protected]
Prior to contacting technical support, please refer to the Genesys Technical Support Guide for complete contact information and procedures.
Ordering and Licensing Information Complete information on ordering and licensing Genesys products can be found in the Genesys 7 Licensing Guide.
Released By Genesys Telecommunications Laboratories, Inc. www.genesyslab.com Document Version: 06-2009

Installation Guide 3
Chapter 1 Introduction..............................................................................................9
Chapter 2 Prerequisites..........................................................................................11 2.1 VoiceGenie Software Overview......................................................11
2.2 Deployment Architecture ................................................................13
2.2.1 All-in-One ...................................................................................14
2.2.2 One Management/Database Server ..........................................14
2.2.3 Two Management/Database Servers ........................................15
2.2.4 Architecture Pros and Cons .......................................................15
2.3 Installation Considerations.............................................................17
2.4 Hardware Considerations ...............................................................17
2.4.1 OS Supported Hardware............................................................17
2.4.2 Processor Speed Requirements ................................................ 18
2.5 Software Considerations ................................................................18
2.5.1 Java Version Requirements.......................................................18
2.6 Contacts for Further Information ...................................................18
Chapter 3 Installation Overview.............................................................................19
Chapter 4 Operating-System and Third-Party Software Installation ..................21 4.1 Supported Operating Systems.......................................................21
4.2 VoiceGenie Linux 3.0 Update 2 Installation and Configuration .........................................................................................22
4.3 Red Hat Enterprise Linux 3.0 and Third-Party Software Installation..............................................................................................27
4.3.1 Red Hat Enterprise Linux 3.0 Operating System Installation...........................................................................................27
4.4 Microsoft Windows 2000 Server and Windows 2003 Server and Third-Party Software Installation......................................31
4.4.1 Windows 2000 Server and Windows 2003 Server Operating-System Installation.............................................................31
Table of Contents

Table of Contents
4 VoiceGenie 7.2.2
4.4.2 Third Party–Software Installation ...............................................33
4.4.3 Cross-OS Installation & Deployment .........................................36
4.4.4 Non-English Windows Details....................................................36
4.5 Red Hat Enterprise Linux 4 and Third-Party Software Installation..............................................................................................39
4.5.1 Red Hat Enterprise Linux 4 Operating-System Installation...........................................................................................39
Chapter 5 Oracle 10g Server and Client Installation (Optional)..........................43 5.1 Hardware Requirements .................................................................43
5.2 Software Requirements...................................................................44
5.3 Linux Oracle Installation.................................................................45
5.4 Windows Oracle Installation...........................................................53
Chapter 6 VoiceGenie OA&M Framework Installation .........................................57 6.1 Installation Order .............................................................................57
6.2 Basic Installation Procedure ..........................................................57
6.3 Database Server and Management Server Setup .........................61
6.3.1 One Management/Database Server ..........................................61
6.3.2 Two Management/Database Servers ........................................63
Chapter 7 Other VoiceGenie Software Installation ..............................................67 7.1 Installation and Deployment via the SMC Overview .................... 67
7.1.1 VoiceGenie Packaging Overview...............................................68
7.1.2 Installation vs. Deployment ........................................................68
7.1.3 Product-File Installation .............................................................69
7.1.4 Configuration Profile Creation....................................................70
7.1.5 Product-File Deployment ...........................................................71
7.2 Installing the VoiceXML Platform...................................................72
7.2.1 Installation and Deployment.......................................................72
7.2.2 Manual Configuration.................................................................73
7.2.3 Licensing....................................................................................74
7.3 Installing the SIP Proxy...................................................................76
7.3.1 Installation and Deployment.......................................................76
7.3.2 Manual Configuration.................................................................77
7.3.3 Licensing....................................................................................77

Table of Contents
Installation Guide 5
7.4 Installing Other VoiceGenie Software............................................78
7.4.1 Installation and Deployment.......................................................78
7.4.2 Manual Configuration.................................................................78
7.4.3 Licensing....................................................................................78
7.5 Installing the VoiceGenie Tools Framework (Call Analyst and Quality Advisor)................................................................79
7.5.1 Installation and Deployment.......................................................79
7.5.2 Manual Configuration.................................................................81
7.5.3 Licensing....................................................................................81
Chapter 8 ASR and TTS Software Installation......................................................83 8.1 Installing MRCP-Direct ASR or TTS Engines ................................87
8.1.1 Installation and Deployment.......................................................87
8.1.2 Manual Configuration...............................................................102
Licensing...........................................................................................119
8.2 Installing MRCP-Native ASR or TTS Engines ............................. 119
8.2.1 Installation and Deployment.....................................................120
8.2.2 Manual Configuration...............................................................124
8.2.3 Licensing..................................................................................125
8.2.4 Manual-Installation Procedures for Watson 6.1 Server ...............................................................................................125
8.2.5 Manual-Installation Procedures for NaturalVoice 4.1 Server ...............................................................................................127
8.3 Targeting Speech Resources .......................................................130
8.3.1 VoiceXML Platform Speech Resources...................................130
8.3.2 MRCP Proxy Speech Resources.............................................131
8.4 Installing the Hotkey Grammar Package ..................................... 132
8.5 Migrating RealSpeak MRCP-Native to RealSpeak MRCP-Direct Installation.....................................................................132
8.5.1 Remove Existing Installation....................................................133
Appendix A Installing Packages from the Command Line ...................................139 A.1 CMP Installer Usage......................................................................139
A.2 CMP Installer Examples................................................................140
A.2.1 Installing a Product File from the Command Line.................... 140

Table of Contents
6 VoiceGenie 7.2.2
A.2.2 Installing a Product File, and Creating a Profile from the Command Line............................................................................140
A.2.3 Creating a Profile, or Upgrading an Existing Profile ................ 141
A.2.4 Upgrading an Existing Profile ..................................................141
Appendix B Deploying Packages from the Command Line .................................143
Appendix C Automating I-Scripts for Silent Install ...............................................145
Appendix D Changing the IP Address of a Computer...........................................147 D.1 Changes to Management Server .................................................147
D.1.1 CMP Server Configuration ...................................................... 147
D.1.2 CMP Proxy Configuration........................................................ 148
D.1.3 Database Entries.....................................................................148
D.2 Changes to Database Server .......................................................149
D.2.1 SMC Configuration ..................................................................149
D.2.2 ODBC Configuration................................................................149
D.3 Changes to Other Servers (VoiceXML Platform, ASR Server, TTS Server) .............................................................................150
D.3.1 Database Entries.....................................................................150
D.4 Network-Setting Changes ............................................................151
D.4.1 Standard Networking...............................................................151
D.4.2 With Bonding Drivers...............................................................151
D.4.3 Restarting the Servers.............................................................152
D.5 Other Optional Component Changes..........................................152
D.5.1 Call Manager ...........................................................................152
D.5.2 CCXML Interpreter ..................................................................152
D.5.3 Speech Resources ..................................................................152
D.5.4 ASR Engines ...........................................................................153
D.5.5 TTS Engines............................................................................153
D.5.6 SIP Proxy ................................................................................154
D.5.7 CCP-RM ..................................................................................154
Appendix E Kernel-Specific Information for Red Hat Enterprise Linux 3.0 ........155
Appendix F OS-Specific Configuration ..................................................................157

Table of Contents
Installation Guide 7
F.1 Linux...............................................................................................157
F.1.1 Forcing File System–Integrity Check After Restart .................. 157
F.2 VoiceGenie Linux RPM List ..........................................................157
Appendix G Configuring the Platform for DTMF Only...........................................169
Appendix H Using AudioCodes Media Gateway with VoiceGenie Media Platform.....................................................................................171
H.1 AudioCodes Configuration ..........................................................171
H.1.1 Codec Settings ........................................................................171
H.1.2 Telephony Endpoint Settings ..................................................172
H.1.3 IP Endpoint Settings................................................................172
H.1.4 VoiceGenie Media Platform Configuration .............................. 173

Table of Contents
8 VoiceGenie 7.2.2

Installation Guide 9
This document is intended to act as a guide for new installations of VoiceGenie and related third-party software products on the various operating systems supported by VoiceGenie. Note that this document does not contain instructions for upgrades. User looking to upgrade their existing VoiceGenie installation should refer to the VoiceGenie Upgrade Guide.
This document includes a high level description of the software products available from VoiceGenie, a discussion about the architecture of a VoiceGenie deployment, as well as information on how to install and configure VoiceGenie and related third-party software.
Before attempting an installation please read Prerequisites to get an understanding of the various VoiceGenie software products and how they interact, as well as the install order that is required to properly setup and configure the software.
Chapter
1 Introduction

Chapter 1: Introduction
10 VoiceGenie 7.2.2

Installation Guide 11
This section outlines the prerequisites required to install and correctly configure the various software components of the VoiceGenie product offering. This section covers the following topics:
• 2.1 VoiceGenie Software Overview
• 2.2 Deployment Architecture
• 2.3 Installation Considerations
• 2.4 Hardware Considerations
• 2.5 Software Considerations
• 2.6 Contacts for Further Information
2.1 VoiceGenie Software Overview The following table outlines the VoiceGenie software product offering:
Product Description Purpose
OA&M Framework and System Management Console (SMC)
The underlying software used to monitor, manage, install, configure, and administer all VoiceGenie software. This software must be installed on all computers that will be part of the VoiceGenie deployment.
Core component required on all VoiceGenie Servers.
VoiceXML Platform
(a.k.a. Media Platform, Phoneweb)
The core VoiceGenie product that processes VoiceXML applications and connects to various telephony and Voice-over-IP interfaces. The package name for this component is phoneweb.
Core component required on all VoiceGenie servers that do VoiceXML application processing.
Chapter
2 Prerequisites

Chapter 2: Prerequisites 2.1 VoiceGenie Software Overview
12 VoiceGenie 7.2.2
Product Description Purpose
Speech Resource Manager (SRM) Server
The software used by the VoiceXML Platform to connect natively (that is, not using MRCP only) to the various third-party ASR (automated speech recognition) and TTS (text-to-speech) engines.
Optional component that is only required for ASR or TTS servers that are integrated using MRCP-Native (as opposed to MRCP-Direct).
Speech Resource Manager (SRM) Proxy
(also known as MRCP Proxy)
Software that can be deployed in a VoiceGenie system to provide load balancing and resource sharing for distributed ASR and TTS resources using MRCP.
Optional component use to load balance across multiple ASR or TTS resources.
CCXML Platform The CCXML Platform provides a CCXML Interpreter that integrates with existing VoiceGenie infrastructure such as the Media Platform and SIP Proxy. The underlying network protocol for CCXML Platform is SIP; this means that CCXML Platform can interoperate with other conferencing servers or dialog servers.
Optional component, only used for environments that use CCXML.
ICM Connector A connector that can be used in addition to the VoiceXML Platform to allow CTI (computer telephony integration) with Cisco ICM.
Optional component, only used for interoperability with ICM.
SIP Proxy Software that can be used to provide load balancing and call routing in Voice-over-IP networks using SIP. Note that the SIP Proxy is not required in most deployments, it is only required if you wish to load balance SIP traffic over multiple VoiceGenie or other SIP capable device.
Optional component, only used for load balancing across multiple SIP devices.
Tools Framework
(Call Analyst and Quality Advisor)
The Call Analyst is a multifaceted tool that provides insight into the performance and usability of applications running on the VoiceGenie platform. The Quality Advisor provides statistics on the service quality of VoiceGenie platform deployments. Service quality is a measurement of the quality of a speech application deployment from the user’s perspective.
Optional component, only used when additional call statistics are desired.
For more information regarding VoiceGenie’s product offering please contact Genesys Support or your Genesys Account Representative.

Chapter 2: Prerequisites 2.2 Deployment Architecture
Installation Guide 13
2.2 Deployment Architecture Before proceeding with the installation, users should decide upon the architecture that is desired for their deployment. The servers within a VoiceGenie deployment can be deployed in various configurations. These servers can be broken down into 3 types based on their role within the deployment. The following table outlines these types:
Server Type Description
Database Server (for example, MySQL)
A deployment must have one Database Server. This server is used by the OA&M Framework and SMC to store configuration and business data. Note that two Database Servers with replication can be installed for high availability.
Management Server (for example, CMP Server)
A deployment must have at least one Management Server. Note that the Database Server and Management Server can reside on one physical computers. Also, Management Servers can be deployed in a redundant pair configuration for high availability requirements.
Other (for example, VoiceXML Platform, ASR Server, TTS Server, and so on)
A deployment can have many other types of servers depending on the requirements of that deployment. Note that it is not desirable to combine the Database and Management Server with other VoiceGenie software (for example, the VoiceXML Platform). Combining all on one server is recommended only in a lab setting, for testing purposes.
The following sections describe some of the various architectures for a VoiceGenie deployment. Note that all possibilities are not presented.

Chapter 2: Prerequisites 2.2 Deployment Architecture
14 VoiceGenie 7.2.2
2.2.1 All-in-One
In this configuration the Database Server, Management Server and other VoiceGenie software (for example, VoiceXML Platform) are located on one computer. This architecture is not approved for deployment purposes and should only be used in a lab or trial basis. This architecture is not recommended for production, because database maintenance or large database queries can affect real-time call processing and degrade user experience.
2.2.2 One Management/Database Server
In this configuration, the Database Server (MySQL) and Management Server (CMP Server) are located on one computer. This one computer handles all requests from one or more Other Servers in the deployment.
Database Server
Management Server
Other Server (VoiceXML Platform, ASR/TTS Server)
Database Server
Management Server
Other Server (VoiceXML Platform, ASR/TTS Server)
Other Server (VoiceXML Platform, ASR/TTS Server)
. . . . . .

Chapter 2: Prerequisites 2.2 Deployment Architecture
Installation Guide 15
2.2.3 Two Management/Database Servers
In this configuration a redundant pair of Management Servers exists with each Management Server having an onboard Database Server. Note that in this case replication is setup between the two databases.
2.2.4 Architecture Pros and Cons
Before installing any VoiceGenie software please decide on which one of the above architectures you will be using. As mentioned previously, these are not all possible architectures, for further information or clarification please consult your sales representative. The following table outlines the pros and cons of the various architectures:
Architecture Pros Cons
All-in-One • Requires very little hardware
• Onboard database is more efficient at logging data
• Is easy to set up
• Cannot be used for production
• No redundancy; not adequate for high availability
One Management/Database Server
• Requires very little hardware
• Onboard database is more efficient at logging data
• Is easy to set up
• No redundancy; not adequate for high availability
Database Server
Management Svr
Other Server (VoiceXML Platform, ASR/TTS Server)
Other Server (VoiceXML Platform, ASR/TTS Server)
. . . . . .
Replicati
Database Server
Management Svr

Chapter 2: Prerequisites 2.2 Deployment Architecture
16 VoiceGenie 7.2.2
Architecture Pros Cons
Two Management/Database Servers
• Excellent redundancy
• Onboard database is more efficient at logging data
• Requires a moderate amount of hardware
• Setup for replication is manual and can be difficult to set up
• Possibility that under some circumstances replication does not occur properly (for example, database goes down in the middle of a synchronization interval while a change is being made)
When you have chosen an architecture, please enter information regarding your network setup, as shown in the following table. This information will be required during setup:
Item IP Address Description
Database Server IP The IP address of the Database Server. This may be the same as the Management Server IP (Primary) if they are on the same physical computers.
Replicated Database Server IP (if necessary)
The IP address of the Database Server that will replicate of the main Database Server. This may be the same as the Management Server IP (Backup); also this is optional depending on the deployment architecture.
Management Server IP (Primary) The IP address of the Primary Management Server. This may be the same as the Database Server, if they are on the same physical computer.
Management Server IP (Backup) (if necessary)
The IP address of the Backup Management Server. This is optional, depending on the deployment architecture.

Chapter 2: Prerequisites 2.3 Installation Considerations
Installation Guide 17
2.3 Installation Considerations VoiceGenie software can be installed and deployed via a web interface. As a result, the installation process requires access to an additional computer on which:
• Microsoft Internet Explorer 6 web browser is installed.
• Five GB of free disk space are available to hold product files.
Also, please ensure that the firewall settings on your network are correct and will allow VoiceGenie software to install correctly. In particular please ensure that port 8080, 8600, and 8650 are open on the Management Server, so that the CMP Proxy can connect and packages can be deployed.
In addition, all computers that are being installed should be on the same physical network, and networking between all computers should be operational. Note that NAT (network address translation) may cause installation issues also.
2.4 Hardware Considerations This section outlines the hardware that is supported by VoiceGenie software and hardware specifics that should be considered prior to installation.
2.4.1 OS Supported Hardware
When purchasing hardware for your VoiceGenie deployment please ensure that the hardware has device drivers that are supported on Red Hat Enterprise Linux 3.0 if you are planning on using either VoiceGenie Linux 3.0 or Red Hat Enterprise Linux 3.0.

Chapter 2: Prerequisites 2.5 Software Considerations
18 VoiceGenie 7.2.2
2.4.2 Processor Speed Requirements
The VoiceGenie software must be installed on a system with a minimum CPU speed of 1 GHz. If the software is installed on a low-end computer (that is, < 1 GHz CPU), installation of the software may fail or produce an unusable system.
Note: The minimum hardware requirement for production systems is 2.4 GHz CPU with 2 GB of memory. The recommended hardware requirement for production systems is Dual 2.4 GHz and 4 GB RAM.
Note: The VoiceGenie software is not supported for AMD processors.
2.5 Software Considerations For information regarding supported operating systems, please refer to Operating-System and Third-Party Software Installation.
For information regarding supported ASR (that is, automated speech recognition) or TTS (text-to-speech) servers, please refer to ASR and TTS Software Installation.
2.5.1 Java Version Requirements
Note that VoiceGenie software is tested to run with Java version 1.4.2. This version is required in order for the installation to run successfully and in order for the SMC (System Management Console) to function correctly.
2.6 Contacts for Further Information For further help, please contact Genesys Support or your Genesys Account Representative.

Installation Guide 19
A number of steps are involved in installing VoiceGenie software. During the installation it is highly advisable to take your own notes so that you can replicate it in the future as well as provide it to VoiceGenie support if you encounter installation problems. Also, after installation, it is advisable to maintain a change log for the system so that you can refer back to any changes that have been made. Finally, please refer to the Deployment Checklist.
The following is a list of the steps required to install the software along with pointers to the sections of this document that explain in detail the procedure required to carry out that step:
1. Install the Operating System: Operating-System and Third-Party Software Installation
2. Install the OA&M Framework: VoiceGenie OA&M Framework Installation
3. Upload and Deploy VoiceGenie Software: Other VoiceGenie Software Installation
4. Install ASR/TTS Software if applicable: ASR and TTS Software Installation
Chapter
3 Installation Overview

Chapter 3: Installation Overview
20 VoiceGenie 7.2.2

Installation Guide 21
This section outlines the operating systems that are supported by VoiceGenie and the steps required to install these operating systems and any related third-party software.
4.1 Supported Operating Systems The following table outlines the operating systems on which the VoiceGenie software is supported:
Operating System Notes
VoiceGenie Linux 3.0 Update 2 This is a freely available distribution of Linux provided by VoiceGenie that is based on Red Hat Enterprise Linux 3.0. The installation CD provided by VoiceGenie installs and configures the Linux operating system to VoiceGenie’s specifications. This includes a number of VoiceGenie customized packages that simplify system configuration and provide basic function for VoiceGenie software. In addition VoiceGenie Linux provides a user friendly, hassle-free Linux installation. Details on the installation of the operating system can be found in Operating-System and Third-Party Software Installation.
Chapter
4 Operating-System and Third-Party Software Installation

Chapter 4: Operating-System and Third-Party Software Installation 4.2 VoiceGenie Linux 3.0 Update 2 Installation and Configuration
22 VoiceGenie 7.2.2
Operating System Notes
Red Hat Enterprise Linux 3.0 Update 8
Red Hat Enterprise Linux 4.0
The operating system software and installation instructions must be obtained from Red Hat. VoiceGenie does provide a sample kick-start file that could be used for installation; however, it is not required to use this kick-start file. For VoiceGenie software a specific set of packages are required. For Red Hat 3, these are checked and installed by the VoiceGenie post install script, for Red Hat 4 a set of commands is executed, For further details, please refer to respective Operating-System and Third-Party Software Installation sections.
Microsoft Windows 2000 Server and Windows 2003 Server
The operating system software and installation must be obtained by the customer. A number of third-party software components must be installed before installing VoiceGenie software. For further details, please refer to Operating-System and Third-Party Software Installation.
4.2 VoiceGenie Linux 3.0 Update 2 Installation and Configuration
This section outlines the procedure for installing and configuring a system with VoiceGenie Linux 3.0 Update 2 (VGL3.0.2). Note that VGL3.0.2 is similar to Red Hat Enterprise Linux 3.0, but is customized to function with VoiceGenie software. The VGL3.0.2 installation creates two user accounts by default. The account logon and password are listed in the following table:
Account Default Password Description
Root root1 Account for system administration
Pw pw Account used to run most VoiceGenie software.
Note that the preceding passwords should be changed when the system has been installed to limit unauthorized access. To change the password, log on to the system as that user (that is, pw or root), and enter the passwd command at the command prompt.
Step 1—Installing the Operating System Software
Note: The VGL3.0.2 installation formats the hard drive on the system. Please ensure that all important information on the system is backed up before the operating system is installed.

Chapter 4: Operating-System and Third-Party Software Installation 4.2 VoiceGenie Linux 3.0 Update 2 Installation and Configuration
Installation Guide 23
Please perform the following to install VGL3.0.2:
1. Insert the VoiceGenie Linux 3.0.2 CD into the CD-ROM drive, and restart the computer so that it starts from the CD-ROM drive.
2. A text-based installation screen will appear. To begin installation, type install on the screen.
3. The installation will take approximately 20 minutes, and no intervention is needed at this stage.
4. When installation of the operating system is complete, a text screen will be displayed, detailing the completion of the installation process. Remove the CD from the CD-ROM, and press Enter to restart the computer.
Note: If the VGL3.0.2 installation fails, please contact Genesys support with your exact hardware details, so that support can direct you further on continuing the install.
Step 2—Basic Network and Firewall Configuration
After VGL3.0.2 has been installed and the system has restarted, the network settings of the system will need to be configured. Please contact your system administrator before proceeding, if you are unsure of the network settings for your computer. To begin the configuration, please carry out the following:
1. Log on to the system as root. The default password is root1.
2. Type vg-install at the command prompt.
Note: If you make any mistakes in answering any of the questions in this section, you can press Ctrl + C at any point to restart the configuration script.
After entering vg-install, you will be presented with the following prompt: Please select one of the following 3 options: 1) Run these scripts now (Recommended) 2) Run these scripts later 3) Never run these scripts
Enter 1 to run the configuration scripts now. You will be prompted with a number of questions related to network configuration. You should enter the information that is appropriate for your network. The following shows a sample run of the network configuration script: ------------------------------------------------------------------- - Basic Network Configuration ------------------------------------------------------------------- Would you like to configure the network setting on this machine now? [Y/n] > Y

Chapter 4: Operating-System and Third-Party Software Installation 4.2 VoiceGenie Linux 3.0 Update 2 Installation and Configuration
24 VoiceGenie 7.2.2
Please enter the HOSTNAME for this machine: [] > syseng2 Please enter DOMAIN NAME for this machine: [] > voicegenie.com Please enter the IP ADDRESS for this machine: [] > 10.0.0.9 Please enter the NETMASK address for this machine: [] > 255.255.255.0 Please enter the GATEWAY IP for this machine: [] > 10.0.0.1 Please enter the NAMESERVER IP for this machine: [] > 10.0.0.123 Restarting network services... Done
Also, note that on systems that have more than one network interface card, the user will be prompted to configure also those interfaces. This configuration step will occur before the network services are restarted. The following shows an example: Would you like to configure for a second ethernet interface (eth1)? [y/N] > y Please enter the 2nd IP ADDRESS for this machine on eth1: [] > 10.0.0.10 Please enter the NETMASK address for this machine on eth1: [] > 255.255.255.0
The next configuration step concerns the firewall and remote-service setup. The following is an example of the questions and answers. You should answer according to your requirements: --------------------------------------------------------- - Firewall Configuration --------------------------------------------------------- Would you like to run the iptables firewall on this machine? [Y/n] > Y A basic firewall configuration has been provided. It is recommended that You review this configuration and tailor it for your network. Would you like to enable TELNET access to this machine? [Y/n] > Y Would you like to enable FTP access to this machine? [Y/n] > Y

Chapter 4: Operating-System and Third-Party Software Installation 4.2 VoiceGenie Linux 3.0 Update 2 Installation and Configuration
Installation Guide 25
Would you like to enable SSH access to this machine? [Y/n] > Y Reloading telnet/ftp services... Reloading ssh service...
Note: Note that both FTP and telnet send passwords in plain text (unencrypted), so these protocols should not be used on non-secure networks.
Make sure the network interface is active after making the preceding changes.
Step 3—Time Zone and NTP Configuration
The next step of the installation involves configuring the time zone of the system as well as NTP for time synchronization with a network time server.
Note: NTP is a widely used protocol, used primarily by Linux and UNIX systems, to synchronize the clocks on multiple computers. By using NTP, it is usually possible to keep all of the clocks within a cluster of computers to within a few milliseconds of each other. When it has been configured, NTP will operate autonomously and periodically send messages to the NTP server to synchronize the local time with its designated time server. The frequency of these messages varies on each system. If you are going to enable NTP, ensure that the NTP server is set up and functioning prior to configuring NTP on the VoiceGenie server.
The following is an example of the related prompts: -------------------------------------------------------------------- Time Zone Configuration -------------------------------------------------------------------- Would you like to configure the time zone? [Y/n] > Y Select your region 1) US/Canada 2) Europe/Asia 3) Australia 4) Custom time zone 5) Skip this step [1] > 1 Select your time zone 1) Newfoundland 2) Atlantic

Chapter 4: Operating-System and Third-Party Software Installation 4.2 VoiceGenie Linux 3.0 Update 2 Installation and Configuration
26 VoiceGenie 7.2.2
3) Eastern 4) Central 5) Mountain 6) Pacific 7) Alaska 8) Hawaii [3] > 3 Would you like to enable the network time protocol (NTP)? [y/N] > Y Please enter the hostnames of one or more NTP server(s): 1 > time.voicegenie.com 2 >
Note: Customers who use the UTC time zone will need to edit the Tomcat start script, because UTC is not considered to be a standard time zone. The following should be added to the script /etc/init.d/vgtomcat after the line CATALINA_OPTS="":
CATALINA_OPTS="$CATALINA_OPTS -Duser.timezone=GMT"
When changing the date/time on an installed system, restart after updating the time. Alternatively, stop all VoiceGenie software including the CMP Proxy, update the time and then restart the software.
Also, note that when time is adjusted forward on a server by NTP, the CMP Proxy may restart its components.
Step 4 – VoiceGenie Software Setup
The last step in the VGL3.0.2 setup is to install the VoiceGenie software. The software can be installed from CD-ROM or via FTP or NFS. The prompt that will be displayed is as follows: ------------------------------------------------------------------- - VoiceGenie Software Installation ------------------------------------------------------------------- Where would you like to install the VoiceGenie software from? 1) CD-ROM 2) FTP or NFS 3) Do not install the VoiceGenie Software [1] > 2
If you have the VoiceGenie Software CD available, select 1, and then place the CD in the CD-ROM drive and proceed to Step 2—Install Basic OA&M Framework. If you are installing using FTP or copying the installation files from a network drive (NFS), select 2, and proceed to Step 2—Install Basic OA&M Framework. You can choose not to install the VoiceGenie software

Chapter 4: Operating-System and Third-Party Software Installation 4.3 Red Hat Enterprise Linux 3.0 and Third-Party Software Installation
Installation Guide 27
until later by selecting option 3. If you choose to install the VoiceGenie software later you can begin the installation procedure by following the procedure as outlines in VoiceGenie OA&M Framework Installation of this guide.
4.3 Red Hat Enterprise Linux 3.0 and Third-Party Software Installation
This section outlines the procedure for installing and a system with Red Hat Enterprise Linux 3.0 (RHEL3.0) Update 8 as well as the other third-party software components needed for running VoiceGenie software.
4.3.1 Red Hat Enterprise Linux 3.0 Operating System Installation
To install Red Hat Enterprise Linux 3.0 Update 8 users must use the standard RHEL3.0 installation CDs provided by Red Hat. Note that users may choose to use the kick-start file provided by VoiceGenie, but it is not a requirement. The VoiceGenie kick-start file can be found on the in the VoiceGenie Post RHEL3.0 Installation package.
Step 1—Copying the VoiceGenie Kick-Start File
This step is required only if you are using the VoiceGenie kick-start file; if you are not using the VoiceGenie kick-start file, please continue to Step 2—Installing RHEL3.0 Update 8.
To use the VoiceGenie kick-start file, copy it to a floppy disk. The VoiceGenie kick-start file can be found in the /kickstart directory of the VoiceGenie Post RHEL3.0 Installation package (post_linux-7.2.0-1.tar.gz), it has the name ks.cfg. This floppy disk will be required later.
Note: If your computer does not have a floppy disk, the kick-start file can be put on the Red Hat installation CD or installed from the network. Please contact support for further instructions on this topic.
Step 2—Installing RHEL3.0 Update 8
To start the installation process, insert CD1 of the RHEL3.0 installation CDs and turn on the computer. The computer should start from this CD and load a text-based installation screen.

Chapter 4: Operating-System and Third-Party Software Installation 4.3 Red Hat Enterprise Linux 3.0 and Third-Party Software Installation
28 VoiceGenie 7.2.2
Users have the option of installing by using either the VoiceGenie kick-start file or the Red Hat installation to choose which packages are installed.
Using the VoiceGenie Kick-Start File
If you opt to use the VoiceGenie kick-start file, the user should place the floppy created in Step 1—Copying the VoiceGenie Kick-Start File into the floppy drive and type the following command to start the installation: linux ks=floppy
This kick-start file will automatically format and partition the hard drive as well as install all the packages required by the VoiceGenie software. When operating-system installation is complete, please restart the computer.
Using Red Hat’s Installer
If you opt to install Red Hat Enterprise Linux by choosing the packages that you install yourself, please ensure that the following list of the packages are installed at a minimum; they are required for VoiceGenie software to function: @ Development Tools @ Kernel Development @ MySQL Database screen openssl096b net-snmp-utils sendmail-cf mailx perl perl-DBI perl-CGI perl-DBD-MySQL perl-DateManip perl-HTML-Parser perl-HTML-Tagset perl-URI perl-libwww-perl mysql unixODBC XFree86-base-fonts XFree86-xauth desktop-file-utils switchdesk xinitrc XFree86 Xaw3d MyODBC httpd rsh-server telnet-server

Chapter 4: Operating-System and Third-Party Software Installation 4.3 Red Hat Enterprise Linux 3.0 and Third-Party Software Installation
Installation Guide 29
tftp-server vsftpd ntp
Step 3 – Running the VoiceGenie Post RHEL3.0 Installation Script
Once the operating system has been installed, the VoiceGenie Post RHEL3.0 Installation script must be run. This script checks that the required packages for VoiceGenie software to function are installed; in addition is installs a number of VoiceGenie specific packages. The scripts and all packages are found in the VoiceGenie Post RHEL3.0 Installation package (post_linux-7.2.0-1.tar.gz).
To run the script, log on to the system as the root user, and create a directory to store the Post RHEL3.0 Installation script and third-party software temporarily. The following is an example: mkdir -p /usr/local/RPMTOP/RPMS/i386/post_RHEL30
Insert the VoiceGenie Post RHEL3.0 Installation CD in the CD-ROM drive and copy all files in the root directory on the CD to the location created above, and untar the file: mount /mnt/cdrom cd /usr/local/RPMTOP/RPMS/i386/post_RHEL30 cp /mnt/cdrom/* . tar -xzvf post_linux-7.2.0-1.tar.gz
Next, ensure that the scripts are executable; the following is an example of this procedure: cd post_linux-7.2.0-1 chmod 755 post_install.sh
Lastly, run the post RHEL3.0 script, the following is an example: ./post_install.sh
The following is an example screen capture of the execution of the script: Current machine kernel version is 2.4.21-9.EL
Warning: VoiceGenie’s software has only been tested on RHEL3.0 kernel 2.4.21-37. Do you wish to proceed? (y/n) > y
The following package is not already installed: MySQL-server-
standard-4.1.20-0.rhel3.i386.rpm Installing package: MySQL-server-standard-4.1.20-0.rhel3.i386.rpm Installation successful
The following package is not already installed: j2sdk-1.4.2-fcs.i586.rpm Installing package: j2sdk-1.4.2-fcs.i586.rpm

Chapter 4: Operating-System and Third-Party Software Installation 4.3 Red Hat Enterprise Linux 3.0 and Third-Party Software Installation
30 VoiceGenie 7.2.2
Installation successful
The following package is not already installed: atsar_linux-1.6-1.i386.rpm Installing package: atsar_linux-1.6-1.i386.rpm Installation successful
The following package(s) is/are already installed:
httpd-2.0.46-26.ent Please confirm that you would like to continue installing the package: httpd-2.0.52-1.i386.rpm? Please enter ‘y’ (yes), ‘n’ (no) or ‘a’ (yes for all). > y Installing package: httpd-2.0.52-1.i386.rpm Installation successful
The following package(s) is/are already installed:
unixODBC-2.2.3-6 Please confirm that you would like to continue installing the package: unixODBC-2.2.11-1.i386.rpm? Please enter ‘y’ (yes), ‘n’ (no) or ‘a’ (yes for all). > a Installing package: unixODBC-2.2.11-1.i386.rpm Installation successful
The following package is not already installed: unixODBC-devel-
2.2.11-1.i386.rpm Installing package: unixODBC-devel-2.2.11-1.i386.rpm Installation successful
The following package is not already installed: vg-scriptmanager-3.0.1-1.i386.rpm Installing package: vg-scriptmanager-3.0.1-1.i386.rpm Installation successful
The following package is not already installed: vg-setup-3.0.0-1.i386.rpm Installing package: vg-setup-3.0.0-1.i386.rpm Installation successful
The following package is not already installed: vg-squid-2.5.6-1.i386.rpm Installing package: vg-squid-2.5.6-1.i386.rpm Installation successful
The following package is not already installed: vg-tomcat-5.0.28-1.i386.rpm Installing package: vg-tomcat-5.0.28-1.i386.rpm Installation successful

Chapter 4: Operating-System and Third-Party Software Installation 4.4 Microsoft Windows 2000 Server and Windows 2003 Server and Third-Party Software Installation
Installation Guide 31
The following package is not already installed: cmp-deployer-1.0.0-15.i386.rpm Installing package: cmp-deployer-1.0.0-15.i386.rpm Installation successful
The following package is not already installed: vg-xerces-2.0.0-1.i386.rpm Installing package: vg-xerces-2.0.0-1.i386.rpm Installation successful
Update complete.
If you have not setup the network interface and time zone, you can run the VoiceGenie provided Network and Time Zone setup scripts, they are located at /usr/local/vg-scriptmanager/done/I010network and /usr/local/vg-scriptmanager/done/I060clock. After running these scripts, the system must be restarted.
4.4 Microsoft Windows 2000 Server and Windows 2003 Server and Third-Party Software Installation
This section outlines the steps for installing Windows 2000/2003 Server and other third-party software components needed for running VoiceGenie software. Note that all installation steps must be carried out as a user who has Administrative privileges.
Note that non-English Windows installations require a number of manual changes to function correctly. Please refer to 4.4.4 Non-English Windows Details for additional details about non-English Windows installations.
4.4.1 Windows 2000 Server and Windows 2003 Server Operating-System Installation
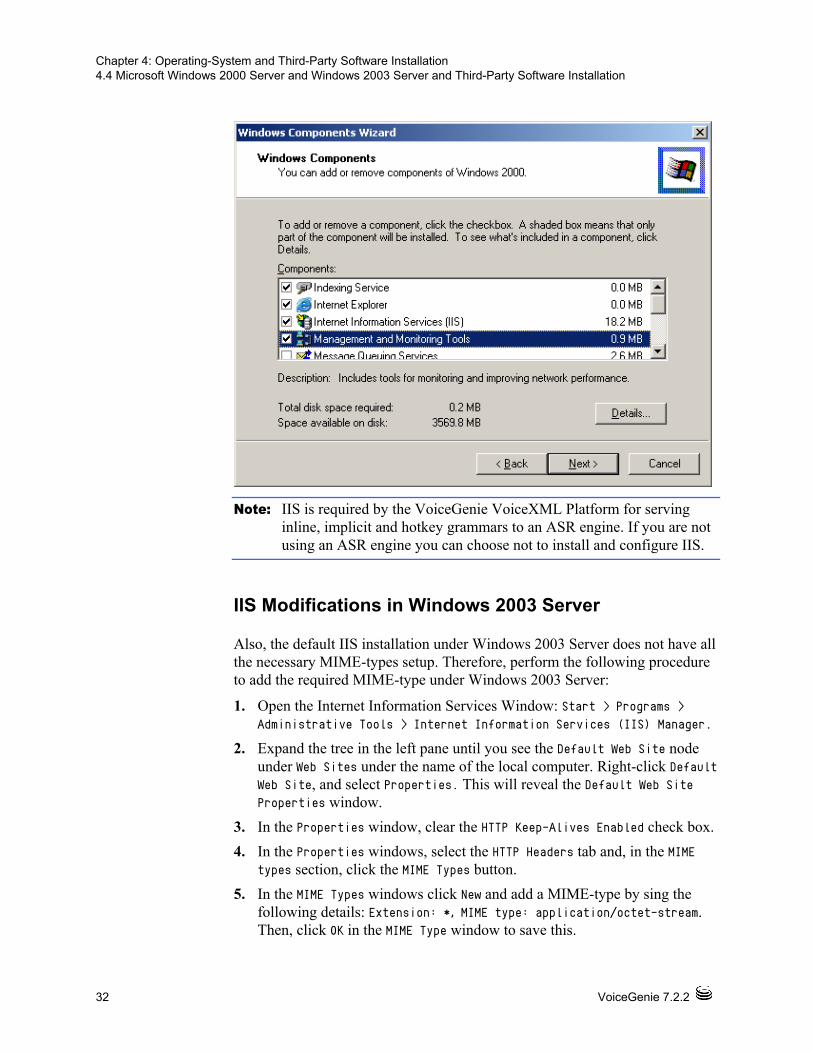
Use the Windows 2000/2003 Server CD to install the operating system. When installing, please make sure that the following components are installed:
• Microsoft Internet Information Services (IIS)
• Terminal Services
• Management and Monitoring Tools
To check that these services are installed, go to Control Panel > Add/Remove Programs > Add/Remove Windows Components, and check that they are selected in the component list. The following screen shot is an example:
Chapter 4: Operating-System and Third-Party Software Installation 4.4 Microsoft Windows 2000 Server and Windows 2003 Server and Third-Party Software Installation
32 VoiceGenie 7.2.2
Note: IIS is required by the VoiceGenie VoiceXML Platform for serving inline, implicit and hotkey grammars to an ASR engine. If you are not using an ASR engine you can choose not to install and configure IIS.
IIS Modifications in Windows 2003 Server
Also, the default IIS installation under Windows 2003 Server does not have all the necessary MIME-types setup. Therefore, perform the following procedure to add the required MIME-type under Windows 2003 Server:
1. Open the Internet Information Services Window: Start > Programs > Administrative Tools > Internet Information Services (IIS) Manager.
2. Expand the tree in the left pane until you see the Default Web Site node under Web Sites under the name of the local computer. Right-click Default Web Site, and select Properties. This will reveal the Default Web Site Properties window.
3. In the Properties window, clear the HTTP Keep-Alives Enabled check box.
4. In the Properties windows, select the HTTP Headers tab and, in the MIME types section, click the MIME Types button.
5. In the MIME Types windows click New and add a MIME-type by sing the following details: Extension: *, MIME type: application/octet-stream. Then, click OK in the MIME Type window to save this.

Chapter 4: Operating-System and Third-Party Software Installation 4.4 Microsoft Windows 2000 Server and Windows 2003 Server and Third-Party Software Installation
Installation Guide 33
6. Click OK in the MIME Types window and the Default Web Site Properties window. Then, restart the default website by right-clicking the Default Web Site node and selecting Stop. When it has stopped, right-click again, and select Start.
Microsoft Security Bulletin Updates
Generally speaking, security updates required by Microsoft to patch security holes in the Windows operating system environment can be applied to systems running the VoiceGenie software. However, it is known that the following security update will prevent the Squid Cache from starting up if installed after Squid is installed:
• Microsoft Security Bulletin MS06-023 (http://www.microsoft.com/technet/security/Bulletin/MS06-023.mspx)
Please refrain from applying this update to the operating system after the Squid has been installed.
Scheduled Task Update for Windows 2003 Server
Under Windows 2003 Server, a scheduled task on all Database Servers (usually, the Primary/Backup Management Servers) must be updated.
In the Control Panel’s Scheduled Tasks, remove the AT1 task and from a command console run the command:
schtasks /create /ru system /sc hourly /st 00:06 /tn At1w2k3 /tr "java -jar C:\VoiceGenie\cmp\cmp-server\bin\dbadmin.jar summarize"
Note: Sometimes, network settings may need to be changed on a computer that has already been installed. After changing network settings on Windows 2000 or 2003 server, the system should be restarted, even if Windows does not give a prompt to do so.
4.4.2 Third Party–Software Installation
When the operating system has been installed, a number of third-party software components must be installed for VoiceGenie software to function correctly. These third-party software components are provided on a separate CD called the VoiceGenie Third-Party Installation CD. Double-click the setup.exe in the root directory of the CD to begin the third-party software installation.
When the VoiceGenie Third-Party Components installation user interface has been loaded, click Next to start the installation process. The following installation screen will be presented:

Chapter 4: Operating-System and Third-Party Software Installation 4.4 Microsoft Windows 2000 Server and Windows 2003 Server and Third-Party Software Installation
34 VoiceGenie 7.2.2
Users should install only the third-party components that are required. The following table outlines what third-party component should be installed, based on the role of the computer in the deployment:
Third-Party Software Component Computer on Which to Install
Windows Script Host v. 5.6 All servers
Java 2 SDK v. 1.4.2_X All servers
Apache Tomcat v. 5.0.28 Management Server
Squid v. 2.5 VoiceXML or CCXML Platform Servers
Select the check box next to the appropriate boxes for the third-party components that will be installed on this computer, and then click Next to begin the installation.
Next, the MySQL setup and MyODBC setup should be run on the Database Servers. This should be installed in the order that follows. The MySQL setup can be run by double-clicking the following executable: mysql-essential-4.1.20-win32.msi 1. At the MySQL.com Sign Up - Setup Wizard screen, choose 'Skip Sign-Up'. 2. At MySQL Server Instance Configuration Wizard, clear (uncheck) the Modify Security Settings check box, and click Next.

Chapter 4: Operating-System and Third-Party Software Installation 4.4 Microsoft Windows 2000 Server and Windows 2003 Server and Third-Party Software Installation
Installation Guide 35
OPTIONAL: You can confirm that MySQL is started after a restart by looking for the mysqld-nt.exe process.
The MyODBC setup can be run by double-clicking the following executable: mysql-connector-odbc-3.51.12-win32.msi
When installation has been completed for all components, please restart the computer.
After restart, the user will need to run the following script by double-clicking it: C:\squid\squidSet.vbs
The following sections provide additional information regarding the various third-party software components.
Windows Script Host v. 5.6
All computers must install Windows Script Host v. 5.6. Please read the license agreement and follow the prompts for installation.
Note that the Windows Script Host installation may present the user with errors during installation on non-English Windows systems. Please disregard this error, and click OK to install the Windows Script Host.
MySQL v. 4.1.20
MySQL must be installed on all Database Server computers. Please read the license agreement when you are prompted to do so, and answer all installation questions by using the default responses, so that MySQL is installed in the "Typical" configuration. Note that this version is required; a newer version of MySQL cannot be used.
MyODBC v. 3.51
MyODBC is an ODBC driver for accessing the MySQL database. It must be installed on the Management Server(s) (both primary and backup). Please read the license agreement, and select the default options when you are prompted during installation.
Java 2 SDK v. 1.4.2_X
The Java 2 SDK should be installed on all computers. Please read the license agreement and use the default options when prompted during installation.

Chapter 4: Operating-System and Third-Party Software Installation 4.4 Microsoft Windows 2000 Server and Windows 2003 Server and Third-Party Software Installation
36 VoiceGenie 7.2.2
Apache Tomcat v. 5.0.28
Apache Tomcat must be installed on the Management Server(s). Please read the license agreement and use default settings when installing. Note that the default HTTP/1.1 Connector port should not be changed from 8080.
Squid v. 2.5
Squid is a web proxy cache that is use by the VoiceXML Platform and CCXML Platform. The third-party install will install all the necessary files for Squid into C:\Squid, as well as register the SquidNT service. Please see C:\Squid\COPYRIGHT for the license agreement. Restart the system after installing Squid.
After restart, the user will need to run the following script, if it has not already been run. To do so, just double-click it: C:\squid\squidSet.vbs
4.4.3 Cross-OS Installation & Deployment
The vast majority of deployments use one operating system for all computers within the deployment. However, there are cases in which a Windows-based VoiceGenie deployment requires an ASR or TTS engine that is available only on Linux, or visa versa. In a situation in which cross-OS installation and deployments occur, it may be necessary to install additional third-party software.
The particular case in which additional third-party software is required is one in which a Windows-based VoiceGenie deployment requires ASR or TTS engines that will be deployed to Linux computers. In this scenario, third-party software must be installed to allow .tar.gz files to be uncompressed under Windows. The software required to perform this is called 7-Zip 3.13 and is available at http://www.7-zip.org/. Please download the setup and install it on all Windows computers that are running the SMC.
4.4.4 Non-English Windows Details
This section details specifics about non-English Windows installations. A number of manual steps and important details are listed in this section.
Program Files Directory
Non-English Windows installations do not have a Program Files directory; instead, the directory that contains the program files are language-specific. For example, under the German version of Windows the directory is labeled as the

Chapter 4: Operating-System and Third-Party Software Installation 4.4 Microsoft Windows 2000 Server and Windows 2003 Server and Third-Party Software Installation
Installation Guide 37
Programme directory. In this case, users must manually copy all directories and files found under C:\Program Files, which have been created by the VoiceGenie installation, to the corresponding language-specific program files directory. For example:
1. Before deploying the OA&M Framework, create a directory names C:\Program Files and copy Apache, Java, and MySQL from C:\Programme\ to C:\Program Files\
2. Next, deploy the OA&M Framework
3. Finally, after the OA&M Framework has successfully deployed, copy the directories in C:\Program Files\ to C:\Programme\
IIS Configuration
In some non-English Windows installation the IIS (Internet Information Services) Manager the name of the default website is not Default Web Site but a language-specific name, for example, under the German version of Windows the name is Standardwebsite. This poses a problem, because the VoiceGenie installation attempts to create a number of virtual directories under this directory name. As a result, some virtual directories will need to be manually created.
When deploying the phoneweb (Media Platform) package, users must manually add the tmp virtual directory into the vggrammarbase directory under the default web site. The tmp virtual directory should point to C:\Voicegenie\mp\tmp. This directory should be public-readable.
Users must also manually add the inlinetmp virtual directory into the vggrammarbase directory under the default website. The inlinetmp virtual directory should point to C:\Voicegenie\mp\grammar\inlinetmp. This directory should be public-readable.
When deploying the srm-server package, users must manually add the srmtmp virtual directory into the vggrammarbase directory under the default web site. The srmtmp should point to C:\Voicegenie\srm-server\tmp.
The following screenshot illustrates the IIS Manager changes to add the virtual directories:

Chapter 4: Operating-System and Third-Party Software Installation 4.4 Microsoft Windows 2000 Server and Windows 2003 Server and Third-Party Software Installation
38 VoiceGenie 7.2.2

Chapter 4: Operating-System and Third-Party Software Installation 4.5 Red Hat Enterprise Linux 4 and Third-Party Software Installation
Installation Guide 39
4.5 Red Hat Enterprise Linux 4 and Third-Party Software Installation
This section outlines the procedure for installing a system with Red Hat Enterprise Linux 4 (RHEL4) Update 6, as well as the other third-party software components needed for running VoiceGenie software.
4.5.1 Red Hat Enterprise Linux 4 Operating-System Installation
To install Red Hat Enterprise Linux 4 Update 6 users must use the standard RHEL4 installation CDs provided by Red Hat.
Step 1—Installing RHEL4
Please refer to the Red Hat Enterprise Linux Installation Guide for instructions on installation process.
In addition to the default selected installation packages, the following groups/package should also be installed:
Development Tools
MySQL Database
mysql-server
Please do not create a user account with user name of “pw”. This user account is reserved for the process owner of the VoiceGenie software. The account will be created automatically in the following step.
Note that users may choose to use the kick-start file provided by VoiceGenie, but it is not a requirement. The VoiceGenie kick-start file can be found in the VoiceGenie RHEL4 Post-Installation package.
Refer to Red Hat Enterprise Linux 4: System Administration Guide for instructions on how to install from a kick-start file.
Step 2—Installing Third-Party Software and VoiceGenie-Specific Packages
When the operating system has been installed, the VoiceGenie RHEL4 Post-Installation packages must be installed.
Chapter 4: Operating-System and Third-Party Software Installation 4.5 Red Hat Enterprise Linux 4 and Third-Party Software Installation
40 VoiceGenie 7.2.2
To install the packages, log on to the system as the root user and create a directory in which to store the Post-Installation packages temporarily. The following is an example: mkdir -p /usr/local/vg_install/post_installation
Insert the VoiceGenie RHEL4 Post-Installation CD in the CD-ROM drive and copy all files in the root directory on the CD to the previously created location: mount /mnt/cdrom cd /usr/local/vg_install/post_installation cp /mnt/cdrom/* . The directory should contain the following RPMs:
cmp-deployer-1.0.0-26.i386.rpm
j2sdk-1_4_2_12-linux-i586.rpm
vg-scriptmanager-3.0.1-7.i386.rpm
vg-setup-1.0.0-9.i386.rpm
vg-tomcat-5.0.28-1.i386.rpm
vg-xerces-EL40-2.7.0-2.i386.rpm
After the files have been copied over, run the following command to install the packages: cd /usr/local/vg_install/post_installation
rpm -ivh *.rpm
If you have not set up the network interface and time zone, you can run the VoiceGenie provided Network and Time Zone setup scripts, which are located at /usr/local/vg-scriptmanager/done/I010network and /usr/local/vg-scriptmanager/done/I060clock. After running these scripts, the system must be restarted.
If you have already configured the network settings, make sure the host name and IP address can be successfully resolved by DNS. If this is not the case, either use the aforementioned script to set up the network, or add the host name/IP address entry into the /etc/hosts file.
Afterward, restart the system.
Step 3—Turning On Required Services
When the required packages have been installed, the required services must be turned on before installing the VoiceGenie software.
Log on to the system as the root user, and run the following command to turn on the services:
chkconfig --add mysqld
chkconfig --level 345 mysqld on

Chapter 4: Operating-System and Third-Party Software Installation 4.5 Red Hat Enterprise Linux 4 and Third-Party Software Installation
Installation Guide 41
chkconfig --level 345 httpd on
chkconfig --level 345 sendmail on
chkconfig --level 345 squid on
chkconfig --level 345 vgtomcat on
Start the services for the first time by running the following command as root:
/etc/init.d/mysqld start
/etc/init.d/httpd start
/etc/init.d/sendmail start
/etc/init.d/squid start
/etc/init.d/vgtomcat start
Restart the system after the changes.
Note that the preceding command should be used at any time to start the services. Run the following command to stop the services:
As root:
/etc/init.d/mysqld stop
/etc/init.d/httpd stop
/etc/init.d/sendmail stop
/etc/init.d/squid stop
/etc/init.d/vgtomcat stop
Step 4—Confirming that Required Services Start
The following two services are required to be started prior to installation of the VoiceGenie OA&M Framework software. Verify the services are started correctly by running “ps -ef” command, and verify the corresponding processes are running—for example:
ps -ef | grep mysqld
ps -ef | grep java
ps –ef | grep squid
Rerun the following commands to start the services if the correct processes do not show in the output:
/etc/init.d/mysqld start
/etc/init.d/vgtomcat start

Chapter 4: Operating-System and Third-Party Software Installation 4.5 Red Hat Enterprise Linux 4 and Third-Party Software Installation
42 VoiceGenie 7.2.2
Others The following changes are necessary for the CMP external agent to monitor the squid process and to stop or start the cache in SMC.
As root:
1. Stop squid if it is running.
2. Edit /etc/squid/squid.conf to have the following:
cache_effective_user pw
cache_effective_group phoneweb
pid_filename /var/run/squid.pid
3. Change the permissions of the following squid files:
chown -R pw:phoneweb /var/log/squid
chown -R pw:phoneweb /var/spool/squid
4. Create a /user/local/squid directory structure:
mkdir /usr/local/squid
cd /usr/local/squid
ln -s /usr/sbin bin
ln -s /var/spool/squid cache
ln -s /var/log/squid logs
ln -s /usr/sbin sbin
mkdir etc under /usr/local/squid
cd etc
ln -s /etc/squid/squid.conf
5. Change the permissions of the related folder and file:
chmod 777 /var/run
chmod o+r /etc/squid/squid.conf
6. Change the location of the squid.pid file:
In /usr/local/phoneweb/bin/squid_start, change it from the following:
if [ -e /usr/local/squid/logs/squid.pid ]
To the following:
if [ -e /var/run/squid.pid ]
Note that if you redeploy the Media Platform package in the future, you should ensure all the preceding changes are maintained after the new deployment.

Installation Guide 43
Chapter
5 Oracle 10g Server and Client Installation (Optional) This section covers installation of the Oracle 10g Server and Client. Installation of Oracle 10g is optional and required only if you are going to be using Oracle as your Database Server. If you are using Oracle as your Database Server, it must be installed before installation of the basic VoiceGenie OA&M Framework software. The procedure outlined in the following sections should be carried out on the actual Database Server. The one exception is the instructions in the Installing the Oracle Client section. This section should be followed only on the server(s) that will be installed with the OA&M Framework CMP Server software. In the event that the Database Server is on the same computer as the CMP Server, carry out all steps on that one computer.
5.1 Hardware Requirements Oracle 10g has the following minimum hardware requirements:
• 1024 MB (or greater) of RAM
• 400 MB of disk space in the /tmp partition
• 3 GB of disk space in the /usr/local partition
On Linux, to check the amount of physical memory and swap space, enter the following command at the command prompt: egrep -i "memtotal|swaptotal" /proc/meminfo

Chapter 5: Oracle 10g Server and Client Installation (Optional) 5.2 Software Requirements
44 VoiceGenie 7.2.2
On Windows, to check the amount of physical memory, open the System Properties UI in Control Panel.
Note: Oracle requires swap space that is double the size of the RAM if there is between 1 GB and 2 GB of RAM. If there is more than 2 GB of RAM, Oracle requires swap space that is one to two times the size of RAM. If more swap space is required, consult the Oracle install guide.
On Linux, to check the amount of disk space available, enter the following commands at the command prompt: df -k /tmp df –k
5.2 Software Requirements Linux
On Linux, Oracle 10g requires that certain software packages are installed.
VoiceGenie Linux 3.0/Red Hat Enterprise Linux 3.0
The following is a list of packages that must be installed on top of the VoiceGenie Linux 3.0 installation: compat-db-4.0.14-5.i386.rpm compat-gcc-7.3-2.96.128.i386.rpm compat-gcc-c++-7.3-2.96.128.i386.rpm compat-libstdc++-7.3-2.96.128.i386.rpm compat-libstdc++-devel-7.3-2.96.128.i386.rpm openmotif21-2.1.30-8.i386.rpm vnc-server-4.0-0.beta4.1.1.i386.rpm
These RPMs can be found in the oracle_vg.tgz file. To install these RPMs, log on to the system as the root user, and then create the /usr/local/vg_install/oracle directory: mkdir -p /usr/local/vg_install/oracle
Then, copy the .tgz file to this directory, and untar the file: cd /usr/local/vg_install/oracle tar -xzvf oracle_vg.tgz
When the files have been extracted, go to the pre_oracle directory: cd /usr/local/vg_install/oracle/pre_oracle

Chapter 5: Oracle 10g Server and Client Installation (Optional) 5.3 Linux Oracle Installation
Installation Guide 45
Next, install all RPMs: rpm -ivh *.rpm
Red Hat Enterprise Linux 4.0
The following is a list of packages that must be installed on top of the Red Hat Enterprise Linux 4.0 basic installation: compat-gcc-32-3.2.3-47.3.i386.rpm compat-gcc-32-c++-3.2.3-47.3.i386.rpm
These RPMs can be found in the RHEL4 CD-ROM at RedHat/RPMS. Log on to the system as root user, and then: cd /media/cdrom/RedHat/RPMS
Next, install the RPMs: rpm -ivh compat-gcc-32-3.2.3-47.3.i386.rpm rpm -ivh compat-gcc-32-c++-3.2.3-47.3.i386.rpm
Create the /usr/local/vg_install/oracle directory: mkdir -p /usr/local/vg_install/oracle
Then, copy the Oracle .tgz file to this directory, and untar the file: cd /usr/local/vg_install/oracle tar -xzvf oracle_vg.tgz
Note that on RHEL4, only /usr/local/vg_install/oracle/post_oracle is needed.
Windows
Windows has no specific software requirements.
5.3 Linux Oracle Installation This section describes the Oracle Server and Oracle Client installation for Linux. If you are installing the Oracle Server or Oracle Client on Windows, please refer to the next section.
Creating Required OS Groups and Users
A number of local OS groups and users are required by the Oracle installation. To create these, please run the following commands at the command prompt:

Chapter 5: Oracle 10g Server and Client Installation (Optional) 5.3 Linux Oracle Installation
46 VoiceGenie 7.2.2
/usr/sbin/groupadd oinstall /usr/sbin/groupadd dba /usr/sbin/useradd -g oinstall -G dba oracle
Next, enter the following command to set the password for the Oracle user; choose any password you desire: passwd oracle
Also, the user nobody should be added if it does not already exist. To check if the ID exists, run the following command: id nobody
If the user nobody does not exist, carry out the following command to create it: /usr/sbin/useradd nobody
Configuring Kernel Parameters
Oracle requires that specific values are set for kernel parameters. Please verify that the kernel parameters shown in the following table are set to values greater than or equal to the recommended value shown. The procedure following the table describes how to verify and set the values.
Parameter Value File
Semmsl 250 /proc/sys/kernel/sem
Semmns 32000 /proc/sys/kernel/sem
Semops 100 /proc/sys/kernel/sem
Semmni 128 /proc/sys/kernel/sem
Shmall 2097152 /proc/sys/kernel/shmall
Shmmax Half the size of physical memory (in bytes)
/proc/sys/kernel/shmmax
Shmmni 4096 /proc/sys/kernel/shmmni
file-max 65536 /proc/sys/fs/file-max
ip_local_port_range Minimum: 1024
Maximum: 65000
/proc/sys/net/ipv4/ip_local_port_range

Chapter 5: Oracle 10g Server and Client Installation (Optional) 5.3 Linux Oracle Installation
Installation Guide 47
Rmem_default 1048576 /proc/sys/net/core/rmem_default
Rmem_max 1048576 /proc/sys/net/core/rmem_max
wmem_default 262144 /proc/sys/net/core/wmem_default
wmem_max 262144 /proc/sys/net/core/wmem_max
Note: If the current value of any parameter is higher than the value listed in this table, do not change the value of that parameter. The exception is the minimum value for ip_local_port_range; for this parameter, the value should be the same (1024) or lower.
To view the current value specified for these kernel parameters carry out the following command on the command prompt: /sbin/sysctl -a | egrep "sem|shm|file-max|ip_local_port_range|rmem_default|rmem_max|wmem_default|wmem_max"
If the value of any kernel parameter is different from the recommended value, use any text editor and create or edit the file /etc/sysctl.conf file. Next, add or edit lines, as necessary; notably, the line should look as follows: kernel.shmmax = 1074135040
By specifying the values in the /etc/sysctl.conf file, the new values will persist when the system is restarted. Please restart the system to check that the values have persisted.
Next, some shell limits for the oracle user must be set to improve the performance of the software; you can set these limits by following the steps below:
1) Edit the file: /etc/security/limits.conf and add the following lines to the end of the file:
oracle soft nproc 2047 oracle hard nproc 16384 oracle soft nofile 1024 oracle hard nofile 65536
2) Edit the /etc/pam.d/login file, and add the following lines if they do not exist:
session required /lib/security/pam_limits.so

Chapter 5: Oracle 10g Server and Client Installation (Optional) 5.3 Linux Oracle Installation
48 VoiceGenie 7.2.2
session required pam_limits.so
3) Edit the /etc/profile file, and add the following lines to the file:
if [ $USER = "oracle" ]; then if [ $SHELL = "/bin/ksh" ]; then ulimit -p 16384 ulimit -n 65536 else ulimit -u 16384 -n 65536 fi fi
Creating Required Directories
The following changes must be made to the file system: mkdir -p /usr/local/u01/app/oracle/product/10.2.0.1 chown -R oracle:oinstall /usr/local/u01/app/oracle/product/10.2.0.1 chmod -R 775 /usr/local/u01/app/oracle/product/10.2.0.1 ln -s /usr/local/u01/ /u01
Setting the Oracle User’s Environment
Edit the .bash_profile file, in the home directory of the Oracle user, and add the following lines. Note that local_host_name should be changed to the host name of the local computer: export DISPLAY=local_host_name:1 umask 022

Chapter 5: Oracle 10g Server and Client Installation (Optional) 5.3 Linux Oracle Installation
Installation Guide 49
Installing the Oracle Server
Please perform the following steps to install the Oracle Server software:
1) Create the installation directory for the Oracle software: su mkdir -p /usr/local/oracle_install/ chown -R oracle:oinstall /usr/local/oracle_install/ su - oracle
cd /usr/local/oracle_install/
2) Next, copy the ZIP file to the previously created installation directory. The steps required to do this depend on the location of the Oracle ZIP file.
3) Unzip the installation file, and change directories: unzip 10201_database_linux32.zip
4) Start the VNC Server so that the installation user interface can be run. When you are asked for a password, you can use any password to access the desktop:
vncserver :1
Note: To kill the X Server to prevent access later, you can run the following command:
vncserver -kill :1
5) Next, start the Oracle installation from the command line. First, if you have installed VoiceGenie Linux 3.0, become the root user, edit the /etc/redhat-release file, and enter the version of the OS. Note that if you have Red Hat Enterprise Linux 3.0 or 4.0 installed, this step is not required: su vi /etc/redhat-release
Add the following line to the text file: RedHat Linux release 3.0
Next, as the root user, enter the following commands to ensure that the ORACLE_HOME and TNS_ADMIN environment variables are not set: unset ORACLE_HOME unset TNS_ADMIN
Finally, run the installation as the Oracle user by executing the following: su – oracle /usr/local/oracle_install/database/runInstaller

Chapter 5: Oracle 10g Server and Client Installation (Optional) 5.3 Linux Oracle Installation
50 VoiceGenie 7.2.2
6) Start the VNC client from your desktop and connect to the session. This is specified by <hostname>:<session>, where <hostname> is the IP of the server and <session> is 1 in the preceding example.
7) In the VNC session, the installation user interface will be shown. Please enter the following information, when you are prompted to do so:
Oracle Home Location: /u01/app/oracle/product/10.2.0.1 Installation Type: Enterprise Edition (1.3GB) UNIX DBA Group: dba Create Starter Database: <Ensure this option is checked> Global Database Name: ndm Database Password: rootsql Confirm Password: rootsql
Then, click Next.
Next, enter the following, when you are prompted to do so:
Enter the full path of the inventory directory: /home/oracle/oraInventory
Specify Operating System group name: dba
Then, click Next.
Next, the Product-Specific Prerequisite Checks screen will appear. Please acknowledge any errors, because these errors will not affect the system negatively. Notably, there will be an error generated concerning the glibc version on VoiceGenie Linux 3.0 or Red Hat Enterprise Linux 3.0. After acknowledging the errors, click Next.
Note: The previously noted error will appear as follows:
Checking Recommended glibc version Expect result": ATLEAST=2.3.2-95.27 Actual Result:2.3.2-95.20
Note: The previously noted error will appear as follows:
Checking Recommended glibc version Expect result": ATLEAST=2.3.2-95.27 Actual Result:2.3.2-95.20
After viewing the Summary page, click Install to start the installation.

Chapter 5: Oracle 10g Server and Client Installation (Optional) 5.3 Linux Oracle Installation
Installation Guide 51
Note: The last step in the Oracle install involves running two scripts as the root user:
/home/oracle/oraInventory/orainstRoot.sh /u01/app/oracle/product/10.2.0.1/root.sh
Ensure that you run these scripts prior to pressing the OK button to complete the install.
After the installation completes you can exit the installer.
8) Next, make the following manual changes to the system as the root user:
Edit the file: /etc/oratab and modify the line: ndm:/u01/app/oracle/product/10.2.0.1:Y
Next, edit the /home/oracle/.bash_profile file, and add the following lines to the end of the file:
ORACLE_HOME=/u01/app/oracle/product/10.2.0.1 export ORACLE_HOME PATH=$PATH:$ORACLE_HOME/bin
Next, edit the file: /u01/app/oracle/product/10.2.0.1/bin/dbstart and edit the line with ORACLE_HOME_LISTNER to the following: ORACLE_HOME_LISTNER=$ORACLE_HOME
9) Next, start the Oracle Server by running the following commands as the root user: su - oracle -c "/u01/app/oracle/product/10.2.0.1/bin/dbstart" su - oracle -c "lsnrctl start"
10) To make additional changes to the system and to test the Oracle server installation you must run the post_oracle_install.pl script. Please carry out the following step as the root user:
Go to the following specified directory: cd /usr/local/vg_install/oracle/post_oracle

Chapter 5: Oracle 10g Server and Client Installation (Optional) 5.3 Linux Oracle Installation
52 VoiceGenie 7.2.2
Next, run the post_oracle_install.pl script and ensure that no major failures are reported: ./post_oracle_install.pl
11) Finally, restart the server to complete the installation.
Stopping and Starting the Oracle Server
If you ever need to stop the Oracle Database, run the following commands as the root user: /etc/init.d/dbora stop su - oracle –c "lsnrctl stop"
If you need to start the Oracle Database, run the following commands as the root user: /etc/init.d/dbora start
Installing the Oracle Client
The Oracle Client, also known as the Oracle ODBC Instant Client, is used by the CMP Server software to communicate to the Oracle Server and is required to be installed prior to installing the CMP Server. This section outlines the steps to download, install, and configure the Client.
1) Download the Basic Instant Client and ODBC Instant Client packages from the Oracle Technology Network Instant Client page. You will need an Oracle Technology Network account to access the packages at the following URL: http://www.oracle.com/technology/software/tech/oci/instantclient/htdocs/linuxsoft.html.
2) The two downloaded packages must be unzipped into same directory. For example, create the following directory, copy the files into the directory, and then unzip them: mkdir /usr/local/oracle_client cd /usr/local/oracle_client
Next, copy the files to this directory and unzip as follows: unzip instantclient-basic-linux32-10.2.0.2-20060331.zip unzip instantclient-odbc-linux32-10.2.0.2-20060331.zip chown –R pw:phoneweb /usr/local/oracle_client

Chapter 5: Oracle 10g Server and Client Installation (Optional) 5.4 Windows Oracle Installation
Installation Guide 53
3) Next, as the root user, execute the odbc_install script while specifying "/" as the Driver Manager installed directory in the command-line argument: cd instantclient_10_2 chmod +x odbc_install.sh ./odbc_install.sh /
This script will add the DSN entry in $HOME/.odbc.ini and /etc/odbcinst.ini with the DSN name set as OracleODBC-10g.
4) Finally, once the installation is complete, the system environment variable LD_LIBRARY_PATH must be modified to add this path, so that the ODBC driver manager can load the Oracle driver. Please carry out the following step: vi /etc/profile
Add the following to the end of the file: export LD_LIBRARY_PATH=/usr/local/oracle_client/instantclient_10_2:$LD_LIBRARY_PATH
5.4 Windows Oracle Installation This section describes the Oracle Server and Oracle Client installation for Windows. If you are installing the Oracle Server or Oracle Client on Linux, please refer to the previous section.
Installing the Oracle Server
Please perform the following steps to install the Oracle Server software:
1) Copy the Oracle Server installation ZIP file (10201_database_win32.zip) to your C: drive and unzip by using WinZip.
2) After the file has been unzipped, the C:\database directory will be created. Enter this directory, and double-click the setup.exe file to launch the Oracle installer.
3) In the Oracle installer, select Installation Method, and choose Basic Installation. Next, enter the following information:
Oracle Home Location: C:\oracle\product\10.2.0\db_1 Installation Type: Enterprise Edition (1.3GB) Create Starter Database: <Ensure this option is checked> Global Database Name: ndm Database Password: rootsql Confirm Password: rootsql
4) Next, the Product-Specific Prerequisite Checks screen will appear. All checks should pass, and you should see Check complete. The overall result

Chapter 5: Oracle 10g Server and Client Installation (Optional) 5.4 Windows Oracle Installation
54 VoiceGenie 7.2.2
of this check should be Passed. After viewing the results, please click Next.
5) On the Summary page, click Install. The installation will take a few minutes. Click OK after it has completed running the Database Configuration Assistant. Click Exit to complete the installation.
Installing the Oracle Client
The Oracle Client, also known as the Oracle ODBC Instant Client, is used by the CMP Server software to communicate to the Oracle Server and is required to be installed prior to installing the CMP Server. This section outlines the steps to download, install, and configure the Client.
1) Download the Basic Instant Client and ODBC Instant Client packages from the Oracle Technology Network Instant Client page. You will need an Oracle Technology Network account to access the packages at the following URL: http://www.oracle.com/technology/software/tech/oci/instantclient/htdocs/winsoft.html.
2) The two downloaded packages must be unzipped into same directory. For example, create the following directory, copy the files into the directory, and then unzip them: md C:\Oracle\instantclient_10_2 cd C:\Oracle\instantclient_10_2
Next, save the files to this directory and unzip into that directory by using Winzip. The two required ZIP files are the following: instantclient-basic-win32-10.2.0.2-20060508.zip instantclient-odbc-win32-10.2.0.2-20060508.zip
3) Next, ensure that the following DLLs are included in the either the C:\WINNT\system32\ or C:\oracle\instantclient_10_2\ directory: msvcr71.dll MFC71.dll
4) After unzipping the Instant Client packages, execute the odbc_install script at the command line: cd C:\oracle\instantclient_10_2 odbc_install.exe
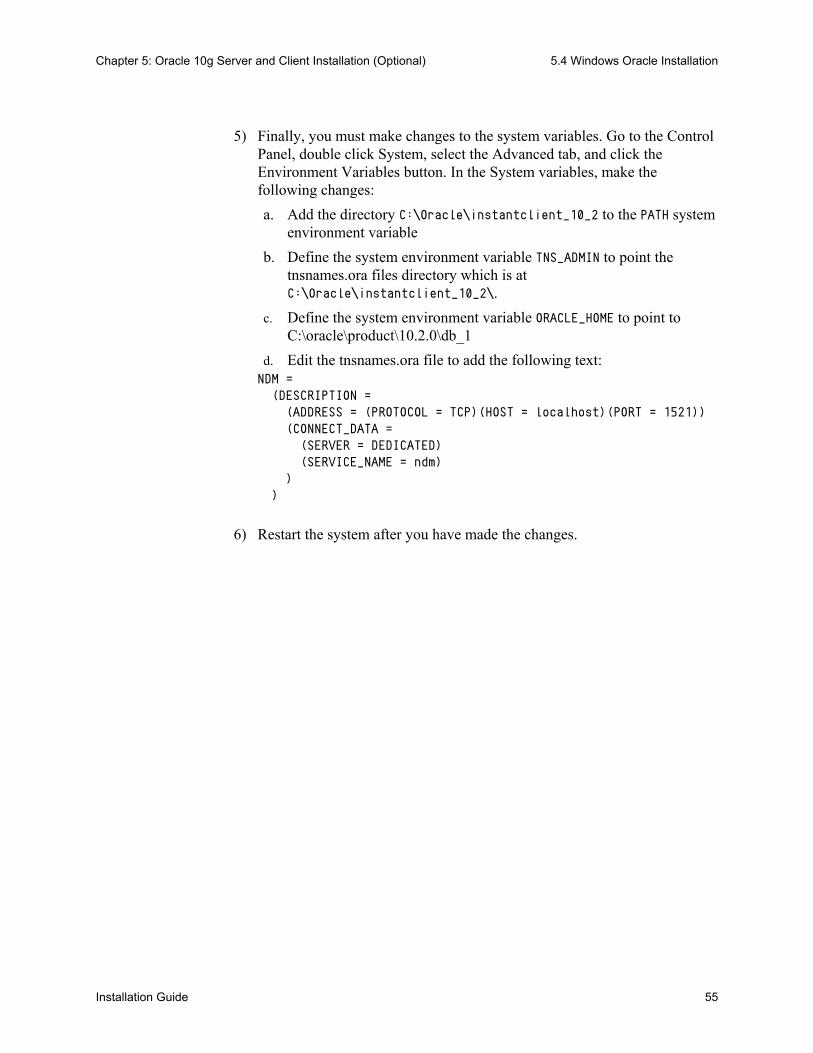
Chapter 5: Oracle 10g Server and Client Installation (Optional) 5.4 Windows Oracle Installation
Installation Guide 55
5) Finally, you must make changes to the system variables. Go to the Control Panel, double click System, select the Advanced tab, and click the Environment Variables button. In the System variables, make the following changes:
a. Add the directory C:\Oracle\instantclient_10_2 to the PATH system environment variable
b. Define the system environment variable TNS_ADMIN to point the tnsnames.ora files directory which is at C:\Oracle\instantclient_10_2\.
c. Define the system environment variable ORACLE_HOME to point to C:\oracle\product\10.2.0\db_1
d. Edit the tnsnames.ora file to add the following text: NDM = (DESCRIPTION = (ADDRESS = (PROTOCOL = TCP)(HOST = localhost)(PORT = 1521)) (CONNECT_DATA = (SERVER = DEDICATED) (SERVICE_NAME = ndm) ) )
6) Restart the system after you have made the changes.

Chapter 5: Oracle 10g Server and Client Installation (Optional) 5.4 Windows Oracle Installation
56 VoiceGenie 7.2.2

Installation Guide 57
This section covers installation assuming that the operating system and all third-party software are installed; if they are not installed please refer to Operating-System and Third-Party Software Installation. This section covers installation of the basic VoiceGenie OA&M Framework software, this software must be installed before any other VoiceGenie or third-party software can be deployed.
6.1 Installation Order When you have selected a deployment architecture, you can begin installing the various servers that make up a VoiceGenie deployment. The components of the OA&M Framework (for example, Database Servers and Management Servers) should be installed first. Subsequently, all other servers that are part of the VoiceGenie deployment (VoiceXML Platforms and others) can be installed.
6.2 Basic Installation Procedure The following procedure should be carried out on all computers that will be part of a VoiceGenie deployment. This procedure installs the basic OA&M Framework, so that installation and deployment can be carried out via the System Management Console (SMC) (for example, the web interface).
Step 1—Copy Basic OA&M Framework Files to the System
If the VoiceGenie Software was installed by using the installation CD, skip ahead to Step 2—Install Basic OA&M Framework.
Chapter
6 VoiceGenie OA&M Framework Installation

Chapter 6: VoiceGenie OA&M Framework Installation 6.2 Basic Installation Procedure
58 VoiceGenie 7.2.2
Linux
Under Linux, copy the following packages to the directory /usr/local/vg_install/products/. Note that x.y.z is the latest version (for example, 7.2.0), and a is the revision of the package (for example, 5):
• cmp-db-x.y.z-a.tar.gz
• cmp-server-x.y.z-a.tar.gz
• cmp-proxy-x.y.z-a.tar.gz
• cmp-smc-x.y.z-a.tar.gz
Windows
Under Windows, copy the following packages to the C:\install\ directory. If this directory does not exist, create it. Note that x.y.z is the latest version (for example, 7.2.0), and a is the revision of the package (for example, 3):
• setup.exe
• cmp-db-x.y.z-a.zip
• cmp-server-x.y.z-a.zip
• cmp-proxy-x.y.z-a.zip
• cmp-smc-x.y.z-a.zip
Step 2—Install Basic OA&M Framework
Linux
To begin the installation, please carry out the following:
1. Log on to the system as root; the default password is root1.
2. Type in vg-install at the command prompt.
Note: If you installed RHEL3 by following section 4.3, or RHEL4 by following section 4.5, after entering vg-install, you will be presented with the following prompt:
Please select one of the following 3 options: 1) Run these scripts now (Recommended) 2) Run these scripts later 3) Never run these scripts
Enter 3 to not run the configuration scripts. The user should again type vg-install.

Chapter 6: VoiceGenie OA&M Framework Installation 6.2 Basic Installation Procedure
Installation Guide 59
After entering vg-install, you will be presented with the following prompt: Will this server be part of a distributed setup (ie. more than 1 server)? [Y/n] >
If you are installing a system for trial or lab purposes you can enter N to install all OA&M Framework software components on this computer. This is called an All-in-One setup, a diagram of which can be found in 2.2.1 All-in-One. Note that this type of setup is not recommended for production systems. If you select N, no further questions will be asked. To continue installation, restart the system when configuration has been completed, and proceed to Other VoiceGenie Software Installation to install other VoiceGenie software.
If you select the default (Y), you will be presented with the following question: What is the role of this server in the network? 1) Database Server Only 2) Management Server Only 3) Database and Management Server 4) Other (VoiceXML Platform, ASR Server, TTS Server, etc.) [4] >
If you are installing a computer that will function as a Database Server or Management Server, please refer to the following section (6.3 Database Server and Management Server Setup), which goes through the various installation scenarios for the Database Server and Management Server.
If you are installing a computer that will function as a VoiceXML Platform, ASR Server, TTS Server, or Other Server, select the default value (4). If this option is selected, you will be presented with the following question: Please enter the IP address or hostname of the Primary CMP Server: [localhost] >
The user should enter the IP address of the Primary CMP Server. Next, the user will be prompted with the following question: Please enter the IP address or hostname of the Backup CMP Server, if one exists: [] >
The user should enter the IP address of the Backup CMP Server if one exists. If one does not exist, just press Enter. After the appropriate configuration changes have been made by the installation scripts, the user should restart the system and proceed to Other VoiceGenie Software Installation to install other VoiceGenie software.
Windows
Under Windows, double-click the setup.exe file in the C:\install\ directory. When the VoiceGenie OA&M Framework installation user interface has been loaded, click Next to start the installation process. Subsequently, read the License Agreement, and click Next.
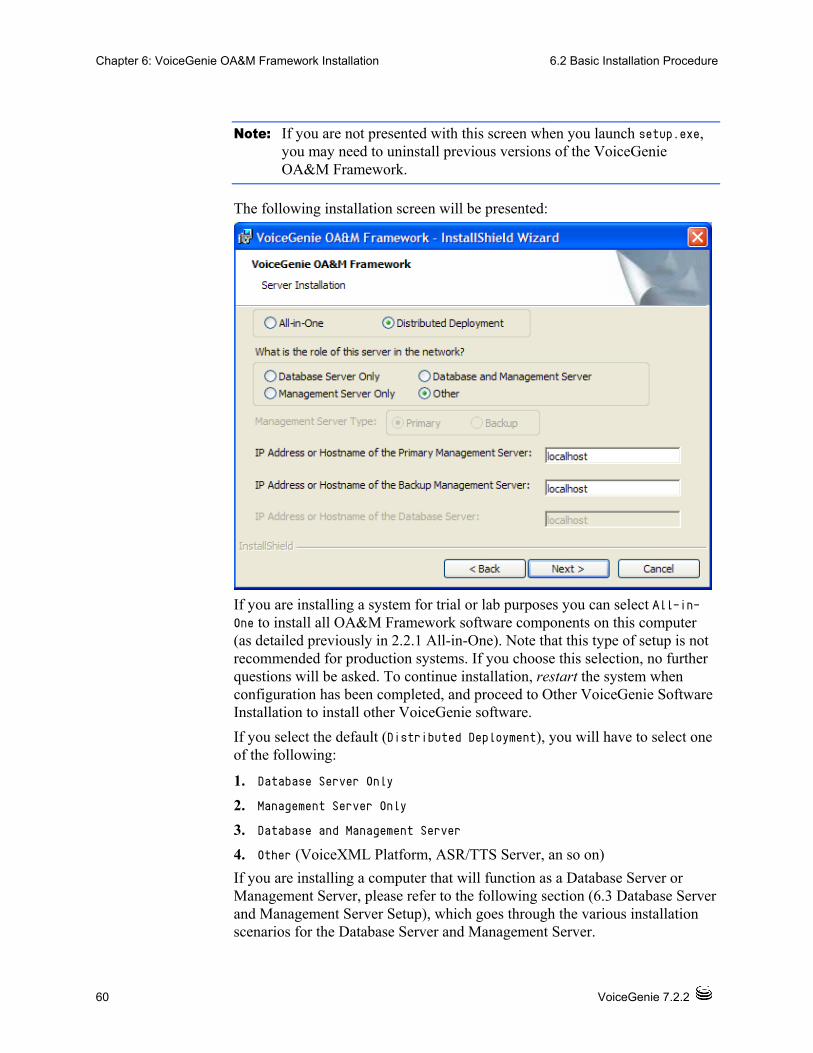
Chapter 6: VoiceGenie OA&M Framework Installation 6.2 Basic Installation Procedure
60 VoiceGenie 7.2.2
Note: If you are not presented with this screen when you launch setup.exe, you may need to uninstall previous versions of the VoiceGenie OA&M Framework.
The following installation screen will be presented:
If you are installing a system for trial or lab purposes you can select All-in-One to install all OA&M Framework software components on this computer (as detailed previously in 2.2.1 All-in-One). Note that this type of setup is not recommended for production systems. If you choose this selection, no further questions will be asked. To continue installation, restart the system when configuration has been completed, and proceed to Other VoiceGenie Software Installation to install other VoiceGenie software.
If you select the default (Distributed Deployment), you will have to select one of the following:
1. Database Server Only
2. Management Server Only
3. Database and Management Server
4. Other (VoiceXML Platform, ASR/TTS Server, an so on)
If you are installing a computer that will function as a Database Server or Management Server, please refer to the following section (6.3 Database Server and Management Server Setup), which goes through the various installation scenarios for the Database Server and Management Server.

Chapter 6: VoiceGenie OA&M Framework Installation 6.3 Database Server and Management Server Setup
Installation Guide 61
If you are installing a computer that will function as a VoiceXML Platform, ASR Server, TTS Server, or Other Server, select the default value. No further questions will be asked. To continue installation, restart the system when configuration has been completed, and proceed to Other VoiceGenie Software Installation to install other VoiceGenie software.
6.3 Database Server and Management Server Setup
This section describes how the various architectures discussed in 2.2.2 One Management/Database Server and 2.2.3 Two Management/Database Servers can be setup using the OA&M Framework packages provided by VoiceGenie. Note that this section does not apply if using an All-in-One configuration, because all software is installed on one computer. This section does not include setting up database replication, which is described in the VoiceGenie OA&M Framework User’s Guide.
Please note that firewall settings must be set correctly on your network to ensure that installation progresses correctly. In particular, ensure that port 8080, 8600 and 8650 are open on the Management Server, so that the CMP Proxy can connect and packages can be deployed.
6.3.1 One Management/Database Server
This section describes the procedure for installing a deployment that has the Database Server and Primary Management Server on one computer.
Linux
When presented with the following question: What is the role of this server in the network? 1) Database Server Only 2) Management Server Only 3) Database and Management Server 4) Other (VoiceXML Platform, ASR Server, TTS Server, etc.) [4] >
The user should select 3, so that the Database and Management Server are installed on this computer. The next question that will be presented is as follows: Will this be the 1) Primary Management Server 2) Backup Management Server [1] >

Chapter 6: VoiceGenie OA&M Framework Installation 6.3 Database Server and Management Server Setup
62 VoiceGenie 7.2.2
Because this is the Primary Management Server the user should select the default, 1. The next question that will be presented is as follows: Please enter the IP address or hostname of the Backup Management Server if one exists. Otherwise press enter: [] >
If there is no Backup Management Server, press Enter; otherwise, enter the IP address of the Backup Management Server. At this point, the installation scripts will make all the necessary system and configuration changes. This will take a few minutes, during which the system will be nonresponsive. When installation is complete, please restart the computer.
After restart, check that the system is functioning correctly. Try to access the SMC by pointing your web browser to http://[Management Server Name]:8080/smc/, where [Management Server Name] is the host name or IP address of the newly installed Management Server.
Please proceed to Other VoiceGenie Software Installation to continue installation.
Windows
On the InstallShield interface that follows shown below select the Database and Management Server radio button in the What is the role of this server in the network? box. Also select the Primary radio button in the Management Server Type box. Finally, if there is a Backup Management Server enter its IP address in the IP Address or Hostname of the Backup Management Server box. Then, click Next to begin installation.
When installation is complete, please restart the computer.
After restart, check that the system is functioning correctly. Try to access the SMC by pointing your web browser to http://[Management Server Name]:8080/smc/, where [Management Server Name] is the host name or IP address of the newly installed Management Server.
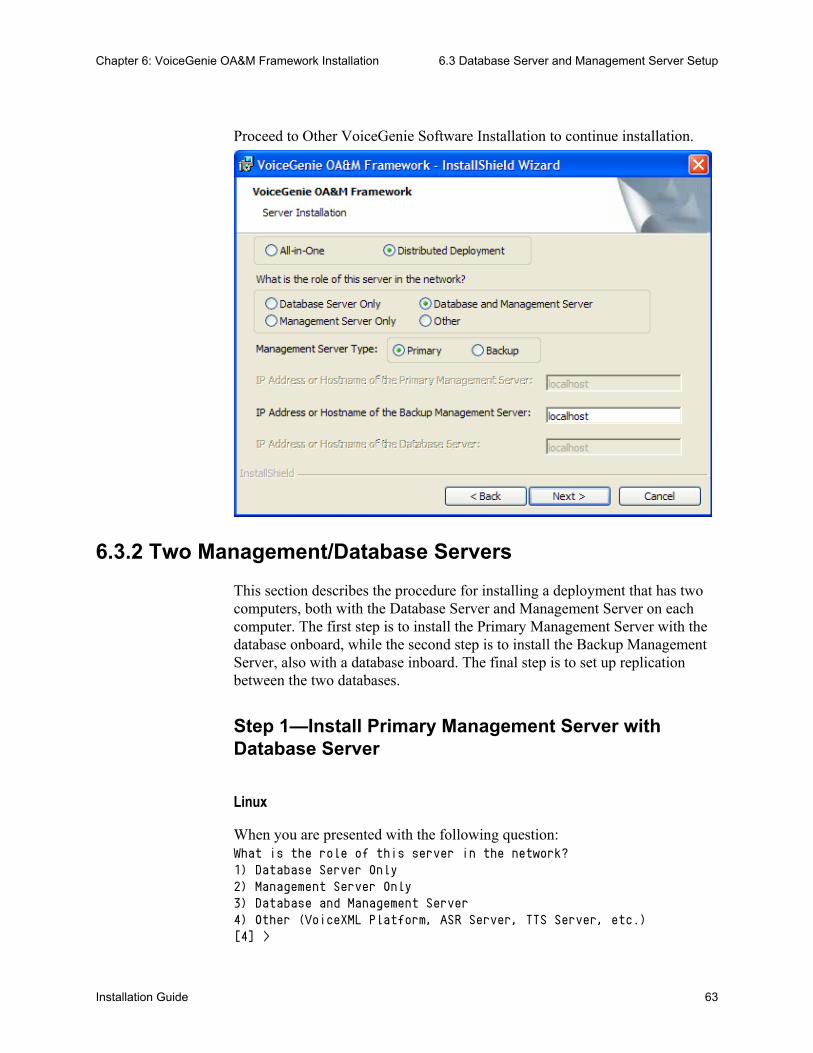
Chapter 6: VoiceGenie OA&M Framework Installation 6.3 Database Server and Management Server Setup
Installation Guide 63
Proceed to Other VoiceGenie Software Installation to continue installation.
6.3.2 Two Management/Database Servers
This section describes the procedure for installing a deployment that has two computers, both with the Database Server and Management Server on each computer. The first step is to install the Primary Management Server with the database onboard, while the second step is to install the Backup Management Server, also with a database inboard. The final step is to set up replication between the two databases.
Step 1—Install Primary Management Server with Database Server
Linux
When you are presented with the following question: What is the role of this server in the network? 1) Database Server Only 2) Management Server Only 3) Database and Management Server 4) Other (VoiceXML Platform, ASR Server, TTS Server, etc.) [4] >

Chapter 6: VoiceGenie OA&M Framework Installation 6.3 Database Server and Management Server Setup
64 VoiceGenie 7.2.2
You should select 3, so that the Database Server and Management Server are installed on this computer. The next question that will be presented is as follows: Will this be the 1) Primary Management Server 2) Backup Management Server [1] >
Because this is the Primary Management Server, the user should select the default, 1. The next question that will be presented is as follows: Please enter the IP address or hostname of the Backup Management Server if one exists. Otherwise press enter: [] >
The user should enter the IP address of the Backup Management Server. At this point, the installation scripts will make all the necessary system and configuration changes. This will take a few minutes, during which the system will be nonresponsive. When installation is complete, please restart the computer.
After restart, check that the system is functioning correctly. Try to access the SMC by pointing your web browser to http://[Management Server Name]:8080/smc/, where [Management Server Name] is the host name or IP address of the newly installed Management Server.
Windows
On the InstallShield interface, the user should select the Database and Management Server radio button in the What is the role of this server in the network? box. Also, select the Primary radio button in the Management Server Type box. Finally, enter the IP address of the Backup Management Server in the IP Address or Hostname of the Backup Management Server box. Then, click Next to begin installation.
When installation is complete, please restart the computer.
After restart, check that the system is functioning correctly. Try to access the SMC by pointing your web browser to http://[Management Server Name]:8080/smc/, where [Management Server Name] is the host name or IP address of the newly installed Management Server.
Chapter 6: VoiceGenie OA&M Framework Installation 6.3 Database Server and Management Server Setup
Installation Guide 65
Step 2—Install Backup Management Server with Database Server
Linux
When presented with the following question: What is the role of this server in the network? 1) Database Server Only 2) Management Server Only 3) Database and Management Server 4) Other (VoiceXML Platform, ASR Server, TTS Server, etc.) [4] >
The user should select 3, so that the Database and Management Server are installed on this computer. The next question that will be presented is as follows: Will this be the 1) Primary Management Server 2) Backup Management Server [1] >
Because this is the Backup Management Server, the user should select 2. The next question that will be presented is as follows: Please enter the IP address or hostname of the Primary Management Server if one exists. Otherwise press enter: [] >
The user should enter the IP address of the Primary Management Server. At this point, the installation scripts will make all the necessary system and configuration changes. This will take a few minutes, during which the system will be nonresponsive. When installation is complete, please restart the computer.
After restart, check that the system is functioning correctly. Try to access the SMC by pointing your web browser to http://[Management Server Name]:8080/smc/, where [Management Server Name] is the host name or IP address of the newly installed Management Server. Note that the Backup SMC should be used only when the Primary SMC is down. This test is just to check basic connectivity.
If you wish to set up database replication, please proceed to the next section; otherwise, please proceed to Other VoiceGenie Software Installation to continue installation.
Windows
On the InstallShield interface that appears next, the user should select the Database and Management Server radio button in the What is the role of this server in the network? box. Also, select the Backup radio button in the

Chapter 6: VoiceGenie OA&M Framework Installation 6.3 Database Server and Management Server Setup
66 VoiceGenie 7.2.2
Management Server Type box. Finally, enter the IP address of the Primary Management Server in the IP Address or Hostname of the Primary Management Server box. Then, click Next to begin installation.
When installation is complete, please restart the computer.
After restart, check that the system is functioning correctly. Try to access the SMC by pointing your web browser to http://[Management Server Name]:8080/smc/, where [Management Server Name] is the host name or IP address of the newly installed Management Server. Note that the Backup SMC should be used only when the Primary SMC is down. This test is just to check basic connectivity.
If you wish to set up database replication, please proceed to the next section; otherwise, please proceed to Other VoiceGenie Software Installation to continue installation.
Step 3 – Setting Up Database Replication
The procedure for setting up database replication is found in the appendix of the VoiceGenie OA&M Framework User’s Guide. Please refer to that document to set up database replication.
When database replication has been set up, please proceed to Other VoiceGenie Software Installation to continue installation.

Installation Guide 67
This section begins by explaining the general method by which VoiceGenie and other third-party software is installed and deployed. Also, it covers the installation of all other VoiceGenie software. This section assumes that the operating system and all related third-party software are installed; if they are not installed, please refer to Installation Overview. Also, this section assumes that the VoiceGenie OA&M Software is set up on all computers, as described in VoiceGenie OA&M Framework Installation, or is an All-in-One system.
7.1 Installation and Deployment via the SMC Overview
This section describes in a general fashion how VoiceGenie and other third-party software is installed using the System Management Console (SMC). For details on how to install specific VoiceGenie or other third-party software please continue on to the correct section, as outlined in the table below:
Software Product Section
VoiceXML Platform 7.2 Installing the VoiceXML Platform
SIP Proxy 7.3 Installing the SIP Proxy
VG SNMP 7.4 Installing Other VoiceGenie Software
MRCP Proxy 7.4 Installing Other VoiceGenie Software
VoiceGenie Tools Framework (Call Analyst and Quality Advisor)
7.5 Installing the VoiceGenie Tools Framework (Call Analyst and Quality Advisor)
ASR or TTS Software ASR and TTS Software Installation
Chapter
7 Other VoiceGenie Software Installation

Chapter 7: Other VoiceGenie Software Installation 7.1 Installation and Deployment via the SMC Overview
68 VoiceGenie 7.2.2
Software Product Section
VoiceGenie 7.2 CCXML Platform See the VoiceGenie 7.2 CCXML Platform Installation and Configuration Guide
Note: Note that not all of the components listed above are required for a deployment. Only those components that you have purchased must be installed. The VoiceGenie 7.2 CCXML Platform must be installed after the VoiceXML Platform; see the VoiceGenie 7.2 CCXML Platform Installation and Configuration Guide for details.
To access the SMC point your web browser to http://[Management Server Name]:8080/smc/, where [Management Server Name] is the host name or IP address of a Management Server. Do not use localhost when accessing the SMC.
7.1.1 VoiceGenie Packaging Overview
VoiceGenie software and any repackaged third-party software delivered by VoiceGenie is provided to customers in the form of a product file. A product file is bundle that contains the software and the information necessary to install and configure the software automatically.
Product files that are delivered for the Linux operation system are TAR files that have the file extension .tar.gz (for example, phoneweb-7.2.0-5.tar.gz). Product files that are delivered for Windows are ZIP files that have the extension .zip (for example, phoneweb-7.2.0-5.zip).
To install and deploy these product files, customers must use the infrastructure provided by the System Management Console, which is part of the OA&M Framework. The OA&M Framework includes the Database Server(s) and Management Server(s), as a result, the OA&M Framework must be set up first.
7.1.2 Installation vs. Deployment
Installation of VoiceGenie software consists of two parts: firstly, installation and, secondly, deployment. Installation is the act of uploading a product file (also called a package) into the SMC. When a package has been uploaded, customers can create configuration profiles that consist of customized configuration, based on user input. Finally, the package can be deployed to one or more computers. Consequently, deployment is the act of positioning a package on a physical computer, as well as automatically configuring and setting up the software.
Please be aware that using a computer that does not match the minimum CPU requirements (1 GHz) may cause installation problems.
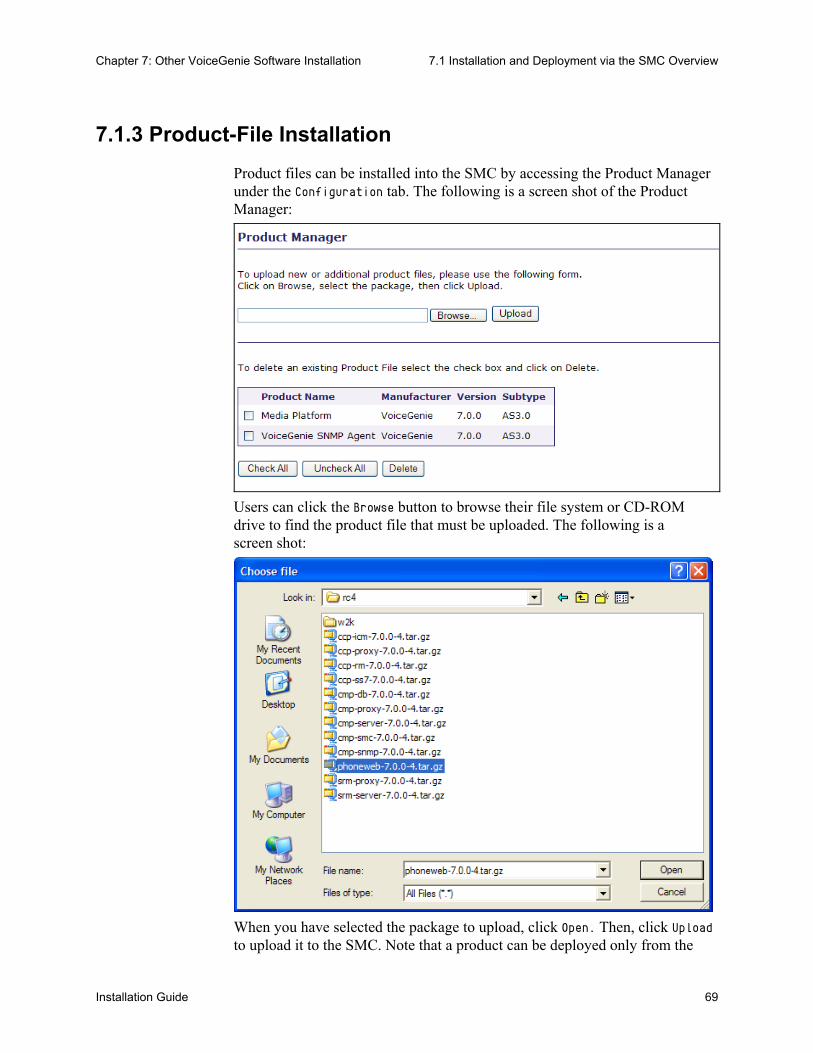
Chapter 7: Other VoiceGenie Software Installation 7.1 Installation and Deployment via the SMC Overview
Installation Guide 69
7.1.3 Product-File Installation
Product files can be installed into the SMC by accessing the Product Manager under the Configuration tab. The following is a screen shot of the Product Manager:
Users can click the Browse button to browse their file system or CD-ROM drive to find the product file that must be uploaded. The following is a screen shot:
When you have selected the package to upload, click Open. Then, click Upload to upload it to the SMC. Note that a product can be deployed only from the

Chapter 7: Other VoiceGenie Software Installation 7.1 Installation and Deployment via the SMC Overview
70 VoiceGenie 7.2.2
SMC in which it was uploaded. When the product-file upload is complete, the product file will be listed in the table at the bottom of the screen. Note that a large product file may take up to 20 minutes to load via the SMC. During this time, customers should not navigate to another web page; otherwise, the upload will be stopped. An uploaded product can be deleted to free-up disk space on the hard drive on the Management Server, if required.
7.1.4 Configuration Profile Creation
When a product file has been uploaded, it cannot be deployed until a configuration profile is created. A configuration profile is a customized set of configuration, based on responses provided by users. Configuration profiles can be created by using the Config Profile Manager. It is accessible by clicking the Config Profile Manager link in the menu under the Configuration tab of the SMC. Note that some products do not require questions to be answered when creating a configuration profile. The following is a screen shot of the Config Profile Manager:
To create a new profile, enter a name for the profile in the Profile Name text box. Please use a meaningful name; then, select the product from the drop-down list, and click Create. If the profile creation requires questions to be answered, these will be presented. When all questions have been answered, the newly created profile will be listed in the table at the bottom.

Chapter 7: Other VoiceGenie Software Installation 7.1 Installation and Deployment via the SMC Overview
Installation Guide 71
Note: Customers should keep track of their responses, so that they can replicate the install, as well as provide this information to VoiceGenie support (if required).
If you are unsure about the correct response to a question, please consult VoiceGenie support for further assistance.
7.1.5 Product-File Deployment
When a Product File has been installed and a configuration profile has been created, the package can be deployed to one or more systems. This is carried out via the Deployment Manager, which is accessible from the menu of the Configuration tab under the SMC. Note that a product can be deployed to more than one computer at a time. The following is a screen shot of the Deployment Manager:
To deploy a product file, select the radio button next to it, as well as the desired configuration profile from the drop-down list. Also, select the servers on which the package should be deployed. Note that a product may not be deployable from a SMC (for example, the radio button is unavailable) if it was not uploaded from that SMC (this occurs in an environment that has more than one SMC), or if a configuration profile does not exist, because one has not been created.
Also, note that the deployment may take up to 20 minutes. The Deployment History page provides an updated status concerning the deployment progress.

Chapter 7: Other VoiceGenie Software Installation 7.2 Installing the VoiceXML Platform
72 VoiceGenie 7.2.2
Note: Users should not start deploying any other software on a computer until all deployments on that computer are complete. Check the status of the deployment on the Deployment History page before attempting to deploy any other software.
When software has been deployed, the computer on which the software has been deployed should be restarted. Note that the system does not have to be restarted after deploying each package—only after all packages have been deployed.
Note: Users should not access the SMC by using localhost in the URL. For example, http://localhost:8080/smc/ is not acceptable. This is not preferred, because, for certain operations related to deployment, the SMC requires the actual IP or host name in the URL.
7.2 Installing the VoiceXML Platform This section describes the steps involved in installing and deploying the VoiceGenie VoiceXML Platform software. Note that the VoiceXML Platform software should only be installed on computers that will be used for processing VoiceXML applications.
7.2.1 Installation and Deployment
This section describes the order in which software must be installed and deployed to a computer to ensure a functioning installation.
Step 1—VoiceGenie VoiceXML Platform Installation
Linux
Under Linux, install the following package by using the Product Manager, which is found under the Configuration tab of the SMC. Note that x.y.z is the latest version (for example, 7.2.0), and a is the revision of the package (for example, 5):
• phoneweb-x.y.z-a.tar.gz
The product file may take a number of minutes to install, so please allow the web browser to upload the file without interruption. Upon installation, the product will be listed in the table at the bottom of the page. For details, refer to 7.1.3 Product-File Installation.

Chapter 7: Other VoiceGenie Software Installation 7.2 Installing the VoiceXML Platform
Installation Guide 73
Windows
Under Windows, install the following package by using the Product Manager, which is found under the Configuration tab of the SMC. Note that x.y.z is the latest version (for example, 7.2.0), and a is the revision of the package (for example, 5):
• phoneweb-x.y.z-a.zip
The product file may take a number of minutes to install, so please allow the web browser to upload the file without interruption. Upon installation, the product will be listed in the table at the bottom of the page. For details, please refer to 7.1.3 Product-File Installation.
Step 2—Create a VoiceXML Platform Profile and Deploy
When the package has been installed, go to the Config Profile Manager, which is found under the Configuration tab of the SMC to create a profile. You will be asked a number of questions regarding the configuration of the VoiceXML Platform software.
Note: Users can create multiple configuration profiles for a software product for different configurations. Also, if a question is answered in error when creating a configuration profile, users should just create another profile and delete the incorrect one.
When the profile has been created, go to the Deployment Manager, which is found under the Configuration tab of the SMC to deploy the VoiceXML Platform on the various computers that will run the software. The deployment step may take up to five minutes. To get the latest status of the deployment, check the Deployment History page.
7.2.2 Manual Configuration
Linux
No manual configuration is required.
Windows
The VoiceXML Platform is configured by default to access the first network connection in the Adapters and Bindings settings. On Windows systems that have multiple network adapters, the network connection that has the correct IP address should appear as the first connection in the Adapters and Bindings list.

Chapter 7: Other VoiceGenie Software Installation 7.2 Installing the VoiceXML Platform
74 VoiceGenie 7.2.2
To check the network connections order, go to Control Panel > Network Connections and click Advanced > Advanced Settings from menu of the Network Connections window. In the Advanced Settings window, make sure the correct connection shows at the top of the list. The following screen shot shows an example:
7.2.3 Licensing
Before the software can be started, a valid license is required. This section explains how to obtain, upload, and back-up licenses for your VoiceGenie software.
Obtaining a License
If you do not already have a license for your VoiceGenie software, please perform the procedure (outlined in the following section) on each computer on which the software is installed. Note that old licenses will work with new software. If you have an old license, you can just apply the license as outlined in the Applying the License section that follows.

Chapter 7: Other VoiceGenie Software Installation 7.2 Installing the VoiceXML Platform
Installation Guide 75
Linux
Log on to the system as the root user (default password is root1), and run the following commands: /usr/local/cmp-proxy/scripts/vginfo_linux.sh cd /usr/local/cmp-proxy/scripts/sys_info
In this directory, a new file will be created that has the following format: <hostname>_<YYYY>_<MM>_<DD>_<hh>_<mm>_<ss>.out
where the values in <> (or angle brackets) are defined as follows:
• <hostname> –host name of the computer
• <YYYY> –year
• <MM> –month
• <DD> –day
• <hh> –hours
• <mm> –minutes
• <ss> –seconds
Please send this output file to Genesys to request a license for this computer.
Windows
From the Start menu, select Run, and run the cmd.exe command to get a command-line window. At the prompt, run the following commands: C:\VoiceGenie\cmp\cmp-proxy\scripts\vginfo_w2k.bat cd C:\VoiceGenie\cmp\cmp-proxy\scripts\sys_info
In this directory, a new file will be created that has the following format: <hostname>_<yyyy>_<mm>_<dd>_<hh>_<mm>_<ss>.txt
where the values in <> (or angle brackets) are defined as follows:
• <hostname> –host name of the computer
• <YYYY> –year
• <MM> –month
• <DD> –day
• <hh> –hours
• <mm> –minutes
• <ss> –seconds
Please send this output file to Genesys to request a license for this computer.
Applying the License
When you have obtained a license, or if you have an existing VoiceGenie license file (for example, vglicense.txt), you can use the SMC to apply the
Chapter 7: Other VoiceGenie Software Installation 7.3 Installing the SIP Proxy
76 VoiceGenie 7.2.2
license to your VoiceXML Platform computer(s). To do so, go to the Operations tab in the SMC, and click the Platform Licensing link.
Note: VoiceGenie license files are keyed to the computer; as a result, each computer has its own unique license file that will not function on any other computer.
On the Platform Licensing page, select the server that corresponds to your license file from the drop-down list, and click Continue. Copy the contents of the license file into the text area, and click Install. When the license is uploaded, you should restart the computer.
After restart, you should be able to start the software from the Start/Stop Software page under the Operations tab of the SMC by selecting the check box next to the server you would like to start and clicking the Start button.
Backing Up the License File
If you plan on reinstalling a computer, ensure that you back up the license file for that computer, so that you do not need to contact VoiceGenie to obtain a new one. The license file is at /usr/local/phoneweb/config/vglicense.txt (on Linux) and at C:\VoiceGenie\mp\config\vglicense.txt (on Windows).
7.3 Installing the SIP Proxy This section describes the steps involved in installing and deploying the VoiceGenie SIP Proxy software. Note that the SIP Proxy software should be installed only when SIP load balancing across multiple VoiceXML Platforms is required.
7.3.1 Installation and Deployment
This section describes the order in which software must be installed and deployed to a computer to ensure a functioning installation.
Step 1—Linux Bonding Driver Installation and Deployment
The VoiceGenie SIP Proxy requires that the Linux bonding driver be installed if multiple network cards are installed on the computer. If the computer does not have multiple network cards, skip this step and continue to the next step.

Chapter 7: Other VoiceGenie Software Installation 7.3 Installing the SIP Proxy
Installation Guide 77
To install the bonding driver, the product file for it should be installed by using the Product Manager in the SMC first. It has the following name:
• bonding-7.0.0-3.tar.gz
The product file may take up to 20 minutes to install, so please allow the web browser to upload the file without interruption. Upon installation, the product will be listed in the table at the bottom of the page. For details, refer to 7.1.3 Product-File Installation.
Use the Config Profile Manager to create a profile for the package, and then use the Deployment Manager to deploy the package to the various computers that will be running the SIP Proxy software.
Step 2—VoiceGenie SIP Proxy Installation
Install the following packages by using the Product Manager in the SMC. Note that x.y.z is the latest version (for example, 7.2.0), and a is the revision of the package (for example, 5):
• ccp-rm-x.y.z-a.tar.gz
• ccp-proxy-x.y.z-a.tar.gz
The product files may take up to 20 minutes to install, so please allow the web browser to upload the file without interruption. Upon installation, the product will be listed in the table at the bottom of the page. For details, refer to 7.1.3 Product-File Installation.
Use the Config Profile Manager to create a profile for these packages, and then use the Deployment Manager to deploy these packages to the various computers that will be running the SIP Proxy software.
7.3.2 Manual Configuration
Please refer to the SIP Proxy User’s Guide and SIP Proxy System Reference Guide for configuration details.
7.3.3 Licensing
Please refer to 7.2.3 Licensing.
Chapter 7: Other VoiceGenie Software Installation 7.4 Installing Other VoiceGenie Software
78 VoiceGenie 7.2.2
7.4 Installing Other VoiceGenie Software This section describes the steps involved in installing and deploying all other VoiceGenie software, not including ASR or TTS server software. The table below outlines what software products are covered by this section:
VoiceGenie Software Package Name (Linux) Package Name (Windows)
VoiceGenie SNMP Agent cmp-snmp-x.y.z-a.tar.gz cmp-snmp-x.y.z-a.zip
MRCP Proxy (a.k.a. SRM Proxy) srm-proxy-x.y.z-a.tar.gz srm-proxy-x.y.z-a.zip
In the preceding table, note that x.y.z is the latest version (for example, 7.2.0), and a is the revision of the package (for example, 3).
The VoiceGenie SNMP Agent should be deployed to any computer on which SNMP access to health data or SNMP traps for error conditions is desired. Note that any other SNMP agents that are running on the system should be disabled first, because there will be a port conflict with the VoiceGenie SNMP Agent.
The MRCP Proxy is required only for deployments that require high availability and load balancing for speech resources.
7.4.1 Installation and Deployment
Install the previously listed package by using the Product Manager in the SMC. The product files may take up to 20 minutes to install, so please allow the web browser to upload the file without interruption. Upon installation, the product will be listed in the table at the bottom of the page. For details, refer to 7.1.3 Product-File Installation.
Use the Config Profile Manager to create a profile for the package, and then use the Deployment Manager to deploy the package to the various computers that will be running the software.
7.4.2 Manual Configuration
Please refer to each component’s User’s Guide and Reference Guide for configuration details.
7.4.3 Licensing
Please refer to 7.2.3 Licensing.
Chapter 7: Other VoiceGenie Software Installation7.5 Installing the VoiceGenie Tools Framework (Call Analyst and Quality Advisor)
Installation Guide 79
7.5 Installing the VoiceGenie Tools Framework (Call Analyst and Quality Advisor)
This section describes the steps involved in installing and deploying the VoiceGenie Tools Framework. These components enable the Call Analyst and Quality Advisor tools to collect and present data about the calls running on a VoiceGenie deployment. This software consists of components that run on the same host as the cluster’s Management Server as well as components that run on the individual VoiceXML Platforms (Note that in an All-in-One setup, the Management Server may reside on the same host as the VoiceXML Platform. In this configuration, all Tools Framework components are installed on the same server).
The LogAgent component runs on the individual VoiceXML Platforms, while the LogMonitor and the Tools Server run on the Management Server. Note that these components should not be installed on the Backup Management server, if one exists. This does not affect system availability as these components are not involved in the handling of caller sessions.
Note: If both the VoiceGenie Tools Framework and VoiceGenie SNMP are being installed, VoiceGenie SNMP must be installed before the VoiceGenie Tools Framework. Otherwise, traps generated by the Tools Framework will not be recognized by SNMP, and get requests against the Tools Framework will not function.
7.5.1 Installation and Deployment
This section describes the order in which software must be installed and deployed to a computer to ensure a functioning installation.
Step 1—Log Monitor and Tools Server Installation
These components are installed on the same host as the Primary Management Server. Install the following packages, in the specified order, by using the Product Manager in the SMC. Note that x.y.z is the latest version (for example, 7.2.0), and a is the revision of the package (for example, 5):
1. tools-logmon-x.y.z-a.tar.gz
2. tools-server-x.y.z-a.tar.gz
The product files may take up to 20 minutes to install, so please allow the web browser to upload the file without interruption. Upon installation, the product will be listed in the table at the bottom of the page.

Chapter 7: Other VoiceGenie Software Installation7.5 Installing the VoiceGenie Tools Framework (Call Analyst and Quality Advisor)
80 VoiceGenie 7.2.2
Use the Config Profile Manager to create a profile for these packages, and then use the Deployment Manager to deploy these packages to the computer that will be running the components.
At this point, you must start the Log Monitor software from the Start/Stop Software page under the Operations tab of the SMC by selecting the check box next to the name or IP of the primary Management Server and clicking the Start button. Note that you will first need to re-log on to the SMC, because the Tools Server installation restarts the Apache Tomcat instance that hosts the SMC software.
Step 2—Log Agent Installation
This component is installed on all hosts running the VoiceXML Platform. Install the following packages by using the Product Manager in the SMC, note that x.y.z is the latest version (for example, 7.2.0), and a is the revision of the package (for example, 3):
• tools-logagent-x.y.z-a.tar.gz
The product files may take up to 20 minutes to install, so please allow the web browser to upload the file without interruption. Upon installation, the product will be listed in the table at the bottom of the page.
Use the Config Profile Manager to create a profile for these packages, and then use the Deployment Manager to deploy these packages on to the various computers that will be running the VoiceXML platform. When the log agent has been installed, you must restart the computer.
Note: When a Log Agent is first added to a cluster, it will not appear in the Service Quality Advisor or Call Analyst until Tomcat is restarted on the Tools server. The new Log Agent will still be collecting statistics for calls to the newly added platform, even before Tomcat is restarted. These statistics will only be accessible, however, after Tomcat is restarted.

Chapter 7: Other VoiceGenie Software Installation7.5 Installing the VoiceGenie Tools Framework (Call Analyst and Quality Advisor)
Installation Guide 81
7.5.2 Manual Configuration
By default, summary statistics collected from calls are available for reports after 5 minutes, and the call log for a subscribed call is available for download after 20 minutes. These parameters can be changed by configuring the Log Agent.
Please refer to the Call Analyst & Quality Advisor User’s Guide and Tools Framework System Reference Guide for configuration details.
7.5.3 Licensing
The Tools Framework includes both the Call Analyst and Quality Advisor tools. To use these tools a license must be installed. Please refer to 7.2.3 Licensing for more details on how to get a license.

Chapter 7: Other VoiceGenie Software Installation7.5 Installing the VoiceGenie Tools Framework (Call Analyst and Quality Advisor)
82 VoiceGenie 7.2.2

Installation Guide 83
Chapter
8 ASR and TTS Software Installation This section describes at a high level how ASR and TTS software is installed in a VoiceGenie deployment. The VoiceGenie VoiceXML Platform integrates with third-party ASR or TTS software via Media Resource Control Protocol (MRCP). However, a further distinction must be made, because this integration can be either a MRCP-Native or MRCP-Direct interface. When interfacing via MRCP-Native integration, the VoiceGenie Speech Resource Manager (SRM) Server must be installed along with the ASR or TTS software (because the SRM Server converts the MRCP into the third-party vendor’s proprietary protocol or API). On the other hand, when interfacing by using MRCP-Direct, the VoiceXML Platform can talk directly with the ASR or TTS software, because it is a standardized protocol.
The following diagram illustrates this communication:
The following tables outline the ASR and TTS software with which the VoiceGenie VoiceXML Platform integrates, the operating system to which they are deployed, and the mechanism (MRCP-Native or MRCP-Direct) that is utilized:
VoiceXML Plat-form
ASR/TTS Soft-ware
VoiceXML Plat-form
ASR/TTS Soft-ware
SRM Server
MRCP-Direct MRCP-Native
MRCP MRCP Native API

Chapter 8: ASR and TTS Software Installation
84 VoiceGenie 7.2.2
ASR Software
Operating System for ASR Software
Mechanism
Instructions
AT&T Watson ASR 6.0.2463
Linux (VGL3.0 and RHEL3.0) MRCP-Native Proceed to 8.2 Installing MRCP-Native ASR or TTS Engines.
AT&T Watson ASR 6.1.3601
Linux (VGL3.0, RHEL3.0, and RHEL4.0)
MRCP-Native
Proceed to 8.2 Installing MRCP-Native ASR or TTS Engines.
AT&T Watson ASR 6.1.3601
Linux (VGL3.0, RHEL3.0, and RHEL4.0)
MRCP-Direct Proceed to 8.1 Installing MRCP-Direct ASR or TTS Engines.
IBM WVS ASR 5.1.3 Linux (RHEL3.0) MRCP-Direct Proceed to 8.1 Installing MRCP-Direct ASR or TTS Engines.
IBM WVS ASR 5.1.3 Windows (2003 Server) MRCP-Direct Proceed to 8.1 Installing MRCP-Direct ASR or TTS Engines.
Nuance 1.0 SP9 Windows (2000 Server and 2003 Server)
MRCP-Direct Proceed to 8.1 Installing MRCP-Direct ASR or TTS Engines.
OSR 3.0.9 Linux (VGL3.0 and RHEL3.0) MRCP-Native Proceed to 8.2 Installing MRCP-Native ASR or TTS Engines.
OSR 3.0.15 Linux (VGL3.0 and RHEL3.0) MRCP-Direct Proceed to 8.1 Installing MRCP-Direct ASR or TTS Engines.
OSR 3.0.15 Windows (2000 Server and 2003 Server)
MRCP-Direct Proceed to 8.1 Installing MRCP-Direct ASR or TTS Engines.
Phonetic GN 5.9.0015 Windows (2000 Server and 2003 Server)
MRCP-Native Proceed to 8.2 Installing MRCP-Native ASR or TTS Engines.
TeliSpeech 1.1 SP1 Linux (VGL3.0 and RHEL3.0) MRCP-Direct Proceed to 8.1 Installing MRCP-Direct ASR or TTS Engines.

Chapter 8: ASR and TTS Software Installation
Installation Guide 85
ASR Software
Operating System for ASR Software
Mechanism
Instructions
VoiceGenie TDD/TTY Server
Linux (VGL3.0 and RHEL3.0) MRCP-Native Proceed to 8.2 Installing MRCP-Native ASR or TTS Engines.
NuanceRecognizer 9.0.4 MRCPv1
Linux (VGL3.0, RHEL3.0, and RHEL 4.0)
MRCP-Direct Proceed to 8.1 Installing MRCP-Direct ASR or TTS Engines.
NuanceRecognizer 9.0.4 MRCPv1
Windows (2000 Server and 2003 Server)
MRCP-Direct Proceed to 8.1 Installing MRCP-Direct ASR or TTS Engines.
TTS Software
Operating System for TTS Software
Mechanism
Instructions
AT&T NaturalVoice 3.0.0 Linux (VGL3.0 and RHEL3.0) MRCP-Native Proceed to 8.2 Installing MRCP-Native ASR or TTS Engines.
AT&T NaturalVoice 4.1.2 Linux (VGL3.0, RHEL3.0, and RHEL4.0)
MRCP-Native
MRCP-Direct
Proceed to 8.2 Installing MRCP-Native ASR or TTS Engines.
AT&T NaturalVoice 4.1.2 Linux (VGL3.0, RHEL3.0, and RHEL4.0)
MRCP-Native
MRCP-Direct
Proceed to 8.1 Installing MRCP-Direct ASR or TTS Engines.
IBM WVS TTS 5.1.3 Linux (RHEL3.0) MRCP-Direct Proceed to 8.1 Installing MRCP-Direct ASR or TTS Engines.
IBM WVS TTS 5.1.3 Windows (2003 Server) MRCP-Direct Proceed to 8.1 Installing MRCP-Direct ASR or TTS Engines.
Nuance Vocalizer 4.0.5 Windows (2000 Server and 2003 Server)
MRCP-Direct Proceed to 8.1 Installing MRCP-Direct ASR or TTS Engines.
RealSpeak TTS 4.0.12 Linux (VGL3.0 and RHEL3.0) MRCP-Direct Proceed to 8.1 Installing MRCP-Direct ASR or TTS Engines.

Chapter 8: ASR and TTS Software Installation
86 VoiceGenie 7.2.2
TTS Software
Operating System for TTS Software
Mechanism
Instructions
RealSpeak TTS 4.0.12 Windows (2000 Server and 2003 Server)
MRCP-Direct Proceed to 8.1 Installing MRCP-Direct ASR or TTS Engines.
VoiceGenie RTSP Server Linux (VGL3.0 and RHEL3.0) MRCP-Native Proceed to 8.2 Installing MRCP-Native ASR or TTS Engines.
RealSpeak TTS 4.5SP1 MRCPv1
Linux (VGL3.0 and RHEL3.0, and RHEL4.0)
MRCP-Direct Proceed to 8.1 Installing MRCP-Direct ASR or TTS Engines.
RealSpeak TTS 4.5SP1 MRCPv1
Windows (2000 Server and 2003 Server)
MRCP-Direct Proceed to 8.1 Installing MRCP-Direct ASR or TTS Engines.
Also, if your application uses hotkey/universal grammars you must install the hotkey grammar package on your VoiceXML Platform. 8.4 Installing the Hotkey Grammar Package outlines the process for installing the hotkey grammars package.
After installing an ASR engine, it is recommended that the VXML ASRENGINE property be set to the actual name of the ASR engine that has been configured. The value is initially set to DEFAULT, but it can be changed in the VoiceXML page or in defaults.vxml. For example: <property name="ASRENGINE" value="SPEECHWORKS"/>

Chapter 8: ASR and TTS Software Installation 8.1 Installing MRCP-Direct ASR or TTS Engines
Installation Guide 87
8.1 Installing MRCP-Direct ASR or TTS Engines
The following section provides an overview of installing ASR or TTS Engines that are integrated using MRCP-Direct. The steps include installing and deploying software as well as manual configuration changes to make the ASR or TTS engine useable by the VoiceXML platform or MRCP Proxy.
8.1.1 Installation and Deployment
This section describes what must be installed and deployed to a computer to ensure a functioning installation.
Step 1—ASR or TTS Software Installation
For all ASR or TTS engines that are integrated by using MRCP-Direct, the installation package that is provided by the vendor is used to install the ASR or TTS software. The following table outlines the name of the installation packages provided by the third-party vendor:
ASR or TTS Software Package Name
IBM VWS ASR/TTS 5.1.3 Five-plus Installation CDs:
• WebSphere Voice Server: Linux Base Installation CD
• WebSphere Application Server: Linux Base Installation CD
• WebSphere Application Server: Fix Pack 1
• WebSphere Voice Server: ASR Install CD (one for each language)
• WebSphere Voice Server: TTS Install CD (one for each voice)
Nuance 1.0 SP9 MRCP-1-0-0-SP9-WIN2K.zip
OSR 3.0.x (Linux) OSR-3.0.x-i386-rhel3.rpm
OSR-<language>-3.0.x-i386-linux.rpm
SWMS-3.1.16-i386-linux.rpm

Chapter 8: ASR and TTS Software Installation 8.1 Installing MRCP-Direct ASR or TTS Engines
88 VoiceGenie 7.2.2
ASR or TTS Software Package Name
OSR 3.0.x (Windows) OSR-3.0.x-i386-win32.zip
OSR-3.0.x-<language>.i386-win32.zip
SWMS-3.1.16-i386-win32.zip
RealSpeak 4.0.12 (Linux) rs-api-4.0.12.i386.rpm
RealSpeak4.0.12-<language-Voice>.tar.gz
rs_4.0.12_lic.tar.gz (needed if RealSpeak is not installed with OSR)
SWMS-3.1.x-i386-linux.rpm
RealSpeak 4.0.12 (Windows) RealSpeak4.0.12.password-required.zip
RealSpeak4.0.12-<language-Voice>.zip
SWMS-3.1.x-i386-win32.zip
TeliSpeech 1.1 SP1 TeliSpeech_1.1_SP1_patch1_linux.zip
USEnglish_30_GA_Linux.zip
Nuance Vocalizer 4.0.5 VOCALIZER-4-0-5B-WIN32-8-5-0-SP050513.zip
NuanceRecognizer 9.0.4 (Linux)
NRec-9.0.4-i386-rhel3.tar.gz
NRec-9.0.0-<language>.i386-rhel3.tar.gz Incident804220111_NSS5.0-Linux.zip * This file contains the full installation for NSS 5.0.3 plus additional fixes.
NuanceRecognizer 9.0.4 (Windows)
NRec-9.0.4-i386-win32.zip
NRec-9.0.0-<language>.i386-win32.zip
Incident804220111_NSS5.0-Win.3_NSRD00038519_patch*
NLICMGR-11.1.0-i386-win32.zip
* This file contains the full installation for NSS 5.0.3 plus additional fixes.

Chapter 8: ASR and TTS Software Installation 8.1 Installing MRCP-Direct ASR or TTS Engines
Installation Guide 89
ASR or TTS Software Package Name
RealSpeak 4.5 SP1 (Linux) RealSpeak_Host_4.5.0-SDK_patch1_Linux.tar
RealSpeak4.5-<language-Voice>.zip
or
RealSpeak4.0.12-<language-Voice>.tar.gz
Incident804220111_NSS5.0-Linux*
NLICMGR-11.1.0-i386- rhel3.tar.gz
* This file contains the full installation for NSS 5.0.3 plus additional fixes.
RealSpeak 4.5 SP1 (Windows) RealSpeak_4.5_Windows.zip
RealSpeak_Host_4.5.0-SDK_patch1_windows.zip
RealSpeak4.5-<language-Voice>.zip
or
RealSpeak4.0.12-<language-Voice>.zip
Incident804220111_NSS5.0-Win.3_NSRD00038519_patch*
NLICMGR-11.1.0-i386-win32.zip
* This file contains the full installation for NSS 5.0.3 plus additional fixes.
The preceding list may not be complete. Please ensure that all the software required to install the ASR or TTS engines is obtained from the appropriate vendor. The following sections outline the detailed procedure for installing the ASR or TTS software. Please jump to the appropriate section that follows, based on the ASR or TTS that you are installing. If instructions are not present, please refer to vendor-provided documentation for installation instructions.
Installation of Watson ASR and NaturalVoice TTS MRCP server is detailed in the “Watson ASR and NaturalVoice TTS MRCP-Direct Server (Linux)” section.
OSR 3.0.x MRCP-Direct (Linux)
Install the vendor-provided RPMs by doing the following: rpm -ivh OSR-3.0-x.i386-rhel3.rpm rpm -ivh OSR-<language>-3.0-x.i386-linux.rpm

Chapter 8: ASR and TTS Software Installation 8.1 Installing MRCP-Direct ASR or TTS Engines
90 VoiceGenie 7.2.2
rpm -ivh SWMS-3.1.x-i386-linux.rpm
Please ensure that the packages are installed in this order.
OSR 3.0.x MRCP-Direct (Windows)
Extract the .zip files to the server where the OSR software will be installed. For example:
• OSR-3.0.x-i386-win32.zip: extract to C:\temp\OSR
• OSR-3.0.x-<language>.i386-win32.zip: extract to C:\temp\<language>
• SWMS-3.1.x-i386-win32.zip: extract to C:\temp\SWMS
Install the OSR software first by double-clicking the setup.exe file in the directory into which it was extracted (that is, C:\temp\OSR). Note that any previous versions of OSR should be uninstalled first. Also, use the default responses for the installation. When installation is complete, restart the server. Note that installing on non-English Windows will fail and that a workaround to complete the installation is required. The workaround is to create a group called Users that has the same members as the Real Users Group (language-dependant). This will allow the setup to complete successfully.
After restart, install all language packages by double-clicking the setup.exe file in the directory into which it was extracted (C:\temp\<language>). Once again, please ensure that any previous versions of the language packages are uninstalled first. Also, use the default responses for the installation.
Finally, install the SWMS (SpeechWorks MediaServer) by double-clicking the setup.exe file in the directory into which it was extracted (C:\temp\SWMS). Once again, please ensure that any previous versions of the SWMS are uninstalled first. On the user interface, click the Install Products button, and then click the SpeechWorks MediaServer button; that is, do not install the client. On the Custom Setup screen, ensure that the following features are selected. Note that Apache HTTP Server is deselected:

Chapter 8: ASR and TTS Software Installation 8.1 Installing MRCP-Direct ASR or TTS Engines
Installation Guide 91
Note: If you install any language packages after installing the SWMS, you will need to reinstall the SWMS software.
After restarting the OSR server, you will need to start the OSR software manually. To do so, go to the Services window (that is, Start > Settings > Control Panel > Administrative Tools > Services), highlight the SpeechWorks MediaServer service, and click the Start button. Also, please ensure that this service is set to start manually.
On non-English installations of Windows, localization may require that certain configuration information passed into OSR has a comma (,) instead of a period (.) to represent the decimal point. For example, in the defaults.vxml, the values for the sensitivity and speedvsaccuracy properties must be changed to use a comma, in order for OSR to start correctly.
RealSpeak 4.0.12 MRCP-Direct (Linux)
Install the vendor-provided RPMs by doing the following: rpm –ivh rs-api-4.0-12.i386.rpm rpm -ivh --force rs-lic-4.0-x.i386.rpm (skip installation of this package if OSR is also on this machine) rpm -ivh --force rs-<language>-<Voice>-4.0-12.i386.rpm rpm -ivh SWMS-3.1.x-i386-linux.rpm
Ensure that the packages are installed in this order.

Chapter 8: ASR and TTS Software Installation 8.1 Installing MRCP-Direct ASR or TTS Engines
92 VoiceGenie 7.2.2
RealSpeak 4.0.12 MRCP-Direct (Windows)
Extract the .zip files into the server on which the RealSpeak software will be installed. For example:
• RealSpeak4.0.12.password-required.zip: extract to C:\temp\RealSpeak
• RealSpeak4.0.12-<lang>.zip: extract to C:\temp\<language>
• SWMS-3.1.x-i386-win32.zip: extract to C:\temp\SWMS
Install the RealSpeak software first by double-clicking the setup.exe file in the directory into which it was extracted (that is, C:\temp\ RealSpeak). Note that any previous versions of OSR should be uninstalled first. Also, use the default responses for the installation. When installation is complete, restart the server. Note that installing on non-English Windows will fail and that a workaround to complete the installation is required. The workaround is to create a group called Users that has the same members as the Real Users Group (language-dependant). This will allow the setup to complete successfully.
After restart, install all language packages by double-clicking the setup.exe file in the directory into which it was extracted (C:\temp\<language>). Once again, ensure that any previous versions of the language packages are uninstalled first. Also, use the default responses for the installation.
Finally, install the SWMS (SpeechWorks MediaServer) by double-clicking the setup.exe file in the directory into which it was extracted (C:\temp\SWMS). Once again, ensure that any previous versions of the SWMS are uninstalled first. On the user interface, click the Install Products button, and then click the SpeechWorks MediaServer button; that is, do not install the client. On the Custom Setup screen, ensure that the following features are selected. Note that Apache HTTP Server is deselected:
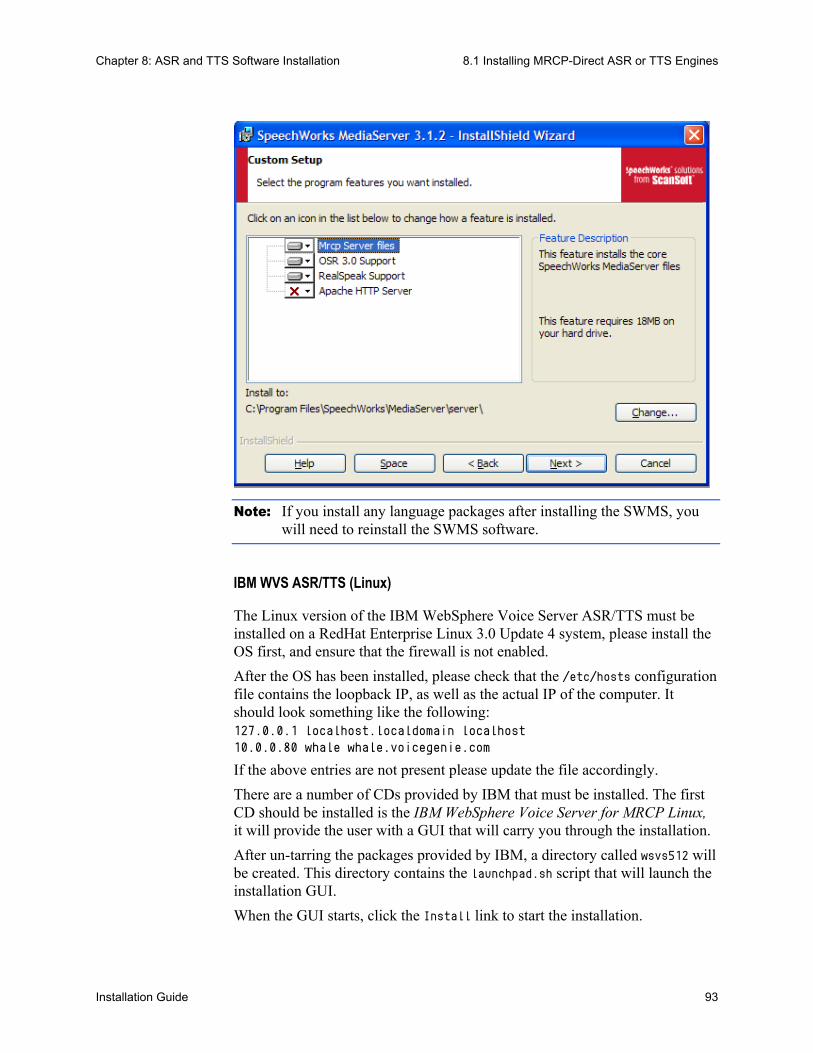
Chapter 8: ASR and TTS Software Installation 8.1 Installing MRCP-Direct ASR or TTS Engines
Installation Guide 93
Note: If you install any language packages after installing the SWMS, you will need to reinstall the SWMS software.
IBM WVS ASR/TTS (Linux)
The Linux version of the IBM WebSphere Voice Server ASR/TTS must be installed on a RedHat Enterprise Linux 3.0 Update 4 system, please install the OS first, and ensure that the firewall is not enabled.
After the OS has been installed, please check that the /etc/hosts configuration file contains the loopback IP, as well as the actual IP of the computer. It should look something like the following: 127.0.0.1 localhost.localdomain localhost 10.0.0.80 whale whale.voicegenie.com
If the above entries are not present please update the file accordingly.
There are a number of CDs provided by IBM that must be installed. The first CD should be installed is the IBM WebSphere Voice Server for MRCP Linux, it will provide the user with a GUI that will carry you through the installation.
After un-tarring the packages provided by IBM, a directory called wsvs512 will be created. This directory contains the launchpad.sh script that will launch the installation GUI.
When the GUI starts, click the Install link to start the installation.

Chapter 8: ASR and TTS Software Installation 8.1 Installing MRCP-Direct ASR or TTS Engines
94 VoiceGenie 7.2.2
After installation, restart the server, and then run the /opt/WebSphere/VoiceServer/firststeps/firststeps.sh script. This will launch a GUI. On this GUI, click the Verify installation link, and wait for the verification result.
If there are no errors, restart the system.
When the system has restarted, use a web browser to navigate to http://<hostname>:9090/admin to access the IBM WVS management web interface and increase the number of ASR/TTS clients. By default, only one client is enabled.
IBM WVS ASR/TTS (Windows)
The Windows version of the IBM WebSphere Voice Server ASR/TTS must be installed on Windows 2003 Server without SP1.
Once again, there are a number of CDs provided by IBM that must be installed. The first CD should be installed is the IBM WebSphere Voice Server for MRCP Linux, it prompts the user with a GUI that will lead the user through the installation.
Nuance Recognizer 9.0.x MRCP-Direct (Linux)
Note, before you install NSS products, including Nuance Recognizer 9.0.x, RealSpeak 4.5 and Nuance Speech Server 5.0.x, you must remove all the previously installed SWMS products in the system. NSS and SWMS product shall not be hosted by the same system. Installing rpms: rpm –ivh NRec-9.0-x.i386-rhel3.rpm rpm -ivh NRec-en-US-9.0-0.i386-rhel3.rpm rpm –ivh Nuance-licmgr-11.4-0.i386-rhel3.rpm
Ensure that the packages are installed in this order.
Nuance Recognizer 9.0.x MRCP-Direct (Windows)
Extract the .zip files to the server on which the NuanceRecognizer software will be installed. For example:
• NRec-9.0.x-i386-win32.zip: extract to C:\temp\NR
• NRec-9.0.0-en-US.i386-win32.zip: extract to C:\temp\NR-enUS
• NLICMGR-11.1.0-i386-win32.zip extract to C:\tmp\license
To install the NuanceRecognizer software first by double-clicking the setup.exe file in the directory into which it was extracted (that is, C:\temp\NR). Note that any previous versions of Nuance Recognizer—including any previous version of Nuance ASR (Nuance 8.x), Nuance TTS
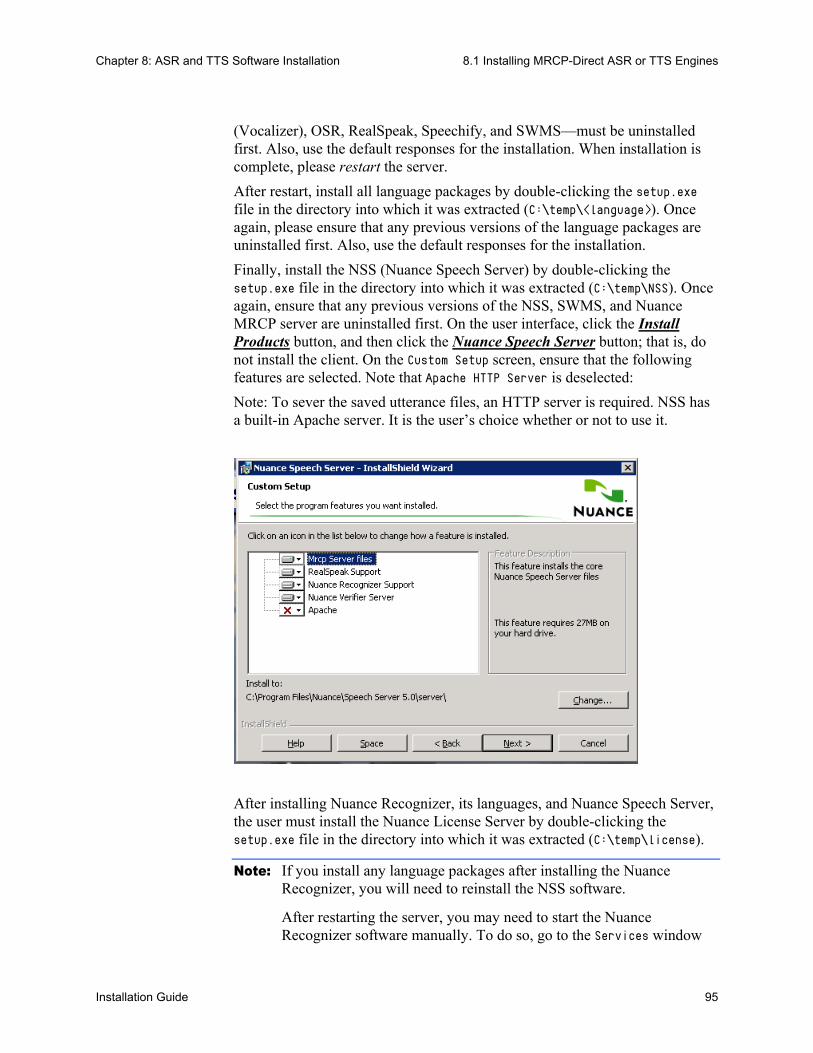
Chapter 8: ASR and TTS Software Installation 8.1 Installing MRCP-Direct ASR or TTS Engines
Installation Guide 95
(Vocalizer), OSR, RealSpeak, Speechify, and SWMS—must be uninstalled first. Also, use the default responses for the installation. When installation is complete, please restart the server.
After restart, install all language packages by double-clicking the setup.exe file in the directory into which it was extracted (C:\temp\<language>). Once again, please ensure that any previous versions of the language packages are uninstalled first. Also, use the default responses for the installation.
Finally, install the NSS (Nuance Speech Server) by double-clicking the setup.exe file in the directory into which it was extracted (C:\temp\NSS). Once again, ensure that any previous versions of the NSS, SWMS, and Nuance MRCP server are uninstalled first. On the user interface, click the Install Products button, and then click the Nuance Speech Server button; that is, do not install the client. On the Custom Setup screen, ensure that the following features are selected. Note that Apache HTTP Server is deselected:
Note: To sever the saved utterance files, an HTTP server is required. NSS has a built-in Apache server. It is the user’s choice whether or not to use it.
After installing Nuance Recognizer, its languages, and Nuance Speech Server, the user must install the Nuance License Server by double-clicking the setup.exe file in the directory into which it was extracted (C:\temp\license).
Note: If you install any language packages after installing the Nuance Recognizer, you will need to reinstall the NSS software.
After restarting the server, you may need to start the Nuance Recognizer software manually. To do so, go to the Services window

Chapter 8: ASR and TTS Software Installation 8.1 Installing MRCP-Direct ASR or TTS Engines
96 VoiceGenie 7.2.2
(Start > Settings > Control Panel > Administrative Tools > Services), highlight the Nuance Speech Server 5.0 service, and click the Start button. Also, ensure that this service is set to start manually.
RealSpeak 4.5 Patch 1 MRCP-Direct (Linux)
Install the vendor-provided RPMs by doing the following:
Extract the RPM packages from the following files:
RealSpeak_Host_4.5.0-SDK_patch1_Linux.tar
RealSpeak4.5-<language-Voice>.zip
Or
RealSpeak4.0.12-<language-Voice>.zip
Incident804220111_NSS5.0-Linux.zip
NLICMGR-11.1.0-i386-rhel3.tar.gz
Installing rpms:
rpm –ivh rs-api-4.5.1-1.i386.rpm rpm -ivh --force rs-<language>-<Voice>-4.0-12.i386.rpm or rpm -ivh --force rs-<language>-<Voice>-4.5.00-00.i386.rpm rpm -ivh Incident804220111_NSS5.0.3_NSRD00038519_patch.zipfromNuance rpm –ivh Nuance-licmgr-11.4-0.i386-rhel3.rpm
Please ensure that the packages are installed in this order.
RealSpeak 4.5 SP1 MRCP-Direct (Windows)
Extract the .zip files into the server on which the RealSpeak 4.5 software will be installed. For example:
• RealSpeak_4.5_Windows.zip: extract to C:\temp\RealSpeak
• RealSpeak4.0.12-AP-English-en-US-Jill.password-
required_acetivibrio>.zip: extract to C:\temp\<language>
• Incident804220111_NSS5.0-Win: extract to C:\temp\NSS
• NLICMGR-11.1.0-i386-win32.zip extract to C:\tmp\license (if it is not installed)
Install the RealSpeak software first by double-clicking the setup.exe file in the directory into which it was extracted (that is, C:\temp\RealSpeak). Note that any previous versions of RealSpeak should be uninstalled first. Also, use the default responses for the installation. When installation is complete, restart the server.

Chapter 8: ASR and TTS Software Installation 8.1 Installing MRCP-Direct ASR or TTS Engines
Installation Guide 97
After restart, install all language packages by double-clicking the setup.exe file in the directory into which it was extracted (C:\temp\<language>). Once again, ensure that any previous versions of the language packages are uninstalled first. Also, use the default responses for the installation.
Finally, install the NSS (Nuance Speech Server) by double-clicking the setup.exe file in the directory into which it was extracted (C:\temp\NSS). Once again, please ensure that any previous versions of the NSS, SWMS and Nuance MRCP server are uninstalled first. On the user interface, click the Install Products button, and then click the Nuance Speech Server button; that is, do not install the client. On the Custom Setup screen, ensure that the following features are selected. Note that HTTP Server is not required by RealSpeak:
After installing Nuance Recognizer, its languages, and Nuance Speech Server, the user must install the Nuance License Server by double-clicking the setup.exe file in the directory into which it was extracted (that is, C:\temp\license).
Note: If you install any language packages after installing the RealSpeak, you will need to reinstall the NSS software.
If you install RealSpeak software with Nuance Recognizer, NSS must be installed all the RealSpeak and Nuance Recognizer language packages are installed. In this case, the RealSpeak and Nuance Recognizer should share the same license server.
After restarting the server, you may need to start the RealSpeak software manually. To do so, go to the Services window (that is, Start

Chapter 8: ASR and TTS Software Installation 8.1 Installing MRCP-Direct ASR or TTS Engines
98 VoiceGenie 7.2.2
> Settings > Control Panel > Administrative Tools > Services), highlight the Nuance Speech Server 5.0 service, and click the Start button. Also, please ensure that this service is set to start manually.
RealSpeak 4.5 SP1 MRCP-Direct (Windows)
• First, install the RealSpeak Host 4.5.0 SDK, if it is not already installed.
• Stop the RealSpeak Host TTS service, if it is running, by going to Control Panel -> Administrative Tools -> Services ->RealSpeak Host.
• Unpack the RealSpeak_Host_4.5.0-SDK_patch1_windows.zip patch zip file in a folder—for example, C:\temp\RealSpeak.
• Install the patched components:
o Copy ttsengine.dll to [INSTALLDIR]\speech\components\common.
o Copy dcteg.dll to [INSTALLDIR]\speech\components\common.
o Copy edct.dll to [INSTALLDIR]\speech\components\common.
o Copy rettt.dll to [INSTALLDIR]\speech\components\common.
o Copy rs_sapi5_telecom.dll to [INSTALLDIR]\speech\components\common.
• Restart the RealSpeak Host TTS service.
Installing Watson ASR and Natural Voice TTS MRCP-Direct Server (Linux) with Genesys Packages
Unlike the other MRCP direct ASR/TTS server, Genesys provides the Watson 6.1 and NaturalVoice 4.1.1 MRCP direct server packages in RHEL3. It is possible to install Watson ASR and NaturalVoice TTS manually, directly with vendor packages. The manual installation step is outlined in the “Watson ASR and Natural Voice TTS MRCP-Direct Server (Linux) manually” section.
1. Install Watson ASR and NaturalVoice TTS MRCP Server Product Files
Use the Product Manager in SMC to create the product files for Watson 6.1 and NaturalVoice 4.1.1 MRCP direct servers, and to install the corresponding software packages listed in the following table:

Chapter 8: ASR and TTS Software Installation 8.1 Installing MRCP-Direct ASR or TTS Engines
Installation Guide 99
ASR or TTS Software Package Name
AT&T Watson ASR 6.1 MRCP Direct Server
watson-mrcp-server-6.1-3601.tar.gz
AT&T NaturalVoice 4.1.1 MRCP Direct Server
naturalvoices-tts-mrcp-base-4.1.1-0.tar.gz
The product file(s) may take up to 20 minutes to install, please allow the web browser to upload the file(s) without interruption. Upon installation, the product(s) will be listed in the table at the bottom of the page.
Use the Config Profile Manager to create a profile for the package(s), and then use the Deployment Manager to deploy the package(s) on to the various computers that will be running the ASR/TTS engine software.
Restart the computer after the package has been successfully deployed.
2: Install NaturalVoice TTS MRCP Server Voices
The NaturalVoice TTS MRCP server has language packages that must be installed on top of the MRCP TTS server. The following table outlines the names of the language packages that are available. Please contact your sales representative for a list of additional language packages:
NaturalVoice TTS Voices Packages Language
naturalvoices-tts-lang-alberto-3.0.0-2.tar.gz U.S. Spanish (male) naturalvoices-tts-lang-craig-3.0.0-2.tar.gz U.S. English (male) naturalvoices-tts-lang-crystal-4.1.1-1.tar.gz U.S. English (female) naturalvoices-tts-lang-jan-4.1.1-1.tar.gz U.S. English (female) naturalvoices-tts-lang-mike-4.1.1-1.tar.gz U.S. English (male)
Install the language packages that are relevant to your deployment via the Product Manager in the SMC. Once again, this may take up to 20 minutes. Create a profile, and then deploy the package on the various NaturalVoice MRCP server computers that will use this language package.
After installing the language packages, restart the ASR/TTS server computer.
Installing Watson ASR MRCP-Direct Server (Linux) Manually
1. Follow 8.2.4 “Manual Installation Procedures for Watson 6.1” to install the Watson 6.1.x server and patch.
2. Edit /usr/local/watson/etc/sysconfig/watsond.
Find the following lines, and change them (as shown): WPORT=23000 WPROTOCOL="wiremrcp"

Chapter 8: ASR and TTS Software Installation 8.1 Installing MRCP-Direct ASR or TTS Engines
100 VoiceGenie 7.2.2
Then, save the changes in the file.
3. Edit /usr/local/watson/run/watsond.cmds.
Find the following line, and insert a '#' to comment it out (as shown): # enableCompatVG
Save the change in the file.
4. Restart Watson MRCP server.
As root, run the following: /etc/rc3.d/S99watsond stop /etc/rc3.d/S99watsond start
Installing Natural Voice TTS MRCP-Direct Server (Linux) Manually
1. Follow 8.2.5 “Manual Installation Procedures for NaturalVoice 4.1 Server” to install NaturalVoice 4.1.x server.
2. Install Python 2.3, if it is not installed. The Python 2.3 RPM is shipped with Watson 6.x.
3. Install nvmrcpd.
-Place the nvmrcpd.tar file in the following directory:
/usr/local/vg_install/ATT_TTS/ATTNaturalVoices/TTS4.1/Server/mrcp
If the mrcp folder does not exist, create one as pw.
-Untar the file by running the following command:
tar xvf nvmrcpd.tar
Ensure /usr/local/ATT_TTS/ATTNaturalVoices/TTS/Server/mrcp/nvmrcpd.py is an executable.
Copy sysconfig_nvmrcpd.
Copy /usr/local/vg_install/ATT_TTS/ATTNaturalVoices/TTS4.1/Server/mrcp/sysconfig_nvmrcpd to /etc/sysconfig as nvmrcpd.
Copy /usr/local/vg_install/ATT_TTS/ATTNaturalVoices/TTS4.1/Server/mrcp/init.d_nvmrcpd to /etc/init.d as nvmrcpd.
4. Configure nvmrcpd:
Modify /etc/sysconfig/nvmrcpd for Server IP address.
Modify it to set the IP address of the TTS server at the NVSERVER line—for example:
# hostname/ip of NV TTS Server to connect to
NVSERVER=138.120.84.22

Chapter 8: ASR and TTS Software Installation 8.1 Installing MRCP-Direct ASR or TTS Engines
Installation Guide 101
5. Start nvmrcpd.
Run the following:
Chkconfig –-add nvmrcpd
As result, S99nvmrcpd is generated in /etc/rc3.d.
Notes:
1). The nvmrcpd script currently assumes the MRCP daemon is installed at /usr/local/ATT_TTS/ATTNaturalVoices/TTS/Server/mrcp/. If this installation path is modified, the nvmrcpd script must also be changed to point to the correct path.
2). The nvmrcpd scripts assume there is a directory beneath NVROOT called run. This is where all runtime files and logs will be stored.
3) Starting with ATT_TTS, all the folders should be owned by pw and not root.
Step 2—MRCP Product-File Installation
For the various MRCP-Direct ASR and TTS engines, there is a MRCP product file that should be installed via the Product Manager in the SMC. This package creates the necessary provisioning, so that the ASR or TTS engine can be used. The following table outlines the names of the various packages. Note that x is the revision number of the package (for example, 5):
ASR or TTS Software (Server OS)
Package Name (MP on Linux)
Package Name (MP on Windows)
IBM WVS ASR 5.1.3 (Linux or Windows)
ibm-asr-mrcp-5.1.3-x.tar.gz ibm-asr-mrcp-5.1.3-x.zip
Nuance 1.0 SP9 (Windows) nuance-mrcp-8.5.0-x.tar.gz nuance-mrcp-8.5.0-x.zip
OSR 3.0.10 (Linux or Windows) osr-mrcp-3.0.4-x.tar.gz osr-mrcp-3.0.4-x.zip
Telisma TeliSpeech 1.1 SP1 (Windows) telisma-mrcp-1.1.0-x.tar.gz telisma-mrcp-1.1.0-x.zip
Nuance Vocalizer 4.0.5 (Windows) vocalizer-mrcp-4.0.0-x.tar.gz vocalizer-mrcp-4.0.0-x.zip
RealSpeak 4.0.12 /4.5 (Linux or Windows)
realspeak-mrcp-4.0.12-1.tar.gz realspeak-mrcp-4.0.12-1.zip
NuanceRecognizer9.0.x (Linux or Windows)
osr-mrcp-3.0.4-x.tar.gz osr-mrcp-3.0.4-x.zip
Watson6.1 (Linux) watson-mrcp-client-6.1-3601.tar
n/a

Chapter 8: ASR and TTS Software Installation 8.1 Installing MRCP-Direct ASR or TTS Engines
102 VoiceGenie 7.2.2
ASR or TTS Software (Server OS)
Package Name (MP on Linux)
Package Name (MP on Windows)
NaturalVoice4.1.1 (general) naturalvoices-tts-mrcp-client-4.1.1-0.tar
n/a
NaturalVoice4.1.1-voice naturalvoices-tts-mrcp-client-xxx-4.1.1-0.tar.gz xxx represents a NaturalVoice voice, which can be (for example): alberto craig jan mike crystal rosa
n/a
Install the appropriate product file. Please allow the web browser to upload the file without interruption. Upon installation, the product will be listed in the table at the bottom of the page.
For MRCP-Direct ASR or TTS engines, no software must be deployed. As a result, only a configuration profile must be created for each MRCP-Direct ASR or TTS Server in the deployment. Consequently, users repeat the process of creating a configuration profile using the Config Profile Manager for each MRCP-Direct ASR or TTS in their deployment.
8.1.2 Manual Configuration
Once a configuration profile is created for a MRCP-Direct ASR or TTS engine, one or more Speech Resource provision records will be created. These Speech Resources can be used by the VoiceXML Platform or the MRCP Proxy. This section explains how to configure the VoiceXML Platform or MRCP Proxy to use these resources. Also, some third-party software requires manual configuration to function correctly, this section outlines those manual configuration steps.
Note: The Speech Resource configuration must be performed correctly; otherwise, the installed Speech Resource will be unusable.
VoiceXML Platform Speech Resources
Please refer to VoiceXML Platform Speech Resources.
Chapter 8: ASR and TTS Software Installation 8.1 Installing MRCP-Direct ASR or TTS Engines
Installation Guide 103
MRCP Proxy Speech Resources
Please refer to MRCP Proxy Speech Resources.
Nuance 1.0 SP9
This section outlines the manual changes that should be made to the Nuance installation so that the engine runs correctly.
In the file C:\Nuance\V8.5.0\mrcp\watcher.startup, the audio.rtp.LocalIPAddress parameter must be set with the IP address of the system, the following is an example: mrcp-server -cfg %NUANCE%/MRCP/mrcp-config -package
%NUANCE%/MRCP/mrcp-en-us -config %NUANCE%/MRCP/nuance-resources.txt config.ClapiConfigFile=%MRCP%/clapi_cfg.xml audio.rtp.LocalIPAddress=10.0.0.91
nlm C:\Nuance\Vocalizer4.0\vginternal-nuance-050601-050304-96voclang0.txt
vocalizer -text_type SSML -config %MRCP%/nuance-resources.txt lm.Addresses=localhost:8471
Nuance Vocalizer 4.0.5
This section outlines the manual changes that should be made to the Nuance installation so that the engine runs correctly.
In the file C:\Nuance\V8.5.0\mrcp\nuance-resource.txt, the following line should be added: client.TTSAddresses=localhost
Telisma TeliSpeech 1.1 SP1
This section outlines the manual changes that should be made to the TeliSpeech installation so that the server runs correctly.
Fix the Link in the Languages Directory
Become the root user and go to the directory: /opt/telisma/languages/
And create a link from en-US to en-us as follows: ln -snf en-US en-us
The same may need to be carried out for other languages also.

Chapter 8: ASR and TTS Software Installation 8.1 Installing MRCP-Direct ASR or TTS Engines
104 VoiceGenie 7.2.2
Ensure the Language Is Set Correctly in Configuration
Open the following file: /opt/telisma/teliSpeech/config/mrcp_server.cfg
And check that the parameter mrcp.speechLanguage is set correctly, for en-US it should be: # default language for builtin grammars mrcp.speechLanguage = en-US
Fix Typo in Configuration
Open the following file: /opt/telisma/teliSpeech/config/mrcp_server.cfg
And change the following line: mrcp.audio.waveform.directory = =./log/audio/
To the following: mrcp.audio.waveform.directory = ./log/audio/
Make Changes for HTTP Server for TeliSpeech
Become the root user, and go to the Apache Server directory: /var/www/html/
And create a link to /opt/telisma/teliSpeech/log/audio/ so that wave files saved by TeliSpeech can be remotely accessed: ln -s /opt/telisma/teliSpeech/log/audio/ audio
Also, open the following file: /opt/telisma/teliSpeech/config/mrcp_server.cfg
And change the following line: mrcp.audio.waveform.base = http://localhost/audio/
To include the IP address and port of the local HTTP server: mrcp.audio.waveform.base = http://<ip of TeliSpeech server>/audio/
After making these changes, restart the ASR server (using mrcp_server under /etc/init.d/).
IBM WVS ASR 5.1.3
This section outlines the manual changes that should be made to the IBM WVS ASR Speech Resource configuration.
Please go the SMC interface, and click the Speech Resource link under the Media Platform. Locate the Speech Resource associated with the IBM WVS ASR, and add the vrm.client.ReverseGrammarOrder parameter with a value of true. The same should be repeated for Speech Resources under the Speech Resources Mgr section, if it exists.

Chapter 8: ASR and TTS Software Installation 8.1 Installing MRCP-Direct ASR or TTS Engines
Installation Guide 105
OSR 3.0.15 (Windows & Linux)
This section outlines the manual changes that should be made to the OSR configuration.
Note: After making the configuration changes outlined in this section, please restart the system.
Configuring License Manager (Linux Only)
For OSR running on Linux go to the directory: /usr/local/SpeechWorks/OpenSpeech_Recognizer/flexlm/components
And create the scripts startLicenseManager.sh and stopLicenseManager.sh. The contents of the scripts are shown below.
startLicenseManager.sh:
#!/bin/sh export OSRLIC_INSTALLROOT=/usr/local/SpeechWorks/OpenSpeech_Recognizer/flexlm/components $OSRLIC_INSTALLROOT/lmgrd -c /usr/local/SpeechWorks/license.lic -l /usr/local/SpeechWorks/lic.log
stopLicenseManager.sh:
#!/bin/sh killall lmgrd killall swilmgrd
These scripts should be given executable permission so that startLicenseManager.sh can be manually executed after restart, and stopLicenseManager.sh can be used to stop the license manager. To make a file executable, perform the following command: chmod a+x <filename>
To have the license manager start automatically upon restart, create the file spwx_licsvr in /etc/init.d by using the following contents, and make it executable: #!/bin/ksh # Start the SpeechWorks license server # # /etc/rc.d/init.d/ # # chkconfig: 345 95 5 # description: Starts the Speechworks license server (for OSR
2.0/Speechify 3.0) # Version: 1.00

Chapter 8: ASR and TTS Software Installation 8.1 Installing MRCP-Direct ASR or TTS Engines
106 VoiceGenie 7.2.2
#!/bin/ksh INSTALL_PATH=/usr/local/SpeechWorks/OpenSpeech_Recognizer export INSTALL_PATH case "$1" in start) if [ -e /usr/local/SpeechWorks/license.lic ] then echo "Starting license server..."
$INSTALL_PATH/flexlm/components/startLicenseManager.sh else echo "No license found at
/usr/local/SpeechWorks/license.lic" fi ;; stop) $INSTALL_PATH/flexlm/components/stopLicenseManager.sh ;; *) echo "Usage $0 [start|stop]" ;; esac
Once /etc/init.d/spwx_licsvr is created (and made executable), execute the following command as root: /sbin/chkconfig --add spwx_licsvr
Baseline.xml Changes
In the file C:\Program Files\SpeechWorks\OpenSpeech Recognizer\config\Baseline.xml under Windows, or /usr/local/SpeechWorks/OpenSpeech_Recognizer/config/Baseline.xml under Linux, please make the following changes:
Change the following: <!-- Add a ScanSoft grammar key to the XML result. --> <param name="swirec_extra_nbest_keys"> <value>SWI_meaning</value> <value>SWI_literal</value> <value>SWI_grammarName</value> </param>
To the following: <!-- Add a ScanSoft grammar key to the XML result. --> <param name="swirec_extra_nbest_keys"> <value>SWI_meaning</value> <!-- <value>SWI_literal</value> -->

Chapter 8: ASR and TTS Software Installation 8.1 Installing MRCP-Direct ASR or TTS Engines
Installation Guide 107
<!-- <value>SWI_grammarName</value> --> </param>
Also, change the following: <!-- Ignore the media type that is returned by the server upon fetching a grammar. --> <param name="swirec_ignore_grammar_media_type"> <value>0</value> </param>
To the following: <!-- Ignore the media type that is returned by the server upon fetching a grammar. --> <param name="swirec_ignore_grammar_media_type"> <value>1</value> </param>
Finally, change the following: <!-- The root path for resolving relative grammar paths on OSR servers--> <param name="SWIsvcRootGrammarDirectory"> <value></value> </param>
To the following: <!-- The root path for resolving relative grammar paths on OSR servers--> <param name="SWIsvcRootGrammarDirectory"> <value>C:\Program Files\SpeechWorks\OpenSpeech Recognizer\config</value> </param>
Also, for A Law systems, make the following changes in the same file:
Change the following: <!-- Defines the format of the audio being supplied to the recognizer. --> <param name="swirec_audio_media_type"> <value>audio/basic;rate=8000</value> <!-- value>application/x-feature;rate=8000;encoding=speechpearl</value --> </param>
To the following: <!-- Defines the format of the audio being supplied to the recognizer. --> <param name="swirec_audio_media_type"> <value>audio/x-alaw-basic;rate=8000</value> <!-- value>application/x-feature;rate=8000;encoding=speechpearl</value --> </param>
And change the following: <!-- Inform the speech detector about the audio format being

Chapter 8: ASR and TTS Software Installation 8.1 Installing MRCP-Direct ASR or TTS Engines
108 VoiceGenie 7.2.2
supplied to the recognizer. --> <param name="swiep_audio_media_type"> <value>audio/basic;rate=8000</value> </param>
To the following: <!-- Inform the speech detector about the audio format being supplied to the recognizer. --> <param name="swiep_audio_media_type"> <value>audio/x-alaw-basic;rate=8000</value> </param>
OSSserver.cfg Changes
In the file C:\Program Files\SpeechWorks\MediaServer\server\config\OSSserver.cfg under Windows, or /usr/local/SpeechWorks/MediaServer/server/config/OSSserver.cfg under Linux, please make the following changes: server.session.ossweb.machine VXIString <hostname>
Where <hostname> should be replaced with the actual IP address of the OSR Server.
Also, change the following: server.session.ossweb.port VXIInteger 80
To the following: server.session.ossweb.port VXIInteger 8000
Where 8000 should be web port number the OSR server.
And change the following: server.transport.sessionTimeout VXIInteger 60000
To the following: server.transport.sessionTimeout VXIInteger 600000
The following additional changes should be made if OSR is installed (these changes are not required for RealSpeak only installations):
Change the following (this may already be done in Linux): server.inet.useInetFromOSR VXIInteger 0
To the following: server.inet.useInetFromOSR VXIInteger 1
In addition, uncomment (that is, remove the #) the following parameters in the file: server.resource.2.name server.resource.2.url server.resource.2.cfgprefix server.ossrec.cache.initialNumber

Chapter 8: ASR and TTS Software Installation 8.1 Installing MRCP-Direct ASR or TTS Engines
Installation Guide 109
server.ossrec.cache.maxNumber server.ossrec.cache.timeoutSec server.ossrec.cookie.enable
And comment out (that is, add a #) the following parameters in the file: server.ossrec.userconfig.path
Also, for A Law systems, please make the following changes in the same file:
Change the following: server.session.osswfm.entry.extension VXIString ulaw
To the following: server.session.osswfm.entry.extension VXIString alaw
Notes:
You will need to configure Apache under Linux, or IIS under Windows, to use port 8000 to access the saved utterances created by OSR. The configuration is as follows.
For Apache on Linux:
1. As root, edit the /etc/httpd/conf/httpd.conf file, and add the following Listen directive:
Listen 8000
2. Next, add the the following VirtualHost on port 8000:
<VirtualHost *:8000>
DocumentRoot /usr/local/SpeechWorks/MediaServer/server/session </VirtualHost> <Directory "/usr/local/SpeechWorks/MediaServer/server/session"> Options Indexes AllowOverride None Order allow,deny Allow from all </Directory>
3. Save the file, and make a symbolic link to the session directory:
ln -snf /usr/local/SpeechWorks/MediaServer/server/session
/var/www/html/session
For IIS on Windows:
1. Run the Internet Information Services Manager, click Start, select Run, and run the command:
inetmgr
2. Right-click the system host name, and select New > Web Site.
3. Use the Website Creation wizard to create a website that contains the following information:
• Description: OSSWebServer

Chapter 8: ASR and TTS Software Installation 8.1 Installing MRCP-Direct ASR or TTS Engines
110 VoiceGenie 7.2.2
• Enter the IP address for this Web site: <Select IP Address of this System>
• TCP port this web site should use: 8000
• Host Header for this site: <Leave this Blank>
• Path: C:\Program Files\SpeechWorks\MediaServer\server\session
• Allow anonymous access to this Web site: <Checked>
• Allow the following: Read, Browse
4. Expand the tree in the left pane until you see the OSSWebServer node under Web Sites under the name of the local computer. Right-click OSSWebServer, and select Properties. This will reveal the OSSWebServer Properties window.
5. In the Properties window, clear the HTTP Keep-Alives Enabled check box.
6. In the Properties windows, select the HTTP Headers tab. Then, in the MIME types section, click the MIME Types button.
7. In the MIME Types windows, click New, and add a MIME-type by using the following details: Extension: *, MIME type: application/octet-stream. Then, click OK in the MIME Type window to save MIME-type.
8. Click OK in the MIME Types window and the OSSWebServer Properties window. Then, restart the OSSWebServer by right-clicking the OSSWebServer node and selecting Stop. When it has stopped, right-click again, and select Start.
Starting SWMS (Linux Only)
As root, create the /etc/init.d/OSSservice file by using the following content: #!/bin/sh # Start the SpeechWorks server # # /etc/rc.d/init.d/ # # chkconfig: 345 96 5 # description: Starts the Speechworks server # Version: 1.00 case "$1" in start) SWISVRSDK=/usr/local/SpeechWorks/MediaServer/server; export
SWISVRSDK SWISRSDK=/usr/local/SpeechWorks/OpenSpeech_Recognizer; export
SWISRSDK LD_LIBRARY_PATH=$SWISRSDK/lib:$LD_LIBRARY_PATH; export
LD_LIBRARY_PATH SSFTTTSSDK=/usr/local/ScanSoft/RealSpeak_4.0; export SSFTTTSSDK

Chapter 8: ASR and TTS Software Installation 8.1 Installing MRCP-Direct ASR or TTS Engines
Installation Guide 111
LD_LIBRARY_PATH=$SSFTTTSSDK/speech/components/common:$LD_LIBRARY_PATH
export LD_LIBRARY_PATH LD_LIBRARY_PATH=/lib/i686:$SSFTTTSSDK/api/lib:$LD_LIBRARY_PATH;
export LD_LIBRARY_PATH SSFT_TTS_LICENSE_SERVERS=27000@localhost; export
SSFT_TTS_LICENSE_SERVERS SSFT_TTS_LICENSE_MODE=implicit; export SSFT_TTS_LICENSE_MODE LD_LIBRARY_PATH=$SWISVRSDK/bin:$LD_LIBRARY_PATH; export
LD_LIBRARY_PATH $SWISVRSDK/bin/OSSserver -d -config
$SWISVRSDK/config/OSSserver.cfg ;; stop) PIDOSS=`ps -e -H | grep OSSserver | head -n 1 | sed -e ‘s!^
*!!’ | sed -e ‘s! .*!!’` # echo ${PIDOSS} kill -s 15 ${PIDOSS} ;; *) echo "Usage $0 [start|stop]" ;; esac
This script should be made executable. To make the script executable, perform the following command: chmod a+x /etc/init.d/OSSservice
Finally, run the following commands as root to have it start automatically: /sbin/chkconfig --add OSSservice
RealSpeak 4.0.12 (Windows & Linux)
This section outlines the manual changes that should be made to the RealSpeak configuration.
Note: After making the configuration changes outlined in this section, please restart the system.
Configuring License Manager (Linux Only)
The following procedure should be carried out if it has not been done for OSR. Go to the following directory:
/usr/local/ScanSoft/RealSpeak_4.0/flexlm/components
Then, create the scripts startLicenseManager.sh and stopLicenseManager.sh.
The contents of the scripts follow.

Chapter 8: ASR and TTS Software Installation 8.1 Installing MRCP-Direct ASR or TTS Engines
112 VoiceGenie 7.2.2
startLicenseManager.sh
#!/bin/sh export OSRLIC_INSTALLROOT=/usr/local/ScanSoft/RealSpeak_4.0/flexlm/components $OSRLIC_INSTALLROOT/lmgrd -c /usr/local/ScanSoft/license.lic -l /usr/local/ScanSoft/lic.log
stopLicenseManager.sh:
#!/bin/sh killall lmgrd killall swilmgrd
These scripts should be given executable permission, so that startLicenseManager.sh can be executed manually after restart and stopLicenseManager.sh can be used to stop the license manager. To make a file executable, perform the following command: chmod a+x <file name>
To have the license manager start automatically upon restart, create the realspeak_licsvr in /etc/init.d file by using the following contents, and make it executable: #!/bin/ksh # Start the SpeechWorks license server # # /etc/rc.d/init.d/ # # chkconfig: 345 95 5 # description: Starts the Speechworks license server (for OSR
2.0/Speechify 3.0) # Version: 1.00 #!/bin/ksh export
LD_LIBRARY_PATH=/usr/local/ScanSoft/RealSpeak_4.0/speech/components/common:$LD_LIBRARY_PATH
export REALSPEAKLIC_INSTALLROOT=/usr/local/ScanSoft/RealSpeak_4.0/flexlm/components
case "$1" in start) if [ -e /usr/local/ScanSoft/license.lic ] then echo -n "Starting RealSpeak server:... " $REALSPEAKLIC_INSTALLROOT/startLicenseManager.sh

Chapter 8: ASR and TTS Software Installation 8.1 Installing MRCP-Direct ASR or TTS Engines
Installation Guide 113
else echo "No license found at
/usr/local/ScanSoft/license.lic" fi ;; stop) echo -n $"Shutting down RealSpeak server: " cd /usr/local/ScanSoft/RealSpeak_4.0/ killall -9 lmgrd swilmgrd ;; *) echo "Usage $0 [start|stop]" ;; esac
When /etc/init.d/realspeak_licsvr has been created (and made executable), execute the following command as root: /sbin/chkconfig --add realspeak_licsvr
Starting SWMS (Linux Only)
The following procedure should be carried out if it has not already been done for OSR. As root, create the /etc/init.d/OSSservice file by using the following content: #!/bin/sh # Start the SpeechWorks server # # /etc/rc.d/init.d/ # # chkconfig: 345 96 5 # description: Starts the Speechworks server # Version: 1.00 case "$1" in start) SWISVRSDK=/usr/local/SpeechWorks/MediaServer/server; export
SWISVRSDK SWISRSDK=/usr/local/SpeechWorks/OpenSpeech_Recognizer; export
SWISRSDK LD_LIBRARY_PATH=$SWISRSDK/lib:$LD_LIBRARY_PATH; export
LD_LIBRARY_PATH SSFTTTSSDK=/usr/local/ScanSoft/RealSpeak_4.0; export SSFTTTSSDK LD_LIBRARY_PATH=$SSFTTTSSDK/speech/components/common:$LD_LIBRARY_
PATH export LD_LIBRARY_PATH LD_LIBRARY_PATH=/lib/i686:$SSFTTTSSDK/api/lib:$LD_LIBRARY_PATH;
export LD_LIBRARY_PATH SSFT_TTS_LICENSE_SERVERS=27000@localhost; export
SSFT_TTS_LICENSE_SERVERS SSFT_TTS_LICENSE_MODE=implicit; export SSFT_TTS_LICENSE_MODE

Chapter 8: ASR and TTS Software Installation 8.1 Installing MRCP-Direct ASR or TTS Engines
114 VoiceGenie 7.2.2
LD_LIBRARY_PATH=$SWISVRSDK/bin:$LD_LIBRARY_PATH; export LD_LIBRARY_PATH
$SWISVRSDK/bin/OSSserver -d -config $SWISVRSDK/config/OSSserver.cfg
;; stop) PIDOSS=`ps -e -H | grep OSSserver | head -n 1 | sed -e ‘s!^
*!!’ | sed -e ‘s! .*!!’` # echo ${PIDOSS} kill -s 15 ${PIDOSS} ;; *) echo "Usage $0 [start|stop]" ;; esac
This script should be made executable. To make the script executable, perform the following command: chmod a+x /etc/init.d/OSSservice
Finally run the following commands as root to have it start automatically: /sbin/chkconfig --add OSSservice
RealSpeak 4.5
NSSserver.cfg Changes
In the file C:\Program Files\Nuance\Speech Server 5.0\server\config\NSSserver.cfg (under Windows) and in /usr/local/Nuance/SpeechServer_5/config/NSSserver.cfg (for root1Linux), please make the following changes: server.session.ossweb.machine VXIString <hostname>
Where <hostname> should be replaced with the actual IP address of the NSS Server. change from server.mrcp2.sip.contact.useHostIPAddress VXIInteger 0 to server.mrcp2.sip.contact.useHostIPAddress VXIInteger 1 Change from server.rtp.strictSdpMediaPortUse VXIInteger 1 To server.rtp.strictSdpMediaPortUse VXIInteger 0

Chapter 8: ASR and TTS Software Installation 8.1 Installing MRCP-Direct ASR or TTS Engines
Installation Guide 115
Nuance Recognizer 9.0.x
This section outlines the manual changes that should be made to the Nuance Recognizer 9.0.x configuration.
Note: After making the configuration changes outlined in this section, please restart the system.
Baseline.xml Changes
In the C:\Program Files\Nuance\Speech Server 5.0\server\config\Baseline.xml (under Windows), make the following changes:
Change the following: <!-- Add a ScanSoft grammar key to the XML result. --> <param name="swirec_extra_nbest_keys"> <value>SWI_meaning</value> <value>SWI_literal</value> <value>SWI_grammarName</value> </param>
To the following: <!-- Add a ScanSoft grammar key to the XML result. --> <param name="swirec_extra_nbest_keys"> <value>SWI_meaning</value> <!-- <value>SWI_literal</value> --> <!-- <value>SWI_grammarName</value> --> </param>
Also, change the following: <!-- Ignore the media type that is returned by the server upon fetching a grammar. --> <param name="swirec_ignore_grammar_media_type"> <value>0</value> </param>
To the following: <!-- Ignore the media type that is returned by the server upon fetching a grammar. --> <param name="swirec_ignore_grammar_media_type"> <value>1</value> </param>
Also, for A Law systems, please make the following changes in the same file:
Change the following: <!-- Defines the format of the audio being supplied to the recognizer. --> <param name="swirec_audio_media_type">

Chapter 8: ASR and TTS Software Installation 8.1 Installing MRCP-Direct ASR or TTS Engines
116 VoiceGenie 7.2.2
<value>audio/basic;rate=8000</value> <!-- value>application/x-feature;rate=8000;encoding=speechpearl</value --> </param>
To the following: <!-- Defines the format of the audio being supplied to the recognizer. --> <param name="swirec_audio_media_type"> <value>audio/x-alaw-basic;rate=8000</value> <!-- value>application/x-feature;rate=8000;encoding=speechpearl</value --> </param>
And change the following: <!-- Inform the speech detector about the audio format being supplied to the recognizer. --> <param name="swiep_audio_media_type"> <value>audio/basic;rate=8000</value> </param>
To the following: <!-- Inform the speech detector about the audio format being supplied to the recognizer. --> <param name="swiep_audio_media_type"> <value>audio/x-alaw-basic;rate=8000</value> </param>
To ensure Nuance Recognizer grammar cache works properly, the following parameters and the corresponding default value must present in the Baseline.xml: <param name="swirec_default_loadfree_properties"> <value>inet.maxage=0</value> <value>inet.maxstale=0</value> <!-- Example: <value>swirec_mem_flush_on_free=1</value> <value>inet.maxage=0</value> --> </param>
NSS 5.0.x NSSserver.cfg Changes
In the C:\Program Files\Nuance\Speech Server 5.0\server\config \NSSserver.cfg file (under Windows), make the following changes: server.session.ossweb.machine VXIString <hostname>
Where <hostname> should be replaced with the actual IP address of the NSS Server.
Chapter 8: ASR and TTS Software Installation 8.1 Installing MRCP-Direct ASR or TTS Engines
Installation Guide 117
Also, change the following: server.session.ossweb.port VXIInteger 80
To the following:
server.session.ossweb.port VXIInteger 8000
And change the following: server.mrcp2.sip.sessionTimeout VXIInteger 60000
To the following: server.mrcp2.sip.sessionTimeout VXIInteger 600000 and server.mrcp1.rtsp.sessionTimeout VXIInteger 6000
server.mrcp1.rtsp.sessionTimeout VXIInteger 60000
Change the following:
server.mrcp2.osrspeechrecog.mrcpdefaults.VSP.server.osrspeechrecog.result.mediatype VXIString application/x-vnd.speechworks.emma+xml;strictconfidencelevel=1;mrcpv=2.06
To the following:
server.mrcp2.osrspeechrecog.mrcpdefaults.VSP.server.osrspeechrecog.result.mediatype VXIString application/x-vnd.speechworks.emma+xml;strictconfidencelevel=1
The following additional changes should be made if OSR is installed (these changes are not required for RealSpeak-only installations):
Change the following (this may already be done in Linux) from: server.inet.useInetFromOSR VXIInteger 0
To the following: server.inet.useInetFromOSR VXIInteger 1
Change the following: server.mrcp2.sip.contact.useHostIPAddress VXIInteger 0
To the following: server.mrcp2.sip.contact.useHostIPAddress VXIInteger 1
Change the following: server.rtp.strictSdpMediaPortUse VXIInteger 1
To the following: server.rtp.strictSdpMediaPortUse VXIInteger 0
Notes:
If you want to change Apache or IIS to use a different port (such as 8000), instead of the original port (80), to access the saved utterances created by NSS, use the following configuration.
For IIS on Windows:

Chapter 8: ASR and TTS Software Installation 8.1 Installing MRCP-Direct ASR or TTS Engines
118 VoiceGenie 7.2.2
1. Run the Internet Information Services Manager, click Start, select Run, and run the following command:
inetmgr
2. Right-click the system host name, and select New > Website.
3. Use the Website Creation wizard to create a website that contains the following information:
• Description: NSSWebServer
• Enter the IP address for this Web site: <Select IP Address of this System>
• TCP port this web site should use: 8000
• Host Header for this site: <Leave this Blank>
• Path: C:\Program Files\Nuance\Speech Server 5.0\server\session
• Allow anonymous access to this Web site: <Checked>
• Allow the following: Read, Browse
4. Expand the tree in the left pane until you see the NSSWebServer node under Websites under the name of the local computer. Right-click NSSWebServer, and select Properties. This will reveal the NSSWebServer Properties window.
5. In the Properties window, clear the HTTP Keep-Alives Enabled check box.
6. In the Properties windows, select the HTTP Headers tab and, in the MIME types section, click the MIME Types button.
7. In the MIME Types windows, click New and add a MIME-type that has the following details: Extension: *, MIME type: application/octet-stream. Then, click OK in the MIME Type window to save this.
8. Click OK in the MIME Types window and the NSSWebServer Properties window. Then, restart the NSSWebServer by right-clicking the NSSWebServer node and selecting Stop. When it has stopped, right click again, and select Start.
Starting NSS (Linux Only)
If you wish to start NSS after restart, you should run the following command as root under /usr/local/Nuance/SpeechServer_5/bin:
NSSservice.sh
And, under /etc/init.d:
chkconfig –add NSSservice

Chapter 8: ASR and TTS Software Installation 8.2 Installing MRCP-Native ASR or TTS Engines
Installation Guide 119
Starting Nuance License Server (Linux Only)
As root, run the following command under /nuance/license_manager/components:
./set-new-lic-file.sh /nuance/license_manager/license/license.lic
As a result, the following file is created:
/etc/init.d/nuance-licmgr
/etc/rc3.d/S97nuance-licmgr
Where:
S97nuance-licmgr -> ../init.d/nuance-licmgr
Changes for Watson 6.1.x MRCP Direct
Watson 6.1 MRCP server requires that the application server return MIME-type for the served grammar. The application server must be configured to support the following grammar-file extension and corresponding MIME-type:
Extension MIME-Type
.grxml application/srgs+xml
application/grammar+xml
text/xml
.wbnf application/watson-bnf application/x-att-watson-bnf
application/x-voicegenie-watson
Licensing
The ASR or TTS engines require licenses before they can function, please contact VoiceGenie for information on licenses. Installation instructions for the license will be sent along with the license. The hardware MAC address will be used for license generation, to speed up the process of license generation, please send the output of the following command on the command line: Linux: ifconfig -a Windows: ipconfig /all
8.2 Installing MRCP-Native ASR or TTS Engines
The following section provides an overview of how to install ASR or TTS engines that are integrated using a MRCP-Native mechanism. The steps

Chapter 8: ASR and TTS Software Installation 8.2 Installing MRCP-Native ASR or TTS Engines
120 VoiceGenie 7.2.2
include installing and deploying software as well as manual configuration changes to make the ASR or TTS engine useable by the VoiceXML platform or MRCP Proxy.
8.2.1 Installation and Deployment
This section describes the order in which software must be installed and deployed to a computer to ensure a functioning installation.
Step 1—Speech Resource Manager (SRM) Server Installation and Deployment
All natively integrated ASR and TTS engines require that the SRM Server is deployed. For all ASR and TTS engines, except for Watson ASR, the SRM Server should be deployed to the same computer as the ASR or TTS software. For Watson ASR, the SRM Server should be deployed to the same computer as the Media Platform.
The first step is to install the product file into the SMC by using the Product Manager. Note that x.y.z is the latest version (for example, 7.2.0), and a is the revision of the package (for example, 5).
On Linux, the package name is as follows:
srm-server-x.y.z-a.tar.gz.
On Windows, the package name is as follows:
srm-server-x.y.z-a.zip
The installation and deployment procedure is outlined in 7.1 Installation and Deployment via the SMC Overview. The product files may take up to 20 minutes to install, so please allow the web browser to upload the file without interruption. Upon installation, the product will be listed in the table at the bottom of the page.
Use the Config Profile Manager to create a profile for the package, the SRM Server asks no questions during profile creation. Subsequently, use the Deployment Manager to deploy the package on to the various computers that will be running the SRM Server software and ASR/TTS engine software.
Note: The SRM Server does not need to be deployed multiple times on a computer that is running more than one ASR or TTS engine that is integrated using a MRCP-Native interface. For example, if an ASR/TTS server is running both the RTSP Server and TDD/TTY Server, only one installation of SRM Server is required.
Chapter 8: ASR and TTS Software Installation 8.2 Installing MRCP-Native ASR or TTS Engines
Installation Guide 121
Step 2—ASR or TTS Software Installation
This step is required only for the Phonetic Operator. If you are installing any other MRCP-Native ASR or TTS engine, you can skip this step.
Phonetic Operator
For the Phonetic Operator, the ASR software must be installed by using the installation package provided by the vendor. The name of the installation package is the following:
• GN 5.09.00 (0015).zip
It should be installed on all computers that will run as Phonetic Operator servers. Please follow the installation instructions provided with the Phonetic software.
Step 3—ASR or TTS Product-File Installation
Install the product file(s) for the ASR or TTS engine you are installing by using the Product Manager in the SMC. The product files contain software directly from the third-party vendors, as well as special VoiceGenie-specific configuration instructions. The following table outlines the names of the various packages. Note that x is the revision number of the package (for example, 5):
ASR or TTS Software Package Name
AT&T Watson ASR6.0.2463 watson-asr-client-6.0-2463.tar.gz watson-asr-server-6.0-2463.tar.gz
AT&T Watson ASR 6.1 watson-asr-server-6.1-3601.tar.gz watson-asr-client-6.1-3601.tar.gz watson-asr-client-6.1-3601-rhel4.tar
OSR 3.0.9 (Linux) osr-base-3.0.9-x.tar.gz
Phonetic GN 5.9.0015 phonetic-base-5.8.0-x.zip
VoiceGenie TDD/TTY Server tty-7.2.0-x.tar.gz
AT&T NaturalVoices naturalvoices-tts-base-3.0.0-x.tar.gz
AT&T NaturalVoices 4.1.1 naturalvoices-tts-base-4.1.1-x.tar.gz naturalvoices-tts-client-base-3.0.0-8.tar.gz
Note that the client and server must be in separate computers.
VoiceGenie RTSP Server rtsp-7.2.0-x.tar.gz

Chapter 8: ASR and TTS Software Installation 8.2 Installing MRCP-Native ASR or TTS Engines
122 VoiceGenie 7.2.2
The product file(s) may take up to 20 minutes to install, so please allow the web browser to upload the file(s) without interruption. Upon installation, the product(s) will be listed in the table at the bottom of the page.
Use the Config Profile Manager to create a profile for the package(s), and then use the Deployment Manager to deploy the package(s) to the various computers that will be running the ASR/TTS engine software. Note that Watson ASR is a special case.
For Watson ASR, the watson-asr-client (along with the SRM Server) should be deployed to the same system as the Media Platform; while the watson-asr-server should be deployed to the computer that will be running the ASR engine software.
When the product file has been deployed, please restart the computer on which the software is deployed.
Note: Watson 6.0.2463 requires a patch. After installing the previously listed Watson engine software by doing the following:
Place the following patch files on the computer that is running Watson 6.0.2463:
loadvad
libvad-eadapt.so
As root, change loadvad to an executable file, and run loadvad. For NaturalVoice 4.1.1, the naturalvoices-tts should be deployed to the computer that is running the TTS server; while the naturalvoices-tts-client should be deployed to the computer that is running the SRM Server.
Step 4—Starting the SRM Server
After restart, you will see that the SRM Server is offline in the SMC. Please use the Start/Stop Software page under the Operations tab of the SMC to start the SRM Server. To do so, select the check box next to the server you would like to start, and click the Start button.
Step 5—ASR Language Product-File Installation
Some ASR and TTS engines have language packages that must be installed on top of the base ASR or TTS installation. The following table outlines the names of some of the language packages that are available. Please contact your sales representative for a list of additional language packages:
ASR or TTS Software Package Name Language
OSR 3.0.9 (Linux) osr-lang-enus-3.0.3-1.tar.gz U.S. English
Chapter 8: ASR and TTS Software Installation 8.2 Installing MRCP-Native ASR or TTS Engines
Installation Guide 123
ASR or TTS Software Package Name Language
osr-lang-engb-3.0.0-2.tar.gz U.K. English
osr-lang-enin-3.0.0-1.tar.gz Indian English
osr-lang-enau-3.0.0-1.tar.gz Australian English
osr-lang-esus-3.0.3-1.tar.gz U.S. Spanish
osr-lang-eses-3.0.0-1.tar.gz Spain Spanish
osr-lang-frca-3.0.0-1.tar.gz Canadian French
osr-lang-frfr-3.0.0-1.tar.gz France French
osr-lang-dede-3.0.0-2.tar.gz German
osr-lang-elgr-3.0.3-1.tar.gz Greek
osr-lang-nlnl-3.0.0-1.tar.gz Netherlands Dutch
osr-lang-plpl-3.0.0-1.tar.gz Polish
osr-lang-jajp-3.0.0-1.tar.gz Japanese
naturalvoices-tts-lang-alberto-3.0.0-2.tar.gz U.S. Spanish (male)
naturalvoices-tts-lang-craig-3.0.0-2.tar.gz U.S. English (male)
naturalvoices-tts-server-lang-crystal-4.1.1-.tar.gz U.S. English (female)
naturalvoices-tts-server-lang-jan-4.1.1-0.tar.gz U.S. English (female)
naturalvoices-tts-server-lang-mike-4.1.1-0.tar.gz U.S. English (male)
AT&T NaturalVoices 4.1.1
naturalvoices-tts-lang-rosa-3.0.0-2.tar.gz U.S. Spanish (female)
naturalvoices-tts-lang-alberto-3.0.0-2.tar.gz U.S. Spanish (male)
naturalvoices-tts-lang-craig-3.0.0-2.tar.gz U.S. English (male)
naturalvoices-tts-lang-crystal-3.0.0-2.tar.gz U.S. English (female)
naturalvoices-tts-lang-jan-3.0.0-2.tar.gz U.S. English (female)
naturalvoices-tts-lang-mike-3.0.0-2.tar.gz U.S. English (male)
AT&T NaturalVoices
naturalvoices-tts-lang-rosa-3.0.0-2.tar.gz U.S. Spanish (female)
Install the language packages that are relevant to your deployment via the Product Manager in the SMC. Once again, this may take up to 20 minutes.

Chapter 8: ASR and TTS Software Installation 8.2 Installing MRCP-Native ASR or TTS Engines
124 VoiceGenie 7.2.2
Create a profile, and then deploy the package on the various computers that will use this language package.
After installing the language packages, restart the ASR/TTS server.
8.2.2 Manual Configuration
When an ASR or TTS package has been deployed, one or more Speech Resource provision records will be created. These Speech Resources can be used by the VoiceXML Platform or the MRCP Proxy. Most deployments will only have VoiceXML Platforms. This section explains how to configure the VoiceXML Platform or MRCP Proxy to use these resources.
Note: The Speech Resource configuration must be performed correctly; otherwise the installed Speech Resource will be unusable.
If the default ASR or TTS language is not en-US, you must change the VoiceXML Interpreter configuration to reflect this. By using the SMC, go to the Configuration tab and change the default_asr_language and/or default_tts_language parameters to the desired values.
AT&T Watson ASR 4.5.1
Please configure the ASR server to allow the number of recognition sessions you require. Change the WatsonRecogizers parameter value in the /usr/local/watson/serverconfig file: WatsonRecognizers 90
The AT&T Watson ASR uses BNF as its grammar format, which is different from the default grammar format used on the VoiceXML Platform, ABNF. As a result, the ASRENGINE property must be set to WATSON in the VoiceXML page or in the defaults.vxml: <property name="ASRENGINE" value="WATSON"/>
Also, users should specify the grammar type in the in-line grammar as follows: <grammar type="application/x-voicegenie-watson">
Natural Voices and Targeting Speech Resources
Natural Voices provides two difference mechanisms for selecting the voice associated with a given TTS request. Depending on the mechanism used, the specific Speech Resource that is targeted will differ.
The two mechanisms that exist are specifying the voice by using the:
1. SSML <voice> tag (e.g. <voice name="jan"></voice>)

Chapter 8: ASR and TTS Software Installation 8.2 Installing MRCP-Native ASR or TTS Engines
Installation Guide 125
2. TTSENGINE property in VoiceXML to include the voice name (e.g. <property name="TTSENGINE" value="NATURALVOICES_JAN"/>)
If method 1 is used, only the Speech Resource with the Speech Resource Name NATURALVOICES should be targeted to the VoiceXML Platform; all others should not be.
If method 2 is used, all Speech Resources associated with Natural Voices (for example, NATURALVOICES, NATURALVOICES_JAN, and NATURALVOICES_CRYSTAL) should be targeted to the VoiceXML Platform.
Note that if the user does not specify the voice by using either technique, the TTS Server will choose the voice. In general, this would be the first voice installed on the system. If both techniques are used simultaneously, the contents of the <voice> tag take precedence.
8.2.3 Licensing
The following ASR or TTS engines require licenses before they can function. Please contact VoiceGenie for information on licenses:
• OSR 3.0.4
• Phonetic GN 5.8.002x
• RealSpeak TTS 4.0.4
• Rhetorical TTS 4.3
Installation instructions for the license will be sent along with the license. The hardware MAC address will be used for license generation. To speed up the process of license generation, please send the output of the following command on the command line: Linux: ifconfig -a Windows: ipconfig /all
8.2.4 Manual-Installation Procedures for Watson 6.1 Server
8.2.4.1. Install the software packages.
The packages can be found in deathstar in /home/public/ASREngines/Watson/6/1, if not pointed otherwise.
As root, place the following RPM packages /usr/local/vg_install, and run the commands respectively:
Step 1: Install the required version of Python (if it is not already installed). rpm -i --nodeps blas-3.0-20.i386.rpm rpm -i --nodeps lapack-3.0-20.i386.rpm rpm -i --nodeps python2.3-2.3.4-3pydotorg.i386.rpm

Chapter 8: ASR and TTS Software Installation 8.2 Installing MRCP-Native ASR or TTS Engines
126 VoiceGenie 7.2.2
Note: The preceding software packages can be found in deathstar /home/public/ASREngines/Watson/6.0/6.0.2463/.
Step 2: Install the Watson 6.1 Server software. rpm -i watson-6.1-3601.i386.rpm rpm -i watson-voicetone-6.1-3601.i386.rpm rpm -i --nodeps watson-6.1-3601.i386.rpm
Note that if the system has a previous Watson server installed, suggest the use of rpm –ivh –force.
In RHEL4, Python-2.3.4-14.4 is installed with the OS. If you see the following error: Failed dependencies: python2.3 is needed by watson-6.1-3601.i386
Use the following command: rpm -i --nodeps watson-6.1-3601.i386.rpm
Step 3: Install the Watson 6.1 Server patch.
• Place the linchen-watson-6.1-patches-20081219.tar.gz patch in the system in which the Watson 6.1 server was installed in Step 2.
• Untar the package into a folder.
• Back up the following original files: /usr/local/watson/lib/python2.3/site-packages/watson/srgs.py /usr/local/watson/lib/python2.3/site-packages/watson/server/channel.py /usr/local/watson/lib/python2.3/site-packages/watson/server/digits.py /usr/local/watson/lib/python2.3/site-packages/watson/server/httpfetch.py /usr/local/watson/lib/python2.3/site-packages/watson/server/lmcache.py /usr/local/watson/lib/python2.3/site-packages/watson/server/cmdlets/enableCompatVG /usr/local/watson/lib/python2.3/site-packages/watson/server/protocol/mrcp.py /usr/local/watson/lib/python2.3/site-packages/watson/server/protocol/wiremrcp.py /usr/local/watson/share/watson-6/data/lm/en-us-number/ /usr/local/watson/share/watson-6/data/lm/en-us-number.wbnf /usr/local/watson/share/watson-6/data/lm/es-us-number/ /usr/local/watson/share/watson-6/data/lm/es-us-number.wbnf

Chapter 8: ASR and TTS Software Installation 8.2 Installing MRCP-Native ASR or TTS Engines
Installation Guide 127
Copy the patch files from the uncompressed folder to the corresponding folders.
Step 4: Set automatic start. chkconfig --add watsond
This command will result in a corresponding file in /etc/rc3.d—for example, S99watsond. This file will make it possible to start the Watson server automatically after a restart.
8.2.4.2. Update the /etc/profile.
The /etc/profile should contain the following lines: export LD_LIBRARY_PATH=/usr/local/watson/bin:$LD_LIBRARY_PATH export PATH=/ usr/local/watson/bin:/usr/local/watson/run:/usr/local/Python-2.3.5/bin:$PATH
8.2.4.3. Change ownership of /usr/local/watson to pw.
8.2.4.4. Check the Watson Server configuration.
Check and ensure the following values in /usr/local/watson/etc/sysconfig/watsond are set correctly: WUSER="pw" WDAEMONDIR="/usr/local/watson/run"
8.2.4.5. Restart the system
8.2.5 Manual-Installation Procedures for NaturalVoice 4.1 Server
8.2.5.1. Package list
The packages can be found in deathstar in /home/public/TTSEngine/NaturalVoices/4.1.2RHEL4, if not pointed out otherwise.
The original NaturalVoice 4.1 engine package includes the following:
server-common-linux-TTS4.1.tar: Standard support files for NV TTS 4.1

Chapter 8: ASR and TTS Software Installation 8.2 Installing MRCP-Native ASR or TTS Engines
128 VoiceGenie 7.2.2
server-linux-gcc323-TTS4.1.tar: NV TTS 4.1 server and shared libraries (RedHat Linux 3.0) server-linux-gcc346-TTS4.1.tar: NV TTS 4.1 server and shared libraries (RedHat Linux 4.0) 3rd-party/3rd-party-data.tar: Data files required for support of Spanish frontend 3rd-party/3rd-party-libs.tar: Libraries required for support of Spanish frontend (RedHat Linux 3.0) 3rd-party/3rd-party-libs-gcc346.tar: Libraries required for support of Spanish frontend (RedHat Linux 4.0) voices/en_us: New voice files for Crystal, Mike, and Jan – in /home/public/TTSEngine/NaturalVoices/4.1.1 cfg/: Sample configuration files for NV TTS 4.1 server nv_tts_host_all: Sample start/stop script for NV TTS 4.1 server nvmrcpd.tar: NV TTS 4.1 MRCP v1 daemon NV411ReleaseNotes.doc: High-level release notes (Word document)
8.2.5.2. Install the software packages
Step 1: server-common-linux-TTS4.1.tar. Under /usr/local/vg_install/ATT_TTS, run as root: tar xvf server-common-linux-TTS4.1.tar It will generate the following path: /usr/local/vg_install/ATT_TTS/ATTNaturalVoices/TTS4.1/Server Change ownership of ATT_TTS to pw. Create /usr/local/ATT_TTS/ATTNaturalVoices, and ensure ATT_TTS/ATTNaturalVoices is owned by pw. Make the following soft link: Ln –s /usr/local/vg_install/ATT_TTS/ATTNaturalVoices/TTS4.1 TTS
Step 2A: server-linux-gcc323-TTS4.1.tar for RHEL3
If the OS is RHEL3, under /usr/local/vg_install/ATT_TTS, run the following: tar xvf server-linux-gcc323-TTS4.1.tar
It will add bin, data, and lib to the following previously created folder:
/usr/local/vg_install/ATT_TTS/ATTNaturalVoices/TTS4.1/Server
Step 2B: server-linux-gcc346-TTS4.1.tar for RHEL4
If the OS is RHEL4, under /usr/local/vg_install/ATT_TTS, run the following: tar xvf server-linux-gcc346-TTS4.1.tar
It will add bin, data, and lib to the following previously created folder: /usr/local/vg_install/ATT_TTS/ATTNaturalVoices/TTS4.1/Server
Chapter 8: ASR and TTS Software Installation 8.2 Installing MRCP-Native ASR or TTS Engines
Installation Guide 129
Step 3: Install Voices.
The Voices (for example, crystal, mike, jan) under voice/en_us must be included in the following: /usr/local/vg_install/ATT_TTS/ATTNaturalVoices/TTS4.1/Server/data/en_us
Step 4: Install es-us frontend.
Under /usr/local/vg_install/ATT_TTS/ATTNaturalVoices/TTS4.1/Server, run the following: tar xvf 3rd-party-data.tar
Step 5: Install es-us lib.
Under /usr/local/vg,_install/ATT_TTS/ATTNaturalVoices/TTS4.1/Server/bin, run the following: tar xvf 3rd-party-libs.tar for RHEL3 tar xvf 3rd-party-libs-gcc346.tar for RHEL4
Step 6: Install the startup script
Place nv_tts_host_all under /etc/init.d as root. Add the start script to inittab.
Step 7: Place the voices configuration file.
Place the nv.cfg (under config/nv.cfg) in the following: /usr/local/vg_install/ATT_TTS/ATTNaturalVoices/TTS4.1/Server/data
Step 8: Place the es-us configuration file.
Place the es.cfg file (under config/es.cfg) in the following: /usr/local/vg_install/ATT_TTS/ATTNaturalVoices/TTS4.1/Server/data/es_us/FreeLing
8.2.5.3. Configure the server
Step 1: /usr/local/ATT_TTS/ATTNaturalVoices/TTS/Server/data/nv.cfg
Edit the voices configuration file (data/nv.cfg) to set the path of the Spanish frontend configuration file. In the Language es_us section, the LanguageAuxConfig variable should be set to the absolute path to the es.cfg file, as follows: LanguageAuxConfig /usr/local/ATT_TTS/ATTNaturalVoices/TTS/Server/data/es_us/FreeLing/es.cfg

Chapter 8: ASR and TTS Software Installation 8.3 Targeting Speech Resources
130 VoiceGenie 7.2.2
Verify that the voices configuration file has the TextAnalysisLoad static option in the Language es_us section.This setting is required for acceptable speed of the Spanish language. TextAnalysisLoad static
Edit the voices configuration file (data/nv.cfg) to point to the correct data file names for each voice.
Step 2: /usr/local/ATT_TTS/ATTNaturalVoices/TTS/Server/data/es_us/FreeLing/es.cfg
Edit the Spanish frontend configuration file (data/es_us/FreeLing/es.cfg) to set the absolute path to each data file. If necessary, replace the /usr/local/ATT_TTS/ATTNaturalVoices/TTS/Server/data/es_us/FreeLing/ path with the correct absolute path to the installed data files. Note that this must be an absolute path, and not a relative path.
8.3 Targeting Speech Resources
8.3.1 VoiceXML Platform Speech Resources
On the Configuration tab of the SMC, under the Media Platform section, is a link for Speech Resources. This page lists all the Speech Resources that can be use by a VoiceXML Platform; an example resource is shown in the following figure:
This resource can either be used as a Primary Resource or as a Backup Resource. To select which VoiceXML Platforms will use it as a Primary resource, click Target as Primary. To select which VoiceXML Platforms will use it as a Backup resource, click Target as Backup. Note that the two are mutually exclusive.

Chapter 8: ASR and TTS Software Installation 8.3 Targeting Speech Resources
Installation Guide 131
Clicking either button will present a tree view that shows all computers that have the VoiceXML Platform software deployed. Select the check box next to the computers that will use this Speech Resource, and click Update to make your changes.
For more details on how Speech Resources are used at the application level, please consult the SRM User’s Guide.
Note: If your deployment has a MRCP Proxy, two Speech Resources will be created—one that allows the VoiceXML Platform to use the Speech Resource directly, and one that allows the VoiceXML Platform to use the Speech Resource via the MRCP Proxy.
8.3.2 MRCP Proxy Speech Resources
The manual configuration described in this section is required only if your deployment has an MRCP Proxy, also known as an SRM Proxy.
On the Configuration tab of the SMC under the Speech Resource Mgr section is a link for Speech Resources. This page lists all the Speech Resources that can be use by the MRCP Proxy; an example resource is shown below:
This resource can be assigned to be used by an MRCP Proxy. To select which MRCP Proxy will use this resource, click Select Target.
Clicking this button will present a tree view that shows all computers that have the MRCP Proxy software deployed. Select the check box next to the

Chapter 8: ASR and TTS Software Installation 8.4 Installing the Hotkey Grammar Package
132 VoiceGenie 7.2.2
computers that will use this Speech Resource, and click Update to make your changes.
For more details on how Speech Resources are used at the application level, please consult the SRM User’s Guide.
8.4 Installing the Hotkey Grammar Package
The final step is to install the hotkey grammar package on all VoiceXML Platforms in your deployment. This section describes the procedure for installing this package.
The product file for this should be installed into the SMC by using the Product Manager. Note that x.y.z is the latest version (for example, 1.0.0), and a is the revision of the package (for example, 1).
On Linux, the package name is as follows:
hotkey-mp-x.y.z-a.tar.gz
On Windows, the package name is as follows:
hotkey-mp-x.y.z-a.zip
The installation and deployment procedure is outlined in 7.1 Installation and Deployment via the SMC Overview. Upon installation, the product will be listed in the table at the bottom of the page.
Use the Config Profile Manager to create a profile for the package. The Hotkey Grammar package asks no questions during profile creation. Subsequently, use the Deployment Manager to deploy the package on to all VoiceXML Platform computers in your deployment.
8.5 Migrating RealSpeak MRCP-Native to RealSpeak MRCP-Direct Installation
This section documents the manual steps in migrating an existing MRCP-Native RealSpeak installation to a MRCP-Direct RealSpeak Installation. The steps described in this section should be carried out by a customer only if:
1. They have an existing MRCP-Native RealSpeak installation running with the VoiceGenie platform
2. They wish to change their existing architecture to a RealSpeak MRCP-Direct integration.
This process is carried out in the following three steps at a high level:

Chapter 8: ASR and TTS Software Installation8.5 Migrating RealSpeak MRCP-Native to RealSpeak MRCP-Direct Installation
Installation Guide 133
1. Remove existing MRCP-Native RealSpeak installation and related VoiceGenie components
2. Install Nuance’s third-party RealSpeak Engine software, language packs, and Speechworks Media Server.
3. Install VoiceGenie’s MRCP RealSpeak package to configure the provisioning data automatically to work with Nuance’s Speechworks Media Server.
8.5.1 Remove Existing Installation
To remove the existing MRCP-Native RealSpeak installation, carry out the following steps in order:
Stop the SRM Server Instance
Before removing the MRCP-Native installation, the existing SRM Server process should be stopped. This can be done by running stop srmserver command from the CLC console: CLC> stop srmserver
Removing RealSpeak Startup Scripts and Cronjobs
Perform the following steps:
1. Log on to the system as super user, and remove the following lines from the /etc/inittab file:
a. RSPK:1314:respawn:su - root -c '/etc/init.d/start-realspeak-server-exagent'
b. RSKC:1319:respawn:su - pw -c '/etc/init.d/start-realspeak-client-exagent'
2. Remove the following files from the /etc/init.d directory:
a. realspeak_licsvr
b. realspeakserver
c. start-realspeak-client-exagent
d. start-realspeak-server-exagent
3. Remove the following files from the /etc/rc3.d directory
a. S95realspeak_licsvr
b. S98realspeakserver

Chapter 8: ASR and TTS Software Installation8.5 Migrating RealSpeak MRCP-Native to RealSpeak MRCP-Direct Installation
134 VoiceGenie 7.2.2
Modifying Platform Configuration from SMC
Go to the System Management Console (SMC) by entering the URL http://<ip of CMP server>:8080/smc/ in your web browser, and carry out the following steps:
1. Remove existing RealSpeak Speech Resources:
a. Go to the Configuration tab. b. Follow the Speech Resources link under the Media Platform
section, located on the panel on the left-hand side. c. Click the Target as Primary button for all existing speech
resources for RealSpeak. Typically, this would have the Speech Resource Name of the form REALSPEAK_<VOICENAME>. On the next page, clear the check box, if necessary, to un-target the Speech Resource from all servers, and then click the Update button. The purpose of this step is to un-target any existing speech resource that is in use, before deletion.
d. After all RealSpeak speech resources are un-targeted, click the delete button for each RealSpeak speech resource. Click the OK button during the confirmation pop-up that says, Warning: You are about to delete the entry from the database. Click OK to confirm, otherwise click Cancel.
2. Remove the TTS configuration from SRM Server:
a. Go to the Configuration tab. b. Follow the SRM Server link under the Speech Resource Mgr
section, located on the panel on the left-hand side. c. Under the TTS specific parameters section, go to the
tts_client_list section, delete all REALSPEAK_<VOICENAME> client configuration instances, by clicking the Del button beside each RealSpeak item. After all RealSpeak items have been removed from the tts_client_list, click the Update button located at the end of the page.
3. Remove the TTS Server/TTS Client from the CMP Network:
a. Go to the Administration tab. b. Follow the Cluster Manager link under the Cluster
Administration section, located on the panel on the left-hand side. c. On the right-hand side, there will be a tree-like structure for the
installed system. Under the Network node, click the properties link beside the server that has SRM Server installed.
d. Under the Server Component Details section, click the Delete button followed by OK when a confirmation dialog box pops up, for the following items: i. TTS Server (20)
ii. TTS Client (20)

Chapter 8: ASR and TTS Software Installation8.5 Migrating RealSpeak MRCP-Native to RealSpeak MRCP-Direct Installation
Installation Guide 135
Removing SRM Server Installation
When we have migrated to the MRCP-Direct architecture, the SRM Server will no longer be required; instead, Nuance’s Speechworks MediaServer will replace the functionality of the SRM Server. To clean up disk space and configuration we should remove the SRM Server from the installation.
This section is optional and should be carried out only if the RealSpeak TTS engine is the only ASR or TTS engine on the computer and configured with SRM Server. If there are other ASR or TTS engines in use that are using the SRM Server (for example, the OSR ASR Engine), the steps described in this section should not be carried out; otherwise, this other engine will not function properly.
1. Remove the SRM Server from the CMP Proxy Configuration:
a. Log on to the SMC, and go to the Configuration tab. b. Follow the CMP Proxy link under the OA&M Framework section,
located on the panel on the left-hand side. c. Select the current active cmpproxy configuration file’s radio
button, and click edit. d. Under the System Start/Stop Configuration section, for the
cmp.components parameter, click the Del button beside SRMS (which stands for SRM Server).
e. Click the Update button located at the bottom of the page.
2. Remove the SRM Server from the CMP Network: a. Log on to the SMC, and go to the Administration tab. b. Follow the Cluster Manager link under the Cluster
Administration section, located on the panel on the left-hand side. c. On the right-hand side, there will be a tree-like structure for the
installed VG system. Under the Network node, click the properties link beside the server that has SRM Server installed.
d. Under the Server Component Details section, click the Delete button, followed by OK, when the confirmation dialog box appears for the following item:
• SRM Server
3. Remove the SRM Server binaries: a. Log on to the computer that has the SRM Server installed, and run
rm -rf /usr/local/srm-server/. This will remove the SRM Server and its subdirectories on the system.
Removing the Existing RealSpeak Installation
In the MRCP-Native integration, the following RPM packages are installed on the system and will need to be removed:

Chapter 8: ASR and TTS Software Installation8.5 Migrating RealSpeak MRCP-Native to RealSpeak MRCP-Direct Installation
136 VoiceGenie 7.2.2
a. RealSpeak license package: rs-lic-<version> (for example, rs-lic-4.0-
x) b. RealSpeak TTS Engine package: rs-api-<version> (for example, rs-api-
4.0-12) c. RealSpeak voice package(s): rs-<country>-<language>-<voicename>-
<version> (for example, rs-American-English-en-US-Tom-4.0-12) d. VoiceGenie RealSpeak license package: realspeak-license-<version>
(for example, realspeak-license-4.0.4-4) e. VoiceGenie RealSpeak voice package(s): realspeak-lang-<VoiceName>-
<language>-<version> (for example, realspeak-lang-Tom-en-US-4.0.12-1)
f. VoiceGenie RealSpeak engine package: realspeak-base-<version> (for example, realspeak-base-4.0.12-1)
You can issue the rpm -qa command at the command prompt to get a list of installed RPM packages.
To remove the installed RPM packages, you can issue the rpm -e <packagename> command. By using the provided examples, we would run the following commands:
a. rpm -e rs-lic-4.0-x b. rpm -e rs-American-English-en-US-Tom-4.0-12 c. rpm -e rs-api-4.0-12 d. rpm -e realspeak-license-4.0.4-4 e. rpm -e realspeak-lang-Tom-en-US-4.0.12-1 f. rpm -e realspeak-base-4.0.12-1 g. After all of the preceding commands have been run, ensure that all
RealSpeak installation are removed by running the following command: rm -rf /usr/local/ScanSoft/RealSpeak_4.0/
Note: The version or Voices may differ in the actual installation.
Note: If Speechworks Media Server (SWMS) is installed on the system, remove the existing installation at this point by running the following command: rpm -e SWMS-3.1.10
Chapter 8: ASR and TTS Software Installation8.5 Migrating RealSpeak MRCP-Native to RealSpeak MRCP-Direct Installation
Installation Guide 137
Installing MRCP-Direct Engine
At this stage, the system is in a clean state and ready to be installed with the RealSpeak MRCP-Direct software. Please follow the steps described in Installing MRCP-Direct ASR or TTS Engines for instructions on continuing the installation of the RealSpeak MRCP-Direct server.

Chapter 8: ASR and TTS Software Installation8.5 Migrating RealSpeak MRCP-Native to RealSpeak MRCP-Direct Installation
138 VoiceGenie 7.2.2

Installation Guide 139
VoiceGenie installable packages are usually uploaded via the SMC such that they can be deployed to multiple servers from the SMC’s Deployment Manager. However, some customer’s have network-access restrictions (for example, no or limited http access) that makes this problematic. Also, the streaming of some of the larger installable packages to the SMC via http can be time consuming if the bandwidth between the web client and web server is limited. As a result, a command-line utility exists to upload VoiceGenie installable packages into the SMC. This section details how this command-line utility, called CMP Installer, can be utilized.
A.1 CMP Installer Usage The CMP Installer can be used on only computers that have the SMC installed. It can be found in the following directories:
Under Linux:
/usr/local/cmp-proxy/scripts/
Under Windows:
C:\VoiceGenie\cmp\cmp-proxy\scripts\
When you are in the correct directory as previously listed, the command can be executed as follows: ./cmpinstaller -i -p <productFile>
The following table outlines the meaning of all the command-line arguments of the CMP Installer:
Appendix
A Installing Packages from the Command Line

Appendix A: ASR and TTS Software Installation A.2 CMP Installer Examples
140 VoiceGenie 7.2.2
Option Optional Description
<productFile> Yes The name of the product file (for example, .tar.gz or .zip) you would like to install. This parameter should be the fully qualified path to the file unless the file is in the current directory. Note that if you are using the -p option then the <productFile> does not need to be specified when configuring previously uploaded products.
-i Yes This option directs the CMP Installer to install the package into the SMC (that is, add it to the list in the SMC’s Product Manager).
-p Yes This option directs the CMP Installer to create a profile for the product file, you can create a new one or upgrade an existing one. If no product file is specified, you will be given a list of products already uploaded to the SMC that can be configured.
A.2 CMP Installer Examples This section shows some examples of the usage of the CMP Installer.
A.2.1 Installing a Product File from the Command Line
[email protected] > ./cmpinstaller -i cmp-db-7.0.4-3.tar.gz ------------------------------------------------------------------------ CMP Command Line Installer ------------------------------------------------------------------------ Installing Package: cmp-db-7.0.4-3.tar.gz Product: OAM Framework Database Manufacturer: VoiceGenie Version: 7.0.4 Sub Version: AS3.0 Installation Result: Success
A.2.2 Installing a Product File, and Creating a Profile from the Command Line
[email protected] > ./cmpinstaller -i -p cmp-db-7.0.4-3.tar.gz ------------------------------------------------------------------------ CMP Command Line Installer ------------------------------------------------------------------------ Installing Package: cmp-db-7.0.4-3.tar.gz Product: OAM Framework Database Manufacturer: VoiceGenie Version: 7.0.4

Appendix A: ASR and TTS Software Installation A.2 CMP Installer Examples
Installation Guide 141
Sub Version: AS3.0 Installation Result: Success Attempting to Create a Profile for Product ID: 15 Enter Configuration Profile Name > System 1 Configuration Profile Creating Result: Success
A.2.3 Creating a Profile, or Upgrading an Existing Profile
[email protected] > ./cmpinstaller -p ------------------------------------------------------------------------ CMP Command Line Installer ------------------------------------------------------------------------ Please enter the product ID of the product for which you would like to create a Configuration Profile: Product ID Name Version Subtype 1 Media Platform 7.0.4 AS3.0 11 Media Platform 7.2.0 AS3.0 6 OAM Framework CMP Proxy 7.2.0 AS3.0 8 OAM Framework CMP Server 7.2.0 AS3.0 15 OAM Framework Database 7.0.4 AS3.0 7 OAM Framework Database 7.2.0 AS3.0 9 System Management Console 7.2.0 AS3.0 2 VoiceGenie SNMP Agent 7.0.4 AS3.0 10 VoiceGenie SNMP Agent 7.2.0 AS3.0 Enter Product ID > 15 Attempting to Create a Profile for Product ID: 15 Enter Configuration Profile Name > New Profile Configuration Profile Creating Result: Success
A.2.4 Upgrading an Existing Profile
[email protected] > ./cmpinstaller -p ------------------------------------------------------------------------ CMP Command Line Installer ------------------------------------------------------------------------ Please enter the product ID of the product for which you would like to create a Configuration Profile:

Appendix A: ASR and TTS Software Installation A.2 CMP Installer Examples
142 VoiceGenie 7.2.2
Product ID Name Version Subtype 1 Media Platform 7.0.4 AS3.0 11 Media Platform 7.2.0 AS3.0 6 OAM Framework CMP Proxy 7.2.0 AS3.0 8 OAM Framework CMP Server 7.2.0 AS3.0 15 OAM Framework Database 7.0.4 AS3.0 7 OAM Framework Database 7.2.0 AS3.0 9 System Management Console 7.2.0 AS3.0 5 Tools Log Agent 1.0.0 AS3.0 12 Tools Log Agent 7.2.0 AS3.0 3 Tools Log Monitor 1.0.0 AS3.0 13 Tools Log Monitor 7.2.0 AS3.0 4 Tools Server 1.0.0 Server All OS 14 Tools Server 7.2.0 Server All OS 2 VoiceGenie SNMP Agent 7.0.4 AS3.0 10 VoiceGenie SNMP Agent 7.2.0 AS3.0 Enter Product ID > 7 Attempting to Create a Profile for Product ID: 7 Enter Configuration Profile Name > New A Configuration Profile for an older version of this product already exists. Would you like to upgrade an existing Configuration Profile? [y|N] > Y The following Configuration Profiles can be upgraded, please enter the Profile ID to upgrade: Profile ID Profile Name Product Name Version Subtype 24 Default OAM Framework Database 7.0.4 AS3.0 25 New OAM Framework Database 7.0.4 AS3.0 Enter Profile ID > 25 Configuration Profile Upgrading Result: Success

Installation Guide 143
Deployment is usually done using the SMC; however, there is a command-line utility to deploy product files also. The CMP Deployer is the application responsible for the deployment process. The executable that carried out deployment can be at /usr/local/cmp-deployer/bin/cmpdeployer (under Linux) and C:\VoiceGenie\cmp\cmp-deployer\bin\cmpdeployer (under Windows). This application can be used as follows: cmpdeployer -f <productFile> cmpdeployer -f <productFile> -p <profileID>
In the preceding examples, the <productFile> (for example, .tar.gz or .zip) must be located on the computer locally. If the -p parameters is not specified, the user will be prompted with a list of profiles that can be used for deployment. The <productFile> path should not contain any spaces in it because the CMP Deployer will not be able to parse it correctly.
To get a list of profileIDs, use the following CLC command: profileinfo "[productName]" "[manufacturer]" [version]
where [productName] is the product name and is surrounded in quotation marks, because the name can have spaces. Also, [manufacturer] is the manufacturer and is also surrounded by quotation marks, because it can have spaces. Finally, [version] is the product version.
Appendix
B Deploying Packages from the Command Line

Appendix B: Deploying Packages from the Command Line
144 VoiceGenie 7.2.2
Installation Guide 145
After installing Linux a number of setup questions are asked to configure the server as well as start VoiceGenie installation. Answering these questions is usually done interactively; however, this procedure can be automated for the purposes of silently installing the system if desired.
The vg-scriptmanager includes a directory that contains the necessary scripts and examples to enable the automation. This directory can be found at the following location: /usr/local/vg-scriptmanager/autoinstall
The scripts within this directory provide the basics to automate the installation process; note however that some customizations to these scripts will need to be made, based on the specifics of your installation.
The top level script is the auto-vg-install script. This script runs the various I-Scripts that setup the system along with a responses file that contains the answers to the questions that are usually asked interactively. The following is an example from the auto-vg-install script: /usr/local/vg-scriptmanager/autoinstall/auto-envoker /usr/local/vg-scriptmanager/done/I010network network-responses
The line above calls the auto-envoker script to run the I-Script, I010network, with the response file network-responses. The network-responses file simply contains the desired answers for the interactive questions prompted by the I010network script. The contents of the network-responses file are the following: y vgplatform yourdomain.com 10.0.0.10 255.255.255.0 10.0.0.1 10.0.0.1
Appendix
C Automating I-Scripts for Silent Install
Appendix C: Automating I-Scripts for Silent Install
146 VoiceGenie 7.2.2
n
The preceding example shows the responses to the questions asked during the network interface setup. Note that the answers to these questions are computer-specific and must be catered to your specific installation.
Using the auto-vg-install script along with modifications to the responses file the initial setup of the computer can be automated.

Installation Guide 147
This appendix provides details on how to change the IP address of a system that already has VoiceGenie components installed. When changing the IP of multiple servers, or servers with multiple roles, complete each section in the order listed before moving on to the next. Note that the system IPs should not be changed until after steps up to D.4 Network-Setting Changes are complete.
If the server in question has multiple roles, the steps for each role should be performed. Thus, if your server acts as a Management Server and Database Server, perform the steps shown for both Management Servers, Database Servers and Networking. If you are running an all in one system please run the steps for the Management Server, Database Server, ‘Other’ Server and Networking sections. Note that the steps outlined in the Networking section must be run for any server whose IP is being changed.
D.1 Changes to Management Server
D.1.1 CMP Server Configuration
By using the CLC on the Primary Management Server, change the value of the cmp.primary_cmpe parameter for the CMP Server configuration. Change it to the new IP address, as follows:
Get the Configuration ID: CLC> cfggetid cmpserver Configuration ID: 2, Name: default, Version: 7.2.0
Use the value of Configuration ID in the next command: CLC> paramupdate 2 cmp.primary_cmpe <NEW_CMP_SERVER_IP>
Appendix
D Changing the IP Address of a Computer

Appendix D: Changing the IP Address of a Computer D.1 Changes to Management Server
148 VoiceGenie 7.2.2
Note: To reconfigure for a Backup Management Server with a changed IP, you should repeat the preceding steps, except that you should modify the cmp.backup_cmpe parameter instead of the cmp.primary_cmpe parameter.
D.1.2 CMP Proxy Configuration
By using the CLC on all servers, change the value of the cmp.primary_cmpe parameter for all CMP Proxy configurations in the OA&M cluster. Change it to the new IP address, as follows:
Get the Configuration ID: CLC> cfggetid cmpproxy Configuration ID: 1, Name: default-<IP>-<DATE>-<TIME>, Version: 7.2.0
Use the value of Configuration ID in the next command: CLC> paramupdate 1 cmp.primary_cmpe <NEW_CMP_SERVER_IP>
Note: To reconfigure for a Backup Management Server with a changed IP, you should repeat the preceding steps, except that you should modify the cmp.backup_cmpe parameter instead of the cmp.primary_cmpe parameter.
D.1.3 Database Entries
On the Database Server, log on to the MySQL database and manually update the IPs: mysql -upw -ppw NDM update Network set host=‘<NEW_CMP_SERVER_IP>‘ where host=‘<OLD_IP>‘; update Network set name=‘<NEW_CMP_SERVER_IP>‘ where name=‘<OLD_IP>‘; exit
Note: You can view the IPs by using the following command inside MySQL:
select host, name from Network;

Appendix D: Changing the IP Address of a Computer D.2 Changes to Database Server
Installation Guide 149
D.2 Changes to Database Server
D.2.1 SMC Configuration
By using the CLC on the Management Server(s), change the value of the cmp.db parameter for the local SMC configuration. Point it to the new IP address, as follows:
Get the Configuration ID: CLC> cfggetid smc Configuration ID: 3, Name: default, Version: 7.2.0
Use the value of Configuration ID in the next command: CLC> paramupdate 3 cmp.db <NEW_DATABASE_SERVER_IP>
D.2.2 ODBC Configuration
Then, on all Management Servers, modify the ODBC to reflect the new IP.
Linux
In /usr/local/cmp-server/config/odbc.ini, change the following: Server = <NEW_DATABASE_SERVER_IP>
Note: This also applies to combined Database + Management Servers whose IP has changed.
Windows
Select the ODBC settings in Control Panel > Administrative Tools > Data Sources (ODBC)
Select the System DSN tab. Select the MySQL source, and use Configure to change Host/Server Name (or IP) to the new database IP address.

Appendix D: Changing the IP Address of a ComputerD.3 Changes to Other Servers (VoiceXML Platform, ASR Server, TTS Server)
150 VoiceGenie 7.2.2
D.3 Changes to Other Servers (VoiceXML Platform, ASR Server, TTS Server)
D.3.1 Database Entries
On the Database Server, log on to the MySQL database and manually update the IPs: mysql -upw -ppw NDM update Network set host=‘<NEW_SERVER_IP>‘ where host=‘<OLD_IP>‘; exit
Note: You can view the IPs by using the following command inside MySQL:
select host, name from Network;

Appendix D: Changing the IP Address of a Computer D.4 Network-Setting Changes
Installation Guide 151
D.4 Network-Setting Changes The last step for all computers is to reconfigure the network settings of the computer whose IP is changing. First stop all VoiceGenie software and services that may be running on the computer. For ‘Other’ Server, enter stop at the CLC prompt to stop VoiceGenie software: CLC> stop
Under Linux, log on as root and stop CMP Server (/etc/init.d/cmp-server stop), CMP Proxy (/etc/init.d/cmp-proxy stop), or Tomcat (/etc/init.d/vgtomcat stop), depending on the role of the server. Under Windows, use the Services window to stop the CMP Server, CMP Proxy, or Tomcat service, depending on the role of the server.
Note: Before continuing, you should have the following information handy, because it is required in the next few steps:
• Host name • Domain name • IP • Gateway • DNS server
Also, if you are unsure about whether or not bonding is in use, run the following command from the command line to check the following: /sbin/ifconfig bond0
If an error is returned, bonding is not in use.
Note: By using the preceding steps, you should update all of the servers that are part of the OA&M framework before you change the network configurations.
D.4.1 Standard Networking
Rerun the I010network configuration script as root: cd /usr/local/vg-scriptmanager/done ./I010network
D.4.2 With Bonding Drivers
Rerun the I010network configuration script as root: cd /usr/local/vg-scriptmanager/done ./I010network
Appendix D: Changing the IP Address of a Computer D.5 Other Optional Component Changes
152 VoiceGenie 7.2.2
Remove the bonding lines from /etc/modules.conf (as root): alias bond0 bonding options bond0 miimon=100 mode=1 multicast=1
Rerun the bonding script (as root): cd /usr/local/vg_install/bonding-7.0.0-3/scripts/ perl I108Bonding
D.4.3 Restarting the Servers
After completing the appropriate preceding steps, restart all computers in the OA&M cluster. VoiceXML platforms may need to be restarted manually after the restart.
D.5 Other Optional Component Changes Computers on which changes have been made from this section should be restarted upon completion.
D.5.1 Call Manager
If necessary, modify the sip.defaultgw parameter in the Call Manager Configuration section of the SMC.
Note: If you have made other (nonstandard) changes requiring IPs, you will need to update these also.
D.5.2 CCXML Interpreter
If necessary, modify the ccpccxml.sip.proxy parameter in the CCXML Interpreter Configuration section of the SMC.
D.5.3 Speech Resources
For each resource, create a new entry that matches the old (with updated IPs). When you have created these entries, link each new resource to the corresponding target and un-target/delete the old.

Appendix D: Changing the IP Address of a Computer D.5 Other Optional Component Changes
Installation Guide 153
D.5.4 ASR Engines
Speechworks OSR—Centralized Licensing (Linux)
Modify /usr/local/SpeechWorks/OpenSpeech_Recognizer/config/ SpeechWorks.cfg SWILicenseServerList=27000@<LICENSESERVER_IP>
D.5.5 TTS Engines
RealSpeak—Centralized Licensing (Linux)
Modify /usr/local/ScanSoft/RealSpeak_4.0/config/ttsserver.xml: ‘server’ entries under <license_servers>
Example: <!-- License servers, must have one or more --> <license_servers> <server>[email protected]</server> <!-- <server>[email protected]</server> --> </license_servers>

Appendix D: Changing the IP Address of a Computer D.5 Other Optional Component Changes
154 VoiceGenie 7.2.2
D.5.6 SIP Proxy
In the SIP Proxy Configuration, remove the old entries for proxy.sip.proxy.respaddr and re-add with the correct IPs using the SMC.
Under SIP Resources in the SMC, click Update for each resource that has changed to update the Hostname.
D.5.7 CCP-RM
In the RM Cluster Mapping section of the SMC, remove the old members and re-add them with the correct Member String.

Installation Guide 155
VoiceGenie software is tested and certified to work correctly on the 2.4.21-47 kernel for Red Hat Enterprise Linux 3.0 Update 8. The VoiceGenie software should not be run on any other kernel. Please contact VoiceGenie if you would like to run on a different kernel version from the one that is certified by VoiceGenie. Note VoiceGenie reserves the right to qualify with a later version of the requested kernel.
In order to run on a different kernel version, VoiceGenie would need to recertify against that specific kernel. This process would typically be completed with the next regularly scheduled patch release; which normally would be no more than 90 days after notification from the customer.
Appendix
E Kernel-Specific Information for Red Hat Enterprise Linux 3.0

Appendix E: Kernel-Specific Information for Red Hat Enterprise Linux 3.0
156 VoiceGenie 7.2.2

Installation Guide 157
F.1 Linux This section describes configuration changes that can be made to the Linux operating system if desired by the customer.
F.1.1 Forcing File System–Integrity Check After Restart
If the Linux system has been shut down in a non-graceful manner (for example, because of loss of power), the operating system can be configured to run a file system–integrity check automatically at startup. By default, the file system–integrity check is not run at startup.
To make this change please carry out the following:
1. As the root user, create the /etc/sysconfig/autofsck file (for example, vi /etc/sysconfig/autofsck).
2. Insert the following line to the file: AUTOFSCK_DEF_CHECK=yes
This configuration change should cause the file system–integrity check to run during startup after a non-graceful shutdown.
F.2 VoiceGenie Linux RPM List This section lists the RPMs and their versions that are included in the VoiceGenie Linux 3.0 Update 2.
acl-2.2.3-1 ami-1.2.2-3 ant-1.5.2-23 ant-devel-1.5.2-23 ant-libs-1.5.2-23
Appendix
F OS-Specific Configuration

Appendix F: OS-Specific Configuration F.2 VoiceGenie Linux RPM List
158 VoiceGenie 7.2.2
apmd-3.0.2-18 arts-1.1.3-2.2 ash-0.3.8-16 aspell-0.33.7.1-25 aspell-devel-0.33.7.1-25 aspell-en-ca-0.33.7.1-25 aspell-nl-0.1-17 aspell-no-0.3-6 at-3.1.8-47 atk-1.2.4-3.0 atsar_linux-1.6-2 attr-2.2.0-1 audiofile-0.2.3-7.1 authconfig-4.3.7-1 autoconf213-2.13-6 autoconf-2.57-3 automake14-1.4p6-6 automake15-1.5-7 automake-1.6.3-5 basesystem-8.0-2 bash-2.05b-29 bc-1.06-15 bcel-5.0-10 beecrypt-3.0.1-0.20030630 bg5ps-1.3.0-12 bind-utils-9.2.2-21 binutils-2.14.90.0.4-35 bison-1.875-4 bonobo-activation-2.2.2-1 byacc-1.9-25 bzip2-1.0.2-11 bzip2-devel-1.0.2-11 bzip2-libs-1.0.2-11 cdecl-2.5-27 chkconfig-1.3.8-3 chkfontpath-1.9.10-1.RHEL cmp-deployer-1.0.0-26 commons-logging-1.0.2-12 comps-3.0.0whitebox-0.20040614 coreutils-4.5.3-26 cpio-2.5-3 cpp-3.2.3-34 cproto-4.6-16 cracklib-2.7-22 cracklib-dicts-2.7-22 crash-3.7-5 crontabs-1.10-5
Appendix F: OS-Specific Configuration F.2 VoiceGenie Linux RPM List
Installation Guide 159
ctags-5.4-2 cups-1.1.17-13.3.37 cups-libs-1.1.17-13.3.37 cup-v10k-10 curl-7.10.6-8.rhel3 curl-devel-7.10.6-8.rhel3 cvs-1.11.2-22 cyrus-sasl-2.1.15-8 cyrus-sasl-devel-2.1.15-8 cyrus-sasl-gssapi-2.1.15-8 cyrus-sasl-md5-2.1.15-8 cyrus-sasl-plain-2.1.15-8 db4-4.1.25-8 db4-devel-4.1.25-8 db4-utils-4.1.25-8 dbskkd-cdb-1.01-18 ddd-3.3.1-23 dejagnu-1.4.2-10 desktop-file-utils-0.3-10 dev-3.3.12-1 dev86-0.16.3-8 devlabel-0.42.05-2.1 dhclient-3.0pl2-6.14 dialog-0.9b-20020814.6 diffstat-1.31-2 diffutils-2.8.1-8 dos2unix-3.1-15 dosfstools-2.8-10 doxygen-1.3.5-0.RHEL3.1 dump-0.4b28-7 e2fsprogs-1.32-15 e2fsprogs-devel-1.32-15 ed-0.2-33 eject-2.0.13-2 ElectricFence-2.2.2-15 elfutils-0.94-1 elfutils-devel-0.94-1 elfutils-libelf-0.94-1 elfutils-libelf-devel-0.94-1 esound-0.2.28-5.1 ethtool-1.8-2 expat-1.95.5-6 expat-devel-1.95.5-6 expect-5.38.0-92 fam-2.6.8-9 fam-devel-2.6.8-9 fbset-2.1-13

Appendix F: OS-Specific Configuration F.2 VoiceGenie Linux RPM List
160 VoiceGenie 7.2.2
file-3.39-9 filesystem-2.2.1-3 findutils-4.1.7-9 flex-2.5.4a-29 fontconfig-2.2.1-8.0 fonts-hebrew-0.80-2.0 fonts-ISO8859-2-1.0-11 fonts-KOI8-R-100dpi-1.0-5 fonts-KOI8-R-1.0-5 fonts-KOI8-R-75dpi-1.0-5 freetype-2.1.4-4.0 FreeWnn-1.11-36 FreeWnn-common-1.11-36 gawk-3.1.1-9 gcc-3.2.3-34 gcc-c++-3.2.3-34 gcc-c++-ssa-3.5ssa-0.20030801.47 gcc-g77-3.2.3-34 gcc-g77-ssa-3.5ssa-0.20030801.47 gcc-gnat-3.2.3-34 gcc-java-3.2.3-34 gcc-java-ssa-3.5ssa-0.20030801.47 gcc-objc-ssa-3.5ssa-0.20030801.47 gcc-ssa-3.5ssa-0.20030801.47 GConf2-2.2.1-4 gd-1.8.4-12 gdb-6.0post-0.20040223.20 gdbm-1.8.0-20 gdbm-devel-1.8.0-20 gdk-pixbuf-0.22.0-13.el3.3 gettext-0.11.4-7 glib-1.2.10-11.1 glib2-2.2.3-2.0 glibc-2.3.2-95.20 glibc-common-2.3.2-95.20 glibc-devel-2.3.2-95.20 glibc-headers-2.3.2-95.20 glibc-kernheaders-2.4-8.34 glibc-profile-2.3.2-95.20 glibc-utils-2.3.2-95.20 gmp-4.1.2-5 gmp-devel-4.1.2-5 gnome-mime-data-2.2.0-3 gnome-vfs2-2.2.5-2.E gperf-2.7.2-9 gpm-1.19.3-27.2 gpm-devel-1.19.3-27.2
Appendix F: OS-Specific Configuration F.2 VoiceGenie Linux RPM List
Installation Guide 161
grep-2.5.1-24.6 groff-1.18.1-27 grub-0.93-4 gtk+-1.2.10-27.1 gtk2-2.2.4-19 gzip-1.3.3-13.rhel3 h2ps-2.06-8 hdparm-5.4-1 hesiod-3.0.2-28 hesiod-devel-3.0.2-28 hotplug-2002_04_01-20.2 htmlview-2.0.0-10 httpd-2.0.52-1 hwdata-0.101.8-1 imlib-1.9.13-12 im-sdk-20030118-6 indent-2.2.9-2 info-4.5-3 initscripts-7.31.30.EL-1.VG iproute-2.4.7-11.30E.1 ipsec-tools-0.2.5-0.7.rhel3.4 iptables-1.2.8-12.3 iptables-ipv6-1.2.8-12.3 iputils-20020927-11 irda-utils-0.9.15-1 isdn4k-utils-3.1-76 j2sdk-1.4.2_12-fcs jaf-20030319-1 jakarta-regexp-1.2-12 javamail-20031006-1 jfsutils-1.1.2-2 jisksp14-0.1-11 jisksp16-1990-0.1-11 junit-3.8.1-1 jwhois-3.2.2-1 kappa20-0.3-12 kbd-1.08-10.2 kernel-2.4.21-47.EL kernel-pcmcia-cs-3.1.31-19 kernel-utils-2.4-8.37.15 knm_new-1.1-10.1 krb5-devel-1.2.7-21 krb5-libs-1.2.7-21 krb5-workstation-1.2.7-21 krbafs-1.1.1-11 krbafs-devel-1.1.1-11 kudzu-1.1.22.2-1

Appendix F: OS-Specific Configuration F.2 VoiceGenie Linux RPM List
162 VoiceGenie 7.2.2
kudzu-devel-1.1.22.2-1 laus-libs-0.1-56RHEL3 less-378-11 lftp-2.6.3-5 lha-1.14i-10.2 libacl-2.2.3-1 libacl-devel-2.2.3-1 libaio-0.3.96-3 libaio-devel-0.3.96-3 libao-0.8.3-3 libao-devel-0.8.3-3 libart_lgpl-2.3.11-2 libattr-2.2.0-1 libattr-devel-2.2.0-1 libbonobo-2.2.3-1 libbonoboui-2.2.2-1 libcap-1.10-15 libcap-devel-1.10-15 libf2c-3.2.3-34 libgcc-3.2.3-34 libgcc-ssa-3.5ssa-0.20030801.47 libgcj-3.2.3-34 libgcj-devel-3.2.3-34 libgcj-ssa-3.5ssa-0.20030801.47 libgcj-ssa-devel-3.5ssa-0.20030801.47 libglade2-2.0.1-3 libgnat-3.2.3-34 libgnome-2.2.2-6 libgnomecanvas-2.2.0.2-2 libgnomeui-2.2.1-1 libjpeg-6b-30 libmng-1.0.4-3 libmudflap-3.5ssa-0.20030801.47 libmudflap-devel-3.5ssa-0.20030801.47 libogg-1.0-5.1 libogg-devel-1.0-5.1 libpng-1.2.2-21 libstdc++-3.2.3-34 libstdc++-devel-3.2.3-34 libstdc++-ssa-3.5ssa-0.20030801.47 libstdc++-ssa-devel-3.5ssa-0.20030801.47 libtabe-0.2.6-5.1 libtermcap-2.0.8-35 libtermcap-devel-2.0.8-35 libtiff-3.5.7-25.el3.1 libtool-1.4.3-6 libtool-libs-1.4.3-6

Appendix F: OS-Specific Configuration F.2 VoiceGenie Linux RPM List
Installation Guide 163
libungif-4.1.0-15 libusb-0.1.6-3 libusb-devel-0.1.6-3 libuser-0.51.7-1 libuser-devel-0.51.7-1 libvorbis-1.0-7 libvorbis-devel-1.0-7 libwvstreams-3.70-10 libxml-1.8.17-9.1 libxml2-2.5.10-6 libxml2-devel-2.5.10-6 libxml2-python-2.5.10-6 libxml-devel-1.8.17-9.1 libxslt-1.0.33-1 lilo-21.4.4-23.1 linc-1.0.3-1 lockdev-1.0.1-1.2 lockdev-devel-1.0.1-1.2 logrotate-3.6.9-1 losetup-2.11y-31.1 lslk-1.29-8 lsof-4.63-4 ltrace-0.3.29-1 lvm-1.0.3-15 m4-1.4.1-13 mailcap-2.1.14-1 mailx-8.1.1-31 make-3.79.1-17 MAKEDEV-3.3.12-1 man-1.5k-10 man-pages-1.60-4.1 mdadm-1.5.0-3 memprof-0.5.1-3 mgetty-1.1.30-3 mingetty-1.06-1 miniChinput-0.0.3-51.0 minicom-2.00.0-17.1 mkbootdisk-1.5.1-1 mkinitrd-3.5.13-WB1 mktemp-1.5-18 modutils-2.4.25-12.EL modutils-devel-2.4.25-12.EL mount-2.11y-31.1 mtools-3.9.8-8 mtr-0.52-2 MySQL-client-standard-4.1.20-0.rhel3 mysql-connector-odbc-3.51.12-1

Appendix F: OS-Specific Configuration F.2 VoiceGenie Linux RPM List
164 VoiceGenie 7.2.2
MySQL-server-standard-4.1.20-0.rhel3 MySQL-shared-compat-4.1.20-0.rhel3 nano-1.2.1-4 nc-1.10-18 ncompress-4.2.4-39.rhel3 ncurses-5.3-9.3 ncurses-devel-5.3-9.3 netconfig-0.8.19-1 netdump-0.6.11-3 net-snmp-5.0.9-2.30E.3 net-snmp-devel-5.0.9-2.30E.3 net-snmp-utils-5.0.9-2.30E.3 net-tools-1.60-20 newt-0.51.5-1 newt-devel-0.51.5-1 nfs-utils-1.0.6-21EL nhpf-1.42-5 nptl-devel-2.3.2-95.20 ntp-4.1.2-4.EL3.1 ntsysv-1.3.8-3 openldap-2.0.27-11 openldap-devel-2.0.27-11 openmotif-2.2.3-5.RHEL3.7 openssh-3.6.1p2-33.30.13 openssh-clients-3.6.1p2-33.30.13 openssh-server-3.6.1p2-33.30.13 openssl096b-0.9.6b-16.42 openssl-0.9.7a-33.21 openssl-devel-0.9.7a-33.21 oprofile-0.5.4-22 oprofile-devel-0.5.4-22 ORBit2-2.6.2-1 pam-0.75-54 pam-devel-0.75-54 pam_smb-1.1.7-1 pango-1.2.5-2.0 parted-1.6.3-29 passwd-0.68-3 patch-2.5.4-16 patchutils-0.2.23-1 pciutils-2.1.10-7 pciutils-devel-2.1.10-7 pcre-3.9-10 pdksh-5.2.14-21 perl-5.8.0-94.EL3 perl-CGI-2.89-94.EL3 perl-CPAN-1.61-94.EL3

Appendix F: OS-Specific Configuration F.2 VoiceGenie Linux RPM List
Installation Guide 165
perl-DateManip-5.40-30 perl-DBD-MySQL-2.1021-3 perl-DBI-1.32-5 perl-Filter-1.29-3 perl-HTML-Parser-3.26-17 perl-HTML-Tagset-3.03-28 perl-libwww-perl-5.65-6 perl-URI-1.21-7 pkgconfig-0.14.0-5 popt-1.8.2-0.14.WB1 portmap-4.0-56 ppp-2.4.1-14 prelink-0.3.0-6 procmail-3.22-9 procps-2.0.13-9.2E psacct-6.3.2-27 psmisc-21.3-1.RHEL.0 pspell-0.12.2-16.1 pspell-devel-0.12.2-16.1 pstack-1.2-3.EL.1 python-2.2.3-6.3 python-devel-2.2.3-6.3 pyxf86config-0.3.5-1 qt-3.1.2-13 quota-3.09-1 raidtools-1.00.3-7 rcs-5.7-20 readline-4.3-5 readline-devel-4.3-5 redhat-config-mouse-1.0.13-1 redhat-java-rpm-scripts-1.0.2-2 redhat-logos-1.1.14.3-1.WB1 redhat-lsb-1.3-3 redhat-menus-0.39-1 redhat-rpm-config-8.0.28-2 rhpl-0.110.4-1 rh-postgresql-devel-7.3.6-1 rh-postgresql-libs-7.3.6-1 rmt-0.4b28-7 rootfiles-7.2-6 rpm-4.2.2-0.14.WB1 rpm-build-4.2.2-0.14.WB1 rpmdb-whitebox-3.0-0.20040614 rpm-devel-4.2.2-0.14.WB1 rpm-python-4.2.2-0.14.WB1 rp-pppoe-3.5-4 rsh-server-0.17-17
Appendix F: OS-Specific Configuration F.2 VoiceGenie Linux RPM List
166 VoiceGenie 7.2.2
rsync-2.5.7-4.3E schedutils-1.3.0-3 screen-3.9.15-10 sed-4.0.7-3 sendmail-8.12.11-4.RHEL3.6 sendmail-cf-8.12.11-4.RHEL3.6 setarch-1.3-1 setserial-2.17-12 setup-2.5.27-1 setuptool-1.13-1 shadow-utils-4.0.3-20 sharutils-4.2.1-16 skkinput-2.06.3-3 slang-1.4.5-18 slang-devel-1.4.5-18 slocate-2.7-3 splint-3.0.1.7-0.20030123 star-1.5a08-4 strace-4.5.1-1.EL.1 sudo-1.6.7p5-1 swig-1.1p5-22 switchdesk-3.9.8-17 sysklogd-1.4.1-12.1 syslinux-2.06-0.3E sysreport-1.3.7-1 sysstat-5.0.5-11.rhel3 SysVinit-2.85-4.2 taipeifonts-1.2-23 tar-1.13.25-15.RHEL3 tcl-8.3.5-92 tcpdump-3.7.2-7.E3.2 tcp_wrappers-7.6-34 tcsh-6.12-4 telnet-0.17-26 telnet-server-0.17-26 termcap-11.0.1-17.1 texinfo-4.5-3 tftp-0.32-4 tftp-server-0.32-4 time-1.7-23 tk-8.3.5-92 tmpwatch-2.8.4-5 traceroute-1.4a12-20 ttmkfdir-3.0.9-6 tzdata-2006m-3.el3 unix2dos-2.2-19 unixODBC-2.2.11-1

Appendix F: OS-Specific Configuration F.2 VoiceGenie Linux RPM List
Installation Guide 167
unixODBC-devel-2.2.11-1 unzip-5.50-34 usbutils-0.11-1 usermode-1.68-5 utempter-0.5.5-1.3EL.0 util-linux-2.11y-31.1 vconfig-1.6-2 vg-scriptmanager-3.0.1-7 vg-setup-1.0.0-10 vg-squid-2.5.11-2 vg-tomcat-5.0.28-1 vg-xerces-2.7.0-2 vim-common-6.2.98-1 vim-minimal-6.2.98-1 vixie-cron-4.1-11.EL3 vsftpd-1.2.1-3 wget-1.10.2-0.30E which-2.14-7 whitebox-release-3.0-5_i386 wireless-tools-26-2 Wnn6-SDK-1.0-25 Wnn6-SDK-devel-1.0-25 words-2-21 wvdial-1.53-11 xalan-j-2.4.1-11 Xaw3d-1.5-18 xcin-2.5.3.pre3-15 xerces-j-2.2.1-11 XFree86-4.3.0-115.EL XFree86-base-fonts-4.3.0-115.EL XFree86-font-utils-4.3.0-115.EL XFree86-libs-4.3.0-115.EL XFree86-libs-data-4.3.0-115.EL XFree86-Mesa-libGL-4.3.0-115.EL XFree86-Mesa-libGLU-4.3.0-115.EL XFree86-xauth-4.3.0-115.EL XFree86-xfs-4.3.0-115.EL xinetd-2.3.12-2.3E xinitrc-3.32-1 ypbind-1.12-5 yp-tools-2.8-1 yum-2.0.7-1.1.WB1 zip-2.3-16 zlib-1.1.4-8.1 zlib-devel-1.1.4-8.1

Appendix F: OS-Specific Configuration F.2 VoiceGenie Linux RPM List
168 VoiceGenie 7.2.2

Installation Guide 169
The following instructions explain how to configure a platform for DTMF only. If you are not installing an ASR, the following procedure should be carried out:
1. Change all applications to remove all references to ASR Engines:
• Remove the ASRENGINE properties on the VXML page, if one exists.
• Change the mode attribute for all grammar tags to mode="dtmf".
• Change the INPUTMODES on defaults.vxml, as well as all applications, to have DTMF (ensure VOICE is not in there).
2. Remove all speech-resource provisioning from SMC:
• Go to the SMC > Configuration tab.
• Under the Media Platform, go to the Speech Resources link.
• Remove all provision data where the Resource Type is ASR.
3. Remove the ASR components from SMC (MRCP-native ASR deployment only):
• Go to the SMC > Configuration tab.
• Click the properties of the server that has the ASR installed.
• Under the Server Component Details section, delete all instances that are named ASR Client and ASR Server.
Appendix
G Configuring the Platform for DTMF Only

Appendix G: Configuring the Platform for DTMF Only
170 VoiceGenie 7.2.2
4. Remove ASR from SRM server client list (MRCP-native ASR deployment only):
• Go to the SMC > Configuration tab.
• Click SRM Server the link.
• Edit the current active configuration.
• Go to the asr_client_list parameter, and click Del on all installed values.
• Click update at the end of page.
• Restart the server to take effect.

Installation Guide 171
This section acts as a quick start guide for configuring the VoiceGenie Media Platform to inter-operate with the AudioCodes Media Gateway products. Please refer to the AudioCodes documentation for the most updated and accurate configuration information on the AudioCodes Media Gateway.
H.1 AudioCodes Configuration These instructions assume that basic configuration (IP address, subnet mask, telephony provisioning, and so on) has already taken place. Please see the AudioCodes documentation for further details. The following steps must be performed by using the AudioCodes Web Interface:
H.1.1 Codec Settings
From the Quick Setup Menu:
Setting up the Audio Codec - From the Coder name section, and using the first coder drop-down list, select the right codec (G711Ulaw64k for North America, G711Alaw64k for Europe), set the msec field to 20, and press Reset.
Appendix
H Using AudioCodes Media Gateway with VoiceGenie Media Platform

Appendix H: Using AudioCodes Media Gateway with VoiceGenie Media Platform H.1 AudioCodes Configuration
172 VoiceGenie 7.2.2
H.1.2 Telephony Endpoint Settings
Trunk groups (or analog endpoint phone numbers) can be configured from the Protocol Management Menu. Please refer to AudioCodes documentation for details.
H.1.3 IP Endpoint Settings
Routing Tables->Tel to IP Routing – The PSTN calls must be routed to the VoiceGenie Media Platform. By using routes, the AudioCodes gateway can route the inbound calls to multiple VoiceGenie Media Platforms. Route selection can be done using the Dest. Phone Prefix and Dest. IP Address fields. For instance, if one of the lines assigned on the AudioCodes gateway has the phone number 416-736-5555, and you want to route the calls from this number to the VoiceGenie Media Platform with IP 10.0.0.100, the route entry could look like 416 * 10.0.0.100 0 n/a. An alternate method makes use of the wildcard character to direct calls from all ports to a specific VoiceGenie Media Platform (IP address) * * 10.0.0.100 0 n/a. After setting, click the Submit button to save the entries.
Note: The * wildcard character must be always in the last position of the table.
Routing Tables->IP to Hunt Group Routing These routes select the right Hunt Group for outbound call based on the Destination (Dialed) number. (See AudioCodes documentation on HuntGroup settings) For example, if a call to the 614 area code must be directed to a specific telephony carrier, the entry will select the Hunt Group let’s say 2 that contains the lines from that telephony carrier. The entry will resemble the following: 614 * * 2 0 Other called numbers starting with a prefix other than 614 will be routed to Hunt Group 1. (Note that this is an example, and Hunt Group ID 2 is not defined.) Click the Submit button to save the entries.
Transfer Settings
It is possible to transfer for a call using the <transfer> tag in VoiceXML. In order to do this, the AudioCodes gateway must be configured to handle a SIP

Appendix H: Using AudioCodes Media Gateway with VoiceGenie Media Platform H.1 AudioCodes Configuration
Installation Guide 173
REFER. Please refer to the AudioCodes documentation on the supported transfer configurations on the PSTN interface.
Miscellaneous Settings
The AudioCodes gateway must be configured to support RFC2833 out-of-band DTMF. This can be done by setting Protocol Definition->DTMF&Dialing->Use Out-of-Band DTMF to Yes and clicking Submit.
Applying the Changes
At this stage, click the Reset Menu, select the Burn radio button to burn the new device configuration into flash memory, and press Reset. Wait about two minutes; it should reset AudioCodes server.
Note that this should be done after any configuration parameter change to save the configuration.
H.1.4 VoiceGenie Media Platform Configuration
In general, no special configuration is required on the VoiceGenie Media Platform. The default install configuration must be used if simple inbound or outbound calls are required.
Call-Routing Settings
If the application is being migrated from PSTN to VoIP, the simplest migration method is to set the "sip.defaultgw" parameter to the IP of the AudioCodes gateway, in VoiceGenie Media Platform. After clicking Configuration Tab in the SMC user interface, click Call Manager link, and edit the current configuration by clicking Edit (if multiple configurations exist, identify the correct configuration by using the Concise Configuration View). Set the AudioCodes gateway IP in the sip.defaultgw field, and then press the Update. With this change, the "dest" attribute of the <transfer>/<call> tag used in the application can remain unchanged (that is, remain using phone: or tel:), and all the outbound calls will automatically be directed to the default gateway IP.
Otherwise, the application developer must explicitly change the "dest" attribute in the <transfer>/<call> tag to be of the format dest="sip:destNumber@AudioCodesIpAddress".

Appendix H: Using AudioCodes Media Gateway with VoiceGenie Media Platform H.1 AudioCodes Configuration
174 VoiceGenie 7.2.2
Transfer Settings
On the VoiceGenie Media Platform, the Refer transfer must be enabled in the Call Manager configuration. To do this, from the SMC click the Configuration Tab. Then, click the Call Manager link, select the configuration in use, and click the Edit button. The sip.transfermethod must have the Refer method selected. The default transfer methods can be set (by using sip.defaultblindxfer, sip.defaultconsultxfer, and sip.defaultbridgexfer) to define the default method used for transferring the call. Click Update after the change is applied.
Otherwise, the application developer must explicitly set the transfer method as refer in the transfer tag. The following is an example of an appropriate transfer tag: <transfer name="newcall" dest="sip:[email protected]" connecttimeout="60s" method="refer" type="unsupervised" bridge="false" connectwhen="immediate" analysis="false">
Note: IMPORTANT NOTE FOR PBX USERS WHO ARE USING HOOKFLASH TRANSFER:
To perform a transfer, some PBXs require a feature activation code to be dialed immediately after the hook flash and before the destination transfer number is dialed (See AudioCodes documentation for enabling Hookflash transfer on AudioCodes Gateway). The AudioCodes Gateway does not have this feature to allow dialing of the transfer activation code. To work around this problem the user must add the DTMF string (the feature activation code) at the application level, in front of the destination number. For instance, if the activation code is "*70", the application should add this sequence in front of the called number (note the difference between this and the previously mentioned transfer example):
<transfer name="newcall" dest="sip:*[email protected]" connecttimeout="60s" method="refer" type="unsupervised" bridge="false" connectwhen="immediate" analysis="false">
For example, in order to interoperate with a Meridian M8x24 Key System connected thru an Analog Terminal Adaptor (Norstar ATA2), the system must dial *70 – feature activation key, right after the Flash Hook and before dialing the destination extension. By using the previously listed workaround example, the M8x24 Key System will recognize the *70 command, and then transfer the call to the new destination.

Revision History
Version Date Change Summary Author/Editor
1.0 March 9, 2005 Initial release Rakesh Tailor, Monti Ghai
1.1 April 13, 2005 Revised version Andrew Ho
1.2 April 13, 2005 Updated for details on cross OS installs Rakesh Tailor
1.3 April 21, 2005 Updated with upgrade instructions and details on RealSpeak install
Rakesh Tailor
1.4 May 5, 2005 Added Call Analyst details for installation Rakesh Tailor
1.5 June 17, 2005 Added details for upgrades Rakesh Tailor
1.6 July 20, 2005 Added instructions for OA&M Framework upgrade Rakesh Tailor
1.7 March 16, 2006 Updates for VoiceGenie 7.1 Rakesh Tailor
1.8 September 5, 2006 Further updates for VoiceGenie 7.1 Monti Ghai
1.9 October 5, 2006 Added AudioCodes details Shifeng Wu
1.10 October 26, 2006 Added details Wen Wang, Rakesh Tailor
1.11 November 20, 2006 Update for 7.1.1 Joseph Choy
1.12 March 1, 2007 ER94716753 Johnson Tse
1.13 July 6, 2007 ERs 103719193, 106471270, 117382381, 116913030, 119937991, 132284532, 125482381, CMT15708
Wen Wang
1.14 September 21, 2007 Update for 7.2 Wen Wang
1.15 March 5, 2008 Update for 7.2.1 Wen Wang
1.16 June 1, 2008 Update for Watson 6.0.2463 Lin Chen
1.17 July 27, 2008 Update to add NSS5.0.x/Nuance Recognizer 9.0.x/RealSpeak 4.5SP1
Lin Chen
1.18 December 3, 2008 ER 212500180 Krunoslav Kovac
1.19 March 17, 2009 Fixed ER204985986 Lin Chen
1.20 April 1, 2009 Updated for Watson 6.1.x and NaturalVoice 4.1.x Lin Chen
1.21 June, 2009 Fixed ER227204044, ER224293840, ER230689997 Lin Chen