Foxit Admin Console Administrator Guide
35
Foxit Admin Console Administrator Guide 1
-
Upload
khangminh22 -
Category
Documents
-
view
0 -
download
0
Transcript of Foxit Admin Console Administrator Guide

Foxit Admin Console
Administrator Guide
1
Foxit Admin Console
Administrator Guide
2
© Foxit Software Incorporated. All Rights Reserved.
No part of this document can be reproduced, transferred, distributed or stored in any format without
the prior written permission of Foxit.
Anti-Grain Geometry - Version 2.4
© Maxim Shemanarev (http://www.antigrain.com)
Portions of this product Copyright [2001-2020] Solid Documents
Permission to copy, use, modify, sell and distribute this software is granted provided this copyright
notice appears in all copies. This software is provided "as is" without express or implied warranty, and
with no claim as to its suitability for any purpose.
Foxit Admin Console
Administrator Guide
3
Contents
Contents ......................................................................................................... 3
Foxit Admin Console Overview .................................................................... 5
Set up and activate ........................................................................................ 5
Home .............................................................................................................. 7
User ID Management .................................................................................... 7
Directory settings ...................................................................................................................... 7
Users ......................................................................................................................................... 12
Groups ...................................................................................................................................... 16
Customize Organization ......................................................................................................... 17
Admin Role Management ...................................................................................................... 18
License Management .................................................................................. 23
Manage Licensing ................................................................................................................... 24
Internal Update Configuration (On-premise environments only) .......... 25
Configuration ........................................................................................................................... 26
Version Management ............................................................................................................. 27
Products ....................................................................................................... 28
Reports ......................................................................................................... 29
Settings ......................................................................................................... 29
Mail Servers (On-premise environments only) ................................................................... 29
Enterprise Brand Customization .......................................................................................... 30

Foxit Admin Console
Administrator Guide
4
Windows Authentication (On-premise environments only) ............................................. 31
Product Configuration ............................................................................................................ 32
Log Cleanup Settings .............................................................................................................. 33
Support (On-cloud environments only) ..................................................... 34
Content Logs ................................................................................................ 34
Contact Us .................................................................................................... 35
Foxit Admin Console
Administrator Guide
5
About Foxit® Admin Console™ Administrator Guide
This guide covers features and functions that are only available to administrators.
Foxit Admin Console Overview
Foxit Admin Console add-on is a Cloud-based portal that serves as a central location for
administrators to manage Foxit products/services and entitled users across their entire
organizations. After setting up and activating Admin Console based on the organization
environment, the administrator can open the URL of Foxit Admin Console to get started.
The Admin Console allows administrators to do the following:
• View the summary of the licenses and products
• Configure the license keys
• Assign license keys to users
• Manage Foxit products
• Configure the internal update of packages (on-premise environments only)
• Configure mail server (on-premise environments only)
• View the detailed reports on the uses and statistics of Foxit products
• Customize enterprise brand information
• View the administrator’s action logs
Set up and activate
Foxit Admin Console can be deployed on AWS and hosted by Foxit (i.e., on-cloud), or
located on the Enterprise’s servers and available through an internal network (i.e. on-
premise) and entirely maintained by the enterprise’s staff. On-cloud (Foxit-hosted) Admin
Console is ready to use after the enterprise receives our email that contains the Admin
Console URL and other configured information. For an on-premise Admin Console, the
enterprise needs to deploy its on-premise environment, for which we provide the related
deployment documentation and instructions in our email after you purchase Foxit Admin
Console; after the deployment of the Admin Console, client configuration is required, and
the documentation and instructions on client configuration are also included in the email

Foxit Admin Console
Administrator Guide
6
sent by Foxit.
When everything is ready, you (the super admin) need to activate Admin Console before
getting started. To activate, do the following:
1. Open your web browser and visit the Admin Console URL. (For an on-cloud Admin
Console, the URL has been provided in the email from Foxit after you purchased Foxit
Admin Console. In an on-premise environment, the URL is created by your company
during the deployment of Foxit Admin Console.)
2. In an on-cloud environment, the activation requires an internet connection. To
activate, log in to the account you purchase Foxit Admin Console with. Then skip to
Step 4.
In an on-premise environment, sign up for an account and log in. Note: For the account
you signed up for, if the email address or user name is the same as that of an SSO account
(your LDAP or SAML account), you will need to use the SSO credential to log in after you set
up LDAP or SAML in the Foxit Admin Console.
3. There are two methods of activation: Online Activation and Offline Activation.
• Online Activation requires an internet connection, and you can click Connect
and activate by logging in to the account you purchased Foxit Admin Console with.
• If your computer is offline, you need to complete an Offline Activation with your
purchased license key file by clicking Browse. (If you haven’t got a key file yet, click
Get One. Then you will obtain the server ID of the Admin Console in the pop-up
dialog box. You need to send the server ID to Foxit by email and Foxit’s team will
send the key file to you later.)
4. After successful activation, click Get Started. Then a wizard (a small green message
box with on-screen instructions) for some items in Admin Console prompts to help
you get started. There are a series of items in the left part of the Admin Console
window, including Home, User ID Management, License Management, Products,
and more. Select an item or a sub item to open the associated page on the right side
and do the settings as needed.
5. (Optional) When you move the cursor over the administrator avatar in the top-right
corner of the Admin Console window, your account information (the email address or
user name, and the admin role) appears as well as a drop-down menu. Click the Log
Out command in the menu to log out of Foxit Admin Console. Click My Profile to open
the My Profile page, where you can view the detailed account information, change the
password, and the following tasks.
• Transfer Admin Privilege – As the super administrator, you can transfer your
administrative privileges to another user. Under the Transfer Admin
Privilege section, enter the email address or user name of the new super
admin and click Transfer. (Note: If you are not only the super admin but also a
user in Admin Console, this operation only revokes all of the administrative control
and access to the Admin Console, without removing your user account from Admin
Console.)
• Dissolve Company – If your company no longer needs to use Foxit products
Foxit Admin Console
Administrator Guide
7
or your Foxit Admin Console expires, you (the super admin) can dissolve your
company in Foxit Admin Console to close your company’s account and remove
all of the associated company data from Foxit. Before the dissolution, be
aware of the effects or risks of dissolving a company, which you can read on
the page. If you are ready to dissolve your company, check the I have read
about the risks of dissolving a business box, and click the Dissolve button.
Then you need to provide your email address and the verification code you
receive to complete the dissolution. Note that the operation is irrevocable.
(On-cloud environments only)
Home
The Home page displays the summary of data such as product licenses and users, which
allows you to take a glance at the usage of Foxit products plans within your organization.
To view the statistics for the number of assigned and activated licenses, you can choose
Last 7 days or Last 30 days to display the data only for the latest week/month. The Home
page also provides enterprise data (including the number of employees, groups, and
logged-in users) and enterprise information such as the Enterprise’s name and logo.
User ID Management
Depending on the requirements or circumstances in your enterprise, you may manage
users (and groups) individually or in batch by uploading CSV files in the Admin Console,
or by connecting Admin Console to your enterprise account system (user directory system)
by configuring Single Sign-On (SSO).
Directory settings
Single Sign-On (SSO) is a session and user authentication service that permits a user to
use one set of login credentials (e.g., the authenticated user ID and password provided in
a company) to access multiple applications. Currently, Foxit Admin Console supports two
popular SSO methods: LDAP and SAML. After you set up LDAP or SAML in Foxit Admin
Console for performing Single Sign-On, all users in your company can directly sign in with
their authenticated accounts to access Foxit applications.
To connect Admin Console to an LDAP or a SAML directory, you (the super admin or a
System Administrator) need to configure the user directory first on the Directory setting
page under User ID Management. (Tip: Admins’ privileges vary from their types of admin
roles, so some items or functions on Foxit Admin Console may be unavailable or invisible for
some admins. More information on admin roles, see also Admin Role Management.)
Foxit Admin Console
Administrator Guide
8
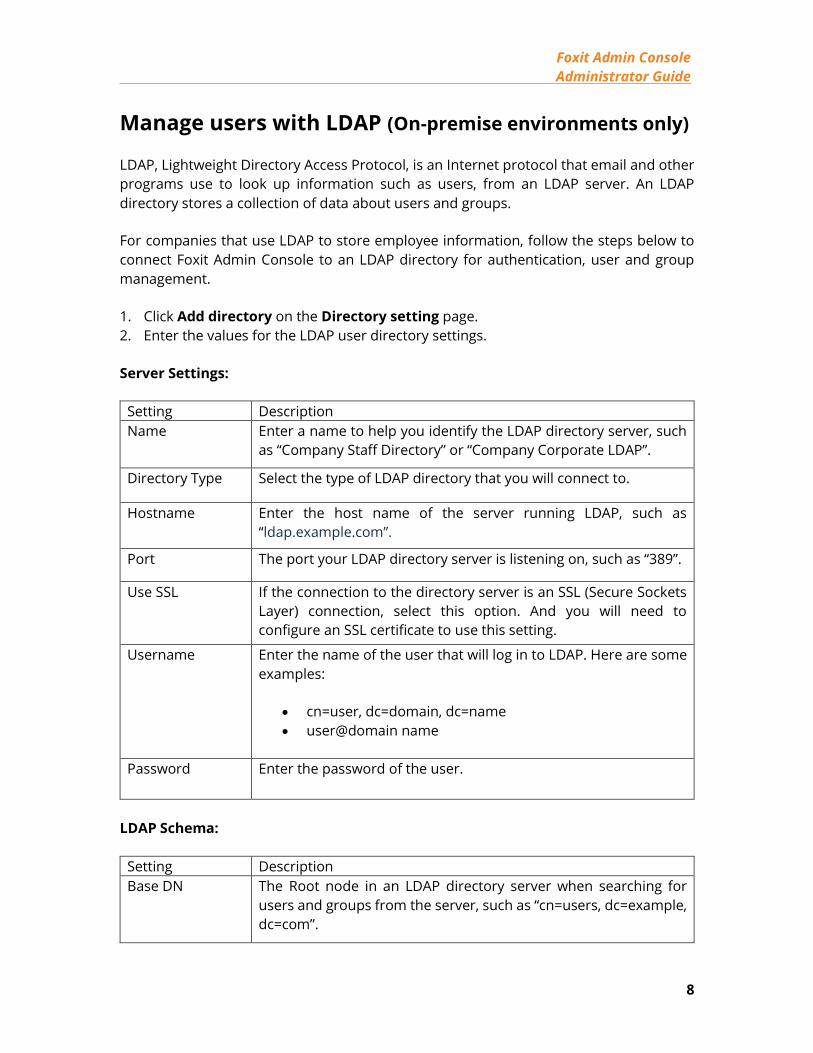
Manage users with LDAP (On-premise environments only)
LDAP, Lightweight Directory Access Protocol, is an Internet protocol that email and other
programs use to look up information such as users, from an LDAP server. An LDAP
directory stores a collection of data about users and groups.
For companies that use LDAP to store employee information, follow the steps below to
connect Foxit Admin Console to an LDAP directory for authentication, user and group
management.
1. Click Add directory on the Directory setting page.
2. Enter the values for the LDAP user directory settings.
Server Settings:
Setting Description
Name Enter a name to help you identify the LDAP directory server, such
as “Company Staff Directory” or “Company Corporate LDAP”.
Directory Type Select the type of LDAP directory that you will connect to.
Hostname Enter the host name of the server running LDAP, such as
“ldap.example.com”.
Port The port your LDAP directory server is listening on, such as “389”.
Use SSL If the connection to the directory server is an SSL (Secure Sockets
Layer) connection, select this option. And you will need to
configure an SSL certificate to use this setting.
Username Enter the name of the user that will log in to LDAP. Here are some
examples:
• cn=user, dc=domain, dc=name
• user@domain name
Password Enter the password of the user.
LDAP Schema:
Setting Description
Base DN The Root node in an LDAP directory server when searching for
users and groups from the server, such as “cn=users, dc=example,
dc=com”.

Foxit Admin Console
Administrator Guide
9
User Schema Settings:
Setting Description
User Object Filter The filter to use when searching user
objects. Examples:
• (objectclass=inetorgperson)
User Name Attribute Field The attribute field to use when loading the
username. Examples:
• cn
• sAMAccountName
User DN Attribute Field The attribute field to use when loading the
user’s distinguished name. Examples:
• entryDN
• distinguishedName
User First Name Attribute Field The attribute field to use when loading the
user's first name, such as “givenName”.
User Last Name Attribute Field The attribute field to use when loading the
user's last name, such as “sn”.
User Display Name Attribute Field The attribute field to use when loading the
user's full name, such as “displayName”.
User Email Attribute Field The attribute field to use when loading the
user's email address, such as “mail”.
Group Schema Settings:
Setting Description
Group Object Filter The filter to use when searching for group
objects, such as
“(&(objectClass=group)(cn=*))”.
Group DN Attribute Field The attribute field to use when loading the
group’s distinguished name. Examples:
• entryDN
• distinguishedName
Group Name Attributes The attribute field to use when loading the
group's name, such as “cn”.
Foxit Admin Console
Administrator Guide
10
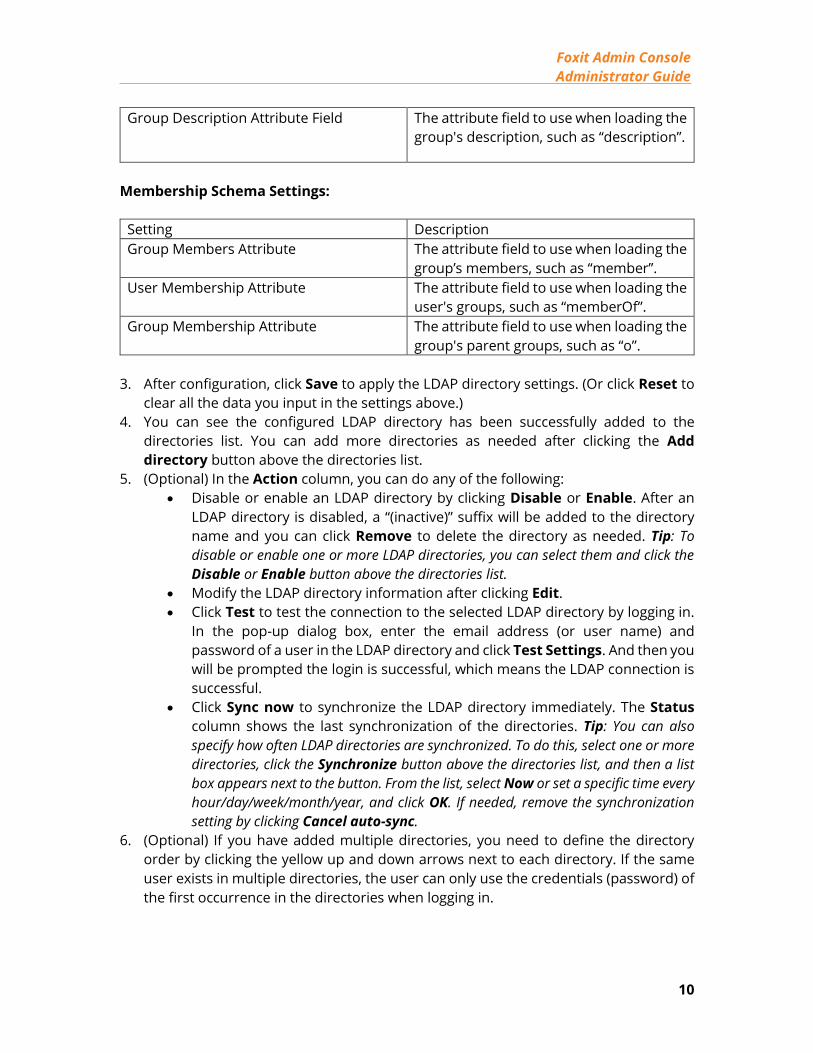
Group Description Attribute Field The attribute field to use when loading the
group's description, such as “description”.
Membership Schema Settings:
Setting Description
Group Members Attribute The attribute field to use when loading the
group’s members, such as “member”.
User Membership Attribute The attribute field to use when loading the
user's groups, such as “memberOf”.
Group Membership Attribute The attribute field to use when loading the
group's parent groups, such as “o”.
3. After configuration, click Save to apply the LDAP directory settings. (Or click Reset to
clear all the data you input in the settings above.)
4. You can see the configured LDAP directory has been successfully added to the
directories list. You can add more directories as needed after clicking the Add
directory button above the directories list.
5. (Optional) In the Action column, you can do any of the following:
• Disable or enable an LDAP directory by clicking Disable or Enable. After an
LDAP directory is disabled, a “(inactive)” suffix will be added to the directory
name and you can click Remove to delete the directory as needed. Tip: To
disable or enable one or more LDAP directories, you can select them and click the
Disable or Enable button above the directories list.
• Modify the LDAP directory information after clicking Edit.
• Click Test to test the connection to the selected LDAP directory by logging in.
In the pop-up dialog box, enter the email address (or user name) and
password of a user in the LDAP directory and click Test Settings. And then you
will be prompted the login is successful, which means the LDAP connection is
successful.
• Click Sync now to synchronize the LDAP directory immediately. The Status
column shows the last synchronization of the directories. Tip: You can also
specify how often LDAP directories are synchronized. To do this, select one or more
directories, click the Synchronize button above the directories list, and then a list
box appears next to the button. From the list, select Now or set a specific time every
hour/day/week/month/year, and click OK. If needed, remove the synchronization
setting by clicking Cancel auto-sync.
6. (Optional) If you have added multiple directories, you need to define the directory
order by clicking the yellow up and down arrows next to each directory. If the same
user exists in multiple directories, the user can only use the credentials (password) of
the first occurrence in the directories when logging in.
Foxit Admin Console
Administrator Guide
11
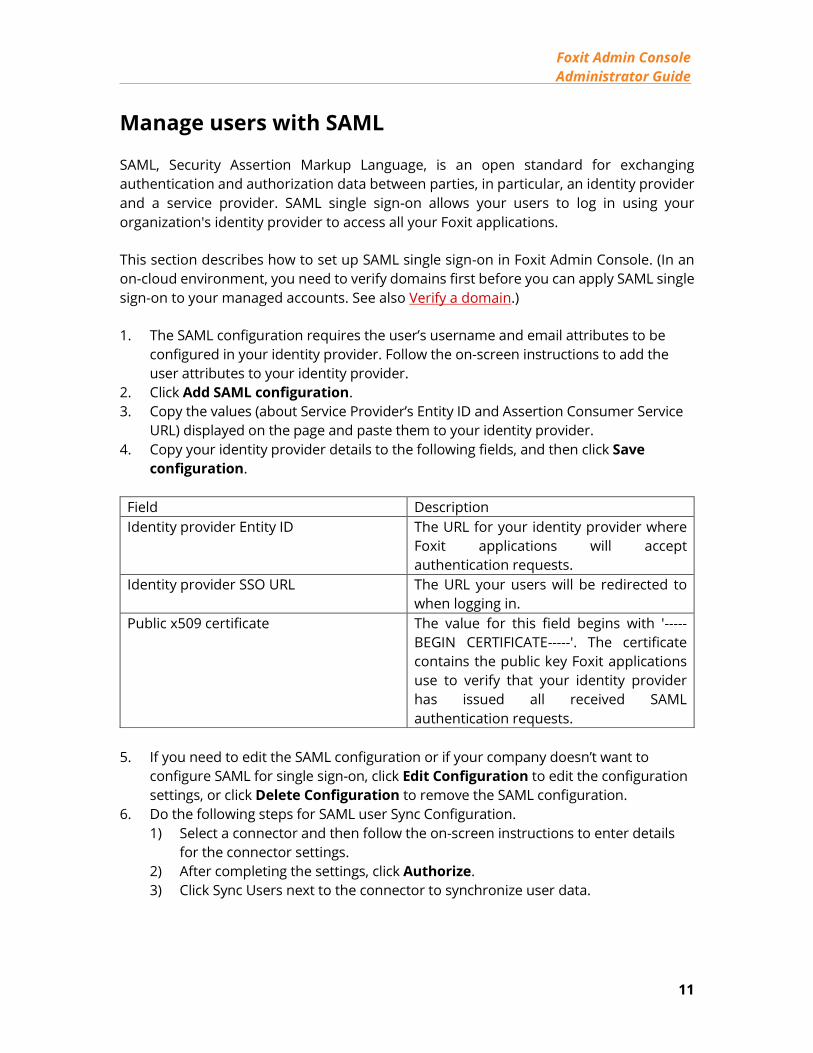
Manage users with SAML
SAML, Security Assertion Markup Language, is an open standard for exchanging
authentication and authorization data between parties, in particular, an identity provider
and a service provider. SAML single sign-on allows your users to log in using your
organization's identity provider to access all your Foxit applications.
This section describes how to set up SAML single sign-on in Foxit Admin Console. (In an
on-cloud environment, you need to verify domains first before you can apply SAML single
sign-on to your managed accounts. See also Verify a domain.)
1. The SAML configuration requires the user’s username and email attributes to be
configured in your identity provider. Follow the on-screen instructions to add the
user attributes to your identity provider.
2. Click Add SAML configuration.
3. Copy the values (about Service Provider’s Entity ID and Assertion Consumer Service
URL) displayed on the page and paste them to your identity provider.
4. Copy your identity provider details to the following fields, and then click Save
configuration.
Field Description
Identity provider Entity ID The URL for your identity provider where
Foxit applications will accept
authentication requests.
Identity provider SSO URL The URL your users will be redirected to
when logging in.
Public x509 certificate The value for this field begins with '-----
BEGIN CERTIFICATE-----'. The certificate
contains the public key Foxit applications
use to verify that your identity provider
has issued all received SAML
authentication requests.
5. If you need to edit the SAML configuration or if your company doesn’t want to
configure SAML for single sign-on, click Edit Configuration to edit the configuration
settings, or click Delete Configuration to remove the SAML configuration.
6. Do the following steps for SAML user Sync Configuration.
1) Select a connector and then follow the on-screen instructions to enter details
for the connector settings.
2) After completing the settings, click Authorize.
3) Click Sync Users next to the connector to synchronize user data.

Foxit Admin Console
Administrator Guide
12
Verify a domain (On-cloud environments only)
1. Navigate to the Directory setting page under User ID Management.
2. Click Verify domain.
3. You can verify domains in the following two methods. Select one method and follow
the on-screen instructions.
• DNS – Copy a TXT record to your domain name system (DNS).
• HTTPS – Upload an HTML file to the root folder of your domain’s website.
4. After uploading the HTML file or adding the TXT record, click Verify Domain.
5. In the pop-up dialog box, select TXT Record or HTTPS correspondingly, enter the
domain you want to verify in the Domain field, and click Verify domain.
6. Then the domain will be added to the Verified Domains List and you can view the
verification status. The status of a domain may show Unverified. For example,
verifying domains using DNS may take up to 72 hours for your domain to verify and
DNS changes to take effect. Then you can click Verify in the Actions column to verify
again.
7. (Optional) To remove a domain from the list, click Remove in the Actions column.
When a verified domain is removed, the users with that domain are no longer
managed and won't appear on your managed account page.
Users
After you have successfully connected Foxit Admin Console to your account system by
configuring SSO, you can add, search, and manage user accounts on the Users page.
These user accounts entitle the end users in your organization to Foxit applications.
The Users page contains two tabs in both environments:
• Directory users and Added users (in an on-premise environment)
• Directory users and Invited users (in an on-cloud environment)
User management with LDAP (On-premise environments
only)
The Directory users tab
All users listed in this tab are from the LDAP directories you configured. On the left side,
the hierarchical structures of the LDAP directories in your enterprise are displayed in a
tree view. Select a group in the LDAP directory, and all the users in that group are listed
on the right side.
The LDAP user directories are synchronized regularly to ensure the user data in the Admin

Foxit Admin Console
Administrator Guide
13
Console is most up-to-date. After synchronization, the unsynchronized users who may
have left your organization will be listed on the Unsynced users page. To view the page,
click Unsynced users under the directory tree. To delete a user, navigate to the user in
the list and click the Delete icon in the Actions column.
You can search for a directory user (not including the Unsynced users) by entering the
user’s name or email address in the Search box and press Enter.
You can view and edit the details of each user. By clicking the View Details icon in the
Action column or by clicking on a user’s email address in the user list, the User info dialog
box appears on the right side, allowing you to do the following:
• Click Edit to assign licenses, or change/delete the user’s existing license
information. If the user belongs to a group, clicking the group name switches to
the Groups page where you can remove the user from his group or move the user
to another group.
• Disable: disables the user account to not allow the user to log in to access Foxit
applications.
• Enable: enables the user account to allow the user to log in to access Foxit
applications. And then you can assign a license to the user as necessary.
The Added users tab
For some users who are not in your account system and request access to Foxit
applications, you can add them manually in the Added users tab. The total number of
added users is displayed above the user list.
• To add users, click the Add users button above the user list to open the drop-
down list. Then do any of the following:
o Choose Add users to add one user, and assign a license to the user as
needed.
o Choose Add users by CSV to add multiple users by uploading a CSV file
that contains the user accounts.
o Choose Bulk operation results to show the results after adding users by
CSV. If any users are not added successfully, they will be displayed in the
results.
• To export users to a CSV file, select the users you need by checking the boxes next
to the users and click the Export Users button above the user list. If no users are
selected, clicking Export Users exports all users in the list.
• To remove users from the Admin Console and revoke their licenses, select the
users and click the Remove button above the user list.
• To search for a user quickly, enter the user’s name/email address in the Search
box and press Enter. Or click the Down arrow in the Search box to drop down

Foxit Admin Console
Administrator Guide
14
the Advanced Search box to filter the users whose last login time was within a
specific period, and then click Search. (Clicking Clear removes the criteria you
specified in the Search and Advanced Search boxes.) Filter users as needed by
selecting a type of the account status (whether their licenses are available or
revoked).
• Click the Revoke icon in the Actions column to remove the license from the
user. Once the license is revoked, the user becomes unable to activate products
by logging in with their accounts until they are assigned licenses again, and the
Revoke icon in the Actions column changes to the Access icon. Click the
Access icon to enable the user to log in to access Foxit applications. See also
Disable/enable users.
• Click the Details icon in the Actions column to view the details of the user
and then do any of the following:
o Click Edit to assign licenses, or change/delete the user’s existing license
information. If the user belongs to a group, clicking the group name
switches to the Groups page where you can remove the user from his
group or move the user to another group.
o Click Set Password to change the password for the user account.
o Click Revoke/Access to disable/enable the user to log in to access Foxit
applications. See also Disable/enable users.
User management with SAML
The Directory users tab
The Directory users tab lists all users in the SAML directories in your organization and
shows the details including the user email and the activation status. You can perform the
following tasks:
• If you click on a user’s email address in the user list, the User info dialog box
appears on the right side, allowing you to do the following:
o Click Edit to edit the user name, assign licenses, or change/delete the
user’s existing license information. If the user belongs to a group, clicking
the group name switches to the Groups page where you can remove the
user from his group or move the user to another group.
o Click Revoke/Access to disable/enable the user to log in to access Foxit
applications. See also Disable/enable users.
• Search for a user by specifying the user’s name/email address or the type of the
account status (whether the license is available or revoked) above the user list in
the Search box or the Advanced Search box. See also Search for added users.
• Click the View unsynced users button above the user list to display the list of
users that were not present after the last directory synchronization, such as users

Foxit Admin Console
Administrator Guide
15
who may have left your organization. Click the View synchronized users button
to return to the list of users in the SAML directories. (Tip: Depending on your choice,
the number of users displayed above the user list is the total number of synchronized
or unsynced users.)
You can also export users to a CSV file using the Export button. If no users are selected,
clicking Export exports all users in the list.
The Added users tab (On-premise environments only)
See also the Added users tab in the User management with LDAP section.
The Invited users tab (On-cloud environments only)
For users who are not in your account system and request access to Foxit applications,
you can invite them manually by email in the Invited users tab. The total number of
invited users is displayed above the user list.
• To invite users, click the Invite users button above the user list, enter email
addresses, and click Send.
• To export users to a CSV file, select the users you need by checking the boxes next
to the users and click the Export Users button above the user list. If no users are
selected, clicking Export Users exports all users in the list.
• To remove users from the Admin Console and revoke their licenses, select the
users and click the Remove button above the user list. The user that is removed
is allowed to be invited again.
• To search for a user quickly, enter the user’s name/email address in the Search
box and press Enter. Or click the Down arrow in the Search box to drop down
the Advanced Search box to filter the users whose last login time was within a
specific period, and then click Search. (Clicking Clear removes the criteria you
specified in the Search and Advanced Search boxes.) Filter users as needed by
selecting a type of the account status (Invited, Accept Invitation, or Deactivated).
The three types of account status:
o Invited: The user has received your invitation but has not accepted it yet.
o Accept Invitation: The user has accepted your invitation and you can assign
a product license to the user. See also License Management.
o Deactivated: The user has been deactivated and has no access to Foxit
products.
• Click the Deactivate icon in the Actions column to remove the license from
the user. Once the license is deactivated, the user becomes unable to activate
products by logging in with their accounts until they are assigned licenses again,
the Deactivate icon in the Actions column changes to the Activate icon,
and the status changes from Accept Invitation to Deactivated. Click the Activate
Foxit Admin Console
Administrator Guide
16
icon to assign a license to the user again.
• Click the Details icon in the Actions column to view the details of the user and
then do any of the following:
o Click Edit to assign licenses, or change/delete the user’s existing license
information. If the user belongs to a group, clicking the group name
switches to the Groups page where you can remove the user from his
group or move the user to another group.
o Click Reset Password to send the user a password reset email to inform
the user that he needs to change his password.
o Click Deactivate/Activate to disable/enable the user to log in to access
Foxit applications. See also Disable/enable users.
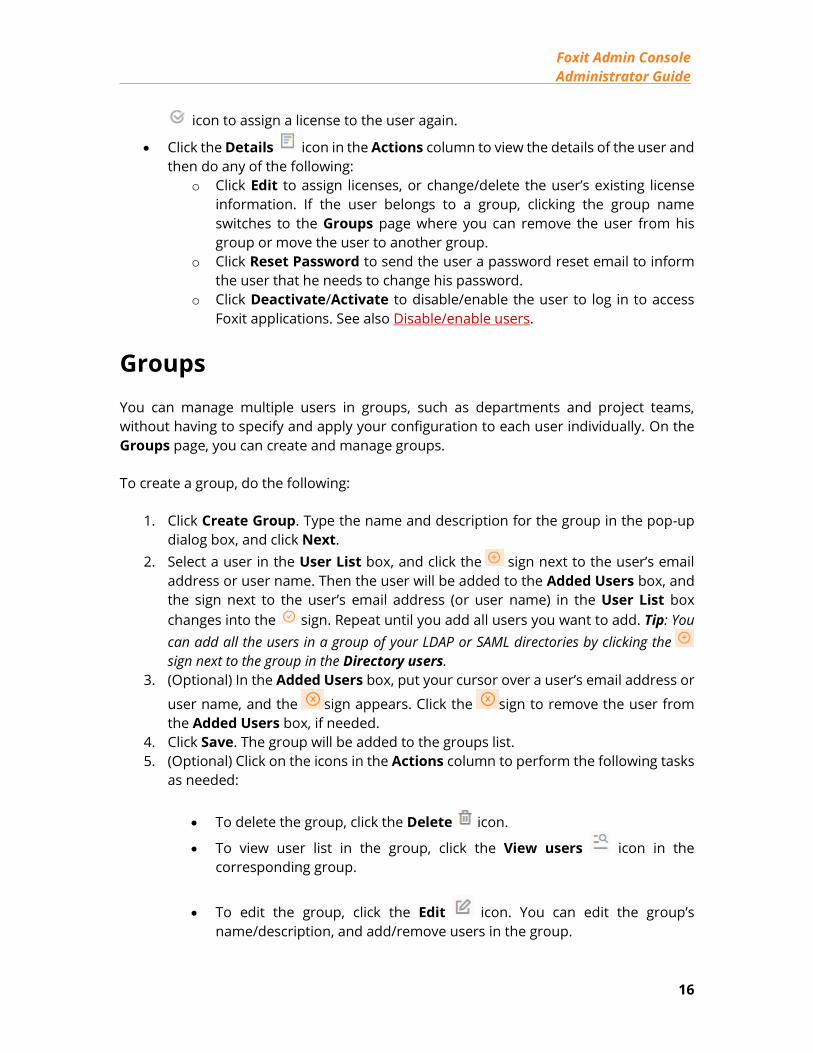
Groups
You can manage multiple users in groups, such as departments and project teams,
without having to specify and apply your configuration to each user individually. On the
Groups page, you can create and manage groups.
To create a group, do the following:
1. Click Create Group. Type the name and description for the group in the pop-up
dialog box, and click Next.
2. Select a user in the User List box, and click the sign next to the user’s email
address or user name. Then the user will be added to the Added Users box, and
the sign next to the user’s email address (or user name) in the User List box
changes into the sign. Repeat until you add all users you want to add. Tip: You
can add all the users in a group of your LDAP or SAML directories by clicking the
sign next to the group in the Directory users.
3. (Optional) In the Added Users box, put your cursor over a user’s email address or
user name, and the sign appears. Click the sign to remove the user from
the Added Users box, if needed.
4. Click Save. The group will be added to the groups list.
5. (Optional) Click on the icons in the Actions column to perform the following tasks
as needed:
• To delete the group, click the Delete icon.
• To view user list in the group, click the View users icon in the
corresponding group.
• To edit the group, click the Edit icon. You can edit the group’s
name/description, and add/remove users in the group.

Foxit Admin Console
Administrator Guide
17
Do any of the following to manage groups:
• To export groups of users to a CSV file, select the group(s) you need and click the
Export Users button above the groups list. If no groups are selected, clicking
Export Users exports all groups in the list.
• To remove groups, select the groups and click the Delete button above the groups
list.
• To search for a group, enter the group’s name, and then press Enter.
Customize Organization
All users in Foxit Admin Console, including LDAP/SAML users and added users, can be
added to an organizational unit (or “OU” for short). On the Customize Organization page,
administrators can create and manage departments for their organizational units.
If you are the super admin (or a System Administrator/User Group Administrator), click
on the OU name in the left part of the Customize Organization page, and all users are
listed on the right. The default name of the OU is the company name provided when you
purchase Foxit Admin Console. You can edit the OU name the same way you edit
department names (described below). To create a department under the OU as a child,
do the following:
1. Click the Add Department button in the left part of the page, where all the
departments are listed. Or move the cursor over the vertical three-dot icon next
to any department, and choose Add Department. (Note: Before adding
departments, make sure you have connected to your LDAP or SAML directories or
added users on the Users page.)
2. In the pop-up dialog box, enter the department name and select a parent
department (if any) that the new department will be listed below as a child
department. Click OK to continue.
3. Then the new department will be listed in the department list. Click on the
department and click Add users in the right part of the page. (In an on-cloud
environment, you can add users by CSV and view the operation results.)
4. In the pop-up dialog box, select a user in the User List box, and click the sign
next to the user’s email address or user name. Then the user will be added to the
Selected user box, and the sign next to the user’s email address (or user name)
in the User List box changes into the sign. Repeat until you add all users you
want to add. Tip: You can add all the users in a group of your LDAP or SAML directories
by clicking the sign next to the group in the Directory users.
5. (Optional) In the Selected user box, put your cursor over a user’s email address
or user name, and the sign appears. Click the sign to remove the user from
the box, if needed.
6. When you’re done, click OK. You can click the Add users button to add more users
Foxit Admin Console
Administrator Guide
18
to the department if needed.
After creating a department, you can perform more actions:
• Click the Columns button above the user list to specify what details to be
displayed in the user list, including users’ names, email addresses, status, and
more.
• To edit a department name or delete a department, move the cursor over the
vertical three-dot icon next to the department, and choose Edit Department or
Delete.
• To remove a user from a department, select the department, navigate to the user
and click the Delete icon in the Actions column. To remove multiple users,
select the users by checking the boxes in front of the user name and click the
Delete button above the user list.
• To move users to other departments, select the users and click the Move to
button above the user list. In the pop-up dialog box, select the desired department
and click OK.
• To adjust the order of the departments, drag the department you want to move
to the desired place. You can also put a department under another department
(the parent department). For example, to put Department A under Department B,
drag Department A onto Department B and release the mouse button when the
pointer is directly over Department B.
If you are a Product administrator:
• In the left part of the Customize Organization page, you can see an assigned
“OU”, which only contains the departments/users assigned by your super/system
administrator. The names of the assigned “OU” and its departments displayed in
your Admin Console are the same as those in the super/system admin’s Admin
Console.
• Any changes to the department (including changing the department name and
adding/deleting department members) made by the super/system admin will be
synched into the departments in the assigned “OU”.
• You are allowed to add users to the departments in the assigned “OU”. For details
on how to add users, see also the Added users tab in the Users section. The users
you add will also be synced into the OU managed by the super/system admin. And
you are allowed to delete a user you added by clicking the Delete icon in the
Actions column.
Admin Role Management
An enterprise can have one super admin and several other admins (including System
Foxit Admin Console
Administrator Guide
19
Administrator, Product Administrator, Deployment Administrator, etc.) to perform
management in Foxit Admin Console. The super admin sits at the top of all other admin
roles, and can perform all tasks in the Admin Console.
On the Admin Role page, the super admin and the system admin can add admins (assign
the admin role to other users), remove admins (revoke admin permissions), and search
admins. (Tip: If needed, the super admin can give the administrative privileges to another user.
For details, please refer to Transfer Admin Privilege.) The following table gives a brief
introduction to different types of admins. For a detailed list of permissions and privileges
for each type of admin, see also Admin Permissions Matrix.
Role Description
Super
Administrator
The super admin for the enterprise with the ability to activate Foxit
Admin Console, and perform all administrative tasks in the Admin
Console. Also, has permissions to “dissolve the company” in Foxit
Admin Console, transfer his administrative privileges to another
user, and assign users different administrative roles.
System
Administrator
Has all permissions that the super admin does except for the ones
to activate Admin Console, dissolve a company, and transfer
administrative privileges.
Product
Administrator
Manages the products assigned by the super admin and performs
all associated administrative tasks, including:
• Add users to owned departments
• Remove users (added by himself previously) from owned
departments
• Set or change the product strategy (See also Product
Configuration)
User Group
Administrator
Administers the user groups assigned by the super admin and
performs all associated administrative tasks, including:
• Add or delete users and user groups
• Add or remove users to/from groups
Deployment
Administrator
(On-premise
environments
only)
Configure the settings of Foxit product updates, which include:
• Specify the products and the version types (Major Version,
Minor Version, Maintenance Version, etc.) to be updated
• Set the frequency of automatic checks for software updates
• Specify the users who need to update the products and set
the update time
• Specify the products and the versions (the specific version
Foxit Admin Console
Administrator Guide
20
number) to be rolled back
Configuration
Administrator
Configure enterprise general settings, including:
• Set the enterprise customization
• Configure a mail server
• Set Windows Authentication
Tip: Admins’ privileges vary from their types of admin roles, so some items or functions on Foxit
Admin Console may be unavailable or invisible for some admins.
Add an admin
1. On the Admin Role page, click Add Admin.
2. Enter the user’s email address (or user name) in the text box, and click Next.
3. Select one or more admin roles and click Next. (Or click Previous to return to the
previous step.)
If you choose Product Administrator, specify the products, users (select All users
or the specific departments), and available license quantity for those products to
be administered by the product administrator.
4. Click Save to confirm your action. Then the user will be added to the admin list on
the Admin Role page.
5. (Optional) You can click Edit icon in the Actions column to modify the admin
roles for the user.
Remove an admin
To removing an admin, navigate to the administrator in the admin list and click on the
Delete icon in the Actions column. Removing an admin only revokes the admin
privileges from the user, without deleting the user from the Admin Console.
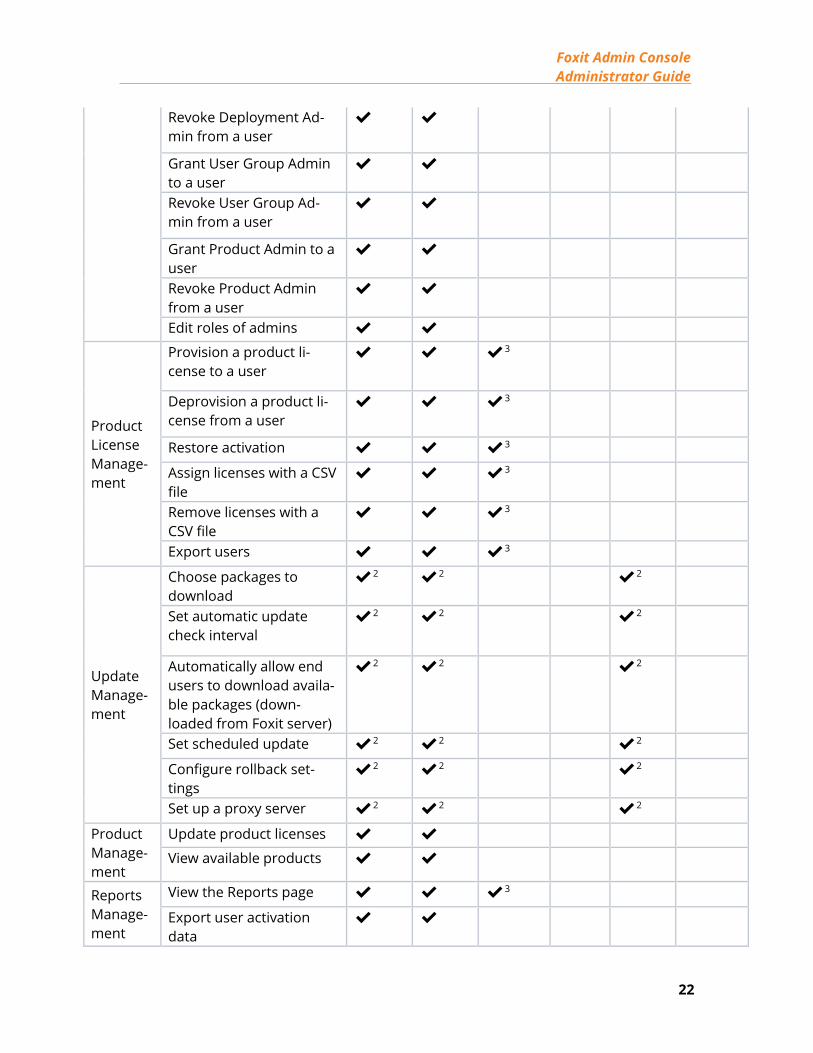
Admin Permissions Matrix
Admins’ privileges vary from their types of admin roles. The following table provides a
detailed list of permissions and privileges for each type of admin.
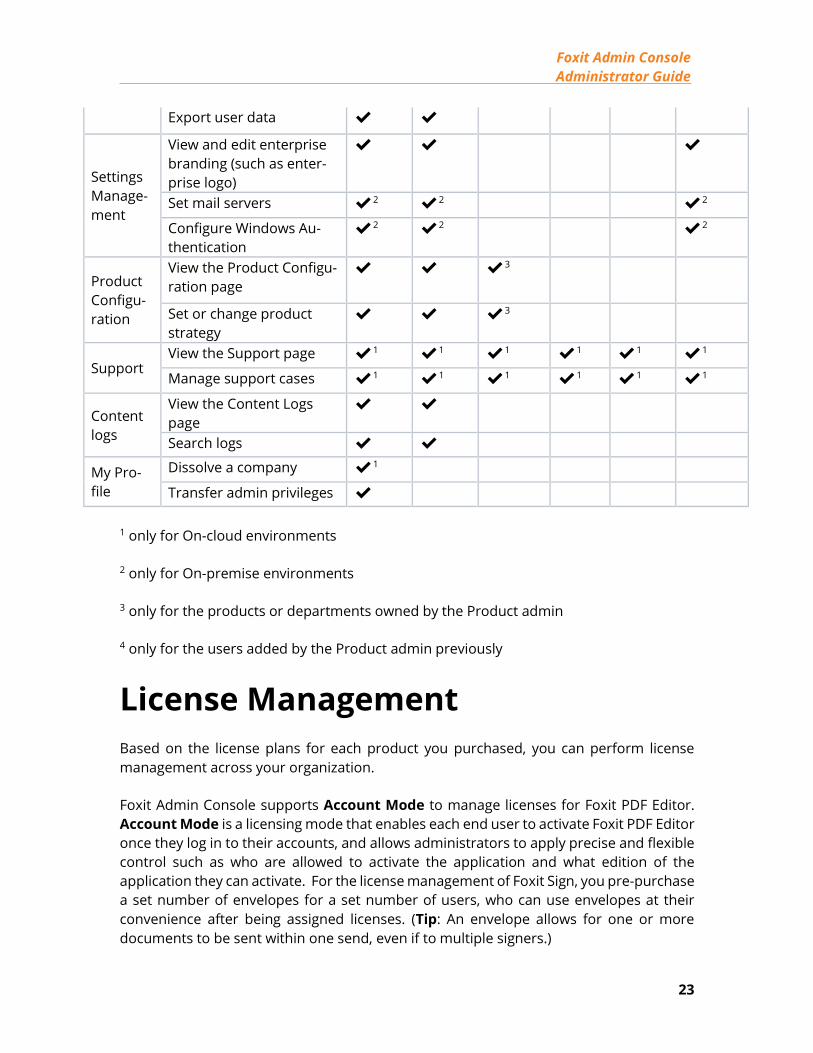
Area Permission Super
Admin
System
Admin
Product
Admin
User
Group
Admin
Deploy-
ment
Admin
Configu-
ration
Admin
Home View the Home page ✔ ✔ ✔ ✔ ✔ ✔

Foxit Admin Console
Administrator Guide
21
Identity
Manage-
ment
Add a domain ✔ ✔
View domain details and
domain listing
✔ ✔
User
Manage-
ment
Add users to org (i.e., the
organization)
✔ ✔ ✔
Remove users from org ✔ ✔ ✔
View user details and user
listing
✔ ✔ ✔
Edit user profiles ✔ ✔ ✔
Bulk add users to org ✔ ✔ ✔
User
Group
Manage-
ment
Create user groups ✔ ✔ ✔
Remove user groups ✔ ✔ ✔
Add users to user groups ✔ ✔ ✔
Remove users from user
groups
✔ ✔ ✔
View members of user
groups
✔ ✔ ✔
View the list of user
groups
✔ ✔ ✔
Organi-
zation
Manage-
ment
Create departments ✔ ✔ ✔
Remove departments ✔ ✔ ✔
Add users to departments ✔ ✔ ✔3 ✔
Bulk add users to depart-
ments
✔ ✔ ✔3 ✔
Remove users from de-
partments
✔ ✔ ✔4 ✔
View members of depart-
ments
✔ ✔ ✔ ✔
Adminis-
trator
Manage-
ment
Grant System Admin to a
user
✔ ✔
Revoke System Admin
from a user
✔ ✔
Grant Product Admin to a
user
✔ ✔
Revoke Product Admin
from a user
✔ ✔
Grant Deployment Admin
to a user
✔ ✔
Foxit Admin Console
Administrator Guide
22
Revoke Deployment Ad-
min from a user
✔ ✔
Grant User Group Admin
to a user
✔ ✔
Revoke User Group Ad-
min from a user
✔ ✔
Grant Product Admin to a
user
✔ ✔
Revoke Product Admin
from a user
✔ ✔
Edit roles of admins ✔ ✔
Product
License
Manage-
ment
Provision a product li-
cense to a user
✔ ✔ ✔3
Deprovision a product li-
cense from a user
✔ ✔ ✔3
Restore activation ✔ ✔ ✔3
Assign licenses with a CSV
file
✔ ✔ ✔3
Remove licenses with a
CSV file
✔ ✔ ✔3
Export users ✔ ✔ ✔3
Update
Manage-
ment
Choose packages to
download
✔2 ✔2 ✔2
Set automatic update
check interval
✔2 ✔2 ✔2
Automatically allow end
users to download availa-
ble packages (down-
loaded from Foxit server)
✔2 ✔2 ✔2
Set scheduled update ✔2 ✔2 ✔2
Configure rollback set-
tings
✔2 ✔2 ✔2
Set up a proxy server ✔2 ✔2 ✔2
Product
Manage-
ment
Update product licenses ✔ ✔
View available products ✔ ✔
Reports
Manage-
ment
View the Reports page ✔ ✔ ✔3
Export user activation
data
✔ ✔
Foxit Admin Console
Administrator Guide
23
Export user data ✔ ✔
Settings
Manage-
ment
View and edit enterprise
branding (such as enter-
prise logo)
✔ ✔ ✔
Set mail servers ✔2 ✔2 ✔2
Configure Windows Au-
thentication
✔2 ✔2 ✔2
Product
Configu-
ration
View the Product Configu-
ration page
✔ ✔ ✔3
Set or change product
strategy
✔ ✔ ✔3
Support View the Support page ✔1 ✔1 ✔1 ✔1 ✔1 ✔1
Manage support cases ✔1 ✔1 ✔1 ✔1 ✔1 ✔1
Content
logs
View the Content Logs
page
✔ ✔
Search logs ✔ ✔
My Pro-
file
Dissolve a company ✔1
Transfer admin privileges ✔
1 only for On-cloud environments
2 only for On-premise environments
3 only for the products or departments owned by the Product admin
4 only for the users added by the Product admin previously
License Management
Based on the license plans for each product you purchased, you can perform license
management across your organization.
Foxit Admin Console supports Account Mode to manage licenses for Foxit PDF Editor.
Account Mode is a licensing mode that enables each end user to activate Foxit PDF Editor
once they log in to their accounts, and allows administrators to apply precise and flexible
control such as who are allowed to activate the application and what edition of the
application they can activate. For the license management of Foxit Sign, you pre-purchase
a set number of envelopes for a set number of users, who can use envelopes at their
convenience after being assigned licenses. (Tip: An envelope allows for one or more
documents to be sent within one send, even if to multiple signers.)
Foxit Admin Console
Administrator Guide
24
Notes:
1. Only the clients whose IP addresses and MAC addresses are in the specified ranges are
allowed to activate Foxit PDF Editor. See also Client Activation Policy.
2. When assigning licenses, you will be prompted if the number of licenses you want to
assign exceeds the number of purchased licenses.
Manage Licensing
On the License Management page, you can assign/change/unassign licenses, and view
the details of assigned users. (Tip: You can click the Columns button above the user list
to specify what details to be displayed in the list of assigned users, including users’ email
addresses, licenses, activation status, assigned time, MAC addresses, and more.)
You can specify criteria to search for specific users. Under the Search box shows the
license usage information such as the number of licenses used (assigned) out of the total
available ones. To export users to a CSV file, select the users you need and click the Export
button above the user list.
Assign licenses to users
1. Click the Assign License button. Choose Assign License to select users and assign
licenses to the selected users.
2. In the pop-up dialog box, select users/groups in the User List box. Then the
selected users/groups will be added to the Selected user box. Repeat until you
add all users you want to add.
3. (Optional) in the Selected user box, put your cursor over a user’s email address
or user name, and the sign appears. Click the sign to remove the user from
the Selected user box, if needed.
4. Select the license you want to assign to the selected users.
5. (Optional) Enterprises are enabled to purchase licenses that allow a user to
activate Foxit products in multiple devices. For this type of licenses, the Number
of allowed devices item appears in the dialog box, allowing you to specify the
number of the devices that are allowed to log in.
6. Click OK.
You can also assign licenses to multiple users with a CSV file by doing the following:
1. Click the Assign License button. Choose Assign licenses with CSV file to
assign licenses to the users listed in a CSV file.
2. In the pop-up dialog box, drag a CSV file to the box or click Browse to select a
CSV file. The CSV file includes the users you want to assign licenses to and the
corresponding licenses for each user. How to create the CSV file, click
Foxit Admin Console
Administrator Guide
25
Download the sample CSV file to see the required format for reference.
3. Click Assign.
Change product licenses for users
1. Click the Detail icon in the Action column and the User info dialog box
appears on the right side.
2. Click Edit, select a desired product license, and then click Save.
Remove licenses from users
To remove licenses from users, do either of the following:
• Select the users from the user list, click the Remove License button above the
user list and choose Remove License.
• Click the Remove License button and choose Remove licenses with CSV file to
unassign licenses from multiple users with a CSV file. Then you can click the
Remove License button and choose Bulk operation results to show the results
after removing licenses. Any licenses that are not removed successfully will be
displayed in the results.
When a license is unassigned from a user, the user will no longer be able to activate Foxit
applications by logging in with their accounts.
Restore activation (Foxit PDF Editor Windows and Mac only)
For a license that allows a user to activate Foxit products only in one device, if the user
has activated Foxit products successfully in Device 1 and needs to activate the products
in Device 2 for some reason (maybe Device 1 is broken), you can restore the activation to
enable the user to sign in to activate the product again. To do this, select the user and
click the Restore Activation button above the user list.
Internal Update Configuration (On-
premise environments only)
In an on-premise enterprise environment, the internal update server sends requests to
the Foxit web server to get the latest versions of Foxit products, and the clients in the
enterprise only get updates from the internal update server. The Internal Update item
in Foxit Admin Console allows you to configure how to get the latest installation packages
from the Foxit web server and how to deploy the package updates to the end users in
your enterprise.

Foxit Admin Console
Administrator Guide
26
Configuration
On the Configuration page, you can specify the packages to be downloaded from the
Foxit web server and the update configuration in your enterprise. After finishing the
settings, click Save at the bottom of the page. If you want to erase all the specified settings,
click Reset.
• Packages to download: Select the packages to be downloaded automatically
from Foxit server. Downloaded packages can be viewed and managed in Version
Management.
• Automatic update check interval: Specify how often the internal update server
automatically checks for new product packages from the Foxit web server.
• Automatically approve downloaded packages: Turn on the switch to enable
Approved automatically option to allow all end users in your enterprise to
download all available packages that have been downloaded from Foxit server.
This setting only applies to the packages that are downloaded from Foxit server
after you specify the setting. By default, this option is disabled and you need to
manually approve downloads for all packages.
• Scheduled Update Settings: Select the Set a scheduled time to update specific
users or groups option to set different times for different users to install updates,
which can help to relieve some of the pressure on server and bandwidth.
o Click Add and select Add user, Add IP Address, or Add MAC address to
add emails or user names, IP, or Mac addresses you want to set a
scheduled time for. All the users you added will be included in the list
below. (If you choose Add MAC address, you can click Add multiple MAC
addresses in the pop-up dialog box to add multiple MAC addresses at
once by importing a CSV file with a list of MAC addresses you want to add.)
o Click Edit time to select the scheduled time for selected users.
o To delete the scheduled update settings for users, select the users from
the list and click Delete.
• Roll Back Setting: Sometimes you might find issues in an update or the end users
are having problems with it. In these cases, administrators can configure rollback
settings to force clients to temporarily roll back one or more versions to an earlier
version. For example, check the Roll back Foxit PDF Editor versions option, and
select the rolled back versions and the available versions to roll back to. Note: Only
main packages support rollback. Rolling back to an earlier version installs the version
and the default components, but the data in the registry and the GPO template will be
retained.
• Network proxy configuration: Set up a proxy server to connect to Foxit server
as needed.
Foxit Admin Console
Administrator Guide
27
Version Management
The Version Management page in Admin Console lists all main packages and plug-in
packages that have been downloaded, are being downloaded, and were not downloaded
successfully from Foxit server. You can filter/delete packages, and restrict which packages
are available to end users by approving distribution.
• To view the details of a package, click the Details icon in the Action column. The
details panel appears in the right of the Admin Console window. Click the button
in the upper right corner of the panel to close the panel.
• To filter packages, specify the package’s name/version/size, or select the approval
status or Download Completion Time in the Search box or the Advanced Search box
as needed. See also Search for added users.
• To delete packages, select the package(s) and click the Delete button above the
packages list.
• To give users access to packages or if the approval status is unapproved currently,
select the package(s) and click the Approve icon in the Action column (or click the
Approve button above the packages list). In the pop-up dialog box, do any the
following:
o Select Approve package for all clients to update to allow all clients in the
organization to download the package, and click Approve.
o To allow some specific clients to download the package, select Approve
package for specific clients to update to add specific clients by selecting
user emails or user names, IP address ranges, or MAC addresses (You can also
add multiple MAC addresses at once by importing a CSV file with a list of MAC
addresses you want to add.). Then click Approve.
o (Optional) For a package with significant changes or security updates, you can
select the Force clients to install update package option for a mandatory
update. Then the package status shows Pushed and all the selected clients
have to download and install the package.
• To not allow users to download a package, select the package and click the Cancel
icon in the Actions column. Or select the package(s) and click the Unapprove button
above the packages list to disable downloading. After a package is
approved/unapproved, Approved or Unapproved is shown respectively in the Status
column.
• (Optional) For a package whose approval status is Approved or Pushed, you can click
the Edit icon in the Action column to modify the approval settings.
Both main packages and add-on packages are categorized into three tabs: Downloaded,
Download failed, and Downloading. Here take main packages for example:
• In the Downloaded tab, you can view each package’s name, version number,

Foxit Admin Console
Administrator Guide
28
Download completion time, size, approval status, and the actions you can perform.
Depending on the package’s approval status, the available actions vary in the
Action column.
• The Download failed tab lists the packages that were not downloaded
successfully, and the time and reason for the failure. To delete a package, select it
and click the Delete button (which appears above the package list when you select
the package); to start the download again, select the package and click the Retry
button.
• The Downloading tab displays the list of packages that are being downloaded at
present. You can view the details of each package including the package name,
version number, and Start Time (when the download began).
Products
The Products page lists all the products and licenses your company has purchased. If
your company has purchased more licenses or products, you can update the products
and their license information displayed in this page by doing the following:
1. Click Update Licenses at the top of the Products page. In an on-cloud environment,
once you click Update Licenses, the updating process starts and just wait for the
updating to complete; in an on-premise environment, follow Step 2 to complete the
updating.
2. In the pop-up dialog box, choose Online updating or Offline updating.
⚫ For Online updating, an internet connection is required. Click Connect to sign
in with your account to update licenses.
⚫ If you don’t have internet access, click Browse to select key files for the products.
(If you haven’t got a key file yet, click Get One. Then you will obtain the server ID
of the Admin Console in the pop-up dialog box. You need to send the server ID
to Foxit by email and Foxit’s team will send the key file to you later.)
On the Products page, you can view the detailed information for each product, including
the expiration time, the software version number, and the number of licenses used
(assigned) out of the total available ones.
If you move your cursor over a product, the orange arrow icon appears. Clicking on
the icon opens the License Management page to view and manage licenses. You
can also click Product Configuration or click the cog icon under each product to
configure the product on the Product Configuration page. For details, see also License
Management and Product Configuration. (Note: For Foxit Sign, you will be switched to the
Settings page of the Foxit Sign website when clicking Product Configuration.)
Foxit Admin Console
Administrator Guide
29
Reports
The Reports page shows a chart about the enterprise statistics including the number of
total licenses, assigned licenses, activated licenses, and active users. Administrators can
specify what statistics to be displayed or export desired data as needed.
⚫ To display specific statistics you need in the chart, do any of the following:
Select a product to display the statistics related to the product.
Select the time period for which you want to view statistics.
Select the statistics you need: the number of total licenses, assigned licenses,
activated licenses, and active users.
⚫ To export data (summarized or detailed) you specified to a CSV file, do any of the
following:
To export summarized data to a CSV file, put your cursor over the Export Data
button in the upper right corner of the page, choose Export Data (choose Export
User Data to export data with detailed user information such as user names and
emails), and choose Export Data Locally. Then specify a local location to
download the file.
To send the exported CSV file with summarized data to your account by email,
put your cursor over the Export Data button, choose Export Data (choose
Export User Data to export and send the detailed data), and choose Send Data
via Email.
Note: When you export detailed user data, all instances of users that meet the specified
criteria will be exported, including the users that have been removed from the Admin
Console.
Settings
Mail Servers (On-premise environments only)
Enterprise administrators can configure an SMTP mail server used by Foxit Admin
Console to send end users email messages such as update notifications and reports.
Generally in an on-premise environment where the enterprise itself is responsible for any
notifications, it is a must to configure an SMTP mail server. On the Mail Servers page, you
can configure a mail server and then test the configured mail server.
Foxit Admin Console
Administrator Guide
30
Configure a mail server
To configure a mail server, navigate to the Mail Servers page, click Configure and fill in
the following fields as required and click Save after you complete editing. After a mail
server is added, you can click the Edit icon on the Mail Servers page to modify the
server information, or click the Delete icon to remove the mail server.
SMTP server details
• Name – Enter a name to identify the mail server in Foxit Admin Console.
• From address – Enter the email address that will be used by Foxit Admin Console
to send notification emails.
• From name – Enter the name that will be displayed in notification emails.
• Subject prefix – Enter the text that you want to appear at the beginning of the
subject line of notification emails.
Tip: You can customize more information for email templates. See also Enterprise Brand
Customization.
Server hostname
• Server hostname - Enter the host name of the mail server or the JNDI location of
a javax.mail Session object.
• Server port – Enter the port the mail server should use.
• User Name – Enter the username that will be used to connect to the mail server,
and then specify the password below.
• Use TLS - Select this option if the SMTP server uses the Transport Layer Security
(TLS) protocol.
Test a mail server
To ensure the mail server is correctly configured, you can click the sign to send a test
email. In the pop-up Send test email dialog box, specify the recipient, and enter the
subject, message type, and messages. Then click OK to send the email. A text message
will appear in the Log box in the Send test email dialog box, telling you whether the email
has been sent successfully.
Enterprise Brand Customization
On the Enterprise Customization page, administrators can customize or modify the logo
of Foxit PDF Editor’s login window on clients and email templates that are used for
Foxit Admin Console
Administrator Guide
31
sending emails to end users, to match your company’s brand.
Customize the client’s login page: (On-premise environments only)
Click Browse to select an image for the logo and enter the server name in the box. Both
the logo and the server name will appear on the Foxit PDF Editor’s login window on clients.
Customize email templates:
Click Browse to select an image for the logo in emails and enter the company name that
appears at the bottom of the email messages sent to your end users.
After completing the settings, click Save. Or click Reset to return to the default settings.
Customize Foxit PDF Editor Cloud: (On-cloud environments only)
Customize the company logo and the company name that appear on the Foxit PDF Editor
Cloud webpages.
Windows Authentication (On-premise environments only)
Integrated Windows authentication enables users to log in applications with their
Windows credentials. For companies that have enabled Active Directory (AD) domains,
administrators can configure their AD domain information in the Admin Console to allow
the AD users to automatically activate products by logging in with their AD accounts.
Overall, two key steps are needed for Windows authentication: configuring settings in the
Admin Console and on clients.
Configure settings in the Admin Console
In Step 1, navigate to the Windows Authentication page under Settings, and enter the
information of the AD domain your organization uses.
• Domain name - The Windows AD domain name.
• IP Address - The IP address of the AD domain controller.
• Hostname - The hostname of the AD domain controller.
• Computer Account - The computer account of the domain controller. If you haven’t
created a computer account for the domain controller yet, click How to get the
above configuration at the bottom of the page to create an account and
password.
• Password – The password of the domain controller.
• Domain of Email – The domain of your email. If you leave this field empty, the

Foxit Admin Console
Administrator Guide
32
system will use the domain name of the Computer Account.
• Reset – Click Reset at the bottom of the Windows Authentication page to clear
all the data you entered above.
After completing the settings, click Save and Test. You will be prompted if the
configuration is successful and then you can go to the next step to configure settings on
clients.
Configure settings on clients
In Step 2, configure Internet Explorer on the client devices in your AD domain.
1. Open Internet Explorer.
2. Click Internet Options > Advanced > Settings > Security > select Enable Integrated
Windows Authentication.
3. Restart Internet Explorer.
4. Click Internet Options > Security > Local Intranet > Sites > Advanced. Copy the URL
provided on the Windows Authentication page to the Websites box. (Note: The URL
is generated automatically after the Admin Console is set up in your organization.)
5. Internet Options > Security > Local Intranet > Custom Level > User Authentication,
select Automatic login in intranet zone only.
Product Configuration
To apply better and more precise control on the access to Foxit applications, you can do
more configuration on the Product Configuration page such as the Foxit PDF Editor’s
activation policy on clients. Clicking on each product opens the corresponding
configuration page and you can do settings as necessary. (Note: Clicking on Foxit Sign
opens the homepage of the Foxit Sign website portal, where you need to do the
configuration settings after logging in to Foxit Sign. For details, please refer to Foxit Sign
Manual.)
Client Activation Policy (for Foxit PDF Editor)
Licensing Model: shows the current licensing mode your company uses to control
product licenses. (On-premise environments only)
Authorization Model: Select an authorization model to assign licenses to users. This
setting is only available for on-premise environments with LDAP set up in the Admin
Console.
• Manual authorization: With this model selected, administrators can specify
which users to assign licenses to. Only the assigned users can activate Foxit PDF

Foxit Admin Console
Administrator Guide
33
Editor successfully after logging in with their accounts. This model is selected by
default.
• Automatically authorize: Select this model, and each user will be allowed to
activate Foxit PDF Editor once they log in with their accounts as long as there are
available licenses.
For the Automatically authorize model, if there are more than one license type
for the same product, you need to specify the priority of how clients obtain
authorization. Clients will automatically activate the product with the available
licenses in the specified priority. Higher priority licenses are used before lower
priority licenses.
IP address range restriction: Specify IP addresses or ranges to allow only the clients
whose IP addresses are in the specified ranges to activate Foxit PDF Editor.
Offline available time: Select the Allow users to use Foxit PDF Editor when offline for:
n days option, and specify a time period after which Foxit PDF Editor on the devices will
be automatically deactivated if those devices do not connect to the Admin Console server
(e.g. devices are switched off or do not connect to the Internet). Generally, if deactivated
because of the failure to connect to the server, Foxit PDF Editor can be activated again
once users connect their devices to the server, unless the licenses are revoked or expire.
Automatic deactivation: Users who do not launch Foxit PDF Editor for a specified time
period will have their licenses automatically revoked. You can specify the time period as
necessary. The minimum is 90 days.
Mac address range restriction: Specify MAC addresses to allow only the clients with the
MAC addresses specified to activate Foxit PDF Editor. You can also add multiple MAC
addresses at once by importing a CSV file with a list of MAC addresses you want to add.
Integrated network drives configuration (for Foxit PDF
Editor Cloud)
You can specify which network drives to be integrated with Foxit PDF Editor Cloud, which
allows users to open or save PDF files from/to those network drives.
Log Cleanup Settings
As needed, you can purge old logs to reduce the amount of disk space that the log data
occupies. To do this, on the Log Cleanup Settings page, turn on the Auto-cleanup log
process and specify a time period (N days) to delete the log data older than N days.
Foxit Admin Console
Administrator Guide
34
Support (On-cloud environments only)
Feel free to contact us should you need any information or have any problems with our
products. We are always here, ready to serve you better. To get support, you can click
Create a ticket on the Support page to submit a support ticket to us, or contact us via
email or phone. Click View issues to view and search all the tickets you have submitted.
Content Logs
Keep track of administrators’ actions on the Admin Console and the user data collected
from clients. Content Logs provides three types of logs: Admin Operation Logs, Internal
Update Logs, and Rolled Back Logs.
Administrators’ actions on the Admin Console are recorded in Admin Operation Logs and
Internal Update Logs. From the lists on the pages, you can see when an action is
performed, the action type (event type), the status (whether the action is performed
successfully), and the operator (which administrator performs the action).
Rolled Back Logs records the events that users or devices roll back a version, including
the rollback time, the user email or user name, the associated product, the version they
roll back to, the user’s MAC address, and more.
⚫ Admin Operation Logs - Records all the actions performed by the administrator.
⚫ Internal Update Logs - Records the administrator’s operation history in internal
update configuration. (On-premise environments only)
⚫ Rolled Back Logs – Records the events that users or devices rolled back a version
successfully.
To filter log data, specify the criteria and click Search. You can also export and download
log data to CSV files.

Foxit Admin Console
Administrator Guide
35
Contact Us
Feel free to contact us should you need any information or have any problems with our
products. We are always here, ready to serve you better.
• Office Address:
Foxit Software Incorporated
41841 Albrae Street
Fremont, CA 94538
USA
• Sales:
1-866-680-3668
• Support & General:
1-866-MYFOXIT, 1-866-693-6948, or 1-510-438-9090
• Fax:
1-510-405-9288
• Website:
www.foxit.com
• E-mail:
Sales - [email protected]
Marketing - [email protected]
Technical Support - enter a trouble ticket via our Support Portal
Business Development - [email protected]
Customer Service Feedback - [email protected]