TIBCO ActiveMatrix BusinessWorks™ Administration
254
TIBCO ActiveMatrix BusinessWorks™ Administration Software Release 6.5.1 February 2019 Document Updated: March 2019, April 2019
-
Upload
khangminh22 -
Category
Documents
-
view
7 -
download
0
Transcript of TIBCO ActiveMatrix BusinessWorks™ Administration
TIBCO ActiveMatrix BusinessWorks™AdministrationSoftware Release 6.5.1 February 2019
Document Updated: March 2019, April 2019

Important Information
SOME TIBCO SOFTWARE EMBEDS OR BUNDLES OTHER TIBCO SOFTWARE. USE OF SUCHEMBEDDED OR BUNDLED TIBCO SOFTWARE IS SOLELY TO ENABLE THE FUNCTIONALITY (ORPROVIDE LIMITED ADD-ON FUNCTIONALITY) OF THE LICENSED TIBCO SOFTWARE. THEEMBEDDED OR BUNDLED SOFTWARE IS NOT LICENSED TO BE USED OR ACCESSED BY ANYOTHER TIBCO SOFTWARE OR FOR ANY OTHER PURPOSE.
USE OF TIBCO SOFTWARE AND THIS DOCUMENT IS SUBJECT TO THE TERMS ANDCONDITIONS OF A LICENSE AGREEMENT FOUND IN EITHER A SEPARATELY EXECUTEDSOFTWARE LICENSE AGREEMENT, OR, IF THERE IS NO SUCH SEPARATE AGREEMENT, THECLICKWRAP END USER LICENSE AGREEMENT WHICH IS DISPLAYED DURING DOWNLOADOR INSTALLATION OF THE SOFTWARE (AND WHICH IS DUPLICATED IN THE LICENSE FILE)OR IF THERE IS NO SUCH SOFTWARE LICENSE AGREEMENT OR CLICKWRAP END USERLICENSE AGREEMENT, THE LICENSE(S) LOCATED IN THE “LICENSE” FILE(S) OF THESOFTWARE. USE OF THIS DOCUMENT IS SUBJECT TO THOSE TERMS AND CONDITIONS, ANDYOUR USE HEREOF SHALL CONSTITUTE ACCEPTANCE OF AND AN AGREEMENT TO BEBOUND BY THE SAME.
ANY SOFTWARE ITEM IDENTIFIED AS THIRD PARTY LIBRARY IS AVAILABLE UNDERSEPARATE SOFTWARE LICENSE TERMS AND IS NOT PART OF A TIBCO PRODUCT. AS SUCH,THESE SOFTWARE ITEMS ARE NOT COVERED BY THE TERMS OF YOUR AGREEMENT WITHTIBCO, INCLUDING ANY TERMS CONCERNING SUPPORT, MAINTENANCE, WARRANTIES,AND INDEMNITIES. DOWNLOAD AND USE OF THESE ITEMS IS SOLELY AT YOUR OWNDISCRETION AND SUBJECT TO THE LICENSE TERMS APPLICABLE TO THEM. BY PROCEEDINGTO DOWNLOAD, INSTALL OR USE ANY OF THESE ITEMS, YOU ACKNOWLEDGE THEFOREGOING DISTINCTIONS BETWEEN THESE ITEMS AND TIBCO PRODUCTS.
This document is subject to U.S. and international copyright laws and treaties. No part of thisdocument may be reproduced in any form without the written authorization of TIBCO Software Inc.
TIBCO, TIBCO ActiveMatrix BusinessWorks, TIBCO Rendezvous, TIBCO Enterprise Message Service,TIBCO Business Studio, TIBCO Enterprise Administrator, TIBCO ActiveSpaces, TIBCO Runtime Agent,TIBCO Designer, and Two-Second Advantage are either registered trademarks or trademarks of TIBCOSoftware Inc. in the United States and/or other countries.
Enterprise Java Beans (EJB), Java Platform Enterprise Edition (Java EE), Java 2 Platform EnterpriseEdition (J2EE), and all Java-based trademarks and logos are trademarks or registered trademarks ofOracle Corporation in the U.S. and other countries.
All other product and company names and marks mentioned in this document are the property of theirrespective owners and are mentioned for identification purposes only.
This software may be available on multiple operating systems. However, not all operating systemplatforms for a specific software version are released at the same time. Please see the readme.txt file forthe availability of this software version on a specific operating system platform.
THIS DOCUMENT IS PROVIDED “AS IS” WITHOUT WARRANTY OF ANY KIND, EITHER EXPRESSOR IMPLIED, INCLUDING, BUT NOT LIMITED TO, THE IMPLIED WARRANTIES OFMERCHANTABILITY, FITNESS FOR A PARTICULAR PURPOSE, OR NON-INFRINGEMENT.
THIS DOCUMENT COULD INCLUDE TECHNICAL INACCURACIES OR TYPOGRAPHICALERRORS. CHANGES ARE PERIODICALLY ADDED TO THE INFORMATION HEREIN; THESECHANGES WILL BE INCORPORATED IN NEW EDITIONS OF THIS DOCUMENT. TIBCOSOFTWARE INC. MAY MAKE IMPROVEMENTS AND/OR CHANGES IN THE PRODUCT(S)AND/OR THE PROGRAM(S) DESCRIBED IN THIS DOCUMENT AT ANY TIME.
THE CONTENTS OF THIS DOCUMENT MAY BE MODIFIED AND/OR QUALIFIED, DIRECTLY ORINDIRECTLY, BY OTHER DOCUMENTATION WHICH ACCOMPANIES THIS SOFTWARE,INCLUDING BUT NOT LIMITED TO ANY RELEASE NOTES AND "READ ME" FILES.
2
TIBCO ActiveMatrix BusinessWorks™ Administration

This and other products of TIBCO Software Inc. may be covered by registered patents. Please refer toTIBCO's Virtual Patent Marking document (https://www.tibco.com/patents) for details.
Copyright © 2001-2019. TIBCO Software Inc. All Rights Reserved.
3
TIBCO ActiveMatrix BusinessWorks™ Administration

Contents
Figures . . . . . . . . . . . . . . . . . . . . . . . . . . . . . . . . . . . . . . . . . . . . . . . . . . . . . . . . . . . . . . . . . . . . . . . . . . . . . . . . . . . . . . . . . . . 10
TIBCO Documentation and Support Services . . . . . . . . . . . . . . . . . . . . . . . . . . . . . . . . . . . . . . . . . . . . . . . . . . . . . . . 11
Administration Architecture Overview . . . . . . . . . . . . . . . . . . . . . . . . . . . . . . . . . . . . . . . . . . . . . . . . . . . . . . . . . . . . . . 13
Getting Started . . . . . . . . . . . . . . . . . . . . . . . . . . . . . . . . . . . . . . . . . . . . . . . . . . . . . . . . . . . . . . . . . . . . . . . . . . . . . . . . . . . 15
Execution Modes . . . . . . . . . . . . . . . . . . . . . . . . . . . . . . . . . . . . . . . . . . . . . . . . . . . . . . . . . . . . . . . . . . . . . . . . . . . . . . . . . . . . . . . . . . . . . . . . . . . . . 15
Running in Local Mode . . . . . . . . . . . . . . . . . . . . . . . . . . . . . . . . . . . . . . . . . . . . . . . . . . . . . . . . . . . . . . . . . . . . . . . . . . . . . . . . . . . . . . . . . . . . . . . 16
Running in Enterprise Mode Using the Command Line . . . . . . . . . . . . . . . . . . . . . . . . . . . . . . . . . . . . . . . . . . . . . . . . . . . . . . . . . . . . . . . . 18
Running in Enterprise Mode Using the Admin UI . . . . . . . . . . . . . . . . . . . . . . . . . . . . . . . . . . . . . . . . . . . . . . . . . . . . . . . . . . . . . . . . . . . . . . 24
Core Admin Sample Scripts . . . . . . . . . . . . . . . . . . . . . . . . . . . . . . . . . . . . . . . . . . . . . . . . . . . . . . . . . . . . . . . . . . . . . . . . . . . . . . . . . . . . . . . . . . 28
Administrator and Agent . . . . . . . . . . . . . . . . . . . . . . . . . . . . . . . . . . . . . . . . . . . . . . . . . . . . . . . . . . . . . . . . . . . . . . . . . . .45
bwadmin . . . . . . . . . . . . . . . . . . . . . . . . . . . . . . . . . . . . . . . . . . . . . . . . . . . . . . . . . . . . . . . . . . . . . . . . . . . . . . . . . . . . . . . . . . . . . . . . . . . . . . . . . . . . . 45
bwagent . . . . . . . . . . . . . . . . . . . . . . . . . . . . . . . . . . . . . . . . . . . . . . . . . . . . . . . . . . . . . . . . . . . . . . . . . . . . . . . . . . . . . . . . . . . . . . . . . . . . . . . . . . . . . .47
Configuring bwagent . . . . . . . . . . . . . . . . . . . . . . . . . . . . . . . . . . . . . . . . . . . . . . . . . . . . . . . . . . . . . . . . . . . . . . . . . . . . . . . . . . . . . . . . . . . . . 48
ActiveSpaces Configuration for bwagent . . . . . . . . . . . . . . . . . . . . . . . . . . . . . . . . . . . . . . . . . . . . . . . . . . . . . . . . . . . . . . . . . . . . . 58
Simple Server Configuration . . . . . . . . . . . . . . . . . . . . . . . . . . . . . . . . . . . . . . . . . . . . . . . . . . . . . . . . . . . . . . . . . . . . . . . . . . . . .59
Simple High Availability Configuration . . . . . . . . . . . . . . . . . . . . . . . . . . . . . . . . . . . . . . . . . . . . . . . . . . . . . . . . . . . . . . . . . . . 60
High Availability Configuration with Remote Clients . . . . . . . . . . . . . . . . . . . . . . . . . . . . . . . . . . . . . . . . . . . . . . . . . . . . . .61
High Availability Configuration with Remote Discovery . . . . . . . . . . . . . . . . . . . . . . . . . . . . . . . . . . . . . . . . . . . . . . . . . . .62
Configuring bwagent for ActiveSpaces . . . . . . . . . . . . . . . . . . . . . . . . . . . . . . . . . . . . . . . . . . . . . . . . . . . . . . . . . . . . . . . . . . .63
Database with TIBCO Enterprise Message Service Configuration for bwagent . . . . . . . . . . . . . . . . . . . . . . . . . . . . . . . . 63
Configuring bwagent for PostgreSQL and TIBCO Enterprise Message Service . . . . . . . . . . . . . . . . . . . . . . . . . . . 65
Configuring bwagent for MySQL and TIBCO Enterprise Message Service . . . . . . . . . . . . . . . . . . . . . . . . . . . . . . . . 67
Configuring bwagent for Microsoft SQL Server and TIBCO Enterprise Message Service . . . . . . . . . . . . . . . . . 69
Configuring bwagent for Oracle and TIBCO Enterprise Message Service . . . . . . . . . . . . . . . . . . . . . . . . . . . . . . . . .70
Configuring bwagent for DB2 and TIBCO Enterprise Message Service . . . . . . . . . . . . . . . . . . . . . . . . . . . . . . . . . . 71
Configuring bwagent for MariaDB and TIBCO EMS . . . . . . . . . . . . . . . . . . . . . . . . . . . . . . . . . . . . . . . . . . . . . . . . . . . . . . 72
Database with TIBCO FTL for bwagent . . . . . . . . . . . . . . . . . . . . . . . . . . . . . . . . . . . . . . . . . . . . . . . . . . . . . . . . . . . . . . . . . . . . . . 74
Configuring bwagent for PostgreSQL and TIBCO FTL® . . . . . . . . . . . . . . . . . . . . . . . . . . . . . . . . . . . . . . . . . . . . . . . . . . 75
Configuring bwagent for MySQL and TIBCO FTL® . . . . . . . . . . . . . . . . . . . . . . . . . . . . . . . . . . . . . . . . . . . . . . . . . . . . . . .76
Configuring bwagent for Microsoft SQL Server and TIBCO FTL® . . . . . . . . . . . . . . . . . . . . . . . . . . . . . . . . . . . . . . . . .78
Configuring bwagent for Oracle and TIBCO FTL® . . . . . . . . . . . . . . . . . . . . . . . . . . . . . . . . . . . . . . . . . . . . . . . . . . . . . . . .79
Configuring bwagent for DB2 and TIBCO FTL® . . . . . . . . . . . . . . . . . . . . . . . . . . . . . . . . . . . . . . . . . . . . . . . . . . . . . . . . . 81
Configuring bwagent for MariaDB and TIBCO FTL® . . . . . . . . . . . . . . . . . . . . . . . . . . . . . . . . . . . . . . . . . . . . . . . . . . . . . .82
Migrating from ActiveSpaces to Database with TIBCO Enterprise Messaging Service . . . . . . . . . . . . . . . . . . . . . . . . . . . . . 83
Migrating from ActiveSpaces to Database with TIBCO FTL . . . . . . . . . . . . . . . . . . . . . . . . . . . . . . . . . . . . . . . . . . . . . . . . . . . . . . . .86
Creating an Agent Network . . . . . . . . . . . . . . . . . . . . . . . . . . . . . . . . . . . . . . . . . . . . . . . . . . . . . . . . . . . . . . . . . . . . . . . . . . . . . . . . . . . . . . .90
4
TIBCO ActiveMatrix BusinessWorks™ Administration
Accessing the bwagent REST API with the Swagger UI . . . . . . . . . . . . . . . . . . . . . . . . . . . . . . . . . . . . . . . . . . . . . . . . . . . . . . . . . . . 90
Using the bwagent REST API to Return Selected Fields . . . . . . . . . . . . . . . . . . . . . . . . . . . . . . . . . . . . . . . . . . . . . . . . . . . . . . . . . . 92
Securing the bwagent REST API . . . . . . . . . . . . . . . . . . . . . . . . . . . . . . . . . . . . . . . . . . . . . . . . . . . . . . . . . . . . . . . . . . . . . . . . . . . . . . . . . 92
Enabling Authentication for the bwagent REST API Using the JAAS Property File . . . . . . . . . . . . . . . . . . . . . . . . . . . . . 92
Enabling LDAP Authentication for the bwagent REST API . . . . . . . . . . . . . . . . . . . . . . . . . . . . . . . . . . . . . . . . . . . . . . . . . . . . 95
Enabling LDAP Over SSL Authentication for the bwagent REST API . . . . . . . . . . . . . . . . . . . . . . . . . . . . . . . . . . . . . . . . . . 96
Authorizing Access to the REST API by Role . . . . . . . . . . . . . . . . . . . . . . . . . . . . . . . . . . . . . . . . . . . . . . . . . . . . . . . . . . . . . . . . .96
Securing the REST API Server . . . . . . . . . . . . . . . . . . . . . . . . . . . . . . . . . . . . . . . . . . . . . . . . . . . . . . . . . . . . . . . . . . . . . . . . . . . . . . 97
Importing LDAP SSL certificate in the cacerts keystore file . . . . . . . . . . . . . . . . . . . . . . . . . . . . . . . . . . . . . . . . . . . . . . . . . . 100
Viewing bwgent Information . . . . . . . . . . . . . . . . . . . . . . . . . . . . . . . . . . . . . . . . . . . . . . . . . . . . . . . . . . . . . . . . . . . . . . . . . . . . . . . . . . . . .101
bwadmin Command Line . . . . . . . . . . . . . . . . . . . . . . . . . . . . . . . . . . . . . . . . . . . . . . . . . . . . . . . . . . . . . . . . . . . . . . . . . . . . . . . . . . . 101
Restoring the File System of a bwagent . . . . . . . . . . . . . . . . . . . . . . . . . . . . . . . . . . . . . . . . . . . . . . . . . . . . . . . . . . . . . . . . . . . . . . . . . 102
Configuring the Location of the Domains Folder . . . . . . . . . . . . . . . . . . . . . . . . . . . . . . . . . . . . . . . . . . . . . . . . . . . . . . . . . . . . . . . . . . . . . .102
Using bwagent with TEA . . . . . . . . . . . . . . . . . . . . . . . . . . . . . . . . . . . . . . . . . . . . . . . . . . . . . . . . . . . . . . . . . . . . . . . . . .104
Registering bwagent with TIBCO Enterprise Administrator . . . . . . . . . . . . . . . . . . . . . . . . . . . . . . . . . . . . . . . . . . . . . . . . . . . . . . . . . . . 105
Autoregistering bwagent with TIBCO Enterprise Administrator . . . . . . . . . . . . . . . . . . . . . . . . . . . . . . . . . . . . . . . . . . . . . . . . . . . 105
Unregistering bwagent with TIBCO Enterprise Administrator . . . . . . . . . . . . . . . . . . . . . . . . . . . . . . . . . . . . . . . . . . . . . . . . . . . . . 106
Enabling and Disabling bwagent's TIBCO Enterprise Administrator Agent Port . . . . . . . . . . . . . . . . . . . . . . . . . . . . . . . . . . . 106
Compatibility Chart for TIBCO ActiveMatrix BusinessWorks™ and TIBCO® Enterprise Administrator . . . . . . . . . . . . . . . . . . 106
TEA Shell . . . . . . . . . . . . . . . . . . . . . . . . . . . . . . . . . . . . . . . . . . . . . . . . . . . . . . . . . . . . . . . . . . . . . . . . . . . . . . . . . . . . . . . . . . . . . . . . . . . . . . . . . . . 112
Using TEA Shell Commands . . . . . . . . . . . . . . . . . . . . . . . . . . . . . . . . . . . . . . . . . . . . . . . . . . . . . . . . . . . . . . . . . . . . . . . . . . . . . . . . . . . . 112
TEA Shell Commands . . . . . . . . . . . . . . . . . . . . . . . . . . . . . . . . . . . . . . . . . . . . . . . . . . . . . . . . . . . . . . . . . . . . . . . . . . . . . . . . . . . . . . . . . . 113
Roles and Permissions . . . . . . . . . . . . . . . . . . . . . . . . . . . . . . . . . . . . . . . . . . . . . . . . . . . . . . . . . . . . . . . . . . . . . . . . . . . 116
Administration Tasks and Reference . . . . . . . . . . . . . . . . . . . . . . . . . . . . . . . . . . . . . . . . . . . . . . . . . . . . . . . . . . . . . . 120
Managing Domains . . . . . . . . . . . . . . . . . . . . . . . . . . . . . . . . . . . . . . . . . . . . . . . . . . . . . . . . . . . . . . . . . . . . . . . . . . . . . . . . . . . . . . . . . . . . . . . . . 120
Creating a Domain . . . . . . . . . . . . . . . . . . . . . . . . . . . . . . . . . . . . . . . . . . . . . . . . . . . . . . . . . . . . . . . . . . . . . . . . . . . . . . . . . . . . . . . . . . . . . .120
bwadmin Command Line . . . . . . . . . . . . . . . . . . . . . . . . . . . . . . . . . . . . . . . . . . . . . . . . . . . . . . . . . . . . . . . . . . . . . . . . . . . . . . . . . . . 120
Admin UI . . . . . . . . . . . . . . . . . . . . . . . . . . . . . . . . . . . . . . . . . . . . . . . . . . . . . . . . . . . . . . . . . . . . . . . . . . . . . . . . . . . . . . . . . . . . . . . . . . .120
Deleting a Domain . . . . . . . . . . . . . . . . . . . . . . . . . . . . . . . . . . . . . . . . . . . . . . . . . . . . . . . . . . . . . . . . . . . . . . . . . . . . . . . . . . . . . . . . . . . . . . 121
bwadmin Command Line . . . . . . . . . . . . . . . . . . . . . . . . . . . . . . . . . . . . . . . . . . . . . . . . . . . . . . . . . . . . . . . . . . . . . . . . . . . . . . . . . . . 121
Admin UI . . . . . . . . . . . . . . . . . . . . . . . . . . . . . . . . . . . . . . . . . . . . . . . . . . . . . . . . . . . . . . . . . . . . . . . . . . . . . . . . . . . . . . . . . . . . . . . . . . .122
Backing Up and Restoring a Domain . . . . . . . . . . . . . . . . . . . . . . . . . . . . . . . . . . . . . . . . . . . . . . . . . . . . . . . . . . . . . . . . . . . . . . . . . . . . 122
bwadmin Command Line . . . . . . . . . . . . . . . . . . . . . . . . . . . . . . . . . . . . . . . . . . . . . . . . . . . . . . . . . . . . . . . . . . . . . . . . . . . . . . . . . . . 123
Admin UI . . . . . . . . . . . . . . . . . . . . . . . . . . . . . . . . . . . . . . . . . . . . . . . . . . . . . . . . . . . . . . . . . . . . . . . . . . . . . . . . . . . . . . . . . . . . . . . . . . .123
Restoring the File System of a Domain . . . . . . . . . . . . . . . . . . . . . . . . . . . . . . . . . . . . . . . . . . . . . . . . . . . . . . . . . . . . . . . . . . . . . . . . . . 124
Managing AppSpaces . . . . . . . . . . . . . . . . . . . . . . . . . . . . . . . . . . . . . . . . . . . . . . . . . . . . . . . . . . . . . . . . . . . . . . . . . . . . . . . . . . . . . . . . . . . . . . . 124
Creating an AppSpace . . . . . . . . . . . . . . . . . . . . . . . . . . . . . . . . . . . . . . . . . . . . . . . . . . . . . . . . . . . . . . . . . . . . . . . . . . . . . . . . . . . . . . . . . .125
bwadmin Command Line . . . . . . . . . . . . . . . . . . . . . . . . . . . . . . . . . . . . . . . . . . . . . . . . . . . . . . . . . . . . . . . . . . . . . . . . . . . . . . . . . . . 125
Admin UI . . . . . . . . . . . . . . . . . . . . . . . . . . . . . . . . . . . . . . . . . . . . . . . . . . . . . . . . . . . . . . . . . . . . . . . . . . . . . . . . . . . . . . . . . . . . . . . . . . .125
5
TIBCO ActiveMatrix BusinessWorks™ Administration

Starting an AppSpace . . . . . . . . . . . . . . . . . . . . . . . . . . . . . . . . . . . . . . . . . . . . . . . . . . . . . . . . . . . . . . . . . . . . . . . . . . . . . . . . . . . . . . . . . . 126
bwadmin Command Line . . . . . . . . . . . . . . . . . . . . . . . . . . . . . . . . . . . . . . . . . . . . . . . . . . . . . . . . . . . . . . . . . . . . . . . . . . . . . . . . . . . 127
Admin UI . . . . . . . . . . . . . . . . . . . . . . . . . . . . . . . . . . . . . . . . . . . . . . . . . . . . . . . . . . . . . . . . . . . . . . . . . . . . . . . . . . . . . . . . . . . . . . . . . . .127
Editing an AppSpace Configuration . . . . . . . . . . . . . . . . . . . . . . . . . . . . . . . . . . . . . . . . . . . . . . . . . . . . . . . . . . . . . . . . . . . . . . . . . . . . . 127
Admin UI . . . . . . . . . . . . . . . . . . . . . . . . . . . . . . . . . . . . . . . . . . . . . . . . . . . . . . . . . . . . . . . . . . . . . . . . . . . . . . . . . . . . . . . . . . . . . . . . . . .127
Viewing AppSpace States . . . . . . . . . . . . . . . . . . . . . . . . . . . . . . . . . . . . . . . . . . . . . . . . . . . . . . . . . . . . . . . . . . . . . . . . . . . . . . . . . . . . . . .128
bwadmin Command Line . . . . . . . . . . . . . . . . . . . . . . . . . . . . . . . . . . . . . . . . . . . . . . . . . . . . . . . . . . . . . . . . . . . . . . . . . . . . . . . . . . . 129
Admin UI . . . . . . . . . . . . . . . . . . . . . . . . . . . . . . . . . . . . . . . . . . . . . . . . . . . . . . . . . . . . . . . . . . . . . . . . . . . . . . . . . . . . . . . . . . . . . . . . . . .129
Stopping an AppSpace . . . . . . . . . . . . . . . . . . . . . . . . . . . . . . . . . . . . . . . . . . . . . . . . . . . . . . . . . . . . . . . . . . . . . . . . . . . . . . . . . . . . . . . . . 129
bwadmin Command Line . . . . . . . . . . . . . . . . . . . . . . . . . . . . . . . . . . . . . . . . . . . . . . . . . . . . . . . . . . . . . . . . . . . . . . . . . . . . . . . . . . . 129
Admin UI . . . . . . . . . . . . . . . . . . . . . . . . . . . . . . . . . . . . . . . . . . . . . . . . . . . . . . . . . . . . . . . . . . . . . . . . . . . . . . . . . . . . . . . . . . . . . . . . . . .129
Deleting an AppSpace . . . . . . . . . . . . . . . . . . . . . . . . . . . . . . . . . . . . . . . . . . . . . . . . . . . . . . . . . . . . . . . . . . . . . . . . . . . . . . . . . . . . . . . . . . 130
bwadmin Command Line . . . . . . . . . . . . . . . . . . . . . . . . . . . . . . . . . . . . . . . . . . . . . . . . . . . . . . . . . . . . . . . . . . . . . . . . . . . . . . . . . . . 130
Admin UI . . . . . . . . . . . . . . . . . . . . . . . . . . . . . . . . . . . . . . . . . . . . . . . . . . . . . . . . . . . . . . . . . . . . . . . . . . . . . . . . . . . . . . . . . . . . . . . . . . .130
Backing Up and Restoring an AppSpace . . . . . . . . . . . . . . . . . . . . . . . . . . . . . . . . . . . . . . . . . . . . . . . . . . . . . . . . . . . . . . . . . . . . . . . . 130
Restoring the File System of an AppSpace . . . . . . . . . . . . . . . . . . . . . . . . . . . . . . . . . . . . . . . . . . . . . . . . . . . . . . . . . . . . . . . . . . . . . . 131
Command History . . . . . . . . . . . . . . . . . . . . . . . . . . . . . . . . . . . . . . . . . . . . . . . . . . . . . . . . . . . . . . . . . . . . . . . . . . . . . . . . . . . . . . . . . . . . . . 132
Managing AppNodes . . . . . . . . . . . . . . . . . . . . . . . . . . . . . . . . . . . . . . . . . . . . . . . . . . . . . . . . . . . . . . . . . . . . . . . . . . . . . . . . . . . . . . . . . . . . . . . . 132
Creating an AppNode . . . . . . . . . . . . . . . . . . . . . . . . . . . . . . . . . . . . . . . . . . . . . . . . . . . . . . . . . . . . . . . . . . . . . . . . . . . . . . . . . . . . . . . . . . .132
bwadmin Command Line . . . . . . . . . . . . . . . . . . . . . . . . . . . . . . . . . . . . . . . . . . . . . . . . . . . . . . . . . . . . . . . . . . . . . . . . . . . . . . . . . . . 133
Admin UI . . . . . . . . . . . . . . . . . . . . . . . . . . . . . . . . . . . . . . . . . . . . . . . . . . . . . . . . . . . . . . . . . . . . . . . . . . . . . . . . . . . . . . . . . . . . . . . . . . .133
Starting an AppNode . . . . . . . . . . . . . . . . . . . . . . . . . . . . . . . . . . . . . . . . . . . . . . . . . . . . . . . . . . . . . . . . . . . . . . . . . . . . . . . . . . . . . . . . . . . 134
bwadmin Command Line . . . . . . . . . . . . . . . . . . . . . . . . . . . . . . . . . . . . . . . . . . . . . . . . . . . . . . . . . . . . . . . . . . . . . . . . . . . . . . . . . . . 134
Admin UI . . . . . . . . . . . . . . . . . . . . . . . . . . . . . . . . . . . . . . . . . . . . . . . . . . . . . . . . . . . . . . . . . . . . . . . . . . . . . . . . . . . . . . . . . . . . . . . . . . .135
Editing an AppNode Configuration . . . . . . . . . . . . . . . . . . . . . . . . . . . . . . . . . . . . . . . . . . . . . . . . . . . . . . . . . . . . . . . . . . . . . . . . . . . . . . 135
Admin UI . . . . . . . . . . . . . . . . . . . . . . . . . . . . . . . . . . . . . . . . . . . . . . . . . . . . . . . . . . . . . . . . . . . . . . . . . . . . . . . . . . . . . . . . . . . . . . . . . . .135
Viewing AppNode Statuses . . . . . . . . . . . . . . . . . . . . . . . . . . . . . . . . . . . . . . . . . . . . . . . . . . . . . . . . . . . . . . . . . . . . . . . . . . . . . . . . . . . . . 136
bwadmin Command Line . . . . . . . . . . . . . . . . . . . . . . . . . . . . . . . . . . . . . . . . . . . . . . . . . . . . . . . . . . . . . . . . . . . . . . . . . . . . . . . . . . . 137
Admin UI . . . . . . . . . . . . . . . . . . . . . . . . . . . . . . . . . . . . . . . . . . . . . . . . . . . . . . . . . . . . . . . . . . . . . . . . . . . . . . . . . . . . . . . . . . . . . . . . . . .138
Stopping an AppNode . . . . . . . . . . . . . . . . . . . . . . . . . . . . . . . . . . . . . . . . . . . . . . . . . . . . . . . . . . . . . . . . . . . . . . . . . . . . . . . . . . . . . . . . . . 139
bwadmin Command Line . . . . . . . . . . . . . . . . . . . . . . . . . . . . . . . . . . . . . . . . . . . . . . . . . . . . . . . . . . . . . . . . . . . . . . . . . . . . . . . . . . . 139
Admin UI . . . . . . . . . . . . . . . . . . . . . . . . . . . . . . . . . . . . . . . . . . . . . . . . . . . . . . . . . . . . . . . . . . . . . . . . . . . . . . . . . . . . . . . . . . . . . . . . . . .139
Force Shutting Down an AppNode . . . . . . . . . . . . . . . . . . . . . . . . . . . . . . . . . . . . . . . . . . . . . . . . . . . . . . . . . . . . . . . . . . . . . . . . . . . . . . 139
bwadmin Command Line . . . . . . . . . . . . . . . . . . . . . . . . . . . . . . . . . . . . . . . . . . . . . . . . . . . . . . . . . . . . . . . . . . . . . . . . . . . . . . . . . . . 139
Admin UI . . . . . . . . . . . . . . . . . . . . . . . . . . . . . . . . . . . . . . . . . . . . . . . . . . . . . . . . . . . . . . . . . . . . . . . . . . . . . . . . . . . . . . . . . . . . . . . . . . .139
Deleting an AppNode . . . . . . . . . . . . . . . . . . . . . . . . . . . . . . . . . . . . . . . . . . . . . . . . . . . . . . . . . . . . . . . . . . . . . . . . . . . . . . . . . . . . . . . . . . . 140
bwadmin Command Line . . . . . . . . . . . . . . . . . . . . . . . . . . . . . . . . . . . . . . . . . . . . . . . . . . . . . . . . . . . . . . . . . . . . . . . . . . . . . . . . . . . 140
Admin UI . . . . . . . . . . . . . . . . . . . . . . . . . . . . . . . . . . . . . . . . . . . . . . . . . . . . . . . . . . . . . . . . . . . . . . . . . . . . . . . . . . . . . . . . . . . . . . . . . . .141
Debugging an AppNode . . . . . . . . . . . . . . . . . . . . . . . . . . . . . . . . . . . . . . . . . . . . . . . . . . . . . . . . . . . . . . . . . . . . . . . . . . . . . . . . . . . . . . . . 141
6
TIBCO ActiveMatrix BusinessWorks™ Administration

bwadmin Command Line . . . . . . . . . . . . . . . . . . . . . . . . . . . . . . . . . . . . . . . . . . . . . . . . . . . . . . . . . . . . . . . . . . . . . . . . . . . . . . . . . . . 141
Admin UI . . . . . . . . . . . . . . . . . . . . . . . . . . . . . . . . . . . . . . . . . . . . . . . . . . . . . . . . . . . . . . . . . . . . . . . . . . . . . . . . . . . . . . . . . . . . . . . . . . .142
Enabling the OSGi Console for an AppNode . . . . . . . . . . . . . . . . . . . . . . . . . . . . . . . . . . . . . . . . . . . . . . . . . . . . . . . . . . . . . . . . . . . . .142
bwadmin Command Line . . . . . . . . . . . . . . . . . . . . . . . . . . . . . . . . . . . . . . . . . . . . . . . . . . . . . . . . . . . . . . . . . . . . . . . . . . . . . . . . . . . 143
OSGi Commands . . . . . . . . . . . . . . . . . . . . . . . . . . . . . . . . . . . . . . . . . . . . . . . . . . . . . . . . . . . . . . . . . . . . . . . . . . . . . . . . . . . . . . . . . . 143
Running OSGi Commands . . . . . . . . . . . . . . . . . . . . . . . . . . . . . . . . . . . . . . . . . . . . . . . . . . . . . . . . . . . . . . . . . . . . . . . . . . . . . . . . . . . . . .146
Running OSGI Commands from bwadmin Command Line . . . . . . . . . . . . . . . . . . . . . . . . . . . . . . . . . . . . . . . . . . . . . . . . . . .146
Running OSGi Commands Using SSH Client . . . . . . . . . . . . . . . . . . . . . . . . . . . . . . . . . . . . . . . . . . . . . . . . . . . . . . . . . . . . . . . 146
Running OSGi Commands Using HTTP Client . . . . . . . . . . . . . . . . . . . . . . . . . . . . . . . . . . . . . . . . . . . . . . . . . . . . . . . . . . . . . . 147
Backing Up and Restoring an AppNode . . . . . . . . . . . . . . . . . . . . . . . . . . . . . . . . . . . . . . . . . . . . . . . . . . . . . . . . . . . . . . . . . . . . . . . . . 147
Restoring the File System of an AppNode . . . . . . . . . . . . . . . . . . . . . . . . . . . . . . . . . . . . . . . . . . . . . . . . . . . . . . . . . . . . . . . . . . . . . . . 148
Command History . . . . . . . . . . . . . . . . . . . . . . . . . . . . . . . . . . . . . . . . . . . . . . . . . . . . . . . . . . . . . . . . . . . . . . . . . . . . . . . . . . . . . . . . . . . . . . 149
Managing an Application . . . . . . . . . . . . . . . . . . . . . . . . . . . . . . . . . . . . . . . . . . . . . . . . . . . . . . . . . . . . . . . . . . . . . . . . . . . . . . . . . . . . . . . . . . . . 149
Creating an Application . . . . . . . . . . . . . . . . . . . . . . . . . . . . . . . . . . . . . . . . . . . . . . . . . . . . . . . . . . . . . . . . . . . . . . . . . . . . . . . . . . . . . . . . . 150
Creating an Application with Multiple Profiles . . . . . . . . . . . . . . . . . . . . . . . . . . . . . . . . . . . . . . . . . . . . . . . . . . . . . . . . . . . . . . . . . . . . 150
Creating an Application Archive . . . . . . . . . . . . . . . . . . . . . . . . . . . . . . . . . . . . . . . . . . . . . . . . . . . . . . . . . . . . . . . . . . . . . . . . . . . . . . . . . 151
Uploading an Application Archive . . . . . . . . . . . . . . . . . . . . . . . . . . . . . . . . . . . . . . . . . . . . . . . . . . . . . . . . . . . . . . . . . . . . . . . . . . . . . . . 152
bwadmin Command Line . . . . . . . . . . . . . . . . . . . . . . . . . . . . . . . . . . . . . . . . . . . . . . . . . . . . . . . . . . . . . . . . . . . . . . . . . . . . . . . . . . . 152
Admin UI . . . . . . . . . . . . . . . . . . . . . . . . . . . . . . . . . . . . . . . . . . . . . . . . . . . . . . . . . . . . . . . . . . . . . . . . . . . . . . . . . . . . . . . . . . . . . . . . . . .152
Deploying an Application . . . . . . . . . . . . . . . . . . . . . . . . . . . . . . . . . . . . . . . . . . . . . . . . . . . . . . . . . . . . . . . . . . . . . . . . . . . . . . . . . . . . . . . .153
bwadmin Command Line . . . . . . . . . . . . . . . . . . . . . . . . . . . . . . . . . . . . . . . . . . . . . . . . . . . . . . . . . . . . . . . . . . . . . . . . . . . . . . . . . . . 153
Admin UI . . . . . . . . . . . . . . . . . . . . . . . . . . . . . . . . . . . . . . . . . . . . . . . . . . . . . . . . . . . . . . . . . . . . . . . . . . . . . . . . . . . . . . . . . . . . . . . . . . .153
Editing Application and Application Instance Properties . . . . . . . . . . . . . . . . . . . . . . . . . . . . . . . . . . . . . . . . . . . . . . . . . . . . . . . . . .156
bwadmin Command Line . . . . . . . . . . . . . . . . . . . . . . . . . . . . . . . . . . . . . . . . . . . . . . . . . . . . . . . . . . . . . . . . . . . . . . . . . . . . . . . . . . . 156
Admin UI . . . . . . . . . . . . . . . . . . . . . . . . . . . . . . . . . . . . . . . . . . . . . . . . . . . . . . . . . . . . . . . . . . . . . . . . . . . . . . . . . . . . . . . . . . . . . . . . . . .156
Exporting an Application Profile . . . . . . . . . . . . . . . . . . . . . . . . . . . . . . . . . . . . . . . . . . . . . . . . . . . . . . . . . . . . . . . . . . . . . . . . . . . . 158
bwadmin Command Line . . . . . . . . . . . . . . . . . . . . . . . . . . . . . . . . . . . . . . . . . . . . . . . . . . . . . . . . . . . . . . . . . . . . . . . . . . . . . . .158
Admin UI . . . . . . . . . . . . . . . . . . . . . . . . . . . . . . . . . . . . . . . . . . . . . . . . . . . . . . . . . . . . . . . . . . . . . . . . . . . . . . . . . . . . . . . . . . . . . . 158
Starting an Application . . . . . . . . . . . . . . . . . . . . . . . . . . . . . . . . . . . . . . . . . . . . . . . . . . . . . . . . . . . . . . . . . . . . . . . . . . . . . . . . . . . . . . . . . 159
bwadmin Command Line . . . . . . . . . . . . . . . . . . . . . . . . . . . . . . . . . . . . . . . . . . . . . . . . . . . . . . . . . . . . . . . . . . . . . . . . . . . . . . . . . . . 159
Admin UI . . . . . . . . . . . . . . . . . . . . . . . . . . . . . . . . . . . . . . . . . . . . . . . . . . . . . . . . . . . . . . . . . . . . . . . . . . . . . . . . . . . . . . . . . . . . . . . . . . .159
Viewing Running Applications . . . . . . . . . . . . . . . . . . . . . . . . . . . . . . . . . . . . . . . . . . . . . . . . . . . . . . . . . . . . . . . . . . . . . . . . . . . . . . . . . . 160
bwadmin Command Line . . . . . . . . . . . . . . . . . . . . . . . . . . . . . . . . . . . . . . . . . . . . . . . . . . . . . . . . . . . . . . . . . . . . . . . . . . . . . . . . . . . 160
Admin UI . . . . . . . . . . . . . . . . . . . . . . . . . . . . . . . . . . . . . . . . . . . . . . . . . . . . . . . . . . . . . . . . . . . . . . . . . . . . . . . . . . . . . . . . . . . . . . . . . . .160
Viewing Endpoints, Components, Processes and Command History . . . . . . . . . . . . . . . . . . . . . . . . . . . . . . . . . . . . . . . . .161
Admin UI . . . . . . . . . . . . . . . . . . . . . . . . . . . . . . . . . . . . . . . . . . . . . . . . . . . . . . . . . . . . . . . . . . . . . . . . . . . . . . . . . . . . . . . . . . . . . . 161
Configuring a Unified Doc URL . . . . . . . . . . . . . . . . . . . . . . . . . . . . . . . . . . . . . . . . . . . . . . . . . . . . . . . . . . . . . . . . . . . . . . . . .162
Stopping an Application . . . . . . . . . . . . . . . . . . . . . . . . . . . . . . . . . . . . . . . . . . . . . . . . . . . . . . . . . . . . . . . . . . . . . . . . . . . . . . . . . . . . . . . . .164
bwadmin Command Line . . . . . . . . . . . . . . . . . . . . . . . . . . . . . . . . . . . . . . . . . . . . . . . . . . . . . . . . . . . . . . . . . . . . . . . . . . . . . . . . . . . 164
7
TIBCO ActiveMatrix BusinessWorks™ Administration
Admin UI . . . . . . . . . . . . . . . . . . . . . . . . . . . . . . . . . . . . . . . . . . . . . . . . . . . . . . . . . . . . . . . . . . . . . . . . . . . . . . . . . . . . . . . . . . . . . . . . . . .164
Undeploying an Application . . . . . . . . . . . . . . . . . . . . . . . . . . . . . . . . . . . . . . . . . . . . . . . . . . . . . . . . . . . . . . . . . . . . . . . . . . . . . . . . . . . . . 165
bwadmin Command Line . . . . . . . . . . . . . . . . . . . . . . . . . . . . . . . . . . . . . . . . . . . . . . . . . . . . . . . . . . . . . . . . . . . . . . . . . . . . . . . . . . . 165
Admin UI . . . . . . . . . . . . . . . . . . . . . . . . . . . . . . . . . . . . . . . . . . . . . . . . . . . . . . . . . . . . . . . . . . . . . . . . . . . . . . . . . . . . . . . . . . . . . . . . . . .165
Starting a component in an Application . . . . . . . . . . . . . . . . . . . . . . . . . . . . . . . . . . . . . . . . . . . . . . . . . . . . . . . . . . . . . . . . . . . . . . . . . .165
bwdmin Command Line . . . . . . . . . . . . . . . . . . . . . . . . . . . . . . . . . . . . . . . . . . . . . . . . . . . . . . . . . . . . . . . . . . . . . . . . . . . . . . . . . . . . 165
Admin UI . . . . . . . . . . . . . . . . . . . . . . . . . . . . . . . . . . . . . . . . . . . . . . . . . . . . . . . . . . . . . . . . . . . . . . . . . . . . . . . . . . . . . . . . . . . . . . . . . . .166
Stopping a component in an Application . . . . . . . . . . . . . . . . . . . . . . . . . . . . . . . . . . . . . . . . . . . . . . . . . . . . . . . . . . . . . . . . . . . . . . . . .166
bwdmin Command Line . . . . . . . . . . . . . . . . . . . . . . . . . . . . . . . . . . . . . . . . . . . . . . . . . . . . . . . . . . . . . . . . . . . . . . . . . . . . . . . . . . . . 166
Admin UI . . . . . . . . . . . . . . . . . . . . . . . . . . . . . . . . . . . . . . . . . . . . . . . . . . . . . . . . . . . . . . . . . . . . . . . . . . . . . . . . . . . . . . . . . . . . . . . . . . .166
Retrieving list of components in an Application . . . . . . . . . . . . . . . . . . . . . . . . . . . . . . . . . . . . . . . . . . . . . . . . . . . . . . . . . . . . . . . . . . 167
bwdmin Command Line . . . . . . . . . . . . . . . . . . . . . . . . . . . . . . . . . . . . . . . . . . . . . . . . . . . . . . . . . . . . . . . . . . . . . . . . . . . . . . . . . . . . 167
Admin UI . . . . . . . . . . . . . . . . . . . . . . . . . . . . . . . . . . . . . . . . . . . . . . . . . . . . . . . . . . . . . . . . . . . . . . . . . . . . . . . . . . . . . . . . . . . . . . . . . . .167
Retrieving details of a component in an Application . . . . . . . . . . . . . . . . . . . . . . . . . . . . . . . . . . . . . . . . . . . . . . . . . . . . . . . . . . . . . . 168
bwdmin Command Line . . . . . . . . . . . . . . . . . . . . . . . . . . . . . . . . . . . . . . . . . . . . . . . . . . . . . . . . . . . . . . . . . . . . . . . . . . . . . . . . . . . . 168
Admin UI . . . . . . . . . . . . . . . . . . . . . . . . . . . . . . . . . . . . . . . . . . . . . . . . . . . . . . . . . . . . . . . . . . . . . . . . . . . . . . . . . . . . . . . . . . . . . . . . . . .168
Backing Up and Restoring an Application . . . . . . . . . . . . . . . . . . . . . . . . . . . . . . . . . . . . . . . . . . . . . . . . . . . . . . . . . . . . . . . . . . . . . . . 168
Restoring the File System of an Archive . . . . . . . . . . . . . . . . . . . . . . . . . . . . . . . . . . . . . . . . . . . . . . . . . . . . . . . . . . . . . . . . . . . . . . . . . 169
Restoring the File System of an Application . . . . . . . . . . . . . . . . . . . . . . . . . . . . . . . . . . . . . . . . . . . . . . . . . . . . . . . . . . . . . . . . . . . . . 169
Publishing APIs to TIBCO Mashery® . . . . . . . . . . . . . . . . . . . . . . . . . . . . . . . . . . . . . . . . . . . . . . . . . . . . . . . . . . . . . . . . . . . . . . . . . . . . 169
Backing Up and Restoring from the Backup . . . . . . . . . . . . . . . . . . . . . . . . . . . . . . . . . . . . . . . . . . . . . . . . . . . . . . . .171
Restoring the File System of Runtime Entities . . . . . . . . . . . . . . . . . . . . . . . . . . . . . . . . . . . . . . . . . . . . . . . . . . . . . .172
Debugging . . . . . . . . . . . . . . . . . . . . . . . . . . . . . . . . . . . . . . . . . . . . . . . . . . . . . . . . . . . . . . . . . . . . . . . . . . . . . . . . . . . . . . 173
Troubleshooting bwagent Issues . . . . . . . . . . . . . . . . . . . . . . . . . . . . . . . . . . . . . . . . . . . . . . . . . . . . . . . . . . . . . . . . . . . . . . . . . . . . . . . . . . . . . 174
Troubleshooting Runtime Entity Issues . . . . . . . . . . . . . . . . . . . . . . . . . . . . . . . . . . . . . . . . . . . . . . . . . . . . . . . . . . . . . . . . . . . . . . . . . . . . . . .177
Troubleshooting Archive Issues . . . . . . . . . . . . . . . . . . . . . . . . . . . . . . . . . . . . . . . . . . . . . . . . . . . . . . . . . . . . . . . . . . . . . . . . . . . . . . . . . . . . . . 183
Troubleshooting Application Issues . . . . . . . . . . . . . . . . . . . . . . . . . . . . . . . . . . . . . . . . . . . . . . . . . . . . . . . . . . . . . . . . . . . . . . . . . . . . . . . . . . 185
Troubleshooting Admin UI Issues . . . . . . . . . . . . . . . . . . . . . . . . . . . . . . . . . . . . . . . . . . . . . . . . . . . . . . . . . . . . . . . . . . . . . . . . . . . . . . . . . . . . 187
Logging . . . . . . . . . . . . . . . . . . . . . . . . . . . . . . . . . . . . . . . . . . . . . . . . . . . . . . . . . . . . . . . . . . . . . . . . . . . . . . . . . . . . . . . . . 191
Application Logging . . . . . . . . . . . . . . . . . . . . . . . . . . . . . . . . . . . . . . . . . . . . . . . . . . . . . . . . . . . . . . . . . . . . . . . . . . . . . . . . . . . . . . . . . . . . . . . . . 192
Creating Separate Log Files for Each Application on the AppNode . . . . . . . . . . . . . . . . . . . . . . . . . . . . . . . . . . . . . . . . . . . . . . . 193
Debugging a Specific Application on the AppNode . . . . . . . . . . . . . . . . . . . . . . . . . . . . . . . . . . . . . . . . . . . . . . . . . . . . . . . . . . . . . . 194
Supported Loggers . . . . . . . . . . . . . . . . . . . . . . . . . . . . . . . . . . . . . . . . . . . . . . . . . . . . . . . . . . . . . . . . . . . . . . . . . . . . . . . . . . . . . . . . . . . . . 195
Backward Compatibility for Application Logging . . . . . . . . . . . . . . . . . . . . . . . . . . . . . . . . . . . . . . . . . . . . . . . . . . . . . . . . . . . . . . . . . .195
AppNode Logging . . . . . . . . . . . . . . . . . . . . . . . . . . . . . . . . . . . . . . . . . . . . . . . . . . . . . . . . . . . . . . . . . . . . . . . . . . . . . . . . . . . . . . . . . . . . . . . . . . . 195
bwadmin Logging . . . . . . . . . . . . . . . . . . . . . . . . . . . . . . . . . . . . . . . . . . . . . . . . . . . . . . . . . . . . . . . . . . . . . . . . . . . . . . . . . . . . . . . . . . . . . . . . . . . 196
bwagent Logging . . . . . . . . . . . . . . . . . . . . . . . . . . . . . . . . . . . . . . . . . . . . . . . . . . . . . . . . . . . . . . . . . . . . . . . . . . . . . . . . . . . . . . . . . . . . . . . . . . . .197
HTTP Logging . . . . . . . . . . . . . . . . . . . . . . . . . . . . . . . . . . . . . . . . . . . . . . . . . . . . . . . . . . . . . . . . . . . . . . . . . . . . . . . . . . . . . . . . . . . . . . . . . . . . . . 198
Viewing Log Files from the Admin UI . . . . . . . . . . . . . . . . . . . . . . . . . . . . . . . . . . . . . . . . . . . . . . . . . . . . . . . . . . . . . . . . . . . . . . . . . . . . . . . . .199
8
TIBCO ActiveMatrix BusinessWorks™ Administration

Fault Tolerance . . . . . . . . . . . . . . . . . . . . . . . . . . . . . . . . . . . . . . . . . . . . . . . . . . . . . . . . . . . . . . . . . . . . . . . . . . . . . . . . . . 201
Application Activation Modes . . . . . . . . . . . . . . . . . . . . . . . . . . . . . . . . . . . . . . . . . . . . . . . . . . . . . . . . . . . . . . . . . . . . . . . . . . . . . . . . . . . . . . . . 203
Engine Persistence Modes . . . . . . . . . . . . . . . . . . . . . . . . . . . . . . . . . . . . . . . . . . . . . . . . . . . . . . . . . . . . . . . . . . . . . . . . . . . . . . . . . . . . . . . . . . 205
Configuring Database for the Engine . . . . . . . . . . . . . . . . . . . . . . . . . . . . . . . . . . . . . . . . . . . . . . . . . . . . . . . . . . . . . . . . . . . . . . . . . . . . 206
Configuring the Engine for Group Persistence Mode . . . . . . . . . . . . . . . . . . . . . . . . . . . . . . . . . . . . . . . . . . . . . . . . . . . . . . . . . . . . . 208
Configuring EMS as the Group Provider for Engine . . . . . . . . . . . . . . . . . . . . . . . . . . . . . . . . . . . . . . . . . . . . . . . . . . . . . . . . . 208
Configuring TIBCO FTL® as the Group Provider for Engine . . . . . . . . . . . . . . . . . . . . . . . . . . . . . . . . . . . . . . . . . . . . . . . . .210
Configuring the Engine for FTGroup Persistence Mode . . . . . . . . . . . . . . . . . . . . . . . . . . . . . . . . . . . . . . . . . . . . . . . . . . . . . . . . . . 212
Configuring EMS as the FTGroup Provider for Engine . . . . . . . . . . . . . . . . . . . . . . . . . . . . . . . . . . . . . . . . . . . . . . . . . . . . . . .213
Configuring TIBCO FTL® as the FTGroup Provider for Engine . . . . . . . . . . . . . . . . . . . . . . . . . . . . . . . . . . . . . . . . . . . . . . .215
Engine and Job Tuning . . . . . . . . . . . . . . . . . . . . . . . . . . . . . . . . . . . . . . . . . . . . . . . . . . . . . . . . . . . . . . . . . . . . . . . . . . . 218
Setting Engine and Job Tuning Properties . . . . . . . . . . . . . . . . . . . . . . . . . . . . . . . . . . . . . . . . . . . . . . . . . . . . . . . . . . . . . . . . . . . . . . . . . . . 220
bwadmin Command Line . . . . . . . . . . . . . . . . . . . . . . . . . . . . . . . . . . . . . . . . . . . . . . . . . . . . . . . . . . . . . . . . . . . . . . . . . . . . . . . . . . . . . . . 220
AppNode level . . . . . . . . . . . . . . . . . . . . . . . . . . . . . . . . . . . . . . . . . . . . . . . . . . . . . . . . . . . . . . . . . . . . . . . . . . . . . . . . . . . . . . . . . . . . . 220
AppSpace level . . . . . . . . . . . . . . . . . . . . . . . . . . . . . . . . . . . . . . . . . . . . . . . . . . . . . . . . . . . . . . . . . . . . . . . . . . . . . . . . . . . . . . . . . . . . 222
Admin UI . . . . . . . . . . . . . . . . . . . . . . . . . . . . . . . . . . . . . . . . . . . . . . . . . . . . . . . . . . . . . . . . . . . . . . . . . . . . . . . . . . . . . . . . . . . . . . . . . . . . . . . 223
Viewing Engine Properties . . . . . . . . . . . . . . . . . . . . . . . . . . . . . . . . . . . . . . . . . . . . . . . . . . . . . . . . . . . . . . . . . . . . . . . . . . . . . . . . . . . . . . . . . . 223
Engine Properties . . . . . . . . . . . . . . . . . . . . . . . . . . . . . . . . . . . . . . . . . . . . . . . . . . . . . . . . . . . . . . . . . . . . . . . . . . . . . . . . . . . . . . . . . . . . . . . . . . . 223
Governance and Monitoring . . . . . . . . . . . . . . . . . . . . . . . . . . . . . . . . . . . . . . . . . . . . . . . . . . . . . . . . . . . . . . . . . . . . . . 230
Monitoring Processes . . . . . . . . . . . . . . . . . . . . . . . . . . . . . . . . . . . . . . . . . . . . . . . . . . . . . . . . . . . . . . . . . . . . . . . . . . . . . . . . . . . . . . . . . . . . . . . 230
Enabling Process Monitoring . . . . . . . . . . . . . . . . . . . . . . . . . . . . . . . . . . . . . . . . . . . . . . . . . . . . . . . . . . . . . . . . . . . . . . . . . . . . . . . . . . . .230
Configuring using UDP . . . . . . . . . . . . . . . . . . . . . . . . . . . . . . . . . . . . . . . . . . . . . . . . . . . . . . . . . . . . . . . . . . . . . . . . . . . . . . . . . . . . . . . . . 233
Configuring using FTL . . . . . . . . . . . . . . . . . . . . . . . . . . . . . . . . . . . . . . . . . . . . . . . . . . . . . . . . . . . . . . . . . . . . . . . . . . . . . . . . . . . . . . . . . . 234
Application Statistics Collection . . . . . . . . . . . . . . . . . . . . . . . . . . . . . . . . . . . . . . . . . . . . . . . . . . . . . . . . . . . . . . . . . . . . . . . . . . . . . . . . . . . . . .235
Application Metrics . . . . . . . . . . . . . . . . . . . . . . . . . . . . . . . . . . . . . . . . . . . . . . . . . . . . . . . . . . . . . . . . . . . . . . . . . . . . . . . . . . . . . . . . . . . . . 235
Process Statistics . . . . . . . . . . . . . . . . . . . . . . . . . . . . . . . . . . . . . . . . . . . . . . . . . . . . . . . . . . . . . . . . . . . . . . . . . . . . . . . . . . . . . . . . . . . . . . .237
Enabling and Disabling Process Statistics . . . . . . . . . . . . . . . . . . . . . . . . . . . . . . . . . . . . . . . . . . . . . . . . . . . . . . . . . . . . . . . . . . .237
Viewing Collected Statistics . . . . . . . . . . . . . . . . . . . . . . . . . . . . . . . . . . . . . . . . . . . . . . . . . . . . . . . . . . . . . . . . . . . . . . . . . . . . . . . . 238
Process Execution Statistics . . . . . . . . . . . . . . . . . . . . . . . . . . . . . . . . . . . . . . . . . . . . . . . . . . . . . . . . . . . . . . . . . . . . . . . . . . . . . . . . . . . . 241
Integrating Execution Statistics Collection Using Logback . . . . . . . . . . . . . . . . . . . . . . . . . . . . . . . . . . . . . . . . . . . . . . . . . . . 243
Writing Process Statistic Data to an External Database . . . . . . . . . . . . . . . . . . . . . . . . . . . . . . . . . . . . . . . . . . . . . . . . . 245
Enabling and Disabling Auditing Events . . . . . . . . . . . . . . . . . . . . . . . . . . . . . . . . . . . . . . . . . . . . . . . . . . . . . . . . . . . . . . . . . . . . . . . . . . . . . . 246
OpenTracing . . . . . . . . . . . . . . . . . . . . . . . . . . . . . . . . . . . . . . . . . . . . . . . . . . . . . . . . . . . . . . . . . . . . . . . . . . . . . . . . . . . . . . . . . . . . . . . . . . . . . . . . 247
Applying Security Policies . . . . . . . . . . . . . . . . . . . . . . . . . . . . . . . . . . . . . . . . . . . . . . . . . . . . . . . . . . . . . . . . . . . . . . . . . . . . . . . . . . . . . . . . . . . 249
Enabling the Governance Agent Using the Admin UI . . . . . . . . . . . . . . . . . . . . . . . . . . . . . . . . . . . . . . . . . . . . . . . . . . . . . . . . . . . . .249
Enabling the Governance Agent Using an AppSpace Configuration File . . . . . . . . . . . . . . . . . . . . . . . . . . . . . . . . . . . . . . . . . .250
List of Ports . . . . . . . . . . . . . . . . . . . . . . . . . . . . . . . . . . . . . . . . . . . . . . . . . . . . . . . . . . . . . . . . . . . . . . . . . . . . . . . . . . . . . 253
9
TIBCO ActiveMatrix BusinessWorks™ Administration
Figures
Administration Architecture . . . . . . . . . . . . . . . . . . . . . . . . . . . . . . . . . . . . . . . . . . . . . . . . . . . . . . . . . . . . . . . . . . . . . . . . . . 13
Simple bwagent Configuration . . . . . . . . . . . . . . . . . . . . . . . . . . . . . . . . . . . . . . . . . . . . . . . . . . . . . . . . . . . . . . . . . . . . . . . . . . . . . . . . . . . . . . . . . .60
bwagent Network with Two bwagents Storing Data . . . . . . . . . . . . . . . . . . . . . . . . . . . . . . . . . . . . . . . . . . . . . . . . . . . . . . . . . . . . . . . . . . . 61
bwagents as Remote Clients . . . . . . . . . . . . . . . . . . . . . . . . . . . . . . . . . . . . . . . . . . . . . . . . . . . . . . . . . . . . . . . . . . . . . . . . . . . . . . . . . . . . . . . . . . . 62
bwagent Configuration for High Availability . . . . . . . . . . . . . . . . . . . . . . . . . . . . . . . . . . . . . . . . . . . . . . . . . . . . . . . . . . . . . . . . . . . . . . . . . . . . 63
Admin UI . . . . . . . . . . . . . . . . . . . . . . . . . . . . . . . . . . . . . . . . . . . . . . . . . . . . . . . . . . . . . . . . . . . . . . . . . . . . . . . . . . . . . . . . 104
New Project in Project Explorer . . . . . . . . . . . . . . . . . . . . . . . . . . . . . . . . . . . . . . . . . . . . . . . . . . . . . . . . . . . . . . . . . . . . . . . . . . . . . . . . . . . . . . . 150
Application Profiles . . . . . . . . . . . . . . . . . . . . . . . . . . . . . . . . . . . . . . . . . . . . . . . . . . . . . . . . . . . . . . . . . . . . . . . . . . . . . . . . . . . . . . . . . . . . . . . . . . . . 151
bwadmin Log File on Install . . . . . . . . . . . . . . . . . . . . . . . . . . . . . . . . . . . . . . . . . . . . . . . . . . . . . . . . . . . . . . . . . . . . . . . . . . . . . . . . . . . . . . . . . . . 196
Fault-tolerant Fail-over . . . . . . . . . . . . . . . . . . . . . . . . . . . . . . . . . . . . . . . . . . . . . . . . . . . . . . . . . . . . . . . . . . . . . . . . . . . . . 202
Active-Active Mode . . . . . . . . . . . . . . . . . . . . . . . . . . . . . . . . . . . . . . . . . . . . . . . . . . . . . . . . . . . . . . . . . . . . . . . . . . . . . . . . . . . . . . . . . . . . . . . . . . . . 204
Active-Passive Mode . . . . . . . . . . . . . . . . . . . . . . . . . . . . . . . . . . . . . . . . . . . . . . . . . . . . . . . . . . . . . . . . . . . . . . . . . . . . . . . . . . . . . . . . . . . . . . . . . . 205
10
TIBCO ActiveMatrix BusinessWorks™ Administration

TIBCO Documentation and Support Services
How to Access TIBCO Documentation
Documentation for TIBCO products is available on the TIBCO Product Documentation website, mainlyin HTML and PDF formats.
The TIBCO Product Documentation website is updated frequently and is more current than any otherdocumentation included with the product. To access the latest documentation, visit https://docs.tibco.com.
Product-Specific Documentation
Documentation for TIBCO products is not bundled with the software. Instead, it is available on theTIBCO Documentation site. To directly access documentation for this product, double-click thefollowing file:
TIBCO_HOME/release_notes/TIB_BW_version_docinfo.html
Access the following TIBCO ActiveMatrix BusinessWorks™ guides on the TIBCO Documentation site:
● Concepts
● Installation
● Getting Started
● Application Development
● Administration
● Bindings and Palettes Reference
● Business Works Samples
● Error Codes
● Migration
● Performance Benchmarking and Tuning
● API Reference
● REST Reference Guide
How to Contact TIBCO Support
You can contact TIBCO Support in the following ways:
● For an overview of TIBCO Support, visit http://www.tibco.com/services/support.
● For accessing the Support Knowledge Base and getting personalized content about products you areinterested in, visit the TIBCO Support portal at https://support.tibco.com.
● For creating a Support case, you must have a valid maintenance or support contract with TIBCO.You also need a user name and password to log in to https://support.tibco.com. If you do not have auser name, you can request one by clicking Register on the website.
How to Join TIBCO Community
TIBCO Community is the official channel for TIBCO customers, partners, and employee subject matterexperts to share and access their collective experience. TIBCO Community offers access to Q&A forums,product wikis, and best practices. It also offers access to extensions, adapters, solution accelerators, andtools that extend and enable customers to gain full value from TIBCO products. In addition, users can
11
TIBCO ActiveMatrix BusinessWorks™ Administration

submit and vote on feature requests from within the TIBCO Ideas Portal. For a free registration, go to https://community.tibco.com.
12
TIBCO ActiveMatrix BusinessWorks™ Administration

Administration Architecture Overview
Applications are deployed into runtime environments and managed using the bwadmin utility.
TIBCO ActiveMatrix BusinessWorks™ provides a flexible framework that allows you to scale yourruntime environment as needed. The runtime also provides an option to execute the engine so that therisk of a single point of failure when running an application is reduced.
The following are the key administrative components:
● An Application Archive is the deployment unit for an application that is generated in TIBCOBusiness Studio™ for BusinessWorks™.
● A domain is a logical group that provides an isolated environment for applications and theirresources to reside.
● An AppSpace is a group of one or more AppNodes, which are runtime entities that hostActiveMatrix BusinessWorks™ applications. AppSpaces are contained within a domain. One ormore than one application can be deployed to an AppSpace.
● An AppNode is a runtime entity that hosts applications. AppNodes are contained in an AppSpace.
● The bwagent is a daemon that runs on every ActiveMatrix BusinessWorks installation. Whenmultiple installations across machines are configured as a network, the bwagents interact with eachother using a datastore. They also synchronize the data from the datastore with the local file system.
The Administration Architecture illustration below shows an example of runtime entities created acrosstwo bwagents in a network. In the illustration, domain M1 spans two machines, Machine A andMachine B. Domain N1 is on Machine A only. Domain M1 contains two AppSpaces, S1 and S2.AppSpace S2 spans both machines. The bwagent on Machine A is configured to interact with thebwagent on Machine B through the datastore.
The Admin UI is a web UI that runs in TIBCO® Enterprise Administrator (TEA). Using the Admin UI isoptional. To enable the Admin UI, the bwagent must be registered with a running TEA server. In theAdministration Architecture illustration below, the bwagent on Machine A is registered with the TIBCOEnterprise Administrator (TEA) server. If the registered bwagent becomes unavailable, the connectionbetween the TEA server and the agent network is automatically recovered. The bwagent on Machine Bwill autoregister with the server.
Administration Architecture
The runtime entities manifest as a hierarchical folder structure on the local file system. Every actionperformed on the runtime entities results in an update to the file system. The location of the default
13
TIBCO ActiveMatrix BusinessWorks™ Administration

domains folder in the local file system can be changed by editing the BW_HOME/domains/DomainHomes.properties file.
When runtime entities span machines, the bwagent synchronizes the data from the datastore with thelocal file system. At any given point in time, the data in the file system is the source of truth. Thisensures that in case of a failure in the communication channel, the runtime is not affected as it refers tothe data on the local file system.
In your production environment, ensure you are using an external database and either TIBCO FTL® orTIBCO Enterprise Message Service™ (EMS) for data persistence and communication transport.
For more information about administration concepts, see the TIBCO ActiveMatrix BusinessWorks™Concepts guide.
14
TIBCO ActiveMatrix BusinessWorks™ Administration

Getting Started
Deploy and manage applications created in TIBCO Business Studio™ for BusinessWorks™ using thebwadmin console or the Admin UI, and the bwagent.
The bwadmin console and the bwagent are executables located in the bin folder of the productinstallation. For more information about the bwadmin console and the bwagent, see Administrator andAgent.
For information about the Admin UI, see Using the Admin UI.
There are several ways to deploy an application:
● bwadmin: For more information about deploying with bwadmin, see Deploying an Archive.
● Admin UI: For more information about deploying with the Admin UI, see Deploying an Archive.
● Deployment servers in TIBCO Business Studio for BusinessWorks: For more information aboutdeploying with deployment servers, see Deploying an Application in the TIBCO ActiveMatrixBusinessWorks™ Application Development guide.
● Rest API
In this document, BW_HOME points to TIBCO_HOME\bw\n.n
Execution ModesThe execution mode is set using the bwadmin command line console or in the bwagent's configurationfile.
The execution mode determines whether bwadmin communicates with the bwagent. There are twomodes: local and enterprise. The default mode is set to local, meaning that there is no communicationwith the bwagent.
Local mode
In local mode, bwadmin modifies the local file system directly instead of delegating the work to abwagent. Local mode does not provide data storage and runtime entities are created in the file system.This mode is useful for developers during development and testing cycles. For more information, see Running in Local Mode.
Enterprise mode
In enterprise mode, bwadmin communicates with the bwagent. bwagents can communicate acrossmachines and can be configured to form a bwagent network. Instead of working on the file systemdirectly, bwadmin sends commands to the bwagent. The bwagent dispatches the command to targetedagent. That agent then completes the command on the local file system. For more information, see Running in Enterprise Mode Using the Command Line. In enterprise mode, the bwagent can beregistered with the TEA server.
To change the mode, navigate to BW_HOME\bin (Windows) or ${BW_HOME}/bin (Unix) and issue thefollowing command: bwadmin mode local (to switch to local mode) or bwadmin mode enterprise (toswitch to enterprise mode).
Changing the mode sets the bw.admin.mode property in the bwagent configuration file. This file iscalled bwagent.ini and is located in the BW_HOME\config folder (Windows) or ${BW_HOME}/configfolder (Unix).
15
TIBCO ActiveMatrix BusinessWorks™ Administration

Running in Local ModeLocal mode allows application testing and debugging on the local file system.
This procedure shows you how to create runtime entities and deploy and run an application usingbwadmin local mode. You will learn how to set the bwadmin mode; create a domain, AppSpace, andAppNode; upload an application archive; start the AppSpace; and deploy and start the uploadedapplication.
The runtime entities created in local mode are not visible to bwagents when they are started.
Procedure
1. In a terminal, navigate to BW_HOME\bin (Windows) or ${BW_HOME}/bin (Unix).2. Set the bwadmin mode to local.
Windows:BW_HOME\bin>bwadmin mode localTIBCO ActiveMatrix BusinessWorks version 6.2.0, build V20, 2014-10-09Admin mode set to local
Unix:[root@BW_HOME bin]# ./bwadmin mode local
3. Create a domain. For more information, see Creating a Domain.
Windows:BW_HOME\bin>bwadmin create domain D1TIBCO ActiveMatrix BusinessWorks version 6.2.0, build V20, 2014-10-09TIBCO-BW-ADMIN-CLI-300100: Domain [D1] created.
Unix:[root@BW_HOME bin]# ./bwadmin create domain D1
4. Show the domain.
Windows:BW_HOME\bin>bwadmin show domain TIBCO ActiveMatrix BusinessWorks version 6.2.0, build V20, 2014-10-09Domains: defaultdomain D1
Unix:[root@BW_HOME bin]# ./bwadmin show domain
5. Create an AppSpace in the domain. See Creating an AppSpace for more information.BW_HOME\bin>bwadmin create -d D1 appspace AS1TIBCO ActiveMatrix BusinessWorks version 6.2.0, build V20, 2014-10-09TIBCO-BW-ADMIN-CLI-300200: AppSpace [AS1] in Domain [D1] created.
Unix:[root@BW_HOME bin]# ./bwadmin create -d D1 appspace AS1
6. Create an AppNode in the AppSpace. When creating an AppNode, you must specify the HTTPmanagement port that allows communication with the AppNode.
The HTTP management port must be unique across all defined AppNodes on a machine. If thespecified port is already in use, an error is issued and the AppNode cannot be created.
Use the show command for the AppSpace after you've created the AppNode.
Windows:BW_HOME\bin>bwadmin create -domain D1 -appspace AS1 -httpPort 8060 appnode AN1TIBCO ActiveMatrix BusinessWorks version 6.2.0, build V20, 2014-10-09TIBCO-BW-ADMIN-CLI-300300: AppNode [AN1] in AppSpace [AS1], Domain [D1] created.
16
TIBCO ActiveMatrix BusinessWorks™ Administration

BW_HOME\bin>bwadmin show -domain D1 -appspace AS1 appnodesTIBCO ActiveMatrix BusinessWorks version 6.2.0, build V20, 2014-10-09Name Status AppSpace MgmtPort Agent ConfigState Up TimeAN1 Stopped AS1 8060 localhost InSync 0d 00:00:00Listed all AppNodes in 0 seconds
Unix:[root@BW_HOME bin]# ./bwadmin create -domain D1 -appspace AS1 -httpPort 8060 appnode AN1
For more information, see Creating an AppNode.
7. Upload an application archive into the domain.
The following command uploads the Bookstore sample application archive. (Note the use of theforward slash in the Windows command line.)
Windows:BW_HOME\bin>bwadmin upload -domain D1 ../samples/core/admin/ears/bookstore/tibco.bw.sample.binding.rest.BookStore.application_1.0.0.earTIBCO ActiveMatrix BusinessWorks version 6.2.0, build V20, 2014-10-09TIBCO-BW-ADMIN-CLI-300410: Uploaded archive [../samples/core/admin/ears/bookstore/tibco.bw.sample.binding.rest.BookStore.application_1.0.0.ear].
Unix:[root@BW_HOME bin]# ./bwadmin upload -domain D1 ../samples/core/admin/ears/bookstore/tibco.bw.sample.binding.rest.BookStore.application_1.0.0.ear
For more information, see Uploading an Archive.
8. Show that the application archive was uploaded.
Windows:BW_HOME\bin>bwadmin show -domain D1 archivesTIBCO ActiveMatrix BusinessWorks version 6.2.0, build V20, 2014-10-09NamePath Version Domain AppName Uploaded Time Uploaded By Size(Kb)tibco.bw.sample.binding.rest.BookStore.application_1.0.0.ear 1.0.0.201403201653 D1 tibco.bw.sample.binding.rest.BookStore.application 2014/10/09 10:18:10 67
Unix:[root@BW_HOME bin]# ./bwadmin show -domain D1 archives
9. Start the AppSpace. This starts the AppNode in the AppSpace.
Windows:BW_HOME\bin>bwadmin start -domain D1 appspace AS1TIBCO ActiveMatrix BusinessWorks version 6.2.0, build V20, 2014-10-09TIBCO-BW-ADMIN-CLI-300203: AppSpace [AS1] in Domain [D1] started.
Unix:[root@BW_HOME bin]# ./bwadmin start -domain D1 appspace AS1
For more information, see Starting an AppSpace.
10. Deploy the application into the AppSpace. This deploys the application to the AppNode.
Windows:BW_HOME\bin>bwadmin deploy -domain D1 -appspace AS1tibco.bw.sample.binding.rest.BookStore.application_1.0.0.earTIBCO ActiveMatrix BusinessWorks version 6.2.0, build V20, 2014-10-09TIBCO-BW-ADMIN-CLI-300403: Deployed application [tibco.bw.sample.binding.rest.BookStore.application:1.0]
Unix:[root@BW_HOME bin]# ./bwadmin deploy -domain D1 -appspace AS1tibco.bw.sample.binding.rest.BookStore.application_1.0.0.ear
17
TIBCO ActiveMatrix BusinessWorks™ Administration

For more information, see Deploying an Application.
11. Show the deployed application.
Windows:BW_HOME\bin>bwadmin show -domain D1 applicationTIBCO ActiveMatrix BusinessWorks version 6.2.0, build V20, 2014-10-09Domain: D1NameVersion AppSpace Status Deployment Status (Running/Total)tibco.bw.sample.binding.rest.BookStore.application 1.0 AS1 Start Deployed (1/1)Listed all Applications in 0 seconds
Unix:[root@BW_HOME bin]# ./bwadmin show -domain D1 application
12. Start the application. Each uploaded application maintains a version. The version number isrequired for starting and stopping the application.
To find the version number, you can use the show command, for example: bwadmin show-domain D1 application
Windows:BW_HOME\bin>bwadmin start -d D1 -appspace AS1 applicationtibco.bw.sample.binding.rest.BookStore.application 1.0TIBCO ActiveMatrix BusinessWorks version 6.2.0, build V20, 2014-10-09TIBCO-BW-ADMIN-CLI-300405: The application [tibco.bw.sample.binding.rest.BookStore.application:1.0] started.
Unix:[root@BW_HOME bin]# ./bwadmin start -d D1 -appspace AS1
For more information, see Starting an Application.
Use the -csv command to print the table content as a comma separated value table. Thefirst row contains the headers and applies to domains, AppSpaces, AppNodes,Applications, Archive, Archives, Machines and Installations. For example,bwadmin[admin@d1]> show -csv apps to show all the Applications in the csv format.
13. Optionally, stop and undeploy the application, stop the AppSpace, and delete the entities (archive,AppNode, AppSpace, and domain).
Result
You used bwadmin in local mode to create a domain (D1), an AppSpace (AS1), and an AppNode(AN1). You uploaded an application archive to the domain, deployed the application, and started andstopped the application. Spend some time experimenting with bwadmin commands. For moreinformation about domains, AppSpaces, AppNodes, and applications, see Administration Tasks andReference.
Running in Enterprise Mode Using the Command LineIn enterprise mode, bwagents can communicate across machines and can be configured to form abwagent network.
This procedure shows you how to set up a network using bwagents on two machines and use bwadminto create runtime entities across machines.
Enterprise mode requires a data persistence and communication transport layer to keep bwagents insync across machines. By default, TIBCO ActiveSpaces® is used for both data persistence andcommunication transport. The software also provides the option of using an external database for datapersistence and either TIBCO FTL® or TIBCO Enterprise Message Service™ (EMS) for communicationtransport. Ensure that you use this configuration for your production environment. For moreinformation about configuring bwagent, see Configuring bwagent .
18
TIBCO ActiveMatrix BusinessWorks™ Administration

The following example uses TIBCO ActiveSpaces, the default configuration.
Prerequisites
Install the software on two machines. Machines are noted as M1 and M2 in the instructions. Make anote of the host name or IP address for each machine.
Procedure
1. Configure the bwagent on machine M1.a) On machine M1, navigate to BW_HOME\config (Windows) or ${BW_HOME}/config (Unix) and
open the bwagent_as.json file in a text editor. Edit parameters in this file as follows:
Parameter Property in bwagent.ini File Setting
adminmode bw.admin.mode enterprise
discoveryurl bw.agent.technology.as.discovery
URL
Add the host name and port orIP address and port of machineM2 after the setting for machineM1. The TCP protocol isrequired for only the first URLin the string.
tcp://M1:5050;M2:5050
b) Save the file and use the bwadmin config command to push the changes from the JSON file tothe bwagent.ini file.
Windows:BW_HOME\bin>bwadmin config -cf ../config/bwagent_as.json agentTIBCO ActiveMatrix BusinessWorks version 6.2.0, build V20, 2014-10-09Configuration updated in bwagent.ini
Unix:[root@BW_HOME bin]# ./bwadmin config -cf ../config/bwagent_as.json agent
The warning messages indicate that previous versions of the product created runtime entities ina folder structure that is different from that used in the current version. These messages can beignored for this example.
2. Repeat the configuration for the bwagent on machine M2.a) On M2, navigate to BW_HOME\config (Windows) or ${BW_HOME}/config (Unix) and open the
bwagent_as.json file in a text editor. Edit parameters in this file as follows:
Parameter Property in bwagent.ini File Setting
adminmode bw.admin.mode enterprise
19
TIBCO ActiveMatrix BusinessWorks™ Administration

Parameter Property in bwagent.ini File Setting
discoveryurl bw.agent.technology.as.discovery
URL
Add the host name and port orIP address and port of machineM1 after the setting for machineM2. The TCP protocol isrequired for only the first URLin the string.
Machines M1 and M2communicate with each otherover the network. Choose apublic interface to ensurediscoverability.
tcp://M2:5050;M1:5050
b) Save the file and use the bwadmin config command to push the changes from the JSON file tothe bwagent.ini file.
Windows:BW_HOME\bin>bwadmin config -cf ../config/bwagent_as.json agent bwagent
Unix:[root@BW_HOME bin]# ./bwadmin config -cf ../config/bwagent_as.json agent bwagent
3. Start the bwagent on M1.a) Open a terminal on M1 and navigate to the BW_HOME\bin folder (Windows) or
[root@BW_HOME bin]# (Unix).b) Type bwagent (Windows) or ./bwagent (Unix). The bwagent starts:
TIBCO ActiveMatrix BusinessWorks version 6.2.0, build V20, 2014-10-09BW Agent name M1BW Agent stores data locallyInitializing datastore using TIBCO ActiveSpaces (Java). Enterprise Edition. Version 2.1.2.124 .............. Initialization of datastore completeBW Agents in the group that store data:Name M1, Host 10.94.202.5TIBCO-BW-AGENT-300002: BusinessWorks Agent started successfully.
4. Start the bwagent on M2.a) Open a terminal on M2 and navigate to BW_HOME\bin folder (Windows) or ${BW_HOME}/bin
(Unix).b) Type bwagent (Windows) or ./bwagent (Unix). The bwagent starts:
TIBCO ActiveMatrix BusinessWorks version 6.2.0, build V20, 2014-10-09BW Agent name M2BW Agent stores data locallyInitializing datastore using TIBCO ActiveSpaces (Java). Enterprise Edition. Version 2.1.4.012 .............. Initialization of datastore completeBW Agents in the group that store data:Name M2, Host 10.106.143.96Name M1, Host 10.94.202.5There are [2] agents in the BW Agent group that store data. However, the property "minSeederCount" in the bwagent.ini file is set to [1], refer to the bwagent.ini file or the documentation and choose an appropriate value.There are [2] agents in the BW Agent group that store data. However, the property "quorumSize" in the bwagent.ini file is set to [1], refer to the bwagent.ini file or the documentation and choose an appropriate value.TIBCO-BW-AGENT-300002: BusinessWorks Agent started successfully.
20
TIBCO ActiveMatrix BusinessWorks™ Administration

The minSeederCount and quorumSize properties are used to configure the TIBCO ActiveSpacespersistence and transport layer. These properties can be ignored for this example. For moreinformation, see ActiveSpaces Configuration.
5. Start the bwadmin console on M1 machine and show the bwagents.
Windows:BW_HOME\bin>bwadmin show agentsTIBCO ActiveMatrix BusinessWorks version 6.2.0, build V21, 2014-10-15Connecting to the BW Agent using TIBCO ActiveSpaces (Java). Enterprise Edition. Version 2.1.4.012 Connected to BW Agent
TEA Server URL : <unknown>Registered TEA Agent : <none>Auto Registration : onName State MachineVersion ConfigState MgmtPort PIDUptimeM1 Running M16.2.0 InSync null:null 138800d 00:00:17
Unix:[root@BW_HOME bin]# ./bwadmin show agents
The TEA Server URL, Registered TEA Agent, and Auto Registration settings are importantwhen you are using the Admin UI. These settings can be ignored for this example. For moreinformation about the Admin UI, see Running Applications in Enterprise Mode using the Admin UIand Using the Admin UI.
6. Now the bwagents on machines M1 and M2 are communicating with each other. You can use thebwadmin console on M1 to create a domain on M2 by specifying the bwagent in the command line.Windows:BW_HOME\bin>bwadmin create -agent M2 domain D1M2TIBCO ActiveMatrix BusinessWorks version 6.2.0, build V20, 2014-10-09Connecting to the BW Agent using TIBCO ActiveSpaces (Java). Enterprise Edition. Version 2.1.4.012 Connected to BW AgentTIBCO-BW-ADMIN-CLI-300100: Domain [D1M2] created.
Unix:[root@BW_HOME bin]# ./bwadmin create -agent M2 domain D1M2
7. On M1, use the show domains command to show the domain.Windows:BW_HOME\bin>bwadmin show domainsTIBCO ActiveMatrix BusinessWorks version 6.2.0, build V20, 2014-10-09Connecting to the BW Agent using TIBCO ActiveSpaces (Java). Enterprise Edition. Version 2.1.4.012 Connected to BW AgentDomains: D1M2
Unix:[root@BW_HOME bin]# ./bwadmin show domains
8. Create an AppSpace on M2 using bwadmin on M1.a) Create an AppSpace on M2 by specifying the bwagent. Two AppNodes are specified. The -
minNodes option specifies the number of nodes in the AppSpace. The AppSpace cannot bestarted until this value is met. For more information about AppSpaces and AppNodes, see theAdministration Concepts topic in the TIBCO ActiveMatrix BusinessWorks™ Concepts guide.Windows:BW_HOME\bin>bwadmin create -agent M2 -domain D1M2 -minNodes 2 appspace AS1M2TIBCO ActiveMatrix BusinessWorks version 6.2.0, build V20, 2014-10-09Connecting to the BW Agent using TIBCO ActiveSpaces (Java). Enterprise Edition. Version 2.1.4.012
21
TIBCO ActiveMatrix BusinessWorks™ Administration

Connected to BW AgentTIBCO-BW-ADMIN-CLI-300200: AppSpace [AS1M2] in Domain [D1M2] created.
Unix:[root@BW_HOME bin]# ./bwadmin create -agent M2 -domain D1M2 -minNodes 2 appspace AS1M2
b) View the file system on machine M2 to verify that the AppSpace was created. The examplebelow shows the file system on a Windows machine.
Each runtime entity is created in the file system. It is critical that all runtime entities are managedusing bwadmin so that they are in sync with the datastore.
9. On machine M1, create the 2 AppNodes for the AppSpace AS1M2, specifying bwagent M2 for theAppNodes. The HTTP management port must be unique. A list of defined AppNodes for a givendomain, including port numbers, is available with the show command: show -d <DomainName>appnodes
When an AppNode is created, an optional port for the OSGi console can be specified tomonitor the AppNode (Only enable this port for troubleshooting purposes.). For moreinformation, see Enabling the OSGi Console for an AppNode.
Windows:BW_HOME\bin>bwadmin create -agent M2 -domain D1M2 -appspace AS1M2 -httpPort 8070 appnode AN1M2TIBCO ActiveMatrix BusinessWorks version 6.2.0, build V20, 2014-10-09Connecting to the BW Agent using TIBCO ActiveSpaces (Java). Enterprise Edition. Version 2.1.4.012 Connected to BW AgentTIBCO-BW-ADMIN-CLI-300300: AppNode [AN1M2] in AppSpace [AS1M2], Domain [D1M2] created.
BW_HOME\bin>bwadmin create -agent M2 -domain D1M2 -appspace AS1M2 -httpPort 8071 appnode AN2M2
Unix:[root@BW_HOME bin]# ./bwadmin create -agent M2 -domain D1M2 -appspace AS1M2 -httpPort 8070 appnode AN1M2
[root@BW_HOME bin]# ./bwadmin create -agent M2 -domain D1M2 -appspace AS1M2 -httpPort 8071 appnode AN2M2
The -httpPort option is case sensitive.
10. From the bwadmin console on M1, upload an application archive into the domain on M2.
22
TIBCO ActiveMatrix BusinessWorks™ Administration

Windows:BW_HOME\bin>bwadmin upload -domain D1M2 ../samples/core/admin/ears/bookstore/tibco.bw.sample.binding.rest.BookStore.application_1.0.0.earTIBCO ActiveMatrix BusinessWorks version 6.2.0, build V20, 2014-10-09Connecting to the BW Agent using TIBCO ActiveSpaces (Java). Enterprise Edition. Version 2.1.4.012 Connected to BW AgentTIBCO-BW-ADMIN-CLI-300410: Uploaded archive [../samples/core/admin/ears/bookstore/tibco.bw.sample.binding.rest.BookStore.application_1.0.0.ear].
Unix:[root@BW_HOME bin]# ./bwadmin upload -domain D1M2 ../samples/core/admin/ears/bookstore/tibco.bw.sample.binding.rest.BookStore.application_1.0.0.ear
11. From M1, start the AppSpace on M2. This starts the AppNodes in the AppSpace on M2.
Windows:BW_HOME\bin>bwadmin start -domain D1M2 appspace AS1M2TIBCO ActiveMatrix BusinessWorks version 6.2.0, build V20, 2014-10-09Connecting to the BW Agent using TIBCO ActiveSpaces (Java). Enterprise Edition. Version 2.1.4.012 Connected to BW AgentTIBCO-BW-ADMIN-CLI-300203: AppSpace [AS1M2] in Domain [D1] started.
Unix:[root@BW_HOME bin]# ./bwadmin start -domain D1M2 appspace AS1M2
12. From the bwadmin console on M1, verify that the AppNodes are running:
Windows:BW_HOME\bin>bwadmin show -domain D1M2 -appspace AS1M2 appnodesTIBCO ActiveMatrix BusinessWorks version 6.2.0, build V20, 2014-10-09Connecting to the BW Agent using TIBCO ActiveSpaces (Java). Enterprise Edition. Version 2.1.4.012 Connected to BW AgentName Status AppSpace MgmtPort Agent ConfigState Up TimeAN1M2 Running AS1M2 8070 M2 InSync 0d 00:09:42AN2M2 Running AS1M2 8071 M2 InSync 0d 00:09:42
Listed all AppNodes in 0 seconds
Unix:[root@BW_HOME bin]# ./bwadmin show -domain D1M2 -appspace AS1M2 appnodes
13. Use bwadmin on M1 to stop the AppSpace on M2. This will stop AppNodes AN1M2 and AN2M2.
Windows:BW_HOME\bin>bwadmin stop -domain D1M2 appspace AS1M2TIBCO ActiveMatrix BusinessWorks version 6.2.0, build V20, 2014-10-09Connecting to the BW Agent using TIBCO ActiveSpaces (Java). Enterprise Edition. Version 2.1.4.012 Connected to BW AgentTIBCO-BW-ADMIN-CLI-300204: AppSpace [AS1M2] in Domain [D1M2] stopped.
Unix:[root@BW_HOME bin]# ./bwadmin stop -domain D1M2 appspace AS1M2
14. Back up the domain. The backup command exports the persisted state of runtime entities into acommand file. This command file can be used to recreate the environment. For more information,see Backing Up and Restoring from the Backup.The backup command requires the name of the specific entity being backed up (domain, agent,AppSpace or AppNode) as well as the path to a destination file. In this example (Windows), D1M2is backed up.BW_HOME\bin>bwadmin backup -s backup.cmd domain D1M2Connecting to the BW Agent using
23
TIBCO ActiveMatrix BusinessWorks™ Administration

TIBCO ActiveSpaces (Java). Enterprise Edition. Version 2.1.4.012 Connected to BW AgentTIBCO-BW-ADMIN-CLI-300131: Backed up Domain [D1M2]TIBCO-BW-ADMIN-CLI-300008: Backup completed.
The bwadmin backup command and the bwadmin restore command are notcomplimentary. The backup command exports the current state of the environment to acommand file. The restore command restores the file system of a bwagent to the state ofthe persistent datastore. For more information, see Backing Up and Restoring from theBackup and Restoring the File System of Runtime Entities.
Result
You set up a network with two bwagents on two machines. You used the bwadmin console on onemachine to create runtime entities on the other machine. You uploaded an application archive to thedomain and started the AppSpace. You also backed up the environment.
You can continue experimenting by adding additional machines to the network, adding more runtimeentities, or deploying the archive (you will need to start the AppSpace again).
When you are done, you can force delete the domain using bwadmin on either machine with thefollowing bwadmin command: delete -force domain D1M2
After you delete the domain, you can recreate the environment from the backup by feeding the backupcommand file to bwadmin, for example: bwadmin -f backup.cmd (Windows).
To exit the bwagent, type ^C (this may take a few seconds). At the command line, type bwagent stop tocompletely stop the agent.
Running in Enterprise Mode Using the Admin UIUse the Admin UI to manage and monitor runtime entities.
The Admin UI is a web UI that runs in TIBCO® Enterprise Administrator (TEA). To enable the AdminUI, the bwagent must be registered with a running TEA server.
This procedure shows you how to create runtime entities and deploy and run an application using theAdmin UI. You will learn how to register the TEA agent with the bwagent; open the Admin UI; create adomain, AppSpace, and AppNode; upload an archive; start the AppSpace; and deploy and start theuploaded application.
Procedure
1. Install TEA and start the TEA server.
Windows:TEA_HOME\2.0\bin>tea.exeTIBCO Enterprise Administrator v2.0.0-008 (pid: 10092)Reading configuration from file TEA_CONFIG_HOME\cfgmgmt\tea\conf\tea.confWriting server logs in TEA_CONFIG_HOME\cfgmgmt\tea\logsInitializing datastore TEA_CONFIG_HOME\cfgmgmt\tea\dataServer startedWeb Server Started at http://M1:8777/
Unix:[root@TEA_HOME bin]# ./tea.sh
2. In a terminal, navigate to BW_HOME\bin (Windows) or {BW_HOME}/bin (Unix).
3. Set the bwadmin mode to enterprise.
Windows:BW_HOME\bin>bwadmin mode enterprise
24
TIBCO ActiveMatrix BusinessWorks™ Administration

Unix:[root@BW_HOME bin]# ./bwadmin mode enterprise
4. Open a new terminal and navigate to BW_HOME\bin or ${BW_HOME}/bin (Unix). Register thebwagent TEA agent with the TEA server. This allows the bwagent to be available to the TIBCOEnterprise Administrator server. The URL to the TIBCO Enterprise Administrator server is requiredin the command. (The URL is available from the terminal where the TEA server was started.)
Windows:BW_HOME\bin>bwadmin registerteaagent http://M1:8777/Connecting to the BW Agent using TIBCO ActiveSpaces (Java). Enterprise Edition. Version 2.1.4.012 Connected to BW AgentTIBCO-BW-ADMIN-CLI-300010: Registered TEA Agent [M1] with TEA Server.
Unix:[root@BW_HOME bin]# ./bwadmin registerteaagent http://M1:8777/
5. Open a web browser and go to the TEA URL. Sign in, using admin for the user name and adminpassword.BusinessWorks is displayed in the Products list.
6. Click the BusinessWorks icon to go to ActiveMatrix BusinessWorks. The Domain Management pageis displayed. If you completed the steps in the "Running in Enterprise Mode Using the CommandLine," you will see a domain listed on the Domain Management page. Otherwise the page will beempty.a) Click Create Domain to open the Create Domain dialog box.b) Enter the domain name UI-Domain1 in the Name field.c) Choose the bwagent registered with the TEA server from the Agent drop-down.d) Click Create to create the domain.The domain is created and displayed on the Domain Management page.
7. Click the domain name to open the domain.
8. Add an AppSpace to the domain.
a) Click the AppSpaces icon to open the AppSpaces page.b) Click Create AppSpace.c) In the Create AppSpace dialog box, enter UI-AppSpace1 in the Name field. Accept the value of 1
in the MinNodes field.
25
TIBCO ActiveMatrix BusinessWorks™ Administration

d) Select the agent registered with the TEA server and click Create.The AppSpace is created. A success notification is displayed at the top of the page. Notice that theAppSpace status is displayed as Degraded, because there are no AppNodes yet for the AppSpace.This will change to Stopped when an AppNode is added to the AppSpace. The AppSpaces pagewill look similar to this:
9. Add an AppNode to the AppSpace.
a) Click the AppNodes icon to open the AppNodes page.b) Click Create AppNode.c) In the Create AppNode dialog box, enter UI-AppNode1 in the Name field.d) Make sure the agent registered with the TEA server is selected in the Agent drop-down.e) Enter a value in the HTTP Port field, for example: 8075. This port must be available; each
AppNode on the machine must be assigned to a unique HTTP management port.f) Leave the OSGi fields empty. (This are optional fields for debugging the AppNode. For more
information, see Enabling the OSGi Console for an AppNode.)g) Make sure UI-AppSpace1 is selected in the AppSpace drop-down.h) Click Create.The AppNode is created. A success notification is displayed at the top of the page and theAppNode is displayed. The AppNodes page will look similar to the following image:
10. Open the AppSpaces page and notice that the status has been updated to Stopped.
a) Start the AppSpace by clicking the Start icon .The AppSpace starts and starts the AppNode. The status changes to Starting, then Running toindicate that both the AppNode and AppSpace are running.
26
TIBCO ActiveMatrix BusinessWorks™ Administration

11. Upload an application archive to the AppSpace.
a) Click the Application Archives icon .b) In the Application Archives page, click the Upload link and drag the BookStore sample
application archive from BW_HOME\samples\core\admin\ears\bookstore\ears to the UploadEar File dialog box.
c) Click Upload.d) A success message is displayed in the dialog box. Click Done to close the dialog box.The application archive is displayed on the Application Archives page:
12. Deploy the application.a) Click the application archive link on the Application Archives page to pivot to the application
view, then click Deploy to deploy the BookStore application.b) In the Deploy Applications dialog box, make sure UI-AppSpace1 is selected in the AppSpace
drop-down.c) Select WindowsProfile.substvar (Default) from the Profile drop-down.d) Check the Start applications on AppNodes after deployment option. This option starts the
application after successful deployment.e) Click Deploy.The application is deployed to the selected AppSpace and is started on the AppNode.
13. Click the REST Doc URL link to view the application's REST API. You can also open the Endpoints,Components, or Processes tabs to drill down into the running application.
27
TIBCO ActiveMatrix BusinessWorks™ Administration
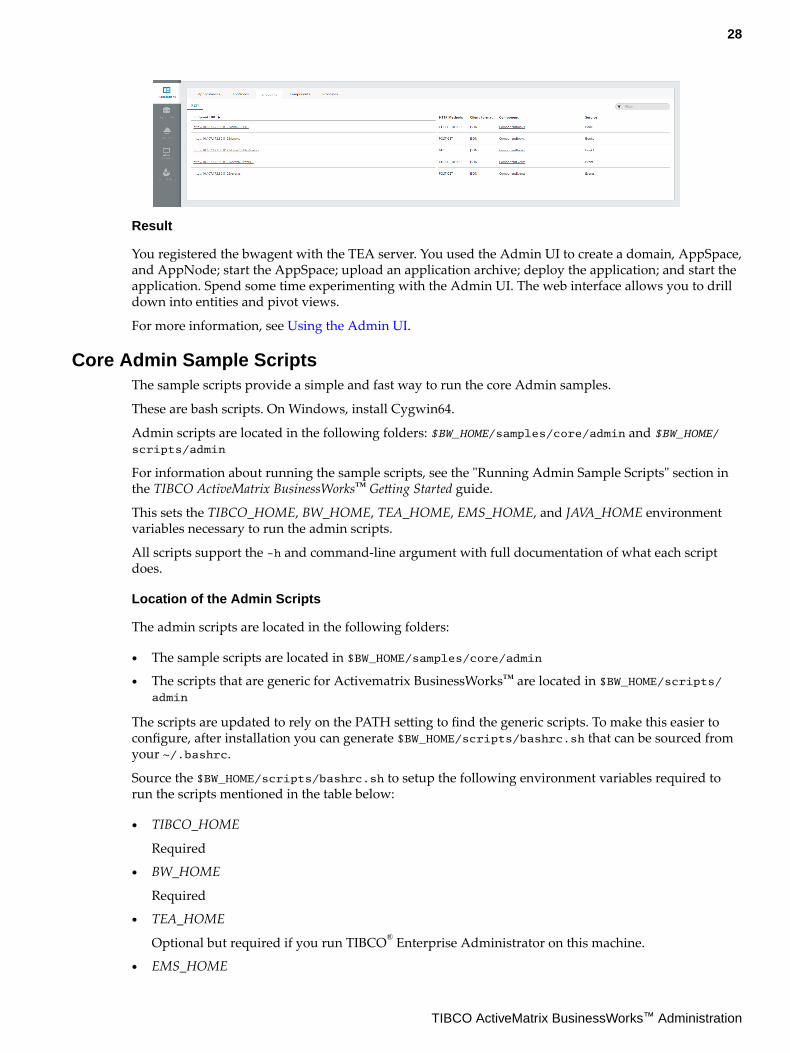
Result
You registered the bwagent with the TEA server. You used the Admin UI to create a domain, AppSpace,and AppNode; start the AppSpace; upload an application archive; deploy the application; and start theapplication. Spend some time experimenting with the Admin UI. The web interface allows you to drilldown into entities and pivot views.
For more information, see Using the Admin UI.
Core Admin Sample ScriptsThe sample scripts provide a simple and fast way to run the core Admin samples.
These are bash scripts. On Windows, install Cygwin64.
Admin scripts are located in the following folders: $BW_HOME/samples/core/admin and $BW_HOME/scripts/admin
For information about running the sample scripts, see the "Running Admin Sample Scripts" section inthe TIBCO ActiveMatrix BusinessWorks™ Getting Started guide.
This sets the TIBCO_HOME, BW_HOME, TEA_HOME, EMS_HOME, and JAVA_HOME environmentvariables necessary to run the admin scripts.
All scripts support the -h and command-line argument with full documentation of what each scriptdoes.
Location of the Admin Scripts
The admin scripts are located in the following folders:
● The sample scripts are located in $BW_HOME/samples/core/admin
● The scripts that are generic for Activematrix BusinessWorks™ are located in $BW_HOME/scripts/admin
The scripts are updated to rely on the PATH setting to find the generic scripts. To make this easier toconfigure, after installation you can generate $BW_HOME/scripts/bashrc.sh that can be sourced fromyour ~/.bashrc.
Source the $BW_HOME/scripts/bashrc.sh to setup the following environment variables required torun the scripts mentioned in the table below:
● TIBCO_HOME
Required
● BW_HOME
Required
● TEA_HOME
Optional but required if you run TIBCO® Enterprise Administrator on this machine.
● EMS_HOME
28
TIBCO ActiveMatrix BusinessWorks™ Administration

Optional but required if Enterprise Message Service™ is configured on this machine.
● PATH
This variable is auto-populated based on the values set for the above variables.
Core Admin Scripts
The following table lists some of the available scripts; browse the folder to see the complete list.
29
TIBCO ActiveMatrix BusinessWorks™ Administration

Core Admin Scripts
Script Description Script Location
AppManage.sh This is a ActiveMatrix BusinessWorks™6.x utility program that emulatesActiveMatrix BusinessWorks™ 5.xAppManage commands.
The main purpose of this utility is todemonstrate how the AppManagecommands from ActiveMatrixBusinessWorks™ 5.x translate tocorresponding TIBCO ActiveMatrixBusinessWorks 6.x bwadmincommands.
This utility creates a cmd/AppManage_deploy.cmd folder thatcontains bwadmin commands and usesbwadmin -f cmd/
AppManage_deploy.cmd to run it.
Not all AppManagecommands are implementedin this emulation utility.
ActiveMatrix BusinessWorks™Augmented Options:
● -appSpace or - a - AppSpace nameto be used for Application lifecycle.
● -profile or -p - ConfigurationProfile to use for deployment. Thisprofile must be available in the EARfile.
● -profileFile- ConfigurationProfile file to use for deployment.
● -debug - Turn on debug tracing forthis utility.
● -sapp - Single Application perAppSpace deployment mode. EachAppSpace supports only oneapplication deployment.
● -mapp - Multiple Applications perAppSpace deployment mode. EachAppSpace supports one or moreapplication deployments.
ActiveMatrixBusinessWorks™ supportsboth -sapp and -mapp modes.The default is -mapp mode.
$BW_HOME/samples/
core/admin
30
TIBCO ActiveMatrix BusinessWorks™ Administration

Script Description Script Location
bootstrap.sh Usage: bootstrap.sh [-h|-help] [-clean] [-forceClean|-force|-
forceclean]
This utility is a wrapper script aroundthe following scripts:
● killtea.sh
● killbwagent.sh
● teaclean.sh only if -clean or -forceClean options is used.
● bwclean.sh if and only if -clean or-forceClean options is used.
● genbwagentini.sh
● tea.sh
● bwagent.sh
● registeragent.sh
[-h] or [-help] - Prints this usagemessage.
-clean Cleans TIBCO EnterpriseAdministrator Server Data Store andActiveMatrix BusinessWorks™ DomainData Store.
The -clean command on thedata store is not reversible, soback up your data storesbefore using the command.Use this option carefully, asyou may lose all yourconfigurations if you do nothave a backup.
-forceClean Same as -clean, except itavoids prompting user to confirm withclean.
-force Same as -forceClean
-forceclean Same as -forceClean
This script assumes that the followingproducts are installed correctly and theenvironment variables are setaccordingly:
TIBCO_HOME = TIBCO_HOMEdirectory where you installedActiveMatrix Businessworks™.
TEA_HOME = Parent directory toTIBCO Enterprise Administrator's /bindirectory.
$BW_HOME/scripts/
admin
31
TIBCO ActiveMatrix BusinessWorks™ Administration

Script Description Script Location
Supports generation of bwagent.inifile for either ActiveSpaces®, Database/EMS, or Database/FTL as the technologytype.
bounce.sh This utility does the following:
1. Stops TIBCO EnterpriseAdministrator Server and bwagentProcesses.
2. Restarts TIBCO EnterpriseAdministrator Server and bwagentProcesses.
3. Registers bwagent to TIBCOEnterprise Administrator Server.
[-h] or [-help] - Prints this helpmessage and exits.
$BW_HOME/scripts/
admin
bounceagent.sh Kills and restarts bwagent Process.
[-h] or [-help] - Prints this helpmessage and exits.
$BW_HOME/scripts/
admin
32
TIBCO ActiveMatrix BusinessWorks™ Administration

Script Description Script Location
bwadmin.sh This is a utility script that wraps aroundthe bwadmin executable.
[-h] or [-help] - Prints this helpmessage and exits.
[-network <bwagent Network Name>]
- Connects to a named bwagentNetwork. This is an optional argument.
By default, this script uses $BW_HOME/config/bwagent.ini
[<bwadminArgs> ...] - Use bwadminto run commands found in the inputfiles.
Start bwadmin in the interactive mode ifcmdFile is not specified.
A bwagent Network Name is a nameddirectory under ${TIBCO_HOME}/bw/networks and contains thecorresponding bwagent.ini.
How to Set Up a Newly NamedNetwork
1. Obtain a bwagent.ini created forthe named bwagent network. Forexample, a named network called"acmeNetwork"
2. Create the acmeNetwork directoryunder ${TIBCO_HOME}/bw/networks. For example, mkdir ${TIBCO_HOME}/bw/networks/
acmeNetwork
3. Copy bwagent.ini to the abovedirectory.
4. Rerun bwadmin.sh -networkacmeNetwork
$BW_HOME/scripts/
admin
33
TIBCO ActiveMatrix BusinessWorks™ Administration

Script Description Script Location
bwagent.sh This script starts bwagent in thebackground and waits until it is fullyinitialized, or the maxWait time (<n> * 2sec) expires.
[-h] or [-help] - Prints this usagemessage.
[-network <Network>] - Starts upbwagent using the configuration of anamed network.
[-maxWait <n>] - Maximum amount ofwait time (2 sec increment) for bwagentstart up success.
The dDefault value for <n> is 30, whichmeans 30 * 2 sec = 60 seconds
When bwagent is configured withActiveSpaces® (for both transport anddata cache), the minimum time requiredfor bwagent to start up is about 11seconds. It takes longer if theActiveSpaces® datastore contains moredata.
$BW_HOME/scripts/
admin
bwclean.sh This utility script cleans upActiveMatrix BusinessWorks™ DomainData and internal Data Store. The endeffect of this clean up is similar to afresh installation of ActiveMatrixBusinessWorks™.
[-force] or [-forceClean] - Proceedswith wiping ActiveMatrixBusinessWorks™ Domain Data andinternal Data Store without promptinguser reconfirmation.
By default, the script prompts userconfirmation.
$BW_HOME/scripts/
admin
34
TIBCO ActiveMatrix BusinessWorks™ Administration

Script Description Script Location
configureBWEngineGroup.sh This utility configures AppNodes in aDomain/AppSpace to form a fault-tolerant group and cross enginepersistence
[-h] or [-help] - Prints this usagemessage.
[-c] or [-clean] - Cleans up anddrops all the previously configureddatabase tables.
Use this option carefully. This operationcannot be undone. Do not specify both -setup and -cleanup on the same run.
[-s] or [-setup] - Does the one timesetup of bwengine Database. When thisoption is used, -domain and -appspacearguments are not needed and are notused even if specified. ${BW_HOME}/config/sqlscripts/<dbtype>/
create.sql is used to set up thedatabase tables and configuration.
[-b] or [-bootstrap] - Does clean upthen setup.
[-t] or [-dbtype] - This is the defaultvalue is postgresql.
-cf <config.sh> - Sourcesconfiguration from the specified<config.sh> file. By default, <$BW_HOME>/scripts/admin/config/
bwengine-group-<dbtype>.sh
[-d] or [-domain] - Domain Name
[-a] or [-appspace <appspace>] -AppSpace Name. All AppNodes in thespecified Domain and AppSpace will beconfigured to form a Fault-Tolerantgroup and across engine persistence.
$BW_HOME/scripts/
admin
35
TIBCO ActiveMatrix BusinessWorks™ Administration

Script Description Script Location
deploy.sh Usage: deploy.sh -ear <EARFile> [-h|-help] [-domain <DomainName>]
[-appspace <AppSpaceName>] [-
redeploy|-force] [-profile
<Profile>]
Deploys the specified ActiveMatrixBusinessWorks™ EAR File into -domain<DomainName> -appspace
<AppSpaceName>
[-h] or [-help]- Prints this helpmessage.
-ear <EARFile> - Enterprise Archivefile to deploy
[-domain <DomainName>] - DomainName - Optional parameter
If it is not specified, DomainName iscomputed from ${USER}-Domain
This utility creates the Domain if it doesnot already exist.
[-appspace <AppSpaceName>] -AppSpace Name - Optional parameter
If it is not specified, AppSpaceName iscomputed from the name of the EARfile.
This utility creates the AppSpace andAppNode if they do not already exist.
[-redeploy|-force] - Redeploy if theapplication has been previouslydeployed.
The application is not redeployed if italready exists and this option is notspecified.
[-profile <Profile>] : Profile nameto use for this deployment.
If it is not specified, the default Profileas packaged in the Enterprise Archivefile is used.
[-mapp] - Optional flag to set MultipleApplications per AppSpace Mode. Thisis the default mode for ActiveMatrixBusinessWorks™.
[-debug] - Prints debug tracing for thisscript ./deploy.sh
$BW_HOME/scripts/
admin
36
TIBCO ActiveMatrix BusinessWorks™ Administration

Script Description Script Location
genbwagentini.sh This script auto generates ${BW_HOME}/config/bwagent.ini based onconfigurations defined in ./config/bwadmin-default- config.sh
-h or -help - Prints this help message.
The following variables are requiredfrom ./config/bwadmin-default-config.sh:
● BWAgentNetworkName - Name ofBWAgent Network.
● BWMachines - Defined as a list ofmachine names (as obtained throughhostname -f). If you have only onemachine to configure, do not add itto this list because this script auto-configures it as a standaloneBWAgent Network.
This script uses hostname -f todetermine the name of the machine it isrun on. It then determines whether thismachine is in the BWMachines list.
You can assume that the discoveryURLof the bwagent.ini is comparable to thatof a Database Server's URL, andBWAgentNetworkName is thencomparable to the Database Name. Youcan configure both to uniquely accessthe specific instance of the Database.
If the KEEP_BWAGENT_INI environmentvariable is defined, bwagent.inigeneration is skipped.
You can edit either the ./config/bwadmin-default- config.sh file, ormake a copy of it, edit it, and then setenvironment variable BWADMIN_CONFIGto point to it. For example, exportBWADMIN_CONFIG=~/config/bwadmin-
my-config.sh
Generates bwagent.ini file for eitherActiveSpaces®, Database/EMS, orDatabase/FTL as the technology type.
$BW_HOME/scripts/
admin
37
TIBCO ActiveMatrix BusinessWorks™ Administration

Script Description Script Location
kill.sh Kills all processes that match thespecified <process name>
-h or -help - Prints this help message.
<process name> - name of the process youwant to kill. This script kills all instancesof the pid that matches this name.
$BW_HOME/scripts/
admin
killall.sh This script finds and kills all instances ofprocesses that match the followingnames:
● tea
● bwagent
● bwappnode
● bwadmin
-h or -help - Prints this help message.
$BW_HOME/scripts/
admin
killbwagent.sh This script finds and kills all instances ofprocesses that match "bwagent" .
-h or -help - Prints this help message.
$BW_HOME/scripts/
admin
killbwappnodes.sh This script finds and kills all instances ofprocesses that match "bwappnode".
-h or -help - Prints this help message.
$BW_HOME/scripts/
admin
killtea.sh This script finds and kills all instance ofprocesses that matches "tea".
-h or -help - Prints this help message.
$BW_HOME/scripts/
admin
killtibemsd64.sh This script finds and kills all instances ofprocesses that match "tibemsd".
-h or -help - Prints this help message.
$BW_HOME/scripts/
admin
recreatedb.sh This script cleans up and recreates thePostgres DB needed by ActiveMatrixBusinessWorks™ BookStore RESTsample located in: ${BW_HOME}/samples/binding/rest/BookStore
-h and -help - Prints this help message.
$BW_HOME/samples/
core/admin
38
TIBCO ActiveMatrix BusinessWorks™ Administration

Script Description Script Location
registeragent.sh This utility registers the local bwagentwith TIBCO Enterprise Administratorserver.
-h or -help - Prints this help message.
This utility assumes that the followingenvironment variables have been set:
export TIBCO_HOME="<WhereActiveMatrix BusinessWorks™ isinstalled>"
At least one of the followingenvironment variable is set:
export TEA_HOME="Where TIBCOEnterprise Administrator is installed inthe form of $TIBCO_HOME/tea/<version>"
Or,
export TEA_HOSTNAME=<HostName>
If TEA_HOSTNAME environmentvariable is set, it assumes the TIBCOEnterprise Administrator server isrunning remotely from the localbwagent instance.
If TEA_HOSTNAME environmentvariable is not set, this script registersthe local bwagent to the locally runningTIBCO Enterprise Administrator server.
$BW_HOME/scripts/
admin
39
TIBCO ActiveMatrix BusinessWorks™ Administration
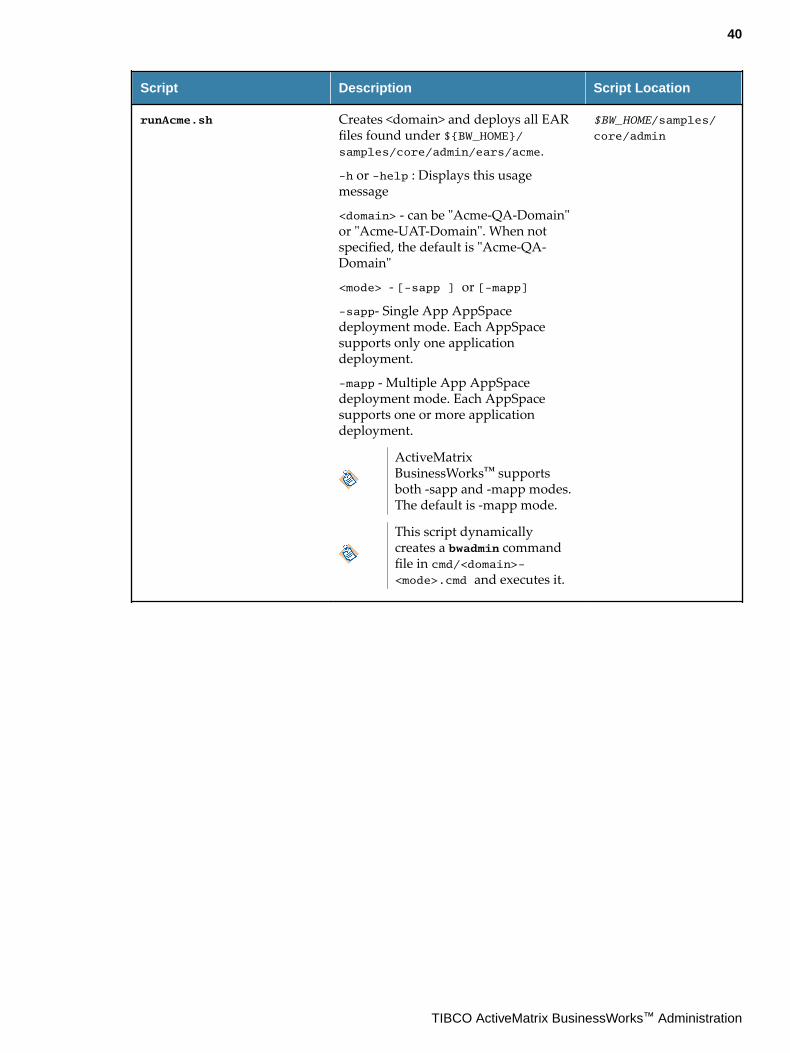
Script Description Script Location
runAcme.sh Creates <domain> and deploys all EARfiles found under ${BW_HOME}/samples/core/admin/ears/acme.
-h or -help : Displays this usagemessage
<domain> - can be "Acme-QA-Domain"or "Acme-UAT-Domain". When notspecified, the default is "Acme-QA-Domain"
<mode> - [-sapp ] or [-mapp]
-sapp- Single App AppSpacedeployment mode. Each AppSpacesupports only one applicationdeployment.
-mapp - Multiple App AppSpacedeployment mode. Each AppSpacesupports one or more applicationdeployment.
ActiveMatrixBusinessWorks™ supportsboth -sapp and -mapp modes.The default is -mapp mode.
This script dynamicallycreates a bwadmin commandfile in cmd/<domain>-<mode>.cmd and executes it.
$BW_HOME/samples/
core/admin
40
TIBCO ActiveMatrix BusinessWorks™ Administration

Script Description Script Location
runAll.sh This utility is a wrapper script thatperforms the following:
● bootstrap.sh - only if running in asingle machine setup
● runBookStore.sh
● runSamples.sh
● runAcme.sh -domain Acme-QA-Domain
● runAcme.sh -domain Acme-UAT-Domain
-h or -help - Displays this usagemessage and exits
-clean - Cleans the TIBCO EnterpriseAdministrator Server Data Store andActiveMatrix BusinessWorks™ DomainData Store.
These data store clean is not reversible.Make sure you back up your data storesbefore running this command. Use thisoption with utmost care, otherwise yourisk losing all your configurations.
-forceClean - Same as -clean, exceptit avoids prompting you to confirm withclean.
-force - Same as -forceClean
<mode> - [-sapp | -mapp]
-sapp - Single Application perAppSpace deployment mode. EachAppSpace supports only oneapplication deployment.
-mapp - Multiple Applications perAppSpace deployment mode. EachAppSpace supports one or moreapplication deployments.
ActiveMatrixBusinessWorks™ supportsboth -sapp and -mapp modes.The default is -mapp mode.
Generates the bwagent.ini file foreither ActiveSpaces®, Database/EMS, orDatabase/FTL technology type.
$BW_HOME/samples/
core/admin
41
TIBCO ActiveMatrix BusinessWorks™ Administration

Script Description Script Location
runBookStore.sh Creates BookStore-Domain and deploysall EAR files found under ${BW_HOME}/samples/core/admin/ ears/
bookstore
-h or -help - Displays this usagemessage.
<mode> - [-sapp | -mapp]
-sapp - Single Application perAppSpace deployment mode. EachAppSpace supports only oneapplication deployment.
-mapp - Multiple Application perAppSpace deployment mode. EachAppSpace supports one or moreapplication deployments.
ActiveMatrixBusinessWorks™ supportsboth -sapp and -mapp modes.The default is -mapp mode.
This script dynamicallycreates a bwadmin cmd file incmd/Samples-Domain-
<mode>.cmd and executes it.
$BW_HOME/samples/
core/admin
runSamples.sh Creates Samples-Domain and deploysall EAR files found under ${BW_HOME}/samples/core/admin/ ears/samples
-h or -help - Displays this usagemessage.
<mode> : [-sapp] or [-mapp]
-sapp : Single Application perAppSpace deployment mode. EachAppSpace supports only oneapplication deployment.
-mapp : Multiple Application perAppSpace deployment mode. EachAppSpace supports one or moreapplication deployments.
ActiveMatrixBusinessWorks™ supportsboth -sapp and -mapp modes.The default is -mapp mode.
This script dynamicallycreates a bwadmin commandfile in cmd/Samples-Domain-<mode>.cmd and executes it.
$BW_HOME/samples/
core/admin
42
TIBCO ActiveMatrix BusinessWorks™ Administration

Script Description Script Location
showprocs.sh Shows process ID and complete binarypath of all processes required inActiveMatrix BusinessWorks™:
● tibemsd
● tea
● bwagent
● bwappnode
● bwadmin
$BW_HOME/scripts/
admin
tea.sh This script starts TIBCO EnterpriseAdministrator in the background andwaits until it is completely initialized, orthe maxWait time (<n> * 2 sec) expires.
-h or -help - Prints this usage message.
[-maxWait <n>] - Max number of waittime (2 sec increment) for TIBCOEnterprise Administrator Server startupsuccess.
The default value for <n> is 30, whichmeans 30 * 2 sec = 60 seconds.
$BW_HOME/scripts/
admin
teaclean.sh This utility script cleans TIBCOEnterprise Administrator Server'sconfiguration data store.
The end effect of this clean up is similarto a fresh installation of TIBCOEnterprise Administrator.
-h or -help - Prints this usage message
-force or -forceClean - Proceeds withwiping ActiveMatrix BusinessWorks™Domain Data and internal data storewithout prompting user reconfirmation.
By default, the script prompts userconfirmation.
$BW_HOME/scripts/
admin
43
TIBCO ActiveMatrix BusinessWorks™ Administration

Script Description Script Location
tibemsd64.sh This script starts tibemsd64 in thebackground and waits until it iscompletely initialized, or the maxWaittime (<n> * 2 sec) expires.
-h or -help - Prints this usage message
[-maxWait <n>] - Max number of waittime (2 seconds increment) fortibemsd64 start up success.
The default value for <n> is 30, whichmeans 30 * 2 sec = 60 seconds.
This script is only supported on UNIXbased systems.
For Windows, use Windows SystemsServices to start or stop tibemsd64.
$BW_HOME/scripts/
admin
Each runAcme.sh, runBookStore.sh, runSamples.sh, deploy.sh, andAppManage.sh generates bwadmin commands before execution.
The generated bwadmin command files are found under cmd subdirectory.
44
TIBCO ActiveMatrix BusinessWorks™ Administration

Administrator and Agent
bwadmin and bwagent are used to create, manage, and monitor domains, AppSpaces, AppNodes,archives, and applications.
For more information, see the topics called bwadmin and bwagent.
Runtime entities are created in the local file system in the BW_HOME/domains folder. The default locationof this folder can be changed. For information, see Configuring the Location of the Default DomainsFolder.
bwadminbwadmin provides a command line console that can be used in local mode or enterprise mode to createand manage domains, AppSpaces, AppNodes, archives, and applications. Collectively, the entitiesprovide the logical and physical structure for the runtime environment.
bwadmin provides the following features:
● One tool for both local and enterprise mode with identical commands● Interactive shell● Batch/silent mode by passing a command file as argument● Ability to execute commands locally as well as remotely● Ability to address different bwagent networks● Simple and intuitive command structures● Nested commands● Unix-style commands for complex scripting● Command completion
A full range of commands is available. Command can be executed stand-alone from the command lineor from the bwadmin console. Unix-style scripts can be created to run bwadmin commands. Whenscripting, you may need to include conditions for possible error codes.
For more information about error codes and the corrective action to take, see the TIBCO ActiveMatrixBusinessWorks™ Error Codes guide.
Commands can be issued from:
● Interactive Mode: Useful for exploration. Commands are executed from the bwadmin shell. Anynumber of commands can be executed in a sequence.
● Command Line: Useful for execution of single commands. Commands are executed stand-alonefrom the command line with the provided syntax.
● Batch Mode: Useful for execution of repetitive commands.
To get help on a command, including syntax information, type help followed by the command name,from either interactive mode or the command line, for example:bwadmin helpbwadmin help createbwadmin help registerteaagent
Interactive Mode
Interactive mode is used for exploring runtime entities. Enter interactive mode by typing bwadmin atthe command line. To view a list of available commands, press tab.
The cd command sets the runtime entity context so you can omit runtime entity options for commandslike create, delete, start, or stop.
45
TIBCO ActiveMatrix BusinessWorks™ Administration

Command Line
bwadmin commands can be issued from the command line in the format: bwadmin [options]command <arguments>
To see the list of all bwadmin commands, type bwadmin help at the command line.
The following options can be specified for bwadmin at the command line:
bwadmin Command Options
Option Description Example
-b / --batch Reads a series of commandsfrom the standard input.
bwadmin --batch | bwadmin get
admin.mode
-config Applies the configuration inthe specified file to the serverinstance.
bwadmin -config -d myDomain -a
myAppSpace -cf file_path/config.ini
-D
<property=value>
Applies the specified value tothe specified property. Use thebwadmin get command toretrieve the value.
bwadmin -D name=User1
-f <file[,<file>] Reads commands from thespecified file or from thecomma-separated list of files.The specified file can containone command or multiplecommands. Exits aftercommand execution iscompleted.
bwadmin -f backupMyAppNode.cmd
-l / --login <arg> Specifies the login ID to usefor the session.
Given the following command: bwadmin-l User1
bwadmin in interactive mode displays:bwadmin[User1]>
-logconfig <file> Uses the specified file forlogback configuration.
bwadmin -logconfig mylogback.xml
For more information about logging, see Logging.
-x,--xtrace Echoes the command to theterminal.
Given the following command bwadmin-x create domain MyDomain1 thefollowing output is issued:TIBCO ActiveMatrix BusinessWorks version 6.2.0, build V20, 2014-10-09+ create domain MyDomain1
exit Exits the command lineconsole.
bwadmin>exit It will exit the commandline console.
For more information about bwadmin commands for different adminitraion tasks, see the "bwadminCommand Line" topics in the Administration Tasks and Reference section.
46
TIBCO ActiveMatrix BusinessWorks™ Administration

Batch Mode
A command file can be passed to bwadmin at the command line with the -f option. The batch fileshould contain all required inputs. An example of a command file is a backup file created with thebackup command.
The -f eoe command is an optional command and you can execute the bwadmin commands in abatch mode. If any of the commands fail, the subsequent commands are not executed. Syntax for thecommand is bwadmin.exe -f eoe <command file>
For example: bwadmin.exe -f eoe bwadmin.sh
bwagentA bwagent is a daemon process that is responsible for provisioning AppNodes and applications,performing administration commands, and synchronizing data from the datastore with the local filesystem.
There is one bwagent for each installation. The bwagent enables communication between agents locatedon different machines. When multiple bwagents are configured to communicate with each other using acommon datastore, they form a bwagent network. bwagents can communicate using TIBCOActiveSpaces® for data persistence and communication transport or by using an external database fordata persistence and TIBCO Enterprise Message Service for communication transport.
In your production environment, make sure you use an external database and either TIBCO FTL® orTIBCO Enterprise Message Service ™ for data persistence and communication transport.
For information about configuring the bwagent, see the section "Configuring bwagent" in the TIBCOActiveMatrix BusinessWorks™ Administration guide.
When multiple bwagents belong to a network and one of the system fails, the failed system can berestored after a restart by using the bwadmin restore command to force the file system to besynchronized with the datastore.
There are multiple ways to access the bwagent: bwadmin, the Admin UI, or the REST API.
● bwadmin: In enterprise mode, bwadmin sends commands to the bwagent. The bwagent dispatchesthe command to the targeted agent. For more information, see the "bwadmin Command Line" tasksunder Administration Tasks and Reference section in the TIBCO ActiveMatrix BusinessWorks™Administration guide.
● Admin UI: When the bwagent is registered with the TEA server, the Admin UI can be used to createand manage runtime entities. For more information, see the "Admin UI" tasks under"Administration Tasks and Reference" section in the TIBCO ActiveMatrix BusinessWorks™Administration guide.
● REST API: View the bwagent REST API in the Swagger UI. For more information, see the section"Accessing the bwagent REST API with the Swagger UI" in the TIBCO ActiveMatrix BusinessWorks™Administration guide.
bwagent supports its own set of commands. Commands are issued from the command line in theformat: bwagent [options] command <arguments>
bwagent commands are listed below.
bwagent Commands
Command Description
apiserver Starts the apiserver that hosts the REST API in the Swagger UI. Open a browser andgo to the following URL: http://localhost:5555
47
TIBCO ActiveMatrix BusinessWorks™ Administration

Command Description
startagent Starts the bwagent. This is the same as the default command when no command isgiven.
stop Stops the bwagent gracefully.
The following options can be specified for bwagent:
bwagent Command Options
Option Description Example
-config Applies the configuration inthe specified file to theserver instance.
bwagent -config bwagent.ini
-logconfig
<file>
Uses the specified file forlogback configuration.
bwagent -logconfig mylogback.xml
-x,--xtrace Echoes the command to theterminal.
Given bwagent -x , the text +startagent isechoed to the console when the agent starts.
Configuring bwagentThe bwagent can be configured for a multi-agent, multi-machine environment.
The bwagent is configured using the bwagent.ini file in the BW_HOME\config folder. The bwagent.inifile template is a configuration file and contains the BW Admin data store configuration properties.Properties are pushed to the configuration file using JSON files.
Properties Description
BW Agent general configuration
bw.admin.mode The Admin mode. BW Administration tools can work in twomodes, enterprise mode or local mode. In the enterprise modeit works with the agents across machines. In the local mode itworks only with local machine and assumes no data store andtransport and agents are available. The actions performed inlocal mode are not visible to the agents when ever they arestarted or even the admin tool when it is started in theenterprise mode.
bw.agent.networkName The name of the network. Must be the same for all thebwagents in the network. For more information, see Creatingan Agent Network.
bw.agent.memberName The name of the bwagent. Must be unique within thenetwork. For more information, see Creating an AgentNetwork.
Logging configuration
48
TIBCO ActiveMatrix BusinessWorks™ Administration

Properties Description
logback.configurationFile The logback configuration file to be used by the agent.
bw.agent.http.port The HTTP port.
bw.agent.http.host The HTTP interface (default=localhost).
bw.appnode.agent.http.communi
cation.port
The internal HTTP communication port the Thor engine usesto communicate with bwagent to send the status ofAppNodes and applications. Update this property to specifya port to start the internal server on. The default port numberis 56565.
bw.agent.http.access.log.conf
ig
The HTTP Request Access Log Configuration file.
bw.agent.bw.auth The authentication mechanism used by the REST API, BASIC(default) or DIGEST.
bw.agent.https.port The secure port.
bw.agent.https.truststorepath The truststore.
bw.agent.https.truststorepass
word
The truststore password
bw.agent.https.keystorepath The keystore.
bw.agent.https.keystorepasswo
rd
The keystore password.
bw.agent.https.excludeprotoco
ls
The protocols to be excluded.
bw.agent.https.includeprotoco
ls
The protocols to be included.
Configuration for AppNode to agent communication
bw.agent.appnode.user The user used by the AppNodes to communicate with thebwagent.
bw.agent.appnode.password The password for user used by AppNodes to communicatewith the bwagent. If not set, the obfuscated password is readfrom the configured realm file. For example, $BW_HOME/config/realm.properties.
bw.agent.appnode.status.notif
y.timeout
Time interval in seconds when the AppNode reports its statusto the bwagent.
TEA Agent configuration
49
TIBCO ActiveMatrix BusinessWorks™ Administration

Properties Description
bw.agent.tea.agent.host Identifies the bwagent for TEA to be registered.
bw.agent.tea.agent.port Identifies the bwagent for TEA to be registered.
bw.agent.tea.agent.context.pa
th=/bwta
Used to create bwagents register URL for TEA.
bw.agent.tea.server.url The bwagent uses this URL to identitfy which server to beregistered to.
Technology Type Configuration. Supported types are ActiveSpaces or DBEMS or DBFTL
bw.agent.technology.type The provider to use for the datastore, transport, and networkprovider. TIBCO ActiveSpaces, an external database(PostgreSQL , MySQL, Microsoft SQL, Oracle, db2 orMariaDB, ) with TIBCO Enterprise Message Service (EMS),and an external database with TIBCO FTL is supported.
ActiveSpaces supports a server/client concept with adiscovery process. When using an external database withEMS, all bwagents use the same network name and the EMSserver for communication.
In your production environment, ensure you areusing an external database for data persistence andeither TIBCO FTL® or TIBCO Enterprise MessageService™ (EMS) for communication transport.
Set to either:
ActiveSpaces
DBEMS
DBFTL
For more information, see the following topics:
● ActiveSpaces Configuration for bwagent
● Database with EMS Configuration for bwagent
● Database with FTL Configuration for bwagent
bw.agent.technology.requestTi
meout
Timeout for requests sent to other bwagents. The defaultvalue is 60000 ms.
ActiveSpaces technology type
bw.agent.technology.as.connec
tionTimeout
Connection timeout for the admin trying to connect to thebwagent. The value is in milli seconds (default: 60s).
bw.agent.technology.as.readTi
meout
Timeout for read requests of data shared by the BW agents.The value is in milliseconds (default: 20s).
50
TIBCO ActiveMatrix BusinessWorks™ Administration

Properties Description
bw.agent.technology.as.writeT
imeout
Timeout for updating data shared by the BW agents. Thevalue is in milliseconds (default: 20s).
bw.agent.technology.as.discov
eryURL
If no port is specified, the default port number value of 5050 isassumed. All the members of the Agent Group must use thesame discovery URL string. This property is required for theagents configured as "server" or "client", not used when theagent is a "remoteclient".
bw.agent.technology.as.listen
URL
Listen port and interface for the agent, if not specified, defaultport is chosen automatically. This property is required for theagents configured as "server" or "client", not used when theagent is a "remoteclient".
bw.agent.technology.as.remote
ListenURL
The port and interface of the agent that remote clients canconnect to. If not specified, remote clients cannot connect.bwadmin connects to this port by default. This property isrequired for the agents configured as "server" or "client", notused when the agent is a "remoteclient".
bw.agent.technology.as.remote
DiscoveryURL
This property is used by bwadmin by discovery, by default itpoints to the local agents remoteListenURL. If local agent isnot running, then this can be changed to theremoteListenURL of an agent running on any remotemachine. Example:bw.agent.technology.as.remoteDiscoveryURL={{remotelistenurl}}?remote=true.
bw.agent.technology.as.minSee
derCount
This property determines the minimum number of bwagentsthat are configured as "server" for the bwadmin cluster tofunction. The default value has to be changed in a multimachine/multi agent setup. General guideline :minSeederCount = Floor(n/2) + 1, n>2 and n must be odd,where n is the number of bwagents configured as "server".Degree of fault tolerance is: n - minSeederCount. For exampleif we configure 5 bwagents as "server", minSeederCount=3,then 2 of the bwagents can be stopped without impacting thebwadmin cluster. For example if we configure 3 bwagents as"server", minSeederCount=2, then 1 of the bwagents can bestopped without impacting the bwadmin cluster.
bw.agent.technology.as.replic
ationCount
This property determines the number of replicas of the datastored by the bwagent, when it is configured as "server". Bydefault all the bwagents will have a copy of the data, no needto change this.
51
TIBCO ActiveMatrix BusinessWorks™ Administration

Properties Description
bw.agent.technology.as.quorum
SizeQuorum size determines the minimum number of bwagentswhich are configured as "server" to be started to recover thedata from the local files when all the bwagents which wereconfigured as "server" were brought down and re-started. Thedefault value has to be changed in a multi machine/multiagent setup. It is recommended to set the value to the numberof bwagents configured as "server". For example if weconfigure 5 bwagents as "server", the bwagents(1-4) will notstart until the 5th bwagent is also started. If one of the agentshas to be canned, then this property in the remaining 4bwagent.ini files has to be changed to 4 when they are re-started.
bw.agent.technology.as.loglev
el
Error/Info/Debug
bw.agent.technology.as.role Role can be server, client or remoteclient. When it isconfigured as a server, it acts as a datastore as well in additionto providing remote management capability. When it isconfigured as a client, it does not store data locally, it willprovide remote management capability. When it is configuredas a remoteclient, it does not store data, it connects to thebwagent configured as a server or client viaremoteDiscoveryURL, it provides remote managementcapability. The number of bwagents to be configured as"server" depends on the total number of bwagents in thedeployment and the degree of fault tolerance required.
bw.agent.technology.as.dataSt
oreLocation
Folder where the bwadmin model data is stored. '/' must beused as a path separator in the folder path. The data is storedin this location only if the bw.agent.technology.as.role isserver.
DBEMS technology type
bw.agent.technology.dbems.db.
provider
Database provider. Supported options are postgresql, mysqland oracle database 12c, MS sqlserver, db2 and MariaDB.
bw.agent.technology.dbems.db.
driver
The DB driver.
Example: dbDriver=org.postgresql.Driver
Example: dbDriver=com.mysql.jdbc.Driver
Example: dbDriver=oracle.jdbc.OracleDriver
Example:dbDriver=com.microsoft.sqlserver.jdbc.SQLServerDriver
Example: dbDriver=com.ibm.db2.jcc.DB2Driver
Example: dbDriver=org.mariadb.jdbc.Driver
52
TIBCO ActiveMatrix BusinessWorks™ Administration

Properties Description
bw.agent.technology.dbems.db.
connectionURL
The DB connection URL.
Example: dbConnectionURL=jdbc:postgresql://db:5432/bwadmindb
Example: dbConnectionURL=jdbc:mysql://db:3306/bwadmindb
Example: dbConnectionURL=jdbc:oracle:thin:@db:1521:bwadmindb
Example: dbConnectionURL=jdbc:sqlserver://db:1433;databaseName=bwadmindb
Example: dbConnectionURL=jdbc:db2://db:50000/bwadmindb
Example: dbConnectionURL=jdbc:mariadb://db:3306/databaseName=bwadmindb
bw.agent.technology.dbems.db.
userName
The DB user.
Example: dbUserName=bwuser
bw.agent.technology.dbems.db.
password
The DB password.
Example: dbPassword=bwuser
bw.agent.technology.dbems.ems
.serverUrl
The EMS server URL.
Example: emsServerUrl=tcp://ems:7222
Provide a comma-separated list to add multipleEMS servers.
bw.agent.technology.dbems.ems
.userName
The EMS user.
Example: emsUserName=admin
bw.agent.technology.dbems.ems
.password
The EMS user password.
Example: emsPassword=
bw.agent.technology.dbems.ems
.requestQueueName
The EMS member queue.
Example: requestQueueName=bw6.admin.operations.queue.{{membername}}
bw.agent.technology.dbems.ems
.qin.EMSPrefix
The BW Agent Qin group name prefix. This property isoptional and the default value is "EMSGMS".
bw.agent.technology.dbems.ems
.ssl.trust.identity
The EMS ssl configuration.
client identity consisting of the certificate, private key andoptionally extra issuer certificates can be included into asingle data block using PKCS12, KeyStore or Entrust Storeencodings.
Example:bw.agent.technology.dbems.ems.ssl.trust.identity={EMS_HOME}/samples/certs/client_identity.p12
53
TIBCO ActiveMatrix BusinessWorks™ Administration

Properties Description
bw.agent.technology.dbems.ems
.ssl.trust.cert.location
The set of Trusted Certificates represents all trusted issuers ofthe server certificate. It must be specified by the clientapplication unless the host certificate verification iscompletely disabled. Example:bw.agent.technology.dbems.ems.ssl.trust.location={EMS_HOME}/samples/certs/server_root.cert.pem
bw.agent.technology.dbems.ems
.ssl.trust.password
EMS SSL connection trust password. This property isrequired if the JMS server protocol is ssl. The password maybe clear text or supplied as an obfuscated string.
bw.agent.technology.dbems.ems
.ssl.disable.verify.host.name
The trusted certificate commonname must match the emsserver hostname if set to false.
bw.agent.technology.dbems.ems
.ssl.disable.verify.host
The client and server certificates must match if set to false.
bw.agent.technology.dbems.ems
.reconnection.interval
Interval for EMS reconnection. Value is in milliseconds(default: 10s).
DBFTL technology type
bw.agent.technology.dbftl.db.
provider
The Database provider. Supported options are postgresql,mysql and oracle database 12c, MS sqlserver, db2 andMariaDB.
bw.agent.technology.dbftl.db.
driver
The DB driver.
Example: dbDriver=org.postgresql.Driver
Example: dbDriver=com.mysql.jdbc.Driver
Example: dbDriver=oracle.jdbc.OracleDriver
Example:dbDriver=com.microsoft.sqlserver.jdbc.SQLServerDriver
Example: dbDriver=com.ibm.db2.jcc.DB2Driver
Example: dbDriver=org.mariadb.jdbc.Driver
54
TIBCO ActiveMatrix BusinessWorks™ Administration

Properties Description
bw.agent.technology.dbftl.db.
connectionURL
The DB connection URL.
Example: dbConnectionURL=jdbc:postgresql://db:5432/bwadmindb
Example: dbConnectionURL=jdbc:mysql://db:3306/bwadmindb
Example: dbConnectionURL=jdbc:oracle:thin:@db:1521:bwadmindb
Example: dbConnectionURL=jdbc:sqlserver://db:1433;databaseName=bwadmindb
Example: dbConnectionURL=jdbc:db2://db:50000/bwadmindb
Example: dbConnectionURL=jdbc:mariadb://db:3306/databaseName=bwadmindb
bw.agent.technology.dbftl.db.
userName
The DB user.
Example: dbUserName=bwuser
bw.agent.technology.dbftl.db.
password
The DB password.
Example: dbPassword=bwuser
bw.agent.technology.dbftl.ftl
.realmserver
The FTL Realm server URL.
Example: ftlRealmServerUrl=http://localhost:8070
bw.agent.technology.dbftl.ftl
.application
The FTL application name.
Example: ftlApplicationName=bwadmin
bw.agent.technology.dbftl.ftl
.identifier
The FTL identifier.
Example: ftlIdentifier=
bw.agent.technology.dbftl.ftl
.secondary
The FTL secondary realm server.
Example: ftlSecondaryUrl=http://localhost:8070
bw.agent.technology.dbftl.ftl
.username
The FTL user.
Example: ftlUserName=admin
bw.agent.technology.dbftl.ftl
.password
The FTL user password.
Example: ftlPassword=
bw.agent.technology.dbftl.ftl
.endpoint
The FTL endpoint.
Example: ftlEndpoint=bw-endpoint
bw.agent.technology.dbftl.ftl
.dataformat
The FTL data format.
Example: ftlDataformat=
55
TIBCO ActiveMatrix BusinessWorks™ Administration

Properties Description
bw.agent.technology.dbftl.ftl
.inbox
The FTL inbox name.
Example: ftlInbox=
Statistics Provider Configuration
bw.agent.technology.statsProv
ider
The stats provider technology.
bw.agent.technology.statsProv
ider.db.provider
The Database provider. Supported options are postgresql,mysql and oracle database 12c, MS sqlserver, db2 andMariaDB.
bw.agent.technology.statsProv
ider.db.driver
The DB driver.
Example: dbDriver=org.postgresql.Driver
Example: dbDriver=com.mysql.jdbc.Driver # Example:dbDriver=oracle.jdbc.OracleDriver
Example:dbDriver=com.microsoft.sqlserver.jdbc.SQLServerDriver
Example: dbDriver=com.ibm.db2.jcc.DB2Driver
Example: dbDriver=org.mariadb.jdbc.Driver
bw.agent.technology.statsProv
ider.db.connectionURL
The DB connection URL.
Example: dbConnectionURL=jdbc:postgresql://db:5432/bwadmindb
Example: dbConnectionURL=jdbc:mysql://db:3306/bwadmindb
Example: dbConnectionURL=jdbc:oracle:thin:@db:1521:bwadmindb
Example: dbConnectionURL=jdbc:sqlserver://db:1433;databaseName=bwadmindb
Example: dbConnectionURL=jdbc:db2://db:50000/bwadmindb
Example: dbConnectionURL=jdbc:mariadb://db:3306/databaseName=bwadmindb
bw.agent.technology.statsProv
ider.db.userName
The DB user.
Example: dbUserName=bwuser
bw.agent.technology.statsProv
ider.db.password
The DB password.
Example: dbPassword=bwuser
Governance and Policy Director Configuration - The properties in this section are applicable toGovernance Lifecycle Event Listener and it is used to communicate with the TIBCO Policy DirectorAdministrator.
56
TIBCO ActiveMatrix BusinessWorks™ Administration

Properties Description
bw.governance.enable To enable or disable the Governance Lifecycle Event Listener.This property is optional and specifies whether theGovernance Lifecycle Event Listener should be enabled ordisabled in the BW Agent. The supported values are: true orfalse. The default value is 'false'.
bw.governance.jms.server.url The Policy Director Administrator JMS URL. This property isoptional and is used to specify the JMS server URL used tocommunicate with the Policy Director Administrator. If thisproperty is not set, then the Lifecycle Event Listener will notattempt to connect to the JMS server. The URL is expected tostart with 'tcp://' or 'ssl://' and the failover URLs can bespecified as a ',' or '+' separated list.
bw.governance.jms.server.user
name
The Policy Director Administrator JMS User Name. Thisproperty is required if the Policy Director Administrator JMSURL is specified.
bw.governance.jms.server.pass
word
The Policy Director Administrator JMS User Password. Thisproperty is required if the Policy Director Administrator JMSURL is specified.
bw.governance.jms.ssl.trust.s
tore.type
The Policy Director Administrator JMS SSL connection truststore type. This property is required if the JMS server protocolis ssl. The supported values are 'JKS' and 'JCEKS'. The defaultvalue is 'JKS'.
bw.governance.jms.ssl.trust.s
tore.location
The Policy Director Administrator JMS SSL connection truststore location. This property is required if the JMS serverprotocol is ssl.
bw.governance.jms.ssl.trust.s
tore.password
The Policy Director Administrator JMS SSL connection truststore password. This property is required if the JMS serverprotocol is ssl. The password may be clear text or supplied asan obfuscated string.
bw.governance.jms.reconnect.a
ttempt.count
The Policy Director Administrator JMS Connection attemptcount. This property is required if the Policy DirectorAdministrator JMS URL is specified and it specifies thenumber of JMS connection attempts the Lifecycle EventListener will make. The default value is '120'.
bw.governance.jms.reconnect.a
ttempt.timeout
The Policy Director Administrator JMS Connection attempttimeout. This property # is required if the Policy DirectorAdministrator JMS URL is specified and # it specifies thetimeout between the attempt to reestablish connection to # theJMS server. The default value is '500'.
57
TIBCO ActiveMatrix BusinessWorks™ Administration

Properties Description
bw.governance.jms.reconnect.a
ttempt.delay
The Policy Director Administrator JMS Connection attemptdelay. This property is required if the Policy DirectorAdministrator JMS URL is specified and it specifies the delayin milliseconds between attempts to establish reestablishconnection the JMS server. The default value is '500'.
bw.governance.jms.queue.pd.re
ceiver.name
The Policy Director Administrator JMS receiver queue nameprefix. This property is required if the Policy DirectorAdministrator JMS URL is specified and it specifies receiverqueue name prefix for the Lifecycle Event Listener and PolicyDirector Administrator communication. This property valuemust match the value specified in the Policy DirectorAdministrator configuration. The default value is'governance.de.bw.default'.
bw.governance.jms.application
.property.<UserCustomProperty
>
The Policy Director Administrator JMS JNDI custom property.This property is optional and it provides the ability to specifycustom property for the JMS JNDI Initial Context. Forexample to provide a custom property called "myProperty"for the JNDI Initial Context, then specify a property"bw.governance.jms.application.property.myProperty=".
The default location of the domains folder, where runtime entities are stored, can be changed. Forinformation, see Configuring the Location of the Default Datastore.
ActiveSpaces Configuration for bwagent
By default, bwagent uses TIBCO ActiveSpaces to provide the persistence and transport layers amongbwagents.
This release deprecates the use of TIBCO ActiveSpaces® as a transport for bwagent. In your productionenvironment, ensure you are using an external database for data persistence and either TIBCO FTL® orTIBCO Enterprise Message Service™ (EMS) for communication transport.
For a multi-agent, multi-machine environment using ActiveSpaces for persistence and transport, thefollowing properties in the bwagent.ini file are important:
bwagent properties for Multi-Agent, Multi-Machine Environments using ActiveSpaces
Property Name Description
bw.agent.technology.as.role The role of the bwagent. One of server, client, orremote client. For more information, see thefollowing:
● Server: See the section "Simple ServerConfiguration".
● Client: See the section "Simple ServerConfiguration".
● Remote Client: See the section "HighAvailability Configuration with RemoteClients".
58
TIBCO ActiveMatrix BusinessWorks™ Administration

Property Name Description
bw.agent.technology.as.listenURL The listen port and interface of the bwagent
bw.agent.technology.as.discoveryURL The port and interface to be used to discover allthe agents in the network. Must be same for allthe agents in the network. This is typically set toa comma separated list of listen URLs that form asmall subset of agents in the network.
For information about setting properties, see Configuring bwagent for ActiveSpaces.
Simple Server Configuration
When setting up a multi-agent, multi-machine environment using ActiveSpaces for the technologytype, there has to be at least one server in the network. (This is configured with thebw.agent.technology.as.role property). A server persists domain data. In the figure below titledSimple bwagent Configuration, the bwagent named bwagent_1 is the server. Once a bwagent is configuredas server (the default setting), bwadmin or the Admin UI can be used to create and manage runtimeentities. Application archive files can be uploaded and deployed into an AppSpace running on thismachine. In the example, the default setting for the bw.agent.technology.as.listenURL property,that configures the listen interface and port for the bwagent, is set to: tcp://Machine1:5050
When TIBCO ActiveMatrix BusinessWorks is installed on the other machines in the environment, thebw.agent.technology.as.role property for these bwagents should be configured as client. In theSimple bwagent Configuration figure below, the bwagents bwagent_2...bwagent_N are configured asclient. Client bwagents write the local filesystem, but do not store the datastore in the local filesystem.Clients require a connection to at least one server.
The discovery URL property bw.agent.technology.as.discoveryURL for bwagentsbwagent_2...bwagent_N in the example should point to the listen URL property of bwagent_1:tcp://Machine1:5050. This configures the server bwagent, bwagent_1, so that it can discover otheragents in the network.
When each of the bwagents is started, they join the network and discover the other bwagents. They canaccess data in the datastore. bwadmin and the Admin UI can be used to manage the entities across themachines in the environment.
This configuration is simple and has the following limitations:
● There is a single point of failure: If bwagent_1 is down, the network is down.
● The bwagents bwagent_2...bwagent_N are full members of the network and operate using a meshof TCP connections.
59
TIBCO ActiveMatrix BusinessWorks™ Administration

Simple bwagent Configuration
Simple High Availability Configuration
In the example described in the Simple Server Configuration section, only one bwagent, bwagent_1, isconfigured as server. The datastore in that example can be set for high availability by configuringadditional bwagents as server.
For example, the bwagent on Machine2 can be turned into a server by changing thebw.agent.technology.as.role property setting from client to server. In this case, the setting of thediscovery URL property bw.agent.technology.as.discoveryURL for all bwagents, includingbwagent_1, should be changed to tcp://Machine1:5050;Machine2:5050 to include the URL for thenewly added server bwagent (the bwagent on Machine2). Now, all bwagents can be discovered, aslong as either bwagent_1 or bwagent_2 is available.
The following configuration properties in the bwagent.ini file are important when multiple bwagentsare configured as server.
bwagent Configuration Properties for Multiple bwagent Servers
Property Name Description
bw.agent.technology.as.
minSeederCountThis property determines the minimum number of bwagents that areconfigured as server in the bwagent network. The default valueshould be changed in a multi-agent, multi-machine configuration.
The general guideline is: minSeederCount = Floor(n/2) + 1, n>2
where: n is an odd number and is the number of bwagents configuredas server.
The degree of fault tolerance is: n - minSeederCount
For example, if five bwagents are configured as server with aminSeederCount=3, then two of the bwagents can be stoppedwithout impacting the bwagent network.
60
TIBCO ActiveMatrix BusinessWorks™ Administration

Property Name Description
bw.agent.technology.as.
quorumSizeThis property determines the minimum number of bwagentsconfigured as server that will be used to recover data from the filesystem when all bwagents configured as server were brought downand restarted. The default value should be changed in a multi-agent,multi-machine configuration.
This value should be set to the number of bwagents configured asserver.
For example, if 5 bwagents are configured as server, bwagents 1 to 4will not start until the 5th bwagent is started. If one of the bwagentscannot be restarted, this property has to be set to 4 in the remainingbwagent.ini files before a restart.
The figure below called bwagent Network with Two bwagents Storing Data illustrates a configurationwhere bwagents bwagent_1 and bwagent_2 are configured as server and the remaining bwagentsbwagent_3...bwagent_N are configured as client. In this configuration, management activities can beperformed using bwadmin or the Admin UI as long as bwgent_1 or bwagent_2 is available.
If a bwagent is not reachable, the runtime entities on that machine are in an unreachable state. Theruntime entities cannot be managed with bwadmin or the Admin UI until the bwagent is runningagain.
To increase datastore availability, additional bwagents can be added and configured as server, usingthe guidelines outlined in the bwagent Configuration Properties for Multiple bwagent Servers table above.
bwagent Network with Two bwagents Storing Data
High Availability Configuration with Remote Clients
The example illustrated above, bwagent Network with Two bwagents Storing Data, allows the datastore tohave high availability. However, the bwagents also have a mesh of TCP connections. This TCPconnection mesh can be avoided by setting the bwagent bw.agent.technology.as.role property toremoteclient instead of client.
The following configuration properties in the bwagent.ini file are important when configuring abwagent as remoteclient.
61
TIBCO ActiveMatrix BusinessWorks™ Administration

bwagent Configuration Properties for Remote Client Configurations
Property Name Description
bw.agent.technology.as.remoteListenURL The port and interface of the bwagent thatremote clients (bwagents configured asremoteclient) can connect to.
bw.agent.technology.as.remoteDiscoveryURL The port and interface of the bwagent thatbwagents configured as remoteclient useto connect to the network.
When a bwagent is configured as remoteclient, it does not start any listeners. It simply connects to thegiven bw.agent.technology.as.remoteDiscoveryURL.
If bwagent_3 to bwagent_N in the example illustrated above (bwagent Network with Two bwagents StoringData) are changed from client to remoteclient, theirbw.agent.technology.as.remoteDiscoveryURL properties should point to thebw.agent.technology.as.remoteListenURL properties of either bwagent_1 or bwagent_2. Thisreduces the TCP connection mesh.
The diagram below illustrates the configuration where bwagent_3 to bwagent_N are configured asremoteclient and point to bwagent_1 on its bw.agent.technology.as.remoteListenURL property.
bwagents as Remote Clients
While this configuration is simple and avoids the mesh of TCP connections, it presents a single point offailure. The bwagents bwagent_3 to bwagent_N would be unreachable and could not be managed ifbwagent_1 was not available.
High Availability Configuration with Remote Discovery
The single point of failure problem can be resolved by adding a comma-separated list of remote listenports and host names to the bw.agent.technology.as.remoteDiscoveryURL property:remoteDiscoveryURL=tcp://Machine1:5060;Machine2:5060
In this case bwagent_3 to bwagent_N would have connections to both servers, bwagent_1 andbwagent_2. bwagent_3 to bwagent_N continue to access the datastore through either bwagent_1 orbwagent_2.
This is the recommended configuration as it offers simplicity and high availability. In the followingdiagram, the two bwagents store data and the remainder of the bwagents connect through a remotediscover URL.
62
TIBCO ActiveMatrix BusinessWorks™ Administration

bwagent Configuration for High Availability
Configuring bwagent for ActiveSpaces
The bwagent uses TIBCO ActiveSpaces® by default for the persistence and transport. Configureproperties to create a highly available multi-agent, multi-environment configuration.
This release deprecates the use of TIBCO ActiveSpaces® as a transport for bwagent. In your productionenvironment, ensure you are using an external database for data persistence and either TIBCO FTL® orTIBCO Enterprise Message Service™ (EMS) for communication transport.
Regularly back up domain data using the bwadmin backup command. For more information aboutbacking up and restoring domain data, see Backing up and Restoring a Domain
Procedure
1. Stop the bwagent if it is running.
2. Open the bwagent_as.json file (located in BW_HOME\config (Windows) or ${BW_HOME}/config(Unix).
3. Update parameters for your environment and use the bwadmin config command with the -cfoption to push the changes from the JSON file to the bwagent.ini file.BW_HOME\bin>bwadmin config -cf ../config/bwagent_as.json agent
4. Restart the bwagent.
Database with TIBCO Enterprise Message Service Configuration for bwagent
The bwagent can be configured to use an external relational database for persistence and TIBCOEnterprise Message Service (EMS) for transport among bwagents. PostgreSQL, MySQL, Microsoft SQL,and Oracle are the supported databases.
In your production environment, ensure you are using an external database for data persistence andeither TIBCO FTL® or TIBCO Enterprise Message Service™ (EMS) for communication transport.
Regularly back up domain data using the bwadmin backup command. For more information aboutbacking up and restoring domain data, see Backing up and Restoring a Domain
For a non admin EMS user, the following permissions are to be given to use bwagent:grant topic "$sys.monitor.>" user=<username> allgrant admin user=<username> view-connection,view-server,create-destination
For a multi-agent, multi-machine environment using an external database and TIBCO EnterpriseMessage Service, the following properties in the bwagent.ini file are important.
63
TIBCO ActiveMatrix BusinessWorks™ Administration

bwagent properties for Multi-Agent, Multi-Machine Environments using Database/EMS
Property Name Description
bw.agent.technology.dbems.db.provider Database provider. One of:
● postgresql
● mysql
● mssql
● oracle
● db2
bw.agent.technology.dbems.db.driver The database driver.
Example:dbDriver=org.postgresql.Driver
bw.agent.technology.dbems.db.connectionURL The URL to connect to the database.
Example: jdbc:postgresql://localhost:5432/bwadmindb
bw.agent.technology.dbems.db.userName The user name to authenticate to thedatabase.
bw.agent.technology.dbems.db.password The password to authenticate to thedatabase.
bw.agent.technology.dbems.ems.serverUrl The URL to connect to the EMSserver.
Example: tcp://localhost:7222
bw.agent.technology.dbems.ems.userName The user name to authenticate to theEMS server. The default is admin.
To authenticate a non-admin user,create a user and set the password.Run the following two commands inthe TIBCO EMS admin console:
● grant topic "$sys.monitor.>"
user=sri2 all
● grant admin user=sri2 view-
connection,view-server
bw.agent.technology.dbems.ems.password The password to authenticate to theEMS server. There is no password bydefault.
bw.agent.technology.dbems.ems.requestQueueName=b
w6.admin.operations.queue.Member queue. Add the value of thebw.agent.network.name property.
64
TIBCO ActiveMatrix BusinessWorks™ Administration

Property Name Description
bw.agent.technology.requestTimeout Timeout for requests sent to otherbwagents The default value is 6000milliseconds.
bw.agent.technology.remote.status.requestTimeout Timeout for requests sent tobwagents to find the status ofAppNodes, applications, and otherbwagents. The default value is 3000milliseconds.
bw.agent.technology.dbems.ems.reconnection.inter
val
Set thebw.agent.technology.dbems.ems.r
econnection.interval property tospecify, in milliseconds, how often thebwagent checks its connection withthe EMS server.
The default value is 10000milliseconds.
For information about setting properties, see:
● PostgreSQL — For instructions, see Configuring bwagent for PostgreSQL and TIBCO EnterpriseMessage Service.
● MySQL — For instructions, see Configuring bwagent for MySQL and TIBCO Enterprise MessageService.
● Microsoft SQL — For instructions, see Configuring bwagent for Microsoft SQL Server and TIBCOEnterprise Message Service.
● Oracle — For instructions, see Configuring bwagent for Oracle and TIBCO Enterprise MessageService.
● DB2 — For instructions, see Configuring bwagent for DB2 and TIBCO Enterprise Message Service.
Configuring bwagent for PostgreSQL and TIBCO Enterprise Message Service
The bwagent can be configured to use PostgreSQL database with TIBCO Enterprise Message Service(EMS) for persistence and transport.
The database name must be unique per agent network if multiple networks share the same physicaldatabase. bwagent and bwengine supports sharing the same database, users and schemas.
Prerequisites
● Install TIBCO Enterprise Messaging Server 8.1 and start the server.● Install PostgreSQL. The PostgreSQL driver is available by default.● Ensure you have installed EMS client libraries. For more information, see the "Integrating with
TIBCO Enterprise Message Service™" section in the TIBCO ActiveMatrix BusinessWorks™ Installationguide.
● Optional. If you are upgrading to ActiveMatrix BusinessWorks™ 6.3.2, or later versions of thesoftware, upgrade the database schema. For more information, see the "Updating the DatabaseSchema to Enable bwagent to Use Database with TIBCO Enterprise Message Service" section in theTIBCO ActiveMatrix BusinessWorks™ Installation guide.
65
TIBCO ActiveMatrix BusinessWorks™ Administration

Procedure
1. After installing PostgreSQL, create a database bwadmindb and the database owner, bwuser asdescribed in the following steps:a) Run the following commands on the psql terminal:
> psql -p 5432 -c "CREATE USER bwuser WITH CREATEDB PASSWORD 'bwuser';"> psql -p 5432 -c "CREATE DATABASE bwadmindb WITH OWNER bwuser;"
b) To add a password for the database owner, expand Login Roles > bwuser, right-click and chooseProperties. Choose the Definition tab and create and save a password.
2. Stop the bwagent if it is running.
3. Open the bwagent_db.json file located in BW_HOME\config (Windows) or ${BW_HOME}/config(Unix).
4. Update the following properties for your environment:
Property Name PostgreSQL Value
dbtype postgresql
dbdriver org.postgresql.Driver
dbhost localhost
dbport 5432
5. Run the bwadmin config command with the -cf option push the changes from the JSON file to thebwagent.ini file.BW_HOME\bin>bwadmin config -cf ../config/bwagent_db.json agent
6. Restart the bwagent.
7. Open the pgAdmin III utility and expand Schemas > Tables in the Object Browser to view thetables in the database:
66
TIBCO ActiveMatrix BusinessWorks™ Administration
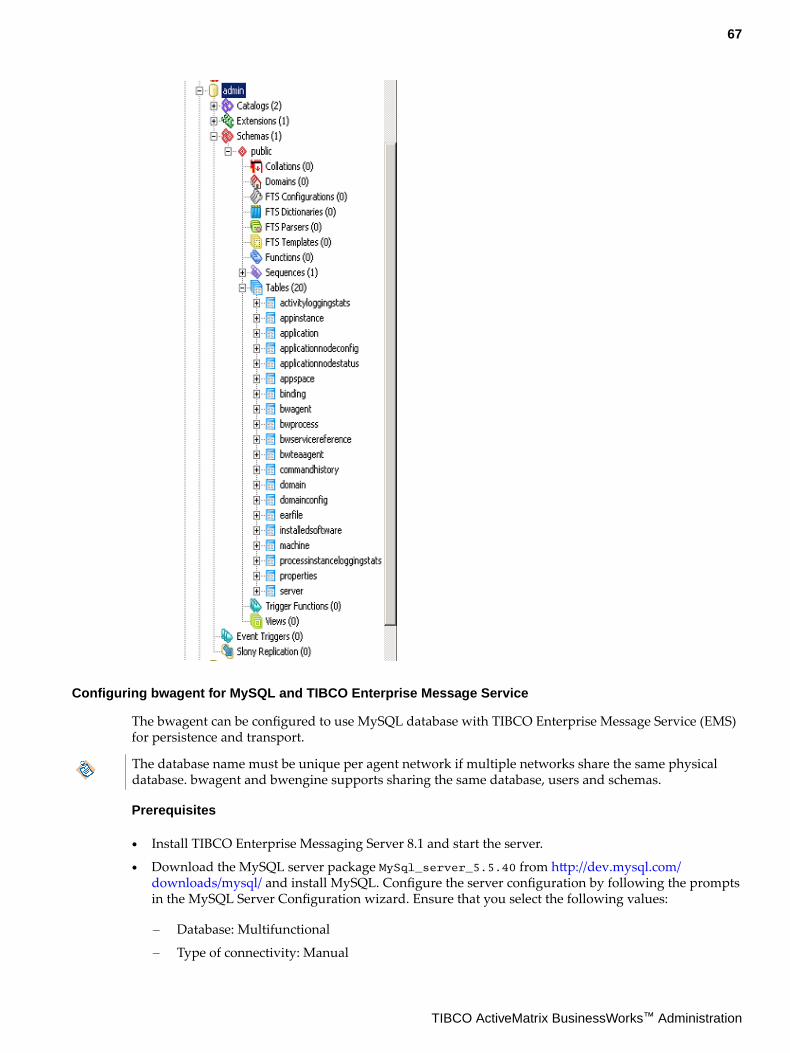
Configuring bwagent for MySQL and TIBCO Enterprise Message Service
The bwagent can be configured to use MySQL database with TIBCO Enterprise Message Service (EMS)for persistence and transport.
The database name must be unique per agent network if multiple networks share the same physicaldatabase. bwagent and bwengine supports sharing the same database, users and schemas.
Prerequisites
● Install TIBCO Enterprise Messaging Server 8.1 and start the server.
● Download the MySQL server package MySql_server_5.5.40 from http://dev.mysql.com/downloads/mysql/ and install MySQL. Configure the server configuration by following the promptsin the MySQL Server Configuration wizard. Ensure that you select the following values:
— Database: Multifunctional
— Type of connectivity: Manual
67
TIBCO ActiveMatrix BusinessWorks™ Administration

— Default port: 3306
● Download the following connector JAR files for MySQL to the BW_HOME\config\drivers\shells\jdbc.mysql.runtime\runtime\plugins\com.tibco.bw.jdbc.datasourcefactory.mysql\lib
folder:
— MySql-connector-java-5.1.30-bin.jar from http://dev.mysql.com/downloads/connector/j/.
● Install the MySQL driver by running the command bwinstall mysql-driver from the /bin folder.
● Ensure you have installed EMS client libraries. For more information, see the "Integrating withTIBCO Enterprise Message Service™" section in the TIBCO ActiveMatrix BusinessWorks™ Installationguide for additional details.
● Optional. If you are upgrading to ActiveMatrix BusinessWorks™ 6.3.2, or later versions of thesoftware, upgrade the database schema. For more information, see the "Updating the DatabaseSchema to Enable bwagent to Use Database with TIBCO Enterprise Message Service" section in theTIBCO ActiveMatrix BusinessWorks™ Installation guide.
Procedure
1. Create a database bwadmindb and grant privileges to the default database owner root as describedin the following steps:a) Run the following command on the MySQL terminal:
mysql>create database bwadmindb
b) Run the following command to view the tables included in the newly created database:mysql>use bwadmindb;
c) Run the following command to grant all privileges to the root user for that database afterreplacing the value for the host IP address:mysql>GRANT ALL PRIVILEGES ON *.* TO root@<host_IP> IDENTIFIED BY 'Tibco123'WITH GRANT OPTION;
To grant the minimum amount of permissions to the bwuser for that database, run the followingcommand, where <host_IP> is replaced with the value for the host IP address:grant create,select,update,insert,delete ON *.* to bwuser@<host_IP> IDENTIFIED BY "bwuser";
2. Stop the bwagent if it is running.
3. Open the bwagent_db.json file located in BW_HOME\config (Windows) or ${BW_HOME}/config(Unix).
4. Update the following properties for your environment:
Property Name MySQL Value
dbtype mysql
dbdriver com.mysql.jdbc.Driver
dbconnectionurl jdbc:mysql://localhost:3306/bwadmindb
5. Run the bwadmin config command with the -cf option to create an .ini file in the correctlocation.BW_HOME\bin>bwadmin config -cf ../config/bwagent_db.json agent
6. Restart the bwagent.
68
TIBCO ActiveMatrix BusinessWorks™ Administration

Configuring bwagent for Microsoft SQL Server and TIBCO Enterprise Message Service
The bwagent can be configured to use Microsoft SQL Server database with TIBCO Enterprise MessageService (EMS) for persistence and transport.
The database name must be unique per agent network if multiple networks share the same physicaldatabase. bwagent and bwengine supports sharing the same database, users and schemas.
Prerequisites
● Install TIBCO Enterprise Messaging Server 8.1 and start the server.
● The Microsoft SQL driver is available by default.
● Ensure you have installed EMS client libraries. For more information, see the "Integrating withTIBCO Enterprise Message Service™" section in the TIBCO ActiveMatrix BusinessWorks™ Installationguide.
● Optional. If you are upgrading to ActiveMatrix BusinessWorks™ 6.3.2, or later versions of thesoftware, upgrade the database schema. For more information, see the "Updating the DatabaseSchema to Enable bwagent to Use Database with TIBCO Enterprise Message Service" section in theTIBCO ActiveMatrix BusinessWorks™ Installation guide for additional details.
After installing Microsoft SQL Server, create a database bwadmindb and grant privileges to the defaultdatabase owner root as described in the following steps:
Procedure
1. Open Microsoft SQL Server Management Studio.
2. From the Object Explorer pane, right-click Databases > New Database to create the databasebwadmindb.
3. Right-click Security > Logins > New Login....
4. Make the following configurations from the Login-New window:a) Type bwuser in the Login name field.b) Select SQL Server Authentication.c) Optional. Unselect Enforce password policy, Enforce password expiration, or User must
change password at next login.d) In the Default database field, select bwadmindb.e) From the Select a page pane, on the left side of the Login - New window, click on the Server
Roles tab.f) To configure the bwagent with MS SQL Server, set the values for Minimum Server Role and
Database Role required for a user, for a particular database. In MS SQL Server ManagementServer, navigate to Security > Logins. Right click Login Properties > Server Roles. Theminimum server role required for a particular user is public. Under User Mapping, the minimumdatabase role membership for the selected database for a user mapped to the login should be oneof the following two combinations: public and db_owner OR public, db_datawriter,db_datareader, and db_ddladmin.
g) Click OK.
5. Stop the bwagent if it is running.
6. Open the bwagent_db.json file located in BW_HOME\config (Windows) or ${BW_HOME}/config(Unix).
7. Update the following properties for your environment:
69
TIBCO ActiveMatrix BusinessWorks™ Administration

Property Name Microsoft SQL Value
dbtype sqlserver
dbdriver com.microsoft.sqlserver.jdbc.SQLServerDriver
dbconnectionurl jdbc:sqlserver://localhost:1433;databaseName=bwadmindb
dbuser bwuser
dbpassword bwuser
8. Run the bwadmin config command with the -cf option push the changes from the JSON file to thebwagent.ini file.BW_HOME\bin>bwadmin config -cf ../config/bwagent_db.json agent
9. Restart the bwagent.
Configuring bwagent for Oracle and TIBCO Enterprise Message Service
The bwagent can be configured to use Oracle database with TIBCO Enterprise Message Service (EMS)for persistence and transport.
The database name must be unique per agent network if multiple networks share the same physicaldatabase. bwagent and bwengine supports sharing the same database.
Prerequisites
● Install TIBCO Enterprise Messaging Server 8.1 and start the server.● Install Oracle Database 12c:
1. Download and install Oracle Database 12c from http://www.oracle.com/technetwork/database/enterprise-edition/downloads/index.html.
2. Configure the server configuration by following the prompts in the Oracle Configurationwizard.
3. Accept the default port value 1521, or enter your own port number.
4. Download the following JDBC driver connector JAR files to the BW_HOME\config\drivers\shells\jdbc.oracle.runtime\runtime\plugins
\com.tibco.bw.jdbc.datasourcefactory.oracle\lib folder:
a. ojdbc7.jar from http://www.oracle.com/technetwork/database/features/jdbc/default-2280470.html
● Install the Oracle driver by running the command bwinstall oracle-driver from the /bin folder.
If you are using Oracle Database 11g, execute the oracle11g_create.sql script at BW_HOME/config/dbscripts/admin/oracle and restart the bwagent.
● Ensure you have installed EMS client libraries. For more information, see the "Integrating withTIBCO Enterprise Message Service™" section in the TIBCO ActiveMatrix BusinessWorks™ Installationguide.
● Optional. If you are upgrading to ActiveMatrix BusinessWorks™ 6.3.2, or later versions of thesoftware, upgrade the database schema.For more information, see the "Updating the DatabaseSchema to Enable bwagent to Use Database with TIBCO Enterprise Message Service" section in theTIBCO ActiveMatrix BusinessWorks™ Installation guide.
70
TIBCO ActiveMatrix BusinessWorks™ Administration

Procedure
1. After installing Oracle Database 12c, create a database bwadmindb and grant privileges to thedefault database owner bwuser as described in the following steps:a) Run the following commands in SQLPlus as a root user:
CREATE DATABASE bwadmindb;create USER C##bwuser identified by "bwuser";GRANT CREATE SESSION TO C##bwuser;grant create sequence to C##bwuser;ALTER USER C##bwuser quota unlimited on USERS;grant create table to C##bwuser;
2. Stop the bwagent if it is running.
3. Open the bwagent_db.json file located in BW_HOME\config (Windows) or ${BW_HOME}/config(Unix).
4. Update the following properties for your environment:
Property Name Oracle Value
dbtype oracle
dbdriver oracle.jdbc.OracleDriver
dbconnectionurl jdbc:oracle:thin:@localhost:[default portvalue]:bwadmindb
dbuser Cbwuser
dbpassword bwuser
5. Run the bwadmin config command with the -cf option push the changes from the JSON file to thebwagent.ini file.BW_HOME\bin>bwadmin config -cf ../config/bwagent_db.json agent
If you are creating a user with '##' ( e.g. c##bwuser), then you need to keep the usernamefield as empty in the bwagent_db.json file and later update the bwagent.ini filemanually.
6. Restart the bwagent.
Configuring bwagent for DB2 and TIBCO Enterprise Message Service
The bwagent can be configured to use DB2 database with TIBCO Enterprise Message Service (EMS) forpersistence and transport.
The database name must be unique per agent network if multiple networks share the same physicaldatabase.
Prerequisites
● Install TIBCO Enterprise Messaging Server 8.1 and start the server.
● Download the DB2 server package 10.5 from http://www-01.ibm.com/software/data/db2/linux-unix-windows/downloads.html and install DB2. Configure the server configuration by following theprompts in the DB2 Server Configuration wizard.
71
TIBCO ActiveMatrix BusinessWorks™ Administration

● Download the following JDBC driver and connector JAR files for DB2 to the BW_HOME\config\drivers\shells\jdbc.db2.runtime\runtime\plugins
\com.tibco.bw.jdbc.datasourcefactory.db2\lib folder:
— db2jcc4.jar from http://www-01.ibm.com/support/docview.wss?uid=swg21363866.
● Install the DB2 driver by running the command bwinstall db2-driver from the /bin folder.● Ensure you have installed EMS client libraries. For more information, see the "Integrating with
TIBCO Enterprise Message Service™" section in the TIBCO ActiveMatrix BusinessWorks™ Installationguide.
● Optional. If you are upgrading to ActiveMatrix BusinessWorks™ 6.3.2, or later versions of thesoftware, upgrade the database schema. For more information, see the "Updating the DatabaseSchema to Enable bwagent to Use Database with TIBCO Enterprise Message Service" section in theTIBCO ActiveMatrix BusinessWorks™ Installation guide.
Procedure
1. Log in to DB2 and create database by executing the following command:CREATE DATABASE <database name> USING CODESET UTF-8 TERRITORY US COLLATE USING
SYSTEM PAGESIZE 16384
Set the page size to 16K (16384) or higher.
2. Stop the bwagent if it is running.3. Open the bwagent_db.json file located in BW_HOME\config (Windows) or ${BW_HOME}/config
(Unix).4. Update the following properties for your environment:
Property Name DB2 Value
dbtype db2
dbdriver com.ibm.db2.jcc.DB2Driver
dbconnectionurl jdbc:db2://localhost:50000/bwadmindb
5. Run the bwadmin config command with the -cf option push the changes from the JSON file to thebwagent.ini file.BW_HOME\bin>bwadmin config -cf ../config/bwagent_db.json agent
6. Restart the bwagent.
Configuring bwagent for MariaDB and TIBCO EMS
The bwagent can be configured to use MariaDB database with TIBCO Enterprise Message Service(EMS) for persistence and transport.
The database name must be unique per agent network if multiple networks share the same physicaldatabase. bwagent and bwengine supports sharing the same database, users and schemas.
Prerequisites
● Install TIBCO Enterprise Messaging Server 8.1 and start the server.● Download the MariaDB server package MariaDB_server_10.1 from https://downloads.mariadb.org/ and install MariaDB. Configure the server configuration by following theprompts in the MariaDB Server Configuration wizard. Ensure that you select the following values:
72
TIBCO ActiveMatrix BusinessWorks™ Administration

— Database: Multifunctional
— Type of connectivity: Manual
— Default port: 3306
● Download the following JAR files for MariaDB to the BW_HOME\config\drivers\shells\jdbc.mariadb.runtime\runtime\plugins\com.tibco.bw.jdbc.datasourcefactory.mariadb
\lib folder:
— mariadb-java-client-2.0.1.jar from https://downloads.mariadb.org/connector-java/2.0.1/.
● To install the MariaDB driver, run the command bwinstall mariadb-driver from the /bin folder.
● Ensure you have installed EMS client libraries. For more information see Integrating with TIBCOEnterprise Message Service™ in the TIBCO ActiveMatrix BusinessWorks™ Installation guide.
● Optional. If you are upgrading to ActiveMatrix BusinessWorks™ 6.3.2, or later versions of thesoftware, upgrade the database schema. For more information, see "Updating the Database Schemato Enable bwagent to Use Database with TIBCO Enterprise Message Service" in the TIBCOActiveMatrix BusinessWorks™ Installation guide.
Procedure
1. Create a database bwadmindb and grant privileges to the default database owner root as describedin the following steps:a) Run the following command on the MariaDB terminal:
mariadb>create database bwadmindb
b) Run the following command to view the tables included in the newly created database:mariadb>use bwadmindb;
c) Run the following command to grant all privileges to the root user for that database afterreplacing the value for the host IP address:mariadb>GRANT ALL PRIVILEGES ON *.* TO root@<host_IP> IDENTIFIED BY 'Tibco123'WITH GRANT OPTION;
To grant the minimum amount of permissions to the bwuser for that database, run the followingcommand, where <host_IP> is replaced with the value for the host IP address:grant create,select,update,insert,delete ON *.* to bwuser@<host_IP> IDENTIFIED BY "bwuser";
2. Stop the bwagent if it is running.
3. Open the bwagent_db.json file located in BW_HOME\config (Windows) or ${BW_HOME}/config(Unix).
4. Update the following properties for your environment:
Property Name MariaDB Value
dbtype mariadb
dbdriver org.mariadb.jdbc.Driver
dbconnectionurl jdbc:mariadb://localhost:3306/bwadmindb
5. Run the bwadmin config command with the -cf option to create an .ini file in the correctlocation.BW_HOME\bin>bwadmin config -cf ../config/bwagent_db.json agent
6. Restart the bwagent.
73
TIBCO ActiveMatrix BusinessWorks™ Administration

Database with TIBCO FTL for bwagent
The bwagent can be configured to use TIBCO FTL for transport among bwagents. PostgreSQL, MySQL,Microsoft SQL, Oracle, and DB2 are the supported databases.
Use of TIBCO FTL® with TIBCO ActiveMatrix BusinessWorks™ for configuring bwagent and forconfiguring group provider for engine does not require TIBCO FTL® licenses.
Regularly back up domain data using the bwadmin backup command. For more information aboutbacking up and restoring domain data, see Backing up and Restoring a Domain
For a multi-agent, multi-machine environment using an external database and TIBCO FTL, modify thefollowing properties in the bwagent.ini file .
bwagent properties for Multi-Agent, Multi-Machine Environments using Database/FTL
Property Name Description
bw.agent.technology.dbftl.db.provider Set one of the following supporteddatabase providers:
● postgresql
● mysql
● mssql
● oracle
● db2
bw.agent.technology.dbftl.db.driver The database driver.
bw.agent.technology.dbftl.db.connectionURL The URL to connect to the database.
bw.agent.technology.dbftl.db.userName The user name to authenticate to thedatabase.
bw.agent.technology.dbftl.db.password The password to authenticate to thedatabase.
bw.agent.technology.type Set dbftl as the technology type forthe bwagent to use.
bw.agent.technology.dbftl.ftl.realmserver Set The FTL realm server.
Example:bw.agent.technology.dbftl.ftl.re
almserver= http://localhost:8070
bw.agent.technology.dbftl.ftl.application Set the application name.
Example:bw.agent.technology.dbftl.ftl.ap
plication=bwadmin
bw.agent.technology.dbftl.ftl.identifier Set the FTL identifier.
74
TIBCO ActiveMatrix BusinessWorks™ Administration
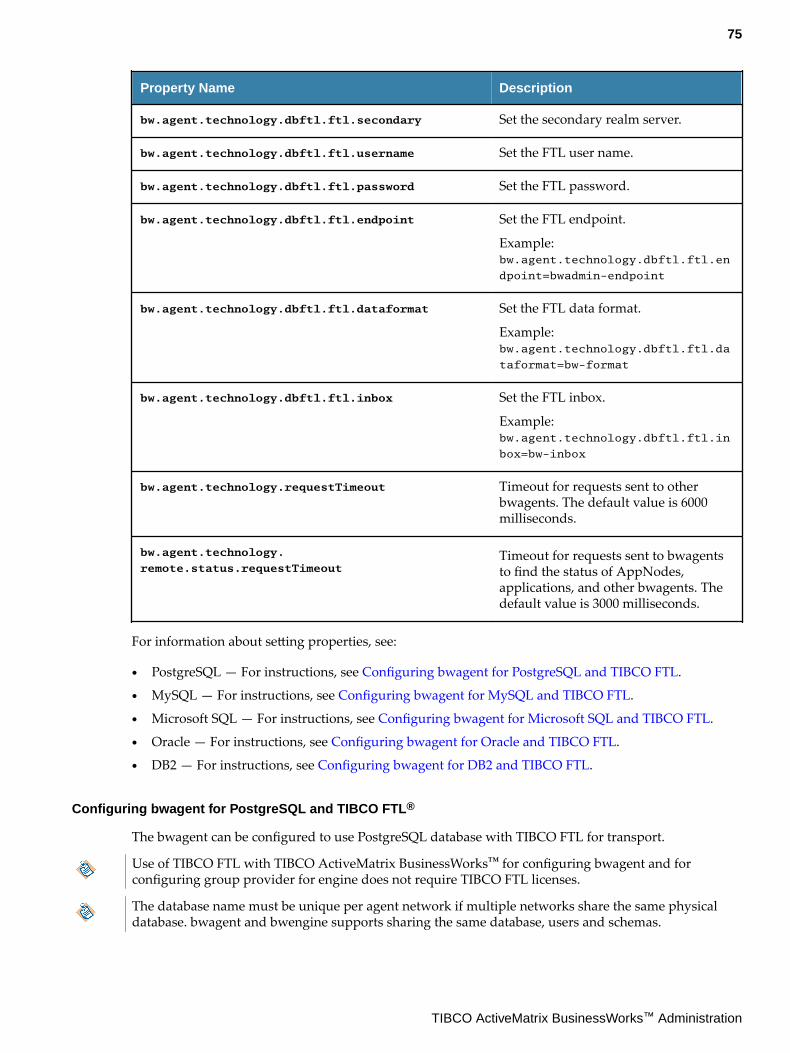
Property Name Description
bw.agent.technology.dbftl.ftl.secondary Set the secondary realm server.
bw.agent.technology.dbftl.ftl.username Set the FTL user name.
bw.agent.technology.dbftl.ftl.password Set the FTL password.
bw.agent.technology.dbftl.ftl.endpoint Set the FTL endpoint.
Example:bw.agent.technology.dbftl.ftl.en
dpoint=bwadmin-endpoint
bw.agent.technology.dbftl.ftl.dataformat Set the FTL data format.
Example:bw.agent.technology.dbftl.ftl.da
taformat=bw-format
bw.agent.technology.dbftl.ftl.inbox Set the FTL inbox.
Example:bw.agent.technology.dbftl.ftl.in
box=bw-inbox
bw.agent.technology.requestTimeout Timeout for requests sent to otherbwagents. The default value is 6000milliseconds.
bw.agent.technology.
remote.status.requestTimeoutTimeout for requests sent to bwagentsto find the status of AppNodes,applications, and other bwagents. Thedefault value is 3000 milliseconds.
For information about setting properties, see:
● PostgreSQL — For instructions, see Configuring bwagent for PostgreSQL and TIBCO FTL.
● MySQL — For instructions, see Configuring bwagent for MySQL and TIBCO FTL.
● Microsoft SQL — For instructions, see Configuring bwagent for Microsoft SQL and TIBCO FTL.
● Oracle — For instructions, see Configuring bwagent for Oracle and TIBCO FTL.
● DB2 — For instructions, see Configuring bwagent for DB2 and TIBCO FTL.
Configuring bwagent for PostgreSQL and TIBCO FTL®
The bwagent can be configured to use PostgreSQL database with TIBCO FTL for transport.
Use of TIBCO FTL with TIBCO ActiveMatrix BusinessWorks™ for configuring bwagent and forconfiguring group provider for engine does not require TIBCO FTL licenses.
The database name must be unique per agent network if multiple networks share the same physicaldatabase. bwagent and bwengine supports sharing the same database, users and schemas.
75
TIBCO ActiveMatrix BusinessWorks™ Administration
Prerequisites
● Install and configure TIBCO FTL on the same machine that you have installed TIBCO ActiveMatrixBusinessWorks™ 6.x on. For more information, see the "Setting Up TIBCO FTL® for bwagentTransport" topic in the TIBCO ActiveMatrix BusinessWorks™ Installation guide.
For the version of TIBCO FTL that is supported with the version of ActiveMatrixBusinessWorks™ 6.x, see the ActiveMatrix BusinessWorks™ readme.
● Install PostgreSQL. The PostgreSQL driver is available by default.
Procedure
1. After installing PostgreSQL, create a database bwadmindb and the database owner, bwuser asdescribed in the following steps:a) Run the following commands on the psql terminal:
> psql -p 5432 -c "CREATE USER bwuser WITH CREATEDB PASSWORD 'bwuser';"> psql -p 5432 -c "CREATE DATABASE bwadmindb WITH OWNER bwuser;"
b) Open the pgAdmin III utility and expand Schemas > Tables in the Object Browser to view thetables in the database.
c) To add a password for the database owner, expand Login Roles > bwuser, right-click and chooseProperties. Choose the Definition tab and create and save a password.
2. Stop the bwagent if it is running.
3. Open the bwagent_ftl.json file located in BW_HOME\config (Windows) or ${BW_HOME}/config(Unix).
4. Update the following properties for your environment:
Property Name PostgreSQL Value
dbtype postgresql
dbdriver org.postgresql.Driver
dbhost localhost
dbport 5432
5. Run the bwadmin config command with the -cf option to push the changes from the JSON file tothe bwagent.ini file.BW_HOME\bin>bwadmin config -cf ../config/bwagent_ftl.json agent
6. Restart the bwagent.
Configuring bwagent for MySQL and TIBCO FTL®
The bwagent can be configured to use MySQL Server database with TIBCO FTL for transport.
Use of TIBCO FTL with TIBCO ActiveMatrix BusinessWorks™ for configuring bwagent and forconfiguring group provider for engine does not require TIBCO FTL licenses.
The database name must be unique per agent network if multiple networks share the same physicaldatabase. bwagent and bwengine supports sharing the same database, users and schemas.
76
TIBCO ActiveMatrix BusinessWorks™ Administration

Prerequisites
● Install and configure TIBCO FTL on the same machine that you have installed ActiveMatrixBusinessWorks™ 6.x on. For more information, see the "Setting Up TIBCO FTL® for bwagentTransport" topic in the TIBCO ActiveMatrix BusinessWorks™ Installation guide.
For the version of TIBCO FTL that is supported with the version of ActiveMatrixBusinessWorks™ 6.x, see the ActiveMatrix BusinessWorks™ readme.
● Download the MySQL server package MySql_server_5.5.40 from http://dev.mysql.com/downloads/mysql/ and install MySQL. Configure the server configuration by following the promptsin the MySQL Server Configuration wizard. Ensure that you select the following values:
— Database: Multifunctional
— Type of connectivity: Manual
— Default port: 3306
● Download the following JDBC driver and connector JAR files for MySQL to the BW_HOME\config\drivers\shells\jdbc.mysql.runtime\runtime\plugins
\com.tibco.bw.jdbc.datasourcefactory.mysql\lib folder:
— com.mysql.jdbc.Driver.jar from http://www.java2s.com/Code/Jar/c/Downloadcommysqljdbc515jar.htm
— MySql-connector-java-5.1.30-bin.jar from http://dev.mysql.com/downloads/connector/j/.
● Install the MySQL driver by running the command bwinstall mysql-driver from the /bin folder.
After installing MySQL Server, create a database bwadmindb and grant privileges to the defaultdatabase owner root as described in the following steps:
Procedure
1. Create a database bwadmindb and grant privileges to the default database owner root as describedin the following steps:a) Run the following command on the MySQL terminal:
mysql>create database bwadmindb
b) Run the following command to view the tables included in the newly created database:mysql>use bwadmindb;
c) Run the following command to grant all privileges to the root user for that database afterreplacing the value for the host IP address:mysql>GRANT ALL PRIVILEGES ON *.* TO root@<host_IP> IDENTIFIED BY 'Tibco123'WITH GRANT OPTION;
To grant the minimum amount of permissions to the bwuser for that database, run the followingcommand, where <host_IP> is replaced with the value for the host IP address:grant create,select,update,insert,delete ON *.* to bwuser@<host_IP> IDENTIFIED BY "bwuser";
2. Stop the bwagent if it is running.
3. Open the bwagent_ftl.json file located in BW_HOME\config (Windows) or ${BW_HOME}/config(Unix).
4. Update the following properties for your environment:
77
TIBCO ActiveMatrix BusinessWorks™ Administration

Property Name MySQL Value
dbtype mysql
dbdriver com.mysql.jdbc.Driver
dbconnectionurl jdbc:mysql://localhost:3306/bwadmindb
5. Run the bwadmin config command with the -cf option push the changes from the JSON file to thebwagent.ini file.BW_HOME\bin>bwadmin config -cf ../config/bwagent_ftl.json agent
6. Restart the bwagent.
Configuring bwagent for Microsoft SQL Server and TIBCO FTL®
The bwagent can be configured to use Microsoft SQL database with TIBCO FTL for transport.
Use of TIBCO FTL with TIBCO ActiveMatrix BusinessWorks™ for configuring bwagent and forconfiguring group provider for engine does not require TIBCO FTL licenses.
The database name must be unique per agent network if multiple networks share the same physicaldatabase. bwagent and bwengine supports sharing the same database, users and schemas.
Prerequisites
● Install and configure TIBCO FTL on the same machine that you have installed ActiveMatrixBusinessWorks™ 6.x on. For more information, see the "Setting Up TIBCO FTL® for bwagentTransport" topic in the TIBCO ActiveMatrix BusinessWorks™ Installation guide.
For the version of TIBCO FTL that is supported with the version of ActiveMatrixBusinessWorks™ 6.x, see the ActiveMatrix BusinessWorks™ readme.
● Install Microsoft SQL server. The Microsoft SQL driver is available by default.
After installing Microsoft SQL Server, create a database bwadmindb and grant privileges to the defaultdatabase owner root as described in the following steps:
Procedure
1. Open Microsoft SQL Server Management Studio.
2. From the Object Explorer pane, right-click Databases > New Database to create the databasebwadmindb.
3. Right-click Security > Logins > New Login....
4. Make the following configurations from the Login-New window:a) Type bwuser in the Login name field.b) Select SQL Server Authentication.c) Optional. Unselect Enforce password policy, Enforce password expiration, or User must
change password at next login.d) In the Default database field, select bwadmindb.e) From the Select a page pane, on the left side of the Login - New window, click on the Server
Roles tab.f) To configure the bwagent with MS SQL Server, set the values for Minimum Server Role and
Database Role required for a user, for a particular database. In MS SQL Server ManagementServer, navigate to Security > Logins. Right click Login Properties > Server Roles. Theminimum server role required for a particular user is public. Under User Mapping, the minimum
78
TIBCO ActiveMatrix BusinessWorks™ Administration

database role membership for the selected database for a user mapped to the login should be oneof the following two combinations: public and db_owner OR public, db_datawriter,db_datareader, and db_ddladmin.
g) Click OK.
5. Stop the bwagent if it is running.
6. Open the bwagent_ftl.json file located in BW_HOME\config (Windows) or ${BW_HOME}/config(Unix).
7. Update the following properties for your environment:
Property Name Microsoft SQL Value
dbtype sqlserver
dbdriver com.microsoft.sqlserver.jdbc.SQLServerDriver
dbconnectionurl jdbc:sqlserver://localhost:1433;databaseName=bwadmindb
dbuser bwuser
dbpassword bwuser
8. Run the bwadmin config command with the -cf option push the changes from the JSON file to thebwagent.ini file.BW_HOME\bin>bwadmin config -cf ../config/bwagent_ftl.json agent
9. Restart the bwagent.
Configuring bwagent for Oracle and TIBCO FTL®
The bwagent can be configured to use Oracle database with TIBCO FTL for transport.
Use of TIBCO FTL with TIBCO ActiveMatrix BusinessWorks™ for configuring bwagent and forconfiguring group provider for engine does not require TIBCO FTL licenses.
The database name must be unique per agent network if multiple networks share the same physicaldatabase. bwagent and bwengine supports sharing the same database.
Prerequisites
Install and configure TIBCO FTL on the same machine that you have installed ActiveMatrixBusinessWorks™ 6.x on. For more information, see the "Setting Up TIBCO FTL® for bwagent Transport"topic in the TIBCO ActiveMatrix BusinessWorks™ Installation guide.
For the version of TIBCO FTL that is supported with the version of ActiveMatrix BusinessWorks™ 6.x,see the ActiveMatrix BusinessWorks™ readme.
Ensure you have installed FTL client libraries. For more information, see the "Integrating with TIBCOFTL" section in the TIBCO ActiveMatrix BusinessWorks™ Installation guide.
Install Oracle Database 12c:
1. Download and install Oracle Database 12c from http://www.oracle.com/technetwork/database/enterprise-edition/downloads/index.html.
2. Configure the server configuration by following the prompts in the Oracle Configuration wizard.
3. Accept the default port value 1521, or enter your own port number.
79
TIBCO ActiveMatrix BusinessWorks™ Administration

4. Download the following JDBC driver connector JAR files to the BW_HOME\config\drivers\shells\jdbc.oracle.runtime\runtime\plugins\com.tibco.bw.jdbc.datasourcefactory.oracle
\lib folder for Windows or the ${BW_HOME}/system/lib for Unix:
a. ojdbc7.jar from http://www.oracle.com/technetwork/database/features/jdbc/default-2280470.html
5. Install the Oracle driver by running the command bwinstall oracle-driver from the /bin folder.
If you are using Oracle Database 11g, execute the oracle11g_create.sql script at BW_HOME/config/dbscripts/admin/oracle and restart the bwagent.
Procedure
1. After installing Oracle Database 12c, create a database bwadmindb and grant privileges to thedefault database owner bwuser as described in the following steps:a) Run the following commands in SQLPlus as a root user:
CREATE DATABASE bwadmindb;create USER C##bwuser identified by "bwuser";GRANT CREATE SESSION TO C##bwuser;grant create sequence to C##bwuser; ALTER USER C##bwuser quota unlimited on USERS;grant create table to C##bwuser;
2. Stop the bwagent if it is running.
3. Open the bwagent_ftl.json file located in BW_HOME\config (Windows) or ${BW_HOME}/config(Unix).
4. Update the following properties for your environment:
Property Name Oracle Value
dbtype oracle
dbdriver oracle.jdbc.OracleDriver
dbconnectionurl jdbc:oracle:thin:@localhost:[default portvalue]:bwadmindb
dbuser Cbwuser
dbpassword bwuser
5. Run the bwadmin config command with the -cf option to push the changes from the JSON file tothe bwagent.ini file.BW_HOME\bin>bwadmin config -cf ../config/bwagent_ftl.json agent
If you are creating a user with '##' ( e.g. c##bwuser), then you need to keep the usernamefield as empty in the bwagent_db.json file and later update the bwagent.ini filemanually.
6. Restart the bwagent.
80
TIBCO ActiveMatrix BusinessWorks™ Administration

Configuring bwagent for DB2 and TIBCO FTL®
The bwagent can be configured to use DB2 database with TIBCO FTL for transport.
Use of TIBCO FTL with TIBCO ActiveMatrix BusinessWorks™ for configuring bwagent and forconfiguring group provider for engine does not require TIBCO FTL licenses.
The database name must be unique per agent network if multiple networks share the same physicaldatabase.
Prerequisites
● Install and configure TIBCO FTL on the same machine that you have installed ActiveMatrixBusinessWorks™ 6.x on. For more information, see the "Setting Up TIBCO FTL® for bwagentTransport" topic in the TIBCO ActiveMatrix BusinessWorks™ Installation guide.
For the version of TIBCO FTL that is supported with the version of ActiveMatrixBusinessWorks™ 6.x, see the ActiveMatrix BusinessWorks™ readme.
● Download the DB2 server package 10.5 from http://www-01.ibm.com/software/data/db2/linux-unix-windows/downloads.html and install DB2. Configure the server configuration by following theprompts in the DB2 Server Configuration wizard.
● Download the following JDBC driver and connector JAR files for DB2 to the BW_HOME\config\drivers\shells\jdbc.db2.runtime\runtime\plugins
\com.tibco.bw.jdbc.datasourcefactory.db2\lib folder for Windows or the ${BW_HOME}/system/lib folder for Unix:
— db2jcc4.jar from http://www-01.ibm.com/support/docview.wss?uid=swg21363866.
● Install the DB2 driver by running the command bwinstall db2-driver from the /bin folder.
Procedure
1. Log in to DB2 and create database by executing the following command:CREATE DATABASE <database name> USING CODESET UTF-8 TERRITORY US COLLATE USING
SYSTEM PAGESIZE 16384
Set the page size to 16K (16384) or higher.
2. Stop the bwagent if it is running.
3. Open the bwagent_ftl.json file located in BW_HOME\config (Windows) or ${BW_HOME}/config(Unix).
4. Update the following properties for your environment:
Property Name DB2 Value
dbtype db2
dbdriver com.ibm.db2.jcc.DB2Driver
dbconnectionurl jdbc:db2://localhost:50000/bwadmindb
5. Run the bwadmin config command with the -cf option to push the changes from the JSON file tothe bwagent.ini file.BW_HOME\bin>bwadmin config -cf ../config/bwagent_ftl.json agent
6. Restart the bwagent.
81
TIBCO ActiveMatrix BusinessWorks™ Administration

Configuring bwagent for MariaDB and TIBCO FTL®
The bwagent can be configured to use MariaDB database with TIBCO FTL for persistence andtransport.
The database name must be unique per agent network if multiple networks share the same physicaldatabase. bwagent and bwengine supports sharing the same database, users and schemas.
Prerequisites
● Install TIBCO Enterprise Messaging Server 8.1 and start the server.
● Download the MariaDB server package MariaDB_server_10.1 from https://downloads.mariadb.org/ and install MariaDB. Configure the server configuration by following theprompts in the MariaDB Server Configuration wizard. Ensure that you select the following values:
— Database: Multifunctional
— Type of connectivity: Manual
— Default port: 3306
● Download the following JAR files for MariaDB to the BW_HOME\config\drivers\shells\jdbc.mariadb.runtime\runtime\plugins\com.tibco.bw.jdbc.datasourcefactory.mariadb
\lib folder:
— mariadb-java-client-2.0.1.jar from https://downloads.mariadb.org/connector-java/2.0.1/.
● Install the MariaDB driver by running the command bwinstall mariadb-driver from the /binfolder.
● Ensure you have installed EMS client libraries. For more information, see "Integrating with TIBCOEnterprise Message Service™" in the TIBCO ActiveMatrix BusinessWorks™ Installation guide.
● Optional. If you are upgrading to ActiveMatrix BusinessWorks™ 6.3.2, or later versions of thesoftware, upgrade the database schema. For more information, see "Updating the Database Schemato Enable bwagent to Use Database with TIBCO Enterprise Message Service" in the TIBCOActiveMatrix BusinessWorks™ Installation guide.
Procedure
1. Create a database bwadmindb and grant privileges to the default database owner root as describedin the following steps:a) Run the following command on the MariaDB terminal:
mariadb>create database bwadmindb
b) Run the following command to view the tables included in the newly created database:mariadb>use bwadmindb;
c) Run the following command to grant all privileges to the root user for that database afterreplacing the value for the host IP address:mariadb>GRANT ALL PRIVILEGES ON *.* TO root@<host_IP> IDENTIFIED BY 'Tibco123'WITH GRANT OPTION;
To grant the minimum amount of permissions to the bwuser for that database, run the followingcommand, where <host_IP> is replaced with the value for the host IP address:grant create,select,update,insert,delete ON *.* to bwuser@<host_IP> IDENTIFIED BY "bwuser";
2. Stop the bwagent if it is running.
3. Open the bwagent_db.json file located in BW_HOME\config (Windows) or ${BW_HOME}/config(Unix).
82
TIBCO ActiveMatrix BusinessWorks™ Administration

4. Update the following properties for your environment:
Property Name MariaDB Value
dbtype mariadb
dbdriver org.mariadb.jdbc.Driver
dbconnectionurl jdbc:mariadb://localhost:3306/bwadmindb
5. Run the bwadmin config command with the -cf option to create an .ini file in the correctlocation.BW_HOME\bin>bwadmin config -cf ../config/bwagent_db.json agent
6. Restart the bwagent.
Migrating from ActiveSpaces to Database with TIBCO Enterprise Messaging ServiceThis procedure shows you how to set back up and restore a network using bwagents on two machinesand using bwadmin to create runtime entities across machines. In the following example scenario, anexternal database and TIBCO Enterprise Message Service™ (EMS) are used for data persistance andcommunication transport:
● There are two machines, and they are referred to as machine1 and machine2.
● There are two bwagents. bwagent1 is the primary agent on machine1, and bwagent2 is thesecondary bwagent on machine2.
● There are two deployed applications. The application acme.acct.ap.application_1.0. 0.ear isdeployed to appspace1, which is comprised of appnode1 on machine1 and appnode3 on machine2.The application acme.hr.payroll.application_1.0.0.ear is deployed to appspace2, which iscomprised of appnode2 on machine1 and appnode4 on machine2.
Backing up The Domain
To back up the current state of the domain, including profiles and archives, enter the backup commandat the command line, using the -s option to identify the name of the destination file. Use the domainargument in the command line, with the name of the domain to back up. The domain can be either alocal domain or a domain in a bwagent in the agent network. By default, destination files are written tothe current working directory.In this example, running the back up command on machine1 and machine2 backs up the domainmyDomain in a networked bwagent to a command file named Domain_backup.cmd.BW_HOME/bin> $ ./bwadmin backup -s myDomain_backup.cmd domain myDomainTIBCO ActiveMatrix BusinessWorks version 6.2.2, hotfix 3, build V28, 2015-9-27Connecting to the BW Agent using TIBCO ActiveSpaces (Java). Enterprise Edition. Version 2.1.4.022...TIBCO-BW-ADMIN-CLI-300131: Backed up Domain [myDomain]TIBCO-BW-ADMIN-CLI-300008: Backup completed.
The file myDomain_backup.cmd and four sub-directories are generated in the working directory.
If you are restoring to a different location, you need to update the command file as follows:
● The agent name will point to localhost by default; you need to change this to the name of themachine you are restoring to.
● Update the domain home to point to the absolute path to the new location.
● Update the path to the application archive (EAR) file to an absolute path.
83
TIBCO ActiveMatrix BusinessWorks™ Administration

Restoring the Domain
After the entire domain is backed up to the specified domain, provide the command file to bwadmin torecreate the domain. The output can be compressed to a ZIP file with the-zipped option.
Procedure
1. Stop, and delete AppNodes on bwagent2.BW_HOME/bin> $ ./bwadmin stop -d myDomain -a appspace1 appnode appnode3TIBCO ActiveMatrix BusinessWorks version 6.2.2, hotfix 3, build V28, 2015-9-27Connecting to the BW Agent usingTIBCO ActiveSpaces (Java). Enterprise Edition. Version 2.1.4.022...TIBCO-BW-ADMIN-CLI-300303: AppNode [appnode3] in Domain [myDomain] stopped.BW_HOME/bin> $ ./bwadmin stop -d myDomain -a appspace2 appnode appnode4TIBCO ActiveMatrix BusinessWorks version 6.2.2, hotfix 3, build V28, 2015-9-27...TIBCO-BW-ADMIN-CLI-300303: AppNode [appnode4] in Domain [myDomain] stopped.BW_HOME/bin> $ ./bwadmin delete -d myDomain -a appspace1 appnode appnode3TIBCO ActiveMatrix BusinessWorks version 6.2.2, hotfix 3, build V28, 2015-9-27...TIBCO-BW-ADMIN-CLI-300301: AppNode [appnode3] in Domain [appspace1] deleted.BW_HOME/bin> $ ./bwadmin delete -d myDomain -a appspace2 appnode appnode4TIBCO ActiveMatrix BusinessWorks version 6.2.2, hotfix 3, build V28, 2015-9-27...TIBCO-BW-ADMIN-CLI-300301: AppNode [appnode4] in Domain [appspace2] deleted.
2. Stop bwagent2 by executing the following command at the command line:BW_HOME/bin> $ ./bwagent stop/bin> $ ./bwagent stop
3. Configure bwagent2 to use an external database and TIBCO Enterprise Messaging System. For moreinformation, see Database with TIBCO Enterprise Message Service Configuration for bwagent.
Ensure that you use a different network name for the bwagent network by setting thefollowing properties in the bwagent_db.json file:● bwagentnetworkname: Specify a new network name.
● membername: Enter the original value, which is “bwagent2”.
4. Restart bwagent2, and run the backup command to restore the domain on bwagent2 . Warningmessages are displayed because machine1 has not joined the new bwagent network yet. Thesemessages are expected and can be ignored.BW_HOME/bin> $ ./bwadmin -f myDomain_backup.cmdTIBCO ActiveMatrix BusinessWorks version 6.2.2, hotfix 3, build V28, 2015-9-27TIBCO-BW-ADMIN-CLI-300100: Domain [myDomain] created.TIBCO-BW-ADMIN-500004: Error invoking [joinmachine] method on the agent [bwagent1], <CausedBy> The BW Agent [bwagent1] on the remote BW Agent [bwagent1]TIBCO-BW-ADMIN-CLI-300410: Uploaded archive [./archives/myDomain/acme.hr.payroll.application_1.0.0.ear].TIBCO-BW-ADMIN-CLI-300410: Uploaded archive [./archives/myDomain/acme.acct.ap.application_1.0.0.ear].TIBCO-BW-ADMIN-CLI-300200: AppSpace [appspace2] in Domain [myDomain] created.TIBCO-BW-ADMIN-CLI-300300: AppNode [appnode4] in AppSpace [appspace2], Domain [myDomain] created.TIBCO-BW-ADMIN-CLI-500302: Failed to create AppNode [appnode2] in AppSpace [appspace2] in Domain [myDomain], TIBCO-BW-ADMIN-500main] failed. Cannot create AppNodes in the AppSpace [appspace2] on the remote BW Agent [bwagent1]TIBCO-BW-ADMIN-CLI-300417: The application [acme.hr.payroll.application:1.0] deployed and started.TIBCO-BW-ADMIN-CLI-300200: AppSpace [appspace1] in Domain [myDomain] created.TIBCO-BW-ADMIN-CLI-300300: AppNode [appnode3] in AppSpace [appspace1], Domain [myDomain] created.TIBCO-BW-ADMIN-CLI-500302: Failed to create AppNode [appnode1] in AppSpace [appspace1] in Domain [myDomain], TIBCO-BW-ADMIN-500main] failed. Cannot create AppNodes in the AppSpace [appspace1] on the remote BW Agent [bwagent1]
84
TIBCO ActiveMatrix BusinessWorks™ Administration

TIBCO-BW-ADMIN-CLI-300417: The application [acme.acct.ap.application:1.0] deployed and started.
5. Start appspace1 and appspace2 on bwagent2.BW_HOME/bin> $ ./bwadmin start -d myDomain appspace appspace1TIBCO ActiveMatrix BusinessWorks version 6.2.2, hotfix 3, build V28, 2015-9-27TIBCO-BW-ADMIN-CLI-300203: AppSpace [appspace1] in Domain [myDomain] started.
BW_HOME/bin> $ ./bwadmin start -d myDomain appspace appspace2TIBCO ActiveMatrix BusinessWorks version 6.2.2, hotfix 3, build V28, 2015-9-27TIBCO-BW-ADMIN-CLI-300203: AppSpace [appspace2] in Domain [myDomain] started.
6. Use the bwadmin show command on machine2 to verify that the applications are running onappspace1 and appspace2.BW_HOME/bin> $ ./bwadmin show -d myDomain applicationsDomain: myDomainName Version AppSpace Profile Status Deployment Status (Running/Total)acme.hr.payroll.application 1.0 appspace2 profile_acme.h..on1.0.substvar Running Deployed (1/1)acme.acct.ap.application 1.0 appspace1 profile_acme.a..on1.0.substvar Running Deployed (1/1)
7. Stop, and delete appnodes on bwagent1.BW_HOME/bin> $ ./bwadmin stop -d myDomain -a appspace1 appnode appnode1...TIBCO-BW-ADMIN-CLI-300303: AppNode [appnode1] in Domain [myDomain] stopped.BW_HOME/bin> $ ./bwadmin stop -d myDomain -a appspace2 appnode appnode2...TIBCO-BW-ADMIN-CLI-300303: AppNode [appnode2] in Domain [myDomain] stopped.BW_HOME/bin> $ ./bwadmin delete -d myDomain -a appspace1 appnode appnode1...TIBCO-BW-ADMIN-CLI-300301: AppNode [appnode1] in Domain [appspace1] deleted.BW_HOME/bin> $ ./bwadmin delete -d myDomain -a appspace2 appnode appnode2...TIBCO-BW-ADMIN-CLI-300301: AppNode [appnode2] in Domain [appspace2] deleted.
8. Stop bwagent1 by executing the following command in the command line:BW_HOME/bin> $ ./bwagent stop
9. Use the Admin UI to unregister bwagent1 from TEA.
10. Register the bwagent2 with TEA by running the following command from the command line:BW_HOME/bin> $ ./bwadmin registerteaagent http://<TEA_HOST>:8777/teaTIBCO-BW-ADMIN-CLI-300010: Registered TEA Agent [bwagent2] with TEA Server.
11. Configure bwagent1 to use an external database and TIBCO Enterprise Messaging System onbwagent2. For more information, see the section Database with TIBCO Enterprise Message ServiceConfiguration for bwagent.
Ensure that you use a different network name for the bwagent network by setting thefollowing properties in the bwagent_db.json file:● bwagentnetworkname: Specify a new network name.
● membername: Enter the original value, which is "bwagent1".
12. Start bwagent1 on machine1 by executing the command $ ./bwagent from the command line.
13. Run the restore command to restore AppNodes on machine1. The warning messages can beignored in this example.BW_HOME/bin> $ ./bwadmin -f myDomain_backup.cmdTIBCO ActiveMatrix BusinessWorks version 6.2.2, hotfix 3, build V28, 2015-9-27TIBCO-BW-ADMIN-CLI-500102: Failed to create Domain [myDomain], TIBCO-BW-ADMIN-500101: Domain [myDomain] already exists, check this and re-try.TIBCO-BW-ADMIN-CLI-300101: BWAgent [bwagent1] registered in Domain [myDomain].TIBCO-BW-ADMIN-CLI-500438: The application [acme.hr.payroll.application] from archive [acme.hr.payroll.application_1.0.0.ear] has been deployed to these
85
TIBCO ActiveMatrix BusinessWorks™ Administration

AppSpaces: appspace2TIBCO-BW-ADMIN-CLI-500439: Applications are out of sync with the archive they were deployed from, They have to be re-deployed to keep them in sync.TIBCO-BW-ADMIN-CLI-500433: Failed to upload archive [./archives/myDomain/acme.hr.payroll.application_1.0.0.ear], <CausedBy> TIBCO-BW-ADMIN-500447: Archive [acme.hr.payroll.application_1.0.0.ear] is already present in the domain, use -replace option to replace the existing archive..TIBCO-BW-ADMIN-CLI-500438: The application [acme.acct.ap.application] from archive [acme.acct.ap.application_1.0.0.ear] has been deployed to these AppSpaces: appspace1TIBCO-BW-ADMIN-CLI-500439: Applications are out of sync with the archive they were deployed from, They have to be re-deployed to keep them in sync.TIBCO-BW-ADMIN-CLI-500433: Failed to upload archive [./archives/myDomain/acme.acct.ap.application_1.0.0.ear], <CausedBy> TIBCO-BW-ADMIN-500447: Archive [acme.acct.ap.application_1.0.0.ear] is already present in the domain, use -replace option to replace the existing archive..TIBCO-BW-ADMIN-CLI-500203: Failed to create AppSpace [appspace2] in Domain [myDomain], TIBCO-BW-ADMIN-500202: The AppSpace [appspace2] is already present in the Domain [myDomain].TIBCO-BW-ADMIN-CLI-500302: Failed to create AppNode [appnode4] in AppSpace [appspace2] in Domain [myDomain], TIBCO-BW-ADMIN-500301: The AppNode [appnode4] already exists in the AppSpace [appspace2] Domain [myDomain].TIBCO-BW-ADMIN-CLI-300300: AppNode [appnode2] in AppSpace [appspace2], Domain [myDomain] created.TIBCO-BW-ADMIN-CLI-300433: An application is already deployed with archive [acme.hr.payroll.application_1.0.0.ear].TIBCO-BW-ADMIN-CLI-500203: Failed to create AppSpace [appspace1] in Domain [myDomain], TIBCO-BW-ADMIN-500202: The AppSpace [appspace1] is already present in the Domain [myDomain].TIBCO-BW-ADMIN-CLI-500302: Failed to create AppNode [appnode3] in AppSpace [appspace1] in Domain [myDomain], TIBCO-BW-ADMIN-500301: The AppNode [appnode3] already exists in the AppSpace [appspace1] Domain [myDomain].TIBCO-BW-ADMIN-CLI-300300: AppNode [appnode1] in AppSpace [appspace1], Domain [myDomain] created.TIBCO-BW-ADMIN-CLI-300433: An application is already deployed with archive [acme.acct.ap.application_1.0.0.ear].
14. Start appnode1 and appnode 2 from the Admin UI.
Result
The migration from ActiveSpaces to an external database and TIBCO Enterprise Messaging System(EMS) is complete.
Migrating from ActiveSpaces to Database with TIBCO FTLThis procedure shows you how to set back up and restore a network using bwagents on two machinesand using bwadmin to create runtime entities across machines. In the following example scenario, anexternal database and TIBCO FTL are used for data persistance and communication transport:
● There are two machines, and they are referred to as machine1 and machine2.
● There are two bwagents. bwagent1 is the primary agent on machine1, and bwagent2 is thesecondary bwagent on machine2.
● There are two deployed applications. The application acme.acct.ap.application_1.0. 0.ear isdeployed to appspace1, which is comprised of appnode1 on machine1 and appnode3 on machine2.The application acme.hr.payroll.application_1.0.0.ear is deployed to appspace2, which iscomprised of appnode2 on machine1 and appnode4 on machine2.
Backing up The Domain
To back up the current state of the domain, including profiles and archives, enter the backup commandat the command line, using the -s option to identify the name of the destination file. Use the domainargument in the command line, with the name of the domain to back up. The domain can be either a
86
TIBCO ActiveMatrix BusinessWorks™ Administration
local domain or a domain in a bwagent in the agent network. By default, destination files are written tothe current working directory.In this example, running the back up command on machine1 and machine2 backs up the domainmyDomain in a networked bwagent to a command file named Domain_backup.cmd.BW_HOME/bin> $ ./bwadmin backup -s myDomain_backup.cmd domain myDomainTIBCO ActiveMatrix BusinessWorks version 6.2.2, hotfix 3, build V28, 2015-9-27Connecting to the BW Agent using TIBCO ActiveSpaces (Java). Enterprise Edition. Version 2.1.4.022...TIBCO-BW-ADMIN-CLI-300131: Backed up Domain [myDomain]TIBCO-BW-ADMIN-CLI-300008: Backup completed.
The file myDomain_backup.cmd and four sub-directories are generated in the working directory.
If you are restoring to a different location, you need to update the command file as follows:
● The agent name will point to localhost by default; you need to change this to the name of themachine you are restoring to.
● Update the domain home to point to the absolute path to the new location.
● Update the path to the application archive (EAR) file to an absolute path.
Restoring the Domain
After the entire domain is backed up to the specified domain, provide the command file to bwadmin torecreate the domain. The output can be compressed to a .zip file with the-zipped option.
Procedure
1. Stop, and delete AppNodes on bwagent2.BW_HOME/bin> $ ./bwadmin stop -d myDomain -a appspace1 appnode appnode3TIBCO ActiveMatrix BusinessWorks version 6.2.2, hotfix 3, build V28, 2015-9-27Connecting to the BW Agent usingTIBCO ActiveSpaces (Java). Enterprise Edition. Version 2.1.4.022...TIBCO-BW-ADMIN-CLI-300303: AppNode [appnode3] in Domain [myDomain] stopped.BW_HOME/bin> $ ./bwadmin stop -d myDomain -a appspace2 appnode appnode4TIBCO ActiveMatrix BusinessWorks version 6.2.2, hotfix 3, build V28, 2015-9-27...TIBCO-BW-ADMIN-CLI-300303: AppNode [appnode4] in Domain [myDomain] stopped.BW_HOME/bin> $ ./bwadmin delete -d myDomain -a appspace1 appnode appnode3TIBCO ActiveMatrix BusinessWorks version 6.2.2, hotfix 3, build V28, 2015-9-27...TIBCO-BW-ADMIN-CLI-300301: AppNode [appnode3] in Domain [appspace1] deleted.BW_HOME/bin> $ ./bwadmin delete -d myDomain -a appspace2 appnode appnode4TIBCO ActiveMatrix BusinessWorks version 6.2.2, hotfix 3, build V28, 2015-9-27...TIBCO-BW-ADMIN-CLI-300301: AppNode [appnode4] in Domain [appspace2] deleted.
2. Stop bwagent2 by executing the following command at the command line:BW_HOME/bin> $ ./bwagent stop/bin> $ ./bwagent stop
3. Configure bwagent2 to use an external database and TIBCO FTL. For more information, see Database with TIBCO FTL for bwagent.
Ensure that you use a different network name for the bwagent network by setting thefollowing properties in the bwagent_db.json file:● bwagentnetworkname: Specify a new network name.
● membername: Enter the original value, which is “bwagent2”.
87
TIBCO ActiveMatrix BusinessWorks™ Administration

4. Restart bwagent2, and run the backup command to restore the domain on bwagent2 . Warningmessages are displayed because machine1 has not joined the new bwagent network yet. Thesemessages are expected and can be ignored.BW_HOME/bin> $ ./bwadmin -f myDomain_backup.cmdTIBCO ActiveMatrix BusinessWorks version 6.2.2, hotfix 3, build V28, 2015-9-27TIBCO-BW-ADMIN-CLI-300100: Domain [myDomain] created.TIBCO-BW-ADMIN-500004: Error invoking [joinmachine] method on the agent [bwagent1], <CausedBy> The BW Agent [bwagent1] on the remote BW Agent [bwagent1]TIBCO-BW-ADMIN-CLI-300410: Uploaded archive [./archives/myDomain/acme.hr.payroll.application_1.0.0.ear].TIBCO-BW-ADMIN-CLI-300410: Uploaded archive [./archives/myDomain/acme.acct.ap.application_1.0.0.ear].TIBCO-BW-ADMIN-CLI-300200: AppSpace [appspace2] in Domain [myDomain] created.TIBCO-BW-ADMIN-CLI-300300: AppNode [appnode4] in AppSpace [appspace2], Domain [myDomain] created.TIBCO-BW-ADMIN-CLI-500302: Failed to create AppNode [appnode2] in AppSpace [appspace2] in Domain [myDomain], TIBCO-BW-ADMIN-500main] failed. Cannot create AppNodes in the AppSpace [appspace2] on the remote BW Agent [bwagent1]TIBCO-BW-ADMIN-CLI-300417: The application [acme.hr.payroll.application:1.0] deployed and started.TIBCO-BW-ADMIN-CLI-300200: AppSpace [appspace1] in Domain [myDomain] created.TIBCO-BW-ADMIN-CLI-300300: AppNode [appnode3] in AppSpace [appspace1], Domain [myDomain] created.TIBCO-BW-ADMIN-CLI-500302: Failed to create AppNode [appnode1] in AppSpace [appspace1] in Domain [myDomain], TIBCO-BW-ADMIN-500main] failed. Cannot create AppNodes in the AppSpace [appspace1] on the remote BW Agent [bwagent1]TIBCO-BW-ADMIN-CLI-300417: The application [acme.acct.ap.application:1.0] deployed and started.
5. Start appspace1 and appspace2 on bwagent2.BW_HOME/bin> $ ./bwadmin start -d myDomain appspace appspace1TIBCO ActiveMatrix BusinessWorks version 6.2.2, hotfix 3, build V28, 2015-9-27TIBCO-BW-ADMIN-CLI-300203: AppSpace [appspace1] in Domain [myDomain] started.
BW_HOME/bin> $ ./bwadmin start -d myDomain appspace appspace2TIBCO ActiveMatrix BusinessWorks version 6.2.2, hotfix 3, build V28, 2015-9-27TIBCO-BW-ADMIN-CLI-300203: AppSpace [appspace2] in Domain [myDomain] started.
6. Use the bwadmin show command on machine2 to verify that the applications are running onappspace1 and appspace2.BW_HOME/bin> $ ./bwadmin show -d myDomain applicationsDomain: myDomainName Version AppSpace Profile Status Deployment Status (Running/Total)acme.hr.payroll.application 1.0 appspace2 profile_acme.h..on1.0.substvar Running Deployed (1/1)acme.acct.ap.application 1.0 appspace1 profile_acme.a..on1.0.substvar Running Deployed (1/1)
7. Stop, and delete appnodes on bwagent1.BW_HOME/bin> $ ./bwadmin stop -d myDomain -a appspace1 appnode appnode1...TIBCO-BW-ADMIN-CLI-300303: AppNode [appnode1] in Domain [myDomain] stopped.BW_HOME/bin> $ ./bwadmin stop -d myDomain -a appspace2 appnode appnode2...TIBCO-BW-ADMIN-CLI-300303: AppNode [appnode2] in Domain [myDomain] stopped.BW_HOME/bin> $ ./bwadmin delete -d myDomain -a appspace1 appnode appnode1...TIBCO-BW-ADMIN-CLI-300301: AppNode [appnode1] in Domain [appspace1] deleted.BW_HOME/bin> $ ./bwadmin delete -d myDomain -a appspace2 appnode appnode2...TIBCO-BW-ADMIN-CLI-300301: AppNode [appnode2] in Domain [appspace2] deleted.
8. Stop bwagent1 by executing the following command in the command line:BW_HOME/bin> $ ./bwagent stop
88
TIBCO ActiveMatrix BusinessWorks™ Administration

9. Use the Admin UI to unregister bwagent1 from TEA.
10. Register the bwagent2 with TEA by running the following command from the command line:BW_HOME/bin> $ ./bwadmin registerteaagent http://<TEA_HOST>:8777/teaTIBCO-BW-ADMIN-CLI-300010: Registered TEA Agent [bwagent2] with TEA Server.
11. Configure bwagent1 to use an external database and TIBCO FTL on bwagent2. For moreinformation, see the section Database with TIBCO FTL for bwagent.
Ensure that you use a different network name for the bwagent network by setting thefollowing properties in the bwagent_db.json file:● bwagentnetworkname: Specify a new network name.
● membername: Enter the original value, which is "bwagent1".
12. Start bwagent1 on machine1 by executing the command $ ./bwagent from the command line.
13. Run the restorecommand to restore AppNodes on machine1. The warning messages can beignored in this example.BW_HOME/bin> $ ./bwadmin -f myDomain_backup.cmdTIBCO ActiveMatrix BusinessWorks version 6.2.2, hotfix 3, build V28, 2015-9-27TIBCO-BW-ADMIN-CLI-500102: Failed to create Domain [myDomain], TIBCO-BW-ADMIN-500101: Domain [myDomain] already exists, check this and re-try.TIBCO-BW-ADMIN-CLI-300101: BWAgent [bwagent1] registered in Domain [myDomain].TIBCO-BW-ADMIN-CLI-500438: The application [acme.hr.payroll.application] from archive [acme.hr.payroll.application_1.0.0.ear] has been deployed to these AppSpaces: appspace2TIBCO-BW-ADMIN-CLI-500439: Applications are out of sync with the archive they were deployed from, They have to be re-deployed to keep them in sync.TIBCO-BW-ADMIN-CLI-500433: Failed to upload archive [./archives/myDomain/acme.hr.payroll.application_1.0.0.ear], <CausedBy> TIBCO-BW-ADMIN-500447: Archive [acme.hr.payroll.application_1.0.0.ear] is already present in the domain, use -replace option to replace the existing archive..TIBCO-BW-ADMIN-CLI-500438: The application [acme.acct.ap.application] from archive [acme.acct.ap.application_1.0.0.ear] has been deployed to these AppSpaces: appspace1TIBCO-BW-ADMIN-CLI-500439: Applications are out of sync with the archive they were deployed from, They have to be re-deployed to keep them in sync.TIBCO-BW-ADMIN-CLI-500433: Failed to upload archive [./archives/myDomain/acme.acct.ap.application_1.0.0.ear], <CausedBy> TIBCO-BW-ADMIN-500447: Archive [acme.acct.ap.application_1.0.0.ear] is already present in the domain, use -replace option to replace the existing archive..TIBCO-BW-ADMIN-CLI-500203: Failed to create AppSpace [appspace2] in Domain [myDomain], TIBCO-BW-ADMIN-500202: The AppSpace [appspace2] is already present in the Domain [myDomain].TIBCO-BW-ADMIN-CLI-500302: Failed to create AppNode [appnode4] in AppSpace [appspace2] in Domain [myDomain], TIBCO-BW-ADMIN-500301: The AppNode [appnode4] already exists in the AppSpace [appspace2] Domain [myDomain].TIBCO-BW-ADMIN-CLI-300300: AppNode [appnode2] in AppSpace [appspace2], Domain [myDomain] created.TIBCO-BW-ADMIN-CLI-300433: An application is already deployed with archive [acme.hr.payroll.application_1.0.0.ear].TIBCO-BW-ADMIN-CLI-500203: Failed to create AppSpace [appspace1] in Domain [myDomain], TIBCO-BW-ADMIN-500202: The AppSpace [appspace1] is already present in the Domain [myDomain].TIBCO-BW-ADMIN-CLI-500302: Failed to create AppNode [appnode3] in AppSpace [appspace1] in Domain [myDomain], TIBCO-BW-ADMIN-500301: The AppNode [appnode3] already exists in the AppSpace [appspace1] Domain [myDomain].TIBCO-BW-ADMIN-CLI-300300: AppNode [appnode1] in AppSpace [appspace1], Domain [myDomain] created.TIBCO-BW-ADMIN-CLI-300433: An application is already deployed with archive [acme.acct.ap.application_1.0.0.ear].
14. Start appnode1 and appnode 2 from the Admin UI.
Result
The migration from ActiveSpaces to an external database and TIBCO FTL is complete.
89
TIBCO ActiveMatrix BusinessWorks™ Administration

Creating an Agent NetworkThis topic shows how to configure bwagents so they can be members of the same agent network.
When using multiple machines, the runtime status of the bwagents and AppNodes cannot becomputed reliably if the machine clocks in the agent network are not in sync with each other. Make surethat the clocks for machines in the network are synchronized.
All agents in a network should be of same 4 part version.
For example, If there is one agent with version 6.4.2_HF009, all the other agents should be of theversion 6.4.2_HF009 only.
Complete the following steps for each bwagent that is to join the agent network.
Procedure
1. Stop bwagent.
2. For each bwagent, open the JSON configuration file, located in BW_HOME\config (Windows) or ${BW_HOME}/config (Unix). Use the configuration file specific to the technology type used by thebwagents in the network.a) Edit parameters in this file as follows:
ParameterProperty in bwagent.iniFile Setting
memberName bw.agent.memberName The name of the bwagent in thenetwork. Must be unique for eachbwagent. If not unique, the memberwill not start.
bwagentnetworkname bw.agent.network.name The name of the network. Must bethe same setting for each bwagent inthe network.
b) Set other parameters in the JSON file. For more information about parameters, see Configuringbwagent.
c) Save the file and use the bwadmin config command to push the changes from the JSON file tothe bwagent.ini file.BW_HOME\bin>bwadmin config -cf ../config/bwagent_as.json agent
3. Restart bwagent.
Result
Use the show agents command to show all discovered bwagents. Agents in a network can be managedby any other bwagent.
Accessing the bwagent REST API with the Swagger UIUse the Swagger UI to access the bwagent REST API, where you can try out operations and see resultsusing sample data.
Procedure
1. Start the bwagent with the apiserver command:BW_HOME\bin>bwagent apiserver
90
TIBCO ActiveMatrix BusinessWorks™ Administration
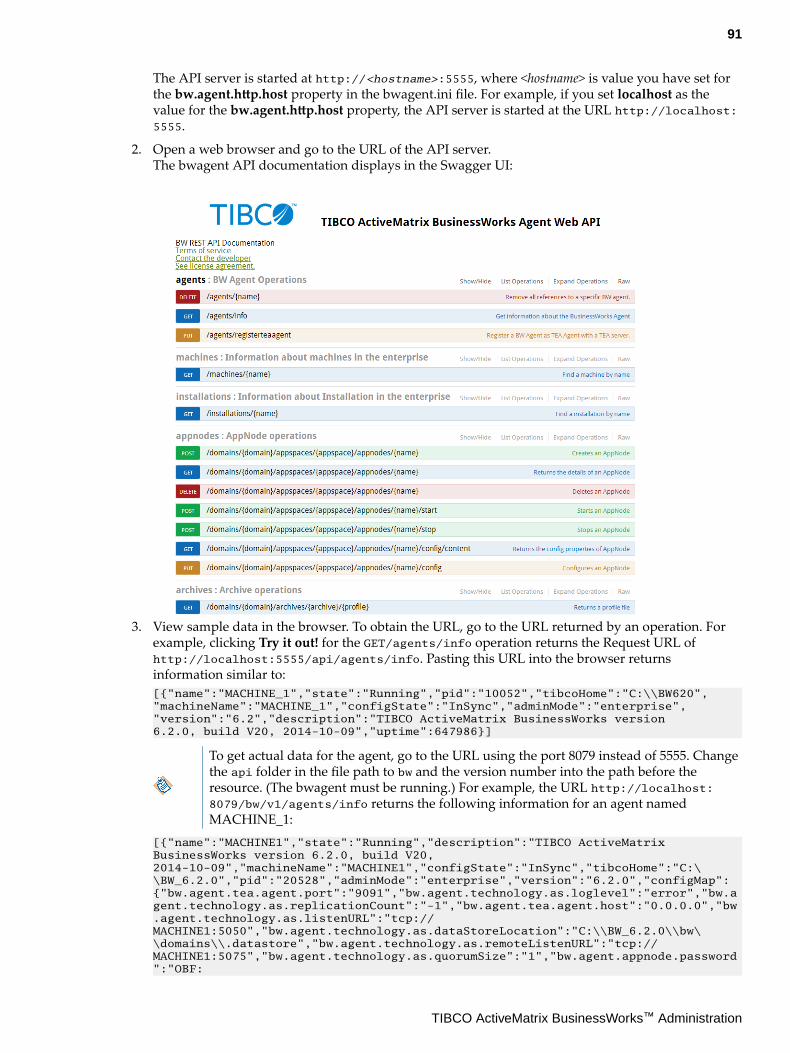
The API server is started at http://<hostname>:5555, where <hostname> is value you have set forthe bw.agent.http.host property in the bwagent.ini file. For example, if you set localhost as thevalue for the bw.agent.http.host property, the API server is started at the URL http://localhost:5555.
2. Open a web browser and go to the URL of the API server.The bwagent API documentation displays in the Swagger UI:
3. View sample data in the browser. To obtain the URL, go to the URL returned by an operation. Forexample, clicking Try it out! for the GET/agents/info operation returns the Request URL ofhttp://localhost:5555/api/agents/info. Pasting this URL into the browser returnsinformation similar to:[{"name":"MACHINE_1","state":"Running","pid":"10052","tibcoHome":"C:\\BW620","machineName":"MACHINE_1","configState":"InSync","adminMode":"enterprise","version":"6.2","description":"TIBCO ActiveMatrix BusinessWorks version6.2.0, build V20, 2014-10-09","uptime":647986}]
To get actual data for the agent, go to the URL using the port 8079 instead of 5555. Changethe api folder in the file path to bw and the version number into the path before theresource. (The bwagent must be running.) For example, the URL http://localhost:8079/bw/v1/agents/info returns the following information for an agent namedMACHINE_1:
[{"name":"MACHINE1","state":"Running","description":"TIBCO ActiveMatrix BusinessWorks version 6.2.0, build V20, 2014-10-09","machineName":"MACHINE1","configState":"InSync","tibcoHome":"C:\\BW_6.2.0","pid":"20528","adminMode":"enterprise","version":"6.2.0","configMap":{"bw.agent.tea.agent.port":"9091","bw.agent.technology.as.loglevel":"error","bw.agent.technology.as.replicationCount":"-1","bw.agent.tea.agent.host":"0.0.0.0","bw.agent.technology.as.listenURL":"tcp://MACHINE1:5050","bw.agent.technology.as.dataStoreLocation":"C:\\BW_6.2.0\\bw\\domains\\.datastore","bw.agent.technology.as.remoteListenURL":"tcp://MACHINE1:5075","bw.agent.technology.as.quorumSize":"1","bw.agent.appnode.password":"OBF:
91
TIBCO ActiveMatrix BusinessWorks™ Administration

1sho1wgi1u9d1x1d1xfj1x191ua51wfg1shu","bw.agent.memberName":"MACHINE1","bw.agent.technology.as.minSeederCount":"1","bw.agent.http.host":"0.0.0.0","bw.agent.technology.as.discoveryURL":"tcp://MACHINE1:5050","bw.admin.mode":"enterprise","bw.agent.http.access.log.config":"bwagent-access.xml","bw.agent.technology.as.remoteDiscoveryURL":"tcp://MACHINE1:5075?remote=true","bw.agent.networkName":"bwmetaspace","bw.agent.technology.as.role":"server","bw.agent.technology.type":"ActiveSpaces","bw.agent.http.port":"8079"},"httpPort":8079,"httpHost":"0.0.0.0","uptime":1020824,"internalPort":63094}]
To change the URL interface or port, edit the http.host or http.port settings in the bwagent.inifile.
Using the bwagent REST API to Return Selected FieldsYou can retrieve information of only selected fields by adding query parameters to the request URL.
The following sample queries show how to retrieve selected fields:
● Example 1: To check the status of an Application, the REST API GET URL would be -
http://localhost:8079/bw/v1/domains/<DomainName>/appspaces/<AppspaceName>/applications/<ApplicationName>/<ApplicationVersion>?fields=state
The URL returns the following response:
{"state":"Running"}
Use comma separated fields after the question mark (?) with fields=keyword in the requestquery. Spaces are not permitted.
● Example 2: To get AppSpace details
Normal query - http://localhost:8079/bw/v1/domains/<DomainName>/appspaces/<AppSpaceName>. It returns the total payload, that is, all fields.
● Select Query: http://localhost:8079/bw/v1/domains/<DomainName>/appspaces/<AppSpaceName>?select=name,status. It retrieves only 2 fields.
● Sub-field: http://localhost:8079/bw/v1/domains/<DomainName>/appspaces/<AppSpaceName>?select=appSpaceConfigRefs.href. It fetches href of appSpaceConfigRefs.
The query returns an empty response when the selected field is a collection.
Securing the bwagent REST APIThe bwagent REST API can be secured via authentication and roles. The bwagent REST API server canbe secured with SSL access.
Enabling Authentication for the bwagent REST API Using the JAAS Property File
Authentication for the bwagent REST API is implemented using the JAAS property file login module.Different login module implementations can be used. For more information, see the Jettydocumentation at eclipse.org.
Prerequisites
Stop the bwagent if it is running.
Procedure
1. To enable authentication for the bwagent REST API,a) Navigate to BW_HOME\bin.
92
TIBCO ActiveMatrix BusinessWorks™ Administration

b) Open the bwagent.tra file in an editor and uncomment the following property:java.property.java.security.auth.login.config=%BW_HOME%/config/jaas.login.conf
This property points to the location of the JAAS configuration file, which enables theauthentication mechanism and, in turn, points to the property file. The property file identifiesusers and stores encrypted/obfuscated passwords.
c) Save the file.
2. To change the name or location of the default property file, edit the BW_HOME\config\jaas.login.conf file. The default property file for the login module implementation is BW_HOME\config\realm.properties.bwloginmodule { org.eclipse.jetty.jaas.spi.PropertyFileLoginModule required file="../config/realm.properties";};
3. To change default users or passwords, edit the BW_HOME\config\realm.properties file. Two usersare provided by default: admin and bwappnode. The admin user is the default user for access to thebwagent REST API. The bwappnode user is the default user for the bwappnode process.a) Open BW_HOME\config\realm.properties in a text editor. The default contents of the file are
outlined below.
The format of this file is: <username>: <password>[,<rolename> ...]
admin: CRYPT:adpexzg3FUZAk,adminbwappnode: OBF:1sho1wgi1u9d1x1d1xfj1x191ua51wfg1shu,admin
where:
Realm.properties File
Item Description
admin Default user for access to bwagent REST API(when configured for authentication). Theadmin user can be used for alladministrative functions.
CRYPT:adpexzg3FUZAk Encrypted password.
admin Role. For more information, see the RoleDefinitions table.
bwappnode Default user for the bwappnode process.
93
TIBCO ActiveMatrix BusinessWorks™ Administration

Item Description
OBF:
1sho1wgi1u9d1x1d1xfj1x191ua51wfg1shu
Obfuscated password for the bwappnodeuser. The password must be able to be de-obfuscated.
If encrypted, the bwappnode process willnot be able to decrypt the password. As aresult, the AppNode will not be able tocommunicate with the bwagent REST APIand will be unable to report its status. Thestatus for the AppNode and anyapplications on that AppNode will displayas Stopped even though they may berunning.
To obfuscate passwords, see the followinginstructions.
admin Role. The user for the bwappnode processmust be configured with the admin role.
b) To create an encrypted or obfuscated password, navigate to the BW_HOME\system\lib\teafolder and use Java with the -cp option to call the Jetty Password utility, passing the password.In this example, the password admin is used. The utility returns the password in a variety offormats.BW_HOME\system\lib\tea java -cp jetty-util-8.1.16.v20140903.jar org.eclipse.jetty.util.security.Password adminadminOBF:1u2a1toa1w8v1tok1u30MD5:21232f297a57a5a743894a0e4a801fc3 CRYPT:adpexzg3FUZAk
c) Copy the OBF, MD5 or CRYPT password from the output and paste it into therealm.properties file for the user name.
d) Save the file.
4. To configure the bwappnode user using the bwagent file,a) Open the BW_HOME\config\bwagent.ini file in a text editor and navigate to the section called"Configuration for AppNode to agent communication."This provides an alternate configuration mechanism.
b) Uncomment the bw.agent.appnode.user property and change the default bwappnode username. If you specify a different user for the bw.agent.appnode.user property, you can add theentry to the realm.properties file (with an obfuscated password and role). If you do not addthis entry to the properties file, set the password for the user, outlined in the next step.
c) Uncomment the property bw.agent.appnode.password and change the default password. Thepassword must be able to be de-obfuscated. If encrypted, the bwappnode process will not beable to decrypt the password. As a result, the AppNode will not be able to communicate withthe bwagent REST API and will be unable to report its status. The status for the AppNode andany applications on that AppNode will display as Stopped even though they may be running. Tocreating an encrypted or obfuscated password, follow the instructions.
If you specify this password, it will be used and the password set in therealm.properties file for the user (if that user exists in the file) will be ignored.
d) Save the file.
5. The default authentication mechanism is set to Basic. To change the authentication to Digest,a) Open the BW_HOME\config\bwagent.ini file in a text editor.b) Navigate to the "Web server HTTP and HTTPS configuration" section of the file and uncomment
the bw.agent.bw.auth property. Change the value from BASIC to DIGEST (all caps).
94
TIBCO ActiveMatrix BusinessWorks™ Administration

c) Add a new property called bw.agent.bw.api.auth. Set the value of this property to DIGEST(all caps).
d) Save the file.
6. Set the bw.agent.http.authorization property to true in the bwagent.ini file for authenticationand authorization.
7. Restart the bwagent.
Enabling LDAP Authentication for the bwagent REST API
Follow these steps to enable LDAP authentication for the bwagent REST API.
Prerequisites
● Stop the bwagent
● Ensure users are assigned the admin, operator, and user roles in the LDAP sever. For moreinformation, see the section Authorizing Access to the REST API by Role.
Procedure
1. Navigate to BW_HOME\bin.
2. Open the bwagent.tra file in an editor and uncomment the following property:java.property.java.security.auth.login.config=%BW_HOME%/config/jaas.login.conf
3. Replace the following lines to the %BW_HOME%/config/jaas.login.conf file.bwloginmodule { org.eclipse.jetty.jaas.spi.LdapLoginModule required debug="true" useLdaps="false" contextFactory="com.sun.jndi.ldap.LdapCtxFactory" hostname="10.97.106.72" port="10389" authenticationMethod="simple" forceBindingLogin="true" userBaseDn="o=tibco" userObjectClass="inetOrgPerson" userRdnAttribute="uid" userIdAttribute="uid" userPasswordAttribute="userPassword" roleBaseDn="ou=roles,o=tibco" roleNameAttribute="cn" roleMemberAttribute="uniqueMember" customRoleForLDAP=test roleObjectClass="groupOfUniqueNames";};};
4. In the bwagent.ini file, set the property bw.agent.http.authorization to true for LDAPauthentication and authorization, and set the property to false to enable authorization for CustomGroup.
5. Restart the bwagent.
6. Open a web browser and go to the URL of the API server. For example, enter the following URL:http://localhost:8079/bw/v1/agents/info
7. Enter the correct LDAP user name and password credentials in the dialogue box that displays.
95
TIBCO ActiveMatrix BusinessWorks™ Administration
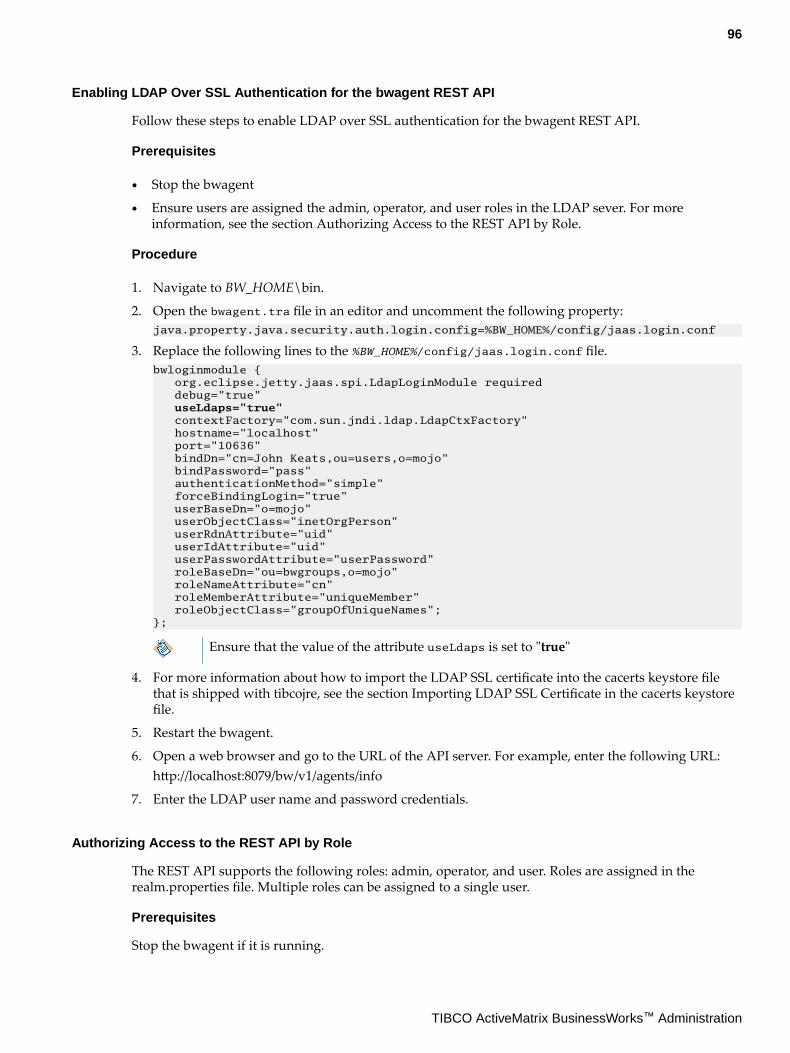
Enabling LDAP Over SSL Authentication for the bwagent REST API
Follow these steps to enable LDAP over SSL authentication for the bwagent REST API.
Prerequisites
● Stop the bwagent
● Ensure users are assigned the admin, operator, and user roles in the LDAP sever. For moreinformation, see the section Authorizing Access to the REST API by Role.
Procedure
1. Navigate to BW_HOME\bin.
2. Open the bwagent.tra file in an editor and uncomment the following property:java.property.java.security.auth.login.config=%BW_HOME%/config/jaas.login.conf
3. Replace the following lines to the %BW_HOME%/config/jaas.login.conf file.bwloginmodule { org.eclipse.jetty.jaas.spi.LdapLoginModule required debug="true" useLdaps="true" contextFactory="com.sun.jndi.ldap.LdapCtxFactory" hostname="localhost" port="10636" bindDn="cn=John Keats,ou=users,o=mojo" bindPassword="pass" authenticationMethod="simple" forceBindingLogin="true" userBaseDn="o=mojo" userObjectClass="inetOrgPerson" userRdnAttribute="uid" userIdAttribute="uid" userPasswordAttribute="userPassword" roleBaseDn="ou=bwgroups,o=mojo" roleNameAttribute="cn" roleMemberAttribute="uniqueMember" roleObjectClass="groupOfUniqueNames";};
Ensure that the value of the attribute useLdaps is set to "true"
4. For more information about how to import the LDAP SSL certificate into the cacerts keystore filethat is shipped with tibcojre, see the section Importing LDAP SSL Certificate in the cacerts keystorefile.
5. Restart the bwagent.
6. Open a web browser and go to the URL of the API server. For example, enter the following URL:http://localhost:8079/bw/v1/agents/info
7. Enter the LDAP user name and password credentials.
Authorizing Access to the REST API by Role
The REST API supports the following roles: admin, operator, and user. Roles are assigned in therealm.properties file. Multiple roles can be assigned to a single user.
Prerequisites
Stop the bwagent if it is running.
96
TIBCO ActiveMatrix BusinessWorks™ Administration

Role Description Access to Operations
admin Full rights: Create, Read, Update, Delete,Lifecycle (default)
All
operator Read and Lifecycle operations Start/Stop, GET
user Read only GET
Procedure
1. Navigate to BW_HOME\config and open the realm.properties file. For more information, seeEnabling Authentication for the bwagent REST API.
2. For each defined user, change the default role as needed.
3. Save the file and restart the bwagent.
Securing the REST API Server
The bwagent REST API server can be secured with an SSL connection.
The SSL connection is configured in the bwagent configuration file.
Prerequisites
Stop the bwagent if it is running.
Procedure
1. Open the BW_HOME\config\bwagent.ini file in a text editor and navigate to the section called "Webserver HTTP and HTTPS configuration."
2. Comment out the bw.agent.http.port property.
3. Uncomment the bw.agent.https.port property.
If the bw.agent.http.port property is also set, requests to the HTTP port areautomatically rerouted to the HTTPS port.
4. Uncomment the following properties and add values:
Property Value Description
bw.agent.https.truststorepath String Path to the trust store file.
bw.agent.https.truststorepassword String The password for the trust store.
bw.agent.https.keystorepath String Path to the keystore file.
bw.agent.https.keystorepassword String Password of the keystore.
If you are using a self-signing certificate, specify CN to be localhost.
5. Add additional SSL properties to the "Web server HTTP and HTTPS configuration" section of thebwagent.ini file as needed.
97
TIBCO ActiveMatrix BusinessWorks™ Administration
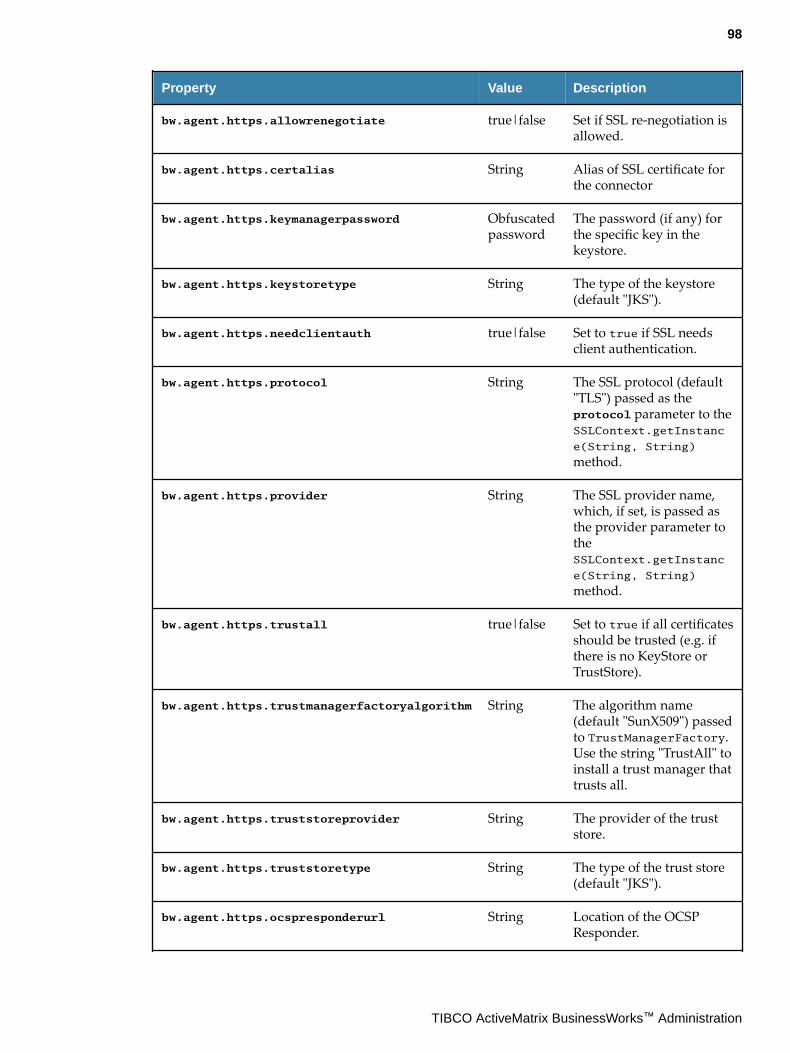
Property Value Description
bw.agent.https.allowrenegotiate true|false Set if SSL re-negotiation isallowed.
bw.agent.https.certalias String Alias of SSL certificate forthe connector
bw.agent.https.keymanagerpassword Obfuscatedpassword
The password (if any) forthe specific key in thekeystore.
bw.agent.https.keystoretype String The type of the keystore(default "JKS").
bw.agent.https.needclientauth true|false Set to true if SSL needsclient authentication.
bw.agent.https.protocol String The SSL protocol (default"TLS") passed as theprotocol parameter to theSSLContext.getInstanc
e(String, String)
method.
bw.agent.https.provider String The SSL provider name,which, if set, is passed asthe provider parameter totheSSLContext.getInstanc
e(String, String)
method.
bw.agent.https.trustall true|false Set to true if all certificatesshould be trusted (e.g. ifthere is no KeyStore orTrustStore).
bw.agent.https.trustmanagerfactoryalgorithm String The algorithm name(default "SunX509") passedto TrustManagerFactory.Use the string "TrustAll" toinstall a trust manager thattrusts all.
bw.agent.https.truststoreprovider String The provider of the truststore.
bw.agent.https.truststoretype String The type of the trust store(default "JKS").
bw.agent.https.ocspresponderurl String Location of the OCSPResponder.
98
TIBCO ActiveMatrix BusinessWorks™ Administration

Property Value Description
bw.agent.https.enablecrldp true|false Set to true to enables CRLDistribution Pointssupport.
bw.agent.https.enableocsp true|false Set to true to enables On-Line Certificate StatusProtocol support.
bw.agent.https.crlpath String The path to the file thatcontains CertificateRevocation List.
bw.agent.https.validatecerts true|false Set to true if SSLcertificates have to bevalidated.
bw.agent.https.validatepeercerts true|false Set to true if SSLcertificates of the peer haveto be validated.
bw.agent.https.wantclientauth true|false Set to true if SSL wantsclient authentication.
bw.agent.https.maxcertpathlength int The maximum number ofintermediate certificates inthe certification path (-1for unlimited).
bw.agent.https.excludeciphersuites Commaseparatedlist ofStrings
The list of cipher suitenames to exclude from.
bw.agent.https.includeciphersuites Commaseparatedlist ofStrings
The list of cipher suitenames to include.
bw.agent.https.securerandomalgorithm String The algorithm name. If set,is passed as the algorithmparameter toSecureRandom.getInstan
ce(String) method toobtain the SecureRandominstance, which is thenpassed to the SSLContextconstructor.
99
TIBCO ActiveMatrix BusinessWorks™ Administration

Property Value Description
bw.agent.https.excludeprotocols String Add this property todisable SSL protocols.Disabled SSL protocols arerepresented in a commadelimited list.
bw.agent.https.includeprotocols String Add this property toenable SSL protocols.Enabled SSL protocols arerepresented in a commadelimited list.
6. Save the file and restart the bwagent.
7. Open a web browser and go to the URL of the API server. For example, enter the following URL:https://localhost:8886/bw/v1/agents/info
Importing LDAP SSL certificate in the cacerts keystore file
To connect the bwagent to the LDAP Over SSL server, ensure that the server certificate is imported intothe cacerts keystore file.
Prerequisites
Ensure that the SSL Certificate has been exported from the LDAP server.
Procedure
● Navigate to BW_Home\ tibcojre64\1.8.0\lib\security# To List Existing Certificates use command :
BW_Home\tibcojre64\1.8.0\lib\security>keytool -list -keystore cacertsEnter keystore password: changeit
Keystore type: JKSKeystore provider: SUN
Your keystore contains 5 entries
verisignclass2g2ca [jdk], Aug 25, 2016, trustedCertEntry,Certificate fingerprint (SHA1): B3:EA:C4:47:76:C9:C8:1C:EA:F2:9D:95:B6:CC:A0:08:1B:67:EC:9Ddigicertassuredidg3 [jdk], Aug 25, 2016, trustedCertEntry,Certificate fingerprint (SHA1): F5:17:A2:4F:9A:48:C6:C9:F8:A2:00:26:9F:DC:0F:48:2C:AB:30:89verisignuniversalrootca [jdk], Aug 25, 2016, trustedCertEntry,Certificate fingerprint (SHA1): 36:79:CA:35:66:87:72:30:4D:30:A5:FB:87:3B:0F:A7:7B:B7:0D:54digicerttrustedrootg4 [jdk], Aug 25, 2016, trustedCertEntry,Certificate fingerprint (SHA1): DD:FB:16:CD:49:31:C9:73:A2:03:7D:3F:C8:3A:4D:7D:77:5D:05:E4verisignclass1g3ca [jdk], Aug 25, 2016, trustedCertEntry,Certificate fingerprint (SHA1): 20:42:85:DC:F7:EB:76:41:95:57:8E:13:6B:D4:B7:D1:E9:8E:46:A5identrustpublicca [jdk], Aug 25, 2016, trustedCertEntry,E:\BW\6.4.0\V11\tibcojre64\1.8.0\lib\security>
#### Import LDAP SSL Certificates to cacerts:BW_Home\tibcojre64\1.8.0\lib\security>keytool -import -keystore cacerts -file <certName>.der
100
TIBCO ActiveMatrix BusinessWorks™ Administration
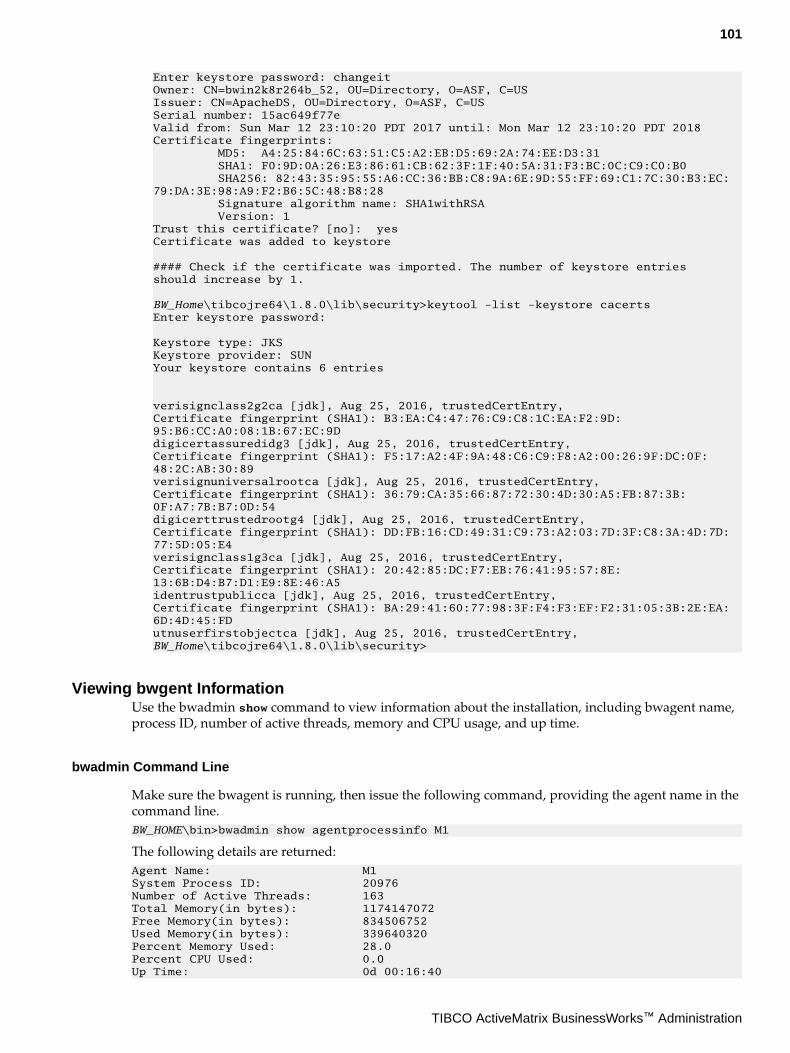
Enter keystore password: changeitOwner: CN=bwin2k8r264b_52, OU=Directory, O=ASF, C=USIssuer: CN=ApacheDS, OU=Directory, O=ASF, C=USSerial number: 15ac649f77eValid from: Sun Mar 12 23:10:20 PDT 2017 until: Mon Mar 12 23:10:20 PDT 2018Certificate fingerprints: MD5: A4:25:84:6C:63:51:C5:A2:EB:D5:69:2A:74:EE:D3:31 SHA1: F0:9D:0A:26:E3:86:61:CB:62:3F:1F:40:5A:31:F3:BC:0C:C9:C0:B0 SHA256: 82:43:35:95:55:A6:CC:36:BB:C8:9A:6E:9D:55:FF:69:C1:7C:30:B3:EC:79:DA:3E:98:A9:F2:B6:5C:48:B8:28 Signature algorithm name: SHA1withRSA Version: 1Trust this certificate? [no]: yesCertificate was added to keystore
#### Check if the certificate was imported. The number of keystore entries should increase by 1.
BW_Home\tibcojre64\1.8.0\lib\security>keytool -list -keystore cacertsEnter keystore password:
Keystore type: JKSKeystore provider: SUNYour keystore contains 6 entries
verisignclass2g2ca [jdk], Aug 25, 2016, trustedCertEntry,Certificate fingerprint (SHA1): B3:EA:C4:47:76:C9:C8:1C:EA:F2:9D:95:B6:CC:A0:08:1B:67:EC:9Ddigicertassuredidg3 [jdk], Aug 25, 2016, trustedCertEntry,Certificate fingerprint (SHA1): F5:17:A2:4F:9A:48:C6:C9:F8:A2:00:26:9F:DC:0F:48:2C:AB:30:89verisignuniversalrootca [jdk], Aug 25, 2016, trustedCertEntry,Certificate fingerprint (SHA1): 36:79:CA:35:66:87:72:30:4D:30:A5:FB:87:3B:0F:A7:7B:B7:0D:54digicerttrustedrootg4 [jdk], Aug 25, 2016, trustedCertEntry,Certificate fingerprint (SHA1): DD:FB:16:CD:49:31:C9:73:A2:03:7D:3F:C8:3A:4D:7D:77:5D:05:E4verisignclass1g3ca [jdk], Aug 25, 2016, trustedCertEntry,Certificate fingerprint (SHA1): 20:42:85:DC:F7:EB:76:41:95:57:8E:13:6B:D4:B7:D1:E9:8E:46:A5identrustpublicca [jdk], Aug 25, 2016, trustedCertEntry,Certificate fingerprint (SHA1): BA:29:41:60:77:98:3F:F4:F3:EF:F2:31:05:3B:2E:EA:6D:4D:45:FDutnuserfirstobjectca [jdk], Aug 25, 2016, trustedCertEntry,BW_Home\tibcojre64\1.8.0\lib\security>
Viewing bwgent InformationUse the bwadmin show command to view information about the installation, including bwagent name,process ID, number of active threads, memory and CPU usage, and up time.
bwadmin Command Line
Make sure the bwagent is running, then issue the following command, providing the agent name in thecommand line.BW_HOME\bin>bwadmin show agentprocessinfo M1
The following details are returned:Agent Name: M1System Process ID: 20976Number of Active Threads: 163Total Memory(in bytes): 1174147072Free Memory(in bytes): 834506752Used Memory(in bytes): 339640320Percent Memory Used: 28.0Percent CPU Used: 0.0Up Time: 0d 00:16:40
101
TIBCO ActiveMatrix BusinessWorks™ Administration

Restoring the File System of a bwagentRestoring a bwagent restores the file system of the bwagent to the state of the datastore.The file system for runtime entities in a bwagent can be restored locally or across a network, if thebwagent is part of an agent network.
Prerequisites
● The name of the bwagent must be known in order to restore.
● The bwagent must be running.
Procedure
1. To restore the file system for runtime entities in a bwagent, open a terminal and navigate toBW_HOME\bin.
2. Enter the restore command at the command line, using the agent argument with the name of thebwagent to restore. The bwagent can be either the local bwagent or a bwagent in the agent network.The following example restores the bwagent named Machine1.BW_HOME\bin>bwadmin restore agent Machine1Connecting to the BW Agent using TIBCO ActiveSpaces (Java). Enterprise Edition. Version 2.1.3.005 Connected to BW AgentTIBCO-BW-ADMIN-CLI-300030: Restored Agent [Machine1]TIBCO-BW-ADMIN-CLI-300007: Restore completed.
3. To verify the restore, check the file system. Open the BW_HOME\domains folder. Look for nameddomain folders to verify if domains for the bwagent have been restored.
Configuring the Location of the Domains FolderRuntime entities are created in the local file system in the BW_HOME/domains folder. Below are severaldifferent ways to change the folder location of a specific domain.
Admin CLI
Point to a new domain home for a specific domain by executing the -home command. For example, runthe following command to create a domain home named testDomain:<BW_HOME>\ bin>bwadmin create -home /Users/testuser/domains domain testDomain
REST API
Use the home parameter in the REST request. For example, http://localhost:8079/bw/v1/domains/testDomain?home=/Users/testuser/domains
Domain Home Properties File
Update the domain home properties file to change the folder location of a specific domain.
Procedure
1. Stop the bwagent if it is running.
2. Open the BW_HOME/domains/DomainHomes.properties file in a text editor.
3. Add a the <domainName>.domainHome property, where <domainName> is the intended domain, tothis file to point to the new domain home for a specific domain. For example, by adding thetestDomain.domainHome property to the DomainHomes file, you are specifying a custom domainfolder for the domain testDomain.
102
TIBCO ActiveMatrix BusinessWorks™ Administration

4. Save the file and restart the bwagent.
5. From the Admin UI, create the domain using the domain name you specified in the domainHomeproperty. For example, if you have added testDomain.domainHome to the DomainHomes file, goto the Admin UI and create a domain called testDomain.
103
TIBCO ActiveMatrix BusinessWorks™ Administration
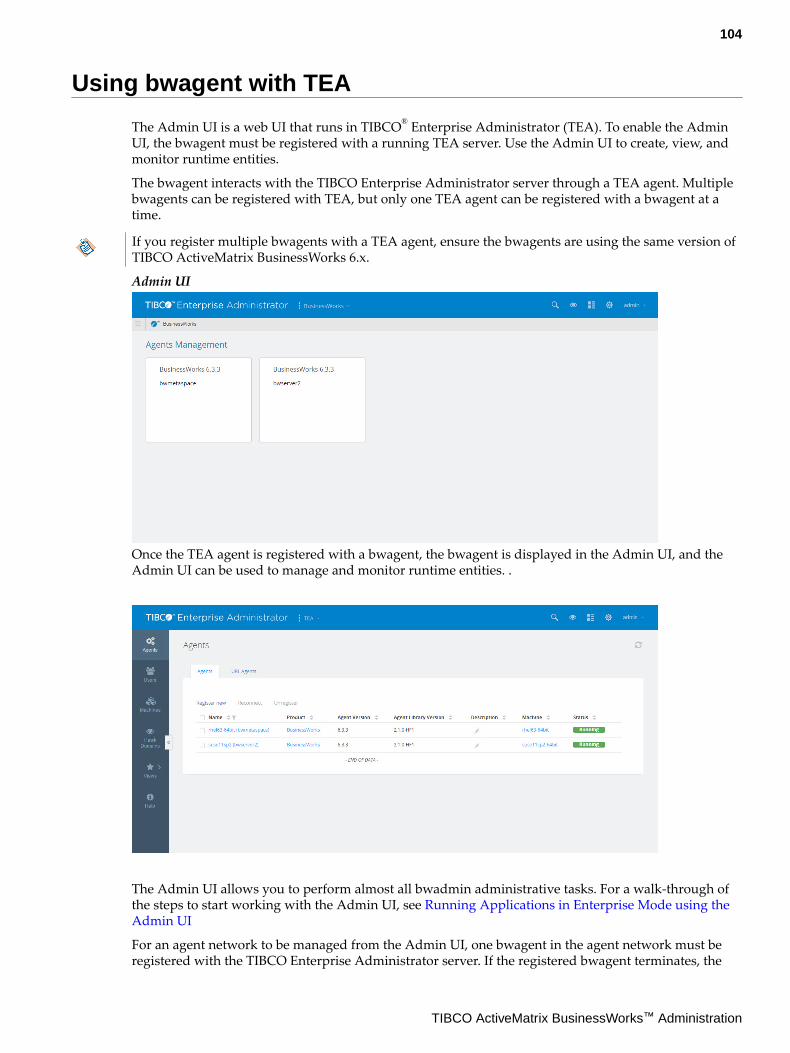
Using bwagent with TEA
The Admin UI is a web UI that runs in TIBCO® Enterprise Administrator (TEA). To enable the AdminUI, the bwagent must be registered with a running TEA server. Use the Admin UI to create, view, andmonitor runtime entities.
The bwagent interacts with the TIBCO Enterprise Administrator server through a TEA agent. Multiplebwagents can be registered with TEA, but only one TEA agent can be registered with a bwagent at atime.
If you register multiple bwagents with a TEA agent, ensure the bwagents are using the same version ofTIBCO ActiveMatrix BusinessWorks 6.x.
Admin UI
Once the TEA agent is registered with a bwagent, the bwagent is displayed in the Admin UI, and theAdmin UI can be used to manage and monitor runtime entities. .
The Admin UI allows you to perform almost all bwadmin administrative tasks. For a walk-through ofthe steps to start working with the Admin UI, see Running Applications in Enterprise Mode using theAdmin UI
For an agent network to be managed from the Admin UI, one bwagent in the agent network must beregistered with the TIBCO Enterprise Administrator server. If the registered bwagent terminates, the
104
TIBCO ActiveMatrix BusinessWorks™ Administration

connection between the server and the agent network is automatically recovered. Another bwagent inthe agent network will autoregister with the server.
Registering bwagent with TIBCO Enterprise AdministratorA bwagent TEA agent must be registered with the TIBCO Enterprise Administrator server before it isavailable in the Admin UI.
Procedure
1. Start the TIBCO Enterprise Administrator server.
2. Start bwagent.
3. Register the bwagent TEA agent with the TIBCO Enterprise Administrator server. Provide the URLto the TEA server. Only one TEA agent can be registered at a time.BW_HOME\bin>bwadmin registerteaagent http://<TEA_HOST>:8777/tea/
Result
Open TIBCO Enterprise Administrator (http://<TEA_HOST>:8777/tea) to access the bwagent. Log incredentials are required; the default user name is admin and the default password is admin.
Click the Agents icon and the registered bwagent is displayed. For more information about creatingand managing runtime entities, see Administration Tasks and Reference.
Autoregistering bwagent with TIBCO Enterprise AdministratorA bwagent can be part of an agent network, which allows commands to be distributed to multiplebwagents simultaneously.
For an agent network to be managed from the Admin UI, one bwagent in the agent network must beregistered with the TIBCO Enterprise Administrator (TEA) server. If the registered bwagent terminates,the connection between the server and the agent network is automatically recovered. Another bwagentin the agent network will auto-register with the server.
The bwadmin disableautoregistration and enableautoregistration commands toggle themechanism used to autoregister a bwagent. The commands can be run against any bwagent in an agentnetwork and act on all bwagents in the agent network. If you disable autoregistration for an agentnetwork, the members of the network are unable to communicate with the TIBCO EnterpriseAdministrator server. You have to manually register a bwagent in the agent network to communicate itwith the server.
If the same TEA server is used for different versions of BWAgents and only one version of BWAgent isup, follow these steps to make sure TEA is working with appropriate UIs:
Procedure
1. Stop the TEA server.
2. Set the property tea.dev.developer-mode to true in the <TEA-HOME>/tibco/cfgmgmt/tea/conf/tea.conf file.
3. Restart the TEA server.
4. As an admin user, on the Agents page, click the Reload button.
5. Verify if new UI changes are picked up.
6. Stop the TEA server.
7. Reset tea.dev.developer-mode to false.
105
TIBCO ActiveMatrix BusinessWorks™ Administration

8. Restart the TEA server.
9. Clear the cache and reload Admin UI.
Unregistering bwagent with TIBCO Enterprise AdministratorYou can unregister bwagent from the Admin UI, or the command line.
Unregistering bwagent Using the Admin UI
To unregister bwagent from the Admin UI, open the TEA URL and perform these steps:
1. Click Agents on the side bar to open the Agent page.
2. Select bwagent to unregister.
3. Click Unregister.
4. In the dialog window that displays, confirm that you want to unregister bwagent.
bwagent is no longer registered with the TEA server.
Unregistering bwagent Using the Command Line
Use bwadmin to execute the unregisterteaagent command, and enter the URL of your TEA server :BW_HOME\bin>bwadmin unregisterteaagent <TEA URL>
Enabling and Disabling bwagent's TIBCO Enterprise Administrator Agent PortYou can disable bwagent's TEA agent port to disable registering bwagent with TIBCO EnterpriseAdministrator.
Execute bwagent.exe startagent -nt command from the Admin Console. While executing thecommand, you are not able to register BWAgent with Admin UI.
To enable the registering again, restart BWAgent with the command bwagent.exe without startagent -nt option.
Compatibility Chart for TIBCO ActiveMatrix BusinessWorks™ and TIBCO®Enterprise Administrator
The TIBCO Enterprise Administrator (TEA) server is an application administration UI that supportsmultiple TIBCO products, including the ActiveMatrix BusinessWorks™. Using the Admin UI you cancreate, view, and monitor runtime entities. Each product registers its own agent with the server and theserver communicates with the products through these agents. The compatibility rules and chart helpdetermine the minimum version of the TEA server required by a given version of ActiveMatrixBusinessWorks.
These are the compatibility rules for the TEA server and TEA agent libraries:
● The TEA server is backward compatible with earlier versions of TEA agent libraries, unless there isa known issue.
● The TEA server does not guarantee forward compatibility with newer versions of TEA agentlibraries.
The following table lists the version of the TEA agent library bundled with a given version ofActiveMatrix BusinessWorks.
ActiveMatrix BusinessWorks Version Version of TEA Agent Library Bundled
6.4.0 2.1.0 HF-001
106
TIBCO ActiveMatrix BusinessWorks™ Administration

ActiveMatrix BusinessWorks Version Version of TEA Agent Library Bundled
6.4.1 2.1.0 HF-001
6.4.2 2.1.0 HF-002
6.5.0 2.1.0 HF-002
6.5.1 2.3.0 HF-005
Compatibility Chart
Based on compatibility rules and the version of the TEA agent library bundled in a given version ofActiveMatrix BusinessWorks, the following compatibility chart can be inferred.
ActiveMatrixBusinessWorksVersionwithTEAAgentLibraryVersion
TEA Server Version
1.2.0
1.3.0
2.0.0
2.1.0
2.2.0
2.2.0HF-003
2.2.0
HF-006
2.2.0HF-008
2.2.0HF-009
2.3.0
2.3.0HF-002
2.3.0HF-005
ActiveMatrixBusinessWorks6.1.0withTEAAgentLibrary1.2.0
ActiveMatrixBusinessWorks6.1.1withTEAAgentLibrary1.2.0
107
TIBCO ActiveMatrix BusinessWorks™ Administration

ActiveMatrixBusinessWorksVersionwithTEAAgentLibraryVersion
TEA Server Version
1.2.0
1.3.0
2.0.0
2.1.0
2.2.0
2.2.0HF-003
2.2.0
HF-006
2.2.0HF-008
2.2.0HF-009
2.3.0
2.3.0HF-002
2.3.0HF-005
ActiveMatrixBusinessWorks6.2.0withTEAAgentLibrary2.0.0
ActiveMatrixBusinessWorks6.2.1withTEAAgentLibrary2.1.0
ActiveMatrixBusinessWorks6.2.2withTEAAgentLibrary2.1.0
ActiveMatrixBusinessWorks6.3.0withTEAAgentLibrary2.1.0
108
TIBCO ActiveMatrix BusinessWorks™ Administration

ActiveMatrixBusinessWorksVersionwithTEAAgentLibraryVersion
TEA Server Version
1.2.0
1.3.0
2.0.0
2.1.0
2.2.0
2.2.0HF-003
2.2.0
HF-006
2.2.0HF-008
2.2.0HF-009
2.3.0
2.3.0HF-002
2.3.0HF-005
ActiveMatrixBusinessWorks6.3.1withTEAAgentLibrary2.1.0
ActiveMatrixBusinessWorks6.3.2withTEAAgentLibrary2.1.0
ActiveMatrixBusinessWorks6.3.3withTEAAgentLibrary2.1.0HF-001
109
TIBCO ActiveMatrix BusinessWorks™ Administration

ActiveMatrixBusinessWorksVersionwithTEAAgentLibraryVersion
TEA Server Version
1.2.0
1.3.0
2.0.0
2.1.0
2.2.0
2.2.0HF-003
2.2.0
HF-006
2.2.0HF-008
2.2.0HF-009
2.3.0
2.3.0HF-002
2.3.0HF-005
ActiveMatrixBusinessWorks6.3.4withTEAAgentLibrary2.1.0HF-001
ActiveMatrixBusinessWorks6.3.5withTEAAgentLibrary2.1.0HF-001
ActiveMatrixBusinessWorks6.4.0withTEAAgentLibrary2.1.0HF-001
110
TIBCO ActiveMatrix BusinessWorks™ Administration
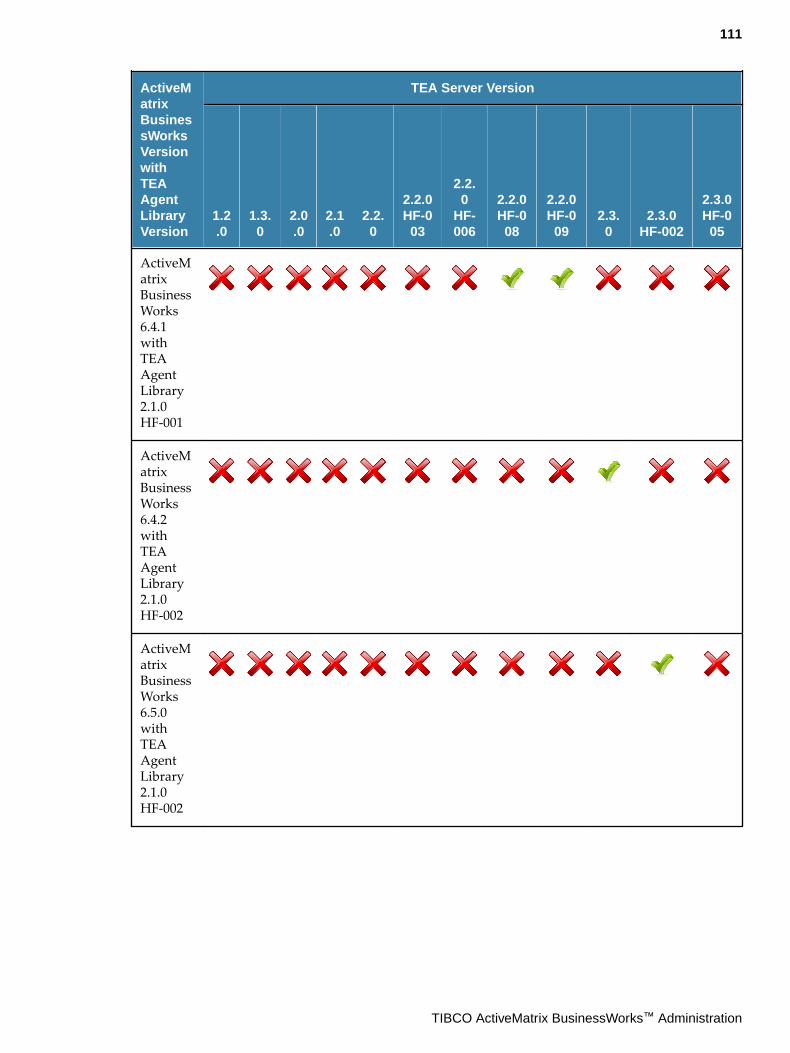
ActiveMatrixBusinessWorksVersionwithTEAAgentLibraryVersion
TEA Server Version
1.2.0
1.3.0
2.0.0
2.1.0
2.2.0
2.2.0HF-003
2.2.0
HF-006
2.2.0HF-008
2.2.0HF-009
2.3.0
2.3.0HF-002
2.3.0HF-005
ActiveMatrixBusinessWorks6.4.1withTEAAgentLibrary2.1.0HF-001
ActiveMatrixBusinessWorks6.4.2withTEAAgentLibrary2.1.0HF-002
ActiveMatrixBusinessWorks6.5.0withTEAAgentLibrary2.1.0HF-002
111
TIBCO ActiveMatrix BusinessWorks™ Administration

ActiveMatrixBusinessWorksVersionwithTEAAgentLibraryVersion
TEA Server Version
1.2.0
1.3.0
2.0.0
2.1.0
2.2.0
2.2.0HF-003
2.2.0
HF-006
2.2.0HF-008
2.2.0HF-009
2.3.0
2.3.0HF-002
2.3.0HF-005
ActiveMatrixBusinessWorks6.5.1withTEAAgentLibrary2.3.0HF-005
TEA ShellA command line utility called the TEA shell is provided with TIBCO Enterprise Administrator server. Itis a remote shell based on the SSH protocol that provides the command line interface for the full rangeof TEA operations. The scripting language is similar to that of bash from Unix.
The TEA shell has the following key features:
● Piping of commands
● Completion of commands
● Help on commands
The BusinessWorks entity structure in the TEA shell is:/BusinessWorksbwagentsdomains apparchives appspaces applications appnodesinstallationsmachines bwagents installations
Change to the BusinessWorks context by typing: admin@M1:/> cd Businessworks
Press the tab key for a list of available commands for the context path.
For information about TEA shell commands, see Using TEA Shell Commands.
Using TEA Shell CommandsTEA shell commands can be used to create, monitor, and manage runtime entities.
TEA shell commands are aligned with bwadmin commands.
112
TIBCO ActiveMatrix BusinessWorks™ Administration

The steps in this section show you some simple TEA shell commands for creating a domain, AppSpace,and AppNode and starting the AppSpace. For a complete list of all supported commands, see TEAShell Commands.
At any time in the TEA shell, press the tab key for a list of supported commands available for thecontext. To get help on a command, type the command with the --help option, for example: create--help
Procedure
1. Connect to the TEA shell through a terminal program, for example Putty. Connect using thefollowing command:ssh -p 2222 admin@localhost
The user name and password are both: admin
On successful connection, the TEA Shell banner is displayed, illustrated below:
2. Change to the BusinessWorks context by typing: admin@M1:/> cd Businessworks
3. Create a domain:admin@M1:/BusinessWorks> create domain TEA-D1Executed the command 'create' successfully.
4. Create an AppSpace in the domain:admin@M1:/BusinessWorks> create -domain TEA-D1 appspace TEA-AS1Executed the command 'create' successfully.
5. Create an AppNode in the AppSpace:admin@M1:/BusinessWorks> create -domain TEA-D1 -appspace TEA-AS1 appnode TEA-AN1 -httpPort 8077Executed the command 'create' successfully.
6. Start the AppSpace. This starts the AppNode in the AppSpace.admin@M1:/BusinessWorks> start -domain TEA-D1 appspace TEA-AS1Executed the command 'start' successfully.
TEA Shell CommandsThis topic lists all TEA shell commands and provides examples.
General Commands
Command Description Example
cd Changes context toentity.
cd /BusinessWorks/domains/Domain1/appspaces/AppSpace01/appnodes/AppNode01
ls Lists the name of eachinstance in thespecified entity.
cd /BusinessWorks/domains/Domain1/appspaces/AppSpace01/appnodesls
113
TIBCO ActiveMatrix BusinessWorks™ Administration
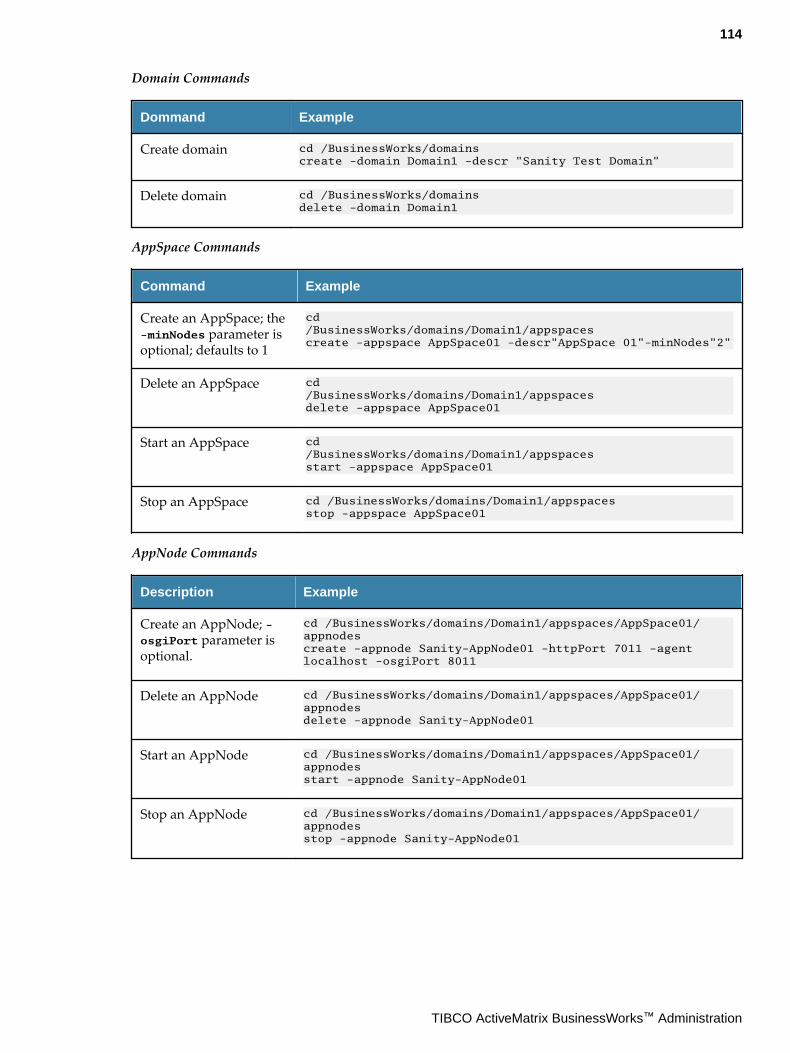
Domain Commands
Dommand Example
Create domain cd /BusinessWorks/domainscreate -domain Domain1 -descr "Sanity Test Domain"
Delete domain cd /BusinessWorks/domainsdelete -domain Domain1
AppSpace Commands
Command Example
Create an AppSpace; the-minNodes parameter isoptional; defaults to 1
cd/BusinessWorks/domains/Domain1/appspacescreate -appspace AppSpace01 -descr"AppSpace 01"-minNodes"2"
Delete an AppSpace cd/BusinessWorks/domains/Domain1/appspacesdelete -appspace AppSpace01
Start an AppSpace cd/BusinessWorks/domains/Domain1/appspacesstart -appspace AppSpace01
Stop an AppSpace cd /BusinessWorks/domains/Domain1/appspacesstop -appspace AppSpace01
AppNode Commands
Description Example
Create an AppNode; -osgiPort parameter isoptional.
cd /BusinessWorks/domains/Domain1/appspaces/AppSpace01/appnodescreate -appnode Sanity-AppNode01 -httpPort 7011 -agent localhost -osgiPort 8011
Delete an AppNode cd /BusinessWorks/domains/Domain1/appspaces/AppSpace01/appnodesdelete -appnode Sanity-AppNode01
Start an AppNode cd /BusinessWorks/domains/Domain1/appspaces/AppSpace01/appnodesstart -appnode Sanity-AppNode01
Stop an AppNode cd /BusinessWorks/domains/Domain1/appspaces/AppSpace01/appnodesstop -appnode Sanity-AppNode01
114
TIBCO ActiveMatrix BusinessWorks™ Administration

Application Commands
Description Example
Start an application cd /BusinessWorks/domains/Domain1/appspaces/AppSpace01/applicationsstart -app acme.acct.ap.application -version 1.0
Start an applicationinstance on theAppNode
cd/BusinessWorks/domains/Domain1/appspaces/AppSpace01/applicationsstartinst -app acme.acct.ap.application -version1.0-appnode Sanity-AppNode01
Stop an application cd /BusinessWorks/domains/Domain1/appspaces/AppSpace01/applicationsstop -app acme.acct.ap.application -version 1.0
Stop an applicationinstance on anAppNode
d /BusinessWorks/domains/Domain1/appspaces/AppSpace01/applicationsstopinst -app acme.acct.ap.application -version 1.0 -appnode Sanity-AppNode01
115
TIBCO ActiveMatrix BusinessWorks™ Administration

Roles and Permissions
Privileges to perform actions and operations in Admin UI are based on the role and permissionsgranted to the user.
Roles
Administrators use roles to allot permissions in Admin UI. When a role is assigned to a user or a group,the user or group receives all the permissions granted to the role.
The following roles are defined in Admin UI: BW User, BW Operator and BW Administrator.
Permissions
Permissions are used to enforce access control. In Admin UI you can grant access permissions at twolevels:
● Entity Based - Permission can be enforced on the complete entity such as a domain, AppSpace andso on. For example, for two domains d1 and d2, if the read permission is granted to the domainentity, you can view both the instances, d1 and d2.
● Instance Based - Permission can be enforced on a particular instance of an entity. For example, if theread permission is granted for the d1 instance of the domain entity, you have permission to viewonly d1.
Types of Permissions
You can assign the following types of permissions to users in Admin UI:
● Read: Read permission for the entities.
● Lifecycle: You can grant lifecycle permission to a user only if he has explicit read permission.Lifecycle permission is applicable only to AppSpaces, AppNodes, and applications, to control thelifecycle of entities such as AppSpaces, AppNodes, and applications (that is to start and stop theentities)
● Full_control: By default, this permission includes the read permission. Entities can perform thefollowing commands with the full control access:
— Domain: delete and backup
— Domains: create
— Archive: deploy and delete
— Archives: upload
— AppSpace: delete, create AppNode and update
— AppSpaces: create
— AppNode: delete and update
— AppNodes: create
— Application: update and undeploy
— Agent: unregister
Entity-Based Permissions
To add the ActiveMatrix BusinessWorks™ product under the list of Products on the Admin UIhomepage, select the following entities on the Add Permission page.
116
TIBCO ActiveMatrix BusinessWorks™ Administration

● BusinessWorks● bwagent● bwagents
To manage permissions for an application, select the application and applications entities on the AddPermission page and assign the required permissions.
Grant access permissions to plural entities to access an instance of the entity. For example, to give readaccess to d1 which is an instance of a domain, grant the read permission to domains (plural entity). Thisis applicable to all entity types.
Entity Hierarchy for Instance-Based Permission
The hierarchy of entities when granting permissions in Admin UI is illustrated in the following image.Domain is the top-level parent entity and includes AppSpaces and Archives. AppSpaces then furtherinclude AppNodes.
If an archive is uploaded to a folder, provide access for the folder first and then to the archive instances.
117
TIBCO ActiveMatrix BusinessWorks™ Administration
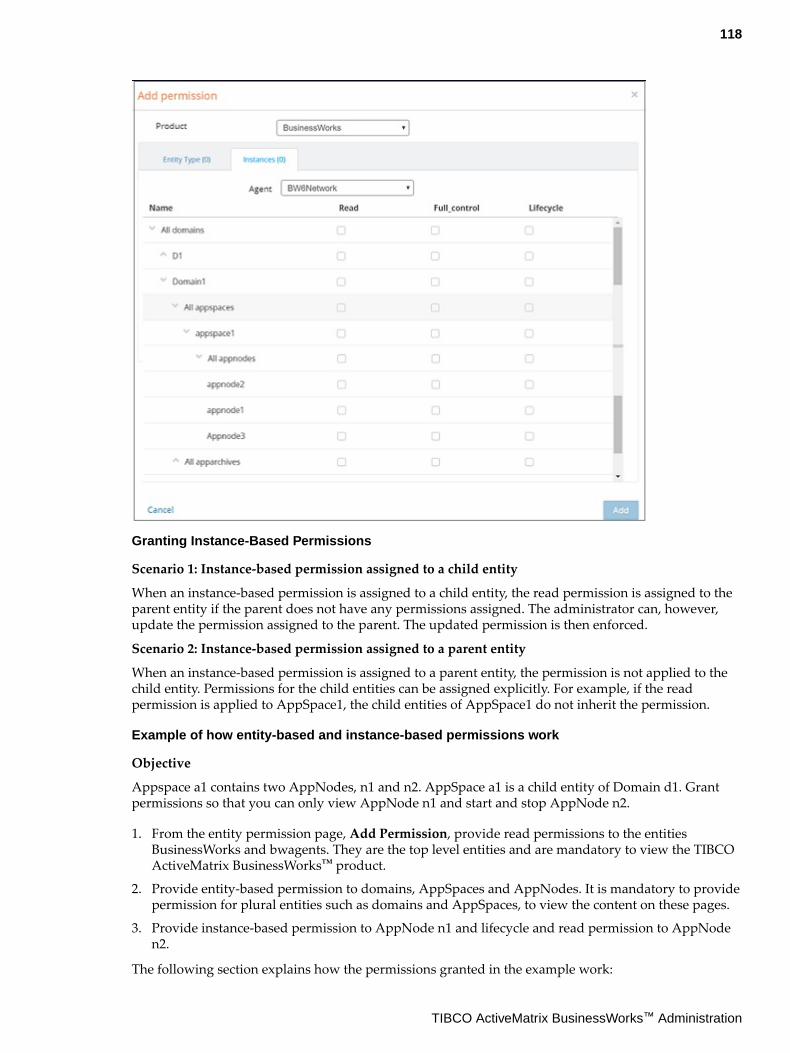
Granting Instance-Based Permissions
Scenario 1: Instance-based permission assigned to a child entity
When an instance-based permission is assigned to a child entity, the read permission is assigned to theparent entity if the parent does not have any permissions assigned. The administrator can, however,update the permission assigned to the parent. The updated permission is then enforced.
Scenario 2: Instance-based permission assigned to a parent entity
When an instance-based permission is assigned to a parent entity, the permission is not applied to thechild entity. Permissions for the child entities can be assigned explicitly. For example, if the readpermission is applied to AppSpace1, the child entities of AppSpace1 do not inherit the permission.
Example of how entity-based and instance-based permissions work
Objective
Appspace a1 contains two AppNodes, n1 and n2. AppSpace a1 is a child entity of Domain d1. Grantpermissions so that you can only view AppNode n1 and start and stop AppNode n2.
1. From the entity permission page, Add Permission, provide read permissions to the entitiesBusinessWorks and bwagents. They are the top level entities and are mandatory to view the TIBCOActiveMatrix BusinessWorks™ product.
2. Provide entity-based permission to domains, AppSpaces and AppNodes. It is mandatory to providepermission for plural entities such as domains and AppSpaces, to view the content on these pages.
3. Provide instance-based permission to AppNode n1 and lifecycle and read permission to AppNoden2.
The following section explains how the permissions granted in the example work:
118
TIBCO ActiveMatrix BusinessWorks™ Administration

● For Domain d1 to be visible, grant permissions to the entities BusinessWorks, bwagents, domainsand for the instance of the domain d1.
● For AppSpace a1 to be visible, grant permission to the entities BusinessWorks, bwagents, domains,AppSpaces and for the instance a1. Explicit permissions are not required to be given to Domain d1.Parents entities are provided view permission automatically.
● For AppNode n1 to be visible grant permission to the entities BusinessWorks, bwagents anddomains, AppSpaces and AppNodes and for the instance a1.
Additional Notes
● Actions taken on parent level transcends the actions taken on the child entity even if you do nothave access to the child entity. For example, If you start and stop an AppSpace, all the AppNode inthis AppSpace start and stop even if you do not have access over all of the AppNodes.
● Custom users cannot view any new entity they create as these users do not have instance basedpermission for that entity. For example, you have full control access to an Appspace and younavigate to the AppSpace page and use the Create button to create a new AppSpace a2. Users willnot be able to view AppSpace a2 as they do not have access permissions for a2. The administratorwill have to grant permissions to access this AppSpace to enable custom users to see it. This isapplicable to all entity types.
● While taking a backup of a domain, all entities within this domain will be backed up irrespective ofthe permissions granted.
● The Appnodes, Appspaces and Application Archives count can be seen on the DomainManagement Page irrespective of permissions granted to the user.
119
TIBCO ActiveMatrix BusinessWorks™ Administration

Administration Tasks and Reference
Administration tasks involve managing domains, AppSpaces, AppNodes, and applications.
The topics in this section show how to do administrative tasks from the bwadmin command line andthe Admin UI:
● To complete tasks from the bwadmin command line, navigate to BW_HOME\bin. Type bwadminhelp for a list of commands. For information, see bwadmin.
● To complete tasks from the Admin UI, register the TEA agent to the bwagent and open the TEAURL. For information see Using the Admin UI.
Managing DomainsA domain is a logical group that provides an isolated environment for applications and their resourcesto reside. It provides an administrative boundary for an integration project. Each domain may sharemachines with other domains, but does not communicate with other domains. Domains includesservers that may or may not be distributed over different machines and operating systems.
Creating a DomainA domain comprises AppSpaces and AppNodes. Create a domain first, and then add the AppSpacesand AppNodes to the domain. The domain name is applied to all contained entities.
The following characters are allowed in the domain name:
● A-Z
● a-z
● 0-9
● - (hyphen)
● _ (underscore)
Illegal characters are stripped from the name.
The maximum length of a runtime entity name is 100 characters. If the maximum length is exceeded,the entity name is shortened to 100 characters.
bwadmin Command Line
If the -home option is not specified in the create command (to set the path to the folder where all filesrelated to the domain are managed), the domain is created in the default location under the BW_HOME\domains directory.
Run the following command to create a domain named MyDomain:BW_HOME\bin>bwadmin create domain MyDomain
Admin UI
Procedure
1. Click the BusinessWorks product icon on the Admin UI home page.
120
TIBCO ActiveMatrix BusinessWorks™ Administration
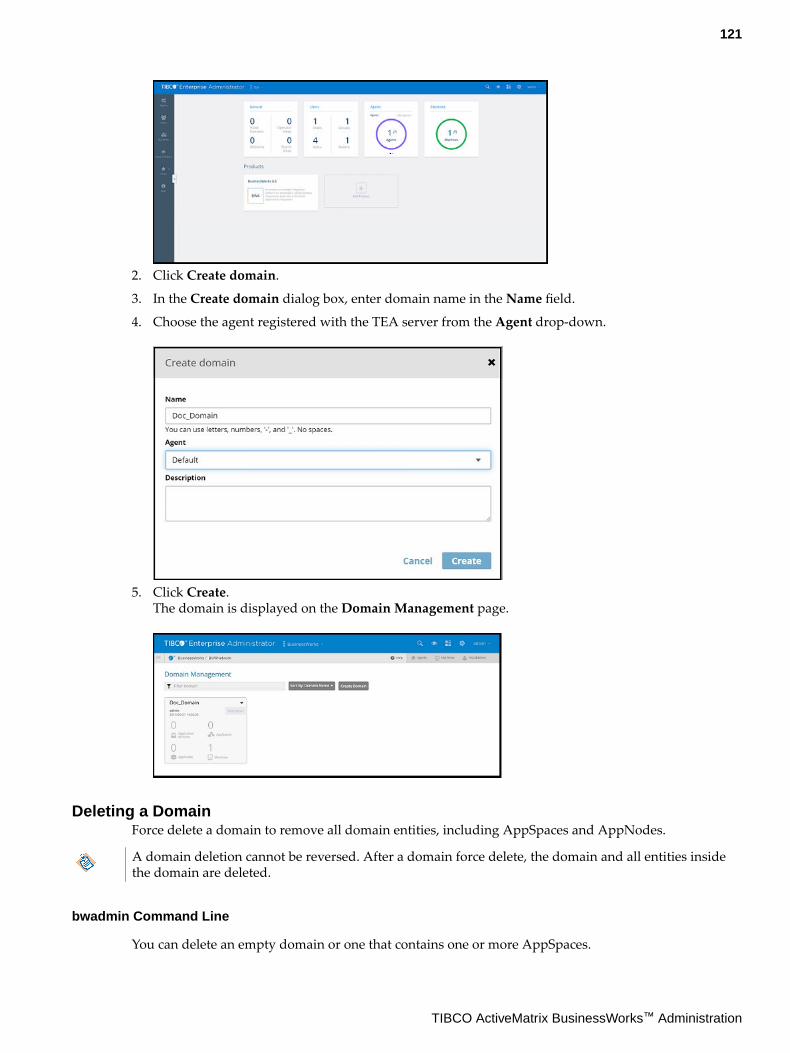
2. Click Create domain.
3. In the Create domain dialog box, enter domain name in the Name field.
4. Choose the agent registered with the TEA server from the Agent drop-down.
5. Click Create.The domain is displayed on the Domain Management page.
Deleting a DomainForce delete a domain to remove all domain entities, including AppSpaces and AppNodes.
A domain deletion cannot be reversed. After a domain force delete, the domain and all entities insidethe domain are deleted.
bwadmin Command Line
You can delete an empty domain or one that contains one or more AppSpaces.
121
TIBCO ActiveMatrix BusinessWorks™ Administration

Option Command
To delete an empty domain BW_HOME\bin>bwadmin delete domain MyDomain
To delete a domain that contains one ormore AppSpaces
BW_HOME\bin>bwadmin delete -force domain
MyDomain
To delete a domain using the timeoutand force argument
BW_HOME\bin>bwadmin delete -timeout xx(time in
minutes) -force domain MyDomain
The -timeout argument is valid only when theAppSpace is running. For more information,see Force Shutting Down an AppNode.
Admin UI
Procedure
1. Click the down arrow for the domain on the Domain Management page and choose Delete.
2. Click Yes, delete in the Delete domain dialog box.
Backing Up and Restoring a DomainBacking up a domain exports the current state of the specified domain and contained runtime entitiesto a bwadmin command file. The entire domain is backed up, including remote bwagents, if applicableto the specified domain. The command file can be provided to bwadmin to recreate the domain. Outputcan be compressed to a ZIP file with the -zipped option.
122
TIBCO ActiveMatrix BusinessWorks™ Administration

bwadmin Command Line
Procedure
1. To back up the current state of a domain, including profiles and archives, enter the backupcommand at the command line, using the -s option to identify the name of the destination file. Usethe domain argument in the command line, with the name of the domain to back up. The domaincan be either a local domain or a domain in a bwagent in the agent network. By default, destinationfiles are written to the current working directory.This example backs up domain Machine2Domain in a networked bwagent to a command file namedmachine2_domain.cmd.
Use the -noarchives option to exclude archives uploaded to the domain from thebackup. (Note that references to the archives are included in the destination file. If needed,the paths in the destination file can manually be added to include archives in the restore.)
The syntax is as follows where -na invokes the no archive option, and -z creates a zip file.
backup -na -z -s C:/Backup/archives.zip domain Domain_Name
backup -na -s C:/Backup/archives.cmd domain Domain_Name
BW_HOME\bin>bwadmin backup -s machine2_domain.cmd domain Machine2Domain
If you are restoring to a different location, you need to update the command file as follows:
● The agent name will point to localhost by default; you need to change this to the name of themachine you are restoring to.
● Update the domain home to point to the absolute path to the new location.
● Update the path to the application archive (EAR) file to an absolute path.
2. To restore the domain,a) Enter the bwadmin command, providing the name of the backup command file. The following
example recreates the domain Machine2Domain and the contained runtime entities.BW_HOME\bin>bwadmin -f machine2_domain.cmd
b) Use the bwadmin show domains command from the command line to verify the restore.
Admin UI
Procedure
1. Click the down arrow for the domain on the Domain Management page and choose Backup.
2. Click Backup in the Backup domain dialog box.a) To exclude archives from the backup, check the Do not back up Application Archives in this
domain option.
123
TIBCO ActiveMatrix BusinessWorks™ Administration

The contents of the domain are written to a ZIP file that is downloaded to your computer. Thefilename is in the format: Domain_backup_domainName.zip The ZIP file contains a .cmd file thatcan be used to restore the environment.
Restoring the File System of a DomainRestoring a domain restores the file system of the specified domain and all runtime entities in thedomain to the state of the datastore.
Prerequisites
● The name of the domain must be known in order to restore.
● The bwagent must be running.
Procedure
1. To restore the file system for a domain and its runtime entities, enter the restore command at thecommand line, using the domain argument with the name of the domain to restore. The domain canbe either a local domain or a domain in a bwagent in the agent network. This example restoresdomain Machine2Domain in a networked bwagent named Machine2.BW_HOME\bin>bwadmin restore -agent Machine2 domain Machine2Domain
2. To verify the restore, check the file system. Open the BW_HOME\domains folder. Look for a domainfolder that matches the name of the domain.
Managing AppSpacesAn application is deployed to an AppSpace.
An AppSpace is a virtual pool of AppNodes where an application is deployed. When an application isdeployed, the AppSpace starts the application on each of its AppNodes. More AppNodes can be addeddynamically to the AppSpace to manage the load-balancing and fault tolerance needs for anapplication.
One or more applications can be deployed to an AppSpace.
A minimum number of AppNodes can be specified as a threshold for determining the AppSpace state.If the threshold falls below the minimum, the runtime state becomes Degraded.
When an application deployed to an AppSpace runs, and scalability is enabled, all the AppNodes in theAppSpace are started and share the load for the application. If scalability is turned off for a deployedapplication, the application executes on just one AppNode. For more information, see Fault Tolerance.
124
TIBCO ActiveMatrix BusinessWorks™ Administration

Creating an AppSpaceAn AppSpace is created under a domain, which must exist before adding an AppSpace to it. AnAppSpace contains one or more AppNodes. The domain name applies to the AppSpace.
The following characters are allowed in the AppSpace name:
● A-Z
● a-z
● 0-9
● - (hyphen)● _ (underscore)
Illegal characters are stripped from the name.
The maximum length of a runtime entity name is 100 characters. If the maximum length is exceeded,the entity name is shortened to 100 characters.
bwadmin Command Line
To create an AppSpace named MyAppSpace in the domain MyDomain, execute the following command atthe command line:BW_HOME\bin>bwadmin create -d MyDomain -minNodes 1 appspace MyAppSpace
The MyAppSpace AppSpace is created in the domain MyDomain that exists on the machine where thebwagent is running. Use the -agent option to create an AppSpace running on a remote machine. Runthe show agents command on the remote machine to get the agent name. If you are in local mode, theagent is not supported.
Admin UI
To create an AppSpace using the Admin UI:
Procedure
1. On the Domain Management page, click the domain you want to add the AppSpace to.The Monitor page is displayed, showing that no runtime entities exist in the domain.
2. Click AppSpaces on the side bar to open the AppSpaces page.
3. Click Create AppSpace to open the Create AppSpace dialog box. Enter the following information.
● Name: AppSpace name.● MinNodes: Minimum number of AppNodes for this AppSpace. Default is 1. The AppSpace
status is set to Degraded if the minimum number of AppNodes is not created.
125
TIBCO ActiveMatrix BusinessWorks™ Administration

● Agent: The bwagent registered with the TEA server.
● Description: Optional description.
Click Create AppNodes in the Create AppSpace dialog box to create AppNodes. You can alsocreate AppNodes from the AppNodes Admin UI page. For information, see Creating an AppNode .
4. Click Create.The AppSpace is created and displayed on the AppSpaces page. The AppSpace status is set toDegraded as there are no AppNodes yet to satisfy the minimum requirement.
Starting an AppSpaceTo run applications in an AppSpace, first start the AppSpace.
If an AppSpace does not contain any AppNodes, it will not be able to start. The AppSpace status is setto Degraded. The minimum number of nodes must be created in order for the AppSpace to start.
126
TIBCO ActiveMatrix BusinessWorks™ Administration

bwadmin Command Line
To start the AppSpace MyAppSpace in the domain MyDomain, execute the following command at thecommand line:BW_HOME\bin>bwadmin start -d MyDomain appspace MyAppSpace
Admin UI
Procedure
● On the AppSpaces page for the domain, click the Start icon for the AppSpace you want to start.If the minimum number of nodes exists, the status displays as Starting, a transient state, thenRunning.
Editing an AppSpace ConfigurationYou can edit the configuration for a running AppSpace from the Admin UI.
Admin UI
For information about some of the properties you can configure for an AppSpace using the Admin UI,see:
● Statistics Collection
● Engine Persistence Modes
● Tuning
Procedure
1. Select the AppSpace you want to configure on the AppSpaces page.
2. Click the Edit icon in the upper right of the AppSpace page. The AppSpace Properties page isdisplayed. Use the General tab to edit AppSpace properties.
127
TIBCO ActiveMatrix BusinessWorks™ Administration

3. Click Edit to open the tab for editing, and click Submit when you are done.
You can also edit user defined properties on the User Defined tab or AppNode propertieson the AppNode tab.
Viewing AppSpace StatesAn AppSpace has two states: Deployment and Runtime.
The Deployment state can have the following statuses:
AppSpace Deployment Statuses
Status Description
In-Sync The AppSpace is synchronized with its bwagents.
Out-of-Sync The AppSpace is out of synchronization. The out-of-sync state may occurwhen:
● a bwagent is not reachable due to network failure, or
● the bwagent configuration may not have been applied remotely.
The Runtime state can have the following statuses:
AppSpace Runtime Statuses
Status
OperationsAllowed inThis Status Description
Running Stop The minimum threshold of AppNodes configured for thisAppSpace are running.
Stopped Start, Delete None of the AppNodes configured for this AppSpace arerunning.
Degraded Stop The number of AppNodes for this running AppSpace fallsbelow the minimum specified threshold.
The state also occurs when the AppSpace is notrunning.
128
TIBCO ActiveMatrix BusinessWorks™ Administration

AppSpaces do not have a starting state. However, AppNodes have their own lifecycle and may go fromstarting to stopped.
bwadmin Command Line
To view the status of the AppSpace MyAppSpace in the domain MyDomain, execute the followingcommand at the command line:BW_HOME\bin>bwadmin show -domain MyDomain appspace MyAppSpace
Admin UI
Navigate to the AppSpace page and view the Status column.
Stopping an AppSpaceWhen an AppSpace is stopped, all applications and AppNodes running in the AppSpace stop.
bwadmin Command Line
To stop the AppSpace MyAppSpace in the domain MyDomain, execute the following command at thecommand line:BW_HOME\bin>bwadmin stop -d MyDomain appspace MyAppSpace
To force shut down the AppSpace MyAppSpace in the domain MyDomain, execute the followingcommand at the command line:BW_HOME\bin>bwadmin stop -timeout xx(time in minutes) -domain MyDomain appspace MyAppSpace
See Force Shutting Down an AppNode for more information.
Admin UI
On the AppSpaces page, click the Stop icon for the AppSpace you want to stop.
The status for the AppSpace changes from Running to Stopping, a transient state, then Stopped.
129
TIBCO ActiveMatrix BusinessWorks™ Administration

Deleting an AppSpaceAn AppSpace can be deleted if it has does not have associated AppNodes. If it contains AppNodes, youcan force delete it.
bwadmin Command Line
To delete the AppSpace MyAppSpace in the domain MyDomain, execute the following command at thecommand line:BW_HOME\bin>bwadmin delete -d MyDomain appspace MyAppSpace
If the AppSpace has an attached AppNode, the delete appspace command will fail. You can deletethe attached AppNode and retry the delete appspace command or use the delete appspacecommand with the -force option.BW_HOME\bin>bwadmin delete -force -domain MyDomain appspace MyAppSpace
To force delete the AppSpace MyAppSpace in the domain MyDomain, and forcefully shut down therunning AppNodes, execute the following command at the command line:BW_HOME\bin>bwadmin delete -timeout xx(time in minutes) -force -domain MyDomain appspace MyAppSpace
See Force Shutting Down an AppNode for more information.
Admin UI
Procedure
1. On the AppSpaces page, click the checkmark next to AppSpace you want to delete.
2. Click Delete.
3. Click Yes, delete in the Delete AppSpaces dialog box. (The dialog box message displays thenumber of applications and AppNodes that will be deleted.)
Backing Up and Restoring an AppSpaceBacking up an AppSpace exports the current state of the specified AppSpace to a bwadmin commandfile. The command file can be provided to bwadmin to recreate the AppSpace. Output can becompressed to a ZIP file with the -zipped option.
Procedure
1. To back up the current state of an AppSpace, enter the backup command at the command line,using the -s option to identify the name of the destination file. Use the -domain option with theappspace argument in the command line, with the name of the AppSpace to back up. The
130
TIBCO ActiveMatrix BusinessWorks™ Administration
AppSpace can be either a local AppSpace or an AppSpace in a bwagent in the agent network. Bydefault, destination files are written to the current working directory.This example backs up AppSpace MyAppSpace in Domain MyDomain to a command file namedmyappspace.cmd
BW_HOME\bin>bwadmin backup -s myappspace.cmd -domain MyDomain appspace MyAppSpace
2. To restore the AppSpace:a) Enter the bwadmin command at the command line, providing the name of the backup commandfile. The following example recreates the AppSpace MyAppSpace.BW_HOME\bin>bwadmin -f myappspace.cmd
If you are restoring to a different location, you need to update the command file as follows:
● The agent name will point to localhost by default; you need to change this to the name ofthe machine you are restoring to.
● Update the domain home to point to the absolute path to the new location.
● Update the path to the application archive (EAR) file to an absolute path.b) Use the bwadmin show appspaces command from the command line, with the -domain option
to verify the restore.
Restoring the File System of an AppSpaceRestoring an AppSpace restores the file system of the specified AppSpace and all runtime entities in theAppSpace to the state of the datastore.
Prerequisites
● The name of the containing domain and the name of the AppSpace must be known in order torestore.
● The bwagent must be running.
Procedure
1. To restore the file system for an AppSpace and the runtime entities in the AppSpace, open aterminal and navigate to BW_HOME \bin.
2. Enter the restore command from the command line, using the -domain option with the appspaceargument specifying the name of the AppSpace to restore. This example restores AppSpaceMyAppSpace in domain MyDomain.BW_HOME\bin>bwadmin restore -d MyDomain appspace MyAppSpace
3. To verify the restore, check the file system. Open the BW_HOME\domains folder. Check for the namedAppSpace folder under: BW_HOME\domains\domain_name\appspaces
131
TIBCO ActiveMatrix BusinessWorks™ Administration

Command HistoryOpen the Command History tab to view the commands or operations that were performed on anAppSpace.
Managing AppNodesAn AppNode is a runtime entity for hosting application modules and libraries.
An AppNode represents a physical engine process that is launched when an application starts to run.
● Install ActiveMatrix BusinessWorks on each machine hosting an AppNode.● One or more AppNodes can be created in an AppSpace.
Creating an AppNodeAn AppNode is created under an AppSpace. The domain and AppSpace name apply to the AppNode.
Multiple AppNodes can be created for an AppSpace.
When creating an AppNode that is on a remote machine, ensure that:
● the remote bwagent is a part of the network.● the name of bwagent running on the remote machine is specified.
When an AppNode is created, do not specify the OSGi port. Only open this port for debugging whenenabling the OSGi console on an AppNode. For details, see Enabling the OSGi Console for anAppNode.
The following characters are allowed in the AppNode name:
● A-Z
● a-z
● 0-9
● - (hyphen)● _ (underscore)
Illegal characters are stripped from the name.
The maximum length of a runtime entity name is 100 characters. If the maximum length is exceeded,the entity name is shortened to 100 characters.
132
TIBCO ActiveMatrix BusinessWorks™ Administration

bwadmin Command Line
Use the create command to create an AppNode.
The bwagent must be running. Issue the following command to create an AppNode named MyAppNodein domain MyDomain and AppSpace MyAppSpace:BW_HOME\bin>bwadmin create -d MyDomain -a MyAppSpace -httpPort 2222 appnode MyAppNode
The httpPort option is required for an AppNode. If the specified port is already in use, an error isdisplayed and the AppNode cannot be created. To get a list of defined AppNodes for a given domain,with port numbers, with the show command: show -d <DomainName> appnodes
The following command creates an AppNode MyAppNodeOnMac in the domain MyDomain and AppSpaceMyAppSpace on a remote machine whose agent name is Machine2.BW_HOME\bin>bwadmin create -d MyDomain -a MyAppSpace -httpPort 2222 -agent Machine2 appnode MyAppNodeOnMac
To create an AppNode on a remote machine, the member name of the bwagent on the machine wherethe AppNode will run must be known. Get the member name value by invoking the bwadmin showagents command on the remote machine.
Admin UI
To create an AppNode using the Admin UI:
Procedure
1. Click AppNodes on the side bar to open the AppNodes page.
2. Click Create AppNode to open the Create AppNode dialog box. Enter the following information:
● Name: AppNode name.
● Agent: The bwagent registered with the TEA server.
● HTTP interface: The HTTP interface for the AppNode.
● HTTP port: The HTTP port for the AppNode. Click Validate to see if the port is available.
The Validate button validates the HTTP ports within the ActiveMatrixBusinessWorks scope only.
● OSGi interface: The OSGi interface for the AppNode. Open this port only for debuggingsessions.
● OSGi port: The OSGi port for the AppNode. Open this port only for debugging sessions.
● AppSpace: The AppSpace for this AppNode.
● Description: Optional description.
133
TIBCO ActiveMatrix BusinessWorks™ Administration

3. Click Create.The AppNode is created and displayed on the AppNode page. The AppNode status is set toStopped.
Starting an AppNodeUse the start command to manually start an AppNode.
When an AppSpace is started, all AppNodes associated with the AppSpace automatically start.
By default, the value for the bw.engine.shutdownOnFailure property is true in the AppSpaceconfig.ini file. This ensures that the AppNode does not start when there are any issues when startingthe bwengine. You can also configure the property at the AppNode, or the AppSpace level.
bwadmin Command Line
Execute the following command at the command line to start the MyAppNode AppNode:BW_HOME\bin>bwadmin start -d MyDomain -a MyAppSpace appnode MyAppNode
If the AppNode is not gracefully shut down, it could corrupt the /config folder.
Configure the bw.appnode.clean.config.folder.on.startup property in the AppNode, or theAppSpace config.ini file.
To create a new /config folder every time the AppNode starts, set thebw.appnode.clean.config.folder.on.startup property to true. Setting the property to false, orleaving it undefined results in the /config folder not being deleted when the AppNode starts.
134
TIBCO ActiveMatrix BusinessWorks™ Administration
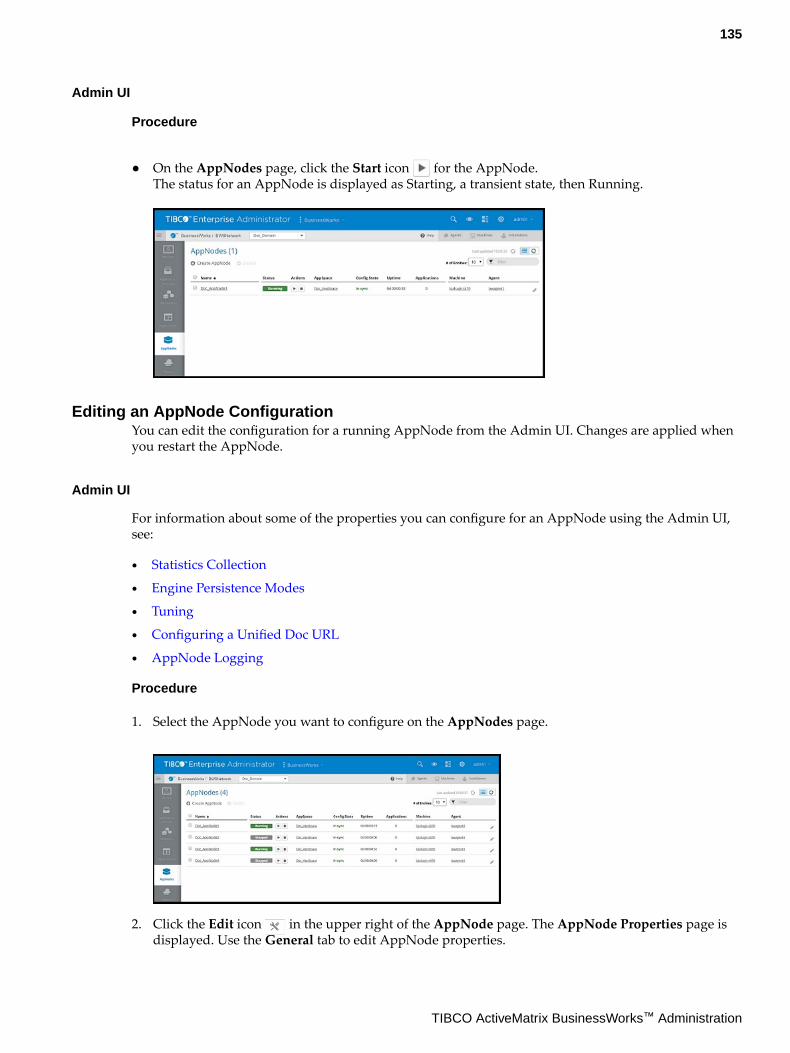
Admin UI
Procedure
● On the AppNodes page, click the Start icon for the AppNode.The status for an AppNode is displayed as Starting, a transient state, then Running.
Editing an AppNode ConfigurationYou can edit the configuration for a running AppNode from the Admin UI. Changes are applied whenyou restart the AppNode.
Admin UI
For information about some of the properties you can configure for an AppNode using the Admin UI,see:
● Statistics Collection
● Engine Persistence Modes
● Tuning
● Configuring a Unified Doc URL
● AppNode Logging
Procedure
1. Select the AppNode you want to configure on the AppNodes page.
2. Click the Edit icon in the upper right of the AppNode page. The AppNode Properties page isdisplayed. Use the General tab to edit AppNode properties.
135
TIBCO ActiveMatrix BusinessWorks™ Administration

3. Click Edit to open the tab for editing, and click Submit when you are done. You need to restart theAppNode to apply the changes. The AppNode status is set to Out of sync until the AppNode isrestarted.You can also edit user defined properties on the User Defined tab.
Viewing AppNode StatusesAn AppNode has two states: Deployment and Runtime.
The Deployment state can have the following statuses:
AppNode Deployment Statuses
Status Description
In-Sync AppNode is in a synchronized state with deployment features,configurations, or both.
Out-of-Sync AppNode is out of synchronization with certain deploymentfeatures, configurations, or both.
An AppNode's Runtime state relies on the timestamp of the hosting machine and on the timestamp ofthe machine hosting the bwagent. The timestamps on the machines must be within 20 seconds of eachother for the status of the AppNode to be reported correctly. The Runtime state can have the followingstatuses:
AppNode Runtime Statuses
Status
OperationsAllowed Whenin This Status Description
Running Stop Reported only by the AppNode.
The AppNode has successfully initialized all the productbundles and reached the target start level.
Stopped Start, Delete The AppNode is not running. This is determined only bythe bwagent.
136
TIBCO ActiveMatrix BusinessWorks™ Administration

Status
OperationsAllowed Whenin This Status Description
Impaired Stop The AppNode is in an Impaired state after it hasencountered an error during the startup in one of theproduct bundles. This means that the application is not yetready to run, and may impact the functionality of theAppNode.
Each application has a list of dependencies that need to besatisfied for it to run. These dependencies are listed below:
● The engine must be up and running. If the engine isconfigured incorrectly, it might not start.
● Shared resources that are defined in the application mustbe initialized. If shared resources are misconfigured,they might not start.
● All bundles that belong to an application must beresolved. If a bundle is missing an import-package, itmight not start.
If any of these dependencies are not met, the application isdisplayed as being in the Impaired state. The "la", whichstands for list applications, command of the OSGi consoleshows the details of the application and their resolved andunresolved dependencies. This will explicitly tell you thedependency that is not met and where to look further toinvestigate the problem.
Unreachable <none> The AppNode is unreachable when a remote bwagent andthe remote machine is down, or a network failure occursresulting in network partitioning.
This state is determined only by the bwagent.
Start Failed Start, Delete This is determined by the bwagent when it is making anattempt to start the AppNode process when the AppNodedoes not start.
Starting Stop This is a transitional state reported by the AppNode whenthe Web API layer has been initialized, but the Web API isstill accessible and can report the state.
This happens when a bundle blocks the shutdown thread.
Stopping <none> This is a transitional state when an AppNode stopsgracefully or is forcefully shut down from the Admin UI orfrom the command line.
bwadmin Command Line
To view the status of the AppNode MyAppNode in the AppSpace MyAppSpace, execute the followingcommand at the command line:
137
TIBCO ActiveMatrix BusinessWorks™ Administration
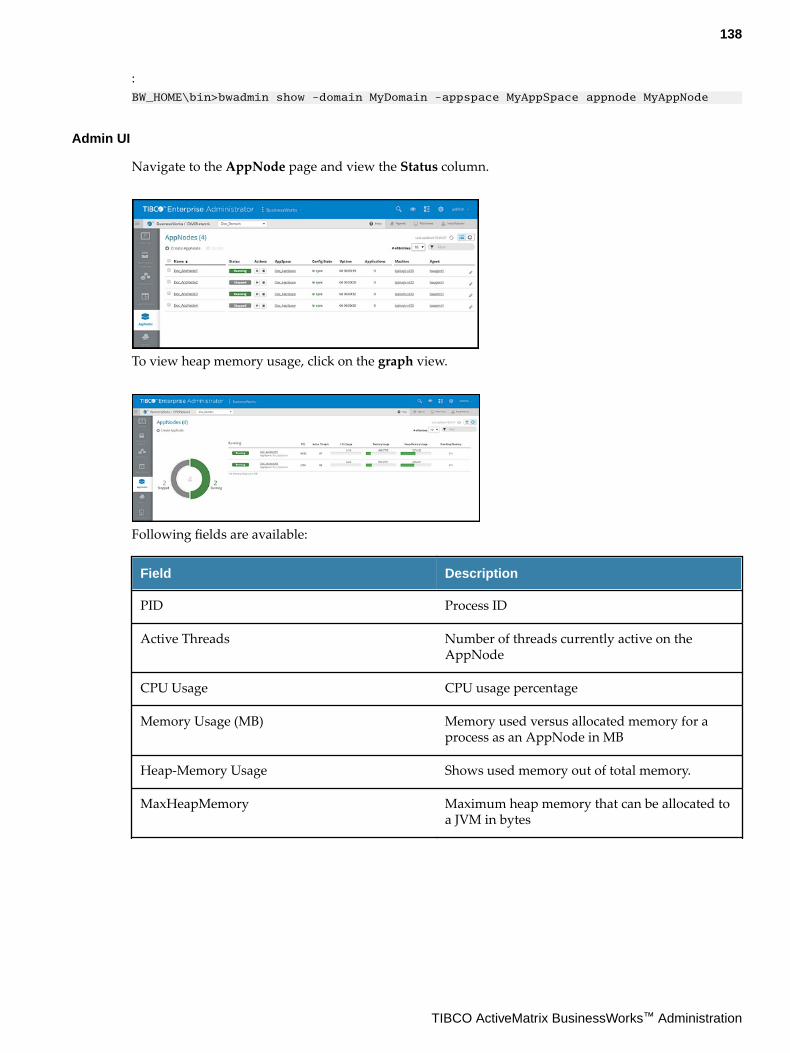
:BW_HOME\bin>bwadmin show -domain MyDomain -appspace MyAppSpace appnode MyAppNode
Admin UI
Navigate to the AppNode page and view the Status column.
To view heap memory usage, click on the graph view.
Following fields are available:
Field Description
PID Process ID
Active Threads Number of threads currently active on theAppNode
CPU Usage CPU usage percentage
Memory Usage (MB) Memory used versus allocated memory for aprocess as an AppNode in MB
Heap-Memory Usage Shows used memory out of total memory.
MaxHeapMemory Maximum heap memory that can be allocated toa JVM in bytes
138
TIBCO ActiveMatrix BusinessWorks™ Administration

Stopping an AppNodeWhen an AppNode is stopped, applications running on the AppNode stop.
bwadmin Command Line
To stop the AppNode MyAppNode in the AppSpace MyAppSpace, execute the following command at thecommand line:BW_HOME\bin>bwadmin stop -d MyDomain -appspace MyAppSpace appnode MyAppNode
Admin UI
On the AppNode page, click the Stop icon for the AppNode.
The AppNode will change from Running to Stopping, a transient state, then Stopped.
Force Shutting Down an AppNodeUse the argument, -timeout xx (in minutes) from the command line to forcefully shut down anAppNode, after the timeout is reached. The default timeout value is zero (0) and the AppNode will stoponly after the completion of all the jobs. From the Admin UI, select the Force shutdown after wait timecheck box. If the check box is not selected the AppNode will stop after the default timeout. From theAdmin UI, AppNodes can also be forcefully shut down from the AppSpace level, the Application level,and from the Agent and Machine level.
When the timeout is specified, the AppNode will shut down after the timeout is reached. If the jobs arecompleted before the timeout value is reached, the AppNode will stop on its own, and will not wait forthe timeout period that has been specified. If the jobs are not completed in the timeout period, theAppNode will shut down irrespective of the state of the running jobs.
Multiple force kill commands can be triggered one after the other, and the most recent force shut downcommand takes precedence over the previous commands.
bwadmin Command Line
To force shut down an AppNode, MyAppNode in the AppSpace MyAppSpace execute the followingcommand at the command line:BW_HOME\bin>bwadmin stop -timeout xx(time in minutes) -d MyDomain -appspace MyAppSpace appnode MyAppNode
Admin UI
,
139
TIBCO ActiveMatrix BusinessWorks™ Administration

Procedure
1. On the AppNode page, click the Stop icon for the AppNode.
2. To shut down the AppNode forcefully within the timeout period, select the Force shutdown afterwait time check box.
3. Set the timeout value (in minutes) in the Max Wait Time for Graceful Shutdown field and click thestop button.
Deleting an AppNodeDeleting an AppNode deletes any contained applications. From the bwadmin command line,AppNodes that are running must be force deleted.
bwadmin Command Line
To delete the AppNode MyAppNode in the AppSpace MyAppSpace, execute the following command atthe command line:BW_HOME\bin>bwadmin delete -d MyDomain -a MyAppSpace appnode MyAppNode
If the AppNode is running, the delete appnode command will fail. You can stop the AppNode andretry the delete appnode command or use the delete appnode command with the -force option.BW_HOME\bin>bwadmin delete -force -d MyDomain -a MyAppSpace appnode MyAppNode
To force delete the AppNode MyAppNode in the AppSpace MyAppSpace, and forcefully shut down therunning AppNode, execute the following command at the command line:BW_HOME\bin>bwadmin delete -timeout xx(time in minutes) -force -d MyDomain -appspace MyAppSpace appnode MyAppNode
See Force Shutting Down an AppNode for more information.
140
TIBCO ActiveMatrix BusinessWorks™ Administration

Admin UI
Procedure
1. On the AppNodes page , click the check mark next to the AppNode to delete.
2. Click Delete.
3. Click Yes, delete in the Delete AppNodes dialog box. (The dialog box message displays the numberof applications that will be deleted.)
Debugging an AppNodeA running AppNode can be enabled for remote debugging from either bwadmin or the Admin UI.Once enabled, use TIBCO Business Studio™ for BusinessWorks™ to debug the application running onthe AppNode. For more information, see "Remote Debugging" in the TIBCO ActiveMatrixBusinessWorks™ Application Development guide. An Appnode should be enabled for remote debuggingin secure environments where only an administrator has the access rights to enable or disable ports.
bwadmin Command Line
The enabledebugport command can only be executed against a running AppNode. It should be issuedfrom bwadmin interactive mode, not from the command line.
Procedure
1. In a terminal, navigate to BW_HOME\bin and type bwadmin.
2. Go to MyDomain.bwadmin[admin]> cd MyDomain
3. Go to MyAppSpace.bwadmin[admin@MyDomain]> cd MyAppSpace
4. Start the AppNode, if it is not already running:bwamdin[admin@MyDomain/MyAppSpace]> start appnode MyAppNode
5. Run the enabledebugport command, passing the host and port number. For example:bwamdin[admin@MyDomain/MyAppSpace]> enabledebugport -n MyAppNode JSMITH-W520 9061Enabled debug port on AppNode [MyAppNode] in AppSpace [MyAppSpace] in Domain [MyDomain]
6. Important: When you finish debugging, close the port to reduce security risks and reduce overhead.For example:bwamdin[admin@MyDomain/MyAppSpace]> disabledebugport -n MyAppNodeDebugger disabled for AppNode [MyAppNode] in AppSpace [MyAppSpace] in Domain [MyDomain]
141
TIBCO ActiveMatrix BusinessWorks™ Administration

Admin UI
Procedure
1. Open the AppNode page for the AppNode to enable for remote debugging.
2. Click the Remote Debugging > ON option. The Enable Remote Debugging dialog box is displayed.
3. Enter the following information, and click Submit to open the port.
● Connection Interface: The default connection interface is the name of the bwagent.
● Connection Port: The debug port.
The port is opened and displayed on the AppNode page:
4. When you finish debugging, close the port by clicking OFF to reduce security risks and reduceoverhead.
Enabling the OSGi Console for an AppNodeThe enableconsole command dynamically enables the OSGi console on the given port for a runningAppNode. Advanced users can telnet to the port and execute native OSGi commands to getinformation about an AppNode's status. This is useful when collecting diagnostic data remotely. Bydefault, the OSGi port is closed.
Although an AppNode can be created with OSGi port details specified, this is not recommended.Keeping this port open when the console is not in use poses a security risk.
142
TIBCO ActiveMatrix BusinessWorks™ Administration

The enableconsole command can only be executed against a running AppNode. It should be issuedfrom bwadmin interactive mode, not from the command line.
If you are testing and running applications in TIBCO Business Studio, you can also access the OSGicommands from the Console view.
bwadmin Command Line
Procedure
1. In a terminal, navigate to BW_HOME\bin and type bwadmin.
2. Go to MyDomain.bwadmin[admin]> cd MyDomain
3. Go to MyAppSpace.bwadmin[admin@MyDomain]> cd MyAppSpace
4. Start the AppNode, if it is not already running:bwamdin[admin@MyDomain/MyAppSpace]> start appnode MyAppNode
5. Run the enableconsole command, passing the host and OSGi port number. For example:bwamdin[admin@MyDomain/MyAppSpace]> enableconsole -n MyAppNode JSMITH-W520 9060TIBCO-BW-ADMIN-CLI-300304: Console enabled for AppNode [MyAppNode] in Domain [MyDomain]
You can also specify the OSGi port number using one of the following syntax:● hostname:port number
● localhost:port number
6. Open a new terminal window and use the telnet command to access the OSGi console:
telnet JSMITH-W520 9060
The OSGi console is opened in a terminal.
7. Use OSGi commands to retrieve information about the engine, the AppNode, the runningapplication. For a list of commands, enter: help. See the topic called OSGi Runtime StatisticsCommands for more information.
8. When you are done, use the disconnect command to gracefully quit the telnet session, and leavethe OSGi port open for reentry. Use the telnet stop command to close the connection after thedebugging session is complete. Do not use the telnet exit command as this will shut down theAppNode.
OSGi Commands
You can run commands to gather data about running AppNodes and applications.
Command Reference
● To view all commands, usecurl -v http://localhost:8090/bw/framework.json/osgi?command=help
● To view command syntax, usecurl -v http://localhost:8090/bw/framework.json/osgi?command=help%20<command_name>
For example,curl -v http://localhost:8090/bw/framework.json/osgi?command=help%20pauseapp
143
TIBCO ActiveMatrix BusinessWorks™ Administration
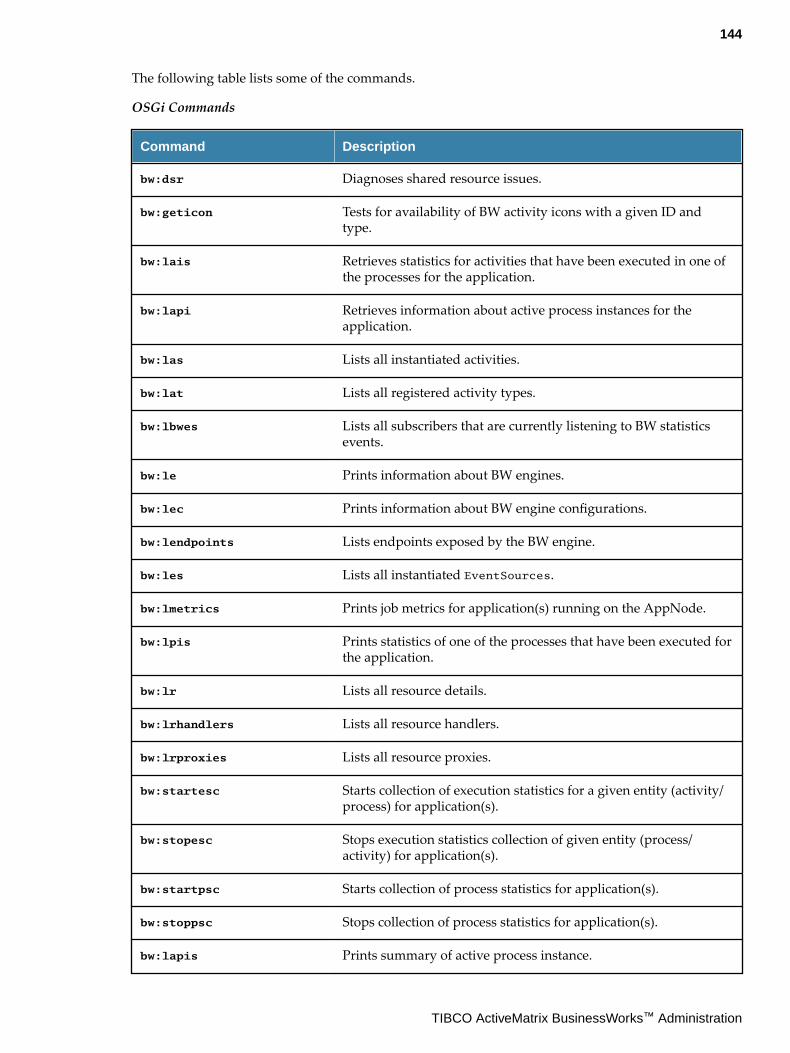
The following table lists some of the commands.
OSGi Commands
Command Description
bw:dsr Diagnoses shared resource issues.
bw:geticon Tests for availability of BW activity icons with a given ID andtype.
bw:lais Retrieves statistics for activities that have been executed in one ofthe processes for the application.
bw:lapi Retrieves information about active process instances for theapplication.
bw:las Lists all instantiated activities.
bw:lat Lists all registered activity types.
bw:lbwes Lists all subscribers that are currently listening to BW statisticsevents.
bw:le Prints information about BW engines.
bw:lec Prints information about BW engine configurations.
bw:lendpoints Lists endpoints exposed by the BW engine.
bw:les Lists all instantiated EventSources.
bw:lmetrics Prints job metrics for application(s) running on the AppNode.
bw:lpis Prints statistics of one of the processes that have been executed forthe application.
bw:lr Lists all resource details.
bw:lrhandlers Lists all resource handlers.
bw:lrproxies Lists all resource proxies.
bw:startesc Starts collection of execution statistics for a given entity (activity/process) for application(s).
bw:stopesc Stops execution statistics collection of given entity (process/activity) for application(s).
bw:startpsc Starts collection of process statistics for application(s).
bw:stoppsc Stops collection of process statistics for application(s).
bw:lapis Prints summary of active process instance.
144
TIBCO ActiveMatrix BusinessWorks™ Administration

Command Description
frwk:appnodeprocessinfo Prints information about AppNode system processes.
frwk:dc Delete a configuration with a given PID.
frwk:dc Delete all configurations.
frwk:la Print information about all applications.
frwk:lap Print all application properties.
frwk:lb List installed bundles matching a substring.
frwk:lb List all installed bundles.
frwk:lcfg Print all CAS configuration details.
frwk:lp Print information about all known BW Processes.
frwk:ll Print information about all libraries.
frwk:lloggers Print all loggers currently configfured on the AppNode.
frwk:lp Print information about all known BW Processes.
frwk:pauseapp Stop the process starters and their bindings and pause all jobs of aBW Application.
frwk:resumeapp Start the process starters and their bindings and resume all jobs ofa BW Application.
frwk:setloglevel Sets the log level for a given logger.
frwk:startcomps Start all process starters and their bindings of a BW Application.
frwk:startps Start the process starters of a BW Application.
frwk:stopps Stop the process starters of a BW Application.
frwk:stopapp Stop an Application gracefully.
frwk:td Print a full thread dump.
To run some of the statistics retrieval commands such as lapi, you must first run the startpscstatistics activation command.
145
TIBCO ActiveMatrix BusinessWorks™ Administration

Running OSGi CommandsYou can execute OSGi commands from the Admin CLI, SSH Client, and HTTP Client.
Running OSGI Commands from bwadmin Command Line
Follow these steps to execute OSGI commands from the bwadmin command line.
Prerequisites
Ensure the AppNode is running.
Procedure
1. From the CLI, navigate to the /bin folder.2. Start bwadmin.3. Enter an OSGI command. OSGI commands can be executed from the command line in the format
osgi [options] [command] . In the following example, the option -n is used to specify theAppNode MyAppNode, and the la command is used to print information about applications onMyAppNode.bwamdin[admin@MyDomain/MyAppSpace]> osgi -n MyAppNode "la"
OSGI Command Options
Option Description
-descr/ -description Description of an entity
-t/-outputfile The OSGI command output is provided in a newlycreated text file. The text file is written to the /binfolder by default, but you can specify a differentlocation, for example, C:/temp/OSGI_OUTPUT.txt.
-d/-domain Specifies the domain name.
-a/-appspace Specifies the name of the AppSpace.
-n/-appnode Specifies the name of the AppNode.
--help Lists all OSGI commands.
For more information on specific commands, see OSGi Commands.
Running OSGi Commands Using SSH Client
You can run OSGi commands using SSH client.
Procedure
1. Edit the AppNode config.ini file.2. Uncomment the following properties:
#osgi.console=null#osgi.console.ssh=<free port>#osgi.console.enable.builtin=false
146
TIBCO ActiveMatrix BusinessWorks™ Administration

#osgi.console.ssh.useDefaultSecureStorage=true#java.security.auth.login.config=../sshconfig/equinox.console.jaas.login.conf#ssh.server.keystore=../sshconfig/hostkey.ser#org.eclipse.equinox.console.jaas.file=../sshconfig/store
3. Configure the property osgi.console with the host name.
4. Configure the property osgi.console.ssh with the free port. This port is used for OSGi remoteaccess.Default credentials to connect via SSH are equinox and equinox
5. Restart the AppNode.
Running OSGi Commands Using HTTP Client
You can run OSGi commands using HTTP client. Preffered way is using curl.
Execute the following OSGi command using curl in the following format:curl -v http://<IP address>:<port on which AppNode is running>/bw/framework.json/osgi?command=<OSGi command>
For Example:
● To print information about BWEngines:curl -v http://localhost:2224/bw/framework.json/osgi?command=le
● To pause all jobs of TIBCO ActiveMatrix BusinessWorks™ applications:curl -v http://localhost:1113/bw/framework.json/osgi?command=pauseapp%20-v%201.0%20tibco.bw.sample.binding.rest.BookStore.application
Backing Up and Restoring an AppNodeBacking up an AppNode exports the current state of the specified AppNode to a bwadmin commandfile. The command file can be provided to bwadmin to recreate the AppNode. Output can becompressed to a ZIP file with the -zipped option.
Procedure
1. To back up the current state of an AppNode,a) Open a terminal and navigate to BW_HOME\bin.b) Enter the backup command from the command line, using -s option to identify the name of the
destination file. Use the -domain and -appspace options , with the appnode argument in thecommand line. The AppNode can be either a local AppNode or an AppNode in a bwagent in theagent network. By default, destination files are written to the current working directory.
147
TIBCO ActiveMatrix BusinessWorks™ Administration

This example backs up AppNode MyAppNode in a bwagent network to a command file namedMyAppNode.cmd.BW_HOME\bin>bwadmin backup -s MyAppnode.cmd -d Machine2Domain -a AS1 appnode MyAppNode
2. To restore the AppNode,a) Open a terminal and navigate to BW_HOME\bin.b) Enter the bwadmin command, providing the name of the backup command file. The following
example recreates the AppNode MyAppNode.BW_HOME\bin>bwadmin -f MyAppnode.cmd
If you are restoring to a different location, you need to update the command file as follows:
● The agent name will point to localhost by default; you need to change this to the name ofthe machine you are restoring to.
● Update the domain home to point to the absolute path to the new location.
● Update the path to the application archive (EAR) file to an absolute path.c) Use the bwadmin show appnodes command at the command line with the -domain and -
appspace options to verify the restore.
Restoring the File System of an AppNodeRestoring an AppNode restores the file system of the specified AppNode and all runtime entities in theAppNode to the state of the datastore.
Prerequisites
● The names of the containing domain and AppSpace and the name of the AppNode must be knownin order to restore.
● The bwagent must be running.
Procedure
1. To restore the file system for an AppNode and the runtime entities in the AppNode, open a terminaland navigate to BW_HOME\bin.
2. Enter the restore command, using the -domain and -appspace options with the appnodeargument specifying the name of the AppNode to restore. This example restores AppNodeMyAppNode in domain Machine1Domain and AppSpace AS1.BW_HOME\bin>bwadmin restore -d Machine1Domain -a AS1 appnode MyAppNode
3. To verify the restore, check the file system. Open the BW_HOME\domains folder. Browse the folderand look for the named AppNode folder under: BW_HOME\domains\domain_name\appnodes
148
TIBCO ActiveMatrix BusinessWorks™ Administration

Command HistoryOpen the Command History tab to view the commands or operations that were performed on anAppNode.
Managing an ApplicationAn application is an instance of a deployment archive. It has an independent lifecycle with regard to anAppSpace or AppNode. After completing the design process in TIBCO Business Studio, the applicationcan be deployed.
An application provides the business logic to perform one or more related tasks and contains anapplication module that was defined in TIBCO Business Studio. The module itself can includeprocesses, subprocesses, a process starter or a process service, and multiple activities. See TIBCOActiveMatrix BusinessWorks Application Development for information about creating applications inTIBCO Business Studio.
Deployment occurs after an archive is uploaded to a domain and before an application is started. Anarchive is deployed to an AppSpace. One or more applications can be deployed to an AppSpace.
If an AppSpace spans multiple machines, the application is deployed onto each of the machines. If thereare multiple AppNodes attached to the AppSpace either on a single machine or across multiplemachines, the start command starts the application on each of the AppNodes. The runtime status ofthe application is reported for each AppNode and can be monitored using bwadmin.
When an application is deployed, you can choose to also start the application by giving the -as optionon the command line. By default, this option is off and the application must be started explicitly afterbeing deployed.
To configure an application, provide the desired profile that should contain the variable values for theapplication. This step is necessary if you want to run the application with different sets of variables anddeploy it with different argument values, for example, for a Windows machine or a Mac.
Preparing for Deployment
Preparation for deployment involves the following steps:
● Creating an Application
● Creating an Application with Multiple Profiles
● Creating an Archive
After creating the application, the profile, and the archive, you are ready to deploy the application intoan AppSpace. Deploying an application involves the following steps:
149
TIBCO ActiveMatrix BusinessWorks™ Administration

● Uploading an Archive
● Deploying an Archive
● Configuring an Application
● Starting an Application
Creating an ApplicationThis section shows how to create a simple project where you design and create an application.
After creating the project, you choose activities from the palettes to design and create an application.For more information, see TIBCO ActiveMatrix BusinessWorks™ Application Development.
Procedure
1. Start TIBCO Business Studio™ for BusinessWorks™.
2. Launch the BusinessWorks Application Module wizard by selecting File > New > Project >BusinessWorks > BusinessWorks Application Module and click Next.
3. In the Project name field, provide a project name.Select the Use default location, Create empty process, and Create Application check boxes.
4. Click Finish.
Result
The new project is visible in the Project Explorer.
New Project in Project Explorer
Creating an Application with Multiple ProfilesYou can define multiple profiles when creating an application in TIBCO Business Studio™ forBusinessWorks™.
A profile is a collection of module and application properties that an application uses. When anapplication is deployed with different properties, different profiles are available for each deployment.For example, you can create a Windows profile for an application that runs on a Windows machine andanother for the same application running on a UNIX machine.
Prerequisites
An application is created with profiles using TIBCO Business Studio for BusinessWorks. For moreinformation about creating applications see the TIBCO ActiveMatrix BusinessWorks™ ApplicationDevelopment guide. The following screenshot shows an application with a profile for Windows andanother for UNIX. Each profile has a set of defined properties and values. The values use theappropriate operating system syntax to point to the files in the file system. The files are created andmaintained outside of TIBCO Business Studio for BusinessWorks.
150
TIBCO ActiveMatrix BusinessWorks™ Administration

Application Profiles
Follow these steps to create an application profile:
Procedure
1. Start TIBCO Business Studio for BusinessWorks and open an application.
2. Expand the application and double-click Properties under Package Unit.This displays the Properties pane in the Process Editor.
3. Click the New Profile button to add a new profile.
4. In the Create New Profile window, enter a name for the new profile. For example, enterWindowsProfile and click OK.The WindowsProfile gets created and available to the right of the [default] column in the Propertiespane.
5. Double-click the field under the profile that corresponds to a property, and enter a value for theproperty.
6. Save the project.You can create multiple profiles as needed.
Creating an Application ArchiveYou can create an application archive in TIBCO Business Studio by dragging and dropping theapplication project from the Project Explorer to the File Explorer window.
You create an application archive after designing and testing the application.
Procedure
1. In TIBCO Business Studio, go to File Explorer tab and click the Open Directory to Browse icon.
2. Select the directory where you want to store the archive and click OK.
3. Drag an application from the Project Explorer to the directory in the File Explorer.
151
TIBCO ActiveMatrix BusinessWorks™ Administration
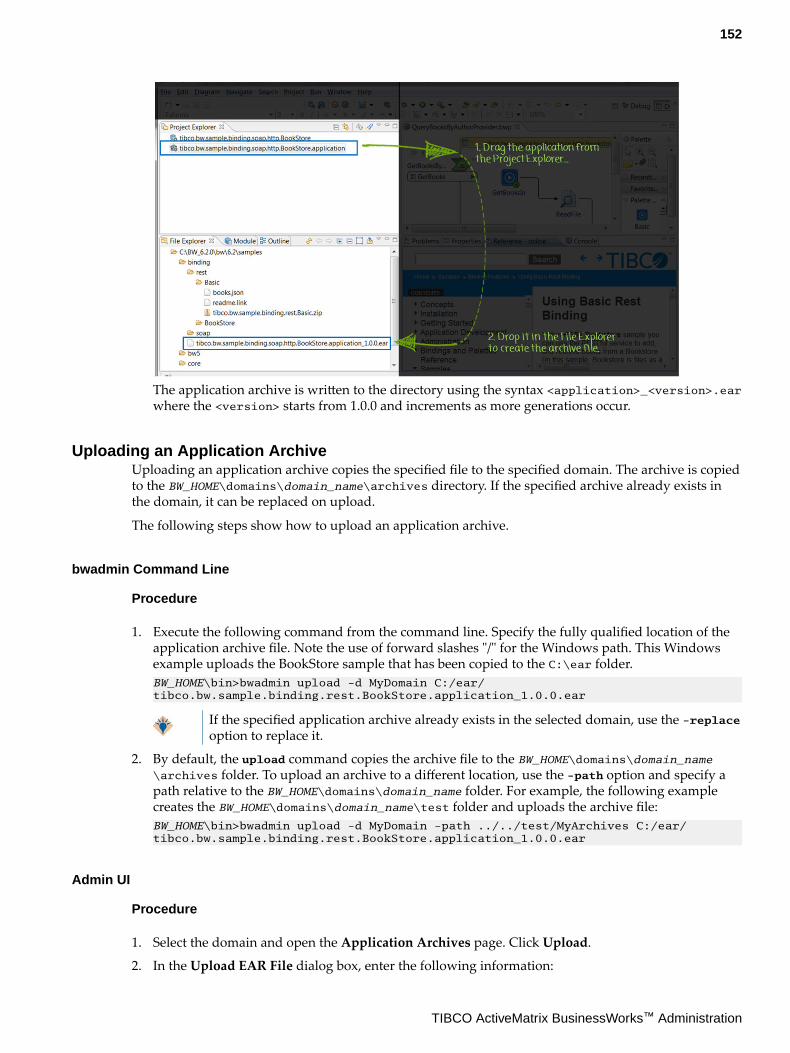
The application archive is written to the directory using the syntax <application>_<version>.earwhere the <version> starts from 1.0.0 and increments as more generations occur.
Uploading an Application ArchiveUploading an application archive copies the specified file to the specified domain. The archive is copiedto the BW_HOME\domains\domain_name\archives directory. If the specified archive already exists inthe domain, it can be replaced on upload.
The following steps show how to upload an application archive.
bwadmin Command Line
Procedure
1. Execute the following command from the command line. Specify the fully qualified location of theapplication archive file. Note the use of forward slashes "/" for the Windows path. This Windowsexample uploads the BookStore sample that has been copied to the C:\ear folder.BW_HOME\bin>bwadmin upload -d MyDomain C:/ear/tibco.bw.sample.binding.rest.BookStore.application_1.0.0.ear
If the specified application archive already exists in the selected domain, use the -replaceoption to replace it.
2. By default, the upload command copies the archive file to the BW_HOME\domains\domain_name\archives folder. To upload an archive to a different location, use the -path option and specify apath relative to the BW_HOME\domains\domain_name folder. For example, the following examplecreates the BW_HOME\domains\domain_name\test folder and uploads the archive file:BW_HOME\bin>bwadmin upload -d MyDomain -path ../../test/MyArchives C:/ear/tibco.bw.sample.binding.rest.BookStore.application_1.0.0.ear
Admin UI
Procedure
1. Select the domain and open the Application Archives page. Click Upload.
2. In the Upload EAR File dialog box, enter the following information:
152
TIBCO ActiveMatrix BusinessWorks™ Administration

● Upload to: EAR file upload folder. Default location is the domains folder.
● EAR file: Drag and drop the archive file. If the file already exists in that folder, select theReplace any existing version check box.
3. Click Upload, then Done.The archive is displayed on the Application Archives page.
Deploying an ApplicationYou use the deploy command to deploy an application archive to an AppSpace.
You can deploy multiple applications to an AppSpace. You can deploy and run multiple versions ofsame application on the same AppNode at the same time.
bwadmin Command Line
When using the deploy command, the EAR filename is the relative location of the archive with respectto the BW_HOME\domains\domain_name\archives folder. For example, if MyDomain contains theAppSpace to deploy to and the archive file is located in the BW_HOME\domains\MyDomain\archivesdirectory, do not specify a qualifier for the archive file location.
Execute the following command from the command line to deploy an uploaded application archive toMyAppSpace:BW_HOME\bin>bwadmin deploy -d MyDomain -a MyAppSpace tibco.bw.sample.binding.rest.BookStore.application_1.0.0.ear
Replacing a deployed archive file will undeploy the application. To replace an archive file that has beenuploaded, but not deployed, use the -replace option with the upload command to upload the archiveagain. When the -replace option is used to replace an archive file that has been uploaded anddeployed, the following error message is displayed,Upload Operation Cancelled. As Application MyApplication from archive MyApplication.ear has been deployed to those AppSpaces. Please use force replace (-f)option with the upload command i.e [upload -domain D -replace -f C:/Users/Administrator/Desktop/EAR/MyApplication.ear]]
The force replace option will undeploy the existing archive file and replace the old archive file with thenew file.
Admin UI
Procedure
1. Select the domain and open the Application Archives page. Drill down into an archive. On theApplication Archive page for the selected archive, click the Deploy button.
153
TIBCO ActiveMatrix BusinessWorks™ Administration

2. In the Deploy Application dialog box, enter the following information:
● AppSpace: The AppSpace to deploy to.
● Profile: The profile file to use for deployment. (An application profile can be changed afterdeployment. See Configuring an Application. Click Upload to upload a new profile.
● Start applications on AppNodes after deployment: Starts the application on AppNodes afterdeployment.
● Replace any existing version: Replaces an existing version of the same application. If theReplace any existing version check box is selected, a warning message is displayed, indicatingthat the upload action will undeploy the existing application from the Appspace.
If the EAR file is uploaded but not deployed, the warning message is not displayedand the EAR file is replaced.
● App name/Version: Read-only fields that display the application name and version.
● Description: Optional description; pulled from archive.
The archieved applications are displayed on the Application Archives page. The Deployed Tocolumn displays the number of AppSpaces where the application has been deployed.
154
TIBCO ActiveMatrix BusinessWorks™ Administration

To view deployment history of the application archive, open the Deployment History tab. You canview the commands that were issued on an application archive, the execution status of thecommands and the timestamp.
To view multiple versions of the same application, open the Applications page.
155
TIBCO ActiveMatrix BusinessWorks™ Administration

Editing Application and Application Instance PropertiesApplication or application instance properties can be changed after deployment. You can then export aconfiguration and apply it to another application or application instance.
bwadmin Command Line
The profile for an application is located under the META-INF folder in the application's archive. Theprofile is the file with the extension .substvar. For details on how to generate more than the defaultprofile for an application, see Creating an Application with Multiple Profiles.
When the config command is applied to an application, the profile changes are applied to allapplication instances by default. To apply a profile change to a specific application instance, use theconfig -appnode option to identify the specific AppNode.
If the archive contains the WindowsProfile.substvar file, use the following command to update theprofile:BW_HOME\bin>bwadmin config -d MyDomain -a MyAppSpace -n MyAppNode -p WindowsProfile.substvar application tibco.bw.sample.binding.rest.BookStore.application_1.0.0.ear
Admin UI
From the Admin UI you can change the profile for all instances of the application, or for a singleapplication instance.
Procedure
1. Select the application you want to configure on the Applications page.The Application page is opened, where you can view the application instances, the AppNodes eachinstance is deployed to, the deployment state, and the applied profile file.
156
TIBCO ActiveMatrix BusinessWorks™ Administration

2. To edit application or application instance properties, click the Edit icon in the upper right ofthe Applications page.The Application Properties page is displayed.
3. Use the General tab to edit application properties and the AppInstances tab to edit applicationinstance properties.
4. Click Edit on the General tab to edit application properties.a) Click Submit to save the property changes and apply them to the application.b) Click More > Change Profile to open the Change Profile dialog box where you can select a newprofile to apply to the application or upload a new profile. Restart the application to apply thenew profile.
5. Click Edit on the AppInstances tab to edit application instances properties. Select the instance (byAppNode)you want to edit.a) Click Submit to save the property changes and apply them to the application instance.b) Click More > Change Profile to open the Change Profile dialog box where you can select a newprofile to apply to the application instance or upload a new profile. Restart the application toapply the new profile.
157
TIBCO ActiveMatrix BusinessWorks™ Administration

Exporting an Application Profile
An application profile can be exported from the application archive with the export command or fromthe Admin UI. After an application is configured with a profile, it becomes part of the applicationarchive. An application configuration can be used to configure another application. If property changesare required after deployment, export the profile, edit, and deploy with the edited profile file.
bwadmin Command Line
Configurations are exported to the file system in the working directory.
The configuration is saved to: application_name_profile_name.substvar
To export a profile, execute the following command at the command line:BW_HOME\bin>bwadmin export -d MyDomain -a MyAppSpace application tibco.bw.sample.binding.rest.BookStore.application 1.0
The application configuration filetibco.bw.sample.binding.rest.BookStore.application_WindowsProfile.substvar is written tothe working directory.
Admin UI
From the Admin UI you can export the profile for an application, or for a single application instance.
Procedure
1. Open the Application page and drill down into the application.
2. Click the Edit icon in the upper right of the page. The Application Properties page is displayed.The General tab displays application properties and the AppInstances tab displays applicationinstance properties.
3. Click More > Download Profile on the General tab to export the application profile.
158
TIBCO ActiveMatrix BusinessWorks™ Administration

4. Click More > Download Profile on the AppInstances tab to export the application instance profile.
Starting an ApplicationTo start an application after deployment, run the start command or click the Start icon in the AdminUI. If you stop an AppNode for a running application, the application state is persisted when yourestart the AppNode.
bwadmin Command Line
When an application archive is deployed, the default action starts the application on each AppNodedefined in the AppSpace. However, an archive file can be deployed with the -startondeploy optionset to false so it is not started after deployment. Then, the start command can be used with the -appnode option to start the application on a specific AppNode.
Procedure
1. Start the AppSpace.
2. Execute the start command for the application. For example:BW_HOME\bin>bwadmin start -d MyDomain -a MyAppSpace -n MyAppNode application tibco.bw.sample.binding.rest.BookStore.application 1.0
Admin UI
To start the application, click the Start icon on the Applications page. The AppSpace and AppNodesmust be running.
159
TIBCO ActiveMatrix BusinessWorks™ Administration

Viewing Running ApplicationsUse the bwadmin show command to verify a running application, or view the application in the AdminUI.
bwadmin Command Line
Execute the show command to see application and configuration status.BW_HOME\bin>bwadmin show -domain MyDomain -appspace MyAppSpace applications
Admin UI
View the application's status on the Application page. (To open this page, drill into the applicationfrom the Applications page.) The Admin UI displays the following information:
● Total number of application instances, the minimum number of instances (AppNodes), and runningnumber of instances.
● Application version.
● AppSpace
● Number of created jobs, running jobs, and faulted jobs.
● The applied profile.
● The deployment state.
● The REST Doc URL for applications using REST services. Click the link to open the REST UI pagewhere you can test out operations. (The application must be running.)
● The application description.
160
TIBCO ActiveMatrix BusinessWorks™ Administration

Viewing Endpoints, Components, Processes and Command History
You can view endpoints, components, processes and the command history for a running applicationfrom the Admin UI.
Admin UI
Procedure
1. Select the running application you want to view details for configure on the Applications page.
2. Open the Endpoints tab to view endpoints exposed by the application. The type of endpoint isdisplayed at the top of the tab.
3. Open the Components tab to view components in the application.
4. Open the Processes tab to view application processes.
If the application archive file was generated using TIBCO ActiveMatrix BusinessWorks 6.2.x orhigher, you can view expand a process and click it to view the SVG process diagram.
When viewing process diagrams through the Admin UI, the optimal resolution is 1920 x1080 pixels or higher.
161
TIBCO ActiveMatrix BusinessWorks™ Administration
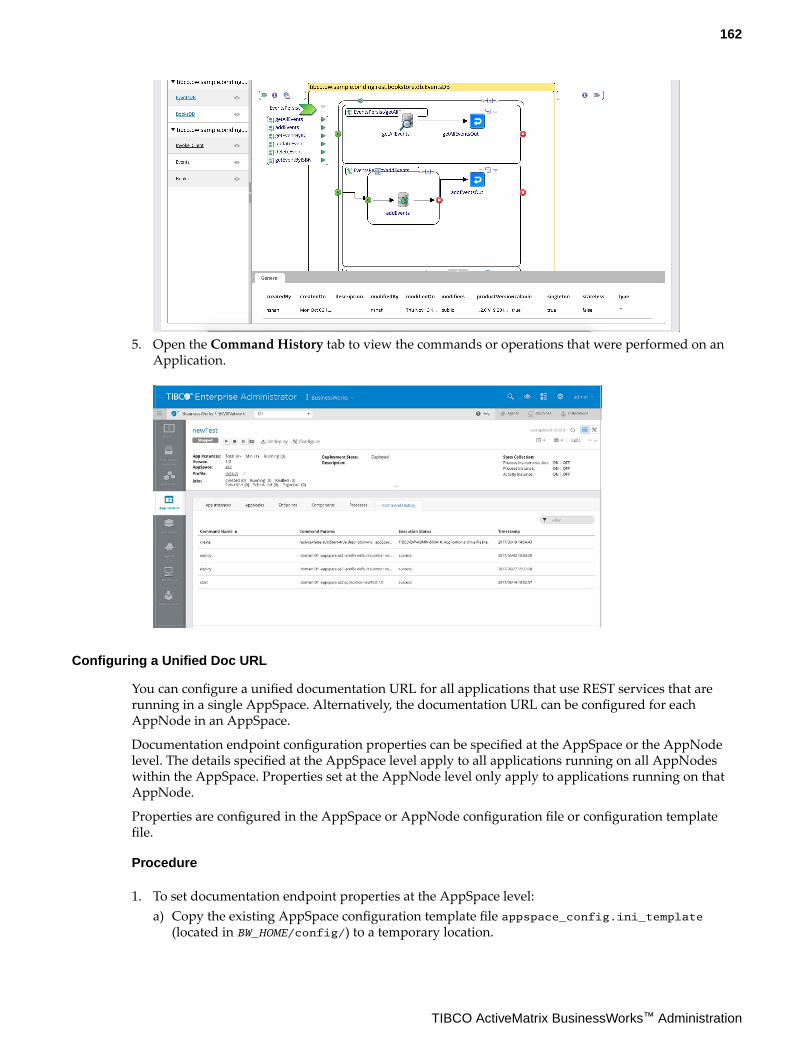
5. Open the Command History tab to view the commands or operations that were performed on anApplication.
Configuring a Unified Doc URL
You can configure a unified documentation URL for all applications that use REST services that arerunning in a single AppSpace. Alternatively, the documentation URL can be configured for eachAppNode in an AppSpace.
Documentation endpoint configuration properties can be specified at the AppSpace or the AppNodelevel. The details specified at the AppSpace level apply to all applications running on all AppNodeswithin the AppSpace. Properties set at the AppNode level only apply to applications running on thatAppNode.
Properties are configured in the AppSpace or AppNode configuration file or configuration templatefile.
Procedure
1. To set documentation endpoint properties at the AppSpace level:a) Copy the existing AppSpace configuration template file appspace_config.ini_template
(located in BW_HOME/config/) to a temporary location.
162
TIBCO ActiveMatrix BusinessWorks™ Administration

b) Uncomment and configure the following properties in the BW REST Swagger Configurationsection of the file:# ------------------------------------------------------------------------------# Section: BW REST Swagger Configuration. The properties in this section# are applicable to the Swagger framework that is utilized by the BW REST # Binding.## Note: There are additional BW REST Swagger configuration properties that# can be specified in the BW AppNode configuration file "config.ini". Refer to# the BW AppNode configuration file's section "BW REST Swagger configuration" # for details. # ------------------------------------------------------------------------------# Swagger framework reverse proxy host name. This property is optional and # it specifies the reverse proxy host name on which Swagger framework serves # the API's, documentation endpoint, api-docs, etc.. #bw.rest.docApi.reverseProxy.hostName=localhost
# Swagger framework port. This property is optional and it specifies the # reverse proxy port on which Swagger framework serves the API's, documentation# endpoint, api-docs, etc.#bw.rest.docApi.reverseProxy.port=0000
2. To set documentation endpoint properties at the AppNode level:a) Copy the existing AppNode config.ini file (located in the root of the AppNode folder), or the
appnode_config.ini_template (located in BW_HOME/config/) file, to a temporary location.b) Configure the following properties in the BW REST Swagger Configuration section of the file
(note that the port property is uncommented by default):# ------------------------------------------------------------------------------# Section: BW REST Swagger configuration. The properties in this section# are applicable to the Swagger framework that is utilized by the BW REST # Binding.## Note: There are additional BW REST Swagger configuration properties that# can be specified in the BW AppSpace configuration file "config.ini". # Refer to the BW AppSpace configuration file's section # "BW REST Swagger configuration" for details. # ------------------------------------------------------------------------------# Swagger framework host name. This property is optional and it specifies the # host name on which Swagger framework serves the API's, documentation endpoint, # api-docs, etc.. The default value is the host name on which the BW AppNode # is executed. #bw.rest.docApi.hostName=localhost
# Swagger framework port. This property is required and it specifies the port# on which Swagger framework serves the API's, documentation endpoint, # api-docs, etc.. bw.rest.docApi.port=7777
3. Use one of the following config admin commands to push the configuration to the AppSpace orthe AppNode:
● AppSpace:bwadmin[admin] > config -d myDomain -a myAppSpace -cf <temporaryLocation>/config.ini
● AppNode:bwadmin[admin]> config –d myDomain –a myAppSpace –n myAppNode –cf <temporaryLocation>/config.ini
Result
Documentation for all applications in the AppSpace that use REST services is available at the givenURL. You can open the documentation URL by clicking the REST Doc URL link for the running
163
TIBCO ActiveMatrix BusinessWorks™ Administration

application in the Admin UI or by opening the URL at the specified host name and port. Theapplication must contain REST services and must be running. If you configured the documentationURL just for the AppNode, the documentation for applications running in the specified AppSpace willbe available at the given URL.
Stopping an ApplicationTo stop a running application after deployment, run the stop command or click the Stop icon in theAdmin UI. Applications or application instances can be stopped. Stop an application beforeundeploying.
bwadmin Command Line
Execute the following command at the command line to stop an application:BW_HOME\bin>bwadmin stop -d MyDomain -a MyAppSpace application tibco.bw.sample.binding.rest.BookStore.application 1.0
To stop an application instance, stop the AppNode the instance is running in.
Admin UI
Procedure
1. To stop an application, click the Stop icon for the application on the Applications page. Thestatus of the application instance will change from Running to Stopping, a transient state, thenStopped:
2. To stop an application instance, click the Stop icon for the instance on the App Instances tab.The status of the application instance will change from Running to Stopping, a transient state, thenStopped:
164
TIBCO ActiveMatrix BusinessWorks™ Administration

Undeploying an ApplicationUndeploying an application removes the deployed application from the AppSpace.
bwadmin Command Line
Execute the following command to undeploy:BW_HOME\bin>bwadmin undeploy -d MyDomain -a MyAppSpace application tibco.bw.sample.binding.rest.BookStore.application 1.0
Admin UI
Procedure
1. On the Applications page, select the application check box and click Undeploy.
2. The Undeploy Application(s) dialog box is displayed. To undeploy all process monitoringhistorical data from the database, select the Remove Process Monitoring related historical data ofselected apps from DB check box. Click the Undeploy button to undeploy the application. Arunning application can be undeployed.
Starting a component in an ApplicationTo start a component in an application, run the startcomponent command or click the Stop icon in theAdmin UI.
bwdmin Command Line
When an application is started, the default action starts all the components of the application on eachAppNode, defined in the AppSpace. However, a component can be stopped using the stopcomponentcommand. The startcomponent command can then be used with the -appnode option to start acomponent of an application on a specific AppNode.
Procedure
1. Start the AppSpace.
165
TIBCO ActiveMatrix BusinessWorks™ Administration

2. Execute the startcomponent command for the component of an application. For example:BW_HOME\bin>bwadmin startcomponent -d MyDomain -a MyAppSpace -n MyAppNode MycomponentName tibco.bw.sample.MyApp.application 1.0
Admin UI
When an application is started, the default action starts all the components of the application on eachAppNode defined in the AppSpace. Click the Components tab to view the components in the
application. Click the Start icon to start all the components in the Appnodes. If all the componentsare running, the Status changes to started. The status bar displays the number of components runningon the AppNodes. On hovering over the status bar, you can see the number of running components. To
start a component on a specific AppNode, click the icon on the left to view the list of AppNodes
the component is running on. Click the Start icon against the component you want to start.
The icon to collapse the list of AppNodes the component is running on, is enabled only after theapplication has started.
Starting the top level Start icon starts all the components on all the AppNodes.
Stopping a component in an ApplicationTo stop a component of an application , run the stopcomponent command or click Stop icon in theAdmin UI.
bwdmin Command Line
When an application is started, the default action starts all the components of the application on eachAppNode, defined in the AppSpace. However, the stopcomponent command can be used with the -appnode option to stop a component of the application on a specific AppNode.
Procedure
1. Start the AppSpace.
2. Execute the stopcomponent command for the component of an application. For example:BW_HOME\bin>bwadmin stopcomponent -d MyDomain -a MyAppSpace -n MyAppNode MycomponentName tibco.bw.sample.MyApp.application 1.0
Admin UI
When an application is started, the default action starts all the components of an application on eachAppNode defined in the AppSpace. Click the Components tab to view the components in theapplication, and select the running application you want to stop the components for. To stop a
166
TIBCO ActiveMatrix BusinessWorks™ Administration

component on a specific AppNode, click the icon on the left to view the list of AppNodes the
component is running on, and click the Stop icon against the component you want to stop. Thestatus bar displays the number of components that have stopped running on the AppNodes. Onhovering over the status bar, in the primary row table, you can see the number of components that arerunning and the number of components that have stopped running on the Appnode.
The collapse icon is enabled only after an application has started.
Stopping the top level Stop icon stops all the running components on all the AppNodes.
Retrieving list of components in an ApplicationTo get the list of components of an application , run the getcomponents command or click theComponents tab in the Admin UI.
bwdmin Command Line
Procedure
1. Start the AppSpace.
2. Execute the getcomponents command for an application. For example:BW_HOME\bin>bwadmin getcomponents -d MyDomain -a MyAppSpace -n MyAppNode tibco.bw.sample.MyApp.application 1.0
Admin UI
On the Applications page, select the running application you want to view the components for. Openthe Components tab to view the components in the application.
167
TIBCO ActiveMatrix BusinessWorks™ Administration

Retrieving details of a component in an ApplicationTo get the details of a particular component of an application , run the getcomponentdetail commandor view the details under the Status label, in the Admin UI.
bwdmin Command Line
Procedure
1. Start the AppSpace.
2. Execute the getcomponentdetail command for a component of an application. For example:BW_HOME\bin>bwadmin getcomponentdetail -d MyDomain -a MyAppSpace -n MyAppNode MycomponentName tibco.bw.sample.MyApp.application 1.0
Admin UI
On the Applications page, the Status label displays the details of the component.
Backing Up and Restoring an ApplicationBacking up an application exports the current state of the specified application to a bwadmin commandfile. The command file can be provided to bwadmin to recreate the application state. Output can becompressed to a ZIP file with the -zipped option.
The default application profile is backed up with the application. Additional *.substvar files thatcontain application configurations can be created in the output folder.
A specific application version can be backed up by providing the version argument. If this argument isnot specified, all application versions are backed up.
Procedure
1. To back up the current state of an application,a) Open a terminal and navigate to BW_HOME\bin.b) Enter the backup command at the command line, using -s option to identify the name of the
destination file. Use the -domain and appspace options with the application argument.Provide the application version number to back up a specific version. By default, destination filesare written to the current working directory.This example backs the current state of an application to a command file namedapp_backup.cmd.BW_HOME\bin>bwadmin backup -s app_backup.cmd -d Machine2Domain -a AS1 application acme.acct.ap.application 1.0
2. To restore the application,a) Open a terminal and navigate to BW_HOME\bin.b) Enter the bwadmin command, providing the name of the backup command file. The following
example recreates the state of the application acme.acct.ap.application. Because the application wasdeployed on backup, it is restored to the deployed state.BW_HOME\bin>bwadmin -f app_backup.cmd
If you are restoring to a different location, you need to update the command file as follows:
● The agent name will point to localhost by default; you need to change this to the name ofthe machine you are restoring to.
● Update the domain home to point to the absolute path to the new location.
168
TIBCO ActiveMatrix BusinessWorks™ Administration

● Update the path to the application archive (EAR) file to an absolute path.c) Use the show applications command with the -domain and -appspace options to verify the
restore. If the bwagent is not running, its status will be listed as Unreachable.
Restoring the File System of an ArchiveRestoring an archive restores the file system of the specified archive to the state of the datastore.
Prerequisites
● The bwagent must be running.
Wildcards can be used to restore archives if archive name(s) are not known.
Procedure
1. To restore the file system for an archive, open a terminal and navigate to BW_HOME\bin.
2. Enter the restore command, with the -domain, -appspace, and appnode options. Provide thearchive argument specifying the name of the archive to restore or wildcards to restore all archivesuploaded to domains in this agent.BW_HOME\bin>bwadmin restore -d Machine1Domain -a AS1 -n AN1 archive *.*
3. To verify the restore, check the file system. Open the BW_HOME\domains folder. Browse the folderand look for the archive in the BW_HOME\domains\domain_name\archives folder.
Restoring the File System of an ApplicationRestoring an application restores the file system of the specified application to the state of the datastore.
Prerequisites
● The bwagent must be running.
Wildcards can be used to restore applications if application name(s) are not known.
Procedure
1. To restore the file system of an application to the state of the datastore, open a terminal andnavigate to BW_HOME\bin.
2. Enter the restore command at the command line, with the -domain, -appspace, and -appnodeoptions. Provide the application argument with the name of the application or wildcards torestore all applications for this domain.BW_HOME\bin>bwadmin restore -d Machine1Domain -a AS1 -n AN1 application *.*
3. To verify the restore, check the file system. Open the BW_HOME\domains folder. Look for theapplication in the BW_HOME\domains\domain_name\appspaces\appspace_name\apps folder.
Publishing APIs to TIBCO Mashery®
Follow these steps to publish application endpoints, or API endpoints, from the Admin UI to Mashery.
Prerequisites
Complete the following tasks:
● Set up a Mashery account.
169
TIBCO ActiveMatrix BusinessWorks™ Administration

● Register your application endpoint domain with Mashery, and ensure Mashery can access it.
● Create the mashery.ini file:
1. Open a text editor, and add the following properties with the correct values.bw.mashery.clientId=<clientId>bw.mashery.clientSecret=<clientSecret>bw.mashery.areaUuid=<areaUuid>bw.mashery.username=<username>bw.mashery.password=<password>bw.mashery.trafficManagerDomain=<trafficManagerDomain>bw.mashery.apiUrl=<https://api.HOST>
2. Save the file as mashery.ini
3. Add the mashery.ini file to the bin folder at BW_HOME/config.
● Edit the bwagent.ini file at BW_HOME/config/bwagent.ini, by adding the following line to the file:
bw.mashery.config.file=../config/mashery.ini
Procedure
1. Start the application from the Admin UI.
2. Click on the Application tab, and click the Endpoints tab.
3. From the Endpoints tab, select all, or individual, application endpoints.
Select the Select All check box, located to the left of Endpoint URL, to select all applicationendpoints.
4. Click the icon, or the icon, to publish the selected endpoints.
Result
Your API endpoints are published to Mashery.
For additional details about managing your API's from Mashery, see Mashery documentation.
170
TIBCO ActiveMatrix BusinessWorks™ Administration

Backing Up and Restoring from the Backup
The backup command backs up a specified runtime entity to a command file. You provide thecommand file as input to bwadmin to recreate the environment.
The following runtime entities can be backed up and restored from a command file:
● Domain
● AppSpace
● AppNode
● Application
Runtime entities can be local or part of an agent network. Run this command frequently on all runtimeentities, so that you always have a backup of your environment. Runtime entities created in local modecan only be restored when bwadmin is in local mode. Runtime entities created in enterprise mode canonly be restored when the bwagent is running.
If you provide the same command file name on a subsequent backup, the existing command file isoverwritten. Output can be compressed to a ZIP file with the -zipped option.
The bwadmin backup command and the bwadmin restore command are not complimentary. Therestore command requires a bwagent and restores the file system to the state of the datastore. Forinformation on the restore command, see Restoring the File System of Runtime Entities.
For more information about backing up and restoring from the backup, see:
● Backing Up and Restoring a Domain
● Backing Up and Restoring an Application
● Backing Up and Restoring an AppNode
● Backing Up and Restoring an AppSpace
171
TIBCO ActiveMatrix BusinessWorks™ Administration

Restoring the File System of Runtime Entities
The restore command restores the file system of a bwagent or a runtime entity to the state of thedatastore. If a machines goes offline and cannot be restarted, that environment can be recreated giventhe name of the bwagent or the runtime entities.
The restore command can restore a bwagent or a specified domain, AppSpace, AppNode, archive, orapplication. The command is only available when the bwagent is running.
● When a bwagent is restored, the file system for all runtime entities in the bwagent datastore arerestored.
● When a domain is restored, the file system for the specified domain and all contained runtimeentities are restored.
● When an AppSpace is restored, the containing domain must exist. The file system for the specifiedAppSpace and all contained runtime entities are restored.
This pattern also applies to AppNodes, archives, and applications.
The bwadmin backup command and the bwadmin restore command are not complimentary. Thebackup command backs up a runtime entity to a command file. For information on the backupcommand, see Backing Up and Restoring from the Backup.
For more information about restoring the file system, see:
● Restoring the File System of a bwagent
● Restoring the File System of a Domain
● Restoring the File System of an AppSpace
● Restoring the File System of an AppNode
● Restoring the File System of an Archive
● Restoring the File System of an Application
172
TIBCO ActiveMatrix BusinessWorks™ Administration

Debugging
In the event of an error, the software provides detailed messages that can help you trace through to thecause of an issue. You can adjust logging levels as needed to capture different granularity of messagesfor different loggers.
Messages returned by TIBCO ActiveMatrix BusinessWorks™ are categorized by component and byerror code within component. The following table shows the components of the software that returnmessages:
Component ID Description
BX ActiveMatrix BusinessWorks™ Engine Layer
PVM ActiveMatrix BusinessWorks Engine Layer
TIBCO-BW-ADMIN ActiveMatrix BusinessWorks Administrator
TIBCO-BW-ADMIN-CLI ActiveMatrix BusinessWorks Administrator Command Line Interface
TIBCO-BW-BINDING-REST
ActiveMatrix BusinessWorks REST Binding
TIBCO-BW-BINDING-SOAP
ActiveMatrix BusinessWorks SOAP Binding
TIBCO-BW-CORE ActiveMatrix BusinessWorks Engine Layer
TIBCO-BW-FRWK ActiveMatrix BusinessWorks Framework
TIBCO-BW-PALETTE ActiveMatrix BusinessWorks Palette Layer
TIBCO-BW-PALETTE-<PaletteName>
ActiveMatrix BusinessWorks Palette specific activity implementation
TIBCO-BW-SR ActiveMatrix BusinessWorks Shared Resource API Layer
TIBCO-BW-SR-<UniqueName>
ActiveMatrix BusinessWorks specific Shared Resource implementation
TIBCO-BW-STATS ActiveMatrix BusinessWorks Stats Collector
TIBCO-THOR-FRWK Thor Framework
The Engine layers with component IDs BX and PVM do not follow this convention.
The following tables identifies the log levels used by the software and the corresponding error coderange:
173
TIBCO ActiveMatrix BusinessWorks™ Administration

Log Level Error Code
TRACE 100001 - 109999
DEBUG 200001 - 209999
INFO 300001 - 309999
WARN 400001 - 409999
ERROR Errors can be indicated by one of the following error code ranges:
● 500001 - 509999
● 600001 and higher
● 0xxxxx
● Error codes 600001 and higher indicate exceptions in the executionand are always associated with a 5xxxxx error code, which can betraced in the log file.
● Error codes starting with 0xxxxx indicate internal errors. ContactTIBCO Support for possible resolution or a workaround.
If you encounter an error that does not start with a 0, change the logging level of the AppNode andbwagent loggers to DEBUG. Try to recreate the scenario and examine the log file to try and trace theissue. The error messages are detailed and can help you understand the chain of events that led up tothe issue. For more information on log files and log file configuration see the section on Logging in theTIBCO ActiveMatrix BusinessWorks™ Administration guide.
The following sections in the TIBCO ActiveMatrix BusinessWorks™ Concepts guide list issues you mightencounter, along with possible resolutions:
● Troubleshooting bwagent Issues
● Troubleshooting Runtime Entities Issues
● Troubleshooting Archive Issues
● Troubleshooting Application Issues
● Troubleshooting TIBCO Enterprise Administrator Integration Issues
Troubleshooting bwagent IssuesSome bwagent issues and possible resolutions are listed below. This list is not complete but providesexamples of messages that might be returned.
For a complete list of error codes, see the TIBCO ActiveMatrix BusinessWorks™ Error Codes guide.
174
TIBCO ActiveMatrix BusinessWorks™ Administration

Issue Message Resolution
When registering abwagent to adomain orAppSpace, orunregistering theAppSpace thebwagent cannot beregistered.
TIBCO-BW-ADMIN-CLI-500132:Failed to unregister BW Agent[bwagent from the AppSpace[AppSpace]. <CausedBy> TIBCO-BW-ADMIN-500004: Errorinvoking [methodName] method onthe agent [Agent], The BW Agent[Agent] on the remote machine isnot running.
Verify the bwagent name. Check thatthe bwagent on the remote machine isrunning.
If you are unable toenable or disablethe autoregistrationfeature from thecommand line afterexecuting theenableautoregist
ration utility orthedisableautoregis
tration utility.
TIBCO-BW-AGENT-500004: Errorinvoking [method] method on theagent [bwagent]. The BW Agent[bwagent] on the remote machineis not running.
Check if bwagent is running, and if it is,verify its name.
The bwagent couldnot start becausethe mode is not setto enterprise.
TIBCO-BW-AGENT-500006:Cannot start the agent. The adminmode in bwagent.ini is notconfigured for enterprise mode.Check your configuration andrestart.
Open a terminal and type the followingcommand at the command line:bwadmin mode enterprise
Restart the bwagent.
A bwadmincommand could notbe completed.
TIBCO-BW-ADMIN-500008: Errorin initializing data manager,TIBCO-BW-ADMIN-PRSTNC-500001: Connection toBW Agent failed.
or
TIBCO-BW-ADMIN-CLI-500006:Failed to initialize transport,TIBCO-BW-ADMIN-PRSTNC-500001: Connection toBW Agent failed.
The first message indicates that thebwagent is not running. Start thebwagent.
The second message is displayed whenbwadmin is configured for enterprisemode and the command could not becompleted due to a failed bwagentconnection.
175
TIBCO ActiveMatrix BusinessWorks™ Administration

Issue Message Resolution
The bwagent couldnot start due to anerror with datastoreinitialization.
TIBCO-BW-AGENT-500009: Failedto start agent due to an error ininitializing data store, reason:Reason
The datastore is written to the BW_HOME\domains\.datastore folder.
Verify the following:
* The specified folder exists.
* Thebw.agent.technology.as.dataStore
Location property in the BW_HOME\config\bwagent.ini file points to thedatastore folder name.
* The bw.agent.technology.as.roleproperty is set to server.
You might also see this message if thereis an issue with thebw.agent.technology.as.dataStore
Location property setting in theBW_HOME\config\bwagent.ini file.Make sure that the TCP protocol isspecified only for the first URL in thestring; not for subsequent URLs.
When starting abwagent that isconfigured as partof an agentnetwork, the URLof another agent inthe network couldnot be found.
unable to resolve networkspecification ('bwagent')
Check the setting of thebw.agent.technology.as.dataStore
Location property in the BW_HOME\config\bwagent.ini file.
Verify that:
● The URL is specified as either IPaddress and port or host name andport, in the format: IP_address/hostname:port
● There are no typos in the URL orport number.
● A semicolon separator is usedbetween URLs.
When starting abwagent that isconfigured as partof an agentnetwork, thebwagent starts butdoes not indicatethat the agent hasjoined the network.
N/A Check that the setting of thebw.agent.network.name property inthe BW_HOME\config\bwagent.inifile is the same as the setting in other theconfiguration file for other bwagents inthe network.
176
TIBCO ActiveMatrix BusinessWorks™ Administration

Issue Message Resolution
When starting abwagent that isconfigured as partof a bwagentnetwork, and thebwagent is notconfigured for thenetwork, warningsare displayed.
There are [2] agents in the BWAgent group that store data.However, the property"minSeederCount" in thebwagent.ini file is set to [1], referto the bwagent.ini file or thedocumentation and choose anappropriate value.
There are [2] agents in the BWAgent group that store data.However, the property"quorumSize" in the bwagent.inifile is set to [1], refer to thebwagent.ini file or thedocumentation and choose anappropriate value.
See comments in the BW_HOME\config\bwagent.ini file forinformation.
The TEA agentcould not beregistered.
TIBCO-BW-ADMIN-500504:Failed to register TEA Agent[teaagent] with TEA server [http://host: port], TEA Agent registrationfailed, TIBCO-BW-TEAAGENT-500300: Failed toregister BW TEA agent [teaagent]with TEA server, <CausedBy>Unable to register agent withname [teaagent]'
Verify the URL to the TEA agent. Checkthat the TEA agent is running.
Intermittentconnectivity issueswhen the bwagentis configured forActiveSpaces.
N/A Use the IP address instead of the hostname when configuring the followingparameters in the bwagent.db.jsonfile:
● discoveryurl
● listenurl
● remotelistenurl
● remotediscoveryurl
See Configuring bwagent forActiveSpaces and ActiveSpacesConfiguration.
Troubleshooting Runtime Entity IssuesSome runtime entity issues and possible resolutions are listed below. This list is not complete butprovides examples of messages that might be returned.
For a complete list of error codes, see the TIBCO ActiveMatrix BusinessWorks™ Error Codes guide.
177
TIBCO ActiveMatrix BusinessWorks™ Administration

Issue Message Resolution
The specified runtimeentity could not becreated as it containsinvalid characters orcontains over 100characters.
TIBCO-BW-ADMIN-CLI-500501: Name containsinvalid characters and doesnot comply with namingconventions. Validcharacters are upper andlower case characters of thealphabet as well as digits, '.'and '-'.
or
TIBCO-BW-ADMIN-CLI-500502: Name lengthexceeds 100 characters and itwill be truncated to satisfythe length limit
Create the runtime entity with validcharacters:
● A-Z
● a-z
● 0-9
● - (hyphen)
● _ (underscore)
Illegal characters are stripped from thename.
The maximum length of a runtime entityname is 100 characters. If the maximumlength is exceeded, the entity name isshortened to 100 characters.
The specified domaincould not be created; italready exists.
TIBCO-BW-ADMIN-CLI-500102: Failed to createDomain [Domain], TIBCO-BW-ADMIN-500101:Domain [Domain] alreadyexists, check this and re-try.
The specified domain already exists.Domain names must be unique; enter adifferent name. To view existing domains,use the show domains command.
The specifiedcommand could notbe completed; thedomain home folderspecified could not befound.
TIBCO-BW-ADMIN-CLI-500103: Domain homefolder [Path] does not exist.Verify if the folder is presentand use forward slash in thefolder path.
Check that the BW_HOME\domains folderexists. If it does exist, make sure forwardslashes are specified (both Windows andUnix).
The specified domaincould not be deleted.
TIBCO-BW-ADMIN-CLI-500104: Failed to deleteDomain [Domain], Reason
The specified domain may haveAppSpaces associated with it. If this is thecase, the following message is displayed:
TIBCO-BW-ADMIN-500109: The Domain[Domain] has AppSpaces associated with it.Use -force option to override
Use the -force option with the deletecommand to delete the domain and allcontained runtime entities.
The minimumnumber of AppNodesfor an AppSpace hasto be at least 1.
TIBCO-BW-ADMIN-CLI-500218: The minNodesconfiguration value for anAppSpace has to be at least1.
The minNodes value for an AppSpace hasto be set to an integer value greater than 0.To create an AppSpace with 1 AppNode,the minNodes option is not required.
178
TIBCO ActiveMatrix BusinessWorks™ Administration

Issue Message Resolution
The minimumnumber of AppNodesis invalid. It has to bean integer valuegreater than 0.
TIBCO-BW-ADMIN-CLI-500219: The minNodesconfiguration argument isinvalid. Valid argument areInteger values greater than0.
The minNodes value for an AppSpace hasto be set to an integer value greater than 0.
The AppSpace couldnot be found in thespecified domain.
TIBCO-BW-ADMIN-CLI-500201: AppSpace[AppSpace] not found inDomain [Domain]
The specified AppSpace does not exist inthe specified domain. Check the value fortypos. Use the show appspaces commandwith the -domain option to viewAppSpaces in the domain.
The specifiedAppSpace in thespecified domaincould not be created; italready exists.
TIBCO-BW-ADMIN-CLI-500203: Failed to createAppSpace [AppSpace] inDomain [Domain]. TIBCO-BW-ADMIN-500202: TheAppSpace [AppSpace] isalready present in theDomain [Domain].
The specified AppSpace has already beencreated. Use the show appspacescommand with the -domain option to viewAppSpaces in the domain.
The specifiedAppSpace alreadyexists for the specifiedbwagent.
TIBCO-BW-ADMIN-CLI-500204: AppSpace[AppSpace] already existswith BW Agent [bwagent]
The specified AppSpace has already beenexpanded to the specified bwagent.
179
TIBCO ActiveMatrix BusinessWorks™ Administration

Issue Message Resolution
The specifiedAppSpace in thespecified domaincould not be started.
TIBCO-BW-ADMIN-CLI-500210: AppSpace[AppSpace] in Domain[Domain] could not bestarted, Reason
The specified AppSpace may not haveassociated AppNodes or it might be on abwagent that is not reachable.
The following message is displayed if thereare no contained AppNodes:
TIBCO-BW-ADMIN-500210: AppSpace[AppSpace] in Domain [Domain] did notstart completely, status is Degraded.
An AppSpace can only be started if itcontains at least one AppNode. Use theshow appnodes command with the -appspace and -domain options to checkfor AppNodes.
If no AppNodes exist, create at least oneand try to start the AppSpace again. If theminimum number of AppNodes wasspecified when the AppSpace was created,that minimum number of AppNodes mustexist.
A message similar to the following will bedisplayed if the AppSpace is on anunreachable bwagent:
TIBCO-BW-ADMIN-500210: AppSpace[AppSpace] in Domain [Domain] did notstart completely, status is Stopped.
The machine might be down or thebwagent might not be running.
The specifiedAppSpace in thespecified domaincould not be deleted.
TIBCO-BW-ADMIN-CLI-500205: Failed to deleteAppSpace [AppSpace] fromDomain [Domain], Reason
The specified AppSpace may haveAppNodes associated with it or it may bescaled across bwagents.
If it has associated AppNodes, thefollowing message is displayed:
TIBCO-BW-ADMIN-500216: AppSpace[AppSpace] has AppNodes associated withit. Delete the AppNodes first and re-try oruse the -force option to override.If the AppSpace is scaled across machines,the following message is displayed:
TIBCO-BW-ADMIN-500220: AppSpace[AppSpace] is scaled across multiple BWAgents. Cannot be deleted. Use -forceoption to override.
In both cases, either delete the containedAppNodes or use the -force option withthe delete command to delete theAppSpace and all contained runtimeentities.
180
TIBCO ActiveMatrix BusinessWorks™ Administration

Issue Message Resolution
When creating anAppNode, the HTTPPort value is required.
httpPort is a mandatoryargument for creating anAppNode.
Create the AppNode again with the -httpPort option. The port must be uniquefor each AppNode on the machine.
The specifiedAppNode in thespecified AppSpaceand domain could notbe created; it alreadyexists.
TIBCO-BW-ADMIN-CLI-500302: Failed to createAppNode [AppNode] inAppSpace [AppSpace] inDomain [Domain], TIBCO-BW-ADMIN-500301: TheAppNode [AppNode] alreadyexists in the AppSpace[AppSpace] Domain[Domain].
The specified AppNode has already beencreated. Use the show appnodes commandwith the -appspace and -domain optionsto view AppNodes.
The specifiedAppNode in thespecified AppSpaceand domain could notbe started.
TIBCO-BW-ADMIN-CLI-500304: AppNode[AppNode] in Domain[Domain] did not start,Reason
The specified AppNode may not exist. Inthis case, the following error is displayed:
TIBCO-BW-ADMIN-500300: The AppNode[AppNode] does not exist in AppSpace[AppSpace] and Domain [Domain].
If the bwagent is in a network, theAppSpace might be on a bwagent that isnot reachable. The machine might be downor the bwagent might not be running. Inthis case, the following error is displayed:
TIBCO-BW-ADMIN-500004: Errorinvoking [startappnode] method on theagent [agent], The BW Agent [agent] on theremote machine is not running.
Start the bwagent on the remote machineand start the AppNode again.
181
TIBCO ActiveMatrix BusinessWorks™ Administration
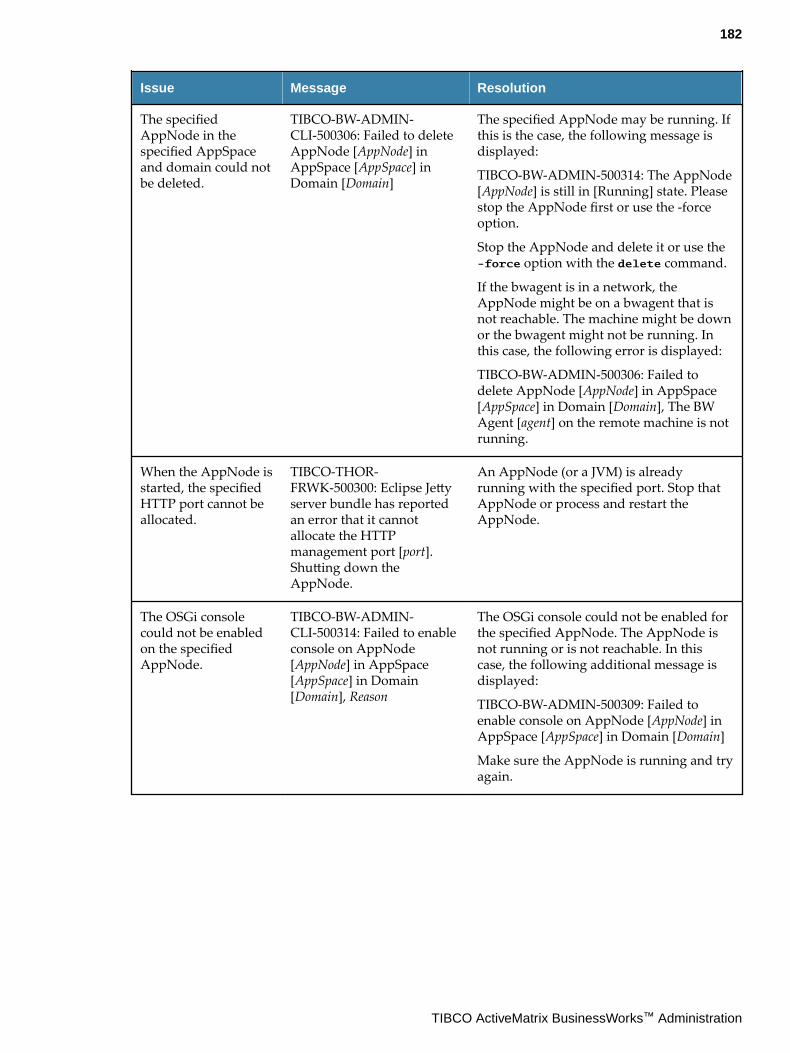
Issue Message Resolution
The specifiedAppNode in thespecified AppSpaceand domain could notbe deleted.
TIBCO-BW-ADMIN-CLI-500306: Failed to deleteAppNode [AppNode] inAppSpace [AppSpace] inDomain [Domain]
The specified AppNode may be running. Ifthis is the case, the following message isdisplayed:
TIBCO-BW-ADMIN-500314: The AppNode[AppNode] is still in [Running] state. Pleasestop the AppNode first or use the -forceoption.
Stop the AppNode and delete it or use the-force option with the delete command.
If the bwagent is in a network, theAppNode might be on a bwagent that isnot reachable. The machine might be downor the bwagent might not be running. Inthis case, the following error is displayed:
TIBCO-BW-ADMIN-500306: Failed todelete AppNode [AppNode] in AppSpace[AppSpace] in Domain [Domain], The BWAgent [agent] on the remote machine is notrunning.
When the AppNode isstarted, the specifiedHTTP port cannot beallocated.
TIBCO-THOR-FRWK-500300: Eclipse Jettyserver bundle has reportedan error that it cannotallocate the HTTPmanagement port [port].Shutting down theAppNode.
An AppNode (or a JVM) is alreadyrunning with the specified port. Stop thatAppNode or process and restart theAppNode.
The OSGi consolecould not be enabledon the specifiedAppNode.
TIBCO-BW-ADMIN-CLI-500314: Failed to enableconsole on AppNode[AppNode] in AppSpace[AppSpace] in Domain[Domain], Reason
The OSGi console could not be enabled forthe specified AppNode. The AppNode isnot running or is not reachable. In thiscase, the following additional message isdisplayed:
TIBCO-BW-ADMIN-500309: Failed toenable console on AppNode [AppNode] inAppSpace [AppSpace] in Domain [Domain]
Make sure the AppNode is running and tryagain.
182
TIBCO ActiveMatrix BusinessWorks™ Administration

Issue Message Resolution
The OSGi consolecould not be disabledon the specifiedAppNode.
TIBCO-BW-ADMIN-CLI-500315: Failed to disableconsole on AppNode[AppNode] in AppSpace[AppSpace] in Domain[Domain], Reason
The OSGi console could not be disabled forthe specified AppNode. The AppNode isnot running or is not reachable. In thiscase, the following additional message isdisplayed:
TIBCO-BW-ADMIN-500310: Failed todisable console on AppNode [AppNode] inAppSpace [AppSpace] in Domain [Domain]
Make sure the AppNode is running and tryagain.
The debug port on theAppNode could notbe enabled.
TIBCO-BW-ADMIN-CLI-500440: Failed to enabledebug port onAppNode[AppNode] in[AppSpace] inDomain[Domain], Reason
The debug port on the AppNode could notbe enabled. The AppNode is not runningor is not reachable. In this case, thefollowing additional message is displayed:
TIBCO-BW-ADMIN-500313: AppNode[AppNode] is not running or could not becontacted.
Make sure the AppNode is running and tryagain.
The debug port on theAppNode could notbe disabled.
TIBCO-BW-ADMIN-CLI-500317: Failed to disabledebugger onAppNode[AppNode] in[AppSpace] inDomain[Domain], Reason
The debug port on the AppNode could notbe disabled. The AppNode is not runningor is not reachable.
Make sure the AppNode is running and tryagain.
Troubleshooting Archive IssuesSome archive issues and possible resolutions are listed below. This list is not complete but providesexamples of messages that might be returned.
For a complete list of error codes, see the TIBCO ActiveMatrix BusinessWorks™ Error Codes guide.
Issue Message Resolution
The specifiedarchive could not beuploaded; it couldnot be located.
TIBCO-BW-ADMIN-CLI-500433:Failed to upload archive [Archive],<CausedBy> TIBCO-THOR-FRWK-CMN-500101: Ear file [Archive] isnot found.
The specified archive could not befound. Check the path and the archivefilename and issue the commandagain.
183
TIBCO ActiveMatrix BusinessWorks™ Administration

Issue Message Resolution
The specifiedarchive has alreadybeen uploaded tothe specifieddomain.
TIBCO-BW-ADMIN-CLI-500433:Failed to upload archive [archive],<CausedBy> TIBCO-BW-ADMIN-500447: Archive [Archive]is already present in the domain,use -replace option to replace theexisting archive.
The specified archive has already beenuploaded to the specified domain. Toreplace the archive, upload the archiveagain, using the -replace option withthe upload command.
Use the show archives command toview archives, versions, timeuploaded, size, and path.
The specifiedarchive could not beuploaded to allmachines in thedomain.
TIBCO-BW-ADMIN-CLI-500432:Failed to upload ear file [Archive] tosome machines in the domain.
Not all machines that the domain hasbeen expanded to are reachable. Checkthat machines are running.
The specifiedarchive has alreadybeen uploaded; theapplication archivehas alreadyuploaded anddeployed.
TIBCO-BW-ADMIN-CLI-500438:The application [Application] fromarchive [Archive] has beendeployed to these AppSpaces:
AppSpace
You already uploaded the archive anddeployed the specified applicationfrom the archive. The messagedisplays the AppSpaces theapplication has been deployed to.
Use the show applicationscommand to view applications,versions, and statuses.
The specifiedarchive could not bedeleted.
TIBCO-BW-ADMIN-CLI-500434:Failed to delete archive [Archive]<CausedBy> Reason
The specified archive may not exist inthe current domain context. If this isthe case, the following message isappended:
TIBCO-BW-ADMIN-500418:Application archive file [Archive] notfound in the domain [Domain].
Use the show archives command toview archives, versions, timeuploaded, size, and path.
The specified archive may be deployedand cannot be deleted. In this case, thefollowing message is displayed:
TIBCO-BW-ADMIN-500450: Archive[Archive] has been deployed to theAppSpaces: [AppSpaces].
The specifiedapplication is not insync with thespecified archive.
TIBCO-BW-ADMIN-CLI-500439:Applications are out of sync withthe archive they were deployedfrom, They have to be re-deployedto keep them in sync.
The application is no longer in syncwith the archive. Use the deploy -replace command to replace theexisting version of the application withthe version from the archive.
This message is displayed with othermessages, for example, if the archivecould not be uploaded.
184
TIBCO ActiveMatrix BusinessWorks™ Administration

Troubleshooting Application IssuesSome application issues and possible resolutions are listed below. This list is not complete but providesexamples of messages that might be returned.
For a complete list of error codes, see the TIBCO ActiveMatrix BusinessWorks™ Error Codes guide.
Issue Message Resolution
The specifiedapplication couldnot be deployed; noAppNodes exist.
TIBCO-BW-ADMIN-CLI-300432: Deployedapplication[Application:Version], TheAppSpace [AppSpace] doesnot have any AppNodes.
No AppNodes have been created in thespecified AppSpace. AppNodes arerequired for deployment. Create one ormore AppNodes and issue the deploycommand again.
The specifiedapplication couldnot be deployed; anapplication hasalready beendeployed for thatarchive.
TIBCO-BW-ADMIN-CLI-300433: An application isalready deployed witharchive [Archive].
The specified application has already beendeployed for the specified archive. Use theshow applications command to view it.
The specifiedapplication versionformat is notsupported.
TIBCO-BW-ADMIN-CLI-500407: Version [Version]is not valid. Only<major>.<minor> versionformat is supported.].
An application version must be specified asa major.minor version within an AppSpace.Check the formatting of the version number.
The specifiedapplication couldnot be started;application notfound in domain.
TIBCO-BW-ADMIN-CLI-500409: Failed to startapplication[Application:Version].<CausedBy> TIBCO-BW-ADMIN-500401: Application[Application] not found in theDomain [Domain]
The specified application is not found in thespecified domain.
Use the show applications command toverify the application.
185
TIBCO ActiveMatrix BusinessWorks™ Administration
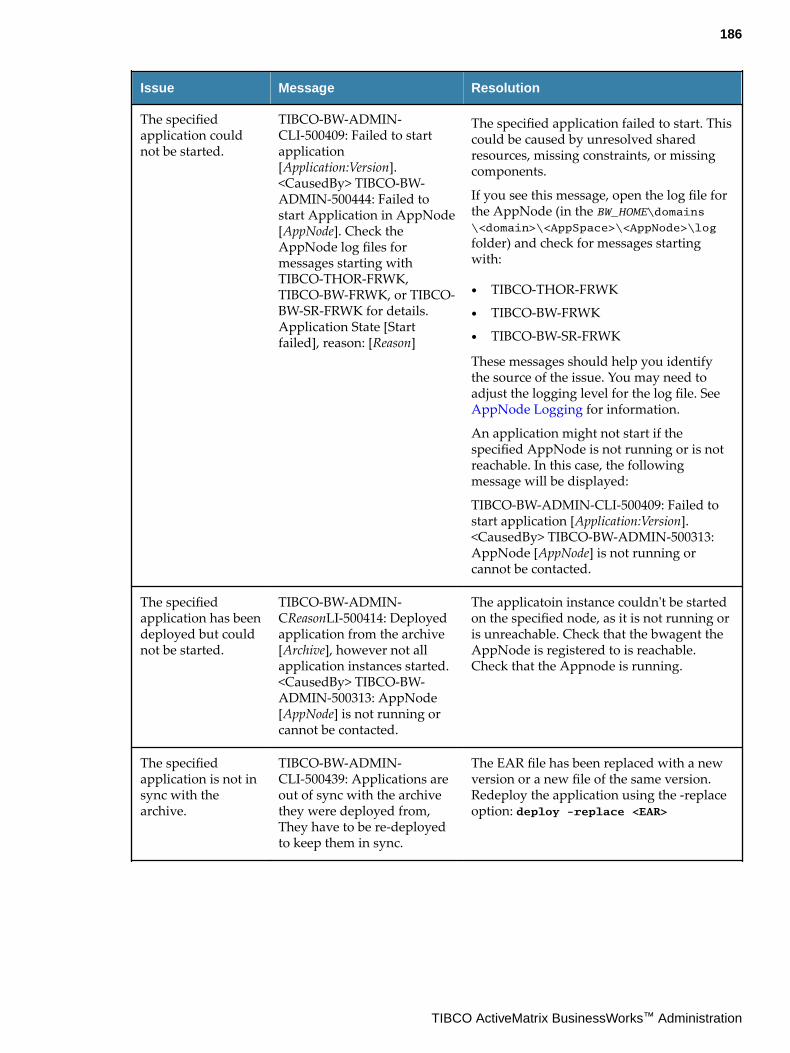
Issue Message Resolution
The specifiedapplication couldnot be started.
TIBCO-BW-ADMIN-CLI-500409: Failed to startapplication[Application:Version].<CausedBy> TIBCO-BW-ADMIN-500444: Failed tostart Application in AppNode[AppNode]. Check theAppNode log files formessages starting withTIBCO-THOR-FRWK,TIBCO-BW-FRWK, or TIBCO-BW-SR-FRWK for details.Application State [Startfailed], reason: [Reason]
The specified application failed to start. Thiscould be caused by unresolved sharedresources, missing constraints, or missingcomponents.
If you see this message, open the log file forthe AppNode (in the BW_HOME\domains\<domain>\<AppSpace>\<AppNode>\log
folder) and check for messages startingwith:
● TIBCO-THOR-FRWK
● TIBCO-BW-FRWK
● TIBCO-BW-SR-FRWK
These messages should help you identifythe source of the issue. You may need toadjust the logging level for the log file. See AppNode Logging for information.
An application might not start if thespecified AppNode is not running or is notreachable. In this case, the followingmessage will be displayed:
TIBCO-BW-ADMIN-CLI-500409: Failed tostart application [Application:Version].<CausedBy> TIBCO-BW-ADMIN-500313:AppNode [AppNode] is not running orcannot be contacted.
The specifiedapplication has beendeployed but couldnot be started.
TIBCO-BW-ADMIN-CReasonLI-500414: Deployedapplication from the archive[Archive], however not allapplication instances started.<CausedBy> TIBCO-BW-ADMIN-500313: AppNode[AppNode] is not running orcannot be contacted.
The applicatoin instance couldn't be startedon the specified node, as it is not running oris unreachable. Check that the bwagent theAppNode is registered to is reachable.Check that the Appnode is running.
The specifiedapplication is not insync with thearchive.
TIBCO-BW-ADMIN-CLI-500439: Applications areout of sync with the archivethey were deployed from,They have to be re-deployedto keep them in sync.
The EAR file has been replaced with a newversion or a new file of the same version.Redeploy the application using the -replaceoption: deploy -replace <EAR>
186
TIBCO ActiveMatrix BusinessWorks™ Administration

Troubleshooting Admin UI IssuesSome Admin UI issues and possible resolutions are listed below. This list is not complete but providesexamples of messages that might be returned.
For a complete list of error codes, see the TIBCO ActiveMatrix BusinessWorks™ Error Codes guide. Whena new version of the product is installed, you may need to open the Admin UI Agents page andreconnect to the bwagent.
Issue Message Resolution
The specified bwagent couldnot be registered in the AdminUI.
Failure registering agent with[URL].
This error can be caused byseveral issues:
● The specified bwagent atthe URL provided in theRegister Agent dialog boxcould not be located. Verifythe URL and register thebwagent again.
● A bwagent with thespecified name alreadyexists. Verify the name ofthe bwagent and registerthe bwagent again.
● The specified bwagentmight not be running. Makesure the bwagent is runningand register the bwagentagain.
The specified bwagent isunreachable.
The status of Unreachable isdisplayed on the AgentManagement page for thespecified bwagent.
The specified bwagent mightnot be running. Make sure thebwagent is running andregister the bwagent again.
The details for a selectedruntime entity cannot bedisplayed.
Error executing operation'getStates'; status '0'; reason'Connection refused: no furtherinformation'.
Since the Admin UI page forthe selected runtime entity wasdisplayed, either the runtimeentity was deleted or thebwagent was stopped. Usebwadmin commands for theregistered bwagent to verify thestate of runtime entities andcheck the status of the bwagent.
The specified domain alreadyexists.
TIBCO-BW-TEAAGENT-500309: Failed tocreated Domain [Domain]TIBCO-BW-ADMIN-500101:Domain [Domain] alreadyexists, check this and re-try.
The specified domain alreadyexists. Domain names must beunique; enter a different name.View existing domains on theDomain Management page.
187
TIBCO ActiveMatrix BusinessWorks™ Administration

Issue Message Resolution
The specified domain couldnot be created; the bwagent onthe remote machine is notrunning.
TIBCO-BW-TEAAGENT-500309: Failed tocreated Domain [Domain]TIBCO-BW-ADMIN-500004:Error invoking [joinmachine]method on the agent [bwagent],The BW Agent [bwagent] on theremote machine is not running.
Verify the bwagent name.Check that the bwagent on theremote machine is running.
The specified AppSpace in theselected domain already exists.
TIBCO-BW-TEAAGENT-500425: AppSpace[AppSpace] already exists indomain [Domain].
The specified AppSpacealready exists. AppSpacenames must be unique; enter adifferent name. View existingAppSpaces on the AppSpacespage.
The AppSpace status isDegraded and cannot bestarted.
The status of Degraded isdisplayed on the AppSpacespage for the specifiedAppSpace.
An AppSpace can only bestarted if it contains at least oneAppNode. Check the minNodesvalue on the AppSpaces pageand then pivot to theAppNodes page. Verify thatthe minimum number ofAppNodes has been created.When the minNodes value isreached, the status of theAppSpace is changed toStopped.
The specified AppNode in theselected AppSpace and domainalready exists.
TIBCO-BW-TEAAGENT-500313: Failed tocreate AppNode [AppNode] inAppSpace [AppSpace] inDomain [Domain], TIBCO-BW-ADMIN-500301: The AppNode[AppNode] already exists in theAppSpace [AppSpace] Domain[Domain].
The specified AppNodealready exists. AppNodenames must be unique; enter adifferent name. View existingAppNodes on the AppNodespage.
The specified archive could notbe uploaded.
Failed to Upload. TIBCO-BW-ADMIN-500447: Archive[Archive] is already present inthe domain, use -replace optionto replace the existing archive.
The specified archive hasalready been uploaded to thespecified domain.
To replace the archive, selectthe Replace any version checkbox in the Upload EAR Filedialog box, and upload thearchive again.
188
TIBCO ActiveMatrix BusinessWorks™ Administration

Issue Message Resolution
The specified archive could notbe deployed.
TIBCO-BW-TEAAGENT-300016: DeployedApplication [Application] inAppSpace [AppSpace] ofDomain [Domain]. TheAppSpace [AppSpace] does nothave any AppNodes.
The specified AppSpace doesnot have any associatedAppNodes. Click CreateAppNodes on the AppNodespage. Select the specifiedAppSpace in the CreateAppNode dialog.
The specified application couldnot be started.
TIBCO-BW-TEAAGENT-500315: Failed todeploy Application fromarchive [Archive] TIBCO-BW-ADMIN-500444: Failed to startApplication in AppNode[AppNode]. Check the AppNodelog files for messages startingwith TIBCO-THOR-FRWK,TIBCO-BW-FRWK, or TIBCO-BW-SR-FRWK for details.Application State [Start failed],reason: Reason
The specified application failedto start. This could be causedby unresolved sharedresources, missing constraints,or missing components.
If you see this message, openthe log file for the AppNode (inthe BW_HOME\domains\<domain>\<AppSpace>
\<AppNode>\log folder) andcheck for messages startingwith:
● TIBCO-THOR-FRWK
● TIBCO-BW-FRWK
● TIBCO-BW-SR-FRWK
These messages should helpyou identify the source of theissue. You may need to adjustthe logging level for the log file.For more information, see AppNode Logging.
189
TIBCO ActiveMatrix BusinessWorks™ Administration

Issue Message Resolution
The specified application couldnot be started.
TIBCO-BW-TEAAGENT-500410: Failed tostart Application
TIBCO-BW-ADMIN-500313:AppNode [AppNode] is notrunning or cannot be contacted.
The specified AppSpace maynot have associated AppNodesor it might be on a bwagentthat is not reachable.
An application can only bestarted if the specifiedAppNode is running. Pivot tothe AppNodes page and verifythe status of AppNodes in theAppSpace. If no AppNodesexist, create at least one and tryto start the application again. Ifthe minimum number ofAppNodes was specified whenthe AppSpace was created, thatminimum number ofAppNodes need to exist.
If the application is on a remotemachine, the machine might bedown or the bwagent might notbe running.
The specified archive could notbe deleted.
Archive could not be deleted.
TIBCO-BW-ADMIN-500450:Archive [Archive] has beendeployed to the AppSpaces:[AppSpaces].
The specified archive has beendeployed. Undeploy thearchive from the ApplicationArchives page, then clickDelete to delete the archive.
The application is not in syncwith the archive.
The Out of Sync state isdisplayed for the applicationDeployment state on theApplications page.
Click the Details link to viewthe reason for the state. The Outof Sync state is displayedwhen the EAR file is replacedwith a new version or a newfile of the same version. Thesoftware can detect that theapplication for this archive wasalready deployed. Redeploythe application to resolve theOut of Sync state.
The following error messagecan also be displayed for an outof sync situation:
TIBCO-BWTEAAGENT-300015:Uploaded Archive [Archive] inDomain [Domain]. Applicationdeployed in the followingAppSpace(s) [AppSpace] is outof sync. Please re-deploy.
190
TIBCO ActiveMatrix BusinessWorks™ Administration
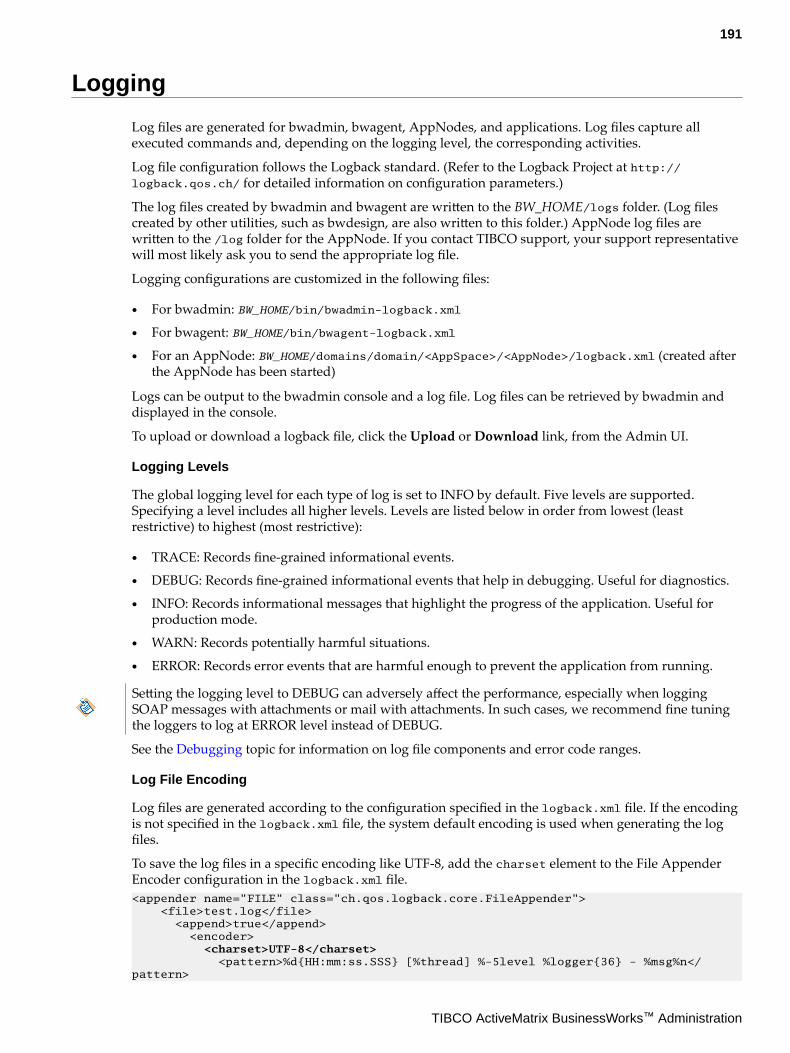
Logging
Log files are generated for bwadmin, bwagent, AppNodes, and applications. Log files capture allexecuted commands and, depending on the logging level, the corresponding activities.
Log file configuration follows the Logback standard. (Refer to the Logback Project at http://logback.qos.ch/ for detailed information on configuration parameters.)
The log files created by bwadmin and bwagent are written to the BW_HOME/logs folder. (Log filescreated by other utilities, such as bwdesign, are also written to this folder.) AppNode log files arewritten to the /log folder for the AppNode. If you contact TIBCO support, your support representativewill most likely ask you to send the appropriate log file.
Logging configurations are customized in the following files:
● For bwadmin: BW_HOME/bin/bwadmin-logback.xml● For bwagent: BW_HOME/bin/bwagent-logback.xml● For an AppNode: BW_HOME/domains/domain/<AppSpace>/<AppNode>/logback.xml (created after
the AppNode has been started)
Logs can be output to the bwadmin console and a log file. Log files can be retrieved by bwadmin anddisplayed in the console.
To upload or download a logback file, click the Upload or Download link, from the Admin UI.
Logging Levels
The global logging level for each type of log is set to INFO by default. Five levels are supported.Specifying a level includes all higher levels. Levels are listed below in order from lowest (leastrestrictive) to highest (most restrictive):
● TRACE: Records fine-grained informational events.● DEBUG: Records fine-grained informational events that help in debugging. Useful for diagnostics.● INFO: Records informational messages that highlight the progress of the application. Useful for
production mode.● WARN: Records potentially harmful situations.● ERROR: Records error events that are harmful enough to prevent the application from running.
Setting the logging level to DEBUG can adversely affect the performance, especially when loggingSOAP messages with attachments or mail with attachments. In such cases, we recommend fine tuningthe loggers to log at ERROR level instead of DEBUG.
See the Debugging topic for information on log file components and error code ranges.
Log File Encoding
Log files are generated according to the configuration specified in the logback.xml file. If the encodingis not specified in the logback.xml file, the system default encoding is used when generating the logfiles.
To save the log files in a specific encoding like UTF-8, add the charset element to the File AppenderEncoder configuration in the logback.xml file.<appender name="FILE" class="ch.qos.logback.core.FileAppender"> <file>test.log</file> <append>true</append> <encoder> <charset>UTF-8</charset> <pattern>%d{HH:mm:ss.SSS} [%thread] %-5level %logger{36} - %msg%n</pattern>
191
TIBCO ActiveMatrix BusinessWorks™ Administration

</encoder> </appender>
Application LoggingYou can generate separate log files for an application either by configuring the Log activity in TIBCOBusiness Studio™ for BusinessWorks™ or by modifying the logback.xml file of the AppNode.
To support application logging, the following prerequisites must be satisfied.
Prerequisites
● A sifting appender <appender-ref ref="APPLICATION-FILE"/> must be present in thelogback.xml file of the AppNode.
● To support Debugging a Specific Application on the AppNode, the logger BWApp must be presentin the the logback.xml file of the AppNode.<!-- Do not modify this logger--><logger name="BWApp"> <level value="ERROR"/> </logger>
● To avoid having hash (#) as part of the logger names in the log files, the appenders present in thelogback.xml file must use the following encoder:
— For AppNode:<encoder class="ch.qos.logback.core.encoder.LayoutWrappingEncoder"> <layout class="com.tibco.bw.extensions.logback.BWLoggerPatternLayout"/></encoder>
— For TIBCO Business Studio for BusinessWorks:<encoder class="ch.qos.logback.core.encoder.LayoutWrappingEncoder"> <layout class="com.tibco.bw.extensions.logback.BWLoggerPatternLayoutStudio"/></encoder>
By default, new log files are created under {BW.HOME}/bw/6.x/logs directory for TIBCO BusinessStudio for BusinessWorks, and for the AppNode, new log files are created under {APPNODE.HOME}/logdirectory.
You can specify a custom location for creation of the log file. However you must use the variable ${fileName} to define the name of the file.
Controlling Output of the Log Activity
You can configure Log activity messages to be logged into separate files in one of the following ways:
● By configuring the Log Activity in TIBCO Business Studio for BusinessWorks
You can configure the Log activity in TIBCO Business Studio for BusinessWorks to separate logs byapplication, process, or event type, depending upon the options selected in the Log activity.
For more information about options in the Log activity, see the "Log" section in the TIBCOActiveMatrix BusinessWorks™ Binding and Palettes Reference.
● By configuring the Logger in the AppNode's logback.xml file
You can separate logs from the Log activity based on your application, without changing the Logactivity just by modifying logback.xml file of the AppNode.
— For one application, add a new logger in the logback.xml file of the AppNode as follows:<logger name="BWApp.#APPNAME#.com.tibco.bw.palette.generalactivities.Log" additivity="false">
192
TIBCO ActiveMatrix BusinessWorks™ Administration

<level value="DEBUG"/> <appender-ref ref="APPLICATION-FILE"/> </logger>
APPNAME is the name of the application.
— For multiple or all aplications, add the previous logger for each application or follow the stepsspecified in the Creating Separate Log Files for Each Application on the AppNode section.
Displaying Log Activity Messages on TIBCO Business Studio for BusinessWorks Console
To display the Log activity messages in the TIBCO Business Studio for BusinessWorks console, theadditivity attribute can be omitted from the logger if the root logger is using STDOUT as its appender.
By modifying the logback.xml file, the logs can only be separated by application and not by process oreventType.
Creating Separate Log Files for Each Application on the AppNodeThere are two steps to generate separate log files for each application running on an AppNode:
1. Change the value of the property bw.engine.separate.logs.by.app to true from the defaultvalue false in the config.ini file of the AppSpace or the AppNode.
To enable this property through TIBCO Business Studio™ for BusinessWorks™, pass it as a VMargument using the -D option.
If the bw.engine.separate.logs.by.app property is set at the AppNode level, thissetting takes precedence over the property set at the AppSpace level. Restart the AppNodewhen the property is updated.
2. Add or modify the loggers in the logback.xml file of AppNode to use <appender-refref="APPLICATION-FILE" />.
If there are any logs that are not specific to an application, and logs generated from all loggers otherthan supported loggers, are written to the defaulf bwappnode.log file.
To create separate log files for all applications in the AppNode, without modifying the Log activity andwithout adding multiple loggers to the logback.xml file, set the propertybw.engine.separate.logs.by.app to true and if not already present add the <appender-refref="APPLICATION-FILE" /> to the logger com.tibco.bw.generalactivities.palette as follows:<logger name="com.tibco.bw.palette.generalactivities.Log" additivity="false"> <level value="DEBUG"/> <appender-ref ref="APPLICATION-FILE"/> </logger>
The following examples demonstrate some common use cases:
1. To separate supported logs by application name, modify the root logger's appender to use the newsifting appender. <root level="ERROR"> <appender-ref ref="APPLICATION-FILE" /></root>
This configuration causes all ERROR logs from all the supported loggers to be separated byapplication name. The level of individual loggers can be set to a desired value such as DEBUG,ERROR, or INFO.
2. To separate logs of only com.tibco.bw.core by application name, modify the logger as follows:<logger name="com.tibco.bw.core" additivity="false"><level value="ERROR"/><appender-ref ref="APPLICATION-FILE"/></logger>
193
TIBCO ActiveMatrix BusinessWorks™ Administration

3. To separate all palette logs by application name, modify the com.tibco.bw.palette logger asfollows:<logger name="com.tibco.bw.palette" additivity="false"><level value="DEBUG"/><appender-ref ref="APPLICATION-FILE"/></logger>
This configuration causes all DEBUG logs from all the palettes in the AppNode to be separated byapplication name.
A similar configuration can be extended to com.tibco.bw.sharedresource and com.tibco.bx.<logger name="com.tibco.bw.sharedresource" additivity="false"><level value="DEBUG"/><appender-ref ref="APPLICATION-FILE"/></logger><!-- ---For bx---><logger name="com.tibco.bx" additivity="false"><level value="DEBUG"/><appender-ref ref="APPLICATION-FILE"/></logger>
4. To separate logs of only JMS Connection shared resource by application name, a new logger must beadded to the logback.xml file.<logger name="com.tibco.bw.sharedresource.jms" additivity="false"><level value="DEBUG"/><appender-ref ref="APPLICATION-FILE"/></logger>
This configuration causes all DEBUG logs from all JMS Connection shared resources in theAppNode to be separated by application name. All other shared resources follow the behavior ofthe logger com.tibco.bw.sharedresource.
For TIBCO Business Studio for BusinessWorks, the bwappnode.log file is created in the same locationwhere the application logs are generated.
If the additivity attribute is not set to false, the logger continues to use the appenders of the parentlogger all the way up to the root logger until it finds a logger whose additivity is set to false.
If not configured correctly, this can lead to duplicate logging.
Debugging a Specific Application on the AppNode
● To enable DEBUG logging on a specific application of the supported loggers, deployed on theAppNode, where multiple applications are running on the AppNode, you can add a new logger tothe existing logback.xml file of the AppNode.
In this scenario the property bw.engine.separate.logs.by.app need not be set to true.
<logger name="BWApp.#APPNAME#"> <level value="DEBUG"/></logger>
Where 'APPNAME' is the name of the application whose debug logs are desired.
For example, if there are three applications running on the AppNode, App1.application,App2.application, and App3.application, the debug logs can be turned on only for App2.applicationby adding a logger BWApp.#App2.application# to the logback.xml file.
<logger name="BWApp.#App2.application#"> <level value="DEBUG"/></logger>
The new logger can be appended by any of the supported loggers.
194
TIBCO ActiveMatrix BusinessWorks™ Administration

● If you want debug logs only for the HTTP palette of the App2.application, add a new logger to thelogback.xml as follows:
<logger name="BWApp.#App2.application#.com.tibco.bw.palette.http"> <level value="DEBUG"/></logger>
● Use <appender-ref ref="APPLICATION-FILE"/> to separate log files for each supported logger.
<logger name="BWApp.#APPNAME#" additivity="false"> <level value="DEBUG"/> <appender-ref ref="APPLICATION-FILE"/></logger>
Supported log level value for these appenders is DEBUG and TRACE only.
Supported LoggersYou can generate separate logs for each application for the following loggers only:
● com.tibco.bw.core
● com.tibco.bw.palette and the hierarchical children. E.g com.tibco.bw.palette.http,com.tibco.bw.palette.file
● com.tibco.bw.sharedresource and the hierarchical children. E.g.com.tibco.bw.sharedresource.jdbc, com.tibco.bw.sharedresource.jms
● com.tibco.bx
Backward Compatibility for Application LoggingYou can execute applications created in the versions prior to the TIBCO ActiveMatrix BusinessWorks™6.5.0 version having Log activities, in the new version with the new or old logback.xml file. There is nochange in the behavior of an application, and it continues to work as is.
If the property bw.engine.separate.logs.by.app is set to false, there is no change in the behaviorof an application, and it continues to work as is.
AppNode LoggingAppNode logging is enabled for every AppNode.
The AppNode log file is named bwappnode.log. It is written to the BW_HOME/domains/<domain>/<AppSpace>/<AppNode>/log folder.
An AppNode log file is created when an AppNode is started. By default, AppNode logs are written to afile appender only. The logs can be viewed in a text editor or displayed in the bwadmin console. Thedefault logging level is ERROR.
In addition to AppNode logging, execution statistics are collected through logback. For information, see Integrating Process Statistics Collection Using Logback.
To view and change the logging level for a single AppNode:
Procedure
1. Create and start an AppNode.
2. Open the logback.xml file in the AppNode root folder in a text editor: BW_HOME/domains/<domain>/<AppSpace>/<AppNode>
3. Change the ROOT level at the end of the file as needed.
195
TIBCO ActiveMatrix BusinessWorks™ Administration

4. Save the logback.xml file. The new configuration is reloaded in 30 seconds by default; theAppNode does not need to be restarted for the logging level to take effect.To change the scan period, add the scanPeriod attribute to the configuration element in thelogback.xml file, for example:<configuration scan="true" scanPeriod="10 seconds">
5. Save the file, start the AppNode, and the application.
6. Open the bwappnode.log file in the root folder of the AppNode to see what has been logged. Thelog file can be opened in the bwadmin console with the following command from the containingAppSpace: getlogfile appnode AppNode
bwadmin Loggingbwadmin creates a log file called bwadmin.log that is written to the BW_HOME/logs folder.The default log is configured as a daily roller appender and is automatically compressed as a ZIP file.The default logging level is INFO. The logback configuration file is BW_HOME/bin/bwadmin-logback.xml.
A bwadmin log file is created on installation, showing the runtime entities that are created by default(domain, AppSpace, and AppNode). The contents of the default log file will look similar to thefollowing image.
bwadmin Log File on Install
To view and change the logging level for bwadmin, follow these steps.
Procedure
1. Start bwadmin. Notice that no INFO messages are displayed:
196
TIBCO ActiveMatrix BusinessWorks™ Administration

If bwadmin could not be started, informational messages will be displayed to help you track downthe cause.
2. Exit bwadmin.
3. Open BW_HOME/bin/bwadmin-logback.xml in a text editor. Change the ROOT level setting(indicated below in bold font) at the end of the file as needed. This changes the level for the fileappender.<root level="INFO"> <appender-ref ref="STDOUT" /> <appender-ref ref="FILE" />
4. Save the logback configuration file and start bwadmin. The configuration file is reloaded in 30seconds by default. Create a domain.
5. Open the log file at BW_HOME/logs/bwadmin.log. More detail is captured in the log file.
bwagent LoggingThe bwagent creates a log file called bwagent.log that is saved in the BW_HOME/logs folder.The default log is configured as a daily roller appender and is automatically compressed as a ZIP file.The default logging level is INFO. The logback configuration file is BW_HOME/bin/bwagent-logback.xml. When the bwagent is started, the bwagent.log log file is created. If the bwagent couldnot be started, informational messages will be displayed to help track down the cause. For the defaultlogging level, the bwagent displays messages similar to the following.C:BW_HOME\bin>bwagentTIBCO ActiveMatrix BusinessWorks version 6.1.1, build V7, 2014-07-21BW Agent name MACHINE_1BW Agent stores data locallyInitializing datastore using TIBCO ActiveSpaces (Java). Enterprise Edition. Version 2.1.3.005 .............. Initialization of datastore completeBW Agents in the group that store data:Name MACHINE_1, Host 10.98.201.18TIBCO-BW-AGENT-300002: BusinessWorks Agent started successfully.
To view and change the logging level for bwagent, follow these steps. (The bwagent does not have to berestarted for the logging level change to take effect.)
197
TIBCO ActiveMatrix BusinessWorks™ Administration
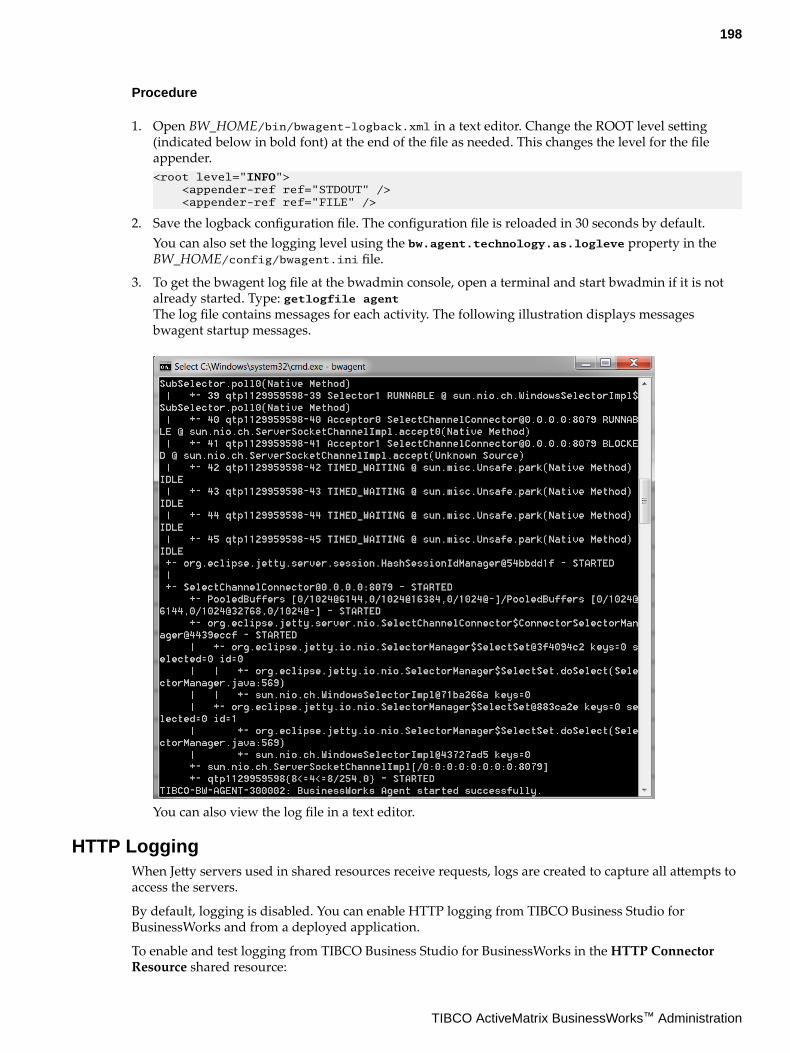
Procedure
1. Open BW_HOME/bin/bwagent-logback.xml in a text editor. Change the ROOT level setting(indicated below in bold font) at the end of the file as needed. This changes the level for the fileappender.<root level="INFO"> <appender-ref ref="STDOUT" /> <appender-ref ref="FILE" />
2. Save the logback configuration file. The configuration file is reloaded in 30 seconds by default.You can also set the logging level using the bw.agent.technology.as.logleve property in theBW_HOME/config/bwagent.ini file.
3. To get the bwagent log file at the bwadmin console, open a terminal and start bwadmin if it is notalready started. Type: getlogfile agentThe log file contains messages for each activity. The following illustration displays messagesbwagent startup messages.
You can also view the log file in a text editor.
HTTP LoggingWhen Jetty servers used in shared resources receive requests, logs are created to capture all attempts toaccess the servers.
By default, logging is disabled. You can enable HTTP logging from TIBCO Business Studio forBusinessWorks and from a deployed application.
To enable and test logging from TIBCO Business Studio for BusinessWorks in the HTTP ConnectorResource shared resource:
198
TIBCO ActiveMatrix BusinessWorks™ Administration

1. In the Advanced tab, select the Enable Access Logs check box.
2. In the Advanced tab, select Logging Configuration.
3. Navigate to bw\<Release_Number>\config\design\logback and selectlogback_leveldebug.xml.
4. Check the console logs to make sure they display content.
To enable and test logging from a deployed application:
1. Deploy the application on a TEA server.
2. Enable the debug logging for appnode.
3. Check the appnode.log file.
4. Check for log contents similar to the following:
++++++++++++++++++++
2017-01-06 16:26:17.609 INFO [bwResourceHTTPConnector.qtp-112]
com.tibco.bw.http.jetty.accesslogger - [HTTP Connector: mpandav-t450:6565]
mpandav-t450
192.168.56.1 - - [06/Jan/2017:16:26:17 +0530] "GET /?hello HTTP/1.1" 200 41 "-"
"Jakarta Commons-HttpClient/3.1" - 32 32
++++++++++++++++++++
Enable debug logging for your application to ensure that the HTTP logs are populated.
For more information on enabling HTTP access logging, see "HTTP Connector" in the TIBCOActiveMatrix BusinessWorks™ Bindings and Palette Referenceguide.
The check box, Enable Access Logs, is supported only from ActiveMatrix BusinessWorks™ 6.3.2version onwards. To enable HTTP access logging for applications created on previous versions ofActiveMatrix BusinessWorks, set the property bw.plugin.http.jetty.accesslogs to true.
Viewing Log Files from the Admin UIAppNode and bwagent log files are available from the Admin UI.
Prerequisites
● The Admin UI is running.
● At least one AppNode has been started.
Procedure
1. Open the Admin UI.
2. Select the BusinessWorks product icon on the home page and click a domain.
3. To view the log file for the bwagent, click the Agents icon on the left, then drill into the bwagent byclicking the bwagent name on the Agents page. The page for the selected bwagent is displayed:
199
TIBCO ActiveMatrix BusinessWorks™ Administration

4. Click the Log File View Online or Download link. View Online displays the bwagent log file in anew browser window. Download downloads the file to your machine. This log file is created by thebwagent using the logging configuration provided in the logback.xml file. See bwagent Loggingfor more information.
5. To view the log file for an AppNode, click the AppNodes icon on the left, then choose an AppNodeby clicking the AppNode name on the AppNode page. The page for the selected AppNode isdisplayed:
6. Click the Log File View Online or Download link. View Online displays the AppNode log file in anew browser window. Download downloads the file to your machine. For more information aboutAppNode logging, see AppNode Logging.
200
TIBCO ActiveMatrix BusinessWorks™ Administration

Fault Tolerance
Fault tolerance is the ability of the system to continue processing requests when an unexpected failureoccurs on one of the AppNodes in the AppSpace.
Fault tolerance is supported only at the AppNode level. When an unexpected failure occurs on one ofthe AppNodes in an AppSpace, the application will no longer be available on that AppNode. However,the fault tolerance configuration enables the application to continue to provide service and processrequests through the other AppNodes in the AppSpace. Depending on the activation mode selected forthe application (See Activation Modes), the fault tolerance configuration can behave in the followingways:
● Distributes the incoming request load among other AppNodes in the AppSpace.
● If an AppNode that has an application in active state fails, another AppNode that has an applicationin the passive (stand-by) state takes over and starts processing requests.
● The check-pointed job data from an application in the failed AppNode can be recovered by anotherAppNode.
● If an application is in the standby or disabled mode, the status in the Components tab in Admin UIchanges to Stopped, and the starter state displayed in the command line changes to Not Active. Formore information on retrieving the list of components, see Retrieving list of components in anApplication.
ActiveMatrix BusinessWorks fault tolerance feature can be classified into two types: Managed FaultTolerance and Non-Managed Fault Tolerance.
Managed Fault Tolerance
In managed fault tolerance, when an AppNode fails, the application on another AppNode takes overautomatically. The AppNodes in an AppSpace are aware of each other’s existence and the enginescollaborate to provide fault tolerance.
The managed fault tolerance requires:
● The engine persistence mode (bw.engine.persistenceMode) to be set to type group. Thepersistence mode of type group requires both database and group provider configurations. See Engine Persistence Modes for details.
● A minimum of two AppNodes in an AppSpace.
The managed fault tolerance configuration supports both the application activation modes - SingleAppNode and Multiple AppNodes. See Application Activation Modes for details. The following tablelists the managed fault tolerance features available for each of the activation modes.
Managed Fault Tolerance Features for Application Activation Modes
Single AppNode (Active-Passive) Multiple AppNode (Active-Active)
The incoming requests are only processed by anAppNode where the application is in an activestate.
The incoming requests can be processed by anyAppNode since the application is active in allAppNodes.
On failure of an AppNode that has theapplication in an active state will automaticallyenable the application in another AppNode totake over and start processing requests.
On failure of an AppNode, other AppNodes willcontinue to process new requests.
201
TIBCO ActiveMatrix BusinessWorks™ Administration

Single AppNode (Active-Passive) Multiple AppNode (Active-Active)
The check pointed data from an application inthe failed AppNode can be recovered by theapplication that is automatically enabled inanother AppNode.
The check pointed data from an application inthe failed AppNode can be automaticallyrecovered by another AppNode.
Fault-tolerant Fail-over
Non-managed Fault Tolerance
In non-managed fault tolerance, the AppNodes in an AppSpace are not aware of each other's existenceand there is no collaboration between the engines. Consequently, if an AppNode fails, then anotherAppNode in the AppSpace will not take over.
The non-managed fault tolerance requires:
● The engine persistence mode (bw.engine.persistenceMode) to be set to type datastore. Thepersistence mode of type datastore requires database configurations. See Engine PersistenceModes for details.
● If there are multiple AppNodes in the AppSpace, then each AppNode must be configured with aunique database configuration. An AppNode specific database configuration is stated through theAppNode config.ini file.
The application activation mode is not applicable in non-managed fault tolerance configuration. That is,the application activation modes Single AppNode or Multiple AppNodes are not supported in thenon-managed fault tolerance. See Activation Modes for details. The application is activated in allAppNodes, however unlike the managed fault tolerance, the other AppNodes in the AppSpace are notaware of each other. The following features are available for non-managed fault tolerance:
202
TIBCO ActiveMatrix BusinessWorks™ Administration

● The incoming requests can be processed by any AppNode since the application is active in allAppNodes.
● On failure on an AppNode, other AppNodes will continue to process new requests.
● An application can have checkpoint; however on failure of an AppNode; other AppNode will notrecover the check-pointed data.
Application Activation ModesActivation mode for an application defines the way an application is loaded, initiated and started whendeployed to an AppSpace.
By choosing the appropriate activation mode, the component in an application module can beconfigured to be active in multiple AppNodes or in a single AppNode. When configured to be active ina single AppNode, the component is active in a single AppNode and in a passive state in all the otherAppNodes of the AppSpace.
A component in an active state is loaded, initialized and enabled to process new events. A componentin a passive state is loaded, initialized; however it is not enabled to process new events, instead it is in astand-by mode. When a component is active in multiple AppNodes, it is considered to be Active-Active. And when a component is active in a single AppNode and passive in other AppNodes, it isconsidered to be Active-Passive.
The component's activation mode is determined by the process that implements the component. Atdesign-time, the process that is implemented by a component in an application module can beconfigured to be active in a single AppNode (Active-Passive) or in multiple AppNodes (Active-Active).To do so, set the Activation field on the Advanced tab of the Properties view as shown:
If the activation mode for a process is set to Multiple AppNodes, then the activation mode for all thesub-processes and child processes (other processes that are called by the process or one of its childprocesses) must be set to Multiple AppNodes as well. Failure to do so can result in a design-timevalidation error.
Enabling the activation mode for an application requires both design-time and runtime configurationsas described in the following sections.
Active-Active (Multiple AppNodes)
In active-active mode, an application is loaded, initiated, and ready to run on all the AppNodes in theAppSpace. Enabling an application for active-active mode requires both design-time and runtimeconfigurations. Perform the following steps to configure an application for active-active mode:
● Design-time: Set the activation mode of the component process to Multiple AppNodes. TheActivation field is configurable from the Advanced tab of the Properties view for the process.
● Runtime: The engine persistence mode must be set to group to enable the engines running in theAppNodes to be aware of the existence of other engines in the AppSpace and provide managed
203
TIBCO ActiveMatrix BusinessWorks™ Administration

fault tolerance feature. See Engine Persistence Modes for details about persistence modes. See Managed Fault Tolerance for details on how to configure the runtime.
Active-Active Mode
Active-Passive (Single AppNode)
In active-passive mode, an application is loaded on all the AppNodes in the AppSpace, and is activatedto run on a single AppNode at any given time. Enabling an application for active-passive moderequires both design-time and runtime configurations. Perform the following steps to configure anapplication for active-passive mode:
● Design-time: Set the activation mode of the component process to Single AppNode. TheActivation field is configurable from the Advanced tab of the Properties view for the process.
● Runtime: The engine persistence mode must be set to group to enable the engines running in theAppNodes to be aware of the existence of other engines in the AppSpace and provide managedfault tolerance feature. See Engine Persistence Modes for details about persistence modes. See Managed Fault Tolerance for details on how to configure the runtime.
204
TIBCO ActiveMatrix BusinessWorks™ Administration
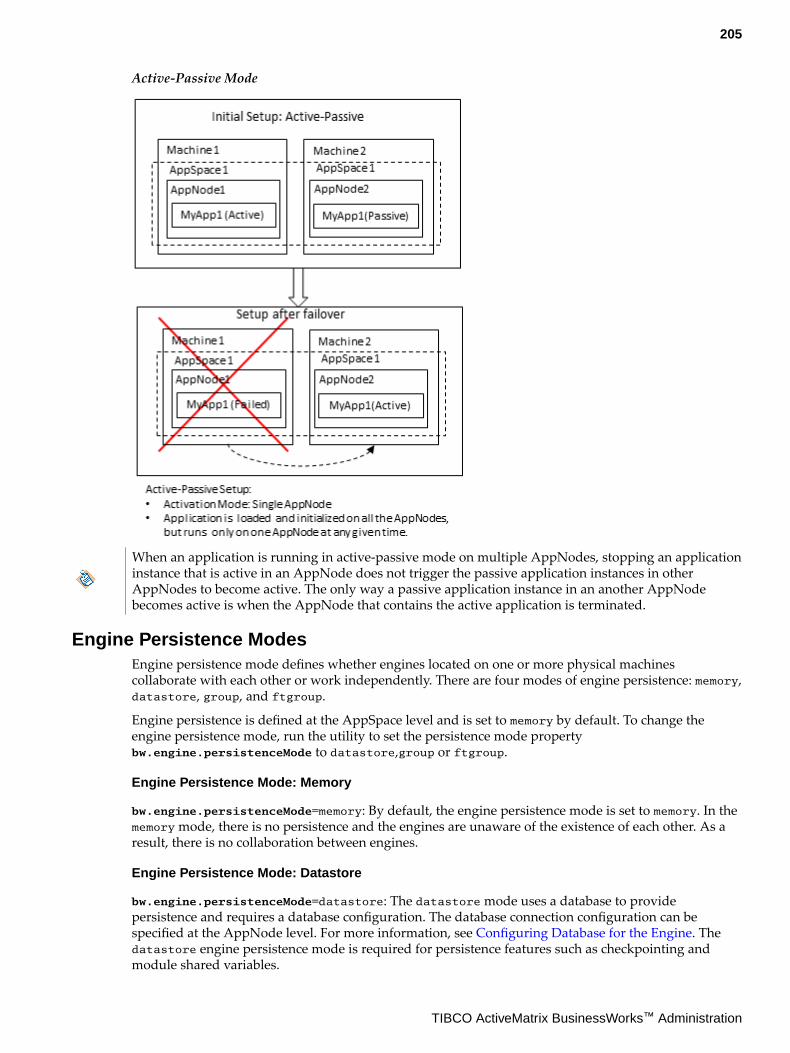
Active-Passive Mode
When an application is running in active-passive mode on multiple AppNodes, stopping an applicationinstance that is active in an AppNode does not trigger the passive application instances in otherAppNodes to become active. The only way a passive application instance in an another AppNodebecomes active is when the AppNode that contains the active application is terminated.
Engine Persistence ModesEngine persistence mode defines whether engines located on one or more physical machinescollaborate with each other or work independently. There are four modes of engine persistence: memory,datastore, group, and ftgroup.
Engine persistence is defined at the AppSpace level and is set to memory by default. To change theengine persistence mode, run the utility to set the persistence mode propertybw.engine.persistenceMode to datastore,group or ftgroup.
Engine Persistence Mode: Memory
bw.engine.persistenceMode=memory: By default, the engine persistence mode is set to memory. In thememory mode, there is no persistence and the engines are unaware of the existence of each other. As aresult, there is no collaboration between engines.
Engine Persistence Mode: Datastore
bw.engine.persistenceMode=datastore: The datastore mode uses a database to providepersistence and requires a database configuration. The database connection configuration can bespecified at the AppNode level. For more information, see Configuring Database for the Engine. Thedatastore engine persistence mode is required for persistence features such as checkpointing andmodule shared variables.
205
TIBCO ActiveMatrix BusinessWorks™ Administration

Engine Persistence Mode: Group
bw.engine.persistenceMode=group: The group mode uses a database and a group provider toprovide persistence and collaboration between the AppNodes. In the group mode, the engines areaware of each other's existence and they can collaborate and work together to enable features such ascheckpointing and managed fault tolerance. The configuration details must be specified at theAppSpace level. For more information, see Configuring Database for the Engine and Configuring theEngine for Group Persistence Mode.
In group mode, the engine requires both DB and TIBCO Enterprise Message Service™ (EMS) or TIBCOFTL® as mandatory infrastructure requirement. Along with the data persistence and collaboration,AppNode uses the database for internal functions too. So ensure that the database is always available.
Engine Persistence Mode: FTGroup
bw.engine.persistenceMode=ftgroup:
The ftgroup mode does not use a database, and disregards the application activation mode, but doesuse a group provider to provide minimal collaboration between the AppNodes. Only one AppNodewill run the applications, while the other AppNodes will be standing by, to take over in the event of afailure of the active AppNode. When configured for the ftgroup persistence mode, the engine requiresa group provider such as TIBCO Enterprise Message Service™ (EMS) or TIBCO FTL®, to be configured.Also, note that, since the ftgroup mode does not use a database, this mode does not supportcheckpointing. For more information, see Configuring the Engine for FTGroup Persistence Mode.
Configuring Database for the EngineCheckpoint activity and other persistence features require the engine persistence mode(bw.engine.persistenceMode) to be configured for a datastore or group mode. When the enginepersistence mode property is configured for datastore or group mode, the engine requires a databaseconfiguration.
Procedure
1. Scripts for creating the engine database for various database types are located at BW_HOME/config/dbscripts/engine. Based on whether the engine persistence mode property is configured fordatastore mode or group mode, complete one of the following steps:a) If the engine persistance mode property is set to datastore mode, run the bundled scripts
create.sql and create-scp.sql to create the engine database.b) If the engine persistance mode property is set to group mode, run the bundled scripts
create.sql and create-dcp.sql to create the engine database.
2. To change the engine persistence mode, run the utility to set the persistence mode propertybw.engine.persistenceMode to datastore or group, and then configure the engine databaseconnection details.bw.engine.persistenceMode=[datastore | group]
Before updating the AppSpace configuration, you must stop the AppSpace if it is running.
The database connection configuration can be specified at the AppSpace or the AppNode level. Thedatabase connection details specified at the AppSpace level will apply to all AppNodes within theAppSpace. The configuration specified at the AppNode level takes precedence over theconfiguration specified at the AppSpace level.
When the engine persistence mode property is set to group, the database connection configurationmust be specified only at the AppSpace level.
When the engine persistence mode property is set to datastore, the database connectionconfiguration cannot be shared by two or more AppNodes in the same AppSpace. As a result, the
206
TIBCO ActiveMatrix BusinessWorks™ Administration

database connection configuration can be specified at the AppSpace level only if the AppSpacecontains a single AppNode. For an AppSpace that contains two or more AppNodes, each AppNoderequires a unique database and the database connection configuration must be specified at theAppNode level.
3. To set database configuration properties at the AppSpace level, follow these steps:
Ensure you are using a different database instance for each AppSpace. To do this with asingle database, create a tablespace or schema for each AppSpace.
a) Copy the existing AppSpace config.ini file (located in the root of the AppSpace folder), or theAppSpace config.ini template file appspace_config.ini_template (located in BW_HOME/config/) to a temporary location.
b) Edit the engine persistence mode property, bw.engine.persistenceMode, and set it todatastore or group.bw.engine.persistenceMode=[datastore | group]
c) Configure the following database connection properties in the BW Engine datastoreconfiguration section of the config.ini file:#------------------------------------------------------------------------------# Section: BW Engine Database Configuration. ## The properties in this section are applicable to the BW Engine database. # All properties in this section are required when the BW Engine # property "bw.engine.persistenceMode" set to "datastore" or "group".# ------------------------------------------------------------------------------# BW Engine Database Driver. bw.engine.db.jdbcDriver=org.postgresql.Driver
# BW Engine Database URL.bw.engine.db.url=jdbc:postgresql://<servername>:<portnumber>/<dbname>
# BW Engine Database User Name.bw.engine.db.userName=user1
# BW Engine Database User Password.bw.engine.db.password=
# BW Engine Database Connection Pool Size. bw.engine.db.maxConnections=15
When setting the password property (bw.engine.db.password), the default format is plain text.Execute the command bwadmin obfuscate, or the command bwobfuscator, from the commandline to encrypt the password; use the generated encrypted text as the password.
The bwadmin bwenginedb command will display BW engine datastore configurationsettings.
4. To set the database for datastore mode at the AppNode level, follow these steps:a) Copy the existing AppNode config.ini file (located in the root of the AppNode folder) to a
temporary location.b) Set engine persistence mode property bw.engine.persistenceMode to datastore andconfigure engine database connection details.bw.engine.persistenceMode=[datastore]
c) Configure the engine database connection properties in the BW Engine datastore configurationsection of the config.ini file. By default, the AppNode config.ini file does not contain theseproperties. Copy these properties from the AppSpace config.ini template file ,appspace_config.ini_template, located in BW_HOME/config to the AppNode config.ini fileand provide the database connection details.
5. Use one of the following config admin commands to push the configuration to the AppSpace orthe AppNode:
207
TIBCO ActiveMatrix BusinessWorks™ Administration

● AppSpace:bwadmin[admin] > config -d myDomain -a myAppSpace -cf <temporaryLocation>/config.ini
● AppNode:bwadmin[admin]> config –d myDomain –a myAppSpace -n myAppnode –cf <temporaryLocation>/config.ini
6. Restart the AppSpace.
7. Before you clean the engine database, ensure that you have backed up all important data.
To clean the engine database that is configured for datastore mode, run the drop.sql and drop-scp.sql scripts. If the engine database is configured for group mode, run the drop.sql and drop-dcp.sql scripts.
Result
You used the bwadmin command line to set the database configuration property. You can also use theAdmin UI to set this property. See the following topics from the TIBCO ActiveMatrix BusinessWorks™Administration guide.
● Editing an AppSpace Configuration
● Editing an AppNode Configuration
Configuring the Engine for Group Persistence ModeThe managed fault tolerance feature requires the engine persistence mode to be configured for thegroup mode. The group mode also supports the Checkpoint activity and other persistence features.When configured for the group persistence mode, the engine requires both a database and a groupprovider, such as TIBCO Enterprise Message Service™ (EMS) or TIBCO FTL®, to be configured.
Refer to the following topics for instructions about setting TIBCO EMS or TIBCO FTL as the groupprovider technology for the engine:
● Configuring EMS as the Group Provider for Engine
● Configuring FTL as the Group Provider for Engine
Configuring EMS as the Group Provider for Engine
Follow these steps to configure the engine for group persistence mode, and to set TIBCO EMS as thegroup provider technology.
Procedure
1. Create the engine database by executing the bundled scripts create.sql,create-scp.sql andcreate-dcp.sql. Scripts for creating the engine database for various database types are located inBW/Home/config/dbscripts/engine. The engine directory contains folders for the supporteddatabase types, and scripts for each database can be found in the respective folders.
2. Set engine persistence mode property (bw.engine.persistenceMode) to group and configure theengine group configuration.a) Copy the existing AppSpace config.ini template file appspace_config.ini_template
(located in BW_HOME/config ) to the root of the AppSpace folder, or a temporary location, andrename the file as config.ini.
b) Edit the ActiveMatrix BusinessWorks engine persistence mode property,bw.engine.persistenceMode, and set it to group.
208
TIBCO ActiveMatrix BusinessWorks™ Administration

Follow these steps to configure the engine for group persistence mode, and to set TIBCOEnterprise Message Service™ (EMS) as the group provider technology.bw.engine.persistenceMode=group
c) Specify the group name and group provider technology in the config.ini file. The group nameis optional and it defaults to domain and AppSpace names separated by an underscore (_). OnlyTIBCO Enterprise Message Service (EMS) is supported by the group provider technology.
You can use a different database instance for each AppSpace. Alternatively, you can usea single database instance for multiple AppSpaces if you create a tablespace or schemafor each one.
# ------------------------------------------------------------------------------# Section: BW Engine Group Configuration. # # The properties in this section are applicable to the BW Engine group.# Some of the properties in this section are required when the BW Engine # property "bw.engine.persistenceMode" is set to "group". # ------------------------------------------------------------------------------# BW Engine Group Name. This is an optional property and it specifies name of # the BW engine group. If this property is not specified, then the group name # defaults to "Group_<DomainName>_<AppSpaceName>". #bw.engine.groupName=mytestgroup
# BW Engine Group Connection Provider Technology. This is a required property # when the persistenceMode is set to "group" (bw.engine.persistenceMode=group) # and it specifies the BW Engine group communication technology. The only # supported values are "ems" and "ftl". The group connection provider technology property # requires additional configuration. See section "Configuring the Engine for Group Persistence Mode" # for additional configuration. bw.engine.groupProvider.technology=ems
d) Specify the group provider configuration:# ------------------------------------------------------------------------------# Section: BW Engine Group Connection Provider EMS Configuration.## Some of the properties in this section are required when the BW Engine Group # Connection Provider Technology property "bw.engine.groupProvider.technology" # value is set to "ems".# ------------------------------------------------------------------------------# BW Engine Group Connection Provider EMS URL. This property is required if # the group provider technology is "ems".bw.engine.groupProvider.qin.EMSServerUrl=tcp://localhost:7222 # BW Engine Group Connection Provider EMS User Name. This property is required # if the group provider technology is "ems".bw.engine.groupProvider.qin.EMSUserName=admin
# BW Engine Group Connection Provider EMS User Password. This property is # required if the group provider technology is "ems".bw.engine.groupProvider.qin.EMSPassword=
# BW Engine Group Connection Provider EMS Member Prefix. This property is # optional and the default value is "EMSGMS". #bw.engine.groupProvider.qin.EMSPrefix=EMSGMS
# BW Engine Group Connection Provider EMS Recovery Timeout in ms. This # property is optional and the default value is "5000" ms. #bw.engine.groupProvider.qin.EMSRecoveryTimeout=5000
# BW Engine Group Connection Provider EMS Recovery Attempt Delay in ms. This
209
TIBCO ActiveMatrix BusinessWorks™ Administration

# property is optional and the default value is "500" ms. #bw.engine.groupProvider.qin.EMSRecoveryAttemptDelay=500
# BW Engine Group Connection Provider EMS Recovery AttemptCount. This # property is optional. #bw.engine.groupProvider.qin.EMSRecoveryAttemptCount=
# BW Engine Group Connection Provider EMS Connect Attempt Count. This property# is optional.#bw.engine.groupProvider.qin.EMSConnectAttemptCount= # BW Engine Group Connection Provider EMS Connect Attempt Delay in ms. This # property is optional. #bw.engine.groupProvider.qin.EMSConnectAttemptDelay=
When setting the password property (bw.engine.groupProvider.qin.EMSPassword), thedefault format is plain text. Execute the command bwadmin obfuscate, or the commandbwobfuscator, from the command line to encrypt the password; use the generated encryptedtext as the password.
3. Optional. The following properties are available for EMS SSL configuration.EMS SSL Configuration#client identity consisting of the certificate,#private key and optionally extra issuer certificates can be included into a single data block using PKCS12.#KeyStore or Entrust Store encodings#bw.engine.groupProvider.ems.ssl.trust.identity=
#The set of Trusted Certificates represents all trusted issuers of the server certificate.#It must be specified by the client application unless the host certificate verification is completely disabled.#bw.engine.groupProvider.ems.ssl.trust.certlocation=
#EMS SSL connection trust password. This #property is required if the JMS server protocol is ssl. The password may#be clear text or supplied as an obfuscated string.#bw.engine.groupProvider.ems.ssl.trust.password=
#trusted certificate commonname must match the ems server hostname if set to false#bw.engine.groupProvider.ems.ssl.disable.verifyHostName=
#client and server certificates must match if set to false#bw.engine.groupProvider.ems.ssl.trust.disable.verifyHost=
4. Optional. If you have saved the config.ini file to a temporary location, ensure you copy it to theAppSpace root folder located in BW_HOME/domains/defaultdomain/appspaces/defaultappspace.
5. Use the config admin command to push the configuration to the AppSpace: bwadmin[admin] >config -d myDomain -a myAppSpace -cf <temporaryLocation>/config.ini.
Configuring TIBCO FTL® as the Group Provider for Engine
Follow these steps to configure the engine for group persistence mode, and to set TIBCO FTL as thegroup provider technology.
Use of TIBCO FTL with TIBCO ActiveMatrix BusinessWorks™ for configuring bwagent and forconfiguring group provider for engine does not require TIBCO FTL licenses.
Prerequisites
● See the ActiveMatrix BusinessWorks™ readme for the version of TIBCO FTL that is supported withthe version of ActiveMatrix BusinessWorks 6.x you are using.
210
TIBCO ActiveMatrix BusinessWorks™ Administration
● Ensure you have installed FTL client libraries. For more information, see Integrating with TIBCOFTL in theTIBCO ActiveMatrix BusinessWorks™ Installation guide.
● These steps are only applicable if you are not using TIBCO FTL as the bwagent transport.● If you are installing TIBCO FTL after you have already installed ActiveMatrix BusinessWorks, set
the tibco.env.FTL_HOME variable in the bwcommon.tra file. You can find this file in the bin folder atBW_HOME\bin for Windows, or ${BW_HOME}/bin for Unix.
1. Install TIBCO FTL. For instructions, see the TIBCO FTL® Installation guide.
2. Start the FTL Realm server by executing the ./tibrealmserver -ht <hostIP>:<port> FTLcommand../tibrealmserver -ht <hostIP>:<port>
3. Execute the following FTL command to populate data in the bwadmin_ftlrealmserver.json templatefile, located in the config folder at BW_HOME/config: ./tibrealmadmin -rs <realmserverurl> -ur <PATH of bwadmin_ftl_realmserver.json>
For instructions about how to configure an FTL backup server for high availability, see "ConfiguringBackup Realm Servers for Fault Tolerance" in the TIBCO FTL® Administration guide.
Procedure
1. Create the engine database by executing the bundled scripts create.sql,create-scp.sql andcreate-dcp.sql. Scripts for creating the engine database for various database types are located atBW_HOME/config/dbscripts/engine. The engine directory contains folders for the supporteddatabase types, and scripts for each database can be found in the respective folders.
2. Set engine persistence mode property (bw.engine.persistenceMode) to group and configure theengine group configuration.a) Copy the existing AppSpace config.ini template file appspace_config.ini_template
(located in BW_HOME/config ) to the root of the AppSpace folder, or a temporary location, andrename the file as config.ini.
b) Edit the ActiveMatrix BusinessWorks engine persistence mode property,bw.engine.persistenceMode, and set it to group.bw.engine.persistenceMode=group
c) Specify the group name and group provider technology as ftl in the config.ini file. Thegroup name is optional and it defaults to domain and AppSpace names separated by anunderscore (_).
Ensure you are using a different database instance for each AppSpace.
# ------------------------------------------------------------------------------# Section: BW Engine Group Configuration. # # The properties in this section are applicable to the BW Engine group.# Some of the properties in this section are required when the BW Engine # property "bw.engine.persistenceMode" is set to "group". # ------------------------------------------------------------------------------# BW Engine Group Name. This is an optional property and it specifies name of # the BW engine group. If this property is not specified, then the group name # defaults to "Group_<DomainName>_<AppSpaceName>". #bw.engine.groupName=mytestgroup
# BW Engine Group Connection Provider Technology. This is a required property # when the persistenceMode is set to "group" (bw.engine.persistenceMode=group) # and it specifies the BW Engine group communication technology. The only # supported values are "ems" and "ftl". The group connection provider technology property
211
TIBCO ActiveMatrix BusinessWorks™ Administration

# requires additional configuration. See section "Configuring the Engine for Group Persistence Mode" # for additional configuration. bw.engine.groupProvider.technology=ftl
d) Specify the group provider configuration:# ------------------------------------------------------------------------------# Section: BW Engine Group Connection Provider FTL Configuration.## Some of the properties in this section are required when the BW Engine Group # Connection Provider Technology property "bw.engine.groupProvider.technology" # value is set to "ftl"# ------------------------------------------------------------------------------# BW Engine Group Connection Provider FTL Realm Server. This property is required if # the group provider technology is "ftl".bw.engine.groupProvider.ftl.realmserver=http://localhost:8080
# BW Engine Group Connection Provider FTL Realm client user name# This property is required if the group provider technology is "ftl".bw.engine.groupProvider.ftl.username=
# BW Engine Group Connection Provider FTL Realm client password# This property is required if the group provider technology is "ftl".bw.engine.groupProvider.ftl.password=
# BW Engine Group Connection Provider FTL application identifier# This property is required if the group provider technology is "ftl".bw.engine.groupProvider.ftl.appinstance.id=bwadmin-endpoint
# BW Engine Group Connection Provider FTL secondary realm server# This property is optional.#bw.engine.groupProvider.ftl.secondaryserver=
# BW Engine Group Connection Provider FTL group name# This property is required if the group provider technology is "ftl".bw.engine.groupProvider.ftl.groupname=
# BW Engine Group Connection Provider FTL application name# This property is required if the group provider technology is "ftl".bw.engine.groupProvider.ftl.appname=bwadmin
# BW Engine Group Connection Provider FTL publish endpoint# This property is required if the group provider technology is "ftl".bw.engine.groupProvider.ftl.publish.endpoint=bwadmin-endpoint
# BW Engine Group Connection Provider FTL application name# This property is required if the group provider technology is "ftl".bw.engine.groupProvider.ftl.subscribe.endpoint=bwadmin-endpoint
When setting the password property (bw.engine.groupProvider.ftl.password), the defaultformat is plain text. Execute the command bwadmin obfuscate, or the commandbwobfuscator, from the command line to encrypt the password; use the generated encryptedtext as the password.
3. Optional. If you have saved the config.ini file to a temporary location, ensure you copy it to theAppSpace root folder located in BW_HOME/domains/defaultdomain/appspaces/defaultappspace.
4. Use the config admin command to push the configuration to the AppSpace: bwadmin[admin] >config -d myDomain -a myAppSpace -cf <temporaryLocation>/config.ini.
Configuring the Engine for FTGroup Persistence ModeIn the managed fault tolerance ftgroup mode, only one AppNode runs the application, and the otherAppNodes are standing by.
212
TIBCO ActiveMatrix BusinessWorks™ Administration

When the bw.engine.ftgroup.lbmode property is set to true in the config.ini file at the AppSpacelevel, all processes having Activation mode set as Multiple AppNodes in TIBCO Business Studio™,run on all bwengines in the group.
By default, bw.engine.ftgroup.lbmode is set to false.
When you want to elect an AppNode as a leader AppNode, then set thebw.engine.use.weighted.node property to true at an AppSpace level. For more information aboutthe bw.engine.use.weighted.node property, see BW Engine ftgroup Properties.
By default, the bw.engine.use.weighted.node property is set to false.
The ftgroup mode does not support checkpointing. When configured for the ftgroup persistencemode, the bwengine requires the group provider, such as TIBCO Enterprise Message Service™ (EMS) orTIBCO FTL®, to be configured.
For instructions about setting TIBCO EMS or TIBCO FTL as the group provider technology for theengine, see the following topics:
● Configuring EMS as the FTGroup Provider for Engine
● Configuring TIBCO FTL® as the FTGroup Provider for Engine
Configuring EMS as the FTGroup Provider for Engine
Follow these steps to configure the engine for ftgroup persistence mode, and to set TIBCO EMS as thegroup provider technology.
Procedure
1. Set engine persistence mode property (bw.engine.persistenceMode) to ftgroup and configurethe engine group configuration.a) Copy the existing AppSpace config.ini template file appspace_config.ini_template
(located in BW_HOME/config ) to the root of the AppSpace folder, or a temporary location, andrename the file as config.ini.
b) Edit the ActiveMatrix BusinessWorks™ engine persistence mode property,bw.engine.persistenceMode, and set it to ftgroup.
Follow these steps to configure the engine for group persistence mode, and to set TIBCOEnterprise Message Service™ (EMS) as the group provider technology.bw.engine.persistenceMode=ftgroup
c) Specify the group name and group provider technology in the config.ini file. The group nameis mandatory.# ------------------------------------------------------------------------------# Section: BW Engine Group Configuration. # # The properties in this section are applicable to the BW Engine group.# Some of the properties in this section are required when the BW Engine # property "bw.engine.persistenceMode" is set to "group" or "ftgroup". # ------------------------------------------------------------------------------# BW Engine Group Name. This is a required property and it specifies name of # the BW engine group. If this property is not specified, then the group name # defaults to "Group_<DomainName>_<AppSpaceName>". #bw.engine.groupName=mytestgroup
# BW Engine Group Connection Provider Technology. This is a required property # when the persistenceMode is set to "group" (bw.engine.persistenceMode=group) or # "ftgroup" (bw.engine.persistenceMode=ftgroup) and it specifies the BW Engine
213
TIBCO ActiveMatrix BusinessWorks™ Administration

group # communication technology. The only supported values are "ems" and "ftl". # The group connection provider technology property requires additional configuration.# See section "Configuring the Engine for Group Persistence Mode" # for additional configuration. bw.engine.groupProvider.technology=ems
d) Specify the group provider configuration:# ------------------------------------------------------------------------------# Section: BW Engine Group Connection Provider EMS Configuration.## Some of the properties in this section are required when the BW Engine Group # Connection Provider Technology property "bw.engine.groupProvider.technology" # value is set to "ems".# ------------------------------------------------------------------------------# BW Engine Group Connection Provider EMS URL. This property is required if # the group provider technology is "ems".bw.engine.groupProvider.qin.EMSServerUrl=tcp://localhost:7222 # BW Engine Group Connection Provider EMS User Name. This property is required # if the group provider technology is "ems".bw.engine.groupProvider.qin.EMSUserName=admin
# BW Engine Group Connection Provider EMS User Password. This property is # required if the group provider technology is "ems".bw.engine.groupProvider.qin.EMSPassword=
# BW Engine Group Connection Provider EMS Member Prefix. This property is # optional and the default value is "EMSGMS". #bw.engine.groupProvider.qin.EMSPrefix=EMSGMS
# BW Engine Group Connection Provider EMS Recovery Timeout in ms. This # property is optional and the default value is "5000" ms. #bw.engine.groupProvider.qin.EMSRecoveryTimeout=5000
# BW Engine Group Connection Provider EMS Recovery Attempt Delay in ms. This # property is optional and the default value is "500" ms. #bw.engine.groupProvider.qin.EMSRecoveryAttemptDelay=500
# BW Engine Group Connection Provider EMS Recovery AttemptCount. This # property is optional. #bw.engine.groupProvider.qin.EMSRecoveryAttemptCount=
# BW Engine Group Connection Provider EMS Connect Attempt Count. This property# is optional.#bw.engine.groupProvider.qin.EMSConnectAttemptCount= # BW Engine Group Connection Provider EMS Connect Attempt Delay in ms. This # property is optional. #bw.engine.groupProvider.qin.EMSConnectAttemptDelay=
When setting the password property (bw.engine.groupProvider.qin.EMSPassword), thedefault format is plain text. Execute the command bwadmin obfuscate, or the commandbwobfuscator, from the command line to encrypt the password; use the generated encryptedtext as the password.
2. Optional. The following properties are available for EMS SSL configuration.EMS SSL Configuration#client identity consisting of the certificate,#private key and optionally extra issuer certificates can be included into a single data block using PKCS12.#KeyStore or Entrust Store encodings#bw.engine.groupProvider.ems.ssl.trust.identity=
#The set of Trusted Certificates represents all trusted issuers of the server certificate.
214
TIBCO ActiveMatrix BusinessWorks™ Administration

#It must be specified by the client application unless the host certificate verification is completely disabled.#bw.engine.groupProvider.ems.ssl.trust.certlocation=
#EMS SSL connection trust password. This #property is required if the JMS server protocol is ssl. The password may#be clear text or supplied as an obfuscated string.#bw.engine.groupProvider.ems.ssl.trust.password=
#trusted certificate commonname must match the ems server hostname if set to false#bw.engine.groupProvider.ems.ssl.disable.verifyHostName=
#client and server certificates must match if set to false#bw.engine.groupProvider.ems.ssl.trust.disable.verifyHost=
3. Optional. If you have saved the config.ini file to a temporary location, ensure you copy it to theAppSpace root folder located in BW_HOME/domains/defaultdomain/appspaces/defaultappspace.
4. Use the config admin command to push the configuration to the AppSpace: bwadmin[admin] >config -d myDomain -a myAppSpace -cf <temporaryLocation>/config.ini.
Configuring TIBCO FTL® as the FTGroup Provider for Engine
Follow these steps to configure the engine for ftgroup persistence mode, and to set TIBCO FTL as thegroup provider technology.
Use of TIBCO FTL with TIBCO ActiveMatrix BusinessWorks™ for configuring bwagent and forconfiguring group provider for engine does not require TIBCO FTL licenses.
Prerequisites
● See the ActiveMatrix BusinessWorks™ readme for the version of TIBCO FTL that is supported withthe version of ActiveMatrix BusinessWorks 6.x you are using.
● Ensure you have installed FTL client libraries. For more information, see "Integrating with TIBCOFTL" in the TIBCO ActiveMatrix BusinessWorks™ Installation guide.
● These steps are only applicable if you are not using TIBCO FTL as the bwagent transport.
● If you are installing TIBCO FTL after you have already installed ActiveMatrix BusinessWorks, setthe tibco.env.FTL_HOME variable in the bwcommon.tra file. You can find this file in the bin folder atBW_HOME\bin for Windows, or ${BW_HOME}/bin for Unix.
1. Install TIBCO FTL. For instructions, see the TIBCO FTL® Installation guide.
2. Start the FTL Realm server by executing the ./tibrealmserver -ht <hostIP>:<port> FTLcommand../tibrealmserver -ht <hostIP>:<port>
3. Execute the following FTL command to populate data in the bwadmin_ftlrealmserver.json templatefile, located in the config folder at BW_HOME/config: ./tibrealmadmin -rs <realmserverurl> -ur <PATH of bwadmin_ftl_realmserver.json>
For instructions about how to configure an FTL backup server for high availability, see "ConfiguringBackup Realm Servers for Fault Tolerance" in the TIBCO FTL® Administration guide .
Procedure
1. Set engine persistence mode property (bw.engine.persistenceMode) to ftgroup and configurethe engine group configuration.
215
TIBCO ActiveMatrix BusinessWorks™ Administration

a) Copy the existing AppSpace config.ini template file appspace_config.ini_template(located in BW_HOME/config ) to the root of the AppSpace folder, or a temporary location, andrename the file as config.ini.
b) Edit the ActiveMatrix BusinessWorks™ engine persistence mode property,bw.engine.persistenceMode, and set it to ftgroup.bw.engine.persistenceMode=ftgroup
c) Specify the group name and group provider technology as ftl in the config.ini file. Thegroup name is mandatory.# ------------------------------------------------------------------------------# Section: BW Engine Group Configuration. # # The properties in this section are applicable to the BW Engine group.# Some of the properties in this section are required when the BW Engine # property "bw.engine.persistenceMode" is set to "ftgroup". # ------------------------------------------------------------------------------# BW Engine Group Name. This is a reqired property and it specifies name of # the BW engine group. If this property is not specified, then the ftgroup name # defaults to "Group_<DomainName>_<AppSpaceName>". #bw.engine.groupName=mytestgroup
# BW Engine Group Connection Provider Technology. This is a required property # when the persistenceMode is set to "ftgroup" (bw.engine.persistenceMode=group) # and it specifies the BW Engine group communication technology. The only # supported values are "ems" and "ftl". The group connection provider technology property # requires additional configuration. See section "Configuring the Engine for Group Persistence Mode" # for additional configuration. bw.engine.groupProvider.technology=ftl
d) Specify the group provider configuration:# ------------------------------------------------------------------------------# Section: BW Engine Group Connection Provider FTL Configuration.## Some of the properties in this section are required when the BW Engine Group # Connection Provider Technology property "bw.engine.groupProvider.technology" # value is set to "ftl"# ------------------------------------------------------------------------------# BW Engine Group Connection Provider FTL Realm Server. This property is required if # the group provider technology is "ftl".bw.engine.groupProvider.ftl.realmserver=http://localhost:8080
# BW Engine Group Connection Provider FTL Realm client user name# This property is required if the group provider technology is "ftl".bw.engine.groupProvider.ftl.username=
# BW Engine Group Connection Provider FTL Realm client password# This property is required if the group provider technology is "ftl".bw.engine.groupProvider.ftl.password=
# BW Engine Group Connection Provider FTL application identifier# This property is required if the group provider technology is "ftl".bw.engine.groupProvider.ftl.appinstance.id=
# BW Engine Group Connection Provider FTL secondary realm server# This property is optional.#bw.engine.groupProvider.ftl.secondaryserver=
# BW Engine Group Connection Provider FTL group name# This property is required if the group provider technology is "ftl".
216
TIBCO ActiveMatrix BusinessWorks™ Administration

bw.engine.groupProvider.ftl.groupname=
# BW Engine Group Connection Provider FTL application name# This property is required if the group provider technology is "ftl".bw.engine.groupProvider.ftl.appname=
# BW Engine Group Connection Provider FTL publish endpoint# This property is required if the group provider technology is "ftl".bw.engine.groupProvider.ftl.publish.endpoint=
# BW Engine Group Connection Provider FTL application name# This property is required if the group provider technology is "ftl".bw.engine.groupProvider.ftl.subscribe.endpoint=
When setting the password property (bw.engine.groupProvider.ftl.password), the defaultformat is plain text. Execute the command bwadmin obfuscate, or the commandbwobfuscator, from the command line to encrypt the password; use the generated encryptedtext as the password.
2. Optional. If you have saved the config.ini file to a temporary location, ensure you copy it to theAppSpace root folder located in BW_HOME/domains/defaultdomain/appspaces/defaultappspace.
3. Use the config admin command to push the configuration to the AppSpace: bwadmin[admin] >config -d myDomain -a myAppSpace -cf <temporaryLocation>/config.ini.
217
TIBCO ActiveMatrix BusinessWorks™ Administration

Engine and Job Tuning
The engine, job tuning and checkpointing properties are specified in the config.ini file for eachAppNode and alternatively, at the AppSpace level. The properties specified in the AppSpaceconfig.ini file apply to all AppNodes associated with the AppSpace; however the properties specifiedin the AppNode config.ini file only apply to a specific AppNode and furthermore, they overwriteany property specified in the AppSpace config.ini file.
The TIBCO ActiveMatrix BusinessWorks™ engine is a multi-threaded engine. When events that triggerthe execution of a process occur concurrently, the engine executes the same process multiple times,concurrently, once for each event. Each process execution, referred to as a process instance, provides anexecution scope for the activities that are a part of the process.
Execution of a component process is called a job. When the business logic is spread across multipleprocesses, a process instance is created for each of these processes and executed in conjunction with aparticular event. Even though these are separate process instances they are all working together andcan be executed as part of the same job. A job can spawn multiple process instances and can providethe execution context for activities that are part of multiple processes. The engine always executes a jobin one engine thread; however, it is not guaranteed that the same engine thread will be used for theentirety of the job.
Engine Tuning
The rate at which the ActiveMatrix BusinessWorks™ engine can execute and complete processesdepends on the ThreadCount and StepCount engine properties.
ThreadCount (bw.engine.threadCount) : The process instances in memory are executed by theengine. The number of process instances that can be executed concurrently by the engine is limited bythe maximum number of threads, indicated by the ThreadCount property. This property specifies thesize of the job thread pool and is applied to all the AppNodes in the AppSpace. Threads execute a finitenumber of tasks or activities uninterrupted and then yield to the next process instance that is ready.Engine threads are shared by all the applications deployed on the same AppNode. The CPU andmemory resources should be measured under a typical processing load to determine if the defaultThreadCount is suitable for your environment. By default, the thread count is eight. See Setting Engineand Job Tuning Properties for instructions on how to change the default value.
If the engine throughput has reached a plateau, but the CPU and memory are not fully utilized, you canincrease the thread count to have a positive effect on the throughput.
If the engine thread count value is too high, it can cause CPU thrashing, or an increase in latencycaused by a large number of messages in the queue.If the engine thread count value is too low, it cancause higher memory use and lower engine throughput as some CPU resources remain unutilized.
The process instances created by the engine are typically held in memory. However, this may not be thecase if the FlowLimit and PageThreshold application properties are set. The number of processinstances that can be created in memory is also limited by the memory available on the machine and thememory allocated to the JVM on which the engine executes.
StepCount (bw.engine.stepCount) : The engine StepCount property determines the number ofactivities that are executed by an engine thread, without any interruption, before yielding the enginethread to another job that is ready in the job pool. This value is applied to all the AppNodes in theAppSpace. Exceptions to StepCount can occur when the job is in a transaction, is blocked, or is waitingfor an asynchronous activity to complete. When a job is in a transaction, the thread is not released untilthe transaction is complete, even when the StepCount is exceeded. However, if a job is blocked orwaiting for an asynchronous activity to complete, the thread can be yielded even when the StepCounthas not been reached.
The default value of this property is -1. When the values is set to -1, the engine can determine thenecessary StepCount value. A low StepCount value can degrade engine performance due to frequent
218
TIBCO ActiveMatrix BusinessWorks™ Administration

thread switches. A high StepCount value may cause less concurrency in executing jobs and hence,result in an inefficient use of CPU.
Job Tuning
Job tuning is done at the application level. Tuning can be narrowed to a specific application version,and a specific component within the application. Job tuning is set by the FlowLimit, PageThreshold,and Priority application properties. When setting these properties, specify the application name. Theapplication version and component name are optional. If the version or component name is notspecified, then the property value applies to all versions or components in the application. Todynamically push any of these properties to runtime, stop the application, update the property in theAppNode or AppSpace config.ini file, and restart the application.
Flow Limit (bw.application.job.flowlimit) : The FlowLimit property specifies the flow limitvalue for an application's process starters or service bindings and is applicable to all the AppNodes inan AppSpace. Flow limit is useful when the engine needs to be throttled as it specifies the maximumnumber of jobs that can be started before suspending the process starter. Thus ensuring that theincoming requests do not overwhelm the engine performance and the CPU and memory is preserved.If the number of jobs being created exceeds the FlowLimit, the engine suspends the creation of newjobs but continues executing the jobs in memory. The engine resumes creating new jobs when sufficientresources are available. There is no default FlowLimit value and it is not enforced by the engine unlessthe FlowLimit property is specified for an application.
Only set the bw.application.job.flowlimit property for applications using non-HTTP-basedtransports, for example, JMS. If applications are using HTTP-based transports, ensure you set the MaxQTP Threads value of the HTTP Connector shared resource to apply Flow Limit.
PageThreshold (bw.application.job.pageThreshold) : The PageThreshold property specifiesthe job page threshold value for an application's process starters or service bindings and is applicable toall the AppNodes in an AppSpace. It specifies the maximum number of jobs that can concurrently beloaded into memory, thus limiting the number of running jobs in the memory. Jobs are paged out ofmemory on the basis of paging strategy selected after the PageThreshold value is reached. The defaultvalue of strategy is PageOnDelete.
There is no default PageThreshold value and it is not enforced by the engine unless thePageThreshold property is specified for an application. The PageThreshold feature requires that theengine persistent mode property (bw.engine.persistenceMode) is set to datastore or group. Formore information, see Engine Persistence Modes.
Paging Strategy (bw.application.job.paging.strategy): The Paging Strategy property specifieshow paging should take place.
It supports two options: PageOnIdle and PageOnDelete.
When you set the value of the property to PageOnIdle, and when the PageThreshold is reached, jobsthat are idle are moved out of memory, and are paged-out to the engine database. The new or old jobsare loaded back into the memory in place of idle jobs when they are created or scheduled.
When you set the value of the property to PageOnDelete, all new jobs created after the PageThresholdvalue is reached are temporarily paged out to the engine database. These jobs are moved back into thememory when the number of jobs in the memory is less than the PageThreshold value.
Priority (bw.application.job.priority): The Priority property specifies the application job'spriority. The option for this property is one of low, normal, or high. The default value is normal. Enginethreads process lower priority jobs only when higher priority jobs are all blocked from continuing.Lower priority jobs are not preempted while in execution.
Checkpointing
To dynamically push any of these properties to runtime, stop the application, update the property inthe AppNode or AppSpace config.ini file, and restart the application.
219
TIBCO ActiveMatrix BusinessWorks™ Administration

Retain Faulted Job (bw.application.checkpoint.retainFaultedJob) : This is an optionalproperty and specifies whether to enable a failed process recovery. The supported values are true andfalse. The default value is false. The Application Name must be a included as a part of this property,however , the Application Version is optional. After setting these properties in the AppNodeconfig.ini file, they can be modified and pushed to runtime by restarting the application.
Recover On Restart (bw.application.checkpoint.recoverOnRestart) :This is an optionalproperty and specifies whether the checkpointed process instances should automatically restart when aprocess engine restarts. The supported values are true and false. The default value is true. TheApplication Name must be included as part of this property, and the Application Version is optional.
Duplicate key Timeout (bw.application.checkpoint.dupKeyTimeout): This is an optionalproperty and specifies the amount of time in minutes to keep duplicate keys stored after thechekpointed job finished executing. By default, the timeout is 0 minutes, and indicates that theduplicate key is deleted as soon as the checkpointed job completes execution.
The ActiveMatrix BusinessWorks application name must be included as part of this property. Howeverthe application version and component name are optional. If the component name is not specified, thevalue is applied to all components in the ActiveMatrix BusinessWorks application.bw.application.checkpoint.dupKeyTimeout.<UsersBWApplicationName> [.<UsersBWApplicationVersion>][.<UsersBWComponentName>]=0
When the property bw.application.checkpoint.retainFaultedJob is set to true for an application,the job is not automatically removed after a failure. So the duplicateKey remains as long as the jobremains. Such a job can be restarted or purged later.
You can also configure the periodic interval in which expired dupKeys should be purged from thedatabase by configuring bw.engine.checkpoint.expired.dupkey.purge.interval property. Itspecifies the default interval for the background thread to poll for expired duplicate keys.
The numerical value can be preceded either by "P" or "D". A value "P60" indicates the backgroundthread polls after every 60 minutes whereas a value "D2" indicates the background thread polls afterevery two days.
The default value is "P30".
Setting Engine and Job Tuning PropertiesEngine and job tuning properties are specified at the Application Level 2 > Config > Job Tuning fromAdmin UI and are set in the Appspace config.ini file. These properties are configured from thebwadmin command line and from the Admin UI at the AppNode level in the AppNode's config.inifile. These properties can also be specified at the AppSpace level, but the AppNode property settingwill take precedence, and the App Instances will go out of sync and but the AppNode will stay in sync.
bwadmin Command LineExecute the following commands at the command line to set the engine and job tuning properties at theAppNode level or the AppSpace level.
AppNode level
Procedure
1. Copy the existing AppNode config.ini file (located in the root of the AppNode folder) to atemporary location.
220
TIBCO ActiveMatrix BusinessWorks™ Administration

2. Uncomment the engine ThreadCount property bw.engine.threadCount and change the defaultvalue as needed.bw.engine.threadCount=8
3. Uncomment the engine StepCount property bw.engine.stepCount and change the default valueas needed. The default value of -1 allows the engine to determine the necessary value.bw.engine.stepCount=-1
4. Uncomment the application FlowLimit property bw.application.job.flowlimit and change thedefault value as needed. The application name must be included in the property. The applicationversion and component name are optional. If the component name is not specified, the FlowLimitvalue will apply to all the components in the application.bw.application.job.flowlimit.<UsersBWApplicationName>[.<UsersBWApplicationVersion>][.<UsersBWComponentName>]=8
5. Uncomment the application PageThreshold property bw.application.job.pageThreshold andchange the default value as needed. The application name must be included in the property. Theapplication version and component name are optional. If the component name is not specified, thePageThreshold value will apply to all the components in the application.bw.application.job.pageThreshold.<UsersBWApplicationName>[.<UsersBWApplicationVersion>][.<UsersBWComponentName>]=10
6. Uncomment the application paging strategy property bw.application.job.paging.strategy andchange the default value as needed. The application name must be included in the property. Theapplication version and component name are optional. If the component name is not specified, thePageThreshold value will apply to all the components in the application.bw.application.job.paging.strategy.<UsersBWApplicationName>[.<UsersBWApplicationVersion>][.<UsersBWComponentName>]=PageOnIdle
7. Uncomment the application Priority property bw.application.job.priority and change thedefault value as needed. The application name must be included in the property. The applicationversion and component name are optional. If the component name is not specified, the Priorityvalue will apply to all the components in the application.bw.application.job.priority.<UsersBWApplicationName>[.<UsersBWApplicationVersion>][.<UsersBWComponentName>]=normal
8. Uncomment the application Retain Faulted Job propertybw.application.checkpoint.retainFaultedJob and change the default value as needed. Theapplication name must be included in the property. The application version and component nameare optional. If the component name is not specified, the Retain Faulted Job value will apply toall the components in the application.bw.application.checkpoint.retainFaultedJob.<UsersBWApplicationName>[.<UsersBWApplicationVersion>][.<UsersBWComponentName>]=false
9. Uncomment the application Recover On Restart propertybw.application.checkpoint.recoverOnRestart and change the default value as needed.Theapplication name must be included in the property. The application version and component nameare optional. If the component name is not specified, the Recover On Restart value will apply toall the components in the application.bw.application.checkpoint.recoverOnRestart.<UsersBWApplicationName>[.<UsersBWApplicationVersion>][.<UsersBWComponentName>]=true
10. Save the edited file(s) and use theconfig admin command to push the configuration to theAppNode:bwadmin[admin]> config –d myDomain -a myAppSpace –n myAppNode –cf <temporaryLocation>/config.ini
221
TIBCO ActiveMatrix BusinessWorks™ Administration

AppSpace level
Procedure
1. Copy the existing AppSpace config.ini file (located in the root of the AppSpace folder), or theAppSpace config.ini template file appspace_config.ini_template (located in BW_HOME/config/) to a temporary location .
2. Uncomment the engine ThreadCount property bw.engine.threadCount and change the defaultvalue as needed.bw.engine.threadCount=8
3. Uncomment the engine StepCount property bw.engine.stepCount and change the default valueas needed. The default value of -1 allows the engine to determine the necessary value.bw.engine.stepCount=-1
4. Uncomment the application FlowLimit property bw.application.job.flowlimit and change thedefault value as needed. Provide the application name. The application name must be included inthe property. The application version and component name are optional. If the component name isnot specified, the FlowLimit value will apply to all the components in the application.bw.application.job.flowlimit.<UsersBWApplicationName>[.<UsersBWApplicationVersion>][.<UsersBWComponentName>]=8
5. Uncomment the application PageThreshold property bw.application.job.pageThreshold andchange the default value as needed. The application name must be included in the property. Theapplication version and component name are optional. If the component name is not specified, thePageThreshold value will apply to all the components in the application.bw.application.job.pageThreshold.<UsersBWApplicationName>[.<UsersBWApplicationVersion>][.<UsersBWComponentName>]=10
6. Uncomment the application paging strategy property bw.application.job.paging.strategy andchange the default value as needed. The application name must be included in the property. Theapplication version and component name are optional. If the component name is not specified, thePageThreshold value will apply to all the components in the application.bw.application.job.paging.strategy.<UsersBWApplicationName>[.<UsersBWApplicationVersion>][.<UsersBWComponentName>]=PageOnIdle
7. Uncomment the application Priority property bw.application.job.priority and change thedefault value as needed. The application name must be included in the property. The applicationversion and component name are optional. If the component name is not specified, the Priorityvalue will apply to all the components in the application.bw.application.job.priority.<UsersBWApplicationName>[.<UsersBWApplicationVersion>][.<UsersBWComponentName>]=normal
8. Uncomment the application Retain Faulted Job propertybw.application.checkpoint.retainFaultedJob and change the default value as needed. Theapplication name must be included in the property. The application version and component nameare optional. If the component name is not specified, the Retain Faulted Job value will apply toall the components in the application.bw.application.checkpoint.retainFaultedJob.<UsersBWApplicationName>[.<UsersBWApplicationVersion>][.<UsersBWComponentName>]=false
9. Uncomment the application Recover On Restart propertybw.application.checkpoint.recoverOnRestart and change the default value as needed. Theapplication name must be included in the property. The application version and component nameare optional. If the component name is not specified, the Recover On Restart value will apply toall the components in the application.bw.application.checkpoint.recoverOnRestart.<UsersBWApplicationName>[.<UsersBWApplicationVersion>][.<UsersBWComponentName>]=true
222
TIBCO ActiveMatrix BusinessWorks™ Administration
10. Save the edited file(s) and use theconfig admin command to push the configuration to theAppSpace:bwadmin[admin] > config -d myDomain -a myAppSpace -cf <temporaryLocation>/config.ini
Admin UIThe application properties, pageThreshold and FlowLimit can be passed dynamically from the AdminUI at the Application, AppNode and AppSpace level.
● To set the job tuning properties at the Application level, open the Application page, click Configureand click the Job Tuning tab and edit the pageThreshold or the FlowLimit property as required.
● To set the job tuning properties at the AppSpaces or the AppNodes level, open the AppSpaces orthe AppNodes page and select the AppSpace or AppNode. Click Configure and then click theGeneral tab to change the value under the Current Value column of the required property.
To delete the pageThreshold and FlowLimit properties, set the property value to zero.
Viewing Engine PropertiesView engine properties, including name, step count, thread count, persistence mode, and engine state,from the bwadmin console.
To view properties, the engine must be running on an AppNode. Open the bwadmin console and enterthe following command to view properties for the engine running on AppNode AN2 in Domain D2 andAppSpace AS2:bwadmin show -d D2 -a AS2 -n AN2 bwengine
The following details are displayed:
Property Description More Information
Engine Name The name of the engine running onthe specified AppNode.
N/A
Engine Step Count The number of activities executedby an engine thread uninterruptedlybefore yielding the thread toanother job.
Engine and Job Tuning
Engine Thread Count The maximum number of threadsthat can be executed concurrently.
Engine and Job Tuning
Engine Persistence Mode The type of collaboration betweenmachines.
Engine Persistence Modes
Engine State The state of the engine. N/A
Engine PropertiesTIBCO ActiveMatrix BusinessWorks™ allows you to set engine properties at AppNode or Appspaceconfig.ini file. Configure the engine by changing or assigning appropriate values to the properties.
223
TIBCO ActiveMatrix BusinessWorks™ Administration

For more information, see appspace_config.ini_template or appnode_config.ini_template filesat {TIBCO_HOME}\bw\6.x\config directory.
BW Engine General Configuration
The properties in this section are applicable to the bwengine.
Property Description
bw.engine.threadCount Engine thread count. It specifies the engine threadpool size. Value of this property must always begreater than 0.
The default value is 8.
bw.engine.stepCount Engine step count. It specifies the number of activitiesto execute for a process instance, before the bwengineyields the thread.
The default value is -1.
bw.engine.separate.logs.by.app Application level logging. It enables separate log filesat the application level.
The default value is false.
bw.engine.node.weight Set the value between 1 to 99. The AppNode withhighest weight is the primary node.
bw.engine.name Specify the name of the engine.
The default value is Main.
bw.engine.persistenceMode Specifies engine execution mode.
The default value is memory.
bw.engine.shutdownOnFailure BW Engine Shutdown Option.
The default value is true.
bw.engine.activity.async.waitTime BW Asynchronous Activity Timeout. It specifies thedefault timeout or wait time value in milliseconds forthe asynchronous activities executed by the BWEngine.
The default value is 180000 ( 3 minutes).
bw.engine.activity.signalin.eventTimeout.purge.interval
Specifies the default interval for the backgroundthread that looks for expired messages. The valuemust be specified in minutes.
The default value is 30 minutes.
224
TIBCO ActiveMatrix BusinessWorks™ Administration
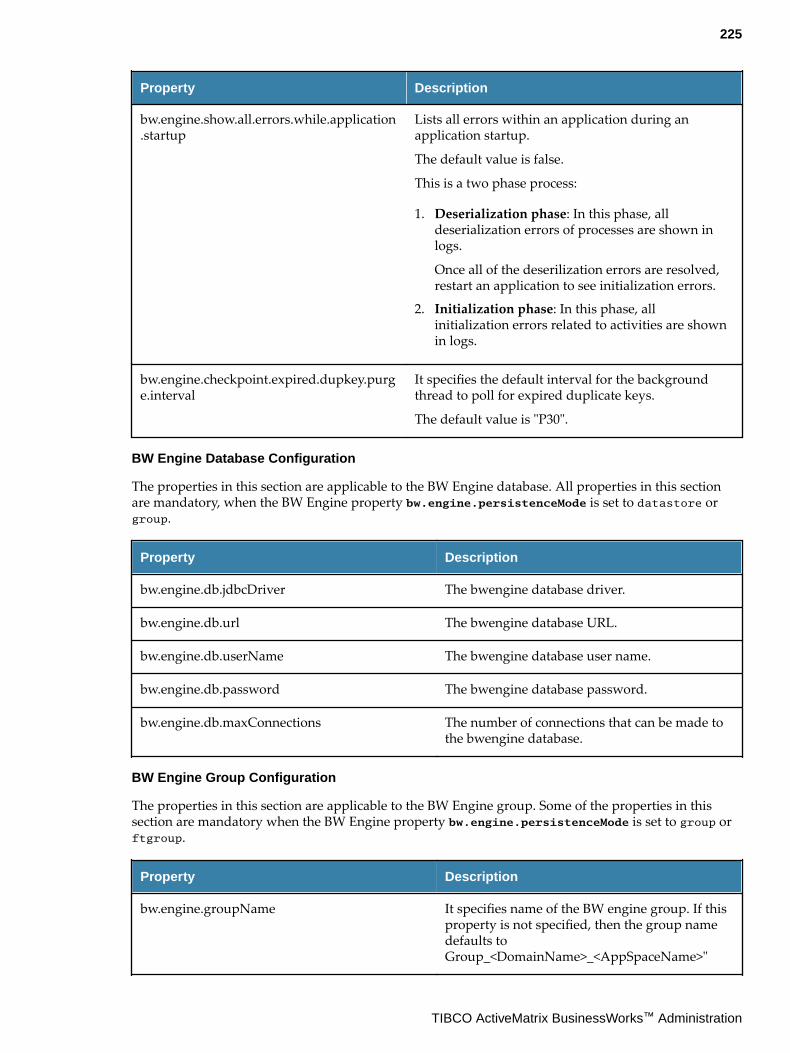
Property Description
bw.engine.show.all.errors.while.application.startup
Lists all errors within an application during anapplication startup.
The default value is false.
This is a two phase process:
1. Deserialization phase: In this phase, alldeserialization errors of processes are shown inlogs.
Once all of the deserilization errors are resolved,restart an application to see initialization errors.
2. Initialization phase: In this phase, allinitialization errors related to activities are shownin logs.
bw.engine.checkpoint.expired.dupkey.purge.interval
It specifies the default interval for the backgroundthread to poll for expired duplicate keys.
The default value is "P30".
BW Engine Database Configuration
The properties in this section are applicable to the BW Engine database. All properties in this sectionare mandatory, when the BW Engine property bw.engine.persistenceMode is set to datastore orgroup.
Property Description
bw.engine.db.jdbcDriver The bwengine database driver.
bw.engine.db.url The bwengine database URL.
bw.engine.db.userName The bwengine database user name.
bw.engine.db.password The bwengine database password.
bw.engine.db.maxConnections The number of connections that can be made tothe bwengine database.
BW Engine Group Configuration
The properties in this section are applicable to the BW Engine group. Some of the properties in thissection are mandatory when the BW Engine property bw.engine.persistenceMode is set to group orftgroup.
Property Description
bw.engine.groupName It specifies name of the BW engine group. If thisproperty is not specified, then the group namedefaults toGroup_<DomainName>_<AppSpaceName>"
225
TIBCO ActiveMatrix BusinessWorks™ Administration

Property Description
bw.engine.group.ats.timeout BW Engine Active to Standby Timeout propertyspecifies the time to wait (in seconds) beforeforce stopping an application on an AppNodethat is transitioning from active to standby state.
The default value is 60 secs. If the value is set to0, it indicates the appnode waits till theapplication is gracefully stopped.
bw.engine.groupProvider.technology BW Engine Group Connection ProviderTechnology. This is a required property whenthe bw.engine.persistenceMode property isset to group or ftgroup.
The supported values for thebw.engine.groupProvider.technology
property are ems and ftl.
BW Engine ftgroup Properties
Property Description
bw.engine.ftgroup.lbmode When this property is false, all processes runon a single engine in the group. One of theengines in the group takes over in the event theprimary engine fails.
When this property is true, all MultipleAppNodes processes run on all the engines inthe group.
This property only applies when the BW Engineproperty bw.engine.persistenceMode is set toftgroup.
The default value is false.
226
TIBCO ActiveMatrix BusinessWorks™ Administration

Property Description
bw.engine.use.weighted.node Indicates whether or not node weights should beused. The property is applied at the AppSpacelevel.
When the property is set to true, the node withthe highest weight is chosen as the primary nodein the group.
Use the property bw.engine.node.weight inthe node config to specify that node's weight.
This property only applies when the BW Engineproperty bw.engine.persistenceMode is set toftgroup.
When you want to elect an AppNode as a leaderAppNode, then set thebw.engine.use.weighted.node property totrue at an AppSpace level.
The default value is false.
BW Event Configuration Properties
The properties in this section are applicable to the BW Event Publisher and various BW EventSubscribers that consume the generated events.
Property Description
bw.engine.event.publisher.enabled Enable or disable the BW Engine EventPublisher property specifies whether BW EngineEvent Publisher should be enabled or disabled inthe BW Engine.
The default value is true.
BW Engine Group Connection Provider EMS Configuration
Some of the properties in this section are mandatory when the BW Engine Group Connection ProviderTechnology property bw.engine.groupProvider.technology value is set to ems
Property Description
bw.engine.groupProvider.qin.EMSServerUrl Mandatory. The bwengine Group ConnectionProvider EMS URL.
bw.engine.groupProvider.qin.EMSUserName Mandatory. The bwengine Group ConnectionProvider EMS User Name.
bw.engine.groupProvider.qin.EMSPassword Mandatory. The bwengine Group ConnectionProvider EMS User Password.
227
TIBCO ActiveMatrix BusinessWorks™ Administration

Property Description
bw.engine.groupProvider.qin.EMSPrefix The bwengine Group Connection Provider EMSMember Prefix.
The default value is EMSGMS.
bw.engine.groupProvider.qin.EMSRecoveryTimeout
The bwengine Group Connection Provider EMSRecovery Timeout in milliseconds.
The default value is 5000.
bw.engine.groupProvider.qin.EMSRecoveryAttemptDelay
The bwengine Group Connection Provider EMSRecovery Attempt Delay in milliseconds.
The default value is 500.
bw.engine.groupProvider.qin.EMSRecoveryAttemptCount
The bwengine Group Connection Provider EMSRecovery AttemptCount.
bw.engine.groupProvider.qin.EMSConnectAttemptCount
The bwengine Group Connection Provider EMSConnect Attempt Count.
bw.engine.groupProvider.qin.EMSConnectAttemptDelay
The bwengine Group Connection Provider EMSConnect Attempt Delay in milliseconds.
bw.engine.groupProvider.ems.ssl.trust.identity EMS ssl configuration client identity consistingof the certificate, private key and optionallyextra issuer certificates can be included into asingle data block using PKCS12, KeyStore orEntrust Store encodings.
bw.engine.groupProvider.ems.ssl.trust.certLocation
The set of Trusted Certificates represents alltrusted issuers of the server certificate.
bw.engine.groupProvider.ems.ssl.trust.password EMS SSL connection trust password.
bw.engine.groupProvider.ems.ssl.disable.verifyHostName
Trusted certificate common name must matchthe ems server hostname if set to false.
bw.engine.groupProvider.ems.ssl.trust.disable.verifyHost
The client and server certificates must match ifset to false.
BW Engine Group Connection Provider FTL Configuration
Some of the properties in this section are mandatory when the BW Engine Group Connection ProviderTechnology property bw.engine.groupProvider.technology value is set to ftl
Property Description
bw.engine.groupProvider.ftl.realmserver Mandatory. BW Engine Group ConnectionProvider FTL Realm Server.
The default value is http://localhost:8080
228
TIBCO ActiveMatrix BusinessWorks™ Administration

Property Description
bw.engine.groupProvider.ftl.username Mandatory. The bwengine Group ConnectionProvider FTL Realm client user name.
bw.engine.groupProvider.ftl.password Mandatory. The bwngine Group ConnectionProvider FTL Realm client password.
bw.engine.groupProvider.ftl.appinstance.id Mandatory. The bwengine Group ConnectionProvider FTL application identifier.
bw.engine.groupProvider.ftl.secondaryserver The bwengine Group Connection Provider FTLsecondary realm server.
bw.engine.groupProvider.ftl.groupname Mandatory. The bwengine Group ConnectionProvider FTL group name.
bw.engine.groupProvider.ftl.appname Mandatory. The bwengine Group ConnectionProvider FTL application name.
bw.engine.groupProvider.ftl.publish.endpoint Mandatory. The bwengine Group ConnectionProvider FTL publish endpoint.
bw.engine.groupProvider.ftl.subscribe.endpoint Mandatory. The bwengine Group ConnectionProvider FTL application name.
229
TIBCO ActiveMatrix BusinessWorks™ Administration

Governance and Monitoring
Enable the agents in the AppNode to monitor applications, to enforce policies, to view statistics, andmonitor process instances for an environment in ActiveMatrix BusinessWorks.
Monitoring ProcessesUsing the process monitoring feature you can observe and check the status of process instances fromthe Admin UI.
All the process instances in the application are grouped by packages, and you can monitor the status ofthe process instances and subprocesses that were sucessfully executed, cancelled or faulted.
Details such as input data,output data, fault data and other configuration details for the activities arealso available by viewing the process diagram for the instances.
Enabling Process MonitoringProcess monitoring can be configured from the bwagent_as.json, bwagent_db.json orbwagent_ftl.json files, set the property statsprovider to true to enable process monitoring.
Process Monitoring
The transport layers communicate between the bwagent and the AppNode, and the supportedtransport layers are UDP and FTL. Set the statstransport property to UDP. This is the default settingin the agent and the AppNode.
The statstransport property is also added to the AppNode config file when the AppNode is created.For more information about UDP and FTL configurations, see Configuring using UDP and Configuringusing FTL respectively.
To access the process monitoring landing page, go to the Application Level 2 page, navigate to the
Process tab, click the Graph View icon and click the Process Instance icon . Youcan also use the shortcut key Shift + P to navigate to the process monitoring landing page directly.
All the instances, processes and subprocesses of the selected application are displayed on the landingpage.
You can begin monitoring your process instances once you enable the Process Instance icon afterdeploying the application.
By default, all the instances in the selected process are displayed. Subprocesses, if any, can be viewed byexpanding the process.
230
TIBCO ActiveMatrix BusinessWorks™ Administration
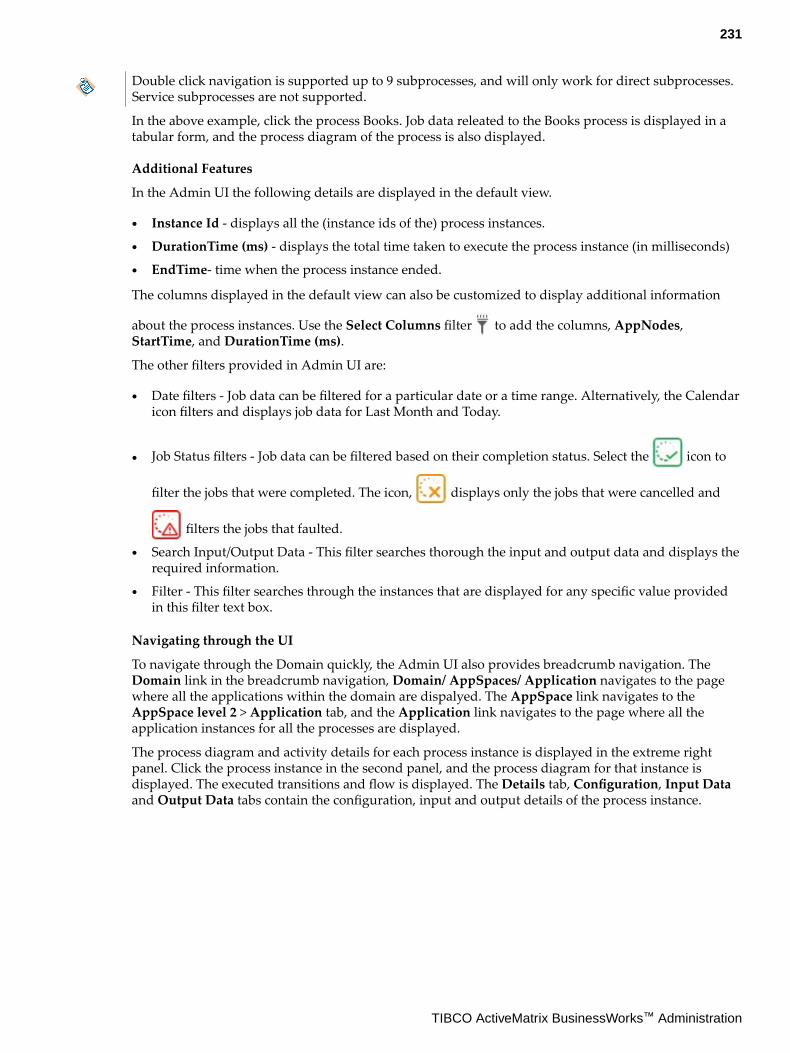
Double click navigation is supported up to 9 subprocesses, and will only work for direct subprocesses.Service subprocesses are not supported.
In the above example, click the process Books. Job data releated to the Books process is displayed in atabular form, and the process diagram of the process is also displayed.
Additional Features
In the Admin UI the following details are displayed in the default view.
● Instance Id - displays all the (instance ids of the) process instances.
● DurationTime (ms) - displays the total time taken to execute the process instance (in milliseconds)
● EndTime- time when the process instance ended.
The columns displayed in the default view can also be customized to display additional information
about the process instances. Use the Select Columns filter to add the columns, AppNodes,StartTime, and DurationTime (ms).
The other filters provided in Admin UI are:
● Date filters - Job data can be filtered for a particular date or a time range. Alternatively, the Calendaricon filters and displays job data for Last Month and Today.
● Job Status filters - Job data can be filtered based on their completion status. Select the icon to
filter the jobs that were completed. The icon, displays only the jobs that were cancelled and
filters the jobs that faulted.
● Search Input/Output Data - This filter searches thorough the input and output data and displays therequired information.
● Filter - This filter searches through the instances that are displayed for any specific value providedin this filter text box.
Navigating through the UI
To navigate through the Domain quickly, the Admin UI also provides breadcrumb navigation. TheDomain link in the breadcrumb navigation, Domain/ AppSpaces/ Application navigates to the pagewhere all the applications within the domain are dispalyed. The AppSpace link navigates to theAppSpace level 2 > Application tab, and the Application link navigates to the page where all theapplication instances for all the processes are displayed.
The process diagram and activity details for each process instance is displayed in the extreme rightpanel. Click the process instance in the second panel, and the process diagram for that instance isdisplayed. The executed transitions and flow is displayed. The Details tab, Configuration, Input Dataand Output Data tabs contain the configuration, input and output details of the process instance.
231
TIBCO ActiveMatrix BusinessWorks™ Administration

Selecting any instance from the table highlights the reference or service, if any, and also highlights ingreen, the activity transitions that were successfully executed.
When a process contains multiple constructors, the activities and transitions in the constructor are notvisible in the Admin UI when the constructor is minimized while creating the EAR file. Expand theconstructors and regenerate the EAR file to view the transitions inside constructors.
Fix any ActivityID related warnings displayed in Studio , and then create the EAR file to ensure theplotting and Input and Output data is displayed correctly.
The process monitoring for cancelled jobs displays the successful transctions in green up until the pointwhere the process was successfully executed.
Processes that faulted due to errors are highlighted in red.
232
TIBCO ActiveMatrix BusinessWorks™ Administration

In the image above, the Ouput Data tab displays the error due to which the process faulted.
Configuring using UDPYou can configure process monitoring using UDP.
Procedure
1. Update the following properties in the bwagent configuration files, bwagent_as.json,bwagent_db.json or bwagent_ftl.json based on your bwagent configuration.
● Set statstransport to UDP
● Set statsprovider to true
● Set dbprovidertype to <db type>
● Set dbproviderdriver to <db provider>
● Set dbproviderconnectionurl to <db connection url>
● Set dbprovideruser to <db user>
● Set dbproviderpassword to <db password>
Run the bwadmin config command with the -cf option to push the changes from the bwagentconfiguration JSON file to the bwagent.ini file.
● To start the bwagent in the ActiveSpace mode
BW_HOME\bin>bwadmin config -cf ../config/bwagent_as.json agent
● To start the bwagent in the dbems mode
BW_HOME\bin>bwadmin config -cf ../config/bwagent_db.json agent
● To start the bwagent in the dbftl mode
BW_HOME\bin>bwadmin config -cf ../config/bwagent_ftl.json agent
2. Start the bwagent and create the AppNode(s).
3. To ensure minimum data loss, set the values of the following two AppNode properties on the lowerside: For example, you can set bw.monitor.publishtimer= 1500 and bw.monitor.batchsize= 1.batchsize: Process Monitoring data is published in batches. This property specifies batch size for thedata.
233
TIBCO ActiveMatrix BusinessWorks™ Administration

publishtimer: This property specifies the time interval for publishing Process Monitoring data.
The criteria that is fulfilled first will take effect.You can configure the AppNode properties using the Configure icon from the Admin UI AppNodelevel 2 page or from the BWAppNode's config.ini file.
Ensure the monitor provider property (bw.monitor.provider=UDP) is present in the the AppNodeconfig.ini file and in the bwagent.ini file.
4. Start the Appnode(s).
5. Upload and deploy the Application. Start the Application.
6. You can enable pocess monitoring for any particular application by navigating to the ApplicationLevel 2 page, turning the Process Monitor button ON and restarting the Application.
7. Navigate to Application Level 2 > Processes > Graph View > Process Instance. Alternatively youcan also use the shortcut key Shift + P from the Application Level 2 Page to directly open theProcess Monitoring landing Page.
8. Select any activity in the process diagram and verify the details in the Details, Configurations, Inputdata or the Output data tabs.In your production environment, it is recommended to use TIBCO FTL®.
Configuring using FTLYou can configure process monitoring using TIBCO FTL ®.
Procedure
1. Download the latest FTL driver and install TIBCO FTL®. Refer to the TIBCO FTL® Installation guidefor installation instructions. Set the property in bwcommon.tra -tibco.env.FTL_HOME=<FTL_HOME> and install the FTL driver using the bwinstall utility.The FTL_HOME path provided should be till the version folder. For example,tibco.env.FTL_HOME=/opt/tibco/ftl/5.4
2. Start the FTL realm server using ./tibrealmserver -ht <IP address>:8080.
3. Execute the FTL command, -./tibrealmadmin -rs http://<IP address>:8080 -ur <PATH ofbwadmin_ftlrealmserver.json>.Two applications are created on the FTL server.
4. Update the following properties in the bwagent_db.json, bwagent_as.json orbwagent_ftl.json file, based on your bwagent configuration.
● Set statstransport to FTL
● Set statsdataformat to bytestream
● Set statsprovider to true
● Set dbprovidertype to <db type>
● Set dbproviderdriver to <db provider>
● Set dbproviderconnectionurl to <db connection url>
● Set dbprovideruser to <db user>
● Set dbproviderpassword to <db password>
● Set statsftlrealmserverurl to http://<IP Address>[:port]
If any of the configuration settings are different from the default settings, update the followingadditional properties as applicable.
234
TIBCO ActiveMatrix BusinessWorks™ Administration

● statsftlapplicationname
● statsftlsecondaryurl
● statsftlusername
● statsftluserpassword
● statsftlendpoint
● statsftldataformat
● statsftlinbox
Run the bwadmin config command with the -cf option to push the changes from the bwagentconfiguration JSON file to the bwagent.ini file.
● To start the bwagent in the ActiveSpace mode
BW_HOME\bin>bwadmin config -cf ../config/bwagent_as.json agent
● To start the bwagent in the dbems mode
BW_HOME\bin>bwadmin config -cf ../config/bwagent_db.json agent
● To start the bwagent in the dbftl mode
BW_HOME\bin>bwadmin config -cf ../config/bwagent_ftl.json agent
5. Start the bwagent and create the AppNode(s).Ensure the monitor data format property (bw.monitor.data.format=bytestream) and themonitor provider property (bw.monitor.provider=FTL) are present in the the AppNodeconfig.ini file and in the bwagent.ini file.
6. Upload and deploy the Application. Start the Application.
7. You can enable pocess monitoring for any particular application by navigating to the ApplicationLevel 2 page, turning the Process Monitor button ON and restarting the Application.
8. Navigate to Application Level 2 > Processes > Graph View > Process Instance.Alternatively, you can also use the shortcut key Shift + P from the Application Level 2 Page todirectly open the Process Monitoring landing Page.
Application Statistics CollectionYou can collect three types of statistics for an application: application job metrics, process statistics, andexecution statistics.
For more information, see the following sections:
● Application job metrics - Application Metrics
● Process instrumentation statistics for ActiveMatrix BusinessWorks 6.x processes and activities - Process Statistics
● Execution statistics for ActiveMatrix BusinessWorks 6.x processes and activities - Process ExecutionStatistics
Application MetricsApplication metrics provides the job statistics of an application. You can view application metrics fromthe command line, or from the Admin UI.
Command Line
To view application metrics from the command line execute the Admin CLI command show metrics.
235
TIBCO ActiveMatrix BusinessWorks™ Administration

The application metrics collection functionality is enabled by default, but can be disabled by setting theproperty ,bw.frwk.event.subscriber.metrics.enabled, to false in the AppSpace config.ini file.Use the bwadmin config command to push this configuration to the AppSpace.
Admin UI
You can view application metrics in the Admin UI from the Monitoring tab, or the Applications tab.
To view job count statistics for multiple applications, click the Monitoring tab.
To view job count statistics for a specific application, click the Applications tab, select the application
you want to view, and switch to the monitoring view by clicking the icon.
236
TIBCO ActiveMatrix BusinessWorks™ Administration

Process StatisticsProcess statistics collection can be enabled or disabled from the command line, or from the Admin UI.
Enabling and Disabling Process Statistics
Process statistics can be enabled and disabled from the command line or from the Admin UI.
Command Line
Enable or disable the collection of process statistics for all applications in an AppNode by using theenablestats and disablestats commands respectively.
To view command syntax, use the help option on the bwadmin console. For example, enter helpenablestats or help disablestats to view the syntax for the enablestats command or thedisablestats command.
● Enable Process Statistics
— To enable process statistics for all applications on a single AppNode, execute the followingcommand:enablestats -d defaultdomain -a MyAppSpace -n MyAppNode process
— To enable process statistics for a single application on an AppNode, execute the enablestatscommand, and specify the application name and version. In the following example, theapplication testApp and version 1.0 are provided in the command syntax:enablestats -d defaultdomain -a MyAppSpace process testApp 1.0
● Disable Process Statistics
— To disable process statistics for all applications on a single AppNode, execute the followingcommand:disablestats -d defaultdomain -a MyAppSpace -n MyAppNode process
— To disable process statistics for a single application on an AppNode, execute the disablestatscommand, and specify the application name and version. In the following example, theapplication testApp and version 1.0 are provided in the command syntax:disablestats -d defaultdomain -a MyAppSpace process testApp 1.0
Admin UI
Application statistics collection can be enabled or disabled from the Admin UI by setting the followingproperties.
237
TIBCO ActiveMatrix BusinessWorks™ Administration

Property Description
Process Instrumentation Click ON to enable process instrumentation datacollection.
To enable data collection of an application that isrunning on multiple Appnodes, click on theApplication tab, and enable the ProcessInstrumentation property. Processinstrumentation statistics will be collected for allapplication instances.
To enable data collection of all applicationsrunning on an AppNode, click on the AppNodestab, and enable the Process Instrumentationproperty. Process instrumentation statistics willbe collected for all applications running on thespecified AppNode.
Process Monitor Click ON to enable process monitoring to viewthe process instances.
To enable process monitoring of an applicationthat is running on multiple Appnodes, click onthe Application level 2 page, and click theProcess Monitor button. Process monitoring willbe enabled for all application instances.
To enable process monitoring of all applicationsrunning on an AppNode, click on the AppNodestab and click the Process Monitor button. Processmonitoring will be enabled for all applicationsrunning on the specified AppNode.
Viewing Collected Statistics
You can view process statistics through the command line, or the Admin UI.
Prerequisites
Ensure that you have enabled process statistics collection. For more information about how to do this,see Enabling and Disabling Process Statistics .
Command Line
You can use the following commands on the OSGi console to view collected statistics:
● bw:lpis to print statistics of processes that have been executed for the application.
● bw:lais to retrieve statistics for activities that have been executed in processes for the application.
Admin UI
For details about how to view application, process, and activity data from the Admin UI, see thefollowing sections.
238
TIBCO ActiveMatrix BusinessWorks™ Administration

View Application Data
To view application job counts on each AppNode, select the Application tab, and click the icon toswitch to the Monitoring View.
View Process Data
Ensure you are on the Application tab, and click the icon to switch to the Monitoring View. Next,select an application and expand it to view job process counts.
To view process instrumentation data, click on an individual process. The Admin UI switches to theProcesses tab, and the process diagram, along with process instrumentation data, displays.
239
TIBCO ActiveMatrix BusinessWorks™ Administration

View Activity Data
Select the Application tab, click the icon to switch to Monitoring View, and select the Processes tabto view the process diagram. From this point you can view activity instrumentation data by clicking on
an activity in the process diagram, or clicking the icon to the top left corner of the Processes tab.
View Process and Activity Instance Data Logged to an External Database
Before you can view process and activity instance data that has been logged to an external database,complete the steps outlined in the section Writing Process Statistic Data to an External Database, andenable process and activity instance statistics collection from the Admin UI.
Ensure you are on the Application tab, and click the icon to switch to Monitoring View. Expand anapplication to view the individual processes, and select one. Next, click the Processes tab, and click the
icon, located at the top left corner of the Processes tab, to view process instance details. Click on aprocess instance ID to view its activity instances.
240
TIBCO ActiveMatrix BusinessWorks™ Administration
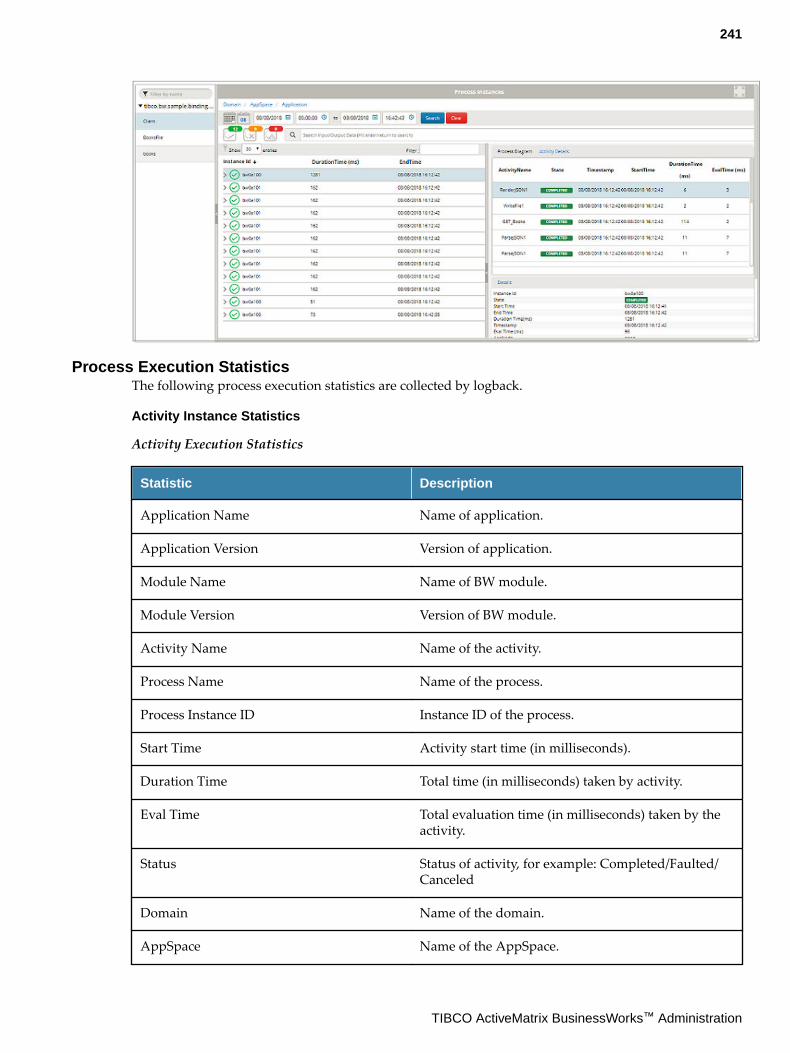
Process Execution StatisticsThe following process execution statistics are collected by logback.
Activity Instance Statistics
Activity Execution Statistics
Statistic Description
Application Name Name of application.
Application Version Version of application.
Module Name Name of BW module.
Module Version Version of BW module.
Activity Name Name of the activity.
Process Name Name of the process.
Process Instance ID Instance ID of the process.
Start Time Activity start time (in milliseconds).
Duration Time Total time (in milliseconds) taken by activity.
Eval Time Total evaluation time (in milliseconds) taken by theactivity.
Status Status of activity, for example: Completed/Faulted/Canceled
Domain Name of the domain.
AppSpace Name of the AppSpace.
241
TIBCO ActiveMatrix BusinessWorks™ Administration
Statistic Description
AppNode Name of the AppNode.
Process Instance Statistics
Process Instance Execution Statistics
Statistic Description
Application Name Name of application.
Application Version Version of application.
Module Name Name of BW module.
Module Version Version of BW module.
Component Process Name Name of process configured to a component. If the process is anon in-lined subprocess, this could be empty.
Job ID Job ID of the process.
Parent Process Name If the process is an in-lined subprocess, the name of the parentprocess.
Parent Process Instance ID If the process is an in-lined subprocess, the instance ID of theparent process.
Process Name Name of process.
Process Instance ID Instance ID of the process.
Start Time Process instance start time.
End Time Process instance end time.
Duration Time Total time (in milliseconds) taken by the process instance tofinish.
Eval Time Total evaluation time (in milliseconds) for all activities executedfor this process instance.
Status Status of process instance, for example: Completed or Faulted
Data is written as comma separated values.
242
TIBCO ActiveMatrix BusinessWorks™ Administration
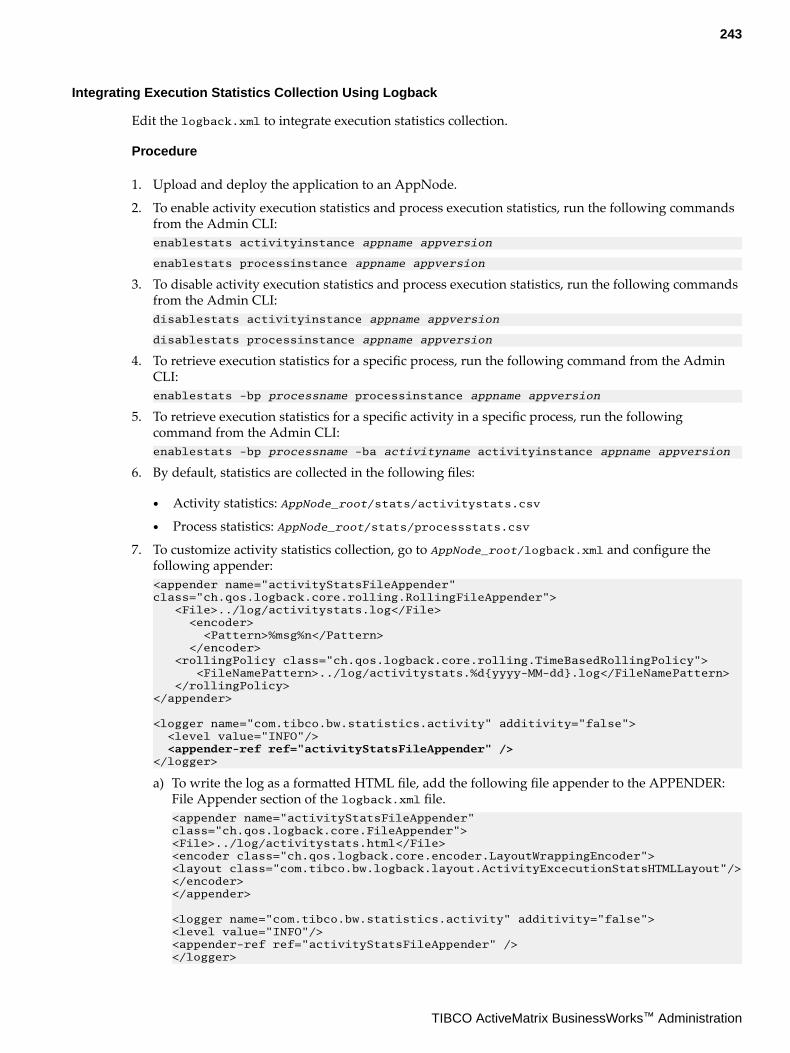
Integrating Execution Statistics Collection Using Logback
Edit the logback.xml to integrate execution statistics collection.
Procedure
1. Upload and deploy the application to an AppNode.
2. To enable activity execution statistics and process execution statistics, run the following commandsfrom the Admin CLI:enablestats activityinstance appname appversion
enablestats processinstance appname appversion
3. To disable activity execution statistics and process execution statistics, run the following commandsfrom the Admin CLI:disablestats activityinstance appname appversion
disablestats processinstance appname appversion
4. To retrieve execution statistics for a specific process, run the following command from the AdminCLI:enablestats -bp processname processinstance appname appversion
5. To retrieve execution statistics for a specific activity in a specific process, run the followingcommand from the Admin CLI:enablestats -bp processname -ba activityname activityinstance appname appversion
6. By default, statistics are collected in the following files:
● Activity statistics: AppNode_root/stats/activitystats.csv
● Process statistics: AppNode_root/stats/processstats.csv
7. To customize activity statistics collection, go to AppNode_root/logback.xml and configure thefollowing appender:<appender name="activityStatsFileAppender" class="ch.qos.logback.core.rolling.RollingFileAppender"> <File>../log/activitystats.log</File> <encoder> <Pattern>%msg%n</Pattern> </encoder> <rollingPolicy class="ch.qos.logback.core.rolling.TimeBasedRollingPolicy"> <FileNamePattern>../log/activitystats.%d{yyyy-MM-dd}.log</FileNamePattern> </rollingPolicy></appender>
<logger name="com.tibco.bw.statistics.activity" additivity="false"> <level value="INFO"/> <appender-ref ref="activityStatsFileAppender" /></logger>
a) To write the log as a formatted HTML file, add the following file appender to the APPENDER:File Appender section of the logback.xml file.<appender name="activityStatsFileAppender" class="ch.qos.logback.core.FileAppender"><File>../log/activitystats.html</File><encoder class="ch.qos.logback.core.encoder.LayoutWrappingEncoder"><layout class="com.tibco.bw.logback.layout.ActivityExcecutionStatsHTMLLayout"/></encoder></appender>
<logger name="com.tibco.bw.statistics.activity" additivity="false"><level value="INFO"/> <appender-ref ref="activityStatsFileAppender" /></logger>
243
TIBCO ActiveMatrix BusinessWorks™ Administration

8. To customize process statistics collection, go to AppNode_root/logback.xml and configure thefollowing appender:<appender name="processinstanceStatsFileAppender" class="ch.qos.logback.core.rolling.RollingFileAppender"> <File>../log/processinstancestats.log</File> <encoder> <Pattern>%msg%n</Pattern> </encoder> <rollingPolicy class="ch.qos.logback.core.rolling.TimeBasedRollingPolicy"> <FileNamePattern>../log/processinstancestats.%d{yyyy-MM-dd}.log</FileNamePattern> </rollingPolicy></appender>
<logger name="com.tibco.bw.statistics.processinstance" additivity="false"> <level value="INFO"/> <appender-ref ref="processinstanceStatsFileAppender" /></logger>
Results look similar to this:
a) To write the log as a formatted HTML file, add the following file appender to the APPENDER:File Appender section of the logback.xml file.<appender name="processinstanceStatsFileAppender" class="ch.qos.logback.core.FileAppender"> <File>../log/processinstancestats.html</File> <encoder class="ch.qos.logback.core.encoder.LayoutWrappingEncoder"> <layout class="com.tibco.bw.logback.layout.ProcessInstanceStatsHTMLLayout"/> </encoder></appender>
<logger name="com.tibco.bw.statistics.activity" additivity="false"><level value="INFO"/> <appender-ref ref="processinstanceStatsFileAppender" /></logger>
Results look similar to this:
244
TIBCO ActiveMatrix BusinessWorks™ Administration

9. Create a table in the database using following script or use an existing one.create table PROCESS_INSTANCE_STAT_TABLE (APPLICATION_NAME varchar(255),APPLICATION_VERSION varchar(255),MODULE_NAME varchar(255),MODULE_VERSION varchar(255),COMPONENT_PROCESS_NAME varchar(255),JOBID varchar(255),PARENT_PROCESS_NAME varchar(255),PARENT_PROCESS_INSTANCEID varchar(255),PROCESS_NAME varchar(255),PROCESS_INSTACEID varchar(255),START_TIME varchar(255),END_TIME varchar(255),ELASPED_TIME varchar(255),EVAL_TIME varchar(255),STATUS varchar(255));
Statistics is written either in the database or in the .csv file, but not both. If statistic is to be writtenin .csv, you need to put statsprovider=false in the bwagent_xxx.json file, and re-push theconfiguration to the bwaget.ini file.
Writing Process Statistic Data to an External Database
A customized database appender can also be used to collect statistics. Once statistics are in a database,reporting tools like TIBCO Jaspersoft or TIBCO Spotfire can be used to create graphs or reports. Addthe following appenders to APPENDER: File Appender section of the logback.xml file to log data toan external database.You can log process statistics data from applications running on existing or new AppNodes:
The supported databases are Oracle Database 12c, MySQL 5.7.x, Microsoft SQL Server 2012, 2014,PostgreSQL 9.2.x.
● To log process statistic data from applications running on existing AppNodes, edit the logback.xmlfile located at BW_HOME/domains/<domain_name>/appnodes/<appspace_name>/<appnode_name>.Restart the AppNode after you have finished editing the file.
● To log process statistic data from applications that will run on new AppNodes, edit the logback.xmlfile at <BW_HOME>/config/ before you create the new AppNodes.
Procedure
1. Update the property, bw.agent.technology.logbackappender=true in the bwagent.ini file.2. Complete the following sub-steps to configure the external database properties in your bwagent
configuration file, located at <BW_HOME>/config/. For example, follow these steps to edit thesedatabase settings in the bwagent_db.json file.statsprovider: false, providertechnology: "db",dbprovidertype: postgresql,dbproviderdriver: "org.postgresql.Driver",dbproviderconnectionurl: "jdbc:postgresql://localhost:5432/bwadmindb",dbprovideruser: bwuser,dbproviderpassword: bwuser,
245
TIBCO ActiveMatrix BusinessWorks™ Administration

a) Set statsprovider to true.b) Do not change the value for the providertechnology property.c) Use the same database details specified in the bwagent.ini file to set the dbprovidertype,
dbproviderdriver, dbproviderconnectionurl , dbprovideruser, and dbproviderpasswordproperties.
d) Run the bwadmin config command with the -cf option to push the changes from the JSON fileto the bwagent.ini file.BW_HOME\bin>bwadmin config -cf ../config/bwagent_db.json agent
3. Edit the logback.xml file, located at BW_HOME/domains/<domain_name>/appnodes/<appspace_name>/<appnode_name>, and add the following appender:<appender name="activityStatsDBAppender" class="com.tibco.bw.thor.management.stats.logback.db.BWActivityStatsDBAppender"> <connectionSource class="ch.qos.logback.core.db.DriverManagerConnectionSource"> <driverClass>org.postgresql.Driver</driverClass> <url>jdbc:postgresql://localhost:5432/bwadmindb</url> <user>bwuser</user> <password>bwuser</password> </connectionSource> </appender>
<appender name="processInstanceStatsDBAppender" class="com.tibco.bw.thor.management.stats.logback.db.BWProcessInstanceStatsDBAppender"> <connectionSource class="ch.qos.logback.core.db.DriverManagerConnectionSource"> <driverClass>org.postgresql.Driver</driverClass> <url>jdbc:postgresql://localhost:5432/bwadmindb</url> <user>bwuser</user> <password>bwuser</password> </connectionSource> </appender>
Ensure the values you set for the driverClass, url, user, and password properties matchthe values set in the bwagent.ini file.
4. Locate the "LOGGER: BusinessWorks statistics collection loggers" section in the logback.xml file,and add the following appender to the appender-ref for activity logger and processinstance logger. <logger name="com.tibco.bw.statistics.activity" additivity="false"> <level value="INFO"/> <appender-ref ref="activityStatsDBAppender"/> </logger> <logger name="com.tibco.bw.statistics.processinstance" additivity="false"> <level value="INFO"/> <appender-ref ref="processInstanceStatsDBAppender"/> </logger>
5. Enable process statistics collection. For more information about enabling statistics collection fromthe command line or the Admin, see Enabling and Disabling Process Statistics.
Enabling and Disabling Auditing EventsThe auditing is used to build metrics and statistics for an application.
Configure the following bwengine property in the config.ini file to enable and disable auditing atAppSpace and AppNode level.
● bw.engine.disable.auditevent: By default, the value of the property is false.
Restart the AppNode after configuring the property.
You can perform auditing without restarting an AppNode or an application with the help of followingCLI commands.
246
TIBCO ActiveMatrix BusinessWorks™ Administration

Command Description
enableauditevents Enable Audit Events for an AppNode
disableauditevents Disable Audit Events for an AppNode
Once you disable audit events, metricsand statistics related features of theTIBCO ActiveMatrix BusinessWorks™Administrator will not work.
Enabling and Disabling Input and Output Data for Audit Events
Configure the following bwengine property in the config.ini file to enable and disable input andoutput data for audit events at an AppSpace and an AppNode level
● bw.engine.enable.activity.input.output.data.for.audit.events: By default, the value ofthe property is false.
Restart the AppNode after configuring these properties.
You can perform enable or diable input and output data for audit events without restarting anAppNode or an application by using the following CLI commands.
Command Description
enableinputoutputdataforauditevents Enable input output data for audit events for anAppNode
disableinputoutputdataforauditevents Disable input output data for audit events for anAppNode
OpenTracingOpenTracing is an open, vendor neutral standard for distributed systems that can be used to keep trackof the current state of the job.
TIBCO ActiveMatrix BusinessWorks™ supports Jaeger libraries to display span for each activity andprocess instance during job execution. Span corresponds to a process instance as well as an activityinstance that has information such as ActivityName, JobID, process instance ID etc. For every processinstance, root span is created and all the activity instances are child spans of it.
Trace represents multiple related process instance spans.
In case of HTTP palette, client and server process instances are shown in one trace, whereas for allother palettes, every process instance is a trace.
For more information about Jaeger, see Jaeger documentation.
Configure the following bwengine property in the BW_JAVA_OPTS environment variable while runningthe application to enable and disable OpenTracing at an AppNode level:
● bw.engine.opentracing.enable=true.
By default, the property is false.
Additionally you can configure a few more properties specific to Jaeger.
For obtaining Open Tracing via UDP connection, configure the following Jaeger properties:
247
TIBCO ActiveMatrix BusinessWorks™ Administration

Properties Description
JAEGER_SAMPLER_MANAGER_HOST_PORT The host name and port when using the remotecontrolled sampler.
JAEGER_AGENT_HOST The hostname for communicating with agent viaUDP.
JAEGER_AGENT_PORT The port for communicating with agent via UDP
For obtaining Open Tracing via HTTP connection, configure the following Jaeger properties:
Properties Description
JAEGER_SAMPLER_MANAGER_HOST_PORT The host name and port when using the remotecontrolled sampler.
JAEGER_ENDPOINT The traces endpoint, in case the client shouldconnect directly to the Collector. For example,http://<jaeger-collector>:<port>/api/
traces
For more information about the properties, see Configuration via Environment section at github.com.
Currently, the following tags are supported for quering on Jaeger UI.
Tag Description
SpanInitiator Name of the process starter activity
DeploymentUnitName Name of the application
DeploymentUnitVersion Version of the application
AppnodeName Name of an AppNode on which an applicationis running.
Hostname Name of the machine on which a TIBCOActiveMatrix BusinessWorks™ application isrunning.
IP IP address
ActivityName Name of an activity in a process
ActivityID Id of an activity
ProcessInstanceId Process instance ID
JobId Job ID of the process.
Dynamically Enabling and Disabling Open Tracing
You can enable OpenTracing without restarting an AppNode or an application with the help offollowing CLI commands.
248
TIBCO ActiveMatrix BusinessWorks™ Administration

Command Description
enableopentracing Enable open tracing for an AppNode
disableopentracing Disable open tracing for an AppNode
Applying Security PoliciesTIBCO ActiveMatrix BusinessWorks™ includes a governance agent that enforces policies forActiveMatrix BusinessWorks™ applications. Every installation of ActiveMatrix BusinessWorks includesthe governance agent that facilitates the enforcement of cross-functional requirements such as securityand compliance for your applications. The governance agent is disabled by default. In order to applysecurity policies, you must enable and configure the governance agent.
For information about enabling the governance agent with TEA, see Enabling the Governance Agentwith TEA.
For information about enabling the governance agent using the AppSpace configuration file, see Enabling the Governance Agent Using the AppSpace Configuration File.
Backwards compatiblity is disabled by default for ActiveMatrix BusinessWorks 6.x applications usingTIBCO ActiveMatrix Policy Director 2.0 to enforce security policies. To enable backwards compatibility,add bw.governance.pd.compatibility.mode=true to the existing AppSpace configuration fileappspace_config.ini (located in the root of the AppSpace folder), or the AppSpace configurationtemplate file, appspace_config.ini_ template, located in <BW_HOME>\config\.
Enabling the Governance Agent Using the Admin UIThe governance agent is disabled by default. In order to apply security policies, enable thebw.governance.enabled property.
Prerequisites
Complete the following tasks:
● The bwadmin mode must be set to enterprise
● The TIBCO Enterprise Administrator server must be running
● The bwagent TEA agent must be registered with the TEA server
Follow these steps to enable the governance agent using the Admin UI:
Procedure
1. Open a web browser and go to the TEA URL. Sign in, by typing admin for the user name andadmin for the password.
BusinessWorks is displayed in the Products list.
2. Click the BusinessWorks icon to go to ActiveMatrix BusinessWorks.The Domain Management page displays.
3. Click the AppSpace icon to open the AppSpace page.
4. Click the AppSpace hosting your application.
249
TIBCO ActiveMatrix BusinessWorks™ Administration

5. On the AppSpaces page, click the Configure icon to view a list of AppSpace
properties you can modify.You can also click Configure icon in the upper right of theAppSpace page.
6. Scroll down to find the bw.governance.enabled property. By default, the value is false.7. Type true and click the Check icon to enable the governance agent. Ensure you enter the value
under the Current Value column.
Ensure the property bw.governance.jms.server.url does not have a value. Theproperty is used to specify the JMS server URL used to communicate with the TIBCOPolicy Director Administrator.
8. Stop and restart the AppSpace to apply the changes.
Result
The governance agent is enabled.
Enabling the Governance Agent Using an AppSpace Configuration FileThe governance agent within each AppNode is disabled by default. You must enable it by settingproperties within their respective config.ini files.
Enabling the Governance Agents in the AppNodes of an AppSpace
Each AppNode in TIBCO ActiveMatrix BusinessWorks includes a governance agent that enforcepolicies for TIBCO ActiveMatrix BusinessWorks applications. The governance agents are disabled bydefault. In order to apply security policies, you must enable these governance agents and configure theenvironment as described below.
To enable governance on an AppSpace, configure the governance agent property on the AppSpace byfollowing these steps:
1. Copy the existing AppSpace configuration file appspace_config.ini that is located in the root ofthe AppSpace folder, or the AppSpace configuration template file,appspace_config.ini_template, that is located in <BW_HOME>\config\ to a temporary location.
Do not modify the original AppSpace configuration file, config.ini located in the root ofthe AppSpace folder, or the AppSpace configuration template file,appspace_config.ini_template file. Instead, make changes to the copy of the file that isin the temporary location.
2. Edit the configuration file in the temporary location to set the following properties.
● Set the value for bw.governance.enabled to true to enable the governance agent. Ifno ActiveMatrix BusinessWorks applications are using TIBCO ActiveMatrix PolicyDirector to enforce security policies, comment out the propertybw.governance.jms.server.url.
● If TIBCO ActiveMatrix Policy Director is already setup, ensure that the JMS serverproperties specified in the AppSpace configuration file match the JMS serverconfigured in the TIBCO ActiveMatrix Policy Director server. For more information,see Applying Security Policies to TIBCO ActiveMatrix BusinessWorks 6.2 Applications.
#-------------------------------------------------------------------------# Section: BW Governance Agent & SPM Configuration. The properties in # this section are applicable to Governance Agent and the Governance SPM # EventSubscriber that is executed within a BW AppNode.#
250
TIBCO ActiveMatrix BusinessWorks™ Administration

-------------------------------------------------------------------------# Enable or disable the governance agent. This property is optional and # it specifies whether the governance agent should be enabled or disabled# in the AppNode. The supported values are: true or false. The default # value is “false”.bw.governance.enabled=true
# BW Governance Agent JMS URL. This property is optional and it is used# to specify the JMS server URL used to communicate with the# TIBCO Policy Director Administrator. If this property is not set, then# the BW Governance agent will not attempt to connect to the JMS server. # The URL is expected to start with 'tcp://' or 'ssl://' and the failover # URLs can be specified as a ',' or '+' separated list.bw.governance.jms.server.url=tcp://localhost:7222
# BW Governance Agent JMS User Name. This property is required if the# Governance Agent JMS URL is specified.bw.governance.jms.server.username=admin
# BW Governance Agent JMS User Password. This property is required if the# Governance Agent JMS URL is specified.bw.governance.jms.server.password=
# BW Governance Agent JMS SSL connection trust store type. This property # is required if the JMS server protocol is ssl. The supported values are # 'JKS'and 'JCEKS'. The default value is 'JKS'bw.governance.jms.ssl.trust.store.type=JKS
# BW Governance Agent JMS SSL connection trust store location. This # property is required if the JMS server protocol is ssl.bw.governance.jms.ssl.trust.store.location=
# BW Governance Agent JMS SSL connection trust store password. This # property is required if the JMS server protocol is ssl. The password # may be clear text or supplied as an obfuscated string.bw.governance.jms.ssl.trust.store.password=
# BW Governance Agent JMS Connection attempt count. This property is # required if the Governance Agent JMS URL is specified and it specifies # the number of JMS connection attempts the Governance Agent will make. # The default value is '120'.bw.governance.jms.reconnect.attempt.count=120
# BW Governance Agent JMS Connection attempt timeout. This property is # required if the Governance Agent JMS URL is specified and it specifies # the timeout between the attempt to reestablish connection to the JMS # server. The default value is '500'.bw.governance.jms.reconnect.attempt.timeout=500
# BW Governance Agent JMS Connection attempt delay. This property is # required if the Governance Agent JMS URL is specified and it specifies # the delay in milliseconds between attempts to establish reestablish # connection to the JMS server. The default value is '500'.bw.governance.jms.reconnect.attempt.delay=500
# BW Governance Agent JMS receiver queue name. This property is required# if the Governance Agent JMS URL is specified and it specifies receiver# queue name for the governance agent and administrator communication.# The default value is 'queue.bw.governance.agent.bw.default’.bw.governance.jms.queue.receiver.name=queue.governance.agent.bw.default
# BW Governance Agent JMS sender queue name. This property is required# if the Governance Agent JMS URL is specified and it specifies the # sender queue name for the governance agent and administrator # communication. It must match the value specified in the Policy Director # Administrator configuration.# The default value is 'governance.de.bw.default’.bw.governance.jms.queue.sender.name=governance.de.bw.default
# BW Governance Agent JMS JNDI custom property. This property is optional# and it provides the ability to specify custom property for the# JMS JNDI Initial Context. For example to provide a custom property
251
TIBCO ActiveMatrix BusinessWorks™ Administration

# called "myProperty" for the JNDI Initial Context, then specify# a property "bw.governance.jms.application.property.myProperty=".#bw.governance.jms.application.property.<UserCustomProperty>=<userValue># BW Governance Agent Shared Resource lookup. This property is optional# and it provides ability for the Governance Agent to lookup shared # resources. # bw.governance.sr.WSSConfiguration=com.tibco.trinity.runtime.core.# provider.authn.wss
3. Restart the AppSpace from the TIBCO ActiveMatrix BusinessWorks agent user interface in TEA.
252
TIBCO ActiveMatrix BusinessWorks™ Administration

List of Ports
This is a list of ports that are used.
List of Ports
Port DescriptionDefaultValue Configuration
Discover port. Applies to bwagenttechnology type of ActiveSpaces.
5050 bw.agent.technology.as.discoveryURL
property in BW_HOME\config\bwagent.ini
Listen port. Applies to bwagenttechnology type of ActiveSpaces.
5050 bw.agent.technology.as.listenURL
property in BW_HOME\config\bwagent.ini
Remote listen port. Applies tobwagent technology type ofActiveSpaces.
5060 bw.agent.technology.as.remoteListenU
RL property in BW_HOME\config\bwagent.ini
Remote discover port. Applies tobwagent technology type ofActiveSpaces.
5060 bw.agent.technology.as.remoteDiscove
ryURL property in BW_HOME\config\bwagent.ini file
External database port. Applies tobwagent technology type ofDatabase/EMS.
5432 bw.agent.technology.dbems.db.connect
ionURL property in BW_HOME\config\bwagent.ini
The internal HTTP communicationport the Thor engine uses tocommunicate with bwagent to sendthe status of AppNodes andapplications. Update this property tospecify a port to start the internalserver on.
56565 bw.appnode.agent.http.communication.
port property in BW_HOME\config\bwagent.ini
AppNode HTTP management port.Must be unique across all definedAppNodes on the same machine.
User-specified
-httpPort option in bwadmin createcommand for AppNode creation or HTTPPort option in Create AppNode dialog boxin Admin UI.
AppNode remote debug port. User-specified
-port option in bwadmin enabledebugportcommand for remote debugging of anAppNode.
OSGi console port. Must be unique. User-specified
port argument in bwadmin enableconsolecommand for enabling OSGi port forAppNode. Can also be specified with -osgiPort option when AppNode createdwith create command.
253
TIBCO ActiveMatrix BusinessWorks™ Administration

Port DescriptionDefaultValue Configuration
● EMS server port for groupconfiguration.
● EMS server port forDatabase/EMS bwagenttechnology type.
7222 Engine:bw.engine.groupProvider.qin.EMSServe
rUrl property in BW_HOME\config\appspace_config-ini_template
Technology type:bw.agent.technology.dbems.db.ems.ser
verURL property in BW_HOME\config\bwagent.ini
Web server HTTP port for SwaggerUI.
5555 Not configurable
Web server HTTP port. 8079 bw.agent.http.port property in BW_HOME\config\bwagent.ini
Web server HTTPs port. 8886 bw.agent.https.port property in BW_HOME\config\bwagent.ini
bwagent TEA agent port. 9091 bw.agent.tea.agent.port property inBW_HOME\config\bwagent.ini
bwagent TEA agent shutdown port. 5678 bw.agent.tea.agent.shutdown.port
property in BW_HOME\config\bwagent.ini
TEA listen port. 8777 tea.http.port property inTEA_CONFIG_HOME\tibco\cfgmgmt\conf
\tea.conf
TEA SSH port. 2222 tea.shell.port property inTEA_CONFIG_HOME\tibco\cfgmgmt\conf
\tea.conf
254
TIBCO ActiveMatrix BusinessWorks™ Administration