TIBCO WebFOCUS® - TIBCO Software
100
TIBCO WebFOCUS® Copyright © 2021. TIBCO Software Inc. All Rights Reserved. App Studio for the Developer Studio User Release 8.2 Version 01 July 2021 DN4501647.0616
-
Upload
khangminh22 -
Category
Documents
-
view
5 -
download
0
Transcript of TIBCO WebFOCUS® - TIBCO Software

TIBCO WebFOCUS®
Copyright © 2021. TIBCO Software Inc. All Rights Reserved.
App Studio for the Developer Studio User
Release 8.2 Version 01July 2021DN4501647.0616


Contents
Preface . . . . . . . . . . . . . . . . . . . . . . . . . . . . . . . . . . . . . . . . . . . . . . . . . . . . . . . . . . . . . . . . . . . . . . . . . 5
Conventions . . . . . . . . . . . . . . . . . . . . . . . . . . . . . . . . . . . . . . . . . . . . . . . . . . . . . . . . . . . . . . . . . . . . . . . . . 6
Related Publications . . . . . . . . . . . . . . . . . . . . . . . . . . . . . . . . . . . . . . . . . . . . . . . . . . . . . . . . . . . . . . . . . . 7
Customer Support . . . . . . . . . . . . . . . . . . . . . . . . . . . . . . . . . . . . . . . . . . . . . . . . . . . . . . . . . . . . . . . . . . . . 7
Information You Should Have . . . . . . . . . . . . . . . . . . . . . . . . . . . . . . . . . . . . . . . . . . . . . . . . . . . . . . . . . . .7
User Feedback . . . . . . . . . . . . . . . . . . . . . . . . . . . . . . . . . . . . . . . . . . . . . . . . . . . . . . . . . . . . . . . . . . . . . . . 8
Information Builders Consulting and Training . . . . . . . . . . . . . . . . . . . . . . . . . . . . . . . . . . . . . . . . . . . . . 9
1. Introduction to WebFOCUS App Studio . . . . . . . . . . . . . . . . . . . . . . . . . . . . . . . . . . . . . . . . .11
The App Studio Paradigm and Terminology . . . . . . . . . . . . . . . . . . . . . . . . . . . . . . . . . . . . . . . . . . . . . . 11
Terminology List. . . . . . . . . . . . . . . . . . . . . . . . . . . . . . . . . . . . . . . . . . . . . . . . . . . . . . . . . . . . . . . . 12
Installing App Studio and Developer Studio on the Same Machine . . . . . . . . . . . . . . . . . . . . . . . . . . 14
WebFOCUS App Studio Documentation Overview . . . . . . . . . . . . . . . . . . . . . . . . . . . . . . . . . . . . . . . . . 14
Recommendations for Editing Developer Studio Files in App Studio . . . . . . . . . . . . . . . . . . . . . . . . . 15
2. Developer Studio and App Studio Interface Differences . . . . . . . . . . . . . . . . . . . . . . . . 17
Comparing the Default Developer Studio and App Studio Interfaces . . . . . . . . . . . . . . . . . . . . . . . . .17
Main Interface Commands . . . . . . . . . . . . . . . . . . . . . . . . . . . . . . . . . . . . . . . . . . . . . . . . . . . . . . . . . . . . 21
WebFOCUS Administration . . . . . . . . . . . . . . . . . . . . . . . . . . . . . . . . . . . . . . . . . . . . . . . . . . . . . . . . . . . . 23
Development Areas . . . . . . . . . . . . . . . . . . . . . . . . . . . . . . . . . . . . . . . . . . . . . . . . . . . . . . . . . . . . . . . . . . 24
Creating Procedures . . . . . . . . . . . . . . . . . . . . . . . . . . . . . . . . . . . . . . . . . . . . . . . . . . . . . . . . . . . . . . . . . 26
Configuring Environments . . . . . . . . . . . . . . . . . . . . . . . . . . . . . . . . . . . . . . . . . . . . . . . . . . . . . . . . . . . . .28
Environments Detail Panel. . . . . . . . . . . . . . . . . . . . . . . . . . . . . . . . . . . . . . . . . . . . . . . . . . . . . . . 30
Managing Your WebFOCUS Environment . . . . . . . . . . . . . . . . . . . . . . . . . . . . . . . . . . . . . . . . . . . . . . . . 31
Filtering Files . . . . . . . . . . . . . . . . . . . . . . . . . . . . . . . . . . . . . . . . . . . . . . . . . . . . . . . . . . . . . . . . . . 31
Filtering for Additional File Types. . . . . . . . . . . . . . . . . . . . . . . . . . . . . . . . . . . . . . . . . . . . . 32
View Options . . . . . . . . . . . . . . . . . . . . . . . . . . . . . . . . . . . . . . . . . . . . . . . . . . . . . . . . . . . . . . . . . . 36
3. Creating Procedures . . . . . . . . . . . . . . . . . . . . . . . . . . . . . . . . . . . . . . . . . . . . . . . . . . . . . . . . . .39
Accessing and Using the Procedure View Panel . . . . . . . . . . . . . . . . . . . . . . . . . . . . . . . . . . . . . . . . . . 39
4. Creating Reports . . . . . . . . . . . . . . . . . . . . . . . . . . . . . . . . . . . . . . . . . . . . . . . . . . . . . . . . . . . . . 43
Creating Reports . . . . . . . . . . . . . . . . . . . . . . . . . . . . . . . . . . . . . . . . . . . . . . . . . . . . . . . . . . . . . . . . . . . . 43
Creating SQL Reports . . . . . . . . . . . . . . . . . . . . . . . . . . . . . . . . . . . . . . . . . . . . . . . . . . . . . . . . . . . . . . . . 44
Report Options Dialog Box . . . . . . . . . . . . . . . . . . . . . . . . . . . . . . . . . . . . . . . . . . . . . . . . . . . . . . . . . . . . 45
App Studio for the Developer Studio User 3

Field Properties Dialog Box . . . . . . . . . . . . . . . . . . . . . . . . . . . . . . . . . . . . . . . . . . . . . . . . . . . . . . . . . . . .55
Adding Fields Using Smart Context . . . . . . . . . . . . . . . . . . . . . . . . . . . . . . . . . . . . . . . . . . . . . . . . . . . . . 58
Field Length Limit . . . . . . . . . . . . . . . . . . . . . . . . . . . . . . . . . . . . . . . . . . . . . . . . . . . . . . . . . . . . . . . . . . . .59
The Object Inspector Setup Tab . . . . . . . . . . . . . . . . . . . . . . . . . . . . . . . . . . . . . . . . . . . . . . . . . . . . . . . 61
&WFFMT Report Variable . . . . . . . . . . . . . . . . . . . . . . . . . . . . . . . . . . . . . . . . . . . . . . . . . . . . . . . . . . . . . 62
5. Creating HTML Pages . . . . . . . . . . . . . . . . . . . . . . . . . . . . . . . . . . . . . . . . . . . . . . . . . . . . . . . . . 63
Creating HTML Pages . . . . . . . . . . . . . . . . . . . . . . . . . . . . . . . . . . . . . . . . . . . . . . . . . . . . . . . . . . . . . . . . 63
Recreating Save Selection Files. . . . . . . . . . . . . . . . . . . . . . . . . . . . . . . . . . . . . . . . . . . . . . . . . . . 64
Using the Properties Panel . . . . . . . . . . . . . . . . . . . . . . . . . . . . . . . . . . . . . . . . . . . . . . . . . . . . . . . . . . . .64
Using the Settings Panel . . . . . . . . . . . . . . . . . . . . . . . . . . . . . . . . . . . . . . . . . . . . . . . . . . . . . . . . . . . . . 66
Requests & Data Sources Panel . . . . . . . . . . . . . . . . . . . . . . . . . . . . . . . . . . . . . . . . . . . . . . . . . . . . . . . 69
Using the Tasks & Animations Panel . . . . . . . . . . . . . . . . . . . . . . . . . . . . . . . . . . . . . . . . . . . . . . . . . . . 72
Tasks Section. . . . . . . . . . . . . . . . . . . . . . . . . . . . . . . . . . . . . . . . . . . . . . . . . . . . . . . . . . . . . . . . . . 73
Generating a Chart From a Report . . . . . . . . . . . . . . . . . . . . . . . . . . . . . . . . . . . . . . . . . . . . . . . . . . . . . .76
Adding Additional Visual Discovery Controls . . . . . . . . . . . . . . . . . . . . . . . . . . . . . . . . . . . . . . . . . . . . . 77
Making an HTML Composer Page Mobile . . . . . . . . . . . . . . . . . . . . . . . . . . . . . . . . . . . . . . . . . . . . . . . .78
6. Creating, Editing, and Managing Synonyms and Adapters . . . . . . . . . . . . . . . . . . . . . . . 85
Creating and Editing Synonyms . . . . . . . . . . . . . . . . . . . . . . . . . . . . . . . . . . . . . . . . . . . . . . . . . . . . . . . . 85
Configuring Adapters . . . . . . . . . . . . . . . . . . . . . . . . . . . . . . . . . . . . . . . . . . . . . . . . . . . . . . . . . . . . . . . . . 87
Rebuilding a Data Source . . . . . . . . . . . . . . . . . . . . . . . . . . . . . . . . . . . . . . . . . . . . . . . . . . . . . . . . . . . . .89
Automatically Adding Synonyms to Projects . . . . . . . . . . . . . . . . . . . . . . . . . . . . . . . . . . . . . . . . . . . . . .91
A. Developer Studio Functionality Deprecated in App Studio . . . . . . . . . . . . . . . . . . . . . . 93
Deprecated Functionality List . . . . . . . . . . . . . . . . . . . . . . . . . . . . . . . . . . . . . . . . . . . . . . . . . . . . . . . . . .93
Contents
4

Preface
This content introduces WebFOCUS App Studio and describes the differences between it andDeveloper Studio. App Studio, like Developer Studio, is a Windows-based GUI developmentenvironment for creating WebFOCUS applications.
This document is only for current Developer Studio users who are transitioning to using AppStudio.
How This Manual Is Organized
This manual includes the following chapters:
Chapter/Appendix Contents
1 Introduction to WebFOCUSApp Studio
Describes the App Studio paradigm, includes aterminology list, provides installation instructions,and offers recommendations for editing DeveloperStudio files in App Studio.
2 Developer Studio and AppStudio Interface Differences
Describes the differences between the DeveloperStudio and App Studio interfaces.
3 Creating Procedures Describes how to create a procedure in App Studio.
4 Creating Reports Describes the differences between DeveloperStudio and App Studio when creating a report.
5 Creating HTML Pages Describes the differences between DeveloperStudio and App Studio when creating an HTMLpage.
6 Creating, Editing, andManaging Synonyms andAdapters
Describes the differences between DeveloperStudio and App Studio when creating, editing, andmanaging synonyms and adapters.
A Developer StudioFunctionality Deprecated inApp Studio
Details Developer Studio functionality that has beendeprecated in App Studio.
App Studio for the Developer Studio User 5

Conventions
The following table describes the conventions that are used in this manual.
Convention Description
THIS TYPEFACE
or
this typeface
Denotes syntax that you must enter exactly as shown.
this typeface Represents a placeholder (or variable) in syntax for avalue that you or the system must supply.
underscore Indicates a default setting.
this typeface Represents a placeholder (or variable), a cross-reference, or an important term. It may also indicate abutton, menu item, or dialog box option that you canclick or select.
Key + Key Indicates keys that you must press simultaneously.
{ } Indicates two or three choices. Type one of them, notthe braces.
[ ] Indicates a group of optional parameters. None arerequired, but you may select one of them. Type only theparameter in the brackets, not the brackets.
| Separates mutually exclusive choices in syntax. Typeone of them, not the symbol.
... Indicates that you can enter a parameter multiple times.Type only the parameter, not the ellipsis (...).
.
.
.
Indicates that there are (or could be) intervening oradditional commands.
Conventions
6

Related Publications
Visit our Technical Content Library at documentation.informationbuilders.com. You can alsocontact the Publications Order Department at (800) 969-4636.
Customer Support
Do you have questions about this product?
Join the Focal Point community. Focal Point is our online developer center and more than amessage board. It is an interactive network of more than 3,000 developers from almost everyprofession and industry, collaborating on solutions and sharing tips and techniques. AccessFocal Point at forums.informationbuilders.com/eve/forums.
You can also access support services electronically, 24 hours a day, with InfoResponseOnline. InfoResponse Online is accessible through our website, www.informationbuilders.com.It connects you to the tracking system and known-problem database at the InformationBuilders support center. Registered users can open, update, and view the status of cases inthe tracking system and read descriptions of reported software issues. New users can registerimmediately for this service. The technical support section of www.informationbuilders.comalso provides usage techniques, diagnostic tips, and answers to frequently asked questions.
Call Information Builders Customer Support Services (CSS) at (800) 736-6130 or (212)736-6130. Customer Support Consultants are available Monday through Friday between 8:00a.m. and 8:00 p.m. EST to address all your questions. Information Builders consultants canalso give you general guidance regarding product capabilities. Please be ready to provide yoursix-digit site code number (xxxx.xx) when you call.
To learn about the full range of available support services, ask your Information Buildersrepresentative about InfoResponse Online, or call (800) 969-INFO.
Information You Should Have
To help our consultants answer your questions effectively, be prepared to provide the followinginformation when you call:
Your six-digit site code (xxxx.xx).
Your WebFOCUS configuration:
The front-end software you are using, including vendor and release.
The communications protocol (for example, TCP/IP or HLLAPI), including vendor andrelease.
The software release.
Preface
App Studio for the Developer Studio User 7

Your server version and release. You can find this information using the Version optionin the Web Console.
The stored procedure (preferably with line numbers) or SQL statements being used inserver access.
The Master File and Access File.
The exact nature of the problem:
Are the results or the format incorrect? Are the text or calculations missing ormisplaced?
Provide the error message and return code, if applicable.
Is this related to any other problem?
Has the procedure or query ever worked in its present form? Has it been changed recently?How often does the problem occur?
What release of the operating system are you using? Has it, your security system,communications protocol, or front-end software changed?
Is this problem reproducible? If so, how?
Have you tried to reproduce your problem in the simplest form possible? For example, if youare having problems joining two data sources, have you tried executing a query containingjust the code to access the data source?
Do you have a trace file?
How is the problem affecting your business? Is it halting development or production? Doyou just have questions about functionality or documentation?
User Feedback
In an effort to produce effective documentation, the Technical Content Management staffwelcomes your opinions regarding this document. You can contact us through our website documentation.informationbuilders.com/connections.asp.
Thank you, in advance, for your comments.
User Feedback
8

Information Builders Consulting and Training
Interested in training? Information Builders Education Department offers a wide variety oftraining courses for this and other Information Builders products.
For information on course descriptions, locations, and dates, or to register for classes, visitour website (education.informationbuilders.com) or call (800) 969-INFO to speak to anEducation Representative.
Preface
App Studio for the Developer Studio User 9

Information Builders Consulting and Training
10

Chapter1Introduction to WebFOCUS App Studio
This topic describes the App Studio paradigm, includes a terminology list, providesinstallation instructions, and offers recommendations for editing Developer Studio files inApp Studio.
Note: The images in this content were captured using App Studio Release 8.2 Version03. The images may look slightly different depending on the release you are using.
In this chapter:
The App Studio Paradigm and Terminology
Installing App Studio and Developer Studio on the Same Machine
WebFOCUS App Studio Documentation Overview
Recommendations for Editing Developer Studio Files in App Studio
The App Studio Paradigm and Terminology
App Studio is the WebFOCUS desktop development environment that you can use to createreports, charts, HTML pages, documents, and much more. Building on the industry-familiarMicrosoft Office® ribbon interface, App Studio offers a simplified user experience andworkflow, allowing developers to create application content immediately, without a costly andtime-consuming learning curve. Additionally, it dramatically increases development efficiency byeliminating the need for developers to utilize multiple tools to piece together an application.
App Studio uses panels, canvases, and a ribbon to eliminate the complex, multi-tool paradigmthat is so prevalent in other business intelligence developer solutions. You can rapidly createand design all of your applications within a single, fully-integrated environment.
App Studio is customizable. You can add your own shortcuts using the Quick Access Toolbar.You are able to move your canvases next to one another, so that you may view and developthem, side by side. Panels can also be pinned, hidden, or moved to any position around theinterface.
App Studio enables you to work in several development modes at the same time. Thisdevelopment environment provides access to a variety of features and modes from which youcan build your applications. The modes available to you in App Studio include, but are notlimited to, Report mode, Chart mode, HTML mode, and Document mode.
App Studio for the Developer Studio User 11

In addition to its native modes, App Studio invokes WebFOCUS tools, such as the Chart tool,Alert Assistant, and Reporting Objects. These tools are invoked as development modes thatare contained within a canvas. This means that when you create a chart, App Studio invokesthe WebFOCUS tool as a development mode on the Chart canvas.
Terminology List
The following tables provide a reference for corresponding terms and labels that have changedbetween the Developer Studio and App Studio user interface.
Developer Studio App Studio
Toolbar Ribbon: tabs and groups
Main Toolbar Home tab
Commands Toolbar Home tab
WebFOCUSEnvironments Toolbar
WebFOCUS Administration menu
Report Painter toolbars Report tab, Format tab, Data tab, Layout tab, View tab, Imagestab, Field tab, Appearance tab, Active Report Options tab,Modeling tab
HTML Composertoolbars
Components tab, Controls tab, Positioning tab, Utilities tab
Document Composertoolbars
Insert tab, Positioning tab, Utilities tab
Synonym Editor Metadata tab
Developer Studio App Studio
Tool Canvas or Mode
Graph Tool Chart canvas, Chart mode
Report Painter Report canvas, Report mode
HTML Composer HTML canvas, HTML mode
The App Studio Paradigm and Terminology
12

Developer Studio App Studio
Document Composer Document canvas, Document mode
Synonym Editor Metadata canvas
Developer Studio App Studio
Window Panel
Developer Studio Explorer Environments Tree panel
Procedure Viewer, Task Viewer Procedure View panel
Properties window Properties panel
Developer Studio App Studio
Dialog Box Dialog Box, Panels, Tabs, Groups
Properties and Settingsdialog box
Settings panel
Report Options dialogbox
Report tab, Format tab, Data tab, Style group, Field tab, Layouttab, Active Report Options tab, Modeling tab
Field Options dialog box Report tab, Format tab, Data tab, Style group, Field tab, Layouttab, Active Report Options tab, Modeling tab, Field Propertiesdialog box
Properties dialog box File/Folder Properties panel
1. Introduction to WebFOCUS App Studio
App Studio for the Developer Studio User 13

Installing App Studio and Developer Studio on the Same Machine
App Studio and Developer Studio can be installed, configured, and run on the same machine,at the same time. To ensure the proper functionality of App Studio and Developer Studio, youmust appropriately configure the web and/or application server, and ensure that you havesufficient memory.
The following are three installation scenarios, and the appropriate web applicationconfiguration for each installation.
If WebFOCUS is already installed on the same system, you can install App Studio andDeveloper Studio by selecting the Use WebFOCUS configuration option in the componentswindow during the installation process. This option is selected by default.
This ensures that both products use the web application for WebFOCUS. One set of contextroots will be created and used by both products.
If WebFOCUS is not installed on the same system, you can install the Managed ReportingEdition of App Studio and Developer Studio, where the products can only access a remoteWebFOCUS environment.
If WebFOCUS is not installed on the same system, you can install the stand-alone versionsof App Studio and Developer Studio. The first product that you install uses the defaultconfiguration and generates the default context roots for the web application. When youinstall the second product, select the Advanced Configuration option to specify a secondset of context roots.
This allows App Studio and Developer Studio to have specific context roots for their ownweb application independently. In this scenario, Apache Tomcat™ will load both webapplications, and more memory will be used as a result. If memory is a concern, you cancopy only the context root XML files for the product that you want to run and save the othercontext root XML files in a directory outside the Apache Tomcat directory.
WebFOCUS App Studio Documentation Overview
The following documentation components are available for App Studio users:
WebFOCUS App Studio Installation and Configuration manual
Context-sensitive online Help system
WebFOCUS App Studio User's Manual
Maintain Data Language Reference
Installing App Studio and Developer Studio on the Same Machine
14

Maintain Data Getting Started
You can access the online Help system through the product. Press F1 on your keyboard, orclick Help throughout the interface, to open the Help window. The online Help system isdesigned to provide you all of the information that you need to develop content in App Studio.
You can also access the Help Wizard by selecting the Help Wizard check box in the View groupon the Home tab of the App Studio ribbon. The Help Wizard content dynamically changes,depending on where you are in the interface.
Recommendations for Editing Developer Studio Files in App Studio
You can open all Developer Studio files in App Studio. If you choose to edit these files in AppStudio, consider the following recommendations.
When saving your changes, choose the Save As option. This option saves the file under adifferent name without changing the original file.
You can run Developer Studio and App Studio simultaneously. However, it is not advised toedit the same file in both, at the same time.
You can edit procedure (.fex) files in App Studio and Developer Studio if the features thatyou use to edit those files exist in both products.
When you open an HTML page in App Studio, the HTML page will undergo a conversionprocess. The conversion occurs in memory. You may execute the page in App Studio toverify correct functionality upon execution. If you save the page, the converted code will besaved. If you exit the tool without saving, the converted code will not be saved. You cannotreopen converted pages in Developer Studio. Only HTML pages created in Release 7.0Version 6.9 and higher can be directly converted. For earlier releases, you will need to firstopen your HTML page in a Release 8 version of Developer Studio, and save it, beforeopening it in App Studio.
1. Introduction to WebFOCUS App Studio
App Studio for the Developer Studio User 15

Recommendations for Editing Developer Studio Files in App Studio
16

Chapter2 Developer Studio and App StudioInterface Differences
This topic outlines the differences between the Developer Studio and App Studiointerfaces. You can create the same types of files in both products. However, theprocess you follow has changed. In Developer Studio, you use menus, dialog boxes,toolbars, and windows to create your files. In App Studio, you use the ribbon, panels, andcanvases to create your files.
In this chapter:
Comparing the Default Developer Studio and App Studio Interfaces
Main Interface Commands
WebFOCUS Administration
Development Areas
Creating Procedures
Configuring Environments
Managing Your WebFOCUS Environment
Comparing the Default Developer Studio and App Studio Interfaces
This section identifies the differences between Developer Studio and App Studio upon startup.Both products are launched by clicking on their respective icons.
Developer Studio opens with the Explorer window, which displays your environments, projects,and files. You can use the Main toolbar, Command toolbar, and the Menu bar to accessspecific tools for creating different files.
App Studio opens with a Welcome screen, where you can access the Getting Started video,and a suite of how-to videos that open within the software window. It also provides a direct linkto the App Studio resources that are available on the WebFOCUS 8.2.x Information Center. TheHome tab provides commands for creating content, options to manage and edit yourenvironments, and accessing the Command Console. Because App Studio focuses on whatyou are creating, instead of how you create it, you no longer need to know how to access themany tools found in Developer Studio. You only need to know what content you want to createand where you want to create it.
App Studio for the Developer Studio User 17

The following image shows a comparison of the default Developer Studio and App Studiointerfaces.
Comparing the Default Developer Studio and App Studio Interfaces
18

Developer StudioThe following image shows the default Developer Studio interface, and highlights the Menubar, Main toolbar, Commands toolbar, and Explorer window.
1. Menu bar. Displays pull-down menus. The menus and options are context-sensitive,and are determined by the active window or selected object.
2. Main toolbar. Provides quick access to commonly performed functions. These buttonsalways appear on the toolbar, but their behavior is determined by the active windowand the selected object.
3. Commands toolbar. Provides quick access to any external program added in theExternal Tools tab of the Developer Studio Options dialog box. When you add anexternal program, it appears as an additional icon on the Commands toolbar.
4. Explorer window. This window is based on the Microsoft Windows Explorer treestructure, and provides access to development tools so you can quickly build anddeploy web-based reporting applications.
To begin creating content in Developer Studio, you need to know what tool to use, andwhere to create it. Some development areas do not allow you to create certain file types.
2. Developer Studio and App Studio Interface Differences
App Studio for the Developer Studio User 19

App Studio
The following image shows the default App Studio interface, and highlights the Welcomescreen, Application button, Quick Access Toolbar, ribbon, Environments Tree panel, andthe canvas.
The App Studio interface components are identified as follows:
Welcome screen. Provides access to resources that help you get started with theproduct as you develop content.
Application button. Provides access to the Application menu of file-related commands.
Quick Access Toolbar. Displays frequently used commands, such as Open, Save,Quick Print, Undo, Redo, Cut, Copy, Paste, and Run.
Ribbon. Displays both static and contextual tabs of commands that you can use tobuild and customize applications.
Environments Tree panel. Provides access to the WebFOCUS environments youconfigure and files you create under each development area.
Canvas. Provides an active preview of your application development.
Comparing the Default Developer Studio and App Studio Interfaces
20

To begin creating content in App Studio, you simply need to know what type of file youwant to create. For example, if you know you want to create a report, click Report on theHome tab to begin creating your report.
Main Interface Commands
This section identifies the differences between the Developer Studio and App Studio maincommands.
In Developer Studio, the Main toolbar and Commands toolbar contain the commands thatprovide quick access to commonly performed functions. Their behavior is determined by theactive window and the selected object. Depending on where you are in the Explorer window,certain toolbar commands may be inactive.
In App Studio, the Application menu, Quick Access Toolbar, and Home tab serve the samepurpose as the Main toolbar and Commands toolbar. They contain similar commands to theMain toolbar and Commands toolbar, and contain additional exclusive commands that are onlyavailable in App Studio.
You can use the Application menu to create a new document, open an existing document, savean active document, and print an active document. The Options button opens the App StudioOptions dialog box, where you can set user preferences, similar to the Developer StudioOptions dialog box. The Application menu also lists recently opened documents.
The Quick Access Toolbar contains frequently used commands. You can add or removecommands by using the shortcut menu on any ribbon command. The Quick Access Toolbarcontains the Open, Save, Print, Undo, Redo, Cut, Copy, Paste, and Run commands by default.
You can use the Home tab to access the features and functions necessary to build anapplication, create new components, open existing components, run existing components, andedit components. If you have RStat installed, the Modeling group will be present on the Hometab. The Home tab is the only tab in App Studio that is always present.
The following image shows the Main toolbar and Commands toolbar in Developer Studio.
2. Developer Studio and App Studio Interface Differences
App Studio for the Developer Studio User 21

The following image shows the Application menu in App Studio.
The following image shows the Quick Access Toolbar in App Studio.
The following image shows the Home tab in App Studio.
The Application Menu, in App Studio, has an area for recently used documents. This allows youto quickly access a previously active document.
You cannot edit the commands on the Main toolbar and Commands toolbar. However, theQuick Access Toolbar can be customized to contain your most frequently used commands. Youcan use this to avoid switching between tabs to click a command.
Main Interface Commands
22

Developer Studio does not clearly display what content you can create. You need to know whattool to use and in which area that tool can be used. App Studio requires that you only knowwhat content you want to create. Once you know what content you want to create, you can usethe Home tab. The Content group contains commands that you can use to begin creatingcontent.
WebFOCUS Administration
This section identifies the differences between Developer Studio and App Studio whenmanaging your environments. In Developer Studio, you use the WebFOCUS Environmentstoolbar to access administration options such as the BI Portal, the ReportCaster Console, theWebFOCUS Administration Console, and others. This toolbar is only available when you selecta server in the Developer Studio Explorer. The WebFOCUS Environments toolbar is shown inthe following image.
In App Studio, you can access the same administration options from the WebFOCUSAdministration menu, which is located in the upper-right corner of the ribbon. The WebFOCUSAdministration menu is shown in the following image.
The WebFOCUS Administration menu is only available when you select an environment in theEnvironments Tree panel. The options available to you change, depending on the developmentarea that you select in the Environments Tree panel. Deferred Status is only available whenyou select a Domains node in the Environments Tree panel. The Reporting Server Console isonly available when you select a Web Applications node in the Environments Tree panel.
2. Developer Studio and App Studio Interface Differences
App Studio for the Developer Studio User 23

Development Areas
This section identifies the differences between Developer Studio and App Studio when creatingdifferent content. In Developer Studio, you create content with different tools, while in AppStudio, you create content using different canvases.
Developer Studio offers a selection of graphical development tools for creating content. Thesetools are contained in their own windows and identified by their distinctive names. Each toolhas a set of toolbars that you can use to create your content. Some tools, such as HTMLComposer, have multiple windows and dialog boxes that are used for setting the properties ofobjects.
The ribbon is contextual. As you develop content in a specific canvas, tabs open to assist youwith development. For example, if you are creating a report using the Report canvas, the ribbonwill only open the tabs that you need to build a report. If the HTML canvas is active, the ribbonopens the tabs needed to build an HTML page. Some canvases also use panels to developcontent. These panels replace some of the windows and dialog boxes found in the DeveloperStudio tools. For example, the Properties and Settings dialog box, found in HTML Composer, isnow the Settings panel in the HTML canvas. Not all canvases have panels associated withthem. Some panels are only available for specific canvases. For example, the Settings panelonly affects the HTML canvas, and will only be available when the HTML canvas is active. If theReport canvas is active, the Settings panel is not available.
Development Areas
24

The following image shows a comparison of the HTML Composer in Developer Studio, and theHTML canvas in App Studio.
The following image shows a comparison of Report Painter in Developer Studio, and the Reportcanvas in App Studio.
2. Developer Studio and App Studio Interface Differences
App Studio for the Developer Studio User 25

The following image shows a comparison of the Graph tool in Developer Studio, and the Chartcanvas in App Studio.
Each tool in Developer Studio opens in its own window. If you have multiple tools open, it canbecome difficult to navigate between them. Each canvas in App Studio has its own tab. Youcan easily switch between the different canvases that you open, by clicking the tab of thecanvas you want to use.
Some tools in Developer Studio have multiple toolbars stacked on top of one another, whichcould be confusing to find a specific option. In App Studio, each command is categorized in agroup, which is also categorized in a tab on the ribbon. On the ribbon, each tab name indicatesthe type of commands you will find in that tab. For example, the Components tab, in the HTMLcanvas, contains the components you can add to your HTML page.
Creating Procedures
This section identifies the differences between the Procedure Viewer in Developer Studio, andthe Procedure View panel in App Studio. Both are used to create multi-component procedures.However, one is a window and the other is a panel.
Creating Procedures
26

In Developer Studio, you use the Procedure Viewer to connect multiple components together,using the component connectors. The Procedure Viewer opens in a new window. When youcreate a new component, that component also opens in a new window or tool. Thecomponents that you add to the procedure are shown in the toolbar at the top of the ProcedureViewer, or are shown as options when you click the component connector.
In App Studio, you can use the Procedure View panel to create multi-component procedures.Right-click a component or the procedure folder, point to New, and then click the name of thecomponent that you want to add. The component will be added to the procedure after thecomponent you right-clicked. If a component in the procedure is open, a green arrow is shownnext to the component icon.
The following image shows the Procedure Viewer in Developer Studio.
The following image shows the Procedure View panel in App Studio.
2. Developer Studio and App Studio Interface Differences
App Studio for the Developer Studio User 27

As you create your multi-component procedure, you can begin to accumulate multiple windows.This can increase the difficulty in navigating between multiple tools. App Studio displays eachcomponent as a tab underneath a procedure tab. This makes navigating between canvasessimple, and fast. You can move the Procedure View panel around the canvas or set it to auto-hide so that you can access it without compromising development space.
Configuring Environments
This section describes the difference between the Explorer window in Developer Studio and theEnvironments Tree panel in App Studio.
Developer Studio uses the Explorer window to manage your WebFOCUS environments andcontent. You can expand the project folder where your files are grouped into different virtualfolders depending on their type. Different options are available based on the area that you aredeveloping in.
App Studio uses the Environments Tree panel to manage your WebFOCUS environments andcontent. You can expand nodes on the Configured Environments tree to view your projects andapplication files. You can click the filtering commands on the top of the Environments Treepanel to view a specific file type within a folder. App Studio also allows you to open existingcontent, create new content, and then develop your application by accessing shortcut menusfrom the Configured Environments tree. If you double-click a file name, it will open in theappropriate mode or canvas. If you right-click an application folder, project folder, or file withinthe Configured Environments tree, a shortcut menu opens. The options in each shortcut menudepend on the development area or file type that you select.
Configuring Environments
28

The following image shows the Explorer window in Developer Studio.
The following image shows the Environments Tree panel in App Studio.
A key difference between the Explorer window and the Environments Tree panel is the ability tofilter content by file type. In App Studio, you can use the filtering options at the top of theEnvironments Tree panel to view a specific type of file. These files are no longer kept indifferent virtual folders like they were in Developer Studio. You can also sort the order in whichyou view the content. For example, you can view the content in descending or ascendingalphabetical order.
2. Developer Studio and App Studio Interface Differences
App Studio for the Developer Studio User 29

By default, the Environments Tree panel appears to the left of the App Studio interface. Youcan resize, move, or auto-hide this panel anywhere around the interface.
Environments Detail Panel
The Environments Detail panel is an optional panel you can use to display your configuredenvironments. This panel functions similar to the Environments Tree panel in App Studio butresembles the Explorer window in Developer Studio.
The Environments Detail panel is similar to the Environments Tree panel, except that contentis displayed in the Details pane rather than under the Configured Environments tree. Do notuse the View Options command to sort content in the Environments Detail panel. Instead, clickthe columns at the top of the Details pane to sort content by either name, size, type, lastmodified, or location.
The following image shows a side-by-side comparison of the Environments Detail panel in AppStudio and the Explorer window in Developer Studio.
Configuring Environments
30

The following image shows the Environments Detail panel and the Environments Tree panel inApp Studio.
Managing Your WebFOCUS Environment
In App Studio, you can manage your WebFOCUS environments by clicking the Environmentscommand on the Home tab, in the Utilities group, as shown in the following image.
This command opens the Environments List dialog box, similar to Developer Studio. You canadd a new environment, remove an environment, or edit the properties of an existingenvironment. For more information on configuring your WebFOCUS environments, see theWebFOCUS App Studio User's Manual.
Filtering Files
Developer Studio and App Studio separate application folders and project folders differently. InDeveloper Studio, virtual folders are used to group your content by file type. App Studio doesnot use virtual folders. Instead, use the filtering options at the top of the Environments Treepanel to view the content in an application folder or project folder. The Environments Treetoolbar filtering options are shown in the following image.
2. Developer Studio and App Studio Interface Differences
App Studio for the Developer Studio User 31

You can use the following filtering options to sort specific files:
View Options. Opens a menu where you can select how you want to view the sortedcontent. You can change the folders to view your content in ascending or descendingalphabetical order.
Show All files. Displays all files in a folder.
Show only Procedure files. Displays only the procedure files in a folder.
Show only Master Files. Displays only the Master Files in a folder.
Show only HTML files. Displays only the HTML files in a folder.
Show only Maintain files. Displays only the Maintain files in a folder.
Show only Image files. Displays only the image files in a folder.
Show only ReportCaster files. Displays only the ReportCaster files in a folder.
Show only Library files. Displays only the library files in a folder.
Other files. Displays any content that is not a procedure file, Master File, HTML file,Maintain file, or an image file.
Filtering for Additional File Types
In Developer Studio, to filter and view additional file types in the Explorer window, along withthe default filtered file types, you must create a new filter. To do this, you must specify the filetype in the Edit Filters tab, in the Properties dialog box. You can access the Properties dialogbox from the project folder shortcut menu.
Managing Your WebFOCUS Environment
32

The Edit Filters tab is shown in the following image.
2. Developer Studio and App Studio Interface Differences
App Studio for the Developer Studio User 33

In App Studio, you do not need to create filters to view additional file types. Instead, you canuse the Show All files filtering command, located on the Environments Tree toolbar. Thiscommand displays all files in a project or folder, regardless of their file type. The Show All filescommand is selected in the following image.
Managing Your WebFOCUS Environment
34

In App Studio, you can also use the Other files command, located on the Environments Treetoolbar, to display files that are not procedure files, Master Files, HTML files, Maintain files, orimage files. The Other files command is selected in the following image.
2. Developer Studio and App Studio Interface Differences
App Studio for the Developer Studio User 35

View Options
App Studio allows you to sort and view content differently using the View Options menu. Thismenu contains options to sort the content alphabetically, by date modified, or by file type. Youcan also switch between viewing the content by title or by name. The View Options menu isshown in the following image.
You can use the following view options to sort content in a specific order:
View items sorted in Alphabetical order. Sorts the content in alphabetic order from A to Z.
View items sorted in reverse Alphabetical order. Sorts the content in reverse alphabeticorder from Z to A.
View items sorted in Chronological order. Sorts content from the most recently written fileto the oldest written file.
View items sorted in reverse Chronological order. Sorts content from the oldest written fileto the most recently written file.
View items grouped by File Type. Sorts the content by file type. This is used when usingthe Other files sort option.
Respect Sort Order Property. Respects the Sort Order Property value specified in the File/Folder Properties panel.
View items by Title. Displays all content by title. If any content does not have a title, thename of the content will be used instead.
View items by Name. Displays all content by name.
Managing Your WebFOCUS Environment
36

Refresh View. Refreshes what is currently visible on your screen, in the Environments Treepanel. This also refreshes any dependencies of the files shown in the Environments Treepanel, even if they are not in view.
2. Developer Studio and App Studio Interface Differences
App Studio for the Developer Studio User 37

Managing Your WebFOCUS Environment
38

Chapter3Creating Procedures
This topic describes how to create a procedure in App Studio. You can add the followingcomponents to a procedure: Report, Define, Define Function, Chart, Set, Join, Use,Allocation, HTMLForm, OLAP Dimensions, Match, or Dialogue Manager. Add thesecomponents to a procedure using the Procedure View panel, similar to the way that youuse the Procedure Viewer in Developer Studio.
In this chapter:
Accessing and Using the Procedure View Panel
Accessing and Using the Procedure View Panel
In App Studio, you can use the Procedure View panel to create multi-component procedures.You can access the Procedure View panel by right-clicking an application folder or project in theEnvironments Tree panel, pointing to New, and then clicking Procedure, as shown in thefollowing image.
The Procedure View panel opens.
App Studio for the Developer Studio User 39

After creating your procedure, the Procedure View panel and Procedure canvas open, as shownin the following image. The first component of every procedure file is a comment component.You can close this canvas and create your procedure or leave it open.
To create new components in the Procedure View panel, right-click the comment or theprocedure folder, point to New, and click the component type you want to create. Thecomponent will be added to the procedure after the component that you right-clicked. Forexample, right-click on the comment file, point to New, and click Report.
If a component of the procedure is open, a green arrow is shown next to the component icon,as shown in the following image.
When multiple components are open at the same time, they are categorized underneath theprocedure tab. The following image shows a chart component, report component, andcomment component, all open under the Procedure5.fex tab.
Accessing and Using the Procedure View Panel
40

This functionality allows you to switch between canvases quickly. You can close thecomponents when you are done editing, and leave the components that you are still workingon open. You can open and close these components as you develop your procedure.
Example: Multi-component Procedure
The following image shows a multi-component procedure in the Procedure View panel, withComment, Join, Set, and Report components. The Comment, Join, and Report componentsare open. Notice that the Report canvas is currently active.
Note:
The Procedure View panel is automatically available when you create a report.
If you unintentionally close the Procedure View panel, select Procedure View on the Hometab, in the View group of the App Studio ribbon.
3. Creating Procedures
App Studio for the Developer Studio User 41

Accessing and Using the Procedure View Panel
42

Chapter4Creating Reports
This topic describes the differences between Developer Studio and App Studio whencreating a report. In Developer Studio, you use toolbars to customize your report, while inApp Studio, you use tabs on the ribbon to customize your report. Some of the keydifferences in the Report canvas, when compared to Report Painter, are whichcommands the Report Options dialog box and Field Properties dialog box display, howfields are added to the canvas, and how reports and SQL reports are created.
In this chapter:
Creating Reports
Creating SQL Reports
Report Options Dialog Box
Field Properties Dialog Box
Adding Fields Using Smart Context
Field Length Limit
The Object Inspector Setup Tab
&WFFMT Report Variable
Creating Reports
In Developer Studio, you create reports using Report Painter. You can access Report Painterfrom a component connector in the Procedure Viewer, or a shortcut menu in the Explorerwindow.
In App Studio, you can create reports using the Report canvas. When you create a new report,use the Report Wizard. You can access the Report Wizard from the Report command on theHome tab, or a shortcut menu in the Environments Tree panel. You can also create a report,as a component of a procedure, in the Procedure View panel. A report created in the ProcedureView panel opens the Report canvas, but not the Report Wizard.
App Studio for the Developer Studio User 43

The Report Wizard is shown in the following image.
Creating SQL Reports
In Developer Studio, you create SQL reports using the SQL Report Wizard. You can access theSQL Report Wizard from a component connector in the Procedure Viewer, or a shortcut menu inthe Explorer window.
In App Studio, you can create SQL reports using the Report Wizard. You can access the ReportWizard from the Report command on the Home tab, or a shortcut menu in the EnvironmentsTree panel. You can also create an SQL report in the Procedure View panel.
Creating SQL Reports
44

The SQL Report Wizard is shown in the following image.
Report Options Dialog Box
In Developer Studio, the Report Options dialog box contains options that you can use tocustomize your report. This dialog box is categorized by tabs. For example, the Style tabcontains styling options for your report.
4. Creating Reports
App Studio for the Developer Studio User 45

In App Studio, all of the options found in the Report Options dialog box have been moved tothe ribbon tabs. Some of those commands can also be accessed from shortcut menusthroughout the product. For example, you now use commands in the Output Types group, onthe Format tab, to change the format of your report.
Output tab
In Developer Studio, the Output tab contains options that change how your report is shownat run time, as well as the report destination. For example, you can choose to run yourreport as a PDF in a new window. The Output tab is shown in the following image.
In App Studio, some of those options are now on the ribbon. You can access them on theFormat tab, in the Output Types group. From this group you can change the output formatof your report and the destination of the report, when it is run. The Output Types group isshown in the following image.
Report Options Dialog Box
46

Some of the Developer Studio Output tab options are also found in the Output FormatOptions dialog box, accessed from the Output Format Options command, in the OutputTypes group, on the Format tab. The Output Format Options dialog box displays differentoptions depending on the output format you select. The Output Format Options dialog boxis shown in the following image.
4. Creating Reports
App Studio for the Developer Studio User 47

Style tab
In Developer Studio, the Style tab contains options that you can use style your report. TheStyle tab is shown in the following image.
In App Studio, these options are now on the ribbon. You can access them on the Reporttab, in the Style group. You can also manage the theme of your report from this tab. TheStyle group is shown in the following image.
Report Options Dialog Box
48

Drill Down tab
In Developer Studio, the Drill Down tab contains options that you can use to execute drilldown actions when a field is clicked at run time. The Drill Down tab is shown in thefollowing image.
In App Studio, these options are now on the ribbon. You can access them on the Reporttab, in the Links group. Click Drill Down to open the Drill Down dialog box. The Drill Downcommand is shown in the following image.
4. Creating Reports
App Studio for the Developer Studio User 49

The Drill Down dialog box is shown in the following image.
Computes tab
In Developer Studio, the Computes tab allows you create calculated computes within thetab. The Computes tab is shown in the following image.
In App Studio, these options are now on the ribbon. You can access them on the Data tab,in the Calculation group. The Calculation group is shown in the following image.
Report Options Dialog Box
50

The Summary (Compute) command opens the Computed Field Creator dialog box, asshown in the following image.
4. Creating Reports
App Studio for the Developer Studio User 51

The Across Compute command opens the Across Compute dialog box, as shown in thefollowing image.
Report Options Dialog Box
52

View tab
In Developer Studio, you can use the View tab to display report data differently and also todisplay the way fields are presented in the Object Inspector differently. The View tab isshown in the following image.
In App Studio, these options are now on the ribbon. You can access them on the View tab,in the Object Inspector group, General group, Field Length group, Repetitions group, andZoom group. The View tab is shown in the following image.
4. Creating Reports
App Studio for the Developer Studio User 53

You can also access the Object Inspector group options from the Object Inspector shortcutmenu. When an option is used in the Object Inspector group, that same option is selectedin the Object Inspector shortcut menu. For example, if you choose to display the Field Listby title, the Object Inspector shortcut menu will show that option as selected. The AppStudio Object Inspector shortcut menu is shown in the following image.
Report Options Dialog Box
54

Images tab
In Developer Studio, you can use the Images tab to add images to your report. The Imagestab is shown in the following image.
In App Studio, these options are now on the ribbon. You can access them on the Imagestab, in the New Image group, Current Image group, Position group, Size group, and Optiongroup. The Image tab is shown in the following image.
Field Properties Dialog Box
The Developer Studio Field Properties dialog box contains options that change the style andfunctionality of a selected field. The dialog box is categorized by tabs. These tabs indicatewhat the options affect. For example, the Sort tab contains sorting options that will modify theselected field.
4. Creating Reports
App Studio for the Developer Studio User 55

Many of the options you find in the Field Properties dialog box in Developer Studio, areavailable in App Studio, on the ribbon, in the Field tab. The Field tab is only available when youselect a field in your report. The General tab is only available for Detail and Aggregate fieldtypes. The Sort tab is only available for the Sort Down field type.
Style tab
In Developer Studio, you can style a selected field using the Style tab. The Style tab isshown in the following image.
In App Studio, these options are now on the ribbon. You can access them on theAppearance tab, in the Style group. The Style group is shown in the following image.
Field Properties Dialog Box
56

Drill Down tab
In Developer Studio, the Drill Down tab contains options that you can use to execute drilldown actions when a field is clicked at run time. The Drill Down tab is shown in thefollowing image.
In App Studio, these options are now on the ribbon. You can access them on theAppearance tab, in the Links group. Click Drill Down to open the Drill Down dialog box. TheDrill Down command is shown in the following image.
4. Creating Reports
App Studio for the Developer Studio User 57

The Drill Down dialog box is shown in the following image.
Adding Fields Using Smart Context
In App Studio, the Report canvas uses smart context functionality to determine what columntype a field should be, given the metadata of the field and/or the position of the field on thecanvas.
Depending on the metadata of the field, and whether you have the smart context option turnedon or off, fields that you add to your report will be added as either an aggregate, BY, SUM, orDetail.
If smart context is on, and the metadata indicates that a field should be a measure ordimension, it will automatically be added as an aggregate or sort down field type,respectively.
If smart context is on, but the metadata does not indicate whether a field is a measure ordimension, then alphanumeric fields and date fields are added as BY fields, while numericfields are added as SUM fields.
If smart context is off, all fields are added as DETAIL fields.
Adding Fields Using Smart Context
58

The smart context options are contained in the App Studio Options dialog box, in the Generaltab, as shown in the following image.
Field Length Limit
In Developer Studio, the Limit Field Lengths command is off by default. The Limit Field Lengthscommand is found in the View tab of the Report Options dialog box and controls the maximumlength of a field or the maximum number of characters that can appear in the report. The FieldLength Limit is set to 36 by default.
4. Creating Reports
App Studio for the Developer Studio User 59

The Report Options dialog box is shown in the following image with the Limit Field Lengthscommand and Field Length Limit command highlighted.
In App Studio, these commands are now on the ribbon. You can access them on the View tab,in the Field Length group. The Limit Field Lengths command is on by default. The Field LengthLimit is set to 15 by default. This is so a field does not display an overwhelming amount ofinformation when initially added to the report.
The View tab is shown in the following image with the Field Length group highlighted.
Field Length Limit
60

The Object Inspector Setup Tab
In Developer Studio, you use the Object Inspector Setup tab to create Defines, Joins, Sets,and OLAP Dimensions that precede your report.
The Setup tab is shown in the following image.
In App Studio, the Setup tab has been removed from the Object Inspector. To create Defines,Joins, Sets, and OLAP Dimensions that precede your report, you can use the Procedure Viewpanel.
4. Creating Reports
App Studio for the Developer Studio User 61

The Procedure View panel is shown in the following image.
For more information on using the Procedure View panel, see Accessing and Using theProcedure View Panel on page 39.
&WFFMT Report Variable
In Developer Studio, the &WFFMT report variable is created and available for selection from theObject Inspector when you select User as the output format.
In App Studio, the &WFFMT is no longer displayed in the Object Inspector when the User outputformat is selected. To edit the &WFFMT variable, on the Format tab, in the Output Types group,click Output Format Options.
&WFFMT Report Variable
62

Chapter5Creating HTML Pages
This topic describes how to create an HTML page, and how to use the Properties panel,Settings panel, Requests & Data sources panel, and the Tasks & Animations panel. InDeveloper Studio, you use toolbars, windows, and dialog boxes to customize your HTMLpage. In App Studio, you use tabs and panels. Some of the key differences in the HTMLcanvas, when compared to HTML Composer are, how to set properties and settings, andhow to create tasks and requests.
In this chapter:
Creating HTML Pages
Using the Properties Panel
Using the Settings Panel
Requests & Data Sources Panel
Using the Tasks & Animations Panel
Generating a Chart From a Report
Adding Additional Visual Discovery Controls
Making an HTML Composer Page Mobile
Creating HTML Pages
In Developer Studio, you create an HTML page using HTML Composer. You access HTMLComposer from a shortcut menu in the Explorer window.
In App Studio, you create an HTML page using the HTML canvas. When you create a new HTMLpage, you use the HTML/Document Wizard. You can access the HTML/Document Wizard fromthe HTML/Document command on the Home tab or from the shortcut menu in theEnvironments Tree panel.
App Studio for the Developer Studio User 63
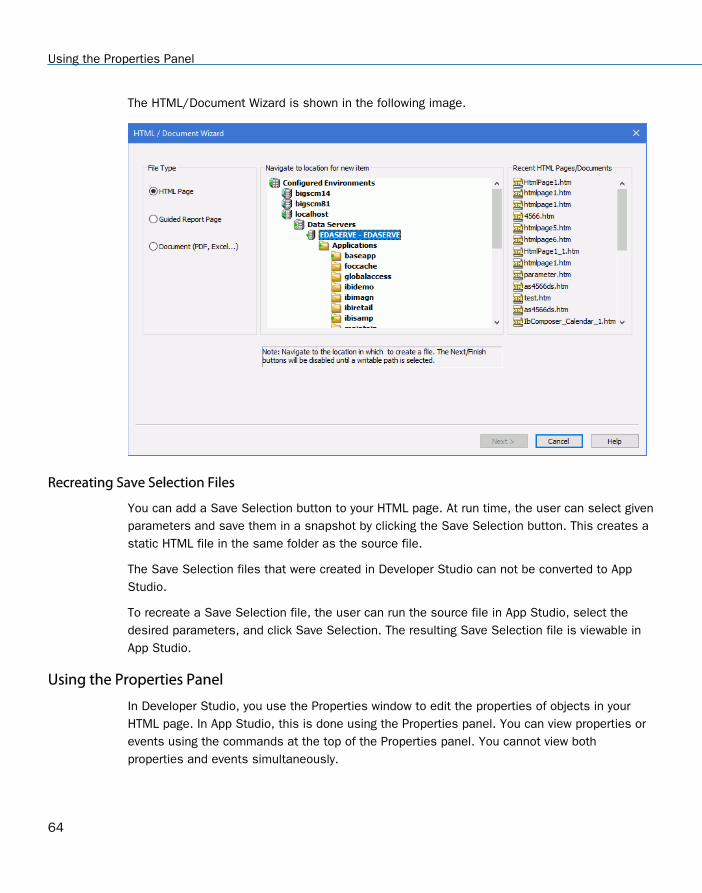
The HTML/Document Wizard is shown in the following image.
Recreating Save Selection Files
You can add a Save Selection button to your HTML page. At run time, the user can select givenparameters and save them in a snapshot by clicking the Save Selection button. This creates astatic HTML file in the same folder as the source file.
The Save Selection files that were created in Developer Studio can not be converted to AppStudio.
To recreate a Save Selection file, the user can run the source file in App Studio, select thedesired parameters, and click Save Selection. The resulting Save Selection file is viewable inApp Studio.
Using the Properties Panel
In Developer Studio, you use the Properties window to edit the properties of objects in yourHTML page. In App Studio, this is done using the Properties panel. You can view properties orevents using the commands at the top of the Properties panel. You cannot view bothproperties and events simultaneously.
Using the Properties Panel
64

The Properties panel contains more advanced organization options than the Properties window.You can sort the properties in the Properties panel using the sort commands at the top of thepanel. These sort options display the properties by category or in alphabetical order. Only oneof these commands can be selected at a time.
The Categorized command sorts the properties into separate categories, based on whatthat property does. For example, in the Properties panel, key properties are categorized underthe Core attributes category, while stylistic properties are categorized under the Style category.You can collapse or expand property groups from view. The following image shows theProperties panel with the properties sorted by category.
5. Creating HTML Pages
App Studio for the Developer Studio User 65

The Alphabetical command sorts the properties alphabetically, from a to z. The followingimage shows the Properties panel with the properties sorted alphabetically.
Using the Settings Panel
In Developer Studio, you use the Properties and Settings dialog box to modify the populationsettings of components, controls, and parameters. The settings that you modify changedepending on which component, control, or parameter you select.
In App Studio, you use the Settings panel to modify the population settings of components,controls, and parameters. The Settings panel has multiple sections that are only availablewhen you select an object or when no object is selected. This is similar to the way theProperties and Settings dialog box functions in Developer Studio.
Using the Settings Panel
66

When you select an object, or when you add an object to the canvas, the settings for thatobject display in the Settings panel. Settings are grouped under sections, and the sectionsand settings change depending on which component, control, or parameter is selected.
When no object is selected on the canvas, you can manage your external cascading stylesheet files and JavaScript files. The Settings panel displays this section by default. You canadd external cascading style sheet files and JavaScript files, located in your WebFOCUS
environment, using the CSS button and JavaScript button . You can reference web-accessible cascading style sheet files and JavaScript files by typing the URL of those files, inthe URL/Find File area, as shown in the following image.
5. Creating HTML Pages
App Studio for the Developer Studio User 67

The following image shows the Settings panel for a parameter created in the HTML page.
The following image shows the Settings panel for a dynamic parameter.
Using the Settings Panel
68

The following image shows the Settings panel for an input control.
You can drag fields and parameters from the Requests & Data sources panel to the Settingspanel when the Input Control Population section is available and the Data type is set toDynamic.
Requests & Data Sources Panel
A request is a definition of something that can be executed. For example, you can execute anembedded procedure, external procedure, HTML page, URL, and more. If a request hasparameters, those parameters will be indented and listed under the request name. By default,all parameters are sent to the Reporting Server. However, you can choose to not send aparameter by using the shortcut menu of the parameter, and clicking Don’t Send. If you chooseto not send a parameter, you must verify that your procedure can work without that value. Forexample, if the procedure contains a -DEFAULT value for the parameter.
When creating an external request that uses an existing file, the request inherits the name ofthat external file. For example, if you create an external request that uses an existingWebFOCUS procedure called Parameter_Report, then your external request will inherit thename Parameter_Report.
5. Creating HTML Pages
App Studio for the Developer Studio User 69

Each request displays two folders beneath it, the Columns and Parameters folders. TheColumns folder contains the fields used in the request. The Parameters folder contains theparameters used in the request. The Parameters folder is expanded by default, while theColumns folder is collapsed by default.
The Data Sources folder contains all data sources used for embedded procedures and defaultcontrol population requests in the HTML page. Referenced data sources are not displayed inthe Requests & Data sources panel. You can add additional data sources to the HTML page byembedding additional requests. You can also add additional data sources by right-clicking onthe Data Sources folder and using the shortcut menu to click Add Data Source.
You can refresh all requests, except empty requests, using the shortcut menu. Right-click on arequest and click Refresh.
You can also duplicate a request by using the shortcut menu on the request you want toduplicate, and clicking Clone. When you clone an embedded request, you can create a copy ofthe embedded request with the name, name_1. Name is the name of the original embeddedrequest. For example, if you clone a request named SalesReport, the cloned request would becalled SalesReport_1. Cloning an external request does not make a second copy of thereferenced procedure.
You can also make edits to a selected procedure using the shortcut menu and clicking Open intext editor, as shown in the rightmost image below. For an embedded procedure, the newprocedure tab opens with an extension of .vrt to show that it is virtual. With a referencedprocedure, the procedure tab opens with an extension of .fex.
In the Requests & Data sources panel, the icon next to each item indicates the type of requestor parameter. For example, a parameter that was created in the current HTML page has theparameter symbol and a plus sign on it. Another example is how an external URL requestdisplays with the word URL on it.
Requests & Data Sources Panel
70

Two sample Requests & Data sources panels are shown in the following images.
You can drag requests from the Requests & Data sources panel to the HTML canvas to createobjects and controls for the request.
Procedure: How to Create an Embedded Procedure Request in App Studio
1. Add an embedded procedure to the Requests & Data sources panel. Click the New drop-down arrow, point to Embedded Request, and then click New Report, New Chart, or NewDocument to create and embed a new procedure.
or
Click Import Existing to embed an existing procedure file.
A new request is created in the Requests & Data sources panel. If you are creating a newprocedure, the Open File dialog box opens, prompting you to select a Master File. If youare embedding an existing file, the Open File dialog opens, prompting you to select aprocedure file.
2. Select a Master File or procedure file and click OK.
If you are creating a new procedure, the canvas for that type of procedure opens. Once youare done creating the procedure, save and close the canvas.
3. In the Requests & Data sources panel, you may drag the request that you created onto thecanvas.
5. Creating HTML Pages
App Studio for the Developer Studio User 71

A procedure object is created on the canvas. If the procedure contains parameters, a formcontrol is also added to the canvas. A task is created in the Tasks section of the Tasks &Animations panel. An example of the Requests & Data sources panel and the Tasks &Animations panel for a request is shown in the following image.
Using the Tasks & Animations Panel
The Tasks & Animations panel contains two sections: Tasks and jQuery Animations.
Using the Tasks & Animations Panel
72

Tasks Section
The Tasks section of the Tasks & Animations panel allows you to execute a request when acertain criteria is met. For example, you can create a task that runs an embedded report whena button is clicked. You can use this section with the Request & Data sources panel andjQuery Animations section. An example of a task, created in the Tasks section, is shown in thefollowing image.
Procedure: How to Create a Hyperlink in App Studio
In Developer Studio, you use the Hyperlink Properties dialog box to create hyperlinks. In AppStudio, use the Hyperlink component and the Tasks & Animations panel to create hyperlinks.The following is an example of creating a hyperlink.
1. In the Components tab, in the Generic Elements group, click Hyperlink.
A task is added to the Tasks section of the Tasks & Animations panel, with a trigger typeand trigger identifier preselected.
2. In the Requests & Data sources panel, create a new external request for a WebFOCUSProcedure.
3. Drag the request on to the canvas to create a frame.
5. Creating HTML Pages
App Studio for the Developer Studio User 73

4. In the Tasks section of the Tasks & Animations panel, in the Requests/Actions list, clickthe Requests selection command, point to Run Request, and select the request youcreated in step 2.
5. In the Target Type drop-down list, select Frame.
6. In the Target/Template Name drop-down, select the frame you created in step 3.
When the HTML page is run and you click on the hyperlink, the WebFOCUS procedure youchose will run in the frame.
The following image shows the Requests & Data sources panel and the Tasks &Animations panel after creating this hyperlink example.
Procedure: How to Automatically Execute a Request When a Page is Loaded
In Developer Studio, you use the Auto Execute property, in the Properties window, to set areport or graph to execute when your HTML page is loaded. In App Studio, use the Requests &Data sources panel and the Tasks sections of the Tasks & Animations panel to create arequest that executes when your HTML page is loaded. To do this, you must use the load taskin the Task Section. The load task is automatically added to every page and runs all selectedrequests when the page initially loads.
1. In the Tasks section of the Tasks & Animations panel, select the load task.
2. In the Trigger Type drop-down list, select the Load trigger type. This option is selected bydefault for a load task.
Using the Tasks & Animations Panel
74

3. From the Requests/Actions list, select a request.
4. From the Target type drop-down list, select the destination of the procedure. For example,you can have the procedure run in a new window or in a report frame on the HTML page.
5. Select which frame the procedure will run in. This option is only needed if you want to runthe procedure, in a frame, on the HTML page, and not a new window.
The following image is an example of the Tasks section for a procedure that willautomatically execute when the page is loaded.
5. Creating HTML Pages
App Studio for the Developer Studio User 75

Generating a Chart From a Report
In Developer Studio, when you generate a graph from a report, that graph is created on theright-side of the report, as shown in the following image.
In App Studio, when you generate a chart from a report, that chart is created below the report,as shown in the following image.
Generating a Chart From a Report
76

Adding Additional Visual Discovery Controls
You can add new Visual Discovery controls to HTML pages, that were created in DeveloperStudio, and already contain at least one Visual Discovery control. You cannot add new VisualDiscovery controls to HTML pages created in App Studio.
In App Studio, to add new Visual Discovery controls to HTML pages created in DeveloperStudio, and that already contain a Visual Discovery control, use the canvas shortcut menu,point to Controls and select Visual Discovery Control, as shown in the following image.
5. Creating HTML Pages
App Studio for the Developer Studio User 77

Making an HTML Composer Page Mobile
You can make an existing Developer Studio HTML Composer page compatible with mobileoutput and autosize, as shown in the following procedures.
Making an HTML Composer Page Mobile
78

Procedure: How to Make an HTML Composer Page Mobile
1. Open the HTML Composer page in the HTML canvas in App Studio, as shown in thefollowing image.
5. Creating HTML Pages
App Studio for the Developer Studio User 79

2. In the Miscellaneous section of the Properties panel, set the Mobile property for theDocument object to Yes, as shown in the following image.
Making an HTML Composer Page Mobile
80

3. Right-click the canvas and click Show Mobile Layout (basic) or Show Mobile Layout(advanced), as shown in the following image.
Note: For more information on the Show Mobile Layout (basic) and Show Mobile Layout(advanced) options, see the App Studio online Help.
A preview of the mobile design displays in the canvas.
The following images show the mobile design for each of the pages (parameter, report,and chart).
5. Creating HTML Pages
App Studio for the Developer Studio User 81

Mobile Design of the Parameter Page in the HTML Canvas
Mobile Design of the Report Page in the HTML Canvas
Making an HTML Composer Page Mobile
82

Mobile Design of the Chart Page in the HTML Canvas
5. Creating HTML Pages
App Studio for the Developer Studio User 83

Procedure: How to Make an HTML Composer Page Autosize
1. Open the HTML Composer page in the HTML canvas in App Studio.
2. In the Properties panel, select DOCUMENT from the drop-down list at the top. In the Bodysection, set the Autosize Children property to Yes, as shown in the following image.
For a multipage container, like a tab, window, or accordion, Autosize Children is a per-pageproperty, so some pages can autosize and others cannot. This property is in theWindow/Tab/Accordion attributes section of the Properties panel and is called SelectedPage: Autosize Children.
Note: You can also enable both mobile and autosize by following the steps for bothoptions.
Making an HTML Composer Page Mobile
84

Chapter6 Creating, Editing, and ManagingSynonyms and Adapters
This topic describes the differences between Developer Studio and App Studio whencreating, editing, and managing synonyms and adapters. In Developer Studio, you usethe toolbars in the Synonym Editor to create and edit a synonym. In App Studio, you usethe tabs on the ribbon that are available when the Metadata canvas is active. One of thekey differences between the Synonym Editor in Developer Studio and the Metadatacanvas in App Studio is how they are invoked.
In this chapter:
Creating and Editing Synonyms
Configuring Adapters
Rebuilding a Data Source
Automatically Adding Synonyms to Projects
Creating and Editing Synonyms
In Developer Studio, you can create new synonyms using the Synonym Editor. To access theSynonym Editor, right-click a Master File folder, point to New, and then click Synonym viaMetadata Canvas.
In App Studio, you can create new synonyms and edit existing synonyms using the Metadatacanvas. To access the Metadata canvas, go to the Home tab, and in the Content group, clickData, and then click Synonym via Metadata Canvas, as shown in the following image.
App Studio for the Developer Studio User 85

The Data Source Definition Wizard opens, as shown in the following image.
If you click Create New Synonym, the Select Application pane of the Data Source DefinitionWizard is displayed. Select a location to create your synonym and click Finish to open theMetadata canvas.
If you click Open Existing, the Selecting Data Source pane of the Data Source Definition Wizardis displayed. Select a data source to edit and click Finish to open the Metadata canvas.
Creating and Editing Synonyms
86

The Metadata canvas and Metadata tab open, as shown in the following image.
If you clicked New Synonym, you can begin creating a new data source once you are in theMetadata canvas. If you clicked Open Existing, you can edit your existing data source in theMetadata canvas.
Configuring Adapters
In Developer Studio, you use the Create Synonym tool to configure the adapters that you useto access synonyms. To configure which adapters are available for use, right-click a Master Filefolder and then click Synonym.
6. Creating, Editing, and Managing Synonyms and Adapters
App Studio for the Developer Studio User 87

In App Studio, you can use the Manage Adapters command to configure the adapters that youuse to access synonyms. To configure your available adapters, go to the Home tab, and in theContent group, click Data, and then click Manage Adapters, as shown in the following image.
The Select Server Node dialog box opens. Select an application folder, and click Select, asshown in the following image.
Configuring Adapters
88

The Manage and Configure Adapters dialog box opens, as shown in the following image.
You can edit the settings of your currently configured adapters, listed under the Configuredfolder, or configure a new adapter by selecting one from the Available folder.
Rebuilding a Data Source
In Developer Studio, you click Utilities on the Commands toolbar and then select Rebuild toaccess the Rebuild dialog box.
6. Creating, Editing, and Managing Synonyms and Adapters
App Studio for the Developer Studio User 89

In App Studio, you can use the Rebuild Data Source command to access the Rebuild dialogbox, where you can rebuild data sources, index a field, or check the integrity of a file. Toaccess the Rebuild Data Source command, in the Content group, click Data, and then clickRebuild Data Source, as shown in the following image.
The Rebuild dialog box opens, as shown in the following image.
Rebuilding a Data Source
90

Automatically Adding Synonyms to Projects
In Developer Studio, when you create a synonym in the Synonym Editor, it is automaticallyadded to the current project and is visible in the Explorer window.
In App Studio, for a synonym that you create in the Metadata canvas to show in the ConfiguredEnvironments tree of the Environments Detail panel, you must select the Show All Files inAssociated Paths option in the View Options drop-down menu. The View Options drop-downmenu and the Show Files in Associated Paths option are shown in the following image.
Note: If you add a synonym to a project, that synonym will show whether Show All Files inAssociated Paths is selected or not.
6. Creating, Editing, and Managing Synonyms and Adapters
App Studio for the Developer Studio User 91

Automatically Adding Synonyms to Projects
92

AppendixA Developer Studio FunctionalityDeprecated in App Studio
This appendix details Developer Studio functionality that has been deprecated in AppStudio.
In this appendix:
Deprecated Functionality List
Deprecated Functionality List
The following Developer Studio functionality has been deprecated in App Studio due toimprovements in design, workflow, and usability.
Item Reason/Notes
Creating Visual DiscoveryActiveX Dashboards usingHTML Composer
Reason: The new Visual Discovery Advanced Edition (AE)Workbench is now used to create Visual Discoverydashboards. Visual Discovery ActiveX does not containas much functionality as the Visual Discovery AEproduct. When using Visual Discovery ActiveX, you canonly use Internet Explorer to view these types of pages.
Notes: The Visual Discovery license for App Studio onlyprovides the options that you need to open and edit anexisting dashboard in the HTML canvas. In App Studio,you can edit existing Visual Discovery controls in theSettings panel. You cannot add new Visual Discoverycontrols to a dashboard in App Studio.
Maintain DevelopmentEnvironment
Reason: Maintain development is being integrated intoApp Studio as part of the HTML canvas, in a futurerelease.
Notes: App Studio and Developer Studio can be runsimultaneously. To create Maintain files, continue to useDeveloper Studio. To create files that are not Maintainfiles, use App Studio.
App Studio for the Developer Studio User 93

Item Reason/Notes
Text editor tab in DocumentComposer
Reason: Text editing should be done outside of the userinterface. This is because any edits made in the TextEditor that are not supported by the user interface willproduce unexpected results or errors.
Logical View Reason: This feature is not widely used in DeveloperStudio.
RIA (Bindows) Themes for newHTML pages
Reason: This feature is not widely used in DeveloperStudio.
Notes: You can open and edit existing RIA pages in AppStudio and they will be converted to use standardthemes and jQuery animations. The option to create newRIA pages has been removed. Instead, you can now usejQuery Animations to animate objects on your HTMLpage.
Viewing FOCUS Files in AppStudio
Reason: FOCUS files are not able to be edited, so theydo not display when filtering the Environments Treepanel to show Master Files.
Initial Presentation for ActiveReports
Reason: This was initially implemented because activereports did not work with the GRAPH command. Now thatactive reports work with the GRAPH command, and muchmore chart functionality is available, Initial Presentationis no longer needed.
Project Deployment Reason: This feature is not widely used in DeveloperStudio.
Notes: Instead of using Project Deployment, werecommend creating separate WebFOCUS clientconfigurations for Development, Test, and Production.
Deprecated Functionality List
94

Item Reason/Notes
Workspaces Reason: This feature is not widely used in DeveloperStudio.
Notes: Developing on a remote environment in DataServer application folders and/or Managed Reportingdomain folders provides a similar organizational schemefor application content.
Select All option in ReportPainter
Reason: The Select All option has been removed withthe paradigm change from toolbars to the ribbon.
Notes: The functionality to select all fields in the ObjectInspector still exists. In order to select all fields in theObject Inspector, you would select the first field and thenShift + click the last field.
HTML Layout Templates inHTML Composer
Reason: This feature is not widely used in DeveloperStudio.
Notes: Existing pages that use templates can be run andmodified in App Studio.
Refresh of the Design view tabby switching to EmbeddedJavaScript/CSS view tab.
Reason: You can now refresh all objects on the canvasby using the Refresh All command, in the Miscellaneousgroup, on Utilities tab, while in the HTML canvas.
A. Developer Studio Functionality Deprecated in App Studio
App Studio for the Developer Studio User 95

Deprecated Functionality List
96

Index
A
active reports
Initial Presentation 94
ActiveX 93
adapter 87, 89
administratio n 12
App Studio interface
application button 20
canvas 20
Configured Environments panel 20
Quick Access Toolbar 20
ribbon 20
App Studio
interface components 20
Application menu 21
B
Bindows 94
C
Calculation group 50
canvas 24
Chart 24
Document 24
HTML 24, 63
Metadata 24
Procedure 24
Report 24
Chart canvas 12
Commands toolbar 12, 21
D
data source 85
Data tab 50
Developer Studio Explorer 13, 28
Document canvas 13
Document Composer 13, 24
Text Editor 94
E
environments 28
adding 28
editing 28
managing 28
F
field 58
Field Properties dialog box 55
Drill Down tab 57
Style tab 56
Field tab 55–57
files 15
editing 15
filtering 31
recommendations 15
sorting 31
App Studio for the Developer Studio User 97

files 15
viewing 31
Format tab 46
G
Graph tool 12, 24
group 12
H
Home tab 12
HTML canvas 12
HTML Composer 12, 24, 63
Templates 95
hyperlink 69
I
Images tab 53, 55
installation 14
interface 17
App Studio 17
Developer Studio 17
L
Links group 49, 57
Logical View 94
M
main interface 17
Main toolbar 12, 21
Maintain 93
Metadata canvas 13, 85
O
onload 73
Output types group 46
P
panel 13
Environments Tree 13, 28
Procedure View 13
Properties 13
File/Folder Properties 13
Properties 64
Settings 13, 66
parameter 69
procedure 26, 39, 69
embedded 69
Project Deployment 94
Properties and Settings dialog box 13, 66
Properties panel 13
Properties window 13, 64
R
report 43, 69
Report canvas 12, 43
Report Options dialog box 45, 49
Computes tab 50
Drill Down tab 49
Images tab 53, 55
Index
98

Report Options dialog box 45, 49
Output tab 46
Style tab 48
Report Painter 12, 24, 43
Select All 95
Report tab 48, 49
request 69
RIA 94
ribbon 12
S
Settings panel 13
smart context 58
SQL report 44
Style group 48, 56
synonym 85
adapter 85
creating 85
editing 85
T
tab 12
Active Report Options 12
Components 12
Controls 12
Data 12
Document Composer 12
Field 12
tab 12
Format 12
Home 21
Insert 12
Layout 12
Metadata 12
Modeling 12
Positioning 12
Report 12
Styling 12
Utilities 12
task 73
autoexecute 73
load 73
Tasks and Animations panel 72
Requests section 69
Tasks section 73
terminology 12
tool 24
toolbar 12
Report Painter 12
V
Visual Discovery 93
W
Workspaces 95
Index
App Studio for the Developer Studio User 99

Index
100