Data ONTAP 8.2 Storage Management Guide For 7-Mode
397
Data ONTAP ® 8.2 Storage Management Guide For 7-Mode Updated for 8.2.1 NetApp, Inc. 495 East Java Drive Sunnyvale, CA 94089 U.S. Telephone: +1 (408) 822-6000 Fax: +1 (408) 822-4501 Support telephone: +1 (888) 463-8277 Web: www.netapp.com Feedback: [email protected] Part number: 215-08531_C0 December 2014
-
Upload
khangminh22 -
Category
Documents
-
view
1 -
download
0
Transcript of Data ONTAP 8.2 Storage Management Guide For 7-Mode

Data ONTAP® 8.2
Storage Management Guide
For 7-Mode
Updated for 8.2.1
NetApp, Inc.495 East Java DriveSunnyvale, CA 94089U.S.
Telephone: +1 (408) 822-6000Fax: +1 (408) 822-4501Support telephone: +1 (888) 463-8277Web: www.netapp.comFeedback: [email protected]
Part number: 215-08531_C0December 2014


Contents
Data ONTAP storage architecture overview ........................................... 17Managing disks using Data ONTAP ......................................................... 18
How Data ONTAP reports disk types ....................................................................... 18
Storage connection types and topologies supported by Data ONTAP ...................... 20
How disks can be combined for the SAS storage connection type ............... 20
How disks can be combined for the FC-AL storage connection type ........... 20
Methods of calculating aggregate and system capacity ............................................ 21
Disk speeds supported by Data ONTAP ................................................................... 21
How drive checksum types affect aggregate and spare management ....................... 22
Drive name formats ................................................................................................... 23
Loop IDs for FC-AL connected disks ........................................................... 24
Understanding RAID disk types ............................................................................... 25
How disk sanitization works ..................................................................................... 25
Disk sanitization process ............................................................................... 26
When disk sanitization cannot be performed ................................................ 26
What happens if disk sanitization is interrupted ........................................... 27
How selective disk sanitization works .......................................................... 27
Tips for creating and backing up aggregates containing data to be
sanitized ................................................................................................... 28
How Data ONTAP monitors disk performance and health ....................................... 28
What happens when Data ONTAP takes disks offline ................................. 28
How Data ONTAP reduces disk failures using Rapid RAID Recovery ....... 28
How the maintenance center helps prevent drive errors ............................... 29
How Data ONTAP uses continuous media scrubbing to prevent media
errors ........................................................................................................ 31
Increasing storage availability by using ACP ........................................................... 32
Enabling ACP ................................................................................................ 32
How you use SSDs to increase storage performance ................................................ 34
How Data ONTAP manages SSD wear life .................................................. 34
Capability differences between SSDs and HDDs ......................................... 35
Guidelines and requirements for using multi-disk carrier storage shelves ............... 35
Table of Contents | 3

How Data ONTAP avoids RAID impact when a multi-disk carrier must
be removed .............................................................................................. 36
How to determine when it is safe to remove a multi-disk carrier ................. 36
Spare requirements for multi-disk carrier disks ............................................ 37
Shelf configuration requirements for multi-disk carrier storage shelves ...... 37
Aggregate requirements for disks in multi-disk carrier storage shelves ....... 37
Considerations for using disks from a multi-disk carrier storage shelf in
an aggregate ............................................................................................. 38
Adding disks to a storage system .............................................................................. 39
When you need to update the Disk Qualification Package ........................... 40
Replacing disks that are currently being used in an aggregate ................................. 40
Replacing a self-encrypting disk ............................................................................... 42
Converting a data disk to a hot spare ........................................................................ 42
Removing disks from a storage system ..................................................................... 43
Removing a failed disk .................................................................................. 43
Removing a hot spare disk ............................................................................ 44
Removing a data disk .................................................................................... 45
Using disk sanitization to remove data from disks ................................................... 46
Removing data from disks using selective disk sanitization ......................... 49
Stopping disk sanitization ............................................................................. 55
How ownership for disks and array LUNs works ................................... 56Reasons to assign ownership of disks and array LUNs ............................................ 56
What it means for Data ONTAP to own an array LUN ............................................ 56
Why you might assign array LUN ownership after installation ................................ 57
How disks and array LUNs become available for use .............................................. 58
How automatic ownership assignment works for disks ............................................ 59
What automatic ownership assignment does ................................................ 59
When automatic ownership assignment is invoked ...................................... 60
How disk ownership works for platforms based on Data ONTAP-v technology ..... 60
Examples showing when Data ONTAP can use array LUNs ................................... 60
Managing ownership for disks and array LUNs ..................................... 63Guidelines for assigning ownership for disks ........................................................... 63
Assigning ownership for unowned disks and array LUNs ........................................ 64
Removing ownership from a disk ............................................................................. 66
Configuring automatic ownership assignment of disks ............................................ 67
Modifying assignment of spare disks or array LUNs ............................................... 68
4 | Storage Management Guide

Verifying the existence of two paths to an array LUN ............................................. 70
Verifying the existence of two paths: storage show disk command ............. 70
Verifying the existence of two paths: storage array show-config
command ................................................................................................. 71
Verifying path failover for array LUNs .................................................................... 71
Verifying path failover for array LUNs in a stand-alone system .................. 72
Verifying path failover for array LUNs in an HA pair ................................. 72
Guidelines for assigning disks or array LUNs to SyncMirror pools ......................... 73
How you use the wildcard character with the disk ownership commands ................ 73
Managing array LUNs using Data ONTAP ............................................. 75Data ONTAP systems that can use array LUNs on storage arrays ........................... 75
Array LUN name format ........................................................................................... 76
Guidelines for adding storage to a storage system that uses array LUNs ................. 77
Checking the checksum type of spare array LUNs ................................................... 78
Changing the checksum type of an array LUN ......................................................... 78
Prerequisites to reconfiguring an array LUN on the storage array ........................... 79
Changing array LUN size or composition ................................................................. 80
Removing one array LUN from use by Data ONTAP .............................................. 81
Preparing array LUNs before removing a Data ONTAP system from service ......... 81
Commands to display information about your storage .......................... 82Commands to display drive and array LUN information .......................................... 82
Commands to display space information .................................................................. 84
Commands to display storage subsystem information .............................................. 84
Enabling or disabling a host adapter ........................................................ 87Introduction to Storage Encryption ......................................................... 88
What Storage Encryption is ....................................................................................... 88
Purpose of the external key management server ........................................... 88
How Storage Encryption works ................................................................................ 89
Disk operations with SEDs ....................................................................................... 89
Benefits of using Storage Encryption ........................................................................ 90
Data protection in case of disk loss or theft .................................................. 90
Data protection when returning disks to vendors .......................................... 90
Data protection when moving disks to end-of-life ........................................ 91
Data protection through emergency data shredding ...................................... 91
Limitations of Storage Encryption ............................................................................ 91
Managing Storage Encryption .................................................................. 93
Table of Contents | 5

Displaying Storage Encryption disk information ...................................................... 93
Displaying key management server information ...................................................... 94
Verifying key management server links .................................................................... 94
Adding key management servers .............................................................................. 96
Removing key management servers .......................................................................... 97
What happens when key management servers are not reachable during the boot
process ................................................................................................................. 97
Changing the authentication key ............................................................................... 98
Retrieving authentication keys .................................................................................. 99
Deleting an authentication key ................................................................................ 100
SSL issues due to expired certificates ..................................................................... 100
Removing old SSL certificates before installing new ones ......................... 101
Installing replacement SSL certificates on the storage system ................... 102
Returning SEDs to unprotected mode ..................................................................... 102
Destroying data on disks using Storage Encryption ............................. 104Sanitizing disks using Storage Encryption before return to vendor ........................ 104
Setting the state of disks using Storage Encryption to end-of-life .......................... 105
Emergency shredding of data on disks using Storage Encryption .......................... 106
How Data ONTAP uses RAID to protect your data and dataavailability ............................................................................................ 108
RAID protection levels for disks ............................................................................. 108
What RAID-DP protection is ...................................................................... 108
What RAID4 protection is ........................................................................... 109
RAID protection for array LUNs ............................................................................ 109
RAID protection for Data ONTAP-v storage ......................................................... 110
Protection provided by RAID and SyncMirror ....................................................... 110
Understanding RAID disk types ............................................................................. 113
How RAID groups work ......................................................................................... 114
How RAID groups are named ..................................................................... 114
Considerations for sizing RAID groups ...................................................... 114
Customizing the size of your RAID groups ................................................ 115
Considerations for Data ONTAP RAID groups for array LUNs ................ 116
How Data ONTAP works with hot spare disks ....................................................... 117
Minimum number of hot spares you should have ....................................... 117
What disks can be used as hot spares .......................................................... 118
What a matching spare is ............................................................................ 118
6 | Storage Management Guide

What an appropriate hot spare is ................................................................. 119
About degraded mode ................................................................................. 119
How low spare warnings can help you manage your spare drives .............. 120
How Data ONTAP handles a failed disk with a hot spare ...................................... 120
How Data ONTAP handles a failed disk that has no available hot spare ............... 121
Considerations for changing the timeout RAID option .......................................... 122
How RAID-level disk scrubs verify data integrity .................................................. 122
How you schedule automatic RAID-level scrubs ....................................... 122
How you run a manual RAID-level scrub ................................................... 123
Controlling the impact of RAID operations on system performance .. 125Controlling the performance impact of RAID data reconstruction ......................... 125
Controlling the performance impact of RAID-level scrubbing .............................. 126
Controlling the performance impact of plex resynchronization .............................. 127
Controlling the performance impact of mirror verification .................................... 128
What aggregates are ................................................................................. 129Introduction to 64-bit and 32-bit aggregate formats ............................................... 129
Best practices for expanding a 32-bit aggregate to 64-bit ....................................... 130
How unmirrored aggregates work ........................................................................... 130
How mirrored aggregates work ............................................................................... 132
What a Flash Pool aggregate is ............................................................................... 133
How Flash Pool aggregates work ................................................................ 133
Requirements for using Flash Pool aggregates ........................................... 134
How Flash Pool aggregates and Flash Cache compare ............................... 135
About read and write caching for Flash Pool aggregates ............................ 135
How the available Flash Pool cache capacity is calculated ........................ 136
Restrictions for using aggregates composed of SSDs ............................................. 136
How you can use disks with mixed speeds in the same aggregate ......................... 137
How to control disk selection from heterogeneous storage .................................... 137
Rules for mixing HDD types in aggregates ............................................................ 138
Rules for mixing drive types in Flash Pool aggregates ........................................... 139
How drive checksum types affect aggregate and spare management ..................... 139
Rules for mixing storage in array LUN aggregates ................................................. 140
How the checksum type is determined for array LUN aggregates ......................... 140
Understanding the root aggregate ........................................................................... 141
Managing aggregate Snapshot copies ..................................................................... 142
Considerations for increasing the aggregate Snapshot reserve ................... 142
Table of Contents | 7

Managing aggregates ............................................................................... 144Creating an aggregate .............................................................................................. 144
Creating a Flash Pool aggregate .............................................................................. 146
Determining and enabling volume write-caching eligibility ....................... 148
Determining the optimal Flash Pool cache size ...................................................... 151
Changing the RAID type of RAID groups in a Flash Pool aggregate .................... 154
Increasing the size of an aggregate ......................................................................... 155
What happens when you add storage to an aggregate ................................. 158
Forcibly adding disks to aggregates ............................................................ 159
Expanding an aggregate to 64-bit without adding storage ...................................... 159
Taking an aggregate offline ..................................................................................... 160
Bringing an aggregate online .................................................................................. 161
Putting an aggregate into restricted state ................................................................. 162
Changing the RAID level of an aggregate .............................................................. 162
Changing an aggregate's RAID level from RAID4 to RAID-DP ............... 162
Changing an aggregate's RAID level from RAID-DP to RAID4 ............... 163
Destroying an aggregate .......................................................................................... 164
Restoring a destroyed aggregate ............................................................................. 165
Physically moving an aggregate composed of disks ............................................... 166
Moving an aggregate composed of array LUNs ..................................................... 169
Using volumes ........................................................................................... 173How FlexVol volumes work ................................................................................... 173
Differences between 64-bit and 32-bit FlexVol volumes ........................... 173
Interoperability between 64-bit and 32-bit FlexVol volumes ..................... 174
How traditional volumes work ................................................................................ 174
How the volume language attribute affects data visibility and availability ............ 175
How file access protocols affect what language to use for your volumes .. 176
How to manage duplicate volume names ................................................................ 176
Volume states and status ......................................................................................... 176
How security styles affect data access .................................................................... 179
Improving client performance with traditional and lease oplocks .......................... 179
How Data ONTAP can automatically provide more space for full FlexVol
volumes .............................................................................................................. 180
Considerations for changing the maximum number of files allowed on a volume . 181
Cautions for increasing the maximum directory size for FlexVol volumes ........... 181
Understanding the root volume ............................................................................... 182
8 | Storage Management Guide

Recommendations for the root volume ................................................................... 182
Special system files ................................................................................................. 184
General volume operations ...................................................................... 185Migrating from traditional volumes to FlexVol volumes ....................................... 185
Preparing your destination volume ............................................................. 185
Migrating your data ..................................................................................... 187
Completing the migration ............................................................................ 188
Putting a volume into restricted state .......................................................... 189
Taking a volume offline .......................................................................................... 190
Bringing a volume online ........................................................................................ 190
Renaming a volume ................................................................................................. 191
Destroying a volume ............................................................................................... 191
Displaying file or inode usage ................................................................................. 192
Changing the maximum number of files allowed in a volume ............................... 193
Changing the language for a volume ....................................................................... 194
Changing the root volume ....................................................................................... 195
FlexVol volume operations ...................................................................... 197Creating a FlexVol volume ..................................................................................... 197
Resizing a FlexVol volume ..................................................................................... 199
Displaying the containing aggregate for a FlexVol volume ................................... 200
Traditional volume operations ................................................................ 201Creating a traditional volume .................................................................................. 201
Using FlexCache volumes to accelerate data access .............................. 204How FlexCache volumes serve read requests ......................................................... 204
FlexCache hardware and software requirements .................................................... 204
Limitations of FlexCache volumes ......................................................................... 206
Types of volumes you can use for FlexCache ......................................................... 208
How the FlexCache Autogrow capability works .................................................... 208
How FlexCache volumes use space management ................................................... 209
How FlexCache volumes share space with other volumes ..................................... 209
Methods to view FlexCache statistics ..................................................................... 210
What happens when connectivity to the origin system is lost ................................. 210
How the NFS export status of the origin volume affects FlexCache access ........... 213
How FlexCache caching works ............................................................................... 213
What a cached file contains ......................................................................... 213
How data changes affect FlexCache volumes ............................................. 213
Table of Contents | 9

How cache consistency is achieved ............................................................ 214
What cache hits and misses are ................................................................... 216
Typical FlexCache deployments ............................................................................. 217
WAN deployment ....................................................................................... 217
LAN deployment ......................................................................................... 218
Using FlexCache volumes to cache clustered Data ONTAP volumes .................... 219
About using LUNs in FlexCache volumes .............................................................. 219
What FlexCache status messages mean .................................................................. 220
How FlexCache volumes connect to their origin volume ....................................... 220
About SA systems ................................................................................................... 220
FlexCache volume operations .................................................................. 222Creating FlexCache volumes .................................................................................. 222
Displaying free space for FlexCache volumes ........................................................ 224
Configuring the FlexCache Autogrow capability ................................................... 224
Flushing files from FlexCache volumes .................................................................. 225
Displaying FlexCache client statistics ..................................................................... 225
Displaying FlexCache server statistics .................................................................... 225
Displaying FlexCache status ................................................................................... 226
Using FlexClone volumes to create efficient copies of your FlexVolvolumes ................................................................................................. 227
Understanding FlexClone volumes ......................................................................... 227
FlexClone volumes and space guarantees ............................................................... 228
How to identify shared Snapshot copies in FlexClone volumes ............................. 229
FlexClone volumes and shared Snapshot copies ..................................................... 229
How you use volume SnapMirror replication with FlexClone volumes ................. 230
Considerations for creating a FlexClone volume from a SnapMirror source or
destination volume ............................................................................................. 230
How splitting a FlexClone volume from its parent works ...................................... 231
FlexClone volumes and LUNs ................................................................................ 232
FlexClone volume operations .................................................................. 233Creating a FlexClone volume .................................................................................. 233
Splitting a FlexClone volume from its parent ......................................................... 234
Determining the parent volume and base Snapshot copy for a FlexClone volume
............................................................................................................................ 235
Determining the space used by a FlexClone volume .............................................. 235
Moving your volumes nondisruptively ................................................... 237
10 | Storage Management Guide

Ways to use volume move ...................................................................................... 237
Requirements for performing a volume move ........................................................ 237
How the setup phase of volume move works .......................................................... 239
How the data copy phase of volume move works ................................................... 239
How the cutover phase of volume move works ...................................................... 239
Performing the volume move operation .................................................................. 241
Pausing the volume move operation ....................................................................... 242
Resuming the volume move operation .................................................................... 242
Monitoring the volume move status ........................................................................ 243
Performing manual cutover of the volume move operation .................................... 244
Canceling the volume move operation .................................................................... 244
Using FlexClone files and FlexClone LUNs to create efficient copiesof files and LUNs ................................................................................. 245
Benefits of FlexClone files and FlexClone LUNs .................................................. 245
How FlexClone files and FlexClone LUNs work ................................................... 245
Considerations for working with FlexClone files and FlexClone LUNs ................ 247
Creating a FlexClone file or FlexClone LUN ......................................................... 248
Viewing the space savings due to FlexClone files and FlexClone LUNs ............... 250
Features supported with FlexClone files and FlexClone LUNs ........... 252How deduplication works with FlexClone files and FlexClone LUNs ................... 252
How Snapshot copies work with FlexClone files and FlexClone LUNs ................ 253
How access control lists work with FlexClone files and FlexClone LUNs ............ 253
How vFiler units work with FlexClone files and FlexClone LUNs ........................ 254
How quotas work with FlexClone files and FlexClone LUNs ................................ 254
How FlexClone volumes work with FlexClone files and FlexClone LUNs ........... 254
How NDMP works with FlexClone files and FlexClone LUNs ............................. 255
How synchronous SnapMirror works with FlexClone files and FlexClone LUNs . 255
How volume SnapMirror works with FlexClone files and FlexClone LUNs ......... 256
How qtree SnapMirror and SnapVault work with FlexClone files and FlexClone
LUNs ................................................................................................................. 256
How volume move affects FlexClone files and FlexClone LUNs .......................... 256
How volume copy works with FlexClone files and FlexClone LUNs .................... 257
How space reservation works with FlexClone files and FlexClone LUNs ............. 257
How an HA configuration works with FlexClone files and FlexClone LUNs ....... 257
Using deduplication and data compression to increase storageefficiency ............................................................................................... 258
Table of Contents | 11

How to set up efficiency operations ........................................................................ 258
Configuring deduplication ....................................................................................... 258
How deduplication works ............................................................................ 258
What deduplication metadata is .................................................................. 259
Guidelines for using deduplication ............................................................. 260
Enabling deduplication on a volume ........................................................... 261
Disabling deduplication on a volume .......................................................... 262
Configuring data compression ................................................................................ 262
How data compression works ..................................................................... 263
How data compression detects incompressible data and saves system
resources ................................................................................................ 263
Enabling data compression on a volume ..................................................... 264
Disabling data compression on a volume .................................................... 265
Managing volume efficiency operations using schedules ....................................... 265
Modifying scheduling of efficiency operations .......................................... 266
Running efficiency operations manually ..................................................... 267
Running efficiency operations depending on the amount of new data
written .................................................................................................... 268
Using checkpoints to resume efficiency operation ..................................... 269
Running efficiency operations manually on existing data .......................... 270
Monitoring volume efficiency operations ............................................................... 270
Viewing the status of efficiency operations on a FlexVol volume ............. 271
Viewing efficiency space savings on a FlexVol volume ............................ 272
Stopping volume efficiency operations ................................................................... 273
Information about removing space savings from a volume .................................... 274
Deduplication interoperability with Data ONTAP features .................................... 274
How fractional reserve works with deduplication ....................................... 275
How Snapshot copies work with deduplication .......................................... 275
How volume SnapMirror works with deduplication ................................... 275
How qtree SnapMirror works with deduplication ....................................... 276
How SnapVault works with deduplication .................................................. 276
How tape backup works with deduplication ............................................... 277
How SnapRestore works with deduplication .............................................. 277
How MetroCluster configurations work with deduplication ....................... 278
How OnCommand Unified Manager server works with deduplication ...... 278
How volume copy works with deduplication .............................................. 279
12 | Storage Management Guide

How deduplication works with data compression ....................................... 279
How FlexClone volumes work with deduplication ..................................... 279
How HA pairs work with deduplication ..................................................... 280
How vFiler units work with deduplication .................................................. 280
How DataMotion for Volumes works with deduplication .......................... 280
Data compression interoperability with Data ONTAP features .............................. 281
How fractional reserve works with data compression ................................ 282
How Snapshot copies work with data compression .................................... 282
How volume SnapMirror works with data compression ............................. 282
How qtree SnapMirror works with data compression ................................. 283
How SnapVault works with data compression ........................................... 284
How tape backup works with data compression ......................................... 284
How SnapLock works with data compression ............................................ 284
How volume-based SnapRestore works with data compression ................. 285
How single file SnapRestore works with data compression ....................... 285
How MetroCluster configurations work with data compression ................ 285
How volume copy works with data compression ........................................ 286
How aggregate copy works with data compression .................................... 286
How deduplication works with data compression ....................................... 287
How FlexClone volumes work with data compression ............................... 287
How FlexClone files work with data compression ..................................... 287
How HA pairs work with data compression ............................................... 287
How Performance Acceleration Module and Flash cache cards work
with data compression ........................................................................... 287
How vFiler units work with data compression ............................................ 288
How DataMotion for Volumes works with data compression .................... 288
How Flash Pool aggregates work with data compression ........................... 288
How you use space management capabilities ......................................... 289How volume guarantees work with FlexVol volumes ............................................ 289
Enabling guarantees for FlexVol volumes .................................................. 291
How the guarantee affects FlexVol volume space requirements ................ 292
How file and LUN reservations work ..................................................................... 293
Considerations for setting fractional reserve ........................................................... 293
How Data ONTAP can automatically provide more space for full FlexVol
volumes .............................................................................................................. 294
Selecting the first method to increase space for full FlexVol volumes ....... 295
Table of Contents | 13

Deleting Snapshot copies automatically ..................................................... 296
How a FlexVol volume can automatically change its size ...................................... 299
Configuring a FlexVol volume to automatically change its size ................ 300
Requirements for enabling both autoshrink and automatic Snapshot
copy deletion ......................................................................................... 301
How the autoshrink functionality interacts with Snapshot copy deletion ... 302
Considerations for using thin provisioning with FlexVol volumes ........................ 302
How to determine space usage in a volume or aggregate ....................................... 303
How to determine space usage in an aggregate ........................................... 304
How you can determine and control a volume's space usage in the
aggregate ................................................................................................ 305
How you can determine and control space usage in a volume .................... 307
How Snapshot copies and Snapshot reserve use space in a volume ........... 311
When to use the df command and the space usage commands ................... 312
Methods to create space in a FlexVol volume ........................................................ 313
Methods to create space in an aggregate ................................................................. 314
About qtrees .............................................................................................. 316When to use qtrees .................................................................................................. 316
How qtrees compare with FlexVol volumes ........................................................... 316
Qtree name restrictions ............................................................................................ 317
Managing qtrees ....................................................................................... 318Creating a qtree ....................................................................................................... 318
Displaying qtree status ............................................................................................ 319
Displaying qtree access statistics ............................................................................ 319
Converting a directory to a qtree ............................................................................. 320
Converting a directory to a qtree using a Windows client .......................... 321
Converting a directory to a qtree using a UNIX client ............................... 321
Deleting a qtree ....................................................................................................... 322
Renaming a qtree ..................................................................................................... 323
About quotas ............................................................................................. 325Why you use quotas ................................................................................................ 325
Overview of the quota process ................................................................................ 325
Understanding quota notifications .............................................................. 325
Quota targets and types ........................................................................................... 326
Special kinds of quotas ............................................................................................ 327
How default quotas work ............................................................................ 327
14 | Storage Management Guide

How you use explicit quotas ....................................................................... 328
How derived quotas work ........................................................................... 329
How you use tracking quotas ...................................................................... 330
How quotas are applied ........................................................................................... 330
How quotas work with users and groups ................................................................ 331
How you specify UNIX users for quotas .................................................... 331
How you specify Windows users for quotas ............................................... 332
How default user and group quotas create derived quotas .......................... 333
How quotas are applied to the root user ...................................................... 335
How quotas work with special Windows groups ........................................ 335
How quotas are applied to users with multiple IDs .................................... 335
How Data ONTAP determines user IDs in a mixed environment .............. 336
How quotas with multiple users work ......................................................... 336
How you link UNIX and Windows names for quotas ................................ 337
How quotas work with qtrees .................................................................................. 339
How tree quotas work ................................................................................. 339
How user and group quotas work with qtrees ............................................. 339
How default tree quotas on a volume create derived tree quotas ................ 340
How default user quotas on a volume affect quotas for the qtrees in that
volume ................................................................................................... 341
How qtree changes affect quotas ............................................................................. 341
How deleting a qtree affects tree quotas ..................................................... 341
How renaming a qtree affects quotas .......................................................... 341
How changing the security style of a qtree affects user quotas .................. 341
Differences among hard, soft, and threshold quotas ............................................... 342
How the quotas file works ....................................................................................... 343
The syntax of quota entries ......................................................................... 343
How Data ONTAP reads the quotas file ..................................................... 348
What character encodings are supported by the quotas file ........................ 348
Sample quotas file ....................................................................................... 348
How quotas are activated ........................................................................................ 349
When you can use resizing .......................................................................... 350
When a full quota reinitialization is required .............................................. 352
How quotas work with vFiler units ......................................................................... 352
How quota reports work .......................................................................................... 353
What fields quota reports contain ................................................................ 353
Table of Contents | 15

How quota report options affect quota reports ............................................ 354
How the ID field is displayed in quota reports ............................................ 355
How you can use the quota report to see what quotas are in effect ............ 356
Difference in space usage displayed by a quota report and a UNIX client ............. 358
How a quota report accounts for disk space and file usage ........................ 359
How the ls command accounts for space usage .......................................... 359
How the df command accounts for file size ................................................ 360
How the du command accounts for space usage ......................................... 361
Difference between a quota report and the df command in accounting space
usage of CIFS sparse files ................................................................................. 362
Examples of using quotas ........................................................................................ 362
Managing quotas ...................................................................................... 367Activating quotas ..................................................................................................... 367
Reinitializing quotas ................................................................................................ 368
Deactivating quotas ................................................................................................. 369
Canceling quota initialization .................................................................................. 369
Resizing quotas ....................................................................................................... 369
Deleting quotas ........................................................................................................ 370
Deleting a quota by removing resource restrictions .................................... 370
Deleting a quota by removing the quotas file entry .................................... 370
Managing quota message logging ........................................................................... 371
Displaying a quota report ........................................................................................ 371
Using the quota report to determine which quotas limit writes to a specific file .... 372
Storage limits ............................................................................................ 373Copyright information ............................................................................. 378Trademark information ........................................................................... 379How to send your comments .................................................................... 380Index ........................................................................................................... 381
16 | Storage Management Guide

Data ONTAP storage architecture overview
Storage architecture refers to how Data ONTAP provides data storage resources to host or clientsystems and applications. Data ONTAP distinguishes between the physical layer of data storageresources and the logical layer.
• The physical layer includes drives, array LUNs, virtual disks, RAID groups, plexes, andaggregates.
Note: A drive (or disk) is the basic unit of storage for storage systems that use Data ONTAP toaccess native disk shelves. An array LUN is the basic unit of storage that a storage arrayprovides to a storage system that runs Data ONTAP. A virtual disk is the basic unit of storagefor a storage system that runs Data ONTAP-v.
• The logical layer includes the file systems—volumes, qtrees, logical unit numbers (LUNs)—andthe directories and files that store data.
Note: LUNs are storage target devices in iSCSI and FC networks.
Aggregates provide storage to volumes. Aggregates can be composed of either drives or array LUNs,but not both. Data ONTAP organizes the drives or array LUNs in an aggregate into one or moreRAID groups. RAID groups are then collected into one or two plexes, depending on whether RAID-level mirroring (SyncMirror) is in use. Aggregates can have two formats: 32-bit and 64-bit. Anaggregate's format affects its maximum size.
Volumes are data containers. Clients can access the data in volumes through the access protocolssupported by Data ONTAP. These protocols include Network File System (NFS), Common InternetFile System (CIFS), HyperText Transfer Protocol (HTTP), Web-based Distributed Authoring andVersioning (WebDAV), Fibre Channel (FC), and Internet SCSI (iSCSI).
You can partition volumes and control resource usage using qtrees. You can create LUNs for use in aSAN environment, using the FC or iSCSI access protocols. Volumes, qtrees, and LUNs containdirectories and files.
Related concepts
Managing disks using Data ONTAP on page 18
Managing array LUNs using Data ONTAP on page 75
How Data ONTAP uses RAID to protect your data and data availability on page 108
What aggregates are on page 129
Using volumes on page 173
About qtrees on page 316
17

Managing disks using Data ONTAP
Disks (sometimes also called drives) provide the basic unit of storage for storage systems runningData ONTAP that use native storage shelves. Understanding how Data ONTAP uses and classifiesdisks will help you manage your storage more effectively.
How Data ONTAP reports disk typesData ONTAP associates a type with every disk. Data ONTAP reports some disk types differentlythan the industry standards; you should understand how Data ONTAP disk types map to industrystandards to avoid confusion.
When Data ONTAP documentation refers to a disk type, it is the type used by Data ONTAP unlessotherwise specified. RAID disk types denote the role a specific disk plays for RAID. RAID disktypes are not related to Data ONTAP disk types.
For a specific configuration, the disk types supported depend on the storage system model, the shelftype, and the I/O modules installed in the system. For more information about the types of diskssupported by your configuration, see the Hardware Universe at hwu.netapp.com.
The following tables show how Data ONTAP disk types map to industry standard disk types for theSAS and FC storage connection types, storage arrays, and for virtual storage (Data ONTAP-v):
Table 1: SAS-connected storage
Data ONTAP disktype
Disk class Industry standarddisk type
Description
BSAS Capacity SATA Bridged SAS-SATA diskswith added hardware toenable them to be pluggedinto a SAS-connectedstorage shelf.
FSAS Capacity NL-SAS Near Line SAS
MSATA Capacity SATA SATA disk in multi-diskcarrier storage shelf
SAS Performance SAS Serial-Attached SCSI
SSD Ultra-performance SSD Solid-state drives
18 | Storage Management Guide

Table 2: FC-connected storage
Data ONTAP disktype
Disk class Industry standard disktype
Description
ATA Capacity SATA
FCAL Performance FC
Table 3: Storage arrays
Data ONTAP disktype
Disk class Industry standard disktype
Description
LUN N/A LUN A logical storagedevice backed bystorage arrays andused by DataONTAP as a disk.These LUNs arereferred to as arrayLUNs to distinguishthem from theLUNs that DataONTAP serves toclients.
Table 4: Virtual storage (Data ONTAP-v)
Data ONTAP disktype
Disk class Industry standard disktype
Description
SAS N/A VMDK Virtual disks thatare formatted andmanaged byVMware ESX.
For information about best practices for working with different types of disks, see Technical Report3437: Storage Subsystem Resiliency Guide.
Related concepts
Rules for mixing HDD types in aggregates on page 138
Related information
TR 3437: Storage Subsystem Resiliency Guide
Managing disks using Data ONTAP | 19

Storage connection types and topologies supported by DataONTAP
Data ONTAP supports two storage connection types: Serial-Attached SCSI (SAS) and Fibre Channel(FC). The FC connection type supports three topologies: arbitrated loop, switched, and point-to-point.
• SAS, BSAS, FSAS, SSD, and MSATA disks use the SAS connection type.SAS-connected storage shelves are connected to the controller on a daisy chain called a stack.
• FC and ATA disks use the FC connection type with an arbitrated-loop topology (FC-AL).FC-connected storage shelves are connected to the controller on a loop.
• Array LUNs use the FC connection type, with either the point-to-point or switched topology.
You cannot combine different connection types in the same loop or stack. However, for MetroClusterconfigurations, the FC and SAS connection types can be combined in a bridged connection, with FCon the controller side and SAS on the shelf side. The bridged connection can be used in either adirect-attached or switched topology. For more information, see Configuring a MetroCluster systemwith SAS disk shelves and FibreBridge 6500N bridges.
How disks can be combined for the SAS storage connection type
You can combine SAS-connected storage shelves containing performance disks and SAS-connectedstorage shelves containing capacity disks within the same stack, although this configuration is notrecommended.
Each SAS-connected storage shelf can contain only one class of disk (capacity, performance, orSSDs). The only exception to this rule is if the shelf is being used for a Flash Pool aggregate. In thatcase, for some SSD sizes and shelf models, you can combine SSDs and HDDs in the same shelf. Formore information, see the Hardware Universe.
How disks can be combined for the FC-AL storage connection type
You cannot combine storage shelves containing FC disks and storage shelves containing ATA disksin the same loop.
20 | Storage Management Guide

Methods of calculating aggregate and system capacityYou use the physical and usable capacity of the drives you employ in your storage systems to ensurethat your storage architecture conforms to the overall system capacity limits and the size limits ofyour aggregates.
To maintain compatibility across different brands of drives, Data ONTAP rounds down (right-sizes)the amount of space available for user data. In addition, the numerical base used to calculate capacity(base 2 or base 10) also impacts sizing information. For these reasons, it is important to use thecorrect size measurement, depending on the task you want to accomplish:
• For calculating overall system capacity, you use the physical capacity of the drive, and countevery drive that is owned by the storage system.
• For calculating how many drives you can put into an aggregate before you exceed its maximumsize, you use the right-sized, or usable, capacity of all data drives in that aggregate.Parity, dparity, and cache drives are not counted against the maximum aggregate size.
To see the physical and usable capacity for a specific drive, see the Hardware Universe at hwu.netapp.com.
Disk speeds supported by Data ONTAPFor hard disk drives, which use rotating media, speed is measured in revolutions per minute (RPM).Faster drives provide more input/output operations per second (IOPS) and faster response time.
It is best to use disks of the same speed in an aggregate.
Data ONTAP supports the following rotational speeds for hard disk drives:
• Performance disks (SAS-connected)
◦ 10K RPM
◦ 15K RPM
• Capacity disks (SAS-connected)
◦ 7.2K RPM
• Performance disks (FC-connected)
◦ 10K RPM
◦ 15K RPM
• Capacity disks (FC-connected)
Managing disks using Data ONTAP | 21

◦ 7.2K RPM
Solid-state drives, or SSDs, are flash media-based devices and therefore the concept of rotationalspeed does not apply to them.
For more information about which disks are supported with specific hardware configurations, see theHardware Universe at hwu.netapp.com.
Related concepts
How you can use disks with mixed speeds in the same aggregate on page 137
What aggregates are on page 129
How drive checksum types affect aggregate and sparemanagement
There are two checksum types available for drives used by Data ONTAP: BCS (block) and AZCS(zoned). Understanding how the checksum types differ and how they impact storage managementenables you to manage your storage more effectively.
Both checksum types provide the same resiliency capabilities. BCS optimizes for data access speed,and reserves the smallest amount of capacity for the checksum for drives with 520-byte sectors.AZCS provides enhanced storage utilization and capacity for drives with 512-byte sectors. Youcannot change the checksum type of a drive.
To determine the checksum type of a specific drive model, see the Hardware Universe.
Aggregates have a checksum type, which is determined by the checksum type of the drives or arrayLUNs that compose the aggregate. The following configuration rules apply to aggregates, drives, andchecksums:
• Checksum types cannot be combined within RAID groups.This means that you must consider checksum type when you provide hot spare drives.
• When you add storage to an aggregate, if it has a different checksum type than the storage in theRAID group to which it would normally be added, Data ONTAP creates a new RAID group.
• An aggregate can have RAID groups of both checksum types.These aggregates have a checksum type of mixed.
• For mirrored aggregates, both plexes must have the same checksum type.
• Drives of a different checksum type cannot be used to replace a failed drive.
• You cannot change the checksum type of a drive.
22 | Storage Management Guide

Drive name formatsEach drive has a name that differentiates it from all other drives. Drive names have different formats,depending on the connection type (FC or SAS) and how the drive is attached.
The following table shows the various formats for drive names, depending on how they areconnected to the storage system.
Note: For internal drives, the slot number is zero, and the internal port number depends on thesystem model.
Drive connection Drive name Example
SAS, direct-attached <slot><port>.<shelfID>.<bay> The drive in shelf2, bay 11,connected toonboard port 0a isnamed 0a.2.11.
The drive in shelf6, bay 3, connectedto an HBA in slot1, port c, is named1c.6.3.
SAS, direct-attached inmulti-disk carrier diskshelf
<slot><port>.<shelfID>.<bay>L<carrierPosition> Carrier position is1 or 2.
SAS, direct-attached,for systems runningData ONTAP-v
<slot><port>.<ID> The third virtualdisk connected tothe first port isnamed 0b.3. Thesecond virtual diskconnected to thethird port is named0d.2.
The range of portsis b through e, andthe range of disksis 0 through 15.
Managing disks using Data ONTAP | 23

Drive connection Drive name Example
SAS, bridge-attached(FibreBridge, used forMetroClusterconfigurations)
<slot><port>.<loopID>L<LUN> The drive withLUN 2 behind thebridge connectedto port a in slot 3,loop ID 125, isnamed 3a.125L2.
SAS, bridge-attachedthrough a switch(FibreBridge, used forMetroClusterconfigurations)
<switch_name>:<switch_port>.<loopID>L<LUN>
The drive withLUN 5 behind thebridge connectedto port 2 of switchbrcd44, loop ID126, is namedbrcd44:2.126L5.
FC, direct-attached <slot><port>.<loopID> The drive withloop ID 19 (bay 3of shelf 1)connected toonboard port 0a isnamed 0a.19.
The drive withloop ID 34connected to anHBA in slot 8, portc is named 8c.34.
FC, switch-attached <switch_name>.<switch_port>.<loopID> The drive withloop ID 51connected to port 3of switch SW7 isnamed SW7.3.51.
For information about determining the LUN for drives using the FibreBridge connection architecture,see Configuring a MetroCluster system with SAS disk shelves and FibreBridge 6500N bridges.
Loop IDs for FC-AL connected disks
For disks connected using Fibre Channel-Arbitrated Loop (FC-AL or FC), the loop ID is an integerbetween 16 and 126. The loop ID identifies the disk within its loop, and is included in the disk name,which identifies the disk uniquely for the entire system.
The loop ID corresponds to the storage shelf number and the bay in which the disk is installed. Thelowest loop ID is always in the far right bay of the first storage shelf. The next higher loop ID is in
24 | Storage Management Guide

the next bay to the left, and so on. You can view the device map for your storage shelves by using thefcadmin device_map command.
For more information about the loop ID map for your storage shelf, see the hardware guide for thestorage shelf.
Understanding RAID disk typesData ONTAP classifies disks as one of four types for RAID: data, hot spare, parity, or dParity. TheRAID disk type is determined by how RAID is using a disk; it is different from the Data ONTAPdisk type.
Data disk
Holds data stored on behalf of clients within RAID groups (and any data generated aboutthe state of the storage system as a result of a malfunction).
Spare disk
Does not hold usable data, but is available to be added to a RAID group in an aggregate.Any functioning disk that is not assigned to an aggregate but is assigned to a systemfunctions as a hot spare disk.
Parity disk
Stores row parity information that is used for data reconstruction when a single disk drivefails within the RAID group.
dParity disk
Stores diagonal parity information that is used for data reconstruction when two diskdrives fail within the RAID group, if RAID-DP is enabled.
How disk sanitization worksDisk sanitization is the process of physically obliterating data by overwriting disks or SSDs withspecified byte patterns or random data so that recovery of the original data becomes impossible. Youuse the sanitization process to ensure that no one can recover the data on the disks.
Related tasks
Using disk sanitization to remove data from disks on page 46
Destroying data on disks using Storage Encryption on page 104
Managing disks using Data ONTAP | 25

Disk sanitization process
Understanding the basics of the disk sanitization process helps you understand what to anticipateduring the sanitization process and after it is complete.
The disk sanitization process uses three successive default or user-specified byte overwrite patternsfor up to seven cycles per operation. The random overwrite pattern is repeated for each cycle.
Depending on the disk capacity, the patterns, and the number of cycles, the process can take severalhours. Sanitization runs in the background. You can start, stop, and display the status of thesanitization process.
The sanitization process contains two phases:
1. Formatting phaseThe operation performed for the formatting phase depends on the class of disk being sanitized, asshown in the following table:
Disk class Formatting phase
Capacity HDDs Skipped
Performance HDDs SCSI format operation
SSDs SCSI sanitize operation
2. Pattern overwrite phaseThe specified overwrite patterns are repeated for the specified number of cycles.
When the sanitization process is complete, the specified disks are in a sanitized state. They are notreturned to spare status automatically. You must return the sanitized disks to the spare pool beforethe newly sanitized disks are available to be added to another aggregate.
When disk sanitization cannot be performed
Disk sanitization is not supported for all disk types. In addition, there are times when disksanitization cannot be performed.
You should be aware of the following facts about the disk sanitization process:
• It is not supported on all SSD part numbers.For information about which SSD part numbers support disk sanitization, see the HardwareUniverse at hwu.netapp.com.
• It is not supported in takeover mode for systems in an HA pair.
• It cannot be performed on disks that were failed due to readability or writability problems.
• It cannot be performed on disks that belong to an SEC 17a-4-compliant SnapLock volume untilthe expiration periods on all files have expired--that is, all of the files have reached their retentiondates.
26 | Storage Management Guide

• It does not perform its formatting phase on ATA drives.
• If you are using the random pattern, it cannot be performed on more than 100 disks at one time.
• It is not supported on array LUNs.
• If you sanitize both SES disks in the same ESH shelf at the same time, you see errors on theconsole about access to that shelf, and shelf warnings are not reported for the duration of thesanitization.However, data access to that shelf is not interrupted.
• You can perform disk sanitization on disks using Storage Encryption.However, there are other methods to obliterate data on disks using Storage Encryption that arefaster and do not require an operational storage system.
What happens if disk sanitization is interrupted
Disk sanitization is a long-running operation. If disk sanitization is interrupted by user intervention oran unexpected event such as a power outage, Data ONTAP takes action to return the disks that werebeing sanitized to a known state, but you must also take action before the sanitization process canfinish.
If the sanitization process is interrupted by power failure, system panic, or manual intervention, thesanitization process must be repeated from the beginning. The disk is not designated as sanitized.
If the formatting phase of disk sanitization is interrupted, Data ONTAP must recover any disks thatwere corrupted by the interruption. After a system reboot and once every hour, Data ONTAP checksfor any sanitization target disk that did not complete the formatting phase of its sanitization. If anysuch disks are found, Data ONTAP recovers them. The recovery method depends on the type of thedisk. After a disk is recovered, you can rerun the sanitization process on that disk; for HDDs, you canuse the -s option to specify that the formatting phase is not repeated again.
How selective disk sanitization works
Selective disk sanitization consists of physically obliterating data in specified files or volumes whilepreserving all other data located on the affected aggregate for continued user access. Because a filecan be stored on multiple disks, there are three parts to the process.
To selectively sanitize data contained in an aggregate, you must carry out three general tasks:
1. Delete the files, directories or volumes that contain the data you want to sanitize from theaggregate that contains them.
2. Migrate the data that you want to preserve to a new set of disks in a destination aggregate on thesame storage system.You can migrate data using the ndmpcopy command or qtree SnapMirror.
3. Destroy the original aggregate and sanitize all the disks that were RAID group members in thataggregate.
Managing disks using Data ONTAP | 27

Related tasks
Removing data from disks using selective disk sanitization on page 49
Tips for creating and backing up aggregates containing data to be sanitized
If you are creating or backing up aggregates to contain data that might need to be sanitized, followingsome simple guidelines will reduce the time it takes to sanitize your data.
• Make sure your aggregates containing sensitive data are not larger than they need to be.If they are larger than needed, sanitization requires more time, disk space, and bandwidth.
• When you back up aggregates containing sensitive data, avoid backing them up to aggregates thatalso contain large amounts of nonsensitive data.This reduces the resources required to move nonsensitive data before sanitizing sensitive data.
How Data ONTAP monitors disk performance and healthData ONTAP continually monitors disks to assess their performance and health. When Data ONTAPencounters certain errors or behaviors from a disk, it takes the disk offline temporarily or takes thedisk out of service to run further tests.
What happens when Data ONTAP takes disks offline
Data ONTAP temporarily stops I/O activity to a disk and takes a disk offline when Data ONTAP isupdating disk firmware in background mode or when disks become non-responsive. While the disk isoffline, Data ONTAP performs a quick check on it to reduce the likelihood of forced disk failures.
A disk can be taken offline only if its containing RAID group is in a normal state and the plex oraggregate is not offline.
While the disk is offline, Data ONTAP reads from other disks within the RAID group while writesare logged. When the offline disk is ready to come back online, Data ONTAP resynchronizes theRAID group and brings the disk online. This process generally takes a few minutes and incurs anegligible performance impact.
How Data ONTAP reduces disk failures using Rapid RAID Recovery
When Data ONTAP determines that a disk has exceeded its error thresholds, Data ONTAP canperform Rapid RAID Recovery by removing the disk from its RAID group for testing and, ifnecessary, failing the disk. Spotting disk errors quickly helps prevent multiple disk failures andallows problem disks to be replaced.
By performing the Rapid RAID Recovery process on a suspect disk, Data ONTAP avoids threeproblems that occur during sudden disk failure and the subsequent RAID reconstruction process:
• Rebuild time
28 | Storage Management Guide

• Performance degradation
• Potential data loss due to additional disk failure during reconstruction
During Rapid RAID Recovery, Data ONTAP performs the following tasks:
1. Places the suspect disk in pre-fail mode.
2. Selects a hot spare replacement disk.
Note: If no appropriate hot spare is available, the suspect disk remains in pre-fail mode anddata continues to be served. However, a suspect disk performs less efficiently. Impact onperformance ranges from negligible to worse than degraded mode. For this reason, hot sparesshould always be available.
3. Copies the suspect disk’s contents to the spare disk on the storage system before an actual failureoccurs.
4. After the copy is complete, attempts to put the suspect disk into the maintenance center, or elsefails the disk.
Note: Tasks 2 through 4 can occur only when the RAID group is in normal (not degraded) mode.
If the suspect disk fails on its own before copying to a hot spare is complete, Data ONTAP startsthe normal RAID reconstruction process.
A message is sent to the log file when the Rapid RAID Recovery process is started and when it iscomplete. The messages are tagged raid.rg.diskcopy.start:notice andraid.rg.diskcopy.done:notice.
Related concepts
About degraded mode on page 119
When Data ONTAP can put a disk into the maintenance center on page 30
How Data ONTAP works with hot spare disks on page 117
How the maintenance center helps prevent drive errors
Data ONTAP provides a mechanism to test drives called the maintenance center. Sometimes DataONTAP puts drives into the maintenance center automatically; you can also put a suspect drive intothe maintenance center manually. Knowing how the maintenance center works helps you manageyour storage effectively.
When a disk is in the maintenance center, it is subjected to a number of tests. If the disk passes all ofthe tests, it is redesignated as a spare. Otherwise, Data ONTAP fails the disk.
The maintenance center is controlled by the disk.maint_center.enable option. It is on bydefault.
Managing disks using Data ONTAP | 29

Data ONTAP puts disks into the maintenance center only if there are two or more spares availablefor that disk.
You can control the number of times a disk is allowed to go to the maintenance center by using thedisk.maint_center.allowed_entries option. The default value for this option is 1, whichmeans that if the disk is ever sent back to the maintenance center, it is automatically failed.
You can also put a disk into the maintenance center manually by using the disk maint startcommand. If the target disk is in use, it does not enter the maintenance center until its contents havebeen copied to another disk (unless you include the -i option).
Data ONTAP informs you of these activities by sending messages to the following destinations:
• The console
• A log file at /etc/log/maintenance.log
When Data ONTAP puts a disk into the maintenance center and that disk is housed in a storage shelfthat supports automatic power cycling, power to that disk might be turned off for a short period oftime. If the disk returns to a ready state after the power cycle, the maintenance center tests the disk.Otherwise, the maintenance center fails the disk immediately.
You can see the power-cycle status for ESH4 storage shelves by using the environmentshelf_power_status command.
For information about best practices for working with the maintenance center, see Technical Report3437: Storage Best Practices and Resiliency Guide.
Related information
TR 3437: Storage Best Practices and Resiliency Guide
When Data ONTAP can put a disk into the maintenance center
When Data ONTAP detects certain disk errors, it tries to put the disk into the maintenance center fortesting. Certain requirements must be met for the disk to be put into the maintenance center.
If a disk experiences more errors than are allowed for that disk type, Data ONTAP takes one of thefollowing actions:
• If the disk.maint_center.spares_check option is set to on (the default) and two or morespares are available (four for multi-disk carriers), Data ONTAP takes the disk out of service andassigns it to the maintenance center for data management operations and further testing.
• If the disk.maint_center.spares_check option is set to on and fewer than two spares areavailable (four for multi-disk carriers), Data ONTAP does not assign the disk to the maintenancecenter.It fails the disk and designates the disk as a broken disk.
• If the disk.maint_center.spares_check option is set to off, Data ONTAP assigns the diskto the maintenance center without checking the number of available spares.
30 | Storage Management Guide

Note: The disk.maint_center.spares_check option has no effect on putting disks into themaintenance center from the command-line interface.
Data ONTAP does not put SSDs into the maintenance center.
How Data ONTAP uses continuous media scrubbing to prevent mediaerrors
The purpose of the continuous media scrub is to detect and correct media errors to minimize thechance of storage system disruption due to a media error while a storage system is in degraded orreconstruction mode.
By default, Data ONTAP runs continuous background media scrubbing for media errors on allstorage system disks. If a media error is found, Data ONTAP uses RAID to reconstruct the data andrepairs the error.
Media scrubbing is a continuous background process. Therefore, you might observe disk LEDsblinking on an apparently idle storage system. You might also observe some CPU activity even whenno user workload is present.
How continuous media scrubbing impacts system performance
Because continuous media scrubbing searches only for media errors, its impact on systemperformance is negligible. In addition, the media scrub attempts to exploit idle disk bandwidth andfree CPU cycles to make faster progress. However, any client workload results in aggressivethrottling of the media scrub resource.
If needed, you can further decrease the CPU resources consumed by a continuous media scrub undera heavy client workload by increasing the maximum time allowed for a media scrub cycle tocomplete. You can do this by using the raid.media_scrub.rate option.
Why continuous media scrubbing should not replace scheduled RAID-level disk scrubs
Because the continuous media scrub process scrubs only media errors, you should continue to run thestorage system’s scheduled complete RAID-level scrub operation. The RAID-level scrub finds andcorrects parity and checksum errors as well as media errors.
Related concepts
How you schedule automatic RAID-level scrubs on page 122
Managing disks using Data ONTAP | 31

Increasing storage availability by using ACPACP, or Alternate Control Path, is a protocol that enables Data ONTAP to manage and control aSAS-connected storage shelf subsystem. It uses a separate network (alternate path) from the datapath, so management communication is not dependent on the data path being intact and available.
You do not need to actively manage the SAS-connected storage shelf subsystem. Data ONTAPautomatically monitors and manages the subsystem without operator intervention. However, youmust provide the required physical connectivity and configuration parameters to enable the ACPfunctionality.
Note: You can install SAS-connected storage shelves without configuring ACP. However, formaximum storage availability and stability, you should always have ACP configured and enabled.
After you enable ACP, you can use the storage show acp and acpadmin list_all commandsto display information about your ACP subsystem.
Because ACP communication is on a separate network, it does not affect data access in any way.
Enabling ACP
ACP can increase your storage availability when you use SAS-connected storage shelves. If yourstorage system model has a dedicated port for ACP, then ACP is enabled by default and you do notneed to explicitly enable ACP.
Before you begin
• The ACP subnet must be cabled on an isolated network, with no switches or hubs.For more information, see the Installation and Service Guide for your storage shelf.
• If you are configuring ACP for storage shelves attached to an HA pair, you must have recordedthe domain name and network mask to ensure that they are the same for both nodes.
About this task
The ACP subnet is a private Ethernet network that enables the ACP processor in the SAS module tocommunicate both with Data ONTAP and the SAS IOMs in the storage shelves.
The ACP subnet is separate from the I/O data path that connects the storage shelves to the HBA onthe storage controller. When you configure ACP on one of the system's network interfaces, you mustsupply a private domain name that conforms to the standard for private internet addresses(RFC1918). You can use the system default domain or another network name (that is, an IP addressending in 0) that conforms to the standard.
If your system has a dedicated port for ACP (e0P), you must use it. If you previously configuredACP to use a different port, when you run the acpadmin configure command, ACP is updated touse the dedicated port.
32 | Storage Management Guide

Steps
1. If your system does not have a dedicated port for ACP (e0P), ensure that the port you areassigning to ACP is not in use by any other subsystem by reviewing your /etc/rc file andentering the following command:
ifconfig interface_name
The interface you use for ACP should not be part of an Interface Group, and it should have noVLANs or IP addresses configured on it.
2. At the Data ONTAP command line, enter the following command:
acpadmin configure
If you have not previously configured the networking information for ACP, you are prompted forthat information. When you select a domain name and network mask for the ACP interface, DataONTAP automatically assigns IP addresses for the ACP interface on the storage controller andboth I/O modules on each storage shelf on the ACP subnet.
3. If you configured ACP to use a different port, reboot the node.
The previous port becomes available for use by another subsystem.
4. Verify your ACP connectivity by entering the following command:
storage show acp
The ACP Connectivity Status should show “Full Connectivity”.
Example
For example, with a dedicated ACP port, 192.168.0.0 as the ACP domain, and 255.255.252.0as the network mask for the ACP subnet, the storage show acp command output lookssimilar to the following:
my-sys-1> storage show acp
Alternate Control Path: Enabled Ethernet Interface: e0p ACP Status: Active ACP IP address: 192.168.2.61 ACP domain: 192.168.0.0 ACP netmask: 255.255.252.0 ACP Connectivity Status: Full Connectivity ACP Partner Connectivity Status: NA
Shelf Module Reset Cnt IP address FW Version Module Type Status---------------------------------------------------------------------------------7a.001.A 002 192.168.0.145 01.05 IOM6 active7a.001.B 003 192.168.0.146 01.05 IOM6 active7c.002.A 000 192.168.0.206 01.05 IOM6 active7c.002.B 001 192.168.0.204 01.05 IOM6 active
Managing disks using Data ONTAP | 33

How you use SSDs to increase storage performanceSolid-state drives (SSDs) are flash media-based storage devices that provide better overallperformance than hard disk drives (HDDs), which are mechanical devices using rotating media. Youshould understand how Data ONTAP manages SSDs and the capability differences between SSDsand HDDs.
Depending on your storage system model, you can use SSDs in two ways:
• You can create Flash Pool aggregates—aggregates composed mostly of HDDs, but with someSSDs that function as a high-performance cache for your working data set.
• You can create aggregates composed entirely of SSDs, where the SSDs function as the persistentstorage for all data in the aggregate.
You manage Flash Pool aggregates and aggregates composed entirely of SSDs the same way youmanage aggregates composed entirely of HDDs. However, there are some differences in the way youmanage SSDs from the way you manage disks. In addition, some Data ONTAP capabilities are notavailable on SSDs and Flash Pool aggregates.
SSDs are not supported on all storage system models. For information about which models supportSSDs, see the Hardware Universe at hwu.netapp.com.
Related concepts
How Flash Pool aggregates work on page 133
Restrictions for using aggregates composed of SSDs on page 136
How Data ONTAP manages SSD wear life
Solid-state disks (SSDs) have a different end-of-life behavior than rotating media (hard disk drives,or HDDs). Data ONTAP monitors and manages SSDs to maximize storage performance andavailability.
In the absence of a mechanical failure, rotating media can serve data almost indefinitely. This is nottrue for SSDs, which can accept only a finite (though very large) number of write operations. SSDsprovide a set of internal spare capacity, called spare blocks, that can be used to replace blocks thathave reached their write operation limit. After all of the spare blocks have been used, the next blockthat reaches its limit causes the disk to fail.
Because a drive failure is an undesirable occurrence, Data ONTAP replaces SSDs before they reachtheir limit. When a predetermined percentage of the spare blocks have been used (approximately90%), Data ONTAP performs the following actions:
1. Sends an AutoSupport message.
2. If a spare SSD is available, starts a disk copy to that spare.
34 | Storage Management Guide

3. If no spare is available, starts a periodic check for a spare so that the disk copy can be startedwhen a spare becomes available.
4. When the disk copy finishes, fails the disk.
Note: You do not need to replace SSDs before they are failed by Data ONTAP. However, whenyou use SSDs in your storage system (as for all disk types), it is important to ensure that you havesufficient hot spares available at all times.
Capability differences between SSDs and HDDs
Usually, you manage SSDs the same as HDDs, including firmware updates, scrubs, and zeroing.However, some Data ONTAP capabilities do not make sense for SSDs, and SSDs are not supportedon all hardware models.
SSDs cannot be combined with HDDs within the same RAID group. When you replace an SSD in anaggregate, you must replace it with another SSD. Similarly, when you physically replace an SSDwithin a shelf, you must replace it with another SSD.
The following capabilities of Data ONTAP are not available for SSDs:
• Disk sanitization is not supported for all SSD part numbers.For information about which SSD part numbers support sanitization, see the Hardware Universe.
• The maintenance center
• FlexShare
SSDs are not supported on all storage system models. For information about which models supportSSDs, see the Hardware Universe at hwu.netapp.com.
Guidelines and requirements for using multi-disk carrierstorage shelves
Data ONTAP automatically handles most of the extra steps required to manage disks in multi-diskcarriers. However, there are some extra management and configuration requirements that you mustunderstand before incorporating multi-disk carrier disk shelves in your storage architecture.
When using storage from multi-disk carrier disk shelves such as the DS4486, you must familiarizeyourself with the guidelines and requirements governing the following topics:
• The process that Data ONTAP uses to avoid impacting any RAID groups when a multi-diskcarrier needs to be removed
• When it is safe to remove a multi-disk carrier after a disk failure
• The minimum required number of spares for multi-disk carrier disks
Managing disks using Data ONTAP | 35

• Multi-disk carrier disk shelf configuration
• Aggregate configuration requirements when using multi-disk carrier disk shelves
• Guidelines and best practices for using disks from a multi-disk carrier disk shelf in an aggregate
How Data ONTAP avoids RAID impact when a multi-disk carrier must beremoved
Data ONTAP takes extra steps to ensure that both disks in a carrier can be replaced withoutimpacting any RAID group. Understanding this process helps you know what to expect when a diskfrom a multi-disk carrier storage shelf fails.
A multi-disk carrier storage shelf, such as the DS4486, has double the storage density of other SAS-connected storage shelves. It accomplishes this by housing two disks per disk carrier. When twodisks share the same disk carrier, they must be removed and inserted together. This means that whenone of the disks in a carrier needs to be replaced, the other disk in the carrier must also be replaced,even if it was not experiencing any issues.
Removing two data or parity disks from an aggregate at the same time is undesirable, because itcould leave two RAID groups degraded, or one RAID group double-degraded. To avoid thissituation, Data ONTAP initiates a storage evacuation operation for the carrier mate of the failed disk,as well as the usual reconstruction to replace the failed disk. The disk evacuation operation copies thecontents of the carrier mate to a disk in a different carrier so that the data on that disk remainsavailable when you remove the carrier. During the evacuation operation, the status for the disk beingevacuated is shown as evacuating.
In addition, Data ONTAP tries to create an optimal layout that avoids having two carrier mates in thesame RAID group. Depending on how the other disks are laid out, achieving the optimal layout canrequire as many as three consecutive disk evacuation operations. Depending on the size of the disksand the storage system load, each storage evacuation operation could take several hours, so the entireswapping process could take an entire day or more.
If insufficient spares are available to support the swapping operation, Data ONTAP issues a warningand waits to perform the swap until you provide enough spares.
How to determine when it is safe to remove a multi-disk carrier
Removing a multi-disk carrier before it is safe to do so can result in one or more RAID groupsbecoming degraded, or possibly even a storage disruption. Data ONTAP provides several indicationsof when it is safe to remove a multi-disk carrier.
When a multi-disk carrier needs to be replaced, the following events must have occurred before youcan remove the carrier safely:
• An AutoSupport message must have been logged indicating that the carrier is ready to beremoved.
• An EMS message must have been logged indicating that the carrier is ready to be removed.
36 | Storage Management Guide

• Both disks in the carrier must be displayed in the list of broken disks.You can see the list of broken disks by using the aggr status -f command.The disk that was evacuated to allow the carrier to be removed shows the outage reason ofevacuated.
• The amber LED on the carrier must be lit continuously.
• The green LED on the carrier must show no activity.
Attention: You cannot reuse the carrier mate of a failed disk. When you remove a multi-diskcarrier that contains a failed disk, you must replace and return the entire carrier.
Spare requirements for multi-disk carrier disks
Maintaining the proper number of spares for disks in multi-disk carriers is critical for optimizingstorage redundancy and minimizing the amount of time Data ONTAP must spend copying disks toachieve an optimal disk layout.
You must maintain a minimum of two hot spares for multi-disk carrier disks at all times. To supportthe use of the Maintenance Center, and to avoid issues caused by multiple concurrent disk failures,you should maintain at least four hot spares for steady state operation, and replace failed diskspromptly.
If two disks fail at the same time with only two available hot spares, Data ONTAP might not be ableto swap the contents of both the failed disk and its carrier mate to the spare disks. This scenario iscalled a stalemate. If this happens, you are notified through EMS messages and AutoSupportmessages. When the replacement carriers become available, you must follow the instructionsprovided by the EMS messages or contact technical support to recover from the stalemate.
Shelf configuration requirements for multi-disk carrier storage shelves
You can combine multi-disk carrier disk shelves with single-disk carrier disk shelves (standard diskshelves) on the same storage system and within in the same stack.
Aggregate requirements for disks in multi-disk carrier storage shelves
Aggregates composed of disks in multi-disk carrier disk shelves must conform to some configurationrequirements.
The following configuration requirements apply to aggregates composed of disks in multi-diskcarrier disk shelves:
• The RAID type must be RAID-DP.
• The format must be 64-bit.
• All HDDs in the aggregate must be the same Data ONTAP disk type.The aggregate can be a Flash Pool aggregate.
Managing disks using Data ONTAP | 37

• If the aggregate is mirrored, both plexes must have the same Data ONTAP disk type (or types, inthe case of a Flash Pool aggregate).
• The aggregate cannot be a traditional volume.
Related concepts
How Flash Pool aggregates work on page 133
Considerations for using disks from a multi-disk carrier storage shelf in anaggregate
Observing the requirements and best practices for using disks from a multi-disk carrier disk shelf inan aggregate enables you to maximize storage redundancy and minimize the impact of disk failures.
Disks in multi-disk carriers always have the Data ONTAP disk type of MSATA. MSATA diskscannot be mixed with HDDs from a single-carrier disk shelf in the same aggregate.
The following disk layout requirements apply when you are creating or increasing the size of anaggregate composed of MSATA disks:
• Data ONTAP prevents you from putting two disks in the same carrier into the same RAID group.
• Do not put two disks in the same carrier into different pools, even if the shelf is supplying disks toboth pools.
• Do not assign disks in the same carrier to different nodes.
• For the best layout, do not name specific disks; allow Data ONTAP to select the disks to be usedor added.If the operation cannot result in an optimal layout due to the placement of the disks and availablespares, Data ONTAP automatically swaps disk contents until an optimal layout is achieved. Ifthere are not enough available spares to support the swaps, Data ONTAP issues a warning andwaits to perform the disk swaps until you provide the necessary number of hot spares. If youname disks and an optimal layout cannot be achieved, you must explicitly force the operation;otherwise, the operation fails.
Aggregate creation example
To create an aggregate using MSATA disks, you can specify the disk type and size but leavethe disk selection and layout to Data ONTAP by using a command like this:
aggr create n1_aggr1 -T MSATA 14
38 | Storage Management Guide

Adding disks to a storage systemYou add disks to a storage system to increase the number of hot spares, to add space to an aggregate,or to replace disks.
Before you begin
You must have confirmed that your storage system supports the type of disk you want to add. Forinformation about supported disk drives, see the Hardware Universe at hwu.netapp.com.
About this task
You use this procedure to add physical disks to your storage system. If you are administering astorage system that uses virtual disks, for example, a system based on Data ONTAP-v technology,see the installation and administration guide that came with your Data ONTAP-v system forinformation about adding virtual disks.
Steps
1. Check the NetApp Support Site for newer disk and shelf firmware and Disk QualificationPackage files. If your system does not have the latest versions, update them before installing thenew disk.
2. Install one or more disks according to the hardware guide for your disk shelf or the hardware andservice guide for your storage system.
The new disks are not recognized until they are assigned to a system and pool. You can assign thenew disks manually, or you can wait for Data ONTAP to automatically assign the new disks ifyour system follows the rules for disk autoassignment.
3. After the new disks have all been recognized, verify their addition and their ownershipinformation by entering the following command:
disk show -v
You should see the new disks, owned by the correct system and in the correct pool, listed as hotspare disks.
4. You can zero the newly added disks now, if needed, by entering the following command:
disk zero spares
Note: Disks that have been used previously in a Data ONTAP aggregate must be zeroed beforethey can be added to another aggregate. Zeroing the disks now can prevent delays in case youneed to quickly increase the size of an aggregate. The disk zeroing command runs in thebackground and can take hours to complete, depending on the size of the non-zeroed disks inthe system.
Managing disks using Data ONTAP | 39

Result
The new disks are ready to be added to an aggregate, used to replace an existing disk, or placed ontothe list of hot spares.
Related concepts
Guidelines for assigning ownership for disks on page 63
How automatic ownership assignment works for disks on page 59
Managing disks using Data ONTAP on page 18
Related information
Disk Qualification Package Instructions: support.netapp.com/NOW/download/tools/diskqual/Disk Drive & Firmware Matrix: support.netapp.com/NOW/download/tools/diskfw/
When you need to update the Disk Qualification Package
The Disk Qualification Package (DQP) adds full support for newly qualified drives. Before youupdate drive firmware or add new drive types or sizes to a storage system, you must update the DQP.A best practice is to also update the DQP regularly; for example, every quarter or semi-annually.
You need to download and install the DQP in the following situations:
• Whenever you add a new drive type or size to the nodeFor example, if you already have 1-TB drives and add 2-TB drives, you need to check for thelatest DQP update.
• Whenever you update the disk firmware
• Whenever newer disk firmware or DQP files are available
• Whenever you upgrade to a new version of Data ONTAP.The DQP is not updated as part of a Data ONTAP upgrade.
Replacing disks that are currently being used in anaggregate
You can use the disk replace command to replace disks that are part of an aggregate withoutdisrupting data service. You do this to swap out mismatched disks from a RAID group. Keeping yourRAID groups homogeneous helps optimize storage system performance.
Before you begin
You should already have an appropriate hot spare disk of the correct type, size, speed, and checksumtype installed in your storage system. This spare disk must be assigned to the same system and pool
40 | Storage Management Guide

as the disk it will replace. For multi-disk carrier disks, you should have at least two hot spare disksavailable, to enable Data ONTAP to provide an optimal disk layout.
About this task
If you need to replace a disk—for example a mismatched data disk in a RAID group—you canreplace the disk. This operation uses Rapid RAID Recovery to copy data from the specified old diskin a RAID group to the specified spare disk in the storage system. At the end of the process, the sparedisk replaces the old disk as the new data disk, and the old disk becomes a spare disk in the storagesystem.
Note: If you replace a smaller disk with a larger disk, the capacity of the larger disk is downsizedto match that of the smaller disk; the usable capacity of the aggregate is not increased.
Step
1. Enter the following command:
disk replace start [-m] old_disk_name new_spare_disk_name
If you need to use a disk that does not match the speed or pool of the other disks in the aggregate,you can use the -m option.
If you need to stop the disk replace operation, you can use the disk replace stop command.If you halt a disk replace operation, the target spare disk needs to be zeroed before it can be usedin another aggregate.
Result
The old disk is converted to a spare disk, and the new disk is now used in the aggregate.
Related concepts
How Data ONTAP works with hot spare disks on page 117
Managing disks using Data ONTAP on page 18
Guidelines for assigning ownership for disks on page 63
How automatic ownership assignment works for disks on page 59
Related tasks
Adding disks to a storage system on page 39
Assigning ownership for unowned disks and array LUNs on page 64
Managing disks using Data ONTAP | 41

Replacing a self-encrypting diskReplacing a self-encrypting disk (SED) is similar to replacing a regular disk, except that there aresome extra steps you must take to reenable Storage Encryption after you replace the disk.
Before you begin
You should know the key used by the SEDs on your storage system so that you can configure thereplacement SED to use the same key.
Steps
1. Ensure that reconstruction has started by entering the following command:
aggr status -r
The status of the disk should display as "Reconstructing".
2. Remove the failed disk and replace it with a new SED, following the instructions in the hardwareguide for your disk shelf model.
3. Assign ownership of the newly replaced SED by entering the following command:
disk assign disk_name
4. Confirm that the new disk has been properly assigned by entering the following command:
disk encrypt show
You should see the newly added disk in the output.
5. Encrypt the disk by entering the following command:
disk encrypt rekey key_id disk_name
6. Finalize the replacement process by entering the following command:
disk encrypt lock disk_name
The newly replaced SED is ready for use, and Storage Encryption is enabled and working on thissystem.
Converting a data disk to a hot spareData disks can be converted to hot spares by destroying the aggregate that contains them.
Before you begin
The aggregate to be destroyed cannot contain volumes.
42 | Storage Management Guide

About this task
Converting a data disk to a hot spare does not change the ownership information for that disk. Youmust remove ownership information from a disk before moving it to another storage system.
Step
1. Destroy the aggregate that contains the disk by entering the following command:
aggr destroy aggr_name
All disks in use by that aggregate are converted to hot spare disks.
Removing disks from a storage systemHow you remove a disk from your storage system depends how the disk is being used. By using thecorrect procedure, you can prevent unwanted AutoSupport notifications from being generated andensure that the disk functions correctly if it is reused in another storage system.
You cannot reduce the number of disks in an aggregate by removing data disks. The only way toreduce the number of data disks in an aggregate is to copy the data and transfer it to a new aggregatethat has fewer data disks.
Removing a failed disk
A disk that is completely failed is no longer counted by Data ONTAP as a usable disk, and you canimmediately disconnect the disk from the disk shelf. However, you should leave a partially faileddisk connected long enough for the Rapid RAID Recovery process to complete.
About this task
If you are removing a disk because it has failed or because it is producing excessive error messages,you should not use the disk again in this or any other storage system.
Steps
1. Find the disk ID of the failed disk by entering the following command:
aggr status -f
If the disk does not appear in the list of failed disks, it might be partially failed, with a RapidRAID Recovery in process. In this case, you should wait until the disk is present in the list offailed disks (which means that the Rapid RAID Recovery process is complete) before removingthe disk.
2. Determine the physical location of the disk you want to remove from the output of the aggrstatus -f command. The location is shown in the columns labeled HA, SHELF, and BAY.
Managing disks using Data ONTAP | 43

3. Remove the disk from the disk shelf, following the instructions in the hardware guide for yourdisk shelf model.
Related concepts
How to determine when it is safe to remove a multi-disk carrier on page 36
Removing a hot spare disk
Removing a hot spare disk requires you to remove ownership information from the disk. Thisprevents the disk from causing problems when it is inserted into another storage system, and notifiesData ONTAP that you are removing the disk to avoid unwanted AutoSupport messages.
About this task
Removing a hot spare disk does not make the contents of that disk inaccessible. If you need absoluteassurance that the data contained by this disk is irretrievable, you should sanitize the disk instead ofcompleting this procedure.
Steps
1. Find the disk name of the hot spare disk you want to remove:
aggr status -s
The names of the hot spare disks appear next to the word spare. The locations of the disks areshown to the right of the disk name.
2. Enter the advanced privilege level:
priv set advanced
3. Determine the physical location of the disk you want to remove:
led_on disk_name
The fault LED on the face of the disk is lit.
4. If disk ownership automatic assignment is on, turn it off:
options disk.auto_assign off
5. Repeat the previous step on the node's HA partner if it has one.
6. Remove the software ownership information from the disk:
disk remove_ownership disk_name
7. Return to admin privilege level:
priv set
44 | Storage Management Guide

8. Remove the disk from the disk shelf, following the instructions in the hardware guide for yourdisk shelf model.
9. If you turned off disk ownership automatic assignment previously, turn it on now:
options disk.auto_assign on
Related concepts
How to determine when it is safe to remove a multi-disk carrier on page 36
Removing a data disk
The only time that you should remove a data disk from a storage system is if the disk is notfunctioning correctly. If you want to remove a data disk so that it can be used in another system, youmust convert it to a hot spare disk first.
About this task
You can cause Data ONTAP to fail the disk immediately or allow a disk copy to finish before thedisk is failed. If you do not fail the disk immediately, you must wait for the disk copy to finish beforephysically removing the disk. This operation might take several hours, depending on the size of thedisk and the load on the storage system.
Do not immediately fail a disk unless it is causing immediate performance or availability issues foryour storage system. Depending on your storage system configuration, additional disk failures couldresult in data loss.
Steps
1. Determine the name of the disk you want to remove.
If the disk is reporting errors, you can find the disk name in the log messages that report diskerrors. The name is prefixed with the word “Disk”.
2. Determine the location of the disk you want to remove by entering the following command:
aggr status -r
The location of the disk appears to the right of its name, in the columns HA, SHELF, and BAY.
3. Take the appropriate action based on whether you need to fail the disk immediately.
Managing disks using Data ONTAP | 45

If you... Then...
Can wait for the copyoperation to finish(recommended)
Enter the following command to pre-fail the disk:
disk fail disk_name
Data ONTAP pre-fails the specified disk and attempts to create areplacement disk by copying the contents of the pre-failed disk to a sparedisk.
If the copy operation is successful, then Data ONTAP fails the disk andthe new replacement disk takes its place. If the copy operation fails, thepre-failed disk fails and the storage system operates in degraded modeuntil the RAID system reconstructs a replacement disk.
Need to remove the diskimmediately
Enter the following command to cause the disk to fail immediately:
disk fail -i disk_name
The disk fails and the storage system operates in degraded mode until theRAID system reconstructs a replacement disk.
4. Ensure that the disk you want to remove is shown as failed by entering the following command,and looking for its disk name:
aggr status -f
Do not remove the disk until its name appears in the list of failed disks.
5. Remove the failed disk from the disk shelf, following the instructions in the hardware guide foryour disk shelf model.
Related concepts
About degraded mode on page 119
Managing disks using Data ONTAP on page 18
How to determine when it is safe to remove a multi-disk carrier on page 36
Using disk sanitization to remove data from disksDisk sanitization enables you to remove data from a disk or set of disks so that the data can never berecovered.
Before you begin
The disks that you want to sanitize must be spare disks; they must be owned by but not used in anaggregate.
46 | Storage Management Guide

About this task
When disk sanitization is enabled, it disables some Data ONTAP commands, including volume move(unless SnapMirror is also enabled). Once disk sanitization is enabled on a storage system, it cannotbe disabled.
If you need to remove data from disks using Storage Encryption, do not use this procedure. Use theprocedure for destroying data on disks using Storage Encryption.
Steps
1. Enable disk sanitization by entering the following command:
options licensed_feature.disk_sanitization.enable on
You are asked to confirm the command because it is irreversible.
2. Sanitize the specified disks by entering the following command:
disk sanitize start [-p pattern1|-r [-p pattern2|-r [-p pattern3|-r]]][-c cycle_count] disk_list
Attention: Do not turn off the storage system, disrupt the storage connectivity, or removetarget disks while sanitizing. If sanitizing is interrupted during the formatting phase, theformatting phase must be restarted and allowed to finish before the disks are sanitized andready to be returned to the spare pool.
If you need to abort the sanitization process, you can do so by using the disk sanitizeabort command. If the specified disks are undergoing the formatting phase of sanitization, theabort does not occur until the phase is complete. At that time, Data ONTAP displays a messagetelling you that the sanitization process was stopped.
-p pattern1 -p pattern2 -p pattern3 specifies a cycle of one to three user-defined hex byteoverwrite patterns that can be applied in succession to the disks being sanitized. The defaultpattern is three passes, using 0x55 for the first pass, 0xaa for the second pass, and 0x3c for thethird pass.
-r replaces a patterned overwrite with a random overwrite for any or all of the passes.
-c cycle_count specifies the number of times that the specified overwrite patterns are applied.The default value is one cycle. The maximum value is seven cycles.
disk_list specifies a space-separated list of the IDs of the spare disks to be sanitized.
3. If you want to check the status of the disk sanitization process, enter the following command:
disk sanitize status [disk_list]
4. After the sanitization process is complete, return the disks to spare status by entering thefollowing command for each disk:
disk sanitize release disk_name
Managing disks using Data ONTAP | 47

5. Determine whether all of the disks were returned to spare status by entering the followingcommand:
aggr status -s
If... Then...
All of the sanitized disks arelisted as spares
You are done. The disks are sanitized and in spare status.
Some of the sanitized disksare not listed as spares
Complete the following steps:
a. Enter advanced privilege mode:
priv set advanced
b. Assign the disks to the appropriate storage system by entering thefollowing command for each disk:
disk assign disk_name -o system_name
c. Return the disks to spare status by entering the following commandfor each disk:
disk unfail -s disk_name
d. Return to administrative mode:
priv set
Result
The specified disks are sanitized and designated as hot spares. The serial numbers of the sanitizeddisks are written to /etc/log/sanitized_disks.
Examples
The following command applies the default three disk sanitization overwrite patterns for onecycle (for a total of three overwrites) to the specified disks 8a.6, 8a.7, and 8a.8:
disk sanitize start 8a.6 8a.7 8a.8
The following command would result in three disk sanitization overwrite patterns for sixcycles (for a total of 18 overwrites) to the specified disks:
disk sanitize start -c 6 8a.6 8a.7 8a.8
Related concepts
How disk sanitization works on page 25
When disk sanitization cannot be performed on page 26
Managing disks using Data ONTAP on page 18
48 | Storage Management Guide

Related tasks
Destroying data on disks using Storage Encryption on page 104
Removing data from disks using selective disk sanitization
The procedure you use to selectively sanitize data depends on whether your data is contained inFlexVol or traditional volumes.
Related concepts
How selective disk sanitization works on page 27
Managing disks using Data ONTAP on page 18
Selectively sanitizing data contained in FlexVol volumes
To selectively sanitize data contained in FlexVol volumes, you need to migrate any data that youwant to preserve in the entire aggregate, because every disk used by that aggregate must be sanitized.
Before you begin
• You must have the licensed_feature.disk_sanitization.enable option set to On.
Attention: After disk sanitization is enabled on a storage system, it is permanent.
• You need enough free space to duplicate the data that you want to preserve, plus extra space foroverhead.If you have a limited amount of free space, you can decrease the size of the FlexVol volumesafter you delete the data that you do not want to preserve and before migrating the volume.
Steps
1. Stop any applications that write to the aggregate that you plan to sanitize.
2. From a Windows or UNIX client, delete the directories or files whose data you want toselectively sanitize from the active file system.
Use the appropriate Windows or UNIX command, for example, rm /nixdir/nixfile.doc
3. Remove NFS and CIFS access to all volumes in the aggregate.
4. From the Data ONTAP command line, enter the following command to delete all volumeSnapshot copies of the FlexVol volumes that contained the files and directories you just deleted:
snap delete -V -a vol_name
vol_name is the FlexVol volume that contains the files or directories that you just deleted.
5. Note the names of the volumes that contain data you want to preserve.
Managing disks using Data ONTAP | 49

6. Enter the following command for each volume that you want to preserve, noting the total size andspace used:
df -g vol_name
7. If you do not have sufficient free space to create an aggregate to contain the migrated volumes attheir current size and the volumes have free space, enter the following command for each volumeto decrease its size:
vol size vol_name new_size
Note: The new size must be larger than the used space in the volume.
8. Create an aggregate to which you will migrate the data you did not delete by entering thefollowing command:
aggr create dest_vol disks
Example
aggr create nixdestaggr 8@72G
This new aggregate provides a migration destination that is free of the data that you want tosanitize.
9. For each FlexVol volume that contains data you want to preserve, enter the following commandto create a corresponding FlexVol volume in the new aggregate:
vol create dest_vol dest_aggr size
dest_vol is the name of the new FlexVol volume. Use a different name for the new FlexVolvolume.
dest_aggr is the aggregate you just created.
size must be at least as large as the current size of the FlexVol volume in the aggregate you willsanitize.
Example
To create a FlexVol volume to preserve the data in the nixsrcvol volume, which is a little morethan 19 GB, you could use the following command:
vol create nixsrcvol_1 nixdestaggr 20G
You now have the volumes into which you will copy the data that you want to preserve.
10. For each FlexVol volume that contains data you want to preserve, enter the following commandto copy the data to the new aggregate:
ndmpcopy /vol/src_vol /vol/dest_vol
src_vol is the FlexVol volume in the aggregate that you want to sanitize.
50 | Storage Management Guide

dest_vol is the new FlexVol volume that you just created that corresponded to the src_volvolume.
Example
ndmpcopy /vol/nixsrcvol /vol/nixsrcvol_1
For information about the ndmpcopy command, see the Data ONTAP Data Protection TapeBackup and Recovery Guide for 7-Mode.
All of the data that you want to preserve is now contained in the new aggregate.
11. List the disk IDs used by the source aggregate by entering the following command:
aggr status src_aggr -r
Example
aggr status nixsrcaggr -r
The disks that you will sanitize are listed in the Device column of the aggr status -r output.
12. Record the disk IDs that you listed in the previous step.
13. For each FlexVol volume in the aggregate that you are sanitizing, enter the following commandsto take the volume offline and destroy it:
vol offline src_vol
vol destroy src_vol
14. Enter the following commands to take the source aggregate offline and destroy it:
aggr offline src_aggr
aggr destroy src_aggr
The volumes and aggregate that housed the data you want to sanitize have been destroyed. Thedisks used in this aggregate are now hot spares.
15. Enter the following command to rename the new aggregate, giving it the name of the aggregatethat you just destroyed:
aggr rename dest_aggr old_src_aggr_name
Example
aggr rename nixdestaggr nixsrcaggr
16. For each FlexVol volume in the new aggregate, enter the following command to rename theFlexVol volume to the name of the original FlexVol volume:
vol rename dest_vol old_src_vol_name
Managing disks using Data ONTAP | 51

Example
vol rename nixsrcvol_1 nixsrcvol
17. Reestablish your CIFS or NFS services.
• If the original volume supported CIFS services, restart the CIFS services on the volumes inthe destination aggregate after migration is complete.
• If the original volume supported NFS services, enter the following command:
exportfs -a
Users who were accessing files in the original volume continue to access those files in therenamed destination volume with no remapping of their connections required.
18. Follow the procedure for sanitizing disks on the disks that belonged to the source aggregate.
Related tasks
Using disk sanitization to remove data from disks on page 46
Selectively sanitizing data contained in traditional volumes
To selectively sanitize data contained in traditional volumes, you migrate any data you want topreserve to a new volume, and then sanitize the disks that contained the old volume.
Before you begin
• You must have set the licensed_feature.disk_sanitization.enable option to On.
Attention: After disk sanitization is enabled on a storage system, it is permanent, and itprevents certain Data ONTAP commands from being run.
• Your system must have enough free space to duplicate the entire traditional volume you areperforming the selective sanitization on, regardless of how much data you are deleting beforemigrating the data.
Steps
1. Stop any applications that write to the volume you plan to sanitize.
2. From a Windows or UNIX client, delete the directories or files whose data you want toselectively sanitize from the active file system.
Use the appropriate Windows or UNIX command, such as rm /nixdir/nixfile.doc.
3. Remove NFS and CIFS access to the volume you plan to sanitize.
4. Create a traditional volume to which you will migrate the data you did not delete by entering thefollowing command:
52 | Storage Management Guide

aggr create dest_vol -v disks
Note: This traditional volume must have a storage capacity equal to or greater than the volumefrom which you are migrating. It must have a different name; later, you will rename it to havethe same name as the volume you are sanitizing.
Example
aggr create nixdestvol -v 8@72G
This new volume provides a migration destination that is free of the data that you want tosanitize.
5. From the Data ONTAP command line, enter the following command to delete all volumeSnapshot copies of the traditional volume that contained the files and directories you just deleted:
snap delete -V -a vol_name
vol_name is the traditional volume that contained the files or directories that you just deleted.
Example
snap delete -V -a nixdestvol
6. Confirm that you have deleted all files or directories that you want to sanitize from the sourcevolume.
7. Copy the data you want to preserve to the destination volume from the volume you want tosanitize by entering the following command:
ndmpcopy /vol/src_vol /vol/dest_vol
src_vol is the volume you want to sanitize.
dest_vol is the destination volume.
For information about the ndmpcopy command, see the Data ONTAP Data Protection TapeBackup and Recovery Guide for 7-Mode.
Example
ndmpcopy /vol/nixsrcvol /vol/nixdestvol
8. List the disks used in the source volume by entering the following command:
aggr status src_vol -r
Example
aggr status nixsrcvol -r
The disks that you will sanitize are listed in theDevice
column of the aggr status -r output.
Managing disks using Data ONTAP | 53

9. Record the IDs of the disks used in the source volume.
After that volume is destroyed, you will sanitize these disks.
10. Take the volume you are sanitizing offline and destroy it by entering the following commands:
aggr offline src_vol
aggr destroy src_vol
Example
aggr offline nixsrcvol
aggr destroy nixsrcvol
11. Rename the new volume, giving it the name of the volume that you just destroyed, by enteringthe following command:
aggr rename dest_vol old_src_vol_name
Example
aggr rename nixdestvol nixsrcvol
12. To confirm that the new volume is named correctly, list your volumes by entering the followingcommand:
aggr status old_src_vol_name
13. Reestablish your CIFS or NFS services.
• If the original volume supported CIFS services, restart the CIFS services on the volumes inthe destination aggregate after migration is complete.
• If the original volume supported NFS services, enter the following command:
exportfs -a
Users who were accessing files in the original volume will continue to access those files in therenamed destination volume.
14. Follow the procedure for sanitizing disks to sanitize the disks that belonged to the source volume.
Result
After sanitizing, the data that you removed from the source volume no longer exists anywhere onyour storage system and cannot be restored.
Related tasks
Using disk sanitization to remove data from disks on page 46
54 | Storage Management Guide

Stopping disk sanitization
You can use the disk sanitize abort command to stop an ongoing sanitization process on oneor more specified disks.
Step
1. Enter the following command:
disk sanitize abort disk_list
If the specified disks are undergoing the disk formatting phase of sanitization, the process doesnot stop until the disk formatting is complete.
Data ONTAP displays the message Sanitization abort initiated. After the processstops, Data ONTAP displays another message for each disk to inform you that sanitization is nolonger in progress.
Managing disks using Data ONTAP | 55

How ownership for disks and array LUNs works
Disk and array LUN ownership determines which node owns a disk or array LUN and what pool adisk or array LUN is associated with. Understanding how ownership works enables you to maximizestorage redundancy and manage your hot spares effectively.
Data ONTAP stores ownership information directly on the disk or array LUN.
Reasons to assign ownership of disks and array LUNsStorage system ownership must be assigned for disks and array LUNs before they become aneffective part of your system. You must explicitly assign ownership for array LUNs. Disks can beautomatically or manually assigned.
You assign ownership of a disk or array LUN to accomplish the following actions:
• Associate the disk or array LUN with a specific storage system.For a stand-alone system, all disks and array LUNs are owned by that system. In an HAconfiguration, the disks and array LUNs can be owned by either system.
• Enable the disk or array LUN to be used and managed by the system that owns it.Unowned disks cannot be used as spares and do not receive the automatic firmware updates thatowned disks do.
• Associate the disk or array LUN with a specific SyncMirror pool (when SyncMirror is in use).If SyncMirror is not in use, all disks and array LUNs are in pool0.
What it means for Data ONTAP to own an array LUNData ONTAP cannot use an array LUN presented to it by a storage array until you configure a logicalrelationship in Data ONTAP that identifies a specific system running Data ONTAP as the owner ofthe array LUN.
A storage array administrator creates array LUNs and makes them available to specified FC initiatorports of storage systems running Data ONTAP. (The process for how to do this varies among storagearray vendors.) When you assign an array LUN to a system running Data ONTAP, Data ONTAPwrites data to the array LUN to identify that system as the owner of the array LUN. Thereafter, DataONTAP ensures that only the owner can write data to and read data from the array LUN.
From the perspective of Data ONTAP, this logical relationship is referred to as disk ownershipbecause Data ONTAP considers an array LUN to be a virtual disk. From the perspective of DataONTAP, you are assigning disks to a storage system.
56 | Storage Management Guide

An advantage of the disk ownership scheme is that you can make changes through the Data ONTAPsoftware that, on typical hosts, must be done by reconfiguring hardware or LUN access controls. Forexample, through Data ONTAP you can balance the load of requests among a group of systemsrunning Data ONTAP by moving data service from one system to another, and the process istransparent to most users. You do not need to reconfigure hardware or the LUN access controls onthe storage array to change which system running Data ONTAP is the owner and, therefore, servicingdata requests.
Attention: The Data ONTAP software-based scheme provides ownership control only for storagesystems running Data ONTAP; it does not prevent a different type of host from overwriting data inan array LUN owned by a system running Data ONTAP. Therefore, if multiple hosts are accessingarray LUNs through the same storage array port, be sure to use LUN security on your storage arrayto prevent the systems from overwriting each other's array LUNs.
Array LUN reconfiguration, such as resizing the array LUN, must be done from the storage array.Before such activities can occur, you must release Data ONTAP ownership of the array LUN.
Why you might assign array LUN ownership afterinstallation
For a Data ONTAP system ordered with disk shelves, you are not required to set up the system towork with array LUNs during initial installation. In the case of a Data ONTAP system using onlyarray LUNs, you need to assign only two array LUNs during initial installation.
Note: V-Series (“V”) systems and new FAS platforms released in Data ONTAP 8.2.1 and later canuse array LUNs if the proper license is installed. In the documentation, these systems arecollectively referred to as Data ONTAP systems.
If you ordered your Data ONTAP system with disk shelves, you do not need to assign any arrayLUNs initially because the factory installs the root volume on a disk for you. If you are using onlyarray LUNs, you must configure one array LUN for the root volume and one array LUN as a sparefor core dumps during initial installation. In either case, you can assign ownership of additional arrayLUNs to your system at any time after initial installation.
After you configure your system, you might assign ownership of an array LUN in the followingcircumstances:
• You ordered your Data ONTAP system with native disk shelves and did not set up your system towork with array LUNs initially
• You left some LUNs that the storage array presented to Data ONTAP unowned, and you nowneed to use the storage
• Another system released the ownership of a particular array LUN and you want this system to usethe LUN
How ownership for disks and array LUNs works | 57

• The storage array administrator has not made the LUNs available to Data ONTAP during theinitial system configuration, and you want to use the storage.
Related concepts
Data ONTAP systems that can use array LUNs on storage arrays on page 75
How disks and array LUNs become available for useWhen you add a disk or array LUN to a system running Data ONTAP, the disk or array LUN goesthrough several stages before it can be used by Data ONTAP to store data or parity information.
The process for making a disk available for use differs slightly from the process for making an arrayLUN available for use. Both processes are shown in the following diagram:
Add toaggregate (optional)
Install a newdisk on adisk shelf
Storage array
Create arrayLUNs
Make arrayLUNs available to
Data ONTAP
System running Data ONTAP
Data ONTAP
Manual assignment of array LUNs to a
system running Data ONTAP
Automatic ormanual assignmentof a new disk to asystem running Data ONTAP
Spare diskor array LUNIt is owned by
the storagesystem, but it
cannot beused yet.
In-use diskor array LUN
The disk or LUN is in use bythe system
that owns it.
Unowneddisk or
array LUN
The process for disks includes the following actions:
1. The administrator physically installs the disk into a disk shelf.Data ONTAP can see the disk, but the disk is still unowned.
2. If the system is configured to support disk autoassignment, Data ONTAP assigns ownership forthe disk; otherwise, the administrator must assign ownership of the disk manually.
58 | Storage Management Guide

The disk is now a spare disk.
3. The administrator or Data ONTAP adds the disk to an aggregate.The disk is now in use by that aggregate. It could contain data or parity information.
The process for array LUNs includes the following actions:
1. The storage array administrator creates the array LUN and makes it available to Data ONTAP.Data ONTAP can see the array LUN, but the array LUN is still unowned.
2. The Data ONTAP administrator assigns ownership of the array LUN to a Data ONTAP system.The array LUN is now a spare array LUN.
3. The Data ONTAP administrator adds the array LUN to an aggregate.The array LUN is now in use by that aggregate and is storing data.
Related concepts
Data ONTAP systems that can use array LUNs on storage arrays on page 75
How automatic ownership assignment works for disksIf your configuration follows some basic rules to avoid ambiguity, Data ONTAP can automaticallyassign ownership and pool membership for disks. Automatic ownership assignment is not availablefor array LUNs or virtual disks.
If you decide to change the way Data ONTAP has assigned the disks, you can do so at any time.
If you need to temporarily remove disk ownership for a disk while you perform an administrativetask, you must disable automatic disk ownership first to prevent Data ONTAP from immediatelyreassigning ownership for that disk.
What automatic ownership assignment doesWhen automatic disk ownership assignment runs, Data ONTAP looks for any unassigned disks andassigns them to the same system and pool as all other disks on their loop, stack, or shelf.
Note: If a single loop or stack has disks assigned to multiple systems or pools, Data ONTAP doesnot perform automatic ownership assignment on that loop or stack. Automatic assignment worksonly when it is clear which system or pool to assign unowned disks to. For this reason, alwaysfollow the disk assignment guidelines for your automatic assignment configuration.
You configure Data ONTAP to automatically assign disks at the stack or shelf level, depending onyour system requirements and configuration. By default, autoassignment is at the stack or loop level.Data ONTAP automatically assigns the unowned disks to the system that owns the rest of the disks inthat stack or loop.
If you need to have the disks in a single stack owned by more than one system, you can configureData ONTAP to perform automatic disk assignment at the shelf level. In this case, Data ONTAP
How ownership for disks and array LUNs works | 59

automatically assigns the unowned disks to the same owner as the already assigned disks on thatshelf.
Related concepts
Guidelines for assigning ownership for disks on page 63
Managing disks using Data ONTAP on page 18
When automatic ownership assignment is invoked
Automatic disk ownership assignment does not happen immediately after disks are introduced intothe storage system.
Automatic ownership assignment is invoked at the following times:
• Every five minutes during normal system operation
• Ten minutes after the initial system initializationThis delay enables the person configuring the system enough time to finish the initial diskassignments so that the results of the automatic ownership assignment are correct.
• Whenever you enable automatic ownership assignment.
How disk ownership works for platforms based on DataONTAP-v technology
You manage ownership for virtual disks by using the same commands you use for physical disks.However, automatic ownership assignment works differently for virtual disks.
Storage systems based on Data ONTAP-v technology automatically assign ownership for all thevirtual data disks you defined during the initial system setup. Automatic assignment is not availablefor any virtual disks you add after the initial system setup.
For information about adding virtual disks and managing a storage system based on Data ONTAP-vtechnology, see the Data ONTAP Edge Installation and Administration Guide.
Examples showing when Data ONTAP can use array LUNsAfter an array LUN has been assigned to a storage system, it can be added to an aggregate and usedfor storage or it can remain a spare LUN until it is needed for storage.
No storage system owns the LUNs yet
In this example, the storage array administrator made the array LUNs available to DataONTAP. However, system vs1 has not yet been configured to “own” any of the LUNs.Therefore, it cannot read data from or write data to any array LUNs on the storage array:
60 | Storage Management Guide

Only some array LUNs are owned
In this example, vs1 was configured to own array LUNs 1 and 2, but not array LUNs 3 and 4.LUNs 3 and 4 are still available to Data ONTAP, however, and can be assigned to a storagesystem later:
Data ONTAP used LUN 1 for the root volume. System vs1 can read data from and write datato LUN 1, because LUN 1 is in an aggregate. LUN 2 remains a spare LUN because it has notyet been added to an aggregate. System vs1 cannot read data from and write data to LUN 2while it is a spare.
After you perform initial setup of the storage system, you could configure vs1 to also ownLUN 3, LUN 4, both, or neither, depending on your storage needs.
Ownership of LUNs in an HA pair
In this example, two storage systems running Data ONTAP are configured in an HA pair. In anHA pair, only one node can be the owner of a particular LUN, but both nodes must be able tosee the same LUNs so that the partner can take over if the owning node becomes unavailable.
LUN 1 through LUN 4 were created on the storage array and mapped to the ports on thestorage array to which the storage systems are connected. All four LUNs are visible to eachnode in the HA pair.
How ownership for disks and array LUNs works | 61

Assume that during initial setup vs1 was assigned ownership of LUN 1 and LUN 2. LUN 1was automatically added to the root volume, so LUN 1 is now “in use” by vs1. LUN 2 remainsa spare until it is explicitly added to an aggregate on vs1. Similarly, assume that during initialsetup vs2 was assigned ownership of LUN 3 and LUN 4, with LUN 3 assigned to the rootvolume. LUN 4 remains a spare LUN until it is explicitly added to an aggregate.
The key points of this example are as follows:
• By deploying the storage systems in an HA pair, one system can take over services for itspartner if the partner becomes unavailable.
• Only one storage system can own a specific array LUN.However, all array LUNs assigned to a node in an HA pair must be visible to—but notassigned to or owned by—the other node in the HA pair.
• By deploying two switches, if one switch fails, the other switch provides the alternate pathto the storage array.
• Both switches must be zoned correctly so that each storage system in the HA pair can seethe array LUNs owned by its partner.
Related concepts
Data ONTAP systems that can use array LUNs on storage arrays on page 75
62 | Storage Management Guide

Managing ownership for disks and array LUNs
Disk ownership determines which node owns a disk and what pool a disk is associated with. DataONTAP stores ownership information directly on the disk.
Guidelines for assigning ownership for disksWhen you assign ownership for disks, you need to follow certain guidelines to keep automaticownership assignment working and to maximize fault isolation.
Use these guidelines for configuring automatic disk ownership at the stack or loop level:
• Always assign all disks on the same loop or stack to the same system and pool.
• Always assign all loops or stacks connected to the same adapter to the same pool.
• For HA configurations using SyncMirror, pool0 is typically assigned to the local pool and pool1is assigned to the remote pool.
• Always assign disks in the same multi-disk carrier to the same system.
Note: On storage system models that support only one loop or stack, you can configure yoursystem to have both pools on a single loop or stack. Automatic assignment at the stack or looplevel does not work, but automatic assignment at the shelf level works for this configuration.
Use these guidelines for configuring automatic disk ownership at the shelf level:
• Always assign all disks on the same shelf to the same system and pool.
• On storage systems that contain two controllers but only a single stack, if the stack contains morethan one shelf, you can use shelf-level assignment.
For more information about configuring SyncMirror with disks or array LUNs, see the Data ONTAPData Protection Online Backup and Recovery Guide for 7-Mode.
For the guidelines for assigning disk ownership in a MetroCluster configuration, see the DataONTAP High Availability and MetroCluster Configuration Guide for 7-Mode.
63

Assigning ownership for unowned disks and array LUNsDisks and array LUNs must be owned by a storage system before they can be used in an aggregate. Ifyour system is not configured to assign ownership automatically, or if your system contains arrayLUNs, you must assign ownership manually.
About this task
This procedure assigns ownership of disks and array LUNs that are currently unowned. If you wantto change the ownership of disks or array LUNs that are already owned by a system, you must usethe procedure “Modifying assignment of spare disks or array LUNs”.
Steps
1. Use the disk show -n command to view all disks and array LUNs that do not have assignedowners.
Note: You must make array LUNs available to Data ONTAP before they can be assigned to asystem.
2. Assign the disks and array LUNs that are labeled Not Owned to a storage system:
disk assign {disk_list | all | [-T storage_type] -n count|auto} [-cblock | zoned] [-o owner_name] [-s sysid] [-f] [-p pool]
You can specify the disks and array LUNs to be assigned in the following ways:
• disk_list specifies one or more individual disk or array LUN names.This is the most explicit way to specify disks and array LUNs. However, you have tomanually enter each disk name.
• You can use disk_list with the wildcard character (*) to specify a group of disks or arrayLUN names.
• all specifies all unowned disks and array LUNs.
• -n count specifies a number of unassigned disks and array LUNs to be assigned
• auto causes Data ONTAP to initiate automatic disk ownership assignment.
Note: Only disks installed in loops, stacks, or shelves that conform to the automaticownership assignment guidelines are affected. Automatic ownership assignment does notoperate on array LUNs.
You use the following options to fine-tune automatic ownership assignment for disks:
◦ To configure automatic ownership assignment to a stack, set the disk.auto_assignoption to on.
64 | Storage Management Guide

◦ To configure automatic ownership assignment to a shelf, the disk.auto_assign anddisk.auto_assign_shelf options to set on.
• You can use the -shelf option to manually assign unowned disks to the specified shelf.
You use the following options to further qualify which disks and array LUNs Data ONTAPassigns:
• -T specifies the Data ONTAP disk type of the storage to be assigned.
Note: If you have different disk types or disks and array LUNs on your system, always usethe -T option to ensure that Data ONTAP uses the disks or array LUNs that you expect.Without this option, Data ONTAP uses the type of disk or array LUN with the most spares.
This option cannot be used with a list of disk or array LUN names. You must use the -noption with the -T option.
• -c specifies the checksum type for the disk or array LUNs to be assigned.For array LUNs, the checksum type can be block or zoned. The default checksum type isblock. For more information about checksums for array LUNs, see the FlexArrayVirtualization Installation Requirements and Reference Guide.For disks, the checksum type can be block or zoned (AZCS). Only the default checksumtype is supported for disks.
You use the following options to specify the system to own the disks and array LUNs you areassigning:
Note: If you do not specify a system to own the disks and array LUNs, they are assigned to thelocal system.
• -o owner_name specifies the name of the system to which you want to assign the disks andarray LUNs.
• -s sysid specifies the ID of the system that the disks and array LUNs are assigned to.This is an alternative to specifying the system name by using the -o option.
• -f is used for changing ownership for a disk or array LUN that is already owned by a system.For array LUNs, -f is also used to enable assignment of an array LUN to a system when thereis a redundancy error.
-p specifies which SyncMirror pool the disks and array LUNs are assigned to. Its value is either 0or 1. If you do not specify a pool, the disks and array LUNs are assigned to pool0. You need tospecify the pool only if SyncMirror is in use on your system.
3. Use the disk show -v command to verify the assignments that you just made.
Managing ownership for disks and array LUNs | 65

After you finish
If you assigned ownership for array LUNs, you should verify that two paths exist for each array LUNand verify path failover to ensure that you have path redundancy.
Related concepts
How ownership for disks and array LUNs works on page 56
How disks and array LUNs become available for use on page 58
How Data ONTAP reports disk types on page 18
How you use the wildcard character with the disk ownership commands on page 73
Verifying the existence of two paths to an array LUN on page 70
Removing ownership from a diskData ONTAP writes disk ownership information to the disk. Before a spare disk or its shelf isremoved from a storage system, you should remove its ownership information so that it can beproperly integrated into another system.
Before you begin
The disk you want to remove ownership from must meet the following requirements:
• It must be a spare disk.You cannot remove ownership from a disk that is being used in an aggregate.
• It cannot be in the maintenance center.
• It cannot be undergoing sanitization.
• It cannot be failed.It is not necessary to remove ownership from a failed disk.
About this task
If you have automatic disk assignment turned on, the system could automatically reassign ownershipbefore you remove the disk. For this reason, you turn off automatic ownership assignment until thedisk is removed, and then turn it back on.
Steps
1. If disk ownership automatic assignment is on, turn it off:
options disk.auto_assign off
2. Repeat the previous step on the node's HA partner if it has one.
3. Enter the advanced privilege level:
66 | Storage Management Guide

priv set advanced
4. Remove the software ownership information from the disk:
disk remove_ownership disk_name
To remove ownership information from multiple disks, use a space-separated list.
Example
disk remove_ownership 0a.29 0a.28 0a.27
5. Return to admin privilege level:
priv set
6. If you turned off disk ownership automatic assignment previously, turn it on after the disk hasbeen removed or reassigned:
options disk.auto_assign on
7. Repeat the previous step on the node's HA partner if it has one.
Configuring automatic ownership assignment of disksIf you have unowned disks on a stack, loop, or shelf, you can configure Data ONTAP toautomatically assign disk ownership at the stack or shelf level.
Before you begin
• Your system must adhere to the requirements for automatic disk ownership.
• If you have multiple stacks or shelves that must have different ownership, one disk must havebeen manually assigned on each stack or shelf so that automatic ownership assignment will workon each stack or shelf.
About this task
For most system configurations, you can use automatic assignment at the stack or loop level; forsmaller configurations, you can use automatic assignment at shelf level.
You can use automatic assignment at the shelf level for the following system configurations:
• Your storage system supports only one stack or loop.
• Your storage system contains two controllers but only a single stack with more than one shelf.
• Your MetroCluster configuration consists of one stack or loop for each node and two shelves.With shelf level automatic assignment, you can have one shelf for one pool and one shelf for theother pool.
Managing ownership for disks and array LUNs | 67

• You have any other configuration for which you cannot assign an entire stack or loop to a singlesystem or pool.
If the disks on a single shelf have ownership split between two systems, you need to manually assignthose disks; you cannot use automatic disk assignment for the disks on that shelf.
Steps
1. The action you take depends on whether you want to set up automatic ownership assignment atthe stack, loop, or shelf level:
If you want to... Then...
Configure automaticownership assignment at thestack or loop level
Set options disk.auto_assign to on.
Configure automaticownership assignment at theshelf level
Set options disk.auto_assign to on and optionsdisk.auto_assign_shelf to on.
Turn off automatic ownershipassignment
Set options disk.auto_assign to off and optionsdisk.auto_assign_shelf to off.
Example
For example, you have a shelf whose disks are owned by one system and another shelf on thesame loop whose disks are owned by a different system. In this case, you would configureautomatic ownership assignment at the shelf level.
options disk.auto_assign onoptions disk.auto_assign_shelf on
Data ONTAP automatically assigns unowned disks on the stack, loop, or shelf, depending on thecommand you entered.
2. Verify the automatic assignment settings for the disks:
disk show -o owner_name -v
Modifying assignment of spare disks or array LUNsYou can change the ownership of a spare disk or array LUN to another storage system.
Before you begin
A disk or array LUN that is a spare has been assigned to a specific system, but it has not yet beenadded to an aggregate. If the disk or array LUN whose ownership you want to change is in anaggregate, you must do the following before you can change ownership of the disk or array LUN:
68 | Storage Management Guide

• For an array LUN that is part of an aggregate, you must first remove the LUN from the aggregate,which changes the state of the array LUN to spare.To remove an array LUN from an aggregate, you must destroy the aggregate.
• For a disk that is part of an aggregate, you must first perform a disk replace and make the disk aspare.
About this task
You can change ownership of disks only between nodes in an HA pair. You can change ownership ofarray LUNs among the systems in a neighborhood for array LUNs.
Steps
1. At the console of the storage system that owns the disk or array LUN that you want to reassign,view the list of spare disks or spare array LUNs on the system:
aggr status -s
2. On the system that owns the spare disk or array LUN you want to reassign, enter either of thefollowing commands to reassign ownership of the disk or array LUN:
disk assign LUN-or-disk-name -o new_owner_name -f
disk assign LUN-or-disk-name -s sysID-of-receiving_system -f
-o is the name of the system that you want to be the new owner of the disk or array LUN.
-s is the ID of the system that you want to be the new owner of the disk or array LUN. You canobtain the system ID of the destination system by running sysconfig on the destination system.
-f is required to force the change.
3. Verify that the ownership of the spare disk or array LUN moved to the other system:
aggr status -s
The spare disk or array LUN that you moved should no longer appear in the list of spares.
4. On the destination system, verify that the spare disk or spare array LUN whose ownership youchanged is listed as a spare owned by the destination system:
aggr status -s
After you finish
If you changed ownership for array LUNs, you should verify that two paths exist for each array LUNand verify path failover to ensure that you have path redundancy. You must add the disk or arrayLUN to an aggregate before you can use it for storage.
Related concepts
How ownership for disks and array LUNs works on page 56
Managing ownership for disks and array LUNs | 69

Verifying the existence of two paths to an array LUN on page 70
Verifying the existence of two paths to an array LUNIf the primary path to any array LUN fails, Data ONTAP automatically maps each port of the DataONTAP system to a secondary path. You must ensure that there are two paths to each array LUN sothat the Data ONTAP system can continue to work when running on a single path.
Verifying the existence of two paths: storage show disk command
You should verify that your Data ONTAP system is configured with two paths to an array LUN sothat there is a secondary path in case the primary path fails or is taken offline.
Steps
1. Enter the following command to show the primary and secondary paths to array LUNs:
storage show disk -p all
The system displays information similar to the following:
PRIMARY PORT SECONDARY PORT SHELF BAY ADAPTER-------------------- ---- ------------------------- ---- ---vnmc4500s32:4.127L1 - vnmc4500s33:19.127L1 - - - 0avnmc4500s32:4.127L12 - vnmc4500s33:19.127L12 - - - 0avnmc4500s33:19.127L2 - vnmc4500s32:4.127L2 - - - 0cvnmc4500s33:19.127L13 - vnmc4500s32:4.127L13 - - - 0c
Note: When you use the all variable, adapters are displayed, but unassigned LUNs are notvisible.
2. Determine whether a primary path and a secondary path to the array LUNs are shown.
If you do not see a primary and secondary path, check the zoning, host group configuration, andcabling.
Note: Do not continue with testing until you see two paths.
For information about troubleshooting pathing, see the FlexArray Virtualization InstallationRequirements and Reference Guide
3. Look at the adapters shown to see whether all paths are on a single adapter.
If you see both paths through one port (for example, both paths through the 0c port), this is anindication that the back-end zoning is redundantly crossed. This is not a supported configuration.
70 | Storage Management Guide

Note: Data ONTAP changes the path to array LUNs, as necessary, for load balancing.Therefore, the primary and secondary paths for a given array LUN can change when thestorage show disk command is issued at different times.
Verifying the existence of two paths: storage array show-config command
You should verify that your Data ONTAP system is configured with two paths to an array LUN sothat there is a secondary path in case the primary path fails or is taken offline.
Step
1. Enter the following command to show the primary and secondary paths to array LUNs:
storage array show-config
You see information similar to the following:
LUN Group Array Name Array Target Ports Switch Port InitiatorGroup 0 (4 LUNS) HP_V210 50:00:1f:e1:50:0a:86:6d vnmc4300s35:11 0b 50:00:1f:e1:50:0a:86:68 vnbr4100s31:1 0a 50:00:1f:e1:50:0a:86:6c vnmc4300s35:6 0dGroup 1(50 LUNS) HP_V200 50:00:1f:e1:50:0d:14:6d vnbr4100s31:5 0a 50:00:1f:e1:50:0d:14:68 vnmc4300s35:3 0d
This example shows output from a Data ONTAP system that is connected to two storage arrays.Each LUN group consists of LUNs that share the same two paths. Group 0 contains a total of 4LUNs on the HP_V210 array and Group 1 contains 50 LUNs on the HP_V200 array.
Array LUNs that are not configured with two paths are shown as one or more LUNs with a singlepath, similar to the following example.
LUN Group Array Name Array Target Ports Switch Port Initiator (4 LUNS) HP_V210 50:00:1f:e1:50:0a:86:6d vnmc4300s35:11 0b
Verifying path failover for array LUNsYou want to demonstrate that the Data ONTAP system continues to work when running with a singlepath, for example, when a switch or storage array port is taken offline. You can test path failover byphysically removing fibre cables or taking ports offline using Data ONTAP commands.
The procedure you use to test path failover differs slightly, depending on whether you are testing astand-alone system or an HA pair.
Managing ownership for disks and array LUNs | 71

Verifying path failover for array LUNs in a stand-alone system
It is important to demonstrate that a stand-alone Data ONTAP system continues to operate on asingle path.
Steps
1. Set your privilege level to advanced:
priv set advanced
2. Set port 0a offline by using the following command:
fcadmin offline 0a
3. Show the number of disks seen on each adapter using the following command:
sysconfig
No disks will be assigned to adapter 0a.
4. Show the primary and secondary paths by using the following command:
storage show disk -p
5. Return port 0a to online:
fcadmin online 0a
Verifying path failover for array LUNs in an HA pair
It is important to demonstrate that controller failover and then path failover occur in an HA pair sothat the system can to continue to operate on a single path.
Steps
1. Set your privilege level to advanced:
priv set advanced
You need to enter this command on the local and partner node.
2. On the local node, enter the following command to set port 0a offline (assuming that theredundant port pair is 0a and 0c):
fcadmin offline 0a
3. Verify that only one path is available on the port pair:
storage show disk -p
4. Enter the following command to initiate HA pair takeover:
cf takeover
72 | Storage Management Guide

5. On the partner node, enter the following command:
cf giveback
6. After the partner node is back online, repeat Steps 1, 2, and 3 on the partner node.
Guidelines for assigning disks or array LUNs to SyncMirrorpools
Assigned disks and array LUNs are associated with a pool, either pool0 or pool1. Keeping all diskson a loop or stack in the same pool ensures redundancy and supports automatic disk assignment.
Typically, pool0 is assigned to the local pool and pool1 is assigned to the remote pool.
On storage system models that only support one loop or stack, you can configure your system to haveboth pools on a single loop or stack. Automatic assignment at the stack or loop level does not work,but automatic assignment at the shelf level works for this configuration.
For more information about configuring SyncMirror with disks or array LUNs, see the Data ONTAPData Protection Tape Backup and Recovery Guide for 7-Mode.
How you use the wildcard character with the disk ownershipcommands
You can use the wildcard character (*) with some commands, including commands to manage diskownership. However, you should understand how Data ONTAP expands the wildcard character.
You can use the wildcard character with the following disk ownership commands:
• disk show
• disk assign
• disk remove_ownership
When you use the wildcard character with these commands, Data ONTAP expands it with zero ormore characters to create a list of disk names that will be operated on by the command. This can bevery useful when you want to assign all of the disks attached to a particular port or switch, forexample.
Note: Be careful when you use the wildcard character. It is accepted anywhere in the disk namestring, and is a simple string substitution. Therefore, you might get unexpected results.
For example, to assign all disks on port 1 of the switch brocade23 to node03, you would use thefollowing command:
disk assign brocade23:1.* -o node03
Managing ownership for disks and array LUNs | 73

However, if you left off the second “.” as in the following command, you would assign all disksattached to ports 1, 10, 11, 12, and so on:
disk assign brocade23:1* -p 0
Assigning multiple disks attached to an HBA
To assign all of the disks attached to the B port of the HBA in expansion slot 5 to pool0, youwould use the following command:
disk assign 5b.* -p 0
74 | Storage Management Guide
Managing array LUNs using Data ONTAP
For Data ONTAP to be able to use storage on a storage array, some tasks must be done on the storagearray and some tasks must be done in Data ONTAP.
For example, the storage array administrator must create array LUNs for Data ONTAP use and mapthem to Data ONTAP. You can then assign them to systems running Data ONTAP.
If the storage array administrator wants to make configuration changes to an array LUN after it isassigned to a system, for example to resize it, you might need to perform some activities in DataONTAP before it is possible to reconfigure the LUN on the storage array.
Data ONTAP systems that can use array LUNs on storagearrays
V-Series (“V”) systems and new FAS platforms released in Data ONTAP 8.2.1 and later can usearray LUNs if the proper license is installed. In discussions in the Data ONTAP and FlexArrayVirtualization documentation, these systems are collectively referred to as Data ONTAP systemswhen it is necessary to make it clear which information applies to them and what information appliesto storage arrays.
Note: Starting with Data ONTAP 8.2.1, the capability of using LUNs on a storage array, formerlyidentified as V-Series functionality, has a new name—Data ONTAP FlexArray VirtualizationSoftware. The capability of using array LUNs continues to be available as a licensed feature inData ONTAP.
Systems prior to Data ONTAP 8.2.1 that can use array LUNs
The only systems released prior to Data ONTAP 8.2.1 that can use array LUNs are V-Series systems—systems with a “V” or “GF” prefix. A V-Series system is an open storage controller that virtualizesstorage from storage array vendors, native disks, or both into a single heterogeneous storage pool.
Note: Almost all Data ONTAP platforms released prior to Data ONTAP 8.2.1 were released withFAS and V-Series equivalent models (for example, a FAS6280 and a V6280 ). (For a few systems,there were no “V” equivalent models.) Although both types of models could access native disks,only the V-Series systems (a “V” or “GF” prefix) could attach to storage arrays.
Systems in Data ONTAP 8.2.1 and later that can use array LUNs
Starting with Data ONTAP 8.2.1, the model for how platforms are released and the storage they canuse changes. Attaching to storage arrays is no longer limited to V-Series systems.
Starting with Data ONTAP 8.2.1, all new platforms are released as a single hardware model. Thissingle hardware model has a FAS prefix; there are no longer separate “V” and FAS models for new
75

platforms. If the V_StorageAttach license package is installed on a new FAS model, it can attach tostorage arrays. (This is the same license required on a V-Series system.)
Important: FAS systems released prior to Data ONTAP 8.2.1 cannot use LUNs on storage arrays,even if they are upgraded to Data ONTAP 8.2.1 or later; only the “V” equivalent of a platform canuse array LUNs.
Array LUN name formatThe array LUN name is a path-based name that includes the devices in the path between the DataONTAP system and the storage array, ports used, and the SCSI LUN ID on the path that the storagearray presents externally for mapping to hosts.
On a Data ONTAP system operating in 7-Mode, there are two names for each array LUN becausethere are two paths to each LUN, for example, brocade3:6.126L1 and brocade15:6.126L1.
Array LUN format for systems operating in 7-Mode and releases prior to 8.0
Configuration Array LUN name format Component descriptions
Direct-attached adapter.idlun-id adapter is the adapternumber on the Data ONTAPsystem.
id is the channel adapter porton the storage array.
lun-id is the array LUNnumber that the storage arraypresents to hosts.
Example:
0a.0L1
76 | Storage Management Guide

Configuration Array LUN name format Component descriptions
Fabric-attached switch-name:port.idlun-
id
switch-name is the name ofthe switch.
port is the switch port that isconnected to the target port(the end point).
id is the device ID.
lun-id is the array LUNnumber that the storage arraypresents to hosts.
Example:
brocade3:6.126L1
brocade3:6.126 is the pathcomponent and L1 is the SCSILUN ID.
Guidelines for adding storage to a storage system that usesarray LUNs
Starting with Data ONTAP 8.2.1, memory is allocated dynamically for storage devices as youpresent them to a storage system that uses array LUNs. Depending on the memory configuration ofthe particular storage system, you should set the bootarg.disk.init.dynamic.allocationvariable to true or false at boot time.
If you set the bootarg.disk.init.dynamic.allocation variable to true (for examplesetenv bootarg.disk.init.dynamic.allocation? true) at boot time, memory is allocatedonly for the number of storage devices visible to the system at that time. Memory is allocateddynamically if and when you present more storage devices to the system at run time.
If you set the bootarg.disk.init.dynamic.allocation variable to false (for examplesetenv bootarg.disk.init.dynamic.allocation? false) at boot time, memory isallocated for the maximum number of storage devices allowed for that platform.
By default, the bootarg.disk.init.dynamic.allocation variable is set to true.
Managing array LUNs using Data ONTAP | 77

Checking the checksum type of spare array LUNsIf you plan to add a spare array LUN to an aggregate by specifying its name, you need to make surethat the checksum type of the array LUN you want to add is the same as the aggregate checksumtype.
About this task
You cannot mix array LUNs of different checksum types in an array LUN aggregate. The checksumtype of the aggregate and the checksum type of the array LUNs added to it must be the same.
If you specify a number of spare array LUNs to be added to an aggregate, by default Data ONTAPselects array LUNs of the same checksum type as the aggregate.
Note: Data ONTAP 8.1.1 and later supports a new checksum scheme called advanced zonedchecksum (AZCS). Existing zoned checksum aggregates are still supported. The checksum type ofall newly created aggregates using zoned checksum array LUNS is AZCS, which provides morefunctionality than the “version 1” zoned checksum type that was supported in previous releasesand continues to be supported for existing zoned aggregates. Zoned checksum spare array LUNsadded to an existing zoned checksum aggregate continue to be zoned checksum array LUNs.Zoned checksum spare array LUNs added to an AZCS checksum type aggregate use the AZCSchecksum scheme for managing checksums.
Step
1. Check the checksum type of the spare array LUNs by entering the following command:
For... The command is...
7-Mode aggr status -s
The output shows information about the spare disks or array LUNs on thesystem, including the checksum type of each. You can add a blockchecksum array LUN to a block checksum aggregate and a zoned arrayLUN to either a zoned aggregate or an AZCS checksum aggregate.
Changing the checksum type of an array LUNYou must change the checksum type of an array LUN if you want to add it to an aggregate that has adifferent checksum type than the checksum type of the LUN.
Before you begin
You should have reviewed the tradeoffs between performance in certain types of workloads andstorage capacity utilization of each checksum type. The FlexArray Virtualization Installation
78 | Storage Management Guide

Requirements and Reference Guide contains information about checksum use for array LUNs. Youcan also contact your Sales Engineer for details about using checksums.
About this task
You must assign a zoned checksum type to an array LUN that you plan to add to a zoned checksumaggregate or an advanced zoned checksum (AZCS) aggregate. When a zoned checksum array LUN isadded to an AZCS aggregate, it becomes an advanced zoned checksum array LUN. Similarly, when azoned checksum array LUN is added to a zoned aggregate, it is a zoned checksum type.
Step
1. Enter the following command:
disk assign LUN-name -c new_checksum_type
LUN-name is the name of the array LUN whose checksum type you want to change.
new_checksum_type can be block or zoned.
The checksum type of the array LUN is changed to the new checksum type you specified.
Prerequisites to reconfiguring an array LUN on the storagearray
If an array LUN has already been assigned (through Data ONTAP) to a particular Data ONTAPsystem, the information that Data ONTAP wrote to the array LUN must be removed before thestorage administrator attempts to reconfigure the array LUN on the storage array.
When the storage array presents an array LUN to Data ONTAP, Data ONTAP collects informationabout the array LUN (for example, its size) and writes that information to the array LUN. DataONTAP cannot dynamically update information that it wrote to an array LUN. Therefore, before thestorage array administrator reconfigures an array LUN, you must use Data ONTAP to change thestate of the array LUN to unused. The array LUN is unused from the perspective of Data ONTAP.
While changing the state of the array LUN to unused, Data ONTAP does the following:
• Terminates I/O operations to the array LUN
• Removes the label for RAID configuration information and the persistent reservations from thearray LUN, which makes the array LUN unowned by any Data ONTAP system
After this process finishes, no Data ONTAP information remains in the array LUN.
You can do the following after the array LUN's state is changed to unused:
• Remove the mapping of the array LUN to Data ONTAP and make the array LUN available toother hosts.
Managing array LUNs using Data ONTAP | 79

• Resize the array LUN or change its composition.
If you want Data ONTAP to resume using the array LUN after its size or composition is changed,you must present the array LUN to Data ONTAP again, and assign the array LUN to a Data ONTAPsystem again. Data ONTAP is aware of the new array LUN size or composition.
Changing array LUN size or compositionReconfiguring the size or composition of an array LUN must be done on the storage array. If an arrayLUN has already been assigned to a Data ONTAP system, you must use Data ONTAP to change thestate of the array LUN to unused before the storage array administrator can reconfigure it.
Before you begin
The array LUN must be a spare array LUN before you can change its state to unused.
Steps
1. On the Data ONTAP system, enter the following command to remove ownership information:
disk remove -w LUNfullname
2. On the storage array, complete the following steps:
a. Unmap (unpresent) the array LUN from the Data ONTAP systems so that they can no longersee the array LUN.
b. Change the size or composition of the array LUN.
c. If you want Data ONTAP to use the array LUN again, present the array LUN to the DataONTAP systems again.
At this point, the array LUN is visible to the FC initiator ports to which the array LUN waspresented, but it cannot be used by any Data ONTAP systems yet.
3. Enter the following command on the Data ONTAP system that you want to be the owner of thearray LUN:
disk assign {disk_list | all | [-T storage_type] -n count|auto} [-cblock | zoned] [-o owner_name] [-s sysid] [-f] [-p pool]
After the ownership information is removed, the array LUN cannot be used by any Data ONTAPsystem until the array LUN is assigned again to a system. You can leave the array LUN as a spareor add it to an aggregate. You must add the array LUN to an aggregate before the array LUN canbe used for storage.
80 | Storage Management Guide

Removing one array LUN from use by Data ONTAPIf the storage array administrator no longer wants to use a particular array LUN for Data ONTAP,you must remove the information that Data ONTAP wrote to the LUN (for example, size andownership) before the administrator can reconfigure the LUN for use by another host.
Before you begin
If the LUN that the storage array administrator no longer wants Data ONTAP to use is in anaggregate, you must take the aggregate offline and destroy the aggregate before starting thisprocedure. Taking an aggregate offline and destroying it changes the data LUN to a spare LUN.
Step
1. Enter the following command:
disk remove -w LUNfullname
LUNfullname is the full name of the array LUN.
Preparing array LUNs before removing a Data ONTAPsystem from service
You must release the persistent reservations on all array LUNs assigned to a Data ONTAP systembefore removing the system from service.
About this task
When you assign Data ONTAP ownership of an array LUN, Data ONTAP places persistentreservations (ownership locks) on that array LUN to identify which Data ONTAP system owns theLUN. If you want the array LUNs to be available for use by other types of hosts, you must removethe persistent reservations that Data ONTAP put on those array LUNs; some arrays do not allow youto destroy a reserved LUN if you do not remove the ownership and persistent reservations that DataONTAP wrote to that LUN.
For example, the Hitachi USP storage array does not have a user command for removing persistentreservations from LUNs. If you do not remove persistent reservations through Data ONTAP beforeremoving the Data ONTAP system from service, you must call Hitachi technical support to removethe reservations.
Contact technical support for instructions about how to remove persistent reservations from LUNsbefore removing a Data ONTAP system from service.
Managing array LUNs using Data ONTAP | 81

Commands to display information about yourstorage
Data ONTAP provides commands to display information about disks, array LUNs, disk space, andstorage subsystems.
Commands to display drive and array LUN informationYou can see information about your drives and array LUNs using several commands, including theaggr, disk, fcstat, sasadmin, storage, sysconfig, and sysstat commands.
Use this Data ONTAPcommand...
To display information about...
aggr status -f Drives or array LUNs in your storage system that have failed,or that have been preemptively failed by Data ONTAP.
aggr status -m Drives in your storage system that are currently in themaintenance center, that have been or are being sanitized, andthat are being checked by Data ONTAP due to poor responsetime.
aggr status -r RAID layout and status for all aggregates; how each drive isused in its aggregate.
aggr status -s Hot spares available in your storage system.
disk encrypt show Disks that have Storage Encryption enabled.
disk maint status The status of drive maintenance tests that are in progress.
disk sanitize status The status of the sanitization process, after the disksanitize start command has been executed.
disk show List of drives and array LUNs owned by a storage system, orunowned drives and array LUNs.
disk show -v All of the information provided by the disk show command,plus the checksum of each drive.
fcstat device_map A physical representation of where FC-AL attached drivesreside in a loop and a mapping of the disks to the disk shelves.
fcstat fcal_stats Error and exception conditions, and handler code pathsexecuted.
fcstat link_stats Link event counts.
82 | Storage Management Guide

Use this Data ONTAPcommand...
To display information about...
sasadmin devstats Statistics for SAS-connected drives: command completioncounts, frame in and out counts, error and timeout counts.
sasadmin shelf[short] Logical view of SAS shelf (long and short view).
storage array show-
config
The connectivity between the storage system and individualarray LUN groups on a storage array by showing specificstorage system FC initiator ports, switch ports, and storagearray ports on the path to each array LUN group.
storage array show-luns The array LUNs that the storage array presented to DataONTAP over the storage array World Wide Port Names(WWPNs) you specify.
storage show acp The Alternate Control Path (ACP) module. Specifies whetherthe mode is enabled and displays connectivity andconfiguration information.
storage show disk -a Detailed information about drives, including SSD life-cyclereporting, presented in a report form that is easily interpretedby scripts. This content also appears in the STORAGE sectionof an AutoSupport report.
storage show disk -p Primary and secondary paths to all disks and array LUNs.
storage show disk -T -x The Data ONTAP drive type and the drive and array LUNinformation.
storage show disk -x The drive ID, shelf, bay, serial number, vendor, model, andrevision level of all drives and array LUNs.
sysconfig -d The drive name in the Device column, followed by theexpansion slot number, shelf, bay, channel, and serial number.
sysconfig -h Each drive, along with the size displayed in appropriate units(KB, GB, or TB) as calculated using the powers of two (GB =1024 × 1024 × 1024).
sysstat The number of kilobytes per second (kB/s) of data being readand written.
Commands to display information about your storage | 83

Commands to display space informationSeeing information about how space is being used in your aggregates and volumes and theirSnapshot copies enables you to manage your storage more effectively.
Use this Data ONTAPcommand...
To display information about...
aggr status -S Disk space usage for aggregates
vol status -F Disk space usage by volumes within an aggregate
vol status -S Disk space usage for volumes
df Disk space usage for volumes or aggregates
snap delta The estimated rate of change of data between Snapshot copiesin a volume
snap reclaimable The estimated amount of space freed if you delete the specifiedSnapshot copies
For more information about the snap commands, see the Data ONTAP Data Protection OnlineBackup and Recovery Guide for 7-Mode. For more information about the df and aggr status -Scommands, see the appropriate man page.
Commands to display storage subsystem informationYou can use the acpadmin, environment, fcadmin, sasadmin, storage show, and sysconfigcommands to display information about your storage subsystems.
Note: For detailed information about these commands and their options, see the appropriate manpages.
Use this Data ONTAP command... To display information about...
acpadmin list_all Alternative Control Path (ACP) processors(SAS shelves only).
environment shelf Environmental information for each hostadapter, including SES configuration and SESpath.
84 | Storage Management Guide

Use this Data ONTAP command... To display information about...
environment shelf_log Shelf-specific module log file information, forshelves that support this feature. Loginformation is sent to the /etc/log/shelflog directory and included as anattachment on AutoSupport reports.
fcadmin channels WWPN information.
fcadmin device_map What disks are on each loop and shelf.
fcadmin link_state How the ports are connected.
sasadmin expander What disks are attached to expander PHYs.
sasadmin expander_phy_state Expander PHY state, dongle state and eventcounters, PHY statistics.
sasadmin shelf [short] The disks on each shelf (or a specific diskshelf), including a pictorial representation ofdisk placement (long or short view).
storage show All disks and host adapters on the system.
storage show acp Connectivity and status information for theAlternate Control Path (ACP) module (SASshelves only).
storage show adapter FC host adapter attributes, including (asappropriate for the adapter type) a description,firmware revision level, Peripheral ComponentInterconnect (PCI) bus width, PCI clock speed,FC node name, cacheline size, FC packet size,link data rate, static random access memory(SRAM) parity, state, in use, redundant.
storage show bridge [-v] Information about the bridges connected to thiscontroller. The -v option includes informationabout the bridge SAS ports.
storage show disk -p How many paths are available to each disk.
Commands to display information about your storage | 85

Use this Data ONTAP command... To display information about...
storage show expander SAS expander attributes, including shelf name,channel, module, shelf ID, shelf UID, IOMstate, and the following information for thedisks attached to the expander: disk ID, portstate, partial path timeout, link rate, invalidword count, running disparity count, PHY resetproblem, CRC error count, and PHY changecount.
storage show hub Hub attributes: hub name, channel, loop, shelfID, shelf user ID (UID), term switch, shelf state,ESH state, and hub activity for each disk ID:loop up count, invalid cyclic redundancy check(CRC) count, invalid word count, clock delta,insert count, stall count, utilization percentage.
storage show mc All media changer devices that are installed inthe system.
storage show port Switch ports connected to the system.
storage show shelf Shelf module statistics for shelves with SAS,ESH, ESH2, or ESH4 modules.
storage show switch Switches connected to the system.
storage show tape All tape drive devices attached to the system.
storage show tape supported [-v] All tape drives supported. With -v, informationabout density and compression settings is alsodisplayed.
storage stats tape Statistics for all tape drives attached to thesystem.
sysconfig -A All sysconfig reports, including configurationerrors, disks, array LUNs, media changers,RAID details, tape devices, and aggregates.
sysconfig -m Tape libraries.
sysconfig -t Tape drives.
86 | Storage Management Guide

Enabling or disabling a host adapter
A host adapter can be enabled or disabled by using the storage command. You disable an adapterto replace hardware components or modules.
About this task
You might want to disable an adapter for the following reasons:
• You are replacing any of the hardware components connected to the adapter.
• You are replacing a malfunctioning I/O module.
You can disable an adapter only if all disks connected to it can be reached through another adapter.After an adapter connected to dual-connected disks has been disabled, the other adapter is notconsidered redundant; thus, the other adapter cannot be disabled.
Steps
1. Identify the name of the adapter whose state you want to change:
storage show adapter
The field that is labeled Slot lists the adapter name.
2. Enter the applicable command:
If you want to... Then use this command
Enable the adapter storage enable adapter adapter_name
Disable the adapter storage disable adapter adapter_name
87

Introduction to Storage Encryption
Overview of Storage Encryption concepts, functionality, benefits, and limitations.
What Storage Encryption isStorage Encryption is an optional feature that you can enable for additional data protection. It isavailable on certain supported storage controllers and disk shelves that contain disks with built-inencryption functionality.
In a standard storage environment, data is written to disk in cleartext format. This makes the datavulnerable to potential exposure to unauthorized users when disks removed from a storage system arelost or stolen.
When you enable Storage Encryption, the storage system protects your data at rest by storing it onself-encrypting disks.
The authentication keys used by the self-encrypting disks are stored securely on external keymanagement servers.
Purpose of the external key management server
An external key management server is a third-party system in your storage environment that securelymanages authentication keys used by the self-encrypting disks in the storage system. You link theexternal key management server to other systems that use authentication or encryption keys such asyour storage system.
The storage system uses a secure SSL connection to connect to the external key management serverto store and retrieve authentication keys. The communication between the storage system and keymanagement server uses the Key Management Interoperability Protocol (KMIP).
The external key management server securely stores authentication or encryption keys entrusted to itand provides them upon demand to authorized linked systems. This provides an additional level ofsecurity by storing authentication keys separate from the storage system. Additionally, authenticationkeys are always handled and stored securely. The keys are never displayed in cleartext.
You must link at least one key management server to the storage system during the StorageEncryption setup and configuration process. You should link multiple key management servers forredundancy. If the only key management server in the environment becomes unavailable, access toprotected data might become unavailable until the key management server is available again. Forexample, when the storage system needs to unlock self-encrypting disks but cannot retrieve theauthentication key from the key management server because it is unavailable.
You can specify up to four key servers during or after setup for redundancy.
For a list of supported key management servers, see the Interoperability Matrix.
88 | Storage Management Guide

How Storage Encryption worksStorage Encryption occurs at the firmware level of disks that are equipped with special firmware andhardware to provide the additional security, also known as self-encrypting disks (SEDs). SEDs canoperate either in unprotected mode like regular disks, or in protected mode requiring authenticationafter the power-on process.
SEDs always encrypt data for storage. In unprotected mode, the encryption key needed to decryptand access the data is freely available. In protected mode, the encryption key is protected andrequires authentication to be used.
When you first enable and configure Storage Encryption on a storage system using SEDs, you createan authentication key that the storage system uses to authenticate itself to the SEDs. You configurethe storage system with the IP address to one or more external key management servers that securelystores the authentication key.
The storage system communicates with the key management servers at boot time to retrieve theauthentication keys. Data ONTAP requires the authentication keys to authenticate itself to the SEDsany time after the SEDs are power-cycled.
If the authentication is successful, the SEDs are unlocked. The SEDs use the authentication key todecrypt the data encryption keys stored inside the disk. When presented with a read request, SEDsautomatically decrypt the stored data before passing it on to the storage system. When presented witha write request from the storage system, SEDs automatically encrypt the data before writing the datato the disk's storage platters. When the SEDs are locked, Data ONTAP must successfullyauthenticate itself to the disk before the SEDs allow data to be read or written. When locked, SEDsrequire authentication each time the disk is powered on.
Encryption and decryption happens without a perceptible disk performance decrease or boot timeincrease. Storage Encryption does not require a separate license key. The only additional requiredcomponent is an external key management server.
When you halt and power down the storage system, including the disk shelves containing SEDs, thedisks are locked again and the data becomes inaccessible.
Disk operations with SEDsMost of the disk-related operations are identical for SEDs and regular disks.
Because storage encryption happens at a very low level, specifically the disk firmware, it does notaffect any higher level functionality. The storage controller sees SEDs the same as regular disks, andall functionality remains the same.
There are some additional options and requirements with SEDs:
• Sanitizing disksThere are additional options to sanitize disks when using SEDs.
Introduction to Storage Encryption | 89

• Moving aggregatesAdditional steps are required when moving aggregates that contain SEDs.
• Destroying disksAn additional option enables you to make the disks permanently inaccessible.
Benefits of using Storage EncryptionThere are several scenarios where using Storage Encryption provides significant benefits byprotecting data from unauthorized access when disks removed from a storage system have fallen intothe wrong hands.
Data protection in case of disk loss or theft
Storage Encryption protects your data if disks are lost or stolen.
Someone who comes into possession of disks that store data using Storage Encryption cannot accessthe data. Without the authentication key that is required to authenticate and unlock the disks, allattempts to read or write data result in an error message returned by the SEDs.
Circumventing the disk authentication by moving the platters into another disk without encryptionfirmware would be unsuccessful as well. The data stored on the platters appears as ciphertext and isfully protected from unauthorized access.
Data protection when returning disks to vendors
Storage Encryption protects your data when you return disks to vendors.
The following three options are available to protect data on disks that are removed from a storagesystem and returned to a vendor:
• If the SED is owned by a storage system, it requires authentication to access the data. Since thevendor does not know, or have access to, the authentication key, the vendor cannot access data onthe disk.
• If you sanitize the disk before returning it to a vendor, it changes the encryption key to a newunknown key. Any subsequent attempts to read data from the disk result in random data.
• If you "destroy" the disk, it changes the encryption key to a random unknown key, it changes theauthentication key to a random unknown key, and permanently locks the disk, preventing anyfurther decryption of the data and access to the disk.
Related tasks
Sanitizing disks using Storage Encryption before return to vendor on page 104
90 | Storage Management Guide

Data protection when moving disks to end-of-life
Storage Encryption protects your data when moving a disk to an end-of-life state.
You can protect data on a disk by changing the authentication key to a random value that is notstored and permanently locking the drive. This prevents any further decryption of the data and accessto the disk.
Related tasks
Setting the state of disks using Storage Encryption to end-of-life on page 105
Data protection through emergency data shredding
Storage Encryption protects your data in emergency situations by allowing you to instantaneouslyprevent access to the data on the disk.
This might include extreme scenarios where power to the storage system or the key managementserver (or both) is not available, or one or both have fallen into possession of a hostile third-party.
Related tasks
Emergency shredding of data on disks using Storage Encryption on page 106
Limitations of Storage EncryptionYou must keep certain limitations in mind when using Storage Encryption.
• Storage Encryption is not supported with SnapLock.If a SnapLock license is installed on the storage system, Storage Encryption functionality isunavailable. If Storage Encryption is enabled on a storage system, you cannot add a SnapLocklicense.
• For the latest information about which storage systems, disk shelves, and key managementservers are supported with Storage Encryption, see the Interoperability Matrix.
• All disks in the storage system and optional attached disk shelves must have encryptionfunctionality to be able to use Storage Encryption. You cannot mix regular non-encrypting diskswith self-encrypting disks.
• Storage Encryption is not supported with Flash Pool aggregates.
• Storage Encryption key_manager commands are only available for local nodes.They are not available in takeover mode for partner nodes.
• Do not configure Storage Encryption to use 10 Gigabit network interfaces for communicationwith key management servers. This limitation does not apply to serving data.
Introduction to Storage Encryption | 91

• Storage Encryption supports a maximum of 128 authentication keys per key management server.You receive a warning when the number of stored authentication keys reaches 100. You cannotcreate new authentication keys when the number of stored authentication keys reaches the limit of128. You must then delete unused authentication keys before you can create new ones.
Related information
Interoperability Matrix: support.netapp.com/matrix
92 | Storage Management Guide

Managing Storage Encryption
You can perform various tasks to manage Storage Encryption, including viewing and removing keymanagement servers, and creating, deleting, restoring and synchronizing authentication keys.
Displaying Storage Encryption disk informationYou can display information about self-encrypting disks by using the disk encrypt showcommand. This command displays the key ID and lock status for each self-encrypting disk.
About this task
The key ID displayed in the command output is an identifier used by Storage Encryption and keymanagement servers as a reference to the authentication key. It is not the actual authentication key orthe data encryption key.
Step
1. To display information about SEDs, enter the following command:
disk encrypt show
The disk encrypt show, lock, and rekey commands support extended wildcard matching.For more information, see the disk encrypt show man page.
Example
The following command displays the status of each self-encrypting disk:
storage-system> disk encrypt showDisk Key ID Locked?0c.00.1 080CF0C8000000000100000000000000A948EE8604F4598ADFFB185B5BB7FED3 Yes0c.00.0 080CF0C8000000000100000000000000A948EE8604F4598ADFFB185B5BB7FED3 Yes0c.00.3 080CF0C8000000000100000000000000A948EE8604F4598ADFFB185B5BB7FED3 Yes0c.00.4 080CF0C8000000000100000000000000A948EE8604F4598ADFFB185B5BB7FED3 Yes0c.00.2 080CF0C8000000000100000000000000A948EE8604F4598ADFFB185B5BB7FED3
93

Yes0c.00.5 080CF0C8000000000100000000000000A948EE8604F4598ADFFB185B5BB7FED3 Yes
Displaying key management server informationYou can display information about the external key management servers associated with the storagesystem by using the key_manager show command.
Step
1. To display external key management servers, enter the following command:
key_manager show
All external key management servers associated with the storage system are listed.
Example
The following command displays all external key management servers associated with thestorage system:
storage-system> key_manager show 172.18.99.175
Verifying key management server linksYou use the key_manager status or key_manager query commands to verify that all keymanagement servers are successfully linked to the storage system. These commands are useful forverifying proper operation and troubleshooting.
About this task
Both commands display whether key management servers are responding.
Steps
1. Perform one of the following actions:
94 | Storage Management Guide

If you want to... Then enter the following command:
Check the status of a specifickey management server
key_manager status -key_server key_server_ip_address
Check the status of all keymanagement servers
key_manager status
Check the status of all keymanagement servers and viewadditional server details.
key_manager query
The key_manager query command displays additional informationabout key tags and key IDs.
2. Check the output to verify that all of the appropriate keys are available in the Data ONTAP keytable.
If the output of the key_manager query command displays key IDs marked with an asterisk(*), those keys exist on a key server but are not currently available in the Data ONTAP key table.To import those keys from the key management server into the key table, enter the followingcommand:
key_manager restore
Examples
The following command checks the status of all key management servers linked to the storagesystem:
storage-system> key_manager status Key server Status172.16.132.118 Server is responding172.16.132.211 Server is responding
The following command checks the status of all key management servers linked to the storagesystem and displays additional information:
storage-system> key_manager query Key server 172.16.132.118 is responding.Key server 172.16.132.211 is responding.
Key server 172.16.132.118 reports 4 keys.
Key tag Key ID-------- -------storage-system 080CDCB20...storage-system 080CDCB20...storage-system 080CDCB20...storage-system 080CDCB20...
Key server 172.16.132.211 reports 4 keys.
Key tag Key ID
Managing Storage Encryption | 95

-------- -------storage-system *080CDCB20...storage-system 080CDCB20...storage-system 080CDCB20...storage-system *080CDCB20...
Adding key management serversYou can use the key_manager add command to link key management servers to the storagesystem. This enables you to add additional key management servers for redundancy after initial setupor to replace existing key management servers.
Before you begin
You must first install the required storage system and key management server SSL certificates. Ifthey are not present, the command fails.
You must know the IP address for each key management server you want to link.
Step
1. To add a key management server, enter the following command:
key_manager add -key_server key_server_ip_address
Example
The following command adds a link from the storage system to the key management serverwith the IP address 172.16.132.118:
storage-system> key_manager add -key_server 172.16.132.118Found client certificate file client.pem.Registration successful for client.pem.Found client private key file client_private.pem.Is this file protected by a passphrase? [no]: noRegistration successful for client_private.pem.Registering 1 key servers...Found client CA certificate file 172.16.132.118_CA.pem.Registration successful for 172.16.132.118_CA.pem.Registration complete.
96 | Storage Management Guide

Removing key management serversIf you no longer want to use a key management server to store authentication keys used by self-encrypting disks in the storage system, you can remove the key management server link to thestorage system by using the key_manager remove command.
Before you begin
You must know the IP address for each key management server that you want to remove.
About this task
Storage Encryption requires at least one key management server linked to the storage system tooperate. If you want to replace a single key management server with another one, you must first addthe new one before removing the old one.
Step
1. To remove key management servers, enter the following command:
key_manager remove -key_server key_server_ip_address
-key_server key_server_ip_address specifies the IP address of the key managementserver you want to remove.
Example
The following command removes the link between the storage system and the keymanagement server with the IP address 172.18.99.175:
storage-system> key_manager remove -key_server 172.18.99.175Key server 172.18.99.175 will be unregistered from service.Unregistration successful.
What happens when key management servers are notreachable during the boot process
Data ONTAP takes certain precautions to avoid undesired behavior in the event that the storagesystem cannot reach any of the specified key management servers during the boot process.
If the storage system is configured for Storage Encryption, the SEDs have been rekeyed and locked,and the SEDs are powered on, the storage system must retrieve the required authentication keys fromthe key management servers to authenticate itself to the SEDs before it can access the data.
Managing Storage Encryption | 97

The storage system attempts to contact the specified key management servers for up to three hours. Ifthe storage system cannot reach any of them after that time, the boot process stops and the storagesystem halts.
If the storage system successfully contacts any specified key management server, it then attempts toestablish an SSL connection for up to 15 minutes. If the storage system cannot establish an SSLconnection with any specified key management server, the boot process stops and the storage systemhalts.
While the storage system attempts to contact and connect to key management servers, it displaysdetailed information about the failed contact attempts at the CLI. You can interrupt the contactattempts at any time by pressing Ctrl-C.
As a security measure, SEDs allow only a limited number of unauthorized access attempts, afterwhich they permanently disable access to the existing data. If the storage system cannot contact anyspecified key management servers to obtain the proper authentication keys, it can only attempt toauthenticate with the default key which leads to a failed attempt and a panic. If the storage system isconfigured to automatically reboot in case of a panic, it would enter a boot loop which results incontinuous failed authentication attempts on the SEDs.
Halting the storage system in these scenarios is by design to prevent the storage system from enteringa boot loop and unintended data loss as a result of the SEDs locked permanently due to exceeding thesafety limit of 1024 consecutive failed authentication attempts.
If you encounter this scenario where the storage system is halted due to failure to reach any specifiedkey management servers, you must first identify and correct the cause for the communication failurebefore you attempt to continue booting the storage system.
Changing the authentication keyYou can change the authentication key at any time by using the key_manager rekey command.You might want to change the authentication key as part of your security protocol or when movingan aggregate to another storage system.
Step
1. Perform one of the following actions:
If you want to... Then...
Change the authenticationkey and enter a new onemanually
a. Enter the following command at the storage system prompt:
key_manager rekey -manual -key_tag key_tag
b. When prompted, enter the new authentication key.It must be 20 to 32 characters long.
98 | Storage Management Guide

If you want to... Then...
Change the authenticationkey and have the systemgenerate a new oneautomatically
Enter the following command at the storage system prompt:
key_manager rekey -key_tag key_tag
key_tag is the label used to associate keys with a particular storage system. If you do not specifya key tag, the storage system uses the key tag specified when you set up Storage Encryption. Ifyou did not specify this key tag during setup, it uses the parent key tag as the default. Each nodehas a parent key tag. HA pair members share the same parent key tag.
Example
The following command changes the authentication key and prompts you to enter a new onemanually. You can run the disk encrypt show command after completion to verify theresults.
storage-system> key_manager rekey -manualPlease enter a new passphrase: Please reenter the new passphrase:
New passphrase generated.Key ID: 080CDCB2000000000100000000000000B0A11CBF3DDD20EFB0FBB5EE198DB22AKey tag: storage-system
Notice: Remember to store the passphrase and the Key ID in a secure location.
Passphrase, key ID, and key tag synchronized with the following key server(s): 172.16.132.118 172.16.132.211Completed rekey on 4 disks: 4 successes, 0 failures, including 0 unknown key and 0 authentication failures.
Retrieving authentication keysYou can use the key_manager restore command to retrieve authentication keys from a keymanagement server to a storage system. For example, when you created authentication keys on anode, you use this command to retrieve the keys for use on the partner node.
Before you begin
You must know the IP address for each key management server that you want to retrieveauthentication keys from.
Managing Storage Encryption | 99

Step
1. To retrieve authentication keys from a key management server to the storage system, enter thefollowing command:
key_manager restore -key_server key_server_ip_address -key_tag key_tag
If all specified key management servers are available, you can use the -all option instead of the-key_server option to clear out the current Data ONTAP key table and retrieve all keysmatching the specified key tag from all specified key management servers.
Examples
The following command restores keys with the key tag storage-system from the keymanagement server with the IP address 172.18.99.175:
storage-system> key_manager restore -key_server 172.18.99.175 -key_tag storage-system
The following command restores all keys with the key tag storage-system from all keymanagement servers linked to the storage system:
storage-system> key_manager restore -all -key_tag storage-system
Deleting an authentication keyYou can delete an authentication key that is no longer needed by removing it from the external keymanagement server.
Before you begin
Verify that the authentication key is no longer needed before deleting it. Deleting an authenticationkey that is still in use can permanently prevent access to data on a storage system.
Step
1. Refer to the documentation for the external key management server for details on how to deletestored authentication keys.
SSL issues due to expired certificatesIf the SSL certificates used to secure key management communication between the storage systemand key management servers expire, the storage system can no longer retrieve authentication keys
100 | Storage Management Guide

from the key management server at bootup. This issue can cause data on SEDs to be unavailable.You can prevent this issue by updating all SSL certificates before their individual expiration dates.
SSL certificates have a limited lifespan because they have an expiration date. After the SSLcertificates reach their expiration dates, the certificates are no longer valid. When this happens, SSLconnections that use expired certificates fail.
For Storage Encryption, this means that the SSL connections between the storage system and the keymanagement servers fail, the storage system no longer can retrieve authentication keys when needed,and data access to the SEDs fails, resulting in storage system panic and downtime.
To prevent this issue from occurring, you must keep track of the expiration dates of all installed SSLcertificates so that you can obtain new SSL certificates before they expire.
After you have obtained the new certificate files, you must first remove the existing certificate filesfrom the storage system, and then install the new certificates on the storage system.
Steps
1. Removing old SSL certificates before installing new ones on page 101If you want to update or reinstall the SSL certificates used by Storage Encryption, you must firstmanually remove the old ones to ensure that the new ones are used.
2. Installing replacement SSL certificates on the storage system on page 102After you remove the old certificates, you create the new replacement SSL certificates, save themwith the proper file name and format, and then install them on the storage system.
Removing old SSL certificates before installing new ones
If you want to update or reinstall the SSL certificates used by Storage Encryption, you must firstmanually remove the old ones to ensure that the new ones are used.
Steps
1. Remove the IP addresses of all key management servers by entering the following command foreach key management server:
key_manager remove -key_server key_server_ip_address
2. Remove the storage system's client certificates by entering the following commands:
keymgr delete cert client_private.pem
keymgr delete cert client.pem
3. Remove all installed key management server certificates by entering the following commands foreach key management server:
keymgr delete cert key_server_ip_address_CA.pem
Managing Storage Encryption | 101

Installing replacement SSL certificates on the storage system
After you remove the old certificates, you create the new replacement SSL certificates, save themwith the proper file name and format, and then install them on the storage system.
Before you begin
• You must have removed the old certificates that are about to expire from the storage system.
• You must have obtained the replacement public and private certificates for the storage system andthe public certificate for the key management server, and named them as required.For more information, see the Data ONTAP Software Setup Guide for 7-Mode.
• You must have installed the appropriate new certificates on the key management server.For more information, see the documentation for your key management server.
Steps
1. Copy the certificate files to a temporary location on the storage system.
2. Install the public certificate of the storage system by entering the following command:
keymgr install cert /path/client.pem
3. Install the private certificate of the storage system by entering the following command:
keymgr install cert /path/client_private.pem
4. Install the public certificate of all key management servers by entering the following commandfor each key management server:
keymgr install cert /path/key_management_server_ipaddress_CA.pem
5. Add all key management servers by entering the following command for each key managementserver:
key_manager add -key_server key_server_ip_address
6. Verify connectivity between the storage system and key management servers by entering thefollowing command:
key_manager query
You should see a list of existing key IDs retrieved from the key management servers.
Returning SEDs to unprotected modeIf your storage system is configured to use Storage Encryption but you decide to stop using thisfeature, you can do so by returning the SEDs to unprotected mode. You cannot disable StorageEncryption altogether because SEDs always encrypt data for storage. However, you can return them
102 | Storage Management Guide

to unprotected mode where they no longer use secret authentication keys, and use the default MSIDinstead.
Steps
1. To change the authentication key for all SEDs on the storage system back to the default MSID,enter the following command:
disk encrypt rekey * 0x0
2. If you expect to operate the storage system in unprotected mode permanently, you should alsoremove all key management servers by entering the following command for each one:
key_manager remove -key_server key_server_ip_address
-key_server key_server_ip_address specifies the IP address of the key managementserver you want to remove.
The storage system displays two kmip_init errors during every bootup after you remove all keymanagement servers. These errors are normal in this situation and you can disregard them.
3. If you expect to operate the storage system in unprotected mode permanently and you removedall key management servers in the preceding step, you should view the list of installed StorageEncryption related SSL certificates, and then remove all key management server SSL certificates:
keymgr cert list
keymgr delete cert client.pem
keymgr delete cert client_private.pem
keymgr delete cert key_management_server_ipaddress_CA.pem
If you had multiple key management servers linked to the storage system, repeat the lastcommand for each public certificate of each key management server.
Managing Storage Encryption | 103

Destroying data on disks using StorageEncryption
You can destroy data stored on disks using Storage Encryption for security reasons, includingsanitizing the disks, setting the disk state to end-of-life, and emergency shredding of the data.
Related tasks
Using disk sanitization to remove data from disks on page 46
Sanitizing disks using Storage Encryption before return tovendor
If you want to return a disk to a vendor but do not want anyone to access sensitive data on the disk,you can sanitize it first by using the disk encrypt sanitize command. This renders the data onthe disk inaccessible, but the disk can be reused. This command only works on spare disks.
Steps
1. Migrate any data that needs to be preserved to a different aggregate.
2. Destroy the aggregate.
3. Identify the disk ID for the disk to be sanitized by entering the following command:
disk encrypt show
4. Enter the following command:
disk encrypt sanitize disk_ID
Example
The following command sanitizes a self-encrypting disk with the disk ID 0c.00.3. You can runthe sysconfig -r command before and after the operation to verify the results.
storage-system> sysconfig -rAggregate aggr0 (online, raid_dp) (block checksums) Plex /aggr0/plex0 (online, normal, active) RAID group /aggr0/plex0/rg0 (normal)
RAID Disk Device HA SHELF BAY CHAN Pool Type RPM Used (MB/blks) Phys (MB/blks) --------- ------ ------------- ---- ---- ---- ----- -------------- -------------- dparity 0c.00.0 0c 0 0 SA:B - SAS 15000 560000/1146880000 560208/1147307688 parity 0c.00.1 0c 0 1 SA:B - SAS 15000 560000/1146880000 560208/1147307688 data 0c.00.2 0c 0 2 SA:B - SAS 15000 560000/1146880000 560208/1147307688
Spare disks
RAID Disk Device HA SHELF BAY CHAN Pool Type RPM Used (MB/blks) Phys (MB/blks)
104 | Storage Management Guide

--------- ------ ------------- ---- ---- ---- ----- -------------- --------------Spare disks for block or zoned checksum traditional volumes or aggregatesspare 0c.00.3 0c 0 3 SA:B - SAS 15000 560000/1146880000 560208/1147307688 spare 0c.00.4 0c 0 4 SA:B - SAS 15000 560000/1146880000 560208/1147307688 spare 0c.00.5 0c 0 5 SA:B - SAS 15000 560000/1146880000 560208/1147307688
storage-system> disk encrypt sanitize 0c.00.3storage-system> Wed Jun 30 17:49:16 PDT [disk.failmsg:error]: Disk 0c.00.3 (3SL04F3V00009015WTHU): message received.Wed Jun 30 17:49:16 PDT [raid.disk.unload.done:info]: Unload of Disk 0c.00.3 Shelf 0 Bay 3 [SYSTEM X415_S15K7560A15 NQS3] S/N [3SL04F3V00009015WTHU] has completed successfully
storage-system> Wed Jun 30 17:49:25 PDT [disk.sanit.complete:info]: Disk 0c.00.3 [S/N 3SL04F3V00009015WTHU] has completed sanitization.
storage-system> sysconfig -r Aggregate aggr0 (online, raid_dp) (block checksums) Plex /aggr0/plex0 (online, normal, active) RAID group /aggr0/plex0/rg0 (normal)
RAID Disk Device HA SHELF BAY CHAN Pool Type RPM Used (MB/blks) Phys (MB/blks) --------- ------ ------------- ---- ---- ---- ----- -------------- -------------- dparity 0c.00.0 0c 0 0 SA:B - SAS 15000 560000/1146880000 560208/1147307688 parity 0c.00.1 0c 0 1 SA:B - SAS 15000 560000/1146880000 560208/1147307688 data 0c.00.2 0c 0 2 SA:B - SAS 15000 560000/1146880000 560208/1147307688
Spare disks
RAID Disk Device HA SHELF BAY CHAN Pool Type RPM Used (MB/blks) Phys (MB/blks)--------- ------ ------------- ---- ---- ---- ----- -------------- --------------Spare disks for block or zoned checksum traditional volumes or aggregatesspare 0c.00.4 0c 0 4 SA:B - SAS 15000 560000/1146880000 560208/1147307688 spare 0c.00.5 0c 0 5 SA:B - SAS 15000 560000/1146880000 560208/1147307688
Maintenance disks
RAID Disk Device HA SHELF BAY CHAN Pool Type RPM Used (MB/blks) Phys (MB/blks)--------- ------ ------------- ---- ---- ---- ----- -------------- --------------sanitized 0c.00.3 0c 0 3 SA:B - SAS 15000 560000/1146880000 560208/1147307688 storage-system>
Setting the state of disks using Storage Encryption to end-of-life
If you want to render a disk permanently unusable and the data on it inaccessible, you can set thestate of the disk to end-of-life by using the disk encrypt destroy command. This commandonly works on spare disks.
Steps
1. Remove any data from the aggregate containing the disk.
2. Migrate any data that needs to be preserved to a different aggregate.
3. Destroy the aggregate.
4. Enter the following command:
disk encrypt destroy disk_ID
Destroying data on disks using Storage Encryption | 105

Result
The disk's encryption key is set to an unknown random value and the disk is irreversibly locked. Thedisk is now completely unusable and can be safely disposed of without risk of unauthorized dataaccess.
Emergency shredding of data on disks using StorageEncryption
In case of a security emergency, you can instantly prevent access to data on disks using StorageEncryption, even if power is not available to the storage system or the external key server.
Before you begin
You must configure the external key server so that it only operates if an easily destroyedauthentication item (for example, a smart card or USB drive) is present. See the documentation forthe external key management server for details.
About this task
The steps for emergency shredding vary depending on whether power is available to the storagesystem and the external key server.
Step
1. Perform one of the following actions:
If... Then...
Power is available to thestorage system and you havetime to gracefully take thestorage system offline
a. If the storage system is a node in an HA pair, disable takeover.
b. Take all aggregates offline and destroy them.
c. Halt the storage system.
d. Boot into maintenance mode.
e. Enter the following command:
disk encrypt sanitize -all
This leaves the storage system in a permanently disabled state with alldata erased. To use the storage system again, you must set it up from thebeginning. For more information, see the Data ONTAP Software SetupGuide for 7-Mode.
106 | Storage Management Guide

If... Then...
Power is available to thestorage system and you mustshred the data immediately;time is critical
a. If the storage system is a node in an HA pair, disable takeover.
b. Set the privilege level to advanced.
c. Enter the following command:
disk encrypt sanitize -all
The storage system panics, which is expected due to the abrupt nature ofthe procedure. It leaves the storage system in a permanently disabledstate with all data erased. To use the storage system again, you must set itup from the beginning. For more information, see the Data ONTAPSoftware Setup Guide for 7-Mode.
Power is available to theexternal key server but not tothe storage system
a. Log in to the external key server.
b. Destroy all keys associated with the disks containing data to protect.
Power is not available to theexternal key server or thestorage system
Destroy the authentication item for the key server (for example, the smartcard). If power to the systems is restored, the external key server cannotoperate due to the missing authentication item. This prevents access tothe disk encryption keys by the storage system, and therefore access tothe data on the disks.
Destroying data on disks using Storage Encryption | 107

How Data ONTAP uses RAID to protect your dataand data availability
Understanding how RAID protects your data and data availability can help you administer yourstorage systems more effectively.
For native storage, Data ONTAP uses RAID-DP (double-parity) or RAID Level 4 (RAID4)protection to ensure data integrity within a RAID group even if one or two of those drives fail. Paritydrives provide redundancy for the data stored in the data drives. If a drive fails (or, for RAID-DP, upto two drives), the RAID subsystem can use the parity drives to reconstruct the data in the drive thatfailed.
For array LUNs, Data ONTAP stripes data across the array LUNs using RAID0. The storage arrays,not Data ONTAP, provide the RAID protection for the array LUNs that they make available to DataONTAP.
Related tasks
Controlling the performance impact of RAID-level scrubbing on page 126
RAID protection levels for disksData ONTAP supports two levels of RAID protection for aggregates composed of disks in nativedisk shelves: RAID-DP and RAID4. RAID-DP is the default RAID level for new aggregates.
For more information about configuring RAID, see Technical Report 3437: Storage SubsystemResiliency Guide.
Related information
TR 3437: Storage Subsystem Resiliency Guide
What RAID-DP protection is
If an aggregate is configured for RAID-DP protection, Data ONTAP reconstructs the data from oneor two failed disks within a RAID group and transfers that reconstructed data to one or two sparedisks as necessary.
RAID-DP provides double-parity disk protection when the following conditions occur:
• There is a single-disk failure or double-disk failure within a RAID group.
• There are media errors on a block when Data ONTAP is attempting to reconstruct a failed disk.
108 | Storage Management Guide

The minimum number of disks in a RAID-DP group is three: at least one data disk, one regular paritydisk, and one double-parity (dParity) disk.
If there is a data-disk failure or parity-disk failure in a RAID-DP group, Data ONTAP replaces thefailed disk in the RAID group with a spare disk and uses the parity data to reconstruct the data of thefailed disk on the replacement disk. If there is a double-disk failure, Data ONTAP replaces the faileddisks in the RAID group with two spare disks and uses the double-parity data to reconstruct the dataof the failed disks on the replacement disks.
RAID-DP is the default RAID type for all aggregates.
What RAID4 protection is
RAID4 provides single-parity disk protection against single-disk failure within a RAID group. If anaggregate is configured for RAID4 protection, Data ONTAP reconstructs the data from a singlefailed disk within a RAID group and transfers that reconstructed data to a spare disk.
The minimum number of disks in a RAID4 group is two: at least one data disk and one parity disk.
If there is a single data or parity disk failure in a RAID4 group, Data ONTAP replaces the failed diskin the RAID group with a spare disk and uses the parity data to reconstruct the failed disk’s data onthe replacement disk. If no spare disks are available, Data ONTAP goes into degraded mode andalerts you of this condition.
Attention: With RAID4, if there is a second disk failure before data can be reconstructed from thedata on the first failed disk, there will be data loss. To avoid data loss when two disks fail, you canselect RAID-DP. This provides two parity disks to protect you from data loss when two diskfailures occur in the same RAID group before the first failed disk can be reconstructed.
Related concepts
How Data ONTAP handles a failed disk with a hot spare on page 120
How Data ONTAP handles a failed disk that has no available hot spare on page 121
About degraded mode on page 119
RAID protection for array LUNsStorage arrays provide the RAID protection for the array LUNs that they make available to DataONTAP; Data ONTAP does not provide the RAID protection.
Data ONTAP uses RAID0 (striping) for array LUNs. Data ONTAP supports a variety of RAID typeson the storage arrays, except RAID0 because RAID0 does not provide storage protection.
When creating RAID groups on storage arrays, you need to follow the best practices of the storagearray vendor to ensure that there is an adequate level of protection on the storage array so that diskfailure does not result in loss of data or loss of access to data.
How Data ONTAP uses RAID to protect your data and data availability | 109

Note: A RAID group on a storage array is the arrangement of disks that together form the definedRAID level. Each RAID group supports only one RAID type. The number of disks that you selectfor a RAID group determines the RAID type that a particular RAID group supports. Differentstorage array vendors use different terms to describe this entity—RAID groups, parity groups, diskgroups, Parity RAID groups, and other terms.
Data ONTAP supports RAID4 and RAID-DP on the native disk shelves connected to a V-Seriessystem but does not support RAID4 and RAID-DP with array LUNs.
RAID protection for Data ONTAP-v storageBecause Data ONTAP-v storage is connected to the host server, rather than a storage system runningData ONTAP, the host server provides the RAID protection for the physical disks. Data ONTAP usesRAID0 for the virtual disks to optimize performance.
See the Data ONTAP Edge Installation and Administration Guide for more information.
Protection provided by RAID and SyncMirrorCombining RAID and SyncMirror provides protection against more types of drive failures than usingRAID alone.
You can use RAID in combination with the SyncMirror functionality, which also offers protectionagainst data loss due to drive or other hardware component failure. SyncMirror protects against dataloss by maintaining two copies of the data contained in the aggregate, one in each plex. Any data lossdue to drive failure in one plex is repaired by the undamaged data in the other plex.
For more information about SyncMirror, see the Data ONTAP Data Protection Online Backup andRecovery Guide for 7-Mode.
The following tables show the differences between using RAID alone and using RAID withSyncMirror:
110 | Storage Management Guide

Table 5: RAID-DP and SyncMirror
Criteria RAID-DP alone RAID-DP with SyncMirror
Failures protected against • Single-drive failure
• Double-drive failure withina single RAID group
• Multiple-drive failures, aslong as no more than twodrives within a singleRAID group fail
• All failures protectedagainst by RAID-DP alone
• Any combination offailures protected againstby RAID-DP alone in oneplex, concurrent with anunlimited number offailures in the other plex
• Storage subsystem failures(HBA, cables, shelf), aslong as only one plex isaffected
Failures not protected against • Three or more concurrentdrive failures within asingle RAID group
• Storage subsystem failures(HBA, cables, shelf) thatlead to three or moreconcurrent drive failureswithin a single RAID group
• Three or more concurrentdrive failures in a singleRAID group on both plexes
Required resources per RAIDgroup
n data drives + 2 parity disks 2 x (n data drives + 2 paritydrives)
Performance cost Almost none Low mirroring overhead; canimprove performance
Additional cost and complexity None SyncMirror license andconfiguration
How Data ONTAP uses RAID to protect your data and data availability | 111

Table 6: RAID4 and SyncMirror
Criteria RAID4 alone RAID4 with SyncMirror
Failures protected against • Single-disk failure
• Multiple-disk failures, aslong as no more than onedisk within a single RAIDgroup fails
• All failures protectedagainst by RAID4 alone
• Any combination offailures protected againstby RAID4 alone in oneplex, concurrent with anunlimited number offailures in the other plex
• Storage subsystem failures(HBA, cables, shelf), aslong as only one plex isaffected
Failures not protected against • Two or more concurrentdrive failures within asingle RAID group
• Storage subsystem failures(HBA, cables, shelf) thatlead to two or moreconcurrent drive failureswithin a single RAID group
• Two or more concurrentdrive failures in a singleRAID group on both plexes
Required resources per RAIDgroup
n data drives + 1 parity drive 2 x (n data drives + 1 paritydrive)
Performance cost None Low mirroring overhead; canimprove performance
Additional cost and complexity None SyncMirror configuration andextra storage requirement
112 | Storage Management Guide

Table 7: RAID0 and SyncMirror
Criteria RAID0 alone RAID0 with SyncMirror
Failures protected against No protection against anyfailures
RAID protection is providedby the RAID implemented onthe storage array.
Any combination of arrayLUN, connectivity, orhardware failures, as long asonly one plex is affected
Failures not protected against No protection against anyfailures
RAID protection is providedby the RAID implemented onthe storage array.
Any concurrent failures thataffect both plexes
Required array LUN resourcesper RAID group
No extra array LUNs requiredother than n data array LUNs
2 x n data array LUNs
Performance cost None Low mirroring overhead; canimprove performance
Additional cost and complexity None SyncMirror configuration andextra storage requirement
Understanding RAID disk typesData ONTAP classifies disks as one of four types for RAID: data, hot spare, parity, or dParity. TheRAID disk type is determined by how RAID is using a disk; it is different from the Data ONTAPdisk type.
Data disk
Holds data stored on behalf of clients within RAID groups (and any data generated aboutthe state of the storage system as a result of a malfunction).
Spare disk
Does not hold usable data, but is available to be added to a RAID group in an aggregate.Any functioning disk that is not assigned to an aggregate but is assigned to a systemfunctions as a hot spare disk.
Parity disk
Stores row parity information that is used for data reconstruction when a single disk drivefails within the RAID group.
dParity disk
Stores diagonal parity information that is used for data reconstruction when two diskdrives fail within the RAID group, if RAID-DP is enabled.
How Data ONTAP uses RAID to protect your data and data availability | 113

How RAID groups workA RAID group consists of one or more data disks or array LUNs, across which client data is stripedand stored, and up to two parity disks, depending on the RAID level of the aggregate that containsthe RAID group.
RAID-DP uses two parity disks to ensure data recoverability even if two disks within the RAIDgroup fail.
RAID4 uses one parity disk to ensure data recoverability if one disk within the RAID group fails.
RAID0 does not use any parity disks; it does not provide data recoverability if any disks within theRAID group fail.
How RAID groups are named
Within each aggregate, RAID groups are named rg0, rg1, rg2, and so on in order of their creation.You cannot specify the names of RAID groups.
Considerations for sizing RAID groups
Configuring an optimum RAID group size requires a trade-off of factors. You must decide whichfactors—speed of RAID rebuild, assurance against risk of data loss due to drive failure, optimizingI/O performance, and maximizing data storage space—are most important for the aggregate that youare configuring.
When you create larger RAID groups, you maximize the space available for data storage for the sameamount of storage used for parity (also known as the “parity tax”). On the other hand, when a diskfails in a larger RAID group, reconstruction time is increased, impacting performance for a longerperiod of time. In addition, having more disks in a RAID group increases the probability of amultiple disk failure within the same RAID group.
HDD or array LUN RAID groups
You should follow these guidelines when sizing your RAID groups composed of HDDs or arrayLUNs:
• All RAID groups in an aggregate should have a similar number of disks.The RAID groups do not have to be exactly the same size, but you should avoid having anyRAID group that is less than one half the size of other RAID groups in the same aggregate whenpossible.
• The recommended range of RAID group size is between 12 and 20.The reliability of performance disks can support a RAID group size of up to 28, if needed.
• If you can satisfy the first two guidelines with multiple RAID group sizes, you should choose thelarger size.
114 | Storage Management Guide

SSD RAID groups in Flash Pool aggregates
The SSD RAID group size can be different from the RAID group size for the HDD RAID groups in aFlash Pool aggregate. Usually, you should ensure that you have only one SSD RAID group for aFlash Pool aggregate, to minimize the number of SSDs required for parity.
SSD RAID groups in SSD aggregates
You should follow these guidelines when sizing your RAID groups composed of SSDs:
• All RAID groups in an aggregate should have a similar number of drives.The RAID groups do not have to be exactly the same size, but you should avoid having anyRAID group that is less than one half the size of other RAID groups in the same aggregate whenpossible.
• For RAID-DP, the recommended range of RAID group size is between 20 and 28.
Related concepts
How Flash Pool aggregates work on page 133
Customizing the size of your RAID groups
You can customize the size of your RAID groups to ensure that your RAID group sizes areappropriate for the amount of storage you plan to include for an aggregate.
About this task
For standard aggregates, you change the size of RAID groups on a per-aggregate basis. For FlashPool aggregates, you can change the RAID group size for the SSD RAID groups and the HDD RAIDgroups independently.
The following list outlines some facts about changing the RAID group size:
• By default, if the number of disks or array LUNs in the most recently created RAID group is lessthan the new RAID group size, disks or array LUNs will be added to the most recently createdRAID group until it reaches the new size.
• All other existing RAID groups in that aggregate remain the same size, unless you explicitly adddisks to them.
• You can never cause a RAID group to become larger than the current maximum RAID group sizefor the aggregate.
• You cannot decrease the size of already created RAID groups.
• The new size applies to all RAID groups in that aggregate (or, in the case of a Flash Poolaggregate, all RAID groups for the affected RAID group type—SSD or HDD).
How Data ONTAP uses RAID to protect your data and data availability | 115

Step
1. Use the applicable command:
If you want to... Enter the following command...
Change the maximum RAIDgroup size for the SSD RAIDgroups of a Flash Poolaggregate
aggr options aggr_name cache_raidsize size
Change the maximum size ofany other RAID groups
aggr options aggr_name raidsize size
Examples
The following command changes the maximum RAID group size of the aggregate n1_a4 to 20disks or array LUNs:
aggr options n1_a4 raidsize 20
The following command changes the maximum RAID group size of the SSD cache RAIDgroups of the Flash Pool aggregate n1_cache_a2 to 24:
aggr options n1_cache_a2 cache_raidsize 24
Related concepts
How Data ONTAP uses RAID to protect your data and data availability on page 108
Considerations for sizing RAID groups on page 114
Considerations for Data ONTAP RAID groups for array LUNs on page 116
How RAID groups work on page 114
Related tasks
Increasing the size of an aggregate on page 155
Considerations for Data ONTAP RAID groups for array LUNs
Setting up Data ONTAP RAID groups for array LUNs requires planning and coordination with thestorage array administrator so that the administrator makes the number and size of array LUNs youneed available to Data ONTAP.
For array LUNs, Data ONTAP uses RAID0 RAID groups to determine where to allocate data to theLUNs on the storage array. The RAID0 RAID groups are not used for RAID data protection. Thestorage arrays provide the RAID data protection.
Note: Data ONTAP RAID groups are similar in concept to what storage array vendors call RAIDgroups, parity groups, disk groups, Parity RAID groups, and other terms.
116 | Storage Management Guide

Follow these steps when planning your Data ONTAP RAID groups for array LUNs:
1. Plan the size of the aggregate that best meets your data needs.
2. Plan the number and size of RAID groups that you need for the size of the aggregate.
Note: It is best to use the default RAID group size for array LUNs. The default RAID groupsize is adequate for most organizations. The default RAID group size is different for arrayLUNs and disks.
3. Plan the size of the LUNs that you need in your RAID groups.
• To avoid a performance penalty, all array LUNs in a particular RAID group should be thesame size.
• The LUNs should be the same size in all RAID groups in the aggregate.
4. Ask the storage array administrator to create the number of LUNs of the size you need for theaggregate.The LUNs should be optimized for performance, according to the instructions in the storage arrayvendor documentation.
5. Create all the RAID groups in the aggregate at the same time.
Note: Do not mix array LUNs from storage arrays with different characteristics in the sameData ONTAP RAID group.
Note: If you create a new RAID group for an existing aggregate, be sure that the new RAIDgroup is the same size as the other RAID groups in the aggregate, and that the array LUNs arethe same size as the LUNs in the other RAID groups in the aggregate.
How Data ONTAP works with hot spare disksA hot spare disk is a disk that is assigned to a storage system but is not in use by a RAID group. Itdoes not yet hold data but is ready for use. If a disk failure occurs within a RAID group, DataONTAP automatically assigns hot spare disks to RAID groups to replace the failed disks.
Minimum number of hot spares you should have
Having insufficient spares increases the risk of a disk failure with no available spare, resulting in adegraded RAID group. A spare disk is also required to provide important information (a core file) totechnical support in case of a controller disruption.
MSATA disks, or disks in a multi-disk carrier, should have four hot spares during steady stateoperation, and you should never allow the number of MSATA hot spares to dip below two.
For RAID groups composed of SSDs, you should have at least one spare disk.
How Data ONTAP uses RAID to protect your data and data availability | 117

For all other Data ONTAP disk types, you should have at least one matching or appropriate hot spareavailable for each kind of disk installed in your storage system. However, having two available hotspares for all disks provides the best protection against disk failure. Having at least two available hotspares provides the following benefits:
• When you have two or more hot spares for a data disk, Data ONTAP can put that disk into themaintenance center if needed.Data ONTAP uses the maintenance center to test suspect disks and take offline any disk thatshows problems.
• Having two hot spares means that when a disk fails, you still have a spare available if anotherdisk fails before you replace the first failed disk.
A single spare disk can serve as a hot spare for multiple RAID groups. However, if any disk in thoseRAID groups fails, then no spare is available for any future disk failures, or for a core file, until thespare is replaced. For this reason, having more than one spare is recommended.
Related concepts
Spare requirements for multi-disk carrier disks on page 37
What disks can be used as hot spares
A disk must conform to certain criteria to be used as a hot spare for a particular data disk.
For a disk to be used as a hot spare for another disk, it must conform to the following criteria:
• It must be either an exact match for the disk it is replacing or an appropriate alternative.
• If SyncMirror is in use, the spare must be in the same pool as the disk it is replacing.
• The spare must be owned by the same system as the disk it is replacing.
What a matching spare is
A matching hot spare exactly matches several characteristics of a designated data disk.Understanding what a matching spare is, and how Data ONTAP selects spares, enables you tooptimize your spares allocation for your environment.
A matching spare is a disk that exactly matches a data disk for all of the following criteria:
• Effective Data ONTAP disk typeThe effective disk type can be affected by the value of the raid.mix.hdd.performance andraid.mix.hdd.capacity options, which determine the disk types that are considered to beequivalent.
• Size
• Speed (RPM)
118 | Storage Management Guide

• Checksum type (BCS or AZCS)
Related concepts
How Data ONTAP reports disk types on page 18
What an appropriate hot spare is
If a disk fails and no hot spare disk that exactly matches the failed disk is available, Data ONTAPuses the best available spare. Understanding how Data ONTAP chooses an appropriate spare whenthere is no matching spare enables you to optimize your spare allocation for your environment.
Data ONTAP picks a non-matching hot spare based on the following criteria:
• If the available hot spares are not the correct size, Data ONTAP uses one that is the next size up,if there is one.The replacement disk is downsized to match the size of the disk it is replacing; the extra capacityis not available.
• If the available hot spares are not the correct speed, Data ONTAP uses one that is a differentspeed.Using drives with different speeds within the same aggregate is not optimal. Replacing a diskwith a slower disk can cause performance degradation, and replacing a disk with a faster disk isnot cost-effective.
• If the failed disk is part of a mirrored aggregate and there are no hot spares available in thecorrect pool, Data ONTAP uses a spare from the other pool.Using drives from the wrong pool is not optimal because you no longer have fault isolation foryour SyncMirror configuration.
If no spare exists with an equivalent disk type or checksum type, the RAID group that contains thefailed disk goes into degraded mode; Data ONTAP does not combine effective disk types orchecksum types within a RAID group.
About degraded mode
When a disk fails, Data ONTAP can continue to serve data, but it must reconstruct the data from thefailed disk using RAID parity. When this happens, the affected RAID group is said to be in degradedmode. The performance of a storage system with one or more RAID groups in degraded mode isdecreased.
A RAID group goes into degraded mode in the following scenarios:
• A single disk fails in a RAID4 group.After the failed disk is reconstructed to a spare, the RAID group returns to normal mode.
• One or two disks fail in a RAID-DP group.If two disks have failed in a RAID-DP group, the RAID group goes into double-degraded mode.
How Data ONTAP uses RAID to protect your data and data availability | 119

• A disk is taken offline by Data ONTAP.After the offline disk is brought back online, the RAID group returns to normal mode.
Note: If another disk fails in a RAID-DP group in double-degraded mode or a RAID4 group indegraded mode, data loss could occur (unless the data is mirrored). For this reason, alwaysminimize the amount of time a RAID group is in degraded mode by ensuring that appropriate hotspares are available.
How low spare warnings can help you manage your spare drives
By default, Data ONTAP issues warnings to the console and logs if you have fewer than one hotspare drive that matches the attributes of each drive in your storage system. You can change thethreshold value for these warning messages to ensure that your system adheres to best practices.
To make sure that you always have two hot spares for every drive (a best practice), you can set themin_spare_count RAID option to 2.
Setting the min_spare_count RAID option to 0 disables low spare warnings. You might want todo this if you do not have enough drives to provide hot spares (for example, if your storage systemdoes not support external disk shelves). You can disable the warnings only if the followingrequirements are met:
• Your system has 16 or fewer drives.
• You have no RAID groups that use RAID4.
Note: You cannot create aggregates that use RAID4 protection while theraid.min_spare_count option is set to 0. If either of these requirements is no longer metafter this option has been set to 0, the option is automatically set back to 1.
How Data ONTAP handles a failed disk with a hot spareUsing an available matching hot spare, Data ONTAP can use RAID to reconstruct the missing datafrom the failed disk onto the hot spare disk with no data service interruption.
If a disk fails and a matching or appropriate spare is available, Data ONTAP performs the followingtasks:
• Replaces the failed disk with a hot spare disk.If RAID-DP is enabled and a double-disk failure occurs in the RAID group, Data ONTAPreplaces each failed disk with a separate spare disk.
• In the background, reconstructs the missing data onto the hot spare disk or disks.
Note: During reconstruction, the system is in degraded mode, and file service might slowdown.
• Logs the activity in the /etc/messages file.
120 | Storage Management Guide

• Sends an AutoSupport message.
Attention: Always replace the failed disks with new hot spare disks as soon as possible, so that hotspare disks are always available in the storage system.
Note: If the available spare disks are not the correct size, Data ONTAP chooses a disk of the nextlarger size and restricts its capacity to match the size of the disk it is replacing.
Related concepts
How Data ONTAP handles a failed disk that has no available hot spare on page 121
Related tasks
Removing a failed disk on page 43
Adding disks to a storage system on page 39
How Data ONTAP handles a failed disk that has no availablehot spare
When a failed disk has no appropriate hot spare available, Data ONTAP puts the affected RAIDgroup into degraded mode indefinitely and the storage system automatically shuts down within aspecified time period.
If the maximum number of disks have failed in a RAID group (two for RAID-DP, one for RAID4),the storage system automatically shuts down in the period of time specified by the raid.timeoutoption. The default timeout value is 24 hours.
To ensure that you are aware of the situation, Data ONTAP sends an AutoSupport message whenevera disk fails. In addition, it logs a warning message in the /etc/message file once per hour after adisk fails.
Attention: If a disk fails and no hot spare disk is available, contact technical support.
Related concepts
About degraded mode on page 119
How Data ONTAP handles a failed disk with a hot spare on page 120
How Data ONTAP uses RAID to protect your data and data availability | 121

Considerations for changing the timeout RAID optionThe raid.timeout option controls how long a storage system runs after a RAID group goes intodegraded mode or the NVRAM battery malfunctions or loses power. You can change the value ofthis option, but you should understand the implications of doing so.
The purpose for the system shutdown is to avoid data loss, which can happen if an additional diskfailure occurs in a RAID group that is already running in degraded mode, or if a stand-alone systemencounters a catastrophic error and has to shut down without NVRAM. You can extend the numberof hours the system operates in these conditions by increasing the value of this option (the defaultvalue is 24). You can even disable the shutdown by setting the option to 0, but the longer the systemoperates with one or both of these conditions, the greater the chance of incurring data loss.
How RAID-level disk scrubs verify data integrityRAID-level scrubbing means checking the disk blocks of all disks in use in aggregates (or in aparticular aggregate, plex, or RAID group) for media errors and parity consistency. If Data ONTAPfinds media errors or inconsistencies, it uses RAID to reconstruct the data from other disks andrewrites the data.
RAID-level scrubs help improve data availability by uncovering and fixing media and checksumerrors while the RAID group is in a normal state (for RAID-DP, RAID-level scrubs can also beperformed when the RAID group has a single-disk failure).
RAID-level scrubs can be scheduled or run manually.
How you schedule automatic RAID-level scrubs
By default, Data ONTAP performs a weekly RAID-level scrub starting on Sunday at 1:00 a.m. for aduration of six hours. You can change the start time and duration of the weekly scrub, or add moreautomatic scrubs.
To schedule an automatic RAID-level scrub, you use the raid.scrub.schedule option.
To change the duration of automatic RAID-level scrubbing without changing the start time, you usethe raid.scrub.duration option, specifying the number of minutes you want automatic RAID-level scrubs to run. If you set this option to -1, all automatic RAID-level scrubs run to completion.
Note: If you specify a duration using the raid.scrub.schedule option, that value overrides thevalue you specify with the raid.scrub.duration option.
Scheduling example
The following command schedules two weekly RAID scrubs. The first scrub is for 240minutes (four hours) every Tuesday starting at 2 a.m. The second scrub is for eight hours everySaturday starting at 10 p.m.
122 | Storage Management Guide

options raid.scrub.schedule 240m@tue@2,8h@sat@22
Verification example
The following command displays your current RAID-level automatic scrub schedule.
options raid.scrub.schedule
Reverting to the default schedule example
The following command reverts your automatic RAID-level scrub schedule to the default(Sunday at 1:00 a.m., for six hours):
options raid.scrub.schedule ""
Related tasks
Controlling the performance impact of RAID-level scrubbing on page 126
How you run a manual RAID-level scrub
You can manually run a RAID-level scrub on individual RAID groups, plexes, aggregates, or allaggregates using the aggr scrub command. You can also stop, suspend, and resume manual RAID-level scrubs.
If you try to run a RAID-level scrub on a RAID group that is not in a normal state (for example, agroup that is reconstructing or degraded), the scrub returns errors and does not check that RAIDgroup. You can run a RAID-level scrub on a RAID-DP group with one failed disk.
Scrubbing all aggregates
The following command starts a RAID-level scrub on all of the aggregates in the storagesystem:
aggr scrub start
Scrubbing a particular RAID group
The following command starts a RAID-level scrub on rg0 in plex1 of aggregate aggr2:
aggr scrub start aggr2/plex1/rg0
Stopping a manual RAID-level scrub
The following command stops a manual RAID-level scrub currently running on plex1 oraggr0:
aggr scrub stop aggr0/plex1
How Data ONTAP uses RAID to protect your data and data availability | 123

If you do not specify a name of an aggregate, plex, or RAID group, Data ONTAP stops allmanual RAID-level scrubs. After you stop a scrub, it cannot be resumed.
Suspending a manual RAID-level scrub
The following command suspends a manual RAID-level scrub currently running on aggregateaggr3:
aggr scrub suspend aggr3
You can resume this scrub later by using the aggr scrub resume command.
Viewing RAID-level scrub status
The following command displays the status of all currently running RAID-level scrubs, alongwith the date and time when the last full scrub was completed:
aggr scrub status -v
124 | Storage Management Guide

Controlling the impact of RAID operations onsystem performance
You can reduce the impact of RAID operations on system performance by decreasing the speed ofthe RAID operations.
You can control the speed of the following RAID operations with RAID options:
• RAID data reconstruction
• Disk scrubbing
• Plex resynchronization
• Synchronous mirror verification
The speed that you select for each of these operations might affect the overall performance of thestorage system. However, if the operation is already running at the maximum speed possible and it isfully utilizing one of the three system resources (the CPU, disks, or the disk-to-controller connectionbandwidth), changing the speed of the operation has no effect on the performance of the operation orthe storage system.
If the operation is not yet running, you can set a speed that minimally slows storage system networkoperations or a speed that severely slows storage system network operations. For each operation, usethe following guidelines:
• If you want to reduce the performance impact on client access to the storage system, change thespecific RAID option from medium to low. Doing so also causes the operation to slow down.
• If you want to speed up the operation, change the RAID option from medium to high. Doing somight decrease the performance of the storage system in response to client access.
Controlling the performance impact of RAID datareconstruction
Because RAID data reconstruction consumes CPU resources, increasing the speed of datareconstruction sometimes slows storage system network and disk operations. You can control thespeed of data reconstruction with the raid.reconstruc.perf_impact option.
About this task
When RAID data reconstruction and plex resynchronization are running at the same time, DataONTAP limits the combined resource utilization to the greater impact set by either operation. Forexample, if raid.resync.perf_impact is set to medium and
125

raid.reconstruct.perf_impact is set to low, the resource utilization of both operations has amedium impact.
The setting for this option also controls the speed of Rapid RAID Recovery.
Step
1. Enter the following command:
options raid.reconstruct.perf_impact impact
impact can be high, medium, or low.
high means that the storage system uses most of the system resources available for RAID datareconstruction; this setting can heavily affect storage system performance, but reconstructionfinishes sooner, reducing the time that the RAID group is in degraded mode.
low means that the storage system uses very little of the system resources; this setting lightlyaffects storage system performance. However, reconstruction takes longer to complete, increasingthe time that the storage system is running in degraded mode.
The default impact is medium.
Controlling the performance impact of RAID-level scrubbingWhen Data ONTAP performs a RAID-level scrub, it checks the disk blocks of all disks on thestorage system for media errors and parity consistency. You can control the impact this operation hason system performance with the raid.verify.perf_impact option.
About this task
When RAID-level scrubbing and mirror verification are running at the same time, Data ONTAPlimits the combined resource utilization to the greater impact set by either operation. For example, ifraid.verify.perf_impact is set to medium and raid.scrub.perf_impact is set to low, theresource utilization by both operations has a medium impact.
If there are times during the day when the load on your storage system is decreased, you can alsolimit the performance impact of the automatic RAID-level scrub by changing the start time orduration of the automatic scrub.
Step
1. Enter the following command:
options raid.scrub.perf_impact impact
impact can be high, medium, or low.
high means that the storage system uses most of the system resources available for scrubbing;this setting can heavily affect storage system performance, but the scrub finishes sooner.
126 | Storage Management Guide

low means that the storage system uses very little of the system resources; this setting lightlyaffects storage system performance, but the scrub takes longer to complete.
The default impact is low.
Related concepts
How you schedule automatic RAID-level scrubs on page 122
How Data ONTAP uses RAID to protect your data and data availability on page 108
Controlling the performance impact of plexresynchronization
Plex resynchronization ensures that both plexes of a mirrored aggregate are identical. You cancontrol the performance impact of plex resynchronization by using theraid.resync.perf_impact option.
About this task
When plex resynchronization and RAID data reconstruction are running at the same time, DataONTAP limits the combined resource utilization to the greatest impact set by either operation. Forexample, if raid.resync.perf_impact is set to medium andraid.reconstruct.perf_impact is set to low, the resource utilization by both operations has amedium impact.
You should set this option to the same value for both nodes in an HA configuration.
Step
1. Enter the following command:
options raid.resync.perf_impact impact
impact can be high, medium, or low.
high means that the storage system uses most of the system resources available for plexresynchronization; this setting can heavily affect storage system performance, but theresynchronization finishes sooner.
low means that the storage system uses very little of the system resources; this setting lightlyaffects storage system performance, but the resynchronization takes longer to complete.
The default impact is medium.
Controlling the impact of RAID operations on system performance | 127

Controlling the performance impact of mirror verificationYou use mirror verification to ensure that the two plexes of a synchronous mirrored aggregate areidentical. You can control the speed of mirror verification, and its effect on system resources, byusing the raid.verify.perf_impact option.
About this task
When mirror verification and RAID-level scrubbing are running at the same time, Data ONTAPlimits the combined resource utilization to the greatest impact set by either operation. For example, ifraid.verify.perf_impact is set to medium and raid.scrub.perf_impact is set to low, theresource utilization of both operations has a medium impact.
For more information about synchronous mirroring, see the Data ONTAP Data Protection TapeBackup and Recovery Guide for 7-Mode.
Step
1. Enter the following command:
options raid.verify.perf_impact impact
impact can be high, medium, or low.
high means that the storage system uses most of the system resources available for mirrorverification; this setting can heavily affect storage system performance, but the mirror verificationfinishes sooner.
low means that the storage system uses very little of the system resources; this setting lightlyaffects storage system performance, but the mirror verification takes longer to complete.
The default impact is low.
128 | Storage Management Guide

What aggregates are
To support the differing security, backup, performance, and data sharing needs of your users, you cangroup the physical data storage resources on your storage system into one or more aggregates. Youcan then design and configure these aggregates to provide the appropriate level of performance andredundancy.
Each aggregate has its own RAID configuration, plex structure, and set of assigned drives or arrayLUNs. The aggregate provides storage, based on its configuration, to its associated FlexVol volumes.
Aggregates have the following characteristics:
• They can be composed of drives or array LUNs.
• They can be mirrored or unmirrored.
• They can be in 64-bit or 32-bit format.
• If they are composed of drives, they can be single-tier (composed of only HDDs or only SSDs) orthey can be Flash Pool aggregates, which include both HDD RAID groups and an SSD cache.
For information about best practices for working with aggregates, see Technical Report 3437:Storage Subsystem Resiliency Guide.
Related concepts
Disk speeds supported by Data ONTAP on page 21
Related references
Storage limits on page 373
Related information
Technical Report 3437: Storage Subsystem Resiliency Guide
Introduction to 64-bit and 32-bit aggregate formatsAggregates are either 64-bit or 32-bit format. 64-bit aggregates have much larger size limits than 32-bit aggregates. 64-bit and 32-bit aggregates can coexist on the same storage system.
32-bit aggregates have a maximum size of 16 TB; 64-bit aggregates' maximum size depends on thestorage system model. For the maximum 64-bit aggregate size of your storage system model, see theHardware Universe at hwu.netapp.com.
When you create a new aggregate, it is a 64-bit format aggregate.
129

You can expand 32-bit aggregates to 64-bit aggregates by increasing their size beyond 16 TB. 64-bitaggregates, including aggregates that were previously expanded, cannot be converted to 32-bitaggregates.
You can see whether an aggregate is a 32-bit aggregate or a 64-bit aggregate by using the aggrstatus command.
Related references
Storage limits on page 373
Best practices for expanding a 32-bit aggregate to 64-bitYou should be aware of certain best practices before expanding an aggregate from 32-bit to 64-bitformat.
Following these suggestions ensures a smooth expansion operation:
• If the aggregate you are adding storage to contains FlexCache volumes, destroy the FlexCachevolumes before initiating the expansion and re-create them after the operation is complete.
• If you are expanding aggregates that contain volumes in a SnapMirror relationship, expand theaggregate containing the source volume first whenever possible.Otherwise, expand the source aggregate as soon as possible after expanding the destinationaggregate.
• If you are creating a FlexClone volume from a SnapMirror destination volume and you areexpanding the aggregates containing the source and destination volumes, expand both source anddestination, and use a base Snapshot copy that was created after the source volume was expanded.
• When you add storage to any aggregate, add an entire RAID group at a time to keep the size ofyour RAID groups homogeneous.
For more information about expanding a 32-bit aggregate to 64-bit, see TR-3978, In-Place Expansionof 32-bit Aggregates to 64-bit Overview and Best Practices.
Related information
TR 3978: In-Place Expansion of 32-bit Aggregates to 64-bit Overview and Best Practices
How unmirrored aggregates workUnless you are using SyncMirror, all of your aggregates are unmirrored. Unmirrored aggregates haveonly one plex (copy of their data), which contains all of the RAID groups belonging to thataggregate.
The following diagram shows an unmirrored aggregate with disks, with its one plex:
130 | Storage Management Guide

Hot spare diskData diskParity diskdParity diskRAID group
Aggregate (aggrA)
Plex (plex0)
pool0
rg0rg1rg2rg3
Legend
Hot spare disks
The following diagram shows an unmirrored aggregate with array LUNs, with its one plex:
Aggregate (aggrA)
Plex (plex0) = pool 0
rg0rg1
Legend
array LUN in the aggregate
Data ONTAP RAID group
What aggregates are | 131

How mirrored aggregates workMirrored aggregates have two plexes (copies of their data), which use the SyncMirror functionality toduplicate the data to provide redundancy.
When SyncMirror is enabled, all the disks or array LUNs are divided into two pools, and a copy ofthe plex is created. The plexes are physically separated (each plex has its own RAID groups and itsown pool), and the plexes are updated simultaneously. This provides added protection against dataloss if more disks fail than the RAID level of the aggregate protects against or there is a loss ofconnectivity, because the unaffected plex continues to serve data while you fix the cause of thefailure. After the plex that had a problem is fixed, you can resynchronize the two plexes andreestablish the mirror relationship.
In the following diagram of a storage system using disks, SyncMirror is enabled and implemented, soData ONTAP copies plex0 and automatically names the copy plex1. Plex0 and plex1 contain copiesof one or more file systems. In this diagram, 32 disks were available prior to the SyncMirrorrelationship being initiated. After initiating SyncMirror, the spare disks are allocated to pool0 orpool1.
Aggregate (aggrA)
Plex (plex0) Plex (plex1)
pool0 pool1
rg0rg1rg2rg3
rg0rg1rg2rg3
Hot spare disks, a pool for each plex.
The following diagram shows a storage system using array LUNs with SyncMirror enabled andimplemented.
132 | Storage Management Guide

Aggregate (aggrA)
Plex (plex0) = pool 0 Plex (plex1) = pool 1
rg0rg0rg1rg1
array LUN in the aggregate
Data ONTAP RAID group
What a Flash Pool aggregate isA Flash Pool aggregate combines both SSDs and HDDs (performance or capacity) to provide a high-performance aggregate more economically than an SSD aggregate.
The SSDs provide a high-performance cache for the active data set of the data volumes provisionedon the Flash Pool aggregate, offloading random read operations and repetitive random writeoperations to improve response times and overall throughput for disk I/O-bound data accessoperations. (Performance is not significantly increased for predominately sequential workloads.)
How Flash Pool aggregates work
The Flash Pool technology enables you to add one or more RAID groups composed of SSDs to anaggregate that consists of HDD RAID groups.
The SSD cache does not contribute to the size of the aggregate as calculated against the maximumaggregate size. For example, even if an aggregate is at the maximum aggregate size, you can add anSSD RAID group to it. The SSDs do count toward the overall (node or HA pair) drive limit.
The HDD RAID groups in a Flash Pool aggregate behave the same as HDD RAID groups in astandard aggregate, following the same rules for mixing disk types, sizes, speeds, and checksums.For example, you cannot combine performance and capacity disks in the HDD RAID groups of aFlash Pool aggregate.
The checksum type, RAID type, and RAID group size values can be configured for the SSD cacheRAID groups and HDD RAID groups independently.
There is a platform-dependent maximum size for the SSD cache. For information about this limit foryour platform, see the Hardware Universe.
What aggregates are | 133

Requirements for using Flash Pool aggregates
The Flash Pool technology has some configuration requirements that you should be aware of beforeplanning to use it in your storage architecture.
Flash Pool aggregates cannot be used in the following configurations:
• 32-bit aggregates
• Aggregates composed of array LUNs
• Aggregates that use the ZCS checksum type
• SnapLock aggregates
• Traditional volumes
You can use Flash Pool aggregates and the Flash Cache module (WAFL external cache) in the samesystem. However, data stored in a Flash Pool aggregate is not cached in the Flash Cache module.Flash Cache is reserved for data stored in aggregates composed of only HDDs. For more informationabout Flash Cache and WAFL external cache, see the Data ONTAP System Administration Guidefor 7-Mode.
You can use data compression on volumes associated with a Flash Pool aggregate. However,compressed blocks are not cached in the Flash Pool cache for either read or write operations.
FlexShare is not supported for volumes associated with Flash Pool aggregates.
Read-only volumes, such as SnapMirror or SnapVault destinations, are not cached in the Flash Poolcache.
If the Flash Pool aggregate is not mirrored and it is not used for a MetroCluster configuration, youshould disable automatic aggregate Snapshot creation for the Flash Pool (aggr options nosnapcommand). For information about automatic aggregate Snapshot copy creation, see the Data ONTAPSystem Administration Guide for 7-Mode.
Flash Pool aggregates can be created from mirrored aggregates; however, the SSD configurationmust be kept the same for both plexes.
For a list of the platforms that support Flash Pool aggregates, and for minimum numbers of SSDs,see the Hardware Universe.
If you create a Flash Pool aggregate using an aggregate that was created using Data ONTAP 7.1 orearlier, the volumes associated with that Flash Pool aggregate will not support write caching.
For more information about the types of workloads that benefit from using Flash Pool aggregates, seeTechnical Report 4070: NetApp Flash Pool Design and Implementation Guide.
Related information
TR 4070: NetApp Flash Pool Design and Implementation Guide
134 | Storage Management Guide

How Flash Pool aggregates and Flash Cache compare
Both the Flash Pool technology and the family of Flash Cache modules (Flash Cache and FlashCache 2) provide a high-performance cache to increase storage performance. However, there aredifferences between the two technologies that you should understand before choosing between them.
You can employ both technologies on the same system. However, data stored in volumes associatedwith a Flash Pool aggregate (or an SSD aggregate) is not cached by Flash Cache.
Criteria Flash Pool aggregate Flash Cache
Scope A specific aggregate All aggregates assigned to acontroller
Caching types supported Read and write Read
Cached data availability duringand after takeover events
Cached data is available andunaffected by either planned orunplanned takeover events.
Cached data is not availableduring takeover events. Aftergiveback for a plannedtakeover, previously cacheddata that is still valid is re-cached automatically.
PCIe slot on storage controllerrequired?
No Yes
Supported with array LUNs? No Yes
Supported with StorageEncryption?
No Yes. Data in the cache is notencrypted.
Supported with SnapLock? No Yes
For more information about Flash Cache, see the Data ONTAP System Administration Guide for 7-Mode.
About read and write caching for Flash Pool aggregates
The Flash Pool technology provides both read caching and write caching for random I/O workloads.You can configure Flash Pool caching on the volume, but for most workloads, the default cachingpolicies result in optimal performance.
Some volumes cannot be enabled for write caching. When you attempt to use an aggregate associatedwith one or more of these volumes as a Flash Pool aggregate, you must force the operation. In thiscase, writes to that volume would not be cached in the SSD cache, but otherwise the Flash Poolaggregate would function normally. You can get more information about why a volume cannot beenabled for write caching by using the vol status -v command.
For more information about read and write caching policies, see Technical Report 4070: NetAppFlash Pool Design and Implementation Guide.
What aggregates are | 135

Related information
TR 4070: NetApp Flash Pool Design and Implementation Guide
How the available Flash Pool cache capacity is calculated
Knowing the available cache capacity enables you to determine how many data SSDs you can addbefore reaching the limit, because Flash Pool cache capacity cannot exceed a platform-dependentlimit for the system or HA configuration.
The current cache capacity is the sum of the “used size” capacity (as reported by the sysconfig -rcommand) of all of the data SSDs used in Flash Pool aggregates on the system. Parity SSDs are notincluded. For systems using SyncMirror, including MetroCluster configurations, only the Flash Poolcache of one plex counts toward the cache limit.
For systems in an HA configuration, the cache size limits apply to the HA configuration as a whole,and can be split arbitrarily between the two nodes, provided that the total limit for the HAconfiguration is not exceeded.
If Flash Cache modules are installed in a system, the available cache capacity for Flash Pool use isthe Flash Pool cache capacity limit minus the sum of the Flash Cache module cache installed on thenode. (In the unusual case where the size of the Flash Cache modules is not symmetrical between thetwo nodes in an HA configuration, the available Flash Pool cache capacity is decreased by the size ofthe larger Flash Cache module.)
For information about cache size limits, see the Hardware Universe.
Example calculation with Flash Cache modules
For an HA configuration composed of two storage controllers with a maximum cache capacityof 12 TB and 2 TB of Flash Cache installed on each node, the maximum Flash Pool aggregatecache capacity for the HA pair would be 12 TB minus 2 TB, or 10 TB.
Example calculation with asymmetrically sized Flash Cache modules
For an HA configuration composed of two storage controllers with a maximum cache capacityof 12 TB and 2 TB of Flash Cache installed on one node and 3 TB of Flash Cache installed onthe other node, the maximum Flash Pool aggregate cache capacity for the HA pair would be 12TB minus 3 TB, or 9 TB.
Restrictions for using aggregates composed of SSDsAggregates composed of SSDs have some restrictions on when they can be used.
You cannot use aggregates composed of SSDs with the following configurations or technologies:
• SnapLock
136 | Storage Management Guide

• Traditional volumes
• Storage Encryption
• FlexShare
How you can use disks with mixed speeds in the sameaggregate
Whenever possible, you should use disks of the same speed in an aggregate. However, if needed, youcan configure Data ONTAP to allow mixed speed aggregates based on the disk class.
To configure Data ONTAP to allow mixed speed aggregates, you use the following RAID options:
• raid.mix.hdd.rpm.performance
• raid.mix.hdd.rpm.capacity
When these options are set to on, Data ONTAP allows mixing speeds for the designated disk class.Performance disk types are FC and SAS; capacity disk types are BSAS, FSAS, MSATA, and ATA.
By default, raid.mix.hdd.rpm.performance is set to off, and raid.mix.hdd.rpm.capacityis set to on.
Even if Data ONTAP is not configured to allow mixing speeds, you can still create aggregates out ofdisks with different speeds by using the -f option of the aggr create or aggr add commands.
Related concepts
Disk speeds supported by Data ONTAP on page 21
How to control disk selection from heterogeneous storageWhen disks with different characteristics coexist on the same node, or when both disks and arrayLUNs are attached to the same node, the system has heterogeneous storage. When you create anaggregate from heterogeneous storage, you should take steps to ensure that Data ONTAP uses thedisks you expect.
If your node has heterogeneous storage and you do not explicitly specify what type of disks to use,Data ONTAP uses the disk type (including array LUNs) with the highest number of available disks.When you create or add storage to an aggregate using heterogeneous storage, you should use one ofthe following methods to ensure that Data ONTAP selects the correct disks or disk types:
• Through disk attributes:
◦ You can specify disk size by using the @size option.Disks within 20% of the specified size are selected.
What aggregates are | 137

◦ You can specify disk speed by using the -R option.
◦ You can specify disk type by using the -T option.
• Through an explicit disk list.You can list the names of specific disks you want to use.
• Through disk selection preview.You can use the -n option to identify which disks Data ONTAP selects automatically. If you arehappy with the disks selected, you can proceed with automatic disk selection. Otherwise, you canuse one of the previous methods to ensure that the correct disks are selected.
Note: For unplanned events such as disk failures, which cause Data ONTAP to add another disk toa RAID group automatically, the best way to ensure that Data ONTAP chooses the best disk forany RAID group on your system is to always have at least one spare (and preferably two) availableto match all disk types and sizes in use in your system.
Rules for mixing HDD types in aggregatesYou can mix disks from different loops or stacks within the same aggregate. Depending on the valueof the raid.mix.hdd.disktype RAID options, you can mix certain types of HDDs within thesame aggregate, but some disk type combinations are more desirable than others.
When the appropriate raid.mix.hdd.disktype option is set to off, HDD RAID groups can becomposed of only one Data ONTAP disk type. This setting ensures that your aggregates arehomogeneous, and requires that you provide sufficient spare disks for every disk type in use in yoursystem.
The default value for the raid.mix.hdd.disktype.performance option is off, to preventmixing SAS and FCAL disks.
The default value for the raid.mix.hdd.disktype.capacity option is on. For this setting, theBSAS, FSAS, and ATA disk types are considered to be equivalent for the purposes of creating andadding to aggregates, and spare management.
To maximize aggregate performance and for easier storage administration, you should avoid mixingFC-connected and SAS-connected disks in the same aggregate. This is because of the performancemismatch between FC-connected storage shelves and SAS-connected storage shelves. When you mixthese connection types in the same aggregate, the performance of the aggregate is limited by thepresence of the FC-connected storage shelves, even though some of the data is being served from thehigher-performing SAS-connected storage shelves.
MSATA disks cannot be mixed with any other disk type in the same aggregate.
Disks using Storage Encryption have a Data ONTAP disk type of SAS. However, they cannot bemixed with any other disk type, including SAS disks that are not using Storage Encryption. If anydisks on a storage system use Storage Encryption, all of the disks on the storage system (and its high-availability partner node) must use Storage Encryption.
138 | Storage Management Guide

Note: If you set a raid.mix.hdd.disktype option to off for a system that already containsaggregates with more than one type of HDD, those aggregates continue to function normally andaccept both types of HDDs. However, no other aggregates composed of the specified disk typewill accept mixed HDD types as long as that option is set to off.
For information about best practices for working with different types of disks, see Technical Report3437: Storage Best Practices and Resiliency Guide.
Related concepts
How Data ONTAP reports disk types on page 18
Related information
TR 3437: Storage Best Practices and Resiliency Guide
Rules for mixing drive types in Flash Pool aggregatesBy definition, Flash Pool aggregates contain more than one drive type. However, the HDD RAIDgroups follow the same drive-type mixing rules as standard aggregates. For example, you cannot mixperformance and capacity disks in the same Flash Pool aggregate. The SSD cache can contain onlySSDs.
How drive checksum types affect aggregate and sparemanagement
There are two checksum types available for drives used by Data ONTAP: BCS (block) and AZCS(zoned). Understanding how the checksum types differ and how they impact storage managementenables you to manage your storage more effectively.
Both checksum types provide the same resiliency capabilities. BCS optimizes for data access speed,and reserves the smallest amount of capacity for the checksum for drives with 520-byte sectors.AZCS provides enhanced storage utilization and capacity for drives with 512-byte sectors. Youcannot change the checksum type of a drive.
To determine the checksum type of a specific drive model, see the Hardware Universe.
Aggregates have a checksum type, which is determined by the checksum type of the drives or arrayLUNs that compose the aggregate. The following configuration rules apply to aggregates, drives, andchecksums:
• Checksum types cannot be combined within RAID groups.This means that you must consider checksum type when you provide hot spare drives.
• When you add storage to an aggregate, if it has a different checksum type than the storage in theRAID group to which it would normally be added, Data ONTAP creates a new RAID group.
What aggregates are | 139

• An aggregate can have RAID groups of both checksum types.These aggregates have a checksum type of mixed.
• For mirrored aggregates, both plexes must have the same checksum type.
• Drives of a different checksum type cannot be used to replace a failed drive.
• You cannot change the checksum type of a drive.
Rules for mixing storage in array LUN aggregatesWhen planning for aggregates, you must consider the rules for mixing storage in aggregates. Youcannot mix different storage types or array LUNs from different vendors or vendor families in thesame aggregate.
Adding the following to the same aggregate is not supported:
• Array LUNs and disks
• Array LUNs with different checksum types
• Array LUNs from different drive types (for example, FC and SATA) or different speeds
• Array LUNs from different storage array vendors
• Array LUNs from different storage array model families
Note: Storage arrays in the same family share the same performance and failover characteristics.For example, members of the same family all perform active-active failover, or they all performactive-passive failover. More than one factor might be used to determine storage array families.For example, storage arrays with different architectures would be in different families even thoughother characteristics might be the same.
How the checksum type is determined for array LUNaggregates
Each Data ONTAP aggregate has a checksum type associated with it. The aggregate checksum typeis determined by the checksum type of the array LUNs that are added to it.
The checksum type of an aggregate is determined by the checksum type of the first array LUN that isadded to the aggregate. The checksum type applies to an entire aggregate (that is, to all volumes inthe aggregate). Mixing array LUNs of different checksum types in an aggregate is not supported.
• An array LUN of type block must be used with block checksum type aggregates.
• An array LUN of type zoned must be used with advanced zoned checksum (AZCS oradvanced_zoned) type aggregates.
140 | Storage Management Guide

Note: Prior to Data ONTAP 8.1.1, zoned checksum array LUNs were used with ZCS (zoned)type aggregates. Starting in 8.1.1, any new aggregates created with zoned checksum arrayLUNs are AZCS aggregates. However, you can add zoned checksum array LUNs to existingZCS aggregates.
Before you add array LUNs to an aggregate, you must know the checksum type of the LUNs youwant to add, for the following reasons:
• You cannot add array LUNs of different checksum types to the same aggregate.
• You cannot convert an aggregate from one checksum type to the other.
When you create an aggregate you can specify the number of array LUNs to be added, or you canspecify the names of the LUNs to be added. If you want to specify a number of array LUNs to beadded to the aggregate, the same number or more array LUNs of that checksum type must beavailable.
Understanding the root aggregateThe root aggregate contains the root volume, which contains special directories and configurationfiles that help you administer the storage system.
The following facts apply to the root aggregate:
• Starting with Data ONTAP 8.1, new systems are shipped with the root volume in a 64-bit rootaggregate.
• By default, the storage system is set up to use a hard disk drive (HDD) aggregate for the rootaggregate.When no HDDs are available, the system is set up to use a solid-state drive (SSD) aggregate forthe root aggregate. If you want to change the root aggregate, you can choose either an HDDaggregate or an SSD aggregate to be the root aggregate (aggr options aggr_name root),provided that the corresponding type of disk drives is available on the system.
• A Flash Pool aggregate (an aggregate that contains both HDDs and SSDs) can be used as the rootaggregate.
Attention: If you revert or downgrade to Data ONTAP 8.1 or earlier with a Flash Poolaggregate configured as your root aggregate, your system will not boot.
What aggregates are | 141

Managing aggregate Snapshot copiesAn aggregate Snapshot copy is a point-in-time, read-only image of an aggregate. You use aggregateSnapshot copies when the contents of an entire aggregate need to be recorded.
An aggregate Snapshot copy is similar to a volume Snapshot copy, except that it captures thecontents of the entire aggregate, rather than any particular volume. Also, you do not restore datadirectly from an aggregate Snapshot copy. To restore data, you use a volume Snapshot copy.
How you use aggregate Snapshot copies depends on whether you use the SyncMirror orMetroCluster functionality.
• If you use SyncMirror or MetroCluster functionality, you must enable automatic aggregateSnapshot copy creation and keep your aggregate Snapshot reserve at 5 percent or higher.If you use SyncMirror or MetroCluster functionality and you need to break the mirror, anaggregate Snapshot copy is created automatically before breaking the mirror to decrease the timeit takes to resynchronize the mirror later. You should not schedule or manually create aggregateSnapshot copies for a mirrored aggregate. These Snapshot copies compete with the SyncMirrorbaseline Snapshot copies for the aggregate's Snapshot reserve; insufficient Snapshot reserve couldprevent a level-1 resynchronization operation from being completed successfully.
• If you do not use either SyncMirror or MetroCluster functionality, you do not need to enableautomatic aggregate Snapshot copy creation or reserve space for aggregate Snapshot copies.If the aggregate file system becomes inconsistent, aggregate Snapshot copies can be used bytechnical support to restore the file system to a consistent state. If that is important to you, youcan ensure that automatic aggregate Snapshot copy creation is enabled. However, disablingautomatic aggregate Snapshot copy creation and keeping your aggregate Snapshot reserve at 0percent increases your storage utilization, because no disk space is reserved for aggregateSnapshot copies. Disabling automatic aggregate Snapshot copy creation and setting the aggregateSnapshot reserve to 0 percent does not affect normal operation, except for making more freespace available for data.
For more information about Snapshot copies, see the Data ONTAP Data Protection Online Backupand Recovery Guide for 7-Mode.
Considerations for increasing the aggregate Snapshot reserve
You should consider increasing the aggregate Snapshot reserve under some circumstances.
Just as there is space reserved for volume Snapshot copies in their volume (the volume Snapshotreserve), there is space reserved for aggregate Snapshot copies in the aggregate. This space is calledthe aggregate Snapshot reserve.
As more and more data blocks in the aggregate are changed, the aggregate Snapshot reservegradually becomes full. Data ONTAP automatically deletes the oldest aggregate Snapshot copies torecover space in the aggregate Snapshot reserve.
142 | Storage Management Guide

Newly created nonmirrored aggregates, including the root aggregate, have the aggregate Snapshotreserve set to 0 percent by default. A newly created mirrored aggregate's Snapshot reserve is set to 5percent by default.
If you convert an existing, nonmirrored aggregate to a mirrored aggregate, the system attempts toincrease the aggregate Snapshot reserve to 5 percent. If there is not enough space in the aggregate forthe reserve increase, the operation to convert a nonmirrored aggregate to a mirrored aggregate fails.
You should consider increasing the aggregate Snapshot reserve in the following situations:
• You find that aggregate Snapshot copies are being created and deleted often enough to affectsystem performance.
• You need to complete a mirror resync operation when data is being written to an aggregatefrequently.In this case, the standard aggregate Snapshot reserve size of 5 percent might not be large enoughto hold all the resynchronized Snapshot copies until the resync operation is complete.
• You do not want aggregate Snapshot copies deleted immediately.To preserve aggregate Snapshot copies, you would increase the reserve sufficiently to keep theaggregate Snapshot copies available for overwrites until they are no longer needed and delete allother Snapshot copies.
If an aggregate has an aggregate Snapshot reserve of 0 percent, the operation to create aggregateSnapshot copies still succeeds if the aggregate has enough free space available.
What aggregates are | 143

Managing aggregates
You manage aggregates by creating them, increasing their size, setting their RAID level, andmanaging their state. In addition, you can destroy, undestroy, and move aggregates.
You cannot reduce the number of disks in an aggregate by removing data disks. The only way toreduce the number of data disks in an aggregate is to copy the data and transfer it to a new aggregatethat has fewer data disks.
Creating an aggregateYou create an aggregate to provide storage to one or more FlexVol volumes.
Before you begin
• You should know what drives or array LUNs will be used in the new aggregate.
• You should have determined the correct RAID group size given the number of drives or arrayLUNs you are using to create the aggregate and your plans for expanding the aggregate in thefuture.
• If you have multiple drive types in your system (heterogeneous storage), you should understandhow you can ensure that the correct drive type is selected.
About this task
Aggregate names must conform to the following requirements:
• They must begin with either a letter or an underscore (_).
• They can contain only letters, digits, and underscores.
• They must contain 250 or fewer characters.
Steps
1. Display a list of available spares:
aggr status -s
2. Create the aggregate:
aggr create aggr_name [-f] [-m] [-n] [-t {raid0 | raid4 | raid_dp}] [-rraidsize] [-T disk-type] -R rpm] [-L] [-p] disk-list
aggr_name is the name for the new aggregate.
144 | Storage Management Guide

-f overrides the default behavior that does not permit drives in a plex to belong to differentpools. This option also enables you to mix drives with different RPM speeds even if theappropriate raid.rpm option is not off.
-m specifies the optional creation of a SyncMirror-replicated volume if you want to supplementRAID protection with SyncMirror protection.
-n displays the results of the command but does not execute it. This is useful for displaying thedrives that would be automatically selected prior to executing the command.
-t {raid0 | raid4 | raid_dp} specifies the level of RAID protection you want to provide forthis aggregate. If no RAID level is specified for an aggregate composed of drives, the defaultvalue (raid_dp) is applied. raid0 is used only for array LUNs.
-r raidsize is the maximum size of the RAID groups for this aggregate. If no size is specified,the default is used.
-T disk-type specifies the Data ONTAP drive type. This option is needed when creatingaggregates on systems that have mixed drive types or both drives and array LUNs.
-R rpm specifies the type of drive to use based on its speed. Valid values for rpm include 5400,7200, 10000, and 15000.
-L creates a SnapLock aggregate. For more information about the SnapLock feature, see thena_aggr(1) man page or the Data ONTAP Archive and Compliance Management Guide for 7-Mode.
-p specifies the pool from which the drives are selected.
disk-list is one of the following values:
• ndisks[@disk-size]ndisks is the number of drives to use.disk-size is the drive size to use, in gigabytes.
• -d disk_name1 disk_name2... disk_nameNdisk_name1, disk_name2, and disk_nameN are drive IDs of available drives; use a spaceto separate drive IDs.
3. Verify the RAID groups and drives of your new aggregate:
aggr status -r aggr_name
Example
You want to create a storage configuration for a single node cluster and have 4 shelves of SASdisks totaling 96 drives, with 3 drives used for the root aggregate. You decide to allocate theremaining drives in the following manner:
• 2 spares
Managing aggregates | 145

• 91 drives used for data in one aggregate:
◦ 4 RAID groups of 18 drives each
◦ 1 RAID group of 19 drives
To accomplish this goal, you use the following steps:
1. Create the first RAID group of 19 disks:
aggr create n01sas01 -r 19 -T SAS 19
2. Change the aggregate's maximum RAID group size to 18:
aggr options n01sas01 raidsize 18
3. Add the remaining 54 disks as 4 RAID groups of 18 disks each:
aggr add n01sas01 -T SAS 54
Later, if you added a 24-drive shelf to the node and wanted to add the storage to this aggregate,you could again modify the RAID group size to 24 so that the entire shelf could beaccommodated in a single RAID group, provided that a RAID group size of 24 is acceptablefor your installation.
Related concepts
Considerations for sizing RAID groups on page 114
Considerations for Data ONTAP RAID groups for array LUNs on page 116
Protection provided by RAID and SyncMirror on page 110
What aggregates are on page 129
How Data ONTAP uses RAID to protect your data and data availability on page 108
How you can use disks with mixed speeds in the same aggregate on page 137
Related references
Storage limits on page 373
Creating a Flash Pool aggregateYou create a Flash Pool aggregate by enabling the feature on an existing 64-bit aggregate composedof HDD RAID groups, and then adding one or more SSD RAID groups to that aggregate. This results
146 | Storage Management Guide

in two sets of RAID groups for that aggregate: SSD RAID groups (the SSD cache) and HDD RAIDgroups.
Before you begin
• You must have identified a valid 64-bit aggregate composed of HDDs to convert to a Flash Poolaggregate.
• You must have determined write-caching eligibility of the volumes associated with the aggregate,and completed any required steps to resolve eligibility issues.
• You must have determined the SSDs you will be adding, and these SSDs must be owned by thenode on which you are creating the Flash Pool aggregate.
• You must have determined the checksum types of both the SSDs you are adding and the HDDsalready in the aggregate.
• You must have determined the number of SSDs you are adding and the optimal RAID group sizefor the SSD RAID groups.Using fewer RAID groups in the SSD cache reduces the number of parity disks required.
• You must have determined the RAID level you want to use for the SSD cache.
• You must have familiarized yourself with the configuration requirements for Flash Poolaggregates.
About this task
After you add an SSD cache to an aggregate to create a Flash Pool aggregate, you cannot remove theSSD cache to convert the aggregate back to its original configuration.
You can change the RAID group size of the SSD cache, but you cannot make this change until afterSSDs have been added. After disks have been added to a RAID group, they cannot be removed. Ifyou know that you want to use a different RAID group size than the default SSD RAID group size,you can add a small number SSDs at first. Then, after you update the RAID group size, you can addthe rest of the SSDs.
By default, the RAID level of the SSD cache is the same as the RAID level of the HDD RAIDgroups. You can override this default selection by specifying the -t option when you add the firstSSD RAID groups. Although the SSD cache is providing caching for the HDD RAID groups, theSSD cache is integral to the health of the aggregate as a whole. An SSD RAID group thatexperiences a failure that exceeds the RAID protection capability of the RAID level in use takes theaggregate offline. For this reason, it is a best practice to keep the RAID level of the SSD cache thesame as that of the HDD RAID groups.
There are platform- and workload-specific best practices for Flash Pool SSD cache size andconfiguration. For information about these best practices, see Technical Report 4070: NetApp FlashPool Design and Implementation Guide.
Managing aggregates | 147

Steps
1. Mark the aggregate as hybrid-enabled:
aggr options aggr_name hybrid_enabled true
If this step does not succeed, determine write-caching eligibility for the target aggregate.
2. Add the SSDs to the aggregate by using the aggr add command.
You can specify the SSDs by ID or by using the disk_type and ndisks parameters. You do notneed to specify a new RAID group; Data ONTAP automatically puts the SSDs into their ownRAID group.
If you plan to change the RAID group size for the SSD cache, you should add only a smallnumber SSDs in this step. (You must add at least three.)
If the HDDs and the SSDs do not have the same checksum type, or if the aggregate is a mixed-checksum aggregate, then you must use the -c parameter to specify the checksum type of thedisks you are adding to the aggregate.
You can specify a different RAID type for the SSD cache by using the -t option.
3. If you want a different RAID group size for the SSD cache than for the HDD RAID groups,change the SSD RAID group size:
aggr options aggr_name cache_raid_group_size size
4. If you did not add all of the required SSDs in the previous step, add the rest of the SSDs by usingthe aggr add command again.
Related concepts
How Flash Pool aggregates work on page 133
Requirements for using Flash Pool aggregates on page 134
Related tasks
Determining and enabling volume write-caching eligibility on page 148
Related information
TR 4070: NetApp Flash Pool Design and Implementation Guide
Determining and enabling volume write-caching eligibility
Understanding whether the FlexVol volumes associated with an aggregate are eligible for writecaching can help you ensure that the volumes with high performance requirements can get the
148 | Storage Management Guide

maximum performance improvement from having their associated aggregate converted to a FlashPool aggregate.
About this task
You can use this procedure to determine write caching eligibility to help you decide whichaggregates are good candidates to become Flash Pool aggregates. You do not need any SSDs tocomplete this procedure.
Flash Pool aggregates employ two types of caching: read caching and write caching. Read caching isavailable for all volumes. Write caching is usually available for most volumes, but might be disableddue to the following reasons:
• The associated aggregate was created using Data ONTAP 7.1 or earlierThe error message for this condition refers to an incompatible file system version.
• An internal ID collisionThe error message for this condition says that one or more volumes in the aggregateis not eligible for write caching.
If the aggregate you want to convert to a Flash Pool aggregate was created using Data ONTAP 7.1 orearlier and you want write caching to be enabled for its associated volumes, you must copy eachFlexVol volume associated with the aggregate to a new aggregate and convert the new aggregate to aFlash Pool aggregate. If some volumes are ineligible due to an ID collision, you can resolve the IDcollision by moving the ineligible volumes to another aggregate (and back again if needed) or simplyproceed with the conversion, using the force option. In this case, the ineligible volumes do notbenefit from the Flash Pool aggregate cache for write operations.
Steps
1. Attempt to enable the Flash Pool aggregate capability on the aggregate:
aggr options aggr_name hybrid_enabled true
2. Take the applicable action based on the result of Step 1:
If the... Then...
Flash Pool aggregatecapability is successfullyenabled
Disable the Flash Pool aggregate capability again:
aggr options aggr_name hybrid_enabled false
You have completed this task. All of the volumes associated with theaggregate are eligible for write caching.
Command displays an errormessage telling you that theaggregate cannot beconverted to a Flash Poolaggregate
Go to the next step.
Managing aggregates | 149

3. Take the applicable action based on why the volumes are ineligible and your requirements forthose volumes:
If the volumes are ineligiblebecause...
Then...
The aggregate was createdusing Data ONTAP 7.1 orearlier, and you do not needto enable write caching for itsassociated volumes
You can convert the aggregate by using the force option.
The aggregate was createdusing Data ONTAP 7.1 orearlier, and you want toenable write caching for itsassociated volumes
Copy all of the volumes associated with this aggregate to a newaggregate, and then repeat this procedure on the new aggregate.
There are ID collisions forsome volumes in theaggregate, and you do notneed to enable write cachingfor those volumes
You can convert the aggregate by using the force option.
There are ID collisions forsome volumes in theaggregate, and you need toenable write caching for thosevolumes
Complete the following steps:
a. Determine which volumes have ID collisions by running the volstatus -v command for each volume, and noting the ones that donot show read-write eligibility.
b. Copy or move all but one of each set of volumes with the sameconflicting ID to a different aggregate, and then move them backuntil no more volumes show an ID conflict.If the volumes are accessed using only SAN protocols, you can useDataMotion for Volumes to move the volumes nondisruptively. Formore information, see the Data ONTAP SAN Administration Guidefor 7-Mode.
Example with ID collision
The following example shows the system output when volumes within the aggregate have IDcollisions:
sys1> aggr options aggr1 hybrid_enabled onaggr options: Failed to set caching policies on Aggregate "aggr1" because one or more volumes in the aggregate is not eligible for write caching.
sys1> vol status -v vol8...........
svo_allow_rman=off, svo_reject_errors=off, no_i2p=off, fractional_reserve=100,
150 | Storage Management Guide

extent=off, try_first=volume_grow, read_realloc=off, snapshot_clone_dependency=off, no_delete_log=off, dlog_hole_reserve=off, nbu_archival_snap=off Volume has clones: vol8_clone Volume UUID: 4a7afb51-47cd-11e1-bebd-123478563412 Containing aggregate: 'aggr1' Volinfo mode: 7-mode Volume Instance UUID: 4a7afb94-47cd-11e1-bebd-123478563412 Volume Provenance UUID: 4a7afb94-47cd-11e1-bebd-123478563412
Plex /aggr1/plex0: online, normal, active RAID group /aggr1/plex0/rg0: normal, block checksums RAID group /aggr1/plex0/rg1: normal, block checksums
Snapshot autodelete settings for vol8: state=off commitment=try trigger=volume target_free_space=20% delete_order=oldest_first defer_delete=user_created prefix=(not specified) destroy_list=none Volume autosize settings: state=off Hybrid Cache: Eligibility=read Write caching ineligibility reason=ID Collision(25443)
Determining the optimal Flash Pool cache sizeBefore converting an existing aggregate to a Flash Pool aggregate, you can determine the best FlashPool cache size for your workload and budget. You can also check whether the cache of an existingFlash Pool aggregate is sized correctly.
Before you begin
You should know approximately when the aggregate you are analyzing experiences its peak load.
Steps
1. Enter advanced mode:
priv set advanced
2. Start AWA:
wafl awa start aggr_name
AWA begins collecting workload data for the volumes associated with the specified aggregate.
3. Exit advanced mode:
Managing aggregates | 151

priv set admin
4. Allow AWA to run until one or more intervals of peak load have occurred.
AWA analyzes data for up to one rolling week in duration. Running AWA for more than oneweek will report only on data collected from the previous week. Cache size estimates are basedon the highest loads seen during the data collection period. You do not need to ensure that theload is high for the entire data collection period.
AWA collects workload statistics for the volumes associated with the specified aggregate.
5. Enter advanced mode:
priv set advanced
6. Display the workload analysis:
wafl awa print
AWA displays the workload statistics and optimal Flash Pool cache size.
7. Stop AWA:
wafl awa stop
All workload data is flushed and is no longer available for analysis.
8. Exit advanced mode:
priv set admin
Example
In the following example, AWA was run on aggregate “aggr1”. Here is the output of the awaprint command after AWA had been running for about 3 days (442 10-minute intervals):
### FP AWA Stats ###
Basic Information Aggregate aggr1 Current-time Mon Jul 28 16:02:21 CEST 2014 Start-time Thu Jul 31 12:07:07 CEST 2014 Total runtime (sec) 264682 Interval length (sec) 600 Total intervals 442 In-core Intervals 1024 Summary of the past 442 intervals max Read Throughput 39.695 MB/s Write Throughput 17.581 MB/s Cacheable Read (%) 92 % Cacheable Write (%) 83 %Max Projected Cache Size 114 GiB
152 | Storage Management Guide

Projected Read Offload 82 % Projected Write Offload 82 % Summary Cache Hit Rate vs. Cache Size Size 20% 40% 60% 80% 100% Read Hit 34 51 66 75 82 Write Hit 35 44 53 62 82 The entire results and output of Automated Workload Analyzer (AWA) areestimates. The format, syntax, CLI, results and output of AWA maychange in future Data ONTAP releases. AWA reports the projected cachesize in capacity. It does not make recommendations regarding thenumber of data SSDs required. Please follow the guidelines forconfiguring and deploying Flash Pool; that are provided in tools andcollateral documents. These include verifying the platform cache sizemaximums and minimum number and maximum number of data SSDs. ### FP AWA Stats End ###________________________________________
The results provide the following pieces of information:
• Read Throughput and Write ThroughputThe throughput measurements can help you identify an aggregate that is receiving a higheramount of traffic. Note that these numbers do not indicate whether that aggregate is I/Obound.
• Max Projected Cache Size
The size at which the SSD cache would hold every eligible data block that was requestedfrom disk during the AWA run. Note that this does not guarantee a hit for all future I/Ooperations, because they might request data that is not in the cache. However, if theworkload during the AWA run was a typical one, and if your budget allows for it, thiswould be an ideal size for your Flash Pool cache.
• Projected Read Offload and Projected Write OffloadThe approximate percentages of read and write operations that would have been handled bya Flash Pool cache of the optimal size rather than going to disk (projected cache hit rate).Note that this number is related to the performance increase you would see by convertingthe aggregate to a Flash Pool aggregate, but not an exact prediction.
• Summary Cache Hit Rate vs. Cache Size
This table can help you predict the performance impact of decreasing the size of the SSDcache from Max Projected Cache Size. These values are highly impacted by yourworkload. Depending on whether data that was aged out of the cache was ever accessed
Managing aggregates | 153

again, the impact of decreasing the size of the cache might be large or almost nonexistent.You can use this table to find the “sweet spot” of cost versus performance for yourworkload and budget.
Changing the RAID type of RAID groups in a Flash Poolaggregate
The SSD cache of a Flash Pool aggregate can have a different RAID type than the HDD RAIDgroups if you need to reduce the parity overhead for your SSD RAID groups.
Before you begin
• You should understand the considerations for RAID type and spare management for Flash Poolcache.
• If you are changing the RAID type of the SSD cache from RAID-DP to RAID4, you shouldensure that doing so will not cause you to exceed your cache size limit.
About this task
If the SSD cache has a different RAID type than the HDD RAID groups, the Flash Pool aggregate isconsidered to have a mixed RAID type, displayed as mixed_raid_type for the aggregate. In thiscase, the RAID type is also displayed for each RAID group.
All HDD RAID groups in a Flash Pool aggregate must have the same RAID type, which should beRAID-DP.
Steps
1. Change the RAID type of the SSD cache or HDD RAID groups of the Flash Pool aggregate:
aggr options aggr_name -T disk-type
To change the RAID type of the SSD cache, use -T SSD. To change the RAID type of the HDDRAID groups, specify any disk type included in the HDD RAID groups.
2. Verify the RAID groups in your Flash Pool aggregate:
aggr status aggr_name -r
You also can use the aggr status -r command to obtain more details about the RAID typesof the HDD RAID groups and SSD cache of the Flash Pool aggregate.
154 | Storage Management Guide

Increasing the size of an aggregateYou can add disks or array LUNs to an aggregate so that it can provide more storage to its associatedvolumes. If you need to add enough storage to a 32-bit aggregate to increase its size beyond 16 TB,you can do so; this operation expands the aggregate to 64-bit format.
Before you begin
• You must understand the requirement to add disks or array LUNs owned by the same system andpool
• For aggregates composed of disks, you must understand the following:
◦ Benefits of keeping your RAID groups homogeneous for disk size and speed
◦ Which types of disks can be used together
◦ Checksum rules when disks of more than one checksum type are in use
◦ How to ensure that the correct disks are added to the aggregate (the disk addition operationcannot be undone)
◦ How to add disks to aggregates from heterogeneous storage
◦ Minimum number of disks to add for best performance
◦ Number of hot spares you need to provide for protection against disk failures
◦ Requirements for adding disks from multi-disk carrier disk shelves
◦ Requirement to add storage to both plexes of a mirrored aggregate at the same time to ensurethat the plexes are the same size and contain the same disk types
◦ If you are adding cache to a Flash Pool aggregate, the cache limit for your platform model andhow much cache you are adding towards the limit
About this task
Following these best practices when you add storage to an aggregate optimizes aggregateperformance:
• Add a complete RAID group at a time.The new RAID group does not have to be exactly the same size as the existing RAID groups, butit should not be less than one half the size of the existing RAID groups.
• If any small RAID groups exist already, you can bring them up to the size of the other RAIDgroups, as long as you add at least as many data drives as are already in the RAID group.
Managing aggregates | 155

• Avoid adding a small number of drives to an existing RAID group.Doing so results in the added disks being the target for a disproportionate percentage of new data,causing the new disks to become a performance bottleneck.
For information about adding SSDs to a Flash Pool aggregate, see Technical Report 4070: NetAppFlash Pool Design and Implementation Guide.
Steps
1. Verify that appropriate spare disks or array LUNs are available for you to add:
aggr status -s
For disks, make sure that enough of the spares listed are of the correct type, size, speed, andchecksum type for the target RAID group in the aggregate to which you are adding the disks.
2. Add the disks or array LUNs:
aggr add aggr_name [-T] [-c] [-f] [-n] [-g {raid_group_name | new |all}] disk_list
If you are adding disks with a different checksum than the aggregate, as when creating a FlashPool aggregate, or if you are adding disks to a mixed checksum aggregate, you must eitherspecify the disks to be added with a disk list or use the -c option to specify the checksum.
If you are adding disks to a Flash Pool aggregate, you must either specify the disks to be addedwith a disk list or use the -T option to specify the disk type.
-f enables you to add disks or array LUNs from a different pool or, for disks, of a differentspeed.
-n displays the results of the command but does not execute it. This is useful for displaying thedisks or array LUNs that Data ONTAP would automatically select. You can then decide whetherto accept the selection provided by Data ONTAP or to add different disks or array LUNs.
If you specify the -g option, the storage is added to the RAID group you specify.raid_group_name is the name that Data ONTAP gave to the group—for example, rg0. If youare adding SSDs to the SSD cache of a Flash Pool aggregate, you do not need to specify theRAID group name; the SSD RAID group is selected by default based on the type of the disks youare adding. You should always fill up the existing SSD RAID group before creating a new one.
To add the storage to a new RAID group, use the new value instead of the group name.
To fill all existing RAID groups to the current value of the raidsize option before creating anew RAID group, use the all keyword instead of the group name. When you specify the allkeyword, Data ONTAP adds disks to an existing RAID group until it reaches the maximum size,and then moves on to the next existing RAID group. If there are more disks to be added and allexisting RAID groups are full, Data ONTAP creates a new RAID group.
disk_list is one of the following parameters:
• ndisks[@disk_size]
156 | Storage Management Guide

• -d disk1 [disk2...]
The disk_size parameter is the approximate size of the disk in GB. Disks that are withinapproximately 20 percent of the specified size are selected.
3. If the previous step was unsuccessful because you are adding disks to a 32-bit aggregate and theadditional disks would cause its size to exceed 16 TB, complete the following steps to expand theaggregate to 64-bit:
a. Repeat the aggr add command you entered before, with the -64bit-upgrade normalparameter added.
Example
For example, if you entered the aggr add 10@600G command, you would enter thefollowing command:
aggr add -64bit-upgrade normal 10@600G
Data ONTAP checks each volume associated with the aggregate to ensure that it has enoughfree space to be expanded to 64-bit. If all of the volumes have enough free space, the disks areadded and the aggregate is expanded to the 64-bit format. If any of the volumes are too full tobe expanded, the command fails.
b. If the previous command failed, run the command again, replacing the -64-bit-upgradenormal parameter with the -64-bit-upgrade check parameter and following theinstructions in the output of that command.
c. If you had to add more space to any volume, repeat the aggr add command again, this timewith the -64bit-upgrade normal parameter.
d. If you want to ensure that the disk usage quota accounting for this aggregate is exactly correct,reinitialize quotas on all of its volumes.
If you do not reinitialize quotas, quotas on volumes associated with this aggregate will remainactive, but the disk usage accounting will be slightly lower than the actual usage until the nexttime quotas are reinitialized.
After you finish
After you add storage to an aggregate, you should run a full reallocation job on each FlexVol volumecontained in that aggregate. For information about reallocation, see the Data ONTAP SystemAdministration Guide for 7-Mode.
Related concepts
What happens when you add storage to an aggregate on page 158
How to control disk selection from heterogeneous storage on page 137
How you can use disks with mixed speeds in the same aggregate on page 137
Managing aggregates | 157

Minimum number of hot spares you should have on page 117
Best practices for expanding a 32-bit aggregate to 64-bit on page 130
What aggregates are on page 129
How Flash Pool aggregates work on page 133
Related references
Storage limits on page 373
Related information
TR 4070: NetApp Flash Pool Design and Implementation Guide
What happens when you add storage to an aggregate
By default, Data ONTAP adds new drives or array LUNs to the most recently created RAID groupuntil it reaches its maximum size. Then Data ONTAP creates a new RAID group. Alternatively, youcan specify a RAID group that you want to add storage to.
When you create an aggregate or add storage to an aggregate, Data ONTAP creates new RAIDgroups as each RAID group is filled with its maximum number of drives or array LUNs. The lastRAID group formed might contain fewer drives or array LUNs than the maximum RAID group sizefor the aggregate. In that case, any storage added to the aggregate is added to the last RAID groupuntil the specified RAID group size is reached.
If you increase the RAID group size for an aggregate, new drives or array LUNs are added only tothe most recently created RAID group; the previously created RAID groups remain at their currentsize unless you explicitly add storage to them.
If you add a drive to a RAID group that is larger than the drives already there, the new drive iscapacity-limited to be the same size as the other drives.
Note: You are advised to keep your RAID groups homogeneous when possible. If needed, you canreplace a mismatched drive with a more suitable drive later.
Related concepts
How to control disk selection from heterogeneous storage on page 137
How you can use disks with mixed speeds in the same aggregate on page 137
How mirrored aggregates work on page 132
Related tasks
Replacing disks that are currently being used in an aggregate on page 40
158 | Storage Management Guide

Forcibly adding disks to aggregates
You might want to override some of the restrictions on what disks can be added to an aggregate ifyou do not have disks of the right speed or enough disks in the correct pool. You can do so by usingthe aggr add -f command.
About this task
Forcibly adding disks can be useful in the following situations:
• You need to add disks from two different spare disk pools to a mirrored aggregate.
Note: Using disks from the wrong pool in a mirrored aggregate removes an important faultisolation property of the SyncMirror functionality. You should do so only when absolutelynecessary, and you should return to a supported configuration as soon as possible.
• You need to add disks of a different speed than that of existing disks in the aggregate.
Step
1. Add the disks by entering the following command:
aggr add aggr_name -f [-n] [-g {raid_group_name | new | all}] disk_list
Expanding an aggregate to 64-bit without adding storageYou can expand a 32-bit aggregate to the 64-bit format without adding storage to it. This enables youto use capabilities that are supported only on 64-bit aggregates, and helps you remove 32-bit datafrom your storage system.
Before you begin
• If the aggregate contains destination volumes for a SnapMirror relationship with a 32-bit sourcevolume, the aggregate containing the source volume must be expanded before expanding theaggregate containing the destination volume.
• All FlexCache volumes contained by the aggregate to be expanded must be destroyed before youinitiate the expansion.They can be re-created after the expansion is complete.
About this task
For volumes in a SnapMirror relationship, the destination volume inherits the format of the sourcevolume while the mirror is intact. If the aggregate you are expanding contains a destination volumewhose source is a 32-bit volume and you break the mirror before expanding the aggregate, thedestination volume will be expanded to the 64-bit format. However, if you reestablish the mirror and
Managing aggregates | 159

the source volume is still 32-bit, the destination volume returns to the 32-bit format. For this reason,you must expand the aggregate containing the source volume before reestablishing the SnapMirrorrelationship if you want to expand all 32-bit volumes in the aggregate to the 64-bit format.
Steps
1. Enter advanced privilege mode:
priv set advanced
2. Initiate the expansion:
aggr 64bit-upgrade start aggr_name
3. Depending on the result of the preceding step, take the appropriate action:
If the command... Then...
Initiates successfully Proceed to the next step.
Indicates that one or morevolumes could not beexpanded because they didnot have enough space
Retry the command, adding the grow-all option.
Indicates that the expansioncould not be completed forsome other reason
Take the appropriate action, based on the issue outlined in the errormessage.
4. Display the status of the expansion:
aggr 64bit-upgrade status aggr_name
The current status of the expansion is displayed. When the message that there is no upgrade inprogress is displayed, the expansion is complete.
5. Optional: Confirm that all volumes in the aggregate are 64-bit format:
aggr 64bit-upgrade status aggr_name -all
6. Return to administrative privilege mode:
priv set admin
Taking an aggregate offlineYou use the aggr offline command to take an aggregate offline to perform maintenance on theaggregate, move it, or destroy it.
Steps
1. If the aggregate you want to take offline contains FlexVol volumes, boot into maintenance mode.
160 | Storage Management Guide

Note: This step is not necessary for traditional volumes.
2. Enter the following command:
aggr offline aggr_name
3. If you previously booted into maintenance mode, return to normal mode.
Result
The aggregate is now offline. You cannot access any data in the aggregate's volumes.
Related tasks
Taking a volume offline on page 190
Bringing an aggregate onlineAfter you restrict an aggregate or take it offline, you can use the aggr online command to make itavailable to the storage system again by bringing it back online.
Step
1. Enter the following command:
aggr online aggr_name
If the aggregate is inconsistent, the command prompts you for confirmation.
Attention: If you bring an inconsistent aggregate online, it might suffer further file systemcorruption. If you have an inconsistent aggregate, contact technical support.
Result
The aggregate is online and available for use.
Related tasks
Bringing a volume online on page 190
Managing aggregates | 161

Putting an aggregate into restricted statePutting an aggregate into the restricted state prevents data access to volumes associated with theaggregate but does not take the aggregate completely offline. You must put an aggregate into therestricted state to make it the target of an aggregate copy or SnapMirror operation.
Steps
1. If the aggregate you want to restrict contains FlexVol volumes, boot into maintenance mode.
2. Enter the following command:
aggr restrict aggr_name
3. If you previously booted into maintenance mode, return to normal mode.
Result
The aggregate is now restricted. Data in the aggregate's volumes is unavailable to clients.
Related tasks
Putting a volume into restricted state on page 189
Changing the RAID level of an aggregateWhen you change an aggregate’s RAID level (from RAID4 to RAID-DP, for example), DataONTAP reconfigures existing RAID groups to the new level and applies the new level tosubsequently created RAID groups.
You cannot change the Data ONTAP RAID level of aggregates containing array LUNs. Aggregatesthat contain array LUNs must have a Data ONTAP RAID level of RAID0. RAID protection foraggregates that contain array LUNs is provided by the storage array.
Changing an aggregate's RAID level from RAID4 to RAID-DP
You can change an existing aggregate's RAID level from RAID4 to RAID-DP if you want theincreased protection that RAID-DP provides.
Steps
1. Determine the number of RAID groups and the size of their parity disks in the aggregate inquestion by entering the following command:
aggr status aggr_name -r
162 | Storage Management Guide

2. List the available hot spares on your system by entering the following command:
aggr status -s
3. Make sure that at least one, and preferably two hot spare disks exist for each RAID group listed.If necessary, add additional hot spare disks.
4. Enter the following command:
aggr options aggr_name raidtype raid_dp
Result
When you change the RAID level of an aggregate from RAID4 to RAID-DP, Data ONTAP makesthe following changes:
• Adds an additional disk to each existing RAID group from the storage system’s hot spare disks;assigns the new disk the dParity disk function for the RAID group. A reconstruction begins foreach RAID group to populate the dParity disk.
• Changes the raidsize option for the aggregate to the appropriate RAID-DP default value.
Note: You can change the raidsize option after the RAID level change is complete.
After you finish
You can verify the new RAID level by using the aggr options command.
Related concepts
What aggregates are on page 129
How Data ONTAP works with hot spare disks on page 117
Related tasks
Customizing the size of your RAID groups on page 115
Related references
Storage limits on page 373
Changing an aggregate's RAID level from RAID-DP to RAID4
When you change an aggregate's RAID level from RAID-DP to RAID4, the extra parity disks areconverted to spares. In addition, the raidsize option is changed.
Step
1. Change the RAID level:
aggr options aggr_name raidtype raid4
Managing aggregates | 163

Result
When you change the RAID level of an aggregate from RAID-DP to RAID4, Data ONTAP makesthe following changes:
• In each of the aggregate’s existing RAID groups, the second parity disk (dParity) is removed anddesignated as a hot spare, thus reducing each RAID group’s size by one parity disk.
• The setting for the aggregate’s raidsize option is changed to the size of the largest RAID groupin the aggregate, except in the following situations:
◦ If the aggregate’s largest RAID group is larger than the maximum RAID4 group size, then theaggregate’s raidsize option is set to the maximum.
◦ If the aggregate’s largest RAID group is smaller than the default RAID4 group size, then theaggregate’s raidsize option is set to the default group size.
◦ If the aggregate's raidsize option is already below the default value for RAID4, it isreduced by 1.
After you finish
You can verify the new RAID level by using the aggr options command.
Related concepts
What aggregates are on page 129
Related tasks
Customizing the size of your RAID groups on page 115
Related references
Storage limits on page 373
Destroying an aggregateYou destroy an aggregate when you no longer need the data in that aggregate or when you havecopied the content of the aggregate to another location.
Before you begin
Before you can destroy an aggregate, you must have destroyed all of the FlexVol volumes associatedwith that aggregate.
164 | Storage Management Guide

About this task
When you destroy an aggregate, Data ONTAP converts its parity disks and its data disks back intohot spares. You can then use the spares in other aggregates and other storage systems.
Attention: If you destroy an aggregate, the data in the aggregate is no longer accessible by normalaccess methods, unless you restore it before any of its disks are zeroed or reused in anotheraggregate.
Note: If you want to make the data in the aggregate inaccessible by any means, you can sanitize itsdisks.
Note: You cannot destroy a SnapLock Compliance aggregate until the retention periods for alldata contained in it have expired. For more information about the SnapLock functionality, see theData ONTAP Archive and Compliance Management Guide for 7-Mode.
Steps
1. Take the aggregate offline by entering the following command:
aggr offline aggr_name
2. Destroy the aggregate by entering the following command:
aggr destroy aggr_name
The following message is displayed:
Are you sure you want to destroy this aggregate ?
3. Enter the following command to confirm that you want to destroy the aggregate:
y
The following message is displayed:Aggregate 'aggr_name' destroyed.
Related concepts
How disk sanitization works on page 25
Restoring a destroyed aggregateIf you previously destroyed an aggregate and have changed your mind, you can restore the aggregateif the data is still intact and the aggregate was not SnapLock-compliant.
Before you begin
You must know the name of the aggregate you want to restore, because there is no Data ONTAPcommand available to display destroyed aggregates, and they do not appear in the management tools.
Managing aggregates | 165

Steps
1. Restore the aggregate by entering the following command:
aggr undestroy aggr_name
Example
aggr undestroy aggr1
The following message is displayed:To proceed with aggr undestroy, select one of the following options [1]abandon the command [2] undestroy aggregate aggr1 ID:0xf8737c0-11d9c001-a000d5a3-bb320198 Selection (1-2)?
If you select 2, a message is displayed with a date and time stamp for each disk that is restored tothe aggregate.
2. Run the wafliron program with the privilege level set to advanced.
Physically moving an aggregate composed of disksTo move an aggregate composed of disks from one storage system (the source) to another (thetarget), you need to physically move disks, disk shelves, or entire loops or stacks. You might movean aggregate to move data to a new storage system model or remove data from an impaired storagesystem.
Before you begin
The target storage system must meet the following requirements:
• It must be running a version of Data ONTAP that is the same or later than the version running onthe source system.
Note: You cannot move an aggregate between a system running Data ONTAP operating in 7-Mode and a system running Data ONTAP operating in Cluster-Mode.
• It must support the shelf, I/O module, and disk types being moved.
• It must support the size of the aggregate being moved.
About this task
The procedure described here does not apply to aggregates composed of array LUNs.
If you are moving an aggregate composed of disks using Storage Encryption, you need to take someextra steps before and after moving the aggregate. If the physical security of the disks during themove is a concern and your key management server supports the creation of a trust relationshipbetween two storage systems, then you should use that capability to retain secure encryption on thedisks during the move. Otherwise, you must set the encryption key to a known value before moving
166 | Storage Management Guide

the disks and give them a new authentication key after the disks are installed in the destinationstorage system. This is the method described in the steps below.
Steps
1. Enter the following command at the source storage system to locate the disks that contain theaggregate:
aggr status aggr_name -r
The locations of the data, parity, and dParity disks in the aggregate appear under the HA, SHELF,and BAY columns (dParity disks appear for RAID-DP aggregates only).
2. If you are moving disks using Storage Encryption, reset their authentication key to their MSID(the default security ID set by the manufacturer) by entering the following command on thesource storage system:
disk encrypt rekey 0x0 disk_list
You can also use the wildcard character (*) to specify the disks to be rekeyed. For example, torekey all disks in a specific shelf, you can specify adapter-name.shelI-ID.* as your disk list.
3. Boot the source storage system into Maintenance mode.
4. Take the aggregate offline:
aggr offline aggr_name
The aggregate is taken offline and its hosted volumes are unmounted.
5. Reboot into Normal mode.
6. If disk ownership autoassignment is on, turn it off:
options disk.auto_assign off
If the system is part of an HA pair, you must complete this step on each node.
7. Remove the software ownership information from the disks to be moved by entering thefollowing command for each disk:
disk assign disk_name -s unowned -f
8. Follow the instructions in the disk shelf hardware guide to remove the disks or shelves that youidentified previously from the source storage system.
9. If you turned off disk ownership autoassignment previously, turn it back on:
options disk.auto_assign on
If the system is part of an HA pair, you must complete this step on each node.
10. Install the disks or disk shelves in the target storage system.
Managing aggregates | 167

11. Assign the disks that you moved to the target storage system by entering the following commandfor each moved disk:
disk assign disk_name
The newly relocated aggregate is offline and considered as a foreign aggregate. If the newlyrelocated aggregate has the same name as an existing aggregate on the target storage system, DataONTAP renames it aggr_name(1), where aggr_name is the original name of the aggregate.
12. Confirm that the newly relocated aggregate is complete:
aggr status aggr_name
Attention: If the aggregate is incomplete (if it has a status of partial), add all missing disksbefore proceeding. Do not try to add missing disks after the aggregate comes online; doing socauses them to become hot spare disks. You can identify the disks currently used by theaggregate by using the aggr status -r command.
13. If the storage system renamed the aggregate because of a name conflict, rename the aggregate:
aggr rename aggr_name new_name
14. Bring the aggregate online in the destination storage system:
aggr online aggr_name
The aggregate comes online and is no longer considered to be a foreign aggregate.
15. Confirm that the added aggregate came online:
aggr status aggr_name
16. If you moved disks using Storage Encryption, set them back to a secure encryption key.
If you... Then...
Want all of the disks on yourstorage system to have thesame authentication key andyou have the authenticationkey for the other disks on thestorage system
Rekey the disks that were moved using the existing authentication key byentering the following command at the destination storage systemprompt:
disk encrypt rekey new_key_ID disk_list
new_key_ID is the key ID for the existing authentication key on thedestination storage system.
You can use the wildcard character (*) to specify the disks to be rekeyed.For example, to rekey all disks in a specific shelf, you can specifyadapter-name.shelI-ID.* as your disk list.
168 | Storage Management Guide

If you... Then...
Want all of the disks on yourstorage system to have thesame authentication key andyou do not have theauthentication key for theother disks on the storagesystem
Rekey all of the disks in the destination storage system by entering thefollowing command at the destination storage system prompt:
key_manager rekey -keytag key_tag
You can allow Data ONTAP to generate a new authentication keyautomatically or provide your own by using the -manual parameter.
Do not need all of the diskson your storage system tohave the same authenticationkey
Rekey the disks that were moved:
disk encrypt rekey new_key_ID disk_list
new_key_ID is the key ID for a new authentication key on thedestination storage system.
You can use the wildcard character (*) to specify the disks to be rekeyed.For example, to rekey all disks in a specific shelf, you can specifyadapter-name.shelI-ID.* as your disk list.
After you finish
After you move the aggregate and bring it online in the destination storage system, you need to re-create the following configuration information for all volumes associated with the aggregate:
• Client connections (CIFS shares or NFS exports)
• Scheduled tasks (for example, deduplication or reallocation)
• Quotas
• Relationships between volumes (for example, SnapMirror or SnapVault)
• FlexCache volumes
• LUN connection information
Moving an aggregate composed of array LUNsYou might want to move an aggregate composed of array LUNs to a less-loaded system to balancethe load processing over the systems.
Before you begin
• You should plan the number and size of your aggregates ahead of time so that you have flexibilityin the amount of the workload that you can shift from one system to another.
• You should ensure that the target system meets the following requirements:
Managing aggregates | 169

◦ The target system must be running a version of Data ONTAP that is the same as or later thanthe version running on the source system.
◦ The target system must support the size of the aggregate being moved.
About this task
To move the aggregate composed of array LUNs from one storage system (the source) to another(the target), you need to change the ownership of each array LUN in the aggregate from the sourcesystem to the target system. You can move both aggregates and traditional volumes using thisprocedure.
Note: If there are vFiler units in the aggregate you want to move, you might prefer to useSnapMover to move the aggregate. When SnapMover is used to move a vFiler unit, all aggregatesin the vFiler unit are moved with the vFiler unit. To use vFiler units, you must have MultiStoresoftware and SnapMover. See the Data ONTAP MultiStore Management Guide for 7-Mode formore information.
Steps
1. Enter the following commands on the target system:
a. Obtain the system ID of the target system by entering either of the following commands:
disk show
or
sysconfig
You need to provide the target system's ID on the source system when you assign each of thearray LUNs to the target system.
2. Enter the following commands on the source system:
a. Enter the following command to display the array LUNs that the aggregate contains:
aggr status aggr_name -r
The array LUNs that are displayed are the LUNs that you need to reassign to the target systemto be able to move the aggregate.
b. Write down the names of the array LUNs in the aggregate that you want to move.
c. Enter the following command to shut down the source system:
halt
d. At the boot environment prompt, enter the following command to boot the source system:
bye
e. Interrupt the boot process by pressing Ctrl-C when you see the following message on theconsole:
170 | Storage Management Guide

Press Ctrl-C for Boot menu
f. Enter Maintenance mode.
g. When prompted whether you want to continue with booting, enter the following:
y
h. Enter the following command to take the aggregate offline:
aggr offline aggr_name
aggr_name is the name of the traditional volume or aggregate.
i. Enter the following and confirm that the aggregate is offline:
aggr status
j. In Maintenance mode, enter the following command separately for each array LUN in theaggregate that you are moving to the target system:
disk assign -s system_id_target disk_id -f
system_id_target is the system ID of the target system (the system to which you want tomove the array LUN.)
disk_id is the ID of the array LUN you want to move.
Note: Entering this command automatically removes ownership of the array LUN from thesource system and assigns it to the target system.
3. Enter the following commands on the target system.
a. Enter the following command to start a scan so that the target system can recognize the LUNsyou moved to it as its own:
disk show
b. Enter the following command:
aggr status
The display shows the foreign aggregate as offline.
Note: The aggregate you are moving is a foreign aggregate to the target system.
If the foreign aggregate has the same name as an existing aggregate on the system, DataONTAP renames it aggr_name(1), where aggr_name is the original name of the aggregate.
Attention: If the foreign aggregate is incomplete, that is, if you have not moved all thearray LUNs in the aggregate, go back to the source system to add the missing array LUNsto the aggregate you moved to the target system. Enter the following on the source system:
disk assign -s system_id_target disk_id -f
c. If Data ONTAP renamed the foreign aggregate because of a name conflict and you want tochange the name, enter the following command to rename the aggregate:
Managing aggregates | 171

aggr rename aggr_name new_name
aggr_name is the name of the aggregate you want to rename.
new_name is the new name of the aggregate.
Example
The following command renames the users(1) aggregate as newusers:
aggr rename users(1) newusers
d. Enter the following command to confirm that the aggregate you moved is online:
aggr status aggr_name
aggr_name is the name of the aggregate.
4. On the source system, reboot the system out of Maintenance mode.
172 | Storage Management Guide

Using volumes
Volumes are data containers. In a NAS environment, they contain file systems that hold user datathat is accessible using one or more of the access protocols supported by Data ONTAP, includingNFS, CIFS, HTTP, FTP, FC, and iSCSI. In a SAN environment, they contain LUNs.
Volumes depend on their associated aggregate for their physical storage.
FlexCache volumes, FlexClone volumes, and SnapLock volumes are types of volumes that sharesome characteristics with FlexVol volumes, but also have some special capabilities and requirements.
Related references
Storage limits on page 373
How FlexVol volumes workA FlexVol volume is a volume that is loosely coupled to its containing aggregate. A FlexVol volumecan share its containing aggregate with other FlexVol volumes. Thus, a single aggregate can be theshared source of all the storage used by all the FlexVol volumes contained by that aggregate.
Because a FlexVol volume is managed separately from the aggregate, you can create small FlexVolvolumes (20 MB or larger), and you can increase or decrease the size of FlexVol volumes inincrements as small as 4 KB.
When a FlexVol volume is created, it reserves a small amount of extra space (approximately 0.5percent of its nominal size) from the free space of its containing aggregate. This space is used to storevolume metadata. Therefore, upon creation, a FlexVol volume with a space guarantee of volumeuses free space from the aggregate equal to its size × 1.005. A newly-created FlexVol volume with aspace guarantee of none or file uses free space equal to 0.005 × its nominal size.
Related tasks
FlexVol volume operations on page 197
Related references
Storage limits on page 373
Differences between 64-bit and 32-bit FlexVol volumes
FlexVol volumes are one of two formats: 64-bit or 32-bit. A 64-bit volume has a larger maximumsize than a 32-bit volume.
A newly created FlexVol volume is the same format as its associated aggregate. However, a volumecan be a different format from its associated aggregate in certain cases.
173

The maximum size of a 64-bit volume is determined by the size of its associated aggregate, whichdepends on the storage system model.
A 32-bit volume has a maximum size of 16 TB.
Note: For both volume formats, the maximum size for each LUN or file is 16 TB.
Related references
Storage limits on page 373
Interoperability between 64-bit and 32-bit FlexVol volumes
Some Data ONTAP features use two FlexVol volumes; those volumes can be different formats.Some of these features can interoperate between different volume formats, but some cannot.
Data ONTAP feature Interoperates between 64-bit and 32-bitformat?
FlexCache Y
ndmpcopy Y
Qtree SnapMirror Y
Synchronous SnapMirror Y
volume copy Y
Volume SnapMirror Y
volume move (DataMotion for Volumes) 32-bit to 64-bit only
DataMotion for vFiler N
How traditional volumes workA traditional volume is a volume that is contained by a single, dedicated, aggregate. It is tightlycoupled with its containing aggregate. No other volumes can get their storage from this containingaggregate.
The only way to increase the size of a traditional volume is to add entire disks to its containingaggregate. You cannot decrease the size of a traditional volume. The smallest possible traditionalvolume uses all the space on two disks (for RAID4) or three disks (for RAID-DP).
Traditional volumes and their containing aggregates are always of type 32-bit. You cannot grow atraditional volume larger than 16 TB.
You cannot use SSDs to create a traditional volume.
174 | Storage Management Guide

How the volume language attribute affects data visibility andavailability
Every volume has a language. The language of the volume determines the character set Data ONTAPuses to display file names and data for that volume.
Attention: You are strongly advised to set all volumes to have the same language as the rootvolume, and to set the volume language at volume creation time. Changing the language of anexisting volume can cause some files to become inaccessible.
The language of the root volume has special significance, because it affects or determines thefollowing items:
• Default language for all volumes
• System name
• Domain name
• Console commands and command output
• NFS user and group names
• CIFS share names
• CIFS user account names
• Access from CIFS clients that don't support Unicode
• How configuration files in /etc are read
• How the home directory definition file is read
Note: Regardless of the language you specify for the root volume, names of the following objectsmust be in ASCII characters:
• Qtrees
• Snapshot copies
• Volumes
• Aggregates
For more information about the root volume, see the System Administration Guide.
Using volumes | 175

How file access protocols affect what language to use for your volumes
Your choice of file access protocol (CIFS or NFS) affects the languages you should choose for yourvolumes.
Protocols in use Volume language
NFS Classic (v2 or v3) only Language setting does not matter
NFS Classic (v2 or v3) and CIFS Language of the clients
NFS v4, with or without CIFS cl_lang.UTF-8, where cl_lang is thelanguage of the clients.
Note: If you use NFS v4, all NFS Classicclients must be configured to present filenames using UTF-8.
How to manage duplicate volume namesVolume names must be unique for a storage system. When Data ONTAP detects a duplicate volumename, it renames one of the volumes, but the substitute names it uses can cause problems, so youneed to take corrective action if that happens.
When Data ONTAP detects a potential duplicate volume name, it appends the string “(d)” to the endof the name of the new volume, where d is a digit that makes the name unique.
For example, if you have a volume named vol1 and you copy a volume named vol1 from anotherstorage system, Data ONTAP renames the newly copied volume to vol1(1).
You must rename any volume with an appended digit as soon as possible, for the following reasons:
• The name containing the appended digit is not guaranteed to persist across reboots.Renaming the volume prevents the name of the volume from changing unexpectedly later on.
• The parentheses characters, “(” and “)”, are not legal characters for NFS.Any volume whose name contains those characters cannot be exported to NFS clients.
• The parentheses characters could cause problems for client scripts.
Volume states and statusVolumes can be in one of four states—online, offline, restricted, or quiesced. In addition, they canshow one or more status values, depending on how they are configured and the health of their disks.
You can determine a volume's current state and status by using the vol status command.
176 | Storage Management Guide

The following table displays the possible states for volumes.
State Description
online Read and write access to this volume isallowed.
restricted Some operations, such as parity reconstruction,are allowed, but data access is not allowed.
offline No access to the volume is allowed.
quiesced The volume is in the final stages of a move.Data access is not allowed, and many volume,qtree, and quota management operations aretemporarily unavailable.
The following table displays the possible status values for volumes.
Note: Although FlexVol volumes do not directly involve RAID, the state of a FlexVol volumeincludes the state of its containing aggregate. Thus, the states pertaining to RAID apply to FlexVolvolumes as well as traditional volumes.
Status Description
access denied The origin system is not allowing access. (FlexCachevolumes only.)
connecting The caching system is trying to connect to the originsystem. (FlexCache volumes only.)
copying The volume is currently the target of an active vol copyor snapmirror operation.
degraded The volume's containing aggregate contains at least onedegraded RAID group that is not being reconstructed aftersingle disk failure.
double degraded The volume's containing aggregate contains at least onedegraded RAID-DP group that is not being reconstructedafter double disk failure.
flex The volume is a FlexVol volume.
flexcache The volume is a FlexCache volume.
foreign Disks used by the volume's containing aggregate weremoved to the current storage system from another storagesystem.
Using volumes | 177

Status Description
growing Disks are being added to the volume's containingaggregate.
initializing The volume's containing aggregate is being initialized.
invalid The volume does not contain a valid file system.
ironing A WAFL consistency check is being performed on thevolume's containing aggregate.
lang mismatch The language setting of the origin volume was changedsince the caching volume was created. (FlexCache volumesonly.)
mirror degraded The volume's containing aggregate is mirrored and one ofits plexes is offline or resynchronizing.
mirrored The volume's containing aggregate is mirrored.
needs check A WAFL consistency check needs to be performed on thevolume's containing aggregate.
out-of-date The volume's containing aggregate is mirrored and needs tobe resynchronized.
partial At least one disk was found for the volume's containingaggregate, but two or more disks are missing.
raid0 The volume's containing aggregate consists of RAID0 (noparity) groups (array LUNs only).
raid4 The volume's containing aggregate consists of RAID4groups.
raid_dp The volume's containing aggregate consists of RAID-DPgroups.
reconstruct At least one RAID group in the volume's containingaggregate is being reconstructed.
rem vol changed The origin volume was deleted and re-created with thesame name. (FlexCache volumes only.)
rem vol unavail The origin volume is offline or has been deleted.(FlexCache volumes only.)
remote nvram err The origin system is experiencing problems with itsNVRAM. (FlexCache volumes only.)
resyncing One of the plexes of the volume's containing mirroredaggregate is being resynchronized.
178 | Storage Management Guide

Status Description
snapmirrored The volume is in a SnapMirror relationship with anothervolume.
trad The volume is a traditional volume.
unrecoverable The volume is a FlexVol volume that has been markedunrecoverable; if you have a volume in this state, youshould contact technical support.
unsup remote vol The origin system is running a version of Data ONTAP thedoes not support FlexCache volumes or is not compatiblewith the version running on the caching system.(FlexCache volumes only.)
verifying RAID mirror verification is running on the volume'scontaining aggregate.
wafl inconsistent The volume or its containing aggregate has been markedcorrupted. If you have a volume in this state, you shouldcontact technical support.
Related concepts
Using FlexCache volumes to accelerate data access on page 204
How security styles affect data accessEach volume and qtree on the storage system has a security style. The security style determines whattype of permissions are used for data on volumes when authorizing users. You must understand whatthe different security styles are, when and where they are set, how they impact permissions, how theydiffer between volume types, and more.
For more information about security styles, see the Data ONTAP File Access and ProtocolsManagement Guide for 7-Mode.
Improving client performance with traditional and leaseoplocks
Traditional oplocks (opportunistic locks) and lease oplocks enable an SMB client in certain file-sharing scenarios to perform client-side caching of read-ahead, write-behind, and lock information. A
Using volumes | 179

client can then read from or write to a file without regularly reminding the server that it needs accessto the file in question. This improves performance by reducing network traffic.
Lease oplocks are an enhanced form of oplocks available with the SMB 2.1 protocol and later. Leaseoplocks allow a client to obtain and preserve client caching state across multiple SMB opensoriginating from itself.
For more information, see the Data ONTAP File Access and Protocols Management Guide for 7-Mode.
How Data ONTAP can automatically provide more space forfull FlexVol volumes
Data ONTAP uses two methods for automatically providing more space for a FlexVol volume whenthat volume is nearly full: allowing the volume size to increase, and deleting Snapshot copies (withany associated storage objects). If you enable both of these methods, you can specify which methodData ONTAP should try first.
Data ONTAP can automatically provide more free space for the volume by using one of thefollowing methods:
• Increase the size of the volume when it is nearly full (known as the autogrow feature).This method is useful if the volume's containing aggregate has enough space to support a largervolume. You can configure Data ONTAP to increase the size in increments and set a maximumsize for the volume. The increase is automatically triggered based on the amount of data beingwritten to the volume in relation to the current amount of used space and any thresholds set.
• Delete Snapshot copies when the volume is nearly full.For example, you can configure Data ONTAP to automatically delete Snapshot copies that arenot linked to Snapshot copies in cloned volumes or LUNs, or you can define which Snapshotcopies you want Data ONTAP to delete first—your oldest or newest Snapshot copies. You canalso determine when Data ONTAP should begin deleting Snapshot copies—for example, whenthe volume is nearly full or when the volume’s Snapshot reserve is nearly full.
If you enable both of these methods, you can specify which method Data ONTAP tries first when avolume is nearly full. If the first method does not provide sufficient additional space to the volume,Data ONTAP tries the other method next. By default, Data ONTAP tries to increase the size of thevolume first.
180 | Storage Management Guide

Considerations for changing the maximum number of filesallowed on a volume
Volumes have a maximum number of files that they can contain. You can change the maximumnumber of files for a volume, but before doing so you should understand how this change affects thevolume.
The number of files a volume can contain is determined by how many inodes it has. An inode is adata structure that contains information about files. Volumes have both private and public inodes.Public inodes are used for files that are visible to the user; private inodes are used for files that areused internally by Data ONTAP. You can change only the maximum number of public inodes for avolume. You cannot affect the number of private inodes.
Data ONTAP automatically sets the maximum number of public inodes for a newly created volumebased on the size of the volume: 1 inode per 32 KB of volume size. When the size of a volume isincreased, either directly by an administrator or automatically by Data ONTAP through the autosizefeature, Data ONTAP also increases (if necessary) the maximum number of public inodes so there isat least 1 inode per 32 KB of volume size, until the volume reaches approximately 1 TB in size.Growing the volume greater than 1 TB in size does not automatically result in more inodes, becauseData ONTAP does not automatically create more than 33,554,409 inodes. If you need more files thanthe default number for any size volume, you can use the maxfiles command to increase themaximum number of inodes for the volume.
You can also decrease the maximum number of public inodes. This does not change the amount ofspace currently allocated to inodes, but it does lower the maximum amount of space the public inodefile can consume. However, after space has been allocated for inodes, it is never returned to thevolume. Therefore, lowering the maximum number of inodes below the number of inodes currentlyallocated does not return the space used by the allocated but unused inodes to the volume.
Cautions for increasing the maximum directory size forFlexVol volumes
The default maximum directory size for FlexVol volumes is model-dependent, and optimized for thesize of system memory. Before increasing the maximum directory size, involve technical support.
You can increase the default maximum directory size for a specific volume by using themaxdirsize volume option, but doing so could impact system performance.
Using volumes | 181

Understanding the root volumeThe storage system's root volume contains special directories and configuration files that help youadminister the storage system. Understanding the facts about the root volume helps you manage it.
The following facts apply to the root volume:
• How the root volume is installed and whether you need to create it yourself depend on the storagesystem:
◦ For a storage system ordered with disk shelves, the root volume is a FlexVol volume that isinstalled at the factory.
◦ For a storage system that uses array LUNs and does not have a disk shelf, you install the rootvolume on an array LUN.For more information about setting up a system to use only array LUNs, see the Data ONTAPSoftware Setup Guide for 7-Mode.
◦ For systems running virtual storage, the Data ONTAP-v installation process creates a singleaggregate by using all currently defined virtual disks and creates the root FlexVol volume inthat aggregate.For more information about system setup, see the Installation and Administration Guide thatcame with your Data ONTAP-v system.
• The default name for the root volume is /vol/vol0.You can designate a different volume to be the new root volume. Starting in Data ONTAP 8.0.1,you can designate a 64-bit volume to be the new root volume.
• The root volume's fractional reserve must be 100%.
Related tasks
Changing the root volume on page 195
Recommendations for the root volumeThere are recommendations to keep in mind when choosing what kind of volume to use for the rootvolume.
The following are general recommendations for root volumes:
• Root volumes can use either FlexVol or traditional volumes.If a root volume exists as a traditional volume, it can be a stand-alone RAID4 or RAID-DPvolume. RAID4 requires a minimum of two disks and can protect against single-disk failures.RAID-DP, the default RAID type, requires a minimum of three disks and can protect againstdouble-disk failures. Using RAID-DP for the root aggregate is recommended.
182 | Storage Management Guide

Data ONTAP 8.0 or later allows you to create only a new FlexVol root volume, not a newtraditional root volume, from the boot menu. However, preexisting traditional root volumes arestill supported.
• It is recommended that the root volume be in a separate aggregate that does not include datavolumes or other user data.However, for small storage systems where cost concerns outweigh resiliency, a FlexVol basedroot volume on a regular aggregate might be more appropriate.
• You should avoid storing user data in the root volume, regardless of the type of volume used forthe root volume.
• For a storage system that has disk shelves and also uses array LUNs, the root volume can resideon the disk shelf (recommended) or on the storage array.For a storage system that uses only array LUNs (no disk shelves), the root volume resides on astorage array. You can install only one root volume per storage system, regardless of the numberof storage arrays or disk shelves that the system uses for storage.
The following are additional facts and considerations if the root volume is on a disk shelf:
• Smaller stand-alone root volumes offer fault isolation from general application storage; on theother hand, FlexVol volumes have less impact on overall storage utilization, because they do notrequire two or three disks to be dedicated to the root volume and its small storage requirements.
• If a FlexVol volume is used for the root volume, file system consistency checks and recoveryoperations could take longer to finish than with the two- or three-disk traditional root volume.FlexVol recovery commands work at the aggregate level, so all of the aggregate's disks aretargeted by the operation. One way to mitigate this effect is to use a smaller aggregate with only afew disks to house the FlexVol volume containing the root volume.
• In practice, having the root volume on a FlexVol volume makes a bigger difference with smallercapacity storage systems than with very large ones, in which dedicating two disks for the rootvolume has little impact.
• For higher resiliency, use a separate two-disk root volume.For Data ONTAP 7.3 and later, the default RAID type for traditional root volume is RAID-DP. Ifyou want to use RAID4 as the raid type for your traditional root volume to minimize the numberof disks required, you can change the RAID type from RAID-DP to RAID4 by using voloptions vol0 raidtype raid4.
The following requirement applies if the root volume is on a storage array:
• For storage systems whose root volume is on a storage array, only one array LUN is required forthe root volume regardless of whether the root volume is a traditional volume or a FlexVolvolume.
Using volumes | 183

Special system filesFor storage systems upgraded from a release earlier than Data ONTAP 8.0, some system files exist inevery volume of the system. You must not remove or modify these files unless technical supportdirects you to do so. These files enable you to restore LUNs in Snapshot copies if you revert to arelease earlier than Data ONTAP 8.0.
The following system files are in the root level of every volume, including the root volume:
• .vtoc_internal
• .bplusvtoc_internal
184 | Storage Management Guide

General volume operations
General volume operations are operations you can perform on either a FlexVol volume or atraditional volume. They include managing a volume's language, viewing or changing its state,renaming or destroying it, increasing the number of files it can contain, and running a reallocationoperation on it.
Migrating from traditional volumes to FlexVol volumesYou cannot convert directly from a traditional volume to a FlexVol volume. You must create a newFlexVol volume and then move the data to the new volume.
NetApp Professional Services staff, including Professional Services Engineers (PSEs) andProfessional Services Consultants (PSCs) are trained to assist customers with migrating data betweenvolume types, among other services. For more information, contact your local NetApp Salesrepresentative, PSE, or PSC.
Related concepts
How FlexVol volumes work on page 173
Using volumes on page 173
Preparing your destination volume
Before migrating, you need to create and name a destination volume of the correct size and numberof inodes.
Before you begin
If your destination volume is on the same storage system as the source volume, your system musthave enough free space to contain both copies of the volume during the migration.
If the new FlexVol volume will be the root volume, it must meet the minimum size requirements forroot volumes, which are based on your storage system. Data ONTAP prevents you from designatingas root a volume that does not meet the minimum size requirement. For more information, see theData ONTAP System Administration Guide for 7-Mode.
Steps
1. Enter the following command to determine the amount of space your traditional volume uses:
df -Ah vol_name
185

Example
sys1> df -Ah vol0Aggregate total used avail capacityvol0 24GB 1434MB 22GB 7%vol0/.snapshot 6220MB 4864MB 6215MB 0%
The total space used by the traditional volume is displayed as used for the volume name.
2. Enter the following command to determine the number of inodes your traditional volume uses:
df -I vol_name
Example
sys1> df -I vol0Filesystem iused ifree %iused Mounted onvol0 1010214 27921855 3% /vol/vol0
The number of inodes your traditional volume uses is displayed as iused.
3. Identify or create an aggregate to contain the new FlexVol volume.
Note: To determine if an existing aggregate is large enough to contain the new FlexVolvolume, you can use the df -Ah command. The space listed under avail should be largeenough to contain the new FlexVol volume.
4. If you want the destination (FlexVol) volume to have the same name as the source (traditional)volume, and they are on the same storage system, you must rename the source volume beforecreating the destination volume. Do this by entering the following command:
aggr rename vol_name new_vol_name
Example
aggr rename vol0 vol0trad
5. Create the destination volume in the containing aggregate.
Example
vol create vol0 aggrA 90g
Note: For root volumes, you must use the (default) volume space guarantee, because it ensuresthat writes to the volume do not fail due to a lack of available space in the containingaggregate.
6. Confirm that the size of the destination volume is at least as large as the source volume byentering the following command on the target volume:
186 | Storage Management Guide

df -h vol_name
7. Confirm that the destination volume has at least as many inodes as the source volume by enteringthe following command on the destination volume:
df -I vol_name
Note: If you need to increase the number of inodes in the destination volume, use themaxfiles command.
Result
You have created a destination volume with sufficient resources to accept the data from the sourcevolume.
Related tasks
Creating an aggregate on page 144
Creating a FlexVol volume on page 197
Migrating your data
You use the ndmpcopy command from the Data ONTAP prompt to migrate your data to the targetvolume.
Steps
1. Ensure that NDMP is configured correctly by entering the following commands:
options ndmpd.enable on
options ndmpd.authtype challenge
Note: If you are migrating your volume between storage systems, make sure that these optionsare set correctly on both systems.
2. Disable data access to the source volume.
3. Migrate the data by entering the following command at the storage system prompt:
ndmpcopy src_vol_name dest_vol_name
Example
ndmpcopy /vol/vol0trad /vol/vol0
Attention: Make sure that you use the storage system command-line interface to run thendmpcopy command. If you run this command from a client, your data will not migratesuccessfully.
General volume operations | 187

For more information about the ndmpcopy command, see the Data ONTAP Data ProtectionOnline Backup and Recovery Guide for 7-Mode.
4. Verify that the ndmpcopy operation completed successfully by validating the copied data.
Result
The target volume now contains the data from the source volume.
Snapshot copies on the source volume are not affected by this procedure. However, they are notreplicated to the target FlexVol volume as part of the migration.
Completing the migration
After you copy your data, you need to perform some additional tasks before the migration iscomplete.
Steps
1. If you are migrating your root volume, complete the following steps:
a. Make the new FlexVol volume the root volume by entering the following command:
vol options vol_name root
Example
vol options vol0 root
b. Reboot the storage system.
2. Update the clients to point to the new FlexVol volume.
• In a CIFS environment, complete these steps:
a. Point CIFS shares to the new FlexVol volume.
b. Update the CIFS maps on the client machines so that they point to the new FlexVol volume.
• In an NFS environment, complete these steps:
a. Point NFS exports to the new FlexVol volume.
b. Update the NFS mounts on the client machines so that they point to the new FlexVol volume.
3. Make sure that all clients can see the new FlexVol volume and read and write data:
a. Using a CIFS or an NFS client, create a new folder or directory.
b. Using the client, copy some temporary data into the new folder or directory and confirm thatyou can access that data from the client.
188 | Storage Management Guide

c. Delete the new folder.
4. If you are migrating the root volume and you changed the name of the root volume, update thehttpd.rootdir option to point to the new root volume.
5. If quotas were used with the traditional volume, configure the quotas on the new FlexVol volume.
6. Create a Snapshot copy of the target volume and create a new Snapshot schedule as needed.
For more information, see the Data ONTAP Data Protection Tape Backup and Recovery Guidefor 7-Mode.
7. Start using the migrated volume for the data source for your applications.
8. When you are confident the volume migration was successful, you can take the original volumeoffline or destroy it.
Note: You should preserve the original volume and its Snapshot copies until the new FlexVolvolume has been stable for some time.
Putting a volume into restricted state
You use the vol restrict command to put a volume into restricted state, which makes itunavailable for read or write access by clients. You might want to do this if you want the volume tobe the target of a volume copy or SnapMirror replication operation.
About this task
When you restrict a FlexVol volume, it relinquishes any unused space that has been allocated for it inits containing aggregate. If this space is allocated for another volume and then you bring the volumeback online, this can result in an overcommitted aggregate.
Related concepts
Using volumes on page 173
Related tasks
Putting an aggregate into restricted state on page 162
General volume operations | 189

Taking a volume offlineYou use the vol offline command to take a volume offline to perform maintenance on thevolume, move it, or destroy it. When a volume is offline, it is unavailable for read or write access byclients.
About this task
When you take a FlexVol volume offline, it relinquishes any unused space that has been allocated forit in its containing aggregate. If this space is allocated for another volume and then you bring thevolume back online, this can result in an overcommitted aggregate.
Note: You cannot take the root volume offline.
Note: If you attempt to take a volume offline while any files contained by that volume are open,the volume offline command fails and displays the names (or inodes, if i2p is disabled) of thefiles that are open, along with the processes that opened them.
Related concepts
Using volumes on page 173
Related tasks
Taking an aggregate offline on page 160
Bringing a volume onlineAfter you restrict a volume or take it offline, you can make it available to the storage system again bybringing it online using the vol online command.
About this task
If you bring a FlexVol volume online into an aggregate that does not have sufficient free space tofulfill the space guarantee for that volume, this command fails.
Attention: If the volume you are bringing online is inconsistent, the vol online commandprompts you for confirmation. If you bring an inconsistent volume online, it might suffer furtherfile system corruption.
Related concepts
Using volumes on page 173
190 | Storage Management Guide

Related tasks
Bringing an aggregate online on page 161
Renaming a volumeYou use the vol rename command to rename a volume. You can rename volumes withoutinterrupting data service.
Step
1. Enter the following command:
vol rename vol_name new-name
Result
The following events occur:
• The volume is renamed.
• If NFS is in use and the nfs.export.auto-update option is On, the /etc/exports file isupdated to reflect the new volume name.
• If CIFS is running, shares that refer to the volume are updated to reflect the new volume name.
• The in-memory information about active exports gets updated automatically, and clients continueto access the exports without problems.
After you finish
If you access the storage system using NFS, add the appropriate mount point information tothe /etc/fstab or /etc/vfstab file on clients that mount volumes from the storage system.
Destroying a volumeIf you no longer need a volume and the data it contains, you can destroy the volume to free its spacefor other data.
About this task
When you destroy a FlexVol volume, all the disks included in its containing aggregate remainassigned to that containing aggregate, although the space associated with the volume is returned asfree space to the containing aggregate.
When you destroy a traditional volume, however, you also destroy the traditional volume’s dedicatedcontaining aggregate. This converts its parity disk and all its data disks back into hot spares. After the
General volume operations | 191

disks have been zeroed, you can use them in other aggregates, traditional volumes, or storagesystems.
Attention: If you destroy a volume, the data in the volume is no longer accessible.
Steps
1. Take the volume offline by entering the following command:
vol offline vol_name
2. Enter the following command to destroy the volume:
vol destroy vol_name
Result
The following events occur:
• The volume is destroyed.
• If NFS is in use and the nfs.exports.auto-update option is on, entries in the /etc/exports file that refer to the destroyed volume are removed.
• If CIFS is running, any shares that refer to the destroyed volume are deleted.
• If the destroyed volume was a FlexVol volume, its allocated space is freed, becoming availablefor allocation to other FlexVol volumes contained by the same aggregate.
• If the destroyed volume was a traditional volume, the disks it used become hot spare disks.
After you finish
If you access your storage system using NFS, update the appropriate mount point information inthe /etc/fstab or /etc/vfstab file on clients that mount volumes from the storage system.
Displaying file or inode usageFlexVol volumes have a maximum number of files that they can contain. Knowing how many filesare contained by your volumes helps you determine whether you need to increase the number of(public) inodes for your volumes to prevent them from hitting their maximum file limit.
About this task
Public inodes can be either free (they are not associated with a file) or used (they point to a file). Thenumber of free inodes for a volume is the total number of inodes for the volume minus the number ofused inodes (the number of files).
192 | Storage Management Guide

Step
1. To display inode usage for a volume, enter the following command:
df -i volume_name
You can omit the volume name; in this case, Data ONTAP displays the inode usage for allvolumes on the node.
Example
shl5> df -iFilesystem iused ifree %iused Mounted on/vol/root_vs0/ 97 19893 0% /vol/root_vs0//vol/vol0/ 8455 10977711 0% /vol/vol0//vol/v1/ 100 1096 8% /vol/v1/
Changing the maximum number of files allowed in a volumeVolumes have a limit on the number of files they can contain. You can change this limit using themaxfiles command, which affects the maximum number of public inodes the volume can have.
Steps
1. Enter the following command:
maxfiles vol_name max_num_files
Note: Inodes are added in blocks. If the requested increase in the number of files is too small torequire a new inode block to be added, the maxfiles value is not increased. If this happens,repeat the command with a larger value for max_num_files.
You cannot decrease max_num_files below the number of currently allocated public inodes,but the number of public inodes may be less than the current value of max_num_files.
2. You can confirm the new maximum number of files, as well as the number of files currentlypresent in the volume, by entering the following command:
maxfiles vol_name
Note: The value returned reflects only the number of files that can be created by users, orpublic inodes; the private inodes reserved for internal use are not included in this number.
General volume operations | 193

Changing the language for a volumeYou should use caution when changing the language for an existing volume, because doing so couldaffect the system's ability to display your data. In addition, a system reboot is necessary before thelanguage change is complete.
Before you begin
Before changing the language that a volume uses, be sure you understand how volumes use thelanguage attribute and how this change could affect access to your data.
Steps
1. Determine the correct language code for your volume.
You can view the possible language codes by using the vol lang command.
2. Enter the following command to change the volume language:
vol lang vol_name language
Note: If you are changing the NFS character set, you are asked to confirm your choice, andalso whether you want to halt the system so that WAFL_check can be run to check for any filesthat will no longer be accessible using NFS. The default answer for this question is yes. If youdo not want to halt the system, you must enter n.
3. Reboot the storage system.
Note: Although the language change is effective for the target volume immediately, the fulleffect of the change is not complete until after the reboot.
After you finish
You can verify the new language by using the vol status -l command.
Related concepts
How the volume language attribute affects data visibility and availability on page 175
Using volumes on page 173
194 | Storage Management Guide

Changing the root volumeEvery storage system must have a root volume. Therefore, you must always have one volumedesignated as the root volume. However, you can change which volume is used as the system's rootvolume.
Before you begin
The volume that you are designating to be the new root volume must meet the minimum sizerequirement. The required minimum size for the root volume varies, depending on the storage systemmodel. If the volume is too small to become the new root volume, Data ONTAP prevents you fromsetting the root option.
In addition, the volume that you are designating to be the new root volume must have at least 2 GBof free space. It must also have a fractional reserve of 100%. The vol status –v commanddisplays information about a volume’s fractional reserve.
If you use a FlexVol volume for the root volume, ensure that it has a guarantee of volume.
Starting in Data ONTAP 8.0.1, you can designate a volume in a 64-bit aggregate to be the new rootvolume.
If you move the root volume outside the current root aggregate, you must also change the value ofthe aggregate root option so that the aggregate containing the root volume becomes the rootaggregate.
For storage systems with the root volume on the storage array, the array LUN used for the rootvolume must meet the minimum array LUN size for the root volume. For more information about theminimum array LUN size for the root volume, see the Hardware Universe at hwu.netapp.com.
About this task
You might want to change the storage system's root volume, for example, when you migrate yourroot volume from a traditional volume to a FlexVol volume.
Steps
1. Identify an existing volume to use as the new root volume, or create the new root volume byusing the vol create command.
2. Use the ndmpcopy command to copy the /etc directory and all of its subdirectories from thecurrent root volume to the new root volume.
For more information about ndmpcopy, see the Data ONTAP Data Protection Tape Backup andRecovery Guide for 7-Mode.
3. Enter the following command to specify the new root volume:
General volume operations | 195

vol options vol_name root
vol_name is the name of the new root volume.
If the volume does not have at least 2 GB of free space, the command fails and an error messageappears.
After a volume is designated to become the root volume, it cannot be brought offline or restricted.
4. If you moved the root volume outside the current root aggregate, enter the following command tochange the value of the aggregate root option so that the aggregate containing the root volumebecomes the root aggregate:
aggr options aggr_name root
aggr_name is the name of the new root aggregate.
For more information about the aggregate root option, see the na_aggr(1) man page.
5. Enter the following command to reboot the storage system:
reboot
When the storage system finishes rebooting, the root volume is changed to the specified volume.
If you changed the root aggregate, a new root volume is created during the reboot when theaggregate does not already contain a FlexVol volume designated as the root volume and when theaggregate has at least 2 GB of free space.
6. Update the httpd.rootdir option to point to the new root volume.
196 | Storage Management Guide

FlexVol volume operations
You can create FlexVol volumes, clone them, determine the amount of space they use, resize them,and display their containing aggregate, among other tasks.
Related concepts
How FlexVol volumes work on page 173
Creating a FlexVol volumeYou create FlexVol volumes to provide resizable, flexible data containers that can be mounted andaccessed using all data access protocols supported by Data ONTAP.
Before you begin
Before creating a FlexVol volume, you must have determined the following attributes for the newvolume:
• NameThe volume name must conform to the following requirements:
◦ Begin with either a letter or an underscore (_)
◦ Contain only letters, digits, and underscores
◦ Contain no more than 250 characters
◦ Be different from all other volume names on the storage system
• SizeThe volume must be at least 20 MB in size. Its maximum size depends on whether it is in a 32-bitor 64-bit aggregate and the model of the storage system that hosts the volume.
• LanguageThe default language is the language of the root volume.
• Space guarantee setting (optional)The default space guarantee is volume.
• If the volume is to be accessed using CIFS, the CIFS oplocks setting
• Security style setting
197

Steps
1. If you have not already done so, create the aggregate that will contain the FlexVol volume thatyou want to create.
2. Enter the following command:
vol create vol_name [-l language_code] [-s {volume|file|none}]aggr_name size{k|m|g|t}
vol_name is the name for the new FlexVol volume (without the /vol/ prefix)
language_code specifies a language other than that of the root volume.
-s {volume | file | none} specifies the space guarantee setting that is enabled for the specifiedFlexVol volume. If no value is specified, the default value is volume.
aggr_name is the name of the containing aggregate for the new FlexVol volume.
size{k | m | g | t} specifies the volume size in kilobytes, megabytes, gigabytes, or terabytes. Forexample, you would enter 20m to indicate 20 megabytes. If you do not specify a unit, size is takenas bytes and rounded up to the nearest multiple of 4 KB.
Example
The following command creates a 200-MB volume called newvol, in the aggregate called aggr1,using the French character set:
vol create newvol -l fr aggr1 200M
The new volume is created and, if NFS is in use, an entry is added to the /etc/exports file forthe new volume. The default automatic Snapshot schedule is applied to the new volume.
3. If you access the storage system using CIFS, update the share information for the new volume.
4. If you access the storage system using NFS, complete the following steps:
a. Verify that the line added to the /etc/exports file for the new volume is correct for yoursecurity model.
b. Add the appropriate mount point information to the /etc/fstab or /etc/vfstab file onclients that mount volumes from the storage system.
After you finish
If needed, you can verify that the CIFS oplocks and security style settings are correct, and modifythem as needed.
Note: You should set these values as soon as possible after creating the volume. If you changethese values after files are in the volume, the files might become inaccessible to users because ofconflicts between the old and new values. For example, UNIX files available under mixed securitymight not be available after you change to NTFS security.
198 | Storage Management Guide

If the default automatic Snapshot schedule does not match your data protection strategies, update theSnapshot schedule for the newly created volume with a more appropriate schedule. For moreinformation about Snapshot schedules, see the Data ONTAP Data Protection Online Backup andRecovery Guide for 7-Mode.
Related concepts
How the volume language attribute affects data visibility and availability on page 175
How volume guarantees work with FlexVol volumes on page 289
Using volumes on page 173
Related tasks
Creating an aggregate on page 144
Related references
Storage limits on page 373
Resizing a FlexVol volumeYou can increase or decrease the amount of space that an existing FlexVol volume is allowed tooccupy in its containing aggregate. A FlexVol volume can grow to the size you specify as long as thecontaining aggregate has enough free space to accommodate that growth.
Steps
1. Check the available space of the containing aggregate by entering the following command:
df -A aggr_name
2. If you want to determine the current size of the volume, enter one of the following commands:
vol size vol_name
df vol_name
3. Enter the following command to resize the volume:
vol size vol_name [+|-] n{k|m|g|t}
If you include the + or -, n{k|m|g|t} specifies how many kilobytes, megabytes, gigabytes orterabytes to increase or decrease the volume size. If you do not specify a unit, size is taken asbytes and rounded up to the nearest multiple of 4 KB.
If you omit the + or -, the size of the volume is set to the size you specify, in kilobytes,megabytes, gigabytes, or terabytes. If you do not specify a unit, size is taken as bytes and roundedup to the nearest multiple of 4 KB.
FlexVol volume operations | 199

Note: If you attempt to decrease the size of a FlexVol volume to less than the amount of spacethat it is currently using, the command fails.
Decreasing the size of a FlexVol volume does not decrease the space reserved for metadata forthe volume (it remains .5 percent of the original nominal size of the volume).
4. You can verify the success of the resize operation by entering the following command:
vol size vol_name
Related references
Storage limits on page 373
Displaying the containing aggregate for a FlexVol volumeYou display a FlexVol volume's containing aggregate by using the vol container command.
200 | Storage Management Guide

Traditional volume operations
Operations that apply exclusively to traditional volumes usually involve management of theaggregate to which that volume is closely coupled.
About this task
Additional traditional volume operations described in other chapters or other guides include thefollowing operations:
• Configuring and managing SyncMirror replication of volume dataSee the Data ONTAP Data Protection Online Backup and Recovery Guide for 7-Mode.
• Configuring and managing SnapLock volumesSee the Data ONTAP Archive and Compliance Management Guide for 7-Mode.
Related concepts
Changing the RAID level of an aggregate on page 162
How Data ONTAP uses RAID to protect your data and data availability on page 108
Related tasks
Increasing the size of an aggregate on page 155
Physically moving an aggregate composed of disks on page 166
Creating a traditional volumeTraditional volumes do not provide the flexibility that FlexVol volumes do, because they are tightlycoupled with their containing aggregate. However, if you want a single-volume aggregate, you cancreate a traditional volume.
Before you begin
You must have determined the name of the traditional volume. Volume names must conform to thefollowing requirements:
• Begin with either a letter or an underscore (_)
• Contain only letters, digits, and underscores
• Contain no more than 250 characters
Note: You can change the name of a traditional volume later by using the aggr renamecommand.
201

You must have determined what disks will be used in the new volume. You can specify disks bylisting their IDs, or by specifying a disk characteristic such as speed or type. You can display a list ofthe available spares on your storage system by using the aggr status -s command.
You must have determined the CIFS oplocks setting for the new volume.
You must have determined the security setting for the new volume.
Steps
1. Enter the following command:
aggr create vol_name -v [-l language_code] [-f] [-m] [-n] [-v] [-t{raid4|raid_dp}] [-r raidsize] [-T disk-type] -R rpm] [-L] disk-list
vol_name is the name for the new volume (without the /vol/ prefix).
language_code specifies the language for the new volume. The default is the language of theroot volume.
Note: For a description of the RAID-related parameters, see the na_aggr(1) man page or theinformation about creating aggregates.
The new volume is created and, if NFS is in use, an entry for the new volume is added tothe /etc/exports file. The default automatic Snapshot schedule is applied to the new volume.
2. Verify that the volume exists as you specified:
aggr status vol_name -r
The system displays the RAID groups and disks of the specified volume on your storage system.
3. If you access the storage system using CIFS, update your CIFS shares as necessary.
4. If you access the storage system using NFS, complete the following steps:
a. Verify that the line added to the /etc/exports file for the new volume is correct for yoursecurity model.
b. Add the appropriate mount point information to the /etc/fstab or /etc/vfstab file onclients that mount volumes from the storage system.
5. Verify that the CIFS oplocks and security style settings are correct, or modify them as needed.
You should update these values as soon as possible after creating the volume. If you change thevalues after files are in the volume, the files might become inaccessible to users because ofconflicts between the old and new values. For example, UNIX files available under mixedsecurity might not be available after you change to NTFS security.
After you finish
If the default automatic Snapshot schedule does not match your data protection strategies, update theSnapshot schedule for the newly created volume with a more appropriate schedule. For more
202 | Storage Management Guide

information about Snapshot schedules, see the Data ONTAP Data Protection Tape Backup andRecovery Guide for 7-Mode.
Related concepts
How the volume language attribute affects data visibility and availability on page 175
How to control disk selection from heterogeneous storage on page 137
Using volumes on page 173
What aggregates are on page 129
Related tasks
Creating an aggregate on page 144
Related references
Storage limits on page 373
Traditional volume operations | 203

Using FlexCache volumes to accelerate dataaccess
A FlexCache volume is a sparsely-populated volume on a local storage system that is backed by avolume on a different, optionally remote, storage system. A sparsely-populated volume or a sparsevolume provides access to data in the backing volume (also called the origin volume) withoutrequiring that all the data be in the sparse volume.
You can use only FlexVol volumes to create FlexCache volumes. However, many of the regularFlexVol volumes features are not supported on FlexCache volumes, such as Snapshot copy creation,deduplication, compression, FlexClone volume creation, volume move, and volume copy.
You can use FlexCache volumes to speed up access to data, or to offload traffic from heavilyaccessed volumes. FlexCache volumes help improve performance, especially when clients need toaccess the same data repeatedly, because the data can be served directly without having to access thesource. Therefore, you can use FlexCache volumes to handle system workloads that are read-intensive.
Cache consistency techniques help in ensuring that the data served by the FlexCache volumesremains consistent with the data in the origin volumes.
Related tasks
FlexCache volume operations on page 222
How FlexCache volumes serve read requestsA FlexCache volume directly serves read requests if it contains the data requested by the client.Otherwise, the FlexCache volume requests the data from the origin volume and stores the data beforeserving the client request. Subsequent read requests for the data are then served directly from theFlexCache volume.
This improves performance when the same data is accessed repeatedly, because after the firstrequest, the data no longer has to travel across the network, or be served from an overloaded system.
FlexCache hardware and software requirementsBefore you can create FlexCache volumes and use them to access data in their origin volumes, youmust ensure that both your origin and caching systems meet the hardware and software requirementsfor the FlexCache functionality.
The requirements for the caching system and the origin system are different.
For the caching system, the following requirements must be met:
204 | Storage Management Guide

• If you want to cache a 7-Mode volume, ensure that the caching system has one of the followingversions of Data ONTAP:
◦ Data ONTAP 7.0.5 or later in the 7.0 release family
◦ Data ONTAP 7.2.1 or later in the 7.2 release family
◦ Any version in the Data ONTAP 7.3 release family
◦ Data ONTAP 8.x or later operating in 7-Mode
Note: Systems running Data ONTAP 8.0 or 8.1 clustered releases or any version in the DataONTAP 10.0 release family cannot serve as caching systems.
Note: The caching and origin systems do not need to have the same version of Data ONTAP.
• The caching system for a clustered Data ONTAP volume must have Data ONTAP 8.x or lateroperating in 7-Mode.
• The caching system must have a valid NFS license, with NFS enabled.
Note: The NFS license is not required when the caching system is an SA system.
• The licensed_feature.flexcache_nfs.enable option must be set to on.
For the origin system, the following requirements must be met:
• The system must have one of the following versions of Data ONTAP:
◦ Data ONTAP 7.0.1 or later in the 7.x release families
◦ Any version in the Data ONTAP 8.x release families
◦ Data ONTAP 10.0.4 or later in the 10.0 release family
Note: If your origin system is running Data ONTAP 10.0 or Data ONTAP 8.x, your cachingsystem must have Data ONTAP 7.2.1 or later.
• For caching a clustered Data ONTAP volume, the origin system must be running clustered DataONTAP 8.2 or later.
• The origin system must have a valid NFS license, with NFS enabled.
• The flexcache.access option must be set to allow access to FlexCache volumes.
Note: For more information about this option, see the na_protocolaccess(8) man page.
If the origin volume is in a vFiler unit, you must set this option for the vFiler context.
• The flexcache.enable option must be set to on.
Using FlexCache volumes to accelerate data access | 205

Note: If the origin volume is in a vFiler unit, you must set this option for the vFiler context.
For information about configuring and managing FlexCache volumes in a clustered Data ONTAPenvironment, see the Clustered Data ONTAP Logical Storage Management Guide
Limitations of FlexCache volumesYou can have a maximum of 100 FlexCache volumes on a storage system. In addition, there arecertain features of Data ONTAP that are not available on FlexCache volumes, and others that are notavailable on volumes that are backing FlexCache volumes.
You cannot use the following Data ONTAP capabilities on FlexCache volumes (these limitations donot apply to the origin volumes):
• Client access using any protocol other than NFSv2 or NFSv3
• Client access using IPv6
• Compression (compressed origin volumes are supported)
• Snapshot copy creation
• SnapRestore
• SnapMirror (qtree or volume)
• SnapVault
• FlexClone volume creation
• The ndmp command
• Quotas
• Qtrees
• Volume copy
• Deduplication
• Creation of FlexCache volumes in any vFiler unit other than vFiler0
• Creation of FlexCache volumes in the same aggregate as their origin volume
• Mounting the FlexCache volume as a read-only volume
If your origin volume is larger than 16 TB, the output of the df command on the caching system willshow "---" for the size information about the origin volume. To see the size information for the originvolume, you must run the df command on the origin system.
206 | Storage Management Guide

You cannot use the following Data ONTAP capabilities on FlexCache origin volumes or storagesystems without rendering all of the FlexCache volumes backed by that volume or storage systemunusable:
Note: If you want to perform these operations on an origin system, you can destroy the affectedFlexCache volumes, perform the operation, and re-create the FlexCache volumes. However, theFlexCache volumes will need to be repopulated.
• You cannot move an origin volume between vFiler units or to vFiler0 by using any of thefollowing commands:
◦ vfiler move
◦ vfiler add
◦ vfiler remove
◦ vfiler destroy
Note: You can use SnapMover (vfiler migrate) to migrate an origin volume withouthaving to re-create FlexCache volumes backed by that volume.
Origin volumes can be owned by any vFiler unit.
• You cannot use a FlexCache origin volume as the destination of a snapmirror migratecommand.
• You cannot change the language of the origin volume if the change causes the underlyingcharacter set to change, or if the new language is not available on the caching system.For example, you can change the language of the origin volume from English to US English.However, if you want to change the language from English to a language that uses a differentcharacter set, such as Japanese, then you need to destroy and re-create all of the FlexCachevolumes backed by the origin volume.
• Qtrees contained by the origin volume that belong to a vFiler unit other than the vFiler unit thatowns the origin volume are not accessible to a FlexCache volume.For example, suppose that volume vol1 is owned by vFiler0 but qtree1, which is contained byvol1, is owned by another vFiler unit. FlexCache volumes created with vol1 as the backingvolume will not be able to access the data contained in qtree1.
• If your origin volume is on a system running a version of the Data ONTAP 10.0 release family,and any node in the origin cluster is down, the FlexCache volume will not be able to establish aconnection with the origin volume.
• If the origin volume contains Snapshot copies, the Snapshot data is not written to disk (cached).Snapshot data is stored only in the in-memory buffer cache of the caching filer.
Using FlexCache volumes to accelerate data access | 207

Types of volumes you can use for FlexCacheA FlexCache volume must be a FlexVol volume. The origin volume can be a FlexVol or a traditionalvolume; it can also be a SnapLock volume. There are some restrictions on what can be used as anorigin volume.
FlexCache volumes and FlexVol origin volumes can be either 32-bit or 64-bit volumes; a FlexCachevolume does not need to be the same type as its origin volume (a 32-bit FlexCache volume can havea 64-bit origin volume and vice versa).
You cannot use the following storage containers as a FlexCache origin volume:
• A FlexCache volume
• A volume that contains SnapVault destinations
• A qtree
How the FlexCache Autogrow capability worksFor best caching performance, you should allow Data ONTAP to control the size of your FlexCachevolumes, by using the FlexCache Autogrow capability.
Making your FlexCache volume too small can negatively impact your caching performance. Whenthe FlexCache volume begins to fill up, it flushes randomly chosen, previously cached files to makeroom for newly requested data. When data from the flushed files is requested again, it must beretrieved again from the origin volume.
Therefore it is best to use the Autogrow capability and allow Data ONTAP to increase the size ofyour FlexCache volumes as the size of the working set increases. This method has the followingadvantages:
• If the size of the FlexCache volume's working set increases, as long as there is space in thecontaining aggregate, the FlexCache volume automatically increases its size rather than ejectingdata from the cache, which could affect data access performance.
• These size increases happen without operator intervention.
• If you have several FlexCache volumes sharing the same aggregate, the volumes that are gettingthe most data accesses will also receive the most space.
• If you increase the size of an aggregate, the FlexCache volumes contained by that aggregate willautomatically take advantage of the extra space if needed.
The Autogrow capability is enabled by default in new FlexCache volumes created without specifyinga size using Data ONTAP 7.3 and later. You can enable the Autogrow capability on existingFlexCache volumes by using the vol options command with the flexcache_autogrow option.
208 | Storage Management Guide

Note: Before the Autogrow capability was available, the preferred sizing strategy for FlexCachevolumes was to size the FlexCache volume to the same size as its containing aggregate. If thisapproach is providing you with the performance and space utilization you need, you do not need toreconfigure those existing FlexCache volumes to use the Autogrow capability.
How FlexCache volumes use space managementFlexCache volumes do not use space management in the same manner as regular FlexVol volumes.The amount of disk space reserved for a FlexCache volume is determined by the value of theflexcache_min_reserved volume option, rather than the nominal size of the FlexCache volume.
The default value for the flexcache_min_reserved volume option is 100 MB. In general, youshould not change the value of this option.
Attention: FlexCache volumes’ space guarantees must be honored. When you take a FlexCachevolume offline, the space allocated for the FlexCache becomes available for use by other volumesin the aggregate (as with all FlexVol volumes). However, unlike regular FlexVol volumes,FlexCache volumes cannot be brought online if there is insufficient space in the aggregate to honortheir space guarantee.
Related concepts
How volume guarantees work with FlexVol volumes on page 289
Using volumes on page 173
How FlexCache volumes share space with other volumesYou can have multiple FlexCache volumes in the same aggregate. You can also have regular FlexVolvolumes in the same aggregate as the FlexCache volumes. If you want to set up your systemefficiently, you must understand the way these volumes share space.
When you include multiple FlexCache volumes in the same aggregate, each FlexCache volumereserves only a small amount of space. The rest of the space is allocated as required. This means thata “hot” FlexCache volume (one that is being accessed heavily) is permitted to take up more space,while a FlexCache volume that is not being accessed as often will gradually be reduced in size.
Note: When an aggregate containing FlexCache volumes runs out of free space, Data ONTAPrandomly selects a FlexCache volume in that aggregate to be truncated. Truncation means thatfiles are removed from the FlexCache volume until the size of the volume is decreased to apredetermined percentage of its former size.
If you have regular FlexVol volumes in the same aggregate as your FlexCache volumes, and theaggregate starts filling up, the FlexCache volumes can lose some of their unreserved space (if it is notbeing used). In this case, when the FlexCache volume needs to fetch a new data block and it does not
Using FlexCache volumes to accelerate data access | 209

have enough free space to accommodate the data block, an existing data block is removed from oneof the FlexCache volumes to accommodate the new data block.
If the ejected data is causing many cache misses, you can add more space to the aggregate or movesome of the data to another aggregate.
Methods to view FlexCache statisticsData ONTAP provides statistics about FlexCache volumes to help you understand the access patternsand administer the FlexCache volumes effectively.
You can display statistics for your FlexCache volumes by using the following methods:
• The flexcache stats command (client and server statistics)
• The nfsstat command (client statistics only)
• The perfstat utility
• The stats command
Note: You can use the fstat command for statistics about the objects cached by the FlexCachevolume.
For more information about the commands, see the na_flexcache(1), na_stats(1), and nfsstat(1) manpages.
Related tasks
Displaying FlexCache client statistics on page 225
Displaying FlexCache server statistics on page 225
What happens when connectivity to the origin system is lostYou can control how the FlexCache volume functions when connectivity between the caching andorigin systems is lost by using the disconnected_mode and acdisconnected volume options.
The disconnected_mode volume option and the acdisconnected timeout, combined with theregular TTL timeouts (acregmax, acdirmax, acsymmax, and actimeo), enable you to control thebehavior of the FlexCache volume when contact with the origin volume is lost.
When you configure the FlexCache disconnected options, you should consider the followingquestions:
• Would your applications or file access protocols react better if an I/O request returned an error orif it did not return at all?
• How long can you safely serve stale data when connectivity is lost?
210 | Storage Management Guide

The following flowchart shows the multi-step decision process used by Data ONTAP to determinewhat happens when a FlexCache volume is disconnected from its origin volume. The possibleoutcomes of this process are:
• The data is served.
• An error is returned.
• The operation hangs.
Using FlexCache volumes to accelerate data access | 211

212 | Storage Management Guide

How the NFS export status of the origin volume affectsFlexCache access
A volume does not need to be exported to serve as an origin volume for a FlexCache volume. If youwant to prevent a volume from being an origin volume, set the flexcache.access option to none.
How FlexCache caching worksUnderstanding how FlexCache determines the validity of cached data will help you determinewhether your data set is a good candidate for a FlexCache.
What a cached file contains
When the client requests a data block of a specific file from a FlexCache volume, then the attributesof that file are cached, and that file is considered to be cached, even if all of its data blocks are notpresent in the FlexCache volume. If the requested data is cached and valid, a read request for thatdata is fulfilled without access to the origin volume.
How data changes affect FlexCache volumes
How data changes affect FlexCache volumes depends on where the change is made: on theFlexCache volume, the origin volume, or another FlexCache volume. If a file is directly updated onthe origin volume, the cached copy of the file is invalidated. If the write request is relayed to theorigin volume, only the changed blocks are invalidated in the FlexCache volume.
Writes to a file on the origin volume
When a change is made to a file on the origin system, Data ONTAP revokes the delegation for thatfile and invalidates the entire file for all FlexCache volumes backed by that origin volume.
Note: The FlexCache copy of the file is not invalidated until an access to that file is made on theFlexCache volume.
The cache is not affected when only the access time of a file is updated.
Writes to a file on the FlexCache volume
When a write is made to a file on the FlexCache volume, the write request is relayed to the originvolume. When the origin volume acknowledges the request, the blocks that were changed areinvalidated on the FlexCache volume, but the rest of the file remains valid.
Using FlexCache volumes to accelerate data access | 213

How cache consistency is achieved
Cache consistency for FlexCache volumes is achieved by using three primary techniques:delegations, attribute cache timeouts, and write operation proxy.
Delegations ensure that the FlexCache volumes can directly serve client read requests without havingto access the origin volume. As long as the FlexCache volume continues to have a delegation for thedata on a file, the origin volume does not modify the contents of the file. The origin volume mustrevoke all the delegations to a file from the FlexCache volumes before modifying the contents of thefile.
If a FlexCache volume does not have delegations to a cached file, the data in the cache is consideredvalid for a duration determined by the attribute cache timeout value.
Any FlexCache volume that receives a write request from the client proxies the request to the originvolume. If the FlexCache volume contains a cached copy of the data that changes in the origin, theFlexCache volume removes the file containing the cached data and stores the updated data during asubsequent read operation.
Delegations
A delegation is a token that the origin system grants the caching volume to ensure that the cachingvolume can serve read requests without the need for validating the data with the origin volume.Delegations are used only in certain situations.
When the FlexCache volume retrieves data from a file on the origin volume, the origin volumeprovides a delegation for that file to the FlexCache volume. The FlexCache volume retains thedelegation until the origin volume revokes the delegation before the particular file gets modified.After the data is modified, the FlexCache volume must fetch the data before serving it to clients.
If multiple caching volumes have delegations for a particular file, then all the delegations are revokedbefore the file is updated.
Note: You can use the lock status -p flexcache command to view the FlexCachedelegations granted by the storage system.
Delegations can cause a performance decrease for writes to the origin volume, depending on thenumber of FlexCache volumes that are holding delegations for the file being modified.
The following list outlines situations when delegations cannot be used to guarantee that an object hasnot changed:
• Objects other than regular files: Directories, symbolic links, and other objects that are not regularfiles have no delegations.
• Origin volumes that are SnapMirror destinations: If the origin volume is a SnapMirrordestination, delegations are not used.
214 | Storage Management Guide

• When the FlexCache volume is taken offline: All the delegations given to the volume aredestroyed.
• When connectivity is lost: If connectivity is lost between the origin and caching systems, thendelegations are considered to be revoked.
• When the maximum number of delegations is reached: If the origin volume cannot store all of itsdelegations, it might revoke an existing delegation to accommodate a new one.
• When the origin volume has a resource constraint: The origin volume reclaims some delegationsfrom all its FlexCache volumes.
Attribute cache timeouts
When data is retrieved from the origin volume, the file that contains that data is considered valid inthe FlexCache volume as long as a delegation exists for that file. If no delegation exists, the file isconsidered valid for a certain length of time, specified by the attribute cache timeout.
If a client requests data from a file for which there are no delegations, and the attribute cache timeouthas been exceeded, the FlexCache volume compares the file attributes of the cached file with theattributes of the file on the origin system. Then one of the following actions is taken:
• If the two sets of file attributes match, the requested data is directly returned to the client (if it wasalready in the FlexCache volume) or retrieved from the origin system and then returned to theclient.
• If the two sets of file attributes do not match, the file is marked as invalid in the cache. Then therequested data blocks are read from the origin system and stored in the FlexCache volume, as if itwere the first time that file had been accessed from that FlexCache volume.
With attribute cache timeouts, clients can get stale data when all of the following conditions are true:
• There are no delegations for the file on the caching volume.
• The file’s attribute cache timeout has not been reached.
• The file has changed on the origin volume since it was last accessed by the caching volume.
Note: Clients can get stale data when a file on the origin volume is added to or removed from adirectory that is already stored on the FlexCache volume. The file addition or deletion does notbecome visible on the FlexCache until the length of time specified in the directory attribute cachetimeout (acdirmax) has passed since the last time the directory was updated on the FlexCachevolume.
To prevent clients from ever getting stale data, you can set the attribute cache timeout to 0. However,this negatively affects your caching performance, because every data request for which there is nodelegation causes an access to the origin system.
The attribute cache timeouts are determined by using volume options. The option names and defaultvalues are outlined in the following table:
Using FlexCache volumes to accelerate data access | 215

Volume option Description Default value (seconds)
acdirmax Attribute cache timeout fordirectories
15s
acregmax Attribute cache timeout forregular files
15s
acsymmax Attribute cache timeout forsymbolic links
15s
actimeo Attribute cache timeout for allobjects
15s
For more information about modifying these options, see the na_vol(1) man page.
Write operation proxy
When a client writes to a cached file, the FlexCache volume proxies the write request to the originvolume, which makes the requested changes. The FlexCache volume is then updated to reflect thechanges.
When writes are relayed through the FlexCache volume, if that volume contains the portion of thefile that is changing, the entire file is invalidated from the FlexCache volume. In addition, the originvolume revokes any delegation to the file. On subsequent access of the new data, the cache volumerequests the data from the origin volume.
If other FlexCache volumes are mapped to the origin volume and if they contain the changed data,then the origin volume revokes all delegations to the cached data in the FlexCache volumes. If thecached data on any of these FlexCache volumes is accessed after the attribute cache timeout expires,the particular FlexCache volume verifies the file attributes with those on the origin volume,invalidates its own copy of the cached file, and stores the updated file.
What cache hits and misses are
Cache hits and misses indicate if the data requested by the client is served directly from theFlexCache volume or from the origin volume. The occurrence of a cache hit or miss depends onfactors such as availability of the requested data in the cache, the attribute cache timeout values, andthe difference between attributes of a file in the cache and the origin.
Cache hits
When a client sends a read request, if the relevant block is cached in the FlexCache volume, the datais read directly from the FlexCache volume. This is called a cache hit. Cache hits are the result of aprevious request.
A cache hit can be one of the following types:
• Hit: The requested data is already cached and the FlexCache volume serves the read requestwithout accessing the origin volume.
216 | Storage Management Guide

• Hit-Verify: The requested data is already cached but the FlexCache volume needs to verify theattributes of the cached file with those on the origin. The FlexCache does not request any datafrom the origin volume while performing this verification process.
Cache misses
If the requested data is not on the FlexCache volume, or if the data has changed since it was cached,the caching system loads the data from the origin volume, and then returns it to the requesting client.This is called a cache miss.
A cache miss can be one of the following types:
• Miss: The requested data is not cached and is read from the origin volume.
• Miss-Verify: The requested data is cached but the file attributes have changed since it was lastcached. Therefore, the file is removed from the cache, and the requested data is read from theorigin.
Typical FlexCache deploymentsFlexCache is typically used in WAN deployments (which decrease average access time for remoteclients) and LAN deployments (which reduce the workload of an overloaded storage system).
WAN deployment
In a WAN deployment, the FlexCache volume is remote from the data center. As clients request data,the FlexCache volume caches popular data, giving the end user faster access to information.
The FlexCache volume is placed as close as possible to the remote office. Client requests are thenexplicitly directed to the FlexCache volume. If valid data exists in the cache, that data is serveddirectly to the client. If the data does not exist in the cache, it is retrieved across the WAN from theorigin system, cached in the FlexCache volume, and returned to the client. A WAN deployment isshown in the following diagram.
Using FlexCache volumes to accelerate data access | 217
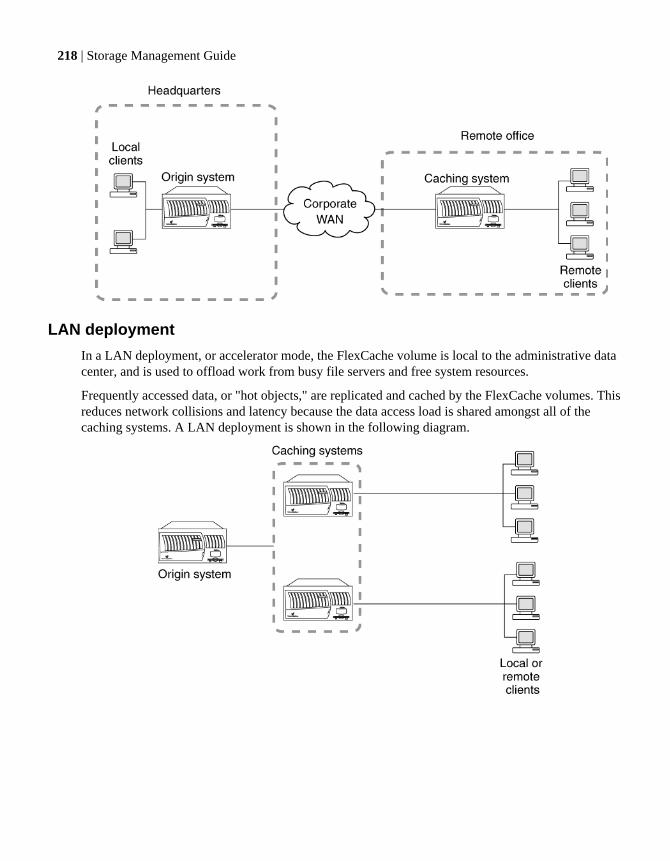
LAN deployment
In a LAN deployment, or accelerator mode, the FlexCache volume is local to the administrative datacenter, and is used to offload work from busy file servers and free system resources.
Frequently accessed data, or "hot objects," are replicated and cached by the FlexCache volumes. Thisreduces network collisions and latency because the data access load is shared amongst all of thecaching systems. A LAN deployment is shown in the following diagram.
218 | Storage Management Guide

Using FlexCache volumes to cache clustered Data ONTAPvolumes
You can cache a clustered Data ONTAP volume outside the cluster by using a FlexCache volume ina storage system that is deployed at a remote site and connected to the cluster over a Wide AreaNetwork (WAN). This type of configuration can help in situations such as distributing read-intensivedata across multiple locations.
You must consider the following when using a FlexCache volume to cache a clustered Data ONTAPvolume outside the cluster:
• The FlexCache volume must be connected directly to the clustered Data ONTAP volume and notto any namespace or junction point.
• The client applications cannot access volumes that are associated with the FlexCache volumesthrough junctions.
For more information about clustered Data ONTAP volumes, see the Clustered Data ONTAPLogical Storage Management Guide.
Related tasks
Creating FlexCache volumes on page 222
About using LUNs in FlexCache volumesYou cannot use SAN access protocols to access FlexCache volumes. You can cache a volume thatcontains LUNs, but this configuration can change system behavior.
When you attempt to access, in a FlexCache volume, a directory that contains a LUN, the commandsometimes returns "stale NFS file handle" for the LUN. If you get that error message, you shouldrepeat the command.
If you use the fstat command on a LUN, fstat always indicates that the LUN is not cached. This isexpected behavior.
Note: LUNs in this context refer to the LUNs that Data ONTAP serves to clients, not to the arrayLUNs used for storage on a storage array.
Using FlexCache volumes to accelerate data access | 219

What FlexCache status messages meanWhen you enter the vol status command for a FlexCache volume, and the status of the FlexCachevolume is not normal, you get a FlexCache status message.
The following table lists the status messages you might see for a FlexCache volume and what theymean:
FlexCache status Description
access denied The origin system is not allowing FlexCache access. Check the settingof the flexcache.access option on the origin system.
connecting The caching system is trying to connect to the origin system.
lang mismatch The language setting of the origin volume was changed since theFlexCache volume was created.
rem vol changed The origin volume was deleted and re-created with the same name. Re-create the FlexCache volume to reenable the FlexCache relationship.
rem vol unavail The origin volume is offline or has been deleted.
remote nvram err The origin system is experiencing problems with its NVRAM.
unsup remote vol The origin system is running a version of Data ONTAP that either doesnot support FlexCache volumes or is not compatible with the versionrunning on the caching system.
How FlexCache volumes connect to their origin volumeFlexCache volumes use a proprietary protocol to connect to their origin volume. The protocol usesport 2050.
About SA systemsSA systems support a subset of features supported by FAS systems. SA systems are storage systemscapable of storing only FlexCache volumes.
You manage an SA system the same way you manage a FAS system, with the following differences:
• Only FlexCache volumes and the root volume can be mounted, using NFSv2 or NFSv3.
• No file access protocol other than NFSv2 and NFSv3 is supported.
• Only the following licenses are supported:
220 | Storage Management Guide

◦ flexcache_nfs
◦ cluster
◦ flex_scale
• The size of the root volume is restricted:
◦ Traditional root volumes cannot be increased in size.
◦ Flexible root volumes can grow only to 100 GB or the minimum root volume size, whicheveris larger.
• SA systems can be configured in a standard HA configuration, but not a mirrored HAconfiguration or a mirrored MetroCluster configuration.
Using FlexCache volumes to accelerate data access | 221

FlexCache volume operations
Operations you can perform with FlexCache volumes include creating them, displaying their statusand free space, configuring the Autogrow capability, and flushing files that they are caching.
Related concepts
Using FlexCache volumes to accelerate data access on page 204
Creating FlexCache volumesYou use FlexCache volumes to speed access to remote data, or to offload traffic from heavilyaccessed volumes.
Before you begin
• You must have configured and enabled the FlexCache feature correctly on the caching system.
• If the origin volume is a clustered Data ONTAP volume, the following items must be true:
◦ There is a data LIF configured for the origin volume's SVM enabled for the -fcacheprotocol.For more information about creating and configuring LIFs, see the Clustered Data ONTAPNetwork Management Guide.
◦ An export policy exists for the origin volume's SVM that includes the flexcache protocol,and all systems hosting FlexCache volumes you want to access this origin volume are listed asclients for the export policy.For more information about creating export policies, see the Clustered Data ONTAP FileAccess Management Guide for NFS.
Step
1. Create the volume:
vol create cache_vol aggr [size{k|m|g|t}] -S origin:source_vol
origin is the name or IP address of the origin system. If you are caching a clustered DataONTAP volume, specify the data LIF with the fcache protocol enabled.
source_vol is the name of the volume you want to use as the origin volume on the originsystem.
cache_vol is the name of the new FlexCache volume you want to create.
aggr is the name of the containing aggregate for the new FlexCache volume.
222 | Storage Management Guide

size{ k | m | g | t } specifies the FlexCache volume size in kilobytes, megabytes, gigabytes, orterabytes. If you do not specify a size, bytes is used and rounded up to the nearest multiple of 4KB.
Note: For best performance, do not specify a size when you create a FlexCache volume.Specifying a size disables the FlexCache Autogrow capability.
Result
The new FlexCache volume is created and an entry is added to the /etc/export file for the newvolume.
Example
The following command creates a FlexCache volume called newcachevol, with theAutogrow capability enabled, in the aggregate called aggr1, with a source volume vol1 onstorage system corp_storage:
vol create newcachevol aggr1 -S corp_storage:vol1
Related concepts
FlexCache hardware and software requirements on page 204
How the FlexCache Autogrow capability works on page 208
Using FlexCache volumes to accelerate data access on page 204
Using volumes on page 173
FlexCache hardware and software requirements on page 204
Using FlexCache volumes to cache clustered Data ONTAP volumes on page 219
FlexCache volume operations | 223

Displaying free space for FlexCache volumesWhen you use the df command on the caching storage system, you display the disk free space for theorigin volume, rather than the local caching volume. You can display the disk free space for the localcaching volume by using the -L option for the df command.
Configuring the FlexCache Autogrow capabilityWith the Autogrow capability enabled, Data ONTAP increases the size of a FlexCache volume whenthe volume starts to fill up. The Autogrow capability is enabled and disabled per FlexCache volume,and is enabled by default on new FlexCache volumes.
Step
1. Enter the command below, depending on the operation you want to perform:
If you want to.. Then enter...
Enable the Autogrowcapability
vol options vol_name flexcache_autogrow on
Disable the Autogrowcapability
vol options vol_name flexcache_autogrow off
Example
To enable the FlexCache Autogrow capability on the FlexCache volume fc1, enter thefollowing command:
vol options fc1 flexcache_autogrow on
Related concepts
How the FlexCache Autogrow capability works on page 208
224 | Storage Management Guide

Flushing files from FlexCache volumesIf you know that a specific file has changed on the origin volume and you want to flush it from yourFlexCache volume before it is accessed, you can use the flexcache eject command. For moreinformation about this command, see the na_flexcache(1) man page.
Displaying FlexCache client statisticsYou can use client statistics to see how many operations are being served by the FlexCache volumerather than the origin system. A large number of cache misses might indicate that the FlexCachevolume is too small and data is being discarded and fetched again later.
Before you begin
Give the cache time to become populated before tracking cache misses.
Step
1. Depending on what statistics you want to see, enter the appropriate command.
If you want to... Use this command:
Display FlexCache statistics flexcache stats -C
Display NFS statistics forthe FlexCache volume
nfsstat -C
Related concepts
Methods to view FlexCache statistics on page 210
Displaying FlexCache server statisticsIf you are using the LAN deployment to offload an overloaded volume, you can use server statisticsto get information about the origin system and ensure that the load is evenly distributed among thecaching volumes.
Step
1. Depending on what statistics you want to see, enter the appropriate command.
FlexCache volume operations | 225

If you want to... Use this command:
Display overall serverstatistics
flexcache stats -S
Display server statistics perclient
flexcache stats -S -c
Note: To get per-client statistics, theflexcache.per_client_stats option must be set to on.
Related concepts
Methods to view FlexCache statistics on page 210
Displaying FlexCache statusYou display the status for a FlexCache volume using the vol status command. If your FlexCachevolume has a problem, a FlexCache status is displayed as the last line of the volume status output. Ifthe status of the FlexCache is normal, no FlexCache status is displayed.
Related concepts
Using FlexCache volumes to accelerate data access on page 204
Related references
What FlexCache status messages mean on page 220
226 | Storage Management Guide

Using FlexClone volumes to create efficientcopies of your FlexVol volumes
FlexClone volumes are writable, point-in-time copies of a parent FlexVol volume. FlexClonevolumes are space-efficient because they share the same data blocks with their parent FlexVolvolumes for common data. The Snapshot copy used to create a FlexClone volume is also shared withthe parent volume.
You can clone an existing FlexClone volume to create another FlexClone volume. You can alsocreate a clone of a FlexVol volume containing LUNs and LUN clones.
You can also split a FlexClone volume from its parent volume. As a result, the FlexClone volumebecomes an independent FlexVol volume with its own disk space, instead of sharing disk space withits parent.
Understanding FlexClone volumesFlexClone volumes can be managed similarly to regular FlexVol volumes, with a few importantdifferences. For instance, the changes made to the parent FlexVol volume after the FlexClonevolume is created are not reflected in the FlexClone volume.
The following list outlines important facts about FlexClone volumes:
• A FlexClone volume is a point-in-time, writable copy of the parent FlexVol volume.
• You must install the license for the FlexClone feature before you can create FlexClone volumes.
• A FlexClone volume is a fully functional FlexVol volume similar to its parent.
• A FlexClone volume is always created in the same aggregate as its parent.
• A traditional volume cannot be used as the parent of a FlexClone volume.To create a copy of a traditional volume, you must use the vol copy command, which creates adistinct copy that uses additional storage space equivalent to the amount of storage space used bythe volume you copied.
• Because a FlexClone volume and its parent share the same disk space for common data, creatinga FlexClone volume is instantaneous and requires no additional disk space (until changes aremade to the FlexClone volume or its parent).
• A FlexClone volume is created with the same volume guarantee as its parent.The volume guarantee setting is enforced for the new FlexClone volume only if there is enoughspace in the containing aggregate.
• A FlexClone volume is created with the same space reservation and fractional reserve settings asits parent.
227

• A FlexClone volume is created with the same Snapshot schedule as its parent.
• A FlexClone volume is created with the same language setting as its parent.
• The common Snapshot copy shared between a FlexClone volume and its parent volume cannot bedeleted while the FlexClone volume exists.
• While a FlexClone volume exists, some operations on its parent are not allowed, such as deletingthe parent volume.
• You can sever the connection between the parent volume and the FlexClone volume.This is called splitting the FlexClone volume. Splitting removes all restrictions on the parentvolume and causes the FlexClone volume to use its own additional disk space rather than sharingspace with its parent.
Attention: Splitting a FlexClone volume from its parent volume deletes all existing Snapshotcopies of the FlexClone volume, and disables the creation of new Snapshot copies while thesplitting operation is in progress.
If you want to retain the Snapshot copies of the FlexClone volume, you can move theFlexClone volume to a different aggregate by using the vol move command. During thevolume move operation, you can also create new Snapshot copies, if required. For moreinformation about the volume move operation, see the Data ONTAP SAN AdministrationGuide for 7-Mode.
• Quotas applied to the parent volume are not automatically applied to the FlexClone volume.
• The clone of a SnapLock volume is also a SnapLock volume, and inherits the expiry date of theparent volume. This date cannot be changed, and the volume cannot be destroyed before theexpiry date. For more information about SnapLock volumes, see the Data ONTAP Archive andCompliance Management Guide for 7-Mode.
• When a FlexClone volume is created, any LUNs present in the parent volume are present in theFlexClone volume but are unmapped and offline.
Related concepts
How splitting a FlexClone volume from its parent works on page 231
How volume guarantees work with FlexVol volumes on page 289
FlexClone volumes and space guaranteesA FlexClone volume inherits its initial space guarantee from its parent volume. For example, if youcreate a FlexClone volume from a parent volume with a space guarantee of volume, then the
228 | Storage Management Guide

FlexClone volume's initial space guarantee will be volume also. You can change the FlexClonevolume's space guarantee.
For example, suppose that you have a 100-MB FlexVol volume with a space guarantee of volume,with 70 MB used and 30 MB free, and you use that FlexVol volume as a parent volume for a newFlexClone volume. The new FlexClone volume has an initial space guarantee of volume, but it doesnot require a full 100 MB of space from the aggregate, as it would if you had copied the volume.Instead, the aggregate needs to allocate only 30 MB (100 MB minus 70 MB) of free space to theclone.
If you have multiple clones with the same parent volume and a space guarantee of volume, they allshare the same shared parent space with each other, so the space savings are even greater.
Note: The shared space depends on the existence of the shared Snapshot copy (the base Snapshotcopy that was used to create the FlexClone volume). If you delete this shared Snapshot copy, youlose the space savings provided by the FlexClone volume.
Related concepts
FlexClone volumes and shared Snapshot copies on page 229
How volume guarantees work with FlexVol volumes on page 289
How to identify shared Snapshot copies in FlexClonevolumes
You can identify a shared Snapshot copy by using the snap list command to list the Snapshotcopies in the parent volume. Any Snapshot copy that is marked as busy in the parent volume and isalso present in the FlexClone volume is a shared Snapshot copy.
FlexClone volumes and shared Snapshot copiesWhen volume guarantees are in effect, a new FlexClone volume uses the Snapshot copy it shareswith its parent to minimize its space requirements. If you delete the shared Snapshot copy, you mightincrease the space requirements of the FlexClone volume.
For example, suppose that you have a 100-MB FlexVol volume that has a volume guarantee ofvolume, with 70 MB used and 30 MB free, and you use that FlexVol volume as a parent volume fora new FlexClone volume. The new FlexClone volume has an initial volume guarantee of volume,but it does not require a full 100 MB of space from the aggregate, as it would if you had copied thevolume. Instead, the aggregate needs to allocate only 30 MB (100 MB – 70 MB) of free space to theclone.
Now, suppose that you delete the shared Snapshot copy from the FlexClone volume. The FlexClonevolume can no longer optimize its space requirements, and the full 100 MB is required from thecontaining aggregate.
Using FlexClone volumes to create efficient copies of your FlexVol volumes | 229

Note: If you are prevented from deleting a Snapshot copy from a FlexClone volume due to“insufficient space in the aggregate” it is because deleting that Snapshot copy requires theallocation of more space than the aggregate currently has available. You can either increase thesize of the aggregate, or change the volume guarantee of the FlexClone volume.
How you use volume SnapMirror replication with FlexClonevolumes
Because both volume SnapMirror replication and FlexClone volumes rely on Snapshot copies, thereare some restrictions on how the two features can be used together. For instance, you can create avolume SnapMirror relationship using a FlexClone volume or its parent as the source volume.However, you cannot create a new volume SnapMirror relationship using either a FlexClone volumeor its parent as the destination volume.
Considerations for creating a FlexClone volume from aSnapMirror source or destination volume
You can create a FlexClone volume from the source or destination volume in an existing volumeSnapMirror relationship. However, doing so could prevent future SnapMirror replication operationsfrom completing successfully.
Replication might not work because when you create the FlexClone volume, you might lock aSnapshot copy that is used by SnapMirror. If this happens, SnapMirror stops replicating to thedestination volume until the FlexClone volume is destroyed or is split from its parent. You have twooptions for addressing this issue:
• If you require the FlexClone volume on a temporary basis and can accommodate a temporarystoppage of the SnapMirror replication, you can create the FlexClone volume and either delete itor split it from its parent when possible.The SnapMirror replication continues normally when the FlexClone volume is deleted or is splitfrom its parent.
• If a temporary stoppage of the SnapMirror replication is not acceptable, you can create aSnapshot copy in the SnapMirror source volume, and then use that Snapshot copy to create theFlexClone volume. (If you are creating the FlexClone volume from the destination volume, youmust wait until that Snapshot copy replicates to the SnapMirror destination volume.)This method of creating a Snapshot copy in the SnapMirror source volume allows you to createthe clone without locking a Snapshot copy that is in use by SnapMirror.
230 | Storage Management Guide

How splitting a FlexClone volume from its parent worksSplitting a FlexClone volume from its parent removes any space optimizations that are currently usedby the FlexClone volume. After the split, both the FlexClone volume and the parent volume requirethe full space allocation determined by their volume guarantees. The FlexClone volume becomes anormal FlexVol volume.
You must be aware of the following considerations related to clone-splitting operations:
• When you split a FlexClone volume from its parent, all existing Snapshot copies of the FlexClonevolume are deleted. If you want to retain the Snapshot copies of the FlexClone volume, you canmove the FlexClone volume to a different aggregate by using the vol move command. Duringthe volume move operation, you can also create new Snapshot copies, if required. For details ofthe vol move command, see the Data ONTAP SAN Administration Guide for 7-Mode.
• No new Snapshot copies can be created of the FlexClone volume during the split operation.
• Because the clone-splitting operation is a copy operation that might take considerable time tocomplete, Data ONTAP provides the vol clone split stop and vol clone splitstatus commands to stop or check the status of a clone-splitting operation.
• The clone-splitting operation proceeds in the background and does not interfere with data accessto either the parent or the clone volume.
• The FlexClone volume must be online when you start the split operation.
• The parent volume must be online for the split operation to succeed.
• If you take the FlexClone volume offline while splitting is in progress, the operation issuspended; when you bring the FlexClone volume back online, the splitting operation resumes.
• If the FlexClone volume has a data protection or load sharing mirror, it cannot be split from itsparent volume.
• If you split a FlexClone volume from a FlexVol volume that has deduplication and compressionenabled, the split volume does not have deduplication and compression enabled.
• After a FlexClone volume and its parent volume have been split, they cannot be rejoined.
Related tasks
Splitting a FlexClone volume from its parent on page 234
Using FlexClone volumes to create efficient copies of your FlexVol volumes | 231

FlexClone volumes and LUNsYou can clone FlexVol volumes that contain LUNs and LUN clones.
Note: LUNs in this context refer to the LUNs that Data ONTAP serves to clients, not to the arrayLUNs used for storage on a storage array.
When you create a FlexClone volume, LUNs in the parent volume are present in the FlexClonevolume but they are not mapped and they are offline. To bring the LUNs in the FlexClone volumeonline, you need to map them to initiator groups. When the LUNs in the parent volume are backed bySnapshot copies, the FlexClone volume also inherits the Snapshot copies.
If the parent volume contains LUN clones (LUNs created by using the lun clone command), theFlexClone volume inherits the LUN clones and their base Snapshot copies. In this case, the LUNclone's base Snapshot copy in the parent volume shares blocks with the base Snapshot copy in theFlexClone volume. You cannot delete the LUN clone's base Snapshot copy in the parent volumewhile the base Snapshot copy in the FlexClone volume still exists.
If the parent volume contains FlexClone files or FlexClone LUNs (LUNs created by using the clonestart command), the FlexClone volume also contains FlexClone files and FlexClone LUNs, whichshare storage with the FlexClone files and FlexClone LUNs in the parent volume.
232 | Storage Management Guide

FlexClone volume operations
Operations you can perform with FlexClone volumes include creating a FlexClone volume andsplitting it from its parent volume.
Creating a FlexClone volumeIf you need a temporary copy of your data that can be made quickly and without using a lot of diskspace, you can create a FlexClone volume. FlexClone volumes save data space because allunchanged data blocks are shared between the FlexClone volume and its parent.
Before you begin
Ensure that you have the flex_clone license installed.
Step
1. Enter the following command to clone the volume:
vol clone create clone_name [-s {volume|file|none}] -b parent_name[parent_snap]
clone_name is the name of the FlexClone volume that you want to create.
-s {volume | file | none} specifies the space guarantee setting for the new FlexClone volume.If no value is specified, the FlexClone volume is given the same space guarantee setting as itsparent.
parent_name is the name of the FlexVol volume that you intend to clone.
parent_snap is the name of the base Snapshot copy of the parent FlexVol volume. If no name isspecified, Data ONTAP creates a base Snapshot copy with the nameclone_cl_name_prefix.id, where cl_name_prefix is up to 16 characters of the name ofthe new FlexClone volume and id is a unique digit identifier (for example 1, 2, and so on).
Note: The base Snapshot copy cannot be deleted as long as any clones based on that Snapshotcopy exist.
Result
The FlexClone volume is created and, if NFS is in use, an entry is added to the /etc/exports filefor every entry found for the parent volume.
The base Snapshot copy becomes a shared Snapshot copy between the FlexClone volume and itsparent.
233

Example
To create a FlexClone volume named newclone from the parent FlexVol volume flexvol1, youwould enter the following command:
vol clone create newclone -b flexvol1
Note: The Snapshot copy created by Data ONTAP is named clone_newclone.1.
After you finish
You can verify the status of the new FlexClone volume by using the vol status -v command.
Related concepts
Using FlexClone volumes to create efficient copies of your FlexVol volumes on page 227
How volume guarantees work with FlexVol volumes on page 289
Splitting a FlexClone volume from its parentIf you want the FlexClone volume to have its own disk space, rather than using that of its parent, youcan split it from its parent.
Steps
1. Determine the approximate amount of free space required to split a FlexClone volume from itsparent by entering the following command:
vol clone split estimate clone_name
2. Verify that enough free space exists in the containing aggregate to support the split by enteringthe following command:
df -A aggr_name
The avail column tells you how much available space you have in your aggregate.
3. Enter the following command to split the volume:
vol clone split start clone_name
The clone-splitting operation begins. All existing Snapshot copies of the clone are deleted, andthe creation of Snapshot copies of the clone is prevented for the duration of the split operation.
Note: If an online data migration operation is in progress, this command might fail. In thiscase, wait and retry the command when the online data migration operation is complete.
This operation could take some time to complete, depending on how much space is sharedbetween the FlexClone volume and its parent.
234 | Storage Management Guide

If you take no further action, when all shared data has been copied, the clone will be split from itsparent volume and become a regular FlexVol volume.
4. If you want to check the status of a clone-splitting operation, enter the following command:
vol clone split status clone_name
5. If you want to stop the progress of an ongoing clone-splitting operation, enter the followingcommand:
vol clone split stop clone_name
The clone-splitting operation halts; the original and FlexClone volumes remain clone partners,but they no longer share the disk space that was duplicated by the split.
6. You can display the status of the newly split FlexVol volume and verify the success of the clone-splitting operation by using the vol status -v command.
Related concepts
How splitting a FlexClone volume from its parent works on page 231
Determining the parent volume and base Snapshot copy fora FlexClone volume
You can determine the parent volume and base Snapshot copy for a FlexClone volume by using thevol status command.
Determining the space used by a FlexClone volumeYou can determine the space used by a FlexClone volume based on its nominal size and the amountof space it shares with the parent FlexVol volume.
About this task
When a FlexClone volume is created, it shares all of its data with its parent volume. Therefore,although the nominal size of the FlexVol volume is the same as its parent's size, it uses very little freespace from the aggregate. The free space used by a newly-created FlexClone volume isapproximately 0.5% of its nominal size. This space is used to store the FlexClone volume's metadata.
New data written to either the parent or the FlexClone volume is not shared between the volumes.The increase in the amount of new data that gets written to the FlexClone volume leads to an increasein the space the FlexClone volume requires from its containing aggregate.
Steps
1. Determine the nominal size of the FlexClone volume by entering the following command:
FlexClone volume operations | 235

df -m FlexClone_name
2. Determine the amount of space that is shared between the parent and FlexClone volume byentering the following command:
vol clone split estimate clone_name
3. Subtract the size of the shared space from the nominal size of the FlexClone volume to determinethe amount of free space being used by the FlexClone volume.
236 | Storage Management Guide

Moving your volumes nondisruptively
NetApp DataMotion for Volumes enables you to nondisruptively move a volume from one aggregateto another within the same controller for capacity utilization, improved performance, and to satisfyservice-level agreements. In a SAN environment, FlexVol volumes and the LUNs in the volumes aremoved nondisruptively from one aggregate to another.
In a volume move, SCSI applications accessing different LUNs in the volume can continue to runduring the move. Applications that use FC and iSCSI to access a LUN in the volume that is beingmoved do not see any I/O disruptions during the volume move. You can continue to access data inthe volume during and after the volume move.
The volume move occurs in three phases: setup phase, data copy phase, and cutover phase.
Ways to use volume moveYou can perform a nondisruptive volume move in different scenarios, such as moving it from a busyaggregate to a less busy aggregate, or from a high-speed disk to a lower-speed disk.
You can move the volume in the following scenarios:
• From a high-speed disk to a lower-speed disk or from a lower-speed disk to a high-speed disk, tosatisfy SLA requirements.
• From a full aggregate to an aggregate that has space for growth.
• From an array LUN aggregate to an aggregate on native storage disks.
• Between different RAID types, such as RAID-DP and RAID4.
• Between different types of disk drives, such as array LUNs, SSDs, SAS-connected drives, andSATA-connected drives.
Requirements for performing a volume moveBefore you move a volume nondisruptively, you must be aware of the types of volumes you canmove and the operations that might conflict with the volume move. The volume move does not startif the volume has unsupported settings or if there are conflicting operations.
• Your Data ONTAP system must be running Data ONTAP 8.0.1 7-Mode or later.
• You can move only one 7-Mode FlexVol volume at a time.
• Moving a root volume requires clustered Data ONTAP 8.2 or later.
237

• The volume move cannot be initiated from or to a root aggregate.
• The volume must be online.
• The source volume must be consistent.
• You cannot move the following types of volumes:
◦ A FlexClone volume
◦ A FlexCache volume
◦ A volume that is the destination of any replication relationship, such as volume SnapMirror orqtree SnapMirror.
◦ A volume that is a SnapVault destination
Note: During a volume move, you must not initiate qtree SnapMirror or SnapVaultrelationships from the destination volume.
◦ A read-only volume
◦ A volume in a nondefault vFiler unit
◦ A volume from a 64-bit aggregate to a 32-bit aggregate
• The source volume should not be exported to NFS or CIFS clients when the volume moveoperation is in progress.There is a small window of time when you can export the source volume over NFS or CIFSbefore the volume move enters the cutover phase. However, if you do so, the cutover phase mightnot be successfully completed. If the cutover phase is not completed, there is no disruption toiSCSI clients because the volume move rolls back to continue with the data copy phase.
• The volume guarantee option must not be set to file.
• Deduplication operations must not be running on the source volume.If deduplication is active, the volume move is paused and the cutover phase is not initiated.
• The following operations must not be running, because they conflict with volume moves:
◦ SnapRestore of the source volume or the containing aggregate
◦ WAFLIron operation on the source or the destination aggregate
◦ Active LUN clone split operations on the source volume
◦ Revert operation on the storage system
Note: FlexClone volumes in the source volume are not moved along with the source volume.Fingerprint databases and change logs in the source volume are moved along with the sourcevolume.
238 | Storage Management Guide

Related information
Data ONTAP documentation on the NetApp Support Site: support.netapp.comNetApp Interoperability Matrix: support.netapp.com/matrixHost Utilities documentation: www.support.netapp.com
How the setup phase of volume move worksThe setup phase creates a temporary destination volume in the destination aggregate and initiatesdata transfer from the source volume to the destination volume.
During the setup phase, the system checks whether the volume you plan to move meets the specifiedrequirements. If any of these checks fail, then the volume move is terminated and an error message isdisplayed. You should follow the guidance of the error message before you manually resume thevolume move.
How the data copy phase of volume move worksThe data copy phase follows the setup phase of a volume move operation. In the data copy phase,incremental data is transferred automatically from the source volume to the destination volume, afterwhich the cutover phase can begin.
After each block of data is transferred, the volume move determines whether the cutover phase canbe initiated.
If a SnapRestore or a WAFLIron operation is started on the source volume, the destination volume,or the containing aggregate, the volume move is canceled and an appropriate error message isrecorded in the log file.
Note: During the data copy phase, if you attempt SnapMirror migrate on the source volume, thenthe volume move pauses, and you cannot resume or abort the volume move operation.
If the volume move finds any unsupported settings or conflicting operations before entering thecutover phase, the volume move operation is paused and the reason for the pause is displayed. Youmust resolve the issue before you can manually resume the volume move.
How the cutover phase of volume move worksThe cutover phase is the final phase of the volume move. During the cutover phase, the data in thesource volume and the destination volume is synchronized. I/O operations are redirected to thedestination volume and the volume move is complete.
The following processes take place during the cutover phase.
Moving your volumes nondisruptively | 239

• All LUNs in the source volume are in a suspended I/O (quiesced) state. The quiesced stateempties the LUNs of pending I/Os and prevents new I/Os from being scheduled. Any new I/Opost-LUN quiesce is simply dropped and no response is sent to the initiator.
• The source volume is quiesced. The volume quiesce fails new commands on the volume withbusy status and drains pending commands on the volume. As part of the quiesce operation,WAFL captures the final delta lag in a Snapshot copy, which is named according to theconvention ndvm_final_<timestamp>.
• The destination volume is then synchronized completely with the source volume with the deltafrom ndvm_final_<timestamp>. This is the last SnapMirror update between the two volumesbefore servicing the I/O from the destination volume.
• The identities of the source volume and the destination volume are swapped.
• The migrated volume is brought online with the identity of the original source volume and theLUNs are unquiesced, at which point they are in a mapped state and ready to accept I/O.
• The source volume is deleted, unless the user specified retaining it. The volume can be retainedusing the vol move -k command. If the source volume it retained, the vol move operation willrename it as <source volume name>_old_<timestamp>.
• The ndvm_final_<timestamp> Snapshot copy is retained in the moved volume at thedestination. However, once cutover is complete, you can delete it.
Note: The host application might encounter I/O disruptions if storage system reboot, nondisruptiveupgrade (NDU), shutdown, takeover, or giveback occurs during the volume move.
If the volume move is not completed within the specified cutover period (default 60 seconds), thenthe cutover phase is timed out, logging the appropriate error messages, and the volume move revertsto the data copy phase.
If the cutover phase is successful, it results in the following:
• The contents of the destination volume are identical to the source volume.
• The destination volume takes the identity of the source volume.
• After the volume is moved, the LUN at the destination starts processing I/O operations.
Depending on the number of cutover attempts, the volume move tries to enter the cutover phaseagain. If cutover is not completed within the specified number of cutover attempts, then the volumemove is paused and an appropriate error message is recorded in the log file. You can then manuallyresume the volume move.
240 | Storage Management Guide

Performing the volume move operationYou can nondisruptively move a volume from one aggregate to another within a storage system. Youcan continue to access data in the LUNs during the volume move.
Before you begin
Before the volume move enters the cutover phase, you must ensure that any existing synchronousSnapMirror relationships established on the source volume are destroyed. You can resynchronize theSnapMirror relationships after the volume move is completed.
About this task
• A temporary volume is created at the beginning of the volume move.You should not change the contents, state, or attributes of the destination volume, or create anyreplication, disaster recovery, SnapVault, or qtree SnapMirror relationship with other volumes forthe duration of the move.
• MetroCluster relationships are not affected by the volume move.
• If your volume guarantee is set to none, the fractional reserve of the volume is automatically setto 0 after the move is completed.
Step
1. Start the volume move by entering the following command:
vol move start srcvol dstaggr [-k] [-m | -r num_cutover_attempts] [-wcutover_window] [-o] [-d]
srcvol specifies the source volume.
dstaggr specifies the destination aggregate.
-k retains the source volume after a successful move. The source volume remains offline.
-m specifies that the volume move does not initiate automatic cutover. The system continuouslyruns updates and you can initiate manual cutover at any point during the volume move.
num_cutover_attempts specifies the number of cutover attempts. The minimum number ofcutover attempts is one and the default number of attempts is three. If cutover cannot becompleted in the specified number of attempts, then the volume move is paused.
cutover_window specifies the duration of the cutover window. The default and minimum valueis 60 seconds.
-o displays warning messages on the console and the operation continues.
Moving your volumes nondisruptively | 241

-d runs all the data copy phase checks. If any of the checks fail, error messages are displayed onthe console and the operation is terminated.
Result
If the volume move is successful, the destination volume retains the following:
• Snapshot copies of the source volume
• Attributes of the LUNs from the source volume in the corresponding LUNs in the destinationvolume
Pausing the volume move operationYou can manually pause the volume move during the setup phase or the data copy phase to completeany high priority I/O operations.
Step
1. Pause the volume move by entering the following command:
vol move pause srcvol
Example
system1> vol move pause vol1Wed Aug 29 08:11:40 GMT [system1: replication.src.err:error]: SnapMirror: source transfer from vol1 to system1:ndm_dstvol_1188375081 : transfer failed.Wed Aug 29 08:11:41 GMT [system1: replication.dst.err:error]: SnapMirror: destination transfer from 127.0.0.1:vol1 to ndm_dstvol_1188375081 : replication transfer failed to complete.Wed Aug 29 08:11:41 GMT [system1: vol.move.paused:info]: Move of volume vol1 to aggregate aggr1 paused : User initiated
Resuming the volume move operationWhen the volume move is manually or automatically paused, you can resume it by running the volmove resume command. On resuming, the volume move runs the same set of checks that were runduring the data copy phase. You can add to or change the options you specified when you started thevolume move.
Step
1. Resume the volume move operation by entering the following command:
242 | Storage Management Guide

vol move resume srcvol [-k] [-m | -r num_cutover_attempts] [-wcutover_window] [-o]
Example
system1> vol move resume vol1 -k -r 8 -w 120Wed Aug 29 08:15:14 GMT [system1: vol.move.resume:info]: Move of volume vol1 to aggregate aggr1 was resumed.system1> Wed Aug 29 08:15:14 GMT [system1: vol.move.transferStart:info]: Baseline transfer from volume vol1 to ndm_dstvol_1188375081 started.
Monitoring the volume move statusYou can use the vol move status command to display information about the volume that ismoved.
About this task
Note: If you are running the vol move status command in a continuous loop during cutoverphase, you might see a message indicating that vol move is complete even before actualcompletion. This may not be indicating actual cutover completion. To confirm, wait a few secondsand run vol move status again.
Step
1. Obtain the status of the volume move operation by entering the following command:
vol move status srcvol [-v]
-v provides additional information about the destination volume name, amount of datatransferred, the time taken for the data transfer, and the amount of data that is currently beingtransferred.
Example
system1> vol move status vol1 -vSource : vol1Destination : aggr1:ndm_dstvol_1188375081State : moveCutover Attempts : 3Cutover Time : 60Last Completed Transfer: Data Transferred = 324 KB Time Taken = 1 s Current Transfer Size = 0 KB
Moving your volumes nondisruptively | 243

Performing manual cutover of the volume move operationIf the volume move is unable to complete automatic cutover in the specified number of cutoverattempts, you can initiate manual cutover. You can specify the -m option when starting or resumingthe volume move to initiate cutover and increase the probability of completing the volume movewithin the cutover period.
Before you begin
Before starting manual cutover, you should perform any prerequisites based on the failure observedthrough EMS in the automatic cutover.
Step
1. Manually cut over the volume move operation by entering the following command:
vol move cutover srcvol [-w cutover_window]
Canceling the volume move operationYou can cancel the volume move if you want to complete any high priority operations.
Step
1. Cancel the volume move operation by entering the following command:
vol move abort srcvol
244 | Storage Management Guide

Using FlexClone files and FlexClone LUNs tocreate efficient copies of files and LUNs
FlexClone files and FlexClone LUNs are writable, space-efficient clones of parent files and parentLUNs, and help in efficient utilization of the physical aggregate space.
FlexClone files and FlexClone LUNs utilize 0.4 percent of their size to store the metadata. Clonesshare the data blocks of their parent files and parent LUNs and occupy negligible storage space untilclients write new data either to the parent file or LUN, or to the clone.
Clients can perform all file and LUN operations on both the parent and the clone entities.
Benefits of FlexClone files and FlexClone LUNsThe process of creating FlexClone files or FlexClone LUNs is highly space-efficient and time-efficient because the cloning operation does not involve physically copying any data.
You can create space-efficient copies of your data by using FlexClone files and FlexClone LUNs insituations such as the following:
• When you need to deploy, upgrade, or redeploy thousands of standardized virtual desktops orservers.
• When you need a copy of a database for application development purposes.
• When you need to boot servers in a server farm.You can create FlexClone LUNs of the parent boot LUN, then use the FlexClone LUN to boot aserver in a server farm.
How FlexClone files and FlexClone LUNs workFlexClone files and FlexClone LUNs share the same physical data blocks with their parent files andLUNs present in FlexVol or FlexClone volumes, and occupy negligible space in the form ofmetadata.
You can create a clone of a file that is present in a FlexVol volume in a NAS environment, and youcan also clone a LUN in a SAN environment.
The cloned copies are highly space-efficient and time-efficient because the cloning operation doesnot copy physical blocks of data. When you write new data to a parent or clone, then the entity onwhich new data is written starts occupying extra storage space.
245

The following illustration shows the parent files or LUNs and FlexClone files or LUNs accessing thesame data blocks on the storage system. On the host side, the parent files or LUNs and FlexClonefiles or LUNs appear as normal files and LUNs:
FlexClone files and FlexClone LUNs appear as normal files and LUNs on host side.
Physical Data Blocks
ParentFile/LUN
File/LUN File/LUN File/LUN File/LUN
FlexCloneFile/LUN
FlexCloneFile/LUN
FlexCloneFile/LUN
Parent file/LUNand FlexClone
files/LUNs access the same data blocks on a storage system.
Parent file/LUN and FlexClonefiles/LUNs inside a FlexVol volume.
FlexVol Volume
The cloning operation is instantaneous and has no impact on client access to the parent file or LUN.Clients that are accessing the parent file or LUN do not experience any disruption or outage. Clientscan perform all operations on FlexClone files and FlexClone LUNs as they can on standard files andLUNs.
You can create a maximum of 32,767 FlexClone files or FlexClone LUNs from a parent file or LUNwithout creating a physical copy of the parent entity. If you try to create more than 32,767 clones,Data ONTAP automatically creates a new physical copy of the parent file or LUN.
246 | Storage Management Guide

Note: FlexClone LUNs are not the same as LUN clones. You can create a FlexClone LUN withouta backing Snapshot copy of the parent LUN. However, to create a LUN clone, you must have abacking Snapshot copy of the parent LUN. For more information about LUN clones, see the DataONTAP SAN Administration Guide for 7-Mode.
Considerations for working with FlexClone files andFlexClone LUNs
You should keep several considerations in mind when working with FlexClone files and FlexCloneLUNs.
• You can create FlexClone files and LUNs only in the same FlexVol volume containing the parentfiles and LUNs.
• You can clone a complete file, sub-file, LUN, or sub-LUN.To clone a sub-file or sub-LUN, you should know the block range of the parent entity and cloneentity.
• The sis attribute is added to a FlexVol volume when a FlexClone file or FlexClone LUN iscreated for the first time.
• When clients write new data either to a FlexClone file or FlexClone LUN, or the parent file orparent LUN, then the new data occupies additional storage space.
• If you delete the FlexClone files or LUNs, the parent files or LUNs are not affected.Deleting a parent file or LUN has no impact on the FlexClone files or FlexClone LUNs.
• If you create FlexClone files or LUNs from a Snapshot copy, you cannot create new Snapshotcopies until the cloning process is complete.
• If a FlexVol volume containing FlexClone files and LUNs has the fractional reserve set to zero,you must follow extra configuration and management requirements to ensure that the applicationsaccessing the FlexVol volume do not receive errors due to lack of space (ENOSPC).
Related concepts
Considerations for setting fractional reserve on page 293
Using FlexClone files and FlexClone LUNs to create efficient copies of files and LUNs | 247
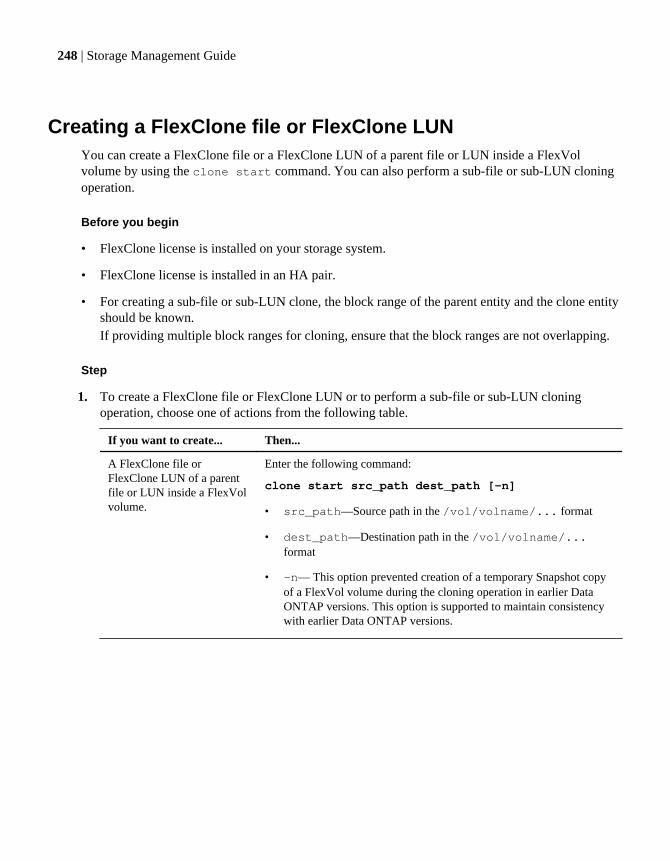
Creating a FlexClone file or FlexClone LUNYou can create a FlexClone file or a FlexClone LUN of a parent file or LUN inside a FlexVolvolume by using the clone start command. You can also perform a sub-file or sub-LUN cloningoperation.
Before you begin
• FlexClone license is installed on your storage system.
• FlexClone license is installed in an HA pair.
• For creating a sub-file or sub-LUN clone, the block range of the parent entity and the clone entityshould be known.If providing multiple block ranges for cloning, ensure that the block ranges are not overlapping.
Step
1. To create a FlexClone file or FlexClone LUN or to perform a sub-file or sub-LUN cloningoperation, choose one of actions from the following table.
If you want to create... Then...
A FlexClone file orFlexClone LUN of a parentfile or LUN inside a FlexVolvolume.
Enter the following command:
clone start src_path dest_path [-n]
• src_path—Source path in the /vol/volname/... format
• dest_path—Destination path in the /vol/volname/...format
• –n— This option prevented creation of a temporary Snapshot copyof a FlexVol volume during the cloning operation in earlier DataONTAP versions. This option is supported to maintain consistencywith earlier Data ONTAP versions.
248 | Storage Management Guide

If you want to create... Then...
A sub-file or sub-LUN clone. Enter the following command:
clone start src_path [dest_path] [-n] -rsrc_fbn:dest_fbn:fbn_cnt ...
• src_path—Source path in the /vol/volname/... format
• dest_path—Destination path in the /vol/volname/...format
• –n— This option prevented creation of a temporary Snapshot copyof a FlexVol volume during the cloning operation in earlier versionsof Data ONTAP. This option is supported to maintain consistencywith earlier Data ONTAP versions.
• –r—Specifies block ranges.
• src_fbn—Starting fbn of the source block range. For a LUN, thefbn is considered as LBA (Logical block address).
• dest_fbn—Starting fbn of the destination block range.
• fbn_cnt—Number of blocks to be cloned.
A FlexClone file orFlexClone LUN of a parentfile or LUN inside a FlexVolvolume from a Snapshot copy
Enter the following command:
clone start src_path dest_path[-s<snapshot_name>]
• src_path—Source path in the /vol/volname/... format
• dest_path—Destination path in the /vol/volname/...format.
• snapshot_name—Source Snapshot copy
You should use the -s option only when you want to create a clonefrom a Snapshot copy.In addition, you should provide the destination path when you use the-s option. Otherwise, the command fails and an error message isdisplayed.
Using FlexClone files and FlexClone LUNs to create efficient copies of files and LUNs | 249

If you want to create... Then...
A sub-file or sub-LUN clonefrom a Snapshot copy.
Enter the following command:
clone start src_path [dest_path] [-s<snapshot_name>] -r src_fbn:dest_fbn:fbn_cnt ...
• src_path—Source path in the /vol/volname/... format
• dest_path—Destination path in the /vol/volname/...format.
• snapshot_name—Source Snapshot copy
You should use the -s option only when you want to create a clonefrom a Snapshot copy.In addition, you should provide the destination path when you use the-s option. Otherwise, the command fails and an error message isdisplayed.
• –r—Specifies block ranges.
• src_fbn—Starting fbn of the source block range. For a LUN, thefbn is considered as LBA (Logical block address).
• dest_fbn—Starting fbn of the destination block range.
• fbn_cnt—Number of blocks to be cloned.
Note: You cannot use the clone start command to create a FlexClone LUN from a LUNclone.
Viewing the space savings due to FlexClone files andFlexClone LUNs
You can view the percentage of disk space saved by block sharing within a volume containingFlexClone files and LUNs.
Step
1. To view the space saving achieved due to FlexClone files and FlexClone LUNs, enter thefollowing command:
df -s volname
volname is the name of the FlexVol volume.
Note: If you run the df -s command on a deduplication-enabled FlexVol volume, you canview the space saved by both deduplication and FlexClone files and LUNs.
For more information about the df -s command, see the df(1) man page.
250 | Storage Management Guide

Example
The following example shows the space saving on a FlexClone volume test1:
systemA> df -s test1
Filesystem used saved %saved /vol/test1/ 4828 5744 54%
Using FlexClone files and FlexClone LUNs to create efficient copies of files and LUNs | 251

Features supported with FlexClone files andFlexClone LUNs
FlexClone files and FlexClone LUNs work with different Data ONTAP features such asdeduplication, Snapshot copies, quotas, and volume SnapMirror.
The following features are supported with FlexClone files and FlexClone LUNs:
• Deduplication
• Snapshot copies
• Access control lists
• vFiler units
• Quotas
• FlexClone volumes
• NDMP
• Volume SnapMirror
• Qtree SnapMirror
• The volume move command
• The volume copy command
• Space reservation
• HA configuration
Note: Synchronous SnapMirror is not supported on FlexVol volumes with FlexClone files andFlexClone LUNs.
How deduplication works with FlexClone files and FlexCloneLUNs
You can efficiently use the physical storage space of the data blocks by creating a FlexClone file orFlexClone LUN of the parent file and parent LUN in a deduplication-enabled volume.
The block-sharing mechanism used by FlexClone files and LUNs is also used by deduplication. Youcan maximize the space savings in a FlexVol volume by enabling deduplication on the volume andthen cloning the deduplication-enabled volume.
252 | Storage Management Guide

Note: While executing the sis revert_to command on a deduplication-enabled volume, youcannot create FlexClone files and FlexClone LUNs of the parent files and parent LUNs residing inthat volume.
How Snapshot copies work with FlexClone files andFlexClone LUNs
You can create FlexClone files and FlexClone LUNs from an existing Snapshot copy of the parentfiles and parent LUNs contained in a FlexVol volume. If the base Snapshot copy of a FlexVolvolume is deleted, the dependent FlexClone files and FlexClone LUNs are not deleted.
You must consider the following while using a Snapshot copy for creating FlexClone files andFlexClone LUNs:
• If the Snapshot copy gets automatically deleted because of using the snap autodeletecommand, the dependent FlexClone files and FlexClone LUNs are not deleted. However, if theblock-sharing on the FlexClone files and FlexClone LUNs is not complete, data might be lost.
• You cannot manually delete a Snapshot copy from which FlexClone files or FlexClone LUNs arebeing created until the block-sharing process between the parent and clone entities is complete.The Snapshot copy remains locked until the completion of the block-sharing process, whichhappens in the background. Therefore, when you try deleting a locked Snapshot copy, the systemdisplays a message asking you to retry the operation after some time. In such a situation, if youwant to manually delete the particular Snapshot copy, you must keep retrying the deletionoperation so that the Snapshot copy gets deleted after the block sharing is complete.
For more information about the automatic and manual deletion of Snapshot copies, see the DataONTAP Data Protection Online Backup and Recovery Guide for 7-Mode.
How access control lists work with FlexClone files andFlexClone LUNs
FlexClone files and FlexClone LUNs inherit the access control lists of their parent files and LUNs.
However, you cannot clone the FlexClone files associated with Windows NT streams.
For more information about access control lists, see the Data ONTAP File Access and ProtocolsManagement Guide for 7-Mode.
Features supported with FlexClone files and FlexClone LUNs | 253

How vFiler units work with FlexClone files and FlexCloneLUNs
You can manage FlexClone files and FlexClone LUNs of parent files and parent LUNs in both thedefault and nondefault vFiler contexts.
If you are a default vFiler administrator, you can manage the FlexClone files and FlexClone LUNs ofall the FlexClone volumes in both the default and the nondefault vFiler units. However, if you are anondefault vFiler administrator, you can only manage the FlexClone files and FlexClone LUNs ofthe FlexClone volumes in that nondefault vFiler unit.
While creating FlexClone files and FlexClone LUNs of FlexClone volumes in a nondefault vFilerunit, you must ensure that the source file path and the destination file path are in the same vFiler unit.
For more information about vFiler units, see the Data ONTAP MultiStore Management Guide for 7-Mode.
How quotas work with FlexClone files and FlexClone LUNsQuota limits are applied on the total logical size of the FlexClone files or FlexClone LUNs. Startingfrom Data ONTAP 8.1, cloning operations do not fail block sharing even if it causes quotas toexceed.
When you create a FlexClone file or FlexClone LUN, quotas do not recognize any space savings. Forexample, if you create a FlexClone file of a parent file of 10 GB, you are only using 10 GB ofphysical space, but the quota utilization is recorded as 20 GB (10 GB for the parent and 10 GB forthe FlexClone file).
If the creation of a FlexClone file or LUN results in the group or user quota's being exceeded, theclone operation succeeds provided the FlexVol volume has enough space to hold the metadata for theclone. However, the quota for that user or group is oversubscribed.
How FlexClone volumes work with FlexClone files andFlexClone LUNs
You can create a FlexClone volume of a FlexVol volume that has both a FlexClone file andFlexClone LUN and its parent file or LUN in it.
FlexClone files or FlexClone LUNs and their parent files or LUNs that are present in the FlexClonevolume continue to share blocks the same way they do in the parent FlexVol volume. In fact, all theFlexClone entities and their parents share the same underlying physical data blocks, minimizingphysical disk space usage.
254 | Storage Management Guide

If the FlexClone volume is split from its parent volume, then the FlexClone files or FlexClone LUNsand their parent files or LUNs stop sharing the blocks in the clone of the FlexClone volume.Thereafter they exist as independent files or LUNs. This means that the clone of the volume usesmore space than before the splitting operation.
How NDMP works with FlexClone files and FlexClone LUNsNDMP works at the logical level with FlexClone files and FlexClone LUNs. All FlexClone files orLUNs are backed up as separate files or LUNs.
When you use NDMP services to back up a qtree or a FlexVol volume that contains FlexClone filesor FlexClone LUNs, block sharing between parent and clone entities is not preserved, and cloneentities are backed up to tape as separate files or LUNs. The space saving is lost. Therefore, the tapeonto which you are backing up should have sufficient space to store the expanded amount of data.When you restore, all the FlexClone files and FlexClone LUNs are restored as separate physical filesand LUNs. You can enable deduplication on the volume to restore the block-sharing benefits.
Note: When FlexClone files and FlexClone LUNs are being created from an existing Snapshotcopy of a FlexVol volume, you cannot back up the volume to tape until the block-sharing process,which happens in the background, is complete. If you use NDMP on the volume when the block-sharing process is in progress, the system displays a message asking you to retry the operationafter some time. In such a situation, you must keep retrying the tape backup operation so that itsucceeds after the block sharing is complete.
For more information about tape backup, see the Data ONTAP Data Protection Tape Backup andRecovery Guide for 7-Mode
How synchronous SnapMirror works with FlexClone filesand FlexClone LUNs
You should not use a FlexVol volume that has FlexClone files and FlexClone LUNs as a source forsynchronous SnapMirror.
Synchronous SnapMirror is not qualified on a FlexVol volume with FlexClone files or FlexCloneLUNs.
For more information about synchronous SnapMirror, see the Data ONTAP Data Protection OnlineBackup and Recovery Guide for 7-Mode.
Features supported with FlexClone files and FlexClone LUNs | 255

How volume SnapMirror works with FlexClone files andFlexClone LUNs
Volume SnapMirror used with FlexClone files and FlexClone LUNs helps in maintaining spacesavings because the cloned entities are replicated only once.
If a FlexVol volume is a volume SnapMirror source and contains FlexClone files or FlexCloneLUNs, volume SnapMirror transfers only the shared physical block and a small amount of metadatato the volume SnapMirror destination. The destination stores only one copy of the physical block,and this block is shared between the parent and cloned entities. Therefore, the destination volume isan exact copy of the source volume and all the clone files or LUNs on the destination volume sharethe same physical block.
For more information about volume SnapMirror, see the Data ONTAP Data Protection OnlineBackup and Recovery Guide for 7-Mode.
How qtree SnapMirror and SnapVault work with FlexClonefiles and FlexClone LUNs
Qtree SnapMirror and SnapVault mirror all the FlexClone files and LUNs to the destination volumeas individual physical files and LUNs.
The destination FlexVol volume must have enough capacity to store the FlexClone files or LUNs, asseparate files or LUNs.
Running deduplication on the destination volume after the qtree SnapMirror and SnapVault transferis complete reduces the amount of used space on the destination FlexVol volume.
For more information about qtree SnapMirror and SnapVault, see the Data ONTAP Data ProtectionOnline Backup and Recovery Guide for 7-Mode.
How volume move affects FlexClone files and FlexCloneLUNs
During the cutover phase of a volume move operation, you cannot create FlexClone files orFlexClone LUNs of a FlexVol volume.
For more information about the volume move operation, see the Data ONTAP SAN AdministrationGuide for 7-Mode.
256 | Storage Management Guide

How volume copy works with FlexClone files and FlexCloneLUNs
You can perform a volume copy operation on a FlexVol volume that has FlexClone files andFlexClone LUNs in it.
After the volume copy operation is done, the FlexClone files and FlexClone LUNs and their parentson the destination FlexVol volume share the same data blocks as they did on the source FlexVolvolume.
For more information about the vol copy command, see the Data ONTAP Data Protection OnlineBackup and Recovery Guide for 7-Mode.
How space reservation works with FlexClone files andFlexClone LUNs
FlexClone files and FlexClone LUNs inherit the space reservation attribute from the parent file andparent LUN.
FlexClone files and FlexClone LUNs inherit the space reservation settings of the parent file and theparent LUN. Therefore, if there is not enough space in the FlexVol volume to create a FlexCloneLUN with the same space reservation as that of the parent, then the cloning operation fails.
Note: The space required according to space reservation attribute is separate for the parent LUNand the FlexClone LUN.
How an HA configuration works with FlexClone files andFlexClone LUNs
FlexClone file and FlexClone LUN operations are supported in an HA configuration.
In an HA pair, you cannot create FlexClone files or FlexClone LUNs on the partner while thetakeover or giveback operation is in progress. All the pending block sharing operations on the partnerare resumed after the takeover or giveback operation is complete.
Features supported with FlexClone files and FlexClone LUNs | 257

Using deduplication and data compression toincrease storage efficiency
You can run deduplication and data compression together or independently on a FlexVol volume toachieve optimal space savings. Deduplication eliminates the duplicate data blocks and datacompression compresses the data blocks to reduce the amount of physical storage required.
How to set up efficiency operationsDepending on your storage environment setup, you can first estimate the space savings that can beachieved and then configure deduplication and data compression or only deduplication. You can runthe efficiency operations on a volume by using schedules.
You can use the space savings estimation tool to estimate the savings you can achieve in an existingenvironment. The space savings estimation tool can evaluate a maximum of 2 TB of data. You candownload the space savings estimation tool from communities.netapp.com/docs/DOC-18699.
Configuring deduplicationDeduplication is a Data ONTAP feature that reduces the amount of physical storage space requiredby eliminating duplicate data blocks within a FlexVol volume. You should not enable deduplicationon the root volume.
You can decide to deduplicate only the new data that is written to the volume after enablingdeduplication or both the new data and the data existing in the volume prior to enablingdeduplication.
How deduplication works
Deduplication operates at the block level within the entire FlexVol volume, eliminating duplicatedata blocks, and storing only unique data blocks.
Each block of data has a digital signature that is compared with all other signatures in a data volume.If an exact block signature match exists, a byte-by-byte comparison is done for all the bytes in theblock. Only if all the bytes match, the duplicate block is discarded and its disk space is reclaimedresulting in no data loss.
Deduplication removes data redundancies, as shown in the following illustration:
258 | Storage Management Guide

AfterBefore
Data ONTAP writes all data to a storage system in 4-KB blocks. When deduplication runs for thefirst time on a volume with existing data, it scans all the blocks in the volume and creates a digitalfingerprint for each of the blocks. Each of the fingerprints is compared to all the other fingerprintswithin the volume. If two fingerprints are found to be identical, a byte-by-byte comparison is donefor all data within the block. If the byte-by-byte comparison detects identical data, the pointer to thedata block is updated, and the duplicate block is removed.
Note: When deduplication is run on a volume with existing data, it is best to configurededuplication to scan all the blocks in the volume for better space savings.
Deduplication runs on the active file system. Therefore, as additional data is written to thededuplicated volume, fingerprints are created for each new block and written to a change log file. Forsubsequent deduplication operations, the change log is sorted and merged with the fingerprint file,and the deduplication operation continues with fingerprint comparisons as previously described.
What deduplication metadata is
The deduplication metadata includes the fingerprint file and change logs. Fingerprints are the digitalsignatures for every 4-KB data block in a FlexVol volume.
The deduplication metadata contains two change log files. When deduplication is running, thefingerprints of the new data blocks from one change log file are merged into the fingerprint file, andthe second change log file stores the fingerprints of the new data that is written to the volume duringthe deduplication operation. The roles of the change log files are reversed when the nextdeduplication operation is run.
In Data ONTAP 8.0.1, the deduplication metadata is located within the aggregate. Starting with DataONTAP 8.1, two copies of deduplication metadata are maintained per volume. A copy of thededuplication metadata resides in the volume and another copy is in the aggregate. The deduplicationmetadata in the aggregate is used as the working copy for all the deduplication operations. Anadditional copy of the deduplication metadata resides in the volume.
When a volume is moved, the deduplication metadata is also transferred with the volume. If thevolume ownership changes, the next time deduplication is run, then the deduplication metadata
Using deduplication and data compression to increase storage efficiency | 259

which resides in the aggregate is created automatically by using the copy of deduplication metadatain the volume. This method is a faster operation than creating a new fingerprint file.
Starting with Data ONTAP 8.2, the fingerprints are stored for each physical block, this reduces theamount of space required to store the deduplication metadata.
Deduplication metadata can occupy up to 7 percent of the total physical data contained within thevolume, as follows:
• In a volume, deduplication metadata can occupy up to 4 percent of the total amount of datacontained within the volume.
• In an aggregate, deduplication metadata can occupy up to 3 percent of the total physical datacontained within the volume.
You can use the df -A aggrname command to check the available space in an aggregate and the dfpath command to check the available space in a volume. For more information about thesecommands, see the man pages.
Example
A 2 TB aggregate has four volumes, each 400 GB in size, in the aggregate. You need threevolumes to be deduplicated with varying savings percentage on each volume.
The space required in the different volumes for deduplication metadata is as follows:
• 2 GB [4% × (50% of 100 GB)] for a 100 GB of logical data with 50 percent savings
• 6 GB [4% × (75% of 200 GB)] for a 200 GB of logical data with 25 percent saving
• 3 GB [4% × (25% of 300 GB)] for a 300 GB of logical data with 75 percent savings
The aggregate needs a total of 8.25 GB [(3% × (50% of 100 GB)) + (3% × (75% of 200 GB))+ (3% × (25% of 300 GB)) = 1.5+4.5+2.25= 8.25 GB] of space available in the aggregate fordeduplication metadata.
Guidelines for using deduplication
Deduplication runs as a system operation and consumes system resources when the deduplicationoperation is running on FlexVol volumes.
If the data does not change often in a volume, it is best to run deduplication less frequently. If yourun multiple concurrent deduplication operations on a storage system, these operations lead to ahigher consumption of system resources. It is best to begin with fewer concurrent deduplicationoperations. Increasing the number of concurrent deduplication operations gradually enables you tobetter understand the impact on the system.
260 | Storage Management Guide

Performance considerations for deduplication
Various factors affect the performance of deduplication. You should check the performance impactof deduplication in a test setup, including sizing considerations, before deploying deduplication inperformance-sensitive or production environments.
The following factors can affect the performance of deduplication:
• The data access pattern (for example, sequential versus random access, the size, and pattern of theinput and output)
• The amount of duplicate data, the amount of total data, and the average file size
• The nature of data layout in the volume
• The amount of changed data between deduplication operations
• The number of concurrent deduplication operations
• Hardware platform (system memory and CPU module)
• Load on the system
• Disk types (for example, ATA/FC and RPM of the disk)
For more information about performance aspects of deduplication, see Technical Report 3958: DataCompression and Deduplication Deployment and Implementation Guide for 7-Mode.
Related information
Data Compression and Deduplication Deployment and Implementation Guide for 7-Mode:media.netapp.com/documents/tr-3958.pdf
Enabling deduplication on a volume
You can enable deduplication on a FlexVol volume to achieve storage efficiency by using the sison command.
Before you begin
For a FlexVol volume, you must have verified that enough free space exists for deduplicationmetadata in the volumes and aggregates.
Step
1. Enable deduplication by entering the following command:
sis on path
path is the complete path to the FlexVol volume.
Using deduplication and data compression to increase storage efficiency | 261

Example
The following command enables deduplication on the volume VolA:
sis on /vol/VolA
Disabling deduplication on a volume
You can disable deduplication on a volume by using the sis off command.
About this task
If you have enabled data compression on the volume, running the sis off command disables datacompression.
Steps
1. Stop any volume efficiency operation that is currently active on the volume by entering thefollowing command:
sis stop path
path is the complete path to the FlexVol volume.
2. Disable the deduplication operation by entering the following command:
sis off path
path is the complete path to the FlexVol volume.
This command stops all future deduplication operations. For more information about the siscommand, see the sis(1) man page.
Example
The following command disables deduplication on the volume VolA:
sis off /vol/VolA
Configuring data compressionData compression is a Data ONTAP feature that enables you to reduce the physical capacity that isrequired to store data on storage systems by compressing the data blocks within a FlexVol volume.You can use data compression only on volumes contained within 64-bit aggregates.
You can use data compression on primary, secondary, and tertiary storage tiers.
262 | Storage Management Guide

How data compression works
Data compression enables you to store more data in less space. Further, you can use datacompression to reduce the time and bandwidth required to replicate data during volume SnapMirrortransfers. Data compression can save space on regular files or LUNs.
However, storage system internal files, Windows NT streams, and volume metadata are notcompressed.
Data compression works by compressing a small group of consecutive blocks known as acompression group. Data compression can be done in the following ways:
• Inline compressionIf inline compression is enabled on a volume, during subsequent data writes the compressibledata is compressed and written to the volume. However, data which cannot be compressed or databypassed by inline compression is written in the uncompressed format to the volume.
• Postprocess compressionIf postprocess compression is enabled on a volume, the new data writes to the volume which werenot compressed initially (if inline compression is enabled), are rewritten as compressed data tothe volume when postprocess compression is run. The postprocess compression operation runs asa low-priority background process.
If both inline and postprocess compression are enabled, then postprocess compression compressesonly the blocks on which inline compression was not run. This includes blocks that were bypassed byinline compression such as small, partial compression group overwrites.
Note: You cannot enable data compression on the storage system root volumes or on the volumesthat are contained within 32-bit aggregates.
How data compression detects incompressible data and saves systemresources
Incompressible data detection enables you to check if a file is compressible and, for large files, if acompression group within a file is compressible. Enabling detection of incompressible data saves thesystem resources used by inline compression for compressing incompressible files or compressiongroups.
By default, for files under 500 MB (this value can be changed), inline compression checks if acompression group can be compressed. If incompressible data is detected within a compressiongroup, then a flag is set for the file containing the compression group to indicate that the file isincompressible. During subsequent compression attempts, inline compression first checks if theincompressible data flag is set for the file. If the flag is set, then inline compression is not attemptedon the file.
For files equal to or greater than 500 MB (this value can be changed), inline compression performs aquick check on the first 4-KB block of each compression group to determine if it can be compressed.If the 4-KB block cannot be compressed, the compression group is left uncompressed. However, if
Using deduplication and data compression to increase storage efficiency | 263

compression of the 4-KB block is successful, then compression is attempted on the wholecompression group.
Postprocess compression runs on all files, irrespective of whether the file is compressible or not. Ifpostprocess compression compresses at least one compression group in an incompressible file, thenthe incompressible data flag for that file is cleared. During the next compression attempt, inlinecompression can run on this file to achieve space savings.
For more information about enabling or disabling incompressible data detection and modifying theminimum file size to attempt quick check on a file, see the sis config command man page.
Enabling data compression on a volume
You can enable data compression only on FlexVol volumes that are contained within 64-bitaggregates. You can enable data compression to achieve space savings by using the sis configcommand.
Before you begin
You must have enabled deduplication on the volume.
About this task
You can enable both inline and postprocess compression or only postprocess compression on avolume. Before enabling inline compression, you must enable postprocess compression on thevolume.
Step
1. Enable data compression by entering the following command:
sis config [-C {true|false}] | [-I {true|false}] | [-Q {true|false}] |[-z <file_size>] path
true value for -C option enables postprocess compression.
true value for -I option enables inline compression.
true value for -Q option enables incompressible data detection.
file size for -z option specifies the minimum file size to attempt quick check on a file.
path is the complete path to the FlexVol volume.
Examples
The following command enables postprocess compression on the volume VolA:
sis config -C true /vol/VolA
The following command enables both postprocess and inline compression on the volumeVolA:
264 | Storage Management Guide

sis config -C true -I true /vol/VolA
Disabling data compression on a volume
You can disable data compression on a FlexVol volume by using the sis config command.
About this task
If you want to disable postprocess compression, you must first disable inline compression on thevolume.
Steps
1. Stop any volume efficiency operation that is currently active on the volume by entering thefollowing command:
sis stop path
path is the complete path to the FlexVol volume.
2. Disable data compression by entering the following command:
sis config [-C {true|false}] [-I {true|false}] path
false value for -C disables background compression.
false value for -I disables in-line compression.
path is the complete path to the FlexVol volume.
Examples
The following command disables inline compression on the volume VolA:
sis config -I false /vol/VolA
The following command disables both postprocess and inline compression on the volumeVolA:
sis config -C false -I false /vol/VolA
Managing volume efficiency operations using schedulesYou can manage how the efficiency operations run on a volume by running efficiency operationsmanually, or using a schedule, or depending on the amount of new data written to the volume.
You can also control how the efficiency operations run based on the following conditions:
• Use checkpoints or not
Using deduplication and data compression to increase storage efficiency | 265

• Run efficiency operations on existing data or only new data
• Not run efficiency operations at the end of each SnapVault transfer
• Stop efficiency operations if required
You can use the sis config command to view the schedule assigned to the volumes.
Modifying scheduling of efficiency operations
You can modify the scheduling of deduplication or data compression operation on a volume by usingthe sis config -s command.
Step
1. Modify the scheduling of deduplication or data compression operation on a volume by enteringthe following command:
sis config -s schedule path
schedule lists the days and hours of the day when the efficiency operations run. schedule canbe one of the following types:
• day_list[@hour_list]If hour_list is not specified, the efficiency operation runs at midnight on each scheduledday.
• hour_list[@day_list]If day_list is not specified, the efficiency operation runs every day at the specified hours.
• -
If a hyphen (-) is specified, the scheduled efficiency operations are turned off on the specifiedvolume.
Note: When the efficiency operation schedule is turned off and additional data is written tothe volume, the change log file size increases. This results in increase in deduplicationmetadata. You can schedule deduplication to be run periodically to avoid the increase indeduplication metadata.
• auto
The auto option can be used to run an efficiency operation on a volume depending on theamount of new data that is written to the volume after the previous efficiency operation.
• manual
The manual option can be used only on SnapVault destination volumes. This option ensuresthat deduplication or post-process compression is not triggered automatically after everyupdate to the destination volumes.
path is the complete path to the volume.
266 | Storage Management Guide

Examples
The following command modifies the scheduling of efficiency operation for VolA to run at 11p.m., Monday through Friday:
sis config -s mon-fri@23 /vol/VolA
Running efficiency operations manually
You can run efficiency operations manually on a FlexVol volume by using the sis startcommand.
Before you begin
Depending on the efficiency operation you want to run manually, you must have enableddeduplication or both data compression and deduplication.
About this task
If only deduplication is enabled on a volume, then deduplication runs on the data. However, ifdeduplication and data compression are enabled on a volume, data compression is run initiallyfollowed by deduplication.
Deduplication is a background process that consumes system resources while it is running. If the datadoes not change often in a volume, it is best to run deduplication less frequently. Multiple concurrentdeduplication operations running on a storage system lead to a higher consumption of systemresources.
You can run a maximum of eight concurrent deduplication or data compression operations per node.If any more efficiency operations are scheduled, the operations are queued.
Step
1. Run an efficiency operation by entering the following command:
sis start [-s [-m][-o][-p]] [-f] [-d] [-q] path
The -s option is used to scan the data that existed in the volume prior to enabling deduplication.You are prompted to confirm whether deduplication or data compression, if enabled, should bestarted on the volume.
The -m option can be used to scan the existing data, generate deduplication metadata, and skipsharing. This option is used only with -s option.
The -o option can be used to scan the existing data and skip shared block optimization. Thisoption is used only with -s option.
The -p enables the efficiency operation to use the previous checkpoint. This option is used onlywith -s option.
The -f option can be used to start the efficiency operation without any prompts.
Using deduplication and data compression to increase storage efficiency | 267

The -d starts a new efficiency operation after deleting the previous checkpoint.
The -q option queues the efficiency operation.
path is the complete path to the volume.
Examples
The following command allows you to manually start only deduplication or data compressionfollowed by deduplication on the volume VolA:
sis start /vol/VolA
The following command allows you to manually run the efficiency operations on the existingdata in the volume VolA:
sis start -s /vol/VolA
Running efficiency operations depending on the amount of new datawritten
You can modify the efficiency operation schedule to run deduplication or data compression when thenumber of new blocks written to the volume after the previous efficiency operation (performedmanually or scheduled) exceeds a specified threshold percentage.
About this task
If the schedule option is set to auto, the scheduled efficiency operation runs when the amount ofnew data exceeds the specified percentage. The default threshold value is 20 percent. This thresholdvalue is the percentage of the total number of blocks already processed by the efficiency operation.
Step
1. Modify the threshold percentage value by entering the following command:
sis config -s auto@num path
num is a two-digit number to specify the percentage.
path is the complete path to the volume.
Example
The following command modifies the threshold percentage value to 30 percent for the volumeVolA:
sis config -s auto@30 /vol/VolA
268 | Storage Management Guide

Using checkpoints to resume efficiency operation
You can use the checkpoints to periodically log the execution process of an efficiency operation.When an efficiency operation is stopped for any reason (such as system halt, system disruption,reboot, or because last efficiency operation failed or stopped) and checkpoint data exists, anefficiency operation can resume from the latest checkpoint file.
A checkpoint is created at the end of each stage or substage of the efficiency operation. When anefficiency operation scans the existing data in a volume, a checkpoint is created approximately everyhour.
Resuming an efficiency operation using the checkpoint option
You can resume an efficiency operation by using the sis start command with the checkpointoption.
About this task
If only deduplication is enabled on the volume, deduplication runs on the data. However, ifdeduplication and data compression are enabled, data compression runs on the existing data followedby deduplication.
You can view the details of the checkpoint for a volume by using the sis status command.
By default the efficiency operations resume from checkpoints. However, if a checkpointcorresponding to a previous efficiency operation (the phase when the sis start -s command isrun) is older than 24 hours, then the efficiency operation does not resume from the previouscheckpoint automatically. In this case, the efficiency operation starts from the beginning. However, ifyou know that significant changes have not occurred in the volume since the last scan, you can forcecontinuation from the previous checkpoint by using the -p option.
Step
1. Resume an efficiency operation by using the checkpoint option by entering the followingcommand:
sis start -sp path
The -sp option enables you to resume an efficiency operation on the volume by using acheckpoint, even when the validity of the checkpoint has expired.
path is the complete path to the volume.
Example
The following command enables you to resume an efficiency operation by using thecheckpoint option on the volume VolA:
sis start -sp /vol/VolA
Using deduplication and data compression to increase storage efficiency | 269

Running efficiency operations manually on existing data
You can manually run the efficiency operations on the data that exists in the FlexVol volume prior toenabling deduplication or data compression. Deduplication or data compression followed bydeduplication can be run by using the sis start -s command.
About this task
If only deduplication is enabled on a volume, then deduplication runs on the data. However, Ifdeduplication and data compression are enabled on a volume, data compression is run initiallyfollowed by deduplication.
When you run data compression on existing data, by default the data compression operation skips thedata blocks that are shared by deduplication and the data blocks that are locked by Snapshot copies.
You can run a maximum of eight deduplication or data compression operations concurrently pernode and the remaining operations are queued.
Step
1. Run deduplication or data compression followed by deduplication manually on the existing databy entering the following command:
sis start -s path
path is the complete path to the volume.
Example
The following command allows you to manually run deduplication or data compressionfollowed by deduplication on the existing data in the volume VolA:
sis start -s /vol/VolA
Monitoring volume efficiency operationsYou can monitor the progress of efficiency operations on a volume by viewing the status of theefficiency operations and the space savings achieved on the volume.
270 | Storage Management Guide

Viewing the status of efficiency operations on a FlexVol volume
You can view whether deduplication or data compression is enabled on a volume and check thestatus, state, and progress of the efficiency operations on a volume by using the sis statuscommand.
Step
1. View the status of an efficiency operation on a volume by entering the following command:
sis status path
path is the complete path to the volume.
The following table describes status and progress messages that you might see after running thesis status command:
Message Message type Description
Idle status and progress No active efficiency operation is inprogress.
Pending status The limit of maximum concurrentefficiency operations allowed for astorage system or a vFiler unit isreached. Any efficiency operationrequested beyond this limit is queued.
Active status Efficiency operations are running.
size Scanned progress A scan of the entire volume isrunning, of which size is alreadyscanned.
size Compressed progress Compression operations havecompressed data, of which size isalready compressed.
size Searched progress A search of duplicated data isrunning, of which size is alreadysearched.
size (pct%) Done progress Efficiency operations have savedsize amounts of data. pct% is thepercentage saved of the totalduplicated data that was discoveredin the search stage.
Using deduplication and data compression to increase storage efficiency | 271

Message Message type Description
size Verified progress A verification of the metadata ofprocessed data blocks is running, ofwhich size is already verified.
pct% merged progress Deduplication operations havemerged pct% (percentage) of all theverified metadata of processed datablocks to an internal format thatsupports fast deduplicationoperations.
Example
The following command displays the status of an efficiency operation on volume VolA:
sis status /vol/VolA
If the efficiency operation is enabled on volume VolA and the operation is idle, then you cansee the following in the system output:
node1> sis status /vol/VolAPath State Status Progress/vol/VolA Enabled Active 23 MB Scanned, 20 MB Compressed
Viewing efficiency space savings on a FlexVol volume
You can view the amount of space savings achieved through deduplication and data compression ona volume by using the df -S command.
About this task
The space savings in Snapshot copies are not included when calculating the space savings achievedon a volume. Using deduplication does not affect volume quotas. Quotas are reported at the logicallevel, and remain unchanged.
Step
1. View the space savings achieved on a volume using deduplication and data compression byentering the following command:
df -S path
path is the complete path to the volume.
272 | Storage Management Guide

Example
The following command enables you to view the space savings achieved by usingdeduplication and data compression on volume VolA:
df -S /vol/VolA
node1> df -S /vol/VolAFilesystem used total-saved %total-saved deduplicated %deduplicated compressed %compressed/vol/vol1/ 236 2028 90% 244 51% 1784 88%
Stopping volume efficiency operationsYou can stop a deduplication or postprocess compression operation by using the sis stopcommand. This command automatically generates a checkpoint.
Step
1. You can stop an active deduplication or postprocess compression operation by entering thefollowing command:
sis stop path
path is the complete path to the volume.
If you specify the -all option, active and queued efficiency operations are aborted.
Examples
The following command stops the deduplication or postprocess compression operation that iscurrently active on volume VolA:
sis stop /vol/VolA
The following command aborts both active and queued deduplication or postprocesscompression operations on volume VolA:
sis stop -all /vol/VolA
Using deduplication and data compression to increase storage efficiency | 273

Information about removing space savings from a volumeYou can choose to remove the space savings achieved by running efficiency operations on a volume.You must ensure that you contact technical support before removing or undoing the space savings ona volume.
For more information about removing space savings from a volume, see the technical reportTR-3958: Data Compression and Deduplication Deployment and Implementation Guide for 7-Mode.
Related information
Data Compression and Deduplication Deployment and Implementation Guide for 7-Mode:media.netapp.com/documents/tr-3958.pdf
Deduplication interoperability with Data ONTAP featuresWhen you use deduplication, you should be aware of the features supported by deduplication andhow they work with deduplication.
The following features are supported by deduplication:
• Snapshot copies
• Volume SnapMirror
• Qtree SnapMirror
• SnapVault
• SMTape backup
• SnapRestore
• Stretch and fabric-attached MetroCluster configurations
• OnCommand Unified Manager server
• Volume copy
• Data compression
• FlexClone volumes
• HA pair
• vFiler units
• DataMotion for Volumes
274 | Storage Management Guide

• SnapLock
You can enable extents on deduplicated volumes. You can perform read reallocation to improve thefile layout and the sequential read performance of a deduplicated volume.
However, deduplicated volumes cannot be replicated using synchronous SnapMirror and semi-synchronous SnapMirror.
How fractional reserve works with deduplication
If you are using deduplication for a volume with a fractional reserve setting of 0, there are additionalconfiguration requirements if you need to ensure that your applications never receive an ENOSPC(out of space) error. For more information, see the documentation on setting fractional reserve.
Related concepts
Considerations for setting fractional reserve on page 293
How Snapshot copies work with deduplication
You can run deduplication only on the active file system. However, this data can get locked inSnapshot copies created before you run deduplication, resulting in reduced space savings.
To avoid conflicts between deduplication and Snapshot copies, you should follow these guidelines:
• Run deduplication before creating new Snapshot copies.
• Remove unnecessary Snapshot copies stored in deduplicated volumes.
• Reduce the retention time of Snapshot copies stored in deduplicated volumes.
• Schedule deduplication only after significant new data has been written to the volume.
• Configure appropriate reserve space for the Snapshot copies.
• If snap reserve is 0, you should turn off the schedule for automatic creation of Snapshot copies(which is the case in most LUN deployments).
How volume SnapMirror works with deduplication
You can use volume SnapMirror to replicate a deduplicated volume regardless of size of the volumeand logical data in the volume.
When using volume SnapMirror with deduplication, you must consider the following information:
• You can enable deduplication on the source system, the destination system, or both systems.
• The shared blocks are transferred only once.Therefore, deduplication also reduces the use of network bandwidth.
Using deduplication and data compression to increase storage efficiency | 275

• When the volume SnapMirror relationship is broken, the default deduplication schedule is appliedat the destination storage system.
When configuring volume SnapMirror and deduplication, you should coordinate the deduplicationschedule and the volume SnapMirror schedule. You should start volume SnapMirror transfers of adeduplicated volume after the deduplication operation is complete. This schedule prevents thesending of undeduplicated data and additional temporary metadata files over the network. If thetemporary metadata files in the source volume are locked in Snapshot copies, these files consumeextra space in the source and destination volumes.
How qtree SnapMirror works with deduplication
You can use deduplication for volumes that use qtree SnapMirror. Qtree SnapMirror does notautomatically initiate a deduplication operation at the completion of every individual qtreeSnapMirror transfer. You can set up a deduplication schedule independent of your qtree SnapMirrortransfer schedule.
When using qtree SnapMirror with deduplication, you must consider the following information:
• You can enable deduplication on the source system, the destination system, or both systems.
• Even when deduplication is enabled on the source system, duplicate blocks are sent to thedestination system. Therefore, no network bandwidth savings is achieved.
• To recognize space savings on the destination system, you should run deduplication on thedestination after the qtree SnapMirror transfer is complete.
• Qtree SnapMirror recognizes deduplicated blocks as changed blocks. Therefore, when you rundeduplication on an existing qtree SnapMirror source system for the first time, all thededuplicated blocks are transferred to the destination system. This process might result in atransfer several times larger than the regular transfers.
When using qtree SnapMirror with deduplication, you should ensure that qtree SnapMirror uses onlythe minimum number of Snapshot copies that it requires. To ensure this minimum, you should retainonly the latest Snapshot copies.
How SnapVault works with deduplication
The deduplication feature is integrated with the SnapVault secondary license. This feature increasesthe efficiency of data backup and improves the use of secondary storage.
The behavior of deduplication with SnapVault is similar to the behavior of deduplication with qtreeSnapMirror, with the following exceptions:
• Deduplication is also supported on the SnapVault destination volume.
• The deduplication schedule depends on the SnapVault update schedule on the destination system.However, the deduplication schedule on the source system does not depend on the SnapVaultupdate schedule, and it can be configured independently on a volume. You can set manualschedules on a SnapVault destination volume.
276 | Storage Management Guide

• Every SnapVault update (baseline or incremental) starts a deduplication process on thedestination system after the archival Snapshot copy is taken.
• A new Snapshot copy replaces the archival Snapshot copy after deduplication finishes running onthe destination system. (The name of this new Snapshot copy is the same as that of the archivalcopy, but the Snapshot copy uses a new timestamp, which is the creation time.)
• You cannot configure the deduplication schedule on the destination system manually or run thesis start command. However, you can run the sis start -s command on the destinationsystem.
• The SnapVault update does not depend on the deduplication operation. A subsequent incrementalupdate is allowed to continue while the deduplication operation on the destination volume fromthe previous backup is still in progress. In this case, the deduplication operation continues;however, the archival Snapshot copy is not replaced after the deduplication operation is complete.
• The SnapVault update recognizes the deduplicated blocks as changed blocks. Thus, whendeduplication is run on an existing SnapVault source for the first time, all saved space istransferred to the destination system. The size of the transfer might be several times larger thanthe regular transfers. Running deduplication on the source system periodically will help preventthis issue for future qtree SnapMirror transfers. You should run deduplication before theSnapVault baseline transfer.
Note: You can run a maximum of eight concurrent deduplication operations on a system. Thisnumber includes the deduplication operations linked to SnapVault volumes and those that are notlinked to SnapVault volumes.
How tape backup works with deduplication
When you backup to a tape through the SMTape engine, the data format of the source volume ispreserved on the tape and all deduplication savings are retained on the tape. The deduplicationsavings are preserved on the volume to which the data is restored from the tape.
When you backup to a tape through NDMP, the deduplication savings are not preserved on the tape.
How SnapRestore works with deduplication
The metadata created during a deduplication operation is located both in the FlexVol volume and inthe aggregate. Therefore, when you initiate a SnapRestore operation on a volume, the metadata isrestored to the volume and the restored data retains the original space savings.
After a SnapRestore operation is completed, if deduplication is enabled on the volume, any new datawritten to the volume continues to be deduplicated.
Using deduplication and data compression to increase storage efficiency | 277

How MetroCluster configurations work with deduplication
Deduplication is supported for stretch and fabric-attached MetroCluster configurations.
When deduplication is enabled for MetroCluster configurations, you must take into account thefollowing information:
• Deduplication impacts the CPU resources because MetroCluster configurations write to twoplexes.This results in extra disk write operations and additional system resources are required.
• In takeover mode deduplication operations continue to run as per the schedule.
• A node in takeover mode services the I/O modules targeted by the partner FlexVol volumes.
How OnCommand Unified Manager server works with deduplication
Deduplication is supported with the NetApp Management Console data protection capability, theNetApp Management Console provisioning capability, and Operations Manager in OnCommandUnified Manager server.
Deduplication and the NetApp Management Console data protection capability inOnCommand Unified Manager server
In releases earlier than OnCommand Unified Manager server, the NetApp Management Console dataprotection capability waits for an active deduplication operation to complete, before renaming theSnapshot copies. While the NetApp Management Console data protection capability waits, it doesnot allow clients to list the Snapshot copies or restore from them. Therefore, in releases prior toOnCommand Unified Manager server, the use of deduplication with the NetApp ManagementConsole data protection capability is not optimal.
However, this limitation is removed in OnCommand Unified Manager server.
Deduplication and the NetApp Management Console provisioning capability in OnCommandUnified Manager server
With the NetApp Management Console provisioning capability in OnCommand Unified Managerserver, you can enable the provisioning policies to support all three modes of deduplication, namely,on-demand deduplication, automated deduplication, and scheduled deduplication.
For more information about using deduplication with the NetApp Management Console provisioningcapability and the NetApp Management Console data protection capability, see the ProvisioningManager and Protection Manager Guide to Common Workflows for Administrators.
Deduplication and Operations Manager in OnCommand Unified Manager server
You can perform deduplication operations from Operations Manager in OnCommand UnifiedManager server.
You can configure deduplication on the system and generate reports or graphs summarizing spacesavings for file and LUN clones.
278 | Storage Management Guide

For more information about using deduplication with Operations Manager, see the OperationsManager Administration Guide.
Related information
Documentation on the NetApp Support Site: support.netapp.com
How volume copy works with deduplication
When deduplicated data is copied by using the vol copy command, the copy of the data at thedestination inherits all the deduplication attributes and storage savings of the source data.
The metadata created during a deduplication operation (fingerprint files and change log files) islocated inside the FlexVol volume and in the active copy within the aggregate. Therefore, when yourun the volume copy operation on a FlexVol volume, the fingerprint files and change log files arecopied to the destination volume. After a volume copy operation, if deduplication is enabled on thedestination volume, any new data written to the volume continues to be deduplicated.
The first deduplication operation that is run on the copied FlexVol volume automatically reconstructsthe deduplication metadata in the aggregate based on the copy that is available in the volume.
How deduplication works with data compression
When both data compression and deduplication are enabled on a FlexVol volume, the data is firstcompressed and then deduplicated. Depending on the type of data, the combined savings can yieldhigher savings than running deduplication alone.
How FlexClone volumes work with deduplication
Deduplication is supported on FlexClone volumes. The FlexClone volume of a deduplicated volumeis a deduplicated volume. The cloned volume inherits the deduplication configuration of the parentvolume (for example, deduplication schedules).
The metadata created during a deduplication operation (fingerprint files and change log files) iscloned. This metadata is located both in the FlexVol volume and in the aggregate.
If you run deduplication on a clone volume, the clone is deduplicated, but the parent volume remainsnon-deduplicated.
To run deduplication manually for all new data in the cloned volume, you should use the sis startcommand.
When a cloned volume is split from the parent volume, deduplication of all data in the clone that waspart of the parent volume is removed after the volume-split operation. However, if deduplication isrunning on the clone volume, the data is deduplicated in the subsequent deduplication operation.
Using deduplication and data compression to increase storage efficiency | 279

How HA pairs work with deduplication
Starting with Data ONTAP 8.1, deduplication operations can be run on volumes from either of thenodes during takeover in an HA pair. The maximum number of concurrent deduplication operationsallowed on each node of an HA pair is eight.
If one of the nodes fails, the other node takes over the deduplication operations managed by thefailed node. In takeover mode, the working node continues with the deduplication operations. Theworking node can start deduplication operations on volumes that belong to the failed node. When theworking node is managing the deduplication operations on volumes that belong to both the nodes, themaximum number of concurrent deduplication operations is still eight.
How vFiler units work with deduplication
Deduplication commands are available in all the vfiler contexts. Deduplication support on vFilerunits allows users to reduce redundant data blocks within vFiler units.
How to set the maximum deduplication sessions per vFiler unit
You can specify the number of concurrent deduplication sessions that can be run per vFiler unit byusing the option sis.max_vfiler_active_ops command.
Note: The maximum number of concurrent deduplication operations per storage system is eight.However, on a 32-bit platform, the maximum number of concurrent deduplication operations perstorage system is five. The option sis.max_vfiler_active_ops command first checks thededuplication sessions on the physical storage system, and then on the vFiler unit.
How DataMotion for Volumes works with deduplication
Deduplication savings on a FlexVol volume are retained when the volume is moved by using theDataMotion for Volumes (volume move) operation. If deduplication operations are running when avolume move operation is active, then these operations are stopped shortly before the final cutover iscomplete.
After the volume move is complete, the efficiency operations cannot be resumed from the previouscheckpoint and the efficiency operations start from the beginning.
If you try to nondisruptively move a FlexVol volume that has deduplication operations running, thenthe deduplication operation is aborted.
280 | Storage Management Guide

Data compression interoperability with Data ONTAPfeatures
When you use data compression, you should be aware of the features supported by data compressionand how they work with data compression.
The following features are supported by data compression:
• Snapshot copies
• Volume SnapMirror
• Qtree SnapMirror
• SnapVault
• SMTape backup
• SnapLock
• Volume-based SnapRestore
• Single file SnapRestore
• Stretch and fabric-attached MetroCluster configurations
• Volume copy
• Aggregate copy
• Deduplication
• FlexClone volumes
• FlexClone files
• HA pair
• Flash cache cards
• vFiler units
• DataMotion for Volumes
• Flash Pool aggregates
Compressed volumes cannot be replicated using synchronous SnapMirror and semi-synchronousSnapMirror. Read reallocation and extents are not supported on compressed volumes.
Using deduplication and data compression to increase storage efficiency | 281

How fractional reserve works with data compression
If you are using data compression for a volume with a fractional reserve setting of 0, there areadditional configuration requirements if you need to ensure that your applications never receive anENOSPC (out of space) error. For more information, see the documentation on setting fractionalreserve.
Related concepts
Considerations for setting fractional reserve on page 293
How Snapshot copies work with data compression
When you run data compression in the default mode after a Snapshot copy is created, the existingdata that is locked by the Snapshot copy is compressed.
Snapshot copies lock blocks of data that cannot be freed until the Snapshot copy expires or is deleted.On any volume on which data compression is enabled, when a Snapshot copy of the data is created,any subsequent changes to the data temporarily requires additional disk space, until the Snapshotcopy is deleted or expires.
How volume SnapMirror works with data compression
Because volume SnapMirror operates at the physical block level, when data compression is enabledon the source storage system, the data remains compressed when it is replicated to the destinationstorage system. This operation can significantly reduce the amount of required network bandwidthduring replication.
When using volume SnapMirror with data compression, you must observe the following guidelines:
• For SnapMirror transfer to occur, the source and destination volumes must be contained in 64-bitaggregates and the destination storage system must be running the same or later version of DataONTAP.For example, if the source storage system is running on Data ONTAP 8.0.1, then the destinationstorage system must be running on Data ONTAP 8.0.1 or later. If the source storage system isrunning on Data ONTAP 8.1, then the destination storage system must be running on DataONTAP 8.1 or later.
• You can enable, run, and manage data compression only from the primary storage system.However, the FlexVol volume in the secondary storage system inherits all the data compressionattributes and storage savings through the volume SnapMirror transfer.
• If you plan to compress existing data in the disk with the -s option on a FlexVol volume that hasdata blocks locked in Snapshot copies and has existing volume SnapMirror relationships, thenthis operation might result in a large transfer of data blocks.
The data compression operation rewrites data as new compressed blocks and these blocks aretransferred in the next incremental transfer.
282 | Storage Management Guide

For more information about volume SnapMirror, see the Data ONTAP Data Protection OnlineBackup and Recovery Guide for 7-Mode.
Related information
Documentation on the NetApp Support Site: support.netapp.com
How qtree SnapMirror works with data compression
Because qtree SnapMirror operates at the logical level, when data compression is enabled on thesource storage system, the data is uncompressed in memory before being replicated to the destinationsystem. If data compression is enabled on the secondary storage system, then all transfers arecompressed on the secondary storage system.
You can use data compression to compress any existing data on the secondary storage system.
When using qtree SnapMirror with data compression, consider the following guidelines:
• If you want to compress data on your source volume, you must enable data compression on thesource volumes.
• If you want to compress data on the destination storage system, you must enable datacompression on the destination volume.
• When data compression is enabled on the source storage system, blocks are sent as uncompresseddata to the destination storage system.Therefore, no network bandwidth savings are achieved by data compression.
• You can enable data compression on the destination storage system even if it is not enabled onthe source storage system.Therefore, space savings are achieved on the destination storage system.
• If you plan to compress existing data on the disk with the -a or -b option on a source FlexVolvolume that has existing qtree SnapMirror relationships, then this might result in a large transferof data blocks.When data compression is complete, all the newly compressed blocks are written as new blocksand all the newly compressed data blocks are transferred in the next incremental transfer.
For more information about qtree SnapMirror, see the Data ONTAP Data Protection Online Backupand Recovery Guide for 7-Mode.
Related information
Documentation on the NetApp Support Site: support.netapp.com
Using deduplication and data compression to increase storage efficiency | 283

How SnapVault works with data compression
SnapVault operates at the logical level and when data compression is enabled on the source storagesystem, the data is uncompressed in memory on the source storage system before it is backed up.
If inline compression is enabled on the destination storage system, all new writes to the destinationstorage system are compressed.
When using SnapVault with data compression, you must consider the following guidelines:
• When data compression is enabled on the source system, blocks are sent as uncompressed data tothe destination storage system.Therefore, no network bandwidth savings are achieved by data compression.
• You can enable data compression on the destination storage system even if it is not enabled onthe source storage system.After the SnapVault transfer is complete, the post-process compression runs automatically unlessthe schedule is set to manual on the destination system.
For more information about SnapVault, see the Data ONTAP Data Protection Online Backup andRecovery Guide for 7-Mode.
Related information
Documentation on the NetApp Support Site: support.netapp.com
How tape backup works with data compression
When you backup compressed data to a tape through the SMTape engine, the data format of thesource volume is preserved on the tape and all compression savings are retained on the tape.
You can restore the compressed data from a SMTape to a destination volume and the saving will beretained. You must enable inline compression only if you want the new data that is written from theclient to be compressed on the restored volume.
When you backup to a tape through NDMP, the data compression savings are not preserved on thetape.
How SnapLock works with data compression
You can use data compression on a SnapLock volume contained within 64-bit aggregates. However,inline compression is not supported for WORM append files in SnapLock volumes that are presenton 64-bit storage systems with 4 or more processors.
For more information about SnapLock, see the Data ONTAP Archive and Compliance ManagementGuide for 7-Mode.
284 | Storage Management Guide

Related information
Documentation on the NetApp Support Site: support.netapp.com
How volume-based SnapRestore works with data compression
When you initiate a volume-based SnapRestore operation on a FlexVol volume that containscompressed data, the compression setting is restored to that of the Snapshot copy and the restoreddata retains the original space savings of the Snapshot copy.
For more information about volume-based SnapRestore, see the Data ONTAP Data ProtectionOnline Backup and Recovery Guide for 7-Mode.
Related information
Documentation on the NetApp Support Site: support.netapp.com
How single file SnapRestore works with data compression
When you initiate a single file SnapRestore operation, the data is restored from the Snapshot copy tothe active file system and the original space savings are restored.
If incompressible data detection is enabled on the volume, then the incompressible data flag isrestored to the active file system from the Snapshot copy.
For more information about single file SnapRestore, see the Data ONTAP Data Protection OnlineBackup and Recovery Guide for 7-Mode.
Related information
Documentation on the NetApp Support Site: support.netapp.com
How MetroCluster configurations work with data compression
Data compression is supported in both stretch and fabric-attached MetroCluster configurations.
When data compression is enabled for MetroCluster configurations, you must consider the followinginformation:
• Data compression impacts the CPU resources because MetroCluster configurations write to twoplexes.This results in extra disk write operations and additional system resources are required.
• In takeover mode data compression continues to run normally.
Using deduplication and data compression to increase storage efficiency | 285

How volume copy works with data compression
When a volume with compressed data is copied to the destination system by using the vol copycommand, the copy of the data at the destination system inherits all the compression attributes andstorage savings of the original data.
For more information about volume copy, see the Data ONTAP Data Protection Online Backup andRecovery Guide for 7-Mode.
Related information
Documentation on the NetApp Support Site: support.netapp.com
How aggregate copy works with data compression
When an aggregate with compressed data is copied by using the aggr copy command, the copy ofthe data at the destination storage system inherits all the compression attributes and storage savingsof the original data.
Data ONTAP 8.1 can read volumes that contain data compressed by Data ONTAP 8.0.1, but DataONTAP 8.0.1 cannot read volumes that contain data compressed by Data ONTAP 8.1. If the sourcestorage system is running Data ONTAP 8.1 and the destination storage system is running an earlierversion of Data ONTAP, the following operations take place at the destination storage system afterthe aggregate copy operation is complete and the aggregate is online:
• All FlexVol volumes are copied.
• All FlexVol volumes that contain compressed data go offline.Attempts to bring these volumes online fail.
• All FlexVol volumes that do not contain compressed data are online.
For more information about aggregate copy, see the Data ONTAP Data Protection Online Backupand Recovery Guide for 7-Mode.
Related information
Documentation on the NetApp Support Site: support.netapp.com
286 | Storage Management Guide

How deduplication works with data compression
When both data compression and deduplication are enabled on a FlexVol volume, the data is firstcompressed and then deduplicated. Depending on the type of data, the combined savings can yieldhigher savings than running deduplication alone.
How FlexClone volumes work with data compression
If you split a FlexClone volume from the parent volume, then the new volume inherits datacompression attributes from the parent volume. The attributes inherited indicate whetherdeduplication, postprocess compression, and inline compression are enabled. The space savingsachieved in the parent volume are inherited by the new volume.
If you create a FlexClone volume when the decompression operation is active on the parent volume,then the decompression operation does not run on the cloned volume.
How FlexClone files work with data compression
You can run data compression on a FlexVol volume that contains FlexClone files. Only fully clonedfiles can be created on FlexVol volumes that have data compression enabled. Partially cloned filescannot be created on FlexVol volumes that have data compression enabled.
If incompressible data detection is enabled on the volume, then the incompressible flag is inheritedby the cloned file.
How HA pairs work with data compression
You can enable data compression in an HA pair. If one of the nodes fails, the other node takes overthe operations of the failed node. In takeover mode, the working node continues to perform the datacompression operations.
For more information about HA pairs, see the Data ONTAP High Availability and MetroClusterConfiguration Guide for 7-Mode.
Related information
Documentation on the NetApp Support Site: support.netapp.com
How Performance Acceleration Module and Flash cache cards work withdata compression
Although data compression, Performance Acceleration Module, and Flash cache cards work in thesame storage system, the read performance of the compressed data remains the same with or withoutPAM and Flash cache cards.
Using deduplication and data compression to increase storage efficiency | 287

How vFiler units work with data compression
Data compression enables you to reduce the space required to store data in vFiler units bycompressing data blocks within a FlexVol volume. Compressed data in volumes is also migratedduring the online migration of vFiler units.
When you perform online migration of vFiler units, the bandwidth and time required for themigration are less. The FlexVol volumes on the destination vFiler unit inherit the data compressionattributes of the source vFiler unit.
For more information about the compression commands that are not supported during an onlinemigration of vFiler units, see the Data ONTAP MultiStore Management Guide for 7-Mode.
Related information
Documentation on the NetApp Support Site: support.netapp.com
How DataMotion for Volumes works with data compression
Data compression savings on a FlexVol volume are retained when the volume is moved using theDataMotion for Volumes (volume move) operation. For a volume move operation to be successful,the destination volumes must be contained within a 64-bit aggregate and both the source anddestination volumes must run the same version of Data ONTAP.
How Flash Pool aggregates work with data compression
Data compression is supported on Flash Pool aggregates, but the compressed blocks are not read orwrite cached in the solid-state disk (SSD) of the Flash Pool aggregates. For a volume that has datacompression enabled, only the blocks which not compressed are read or write cached.
288 | Storage Management Guide

How you use space management capabilities
To use the storage provided by FlexVol volumes as effectively as possible, you need to understandthe space management capabilities that help you balance overall available storage against requireduser and application storage needs.
Data ONTAP enables space management using the following capabilities:
• Volume (space) guaranteeThe volume guarantee, also called space guarantee or just guarantee, determines how much spacefor the volume is preallocated from the volume's associated aggregate when the volume iscreated.
• ReservationsReservations, also called space reservations, file reservations, or LUN reservations, determinewhether space for a particular file or LUN is preallocated from the volume.
• Fractional reserveFractional reserve, also called fractional overwrite reserve or LUN overwrite reserve, enables youto control the size of the overwrite reserve for a FlexVol volume.
• Automatic free space preservationAutomatic free space preservation can either increase the size of a volume or delete Snapshotcopies to prevent a volume from running out of space—all without operator intervention.
These capabilities are used together to enable you to determine, on a volume-by-volume basis,whether to emphasize storage utilization, ease of management, or something in between.
How volume guarantees work with FlexVol volumesVolume guarantees (sometimes called space guarantees) determine how space for a volume isallocated from its containing aggregate—whether the space is preallocated for the entire volume orfor only the reserved files or LUNs in the volume, or whether space for user data is not preallocated.
The guarantee is an attribute of the volume.
You set the guarantee when you create a new volume; you can also change the guarantee for anexisting volume by using the vol options command with the guarantee option. You can viewthe guarantee type and status by using the vol status command.
Volume guarantee types can be volume (the default type), file, or none.
• A guarantee type of volume allocates space in the aggregate for the volume when you create thevolume, regardless of whether that space is used for data yet.This approach to space management is called thick provisioning. The allocated space cannot beprovided to or allocated for any other volume in that aggregate.
289

When you use thick provisioning, all of the space specified for the volume is allocated from theaggregate at volume creation time. The volume cannot run out of space before the amount of datait contains (including Snapshot copies) reaches the size of the volume. However, if your volumesare not very full, this comes at the cost of reduced storage utilization.
• A guarantee type of file allocates space for the volume in its containing aggregate so that anyreserved LUN or file in the volume can be completely rewritten, even if its blocks are beingretained on disk by a Snapshot copy.However, writes to any file in the volume that is not reserved could run out of space.Before configuring your volumes with a guarantee of file, you should refer to Technical Report3965: Thin Provisioning Deployment and Implementation Guide. You should also be aware thatvolume guarantees of type file will not be supported in a future release of Data ONTAP.
• A guarantee of none allocates space from the aggregate only as it is needed by the volume.This approach to space management is called thin provisioning. The amount of space consumedby volumes with this guarantee type grows as data is added instead of being determined by theinitial volume size, which might leave space unused if the volume data does not grow to that size.The maximum size of a volume with a guarantee of none is not limited by the amount of freespace in its aggregate. It is possible for the total size of all volumes associated with an aggregateto exceed the amount of free space for the aggregate.Writes to LUNs or files (including space-reserved LUNs and files) contained by that volumecould fail if the containing aggregate does not have enough available space to accommodate thewrite. If you configure your volumes with a volume guarantee of none, you should refer toTechnical Report 3965: Thin Provisioning Deployment and Implementation Guide forinformation about how doing so can affect storage availability.
When space in the aggregate is allocated for a volume or file guarantee for an existing volume,that space is no longer considered free in the aggregate, even if the volume is not yet using the space.Operations that consume free space in the aggregate, such as creation of aggregate Snapshot copiesor creation of new volumes in the containing aggregate, can occur only if there is enough availablefree space in that aggregate; these operations are prevented from using space already allocated toanother volume.
When the free space in an aggregate is exhausted, only writes to volumes or files in that aggregatewith preallocated space are guaranteed to succeed.
Guarantees are honored only for online volumes. If you take a volume offline, any allocated butunused space for that volume becomes available for other volumes in that aggregate. When you try tobring that volume back online, if there is insufficient available space in the aggregate to fulfill itsguarantee, it will remain offline. You must force the volume online, at which point the volume'sguarantee will be disabled.
Related information
Technical Report: Thin Provisioning Deployment and Implementation Guide: media.netapp.com/documents/tr-3965.pdf
290 | Storage Management Guide

Enabling guarantees for FlexVol volumes
When a volume’s guarantee is disabled, the volume functions as though it has a guarantee of none. Ifyou have volumes with disabled guarantees, you should address the situation by making more spaceavailable to those volumes as soon as possible.
Before you begin
The FlexVol volume must be online.
About this task
Enabled guarantees preallocate space in the aggregate. In volumes with disabled guarantees,operations that require space, such as writes and even deletions, might be disallowed. If a volume'sguarantee becomes disabled, you should reenable the guarantee to be able to manually increase thevolume size. Volumes with a disabled guarantee and the autogrow feature enabled can stillautomatically increase in size.
You can view the status of the volume's guarantee first or try to enable the guarantee. If enabling theguarantee fails, Data ONTAP provides the reason (typically insufficient space) and specifies theamount of free space needed in the aggregate. A guarantee type of none is never disabled, becausethere is no space allocated for this guarantee type.
You can set a volume's guarantee to none. In this case, there is no concept of enabled or disabled,because the guarantee requires no space.
Steps
1. Optional: View the status of the volume’s guarantee by using the vol status command.
If it is not disabled, it will not be listed in the Options column.
If you want to see both the type of guarantee and also whether it is disabled, you can use the voloptions command.
In the command output, look for the guarantee type or whether the guarantee is disabled.
Example
The following vol status command displays the status of the guarantee for a volume calledvol2. The Options column displays the guarantee because it is disabled.
sys1> vol status vol2 Volume State Status Options vol2 online raid_dp, flex guarantee=volume(disabled) 64-bit
The following vol options command displays the type of guarantee and whether it is disabledfor a volume called vol2:
How you use space management capabilities | 291

sys1> vol options vol2nosnap=on, nosnapdir=off, minra=off, no_atime_update=off, nvfail=off, ignore_inconsistent=off, snapmirrored=off, create_ucode=off, convert_ucode=off, maxdirsize=41861, schedsnapname=ordinal, fs_size_fixed=off, guarantee=volume(disabled), svo_enable=off, svo_checksum=off, svo_allow_rman=off, svo_reject_errors=off, no_i2p=off, fractional_reserve=100, extent=off, try_first=volume_grow, read_realloc=off, snapshot_clone_dependency=off, dlog_hole_reserve=off,nbu_archival_snap=off
The output displays the guarantee type and whether the guarantee is enabled or disabled for thespecified volume.
2. Enable or reenable the guarantee.
Use the vol options command with the guarantee option set to the existing guarantee type.If you specify a different guarantee than the one currently configured for this volume, DataONTAP changes the guarantee to the one you specify and enables that guarantee.
The guarantee is enabled, or you receive an error message that tells you how much space youneed to create in the aggregate before the guarantee can be enabled.
3. If there is not enough space in the aggregate to enable the guarantee, you must create more space.
Example
The following is an example of an error message displayed when trying to enable a guarantee fora volume named testvol:
sys1::> vol options testvol guarantee volumevol options: Request to enable guarantee for this volume failed because there is not enough space in the aggregate. Create 4.79MB of free space in the aggregate.
4. Try to enable the guarantee again, and view the command output to see whether the guarantee isnow enabled.
If the guarantee is still not enabled, you must try another method of creating more space.
How the guarantee affects FlexVol volume space requirements
The amount of space that a FlexVol volume requires from its aggregate varies depending on thevolume's guarantee type. Understanding a volume's space requirement helps you predict how muchspace becomes available or is required when you change its guarantee or delete the volume.
A volume with a guarantee type of none requires space in the aggregate only for data that is alreadywritten to it.
A volume with a guarantee type of volume requires an amount of space in the aggregate equivalentto the volume's size, regardless of how much data (if any) is actually in the volume.
292 | Storage Management Guide

A volume with a guarantee type of file requires enough space in the aggregate to enable writes andoverwrites to reserved files or LUNs, even if a block being overwritten is locked by a Snapshot copyor other block-sharing technology.
How file and LUN reservations workEnabling reservations for a file or LUN tells Data ONTAP to reserve the space required for that fileor LUN at creation time rather than as the space is required for writes. Disabling reservations enablesyou to overcommit the containing volume by creating LUNs that appear to provide more space thanthe volume can currently provide.
Reservations are an attribute of the file or LUN; they are persistent across storage system reboots,takeovers, and givebacks. Reservations are enabled for new LUNs by default, but you can create afile or LUN with reservations disabled or enabled. After you create a LUN, you change thereservation attribute by using the lun set reservation command. You change the reservationattribute for files by using the file reservation command.
When a volume contains one or more files or LUNs with reservations enabled, operations thatrequire free space, such as the creation of Snapshot copies, are prevented from using the reservedspace. If these operations do not have sufficient unreserved free space, they fail. However, writes tothe files or LUNs with reservations enabled continue to succeed.
You can enable reservations for files and LUNs contained by volumes with volume guarantees of anyvalue. However, if the volume has a guarantee of none, reservations do not have any effect.
Example
If you create a 100-GB space-reserved LUN in a 500-GB volume, that 100 GB of space isimmediately allocated, leaving 400 GB remaining in the volume. In contrast, if spacereservation is disabled on the LUN, all 500 GB in the volume remain available until writes aremade to the LUN.
Considerations for setting fractional reserveFractional reserve, also called LUN overwrite reserve, enables you to turn off overwrite reserve forspace-reserved LUNs and files in a FlexVol volume. This can help you maximize your storageutilization, but if your environment is negatively affected by write operations failing due to lack ofspace, you must understand the requirements that this configuration imposes.
The fractional reserve setting is expressed as a percentage; the only valid values are 0 and 100percent. The fractional reserve setting is an attribute of the volume.
Setting fractional reserve to 0 increases your storage utilization. However, an application accessingdata residing in the volume could experience a data outage if the volume is out of free space, evenwith the volume guarantee set to volume. With proper volume configuration and use, however, you
How you use space management capabilities | 293

can minimize the chance of writes failing. Data ONTAP provides a “best effort” write guarantee forvolumes with fractional reserve set to 0 when all of the following requirements are met:
• Deduplication is not in use
• Compression is not in use
• ODX and FlexClone copy offload are not in use
• Volume guarantee is set to volume
• File or LUN reservations are enabled
• Volume Snapshot reserve is set to 0
• Volume Snapshot copy automatic deletion is enabled with a commitment level of destroy, adestroy list of lun_clone,vol_clone,cifs_share,file_clone,sfsr, and a trigger ofvolume
Note that if your rate of change is high, in rare cases the Snapshot copy automatic deletion could fallbehind, resulting in the volume running out of space, even with all of the above requiredconfiguration settings in use.
In addition, you can optionally use the volume autogrow capability to decrease the likelihood ofvolume Snapshot copies needing to be deleted automatically. If you enable the autogrow capability,you must monitor the free space in the associated aggregate. If the aggregate becomes full enoughthat the volume is prevented from growing, more Snapshot copies will probably be deleted as the freespace in the volume is depleted.
If you cannot meet all of the above configuration requirements and you need to ensure that thevolume does not run out of space, you must set the volume's fractional reserve setting to 100. Thisrequires more free space up front, but guarantees that data modification operations will succeed evenwhen the technologies listed above are in use.
The default value and allowed values for the fractional reserve setting depend on the guarantee of thevolume:
Volume guarantee Default fractional reserve Allowed values
Volume 100 0, 100
None 0 0, 100
How Data ONTAP can automatically provide more space forfull FlexVol volumes
Data ONTAP uses two methods for automatically providing more space for a FlexVol volume whenthat volume is nearly full: allowing the volume size to increase, and deleting Snapshot copies (with
294 | Storage Management Guide

any associated storage objects). If you enable both of these methods, you can specify which methodData ONTAP should try first.
Data ONTAP can automatically provide more free space for the volume by using one of thefollowing methods:
• Increase the size of the volume when it is nearly full (known as the autogrow feature).This method is useful if the volume's containing aggregate has enough space to support a largervolume. You can configure Data ONTAP to increase the size in increments and set a maximumsize for the volume. The increase is automatically triggered based on the amount of data beingwritten to the volume in relation to the current amount of used space and any thresholds set.
• Delete Snapshot copies when the volume is nearly full.For example, you can configure Data ONTAP to automatically delete Snapshot copies that arenot linked to Snapshot copies in cloned volumes or LUNs, or you can define which Snapshotcopies you want Data ONTAP to delete first—your oldest or newest Snapshot copies. You canalso determine when Data ONTAP should begin deleting Snapshot copies—for example, whenthe volume is nearly full or when the volume’s Snapshot reserve is nearly full.
If you enable both of these methods, you can specify which method Data ONTAP tries first when avolume is nearly full. If the first method does not provide sufficient additional space to the volume,Data ONTAP tries the other method next. By default, Data ONTAP tries to increase the size of thevolume first.
Selecting the first method to increase space for full FlexVol volumes
If you enable both the volume autosize capability and automatic Snapshot deletion for the samevolume, you can also specify which method Data ONTAP tries first when that volume needsadditional free space. How you configure the volume depends on whether you would prefer that thevolume continue to grow or that Snapshot copies are deleted.
About this task
If the first method that Data ONTAP tries to use for providing additional free space does not result inaddressing the free space needs of the volume, then Data ONTAP tries the other method.
In most cases, the default configuration (growing the volume first) is preferable, because when aSnapshot copy is deleted, it cannot be restored. However, in certain situations, you might want toavoid growing the size of a volume when possible. In this case, you can configure Data ONTAP todelete Snapshot copies before increasing the size of the volume.
Step
1. Select the first method that Data ONTAP should use to provide free space to a volume by usingthe vol options command with the try-first option.
To specify increasing the size of the volume first (the default), use volume_grow. To specifydeleting Snapshot copies first, use snap_delete.
How you use space management capabilities | 295

Example
The following command configures Data ONTAP to delete Snapshot copies before increasingthe volume size for the volume vol0001:
vol options vol0001 try_first snap_delete
Deleting Snapshot copies automatically
You can define and enable a policy for automatically deleting Snapshot copies by using the snapautodelete command. Automatically deleting Snapshot copies can help you manage spaceutilization.
Step
1. To enable a policy for automatically deleting Snapshot copies, enter the following command:
snap autodelete vol_name on option value
vol_name is the name of the volume.
on enables the Snapshot copy autodelete policy.
Note: You cannot delete Snapshot copies that are locked by LockVault.
To specify which Snapshot copies to delete, enter the following options and their values:
Option Value
commitment Specifies whether Snapshot copies locked by data protection utilities(SnapMirror or ndmpcopy command) or data backup mechanisms(volume or LUN clones) can be deleted.
• try
Deletes all Snapshot copies that are unlocked. This option deletesSnapshot copies that are not locked by data protection utilities ordata backup mechanisms.
• disrupt
Deletes Snapshot copies that are unlocked or locked by dataprotection utilities. Snapshot copies that are locked by databackup mechanisms cannot be deleted by using the disruptoption. This option is used when there are no Snapshot copies forthe try option to delete.
• destroy
Deletes Snapshot copies that are locked by data protectionutilities and data backup mechanisms.
296 | Storage Management Guide

Option Value
destroy_list Specifies whether Snapshot copies locked by LUN clones, fileclones, volume clones, or CIFS share can be deleted.
• lun_clone
Deletes Snapshot copies that are locked by LUN clones.
• file_clone
Deletes Snapshot copies that are locked by file clones.
• vol_clone
Deletes Snapshot copies that are locked by volume clones.
• cifs_share
Deletes Snapshot copies that are locked by CIFS share.
• none
Prevents all Snapshot copies from being deleted.
You can specify multiple values (except none) as a comma-separatedlist for the destroy_list option.
Note: You can use this option only if you specify destroy for thecommitment option.
How you use space management capabilities | 297

Option Value
trigger Specifies when to begin automatically deleting Snapshot copies.
• volume
Begins deleting Snapshot copies when the volume reaches itsautodelete threshold and no space is available in the Snapshotcopy reserve.
• snap_reserve
Begins deleting Snapshot copies when the Snapshot copy reservereaches the autodelete threshold.
• space_reserve
Begins deleting Snapshot copies when the space reserved in thevolume reaches the autodelete threshold and no space is availablein the Snapshot copy reserve.
The autodelete threshold is some percentage of the volume size, asfollows:
• If the volume size is less than 20 GB, the autodelete threshold is85%.
• If the volume size is equal to or greater than 20 GB and less than100 GB, the autodelete threshold is 90%.
• If the volume size is equal to or greater than 100 GB and less than500 GB, the autodelete threshold is 92%.
• If the volume size is equal to or greater than 500 GB and less than1 TB, the autodelete threshold is 95%.
• If the volume size is equal to or greater than 1 TB, the autodeletethreshold is 98%.
target_free_space Determines when to stop deleting Snapshot copies. Thetarget_free_space value is some percentage of the volume. Forexample, if you specify 20, then Snapshot copies are deleted until20% of the volume is free space. It is a common practice to specifythe target_free_space value 2% less than the autodeletethreshold to avoid deleting Snapshot copies unnecessarily.
298 | Storage Management Guide

Option Value
delete_order Specifies which Snapshot copies to delete first: newest or oldest.
• newest_first
Deletes the most recent Snapshot copies first.
• oldest_first
Deletes the oldest Snapshot copies first.
defer_delete Deletes one of the following types of Snapshot copies last:
• scheduled
Snapshot copies that are scheduled automatically.
• user_created
Snapshot copies that are not scheduled automatically.
• prefix
Snapshot copies with the specified prefix string.
• none
Deletes all Snapshot copies immediately.
prefix Deletes Snapshot copies with a specific prefix last. You can specifyup to 15 characters (Example: sv_snap_week).
Note: You can use this option only if you specify prefix for thedefer_delete option.
How a FlexVol volume can automatically change its sizeA volume can be configured to grow and shrink automatically in response to space usagerequirements. Automatic growing occurs when used space exceeds an autogrow threshold. Automaticshrinking occurs when used space drops below an autoshrink threshold.
The autosizing feature consists of two possible functionalities:
• The autogrow functionality grows a volume's size automatically (grow option).Automatic growth can provide additional space to a volume when it is about to run out of space,as long as there is space available in the associated aggregate. When the volume's free spacepercentage is below the specified threshold, it continues to grow by the specified increment untileither the free space percentage arrives at the threshold or the associated aggregate runs out ofspace.
How you use space management capabilities | 299

If a volume does not have enough space for a Snapshot copy to be created, an attempt to create aSnapshot copy does not cause the volume to automatically grow. In this case, the Snapshot copycreation fails.
• The autoshrink functionality shrinks a volume's size automatically (grow_shrink option).The autoshrink functionality is only used in combination with autogrow to meet changing spacedemands and is not available alone. Automatic shrinking helps to more accurately size a volumeand prevents a volume from being larger than it needs to be at any given point. The volumeshrinks and returns space to the aggregate if the guarantee type is volume.
Because the size of the Snapshot reserve is a percentage of the size of the volume, Snapshot spill canstart to occur or increase as a result of a volume shrinking.
Configuring a FlexVol volume to automatically change its size
You can configure a volume to grow automatically or grow and shrink automatically (known asautosizing) in response to space usage requirements. Automatic growing helps prevent a volumefrom running out of space or forcing you to delete files manually. Automatic shrinking prevents avolume from being larger than needed.
Before you begin
The FlexVol volume must be online.
About this task
The autosize capability is off by default, except for data protection mirrors, which have thegrow_shrink option enabled by default.
You cannot configure a root FlexVol volume for the grow_shrink autosize mode.
Step
1. Enter the applicable command to grow the volume size automatically or to grow and shrink thevolume size automatically:
• vol autosize <vol_name> grow
• vol autosize <vol_name> grow_shrink
You can specify the following parameters related to growing the volume automatically:
• -m sets the maximum size to which a volume can grow.The default is 120 percent of the volume size. If you resize the volume manually, this value isreset to 120 percent of the current volume size. A volume does not grow automatically if itscurrent size is greater than or equal to the value of this option.If you attempt to set this parameter greater than the platform-dependent maximum volumesize, it is silently reset to the maximum volume size.
300 | Storage Management Guide

• -i specifies the amount by which the volume size increases each time the volume growsautomatically.You can specify the increment amount either as a fixed size (in bytes) or as a percentage. Thepercentage is converted to a fixed size that is based on the volume size when the command isissued. The default is the lesser value of either 1 GB or 5 percent of the volume size at thetime the volume was created. When increasing the size of a volume, Data ONTAP uses thespecified increment as a guide; the actual size increase can be larger or smaller.
• -grow-threshold-percent specifies the used space threshold above which growingshould start.When the volume’s used space exceeds this threshold, the volume grows automatically unlessit has reached the maximum size specified for automatic growth. The default depends on thesize of the volume.
You can specify the following parameters related to shrinking the volume automatically (inaddition to the parameters related to growing):
• -minimum size specifies the smallest size to which the volume can shrink, enabling you tomaintain a percentage of free space.The default minimum size is the initial volume size. Manually resizing the volume or using aninvalid minimum size value when you enable the autosizing feature resets this value to thecurrent volume size.
• -shrink-threshold percent specifies the volume's used space percent threshold belowwhich shrinking should start.When the amount of used space drops below this threshold, the volume shrinks automaticallyunless it has reached the specified minimum size. For example, if used space is 50 percent andthe threshold is 51 percent, automatic shrinking begins. The default is 50 percent.
Example
The command in this example enables the autosizing feature on a volume called thevol. No otherparameters were specified, so the defaults are used for growing and shrinking.
sys1> vol autosize thevol grow_shrinkvol autosize: Flexible volume 'thevol' autosize settings UPDATED.sys1> Fri Nov 30 02:42:02 GMT [sys1:wafl.spacemgmnt.policyChg:info]: The space management policy for volume thevol has changed: autosize state enabled.
Requirements for enabling both autoshrink and automatic Snapshot copydeletion
The autoshrink functionality can be used with automatic Snapshot copy deletion if certainconfiguration requirements are met.
If you want to enable both the autoshrink functionality and automatic Snapshot copy deletion, yourconfiguration must meet the following requirements:
How you use space management capabilities | 301

• Data ONTAP must be configured to attempt to increase volume size before trying to deleteSnapshot copies (the try_first option must be set to volume_grow).
• The trigger for automatic Snapshot copy deletion must be volume fullness (the triggerparameter must be set to volume).
How the autoshrink functionality interacts with Snapshot copy deletion
Because the autoshrink functionality shrinks the size of a FlexVol volume, it can also affect whenvolume Snapshot copies are automatically deleted.
The autoshrink functionality interacts with automatic volume Snapshot copy deletion in thefollowing ways:
• If both the grow_shrink autosize mode and automatic Snapshot copy deletion are enabled,when a volume size shrinks it can trigger an automatic Snapshot copy deletion.This is because the Snapshot reserve is based on a percentage of the volume size (5 percent bydefault), and that percentage is now based on a smaller volume size. This can cause Snapshotcopies to spill out of the reserve and be deleted automatically.
• If the grow_shrink autosize mode is enabled and you manually delete a Snapshot copy, it mighttrigger an automatic volume shrinkage.
Considerations for using thin provisioning with FlexVolvolumes
Using thin provisioning, you can configure your volumes so that they appear to provide more storagethan they have available, provided that the storage that is actually being used does not exceed theavailable storage.
To use thin provisioning with FlexVol volumes, you create the volume with a guarantee of none.With a guarantee of none, the volume size is not limited by the aggregate size. In fact, each volumecould, if required, be larger than the containing aggregate. The storage provided by the aggregate isused up only as data is written to the LUN or file.
If the volumes associated with an aggregate show more storage as available than the physicalresources available to that aggregate, the aggregate is overcommitted. When an aggregate isovercommitted, it is possible for writes to LUNs or files in volumes contained by that aggregate tofail if there is not sufficient free space available to accommodate the write.
If you have overcommitted your aggregate, you must monitor your available space and add storage tothe aggregate as needed to avoid write errors due to insufficient space.
Aggregates can provide storage to FlexVol volumes associated with more than one Storage VirtualMachine (SVM). When sharing aggregates for thin-provisioned volumes in a multi-tenancyenvironment, be aware that one tenant's aggregate space availability can be adversely affected by thegrowth of another tenant's volumes.
302 | Storage Management Guide

For more information about thin provisioning, see the following technical reports:
• TR 3965: NetApp Thin Provisioning Deployment and Implementation Guide
• TR 3483: Thin Provisioning in a NetApp SAN or IP SAN Enterprise Environment
How to determine space usage in a volume or aggregateEnabling a feature in Data ONTAP might consume space that you are not aware of or more spacethan you expected. Data ONTAP helps you determine how space is being consumed by providingthree perspectives from which to view space: the volume, a volume's footprint within the aggregate,and the aggregate.
A volume can run out of space due to space consumption or insufficient space within the volume,aggregate, or a combination of both. By seeing a feature-oriented breakdown of space usage fromdifferent perspectives, you can assess which features you might want to adjust or turn off, or takeother action (such as increase the size of the aggregate or volume).
You can view space usage details from any of these perspectives:
• The volume's space usageThis perspective provides details about space usage within the volume, including usage bySnapshot copies. The volume's active file system consists of user data, file system metadata, andinodes. Data ONTAP features that you enable might increase the amount of metadata, and in thecase of Snapshot copies, can sometimes spill into the user data portion of the active file system.You see a volume's space usage by using the vol status -S command.
• The volume's footprint within the aggregateThis perspective provides details about the amount of space each volume is using in thecontaining aggregate, including the volume's metadata.You see a volume's footprint with the aggregate by using the vol status -F command.
• The aggregate's space usageThis perspective includes totals of the volume footprints of all of the volumes contained in theaggregate, space reserved for aggregate Snapshot copies, and other aggregate metadata.You can see the aggregate's space usage by using the aggr status -S command.
Certain features, such as tape backup and deduplication, use space for metadata both from thevolume and directly from the aggregate. These features show different space usage between thevolume and volume footprint perspectives.
How you use space management capabilities | 303

How to determine space usage in an aggregate
You can view space usage by all FlexVol volumes in one or more aggregates with the aggr status-S command. This helps you see which volumes are consuming the most space in their containingaggregates so that you can take actions to free more space.
The used space in an aggregate is directly affected by the space used in the FlexVol volumes itcontains. Measures that you take to increase space in a volume also affect space in the aggregate.
When the aggregate is offline, no values are displayed. Only non-zero values are displayed in thecommand output. However, you can use the -v parameter to display all possible feature rowsregardless of whether they are enabled and using any space. A value of - indicates that there is nodata available to display.
The following rows are included in the aggr status -S command output:
• Volume FootprintsThe total of all volume footprints within the aggregate. It includes all of the space that is used orreserved by all data and metadata of all volumes in the containing aggregate. It is also the amountof space that is freed if all volumes in the containing aggregate are destroyed.
• Aggregate MetadataThe total file system metadata required by the aggregate, such as allocation bitmaps and inodefiles.
• Snapshot ReserveThe amount of space reserved for aggregate Snapshot copies, based on volume size. It isconsidered used space and is not available to volume or aggregate data or metadata. Theaggregate's Snapshot reserve is set to 0 percent by default.
• Total UsedThe sum of all space used or reserved in the aggregate by volumes, metadata, or Snapshot copies.
There is never a row for Snapshot spill.
The following example shows the aggr status -S command output:
sys1> aggr status -SAggregate : aggr0
Feature Used Used% -------------------------------- ---------- ------ Volume Footprints 6.05GB 95% Aggregate Metadata 688KB 0%
Total Used 6.05GB 95%
304 | Storage Management Guide

How you can determine and control a volume's space usage in theaggregate
You can determine which FlexVol volumes are using the most space in the aggregate and specificallywhich features within the volume. The vol status -F command provides information about avolume's footprint, or its space usage within the containing aggregate.
The vol status -F command shows details about the space usage of each volume in an aggregate,including offline volumes. This command does not directly correspond to the output of the dfcommand, but instead bridges the gap between the output of vol status -S and aggr status -S commands. All percentages are calculated as a percent of aggregate size.
Only non-zero values are displayed in the command output. However, you can use the -v parameterto display all possible feature rows regardless of whether they are enabled and using any space. Avalue of - indicates that there is no data available to display.
The following example shows the vol status -F command output for a volume called testvol:
sys1> vol status -FVolume : testvol
Feature Used Used% -------------------------------- ---------- ------ Volume Data Footprint 2.64GB 42% Volume Guarantee 3.32GB 52% Flexible Volume Metadata 34.2MB 1% Delayed Frees 54.8MB 1%
Total 6.05GB 95%
The following table explains some of the key rows of the output of the vol status -F commandand what you can do to try to decrease space usage by that feature:
Row/featurename
Description/contents of row Some ways to decrease
Volume DataFootprint
The total amount of space used in thecontaining aggregate by a volume's datain the active file system and the spaceused by the volume's Snapshot copies.This row does not include reservedspace, so if volumes have reserved files,the volume's total used space in the volstatus -S command output canexceed the value in this row.
• Deleting data from the volume.
• Deleting Snapshot copies fromthe volume.
How you use space management capabilities | 305

Row/featurename
Description/contents of row Some ways to decrease
VolumeGuarantee
The amount of space reserved by thevolume in the aggregate for futurewrites. The amount of space reserveddepends on the guarantee type of thevolume.
Changing the type of guarantee forthe volume to none. This row willgo to 0.
If you configure your volumes witha volume guarantee of none, youshould refer to Technical Report3965 or 3483 for information abouthow a volume guarantee of nonecan affect storage availability.
Flexible VolumeMetadata
The total amount of space used in theaggregate by the volume's metadatafiles.
No direct method to control.
Delayed Frees Blocks that Data ONTAP used forperformance and cannot be immediatelyfreed.
When Data ONTAP frees blocks in aFlexVol volume, this space is not alwaysimmediately shown as free in theaggregate because operations to free thespace in the aggregate are batched forincreased performance. Blocks that aredeclared free in the FlexVol volume butthat are not yet free in the aggregate arecalled “delayed free blocks” until theassociated delayed free blocks areprocessed.
For SnapMirror destinations, this rowhas a value of 0 and is not displayed.
No direct method to control.
Total The total amount of space that thevolume uses in the aggregate. It is thesum of all of the rows.
Any of the methods used todecrease space used by a volume.
Related information
Technical Report: Thin Provisioning Deployment and Implementation Guide: media.netapp.com/documents/tr-3965.pdfTechnical Report: Thin Provisioning in a NetApp SAN or IP SAN Enterprise Environment:media.netapp.com/documents/tr3483.pdf
306 | Storage Management Guide

What the volume footprint is
A volume footprint is the amount of space a volume is using within the aggregate. Understandingwhat is included in the volume footprint helps you understand the space requirements for the volume.
The volume footprint consists of the space used by user data and metadata, including metadata thatresides in the aggregate rather than within the volume itself. For this reason it can be larger than thevolume size, as shown in the following diagram:
Aggregate
Space reserved for guarantee Aggregate free space
Volume size
Volume footprint with guarantee = Volume
Volume footprint with guarantee = None
Volume meta-data
File system metadata
User dataSnap-shot copies
How you can determine and control space usage in a volume
You can view details about space usage in a volume to understand which Data ONTAP features areconsuming space and what you can do to decrease that used space.
The vol status -S command displays the space used by each of the file system components aswell as other features. The vol status -S command includes offline volumes. For example, youmight want to understand why the df command output shows that a large amount of space is stillused even though you deleted all of your data in a volume. In this case, output for the volume spaceusage command might show that it is due to Snapshot copies, inodes, or other metadata that does notshrink.
Only non-zero values are displayed in the command output. However, you can use the -v parameterto display all possible feature rows regardless of whether they are enabled and using any space. Avalue of - indicates that there is no data available to display.
The following tables explain some of the common rows in the vol status -S command outputand what you can do to try to decrease space usage by that feature:
The output for this command consists of the following main categories:
• User data
• Volume metadata
How you use space management capabilities | 307

• Snapshot copy information
• Total used space
For information about how to reduce space consumed by other features (such as deduplication), seethe respective Data ONTAP guides.
The available space in a volume with a guarantee type of None is limited by the available space inthe aggregate. Checking the available space in the aggregate might show you that the aggregate isnearly full from aggregate Snapshot copies.
User data
The following output row relates to user data:
Row/featurename
Description Some ways to decrease space usage
User Data Everything related to user data, includingthe data written to the volume, includingindirect blocks and directory blocksassociated with user inodes, and the spacereserved in the volume.
• Deleting user data
• Turning off file or LUNreservationsNote that turning off file or LUNreservations disables the DataONTAP ability to guaranteewrites to those files or LUNs. Thiscan result in out of space errorsbeing returned. Turning offreservations should be atemporary measure, andreservations should be reenabledas soon as you have providedmore free space to the volume.
Volume metadata
The following output rows relate to volume metadata:
Row/featurename
Description Some ways to decrease space usage
Deduplication /DeduplicationPercent
The amount of space used bydeduplication metadata files.
Comparison of the space savings you aregetting from deduplication with the size ofthe metadata required. If the metadatarequirement is larger than the savings, youcan disable deduplication on the volume.
308 | Storage Management Guide

Row/featurename
Description Some ways to decrease space usage
TemporaryDeduplication /TemporaryDeduplicationPercent
The amount of space used bytemporary deduplicationmetadata files.
No direct method to control. Thetemporary metadata usage decreases afterdeduplication scanners finish running.
FilesystemMetadata /FilesystemMetadata Percent
Internal tracking for the filesystem required by DataONTAP.
No direct method to control.
SnapMirrorMetadata /SnapMirrorMetadata Percent
The amount of space in use bySnapMirror metadata files. Thisrow relates only to logicalreplication. During transfers,some additional space is usedtemporarily.
No direct method to control.
You can allow the transfer to finish so theadditional space used temporarily is freed.
Tape BackupMetadata / TapeBackup MetadataPercent
The amount of space in use bytape backup metadata files in thevolume.
The amount of space consumed by tapebackup metadata is cleared when the nextbaseline (Level 0) backup is successfullyrun. You can initiate a baseline backup orlet it run at the next scheduled time.
Quota Metadata /Quota MetadataPercent
The amount of space used byquota metadata files.
Turning off quotas.
Inodes / InodesPercent
This row is proportional to themaximum number of files evercreated in the volume.
No direct method to control current usage.
You can reduce the maximum amount ofspace that can be used for inode allocationsby lowering the maximum public inodesetting (maxfiles). However, space that hasalready been allocated for inodes is neverreturned to the volume, so if those inodeshave already been used, this action has noeffect.
Snapshot copy information
The following output rows relate to Snapshot copies:
How you use space management capabilities | 309

Row/featurename
Description Some ways to decrease space usage
SnapshotReserve
Based on the current volumesize. The Snapshot reserve is notavailable to the active filesystem and is counted as usedspace, even if there are noSnapshot copies in the reserve.
This row is the same as the totalspace used for the .snapshotrow in the df command.
You can use the snap reserve command withthe percent option to lower the space allowedfor Snapshot copies in the volume.
SnapshotSpill
The amount of space used bySnapshot copies that exceeds theSnapshot reserve size, and spillsover into the active file system.This space is not available forwrites to the active file systemuntil Snapshot copies aredeleted.
A non-zero value in this rowindicates that your Snapshotreserve has not been sizedcorrectly for your currentconfiguration.
Volume clones, SnapMirror, andregularly scheduled Snapshotcopies can cause Snapshot copyspill.
• Increasing the size of the Snapshot reserve.
• Deleting volume Snapshot copies, eithermanually or by enabling the Snapshotautodelete capability.
• Changing the SnapMirror schedule.
Total used space
The following row relates to total used space in the volume:
310 | Storage Management Guide

Row/featurename
Description Some ways todecrease spaceusage
Total The total amount of used space in the volume, including the amountof space allotted for the entire Snapshot reserve and space for theactive file system.
Snapshot space is treated as used space, so this row can be higherthan the df command's output. In the df command, this row isequivalent to the volume's used space in the used column plus theSnapshot total (in the total column) for the Snapshot used space(.snapshot) row.
When Snapshot spill exists, the vol status -S command onlyaccounts for the used space once. However, the df command showsthat space as used for both the active file system and forthe .snapshot row.
Any of themethods forindividual outputrows.
Example output
The following example displays output for a FlexVol volume called testvol:
sys1> vol status -SVolume : testvol
Feature Used Used% -------------------------------- ---------- ------ User Data 2.40GB 40% Filesystem Metadata 1.07MB 0% Inodes 2.63MB 0% Snapshot Reserve 308MB 5%
Total 2.71GB 45%
How Snapshot copies and Snapshot reserve use space in a volume
Understanding the Snapshot reserve area of a FlexVol volume and what Snapshot spill is can helpyou correctly size the Snapshot reserve and decide whether to enable the Snapshot autodeletecapability.
When Snapshot copies use more space than the Snapshot reserve, they spill over and use space in theactive file system. The Snapshot reserve area of a volume is the space reserved exclusively forSnapshot copies. It is not available to the user data or metadata area of the volume. The size of theSnapshot reserve is a specified percentage of the current volume size, and does not depend on thenumber of Snapshot copies or how much space they consume.
How you use space management capabilities | 311

If all of the space allotted for the Snapshot reserve is used but the active file system (user data andmetadata) is not full, Snapshot copies can use more space than the Snapshot reserve and spill into theactive file system. This extra space is called Snapshot spill.
The following illustration shows a FlexVol volume with no Snapshot spill occurring. The two blockson the left show the volume's used and available space for user data and metadata. The two blocks onthe right show the used and unused portions of the Snapshot reserve. When you modify the size ofthe Snapshot reserve, it is the blocks on the right that change.
Volume
Used space
User data and metadata
Available spaceUnused
Snapshot reserve
Used Snapshot reserve
Snapshot reserve
The following illustration shows a FlexVol volume with Snapshot spill occurring. The Snapshotreserve area is full and Snapshot copies spilling over into a Spill area that is part of the user data andmetadata area's available space. The size of the Snapshot reserve remains the same.
Volume
Used space
User data and metadata
Available space Used Snapshot reserve
Spill Snapshot reserve
For more information about Snapshot copies, see the Data ONTAP Data Protection Online Backupand Recovery Guide for 7-Mode
When to use the df command and the space usage commands
You use the df command when you want concise information about used and available space involumes or aggregates. If you want a detailed breakdown of space usage by feature in a volume,aggregate, or a volume's footprint within an aggregate, you use the space usage commands.
The df command is useful if you want a quick view of how much space each volume has availableor used.
You use the df command (or volume show and aggregate show commands) to see total space,available space, and used space. If you need more information about how or why space is being usedin your volume or aggregate, you use the show-space and show-footprint commands (the spaceusage commands) for the volume or aggregate.
312 | Storage Management Guide

The space usage commands, on the other hand, provide much more detail about used space and whatData ONTAP capability is causing the space to be used. For example, they could be used to help youunderstand why the df command output shows used space even though there is no data in a volume.
Used space is dynamic, even for a system that is not being accessed by clients. For this reason, youshould not try to compare the output of two different space commands, or even the same commandinvoked twice, too closely.
Methods to create space in a FlexVol volumeThere are multiple ways to create space in a FlexVol volume. Understanding what these methods areand their respective benefits and drawbacks helps you decide which method is best for yourrequirements.
Some common ways to create space in a volume are as follows:
• Increase the size of the volume.You can do this manually, or automatically by enabling the autogrow functionality.
• Reduce the size of the Snapshot reserve if the df command shows that the Snapshot reserve is not100 percent full.This makes space available to the active file system.
• Make more space in the aggregate.This results directly or indirectly in more space being made for the volume. For example, morespace in the aggregate can allow a volume to increase in size automatically with the autogrowcapability.
• Enable storage efficiency technologies, such as deduplication and compression.
• Delete volume Snapshot copies if the Snapshot reserve is 100 percent full and Snapshot copiesare spilling into the active file system.You can delete Snapshot copies manually, or automatically by enabling the Snapshot autodeletecapability for the volume.
• Delete FlexClone LUNs and LUN clones.
• (Temporarily) change the fractional reserve to 0 percent if your volume contains reserved files orLUNs and the fractional reserve is 100 percent.You should only use this as a temporary measure to create space. When the fractional reserve isset to 0 percent, overwrites might fail, and in certain deployments write failures might not beacceptable.
• Delete files.If the volume is 100 percent full, it might not be possible to delete a file if it participates in anyblock sharing, such as volume Snapshot copies or deduplication, and you cannot recover thespace. In addition, modifying a directory to delete a file might require additional space, so
How you use space management capabilities | 313

deleting the file can actually consume space. Under these conditions, you can do one of thefollowing:
◦ You can use the rm command, available at the advanced privilege level, to delete files even infull volumes with Snapshot copies.
◦ You can use any of the other methods listed to create more space in the volume and aggregateso that there is enough space available for file deletions.
Methods to create space in an aggregateIf an aggregate runs out of free space, various problems can result that range from loss of data todisabling a volume's guarantee. There are multiple ways to make more space in an aggregate.
All of the methods have various consequences. Prior to taking any action, you should read therelevant section in the documentation.
The following are some common ways to make space in an aggregate, in order of least to mostconsequences:
• Add disks to the aggregate.
• Move some volumes to another aggregate with available space.
• Shrink the size of volumes whose guarantee type is volume in the aggregate.You can do this manually or with the autoshrink option of the autosize capability.
• Change volume guarantee types to none on volumes that are using large amounts of space (largevolume-guaranteed volumes or file-guaranteed volumes with large reserved files) so that thevolumes take up less space in the aggregate.A volume with a guarantee type of none has a smaller footprint in the aggregate than volumeswith other guarantee types. The Volume Guarantee row of the vol status -F commandoutput shows whether a volume is reserving a large amount of space in the aggregate due to itsguarantee.If you configure your volumes with a volume guarantee of none, you should refer to TechnicalReport 3965 for information about how doing so can affect storage availability.
• Delete unneeded volume Snapshot copies if the volume's guarantee type is none.
• Delete unneeded volumes.
• Enable space-saving features, such as deduplication or compression.
• (Temporarily) disable features that are using a large amount of metadata (visible with the volstatus -F command).
314 | Storage Management Guide

Related information
Technical Report: Thin Provisioning Deployment and Implementation Guide: media.netapp.com/documents/tr-3965.pdfTechnical Report: Thin Provisioning in a NetApp SAN or IP SAN Enterprise Environment:media.netapp.com/documents/tr3483.pdf
How you use space management capabilities | 315

About qtrees
Qtrees enable you to partition your volumes into smaller segments that you can manage individually.You can set a qtree's size or security style, back it up, and restore it.
When to use qtreesQtrees enable you to partition your data without incurring the overhead associated with a volume.You might create qtrees to organize your data, or to manage one or more of the following factors:quotas, backup strategy, security style, and CIFS oplocks setting.
The following list describes examples of qtree usage strategies:
• QuotasYou can limit the size of the data used by a particular project, by placing all of that project's filesinto a qtree and applying a tree quota to the qtree.
• BackupsYou can use qtrees to keep your backups more modular, to add flexibility to backup schedules, orto limit the size of each backup to one tape.
• Security styleIf you have a project that needs to use NTFS-style security, because the members of the projectuse Windows files and applications, you can group the data for that project in a qtree and set itssecurity style to NTFS, without requiring that other projects also use the same security style.
• CIFS oplocks settingsIf you have a project using a database that requires CIFS oplocks to be off, you can set CIFSoplocks to off for that project's qtree, while allowing other projects to retain CIFS oplocks.
How qtrees compare with FlexVol volumesIn general, qtrees are similar to FlexVol volumes. However, the two technologies have some keydifferences. Understanding these differences helps you choose between them when you design yourstorage architecture.
The following table compares qtrees and FlexVol volumes:
Functionality Qtree FlexVol volume
Enables organizing user data Yes Yes
316 | Storage Management Guide

Functionality Qtree FlexVol volume
Enables grouping users withsimilar needs
Yes Yes
Accepts a security style Yes Yes
Accepts oplocks configuration Yes Yes
Can be backed up and restoredas a unit using SnapMirror
Yes Yes
Can be backed up and restoredas a unit using SnapVault
Yes No
Can be resized Yes (using quota limits) Yes
Supports Snapshot copies No (qtree data can be extractedfrom volume Snapshot copies)
Yes
Supports quotas Yes Yes
Can be cloned No (except as part of a FlexVolvolume)
Yes
Can be exported using NFS Yes Yes
Related references
Storage limits on page 373
Qtree name restrictionsQtree names can be no more than 64 characters in length. In addition, using some special charactersin qtree names, such as commas and spaces, can cause problems with other Data ONTAPcapabilities, and should be avoided.
The following characters should be avoided in qtree names:
• SpaceSpaces in qtree names can prevent SnapMirror updates from working correctly.
• CommaCommas in qtree names can prevent quotas from working correctly for that qtree, unless the nameis enclosed in double quotation marks.
About qtrees | 317

Managing qtrees
You can create, delete, and rename qtrees. In addition, you can display their status and accessstatistics. You can also convert directories at the root of a volume into qtrees. You do many of theseoperations using your UNIX or Windows client.
About this task
Note: Many qtree commands cannot be performed while a volume move operation is in progress.If you are prevented from completing a qtree command for this reason, wait until the volume moveis complete and then retry the command.
Creating a qtreeYou create qtrees using the qtree create command. You can also specify a UNIX-stylepermission for the new qtree.
Steps
1. Enter the following command:
qtree create path [-m mode]
mode is a UNIX-style octal number that specifies the permissions for the new qtree. If you do notspecify a mode, the qtree is created with the permissions specified by thewafl.default_qtree_mode option.
For more information about the format of the mode number, see your UNIX documentation.
Note: If you are using this qtree in an NTFS-only environment, you can set the appropriateACLs after creation using Windows tools.
path is the path name of the qtree, with the following notes:
• If you want to create the qtree in a volume other than the root volume, include the volume inthe name.
• If the path name does not begin with a slash (/), the qtree is created in the root volume.
• Qtree names can be up to 64 characters long. The entire path can be up to 1,024 characterslong.
2. If you want to change the default security style or the default CIFS oplocks setting of the newqtree, you can change it now by using the qtree security or qtree oplocks commands.
318 | Storage Management Guide

Examples
The following command creates the news qtree in the users volume, giving the owner and theowner’s group permission to read, write and execute the qtree:
qtree create /vol/users/news -m 770
The following command creates the news qtree in the root volume:
qtree create news
Related concepts
Qtree name restrictions on page 317
About qtrees on page 316
Displaying qtree statusTo find the security style, oplocks attribute, and SnapMirror status for all volumes and qtrees on thestorage system or for a specified volume, you use the qtree status command.
Step
1. Enter the following command:
qtree status [-i] [-v] [vol_name]
The -i option includes the qtree ID number in the display.
The -v option includes the owning vFiler unit, if the MultiStore license is enabled.
Displaying qtree access statisticsYou display statistics on user accesses to files in qtrees on your system using the qtree statscommand. This can help you determine which qtrees are incurring the most traffic. Determiningtraffic patterns helps with qtree-based load balancing.
About this task
The qtree stats command displays the number of NFS and CIFS accesses to the designatedqtrees since the counters were last reset. The qtree stats counters are reset when one of the followingactions occurs:
• The system is booted.
• The volume containing the qtree is brought online.
Managing qtrees | 319

• The counters are explicitly reset using the qtree stats -z command.
Step
1. Enter the following command:
qtree stats [-z] [vol_name]
The -z option clears the counter for the designated qtree, or clears all counters if no qtree isspecified.
vol_name optionally specifies a volume. Statistics for all qtrees in that volume are displayed. Ifno volume is specified, statistics for all qtrees on the storage system are displayed.
Example output
system> qtree stats vol1Volume Tree NFS ops CIFS ops -------- -------- ------- -------- vol1 proj1 1232 23 vol1 proj2 55 312
Converting a directory to a qtreeIf you have a directory at the root of a FlexVol volume that you want to convert to a qtree, you mustmigrate the data contained in the directory to a new qtree with the same name, using your clientapplication.
About this task
The steps you take to convert a directory to a qtree depend on what client you use. The followingprocess outlines the general tasks you need to complete:
Steps
1. Rename the directory to be made into a qtree.
2. Create a new qtree with the original directory name.
3. Use the client application to move the contents of the directory into the new qtree.
4. Delete the now-empty directory.
Note: You cannot delete a directory if it is associated with an existing CIFS share.
320 | Storage Management Guide

Converting a directory to a qtree using a Windows client
To convert a directory to a qtree using a Windows client, you rename the directory, create a qtree onthe storage system, and move the directory's contents to the qtree.
About this task
You must use Windows Explorer for this procedure. You cannot use the Windows command-lineinterface or the DOS prompt environment.
Steps
1. Open Windows Explorer.
2. Click the folder representation of the directory you want to change.
Note: The directory must reside at the root of its containing volume.
3. From the File menu, select Rename to give this directory a different name.
4. On the storage system, use the qtree create command to create a new qtree with the originalname of the directory.
5. In Windows Explorer, open the renamed directory folder and select the files inside it.
6. Drag these files into the folder representation of the new qtree.
Note: The more subfolders contained in the folder that you are moving, the longer the moveoperation takes.
7. From the File menu, select Delete to delete the renamed, now-empty directory folder.
Converting a directory to a qtree using a UNIX client
To convert a directory to a qtree in UNIX, you rename the directory, create a qtree on the storagesystem, and move the directory's contents to the qtree.
Steps
1. Open a UNIX client window.
2. Use the mv command to rename the directory.
Example
client: mv /n/user1/vol1/dir1 /n/user1/vol1/olddir
Managing qtrees | 321

3. From the storage system, use the qtree create command to create a qtree with the originalname.
Example
system1: qtree create /n/user1/vol1/dir1
4. From the client, use the mv command to move the contents of the old directory into the qtree.
Note: The more subdirectories contained in a directory that you are moving, the longer themove operation will take.
Example
client: mv /n/user1/vol1/olddir/* /n/user1/vol1/dir1
5. Use the rmdir command to delete the old, now-empty directory.
Example
client: rmdir /n/user1/vol1/olddir
After you finish
Depending on how your UNIX client implements the mv command, file ownership and permissionsmight not be preserved. If this occurs, update file owners and permissions to their previous values.
Deleting a qtreeYou can delete a qtree using Windows Explorer or a UNIX client, if the qtree permissions allow.
Before you begin
The following conditions must be true:
• The volume that contains the qtree you want to delete must be mounted (for NFS) or mapped (forCIFS).
• The qtree you are deleting must not be directly mounted and must not have a CIFS share directlyassociated with it.
• The qtree permissions must allow you to modify the qtree.
322 | Storage Management Guide

Steps
1. Find the qtree you want to delete.
Note: The qtree appears as a normal directory at the root of the volume.
2. Delete the qtree using the method appropriate for your client.
Example
The following command on a UNIX host deletes a qtree that contains files and subdirectories:
rm -Rf directory
Note: On a Windows host, you must use Windows Explorer to delete a qtree.
Related concepts
How deleting a qtree affects tree quotas on page 341
About qtrees on page 316
Renaming a qtreeYou can rename a qtree using Windows Explorer or a UNIX client, if the qtree permissions allow.
Before you begin
The following conditions must be true:
• The volume that contains the qtree you want to rename must be mounted (for NFS) or mapped(for CIFS).
• The qtree you are renaming must not be directly mounted and must not have a CIFS sharedirectly associated with it.
• The qtree permissions must allow you to modify the qtree.
Steps
1. Find the qtree you want to rename.
Note: The qtree appears as a normal directory at the root of the volume.
2. Rename the qtree using the method appropriate for your client.
Example
The following command on a UNIX host renames a qtree:
mv old_name new_name
Managing qtrees | 323

Note: On a Windows host, you must use Windows Explorer to rename a qtree.
After you finish
If you have quotas on the renamed qtree, update the quotas file to use the new qtree name.
Related concepts
How renaming a qtree affects quotas on page 341
About qtrees on page 316
324 | Storage Management Guide

About quotas
Quotas provide a way to restrict or track the disk space and number of files used by a user, group, orqtree. You specify quotas using the /etc/quotas file.
Why you use quotasYou can use quotas to limit resource usage, to provide notification when resource usage reachesspecific levels, or to track resource usage.
You specify a quota for the following reasons:
• To limit the amount of disk space or the number of files that can be used by a user or group, orthat can be contained by a qtree
• To track the amount of disk space or the number of files used by a user, group, or qtree, withoutimposing a limit
• To warn users when their disk usage or file usage is high
Overview of the quota processQuotas can be soft or hard. Soft quotas cause Data ONTAP to send a notification when specifiedthresholds are exceeded, and hard quotas prevent a write operation from succeeding when specifiedthresholds are exceeded.
When Data ONTAP receives a request to write to a volume, it checks to see whether quotas areactivated for that volume. If so, Data ONTAP determines whether any quota for that volume (and, ifthe write is to a qtree, for that qtree) would be exceeded by performing the write operation. If anyhard quota is exceeded, the write operation fails, and a quota notification is sent. If any soft quota isexceeded, the write operation succeeds, and a quota notification is sent.
Understanding quota notifications
Quota notifications are messages sent to the console and the /etc/messages file. You can alsoconfigure SNMP traps to be triggered when a quota is exceeded.
Notifications are sent in response to the following events:
• A hard quota is reached; in other words, an attempt is made to exceed it
• A soft quota is exceeded
• A soft quota is no longer exceeded
325

Thresholds are slightly different from other soft quotas. Thresholds trigger notifications only whenthey are exceeded, not when they are no longer exceeded.
Hard-quota notifications are configurable by using the quota logmsg command. You can turn themoff completely, and you can change their frequency, for example, to prevent sending of redundantmessages.
Soft-quota notifications are not configurable because they are unlikely to generate redundantmessages and their sole purpose is notification.
SNMP traps can be used to arrange alternative methods of notification, such as email. You can finddetails on SNMP traps in the /etc/mib/netapp.mib file.
Note: Notifications contain qtree ID numbers rather than qtree names. You can correlate qtreenames to ID numbers by using the qtree status -i command.
Quota targets and typesQuotas have a type: they can be either user, group, or tree. Quota targets specify the user, group, orqtree for which the quota limits are applied.
The following table lists the kinds of quota targets, what types of quotas each quota target isassociated with, and how each quota target is represented:
Quota target Quota typeHow target isrepresented Notes
user user quota UNIX user name
UNIX UID
A file or directorywhose UID matchesthe user
Windows user name inpre-Windows 2000format
Windows SID
A file or directorywith an ACL ownedby the user's SID
User quotas can beapplied for a specificvolume or qtree.
326 | Storage Management Guide

Quota target Quota typeHow target isrepresented Notes
group group quota UNIX group name
UNIX GID
A file or directorywhose GID matchesthe group
Group quotas can beapplied for a specificvolume or qtree.
Note: Data ONTAPdoes not applygroup quotas basedon Windows IDs.
qtree tree quota path name to the qtree
For example, vol/vol1/qtree2
Tree quotas areapplied to a particularvolume and do notaffect qtrees in othervolumes.
* user quota
group quota
tree quota
The asterisk character(*)
A quota target of *denotes a defaultquota. For defaultquotas, the quota typeis determined by thevalue of the type field.
Special kinds of quotasYou use default, explicit, derived and tracking quotas to manage disk usage in the most efficientmanner.
How default quotas work
You can use default quotas to apply a quota to all instances of a given quota type. For example, adefault user quota affects all users on the system for the specified volume or qtree. . In addition,default quotas enable you to modify your quotas easily.
You can use default quotas to automatically apply a limit to a large set of quota targets withouthaving to create separate quotas for each target. For example, if you want to limit most users to 10GB of disk space, you can specify a default user quota of 10 GB of disk space instead of creating aquota for each user. If you have specific users for whom you want to apply a different limit, you cancreate explicit quotas for those users. (Explicit quotas—quotas with a specific target or list of targets—override default quotas.)
In addition, default quotas enable you to use resizing rather than reinitialization when you want quotachanges to take effect. For example, if you add an explicit user quota to a volume that already has adefault user quota, you can activate the new quota by resizing.
About quotas | 327
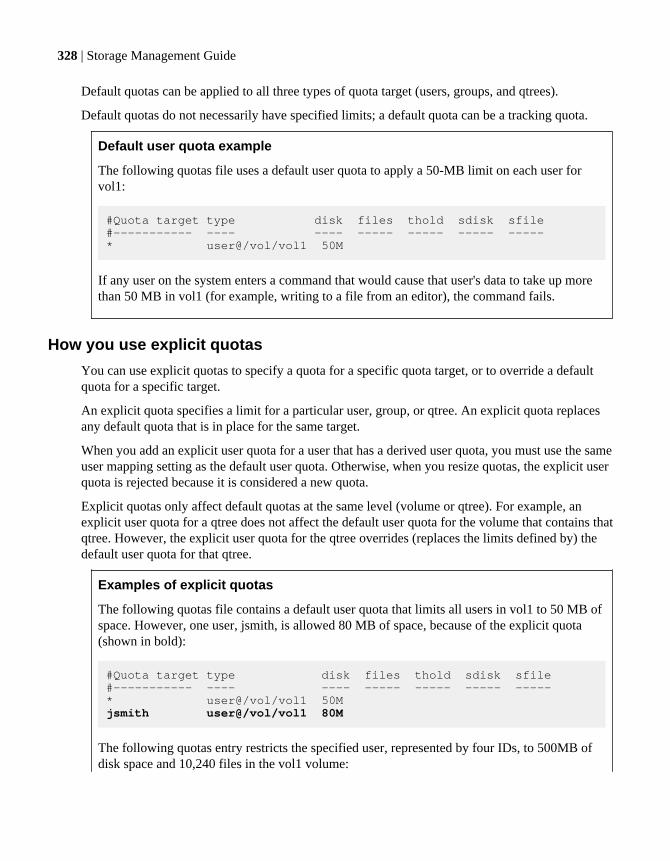
Default quotas can be applied to all three types of quota target (users, groups, and qtrees).
Default quotas do not necessarily have specified limits; a default quota can be a tracking quota.
Default user quota example
The following quotas file uses a default user quota to apply a 50-MB limit on each user forvol1:
#Quota target type disk files thold sdisk sfile#----------- ---- ---- ----- ----- ----- -----* user@/vol/vol1 50M
If any user on the system enters a command that would cause that user's data to take up morethan 50 MB in vol1 (for example, writing to a file from an editor), the command fails.
How you use explicit quotas
You can use explicit quotas to specify a quota for a specific quota target, or to override a defaultquota for a specific target.
An explicit quota specifies a limit for a particular user, group, or qtree. An explicit quota replacesany default quota that is in place for the same target.
When you add an explicit user quota for a user that has a derived user quota, you must use the sameuser mapping setting as the default user quota. Otherwise, when you resize quotas, the explicit userquota is rejected because it is considered a new quota.
Explicit quotas only affect default quotas at the same level (volume or qtree). For example, anexplicit user quota for a qtree does not affect the default user quota for the volume that contains thatqtree. However, the explicit user quota for the qtree overrides (replaces the limits defined by) thedefault user quota for that qtree.
Examples of explicit quotas
The following quotas file contains a default user quota that limits all users in vol1 to 50 MB ofspace. However, one user, jsmith, is allowed 80 MB of space, because of the explicit quota(shown in bold):
#Quota target type disk files thold sdisk sfile#----------- ---- ---- ----- ----- ----- -----* user@/vol/vol1 50M jsmith user@/vol/vol1 80M
The following quotas entry restricts the specified user, represented by four IDs, to 500MB ofdisk space and 10,240 files in the vol1 volume:
328 | Storage Management Guide

jsmith,corp\jsmith,engineering\”john smith”, S-1-5-32-544 user@/vol/vol1 500M 10K
The following quotas entry restricts the eng1 group to 150 MB of disk space and an unlimitednumber of files in the /vol/vol2/proj1 qtree:
eng1 group@/vol/vol2/proj1 150M
The following quotas entry restricts the proj1 qtree in the vol2 volume to 750 MB of diskspace and 76,800 files:
/vol/vol2/proj1 tree 750M 75K
How derived quotas work
A quota enforced as a result of a default quota, rather than an explicit quota (a quota with a specifictarget), is referred to as a derived quota.
The number and location of the derived quotas depends on the quota type:
• A default tree quota on a volume creates derived tree quotas for every qtree on the volume.
• A default user or group quota creates a derived user or group quota for every user or group thatowns a file at the same level (volume or qtree).
• A default user or group quota on a volume creates a default user or group quota on every qtreethat also has a tree quota.
The settings—including limits and user mapping—of derived quotas are the same as the settings ofthe corresponding default quotas. For example, a default tree quota with a 20-GB disk limit on avolume creates derived tree quotas with 20-GB disk limits on the qtrees in the volume. If a defaultquota is a tracking quota (with no limits), the derived quotas are also tracking quotas.
To see derived quotas, you can generate a quota report. In the report, a derived user or group quota isindicated by a Quota Specifier that is either blank or an asterisk (*). A derived tree quota, however,has a Quota Specifier; to identify a derived tree quota, you must look for a default tree quota on thevolume with the same limits.
Explicit quotas interact with derived quotas in the following ways:
• Derived quotas are not created if an explicit quota already exists for the same target.
• If a derived quota exists when you create an explicit quota for a target, you can activate theexplicit quota by resizing rather than having to perform a full quota initialization.
About quotas | 329

How you use tracking quotas
Tracking quotas generate reports of disk and file usage and do not limit resource usage. Whentracking quotas are used, modifying quota values is less disruptive, because you can resize quotasrather than turning them off and back on.
To create a tracking quota, you specify a dash ("-") for the disk and files values. This tells DataONTAP to monitor disk and files usage for that target at that level (volume or qtree), withoutimposing any limits.
You can also specify a default tracking quota, which applies to all instances of the target. Defaulttracking quotas enable you to track usage for all instances of a quota type (for example, all qtrees orall users). In addition, they enable you use resizing rather than reinitialization when you want quotachanges to take effect.
Examples
The following quotas file shows tracking quotas in place for a specific user, group, and qtree:
#Quota target type disk files thold sdisk sfile#----------- ---- ---- ----- ----- ----- -----kjones user@/vol/vol1 - - eng1 group@/vol/vol1 - - proj1 tree@/vol/vol1 - -
The following quotas file contains the three possible default tracking quotas (users, groups,and qtrees):
#Quota target type disk files thold sdisk sfile#----------- ---- ---- ----- ----- ----- -----* user@/vol/vol1 - - * group@/vol/vol1 - - * tree@/vol/vol1 - -
How quotas are appliedUnderstanding how quotas are applied enables you to configure quotas and set the expected limits.
Whenever an attempt is made to create a file or write data to a file in a volume that has quotasenabled, the quota limits are checked before the operation proceeds. If the operation exceeds eitherthe disk limit or the files limit, the operation is prevented.
Quota limits are checked in the following order:
330 | Storage Management Guide

1. The tree quota for that qtree (This check is not relevant if the file is being created or written toqtree0.)
2. The user quota for the user that owns the file on the volume
3. The group quota for the group that owns the file on the volume
4. The user quota for the user that owns the file on the qtree (This check is not relevant if the file isbeing created or written to qtree0.)
5. The group quota for the group that owns the file on the qtree (This check is not relevant if the fileis being created or written to qtree0.)
The quota with the smallest limit might not be the one that is exceeded first. For example, if a userquota for volume vol1 is 100 GB, and the user quota for qtree q2 contained in volume vol1 is 20 GB,the volume limit could be reached first if that user has already written more than 80 GB of data involume vol1 (but outside of qtree q2).
Related concepts
How quotas work with users and groups on page 331
How you use explicit quotas on page 328
How default quotas work on page 327
Quota targets and types on page 326
How quotas work with users and groupsWhen you specify a user or group as the target of a quota, the limits imposed by that quota areapplied to that user or group. However, some special groups and users are handled differently. Thereare different ways to specify IDs for users, depending on your environment.
Related concepts
How default quotas work on page 327
How you use tracking quotas on page 330
How you specify UNIX users for quotas
You can specify a UNIX user for a quota using one of three formats: the user name, the UID, or a fileor directory owned by the user.
To specify a UNIX user for a quota, you can use one of the following formats:
• The user name as defined in the /etc/passwd file or the NIS password map, for example,jsmith.
About quotas | 331

Note: You cannot use a UNIX user name to specify a quota if that name includes a backslash(\) or an @ sign. This is because Data ONTAP treats names containing these characters asWindows names.
• The UID, such as 20.
• The path of a file or directory owned by that user, so that the file's UID matches the user.
Note: If you specify a file or directory name, you must select a file or directory that will last aslong as the user account remains on the system.
Specifying a file or directory name for the UID does not cause Data ONTAP to apply a quotato that file or directory.
How you specify Windows users for quotas
You can specify a Windows user for a quota using one of three formats: the Windows name in pre-Windows 2000 format, the SID, or a file or directory owned by the SID of the user.
To specify a Windows user for a quota, you can use one of the following formats:
• The Windows name in pre-Windows 2000 format.
• The security ID (SID), as displayed by Windows in text form, such as S-1-5-32-544.
• The name of a file or directory that has an ACL owned by that user's SID.
Note: If you specify a file or directory name, you must select a file or directory that will last aslong as the user account remains on the system.
For Data ONTAP to obtain the SID from the ACL, the ACL must be valid.
If the file or directory exists in a UNIX-style qtree, or if the storage system uses UNIX modefor user authentication, Data ONTAP applies the user quota to the user whose UID, not SID,matches that of the file or directory.
Specifying a file or directory name to identify a user for a quota does not cause Data ONTAPto apply a quota to that file or directory.
How you specify a user name in pre-Windows 2000 format
The pre-Windows 2000 format, for example engineering\john_smith, is used by the quotas filefor specifying Windows users.
Keep in mind the following rules when creating pre-Windows 2000 format user names:
• The user name must not exceed 20 characters.
• The NetBIOS form of the domain name must be used.
332 | Storage Management Guide

How you specify a Windows domain using the QUOTA_TARGET_DOMAIN directive
Using the QUOTA_TARGET_DOMAIN directive in the quotas file enables you to specify thedomain name only once for a group of Windows users.
The QUOTA_TARGET_DOMAIN directive takes an optional argument. This string, followed by abackslash (\), is prefixed to the name specified in the quota entry. Data ONTAP stops adding thedomain name when it reaches the end of the quotas file or another QUOTA_TARGET_DOMAINdirective.
Example
The following example illustrates the use of the QUOTA_TARGET_DOMAIN directive:
QUOTA_TARGET_DOMAIN corproberts user@/vol/vol2 900M 30K smith user@/vol/vol2 900M 30K QUOTA_TARGET_DOMAIN engineeringdaly user@/vol/vol2 900M 30K thomas user@/vol/vol2 900M 30K QUOTA_TARGET_DOMAINstevens user@/vol/vol2 900M 30K
The string corp\ is added as a prefix to the user names of the first two entries. The stringengineering\ is added as a prefix to the user names of the third and fourth entries. The lastentry is unaffected by the QUOTA_TARGET_DOMAIN entry because the entry contains noargument.
The following entries produce the same effects:
corp\roberts user@/vol/vol2 900M 30K corp\smith user@/vol/vol2 900M 30K engineering\daly user@/vol/vol2 900M 30Kengineering\thomas user@/vol/vol2 900M 30Kstevens user@/vol/vol2 900M 30K
How default user and group quotas create derived quotas
When you create default user or group quotas, corresponding derived user or group quotas areautomatically created for every user or group that owns files at the same level.
Derived user and group quotas are created in the following ways:
• A default user quota on a volume creates derived user quotas for every user that owns a fileanywhere on the volume.
• A default user quota on a qtree creates derived user quotas for every user that owns a file in theqtree.
About quotas | 333

• A default group quota on a volume creates derived group quotas for every group that owns a fileanywhere on the volume.
• A default group quota on a qtree creates derived group quotas for every group that owns a file inthe qtree.
If a user or group does not own files at the level of a default user or group quota, derived quotas arenot created for the user or group. For example, if a default user quota is created for qtree proj1 andthe user jsmith owns files on a different qtree, no derived user quota is created for jsmith.
The derived quotas have the same settings as the default quotas, including limits and user mapping.For example, if a default user quota has a 50-MB disk limit and has user mapping turned on, anyresulting derived quotas also have a 50-MB disk limit and user mapping turned on.
However, no limits exist in derived quotas for three special users and groups. If the following usersand groups own files at the level of a default user or group quota, a derived quota is created with thesame user-mapping setting as the default user or group quota, but it is only a tracking quota (with nolimits):
• UNIX root user (UID 0)
• UNIX root group (GID 0)
• Windows BUILTIN\Administrators groupSince quotas for Windows groups are tracked as user quotas, a derived quota for this group is auser quota that is derived from a default user quota, not a default group quota.
Example of derived user quotas
If you have volume where three users—root, jsmith, and bob—own files, and you create adefault user quota on the volume, Data ONTAP automatically creates three derived userquotas. Therefore, after you reinitialize quotas on the volume, four new quotas appear in thequota report:
filer1> quota report K-Bytes FilesType ID Volume Tree Used Limit Used Limit Quota Specifier----- -------- -------- -------- --------- --------- ------- ------- ---------------user * vol1 - 0 51200 0 - *user root vol1 - 5 - 1 - user jsmith vol1 - 30 51200 10 - *user bob vol1 - 40 51200 15 - *
The first new line is the default user quota that you created, which is identifiable by theasterisk (*) as the ID. The other new lines are the derived user quotas. The derived quotas forjsmith and bob have the same 50-MB disk limit as the default quota. The derived quota for theroot user is a tracking quota without limits.
334 | Storage Management Guide

How quotas are applied to the root user
The root user (UID=0) on UNIX clients is subject to tree quotas, but not user quotas or group quotas.This allows the root user to take actions on behalf of other users that would otherwise be preventedby a quota.
When root carries out a file or directory ownership change or other operation (such as the UNIXchown command) on behalf of a user with less privileges, Data ONTAP checks the quotas based onthe new owner but does not report errors or stop the operation, even if the hard quota restrictions ofthe new owner are exceeded. This can be useful when an administrative action, such as recoveringlost data, results in temporarily exceeding quotas.
Note: After the ownership transfer is carried out, however, a client system will report a disk spaceerror if the user attempts to allocate more disk space while the quota is still exceeded.
How quotas work with special Windows groups
Quotas are applied to the Everyone group and the BUILTIN\Administrators group differently than toother Windows groups.
The following list describes what happens if the quota target is a special Windows group ID:
• If the quota target is the Everyone group, a file whose ACL shows that the owner is Everyone iscounted under the SID for Everyone.
• If the quota target is BUILTIN\Administrators, the entry is considered a user quota, for trackingonly.You cannot impose restrictions on BUILTIN\Administrators.If a member of BUILTIN\Administrators creates a file, the file is owned by BUILTIN\Administrators and is counted under the SID for BUILTIN\Administrators, not the user'spersonal SID.
Note: Data ONTAP does not support group quotas based on Windows group IDs. If you specify aWindows group ID as the quota target, the quota is considered to be a user quota.
How quotas are applied to users with multiple IDs
A user can be represented by multiple IDs. You can set up a single user quota for such a user byspecifying a list of IDs as the quota target. A file owned by any of these IDs is subject to therestriction of the user quota.
Suppose a user has the UNIX UID 20 and the Windows IDs corp\john_smith and engineering\jsmith.For this user, you can specify a quota where the quota target is a list of the UID and Windows IDs.When this user writes to the storage system, the specified quota applies, regardless of whether thewrite originates from UID 20, corp\john_smith, or engineering\jsmith.
Note: Separate quota file entries are considered separate targets, even if the IDs belong to the sameuser.
About quotas | 335

For example, for the same user you can specify one quota that limits UID 20 to 1 GB of disk spaceand another quota that limits corp\john_smith to 2 GB of disk space, even though both IDsrepresent the same user. Data ONTAP applies quotas to UID 20 and corp\john_smith separately.
In this case, no limits are applied to engineering\jsmith, even though limits are applied to the otherIDs used by the same user.
How Data ONTAP determines user IDs in a mixed environment
If you have users accessing your Data ONTAP storage from both Windows and UNIX clients, thenboth Windows and UNIX security are used to determine file ownership. Several factors determinewhether Data ONTAP uses a UNIX or Windows ID when applying user quotas.
If the security style of the qtree or volume that contains the file is only NTFS or only UNIX, then thesecurity style determines the type of ID used when applying user quotas. For qtrees with the mixedsecurity style, the type of ID used is determined by whether the file has an ACL.
The following table summarizes what type of ID is used:
Security Style ACL No ACL
UNIX UNIX ID UNIX ID
Mixed Windows ID UNIX ID
NTFS Windows ID Windows ID
Note: If a file is in a volume or qtree with a particular security style, but is owned by a user of theother type, and no mapping to the determined type exists, then Data ONTAP uses the default userID for the determined type as defined in the following options:
• wafl.default_nt_user
• wafl.default_unix_user
For example, suppose the winfile file is in a qtree with the UNIX security style, and it is owned byWindows user corp\bob. If there is no mapping between corp\bob and a UNIX user id in the quotasfile, the winfile file is charged against the user defined by the wafl.default_nt_user option.
How quotas with multiple users work
When you put multiple users in the same quota target, the quota limits defined by that quota are notapplied to each individual user; in this case, the quota limits are shared among all users listed in thequota target.
Note: If you combine separate user quotas into one multi-user quota, you can activate the changeby resizing quotas. However, if you want to remove users from a quota target with multiple users,
336 | Storage Management Guide

or add users to a target that already has multiple users, you must reinitialize quotas before thechange takes effect.
Example of more than one user in a quotas file entry
In the following example, there are two users listed in the quota entry:
#Quota target type disk files thold sdisk sfile#---------- ---- ---- ----- ----- ----- -----jsmith,chen user@/vol/vol1 80M
The two users can use up to 80 MB of space combined. If one uses 75 MB, then the other onecan use only 5 MB.
How you link UNIX and Windows names for quotas
In a mixed environment, users can log in as either Windows users or UNIX users. You can configurequotas to recognize that a user's UNIX id and Windows ID represent the same user.
How you map names using the same quotas file entry
You can map Windows to UNIX names by putting them together in the same entry in the quotas file.However, this requires a quotas file entry for every user.
Example
The following quotas file entry links the Windows ID corp\jroberts to the UNIX ID roberts forquotas:roberts,corp\jroberts user@/vol/vol2 900M 30K
How you map names using the QUOTA_PERFORM_USER_MAPPING directive
If you have configured the system's /etc/usermap.cfg file with a one-to-one correspondencebetween UNIX names and Windows names, the QUOTA_PERFORM_USER_MAPPING directivein the quotas file automatically links the names. You do not have to add a separate entry for eachuser.
When you use this directive, Data ONTAP consults the usermap.cfg file to map the user names.When a UNIX and Windows name are mapped together, they are treated as the same person fordetermining quota usage.
For more information about the usermap.cfg file, see the Data ONTAP File Access and ProtocolsManagement Guide for 7-Mode.
About quotas | 337

Note: If you use the user mapping feature, make sure that CIFS is either completely configured ornot licensed. Leaving CIFS installed but not configured while using user mapping could impactstorage system performance.
Note: This directive requires a one-to-one correspondence between Windows names and UNIXnames. If a name maps to more than one name in the usermap.cfg file, there are duplicate entriesin the quotas file and you might see unpredictable results.
Note: If you are using this directive, when you make changes to the usermap.cfg file, you mustturn quotas off and back on before your changes will take effect.
Example
The following example illustrates the use of the QUOTA_PERFORM_USER_MAPPINGdirective:
QUOTA_PERFORM_USER_MAPPING ONroberts user@/vol/vol2 900M 30K corp\stevens user@/vol/vol2 900M 30K QUOTA_PERFORM_USER_MAPPING OFF
If the usermap.cfg file maps roberts to corp\jroberts, the first quota entry applies to the userwhose UNIX name is roberts and whose Windows name is corp\jroberts. A file owned byeither user name is subject to the restriction of this quota entry.
If the usermap.cfg file maps corp\stevens to cws, the second quota entry applies to the userwhose Windows name is corp\stevens and whose UNIX name is cws. A file owned by eitheruser name is subject to the restriction of this quota entry.
The effect of this example could also be achieved with multiple user names in a single quotasfile entry, as in the following example:
roberts,corp\jroberts user@/vol/vol2 900M 30K corp\stevens,cws user@/vol/vol2 900M 30K
About using wildcard entries in the usermap.cfg file
The use of wildcard entries in the /etc/usermap.cfg file causes ambiguity because all trusteddomains are searched in an unspecified order for a match. To prevent this problem, you shouldspecify the order in which Data ONTAP searches domains by using the cifs.search_domainsoption.
Unexpected results might occur if your usermap.cfg file contains the following entry:
*\* *
338 | Storage Management Guide

If you use the QUOTA_PERFORM_USER_MAPPING directive in your quotas file with thiswildcard entry in the usermap.cfg file, Data ONTAP tries to find users in one of the trusteddomains. However, because Data ONTAP searches domains in an unspecified order, the results ofthis search can be unpredictable.
To address this issue, you can specify the order that Data ONTAP searches domain by using thecifs.search_domains option.
How quotas work with qtreesYou can create quotas with a qtree as their target; these quotas are called tree quotas. You can alsocreate user and group quotas for a specific qtree. In addition, quotas for a volume are sometimesinherited by the qtrees contained by that volume.
How tree quotas work
You can create a quota with a qtree as its target to limit how large the target qtree can become. Thesequotas are also called tree quotas.
When you apply a quota to a qtree, the result is similar to a disk partition, except that you can changethe qtree's maximum size at any time by changing the quota. When applying a tree quota, DataONTAP limits the disk space and number of files in the qtree, regardless of their owners. No users,including root and members of the BUILTIN\Administrators group, can write to the qtree if the writeoperation causes the tree quota to be exceeded.
Note: The size of the quota does not guarantee any specific amount of available space. The size ofthe quota can be larger than the amount of free space available to the qtree. You can use the dfcommand to determine the true amount of available space in the qtree.
How user and group quotas work with qtrees
Tree quotas limit the overall size of the qtree. To prevent individual users or groups from consumingthe entire qtree, you specify a user or group quota for that qtree.
Example user quota in a qtree
Suppose you have the following quotas file:
#Quota target type disk files thold sdisk sfile#----------- ---- ---- ----- ----- ----- -----* user@/vol/vol1 50M - 45Mjsmith user@/vol/vol1 80M - 75M
It comes to your attention that a certain user, kjones, is taking up too much space in a criticalqtree, qt1, which resides in vol2. You can restrict this user's space by adding the following lineto the quotas file:
About quotas | 339

kjones user@/vol/vol2/qt1 20M - 15M
How default tree quotas on a volume create derived tree quotas
When you create a default tree quota on a volume, corresponding derived tree quotas areautomatically created for every qtree in that volume.
These derived tree quotas have the same limits as the default tree quota. If no additional quotas exist,the limits have the following effects:
• Users can use as much space in a qtree as they are allotted for the entire volume (provided theydid not exceed the limit for the volume by using space in the root or another qtree).
• Each of the qtrees can grow to consume the entire volume.
The existence of a default tree quota on a volume continues to affect all new qtrees that are added tothe volume. Each time a new qtree is created, a derived tree quota is also created.
Like all derived quotas, derived tree quotas display the following behaviors:
• Are created only if the target does not already have an explicit quota.
• Appear in quota reports.
Example of derived tree quotas
You have a volume with three qtrees (proj1, proj2, and proj3) and the only tree quota is anexplicit quota on the proj1 qtree limiting its disk size to 10 GB. If you create a default treequota on the volume and reinitialize quotas on the volume, the quota report now contains fourtree quotas:
filer1>quota report K-Bytes FilesType ID Volume Tree Used Limit Used Limit Quota Specifier----- -------- -------- -------- --------- --------- ------- ------- ---------------tree 1 vol1 proj1 0 10485760 1 - /vol/vol1/proj1tree * vol1 - 0 20971520 0 - *tree 2 vol1 proj2 0 20971520 1 - /vol/vol1/proj2tree 3 vol1 proj3 0 20971520 1 - /vol/vol1/proj3...
The first line shows the original explicit quota on the proj1 qtree. This quota remainsunchanged.
The second line shows the new default tree quota on the volume. The asterisk (*) QuotaSpecifier indicates it is a default quota. This quota is a result of the quota rule that you created.
The last two lines show new derived tree quotas for the proj2 and proj3 qtrees. Data ONTAPautomatically created these quotas as a result of the default tree quota on the volume. Thesederived tree quotas have the same 20-GB disk limit as the default tree quota on the volume.
340 | Storage Management Guide

Data ONTAP did not create a derived tree quota for the proj1 qtree because the proj1 qtreealready had an explicit quota.
How default user quotas on a volume affect quotas for the qtrees in thatvolume
If a default user quota is defined for a volume, a default user quota is automatically created for everyqtree contained by that volume for which an explicit or derived tree quota exists.
If a default user quota on the qtree already exists, it remains unaffected when the default user quotaon the volume is created.
The automatically created default user quotas on the qtrees have the same limits as the default userquota you create for the volume.
An explicit user quota for a qtree overrides (replaces the limits applied by) the automatically createddefault user quota, the same way as it overrides a default user quota on that qtree that was created byan administrator.
How qtree changes affect quotasWhen you delete, rename, or change the security style of a qtree, the quotas applied by Data ONTAPmight change, depending on the current quotas being applied.
How deleting a qtree affects tree quotas
When you delete a qtree, all quotas applicable to that qtree, whether they are explicit or derived, areno longer applied by Data ONTAP.
If you create a new qtree with the same name as the one you deleted, the quotas previously applied tothe deleted qtree are not applied automatically to the new qtree until you reinitialize quotas. If adefault tree quota exists, Data ONTAP creates new derived quotas for the new qtree.
If you don't create a new qtree with the same name as the one you deleted, you can delete the quotasthat applied to that qtree to avoid getting errors when you reinitialize quotas.
How renaming a qtree affects quotas
When you rename a qtree, its ID does not change. As a result, all quotas applicable to the qtreecontinue to be applicable, without reinitializing quotas. However, before you reinitialize quotas, youmust update the quota with the new qtree name to ensure that the quota continues to be applied forthat qtree.
How changing the security style of a qtree affects user quotas
You can apply Access Control Lists (ACLs) on qtrees by using NTFS or mixed security styles, butnot by using the UNIX security style. Therefore, changing the security style of a qtree might affect
About quotas | 341

how quotas are calculated. You should always reinitialize quotas after you change the security styleof a qtree.
If you change the security style of a qtree from NTFS or mixed to UNIX, any ACLs on files in thatqtree are ignored and the file usage is charged against the UNIX user IDs.
If you change the security style of a qtree from UNIX to either mixed or NTFS, the previouslyhidden ACLs become visible. In addition, any ACLs that were ignored become effective again, andthe NFS user information is ignored. If no ACL existed before, the NFS information continues to beused in the quota calculation.
Note: To make sure that quota usages for both UNIX and Windows users are properly calculatedafter you change the security style of a qtree, you must reinitialize quotas for the volumecontaining that qtree.
Example
The following example shows how a change in the security style of a qtree results in adifferent user being charged for the usage of a file in the particular qtree.
Suppose NTFS security is in effect on qtree A, and an ACL gives Windows user corp\joeownership of a 5 MB file. User corp\joe is charged with 5 MB of disk space usage for qtree A.
Now you change the security style of qtree A from NTFS to UNIX. After quotas arereinitialized, Windows user corp\joe is no longer charged for this file; instead, the UNIX usercorresponding to the UID of the file is charged for the file. The UID could be a UNIX usermapped to corp\joe or the root user.
Related concepts
How Data ONTAP determines user IDs in a mixed environment on page 336
Differences among hard, soft, and threshold quotasHard quotas prevent operations while soft quotas trigger notifications.
Hard quotas impose a hard limit on system resources; any operation that would result in exceedingthe limit fails. The following settings create hard quotas:
• Disk field
• Files field
Soft quotas send a warning message when resource usage reaches a certain level, but do not affectdata access operations, so you can take appropriate action before the quota is exceeded. Thefollowing settings create soft quotas:
• Threshold field
342 | Storage Management Guide

• Soft Disk field
• Soft Files field
Threshold and Soft Disk quotas enable administrators to receive more than one notification about aquota. Typically, administrators set the Threshold to a value that is only slightly smaller than theDisk limit, so that the threshold provides a "final warning" before writes start to fail.
Related concepts
Understanding quota notifications on page 325
How the quotas file worksThe quotas file, found in the /etc directory, contains one or more entries specifying limit or trackingquotas for qtrees, groups, and users. The file can contain default (general) and specific entries.
The syntax of quota entries
The syntax of a quota entry in the quotas file is quota_target type[@/vol/dir/qtree_path]disk [files] [threshold] [soft_disk] [soft_files]. Fields are separated by spacecharacters or tabs.
How the Quota Target field works
The Quota Target field specifies the name of the qtree, group, or user to which this quota is beingapplied. An asterisk (*) in this field denotes a default quota, which is applied to all members of thetype specified in this entry that do not have an explicit quota.
If you create multiple explicit quotas with the same target, only the first quota with that target isaccepted and applied. The others are rejected and do not take effect.
Related concepts
Quota targets and types on page 326
How the Type field works
The Type field specifies the type of entity (qtree, group, or user) to which this quota is being applied.If the type is user or group, this field can optionally restrict the quota to a specific volume, directory,or qtree.
The Type field specifies the quota type, which can be one of the following types:
• User or group quotas, which specify the amount of disk space and the number of files thatparticular users and groups can own.
• Tree quotas, which specify the amount of disk space and the number of files that particular qtreescan contain.
About quotas | 343

The following table summarizes the possible values for the Type field, along with examples.
Quota type Value in the Type field Sample Type field
User quota in a volume
(explicit or default)
user@/vol/volumeuser@/vol/vol1
User quota in a qtree
(explicit or default)
user@/vol/volume/qtreeuser@/vol/vol0/home
Group quota in a volume
(explicit or default)
group@/vol/volumegroup@/vol/vol1
Group quota in a qtree
(explicit or default)
group@/vol/volume/qtreegroup@/vol/vol0/home
Explicit tree quota treetree
Default tree quota tree@/vol/volumetree@/vol/vol0
How the Disk field works
The Disk field specifies the maximum amount of disk space that the quota target can use. The valuein this field represents a hard limit that cannot be exceeded.
The following list describes the rules for specifying a value in this field:
• You cannot leave the Disk field blank.The value that follows the Type field is always assigned to the Disk field; thus, for example, DataONTAP regards the following two quotas file entries as equivalent:
#Quota Target type disk files /export tree 75K /export tree 75K
• K means 1,024 bytes, M means 2 to the 20th power or 1024 * 1024 bytes, and G means 2 to the30th power or 1024 * 1024 * 1024 bytes.
Note: The Disk field is not case-sensitive. Therefore, you can use K, k, M, m, G, or g.
• The maximum value you can enter in the Disk field is one of the following values (approximatelyequivalent to 1,023 PB):
344 | Storage Management Guide

◦ 1,073,741,823G
◦ 1,099,511,627,775M
◦ 1,125,899,906,842,620K
Note: If you omit the K, M, or G, Data ONTAP assumes a default value of K. The valuecannot be specified in decimal notation.
• The value in the Disk field should be a multiple of 4 KB.If it is not, the Disk field can appear incorrect in quota reports. This happens because the Diskfield is always rounded up to the nearest multiple of 4 KB to match disk space limits, which aretranslated into 4-KB disk blocks.
• Your quota limit can be larger than the amount of disk space available in the volume.In this case, a warning message is printed to the console when quotas are initialized.
• To apply a tracking quota (which tracks disk usage without imposing a limit), type a hyphen (-).
How the Files field works
The Files field specifies the maximum number of files that the quota target can own. This field isoptional. The value in this field represents a hard limit that cannot be exceeded.
The following list describes the rules for specifying a value in this field:
• K means 1,024 files, M means 2 to the 20th power or 1024 * 1024 files, and G means 2 to the30th power or 1024 * 1024 * 1024 files.You can omit the K, M, or G. For example, if you type 100, it means that the maximum numberof files is 100.
Note: The Files field is not case-sensitive. Therefore, you can use K, k, M, m, G, or g.
• The maximum value you can enter in the Files field is 4G or one of the following values:
◦ 4,294,967,295
◦ 4,194,304K
◦ 4,096M
• To apply a tracking quota (which tracks file usage without imposing a limit), type a hyphen (-).
Note: If the quota target is root, or if you specify 0 as the UID or GID, you must type ahyphen.
• A blank in the Files field means there is no restriction on the number of files that the quota targetcan use.
Note: If you leave the Files field blank, you cannot specify values for the Threshold, Soft Disk,or Soft Files fields.
About quotas | 345

• The Files field must be on the same line as the Disk field.Otherwise, the Files field is ignored.
How the Threshold field works
The Threshold field specifies the disk space threshold. If a write causes the quota target to exceed thethreshold, the write still succeeds, but a warning message is logged to the storage system console andan SNMP trap is generated. This field is optional.
The following list describes the rules for specifying a value in this field:
• K means 1,024 bytes, M means 2 to the 20th power or 1024 * 1024 bytes, and G means 2 to the30th power or 1024 * 1024 * 1024 bytes.
Note: The Threshold field is not case-sensitive. Therefore, you can use K, k, M, m, G, or g.
• The maximum value you can enter in the Threshold field is one of the following values (roughlyequivalent to 1,023 PB):
◦ 1,073,741,823G
◦ 1,099,511,627,775M
◦ 1,125,899,906,842,620K
Note: If you omit the K, M, or G, Data ONTAP assumes a default value of K. The valuecannot be specified in decimal notation.
• The value in the Threshold field, if any, should be a multiple of 4 KB.If it is not, the Threshold field can appear incorrect in quota reports. This happens because theThreshold field is always rounded up to the nearest multiple of 4 KB to match disk space limits,which are translated into 4-KB disk blocks.
• The Threshold field must be on the same line as the Disk field.Otherwise, the Threshold field is ignored.
• If you do not want to specify a threshold for the quota target, enter a hyphen (-) in this field orleave it blank.
How the Soft Disk field works
The Soft Disk field specifies the amount of disk space that the quota target can use before a warningis issued. If the quota target exceeds the soft limit, a warning message is logged to the storage systemconsole and an SNMP trap is generated. This field is optional, and works the same way as theThreshold field.
The following list describes the rules for specifying a value in this field:
• K means 1,024 bytes, M means 2 to the 20th power or 1024 * 1024 bytes, and G means 2 to the30th power or 1024 * 1024 * 1024 bytes.
346 | Storage Management Guide

Note: The Soft Disk field is not case-sensitive. Therefore, you can use K, k, M, m, G, or g.
• The maximum value you can enter in the Soft Disk field is one of the following values (roughlyequivalent to 1,023 PB):
◦ 1,073,741,823G
◦ 1,099,511,627,775M
◦ 1,125,899,906,842,620K
Note: If you omit the K, M, or G, Data ONTAP assumes a default value of K. The valuecannot be specified in decimal notation.
• The value in the Threshold field, if any, should be a multiple of 4 KB.If it is not, the Soft Disk field can appear incorrect in quota reports. This happens because the SoftDisk field is always rounded up to the nearest multiple of 4 KB to match disk space limits, whichare translated into 4-KB disk blocks.
• The Soft Disk field must be on the same line as the Disk field.Otherwise, the Soft Disk field is ignored.
• If you do not want to specify a soft disk limit for the quota target, enter a hyphen (-) in this fieldor leave it blank.
How the Soft Files field works
The Soft Files field specifies the number of files that the quota target can use before a warning isissued. If the quota target exceeds the soft limit, a warning message is logged to the storage systemconsole and an SNMP trap is generated. This is an optional field.
The following list describes the rules for specifying a value in the Soft Files field:
• K means 1,024 files, M means 2 to the 20th power or 1024 * 1024 files, and G means 2 to the30th power or 1024 * 1024 * 1024 files.You can omit the K, M, or G. For example, if you type 100, it means that the soft limit on thenumber of files is 100.
Note: The Soft Files field is not case-sensitive. Therefore, you can use K, k, M, m, G, or g.
• The maximum value you can enter in the Soft Files field is 4G or one of the following values:
◦ 4,294,967,295
◦ 4,194,304K
◦ 4,096M
• A blank in the Soft Files field means there is no soft quota on the number of files that the quotatarget can use.
About quotas | 347

• The Soft Files field must be on the same line as the Disk field.Otherwise, the Soft Files field is ignored.
How Data ONTAP reads the quotas file
There are a few simple rules to follow to ensure that Data ONTAP can read your quotas file properly.
An entry in the quotas file can extend to multiple lines. However, the Files, Threshold, Soft Disk, andSoft Files fields must be on the same line as the Disk field; otherwise, they are ignored.
If you do not want to specify a value for a field in the middle of an entry, you can use a dash (-).
Any text after a pound sign (#) is considered a comment.
Entries in the quotas file can be in any order. After Data ONTAP receives a write request, it grantsaccess only if the request meets the requirements specified by all quotas entries.
If you create multiple explicit quotas file entries with the same target, only the first quota with thattarget is accepted and applied. The others are rejected and do not take effect.
What character encodings are supported by the quotas file
The quotas file supports two types of character encoding: Unicode and root volume UNIX encoding(the language specified for the root volume using the vol lang command).
You can edit the quotas file from either a PC or a UNIX workstation. Data ONTAP can detectwhether a file was edited and saved by a Unicode-capable editor, such as Notepad. If so, DataONTAP considers all entries in the file to be in Unicode. Otherwise, Data ONTAP considers theentries to be in the root volume UNIX encoding.
Standard Generalized Markup Language (SGML) entities are allowed only in the root volume UNIXencoding.
Note: If you want to include non-ASCII characters in your quotas file, you must use Unicode orSGML.
Sample quotas file
A short example quotas file, together with explanations, can help you to understand the differenttypes of quota entries and how they affect your quotas.
The following sample quotas file contains both default and explicit quotas:
#Quota Target type disk files thold sdisk sfile#------------ ---- ---- ----- ----- ----- -----* user@/vol/vol1 50M 15K* group@/vol/vol1 750M 85K* tree@/vol/vol1 100M 75Kjdoe user@/vol/vol1/proj1 100M 75Kmsmith user@/vol/vol1 75M 75Kmsmith user@/vol/vol1/proj1 75M 75K
348 | Storage Management Guide

This quotas file has the following effects:
• Any user not otherwise mentioned in this file can use 50 MB of disk space and 15,360 files in thevol1 volume.
• Any group not otherwise mentioned in this file can use 750 MB of disk space and 87,040 files inthe vol1 volume.
• Any qtree in the vol1 volume not otherwise mentioned in this file can use 100 MB of disk spaceand 76,800 files.
• If a qtree is created in the vol1 volume (for example, a qtree named /vol/vol1/proj2), DataONTAP enforces a derived default user quota and a derived default group quota that have thesame effect as the following quota entries:
* user@/vol/vol1/proj2 50M 15K * group@/vol/vol1/proj2 750M 85K
• If a qtree is created in the vol1 volume (for example, a qtree named /vol/vol1/proj2), DataONTAP tracks the disk space and number of files owned by UID 0 and GID 0 in the /vol/vol1/proj2 qtree. This is due to the following quotas file entry:
* tree@/vol/vol1 100M 75K
• A user named msmith can use 75 MB of disk space and 76,800 files in the vol1 volume becausean explicit quota for this user exists in the /etc/quotas file, overriding the default limit of 50 MBof disk space and 15,360 files.
• By giving jdoe and msmith 100 MB and 75 MB explicit quotas for the proj1 qtree, which has atree quota of 100MB, that qtree becomes oversubscribed. This means that the qtree could run outof space before the user quotas are exhausted.
Note: Quota oversubscription is supported; however, a warning is printed alerting you to theoversubscription.
How quotas are activatedNew quotas and changes to quotas do not take effect until they are activated. Knowing how quotaactivation works can help you manage your quotas less disruptively.
You can activate quotas at the volume level.
Your quotas file does not need to be free of all errors to activate quotas. Invalid entries are reportedand skipped. If the quotas file contains any valid entries, the quotas are activated.
Quotas are activated either by initializing (turning them on) or by resizing. Turning off quotas andturning them on again is called reinitializing.
About quotas | 349

The length of the activation process and its impact on quota enforcement depends on the type ofactivation:
• The initialization process involves two parts: a quota on command and a quota scan of thevolume's entire file system. The scan begins after the quota on command completessuccessfully. The quota scan can take some time; the more files that the volume has, the longer ittakes. Until the scan is finished, quota activation is not complete and quotas are not enforced.
• The resize process involves only a quota resize command. Because it does not involve aquota scan, resizing takes less time than a quota initialization. During a resize process, quotas areenforced.
By default, the quota on and quota resize commands run in the background, which permits youto use other commands at the same time.
Errors and warnings from the activation process are sent to the system log messages. Using the -woption with the quota on command displays the error messages as part of the command output; thisis useful if you are reinitializing from a script. (The quota resize command does not have a -woption.)
Quota activation persists across halts and reboots. You should not activate quotas in the /etc/rcfile. The process of quota activation does not affect the availability of the storage system data.
Related concepts
When you can use resizing on page 350
When a full quota reinitialization is required on page 352
When you can use resizing
Because quota resizing is faster than quota initialization, you should use resizing whenever possible.However, resizing only works for certain types of quota changes.
You can resize quotas when making the following types of changes to the quotas file:
• Changing an existing quota.For example, changing the limits of an existing quota.
• Adding a quota for a quota target for which a default quota or a default tracking quota exists.
• Deleting a quota for which a default quota or default tracking quota entry is specified.
• Combining separate user quotas into one multi-user quota.
Attention: After you have made extensive quotas changes, you should perform a fullreinitialization to ensure that all of the changes take effect.
Note: If you attempt to resize and not all of your quota changes can be incorporated by using aresize operation, Data ONTAP issues a warning.
350 | Storage Management Guide

You can determine from the quota report whether your storage system is tracking disk usage for aparticular user, group, or qtree. If you see a quota in the quota report, it means that the storagesystem is tracking the disk space and the number of files owned by the quota target.
Example quotas changes that can be made effective by resizing
Some quotas file changes can be made effective by resizing. Consider the following quotas:
#Quota Target type disk files thold sdisk sfile#------------ ---- ---- ----- ----- ----- -----* user@/vol/vol2 50M 15K* group@/vol/vol2 750M 85K* tree@/vol/vol2 - -jdoe user@/vol/vol2/ 100M 75Kkbuck user@/vol/vol2/ 100M 75K
Suppose you make the following changes:
• Increase the number of files for the default user target.
• Add a new user quota for a new user, boris, that needs more disk limit than the default userquota.
• Delete the kbuck user’s explicit quota entry; the new user now needs only the default quotalimits.
These changes result in the following quotas:
#Quota Target type disk files thold sdisk sfile#------------ ---- ---- ----- ----- ----- -----* user@/vol/vol2 50M 25K* group@/vol/vol2 750M 85K* tree@/vol/vol2 - -jdoe user@/vol/vol2/ 100M 75Kboris user@/vol/vol2/ 100M 75K
Resizing activates all of these changes; a full quota reinitialization is not necessary.
Related concepts
How quota reports work on page 353
About quotas | 351

When a full quota reinitialization is required
Although resizing quotas is faster, you must do a full quota reinitialization if you make certain smallor extensive changes to your quotas.
A full quota reinitialization is necessary in the following circumstances:
• You create a quota for a target that has not previously had a quota.
• You change user mapping in the usermap.cfg file and you use theQUOTA_PERFORM_USER_MAPPING entry in the quotas file.
• You change the security style of a qtree from UNIX to either mixed or NTFS.
• You change the security style of a qtree from mixed or NTFS to UNIX.
• You remove users from a quota target with multiple users, or add users to a target that already hasmultiple users.
• You make extensive changes to your quotas.
Example of quotas changes that require initialization
Suppose you have a volume that contains three qtrees and the only quotas in the volume arethree tree quotas. You decide to make the following changes:
• Add a new qtree and create a new tree quota for it.
• Add a default user quota for the volume.
Both of these changes require a full quota initialization. Resizing does not make the quotaseffective.
Related concepts
How you map names using the QUOTA_PERFORM_USER_MAPPING directive on page 337
How quotas work with vFiler unitsWhen you create vFiler units, or move resources between vFiler units, quotas for the containingvolume are deactivated.
After you create vFiler units or reassign resources between vFiler units, you should ensure thatquotas are on.
Note: If having quotas briefly deactivated is disruptive to any applications, you should disablethose applications before assigning resources to vFiler units.
352 | Storage Management Guide

How quota reports workQuota reports enable you to see what quotas Data ONTAP is applying. You can change the format ofthe quota report and how user IDs are displayed using the options for the quota report command.
What fields quota reports contain
Some quota report fields are always displayed; others depend on what options you use for the quotareport command.
The following table lists the headings that can appear in quota reports, with a description and theoption required to display that heading if needed:
Quota reportheading
Description
Type Quota type: user, group, or tree.
ID User ID, UNIX group name, qtree name.
If the quota is a default quota, the value in this field is an asterisk.
Volume Volume to which the quota is applied.
Tree Qtree to which the quota is applied.
K-Bytes Used Current amount of disk space used by the quota target.
If the quota is a default quota, the value in this field is 0.
Limit Maximum amount of disk space that can be used by the quota target (thevalue in the Disk field of the quotas file).
S-Limit Maximum amount of disk space that can be used by the quota target beforea warning is issued (the value in the Soft Disk field of the quotas file).
This column is displayed only when you use the -s option for the quotareport command.
T-hold Disk space threshold (the value in the Threshold field of the quotas file).
This column is displayed only when you use the -t option for the quotareport command.
Files Used Current number of files used by the quota target.
If the quota is a default quota, the value in this field is 0.
Limit Maximum number of files allowed for the quota target (the value in the Filefield of the quotas file).
About quotas | 353

Quota reportheading
Description
S-Limit Maximum number of files that can be used by the quota target before awarning is issued (the value in the Soft Files field of the quotas file).
This column is displayed only when you use the -s option for the quotareport command.
VFiler Displays the name of the vFiler unit for this quota entry.
This column is displayed only when you use the -v option for the quotareport command. This option is available only on storage systems thathave MultiStore licensed.
Quota Specifier For an explicit quota, this field shows how the quota target is specified inthe quotas file. For a derived quota, the field is blank.
How quota report options affect quota reports
What options you use for the quota report command affect how the report is formatted and howuser IDs are displayed.
The following table lists the options for the quota report command with their results on the quotareport:
Option Result
none Generates the default quota report.
The ID field displays one of the IDs using the following formats:
• For a Windows name, the first seven characters of the user name with a precedingbackslash are displayed. The domain name is omitted.
• For a SID, the last eight characters are displayed.
The Quota Specifier field displays an ID that matches the one in the ID field, usingthe same format as the /etc/quotas file entry.
-q Displays the quota target’s UNIX UID, GID or Windows SID in the followingformats:
• UNIX UIDs and GIDs are displayed as numbers.
• Windows SIDs are displayed as text.
Note: Data ONTAP does not perform a lookup of the name associated with thetarget ID.
-s The soft limit (S-limit) columns are included.
354 | Storage Management Guide

Option Result
-t The threshold (T-hold) column is included.
-v The vFiler column is included.
-u Displays multiple IDs for your quota targets.
The ID field displays all the IDs listed in the quota target of a user quota in thefollowing format:
• On the first line, the format is the same as the default format.
• Each additional name in the quota target is displayed, in its entirety, on a separateline.
The Quota Specifier field displays the list of IDs specified in the quota target.
Note: You cannot combine the -u and -x options.
-x Displays all the quota target’s IDs on the first line of that quota target’s entry, as acomma separated list.
Note:
You cannot combine the -u and -x options.
The threshold column is included.
How the ID field is displayed in quota reports
Usually, the ID field of the quota report displays a user name instead of a UID or SID. However,there are some exceptions to this rule.
The ID field does not display a user name in the following circumstances:
• For a quota with a UNIX user as the target, the ID field shows the UID instead of a name if eitherof the following conditions applies:
◦ No user name for the UID is found in the password database.
◦ You specifically request the UID by including the -q option for the quota reportscommand.
• For a quota with a Windows user as the target, the ID field shows the SID instead of a name ifeither of the following conditions applies:
◦ The SID is specified as a quota target and the SID no longer corresponds to a user name.
◦ Data ONTAP cannot find an entry for the SID in the SID-to-name map cache and cannotconnect to the domain controller to ascertain the user name for the SID when it generates thequota report.
About quotas | 355

How you can use the quota report to see what quotas are in effect
Because of the various ways that quotas interact, more quotas are in effect than just the ones youhave explicitly created. To see what quotas are in effect, you can view the quota report.
The following examples show quota reports for different types of quotas applied on a volume vol1,and a qtree q1 contained in that volume:
Example with no user quotas specified for the qtree
In this example, there is one qtree, q1, which is contained by the volume vol1. Theadministrator has created three quotas:
• A default tree quota limit on vol1 of 400 MB
• A default user quota limit on vol1 of 100 MB
• An explicit user quota limit on vol1 of 200 MB for the user jsmith
The quotas file for these quotas looks similar to the following excerpt:
#Quota target type disk files thold sdisk sfile#----------- ---- --- ----- ---- ----- -----* tree@/vol/vol1 400M* user@/vol/vol1 100Mjsmith user@/vol/vol1 200M
The quota report for these quotas looks similar to the following excerpt:
sys1> quota report K-Bytes FilesType ID Volume Tree Used Limit Used Limit Quota Specifier----- -------- -------- -------- --------- --------- ------- ------- ---------------tree * vol1 - 0 409600 0 - *user * vol1 - 0 102400 0 - *user jsmith vol1 - 112 204800 7 - jsmithtree 1 vol1 q1 0 409600 6 - /vol/vol1/q1user * vol1 q1 0 102400 0 - user jsmith vol1 q1 0 102400 5 -user root vol1 q1 0 - 1 -user root vol1 - 0 - 8 -
The first three lines of the quota report display the three quotas specified by the administrator.Since two of these quotas are default quotas, Data ONTAP automatically creates derivedquotas.
The fourth line displays the tree quota that is derived from the default tree quota for everyqtree in vol1 (in this example, only q1).
The fifth line displays the default user quota that is created for the qtree as a result of theexistence of the default user quota on the volume and the qtree quota.
356 | Storage Management Guide

The sixth line displays the derived user quota that is created for jsmith on the qtree becausethere is a default user quota for the qtree (line 5) and the user jsmith owns files on that qtree.Note that the limit applied to the user jsmith in the qtree q1 is not determined by the explicituser quota limit (200 MB). This is because the explicit user quota limit is on the volume, so itdoes not affect limits for the qtree. Instead, the derived user quota limit for the qtree isdetermined by the default user quota for the qtree (100 MB).
The last two lines display more user quotas that are derived from the default user quotas on thevolume and on the qtree. A derived user quota was created for the root user on both the volumeand the qtree because the root user owned files on both the volume and the qtree. Since theroot user gets special treatment in terms of quotas, its derived quotas are tracking quotas only.
Example with user quotas specified for the qtree
This example is similar to the previous one, except that the administrator has added two quotason the qtree.
There is still one volume, vol1, and one qtree, q1. The administrator has created the followingquotas:
• A default tree quota limit on vol1 of 400 MB
• A default user quota limit on vol1 of 100 MB
• An explicit user quota limit on vol1 for the user jsmith of 200 MB
• A default user quota limit on qtree q1 of 50 MB
• An explicit user quota limit on qtree q1 for the user jsmith of 75 MB
The quotas file for these quotas looks like this:
#Quota target type disk files thold sdisk sfile#----------- ---- --- ----- ---- ----- -----* tree@/vol/vol1 400M* user@/vol/vol1 100Mjsmith user@/vol/vol1 200M* user@/vol/vol1/q1 50Mjsmith user@/vol/vol1/q1 75M
The quota report for these quotas looks like this:
sys1> quota report K-Bytes FilesType ID Volume Tree Used Limit Used Limit Quota Specifier----- -------- -------- -------- --------- --------- ------- ------- ---------------tree * vol1 - 0 409600 0 - *user * vol1 - 0 102400 0 - *user jsmith vol1 - 112 204800 7 - jsmithuser * vol1 q1 0 51200 0 - *
About quotas | 357

user jsmith vol1 q1 0 76800 5 - jsmithtree 1 vol1 q1 0 409600 6 - /vol/vol1/q1user root vol1 - 0 - 2 -user root vol1 q1 0 - 1 -
The first five lines of the quota report display the five quotas created by the administrator.Since some of these quotas are default quotas, Data ONTAP automatically creates derivedquotas.
The sixth line displays the tree quota that is derived from the default tree quota for every qtreein vol1 (in this example, only q1).
The last two lines display the user quotas that are derived from the default user quotas on thevolume and on the qtree. A derived user quota was created for the root user on both the volumeand the qtree because the root user owned files on both the volume and the qtree. Since theroot user gets special treatment in terms of quotas, its derived quotas are tracking quotas only.
No other default quotas or derived quotas were created for the following reasons:
• A derived user quota was not created for the jsmith user even though the user owns files onboth the volume and the qtree because the user already has explicit quotas at both levels.
• No derived user quotas were created for other users because no other users own files oneither the volume or the qtree.
• The default user quota on the volume did not create a default user quota on the qtreebecause the qtree already had a default user quota.
Related concepts
How default user quotas on a volume affect quotas for the qtrees in that volume on page 341
How you use explicit quotas on page 328
How default quotas work on page 327
How derived quotas work on page 329
Related tasks
Using the quota report to determine which quotas limit writes to a specific file on page 372
Difference in space usage displayed by a quota report and aUNIX client
The value of used disk space that is displayed in a quota report for a volume or qtree can be differentfrom the value displayed by a UNIX client for the same volume or qtree. The difference in usage
358 | Storage Management Guide

values is because of the difference in methods followed by the quota report and the UNIX commandsfor calculating the data blocks in the volume or qtree.
For example, if a volume contains a file that has empty data blocks (to which data is not written), thequota report for the volume does not count the empty data blocks while reporting the space usage.However, when the volume is mounted on a UNIX client and the file is shown as the output of the lscommand, the empty data blocks are also included in the space usage. Therefore, the ls commanddisplays a higher file size when compared to the space usage displayed by the quota report.
Similarly, the space usage values shown in a quota report can also differ from the values shown as aresult of UNIX commands such as df and du.
How a quota report accounts for disk space and file usage
The number of files used and the amount of disk space specified in a quota report for a volume or aqtree depend on the count of the used data blocks corresponding to every inode in the volume or theqtree.
The block count includes both direct and indirect blocks used for regular and stream files. The blocksused for directories, Access Control Lists (ACLs), stream directories, and metafiles do not getaccounted for in the quota report. In case of UNIX sparse files, empty data blocks are not included inthe quota report.
Related concepts
How the ls command accounts for space usage on page 359
How the df command accounts for file size on page 360
How the du command accounts for space usage on page 361
How the ls command accounts for space usage
When you use the ls command to view the contents of a volume mounted on a UNIX client, the filesizes displayed in the output could be lesser or more than the space usage displayed in the quotareport for the volume depending on the type of data blocks for the file.
The output of the ls command displays only the size of a file and does not include indirect blocksused by the file. Any empty blocks of the file also get included in the output of the command.
Therefore, if a file does not have empty blocks, the size displayed by the ls command might be lessthan the disk usage specified by a quota report because of the inclusion of indirect blocks in the quotareport. Conversely, if the file has empty blocks, then the size displayed by the ls command might bemore than the disk usage specified by the quota report.
The output of the ls command displays only the size of a file and does not include indirect blocksused by the file. Any empty blocks of the file also get included in the output of the command.
About quotas | 359

Example of the difference between space usage accounted by the ls commandand a quota report
The following quota report shows a limit of 10 MB for a qtree q1:
system1>quota report K-Bytes FilesType ID Volume Tree Used Limit Used Limit Quota Specifier----- -------- -------- -------- --------- --------- ------- ------- ---------------tree user1 vol1 q1 10485760 10485760 1 - /vol/vol1/q1...
A file present in the same qtree can have a size exceeding the quota limit when viewed from aUNIX client by using the ls command, as shown in the following example:
[user1@lin-sys1 q1]$ ls -lh-rwxr-xr-x 1 user1 nfsuser 27M Apr 09 2013 file1
Related concepts
How a quota report accounts for disk space and file usage on page 359
How the df command accounts for file size on page 360
How the du command accounts for space usage on page 361
How the df command accounts for file size
When you run the df command from the mount point of a qtree for which a quota rule is configured,the output of the command shows the same space usage as the value specified by the quota report.
If quotas are enabled for the volume that contains the qtree, the space usage reported by the dfcommand excludes blocks used by directories, ACLs, stream directories, and metafiles. Therefore,the reported space usage exactly matches the value specified by the quota report.
However, if the qtree does not have a quota rule configured or if quotas are not enabled for thevolume, then the reported space usage includes the blocks consumed by directories, ACLs, streamdirectories and metafiles for the entire volume, including other qtrees within the volume. In such asituation, the space usage reported by the df command is more than the value specified by the quotareport.
Example of space usage accounted by the df command and a quota report
The following quota report shows a limit of 10 MB for a qtree q1:
system1>quota report K-Bytes FilesType ID Volume Tree Used Limit Used Limit Quota Specifier----- -------- -------- -------- --------- --------- ------- ------- ---------------tree user1 vol1 q1 10485760 10485760 1 - /vol/vol1/q1...
360 | Storage Management Guide

In the following example, the space usage as the output of the df command shows the samelimit of 10 MB (in terms of 1K blocks) because quota rules are configured for the qtree:
[user1@lin-sys1 q1]$ df -k192.0.2.245:/vol/vol1/q1 10240 10240 0 100% /q1
Related concepts
How a quota report accounts for disk space and file usage on page 359
How the ls command accounts for space usage on page 359
How the du command accounts for space usage on page 361
How the du command accounts for space usage
When you run the du command to check the disk space usage for a qtree or volume mounted on aUNIX client, the usage value might be higher than the value displayed by a quota report for the qtreeor volume.
The output of the du command contains the combined space usage of all the files through thedirectory tree beginning at the level of the directory where the command is issued. Because the usagevalue displayed by the du command also includes the data blocks for directories, it is higher than thevalue displayed by a quota report.
Example of the difference between space usage accounted by the du commandand a quota report
The following quota report shows a limit of 10 MB for a qtree q1:
system1>quota report K-Bytes FilesType ID Volume Tree Used Limit Used Limit Quota Specifier----- -------- -------- -------- --------- --------- ------- ------- ---------------tree user1 vol1 q1 10485760 10485760 1 - /vol/vol1/q1...
In the following example, the disk space usage as the output of the du command shows ahigher value that exceeds the quota limit:
[user1@lin-sys1 q1]$ du -sh11M q1
Related concepts
How a quota report accounts for disk space and file usage on page 359
How the ls command accounts for space usage on page 359
About quotas | 361

How the df command accounts for file size on page 360
Difference between a quota report and the df command inaccounting space usage of CIFS sparse files
The value of the disk space that is displayed in a quota report for a volume on the storage system canbe different from the value displayed by the output of the df command executed from the storagesystem for the same volume if the particular volume has CIFS sparse files.
The difference in the space usage values is because of the difference in methods followed by thequota report and the df command for calculating the empty data blocks in the CIFS sparse files.
When you run the df command on a volume containing CIFS sparse files, the empty data blocks inthe sparse files are not counted towards the disk space. However, the quota report considers all thedata blocks of the sparse files, including the empty blocks, while calculating the space usage.Therefore, the disk usage reported by the df command is less than the value reported by a quotareport in case of volumes containing CIFS sparse files.
Example of the difference between space usage accounted by the df commandand a quota report
The following quota report shows usage of 200 GB in a volume vol1:
system1>quota report K-Bytes FilesType ID Volume Tree Used Limit Used Limit Quota Specifier----- -------- -------- -------- --------- --------- ------- ------- ---------------tree user1 vol1 q1 209900230 - 4373805 - /vol/vol1/q1...
If vol1 has CIFS sparse files, the space usage for the same volume by means of the dfcommand can be 100 GB less than the value specified in the quota report, as shown in thefollowing example:
system1>df -V vol1Filesystem kbytes used avail capacity Mounted on/vol/vol1/ 367186630 105042630 262329030 28% /vol/vol1/
Examples of using quotasThese examples help you understand how to create your quotas file and read your quota reports.
For the following examples, assume that you have a storage system that has one volume, vol1:
362 | Storage Management Guide

Example 1: Default quota
You decide to impose a hard limit of 50 MB for each user in vol1, by using the followingquotas file:
#Quota target type disk files thold sdisk sfile#----------- ---- --- ----- ---- ----- -----* user@/vol/vol1 50M
If any user on the system enters a command that would use more than 50 MB in vol1, thecommand fails (for example, writing to a file from an editor).
Example 2: Default quota override
Suppose that you have received a request from a user, jsmith, who requires more space in vol1.You can update your quotas file as follows:
#Quota target type disk files thold sdisk sfile#----------- ---- --- ----- ---- ----- -----* user@/vol/vol1 50M jsmith user@/vol/vol1 80M
Now, jsmith can use up to 80 MB of space on vol1, even though all other users are still limitedto 50 MB.
The resulting quota report is similar to the following:
filer1> quota report K-Bytes FilesType ID Volume Tree Used Limit Used Limit Quota Specifier----- -------- -------- -------- --------- --------- ------- ------- ---------------user * vol1 - 0 51200 0 - *user jsmith vol1 - 63275 81920 37 - jsmithuser root vol1 - 0 - 1 -
Note that an extra quota is shown for the root user. Default user quotas do not apply to root;therefore, the root user has no space limit on vol1, as shown in the quota report by the dash(“-”) in the Limit column for the root user.
Example 3: Thresholds
This example sets up a threshold for all users at 45 MB, except for jsmith, who gets a thresholdat 75 MB. To set up a user-specific threshold, change the quotas file to read as follows:
#Quota target type disk files thold sdisk sfile#----------- ---- ---- ----- ----- ----- -----
About quotas | 363

* user@/vol/vol1 50M - 45Mjsmith user@/vol/vol1 80M - 75M
It is necessary to add a dash (-) in the Files field as a placeholder because the Threshold fieldappears after the Files field in the quotas file.
The resulting quota report is similar to the following:
filer1> quota report -t K-Bytes FilesType ID Volume Tree Used Limit T-hold Used Limit Quota Specifier------ ----- -------- ----- ------ -------- -------- ------- -------- ----------------user * vol1 - 0 51200 46080 0 - *user jsmith vol1 - 63280 81920 76800 47 - jsmithuser root vol1 - 0 - - 51 -
Note that the -t flag is used to display threshold limits.
Example 4: Quotas on qtrees
Suppose you need to partition some space for two projects. You can create two qtrees, namedproj1 and proj2, to accommodate those projects within vol1. Creating qtrees does not causeany change for the quotas, because the quotas file only applies quotas to the volume so far.Users can use as much space in a qtree as they are allotted for the entire volume (provided theydid not exceed the limit for the volume by using space in the root or another qtree). In addition,each of the qtrees can grow to consume the entire volume.
You decide that you want to make sure that neither qtree grows to more than 20 GB. Yourquotas file now looks like this:
#Quota target type disk files thold sdisk sfile#----------- ---- ---- ----- ----- ----- -----* user@/vol/vol1 50M - 45Mjsmith user@/vol/vol1 80M - 75M* tree@/vol/vol1 20G
Note that the correct type is tree, not qtree.
The resulting quota report is similar to the following:
filer1> quota report -t K-Bytes FilesType ID Volume Tree Used Limit T-hold Used Limit Quota Specifier----- ------ -------- ------ --------- --------- -------- ------- ----- -------------user * vol1 - 0 51200 46080 0 - *user jsmith vol1 - 63280 81920 76800 55 - jsmithtree * vol1 - 0 20971520 - 0 - *tree 1 vol1 proj1 0 20971520 - 1 - /vol/vol1/proj1user * vol1 proj1 0 51200 46080 0 - user root vol1 proj1 0 - - 1 -
364 | Storage Management Guide

tree 2 vol1 proj2 0 20971520 - 1 - /vol/vol1/proj2user * vol1 proj2 0 51200 46080 0 - user root vol1 proj2 0 - - 1 - user root vol1 - 0 - - 3 -
The quota report in the example contains the following new lines:
• The first new line is the one that was added to the quotas file:tree * vol1 - 0 20971520 - 0 - *
• The next line shows a derived quota. This quota was not added directly but derived fromthe default tree quota that was added. This new line means that a quota of 20 GB is beingapplied to the proj1 qtree:tree 1 vol1 proj1 0 20971520 - 1 - /vol/vol1/proj1
• The following line after the derived quota shows another derived quota.This quota is derived from the default user quota that was added in an earlier example.Default user quotas on a volume are automatically inherited for all qtrees contained by thatvolume, if quotas are enabled for qtrees. When you added the first qtree quota, quotas wereenabled on qtrees as a result of which the derived quota was created:user * vol1 proj1 0 51200 46080 0 -
• The remaining new lines are for the root user and for the qtree named proj2.
Example 5: User quota on a qtree
Suppose, you decide to limit users to space less than 10 MB in the proj1 qtree. Therefore, youcan update the quotas file as follows:
#Quota target type disk files thold sdisk sfile#----------- ---- ---- ----- ----- ----- -----* user@/vol/vol1 50M - 45Mjsmith user@/vol/vol1 80m - 75M* tree@/vol/vol1 20G* user@/vol/vol1/proj1 10M
The resulting quota report is similar to the following:
filer1> quota report K-Bytes FilesType ID Volume Tree Used Limit Used Limit Quota Specifier----- -------- -------- -------- --------- --------- ------- ------- ---------------user * vol1 - 0 51200 0 - *user jsmith vol1 - 0 81920 57 - jsmithtree * vol1 - 0 20971520 0 - *user * vol1 proj1 0 10240 0 - *tree 1 vol1 proj1 0 20971520 1 - /vol/vol1/proj1tree 2 vol1 proj2 0 20971520 1 - /vol/vol1/proj2user * vol1 proj2 0 51200 0 - user root vol1 proj2 0 - 1 - user root vol1 - 0 - 3 - user root vol1 proj1 0 - 1 -
The following new entry appears in the quota report:user * vol1 proj1 0 10240 0 - *
About quotas | 365

However, this attempt to limit space to users in the proj1 qtree also reduces the amount ofspace that was originally assigned to the user jsmith. The user is prevented from writing moredata to the proj1 qtree because the quota that was created to override the default user quota ison the volume vol1.
The new default user quota on the proj1 qtree limits all the users' space in that qtree, includingjsmith. This is because the quota originally created to provide more space to jsmith is alsopresent on the volume. Therefore, to provide more space to the particular user in the proj1qtree, include the following:
jsmith user@/vol/vol1/proj1 80M
This entry adds the following line to the quota report:
Type ID Volume Tree Used Limit Used Limit Quota Specifier----- -------- -------- -------- --------- --------- ------- ------- ---------------user jsmith vol1 proj1 57864 81920 57 - jsmith
Related concepts
How default quotas work on page 327
How derived quotas work on page 329
How you use explicit quotas on page 328
How the quotas file works on page 343
How quota reports work on page 353
About quotas on page 325
366 | Storage Management Guide

Managing quotas
You create, delete, and modify quotas as your users and their storage requirements and limitationschange. You can also manage how quota messages are logged, and view quota reports, which helpyou understand what quotas Data ONTAP is applying.
Activating quotasYou activate quotas to turn quotas on and read the quotas file. You activate quotas using the quotaon command, for one volume at a time.
Before you begin
If the quotas file contains user quotas that use Windows IDs as targets, CIFS must be running whenyou activate quotas.
Step
1. Enter the following command:
quota on [-w] vol_name
The -w option causes the command to return only after the entire quotas file has been scanned(synchronous mode). This is useful when activating quotas from a script.
Example
The following example activates quotas on a volume named vol2:
quota on vol2
Quota reinitialization is started for the specified volume. Quota reinitialization can take sometime, during which storage system data is available, but quotas are not enforced for the specifiedvolume.
Result
When quota initialization is complete, quotas are on for the specified volume. This procedure doesnot modify or initialize quotas for any other volume.
After you finish
If a quota initialization is still running when the storage system is upgraded, Data ONTAP terminatesthe quota initialization, which must be manually restarted from the beginning. For this reason, youshould allow any running quota initialization to complete before upgrading your storage system.
367

Related concepts
How quotas are activated on page 349
About quotas on page 325
Reinitializing quotasYou reinitialize quotas by using the quota off command followed by the quota on command.This causes Data ONTAP to reread the quotas file. Reinitializing quotas takes time. In some casesresizing is more efficient.
Before you begin
If the quotas file contains user quotas that use Windows IDs as targets, CIFS must be running whenyou reinitialize quotas.
About this task
Depending on how many quotas you have and the size of the file system, quota reinitialization cantake some time. During quota reinitialization, data access is not affected. However, quotas are notenforced until reinitialization completes.
Steps
1. If quotas are already activated for the volume on which you want to reinitialize quotas, enter thefollowing command:
quota off vol_name
Quotas are turned off for the specified volume.
2. Enter the following command:
quota on [-w] vol_name
The -w option causes the command to return only after the entire quotas file has been scanned(synchronous mode). This is useful when activating quotas from a script.
Quota reinitialization is started for the specified volume. Quota reinitialization can take sometime, during which storage system data is available, but quotas are not enforced for the specifiedvolume.
Result
When quota initialization is complete, quotas are back on for the specified volume.
Note: Quotas are not affected for any volume other than the volume specified in the quota oncommand.
368 | Storage Management Guide

Related concepts
How quotas are activated on page 349
About quotas on page 325
Deactivating quotasYou use the quota off command to deactivate quotas for a specific volume.
About this task
If a quota initialization is almost complete, the quota off command can fail. If this happens, retrythe command after a minute or two.
Canceling quota initializationIf you started a quota initialization and you now want to cancel it, you can use the quota offcommand.
About this task
If a quota initialization is almost complete, the quota off command can fail. If this happens, thequota on command should finish shortly.
Resizing quotasYou use the quota resize command to cause Data ONTAP to reread the quotas file for thespecified volume. Resizing only works for certain types of changes to the quotas file. For otherchanges, you need to reinitialize quotas.
Related concepts
When you can use resizing on page 350
About quotas on page 325
Managing quotas | 369

Deleting quotasYou can remove quota restrictions for a quota target in two ways: by changing the quotas file entryso that there is no restriction on resource use for that quota target, or by deleting the quotas file entryfor that quota target.
Deleting a quota by removing resource restrictions
You can remove a quota for a specific target by removing the resource restrictions for that target.This is equivalent to changing that quota entry to a tracking quota.
Steps
1. Open the quotas file with the editor of your choice and edit the quotas file entry for the specifiedtarget so that the quota entry becomes a tracking quota.
Example
Suppose your quotas file contained the following entry for the jdoe user:
jdoe user@/vol/vol2/ 100M 75K
To remove the restrictions for jdoe, you edit the entry as follows:
jdoe user@/vol/vol2/ - -
2. Save and close the quotas file.
The quotas file is updated but the change is not yet effective.
After you finish
Run the quota resize command to cause Data ONTAP to reread the quotas file; this will causeyour change to become effective.
Deleting a quota by removing the quotas file entry
You can remove a quota for a specific target by removing the quotas file entry for that target.Depending on what other quotas you have set up, you then need to resize or reinitialize quotas.
Steps
1. Open the quotas file with the editor of your choice and remove the entry for the quota you want todelete.
370 | Storage Management Guide

Note: If the change is temporary, you can disable the quota by prepending the pound sign (#)to the line. This causes Data ONTAP to treat the line as a comment.
2. Save and close the quotas file.
The quotas file is updated but the change is not yet effective.
After you finish
If you have a default quota or default tracking quota in place for the quota type you modified, youcan use the quota resize command to cause Data ONTAP to reread the quotas file. Otherwise,reinitialize quotas using the quota off and quota on commands for the volume for which youmodified the quota.
Managing quota message loggingYou turn quota message logging on or off, for a single volume or for all volumes, using the quotalogmsg command. You can also specify a time interval during which quota messages are not logged.This interval defaults to 60 minutes.
About this task
For more information about the quota logmsg command, see the na_quota(1) man page.
Displaying a quota reportYou display a quota report using the quota report command. You can display a quota report forall quotas or for a specific file, directory, qtree or volume by specifying a pathname.
Step
1. To display a quota report, enter the following command:
quota report [path]
You can display a quota report for all quotas or for a specific file, directory, qtree or volume byspecifying a path.
You can control the format and fields displayed using the quota report command options. Formore information on the available options, see the na_quota(1) man page.
Related concepts
How quota reports work on page 353
About quotas on page 325
Managing quotas | 371
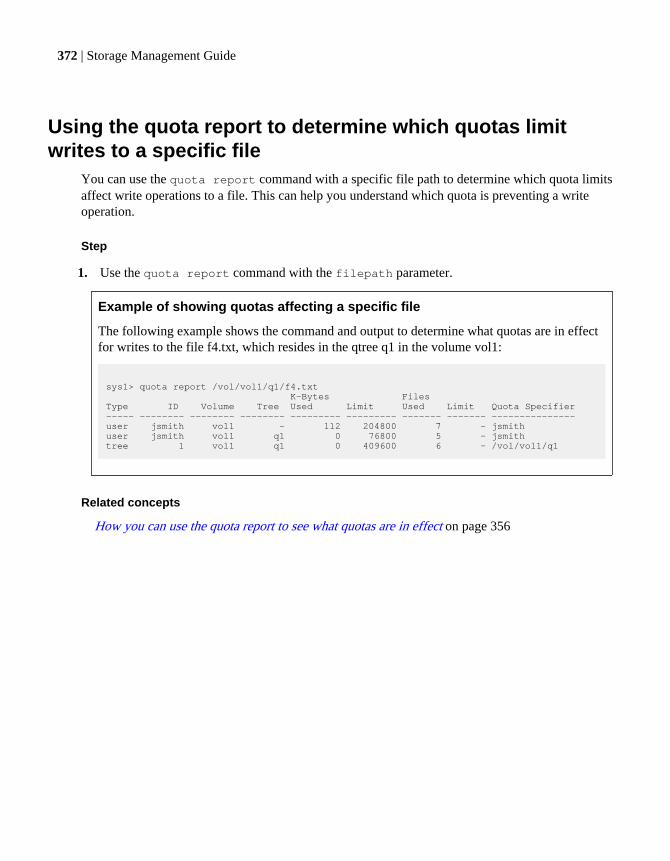
Using the quota report to determine which quotas limitwrites to a specific file
You can use the quota report command with a specific file path to determine which quota limitsaffect write operations to a file. This can help you understand which quota is preventing a writeoperation.
Step
1. Use the quota report command with the filepath parameter.
Example of showing quotas affecting a specific file
The following example shows the command and output to determine what quotas are in effectfor writes to the file f4.txt, which resides in the qtree q1 in the volume vol1:
sys1> quota report /vol/vol1/q1/f4.txt K-Bytes FilesType ID Volume Tree Used Limit Used Limit Quota Specifier----- -------- -------- -------- --------- --------- ------- ------- ---------------user jsmith vol1 - 112 204800 7 - jsmithuser jsmith vol1 q1 0 76800 5 - jsmithtree 1 vol1 q1 0 409600 6 - /vol/vol1/q1
Related concepts
How you can use the quota report to see what quotas are in effect on page 356
372 | Storage Management Guide

Storage limits
There are limits for storage objects that you should consider when planning and managing yourstorage architecture.
Limits are listed in the following sections:
• Volume limits on page 373
• Aggregate limits on page 375
• RAID group limits on page 376
• FlexClone file and FlexClone LUN limits on page 376
Volume limits
Limit Native storage Storage arrays Virtual storage(Data ONTAP-v)
Notes
Array LUNs
Minimum sizefor root volume
N/A Model-dependent
N/A See the HardwareUniverse.
Files
Maximum size
16 TB 16 TB 16 TB
Files
Maximum pervolume
Volume sizedependent, upto 2 billion
Volume sizedependent, upto 2 billion
Volume sizedependent, up to 2billion
2 billion = 2 × 10 tothe 9th power.
FlexCachevolumes
Maximum persystem
100 100 N/A
FlexClonevolumes
Hierarchicalclone depth
499 499 499 The maximum depthof a nested hierarchyof FlexClonevolumes that can becreated from a singleFlexVol volume.
373

Limit Native storage Storage arrays Virtual storage(Data ONTAP-v)
Notes
FlexVolvolumes
Maximum persystem
Model-dependent
Model-dependent
200 See the HardwareUniverse.
FlexVolvolumes
Minimum size
20 MB 20 MB 20 MB
FlexVolvolumes (32-bit)
Maximum size
16 TB 16 TB 16 TB
FlexVolvolumes (64-bit)
Maximum size
Model-dependent
Model-dependent
Model-dependent See the HardwareUniverse.
FlexVol rootvolumes
Minimum size
Model-dependent
Model-dependent
Model-dependent See the HardwareUniverse.
LUNs
Maximum percontroller or HApair
Model-dependent
Model-dependent
1,024 See the Data ONTAPSAN ConfigurationGuide for 7-Mode.
LUNs
Maximum pervolume
Model-dependent
Model-dependent
512 See the Data ONTAPSAN ConfigurationGuide for 7-Mode.
LUNs
Maximum size
16 TB 16 TB 16 TB
Qtrees
Maximum pervolume
4,995 4,995 4,995
374 | Storage Management Guide

Limit Native storage Storage arrays Virtual storage(Data ONTAP-v)
Notes
Snapshotcopies
Maximum perFlexVol volume
255 255 255 The use of certainData ONTAPcapabilities couldreduce this limit. Formore information, seethe Data ONTAPData ProtectionOnline Backup andRecovery Guide for7-Mode.
Traditionalvolumes
Maximum size
16 TB 16 TB Model-dependent See the HardwareUniverse.
Traditionalvolumes andaggregates
Maximum persystem
100 100 100 In an HAconfiguration, thislimit applies to eachnode individually, sothe overall limit forthe pair is doubled.
Aggregate limits
Limit Nativestorage
Storagearrays
Virtual storage(Data ONTAP-v)
Notes
Aggregates andtraditionalvolumes(combined)
Maximum persystem
100 100 60 In an HAconfiguration, thislimit applies to eachnode individually, sothe overall limit forthe pair is doubled.
Aggregates (32-bit)
Maximum size
16 TB 16 TB 16 TB
Aggregates (64-bit)
Maximum size
Model-dependent
Model-dependent
16 TB See the HardwareUniverse.
Storage limits | 375

Limit Nativestorage
Storagearrays
Virtual storage(Data ONTAP-v)
Notes
Aggregates
Minimum size
RAID-DP: 3disks
RAID4: 2disks
Model-dependent
1 disk See the HardwareUniverse for theminimum aggregatesize for storagearrays.
Aggregates(mirrored)
Maximumsuggested persystem
64 64 N/A You can create morethan 64 mirroredaggregates on astorage system, butdoing so could causeplex synchronizationproblems after certaintypes of failures.
RAID groups
Maximum peraggregate
150 150 60
Traditionalvolumes
Maximum size
16 TB 16 TB 16 TB
RAID group limits
For maximum and default RAID group sizes, see the Hardware Universe.
Limit Nativestorage
Storagearrays
Virtual storage(Data ONTAP-v)
Notes
Maximum persystem
400 400 60
Maximum peraggregate
150 150 60
376 | Storage Management Guide

FlexClone file and FlexClone LUN limits
Limit Nativestorage
Storagearrays
Virtual storage(Data ONTAP-v)
Notes
Maximum perfile or LUN
32,767 32,767 32,767 If you try to createmore than 32,767clones, Data ONTAPautomatically createsa new physical copyof the parent file orLUN.
This limit might belower for FlexVolvolumes that usededuplication.
Maximum totalshared data perFlexVol volume
640 TB 640 TB 100 TB
Related concepts
How Data ONTAP reports disk types on page 18
GUID-3EB42BAD-217F-42BA-BB33-2E22FC7BFC60What aggregates are on page 129
Using volumes on page 173
Differences between 64-bit and 32-bit FlexVol volumes on page 173
Storage limits | 377

Copyright information
Copyright © 1994–2014 NetApp, Inc. All rights reserved. Printed in the U.S.
No part of this document covered by copyright may be reproduced in any form or by any means—graphic, electronic, or mechanical, including photocopying, recording, taping, or storage in anelectronic retrieval system—without prior written permission of the copyright owner.
Software derived from copyrighted NetApp material is subject to the following license anddisclaimer:
THIS SOFTWARE IS PROVIDED BY NETAPP "AS IS" AND WITHOUT ANY EXPRESS ORIMPLIED WARRANTIES, INCLUDING, BUT NOT LIMITED TO, THE IMPLIEDWARRANTIES OF MERCHANTABILITY AND FITNESS FOR A PARTICULAR PURPOSE,WHICH ARE HEREBY DISCLAIMED. IN NO EVENT SHALL NETAPP BE LIABLE FOR ANYDIRECT, INDIRECT, INCIDENTAL, SPECIAL, EXEMPLARY, OR CONSEQUENTIALDAMAGES (INCLUDING, BUT NOT LIMITED TO, PROCUREMENT OF SUBSTITUTEGOODS OR SERVICES; LOSS OF USE, DATA, OR PROFITS; OR BUSINESSINTERRUPTION) HOWEVER CAUSED AND ON ANY THEORY OF LIABILITY, WHETHERIN CONTRACT, STRICT LIABILITY, OR TORT (INCLUDING NEGLIGENCE OROTHERWISE) ARISING IN ANY WAY OUT OF THE USE OF THIS SOFTWARE, EVEN IFADVISED OF THE POSSIBILITY OF SUCH DAMAGE.
NetApp reserves the right to change any products described herein at any time, and without notice.NetApp assumes no responsibility or liability arising from the use of products described herein,except as expressly agreed to in writing by NetApp. The use or purchase of this product does notconvey a license under any patent rights, trademark rights, or any other intellectual property rights ofNetApp.
The product described in this manual may be protected by one or more U.S. patents, foreign patents,or pending applications.
RESTRICTED RIGHTS LEGEND: Use, duplication, or disclosure by the government is subject torestrictions as set forth in subparagraph (c)(1)(ii) of the Rights in Technical Data and ComputerSoftware clause at DFARS 252.277-7103 (October 1988) and FAR 52-227-19 (June 1987).
378 | Storage Management Guide

Trademark information
NetApp, the NetApp logo, Network Appliance, the Network Appliance logo, Akorri,ApplianceWatch, ASUP, AutoSupport, BalancePoint, BalancePoint Predictor, Bycast, CampaignExpress, ComplianceClock, Customer Fitness, Cryptainer, CryptoShred, CyberSnap, Data CenterFitness, Data ONTAP, DataFabric, DataFort, Decru, Decru DataFort, DenseStak, Engenio, Engeniologo, E-Stack, ExpressPod, FAServer, FastStak, FilerView, Fitness, Flash Accel, Flash Cache, FlashPool, FlashRay, FlexCache, FlexClone, FlexPod, FlexScale, FlexShare, FlexSuite, FlexVol, FPolicy,GetSuccessful, gFiler, Go further, faster, Imagine Virtually Anything, Lifetime Key Management,LockVault, Manage ONTAP, Mars, MetroCluster, MultiStore, NearStore, NetCache, NOW (NetAppon the Web), Onaro, OnCommand, ONTAPI, OpenKey, PerformanceStak, RAID-DP, ReplicatorX,SANscreen, SANshare, SANtricity, SecureAdmin, SecureShare, Select, Service Builder, ShadowTape, Simplicity, Simulate ONTAP, SnapCopy, Snap Creator, SnapDirector, SnapDrive, SnapFilter,SnapIntegrator, SnapLock, SnapManager, SnapMigrator, SnapMirror, SnapMover, SnapProtect,SnapRestore, Snapshot, SnapSuite, SnapValidator, SnapVault, StorageGRID, StoreVault, theStoreVault logo, SyncMirror, Tech OnTap, The evolution of storage, Topio, VelocityStak, vFiler,VFM, Virtual File Manager, VPolicy, WAFL, Web Filer, and XBB are trademarks or registeredtrademarks of NetApp, Inc. in the United States, other countries, or both.
IBM, the IBM logo, and ibm.com are trademarks or registered trademarks of International BusinessMachines Corporation in the United States, other countries, or both. A complete and current list ofother IBM trademarks is available on the web at www.ibm.com/legal/copytrade.shtml.
Apple is a registered trademark and QuickTime is a trademark of Apple, Inc. in the United Statesand/or other countries. Microsoft is a registered trademark and Windows Media is a trademark ofMicrosoft Corporation in the United States and/or other countries. RealAudio, RealNetworks,RealPlayer, RealSystem, RealText, and RealVideo are registered trademarks and RealMedia,RealProxy, and SureStream are trademarks of RealNetworks, Inc. in the United States and/or othercountries.
All other brands or products are trademarks or registered trademarks of their respective holders andshould be treated as such.
NetApp, Inc. is a licensee of the CompactFlash and CF Logo trademarks.
NetApp, Inc. NetCache is certified RealSystem compatible.
379

How to send your comments
You can help us to improve the quality of our documentation by sending us your feedback.
Your feedback is important in helping us to provide the most accurate and high-quality information.If you have suggestions for improving this document, send us your comments by email to [email protected]. To help us direct your comments to the correct division, include in thesubject line the product name, version, and operating system.
You can also contact us in the following ways:
• NetApp, Inc., 495 East Java Drive, Sunnyvale, CA 94089 U.S.
• Telephone: +1 (408) 822-6000
• Fax: +1 (408) 822-4501
• Support telephone: +1 (888) 463-8277
380 | Storage Management Guide

Index
32-bit aggregatesexpanding to 64-bit without adding storage 159format explained 129
32-bit volumesdifferences between 64-bit volumes 173interoperability with 64-bit volumes 174
64-bit aggregatesexpanding 32-bit aggregates to, without addingstorage 159format explained 129
64-bit volumesdifferences between 32-bit volumes 173interoperability with 32-bit volumes 174
A
Access Control Listshow they work with FlexClone files and LUNs 253
ACPabout increasing storage availability by using 32enabling 32
adaptersenabling or disabling host 87
addingdisks 39key management servers 96
adding storage 77aggr status -S command
understanding output 304aggregate overcommitment
considerations for using with FlexVol volumes 302aggregate Snapshot copies
considerations for managing 142aggregate Snapshot reserve
considerations for increasing 142aggregates
64-bit, 32-bit formats explained 129adding disks or array LUNs to 155bringing online 161changing RAID level from RAID-DP to RAID4 163changing RAID level from RAID4 to RAID-DP 162changing size of RAID groups for 115composed of SSDs, restrictions for using 136configuration requirements for multi-disk carriershelves 37considerations for sizing RAID groups 114
considerations for using disks from multi-diskcarriers in 38containing, displaying 200creating 144creating Flash Pool 146description and characteristics of 129destroying 164determination of checksum type of array LUN 140determining optimal cache size for Flash Pool 151expanding to 64-bit 155expanding to 64-bit without adding storage 159expanding to 64-bit, best practices for 130Flash Pool, defined 133Flash Pool, how they work 133forcing disk adds for 159format explained 129how cache capacity is calculated for Flash Pool 136how drive checksum types affect management 22,139how to determine space usage in 303, 304increasing the size of 155introduction to managing 144introduction to root 141maximum and minimum size of 375maximum per system 375maximum size, methods of calculating 21methods of creating space in 314mirrored, explained 132mirrored, maximum per system 375moving for disks 166moving with array LUNs 169RAID level, changing 162requirements for using Flash Pool 134restoring destroyed 165restricting 162rules about mixing storage types in 140rules for mixing HDD types in 138rules for storage array families 140taking offline 160tips for creating and backing up, for sensitive data 28unmirrored, defined 130ways to use disks with mixed speeds in 137what happens when adding storage to 158
Alternate Control PathSee ACP
architecture
Index | 381

overview of Data ONTAP storage 17array LUN ownership
how it works 56array LUNs
adding to aggregates 155assigning ownership for 64commands for displaying information about 82considerations for sizing RAID groups for 114guidelines for assigning to SyncMirror pools 73introduction to managing ownership for 63reasons to assign ownership of 56systems running Data ONTAP that can use 75
ATA driveshow Data ONTAP reports disk types 18
attribute cache timeoutshow they ensure cache consistency 215
authentication keyschanging 98deleting 100how Storage Encryption uses 89removing management server that stores 97retrieving 99
autoassignmentSee automatic ownership assignment
autogrowconfiguring FlexVol volume size 300how Data ONTAP can add space for FlexVolvolumes automatically 180, 294how FlexVol volumes can automatically change size299
Automated Workflow AnalyzerSee AWA
automatic ownership assignmentconfiguring for disks 67described 59guidelines for assigning disks or array LUNs toSyncMirror pools 73guidelines for disks 63how it works for disks 59when it is invoked 60
automatic RAID-level scrubshow to schedule 122
automatic sizingconfiguring FlexVol volume 300FlexVol volume, explained 299
automatically deletingSnapshot copies 296
autoshrinkconfiguring FlexVol volume size 300
how FlexVol volumes can automatically change size299requirements for using with automatic Snapshotcopy deletion 301
autoshrink functionalityinteraction with automatic Snapshot copy deletion involumes 302
autosizinghow Data ONTAP can add space for FlexVolvolumes automatically 180, 294
availabilityhow Data ONTAP uses RAID to ensure data 108
AWAdetermining Flash Pool optimal cache size by using151
AZCS type checksumsconfiguration rules 22, 139effect on aggregate management 22, 139effect on spare management 22, 139
B
BCS type checksumsconfiguration rules 22, 139effect on aggregate management 22, 139effect on spare management 22, 139
benefitsof Storage Encryption 90
block checksum typechanging for array LUNs 78
BSAS driveshow Data ONTAP reports disk types 18
C
cache capacityhow calculated for Flash Pool aggregates 136
cache consistency techniquesattribute cache timeouts 214delegations 214write operation proxy 214
cache hitswhat they are 216
cache misseswhat they are 216
cache sizedetermining optimal for Flash Pool aggregates 151
cachescomparison of Flash Pool and Flash Cache 135
caching
382 | Storage Management Guide

read and write for Flash Pool aggregates, about 135capacity
methods of calculating aggregate and system 21carriers
determining when to remove multi-disk 36how Data ONTAP avoids RAID impact whenremoving multi-disk 36spare requirements for multi-disk 37
certificatesinstalling replacement SSL 102preventing SSL expiration issues 100removing old SSL 101
changingauthentication keys 98RAID group size 115RAID type for Flash Pool cache 154
checksumschecking the type 78configuration rules 22, 139rules for aggregates 140type, changing for array LUNs 78type, effect on aggregate and spare management 22,139
commandsdisplaying drive and array LUN information 82for determining space usage in volume or aggregate303when to use df instead of space usage 312
commands to display storage information 82composition
changing array LUN 80compression
and MetroCluster configurations 285impact with zero fractional reserve 293
configuringautomatic ownership assignment of disks 67
connection typeshow disks can be combined for SAS 20supported storage 20
considerationsfor increasing the aggregate Snapshot reserve 142
continuous media scrubbinghow Data ONTAP uses, to prevent media errors 31impact on system performance 31reasons it should not replace scheduled RAID-leveldisk scrubs 31
core filesspare disk requirement for 117
creatingaggregates 144
Flash Pool aggregates 146FlexVol volumes 197traditional volumes 201
cutover phasecutover attempts 239volume move 239
D
datahow Data ONTAP uses RAID to protect and ensureavailability 108migrating to target volume 187selectively sanitizing in FlexVol volumes 49selectively sanitizing in traditional volumes 52tips for creating and backing up aggregatescontaining sensitive 28using sanitization to remove disk 46
data accessintroduction to how security styles affect 179
data compressioncheckpoints 269detecting incompressible data to save systemresources 263disabling 265enabling 264how fractional reserve works with 282how it works 263how tape backup works with 284incompressible data
detecting to save system resources 263increasing storage efficiency 262interoperability with an HA pair 287interoperability with Data ONTAP features 281interoperability with Flash Cache cards 287interoperability with Performance AccelerationModule 287managing operations 265modifying schedule 266monitoring operations 270running based on amount of new data 268running on existing data 270running, using checkpoint 269starting manually 267stopping operation 273undo space savings 274viewing status 271viewing progress 271viewing space savings 272viewing state 271
Index | 383

data compression's interoperabilitywith aggregate copy 286with DataMotion for Volumes 288with deduplication 279, 287with FlexClone file 287with FlexClone LUN 287with FlexClone volumes 287with qtree SnapMirror 283with single file SnapRestore 285with SnapLock 284with Snapshot copies 282with SnapVault 284with vFiler units 288with volume copy 286with volume SnapMirror 282with volume-based SnapRestore 285
data copy phasevolume move 239
data disksremoving 45
data integrityhow RAID-level disk scrubs verify 122
Data ONTAPrestoring LUNs 184
Data ONTAP disk typescomparison with industry standard 18
Data ONTAP-vdisk ownership 60
Data ONTAP-v systemsroot volume, introduction to 182
data protectionin case of disk loss or theft 90through emergency shredding 91when moving disks to end-of-life 91when returning disks to vendors 90
data reconstructioncontrolling performance impact of RAID 125
data shreddingperforming emergency, on disks using StorageEncryption 106
DataMotion for vFiler64-bit and 32-bit volume interoperability with 174
DataMotion for Volumes64-bit and 32-bit volume interoperability with 174about 237
deduplicationand HA pairs 280and MetroCluster configurations 278and Snapshot copies 275and tape backup 277
checkpoints 269disabling 262enabling 261factors affecting performance 261guidelines for running 260how fractional reserve works with 275how it works 258how it works with FlexClone files and FlexCloneLUNs 252impact with zero fractional reserve 293increasing storage efficiency 258interoperability with Data ONTAP features 274managing operations 265metadata relocated 259modifying schedule 266monitoring operations 270running based on amount of new data 268running on existing data 270running, using checkpoint 269setting maximum sessions per vFiler unit 280starting manually 267stopping operation 273undo space savings 274viewing progress 271viewing space savings 272viewing state 271viewing status 271with qtree SnapMirror 276with SnapRestore 277with SnapVault 276with vFiler units 280with volume copy 279with volume SnapMirror 275works with FlexClone volumes 279
deduplication operations not allowedduring nondisruptive volume move 280
deduplication with SnapRestore 277deduplication with volume copy 279default quotas
how they work 327default user quotas
impacting quotas for qtrees 341degraded mode 119delegations
what they are 214deleting
authentication keys 100qtrees 322Snapshot copies automatically 296
derived quotas
384 | Storage Management Guide

creating from default user and group quotas 333derived tree quotas
about 340destination volumes
preparing 185destroying
aggregates 164destroying data on disks
using Storage Encryption 104determining
space used by FlexClone volume 235df command
how it accounts for space usage 360when to use instead of space usage commands 312
difference between quota report and UNIX client 358directories
converting to qtrees 320converting to qtrees using UNIX 321converting to qtrees using Windows 321
directory sizecautions for increasing maximum 181
diskperformance monitors 28sanitization, selective 27types for RAID 25, 113
disk connection typeshow disks can be combined for SAS 20
disk operationswith SEDs 89
disk ownershipapplication to array LUNs 56, 58application to disks 58configuring automatic assignment 67Data ONTAP-v 60how it works 56ownership
removing array LUN ownership 81removing array LUN ownership 81
disk ownership commandshow you use wildcard character with 73
Disk Qualification Packagewhen you need to update 40
disk remove -wremoving an array LUN 81
disk sanitizationintroduction to how it works 25process described 26when it cannot be performed 26
disk scrubbing
reasons continuous media scrubbing should notreplace scheduled RAID-level 31
disk shelvesabout increasing storage availability by using ACPwith SAS-connected 32aggregate configuration requirements for multi-diskcarrier 37configuration requirements for multi-disk carrier 37requirements for using multi-disk carrier 35
disk space usage 358disk types
how to control selection from heterogeneous storage137
disksadding 39adding to aggregates 155assigning ownership for 64automatic ownership assignment, described 59considerations for removing from storage systems 43considerations for using, from multi-disk carriers inaggregates 38data, converting to spare 42displaying information about Storage Encryption 93evacuation process, about 36forcing additions of 159guidelines for assigning ownership 63guidelines for assigning to SyncMirror pools 73how automatic ownership assignment works 59how available for Data ONTAP use 58how Data ONTAP handles failed, with available hotspares 120how Data ONTAP handles failed, with no availablehot spare 121how Data ONTAP reduces failures using RapidRAID Recovery 28how Data ONTAP reports types 18how low spare warnings can help you manage spare120how RAID-level scrubs verify data integrity 122how they can be combined for SAS connection type20how to control selection from heterogeneous storage137introduction to managing ownership for 63loop IDs for FC-AL connected, about 24managing using Data ONTAP 18matching spares defined 118minimum required hot spare 117moving aggregates composed of 166
Index | 385

performing emergency data shredding on StorageEncryption 106RAID protection levels for 108reasons to assign ownership of 56removing data 45removing failed 43removing hot spares 44removing ownership from 66replacing in aggregate 40replacing self-encrypting 42rules for mixing HDD types in aggregates 138sanitization process described 26sanitization, what happens if interrupted 27sanitizing 104setting state to end-of-life 105spare requirements for multi-disk carrier 37spare, appropriate 119SSD and HDD capability differences 35stopping sanitization 55supported speeds in RPM 21using sanitization to remove data from 46ways to mix speed of, in aggregates 137what happens when Data ONTAP takes them offline28when automatic ownership assignment is invoked 60when sanitization cannot be performed 26when they can be put into maintenance center 30when you need to update the Disk QualificationPackage for 40
displayinginode or file usage 192key management server information 94key management server status 94space information, commands for 84Storage Encryption disk information 93
DQPSee Disk Qualification Package
drivescommands for displaying information about 82considerations for sizing RAID groups for 114how Data ONTAP handles failed, with available hotspares 120how Data ONTAP handles failed, with no availablehot spares 121how low spare warnings can help you manage spare120name formats 23rules for mixing types in Flash Pool aggregates 139See also disks
du command
how it accounts for space usage 361duplicate volume names
how to manage 176dynamic memory allocation 77
E
emergency data shreddingdata protection through 91performing on disks using Storage Encryption 106
end-of-lifesetting disk state to 105
errorshow Data ONTAP uses media scrubbing to preventmedia 31
evacuation processfor disks, about 36
expandingaggregate size 155aggregates to 64-bit without adding storage 159aggregates to 64-bit, best practices for 130
explicit quotashow you use them 328
external key management serversdefined 88displaying information about 94
F
failed disksremoving 43
familydefined 140
FAS systemsroot volume, introduction to 182
FC storage connection typehow disks can be combined for 20support for 20
FCAL driveshow Data ONTAP reports disk types 18
Fibre ChannelSee FC
file reservationshow they work 293
filesdisplaying usage 192how it is cached 213maximum allowed, considerations for changing 181maximum per volume 373maximum size of 373
386 | Storage Management Guide

files and LUNscreating space-efficient copies 245
Flash Cachecompared with Flash Pool aggregates 135
Flash Pool aggregatesabout read and write caching 135changing RAID type 154compared with Flash Cache 135creating 146defined 133determining optimal cache size for 151how cache capacity is calculated for 136how they work 133how they work with data compression 288requirements for using 134rules for mixing drive types in 139
Flash Poolsdetermining volume write-caching eligibility 148
FlexCachestatistics, client, displaying 225statistics, server, viewing 225
FlexCache volume status messageswhat they mean 220
FlexCache volumes64-bit volumes and 174about 204connectivity loss 210creating 222flushing files from 225free space, displaying for 224how they serve read requests 204impact of data changes 213LAN deployment for 218limitations of 206LUNs and 219maximum per system 373NFS export status and 213sizing 208space management and 209space, sharing with other volumes 209status 226viewing statistics about 210volumes you can use for 208WAN deployment for 217write operation proxy and 216
FlexClone fileshow they work 245interoperability 245
FlexClone files and FlexClone LUNsabout 245
benefits 245considerations 247creating 248creating FlexClone volumes 254HA pair 257how deduplication works with 252how FlexClone volumes work with 254how quotas work with 254how Snapshot copy works with 253interoperability with Data ONTAP features 252maximum per file or LUN 376maximum shared data per volume 376maximum size of volume 376qtree SnapMirror and SnapVault 256synchronous SnapMirror 255viewing space saving 250volume move 256with space reservation 257with volume copy 257
FlexClone files and LUNsimpact with zero fractional reserve 293
FlexClone LUNshow they work 245interoperability 245
FlexClone volumeworks with deduplication 279
FlexClone volumesabout 227creating 233determining space used by 235hierarchical clone depth 373How they are used with Volume SnapMirror 230how they work with LUNs and LUN clones 232parent volume, determining 235shared Snapshot copies and 229shared Snapshot copies, identifying 229space guarantees and 228splitting from parent volume 234what they are 227
FlexVol volumesabout 173automatic size changes explained 299autoshrink interaction with automatic Snapshot copydeletion 302bringing online 190comparison with qtrees 316configuring automatic size changes 300considerations for setting fractional reserve 293considerations for using thin provisioning with 302containing aggregate, displaying 200
Index | 387

creating 197creating aggregates for 144deduplication guidelines 260destroying 191determining write-caching eligibility 148effect of guarantees on space requirements 292enabling guarantees for 291how Data ONTAP can automatically add space for180, 294how to determine space usage in 303, 307how volume guarantees work with 289introduction to operations for 197language, changing 194maximum and minimum size 373maximum directory size, cautions for increasing 181maximum files, considerations for changing 181maximum files, increasing 193methods to create space in 313renaming 191requirements for enabling autoshrink and automaticSnapshot copy deletion 301resizing 199restricting 189selecting first method for automatic space increases295selectively sanitizing data in 49taking offline 190thick provisioning for 289thin provisioning for 289understanding space used by Snapshot copies 311
footprintvolume, described 307
formats64-bit, 32-bit aggregates explained 129drive name 23
fractional reserveconsiderations for setting for FlexVol volumes 293
fractional reserveswork with data compression 282work with deduplication 275
free spaceFlexCache volumes, displaying for 224how Data ONTAP can increase automatically forFlexVol volumes 180, 294selecting first method to automatically increaseFlexVol volume 295
FSAS driveshow Data ONTAP reports disk types 18
G
groupsRAID, how they work 114
guaranteeseffect on FlexVol volume space requirements 292enabling FlexVol volume 291volume, how they work with FlexVol volumes 289
guidelinesassigning disk ownership 63for running deduplication 260
H
HA pairsand deduplication 280verifying path failover for array LUNs in 72
hard disk drivesSee HDDs
HDD RAID groupssizing considerations for 114
HDDscapability differences with SSDs 35rules for mixing types in aggregates 138
heterogeneous storagehow to control disk selection from 137
high-performance aggregatesFlash Pool, defined 133
host adaptersenabling or disabling 87
hot sparesappropriate 119defined 117how Data ONTAP handles failed disks withavailable 120how Data ONTAP handles failed disks with noavailable 121matching, defined 118minimum needed 117removing 44what disks can be used as 118
hybrid aggregatesSee Flash Pool aggregates
I
IDsabout loop, for FC-AL connected disks 24
increasingaggregate size 155
388 | Storage Management Guide

inodesdisplaying usage 192
installingreplacement SSL certificates 102
K
Key Management Interoperability Protocolusing for communication with key managementservers 88
key management serversadding 96displaying information about 94displaying status 94external, defined 88removing 97unreachable 97verifying links 94
keyschanging authentication 98how Storage Encryption uses authentication 89retrieving authentication 99
KMIPSee Key Management Interoperability Protocol
L
languagehow file access protocols affect volume 176
lease oplocksimproving SMB client performance with 179
levelsRAID protection, for disks 108
limitationsStorage Encryption 91
limitsaggregate storage 373FlexClone file and LUN storage 373RAID group storage and size 373volume storage 373
loop IDsabout FC-AL connected disk 24
loopsconfiguring automatic ownership assignment for 67
low spare warningshow they can help you manage spare drives 120
ls commandhow it accounts for space usage 359
LUN (Logical Unit Number)restore 184
LUN reservationshow they work 293
LUNsmaximum per node and volume 373
LUNs (array)changing checksum type 78changing size or composition 80changing system assignment 68checking the checksum type of 78Data ONTAP owning 56Data ONTAP RAID groups with 116examples of when Data ONTAP can use 60how available for Data ONTAP use 58managing through Data ONTAP 75moving aggregates 169names
format of 76prerequisites to changing composition 79prerequisites to changing size 79RAID protection for 109reasons to assign ownership of 56reasons you might assign to a system 57requirements before removing a system running DataONTAP from service 81rules about mixing storage types in aggregates 140setting them up in Data ONTAP 75systems running Data ONTAP that can use 75
LUNs, arrayverifying path failover for, in HA pairs 72See also LUNs (array)
M
maintenance centerhow it works 29when disks go into 30
management serversadding key 96displaying information about key 94removing authentication key 97verifying server links of key 94
managingStorage Encryption 93
manual RAID-level scrubshow to run 123
matching spare disksdefined 118
maxfilesconsiderations for changing 181
maximum directory size
Index | 389

cautions for increasing 181media errors
how Data ONTAP uses media scrubbing to prevent31
media scrubbinghow Data ONTAP uses, to prevent media errors 31impact on system performance 31reasons it should not replace scheduled RAID-leveldisk scrubs 31
migrationcompleting the 188
mirror verificationcontrolling performance impact 128
mirrored aggregatesexplained 132
movingaggregates composed of disks 166
moving volumesDataMotion for Volumes 237
MSATA driveshow Data ONTAP reports disk types 18
MSIDsrekeying SEDs to 102
multi-disk carrier shelvesaggregate configuration requirements for 37configuration requirements for 37in aggregates, considerations for using disks from 38requirements for using 35
multi-disk carriersdetermining when to remove 36how Data ONTAP handles when removing 36spare requirements for 37
N
name restrictionsqtree 317
namesformats for drive 23
NDMPHow it works with FlexClone files and FlexCloneLUNs 255
ndmpcopy64-bit and 32-bit volume interoperability with 174
ndmpcopy commandusing to migrate data to target volume 187
NL-SAS driveshow Data ONTAP reports disk types 18
O
offlinewhat happens when Data ONTAP takes disks 28
oplocksimproving SMB client performance with 179
out of space errorspossible with zero fractional reserve 293
ownershipassigning for disks and array LUNs 64automatically assigning to a stack or shelf 67guidelines for assigning disk 63how it works for disks and array LUNs 56introduction to managing, for array LUNs 63introduction to managing, for disks 63reasons to assign disk and array LUN 56removing from disks 66
ownership assignmentwhen it is invoked for disks 60
P
parent FlexVol volumessplitting FlexClone volumes from 231
path failoververifying for array LUNs in HA pairs 72
path failover for array LUNsoverview 71verifying in a stand-alone system 72
paths to an array LUNvalidating 70, 71
performancecontrolling impact of RAID data reconstruction 125deduplication, factors affecting 261impact of media scrubbing on system 31using oplocks to improve SMB client 179
persistent reservationsreleasing all 81
plex resynchronizationcontrolling performance impact of 127
plexesmirrored aggregate, explained 132
poolsguidelines for assigning disks to SyncMirror 73
pre-Windows 2000 formatrules for specifying user names in 332
protectionhow Data ONTAP uses to RAID for data 108RAID levels for disks 108
390 | Storage Management Guide

Q
qtree SnapMirror64-bit and 32-bit volume interoperability with 174
qtree SnapMirror with deduplication 276qtrees
comparison with FlexVol volumes 316converting directory to 320converting directory to, using UNIX 321converting directory to, using Windows 321creating 318deleting 322deletion, quotas and 341introduction to managing 318maximum per volume 373name restrictions 317renaming 323renaming, quotas and 341statistics, displaying 319status 319when to use 316
quota limitsorder 330
quota reportsdisplaying 371displaying ID field in 355how they account used space 359limiting writes to files 372options and 354to see what quotas are in effect 356what fields they contain 353
quota targetsassociation with quota types 326
quotasactivating 367deactivating 369default 327deleting 370derived 329determining user IDs for 336examples 362FlexClone files and FlexClone LUNs 254group 325hard 342how they are activated 349how they work 325how they work with qtrees 339how they work with special Windows groups 335initialization, cancelling 369linking UNIX and Windows names for 337
message logging, configuring 371multiple users 336notifications 325qtree 325qtree deletion, and 341qtree rename and 341QUOTA_PERFORM_USER_MAPPING directiveand 337reinitializing 352, 368resizing 369resizing, when you can use 350root user and 335security style changes 341SNMP traps for 325soft 342threshold 342tracking 330tree 339user 325user and group, working with qtrees 339users with multiple IDs and 335volume 325why you use 325
quotas filecharacter encodings supported by 348Disk field 344Files field 345how Data ONTAP reads 348Quota Target field 343sample 348Soft Disk field 346Soft Files field 347Threshold field 346Type field 343
R
RAIDavoiding impact to, when replacing multi-diskcarriers 36changing aggregate level from RAID-DP to RAID4163changing aggregate RAID level from RAID4 toRAID-DP 162changing level 162data reconstruction, controlling performance impact125how Data ONTAP to protect data and dataavailability 108how disk scrubs verify data integrity 122
Index | 391

operations, controlling performance impact 125protection levels for disks 108protection with SyncMirror and 110scrub, controlling performance impact 126type, changing for Flash Pool cache 154
RAID disk types 25, 113RAID groups
changing size of 115definition 114how they work 114maximum per aggregate 375maximum per system 376naming convention 114sizing considerations for 114what happens when adding storage to aggregates in158with array LUNs, considerations 116
RAID protectionfor array LUNs 109
RAID-DPdescribed 108
RAID-level scrubshow to run manual 123how to schedule automatic 122reasons media scrubbing should not replacescheduled 31
raid.timeout optionconsiderations for changing 122
RAID0aggregate checksum type for array LUNs 140how Data ONTAP uses for array LUNs 109use by Data ONTAP 109
RAID4described 109
Rapid RAID Recoveryhow Data ONTAP reduces disk failures using 28
rekeyingSEDs to MSID 102
removingdata disks 45failed disks 43hot spare disks 44key management servers 97multi-disk carriers, determining when it is safe 36old SSL certificates 101
removing datausing disk sanitization 46
renamingqtrees 323
replacing
disks in aggregates 40requirements
Flash Pool aggregate use 134reservations
how they work for LUNs 293reserves
considerations for increasing aggregate Snapshot142
resizing FlexVol volumes 199resizing quotas 350restrictions
qtree name 317resuming volume move
data copy phase 242resynchronization
controlling performance impact of plex 127retrieving
authentication keys 99root aggregates
introduction to 141root volumes
changing 195introduction to 182recommendations for 182
rulesfor mixing drive types in Flash Pool aggregates 139for mixing HDD types in aggregates 138
S
SA systems 220sanitization
disk process described 26disk, introduction to how it works 25removing data using disk 46stopping disk 55tips for creating and backing up aggregatescontaining sensitive data 28what happens if interrupted 27when it cannot be performed 26
sanitizingdisks 104
sanitizing dataselectively, in FlexVol volumes 49selectively, in traditional volumes 52
SASstorage connection type, support for 20
SAS driveshow Data ONTAP reports disk types 18
SAS-connected shelves
392 | Storage Management Guide

about increasing storage availability by using ACPwith 32how disks can be combined for 20
SATA driveshow Data ONTAP reports disk types 18
scrubbinghow Data ONTAP uses media, to prevent mediaerrors 31impact of media, on system performance 31media, reasons it should not replace scheduledRAID-level disk scrubs 31
scrubscontrolling performance impact of RAID 126how to run manual RAID-level 123how to schedule automatic RAID-level 122RAID-level, how they verify data integrity 122
security styleschanging quotas 341introduction to how they affect data access 179
SEDsdisk operations with 89how Storage Encryption works with 89replacing 42returning to unprotected mode 102
selective disk sanitizationintroduction to removing data from disks using 49
self-encrypting disksSee SEDs
serial-attached SCSISee SAS
serversadding key management 96displaying information about key management 94removing authentication key management 97verifying server links of key management 94
setting maximum deduplication sessions per vFiler unit280setting up
array LUNs 75setup phase
volume move 239shelves
aggregate configuration requirements for multi-diskcarrier 37configuration requirements for multi-disk carrier 37configuring automatic ownership assignment for 67requirements for using multi-disk carrier 35
shreddingperforming emergency data, on disks using StorageEncryption 106
shrinking FlexVol volume sizeautoshrink interaction with automatic Snapshot copydeletion 302
sizechanging array LUN size 79
sizeschanging array LUN 80
sizingRAID groups, considerations for 114
SMB clientsusing oplocks to improve performance on 179
SnapMirror volumesFlexClone volumes considerations for 230
SnapRestorewith deduplication 277
Snapshot copiesconsiderations for managing aggregate 142deleting automatically 296how they use space in a volume 311interaction of autoshrink functionality withautomatic deletion of 302maximum per volume 373requirements for enabling autoshrink and automaticdeletion for 301understanding Snapshot reserve 311understanding Snapshot spill 311
Snapshot reserveconsiderations for increasing aggregate 142understanding used and unused space in 311
Snapshot spilldefined 311
SnapVaultwith deduplication 276
SnapVault and FlexCache 208solid state drives
See SSDssolid-state disks
See SSDsspace
how Data ONTAP can automatically add FlexVolvolume 180, 294methods of creating in an aggregate 314methods to create, in FlexVol volumes 313
space guaranteesSee volume guarantees
space informationcommands to display 84
space managementFlexCache volumes and 209how you use 289
Index | 393

space requirementseffect of FlexVol volume guarantees on 292
space reservationsSee reservations
space usagecommands for determining in volume or aggregate303how to determine and control volume, in aggregates305how to determine in an aggregate 304how to determine in volume or aggregate 303how to determine in volumes 307
space usage commandswhen to use instead of df command 312
space usage for CIFS filesdifference between quota report and df command362
spare array LUNschanging array LUN assignment 68changing disk ownership 68changing system assignment 68checking the type 78
spare disksappropriate 119defined 117how checksum types affect management 22, 139how Data ONTAP handles failed disks withavailable 120how Data ONTAP handles failed disks with noavailable 121how low spare warnings can help you manage 120matching, defined 118minimum needed 117removing 44removing ownership from 66requirements for multi-disk carriers 37what disks can be used as 118
special system files.bplusvtoc_internal 184.vtoc_internal 184
speedsdisk, supported by Data ONTAP 21ways to mix disk, in aggregates 137
splittingFlexClone volumes from parent volumes 231
splitting FlexClone volumes 234SSDs
aggregates composed of, restrictions for using 136capability differences with HDDs 35changing size of RAID groups for 115
how Data ONTAP manages wear life 34how Data ONTAP reports disk types 18how used in Flash Pool aggregates 133introduction to using 34sizing considerations for RAID groups 114
SSL certificatesinstalling replacement 102preventing expiration issues 100removing old 101
stacksconfiguring automatic ownership assignment for 67
stand-alone systemsverifying path failover for array LUNs 72
state of diskssetting to end-of-life 105
statesfor volumes 176
statusvalues for volumes 176
stoppingdisk sanitization 55
storagehow to control disk selection from heterogeneous137what happens when adding to an aggregate 158
storage architectureoverview of Data ONTAP 17
storage array show-config commandverifying secondary path to an array LUN 71
storage arraysrules about mixing in aggregates 140
storage connection typessupported 20
storage disk removeowner commandremoving an array LUN 81
storage efficiencydata compression 262deduplication 258how to setup 258using data compression 258using deduplication 258
Storage Encryptionbenefits 90destroying data using 104displaying disk information 93explained 88how it works 89installing replacement SSL certificates 102limitations 91managing 93
394 | Storage Management Guide

overview 88performing emergency data shredding 106preventing SSL certificate expiration issues 100purpose of external key management server 88removing old SSL certificates 101replacing self-encrypting disks 42sanitizing disks using 104setting disk state to end-of-life 105
storage limitsaggregate 373FlexClone file and LUN 373RAID group 373volume 373
storage performanceintroduction to using SSDs to increase 34performance
introduction to using SSDs to increase storage34
storage shelvesrequirements for using multi-disk carrier 35
storage show disk commandverifying secondary path to an array LUN 70
storage subsystemscommands to display information about 84
storage systemsconsiderations for removing disks from 43
synchronous SnapMirror64-bit and 32-bit volume interoperability with 174
SyncMirrorguidelines for assigning disks to pools 73protection with RAID and 110
system capacitymethods of calculating 21
system files, Data ONTAP.bplusvtoc_internal 184.vtoc_internal 184
system performanceimpact of media scrubbing on 31
T
target volumesmigrating data to 187
terminologyfamily 140
thick provisioningfor FlexVol volumes 289
thin provisioningconsiderations for using with FlexVol volumes 302for FlexVol volumes 289
timeoutsRAID option, considerations for changing 122
tipsfor creating and backing up aggregates, for sensitivedata 28
topologiessupported storage connection type 20
tracking quotas 330tradition volumes
operations on 201traditional oplocks
improving SMB client performance with 179traditional volumes
about 174bringing online 190creating 201destroying 191language, changing 194maximum files, considerations for changing 181maximum files, increasing 193maximum per system 373maximum size of 373migrating to FlexVol volumes 185renaming 191restricting 189selectively sanitizing data in 52taking offline 190
tree quotas 339try_first volume option
for selecting first method of automatic FlexVolvolume space increases 295
two paths to an array LUNverifying 70
U
undestroying aggregates 165UNIX
using to convert directory to qtree 321UNIX users for quotas
how you can specify them 331unmirrored aggregates
defined 130unprotected mode
returning SEDs to 102usage
displaying for files or inodes 192used space
how to determine and control in aggregates, byvolume 305
Index | 395

how to determine in aggregate 304how to determine in volume or aggregate 303how to determine in volumes 307understanding, in Snapshot reserve 311
user namesrules for specifying in pre-Windows 2000 format332
usermap.cfg file, wildcard entries in 338
V
V-Series functionalityname change to FlexArray Virtualization 75
V-Series systemsSee LUNs (array)
verifyingkey management server links 94path failover for array LUNs in HA pairs 72secondary path to an array LUN 70, 71
verifying path failover for array LUNs instand-alone systems 72
vFiler unit with deduplication 280vFilers
FlexClone files and FlexClone LUNs 254VMDK drives
how Data ONTAP reports disk types 18vol status -F command
understanding output 305vol status -S command
for determining FlexVol volume space usage 307volume copy
64-bit and 32-bit volume interoperability with 174with deduplication 279
volume footprintdescribed 307
volume guaranteeseffect on FlexVol volume space requirements 292effect on maximum FlexVol volume size 289enabling FlexVol 291how they work with FlexVol volumes 289
volume moveabort 244about 237automatic cutover 244cancel 244cutover phase
temporary destination volume 239data copy phase 239data transfer 243DataMotion for Volumes 237
destination volume 237, 241high priority
I/O operations 242manual cutover 244pausing 242requirements 239resuming volume move 242scenarios 237setup phase 239SLA requirements 237source volume 241temporary volume 241volume status 243
volume movesdeduplication operations not allowed 280
volume SnapMirror64-bit and 32-bit volume interoperability with 174how it works with FlexClone files and FlexCloneLUNs 256
volume SnapMirror with deduplication 275volumes
automatic size changes explained 299autoshrink interaction with automatic Snapshot copydeletion 302bringing online 190changing root 195comparison of qtrees with FlexVol 316configuring automatic FlexVol volume size changes300considerations for setting fractional reserve forFlexVol 293considerations for using thin provisioning withFlexVol 302creating aggregates for FlexVol 144creating FlexVol 197destroying 191determining write-caching eligibility for FlexVol148differences between 64-bit and 32-bit 173FlexCache, creating 222FlexVol, about 173how Data ONTAP can automatically add space for180, 294how file access protocols affect language use 176how to determine space usage in 303, 307how to determine space usage of, in aggregate 305how to manage duplicate names 176introduction to general operations on 185introduction to operations for FlexVol 197introduction to root 182
396 | Storage Management Guide

introduction to using 173language 175language, changing 194maximum files, considerations for changing 181maximum files, increasing 193methods to create space in FlexVol 313migrating data to target 187migrating traditional to FlexVol 185moving nondisruptively 237preparing destination 185recommendations for root 182renaming 191requirements for enabling autoshrink and automaticSnapshot copy deletion for FlexVol 301restricting 189selectively sanitizing data in FlexVol 49states and status 176taking offline 190traditional, about 174
W
WAFL external cache
compared with Flash Pool aggregates 135wear life
how Data ONTAP manages SSD wear 34wildcard characters
how you use with disk ownership commands 73Windows
using to convert directory to qtree 321Windows users for quotas
how you can specify them 332write caching
determining eligibility for volume 148
Z
zoned checksum typechanging for array LUNs 78
Index | 397


![kkt_6_dan_7_pemupukan_2014 [Compatibility Mode]](https://static.fdokumen.com/doc/165x107/6322b43c28c445989105e2db/kkt6dan7pemupukan2014-compatibility-mode.jpg)