
Release 8.2 Citus Data
340
Citus Documentation Release 8.2 Citus Data Apr 07, 2022
-
Upload
khangminh22 -
Category
Documents
-
view
1 -
download
0
Transcript of Release 8.2 Citus Data

Citus DocumentationRelease 8.2
Citus Data
Apr 07, 2022


Get Started
1 What is Citus? 31.1 How Far Can Citus Scale? . . . . . . . . . . . . . . . . . . . . . . . . . . . . . . . . . . . . . . . . 3
2 When to Use Citus 52.1 Multi-Tenant Database . . . . . . . . . . . . . . . . . . . . . . . . . . . . . . . . . . . . . . . . . . 52.2 Real-Time Analytics . . . . . . . . . . . . . . . . . . . . . . . . . . . . . . . . . . . . . . . . . . . 52.3 Considerations for Use . . . . . . . . . . . . . . . . . . . . . . . . . . . . . . . . . . . . . . . . . . 62.4 When Citus is Inappropriate . . . . . . . . . . . . . . . . . . . . . . . . . . . . . . . . . . . . . . . 6
3 Quick Tutorials 73.1 Multi-tenant Applications . . . . . . . . . . . . . . . . . . . . . . . . . . . . . . . . . . . . . . . . 73.2 Real-time Analytics . . . . . . . . . . . . . . . . . . . . . . . . . . . . . . . . . . . . . . . . . . . 10
4 Single-Machine Cluster 134.1 Docker (Mac or Linux) . . . . . . . . . . . . . . . . . . . . . . . . . . . . . . . . . . . . . . . . . . 134.2 Ubuntu or Debian . . . . . . . . . . . . . . . . . . . . . . . . . . . . . . . . . . . . . . . . . . . . 144.3 Fedora, CentOS, or Red Hat . . . . . . . . . . . . . . . . . . . . . . . . . . . . . . . . . . . . . . . 16
5 Multi-Machine Cluster 195.1 Ubuntu or Debian . . . . . . . . . . . . . . . . . . . . . . . . . . . . . . . . . . . . . . . . . . . . 195.2 Fedora, CentOS, or Red Hat . . . . . . . . . . . . . . . . . . . . . . . . . . . . . . . . . . . . . . . 215.3 AWS CloudFormation . . . . . . . . . . . . . . . . . . . . . . . . . . . . . . . . . . . . . . . . . . 22
6 Managed Deployment 27
7 Multi-tenant Applications 297.1 Let’s Make an App – Ad Analytics . . . . . . . . . . . . . . . . . . . . . . . . . . . . . . . . . . . 307.2 Scaling the Relational Data Model . . . . . . . . . . . . . . . . . . . . . . . . . . . . . . . . . . . . 317.3 Preparing Tables and Ingesting Data . . . . . . . . . . . . . . . . . . . . . . . . . . . . . . . . . . . 327.4 Integrating Applications . . . . . . . . . . . . . . . . . . . . . . . . . . . . . . . . . . . . . . . . . 357.5 Sharing Data Between Tenants . . . . . . . . . . . . . . . . . . . . . . . . . . . . . . . . . . . . . . 367.6 Online Changes to the Schema . . . . . . . . . . . . . . . . . . . . . . . . . . . . . . . . . . . . . . 377.7 When Data Differs Across Tenants . . . . . . . . . . . . . . . . . . . . . . . . . . . . . . . . . . . 377.8 Scaling Hardware Resources . . . . . . . . . . . . . . . . . . . . . . . . . . . . . . . . . . . . . . . 387.9 Dealing with Big Tenants . . . . . . . . . . . . . . . . . . . . . . . . . . . . . . . . . . . . . . . . 397.10 Where to Go From Here . . . . . . . . . . . . . . . . . . . . . . . . . . . . . . . . . . . . . . . . . 41
8 Real-Time Dashboards 438.1 Data Model . . . . . . . . . . . . . . . . . . . . . . . . . . . . . . . . . . . . . . . . . . . . . . . . 43
i

8.2 Rollups . . . . . . . . . . . . . . . . . . . . . . . . . . . . . . . . . . . . . . . . . . . . . . . . . . 458.3 Expiring Old Data . . . . . . . . . . . . . . . . . . . . . . . . . . . . . . . . . . . . . . . . . . . . 478.4 Approximate Distinct Counts . . . . . . . . . . . . . . . . . . . . . . . . . . . . . . . . . . . . . . 478.5 Unstructured Data with JSONB . . . . . . . . . . . . . . . . . . . . . . . . . . . . . . . . . . . . . 48
9 Timeseries Data 519.1 Scaling Timeseries Data on Citus . . . . . . . . . . . . . . . . . . . . . . . . . . . . . . . . . . . . 529.2 Automating Partition Creation . . . . . . . . . . . . . . . . . . . . . . . . . . . . . . . . . . . . . . 53
10 Concepts 5710.1 Nodes . . . . . . . . . . . . . . . . . . . . . . . . . . . . . . . . . . . . . . . . . . . . . . . . . . . 5710.2 Distributed Data . . . . . . . . . . . . . . . . . . . . . . . . . . . . . . . . . . . . . . . . . . . . . 57
11 Citus MX 6111.1 Data Access . . . . . . . . . . . . . . . . . . . . . . . . . . . . . . . . . . . . . . . . . . . . . . . 6211.2 Scaling Out a Raw Events Table . . . . . . . . . . . . . . . . . . . . . . . . . . . . . . . . . . . . . 6311.3 MX Limitations . . . . . . . . . . . . . . . . . . . . . . . . . . . . . . . . . . . . . . . . . . . . . 64
12 Determining Application Type 6512.1 At a Glance . . . . . . . . . . . . . . . . . . . . . . . . . . . . . . . . . . . . . . . . . . . . . . . . 6512.2 Examples and Characteristics . . . . . . . . . . . . . . . . . . . . . . . . . . . . . . . . . . . . . . 65
13 Choosing Distribution Column 6713.1 Multi-Tenant Apps . . . . . . . . . . . . . . . . . . . . . . . . . . . . . . . . . . . . . . . . . . . . 6713.2 Real-Time Apps . . . . . . . . . . . . . . . . . . . . . . . . . . . . . . . . . . . . . . . . . . . . . 6813.3 Timeseries Data . . . . . . . . . . . . . . . . . . . . . . . . . . . . . . . . . . . . . . . . . . . . . 6913.4 Table Co-Location . . . . . . . . . . . . . . . . . . . . . . . . . . . . . . . . . . . . . . . . . . . . 69
14 Migrating an Existing App 7514.1 Identify Distribution Strategy . . . . . . . . . . . . . . . . . . . . . . . . . . . . . . . . . . . . . . 7514.2 Prepare Source Tables for Migration . . . . . . . . . . . . . . . . . . . . . . . . . . . . . . . . . . . 7614.3 Prepare Application for Citus . . . . . . . . . . . . . . . . . . . . . . . . . . . . . . . . . . . . . . 7814.4 Migrate Production Data . . . . . . . . . . . . . . . . . . . . . . . . . . . . . . . . . . . . . . . . . 102
15 SQL Reference 10715.1 Creating and Modifying Distributed Tables (DDL) . . . . . . . . . . . . . . . . . . . . . . . . . . . 10715.2 Ingesting, Modifying Data (DML) . . . . . . . . . . . . . . . . . . . . . . . . . . . . . . . . . . . . 11415.3 Caching Aggregations with Rollups . . . . . . . . . . . . . . . . . . . . . . . . . . . . . . . . . . . 11515.4 Querying Distributed Tables (SQL) . . . . . . . . . . . . . . . . . . . . . . . . . . . . . . . . . . . 11815.5 Query Processing . . . . . . . . . . . . . . . . . . . . . . . . . . . . . . . . . . . . . . . . . . . . . 12315.6 Manual Query Propagation . . . . . . . . . . . . . . . . . . . . . . . . . . . . . . . . . . . . . . . . 12815.7 SQL Support and Workarounds . . . . . . . . . . . . . . . . . . . . . . . . . . . . . . . . . . . . . 131
16 Citus API 13316.1 Citus Utility Functions . . . . . . . . . . . . . . . . . . . . . . . . . . . . . . . . . . . . . . . . . . 13316.2 Citus Tables and Views . . . . . . . . . . . . . . . . . . . . . . . . . . . . . . . . . . . . . . . . . . 15316.3 Configuration Reference . . . . . . . . . . . . . . . . . . . . . . . . . . . . . . . . . . . . . . . . . 16516.4 Append Distribution . . . . . . . . . . . . . . . . . . . . . . . . . . . . . . . . . . . . . . . . . . . 174
17 External Integrations 18317.1 Ingesting Data from Kafka . . . . . . . . . . . . . . . . . . . . . . . . . . . . . . . . . . . . . . . . 18317.2 Ingesting Data from Spark . . . . . . . . . . . . . . . . . . . . . . . . . . . . . . . . . . . . . . . . 18517.3 Business Intelligence with Tableau . . . . . . . . . . . . . . . . . . . . . . . . . . . . . . . . . . . 188
18 Get Started 19318.1 Provisioning . . . . . . . . . . . . . . . . . . . . . . . . . . . . . . . . . . . . . . . . . . . . . . . 193
ii

18.2 Connecting . . . . . . . . . . . . . . . . . . . . . . . . . . . . . . . . . . . . . . . . . . . . . . . . 195
19 Manage 19719.1 Scaling . . . . . . . . . . . . . . . . . . . . . . . . . . . . . . . . . . . . . . . . . . . . . . . . . . 19719.2 Monitoring . . . . . . . . . . . . . . . . . . . . . . . . . . . . . . . . . . . . . . . . . . . . . . . . 20019.3 Security . . . . . . . . . . . . . . . . . . . . . . . . . . . . . . . . . . . . . . . . . . . . . . . . . . 20919.4 Backup, Availability, and Replication . . . . . . . . . . . . . . . . . . . . . . . . . . . . . . . . . . 21319.5 Formation API . . . . . . . . . . . . . . . . . . . . . . . . . . . . . . . . . . . . . . . . . . . . . . 21719.6 Upgrades . . . . . . . . . . . . . . . . . . . . . . . . . . . . . . . . . . . . . . . . . . . . . . . . . 22019.7 Logging . . . . . . . . . . . . . . . . . . . . . . . . . . . . . . . . . . . . . . . . . . . . . . . . . . 222
20 Additional Features 22720.1 Extensions . . . . . . . . . . . . . . . . . . . . . . . . . . . . . . . . . . . . . . . . . . . . . . . . 22720.2 Forking . . . . . . . . . . . . . . . . . . . . . . . . . . . . . . . . . . . . . . . . . . . . . . . . . . 22820.3 Followers . . . . . . . . . . . . . . . . . . . . . . . . . . . . . . . . . . . . . . . . . . . . . . . . . 23020.4 Custom PostgreSQL Configuration . . . . . . . . . . . . . . . . . . . . . . . . . . . . . . . . . . . 231
21 Support and Billing 23321.1 Support . . . . . . . . . . . . . . . . . . . . . . . . . . . . . . . . . . . . . . . . . . . . . . . . . . 23321.2 Billing . . . . . . . . . . . . . . . . . . . . . . . . . . . . . . . . . . . . . . . . . . . . . . . . . . 233
22 Cluster Management 23522.1 Choosing Cluster Size . . . . . . . . . . . . . . . . . . . . . . . . . . . . . . . . . . . . . . . . . . 23522.2 Initial Hardware Size . . . . . . . . . . . . . . . . . . . . . . . . . . . . . . . . . . . . . . . . . . . 23622.3 Scaling the cluster . . . . . . . . . . . . . . . . . . . . . . . . . . . . . . . . . . . . . . . . . . . . 23622.4 Dealing With Node Failures . . . . . . . . . . . . . . . . . . . . . . . . . . . . . . . . . . . . . . . 23922.5 Tenant Isolation . . . . . . . . . . . . . . . . . . . . . . . . . . . . . . . . . . . . . . . . . . . . . 24022.6 Viewing Query Statistics . . . . . . . . . . . . . . . . . . . . . . . . . . . . . . . . . . . . . . . . . 24122.7 Resource Conservation . . . . . . . . . . . . . . . . . . . . . . . . . . . . . . . . . . . . . . . . . . 24422.8 Security . . . . . . . . . . . . . . . . . . . . . . . . . . . . . . . . . . . . . . . . . . . . . . . . . . 24422.9 PostgreSQL extensions . . . . . . . . . . . . . . . . . . . . . . . . . . . . . . . . . . . . . . . . . . 24722.10 Creating a New Database . . . . . . . . . . . . . . . . . . . . . . . . . . . . . . . . . . . . . . . . 24722.11 Checks For Updates and Cluster Statistics . . . . . . . . . . . . . . . . . . . . . . . . . . . . . . . . 248
23 Table Management 25123.1 Determining Table and Relation Size . . . . . . . . . . . . . . . . . . . . . . . . . . . . . . . . . . 25123.2 Vacuuming Distributed Tables . . . . . . . . . . . . . . . . . . . . . . . . . . . . . . . . . . . . . . 25223.3 Analyzing Distributed Tables . . . . . . . . . . . . . . . . . . . . . . . . . . . . . . . . . . . . . . 252
24 Upgrading Citus 25324.1 Upgrading Citus Versions . . . . . . . . . . . . . . . . . . . . . . . . . . . . . . . . . . . . . . . . 25324.2 Upgrading PostgreSQL version from 10 to 11 . . . . . . . . . . . . . . . . . . . . . . . . . . . . . . 254
25 Query Performance Tuning 25925.1 Table Distribution and Shards . . . . . . . . . . . . . . . . . . . . . . . . . . . . . . . . . . . . . . 25925.2 PostgreSQL tuning . . . . . . . . . . . . . . . . . . . . . . . . . . . . . . . . . . . . . . . . . . . . 25925.3 Scaling Out Performance . . . . . . . . . . . . . . . . . . . . . . . . . . . . . . . . . . . . . . . . . 26225.4 Distributed Query Performance Tuning . . . . . . . . . . . . . . . . . . . . . . . . . . . . . . . . . 26225.5 Scaling Out Data Ingestion . . . . . . . . . . . . . . . . . . . . . . . . . . . . . . . . . . . . . . . . 265
26 Useful Diagnostic Queries 26926.1 Finding which shard contains data for a specific tenant . . . . . . . . . . . . . . . . . . . . . . . . . 26926.2 Finding the distribution column for a table . . . . . . . . . . . . . . . . . . . . . . . . . . . . . . . 26926.3 Detecting locks . . . . . . . . . . . . . . . . . . . . . . . . . . . . . . . . . . . . . . . . . . . . . . 27026.4 Querying the size of your shards . . . . . . . . . . . . . . . . . . . . . . . . . . . . . . . . . . . . . 271
iii

26.5 Querying the size of all distributed tables . . . . . . . . . . . . . . . . . . . . . . . . . . . . . . . . 27226.6 Determining Replication Factor per Table . . . . . . . . . . . . . . . . . . . . . . . . . . . . . . . . 27226.7 Identifying unused indices . . . . . . . . . . . . . . . . . . . . . . . . . . . . . . . . . . . . . . . . 27226.8 Monitoring client connection count . . . . . . . . . . . . . . . . . . . . . . . . . . . . . . . . . . . 27326.9 Index hit rate . . . . . . . . . . . . . . . . . . . . . . . . . . . . . . . . . . . . . . . . . . . . . . . 274
27 Common Error Messages 27527.1 Failed to execute task n . . . . . . . . . . . . . . . . . . . . . . . . . . . . . . . . . . . . . . . . . . 27527.2 Relation foo is not distributed . . . . . . . . . . . . . . . . . . . . . . . . . . . . . . . . . . . . . . 27627.3 Could not receive query results . . . . . . . . . . . . . . . . . . . . . . . . . . . . . . . . . . . . . 27627.4 Canceling the transaction since it was involved in a distributed deadlock . . . . . . . . . . . . . . . . 27627.5 Cannot establish a new connection for placement n, since DML has been executed on a connection
that is in use . . . . . . . . . . . . . . . . . . . . . . . . . . . . . . . . . . . . . . . . . . . . . . . 27727.6 Could not connect to server: Cannot assign requested address . . . . . . . . . . . . . . . . . . . . . 27827.7 SSL error: certificate verify failed . . . . . . . . . . . . . . . . . . . . . . . . . . . . . . . . . . . . 27827.8 Could not connect to any active placements . . . . . . . . . . . . . . . . . . . . . . . . . . . . . . . 27827.9 Remaining connection slots are reserved for non-replication superuser connections . . . . . . . . . . 27927.10 PgBouncer cannot connect to server . . . . . . . . . . . . . . . . . . . . . . . . . . . . . . . . . . . 27927.11 Unsupported clause type . . . . . . . . . . . . . . . . . . . . . . . . . . . . . . . . . . . . . . . . . 27927.12 Cannot open new connections after the first modification command within a transaction . . . . . . . 27927.13 Cannot create uniqueness constraint . . . . . . . . . . . . . . . . . . . . . . . . . . . . . . . . . . . 28027.14 Function create_distributed_table does not exist . . . . . . . . . . . . . . . . . . . . . . . . . . . . . 28027.15 STABLE functions used in UPDATE queries cannot be called with column references . . . . . . . . 281
28 Frequently Asked Questions 28328.1 Can I create primary keys on distributed tables? . . . . . . . . . . . . . . . . . . . . . . . . . . . . . 28328.2 How do I add nodes to an existing Citus cluster? . . . . . . . . . . . . . . . . . . . . . . . . . . . . 28328.3 How does Citus handle failure of a worker node? . . . . . . . . . . . . . . . . . . . . . . . . . . . . 28328.4 How does Citus handle failover of the coordinator node? . . . . . . . . . . . . . . . . . . . . . . . . 28428.5 How do I ingest the results of a query into a distributed table? . . . . . . . . . . . . . . . . . . . . . 28428.6 Can I join distributed and non-distributed tables together in the same query? . . . . . . . . . . . . . 28428.7 Are there any PostgreSQL features not supported by Citus? . . . . . . . . . . . . . . . . . . . . . . 28428.8 How do I choose the shard count when I hash-partition my data? . . . . . . . . . . . . . . . . . . . . 28528.9 How do I change the shard count for a hash partitioned table? . . . . . . . . . . . . . . . . . . . . . 28528.10 How does citus support count(distinct) queries? . . . . . . . . . . . . . . . . . . . . . . . . . . . . . 28528.11 In which situations are uniqueness constraints supported on distributed tables? . . . . . . . . . . . . 28528.12 How do I create database roles, functions, extensions etc in a Citus cluster? . . . . . . . . . . . . . . 28628.13 What if a worker node’s address changes? . . . . . . . . . . . . . . . . . . . . . . . . . . . . . . . . 28628.14 Which shard contains data for a particular tenant? . . . . . . . . . . . . . . . . . . . . . . . . . . . 28628.15 I forgot the distribution column of a table, how do I find it? . . . . . . . . . . . . . . . . . . . . . . . 28628.16 Can I distribute a table by multiple keys? . . . . . . . . . . . . . . . . . . . . . . . . . . . . . . . . 28728.17 Why does pg_relation_size report zero bytes for a distributed table? . . . . . . . . . . . . . . . . . . 28728.18 Why am I seeing an error about max_intermediate_result_size? . . . . . . . . . . . . . . . . . . . . 28728.19 Can I run Citus on Heroku? . . . . . . . . . . . . . . . . . . . . . . . . . . . . . . . . . . . . . . . 28728.20 Can I run Citus on Microsoft Azure? . . . . . . . . . . . . . . . . . . . . . . . . . . . . . . . . . . 28728.21 Can I run Citus on Amazon RDS? . . . . . . . . . . . . . . . . . . . . . . . . . . . . . . . . . . . . 28828.22 Can I use Citus with my existing AWS account? . . . . . . . . . . . . . . . . . . . . . . . . . . . . 28828.23 Can I shard by schema on Citus for multi-tenant applications? . . . . . . . . . . . . . . . . . . . . . 28828.24 How does cstore_fdw work with Citus? . . . . . . . . . . . . . . . . . . . . . . . . . . . . . . . . . 28828.25 What happened to pg_shard? . . . . . . . . . . . . . . . . . . . . . . . . . . . . . . . . . . . . . . . 288
29 Related Articles 28929.1 Introducing Citus Add-on for Heroku: Scale out your Postgres . . . . . . . . . . . . . . . . . . . . . 28929.2 Efficient Rollup Tables with HyperLogLog in Postgres . . . . . . . . . . . . . . . . . . . . . . . . . 291
iv

29.3 Distributed Distinct Count with HyperLogLog on Postgres . . . . . . . . . . . . . . . . . . . . . . . 29629.4 How to Scale PostgreSQL on AWS: Learnings from Citus Cloud . . . . . . . . . . . . . . . . . . . 29929.5 Postgres Parallel Indexing in Citus . . . . . . . . . . . . . . . . . . . . . . . . . . . . . . . . . . . . 30729.6 Real-time Event Aggregation at Scale Using Postgres with Citus . . . . . . . . . . . . . . . . . . . . 30929.7 How Distributed Outer Joins on PostgreSQL with Citus Work . . . . . . . . . . . . . . . . . . . . . 31329.8 Designing your SaaS Database for Scale with Postgres . . . . . . . . . . . . . . . . . . . . . . . . . 31829.9 Building a Scalable Postgres Metrics Backend using the Citus Extension . . . . . . . . . . . . . . . 32129.10 Sharding a Multi-Tenant App with Postgres . . . . . . . . . . . . . . . . . . . . . . . . . . . . . . . 32329.11 Sharding Postgres with Semi-Structured Data and Its Performance Implications . . . . . . . . . . . . 32729.12 Scalable Real-time Product Search using PostgreSQL with Citus . . . . . . . . . . . . . . . . . . . . 329
v

vi

Citus Documentation, Release 8.2
Welcome to the documentation for Citus 8.2! Citus horizontally scales PostgreSQL across commodity servers usingsharding and replication. Its query engine parallelizes incoming SQL queries across these servers to enable real-timeresponses on large datasets.
Get Started 1

Citus Documentation, Release 8.2
2 Get Started

CHAPTER 1
What is Citus?
Citus is basically worry-free Postgres that is built to scale out. It’s an extension to Postgres that distributes dataand queries in a cluster of multiple machines. As an extension (rather than a fork), Citus supports new PostgreSQLreleases, allowing users to benefit from new features while maintaining compatibility with existing PostgreSQL tools.
Citus horizontally scales PostgreSQL across multiple machines using sharding and replication. Its query engine par-allelizes incoming SQL queries across these servers to enable human real-time (less than a second) responses on largedatasets.
Available in Three Ways:
1. As open source to add to existing Postgres servers
2. On-premise with additional enterprise grade security and cluster management tools
3. As a fully-managed database as a service on both Microsoft Azure and Amazon AWS. For info on these offer-ings, see Azure Database for PostgreSQL — Hyperscale (Citus) and Citus Cloud on AWS
1.1 How Far Can Citus Scale?
Citus scales horizontally by adding worker nodes, vertically by upgrading workers/coordinator, and supports switchingto Citus MX mode if needed. In practice our customers have achieved the following scale, with room to grow evenmore:
• Algolia
– 5-10B rows ingested per day
• Heap
– 500+ billion events
– 900TB of data on a 40-node Citus database cluster
• Chartbeat
– >2.6B rows of data added per month
• Pex
– 30B rows updated/day
– 20-node Citus database cluster on Google Cloud
– 2.4TB memory, 1280 cores, and 60TB of data
– ...with plans to grow to 45 nodes
3

Citus Documentation, Release 8.2
• Mixrank
– 1.6PB of time series data
For more customers and statistics, see our customer stories.
4 Chapter 1. What is Citus?

CHAPTER 2
When to Use Citus
2.1 Multi-Tenant Database
Most B2B applications already have the notion of a tenant, customer, or account built into their data model. In thismodel, the database serves many tenants, each of whose data is separate from other tenants.
Citus provides full SQL coverage for this workload, and enables scaling out your relational database to 100K+ tenants.Citus also adds new features for multi-tenancy. For example, Citus supports tenant isolation to provide performanceguarantees for large tenants, and has the concept of reference tables to reduce data duplication across tenants.
These capabilities allow you to scale out your tenants’ data across many machines, and easily add more CPU, memory,and disk resources. Further, sharing the same database schema across multiple tenants makes efficient use of hardwareresources and simplifies database management.
Some advantages of Citus for multi-tenant applications:
• Fast queries for all tenants
• Sharding logic in the database, not the application
• Hold more data than possible in single-node PostgreSQL
• Scale out without giving up SQL
• Maintain performance under high concurrency
• Fast metrics analysis across customer base
• Easily scale to handle new customer signups
• Isolate resource usage of large and small customers
2.2 Real-Time Analytics
Citus supports real-time queries over large datasets. Commonly these queries occur in rapidly growing event systemsor systems with time series data. Example use cases include:
• Analytic dashboards with subsecond response times
• Exploratory queries on unfolding events
• Large dataset archival and reporting
• Analyzing sessions with funnel, segmentation, and cohort queries
5

Citus Documentation, Release 8.2
Citus’ benefits here are its ability to parallelize query execution and scale linearly with the number of worker databasesin a cluster. Some advantages of Citus for real-time applications:
• Maintain sub-second responses as the dataset grows
• Analyze new events and new data as it happens, in real-time
• Parallelize SQL queries
• Scale out without giving up SQL
• Maintain performance under high concurrency
• Fast responses to dashboard queries
• Use one database, not a patchwork
• Rich PostgreSQL data types and extensions
2.3 Considerations for Use
Citus extends PostgreSQL with distributed functionality, but it is not a drop-in replacement that scales out all work-loads. A performant Citus cluster involves thinking about the data model, tooling, and choice of SQL features used.
A good way to think about tools and SQL features is the following: if your workload aligns with use-cases describedhere and you happen to run into an unsupported tool or query, then there’s usually a good workaround.
2.4 When Citus is Inappropriate
Some workloads don’t need a powerful distributed database, while others require a large flow of information betweenworker nodes. In the first case Citus is unnecessary, and in the second not generally performant. Here are someexamples:
• When single-node Postgres can support your application and you do not expect to grow
• Offline analytics, without the need for real-time ingest nor real-time queries
• Analytics apps that do not need to support a large number of concurrent users
• Queries that return data-heavy ETL results rather than summaries
6 Chapter 2. When to Use Citus

CHAPTER 3
Quick Tutorials
3.1 Multi-tenant Applications
In this tutorial, we will use a sample ad analytics dataset to demonstrate how you can use Citus to power your multi-tenant application.
Note: This tutorial assumes that you already have Citus installed and running. If you don’t have Citus running, youcan:
• Provision a cluster using Citus Cloud, or
• Setup Citus locally using Docker (Mac or Linux).
3.1.1 Data model and sample data
We will demo building the database for an ad-analytics app which companies can use to view, change, analyze andmanage their ads and campaigns (see an example app). Such an application has good characteristics of a typical multi-tenant system. Data from different tenants is stored in a central database, and each tenant has an isolated view of theirown data.
We will use three Postgres tables to represent this data. To get started, you will need to download sample data for thesetables:
curl https://examples.citusdata.com/tutorial/companies.csv > companies.csvcurl https://examples.citusdata.com/tutorial/campaigns.csv > campaigns.csvcurl https://examples.citusdata.com/tutorial/ads.csv > ads.csv
If you are using Docker, you should use the docker cp command to copy the files into the Docker container.
docker cp companies.csv citus_master:.docker cp campaigns.csv citus_master:.docker cp ads.csv citus_master:.
3.1.2 Creating tables
To start, you can first connect to the Citus coordinator using psql.
If you are using Citus Cloud, you can connect by specifying the connection string (URL in the formation details):
7
Citus Documentation, Release 8.2
psql connection-string
Please note that certain shells may require you to quote the connection string when connecting to Citus Cloud. Forexample, psql "connection-string".
If you are using Docker, you can connect by running psql with the docker exec command:
docker exec -it citus_master psql -U postgres
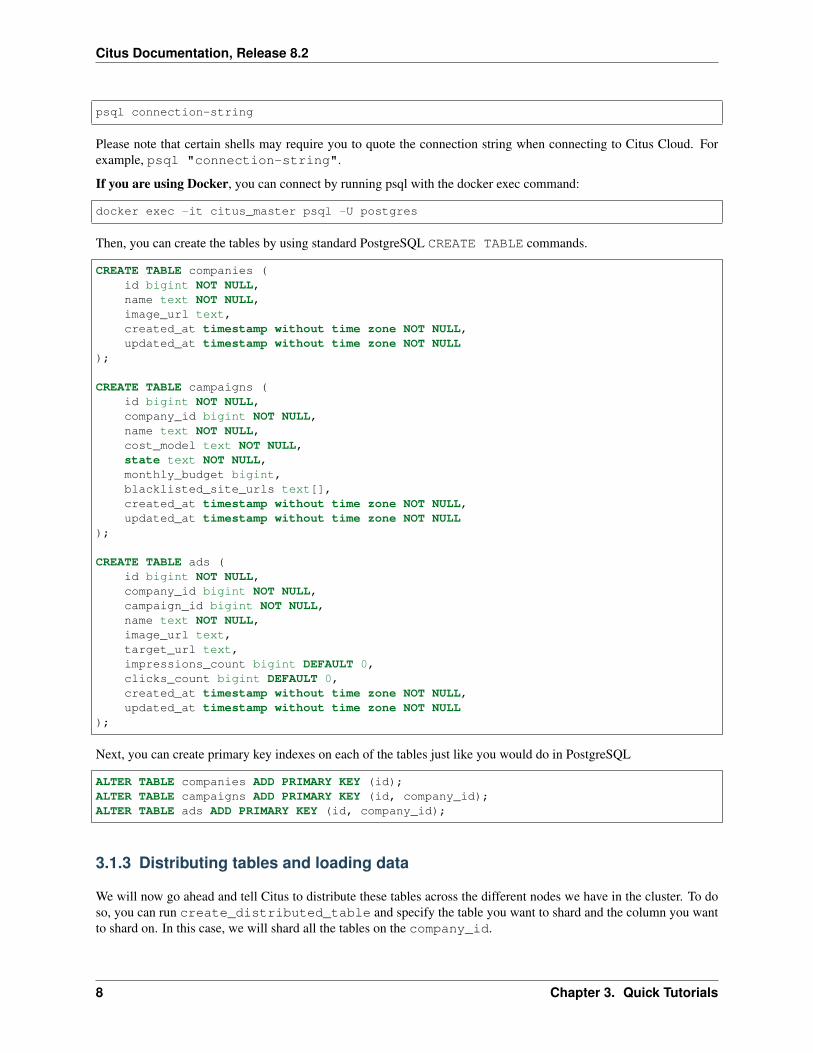
Then, you can create the tables by using standard PostgreSQL CREATE TABLE commands.
CREATE TABLE companies (id bigint NOT NULL,name text NOT NULL,image_url text,created_at timestamp without time zone NOT NULL,updated_at timestamp without time zone NOT NULL
);
CREATE TABLE campaigns (id bigint NOT NULL,company_id bigint NOT NULL,name text NOT NULL,cost_model text NOT NULL,state text NOT NULL,monthly_budget bigint,blacklisted_site_urls text[],created_at timestamp without time zone NOT NULL,updated_at timestamp without time zone NOT NULL
);
CREATE TABLE ads (id bigint NOT NULL,company_id bigint NOT NULL,campaign_id bigint NOT NULL,name text NOT NULL,image_url text,target_url text,impressions_count bigint DEFAULT 0,clicks_count bigint DEFAULT 0,created_at timestamp without time zone NOT NULL,updated_at timestamp without time zone NOT NULL
);
Next, you can create primary key indexes on each of the tables just like you would do in PostgreSQL
ALTER TABLE companies ADD PRIMARY KEY (id);ALTER TABLE campaigns ADD PRIMARY KEY (id, company_id);ALTER TABLE ads ADD PRIMARY KEY (id, company_id);
3.1.3 Distributing tables and loading data
We will now go ahead and tell Citus to distribute these tables across the different nodes we have in the cluster. To doso, you can run create_distributed_table and specify the table you want to shard and the column you wantto shard on. In this case, we will shard all the tables on the company_id.
8 Chapter 3. Quick Tutorials

Citus Documentation, Release 8.2
SELECT create_distributed_table('companies', 'id');SELECT create_distributed_table('campaigns', 'company_id');SELECT create_distributed_table('ads', 'company_id');
Sharding all tables on the company identifier allows Citus to colocate the tables together and allow for features likeprimary keys, foreign keys and complex joins across your cluster. You can learn more about the benefits of thisapproach here.
Then, you can go ahead and load the data we downloaded into the tables using the standard PostgreSQL \COPYcommand. Please make sure that you specify the correct file path if you downloaded the file to some other location.
\copy companies from 'companies.csv' with csv\copy campaigns from 'campaigns.csv' with csv\copy ads from 'ads.csv' with csv
3.1.4 Running queries
Now that we have loaded data into the tables, let’s go ahead and run some queries. Citus supports standard INSERT,UPDATE and DELETE commands for inserting and modifying rows in a distributed table which is the typical way ofinteraction for a user-facing application.
For example, you can insert a new company by running:
INSERT INTO companies VALUES (5000, 'New Company', 'https://randomurl/image.png',→˓now(), now());
If you want to double the budget for all the campaigns of a company, you can run an UPDATE command:
UPDATE campaignsSET monthly_budget = monthly_budget*2WHERE company_id = 5;
Another example of such an operation would be to run transactions which span multiple tables. Let’s say you want todelete a campaign and all its associated ads, you could do it atomically by running.
BEGIN;DELETE from campaigns where id = 46 AND company_id = 5;DELETE from ads where campaign_id = 46 AND company_id = 5;COMMIT;
Other than transactional operations, you can also run analytics queries on this data using standard SQL. One interestingquery for a company to run would be to see details about its campaigns with maximum budget.
SELECT name, cost_model, state, monthly_budgetFROM campaignsWHERE company_id = 5ORDER BY monthly_budget DESCLIMIT 10;
We can also run a join query across multiple tables to see information about running campaigns which receive themost clicks and impressions.
SELECT campaigns.id, campaigns.name, campaigns.monthly_budget,sum(impressions_count) as total_impressions, sum(clicks_count) as total_clicks
FROM ads, campaignsWHERE ads.company_id = campaigns.company_id
3.1. Multi-tenant Applications 9

Citus Documentation, Release 8.2
AND campaigns.company_id = 5AND campaigns.state = 'running'GROUP BY campaigns.id, campaigns.name, campaigns.monthly_budgetORDER BY total_impressions, total_clicks;
With this, we come to the end of our tutorial on using Citus to power a simple multi-tenant application. As a next step,you can look at the Multi-Tenant Apps section to see how you can model your own data for multi-tenancy.
3.2 Real-time Analytics
In this tutorial, we will demonstrate how you can use Citus to ingest events data and run analytical queries on that datain human real-time. For that, we will use a sample Github events dataset.
Note: This tutorial assumes that you already have Citus installed and running. If you don’t have Citus running, youcan:
• Provision a cluster using Citus Cloud, or
• Setup Citus locally using Docker (Mac or Linux).
3.2.1 Data model and sample data
We will demo building the database for a real-time analytics application. This application will insert large volumes ofevents data and enable analytical queries on that data with sub-second latencies. In our example, we’re going to workwith the Github events dataset. This dataset includes all public events on Github, such as commits, forks, new issues,and comments on these issues.
We will use two Postgres tables to represent this data. To get started, you will need to download sample data for thesetables:
curl https://examples.citusdata.com/tutorial/users.csv > users.csvcurl https://examples.citusdata.com/tutorial/events.csv > events.csv
If you are using Docker, you should use the docker cp command to copy the files into the Docker container.
docker cp users.csv citus_master:.docker cp events.csv citus_master:.
3.2.2 Creating tables
To start, you can first connect to the Citus coordinator using psql.
If you are using Citus Cloud, you can connect by specifying the connection string (URL in the formation details):
psql connection-string
Please note that certain shells may require you to quote the connection string when connecting to Citus Cloud. Forexample, psql "connection-string".
If you are using Docker, you can connect by running psql with the docker exec command:
10 Chapter 3. Quick Tutorials

Citus Documentation, Release 8.2
docker exec -it citus_master psql -U postgres
Then, you can create the tables by using standard PostgreSQL CREATE TABLE commands.
CREATE TABLE github_events(
event_id bigint,event_type text,event_public boolean,repo_id bigint,payload jsonb,repo jsonb,user_id bigint,org jsonb,created_at timestamp
);
CREATE TABLE github_users(
user_id bigint,url text,login text,avatar_url text,gravatar_id text,display_login text
);
Next, you can create indexes on events data just like you would do in PostgreSQL. In this example, we’re also goingto create a GIN index to make querying on jsonb fields faster.
CREATE INDEX event_type_index ON github_events (event_type);CREATE INDEX payload_index ON github_events USING GIN (payload jsonb_path_ops);
3.2.3 Distributing tables and loading data
We will now go ahead and tell Citus to distribute these tables across the nodes in the cluster. To do so, you can runcreate_distributed_table and specify the table you want to shard and the column you want to shard on. Inthis case, we will shard all the tables on user_id.
SELECT create_distributed_table('github_users', 'user_id');SELECT create_distributed_table('github_events', 'user_id');
Sharding all tables on the user identifier allows Citus to colocate these tables together, and allows for efficient joinsand distributed roll-ups. You can learn more about the benefits of this approach here.
Then, you can go ahead and load the data we downloaded into the tables using the standard PostgreSQL \COPYcommand. Please make sure that you specify the correct file path if you downloaded the file to a different location.
\copy github_users from 'users.csv' with csv\copy github_events from 'events.csv' with csv
3.2.4 Running queries
Now that we have loaded data into the tables, let’s go ahead and run some queries. First, let’s check how many userswe have in our distributed database.
3.2. Real-time Analytics 11

Citus Documentation, Release 8.2
SELECT count(*) FROM github_users;
Now, let’s analyze Github push events in our data. We will first compute the number of commits per minute by usingthe number of distinct commits in each push event.
SELECT date_trunc('minute', created_at) AS minute,sum((payload->>'distinct_size')::int) AS num_commits
FROM github_eventsWHERE event_type = 'PushEvent'GROUP BY minuteORDER BY minute;
We also have a users table. We can also easily join the users with events, and find the top ten users who created themost repositories.
SELECT login, count(*)FROM github_events geJOIN github_users guON ge.user_id = gu.user_idWHERE event_type = 'CreateEvent' AND payload @> '{"ref_type": "repository"}'GROUP BY loginORDER BY count(*) DESC LIMIT 10;
Citus also supports standard INSERT, UPDATE, and DELETE commands for ingesting and modifying data. Forexample, you can update a user’s display login by running the following command:
UPDATE github_users SET display_login = 'no1youknow' WHERE user_id = 24305673;
With this, we come to the end of our tutorial. As a next step, you can look at the Real-Time Apps section to see howyou can model your own data and power real-time analytical applications.
12 Chapter 3. Quick Tutorials

CHAPTER 4
Single-Machine Cluster
If you are a developer looking to try Citus out on your machine, the guides below will help you get started quickly.
4.1 Docker (Mac or Linux)
This section describes setting up a Citus cluster on a single machine using docker-compose.
Note: The Docker image is intended for development/testing purposes only, and has not been prepared forproduction use. The images use default connection settings, which are very permissive, and not suitable for any kindof production setup. These should be updated before using the image for production use. The PostgreSQL manualexplains how to make them more restrictive.
1. Install Docker Community Edition and Docker Compose
On Mac:
• Install Docker.
• Start Docker by clicking on the application’s icon.
On Linux:
curl -sSL https://get.docker.com/ | shsudo usermod -aG docker $USER && exec sg docker newgrp `id -gn`sudo systemctl start docker
sudo curl -sSL https://github.com/docker/compose/releases/download/1.16.1/docker-→˓compose-`uname -s`-`uname -m` -o /usr/local/bin/docker-composesudo chmod +x /usr/local/bin/docker-compose
The above version of Docker Compose is sufficient for running Citus, or you can install the latest version. 2. Startthe Citus Cluster
Citus uses Docker Compose to run and connect containers holding the database coordinator node, workers, and apersistent data volume. To create a local cluster download our Docker Compose configuration file and run it
curl -L https://raw.githubusercontent.com/citusdata/docker/master/docker-compose.yml >→˓ docker-compose.ymlCOMPOSE_PROJECT_NAME=citus docker-compose up -d
13

Citus Documentation, Release 8.2
The first time you start the cluster it builds its containers. Subsequent startups take a matter of seconds.
Note: If you already have PostgreSQL running on your machine you may encounter this error when starting theDocker containers:
Error starting userland proxy:Bind for 0.0.0.0:5432: unexpected error address already in use
This is because the “master” (coordinator) service attempts to bind to the standard PostgreSQL port 5432. Simplychoose a different port for coordinator service with the MASTER_EXTERNAL_PORT environment variable. For ex-ample:
MASTER_EXTERNAL_PORT=5433 COMPOSE_PROJECT_NAME=citus docker-compose up -d
3. Verify that installation has succeeded
To verify that the installation has succeeded we check that the coordinator node has picked up the desired workerconfiguration. First start the psql shell on the coordinator (master) node:
docker exec -it citus_master psql -U postgres
Then run this query:
SELECT * FROM master_get_active_worker_nodes();
You should see a row for each worker node including the node name and port.
Once you have the cluster up and running, you can visit our tutorials on multi-tenant applications or real-time analyticsto get started with Citus in minutes.
4. Shut down the cluster when ready
When you wish to stop the docker containers, use Docker Compose:
COMPOSE_PROJECT_NAME=citus docker-compose down -v
Note: Please note that Citus reports anonymous information about your cluster to the Citus Data company servers. Tolearn more about what information is collected and how to opt out of it, see Checks For Updates and Cluster Statistics.
4.2 Ubuntu or Debian
This section describes the steps needed to set up a single-node Citus cluster on your own Linux machine from debpackages.
1. Install PostgreSQL 11 and the Citus extension
# Add Citus repository for package managercurl https://install.citusdata.com/community/deb.sh | sudo bash
# install the server and initialize dbsudo apt-get -y install postgresql-11-citus-8.2
14 Chapter 4. Single-Machine Cluster

Citus Documentation, Release 8.2
2. Initialize the Cluster
Citus has two kinds of components, the coordinator and the workers. The coordinator coordinates queries and main-tains metadata on where in the cluster each row of data is. The workers hold your data and respond to queries.
Let’s create directories for those nodes to store their data. For convenience in using PostgreSQL Unix domain socketconnections we’ll use the postgres user.
# this user has access to sockets in /var/run/postgresqlsudo su - postgres
# include path to postgres binariesexport PATH=$PATH:/usr/lib/postgresql/11/bin
cd ~mkdir -p citus/coordinator citus/worker1 citus/worker2
# create three normal postgres instancesinitdb -D citus/coordinatorinitdb -D citus/worker1initdb -D citus/worker2
Citus is a Postgres extension, to tell Postgres to use this extension you’ll need to add it to a configuration variablecalled shared_preload_libraries:
echo "shared_preload_libraries = 'citus'" >> citus/coordinator/postgresql.confecho "shared_preload_libraries = 'citus'" >> citus/worker1/postgresql.confecho "shared_preload_libraries = 'citus'" >> citus/worker2/postgresql.conf
3. Start the coordinator and workers
We will start the PostgreSQL instances on ports 9700 (for the coordinator) and 9701, 9702 (for the workers). Weassume those ports are available on your machine. Feel free to use different ports if they are in use.
Let’s start the databases:
pg_ctl -D citus/coordinator -o "-p 9700" -l coordinator_logfile startpg_ctl -D citus/worker1 -o "-p 9701" -l worker1_logfile startpg_ctl -D citus/worker2 -o "-p 9702" -l worker2_logfile start
Above you added Citus to shared_preload_libraries. That lets it hook into some deep parts of Postgres,swapping out the query planner and executor. Here, we load the user-facing side of Citus (such as the functions you’llsoon call):
psql -p 9700 -c "CREATE EXTENSION citus;"psql -p 9701 -c "CREATE EXTENSION citus;"psql -p 9702 -c "CREATE EXTENSION citus;"
Finally, the coordinator needs to know where it can find the workers. To tell it you can run:
psql -p 9700 -c "SELECT * from master_add_node('localhost', 9701);"psql -p 9700 -c "SELECT * from master_add_node('localhost', 9702);"
4. Verify that installation has succeeded
To verify that the installation has succeeded we check that the coordinator node has picked up the desired workerconfiguration. First start the psql shell on the coordinator node:
psql -p 9700 -c "select * from master_get_active_worker_nodes();"
4.2. Ubuntu or Debian 15

Citus Documentation, Release 8.2
You should see a row for each worker node including the node name and port.
At this step, you have completed the installation process and are ready to use your Citus cluster. To help you getstarted, we have a tutorial which has instructions on setting up a Citus cluster with sample data in minutes.
Note: Please note that Citus reports anonymous information about your cluster to the Citus Data company servers. Tolearn more about what information is collected and how to opt out of it, see Checks For Updates and Cluster Statistics.
4.3 Fedora, CentOS, or Red Hat
This section describes the steps needed to set up a single-node Citus cluster on your own Linux machine from RPMpackages.
1. Install PostgreSQL 11 and the Citus extension
# Add Citus repository for package managercurl https://install.citusdata.com/community/rpm.sh | sudo bash
# install Citus extensionsudo yum install -y citus82_11
2. Initialize the Cluster
Citus has two kinds of components, the coordinator and the workers. The coordinator coordinates queries and main-tains metadata on where in the cluster each row of data is. The workers hold your data and respond to queries.
Let’s create directories for those nodes to store their data. For convenience in using PostgreSQL Unix domain socketconnections we’ll use the postgres user.
# this user has access to sockets in /var/run/postgresqlsudo su - postgres
# include path to postgres binariesexport PATH=$PATH:/usr/pgsql-11/bin
cd ~mkdir -p citus/coordinator citus/worker1 citus/worker2
# create three normal postgres instancesinitdb -D citus/coordinatorinitdb -D citus/worker1initdb -D citus/worker2
Citus is a Postgres extension, to tell Postgres to use this extension you’ll need to add it to a configuration variablecalled shared_preload_libraries:
echo "shared_preload_libraries = 'citus'" >> citus/coordinator/postgresql.confecho "shared_preload_libraries = 'citus'" >> citus/worker1/postgresql.confecho "shared_preload_libraries = 'citus'" >> citus/worker2/postgresql.conf
3. Start the coordinator and workers
We will start the PostgreSQL instances on ports 9700 (for the coordinator) and 9701, 9702 (for the workers). Weassume those ports are available on your machine. Feel free to use different ports if they are in use.
Let’s start the databases:
16 Chapter 4. Single-Machine Cluster

Citus Documentation, Release 8.2
pg_ctl -D citus/coordinator -o "-p 9700" -l coordinator_logfile startpg_ctl -D citus/worker1 -o "-p 9701" -l worker1_logfile startpg_ctl -D citus/worker2 -o "-p 9702" -l worker2_logfile start
Above you added Citus to shared_preload_libraries. That lets it hook into some deep parts of Postgres,swapping out the query planner and executor. Here, we load the user-facing side of Citus (such as the functions you’llsoon call):
psql -p 9700 -c "CREATE EXTENSION citus;"psql -p 9701 -c "CREATE EXTENSION citus;"psql -p 9702 -c "CREATE EXTENSION citus;"
Finally, the coordinator needs to know where it can find the workers. To tell it you can run:
psql -p 9700 -c "SELECT * from master_add_node('localhost', 9701);"psql -p 9700 -c "SELECT * from master_add_node('localhost', 9702);"
4. Verify that installation has succeeded
To verify that the installation has succeeded we check that the coordinator node has picked up the desired workerconfiguration. First start the psql shell on the coordinator node:
psql -p 9700 -c "select * from master_get_active_worker_nodes();"
You should see a row for each worker node including the node name and port.
At this step, you have completed the installation process and are ready to use your Citus cluster. To help you getstarted, we have a tutorial which has instructions on setting up a Citus cluster with sample data in minutes.
Note: Please note that Citus reports anonymous information about your cluster to the Citus Data company servers. Tolearn more about what information is collected and how to opt out of it, see Checks For Updates and Cluster Statistics.
4.3. Fedora, CentOS, or Red Hat 17

Citus Documentation, Release 8.2
18 Chapter 4. Single-Machine Cluster

CHAPTER 5
Multi-Machine Cluster
The Single-Machine Cluster section has instructions on installing a Citus cluster on one machine. If you are lookingto deploy Citus across multiple nodes, you can use the guide below.
5.1 Ubuntu or Debian
This section describes the steps needed to set up a multi-node Citus cluster on your own Linux machines using debpackages.
5.1.1 Steps to be executed on all nodes
1. Add repository
# Add Citus repository for package managercurl https://install.citusdata.com/community/deb.sh | sudo bash
2. Install PostgreSQL + Citus and initialize a database
# install the server and initialize dbsudo apt-get -y install postgresql-11-citus-8.2
# preload citus extensionsudo pg_conftool 11 main set shared_preload_libraries citus
This installs centralized configuration in /etc/postgresql/11/main, and creates a database in /var/lib/postgresql/11/main.3. Configure connection and authentication
Before starting the database let’s change its access permissions. By default the database server listens only to clients onlocalhost. As a part of this step, we instruct it to listen on all IP interfaces, and then configure the client authenticationfile to allow all incoming connections from the local network.
sudo pg_conftool 11 main set listen_addresses '*'
sudo vi /etc/postgresql/11/main/pg_hba.conf
# Allow unrestricted access to nodes in the local network. The following ranges# correspond to 24, 20, and 16-bit blocks in Private IPv4 address spaces.host all all 10.0.0.0/8 trust
19

Citus Documentation, Release 8.2
# Also allow the host unrestricted access to connect to itselfhost all all 127.0.0.1/32 trusthost all all ::1/128 trust
Note: Your DNS settings may differ. Also these settings are too permissive for some environments, see our notesabout Increasing Worker Security. The PostgreSQL manual explains how to make them more restrictive.
4. Start database servers, create Citus extension
# start the db serversudo service postgresql restart# and make it start automatically when computer doessudo update-rc.d postgresql enable
You must add the Citus extension to every database you would like to use in a cluster. The following example addsthe extension to the default database which is named postgres.
# add the citus extensionsudo -i -u postgres psql -c "CREATE EXTENSION citus;"
5.1.2 Steps to be executed on the coordinator node
The steps listed below must be executed only on the coordinator node after the previously mentioned steps have beenexecuted.
1. Add worker node information
We need to inform the coordinator about its workers. To add this information, we call a UDF which adds the nodeinformation to the pg_dist_node catalog table. For our example, we assume that there are two workers (named worker-101, worker-102). Add the workers’ DNS names (or IP addresses) and server ports to the table.
sudo -i -u postgres psql -c "SELECT * from master_add_node('worker-101', 5432);"sudo -i -u postgres psql -c "SELECT * from master_add_node('worker-102', 5432);"
2. Verify that installation has succeeded
To verify that the installation has succeeded, we check that the coordinator node has picked up the desired workerconfiguration. This command when run in the psql shell should output the worker nodes we added to the pg_dist_nodetable above.
sudo -i -u postgres psql -c "SELECT * FROM master_get_active_worker_nodes();"
Ready to use Citus
At this step, you have completed the installation process and are ready to use your Citus cluster. The new Citusdatabase is accessible in psql through the postgres user:
sudo -i -u postgres psql
Note: Please note that Citus reports anonymous information about your cluster to the Citus Data company servers. Tolearn more about what information is collected and how to opt out of it, see Checks For Updates and Cluster Statistics.
20 Chapter 5. Multi-Machine Cluster

Citus Documentation, Release 8.2
5.2 Fedora, CentOS, or Red Hat
This section describes the steps needed to set up a multi-node Citus cluster on your own Linux machines from RPMpackages.
5.2.1 Steps to be executed on all nodes
1. Add repository
# Add Citus repository for package managercurl https://install.citusdata.com/community/rpm.sh | sudo bash
2. Install PostgreSQL + Citus and initialize a database
# install PostgreSQL with Citus extensionsudo yum install -y citus82_11# initialize system database (using RHEL 6 vs 7 method as necessary)sudo service postgresql-11 initdb || sudo /usr/pgsql-11/bin/postgresql-11-setup initdb# preload citus extensionecho "shared_preload_libraries = 'citus'" | sudo tee -a /var/lib/pgsql/11/data/→˓postgresql.conf
PostgreSQL adds version-specific binaries in /usr/pgsql-11/bin, but you’ll usually just need psql, whose latest versionis added to your path, and managing the server itself can be done with the service command. 3. Configure connectionand authentication
Before starting the database let’s change its access permissions. By default the database server listens only to clients onlocalhost. As a part of this step, we instruct it to listen on all IP interfaces, and then configure the client authenticationfile to allow all incoming connections from the local network.
sudo vi /var/lib/pgsql/11/data/postgresql.conf
# Uncomment listen_addresses for the changes to take effectlisten_addresses = '*'
sudo vi /var/lib/pgsql/11/data/pg_hba.conf
# Allow unrestricted access to nodes in the local network. The following ranges# correspond to 24, 20, and 16-bit blocks in Private IPv4 address spaces.host all all 10.0.0.0/8 trust
# Also allow the host unrestricted access to connect to itselfhost all all 127.0.0.1/32 trusthost all all ::1/128 trust
Note: Your DNS settings may differ. Also these settings are too permissive for some environments, see our notesabout Increasing Worker Security. The PostgreSQL manual explains how to make them more restrictive.
4. Start database servers, create Citus extension
# start the db serversudo service postgresql-11 restart
5.2. Fedora, CentOS, or Red Hat 21

Citus Documentation, Release 8.2
# and make it start automatically when computer doessudo chkconfig postgresql-11 on
You must add the Citus extension to every database you would like to use in a cluster. The following example addsthe extension to the default database which is named postgres.
sudo -i -u postgres psql -c "CREATE EXTENSION citus;"
5.2.2 Steps to be executed on the coordinator node
The steps listed below must be executed only on the coordinator node after the previously mentioned steps have beenexecuted.
1. Add worker node information
We need to inform the coordinator about its workers. To add this information, we call a UDF which adds the nodeinformation to the pg_dist_node catalog table, which the coordinator uses to get the list of worker nodes. For ourexample, we assume that there are two workers (named worker-101, worker-102). Add the workers’ DNS names (orIP addresses) and server ports to the table.
sudo -i -u postgres psql -c "SELECT * from master_add_node('worker-101', 5432);"sudo -i -u postgres psql -c "SELECT * from master_add_node('worker-102', 5432);"
2. Verify that installation has succeeded
To verify that the installation has succeeded, we check that the coordinator node has picked up the desired workerconfiguration. This command when run in the psql shell should output the worker nodes we added to the pg_dist_nodetable above.
sudo -i -u postgres psql -c "SELECT * FROM master_get_active_worker_nodes();"
Ready to use Citus
At this step, you have completed the installation process and are ready to use your Citus cluster. The new Citusdatabase is accessible in psql through the postgres user:
sudo -i -u postgres psql
Note: Please note that Citus reports anonymous information about your cluster to the Citus Data company servers. Tolearn more about what information is collected and how to opt out of it, see Checks For Updates and Cluster Statistics.
5.3 AWS CloudFormation
Warning: CloudFormation is deprecated, and can deploy only Citus versions 8.0 and below. For a more flexiblereplacement, we suggest Citus Cloud.
You can manage a Citus cluster manually on EC2 instances using CloudFormation. The CloudFormation template forCitus enables users to start a Citus cluster on AWS in just a few clicks, with also cstore_fdw extension for columnarstorage is pre-installed. The template automates the installation and configuration process so that the users don’t needto do any extra configuration steps while installing Citus.
22 Chapter 5. Multi-Machine Cluster

Citus Documentation, Release 8.2
Please ensure that you have an active AWS account and an Amazon EC2 key pair before proceeding with the nextsteps.
Introduction
CloudFormation lets you create a “stack” of AWS resources, such as EC2 instances and security groups, from atemplate defined in a JSON file. You can create multiple stacks from the same template without conflict, as long asthey have unique stack names.
Below, we explain in detail the steps required to setup a multi-node Citus cluster on AWS.
1. Start a Citus cluster
Note: You might need to login to AWS at this step if you aren’t already logged in.
2. Select Citus template
You will see select template screen. Citus template is already selected, just click Next.
3. Fill the form with details about your cluster
In the form, pick a unique name for your stack. You can customize your cluster setup by setting availability zones,number of workers and the instance types. You also need to fill in the AWS keypair which you will use to access thecluster.
5.3. AWS CloudFormation 23

Citus Documentation, Release 8.2
Note: Please ensure that you choose unique names for all your clusters. Otherwise, the cluster creation may fail withthe error “Template_name template already created”.
Note: If you want to launch a cluster in a region other than US East, you can update the region in the top-right cornerof the AWS console as shown below.
4. Acknowledge IAM capabilities
The next screen displays Tags and a few advanced options. For simplicity, we use the default options and click Next.
Finally, you need to acknowledge IAM capabilities, which give the coordinator node limited access to the EC2 APIsto obtain the list of worker IPs. Your AWS account needs to have IAM access to perform this step. After ticking thecheckbox, you can click on Create.
5. Cluster launching
After the above steps, you will be redirected to the CloudFormation console. You can click the refresh button on thetop-right to view your stack. In about 10 minutes, stack creation will complete and the hostname of the coordinatornode will appear in the Outputs tab.
24 Chapter 5. Multi-Machine Cluster

Citus Documentation, Release 8.2
Note: Sometimes, you might not see the outputs tab on your screen by default. In that case, you should click on“restore” from the menu on the bottom right of your screen.
Troubleshooting:
You can use the cloudformation console shown above to monitor your cluster.
If something goes wrong during set-up, the stack will be rolled back but not deleted. In that case, you can either use adifferent stack name or delete the old stack before creating a new one with the same name.
6. Login to the cluster
Once the cluster creation completes, you can immediately connect to the coordinator node using SSH with usernameec2-user and the keypair you filled in. For example:
ssh -i your-keypair.pem [email protected]
7. Ready to use the cluster
At this step, you have completed the installation process and are ready to use the Citus cluster. You can now login tothe coordinator node and start executing commands. The command below, when run in the psql shell, should outputthe worker nodes mentioned in the pg_dist_node.
/usr/pgsql-9.6/bin/psql -h localhost -d postgresselect * from master_get_active_worker_nodes();
8. Cluster notes
The template automatically tunes the system configuration for Citus and sets up RAID on the SSD drives whereappropriate, making it a great starting point even for production systems.
The database and its configuration files are stored in /data/base. So, to change any configuration parameters, you needto update the postgresql.conf file at /data/base/postgresql.conf.
Similarly to restart the database, you can use the command:
/usr/pgsql-9.6/bin/pg_ctl -D /data/base -l logfile restart
5.3. AWS CloudFormation 25
Citus Documentation, Release 8.2
Note: You typically want to avoid making changes to resources created by CloudFormation, such as terminating EC2instances. To shut the cluster down, you can simply delete the stack in the CloudFormation console.
26 Chapter 5. Multi-Machine Cluster

CHAPTER 6
Managed Deployment
In addition to installing Citus yourself, you can rent a fully managed instance. “Citus-as-a-Service” is an easy wayto provision and monitor a high-availability cluster. We offer managed deployments on both the Microsoft Azureplatform, and Amazon Web Services.
Learn more:
27

Citus Documentation, Release 8.2
28 Chapter 6. Managed Deployment
CHAPTER 7
Multi-tenant Applications
Contents
• Multi-tenant Applications
– Let’s Make an App – Ad Analytics
– Scaling the Relational Data Model
– Preparing Tables and Ingesting Data
* Try it Yourself
– Integrating Applications
– Sharing Data Between Tenants
– Online Changes to the Schema
– When Data Differs Across Tenants
– Scaling Hardware Resources
– Dealing with Big Tenants
– Where to Go From Here
Estimated read time: 30 minutes
If you’re building a Software-as-a-service (SaaS) application, you probably already have the notion of tenancy builtinto your data model. Typically, most information relates to tenants / customers / accounts and the database tablescapture this natural relation.
For SaaS applications, each tenant’s data can be stored together in a single database instance and kept isolated fromand invisible to other tenants. This is efficient in three ways. First application improvements apply to all clients.Second, sharing a database between tenants uses hardware efficiently. Last, it is much simpler to manage a singledatabase for all tenants than a different database server for each tenant.
However, a single relational database instance has traditionally had trouble scaling to the volume of data needed fora large multi-tenant application. Developers were forced to relinquish the benefits of the relational model when dataexceeded the capacity of a single database node.
Citus allows users to write multi-tenant applications as if they are connecting to a single PostgreSQL database, whenin fact the database is a horizontally scalable cluster of machines. Client code requires minimal modifications and cancontinue to use full SQL capabilities.
This guide takes a sample multi-tenant application and describes how to model it for scalability with Citus. Along the
29

Citus Documentation, Release 8.2
way we examine typical challenges for multi-tenant applications like isolating tenants from noisy neighbors, scalinghardware to accommodate more data, and storing data that differs across tenants. PostgreSQL and Citus provide allthe tools needed to handle these challenges, so let’s get building.
7.1 Let’s Make an App – Ad Analytics
We’ll build the back-end for an application that tracks online advertising performance and provides an analytics dash-board on top. It’s a natural fit for a multi-tenant application because user requests for data concern one (their own)company at a time. Code for the full example application is available on Github.
Let’s start by considering a simplified schema for this application. The application must keep track of multiple com-panies, each of which runs advertising campaigns. Campaigns have many ads, and each ad has associated records ofits clicks and impressions.
Here is the example schema. We’ll make some minor changes later, which allow us to effectively distribute and isolatethe data in a distributed environment.
CREATE TABLE companies (id bigserial PRIMARY KEY,name text NOT NULL,image_url text,created_at timestamp without time zone NOT NULL,updated_at timestamp without time zone NOT NULL
);
CREATE TABLE campaigns (id bigserial PRIMARY KEY,company_id bigint REFERENCES companies (id),name text NOT NULL,cost_model text NOT NULL,state text NOT NULL,monthly_budget bigint,blacklisted_site_urls text[],created_at timestamp without time zone NOT NULL,updated_at timestamp without time zone NOT NULL
);
CREATE TABLE ads (id bigserial PRIMARY KEY,campaign_id bigint REFERENCES campaigns (id),name text NOT NULL,image_url text,target_url text,impressions_count bigint DEFAULT 0,clicks_count bigint DEFAULT 0,created_at timestamp without time zone NOT NULL,updated_at timestamp without time zone NOT NULL
);
CREATE TABLE clicks (id bigserial PRIMARY KEY,ad_id bigint REFERENCES ads (id),clicked_at timestamp without time zone NOT NULL,site_url text NOT NULL,cost_per_click_usd numeric(20,10),user_ip inet NOT NULL,user_data jsonb NOT NULL
30 Chapter 7. Multi-tenant Applications

Citus Documentation, Release 8.2
);
CREATE TABLE impressions (id bigserial PRIMARY KEY,ad_id bigint REFERENCES ads (id),seen_at timestamp without time zone NOT NULL,site_url text NOT NULL,cost_per_impression_usd numeric(20,10),user_ip inet NOT NULL,user_data jsonb NOT NULL
);
There are modifications we can make to the schema which will give it a performance boost in a distributed environmentlike Citus. To see how, we must become familiar with how Citus distributes data and executes queries.
7.2 Scaling the Relational Data Model
The relational data model is great for applications. It protects data integrity, allows flexible queries, and accommodateschanging data. Traditionally the only problem was that relational databases weren’t considered capable of scaling tothe workloads needed for big SaaS applications. Developers had to put up with NoSQL databases – or a collection ofbackend services – to reach that size.
With Citus you can keep your data model and make it scale. Citus appears to applications as a single PostgreSQLdatabase, but it internally routes queries to an adjustable number of physical servers (nodes) which can process requestsin parallel.
Multi-tenant applications have a nice property that we can take advantage of: queries usually always request informa-tion for one tenant at a time, not a mix of tenants. For instance, when a salesperson is searching prospect informationin a CRM, the search results are specific to his employer; other businesses’ leads and notes are not included.
Because application queries are restricted to a single tenant, such as a store or company, one approach for makingmulti-tenant application queries fast is to store all data for a given tenant on the same node. This minimizes networkoverhead between the nodes and allows Citus to support all your application’s joins, key constraints and transactionsefficiently. With this, you can scale across multiple nodes without having to totally re-write or re-architect yourapplication.
7.2. Scaling the Relational Data Model 31

Citus Documentation, Release 8.2
We do this in Citus by making sure every table in our schema has a column to clearly mark which tenant owns whichrows. In the ad analytics application the tenants are companies, so we must ensure all tables have a company_idcolumn.
We can tell Citus to use this column to read and write rows to the same node when the rows are marked for the samecompany. In Citus’ terminology company_id will be the distribution column, which you can learn more about inDistributed Data Modeling.
7.3 Preparing Tables and Ingesting Data
In the previous section we identified the correct distribution column for our multi-tenant application: the company id.Even in a single-machine database it can be useful to denormalize tables with the addition of company id, whether itbe for row-level security or for additional indexing. The extra benefit, as we saw, is that including the extra columnhelps for multi-machine scaling as well.
The schema we have created so far uses a separate id column as primary key for each table. Citus requires that primaryand foreign key constraints include the distribution column. This requirement makes enforcing these constraints muchmore efficient in a distributed environment as only a single node has to be checked to guarantee them.
In SQL, this requirement translates to making primary and foreign keys composite by including company_id. Thisis compatible with the multi-tenant case because what we really need there is to ensure uniqueness on a per-tenantbasis.
Putting it all together, here are the changes which prepare the tables for distribution by company_id.
CREATE TABLE companies (id bigserial PRIMARY KEY,
32 Chapter 7. Multi-tenant Applications

Citus Documentation, Release 8.2
name text NOT NULL,image_url text,created_at timestamp without time zone NOT NULL,updated_at timestamp without time zone NOT NULL
);
CREATE TABLE campaigns (id bigserial, -- was: PRIMARY KEYcompany_id bigint REFERENCES companies (id),name text NOT NULL,cost_model text NOT NULL,state text NOT NULL,monthly_budget bigint,blacklisted_site_urls text[],created_at timestamp without time zone NOT NULL,updated_at timestamp without time zone NOT NULL,PRIMARY KEY (company_id, id) -- added
);
CREATE TABLE ads (id bigserial, -- was: PRIMARY KEYcompany_id bigint, -- addedcampaign_id bigint, -- was: REFERENCES campaigns (id)name text NOT NULL,image_url text,target_url text,impressions_count bigint DEFAULT 0,clicks_count bigint DEFAULT 0,created_at timestamp without time zone NOT NULL,updated_at timestamp without time zone NOT NULL,PRIMARY KEY (company_id, id), -- addedFOREIGN KEY (company_id, campaign_id) -- addedREFERENCES campaigns (company_id, id)
);
CREATE TABLE clicks (id bigserial, -- was: PRIMARY KEYcompany_id bigint, -- addedad_id bigint, -- was: REFERENCES ads (id),clicked_at timestamp without time zone NOT NULL,site_url text NOT NULL,cost_per_click_usd numeric(20,10),user_ip inet NOT NULL,user_data jsonb NOT NULL,PRIMARY KEY (company_id, id), -- addedFOREIGN KEY (company_id, ad_id) -- addedREFERENCES ads (company_id, id)
);
CREATE TABLE impressions (id bigserial, -- was: PRIMARY KEYcompany_id bigint, -- addedad_id bigint, -- was: REFERENCES ads (id),seen_at timestamp without time zone NOT NULL,site_url text NOT NULL,cost_per_impression_usd numeric(20,10),user_ip inet NOT NULL,user_data jsonb NOT NULL,
7.3. Preparing Tables and Ingesting Data 33
Citus Documentation, Release 8.2
PRIMARY KEY (company_id, id), -- addedFOREIGN KEY (company_id, ad_id) -- addedREFERENCES ads (company_id, id)
);
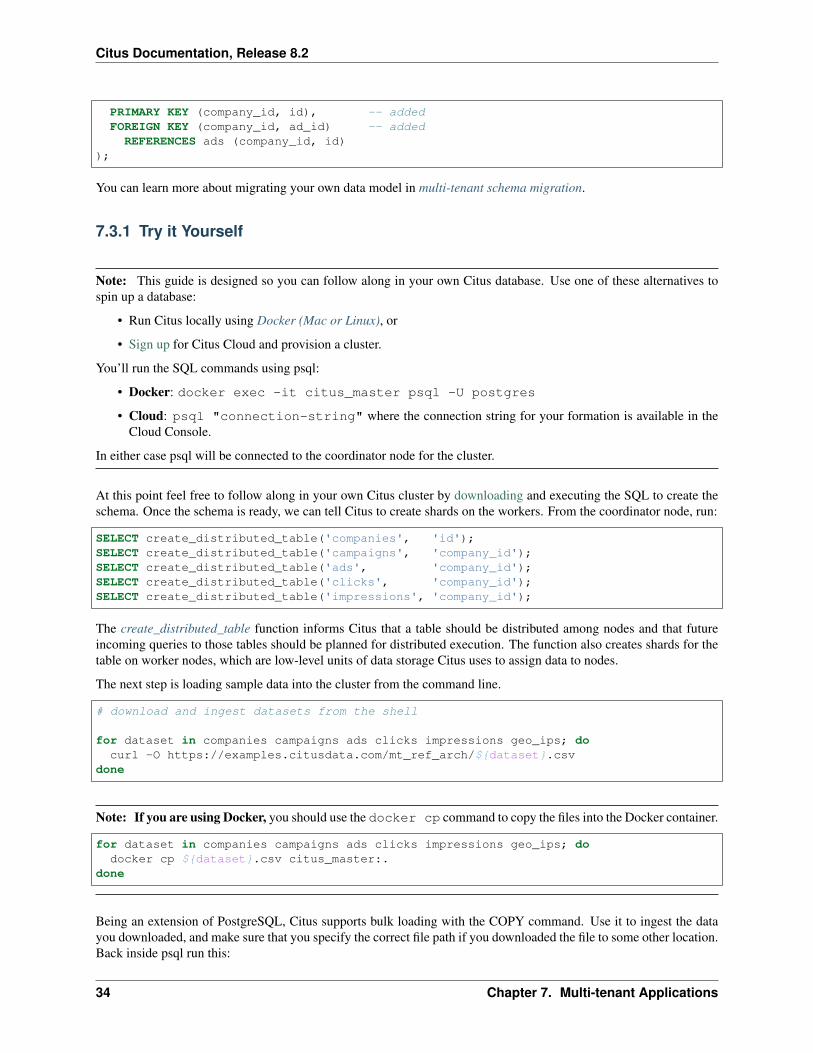
You can learn more about migrating your own data model in multi-tenant schema migration.
7.3.1 Try it Yourself
Note: This guide is designed so you can follow along in your own Citus database. Use one of these alternatives tospin up a database:
• Run Citus locally using Docker (Mac or Linux), or
• Sign up for Citus Cloud and provision a cluster.
You’ll run the SQL commands using psql:
• Docker: docker exec -it citus_master psql -U postgres
• Cloud: psql "connection-string" where the connection string for your formation is available in theCloud Console.
In either case psql will be connected to the coordinator node for the cluster.
At this point feel free to follow along in your own Citus cluster by downloading and executing the SQL to create theschema. Once the schema is ready, we can tell Citus to create shards on the workers. From the coordinator node, run:
SELECT create_distributed_table('companies', 'id');SELECT create_distributed_table('campaigns', 'company_id');SELECT create_distributed_table('ads', 'company_id');SELECT create_distributed_table('clicks', 'company_id');SELECT create_distributed_table('impressions', 'company_id');
The create_distributed_table function informs Citus that a table should be distributed among nodes and that futureincoming queries to those tables should be planned for distributed execution. The function also creates shards for thetable on worker nodes, which are low-level units of data storage Citus uses to assign data to nodes.
The next step is loading sample data into the cluster from the command line.
# download and ingest datasets from the shell
for dataset in companies campaigns ads clicks impressions geo_ips; docurl -O https://examples.citusdata.com/mt_ref_arch/${dataset}.csv
done
Note: If you are using Docker, you should use the docker cp command to copy the files into the Docker container.
for dataset in companies campaigns ads clicks impressions geo_ips; dodocker cp ${dataset}.csv citus_master:.
done
Being an extension of PostgreSQL, Citus supports bulk loading with the COPY command. Use it to ingest the datayou downloaded, and make sure that you specify the correct file path if you downloaded the file to some other location.Back inside psql run this:
34 Chapter 7. Multi-tenant Applications
Citus Documentation, Release 8.2
\copy companies from 'companies.csv' with csv\copy campaigns from 'campaigns.csv' with csv\copy ads from 'ads.csv' with csv\copy clicks from 'clicks.csv' with csv\copy impressions from 'impressions.csv' with csv
7.4 Integrating Applications
Here’s the good news: once you have made the slight schema modification outlined earlier, your application can scalewith very little work. You’ll just connect the app to Citus and let the database take care of keeping the queries fast andthe data safe.
Any application queries or update statements which include a filter on company_id will continue to work exactly asthey are. As mentioned earlier, this kind of filter is common in multi-tenant apps. When using an Object-RelationalMapper (ORM) you can recognize these queries by methods such as where or filter.
ActiveRecord:
Impression.where(company_id: 5).count
Django:
Impression.objects.filter(company_id=5).count()
Basically when the resulting SQL executed in the database contains a WHERE company_id = :value clause onevery table (including tables in JOIN queries), then Citus will recognize that the query should be routed to a singlenode and execute it there as it is. This makes sure that all SQL functionality is available. The node is an ordinaryPostgreSQL server after all.
Also, to make it even simpler, you can use our activerecord-multi-tenant library for Rails, or django-multitenant forDjango which will automatically add these filters to all your queries, even the complicated ones. Check out ourmigration guides for Ruby on Rails and Django.
This guide is framework-agnostic, so we’ll point out some Citus features using SQL. Use your imagination for howthese statements would be expressed in your language of choice.
Here is a simple query and update operating on a single tenant.
-- campaigns with highest budget
SELECT name, cost_model, state, monthly_budgetFROM campaigns
WHERE company_id = 5ORDER BY monthly_budget DESCLIMIT 10;
-- double the budgets!
UPDATE campaignsSET monthly_budget = monthly_budget*2
WHERE company_id = 5;
A common pain point for users scaling applications with NoSQL databases is the lack of transactions and joins.However, transactions work as you’d expect them to in Citus:
7.4. Integrating Applications 35
Citus Documentation, Release 8.2
-- transactionally reallocate campaign budget money
BEGIN;
UPDATE campaignsSET monthly_budget = monthly_budget + 1000
WHERE company_id = 5AND id = 40;
UPDATE campaignsSET monthly_budget = monthly_budget - 1000
WHERE company_id = 5AND id = 41;
COMMIT;
As a final demo of SQL support, we have a query which includes aggregates and window functions and it works thesame in Citus as it does in PostgreSQL. The query ranks the ads in each campaign by the count of their impressions.
SELECT a.campaign_id,RANK() OVER (PARTITION BY a.campaign_idORDER BY a.campaign_id, count(*) desc
), count(*) as n_impressions, a.idFROM ads as aJOIN impressions as iON i.company_id = a.company_idAND i.ad_id = a.id
WHERE a.company_id = 5GROUP BY a.campaign_id, a.idORDER BY a.campaign_id, n_impressions desc;
In short when queries are scoped to a tenant then inserts, updates, deletes, complex SQL, and transactions all work asexpected.
7.5 Sharing Data Between Tenants
Up until now all tables have been distributed by company_id, but sometimes there is data that can be shared by alltenants, and doesn’t “belong” to any tenant in particular. For instance, all companies using this example ad platformmight want to get geographical information for their audience based on IP addresses. In a single machine databasethis could be accomplished by a lookup table for geo-ip, like the following. (A real table would probably use PostGISbut bear with the simplified example.)
CREATE TABLE geo_ips (addrs cidr NOT NULL PRIMARY KEY,latlon point NOT NULLCHECK (-90 <= latlon[0] AND latlon[0] <= 90 AND
-180 <= latlon[1] AND latlon[1] <= 180));CREATE INDEX ON geo_ips USING gist (addrs inet_ops);
To use this table efficiently in a distributed setup, we need to find a way to co-locate the geo_ips table with clicksfor not just one – but every – company. That way, no network traffic need be incurred at query time. We do this inCitus by designating geo_ips as a reference table.
36 Chapter 7. Multi-tenant Applications

Citus Documentation, Release 8.2
-- Make synchronized copies of geo_ips on all workers
SELECT create_reference_table('geo_ips');
Reference tables are replicated across all worker nodes, and Citus automatically keeps them in sync during modifica-tions. Notice that we call create_reference_table rather than create_distributed_table.
Now that geo_ips is established as a reference table, load it with example data:
\copy geo_ips from 'geo_ips.csv' with csv
Now joining clicks with this table can execute efficiently. We can ask, for example, the locations of everyone whoclicked on ad 290.
SELECT c.id, clicked_at, latlonFROM geo_ips, clicks c
WHERE addrs >> c.user_ipAND c.company_id = 5AND c.ad_id = 290;
7.6 Online Changes to the Schema
Another challenge with multi-tenant systems is keeping the schemas for all the tenants in sync. Any schema changeneeds to be consistently reflected across all the tenants. In Citus, you can simply use standard PostgreSQL DDLcommands to change the schema of your tables, and Citus will propagate them from the coordinator node to theworkers using a two-phase commit protocol.
For example, the advertisements in this application could use a text caption. We can add a column to the table byissuing the standard SQL on the coordinator:
ALTER TABLE adsADD COLUMN caption text;
This updates all the workers as well. Once this command finishes, the Citus cluster will accept queries that read orwrite data in the new caption column.
For a fuller explanation of how DDL commands propagate through the cluster, see Modifying Tables.
7.7 When Data Differs Across Tenants
Given that all tenants share a common schema and hardware infrastructure, how can we accommodate tenants whichwant to store information not needed by others? For example, one of the tenant applications using our advertisingdatabase may want to store tracking cookie information with clicks, whereas another tenant may care about browseragents. Traditionally databases using a shared schema approach for multi-tenancy have resorted to creating a fixednumber of pre-allocated “custom” columns, or having external “extension tables.” However PostgreSQL provides amuch easier way with its unstructured column types, notably JSONB.
Notice that our schema already has a JSONB field in clicks called user_data. Each tenant can use it for flexiblestorage.
Suppose company five includes information in the field to track whether the user is on a mobile device. The companycan query to find who clicks more, mobile or traditional visitors:
7.6. Online Changes to the Schema 37

Citus Documentation, Release 8.2
SELECTuser_data->>'is_mobile' AS is_mobile,count(*) AS count
FROM clicksWHERE company_id = 5GROUP BY user_data->>'is_mobile'ORDER BY count DESC;
The database administrator can even create a partial index to improve speed for an individual tenant’s query patterns.Here is one to improve company 5’s filters for clicks from users on mobile devices:
CREATE INDEX click_user_data_is_mobileON clicks ((user_data->>'is_mobile'))WHERE company_id = 5;
Additionally, PostgreSQL supports GIN indices on JSONB. Creating a GIN index on a JSONB column will create anindex on every key and value within that JSON document. This speeds up a number of JSONB operators such as ?,?|, and ?&.
CREATE INDEX click_user_dataON clicks USING gin (user_data);
-- this speeds up queries like, "which clicks have-- the is_mobile key present in user_data?"
SELECT idFROM clicks
WHERE user_data ? 'is_mobile'AND company_id = 5;
7.8 Scaling Hardware Resources
Note: This section uses features available only in Citus Cloud and Citus Enterprise. Also, please note that thesefeatures are available in Citus Cloud across all plans except for the “Dev Plan”.
Multi-tenant databases should be designed for future scale as business grows or tenants want to store more data. Cituscan scale out easily by adding new machines without having to make any changes or take application downtime.
Being able to rebalance data in the Citus cluster allows you to grow your data size or number of customers and improveperformance on demand. Adding new machines allows you to keep data in memory even when it is much larger thanwhat a single machine can store.
Also, if data increases for only a few large tenants, then you can isolate those particular tenants to separate nodes forbetter performance.
To scale out your Citus cluster, first add a new worker node to it. On Citus Cloud, you can use the slider present in the“Settings” tab, sliding it to add the required number of nodes. Alternately, if you run your own Citus installation, youcan add nodes manually with the master_add_node UDF.
38 Chapter 7. Multi-tenant Applications
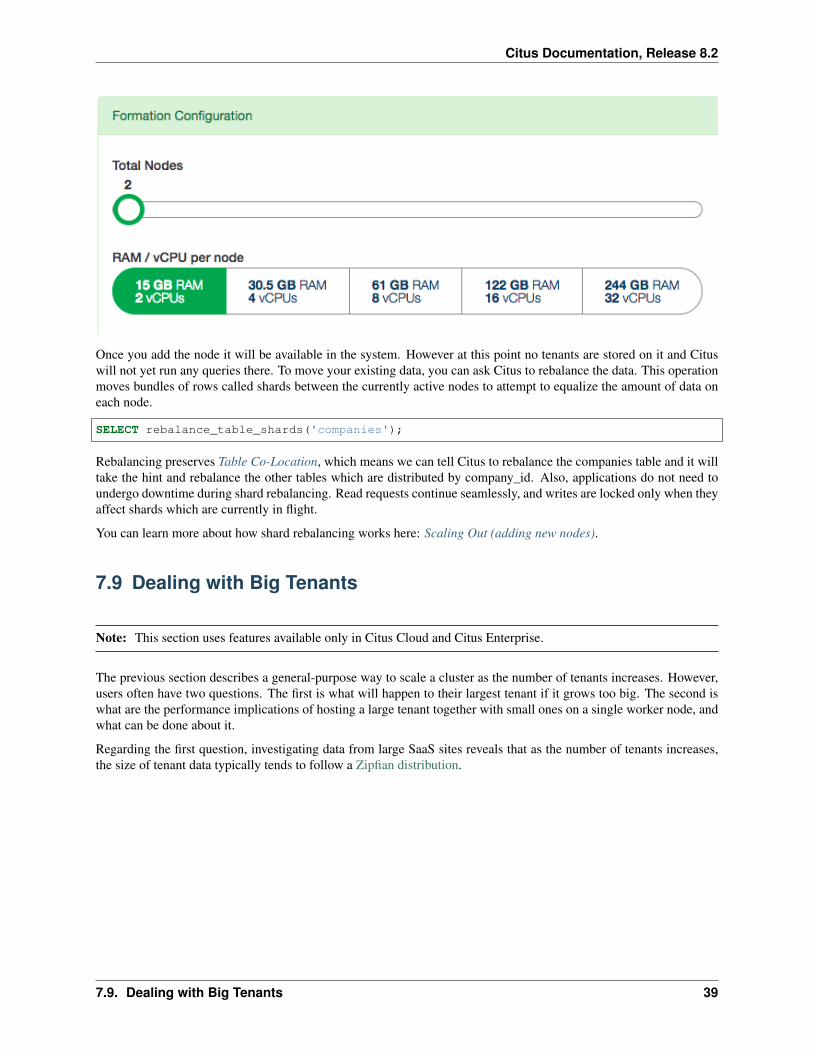
Citus Documentation, Release 8.2
Once you add the node it will be available in the system. However at this point no tenants are stored on it and Cituswill not yet run any queries there. To move your existing data, you can ask Citus to rebalance the data. This operationmoves bundles of rows called shards between the currently active nodes to attempt to equalize the amount of data oneach node.
SELECT rebalance_table_shards('companies');
Rebalancing preserves Table Co-Location, which means we can tell Citus to rebalance the companies table and it willtake the hint and rebalance the other tables which are distributed by company_id. Also, applications do not need toundergo downtime during shard rebalancing. Read requests continue seamlessly, and writes are locked only when theyaffect shards which are currently in flight.
You can learn more about how shard rebalancing works here: Scaling Out (adding new nodes).
7.9 Dealing with Big Tenants
Note: This section uses features available only in Citus Cloud and Citus Enterprise.
The previous section describes a general-purpose way to scale a cluster as the number of tenants increases. However,users often have two questions. The first is what will happen to their largest tenant if it grows too big. The second iswhat are the performance implications of hosting a large tenant together with small ones on a single worker node, andwhat can be done about it.
Regarding the first question, investigating data from large SaaS sites reveals that as the number of tenants increases,the size of tenant data typically tends to follow a Zipfian distribution.
7.9. Dealing with Big Tenants 39

Citus Documentation, Release 8.2
For instance, in a database of 100 tenants, the largest is predicted to account for about 20% of the data. In a morerealistic example for a large SaaS company, if there are 10k tenants, the largest will account for around 2% of the data.Even at 10TB of data, the largest tenant will require 200GB, which can pretty easily fit on a single node.
Another question is regarding performance when large and small tenants are on the same node. Standard shard rebal-ancing will improve overall performance but it may or may not improve the mixing of large and small tenants. Therebalancer simply distributes shards to equalize storage usage on nodes, without examining which tenants are allocatedon each shard.
To improve resource allocation and make guarantees of tenant QoS it is worthwhile to move large tenants to dedicatednodes. Citus provides the tools to do this.
In our case, let’s imagine that our old friend company id=5 is very large. We can isolate the data for this tenant in twosteps. We’ll present the commands here, and you can consult Tenant Isolation to learn more about them.
First sequester the tenant’s data into a bundle (called a shard) suitable to move. The CASCADE option also appliesthis change to the rest of our tables distributed by company_id.
SELECT isolate_tenant_to_new_shard('companies', 5, 'CASCADE'
);
The output is the shard id dedicated to hold company_id=5:
-------------------| isolate_tenant_to_new_shard |-------------------| 102240 |-------------------
Next we move the data across the network to a new dedicated node. Create a new node as described in the previoussection. Take note of its hostname as shown in the Nodes tab of the Cloud Console.
-- find the node currently holding the new shard
40 Chapter 7. Multi-tenant Applications

Citus Documentation, Release 8.2
SELECT nodename, nodeportFROM pg_dist_placement AS placement,
pg_dist_node AS nodeWHERE placement.groupid = node.groupid
AND node.noderole = 'primary'AND shardid = 102240;
-- move the shard to your choice of worker (it will also move the-- other shards created with the CASCADE option)
SELECT master_move_shard_placement(102240,'source_host', source_port,'dest_host', dest_port);
You can confirm the shard movement by querying pg_dist_placement again.
7.10 Where to Go From Here
With this, you now know how to use Citus to power your multi-tenant application for scalability. If you have anexisting schema and want to migrate it for Citus, see Multi-Tenant Transitioning.
To adjust a front-end application, specifically Ruby on Rails or Django, read Ruby on Rails. Finally, try Citus Cloud,the easiest way to manage a Citus cluster, available with discounted developer plan pricing.
7.10. Where to Go From Here 41

Citus Documentation, Release 8.2
42 Chapter 7. Multi-tenant Applications

CHAPTER 8
Real-Time Dashboards
Citus provides real-time queries over large datasets. One workload we commonly see at Citus involves poweringreal-time dashboards of event data.
For example, you could be a cloud services provider helping other businesses monitor their HTTP traffic. Every timeone of your clients receives an HTTP request your service receives a log record. You want to ingest all those recordsand create an HTTP analytics dashboard which gives your clients insights such as the number HTTP errors their sitesserved. It’s important that this data shows up with as little latency as possible so your clients can fix problems withtheir sites. It’s also important for the dashboard to show graphs of historical trends.
Alternatively, maybe you’re building an advertising network and want to show clients clickthrough rates on theircampaigns. In this example latency is also critical, raw data volume is also high, and both historical and live data areimportant.
In this section we’ll demonstrate how to build part of the first example, but this architecture would work equally wellfor the second and many other use-cases.
8.1 Data Model
The data we’re dealing with is an immutable stream of log data. We’ll insert directly into Citus but it’s also commonfor this data to first be routed through something like Kafka. Doing so has the usual advantages, and makes it easier topre-aggregate the data once data volumes become unmanageably high.
We’ll use a simple schema for ingesting HTTP event data. This schema serves as an example to demonstrate theoverall architecture; a real system might use additional columns.
-- this is run on the coordinator
CREATE TABLE http_request (site_id INT,ingest_time TIMESTAMPTZ DEFAULT now(),
url TEXT,request_country TEXT,ip_address TEXT,
status_code INT,response_time_msec INT
);
SELECT create_distributed_table('http_request', 'site_id');
43

Citus Documentation, Release 8.2
When we call create_distributed_table we ask Citus to hash-distribute http_request using the site_id column.That means all the data for a particular site will live in the same shard.
The UDF uses the default configuration values for shard count. We recommend using 2-4x as many shards as CPUcores in your cluster. Using this many shards lets you rebalance data across your cluster after adding new workernodes.
Note: Citus Cloud uses streaming replication to achieve high availability and thus maintaining shard replicaswould be redundant. In any production environment where streaming replication is unavailable, you should setcitus.shard_replication_factor to 2 or higher for fault tolerance.
With this, the system is ready to accept data and serve queries! Keep the following loop running in a psql consolein the background while you continue with the other commands in this article. It generates fake data every second ortwo.
DO $$BEGIN LOOPINSERT INTO http_request (site_id, ingest_time, url, request_country,ip_address, status_code, response_time_msec
) VALUES (trunc(random()*32), clock_timestamp(),concat('http://example.com/', md5(random()::text)),('{China,India,USA,Indonesia}'::text[])[ceil(random()*4)],concat(
trunc(random()*250 + 2), '.',trunc(random()*250 + 2), '.',trunc(random()*250 + 2), '.',trunc(random()*250 + 2)
)::inet,('{200,404}'::int[])[ceil(random()*2)],5+trunc(random()*150)
);COMMIT;PERFORM pg_sleep(random() * 0.25);
END LOOP;END $$;
Once you’re ingesting data, you can run dashboard queries such as:
SELECTsite_id,date_trunc('minute', ingest_time) as minute,COUNT(1) AS request_count,SUM(CASE WHEN (status_code between 200 and 299) THEN 1 ELSE 0 END) as success_count,SUM(CASE WHEN (status_code between 200 and 299) THEN 0 ELSE 1 END) as error_count,SUM(response_time_msec) / COUNT(1) AS average_response_time_msec
FROM http_requestWHERE date_trunc('minute', ingest_time) > now() - '5 minutes'::intervalGROUP BY site_id, minuteORDER BY minute ASC;
The setup described above works, but has two drawbacks:
• Your HTTP analytics dashboard must go over each row every time it needs to generate a graph. For example,if your clients are interested in trends over the past year, your queries will aggregate every row for the past yearfrom scratch.
44 Chapter 8. Real-Time Dashboards

Citus Documentation, Release 8.2
• Your storage costs will grow proportionally with the ingest rate and the length of the queryable history. Inpractice, you may want to keep raw events for a shorter period of time (one month) and look at historical graphsover a longer time period (years).
8.2 Rollups
You can overcome both drawbacks by rolling up the raw data into a pre-aggregated form. Here, we’ll aggregate theraw data into a table which stores summaries of 1-minute intervals. In a production system, you would probably alsowant something like 1-hour and 1-day intervals, these each correspond to zoom-levels in the dashboard. When theuser wants request times for the last month the dashboard can simply read and chart the values for each of the last 30days.
CREATE TABLE http_request_1min (site_id INT,ingest_time TIMESTAMPTZ, -- which minute this row represents
error_count INT,success_count INT,request_count INT,average_response_time_msec INT,CHECK (request_count = error_count + success_count),CHECK (ingest_time = date_trunc('minute', ingest_time))
);
SELECT create_distributed_table('http_request_1min', 'site_id');
CREATE INDEX http_request_1min_idx ON http_request_1min (site_id, ingest_time);
This looks a lot like the previous code block. Most importantly: It also shards on site_id and uses the same defaultconfiguration for shard count and replication factor. Because all three of those match, there’s a 1-to-1 correspondencebetween http_request shards and http_request_1min shards, and Citus will place matching shards on thesame worker. This is called co-location; it makes queries such as joins faster and our rollups possible.
In order to populate http_request_1min we’re going to periodically run an INSERT INTO SELECT. This ispossible because the tables are co-located. The following function wraps the rollup query up for convenience.
8.2. Rollups 45

Citus Documentation, Release 8.2
-- single-row table to store when we rolled up lastCREATE TABLE latest_rollup (
minute timestamptz PRIMARY KEY,
-- "minute" should be no more precise than a minuteCHECK (minute = date_trunc('minute', minute))
);
-- initialize to a time long agoINSERT INTO latest_rollup VALUES ('10-10-1901');
-- function to do the rollupCREATE OR REPLACE FUNCTION rollup_http_request() RETURNS void AS $$DECLARE
curr_rollup_time timestamptz := date_trunc('minute', now());last_rollup_time timestamptz := minute from latest_rollup;
BEGININSERT INTO http_request_1min (site_id, ingest_time, request_count,success_count, error_count, average_response_time_msec
) SELECTsite_id,date_trunc('minute', ingest_time),COUNT(1) as request_count,SUM(CASE WHEN (status_code between 200 and 299) THEN 1 ELSE 0 END) as success_
→˓count,SUM(CASE WHEN (status_code between 200 and 299) THEN 0 ELSE 1 END) as error_count,SUM(response_time_msec) / COUNT(1) AS average_response_time_msec
FROM http_request-- roll up only data new since last_rollup_timeWHERE date_trunc('minute', ingest_time) <@
tstzrange(last_rollup_time, curr_rollup_time, '(]')GROUP BY 1, 2;
-- update the value in latest_rollup so that next time we run the-- rollup it will operate on data newer than curr_rollup_timeUPDATE latest_rollup SET minute = curr_rollup_time;
END;$$ LANGUAGE plpgsql;
Note: The above function should be called every minute. You could do this by adding a crontab entry on thecoordinator node:
* * * * * psql -c 'SELECT rollup_http_request();'
Alternately, an extension such as pg_cron allows you to schedule recurring queries directly from the database.
The dashboard query from earlier is now a lot nicer:
SELECT site_id, ingest_time as minute, request_count,success_count, error_count, average_response_time_msec
FROM http_request_1minWHERE ingest_time > date_trunc('minute', now()) - '5 minutes'::interval;
46 Chapter 8. Real-Time Dashboards

Citus Documentation, Release 8.2
8.3 Expiring Old Data
The rollups make queries faster, but we still need to expire old data to avoid unbounded storage costs. Simply decidehow long you’d like to keep data for each granularity, and use standard queries to delete expired data. In the followingexample, we decided to keep raw data for one day, and per-minute aggregations for one month:
DELETE FROM http_request WHERE ingest_time < now() - interval '1 day';DELETE FROM http_request_1min WHERE ingest_time < now() - interval '1 month';
In production you could wrap these queries in a function and call it every minute in a cron job.
Data expiration can go even faster by using table range partitioning on top of Citus hash distribution. See the TimeseriesData section for a detailed example.
Those are the basics! We provided an architecture that ingests HTTP events and then rolls up these events intotheir pre-aggregated form. This way, you can both store raw events and also power your analytical dashboards withsubsecond queries.
The next sections extend upon the basic architecture and show you how to resolve questions which often appear.
8.4 Approximate Distinct Counts
A common question in HTTP analytics deals with approximate distinct counts: How many unique visitors visited yoursite over the last month? Answering this question exactly requires storing the list of all previously-seen visitors in therollup tables, a prohibitively large amount of data. However an approximate answer is much more manageable.
A datatype called hyperloglog, or HLL, can answer the query approximately; it takes a surprisingly small amount ofspace to tell you approximately how many unique elements are in a set. Its accuracy can be adjusted. We’ll use oneswhich, using only 1280 bytes, will be able to count up to tens of billions of unique visitors with at most 2.2% error.
An equivalent problem appears if you want to run a global query, such as the number of unique IP addresses whichvisited any of your client’s sites over the last month. Without HLLs this query involves shipping lists of IP addressesfrom the workers to the coordinator for it to deduplicate. That’s both a lot of network traffic and a lot of computation.By using HLLs you can greatly improve query speed.
First you must install the HLL extension; the github repo has instructions. Next, you have to enable it:
---------------------------------------------------------- Run on all nodes ------------------------------------
CREATE EXTENSION hll;
Note: This is not necessary on Citus Cloud, which has HLL already installed, along with other useful Extensions.
Now we’re ready to track IP addresses in our rollup with HLL. First add a column to the rollup table.
ALTER TABLE http_request_1min ADD COLUMN distinct_ip_addresses hll;
Next use our custom aggregation to populate the column. Just add it to the query in our rollup function:
@@ -1,10 +1,12 @@INSERT INTO http_request_1min (site_id, ingest_time, request_count,success_count, error_count, average_response_time_msec,
+ distinct_ip_addresses
8.3. Expiring Old Data 47

Citus Documentation, Release 8.2
) SELECTsite_id,minute,COUNT(1) as request_count,SUM(CASE WHEN (status_code between 200 and 299) THEN 1 ELSE 0 END) as success_
→˓count,SUM(CASE WHEN (status_code between 200 and 299) THEN 0 ELSE 1 END) as error_count,SUM(response_time_msec) / COUNT(1) AS average_response_time_msec,
+ hll_add_agg(hll_hash_text(ip_address)) AS distinct_ip_addressesFROM http_request
Dashboard queries are a little more complicated, you have to read out the distinct number of IP addresses by callingthe hll_cardinality function:
SELECT site_id, ingest_time as minute, request_count,success_count, error_count, average_response_time_msec,hll_cardinality(distinct_ip_addresses) AS distinct_ip_address_count
FROM http_request_1minWHERE ingest_time > date_trunc('minute', now()) - interval '5 minutes';
HLLs aren’t just faster, they let you do things you couldn’t previously. Say we did our rollups, but instead of usingHLLs we saved the exact unique counts. This works fine, but you can’t answer queries such as “how many distinctsessions were there during this one-week period in the past we’ve thrown away the raw data for?”.
With HLLs, this is easy. You can compute distinct IP counts over a time period with the following query:
SELECT hll_cardinality(hll_union_agg(distinct_ip_addresses))FROM http_request_1minWHERE ingest_time > date_trunc('minute', now()) - '5 minutes'::interval;
You can find more information on HLLs in the project’s GitHub repository.
8.5 Unstructured Data with JSONB
Citus works well with Postgres’ built-in support for unstructured data types. To demonstrate this, let’s keep track ofthe number of visitors which came from each country. Using a semi-structure data type saves you from needing toadd a column for every individual country and ending up with rows that have hundreds of sparsely filled columns. Wehave a blog post explaining which format to use for your semi-structured data. The post recommends JSONB, herewe’ll demonstrate how to incorporate JSONB columns into your data model.
First, add the new column to our rollup table:
ALTER TABLE http_request_1min ADD COLUMN country_counters JSONB;
Next, include it in the rollups by modifying the rollup function:
@@ -1,14 +1,19 @@INSERT INTO http_request_1min (site_id, ingest_time, request_count,success_count, error_count, average_response_time_msec,
+ country_counters) SELECTsite_id,minute,COUNT(1) as request_count,SUM(CASE WHEN (status_code between 200 and 299) THEN 1 ELSE 0 END) as success_c
48 Chapter 8. Real-Time Dashboards
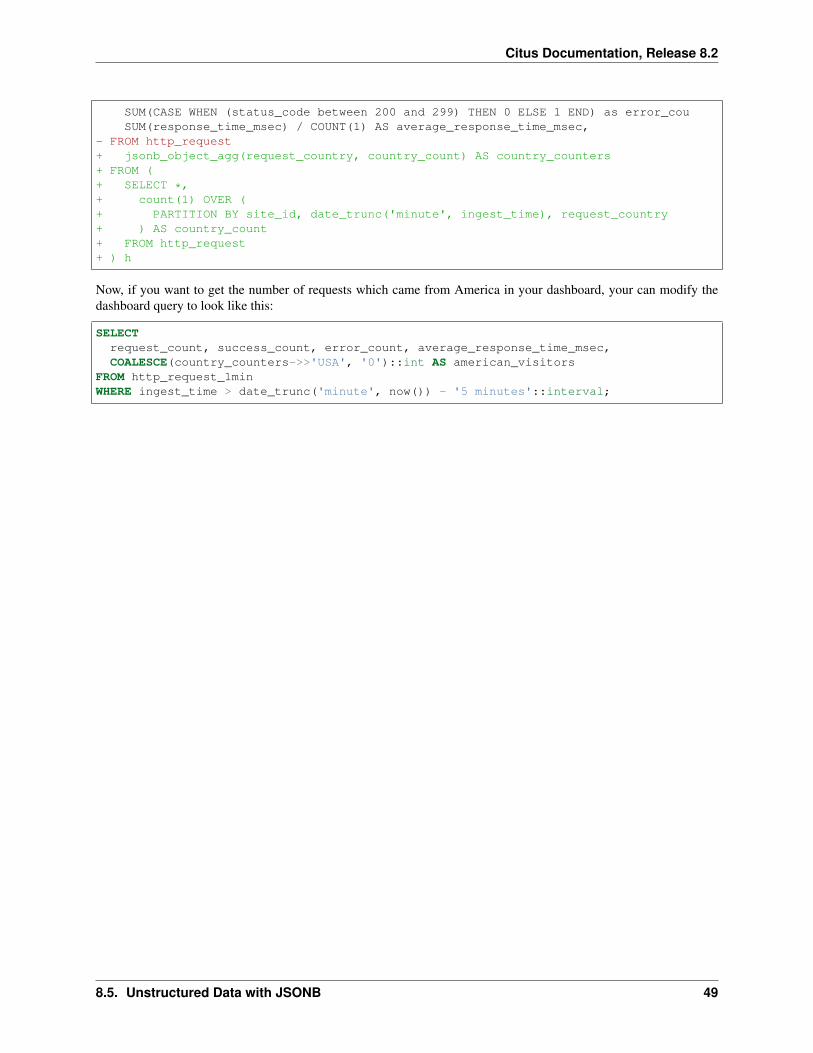
Citus Documentation, Release 8.2
SUM(CASE WHEN (status_code between 200 and 299) THEN 0 ELSE 1 END) as error_couSUM(response_time_msec) / COUNT(1) AS average_response_time_msec,
- FROM http_request+ jsonb_object_agg(request_country, country_count) AS country_counters+ FROM (+ SELECT *,+ count(1) OVER (+ PARTITION BY site_id, date_trunc('minute', ingest_time), request_country+ ) AS country_count+ FROM http_request+ ) h
Now, if you want to get the number of requests which came from America in your dashboard, your can modify thedashboard query to look like this:
SELECTrequest_count, success_count, error_count, average_response_time_msec,COALESCE(country_counters->>'USA', '0')::int AS american_visitors
FROM http_request_1minWHERE ingest_time > date_trunc('minute', now()) - '5 minutes'::interval;
8.5. Unstructured Data with JSONB 49
Citus Documentation, Release 8.2
50 Chapter 8. Real-Time Dashboards

CHAPTER 9
Timeseries Data
In a time-series workload, applications (such as some Real-Time Apps) query recent information, while archiving oldinformation.
To deal with this workload, a single-node PostgreSQL database would typically use table partitioning to break a bigtable of time-ordered data into multiple inherited tables with each containing different time ranges.
Storing data in multiple physical tables speeds up data expiration. In a single big table, deleting rows incurs the costof scanning to find which to delete, and then vacuuming the emptied space. On the other hand, dropping a partition isa fast operation independent of data size. It’s the equivalent of simply removing files on disk that contain the data.
Partitioning a table also makes indices smaller and faster within each date range. Queries operating on recent data arelikely to operate on “hot” indices that fit in memory. This speeds up reads.
Also inserts have smaller indices to update, so they go faster too.
51

Citus Documentation, Release 8.2
Time-based partitioning makes most sense when:
1. Most queries access a very small subset of the most recent data
2. Older data is periodically expired (deleted/dropped)
Keep in mind that, in the wrong situation, reading all these partitions can hurt overhead more than it helps. Howeverin the right situations it is quite helpful. For example, when keeping a year of time series data and regularly queryingonly the most recent week.
9.1 Scaling Timeseries Data on Citus
We can mix the single-node table partitioning techniques with Citus’ distributed sharding to make a scalable time-series database. It’s the best of both worlds. It’s especially elegant atop the declarative table partitioning in Postgres10.
For example, let’s distribute and partition a table holding historical GitHub events data.
Each record in this GitHub data set represents an event created in GitHub, along with key information regarding theevent such as event type, creation date, and the user who created the event.
The first step is to create and partition the table by time as we would in a single-node PostgreSQL database:
-- the separate schema will be useful laterCREATE SCHEMA github;
-- declaratively partitioned tableCREATE TABLE github.events (
event_id bigint,event_type text,event_public boolean,
52 Chapter 9. Timeseries Data

Citus Documentation, Release 8.2
repo_id bigint,payload jsonb,repo jsonb, actor jsonb,org jsonb,created_at timestamp
) PARTITION BY RANGE (created_at);
Notice the PARTITION BY RANGE (created_at). This tells Postgres that the table will be partitioned by thecreated_at column in ordered ranges. We have not yet created any partitions for specific ranges, though.
Before creating specific partitions, let’s distribute the table in Citus. We’ll shard by repo_id, meaning the eventswill be clustered into shards per repository.
SELECT create_distributed_table('github.events', 'repo_id');
At this point Citus has created shards for this table across worker nodes. Internally each shard is a table with the namegithub.events_N for each shard identifier N. Also, Citus propagated the partitioning information, and each ofthese shards has Partition key: RANGE (created_at) declared.
A partitioned table cannot directly contain data, it is more like a view across its partitions. Thus the shards are not yetready to hold data. We need to manually create partitions and specify their time ranges, after which we can insert datathat match the ranges.
-- manually make a partition for 2016 eventsCREATE TABLE github.events_2016 PARTITION OF github.eventsFOR VALUES FROM ('2016-01-01') TO ('2016-12-31');
The coordinator node now has the tables github.events and github.events_2016. Citus will propagatepartition creation to all the shards, creating a partition for each shard.
9.2 Automating Partition Creation
In the previous section we manually created a partition of the github.events table. It’s tedious to keep doingthis, especially when using narrower partitions holding less than a year’s range of data. It’s more pleasant to let thepg_partman extension automatically create partitions on demand. The core functionality of pg_partman works out ofthe box with Citus when using it with native partitioning.
First clone, build, and install the pg_partman extension. Then tell partman we want to make partitions that each holdone hour of data. This will create the initial empty hourly partitions:
CREATE SCHEMA partman;CREATE EXTENSION pg_partman WITH SCHEMA partman;
-- Partition the table into hourly ranges of "created_at"SELECT partman.create_parent('github.events', 'created_at', 'native', 'hourly');UPDATE partman.part_config SET infinite_time_partitions = true;
Running \d+ github.events will now show more partitions:
\d+ github.eventsTable "github.events"
Column | Type | Collation | Nullable | Default |→˓Storage | Stats target | Description--------------+-----------------------------+-----------+----------+---------+--------→˓--+--------------+-------------event_id | bigint | | | | plain→˓ | |
9.2. Automating Partition Creation 53

Citus Documentation, Release 8.2
event_type | text | | | |→˓extended | |event_public | boolean | | | | plain→˓ | |repo_id | bigint | | | | plain→˓ | |payload | jsonb | | | |→˓extended | |repo | jsonb | | | |→˓extended | |actor | jsonb | | | |→˓extended | |org | jsonb | | | |→˓extended | |created_at | timestamp without time zone | | | | plain→˓ | |Partition key: RANGE (created_at)Partitions: github.events_p2018_01_15_0700 FOR VALUES FROM ('2018-01-15 07:00:00') TO→˓('2018-01-15 08:00:00'),
github.events_p2018_01_15_0800 FOR VALUES FROM ('2018-01-15 08:00:00') TO→˓('2018-01-15 09:00:00'),
github.events_p2018_01_15_0900 FOR VALUES FROM ('2018-01-15 09:00:00') TO→˓('2018-01-15 10:00:00'),
github.events_p2018_01_15_1000 FOR VALUES FROM ('2018-01-15 10:00:00') TO→˓('2018-01-15 11:00:00'),
github.events_p2018_01_15_1100 FOR VALUES FROM ('2018-01-15 11:00:00') TO→˓('2018-01-15 12:00:00'),
github.events_p2018_01_15_1200 FOR VALUES FROM ('2018-01-15 12:00:00') TO→˓('2018-01-15 13:00:00'),
github.events_p2018_01_15_1300 FOR VALUES FROM ('2018-01-15 13:00:00') TO→˓('2018-01-15 14:00:00'),
github.events_p2018_01_15_1400 FOR VALUES FROM ('2018-01-15 14:00:00') TO→˓('2018-01-15 15:00:00'),
github.events_p2018_01_15_1500 FOR VALUES FROM ('2018-01-15 15:00:00') TO→˓('2018-01-15 16:00:00')
By default create_parent creates four partitions in the past, four in the future, and one for the present, all basedon system time. If you need to backfill older data, you can specify a p_start_partition parameter in the call tocreate_parent, or p_premake to make partitions for the future. See the pg_partman documentation for details.
As time progresses, pg_partman will need to do some maintenance to create new partitions and drop old ones. Anytimeyou want to trigger maintenance, call:
-- disabling analyze is recommended for native partitioning-- due to aggressive locksSELECT partman.run_maintenance(p_analyze := false);
It’s best to set up a periodic job to run the maintenance function. Pg_partman can be built with support for a backgroundworker (BGW) process to do this. Or we can use another extension like pg_cron:
SELECT cron.schedule('@hourly', $$SELECT partman.run_maintenance(p_analyze := false);
$$);
Once periodic maintenance is set up, you no longer have to think about the partitions, they just work.
Finally, to configure pg_partman to drop old partitions, you can update the partman.part_config table:
54 Chapter 9. Timeseries Data

Citus Documentation, Release 8.2
UPDATE partman.part_configSET retention_keep_table = false,
retention = '1 month'WHERE parent_table = 'github.events';
Now whenever maintenance runs, partitions older than a month are automatically dropped.
Note: Be aware that native partitioning in Postgres is still quite new and has a few quirks. For example, you cannotdirectly create an in index on a partitioned table. Instead, pg_partman lets you create a template table to define indexesfor new partitions. Maintenance operations on partitioned tables will also acquire aggressive locks that can briefly stallqueries. There is currently a lot of work going on within the postgres community to resolve these issues, so expecttime partitioning in Postgres to only get better.
9.2. Automating Partition Creation 55

Citus Documentation, Release 8.2
56 Chapter 9. Timeseries Data

CHAPTER 10
Concepts
10.1 Nodes
Citus is a PostgreSQL extension that allows commodity database servers (called nodes) to coordinate with one anotherin a “shared nothing” architecture. The nodes form a cluster that allows PostgreSQL to hold more data and use moreCPU cores than would be possible on a single computer. This architecture also allows the database to scale by simplyadding more nodes to the cluster.
10.1.1 Coordinator and Workers
Every cluster has one special node called the coordinator (the others are known as workers). Applications send theirqueries to the coordinator node which relays it to the relevant workers and accumulates the results.
For each query, the coordinator either routes it to a single worker node, or parallelizes it across several depending onwhether the required data lives on a single node or multiple. The coordinator knows how to do this by consulting itsmetadata tables. These Citus-specific tables track the DNS names and health of worker nodes, and the distribution ofdata across nodes. For more information, see our Citus Tables and Views.
Note: Citus MX removes the need to send all queries through the coordinator node. With MX, users can send queriesdirectly to any worker node, which allows both reads and writes to be scaled even more.
10.2 Distributed Data
10.2.1 Table Types
There are three types of tables in a Citus cluster, each used for different purposes.
Type 1: Distributed Tables
The first type, and most common, is distributed tables. These appear to be normal tables to SQL statements, but arehorizontally partitioned across worker nodes.
57

Citus Documentation, Release 8.2
Here the rows of table are stored in tables table_1001, table_1002 etc on the workers. The componentworker tables are called shards.
Citus runs not only SQL but DDL statements throughout a cluster, so changing the schema of a distributed tablecascades to update all the table’s shards across workers.
To learn how to create a distributed table, see Creating and Modifying Distributed Tables (DDL).
Distribution Column
Citus uses algorithmic sharding to assign rows to shards. This means the assignment is made deterministically – inour case based on the value of a particular table column called the distribution column. The cluster administratormust designate this column when distributing a table. Making the right choice is important for performance andfunctionality, as described in the general topic of Distributed Data Modeling.
Type 2: Reference Tables
A reference table is a type of distributed table whose entire contents are concentrated into a single shard which isreplicated on every worker. Thus queries on any worker can access the reference information locally, without thenetwork overhead of requesting rows from another node. Reference tables have no distribution column because thereis no need to distinguish separate shards per row.
Reference tables are typically small, and are used to store data that is relevant to queries running on any worker node.For example, enumerated values like order statuses, or product categories.
When interacting with a reference table we automatically perform two-phase commits (2PC) on transactions. Thismeans that Citus makes sure your data is always in a consistent state, regardless of whether you are writing, modifying,or deleting it.
The Reference Tables section talks more about these tables and how to create them.
Type 3: Local Tables
When you use Citus, the coordinator node you connect to and interact with is a regular PostgreSQL database with theCitus extension installed. Thus you can create ordinary tables and choose not to shard them. This is useful for small
58 Chapter 10. Concepts

Citus Documentation, Release 8.2
administrative tables that don’t participate in join queries. An example would be users table for application login andauthentication.
Creating standard PostgreSQL tables is easy because it’s the default. It’s what you get when you run CREATE TABLE.In almost every Citus deployment we see standard PostgreSQL tables co-existing with distributed and reference tables.Indeed, Citus itself uses local tables to hold cluster metadata, as mentioned earlier.
10.2.2 Shards
The previous section described a shard as containing a subset of the rows of a distributed table in a smaller table withina worker node. This section gets more into the technical details.
The pg_dist_shard metadata table on the coordinator contains a row for each shard of each distributed table in thesystem. The row matches a shardid with a range of integers in a hash space (shardminvalue, shardmaxvalue):
SELECT * from pg_dist_shard;logicalrelid | shardid | shardstorage | shardminvalue | shardmaxvalue
---------------+---------+--------------+---------------+---------------github_events | 102026 | t | 268435456 | 402653183github_events | 102027 | t | 402653184 | 536870911github_events | 102028 | t | 536870912 | 671088639github_events | 102029 | t | 671088640 | 805306367(4 rows)
If the coordinator node wants to determine which shard holds a row of github_events, it hashes the value of thedistribution column in the row, and checks which shard’s range contains the hashed value. (The ranges are defined sothat the image of the hash function is their disjoint union.)
Shard Placements
Suppose that shard 102027 is associated with the row in question. This means the row should be read or written to atable called github_events_102027 in one of the workers. Which worker? That is determined entirely by themetadata tables, and the mapping of shard to worker is known as the shard placement.
Joining some metadata tables gives us the answer. These are the types of lookups that the coordinator does to routequeries. It rewrites queries into fragments that refer to the specific tables like github_events_102027, and runsthose fragments on the appropriate workers.
SELECTshardid,node.nodename,node.nodeport
FROM pg_dist_placement placementJOIN pg_dist_node node
ON placement.groupid = node.groupidAND node.noderole = 'primary'::noderole
WHERE shardid = 102027;
--------------------| shardid | nodename | nodeport |--------------------| 102027 | localhost | 5433 |--------------------
In our example of github_events there were four shards. The number of shards is configurable per table at thetime of its distribution across the cluster. The best choice of shard count depends on your use case, see Shard Count.
10.2. Distributed Data 59

Citus Documentation, Release 8.2
Finally note that Citus allows shards to be replicated for protection against data loss. There are two replication“modes:” Citus replication and streaming replication. The former creates extra backup shard placements and runsqueries against all of them that update any of them. The latter is more efficient and utilizes PostgreSQL’s streamingreplication to back up the entire database of each node to a follower database. This is transparent and does not requirethe involvement of Citus metadata tables.
10.2.3 Co-Location
Since shards and their replicas can be placed on nodes as desired, it makes sense to place shards containing relatedrows of related tables together on the same nodes. That way join queries between them can avoid sending as muchinformation over the network, and can be performed inside a single Citus node.
One example is a database with stores, products, and purchases. If all three tables contain – and are distributed by –a store_id column, then all queries restricted to a single store can run efficiently on a single worker node. This is trueeven when the queries involve any combination of these tables.
For a full explanation and examples of this concept, see Table Co-Location.
10.2.4 Parallelism
Spreading queries across multiple machines allows more queries to run at once, and allows processing speed to scale byadding new machines to the cluster. Additionally splitting a single query into fragments as described in the previoussection boosts the processing power devoted to it. The latter situation achieves the greatest parallelism, meaningutilization of CPU cores.
Queries reading or affecting shards spread evenly across many nodes are able to run at “real-time” speed. Note thatthe results of the query still need to pass back through the coordinator node, so the speedup is most apparent when thefinal results are compact, such as aggregate functions like counting and descriptive statistics.
Query Processing explains more about how queries are broken into fragments and how their execution is managed.
60 Chapter 10. Concepts

CHAPTER 11
Citus MX
Citus MX is a new version of Citus that adds the ability to use hash-distributed tables from any node in a Citus cluster,which allows you to scale out your query throughput by opening many connections across all the nodes. This isparticularly useful for performing small reads and writes at a very high rate in a way that scales horizontally. CitusMX is currently available in Citus Enterprise Edition and on Citus Cloud.
In the Citus MX architecture, all nodes are PostgreSQL servers running the Citus extension. One node is acting ascoordinator and the others as data nodes, each node also has a hot standby that automatically takes over in case offailure. The coordinator is the authoritative source of metadata for the cluster and data nodes store the actual data inshards. Distributed tables can only be created, altered, or dropped via the coordinator, but can be queried from anynode. When making changes to a table (e.g. adding a column), the metadata for the distributed tables is propagatedto the workers using PostgreSQL’s built-in 2PC mechanism and distributed locks. This ensures that the metadata isalways consistent such that every node can run distributed queries in a reliable way.
Citus MX uses PostgreSQL’s own streaming replication, which allows a higher rate of writes on the shards as well as
61

Citus Documentation, Release 8.2
removing the need to perform all writes through a single leader node to ensure linearizability and consistency. Fromthe Citus perspective, there is now only a single replica of each shard and it does not have to keep multiple replicas insync, since streaming replication handles that. In the background, we monitor every node and automatically fail overto a hot standby in case of a failure.
11.1 Data Access
In Citus MX you can access your database in one of two ways: Either through the coordinator which allows you tocreate or change distributed tables, or via the data URL, which routes you to one of the data nodes on which you canperform regular queries on the distributed tables. These are also the nodes that hold the shards, the regular PostgreSQLtables in which the data is stored.
Supported operations on the coordinator are: Create/drop distributed table, shard rebalancer, DDL, DML, SELECT,COPY.
Supported operations on the data URL are: DML, SELECT, COPY.
If you connect to the data URL using psql and run \d, then you will see all the distributed tables. When performing aquery on a distributed table, the right shard is determined based on the filter conditions and the query is forwarded tothe node that stores the shard. If a query spans all the shards, it is parallelised across all the nodes.
For some advanced usages, you may want to perform operations on shards directly (e.g. add triggers). In that case, youcan connect to each individual worker node rather than using the data URL. You can find the worker nodes hostnamesby running SELECT * FROM master_get_active_worker_nodes() from any node and use the same credentials as thedata URL.
A typical way of using MX is to manually set up tables via the coordinator and then making all queries via the dataURL. An alternative way is to use the coordinator as your main application back-end, and use the data URL for dataingestion. The latter is useful if you also need to use some local PostgreSQL tables. We find both approaches to beviable in a production setting.
62 Chapter 11. Citus MX

Citus Documentation, Release 8.2
11.2 Scaling Out a Raw Events Table
A common source of high volume writes are various types of sensors reporting back measurements. This can in-clude software-based sensors such as network telemetry, mobile devices, or hardware sensors in Internet-of-thingsapplications. Below we give an example of how to set-up a write-scalable events table in Citus MX.
Since Citus is an PostgreSQL extension, you can use all the latest PostgreSQL 10 features, including JSONB andBRIN indexes. When sensors can generate different types of events, JSONB can be useful to represent different datastructures. Brin indexes allow you to index data that is ordered by time in a compact way.
To create a distributed events table with a JSONB column and a BRIN index, we can run the following commands:
$ psql postgres://citus:pw@coordinator-host:5432/citus?sslmode=require
CREATE TABLE events (device_id bigint not null,event_id uuid not null default uuid_generate_v4(),event_time timestamp not null default now(),event_type int not null default 0,payload jsonb,primary key (device_id, event_id)
);CREATE INDEX event_time_idx ON events USING BRIN (event_time);SELECT create_distributed_table('events', 'device_id');
Once the distributed table is created, we can immediately start using it via the data URL and writes done on one nodewill immediately be visible from all the other nodes in a consistent way.
$ psql postgres://citus:pw@data-url:5432/citus?sslmode=require
citus=> INSERT INTO events (device_id, payload)VALUES (12, '{"temp":"12.8","unit":"C"}');
Time: 3.674 ms
SELECT queries that filter by a specific device_id are particularly fast, because Citus can route them directly to asingle worker and execute them on a single shard.
$ psql postgres://citus:pw@data-url:5432/citus?sslmode=require
citus=> SELECT event_id, event_time, payload FROM events WHERE device_id = 12 ORDER→˓BY event_time DESC LIMIT 10;
Time: 4.212 ms
As with regular Citus, you can also run analytical queries which are parallelized across the cluster:
citus=>SELECT minute,
min(temperature)::decimal(10,1) AS min_temperature,avg(temperature)::decimal(10,1) AS avg_temperature,max(temperature)::decimal(10,1) AS max_temperature
FROM (SELECT date_trunc('minute', event_time) AS minute, (payload->>'temp')::float
→˓AS temperatureFROM events WHERE event_time >= now() - interval '10 minutes'
) ev
11.2. Scaling Out a Raw Events Table 63

Citus Documentation, Release 8.2
GROUP BY minute ORDER BY minute ASC;
Time: 554.565
The ability to perform analytical SQL queries combined with high volume data ingestion uniquely positions Citus forreal-time analytics applications.
An important aspect to consider is that horizontally scaling out your processing power ensures that indexes don’t neces-sarily become an ingestion bottleneck as your application grows. PostgreSQL has very powerful indexing capabilitiesand with the ability to scale out you can almost always get the desired read- and write-performance.
11.3 MX Limitations
Although MX allows direct reading and writing from worker nodes, it doesn’t support all commands on workers. Thecoordinator node is the authoritative source of Citus metadata, so queries that change metadata must happen via thecoordinator.
11.3.1 Supported only via coordinator
• DDL commands.
• Citus Utility Functions that change Citus metadata.
• Queries accessing append distributed tables.
11.3.2 Other query limitations
• Foreign data wrappers, including cstore_fdw, are not supported with Citus MX.
• Serial columns must have type “bigserial.” Globally in the cluster the sequence values will not be monotonicallyincreasing because the sixteen most significant bits hold the worker node id.
64 Chapter 11. Citus MX

CHAPTER 12
Determining Application Type
Running efficient queries on a Citus cluster requires that data be properly distributed across machines. This varies bythe type of application and its query patterns.
There are broadly two kinds of applications that work very well on Citus. The first step in data modeling is to identifywhich of them more closely resembles your application.
12.1 At a Glance
Multi-Tenant Applications Real-Time ApplicationsSometimes dozens or hundreds of tables in schema Small number of tablesQueries relating to one tenant (company/store) at a time Relatively simple analytics queries with aggregationsOLTP workloads for serving web clients High ingest volume of mostly immutable dataOLAP workloads that serve per-tenant analytical queries Often centering around big table of events
12.2 Examples and Characteristics
Multi-Tenant Application
These are typically SaaS applications that serve other companies, accounts, or organizations. Most SaaSapplications are inherently relational. They have a natural dimension on which to distribute data acrossnodes: just shard by tenant_id.
Citus enables you to scale out your database to millions of tenants without having to re-architect your ap-plication. You can keep the relational semantics you need, like joins, foreign key constraints, transactions,ACID, and consistency.
• Examples: Websites which host store-fronts for other businesses, such as a digital marketing solu-tion, or a sales automation tool.
• Characteristics: Queries relating to a single tenant rather than joining information across tenants.This includes OLTP workloads for serving web clients, and OLAP workloads that serve per-tenantanalytical queries. Having dozens or hundreds of tables in your database schema is also an indicatorfor the multi-tenant data model.
Scaling a multi-tenant app with Citus also requires minimal changes to application code. We have supportfor popular frameworks like Ruby on Rails and Django.
Real-Time Analytics
65
Citus Documentation, Release 8.2
Applications needing massive parallelism, coordinating hundreds of cores for fast results to numerical,statistical, or counting queries. By sharding and parallelizing SQL queries across multiple nodes, Citusmakes it possible to perform real-time queries across billions of records in under a second.
• Examples: Customer-facing analytics dashboards requiring sub-second response times.
• Characteristics: Few tables, often centering around a big table of device-, site- or user-events andrequiring high ingest volume of mostly immutable data. Relatively simple (but computationallyintensive) analytics queries involving several aggregations and GROUP BYs.
If your situation resembles either case above then the next step is to decide how to shard your data in the Citus cluster.As explained in the Concepts section, Citus assigns table rows to shards according to the hashed value of the table’sdistribution column. The database administrator’s choice of distribution columns needs to match the access patternsof typical queries to ensure performance.
66 Chapter 12. Determining Application Type

CHAPTER 13
Choosing Distribution Column
Citus uses the distribution column in distributed tables to assign table rows to shards. Choosing the distribution columnfor each table is one of the most important modeling decisions because it determines how data is spread across nodes.
If the distribution columns are chosen correctly, then related data will group together on the same physical nodes,making queries fast and adding support for all SQL features. If the columns are chosen incorrectly, the system willrun needlessly slowly, and won’t be able to support all SQL features across nodes.
This section gives distribution column tips for the two most common Citus scenarios. It concludes by going in depthon “co-location,” the desirable grouping of data on nodes.
13.1 Multi-Tenant Apps
The multi-tenant architecture uses a form of hierarchical database modeling to distribute queries across nodes in thedistributed cluster. The top of the data hierarchy is known as the tenant id, and needs to be stored in a column oneach table. Citus inspects queries to see which tenant id they involve and routes the query to a single worker node forprocessing, specifically the node which holds the data shard associated with the tenant id. Running a query with allrelevant data placed on the same node is called Table Co-Location.
The following diagram illustrates co-location in the multi-tenant data model. It contains two tables, Accounts andCampaigns, each distributed by account_id. The shaded boxes represent shards, each of whose color representswhich worker node contains it. Green shards are stored together on one worker node, and blue on another. Noticehow a join query between Accounts and Campaigns would have all the necessary data together on one node whenrestricting both tables to the same account_id.
To apply this design in your own schema the first step is identifying what constitutes a tenant in your application.Common instances include company, account, organization, or customer. The column name will be something likecompany_id or customer_id. Examine each of your queries and ask yourself: would it work if it had additionalWHERE clauses to restrict all tables involved to rows with the same tenant id? Queries in the multi-tenant model areusually scoped to a tenant, for instance queries on sales or inventory would be scoped within a certain store.
13.1.1 Best Practices
• Partition distributed tables by a common tenant_id column. For instance, in a SaaS application wheretenants are companies, the tenant_id will likely be company_id.
• Convert small cross-tenant tables to reference tables. When multiple tenants share a small table of informa-tion, distribute it as a reference table.
• Restrict filter all application queries by tenant_id. Each query should request information for one tenant at atime.
67

Citus Documentation, Release 8.2
Read the Multi-tenant Applications guide for a detailed example of building this kind of application.
13.2 Real-Time Apps
While the multi-tenant architecture introduces a hierarchical structure and uses data co-location to route queries pertenant, real-time architectures depend on specific distribution properties of their data to achieve highly parallel pro-cessing.
We use “entity id” as a term for distribution columns in the real-time model, as opposed to tenant ids in the multi-tenantmodel. Typical entities are users, hosts, or devices.
Real-time queries typically ask for numeric aggregates grouped by date or category. Citus sends these queries to eachshard for partial results and assembles the final answer on the coordinator node. Queries run fastest when as manynodes contribute as possible, and when no single node must do a disproportionate amount of work.
13.2.1 Best Practices
• Choose a column with high cardinality as the distribution column. For comparison, a “status” field on anorder table with values “new,” “paid,” and “shipped” is a poor choice of distribution column because it assumesonly those few values. The number of distinct values limits the number of shards that can hold the data, and thenumber of nodes that can process it. Among columns with high cardinality, it is good additionally to choosethose that are frequently used in group-by clauses or as join keys.
• Choose a column with even distribution. If you distribute a table on a column skewed to certain commonvalues, then data in the table will tend to accumulate in certain shards. The nodes holding those shards will endup doing more work than other nodes.
• Distribute fact and dimension tables on their common columns. Your fact table can have only one distribu-tion key. Tables that join on another key will not be co-located with the fact table. Choose one dimension to
68 Chapter 13. Choosing Distribution Column

Citus Documentation, Release 8.2
co-locate based on how frequently it is joined and the size of the joining rows.
• Change some dimension tables into reference tables. If a dimension table cannot be co-located with the facttable, you can improve query performance by distributing copies of the dimension table to all of the nodes inthe form of a reference table.
Read the Real-Time Dashboards guide for a detailed example of building this kind of application.
13.3 Timeseries Data
In a time-series workload, applications query recent information while archiving old information.
The most common mistake in modeling timeseries information in Citus is using the timestamp itself as a distributioncolumn. A hash distribution based on time will distribute times seemingly at random into different shards rather thankeeping ranges of time together in shards. However queries involving time generally reference ranges of time (forexample the most recent data), so such a hash distribution would lead to network overhead.
13.3.1 Best Practices
• Do not choose a timestamp as the distribution column. Choose a different distribution column. In a multi-tenant app, use the tenant id, or in a real-time app use the entity id.
• Use PostgreSQL table partitioning for time instead. Use table partitioning to break a big table of time-ordereddata into multiple inherited tables with each containing different time ranges. Distributing a Postgres-partitionedtable in Citus creates shards for the inherited tables.
Read the Timeseries Data guide for a detailed example of building this kind of application.
13.4 Table Co-Location
Relational databases are the first choice of data store for many applications due to their enormous flexibility andreliability. Historically the one criticism of relational databases is that they can run on only a single machine, whichcreates inherent limitations when data storage needs outpace server improvements. The solution to rapidly scalingdatabases is to distribute them, but this creates a performance problem of its own: relational operations such asjoins then need to cross the network boundary. Co-location is the practice of dividing data tactically, where one keepsrelated information on the same machines to enable efficient relational operations, but takes advantage of the horizontalscalability for the whole dataset.
The principle of data co-location is that all tables in the database have a common distribution column and are shardedacross machines in the same way, such that rows with the same distribution column value are always on the samemachine, even across different tables. As long as the distribution column provides a meaningful grouping of data,relational operations can be performed within the groups.
13.4.1 Data co-location in Citus for hash-distributed tables
The Citus extension for PostgreSQL is unique in being able to form a distributed database of databases. Every nodein a Citus cluster is a fully functional PostgreSQL database and Citus adds the experience of a single homogenousdatabase on top. While it does not provide the full functionality of PostgreSQL in a distributed way, in many casesit can take full advantage of features offered by PostgreSQL on a single machine through co-location, including fullSQL support, transactions and foreign keys.
13.3. Timeseries Data 69

Citus Documentation, Release 8.2
In Citus a row is stored in a shard if the hash of the value in the distribution column falls within the shard’s hash range.To ensure co-location, shards with the same hash range are always placed on the same node even after rebalanceoperations, such that equal distribution column values are always on the same node across tables.
A distribution column that we’ve found to work well in practice is tenant ID in multi-tenant applications. For example,SaaS applications typically have many tenants, but every query they make is specific to a particular tenant. Whileone option is providing a database or schema for every tenant, it is often costly and impractical as there can be manyoperations that span across users (data loading, migrations, aggregations, analytics, schema changes, backups, etc).That becomes harder to manage as the number of tenants grows.
13.4.2 A practical example of co-location
Consider the following tables which might be part of a multi-tenant web analytics SaaS:
CREATE TABLE event (tenant_id int,event_id bigint,page_id int,payload jsonb,primary key (tenant_id, event_id)
);
CREATE TABLE page (tenant_id int,page_id int,path text,primary key (tenant_id, page_id)
);
Now we want to answer queries that may be issued by a customer-facing dashboard, such as: “Return the number ofvisits in the past week for all pages starting with ‘/blog’ in tenant six.”
13.4.3 Using Regular PostgreSQL Tables
If our data was in a single PostgreSQL node, we could easily express our query using the rich set of relational opera-tions offered by SQL:
70 Chapter 13. Choosing Distribution Column

Citus Documentation, Release 8.2
SELECT page_id, count(event_id)FROM
pageLEFT JOIN (
SELECT * FROM eventWHERE (payload->>'time')::timestamptz >= now() - interval '1 week'
) recentUSING (tenant_id, page_id)WHERE tenant_id = 6 AND path LIKE '/blog%'GROUP BY page_id;
As long as the working set for this query fits in memory, this is an appropriate solution for many application since itoffers maximum flexibility. However, even if you don’t need to scale yet, it can be useful to consider the implicationsof scaling out on your data model.
13.4.4 Distributing tables by ID
As the number of tenants and the data stored for each tenant grows, query times will typically go up as the working setno longer fits in memory or CPU becomes a bottleneck. In this case, we can shard the data across many nodes usingCitus. The first and most important choice we need to make when sharding is the distribution column. Let’s start witha naive choice of using event_id for the event table and page_id for the page table:
-- naively use event_id and page_id as distribution columns
SELECT create_distributed_table('event', 'event_id');SELECT create_distributed_table('page', 'page_id');
Given that the data is dispersed across different workers, we cannot simply perform a join as we would on a singlePostgreSQL node. Instead, we will need to issue two queries:
Across all shards of the page table (Q1):
SELECT page_id FROM page WHERE path LIKE '/blog%' AND tenant_id = 6;
Across all shards of the event table (Q2):
SELECT page_id, count(*) AS countFROM eventWHERE page_id IN (/*...page IDs from first query...*/)
AND tenant_id = 6AND (payload->>'time')::date >= now() - interval '1 week'
GROUP BY page_id ORDER BY count DESC LIMIT 10;
Afterwards, the results from the two steps need to be combined by the application.
The data required to answer the query is scattered across the shards on the different nodes and each of those shardswill need to be queried:
13.4. Table Co-Location 71
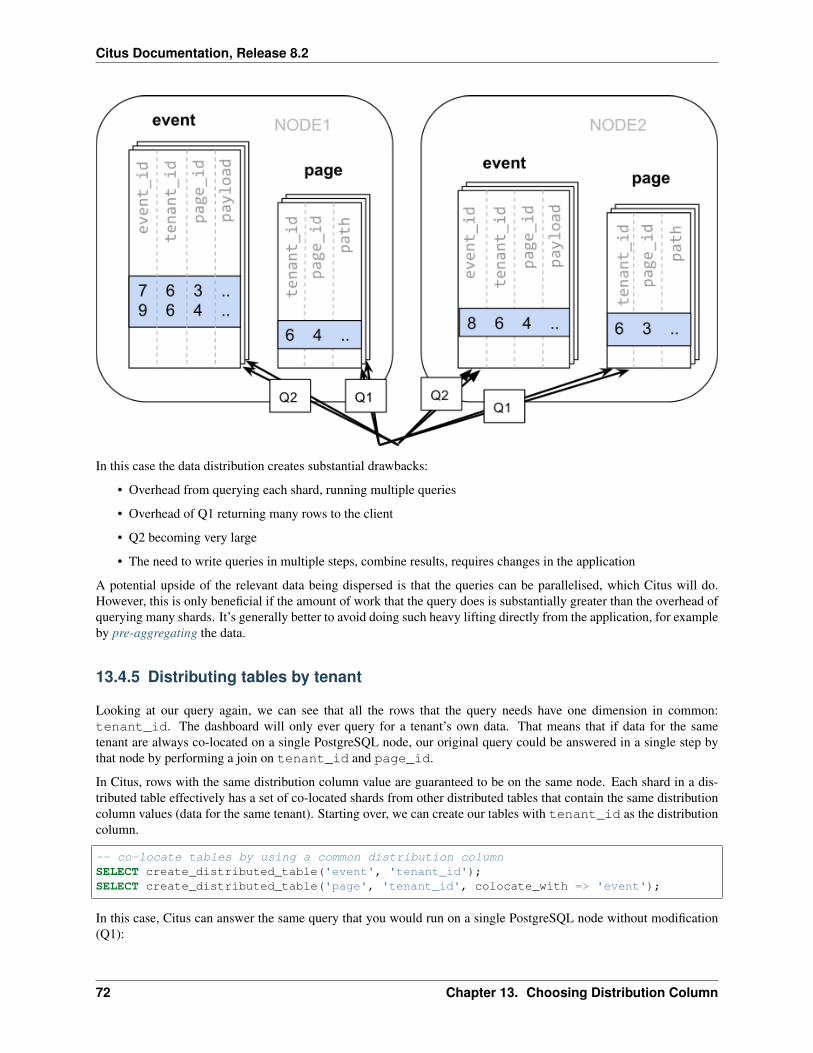
Citus Documentation, Release 8.2
In this case the data distribution creates substantial drawbacks:
• Overhead from querying each shard, running multiple queries
• Overhead of Q1 returning many rows to the client
• Q2 becoming very large
• The need to write queries in multiple steps, combine results, requires changes in the application
A potential upside of the relevant data being dispersed is that the queries can be parallelised, which Citus will do.However, this is only beneficial if the amount of work that the query does is substantially greater than the overhead ofquerying many shards. It’s generally better to avoid doing such heavy lifting directly from the application, for exampleby pre-aggregating the data.
13.4.5 Distributing tables by tenant
Looking at our query again, we can see that all the rows that the query needs have one dimension in common:tenant_id. The dashboard will only ever query for a tenant’s own data. That means that if data for the sametenant are always co-located on a single PostgreSQL node, our original query could be answered in a single step bythat node by performing a join on tenant_id and page_id.
In Citus, rows with the same distribution column value are guaranteed to be on the same node. Each shard in a dis-tributed table effectively has a set of co-located shards from other distributed tables that contain the same distributioncolumn values (data for the same tenant). Starting over, we can create our tables with tenant_id as the distributioncolumn.
-- co-locate tables by using a common distribution columnSELECT create_distributed_table('event', 'tenant_id');SELECT create_distributed_table('page', 'tenant_id', colocate_with => 'event');
In this case, Citus can answer the same query that you would run on a single PostgreSQL node without modification(Q1):
72 Chapter 13. Choosing Distribution Column

Citus Documentation, Release 8.2
SELECT page_id, count(event_id)FROM
pageLEFT JOIN (
SELECT * FROM eventWHERE (payload->>'time')::timestamptz >= now() - interval '1 week'
) recentUSING (tenant_id, page_id)WHERE tenant_id = 6 AND path LIKE '/blog%'GROUP BY page_id;
Because of the tenantid filter and join on tenantid, Citus knows that the entire query can be answered using the set ofco-located shards that contain the data for that particular tenant, and the PostgreSQL node can answer the query in asingle step, which enables full SQL support.
In some cases, queries and table schemas will require minor modifications to ensure that the tenant_id is alwaysincluded in unique constraints and join conditions. However, this is usually a straightforward change, and the extensiverewrite that would be required without having co-location is avoided.
While the example above queries just one node because there is a specific tenant_id = 6 filter, co-location also allowsus to efficiently perform distributed joins on tenant_id across all nodes, be it with SQL limitations.
13.4.6 Co-location means better feature support
The full list of Citus features that are unlocked by co-location are:
• Full SQL support for queries on a single set of co-located shards
• Multi-statement transaction support for modifications on a single set of co-located shards
• Aggregation through INSERT..SELECT
• Foreign keys
• Distributed outer joins
13.4. Table Co-Location 73

Citus Documentation, Release 8.2
Data co-location is a powerful technique for providing both horizontal scale and support to relational data models.The cost of migrating or building applications using a distributed database that enables relational operations throughco-location is often substantially lower than moving to a restrictive data model (e.g. NoSQL) and, unlike a single-nodedatabase, it can scale out with the size of your business. For more information about migrating an existing databasesee Transitioning to a Multi-Tenant Data Model.
13.4.7 Query Performance
Citus parallelizes incoming queries by breaking it into multiple fragment queries (“tasks”) which run on the workershards in parallel. This allows Citus to utilize the processing power of all the nodes in the cluster and also of individualcores on each node for each query. Due to this parallelization, you can get performance which is cumulative of thecomputing power of all of the cores in the cluster leading to a dramatic decrease in query times versus PostgreSQL ona single server.
Citus employs a two stage optimizer when planning SQL queries. The first phase involves converting the SQL queriesinto their commutative and associative form so that they can be pushed down and run on the workers in parallel. Asdiscussed in previous sections, choosing the right distribution column and distribution method allows the distributedquery planner to apply several optimizations to the queries. This can have a significant impact on query performancedue to reduced network I/O.
Citus’s distributed executor then takes these individual query fragments and sends them to worker PostgreSQL in-stances. There are several aspects of both the distributed planner and the executor which can be tuned in order toimprove performance. When these individual query fragments are sent to the workers, the second phase of queryoptimization kicks in. The workers are simply running extended PostgreSQL servers and they apply PostgreSQL’sstandard planning and execution logic to run these fragment SQL queries. Therefore, any optimization that helps Post-greSQL also helps Citus. PostgreSQL by default comes with conservative resource settings; and therefore optimizingthese configuration settings can improve query times significantly.
We discuss the relevant performance tuning steps in the Query Performance Tuning section of the documentation.
74 Chapter 13. Choosing Distribution Column

CHAPTER 14
Migrating an Existing App
Migrating an existing application to Citus sometimes requires adjusting the schema and queries for optimal perfor-mance. Citus extends PostgreSQL with distributed functionality, but it is not a drop-in replacement that scales out allworkloads. A performant Citus cluster involves thinking about the data model, tooling, and choice of SQL featuresused.
The first steps are to optimize the existing database schema so that it can work efficiently across multiple computers.
14.1 Identify Distribution Strategy
14.1.1 Pick distribution key
The first step in migrating to Citus is identifying suitable distribution keys and planning table distribution accordingly.In multi-tenant applications this will typically be an internal identifier for tenants. We typically refer to it as the “tenantID.” The use-cases may vary, so we advise being thorough on this step.
For guidance, read these sections:
1. Determining Application Type
2. Choosing Distribution Column
We are happy to help review your environment to be sure that the ideal distribution key is chosen. To do so, wetypically examine schema layouts, larger tables, long-running and/or problematic queries, standard use cases, andmore.
14.1.2 Identify types of tables
Once a distribution key is identified, review the schema to identify how each table will be handled and whether anymodifications to table layouts will be required. We typically advise tracking this with a spreadsheet, and have createda template you can use.
Tables will generally fall into one of the following categories:
1. Ready for distribution. These tables already contain the distribution key, and are ready for distribution.
2. Needs backfill. These tables can be logically distributed by the chosen key, but do not contain a column directlyreferencing it. The tables will be modified later to add the column.
3. Reference table. These tables are typically small, do not contain the distribution key, are commonly joined bydistributed tables, and/or are shared across tenants. A copy of each of these tables will be maintained on allnodes. Common examples include country code lookups, product categories, and the like.
75

Citus Documentation, Release 8.2
4. Local table. These are typically not joined to other tables, and do not contain the distribution key. They aremaintained exclusively on the coordinator node. Common examples include admin user lookups and otherutility tables.
Consider an example multi-tenant application similar to Etsy or Shopify where each tenant is a store. Here’s a portionof a simplified schema:
In this example stores are a natural tenant. The tenant id is in this case the store_id. After distributing tables in thecluster, we want rows relating to the same store to reside together on the same nodes.
14.2 Prepare Source Tables for Migration
Once the scope of needed database changes is identified, the next major step is to modify the data structure for theapplication’s existing database. First, tables requiring backfill are modified to add a column for the distribution key.
14.2.1 Add distribution keys
In our storefront example the stores and products tables have a store_id and are ready for distribution. Being normal-ized, the line_items table lacks a store id. If we want to distribute by store_id, the table needs this column.
-- denormalize line_items by including store_id
ALTER TABLE line_items ADD COLUMN store_id uuid;
Be sure to check that the distribution column has the same type in all tables, e.g. don’t mix int and bigint. Thecolumn types must match to ensure proper data colocation.
14.2.2 Backfill newly created columns
Once the schema is updated, backfill missing values for the tenant_id column in tables where the column was added.In our example line_items requires values for store_id.
We backfill the table by obtaining the missing values from a join query with orders:
UPDATE line_itemsSET store_id = orders.store_idFROM line_items
INNER JOIN ordersWHERE line_items.order_id = orders.order_id;
Doing the whole table at once may cause too much load on the database and disrupt other queries. The backfill candone more slowly instead. One way to do that is to make a function that backfills small batches at a time, then call thefunction repeatedly with pg_cron.
-- the a function to backfill up to-- one thousand rows from line_items
CREATE FUNCTION backfill_batch()RETURNS void LANGUAGE sql AS $$WITH batch AS (SELECT line_items_id, order_idFROM line_items
WHERE store_id IS NULLLIMIT 10000
76 Chapter 14. Migrating an Existing App

Citus Documentation, Release 8.2
Fig. 14.1: (Underlined items are primary keys, italicized items are foreign keys.)
14.2. Prepare Source Tables for Migration 77

Citus Documentation, Release 8.2
FOR UPDATESKIP LOCKED
)UPDATE line_items AS li
SET store_id = orders.store_idFROM batch, orders
WHERE batch.line_item_id = li.line_item_idAND batch.order_id = orders.order_id;
$$;
-- run the function every quarter hourSELECT cron.schedule('*/15 * * * *', 'SELECT backfill_batch()');
-- ^^ note the return value of cron.schedule
Once the backfill is caught up, the cron job can be disabled:
-- assuming 42 is the job id returned-- from cron.schedule
SELECT cron.unschedule(42);
Next, update application code and queries to deal with the schema changes.
14.3 Prepare Application for Citus
14.3.1 Set up Development Citus Cluster
When modifying the application to work with Citus, you’ll need a database to test against. Follow the instructions toset up a Single-Machine Cluster of your choice.
Next dump a copy of the schema from your application’s original database and restore the schema in the new devel-opment database.
# get schema from source db
pg_dump \--format=plain \--no-owner \--schema-only \--file=schema.sql \--schema=target_schema \postgres://user:pass@host:5432/db
# load schema into test db
psql postgres://user:pass@testhost:5432/db -f schema.sql
The schema should include a distribution key (“tenant id”) in all tables you wish to distribute. Before pg_dumping theschema, be sure you have completed the step Prepare Source Tables for Migration from the previous section.
78 Chapter 14. Migrating an Existing App

Citus Documentation, Release 8.2
Include distribution column in keys
Citus cannot enforce uniqueness constraints unless a unique index or primary key contains the distribution column.Thus we must modify primary and foreign keys in our example to include store_id.
Some of the libraries listed in the next section are able to help migrate the database schema to include the distributioncolumn in keys. However, here is an example of the underlying SQL commands to turn the simple keys composite inthe development database:
BEGIN;
-- drop simple primary keys (cascades to foreign keys)
ALTER TABLE products DROP CONSTRAINT products_pkey CASCADE;ALTER TABLE orders DROP CONSTRAINT orders_pkey CASCADE;ALTER TABLE line_items DROP CONSTRAINT line_items_pkey CASCADE;
-- recreate primary keys to include would-be distribution column
ALTER TABLE products ADD PRIMARY KEY (store_id, product_id);ALTER TABLE orders ADD PRIMARY KEY (store_id, order_id);ALTER TABLE line_items ADD PRIMARY KEY (store_id, line_item_id);
-- recreate foreign keys to include would-be distribution column
ALTER TABLE line_items ADD CONSTRAINT line_items_store_fkeyFOREIGN KEY (store_id) REFERENCES stores (store_id);
ALTER TABLE line_items ADD CONSTRAINT line_items_product_fkeyFOREIGN KEY (store_id, product_id) REFERENCES products (store_id, product_id);
ALTER TABLE line_items ADD CONSTRAINT line_items_order_fkeyFOREIGN KEY (store_id, order_id) REFERENCES orders (store_id, order_id);
COMMIT;
Thus completed, our schema from the previous section will look like this:
Be sure to modify data flows to add keys to incoming data.
14.3.2 Add distribution key to queries
Once the distribution key is present on all appropriate tables, the application needs to include it in queries. Thefollowing steps should be done using a copy of the application running in a development environment, and testingagainst a Citus back-end. After the application is working with Citus we’ll see how to migrate production data fromthe source database into a real Citus cluster.
• Application code and any other ingestion processes that write to the tables should be updated to include the newcolumns.
• Running the application test suite against the modified schema on Citus is a good way to determine which areasof the code need to be modified.
• It’s a good idea to enable database logging. The logs can help uncover stray cross-shard queries in a multi-tenantapp that should be converted to per-tenant queries.
Cross-shard queries are supported, but in a multi-tenant application most queries should be targeted to a single node.For simple select, update, and delete queries this means that the where clause should filter by tenant id. Citus can thenrun these queries efficiently on a single node.
14.3. Prepare Application for Citus 79

Citus Documentation, Release 8.2
Fig. 14.2: (Underlined items are primary keys, italicized items are foreign keys.)
80 Chapter 14. Migrating an Existing App

Citus Documentation, Release 8.2
There are helper libraries for a number of popular application frameworks that make it easy to include a tenant id inqueries:
Ruby on Rails
This section investigates how to migrate multi-tenant Rails applications to a Citus storage backend. We’ll use theactiverecord-multi-tenant Ruby gem for easier scale-out.
This Ruby gem has evolved from our experience working with customers scaling out their multi-tenant apps. It patchessome restrictions that ActiveRecord and Rails currently have when it comes to automatic query building. It is basedon the excellent acts_as_tenant library, and extends it for the particular use-case of a distributed multi-tenant databaselike Citus.
Preparing to scale-out a multi-tenant application
Initially you’ll often start out with all tenants placed on a single database node, and using a framework like Ruby onRails and ActiveRecord to load the data for a given tenant when you serve a web request that returns the tenant’s data.
ActiveRecord makes a few assumptions about the data storage that limit your scale-out options. In particular, Ac-tiveRecord introduces a pattern where you normalize data and split it into many distinct models each identified by asingle id column, with multiple belongs_to relationships that tie objects back to a tenant or customer:
# typical pattern with multiple belongs_to relationships
class Customer < ActiveRecord::Basehas_many :sites
endclass Site < ActiveRecord::Base
belongs_to :customerhas_many :page_views
endclass PageView < ActiveRecord::Base
belongs_to :siteend
The tricky thing with this pattern is that in order to find all page views for a customer, you’ll have to query for all of acustomer’s sites first. This becomes a problem once you start sharding data, and in particular when you run UPDATEor DELETE queries on nested models like page views in this example.
There are a few steps you can take today, to make scaling out easier in the future:
1. Introduce a column for the tenant_id on every record that belongs to a tenant
In order to scale out a multi-tenant model, it’s essential you can locate all records that belong to a tenant quickly. Theeasiest way to achieve this is to simply add a tenant_id column (or “customer_id” column, etc) on every objectthat belongs to a tenant, and backfilling your existing data to have this column set correctly.
When you move to a distributed multi-tenant database like Citus in the future, this will be a required step - but ifyou’ve done this before, you can simply COPY over your data, without doing any additional data modification.
2. Use UNIQUE constraints which include the tenant_id
Unique and foreign-key constraints on values other than the tenant_id will present a problem in any distributed system,since it’s difficult to make sure that no two nodes accept the same unique value. Enforcing the constraint would requireexpensive scans of the data across all nodes.
14.3. Prepare Application for Citus 81

Citus Documentation, Release 8.2
To solve this problem, for the models which are logically related to a store (the tenant for our app), you should addstore_id to the constraints, effectively scoping objects uniquely inside a given store. This helps add the concept oftenancy to your models, thereby making the multi-tenant system more robust.
For example, Rails creates a primary key by default, that only includes the id of the record:
Indexes:"page_views_pkey" PRIMARY KEY, btree (id)
You should modify that primary key to also include the tenant_id:
ALTER TABLE page_views DROP CONSTRAINT page_views_pkey;ALTER TABLE page_views ADD PRIMARY KEY(id, customer_id);
An exception to this rule might be an email or username column on a users table (unless you give each tenant theirown login page), which is why, once you scale out, we typically recommend these to be split out from your distributedtables and placed as a local table on the Citus coordinator node.
3. Include the tenant_id in all queries, even when you can locate an object using its own object_id
The easiest way to run a typical SQL query in a distributed system without restrictions is to always access data thatlives on a single node, determined by the tenant you are accessing.
For this reason, once you use a distributed system like Citus, we recommend you always specify both the tenant_idand an object’s own ID for queries, so the coordinator can locate your data quickly, and can route the query to a singleshard - instead of going to each shard in the system individually and asking the shard whether it knows the givenobject_id.
Updating the Rails Application
You can get started by including gem 'activerecord-multi-tenant' into your Gemfile, running bundleinstall, and then annotating your ActiveRecord models like this:
class PageView < ActiveRecord::Basemulti_tenant :customer# ...
end
In this case customer is the tenant model, and your page_views table needs to have a customer_id columnthat references the customer the page view belongs to.
The activerecord-multi-tenant Ruby gem aims to make it easier to implement the above data changes in a typical Railsapplication.
Note: The library relies on the tenant id column to be present and non-null for all rows. However, it is often usefulto have the library set the tenant id for new records, while backfilling missing tenant id values in existing records as abackground task. This makes it easier to get started with activerecord-multi-tenant.
To support this, the library has a write-only mode, in which the tenant id column is not filtered in queries, but is setproperly for new records. Include the following in a Rails initializer to enable it:
MultiTenant.enable_write_only_mode
Once you are ready to enforce tenancy, add a NOT NULL constraint to your tenant_id column and simply remove theinitializer line.
82 Chapter 14. Migrating an Existing App

Citus Documentation, Release 8.2
As mentioned in the beginning, by adding multi_tenant :customer annotations to your models, the libraryautomatically takes care of including the tenant_id with all queries.
In order for that to work, you’ll always need to specify which tenant you are accessing, either by specifying it on aper-request basis:
class ApplicationController < ActionController::Base# Opt-into the "set_current_tenant" controller helpers by specifying this:set_current_tenant_through_filter
before_filter :set_customer_as_tenant
def set_customer_as_tenantcustomer = Customer.find(session[:current_customer_id])set_current_tenant(customer) # Set the tenant
endend
Or by wrapping your code in a block, e.g. for background and maintenance tasks:
customer = Customer.find(session[:current_customer_id])# ...MultiTenant.with(customer) do
site = Site.find(params[:site_id])
# Modifications automatically include tenant_idsite.update! last_accessed_at: Time.now
# Queries also include tenant_id automaticallysite.page_views.count
end
Once you are ready to use a distributed multi-tenant database like Citus, all you need is a few adjustments to yourmigrations, and you’re good to go:
class InitialTables < ActiveRecord::Migrationdef upcreate_table :page_views, partition_key: :customer_id do |t|t.references :customer, null: falset.references :site, null: false
t.text :url, null: false...t.timestamps null: false
endcreate_distributed_table :page_views, :account_id
end
def downdrop_table :page_views
endend
Note the partition_key: :customer_id, something that’s added to Rails’ create_table by our library,which ensures that the primary key includes the tenant_id column, as well as create_distributed_tablewhich enables Citus to scale out the data to multiple nodes.
14.3. Prepare Application for Citus 83

Citus Documentation, Release 8.2
Updating the Test Suite
If the test suite for your Rails application uses the database_cleaner gem to reset the test database between runs,be sure to use the “truncation” strategy rather than “transaction.” We have seen occassional failures during transactionrollbacks in the tests. The database_cleaner documentation has instructions for changing the cleaning strategy.
Continuous Integration
The easiest way to run a Citus cluster in continuous integration is by using the official Citus Docker containers. Hereis how to do it on Circle CI in particular.
1. Copy https://github.com/citusdata/docker/blob/master/docker-compose.yml into the Rails project, and name itcitus-docker-compose.yml.
2. Update the steps: section in .circleci/config.yml. This will start a coordinator and worker node:
steps:- setup_remote_docker:
docker_layer_caching: true- run:
name: Install Docker Composecommand: |curl -L https://github.com/docker/compose/releases/download/1.19.0/docker-
→˓compose-`uname -s`-`uname -m` > ~/docker-composechmod +x ~/docker-composemv ~/docker-compose /usr/local/bin/docker-compose
- checkout
- run:name: Starting Citus Clustercommand: docker-compose -f citus-docker-compose.yml up -d
3. Have your test suite connect to the database in Docker, which will be on localhost:5432.
Example Application
If you are interested in a more complete example, check out our reference app that showcases a simplified sampleSaaS application for ad analytics.
84 Chapter 14. Migrating an Existing App

Citus Documentation, Release 8.2
As you can see in the screenshot, most data is associated to the currently logged in customer - even though this iscomplex analytical data, all data is accessed in the context of a single customer or tenant.
Django
In Identify Distribution Strategy we discussed the framework-agnostic database changes required for using Citus inthe multi-tenant use case. Here we investigate specifically how to migrate multi-tenant Django applications to a Citusstorage backend with the help of the django-multitenant library.
This process will be in 5 steps:
• Introducing the tenant column to models missing it that we want to distribute
• Changing the primary keys of distributed tables to include the tenant column
• Updating the models to use the TenantModelMixin
• Distributing the data
• Updating the Django Application to scope queries
Preparing to scale-out a multi-tenant application
Initially you’ll start with all tenants placed on a single database node. To be able to scale out django, some simplechanges will have to be made to your models.
Let’s consider this simplified model:
from django.utils import timezonefrom django.db import models
class Country(models.Model):name = models.CharField(max_length=255)
class Account(models.Model):name = models.CharField(max_length=255)
14.3. Prepare Application for Citus 85

Citus Documentation, Release 8.2
domain = models.CharField(max_length=255)subdomain = models.CharField(max_length=255)country = models.ForeignKey(Country, on_delete=models.SET_NULL)
class Manager(models.Model):name = models.CharField(max_length=255)account = models.ForeignKey(Account, on_delete=models.CASCADE,
related_name='managers')
class Project(models.Model):name = models.CharField(max_length=255)account = models.ForeignKey(Account, related_name='projects',
on_delete=models.CASCADE)managers = models.ManyToManyField(Manager)
class Task(models.Model):name = models.CharField(max_length=255)project = models.ForeignKey(Project, on_delete=models.CASCADE,
related_name='tasks')
The tricky thing with this pattern is that in order to find all tasks for an account, you’ll have to query for all of anaccount’s project first. This becomes a problem once you start sharding data, and in particular when you run UPDATEor DELETE queries on nested models like task in this example.
1. Introducing the tenant column to models belonging to an account
1.1 Introducting the column to models belonging to an account
In order to scale out a multi-tenant model, it’s essential for queries to quickly locate all records that belong to anaccount. Consider an ORM call such as:
Project.objects.filter(account_id=1).prefetch_related('tasks')
It generates these underlying SQL queries:
SELECT *FROM myapp_projectWHERE account_id = 1;
SELECT *FROM myapp_taskWHERE project_id IN (1, 2, 3);
However the second query would go faster with an extra filter:
-- the AND clause identifies the tenantSELECT *FROM myapp_taskWHERE project_id IN (1, 2, 3)
AND account_id = 1;
This way you can easily query the tasks belonging to one account. The easiest way to achieve this is to simply add aaccount_id column on every object that belongs to an account.
86 Chapter 14. Migrating an Existing App

Citus Documentation, Release 8.2
In our case:
class Task(models.Model):name = models.CharField(max_length=255)project = models.ForeignKey(Project, on_delete=models.CASCADE,
related_name='tasks')account = models.ForeignKey(Account, related_name='tasks',
on_delete=models.CASCADE)
Create a migration to reflect the change: python manage.py makemigrations.
1.2. Introduce a column for the account_id on every ManyToMany model that belongs to an account
The goal is the same as previously. We want to be able to have ORM calls and queries routed to one account. We alsowant to be able to distribute the ManyToMany relationship related to an account on the account_id.
So the calls generated by:
Project.objects.filter(account_id=1).prefetch_related('managers')
Can include in their WHERE clause the account_id like this:
SELECT *FROM "myapp_project" WHERE "myapp_project"."account_id" = 1;
SELECT *FROM myapp_manager managerINNER JOIN myapp_projectmanager projectmanagerON (manager.id = projectmanager.manager_idAND projectmanager.account_id = manager.account_id)WHERE projectmanager.project_id IN (1, 2, 3)AND manager.account_id = 1;
For that we need to introduce through models. In our case:
class Project(models.Model):name = models.CharField(max_length=255)account = models.ForeignKey(Account, related_name='projects',
on_delete=models.CASCADE)managers = models.ManyToManyField(Manager, through='ProjectManager')
class ProjectManager(models.Model):project = models.ForeignKey(Project, on_delete=models.CASCADE)manager = models.ForeignKey(Manager, on_delete=models.CASCADE)account = models.ForeignKey(Account, on_delete=models.CASCADE)
Create a migration to reflect the change: python manage.py makemigrations.
2. Include the account_id in all primary keys and unique constraints
Primary-key and unique constraints on values other than the tenant_id will present a problem in any distributed system,since it’s difficult to make sure that no two nodes accept the same unique value. Enforcing the constraint would requireexpensive scans of the data across all nodes.
To solve this problem, for the models which are logically related to an account (the tenant for our app), you shouldadd account_id to the primary keys and unique constraints, effectively scoping objects unique inside a given account.This helps add the concept of tenancy to your models, thereby making the multi-tenant system more robust.
14.3. Prepare Application for Citus 87

Citus Documentation, Release 8.2
2.1 Including the account_id to primary keys
Django automatically creates a simple “id” primary key on models, so we will need to circumvent that behavior with acustom migration of our own. Run python manage.py makemigrations appname --empty --nameremove_simple_pk, and edit the result to look like this:
from django.db import migrations
class Migration(migrations.Migration):
dependencies = [# leave this as it was generated
]
operations = [# Django considers "id" the primary key of these tables, but# we want the primary key to be (account_id, id)migrations.RunSQL("""
ALTER TABLE myapp_managerDROP CONSTRAINT myapp_manager_pkey CASCADE;
ALTER TABLE myapp_managerADD CONSTRAINT myapp_manager_pkeyPRIMARY KEY (account_id, id)
"""),
migrations.RunSQL("""ALTER TABLE myapp_projectDROP CONSTRAINT myapp_project_pkey CASCADE;
ALTER TABLE myapp_projectADD CONSTRAINT myapp_product_pkeyPRIMARY KEY (account_id, id)
"""),
migrations.RunSQL("""ALTER TABLE myapp_taskDROP CONSTRAINT myapp_task_pkey CASCADE;
ALTER TABLE myapp_taskADD CONSTRAINT myapp_task_pkeyPRIMARY KEY (account_id, id)
"""),
migrations.RunSQL("""ALTER TABLE myapp_projectmanagerDROP CONSTRAINT myapp_projectmanager_pkey CASCADE;
ALTER TABLE myapp_projectmanagerADD CONSTRAINT myapp_projectmanager_pkey PRIMARY KEY (account_id, id);
"""),]
2.2 Including the account_id to unique constraints
The same thing needs to be done for UNIQUE constraints. You can have explicit constraints that you might have setin your model with unique=True or unique_together like:
88 Chapter 14. Migrating an Existing App

Citus Documentation, Release 8.2
class Project(models.Model):name = models.CharField(max_length=255, unique=True)account = models.ForeignKey(Account, related_name='projects',
on_delete=models.CASCADE)managers = models.ManyToManyField(Manager, through='ProjectManager')
class Task(models.Model):name = models.CharField(max_length=255)project = models.ForeignKey(Project, on_delete=models.CASCADE,
related_name='tasks')account = models.ForeignKey(Account, related_name='tasks',
on_delete=models.CASCADE)
class Meta:unique_together = [('name', 'project')]
For these constraints, you can simply change in the models the constraints:
class Project(models.Model):name = models.CharField(max_length=255)account = models.ForeignKey(Account, related_name='projects',
on_delete=models.CASCADE)managers = models.ManyToManyField(Manager, through='ProjectManager')
class Meta:unique_together = [('account', 'name')]
class Task(models.Model):name = models.CharField(max_length=255)project = models.ForeignKey(Project, on_delete=models.CASCADE,
related_name='tasks')account = models.ForeignKey(Account, related_name='tasks',
on_delete=models.CASCADE)
class Meta:unique_together = [('account', 'name', 'project')]
Then generate the migration with:
python manage.py makemigrations
Some UNIQUE constraints are created by the ORM and you will need to explicitily drop them. This is the case forOneToOneField and ManyToMany fields.
For these cases you will need to: 1. Find the constraints 2. Do a migration to drop them 3. Re-create constraintsincluding the account_id field
To find the constraints, connect to your database using psql and run \d+ myapp_projectmanager You willsee the ManyToMany (or OneToOneField) constraint:
"myapp_projectmanager" UNIQUE CONSTRAINT myapp_projectman_project_id_manager_id_→˓bc477b48_uniq,btree (project_id, manager_id)
Drop this constraint in a migration:
14.3. Prepare Application for Citus 89

Citus Documentation, Release 8.2
from django.db import migrations
class Migration(migrations.Migration):
dependencies = [# leave this as it was generated
]
operations = [migrations.RunSQL("""
DROP CONSTRAINT myapp_projectman_project_id_manager_id_bc477b48_uniq;"""),
Then change your models to have a unique_together including the account\_id
class ProjectManager(models.Model):project = models.ForeignKey(Project, on_delete=models.CASCADE)manager = models.ForeignKey(Manager, on_delete=models.CASCADE)account = models.ForeignKey(Account, on_delete=models.CASCADE)
class Meta:unique_together=(('account', 'project', 'manager'))
And finally apply the changes by creating a new migration to generate these constraints:
python manage.py makemigrations
3. Updating the models to use TenantModelMixin and TenantForeignKey
Next, we’ll use the django-multitenant library to add account_id to foreign keys, and make application queries easierlater on.
In requirements.txt for your Django application, add
django_multitenant>=2.0.0, <3
Run pip install -r requirements.txt.
In settings.py, change the database engine to the customized engine provied by django-multitenant:
'ENGINE': 'django_multitenant.backends.postgresql'
3.1 Introducing the TenantModelMixin and TenantManager
The models will now not only inherit from models.Model but also from the TenantModelMixin.
To do that in your models.py file you will need to do the following imports
from django_multitenant.mixins import *
Previously our example models inherited from just models.Model, but now we need to change them toalso inherit from TenantModelMixin. The models in real projects may inherit from other mixins too likedjango.contrib.gis.db, which is fine.
You will also, at this point, introduce the tenant_id to define which column is the distribution column.
90 Chapter 14. Migrating an Existing App

Citus Documentation, Release 8.2
class TenantManager(TenantManagerMixin, models.Manager):pass
class Account(TenantModelMixin, models.Model):...tenant_id = 'id'objects = TenantManager()
class Manager(TenantModelMixin, models.Model):...tenant_id = 'account_id'objects = TenantManager()
class Project(TenantModelMixin, models.Model):...tenant_id = 'account_id'objects = TenantManager()
class Task(TenantModelMixin, models.Model):...tenant_id = 'account_id'objects = TenantManager()
class ProjectManager(TenantModelMixin, models.Model):...tenant_id = 'account_id'objects = TenantManager()
3.2 Handling ForeignKey constraints
For ForeignKey and OneToOneField constraint, we have a few different cases:
• Foreign key (or One to One) between distributed tables, for which you should use the TenantForeignKey(or TenantOneToOneField).
• Foreign key between a distributed table and a reference table, which don’t require changed.
• Foreign key between a distributed table and a local table, which require to drop the constraint by usingmodels.ForeignKey(MyModel,on_delete=models.CASCADE,db_constraint=False).
Finally your models should look like this:
from django.db import modelsfrom django_multitenant.fields import TenantForeignKeyfrom django_multitenant.mixins import *
class Country(models.Model): # This table is a reference tablename = models.CharField(max_length=255)
class TenantManager(TenantManagerMixin, models.Manager):pass
class Account(TenantModelMixin, models.Model):name = models.CharField(max_length=255)domain = models.CharField(max_length=255)subdomain = models.CharField(max_length=255)country = models.ForeignKey(Country, on_delete=models.SET_NULL) # No changes
→˓needed
14.3. Prepare Application for Citus 91

Citus Documentation, Release 8.2
tenant_id = 'id'objects = TenantManager()
class Manager(TenantModelMixin, models.Model):name = models.CharField(max_length=255)account = models.ForeignKey(Account, related_name='managers',
on_delete=models.CASCADE)tenant_id = 'account_id'objects = TenantManager()
class Project(TenantModelMixin, models.Model):account = models.ForeignKey(Account, related_name='projects',
on_delete=models.CASCADE)managers = models.ManyToManyField(Manager, through='ProjectManager')tenant_id = 'account_id'objects = TenantManager()
class Task(TenantModelMixin, models.Model):name = models.CharField(max_length=255)project = TenantForeignKey(Project, on_delete=models.CASCADE,
related_name='tasks')account = models.ForeignKey(Account, on_delete=models.CASCADE)
tenant_id = 'account_id'objects = TenantManager()
class ProjectManager(TenantModelMixin, models.Model):project = TenantForeignKey(Project, on_delete=models.CASCADE)manager = TenantForeignKey(Manager, on_delete=models.CASCADE)account = models.ForeignKey(Account, on_delete=models.CASCADE)
tenant_id = 'account_id'objects = TenantManager()
3.3 Handling ManyToMany constraints
In the second section of this article, we introduced the fact that with citus, ManyToMany relationships require athrough model with the tenant column. Which is why we have the model:
class ProjectManager(TenantModelMixin, models.Model):project = TenantForeignKey(Project, on_delete=models.CASCADE)manager = TenantForeignKey(Manager, on_delete=models.CASCADE)account = models.ForeignKey(Account, on_delete=models.CASCADE)
tenant_id = 'account_id'objects = TenantManager()
After installing the library, changing the engine, and updating the models, run python manage.pymakemigrations. This will produce a migration to make the foreign keys composite when necessary.
4. Distribute data in Citus
We need one final migration to tell Citus to mark tables for distribution. Create a new migration pythonmanage.py makemigrations appname --empty --name distribute_tables. Edit the result tolook like this:
92 Chapter 14. Migrating an Existing App

Citus Documentation, Release 8.2
from django.db import migrations
class Migration(migrations.Migration):dependencies = [# leave this as it was generated
]
operations = [migrations.RunSQL(
"SELECT create_distributed_table('myapp_account','id')"),migrations.RunSQL(
"SELECT create_distributed_table('myapp_manager','account_id')"),migrations.RunSQL(
"SELECT create_distributed_table('myapp_project','account_id')"),migrations.RunSQL(
"SELECT create_distributed_table('myapp_projectmanager','account_id')"),migrations.RunSQL(
"SELECT create_distributed_table('myapp_task','account_id')"),
]
With all the migrations created from the steps so far, apply them to the database with python manage.pymigrate.
At this point the Django application models are ready to work with a Citus backend. You can continue by importingdata to the new system and modifying controllers as necessary to deal with the model changes.
Updating the Django Application to scope queries
The django-multitenant library discussed in the previous section is not only useful for migrations, but for simplifyingapplication queries. The library allows application code to easily scope queries to a single tenant. It automaticallyadds the correct SQL filters to all statements, including fetching objects through relations.
For instance, in a controller simply set_current_tenant and all the queries or joins afterward will include afilter to scope results to a single tenant.
# set the current tenant to the first accounts = Account.objects.first()set_current_tenant(s)
# now this count query applies only to Project for that accountProject.objects.count()
# Find tasks for very import projects in the current accountTask.objects.filter(project__name='Very important project')
In the context of an application controller, the current tenant object can be stored as a SESSION variable when a userlogs in, and controller actions can set_current_tenant to this value. See the README in django-multitenantfor more examples.
14.3. Prepare Application for Citus 93

Citus Documentation, Release 8.2
ASP.NET
In Identify Distribution Strategy we discussed the framework-agnostic database changes required for using Citus inthe multi-tenant use case. The current section investigates how to build multi-tenant ASP.NET applications that workwith a Citus storage backend.
Example App
To make this migration section concrete, let’s consider a simplified version of StackExchange. For reference, the finalresult exists on Github.
Schema
We’ll start with two tables:
CREATE TABLE tenants (id uuid NOT NULL,domain text NOT NULL,name text NOT NULL,description text NOT NULL,created_at timestamptz NOT NULL,updated_at timestamptz NOT NULL
);
CREATE TABLE questions (id uuid NOT NULL,tenant_id uuid NOT NULL,title text NOT NULL,votes int NOT NULL,created_at timestamptz NOT NULL,updated_at timestamptz NOT NULL
);
ALTER TABLE tenants ADD PRIMARY KEY (id);ALTER TABLE questions ADD PRIMARY KEY (id, tenant_id);
Each tenant of our demo application will connect via a different domain name. ASP.NET Core will inspect incomingrequests and look up the domain in the tenants table. You could also look up tenants by subdomain (or any otherscheme you want).
Notice how the tenant_id is also stored in the questions table? This will make it possible to colocate the data.With the tables created, use create_distributed table to tell Citus to shard on the tenant ID:
SELECT create_distributed_table('tenants', 'id');SELECT create_distributed_table('questions', 'tenant_id');
Next include some test data.
INSERT INTO tenants VALUES ('c620f7ec-6b49-41e0-9913-08cfe81199af','bufferoverflow.local','Buffer Overflow','Ask anything code-related!',now(),now());
94 Chapter 14. Migrating an Existing App

Citus Documentation, Release 8.2
INSERT INTO tenants VALUES ('b8a83a82-bb41-4bb3-bfaa-e923faab2ca4','dboverflow.local','Database Questions','Figure out why your connection string is broken.',now(),now());
INSERT INTO questions VALUES ('347b7041-b421-4dc9-9e10-c64b8847fedf','c620f7ec-6b49-41e0-9913-08cfe81199af','How do you build apps in ASP.NET Core?',1,now(),now());
INSERT INTO questions VALUES ('a47ffcd2-635a-496e-8c65-c1cab53702a7','b8a83a82-bb41-4bb3-bfaa-e923faab2ca4','Using postgresql for multitenant data?',2,now(),now());
This completes the database structure and sample data. We can now move on to setting up ASP.NET Core.
ASP.NET Core project
If you don’t have ASP.NET Core installed, install the .NET Core SDK from Microsoft. These instructions will use thedotnet CLI, but you can also use Visual Studio 2017 or newer if you are on Windows.
Create a new project from the MVC template with dotnet new:
dotnet new mvc -o QuestionExchangecd QuestionExchange
You can preview the template site with dotnet run if you’d like. The MVC template includes almost every-thing you need to get started, but Postgres support isn’t included out of the box. You can fix this by installing theNpgsql.EntityFrameworkCore.PostgreSQL package:
dotnet add package Npgsql.EntityFrameworkCore.PostgreSQL
This package adds Postgres support to Entity Framework Core, the default ORM and database layer in ASP.NET Core.Open the Startup.cs file and add these lines anywhere in the ConfigureServices method:
var connectionString = "connection-string";
services.AddEntityFrameworkNpgsql().AddDbContext<AppDbContext>(options => options.UseNpgsql(connectionString));
You’ll also need to add these declarations at the top of the file:
using Microsoft.EntityFrameworkCore;using QuestionExchange.Models;
14.3. Prepare Application for Citus 95

Citus Documentation, Release 8.2
Replace connection-string with your Citus connection string. Mine looks like this:
Server=myformation.db.citusdata.com;Port=5432;Database=citus;Userid=citus;→˓Password=mypassword;SslMode=Require;Trust Server Certificate=true;
Note: You can use the Secret Manager to avoid storing your database credentials in code (and accidentally checkingthem into source control).
Next, you’ll need to define a database context.
Adding Tenancy to App
Define the Entity Framework Core context and models
The database context class provides an interface between your code and your database. Entity Framework Core usesit to understand what your data schema looks like, so you’ll need to define what tables are available in your database.
Create a file called AppDbContext.cs in the project root, and add the following code:
using System.Linq;using Microsoft.EntityFrameworkCore;using QuestionExchange.Models;namespace QuestionExchange{
public class AppDbContext : DbContext{
public AppDbContext(DbContextOptions<AppDbContext> options): base(options)
{}
public DbSet<Tenant> Tenants { get; set; }
public DbSet<Question> Questions { get; set; }}
}
The two DbSet properties specify which C# classes to use to model the rows of each table. You’ll create these classesnext. Before you do that, add a new method below the Questions property:
protected override void OnModelCreating(ModelBuilder modelBuilder){
var mapper = new Npgsql.NpgsqlSnakeCaseNameTranslator();var types = modelBuilder.Model.GetEntityTypes().ToList();
// Refer to tables in snake_case internallytypes.ForEach(e => e.Relational().TableName = mapper.TranslateMemberName(e.
→˓Relational().TableName));
// Refer to columns in snake_case internallytypes.SelectMany(e => e.GetProperties())
.ToList()
.ForEach(p => p.Relational().ColumnName = mapper.TranslateMemberName(p.→˓Relational().ColumnName));}
96 Chapter 14. Migrating an Existing App
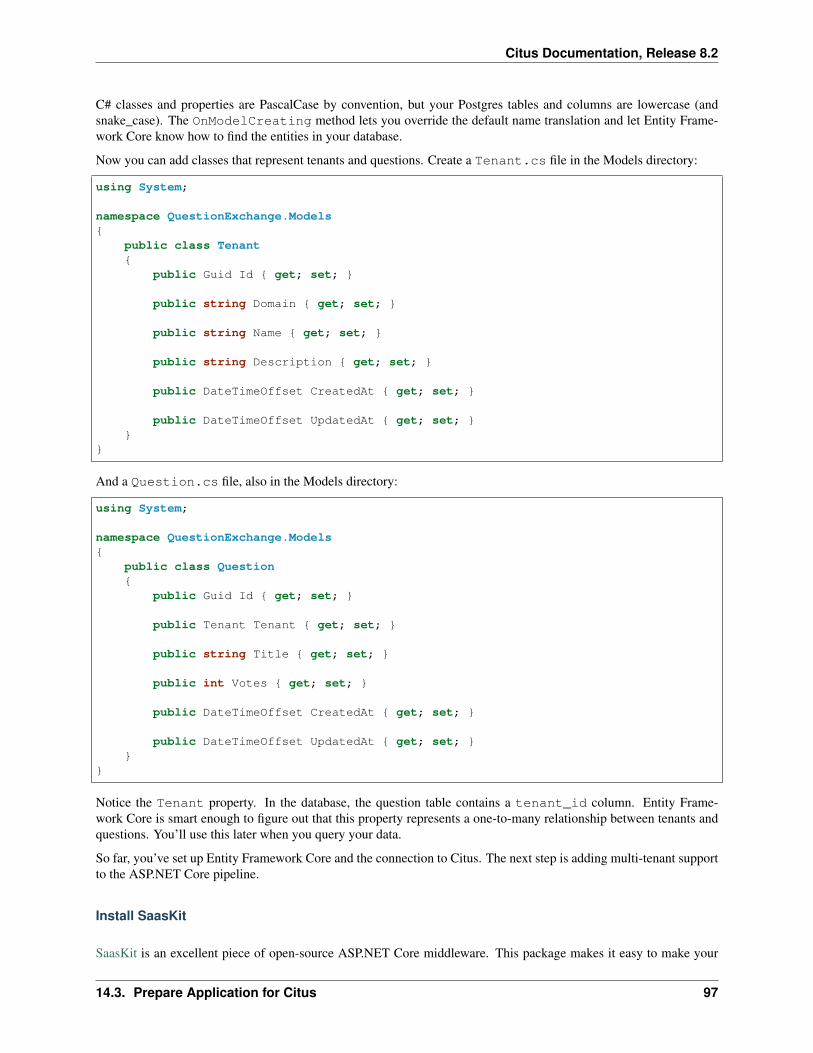
Citus Documentation, Release 8.2
C# classes and properties are PascalCase by convention, but your Postgres tables and columns are lowercase (andsnake_case). The OnModelCreating method lets you override the default name translation and let Entity Frame-work Core know how to find the entities in your database.
Now you can add classes that represent tenants and questions. Create a Tenant.cs file in the Models directory:
using System;
namespace QuestionExchange.Models{
public class Tenant{
public Guid Id { get; set; }
public string Domain { get; set; }
public string Name { get; set; }
public string Description { get; set; }
public DateTimeOffset CreatedAt { get; set; }
public DateTimeOffset UpdatedAt { get; set; }}
}
And a Question.cs file, also in the Models directory:
using System;
namespace QuestionExchange.Models{
public class Question{
public Guid Id { get; set; }
public Tenant Tenant { get; set; }
public string Title { get; set; }
public int Votes { get; set; }
public DateTimeOffset CreatedAt { get; set; }
public DateTimeOffset UpdatedAt { get; set; }}
}
Notice the Tenant property. In the database, the question table contains a tenant_id column. Entity Frame-work Core is smart enough to figure out that this property represents a one-to-many relationship between tenants andquestions. You’ll use this later when you query your data.
So far, you’ve set up Entity Framework Core and the connection to Citus. The next step is adding multi-tenant supportto the ASP.NET Core pipeline.
Install SaasKit
SaasKit is an excellent piece of open-source ASP.NET Core middleware. This package makes it easy to make your
14.3. Prepare Application for Citus 97

Citus Documentation, Release 8.2
Startup request pipeline tenant-aware, and is flexible enough to handle many different multi-tenancy use cases.
Install the SaasKit.Multitenancy package:
dotnet add package SaasKit.Multitenancy
SaasKit needs two things to work: a tenant model and a tenant resolver. You already have the former (the Tenantclass you created earlier), so create a new file in the project root called CachingTenantResolver.cs:
using System;using System.Collections.Generic;using System.Threading.Tasks;using Microsoft.AspNetCore.Http;using Microsoft.EntityFrameworkCore;using Microsoft.Extensions.Caching.Memory;using Microsoft.Extensions.Logging;using SaasKit.Multitenancy;using QuestionExchange.Models;
namespace QuestionExchange{
public class CachingTenantResolver : MemoryCacheTenantResolver<Tenant>{
private readonly AppDbContext _context;
public CachingTenantResolver(AppDbContext context, IMemoryCache cache, ILoggerFactory loggerFactory): base(cache, loggerFactory)
{_context = context;
}
// Resolver runs on cache missesprotected override async Task<TenantContext<Tenant>> ResolveAsync(HttpContext
→˓context){
var subdomain = context.Request.Host.Host.ToLower();
var tenant = await _context.Tenants.FirstOrDefaultAsync(t => t.Domain == subdomain);
if (tenant == null) return null;
return new TenantContext<Tenant>(tenant);}
protected override MemoryCacheEntryOptions CreateCacheEntryOptions()=> new MemoryCacheEntryOptions().SetAbsoluteExpiration(TimeSpan.
→˓FromHours(2));
protected override string GetContextIdentifier(HttpContext context)=> context.Request.Host.Host.ToLower();
protected override IEnumerable<string> GetTenantIdentifiers(TenantContext→˓<Tenant> context)
=> new string[] { context.Tenant.Domain };}
}
98 Chapter 14. Migrating an Existing App

Citus Documentation, Release 8.2
The ResolveAsync method does the heavy lifting: given an incoming request, it queries the database and looks fora tenant matching the current domain. If it finds one, it passes a TenantContext back to SaasKit. All of tenantresolution logic is totally up to you - you could separate tenants by subdomains, paths, or anything else you want.
This implementation uses a tenant caching strategy so you don’t hit the database with a tenant lookup on every in-coming request. After the first lookup, tenants are cached for two hours (you can change this to whatever makessense).
With a tenant model and a tenant resolver ready to go, open up the Startup class and add this line anywhere insidethe ConfigureServices method:
services.AddMultitenancy<Tenant, CachingTenantResolver>();
Next, add this line to the Configure method, below UseStaticFiles but above UseMvc:
app.UseMultitenancy<Tenant>();
The Configure method represents your actual request pipeline, so order matters!
Update views
Now that all the pieces are in place, you can start referring to the current tenant in your code and views. Open up theViews/Home/Index.cshtml view and replace the whole file with this markup:
@inject Tenant Tenant@model QuestionListViewModel
@{ViewData["Title"] = "Home Page";
}
<div class="row"><div class="col-md-12">
<h1>Welcome to <strong>@Tenant.Name</strong></h1><h3>@Tenant.Description</h3>
</div></div>
<div class="row"><div class="col-md-12">
<h4>Popular questions</h4><ul>
@foreach (var question in Model.Questions){
<li>@question.Title</li>}
</ul></div>
</div>
The @inject directive gets the current tenant from SaasKit, and the @model directive tells ASP.NET Core that thisview will be backed by a new model class (that you’ll create). Create the QuestionListViewModel.cs file inthe Models directory:
using System.Collections.Generic;
namespace QuestionExchange.Models
14.3. Prepare Application for Citus 99

Citus Documentation, Release 8.2
{public class QuestionListViewModel{public IEnumerable<Question> Questions { get; set; }}
}
Query the database
The HomeController is responsible for rendering the index view you just edited. Open it up and replace theIndex() method with this one:
public async Task<IActionResult> Index(){
var topQuestions = await _context.Questions.Where(q => q.Tenant.Id == _currentTenant.Id).OrderByDescending(q => q.UpdatedAt).Take(5).ToArrayAsync();
var viewModel = new QuestionListViewModel{
Questions = topQuestions};
return View(viewModel);}
This query gets the newest five questions for this tenant (granted, there’s only one question right now) and populatesthe view model.
For a large application, you’d typically put data access code in a service or repository layer and keep itout of your controllers. This is just a simple example!
The code you added needs _context and _currentTenant, which aren’t available in the controller yet. You canmake these available by adding a constructor to the class:
public class HomeController : Controller{
private readonly AppDbContext _context;private readonly Tenant _currentTenant;
public HomeController(AppDbContext context, Tenant tenant){
_context = context;_currentTenant = tenant;
}
// Existing code...
To keep the compiler from complaining, add this declaration at the top of the file:
using Microsoft.EntityFrameworkCore;
100 Chapter 14. Migrating an Existing App

Citus Documentation, Release 8.2
Test the app
The test tenants you added to the database were tied to the (fake) domains bufferoverflow.local anddboverflow.local. You’ll need to edit your hosts file to test these on your local machine:
127.0.0.1 bufferoverflow.local127.0.0.1 dboverflow.local
Start your project with dotnet run or by clicking Start in Visual Studio and the application will begin listening ona URL like localhost:5000. If you visit that URL directly, you’ll see an error because you haven’t set up anydefault tenant behavior yet.
Instead, visit http://bufferoverflow.local:5000 and you’ll see one tenant of your multi-tenant application! Switch tohttp://dboverflow.local:5000 to view the other tenant. Adding more tenants is now a simple matter of adding morerows in the tenants table.
It’s possible to use the libraries for database writes first (including data ingestion), and later for read queries. Theactiverecord-multi-tenant gem for instance has a write-only mode that will modify only the write queries.
Other (SQL Principles)
If you’re using a different ORM than those above, or doing multi-tenant queries more directly in SQL, follow thesegeneral principles. We’ll use our earlier example of the ecommerce application.
Suppose we want to get the details for an order. Distributed queries that filter on the tenant id run most efficiently inmulti-tenant apps, so the change below makes the query faster (while both queries return the same results):
-- beforeSELECT *FROM orders
WHERE order_id = 123;
-- afterSELECT *FROM orders
WHERE order_id = 123AND store_id = 42; -- <== added
The tenant id column is not just beneficial – but critical – for insert statements. Inserts must include a value for thetenant id column or else Citus will be unable to route the data to the correct shard and will raise an error.
Finally, when joining tables make sure to filter by tenant id too. For instance here is how to inspect how many“awesome wool pants” a given store has sold:
-- One way is to include store_id in the join and also-- filter by it in one of the queries
SELECT sum(l.quantity)FROM line_items l
INNER JOIN products pON l.product_id = p.product_id
AND l.store_id = p.store_idWHERE p.name='Awesome Wool Pants'
AND l.store_id='8c69aa0d-3f13-4440-86ca-443566c1fc75'
-- Equivalently you omit store_id from the join condition-- but filter both tables by it. This may be useful if
14.3. Prepare Application for Citus 101

Citus Documentation, Release 8.2
-- building the query in an ORM
SELECT sum(l.quantity)FROM line_items l
INNER JOIN products p ON l.product_id = p.product_idWHERE p.name='Awesome Wool Pants'
AND l.store_id='8c69aa0d-3f13-4440-86ca-443566c1fc75'AND p.store_id='8c69aa0d-3f13-4440-86ca-443566c1fc75'
14.3.3 Enable Secure Connections
Clients should connect to Citus with SSL to protect information and prevent man-in-the-middle attacks. Citus Cloud,in fact, rejects unencrypted connections. To learn how to make an SSL connection see Connecting with SSL.
14.3.4 Check for cross-node traffic
With large and complex application code-bases, certain queries generated by the application can often be overlooked,and thus won’t have a tenant_id filter on them. Citus’ parallel executor will still execute these queries successfully,and so, during testing, these queries remain hidden since the application still works fine. However, if a query doesn’tcontain the tenant_id filter, Citus’ executor will hit every shard in parallel, but only one will return any data. Thisconsumes resources needlessly, and may exhibit itself as a problem only when one moves to a higher-throughputproduction environment.
To prevent encountering such issues only after launching in production, one can set a config value to log queries whichhit more than one shard. In a properly configured and migrated multi-tenant application, each query should only hitone shard at a time.
During testing, one can configure the following:
-- adjust for your own database's name of course
ALTER DATABASE citus SET citus.multi_task_query_log_level = 'error';
Citus will then error out if it encounters queries which are going to hit more than one shard. Erroring out during testingallows the application developer to find and migrate such queries.
During a production launch, one can configure the same setting to log, instead of error out:
ALTER DATABASE citus SET citus.multi_task_query_log_level = 'log';
The configuration parameter section has more info on supported values for this setting.
After testing the changes in a development environment, the last step is to migrate production data to a Citus clusterand switch over the production app. We have techniques to minimize downtime for this step.
14.4 Migrate Production Data
At this time, having updated the database schema and application queries to work with Citus, you’re ready for the finalstep. It’s time to migrate data to the Citus cluster and cut over the application to its new database.
The data migration path is dependent on downtime requirements and data size, but generally falls into one of thefollowing two categories.
102 Chapter 14. Migrating an Existing App

Citus Documentation, Release 8.2
14.4.1 Small Database Migration
For smaller environments that can tolerate a little downtime, use a simple pg_dump/pg_restore process. Here are thesteps.
1. Save the database structure from your development database:
pg_dump \--format=plain \--no-owner \--schema-only \--file=schema.sql \--schema=target_schema \postgres://user:pass@host:5432/db
2. Connect to the Citus cluster using psql and create the schema:
\i schema.sql
3. Run your create_distributed_table and create_reference_table statements. If you get an error about foreignkeys, it’s generally due to the order of operations. Drop foreign keys before distributing tables and then re-addthem.
4. Put the application into maintenance mode, and disable any other writes to the old database.
5. Save the data from the original production database to disk with pg_dump:
pg_dump \--format=custom \--no-owner \--data-only \--file=data.dump \--schema=target_schema \postgres://user:pass@host:5432/db
6. Import into Citus using pg_restore:
# remember to use connection details for Citus,# not the source databasepg_restore \
--host=host \--dbname=dbname \--username=username \data.dump
# it'll prompt you for the connection password
7. Test application.
8. Launch!
14.4.2 Big Database Migration
Larger environments can use Citus Warp for online replication. Citus Warp allows you to stream changes from aPostgreSQL source database into a Citus Cloud cluster as they happen. It’s as if the application automatically writesto two databases rather than one, except with perfect transactional logic. Citus Warp works with Postgres versions 9.4and above which have the logical_decoding plugin enabled (this is supported on Amazon RDS as long as you’re atversion 9.4 or higher).
14.4. Migrate Production Data 103

Citus Documentation, Release 8.2
For this process we strongly recommend contacting us by opening a ticket, contacting one of our solutions engineerson Slack, or whatever method works for you. To do a warp, we connect the coordinator node of a Citus cluster to anexisting database through VPC peering or IP white-listing, and begin replication.
Here are the steps you need to perform before starting the Citus Warp process:
1. Duplicate the structure of the schema on a destination Citus cluster
2. Enable logical replication in the source database
3. Allow a network connection from Citus coordinator node to source
4. Contact us to begin the replication
Duplicate schema
The first step in migrating data to Citus is making sure that the schemas match exactly, at least for the tables you chooseto migrate. One way to do this is by running pg_dump --schema-only against your development database (theCitus database you used for locally testing the application). Replay the output on the coordinator Citus node. Anotherway to is to run application migration scripts against the destination database.
All tables that you wish to migrate must have primary keys. The corresponding destination tables must have primarykeys as well, the only difference being that those keys are allowed to be composite to contain the distribution columnas well, as described in Identify Distribution Strategy.
Also be sure to distribute tables across the cluster prior to starting replication so that the data doesn’t have to fit on thecoordinator node alone.
Enable logical replication
Some hosted databases such as Amazon RDS require enabling replication by changing a server configuration pa-rameter. On RDS you will need to create a new parameter group, set rds.logical_replication = 1 in it,then make the parameter group the active one. Applying the change requires a database server reboot, which can bescheduled for the next maintenance window.
If you’re administering your own PostgreSQL installation, add these settings to postgresql.conf:
wal_level = logicalmax_replication_slots = 5 # has to be > 0max_wal_senders = 5 # has to be > 0
A database restart is required for the changes to take effect.
Open access for network connection
In the Cloud console, identify the hostname (it ends in db.citusdata.com). Dig the hostname to find its IPaddress:
dig +short <hostname> A
If you’re using RDS, edit the inbound database security group to add a custom TCP rule:
Protocol TCP
Port Range 5432
Source <citus ip>/32
104 Chapter 14. Migrating an Existing App

Citus Documentation, Release 8.2
This white-lists the IP address of the Citus coordinator node to make an inbound connection. An alternate way toconnect the two is to establish peering between their VPCs. We can help set that up if desired.
Begin Replication
Contact us by opening a support ticket in the Citus Cloud console. A Cloud engineer will connect to your databasewith Citus Warp to perform an intial database dump, open a replication slot, and begin the replication. We caninclude/exclude your choice of tables in the migration.
During the first stage of replication, the Postgres write-ahead log (WAL) may grow substantially if the database isunder write load. Make sure you have sufficient disk space on the source database before starting this process. Werecommend 100GB free or 20% of total disk space, whichever is greater. Once the initial dump/restore is completeand replication begins, then the database will be able to archive unused WAL files again.
As the Warp proceeds, pay attention to disk usage on the source database. If there is a data-type mismatch betweenthe source and destination, or other unexpected schema change, the replication can stall. The replication slot can growindefinitely on the source during a prolonged stall, leading to potential crashes.
Because of the potential for replication stalls, we strongly recommend minimizing schema changes while doing aCitus warp. If an invasive schema change is required, you will need to stop the warp and try again.
Steps to make an invasive schema change:
1. Ask a Citus Cloud engineer to stop the warp.
2. Change the schema on the source database.
3. Change the schema on the destination database.
4. Begin the warp again.
Switch over to Citus and stop all connections to old database
When the replication has caught up with the current state of the source database, there is one more thing to do. Dueto the nature of the replication process, sequence values don’t get updated correctly on the destination databases. Inorder to have the correct sequence value for e.g. an id column, you need to manually adjust the sequence values beforeturning on writes to the destination database.
Once this is all complete, the application is ready to connect to the new database. We do not recommend writing toboth the source and destination database at the same time.
When the application has cut over to the new database and no further changes are happening on the source database,contact us again to remove the replication slot. The migration is complete.
14.4. Migrate Production Data 105

Citus Documentation, Release 8.2
106 Chapter 14. Migrating an Existing App

CHAPTER 15
SQL Reference
15.1 Creating and Modifying Distributed Tables (DDL)
Note: Citus (including Citus MX) requires that DDL commands be run from the coordinator node only.
15.1.1 Creating And Distributing Tables
To create a distributed table, you need to first define the table schema. To do so, you can define a table using theCREATE TABLE statement in the same way as you would do with a regular PostgreSQL table.
CREATE TABLE github_events(
event_id bigint,event_type text,event_public boolean,repo_id bigint,payload jsonb,repo jsonb,actor jsonb,org jsonb,created_at timestamp
);
Next, you can use the create_distributed_table() function to specify the table distribution column and create the workershards.
SELECT create_distributed_table('github_events', 'repo_id');
This function informs Citus that the github_events table should be distributed on the repo_id column (by hash-ing the column value). The function also creates shards on the worker nodes using the citus.shard_count and ci-tus.shard_replication_factor configuration values.
This example would create a total of citus.shard_count number of shards where each shard owns a portion of a hashtoken space and gets replicated based on the default citus.shard_replication_factor configuration value. The shardreplicas created on the worker have the same table schema, index, and constraint definitions as the table on the coor-dinator. Once the replicas are created, this function saves all distributed metadata on the coordinator.
Each created shard is assigned a unique shard id and all its replicas have the same shard id. Each shard is representedon the worker node as a regular PostgreSQL table with name ‘tablename_shardid’ where tablename is the name of the
107

Citus Documentation, Release 8.2
distributed table and shardid is the unique id assigned to that shard. You can connect to the worker postgres instancesto view or run commands on individual shards.
You are now ready to insert data into the distributed table and run queries on it. You can also learn more about theUDF used in this section in the Citus Utility Functions of our documentation.
Reference Tables
The above method distributes tables into multiple horizontal shards, but another possibility is distributing tables intoa single shard and replicating the shard to every worker node. Tables distributed this way are called reference tables.They are used to store data that needs to be frequently accessed by multiple nodes in a cluster.
Common candidates for reference tables include:
• Smaller tables which need to join with larger distributed tables.
• Tables in multi-tenant apps which lack a tenant id column or which aren’t associated with a tenant. (In somecases, to reduce migration effort, users might even choose to make reference tables out of tables associated witha tenant but which currently lack a tenant id.)
• Tables which need unique constraints across multiple columns and are small enough.
For instance suppose a multi-tenant eCommerce site needs to calculate sales tax for transactions in any of its stores.Tax information isn’t specific to any tenant. It makes sense to consolidate it in a shared table. A US-centric referencetable might look like this:
-- a reference table
CREATE TABLE states (code char(2) PRIMARY KEY,full_name text NOT NULL,general_sales_tax numeric(4,3)
);
-- distribute it to all workers
SELECT create_reference_table('states');
Now queries such as one calculating tax for a shopping cart can join on the states table with no network overhead,and can add a foreign key to the state code for better validation.
In addition to distributing a table as a single replicated shard, the create_reference_table UDF marks it as areference table in the Citus metadata tables. Citus automatically performs two-phase commits (2PC) for modificationsto tables marked this way, which provides strong consistency guarantees.
If you have an existing distributed table which has a shard count of one, you can upgrade it to be a recognized referencetable by running
SELECT upgrade_to_reference_table('table_name');
For another example of using reference tables in a multi-tenant application, see Sharing Data Between Tenants.
Distributing Coordinator Data
If an existing PostgreSQL database is converted into the coordinator node for a Citus cluster, the data in its tables canbe distributed efficiently and with minimal interruption to an application.
108 Chapter 15. SQL Reference

Citus Documentation, Release 8.2
The create_distributed_table function described earlier works on both empty and non-empty tables, andfor the latter it automatically distributes table rows throughout the cluster. You will know if it does this by the presenceof the message, “NOTICE: Copying data from local table...” For example:
CREATE TABLE series AS SELECT i FROM generate_series(1,1000000) i;SELECT create_distributed_table('series', 'i');NOTICE: Copying data from local table...create_distributed_table--------------------------
(1 row)
Writes on the table are blocked while the data is migrated, and pending writes are handled as distributed queries oncethe function commits. (If the function fails then the queries become local again.) Reads can continue as normal andwill become distributed queries once the function commits.
Note: When distributing a number of tables with foreign keys between them, it’s best to drop the foreign keys beforerunning create_distributed_table and recreating them after distributing the tables. Foreign keys cannotalways be enforced when one table is distributed and the other is not. However foreign keys are supported betweendistributed tables and reference tables.
When migrating data from an external database, such as from Amazon RDS to Citus Cloud, first create the Citusdistributed tables via create_distributed_table, then copy the data into the table.
15.1.2 Co-Locating Tables
Co-location is the practice of dividing data tactically, keeping related information on the same machines to enableefficient relational operations, while taking advantage of the horizontal scalability for the whole dataset. For moreinformation and examples see Table Co-Location.
Tables are co-located in groups. To manually control a table’s co-location group assignment use the optionalcolocate_with parameter of create_distributed_table. If you don’t care about a table’s co-locationthen omit this parameter. It defaults to the value 'default', which groups the table with any other default co-location table having the same distribution column type, shard count, and replication factor.
-- these tables are implicitly co-located by using the same-- distribution column type and shard count with the default-- co-location group
SELECT create_distributed_table('A', 'some_int_col');SELECT create_distributed_table('B', 'other_int_col');
When a new table is not related to others in its would-be implicit co-location group, specify colocated_with =>'none'.
-- not co-located with other tables
SELECT create_distributed_table('A', 'foo', colocate_with => 'none');
Splitting unrelated tables into their own co-location groups will improve shard rebalancing performance, becauseshards in the same group have to be moved together.
When tables are indeed related (for instance when they will be joined), it can make sense to explicitly co-locate them.The gains of appropriate co-location are more important than any rebalancing overhead.
To explicitly co-locate multiple tables, distribute one and then put the others into its co-location group. For example:
15.1. Creating and Modifying Distributed Tables (DDL) 109

Citus Documentation, Release 8.2
-- distribute storesSELECT create_distributed_table('stores', 'store_id');
-- add to the same group as storesSELECT create_distributed_table('orders', 'store_id', colocate_with => 'stores');SELECT create_distributed_table('products', 'store_id', colocate_with => 'stores');
Information about co-location groups is stored in the pg_dist_colocation table, while pg_dist_partition reveals whichtables are assigned to which groups.
Upgrading from Citus 5.x
Starting with Citus 6.0, we made co-location a first-class concept, and started tracking tables’ assignment to co-locationgroups in pg_dist_colocation. Since Citus 5.x didn’t have this concept, tables created with Citus 5 were not explicitlymarked as co-located in metadata, even when the tables were physically co-located.
Since Citus uses co-location metadata information for query optimization and pushdown, it becomes critical to informCitus of this co-location for previously created tables. To fix the metadata, simply mark the tables as co-located usingmark_tables_colocated:
-- Assume that stores, products and line_items were created in a Citus 5.x database.
-- Put products and line_items into store's co-location groupSELECT mark_tables_colocated('stores', ARRAY['products', 'line_items']);
This function requires the tables to be distributed with the same method, column type, number of shards, and replica-tion method. It doesn’t re-shard or physically move data, it merely updates Citus metadata.
15.1.3 Dropping Tables
You can use the standard PostgreSQL DROP TABLE command to remove your distributed tables. As with regulartables, DROP TABLE removes any indexes, rules, triggers, and constraints that exist for the target table. In addition,it also drops the shards on the worker nodes and cleans up their metadata.
DROP TABLE github_events;
15.1.4 Modifying Tables
Citus automatically propagates many kinds of DDL statements, which means that modifying a distributed table onthe coordinator node will update shards on the workers too. Other DDL statements require manual propagation, andcertain others are prohibited such as those which would modify a distribution column. Attempting to run DDL that isineligible for automatic propagation will raise an error and leave tables on the coordinator node unchanged.
Here is a reference of the categories of DDL statements which propagate. Note that automatic propagation can beenabled or disabled with a configuration parameter.
Adding/Modifying Columns
Citus propagates most ALTER TABLE commands automatically. Adding columns or changing their default valueswork as they would in a single-machine PostgreSQL database:
110 Chapter 15. SQL Reference

Citus Documentation, Release 8.2
-- Adding a column
ALTER TABLE products ADD COLUMN description text;
-- Changing default value
ALTER TABLE products ALTER COLUMN price SET DEFAULT 7.77;
Significant changes to an existing column like renaming it or changing its data type are fine too. However the datatype of the distribution column cannot be altered. This column determines how table data distributes through the Cituscluster, and modifying its data type would require moving the data.
Attempting to do so causes an error:
-- assumining store_id is the distribution column-- for products, and that it has type integer
ALTER TABLE productsALTER COLUMN store_id TYPE text;
/*ERROR: XX000: cannot execute ALTER TABLE command involving partition columnLOCATION: ErrorIfUnsupportedAlterTableStmt, multi_utility.c:2150
*/
Adding/Removing Constraints
Using Citus allows you to continue to enjoy the safety of a relational database, including database constraints (see thePostgreSQL docs). Due to the nature of distributed systems, Citus will not cross-reference uniqueness constraints orreferential integrity between worker nodes.
Foreign keys may be created in these situations:
• between two local (non-distributed) tables,
• between two colocated distributed tables when the key includes the distribution column, or
• as a distributed table referencing a reference table
Reference tables are not supported as the referencing table of a foreign key constraint, i.e. keys from reference toreference and reference to distributed are not supported.
To set up a foreign key between colocated distributed tables, always include the distribution column in the key. Thismay involve making the key compound.
Note: Primary keys and uniqueness constraints must include the distribution column. Adding them to a non-distribution column will generate an error (see Cannot create uniqueness constraint).
This example shows how to create primary and foreign keys on distributed tables:
---- Adding a primary key-- --------------------
-- We'll distribute these tables on the account_id. The ads and clicks-- tables must use compound keys that include account_id.
15.1. Creating and Modifying Distributed Tables (DDL) 111

Citus Documentation, Release 8.2
ALTER TABLE accounts ADD PRIMARY KEY (id);ALTER TABLE ads ADD PRIMARY KEY (account_id, id);ALTER TABLE clicks ADD PRIMARY KEY (account_id, id);
-- Next distribute the tables
SELECT create_distributed_table('accounts', 'id');SELECT create_distributed_table('ads', 'account_id');SELECT create_distributed_table('clicks', 'account_id');
---- Adding foreign keys-- -------------------
-- Note that this can happen before or after distribution, as long as-- there exists a uniqueness constraint on the target column(s) which-- can only be enforced before distribution.
ALTER TABLE ads ADD CONSTRAINT ads_account_fkFOREIGN KEY (account_id) REFERENCES accounts (id);
ALTER TABLE clicks ADD CONSTRAINT clicks_ad_fkFOREIGN KEY (account_id, ad_id) REFERENCES ads (account_id, id);
Similarly, include the distribution column in uniqueness constraints:
-- Suppose we want every ad to use a unique image. Notice we can-- enforce it only per account when we distribute by account id.
ALTER TABLE ads ADD CONSTRAINT ads_unique_imageUNIQUE (account_id, image_url);
Not-null constraints can be applied to any column (distribution or not) because they require no lookups betweenworkers.
ALTER TABLE ads ALTER COLUMN image_url SET NOT NULL;
Using NOT VALID Constraints
In some situations it can be useful to enforce constraints for new rows, while allowing existing non-conforming rowsto remain unchanged. Citus supports this feature for CHECK constraints and foreign keys, using PostgreSQL’s “NOTVALID” constraint designation.
For example, consider an application which stores user profiles in a reference table.
-- we're using the "text" column type here, but a real application-- might use "citext" which is available in a postgres contrib module
CREATE TABLE users ( email text PRIMARY KEY );SELECT create_reference_table('users');
In the course of time imagine that a few non-addresses get into the table.
INSERT INTO users VALUES('[email protected]'), ('[email protected]'), ('lol');
We would like to validate the addresses, but PostgreSQL does not ordinarily allow us to add a CHECK constraint thatfails for existing rows. However it does allow a constraint marked not valid:
112 Chapter 15. SQL Reference

Citus Documentation, Release 8.2
ALTER TABLE usersADD CONSTRAINT syntactic_emailCHECK (email ~
'^[a-zA-Z0-9.!#$%&''*+/=?^_`{|}~-]+@[a-zA-Z0-9](?:[a-zA-Z0-9-]{0,61}[a-zA-Z0-9])?(?→˓:\.[a-zA-Z0-9](?:[a-zA-Z0-9-]{0,61}[a-zA-Z0-9])?)*$') NOT VALID;
This succeeds, and new rows are protected.
INSERT INTO users VALUES ('fake');
/*ERROR: new row for relation "users_102010" violates
check constraint "syntactic_email_102010"DETAIL: Failing row contains (fake).
*/
Later, during non-peak hours, a database administrator can attempt to fix the bad rows and re-validate the constraint.
-- later, attempt to validate all rowsALTER TABLE usersVALIDATE CONSTRAINT syntactic_email;
The PostgreSQL documentation has more information about NOT VALID and VALIDATE CONSTRAINT in theALTER TABLE section.
Adding/Removing Indices
Citus supports adding and removing indices:
-- Adding an index
CREATE INDEX clicked_at_idx ON clicks USING BRIN (clicked_at);
-- Removing an index
DROP INDEX clicked_at_idx;
Adding an index takes a write lock, which can be undesirable in a multi-tenant “system-of-record.” To minimizeapplication downtime, create the index concurrently instead. This method requires more total work than a standardindex build and takes significantly longer to complete. However, since it allows normal operations to continue whilethe index is built, this method is useful for adding new indexes in a production environment.
-- Adding an index without locking table writes
CREATE INDEX CONCURRENTLY clicked_at_idx ON clicks USING BRIN (clicked_at);
Manual Modification
Currently other DDL commands are not auto-propagated, however you can propagate the changes manually. SeeManual Query Propagation.
15.1. Creating and Modifying Distributed Tables (DDL) 113

Citus Documentation, Release 8.2
15.2 Ingesting, Modifying Data (DML)
15.2.1 Inserting Data
To insert data into distributed tables, you can use the standard PostgreSQL INSERT commands. As an example, wepick two rows randomly from the Github Archive dataset.
/*CREATE TABLE github_events(
event_id bigint,event_type text,event_public boolean,repo_id bigint,payload jsonb,repo jsonb,actor jsonb,org jsonb,created_at timestamp
);
*/
INSERT INTO github_events VALUES (2489373118,'PublicEvent','t',24509048,'{}','{"id":→˓24509048, "url": "https://api.github.com/repos/SabinaS/csee6868", "name": "SabinaS/→˓csee6868"}','{"id": 2955009, "url": "https://api.github.com/users/SabinaS", "login":→˓ "SabinaS", "avatar_url": "https://avatars.githubusercontent.com/u/2955009?",→˓"gravatar_id": ""}',NULL,'2015-01-01 00:09:13');
INSERT INTO github_events VALUES (2489368389,'WatchEvent','t',28229924,'{"action":→˓"started"}','{"id": 28229924, "url": "https://api.github.com/repos/inf0rmer/blanket→˓", "name": "inf0rmer/blanket"}','{"id": 1405427, "url": "https://api.github.com/→˓users/tategakibunko", "login": "tategakibunko", "avatar_url": "https://avatars.→˓githubusercontent.com/u/1405427?", "gravatar_id": ""}',NULL,'2015-01-01 00:00:24');
When inserting rows into distributed tables, the distribution column of the row being inserted must be specified. Basedon the distribution column, Citus determines the right shard to which the insert should be routed to. Then, the query isforwarded to the right shard, and the remote insert command is executed on all the replicas of that shard.
Sometimes it’s convenient to put multiple insert statements together into a single insert of multiple rows. It can alsobe more efficient than making repeated database queries. For instance, the example from the previous section can beloaded all at once like this:
INSERT INTO github_events VALUES(2489373118,'PublicEvent','t',24509048,'{}','{"id": 24509048, "url": "https://api.
→˓github.com/repos/SabinaS/csee6868", "name": "SabinaS/csee6868"}','{"id": 2955009,→˓"url": "https://api.github.com/users/SabinaS", "login": "SabinaS", "avatar_url":→˓"https://avatars.githubusercontent.com/u/2955009?", "gravatar_id": ""}',NULL,'2015-→˓01-01 00:09:13'), (2489368389,'WatchEvent','t',28229924,'{"action": "started"}','{"id": 28229924,
→˓"url": "https://api.github.com/repos/inf0rmer/blanket", "name": "inf0rmer/blanket"}→˓','{"id": 1405427, "url": "https://api.github.com/users/tategakibunko", "login":→˓"tategakibunko", "avatar_url": "https://avatars.githubusercontent.com/u/1405427?",→˓"gravatar_id": ""}',NULL,'2015-01-01 00:00:24');
114 Chapter 15. SQL Reference

Citus Documentation, Release 8.2
“From Select” Clause (Distributed Rollups)
Citus also supports INSERT ... SELECT statements – which insert rows based on the results of a select query.This is a convenient way to fill tables and also allows “upserts” with the ON CONFLICT clause, the easiest way to dodistributed rollups.
In Citus there are two ways that inserting from a select statement can happen. The first is if the source tables anddestination table are colocated, and the select/insert statements both include the distribution column. In this case Cituscan push the INSERT ... SELECT statement down for parallel execution on all nodes.
The second way of executing an INSERT ... SELECT statement is selecting the results from worker nodes,pulling the data up to the coordinator node, and then issuing an INSERT statement from the coordinator with the data.Citus is forced to use this approach when the source and destination tables are not colocated. Because of the networkoverhead, this method is not as efficient.
If upserts are an important operation in your application, the ideal solution is to model the data so that the source anddestination tables are colocated, and so that the distribution column can be part of the GROUP BY clause in the upsertstatement (if aggregating). This allows the operation to run in parallel across worker nodes for maximum speed.
When in doubt about which method Citus is using, use the EXPLAIN command, as described in PostgreSQL tuning.
COPY Command (Bulk load)
To bulk load data from a file, you can directly use PostgreSQL’s \COPY command.
First download our example github_events dataset by running:
wget http://examples.citusdata.com/github_archive/github_events-2015-01-01-{0..5}.csv.→˓gzgzip -d github_events-2015-01-01-*.gz
Then, you can copy the data using psql:
\COPY github_events FROM 'github_events-2015-01-01-0.csv' WITH (format CSV)
Note: There is no notion of snapshot isolation across shards, which means that a multi-shard SELECT that runsconcurrently with a COPY might see it committed on some shards, but not on others. If the user is storing events data,he may occasionally observe small gaps in recent data. It is up to applications to deal with this if it is a problem (e.g.exclude the most recent data from queries, or use some lock).
If COPY fails to open a connection for a shard placement then it behaves in the same way as INSERT, namely to markthe placement(s) as inactive unless there are no more active placements. If any other failure occurs after connecting,the transaction is rolled back and thus no metadata changes are made.
15.3 Caching Aggregations with Rollups
Applications like event data pipelines and real-time dashboards require sub-second queries on large volumes of data.One way to make these queries fast is by calculating and saving aggregates ahead of time. This is called “rolling up”the data and it avoids the cost of processing raw data at run-time. As an extra benefit, rolling up timeseries data intohourly or daily statistics can also save space. Old data may be deleted when its full details are no longer needed andaggregates suffice.
For example, here is a distributed table for tracking page views by url:
15.3. Caching Aggregations with Rollups 115

Citus Documentation, Release 8.2
CREATE TABLE page_views (site_id int,url text,host_ip inet,view_time timestamp default now(),
PRIMARY KEY (site_id, url));
SELECT create_distributed_table('page_views', 'site_id');
Once the table is populated with data, we can run an aggregate query to count page views per URL per day, restrictingto a given site and year.
-- how many views per url per day on site 5?SELECT view_time::date AS day, site_id, url, count(*) AS view_countFROM page_viewsWHERE site_id = 5 ANDview_time >= date '2016-01-01' AND view_time < date '2017-01-01'
GROUP BY view_time::date, site_id, url;
The setup described above works, but has two drawbacks. First, when you repeatedly execute the aggregate query, itmust go over each related row and recompute the results for the entire data set. If you’re using this query to render adashboard, it’s faster to save the aggregated results in a daily page views table and query that table. Second, storagecosts will grow proportionally with data volumes and the length of queryable history. In practice, you may want tokeep raw events for a short time period and look at historical graphs over a longer time window.
To receive those benefits, we can create a daily_page_views table to store the daily statistics.
CREATE TABLE daily_page_views (site_id int,day date,url text,view_count bigint,PRIMARY KEY (site_id, day, url)
);
SELECT create_distributed_table('daily_page_views', 'site_id');
In this example, we distributed both page_views and daily_page_views on the site_id column. Thisensures that data corresponding to a particular site will be co-located on the same node. Keeping the two tables’ rowstogether on each node minimizes network traffic between nodes and enables highly parallel execution.
Once we create this new distributed table, we can then run INSERT INTO ... SELECT to roll up raw page viewsinto the aggregated table. In the following, we aggregate page views each day. Citus users often wait for a certain timeperiod after the end of day to run a query like this, to accommodate late arriving data.
-- roll up yesterday's dataINSERT INTO daily_page_views (day, site_id, url, view_count)SELECT view_time::date AS day, site_id, url, count(*) AS view_countFROM page_viewsWHERE view_time >= date '2017-01-01' AND view_time < date '2017-01-02'GROUP BY view_time::date, site_id, url;
-- now the results are available right out of the tableSELECT day, site_id, url, view_count
FROM daily_page_views
116 Chapter 15. SQL Reference

Citus Documentation, Release 8.2
WHERE site_id = 5 ANDday >= date '2016-01-01' AND day < date '2017-01-01';
The rollup query above aggregates data from the previous day and inserts it into daily_page_views. Running thequery once each day means that no rollup tables rows need to be updated, because the new day’s data does not affectprevious rows.
The situation changes when dealing with late arriving data, or running the rollup query more than once per day. If anynew rows match days already in the rollup table, the matching counts should increase. PostgreSQL can handle thissituation with “ON CONFLICT,” which is its technique for doing upserts. Here is an example.
-- roll up from a given date onward,-- updating daily page views when necessaryINSERT INTO daily_page_views (day, site_id, url, view_count)SELECT view_time::date AS day, site_id, url, count(*) AS view_countFROM page_viewsWHERE view_time >= date '2017-01-01'GROUP BY view_time::date, site_id, urlON CONFLICT (day, url, site_id) DO UPDATE SETview_count = daily_page_views.view_count + EXCLUDED.view_count;
15.3.1 Updates and Deletion
You can update or delete rows from your distributed tables using the standard PostgreSQL UPDATE and DELETEcommands.
DELETE FROM github_eventsWHERE repo_id IN (24509048, 24509049);
UPDATE github_eventsSET event_public = TRUEWHERE (org->>'id')::int = 5430905;
When updates/deletes affect multiple shards as in the above example, Citus defaults to using a one-phase commitprotocol. For greater safety you can enable two-phase commits by setting
SET citus.multi_shard_commit_protocol = '2pc';
If an update or delete affects only a single shard then it runs within a single worker node. In this case enabling 2PC isunnecessary. This often happens when updates or deletes filter by a table’s distribution column:
-- since github_events is distributed by repo_id,-- this will execute in a single worker node
DELETE FROM github_eventsWHERE repo_id = 206084;
Furthermore, when dealing with a single shard, Citus supports SELECT ... FOR UPDATE. This is a techniquesometimes used by object-relational mappers (ORMs) to safely:
1. load rows
2. make a calculation in application code
3. update the rows based on calculation
15.3. Caching Aggregations with Rollups 117

Citus Documentation, Release 8.2
Selecting the rows for update puts a write lock on them to prevent other processes from causing a “lost update”anomaly.
BEGIN;
-- select events for a repo, but-- lock them for writingSELECT *FROM github_eventsWHERE repo_id = 206084FOR UPDATE;
-- calculate a desired value event_public using-- application logic that uses those rows...
-- now make the updateUPDATE github_eventsSET event_public = :our_new_valueWHERE repo_id = 206084;
COMMIT;
This feature is supported for hash distributed and reference tables only, and only those that have a replication_factorof 1.
15.3.2 Maximizing Write Performance
Both INSERT and UPDATE/DELETE statements can be scaled up to around 50,000 queries per second on largemachines. However, to achieve this rate, you will need to use many parallel, long-lived connections and considerhow to deal with locking. For more information, you can consult the Scaling Out Data Ingestion section of ourdocumentation.
15.4 Querying Distributed Tables (SQL)
As discussed in the previous sections, Citus is an extension which extends the latest PostgreSQL for distributed ex-ecution. This means that you can use standard PostgreSQL SELECT queries on the Citus coordinator for querying.Citus will then parallelize the SELECT queries involving complex selections, groupings and orderings, and JOINs tospeed up the query performance. At a high level, Citus partitions the SELECT query into smaller query fragments,assigns these query fragments to workers, oversees their execution, merges their results (and orders them if needed),and returns the final result to the user.
In the following sections, we discuss the different types of queries you can run using Citus.
15.4.1 Aggregate Functions
Citus supports and parallelizes most aggregate functions supported by PostgreSQL. Citus’s query planner transformsthe aggregate into its commutative and associative form so it can be parallelized. In this process, the workers run anaggregation query on the shards and the coordinator then combines the results from the workers to produce the finaloutput.
118 Chapter 15. SQL Reference

Citus Documentation, Release 8.2
Count (Distinct) Aggregates
Citus supports count(distinct) aggregates in several ways. If the count(distinct) aggregate is on the distribution column,Citus can directly push down the query to the workers. If not, Citus runs select distinct statements on each worker, andreturns the list to the coordinator where it obtains the final count.
Note that transferring this data becomes slower when workers have a greater number of distinct items. This is espe-cially true for queries containing multiple count(distinct) aggregates, e.g.:
-- multiple distinct counts in one query tend to be slowSELECT count(distinct a), count(distinct b), count(distinct c)FROM table_abc;
For these kind of queries, the resulting select distinct statements on the workers essentially produce a cross-product ofrows to be transferred to the coordinator.
For increased performance you can choose to make an approximate count instead. Follow the steps below:
1. Download and install the hll extension on all PostgreSQL instances (the coordinator and all the workers).
Please visit the PostgreSQL hll github repository for specifics on obtaining the extension.
2. Create the hll extension on all the PostgreSQL instances
CREATE EXTENSION hll;
3. Enable count distinct approximations by setting the Citus.count_distinct_error_rate configuration value. Lowervalues for this configuration setting are expected to give more accurate results but take more time for computa-tion. We recommend setting this to 0.005.
SET citus.count_distinct_error_rate to 0.005;
After this step, count(distinct) aggregates automatically switch to using HLL, with no changes necessaryto your queries. You should be able to run approximate count distinct queries on any column of the table.
HyperLogLog Column
Certain users already store their data as HLL columns. In such cases, they can dynamically roll up those data bycalling hll_union_agg(hll_column).
Estimating Top N Items
Calculating the first n elements in a set by applying count, sort, and limit is simple. However as data sizes increase,this method becomes slow and resource intensive. It’s more efficient to use an approximation.
The open source TopN extension for Postgres enables fast approximate results to “top-n” queries. The extensionmaterializes the top values into a JSON data type. TopN can incrementally update these top values, or merge themon-demand across different time intervals.
Basic Operations
Before seeing a realistic example of TopN, let’s see how some of its primitive operations work. First topn_addupdates a JSON object with counts of how many times a key has been seen:
-- starting from nothing, record that we saw an "a"select topn_add('{}', 'a');-- => {"a": 1}
15.4. Querying Distributed Tables (SQL) 119

Citus Documentation, Release 8.2
-- record the sighting of another "a"select topn_add(topn_add('{}', 'a'), 'a');-- => {"a": 2}
The extension also provides aggregations to scan multiple values:
-- for normal_randcreate extension tablefunc;
-- count values from a normal distributionSELECT topn_add_agg(floor(abs(i))::text)FROM normal_rand(1000, 5, 0.7) i;
-- => {"2": 1, "3": 74, "4": 420, "5": 425, "6": 77, "7": 3}
If the number of distinct values crosses a threshold, the aggregation drops information for those seen least frequently.This keeps space usage under control. The threshold can be controlled by the topn.number_of_countersGUC.Its default value is 1000.
Realistic Example
Now onto a more realistic example of how TopN works in practice. Let’s ingest Amazon product reviews from theyear 2000 and use TopN to query it quickly. First download the dataset:
curl -L https://examples.citusdata.com/customer_reviews_2000.csv.gz | \gunzip > reviews.csv
Next, ingest it into a distributed table:
CREATE TABLE customer_reviews(
customer_id TEXT,review_date DATE,review_rating INTEGER,review_votes INTEGER,review_helpful_votes INTEGER,product_id CHAR(10),product_title TEXT,product_sales_rank BIGINT,product_group TEXT,product_category TEXT,product_subcategory TEXT,similar_product_ids CHAR(10)[]
);
SELECT create_distributed_table('customer_reviews', 'product_id');
\COPY customer_reviews FROM 'reviews.csv' WITH CSV
Next we’ll add the extension, create a destination table to store the json data generated by TopN, and apply thetopn_add_agg function we saw previously.
-- note: Citus Cloud has extension alreadyCREATE EXTENSION topn;SELECT run_command_on_workers(' create extension topn; ');
-- a table to materialize the daily aggregateCREATE TABLE reviews_by_day
120 Chapter 15. SQL Reference

Citus Documentation, Release 8.2
(review_date date unique,agg_data jsonb
);
SELECT create_reference_table('reviews_by_day');
-- materialize how many reviews each product got per day per customerINSERT INTO reviews_by_daySELECT review_date, topn_add_agg(product_id)FROM customer_reviewsGROUP BY review_date;
Now, rather than writing a complex window function on customer_reviews, we can simply apply TopN toreviews_by_day. For instance, the following query finds the most frequently reviewed product for each of thefirst five days:
SELECT review_date, (topn(agg_data, 1)).*FROM reviews_by_dayORDER BY review_dateLIMIT 5;
------------------------| review_date | item | frequency |------------------------| 2000-01-01 | 0939173344 | 12 || 2000-01-02 | B000050XY8 | 11 || 2000-01-03 | 0375404368 | 12 || 2000-01-04 | 0375408738 | 14 || 2000-01-05 | B00000J7J4 | 17 |------------------------
The json fields created by TopN can be merged with topn_union and topn_union_agg. We can use the latterto merge the data for the entire first month and list the five most reviewed products during that period.
SELECT (topn(topn_union_agg(agg_data), 5)).*FROM reviews_by_dayWHERE review_date >= '2000-01-01' AND review_date < '2000-02-01'ORDER BY 2 DESC;
---------------| item | frequency |---------------| 0375404368 | 217 || 0345417623 | 217 || 0375404376 | 217 || 0375408738 | 217 || 043936213X | 204 |---------------
For more details and examples see the TopN readme.
15.4.2 Limit Pushdown
Citus also pushes down the limit clauses to the shards on the workers wherever possible to minimize the amount ofdata transferred across network.
15.4. Querying Distributed Tables (SQL) 121

Citus Documentation, Release 8.2
However, in some cases, SELECT queries with LIMIT clauses may need to fetch all rows from each shard to generateexact results. For example, if the query requires ordering by the aggregate column, it would need results of thatcolumn from all shards to determine the final aggregate value. This reduces performance of the LIMIT clause due tohigh volume of network data transfer. In such cases, and where an approximation would produce meaningful results,Citus provides an option for network efficient approximate LIMIT clauses.
LIMIT approximations are disabled by default and can be enabled by setting the configuration parameter ci-tus.limit_clause_row_fetch_count. On the basis of this configuration value, Citus will limit the number of rowsreturned by each task for aggregation on the coordinator. Due to this limit, the final results may be approximate.Increasing this limit will increase the accuracy of the final results, while still providing an upper bound on the numberof rows pulled from the workers.
SET citus.limit_clause_row_fetch_count to 10000;
15.4.3 Views on Distributed Tables
Citus supports all views on distributed tables. For an overview of views’ syntax and features, see the PostgreSQLdocumentation for CREATE VIEW.
Note that some views cause a less efficient query plan than others. For more about detecting and improving poor viewperformance, see Subquery/CTE Network Overhead. (Views are treated internally as subqueries.)
Citus supports materialized views as well, and stores them as local tables on the coordinator node. Using them indistributed queries after materialization requires wrapping them in a subquery, a technique described in JOIN a localand a distributed table.
15.4.4 Joins
Citus supports equi-JOINs between any number of tables irrespective of their size and distribution method. The queryplanner chooses the optimal join method and join order based on how tables are distributed. It evaluates severalpossible join orders and creates a join plan which requires minimum data to be transferred across network.
Co-located joins
When two tables are co-located then they can be joined efficiently on their common distribution columns. A co-locatedjoin is the most efficient way to join two large distributed tables.
Internally, the Citus coordinator knows which shards of the co-located tables might match with shards of the other tableby looking at the distribution column metadata. This allows Citus to prune away shard pairs which cannot producematching join keys. The joins between remaining shard pairs are executed in parallel on the workers and then theresults are returned to the coordinator.
Note: Be sure that the tables are distributed into the same number of shards and that the distribution columns of eachtable have exactly matching types. Attempting to join on columns of slightly different types such as int and bigint cancause problems.
Reference table joins
Reference Tables can be used as “dimension” tables to join efficiently with large “fact” tables. Because reference tablesare replicated in full across all worker nodes, a reference join can be decomposed into local joins on each worker and
122 Chapter 15. SQL Reference

Citus Documentation, Release 8.2
performed in parallel. A reference join is like a more flexible version of a co-located join because reference tablesaren’t distributed on any particular column and are free to join on any of their columns.
Repartition joins
In some cases, you may need to join two tables on columns other than the distribution column. For such cases, Citusalso allows joining on non-distribution key columns by dynamically repartitioning the tables for the query.
In such cases the table(s) to be partitioned are determined by the query optimizer on the basis of the distributioncolumns, join keys and sizes of the tables. With repartitioned tables, it can be ensured that only relevant shard pairsare joined with each other reducing the amount of data transferred across network drastically.
In general, co-located joins are more efficient than repartition joins as repartition joins require shuffling of data. So,you should try to distribute your tables by the common join keys whenever possible.
15.5 Query Processing
A Citus cluster consists of a coordinator instance and multiple worker instances. The data is sharded and replicated onthe workers while the coordinator stores metadata about these shards. All queries issued to the cluster are executed viathe coordinator. The coordinator partitions the query into smaller query fragments where each query fragment can berun independently on a shard. The coordinator then assigns the query fragments to workers, oversees their execution,merges their results, and returns the final result to the user. The query processing architecture can be described in briefby the diagram below.
15.5. Query Processing 123

Citus Documentation, Release 8.2
Citus’s query processing pipeline involves the two components:
• Distributed Query Planner and Executor
• PostgreSQL Planner and Executor
We discuss them in greater detail in the subsequent sections.
15.5.1 Distributed Query Planner
Citus’s distributed query planner takes in a SQL query and plans it for distributed execution.
For SELECT queries, the planner first creates a plan tree of the input query and transforms it into its commutative andassociative form so it can be parallelized. It also applies several optimizations to ensure that the queries are executedin a scalable manner, and that network I/O is minimized.
Next, the planner breaks the query into two parts - the coordinator query which runs on the coordinator and the workerquery fragments which run on individual shards on the workers. The planner then assigns these query fragments to theworkers such that all their resources are used efficiently. After this step, the distributed query plan is passed on to thedistributed executor for execution.
The planning process for key-value lookups on the distribution column or modification queries is slightly different
124 Chapter 15. SQL Reference

Citus Documentation, Release 8.2
as they hit exactly one shard. Once the planner receives an incoming query, it needs to decide the correct shard towhich the query should be routed. To do this, it extracts the distribution column in the incoming row and looks up themetadata to determine the right shard for the query. Then, the planner rewrites the SQL of that command to referencethe shard table instead of the original table. This re-written plan is then passed to the distributed executor.
15.5.2 Distributed Query Executor
Citus’s distributed executors run distributed query plans and handle failures that occur during query execution. Theexecutors connect to the workers, send the assigned tasks to them and oversee their execution. If the executor cannotassign a task to the designated worker or if a task execution fails, then the executor dynamically re-assigns the taskto replicas on other workers. The executor processes only the failed query sub-tree, and not the entire query whilehandling failures.
Citus has three basic executor types: real time, router, and task tracker. It chooses which to use dynamically, dependingon the structure of each query, and can use more than one at once for a single query, assigning different executors todifferent subqueries/CTEs as needed to support the SQL functionality. This process is recursive: if Citus cannotdetermine how to run a subquery then it examines sub-subqueries.
At a high level, the real-time executor is useful for handling simple key-value lookups and INSERT, UPDATE, andDELETE queries. The task tracker is better suited for larger SELECT queries, and the router executor for access datathat is co-located in a single worker node.
The choice of executor for each query can be displayed by running PostgreSQL’s EXPLAIN command. This can beuseful for debugging performance issues.
Real-time Executor
The real-time executor is the default executor used by Citus. It is well suited for getting fast responses to queriesinvolving filters, aggregations and co-located joins. The real time executor opens one connection per shard to theworkers and sends all fragment queries to them. It then fetches the results from each fragment query, merges them,and gives the final results back to the user.
Since the real time executor maintains an open connection for each shard to which it sends queries, it may reach filedescriptor / connection limits while dealing with high shard counts. In such cases, the real-time executor throttles onassigning more tasks to workers to avoid overwhelming them with too many tasks. One can typically increase the filedescriptor limit on modern operating systems to avoid throttling, and change Citus configuration to use the real-timeexecutor. But, that may not be ideal for efficient resource management while running complex queries. For queriesthat touch thousands of shards or require large table joins, you can use the task tracker executor.
Furthermore, when the real time executor detects simple INSERT, UPDATE or DELETE queries it assigns the in-coming query to the worker which has the target shard. The query is then handled by the worker PostgreSQL serverand the results are returned back to the user. In case a modification fails on a shard replica, the executor marks thecorresponding shard replica as invalid in order to maintain data consistency.
Router Executor
When all data required for a query is stored on a single node, Citus can route the entire query to the node and run itthere. The result set is then relayed through the coordinator node back to the client. The router executor takes care ofthis type of execution.
Although Citus supports a large percentage of SQL functionality even for cross-node queries, the advantage of routerexecution is 100% SQL coverage. Queries executing inside a node are run in a full-featured PostgreSQL workerinstance. The disadvantage of router execution is the reduced parallelism of executing a query using only one computer.
15.5. Query Processing 125

Citus Documentation, Release 8.2
Task Tracker Executor
The task tracker executor is well suited for long running, complex data warehousing queries. This executor opensonly one connection per worker, and assigns all fragment queries to a task tracker daemon on the worker. The tasktracker daemon then regularly schedules new tasks and sees through their completion. The executor on the coordinatorregularly checks with these task trackers to see if their tasks completed.
Each task tracker daemon on the workers also makes sure to execute at most citus.max_running_tasks_per_nodeconcurrently. This concurrency limit helps in avoiding disk I/O contention when queries are not served from memory.The task tracker executor is designed to efficiently handle complex queries which require repartitioning and shufflingintermediate data among workers.
Subquery/CTE Push-Pull Execution
If necessary Citus can gather results from subqueries and CTEs into the coordinator node and then push them backacross workers for use by an outer query. This allows Citus to support a greater variety of SQL constructs, and evenmix executor types between a query and its subqueries.
For example, having subqueries in a WHERE clause sometimes cannot execute inline at the same time as the mainquery, but must be done separately. Suppose a web analytics application maintains a visits table partitioned bypage_id. To query the number of visitor sessions on the top twenty most visited pages, we can use a subquery tofind the list of pages, then an outer query to count the sessions.
SELECT page_id, count(distinct session_id)FROM visitsWHERE page_id IN (
SELECT page_idFROM visitsGROUP BY page_idORDER BY count(*) DESCLIMIT 20
)GROUP BY page_id;
The real-time executor would like to run a fragment of this query against each shard by page_id, counting distinctsession_ids, and combining the results on the coordinator. However the LIMIT in the subquery means the subquerycannot be executed as part of the fragment. By recursively planning the query Citus can run the subquery separately,push the results to all workers, run the main fragment query, and pull the results back to the coordinator. The “push-pull” design supports a subqueries like the one above.
Let’s see this in action by reviewing the EXPLAIN output for this query. It’s fairly involved:
GroupAggregate (cost=0.00..0.00 rows=0 width=0)Group Key: remote_scan.page_id-> Sort (cost=0.00..0.00 rows=0 width=0)Sort Key: remote_scan.page_id-> Custom Scan (Citus Real-Time) (cost=0.00..0.00 rows=0 width=0)
-> Distributed Subplan 6_1-> Limit (cost=0.00..0.00 rows=0 width=0)-> Sort (cost=0.00..0.00 rows=0 width=0)
Sort Key: COALESCE((pg_catalog.sum((COALESCE((pg_catalog.sum(remote_scan.→˓worker_column_2))::bigint, '0'::bigint))))::bigint, '0'::bigint) DESC
-> HashAggregate (cost=0.00..0.00 rows=0 width=0)Group Key: remote_scan.page_id-> Custom Scan (Citus Real-Time) (cost=0.00..0.00 rows=0 width=0)Task Count: 32Tasks Shown: One of 32
126 Chapter 15. SQL Reference

Citus Documentation, Release 8.2
-> TaskNode: host=localhost port=5433 dbname=postgres-> Limit (cost=1883.00..1883.05 rows=20 width=12)-> Sort (cost=1883.00..1965.54 rows=33017 width=12)Sort Key: (count(*)) DESC-> HashAggregate (cost=674.25..1004.42 rows=33017 width=12)Group Key: page_id-> Seq Scan on visits_102264 visits (cost=0.00..509.17
→˓rows=33017 width=4)Task Count: 32Tasks Shown: One of 32-> Task
Node: host=localhost port=5433 dbname=postgres-> HashAggregate (cost=734.53..899.61 rows=16508 width=8)Group Key: visits.page_id, visits.session_id-> Hash Join (cost=17.00..651.99 rows=16508 width=8)
Hash Cond: (visits.page_id = intermediate_result.page_id)-> Seq Scan on visits_102264 visits (cost=0.00..509.17 rows=33017
→˓width=8)-> Hash (cost=14.50..14.50 rows=200 width=4)-> HashAggregate (cost=12.50..14.50 rows=200 width=4)Group Key: intermediate_result.page_id-> Function Scan on read_intermediate_result intermediate_result
→˓(cost=0.00..10.00 rows=1000 width=4)
Let’s break it apart and examine each piece.
GroupAggregate (cost=0.00..0.00 rows=0 width=0)Group Key: remote_scan.page_id-> Sort (cost=0.00..0.00 rows=0 width=0)Sort Key: remote_scan.page_id
The root of the tree is what the coordinator node does with the results from the workers. In this case it is groupingthem, and GroupAggregate requires they be sorted first.
-> Custom Scan (Citus Real-Time) (cost=0.00..0.00 rows=0 width=0)-> Distributed Subplan 6_1
.
The custom scan has two large sub-trees, starting with a “distributed subplan.”
-> Limit (cost=0.00..0.00 rows=0 width=0)-> Sort (cost=0.00..0.00 rows=0 width=0)Sort Key: COALESCE((pg_catalog.sum((COALESCE((pg_catalog.sum(remote_scan.
→˓worker_column_2))::bigint, '0'::bigint))))::bigint, '0'::bigint) DESC-> HashAggregate (cost=0.00..0.00 rows=0 width=0)Group Key: remote_scan.page_id-> Custom Scan (Citus Real-Time) (cost=0.00..0.00 rows=0 width=0)Task Count: 32Tasks Shown: One of 32-> TaskNode: host=localhost port=5433 dbname=postgres-> Limit (cost=1883.00..1883.05 rows=20 width=12)-> Sort (cost=1883.00..1965.54 rows=33017 width=12)Sort Key: (count(*)) DESC-> HashAggregate (cost=674.25..1004.42 rows=33017 width=12)Group Key: page_id-> Seq Scan on visits_102264 visits (cost=0.00..509.17
→˓rows=33017 width=4)
15.5. Query Processing 127

Citus Documentation, Release 8.2
.
Worker nodes run the above for each of the thirty-two shards (Citus is choosing one representative for display). Wecan recognize all the pieces of the IN (...) subquery: the sorting, grouping and limiting. When all workers havecompleted this query, they send their output back to the coordinator which puts it together as “intermediate results.”
Task Count: 32Tasks Shown: One of 32-> Task
Node: host=localhost port=5433 dbname=postgres-> HashAggregate (cost=734.53..899.61 rows=16508 width=8)Group Key: visits.page_id, visits.session_id-> Hash Join (cost=17.00..651.99 rows=16508 width=8)Hash Cond: (visits.page_id = intermediate_result.page_id)
.
Citus starts another real-time job in this second subtree. It’s going to count distinct sessions in visits. It uses a JOIN toconnect with the intermediate results. The intermediate results will help it restrict to the top twenty pages.
-> Seq Scan on visits_102264 visits (cost=0.00..509.17 rows=33017→˓width=8)
-> Hash (cost=14.50..14.50 rows=200 width=4)-> HashAggregate (cost=12.50..14.50 rows=200 width=4)Group Key: intermediate_result.page_id-> Function Scan on read_intermediate_result intermediate_result
→˓(cost=0.00..10.00 rows=1000 width=4).
The worker internally retrieves intermediate results using a read_intermediate_result function which loadsdata from a file that was copied in from the coordinator node.
This example showed how Citus executed the query in multiple steps with a distributed subplan, and how you can useEXPLAIN to learn about distributed query execution.
15.5.3 PostgreSQL planner and executor
Once the distributed executor sends the query fragments to the workers, they are processed like regular PostgreSQLqueries. The PostgreSQL planner on that worker chooses the most optimal plan for executing that query locally onthe corresponding shard table. The PostgreSQL executor then runs that query and returns the query results back to thedistributed executor. You can learn more about the PostgreSQL planner and executor from the PostgreSQL manual.Finally, the distributed executor passes the results to the coordinator for final aggregation.
15.6 Manual Query Propagation
When the user issues a query, the Citus coordinator partitions it into smaller query fragments where each queryfragment can be run independently on a worker shard. This allows Citus to distribute each query across the cluster.
However the way queries are partitioned into fragments (and which queries are propagated at all) varies by the typeof query. In some advanced situations it is useful to manually control this behavior. Citus provides utility functions topropagate SQL to workers, shards, or placements.
Manual query propagation bypasses coordinator logic, locking, and any other consistency checks. These functions areavailable as a last resort to allow statements which Citus otherwise does not run natively. Use them carefully to avoiddata inconsistency and deadlocks.
128 Chapter 15. SQL Reference

Citus Documentation, Release 8.2
15.6.1 Running on all Workers
The least granular level of execution is broadcasting a statement for execution on all workers. This is useful forviewing properties of entire worker databases or creating UDFs uniformly throughout the cluster. For example:
-- Make a UDF available on all workersSELECT run_command_on_workers($cmd$ CREATE FUNCTION ... $cmd$);
-- List the work_mem setting of each worker databaseSELECT run_command_on_workers($cmd$ SHOW work_mem; $cmd$);
Note: The run_command_on_workers function and other manual propagation commands in this section can runonly queries which return a single column and single row.
15.6.2 Running on all Shards
The next level of granularity is running a command across all shards of a particular distributed table. It can be useful,for instance, in reading the properties of a table directly on workers. Queries run locally on a worker node have fullaccess to metadata such as table statistics.
The run_command_on_shards function applies a SQL command to each shard, where the shard name is providedfor interpolation in the command. Here is an example of estimating the row count for a distributed table by using thepg_class table on each worker to estimate the number of rows for each shard. Notice the %s which will be replacedwith each shard’s name.
-- Get the estimated row count for a distributed table by summing the-- estimated counts of rows for each shard.SELECT sum(result::bigint) AS estimated_count
FROM run_command_on_shards('my_distributed_table',$cmd$
SELECT reltuplesFROM pg_class cJOIN pg_catalog.pg_namespace n on n.oid=c.relnamespace
WHERE (n.nspname || '.' || relname)::regclass = '%s'::regclassAND n.nspname NOT IN ('citus', 'pg_toast', 'pg_catalog')
$cmd$);
15.6.3 Running on all Placements
The most granular level of execution is running a command across all shards and their replicas (aka placements). Itcan be useful for running data modification commands, which must apply to every replica to ensure consistency.
For example, suppose a distributed table has an updated_at field, and we want to “touch” all rows so that theyare marked as updated at a certain time. An ordinary UPDATE statement on the coordinator requires a filter by thedistribution column, but we can manually propagate the update across all shards and replicas:
-- note we're using a hard-coded date rather than-- a function such as "now()" because the query will-- run at slightly different times on each replica
SELECT run_command_on_placements(
15.6. Manual Query Propagation 129

Citus Documentation, Release 8.2
'my_distributed_table',$cmd$UPDATE %s SET updated_at = '2017-01-01';
$cmd$);
A useful companion to run_command_on_placements is run_command_on_colocated_placements.It interpolates the names of two placements of co-located distributed tables into a query. The placement pairs arealways chosen to be local to the same worker where full SQL coverage is available. Thus we can use advanced SQLfeatures like triggers to relate the tables:
-- Suppose we have two distributed tablesCREATE TABLE little_vals (key int, val int);CREATE TABLE big_vals (key int, val int);SELECT create_distributed_table('little_vals', 'key');SELECT create_distributed_table('big_vals', 'key');
-- We want to synchronise them so that every time little_vals-- are created, big_vals appear with double the value---- First we make a trigger function on each worker, which will-- take the destination table placement as an argumentSELECT run_command_on_workers($cmd$CREATE OR REPLACE FUNCTION embiggen() RETURNS TRIGGER AS $$BEGIN
IF (TG_OP = 'INSERT') THENEXECUTE format('INSERT INTO %s (key, val) SELECT ($1).key, ($1).val*2;',TG_ARGV[0]
) USING NEW;END IF;RETURN NULL;
END;$$ LANGUAGE plpgsql;
$cmd$);
-- Next we relate the co-located tables by the trigger function-- on each co-located placementSELECT run_command_on_colocated_placements(
'little_vals','big_vals',$cmd$CREATE TRIGGER after_insert AFTER INSERT ON %s
FOR EACH ROW EXECUTE PROCEDURE embiggen(%s)$cmd$
);
15.6.4 Limitations
• There are no safe-guards against deadlock for multi-statement transactions.
• There are no safe-guards against mid-query failures and resulting inconsistencies.
• Query results are cached in memory; these functions can’t deal with very big result sets.
• The functions error out early if they cannot connect to a node.
• You can do very bad things!
130 Chapter 15. SQL Reference

Citus Documentation, Release 8.2
15.7 SQL Support and Workarounds
As Citus provides distributed functionality by extending PostgreSQL, it is compatible with PostgreSQL constructs.This means that users can use the tools and features that come with the rich and extensible PostgreSQL ecosystem fordistributed tables created with Citus.
Citus has 100% SQL coverage for any queries it is able to execute on a single worker node. These kind of queriesare called router executable and are common in Multi-tenant Applications when accessing information about a singletenant.
Even cross-node queries (used for parallel computations) support most SQL features. However some SQL features arenot supported for queries which combine information from multiple nodes.
Limitations for Cross-Node SQL Queries:
• Window functions are supported only when they include the distribution column in PARTITION BY.
• SELECT . . . FOR UPDATE work in Router Executor queries only
• TABLESAMPLE work in Router Executor queries only
• Correlated subqueries are supported only when the correlation is on the Distribution Column and the subqueriesconform to subquery pushdown rules (e.g., grouping by the distribution column, with no LIMIT or LIMITOFFSET clause).
• Recursive CTEs work in Router Executor queries only
• Grouping sets work in Router Executor queries only
To learn more about PostgreSQL and its features, you can visit the PostgreSQL documentation. For a detailed referenceof the PostgreSQL SQL command dialect (which can be used as is by Citus users), you can see the SQL CommandReference.
15.7.1 Workarounds
Before attempting workarounds consider whether Citus is appropriate for your situation. Citus’ current version workswell for real-time analytics and multi-tenant use cases.
Citus supports all SQL statements in the multi-tenant use-case. Even in the real-time analytics use-cases, with queriesthat span across nodes, Citus supports the majority of statements. The few types of unsupported queries are listedin Are there any PostgreSQL features not supported by Citus? Many of the unsupported features have workarounds;below are a number of the most useful.
JOIN a local and a distributed table
Attempting to execute a JOIN between a local table “local” and a distributed table “dist” causes an error:
SELECT * FROM local JOIN dist USING (id);
/*ERROR: relation local is not distributedSTATEMENT: SELECT * FROM local JOIN dist USING (id);ERROR: XX000: relation local is not distributedLOCATION: DistributedTableCacheEntry, metadata_cache.c:711
*/
15.7. SQL Support and Workarounds 131

Citus Documentation, Release 8.2
Although you can’t join such tables directly, by wrapping the local table in a subquery or CTE you can make Citus’recursive query planner copy the local table data to worker nodes. By colocating the data this allows the query toproceed.
-- either
SELECT *FROM (SELECT * FROM local) AS xJOIN dist USING (id);
-- or
WITH x AS (SELECT * FROM local)SELECT * FROM xJOIN dist USING (id);
Remember that the coordinator will send the results in the subquery or CTE to all workers which require it for process-ing. Thus it’s best to either add the most specific filters and limits to the inner query as possible, or else aggregate thetable. That reduces the network overhead which such a query can cause. More about this in Subquery/CTE NetworkOverhead.
Temp Tables: the Workaround of Last Resort
There are still a few queries that are unsupported even with the use of push-pull execution via subqueries. One of themis running window functions that partition by a non-distribution column.
Suppose we have a table called github_events, distributed by the column user_id. Then the following windowfunction will not work:
-- this won't work
SELECT repo_id, org->'id' as org_id, count(*)OVER (PARTITION BY repo_id) -- repo_id is not distribution columnFROM github_events
WHERE repo_id IN (8514, 15435, 19438, 21692);
There is another trick though. We can pull the relevant information to the coordinator as a temporary table:
-- grab the data, minus the aggregate, into a local table
CREATE TEMP TABLE results AS (SELECT repo_id, org->'id' as org_idFROM github_events
WHERE repo_id IN (8514, 15435, 19438, 21692));
-- now run the aggregate locally
SELECT repo_id, org_id, count(*)OVER (PARTITION BY repo_id)FROM results;
Creating a temporary table on the coordinator is a last resort. It is limited by the disk size and CPU of the node.
132 Chapter 15. SQL Reference

CHAPTER 16
Citus API
16.1 Citus Utility Functions
This section contains reference information for the User Defined Functions provided by Citus. These functions helpin providing additional distributed functionality to Citus other than the standard SQL commands.
16.1.1 Table and Shard DDL
create_distributed_table
The create_distributed_table() function is used to define a distributed table and create its shards if it’s a hash-distributedtable. This function takes in a table name, the distribution column and an optional distribution method and insertsappropriate metadata to mark the table as distributed. The function defaults to ‘hash’ distribution if no distributionmethod is specified. If the table is hash-distributed, the function also creates worker shards based on the shard countand shard replication factor configuration values. If the table contains any rows, they are automatically distributed toworker nodes.
This function replaces usage of master_create_distributed_table() followed by master_create_worker_shards().
Arguments
table_name: Name of the table which needs to be distributed.
distribution_column: The column on which the table is to be distributed.
distribution_type: (Optional) The method according to which the table is to be distributed. Permissible values areappend or hash, and defaults to ‘hash’.
colocate_with: (Optional) include current table in the co-location group of another table. By default tables areco-located when they are distributed by columns of the same type, have the same shard count, and have the samereplication factor. Possible values for colocate_with are default, none to start a new co-location group, orthe name of another table to co-locate with that table. (See Co-Locating Tables.)
Keep in mind that the default value of colocate_with does implicit co-location. As Table Co-Location explains,this can be a great thing when tables are related or will be joined. However when two tables are unrelated but happen touse the same datatype for their distribution columns, accidentally co-locating them can decrease performance duringshard rebalancing. The table shards will be moved together unnecessarily in a “cascade.”
If a new distributed table is not related to other tables, it’s best to specify colocate_with => 'none'.
133

Citus Documentation, Release 8.2
Return Value
N/A
Example
This example informs the database that the github_events table should be distributed by hash on the repo_id column.
SELECT create_distributed_table('github_events', 'repo_id');
-- alternatively, to be more explicit:SELECT create_distributed_table('github_events', 'repo_id',
colocate_with => 'github_repo');
For more examples, see Creating and Modifying Distributed Tables (DDL).
create_reference_table
The create_reference_table() function is used to define a small reference or dimension table. This function takes in atable name, and creates a distributed table with just one shard, replicated to every worker node.
Arguments
table_name: Name of the small dimension or reference table which needs to be distributed.
Return Value
N/A
Example
This example informs the database that the nation table should be defined as a reference table
SELECT create_reference_table('nation');
upgrade_to_reference_table
The upgrade_to_reference_table() function takes an existing distributed table which has a shard count of one, andupgrades it to be a recognized reference table. After calling this function, the table will be as if it had been createdwith create_reference_table.
Arguments
table_name: Name of the distributed table (having shard count = 1) which will be distributed as a reference table.
134 Chapter 16. Citus API

Citus Documentation, Release 8.2
Return Value
N/A
Example
This example informs the database that the nation table should be defined as a reference table
SELECT upgrade_to_reference_table('nation');
mark_tables_colocated
The mark_tables_colocated() function takes a distributed table (the source), and a list of others (the targets), and putsthe targets into the same co-location group as the source. If the source is not yet in a group, this function creates one,and assigns the source and targets to it.
Usually colocating tables ought to be done at table distribution time via the colocate_with parameter of cre-ate_distributed_table. But mark_tables_colocated can take care of it if necessary.
Arguments
source_table_name: Name of the distributed table whose co-location group the targets will be assigned to match.
target_table_names: Array of names of the distributed target tables, must be non-empty. These distributed tablesmust match the source table in:
• distribution method
• distribution column type
• replication type
• shard count
Failing this, Citus will raise an error. For instance, attempting to colocate tables apples and oranges whosedistribution column types differ results in:
ERROR: XX000: cannot colocate tables apples and orangesDETAIL: Distribution column types don't match for apples and oranges.
Return Value
N/A
Example
This example puts products and line_items in the same co-location group as stores. The example assumesthat these tables are all distributed on a column with matching type, most likely a “store id.”
SELECT mark_tables_colocated('stores', ARRAY['products', 'line_items']);
16.1. Citus Utility Functions 135

Citus Documentation, Release 8.2
master_create_distributed_table
Note: This function is deprecated, and replaced by create_distributed_table.
The master_create_distributed_table() function is used to define a distributed table. This function takes in a table name,the distribution column and distribution method and inserts appropriate metadata to mark the table as distributed.
Arguments
table_name: Name of the table which needs to be distributed.
distribution_column: The column on which the table is to be distributed.
distribution_method: The method according to which the table is to be distributed. Permissible values are append orhash.
Return Value
N/A
Example
This example informs the database that the github_events table should be distributed by hash on the repo_id column.
SELECT master_create_distributed_table('github_events', 'repo_id', 'hash');
master_create_worker_shards
Note: This function is deprecated, and replaced by create_distributed_table.
The master_create_worker_shards() function creates a specified number of worker shards with the desired replicationfactor for a hash distributed table. While doing so, the function also assigns a portion of the hash token space (whichspans between -2 Billion and 2 Billion) to each shard. Once all shards are created, this function saves all distributedmetadata on the coordinator.
Arguments
table_name: Name of hash distributed table for which shards are to be created.
shard_count: Number of shards to create.
replication_factor: Desired replication factor for each shard.
Return Value
N/A
136 Chapter 16. Citus API

Citus Documentation, Release 8.2
Example
This example usage would create a total of 16 shards for the github_events table where each shard owns a portion ofa hash token space and gets replicated on 2 workers.
SELECT master_create_worker_shards('github_events', 16, 2);
master_create_empty_shard
The master_create_empty_shard() function can be used to create an empty shard for an append distributed table.Behind the covers, the function first selects shard_replication_factor workers to create the shard on. Then, it connectsto the workers and creates empty placements for the shard on the selected workers. Finally, the metadata is updatedfor these placements on the coordinator to make these shards visible to future queries. The function errors out if it isunable to create the desired number of shard placements.
Arguments
table_name: Name of the append distributed table for which the new shard is to be created.
Return Value
shard_id: The function returns the unique id assigned to the newly created shard.
Example
This example creates an empty shard for the github_events table. The shard id of the created shard is 102089.
SELECT * from master_create_empty_shard('github_events');master_create_empty_shard
---------------------------102089
(1 row)
16.1.2 Table and Shard DML
master_append_table_to_shard
The master_append_table_to_shard() function can be used to append a PostgreSQL table’s contents to a shard of anappend distributed table. Behind the covers, the function connects to each of the workers which have a placement ofthat shard and appends the contents of the table to each of them. Then, the function updates metadata for the shardplacements on the basis of whether the append succeeded or failed on each of them.
If the function is able to successfully append to at least one shard placement, the function will return successfully. Itwill also mark any placement to which the append failed as INACTIVE so that any future queries do not consider thatplacement. If the append fails for all placements, the function quits with an error (as no data was appended). In thiscase, the metadata is left unchanged.
16.1. Citus Utility Functions 137

Citus Documentation, Release 8.2
Arguments
shard_id: Id of the shard to which the contents of the table have to be appended.
source_table_name: Name of the PostgreSQL table whose contents have to be appended.
source_node_name: DNS name of the node on which the source table is present (“source” node).
source_node_port: The port on the source worker node on which the database server is listening.
Return Value
shard_fill_ratio: The function returns the fill ratio of the shard which is defined as the ratio of the current shard sizeto the configuration parameter shard_max_size.
Example
This example appends the contents of the github_events_local table to the shard having shard id 102089. The tablegithub_events_local is present on the database running on the node master-101 on port number 5432. The functionreturns the ratio of the the current shard size to the maximum shard size, which is 0.1 indicating that 10% of the shardhas been filled.
SELECT * from master_append_table_to_shard(102089,'github_events_local','master-101',→˓5432);master_append_table_to_shard
------------------------------0.100548
(1 row)
master_apply_delete_command
The master_apply_delete_command() function is used to delete shards which match the criteria specified by the deletecommand on an append distributed table. This function deletes a shard only if all rows in the shard match the deletecriteria. As the function uses shard metadata to decide whether or not a shard needs to be deleted, it requires theWHERE clause in the DELETE statement to be on the distribution column. If no condition is specified, then all shardsof that table are deleted.
Behind the covers, this function connects to all the worker nodes which have shards matching the delete criteria andsends them a command to drop the selected shards. Then, the function updates the corresponding metadata on thecoordinator. If the function is able to successfully delete a shard placement, then the metadata for it is deleted. If aparticular placement could not be deleted, then it is marked as TO DELETE. The placements which are marked as TODELETE are not considered for future queries and can be cleaned up later.
Arguments
delete_command: valid SQL DELETE command
Return Value
deleted_shard_count: The function returns the number of shards which matched the criteria and were deleted (ormarked for deletion). Note that this is the number of shards and not the number of shard placements.
138 Chapter 16. Citus API

Citus Documentation, Release 8.2
Example
The first example deletes all the shards for the github_events table since no delete criteria is specified. In the secondexample, only the shards matching the criteria (3 in this case) are deleted.
SELECT * from master_apply_delete_command('DELETE FROM github_events');master_apply_delete_command
-----------------------------5
(1 row)
SELECT * from master_apply_delete_command('DELETE FROM github_events WHERE review_→˓date < ''2009-03-01''');master_apply_delete_command
-----------------------------3
(1 row)
master_modify_multiple_shards
The master_modify_multiple_shards() function is used to run data modification statements which could span multipleshards. Depending on the value of citus.multi_shard_commit_protocol, the commit can be done in one- or two-phases.
Limitations:
• It cannot be called inside a transaction block
• It must be called with simple operator expressions only
Arguments
modify_query: A simple DELETE or UPDATE query as a string.
Return Value
N/A
Example
SELECT master_modify_multiple_shards('DELETE FROM customer_delete_protocol WHERE c_custkey > 500 AND c_custkey < 500');
16.1.3 Metadata / Configuration Information
master_add_node
The master_add_node() function registers a new node addition in the cluster in the Citus metadata table pg_dist_node.It also copies reference tables to the new node.
16.1. Citus Utility Functions 139

Citus Documentation, Release 8.2
Arguments
node_name: DNS name or IP address of the new node to be added.
node_port: The port on which PostgreSQL is listening on the worker node.
group_id: A group of one primary server and zero or more secondary servers, relevant only for streaming replication.Default 0
node_role: Whether it is ‘primary’ or ‘secondary’. Default ‘primary’
node_cluster: The cluster name. Default ‘default’
Return Value
A tuple which represents a row from pg_dist_node table.
Example
select * from master_add_node('new-node', 12345);nodeid | groupid | nodename | nodeport | noderack | hasmetadata | isactive | groupid→˓| noderole | nodecluster--------+---------+----------+----------+----------+-------------+----------+---------→˓+----------+ ------------
7 | 7 | new-node | 12345 | default | f | t | 0→˓| primary | default(1 row)
master_update_node
The master_update_node() function changes the hostname and port for a node registered in the Citus metadata tablepg_dist_node.
Arguments
node_id: id from the pg_dist_node table.
node_name: updated DNS name or IP address for the node.
node_port: the port on which PostgreSQL is listening on the worker node.
Return Value
N/A
Example
select * from master_update_node(123, 'new-address', 5432);
140 Chapter 16. Citus API

Citus Documentation, Release 8.2
master_add_inactive_node
The master_add_inactive_node function, similar to master_add_node, registers a new node inpg_dist_node. However it marks the new node as inactive, meaning no shards will be placed there. Also itdoes not copy reference tables to the new node.
Arguments
node_name: DNS name or IP address of the new node to be added.
node_port: The port on which PostgreSQL is listening on the worker node.
group_id: A group of one primary server and zero or more secondary servers, relevant only for streaming replication.Default 0
node_role: Whether it is ‘primary’ or ‘secondary’. Default ‘primary’
node_cluster: The cluster name. Default ‘default’
Return Value
A tuple which represents a row from pg_dist_node table.
Example
select * from master_add_inactive_node('new-node', 12345);nodeid | groupid | nodename | nodeport | noderack | hasmetadata | isactive | groupid→˓| noderole | nodecluster--------+---------+----------+----------+----------+-------------+----------+---------→˓+----------+ -------------
7 | 7 | new-node | 12345 | default | f | f | 0→˓| primary | default(1 row)
master_activate_node
The master_activate_node function marks a node as active in the Citus metadata table pg_dist_node andcopies reference tables to the node. Useful for nodes added via master_add_inactive_node.
Arguments
node_name: DNS name or IP address of the new node to be added.
node_port: The port on which PostgreSQL is listening on the worker node.
Return Value
A tuple which represents a row from pg_dist_node table.
16.1. Citus Utility Functions 141

Citus Documentation, Release 8.2
Example
select * from master_activate_node('new-node', 12345);nodeid | groupid | nodename | nodeport | noderack | hasmetadata | isactive| noderole→˓| nodecluster--------+---------+----------+----------+----------+-------------+---------+----------→˓+ -------------
7 | 7 | new-node | 12345 | default | f | t | primary→˓| default(1 row)
master_disable_node
The master_disable_node function is the opposite of master_activate_node. It marks a node as inactivein the Citus metadata table pg_dist_node, removing it from the cluster temporarily. The function also deletes allreference table placements from the disabled node. To reactivate the node, just run master_activate_nodeagain.
Arguments
node_name: DNS name or IP address of the node to be disabled.
node_port: The port on which PostgreSQL is listening on the worker node.
Return Value
N/A
Example
select * from master_disable_node('new-node', 12345);
master_add_secondary_node
The master_add_secondary_node() function registers a new secondary node in the cluster for an existing primary node.It updates the Citus metadata table pg_dist_node.
Arguments
node_name: DNS name or IP address of the new node to be added.
node_port: The port on which PostgreSQL is listening on the worker node.
primary_name: DNS name or IP address of the primary node for this secondary.
primary_port: The port on which PostgreSQL is listening on the primary node.
node_cluster: The cluster name. Default ‘default’
142 Chapter 16. Citus API

Citus Documentation, Release 8.2
Return Value
A tuple which represents a row from pg_dist_node table.
Example
select * from master_add_secondary_node('new-node', 12345, 'primary-node', 12345);nodeid | groupid | nodename | nodeport | noderack | hasmetadata | isactive |→˓noderole | nodecluster--------+---------+----------+----------+----------+-------------+----------+---------→˓--+-------------
7 | 7 | new-node | 12345 | default | f | t |→˓secondary | default(1 row)
master_remove_node
The master_remove_node() function removes the specified node from the pg_dist_node metadata table. This functionwill error out if there are existing shard placements on this node. Thus, before using this function, the shards will needto be moved off that node.
Arguments
node_name: DNS name of the node to be removed.
node_port: The port on which PostgreSQL is listening on the worker node.
Return Value
N/A
Example
select master_remove_node('new-node', 12345);master_remove_node
--------------------
(1 row)
master_get_active_worker_nodes
The master_get_active_worker_nodes() function returns a list of active worker host names and port numbers.
Arguments
N/A
16.1. Citus Utility Functions 143

Citus Documentation, Release 8.2
Return Value
List of tuples where each tuple contains the following information:
node_name: DNS name of the worker node
node_port: Port on the worker node on which the database server is listening
Example
SELECT * from master_get_active_worker_nodes();node_name | node_port
-----------+-----------localhost | 9700localhost | 9702localhost | 9701
(3 rows)
master_get_table_metadata
The master_get_table_metadata() function can be used to return distribution related metadata for a distributed table.This metadata includes the relation id, storage type, distribution method, distribution column, replication count, maxi-mum shard size and the shard placement policy for that table. Behind the covers, this function queries Citus metadatatables to get the required information and concatenates it into a tuple before returning it to the user.
Arguments
table_name: Name of the distributed table for which you want to fetch metadata.
Return Value
A tuple containing the following information:
logical_relid: Oid of the distributed table. This values references the relfilenode column in the pg_class system catalogtable.
part_storage_type: Type of storage used for the table. May be ‘t’ (standard table), ‘f’ (foreign table) or ‘c’ (columnartable).
part_method: Distribution method used for the table. May be ‘a’ (append), or ‘h’ (hash).
part_key: Distribution column for the table.
part_replica_count: Current shard replication count.
part_max_size: Current maximum shard size in bytes.
part_placement_policy: Shard placement policy used for placing the table’s shards. May be 1 (local-node-first) or 2(round-robin).
144 Chapter 16. Citus API

Citus Documentation, Release 8.2
Example
The example below fetches and displays the table metadata for the github_events table.
SELECT * from master_get_table_metadata('github_events');logical_relid | part_storage_type | part_method | part_key | part_replica_count |→˓part_max_size | part_placement_policy---------------+-------------------+-------------+----------+--------------------+----→˓-----------+-----------------------
24180 | t | h | repo_id | 2 |→˓1073741824 | 2(1 row)
get_shard_id_for_distribution_column
Citus assigns every row of a distributed table to a shard based on the value of the row’s distribution column and thetable’s method of distribution. In most cases the precise mapping is a low-level detail that the database administratorcan ignore. However it can be useful to determine a row’s shard, either for manual database maintenance tasks or justto satisfy curiosity. The get_shard_id_for_distribution_column function provides this info for hash-and range-distributed tables as well as reference tables. It does not work for the append distribution.
Arguments
table_name: The distributed table.
distribution_value: The value of the distribution column.
Return Value
The shard id Citus associates with the distribution column value for the given table.
Example
SELECT get_shard_id_for_distribution_column('my_table', 4);
get_shard_id_for_distribution_column--------------------------------------
540007(1 row)
column_to_column_name
Translates the partkey column of pg_dist_partition into a textual column name. This is useful to determinethe distribution column of a distributed table.
For a more detailed discussion, see Finding the distribution column for a table.
16.1. Citus Utility Functions 145

Citus Documentation, Release 8.2
Arguments
table_name: The distributed table.
column_var_text: The value of partkey in the pg_dist_partition table.
Return Value
The name of table_name‘s distribution column.
Example
-- get distribution column name for products table
SELECT column_to_column_name(logicalrelid, partkey) AS dist_col_nameFROM pg_dist_partition
WHERE logicalrelid='products'::regclass;
Output:
----------| dist_col_name |----------| company_id |----------
citus_relation_size
Get the disk space used by all the shards of the specified distributed table. This includes the size of the “main fork,”but excludes the visibility map and free space map for the shards.
Arguments
logicalrelid: the name of a distributed table.
Return Value
Size in bytes as a bigint.
Example
SELECT pg_size_pretty(citus_relation_size('github_events'));
pg_size_pretty--------------23 MB
146 Chapter 16. Citus API

Citus Documentation, Release 8.2
citus_table_size
Get the disk space used by all the shards of the specified distributed table, excluding indexes (but including TOAST,free space map, and visibility map).
Arguments
logicalrelid: the name of a distributed table.
Return Value
Size in bytes as a bigint.
Example
SELECT pg_size_pretty(citus_table_size('github_events'));
pg_size_pretty--------------37 MB
citus_total_relation_size
Get the total disk space used by the all the shards of the specified distributed table, including all indexes and TOASTdata.
Arguments
logicalrelid: the name of a distributed table.
Return Value
Size in bytes as a bigint.
Example
SELECT pg_size_pretty(citus_total_relation_size('github_events'));
pg_size_pretty--------------73 MB
citus_stat_statements_reset
Removes all rows from citus_stat_statements. Note that this works independently frompg_stat_statements_reset(). To reset all stats, call both functions.
16.1. Citus Utility Functions 147

Citus Documentation, Release 8.2
Arguments
N/A
Return Value
None
16.1.4 Cluster Management And Repair Functions
master_copy_shard_placement
If a shard placement fails to be updated during a modification command or a DDL operation, then it gets marked asinactive. The master_copy_shard_placement function can then be called to repair an inactive shard placement usingdata from a healthy placement.
To repair a shard, the function first drops the unhealthy shard placement and recreates it using the schema on thecoordinator. Once the shard placement is created, the function copies data from the healthy placement and updates themetadata to mark the new shard placement as healthy. This function ensures that the shard will be protected from anyconcurrent modifications during the repair.
Arguments
shard_id: Id of the shard to be repaired.
source_node_name: DNS name of the node on which the healthy shard placement is present (“source” node).
source_node_port: The port on the source worker node on which the database server is listening.
target_node_name: DNS name of the node on which the invalid shard placement is present (“target” node).
target_node_port: The port on the target worker node on which the database server is listening.
Return Value
N/A
Example
The example below will repair an inactive shard placement of shard 12345 which is present on the database serverrunning on ‘bad_host’ on port 5432. To repair it, it will use data from a healthy shard placement present on the serverrunning on ‘good_host’ on port 5432.
SELECT master_copy_shard_placement(12345, 'good_host', 5432, 'bad_host', 5432);
master_move_shard_placement
148 Chapter 16. Citus API
Citus Documentation, Release 8.2
Note: The master_move_shard_placement function is a part of Citus Enterprise. Please contact us to obtain thisfunctionality.
This function moves a given shard (and shards co-located with it) from one node to another. It is typically usedindirectly during shard rebalancing rather than being called directly by a database administrator.
There are two ways to move the data: blocking or nonblocking. The blocking approach means that during the moveall modifications to the shard are paused. The second way, which avoids blocking shard writes, relies on Postgres 10logical replication.
After a successful move operation, shards in the source node get deleted. If the move fails at any point, this functionthrows an error and leaves the source and target nodes unchanged.
Arguments
shard_id: Id of the shard to be moved.
source_node_name: DNS name of the node on which the healthy shard placement is present (“source” node).
source_node_port: The port on the source worker node on which the database server is listening.
target_node_name: DNS name of the node on which the invalid shard placement is present (“target” node).
target_node_port: The port on the target worker node on which the database server is listening.
shard_transfer_mode: (Optional) Specify the method of replication, whether to use PostgreSQL logical replicationor a cross-worker COPY command. The possible values are:
• auto: Require replica identity if logical replication is possible, otherwise use legacy behaviour (e.g. for shardrepair, PostgreSQL 9.6). This is the default value.
• force_logical: Use logical replication even if the table doesn’t have a replica identity. Any concurrentupdate/delete statements to the table will fail during replication.
• block_writes: Use COPY (blocking writes) for tables lacking primary key or replica identity.
Return Value
N/A
Example
SELECT master_move_shard_placement(12345, 'from_host', 5432, 'to_host', 5432);
rebalance_table_shards
Note: The rebalance_table_shards function is a part of Citus Enterprise. Please contact us to obtain this functionality.
The rebalance_table_shards() function moves shards of the given table to make them evenly distributed among theworkers. The function first calculates the list of moves it needs to make in order to ensure that the cluster is balancedwithin the given threshold. Then, it moves shard placements one by one from the source node to the destination nodeand updates the corresponding shard metadata to reflect the move.
16.1. Citus Utility Functions 149

Citus Documentation, Release 8.2
Arguments
table_name: The name of the table whose shards need to be rebalanced.
threshold: (Optional) A float number between 0.0 and 1.0 which indicates the maximum difference ratio of nodeutilization from average utilization. For example, specifying 0.1 will cause the shard rebalancer to attempt to balanceall nodes to hold the same number of shards ±10%. Specifically, the shard rebalancer will try to converge utilizationof all worker nodes to the (1 - threshold) * average_utilization ... (1 + threshold) * average_utilization range.
max_shard_moves: (Optional) The maximum number of shards to move.
excluded_shard_list: (Optional) Identifiers of shards which shouldn’t be moved during the rebalance operation.
shard_transfer_mode: (Optional) Specify the method of replication, whether to use PostgreSQL logical replicationor a cross-worker COPY command. The possible values are:
• auto: Require replica identity if logical replication is possible, otherwise use legacy behaviour (e.g. for shardrepair, PostgreSQL 9.6). This is the default value.
• force_logical: Use logical replication even if the table doesn’t have a replica identity. Any concurrentupdate/delete statements to the table will fail during replication.
• block_writes: Use COPY (blocking writes) for tables lacking primary key or replica identity.
Return Value
N/A
Example
The example below will attempt to rebalance the shards of the github_events table within the default threshold.
SELECT rebalance_table_shards('github_events');
This example usage will attempt to rebalance the github_events table without moving shards with id 1 and 2.
SELECT rebalance_table_shards('github_events', excluded_shard_list:='{1,2}');
get_rebalance_progress
Note: The get_rebalance_progress() function is a part of Citus Enterprise. Please contact us to obtain this function-ality.
Once a shard rebalance begins, the get_rebalance_progress() function lists the progress of every shardinvolved. It monitors the moves planned and executed by rebalance_table_shards().
Arguments
N/A
150 Chapter 16. Citus API

Citus Documentation, Release 8.2
Return Value
Tuples containing these columns:
• sessionid: Postgres PID of the rebalance monitor
• table_name: The table whose shards are moving
• shardid: The shard in question
• shard_size: Size in bytes
• sourcename: Hostname of the source node
• sourceport: Port of the source node
• targetname: Hostname of the destination node
• targetport: Port of the destination node
• progress: 0 = waiting to be moved; 1 = moving; 2 = complete
Example
SELECT * FROM get_rebalance_progress();
------------------------------------------------------------------------| sessionid | table_name | shardid | shard_size | sourcename | sourceport |→˓targetname | targetport | progress |------------------------------------------------------------------------| 7083 | foo | 102008 | 1204224 | n1.foobar.com | 5432 | n4.→˓foobar.com | 5432 | 0 || 7083 | foo | 102009 | 1802240 | n1.foobar.com | 5432 | n4.→˓foobar.com | 5432 | 0 || 7083 | foo | 102018 | 614400 | n2.foobar.com | 5432 | n4.→˓foobar.com | 5432 | 1 || 7083 | foo | 102019 | 8192 | n3.foobar.com | 5432 | n4.→˓foobar.com | 5432 | 2 |------------------------------------------------------------------------
replicate_table_shards
Note: The replicate_table_shards function is a part of Citus Enterprise. Please contact us to obtain this functionality.
The replicate_table_shards() function replicates the under-replicated shards of the given table. The function firstcalculates the list of under-replicated shards and locations from which they can be fetched for replication. The functionthen copies over those shards and updates the corresponding shard metadata to reflect the copy.
Arguments
table_name: The name of the table whose shards need to be replicated.
shard_replication_factor: (Optional) The desired replication factor to achieve for each shard.
max_shard_copies: (Optional) Maximum number of shards to copy to reach the desired replication factor.
16.1. Citus Utility Functions 151

Citus Documentation, Release 8.2
excluded_shard_list: (Optional) Identifiers of shards which shouldn’t be copied during the replication operation.
Return Value
N/A
Examples
The example below will attempt to replicate the shards of the github_events table to shard_replication_factor.
SELECT replicate_table_shards('github_events');
This example will attempt to bring the shards of the github_events table to the desired replication factor with a maxi-mum of 10 shard copies. This means that the rebalancer will copy only a maximum of 10 shards in its attempt to reachthe desired replication factor.
SELECT replicate_table_shards('github_events', max_shard_copies:=10);
isolate_tenant_to_new_shard
Note: The isolate_tenant_to_new_shard function is a part of Citus Enterprise. Please contact us to obtain thisfunctionality.
This function creates a new shard to hold rows with a specific single value in the distribution column. It is especiallyhandy for the multi-tenant Citus use case, where a large tenant can be placed alone on its own shard and ultimately itsown physical node.
For a more in-depth discussion, see Tenant Isolation.
Arguments
table_name: The name of the table to get a new shard.
tenant_id: The value of the distribution column which will be assigned to the new shard.
cascade_option: (Optional) When set to “CASCADE,” also isolates a shard from all tables in the current table’sCo-Locating Tables.
Return Value
shard_id: The function returns the unique id assigned to the newly created shard.
Examples
Create a new shard to hold the lineitems for tenant 135:
SELECT isolate_tenant_to_new_shard('lineitem', 135);
152 Chapter 16. Citus API

Citus Documentation, Release 8.2
-------------------| isolate_tenant_to_new_shard |-------------------| 102240 |-------------------
citus_create_restore_point
Temporarily blocks writes to the cluster, and creates a named restore point on all nodes. This function is similar topg_create_restore_point, but applies to all nodes and makes sure the restore point is consistent across them. Thisfunction is well suited to doing point-in-time recovery, and cluster forking.
Arguments
name: The name of the restore point to create.
Return Value
coordinator_lsn: Log sequence number of the restore point in the coordinator node WAL.
Examples
select citus_create_restore_point('foo');
-------------------| citus_create_restore_point |-------------------| 0/1EA2808 |-------------------
16.2 Citus Tables and Views
16.2.1 Coordinator Metadata
Citus divides each distributed table into multiple logical shards based on the distribution column. The coordinatorthen maintains metadata tables to track statistics and information about the health and location of these shards. In thissection, we describe each of these metadata tables and their schema. You can view and query these tables using SQLafter logging into the coordinator node.
Partition table
The pg_dist_partition table stores metadata about which tables in the database are distributed. For each distributedtable, it also stores information about the distribution method and detailed information about the distribution column.
16.2. Citus Tables and Views 153
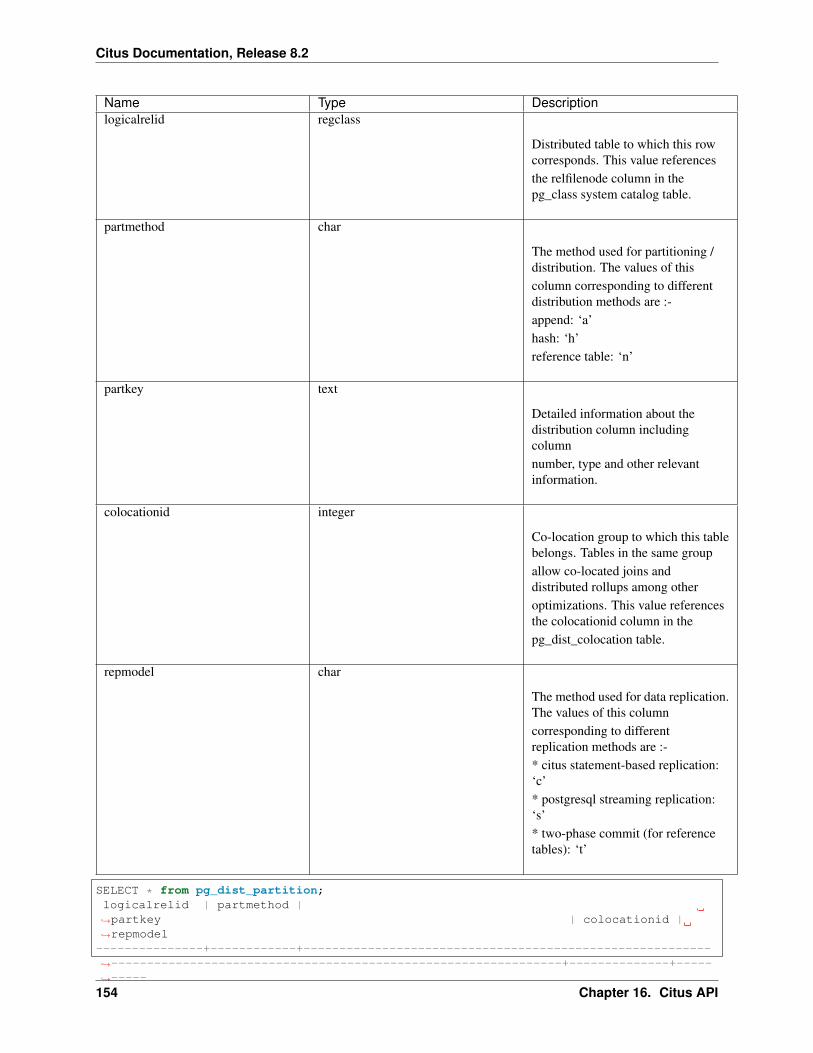
Citus Documentation, Release 8.2
Name Type Descriptionlogicalrelid regclass
Distributed table to which this rowcorresponds. This value referencesthe relfilenode column in thepg_class system catalog table.
partmethod char
The method used for partitioning /distribution. The values of thiscolumn corresponding to differentdistribution methods are :-append: ‘a’hash: ‘h’reference table: ‘n’
partkey text
Detailed information about thedistribution column includingcolumnnumber, type and other relevantinformation.
colocationid integer
Co-location group to which this tablebelongs. Tables in the same groupallow co-located joins anddistributed rollups among otheroptimizations. This value referencesthe colocationid column in thepg_dist_colocation table.
repmodel char
The method used for data replication.The values of this columncorresponding to differentreplication methods are :-* citus statement-based replication:‘c’* postgresql streaming replication:‘s’* two-phase commit (for referencetables): ‘t’
SELECT * from pg_dist_partition;logicalrelid | partmethod |→˓partkey | colocationid |→˓repmodel---------------+------------+---------------------------------------------------------→˓---------------------------------------------------------------+--------------+-----→˓-----
154 Chapter 16. Citus API

Citus Documentation, Release 8.2
github_events | h | {VAR :varno 1 :varattno 4 :vartype 20 :vartypmod -1 :→˓varcollid 0 :varlevelsup 0 :varnoold 1 :varoattno 4 :location -1} | 2 | c(1 row)
Shard table
The pg_dist_shard table stores metadata about individual shards of a table. This includes information about whichdistributed table the shard belongs to and statistics about the distribution column for that shard. For append distributedtables, these statistics correspond to min / max values of the distribution column. In case of hash distributed tables,they are hash token ranges assigned to that shard. These statistics are used for pruning away unrelated shards duringSELECT queries.
Name Type Descriptionlogicalrelid regclass
Distributed table to which this shardbelongs. This value references therelfilenode column in the pg_classsystem catalog table.
shardid bigint
Globally unique identifier assignedto this shard.
shardstorage char
Type of storage used for this shard.Different storage types arediscussed in the table below.
shardminvalue text
For append distributed tables,minimum value of the distributioncolumnin this shard (inclusive).For hash distributed tables, minimumhash token value assigned to thatshard (inclusive).
shardmaxvalue text
For append distributed tables,maximum value of the distributioncolumnin this shard (inclusive).For hash distributed tables,maximum hash token value assignedto thatshard (inclusive).
16.2. Citus Tables and Views 155

Citus Documentation, Release 8.2
SELECT * from pg_dist_shard;logicalrelid | shardid | shardstorage | shardminvalue | shardmaxvalue
---------------+---------+--------------+---------------+---------------github_events | 102026 | t | 268435456 | 402653183github_events | 102027 | t | 402653184 | 536870911github_events | 102028 | t | 536870912 | 671088639github_events | 102029 | t | 671088640 | 805306367(4 rows)
Shard Storage Types
The shardstorage column in pg_dist_shard indicates the type of storage used for the shard. A brief overview of differentshard storage types and their representation is below.
Storage Type Shardstorage value DescriptionTABLE ‘t’
Indicates that shard stores databelonging to a regulardistributed table.
COLUMNAR ‘c’
Indicates that shard stores columnardata. (Used bydistributed cstore_fdw tables)
FOREIGN ‘f’
Indicates that shard stores foreigndata. (Used bydistributed file_fdw tables)
Shard placement table
The pg_dist_placement table tracks the location of shard replicas on worker nodes. Each replica of a shard assigned toa specific node is called a shard placement. This table stores information about the health and location of each shardplacement.
156 Chapter 16. Citus API

Citus Documentation, Release 8.2
Name Type Descriptionshardid bigint
Shard identifier associated with thisplacement. This value referencesthe shardid column in thepg_dist_shard catalog table.
shardstate int
Describes the state of this placement.Different shard states arediscussed in the section below.
shardlength bigint
For append distributed tables, thesize of the shard placement on theworker node in bytes.For hash distributed tables, zero.
placementid bigint
Unique auto-generated identifier foreach individual placement.
groupid int
Identifier used to denote a group ofone primary server and zero or moresecondary servers, when thestreaming replication model is used.
SELECT * from pg_dist_placement;shardid | shardstate | shardlength | placementid | groupid
---------+------------+-------------+-------------+---------102008 | 1 | 0 | 1 | 1102008 | 1 | 0 | 2 | 2102009 | 1 | 0 | 3 | 2102009 | 1 | 0 | 4 | 3102010 | 1 | 0 | 5 | 3102010 | 1 | 0 | 6 | 4102011 | 1 | 0 | 7 | 4
Note: As of Citus 7.0 the analogous table pg_dist_shard_placement has been deprecated. It included thenode name and port for each placement:
SELECT * from pg_dist_shard_placement;shardid | shardstate | shardlength | nodename | nodeport | placementid
---------+------------+-------------+-----------+----------+-------------102008 | 1 | 0 | localhost | 12345 | 1102008 | 1 | 0 | localhost | 12346 | 2102009 | 1 | 0 | localhost | 12346 | 3102009 | 1 | 0 | localhost | 12347 | 4102010 | 1 | 0 | localhost | 12347 | 5
16.2. Citus Tables and Views 157

Citus Documentation, Release 8.2
102010 | 1 | 0 | localhost | 12345 | 6102011 | 1 | 0 | localhost | 12345 | 7
That information is now available by joining pg_dist_placement with pg_dist_node on the groupid. For compatibilityCitus still provides pg_dist_shard_placement as a view. However we recommend using the new, more normalized,tables when possible.
Shard Placement States
Citus manages shard health on a per-placement basis and automatically marks a placement as unavailable if leaving theplacement in service would put the cluster in an inconsistent state. The shardstate column in the pg_dist_placementtable is used to store the state of shard placements. A brief overview of different shard placement states and theirrepresentation is below.
State name Shardstate value DescriptionFINALIZED 1
This is the state new shards arecreated in. Shard placementsin this state are consideredup-to-date and are used in queryplanning and execution.
INACTIVE 3
Shard placements in this state areconsidered inactive due tobeing out-of-sync with other replicasof the same shard. Thiscan occur when an append,modification (INSERT, UPDATE orDELETE ) or a DDL operation failsfor this placement. The queryplanner will ignore placements inthis state during planning andexecution. Users can synchronize thedata in these shards witha finalized replica as a backgroundactivity.
TO_DELETE 4
If Citus attempts to drop a shardplacement in response to amaster_apply_delete_command calland fails, the placement ismoved to this state. Users can thendelete these shards as asubsequent background activity.
158 Chapter 16. Citus API

Citus Documentation, Release 8.2
Worker node table
The pg_dist_node table contains information about the worker nodes in the cluster.
Name Type Descriptionnodeid int
Auto-generated identifier for anindividual node.
groupid int
Identifier used to denote a group ofone primary server and zero or moresecondary servers, when thestreaming replication model is used.Bydefault it is the same as the nodeid.
nodename text
Host Name or IP Address of thePostgreSQL worker node.
nodeport int
Port number on which thePostgreSQL worker node islistening.
noderack text
(Optional) Rack placementinformation for the worker node.
hasmetadata boolean
Reserved for internal use.
isactive boolean
Whether the node is active acceptingshard placements.
noderole text
Whether the node is a primary orsecondary
nodecluster text
The name of the cluster containingthis node
SELECT * from pg_dist_node;nodeid | groupid | nodename | nodeport | noderack | hasmetadata | isactive |→˓noderole | nodecluster
16.2. Citus Tables and Views 159

Citus Documentation, Release 8.2
--------+---------+-----------+----------+----------+-------------+----------+--------→˓--+ -------------
1 | 1 | localhost | 12345 | default | f | t |→˓primary | default
2 | 2 | localhost | 12346 | default | f | t |→˓primary | default
3 | 3 | localhost | 12347 | default | f | t |→˓primary | default(3 rows)
Co-location group table
The pg_dist_colocation table contains information about which tables’ shards should be placed together, or co-located.When two tables are in the same co-location group, Citus ensures shards with the same partition values will be placedon the same worker nodes. This enables join optimizations, certain distributed rollups, and foreign key support. Shardco-location is inferred when the shard counts, replication factors, and partition column types all match between twotables; however, a custom co-location group may be specified when creating a distributed table, if so desired.
Name Type Descriptioncolocationid int
Unique identifier for the co-locationgroup this row corresponds to.
shardcount int
Shard count for all tables in thisco-location group
replicationfactor int
Replication factor for all tables inthis co-location group.
distributioncolumntype oid
The type of the distribution columnfor all tables in thisco-location group.
SELECT * from pg_dist_colocation;colocationid | shardcount | replicationfactor | distributioncolumntype
--------------+------------+-------------------+------------------------2 | 32 | 2 | 20
(1 row)
Query statistics table
Note: The citus_stat_statements view is a part of Citus Enterprise. Please contact us to obtain this functionality.
Citus provides citus_stat_statements for stats about how queries are being executed, and for whom. It’sanalogous to (and can be joined with) the pg_stat_statements view in PostgreSQL which tracks statistics about query
160 Chapter 16. Citus API

Citus Documentation, Release 8.2
speed.
This view can trace queries to originating tenants in a multi-tenant application, which helps for deciding when to doTenant Isolation.
Name Type Descriptionqueryid bigint identifier (good for pg_stat_statements joins)userid oid user who ran the querydbid oid database instance of coordinatorquery text anonymized query stringexecutor text Citus executor used: real-time, task-tracker, router, or insert-selectpartition_key text value of distribution column in router-executed queries, else NULLcalls bigint number of times the query was run
-- create and populate distributed tablecreate table foo ( id int );select create_distributed_table('foo', 'id');insert into foo select generate_series(1,100);
-- enable stats-- pg_stat_statements must be in shared_preload librariescreate extension pg_stat_statements;
select count(*) from foo;select * from foo where id = 42;
select * from citus_stat_statements;
Results:
--------------------------------------------------------------------------| queryid | userid | dbid | query |→˓executor | partition_key | calls |--------------------------------------------------------------------------| 1496051219 | 16384 | 16385 | select count(*) from foo; | real-→˓time | NULL | 1 || 2530480378 | 16384 | 16385 | select * from foo where id = $1 |→˓router | 42 | 1 || 3233520930 | 16384 | 16385 | insert into foo select generate_series($1,$2) |→˓insert-select | NULL | 1 |--------------------------------------------------------------------------
Caveats:
• The stats data is not replicated, and won’t survive database crashes or failover
• It’s a coordinator node feature, with no Citus MX support
• Tracks a limited number of queries, set by the pg_stat_statements.max GUC (default 5000)
• To truncate the table, use the citus_stat_statements_reset() function
Distributed Query Activity
With Citus MX users can execute distributed queries from any node. Examining the standard Postgres pg_stat_activityview on the coordinator won’t include those worker-initiated queries. Also queries might get blocked on row-levellocks on one of the shards on a worker node. If that happens then those queries would not show up in pg_locks on theCitus coordinator node.
16.2. Citus Tables and Views 161

Citus Documentation, Release 8.2
Citus provides special views to watch queries and locks throughout the cluster, including shard-specific queries usedinternally to build results for distributed queries.
• citus_dist_stat_activity: shows the distributed queries that are executing on all nodes. A superset ofpg_stat_activity, usable wherever the latter is.
• citus_worker_stat_activity: shows queries on workers, including fragment queries against individual shards.
• citus_lock_waits: Blocked queries throughout the cluster.
The first two views include all columns of pg_stat_activity plus the host host/port of the worker that initiated the queryand the host/port of the coordinator node of the cluster.
For example, consider counting the rows in a distributed table:
-- run from worker on localhost:9701
SELECT count(*) FROM users_table;
We can see the query appear in citus_dist_stat_activity:
SELECT * FROM citus_dist_stat_activity;
-[ RECORD 1 ]----------+----------------------------------query_hostname | localhostquery_hostport | 9701master_query_host_name | localhostmaster_query_host_port | 9701transaction_number | 1transaction_stamp | 2018-10-05 13:27:20.691907+03datid | 12630datname | postgrespid | 23723usesysid | 10usename | citusapplication_name | psqlclient_addr |client_hostname |client_port | -1backend_start | 2018-10-05 13:27:14.419905+03xact_start | 2018-10-05 13:27:16.362887+03query_start | 2018-10-05 13:27:20.682452+03state_change | 2018-10-05 13:27:20.896546+03wait_event_type | Clientwait_event | ClientReadstate | idle in transactionbackend_xid |backend_xmin |query | SELECT count(*) FROM users_table;backend_type | client backend
This query requires information from all shards. Some of the information is in shard users_table_102038which happens to be stored in localhost:9700. We can see a query accessing the shard by looking at thecitus_worker_stat_activity view:
SELECT * FROM citus_worker_stat_activity;
-[ RECORD 1 ]----------+--------------------------------------------------------------→˓---------------------------query_hostname | localhost
162 Chapter 16. Citus API

Citus Documentation, Release 8.2
query_hostport | 9700master_query_host_name | localhostmaster_query_host_port | 9701transaction_number | 1transaction_stamp | 2018-10-05 13:27:20.691907+03datid | 12630datname | postgrespid | 23781usesysid | 10usename | citusapplication_name | citusclient_addr | ::1client_hostname |client_port | 51773backend_start | 2018-10-05 13:27:20.75839+03xact_start | 2018-10-05 13:27:20.84112+03query_start | 2018-10-05 13:27:20.867446+03state_change | 2018-10-05 13:27:20.869889+03wait_event_type | Clientwait_event | ClientReadstate | idle in transactionbackend_xid |backend_xmin |query | COPY (SELECT count(*) AS count FROM users_table_102038 users_→˓table WHERE true) TO STDOUTbackend_type | client backend
The query field shows data being copied out of the shard to be counted.
Note: If a router query (e.g. single-tenant in a multi-tenant application, SELECT * FROM tableWHERE tenant_id = X) is executed without a transaction block, then master_query_host_name and mas-ter_query_host_port columns will be NULL in citus_worker_stat_activity.
To see how citus_lock_waits works, we can generate a locking situation manually. First we’ll set up a test tablefrom the coordinator:
CREATE TABLE numbers ASSELECT i, 0 AS j FROM generate_series(1,10) AS i;
SELECT create_distributed_table('numbers', 'i');
Then, using two sessions on the coordinator, we can run this sequence of statements:
-- session 1 -- session 2------------------------------------- -------------------------------------BEGIN;UPDATE numbers SET j = 2 WHERE i = 1;
BEGIN;UPDATE numbers SET j = 3 WHERE i = 1;-- (this blocks)
The citus_lock_waits view shows the situation.
SELECT * FROM citus_lock_waits;
-[ RECORD 1 ]-------------------------+----------------------------------------waiting_pid | 88624
16.2. Citus Tables and Views 163

Citus Documentation, Release 8.2
blocking_pid | 88615blocked_statement | UPDATE numbers SET j = 3 WHERE i = 1;current_statement_in_blocking_process | UPDATE numbers SET j = 2 WHERE i = 1;waiting_node_id | 0blocking_node_id | 0waiting_node_name | coordinator_hostblocking_node_name | coordinator_hostwaiting_node_port | 5432blocking_node_port | 5432
In this example the queries originated on the coordinator, but the view can also list locks between queries originatingon workers (executed with Citus MX for instance).
16.2.2 Tables on all Nodes
Citus has other informational tables and views which are accessible on all nodes, not just the coordinator.
Connection Credentials Table
Note: This table is a part of Citus Enterprise Edition. Please contact us to obtain this functionality.
The pg_dist_authinfo table holds authentication parameters used by Citus nodes to connect to one another.
Name Type Descriptionnodeid integer Node id from Worker node table, or 0, or -1rolename name Postgres roleauthinfo text Space-separated libpq connection parameters
Upon beginning a connection, a node consults the table to see whether a row with the destination nodeid and desiredrolename exists. If so, the node includes the corresponding authinfo string in its libpq connection. A commonexample is to store a password, like 'password=abc123', but you can review the full list of possibilities.
The parameters in authinfo are space-separated, in the form key=val. To write an empty value, or a valuecontaining spaces, surround it with single quotes, e.g., keyword='a value'. Single quotes and backslashes withinthe value must be escaped with a backslash, i.e., \' and \\.
The nodeid column can also take the special values 0 and -1, which mean all nodes or loopback connections,respectively. If, for a given node, both specific and all-node rules exist, the specific rule has precedence.
SELECT * FROM pg_dist_authinfo;
nodeid | rolename | authinfo--------+----------+-----------------
123 | jdoe | password=abc123(1 row)
Connection Pooling Credentials
Note: This table is a part of Citus Enterprise Edition. Please contact us to obtain this functionality.
164 Chapter 16. Citus API

Citus Documentation, Release 8.2
If you want to use a connection pooler to connect to a node, you can specify the pooler options usingpg_dist_poolinfo. This metadata table holds the host, port and database name for Citus to use when connectingto a node through a pooler.
If pool information is present, Citus will try to use these values instead of setting up a direct connection. Thepg_dist_poolinfo information in this case supersedes pg_dist_node.
Name Type Descriptionnodeid integer Node id from Worker node tablepoolinfo text Space-separated parameters: host, port, or dbname
Note: In some situations Citus ignores the settings in pg_dist_poolinfo. For instance Shard rebalancing is notcompatible with connection poolers such as pgbouncer. In these scenarios Citus will use a direct connection.
-- how to connect to node 1 (as identified in pg_dist_node)
INSERT INTO pg_dist_poolinfo (nodeid, poolinfo)VALUES (1, 'host=127.0.0.1 port=5433');
Shards and Indices on MX Workers
Note: The citus_shards_on_worker and citus_shard_indexes_on_worker views are relevant in Citus MX only. In thenon-MX scenario they contain no rows.
Worker nodes store shards as tables that are ordinarily hidden in Citus MX (see citus.override_table_visibility(boolean)). The easiest way to obtain information about the shards on each worker is to consult that worker’scitus_shards_on_worker view. For instance, here are some shards on a worker for the distributed tabletest_table:
SELECT * FROM citus_shards_on_worker ORDER BY 2;Schema | Name | Type | Owner
--------+--------------------+-------+-------public | test_table_1130000 | table | cituspublic | test_table_1130002 | table | citus
Indices for shards are also hidden, but discoverable through another view, citus_shard_indexes_on_worker:
SELECT * FROM citus_shard_indexes_on_worker ORDER BY 2;Schema | Name | Type | Owner | Table
--------+--------------------+-------+-------+--------------------public | test_index_1130000 | index | citus | test_table_1130000public | test_index_1130002 | index | citus | test_table_1130002
16.3 Configuration Reference
There are various configuration parameters that affect the behaviour of Citus. These include both standard PostgreSQLparameters and Citus specific parameters. To learn more about PostgreSQL configuration parameters, you can visitthe run time configuration section of PostgreSQL documentation.
The rest of this reference aims at discussing Citus specific configuration parameters. These parameters can be setsimilar to PostgreSQL parameters by modifying postgresql.conf or by using the SET command.
16.3. Configuration Reference 165

Citus Documentation, Release 8.2
As an example you can update a setting with:
ALTER DATABASE citus SET citus.multi_task_query_log_level = 'log';
16.3.1 General configuration
citus.max_worker_nodes_tracked (integer)
Citus tracks worker nodes’ locations and their membership in a shared hash table on the coordinator node. Thisconfiguration value limits the size of the hash table, and consequently the number of worker nodes that can be tracked.The default for this setting is 2048. This parameter can only be set at server start and is effective on the coordinatornode.
citus.use_secondary_nodes (enum)
Sets the policy to use when choosing nodes for SELECT queries. If this is set to ‘always’, then the planner will queryonly nodes which are marked as ‘secondary’ noderole in pg_dist_node.
The supported values for this enum are:
• never: (default) All reads happen on primary nodes.
• always: Reads run against secondary nodes instead, and insert/update statements are disabled.
citus.cluster_name (text)
Informs the coordinator node planner which cluster it coordinates. Once cluster_name is set, the planner will queryworker nodes in that cluster alone.
citus.enable_version_checks (boolean)
Upgrading Citus version requires a server restart (to pick up the new shared-library), as well as running an ALTEREXTENSION UPDATE command. The failure to execute both steps could potentially cause errors or crashes. Citusthus validates the version of the code and that of the extension match, and errors out if they don’t.
This value defaults to true, and is effective on the coordinator. In rare cases, complex upgrade processes may requiresetting this parameter to false, thus disabling the check.
citus.log_distributed_deadlock_detection (boolean)
Whether to log distributed deadlock detection related processing in the server log. It defaults to false.
citus.distributed_deadlock_detection_factor (floating point)
Sets the time to wait before checking for distributed deadlocks. In particular the time to wait will be this valuemultiplied by PostgreSQL’s deadlock_timeout setting. The default value is 2. A value of -1 disables distributeddeadlock detection.
166 Chapter 16. Citus API

Citus Documentation, Release 8.2
citus.node_conninfo (text)
The citus.node_conninfo GUC sets non-sensitive libpq connection parameters used for all inter-node connec-tions.
-- key=value pairs separated by spaces.-- For example, ssl options:
ALTER DATABASE fooSET citus.node_conninfo ='sslrootcert=/path/to/citus.crt sslmode=verify-full';
Citus honors only a whitelisted subset of the options, namely:
• application_name
• connect_timeout
• gsslib†
• keepalives
• keepalives_count
• keepalives_idle
• keepalives_interval
• krbsrvname†
• sslcompression
• sslcrl
• sslmode (defaults to “require” as of Citus 8.1)
• sslrootcert
(† = subject to the runtime presence of optional PostgreSQL features)
citus.override_table_visibility (boolean)
Note: This GUC has an effect on Citus MX only.
Shards are stored on the worker nodes as regular tables with an identifier appended to their names. Unlike regularCitus, by default Citus MX does not show shards in the list of tables, when for instance a user runs \d in psql.However the shards can be made visible in MX by updating the GUC:
SET citus.override_table_visibility TO FALSE;
\d
+----------+--------------------+--------+----------+| Schema | Name | Type | Owner ||----------+--------------------+--------+----------|| public | test_table | table | citus || public | test_table_102041 | table | citus || public | test_table_102043 | table | citus || public | test_table_102045 | table | citus |
16.3. Configuration Reference 167

Citus Documentation, Release 8.2
| public | test_table_102047 | table | citus |+----------+--------------------+--------+----------+
Now the test_table shards (test_table_<n>) appear in the list.
Another way to see the shards is by querying the citus_shards_on_worker view.
16.3.2 Query Statistics
citus.stat_statements_purge_interval (integer)
Note: This GUC is a part of Citus Enterprise. Please contact us to obtain this functionality.
Sets the frequency at which the maintenance daemon removes records from citus_stat_statements that are unmatchedin pg_stat_statements. This configuration value sets the time interval between purges in seconds, with a defaultvalue of 10. A value of 0 disables the purges.
SET citus.stat_statements_purge_interval TO 5;
This parameter is effective on the coordinator and can be changed at runtime.
citus.stat_statements_max (integer)
Note: This GUC is a part of Citus Enterprise. Please contact us to obtain this functionality.
The maximum number of rows to store in citus_stat_statements. Defaults to 50000, and may be changed to any valuein the range 1000 - 10000000. Note that each row requires 140 bytes of storage, so setting stat_statements_max to itsmaximum value of 10M would consume 1.4GB of memory.
Changing this GUC will not take effect until PostgreSQL is restarted.
16.3.3 Data Loading
citus.multi_shard_commit_protocol (enum)
Sets the commit protocol to use when performing COPY on a hash distributed table. On each individual shard place-ment, the COPY is performed in a transaction block to ensure that no data is ingested if an error occurs during theCOPY. However, there is a particular failure case in which the COPY succeeds on all placements, but a (hardware)failure occurs before all transactions commit. This parameter can be used to prevent data loss in that case by choosingbetween the following commit protocols:
• 2pc: (default) The transactions in which COPY is performed on the shard placements are first pre-pared using PostgreSQL’s two-phase commit and then committed. Failed commits can be manually re-covered or aborted using COMMIT PREPARED or ROLLBACK PREPARED, respectively. When using2pc, max_prepared_transactions should be increased on all the workers, typically to the same value asmax_connections.
• 1pc: The transactions in which COPY is performed on the shard placements is committed in a single round.Data may be lost if a commit fails after COPY succeeds on all placements (rare).
168 Chapter 16. Citus API

Citus Documentation, Release 8.2
citus.shard_replication_factor (integer)
Sets the replication factor for shards i.e. the number of nodes on which shards will be placed and defaults to 1. Thisparameter can be set at run-time and is effective on the coordinator. The ideal value for this parameter depends on thesize of the cluster and rate of node failure. For example, you may want to increase this replication factor if you runlarge clusters and observe node failures on a more frequent basis.
citus.shard_count (integer)
Sets the shard count for hash-partitioned tables and defaults to 32. This value is used by the create_distributed_tableUDF when creating hash-partitioned tables. This parameter can be set at run-time and is effective on the coordinator.
citus.shard_max_size (integer)
Sets the maximum size to which a shard will grow before it gets split and defaults to 1GB. When the source file’s size(which is used for staging) for one shard exceeds this configuration value, the database ensures that a new shard getscreated. This parameter can be set at run-time and is effective on the coordinator.
16.3.4 Planner Configuration
citus.limit_clause_row_fetch_count (integer)
Sets the number of rows to fetch per task for limit clause optimization. In some cases, select queries with limitclauses may need to fetch all rows from each task to generate results. In those cases, and where an approximationwould produce meaningful results, this configuration value sets the number of rows to fetch from each shard. Limitapproximations are disabled by default and this parameter is set to -1. This value can be set at run-time and is effectiveon the coordinator.
citus.count_distinct_error_rate (floating point)
Citus can calculate count(distinct) approximates using the postgresql-hll extension. This configuration entry setsthe desired error rate when calculating count(distinct). 0.0, which is the default, disables approximations forcount(distinct); and 1.0 provides no guarantees about the accuracy of results. We recommend setting this parame-ter to 0.005 for best results. This value can be set at run-time and is effective on the coordinator.
citus.task_assignment_policy (enum)
Note: This GUC is applicable only when shard_replication_factor is greater than one, or for queries against ReferenceTables.
Sets the policy to use when assigning tasks to workers. The coordinator assigns tasks to workers based on shardlocations. This configuration value specifies the policy to use when making these assignments. Currently, there arethree possible task assignment policies which can be used.
• greedy: The greedy policy is the default and aims to evenly distribute tasks across workers.
• round-robin: The round-robin policy assigns tasks to workers in a round-robin fashion alternating betweendifferent replicas. This enables much better cluster utilization when the shard count for a table is low comparedto the number of workers.
16.3. Configuration Reference 169

Citus Documentation, Release 8.2
• first-replica: The first-replica policy assigns tasks on the basis of the insertion order of placements (replicas)for the shards. In other words, the fragment query for a shard is simply assigned to the worker which has thefirst replica of that shard. This method allows you to have strong guarantees about which shards will be used onwhich nodes (i.e. stronger memory residency guarantees).
This parameter can be set at run-time and is effective on the coordinator.
16.3.5 Intermediate Data Transfer
citus.binary_worker_copy_format (boolean)
Use the binary copy format to transfer intermediate data between workers. During large table joins, Citus may have todynamically repartition and shuffle data between different workers. By default, this data is transferred in text format.Enabling this parameter instructs the database to use PostgreSQL’s binary serialization format to transfer this data.This parameter is effective on the workers and needs to be changed in the postgresql.conf file. After editing the configfile, users can send a SIGHUP signal or restart the server for this change to take effect.
citus.binary_master_copy_format (boolean)
Use the binary copy format to transfer data between coordinator and the workers. When running distributed queries, theworkers transfer their intermediate results to the coordinator for final aggregation. By default, this data is transferred intext format. Enabling this parameter instructs the database to use PostgreSQL’s binary serialization format to transferthis data. This parameter can be set at runtime and is effective on the coordinator.
citus.max_intermediate_result_size (integer)
The maximum size in KB of intermediate results for CTEs and complex subqueries. The default is 1GB, and a valueof -1 means no limit. Queries exceeding the limit will be canceled and produce an error message.
16.3.6 DDL
citus.enable_ddl_propagation (boolean)
Specifies whether to automatically propagate DDL changes from the coordinator to all workers. The default value istrue. Because some schema changes require an access exclusive lock on tables and because the automatic propagationapplies to all workers sequentially it can make a Citus cluster temporarily less responsive. You may choose to disablethis setting and propagate changes manually.
Note: For a list of DDL propagation support, see Modifying Tables.
16.3.7 Executor Configuration
citus.all_modifications_commutative
Citus enforces commutativity rules and acquires appropriate locks for modify operations in order to guarantee correct-ness of behavior. For example, it assumes that an INSERT statement commutes with another INSERT statement, butnot with an UPDATE or DELETE statement. Similarly, it assumes that an UPDATE or DELETE statement does not
170 Chapter 16. Citus API
Citus Documentation, Release 8.2
commute with another UPDATE or DELETE statement. This means that UPDATEs and DELETEs require Citus toacquire stronger locks.
If you have UPDATE statements that are commutative with your INSERTs or other UPDATEs, then you can relaxthese commutativity assumptions by setting this parameter to true. When this parameter is set to true, all commandsare considered commutative and claim a shared lock, which can improve overall throughput. This parameter can beset at runtime and is effective on the coordinator.
citus.max_task_string_size (integer)
Sets the maximum size (in bytes) of a worker task call string. Changing this value requires a server restart, it cannotbe changed at runtime.
Active worker tasks are tracked in a shared hash table on the master node. This configuration value limits the maximumsize of an individual worker task, and affects the size of pre-allocated shared memory.
Minimum: 8192, Maximum 65536, Default 12288
citus.remote_task_check_interval (integer)
Sets the frequency at which Citus checks for statuses of jobs managed by the task tracker executor. It defaults to10ms. The coordinator assigns tasks to workers, and then regularly checks with them about each task’s progress.This configuration value sets the time interval between two consequent checks. This parameter is effective on thecoordinator and can be set at runtime.
citus.task_executor_type (enum)
Citus has two executor types for running distributed SELECT queries. The desired executor can be selected by settingthis configuration parameter. The accepted values for this parameter are:
• real-time: The real-time executor is the default executor and is optimal when you require fast responses toqueries that involve aggregations and co-located joins spanning across multiple shards.
• task-tracker: The task-tracker executor is well suited for long running, complex queries which require shufflingof data across worker nodes and efficient resource management.
This parameter can be set at run-time and is effective on the coordinator. For more details about the executors, youcan visit the Distributed Query Executor section of our documentation.
citus.multi_task_query_log_level (enum)
Sets a log-level for any query which generates more than one task (i.e. which hits more than one shard). This is usefulduring a multi-tenant application migration, as you can choose to error or warn for such queries, to find them and adda tenant_id filter to them. This parameter can be set at runtime and is effective on the coordinator. The default valuefor this parameter is ‘off’.
The supported values for this enum are:
• off: Turn off logging any queries which generate multiple tasks (i.e. span multiple shards)
• debug: Logs statement at DEBUG severity level.
• log: Logs statement at LOG severity level. The log line will include the SQL query that was run.
• notice: Logs statement at NOTICE severity level.
• warning: Logs statement at WARNING severity level.
16.3. Configuration Reference 171

Citus Documentation, Release 8.2
• error: Logs statement at ERROR severity level.
Note that it may be useful to use error during development testing, and a lower log-level like log during actualproduction deployment. Choosing log will cause multi-task queries to appear in the database logs with the queryitself shown after “STATEMENT.”
LOG: multi-task query about to be executedHINT: Queries are split to multiple tasks if they have to be split into several→˓queries on the workers.STATEMENT: select * from foo;
Real-time executor configuration
The Citus query planner first prunes away the shards unrelated to a query and then hands the plan over to the real-time executor. For executing the plan, the real-time executor opens one connection and uses two file descriptors perunpruned shard. If the query hits a high number of shards, then the executor may need to open more connections thanmax_connections or use more file descriptors than max_files_per_process.
In such cases, the real-time executor will begin throttling tasks to prevent overwhelming the worker resources. Sincethis throttling can reduce query performance, the real-time executor will issue an appropriate warning suggesting thatincreasing these parameters might be required to maintain the desired performance. These parameters are discussedin brief below.
max_connections (integer)
Sets the maximum number of concurrent connections to the database server. The default is typically 100 connections,but might be less if your kernel settings will not support it (as determined during initdb). The real time executormaintains an open connection for each shard to which it sends queries. Increasing this configuration parameter willallow the executor to have more concurrent connections and hence handle more shards in parallel. This parameter hasto be changed on the workers as well as the coordinator, and can be done only during server start.
max_files_per_process (integer)
Sets the maximum number of simultaneously open files for each server process and defaults to 1000. The real-timeexecutor requires two file descriptors for each shard it sends queries to. Increasing this configuration parameter willallow the executor to have more open file descriptors, and hence handle more shards in parallel. This change has to bemade on the workers as well as the coordinator, and can be done only during server start.
Note: Along with max_files_per_process, one may also have to increase the kernel limit for open file descriptors perprocess using the ulimit command.
citus.enable_repartition_joins (boolean)
Ordinarily, attempting to perform Repartition joins with the real-time executor will fail with an error message. How-ever setting citus.enable_repartition_joins to true allows Citus to temporarily switch into the task-tracker executor to perform the join. The default value is false.
172 Chapter 16. Citus API

Citus Documentation, Release 8.2
Task tracker executor configuration
citus.task_tracker_delay (integer)
This sets the task tracker sleep time between task management rounds and defaults to 200ms. The task tracker processwakes up regularly, walks over all tasks assigned to it, and schedules and executes these tasks. Then, the task trackersleeps for a time period before walking over these tasks again. This configuration value determines the length of thatsleeping period. This parameter is effective on the workers and needs to be changed in the postgresql.conf file. Afterediting the config file, users can send a SIGHUP signal or restart the server for the change to take effect.
This parameter can be decreased to trim the delay caused due to the task tracker executor by reducing the time gapbetween the management rounds. This is useful in cases when the shard queries are very short and hence update theirstatus very regularly.
citus.max_tracked_tasks_per_node (integer)
Sets the maximum number of tracked tasks per node and defaults to 1024. This configuration value limits the sizeof the hash table which is used for tracking assigned tasks, and therefore the maximum number of tasks that can betracked at any given time. This value can be set only at server start time and is effective on the workers.
This parameter would need to be increased if you want each worker node to be able to track more tasks. If this valueis lower than what is required, Citus errors out on the worker node saying it is out of shared memory and also gives ahint indicating that increasing this parameter may help.
citus.max_assign_task_batch_size (integer)
The task tracker executor on the coordinator synchronously assigns tasks in batches to the deamon on the workers.This parameter sets the maximum number of tasks to assign in a single batch. Choosing a larger batch size allows forfaster task assignment. However, if the number of workers is large, then it may take longer for all workers to get tasks.This parameter can be set at runtime and is effective on the coordinator.
citus.max_running_tasks_per_node (integer)
The task tracker process schedules and executes the tasks assigned to it as appropriate. This configuration value setsthe maximum number of tasks to execute concurrently on one node at any given time and defaults to 8. This parameteris effective on the worker nodes and needs to be changed in the postgresql.conf file. After editing the config file, userscan send a SIGHUP signal or restart the server for the change to take effect.
This configuration entry ensures that you don’t have many tasks hitting disk at the same time and helps in avoidingdisk I/O contention. If your queries are served from memory or SSDs, you can increase max_running_tasks_per_nodewithout much concern.
citus.partition_buffer_size (integer)
Sets the buffer size to use for partition operations and defaults to 8MB. Citus allows for table data to be re-partitionedinto multiple files when two large tables are being joined. After this partition buffer fills up, the repartitioned data isflushed into files on disk. This configuration entry can be set at run-time and is effective on the workers.
16.3. Configuration Reference 173

Citus Documentation, Release 8.2
Explain output
citus.explain_all_tasks (boolean)
By default, Citus shows the output of a single, arbitrary task when running EXPLAIN on a distributed query. In mostcases, the explain output will be similar across tasks. Occasionally, some of the tasks will be planned differently orhave much higher execution times. In those cases, it can be useful to enable this parameter, after which the EXPLAINoutput will include all tasks. This may cause the EXPLAIN to take longer.
16.4 Append Distribution
Note: Append distribution is a specialized technique which requires care to use efficiently. Hash distribution is abetter choice for most situations.
While Citus’ most common use cases involve hash data distribution, it can also distribute timeseries data across avariable number of shards by their order in time. This section provides a short reference to loading, deleting, andmanipulating timeseries data.
As the name suggests, append based distribution is more suited to append-only use cases. This typically includes eventbased data which arrives in a time-ordered series. You can then distribute your largest tables by time, and batch loadyour events into Citus in intervals of N minutes. This data model can be generalized to a number of time series usecases; for example, each line in a website’s log file, machine activity logs or aggregated website events. Append baseddistribution supports more efficient range queries. This is because given a range query on the distribution key, theCitus query planner can easily determine which shards overlap that range and send the query only to relevant shards.
Hash based distribution is more suited to cases where you want to do real-time inserts along with analytics on yourdata or want to distribute by a non-ordered column (eg. user id). This data model is relevant for real-time analytics usecases; for example, actions in a mobile application, user website events, or social media analytics. In this case, Cituswill maintain minimum and maximum hash ranges for all the created shards. Whenever a row is inserted, updated ordeleted, Citus will redirect the query to the correct shard and issue it locally. This data model is more suited for doingco-located joins and for queries involving equality based filters on the distribution column.
Citus uses slightly different syntaxes for creation and manipulation of append and hash distributed tables. Also, theoperations supported on the tables differ based on the distribution method chosen. In the sections that follow, wedescribe the syntax for creating append distributed tables, and also describe the operations which can be done onthem.
16.4.1 Creating and Distributing Tables
Note: The instructions below assume that the PostgreSQL installation is in your path. If not, you will need to add itto your PATH environment variable. For example:
export PATH=/usr/lib/postgresql/9.6/:$PATH
We use the github events dataset to illustrate the commands below. You can download that dataset by running:
wget http://examples.citusdata.com/github_archive/github_events-2015-01-01-{0..5}.csv.→˓gzgzip -d github_events-2015-01-01-*.gz
174 Chapter 16. Citus API

Citus Documentation, Release 8.2
To create an append distributed table, you need to first define the table schema. To do so, you can define a table usingthe CREATE TABLE statement in the same way as you would do with a regular PostgreSQL table.
-- psql -h localhost -d postgres
CREATE TABLE github_events(
event_id bigint,event_type text,event_public boolean,repo_id bigint,payload jsonb,repo jsonb,actor jsonb,org jsonb,created_at timestamp
);
Next, you can use the create_distributed_table() function to mark the table as an append distributed table and specifyits distribution column.
SELECT create_distributed_table('github_events', 'created_at', 'append');
This function informs Citus that the github_events table should be distributed by append on the created_at column.Note that this method doesn’t enforce a particular distribution; it merely tells the database to keep minimum andmaximum values for the created_at column in each shard which are later used by the database for optimizing queries.
16.4.2 Expiring Data
In append distribution, users typically want to track data only for the last few months / years. In such cases, theshards that are no longer needed still occupy disk space. To address this, Citus provides a user defined functionmaster_apply_delete_command() to delete old shards. The function takes a DELETE command as input and deletesall the shards that match the delete criteria with their metadata.
The function uses shard metadata to decide whether or not a shard needs to be deleted, so it requires the WHERE clausein the DELETE statement to be on the distribution column. If no condition is specified, then all shards are selected fordeletion. The UDF then connects to the worker nodes and issues DROP commands for all the shards which need tobe deleted. If a drop query for a particular shard replica fails, then that replica is marked as TO DELETE. The shardreplicas which are marked as TO DELETE are not considered for future queries and can be cleaned up later.
The example below deletes those shards from the github_events table which have all rows with created_at >= ‘2015-01-01 00:00:00’. Note that the table is distributed on the created_at column.
SELECT * from master_apply_delete_command('DELETE FROM github_events WHERE created_at→˓>= ''2015-01-01 00:00:00''');master_apply_delete_command
-----------------------------3
(1 row)
To learn more about the function, its arguments and its usage, please visit the Citus Utility Functions section of ourdocumentation. Please note that this function only deletes complete shards and not individual rows from shards. Ifyour use case requires deletion of individual rows in real-time, see the section below about deleting data.
16.4. Append Distribution 175

Citus Documentation, Release 8.2
16.4.3 Deleting Data
The most flexible way to modify or delete rows throughout a Citus cluster with regular SQL statements:
DELETE FROM github_eventsWHERE created_at >= '2015-01-01 00:03:00';
Unlike master_apply_delete_command, standard SQL works at the row- rather than shard-level to modify or delete allrows that match the condition in the where clause. It deletes rows regardless of whether they comprise an entire shard.
16.4.4 Dropping Tables
You can use the standard PostgreSQL DROP TABLE command to remove your append distributed tables. As withregular tables, DROP TABLE removes any indexes, rules, triggers, and constraints that exist for the target table. Inaddition, it also drops the shards on the worker nodes and cleans up their metadata.
DROP TABLE github_events;
16.4.5 Data Loading
Citus supports two methods to load data into your append distributed tables. The first one is suitable for bulk loadsfrom files and involves using the \copy command. For use cases requiring smaller, incremental data loads, Citusprovides two user defined functions. We describe each of the methods and their usage below.
Bulk load using \copy
The \copy command is used to copy data from a file to a distributed table while handling replication and failuresautomatically. You can also use the server side COPY command. In the examples, we use the \copy command frompsql, which sends a COPY .. FROM STDIN to the server and reads files on the client side, whereas COPY from a filewould read the file on the server.
You can use \copy both on the coordinator and from any of the workers. When using it from the worker, you need toadd the master_host option. Behind the scenes, \copy first opens a connection to the coordinator using the providedmaster_host option and uses master_create_empty_shard to create a new shard. Then, the command connects to theworkers and copies data into the replicas until the size reaches shard_max_size, at which point another new shard iscreated. Finally, the command fetches statistics for the shards and updates the metadata.
SET citus.shard_max_size TO '64MB';\copy github_events from 'github_events-2015-01-01-0.csv' WITH (format CSV, master_→˓host 'coordinator-host')
Citus assigns a unique shard id to each new shard and all its replicas have the same shard id. Each shard is representedon the worker node as a regular PostgreSQL table with name ‘tablename_shardid’ where tablename is the name of thedistributed table and shardid is the unique id assigned to that shard. One can connect to the worker postgres instancesto view or run commands on individual shards.
By default, the \copy command depends on two configuration parameters for its behavior. These are called ci-tus.shard_max_size and citus.shard_replication_factor.
1. citus.shard_max_size :- This parameter determines the maximum size of a shard created using \copy, anddefaults to 1 GB. If the file is larger than this parameter, \copy will break it up into multiple shards.
2. citus.shard_replication_factor :- This parameter determines the number of nodes each shard gets replicatedto, and defaults to one. Set it to two if you want Citus to replicate data automatically and provide fault tolerance.
176 Chapter 16. Citus API

Citus Documentation, Release 8.2
You may want to increase the factor even higher if you run large clusters and observe node failures on a morefrequent basis.
Note: The configuration setting citus.shard_replication_factor can only be set on the coordinator node.
Please note that you can load several files in parallel through separate database connections or from different nodes. Itis also worth noting that \copy always creates at least one shard and does not append to existing shards. You can usethe method described below to append to previously created shards.
Note: There is no notion of snapshot isolation across shards, which means that a multi-shard SELECT that runsconcurrently with a COPY might see it committed on some shards, but not on others. If the user is storing events data,he may occasionally observe small gaps in recent data. It is up to applications to deal with this if it is a problem (e.g.exclude the most recent data from queries, or use some lock).
If COPY fails to open a connection for a shard placement then it behaves in the same way as INSERT, namely to markthe placement(s) as inactive unless there are no more active placements. If any other failure occurs after connecting,the transaction is rolled back and thus no metadata changes are made.
Incremental loads by appending to existing shards
The \copy command always creates a new shard when it is used and is best suited for bulk loading of data. Us-ing \copy to load smaller data increments will result in many small shards which might not be ideal. In order toallow smaller, incremental loads into append distributed tables, Citus provides 2 user defined functions. They aremaster_create_empty_shard() and master_append_table_to_shard().
master_create_empty_shard() can be used to create new empty shards for a table. This function also replicates theempty shard to citus.shard_replication_factor number of nodes like the \copy command.
master_append_table_to_shard() can be used to append the contents of a PostgreSQL table to an existing shard. Thisallows the user to control the shard to which the rows will be appended. It also returns the shard fill ratio which helpsto make a decision on whether more data should be appended to this shard or if a new shard should be created.
To use the above functionality, you can first insert incoming data into a regular PostgreSQL table. You can then createan empty shard using master_create_empty_shard(). Then, using master_append_table_to_shard(), you can appendthe contents of the staging table to the specified shard, and then subsequently delete the data from the staging table.Once the shard fill ratio returned by the append function becomes close to 1, you can create a new shard and startappending to the new one.
SELECT * from master_create_empty_shard('github_events');master_create_empty_shard---------------------------
102089(1 row)
SELECT * from master_append_table_to_shard(102089, 'github_events_temp', 'master-101',→˓ 5432);master_append_table_to_shard------------------------------
0.100548(1 row)
To learn more about the two UDFs, their arguments and usage, please visit the Citus Utility Functions section of thedocumentation.
16.4. Append Distribution 177

Citus Documentation, Release 8.2
Increasing data loading performance
The methods described above enable you to achieve high bulk load rates which are sufficient for most use cases. Ifyou require even higher data load rates, you can use the functions described above in several ways and write scripts tobetter control sharding and data loading. The next section explains how to go even faster.
16.4.6 Scaling Data Ingestion
If your use-case does not require real-time ingests, then using append distributed tables will give you the highest ingestrates. This approach is more suitable for use-cases which use time-series data and where the database can be a fewminutes or more behind.
Coordinator Node Bulk Ingestion (100k/s-200k/s)
To ingest data into an append distributed table, you can use the COPY command, which will create a new shardout of the data you ingest. COPY can break up files larger than the configured citus.shard_max_size into multipleshards. COPY for append distributed tables only opens connections for the new shards, which means it behavesa bit differently than COPY for hash distributed tables, which may open connections for all shards. A COPY forappend distributed tables command does not ingest rows in parallel over many connections, but it is safe to run manycommands in parallel.
-- Set up the events tableCREATE TABLE events (time timestamp, data jsonb);SELECT create_distributed_table('events', 'time', 'append');
-- Add data into a new staging table\COPY events FROM 'path-to-csv-file' WITH CSV
COPY creates new shards every time it is used, which allows many files to be ingested simultaneously, but may causeissues if queries end up involving thousands of shards. An alternative way to ingest data is to append it to existingshards using the master_append_table_to_shard function. To use master_append_table_to_shard, the data needs to beloaded into a staging table and some custom logic to select an appropriate shard is required.
-- Prepare a staging tableCREATE TABLE stage_1 (LIKE events);\COPY stage_1 FROM 'path-to-csv-file WITH CSV
-- In a separate transaction, append the staging tableSELECT master_append_table_to_shard(select_events_shard(), 'stage_1', 'coordinator-→˓host', 5432);
An example of a shard selection function is given below. It appends to a shard until its size is greater than 1GB andthen creates a new one, which has the drawback of only allowing one append at a time, but the advantage of boundingshard sizes.
CREATE OR REPLACE FUNCTION select_events_shard() RETURNS bigint AS $$DECLARE
shard_id bigint;BEGIN
SELECT shardid INTO shard_idFROM pg_dist_shard JOIN pg_dist_placement USING (shardid)WHERE logicalrelid = 'events'::regclass AND shardlength < 1024*1024*1024;
IF shard_id IS NULL THEN/* no shard smaller than 1GB, create a new one */
178 Chapter 16. Citus API

Citus Documentation, Release 8.2
SELECT master_create_empty_shard('events') INTO shard_id;END IF;
RETURN shard_id;END;$$ LANGUAGE plpgsql;
It may also be useful to create a sequence to generate a unique name for the staging table. This way each ingestioncan be handled independently.
-- Create stage table name sequenceCREATE SEQUENCE stage_id_sequence;
-- Generate a stage table nameSELECT 'stage_'||nextval('stage_id_sequence');
To learn more about the master_append_table_to_shard and master_create_empty_shard UDFs, please visit the CitusUtility Functions section of the documentation.
Worker Node Bulk Ingestion (100k/s-1M/s)
For very high data ingestion rates, data can be staged via the workers. This method scales out horizontally and providesthe highest ingestion rates, but can be more complex to use. Hence, we recommend trying this method only if yourdata ingestion rates cannot be addressed by the previously described methods.
Append distributed tables support COPY via the worker, by specifying the address of the coordinator in a master_hostoption, and optionally a master_port option (defaults to 5432). COPY via the workers has the same general propertiesas COPY via the coordinator, except the initial parsing is not bottlenecked on the coordinator.
psql -h worker-host-n -c "\COPY events FROM 'data.csv' WITH (FORMAT CSV, MASTER_HOST→˓'coordinator-host')"
An alternative to using COPY is to create a staging table and use standard SQL clients to append it to the distributedtable, which is similar to staging data via the coordinator. An example of staging a file via a worker using psql is asfollows:
stage_table=$(psql -tA -h worker-host-n -c "SELECT 'stage_'||nextval('stage_id_→˓sequence')")psql -h worker-host-n -c "CREATE TABLE $stage_table (time timestamp, data jsonb)"psql -h worker-host-n -c "\COPY $stage_table FROM 'data.csv' WITH CSV"psql -h coordinator-host -c "SELECT master_append_table_to_shard(choose_underutilized_→˓shard(), '$stage_table', 'worker-host-n', 5432)"psql -h worker-host-n -c "DROP TABLE $stage_table"
The example above uses a choose_underutilized_shard function to select the shard to which to append. To ensureparallel data ingestion, this function should balance across many different shards.
An example choose_underutilized_shard function belows randomly picks one of the 20 smallest shards or creates anew one if there are less than 20 under 1GB. This allows 20 concurrent appends, which allows data ingestion of up to1 million rows/s (depending on indexes, size, capacity).
/* Choose a shard to which to append */CREATE OR REPLACE FUNCTION choose_underutilized_shard()RETURNS bigint LANGUAGE plpgsqlAS $function$DECLARE
16.4. Append Distribution 179

Citus Documentation, Release 8.2
shard_id bigint;num_small_shards int;
BEGINSELECT shardid, count(*) OVER () INTO shard_id, num_small_shardsFROM pg_dist_shard JOIN pg_dist_placement USING (shardid)WHERE logicalrelid = 'events'::regclass AND shardlength < 1024*1024*1024GROUP BY shardid ORDER BY RANDOM() ASC;
IF num_small_shards IS NULL OR num_small_shards < 20 THENSELECT master_create_empty_shard('events') INTO shard_id;
END IF;
RETURN shard_id;END;$function$;
A drawback of ingesting into many shards concurrently is that shards may span longer time ranges, which means thatqueries for a specific time period may involve shards that contain a lot of data outside of that period.
In addition to copying into temporary staging tables, it is also possible to set up tables on the workers which cancontinuously take INSERTs. In that case, the data has to be periodically moved into a staging table and then appended,but this requires more advanced scripting.
Pre-processing Data in Citus
The format in which raw data is delivered often differs from the schema used in the database. For example, the rawdata may be in the form of log files in which every line is a JSON object, while in the database table it is more efficientto store common values in separate columns. Moreover, a distributed table should always have a distribution column.Fortunately, PostgreSQL is a very powerful data processing tool. You can apply arbitrary pre-processing using SQLbefore putting the results into a staging table.
For example, assume we have the following table schema and want to load the compressed JSON logs fromgithubarchive.org:
CREATE TABLE github_events(
event_id bigint,event_type text,event_public boolean,repo_id bigint,payload jsonb,repo jsonb,actor jsonb,org jsonb,created_at timestamp
);SELECT create_distributed_table('github_events', 'created_at', 'append');
To load the data, we can download the data, decompress it, filter out unsupported rows, and extract the fields in whichwe are interested into a staging table using 3 commands:
CREATE TEMPORARY TABLE prepare_1 (data jsonb);
-- Load a file directly from Github archive and filter out rows with unescaped 0-bytesCOPY prepare_1 FROM PROGRAM'curl -s http://data.githubarchive.org/2016-01-01-15.json.gz | zcat | grep -v "\\u0000→˓"'
180 Chapter 16. Citus API

Citus Documentation, Release 8.2
CSV QUOTE e'\x01' DELIMITER e'\x02';
-- Prepare a staging tableCREATE TABLE stage_1 ASSELECT (data->>'id')::bigint event_id,
(data->>'type') event_type,(data->>'public')::boolean event_public,(data->'repo'->>'id')::bigint repo_id,(data->'payload') payload,(data->'actor') actor,(data->'org') org,(data->>'created_at')::timestamp created_at FROM prepare_1;
You can then use the master_append_table_to_shard function to append this staging table to the distributed table.
This approach works especially well when staging data via the workers, since the pre-processing itself can be scaledout by running it on many workers in parallel for different chunks of input data.
For a more complete example, see Interactive Analytics on GitHub Data using PostgreSQL with Citus.
16.4. Append Distribution 181

Citus Documentation, Release 8.2
182 Chapter 16. Citus API
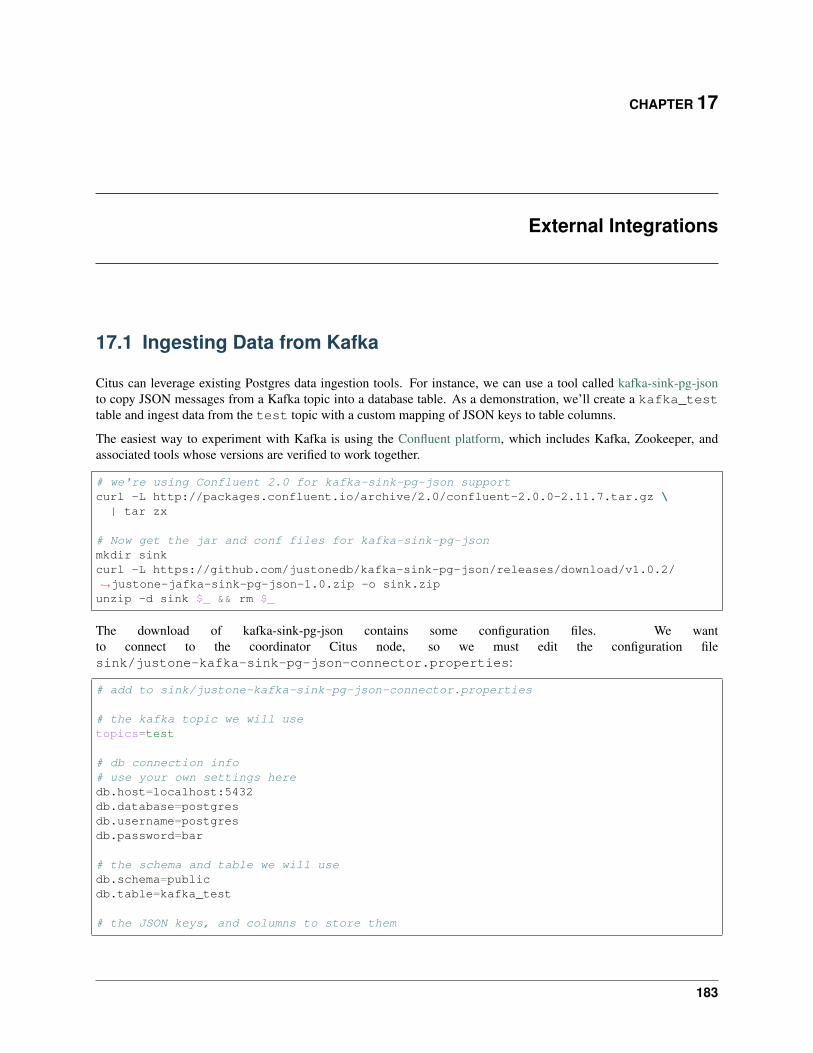
CHAPTER 17
External Integrations
17.1 Ingesting Data from Kafka
Citus can leverage existing Postgres data ingestion tools. For instance, we can use a tool called kafka-sink-pg-jsonto copy JSON messages from a Kafka topic into a database table. As a demonstration, we’ll create a kafka_testtable and ingest data from the test topic with a custom mapping of JSON keys to table columns.
The easiest way to experiment with Kafka is using the Confluent platform, which includes Kafka, Zookeeper, andassociated tools whose versions are verified to work together.
# we're using Confluent 2.0 for kafka-sink-pg-json supportcurl -L http://packages.confluent.io/archive/2.0/confluent-2.0.0-2.11.7.tar.gz \
| tar zx
# Now get the jar and conf files for kafka-sink-pg-jsonmkdir sinkcurl -L https://github.com/justonedb/kafka-sink-pg-json/releases/download/v1.0.2/→˓justone-jafka-sink-pg-json-1.0.zip -o sink.zipunzip -d sink $_ && rm $_
The download of kafka-sink-pg-json contains some configuration files. We wantto connect to the coordinator Citus node, so we must edit the configuration filesink/justone-kafka-sink-pg-json-connector.properties:
# add to sink/justone-kafka-sink-pg-json-connector.properties
# the kafka topic we will usetopics=test
# db connection info# use your own settings heredb.host=localhost:5432db.database=postgresdb.username=postgresdb.password=bar
# the schema and table we will usedb.schema=publicdb.table=kafka_test
# the JSON keys, and columns to store them
183

Citus Documentation, Release 8.2
db.json.parse=/@a,/@bdb.columns=a,b
Notice db.columns and db.json.parse. The elements of these lists match up, with the items indb.json.parse specifying where to find values inside incoming JSON objects.
Note: The paths in db.json.parse are written in a language that allows some flexibility in getting values out ofJSON. Given the following JSON,
{"identity":71293145,"location": {"latitude":51.5009449,"longitude":-2.4773414
},"acceleration":[0.01,0.0,0.0]
}
here are some example paths and what they match:
• /@identity - the path to element 71293145.
• /@location/@longitude - the path to element -2.4773414.
• /@acceleration/#0 - the path to element 0.01
• /@location - the path to element {"latitude":51.5009449,"longitude":-2.4773414}
Our own scenario is simple. Our events will be objects like {"a":1,"b":2}. The parser will pull those values intoeponymous columns.
Now that the configuration file is set up, it’s time to prepare the database. Connect to the coordinator node with psqland run this:
-- create metadata tables for kafka-sink-pg-json\i sink/install-justone-kafka-sink-pg-1.0.sql
-- create and distribute target ingestion tablecreate table kafka_test ( a int, b int );select create_distributed_table('kafka_test', 'a');
Start the Kafka machinery:
# save some typingexport C=confluent-2.0.0
# start zookeeper$C/bin/zookeeper-server-start \
$C/etc/kafka/zookeeper.properties
# start kafka server$C/bin/kafka-server-start \$C/etc/kafka/server.properties
# create the topic we'll be reading/writing$C/bin/kafka-topics --create --zookeeper localhost:2181 \
--replication-factor 1 --partitions 1 \--topic test
184 Chapter 17. External Integrations

Citus Documentation, Release 8.2
Run the ingestion program:
# the jar files for this are in "sink"export CLASSPATH=$PWD/sink/*
# Watch for new events in topic and insert them$C/bin/connect-standalone \sink/justone-kafka-sink-pg-json-standalone.properties \sink/justone-kafka-sink-pg-json-connector.properties
At this point Kafka-Connect is watching the test topic, and will parse events there and insert them intokafka_test. Let’s send an event from the command line.
echo '{"a":42,"b":12}' | \$C/bin/kafka-console-producer --broker-list localhost:9092 --topic test
After a small delay the new row will show up in the database.
select * from kafka_test;
------| a | b |------| 42 | 12 |------
17.1.1 Caveats
• At the time of this writing, kafka-sink-pg-json requires Kafka version 0.9 or earlier.
• The kafka-sink-pg-json connector config file does not provide a way to connect with SSL support, so this toolwill not work with Citus Cloud which requires secure connections.
• A malformed JSON string in the Kafka topic will cause the tool to become stuck. Manual intervention in thetopic is required to process more events.
17.2 Ingesting Data from Spark
People sometimes use Spark to transform Kafka data, such as by adding computed values. In this section we’ll seehow to ingest Spark dataframes into a distributed Citus table.
First let’s start a local Spark cluster. It has several moving parts, so the easiest way is to run the pieces with docker-compose.
wget https://raw.githubusercontent.com/gettyimages/docker-spark/master/docker-compose.→˓yml
# this may require "sudo" depending on the docker daemon configurationdocker-compose up
To do the ingestion into PostgreSQL, we’ll be writing custom Scala code. We’ll use the Scala Build Tool (SBT) toload dependencies and run our code, so download SBT and install it on your machine.
Next create a new directory for our project.
17.2. Ingesting Data from Spark 185

Citus Documentation, Release 8.2
mkdir sparkcitus
Create a file called sparkcitus/build.sbt to tell SBT our project configuration, and add this:
// add this to build.sbt
name := "sparkcitus"version := "1.0"
scalaVersion := "2.10.4"
resolvers ++= Seq("Maven Central" at "http://central.maven.org/maven2/"
)
libraryDependencies ++= Seq("org.apache.spark" %% "spark-core" % "2.2.1","org.apache.spark" %% "spark-sql" % "2.2.1","org.postgresql" % "postgresql" % "42.2.2"
)
Next create a helper Scala class for doing ingestion through JDBC. Add the following tosparkcitus/copy.scala:
import java.io.InputStreamimport java.sql.DriverManagerimport java.util.Properties
import org.apache.spark.sql.{DataFrame, Row}import org.postgresql.copy.CopyManagerimport org.postgresql.core.BaseConnection
object CopyHelper {
def rowsToInputStream(rows: Iterator[Row]): InputStream = {val bytes: Iterator[Byte] = rows.map { row =>
(row.toSeq.map { v =>if (v == null) {"""\N"""
} else {"\"" + v.toString.replaceAll("\"", "\"\"") + "\""
}}.mkString("\t") + "\n").getBytes
}.flatten
new InputStream {override def read(): Int =if (bytes.hasNext) {bytes.next & 0xff // make the signed byte an unsigned int
} else {-1
}}
}
def copyIn(url: String, df: DataFrame, table: String):Unit = {
186 Chapter 17. External Integrations

Citus Documentation, Release 8.2
var cols = df.columns.mkString(",")
df.foreachPartition { rows =>val conn = DriverManager.getConnection(url)try {val cm = new CopyManager(conn.asInstanceOf[BaseConnection])cm.copyIn(s"COPY $table ($cols) " + """FROM STDIN WITH (NULL '\N', FORMAT CSV,
→˓DELIMITER E'\t')""",rowsToInputStream(rows))
()} finally {
conn.close()}
}}
}
Continuing the setup, save some sample data into people.json. Note the intentional lack of surrounding squarebrackets. Later we’ll create a Spark dataframe from the data.
{"name":"Tanya Rosenau" , "age": 24},{"name":"Rocky Slay" , "age": 85},{"name":"Tama Erdmann" , "age": 48},{"name":"Jared Olivero" , "age": 42},{"name":"Gudrun Shannon" , "age": 53},{"name":"Quentin Yoon" , "age": 32},{"name":"Yanira Huckstep" , "age": 53},{"name":"Brendon Wesley" , "age": 19},{"name":"Minda Nordeen" , "age": 79},{"name":"Katina Woodell" , "age": 83},{"name":"Nevada Mckinnon" , "age": 65},{"name":"Georgine Mcbee" , "age": 56},{"name":"Mittie Vanetten" , "age": 17},{"name":"Lecia Boyett" , "age": 37},{"name":"Tobias Mickel" , "age": 69},{"name":"Jina Mccook" , "age": 82},{"name":"Cassidy Turrell" , "age": 37},{"name":"Cherly Skalski" , "age": 29},{"name":"Reita Bey" , "age": 69},{"name":"Keely Symes" , "age": 34}
Finally, create and distribute a table in Citus:
create table spark_test ( name text, age integer );select create_distributed_table('spark_test', 'name');
Now we’re ready to hook everything together. Start up sbt:
# run this in the sparkcitus directory
sbt
Once inside sbt, compile the project and then go into the “console” which is a Scala repl that loads our code anddependencies:
sbt:sparkcitus> compile[success] Total time: 3 s
17.2. Ingesting Data from Spark 187

Citus Documentation, Release 8.2
sbt:sparkcitus> console[info] Starting scala interpreter...
scala>
Type these Scala commands into the console:
// inside the sbt scala interpreter
import org.apache.spark.sql.SparkSession
// open a session to the Spark clusterval spark = SparkSession.builder().appName("sparkcitus").config("spark.master", "local→˓").getOrCreate()
// load our sample data into Sparkval df = spark.read.json("people.json")
// this is a simple connection url (it assumes Citus// is running on localhost:5432), but more complicated// JDBC urls differ subtly from Postgres urls, see:// https://jdbc.postgresql.org/documentation/head/connect.htmlval url = "jdbc:postgresql://localhost/postgres"
// ingest the data frame using our CopyHelper classCopyHelper.copyIn(url, df, "spark_test")
This uses the CopyHelper to ingest the ionformation. At this point the data will appear in the distributed table.
Note: Our method of ingesting the dataframe is straightforward but doesn’t protect against Spark errors. Sparkguarantees “at least once” semantics, i.e. a read error can cause a subsequent read to encounter previously seen data.
A more complicated, but robust, approach is to use the custom Spark partitioner spark-citus so that partitions matchup exactly with Citus shards. This allows running transactions directly on worker nodes which can rollback on readfailure. See the presentation linked in that repository for more information.
17.3 Business Intelligence with Tableau
Tableau is a popular business intelligence and analytics tool for databases. Citus and Tableau provide a seamlessexperience for performing ad-hoc reporting or analysis.
You can now interact with Tableau using the following steps.
• Choose PostgreSQL from the “Add a Connection” menu.
188 Chapter 17. External Integrations

Citus Documentation, Release 8.2
• Enter the connection details for the coordinator node of your Citus cluster. (Note if you’re connecting to CitusCloud you must select “Require SSL.”)
17.3. Business Intelligence with Tableau 189

Citus Documentation, Release 8.2
• Once you connect to Tableau, you will see the tables in your database. You can define your data source bydragging and dropping tables from the “Table” pane. Or, you can run a custom query through “New CustomSQL”.
• You can create your own sheets by dragging and dropping dimensions, measures, and filters. You can also createan interactive user interface with Tableau. To do this, Tableau automatically chooses a date range over the data.Citus can compute aggregations over this range in human real-time.
190 Chapter 17. External Integrations

Citus Documentation, Release 8.2
17.3. Business Intelligence with Tableau 191

Citus Documentation, Release 8.2
192 Chapter 17. External Integrations

CHAPTER 18
Get Started
Citus Cloud is a fully managed hosted version of Citus Enterprise edition on top of AWS. Citus Cloud comes with thebenefit of Citus allowing you to easily scale out your memory and processing power, without having to worry aboutkeeping it up and running.
Note: We also offer a managed deployment on Azure Database for PostgreSQL — Hyperscale (Citus).
18.1 Provisioning
Once you’ve created your account at https://console.citusdata.com you can provision your Citus cluster. When youlogin you’ll be at the home of the dashboard, and from here you can click New Formation to begin your formationcreation.
193

Citus Documentation, Release 8.2
18.1.1 Configuring Your Plan
Citus Cloud plans vary based on the size of your primary node, size of your distributed nodes, number of distributednodes and whether you have high availability or not. From within the Citus console you can configure your plan oryou can preview what it might look like within the pricing calculator.
The key items you’ll care about for each node:
• Storage - All nodes come with 1 TB of storage
• Memory - The memory on each node varies based on the size of node you select
• Cores - The cores on each node varies based on the size of node you select
18.1.2 Supported Regions
Citus Cloud runs on top of Amazon Web Services. During provisioning you’re able to select your database region. Wecurrently support:
• US East (N. Virginia) [us-east-1]
• US East (Ohio) [us-east-2]
• Asia Pacific (Tokyo) [ap-northeast-1]
• Asia Pacific (Seoul) [ap-northeast-2]
• Asia Pacific (Singapore) [ap-southeast-1]
194 Chapter 18. Get Started

Citus Documentation, Release 8.2
• Asia Pacific (Sydney) [ap-southeast-2]
• Asia Pacific (Mumbai) [ap-south-1]
• EU (Frankfurt) [eu-central-1]
• EU (Ireland) [eu-west-1]
• EU (London) [eu-west-2]
• EU (Paris) [eu-west-3]
• South America (São Paulo) [sa-east-1]
• US West (N. California) [us-west-1]
• US West (Oregon) [us-west-2]
• Canada (Central) [ca-central-1]
If there is an AWS region you do not see listed but would like for us to add support for please contact us and we’d behappy to look into it.
18.1.3 Other infrastructure providers
At this time we only support Citus Cloud on top of Amazon Web Services. We are continually exploring other infras-tructure providers to make Citus Cloud available on. If you have immediate needs you could consider running CitusCommunity Edition or Citus Enterprise Edition. Or if you have questions about our timeline for other infrastructureproviders please feel free to reach out.
18.2 Connecting
Applications connect to Citus the same way they would PostgreSQL, using a connection URI. This is a string whichincludes network and authentication information, and has the form:
postgresql://[user[:password]@][host][:port][/dbname][?param1=value1&...]
The connection string for each Cloud Formation is provided on the Overview tab in Citus Console.
By default the URL displays only the hostname of the connection, but the full URL is available by clicking the “ShowFull URL” link.
18.2. Connecting 195

Citus Documentation, Release 8.2
Notice how the end of the connection string contains ?sslmode=require. Citus Cloud accepts only SSL connec-tions for security, so this url parameter is required. When connecting from an application framework such as Rails,Django, or Spring you may need to explicitly specify the sslmode as well.
18.2.1 Connecting Directly to a Worker
The previous section shows how to get a connection string for the coordinator node. To connect a database client suchas psql to an individual worker node instead, we’ll need to create new a connection string by replacing the hostnamein the coordinator connection string.
Under the “Nodes” tab in Cloud console each node lists its amazonaws.com hostname, like:
Replace the host in the coordinator connection string with this value, consulting the previous section for the connectionstring format. (As shown in the previous section, the hostname to be replaced will be immediately following an @ sign.)Leave all other parameters unchanged. This will be the new connection string for the worker.
196 Chapter 18. Get Started

CHAPTER 19
Manage
19.1 Scaling
Citus Cloud provides self-service scaling to deal with increased load. The web interface makes it easy to either addnew worker nodes or increase existing nodes’ memory and CPU capacity.
For most cases either approach to scaling is fine and will improve performance. However there are times you maywant to choose one over the other. If the cluster is reaching its disk limit then adding more nodes is the best choice.Alternately, if there is still a lot of headroom on disk but performance is suffering, then scaling node RAM andprocessing power is the way to go.
Both adjustments are available in the formation configuration panel of the settings tab:
The slider, Total Nodes, scales out the cluster by adding new nodes. The RAM buttons scale it up by changing theinstance size (RAM and CPU cores) of existing nodes.
For example, just drag the slider for node count:
197

Citus Documentation, Release 8.2
After you adjust the slider and/or buttons and accept the changes, Citus Cloud begins applying the changes. Increasingthe number of nodes will begin immediately, whereas increasing node instance size will wait for a time in the user-specified maintenance window.
A maintenance window specifies a preferred time for any maintenance tasks to be performed on your formation. Whena window is set, changes to the formation (e.g. changing to a different worker size) will by default occur within thiswindow, unless manually adjusted by Citus Cloud support. In addition, when a maintenance window is set, basebackups on the node will start during the window.
Citus Cloud will display a popup message in the console while scaling actions have begun or are scheduled. Themessage will disappear when the action completes.
For instance, when adding nodes:
Or when waiting for node resize to begin in the maintenance window:
198 Chapter 19. Manage

Citus Documentation, Release 8.2
19.1.1 Scaling Up (increasing node size)
Resizing node size works by creating a PostgreSQL follower for each node, where the followers are provisioned withthe desired amount of RAM and CPU cores. It takes an average of forty minutes per hundred gigabytes of data for theprimary nodes’ data to be fully synchronized on the followers. After the synchronization is complete, Citus Cloud doesa quick switchover from the existing primary nodes to their followers which takes about two minutes. The creationand switchover process uses the same well-tested replication mechanism that powers Cloud’s Backup, Availability, andReplication feature. During the switchover period clients may experience errors and have to retry queries, especiallycross-tenant queries hitting multiple nodes.
19.1.2 Scaling Out (adding new nodes)
Node addition completes in five to ten minutes, which is faster than node resizing because the new nodes are createdwithout data. To take advantage of the new nodes you still must adjust manually rebalance the shards, meaning movesome shards from existing nodes to the new ones.
Rebalancing
You can go to the “Rebalancer” tab in the Cloud console to see the shard balance across nodes. Ordinarily this pagewill show, “No rebalance required.”
However if the shards could be placed more evenly, such as after a new node has been added to the cluster, the pagewill show a “Rebalance recommended.”
For maximum control, the choice of when to run the shard rebalancer is left to the database administrator. Citus doesnot automatically rebalance on node creation. To start the shard rebalancer, connect to the cluster coordinator nodewith psql and run:
SELECT rebalance_table_shards('distributed_table_name');
Note: The rebalance_table_shards function rebalances all tables in the colocation group of the table namedin its argument. Thus you do not have to call it for every single table, just call it on a representative table from eachcolocation group.
19.1. Scaling 199

Citus Documentation, Release 8.2
Learn more about this function in Rebalance Shards without Downtime.
Citus will output progress in both psql (saying which shards are moving) and graphically in the Cloud console:
The rebalance progress is also queryable in SQL with the get_rebalance_progress() function.
19.1.3 Scaling Connections (pgBouncer)
Each client connection to PostgreSQL consumes a noticeable amount of resources. To protect resource usage CitusCloud enforces a hard limit of 300 concurrent connections to the coordinator node.
For further scaling we provide PgBouncer out of the box on Cloud. If your application requires more than 300connections, change the port in the Cloud connection URL from 5432 to 6432. This will connect to PgBouncer ratherthan directly to the coordinator, allowing up to roughly two thousand simultaneous connections. The coordinator canstill only process three hundred at a time, but more can connect and PgBouncer will queue them.
When connecting to PgBouncer you have:
• 1800 idle connections available
• 300 active connections to Citus available
To measure the number of active connections at a given time, run:
SELECT COUNT(*)FROM pg_stat_activity
WHERE state <> 'idle';
19.2 Monitoring
19.2.1 Cloud Platform Status
Any events affecting the Citus Cloud platform as a whole are recorded on status.citusdata.com. This page shows achart of recent uptime, as well as listing any past incidents.
19.2.2 Resources Usage
Citus Cloud metrics enable you to get information about your cluster’s health and performance. The “Metrics” tabof the Cloud Console provides graphs for a number of measurements, all viewable per node. Below are the metrics,broken into categories, with details about the less obvious ones.
Amazon EBS Volume Metrics
(A full description of the metrics reported by Citus Cloud for underlying EBS resources can be found in the AWSdocumentation about I/O Characteristics and Monitoring.)
IOPS are a unit of measure representing input/output operations per second. The operations are measured in KiB, andthe underlying drive technology determines the maximum amount of data that a volume type counts as a single I/O.
• Read IOPS
• Write IOPS
200 Chapter 19. Manage

Citus Documentation, Release 8.2
Volume queue length is the number of pending I/O requests for a device. Latency is the true end-to-end client time ofan I/O operation, in other words, the time elapsed between sending an I/O and receiving an acknowledgement that theI/O read or write is complete.
• Average Queue Length (Count)
• Average Read Latency (Seconds)
• Average Write Latency (Seconds)
• Bytes Read / Second
• Bytes Written / Second
CPU and Network
• CPU Utilization (Percent)
• Network - Bytes In / Second
• Network - Bytes Out / Second
PostgreSQL Write-Ahead Log
• WAL Bytes Written / Second
19.2.3 Formation Events Feed
To monitor events in the life of a formation with outside tools via a standard format, we offer RSS feeds per organiza-tion. You can use a feed reader or RSS Slack integration (e.g. on an #ops channel) to keep up to date.
On the upper right of the “Formations” list in the Cloud console, follow the “Formation Events” link to the RSS feed.
The feed includes entries for three types of events, each with the following details:
Server Unavailable
This is a notification of connectivity problems such as hardware failure.
• Formation name
• Formation url
• Server
Failover Scheduled
For planned upgrades, or when operating a formation without high availability that experiences a failure, this eventwill appear to indicate a future planned failover event.
• Formation name
• Formation url
• Leader
19.2. Monitoring 201

Citus Documentation, Release 8.2
• Failover at
For planned failovers, “failover at” will usually match your maintenance window. Note that the failover might happenat this point or shortly thereafter, once a follower is available and has caught up to the primary database.
Failover
Failovers happen to address hardware failure, as mentioned, and also for other reasons such as performing systemsoftware upgrades, or transferring data to a server with better hardware.
• Formation name
• Formation url
• Leader
• Situation
• Follower
Disk Almost Full
The “disk-almost-full” event happens if the disk utilization in the Postgres data directory reaches or exceeds 90%.
• Formation name
• Formation url
• Server
• “used_bytes”
• “total_bytes”
• “threshold_pct” (always 90)
The alert will appear once every twenty-four hours until the disk usage is resolved.
High CPU Utilization
The “cpu-utilization-high” event happens when there is CPU utilization reaches or exceeds 90%.
• Formation name
• Formation url
• Server
• “util_pct” (0-100% utilization value)
• “threshold_pct” (always 90)
The alert will appear once per hour until CPU utilization goes down to a normal level.
19.2.4 StatsD external reporting
Citus Cloud can send events to an external StatsD server for detailed monitoring. Citus Cloud sends the followingstatsd metrics:
202 Chapter 19. Manage

Citus Documentation, Release 8.2
Metric Notescitus.disk.data.totalcitus.disk.data.usedcitus.load.1 Load in past 1 minutecitus.load.5 Load in past 5 minutescitus.load.15 Load in past 15 minutescitus.locks.granted.<mode>.<locktype>.count See belowcitus.mem.availablecitus.mem.bufferedcitus.mem.cachedcitus.mem.commit_limit Memory currently available to be allocated on the systemcitus.mem.committed_as Total amount of memory estimated to complete the workloadcitus.mem.dirty Amount of memory waiting to be written back to the diskcitus.mem.free Amount of physical RAM left unusedcitus.mem.total Total amount of physical RAMcitus.pgbouncer_outbound.cl_active Active client connectionscitus.pgbouncer_outbound.cl_waiting Waiting client connectionscitus.pgbouncer_outbound.sv_active Active server connectionscitus.pgbouncer_outbound.sv_idle Idle server connectionscitus.pgbouncer_outbound.sv_used Server connections idle more than server_check_delaycitus.postgres_connections.activecitus.postgres_connections.idlecitus.postgres_connections.unknowncitus.postgres_connections.used
Notes:
• The citus.mem.* metrics are reported in kilobytes, and are also recorded in megabytes as system.mem.*.Memory metrics come from /proc/meminfo, and the proc(5) man page contains a description of each.
• The citus.load.* metrics are duplicated as system.load.*.
• citus.locks.granted.* and citus.locks.not_granted.* use mode and locktype as presentin Postgres’ pg_locks table.
• See the pgBouncer docs for more details about the pgbouncer_outbound metrics.
To send these metrics to a statsd server, use the “Create New Metrics Destination” button in the “Metrics” tab of CloudConsole.
Then fill in the host details in the resulting dialog box.
19.2. Monitoring 203
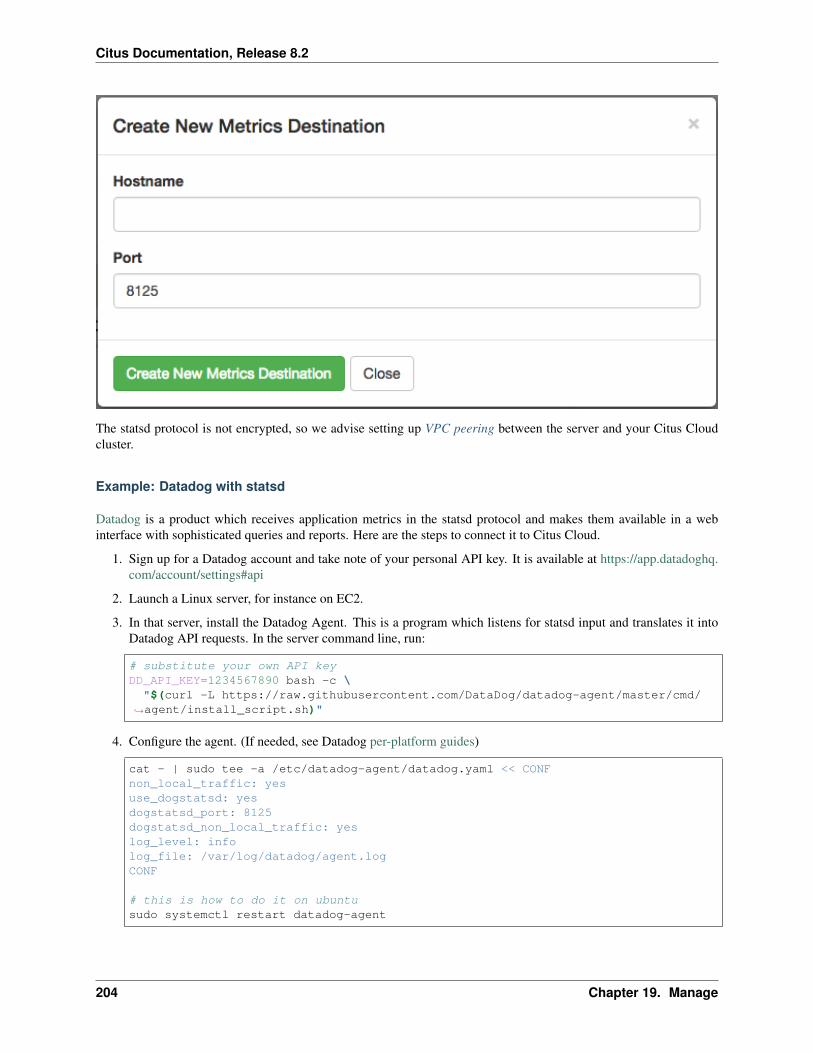
Citus Documentation, Release 8.2
The statsd protocol is not encrypted, so we advise setting up VPC peering between the server and your Citus Cloudcluster.
Example: Datadog with statsd
Datadog is a product which receives application metrics in the statsd protocol and makes them available in a webinterface with sophisticated queries and reports. Here are the steps to connect it to Citus Cloud.
1. Sign up for a Datadog account and take note of your personal API key. It is available at https://app.datadoghq.com/account/settings#api
2. Launch a Linux server, for instance on EC2.
3. In that server, install the Datadog Agent. This is a program which listens for statsd input and translates it intoDatadog API requests. In the server command line, run:
# substitute your own API keyDD_API_KEY=1234567890 bash -c \"$(curl -L https://raw.githubusercontent.com/DataDog/datadog-agent/master/cmd/
→˓agent/install_script.sh)"
4. Configure the agent. (If needed, see Datadog per-platform guides)
cat - | sudo tee -a /etc/datadog-agent/datadog.yaml << CONFnon_local_traffic: yesuse_dogstatsd: yesdogstatsd_port: 8125dogstatsd_non_local_traffic: yeslog_level: infolog_file: /var/log/datadog/agent.logCONF
# this is how to do it on ubuntusudo systemctl restart datadog-agent
204 Chapter 19. Manage

Citus Documentation, Release 8.2
5. Fill in the agent server information as a new metrics destination in the Cloud Console. See the previous sectionfor details.
6. The agent should now appear in the Infrastructure section in Datadog.
Clicking the hostname link goes into a full dashboard of all the metrics, with the ability to write queries and set alerts.
19.2.5 VividCortex External Monitoring
Like the systems above, VividCortex provides a metrics dashboard. While the other systems mostly focus on computerresources, VividCortex focuses on the performance of queries. It tracks their throughput, error rate, 99th percentilelatency, and concurrency.
To integrate VividCortex with Citus Cloud we’ll be using the Off-Host Configuration. In this mode we create adatabase role with permissions to read the PostgreSQL statistics tables, and give the role’s login information to theVividCortex agent. VividCortex then connects and periodically collects information.
Here’s a step-by-step guide to get started.
1. Create a special VividCortex schema and relations on the Citus coordinator node.
# Use their SQL script to create schema and# helper functions to monitor the cluster
curl -L https://docs.vividcortex.com/create-stat-functions-v96.sql | \psql [connection_uri]
2. Create a VividCortex account.
2. On the inventory page, click “Setup your first host.” This will open a wizard.
3. Choose the off-host installation method.
19.2. Monitoring 205

Citus Documentation, Release 8.2
4. Select the PostgreSQL database.
5. In Citus Cloud, create a new role called vividcortex. Then grant it access to the VividCortex schema like
206 Chapter 19. Manage

Citus Documentation, Release 8.2
so:
# Grant our new role access to vividcortex schema
psql [connection_uri] -c \"GRANT USAGE ON SCHEMA vividcortex TO vividcortex;"
Finally note the generated password for the new account. Click “Show full URL” to see it.
6. Input the connection information into the credentials screen in the VividCortex wizard. Make sure SSL Enabledis on, and that you’re using SSL Mode “Verify Full.” Specify /etc/ssl/certs/citus.crt for the SSLAuthority.
7. Provision a server to act as the VividCortex agent. For instance a small EC2 instance will do. On this new hostinstall the Citus Cloud SSL certificate.
sudo curl -L https://console.citusdata.com/citus.crt \-o /etc/ssl/certs/citus.crt
19.2. Monitoring 207

Citus Documentation, Release 8.2
8. Advance to the next screen in the wizard. It will contain commands to run on the agent server, customized witha token for your account.
After running the commands on your server, the server will appear under “Select host.” Click it and thencontinue.
After these steps, VividCortex should show all systems as activated. You can then proceed to the dashboard to monitorqueries on your Citus cluster.
208 Chapter 19. Manage

Citus Documentation, Release 8.2
19.3 Security
19.3.1 Connecting with SSL
For security Citus Cloud accepts only SSL connections, which is why the URL contains the ?sslmode=requireparameter. Within the cluster, nodes also encrypt their communication with one another using SSL.
To avoid a man-in-the-middle attack when connecting to the coordinator node, clients can verify that the server cer-tificate is correct. Download the official Citus Cloud certificate and refer to it in connection string parameters:
?sslrootcert=/location/to/citus.crt&sslmode=verify-full
The string may need to be quoted in your shell to preserve the ampersand.
Note: Database clients must support SSL to connect to Citus Cloud. In particular psql needs to be compiled--with-openssl if building PostgreSQL from source.
Application frameworks can customize database connection parameters using config files. For example, Ruby on Railsuses a file called config/database.yml. This file accepts sslmode and sslrootcert options to specify connectionsecurity. Here are two examples.
Requiring SSL for the production db connection:
production:adapter: postgresqlencoding: unicodesslmode: requireurl: postgres://user:password@host:port/db
Requiring SSL, plus verifying against a certificate:
production:adapter: postgresqlencoding: unicodesslmode: verify-fullsslrootcert: /path/to/citus.crturl: postgres://user:password@host:port/db
Two-Factor Authentication
We support two factor authentication for all Citus accounts. You can enable it from within your Citus Cloud account.We support Google Authenticator and Authy as two primary apps for setting up your two factor authentication.
19.3.2 Users and Permissions
As we saw above, every new Citus Cloud formation includes a user account called citus. This account is great forcreating tables and other DDL, but it has too much power for certain applications.
We’ll want to create new roles for specialized purposes. For instance, a user with read-only access is perfect for aweb/reporting tool. The Cloud console allows us to create a new user, and will set up a new password automatically.Go to the “Roles” tab and click “Create New Role.”
19.3. Security 209

Citus Documentation, Release 8.2
It pops up a dialog where we will fill in the role name, which we can call reports.
After creating the role on a fresh formation, there will be three roles:
-[ RECORD 1 ]----------------------------------------| Role name | citus || Attributes | || Member of | {reports} |-[ RECORD 2 ]----------------------------------------| Role name | postgres || Attributes | Superuser, Create role, Create DB, Replication, Bypass RLS || Member of | {} |-[ RECORD 3 ]----------------------------------------| Role name | reports || Attributes | || Member of | {} |------------------------------------------------
The new reports role starts with no privileges, except “usage” on the public schema, meaning the ability to get alist of the tables etc inside. We have to specifically grant the role extra permissions to database objects. For instance,to allow read-only access to mytable, connect to Citus as the citus user with the connection string provided in theCloud console and issue this command:
-- run as the citus user
GRANT SELECT ON mytable TO reports;
If mytable is in the public schema this will suffice. However if the table is in another schema, there is one morestep. See Granting Access to Other Schemas below.
210 Chapter 19. Manage

Citus Documentation, Release 8.2
You can confirm the privileges by consulting the information schema:
SELECT grantee, privilege_typeFROM information_schema.role_table_grants
WHERE table_name = 'mytable';
-----------------| grantee | privilege_type |-----------------| citus | INSERT || citus | SELECT || citus | UPDATE || citus | DELETE || citus | TRUNCATE || citus | REFERENCES || citus | TRIGGER || reports | SELECT |-----------------
The PostgreSQL documentation has more detailed information about types of privileges you can GRANT on databaseobjects.
Citus Cloud also supports Row-Level Security for greater control in a multi-tenant environment.
Granting Privileges in Bulk
Citus propagates single-table GRANT statements through the entire cluster, making them apply on all worker nodes.However GRANTs that are system-wide (e.g. for all tables in a schema) need to be applied individually to every datanode using a Citus helper function.
-- applies to the coordinator nodeGRANT SELECT ON ALL TABLES IN SCHEMA public TO reports;
-- make it apply to workers as wellSELECT run_command_on_workers('GRANT SELECT ON ALL TABLES IN SCHEMA public TO reports;'
);
Granting Access to Other Schemas
By default, users cannot access objects in schemas they do not own. Note that by default, everyone has CREATE andUSAGE privileges on the public schema. This allows all users that are able to connect to a given database to createobjects in its public schema.
To allow object access in any other schema, the owner of the schema must grant the USAGE privilege on the schema.
GRANT USAGE ON SCHEMA other_schema TO reports;
Even if the reports user has SELECT access on a table like other_schema.foo, the user will not be able toselect rows until they also have USAGE access on other_schema.
19.3.3 Encryption at Rest
All data within Citus Cloud is encrypted at rest, including data on the instance as well as all backups for disasterrecovery. As mentioned in the connection section, we also require that you connect to your database with TLS.
19.3. Security 211

Citus Documentation, Release 8.2
19.3.4 Network Perimeter Controls
All Citus Cloud clusters run in their own isolated Amazon Virtual Private Cloud (VPC). In addition to the optionsdiscussed earlier, Citus Cloud provides the ability to further secure your cluster by limiting network access in twoways:
VPC Peering
VPC peering forms a network connection between two VPCs which routes traffic securely between them using privateIPv4 addresses or IPv6 addresses. Instances in either VPC can communicate with each other as if they are within thesame network. To set up a VPC peering connecting between an existing Citus Cloud formation and an Amazon VPC,open a support ticket and we will initiate the peering request.
IP Whitelisting
IP whitelisting restricts access to servers within a Citus Cloud cluster so that only designated IP addresses are able toconnect to them, typically the addresses of application servers.
To enable IP whitelisting on your Citus Cloud formation, go to the VPCs tab in the Cloud Console:
Then find the VPC containing your formation and click View Details:
Finally, in the “IP Whitelist / Ingress Rules” tab, enter the allowable IP addresses or CIDR blocks, one per line.
212 Chapter 19. Manage

Citus Documentation, Release 8.2
The special address 0.0.0.0/0 means unrestricted access. Note that permitted connections still require a validusername and password to actually access your database.
19.4 Backup, Availability, and Replication
In the real world, insurance is used to manage risk when a natural disaster such as a hurricane or flood strikes. Inthe database world, there are two critical methods of insurance. High Availability (HA) replicates the latest databaseversion virtually instantly. Disaster Recovery (DR) offers continuous protection by saving every database change,allowing database restoration to any point in time.
High availability and disaster recovery are both forms of data backups that are mutually exclusive and inter-related.The difference between them is that HA has a secondary reader database replica (often referred to as stand-by orfollower) ready to take over at any moment, but DR just writes to cold storage (in the case of Amazon that’s S3) andhas latency in the time for the main database to recover data.
Citus Cloud continuously protects the cluster data against hardware failure. To do this we perform backups everytwenty-four hours, then stream the write-ahead log (WAL) from PostgreSQL to S3 every 16 MB or 60 seconds,whichever is less. Even without high availability enabled you won’t lose any data. In the event of a complete infras-tructure failure we’ll restore your back-up and replay the WAL to the exact moment before your system crashed.
19.4.1 High-Availability (HA) Replication
In addition to continuous protection which is explained above, high availability is available if your application requiresless exposure to downtime. We provision stand-bys if you select high availability at provisioning time. This can be foryour primary node, or for your distributed nodes.
For HA, any data that is written to a primary database called the Writer is instantly replicated onto a secondary databasecalled the Reader in real-time, through a stream called a WAL or Write-Ahead-Log.
To ensure HA is functioning properly, Citus Cloud runs health checks every 30 seconds. If the primary fails and datacan’t be accessed after six consecutive attempts, a failover is initiated. This means the primary node will be replacedby the standby node and a new standby will be created.
19.4.2 Disaster Recovery (DR)
19.4. Backup, Availability, and Replication 213

Citus Documentation, Release 8.2
For DR, read-only data is replayed from colder storage. On AWS this is from S3, and for Postgres this is downloaded in16 MB pieces. On Citus Cloud this happens via WAL-E, using precisely the same procedure as creating a new standbyfor HA. WAL-E is an open source tool initially developed by our team, for archiving PostgreSQL WAL (Write AheadLog) files quickly, continuously and with a low operational burden.
This means we can restore your database by fetching the base backup and replaying all of the WAL files on a freshinstall in the event of hardware failure, data corruption or other failure modes.
On Citus Cloud prior to kicking off the DR recovery process, the AWS EC2 instance is automatically restarted. Thisprocess usually takes 7±2 minutes. If it restarts without any issues, the setup remains the same. If the EC2 instancefails to restart, a new instance is created. This happens at a rate of at least 30MB/second, so 512GB of data would takearound 5 hours.
19.4.3 Comparison of HA and DR
While some may be familiar many are not acutely aware of the relationship between HA and DR.
Although it’s technically possible to have one without the other, they are unified in that the HA streaming replicationand DR archiving transmit the same bytes.
For HA the primary “writer” database replicates data through streaming replication to the secondary “reader” database.For DR, the same data is read from S3. In both cases, the “reader” database downloads the WAL and applies itincrementally.
Since DR and HA gets regularly used for upgrades and side-grades, the DR system is maintained with care. Weourselves rely on it for releasing new production features.
Disaster Recovery takes a little extra work but gives greater reliability
You might think that if HA provides virtually instant backup reliability, so ‘Why bother with DR?’ There are somecompelling reasons to use DR in conjunction with HA including cost, reliability and control.
From a cost efficiency perspective, since HA based on EBS and EC2 is a mirrored database, you have to pay for everylayer of redundancy added. However, DR archives in S3 are often 10-30% of the monthly cost of a database instance.And with Citus Cloud the S3 cost is already covered for you in the standard price of your cluster.
From reliability perspective, S3 has proven to be up to a thousand times more reliable than EBS and EC2, though amore reasonable range is ten to a hundred times. S3 archives also have the advantage of immediate restoration, evenwhile teams try to figure out what’s going on. Conversely, sometimes EBS volume availability can be down for hours,leaving uncertainty on whether it will completely restore.
From a control perspective, using DR means a standby database can be created while reducing the impact on theprimary database. It also has the capability of being able to recover a database from a previous version.
Trade-offs between latency and reliability for backups
There is a long history of trade-offs between latency and reliability, dating back to when the gold standard for backupswere on spools of tape.
Writing data to and then reading data from S3 offers latencies that are 100 to 1,000 times longer than streaming bytesbetween two computers as seen in streaming replication. However, S3’s availability and durability are both in excessof ten times better than an EBS volume.
On the other hand, the throughput of S3 is excellent: with parallelism, and without downstream bottlenecks, one canachieve multi-gigabit throughput in backup and WAL reading and writing.
214 Chapter 19. Manage

Citus Documentation, Release 8.2
How High Availability and Disaster Recovery is used for crash recovery
When many customers entrust your company with their data, it is your duty to keep it safe under all circumstances. Sowhen the most severe database crashes strike, you need to be ready to recover.
Our team is battle-hardened from years of experience as the original Heroku Postgres team, managing over 1.5 milliondatabases. Running at that scale with constant risks of failure, meant that it was important to automate recoveryprocesses.
Such crashes are a nightmare. But crash recovery is a way to make sure you sleep well at night by making sure noneof your or your customers data is lost and your downtime is minimal.
19.4.4 Point-in-Time Recovery
While Forking means making a copy of the database at the current moment, point-in-time recovery (PITR) meansmaking a copy from a specific moment in the past. PITR acts as a time machine, allowing simple restoration fromeven the most severe data loss.
Suppose a customer deletes a record stored in your Citus cluster and you want to recover it, or an engineer drops atable by accident. Just navigate to the “Fork / PITR” tab in the Citus Cloud console and select the “Recover to a pointin time” option:
19.4. Backup, Availability, and Replication 215

Citus Documentation, Release 8.2
216 Chapter 19. Manage

Citus Documentation, Release 8.2
Similar to forking, PITR creates a copy of your formation and leaves the original unaffected. It uses the same opera-tions internally as forking does: base backups and WAL shipping. This means that performing PITR causes no extraload on the original database.
Citus Cloud stores base backups and WAL records for up to ten days, which limits the recovery period to that amountof time. The user interface will prevent you from going back further, and will show the earliest possible recovery time.
Note that Citus worker nodes have different base backup timings and sizes, so it can happen that one node restoresfaster than another. In general the recovery process begins with restoring base backups at roughly 30MB/second.When that is complete the Cloud Console will provide a progress meter as it replays transactions from the WAL. Thelength of time for this stage varies by the number of transactions that must be replayed.
19.5 Formation API
Note: Cloud API access is available upon request. Open a support ticket to enable it for your account.
Citus Cloud provides an API to list, delete, and create formations within an organization. This is a convenient way tomanage frequent formation changes.
19.5.1 Authentication
All formation API requests must include an authentication token. To get one, visit the tokens page, accessible throughthe Cloud menu bar in Org > API Tokens:
Create a token with a name that’s meaningful to you. The name does not affect the API, it exists so you can revoke thetoken later if desired. Tokens last for one year.
19.5. Formation API 217

Citus Documentation, Release 8.2
After generating the token, its value will be displayed just once. Copy it to a secure place because it will never bevisible again from the Cloud console.
In the examples below, we will assume that the token is assigned to an environment variable in the shell:
# save to an environment variable for convenience
export API_TOKEN=<token>
The token is in JWT format, and should be added to HTTPS requests using the Authorization header:
Authorization: Token API_TOKEN
For security, all requests must be issued over https. Additionally, API requests are limited to five per minute.
19.5.2 Create Formation
• Endpoint: POST https://console.citusdata.com/api/v1/formations/
• Sample request payload:
{"name": "my-formation","region": "us-east-1","tune_attributes": {
"coordinator_tune": "t2.small","worker_tune": "t2.small","coordinator_ha": false,"worker_ha": false,"worker_count": "2","coordinator_disk_size": "100","worker_disk_size": "100"
}}
Parameters:
– (mandatory) name: a non-empty string of your choice
– (mandatory) region: any of our Supported Regions
– (mandatory) coordinator_tune, worker_tune: a tune is any of these AWS machine types: t2.small,t2.medium, t2.large, r3.large, r3.xlarge, r3.2xlarge, r3.4xlarge, r3.8xlarge r4.large, r4.xlarge, r4.2xlarge,r4.4xlarge, r4.8xlarge, r4.16xlarge, r5.large, r5.xlarge, r5.2xlarge, r5.4xlarge, r5.12xlarge, r5.24xlarge,c4.xlarge, c4.2xlarge, c4.4xlarge, c4.8xlarge, c5.xlarge, c5.2xlarge, c5.4xlarge, c5.9xlarge. (If you choosea tune from the t2.* series, both the coordinator_tune and worker_tune must be same.)
218 Chapter 19. Manage

Citus Documentation, Release 8.2
– (mandatory) coordinator_disk_size, worker_disk_size: size in gigabytes. May be any of the values 100,512, 1024, 1536, 2048, or 2560. (If you choose a tune from the t2.* series, the disk size must be 100.)
– (mandatory) worker_count: numeric value less than or equal to 40
– coordinator_ha, worker_ha: whether to enable High Availability. Default is false.
• Example:
curl -H "Authorization: Token $API_TOKEN" \-H "Content-Type: application/json" \--request POST \-d '{"tune_attributes": { "coordinator_tune": "t2.small", "worker_
→˓tune": "t2.small", "worker_count": "2", "coordinator_disk_size": "100",→˓ "worker_disk_size": "100"}, "name": "my-formation", "region": "us-east-→˓1"}' \
https://console.citusdata.com/api/v1/formations/
• Response:
{"id": "0123456789abcdef0123456789a"
}
19.5.3 List Formations
• Endpoint: GET https://console.citusdata.com/api/v1/formations/
• Example:
curl -H "Authorization: Token $API_TOKEN" \https://console.citusdata.com/api/v1/formations/
• Response:
{"formations": [{"id": "0123456789abcdef0123456789a","name": "my-formation","region": "us-east-1","created_at": "2019-01-01T00:00:00Z"
}]
}
The id attribute identifies the formation and is required to destroy a formation or get its details.
19.5.4 Formation Details
• Endpoint: GET https://console.citusdata.com/api/v1/formations/:formation_id
• Example:
curl -H "Authorization: Token $API_TOKEN" \https://console.citusdata.com/api/v1/formations/0123456789abcdef0123456789a
19.5. Formation API 219

Citus Documentation, Release 8.2
• Response:
{"id": "0123456789abcdef0123456789a","name": "my-formation","state": "steady","region": "us-east-1","created_at": "2019-01-01T00:00:00Z","tune_attributes": {
"is_mx": false,"is_zfs": false,"worker_ha": false,"worker_tune": "t2.small","worker_disk_size": "100","worker_count": 2,"coordinator_ha": false,"coordinator_tune": "t2.small","coordinator_disk_size": "100"
},"database_url": "postgres://foo:bar@host:5432/db?sslmode=require"
}
Possible states include: steady, creating, converging, ready, archiving, and archived.
19.5.5 Destroy Formation
• Endpoint: DELETE https://console.citusdata.com/api/v1/formations/:formation_id
• Example:
curl -H "Authorization: Token $API_TOKEN" --request DELETE \https://console.citusdata.com/api/v1/formations/
→˓0123456789abcdef0123456789a
• Response:
{"success": true
}
19.6 Upgrades
Regularly upgrading PostgreSQL and the Citus extension keeps you on top of all the latest features and bug fixes, andon Citus Cloud an upgrade is as easy as a few clicks of a button. Just visit the Settings tab in the cloud console, andscroll down to the upgrade section:
220 Chapter 19. Manage

Citus Documentation, Release 8.2
Note: We strongly recommend forking a formation and trying the upgrade on the fork before upgrading the productionformation. It takes more time, but provides a dry run for the real upgrade.
You may want to set a maintenance window prior to starting an upgrade. Part of the upgrade process requires a fewminutes of downtime, and setting a window will ensure that the downtime happens during a specific time of day. Thisoption is available in the Settings tab of the cloud console.
When you do start the upgrade, Citus Cloud creates new servers for the coordinator and worker nodes with the re-quested software versions, and replays the write-ahead log from the original nodes to transfer data. This can take afair amount of time depending on the amount of data in existing nodes. During the transfer, the formation overviewtab will contain a notice:
When the new nodes have caught up (and during a maintenance window if one has been set), Citus Cloud switchesover to the new nodes. During the period of redirection there may be a few minutes of downtime. After everything isdone, the upgrade section in Settings will show:
19.6. Upgrades 221

Citus Documentation, Release 8.2
If high-availability replication is enabled, Citus Cloud will automatically create new standby servers. However fol-lower replicas will not receive the updates and must be manually destroyed and recreated.
19.7 Logging
19.7.1 What Is Logged
By default, Citus Cloud logs all errors and other useful information that happen on any of the Citus instances andmakes it available to you.
The logs will contain the following messages:
• Citus and PostgreSQL errors
• Slow queries that take longer than 30 seconds
• Checkpoint statistics
• Temporary files that are written and bigger than 64 MB
• Autovacuum that takes more than 30 seconds
19.7.2 Recent Logs
The Citus Cloud dashboard automatically shows you the most recent 100 log lines from each of your servers. Youdon’t need to configure anything to access this information.
222 Chapter 19. Manage

Citus Documentation, Release 8.2
19.7.3 External Log Destinations
For anything more than a quick look at your logs, we recommend setting up an external provider. Through thismethod the logs will transmit to a dedicated logging service and you can analyze and retain them according to yourown preferences. To use an external provider, create a new logging destination in the Citus Cloud console. Forinstance, here is the new destination dialog filled in with Papertrail settings:
19.7. Logging 223

Citus Documentation, Release 8.2
Note that after creation, it might take up to five minutes for logging preferences to be applied. You’ll then see logsshow up in your chosen provider’s dashboard.
The settings to use differ per provider. In the following tables we list settings verified to work for a number of popularproviders.
Verified Provider Settings
Replace <token> with the custom token listed in the provider’s web site. This token tells them the logs are yours.
Papertrail
Hostname logs4.papertrailapp.comPort 19493TLS YesProtocol IETF SyslogMessage Template
Loggly
Hostname logs-01.loggly.comPort 514TLS NoProtocol BSD Syslog over TCPMessageTemplate
<${PRI}>1 ${ISODATE} ${HOST} ${PROGRAM} ${PID} ${MSGID}[<token>@41058 tag=\\"CITUS\\" ] $MSG\\n
Sumologic
224 Chapter 19. Manage

Citus Documentation, Release 8.2
Hostname syslog.collection.us2.sumologic.comPort 6514TLS YesProtocol IETF SyslogMessageTemplate
<${PRI}>1 ${ISODATE} ${HOST} ${PROGRAM} ${PID} ${MSGID}[<token>@41123] $MSG\\n
Logentries
Hostname data.logentries.comPort 80TLS NoProtocol IETF SyslogMessage Template <token> $ISODATE $HOST $MSG\\n
LogDNA
Hostname syslog-a.logdna.comPort 514TLS NoProtocol BSD Syslog over TCPMessageTemplate
<${PRI}>1 ${ISODATE} ${HOST} ${PROGRAM} ${PID} ${MSGID}[logdna@48950 key=\\"<token>\\"] $MSG\\n
Other
We support other providers that can receive syslog via the BSD or IETF protocols. Internally Citus Cloud uses syslog-ng, so check your providers configuration documentation for syslog-ng settings.
Please reach out if you encounter any issues.
19.7. Logging 225

Citus Documentation, Release 8.2
226 Chapter 19. Manage

CHAPTER 20
Additional Features
20.1 Extensions
To keep a standard Cloud installation for all customers and improve our ability to troubleshoot and provide support,we do not provide superuser access to Cloud clusters. Thus customers are not able to install PostgreSQL extensionsthemselves.
Generally there is no need to install extensions, however, because every Cloud cluster comes pre-loaded with manyuseful ones:
Name Version Schema Descriptionbtree_gin 1.2 public support for indexing common datatypes in GINbtree_gist 1.5 public support for indexing common datatypes in GiSTcitext 1.4 public data type for case-insensitive character stringscitus 8.2-1 pg_catalog Citus distributed databasecube 1.2 public data type for multidimensional cubesdblink 1.2 public connect to other PostgreSQL databases from within a databaseearthdistance 1.1 public calculate great-circle distances on the surface of the Earthfuzzystrmatch 1.1 public determine similarities and distance between stringshll 2.12 public type for storing hyperloglog datahstore 1.4 public data type for storing sets of (key, value) pairsintarray 1.2 public functions, operators, and index support for 1-D arrays of integersltree 1.1 public data type for hierarchical tree-like structurespg_buffercache 1.3 public examine the shared buffer cachepg_cron 1.0 public Job scheduler for PostgreSQLpg_freespacemap 1.2 public examine the free space map (FSM)pg_partman 4.0.0 partman Extension to manage partitioned tables by time or IDpg_prewarm 1.1 public prewarm relation datapg_stat_statements 1.5 public track execution statistics of all SQL statements executedpg_trgm 1.3 public text similarity measurement and index searching based on trigramspgcrypto 1.3 public cryptographic functionspgrowlocks 1.2 public show row-level locking informationpgstattuple 1.5 public show tuple-level statisticsplpgsql 1.0 pg_catalog PL/pgSQL procedural languagesession_analytics 1.0 publicshard_rebalancer 8.2 publicsslinfo 1.2 public information about SSL certificatestablefunc 1.0 public functions that manipulate whole tables, including crosstab
Continued on next page
227

Citus Documentation, Release 8.2
Table 20.1 – continued from previous pageName Version Schema Descriptiontopn 2.1.0 public type for top-n JSONBunaccent 1.1 public text search dictionary that removes accentsuuid-ossp 1.1 public generate universally unique identifiers (UUIDs)xml2 1.1 public XPath querying and XSLT
20.2 Forking
Forking a Citus Cloud formation makes a copy of the cluster’s data at the current point in time and produces a newformation in precisely that state. It allows you to change, query, or generally experiment with production data in aseparate protected environment. Fork creation runs quickly, and you can do it as often as you want without causing anyextra load on the original cluster. This is because forking doesn’t query the cluster, rather it taps into the write-aheadlogs for each database in the formation.
20.2.1 How to Fork a Formation
Citus Cloud makes forking easy. The control panel for each formation has a “Fork” tab. Go there and enter the name,region, and node sizing information for the destination cluster.
228 Chapter 20. Additional Features

Citus Documentation, Release 8.2
Shortly after you click “Fork Formation,” the new formation will appear in the Cloud console. It runs on separatehardware and your database can connect to it in the usual way.
20.2.2 When is it Useful
A fork is a great place to do experiments. Do you think that denormalizing a table might speed things up? Whatabout creating a roll-up table for a dashboard? How can you persuade your colleagues that you need more RAM inthe coordinator node rather than in the workers? You could prove yourself if only you could try your idea on theproduction data.
In such cases, what you need is a temporary copy of the production database. But it would take forever to copy, say,500GB of data to a new formation. Not to mention that making the copy would slow down the production database.Copying the database in the old fashioned way is not a good idea.
However a Citus fork is different. Forking fetches write-ahead log data from S3 and has zero effect on the productionload. You can apply your experiments to the fork and destroy it when you’re done.
20.2. Forking 229

Citus Documentation, Release 8.2
Another use of forking is to enable complex analytical queries. Sometimes data analysts want to have access to liveproduction data for complex queries that would take hours. What’s more, they sometimes want to bend the data:denormalize tables, create aggregations, create an extra index or even pull all the data onto one machine.
Obviously, it is not a good idea to let anyone play with a production database. You can instead create a fork and giveit to whomever wants to play with real data. You can re-create a fork every month to update your analytics results.
20.2.3 How it Works Internally
Citus is an extension of PostgreSQL and can thus leverage all the features of the underlying database. Forking isactually a special form of point-in-time recovery (PITR) into a new database where the recovery time is the time thefork is initiated. The two features relevant for PITR are:
• Base Backups
• Write-Ahead Log (WAL) Shipping
About every twenty-four hours Cloud calls pg_basebackup to make a new base backup, which is just an archive of thePostgreSQL data directory. Cloud also continuously ships the database write-ahead logs (WAL) to Amazon S3 withWAL-E.
Base backups and WAL archives are all that is needed to restore the database to some specific point in time. To doso, we start an instance of the database on the base backup taken most recently before the desired restoration point.The new PostgreSQL instances, upon entering recovery mode, will start playing WAL segments up to the target point.After the recovery instances reach the specified target, they will be available for use as a regular database.
A Citus formation is a group of PostgreSQL instances that work together. To restore the formation we simply need torestore all nodes in the cluster to the same point in time. We perform that operation on each node and, once done, weupdate metadata in the coordinator node to tell it that this new cluster has branched off from your original.
20.3 Followers
Citus Cloud allows you to create a read-only replica of a formation, called a “follower.” Any changes that happen tothe original formation get promptly reflected in its follower, and queries against the follower cause no extra load onthe original. The replica is a safe place for business analysts to run big report queries. In general followers are a usefultool to improve performance for read-only workloads.
Contrast followers with Forking. In a fork the copied formation does not receive post-copy changes from the original,and can diverge with its own updates. A follower, on the other hand, remains faithful to changes in the original.
To create a follower, head to the “Fork / PITR / Follower” tab in the Cloud console. Select the “Create followerformation” radio button, and fill in a name.
230 Chapter 20. Additional Features

Citus Documentation, Release 8.2
Click “Create Follower Formation” and wait. On completion the process will redirect you to a console for the newformation. The follower formation is distinct from the original and has its own database connection string.
20.4 Custom PostgreSQL Configuration
Citus Cloud supports changing of a number of PostgreSQL and Citus database server configuration parameters. Ad-justing the parameters can help tune the server for particular workloads.
Within the configuration tab you can see any configuration parameters that have been customized as well as add newones. Any configurations that require a database failover or restart must be configured by the Citus Cloud team – inorder to customize one of those configurations please open a support ticket. Parameters that do not require a serverrestart are available directly in the customize tab. These settings will be immediately propagated to your cluster whenset.
20.4. Custom PostgreSQL Configuration 231

Citus Documentation, Release 8.2
To access these settings, go to the Configuration tab in your Cloud formation and click “Change a Parameter.” It willpresent a dropdown list of config parameters:
The options are grouped by which server and system they control:
• Coordinator PostgreSQL
• Coordinator Inbound PgBouncer
• Worker PostgreSQL
Selecting an option opens an input box that accepts the appropriate values, whether numerical, textual, or a pre-set list.The selected option also shows a link to learn more about the configuration parameter.
Numerical parameters do not yet allow specifying units in this interface, and are interpreted as their default unit. Thedefault unit appears in the description under the selected parameter. For instance in the picture above it says, “inkilobytes.” In this example one could specify a work_mem of 1GB using the value 1048576 (= 1024*1024).
232 Chapter 20. Additional Features

CHAPTER 21
Support and Billing
All Citus Cloud plans come with support included. Premium support including SLA around response time and phoneescalation is available on a contract basis for customers that may need a more premium level of support.
21.1 Support
Web based support is available on all Citus Cloud plans. You can open a support inquiry within the Citus Cloudconsole. Support response times for ticket classification of Citus Cloud are:
• Urgent (production database offline) - 1 hour response time
• High (production database impacted) - 4 hour response time
• Normal (general support) - 1 business day response time
• Low (general question) - 3 business days response time
21.2 Billing
21.2.1 Pricing
Citus Cloud bills on a per minute basis. We bill for a minimum of one hour of usage across all plans. Pricing variesbased on the size and configuration of the cluster. A few factors that determine your price are:
• Size of your distributed nodes
• Number of distributed nodes
• Whether you have high availability enabled, both on the primary node and on distributed nodes
• Size of your primary node
You can see pricing of various configurations directly within our pricing calculator.
21.2.2 Payments
We accept payments through credit card or directly through bank ACH. To set up payment details, go to “Org” ->“Billing” in the main menu of the Cloud Console.
233

Citus Documentation, Release 8.2
Then choose either “Credit Card” or “Bank Account” and fill out the form for the desired payment option:
234 Chapter 21. Support and Billing

CHAPTER 22
Cluster Management
In this section, we discuss how you can add or remove nodes from your Citus cluster and how you can deal with nodefailures.
Note: To make moving shards across nodes or re-replicating shards on failed nodes easier, Citus Enterprise comeswith a shard rebalancer extension. We discuss briefly about the functions provided by the shard rebalancer as and whenrelevant in the sections below. You can learn more about these functions, their arguments and usage, in the ClusterManagement And Repair Functions reference section.
22.1 Choosing Cluster Size
This section explores configuration settings for running a cluster in production.
22.1.1 Shard Count
The number of nodes in a cluster is easy to change (see Scaling the cluster), but the number of shards to distributeamong those nodes is more difficult to change after cluster creation. Choosing the shard count for each distributedtable is a balance between the flexibility of having more shards, and the overhead for query planning and executionacross them.
Multi-Tenant SaaS Use-Case
The optimal choice varies depending on your access patterns for the data. For instance, in the Multi-Tenant Databaseuse-case we recommend choosing between 32 - 128 shards. For smaller workloads say <100GB, you could start with32 shards and for larger workloads you could choose 64 or 128. This means that you have the leeway to scale from 32to 128 worker machines.
Real-Time Analytics Use-Case
In the Real-Time Analytics use-case, shard count should be related to the total number of cores on the workers. Toensure maximum parallelism, you should create enough shards on each node such that there is at least one shard perCPU core. We typically recommend creating a high number of initial shards, e.g. 2x or 4x the number of currentCPU cores. This allows for future scaling if you add more workers and CPU cores.
235

Citus Documentation, Release 8.2
However keep in mind that for each query Citus opens one database connection per shard, and these connections arelimited. Be careful to keep the shard count small enough that distributed queries won’t often have to wait for a connec-tion. Put another way, the connections needed, (max concurrent queries * shard count), should gen-erally not exceed the total connections possible in the system, (number of workers * max_connectionsper worker).
22.2 Initial Hardware Size
The size of a cluster, in terms of number of nodes and their hardware capacity, is easy to change. (Scaling on CitusCloud is especially easy.) However you still need to choose an initial size for a new cluster. Here are some tips for areasonable initial cluster size.
22.2.1 Multi-Tenant SaaS Use-Case
For those migrating to Citus from an existing single-node database instance, we recommend choosing a cluster wherethe number of worker cores and RAM in total equals that of the original instance. In such scenarios we have seen 2-3xperformance improvements because sharding improves resource utilization, allowing smaller indices etc.
The coordinator node needs less memory than workers, so you can choose a compute-optimized machine for runningthe coordinator. The number of cores required depends on your existing workload (write/read throughput). By defaultin Citus Cloud the workers use Amazon EC2 instance type R4S, and the coordinator uses C4S.
22.2.2 Real-Time Analytics Use-Case
Total cores: when working data fits in RAM, you can expect a linear performance improvement on Citus proportionalto the number of worker cores. To determine the right number of cores for your needs, consider the current latency forqueries in your single-node database and the required latency in Citus. Divide current latency by desired latency, andround the result.
Worker RAM: the best case would be providing enough memory that the majority of the working set fits in memory.The type of queries your application uses affect memory requirements. You can run EXPLAIN ANALYZE on a queryto determine how much memory it requires.
22.3 Scaling the cluster
Citus’s logical sharding based architecture allows you to scale out your cluster without any down time. This sectiondescribes how you can add more nodes to your Citus cluster in order to improve query performance / scalability.
22.3.1 Add a worker
Citus stores all the data for distributed tables on the worker nodes. Hence, if you want to scale out your cluster byadding more computing power, you can do so by adding a worker.
To add a new node to the cluster, you first need to add the DNS name or IP address of that node and port (on whichPostgreSQL is running) in the pg_dist_node catalog table. You can do so using the master_add_node UDF. Example:
SELECT * from master_add_node('node-name', 5432);
236 Chapter 22. Cluster Management

Citus Documentation, Release 8.2
The new node is available for shards of new distributed tables. Existing shards will stay where they are unless redis-tributed, so adding a new worker may not help performance without further steps.
Note: As of Citus 8.1, workers use encrypted communication by default. A new node running version 8.1 or greaterwill refuse to talk with other workers who do not have SSL enabled. When adding a node to a cluster without encryptedcommunication, you must reconfigure the new node before creating the Citus extension.
First, from the coordinator node check whether the other workers use SSL:
SELECT run_command_on_workers('show ssl');
If they do not, then connect to the new node and permit it to communicate over plaintext if necessary:
ALTER SYSTEM SET 'citus.node_conninfo' TO 'sslmode=prefer';SELECT pg_reload_conf();
22.3.2 Rebalance Shards without Downtime
If you want to move existing shards to a newly added worker, Citus Enterprise and Citus Cloud provide a rebal-ance_table_shards function to make it easier. This function will move the shards of a given table to distribute themevenly among the workers.
SELECT rebalance_table_shards('github_events');
Many products, like multi-tenant SaaS applications, cannot tolerate downtime, and Citus rebalancing is able to honorthis requirement on PostgreSQL 10 or above. This means reads and writes from the application can continue withminimal interruption while data is being moved.
How it Works
Citus’ shard rebalancing uses PostgreSQL logical replication to move data from the old shard (called the “publisher”in replication terms) to the new (the “subscriber.”) Logical replication allows application reads and writes to continueuninterrupted while copying shard data. Citus puts a brief write-lock on a shard only during the time it takes to updatemetadata to promote the subscriber shard as active.
As the PostgreSQL docs explain, the source needs a replica identity configured:
A published table must have a “replica identity” configured in order to be able to replicate UPDATEand DELETE operations, so that appropriate rows to update or delete can be identified on the subscriberside. By default, this is the primary key, if there is one. Another unique index (with certain additionalrequirements) can also be set to be the replica identity.
In other words, if your distributed table has a primary key defined then it’s ready for shard rebalancing with no extrawork. However if it doesn’t have a primary key or an explicitly defined replica identity, then attempting to rebalanceit will cause an error. For instance:
-- creating the following table without REPLICA IDENTITY or PRIMARY KEYCREATE TABLE test_table (key int not null, value text not null);SELECT create_distributed_table('test_table', 'key');
-- running shard rebalancer with default behaviorSELECT rebalance_table_shards('test_table');
/*
22.3. Scaling the cluster 237

Citus Documentation, Release 8.2
NOTICE: Moving shard 102040 from localhost:9701 to localhost:9700 ...ERROR: cannot use logical replication to transfer shards of the
relation test_table since it doesn't have a REPLICA IDENTITY orPRIMARY KEY
DETAIL: UPDATE and DELETE commands on the shard will error out duringlogical replication unless there is a REPLICA IDENTIY or PRIMARY KEY.
HINT: If you wish to continue without a replica identity set theshard_transfer_mode to 'force_logical' or 'block_writes'.
*/
Here’s how to fix this error.
First, does the table have a unique index?
If the table to be replicated already has a unique index which includes the distribution column, then choose that indexas a replica identity:
-- supposing my_table has unique index my_table_idx-- which includes distribution column
ALTER TABLE my_table REPLICA IDENTITYUSING INDEX my_table_idx;
Note: While REPLICA IDENTITY USING INDEX is fine, we recommend against adding REPLICAIDENTITY FULL to a table. This setting would result in each update/delete doing a full-table-scan on the sub-scriber side to find the tuple with those rows. In our testing we’ve found this to result in worse performance than evensolution four below.
Otherwise, can you add a primary key?
Add a primary key to the table. If the desired key happens to be the distribution column, then it’s quite easy, just add theconstraint. Otherwise, a primary key with a non-distribution column must be composite and contain the distributioncolumn too.
Unwilling to add primary key or unique index?
If the distributed table doesn’t have a primary key or replica identity, and adding one is unclear or undesirable, youcan still force the use of logical replication on PostgreSQL 10 or above. It’s OK to do this on a table which re-ceives only reads and inserts (no deletes or updates). Include the optional shard_transfer_mode argument ofrebalance_table_shards:
SELECT rebalance_table_shards('test_table',shard_transfer_mode => 'force_logical'
);
In this situation if an application does attempt an update or delete during replication, then the request will merelyreturn an error. Deletes and writes will become possible again after replication is complete.
What about PostgreSQL 9.x?
On PostgreSQL 9.x and lower, logical replication is not supported. In this case we must fall back to a less efficient so-lution: locking a shard for writes as we copy it to its new location. Unlike logical replication, this approach introducesdowntime for write statements (although read queries continue unaffected).
To choose this replication mode, use the shard_transfer_mode parameter again. Here is how to block writesand use the COPY command for replication:
238 Chapter 22. Cluster Management

Citus Documentation, Release 8.2
SELECT rebalance_table_shards('test_table',shard_transfer_mode => 'block_writes'
);
22.3.3 Adding a coordinator
The Citus coordinator only stores metadata about the table shards and does not store any data. This means that allthe computation is pushed down to the workers and the coordinator does only final aggregations on the result of theworkers. Therefore, it is not very likely that the coordinator becomes a bottleneck for read performance. Also, it iseasy to boost up the coordinator by shifting to a more powerful machine.
However, in some write heavy use cases where the coordinator becomes a performance bottleneck, users can addanother coordinator. As the metadata tables are small (typically a few MBs in size), it is possible to copy over themetadata onto another node and sync it regularly. Once this is done, users can send their queries to any coordinatorand scale out performance. If your setup requires you to use multiple coordinators, please contact us.
22.4 Dealing With Node Failures
In this sub-section, we discuss how you can deal with node failures without incurring any downtime on your Cituscluster. We first discuss how Citus handles worker failures automatically by maintaining multiple replicas of the data.We also briefly describe how users can replicate their shards to bring them to the desired replication factor in case anode is down for a long time. Lastly, we discuss how you can setup redundancy and failure handling mechanisms forthe coordinator.
22.4.1 Worker Node Failures
Citus supports two modes of replication, allowing it to tolerate worker-node failures. In the first model, we usePostgreSQL’s streaming replication to replicate the entire worker-node as-is. In the second model, Citus can replicatedata modification statements, thus replicating shards across different worker nodes. They have different advantagesdepending on the workload and use-case as discussed below:
1. PostgreSQL streaming replication. This option is best for heavy OLTP workloads. It replicates entire workernodes by continuously streaming their WAL records to a standby. You can configure streaming replicationon-premise yourself by consulting the PostgreSQL replication documentation or use Citus Cloud which is pre-configured for replication and high-availability.
2. Citus shard replication. This option is best suited for an append-only workload. Citus replicates shardsacross different nodes by automatically replicating DML statements and managing consistency. If a node goesdown, the coordinator node will continue to serve queries by routing the work to the replicas seamlessly. Toenable shard replication simply set SET citus.shard_replication_factor = 2; (or higher) beforedistributing data to the cluster.
22.4.2 Coordinator Node Failures
The Citus coordinator maintains metadata tables to track all of the cluster nodes and the locations of the databaseshards on those nodes. The metadata tables are small (typically a few MBs in size) and do not change very often. Thismeans that they can be replicated and quickly restored if the node ever experiences a failure. There are several optionson how users can deal with coordinator failures.
22.4. Dealing With Node Failures 239

Citus Documentation, Release 8.2
1. Use PostgreSQL streaming replication: You can use PostgreSQL’s streaming replication feature to create a hotstandby of the coordinator. Then, if the primary coordinator node fails, the standby can be promoted to the primaryautomatically to serve queries to your cluster. For details on setting this up, please refer to the PostgreSQL wiki.
2. Since the metadata tables are small, users can use EBS volumes, or PostgreSQL backup tools to backup themetadata. Then, they can easily copy over that metadata to new nodes to resume operation.
22.5 Tenant Isolation
Note: Tenant isolation is a feature of Citus Enterprise Edition and Citus Cloud only.
Citus places table rows into worker shards based on the hashed value of the rows’ distribution column. Multipledistribution column values often fall into the same shard. In the Citus multi-tenant use case this means that tenantsoften share shards.
However sharing shards can cause resource contention when tenants differ drastically in size. This is a commonsituation for systems with a large number of tenants – we have observed that the size of tenant data tend to follow aZipfian distribution as the number of tenants increases. This means there are a few very large tenants, and many smallerones. To improve resource allocation and make guarantees of tenant QoS it is worthwhile to move large tenants todedicated nodes.
Citus Enterprise Edition and Citus Cloud provide the tools to isolate a tenant on a specific node. This happens intwo phases: 1) isolating the tenant’s data to a new dedicated shard, then 2) moving the shard to the desired node. Tounderstand the process it helps to know precisely how rows of data are assigned to shards.
Every shard is marked in Citus metadata with the range of hashed values it contains (more info in the reference forpg_dist_shard). The Citus UDF isolate_tenant_to_new_shard(table_name,tenant_id) moves atenant into a dedicated shard in three steps:
1. Creates a new shard for table_name which (a) includes rows whose distribution column has valuetenant_id and (b) excludes all other rows.
2. Moves the relevant rows from their current shard to the new shard.
3. Splits the old shard into two with hash ranges that abut the excision above and below.
Furthermore, the UDF takes a CASCADE option which isolates the tenant rows of not just table_name but of alltables co-located with it. Here is an example:
-- This query creates an isolated shard for the given tenant_id and-- returns the new shard id.
-- General form:
SELECT isolate_tenant_to_new_shard('table_name', tenant_id);
-- Specific example:
SELECT isolate_tenant_to_new_shard('lineitem', 135);
-- If the given table has co-located tables, the query above errors out and-- advises to use the CASCADE option
SELECT isolate_tenant_to_new_shard('lineitem', 135, 'CASCADE');
Output:
240 Chapter 22. Cluster Management

Citus Documentation, Release 8.2
-------------------| isolate_tenant_to_new_shard |-------------------| 102240 |-------------------
The new shard(s) are created on the same node as the shard(s) from which the tenant was removed. Fortrue hardware isolation they can be moved to a separate node in the Citus cluster. As mentioned, theisolate_tenant_to_new_shard function returns the newly created shard id, and this id can be used to movethe shard:
-- find the node currently holding the new shardSELECT nodename, nodeportFROM pg_dist_placement AS placement,
pg_dist_node AS nodeWHERE placement.groupid = node.groupid
AND node.noderole = 'primary'AND shardid = 102240;
-- list the available worker nodes that could hold the shardSELECT * FROM master_get_active_worker_nodes();
-- move the shard to your choice of worker-- (it will also move any shards created with the CASCADE option)SELECT master_move_shard_placement(
102240,'source_host', source_port,'dest_host', dest_port);
Note that master_move_shard_placement will also move any shards which are co-located with the specifiedone, to preserve their co-location.
22.6 Viewing Query Statistics
Note: The citus_stat_statements view is a feature of Citus Enterprise Edition and Citus Cloud only.
When administering a Citus cluster it’s useful to know what queries users are running, which nodes are involved,and which execution method Citus is using for each query. Citus records query statistics in a metadata view calledcitus_stat_statements, named analogously to Postgres’ pg_stat_statments. Whereas pg_stat_statements stores infoabout query duration and I/O, citus_stat_statements stores info about Citus execution methods and shard partitionkeys (when applicable).
Citus requires the pg_stat_statements extension to be installed in order to track query statistics. On CitusCloud this extension will be pre-activated, but on a self-hosted Postgres instance you must load the extension inpostgresql.conf via shared_preload_libraries, then create the extension in SQL:
CREATE EXTENSION pg_stat_statements;
Let’s see how this works. Assume we have a table called foo that is hash-distributed by its id column.
-- create and populate distributed tablecreate table foo ( id int );select create_distributed_table('foo', 'id');
22.6. Viewing Query Statistics 241

Citus Documentation, Release 8.2
insert into foo select generate_series(1,100);
We’ll run two more queries, and citus_stat_statements will show how Citus chooses to execute them.
-- counting all rows executes on all nodes, and sums-- the results on the coordinatorSELECT count(*) FROM foo;
-- specifying a row by the distribution column routes-- execution to an individual nodeSELECT * FROM foo WHERE id = 42;
To find how these queries were executed, ask the stats table:
SELECT * FROM citus_stat_statements;
Results:
--------------------------------------------------------------------------| queryid | userid | dbid | query |→˓executor | partition_key | calls |--------------------------------------------------------------------------| 1496051219 | 16384 | 16385 | select count(*) from foo; | real-→˓time | NULL | 1 || 2530480378 | 16384 | 16385 | select * from foo where id = $1 |→˓router | 42 | 1 || 3233520930 | 16384 | 16385 | insert into foo select generate_series($1,$2) |→˓insert-select | NULL | 1 |--------------------------------------------------------------------------
We can see that Citus used the real-time executor to run the count query. This executor fragments the query intoconstituent queries to run on each node and combines the results on the coordinator node. In the case of the secondquery (filtering by the distribution column id = $1), Citus determined that it needed the data from just one node.Thus Citus chose the router executor to send the whole query to that node for execution. Lastly, we can see that theinsert into foo select... statement ran with the insert-select executor which provides flexibility to runthese kind of queries. The insert-select executor must sometimes pull results to the coordinator and push them backdown to workers.
So far the information in this view doesn’t give us anything we couldn’t already learn by running theEXPLAIN command for a given query. However in addition to getting information about individual queries, thecitus_stat_statements view allows us to answer questions such as “what percentage of queries in the clusterare run by which executors?”
SELECT executor, sum(calls)FROM citus_stat_statementsGROUP BY executor;
-------------| executor | sum |-------------| insert-select | 1 || real-time | 1 || router | 1 |-------------
In a multi-tenant database, for instance, we would expect to see “router” for the vast majority of queries, because the
242 Chapter 22. Cluster Management

Citus Documentation, Release 8.2
queries should route to individual tenants. Seeing too many real-time queries may indicate that queries do not havethe proper filters to match a tenant, and are using unnecessary resources.
We can also find which partition_ids are the most frequent targets of router execution. In a multi-tenant applicationthese would be the busiest tenants.
SELECT partition_key, sum(calls) as total_queriesFROM citus_stat_statementsWHERE coalesce(partition_key, '') <> ''GROUP BY partition_keyORDER BY total_queries descLIMIT 10;
--------------------| partition_key | total_queries |--------------------| 42 | 1 |--------------------
Finally, by joining citus_stat_statements with pg_stat_statements we can gain a better view into notonly how many queries use different executor types, but how much time each executor spends running queries.
SELECT executor, sum(css.calls), sum(pss.total_time)FROM citus_stat_statements cssJOIN pg_stat_statements pss USING (queryid)GROUP BY executor;
--------------------| executor | sum | sum |--------------------| insert-select | 1 | 18.393312 || real-time | 1 | 3.537155 || router | 1 | 0.392590 |--------------------
22.6.1 Statistics Expiration
The pg_stat_statements view limits the number of statements it tracks, and the duration of its records. Becausecitus_stat_statements tracks a strict subset of the queries in pg_stat_statements, a choice of equal limits for the twoviews would cause a mismatch in their data retention. Mismatched records can cause joins between the views tobehave unpredictably.
There are three ways to help synchronize the views, and all three can be used together.
1. Have the maintenance daemon periodically sync the citus and pg stats. The GUCcitus.stats_statements_purge_interval sets time in seconds for the sync. A value of 0disables periodic syncs.
2. Adjust the number of entries in citus_stat_statements. The citus.stats_statements_max GUC re-moves old entries when new ones cross the threshold. The default value is 50K, and the highest allowable valueis 10M. Note that each entry costs about 140 bytes in shared memory so set the value wisely.
3. Increase pg_stat_statements.max. Its default value is 5000, and could be increased to 10K, 20K or even50K without much overhead. This is most beneficial when there is more local (i.e. coordinator) query workload.
Note: Changing pg_stat_statements.max or citus.stat_statements_max requires restarting the
22.6. Viewing Query Statistics 243

Citus Documentation, Release 8.2
PostgreSQL service. Changing citus.stats_statements_purge_interval, on the other hand, will comeinfo effect with a call to pg_reload_conf().
22.7 Resource Conservation
22.7.1 Limiting Long-Running Queries
Long running queries can hold locks, queue up WAL, or just consume a lot of system resources, so in a productionenvironment it’s good to prevent them from running too long. You can set the statement_timeout parameter on thecoordinator and workers to cancel queries that run too long.
-- limit queries to five minutesALTER DATABASE citusSET statement_timeout TO 300000;
SELECT run_command_on_workers($cmd$ALTER DATABASE citusSET statement_timeout TO 300000;
$cmd$);
The timeout is specified in milliseconds.
Note: It’s not possible to make an exception to the timeout for individual queries. Citus does not yet propagate SETLOCAL to the workers, so the statement_timeout GUC cannot be adjusted within a session.
22.8 Security
22.8.1 Connection Management
When Citus nodes communicate with one another they consult a GUC for connection parameters and, in the Enter-prise Edition of Citus, a table with connection credentials. This gives the database administrator flexibility to adjustparameters for security and efficiency.
To set non-sensitive libpq connection parameters to be used for all node connections, update thecitus.node_conninfo GUC:
-- key=value pairs separated by spaces.-- For example, ssl options:
ALTER DATABASE fooSET citus.node_conninfo ='sslrootcert=/path/to/citus.crt sslmode=verify-full';
There is a whitelist of parameters that the GUC accepts, see the node_conninfo reference for details. As of Citus 8.1,the default value for node_conninfo is sslmode=require, which prevents unencrypted communication betweennodes.
Citus Enterprise Edition includes an extra table used to set sensitive connection credentials. This is fully config-urable per host/user. It’s easier than managing .pgpass files through the cluster and additionally supports certificateauthentication.
244 Chapter 22. Cluster Management

Citus Documentation, Release 8.2
-- only superusers can access this table
INSERT INTO pg_dist_authinfo(nodeid, rolename, authinfo)
VALUES(123, 'jdoe', 'password=abc123');
After this INSERT, any query needing to connect to node 123 as the user jdoe will use the supplied password. Thedocumentation for pg_dist_authinfo has more info.
22.8.2 Increasing Worker Security
For your convenience getting started, our multi-node installation instructions direct you to set up the pg_hba.confon the workers with its authentication method set to “trust” for local network connections. However you might desiremore security.
To require that all connections supply a hashed password, update the PostgreSQL pg_hba.conf on every workernode with something like this:
# Require password access to nodes in the local network. The following ranges# correspond to 24, 20, and 16-bit blocks in Private IPv4 address spaces.host all all 10.0.0.0/8 md5
# Require passwords when the host connects to itself as wellhost all all 127.0.0.1/32 md5host all all ::1/128 md5
The coordinator node needs to know roles’ passwords in order to communicate with the workers. In Citus Enterprisethe pg_dist_authinfo table can provide that information, as discussed earlier. However in Citus CommunityEdition the authentication information has to be maintained in a .pgpass file. Edit .pgpass in the postgres user’s homedirectory, with a line for each combination of worker address and role:
hostname:port:database:username:password
Sometimes workers need to connect to one another, such as during repartition joins. Thus each worker node requiresa copy of the .pgpass file as well.
22.8.3 Row-Level Security
Note: Row-level security support is a part of Citus Enterprise. Please contact us to obtain this functionality.
PostgreSQL row-level security policies restrict, on a per-user basis, which rows can be returned by normal queriesor inserted, updated, or deleted by data modification commands. This can be especially useful in a multi-tenantCitus cluster because it allows individual tenants to have full SQL access to the database while hiding each tenant’sinformation from other tenants.
We can implement the separation of tenant data by using a naming convention for database roles that ties into table row-level security policies. We’ll assign each tenant a database role in a numbered sequence: tenant_1, tenant_2,etc. Tenants will connect to Citus using these separate roles. Row-level security policies can compare the role nameto values in the tenant_id distribution column to decide whether to allow access.
Here is how to apply the approach on a simplified events table distributed by tenant_id. First create the rolestenant_1 and tenant_2 (it’s easy on Citus Cloud, see Users and Permissions). Then run the following as an
22.8. Security 245

Citus Documentation, Release 8.2
administrator:
CREATE TABLE events(tenant_id int,id int,type text
);
SELECT create_distributed_table('events','tenant_id');
INSERT INTO events VALUES (1,1,'foo'), (2,2,'bar');
-- assumes that roles tenant_1 and tenant_2 existGRANT select, update, insert, deleteON events TO tenant_1, tenant_2;
As it stands, anyone with select permissions for this table can see both rows. Users from either tenant can see andupdate the row of the other tenant. We can solve this with row-level table security policies.
Each policy consists of two clauses: USING and WITH CHECK. When a user tries to read or write rows, the databaseevaluates each row against these clauses. Existing table rows are checked against the expression specified in USING,while new rows that would be created via INSERT or UPDATE are checked against the expression specified in WITHCHECK.
-- first a policy for the system admin "citus" userCREATE POLICY admin_all ON events
TO citus -- apply to this roleUSING (true) -- read any existing rowWITH CHECK (true); -- insert or update any row
-- next a policy which allows role "tenant_<n>" to-- access rows where tenant_id = <n>CREATE POLICY user_mod ON events
USING (current_user = 'tenant_' || tenant_id::text);-- lack of CHECK means same condition as USING
-- enforce the policiesALTER TABLE events ENABLE ROW LEVEL SECURITY;
Now roles tenant_1 and tenant_2 get different results for their queries:
Connected as tenant_1:
SELECT * FROM events;
--------------| tenant_id | id | type |--------------| 1 | 1 | foo |--------------
Connected as tenant_2:
SELECT * FROM events;
--------------| tenant_id | id | type |--------------
246 Chapter 22. Cluster Management

Citus Documentation, Release 8.2
| 2 | 2 | bar |--------------
INSERT INTO events VALUES (3,3,'surprise');/*ERROR: 42501: new row violates row-level security policy for table "events_102055"
*/
22.9 PostgreSQL extensions
Citus provides distributed functionality by extending PostgreSQL using the hook and extension APIs. This allowsusers to benefit from the features that come with the rich PostgreSQL ecosystem. These features include, but aren’tlimited to, support for a wide range of data types (including semi-structured data types like jsonb and hstore), operatorsand functions, full text search, and other extensions such as PostGIS and HyperLogLog. Further, proper use of theextension APIs enable compatibility with standard PostgreSQL tools such as pgAdmin and pg_upgrade.
As Citus is an extension which can be installed on any PostgreSQL instance, you can directly use other extensionssuch as hstore, hll, or PostGIS with Citus. However, there are two things to keep in mind. First, while including otherextensions in shared_preload_libraries, you should make sure that Citus is the first extension. Secondly, you shouldcreate the extension on both the coordinator and the workers before starting to use it.
Note: Sometimes, there might be a few features of the extension that may not be supported out of the box. Forexample, a few aggregates in an extension may need to be modified a bit to be parallelized across multiple nodes.Please contact us if some feature from your favourite extension does not work as expected with Citus.
In addition to our core Citus extension, we also maintain several others:
• cstore_fdw - Columnar store for analytics. The columnar nature delivers performance by reading only relevantdata from disk, and it may compress data 6x-10x to reduce space requirements for data archival.
• pg_cron - Run periodic jobs directly from the database.
• postgresql-topn - Returns the top values in a database according to some criteria. Uses an approximation algo-rithm to provide fast results with modest compute and memory resources.
• postgresql-hll - HyperLogLog data structure as a native data type. It’s a fixed-size, set-like structure used fordistinct value counting with tunable precision.
22.10 Creating a New Database
Each PostgreSQL server can hold multiple databases. However new databases do not inherit the extensions of any oth-ers; all desired extensions must be added afresh. To run Citus on a new database, you’ll need to create the database onthe coordinator and workers, create the Citus extension within that database, and register the workers in the coordinatordatabase.
On an existing database on the coordinator run:
-- create the new db on coordinator and workersCREATE DATABASE newbie;SELECT run_command_on_workers('CREATE DATABASE newbie;');
-- review the worker nodes registered in current db
22.9. PostgreSQL extensions 247
Citus Documentation, Release 8.2
SELECT * FROM master_get_active_worker_nodes();
-- switch to new db on coordinator\c newbie
-- create citus extension in new dbCREATE EXTENSION citus;
-- register workers in new dbSELECT * from master_add_node('node-name', 5432);SELECT * from master_add_node('node-name2', 5432);-- ... for each of them
In the new db on every worker, manually run:
CREATE EXTENSION citus;
Now the new database will be operating as another Citus cluster.
22.11 Checks For Updates and Cluster Statistics
Unless you opt out, Citus checks if there is a newer version of itself during installation and every twenty-four hoursthereafter. If a new version is available, Citus emits a notice to the database logs:
a new minor release of Citus (X.Y.Z) is available
During the check for updates, Citus also sends general anonymized information about the running cluster to CitusData company servers. This helps us understand how Citus is commonly used and thereby improve the product.As explained below, the reporting is opt-out and does not contain personally identifying information about schemas,tables, queries, or data.
22.11.1 What we Collect
1. Citus checks if there is a newer version of itself, and if so emits a notice to the database logs.
2. Citus collects and sends these statistics about your cluster:
• Randomly generated cluster identifier
• Number of workers
• OS version and hardware type (output of uname -psr command)
• Number of tables, rounded to a power of two
• Total size of shards, rounded to a power of two
• Whether Citus is running in Docker or natively
Because Citus is an open-source PostgreSQL extension, the statistics reporting code is available for you to audit. Seestatistics_collection.c.
22.11.2 How to Opt Out
If you wish to disable our anonymized cluster statistics gathering, set the following GUC in postgresql.conf on yourcoordinator node:
248 Chapter 22. Cluster Management

Citus Documentation, Release 8.2
citus.enable_statistics_collection = off
This disables all reporting and in fact all communication with Citus Data servers, including checks for whether a newerversion of Citus is available.
If you have super-user SQL access you can also achieve this without needing to find and edit the configuration file.Just execute the following statement in psql:
ALTER SYSTEM SET citus.enable_statistics_collection = 'off';
Since Docker users won’t have the chance to edit this PostgreSQL variable before running the image, we added aDocker flag to disable reports.
# Docker flag prevents reports
docker run -e DISABLE_STATS_COLLECTION=true citusdata/citus:latest
22.11. Checks For Updates and Cluster Statistics 249

Citus Documentation, Release 8.2
250 Chapter 22. Cluster Management

CHAPTER 23
Table Management
23.1 Determining Table and Relation Size
The usual way to find table sizes in PostgreSQL, pg_total_relation_size, drastically under-reports the sizeof distributed tables. All this function does on a Citus cluster is reveal the size of tables on the coordinator node. Inreality the data in distributed tables lives on the worker nodes (in shards), not on the coordinator. A true measure ofdistributed table size is obtained as a sum of shard sizes. Citus provides helper functions to query this information.
UDF Returnscitus_relation_size(relation_name)
• Size of actual data in table (the “main fork”).• A relation can be the name of a table or an index.
citus_table_size(relation_name)• citus_relation_size plus:
– size of free space map– size of visibility map
citus_total_relation_size(relation_name)• citus_table_size plus:
– size of indices
These functions are analogous to three of the standard PostgreSQL object size functions, with the additional note that
• They work only when citus.shard_replication_factor = 1.
• If they can’t connect to a node, they error out.
Here is an example of using one of the helper functions to list the sizes of all distributed tables:
SELECT logicalrelid AS name,pg_size_pretty(citus_table_size(logicalrelid)) AS size
FROM pg_dist_partition;
Output:
---------------| name | size |---------------| github_users | 39 MB || github_events | 37 MB |---------------
251

Citus Documentation, Release 8.2
23.2 Vacuuming Distributed Tables
In PostgreSQL (and other MVCC databases), an UPDATE or DELETE of a row does not immediately remove the oldversion of the row. The accumulation of outdated rows is called bloat and must be cleaned to avoid decreased queryperformance and unbounded growth of disk space requirements. PostgreSQL runs a process called the auto-vacuumdaemon that periodically vacuums (aka removes) outdated rows.
It’s not just user queries which scale in a distributed database, vacuuming does too. In PostgreSQL big busy tableshave great potential to bloat, both from lower sensitivity to PostgreSQL’s vacuum scale factor parameter, and generallybecause of the extent of their row churn. Splitting a table into distributed shards means both that individual shardsare smaller tables and that auto-vacuum workers can parallelize over different parts of the table on different machines.Ordinarily auto-vacuum can only run one worker per table.
Due to the above, auto-vacuum operations on a Citus cluster are probably good enough for most cases. However fortables with particular workloads, or companies with certain “safe” hours to schedule a vacuum, it might make moresense to manually vacuum a table rather than leaving all the work to auto-vacuum.
To vacuum a table, simply run this on the coordinator node:
VACUUM my_distributed_table;
Using vacuum against a distributed table will send a vacuum command to every one of that table’s placements (oneconnection per placement). This is done in parallel. All options are supported (including the column_list param-eter) except for VERBOSE. The vacuum command also runs on the coordinator, and does so before any workers nodesare notified. Note that unqualified vacuum commands (i.e. those without a table specified) do not propagate to workernodes.
23.3 Analyzing Distributed Tables
PostgreSQL’s ANALYZE command collects statistics about the contents of tables in the database. Subsequently, thequery planner uses these statistics to help determine the most efficient execution plans for queries.
The auto-vacuum daemon, discussed in the previous section, will automatically issue ANALYZE commands wheneverthe content of a table has changed sufficiently. The daemon schedules ANALYZE strictly as a function of the numberof rows inserted or updated; it has no knowledge of whether that will lead to meaningful statistical changes. Admin-istrators might prefer to manually schedule ANALYZE operations instead, to coincide with statistically meaningfultable changes.
To analyze a table, run this on the coordinator node:
ANALYZE my_distributed_table;
Citus propagates the ANALYZE command to all worker node placements.
252 Chapter 23. Table Management

CHAPTER 24
Upgrading Citus
24.1 Upgrading Citus Versions
Citus adheres to semantic versioning with patch-, minor-, and major-versions. The upgrade process differs for each,requiring more effort for bigger version jumps.
Upgrading the Citus version requires first obtaining the new Citus extension and then installing it in each of yourdatabase instances. Citus uses separate packages for each minor version to ensure that running a default packageupgrade will provide bug fixes but never break anything. Let’s start by examining patch upgrades, the easiest kind.
24.1.1 Patch Version Upgrade
To upgrade a Citus version to its latest patch, issue a standard upgrade command for your package manager. Assumingversion 8.2 is currently installed on Postgres 11:
Ubuntu or Debian
sudo apt-get updatesudo apt-get install --only-upgrade postgresql-11-citus-8.2sudo service postgresql restart
Fedora, CentOS, or Red Hat
sudo yum update citus82_11sudo service postgresql-11.0 restart
24.1.2 Major and Minor Version Upgrades
Major and minor version upgrades follow the same steps, but be careful: major upgrades can make backward-incompatible changes in the Citus API. It is best to review the Citus changelog before a major upgrade and lookfor any changes which may cause problems for your application.
Note: Starting at version 8.1, new Citus nodes expect and require encrypted inter-node communication by default,whereas nodes upgraded to 8.1 from an earlier version preserve their earlier SSL settings. Be careful when adding anew Citus 8.1 (or newer) node to an upgraded cluster that does not yet use SSL. The adding a worker section coversthat situation.
253

Citus Documentation, Release 8.2
Each major and minor version of Citus is published as a package with a separate name. Installing a newer packagewill automatically remove the older version.
Step 1. Update Citus Package
When doing a major version upgrade instead, be sure to upgrade the Citus extension first, and the PostgreSQL versionsecond (see Upgrading PostgreSQL version from 10 to 11). Here is how to do a minor upgrade from 8.1 to 8.2:
Ubuntu or Debian
sudo apt-get updatesudo apt-get install postgresql-11-citus-8.2sudo service postgresql restart
Fedora, CentOS, or Red Hat
# Fedora, CentOS, or Red Hatsudo yum swap citus81_11 citus82_11sudo service postgresql-11 restart
Step 2. Apply Update in DB
After installing the new package and restarting the database, run the extension upgrade script.
# you must restart PostgreSQL before running thispsql -c 'ALTER EXTENSION citus UPDATE;'
# you should see the newer Citus version in the listpsql -c '\dx'
Note: During a major version upgrade, from the moment of yum installing a new version, Citus will refuse torun distributed queries until the server is restarted and ALTER EXTENSION is executed. This is to protect yourdata, as Citus object and function definitions are specific to a version. After a yum install you should (a) restart and(b) run alter extension. In rare cases if you experience an error with upgrades, you can disable this check via thecitus.enable_version_checks configuration parameter. You can also contact us providing information about the error,so we can help debug the issue.
24.2 Upgrading PostgreSQL version from 10 to 11
Note: Do not attempt to upgrade both Citus and Postgres versions at once. If both upgrades are desired, upgradeCitus first.
Also Citus 7.x is not compatible with Postgres 11. Before upgrading Postgres 10 to 11, be sure to follow the abovesteps to upgrade from Citus 7.x to 8.2.
Record the following paths before you start (your actual paths may be different than those below):
Existing data directory (e.g. /opt/pgsql/10/data) export OLD_PG_DATA=/opt/pgsql/10/data
Existing PostgreSQL installation path (e.g. /usr/pgsql-10) export OLD_PG_PATH=/usr/pgsql-10
254 Chapter 24. Upgrading Citus

Citus Documentation, Release 8.2
New data directory after upgrade export NEW_PG_DATA=/opt/pgsql/11/data
New PostgreSQL installation path export NEW_PG_PATH=/usr/pgsql-11
24.2.1 On Every Node (Coordinator and workers)
1. Back up Citus metadata in the old server.
CREATE TABLE public.pg_dist_partition ASSELECT * FROM pg_catalog.pg_dist_partition;
CREATE TABLE public.pg_dist_shard ASSELECT * FROM pg_catalog.pg_dist_shard;
CREATE TABLE public.pg_dist_placement ASSELECT * FROM pg_catalog.pg_dist_placement;
CREATE TABLE public.pg_dist_node_metadata ASSELECT * FROM pg_catalog.pg_dist_node_metadata;
CREATE TABLE public.pg_dist_node ASSELECT * FROM pg_catalog.pg_dist_node;
CREATE TABLE public.pg_dist_local_group ASSELECT * FROM pg_catalog.pg_dist_local_group;
CREATE TABLE public.pg_dist_transaction ASSELECT * FROM pg_catalog.pg_dist_transaction;
CREATE TABLE public.pg_dist_colocation ASSELECT * FROM pg_catalog.pg_dist_colocation;
2. Configure the new database instance to use Citus.
• Include Citus as a shared preload library in postgresql.conf:
shared_preload_libraries = 'citus'
• DO NOT CREATE Citus extension yet
• DO NOT start the new server
3. Stop the old server.
4. Check upgrade compatibility.
$NEW_PG_PATH/bin/pg_upgrade -b $OLD_PG_PATH/bin/ -B $NEW_PG_PATH/bin/ \-d $OLD_PG_DATA -D $NEW_PG_DATA --check
You should see a “Clusters are compatible” message. If you do not, fix any errors before proceeding. Pleaseensure that
• NEW_PG_DATA contains an empty database initialized by new PostgreSQL version
• The Citus extension IS NOT created
5. Perform the upgrade (like before but without the --check option).
$NEW_PG_PATH/bin/pg_upgrade -b $OLD_PG_PATH/bin/ -B $NEW_PG_PATH/bin/ \-d $OLD_PG_DATA -D $NEW_PG_DATA
6. Start the new server.
• DO NOT run any query before running the queries given in the next step
7. Restore metadata.
24.2. Upgrading PostgreSQL version from 10 to 11 255

Citus Documentation, Release 8.2
INSERT INTO pg_catalog.pg_dist_partitionSELECT * FROM public.pg_dist_partition;
INSERT INTO pg_catalog.pg_dist_shardSELECT * FROM public.pg_dist_shard;
INSERT INTO pg_catalog.pg_dist_placementSELECT * FROM public.pg_dist_placement;
INSERT INTO pg_catalog.pg_dist_node_metadataSELECT * FROM public.pg_dist_node_metadata;
INSERT INTO pg_catalog.pg_dist_nodeSELECT * FROM public.pg_dist_node;
TRUNCATE TABLE pg_catalog.pg_dist_local_group;INSERT INTO pg_catalog.pg_dist_local_groupSELECT * FROM public.pg_dist_local_group;
INSERT INTO pg_catalog.pg_dist_transactionSELECT * FROM public.pg_dist_transaction;
INSERT INTO pg_catalog.pg_dist_colocationSELECT * FROM public.pg_dist_colocation;
8. Drop temporary metadata tables.
DROP TABLE public.pg_dist_partition;DROP TABLE public.pg_dist_shard;DROP TABLE public.pg_dist_placement;DROP TABLE public.pg_dist_node_metadata;DROP TABLE public.pg_dist_node;DROP TABLE public.pg_dist_local_group;DROP TABLE public.pg_dist_transaction;DROP TABLE public.pg_dist_colocation;
9. Restart sequences.
SELECT setval('pg_catalog.pg_dist_shardid_seq', (SELECT MAX(shardid)+1 AS→˓max_shard_id FROM pg_dist_shard), false);
SELECT setval('pg_catalog.pg_dist_placement_placementid_seq', (SELECT→˓MAX(placementid)+1 AS max_placement_id FROM pg_dist_placement), false);
SELECT setval('pg_catalog.pg_dist_groupid_seq', (SELECT MAX(groupid)+1 AS→˓max_group_id FROM pg_dist_node), false);
SELECT setval('pg_catalog.pg_dist_node_nodeid_seq', (SELECT MAX(nodeid)+1 AS→˓max_node_id FROM pg_dist_node), false);
SELECT setval('pg_catalog.pg_dist_colocationid_seq', (SELECT→˓MAX(colocationid)+1 AS max_colocation_id FROM pg_dist_colocation), false);
10. Register triggers.
CREATE OR REPLACE FUNCTION create_truncate_trigger(table_name regclass)→˓RETURNS void LANGUAGE plpgsql as $$DECLAREcommand text;trigger_name text;
BEGINtrigger_name := 'truncate_trigger_' || table_name::oid;command := 'create trigger ' || trigger_name || ' after truncate on ' ||
→˓table_name || ' execute procedure pg_catalog.citus_truncate_trigger()';
256 Chapter 24. Upgrading Citus

Citus Documentation, Release 8.2
execute command;command := 'update pg_trigger set tgisinternal = true where tgname
= ' || quote_literal(trigger_name);execute command;
END;$$;
SELECT create_truncate_trigger(logicalrelid) FROM pg_dist_partition ;
DROP FUNCTION create_truncate_trigger(regclass);
11. Set dependencies.
INSERT INTOpg_depend
SELECT'pg_class'::regclass::oid as classid,p.logicalrelid::regclass::oid as objid,0 as objsubid,'pg_extension'::regclass::oid as refclassid,(select oid from pg_extension where extname = 'citus') as refobjid,0 as refobjsubid ,'n' as deptype
FROMpg_dist_partition p;
24.2. Upgrading PostgreSQL version from 10 to 11 257

Citus Documentation, Release 8.2
258 Chapter 24. Upgrading Citus

CHAPTER 25
Query Performance Tuning
In this section, we describe how you can tune your Citus cluster to get maximum performance. We begin by explaininghow choosing the right distribution column affects performance. We then describe how you can first tune your databasefor high performance on one PostgreSQL server and then scale it out across all the CPUs in the cluster. In this section,we also discuss several performance related configuration parameters wherever relevant.
25.1 Table Distribution and Shards
The first step while creating a distributed table is choosing the right distribution column. This helps Citus push downseveral operations directly to the worker shards and prune away unrelated shards which lead to significant queryspeedups.
Typically, you should pick that column as the distribution column which is the most commonly used join key or onwhich most queries have filters. For filters, Citus uses the distribution column ranges to prune away unrelated shards,ensuring that the query hits only those shards which overlap with the WHERE clause ranges. For joins, if the join keyis the same as the distribution column, then Citus executes the join only between those shards which have matching /overlapping distribution column ranges. All these shard joins can be executed in parallel on the workers and hence aremore efficient.
In addition, Citus can push down several operations directly to the worker shards if they are based on the distributioncolumn. This greatly reduces both the amount of computation on each node and the network bandwidth involved intransferring data across nodes.
Once you choose the right distribution column, you can then proceed to the next step, which is tuning worker nodeperformance.
25.2 PostgreSQL tuning
The Citus coordinator partitions an incoming query into fragment queries, and sends them to the workers for parallelprocessing. The workers are just extended PostgreSQL servers and they apply PostgreSQL’s standard planning andexecution logic for these queries. So, the first step in tuning Citus is tuning the PostgreSQL configuration parameterson the workers for high performance.
Tuning the parameters is a matter of experimentation and often takes several attempts to achieve acceptable perfor-mance. Thus it’s best to load only a small portion of your data when tuning to make each iteration go faster.
To begin the tuning process create a Citus cluster and load data in it. From the coordinator node, run the EXPLAINcommand on representative queries to inspect performance. Citus extends the EXPLAIN command to provide infor-mation about distributed query execution. The EXPLAIN output shows how each worker processes the query and alsoa little about how the coordinator node combines their results.
259

Citus Documentation, Release 8.2
Here is an example of explaining the plan for a particular example query.
EXPLAINSELECT date_trunc('minute', created_at) AS minute,
sum((payload->>'distinct_size')::int) AS num_commitsFROM github_eventsWHERE event_type = 'PushEvent'GROUP BY minuteORDER BY minute;
Sort (cost=0.00..0.00 rows=0 width=0)Sort Key: minute-> HashAggregate (cost=0.00..0.00 rows=0 width=0)Group Key: minute-> Custom Scan (Citus Real-Time) (cost=0.00..0.00 rows=0 width=0)
Task Count: 32Tasks Shown: One of 32-> Task
Node: host=localhost port=5433 dbname=postgres-> HashAggregate (cost=93.42..98.36 rows=395 width=16)Group Key: date_trunc('minute'::text, created_at)-> Seq Scan on github_events_102042 github_events (cost=0.00..88.20
→˓rows=418 width=503)Filter: (event_type = 'PushEvent'::text)
(13 rows)
This tells you several things. To begin with there are thirty-two shards, and the planner chose the Citus real-timeexecutor to execute this query:
-> Custom Scan (Citus Real-Time) (cost=0.00..0.00 rows=0 width=0)Task Count: 32
Next it picks one of the workers and shows you more about how the query behaves there. It indicates the host, port,and database so you can connect to the worker directly if desired:
Tasks Shown: One of 32-> Task
Node: host=localhost port=5433 dbname=postgres
Distributed EXPLAIN next shows the results of running a normal PostgreSQL EXPLAIN on that worker for thefragment query:
-> HashAggregate (cost=93.42..98.36 rows=395 width=16)Group Key: date_trunc('minute'::text, created_at)-> Seq Scan on github_events_102042 github_events (cost=0.00..88.20 rows=418
→˓width=503)Filter: (event_type = 'PushEvent'::text)
You can now connect to the worker at ‘localhost’, port ‘5433’ and tune query performance for the shardgithub_events_102042 using standard PostgreSQL techniques. As you make changes run EXPLAIN again from thecoordinator or right on the worker.
The first set of such optimizations relates to configuration settings. PostgreSQL by default comes with conservativeresource settings; and among these settings, shared_buffers and work_mem are probably the most important ones inoptimizing read performance. We discuss these parameters in brief below. Apart from them, several other configura-tion settings impact query performance. These settings are covered in more detail in the PostgreSQL manual and arealso discussed in the PostgreSQL 9.0 High Performance book.
260 Chapter 25. Query Performance Tuning

Citus Documentation, Release 8.2
shared_buffers defines the amount of memory allocated to the database for caching data, and defaults to 128MB. Ifyou have a worker node with 1GB or more RAM, a reasonable starting value for shared_buffers is 1/4 of the memoryin your system. There are some workloads where even larger settings for shared_buffers are effective, but given theway PostgreSQL also relies on the operating system cache, it’s unlikely you’ll find using more than 25% of RAM towork better than a smaller amount.
If you do a lot of complex sorts, then increasing work_mem allows PostgreSQL to do larger in-memory sorts whichwill be faster than disk-based equivalents. If you see lot of disk activity on your worker node inspite of having a decentamount of memory, then increasing work_mem to a higher value can be useful. This will help PostgreSQL in choosingmore efficient query plans and allow for greater amount of operations to occur in memory.
Other than the above configuration settings, the PostgreSQL query planner relies on statistical information about thecontents of tables to generate good plans. These statistics are gathered when ANALYZE is run, which is enabledby default. You can learn more about the PostgreSQL planner and the ANALYZE command in greater detail in thePostgreSQL documentation.
Lastly, you can create indexes on your tables to enhance database performance. Indexes allow the database to find andretrieve specific rows much faster than it could do without an index. To choose which indexes give the best perfor-mance, you can run the query with EXPLAIN to view query plans and optimize the slower parts of the query. Afteran index is created, the system has to keep it synchronized with the table which adds overhead to data manipulationoperations. Therefore, indexes that are seldom or never used in queries should be removed.
For write performance, you can use general PostgreSQL configuration tuning to increase INSERT rates. We com-monly recommend increasing checkpoint_timeout and max_wal_size settings. Also, depending on the reliabilityrequirements of your application, you can choose to change fsync or synchronous_commit values.
Once you have tuned a worker to your satisfaction you will have to manually apply those changes to the other workersas well. To verify that they are all behaving properly, set this configuration variable on the coordinator:
SET citus.explain_all_tasks = 1;
This will cause EXPLAIN to show the query plan for all tasks, not just one.
EXPLAINSELECT date_trunc('minute', created_at) AS minute,
sum((payload->>'distinct_size')::int) AS num_commitsFROM github_eventsWHERE event_type = 'PushEvent'GROUP BY minuteORDER BY minute;
Sort (cost=0.00..0.00 rows=0 width=0)Sort Key: minute-> HashAggregate (cost=0.00..0.00 rows=0 width=0)
Group Key: minute-> Custom Scan (Citus Real-Time) (cost=0.00..0.00 rows=0 width=0)
Task Count: 32Tasks Shown: All-> TaskNode: host=localhost port=5433 dbname=postgres-> HashAggregate (cost=93.42..98.36 rows=395 width=16)
Group Key: date_trunc('minute'::text, created_at)-> Seq Scan on github_events_102042 github_events (cost=0.00..88.20
→˓rows=418 width=503)Filter: (event_type = 'PushEvent'::text)
-> TaskNode: host=localhost port=5434 dbname=postgres-> HashAggregate (cost=103.21..108.57 rows=429 width=16)
25.2. PostgreSQL tuning 261

Citus Documentation, Release 8.2
Group Key: date_trunc('minute'::text, created_at)-> Seq Scan on github_events_102043 github_events (cost=0.00..97.47
→˓rows=459 width=492)Filter: (event_type = 'PushEvent'::text)
---- ... repeats for all 32 tasks-- alternating between workers one and two-- (running in this case locally on ports 5433, 5434)--
(199 rows)
Differences in worker execution can be caused by tuning configuration differences, uneven data distribution acrossshards, or hardware differences between the machines. To get more information about the time it takes the query torun on each shard you can use EXPLAIN ANALYZE.
Note: Note that when citus.explain_all_tasks is enabled, EXPLAIN plans are retrieved sequentially, which may takea long time for EXPLAIN ANALYZE.
25.3 Scaling Out Performance
As mentioned, once you have achieved the desired performance for a single shard you can set similar configurationparameters on all your workers. As Citus runs all the fragment queries in parallel across the worker nodes, users canscale out the performance of their queries to be the cumulative of the computing power of all of the CPU cores in thecluster assuming that the data fits in memory.
Users should try to fit as much of their working set in memory as possible to get best performance with Citus. If fittingthe entire working set in memory is not feasible, we recommend using SSDs over HDDs as a best practice. This isbecause HDDs are able to show decent performance when you have sequential reads over contiguous blocks of data,but have significantly lower random read / write performance. In cases where you have a high number of concurrentqueries doing random reads and writes, using SSDs can improve query performance by several times as comparedto HDDs. Also, if your queries are highly compute intensive, it might be beneficial to choose machines with morepowerful CPUs.
To measure the disk space usage of your database objects, you can log into the worker nodes and use PostgreSQLadministration functions for individual shards. The pg_total_relation_size() function can be used to get the total diskspace used by a table. You can also use other functions mentioned in the PostgreSQL docs to get more specificsize information. On the basis of these statistics for a shard and the shard count, users can compute the hardwarerequirements for their cluster.
Another factor which affects performance is the number of shards per worker node. Citus partitions an incoming queryinto its fragment queries which run on individual worker shards. Hence, the degree of parallelism for each query isgoverned by the number of shards the query hits. To ensure maximum parallelism, you should create enough shardson each node such that there is at least one shard per CPU core. Another consideration to keep in mind is that Cituswill prune away unrelated shards if the query has filters on the distribution column. So, creating more shards than thenumber of cores might also be beneficial so that you can achieve greater parallelism even after shard pruning.
25.4 Distributed Query Performance Tuning
Once you have distributed your data across the cluster, with each worker optimized for best performance, you shouldbe able to see high performance gains on your queries. After this, the final step is to tune a few distributed performance
262 Chapter 25. Query Performance Tuning

Citus Documentation, Release 8.2
tuning parameters.
Before we discuss the specific configuration parameters, we recommend that you measure query times on your dis-tributed cluster and compare them with the single shard performance. This can be done by enabling \timing andrunning the query on the coordinator node and running one of the fragment queries on the worker nodes. This helpsin determining the amount of time spent on the worker nodes and the amount of time spent in fetching the data to thecoordinator node. Then, you can figure out what the bottleneck is and optimize the database accordingly.
In this section, we discuss the parameters which help optimize the distributed query planner and executors. There areseveral relevant parameters and we discuss them in two sections:- general and advanced. The general performancetuning section is sufficient for most use-cases and covers all the common configs. The advanced performance tuningsection covers parameters which may provide performance gains in specific use cases.
25.4.1 General
For higher INSERT performance, the factor which impacts insert rates the most is the level of concurrency. You shouldtry to run several concurrent INSERT statements in parallel. This way you can achieve very high insert rates if youhave a powerful coordinator node and are able to use all the CPU cores on that node together.
Citus has two executor types for running SELECT queries. The desired executor can be selected by setting the ci-tus.task_executor_type configuration parameter. If your use case mainly requires simple key-value lookups or requiressub-second responses to aggregations and joins, you can choose the real-time executor. On the other hand if there arelong running queries which require repartitioning and shuffling of data across the workers, then you can switch to thetask tracker executor.
Other than the above, there are two configuration parameters which can be useful in cases where approx-imations produce meaningful results. These two parameters are citus.limit_clause_row_fetch_count and ci-tus.count_distinct_error_rate. The former sets the number of rows to fetch from each task while calculating limitswhile the latter sets the desired error rate when calculating approximate distinct counts. You can learn more aboutthe applicability and usage of these parameters in the user guide sections: Count (Distinct) Aggregates and LimitPushdown.
25.4.2 Subquery/CTE Network Overhead
In the best case Citus can execute queries containing subqueries and CTEs in a single step. This is usually becauseboth the main query and subquery filter by tables’ distribution column in the same way, and can be pushed down toworker nodes together. However Citus is sometimes forced to execute subqueries before executing the main query,copying the intermediate subquery results to other worker nodes for use by the main query. This technique is calledSubquery/CTE Push-Pull Execution.
It’s important to be aware when subqueries are executed in a separate step, and avoid sending too much data betweenworker nodes. The network overhead will hurt performance. The EXPLAIN command allows you to discover howqueries will be executed, including whether multiple steps are required. For a detailed example see Subquery/CTEPush-Pull Execution.
Also you can defensively set a safeguard against large intermediate results. Adjust themax_intermediate_result_size limit in a new connection to the coordinator node. By default themax intermediate result size is 1GB, which is large enough to allow some inefficient queries. Try turning it down andrunning your queries:
-- set a restrictive limit for intermediate resultsSET citus.max_intermediate_result_size = '512kB';
-- attempt to run queries-- SELECT ...
25.4. Distributed Query Performance Tuning 263

Citus Documentation, Release 8.2
If the query has subqueries or CTEs that exceed this limit, the query will be canceled and you will see an error message:
ERROR: the intermediate result size exceeds citus.max_intermediate_result_size→˓(currently 512 kB)DETAIL: Citus restricts the size of intermediate results of complex subqueries and→˓CTEs to avoid accidentally pulling large result sets into once place.HINT: To run the current query, set citus.max_intermediate_result_size to a higher→˓value or -1 to disable.
If this happens, consider whether you can move limits or filters inside CTEs/subqueries. For instance
-- It's slow to retrieve all rows and limit afterward
WITH cte_slow AS (SELECT * FROM users_table)SELECT * FROM cte_slow LIMIT 10;
-- Limiting inside makes the intermediate results small
WITH cte_fast AS (SELECT * FROM users_table LIMIT 10)SELECT * FROM cte_fast;
25.4.3 Advanced
In this section, we discuss advanced performance tuning parameters. These parameters are applicable to specific usecases and may not be required for all deployments.
Task Assignment Policy
The Citus query planner assigns tasks to the worker nodes based on shard locations. The algorithm used while makingthese assignments can be chosen by setting the citus.task_assignment_policy configuration parameter. Users can alterthis configuration parameter to choose the policy which works best for their use case.
The greedy policy aims to distribute tasks evenly across the workers. This policy is the default and works well inmost of the cases. The round-robin policy assigns tasks to workers in a round-robin fashion alternating betweendifferent replicas. This enables much better cluster utilization when the shard count for a table is low compared to thenumber of workers. The third policy is the first-replica policy which assigns tasks on the basis of the insertion orderof placements (replicas) for the shards. With this policy, users can be sure of which shards will be accessed on eachmachine. This helps in providing stronger memory residency guarantees by allowing you to keep your working set inmemory and use it for querying.
Intermediate Data Transfer Format
There are two configuration parameters which relate to the format in which intermediate data will be transferred acrossworkers or between workers and the coordinator. Citus by default transfers intermediate query data in the text format.This is generally better as text files typically have smaller sizes than the binary representation. Hence, this leads tolower network and disk I/O while writing and transferring intermediate data.
However, for certain data types like hll or hstore arrays, the cost of serializing and deserializing data is prettyhigh. In such cases, using binary format for transferring intermediate data can improve query performance dueto reduced CPU usage. There are two configuration parameters which can be used to tune this behaviour, ci-tus.binary_master_copy_format and citus.binary_worker_copy_format. Enabling the former uses binary format totransfer intermediate query results from the workers to the coordinator while the latter is useful in queries whichrequire dynamic shuffling of intermediate data between workers.
264 Chapter 25. Query Performance Tuning

Citus Documentation, Release 8.2
Real Time Executor
If you have SELECT queries which require sub-second response times, you should try to use the real-time executor.
The real-time executor opens one connection and uses two file descriptors per unpruned shard (Unrelated shards arepruned away during planning). Due to this, the executor may need to open more connections than max_connectionsor use more file descriptors than max_files_per_process if the query hits a high number of shards.
In such cases, the real-time executor will begin throttling tasks to prevent overwhelming resources on the work-ers. Since this throttling can reduce query performance, the real-time executor will issue a warning suggesting thatmax_connections or max_files_per_process should be increased. On seeing these warnings, you should increase thesuggested parameters to maintain the desired query performance.
Task Tracker Executor
If your queries require repartitioning of data or more efficient resource management, you should use the task trackerexecutor. There are two configuration parameters which can be used to tune the task tracker executor’s performance.
The first one is the citus.task_tracker_delay. The task tracker process wakes up regularly, walks over all tasks assignedto it, and schedules and executes these tasks. This parameter sets the task tracker sleep time between these taskmanagement rounds. Reducing this parameter can be useful in cases when the shard queries are short and henceupdate their status very regularly.
The second parameter is citus.max_running_tasks_per_node. This configuration value sets the maximum number oftasks to execute concurrently on one worker node node at any given time. This configuration entry ensures that youdon’t have many tasks hitting disk at the same time and helps in avoiding disk I/O contention. If your queries areserved from memory or SSDs, you can increase citus.max_running_tasks_per_node without much concern.
With this, we conclude our discussion about performance tuning in Citus. To learn more about the specific configura-tion parameters discussed in this section, please visit the Configuration Reference section of our documentation.
25.5 Scaling Out Data Ingestion
Citus lets you scale out data ingestion to very high rates, but there are several trade-offs to consider in terms ofapplication integration, throughput, and latency. In this section, we discuss different approaches to data ingestion, andprovide guidelines for expected throughput and latency numbers.
25.5.1 Real-time Insert and Updates
On the Citus coordinator, you can perform INSERT, INSERT .. ON CONFLICT, UPDATE, and DELETE commandsdirectly on distributed tables. When you issue one of these commands, the changes are immediately visible to the user.
When you run an INSERT (or another ingest command), Citus first finds the right shard placements based on the valuein the distribution column. Citus then connects to the worker nodes storing the shard placements, and performs anINSERT on each of them. From the perspective of the user, the INSERT takes several milliseconds to process becauseof the network latency to worker nodes. The Citus coordinator node however can process concurrent INSERTs toreach high throughputs.
Insert Throughput
To measure data ingest rates with Citus, we use a standard tool called pgbench and provide repeatable benchmarkingsteps.
25.5. Scaling Out Data Ingestion 265

Citus Documentation, Release 8.2
We also used these steps to run pgbench across different Citus Cloud formations on AWS and observed the followingingest rates for transactional INSERT statements. For these benchmark results, we used the default configuration forCitus Cloud formations, and set pgbench’s concurrent thread count to 64 and client count to 256. We didn’t apply anyoptimizations to improve performance numbers; and you can get higher ingest ratios by tuning your database setup.
Coordinator Node Worker Nodes Latency (ms) Transactions per sec2 cores - 7.5GB RAM 2 * (1 core - 15GB RAM) 28.5 9,0004 cores - 15GB RAM 2 * (1 core - 15GB RAM) 15.3 16,6008 cores - 30GB RAM 2 * (1 core - 15GB RAM) 15.2 16,7008 cores - 30GB RAM 4 * (1 core - 15GB RAM) 8.6 29,600
We have three observations that follow from these benchmark numbers. First, the top row shows performance numbersfor an entry level Citus cluster with one c4.xlarge (two physical cores) as the coordinator and two r4.large (one physicalcore each) as worker nodes. This basic cluster can deliver 9K INSERTs per second, or 775 million transactionalINSERT statements per day.
Second, a more powerful Citus cluster that has about four times the CPU capacity can deliver 30K INSERTs persecond, or 2.75 billion INSERT statements per day.
Third, across all data ingest benchmarks, the network latency combined with the number of concurrent connectionsPostgreSQL can efficiently handle, becomes the performance bottleneck. In a production environment with hundredsof tables and indexes, this bottleneck will likely shift to a different resource.
Update Throughput
To measure UPDATE throughputs with Citus, we used the same benchmarking steps and ran pgbench across differentCitus Cloud formations on AWS.
Coordinator Node Worker Nodes Latency (ms) Transactions per sec2 cores - 7.5GB RAM 2 * (1 core - 15GB RAM) 25.0 10,2004 cores - 15GB RAM 2 * (1 core - 15GB RAM) 19.6 13,0008 cores - 30GB RAM 2 * (1 core - 15GB RAM) 20.3 12,6008 cores - 30GB RAM 4 * (1 core - 15GB RAM) 10.7 23,900
These benchmark numbers show that Citus’s UPDATE throughput is slightly lower than those of INSERTs. Thisis because pgbench creates a primary key index for UPDATE statements and an UPDATE incurs more work on theworker nodes. It’s also worth noting two additional differences between INSERT and UPDATEs.
First, UPDATE statements cause bloat in the database and VACUUM needs to run regularly to clean up this bloat.In Citus, since VACUUM runs in parallel across worker nodes, your workloads are less likely to be impacted byVACUUM.
Second, these benchmark numbers show UPDATE throughput for standard Citus deployments. If you’re on the Cituscommunity edition, using statement-based replication, and you increased the default replication factor to 2, you’regoing to observe notably lower UPDATE throughputs. For this particular setting, Citus comes with additional config-uration (citus.all_modifications_commutative) that may increase UPDATE ratios.
Insert and Update: Throughput Checklist
When you’re running the above pgbench benchmarks on a moderately sized Citus cluster, you can generally expect10K-50K INSERTs per second. This translates to approximately 1 to 4 billion INSERTs per day. If you aren’tobserving these throughputs numbers, remember the following checklist:
• Check the network latency between your application and your database. High latencies will impact your writethroughput.
266 Chapter 25. Query Performance Tuning

Citus Documentation, Release 8.2
• Ingest data using concurrent threads. If the roundtrip latency during an INSERT is 4ms, you can process 250INSERTs/second over one thread. If you run 100 concurrent threads, you will see your write throughput increasewith the number of threads.
• Check whether the nodes in your cluster have CPU or disk bottlenecks. Ingested data passes through the coor-dinator node, so check whether your coordinator is bottlenecked on CPU.
• Avoid closing connections between INSERT statements. This avoids the overhead of connection setup.
• Remember that column size will affect insert speed. Rows with big JSON blobs will take longer than those withsmall columns like integers.
Insert and Update: Latency
The benefit of running INSERT or UPDATE commands, compared to issuing bulk COPY commands, is that changesare immediately visible to other queries. When you issue an INSERT or UPDATE command, the Citus coordinatornode directly routes this command to related worker node(s). The coordinator node also keeps connections to theworkers open within the same session, which means subsequent commands will see lower response times.
-- Set up a distributed table that keeps account history informationCREATE TABLE pgbench_history (tid int, bid int, aid int, delta int, mtime timestamp);SELECT create_distributed_table('pgbench_history', 'aid');
-- Enable timing to see reponse times\timing on
-- First INSERT requires connection set-up, second will be fasterINSERT INTO pgbench_history VALUES (10, 1, 10000, -5000, CURRENT_TIMESTAMP); -- Time:→˓10.314 msINSERT INTO pgbench_history VALUES (10, 1, 22000, 5000, CURRENT_TIMESTAMP); -- Time:→˓3.132 ms
25.5.2 Staging Data Temporarily
When loading data for temporary staging, consider using an unlogged table. These are tables which are not backed bythe Postgres write-ahead log. This makes them faster for inserting rows, but not suitable for long term data storage.You can use an unlogged table as a place to load incoming data, prior to manipulating the data and moving it topermanent tables.
-- example unlogged tableCREATE UNLOGGED TABLE unlogged_table (
key text,value text
);
-- its shards will be unlogged as well when-- the table is distributedSELECT create_distributed_table('unlogged_table', 'key');
-- ready to load data
25.5.3 Bulk Copy (250K - 2M/s)
Distributed tables support COPY from the Citus coordinator for bulk ingestion, which can achieve much higher inges-tion rates than INSERT statements.
25.5. Scaling Out Data Ingestion 267

Citus Documentation, Release 8.2
COPY can be used to load data directly from an application using COPY .. FROM STDIN, from a file on the server,or program executed on the server.
COPY pgbench_history FROM STDIN WITH (FORMAT CSV);
In psql, the \COPY command can be used to load data from the local machine. The \COPY command actually sends aCOPY .. FROM STDIN command to the server before sending the local data, as would an application that loads datadirectly.
psql -c "\COPY pgbench_history FROM 'pgbench_history-2016-03-04.csv' (FORMAT CSV)"
A powerful feature of COPY for distributed tables is that it asynchronously copies data to the workers over manyparallel connections, one for each shard placement. This means that data can be ingested using multiple workersand multiple cores in parallel. Especially when there are expensive indexes such as a GIN, this can lead to majorperformance boosts over ingesting into a regular PostgreSQL table.
From a throughput standpoint, you can expect data ingest ratios of 250K - 2M rows per second when using COPY. Tolearn more about COPY performance across different scenarios, please refer to the following blog post.
Note: Make sure your benchmarking setup is well configured so you can observe optimal COPY performance. Followthese tips:
• We recommend a large batch size (~ 50000-100000). You can benchmark with multiple files (1, 10, 1000, 10000etc), each of that batch size.
• Use parallel ingestion. Increase the number of threads/ingestors to 2, 4, 8, 16 and run benchmarks.
• Use a compute-optimized coordinator. For the workers choose memory-optimized boxes with a decent numberof vcpus.
• Go with a relatively small shard count, 32 should suffice but you could benchmark with 64, too.
• Ingest data for a suitable amount of time (say 2, 4, 8, 24 hrs). Longer tests are more representative of a productionsetup.
25.5.4 Citus MX (50k/s-500k/s)
Citus MX builds on the Citus extension. It gives you the ability to query and write to distributed tables from anynode, which allows you to horizontally scale out your write-throughput using PostgreSQL. It also removes the need tointeract with a primary node in a Citus cluster for data ingest or queries.
Citus MX is available in Citus Enterprise Edition and on Citus Cloud. For more information see Citus MX.
268 Chapter 25. Query Performance Tuning

CHAPTER 26
Useful Diagnostic Queries
26.1 Finding which shard contains data for a specific tenant
The rows of a distributed table are grouped into shards, and each shard is placed on a worker node in the Citus cluster.In the multi-tenant Citus use case we can determine which worker node contains the rows for a specific tenant byputting together two pieces of information: the shard id associated with the tenant id, and the shard placements onworkers. The two can be retrieved together in a single query. Suppose our multi-tenant application’s tenants and arestores, and we want to find which worker node holds the data for Gap.com (id=4, suppose).
To find the worker node holding the data for store id=4, ask for the placement of rows whose distribution column hasvalue 4:
SELECT shardid, shardstate, shardlength, nodename, nodeport, placementidFROM pg_dist_placement AS placement,
pg_dist_node AS nodeWHERE placement.groupid = node.groupid
AND node.noderole = 'primary'AND shardid = (SELECT get_shard_id_for_distribution_column('stores', 4)
);
The output contains the host and port of the worker database.
----------------------------------------------| shardid | shardstate | shardlength | nodename | nodeport | placementid |----------------------------------------------| 102009 | 1 | 0 | localhost | 5433 | 2 |----------------------------------------------
26.2 Finding the distribution column for a table
Each distributed table in Citus has a “distribution column.” For more information about what this is and how it works,see Distributed Data Modeling. There are many situations where it is important to know which column it is. Someoperations require joining or filtering on the distribution column, and you may encounter error messages with hintslike, “add a filter to the distribution column.”
The pg_dist_* tables on the coordinator node contain diverse metadata about the distributed database. In particularpg_dist_partition holds information about the distribution column (formerly called partition column) for eachtable. You can use a convenient utility function to look up the distribution column name from the low-level details inthe metadata. Here’s an example and its output:
269

Citus Documentation, Release 8.2
-- create example table
CREATE TABLE products (store_id bigint,product_id bigint,name text,price money,
CONSTRAINT products_pkey PRIMARY KEY (store_id, product_id));
-- pick store_id as distribution column
SELECT create_distributed_table('products', 'store_id');
-- get distribution column name for products table
SELECT column_to_column_name(logicalrelid, partkey) AS dist_col_nameFROM pg_dist_partition
WHERE logicalrelid='products'::regclass;
Example output:
----------| dist_col_name |----------| store_id |----------
26.3 Detecting locks
This query will run across all worker nodes and identify locks, how long they’ve been open, and the offending queries:
SELECT run_command_on_workers($cmd$SELECT array_agg(blocked_statement || ' $ ' || cur_stmt_blocking_proc|| ' $ ' || cnt::text || ' $ ' || age
)FROM (SELECT blocked_activity.query AS blocked_statement,
blocking_activity.query AS cur_stmt_blocking_proc,count(*) AS cnt,age(now(), min(blocked_activity.query_start)) AS "age"
FROM pg_catalog.pg_locks blocked_locksJOIN pg_catalog.pg_stat_activity blocked_activity
ON blocked_activity.pid = blocked_locks.pidJOIN pg_catalog.pg_locks blocking_locks
ON blocking_locks.locktype = blocked_locks.locktypeAND blocking_locks.DATABASE IS NOT DISTINCT FROM blocked_locks.DATABASEAND blocking_locks.relation IS NOT DISTINCT FROM blocked_locks.relationAND blocking_locks.page IS NOT DISTINCT FROM blocked_locks.pageAND blocking_locks.tuple IS NOT DISTINCT FROM blocked_locks.tupleAND blocking_locks.virtualxid IS NOT DISTINCT FROM blocked_locks.virtualxidAND blocking_locks.transactionid IS NOT DISTINCT FROM blocked_locks.transactionidAND blocking_locks.classid IS NOT DISTINCT FROM blocked_locks.classid
270 Chapter 26. Useful Diagnostic Queries

Citus Documentation, Release 8.2
AND blocking_locks.objid IS NOT DISTINCT FROM blocked_locks.objidAND blocking_locks.objsubid IS NOT DISTINCT FROM blocked_locks.objsubidAND blocking_locks.pid != blocked_locks.pid
JOIN pg_catalog.pg_stat_activity blocking_activity ON blocking_activity.pid =→˓blocking_locks.pid
WHERE NOT blocked_locks.GRANTEDAND blocking_locks.GRANTED
GROUP BY blocked_activity.query,blocking_activity.query
ORDER BY 4) a
$cmd$);
Example output:
-------------------------------------------------------| run_command_on_workers |-------------------------------------------------------| (localhost,5433,t,"") || (localhost,5434,t,"{""update ads_102277 set name = 'new name' where id = 1; $→˓sel...||...ect * from ads_102277 where id = 1 for update; $ 1 $ 00:00:03.729519""}")→˓|-------------------------------------------------------
26.4 Querying the size of your shards
This query will provide you with the size of every shard of a given distributed table, designated here with the place-holder my_distributed_table:
SELECT *FROM run_command_on_shards('my_distributed_table', $cmd$
SELECT json_build_object('shard_name', '%1$s','size', pg_size_pretty(pg_table_size('%1$s'))
);$cmd$);
Example output:
-----------------------------------------------------------| shardid | success | result→˓ |-----------------------------------------------------------| 102008 | t | {"shard_name" : "my_distributed_table_102008", "size" : "2416 kB→˓"} || 102009 | t | {"shard_name" : "my_distributed_table_102009", "size" : "3960 kB→˓"} || 102010 | t | {"shard_name" : "my_distributed_table_102010", "size" : "1624 kB→˓"} || 102011 | t | {"shard_name" : "my_distributed_table_102011", "size" : "4792 kB→˓"} |-----------------------------------------------------------
26.4. Querying the size of your shards 271

Citus Documentation, Release 8.2
26.5 Querying the size of all distributed tables
This query gets a list of the sizes for each distributed table plus the size of their indices.
SELECTtablename,pg_size_pretty(citus_total_relation_size(tablename::text)
) AS total_sizeFROM pg_tables ptJOIN pg_dist_partition pp
ON pt.tablename = pp.logicalrelid::textWHERE schemaname = 'public';
Example output:
------------------| tablename | total_size |------------------| github_users | 39 MB || github_events | 98 MB |------------------
Note that this query works only when citus.shard_replication_factor = 1. Also there are other Citusfunctions for querying distributed table size, see Determining Table and Relation Size.
26.6 Determining Replication Factor per Table
When using Citus replication rather than PostgreSQL streaming replication, each table can have a customized “repli-cation factor.” This controls the number of redundant copies Citus keeps of each of the table’s shards. (See WorkerNode Failures.)
To see an overview of this setting for all tables, run:
SELECT logicalrelid AS tablename,count(*)/count(DISTINCT ps.shardid) AS replication_factor
FROM pg_dist_shard_placement psJOIN pg_dist_shard p ON ps.shardid=p.shardidGROUP BY logicalrelid;
Example output:
-----------------------| tablename | replication_factor |-----------------------| github_events | 1 || github_users | 1 |-----------------------
26.7 Identifying unused indices
This query will run across all worker nodes and identify any unused indexes for a given distributed table, designatedhere with the placeholder my_distributed_table:
272 Chapter 26. Useful Diagnostic Queries

Citus Documentation, Release 8.2
SELECT *FROM run_command_on_shards('my_distributed_table', $cmd$
SELECT array_agg(a) as infosFROM (SELECT (
schemaname || '.' || relname || '##' || indexrelname || '##'|| pg_size_pretty(pg_relation_size(i.indexrelid))::text|| '##' || idx_scan::text
) AS aFROM pg_stat_user_indexes uiJOIN pg_index iON ui.indexrelid = i.indexrelidWHERE NOT indisuniqueAND idx_scan < 50AND pg_relation_size(relid) > 5 * 8192AND (schemaname || '.' || relname)::regclass = '%s'::regclassORDER BY
pg_relation_size(i.indexrelid) / NULLIF(idx_scan, 0) DESC nulls first,pg_relation_size(i.indexrelid) DESC
) sub$cmd$);
Example output:
-----------------------------------------------------------| shardid | success | result→˓ |-----------------------------------------------------------| 102008 | t |→˓ || 102009 | t | {"public.my_distributed_table_102009##stupid_index_102009##28 MB→˓##0"} || 102010 | t |→˓ || 102011 | t |→˓ |-----------------------------------------------------------
26.8 Monitoring client connection count
This query will give you the connection count by each type that are open on the coordinator:
SELECT state, count(*)FROM pg_stat_activityGROUP BY state;
Exxample output:
----------| state | count |----------| active | 3 || | 1 |----------
26.8. Monitoring client connection count 273

Citus Documentation, Release 8.2
26.9 Index hit rate
This query will provide you with your index hit rate across all nodes. Index hit rate is useful in determining how oftenindices are used when querying:
SELECT nodename, result as index_hit_rateFROM run_command_on_workers($cmd$
SELECT CASE sum(idx_blks_hit)WHEN 0 THEN 'NaN'::numericELSE to_char((sum(idx_blks_hit) - sum(idx_blks_read)) / sum(idx_blks_hit + idx_
→˓blks_read), '99.99')::numericEND AS ratio
FROM pg_statio_user_indexes$cmd$);
Example output:
---------------------------------------------| nodename | index_hit_rate |---------------------------------------------| ec2-13-59-96-221.us-east-2.compute.amazonaws.com | 0.88 || ec2-52-14-226-167.us-east-2.compute.amazonaws.com | 0.89 |---------------------------------------------
274 Chapter 26. Useful Diagnostic Queries

CHAPTER 27
Common Error Messages
27.1 Failed to execute task n
This happens when a task fails due to an issue on a particular worker node. For instance, consider a query that generallysucceeds but raises an error on one of the workers:
CREATE TABLE pageviews (page_id int,good_views int,total_views int
);
INSERT INTO pageviewsVALUES (1, 50, 100), (2, 0, 0);
SELECT create_distributed_table('pageviews', 'page_id');
SELECT page_id,good_views / total_views AS goodness
FROM pageviews;
The SELECT query fails:
ERROR: failed to execute task 50STATEMENT: SELECT page_id, good_views/total_views AS goodness FROM pageviews;ERROR: XX000: failed to execute task 50LOCATION: MultiRealTimeExecute, multi_real_time_executor.c:255
To find out what’s really going on, we have to examine the database logs inside worker nodes. In our case page_id=1is stored on one worker and page_id=2 on another. The logs for the latter reveal:
ERROR: division by zeroSTATEMENT: COPY (SELECT page_id, (good_views / total_views) AS goodness FROM→˓pageviews_102480 pageviews WHERE true) TO STDOUTWARNING: division by zeroCONTEXT: while executing command on localhost:5433WARNING: 22012: division by zeroLOCATION: ReportResultError, remote_commands.c:293
That’s because total_views is zero in a row in shard pageviews_102480.
275

Citus Documentation, Release 8.2
27.1.1 Resolution
Check the database logs on worker nodes to identify which query is failing. Common real-life causes for queryfailure on workers include invalid concatenation of jsonb objects, and typecasting errors. If PgBouncer is between thecoordinator and workers, check that it is working properly as well.
27.2 Relation foo is not distributed
This is caused by attempting to join local and distributed tables in the same query.
27.2.1 Resolution
For an example, with workarounds, see JOIN a local and a distributed table.
27.3 Could not receive query results
Caused when the Router Executor on the coordinator node is unable to connect to a worker. (The Real-time Executor,on the other hand, issues Failed to execute task n in this situation.)
SELECT 1 FROM companies WHERE id = 2928;
WARNING: connection error: ec2-52-21-20-100.compute-1.amazonaws.com:5432DETAIL: no connection to the serverERROR: could not receive query results
27.3.1 Resolution
To fix, check that the worker is accepting connections, and that DNS is correctly resolving.
27.4 Canceling the transaction since it was involved in a distributeddeadlock
Deadlocks can happen not only in a single-node database, but in a distributed database, caused by queries executingacross multiple nodes. Citus has the intelligence to recognize distributed deadlocks and defuse them by aborting oneof the queries involved.
We can see this in action by distributing rows across worker nodes, and then running two concurrent transactions withconflicting updates:
CREATE TABLE lockme (id int, x int);SELECT create_distributed_table('lockme', 'id');
-- id=1 goes to one worker, and id=2 anotherINSERT INTO lockme VALUES (1,1), (2,2);
--------------- TX 1 ---------------- --------------- TX 2 ----------------BEGIN;
BEGIN;
276 Chapter 27. Common Error Messages

Citus Documentation, Release 8.2
UPDATE lockme SET x = 3 WHERE id = 1;UPDATE lockme SET x = 4 WHERE id = 2;
UPDATE lockme SET x = 3 WHERE id = 2;UPDATE lockme SET x = 4 WHERE id = 1;
ERROR: 40P01: canceling the transaction since it was involved in a distributed→˓deadlockLOCATION: ProcessInterrupts, postgres.c:2988
27.4.1 Resolution
Detecting deadlocks and stopping them is part of normal distributed transaction handling. It allows an application toretry queries or take another course of action.
27.5 Cannot establish a new connection for placement n, since DMLhas been executed on a connection that is in use
BEGIN;INSERT INTO http_request (site_id) VALUES (1337);INSERT INTO http_request (site_id) VALUES (1338);SELECT count(*) FROM http_request;
ERROR: 25001: cannot establish a new connection for placement 314, since DML has→˓been executed on a connection that is in useLOCATION: FindPlacementListConnection, placement_connection.c:612
This is a current limitation. In a single transaction Citus does not support running insert/update statements with theRouter Executor that reference multiple shards, followed by a read query that consults both of the shards.
Note: A similar error also occurs (misleadingly) when the create_distributed_table function is executed on a table bya role other than the table’s owner. See this github discussion for details. To resolve this particular problem, identifythe table’s owner, switch roles, and try again.
-- find the roleSELECT tablename, tableowner FROM pg_tables;-- switch into itSET ROLE table_owner_name;
Also note that table_owner_name must have LOGIN permissions on the worker nodes.
27.5.1 Resolution
Consider moving the read query into a separate transaction.
27.5. Cannot establish a new connection for placement n, since DML has been executed on aconnection that is in use
277

Citus Documentation, Release 8.2
27.6 Could not connect to server: Cannot assign requested address
WARNING: connection error: localhost:9703DETAIL: could not connect to server: Cannot assign requested address
This occurs when there are no more sockets available by which the coordinator can respond to worker requests.
27.6.1 Resolution
Configure the operating system to re-use TCP sockets. Execute this on the shell in the coordinator node:
sysctl -w net.ipv4.tcp_tw_reuse=1
This allows reusing sockets in TIME_WAIT state for new connections when it is safe from a protocol viewpoint.Default value is 0 (disabled).
27.7 SSL error: certificate verify failed
As of Citus 8.1, nodes are required talk to one another using SSL by default. If SSL is not enabled on a Postgresserver when Citus is first installed, the install process will enable it, which includes creating and self-signing an SSLcertificate.
However, if a root certificate authority file exists (typically in ~/.postgresql/root.crt), then the certificatewill be checked unsuccessfully against that CA at connection time. The Postgres documentation about SSL supportwarns:
For backwards compatibility with earlier versions of PostgreSQL, if a root CA file exists, the behavior ofsslmode=require will be the same as that of verify-ca, meaning the server certificate is validated againstthe CA. Relying on this behavior is discouraged, and applications that need certificate validation shouldalways use verify-ca or verify-full.
27.7.1 Resolution
Possible solutions are to sign the certificate, turn off SSL, or remove the root certificate.
27.8 Could not connect to any active placements
When all available worker connection slots are in use, further connections will fail.
WARNING: 08006: connection error: hostname:5432ERROR: XX000: could not connect to any active placementsDETAIL: FATAL: sorry, too many clients alreadyLOCATION: OpenCopyConnections, multi_copy.c:884
27.8.1 Resolution
This error happens most often when copying data into Citus in parallel. The COPY command opens up one connectionper shard. If you run M concurrent copies into a destination with N shards, that will result in M*N connections. Tosolve the error, reduce the shard count of target distributed tables, or run fewer \copy commands in parallel.
278 Chapter 27. Common Error Messages

Citus Documentation, Release 8.2
27.9 Remaining connection slots are reserved for non-replication su-peruser connections
This occurs when PostgreSQL runs out of available connections to serve concurrent client requests.
27.9.1 Resolution
The max_connections GUC adjusts the limit, with a typical default of 100 connections. Note that each connectionconsumes resources, so adjust sensibly. When increasing max_connections it’s usually a good idea to increasememory limits too.
Using PgBouncer can also help by queueing connection requests which exceed the connection limit. Citus Cloud hasa built-in PgBouncer instance, see Scaling Connections (pgBouncer) to learn how to connect through it.
27.10 PgBouncer cannot connect to server
In a self-hosted Citus cluster, this error indicates that the coordinator node is not responding to PgBouncer.
27.10.1 Resolution
Try connecting directly to the server with psql to ensure it is running and accepting connections.
27.11 Unsupported clause type
This error no longer occurs in the current version of citus. It used to happen when executing a join with an inequalitycondition:
SELECT *FROM identified_event ieJOIN field_calculator_watermark w ON ie.org_id = w.org_id
WHERE w.org_id = 42AND ie.version > w.version
LIMIT 10;
ERROR: unsupported clause type
27.11.1 Resolution
Upgrade to Citus 7.2 or higher.
27.12 Cannot open new connections after the first modification com-mand within a transaction
This error no longer occurs in the current version of citus except in certain unusual shard repair scenarios. It used tohappen when updating rows in a transaction, and then running another command which would open new coordinator-to-worker connections.
27.9. Remaining connection slots are reserved for non-replication superuser connections 279

Citus Documentation, Release 8.2
BEGIN;-- run modification command that uses one connection via-- the router executorDELETE FROM http_requestWHERE site_id = 8AND ingest_time < now() - '1 week'::interval;
-- now run a query that opens connections to more workersSELECT count(*) FROM http_request;
ERROR: cannot open new connections after the first modification command within a→˓transaction
27.12.1 Resolution
Upgrade to Citus 7.2 or higher.
27.13 Cannot create uniqueness constraint
As a distributed system, Citus can guarantee uniqueness only if a unique index or primary key constraint includes atable’s distribution column. That is because the shards are split so that each shard contains non-overlapping partitioncolumn values. The index on each worker node can locally enforce its part of the constraint.
Trying to make a unique index on a non-distribution column will generate an error:
ERROR: 0A000: cannot create constraint on "foo"DETAIL: Distributed relations cannot have UNIQUE, EXCLUDE, or PRIMARY KEY→˓constraints that do not include the partition column (with an equality operator if→˓EXCLUDE).LOCATION: ErrorIfUnsupportedConstraint, multi_utility.c:2505
Enforcing uniqueness on a non-distribution column would require Citus to check every shard on every INSERT tovalidate, which defeats the goal of scalability.
27.13.1 Resolution
There are two ways to enforce uniqueness on a non-distribution column:
1. Create a composite unique index or primary key that includes the desired column (C), but also includes thedistribution column (D). This is not quite as strong a condition as uniqueness on C alone, but will ensure thatthe values of C are unique for each value of D. For instance if distributing by company_id in a multi-tenantsystem, this approach would make C unique within each company.
2. Use a reference table rather than a hash distributed table. This is only suitable for small tables, since the contentsof the reference table will be duplicated on all nodes.
27.14 Function create_distributed_table does not exist
280 Chapter 27. Common Error Messages

Citus Documentation, Release 8.2
SELECT create_distributed_table('foo', 'id');/*ERROR: 42883: function create_distributed_table(unknown, unknown) does not existLINE 1: SELECT create_distributed_table('foo', 'id');HINT: No function matches the given name and argument types. You might need to add→˓explicit type casts.
*/
27.14.1 Resolution
When basic Citus Utility Functions are not available, check whether the Citus extension is properly installed. Running\dx in psql will list installed extensions.
One way to end up without extensions is by creating a new database in a Postgres server, which requires extensions tobe re-installed. See Creating a New Database to learn how to do it right.
27.15 STABLE functions used in UPDATE queries cannot be calledwith column references
Each PostgreSQL function is marked with a volatility, which indicates whether the function can update the database,and whether the function’s return value can vary over time given the same inputs. A STABLE function is guaranteedto return the same results given the same arguments for all rows within a single statement, while an IMMUTABLEfunction is guaranteed to return the same results given the same arguments forever.
Non-immutable functions can be inconvenient in distributed systems because they can introduce subtle changes whenrun at slightly different times across shard replicas. Differences in database configuration across nodes can also interactharmfully with non-immutable functions.
One of the most common ways this can happen is using the timestamp type in Postgres, which unliketimestamptz does not keep a record of time zone. Interpreting a timestamp column makes reference to the databasetimezone, which can be changed between queries, hence functions operating on timestamps are not immutable.
Citus forbids running distributed queries that filter results using stable functions on columns. For instance:
-- foo_timestamp is timestamp, not timestamptzUPDATE foo SET ... WHERE foo_timestamp < now();
ERROR: 0A000: STABLE functions used in UPDATE queries cannot be called with column→˓references
In this case the comparison operator < between timestamp and timestamptz is not immutable.
27.15.1 Resolution
Avoid stable functions on columns in a distributed UPDATE statement. In particular, whenever working with timesuse timestamptz rather than timestamp. Having a time zone in timestamptz makes calculations immutable.
27.15. STABLE functions used in UPDATE queries cannot be called with column references 281

Citus Documentation, Release 8.2
282 Chapter 27. Common Error Messages

CHAPTER 28
Frequently Asked Questions
28.1 Can I create primary keys on distributed tables?
Currently Citus imposes primary key constraint only if the distribution column is a part of the primary key. Thisassures that the constraint needs to be checked only on one shard to ensure uniqueness.
28.2 How do I add nodes to an existing Citus cluster?
On Citus Cloud it’s as easy as dragging a slider in the user interface. The Scaling Out (adding new nodes) section hasinstructions. In Citus Community edition you can add nodes manually by calling the master_add_node UDF with thehostname (or IP address) and port number of the new node.
Either way, after adding a node to an existing cluster it will not contain any data (shards). Citus will start assigning anynewly created shards to this node. To rebalance existing shards from the older nodes to the new node, Citus Cloud andEnterprise edition provide a shard rebalancer utility. You can find more information in the Rebalance Shards withoutDowntime section.
28.3 How does Citus handle failure of a worker node?
Citus supports two modes of replication, allowing it to tolerate worker-node failures. In the first model, we usePostgreSQL’s streaming replication to replicate the entire worker-node as-is. In the second model, Citus can replicatedata modification statements, thus replicating shards across different worker nodes. They have different advantagesdepending on the workload and use-case as discussed below:
1. PostgreSQL streaming replication. This option is best for heavy OLTP workloads. It replicates entire workernodes by continuously streaming their WAL records to a standby. You can configure streaming replicationon-premise yourself by consulting the PostgreSQL replication documentation or use Citus Cloud which is pre-configured for replication and high-availability.
2. Citus shard replication. This option is best suited for an append-only workload. Citus replicates shardsacross different nodes by automatically replicating DML statements and managing consistency. If a node goesdown, the coordinator node will continue to serve queries by routing the work to the replicas seamlessly. Toenable shard replication simply set SET citus.shard_replication_factor = 2; (or higher) beforedistributing data to the cluster.
283

Citus Documentation, Release 8.2
28.4 How does Citus handle failover of the coordinator node?
As the Citus coordinator node is similar to a standard PostgreSQL server, regular PostgreSQL synchronous replicationand failover can be used to provide higher availability of the coordinator node. Many of our customers use synchronousreplication in this way to add resilience against coordinator node failure. You can find more information about handlingCoordinator Node Failures.
28.5 How do I ingest the results of a query into a distributed table?
Citus supports the INSERT / SELECT syntax for copying the results of a query on a distributed table into a distributedtable, when the tables are co-located.
If your tables are not co-located, or you are using append distribution, there are workarounds you can use (for eg.using COPY to copy data out and then back into the destination table). Please contact us if your use-case demandssuch ingest workflows.
28.6 Can I join distributed and non-distributed tables together in thesame query?
If you want to do joins between small dimension tables (regular Postgres tables) and large tables (distributed), thenwrap the local table in a subquery. Citus’ subquery execution logic will allow the join to work. See JOIN a local anda distributed table.
28.7 Are there any PostgreSQL features not supported by Citus?
Since Citus provides distributed functionality by extending PostgreSQL, it uses the standard PostgreSQL SQL con-structs. The vast majority of queries are supported, even when they combine data across the network from multipledatabase nodes. This includes transactional semantics across nodes. Currently all SQL is supported except:
• Correlated subqueries
• Recursive CTEs
• Table sample
• SELECT . . . FOR UPDATE
• Grouping sets
• Window functions that do not include the distribution column in PARTITION BY
What’s more, Citus has 100% SQL support for queries which access a single node in the database cluster. Thesequeries are common, for instance, in multi-tenant applications where different nodes store different tenants (see Whento Use Citus).
Remember that – even with this extensive SQL coverage – data modeling can have a significant impact on queryperformance. See the section on Query Processing for details on how Citus executes queries.
284 Chapter 28. Frequently Asked Questions

Citus Documentation, Release 8.2
28.8 How do I choose the shard count when I hash-partition my data?
One of the choices when first distributing a table is its shard count. This setting can be set differently for each table,and the optimal value depends on use-case. It is possible, but difficult, to change the count after cluster creation, souse these guidelines to choose the right size.
In the Multi-Tenant Database use-case we recommend choosing between 32 - 128 shards. For smaller workloads say<100GB, you could start with 32 shards and for larger workloads you could choose 64 or 128. This means that youhave the leeway to scale from 32 to 128 worker machines.
In the Real-Time Analytics use-case, shard count should be related to the total number of cores on the workers. Toensure maximum parallelism, you should create enough shards on each node such that there is at least one shard perCPU core. We typically recommend creating a high number of initial shards, e.g. 2x or 4x the number of current CPUcores. This allows for future scaling if you add more workers and CPU cores.
To choose a shard count for a table you wish to distribute, update the citus.shard_count variable. This affectssubsequent calls to create_distributed_table. For example
SET citus.shard_count = 64;-- any tables distributed at this point will have-- sixty-four shards
For more guidance on this topic, see Choosing Cluster Size.
28.9 How do I change the shard count for a hash partitioned table?
Note that it is not straightforward to change the shard count of an already distributed table. If you need to do so, pleaseContact Us. It’s good to think about shard count carefully at distribution time, see How do I choose the shard countwhen I hash-partition my data?.
28.10 How does citus support count(distinct) queries?
Citus can evaluate count(distinct) aggregates both in and across worker nodes. When aggregating on a table’s distribu-tion column, Citus can push the counting down inside worker nodes and total the results. Otherwise it can pull distinctrows to the coordinator and calculate there. If transferring data to the coordinator is too expensive, fast approximatecounts are also available. More details in Count (Distinct) Aggregates.
28.11 In which situations are uniqueness constraints supported ondistributed tables?
Citus is able to enforce a primary key or uniqueness constraint only when the constrained columns contain the dis-tribution column. In particular this means that if a single column constitutes the primary key then it has to be thedistribution column as well.
This restriction allows Citus to localize a uniqueness check to a single shard and let PostgreSQL on the worker nodedo the check efficiently.
28.8. How do I choose the shard count when I hash-partition my data? 285

Citus Documentation, Release 8.2
28.12 How do I create database roles, functions, extensions etc in aCitus cluster?
Certain commands, when run on the coordinator node, do not get propagated to the workers:
• CREATE ROLE/USER
• CREATE FUNCTION
• CREATE TYPE
• CREATE EXTENSION
• CREATE DATABASE
• ALTER ... SET SCHEMA
• ALTER TABLE ALL IN TABLESPACE
It is still possible to use these commands by explicitly running them on all nodes. Citus provides a function to executequeries across all workers:
SELECT run_command_on_workers($cmd$/* the command to run */CREATE FUNCTION ...
$cmd$);
Learn more in Manual Query Propagation. Also note that even after manually propagating CREATE DATABASE,Citus must still be installed there. See Creating a New Database.
28.13 What if a worker node’s address changes?
If the hostname or IP address of a worker changes, you need to let the coordinator know using master_update_node:
-- update worker node metadata on the coordinator-- (remember to replace 'old-address' and 'new-address'-- with the actual values for your situation)
select master_update_node(nodeid, 'new-address', nodeport)from pg_dist_node
where nodename = 'old-address';
Until you execute this update, the coordinator will not be able to communicate with that worker for queries.
28.14 Which shard contains data for a particular tenant?
Citus provides UDFs and metadata tables to determine the mapping of a distribution column value to a particularshard, and the shard placement on a worker node. See Finding which shard contains data for a specific tenant formore details.
28.15 I forgot the distribution column of a table, how do I find it?
The Citus coordinator node metadata tables contain this information. See Finding the distribution column for a table.
286 Chapter 28. Frequently Asked Questions

Citus Documentation, Release 8.2
28.16 Can I distribute a table by multiple keys?
No, you must choose a single column per table as the distribution column. A common scenario where people want todistribute by two columns is for timeseries data. However for this case we recommend using a hash distribution ona non-time column, and combining this with PostgreSQL partitioning on the time column, as described in TimeseriesData.
28.17 Why does pg_relation_size report zero bytes for a distributedtable?
The data in distributed tables lives on the worker nodes (in shards), not on the coordinator. A true measure of dis-tributed table size is obtained as a sum of shard sizes. Citus provides helper functions to query this information. SeeDetermining Table and Relation Size to learn more.
28.18 Why am I seeing an error about max_intermediate_result_size?
Citus has to use more than one step to run some queries having subqueries or CTEs. Using Subquery/CTE Push-PullExecution, it pushes subquery results to all worker nodes for use by the main query. If these results are too large,this might cause unacceptable network overhead, or even insufficient storage space on the coordinator node whichaccumulates and distributes the results.
Citus has a configurable setting, citus.max_intermediate_result_size to specify a subquery result sizethreshold at which the query will be canceled. If you run into the error, it looks like:
ERROR: the intermediate result size exceeds citus.max_intermediate_result_size→˓(currently 1 GB)DETAIL: Citus restricts the size of intermediate results of complex subqueries and→˓CTEs to avoid accidentally pulling large result sets into once place.HINT: To run the current query, set citus.max_intermediate_result_size to a higher→˓value or -1 to disable.
As the error message suggests, you can (cautiously) increase this limit by altering the variable:
SET citus.max_intermediate_result_size = '3GB';
28.19 Can I run Citus on Heroku?
Yes, the Citus Heroku add-on provisions a Citus cluster and makes it available to a Heroku app.
28.20 Can I run Citus on Microsoft Azure?
Yes, Citus is a deployment option of Azure Database for PostgreSQL called Hyperscale. It is a fully manageddatabase-as-a-service.
28.16. Can I distribute a table by multiple keys? 287

Citus Documentation, Release 8.2
28.21 Can I run Citus on Amazon RDS?
At this time Amazon does not support running Citus directly on top of Amazon RDS.
If you are looking for something similar, Citus Cloud is our database-as-a-service which we fully manage for you. Itruns on top of AWS (like both RDS and Heroku PostgreSQL) and should provide a very similar product experience,with the addition of Citus’ horizontal scaling.
28.22 Can I use Citus with my existing AWS account?
Yes, Citus Cloud on the AWS Marketplace allows you to provision a Citus Cloud cluster directly through AmazonWeb Services.
28.23 Can I shard by schema on Citus for multi-tenant applications?
It turns out that while storing each tenant’s information in a separate schema can be an attractive way to start whendealing with tenants, it leads to problems down the road. In Citus we partition by the tenant_id, and a shard cancontain data from several tenants. To learn more about the reason for this design, see our article Lessons learned fromPostgreSQL schema sharding.
28.24 How does cstore_fdw work with Citus?
Citus treats cstore_fdw tables just like regular PostgreSQL tables. When cstore_fdw is used with Citus, each logicalshard is created as a foreign cstore_fdw table instead of a regular PostgreSQL table. If your cstore_fdw use case issuitable for the distributed nature of Citus (e.g. large dataset archival and reporting), the two can be used to providea powerful tool which combines query parallelization, seamless sharding and HA benefits of Citus with superiorcompression and I/O utilization of cstore_fdw.
28.25 What happened to pg_shard?
The pg_shard extension is deprecated and no longer supported.
Starting with the open-source release of Citus v5.x, pg_shard’s codebase has been merged into Citus to offer you aunified solution which provides the advanced distributed query planning previously only enjoyed by CitusDB cus-tomers while preserving the simple and transparent sharding and real-time writes and reads pg_shard brought to thePostgreSQL ecosystem. Our flagship product, Citus, provides a superset of the functionality of pg_shard and we havemigration steps to help existing users to perform a drop-in replacement. Please contact us for more information.
288 Chapter 28. Frequently Asked Questions

CHAPTER 29
Related Articles
29.1 Introducing Citus Add-on for Heroku: Scale out your Postgres
(Copy of original publication)
Just as Heroku has made it simple for you to deploy applications, at Citus Data we aim to make it simple for you toscale out your Postgres database.
Once upon a time at Heroku, it all started with git push heroku master. Later, the team at Heroku made iteasy to add any service you could want within your app via heroku addons:create foo. The simplicity ofdragging a slider to scale up your dynos is the type of awesome customer experience we strive to create at Citus. WithCitus Cloud (our fully-managed database as a service), you can simply drag and save—then voila, you’ve scaled theresources to your database.
Today we are excited to announce our Citus add-on for Heroku. Now with heroku addons:create citus youcan get a database that scales out just as easily as your app does.
Fig. 29.1: Citus console provisioning slider
When running Postgres on a single node, the need to scale out can occur anywhere from 100 GB of data up to 1 TB.If you’re running Postgres already, then Citus is a natural fit. With Citus you’ll get much of the experience you expecton Heroku, coupled with the ability to keep scaling out your database. Let’s take a deeper look at a few of the featuresavailable for the Citus add-on.
29.1.1 Continuous protection and monitoring with Citus Cloud
Citus leverages the same underlying tools as Heroku Postgres for continuous protection. In fact, the team that runsCitus Cloud is the founding engineering team from Heroku Postgres.
With continuous protection, Citus takes incremental backups of your database every minute. From there our controlplane then monitors your database every 30 seconds to make sure your database is healthy and active. If anything goeswrong, our Citus state machine begins a series of automated processes to restore availability. If our systems determineit’s needed, we may perform an HA failover or disaster recovery, leveraging the continuous protection and frequentincremental backups to ensure your data is still safe.
I like to say that we wear the pager for you, to keep you up and running. So you can focus on your app, not yourdatabase.
289

Citus Documentation, Release 8.2
29.1.2 The insights you need
When managing an app, there can be a lot to juggle: there are endless options for metrics and what to pay attentionto. Many of the standard best practices for Postgres performance apply—most importantly, I always recommend youpay attention to your cache hit rate and index hit rate, both of which we make available for you in the Citus Clouddashboard.
We also make it easy for you to centralize your logs into any one of the Heroku add-on providers of your choosing. Todo this you can create a new secure TLS drain which will send the logs from all Citus database nodes to your loggingsystem.
Finally, with Citus, you get insights into system level metrics such as disk i/o, network i/o, and perhaps most key, theCPU load:
29.1.3 Granular access control in Citus Cloud
We know that Heroku makes it easy to add new collaborators to your app. And when it comes to your database youmay want to grant access to users that are a bit less familiar with a CLI—or perhaps you don’t want some of yourusers to have full access to your Heroku app. With Citus Cloud, you can add new users and restrict their permissionshowever you see fit. Want to allow inserts but not deletes? Done. Want them to only have read-only permissions?Done. You have the ultimately flexibility to control roles how you see fit.
29.1.4 Scale out Postgres on Heroku today
At Citus we get that flexibility matters. So we’re making it simple for you by allowing custom Citus add-on plans tobe created. If you don’t see the Heroku add-on plan that makes sense for you, just let us or let the Heroku team know
290 Chapter 29. Related Articles

Citus Documentation, Release 8.2
and we’ll make sure to get it created and available for you.
We want scaling your Postgres database on Heroku to be as easy as scaling your Heroku app. Which is why we’reexcited to roll out the Citus add-on to help you grow. If you’re using Heroku Postgres and are looking for scale, givethe Citus add-on for Heroku a try today.
29.2 Efficient Rollup Tables with HyperLogLog in Postgres
(Copy of original publication)
Rollup tables are commonly used in Postgres when you don’t need to perform detailed analysis, but you still need toanswer basic aggregation queries on older data.
With rollup tables, you can pre-aggregate your older data for the queries you still need to answer. Then you no longerneed to store all of the older data, rather, you can delete the older data or roll it off to slower storage—saving spaceand computing power.
Let’s walk through a rollup table example in Postgres without using HLL.
29.2.1 Rollup tables without HLL—using GitHub events data as an example
For this example we will create a rollup table that aggregates historical data: a GitHub events data set.
Each record in this GitHub data set represents an event created in GitHub, along with key information regarding theevent such as event type, creation date, and the user who created the event. (Craig Kerstiens has written about thissame data set in the past, in his getting started with GitHub event data on Citus post.)
If you want to create a chart to show the number of GitHub event creations in each minute, a rollup table would besuper useful. With a rollup table, you won’t need to store all user events in order to create the chart. Rather, you canaggregate the number of event creations for each minute and just store the aggregated data. You can then throw awaythe rest of the events data, if you are trying to conserve space.
To illustrate the example above, let’s create github_events table and load data to the table:
CREATE TABLE github_events(
event_id bigint,event_type text,event_public boolean,repo_id bigint,payload jsonb,repo jsonb,user_id bigint,org jsonb,created_at timestamp
);
\COPY github_events FROM events.csv CSV
In this example, I’m assuming you probably won’t perform detailed analysis on your older data on a regular basis. Sothere is no need to allocate resources for the older data, instead you can use rollup tables and just keep the necessaryinformation in memory. You can create a rollup table for this purpose:
CREATE TABLE github_events_rollup_minute(
created_at timestamp,
29.2. Efficient Rollup Tables with HyperLogLog in Postgres 291

Citus Documentation, Release 8.2
event_count bigint);
And populate with INSERT/SELECT:
INSERT INTO github_events_rollup_minute(created_at,event_count
)SELECT
date_trunc('minute', created_at) AS created_at,COUNT(*) AS event_count
FROM github_eventsGROUP BY 1;
Now you can store the older (and bigger) data in a less expensive resource like disk so that you can access it inthe future—and keep the github_events_rollup_minute table in memory so you can create your analyticsdashboard.
By aggregating the data by minute in the example above, you can answer queries like hourly and daily total eventcreations, but unfortunately it is not possible to know the more granular event creation count for each second.
Further, since you did not keep event creations for each user separately (at least not in this example), you cannot havea separate analysis for each user with this rollup table. All off these are trade-offs.
29.2.2 Without HLL, rollup tables have a few limitations
For queries involving distinct count, rollup tables are less useful. For example, if you pre-aggregate over minutes, youcannot answer queries asking for distinct counts over an hour. You cannot add each minute’s result to have hourlyevent creations by unique users. Why? Because you are likely to have overlapping records in different minutes.
And if you want to calculate distinct counts constrained by combinations of columns, you would need multiple rolluptables.
Sometimes you want to get event creation count by unique users filtered by date and sometimes you want to get uniqueevent creation counts filtered by event type (and sometimes a combination of both.) With HLL, one rollup table cananswer all of these queries—but without HLL, you would need a separate rollup table for each of these different typesof queries.
29.2.3 HLL to the rescue
If you do rollups with the HLL data type (instead of rolling up the final unique user count), you can easily overcomethe overlapping records problem. HLL encodes the data in a way that allows summing up individual unique countswithout re-counting overlapping records.
HLL is also useful if you want to calculate distinct counts constrained by combinations of columns. For example, ifyou want to get unique event creation counts per date and/or per event type, with HLL, you can use just one rolluptable for all combinations.
Whereas without HLL, if you want to calculate distinct counts constrained by combinations of columns, you wouldneed to create:
• 7 different rollup tables to cover all combinations of 3 columns
• 15 rollup tables to cover all combinations of 4 columns
• 2n - 1 rollup tables to cover all combinations in n columns
292 Chapter 29. Related Articles

Citus Documentation, Release 8.2
29.2.4 HLL and rollup tables in action, together
Let’s see how HLL can help us to answer some typical distinct count queries on GitHub events data. If you did notcreate a github_events table in the previous example, create and populate it now with the GitHub events data set:
CREATE TABLE github_events(
event_id bigint,event_type text,event_public boolean,repo_id bigint,payload jsonb,repo jsonb,user_id bigint,org jsonb,created_at timestamp
);
\COPY github_events FROM events.csv CSV
After creating your table, let’s also create a rollup table. We want to get distinct counts both per user and perevent_type basis. Therefore you should use a slightly different rollup table:
DROP TABLE IF EXISTS github_events_rollup_minute;
CREATE TABLE github_events_rollup_minute(created_at timestamp,event_type text,distinct_user_id_count hll
);
Finally, you can use INSERT/SELECT to populate your rollup table and you can use hll_hash_bigint functionto hash each user_id. (For an explanation of why you need to hash elements, be sure to read our Citus blog post ondistributed counts with HyperLogLog on Postgres):
INSERT INTO github_events_rollup_minute(created_at,event_type,distinct_user_id_count
)SELECT
date_trunc('minute', created_at) AS created_at,event_type,sum(hll_hash_bigint(user_id))
FROM github_eventsGROUP BY 1, 2;
INSERT 0 2484
29.2.5 What kinds of queries can HLL answer?
Let’s start with a simple case to see how to materialize HLL values to actual distinct counts. To demonstrate that, wewill answer the question:
How many distinct users created an event for each event type at each minute at 2016-12-01 05:35:00?
29.2. Efficient Rollup Tables with HyperLogLog in Postgres 293
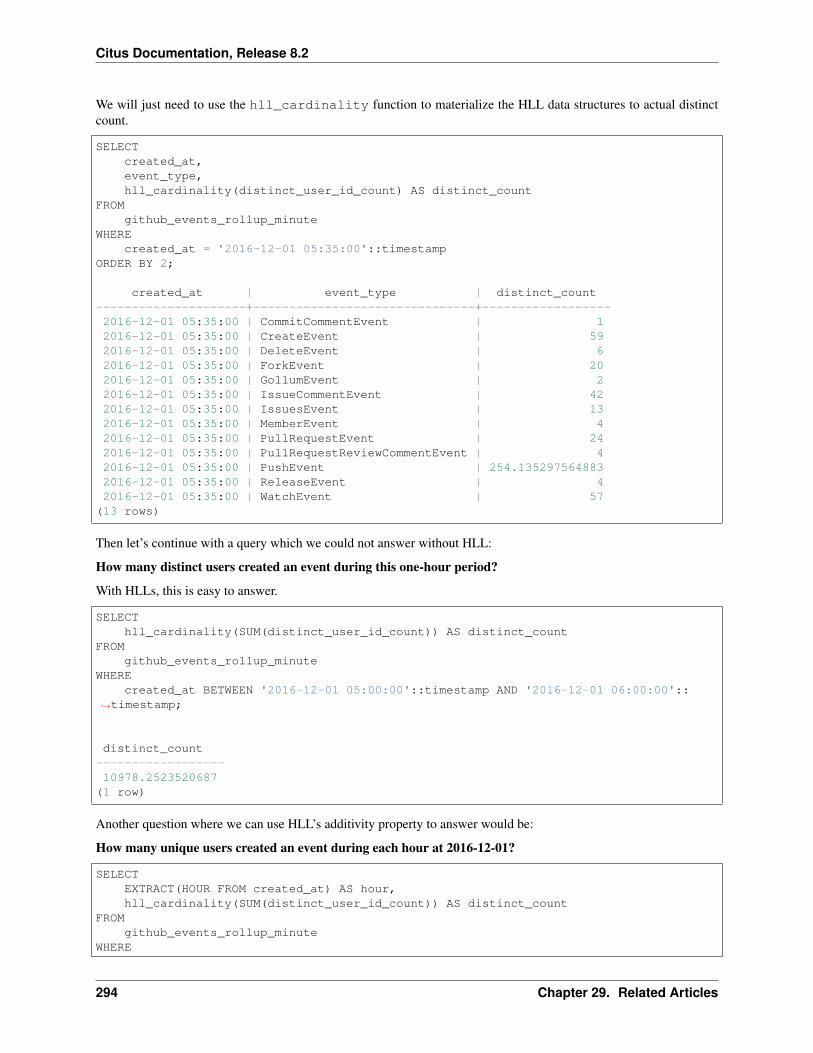
Citus Documentation, Release 8.2
We will just need to use the hll_cardinality function to materialize the HLL data structures to actual distinctcount.
SELECTcreated_at,event_type,hll_cardinality(distinct_user_id_count) AS distinct_count
FROMgithub_events_rollup_minute
WHEREcreated_at = '2016-12-01 05:35:00'::timestamp
ORDER BY 2;
created_at | event_type | distinct_count---------------------+-------------------------------+------------------2016-12-01 05:35:00 | CommitCommentEvent | 12016-12-01 05:35:00 | CreateEvent | 592016-12-01 05:35:00 | DeleteEvent | 62016-12-01 05:35:00 | ForkEvent | 202016-12-01 05:35:00 | GollumEvent | 22016-12-01 05:35:00 | IssueCommentEvent | 422016-12-01 05:35:00 | IssuesEvent | 132016-12-01 05:35:00 | MemberEvent | 42016-12-01 05:35:00 | PullRequestEvent | 242016-12-01 05:35:00 | PullRequestReviewCommentEvent | 42016-12-01 05:35:00 | PushEvent | 254.1352975648832016-12-01 05:35:00 | ReleaseEvent | 42016-12-01 05:35:00 | WatchEvent | 57
(13 rows)
Then let’s continue with a query which we could not answer without HLL:
How many distinct users created an event during this one-hour period?
With HLLs, this is easy to answer.
SELECThll_cardinality(SUM(distinct_user_id_count)) AS distinct_count
FROMgithub_events_rollup_minute
WHEREcreated_at BETWEEN '2016-12-01 05:00:00'::timestamp AND '2016-12-01 06:00:00'::
→˓timestamp;
distinct_count------------------10978.2523520687
(1 row)
Another question where we can use HLL’s additivity property to answer would be:
How many unique users created an event during each hour at 2016-12-01?
SELECTEXTRACT(HOUR FROM created_at) AS hour,hll_cardinality(SUM(distinct_user_id_count)) AS distinct_count
FROMgithub_events_rollup_minute
WHERE
294 Chapter 29. Related Articles

Citus Documentation, Release 8.2
created_at BETWEEN '2016-12-01 00:00:00'::timestamp AND '2016-12-01 23:59:59'::→˓timestampGROUP BY 1ORDER BY 1;
hour | distinct_count-------+------------------
5 | 10598.6371848996 | 17343.28469316877 | 18182.56998166228 | 12663.9497604266
(4 rows)
Since our data is limited, the query only returned 4 rows, but that is not the point of course. Finally, let’s answer a finalquestion:
How many distinct users created a PushEvent during each hour?
SELECTEXTRACT(HOUR FROM created_at) AS hour,hll_cardinality(SUM(distinct_user_id_count)) AS distinct_push_count
FROMgithub_events_rollup_minute
WHEREcreated_at BETWEEN '2016-12-01 00:00:00'::timestamp AND '2016-12-01 23:59:59'::
→˓timestampAND event_type = 'PushEvent'::text
GROUP BY 1ORDER BY 1;
hour | distinct_push_count------+---------------------
5 | 6206.615864985466 | 9517.805421003967 | 10370.40876401668 | 7067.26073810357
(4 rows)
29.2.6 A rollup table with HLL is worth a thousand rollup tables without HLL
Yes, I believe a rollup table with HLL is worth a thousand rollup tables without HLL.
Well, maybe not a thousand, but it is true that one rollup table with HLL can answer lots of queries where otherwiseyou would need a different rollup table for each query. Above, we demonstrated that with HLL, 4 example queriesall can be answered with a single rollup table— and without HLL, we would have needed 3 separate rollup tables toanswer all these queries.
In the real world, if you do not take advantage of HLL you are likely to need even more rollup tables to support youranalytics queries. Basically for all combinations of n constraints, you would need 2n - 1 rollup tables whereas withHLL just one rollup table can do the job.
One rollup table (with HLL) is obviously much easier to maintain than multiple rollup tables. And that one rolluptable uses significantly less memory too. In some cases, without HLL, the overhead of using rollup tables can becometoo expensive and exceeds the benefit of using rollup tables, so people decide not to use rollup tables at all.
29.2. Efficient Rollup Tables with HyperLogLog in Postgres 295

Citus Documentation, Release 8.2
29.2.7 Want to learn more about HLL in Postgres?
HLL is not only useful to create rollup tables, HLL is useful in distributed systems, too. Just as with rollup tables, ina distributed system, such as Citus, we often place different parts of our data in different nodes, hence we are likely tohave overlapping records at different nodes. Thus, the clever techniques HLL uses to encode data to merge separateunique counts (and address the overlapping record problem) can also help in distributed systems.
If you want to learn more about HLL, read how HLL can be used in distributed systems, where we explained theinternals of HLL and how HLL merges separate unique counts without counting overlapping records.
29.3 Distributed Distinct Count with HyperLogLog on Postgres
(Copy of original publication)
Running SELECT COUNT(DISTINCT) on your database is all too common. In applications it’s typical to havesome analytics dashboard highlighting the number of unique items such as unique users, unique products, uniquevisits. While traditional SELECT COUNT(DISTINCT) queries works well in single machine setups, it is a difficultproblem to solve in distributed systems. When you have this type of query, you can’t just push query to the workersand add up results, because most likely there will be overlapping records in different workers. Instead you can do:
• Pull all distinct data to one machine and count there. (Doesn’t scale)
• Do a map/reduce. (Scales but it’s very slow)
This is where approximation algorithms or sketches come in. Sketches are probabilistic algorithms which can generateapproximate results efficiently within mathematically provable error bounds. There are a many of them out there, buttoday we’re just going to focus on one, HyperLogLog or HLL. HLL is very successfull for estimating unique numberof elements in a list. First we’ll look some at the internals of the HLL to help us understand why HLL algorithm isuseful to solve distict count problem in a scalable way, then how it can be applied in a distributed fashion. Then wewill see some examples of HLL usage.
29.3.1 What does HLL do behind the curtains?
Hash all elements
HLL and almost all other probabilistic counting algorithms depend on uniform distribution of the data. Since in thereal world, our data is generally not distributed uniformly, HLL firsts hashes each element to make the data distributionmore uniform. Here, by uniform distribution, we mean that each bit of the element has 0.5 probability of being 0 or 1.We will see why this is useful in couple of minutes. Apart from uniformity, hashing allows HLL to treat all data typessame. As long as you have a hash function for your data type, you can use HLL for cardinality estimation.
Observe the data for rare patterns
After hashing all the elements, HLL looks for the binary representation of each hashed element. It mainly looks ifthere are bit patterns which are less likely to occur. Existence of such rare patterns means that we are dealing withlarge dataset.
For this purpose, HLL looks number of leading zero bits in the hash value of each element and finds maximum numberof leading zero bits. Basically, to be able to observe k leading zeros, we need 2k+1 trials (i.e. hashed numbers).Therefore, if maximum number of leading zeros is k in a data set, HLL concludes that there are approximately 2k+1distinct elements.
This is pretty straightforward and simple estimation method. However; it has some important properties, which areespecially shine in distributed environment;
296 Chapter 29. Related Articles

Citus Documentation, Release 8.2
• HLL has very low memory footprint. For maximum number n, we need to store just log log n bits. For example;if we hash our elements into 64 bit integers, we just need to store 6 bits to make an estimation. This saves a lotof memory especially compared with naive approach where we need to remember all the values.
• We only need to do one pass on the data to find maximum number of leading zeros.
• We can work with streaming data. After calculating maximum number of leading zeros, if some new data arriveswe can include them into calculation without going over whole data set. We only need to find number of leadingzeros of each new element, compare them with maximum number of leading zeros of whole dataset and updatemaximum number of leading zeros if necessary.
• We can merge estimations of two separate datasets efficiently. We only need to pick bigger number of leadingzeros as maximum number of leading zeros of combined dataset. This allow us to separate the data into shards,estimate their cardinality and merge the results. This is called additivity and it allow us to use HLL in distributedsystems.
Stochastic Averaging
If you think above is not that good estimation, you are right. First of all, our prediction is always in the form of 2k.Secondly we may end up with pretty far estimates if the data distribution is not uniform enough.
One possible fix for these problems could be just repeating the process with different hash functions and taking theaverage, which would work fine but hashing all the data multiple times is expensive. HLL fixes this problem somethingcalled stochastic averaging. Basically, we divide our data into buckets and use aforementioned algorithm for eachbucket separately. Then we just take the average of the results. We use first few bits of the hash value to determinewhich bucket a particular element belongs to and use remaining bits to calculate maximum number of leading zeros.
Moreover, we can configure precision by choosing number of buckets to divide the data. We will need to store loglog n bits for each bucket. Since we can store each estimation in log log n bits, we can create lots of buckets andstill end up using insignificant amount of memory. Having such small memory footprint is especially important whileoperating on large scale data. To merge two estimations, we will merge each bucket then take the average. Therefore,if we plan to do merge operation, we should keep each bucket’s maximum number of leading zeros.
More?
HLL does some other things too to increase accuracy of the estimation, however observing bit patterns and stochasticaveraging is the key points of HLL. After these optimizations, HLL can estimate cardinality of a dataset with typicalerror rate 2% error rate using 1.5 kB of memory. Of course is is possible to increase accuracy by using more memory.We will not go into details of other steps but there are tons of content on the internet about HLL.
29.3.2 HLL in distributed systems
As we mentioned, HLL has additivity property. This means you can divide your dataset into several parts, operate onthem with HLL algorithm to find unique element count of each part. Then you can merge intermediate HLL resultsefficiently to find unique element count of all data without looking back to original data.
If you work on large scale data and you keep parts of your data in different physical machines, you can use HLL tocalculate unique count over all your data without pulling whole data to one place. In fact, Citus can do this operationfor you. There is a HLL extension developed for PostgreSQL and it is fully compatible with Citus. If you have HLLextension installed and want to run COUNT(DISTINCT) query on a distributed table, Citus automatically uses HLL.You do not need to do anything extra once you configured it.
29.3. Distributed Distinct Count with HyperLogLog on Postgres 297

Citus Documentation, Release 8.2
29.3.3 Hands on with HLL
Setup
To play with HLL we will use Citus Cloud and GitHub events data. You can see and learn more about Citus Cloudand this data set from here. Assuming you created your Citus Cloud instance and connected it via psql, you can createHLL extension by;
CREATE EXTENSION hll;
You should create the extension at master and all workers. Then enable count distinct approximations by setting thecitus.count_distinct_error_rate configuration value. Lower values for this configuration setting are expected to givemore accurate results but take more time and use more memory for computation. We recommend setting this to 0.005.
SET citus.count_distinct_error_rate TO 0.005;
Different from previous blog post, we will only use github_events table and we will use large_events.csv data set;
CREATE TABLE github_events(
event_id bigint,event_type text,event_public boolean,repo_id bigint,payload jsonb,repo jsonb,user_id bigint,org jsonb,created_at timestamp
);
SELECT create_distributed_table('github_events', 'user_id');
\COPY github_events FROM large_events.csv CSV
Examples
After distributing the table, we can use regular COUNT(DISTINCT) query to find out how many unique users createdan event;
SELECTCOUNT(DISTINCT user_id)
FROMgithub_events;
It should return something like this;
count--------264227
(1 row)
It looks like this query does not have anything with HLL. However if you set citus.count_distinct_error_rate to some-thing bigger than 0 and issue COUNT(DISTINCT) query; Citus automatically uses HLL. For simple use-cases like
298 Chapter 29. Related Articles

Citus Documentation, Release 8.2
this, you don’t even need to change your queries. Exact distinct count of users who created an event is 264198, so ourerror rate is little bigger than 0.0001.
We can also use constraints to filter out some results. For example we can query number of unique users who createda PushEvent;
SELECTCOUNT(DISTINCT user_id)
FROMgithub_events
WHEREevent_type = 'PushEvent'::text;
It would return;
count--------157471
(1 row)
Similarly exact distinct count for this query is 157154 and our error rate is little bigger than 0.002.
Conclusion
If you’re having trouble scaling count (distinct) in Postgres give HLL a look it may be useful if close enoughcounts ares feasible for you.
29.4 How to Scale PostgreSQL on AWS: Learnings from Citus Cloud
(Copy of original publication)
One challenge associated with building a distributed relational database (RDBMS) is that they require notable effortto deploy and operate. To remove these operational barriers, we had been thinking about offering Citus as a manageddatabase for a long time.
Naturally, we were also worried that providing a native database offering on AWS could split our startup’s focus andtake up significant engineering resources. (Honestly, if the founding engineers of the Heroku PostgreSQL team didn’tjoin Citus, we might have decided to wait on this.) Since making Citus Cloud publicly available, we are now morebullish on the cloud then ever.
It turns out that targeting an important use case for your customers and delivering it to them in a way that removestheir pain points, matters more than anything else. In this article, we’ll only focus on removing operational pain pointsand not on use cases: Why is cloud changing the way databases are delivered to customers? What AWS technologiesCitus Cloud is using to enable that in a unique way?
The following sections highlight our learnings from talking to hundreds of prospective customers. Early on, we thoughtthat our customers were asking for something that was more magical than attainable – Citus should handle failoversin a way that’s transparent to the application, elastically scale up and scale out, take automatic backups for disasterrecovery, have monitoring and alarms built in, and provide patches and upgrades with no downtime.
We then started breaking down each customer conversation into smaller pieces and found that our customers had sevenoperational pain points. In the following, we’re going to talk about each one of these seven points as a mini-learning.Although we describe these learnings in the context of PostgreSQL, Citus, and AWS, they are also applicable to otherdatabases and cloud vendors.
29.4. How to Scale PostgreSQL on AWS: Learnings from Citus Cloud 299

Citus Documentation, Release 8.2
Since Citus is an extension to PostgreSQL (not a fork), it makes sense to start with a pain most PostgreSQL usershave.
29.4.1 1. High Availability
PostgreSQL provides streaming replication as a way to provide high availability since its v9.0 release. Streamingreplication works by designating one PostgreSQL instance as the primary node. The primary node takes all writesand executes all changes against the database. It then ships those changes to one or more secondary nodes for them toapply.
When you talk to users who use streaming replication in production, they express two pain points with it. The firstis the complexity associated with it: it takes twelve steps to setup streaming replication, and you may also need tounderstand concepts such as the number of wal segments and replication lag in the process.
The second and more important one relates to auto failover. If the primary node fails, how do you detect the failure andpromote a secondary to be the new primary? (In distributed systems, this is also known as the leader election problem.)To enable this, you need a monitoring component that watches the primary and secondary nodes and reliably initiatestheir failovers.
A common way to do that is through integrating PostgreSQL streaming replication with a distributed synchronizationsolution such as etcd or ZooKeeper. In fact, open source solutions such as Governor and Patroni aim to do just that.That said, this integration again comes with a complexity cost. You now need to have someone in your organizationwho understands these systems – so that you can resolve any issues should they come up in production.
29.4.2 2. Effortless Failovers
Once the underlying HA solution provides auto failover capabilities, the next question becomes this: “My PostgreSQLdriver / ORM tool talks to an IP address. When the primary node changes, do I need to add logic into my application
300 Chapter 29. Related Articles

Citus Documentation, Release 8.2
to detect this failover?”
PostgreSQL has a massive ecosystem that supports many programming languages and frameworks. And most Post-greSQL clients don’t have a mechanism to automatically retry different endpoints in case of a failure. This eithermeans that the user would need to implement this logic into their application or the underlying database provides it forthem.
Fortunately, AWS provides powerful software defined networking (SDN) primitives. You can therefore start by at-taching an elastic IP to the primary node. When your monitoring agent promotes a new secondary, you can detach thiselastic IP from the old primary and attach it to the newly promoted machine. This way, the application doesn’t needto change the endpoint it talks to – it happens magically.
Having a powerful SDN stack also helps with consistency. When the monitoring agent decides to failover the primarynode, it can ask the networking layer to no longer send traffic to the old primary. This is also known as fencing –making sure that you disabled the old primary for all clients so that your data doesn’t diverge.
29.4.3 3. Vertical Scalability
Another feature request that we hear from customers is vertical scalability. For example, you may want to instantlyscale up CPU and memory resources on your database before you scale out. AWS’ Elastic Block Storage (EBS)enables you to quickly detach from one EC2 instance and attach to another instance that has more resources.
EBS also provides security and availability benefits. When an EC2 instance observes a temporary failure, one forexample requires an instance restart, you don’t have any guarantees on whether you will get the same instance back
29.4. How to Scale PostgreSQL on AWS: Learnings from Citus Cloud 301

Citus Documentation, Release 8.2
(or someone else will). With an EBS volume, you can encrypt the data at rest and securely wipe out an EBS volumebefore terminating it.
One known drawback to attaching storage over the network, instead of using your local storage, is performance. Ifyour working set doesn’t fit into memory, your database will pay the penalty of constantly fetching data over thenetwork. Further, as your business grows, your expectations from the underlying database will continue to increase.In that case, you will need your database to scale out.
29.4.4 4. Horizontal Scalability
Deploying a distributed RDBMS into production requires a good understanding of both relational databases and dis-tributed systems. This knowledge becomes important in two ways:
1. Data modeling: When you’re modeling your data for a distributed environment, you need to pick the rightsharding keys for your tables for example.
2. Operational: You need to set up multiple instances and the networking layer between them. More importantly,you need to have an understanding of load management and networking so that you can take the right action.
Running your database on the cloud removes significant operational burden associated with deploying a distributedRDBMS. In particular, Citus Cloud can differentiate between temporary and permanent failures by tracking historical
302 Chapter 29. Related Articles

Citus Documentation, Release 8.2
networking data. It can also deprovision faulty instances and start up new ones in their place, without any involvementfrom the user. Further, if your database needs to more power, you can elastically add more machines to your cluster.
Other operational benefits show themselves with high read/write throughputs. For example, you may need yourapplication to talk to multiple endpoints instead of just one. In this case, Citus Cloud can set up DNS in front ofyour database instances and configure PgBouncer to make sure that your distributed database stays within reasonableconnection limits. The following shows a simplified architecture diagram.
29.4.5 5. Automatic Backups for Disaster Recovery
If your relational database powers your core business, and acts as your system of record, you need to take regularbackups and store those backups in a highly durable location. This way, when the unexpected happens, you canresume your business and not lose it. Therefore, an integrated solution for disaster recovery is among the top featurerequests prospective Citus customers ask for.
The thing about database backups is that they are hard to get right. Fortunately, PostgreSQL has a rich ecosystem andcomes with open source technologies for automatic backups. For example, wal-e encrypts and continuously archivesyour data to a durable storage service, such as S3. In other words, wal-e make sure that your backup solution does theright thing, and cloud service providers make sure that your backups don’t get lost.
29.4. How to Scale PostgreSQL on AWS: Learnings from Citus Cloud 303

Citus Documentation, Release 8.2
For Citus backups, wal-e helps with part of the picture. Taking distributed database backups are even harder. In thiscase, it helps when the author of wal-e also happens to be part of the Citus Cloud team. This way, when you deploy aCitus Cloud formation, we can automatically set up regular backups for your distributed database.
29.4.6 6. Monitoring, Alerts, and Logging
An important part of running a relational database in production includes monitoring your database, alerting on anoma-lies, and setting up a unified logging infrastructure. This seems simple at first, but setting up this infrastructure usuallytakes time to set up and operate.
At a minimum, you need to decide on the type of metrics you’d like to track. Some common ones include hardwaremetrics (such as CPU, memory, network), OS level statistics (VM, RSS, page faults), PostgreSQL metrics (pg_statviews, table and index hit ratios), and active and long running queries.
Once you decide on these metrics, you need to have a daemon that periodically collects these metrics, a solution toserialize and store these metrics, and a visualization layer to display them. A common stack that accomplishes thiscan run collectd on database instances, Graphite to store them, and Grafana to display them.
304 Chapter 29. Related Articles

Citus Documentation, Release 8.2
If you’re thinking of setting up a monitoring infrastructure for PostgreSQL, two good resources to read are Com-pose’s blog post on monitoring PostgreSQL and Sebastien’s presentation at PGConf.EU on Watching Elephants. It’salso worth looking at projects that take a more PostgreSQL centric approach to monitoring, such as PgBadger andpganalyze.
Naturally, setting up a monitoring and logging infrastructure for a distributed RDBMS requires more effort than asingle node one. In this case, we were lucky to have pganalyze’s author as part of the Citus Cloud team. We alsoonly needed to provide this only on the AWS platform and that helped us deliver production-grade monitoring muchsimple.
29.4. How to Scale PostgreSQL on AWS: Learnings from Citus Cloud 305

Citus Documentation, Release 8.2
29.4.7 7. Auto-configure, patch, and upgrade
Most PostgreSQL power users have three more questions when it comes to running their database in production:configuration, deploying security and bug fix patches, and upgrading a database to a new version – preferably with nodowntime.
If you have a solid DBA, they are already turning these knobs for you and deploying new versions without you knowingabout it. If you don’t, The Accidental DBA tutorial provides a good introduction on these topics. That said, you willneed to keep on learning more as your database’s scale increases. And with bigger scale, tuning the right settings inpostgresql.conf, deploying patches, and upgrading to newer versions will become more important and require deeperdatabase know-how.
Providing a database on the cloud significantly helps deploying patches and new versions – since Citus Cloud hashundreds of these machines running in production, we can automate how to deploy new versions in the way they shouldbe. Citus Cloud can also override certain postgresql.conf fields by examining the underlying hardware configurationand workload characteristics.
29.4.8 Conclusion
When we started Citus, we used to think that databases were about databases and we just needed to scale out theRDBMS. After talking to hundreds of customers, we realized that databases were also about native integration withapplications, use cases, and operations.
At Citus, as we provided better integration with PostgreSQL drivers and tools, and focused on use cases, we startedhearing more questions on the operational components. The seven questions above became part of everyday conver-sation.
306 Chapter 29. Related Articles

Citus Documentation, Release 8.2
And answering these questions without offering costly services and training work was hard. When a prospectivecustomer asked us about how to handle failover without changing IP addresses, take automatic backups, integratewith monitoring and logging tools, upgrade their PostgreSQL version with no downtime, or elastically scale out theircluster by adding more machines, we’d tell them about the work involved. In fact, there were calls where we quoted$300K for the services work, and never heard from that user again.
That’s the really exciting part about Citus Cloud. These days, when we hear the same questions, we smile and ask ourusers to simply click a button. Behind the covers, Citus Cloud deploys a production grade distributed database, onethat natively integrates with PostgreSQL. What was once only accessible to large enterprises with solutions such asOracle RAC, is now becoming accessible to everyone with open source technologies like PostgreSQL and Citus, andthe cloud.
29.5 Postgres Parallel Indexing in Citus
(Copy of original publication)
Indexes are an essential tool for optimizing database performance and are becoming ever more important with bigdata. However, as the volume of data increases, index maintenance often becomes a write bottleneck, especially foradvanced index types which use a lot of CPU time for every row that gets written. Index creation may also becomeprohibitively expensive as it may take hours or even days to build a new index on terabytes of data in PostgreSQL.Citus makes creating and maintaining indexes that much faster through parallelization.
Citus can be used to distribute PostgreSQL tables across many machines. One of the many advantages of Citus is thatyou can keep adding more machines with more CPUs such that you can keep increasing your write capacity even ifindexes are becoming the bottleneck. Citus allows CREATE INDEX to be performed in a massively parallel fashion,allowing fast index creation on large tables. Moreover, the COPY command can write multiple rows in parallel whenused on a distributed table, which greatly improves performance for use-cases which can use bulk ingestion (e.g.sensor data, click streams, telemetry).
To show the benefits of parallel indexing, we’ll walk through a small example of indexing ~200k rows containing largeJSON objects from the GitHub archive. To run the examples, we set up a formation using Citus Cloud consisting offour worker nodes with four cores each, running PostgreSQL 9.6.
You can download the sample data by running the following commands:
wget http://examples.citusdata.com/github_archive/github_events-2015-01-01-{0..24}.→˓csv.gzgzip -d github_events-*.gz
Next let’s create the table for the GitHub events once as a regular PostgreSQL table and then distribute it across thefour nodes:
CREATE TABLE github_events (event_id bigint,event_type text,event_public boolean,repo_id bigint,payload jsonb,repo jsonb,actor jsonb,org jsonb,created_at timestamp
);
-- (distributed table only) Shard the table by repo_idSELECT create_distributed_table('github_events', 'repo_id');
29.5. Postgres Parallel Indexing in Citus 307

Citus Documentation, Release 8.2
-- Initial data load: 218934 events from 2015-01-01\COPY github_events FROM PROGRAM 'cat github_events-*.csv' WITH (FORMAT CSV)
Each event in the GitHub data set has a detailed payload object in JSON format. Building a GIN index on the payloadgives us the ability to quickly perform fine-grained searches on events, such as finding commits from a specific author.However, building such an index can be very expensive. Fortunately, parallel indexing makes this a lot faster by usingall cores at the same time and building many smaller indexes:
CREATE INDEX github_events_payload_idx ON github_events USING GIN (payload);
| | Regular table | Distributed table | Speedup ||---------------------------|---------------|-------------------|---------|| CREATE INDEX on 219k rows | 33.2s | 2.6s | 13x |
To test how well this scales we took the opportunity to run our test multiple times. Interestingly, parallel CREATEINDEX exhibits super-linear speedups giving >16x speedup despite having only 16 cores. This is likely due to the factthat inserting into one big index is less efficient than inserting into a small, per-shard index (following O(log N) for Nrows), which gives an additional performance benefit to sharding.
| | Regular table | Distributed table | Speedup ||---------------------------|---------------|-------------------|---------|| CREATE INDEX on 438k rows | 55.9s | 3.2s | 17x || CREATE INDEX on 876k rows | 110.9s | 5.0s | 22x || CREATE INDEX on 1.8M rows | 218.2s | 8.9s | 25x |
Once the index is created, the COPY command also takes advantage of parallel indexing. Internally, COPY sendsa large number of rows over multiple connections to different workers asynchronously which then store and indexthe rows in parallel. This allows for much faster load times than a single PostgreSQL process could achieve. Howmuch speedup depends on the data distribution. If all data goes to a single shard, performance will be very similar toPostgreSQL.
\COPY github_events FROM PROGRAM 'cat github_events-*.csv' WITH (FORMAT CSV)
| | Regular table | Distributed table | Speedup ||-------------------------|---------------|-------------------|---------|| COPY 219k rows no index | 18.9s | 12.4s | 1.5x || COPY 219k rows with GIN | 49.3s | 12.9s | 3.8x |
Finally, it’s worth measuring the effect that the index has on query time. We try two different queries, one across allrepos and one with a specific repo_id filter. This distinction is relevant to Citus because the github_eventstable is sharded by repo_id. A query with a specific repo_id filter goes to a single shard, whereas the other queryis parallelised across all shards.
-- Get all commits by [email protected] from all reposSELECT repo_id, jsonb_array_elements(payload->'commits')FROM github_events
WHERE event_type = 'PushEvent' ANDpayload @> '{"commits":[{"author":{"email":"[email protected]"}}]}';
-- Get all commits by [email protected] from a single repoSELECT repo_id, jsonb_array_elements(payload->'commits')FROM github_events
WHERE event_type = 'PushEvent' ANDpayload @> '{"commits":[{"author":{"email":"[email protected]"}}]}' ANDrepo_id = 17330407;
308 Chapter 29. Related Articles

Citus Documentation, Release 8.2
On 219k rows, this gives us the query times below. Times marked with * are of queries that are executed in parallel byCitus. Parallelisation creates some fixed overhead, but also allows for more heavy lifting, which is why it can eitherbe much faster or a bit slower than queries on a regular table.
| | Regular table | Distributed table ||---------------------------------------|---------------|-------------------|| SELECT no indexes, all repos | 900ms | 68ms* || SELECT with GIN on payload, all repos | 2ms | 11ms* || SELECT no indexes, single repo | 900ms | 28ms || SELECT with indexes, single repo | 2ms | 2ms |
Indexes in PostgreSQL can dramatically reduce query times, but at the same time dramatically slow down writes.Citus gives you the possibility of scaling out your cluster to get good performance on both sides of the pipeline. Aparticular sweet spot for Citus is parallel ingestion and single-shard queries, which gives querying performance that isbetter than regular PostgreSQL, but with much higher and more scalable write throughput.
29.6 Real-time Event Aggregation at Scale Using Postgres with Citus
(Copy of original publication)
Citus is commonly used to scale out event data pipelines on top of PostgreSQL. Its ability to transparently shard dataand parallelise queries over many machines makes it possible to have real-time responsiveness even with terabytes ofdata. Users with very high data volumes often store pre-aggregated data to avoid the cost of processing raw data at run-time. For large datasets, querying pre-computed aggregation tables can be orders of magnitude faster than queryingthe facts table on demand.
To create aggregations for distributed tables, the latest version of Citus supports the INSERT .. SELECT syntax fortables that use the same distribution column. Citus automatically ‘co-locates’ the shards of distributed tables such thatthe same distribution column value is always placed on the same worker node, which allows us to transfer data betweentables as long as the distribution column value is preserved. A common way of taking advantage of co-location is tofollow the multi-tenant data model and shard all tables by tenant_id or customer_id. Even without that model, as longas your tables share the same distribution column, you can leverage the INSERT .. SELECT syntax.
INSERT .. SELECT queries that can be pushed down to the workers are supported, which excludes some SQLfunctionality such as limits, and unions. Since the result will be inserted into a co-located shard in the destinationtable, we need to make sure that the distribution column (e.g. tenant_id) is preserved in the aggregation and is includedin joins. INSERT .. SELECT commands on distributed tables will usually look like:
INSERT INTO aggregation_table (tenant_id, ...)SELECT tenant_id, ... FROM facts_table ...
Now let’s walk through the steps of creating aggregations for a typical example of high-volume data: page views. Weset up a Citus Cloud formation consisting of 4 workers with 4 cores each, and create a distributed facts table withseveral indexes:
CREATE TABLE page_views (tenant_id int,page_id int,host_ip inet,view_time timestamp default now()
);CREATE INDEX view_tenant_idx ON page_views (tenant_id);CREATE INDEX view_time_idx ON page_views USING BRIN (view_time);
SELECT create_distributed_table('page_views', 'tenant_id');
29.6. Real-time Event Aggregation at Scale Using Postgres with Citus 309

Citus Documentation, Release 8.2
Next, we generate 100 million rows of fake data (takes a few minutes) and load it into the database:
\COPY (SELECT s % 307, (random()*5000)::int, '203.0.113.' || (s % 251), now() +→˓random() * interval '60 seconds' FROM generate_series(1,100000000) s) TO '/tmp/→˓views.csv' WITH CSV
\COPY page_views FROM '/tmp/views.csv' WITH CSV
We can now perform aggregations at run-time by performing a SQL query against the facts table:
-- Most views in the past weekSELECT page_id, count(*) AS view_countFROM page_viewsWHERE tenant_id = 5 AND view_time >= date '2016-11-23'GROUP BY tenant_id, page_idORDER BY view_count DESC LIMIT 3;page_id | view_count
---------+------------2375 | 994538 | 951417 | 93
(3 rows)
Time: 269.125 ms
However, we can do much better by creating a pre-computed aggregation, which we also distribute by tenant_id. Citusautomatically co-locates the table with the page_views table:
CREATE TABLE daily_page_views (tenant_id int,day date,page_id int,view_count bigint,primary key (tenant_id, day, page_id)
);
SELECT create_distributed_table('daily_page_views', 'tenant_id');
We can now populate the aggregation using a simple INSERT..SELECT command, which is parallelised across thecores in our workers, processing around 10 million events per second and generating 1.7 million aggregates:
INSERT INTO daily_page_views (tenant_id, day, page_id, view_count)SELECT tenant_id, view_time::date AS day, page_id, count(*) AS view_countFROM page_viewsGROUP BY tenant_id, view_time::date, page_id;
INSERT 0 1690649
Time: 10649.870 ms
After creating the aggregation, we can get the results from the aggregation table in a fraction of the query time:
-- Most views in the past weekSELECT page_id, view_countFROM daily_page_viewsWHERE tenant_id = 5 AND day >= date '2016-11-23'ORDER BY view_count DESC LIMIT 3;page_id | view_count
310 Chapter 29. Related Articles

Citus Documentation, Release 8.2
---------+------------2375 | 994538 | 951417 | 93
(3 rows)
Time: 4.528 ms
We typically want to keep aggregations up-to-date, even as the current day progresses. We can achieve this by expand-ing our original command to only consider new rows and updating existing rows to consider the new data using ONCONFLICT. If we insert data for a primary key (tenant_id, day, page_id) that already exists in the aggregation table,then the count will be added instead.
INSERT INTO page_views VALUES (5, 10, '203.0.113.1');
INSERT INTO daily_page_views (tenant_id, day, page_id, view_count)SELECT tenant_id, view_time::date AS day, page_id, count(*) AS view_countFROM page_viewsWHERE view_time >= '2016-11-23 23:00:00' AND view_time < '2016-11-24 00:00:00'GROUP BY tenant_id, view_time::date, page_idON CONFLICT (tenant_id, day, page_id) DO UPDATE SETview_count = daily_page_views.view_count + EXCLUDED.view_count;
INSERT 0 1
Time: 2787.081 ms
To regularly update the aggregation, we need to keep track of which rows in the facts table have already been processedas to avoid counting them more than once. A basic approach is to aggregate up to the current time, store the timestampin a table, and continue from that timestamp on the next run. We do need to be careful that there may be in-flightrequests with a lower timestamp, which is especially true when using bulk ingestion through COPY. We thereforeroll up to a timestamp that lies slightly in the past, with the assumption that all requests that started before then havefinished by now. We can easily codify this logic into a PL/pgSQL function:
CREATE TABLE aggregations (name regclass primary key, last_update timestamp);INSERT INTO aggregations VALUES ('daily_page_views', now());
CREATE OR REPLACE FUNCTION compute_daily_view_counts()RETURNS void LANGUAGE plpgsql AS $function$DECLARE
start_time timestamp;end_time timestamp := now() - interval '1 minute'; -- exclude in-flight requests
BEGINSELECT last_update INTO start_time FROM aggregations WHERE name = 'daily_page_views
→˓'::regclass;UPDATE aggregations SET last_update = end_time WHERE name = 'daily_page_views'::
→˓regclass;
SET LOCAL citus.all_modifications_commutative TO on; -- for on-premises,→˓replication factor >1 only
EXECUTE $$INSERT INTO daily_page_views (tenant_id, day, page_id, view_count)
SELECT tenant_id, view_time::date AS day, page_id, count(*) AS view_countFROM page_views
29.6. Real-time Event Aggregation at Scale Using Postgres with Citus 311

Citus Documentation, Release 8.2
WHERE view_time >= $1 AND view_time < $2GROUP BY tenant_id, view_time::date, page_idON CONFLICT (tenant_id, day, page_id) DO UPDATE SETview_count = daily_page_views.view_count + EXCLUDED.view_count$$
USING start_time, end_time;END;$function$;
After creating the function, we can periodically call SELECT compute_daily_view_counts() to continu-ously update the aggregation with 1-2 minutes delay. More advanced approaches can bring down this delay to a fewseconds.
A few caveats to note:
• In this example, we used a single, database-generated time column, but it’s generally better to distinguish be-tween the time at which the event happened at the source and the database-generated ingestion time used to keeptrack of whether an event was already processed.
• When running Citus on-premises with built-in replication, we recommend you set ci-tus.all_modifications_commutative to on before any INSERT..SELECT command, since Citus otherwiselocks the source tables to avoid inconsistencies between replicas. On Citus Cloud this is a non-issue as weleverage Postgres streaming replication.
You might be wondering why we used a page_id in the examples instead of something more meaningful like a URL.Are we trying to dodge the overhead of storing URLs for every page view to make our numbers look better? Wecertainly are! With Citus you can often avoid the cost of denormalization that you would pay in distributed databasesthat don’t support joins. You can simply put the static details of a page inside another table and perform a join:
CREATE TABLE pages (tenant_id int,page_id int,url text,language varchar(2),primary key (tenant_id, page_id)
);
SELECT create_distributed_table('pages', 'tenant_id');
... insert pages ...
-- Most views in the past weekSELECT url, view_countFROM daily_page_views JOIN pages USING (tenant_id, page_id)WHERE tenant_id = 5 AND day >= date '2016-11-23'ORDER BY view_count DESC LIMIT 3;
url | view_count----------+------------/home | 99/contact | 95/product | 93
(3 rows)
Time: 7.042 ms
You can also perform joins in the INSERT..SELECT command, allowing you to create more detailed aggregations,e.g. by language.
Distributed aggregation adds another tool to Citus’ broad toolchest in dealing with big data problems. With parallelINSERT .. SELECT, parallel indexing, parallel querying, scaling write throughput through Citus MX, and many other
312 Chapter 29. Related Articles

Citus Documentation, Release 8.2
features, Citus can not only horizontally scale your multi-tenant database, but can also unify many different parts ofyour data pipeline into one platform.
29.7 How Distributed Outer Joins on PostgreSQL with Citus Work
(Copy of original publication)
SQL is a very powerful language for analyzing and reporting against data. At the core of SQL is the idea of joins andhow you combine various tables together. One such type of join: outer joins are useful when we need to retain rows,even if it has no match on the other side.
And while the most common type of join, inner join, against tables A and B would bring only the tuples that have amatch for both A and B, outer joins give us the ability to bring together from say all of table A even if they don’t havea corresponding match in table B. For example, let’s say you keep customers in one table and purchases in anothertable. When you want to see all purchases of customers, you may want to see all customers in the result even if theydid not do any purchases yet. Then, you need an outer join. Within this post we’ll analyze a bit on what outer joinsare, and then how we support them in a distributed fashion on Citus.
Let’s say we have two tables, customer and purchase:
customer table:customer_id | name
-------------+-----------------1 | Corra Ignacio3 | Warren Brooklyn2 | Jalda Francis
purchase table:purchase_id | customer_id | category | comment
-------------+-------------+----------+------------------------------1000 | 1 | books | Nice to Have!1001 | 1 | chairs | Comfortable1002 | 2 | books | Good Read, cheap price1003 | -1 | hardware | Not very cheap1004 | -1 | laptops | Good laptop but expensive...
The following queries and results help clarifying the inner and outer join behaviors:
SELECT customer.name, purchase.commentFROM customer JOIN purchase ON customer.customer_id = purchase.customer_idORDER BY purchase.comment;
name | comment---------------+------------------------Corra Ignacio | ComfortableJalda Francis | Good Read, cheap priceCorra Ignacio | Nice to Have!
29.7. How Distributed Outer Joins on PostgreSQL with Citus Work 313

Citus Documentation, Release 8.2
SELECT customer.name, purchase.commentFROM customer INNER JOIN purchase ON customer.customer_id = purchase.customer_idORDER BY purchase.comment;
name | comment---------------+------------------------Corra Ignacio | ComfortableJalda Francis | Good Read, cheap priceCorra Ignacio | Nice to Have!
SELECT customer.name, purchase.commentFROM customer LEFT JOIN purchase ON customer.customer_id = purchase.customer_idORDER BY purchase.comment;
name | comment-----------------+------------------------Corra Ignacio | ComfortableJalda Francis | Good Read, cheap priceCorra Ignacio | Nice to Have!Warren Brooklyn |
314 Chapter 29. Related Articles
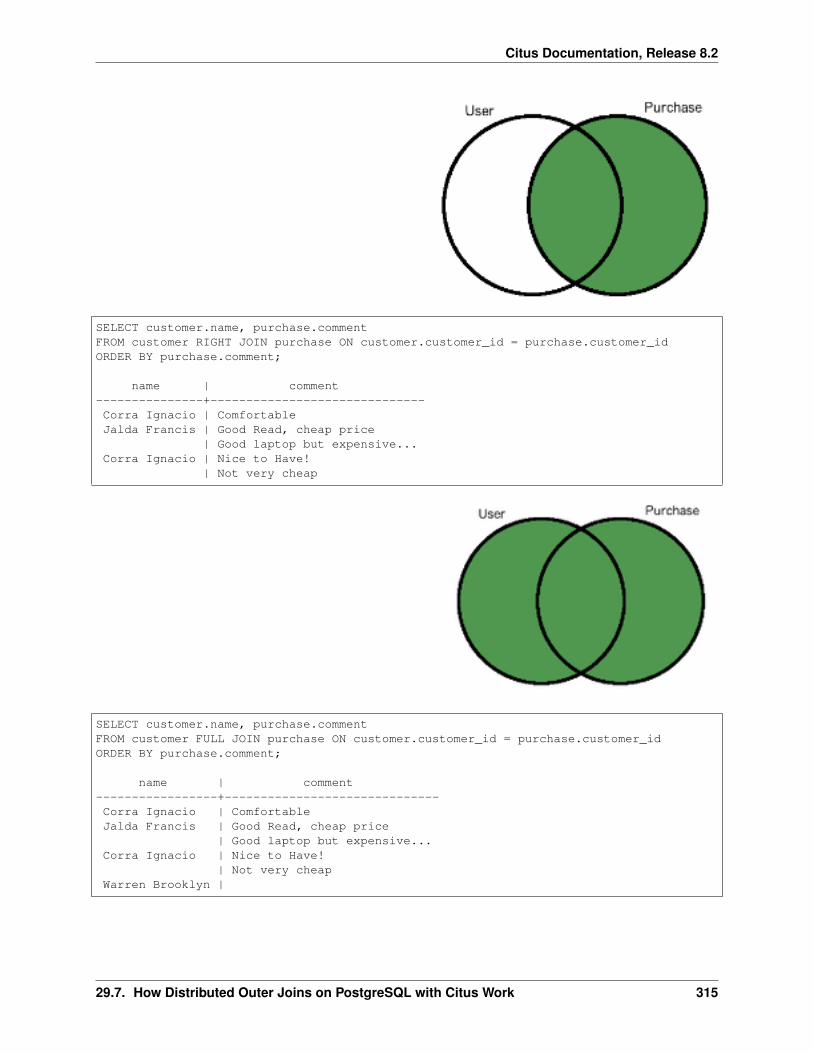
Citus Documentation, Release 8.2
SELECT customer.name, purchase.commentFROM customer RIGHT JOIN purchase ON customer.customer_id = purchase.customer_idORDER BY purchase.comment;
name | comment---------------+------------------------------Corra Ignacio | ComfortableJalda Francis | Good Read, cheap price
| Good laptop but expensive...Corra Ignacio | Nice to Have!
| Not very cheap
SELECT customer.name, purchase.commentFROM customer FULL JOIN purchase ON customer.customer_id = purchase.customer_idORDER BY purchase.comment;
name | comment-----------------+------------------------------Corra Ignacio | ComfortableJalda Francis | Good Read, cheap price
| Good laptop but expensive...Corra Ignacio | Nice to Have!
| Not very cheapWarren Brooklyn |
29.7. How Distributed Outer Joins on PostgreSQL with Citus Work 315

Citus Documentation, Release 8.2
29.7.1 Distributed Outer Joins with Citus
The Citus extension allows PostgreSQL to distribute big tables into smaller fragments called “shards” and performingouter joins on these distributed tables becomes a bit more challenging, since the union of outer joins between individualshards does not always give the correct result. Currently, Citus support distributed outer joins under some criteria:
• Outer joins should be between distributed(sharded) tables only, i.e. it is not possible to outer join a sharded tablewith a regular PostgreSQL table.
• Join criteria should be on partition columns of the distributed tables.
• The query should join the distributed tables on the equality of partition columns (table1.a = table2.a)
• Shards of the distributed table should match one to one, i.e. each shard of table A should overlap with one andonly one shard from table B.
For example lets assume we 3 hash distributed tables X, Y and Z and let X and Y have 4 shards while Z has 8 shards.
CREATE TABLE user (user_id int, name text);SELECT create_distributed_table('user', 'user_id');
CREATE TABLE purchase (user_id int, amount int);SELECT create_distributed_table('purchase', 'user_id');
CREATE TABLE comment (user_id int, comment text, rating int);SELECT create_distributed_table('comment', 'user_id');
The following query would work since distributed tables user and purchase have the same number of shards and thejoin criteria is equality of partition columns:
SELECT * FROM user OUTER JOIN purchase ON user.user_id = purchase.user_id;
The following queries are not supported out of the box:
-- user and comment tables doesn’t have the same number of shards:SELECT * FROM user OUTER JOIN comment ON user.user_id = comment.user_id;
-- join condition is not on the partition columns:SELECT * FROM user OUTER JOIN purchase ON user.user_id = purchase.amount;
-- join condition is not equality:SELECT * FROM user OUTER JOIN purchase ON user.user_id < purchase.user_id;
How Citus Processes OUTER JOINs When one-to-one matching between shards exists, then perform-ing an outer join on large tables is equivalent to combining outer join results of corresponding shards.
Let’s look at how Citus handles an outer join query:
SELECT table1.a, table1.b AS b1, table2.→˓b AS b2, table3.b AS b3, table4.b AS b4FROM table1FULL JOIN table2 ON table1.a = table2.aFULL JOIN table3 ON table1.a = table3.aFULL JOIN table4 ON table1.a = table4.a;
First, the query goes through the standard PostgreSQL plan-ner and Citus uses this plan to generate a distributed planwhere various checks about Citus’ support of the query are
316 Chapter 29. Related Articles

Citus Documentation, Release 8.2
performed. Then individual queries that will go to workersfor distributed table fragments are generated.
SELECT table1.a, table1.b AS b1, table2.→˓b AS b2, table3.b AS b3, table4.b AS b4FROM (((table1_102359 table1FULL JOIN table2_→˓102363 table2 ON ((table1.a = table2.a)))FULL JOIN table3_→˓102367 table3 ON ((table1.a = table3.a)))FULL JOIN table4_102371 table4→˓ON ((table1.a = table4.a))) WHERE true
SELECT table1.a, table1.b AS b1, table2.→˓b AS b2, table3.b AS b3, table4.b AS b4FROM (((table1_102360 table1FULL JOIN table2_→˓102364 table2 ON ((table1.a = table2.a)))FULL JOIN table3_→˓102368 table3 ON ((table1.a = table3.a)))FULL JOIN table4_102372 table4→˓ON ((table1.a = table4.a))) WHERE true
SELECT table1.a, table1.b AS b1, table2.→˓b AS b2, table3.b AS b3, table4.b AS b4FROM (((table1_102361 table1FULL JOIN table2_→˓102365 table2 ON ((table1.a = table2.a)))FULL JOIN table3_→˓102369 table3 ON ((table1.a = table3.a)))FULL JOIN table4_102373 table4→˓ON ((table1.a = table4.a))) WHERE true
SELECT table1.a, table1.b AS b1, table2.→˓b AS b2, table3.b AS b3, table4.b AS b4FROM (((table1_102362 table1FULL JOIN table2_→˓102366 table2 ON ((table1.a = table2.a)))FULL JOIN table3_→˓102370 table3 ON ((table1.a = table3.a)))FULL JOIN table4_102374 table4→˓ON ((table1.a = table4.a))) WHERE true
The resulting queries may seem complex at first but you cansee that they are actually the same with the original querywith just the table names are a bit different. This is becauseCitus stores the data in standard postgres tables called shardswith the name as _. With 1-1 matching of shards, the dis-tributed outer join is equivalent to the union of all outer joinsof individual matching shards. In many cases you don’t evenhave to think about this as Citus simply takes care of you. Ifyou’re sharding on some shared id, as is common in certainuse cases, then Citus will do the join on the appropriate nodewithout any inter-worker communication.
We hope you found the insight into how we perform distributed outer joins valuable. If you’re curious about tryingCitus or learning how more works we encourage you to join the conversation with us on Slack.
29.7. How Distributed Outer Joins on PostgreSQL with Citus Work 317

Citus Documentation, Release 8.2
29.8 Designing your SaaS Database for Scale with Postgres
(Copy of original publication)
If you’re building a SaaS application, you probably already have the notion of tenancy built in your data model.Typically, most information relates to tenants / customers / accounts and your database tables capture this naturalrelation.
With smaller amounts of data (10s of GB), it’s easy to throw more hardware at the problem and scale up your database.As these tables grow however, you need to think about ways to scale your multi-tenant database across dozens orhundreds of machines.
After our blog post on sharding a multi-tenant app with Postgres, we received a number of questions on architecturalpatterns for multi-tenant databases and when to use which. At a high level, developers have three options:
1. Create one database per tenant
2. Create one schema per tenant
3. Have all tenants share the same table(s)
The option you pick has implications on scalability, how you handle data that varies across tenants, isolation, andease-of-maintenance. And these implications have been discussed in detail across many StackOverflow questions anddatabase articles. So, what is the best solution?
In practice, each of the three design options -with enough effort- can address questions around scale, data that variesacross tenants, and isolation. The decision depends on the primary dimension you’re building/optimizing for. Thetldr:
• If you’re building for scale: Have all tenants share the same table(s)
• If you’re building for isolation: Create one database per tenant
In this article, we’ll focus on the scaling dimension, as we found that more users who talked to us had questions in thatarea. (We also intend to describe considerations around isolation in a follow-up blog post.)
To expand on this further, if you’re planning to have 5 or 50 tenants in your B2B application, and your database isrunning into scalability issues, then you can create and maintain a separate database for each tenant. If however youplan to have thousands of tenants, then sharding your tables on a tenant_id/account_id column will help you scale in amuch better way.
Common benefits of having all tenants share the same database are:
Resource pooling (reduced cost): If you create a separate database for each tenant, then you need to allocate resourcesto that database. Further, databases usually make assumptions about resources available to them–for example, Post-greSQL has shared_buffers, makes good use of the operating system cache, comes with connection count settings,runs processes in the background, and writes logs and data to disk. If you’re running 50 of these databases on a fewphysical machines, then resource pooling becomes tricky even with today’s virtualization tech.
If you have a distributed database that manages all tenants, then you’re using your database for what it’s designed todo. You could shard your tables on tenant_id and easily support 1000s or tens of thousands of tenants.
Google’s F1 paper is a good example that demonstrates a multi-tenant database that scales this way. The paper talksabout technical challenges associated with scaling out the Google AdWords platform; and at its core describes amulti-tenant database. The F1 paper also highlights how best to model data to support many tenants/customers in adistributed database.
The data model on the left-hand side follows the relational database model and uses foreign key constraints to ensuredata integrity in the database. This strict relational model introduces certain drawbacks in a distributed environmenthowever.
318 Chapter 29. Related Articles

Citus Documentation, Release 8.2
29.8. Designing your SaaS Database for Scale with Postgres 319

Citus Documentation, Release 8.2
In particular, most transactions and joins you perform on your database, and constraints you’d like to enforce acrossyour tables, have a customer/tenant dimension to them. If you shard your tables on their primary key column (in therelational model), then most distributed transactions, joins, and constraints become expensive. Network and machinefailures further add to this cost.
The diagram on the right-hand side proposes the hierarchical database model. This model is the one used by F1 andresolves the previously mentioned issues. In its simplest form, you add a customer_id/tenant_id column to your tablesand shard them on customer_id. This ensures that data from the same customer gets colocated together – co-locationdramatically reduces the cost associated with distributed transactions, joins, and foreign key constraints.
Ease of maintenance: Another challenge associated with supporting 100-100K tenants is schema changes (Alter Table)and index creations (Create Index). As your application grows, you will iterate on your database model and makeimprovements.
If you’re following an architecture where each tenant lives in a separate database, then you need to implement aninfrastructure that ensures that each schema change either succeeds across all tenants or gets eventually rolled back.For example, what happens when you changed the schema for 5,000 of 10K tenants and observed a failure? How doyou handle that?
When you shard your tables for multi-tenancy, then you’re having your database do the work for you. The databasewill either ensure that an Alter Table goes through across all shards, or it will roll it back.
What about data that varies across tenants? Another challenge with scaling to thousands of tenants relates to handlingdata that varies across tenants. Your multi-tenant application will naturally include a standard database setup withdefault tables, fields, queries, and relationships that are appropriate to your solution. But different tenants/organizationsmay have their own unique needs that a rigid, inextensible default data model won’t be able to address. For example,one organization may need to track their stores in the US through their zip codes. Another customer in Europe mightnot care about US zip codes, but may be interested to keep tax ratios for each store.
This used to be an area where having a tenant per database offered the most flexibility, at the cost of extra maintenancework from the developer(s). You could create separate tables or columns per tenant in each database, and managethose differences across time.
If then you wanted to scale your infrastructure to thousands of tenants, you’d create a huge table with many stringcolumns (Value0, Value1, . . . Value500). Probably, the best known example of this model is Salesforce’s multi-tenantarchitecture.
In this database model, your tables have a preset collection of custom columns, labeled in this image as V1, V2, andV3. Dates and Numbers are stored as strings in a format such that they can be converted to their native types. Whenyou’re storing data associated with a particular tenant, you can then use these custom columns and tailor them to eachtenant’s special needs.
Fortunately, designing your database to account for “flexible” columns became significantly easier with the introduc-tion of semi-structured data types. PostgreSQL has a rich set of semi-structured data types that include hstore, json,and jsonb. You can now represent the previous database schema by simply declaring a jsonb column and scale tothousands of tenants.
Of course, these aren’t the only design criteria and questions to be aware of. If you shard your database tables, howdo you handle isolation or integrate with ORM libraries? What happens if you have a table that you can’t easily
320 Chapter 29. Related Articles

Citus Documentation, Release 8.2
add a tenant_id column? In this article, we focused on building multi-tenant databases with scaling as the primaryconsideration in mind; and skipped over certain points. If you’re looking to learn more about designing multi-tenantdatabases, see Multi-tenant Applications.
The good news is, databases have advanced quite a bit in the past ten years in accommodating SaaS applications atscale. What was once only available to the likes of Google and Salesforce with significant engineering effort, is nowbecoming accessible to everyone with open-source technologies such as PostgreSQL and Citus.
29.9 Building a Scalable Postgres Metrics Backend using the CitusExtension
(Copy of original publication)
From nearly the beginning of the Citus Cloud service, we’ve had an internal formation provisioned and managed bythe service itself. Dogfooding in this manner brings all the usual benefits such as gaining operational knowledge,customer empathy, and etc.
However, more interesting than yet another blog post going over the importance of dogfooding is the two differentways we’re using our Citus formation. Setting up a distributed table requires a bit more forethought than a normalPostgres table, because the choice of shard column has a big impact on the types of queries and joins you can do withthe data.
We’re going to look at two cases here: a time-series metrics table and an events table.
29.9.1 Time-Series Metrics
The first is a metrics table that we fill with data from AWS Cloud Watch for all servers and volumes that we manage.We then show graphs of this both for internal and customer-facing dashboards. The table has the following struc-ture and is sharded on server_id. The primary key is several columns wide to both serve as a unique constraintpreventing duplicate data points and as an index over all the columns we query on.
Table "public.cw_metrics"Column | Type | Modifiers
--------------+--------------------------+--------------------server_id | uuid | not nullaws_id | text | collate C not nullname | text | collate C not nulltimestamp | timestamp with time zone | not nullsample_count | bigint | not nullaverage | double precision | not nullsum | double precision | not nullminimum | double precision | not nullmaximum | double precision | not nullunit | text | collate C not null
Indexes:"cw_metrics_pkey" PRIMARY KEY, btree (server_id, "timestamp", aws_id, name)
29.9. Building a Scalable Postgres Metrics Backend using the Citus Extension 321

Citus Documentation, Release 8.2
Some sample rows:
citus=> select * from cw_metrics order by timestamp desc limit 2;-[ RECORD 1 ]+-------------------------------------server_id | f2239a4b-7297-4b66-b9e3-851291760b70aws_id | i-723a927805464ac8bname | NetworkOuttimestamp | 2016-07-28 14:13:00-07sample_count | 5average | 127505sum | 637525minimum | 111888maximum | 144385unit | Bytes-[ RECORD 2 ]+-------------------------------------server_id | f2239a4b-7297-4b66-b9e3-851291760b70aws_id | i-723a927805464ac8bname | NetworkIntimestamp | 2016-07-28 14:13:00-07sample_count | 5average | 32930.8sum | 164654minimum | 18771maximum | 46584unit | Bytes
There are currently only two queries on this table. The first is simply inserting data after periodically fetching datafrom AWS CloudWatch.
The other gets the data for the graphs that are shown both on the internal admin site and on the customer-facing consoleand looks like select ... where server_id in (?,) and name in (?,) and timestamp >now()-'? hours'::interval. Because Citus shards are just normal postgres tables, this query is parallelizedby going to only the shards necessary for the server_id list. Once on each shard, finding the data is very fastbecause the other two where conditions are covered by the primary key.
The main downside to sharding on server_id is expiring old data is a little cumbersome. We have to go to eachshard and run a delete ... where timestamp > '?'. This can take a while depending on how big awindow we’re pruning, and it leaves a bloated table that requires vacuuming. A nice alternative is to use standardtime-based table partitioning for each of the shards, and then simply drop the old time tables. We haven’t done this yetbecause expiry hasn’t been a problem so far, but it’s nice the option is there.
29.9.2 Events
The other table is a general event table. We are using a hosted exception tracker to discover problems in production.However we were also sending that service unexceptional exceptions. That is, these were expected errors, such as thefailure to ssh into a server that was still booting. Sometimes an increased rate of exceptions in a particular categorycan indicate a problem even though a normal baseline rate is okay.
However the exception tracker was not the right place for this. It made it harder than necessary to spot real errors, sowe moved these events to a distributed Citus table which looks like this:
Table "public.events"Column | Type | Modifiers
------------+--------------------------+-----------id | uuid | not null
322 Chapter 29. Related Articles

Citus Documentation, Release 8.2
name | text | not nullcreated_at | timestamp with time zone | not nulldata | jsonb |
Indexes:"events_pkey" PRIMARY KEY, btree (id)"events_created_at_idx" brin (created_at)"events_data_idx" gin (data jsonb_path_ops)"events_name_idx" btree (name)
The id column is a randomly generated uuid and the shard key, which gives a roughly equal distribution amongst theshards as events come in. Also because Citus is just an extension on top of Postgres, we’re able to take advantage ofthe powerful jsonb data type with the corresponding gin index which gives us very fast lookups on arbitrary keys,and the new brin index type.
Here are some example rows from the events table:
citus=> select * from events order by created_at desc limit 2;-[ RECORD 1 ]-id | 9a3dfdbd-c395-40bb-8d25-45ee7c913662name | Timeout::Errorcreated_at | 2016-07-28 13:18:47.289917-07data | {"id": "5747a999-9768-429c-b13c-c7c0947dd950", "class": "Server",→˓"message": "execution expired"}-[ RECORD 2 ]-id | ba9d6a13-0832-47fb-a849-02f1362c9019name | Sequel::DatabaseConnectionErrorcreated_at | 2016-07-28 12:58:40.506267-07data | {"id": "232835ec-31a1-44d0-ae5b-edafb2cf6978", "class": "Timeline",→˓"message": "PG::ConnectionBad: could not connect to server: Connection→˓refused\n\tIs the server running on host \"ec2-52-207-18-20.compute-1.amazonaws.com\→˓" (52.207.18.20) and accepting\n\tTCP/IP connections on port 5432?\n"}
This data is currently mostly used to show graphs on the admin dashboard to spot outliers. The query to gather data isfor the graphs is
SELECT count(*), name, date_trunc('hour', created_at) as hourFROM eventsWHERE created_at > now()-'1 week'::intervalGROUP BY name, hour;
And the graphs look like
This clearly shows a time period of something not quite right. Sometimes we’ve gone into psql to look at the jsonbto get details if there is a high rate of some particular error to figure out which server is causing it. That is currentlya manual process, and perhaps sample json bodies could be put into the UI, but doing the work for that hasn’t beenworth it yet.
A more exciting project would be to use some machine learning on past time periods to automatically detect outliers.If we ever do that, I’ll be sure to put a writeup on the experience on this blog.
29.10 Sharding a Multi-Tenant App with Postgres
(Copy of original publication)
Whether you’re building marketing analytics, a portal for e-commerce sites, or an application to cater to schools, ifyou’re building an application and your customer is another business then a multi-tenant approach is the norm. The
29.10. Sharding a Multi-Tenant App with Postgres 323

Citus Documentation, Release 8.2
324 Chapter 29. Related Articles

Citus Documentation, Release 8.2
same code runs for all customers, but each customer sees their own private data set, except in some cases of holisticinternal reporting.
Early in your application’s life customer data has a simple structure which evolves organically. Typically all informa-tion relates to a central customer/user/tenant table. With a smaller amount of data (10’s of GB) it’s easy to scale theapplication by throwing more hardware at it, but what happens when you’ve had enough success and data that youhave no longer fits in memory on a single box, or you need more concurrency? You scale out, often painfully.
This scale out model has worked well for the likes of Google and Instagram, but also doesn’t have to be as complicatedas you might think. If you’re able to model your multi-tenant data in the right way sharding can become much simplerand still give you the power you need from a database including joins, indexing, and more. While Citus lets you scaleout your processing power and memory, how you model your data may determine the ease and flexibility you get fromthe system. If you’re building a multi-tenant SaaS application hopefully the following example highlights how youcan plan early for scaling without having to contort too much of your application.
29.10.1 Tenancy
At the core of most non-consumer focused applications tenancy is already built in, whether you realize it or not. Aswe mentioned above you may have a users table. Let’s look at a very basic SaaS schema that highlights this:
CREATE TABLE stores (id UUID,owner_email VARCHAR(255),owner_password VARCHAR(255),name VARCHAR(255),url VARCHAR(255),last_login_at TIMESTAMPTZ,created_at TIMESTAMPTZ
)
CREATE TABLE products (id UUID,name VARCHAR(255),description TEXT,price INTEGER,quantity INTEGER,store_id UUID,created_at TIMESTAMPTZ,updated_at TIMESTAMPTZ
)
CREATE TABLE purchases (id UUID,product_id UUID,customer_id UUID,store_id UUID,price INTEGER,purchased_at TIMESTAMPTZ,
)
The above schema highlights an overly simplified multi-tenant e-commerce site. Say for example someone like anEtsy. And of course there are a number of queries you would run against this:
List the products for a particular store:
SELECT id,name,
29.10. Sharding a Multi-Tenant App with Postgres 325

Citus Documentation, Release 8.2
priceFROM productsWHERE store_id = 'foo';
Or let’s say you want to compute how many purchases exist weekly for a given store:
SELECT date_trunc('week', purchased_at),sum(price * quantity)
FROM purchases,stores
WHERE stores.id = products.stores_idAND store_id = 'foo'
From here you could envision how to give each store its own presence and analytics. Now if we fast-forward a bit andstart to look at scaling this out then we have a choice to make on how we’ll shard the data. The easiest level to do thisat is the tenant level or in this case on store id. With the above data model the largest tables over time are likely to beproducts and purchases, we could shard on both of these. Though if we choose products or purchases the difficultylies in the fact that we may want to do queries that focus on some high level item such as store. If we choose storeid then all data for a particular store would exist on the same node, this would allow you push down all computationsdirectly to the a single node.
29.10.2 Multi-tenancy and co-location, a perfect pair
Co-locating data within the same physical instance avoids sending data over the network during joins. This can resultin much faster operations. With Citus there are a number of ways to move your data around so you can join and queryit in a flexible manner, but for this class of multi-tenant SaaS apps it’s simple if you can ensure data ends up on theshard. To do this though we need to push down our store id to all of our tables.
The key that makes this all possible is including your store_id on all tables. By doing this you can easily shard outall your data so it’s located on the same shard. In the above data model we coincidentally had store_id on all ofour tables, but if it weren’t there you could add it. This would put you in a good position to distribute all your data soit’s stored on the same nodes. So now lets try sharding our tenants, in this case stores:
SELECT create_distributed_table('stores', 'id');SELECT create_distributed_table('products', 'store_id');SELECT create_distributed_table('purchases', 'store_id');
Now you’re all set. Again, you’ll notice that we shard everything by store_id–this allows all queries to be routed toa single Postgres instance. The same queries as before should work just fine for you as long as you have store_id onyour query. An example layout of your data now may look something like:
The alternative to colocation is to choose some lower level shard key such as orders or products. This has a trade-off ofmaking joins and querying more difficult because you have to send more data over the network and make sure thingswork in a distributed way. This lower level key can be useful for consumer focused datasets, if your analytics arealways against the entire data set as is often the case in metrics-focused use cases.
29.10.3 In conclusion
It’s important to note that different distribution models can have different benefits and trade-offs. In some casesmodeling on a lower level entity id such as products or purchases can be the right choice. You gain more parallelismfor analytics and trade off simplicity in querying a single store. Either choice of picking a multi-tenant data model oradopt a more distributed document model can be made to scale, but each comes with its own trade-offs. If you havethe need today to scale out your multi-tenant app then give Citus Cloud a try or if you have any questions on whichmight work best for your situation please don’t hesitate to reach out to us. We can help.
326 Chapter 29. Related Articles

Citus Documentation, Release 8.2
29.11 Sharding Postgres with Semi-Structured Data and Its Perfor-mance Implications
(Copy of original publication)
If you’re looking at Citus its likely you’ve outgrown a single node database. In most cases your application is nolonger performing as you’d like. In cases where your data is still under 100 GB a single Postgres instance will stillwork well for you, and is a great choice. At levels beyond that Citus can help, but how you model your data has amajor impact on how much performance you’re able to get out of the system.
Some applications fit naturally in this scaled out model, but others require changes in your application. The model youchoose can determine the queries you’ll be able to run in a performant manner. You can approach this in two wayseither from how your data may already be modeled today or more ideally by examining the queries you’re looking torun and needs on performance of them to inform which data model may make the most sense.
29.11.1 One large table, without joins
We’ve found that storing semi-structured data in JSONB helps reduce the number of tables required, which improvesscalability. Let’s look at the example of web analytics data. They traditionally store a table of events with minimalinformation, and use lookup tables to refer to the events and record extra information. Some events have more asso-ciated information than others. By replacing the lookup tables by a JSONB column you can easily query and filterwhile still having great performance. Let’s take a look at what an example schema might look like following by a fewqueries to show what’s possible:
CREATE TABLE visits AS (id UUID,site_id uuid,visited_at TIMESTAMPTZ,
29.11. Sharding Postgres with Semi-Structured Data and Its Performance Implications 327

Citus Documentation, Release 8.2
session_id UUID,page TEXT,url_params JSONB
)
Note that url parameters for an event are open-ended, and no parameters are guaranteed. Even the common “utm”parameters (such as utm_source, utm_medium, utm_campaign) are by no means universal. Our choice of using aJSONB column for url_params is much more convenient than creating columns for each parameter. With JSONB wecan get both the flexibility of schema, and combined with GIN indexing we can still have performant queries againstall keys and values without having to index them individually.
29.11.2 Enter Citus
Assuming you do need to scale beyond a single node, Citus can help at scaling out your processing power, memory,and storage. In the early stages of utilizing Citus you’ll create your schema, then tell the system how you wish to shardyour data.
In order to determine the ideal sharding key you need to examine the query load and types of operations you’relooking to perform. If you are storing aggregated data and all of your queries are per customer then a shard key suchas customer_id or tenant_id can be a great choice. Even if you have minutely rollups and then need to report on a dailybasis this can work well. This allows you to easily route queries to shards just for that customer. As a result of routingqueries to a single shard this can allow you a higher concurrency.
In the case where you are storing raw data, there often ends up being a lot of data per customer. Here it can be moredifficult to get sub-second response without further parallelizing queries per customer. It may also be difficult to getpredictable sub-second responsiveness if you have a low number of customers or if 80% of your data comes from onecustomer. In the above mentioned cases, picking a shard key that’s more granular than customer or tenant id can beideal.
The distribution of your data and query workload is what will heavily determine which key is right for you.
With the above example if all of your sites have the same amount of traffic then site_id might be reasonable, but ifeither of the above cases is true then something like session_id could be a more ideal distribution key.
29.11.3 The query workload
With a sharding key of session_id we could easily perform a number of queries such as:
Top page views over the last 7 days for a given site:
SELECT page,count(*)
FROM visitsWHERE site_id = 'foo'
AND visited_at > now() - '7 days'::intervalGROUP BY pageORDER BY 2 DESC;
Unique sessions today:
SELECT distinct(session_id)FROM visitsWHERE site_id = 'foo'
AND visited_at > date_trunc('date', now())
328 Chapter 29. Related Articles

Citus Documentation, Release 8.2
And assuming you have an index on url_params you could easily do various rollups on it. . . Such as find thecampaigns that have driven the most traffic to you over the past 30 days and which pages received the most benefit:
SELECT url_params ->> 'utm_campaign',page,count(*)
FROM visitsWHERE url_params ? 'utm_campaign'
AND visited_at >= now() - '30 days'::intervalAND site_id = 'foo'
GROUP BY url_params ->> 'utm_campaign',page
ORDER BY 3 DESC;
29.11.4 Every distribution has its thorns
Choosing a sharding key always involves trade-offs. If you’re optimising to get the maximum parallelism out of yourdatabase then matching your cores to the number of shards ensures that every query takes full advantage of yourresources. In contrast if you’re optimising for higher read concurrency, then allowing queries to run against only asingle shard will allow more queries to run at once, although each individual query will experience less parallelism.
The choice really comes down to what you’re trying to accomplish in your application. If you have questions aboutwhat method to use to shard your data, or what key makes sense for your application please feel free to reach out to usor join our slack channel.
29.12 Scalable Real-time Product Search using PostgreSQL with Ci-tus
(Copy of original publication)
Product search is a common, yet sometimes challenging use-case for online retailers and marketplaces. It typicallyinvolves a combination of full-text search and filtering by attributes which differ for every product category. Morecomplex use-cases may have many sellers that offer the same product, but with a different price and different proper-ties.
PostgreSQL has the functionality required to build a product search application, but performs poorly when indexingand querying large catalogs. With Citus, PostgreSQL can distribute tables and parallelize queries across many servers,which lets you scale out memory and compute power to handle very large catalogs. While the search functionality isnot as comprehensive as in dedicated search solutions, a huge benefit of keeping the data in PostgreSQL is that it canbe updated in real-time and tables can be joined. This post will go through the steps of setting up an experimentalproducts database with a parallel search function using PostgreSQL and Citus, with the goal of showcasing severalpowerful features.
We start by setting up a multi-node Citus cluster on EC2 using 4 m3.2xlarge instances as workers. An even easier wayto get started is to use Citus Cloud, which gives you a managed Citus cluster with full auto-failover. The main tablein our database schema is the “product” table, which contains the name and description of a product, its price, andattributes in JSON format such that different types of products can use different attributes:
$ psqlCREATE TABLE product (
product_id int primary key,name text not null,description text not null,price decimal(12,2),
29.12. Scalable Real-time Product Search using PostgreSQL with Citus 329

Citus Documentation, Release 8.2
attributes jsonb);
To distribute the table using Citus, we call the functions for Creating and Modifying Distributed Tables (DDL) thetable into 16 shards (one per physical core). The shards are distributed and replicated across the 4 workers.
SELECT create_distributed_table('product', 'product_id');
We create a GIN index to allow fast filtering of attributes by the JSONB containment operator. Forexample, a search query for English books might have the following expression: attributes @>'{"category":"books","language":"english"}', which can use the GIN index.
CREATE INDEX attributes_idx ON product USING GIN (attributes jsonb_path_ops);
To filter products by their name and description, we use the full text search functions in PostgreSQL to find a matchwith a user-specified query. A text search operation is performed on a text search vector (tsvector) using a text searchquery (tsquery). It can be useful to define an intermediate function that generates the tsvector for a product. Theproduct_text_search function below combines the name and description of a product into a tsvector, in which thename is assigned the highest weight (from ‘A’ to ‘D’), such that matches with the name will show up higher whensorting by relevance.
CREATE FUNCTION product_text_search(name text, description text)RETURNS tsvector LANGUAGE sql IMMUTABLE AS $function$
SELECT setweight(to_tsvector(name),'A') ||setweight(to_tsvector(description),'B');
$function$;
To use the product_text_search function in queries and indexes, it also needs to be created on the workers. We’ll userun_command_on_workers to do this (see Running on all Workers for more info).
$ psqlSELECT run_command_on_workers($cmd$
CREATE FUNCTION product_text_search(name text, description text)RETURNS tsvector LANGUAGE sql IMMUTABLE AS $function$SELECT setweight(to_tsvector(name),'A') ||
setweight(to_tsvector(description),'B');$function$;
$cmd$);
After setting up the function, we define a GIN index on it, which speeds up text searches on the product table.
$ psqlCREATE INDEX text_idx ON product USING GIN (product_text_search(name, description));
We don’t have a large product dataset available, so instead we generate 10 million mock products (7GB) by appendingrandom words to generate names, descriptions, and attributes, using a simple generator function. This is probably notbe the fastest way to generate mock data, but we’re PostgreSQL geeks :). After adding some words to the words table,we can run:
\COPY (SELECT * FROM generate_products(10000000)) TO '/data/base/products.tsv'
The new COPY feature in Citus can be used to load the data into the product table. COPY for hash-partitioned tablesis currently available in the latest version of Citus and in Citus Cloud. A benefit of using COPY on distributed tablesis that workers can process multiple rows in parallel. Because each shard is indexed separately, the indexes are alsokept small, which improves ingestion rate for GIN indexes.
330 Chapter 29. Related Articles

Citus Documentation, Release 8.2
\COPY product FROM '/data/base/products.tsv'
The data load takes just under 7 minutes; roughly 25,000 rows/sec on average. We also loaded data into a regularPostgreSQL table in 45 minutes (3,700 rows/sec) by creating the index after copying in the data.
Now let’s search products! Assume the user is searching for “copper oven”. We can convert the phrase into a tsqueryusing the plainto_tsquery function and match it to the name and description using the @@ operator. As anadditional filter, we require that the “food” attribute of the product is either “waste” or “air”. We’re using very randomwords :). To order the query by relevance, we can use the ts_rank function, which takes the tsvector and tsquery asinput.
SELECT p.product_id, p.name, p.priceFROM product pWHERE product_text_search(name, description) @@ plainto_tsquery('copper oven')
AND (attributes @> '{"food":"waste"}' OR attributes @> '{"food":"air"}')ORDER BY ts_rank(product_text_search(name, description),
plainto_tsquery('copper oven')) DESCLIMIT 10;product_id | name | price
------------+----------------------+-------2016884 | oven copper hot | 32.338264220 | rifle copper oven | 92.114021935 | argument chin rub | 79.335347636 | oven approval circle | 50.78
(4 rows)
Time: 68.832 ms (~78ms on non-distributed table)
The query above uses both GIN indexes to do a very fast look-up of a small number of rows. A much broader searchcan take longer because of the need to sort all the results by their rank. For example, the following query has 294,000results that it needs to sort to get the first 10:
SELECT p.product_id, p.name, p.priceFROM product pWHERE product_text_search(name, description) @@ plainto_tsquery('oven')
AND price < 50ORDER BY ts_rank(product_text_search(name, description),
plainto_tsquery('oven')) DESCLIMIT 10;product_id | name | price
------------+----------------------+-------6295883 | end oven oven | 7.803304889 | oven punishment oven | 28.272291463 | town oven oven | 7.47
...(10 rows)
Time: 2262.502 ms (37 seconds on non-distributed table)
This query gets the top 10 results from each of the 16 shards, which is where the majority of time is spent, and themaster sorts the final 160 rows. By using more machines and more shards, the number of rows that needs to be sortedin each shard is lowered significantly, but the amount of sorting work done by the master is still trivially small. Thismeans that we can get significantly lower query times by using a bigger cluster with more shards.
In addition to products, imagine the retailer also has a marketplace where third-party sellers can offer products atdifferent prices. Those offers should also show up in searches if their price is under the maximum. A product canhave many such offers. We create an additional distributed table, which we distribute by product_id and assignthe same number of shards, such that we can perform joins on the co-located product / offer tables on product_id.
29.12. Scalable Real-time Product Search using PostgreSQL with Citus 331

Citus Documentation, Release 8.2
CREATE TABLE offer (product_id int not null,offer_id int not null,seller_id int,price decimal(12,2),new bool,primary key(product_id, offer_id)
);SELECT create_distributed_table('offer', 'product_id');
We load 5 million random offers generated using the generate_offers function and COPY. The following querysearches for popcorn oven products priced under $70, including products with offers under $70. Offers are includedin the results as an array of JSON objects.
SELECT p.product_id, p.name, p.price, to_json(array_agg(to_json(o)))FROM product p LEFT JOIN offer o USING (product_id)WHERE product_text_search(p.name, p.description) @@ plainto_tsquery('popcorn oven')
AND (p.price < 70 OR o.price < 70)GROUP BY p.product_id, p.name, p.description, p.priceORDER BY ts_rank(product_text_search(p.name, p.description),
plainto_tsquery('popcorn oven')) DESCLIMIT 10;product_id | name | price |→˓to_json------------+------------------------+-------+----------------------------------------→˓-----------------------------------------------
9354998 | oven popcorn bridge | 41.18 | [null]1172380 | gate oven popcorn | 24.12 | [{"product_id":1172380,"offer_id":
→˓4853987,"seller_id":2088,"price":55.00,"new":true}]985098 | popcorn oven scent | 73.32 | [{"product_id":985098,"offer_id":
→˓5890813,"seller_id":5727,"price":67.00,"new":true}]...(10 rows)
Time: 337.441 ms (4 seconds on non-distributed tables)
Given the wide array of features available in PostgreSQL, we can keep making further enhancements. For example,we could convert the entire row to JSON, or add a filter to only return reasonably close matches, and we could makesure only lowest priced offers are included in the results. We can also start doing real-time inserts and updates in theproduct and offer tables.
332 Chapter 29. Related Articles