Peazip help
42
1 PeaZip Open source, portable file and archive manager Document revision: 2013 03 22 Author: Giorgio Tani Translation: Giorgio Tani This document refers to: PeaZip 4.9 Licensing: Present documentation is released under GNU GFDL License; PeaZip executable implementation is released under GNU LGPL License. PeaZip official site: http://www.peazip.org/ For more information about the licenses: GNU GFDL License, see http://www.gnu.org/licenses/fdl.txt GNU LGPL License, see http://www.gnu.org/licenses/lgpl.txt
-
Upload
independent -
Category
Documents
-
view
0 -
download
0
Transcript of Peazip help

1
PeaZip
Open source, portable file and archive manager
Document revision: 2013 03 22
Author: Giorgio Tani
Translation: Giorgio Tani
This document refers to:
PeaZip 4.9
Licensing:
Present documentation is released under GNU GFDL License;
PeaZip executable implementation is released under GNU LGPL License.
PeaZip official site:
http://www.peazip.org/
For more information about the licenses:
GNU GFDL License, see http://www.gnu.org/licenses/fdl.txt
GNU LGPL License, see http://www.gnu.org/licenses/lgpl.txt
2
Advanced
Basic
Expert
Additional information
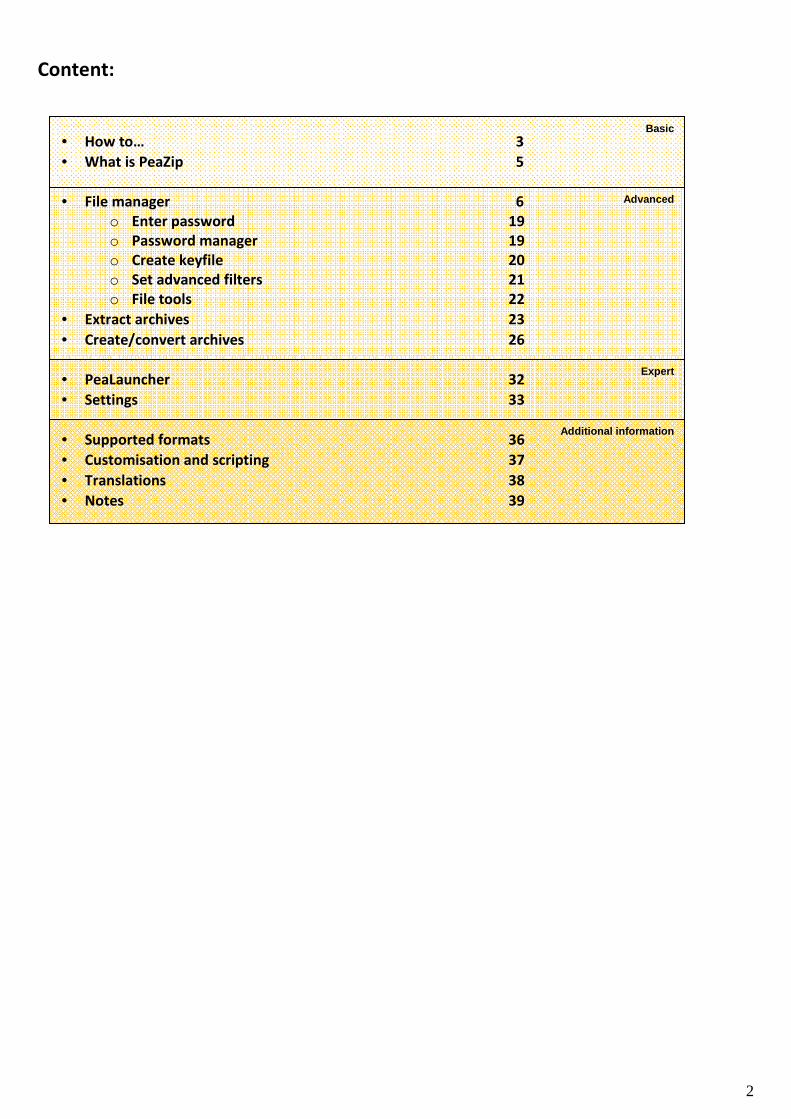
Content:
• How to… 3
• What is PeaZip 5
• File manager 6
o Enter password 19
o Password manager 19
o Create keyfile 20
o Set advanced filters 21
o File tools 22
• Extract archives 23
• Create/convert archives 26
• PeaLauncher 32
• Settings 33
• Supported formats 36
• Customisation and scripting 37
• Translations 38
• Notes 39
3
How to...
This mini-tutorial introduces the most common operations that can be performed through PeaZip, following chapters contains a
more detailed explanation of the application and of terms used here.
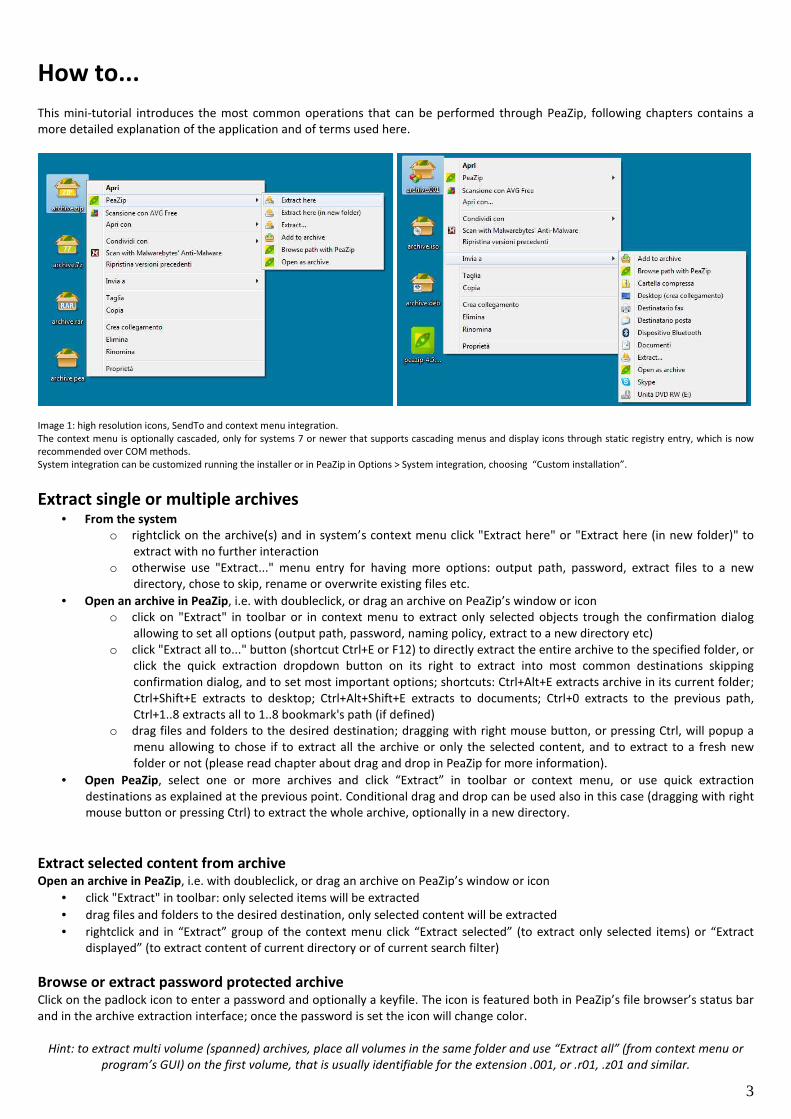
Image 1: high resolution icons, SendTo and context menu integration.
The context menu is optionally cascaded, only for systems 7 or newer that supports cascading menus and display icons through static registry entry, which is now
recommended over COM methods.
System integration can be customized running the installer or in PeaZip in Options > System integration, choosing “Custom installation”.
Extract single or multiple archives • From the system
o rightclick on the archive(s) and in system’s context menu click "Extract here" or "Extract here (in new folder)" to
extract with no further interaction
o otherwise use "Extract..." menu entry for having more options: output path, password, extract files to a new
directory, chose to skip, rename or overwrite existing files etc.
• Open an archive in PeaZip, i.e. with doubleclick, or drag an archive on PeaZip’s window or icon
o click on "Extract" in toolbar or in context menu to extract only selected objects trough the confirmation dialog
allowing to set all options (output path, password, naming policy, extract to a new directory etc)
o click "Extract all to..." button (shortcut Ctrl+E or F12) to directly extract the entire archive to the specified folder, or
click the quick extraction dropdown button on its right to extract into most common destinations skipping
confirmation dialog, and to set most important options; shortcuts: Ctrl+Alt+E extracts archive in its current folder;
Ctrl+Shift+E extracts to desktop; Ctrl+Alt+Shift+E extracts to documents; Ctrl+0 extracts to the previous path,
Ctrl+1..8 extracts all to 1..8 bookmark's path (if defined)
o drag files and folders to the desired destination; dragging with right mouse button, or pressing Ctrl, will popup a
menu allowing to chose if to extract all the archive or only the selected content, and to extract to a fresh new
folder or not (please read chapter about drag and drop in PeaZip for more information).
• Open PeaZip, select one or more archives and click “Extract” in toolbar or context menu, or use quick extraction
destinations as explained at the previous point. Conditional drag and drop can be used also in this case (dragging with right
mouse button or pressing Ctrl) to extract the whole archive, optionally in a new directory.
Extract selected content from archive Open an archive in PeaZip, i.e. with doubleclick, or drag an archive on PeaZip’s window or icon
• click "Extract" in toolbar: only selected items will be extracted
• drag files and folders to the desired destination, only selected content will be extracted
• rightclick and in “Extract” group of the context menu click “Extract selected” (to extract only selected items) or “Extract
displayed” (to extract content of current directory or of current search filter)
Browse or extract password protected archive Click on the padlock icon to enter a password and optionally a keyfile. The icon is featured both in PeaZip’s file browser’s status bar
and in the archive extraction interface; once the password is set the icon will change color.
Hint: to extract multi volume (spanned) archives, place all volumes in the same folder and use “Extract all” (from context menu or
program’s GUI) on the first volume, that is usually identifiable for the extension .001, or .r01, .z01 and similar.

4
Create archives • From the system
o rightclick on objects to be archived and click on "Add to archive" in context menu or SendTo menu. It will open the
archive creation confirmation dialog, more options are available in “Advanced” tab; click OK to create the archive.
o alternatively, drag files/folders to PeaZip’s window or shortcut; the same archive creation interface will be shown.
• From PeaZip select objects to be archived and click on "Add" button; the same archive creation interface will be shown.
Add content to existing archive Open an archive in PeaZip (i.e. with doubleclick, or drag an archive on PeaZip’s window or icon), then drag files and folders to be
added in the archive (or click on "Add" button and use application's context menu to add objects to the archive). It will open the
archive creation confirmation dialog, click OK to update the existing archive.
Span archive in smaller files of a given size While creating an archive as explained in previous points, click on “Single volume” dropdown menu to select a size for output files
(volumes) the archive will be split in. Most common types of archives supports this option.
Create encrypted archives Click on the padlock icon to enter a password and optionally a keyfile; the icon is featured both in PeaZip’s file browser’s status bar
and in archive creation interface.
To hide names of files and directories contained in the archive check “Encrypt also filenames”, please note that it will be applied
only if the archive will be created in a format supporting this function, like 7Z and ARC.
Note that in archive creation interface, alongside the padlock icon, there is a colour line (red for weak password, green for strong
password) at the bottom of the form to visually inform if encryption is set and if the current archive format supports encryption.
Archive items in separate archives at once Add objects to be archived (with PeaZip’s "Add" button, or from system’s context menu or SendTo menu) and before confirming
with "Ok" check "Add each object to a separate archive" option
Convert single or multiple archives From PeaZip select archives to be converted and click on "Convert" on toolbar or context menu, non-archive files and folders can be
added as well, the difference being in archives being extracted before compression stage. Using the “Convert existing archives”
switch in conjunction with “Add each object to a separate archive" (default) it performs a mass conversion of listed archives,
without that switch archive conversion is meant to consolidate input data in a single archive, improving compression efficiency
because it allows recompression of the original data from its uncompressed form.
Directly create an archive of specified format with given compression level Using “System integration” procedure in Options > Settings it is possible to enable context menu entries to directly add selected
files/folders to a ZIP, 7Z or self extracting archive. For Zip and 7Z formats it is also possible to enable context menu entries to
compress to fastest, normal or ultra level, bypassing the default compression level for the selected format.
Save a job definition as script for future batch use Compression/conversion and extraction interfaces features a “Console” tab, allowing to translate the job being defined in the GUI
into a command line, that can be edited, tested and saved as a script for future use - i.e. automating a recurring task (as a backup),
or for fine tuning, or further inspection, or for learning purpose.
Configure PeaZip • Options > Localization (and in Options > Settings, first tab) allows to set application’s language.
• Options > Settings allows to edit applications’ settings
• Options > Theme allows to change application’s icons and appearance
• Options > System integration starts a procedure to configure file associations, context menu and SendTo menu entries (on
Windows)
• Organize menu contains entry to customize, enable or disable browser’s features, like toolbar, address bar, navigation bar,
etc
5
What is PeaZip
PeaZip is a general purpose file and archive manager application, aiming to provide a cross-platform graphical interface for many
Open Source archiving and compression utilities in order to handle most of available archiving formats like 7Z, RAR (extraction), TAR,
ZIP and many other ones, see Supported formats chapter for more information.
The program features powerful and flexible inclusion/exclusion filters and search tools, provide optional two factor authentication
through password and keyfile, and allows to deeply fine tune the job’s definitions, exposing through a single, consistent frontend
GUI the options of underlying applications.
The list of objects to be archived or extracted can be saved for future use, to speed up backup and restore tasks.
Also the resulting command for archive creation and extraction can be saved, to get the full control on job’s definition, helping the
user in bridging the gap between GUI and console applications to get the best of both worlds.
A detailed log is available after each operation.
PeaZip also collects a set of handy file management tools: robust file copy, split and join files, fast or secure file deletion, calculation
of a wide set of checksums and hashes over selected files, byte-to-byte comparison of two files, web search etc.
PeaZip can be used as file manager, or can be used from context and SendTo menu.
File associations and menu entries (both for context and SendTo menu) can be changed running the setup program any time it is
needed.
Hint: on Windows systems you can run the installation as administrator with runas command, or “Run as” entry in system’s context
menu; on Windows UAC will automatically ask for running the process as administrator.
If no system integration is preferred, PeaZip Portable is available as standalone application, not needing installation and not
modifying the host system; both packages are available on application’s website main page: http://www.peazip.org/
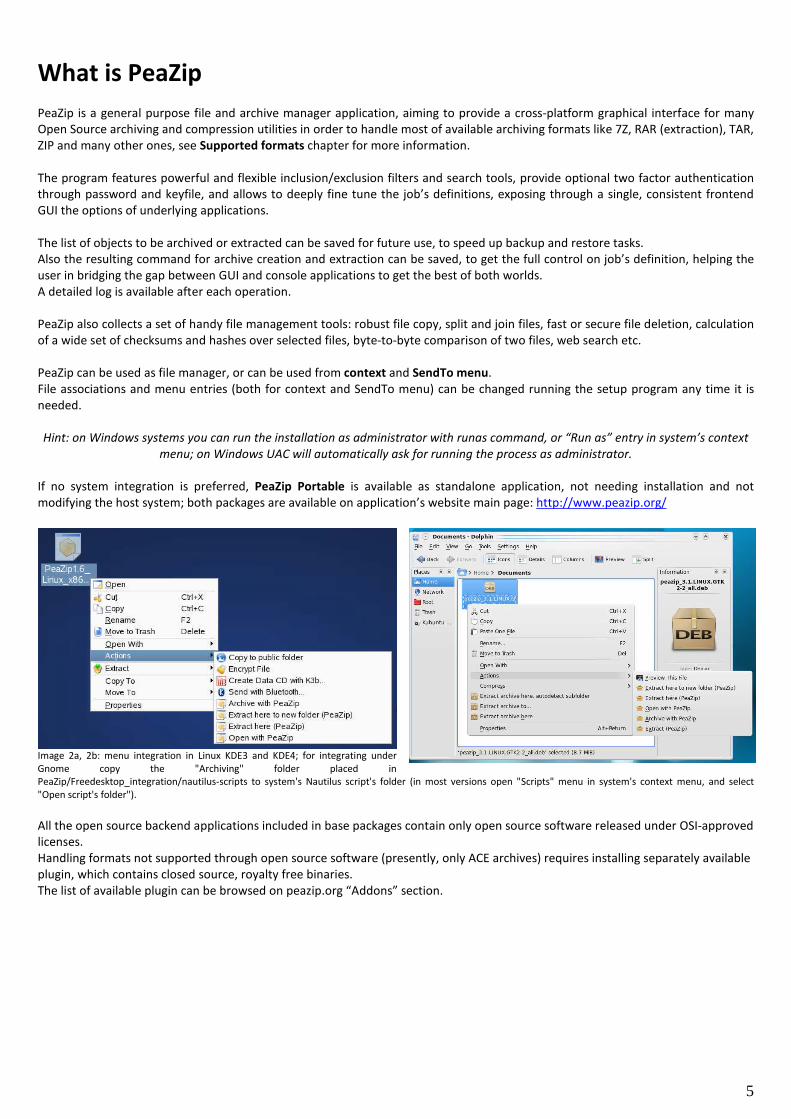
Image 2a, 2b: menu integration in Linux KDE3 and KDE4; for integrating under
Gnome copy the "Archiving" folder placed in
PeaZip/Freedesktop_integration/nautilus-scripts to system's Nautilus script's folder (in most versions open "Scripts" menu in system's context menu, and select
"Open script's folder").
All the open source backend applications included in base packages contain only open source software released under OSI-approved
licenses.
Handling formats not supported through open source software (presently, only ACE archives) requires installing separately available
plugin, which contains closed source, royalty free binaries.
The list of available plugin can be browsed on peazip.org “Addons” section.
6
File manager
The application starts by default with file manager interface, pointing to the last visited directory, for navigation in the filesystem
and in archives.
On start-up, PeaZip parses the input parameters trying to understand to what function they should be passed to (i.e. to open an
archive for browsing, or adding selected objects to a new archive), see “Customisation and scripting” chapter for the startup
parameters that can be passed to PeaZip, if you want to use it in scripts or customize system’s integration (registry entries, SendTo
menu links etc...)
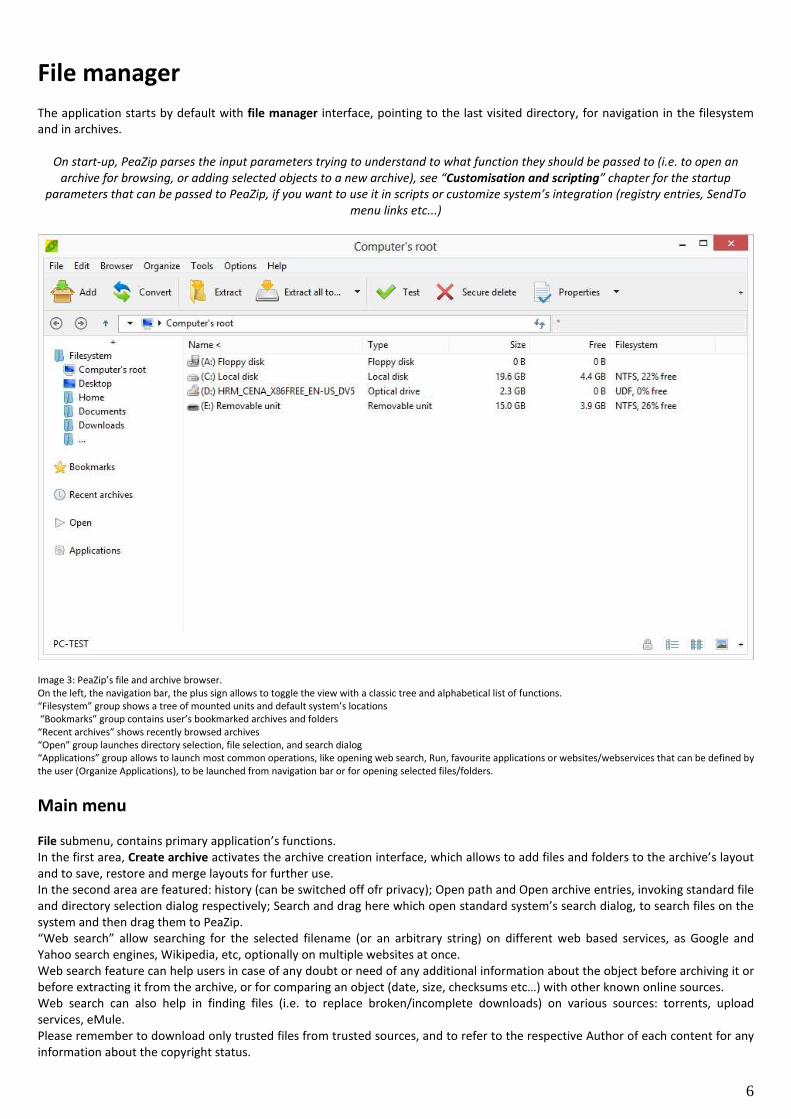
Image 3: PeaZip’s file and archive browser.
On the left, the navigation bar, the plus sign allows to toggle the view with a classic tree and alphabetical list of functions.
“Filesystem” group shows a tree of mounted units and default system’s locations
“Bookmarks” group contains user’s bookmarked archives and folders
“Recent archives” shows recently browsed archives
“Open” group launches directory selection, file selection, and search dialog
“Applications” group allows to launch most common operations, like opening web search, Run, favourite applications or websites/webservices that can be defined by
the user (Organize Applications), to be launched from navigation bar or for opening selected files/folders.
Main menu
File submenu, contains primary application’s functions.
In the first area, Create archive activates the archive creation interface, which allows to add files and folders to the archive’s layout
and to save, restore and merge layouts for further use.
In the second area are featured: history (can be switched off ofr privacy); Open path and Open archive entries, invoking standard file
and directory selection dialog respectively; Search and drag here which open standard system’s search dialog, to search files on the
system and then drag them to PeaZip.
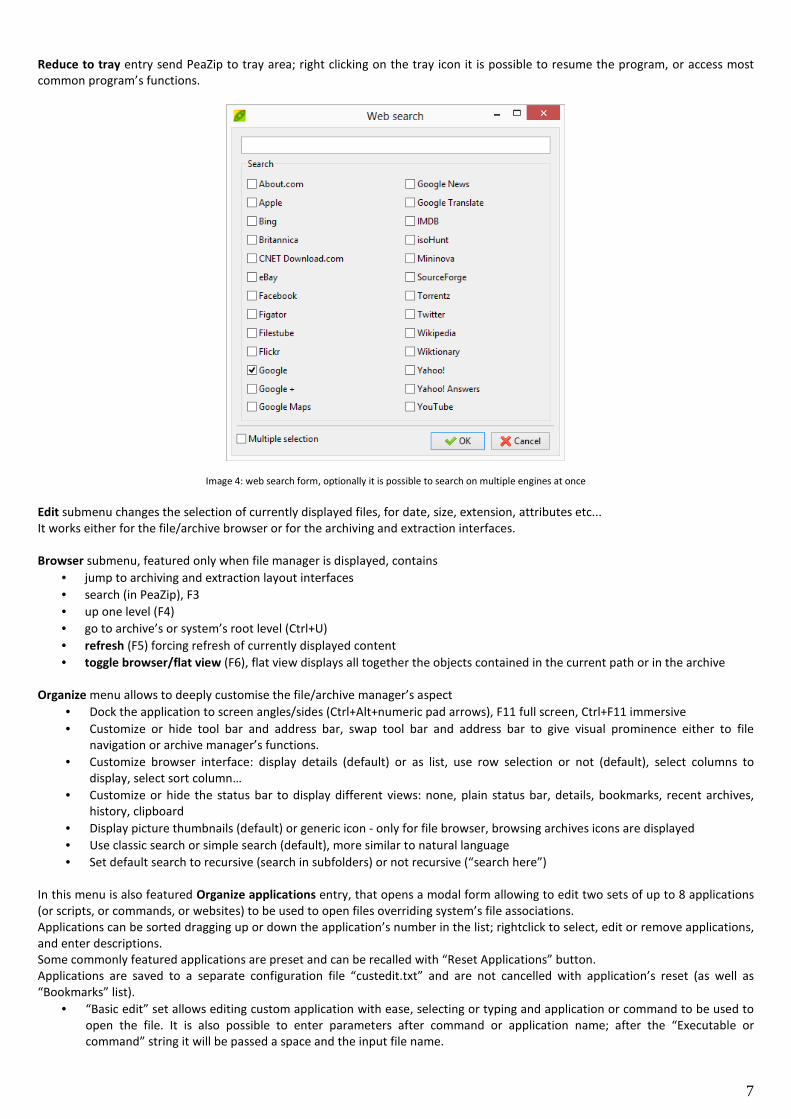
“Web search” allow searching for the selected filename (or an arbitrary string) on different web based services, as Google and
Yahoo search engines, Wikipedia, etc, optionally on multiple websites at once.
Web search feature can help users in case of any doubt or need of any additional information about the object before archiving it or
before extracting it from the archive, or for comparing an object (date, size, checksums etc…) with other known online sources.
Web search can also help in finding files (i.e. to replace broken/incomplete downloads) on various sources: torrents, upload
services, eMule.
Please remember to download only trusted files from trusted sources, and to refer to the respective Author of each content for any
information about the copyright status.
7
Reduce to tray entry send PeaZip to tray area; right clicking on the tray icon it is possible to resume the program, or access most
common program’s functions.
Image 4: web search form, optionally it is possible to search on multiple engines at once
Edit submenu changes the selection of currently displayed files, for date, size, extension, attributes etc...
It works either for the file/archive browser or for the archiving and extraction interfaces.
Browser submenu, featured only when file manager is displayed, contains
• jump to archiving and extraction layout interfaces
• search (in PeaZip), F3
• up one level (F4)
• go to archive’s or system’s root level (Ctrl+U)
• refresh (F5) forcing refresh of currently displayed content
• toggle browser/flat view (F6), flat view displays all together the objects contained in the current path or in the archive
Organize menu allows to deeply customise the file/archive manager’s aspect
• Dock the application to screen angles/sides (Ctrl+Alt+numeric pad arrows), F11 full screen, Ctrl+F11 immersive
• Customize or hide tool bar and address bar, swap tool bar and address bar to give visual prominence either to file
navigation or archive manager’s functions.
• Customize browser interface: display details (default) or as list, use row selection or not (default), select columns to
display, select sort column…
• Customize or hide the status bar to display different views: none, plain status bar, details, bookmarks, recent archives,
history, clipboard
• Display picture thumbnails (default) or generic icon - only for file browser, browsing archives icons are displayed
• Use classic search or simple search (default), more similar to natural language
• Set default search to recursive (search in subfolders) or not recursive (“search here”)
In this menu is also featured Organize applications entry, that opens a modal form allowing to edit two sets of up to 8 applications
(or scripts, or commands, or websites) to be used to open files overriding system’s file associations.
Applications can be sorted dragging up or down the application’s number in the list; rightclick to select, edit or remove applications,
and enter descriptions.
Some commonly featured applications are preset and can be recalled with “Reset Applications” button.
Applications are saved to a separate configuration file “custedit.txt” and are not cancelled with application’s reset (as well as
“Bookmarks” list).
• “Basic edit” set allows editing custom application with ease, selecting or typing and application or command to be used to
open the file. It is also possible to enter parameters after command or application name; after the “Executable or
command” string it will be passed a space and the input file name.

8
Note: in the first group can be defined also websites/webservices to pass the filename to as parameter; in those cases (detected by
PeaZip if the name of the app starts for www. or http:// or https://) only the filename is passed, not the full qualified name
(path+filename) as for local applications.
• “Advanced edit” set allows instead a bit more complex syntax, providing a string to be entered before and after the input
file name (it’s up to the user decide if spaces between strings and file name are needed).
Note: by default antivirus / antimalware scanners are defined in “Advanced edit” set, because some of them requires a bit complex
syntax, but it is only a convention. In the last column of the table it is possible to enter the syntax for the application when no file is
passed as parameter, as this case can require a different syntax, or even invoking a different executable
Note: syntax’s examples of preset applications can be used as model to start customizing entries in both sets; clicking an entry in
“Advanced edit” set will show a line displaying complete command entered, with the pseudocode “%f” representing the input file
name position in the command string.
“Tools” submenu contains:
o Enter password / Keyfile (F9) sets the default password (and optionally keyfile, if two factor authentication is desired) to
be used in browsing, testing, extraction and archive creation
o Create keyfile (Ctrl+F9) allows to sample entropy from the system and from user’s actions to generate a random keyfile;
this utility can be also used to generate random passwords to be used in any other application/website/etc
o Set advanced filters (Shift+F9) sets multiple inclusion and exclusion filters to be used in browsing, testing, extraction and
archive creation; filters are applied only to archive formats managed through 7z backend interface, see “Supported file
types” chapter
o Saved job definition scripts opens a folder containing job definitions saved as script files, created from archiving or
extraction interfaces, that can be run for unattended repetition of user-defined operations
o System tools submenu, collecting system’s disk utilities (clean, defrag, manage, remove), system management tools
(control panel, computer management, task manager) and display environment variables (both for Linux and Windows).
o System benchmark utility to rate the host system in terms of MIPS (millions of integer instructions per second) and Core 2
Duo equivalent speed in MHz
“Options” submenu contains:
o Run as administrator (Windows Vista or more recent), closes current instance and opens a new one, prompting UAC
elevation request, in order to work in protected paths;
o Run as different user (Windows only), closes current instance and opens a new one with alternative user profile;
o Localization, to quickly change applications language;
o Settings, to customize application’s behaviour.
o System integration, to customize file associations, context menu and sendto menu entries (Windows only).
o Theming, to customize application’s aspect.
“Help” submenu points to project’s website and to most up to date documentation available online, as well as offline
documentation included in the package: PeaZip help (linked also to F1 functional key), and a short tutorial introducing most
common operations.
From this submenu it is also possible to go to PeaZip’s donation page, which also allows to donate to some suggested worldwide
charitable organizations.

9
Tool Bar
On the right side of application’s toolbar the “+” area allows to toggle the toolbar between Archive Manager, File Manager, and
Image manager.
Image 5a: Archive Manager tool bar.
Add, Convert and Extract leaves file browser and brings to the proper functional dialog, while “Extract all to…” button directly shows output path selection for direct
extraction without leaving the file browser.
On the right of the “Extract all to…” button, the dropdown shows other quick extraction functions, allowing to extract the entire archive to most commonly used
paths and to check and set most common options.
On the right of “Properties” button it is featured a second dropdown showing additional functions, i.e. copy, move, delete, add to bookmarks…
The Archive Manager toolbar features:
• Add
o While browsing the filesystem, the button adds selected files and folders to the current archive layout; before
confirming the creation of the archive with “Ok” it is possible to modify the list of objects to be archived (dragging
them or using the context menu) as well as other options, output name etc, see “Create archive” chapter for more
information.
o While browsing an existing (writeable) archive, the button brings to the archive update interface; it is possible to
add files and folders to be added to the archive as in the previous case, dragging them or using context menu.
• Convert
o Convert selected archives in the desired format (non-archive files and folders can be added as well, the difference
being in archives being extracted before compression stage). Using with “Add each object to a separate archive"
(default) it performs a mass conversion of listed archives, without that switch archive conversion is meant to
consolidate input data in a single archive, improving compression efficiency because it allows recompression of
the original data from its uncompressed form.
• Extract
o While browsing the filesystem, extracts all selected archives; before conforming the extraction with “Ok” it is
possible to modify output path and other options, and to add other archives to be extracted.
o While browsing an archive, extracts the selected items or all the displayed items if nothing is selected, like
WinRar/7-Zip (it is possible to be sure to extract the whole archive using context menu’s Extract all entry, or
clicking “Extract all” link in extraction interface); before confirming the extraction with “Ok” it is possible to modify
output path and other options.
• Extract all to…
o Always extract the whole archive, asking only for the output path without leaving file/archive browser
• On the right of “Extract all to…” button, an arrow shows a menu with functions to directly extract all the content of the
archive to most common destinations without further interaction with extraction confirmation interface
o In the upper area are listed most common extraction operations: extract all here, extract all to (allowing to select
output directory), extract all to desktop, extract all to documents, extract to 1..3° bookmarked paths (if defined),
and extract to default extraction path. Only first, second and third bookmarks are shown as quick extraction
destination to not clutter the menu, but bookmarks 1..8 are accessible with keyboard shortcuts Ctrl+1..8. Ctrl+0
extracts to the previous output path.
o In the lower area it is possible to set most common extraction options: extract to new folder, naming policy (only
for formats supported through 7z frontend), open output path after the job completes, set default extraction path
• Test
o Test selected archives for integrity
• Secure delete
o Erase selected files and folders (see File Tools chapter). Inside archives it becomes Delete from archive button.
Please note that in booth cases the files being securely deleted, or deleted from archive, cannot be recovered
from the recycle bin.
• Properties (XP and newer Windows systems only)
o Show properties of selected files and folders
• On the right of the “Properties” button, an arrow shows a menu with other functions replicating some ones featured in
context menu, explained in details in context menu section of this chapter:
o File/archive manager functions
• (while browsing files) Copy to and Move to, create new folder and calculate file checksum, Quick delete
and Secure delete

10
o Misc functions: Add to bookmarks, Web search (search selected item’s name on the web), Explore path and Open
command prompt here, to open the path being currently browsed with Explorer (or other default file manager)
and command prompt respectively, Properties.
Right clicking on some of the toolbar buttons shows contextual menus:
• Add: shows favourite formats menu to directly start creating an archive and select the archive format
• Convert: as add, but the favourite format menu starts archive conversion
• Extract: shows menu to extract all and (when browsing archives) displayed or selected objects, for partial extraction from
archives
• Extract all to: shows quick extraction menu, the same shown by the arrow on the right of the button
Image 5b: File Manager tool bar.
The File Manager toolbar features three areas.
The first area contains Open with button, and dropdown menu showing custom applications (can be defined by the user with
Organize > Applications). If nothing is selected, this dropdown becomes a launcher for the custom applications.
The second contains Cut/Copy/Paste buttons (Copy to and Move to are featured in the dropdown).
The third area contains various file management features, similar to ones featured in the last dropdown button of Archive manager
toolbar; find duplicates (see below File tools chapter) and rename featured as buttons.
Image 5c: Image Manager tool bar.
Image Manager toolbar features tree areas with quick access to functions related to manage selected graphic files (BMP, JPEG, PNG,
and TIFF), operations are batch applied to all selected files of supported types, asking if modifying existing files or creating new
ones.
The first area contains rotate left/right buttons and a dropdown menu with more rotation features (180°, flip vertically and mirror
horizontally).
Crop button opens a dialog that allows to crop each side (top, bottom, left, right) of selected images of a given amount, expressed in
percentage or in pixels.
Transform opens a dialog to resize and/or convert selected images; the dropdown menu on the right of Transform button provides
quick access to most common image transformation operations: resize to a given percentage, fit to most common screen sizes,
convert to other image format.
Find duplicate files button and file manager dropdown completes the toolbar, providing additional useful features to manage
collections of images.
Address Bar
In the address bar are featured back and forward arrows to navigate in previously visited path (or any previously applied search
filter), an icon to go to upper level (F4).
The navigation menu is featured in the dropdown menu a the left of the address field in address bar.
Image 6: address bar; back and next icons are greyed when non available (displaying last or first path in history)
Navigation menu is organized in Filesystem, Bookmarks, and History submenus which represent three alternative ways, system
based, user based, and chronological based, to quickly access to most used archives or folders in the browser interface.
• Filesystem menu is organized following a system-centric functional and hierarchical point of view, featuring links to
commonly used paths like home, desktop, documents, mounted devices and more system defined paths. If the system
Navigation icons: back, next, up one level
Click the search icon for search history and to set recursive (current path and subdirs) and non recur sive search (in current path only). Basic filter’s field, also contains in-archive path
Show navigation menu: filesystem, bookmarks, recent
Breadcrumb / Address; click on the arrows or on the free space for editable plain text address bar
Click refresh icon for refresh (F5) entry and histo ry/recent submenu
11
supports it, there are featured also searches’ and libraries’ folders, respectively introduced in Vista and Seven; files in those
folders can be clicked to open the related virtual folder, from which drag objects into PeaZip.
• Bookmarks menu reflects user-centric point of view, storing user defined favourite files, folders and search definitions. The
menu also contains entries for adding bookmarks and activate Bookmarks panel allowing to add, edit, sort and remove
bookmarks. Bookmarks can be added also from Misc > Add to bookmarks entry in file browser’s and layout composer’s
context menus, and from History panel’s context menu.
• History menu is a chronological point of view, displaying the history of visited paths, archives, and filters applied during the
current session; below this first section are listed latest accessed archives (this feature can be disabled for privacy, see
“Settings” chapter).
The menu also features Open path, Open archive and other functions for locating and selecting items.
Navigation menu can be reached also from application’s context menu and rightclicking on Navigation bar on the left of the file
browser.
The address field can be set to be viewed as breadcrumb (default) or simple string, with "Show address as breadcrumb" flag in
Organize in Main menu.
Address breadcrumb allows to click on parent folder levels in order to quickly navigate the file system, the first path is always the
root level (computer icon).
Rightclicking on the breadcrumb shows a context menu showing full list of paths in the breadcrumb.
Clicking on the breadcrumb (in the free space or on spacer arrows) transforms it in a plain address field to allow editing and
cut/paste (with its own proper context menu for text field editing).
Refresh icon on the right of the breadcrumb address bar shows popup menu with history (recently visited archives and current
session's paths) and refresh entry (F5) to force the browser update. The icon is greyed until the browser is ready. During long
operations it changes in a “stop” icon to abandon current instance.
Search (F3) icon is on the right of filter’s filed, it can be used for basic recursive and non recursive searches; * (string) and ? (single
character) wildcards are allowed. Right click on search icons shows history of previously searched strings.
This basic search filter is overridden by advanced filters (Shift+F9) only for archive types allowing inclusion/exclusion filters (i.e. 7z,
rar, tar, zip…). Simple search switch in Organize menu allows close to natural language search.
Navigation Bar
To quickly jump to desired directory or archive PeaZip offers a navigation bar (see Image 3) on the left of the file browser, showing
either navigation shortcuts (system’s paths, user-defined bookmarks, recently visited archives, most common operations), a classic
treeview, and an alphabetically sorted list of functions.
Clicking on the top area of the navigation bar toggle between bar modes; the bar can be hidden in Organize menu.
Status Bar
Image 7: status bar
The padlock icon, first icon in status bar icon group, as well as “Enter password / keyfile” menu entry (F9) allows to set password
and keyfile to be used when operating on archives (browsing, extracting/testing or creating encrypted archives); this information is
kept for the current session, and can be different for each separate instance of the application.
Encrypted content, while browsing an archive, is shown with a ‘*’ appended to filename.
If the archive is encrypted and the password is not provided, a popup will ask the user to enter the password/keyfile when
extract/test/list operation are attempted.
If the password/keyfile is set, the padlock icon is changed to highlight that.
Keyfile is not mandatory, it can be used if two factor authentication is preferred to password-only authentication; keyfile creation
utility can be launched form Tools menu or with Ctrl+F9.
If the directory structure area is encrypted (i.e. .7z archives created with –mhe option), browsing is not possible until the correct
password/keyfile is provided: the archive browser will be empty and “no matches” will be displayed in the status bar until it becomes
possible to browse the archive, having the user provided the right password.
Click for quick file manager organization: set details, list or icons mode
Toggle different views for the status bar: status, details, bookmarks, history, recent archives, clipb oard content
Files and folders in current view (path or search result), and on the right selected items
Set password (and optionally a keyfile) for browsing, extracting and creating encrypted archives
12
Please note the same can happen when the archive cannot be browsed for other reasons, i.e. it was corrupted due to bad download
or storage media failure. When strong encryption is involved, it may not be possible to determinate if the the provided password is
incorrect or if the file is corrupted, since resulting output will be random-looking in both cases.
Featured views in the status area can be toggled from the right side:
• None, hide views to maximize browser’s area (can be set from Organize menu in main menu and context menu)
• Status bar (default) displaying synthetic information about the currently selected and displayed content
• Details, which gives more detailed information than the status bar
• Bookmarks shows bookmarked files, folders and archives, bookmarks can be dragged to arrange them in the desired order,
clicking on the leftmost column of the Bookmarks table; otherwise the bookmarks can be arranged alphabetically by
bookmark’s path or by description clicking on the respective column’s header (clicking again will invert the order). It is
possible to open bookmarked objects with PeaZip with doubleclick, but from bookmarks’ context menu it is also possible to
explore object’s path with PeaZip or system’s file manager, and to open command prompt in item’s path.
• Recent archives collects recently visited archives
• History shows current session’s visited paths
• Clipboard allows to check objects currently cut and/or copied, and to remove single objects from clipboard if it’s need to
refine the selection. Clipboard behaviour can be switched between two modes:
• Standard clipboard (default) behaves like usual file browser’s clipboard, allowing a single cut or copy operation. Any
further selection replaces the previous one, and on paste operation cut objects, have been moved, are removed from
clipboard, while copied objects are kept in clipboard.
• Advanced clipboard allows to store multiple (and mixed) cut and copy operations; any selection is added to the
previous ones (if objects are duplicate, previously selected are kept), even from different paths and disks, and executed
on paste operation, which clears the clipboard content.
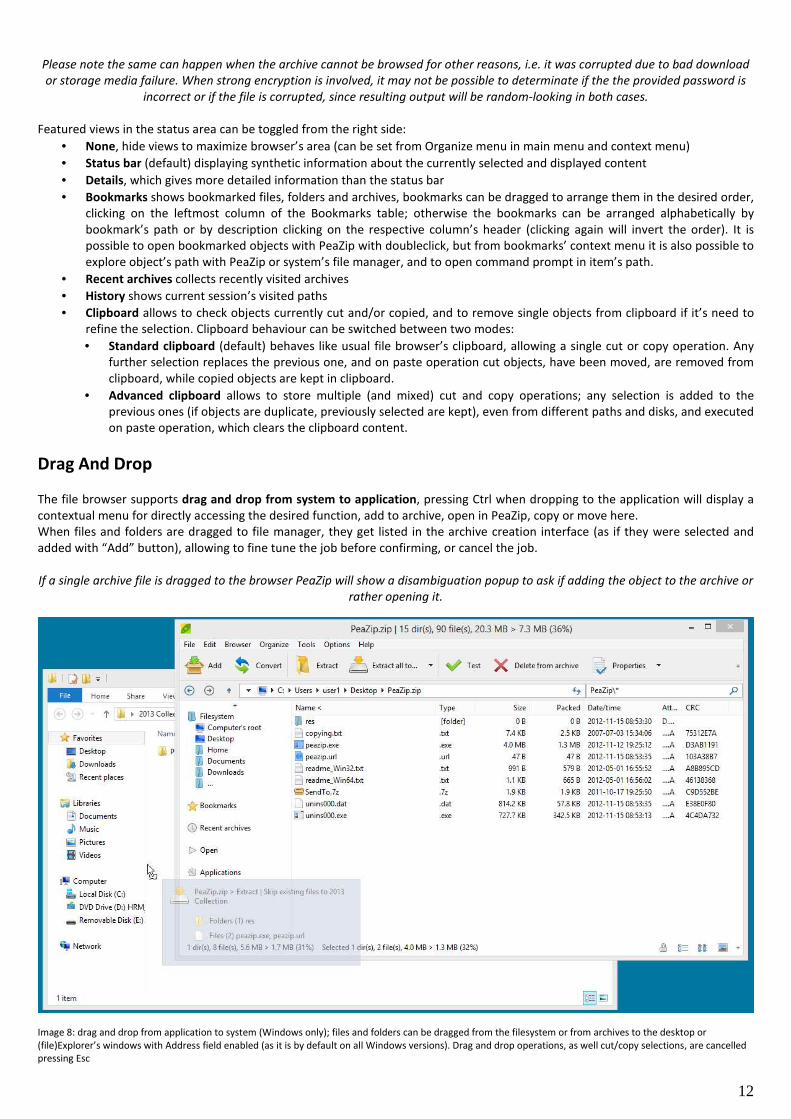
Drag And Drop
The file browser supports drag and drop from system to application, pressing Ctrl when dropping to the application will display a
contextual menu for directly accessing the desired function, add to archive, open in PeaZip, copy or move here.
When files and folders are dragged to file manager, they get listed in the archive creation interface (as if they were selected and
added with “Add” button), allowing to fine tune the job before confirming, or cancel the job.
If a single archive file is dragged to the browser PeaZip will show a disambiguation popup to ask if adding the object to the archive or
rather opening it.
Image 8: drag and drop from application to system (Windows only); files and folders can be dragged from the filesystem or from archives to the desktop or
(file)Explorer’s windows with Address field enabled (as it is by default on all Windows versions). Drag and drop operations, as well cut/copy selections, are cancelled
pressing Esc

13
In the same way, objects dragged into the browser while browsing an archive will be added to the current archive, if the file type
allows modifications.
In example, it will not be possible adding objects to archive types supported only for reading, or to some solid archives.
It is also not possible to add objects to some container types, like i.e. .jar files, MS Office and Open Office documents etc, that are
derived by other standard formats (i.e. zip, tar etc) but features specific fields (i.e. digital signatures) not featured in the original
standard.
In those cases, while PeaZip can be an useful resource to inspect and extract, it is recommended to use a specific tool for editing
those files.
PeaZip checks file extension to prevent improper modifications to those file types, so if it is necessary to bypass this security
recommendation it is possible by changing the file extension in one with read+write support (i.e. .zip) to be able to edit the file with
PeaZip.
File Browser
In the file browser, clicking on titles bar column’s header sorts displayed objects by the selected column i.e. name, full (file and
path) name, extension, date, size etc; a second click inverts the order.
Archives and folders are highlighted (respectively, green and orange), such objects can be opened for browsing with double-click.
Archives contained into another archive will be opened in a separate instance of PeaZip; please note that by default this is a
“preview” operation, extracting data to a temporary folder (by default in the same path, if writeable).
Hint: to open multi volume archives, the first volume (i.e. the one with .001 extension) must be selected.
Hint: unsupported file types can be forcedly open as archives in PeaZip as custom format: this allows to use an arbitrary binary, and
to customize the command’s syntax, for dealing with them.
Otherwise, Open With > Open as archive in application’s context menu forces trying to open unknown file formats through the
7z/p7zip backend, so it is useful for opening a file thought to be a variant of another format as zip, tar, cab etc, rather than switching
to the “Custom” interface.
The browser can switch between flat view mode, displaying all objects contained in the archive, and classic browser mode, using
“Toggles browse/flat view” (F6) in main and context menus.
Flat view is used also when performing basic search or applying advanced filters; opening a folder will browse it in classic mode,
exiting the flat view mode.
Hint: some applications don’t explicitly declare the name of directories contained in the archive; in this way PeaZip cannot list those
undeclared objects. If this case is detected the application automatically switches to flat mode, and in any case the archive’s content
is displayed in summary in application’s window title.
Manually switching to flat mode (F6), or using search or filter feature, will allow displaying all the content of those archives.
Extraction, listing and testing of the archive is not affected by this issue.
ACE, ARC, *PAQ, PEA and QUAD/BALZ archives can be browsed by PeaZip in flat mode only.
In Options > Settings > Open archive it is possible to set PeaZip to start browsing (archives) as classic browser, as flat view or to
remember last used mode. Browsing of the filesystem, rather than of archives, is not affected by this setting and will always start in
classic mode since listing a path in flat mode could take very long time (i.e. if it is a root folder), and the user will be warned of that
when switching to flat mode is requested while browsing the filesystem.
In main menu > Organize it is possible to set file browser to show picture thumbnails (by default off in details mode and on in icon
mode), or show just generic picture’s icon.
Thumbnails are generated in real time, PeaZip does not save thumbnails (neither as a temporary files), this is especially useful if
PeaZip is used as portable application (or when privacy is important), as no track is let on the system and no extra space is taken.
Thumbnails calculation generates a set of 4 dedicated threads, if folder or search filter is changed a new set of threads is created
and old threads are stopped as soon as possible (file level and thread level granularity: each thread can be stopped separately, at
the completion of each image).
Thumbnails are only available browsing the file system, not while browsing archives: no data is automatically trusted to be extracted
from archives (even for temporary preview purpose) without the explicit intervention of the user.
In Organize > Browser it is possible to switch the default Details mode to Icons mode to maximize thumbnails size; it is also possible
to enlarge small and large icon mode thumbnails in Organize > Size menu.
From Organize submenu in Main menu and context menu it is possible a simpler choice from a few common presets, most common
presets are also available as icons on the status bar for fastest selection.

14
Image 9: browser in “Icons and images” preset showing medium sized image thumbnails.
On the bottom, “List and thumbnails” and “Details and thumbnails” presets; alongside presets any combination of style and size is possible to fit different user’s
needs.
Thumbnails are shown only browsing the filesystem (the feature can be turned on and off in Organize menus), not while browsing archives. Images are calculated in
real time with multiple threads and no image cache is ever saved.
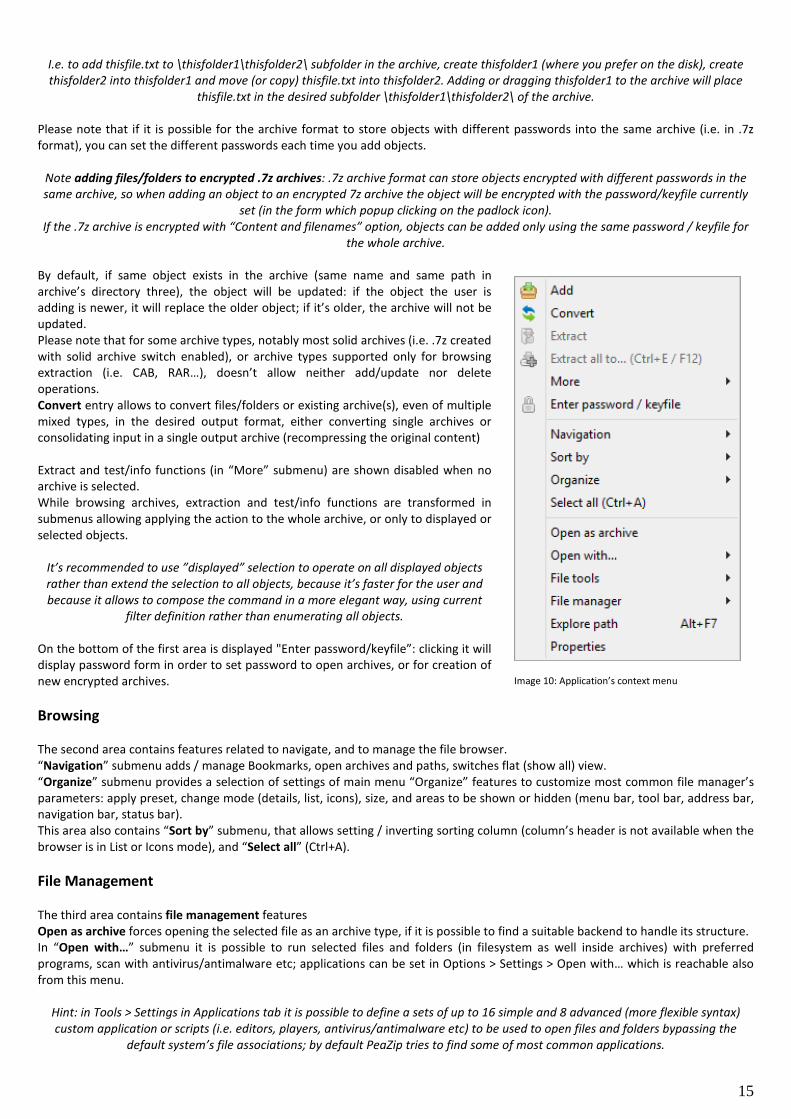
Context Menu
The browser’s context menu, activated right clicking on the archive browser area, is organized in 3 areas, and is context sensitive as
provides different options while browsing the filesystem or archives of various types (which supports different operations).
Archive management
The top area features archive management-related entries: Add, Convert, Extract, Extract all to…, Test, Info (verbose listing of
properties of archived objects), and List (applies also to uncompressed files/folders).
While browsing the filesystem Add will send selected files and folders to the archive layout, while browsing an archive it opens a
submenu allowing to add files or folders or to open a search dialog from which files/folders can dragged into the archive itself.
In this case objects will be archived starting from archive’s root, compressed and encrypted accordingly to the archive’s settings.
Note: currently adding objects to archive adds them in archives root.
If it is needed to add objects to a subfolder of the archive, a workaround is to place the files in a folder (or nested folders) with that
name, and then add that folder to the archive: this will place the file in archive’s subfolder with same name.
15
Image 10: Application’s context menu
I.e. to add thisfile.txt to \thisfolder1\thisfolder2\ subfolder in the archive, create thisfolder1 (where you prefer on the disk), create
thisfolder2 into thisfolder1 and move (or copy) thisfile.txt into thisfolder2. Adding or dragging thisfolder1 to the archive will place
thisfile.txt in the desired subfolder \thisfolder1\thisfolder2\ of the archive.
Please note that if it is possible for the archive format to store objects with different passwords into the same archive (i.e. in .7z
format), you can set the different passwords each time you add objects.
Note adding files/folders to encrypted .7z archives: .7z archive format can store objects encrypted with different passwords in the
same archive, so when adding an object to an encrypted 7z archive the object will be encrypted with the password/keyfile currently
set (in the form which popup clicking on the padlock icon).
If the .7z archive is encrypted with “Content and filenames” option, objects can be added only using the same password / keyfile for
the whole archive.
By default, if same object exists in the archive (same name and same path in
archive’s directory three), the object will be updated: if the object the user is
adding is newer, it will replace the older object; if it’s older, the archive will not be
updated.
Please note that for some archive types, notably most solid archives (i.e. .7z created
with solid archive switch enabled), or archive types supported only for browsing
extraction (i.e. CAB, RAR…), doesn’t allow neither add/update nor delete
operations.
Convert entry allows to convert files/folders or existing archive(s), even of multiple
mixed types, in the desired output format, either converting single archives or
consolidating input in a single output archive (recompressing the original content)
Extract and test/info functions (in “More” submenu) are shown disabled when no
archive is selected.
While browsing archives, extraction and test/info functions are transformed in
submenus allowing applying the action to the whole archive, or only to displayed or
selected objects.
It’s recommended to use ”displayed” selection to operate on all displayed objects
rather than extend the selection to all objects, because it’s faster for the user and
because it allows to compose the command in a more elegant way, using current
filter definition rather than enumerating all objects.
On the bottom of the first area is displayed "Enter password/keyfile”: clicking it will
display password form in order to set password to open archives, or for creation of
new encrypted archives.
Browsing
The second area contains features related to navigate, and to manage the file browser.
“Navigation” submenu adds / manage Bookmarks, open archives and paths, switches flat (show all) view.
“Organize” submenu provides a selection of settings of main menu “Organize” features to customize most common file manager’s
parameters: apply preset, change mode (details, list, icons), size, and areas to be shown or hidden (menu bar, tool bar, address bar,
navigation bar, status bar).
This area also contains “Sort by” submenu, that allows setting / inverting sorting column (column’s header is not available when the
browser is in List or Icons mode), and “Select all” (Ctrl+A).
File Management
The third area contains file management features
Open as archive forces opening the selected file as an archive type, if it is possible to find a suitable backend to handle its structure.
In “Open with…” submenu it is possible to run selected files and folders (in filesystem as well inside archives) with preferred
programs, scan with antivirus/antimalware etc; applications can be set in Options > Settings > Open with… which is reachable also
from this menu.
Hint: in Tools > Settings in Applications tab it is possible to define a sets of up to 16 simple and 8 advanced (more flexible syntax)
custom application or scripts (i.e. editors, players, antivirus/antimalware etc) to be used to open files and folders bypassing the
default system’s file associations; by default PeaZip tries to find some of most common applications.

16
Security related applications like virus scanners are conventionally placed in the second area (advanced) when automatically
detected by PeaZip.
While browsing an archive, “Open with…” submenu is replaced by “Extract and open with…” and “Preview with…” submenus;
preview functions will extract selected objects to a temporary folder rather than to the output path, and then take the programmed
action on the output.
Hint: if the archive is in a read only path, preview functions will transparently switch to user’s temporary folder, while extract here
functions will warn the user and ask to select a writeable output path.
Double-clicking an object (while browsing the filesystem) triggers “open with associated application” action, while browsing an
archive double-click triggers “preview with associated application” action.
When performing any of those actions while browsing archives, the selected object will be extracted without replicating the
directory structure in the archive.
If replicating the archive structure is desired, uncheck “Always ignore paths for Extract and…” option (see “Settings” chapter). If the
object is a directory paths will not be ignored, this condition overrides all other switches.
In this third area, “File tools” submenu contains a set of file management tools described in its own chapter.
“File Tools” contains features to find duplicates, calculate checksums and hashes and more, see File Tools section in this chapter.
“File manager” submenu allows to create new folder, rename (F2 or Ctrl+R), move to Recycle Bin, quick delete or secure delete,
copy or move files (using robust file copy/move with system’s robocopy, or xcopy on pre-Vista systems), open command prompt in
the selected path.
Cut, copy and paste operations can also be performed with keyboard shortcuts of Ctrl+X, Ctrl+C and Ctrl+V respectively.
Pressing Ctrl+V while browsing an archive adds objects from clipboard to the archive; in this case objects will not be removed from
the filesystem even if Ctrl+X was used, since PeaZip tries to not automatize potentially dangerous operations such file deletion,
letting that kind of decision under the full control of the user.
Quick delete performs the fast deletion of selected objects, without needing to move them to recycle bin, and secure delete (only in
the filesystem, not available in archives) performs a secure file deletion as described in “File tools” chapter.
While browsing archives filesystem related functions (including cut, copy, paste) are disabled and the area shows only simple
deletion from archive, if this action is supported for the current archive type.
The area also contains Explore path to open system’s file manager in the selected path, to quickly switching working with PeaZip
and standard system’s file manager, and Properties, starting a standard system’s dialog for displaying properties of selected
files/folders.
File manager’s keyboard shortcuts
File/archive browser supports following keyboard shortcuts; some functions are format-specific and will be ignored if not supported
for the current archive type.
Functional keys:
F1 help
F2 rename file(s) / Ctrl+F2 copy selected to / Shift+F2 move selected to
F3 search (recursivity option is remembered) / Ctrl+F3 start as non recursive (search here) / Shift+F3 recursive / Alt+F3 system
search
F4 up one level / Ctrl+F4 browse root / Shift+F4 browse desktop
F5 refresh
F6 toggle browse/flat view
F7 add to bookmarks / Ctrl+F7 open in a new instance of PeaZip / Shift+F7 open command prompt in selected path / Alt+F7
explore selected path
F8 browse first item in bookmarks list (Ctrl, second, Shift, third)
F9 set password/keyfile / Shift+F9 password manager / Ctrl+F9 create keyfile or random password / Ctrl+Shift+F9 set
advanced filters
F10 menu / Ctrl+F10 run as different user / Alt+F10 run as administrator (Windows Vista and newer systems)
F11 toggle full screen mode / Ctrl + F11 immersive (full screen, no window border and controls)
F12 extract all to...
17
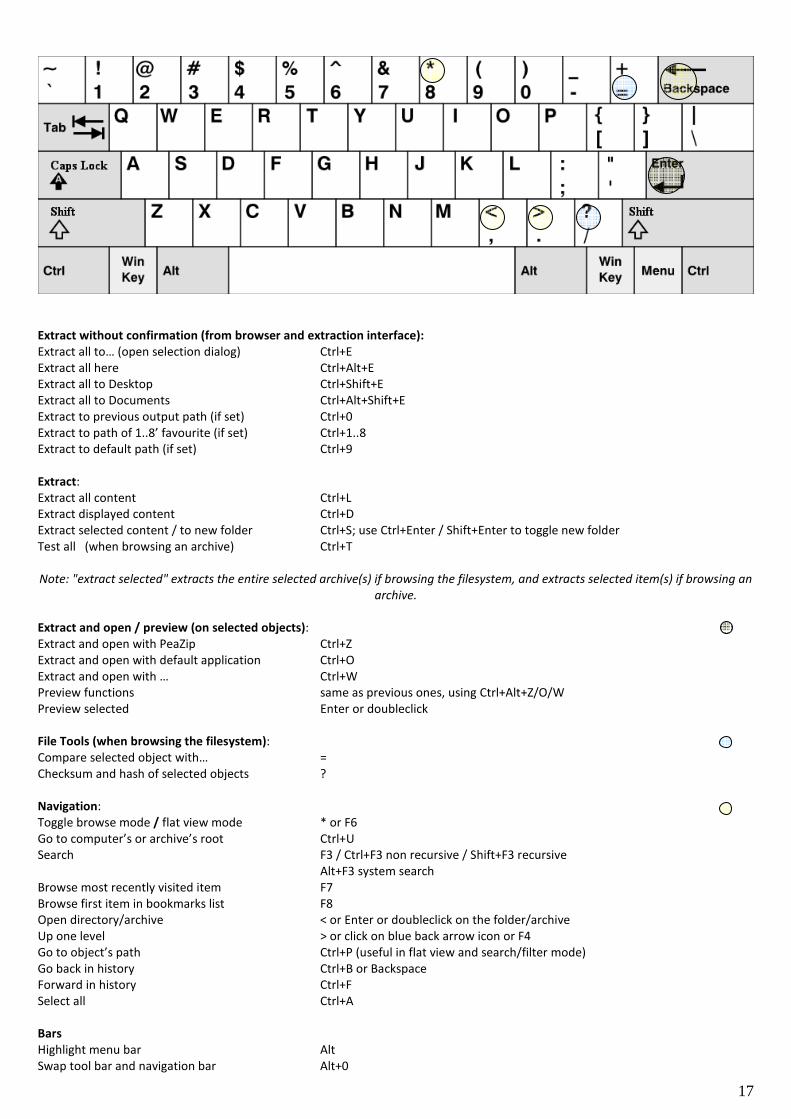
Extract without confirmation (from browser and extraction interface):
Extract all to… (open selection dialog) Ctrl+E
Extract all here Ctrl+Alt+E
Extract all to Desktop Ctrl+Shift+E
Extract all to Documents Ctrl+Alt+Shift+E
Extract to previous output path (if set) Ctrl+0
Extract to path of 1..8’ favourite (if set) Ctrl+1..8
Extract to default path (if set) Ctrl+9
Extract:
Extract all content Ctrl+L
Extract displayed content Ctrl+D
Extract selected content / to new folder Ctrl+S; use Ctrl+Enter / Shift+Enter to toggle new folder
Test all (when browsing an archive) Ctrl+T
Note: "extract selected" extracts the entire selected archive(s) if browsing the filesystem, and extracts selected item(s) if browsing an
archive.
Extract and open / preview (on selected objects):
Extract and open with PeaZip Ctrl+Z
Extract and open with default application Ctrl+O
Extract and open with … Ctrl+W
Preview functions same as previous ones, using Ctrl+Alt+Z/O/W
Preview selected Enter or doubleclick
File Tools (when browsing the filesystem):
Compare selected object with… =
Checksum and hash of selected objects ?
Navigation:
Toggle browse mode / flat view mode * or F6
Go to computer’s or archive’s root Ctrl+U
Search F3 / Ctrl+F3 non recursive / Shift+F3 recursive
Alt+F3 system search
Browse most recently visited item F7
Browse first item in bookmarks list F8
Open directory/archive < or Enter or doubleclick on the folder/archive
Up one level > or click on blue back arrow icon or F4
Go to object’s path Ctrl+P (useful in flat view and search/filter mode)
Go back in history Ctrl+B or Backspace
Forward in history Ctrl+F
Select all Ctrl+A
Bars
Highlight menu bar Alt
Swap tool bar and navigation bar Alt+0
18
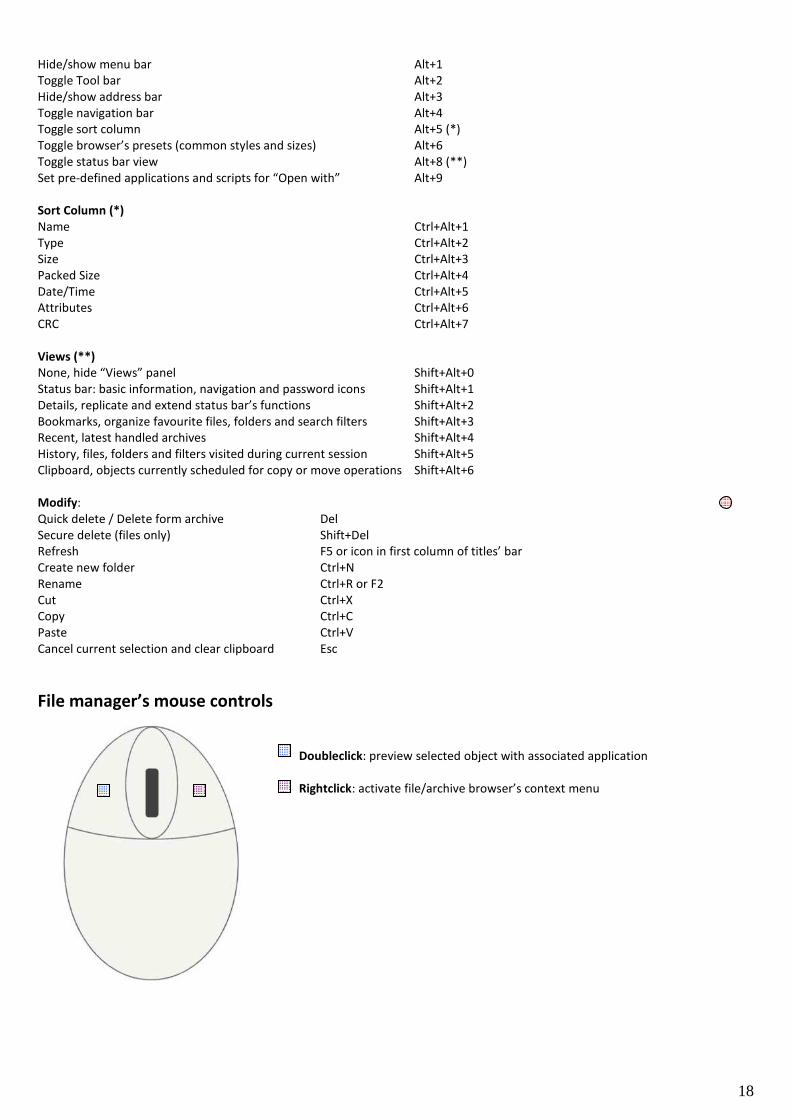
Hide/show menu bar Alt+1
Toggle Tool bar Alt+2
Hide/show address bar Alt+3
Toggle navigation bar Alt+4
Toggle sort column Alt+5 (*)
Toggle browser’s presets (common styles and sizes) Alt+6
Toggle status bar view Alt+8 (**)
Set pre-defined applications and scripts for “Open with” Alt+9
Sort Column (*)
Name Ctrl+Alt+1
Type Ctrl+Alt+2
Size Ctrl+Alt+3
Packed Size Ctrl+Alt+4
Date/Time Ctrl+Alt+5
Attributes Ctrl+Alt+6
CRC Ctrl+Alt+7
Views (**)
None, hide “Views” panel Shift+Alt+0
Status bar: basic information, navigation and password icons Shift+Alt+1
Details, replicate and extend status bar’s functions Shift+Alt+2
Bookmarks, organize favourite files, folders and search filters Shift+Alt+3
Recent, latest handled archives Shift+Alt+4
History, files, folders and filters visited during current session Shift+Alt+5
Clipboard, objects currently scheduled for copy or move operations Shift+Alt+6
Modify:
Quick delete / Delete form archive Del
Secure delete (files only) Shift+Del
Refresh F5 or icon in first column of titles’ bar
Create new folder Ctrl+N
Rename Ctrl+R or F2
Cut Ctrl+X
Copy Ctrl+C
Paste Ctrl+V
Cancel current selection and clear clipboard Esc
File manager’s mouse controls
Doubleclick: preview selected object with associated application
Rightclick: activate file/archive browser’s context menu
19
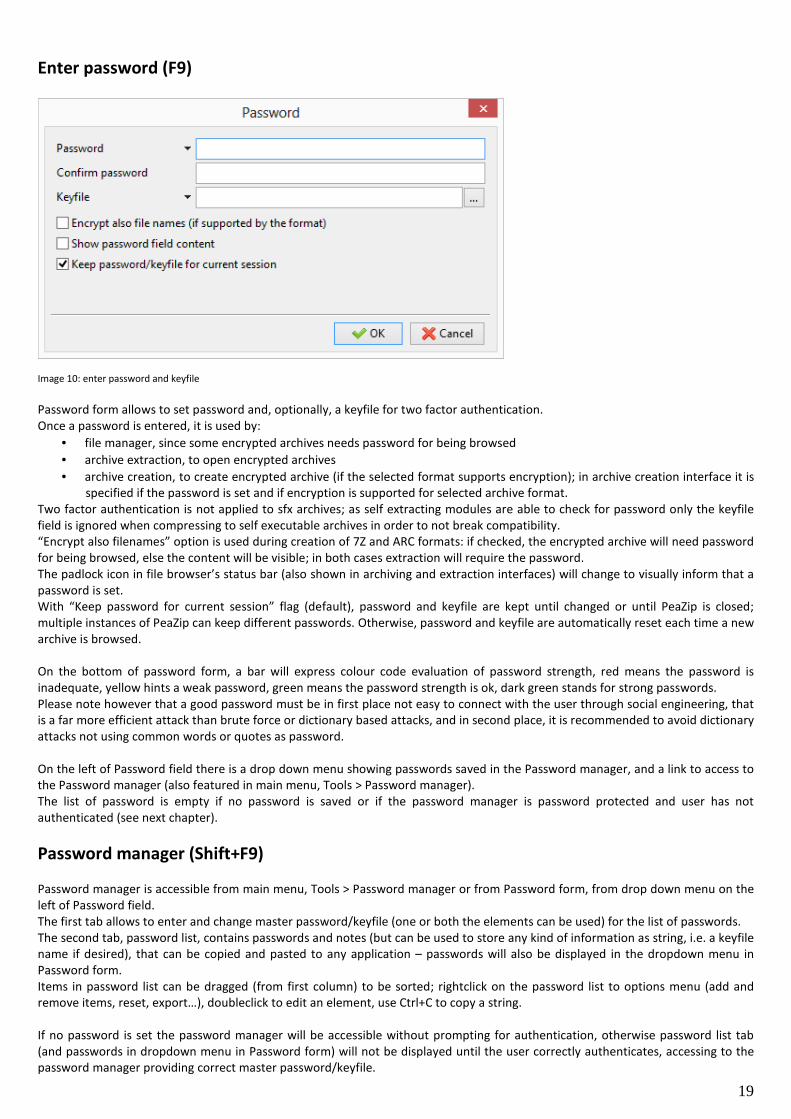
Enter password (F9)
Image 10: enter password and keyfile
Password form allows to set password and, optionally, a keyfile for two factor authentication.
Once a password is entered, it is used by:
• file manager, since some encrypted archives needs password for being browsed
• archive extraction, to open encrypted archives
• archive creation, to create encrypted archive (if the selected format supports encryption); in archive creation interface it is
specified if the password is set and if encryption is supported for selected archive format.
Two factor authentication is not applied to sfx archives; as self extracting modules are able to check for password only the keyfile
field is ignored when compressing to self executable archives in order to not break compatibility.
“Encrypt also filenames” option is used during creation of 7Z and ARC formats: if checked, the encrypted archive will need password
for being browsed, else the content will be visible; in both cases extraction will require the password.
The padlock icon in file browser’s status bar (also shown in archiving and extraction interfaces) will change to visually inform that a
password is set.
With “Keep password for current session” flag (default), password and keyfile are kept until changed or until PeaZip is closed;
multiple instances of PeaZip can keep different passwords. Otherwise, password and keyfile are automatically reset each time a new
archive is browsed.
On the bottom of password form, a bar will express colour code evaluation of password strength, red means the password is
inadequate, yellow hints a weak password, green means the password strength is ok, dark green stands for strong passwords.
Please note however that a good password must be in first place not easy to connect with the user through social engineering, that
is a far more efficient attack than brute force or dictionary based attacks, and in second place, it is recommended to avoid dictionary
attacks not using common words or quotes as password.
On the left of Password field there is a drop down menu showing passwords saved in the Password manager, and a link to access to
the Password manager (also featured in main menu, Tools > Password manager).
The list of password is empty if no password is saved or if the password manager is password protected and user has not
authenticated (see next chapter).
Password manager (Shift+F9)
Password manager is accessible from main menu, Tools > Password manager or from Password form, from drop down menu on the
left of Password field.
The first tab allows to enter and change master password/keyfile (one or both the elements can be used) for the list of passwords.
The second tab, password list, contains passwords and notes (but can be used to store any kind of information as string, i.e. a keyfile
name if desired), that can be copied and pasted to any application – passwords will also be displayed in the dropdown menu in
Password form.
Items in password list can be dragged (from first column) to be sorted; rightclick on the password list to options menu (add and
remove items, reset, export…), doubleclick to edit an element, use Ctrl+C to copy a string.
If no password is set the password manager will be accessible without prompting for authentication, otherwise password list tab
(and passwords in dropdown menu in Password form) will not be displayed until the user correctly authenticates, accessing to the
password manager providing correct master password/keyfile.

20
The Password manager is protected by authenticated encryption (AES256 in EAX mode), and saved as encrypted file “pm” in
PeaZip’s configuration folder, if the file is corrupted or tampered the user will be asked if trying to recover it or to delete it.
Passwords can be exported as plain text (not recommended) or in its encrypted form, in this way a password list's .bak file can be
manually imported as password manager file, renaming it as pm (no extension) and copying it to PeaZip's configuration path (linked
in Options > Settings): this file will have the same content and password it had when it was originally saved.
This mechanism allows in example to roll back to a previous password list, or maintain various off line password lists, or exchange
protected password lists with other users or other machines
Image 11: Password manager’s Password list tab, showing context menu
Create keyfile (Ctrl+F9)
For higher security against dictionary and some social engineering attacks, a keyfile can be used along with the passphrase to key
the encryption.
Image 13: keyfile generation utility
The keyfile need to be securely managed since its content need to remain secret as well as the passphrase; any file can be used as a
key, but it’s strongly recommended to use a randomly generated file.
If a keyfile is used for a non-PEA archive, the SHA256 hash of the file (no size limit) encoded in Base64 (RFC 4648) will be prepended
to the password, then it will be possible to work on archives encrypted with a keyfile using PeaZip or any application following the
same convention, or simply entering the Base64-encoded hash as the first part of the password.

21
PeaZip can create a random keyfile sampling different entropy sources and submitting entropy collected to a robust random
number generation routine, in the same interface it’s also possible to generate a 4-64 character random password; the password
will contain mixed case base characters and digits only, in order to be typeable on any keyboard layout and to be accepted by
almost all applications or online password forms.
The passwords and keyfiles generated in that way can be used not only in PeaZip but also in any other application requiring a strong
password or a random keyfile.
This utility uses functions provided by pea’s libraries so refer to Pea documentation for any detail about random number generation
and entropy collection in PeaZip project.
Set advanced filters (Ctrl+Shift+F9)
“Advanced filters” form allows to use multiple inclusion and exclusion criteria, one per line, that can optionally recurse subdirs of
the archive (“Inclusion/Exclusion filters recurse subdirs” options), and can be applied only to archive formats supported through 7z
and FreeArc backends.
The filters can be applied to archive’s navigation, extraction and creation
Advanced filters bypass the archive browser’s basic search filter (in mentioned archive types) so address bar is disabled, while
browsing archives which supports advanced filters, if “Use advanced filters” option is checked.
Multiple filters, one per line, can be written in the inclusion and exclusion fields; string delimiters (“ on Windows and ‘ on Linux and
other *x systems) are not needed to be explicitly entered by the user.
In example, if the user needs to extract (or display) only “myfile.txt” plus all files named “your file” and all .mp3 files, but not .mp3
starting with a and m, could write in the inclusion field:
myfile.txt
your file.*
*.mp3
and in the exclusion field:
a*.mp3
m*.mp3
To exclude directories, use the syntax dirname*\ which excludes all objects contained in the directory named “dirname”.
To exclude subdirectories, the filter in previous example can be modified as dirname*\subfoldername\* to exclude all items inside
“subfoldername” which is inside “dirname”.
Both absolute and relative paths can be used.
Advanced filters can be set from main menu, which shows the entry checked if advanced filters are in use, and from checkboxes in
archive and extraction.
Please refer to 7z documentation about inclusion and exclusion filters to understand how they works to get best result from this
very flexible tool.
Image 14: inclusion and exclusion filters

22
File tools
PeaZip collect also handy file management utilities
In file manager’s context menu:
List/information (from file browser): lists content of selected files/folders; in info mode it shows number of files and folders, older
and newer object’s date/time, total space occupation, and larger and smaller object’s sizes.
In Delete submenu:
Secure file deletion is intended for securely remove files and folders from disk, avoiding possible data recovery.
In the application’s context menus it is featured alongside quick deletion’s entry rather than in other file tools’ submenu.
Secure deletion accepts multiple files and directories as input, and provides multiple overwriting of file data with random data
stream (AES256 CTR) forcing flush to disk each time, then replacement of content with randomly sized random data to fake file size,
and multiple renaming of the file (or folder) with random string. Please use it carefully since wiped data will reasonably be not
recoverable with known means.
Anyway please note that secure file deletion doesn’t overcome any known risk of data leakage, since may exist copies of the data as
temporary files saved by application that accessed the file, or as not securely deleted older version of the file, or cached by the
system: wiping a file cannot affect that data, which can be recovered with software utilities or specific hardware probes.
Moreover, flash based storage usually re-allocates sectors for writing transparently for the software, in order to reduce unit’s wear
since flash units have a shorter lifespan in terms of writes; this doesn’t allow to efficiently physically overwrite original content,
reducing the efficiency of file wiping.
In those cases only wiping the whole disk would be effective, but this can be very time consuming and, for flash based disks, it will
lead to fast wear and reduced lifespan of devices (complete disk wipe is currently not implemented PeaZip’s file wipe procedure).
In “Settings > File Tools” it is possible to set number of passes to perform (2, 4, 8, 16) over the data.
In File tools submenu:
Find duplicates is a fast routine to find duplicate files displaying the report directly in the file browser. This utility can be combined
with all file browser’s features, like F6 to display subfolder’s content, or F3 to apply a search filter (recursive by default), for all
displayed or only selected items. Only true duplicates are reported, with same size and same binary content.
Control algorithm can be selected (Organize > Browser > Checksum/hash) from a wide array of 15 algorithms: Adler32,
CRC16/24/32/64, eDonkey, MD4, MD5, Ripemd160, SHA1, SHA224/256/386/512, Whirlpool512.
Ripemd, SHA and Whirlpool algorithms are cryptographically strong, and suited to detect malicious modifications that might have
been introduced to pass undetected by simpler control algorithms.
CRC32 / CRC32 (selected) calculate the checksum or hash for all / selected items, using the same control algorithms set for the
duplicate finder. This is useful to check files for corruption or substitution when an original checksum or hash value is known.
In File tools submenu, and also available in archiving extraction interface:
Check files can perform in a single pass multiple user selected hash and checksum on multiple files at once. In Tools > Settings > File
Tools it is possible to select algorithms to be performed over the input files.
Compare files performs byte to byte comparison between two files; unlike checksum or hash based comparison byte to byte
comparison can spot exactly what are the different bytes and it is not susceptible of collisions under any circumstance, even if this
condition is highly improbable and very difficult or not practically possible to trigger if a proper hash function is chosen.
Hexadecimal preview (beta): a very basic tool to view the content of a file represented as hexadecimal values.
Shows offset, hexadecimal representation of bytes, and possible utf8 translation of each string of 16 bytes per row.
At current level of implementation please note that:
- not all rows could be correctly represented in the GUI as utf8 strings, but they will be correctly written to file using save
report feature;
- the implementation is slow and so it’s limited to small files (up to 16MB).
23
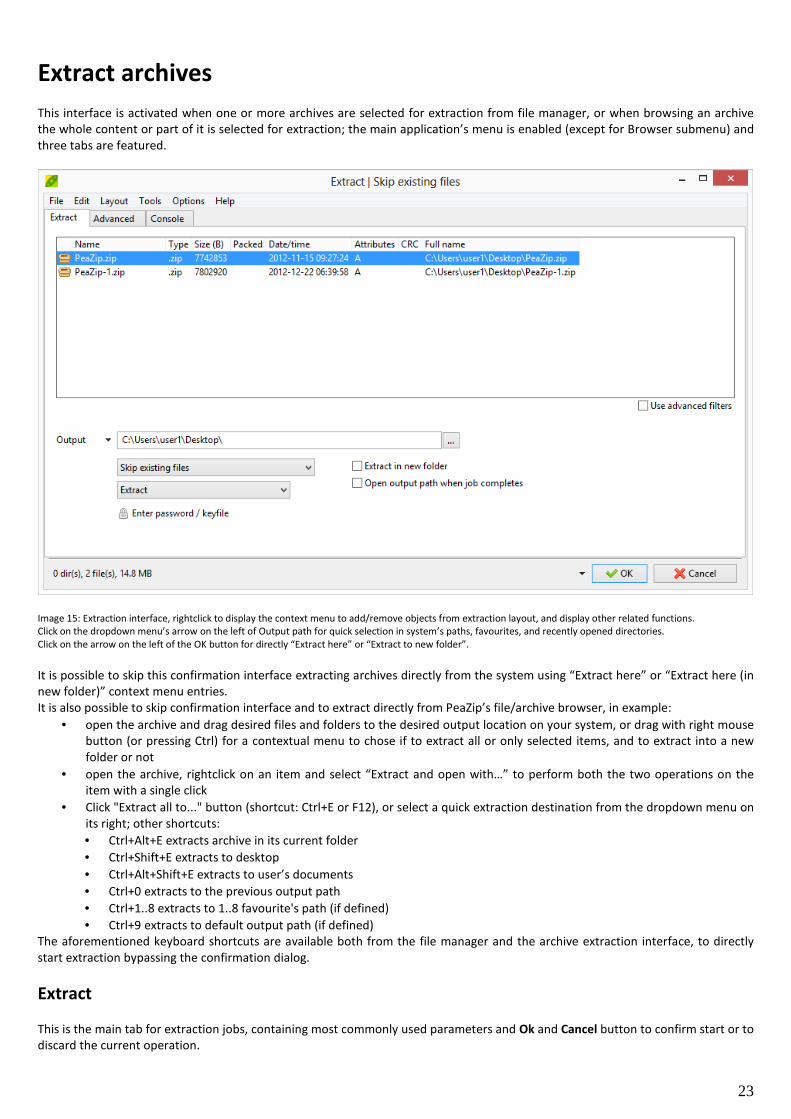
Extract archives
This interface is activated when one or more archives are selected for extraction from file manager, or when browsing an archive
the whole content or part of it is selected for extraction; the main application’s menu is enabled (except for Browser submenu) and
three tabs are featured.
Image 15: Extraction interface, rightclick to display the context menu to add/remove objects from extraction layout, and display other related functions.
Click on the dropdown menu’s arrow on the left of Output path for quick selection in system’s paths, favourites, and recently opened directories.
Click on the arrow on the left of the OK button for directly “Extract here” or “Extract to new folder”.
It is possible to skip this confirmation interface extracting archives directly from the system using “Extract here” or “Extract here (in
new folder)” context menu entries.
It is also possible to skip confirmation interface and to extract directly from PeaZip’s file/archive browser, in example:
• open the archive and drag desired files and folders to the desired output location on your system, or drag with right mouse
button (or pressing Ctrl) for a contextual menu to chose if to extract all or only selected items, and to extract into a new
folder or not
• open the archive, rightclick on an item and select “Extract and open with…” to perform both the two operations on the
item with a single click
• Click "Extract all to..." button (shortcut: Ctrl+E or F12), or select a quick extraction destination from the dropdown menu on
its right; other shortcuts:
• Ctrl+Alt+E extracts archive in its current folder
• Ctrl+Shift+E extracts to desktop
• Ctrl+Alt+Shift+E extracts to user’s documents
• Ctrl+0 extracts to the previous output path
• Ctrl+1..8 extracts to 1..8 favourite's path (if defined)
• Ctrl+9 extracts to default output path (if defined)
The aforementioned keyboard shortcuts are available both from the file manager and the archive extraction interface, to directly
start extraction bypassing the confirmation dialog.
Extract
This is the main tab for extraction jobs, containing most commonly used parameters and Ok and Cancel button to confirm start or to
discard the current operation.
24
Clicking Ok saves modifications to extraction options, while Cancel discards the modifications; it is also possible to confirm changes
with an empty layout in order to modify PeaZip’s behaviour without the need to start a job.
Options will not be saved if forcedly modified entering a special operation mode, i.e. when using system’s context menu entries
“Extract here” or “Extract here (in new folder)”.
In the top area of the tab is shown the Input area, where are listed the archives that are going to be extracted (extraction layout),
with the total number of archives and total size; additional archives can be dragged here to be added to the list.
If extracting from inside an archive, the layout will display items listed to be extracted from the archive, and will not accept
modifications from drag and drop or context menu, and it will be available “Extract all” link below the input list to turn a partial
extraction in extraction of the entire archive if desired.
Rightclicking on the input list shows the contextual menu, which features functions to add archives to extraction layout (add files,
search ad drag here, load layout), and other related functions.
The layout can be saved to a UTF-8 text file (for maximum flexibility of use); when a layout is loaded each object is checked (must
exist, duplicates are skipped).
From the context menu it is also possible to remove objects from the archive’s layout (“Remove selected objects” and “Clear
layout”) and to explore selected object’s path.
“Go to file browser” can be used to return to file browsing without discarding the current list of archives, in example to navigate and
search for other archives to be added to the list from file browser interface.
“Open with…” submenu of context menu allows opening the selected object with PeaZip, associated application, or a custom
applications.
“File Tools” submenu allows quick access to some of PeaZip functions to be applied on selected objects (see “File tools” chapter).
Objects in the archive layout can be sorted by name, full name, size, extension, type, attributes etc, clicking on titles in archive
layout’s title bar.
“Use advanced filters” checkbox shows if advanced filters are set or not; clicking the unchecked box will show the advanced filter’s
form to set inclusion/exclusion filters, clicking the checked bow will deactivate advanced filters.
In the bottom area of the tab is featured Output group, that allows to select output directory; on the left of the address box, the
arrow button popup a navigation menu similar to the one featured in file manager, to speed up the selection of most used paths.
The extraction’s navigation menu is organized in Filesystem, Bookmarks and Recent submenus, containing only directory entries
where the file manager’s navigation menu can feature also file entries.
In the navigation menu is also featured “Use default output path” entry to select an output path to be used by default in place of
archive’s path, useful if the user often extracts to the same path.
When this feature is active, the “Use default output path” entry is flagged, and can be clicked again to remove the flag and
deactivate the option.
In the same area it is also possible to set the password, if needed for extraction, and to check if password is set or not.
This area also feature output options for 7z backend, that is used to support most common file formats (“Advanced” tab contains
parameters for other backend executables).
• Possible actions performed by the extraction routine:
o “Extract” extracts archived objects with paths, replicating the directory structure of the input data;
o “Extract (without path)” will extract all archived files to the same path;
o “List” will show archive’s content;
o “List (with details)” will give a more detailed report on archive’s content, the same given by “Info” entries in
context menu. List functions will always be performed in pipe mode (even if 7z option is set to “console mode”),
using graphical wrapper in order to make easier reading and saving the report.
o “Test” will perform type specific tests to prove or disprove archive’s integrity.
• What the extraction routine will do in case of naming conflict while extracting data. Anyway, using “Extract in new folder”
switch will assure avoiding naming conflict.
o “Skip existing files” assure that pre-existing objects are not touched by the extraction operation, being the
conflicting objects not extracted from the archive (default).
o “Auto rename extracted files” assign a new unique name to objects being extracted from the archive each time a
naming conflict is encountered; that policy assures that pre-existing objects will keep their names and new ones
will get new unique names.
o “Auto rename existing files” assures that extracted objects get the desired name while pre-existing objects are
renamed with a new unique name.
o “Overwrite existing files” make all pre-existing objects overwritten by extracted objects.
o “Ask before overwriting (in console)”: no defined policy, the console will be shown alongside graphic process
launcher allowing the user to decide interactively if overwriting or skipping files.
Extract in new folder checkbox, when checked, triggers extraction to a fresh new folder, avoiding possible naming conflict and
unwanted “tarbomb” effect (when an unexpectedly large number of files is extracted in current path getting mixed with existing
files).
25
Open output path when job completes automatically open the output directory where the archive was extracted to.
Advanced
This tab allows to set parameters for non-7z backend executables. Notably, in this group it is possible to change action for FreeArc
backend to “Repair”, which (for ARC archives only) verifies integrity and tries to repair the archive(s) using the recovery records that
may have been included at the archive creation.
Extract supported non-archive types checkbox, unchecked by default, allows some non-archive types like executables, MS Office
and Open Office documents etc to be treated as archives, in order to be disassembled.
In file manager those file types are displayed with special icons to show they can be accessed as archives by PeaZip, but will not be
treated as archives by default.
Extract unsupported file types checkbox, unchecked by default, allows any arbitrary type of file to be treated as an archive by
PeaZip, providing the user can specify a custom executable backend to handle the file type in “Custom parameters” group, which is
enabled if this option is checked.
Console
From this tab, only when extraction is launched while browsing inside an archive, it is possible to transform the job defined in the
GUI interface into a command line that can be edited (independently from the job definition in the GUI frontend).
Rightclicking on “Click to import…” label or on “Save job” button it is possible to compose the command line operating on all,
displayed or selected objects, if partial extraction of content is supported for the current archive type (7z, arc, rar, tar, zip…).
This command line can be launched or saved as a text file for future use, as study, scripting, analysis etc.
Note about extraction
The default operation is extracting recreating the full parent path’s directory tree, as saved in the archive, in the extraction
destination path.
This may be necessary to preserve the functionalities of reciprocal links of archived objects, i.e. link files, hypertexts, scripts,
programs, databases etc…
In extraction confirmation interface it is possible to override this behaviour selecting “Extract (without paths)” in extraction option:
this option will flatten the extracted content to a single directory, all information about the original directory tree (both up and
below the directory of the selected items) will not be preserved.
In Options > Settings, Open archive tab, are featured “Always ignore paths...” directives, in order to extract items from the archive
in a flat mode without recreating the directory tree, as with “Extract (without paths)”.
These directives can be fine tuned for each special extraction mode: for drag and drop operations, for extract and open with, and for
extract selected or displayed objects (all objects shown with current browsing or search filter).
Unlike “Extract (without paths)”, “Always ignore paths…” directives are overridden if one of the selected objects is a directory, this
because flat extraction will lose information about directory tree so it is considered unfit for directories, and will be applied only if
files are selected. The same rule applies when extracting objects from archives browsed in flat mode, consistently with behaviour of
mainstream archive utilities.
To apply flat extraction to a directory, rightclick, extract > extract selected objects, set “Extract (without paths)”.
By default these directives are set on for “drag and drop” and “extract and open with” operations, so by default all partial extraction
operations starting from file/archive browser interface behaves in the same way, trying to ignore re-creating paths, while by default
all special operations starting from the extraction confirmation dialog (extract selected and displayed) will not.

26
Create / convert archives
This interface is activated when files and folders are selected for being added to an archive from file manager, or when, browsing an
archive, it is requested to update it adding other files and folders.
The same interface is activated using for archive conversion, which activates by default “Convert existing archives” and “Add each
object to a separate archive” options.
Righclicking on "Add" or "Convert" button in toolbar is possible to start creating/converting archives in a specific format chosen
from the "Favourite formats" context menu.
The main application’s menu is enabled (except for Browser submenu) and three tabs are featured.
Image 16: “Create archive” interface.
Rightclick to display the context menu to add files and folders to archiving layout (add files, add folder, search ad drag here, load layout), and display other related
functions.
Click on the arrow on the left of the output address for quick selection of the output path in system’s paths, favourites, and recently opened directories.
Click on the arrow on the left of OK button to directly compress/convert to the selected format.
Archive
This is the main tab for archive creation (or update) jobs, containing most commonly used parameters and Ok and Cancel button to
confirm start or to discard the current operation.
Clicking Ok also saves modifications to archive creation options, while Cancel discards the modifications; it is also possible to
confirm changes with an empty layout in order to modify PeaZip’s behaviour without the need to start a job.
Options will not be saved if forcedly modified entering a special operation mode, i.e. adding files to an existing archives.
Please note that some options (like TAR before or conversion switches, or some advanced format options) are context dependent
and will be reset in next job instances.
In the top area of the tab is featured the Input group, where are listed the items that are going to be archived (archiving layout),
with the total number of files and folders and total size; additional files and folders can be dragged here to be added to the list.
Rightclicking on the input list shows the context menu, which features functions to add files and folders to archiving layout (add
files, add folder, search ad drag here, load layout), and other related functions.
The layout can be saved to a UTF-8 text file (for maximum flexibility of use); when a layout is loaded each object is checked (must
exist, duplicates are skipped).
From the context menu it is also possible to remove objects from the archive’s layout (“Remove selected objects” and “Clear
layout”) and to explore selected object’s path.
Favourite formats context menu

27
“Go to file browser” can be used to return to file browsing without discarding the current list of archives, in example to navigate and
search for other files and folders to be added to the list from file browser interface.
“Open with…” submenu of context menu allows opening the selected object with PeaZip, associated application, or a custom
applications.
“File Tools” submenu allows quick access to some PeaZip functions to be applied on selected objects (see “File tools” chapter).
Objects in the archive layout can be sorted by name, full name, size, extension, type, attributes etc, clicking on titles in archive
layout’s title bar.
“Use advanced filters” checkbox shows if advanced filters are set or not; clicking the unchecked box will show the advanced filter’s
form to set inclusion/exclusion filters, clicking the checked bow will deactivate advanced filters.
In the bottom area of the tab is featured Output group, that allows to select output directory and file name; on the left of the
address box, the arrow button popup a navigation menu similar to the one featured in file manager, to speed up the selection of
most used paths.
The archiving navigation menu is organized in Filesystem, Bookmarks and Recent submenus, containing only directory entries
where the file manager’s navigation menu can feature also file entries.
Output options set the archive format and compression level, more options for each format can be fine-tuned in “Advanced” tab;
last used compression options will be remembered to be used as default, avoiding the need to set it in advanced tab following times
the format is used; resetting applications default resets also compression options.
The info icon in the right of the archive type selection combobox will display a brief explanation of the characteristics and features
offered by the selected format.
The arrow on the left of OK button shows favourite formats menu, which for brevity and simplicity displays only some of the
supported archive format, the most widespread. Favourite formats can be customized in Options > Settings > Create archive.
In the same group it is possible to set Volume size, allow (optionally) splitting the resulting archive in volumes of given size, choosing
between presets (from 1.44 MB FD to 8.5 GB DVD DL size) or freely composing a custom size.
This option is not supported by some formats (i.e. self extracting archives) and will be automatically overridden if not supported (the
combo box will be greyed to be noticed by the user).
Hint: to store large files/archives on small supports, or to respect mail attachments size limitations, it is recommended to split the
output in volumes of desired size instead of spending more time for a deeper compression which is not always capable to reduce the
output under the desired size.
From this area it is also possible to set the password to create an encrypted archive, the button is only displayed if the selected
archive format supports encryption.
From password popup it is possible to check/uncheck “Encrypt filenames” option, which, if supported by the selected archive
format (7Z and ARC formats) does not allow to browse the content of the archive if the right password is not provided.
Add each object to a separate archive send each item in the list to a separate archive.
In example, adding x folders to the archive list with this option checked will create x separate archives; if it is desired to add each file
contained in a folder to a separate archive, instead, select the files in file manager and click “Add” to add them individually to the
list.
Append timestamp to archive name will append current date and time to the name of the archive, it is useful for archiving and
backup purpose.
Convert existing archives extracts listed archives (not modifies non-archive files and folders) in order to recompress the original
data from its uncompressed form, which can improve compression ratio.
Used with “Add each object to a separate archive” option (default, if “Convert” function was requested), it performs a mass
conversion of each listed archive into the desired format, keeping them separated.
After the extraction stage it asks for confirmation to proceed with compression, this allows to abort the process in case of problems
(disk full, unknown password, corrupted archives etc) or to further modify the extracted data before the compression.
After the compression stage, it asks for confirmation before deleting temporary files and folders created for conversion, however
original archives are not deleted and not modified in any stage of the conversion to let the user in control about keeping or
removing them.
Open output path when job completes option (Shift+Ctrl+O) automatically opens the output directory where the archive was
created in at the end of the process.
TAR before option allows to consolidate all input objects in a single TAR archive, temporarily saved in the output path, which will
then (in a second pass) be compress/encrypt/split using the format specified in archive type combo box (after that second pass the
temporary TAR archive will be deleted).
That option allows easily merging the advantages of TAR format (of mainstream and standard usage on most Unix systems) with
features of other archive formats. It is especially useful as it allows to select compression-only formats (like gz, bz, quad) to

28
compress archives of multiple objects (resulting i.e. in tar.gz or tar.bz or tar.quad) quite transparently for the user, but however it
can be used in conjunction with any format (forming i.e tar.7z, tar.paq, tar.pea and so on).
The application will try to check if “TAR before” option is needed; however the user can check/uncheck this option anytime before
launching the archiving process.
Advanced
This tab contains fine-grained options for each supported format, including compression level.
Once advanced options for a given format are set, they are remembered, so it is usually not needed to use Advanced tab and all of
archive creation can be done form Archive tab.
Hint: most of multimedia file formats (like jpg, png, mpg, avi, mp3...) are already compressed with algorithms that are either lossy
and/or strongly optimized for the specific data structure, so compressing them with general purpose lossless compression
algorithms, even most powerful ones, are likely to provide only marginal benefits in terms of size, compared with huge benefits
which can be obtained compressing other types of files (bmp, tiff, doc, xls, txt, html…).
Consequently, it is recommended to use fastest compression settings, or fast algorithms (i.e. gz and zip’s deflate), or even “Store”
option to don’t compress, to archive those types of files in a computationally efficient way; in this way it is possible to consolidate
and optionally encrypt files that are sent to the archive, without spending much time for compression.
Backend executables can be used by PeaZip in the native console mode or, by default, through a graphic wrapper (see
“PeaLauncher” chapter), displaying additional information usually not given by the console application (exit code explanation, input
size, elapsed time in ms, speed in B/ms) and allowing to save a job report (console output plus additional information); this
behaviour can be customized in Options > Settings.
7z - Performances scales very well on multicore machines; following formats are recommended:
7Z when high compression is desired; offers powerful encryption
ZIP to provide archives which all Windows user can read with integrated “compressed folders” utility, or with most of
mainstream file/archive managers
TAR to provide archives which most Unix (Linux, BSD …) users can read with applications usually bundled by default
WIM to create disk images for Windows environment
GZ, BZip2, XZ to compress single files or uncompressed containers, like TAR; GZ is the fastest, BZIP is slower but compresses
better, XZ utterly improves compression but requires more memory and computing power.
Selecting a format supported through 7z executable (7Z, Bzip2, GZ, self-extracting 7Z, TAR, WIM, XZ, ZIP) it will be displayed the 7z
option subpanel, featuring Options, Compression and Encryption group box.
“Compression” group box allows choosing compression level and algorithm and to fine tune compression options, which are format
specific.
Last used compression level and method is remembered by PeaZip for 7z backend, but other custom options (dictionary, word,
passes, solid block size) will be remembered only for the current session (until the archive type is changed or edited) and next times
the last used compression level will be proposed with its default settings.
Option “Compress files open for writing” allows to add files to the archive even if open for writing by other applications, very useful
when running backup jobs (otherwise, if the option is not checked, open for writing files will be skipped); the last used setting is
remembered.
“Create self-extracting archive” options create a Win32 executable (.exe) that will self extract archive content (archived and
compressed in 7z format); the receiver will then not need any application to extract the archive since all what is needed for
extraction is embedded in the archive itself. As drawback the resulting file will be about 80KB bigger than the raw archive and the
executable must be in a single volume (Volume size option will be greyed). Checking this option the user can choose between a
console and a graphical interface (default) for the self-extracting application.
“Encryption” group box contains encryption related options:
• “Algorithm” allows to chose encryption algorithm; 7Z format supports AES, while ZIP supports AES and ZipCrypto algorithm.
AES is always used with 256 bit keys. ZipCrypto is a weak algorithm but may be useful if the user need to generate
encrypted .zip archives compatible with some outdated applications not supporting new WinZip standard AES-based AE
encryption.
“Options” group box allows choosing other format specific options:
• “Function” combo box allow to choose the policy to follow when a pre-existing archive with the given name is found on the
system:
o new archive will force the creation of a new archive, with unique name;
o add will append the input objects to the archive content, if an archive with the given name exists;

29
o update will substitute matching objects into the archive, if existing, with input objects.
• “Threads” combo box allow specifying the number of threads to try to generate for parallelising and speeding up the
execution of the application (possible only for LZMA, Deflate, Deflate64 and BZip2 algorithms) on Hyper threading-enabled
/ multi-core / multi-CPU environments; on Windows systems single processor systems will be recognized and will use “no
multithreading” option by default while multi processor system will use “generic multithreading” option by default; on non
Windows systems “no multithreading” is the default option.
• “Other” edit box allows to freely enter additional parameters for the archiving job. This string is inserted by default after all
the parameters set by the GUI and its syntax is not checked, so use with caution.
• Send by mail open a new mail in the default mail client, attaching the resulting archive; it requires a compatible mail client
as default system client, i.e. Outlook or Outlook Express in Windows, and doesn’t work with multi volume archives (the
options is hidden if Volume size is not “Single volume”).
ARC - Recommended when high compression is desired; offers powerful encryption and, optionally, recovery records. Performances
scales very well on multicore machines.
In FreeARC’s options subpanel, it is possible to adjust compression level, specify file grouping strategy for solid archives, create
recovery records to attempt archive’s repair in case of corruption, encrypt the archive with various encryption algorithms (AES,
Serpent, Twofish, and Blowfish), archive with absolute or relative paths (default), create self extracting archives selecting from many
sfx modules.
The format is currently being actively developed.
Custom - Allows to select an external compressor/decompressor to support file types which are unknown to PeaZip
Selecting “Custom” format, it will be displayed a subpanel allowing to specify archiver/compression utility to use to perform the job,
alongside parameters (free editing) and syntax (the way parameters, input list and output name should be organized on the
resulting command line).
Last 8 used custom executables are remembered and can be chosen from a popup menu rightclicking on executable’s selection
control.
Please note that exact syntax of the command for a custom executable may need to be utterly adjusted, this can be done in
“Console” tab, which allows importing and free editing of the job definition.
Pea - Recommended when powerful encryption and integrity check are desired; provides fast compression
Selecting Pea as archive format it will be displayed the Pea option panel; this is the archive format developed from the author of
PeaZip and it is supported through Pea executable; for more information on it you may look the documentation about Pea on
http://www.peazip.org/peazip-help.html.
QUAD/BALZ - Recommended when it is desired to provide average to good compression, with fast uncompressing
Selecting QUAD/BALZ, the option subpanel will allow to choose compressor engine between QUAD and BALZ (newer ROLZ-based
compressor), and if using max compression mode (for both QUAD and BALZ, compression will be slower, but decompression will
remain fast). QUAD and BALZ are compression only algorithms and likewise other ones (GZ, BZ2, LPAQ) they can benefit of “TAR
before” switch for handling multiple input files.
Split - Recommended to split a single large file to the desired size, without attempting compression
Options for file split are limited to optional integrity check algorithm to be performed on the file; integrity check information will be
saved on a separate file, allowing files splitted by PeaZip to be joined by other similar applications (like Unix split, Hjsplit, FileTools
etc).
UPX - Recommended to developers to reduce the size of executables
UPX compression is intended mainly for developers needing to reduce the size of executables before distribution.
It can accept only a single executable file at time and is not intended to be used as a general purpose compression utility; in fact
misapplying Strip and/or UPX on non suitable executables (i.e. jet stripped executables) may easily lead to unusable output
executables.
It is possible to omit either UPX compression (selecting “do not compress” in “Compression” combo box) or Strip pre-processing
(unchecking “Strip before UPX”).
By default it is created a backup copy of the executable before Strip/UPX (option “Keep executable’s backup”), named as the
executable with .backup extension appended.
*PAQ - Recommended when highest possible compression is desired (experimental; speed and memory usage makes it not
recommendable for general purpose use on current generation machines)
PAQ is a very powerful compression scheme and it’s presently in research state; different versions and branches exist and you
should use the very same implementation to compress and uncompress data, PeaZip uses PAQ8O for compression.
It brings unmatched compression ratio, better than any other compressor; the downside is that the algorithm has very high memory
and computing power requirements for today’s machines, resulting to be very slow if compared to mainstream compression
algorithms, so the user should carefully consider if the speed/compression trade-off would be advantageous case by case.
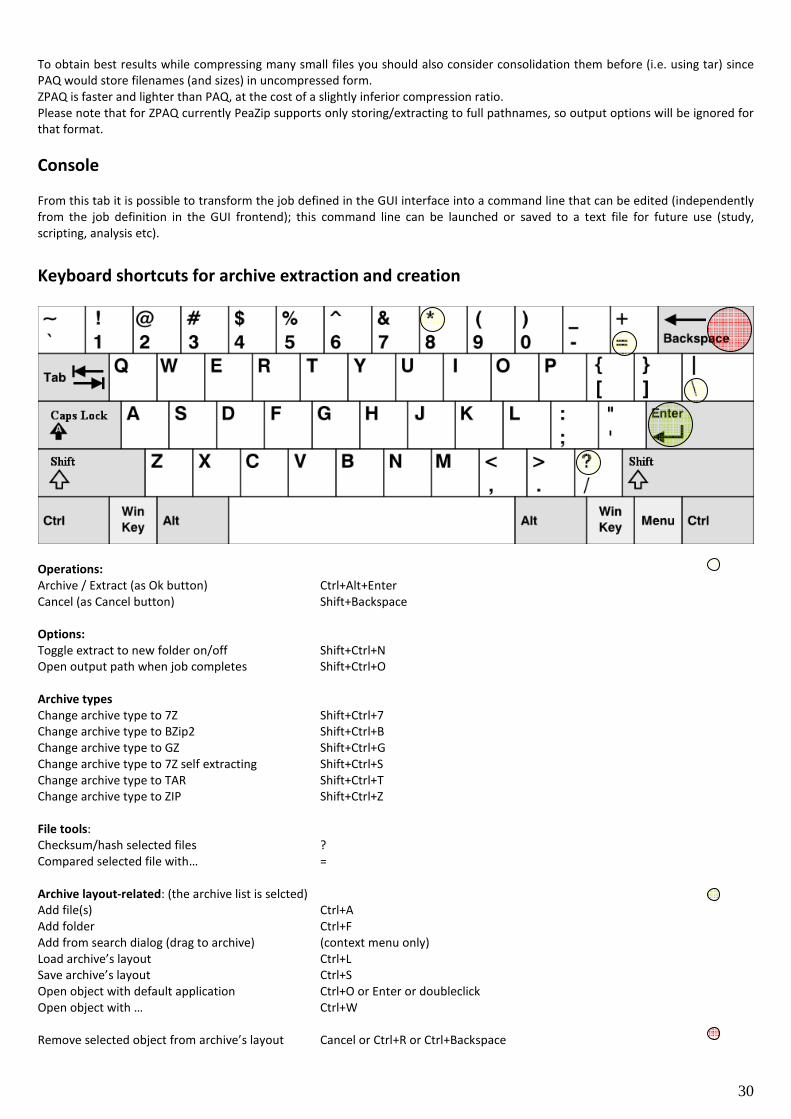
30
To obtain best results while compressing many small files you should also consider consolidation them before (i.e. using tar) since
PAQ would store filenames (and sizes) in uncompressed form.
ZPAQ is faster and lighter than PAQ, at the cost of a slightly inferior compression ratio.
Please note that for ZPAQ currently PeaZip supports only storing/extracting to full pathnames, so output options will be ignored for
that format.
Console
From this tab it is possible to transform the job defined in the GUI interface into a command line that can be edited (independently
from the job definition in the GUI frontend); this command line can be launched or saved to a text file for future use (study,
scripting, analysis etc).
Keyboard shortcuts for archive extraction and creation
Operations:
Archive / Extract (as Ok button) Ctrl+Alt+Enter
Cancel (as Cancel button) Shift+Backspace
Options:
Toggle extract to new folder on/off Shift+Ctrl+N
Open output path when job completes Shift+Ctrl+O
Archive types
Change archive type to 7Z Shift+Ctrl+7
Change archive type to BZip2 Shift+Ctrl+B
Change archive type to GZ Shift+Ctrl+G
Change archive type to 7Z self extracting Shift+Ctrl+S
Change archive type to TAR Shift+Ctrl+T
Change archive type to ZIP Shift+Ctrl+Z
File tools:
Checksum/hash selected files ?
Compared selected file with… =
Archive layout-related: (the archive list is selcted)
Add file(s) Ctrl+A
Add folder Ctrl+F
Add from search dialog (drag to archive) (context menu only)
Load archive’s layout Ctrl+L
Save archive’s layout Ctrl+S
Open object with default application Ctrl+O or Enter or doubleclick
Open object with … Ctrl+W
Remove selected object from archive’s layout Cancel or Ctrl+R or Ctrl+Backspace
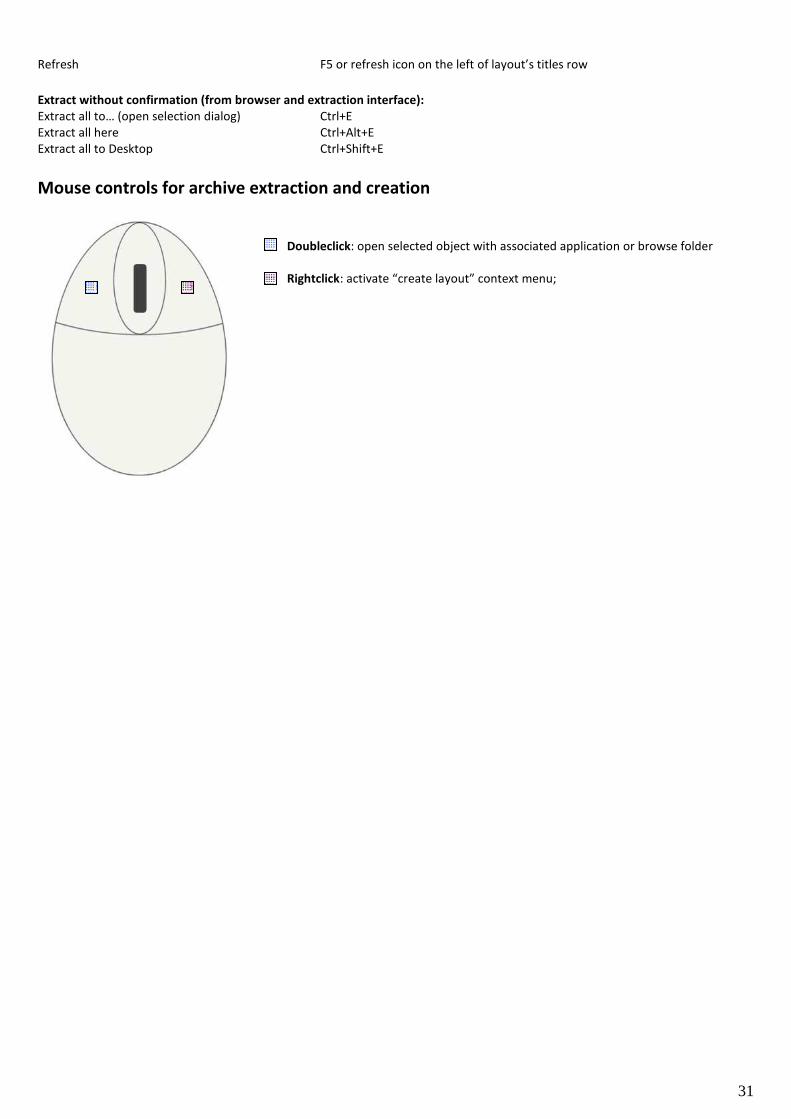
31
Refresh F5 or refresh icon on the left of layout’s titles row
Extract without confirmation (from browser and extraction interface):
Extract all to… (open selection dialog) Ctrl+E
Extract all here Ctrl+Alt+E
Extract all to Desktop Ctrl+Shift+E
Mouse controls for archive extraction and creation
Doubleclick: open selected object with associated application or browse folder
Rightclick: activate “create layout” context menu;

32
PeaLauncher
PeaLauncher is the job’s graphic wrapper, a component that graphically displays an underlying job performed by a console-based
backend used by PeaZip to create, extract, test or list an archive
By default, the window closes if no errors are detected, but remains always open for test, info and list jobs which requires the user
to read the job’s report.
It is possible to always keep the job’s window open after job termination, to inspect job’s log and command line, selecting “Always
keep open” in PeaLauncher combo box in Options > Settings
Image 17: PeaLauncher; it will auto close by default, this behaviour can be changed in PeaZip Options > Settings
The graphical wrapper is not invoked if jobs are running in console interface, either because they need to run in console (UNACE,
UPX) or because the user selected to use “Console interface” in program’s options; however list and test always run in graphic
wrapper mode using pipes to give readable job log.
In console mode, the console will automatically close when job is completed without prompting any message if the job completes
without errors, otherwise an error report will popup.
PeaLauncher can run also in “GUI + console” mode (see Settings chapter) displaying both the graphical interface and the underlying
job running in its native console interface, showing its native progress indicator, usually more detailed and reliable than GUI’s one.
PeaLauncher’s “Options” tab allows to set, for the current job: if the output path should be opened at the end of the job, and if to
shut down the system when the job has terminated. The tab is available only while the job is running.
PeaLauncher can be invoked with no parameters, or with a single archive file as parameter (i.e. dragging an archive over the
executable, or a link to PeaLauncher), to be used as a minimalist standalone extraction application.
33
Settings
Options > Localization allows to set application’s language; the application will be restarted with chosen localization.
Options > Settings allows to configure behaviour and aspect of PeaZip application.
Reset button asks for removing current PeaZip configuration (includes recent archives history), and separately for removing other
customization files: Applications (to reset custom file associations inside PeaZip), Bookmarks, and Password manager.
The link “System integration” in the button area allows to change how PeaZip is integrated in the system (system’s file associations,
context menu and SendTo menu entries), without the need to run the setup package.
This entry is available also for PeaZip Portable and allows to integrate the software in the system if desired.
To remove system integration it is possible to run this function and chose “none of the above group” for files, context menu and
SendTo menu, or else running unins000.exe in PeaZip’s folder (unins001.exe for the installable version) for complete removal of
any integration with the system.
General (1) • “Desktop” contains the path of user’s desktop, if correctly got from PeaZip; it also allow to set an arbitrary path to be used
as desktop for the application, if preferred.
• “Backend binaries user interface” group allow to chose the way the backend command-line applications will run:
o in the native console interface (console mode), giving detailed and real time progress indication;
o through a graphical wrapper using pipes (graphic, default), giving a very detailed job log and allowing to pause,
resume and change priority of the job;
o graphic + console: like the previous, but also showing native console interface: gives a responsive UI and at the
same time plenty details and real time progress indication.
• “PeaLauncher” sets the policy about PeaLauncher window:
o always keep the window open, useful to inspect job’s report and command line
o keep open only if needed (default from version 2.6), keeps the window open only in case of errors, or for test, info
and list jobs requiring the user to read the job’s report
o run minimized, run the job’s window minimized in order to not steal focus from other activities, but show the job’s
window if needed (error, list/test jobs).
o always force to close the window at job termination, regardless the kind and the result of the job
• Open path group contains links to open application’s paths
o Configuration path, containing configuration, bookmarks and “Open with” files, and the persistent randomness
collector file
o Localization, PeaZip’s /res/lang subfolder, containing available language files. If the language file is correctly
loaded, translator’s name and translation’s revision date are displayed.
o Open PeaZip folder
o “Open user’s SendTo menu folder” help in creating, editing and removing SendTo menu links, and to copy those
entries from one user to another, or from reference examples in SendTo.zip file in program’s directory.
• Reset switches:
o Reset Bookmarks
o Reset History – Recent archives: delete records of latest visited or created archives
o Reset Applications: delete configuration of custom editors/players/scripts/websites etc that can be associated to
override default system’s associations in “Open with…” tab, and parse the system to build a list of default
application for “Open with…” menu
o Reset Password manager
General (2) • “Encoding” group contains character encoding related options
o Encode job definition as UTF-8 text: if checked job definition files are saved with UTF-8 encoding header,
otherwise no header will be prepended to the file.
o Archive browser interface’s character encoding option: if flagged, displays extended characters in archived object’s
names as UTF-8 text, otherwise replaces extended characters with “?” jolly character (as in pre-2.5 releases).
o 7z/p7zip -scc allows to set the character set to be used in list operations for archive types supported through
7z/pzip backend, default is UTF-8. If DOS charset is chosen on Windows systems, the characters are utterly
converted from the console’s charset to the Windows’ charset, but at current level of development it is successful
only if system’s console environment uses single-character encoding or UTF-8 (CP65001).
o 7z/p7zip's -mcu if flagged allows to use UTF8 encoding inside ZIP archives for file names that contain non-ASCII
symbols
34
Note: replacing extended characters with “?” jolly character may improve commands syntax if, for any reason (i.e. limitations due to
guest OS, archiving software creating the archive being read, or archive format limitations), the character set used while creating the
archive cannot be successfully translated on the current machine opening the archive.
• “Other” group:
o “Execute jobs in parallel when possible” (off by default) when this option is flagged PeaZip launches all scheduled
compression and extraction jobs at once; if the option is not flagged jobs are launched sequentially in order to
improve disk performances reducing the number of concurrent operations to be performed at once on the disk.
o “Save history of last used archives”: on by default, allows to keep track of recently created and opened archives
(File > Recent submenu); disabling the option the history will not be tracked, the submenu will be disabled and
existing items will be cleaned closing the application. This will also clear history of latest search terms.
o “Show hints”, on by default, enable or disable application’s hint popup.
o “(Windows) Copy files in restartable mode” (off by default) when activated, on Windows, copies files with
Robocopy in restartable mode, which is slower but can be useful on networks to automatically retry and continue
the operation in case of errors.
o “(Windows) Get volume information for network units” (on by default) when activated collects size, free space and
other information about network mapped units. If the network is slow or a mapped unit gets disconnected, the
operation may require many seconds, so if a slowdown is detected this option is automatically unchecked, but is
always possible to change the value manually as desired.
o “Working directory” (output folder / system’s temp folder) allows to set the temporary working directory for
archive creation/updating or archive preview operations, by default the output path is used.
Create archive • “Name archive as selected item's parent folder, if multiple items are added”, flagged by default, follows the convention of
mainstream archivers like WinRar, WinZip and 7-Zip to use the name of the folder where the selected item is in to name
the archive being created, unless the archive contains a single file or folder (in this case the file/folder will give the name to
the archive). If not flagged, it will follow pre-3.7 convention of naming the archive after the selected item.
• “Favourite formats” allows choosing a selection of user’s favourite formats to be displayed in the popup menu on the left
of Ok button in archive creation interface, for a quicker selection.
• “Default format” sets the default archive/compression type, by default last used format is kept
Open archive • “Archive browser interface” sets the way the content of archives is displayed: a classic navigable browser (default), or flat
view to show all archive’s content, or last used mode.
• “Fast open routine, stop browsing if list exceeds:”, default on. PeaZip will stop representing archive’s content in the GUI if
the resulting list’s memory stream is bigger than the given value. It allows to quickly opening very big and populated
archives stopping preliminary operations if they are taking too much time/memory, allowing the user to narrow the
selection with full functional search or filter functions. Extract/list/test operations are not affected by this setting, it is
applied to archive browsing only.
• “Advanced” group contains less often used settings
o “Always ignore paths…” directives: ignore paths extracts file(s) to output path not re-creating the directory
structure as is in the archive, by default it is on for drag and drop and extract and open with operations. It can be
fine tuned applying the directive to:
� Drag and drop operations
� Extract and open with… operations
� Extract displayed objects (objects shown in current browsing or search filter)
� Extract selected objects
Hint: when extracting a folder from the archive the paths will be always preserved, overriding this option for all ignore paths
switches; see Extract archives chapter, Note about extraction paragraph for more information about how extraction operations can
be fine tuned and customized in PeaZip.
o “On extract/list/test operations from system’s menus” set PeaZip behaviour when an extract, list or test operation
is launched form a system’s menu entry:
� Don’t ask for password: assume the archive is not encrypted and immediately start the operation
without spending time in searching if a password is needed;
� Test if password is needed (slower): the default behaviour with PeaZip evaluating if a password is
need, time needed depends from type and size of the archive; test can be limited to archives under
100 MB or 2 GB of size;
� Always ask for password: always popup password request, note that it is possible to ignore it (press
enter or Ok button) to immediately start without providing a password.
File Tools
35
• “Checksum/hash files” group allows to select algorithms to be used for file checksum/has and how to display the result
(hexadecimal, hex LSB, Base64).
• “Secure deletion” group allows choosing number of passes to perform to securely delete files (2-16); each pass perform:
overwrite file with random data, mask original file size, rename file.
Customize theme
Themes set the default values various visual settings of the application, and for Pea and PeaLauncher executables.
Theming values can be saved in the current configuration, and will override correspondent theme settings, which can be restored
clicking on “Reset” link for each variable.
To prevent using of too high levels of transparency that will make the application unusable (up to totally invisible) there is a
maximum level of transparency hard coded for the application.
From Options > Themes, in the “Theme” drop down menu the user can chose to use preset themes which comes packed with
PeaZip, or a custom theme, selecting a theme package with extension “.theme.7z”.
Themes can be downloaded from “Download themes” link on the same panel, pointing to http://www.peazip.org/peazip-add-
ons.html
The user can also create new themes clicking on “Create Theme from current settings”, it will be created a theme package on the
desktop named nameofthetheme.theme.7z; themes can be distributed as independent packages.
To further customise themes, or to remove unwanted themes, “Manage Themes” opens the path containing themes, that is in
user’s application data for installable versions or inside PeaZip’s folder for portable versions.
Theme’s graphic can be edited with any graphic files editor, and theme.txt can be edited as UTF-8 text.
The file note.readme (plain text) is inherited from the original theme, please edit it with relevant information and credits about the
new theme if you plan to release it.
It is recommended to not delete or modify the default theme, saved in \PeaZip\res\themes\, that is “seven” for Windows versions
and “firecrystal” for Linux versions
It is possible to display a custom logo (up to 192 px width, 64 px height) in PeaZip file manager’s toolbar, replacing fm-theme.bmp in
theme’s folder with a custom graphic file in BMP format.
Program’s icons, on Windows, are stored in \PeaZip\res\icons\ path and can be edited with a suitable editor or replaced with
custom icon files; on Linux systems icons (in PNG format) are stored accordingly the distribution and the desktop environment
policies, i.e. \opt\kde3\share\icons\ or \usr\share\icons\
Hint: custom, user-provided icons and other resources can be found on http://code.google.com/p/peazip-resources/downloads/list
Advanced settings editing Program’s configuration is stored in conf.txt file, which by default is saved in /res folder in application’s path, but an alternative
location, either as absolute or relative path, can be set in second line of altconf.txt file in the same folder: “same” string in
altconf.txt specify the data has to be saved in program’s res path (best for portable packages) and “appdata” specify the data has to
be saved to %appdata%\PeaZip\ path in user profile (Windows) or /.PeaZip/ path in user’s home on Unix systems, to guarantee
write access to data from current user’s profile and allow different users to store different and private profiles for PeaZip.
In this way only the invariant data (including altconf.txt, binaries, graphic and default themes, language files etc), which needs to be
accessed only for reading during normal program's usage, is stored in program's path, that could be even set as read-only.
All variable data files (conf.txt, rnd, custedit.txt and bookmarks.txt), which can need to be accessed for writing during normal
program's usage, will be stored in res folder (by default) or any other path specified in altconf.txt.
Variable data path in use is shown on the bottom of the Settings panel; if the altconf.txt file is deleted PeaZip will rebuild a default
one which sets variable data path in /res folder.
The user will then be able to keep separate pre-set configuration files which can be used alternatively editing the altconf.txt file, or
to package the application to fulfill custom needs as to keep the variable and invariant data stored in separated paths.

36
Supported formats
See also http://www.peazip.org/peazip-free-archiver.html
Main families are:
Through Pea executable (LGPL, Windows and Linux)
• Full support
o PEA: security focused, flexible integrity check and optional two factor authentication with passphrase and
keyfile (AES256 EAX mode authenticated encryption), fast compression comparable with Zip/Gzip, native
multi volume spanning.
o Split: compatible volume spanning (file split/join) function with optional integrity check
Through Igor Pavlov’s 7z (LGPL, Windows) and Myspace’s POSIX 7z (LGPL, Linux)
• Full support
o 7z, 7z sfx: feature-rich archiving format, strong AES encryption, awesome compression ratio and optionally auto
extracting archives (sfx, Win32 executables)
o Bzip2 (BZ, BZ2, TBZ, TBZ2): single file compressor, adequate speed and good compression ratio
o Gzip (GZ, TGZ): fast single file compressor, adequate compression ratio
o TAR: mainstream archiving and backup format for Unix platforms, often used to archive data to be compressed
with GZip, BZip2 or other algorithms
o WIM (and SWM) Windows image format, Microsoft's disk image format
o XZ: single file compressor, based on LZMA2 algorithm, providing excellent compression ratio
o ZIP: mainstream archiving and compression format for Windows platform; support covers also Deflate64, LZMA
and PPMd compressed archives, and AES-encrypted archives
• Browse/extract support
o ARJ, LHA, LZH: popular archiving format on DOS and early Windows platform
o CPIO, Z, TAZ, TZ: archive/compression formats for Unix platforms
o LZMA: single file compressed with LZMA algorithm, introduced with 7z format
o RAR: popular archiving and compression format, with advanced encryption and error recovery features
o Various archive types based on ZIP or its modifications
• Java archives: JAR, EAR, WAR
• PAK, PK3, PK4 : modified zip archives, used to store data by some popular games (like Quake3, Quake4,
Doom3)
• SMZIP
• UP3: U3 portable application’s package format
• XPI: Mozilla package format (addons for Firefox, Thunderbird etc)
o MBR, FAT and NTFS filesystems
o Various disk images
• ISO standard disk image format
• IMA, IMG, IMZ images
• UDF widespread disk image format
o Various executable file types
• NSIS: Open Source Windows installer format
• Some Windows executables
• MSI Microsoft’s proprietary installer format for Windows
o Various (non-archive) compressed file formats, like
• CAB compressed archive format
• Compound
• Some of MS Office formats: DOC, XLS, PPT
• CHM, CHW, HXS compressed help files
• OpenOffice file types: container files for text, database, image and multimedia data: ods, ots, odb, odf,
odg, otg, odp, otp, odt, ott, oth, odm, oxt.
• Gnumeric .gnm files
• SWF, FLV
o Various Linux installer formats:
• DEB (Debian based)
• PET/PUP (Puppy Linux)
• RPM (Redhat based)
• SLP (Stampede Linux)
o Various Macintosh formats: DMG/HFS package/disk image format
37
Through PAQ/LPAQ/ZPAQ, Matt Mahoney et al. (GPL, Windows and Linux)
• Full support
o PAQ8O, ZPAQ, LPAQ8
• Read only
o Older PAQ8 formats F/JD/L: experimental compressor; at cost of high computing time and memory usage provides
best known compression ratio for most data structures
o Older LPAQ1 and LPAQ5: lighter and faster version of PAQ, at the cost of some compression (single file
compressor)
Through Strip (GNU binutils) and UPX (GPL Markus F.X.J. Oberhumer, László Molnár and John F. Reiser)
• Compression only
o Strip strips symbols from executables and UPX apply compression: this allows containing the size of binaries of
different types (exe, elf, etc…), which is important i.e. for distribute smaller packages; this feature is mainly
oriented to developers.
Through Ilia Muraviev’s QUAD (GPL) and BALZ (Public Domain)
• Full support
o QUAD: high performance ROLZ-based compressor which features high compression ratio and fast decompression
o BALZ: enhances overall performances compared to QUAD
Through Bulat Ziganshin's FreeARC (GPL)
• Full support
o FreeArc’s ARC/WRC, FreeArc’s sfx: experimental archive format, featuring efficient compression (high ratio and
good speed), and advanced features like strong encryption and recovery records
(SEPARATE PLUGIN)
Through UNACEV2.DLL 2.6.0.0 (Windows) and UNACE (Linux): royalty-free, Marcel Lemke, ACE Compression Software
• Browse/extract support
o ACE: popular compression format, used mainly on Windows systems
Customisation and scripting
PeaZip portable doesn’t need installation and doesn’t modify the host system, however program’s most used functions can be
integrated, under Windows, in SendTo and context menu and, under Linux, in FreeDesktop-compilant desktop environments
through .desktop files (Gnome, KDE…) and Nautilus scripts (Gnome); examples are in FreeDesktop_integration folder included in
Linux packages.
In the same way it is possible to extend the integration automatically provided by installable packages, creating quick links in
system’s menus or in scripts for most of the program’s internal functions.
PeaZip acts as a frontend for many Open Source archiving executables, each with its own syntax developed and maintained by
respective third parts Authors, see “Supported formats” chapter for a comprehensive list of technologies employed in PeaZip.
For the syntax for each backend executable please refer to the original Authors and the original documentation (i.e. in 7-Zip’s or
FreeArc’s documentation and websites), however one of the scopes of PeaZip is offering a simple and homogeneous command line
interface to mask the complexity and the differences in command line syntax of underlying applications.
Quick access to most used PeaZip’s functions is provided passing as first parameter a constant string value identifying the quick
function; those methods can be used invoking PeaZip from scripts or also creating a link to PeaZip executable with the given first
parameter (on any host system).
While through PeaZip’s GUI it is possible to use underlying applications with great granularity (and save command lines for any
further use), PeaZip itself is made accessible through command line to offer an easy access to most common functions.
The full list of strings accepted as quick link to PeaZip functions when passed as first parameter is:
-add2archive: add to a new archive and open PeaZip GUI to set archive’s type and options;
-add2archive-add as -add2archive, but add to existing archive (if found)
-add2archive-update as previous, but update older files only
-add2pea: add to a new .pea archive;
-add2crypt: add to a new encrypted .pea archive;
-add2split: raw split a single input file;
38
-add2wipe: securely delete selected file(s);
-add2compare: byte to byte compare two files;
-add27z: add to a new .7z archive;
-add27zmail: add to a new .7z archive and attach it to a mail (requires compatible mail client) *
-add2separate7z: add each input to a separate new .7z archive;
-add2sfx7z: add to a new self extracting 7z archive (.exe);
-add2sfx7zmail: add to a new self extracting archive and attach it to a mail (requires compatible mail client) *
-add2zip: add to a new .zip archive;
-add2zipmail: add to a new .zip archive and attach it to a mail (requires compatible mail client) *
-add2separatezip: add each input to a separate new .zip archive;
-ext2browse: open (and browse if applicable) the archive(s) in PeaZip GUI;
-ext2browsepath: browse the selected folder (or its path, if a file is selected) in PeaZip
-ext2here: extract archive(s) here;
-ext2folder: extract archive(s) here, each in a new folder named after the archive;
-ext2full: extract archive(s), allowing to specify i/o options, password and keyfile;
-ext2to: extract archive(s) to specified folder;
-ext2tofolder: extract archive(s) to specified folder, each in a new folder named after the archive;
-ext2list: list archive(s) content, to quickly look what is in the archive;
-ext2test: test archive(s) content;
-ext2main: extract archives from main applications “Archive extraction” interface;
-ext2commandprompt: open the command prompt in the selected folder (or in its path, if a file is selected)
-ext2openpwtest requires password as paramstr(2) (always delimited) and archive’s full name as paramstr(3): try to list the
archive and terminate with exit code 0 if archive is not encrypted, 1 if it is encrypted, 2 if it is non readable (corrupted or
with encrypted file list), -1 if archive is not found.
-peazipreset: reset PeaZip configuration, as Options > Reset button; can resolve unexpected problems with configuration,
restarting the application with factory settings
*mail functions require a compatible mail client, like i.e. Outlook and Outlook Express,
to be the default mail client of the system
-add2archive, -ext2main and -ext2browse open the PeaZip GUI, to allow further user’s interaction
Alternatively, on Windows platforms PeaZip can also send multiple input to a single instance through registry entries using
temporary files; temp files are deleted automatically (otherwise the mechanism would not work) but in case of any kind of problem
there is a reset switch in Options > Settings first tab to remove any possible leftover:
-add2multi works like -add2archive
-add2multi7z works like -add27z, but stays in the archiving interface until the user click “Ok” button; it can be modified in -
add2multi7zfastest, *normal, or *ultra to directly set the compression to fastest, normal or ultra levels presets (the
compression method used is the one defined by the user)
-add2multizip works like -add2zip, but stays in the archiving interface until the user click “Ok” button; likewise the previous
switch it can be modified to *fastest, *normal, or *ultra compression level
-add2multisfx works like -add2sfx7z, but stays in the archiving interface until the user click “Ok” button
-ext2multi works like - ext2main
While the instance accepting files is open, it is possible to continue adding input from the same directory selecting objects and using
context menu’s entry, as an alternative to dragging the object to the application window that might be less handy if the desktop is
crowded by windows.
An example of command line syntax may be: peazip –add2zip file1 file2 directory3
which will add specified objects (in the example file 1 and 2, and all content of directory 3) to a .zip archive, auto named after the 1st
object (in this case will be named file1.zip and will be saved in the same path of file1); using –add27z instead of –add2zip will
perform the same task but will result in a .7z archive (-add2pea will result in a .pea archive, -add2sfx7z will result in an self extracting
executable and so on).
Another example may be: peazip –ext2here archive1
which will extract archive1 in the same path; using –ext2folder archive1 will be extracted to a new folder named “archive1” in the
same path of archive1.
Translations
Lazarus development environment has migrated to UTF-8 for LCL (GUI-related libraries), see UTF-8 support status in Lazarus and
PeaZip documentation, so the application’s user interface can now be translated in any language.

39
Language files are UTF-8 encoded text files which can be edited using any suitable text editor.
To create a new translation file you can:
1. copy en.txt (in PeaZip's path in /res/lang subfolder) or any other language file, if you prefer starting from another language,
to a new file;
2. edit lines 2 to 6 of the document to enter language name (both in English and in the original language for better
readability), PeaZip's version (major.minor) the translation is aimed to, translator's and last last revisor's name and last
revision date;
3. translate the text after the "variable_name: " part in "=== PeaZip text group ===" AND "=== PeaLauncher text group ==="
sections of the file (don't move or remove lines, don't change the "variable_name: " part);
4. optionally, translate the mini-tutorial after "=== about text group ===" line (free editing, it is loaded and displayed "as is" as
application's mini-tutorial).
In "PeaZip translations" download page, there is a package named peazip-x.y.about_translations.zip containing a spreadsheet file to
help in creating and maintaining localizations, simply compiling column D of the spreadsheet.
The spreadsheet shows variable name (column B), corresponding text string in english (column C) and a blank, yellow column (D) for
typing the translated text strings.
On the right, a column E (blue) will show the "variable_name: " part assembled with the translated string: the content of this area
can be copied and paste to replace the text in "=== PeaZip text group ===" and "=== PeaLauncher text group ===" sections (the
spreadsheet features TWO pages, one for each of the two groups).
Lines must be pasted in the original order (it is sufficient to sort them by column F).
After column F are featured all currently available translations, in order to help translators more proficient in other languages than
Englis, and to help to spot out what localizations need to be updated.
At each version all language files are mass-updated, with missing text lines in English; to update a localization, it's enough to update
the English text lines.
For a better result it is also recommended to check all the language file to see if the update is coherent with linguistic style used by
the translator of the current version.
For languages spoken in different ways in different countries (i.e. English, Spanish, Portuguese...) it is recommended to fork the
translation, creating i.e. en-us, pt-br etc
PeaZip can load out of order (not optimal for performances) language files for older or newer versions.
IMPORTANT: the spreadsheet contains 3 pages, "PeaZip text group", "PeaLauncher text group", and "About text group": all pages
need to be completed and pasted (column E, for first two pages) in the language file; the "About text group" can be freely edited.
Translated language files can be sent to [email protected], to be evaluated for inclusion in future updates or
publication in http://code.google.com/p/peazip-translations/
All translated language files should be considered as released under GFDL, GNU Free Documentation License, as they have to be
considered derivate work from the application's language file which is released under GFDL.
Configuration, themes and bookmarks files, saved archive layouts, job logs and exported command lines are saved, for PeaZip 2.2
and beyond, as UTF-8 encoded text.
Older archive layouts (saved as ANSI text by previous versions of PeaZip) can still be used by PeaZip.
Notes
SendTo and context menu
Launching the program through links in SendTo, or any other link to the application, or through scripts, allows receiving multiple
input arguments for each instance of the program, while entries in Windows’ context menu, by design, can receive a single input
argument for each instance.
PeaZip’s Context Menu items can handle multiple input argument through a temporary files list, the temporary files are
automatically deleted (otherwise the mechanism would not function), and in any case it is possible to force deleting them in Options
> Settings > Reset peazip-tmp (or resetting PeaZip).
For a similar Windows’ design choice, on pre-Windows 7 systems, program’s entries in Windows context menu are not grouped in a
submenu since it will involve much more complex approach than creating separate registry entries; registry method is now (for
Windows 7 and later) recommended over the previous COM method.
SendTo menu are simple link files, they can be freely renamed, or have the icon changed, and can be copied or moved to one user
to another as needed, they are located in C:\Documents and Settings\(username)\SendTo (Windows XP) or
C:\Users\(username)\AppData\Roaming\Microsoft\Windows\SendTo (Vista/7), assuming C as system's disk.
40
All available SendTo links are featured in SendTo.zip file in PeaZip’s path, more can be built using the switches explained in
“Customisation and scripting”.
Context menu entries are written in the registry; the exact location, different in 7 and previous systems, can be read in the
InnoSetup scripts in “installer” dir of source package. They can be modified using a registry editor, but manually modifying registry is
not generally recommended to users.
Creation of RAR archives
No free software application can create RAR archives, unless the operation is performed invoking WinRar binary itself, because the
RAR format is proprietary, moreover, the UnRAR license explicitly disallows to reverse engineering the file format definitions
implemented to build functional RAR creation software.
With WinRar installed you can use PeaZip's "Custom" archive type interface to use rar.exe to create RAR format archives through
PeaZip's GUI: chose "Custom" format in compression dialog and the first time go to "Advanced" tab to tell PeaZip how to use the
executable
1 - locate where the rar.exe executable is in your system, in "Executable" filed
2 - write a (which stands for create archive) in "Parameters" filed
3 - select the second entry in "Syntax" dropdown menu: "parameters, output, input"
Now any time you will select "Custom" format compression PeaZip will automatically use the syntax
rar.exe a nameofthearchive nameoftheinputfiles
Please note that rar.exe command line syntax is not a 1:1 replacement of WinRar features, especially worth of notice is that "a"
command creates the archive storing full paths (and creation storing relative paths option is not even featured) while WinRar GUI
application creates by default archives storing relative paths.
ACE archives
Unace may require to interactively respond to some warning messages extracting archives (i.e. if an object with this name jet exists
in the output path), or to enter a password for handling an encrypted archive. If the console is not available for user’s input (as
when calling unace through gwrap executable), the feedback cannot be entered and the application would freeze waiting for
feedback.
To avoid this possible stall situation unace extraction and test operations are always called in console mode by PeaZip, while listing
operations, as for all other formats, are always launched in graphical mode of operation to offer better output information handling
(and since naming conflict and password request conditions cannot be encountered in list mode).
To run test on ACE archive it’s recommended to save the command line as text and then execute it as command line or as script, in
order to don’t get the console’s window closed after the operation completes.
Please note that from PeaZip 1.9.1 the program’s base packages contain only open source software, so handling ACE archives will
require installing a separate plugin (see application’s website) as described in “Plugin” chapter. Trying to open an ACE archive
without the plugin installed will result in a message to remember the UNACE plugin is required.
Office, Open Office, MSI and EXE files
Files in those formats are actually containers from different resource objects which can be browsed and extracted by PeaZip.
However since those file types are more commonly archived rather than handled as archives themselves, PeaZip by default don’t
handle them as archives unless they are explicitly opened with “Open archive” function so double clicking on files of those types
within PeaZip starts the associated application rather than opening them as archives.
UTF-8 support
From version 2.2 UTF-8 character encoding is supported, allowing to properly handle extended characters in filenames and to
deploy localization of PeaZip's user interface text in any language.
It should be noted however that, at present level of development of Lazarus/FreePascal project, most of the underlying FreePascal
file-handling routines are still ANSI-only, meaning the UTF-8 strings PeaZip uses internally still have to be translated to ANSI strings
to be passed to some functions.
As PeaZip aims 1) to stay cross-platform and 2) to bridge the gap between GUI and console worlds, allowing to easily export jobs as
command lines, UTF-8 support is utterly complicated because each system / desktop environment / widgetset PeaZip is ported to
has different levels and ways of supporting UTF-8 encoding for different APIs, for system pipes, for command line interpreters etc.
This issue currently causes:
• PeaZip cannot browse files/dirs containing characters which are not featured in host system’s character’s set (they will be
replaced by ? wildcard) due to the need of ANSI translation for strings passed to some FPC routines;
• decoding of names of archived objects containing extended characters, form version 3.0.1, is supported for file types
handled using 7z/p7zip backend (using backend's -sccUTF-8 option). However in some cases, due to the archive format
specifications, or to issues of the software used to create the archive being examined, or due to charset conversion
problems between the source system and the target system that is reading the archive, the conversion of character in
filenames inside the archive may fail anyway. Optionally extended characters can be set to be always replaced by jolly "?"
character to avoid possible issues between archive's and system's character encodings on some special cases.
41
In any case the ability of operate (test, create, extract etc) on the whole archive is not affected by this issue
Compilation, build and porting
PeaZip, Pea and Gwrap are written in FreePascal (highly compatible with Delphi and ObjectPascal languages) and require Lazarus
IDE to be compiled; Windows setup scripts (.iss files) are developed using Inno Setup.
To compile PeaZip binaries open the .lpi file of the desired binary (i.e. peach.lpi for peazip binary) and select "build all".
FreePascal supports multiple widgetsets (Win32, WinCE, GTK1, GTK2, Qt, Carbon, fpGUI) to allow compilation of GUI applications for
the various supported systems and to create different “flavours” of the application for platforms supporting multiple widgetsets (i.e
Linux).
PeaZip's sourcecode is cross platform, platform-specific code portions are contained in conditional compilations blocks.
Deploying the application to other targets than MSWINDOWS, LINUX and BSD may require adaptation of those platform specific
areas (and possibly other fine-tunings).
PeaZip will also need various backend compression and archiving applications to be reachable in expected directories within the
application's path, please refer to the structure of any of the precompiled packages, either installable or portable, to see what third
parts binaries must be included, and refer to respective Authors for ports of those utilities.
Being PeaZip programmed as frontend/backend application, missing or unwanted backend binaries can be omitted, at the cost of
losing the ability of handling supported formats; for the same reason, backend binaries can be freely replaced with 64 bit
counterparts or with updated versions (which will work fine as long as they follow the same syntax).
PeaZip code should be fairly easy to port on Delphi and other Pascal dialects; the underlying crypto library is explicitly written to be
portable to most or all Pascal dialects, however due to some ASM parts some of its features may be x86 processor specific.
From version 2.5 PeaLauncher was extended to be also a standalone extraction application; this could make porting easier at least
for basic extraction features, since its user interface is more simpler than PeaZip’s one.
Qt issues
Currently, Lazarus/Freepascal IDE support for Qt widgetset, on Linux platform, is less mature than support for GTK2.
It means under some circumstances some unexpected behaviours may show, due to issues between the version of Qt PeaZip is
compiled for and the one featured by the host system; know issues are:
• in some cases the drag and drop from system to the Qt version of the application will not work
• in some cases Qt PeaZip will miss the close window icon; the application can be closed using File > Quit in main menu
(Ctrl+Q keyboard shortcut)
• in some cases PeaZip will run only starting it with –style=cleanlooks parameter (this is not inherited when PeaZip starts
other processes, which consequently may not run)
Experiencing problem with Qt version, it is recommended to use GTK2 version, that can run on KDE as well (as Qt version can run on
Gnome as well) because PeaZip is meant to be as desktop and widgetset independent as possible.
Install/uninstall on Linux
On Linux systems, PeaZip installer automatically create menu entries for KDE (on most versions); to add PeaZip to Gnome menu
copy the "Archiving" folder placed in PeaZip/Freedesktop_integration/nautilus-scripts to system's Nautilus script's folder (in most
versions open "Scripts" menu in system's context menu, and select "Open script's folder").
PeaZip is meant to be desktop independent as possible, so it is not limited to be used under KDE and Gnome, and does not requires
different packages to run on different desktop environments.
On PeaZip's official website are featured generic Linux packages, meant to be compatible with as many distributions and versions as
possible, providing the system supports the widgetset (GTK2 * or Qt **) and the installer format, in example:
DEB ***: Debian, Ubuntu/Kubuntu, Knoppix, ...
RPM: Fedora, Mandriva, SUSE, Red Hat, ArkLinux, ...
TGZ: Slackware based.
TAR.GZ (PeaZip Portable) does not need to be installed, so it is the recommended package if you just want to test the application. It
can be used on any Linux family extracting the package and running peazip binary in program's directory.
Third parts packages explicitly targeted to a specific distribution/version are listed on the download page below the official generic
packages, those packages are highly recommended for best integration with a specific Linux distribution and version.
If a package does not run on a specific system please launch peazip binary on a console to get a more detailed error report.
* On some Linux distributions the GTK2 version may require to install some components of gtk/gdk libraries, like libgdk_pixbuf,
those components are quite common and can be usually found in repositories of each distribution.
** Qt widgetset packages requires Qt 4.3.4 or more recent, and needs libqt4intf.so installed in /usr/local/lib or equivalent directory
(copy the file and run ldconfig; it is done automatically in installable packages), such as /usr/lib or /usr/lib32 on some 64 bit
distributions. A copy of libqt4intf.so is available in PeaZip's directory, ./usr/local/share/PeaZip/ for the installable packages.
*** DEB packages reports (all) for architecture check, so can be installed on 32 and 64 bit systems (providing that ia-32 libs are
available).
Note for third parts packagers: those packages can be transformed in i386 DEB if desired; i386 DEB can anyway be installed on 64 bit
systems using dpkg -i --force-architecture
42
Please note that ia32-libs are required to run any 32 bit binary on 64 bit systems.
PeaZip binaries are currently compiled for 32 bit, you will need Lazarus/FPC if you want to compile them from sources.
All backend compression/extraction "engines" (pea, p7zip, *paq, freearc etc) are compiled for 32 bit, please refer to respective
Authors for source packages (all are released under OSI approved Open Source licenses) if you want to recompile them.