StarTal k Setup and Operation Guide
594
StarTalk Setup and Operation Guide - -
-
Upload
khangminh22 -
Category
Documents
-
view
1 -
download
0
Transcript of StarTal k Setup and Operation Guide
StarTal kSetup and OperationGuide
-
-

.
Table Of Contents
1. How To Use This Guide 1-I Introduction l-1 How This Guide is Organized l-1 Knowing the Different Symbols l-4 What Appears On the Display 1-5 Prerequisites 1-5 Other Documents 1-5
2. Learning About StarTalk Introduction How StarTalk Works Who Can Use StarTalk About the Feature Codes
Feature Code Descriptions About the Automated Attendant About the Company Directory About the Mailboxes
The Special Mailboxes Personal Mailboxes
Mailbox Rules Using the Norstar Dialpad Using StarTalk With a Two Line Display Using StarTalk Wifh a Single Line Display Using StarTalk With an Analog Terminal Adapter
Entering Characters Into the Command tine About the StarTalk Voice Prompts
Interrupting a Voice Prompt About the StarTalk Reports Exiting From StarTalk Your Role as System Coordinator
2-1 2-1’ 2-l 2-3 2-3 2-4 2-5 2-6 2-6 2-6 2-7 2-7 2-8 2-9 2-9
2-10 2-11 2-12 2-12 2-13 2-13 2-14
StarTalk Set Up and Operaticm Guide

Table of Contents 2
3. Preparing To Set Up StarTalk 3-1 Introduction 3-1 The StarTalk Programming Record 3-l .
Norstar Hardware Verification 3-2 Norstar Line Data Verification 3-2 StarTalk Hardware Verification 3-2 Optional Equipment 3-2 StarTalk Initialization Verification 3-3 StarTalk Feature Codes 3-4 Business Hours 3-4 Summary Tables and Lists 3-4
About the Greeting Table Summary 3-4 About the Line Number and Greeting Summary 3-5 About the Mailbox List 3-5
Intercom Number Length 3-6 Resetting StarTalk 3-6 Determining the Feature Codes 3-7 Verifying the Feature Codes 3-9 Determining the StarTalk Software Version 3-10 Programming a Memory Button 3-11 StarTalk Language Capability 3-13
4. Setting Up StarTalk Introduction Before You Start Setting StarTalk Date and Time Setting Up the Greeting Tables
Setting Up the Greeting Tables Using the Alternate Language How a Greeting Table is Organized Determining Greeting Table Information
Preparing Your Greetings Recording the Company Greetings
Assigning a Greeting to a Greeting Table Configuring the Lines
Adding tines Assigning the Number of Rings
Viewing and Changing Line Configuration Viewing and Changing Greeting Table Numbers Assigned to Lines Changing the Number of Rings Before StarTalk Answers Changing StarTalk’s Language Availability Designating the Number of Channels for Outdiafing
4-I 4-l 4-l 4-2 4-4 4-4 4-5 4-6 4-6 4-0
4-10 4-14 4-14 4-17 4-19 4-21 4-23 4-25 4-27
e StarTak Set Up and Operation Guide

Table of Contents 3 .
5. Setting Up Mailboxes Introduction Registering Personal Mailboxes
Class of Service Before You Register the Mailboxes
Adding Personal Mailboxes How a Guest Mailbox Can Be Used
Adding Guest Mailboxes Using Information Mailboxes
Adding Infom-ration Mailboxes Special Mailboxes
Initializing the Special Mailboxes About the Passwords Recording the Mailbox in the Company Directory
Before You Begin Recording a Special Mailbox Greeting Selecting a Special Mailbox Greeting
Setting Up the Operator’s Mailbox
5-l 5-1 5-l . 5-2 5-5 5-7
5-10 5-12 5-14 5-15 5-18 5-20 5-20 5-21 5-21 5-23 5-26 5-28
6. Setting the StarTalk Status Introduction Attendant Sign On/Off
Setting the Operator Status Changing the Operator Password Resetting the Operator Password
Changing the Business Status Setting the Business Status Setting Your Company’s Business Hours Enabling StarTalk Line Answering Changing the Operator Default Extension Changing the Automated Attendant Status Recording the Customized Automated Attendant Menu Prompt
6-l 6-1 6-1 6-2 6-3 6-4 6-5 6-6 6-7 6-9
6-10 6-12 6-14
StarTalk Set Up and Operation Guide
Table of Contents 4
7. Administering the Mailboxes Introduction The Special Mailboxes
Listening to Messages Left in the Special Mailboxes Volume Control Delivery Options Opening the Special Mailboxes Copying a Message to a StarTalk Mailbox
Replying to a Message Calling the Message Sender Replying to Messages in the General Delivery Mailbox Replying by Sending a Message
Personal Mail boxes Adding a New Mailbox Changing Mailbox Options
Changing a Mailbox Extension Changing a Mailbox Class of Service Changing a Mailbox Owner’s Name Changing Mailbox Overrides Resetting a Mailbox Password
Deleting a Mailbox
7-l 7-1 7-r 7-2 7-2 7-2 7-3 7-4 7-6 7-6 7-6 7-7 7-8 7-8
7-10 7-l 1 7-13 7-14 7-16 7-18 7-19
8. Sending a Message to More than One Mailbox 8-1 Introduction 8-1 Broadcast Messages 8-1
When To Send a Broadcast Message 8-1 Sending a Broadcast Message 8-2
Group Messages 8-4 Preparing a Group List 8-4 Adding a Group List 8-6 Changing a Group List Name and Company Directory Recording 8-8 Changing the Members of a Group List 8-10 Viewing the Members of a Group List 8-12 Deleting a Group List 8-14 Sending a Group Message 8-15
StarTalk Set Up and Operation Guide
Table of Contents 5
9. StarTalk Reports 9-1 introduction 9-l - The Different Reports 9-2 Printing StarTalk Reports 9-6
10. Troubleshooting StarTalk Introduction System Trouble Operating Trouble
10-l 1 o-1 10-l 10-3
Appendix A: StarTalklNorstar Feature Compatibility A-1 Centrex Feature Compatibility A-6
Appendix B: Configuration Data Definition B-l Appendix C: Resetting StarTalk c-1 Appendix D: Norstar Configuration Tips D-l Appendix E: StarTalk Error Messages E-l Appendix F: StarTalk Samples and Tips F-l
Glossary Glossary l 1
- ~~~
Index Index - 1
StarTalk Set Up and Operation Guide

Table of Contents 6
StarTalk Set Up and Operation Guide

How To Use This Guide
1 n t rod uc t i on This Guide is designed to assist you in setting up and operating the Norstar Business Communication System StarTalk voice module. The set up and operation instructions contained in this Guide are presented in easy to follow steps.
This Guide is intended to lead a System Coordinator through the set up of StarTalk, and continue as an on going reference aid. With this in mind, you should read this Guide carefully.
This section tells you what to expect as you read through this Guide, and how information contained in this Guide is presented.
Ensure you pay particular attention to Section 3, Preparing To Use StarTalk. This section outlines the information you need for a successful StarTalk set up, and also provides information on how to check the configuration of your company’s Norstar Business Communication System.
How The StarTalk System Coordinator’s Set Up and Operation Guide is organized This according t0 SeCtiOnS that Cover:
Guide is How To Use this Guide - provides a brief overview identifying the organization
Organized of this Guide and the conventions used for set up and operation steps.
Learning About StarTalk - provides an overview of how StarTalk works. This section defines the StarTalk terms used in explaining the set up and operation tasks. This section also provides a summary of the System Coordinator’s set up and operation tasks.
StarTalk Set Up and Operation Guide
1 - 2 Section 1: How To Use This Guide
Preparing To Set Up StarTalk - provides an outline of the information that is needed before StarTalk can be set up.
Setting Up StarTalk - provides the necessary information and steps to set up StarTalk. This section also explains how to approach recording your mailbox and company greetings, and includes instructions for establishing outdial channels.
Setting Up Mailboxes - provides the necessary steps to set up the mailboxes used by StarTalk. This section also provides the initialization steps for the Special Mailboxes.
Setting the Operator Status - provides information about the StarTalk operator service. This section covers the steps necessary to enable the operator service, and set the System Prompt and Business Status. It also shows you how to change the StarTalk receptionist or designated operator extension.
Administering the Mailboxes - provides information about administering the Special Mailboxes, and how to set up and maintain User mailboxes, Guest mailboxes, and Information mailboxes.
Sending a Message To More Than One Mailbox - provides instructions for sending Group Messages and system Broadcast Messages to initialized mailboxes.
.
StarTalk Set Up and Operation Guide

Section 1: How To Use This Guide 1 - 3
StarTalk Reports -shows the different StarTalk reports that are available and how to print them.
Troubleshooting StarTalk - provides diagnostic and recovery procedures for problems that might occur while setting up and operating StarTalk.
Appendix A - covers Norstar feature compatibility, and describes how some Norstar features work in conjunction with StarTalk.
Appendix B - covers the StarTalk default settings.
Appendix C - provides the steps necessary for resetting StarTalk.
Appendix D - covers some Norstar configuration tips.
Appendix E - provides a list of error messages that might appear when StarTalk is being used.
Appendix F - provides a sample StarTalk set up, and also describes some common application tips.
Glossary - covers the terms and definitions used in this Guide.
Index - provides a list of everything contained in this Guide and where the information is located. The Index is in alphabetical order. If you cannot find a term, try looking for your item according to its task.
.
StarTalk Set Up and Operation Guide
1 - 4 Section 1: How To Use This Guide
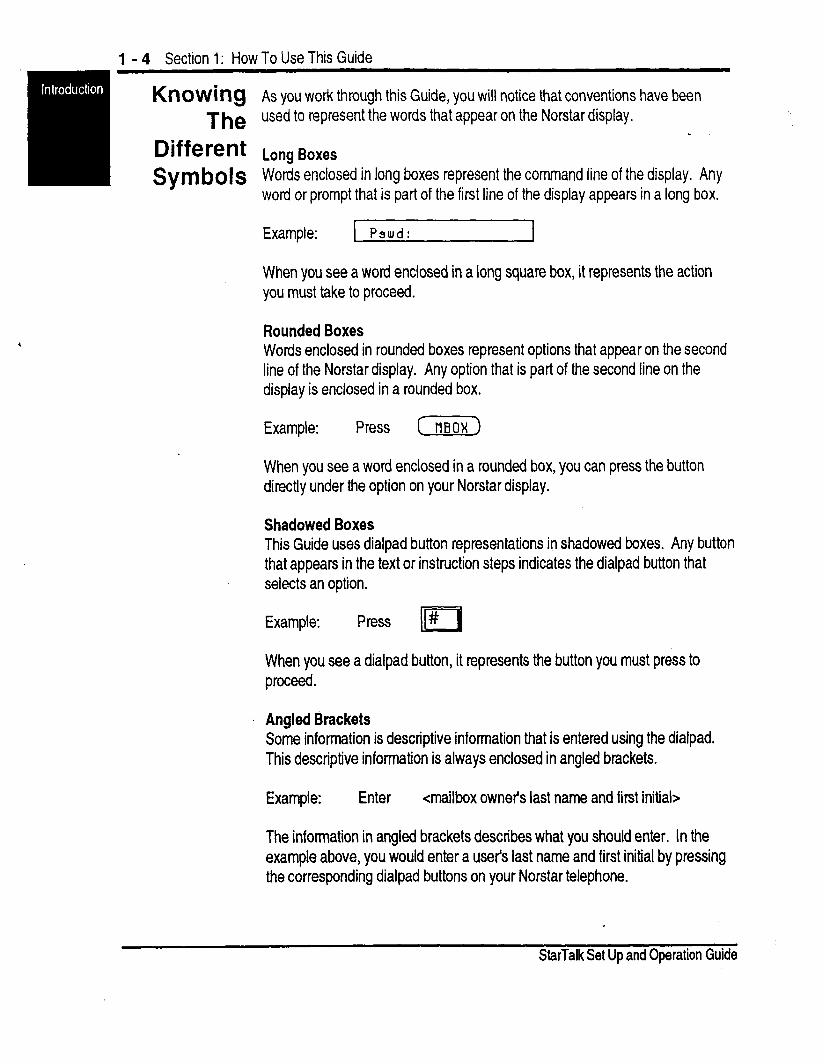
Knowing As you work through this Guide, you will notice that conventions have been The used to represent the words that appear on the Norstar display.
Different Long Boxes Symbols Words enclosed in long boxes represent the command line of the display. Any
word or prompt that is part of the first line of the display appears in a long box.
Example: 1 Paud: I
When you see a word enclosed in a long square box, it represents the action you must take to proceed.
Rounded Boxes Words enclosed in rounded boxes represent options that appear on the second line of the Norstar display. Any option that is part of the second line on the display is enclosed in a rounded box.
Example: Press ( tleox)
When you see a word enclosed in a rounded box, you can press the button directly under the option on your Norstar display.
Shadowed Boxes This Guide uses dialpad button representations in shadowed boxes. Any button that appears in the text or instruction steps indicates the dialpad button that selects an option.
Example: Press # II
When you see a dialpad button, it represents the button you must press to peed.
. Angled Brackets Some information is descriptive information that is entered using the dialpad. This descriptive information is always enclosed in angled brackets.
Example: Enter <mailbox owner’s last name and first initial>
The information in angled brackets describes what you should enter. In the example above, you would enter a user’s last name and first initial by pressing the corresponding dialpad buttons on your Norstar telephone.
StarTalk Set Up and Operation Guide
Section 1: How To Use This Guide 1 - 5
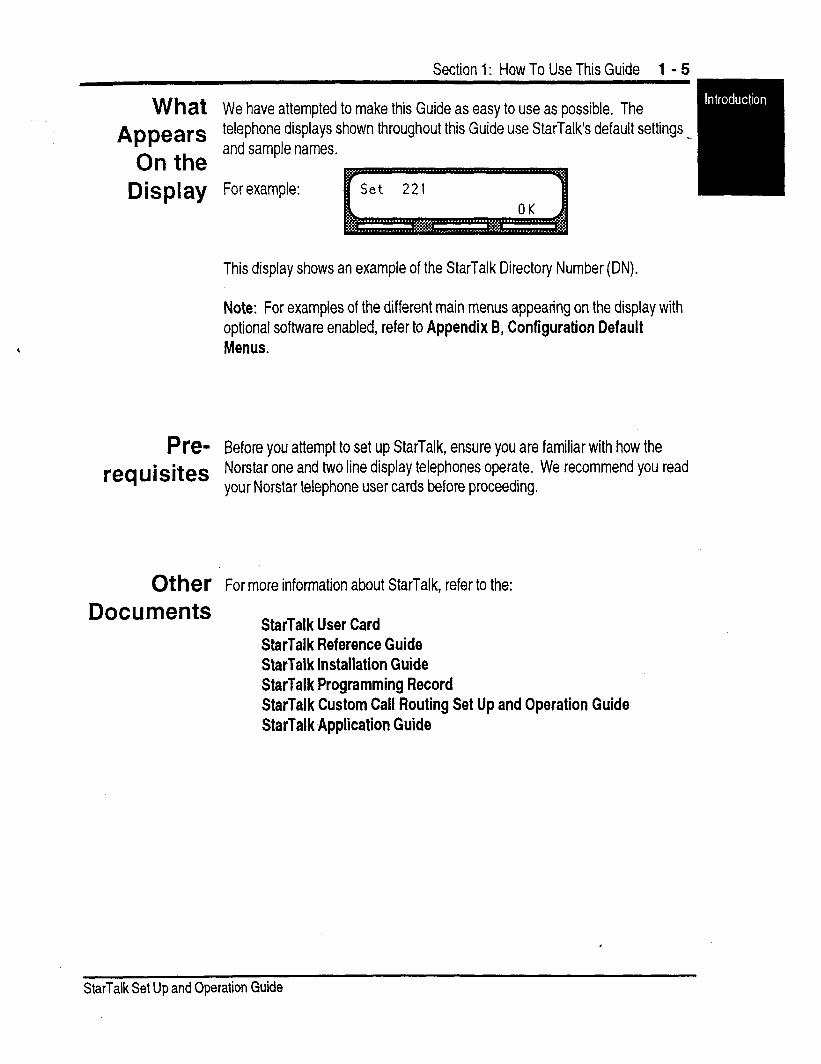
What We have attempted to make this Guide as easy to use as possible. The
Appears telephone displays shown throughout this Guide use StarTalk’s default settings _
On the and sample names.
nienlsw Far examole:
This display shows an example of the StarTalk Directory Number (DN).
Note: For examples of the different main menus appearing on the display with optional software enabled, refer to Appendix B, Configuration Default Menus.
Pre- Before you attempt to set up StarTalk, ensure you are familiar with how the
requisites Norstar one and two line display telephones operate. We recommend you read your Norstar telephone user cards before proceeding.
Other For more information about StarTalk, refer to the:
Documents StarTalk User Card StarTal k Reference Guide StarTalk installation Guide StarTalk Programming Record StarTalk Custom Call Routing Set Up and Operation Guide StarTalk Application Guide
.
StarTalk Set Up and Operation Guide
1 - 6 Section 1: How To Use This Guide
.
StarTalk Set Up and Operation Guide
2-l .
Learning About StarTalk
!ntrOd UCti On. StarTalk is a fully automated receptionist service that offers call routing and message taking services. This section describes how StarTalk works and covers:
.
.
b
b
.
.
.
.
b
l
l
.
basic system operation using the Feature Codes the Automated Attendant the Company Directory the different mailboxes Custom Call Routing using the dialpad the Norstar display voice prompts exiting from StarTalk your role as System Coordinator set up and operation task summaries
HOW StarTalk works with a Norstar Business Communication System, offering a StarTal k receptionist SNiCe that routes calls and provides voice message taking
Works capability. When enabled, StarTalk answers incoming calls and routes the calls to extensions and mailboxes within the system.
StarTalk has three main components:
l Automated Attendant . Mailboxes (Voice Messaging) l Custom Call Routing (Optional)
StarTalk Set Up and Operation Guide
2 - 2 Section 2: Learning About StarTalk
,
The first component is the Automated Attendant. The Automated Attendant works like a receptionist would when answering incoming calls. The Auto- mated Attendant plays a list of options to a caller through a voice prompt. If users know which option they want, they can interrupt the Automated Attendant by pressing their selection on the dialpad of any tone dial telephone.
Once an option has been selected, the Automated Attendant responds to the command by routing the call to an extension or mailbox within your company or directing the user to the Company Directory or designated operator.
The second component of StarTalk is the mailbox. Mailboxes are added by the System Coordinator and then initialized by the mailbox owner. Any caller can leave a message in a mailbox after the mailbox is initialized.
Mailbox owners can open their mailboxes and customize them using all the available options of StarTalk. Some common mailbox options are:
l Primary and Alternate Greetings . Password Selection
For more information about all the StarTalk options, refer to the StarTalk Reference Guide.
The third component of StarTalk is Custom Call Routing (CCR). CCR is a multi-level, single-digit access application, providing callers with a series of vcice prompts and call transfer options. Using CCR, a user can:
. listen to pre-recorded information messages l select a menu 0 leave a message in a mailbox l transfer to an extension
For more information about CCR, refer to the StarTalk Custom Call Routing Set Up and Operation Guide.
StarTalk Set Up and Operation Guide
Section 2: Learnina About StarTalk 2 - 3
Who Can Use StarTalk
About the Feature
Codes
StarTalk can be used by any outside caller, and by mailbox owners in your company. Away from the office, StarTalk can be used with any tone dial
- telephone. Inside your office, StarTalk can be used from any Norstar or tone dial telephone connected to your Norstar system.
Note: Incoming calls from a rotary dial telephone are transferred to your company receptionist or designated operator. If the operator is not available, the caller is directed to the General Delivery mailbox.
When using StarTalk from a Norstar telephone, a user must first enter a Feature Code.
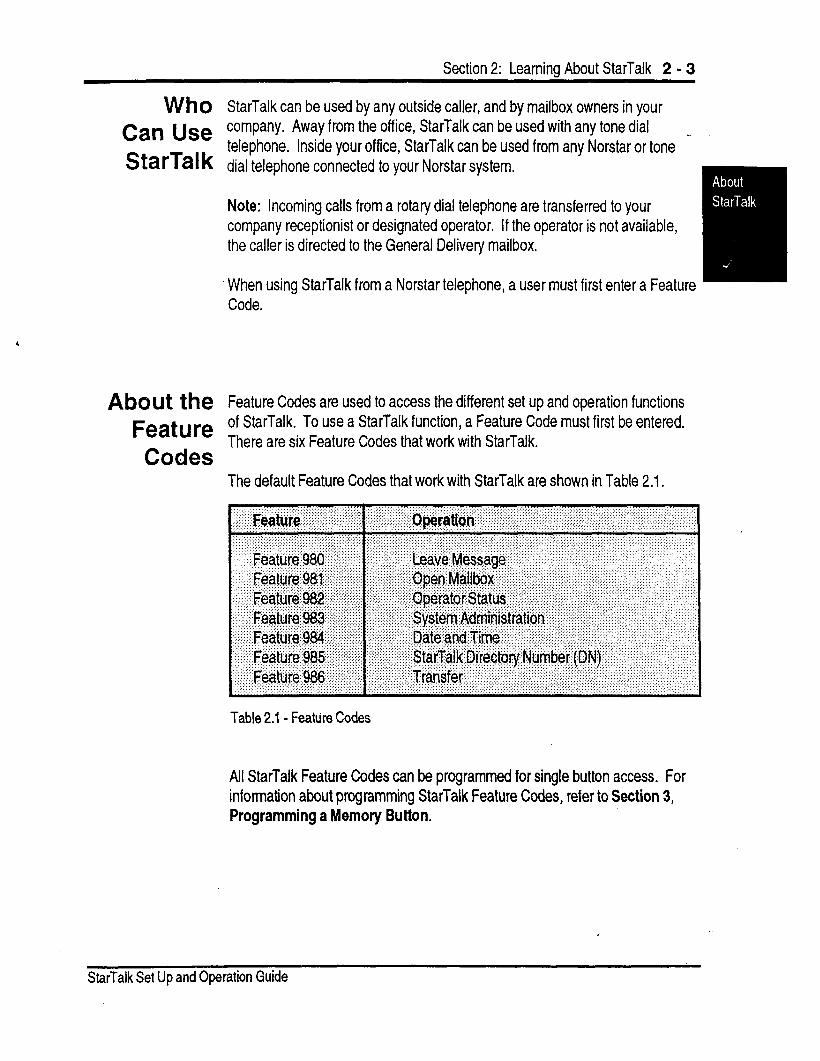
Feature Codes are used to access the different set up and operation functions of StarTalk. To use a StarTalk function, a Feature Code must first be entered. There are six Feature Codes that work with StarTalk.
The default Feature Codes that work with StarTalk are shown in Table 2.1.
Table 2.1 - Feat&e Codes
All StarTalk Feature Codes can be programmed for single button access. For information about programming StarTalk Feature Codes, refer to Section 3, Programming a Memory Button.
StarTalk Set Up and Operation Guide
2 - 4 Section 2: Learning About StarTalk
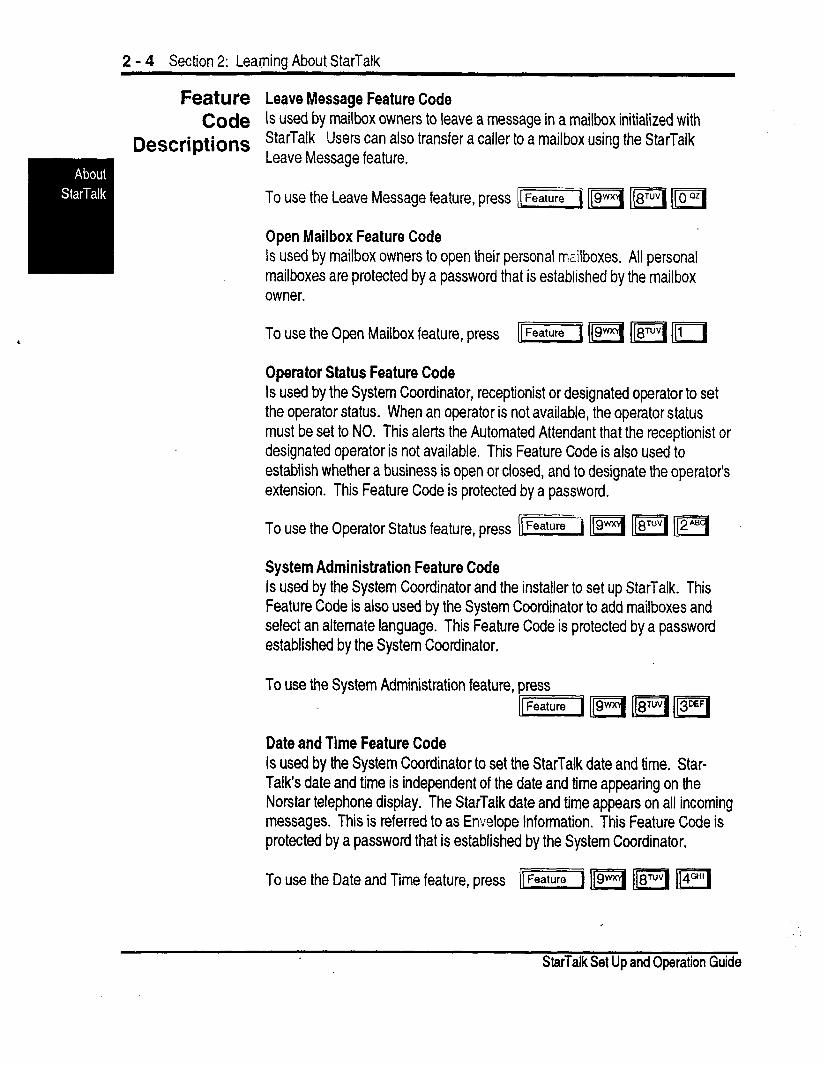
Feature Leave Message Feature Code Code Is used by mailbox owners to leave a message in a mailbox initialized with
Descriptions StarTalk Users can also transfer a caller to a mailbox using the StarTalk Leave Message feature.
To use the Leave Message feature, press -1 m m m
Open Mailbox Feature Code Is used by mailbox owners to open their personal mailboxes. All personal mailboxes are protected by a password that is established by the mailbox owner.
L To use the Open Mailbox feature, press (( (19”1 m 1111
Operator Status Feature Code Is used by the System Coordinator, receptionist or designated operator to set the operator status. When an operator is not available, the operator status must be set to NO. This alerts the Automated Attendant that the receptionist or designated operator is not available. This Feature Code is also used to establish whether a business is open or closed, and to designate the operator’s extension. This Feature Code is protected by a password.
To use the Operator Status feature, press ~~pq@qz=q
System Administration Feature Code Is used by the System Coordinator and the installer to set up StarTalk. This Feature Code is also used by the System Coordinator to add mailboxes and select an alternate language. This Feature Code is protected by a password established by the System Coordinator.
To use the System Administration feature, press ((Featurepq@qpq
Date and Time Feature Code Is used by the System Coordinator to set the StarTalk date and time. Star- Talk’s date and time is independent of the date and time appearing on the Norstar telephone display. The StarTalk date and time appears on all incoming messages. This is referred to as Envelope Information. This Feature Code is protected by a password that is established by the System Coordinator.
To use the Date and Time feature, press F[ ‘m w1 m
Stat-Talk Set Up and Operation Guide
Section 2: Learning About StarTalk 2 - 5
About the Automated
Attendant
Stat-Talk Directory Number (DN) Feature Code Is used to determine StarTalk’s Intercom Number. This number is used to forward a Norstar telephone to StarTalk, and to use StarTalk from a single line . set attached to an Analog Terminal Adapter (ATA).
To use the StarTalk DN feature, press
Transfer Is used to transfer calls to a mailbox. While the call is active, enter the feature code, then enter the mailbox number where you want to direct the call. caller is now transferred.
To use the Transfer feature, press
Note: Do not put the call on hold. Feature 986 must be entered while the call is active.
StarTalk Set Up and Operation Guide
The Automated Attendant is the StarTalk receptionist. When enabled, the Automated Attendant answers your company’s incoming telephone lines according to the time of day with a prerecorded greeting selected from one of StarTalk’s Greeting Tables. When the Automated Attendant is enabled, the Automated Attendant menu prompt provides a list of options so that a caller can:
. reach any extension or mailbox in your company
. leave a message in a mailbox
. select an alternate language (not a prerecorded voice prompt)
. look for an extension or mailbox in the Company Directory
. reach your company receptionist or designated operator
. open a personal mailbox as a mailbox owner (not a prerecorded voice prompt)
The default Automated Attendant menu prompt can be disabled at any time. When you disable the default Automated Attendant menu prompt, you must record a customized Automated Attendant menu prompt. This customized Automated Attendant menu prompt replaces the default Automated Attendant menu prompt.
Important: A caller is returned to the Automated Attendant menu prompt after completing a StarTalk session. When you disable the Automated Attendant menu prompt, your customized Automated Attendant menu prompt plays in place of the prerecorded Automated Attendant prompt. *
2 - 6 Section 2: Learning About StarTalk
About the The Company Directory is an internal voice fist containing the names of users
Company with initialized mailboxes who have been designated to appear in the directory.
Directory A user can open the Company Directory from a Norstar two line display telephone when the display shows the (DlR) option. The Company Directory can also be opened by pressing II# when the Automated Atten- dant announces the option is available.
Mailbox owners must record a Company Directory name before they can use their mailbox. A mailbox owner’s name does not have to appear in the Com- pany Directory. Whether or not a mailbox appears in the Company Directory is established by the System Coordinator when the mailbox is registered with StarTalk. This Company Directory override can be changed at any time.
About the A mailbox is a storage place for messages on the StarTalk system.
Mailboxes There are two groups of StarTal k mail boxes:
l Special Mailboxes l Personal Mailboxes
The Special The Special Mailboxes are administered by the System Coordinator. The Mailboxes Special Mailboxes include:
l System Coordinator Mailbox a General Delivery Mail box l Trouble Mailbox
For more information about the Special Mailboxes refer to Section 5, Setting Up Mail boxes.
StarTalk Set Up and Operation Guide
Section 2: Learnino About StarTalk 2 - 7
Personal Personal mailboxes are assigned by the System Coordinator and maintained Mailboxes by the mailbox owner. There are three kinds of Personal mailboxes, which
include: _
. User Mail boxes
. Guest Mailboxes
. Information Mailboxes
StarTalk can store 500 mailboxes. This total can include any combination of User, Guest, or Information Mailboxes. For a description of Personal Mail- boxes, refer to Section 5, Setting Up Mailboxes.
,
Mail box Only a few rules apply to the StarTalk mailboxes. These rules should be given Rules to any user who is going to have a mailbox.
The mailbox rules are:
1. A password is always needed to open a mailbox.
2. A mailbox can be opened from any Norstar telephone from the 1 Log: 1 display prompt. At this prompt enter the mailbox number and password combination.
When a mailbox is assigned to a Norstar telephone, the display always shows the Pswd : ] prompt. To reach the 1 Log: 1 prompt, press COTHR) or II’
When a Norstar single line display is being used, press II’ to reach the [ Log: ] display prompt.
3. A mailbox must be initialized before it can be used.
StarTalk Set Up and Operation Guide
2 - 8 Section 2: Leamina About StarTalk
’ bb
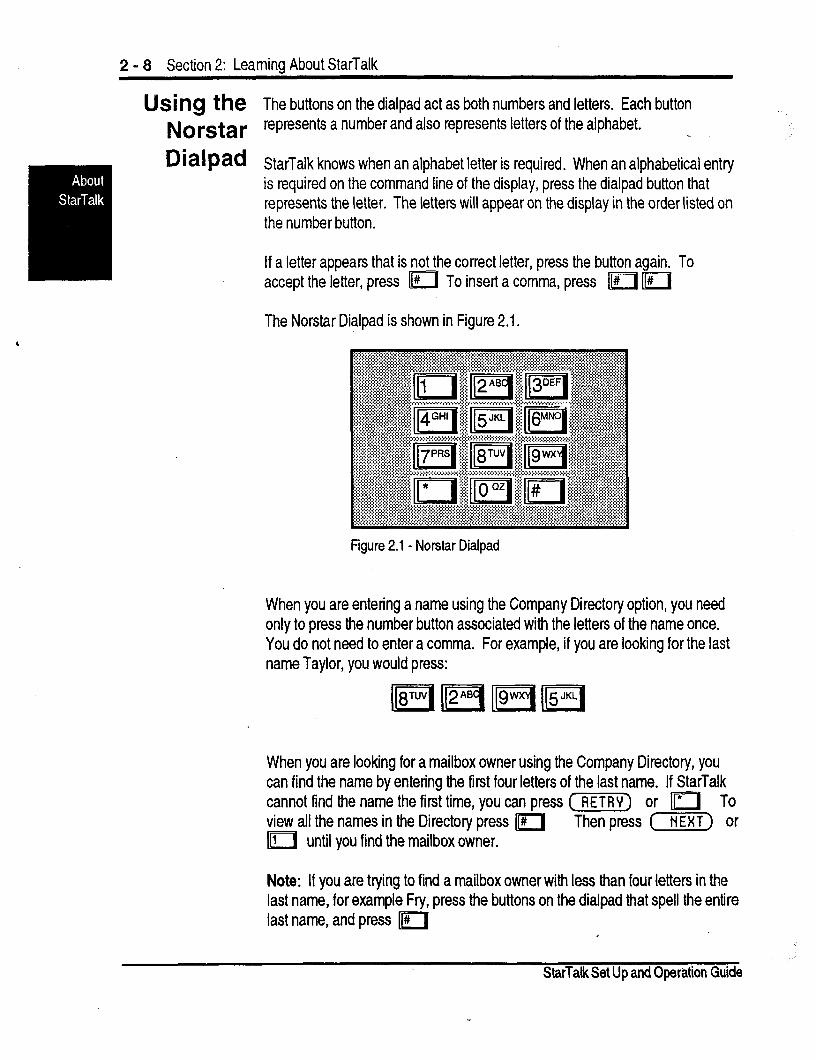
USi ng the The buttons on the dialpad act as both numbers and letters. Each button Norstar represents a number and also represents letters of the alphabet.
DialPad
. .
I
StarTalk knows when an alphabet letter is required. When an alphabetical entry is required on the command line of the display, press the dialpad button that represents the letter. The letters will appear on the display in the order listed on the number button.
If a letter appears that is not the correct letter, press the button again. To accept the letter, press II# To insert a comma, press 1# II#
The Norstar Dialpad is shown in Figure 2.1.
Figure 2.1 - Norstar Dialpad
When you are entering a name using the Company Directory option, you need only to press the number button associated with the letters of the name once. You do not need to enter a comma. For example, if you are looking for the last name Taylor, you would press:
When you are looking for a mailbox owner using the Company Directory, you can find the name by entering the first four letters of the last name. If StarTalk cannot find the name the first time, you can press [RETRY) To or m view all the names in the Directory press II# Then press [NEXT) 111
or until you find the mailbox owner.
Note: If you are trying to find a mailbox owner with less than four letters in the last name,,for example Fry, press the buttons on the dialpad that spell the entire last name, and press m
c
StarTalk Set Up and Operation Guide
Section 2: Learnina About StarTalk 2 - 9
Using StarTalk
With a Two Line
Display
Using StarTal k
With a Single Line
Display
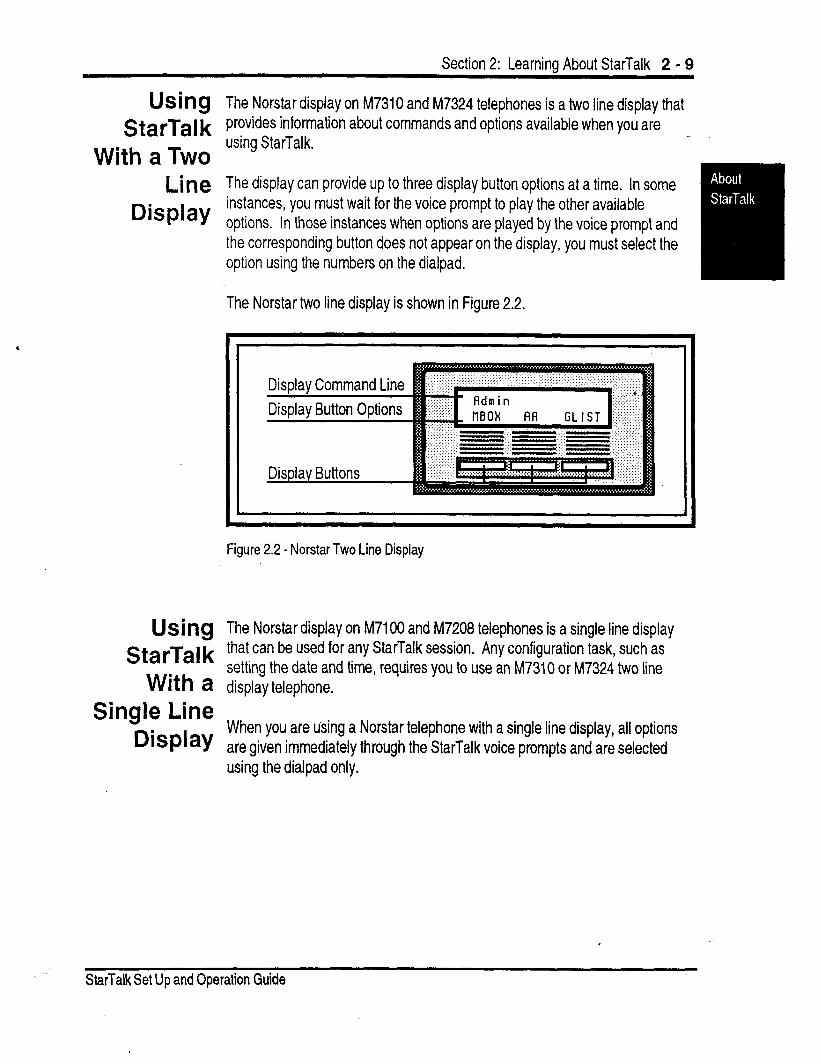
The Norstar display on M7310 and M7324 telephones is a two line display that provides information about commands and options available when you are using StarTalk.
The display can provide up to three display button options at a time. In some instances, you must wait for the voice prompt to play the other available options. In those instances when options are played by the voice prompt and the corresponding button does not appear on the display, you must select the option using the numbers on the dialpad.
The Norstar two line display is shown in Figure 2.2.
figure 2.2 - Norstar Two Line Display
The Norstar display on M7100 and M7208 telephones is a single line display that can be used for any StarTalk session. Any configuration task, such as setting the date and time, requires you to use an M7310 or M7324 two line display telephone.
When you are using a Norstar telephone with a single line display, all options are given immediately through the StarTalk voice prompts and are selected using the dialpad only.
StarTalk Set Up and Operation Guide
2 - 10 Section 2: Leamina About StarTalk
Using StarTal k With an Analog
Terminal Adapter
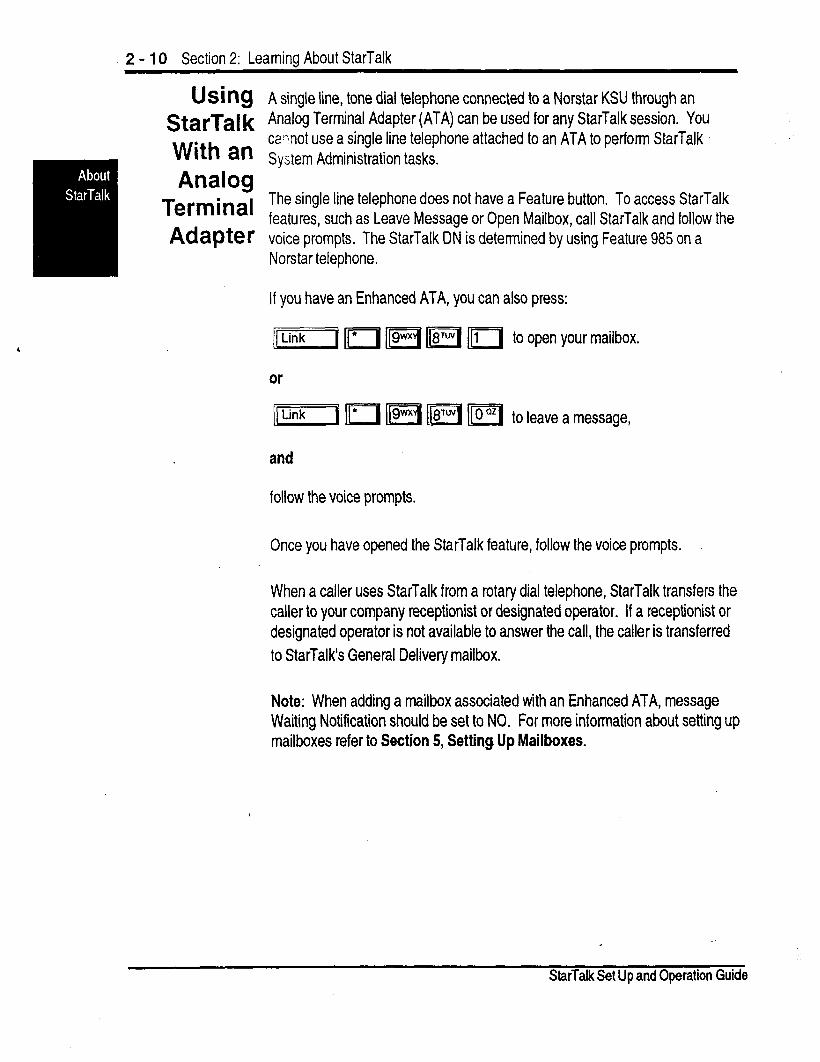
A single line, tone dial telephone connected to a Norstar KSU through an Analog Terminal Adapter (ATA) can be used for any StarTalk session. You canot use a single line telephone attached to an ATA to perfoml StarTalk System Administration tasks.
The single line telephone does not have a Feature button. To access StarTalk features, such as Leave Message or Open Mailbox, call StarTalk and follow the voice prompts. The StarTalk DN is determined by using Feature 985 on a Norstar telephone.
If you have an Enhanced ATA, you can also press:
v ‘1 m m 1111 to open your mailbox.
or
II IF7 119”4 m I\o”I to leave a message,
and
follow the voice prompts.
Once you have opened the StarTalk feature, follow the voice prompts.
When a caller uses StarTalk from a rotary dial telephone, StarTalk transfers the caller to your company receptionist or designated operator. If a receptionist or designated operator is not available to answer the call, the caller is transferred to StarTalk’s General Delivery mailbox.
Note: When adding a mailbox associated with an Enhanced ATA, message Waiting Notification should be set to NO. For more information about setting up mailboxes refer to Section 5, Setting Up Mailboxes.
StarTalk Set Up and Operation Guide
Section 2: Learnina About StarTalk 2 - 11 .
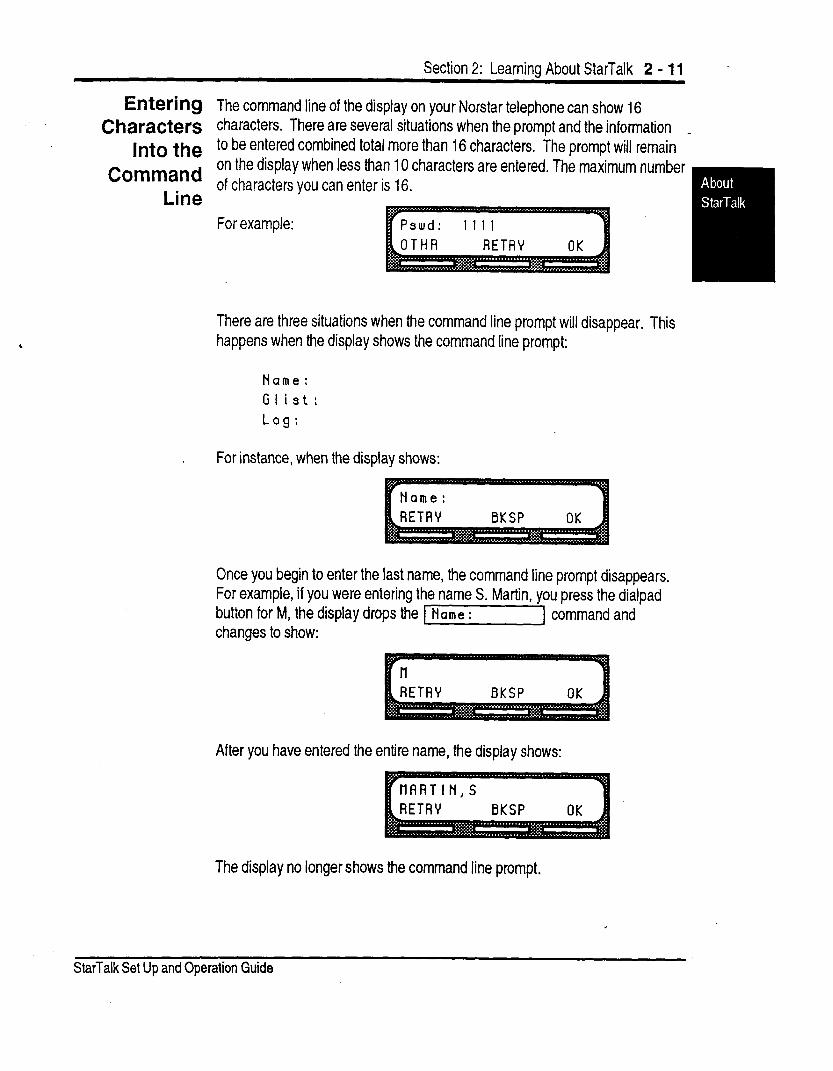
Entering The command line of the display on your Norstar telephone can show 16 Characters characters. There are several situations when the prompt and the information _
Into the to be entered corn IIILU LIIG bined total more than 16 characters. The prompt will remain
Command on the display when less than 10 characters are entered. The maximum number _ * of characters you can enter is 16. Line
For example:
There are three situations when the command line prompt will disappear. This happens when the display shows the command line prompt:
Name : Glist:
Log:
For instance, when the display shows:
Once you begin to enter the last name, the command line prompt disappears. For example, if you were entering the name S. Martin, you press the dialpad button for M, the display drops the 1 Name : ] command and changes to show:
After you have entered the entire name, the display shows:
The display no longer shows the command line prompt.
StarTalk Set Up and Operation Guide
2 - 12 Section 2: Leamina About StarTalk
About the Each command shown on the Norstar display is accompanied by a voice
StarTalk P rom t P- On a Norstar two line display telephone, the voice prompt plays after
Voice a five second delay. When you do not select an option, StarTalk ends the session. On a Norstar single line display telephone, the voice prompt plays
Prompts immediately. When you do not select an option within an additional four seconds, the voice prompt replays the options before StarTalk ends the session.
StarTalk voice prompts provide the same options as the display button options, and additional options not appearing on the display. When the voice prompt plays the available options, it only provides the dialpad number buttons that invoke the options.
When the voice prompt announces a display option with a corresponding dialpad button, you can use the display button or the number on the dialpad. Either button will invoke the selected option.
Interrupting Voice prompts can be interrupted by selecting an option on the display or a Voice dialpad. A voice prompt can be stopped by pressing II# A user cannot
Prompt interrupt a prompt that is informing the user of an error.
When a Norstar one or two line display telephone is being used, pressing II’ backs up the display to the previous display prompt.
Note: There are no voice prompts for configuration options. All configuration commands and options appear on the M7310 or M7324 two line display te!zphone.
StarTalk Set Up and Operation Guide
Section 2: Leamino About StarTalk 2 - 13
About the StarTalk Reports are available to view and verify StarTalk set up information. StarTal k There are five StarTalk Reports:
Reports . Directory Report (1): lists the mailbox users who appear in the Company Directory.
. Numeric Subscriber Mailbox Report (2): lists the mailbox owners according to their mailbox number.
. System Group List Report (3): lists Group List numbers and names, along with the member names and mailbox numbers.
l Message Usage Report (4): lists the current storage available in minutes on the StarTalk module.
l Mailbox Activity Report (5): lists daily and average mailbox activity statistics for an individual mailbox or all mailboxes.
You must have an RS232 printer connected to StarTalk to produce reports. For more information about StarTalk reports refer to Section 9, StarTalk Reports.
Exiting When you are using StarTalk, you can exit a StarTalk session by: ’
From , . StarTa, k . Hanging up the handset.
2. Pressing an alternate line button.
3. Pressing m
Note: When you press [JFeaturel the StarTalk session ends in two to three seconds, except when you are transferring a caller to a mailbox.
.
StarTalk Set Up and Operation Guide
2 - 14 Section 2: Leamina About StarTalk
Your Role as System
Coordinator
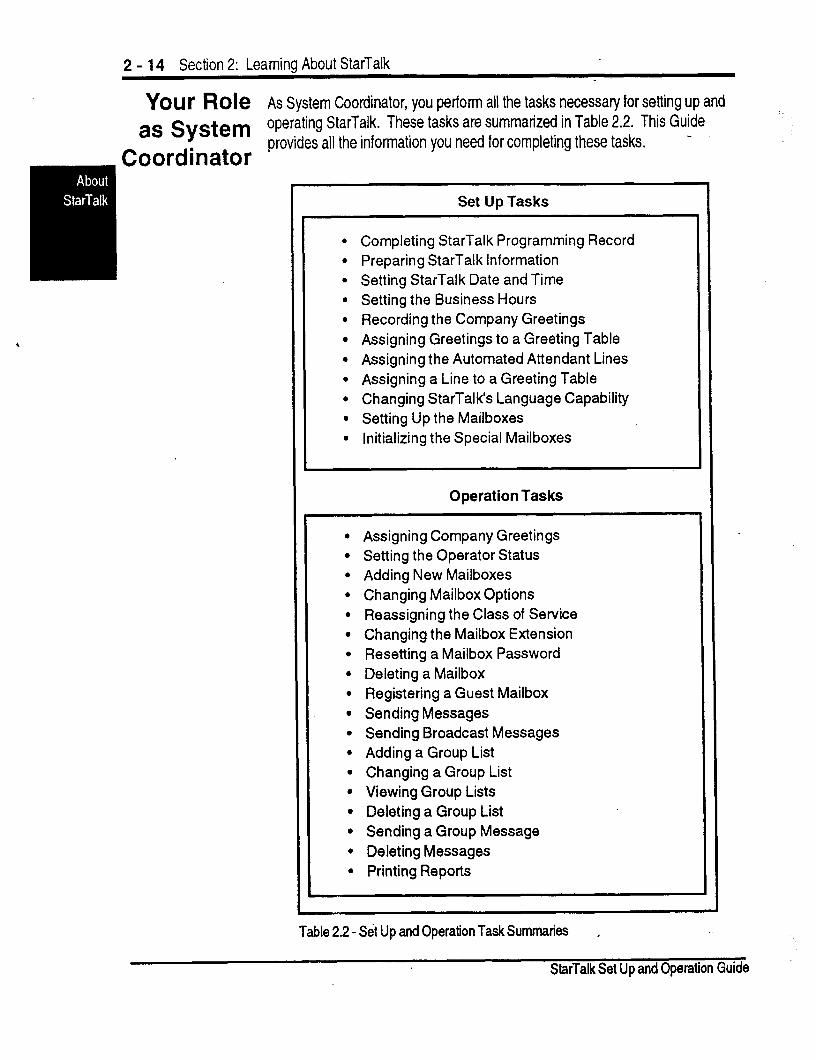
As System Coordinator, you perform all the tasks necessary for setting up and operating StarTalk. These tasks are summarized in Table 2.2. This Guide provides all the information you need for completing these tasks. -
Set Up Tasks
l Completing StarTalk Programming Record l Preparing StarTalk information l Setting StarTalk Date and Time l Setting the Business Hours l Recording the Company Greetings l Assigning Greetings to a Greeting Table l Assigning the Automated Attendant Lines l Assigning a Line to a Greeting Table l Changing StarTalk’s Language Capability l Setting Up the Mailboxes l Initializing the Special Mailboxes
Operation Tasks
l Assigning Company Greetings l Setting the Operator Status l Adding New Mailboxes l Changing Mailbox Options l Reassigning the Class of Service l Changing the Mailbox Extension l Resetting a Mailbox Password . Deleting a Mailbox l Registering a Guest Mailbox l Sending Messages l Sending Broadcast Messages l Adding a Group List l Changing a Group List l Viewing Group Lists l Deleting a Group List l Sending a Group Message l Deleting Messages l Printing Reports
1
Table 2.2 - Set Up and Operation Task Summaries ,
StarTalk Set Up and Operation Guide
3-1
- Preparing To Set Up StarTalk 3 IlItl’Od UCtiOIl -Preparing to set up StarTalk involves collecting the StarTalk set up information.
To set up StarTalk you need to know about the:
. StarTalk Programming Record
. Intercom Number (Directory Number) length
. Programming memory buttons
This section describes the information you need for setting up Star-Talk.
The The StarTalk Programming Record contains information about your company’s StarTal k Norstar Key Service Unit (KSU) and StarTalk. ThisRecord is provided to you
Program- by your StarTalk installer or your customer sales representative.
ming The Programming Record is useful for organizing the StarTalk set up. It
Record contains information about:
0 Norstar Hardware Verification . Norstar Line Data Verification l StarTalk Hardware Verification . StarTalk Initialization Verification l StarTalk Feature Codes
It also provides a Greeting Table Summary, Greeting and Line Summary, Mailbox List, and Class of Service Table. These sections of the Programming Record are useful for recording StarTalk line information, greetings, and mailbox information.
StarTalk Set Up and Operation Guide
3 - 2 Section 3: Preparing To Set Up StarTalk
Norstar This section of the Programming Record has information about the type of Hardware Norstar KSU, and KSU software version being used in your company. It also
Verification includes the type of telephone being used to program StarTalk. -
StarTal k This section of the Programming Record has information about the StarTalk Hardware model being used in your company. This section verifies the size, in minutes, of
Verification the StarTalk model, and the number of available StarTalk voice channels.
Optional Equipment
Note: To perform the StarTalk set up, you need to use a Norstar M7310 or M7324 telephone. These Norstar telephones have a two line display.
This section of the Programming Record provides information about the number of telephone (CO) lines in your company. You need to know the line numbers . so you can assign the lines to a StarTalk Greeting Table. You also need to know the Directory Number Length. The DN length ranges between 2 and 7 digits. For more information about determining the DN length, refer to the Installation Guide.
This section of the Programming Record has information about the optional equipment attached to your StarTalk module. If required, you can attach a floppy disk loader. You can also attach an RS232 terminal. If you are printing reports, you must have an RS232 printer connected to StarTalk.
The Message Storage Pack: the size, in minutes, of the StarTalk message storage pack is useful for determining how much maibox and message informa- tion StarTalk can store. For example, if you are using a StarTalk model 385, this means your company can store 385 minutes of greetings and messages.
The StarTalk Voice Channels: the number of channels available on StarTalk determines how many StarTalk sessions can take place at the same time.
StarTalk Set Up and Operation Guide

Section 3: Preparing To Set Up StarTalk 3 - 3
StarTal k This part of the Programming Record covers: Initialization
- Verification Mailbox Number Length: this is the number of digits in a mailbox number. The mailbox number length must be the same as the Norstar DN length. This is designated by your StarTalk installer.
Bilingual: this identifies whether or not the module has bilingual language capability. Two types of StarTalk modules with bilingual capability are available: one type uses English and French, the other uses English and Spanish. This section of the Programming Record provides a space to record which languages your company will be using with StarTalk.
Primary Language: this specifies which language is being used as the primary language.
Alternate Language: this specifies which language is being used as the alternate language.
Group List Enabled: this establishes whether or not Group Lists are being used. A Group List leading digit must be assigned when the Group List is enabled. This section of the Programming Record provides a space to record the Group List leading digit. For more information about Group Lists refer to Section 8, Sending a Message to More than One Mailbox.
Important: If you need to add the Group List capability or change the Group List leading digit, you must reset StarTalk. Refer to Appendix C.
Warning: Resetting StarTalk erases all the Company Greetings, Greeting Table and mailbox information. Before you reset StarTalk, ensure that you have a copy of the current StarTalk configuration. Refer to your StarTalk Programming Record.
StarTalk Set Up and Operation Guide
3 - 4 Section 3: Preparing To Set Up StarTalk
StarTalk The Feature Codes section of the Programming Record summarizes the Feature StarTalk default Feature Codes 980 through 986. It also provides a space to
Codes record the new Feature Code when the default code is not being used:
For instructions about how to determine the StarTalk Feature Codes, refer to Determining the Feature Codes, later in this Section.
Business This section of the Programming Record shows the default business hours. Hours Business hours can be assigned by your StarTalk installer according to the
business hours used in your company. A space is provided to record the business hours for the Morning, Afternoon, Evening, and Non-business hour.
SulIlmat’y The StarTalk Programming Record also provides a Greeting Table summary, a Tables and Line Number Summary, Greeting Summary, and Mailbox information list.
Lists Before you complete this section of the Programming Record, you should photocopy these pages. Use these pages as master copies for referencing any changes to your StarTalk set up. Keep the completed Programming Record in a safe place for future reference.
About the The StarTalk Greeting Table Summary assists you in summarizing the way a Greeting Table Greeting Table is organized. This section of the Programming Record allows
Summary you to specify the business hours, language preference, and Call Transfer type being used in a Table.
For more information about setting up and using Greeting Tables, refer to Section 4, Setting Up StarTalk.
.
I
-
StarTalk Set Up and Operation Guide
Section 3: Preparing To Set Up StarTalk 3 - 5
About the The Line Number Summary provides space to record the telephone line Line Number numbers used in your company, the telephone number of the line, whether the - and Greeting line is answered by StarTalk, the number of rings before StarTalk answers, and
Summary which Greeting Table the line is assigned to.
The Greeting Summary provides a space where you can record numbered greetings and what the greetings say.
The Greeting Summary also provides a space where you can record the customized Automated Attendant Main Menu prompt, and the Information Mailbox Message.
About the The Mailbox List provides a convenient place to record personal mailbox Mailbox List information. This can serve as a paper record for future reference about
mailbox numbers associated with extensions, a mailbox owner’s name, a Class of Service and mailbox overrides. You can also record guest mailboxes on the Mailbox List, or photocopy the Mailbox List before it is filled out and use the photocopied page as a separate Guest Mailbox List.
Note: StarTalk can store a total of 500 mailboxes. These can be any combina- tion of Personal, Guest, or Information mailboxes.
For more information about setting up mailboxes refer to Section 5, Setting Up Mailboxes.
StarTalk Set Up and Operation Guide
3 - 6 Section 3: Preparing To Set Up StarTalk
IntW’COITI To use StarTalk, the Norstar Intercom Number and the StarTalk mailbox N u m her number lengths must be the same. The StarTalk Mailbox Number Length was
Length established during the StarTalk initialization performed by your installer:
Important: For StarTalk to work, the Norstar Intercom Number length must be the same as the StarTalk Mailbox Number length. If the Norstar Intercom Number length is different from the StarTalk Mailbox Number length, you must change the StarTalk Mailbox Number length. Refer to Appendix C, Resetting StarTal k.
Resetti tlg StarTalk is only reset if you have to change the StarTalk Mailbox Number StarTal k length, the Group List capability, or the Group List leading digit. Appendix C
provides the steps necessary to reset the StarTalk Module.
Warning: Resetting StarTalk erases all the Company Greetings, Greeting Table, and mailbox information. Before you reset StarTalk, ensure you have a copy of the current StarTalk configuration. Refer to your StarTalk Programming Record.
.
I
StarTalk Set Up and Operation Guide
Section 3: Preparing To Set Up StarTalk 3 - 7 -
Determining StarTalk uses Feature Codes 980 through 986. Before you continue with the
the Feature set up, ensure these Feature Codes are available. It is possible that some
Codes Feature Codes might be in use with another Norstar product, such as DCI, - DBN, Hourglass or SMDR. If these codes are being used by another applica- tion, Norstar automatically assigns StarTalk codes between 900 and 999. These codes might not appear in sequential order.
To determine StarTalk’s Feature Code availabilitv: ,
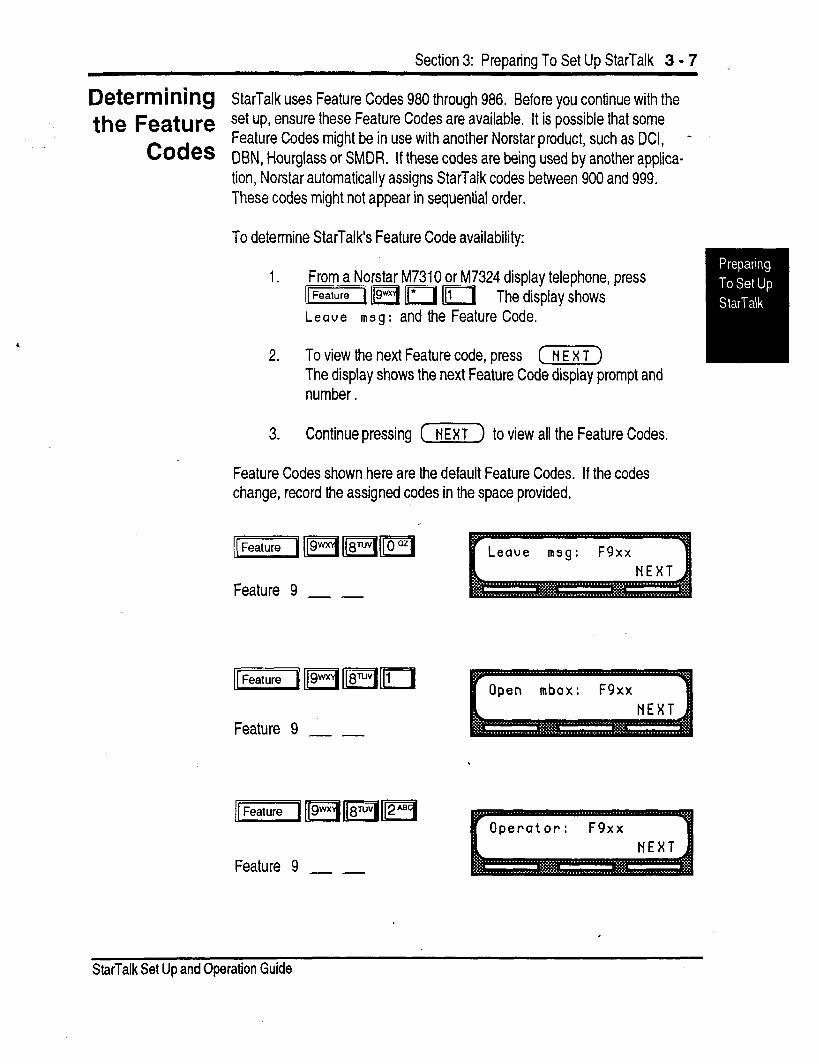
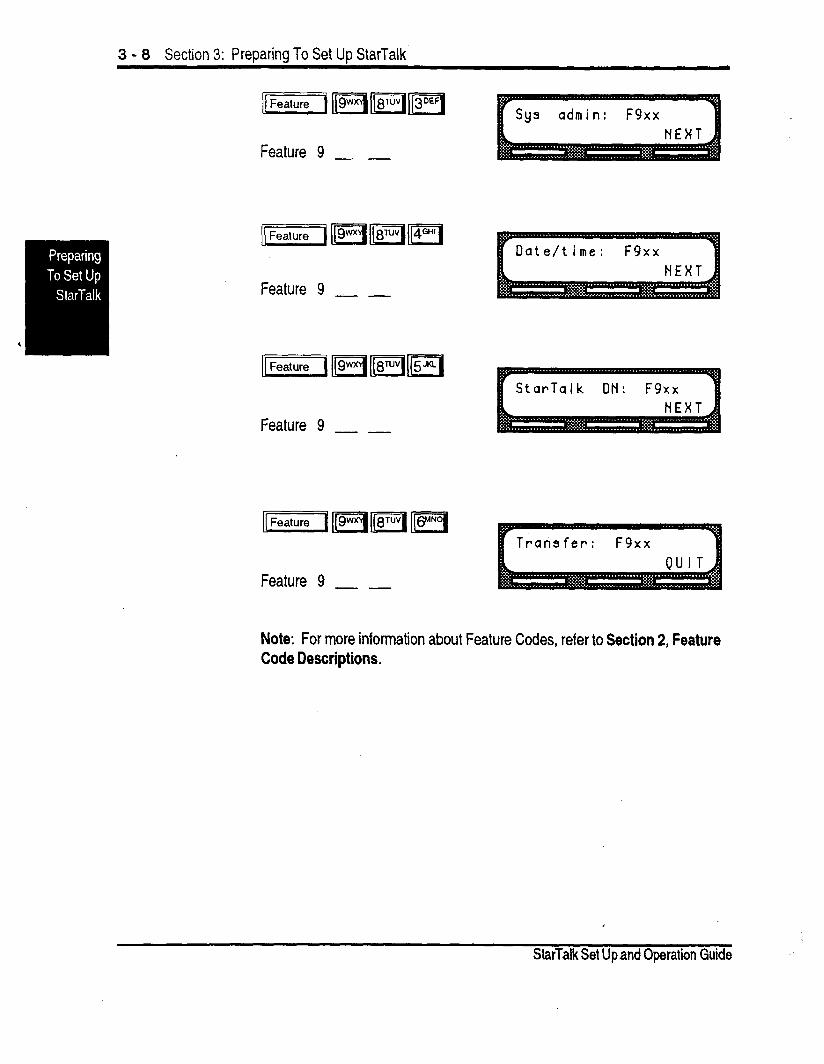
1. From a Norstar M7310 or M7324 display telephone, press [/ lm II* 1111 The display shows Leave msg: and the Feature Code.
2. To view the next Feature code, press (NEXT) The display shows the next Feature Code display prompt and number.
3. Continue pressing (NEXT) to view all the Feature Codes.
Feature Codes shown here are the default Feature Codes. If the codes change, record the assigned codes in the space provided.
Feature 9 - -
Feature 9 - -
StarTalk Set Up and Operation Guide
3 - 8 Section 3: Preparing To Set Up StarTalk
Feature 9 - -
Feature 9 - -
Star-Talk ON: F9xx
Feature 9 - -
Note: For more information about Feature Codes, refer to Section 2, Feature Code Descriptions.
. .
StarTalk Set Upand Operation Guide
Section 3: Preparing To Set Up StarTalk 3 - 9
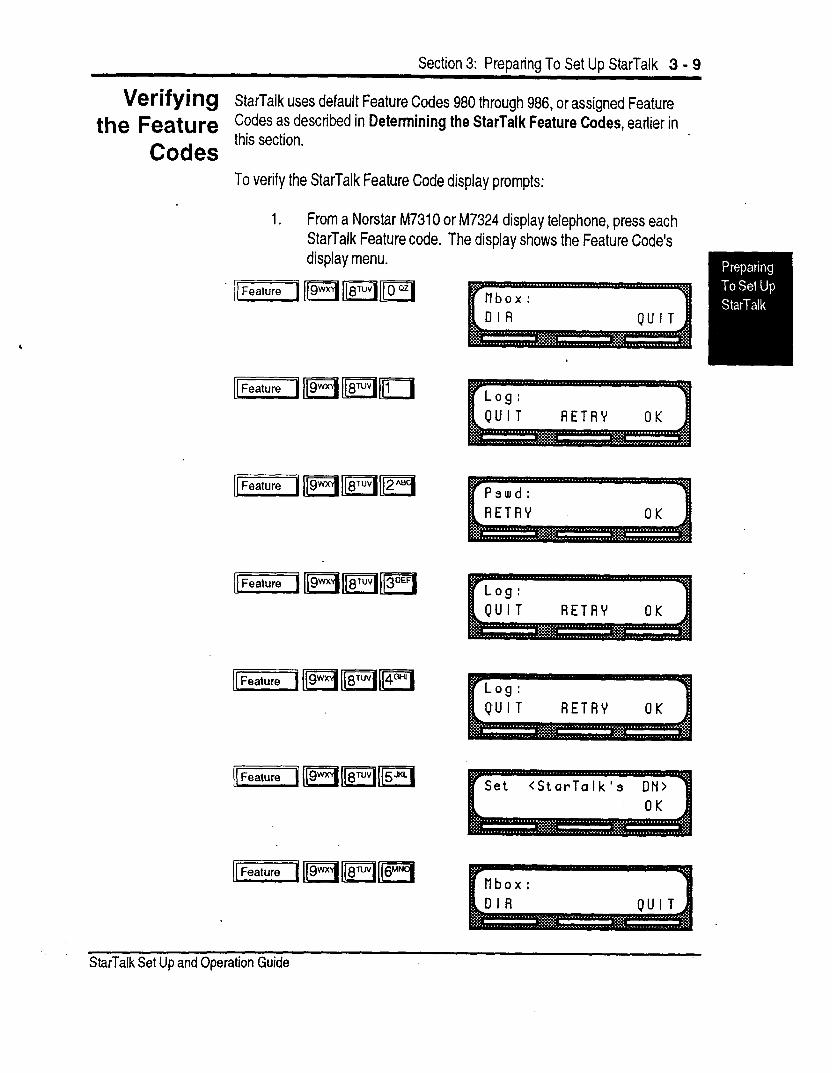
krif@‘lg StarTalk uses default Feature Codes 980 through 986, or assigned Feature
the Feature . . Codes as described in Determining the StarTalk Feature Codes, earlier in Codes thts sectron.
To verify the StarTalk Feature Code display prompts:
1. From a Norstar M7310 or M7324 display telephone, press each StarTalk Feature code. The display shows the Feature Code’s display menu.
RETRY OK
RETRV OK
r ilbox:
StarTalk Set Up and Operation Guide
3 - 10 Section 3: Preparing To Set Up StarTalk
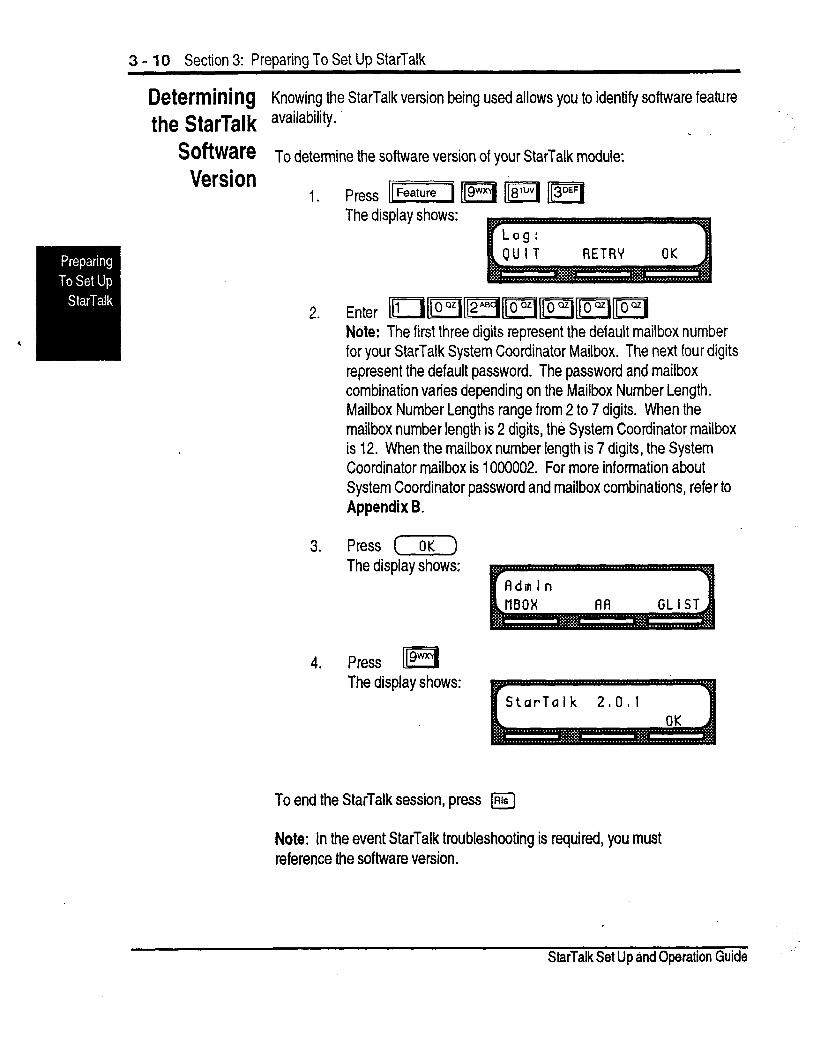
Determining Knowing the StarTalk version being used allows you to identify software feature the StarTalk availability.
Software To determine the software version of your StarTalk module: Version
1.
2.
3.
4.
The display shows:
Note: The first three digits represent the default mailbox number for your StarTalk System Coordinator Mailbox. The next four digits represent the default password. The password and mailbox combination varies depending on the Mailbox Number Length. Mailbox Number Lengths range from 2 to 7 digits. When the mailbox number length is 2 digits, the System Coordinator mailbox is 12. When the mailbox number length is 7 digits, the System Coordinator mailbox is 1000002. For more information about System Coordinator password and mailbox combinations, refer to Appendix B.
Press (OK) The display shows:
Press g II The display shows:
StarTalk 2,041
- To end the StarTalk session, press u
Note: In the event StarTalk troubleshooting is required, you must reference the software version.
.
I
StarTalk Set Up and Operation Guide
Section 3: Preparing To Set Up StarTalk 3 - 11
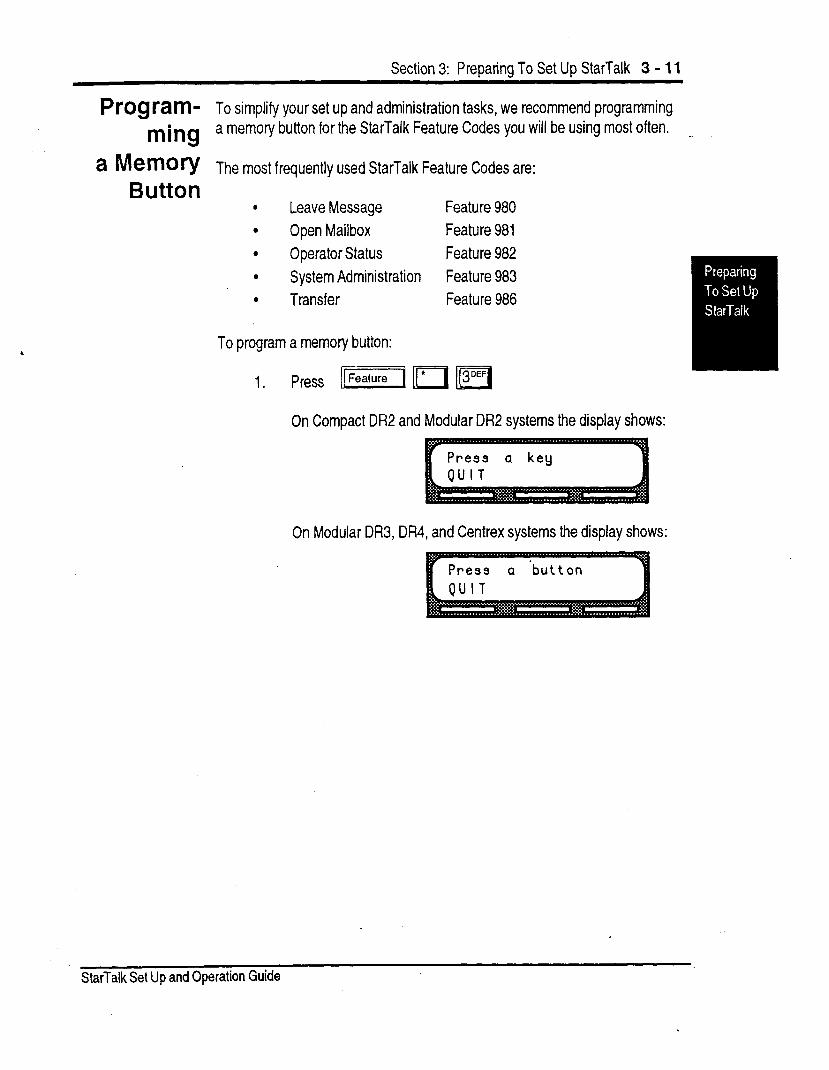
PrOCJWTI- To simplify your set up and administration tasks, we recommend programming
ming a memory button for the StarTalk Feature Codes you will be using most often.
a Memory Th e most frequently used StarTalk Feature Codes are: Button . Leave Message Feature 980
. Open Mailbox Feature 981
. Operator Status Feature 982
. System Administration Feature 983
. Transfer Feature 986
To program a memory button:
1. Press ]LFealureI[r*qpJ
On Compact DR2 and Modular DR2 systems the display shows:
On Modular DR3, DR4, and Centrex systems the display shows:
Press Q button
.
StarTalk Set Up and Operation Guide
3 - 12 Section 3: Preparing To Set Up StarTalk
2. .7 ct a programmable button.
4. Enter the StarTalk Feature Code number. For example, 983.
On Compact DR2 and Modular DR2 systems the display shows:
On Modular DR3, DR4, and Centrex systems the display shows:
5. Label the button with the Feature Code description using the paper labels provided with your Norstar telephone.
Repeat steps 1 through 5 for each StarTalk Feature Code you want to program.
Note: We recommend you program a memory button with StarTalk’s DN. To verify StarTalk’s DN refer to Verifying the Feature Codes, earlier in this section.
StarTalk Set Up and Operation Guide
Section 3: Preparing To Set Up StarTalk 3 - 13
StarTal k StarTalk designates one language as a primary language, and the other
Language language as an alternate language. The installer determines the initial Ian- - guage availability during the StarTalk installation, you determine which lan-
Capability g uage is going to be used as primary and alternate. For example, on an English/French StarTalk module, you can select French as the primary lan- guage and English as the alternate language, or on an English/Spanish module, you can select English as the primary language and Spanish as the alternate language.
The language option can be changed at any time. Refer to Section 4, Chang- ing StarTalk’s Bilingual Language Capability.
When StarTalk’s language option is enabled, the Automated Attendant allows users to select either the primary or alternate language. This is not a pre- I recorded option. For the option to be announced you must include the option in the company greeting that you record. For more information about recording greetings with a language option refer to Section 4, Recording the Company Greetings.
important: If for any reason you disable StarTalk’s language option, a user cannot select the option from the Automated Attendant voice menu.
When you use StarTalk’s bilingual language capability, mailbox Classes of Service determine which language is used by the mailbox. For instance, Class of Service numbers 1,3, 5,7,9,11,13, and 15 default to the primary language, and Class of Service numbers 2,4,6,8,10,12,14, and 16 default to the alternate language. When the bilingual capability is disabled, all Classes of
\ Service use the primary language only.
When a user calls a mailbox that is assigned a different language, the user hears the Automated Attendant voice prompt in the language specified by the System Coordinator. For example, if your mailbox is assigned the primary language Class of Service number 3, and you call a mailbox that is assigned the alternate language Class of Service number 8, and the primary language is set at French all the voice prompts you hear will be in French.
StarTalk Set Up and Operation Guide
3 - 14 Section 3: Prebarina To Set UD StarTalk
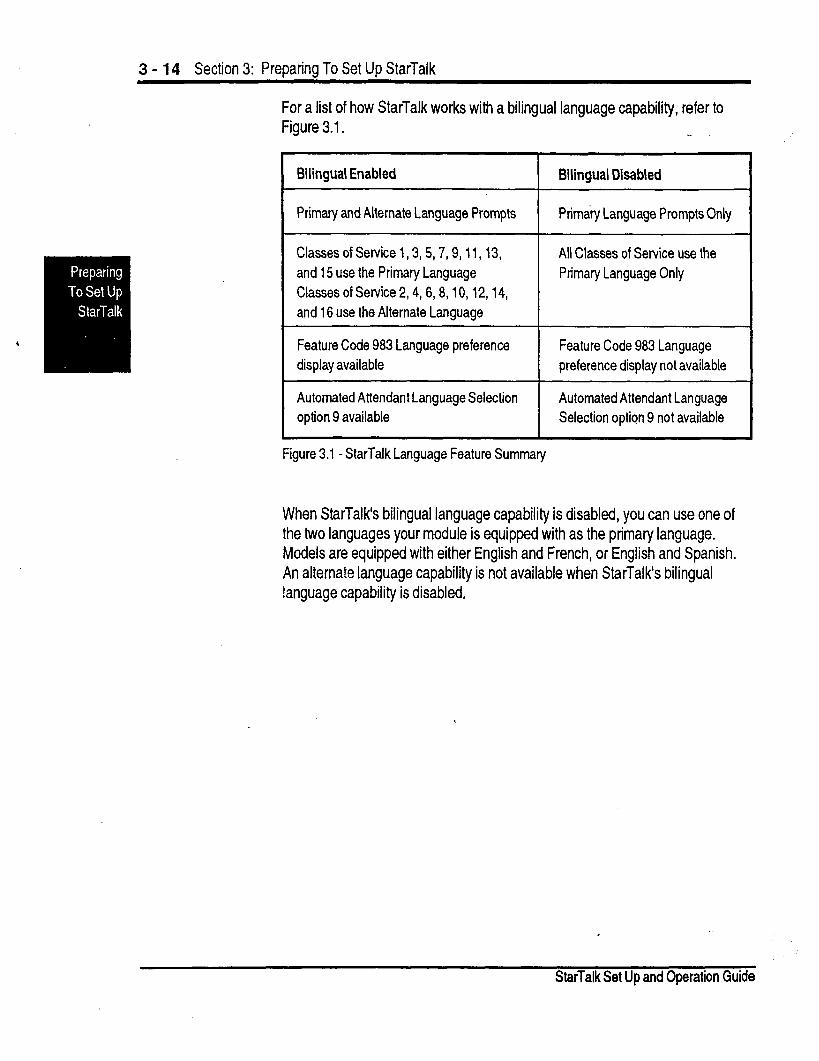
For a list of how StarTalk works with a bilingual language capability, refer to Figure 3.1. -
I Bilingual Enabled I Bilingual Disabled
I Primary and Alternate Language Prompts Primary Language Prompts Only
Classes of Service 1,3,5,7,9,11,13, and 15 use the Primary Language Classes of Service 2,4,6,8,10,12,14, and 16 use the Alternate Language
All Classes of Service use the Primary Language Only
Feature Code 983 Language preference Feature Code 983 Language display available preference display not available
Automated Attendant Language Selection option 9 available
Automated Attendant Language Selection option 9 not available
Figure 3.1 - StarTalk Language Feature Summary
When StarTalk’s bilingual language capability is disabled, you can use one of the two languages your module is equipped with as the primary language. Models are equipped with either English and French, or English and Spanish. An alternate language capability is not available when StarTalk’s bilingual language capability is disabled.
StarTalk Set Up and Operation Guide
4-1
Setting Up StarTalk
Introduction
Before You Start
This section describes the tasks you perform to set up StarTalk. Setting up StarTalk involves:
. setting the date and time
. setting up the Company Greeting Table
. determining which company lines will be answered by StarTalk
. recording your Company Greetings
. assigning a greeting to a Greeting Table l recording the customized Automated Attendant Menu Prompt . number of rings before StarTalk answers . language availability
Before you can begin to use StarTalk, you must determine how your Norstar Business Communication system is set up. Refer to Section 3, Preparing to Set Up StarTalk.
Important: To set up StarTalk in your company you require a Norstar M7310 or M7324 two line display telephone. You cannot set up StarTalk from a Norstar M7100 or M7208 single line display telephone.
Before you begin the StarTalk set up, ensure you have:
1. Read through Section 3, Preparing to Set Up StarTalk. 2. A completed StarTalk Programming Record. 3. Verified StarTalk Feature Code availability. 4. An M7310 or M7324 two line display telephone.
For more information about what you need to set up StarTalk refer to Section 3, Preparing to Set Up StarTalk.
.
StarTalk Set Up and Operation Guide

4 - 2 Section 4: Setting Up StarTalk
Setting StarTal k
Date and Time
The StarTalk date and time is independent of the Norstar time and date. The StarTalk date and time appears on all messages left in a mailbox. This date and time stamp is called Envelope Information.
Once the StarTalk date and time is set, it does not have to be changed unless there is a time change associated with a season. StarTalk can store the date and time for several weeks when the power is interrupted.
To set StarTalk’s date and time:
1. Press m m m w)
The display shows:
2. Enter ~lppq=Fqllo”lIlo”lllo”l
Note: The first three digits represent the default mailbox number for your StarTalk System Coordinator Mailbox. The next four digits represent the default password. The password and mailbox combination varies depending on the Mailbox Number Length. Mailbox Number Lengths range from 2 to 7 digits. When the mailbox number length is 2 digits, the System Coordinator mailbox is 12. When the mailbox number length is 7 digits, the System Coordinator mailbox is 1000002. For more information about System Coordinator password and mailbox combinations, refer to Appendix 6.
3. Press [OK) The display shows:
4. Press [ CHNG) The display shows:
5. Enter <the year, month, and day> Note: This is a six digit field. Any single digit month or day must be preceded by a zero. For example, February 7,199l must be entered as 910207.
StarTalk Set Up and Operation Guide
Enter <the time in hours and minutes> Note: This is a four digit field. Any single digit hour or minute must have a zero preceding the number. For example, 2:03 must be entered as 0203.
The display shows:
Section 4: Setting Up StarTalk 4 - 3 .
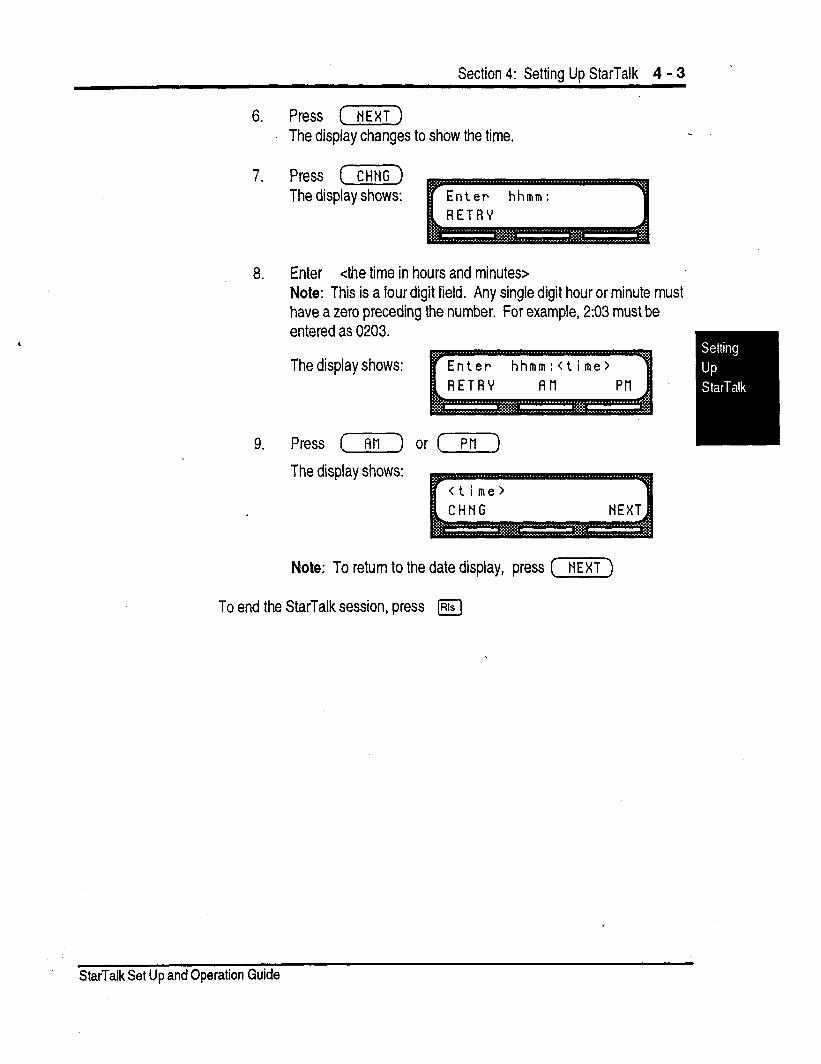
6. Press (NEXT) The display changes to show the time.
7. Press (CHNc) The display shows:
8.
9. Press (Rn) or (?Gi-]
The display shows:
Note: To return to the date display, press (NEXT)
To end the StarTalk session, press m
StatTalk Set Up and Operation Guide

4 - 4 Section 4: Setting Up StarTalk
Setting Up the
Greeting Tables
Setting Up the Greeting
Tables Using the Alternate
Language
StarTalk Greeting Tables store the greetings played by the Automated Attendant to incoming callers. There are four Greeting Tables, numbered 1 to 4. Each Greeting Table is divided into four sections. The four sections of each Greeting Table represent your company greeting for:
. morning b afternoon . evening . non-business
Note: Table 6.1 in Section 6 shows time segments for the morning, afternoon, evening, and non-business hour greetings.
StarTalk can store a total of.40 greetings in memory, but only 16 greetings can be assigned to the four Greeting Tables at any one time. The greeting numbers assigned to the Tables can be any greeting that you record and number from 1 to 40. Greetings 39 and 40 can be used to replace the Automated Attendant Menu Prompt.
Note: For more information about the Automated Attendant Menu Prompt refer to Section 6, Setting the Operator Status.
After all the greetings are recorded and assigned to the different lines in your company, they can then be assigned Greeting Table numbers. For example, your main business line might be assigned to Greeting Table 1, while your accounting department line might be assigned to Greeting Table 3.
When you are using StarTalk’s bilingual language capability, and are also using both the primary and alternate languages, we recommend assigning one or two of the Greeting Tables to the alternate language. For example, if your company has three incoming lines and you would like one line assigned entirely to the alternate language, you must assign that line to a Greeting Table where all’the greetings are recorded in the alternate language.
This means, you could record greetings 5,6,7 and 8 in the alternate language and assign the greetings to Greeting Table 3 for line 2.
. I
I
StarTalk Set Up and Operation Guide
Section 4: Setting Up StarTalk 4 - 5
How a Greeting Table is
Organized
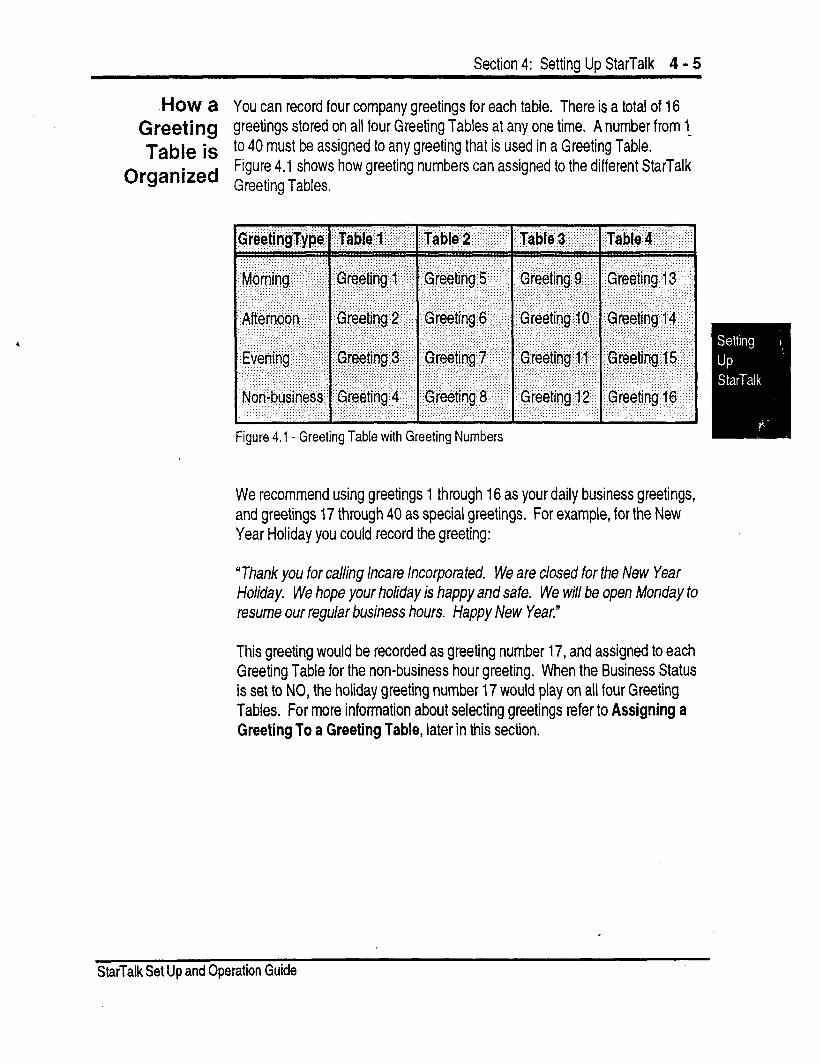
You can record four company greetings for each table. There is a total of 16 greetings stored on all four Greeting Tables at any one time. A number from l- to 40 must be assigned to any greeting that is used in a Greeting Table. Figure 4.1 shows how greeting numbers can assigned to the different StarTalk Greeting Tables.
Figure 4.1 - Greeting Table with Greeting Numbers
We recommend using greetings 1 through 16 as your daily business greetings, and greetings 17 through 40 as special greetings. For example, for the New Year Holiday you could record the greeting:
“Thank you for calling lncare Incorporated. We are closed for the New Year Holiday. We hope your holiday is happy and safe. We will be open Monday to resume our regular business hours. Happy New Year.”
This greeting would be recorded as greeting number 17, and assigned to each Greeting Table for the non-business hour greeting. When the Business Status is set to NO, the holiday greeting number 17 would play on all four Greeting Tables. For more information about selecting greetings refer to Assigning a Greeting To a Greeting Table, later in this section.
StarTalk Set Up and Operation Guide
4 - 6 Section 4: Settina Uo StarTalk
Determining Greeting
Table Information
To set up your company’s Greeting Tables, you first need to:
0 determine a Greeting Table number for each incoming line - . record your company greetings . determine the greeting numbers that you will assign to each table . determine a Call Transfer type
When you are setting up your company’s Greeting Table information, use the Greeting Table Summary provided in the StarTalk Programming Record. The Programming Record will assist you in organizing your company greeting information.
Before you record your company greetings, determine the type of greetings to be used on the different company lines and what you would like the greetings to say. You must prepare at least four greetings for Greeting Table 1. As you record your greetings, number them from 1 to 4.
The four greetings will reflect the morning, afternoon, evening and non- business hour. You must number each greeting 1 to 4. For example:
1) Morning Greeting: “Good Morning. You have reached Touchstone Marketing.”
2) Afternoon Greeting: “Good Afternoon. You have reached Touchstone Malkefing.”
3) Evening Greeting: ‘Good Evening. You have reached Touchstone Marketing.”
4) Non-business Hour Greeting: ’ You have reached Touchstone Marketing. Our business hours are Monday to Friday from 8 am to 5 pm. P/ease stay on the line and leave a message. Thank you for ca/ljng.”
Where you are using Guest mailboxes to make customer announcements or provide ordering information, you must inform callers they can select these mailboxes immediately by pressing m and the mailbox number. For example, if you set up mailbox 417 to provide order taking and product introduction services, you would record your company greeting to say:
“Good Morning. You have reached Touchstone Marketing. To listen to our product selvke information and place an order, press ‘417. ’
StarTalk Set Up and Operation Guide
Section 4: Setting Up StarTalk 4 - 7
Once you have determined what your company greetings will be, practice recording your greetings. Remember to speak slowly and clearly, at a pace that- is easy to understand. Try to use a tone that will encourage callers to use your StarTalk service. For the best recording results, record your greetings directly into the handset.
If you are using a primary and alternate language, remember to record your company greetings in both languages, and include the Automated Attendant option number m to select the alternate language.
If you are using a primary and alternate language it is a good idea to record the option m instruction in the alternate language. For example, if you are using English as your primary language and French as your alternate language, your main greeting would be in English and the option m instruction would be in French. For example:
“Good Morning. This is Touchstone Marketing. [To use our voice messaging service in French, please press 91. ’
The greeting enclosed inside the brackets would be recorded in French.
Important: Since the Automated Attendant does not announce an alternate language option, your greeting must instruct a caller to press m to use the al temate ianguage.
Although StarTalk can store 40 greetings in total, the sections Preparing Your Greetings and Recording the Company Greetings only show you how to prepare the first four company greetings. You can use the steps presented in these sections to record any additional greetings.
Important: You must prepare at least four greetings. These greetings auto- matically play on all four Greeting Tables. Additional greetings will not play until the greetings are assigned to a Greeting Table.
StarTalk greetings can be one to ten minutes in duration. If you need to change the greeting time.you must change the Class of Service of the System Coordi- nator mailbox. The default Class of Service for the System Coordinator mailbox is seven. This has a maximum greeting length of ten minutes. For instructions about changing a mailbox Class of Service refer to Section 7, Changing a Mailbox Class of Service.
StarTalk Set Up and Operation Guide
4 - 8 Section 4: Settina UD StarTalk
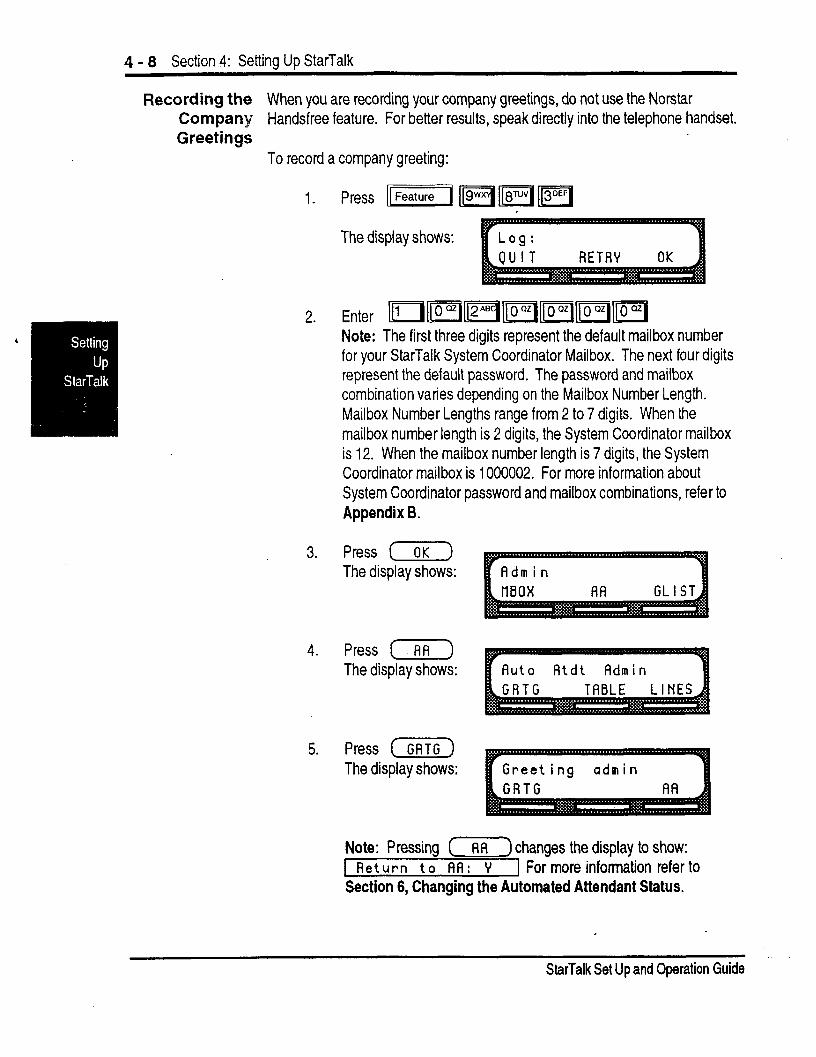
Recording the When you are recording your company greetings, do not use the Norstar Company Handsfree feature. For better results, speak directly into the telephone handset. Greetings
To record a company greeting:
The display shows:
Note: The first three digits represent the default mailbox number for your StarTalk System Coordinator Mailbox. The next four digits represent the default password. The password and mailbox combination varies depending on the Mailbox Number Length. Mailbox Number Lengths range from 2 to 7 digits. When the mailbox number length is 2 digits, the System Coordinator mailbox is 12. When the mailbox number length is 7 digits, the System Coordinator mailbox is 1000002. For more information about System Coordinator password and mailbox combinations, refer to
3.
Appendix B.
Press (OK) The display shows:
4. Press (7) The display shows:
5. Press (cRTc) The display shows:
Note: Pressing (7) changes the display to show: [ Return to AA: Y 1 For more information refer to Section 6, Changing the Automated Attendant Status.
StarTalk Set Up and Operation Guide
Section 4: Setting Up StarTalk 4 - 9
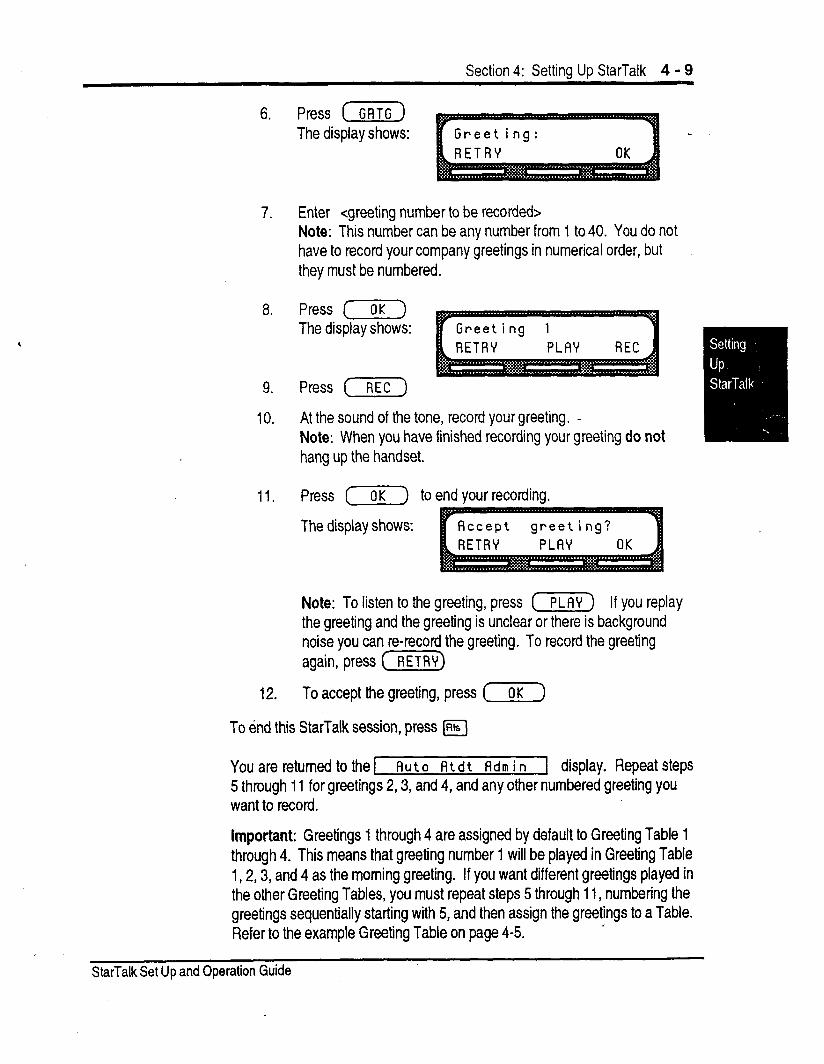
6. Press ( GRTG) The display shows:
7. Enter <greeting number to be recorded> Note: This number can be any number from 1 to 40. You do not have to record your company greetings in numerical order, but they must be numbered.
a. Press [OK) The display shows:
9.
10.
11.
Press (REC)
At the sound of the tone, record your greeting. - Note: When you have finished recording your greeting do not hang up the handset.
Press (-1 to end your recording.
The display shows:
Note: To listen to the greeting, press (-1 If you replay the greeting and the greeting is unclear or there is background noise you can re-record the greeting. To record the greeting again, press (RETRY)
12. To accept the greeting, press ( ) OK
To end this StarTalk session, press (Rls
You are returned to the 1 flu t o fl t d t fldm i n 1 display. Repeat steps 5 through 11 for greetings 2,3, and 4, and any other numbered greeting you want to record.
Important: Greetings 1 through 4 are assigned by default to Greeting Table 1 through 4. This means that greeting number 1 will be played in Greeting Table 1,2,3, and 4 as the morning greeting. If you want different greetings played in the other Greeting Tables, you must repeat steps 5 through 11, numbering the greetings sequentially starting with 5, and then assign the greetings to a Table. Refer to the example Greeting Table on page 4-5.
I
StarTalkSet UpandOperation Guide
4 - 10 Section 4: Setting Up StarTalk
Assigning a Greetings 1 through 4 are the default greetings played on all four Greeting Greeting Tables. To play different greetings on Greeting Table 2,3, and 4, you must
to a Greeting assign a greeting number greater than 4. If you are only using GreetingTable
Table number 1, the numbered greetings you recorded from 1 to 4 will play automati- cally. You do not have to assign greetings 1 to 4 to the Table, but you must select the Language Preference and assign the Call Transfer type.
Before you begin assigning greetings to Greeting Tables, ensure you have recorded all the greetings that you will need for the different Tables.
Language Preference The Language Preference you select determines which language the Auto- mated Attendant uses. There are two language types: primary and alternate.
Note: The language used by a mailbox is determined by the StarTalk Class of Service. Class of Service numbers 1,3,5,7,9,11,13, and 15 use the primary language. Class of Service numbers 2,4,6,8,10,12,14, and 16 use the alternate language. For more information on language options and the Class of Service, refer to Appendix B.
Call Transfer Type There are two Call Transfer types: blind and screened.
A Blind Call Transfer type transfers a call directly to an extension.
A Screened Call Transfer type asks the caller to record their name and then announces the name to the called party. A user, after hearing the name of the caller, can choose whether or not to accept the call. If the call is not accepted, the caller is transferred to the user’s mailbox to leave a message.
Important: If you are only going to assign a Call Transfer type to a Greeting Table you must follow all the steps presented in this section. At each display,
’ press (NEXT) until the 1 Transfer type: 1 display appears.
StarTalk Set Up and Operation Guide
Section 4: Setting Up StarTalk 4 - 11
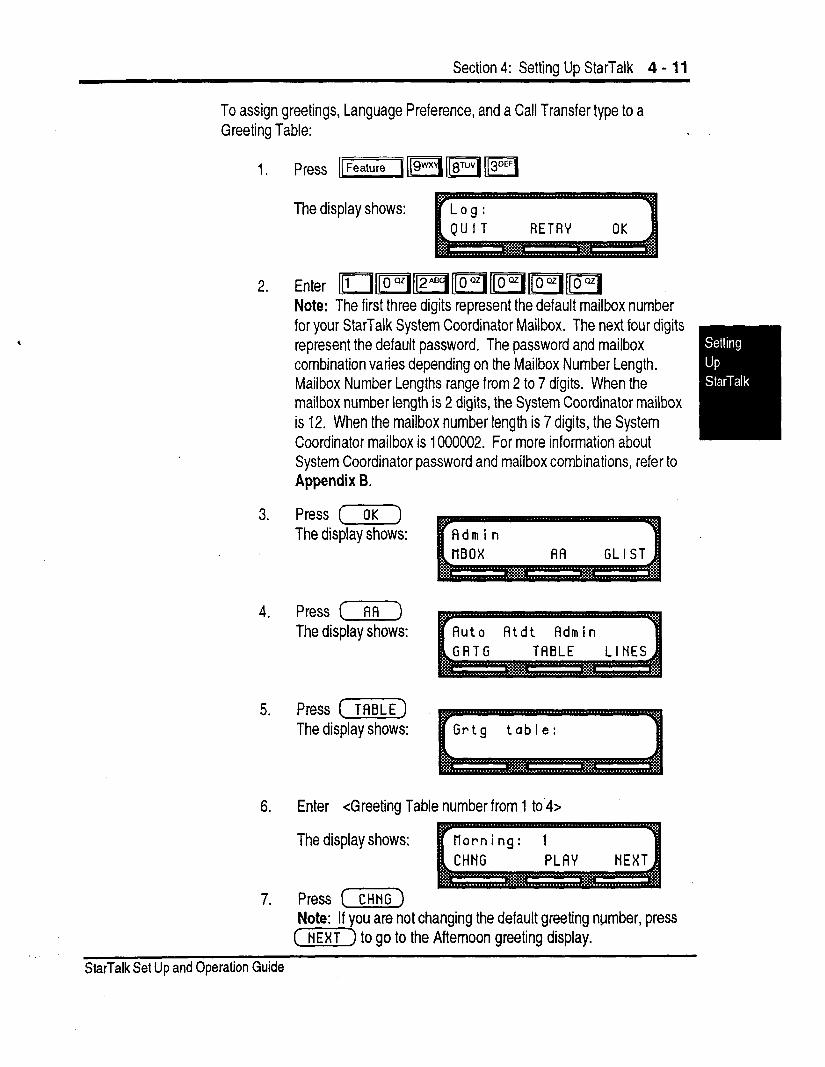
To assign greetings, Language Preference, and a Call Transfer type to a Greeting Table:
The display shows:
Note: The first three digits represent the default mailbox number for your StarTalk System Coordinator Mailbox. The next four digits represent the default password. The password and mailbox combination varies depending on the Mailbox Number Length. Mailbox Number Lengths range from 2 to 7 digits. When the mailbox number length is 2 digits, the System Coordinator mailbox is 12. When the mailbox number length is 7 digits, the System Coordinator mailbox is 1000002. For more information about System Coordinator password and mailbox combinations, refer to Appendix B.
3. Press (OK) The display shows:
4. Press (RA) The display shows:
5. Press (TRBLE) The display shows:
fluto Atdt Admin
6. Enter <Greeting Table number from 1 to‘4>
The display shows:
7. Press (CHNG) Note: If you are not changing the default greeting number, press [NEXT) to go to the Afternoon greeting display.
StarTalk Set Up and Operation Guide
4 - 12 Section 4: Setting Up StarTalk
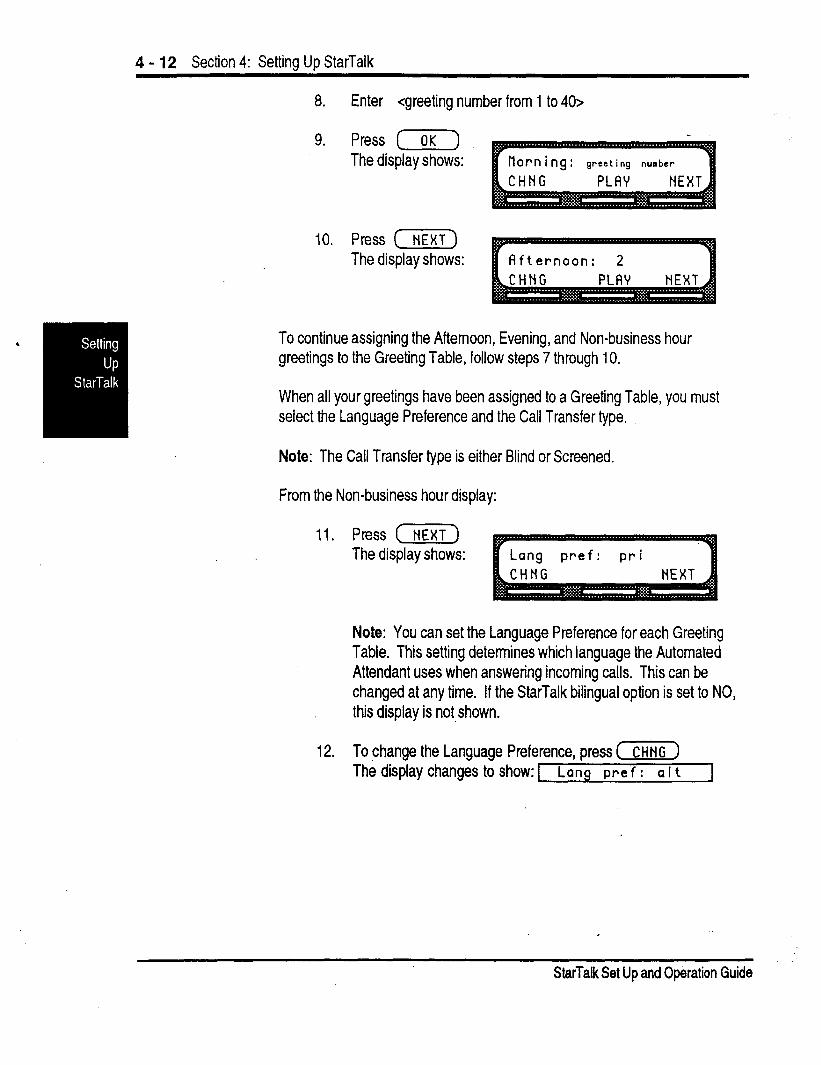
8. Enter <greeting number from 1 to 40~
9. Press (OK) The display shows: greeting number
IO. Press (XK) The display shows:
To continue assigning the Afternoon, Evening, and Non-business hour greetings to the Greeting Table, follow steps 7 through IO.
When all your greetings have been assigned to a Greeting Table, you must select the Language Preference and the Call Transfer type.
Note: The Call Transfer type is either Blind or Screened.
From the Non-business hour display:
11. Press (HEXT) The display shows:
Note: You can set the Language Preference for each Greeting Table. This setting determines which language the Automated Attendant uses when answering incoming calls. This can be changed at any time. If the StarTalk bilingual option is set to NO, this display is not,shown.
12. To change the Language Preference, press ( CHNG ) The display changes to show: 1 Lang pre f : a I t I
StarTalk Set Up and Operation Guide
Section 4: Setting Up StarTalk 4 - 13 .
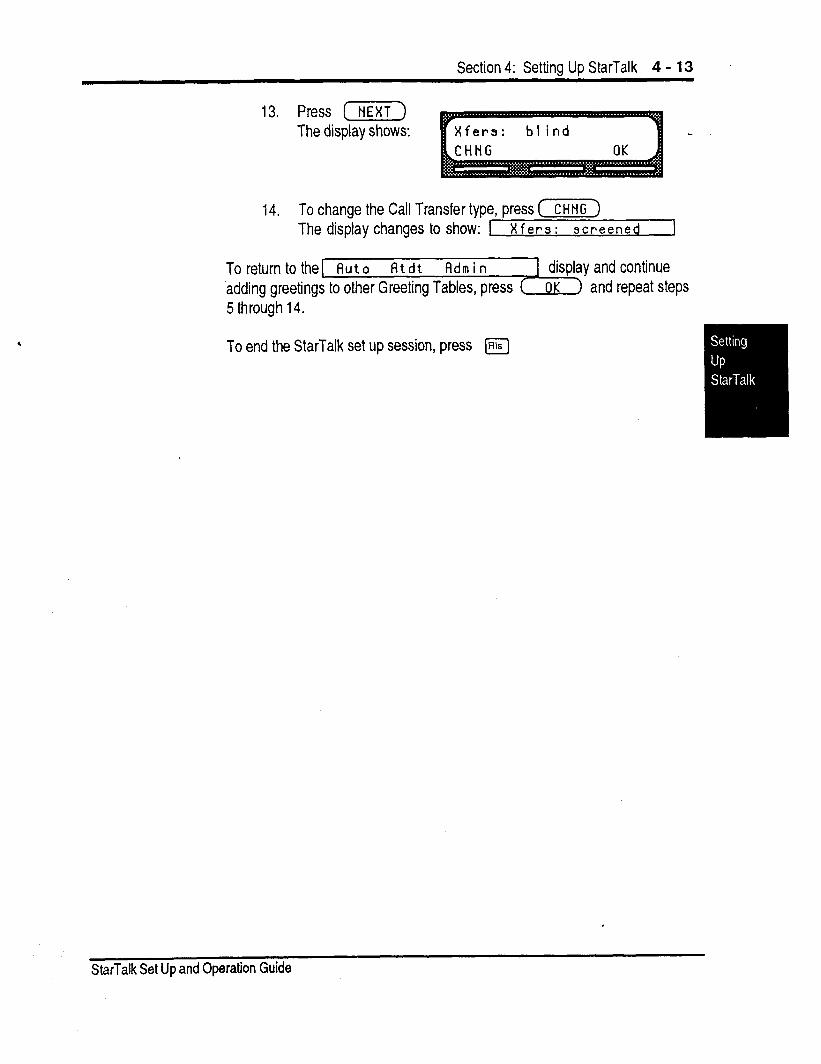
13. Press (NEXT) The display shows:
14. To change the Call Transfer type, press cc) The display changes to show: 1 X f er s : screened 1
To return to the( Ruto fltdt Adm i n 1 display and continue adding greetings to other Greeting Tables, press ( OK ) and repeat steps 5 through 14.
To end the StarTalk set up session, press m
StarTalk Set Up and Operation Guide
4 - 14 Section 4: Setting Up StarTalk
Configuring the Lines
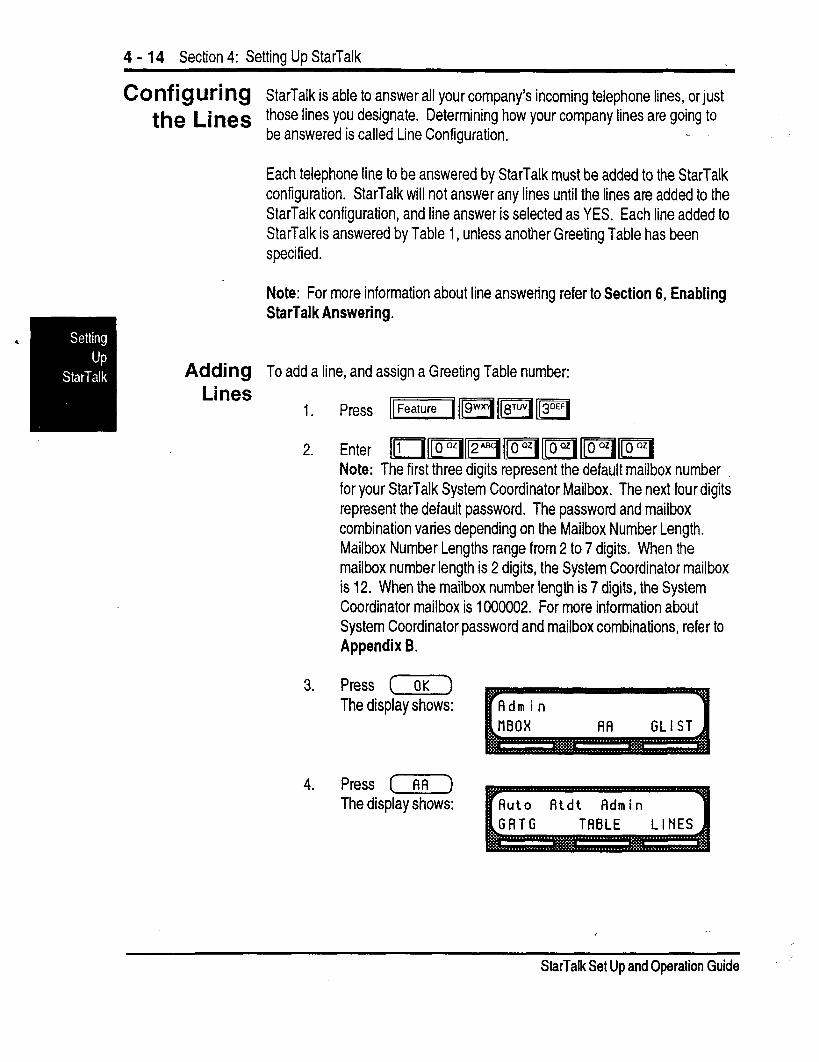
StarTalk is able to answer all your company’s incoming telephone lines, or just those lines you designate. Determining how your company lines are going to be answered is called Line Configuration.
Each telephone line to be answered by StarTalk must be added to the StarTalk configuration. StarTalk will not answer any lines until the lines are added to the StarTalk configuration, and line answer is selected as YES. Each line added to StarTalk is answered by Table 1, unless another Greeting Table has been specified.
Note: For more information about line answering refer to Section 6, Enabling StarTalk Answering.
To add a line, and assign a Greeting Table number:
2. Enter m’m’m m m FiF[ Note: The first three digits represent the default mailbox number for your StarTalk System Coordinator Mailbox. The next four digits represent the default password. The password and mailbox combination varies depending on the Mailbox Number Length. Mailbox Number Lengths range from 2 to 7 digits. When the mailbox number length is 2 digits, the System Coordinator mailbox is 12. When the mailbox number length is 7 digits, the System Coordinator mailbox is 1000002. For more information about System Coordinator password and mailbox combinations, refer to Appendix B.
3. Press (OK) The display shows:
4. Press (AA) The display shows:
StarTalk Set Up and Operation Guide
Section 4: Settina UD StarTalk 4 - 15
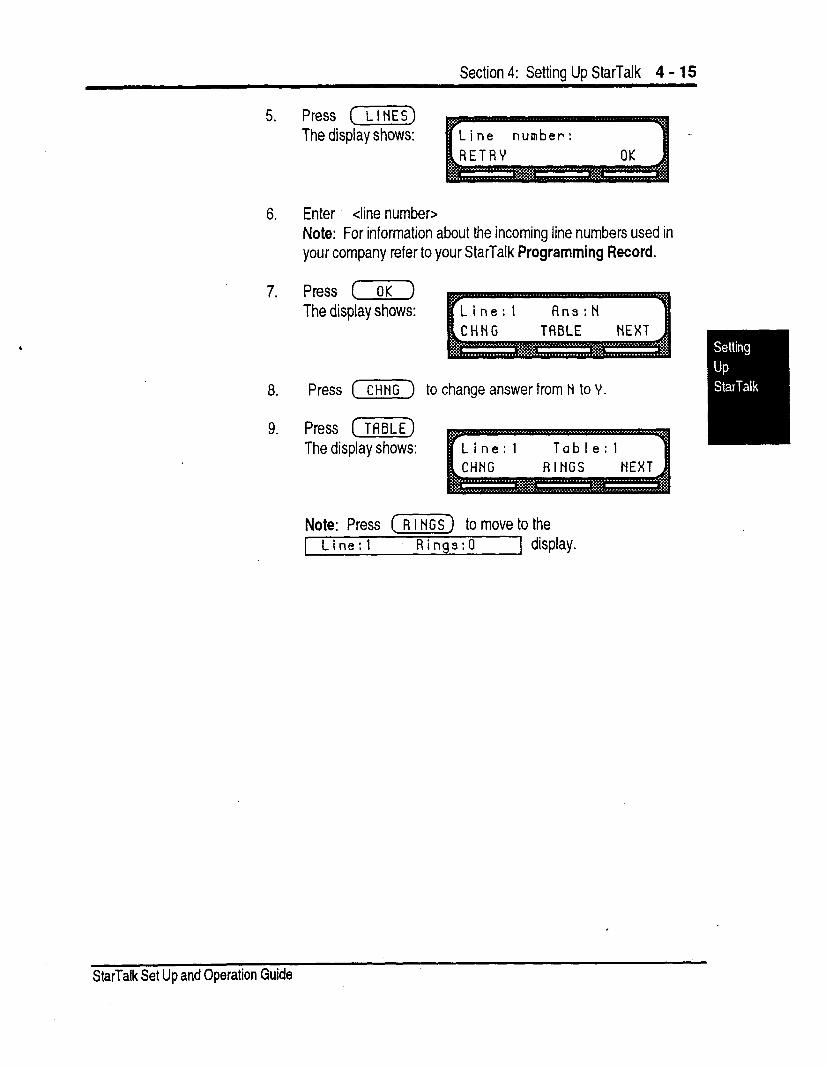
5. Press (7IiKZ) The display shows:
6. Enter <line number> Note: For information about the incoming line numbers used in your company refer to your StarTalk Programming Record.
7. Press (OK-) The display shows:
a. Press ( CHN G ) to change answer from N to V.
9. Press ( TFIBLE) The display shows:
Note: Press (RINGS) to move to the [ Line:1 Rings:0 ] display.
StarTalk Set Up and Operation Guide
4 - 16 Section 4: Setting Up StarTalk
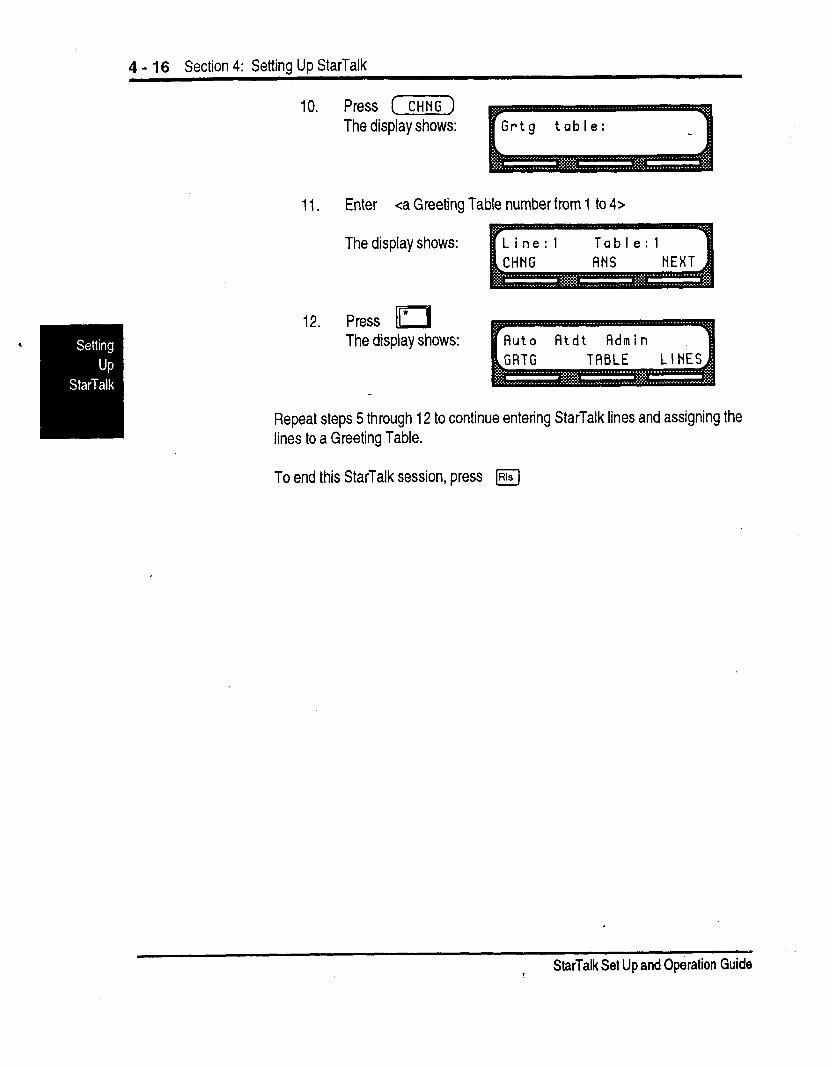
10. Press (CHNc) The display shows:
11. Enter <a Greeting Table number from 1 to 4>
The display shows:
12. Press * II The display shows:
Repeat steps 5 through 12 to continue entering StarTalk lines and assigning the lines to a Greeting Table.
To end this StarTalk session, press m
I StarTalk Set Up and Operation Guide
Section 4: Settina UR StarTalk 4 - 17
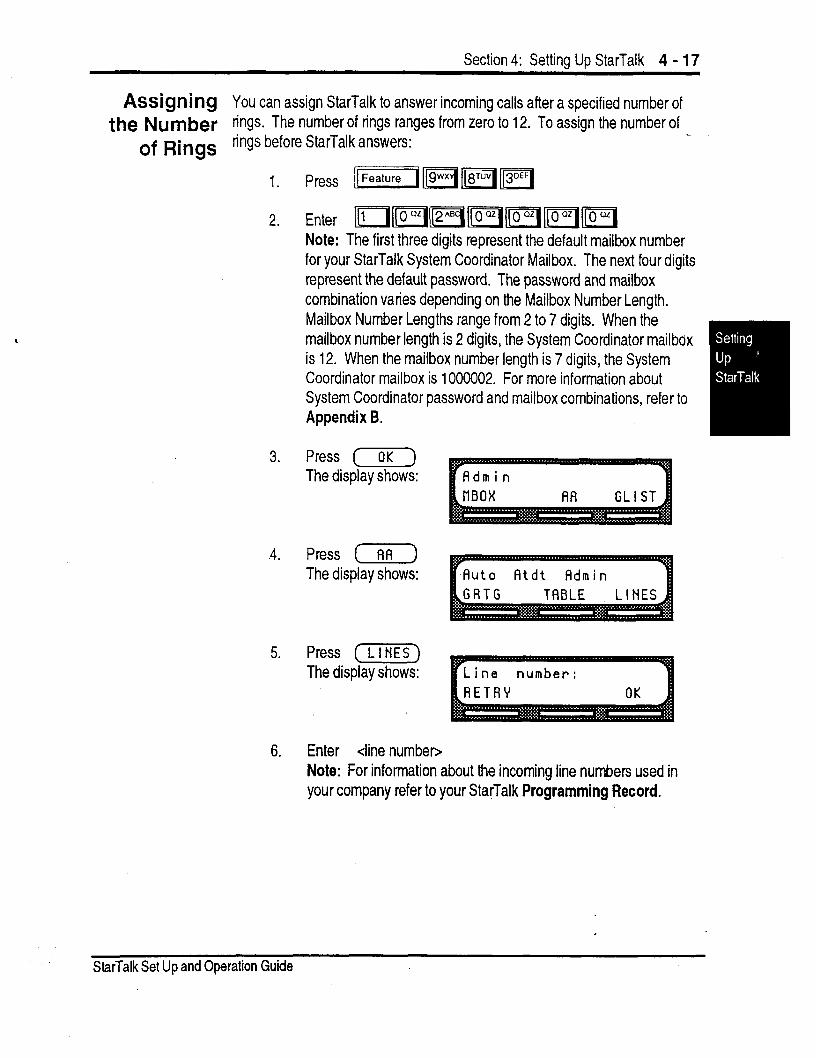
Assigning You can assign StarTalk to answer incoming calls after a specified number of the Number rings. The number of rings ranges from zero to 12. To assign the number of _
of Rings rings before StarTalk answers:
1. Press ~jpqjijq-pq
2. Enter ~ill”~i~q-~[llo~llo~llo~~ Note: The first three digits represent the default mailbox number for your StarTalk System Coordinator Mailbox. The next four digits represent the default password. The password and mailbox combination varies depending on the Mailbox Number Length. Mailbox Number Lengths range from 2 to 7 digits. When the mailbox number length is 2 digits, the System Coordinator mailbox is 12. When the mailbox number length is 7 digits, the System Coordinator mailbox is 1000002. For more information about System Coordinator password and mailbox combinations, refer to Appendix B.
3. Press (OK) The display shows:
.4. Press (RR) The display shows:
5. Press (-iXGZ) The display shows:
6. Enter <line numbeo Note: For information about the incoming line numbers used in your company refer to your StarTalk Programming Record.
StarTalk Set Up and Operation Guide
4 - 18 Section 4: Settina UR StarTalk
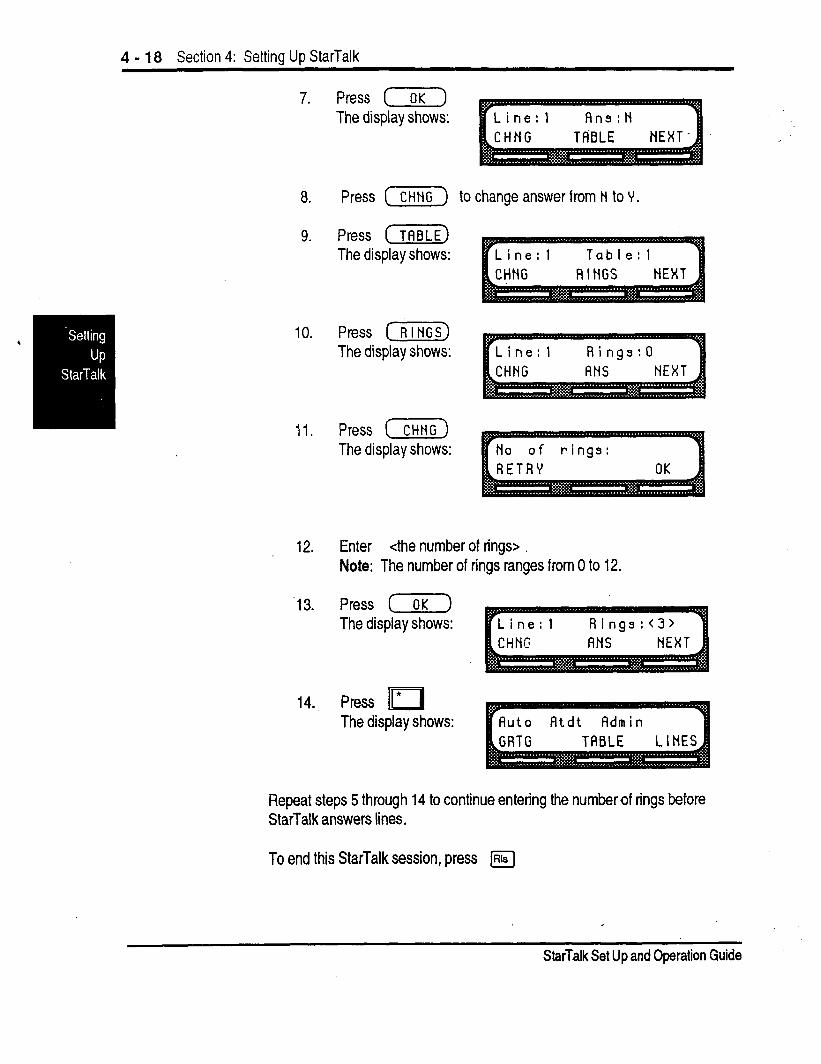
7.
8.
9.
10.
11.
12.
.13.
14.
Press I The display shows:
Press (-3 to change answer from N to V.
Press ( TFIBLE) The display shows:
Press CRINGS) The display shows:
Press ( CHNG ) The display shows:
Line: 1 Table: 1 CHNG RINGS NEXT
No of rings:
Enter <the number of rings> Note: The number of rings ranges from 0 to 12.
Press (OK) The display shows:
t- Press 11* I The display shows: Auto Fltdt Admin
Repeat steps 5 through 14 to continue entering the number of rings before StarTalk answers lines.
To end this StarTalk session, press [Rls
StarTalk Set Up and Operation Guide
Section 4: Setting Up StarTalk 4 - 19 .
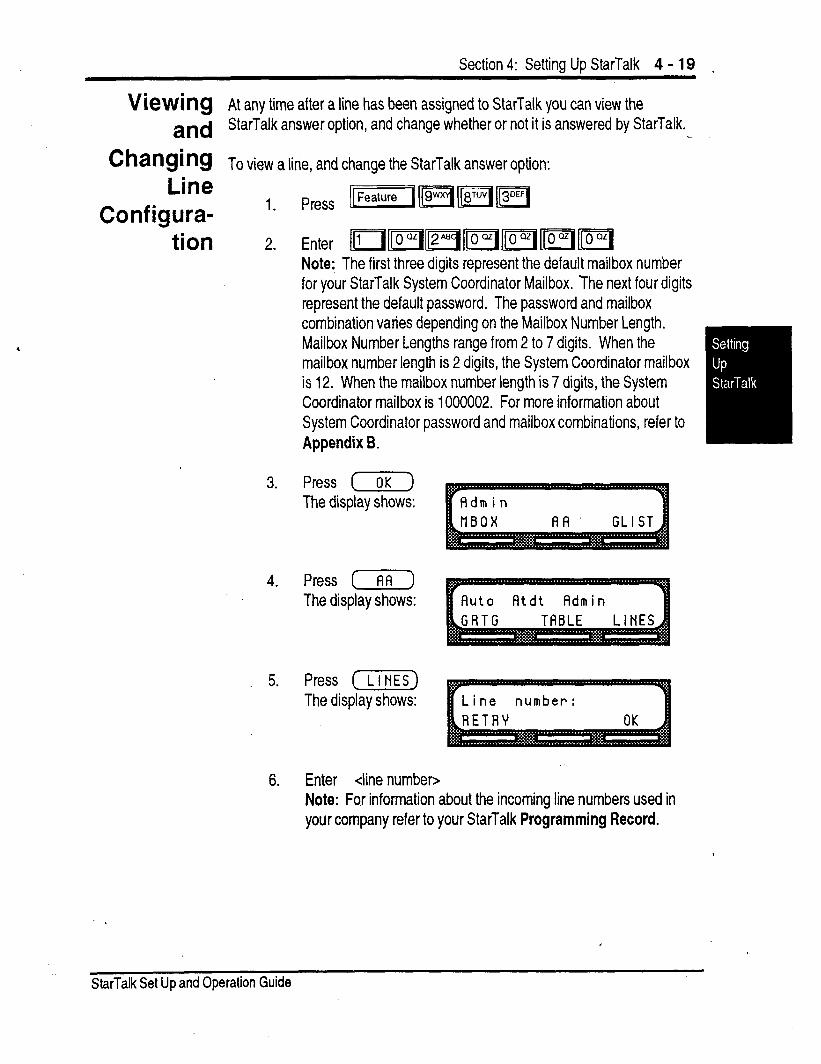
VieWing At any time after a line has been assigned to StarTalk you can view the and StarTalk answer option, and change whether or not it is answered by StarTalk.
Changing T o view a line, and change the StarTalk answer option: Line
Configura- ‘- press F(‘m’Fjj1(3DEF(
tion 2. Enter II’1110”1m11o”IDmD Note: The first three digits represent the default mailbox number for your StarTalk System Coordinator Mailbox. The next four digits represent the default password. The password and mailbox combination varies depending on the Mailbox Number Length. Mailbox Number Lengths range from 2 to 7 digits. When the mailbox number length is 2 digits, the System Coordinator mailbox is 12. When the mailbox number length is 7 digits, the System Coordinator mailbox is 1000002. For more information about System Coordinator password and mailbox combinations, refer to Appendix B.
3. Press (OK) The display shows:
4. Press (F1R) The display shows:
5. Press (LINES) The display shows:
Auto Atdt Admin
6. Enter <line number> Note: For information about the incoming line numbers used in your company refer to your StarTalk Programming Record.
StarTalk Set Up and Operation Guide

4 - 20 Section 4: Settina UD StarTalk
7. Press ( OK ) The display shows:
8. Press (z) to change answer from N to Y.
9. Press (NEXT) The display shows:
10. Use the (NEXT) and buttons to view and change (s) the configuration of all the incoming lines in your company.
To end this StarTalk session, press m
.
StarTalk Set Up and Operation Guide
Section 4: Setting Up StarTalk 4 - 21
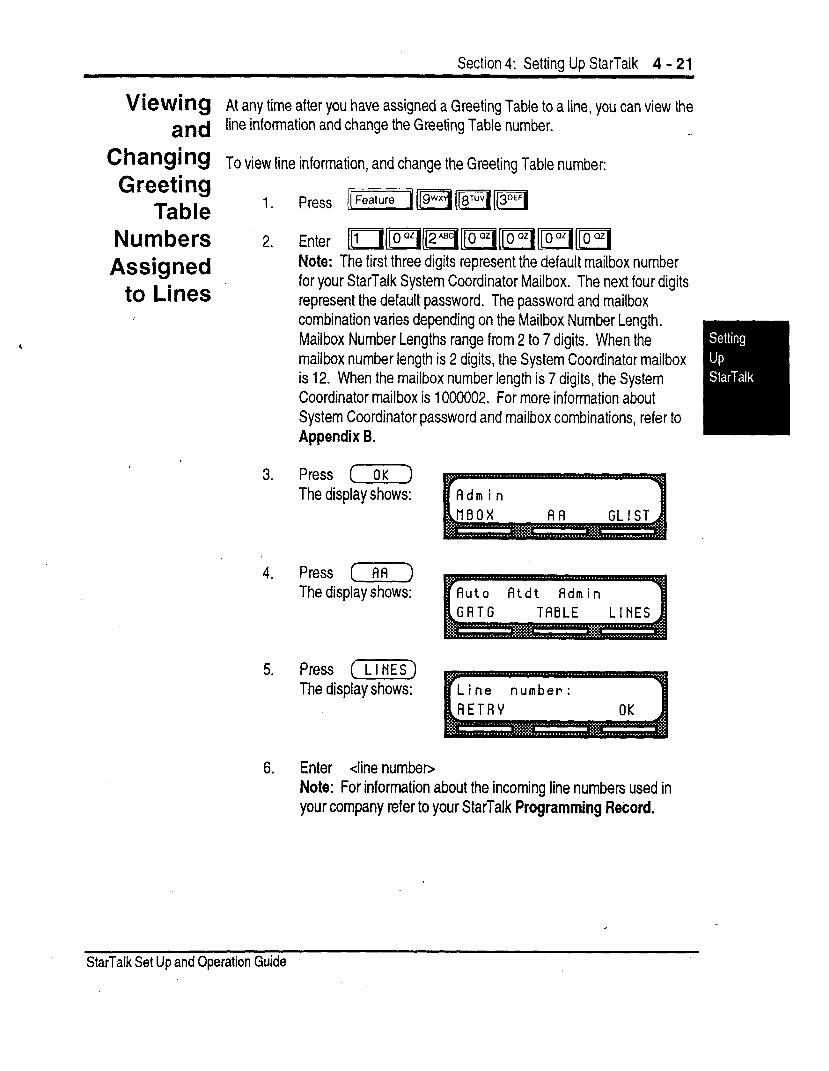
VieWing At any time after you have assigned a Greeting Table to a line, you can view the and line information and change the Greeting Table number.
Changing T o view line information, and change the Greeting Table number: Greeting
Table 1. Press ((Featurepqpq’pq
Numbers Assigned
to Lines Note: The first three digits represent the default mailbox number for your StarTalk System Coordinator Mailbox. The next four digits represent the default password. The password and mailbox combination varies depending on the Mailbox Number Length. Mailbox Number Lengths range from 2 to 7 digits. When the mailbox number length is 2 digits, the System Coordinator mailbox is 12. When the mailbox number length is 7 digits, the System Coordinator mailbox is 1006002. For more information about System Coordinator password and mailbox combinations, refer to Appendix B.
3. Press (7) The display shows:
4. Press (FIA-) The display shows:
5. Press (-iIiKZ) The display shows:
6. Enter <line number> Note: For information about the incoming line numbers used in your company refer to your StarTalk Programming Record.
StarTalk Set Up and Operation Guide

4 - 22 Section 4: Setting Up StarTalk
7.
8.
9.
IO.
Press (OK) The display shows:
Press (Fii!iiZ) The display shows:
Press ( CHNG) The display shows:
Enter <a Greeting Table from 1 to 4> Note: The display changes to show the new Greeting Table number. To continue changing Greeting Table configuration, press (NEXT) The display shows the next line. Repeat steps 9 and IO to continue viewing and changing line assignments.
To end this StarTalk session, press [Rls
.
I
StarTalk Set Up and Operation Guide
Section 4: Settina UD StarTalk 4 - 23 .
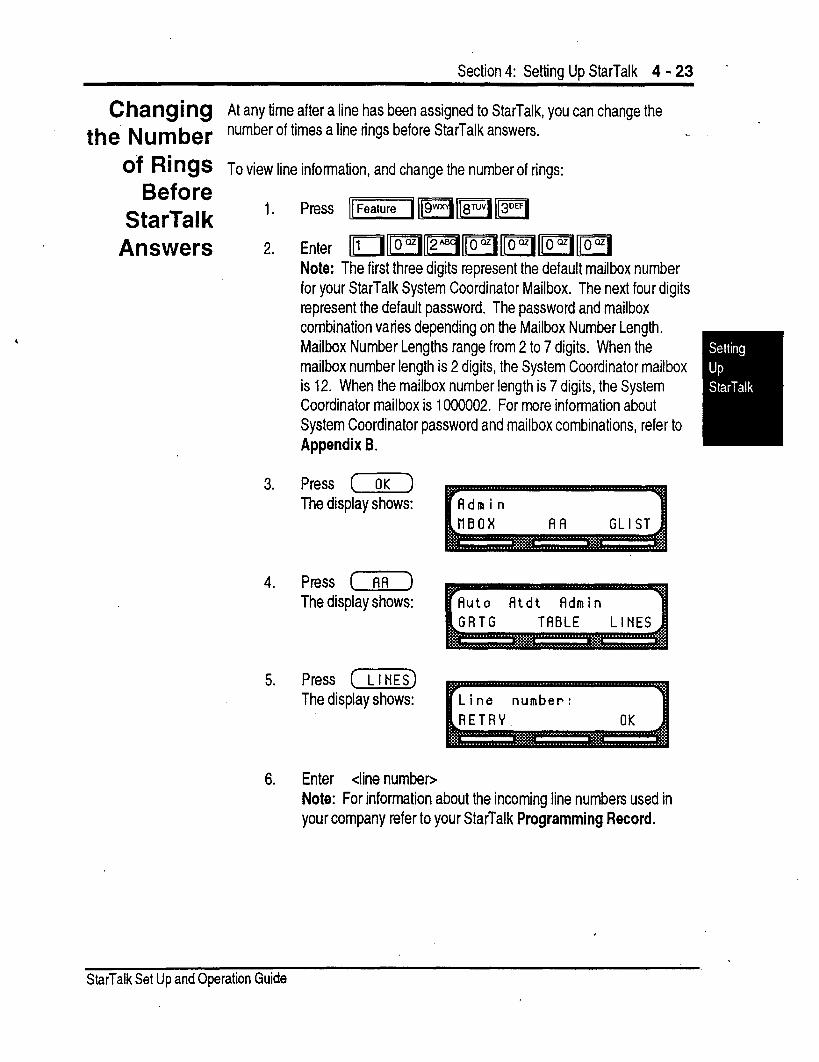
Changi lIg At any time after a line has been assigned to StarTalk, you can change the
the Number number of times a line rings before StarTalk answers.
of Rings T o view line information, and change the number of rings: Before
StarTalk ” Press [Ii 119wp1)18”1 wj
Answers 2. Enter ~~“1112”411o~llo’“l’~o(lzillo~ Note: The first three digits represent the default mailbox number for your StarTalk System Coordinator Mailbox. The next four digits represent the default password. The password and mailbox combination varies depending on. the Mailbox Number Length. Mailbox Number Lengths range from 2 to 7 digits. When the mailbox number length is 2 digits, the System Coordinator mailbox is 12. When the mailbox number length is 7 digits, the System Coordinator mailbox is 1000002. For more information about System Coordinator password and mailbox combinations, refer to Appendix B.
3. Press ( OK )- The display shows:
4. Press ( AA ) The display shows:
5. Press ( LINES) The display shows:
Auto Rtdt Fidmin
Line number:
6. Enter <line numbeo .Note: For information about the incoming line numbers used in your company refer to your StarTalk Programming Record.
StarTalk Set Up and Operation Guide
4 - 24 Section 4: Settina Uo StarTalk
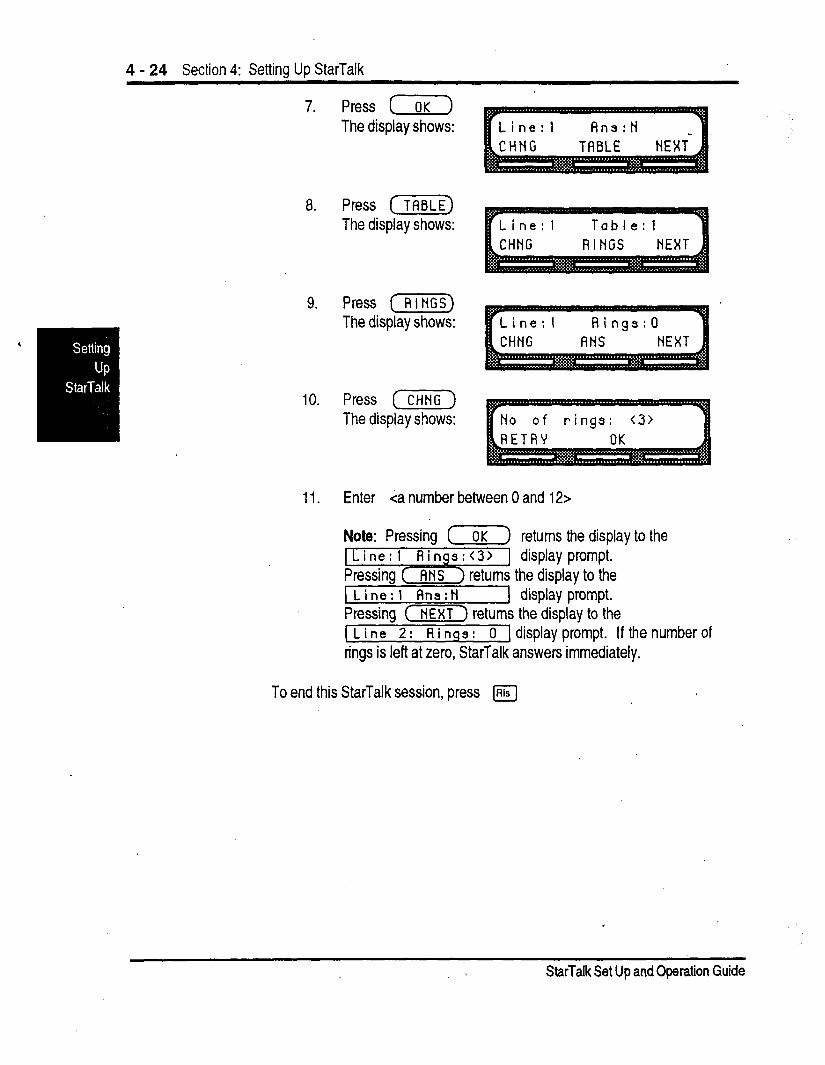
7.
8.
9.
10.
11.
Press (OK) The display shows:
Press (?iGiF) The display shows:
Press [RINGS) The display shows:
Press (CHNc) The display shows:
Line:1 An3:N
CHNG TABLE NEXT-
Enter <a number between 0 and 12~
Note: Pressing (7) returns the display to the
1 Line:1 An3:N 1 display prompt. Pressing (NEXT) returns the display to the (Line 2: Rings: 0 1 display prompt. If the number of rings is left at zero, StarTalk answers immediately.
To end this StarTalk session, press /K-J
.
I
StarTalk Set Up and Operation Guide
Section 4: Setting Up StarTalk 4 - 25
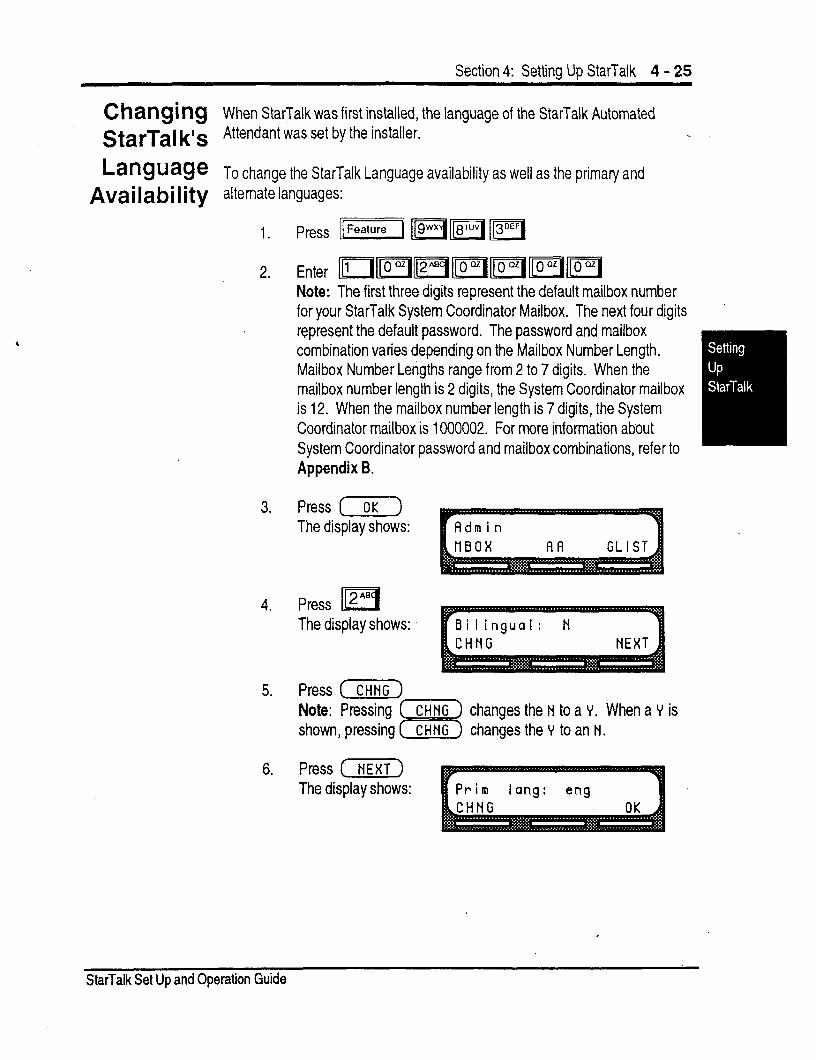
Changing When StarTalk was first installed, the language of the StarTalk Automated
StarTal k’s Attendant was set by the installer.
Language T o c h ange the StarTalk Language availability as well as the primary and Availability altematelanguages:
1. Press [IFeaturep@qFl
Note: The first three digits represent the default mailbox number for your StarTalk System Coordinator Mailbox. The next four digits represent the default password. The password and mailbox combination varies depending on the Mailbox Number Length. Mailbox Number Lengths range from 2 to 7 digits. When the mailbox number length is 2 digits, the System Coordinator mailbox is 12. When the mailbox number length is 7 digits, the System Coordinator mailbox is 1000002. For more information about System Coordinator password and mailbox combinations, refer to Appendix B.
3. Press (OK) The display shows:
4. Press 2AB II The display shows:
5. Press (CHNG) Note: Pressing (m) changes the N to a Y. When a Y is shown, pressing (CHNc) changes the Y to an N.
6. Press (NEXT) The display shows:
StarTalk Set Up and Operation Guide
4 - 26 Section 4: Settina UP StarTalk
7. Press CCHNG) to select the alternate language. In this example English is used as the primary language and is abbrevi- ated as ENG. The alternate language can be either French,‘FRE or Spanish, SPA.
Note: Pressing (7) returns the display to the 1 fldmin 1 display prompt.
To end the StarTalk session press @
When the StarTalk Bilingual option is set to NO there is no alternate language capability, and all the Classes of Service are assi ned the primary language selected. This means, a caller who presses dl ewx when using the Automated Attendant is told the command is not recognized.
StarTalk Set Up and Opertition Guide
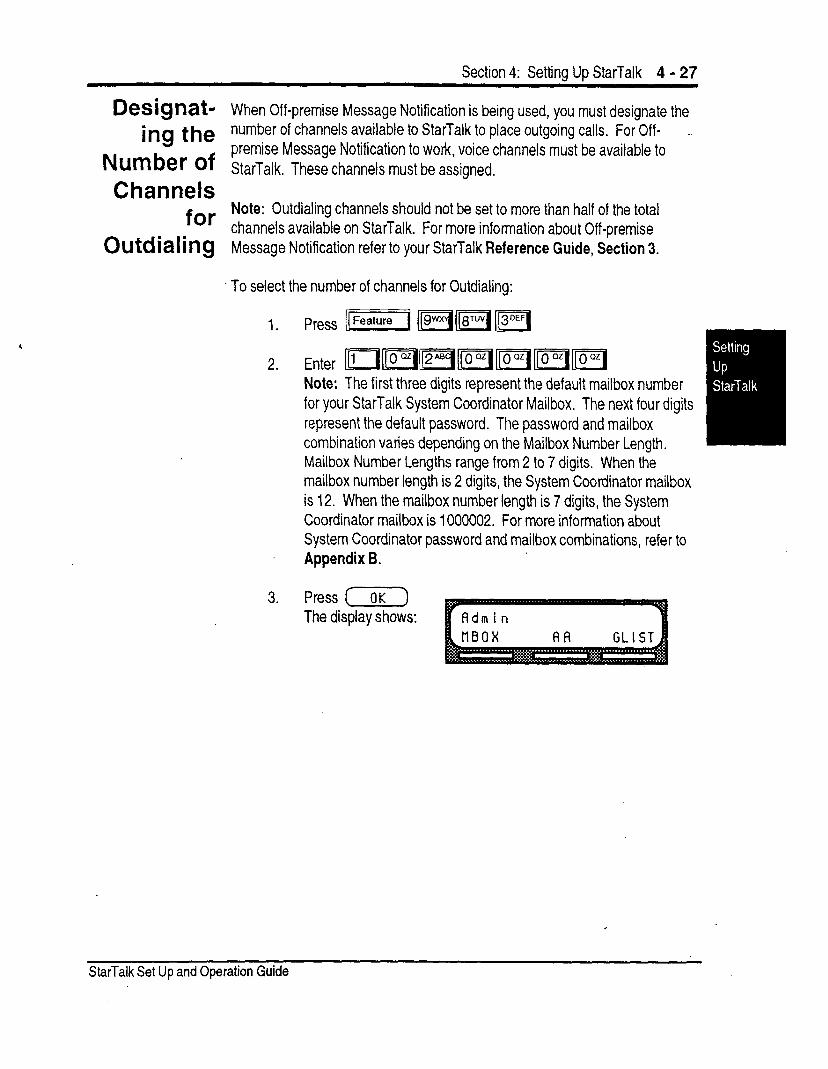
Section 4: Setting Up StarTalk 4 - 27
Designat- ing the
Number of Channels
for Outdialing
When Off-premise Message Notification is being used, you must designate the number of channels available to StarTalk to place outgoing calls. For Off- - premise Message Notification to work, voice channels must be available to StarTalk. These channels must be assigned.
Note: Outdialing channels should not be set to more than half of the total channels available on StarTalk. For more information about Off-premise Message Notification refer to your StarTalk Reference Guide, Section 3.
To select the number of channels for Outdialing:
1. Press Feature l====j pq@qp=q
2. Enter ~pqpj’~pq~“Illo”l
Note: The first three digits represent the default mailbox number for your StarTalk System Coordinator Mailbox. The next four digits represent the default password. The password and mailbox combination varies depending on the Mailbox Number Length. Mailbox Number Lengths range from 2 to 7 digits. When the mailbox number length is 2 digits, the System Coordinator mailbox is 12. When the mailbox number length is 7 digits, the System Coordinator mailbox is 1000002. For more information about System Coordinator password and mailbox combinations, refer to Appendix B.
3. Press [ OK ) The display shows:
StarTalk Set Up and Operation Guide
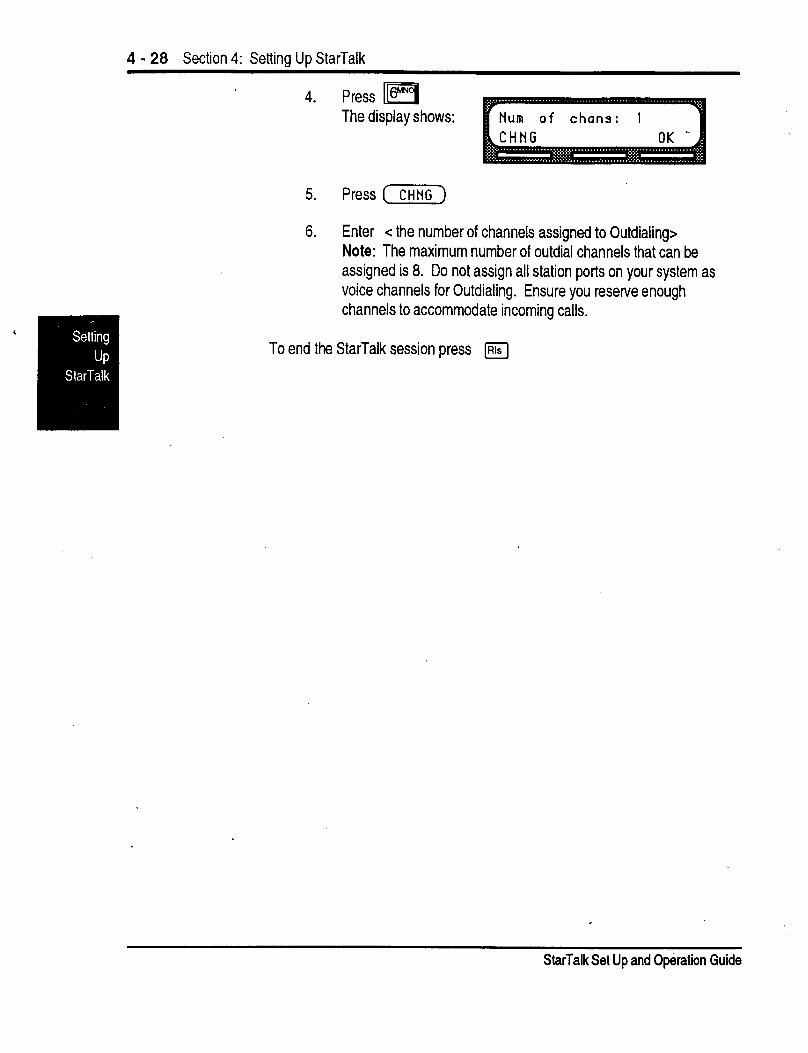
4 - 28 Section 4: Setting Up StarTalk
4. Press )IGKNq The display shows:
5. Press (CHNc)
6. Enter c the number of channels assigned to Outdialing> Note: The maximum number of outdial channels that can be assigned is 8. Do not assign all station ports on your system as voice channels for Outdialing. Ensure you resewe enough channels to accommodate incoming calls.
To end the StarTalk session press m
S&Talk Set Up and Operation Guide
5-l
Setting Up Mailboxes
Introduction
Registering Personal
Mailboxes
This section describes the tasks you need to perform to set up StarTalk mailboxes. Setting up StarTalk mailboxes involves:
. registering Personal Mailboxes
. initializing the Special Mailboxes
Registering a mailbox adds a mailbox number on StarTalk. A Personal Mailbox can be a user, guest, or information mailbox. Each mailbox must be assigned a Class of Service that determines the special features available.
User Mailboxes User mailboxes can be assigned to each user who has an operating Norstar extension. User mailboxes store the messages for users who are unable to answer their telephone.
When you establish personal user mailbox numbers, you should assign the same number as the users Norstar extension.
Guest Mailboxes Guest mailboxes are assigned to users who do not have an operating Norstar extension. These mailboxes act just like the user mailboxes, receiving and storing messages.
When you establish Guest mailboxes, you should assign mailbox numbers beginning with the same number. For example, all Guest mailboxes could start with the number four. Assigning a leading digit helps you identify the mailbox type.
StarTalk Set Up and Operation Guide
5 - 2 Section 5: Setting Up Mailboxes
Class of
Service
Information Mailboxes Information mailboxes relay important company or department messages. Information mailboxes do not have an operating extension. Information - mailboxes should be established as needed. The number of Information mailboxes you assign is determined by request from the users.
When you establish Information mailboxes, we recommend you assign mailbox numbers beginning with the same number. For example, all information mailboxes could start with the number three. Assigning a first digit helps you identify the mailbox type.
A mailbox cannot be added to StarTalk without a Class of Service. For a summary of StarTalk Class of Service defaults, refer to Figure 5.1. A Class of Service outlines the special features of a mailbox. There are 16 Classes of Service that specify:
Language Prompts
Maximum Mailbox Message Time
Maximum Message Length
Message Retention Period
Personal Greeting
StarTalk is enabled with English and French, or English and Spanish. When this feature is designated as Y, Classes ofSetvice1,3,5,7,9,11,13,and15 reflect the primary language, and Classes of Service 2,4,6,8,10,12,14, and 16 reflect the alternate language.
This establishes the total message time available to a mailbox. The maximum message time is 180 minutes.
This establishes the maximum length of an incoming message. The message length ranges from one to 15 minutes.
This establishes the amount of time messages are saved in a mailbox. The message retention period ranges from one day to indefinite.
This establishes whether a mailbox owner is able to record personal primary and alternate greetings.
StarTalk Set Up and Operation Guide
Section 5: Setting Up Mailboxes 5 - 3
Greeting Length
Group Lists
Off -premise Message Notification
This establishes the length of a re- corded mailbox greeting. A mailbox _ greeting length ranges from one to 10 minutes.
This establishes whether a mailbox can be assigned to a Group List.
This allows messages to be directed to another Norstar extension, a telephone number outside the company, or to a pager.
Retry Interval
Number of Attempts This establishes the number of attempts StarTalk will make to notify the recipient of a new or urgent message. The number of attempts ranges from 1 to 9.
Mailbox Mailbox Overrides allow you to change the default for optional parameters. The Overrides default for both optional parameters is YES. This can be changed at any time.
Include in Company Directory This includes the mailbox number, and the mailbox owner’s name in the Company Directory.
Message Waiting Notification This establishes a message notification for a mailbox owner with a “Message for you” display prompt.
StarTalk Set Up and Operation Guide
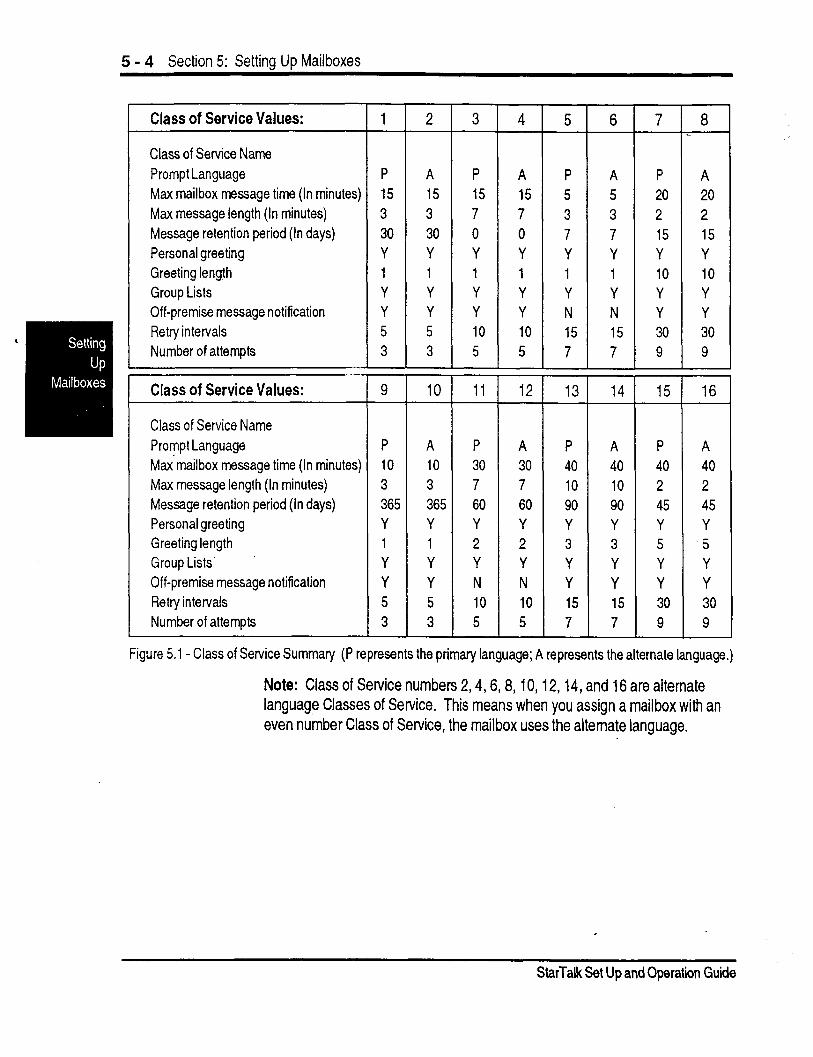
5 - 4 Section 5: Settina UD Mailboxes
Class of Service Values:
Class of Service Name Prompt Language Max mailbox message time (In minutes) Max message length (In minutes) Message retention period (in days) Personal greeting Greeting length Group Lists Off-premise message notification Retry intervals Number of attempts
- -
Class of Service Values:
Class of Service Name Prompt Language Max mailbox message time (In minutes) Max message length (In minutes) Message retention period (In days) Personal greeting Greeting length Group Lists’ Off-premise message notification Retry intervals Number of attempts
1
P 15 3 30 Y 1 Y Y 5 3
-ii-
P 10 3 365 Y 1 Y Y 5 3
2
A 15 3 30 Y 1 Y Y 5 3
10
A 10 3 365 Y 1 Y Y 5 3
3
P 15 7 0 Y 1 Y Y 10 5
11
P 30 7 60 Y 2 Y N 10 5
4
A 15 7 0 Y 1 Y Y 10 5
12
A 30 7 60 Y 2 Y N 10 5
5
P 5 3 7 Y 1 Y N 15 7
13
P 40 10 90 Y 3 Y Y 15 7
6
A 5 3 7 Y 1 Y N 15 7
14
A 40 10 90 Y 3 Y Y 15 7
7
P 20 2 15 Y 10 Y Y 30 9
15
P 40 2 45 Y 5 Y Y 30 9
a
A 20 2 15 Y 10 Y Y 30 9
16
Figure 5.1 - Class of Service Summary (P represents the primary language; A represents the alternate language.)
Note: Class of Service numbers 2,4,6,8,10,12,14, and 16 are alternate language Classes of Service. This means when you assign a mailbox with an even number Class of Service, the mailbox uses the alternate language.
StarTalk Set Up and Operation Guide
Section 5: Settino Up Mailboxes 5 - 5
Before Before you begin adding mailboxes, ensure you have completed the Mailbox you Register List on the StarTalk Programming Record. When you register user mailboxes,-
the we recommend using mailbox numbers that are the same as the extension
Mailboxes numbers currently used in your company. For example, extension number 417 would have a mailbox number assigned as 417.
When you are registering Guest or Information mailboxes, we recommend you select a leading digit different than the personal user mailboxes. This will help you identify the mailbox type. For example, all Guest mailboxes could have a leading digit of 4, and all Information mailboxes could have a leading digit of 3.
When you are completing the Mailbox List you need to determine:
. Class of Service
. Company Directory Option
. Message Waiting Notification
The Company Directory Option and Message Waiting Notification are not included in a Class of Service. When you are adding a mailbox, you can override these options.
The Company Directory Option defaults to YES. When the Company Directory Option is NO, a mailbox owner’s name is not included in the Company Directory, nor can a mailbox owner be selected from the Company Directory. This means the mailbox is not included in the Directory Report. Even though the Company Directory name is not included, the mailbox owner must still record their name when initializing a mailbox.
The Message Waiting Notification defaults to YES. This means StarTalk will leave a “Message for you” notification on a Norstar telephone display. When the Message Waiting Notification is changed to NO, StarTalk will not leave a “Message for you” notification on a Norstar telephone display.
The Message Waiting Notification must be set to NO when you add Guest and Information mailboxes. These mailboxes do not have an operating Norstar extension.
Note: StarTalk can store a maximum 500 mailboxes.
,
StarTalk Set Up and Operation Guide
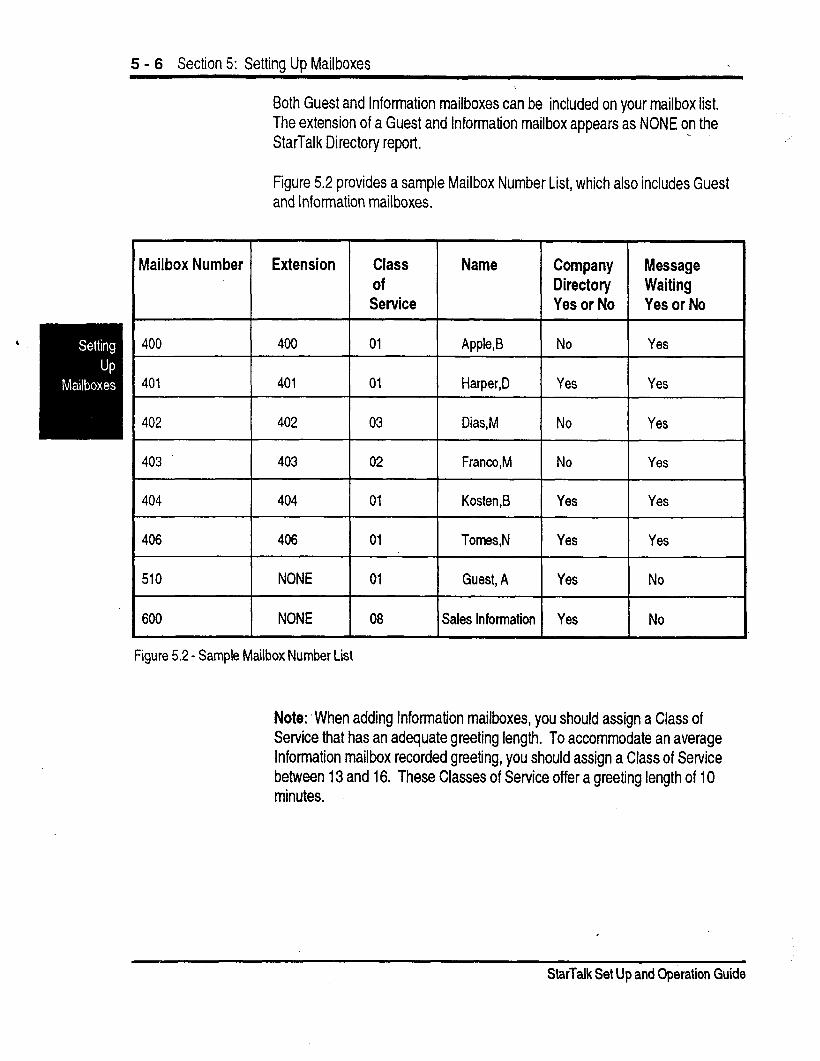
5 - 6 Section 5: Setting Up Mailboxes
Both Guest and information mailboxes can be included on your mailbox list. The extension of a Guest and Information mailbox appears as NONE on the StarTalk Directory report.
Figure 5.2 provides a sample Mailbox Number List, which also includes Guest and Information mailboxes.
Mailbox Number Extension Class Name Company Message of Directory Waiting Service Yes or No Yes or No
400 400 01 ApphB No Yes
401 401 01 Harper,D Yes Yes
402 402 03 Dias,M No Yes -
403 * 403 02 Franco,M No Yes
404 404 01 Kosten ,B Yes Yes
406 406 01 Tomes,N Yes Yes
510 NONE 01 Guest, A Yes No
600 NONE 08 Sales Information Yes No
Figure 5.2 - Sample Mailbox Number List
Note: ‘When adding Information mailboxes, you should assign a Class of Service that has an adequate greeting length. To accommodate an average Information mailbox recorded greeting, you should assign a Class of Service between 13 and 16. These Classes of Service offer a greeting length of 10 minutes.
StarTalk Set Up and Operation Guide
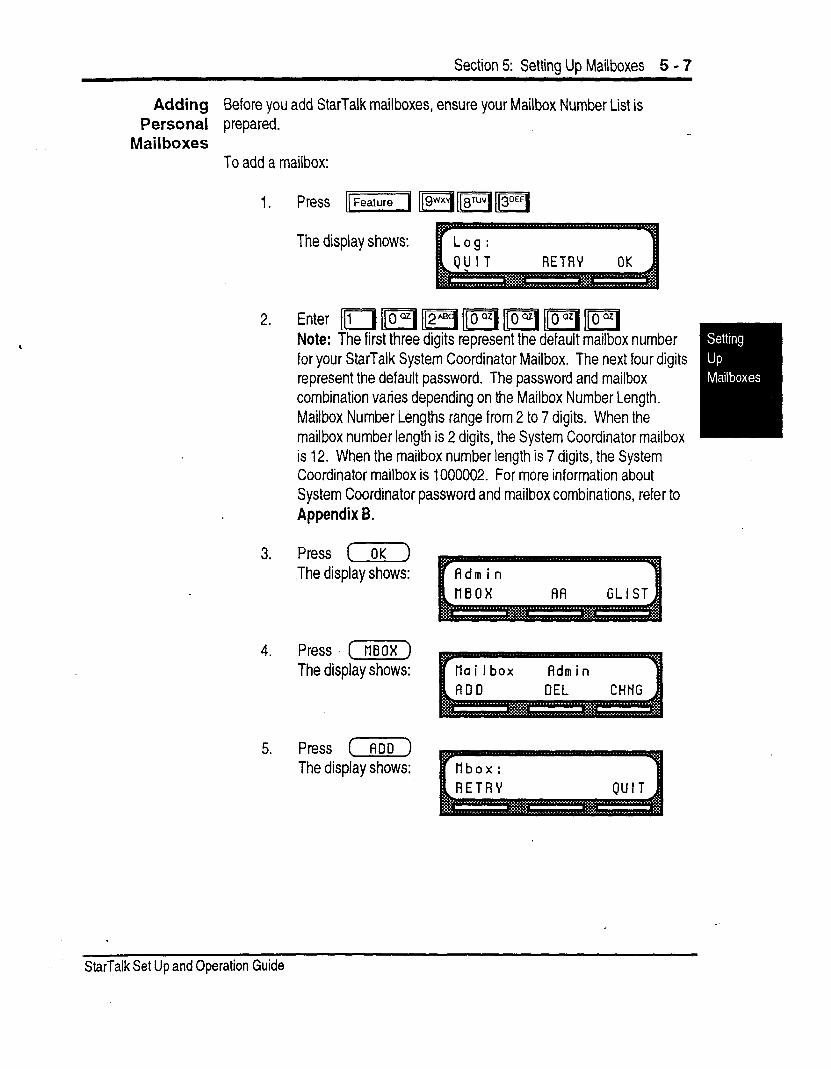
Section 5: Setting Up Mailboxes 5 - 7
Adding Before you add StarTalk mailboxes, ensure your Mailbox Number List is Personal prepared.
Mailboxes To add a mailbox:
1. Press [IFeature! ‘mmp[
The display shows:
2. Enter ~1~~~~1~~ Note: The first three digits represent the default mailbox number for your StarTalk System Coordinator Mailbox. The next four digits represent the default password. The password and mailbox combination varies depending on the Mailbox Number Length. Mailbox Number Lengths range from 2 to 7 digits. When the mailbox number length is 2 digits, the System Coordinator mailbox is 12. When the mailbox number length is 7 digits, the System Coordinator mailbox is 1000002. For more information about System Coordinator password and mailbox combinations, refer to Appendix B.
3. Press ( OK ) The display shows:
4. Press (YiiZK) The display shows:
5. Press ( FlDO ) The display shows:
StarTalk Set Up and Operation Guide
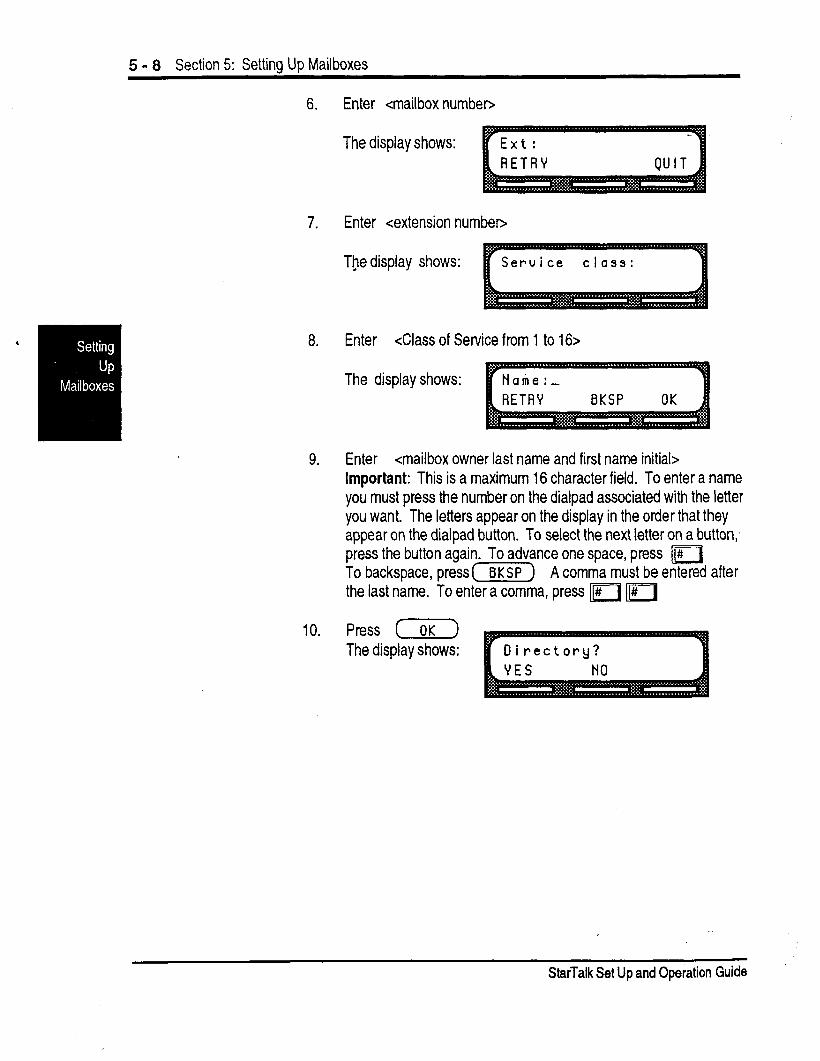
5 - 8 Section 5: Setting Up Mailboxes
6.
7.
8.
9.
10.
Enter <mailbox number>
The display shows:
Enter <extension number>
The display shows:
Enter <Class of Service from 1 to 16>
The display shows:
Enter <mailbox owner last name and first name initial> Important: This is a maximum 16 character field. To enter a name you must press the number on the dialpad associated with the letter you want. The letters appear on the display in the order that they appear on the dialpad button. To select the next letter on a button,. press the button again. To advance one space, press II# To backspace, press(x) A comma must be entered after the last name. To enter a comma, press II# ‘VI
Press (OK) The display shows:
StarTalk Set Up and Operation Guide
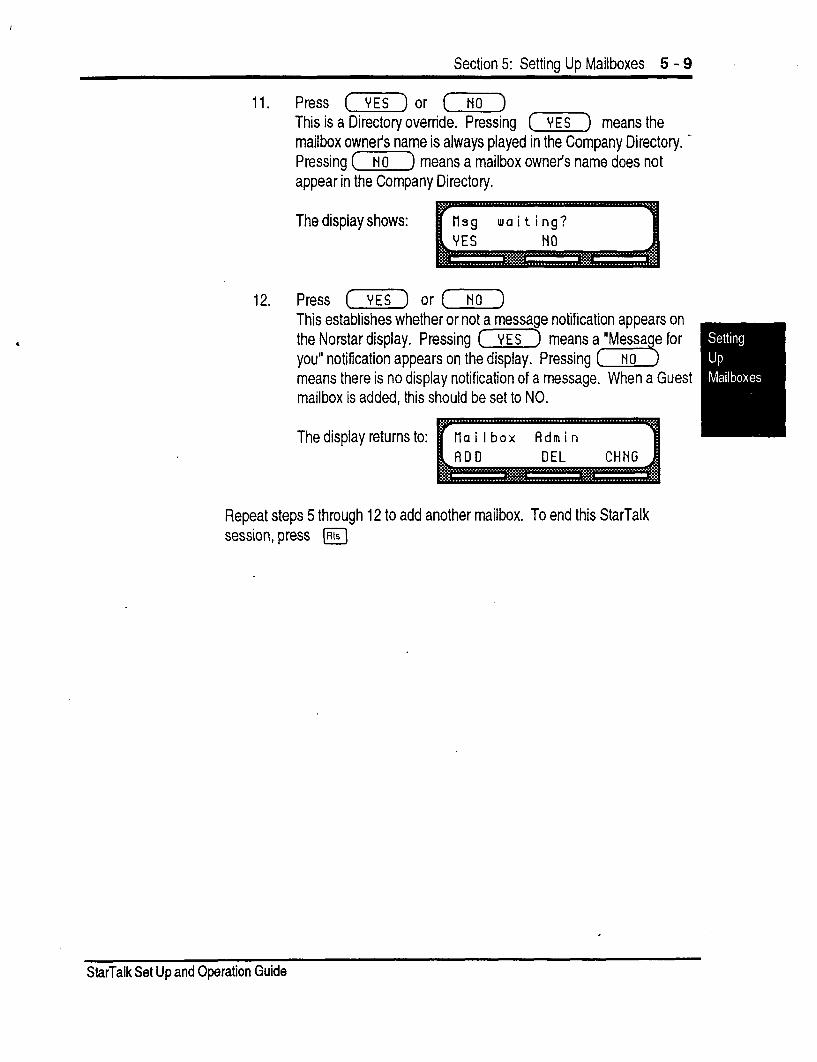
Section 5: Setting Up Mailboxes 5 - 9 .
11. Press (YES) or (7) This is a Directory override. Pressing (YES) means the mailbox owner’s name is always played in the Company Directory. ’ Pressing (7) means a mailbox owner’s name does not appear in the Company Directory.
The display shows:
12. Press (YES) or (NO) This establishes whether or not a message notification appears on the Norstar display. Pressing (YES) means a “Messa e for you” notification appears on the display. Pressing cd NO means there is no display notification of a message. When a Guest mailbox is added, this should be set to NO.
The display returns to:
Repeat steps 5 through 12 to add another mailbox. To end this StarTalk session, press m
StarTalk Set Up and Operation Guide
5 - 10 Section 5: Setting Up Mailboxes
HOW a Guest Guest mailboxes can be used to provide a temporary employee with StarTalk Mailbox services, allow client access to internal messaging and call routing, or they can
Can Be Used be used to allow customers to make telephone orders.
Depending on your business, you might decide to use Guest mailboxes for:
. personal catalogue shopping orders
. listing classes or seminars and providing callers with the ability to register by telephone
. providing frequent customers access to StarTalk services
Guest mailboxes can also be used for making customer reservations, and even reserving a tee off time for a game of golf. How you decide to use a Guest mailbox is as limitless as your imagination.
Setting up a Guest mailbox for any of the above suggestions is easy. The following section shows you how to add a Guest mailbox. The example shown provides you with a suggestion of how to set up a Guest mailbox for an announcement and order taking capability.
When you are providing services that allow a customer to call into a mailbox, you record the mailbox number in the Company Greeting. This allows a caller to transfer directly to the mailbox.
Important: If your Company Greeting directs a caller to a mailbox, you must include a star (‘) before the mailbox number. For example, “...to reach our sales order telephone service, press ‘343”.
StarTalk Set Up and Operation Guide
Section 5: Setting Up Mailboxes 5 - 11
Example 1 - Announcing Courses and Seminars (Telephone Registration)
To use a Guest mailbox to provide telephone registration, you first need to determine a telephone number. The mailbox number you assign does not have a working Norstar extension number. Next, you must determine what the mailbox greeting will say. For example:
“This month we are p/eased to provide the following courses: Jazz Dancing made Easy, lnfen-nediafe Jazz Dancing, Warming Up for that f3ig Performance, and Beginners’ Ballet. If you are interested in any of these courses, p/ease leave your name and telephone number after the tone. One of our instructors will contact you with more information.”
Note: You can even include the time and date the classes are being offered. This example is applicable to Guest mailboxes being used with ordering capability.
After you have determined what the announcement will say, you must record a company greeting to inform callers this mailbox is available. For example:
“Good Morning. This is On Your Toes Dance School. To reach the dance studio, press 4 16. To register for our fall classes, press *208. To reach our company operator, press 0. ’
Note: The extension number 416 in this example is an operating Norstar extension. If this extension has a mailbox, it would be added in the same way that a personal user mailbox is added. The asterisk appearing before mailbox 208 must be included. By pressing the star button (asterisk), a user transfers directly to the mailbox.
The last thing you must do is determine a Class of Service. When you assign a Class of Service for a Guest mailbox being used as an order mailbox, you should choose one that allows for the maximum mailbox greeting recording and message time available. In the example shown here, a mailbox Class of Service between 13 and 16 would be appropriate. Refer to Class of Service Values in Figure 5.1, earlier in this section.
StarTalk Set Up and Operation Guide
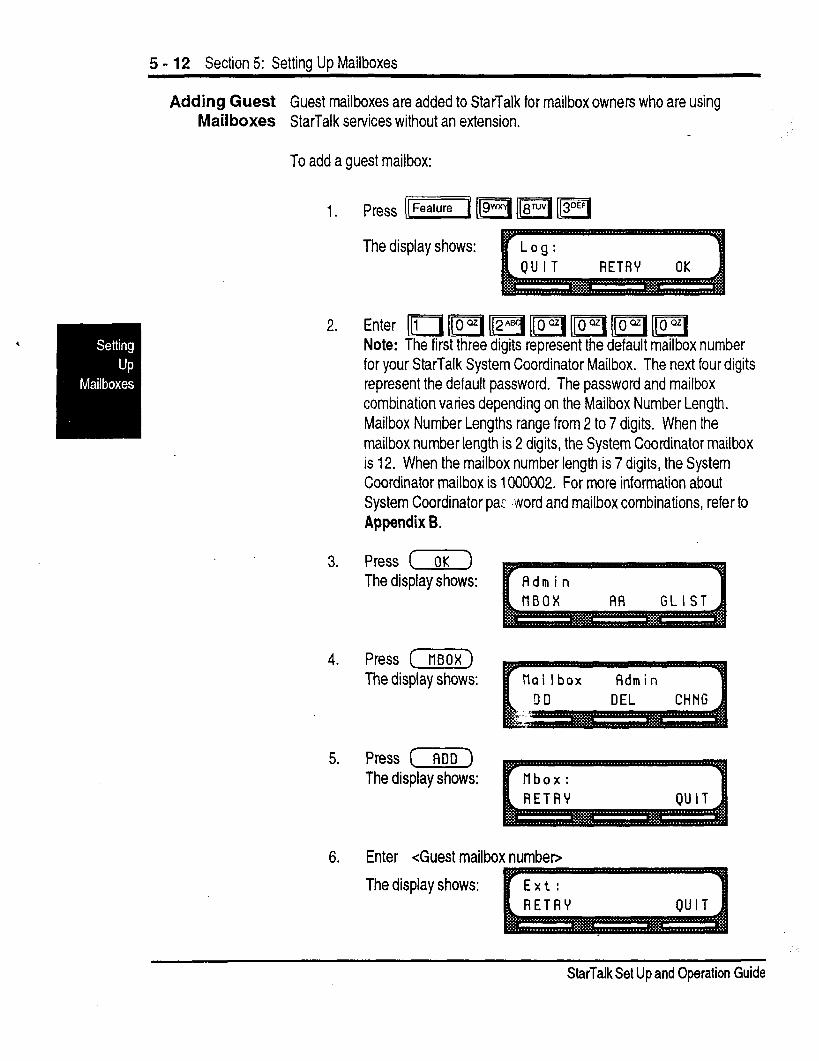
5 - 12 Section 5: Settina UP Mailboxes
Adding Guest Guest mailboxes are added to StarTalk for mailbox owners who are using Mail boxes StarTalk services without an extension.
To add a guest mailbox:
1. press l(featureI [m 1(8ruv( p1
The display shows:
2. Enter m ILo Fd pi pi pi ((O Note: The first three digits represent the default mailbox number for your StarTalk System Coordinator Mailbox. The next four digits represent the default password. The password and mailbox combination varies depending on the Mailbox Number Length. Mailbox Number Lengths range from 2 to 7 digits. When the mailbox number length is 2 digits, the System Coordinator mailbox is 12. When the mailbox number length is 7 digits, the System Coordinator mailbox is 1000002. For more information about System Coordinator pa: word and mailbox combinations, refer to Appendix 6.
3. Press ( OK ) The display shows:
4. Press ( NBOX) The display shows:
5. Press (AOD) The display shows:
6. Enter <Guest mailbox number>
The display shows:
S&Talk Set Up and Operation Guide
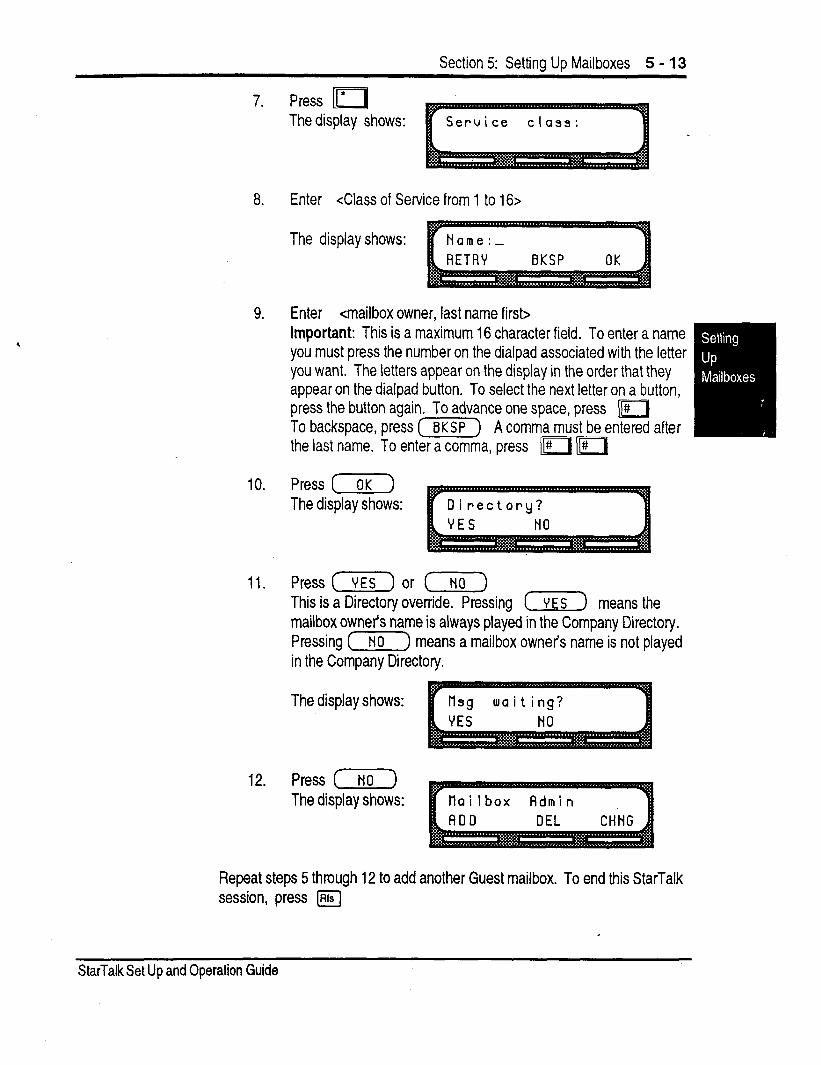
Section 5: Setting Up Mailboxes 5 - 13
7. Press li7j The display shows:
8. Enter <Class of Service from 1 to 16>
The display shows: r N am e : _ 1
9.
10.
11.
12.
Enter <mailbox owner, last name first> Important: This is a maximum 16 character field. To enter a name you must press the number on the dialpad associated with the letter you want. The letters appear on the display in the order that they appear on the dialpad button. To select the next letter on a button, press the button again. To advance one space, press To backspace, press [m)
II# A comma must be entered after
the last name. To enter a comma, press u#m ‘1
Press [OK) The display shows:
Press (YES) or (NO) This is a Directory override. Pressing I?) means the mailbox owner’s name is always played in the Company Directory. Pressing (7) means a mailbox owner’s name is not played in the Company Directory.
The display shows:
Press ( NO ) The display shows:
Repeat steps 5 through 12 to add another Guest mailbox. To end this StarTalk session, press fKJ
.
StarTalk Set Up and Operation Guide
5 - 14 Section 5: Settina UD Mailboxes
Using Information-mailboxes provide messages and announcements to callers. Information Information mailboxes are registered by the System Coordinator, and are either
Mailboxes maintained by you or a StarTalk user.
Information mailboxes can be used to:
. announce sales
. provide product lists l announce special events
Note: Information mailbox greetings can be recorded by you or by the user assigned the Information mailbox. Refer to the StarTalk Reference Guide for instructions about recording information greetings.
When you use the Information mailbox feature, you must ensure the mailboxes are accessible to callers. You can make outside callers aware of your compa- ny’s Information mailboxes by using the following methods:
. Advertise the Automated Attendant main number, and record a Company Greeting informing the caller of all the information mailbox services. You can also provide a list of your company’s Information mailboxes in brochures and yellow pages advertising.
Recording all the Information mailboxes in the company greeting is only applicable with a small number of mailboxes, for example six or seven. If you record several mailboxes, callers might forget the mailbox numbers, and become frustrated when presented with all the other options.
l Assign the operator as the transfer point for all Information mailbox inquiries. In this case, you would record a statement in the company greeting that indicates to callers about pressing zero to reach company information. For example:
‘Good Afternoon. This is on your Toes Dance Studio. To reach our studio, press 4 7 6. To listen to one of our special announce- ments, press [O] to reach the operator.”
When a caller presses zero, the operator provides a list of the different Information mailboxes, and transfers the caller accord- ingly.
S&Talk Set Up and Operation Guide

Section 5: Settinq UR Mailboxes 5 - 15
Adding Information
Mail boxes
When the operator is not available, the operator’s personal mailbox greeting would include a list of all the Information mailboxes available.
You can always select the mailbox option to include Information mailboxes in the Company Directory.
Important: You must make the Information Mailboxes easy for a caller to find. You can do this using your company’s operator, or the StarTalk Company Directory.
Before you can add an Information mailbox, you must determine an appropriate Class of Service. The Class of Service must have adequate message length available to accommodate an information greeting. A Class of Service of 13 or 14 is appropriate for most Information mailboxes, These Classes of Service defaults allow 10 minutes for a recorded greeting.
Note: To customize a Class of Service on a terminal, refer to the StarTalk Installation Guide.
To add an Information mailbox:
The display shows:
Note: The first three digits represent the default mailbox number for your StarTalk System Coordinator Mailbox. The next four digits represent the default password. The password and mailbox combination varies depending on the Mailbox Number Length. Mailbox Number Lengths range from 2 to 7 digits. When the mailbox number length is 2 digits, the System Coordinator mailbox is 12. When the mailbox number length is 7 digits, the System Coordinator mailbox is 1000002. For more information about System Coordinator password and mailbox combinations, refer to Appendix 6.
StarTalk Set Up and Operation Guide
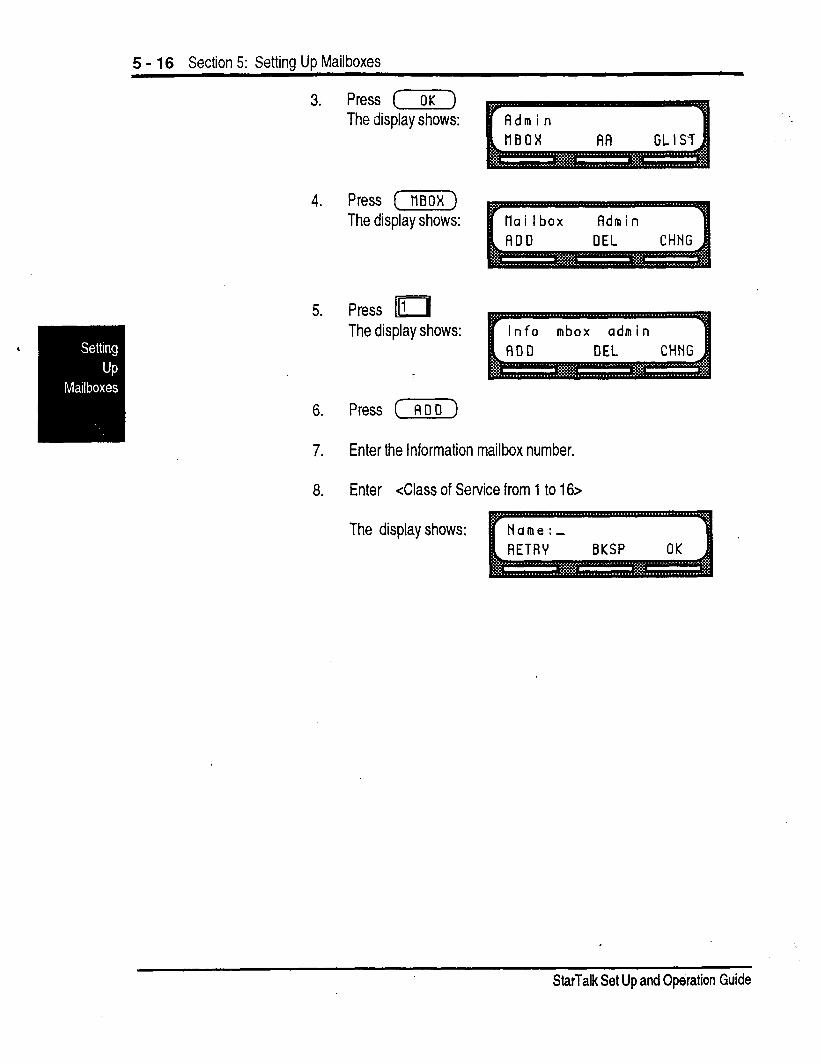
5 - 16 Section 5: Setting Up Mailboxes
3. Press (OK) The display shows:
4. Press (FiKK) The display shows: tlai lbox Admin
5. Press 111 The display shows:
6. Press (Ron)
7. Enter the Information mailbox number.
a. Enter <Class of Service from 1 to 16>
The display shows: BKSP OK
StarTalk Set Up and Operation Guide
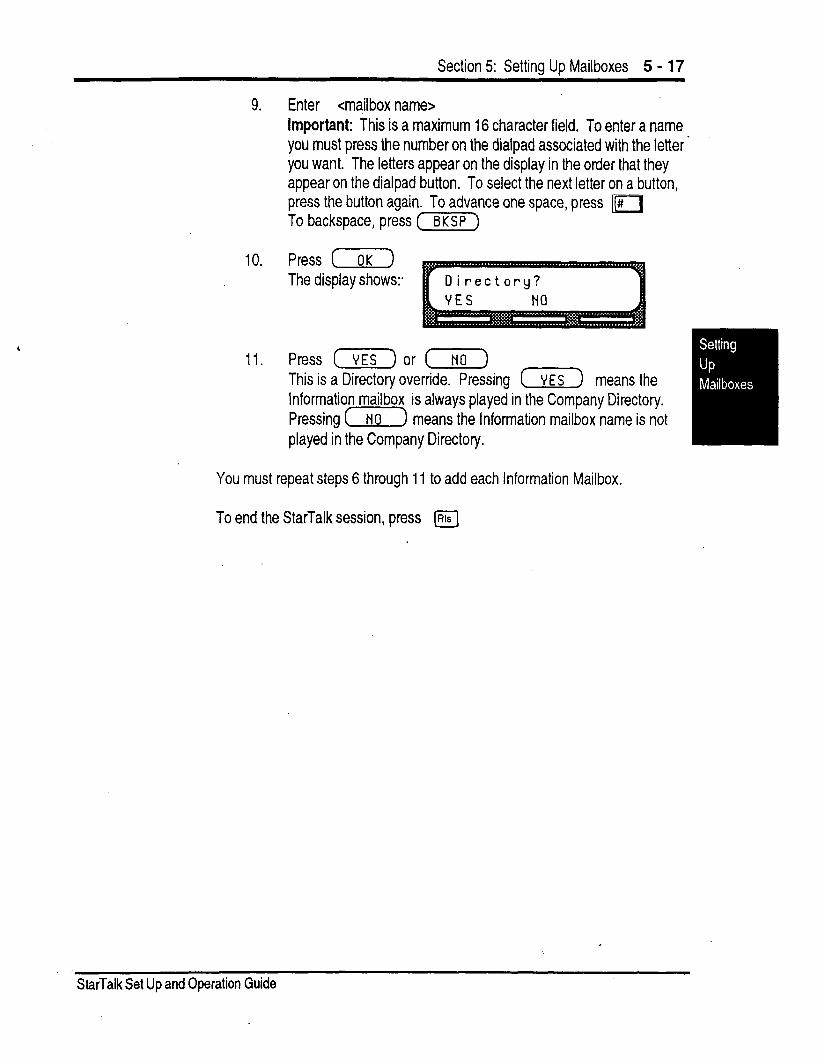
Section 5: Settina UD Mailboxes 5 - 17
9.
10.
11.
Enter cmailbox name> important: This is a maximum 16 character field. To enter a name you must press the number on the dialpad associated with the letter - you want. The letters appear on the display in the order that they appear on the dialpad button. To select the next letter on a button. press the button again. To advance one space, press II# To backspace, press (sKsP)
Press ( OK ) The display shows:.
Press (YES) or (NO) This is a Directory override. Pressing (YES) means the Information mailbox is always played in the Company Directory. Pressing (7) means the Information mailbox name is not played in the Company Directory.
You must repeat steps 6 through 11 to add each Information Mailbox.
To end the StarTalk session, press @
StarTalk Set Up and Operation Guide
5 - 18 Section 5: Settina UP Mailboxes
Special There are three special Mailboxes that you use as System Coordinator:
Mailboxes . General Deliverv mailbox number 100 e Trouble ’ mailbox number 101 . System Coordinator mailbox number 102
Note: The Group List numbers are always 3 digits long. When your DN length is 3 and the leading digit is 1, the Special Mailboxes default to 200,201 and 202. For more information about the StarTalk default values refer to Appendix B.
All the Special Mailboxes are protected by a password that you establish. The password for each mailbox is determined when you initialize the mailbox with StarTalk. For more information about mailbox passwords refer to About the Passwords, later in this sectio
The General Delivery, and the Trouble Mailboxes default to Class of Service 1. The System Coordinator Mailbox defaults to a Class of Service 7. The Class of Service can be changed at any time. Refer to Section 7, Changing a Mailbox Class of Service.
General Delivery The General Delivery Mailbox is used to store messages from callers who are using a rotary dial telephone, calls to the receptionist or operator when the operator is not available, and messages from a Personal mailbox when that ‘mailbox is full. The General Delivery Mailbox has a default greeting, but you can replace this greeting with one you record. Refer to Recording a Special Mailbox Greeting, later in this section.
Messages left in General Delivery must be forwarded to the appropriate StarTalk mailbox. Only the System Coordinator, receptionist, or designated operator can access the messages in the General Delivery Mailbox.
Note: We recommend assigning the StarTalk designated operator the General Delivery mailbox number. Refer to Setting Up the Operator’s Mailbox, later in this section.
StarTalk Set Up and Operation Guide
Section 5: Setting Up Mailboxes 5 - 19 .
Trouble Mail box The Trouble Mailbox is used to report problems or user trouble with StarTalk. Only the System Coordinator can access the messages left in the Trouble . Mailbox. The Trouble Mailbox has a default greeting, but you can replace this greeting with one you record. Refer to Recording a Special Mailbox Greeting, later in this section.
System Coordinator Mailbox The System Coordinator Mailbox is used as your own personal mailbox. This is the only mailbox that is able to send Broadcast Messages. Only the System Coordinator is able to access the System Coordinator Mailbox. Ensure that you listen to messages sent to you in the System Coordinator Mailbox.
The Special Mailboxes must be initialized before they can be used by your co- workers. Refer to Section 6, Initializing the Special Mailboxes.
Note: The mailbox numbers used here for the Special Mailboxes are the StarTalk default mailbox numbers based on a 3 digit DN length. The mailbox number length is determined in the initial StarTalk set up. Mailbox numbers can range from 2 to 7 digits. For more information about the StarTalk defaults refer to Appendix 8.
,
StarTalk Set Up and Operation Guide
5 - 20 Section 5: Setting Up Mailboxes
Initializing Before the System Coordinator mailbox or any StarTalk personal mailbox can the Special be used, it is necessary to initialize the mailbox. Initializing a mailbox involves:
Mailboxes l changing the default password . recording the mailbox name in the Company Directory . recording a mailbox greeting . selecting a mailbox greeting
A personal mailbox cannot receive messages until it is initialized. All the Special Mailboxes must have the default password changed and the name of the mailbox recorded in the Company Directory. Ensure you write down the passwords for the Special Mailboxes in a safe place.
The General Delivery and Trouble Mailboxes can receive messages before they are initialized. You must initialize these mailboxes before you can retrieve any messages from them.
Note: The steps for initializing Special Mailboxes and personal mailboxes are the same.
A mailbox is only initialized once. Once a mailbox is initialized, the mailbox owner can change the password and re-record the Company Directory name using the Mailbox Administration options in the mailbox. For more information refer to the StarTalk Reference Guide, Using Mailbox Options.
About the Each mailbox registered with StarTalk is protected by a password that is Passwords established by the mailbox owner. When you add a mailbox to StarTalk, the
password 0000 is automatically assigned. This is called the default password.
To use a mailbox, a mailbox owner must change the default password. The new password must be between 4 and 8 digits in length.
Note: A mailbox password cannot start with zero, and must be no longer than 8 digits.
If a mailbox owner cannot remember their password, you can reset the mailbox password to the default password 0000. Refer to Section 7, Resetting a Mailbox Password, later in this Guide.
StarTalk Set Up and Operation Guide
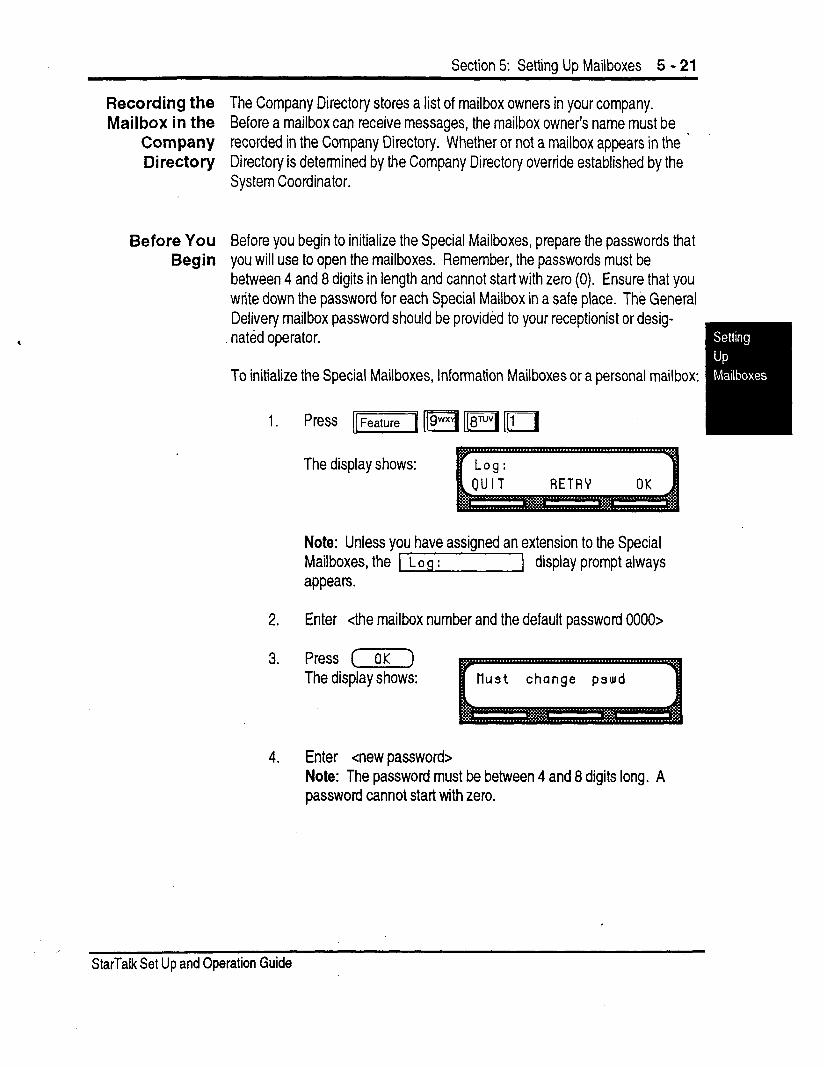
Section 5: Setting Up Mailboxes 5 - 21
Recording the The Company Directory stores a list of mailbox owners in your company. Mailbox in the Before a mailbox can receive messages, the mailbox owner’s name must be
Company recorded in the Company Directory. Whether or not a mailbox appears in the - Directory Directory is determined by the Company Directory override established by the
System Coordinator.
Before You Before you begin to initialize the Special Mailboxes, prepare the passwords that Begin you will use to open the mailboxes. Remember, the passwords must be
between 4 and 8 digits in length and cannot start with zero (0). Ensure that you write down the password for each Special Mailbox in a safe place. The General Delivery mailbox password should be provided to your receptionist or desig- nated operator.
To initialize the Special Mailboxes, Information Mailboxes or a personal mailbox:
1. Press ljFeature Fj ‘m ‘1
The display shows:
Note: Unless you have assigned an extension to the Special Mailboxes, the 1 Log : 1 display prompt always appears.
2. Enter <the mailbox number and the default password OOOO>
3. Press (OK) The display shows:
4. Enter <new password> Note: The password must be between 4 and 8 digits long. A password cannot start with zero.
.
StarTalk Set Up and Operation Guide
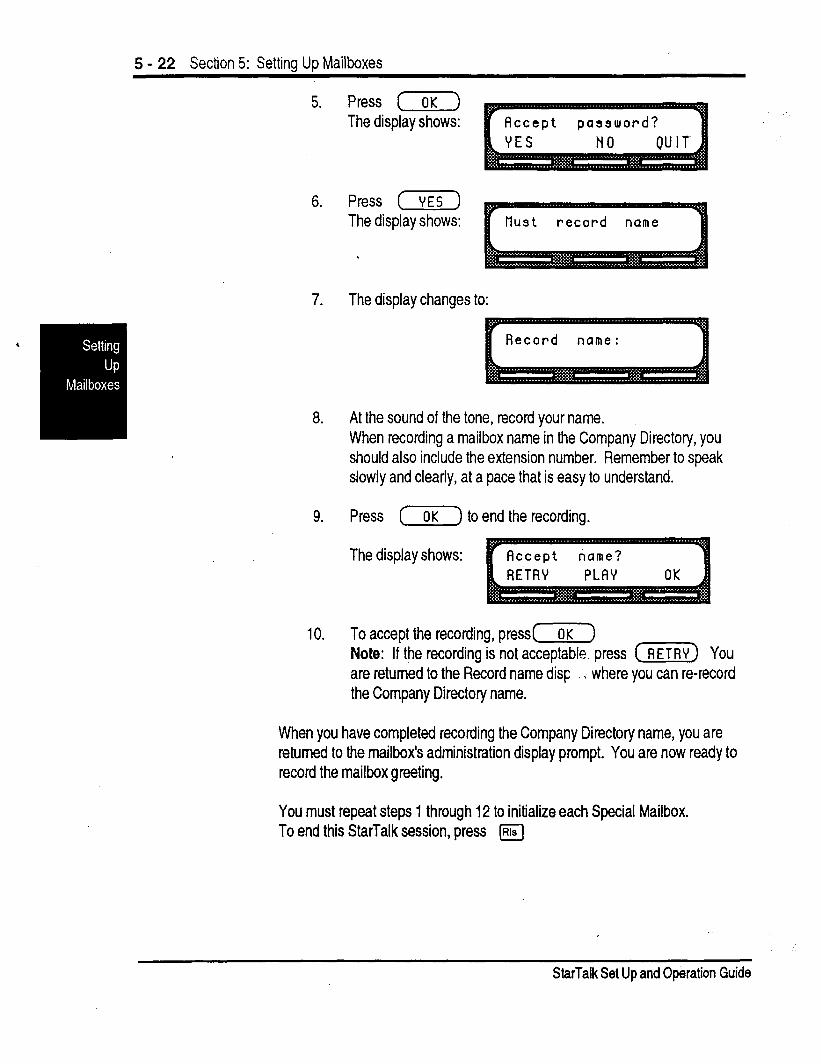
5 - 22 Section 5: Setting Up Mailboxes
5. Press ( OK ) The display shows:
6. Press (VES) The display shows:
.
7. The display changes to:
8. At the sound of the tone, record your name. When recording a mailbox name in the Company Directory, you should also include the extension number. Remember to speak slowly and clearly, at a pace that is easy to understand.
9.
10.
Press (7) to end the recording.
The display shows:
To accept the recording, press( ) OK
Note: If the recording is not acceptable. press (e) You are returned to the Record name disp . where you can re-record the Company Directory name.
Record name:
When you have completed recording the Company Directory name, you are returned to the mailbox’s administration display prompt. You are now ready to record the mailbox greeting.
You must repeat steps 1 through 12 to initialize each Special Mailbox. To end this StarTalk session, press (Rls
StarTalk Set Up and Operation Guide
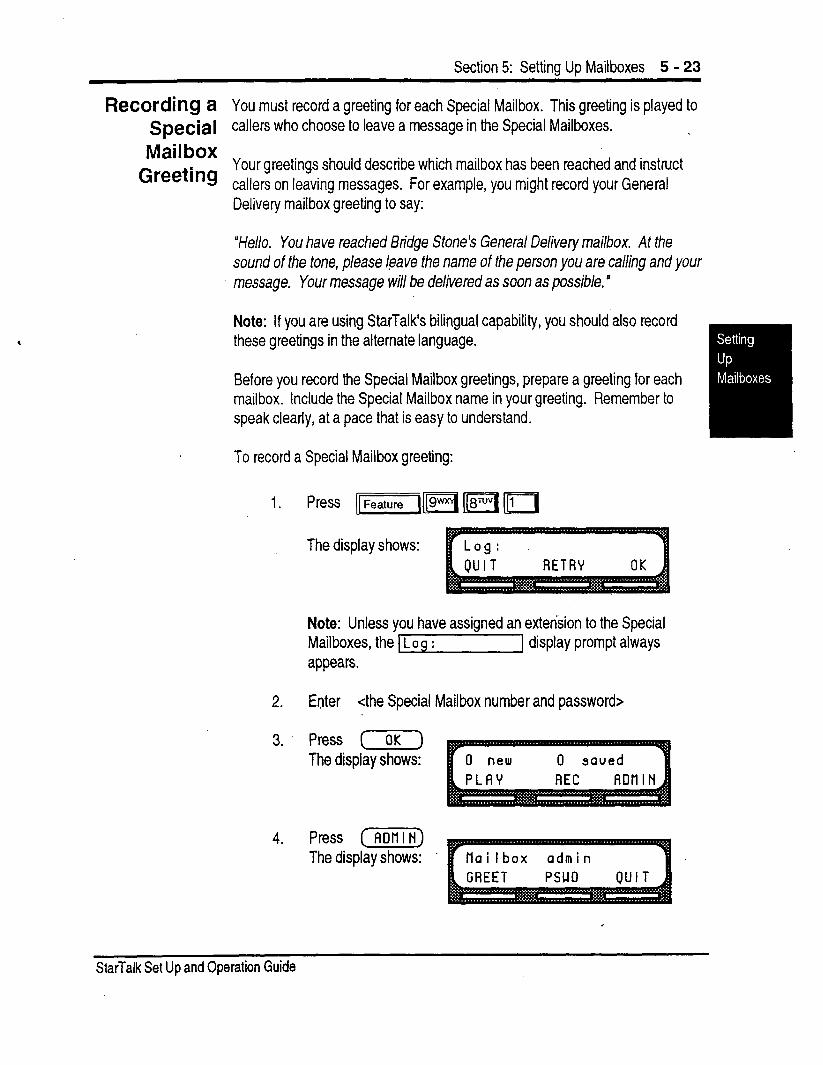
Section 5: Setting Up Mailboxes 5 - 23
Recording a Special Mailbox
Greeting
You must record a greeting for each Special Mailbox. This greeting is played to callers who choose to leave a message in the Special Mailboxes.
Your greetings should describe which mailbox has been reached and instruct callers on leaving messages. For example, you might record your General Delivery mailbox greeting to say:
StarTalk Set Up and Operation Guide
“Hello. You have reached Bridge Stone’s General Delivery mailbox. At the sound of the tone, please /gave fhe name of fhe person you are calling and your message. Your message will be delivered as soon as possible. ’
Note: If you are using StarTalk’s bilingual capability, you should also record these greetings in the alternate language.
Before you record the Special Mailbox greetings, prepare a greeting for each mailbox. Include the Special Mailbox name in your greeting. Remember to speak clearly, at a pace that is easy to understand.
To record a Special Mailbox greeting:
1. Press lj]rd p1 r(
The display shows:
Note: Unless you have assigned an extension to the Special Mailboxes, the 1 Log : ] display prompt always appears.
2. Enter <the Special Mailbox number and password>
3. Press (OK) The display shows:
4. Press ( ADtl I N) The display shows: .
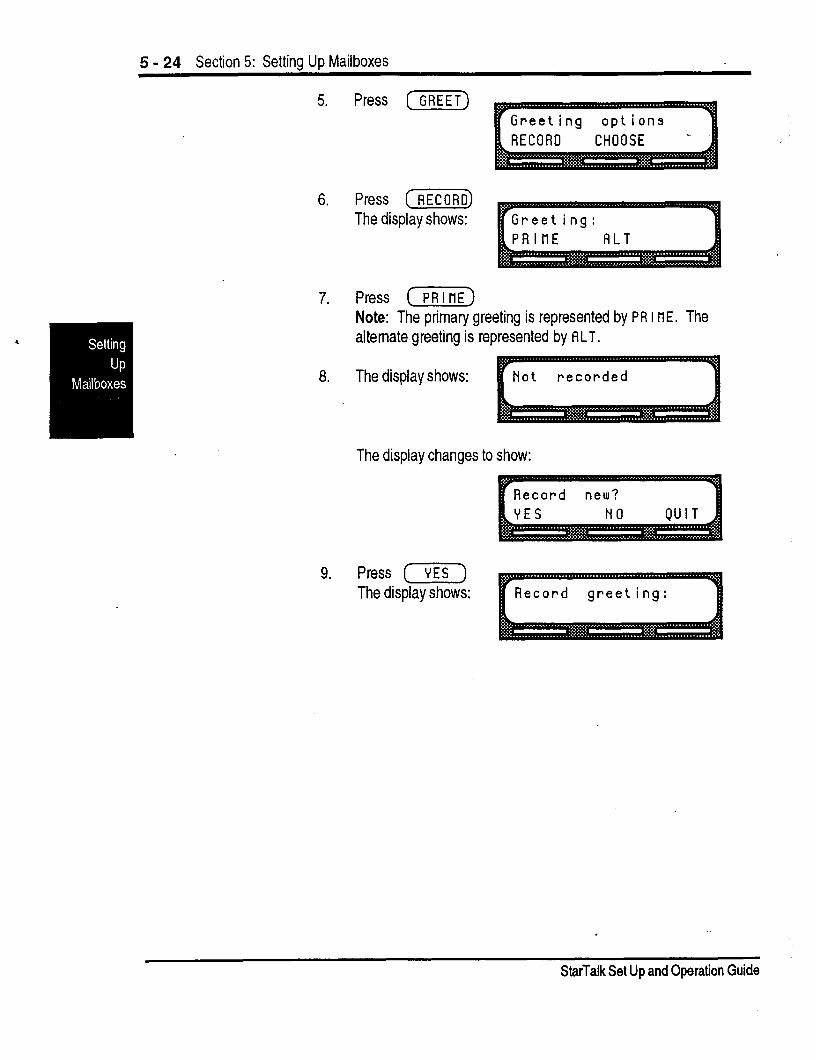
5 - 24 Section 5: Setting Up Mailboxes
5. Press (GREET)
6. Press ( RECORD) The display shows:
7. Press (7GGiF) Note: The primary greeting is represented by PR I tlE. The alternate greeting is represented by ALT.
8. The display shows: Not recorded
The display changes to show:
9. Press ( YES ) The display shows:
StarTalk Set Up and Operation Guide
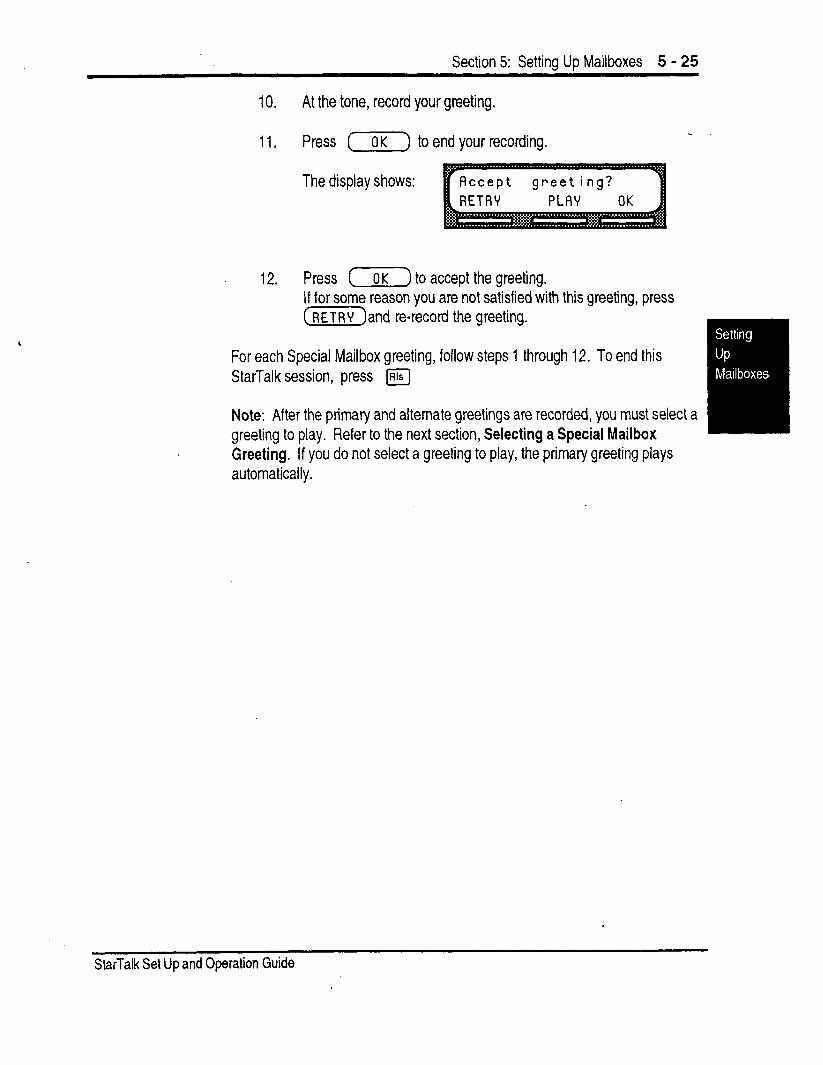
Section 5: Setting Up Mailboxes 5 - 25
10. At the tone, record your greeting.
11. Press (7) to end your recording.
The display shows:
12. Press (7) to accept the greeting. If for some reason you are not satisfied with this greeting, press (m)and re-record the greeting.
For each Special Mailbox greeting, follow steps 1 through 12. To end this StarTalk session, press a
Note: After the primary and alternate greetings are recorded, you must select a greeting to play. Refer to the next section, Selecting a Special Mailbox Greeting. If you do not select a greeting to play, the primary greeting plays automatically.
StarTalk Set Up and Operation Guide
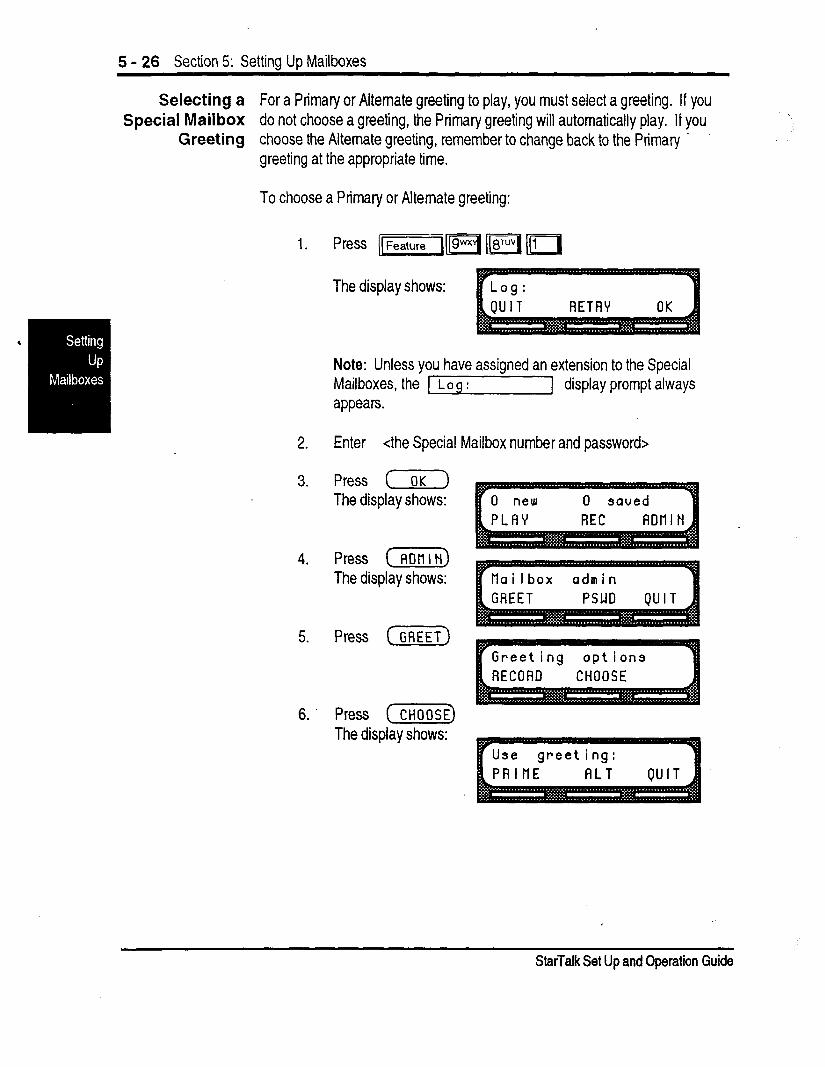
5 - 26 Section 5: Setting Up Mailboxes
Selecting a For a Primary or Alternate greeting to play, you must select a greeting. If you Special Mailbox do not choose a greeting, the Primary greeting will automatically play. If you
Greeting choose the Alternate greeting, remember to change back to the Primary - greeting at the appropriate time.
To choose a Primary or Alternate greeting:
1.
2.
3.
4.
5.
6.
The display shows:
Note: Unless you have assigned an extension to the Special Mailboxes, the 1 Log : ] display prompt always appears.
Enter <the Special Mailbox number and password>
Press ( OK ) The display shows:
Press (z) The display shows:
Press (GREET)
Press (CHOOSE) The display shows:
Greeting opt ions
StarTalk Set Up and Operation Guide

Section 5: Setting Up Mailboxes 5 - 27
7. Select the greeting you want played. Note: If you select a greeting that is not yet recorded, you are transferred back to the Greeting option display to record the greeting.
_
To end this StarTalk session, press m
The Special Mailbox greetings are now selected and will play each time a caller reaches a Special Mailbox. If you have selected an Alternate mailbox greeting .for a Special Mailbox, remember to select the Primary greeting when the situation changes.
Note: The procedure for selecting a personal mailbox greeting is the same as for selecting a Special Mailbox greeting.
StarTalk Set Up and Operation Guide
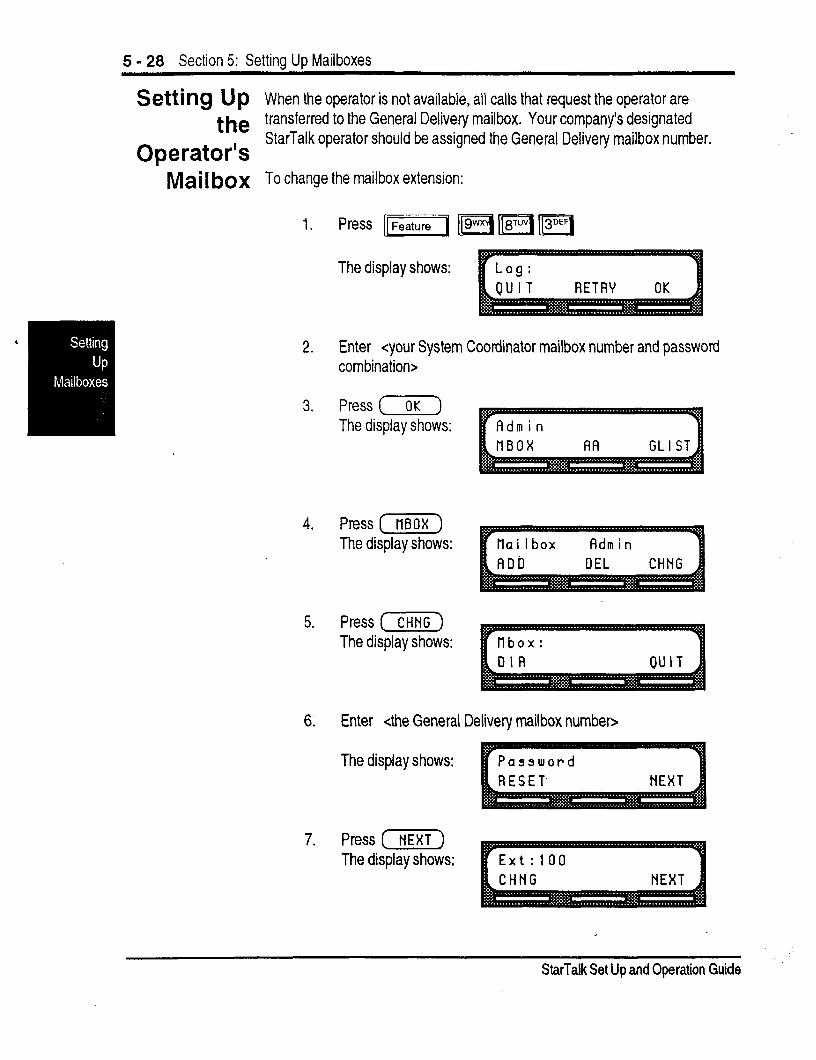
5 - 28 Section 5: Setting Up Mailboxes
Setting up When the operator is not available, all calls that request the operator are the transferred to the General Delivery mailbox. Your company’s designated
Operator’s StarTalk operator should be assigned the General Delivery mailbox number.
Mai 1 box To change the mailbox extension:
1.
The display shows: RETRY OK
2. Enter <your System Coordinator mailbox number and password combination>
3. Press (7) The display shows:
4. Press (7iFiF) The display shows: rtlai lbox Admin
5. Press (CHNG) The display shows:
6. Enter <the General Delivery mailbox number>
The display shows:
7. Press (NEXT) The display shows:
StarTalk Set Up and Operation Guide
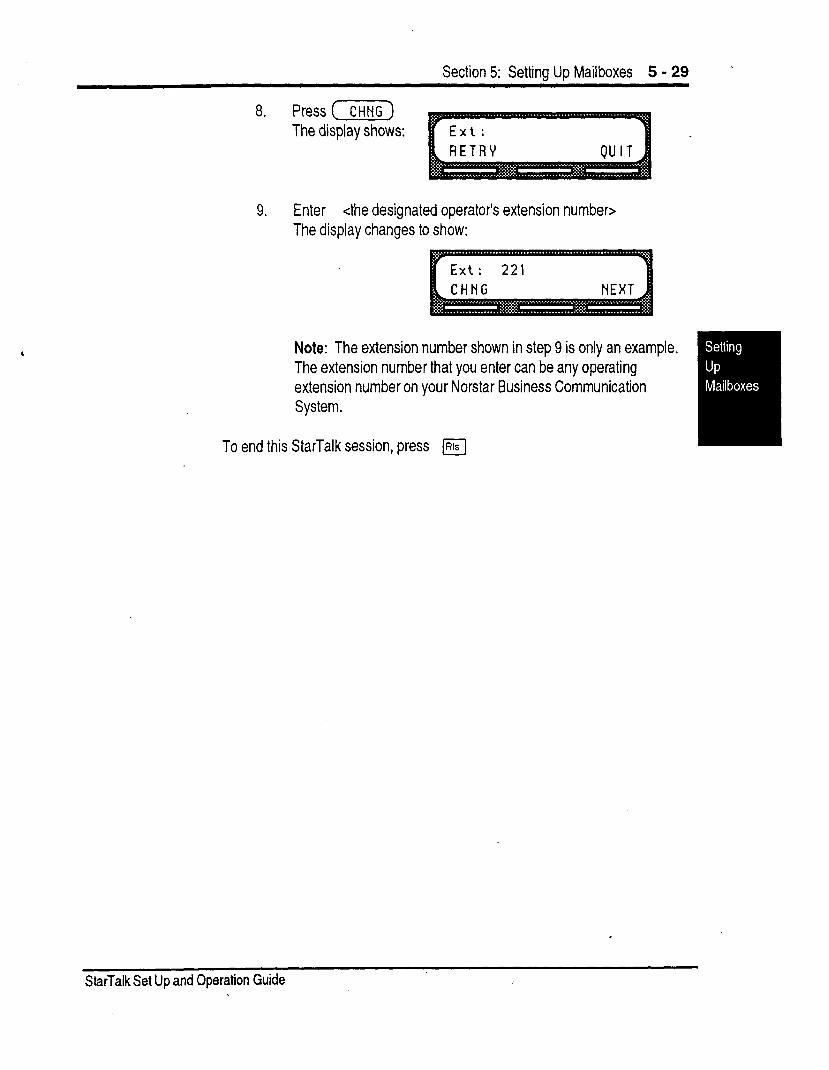
Section 5: Setting Up Mailboxes 5 - 29 .
8. Press (YiGF) The display shows:
9. Enter <the designated operator’s extension number> The display changes to show:
Note: The extension number shown in step 9 is only an example. The extension number that you enter can be any operating extension number on your Norstar Business Communication System.
To end this StarTalk session, press m
StarTalk Set Up and Operation Guide
5 - 30 Section 5: Setting Up Mailboxes
StarTalk Set Up and Operation Guide
6-1
_ Setting the StarTalk Status 6
Introductions Setting the Operator Status determines if your company’s receptionist or designated operator is available to take calls. This section describes how to:
. sign on and off your receptionist or designated operator
. change the operator password
. set your company’s business hours
. change the business status
. enable StarTalk line answering b change the receptionist or designated operator’s extension . set the return to Automated Attendant status
Attendant The Attendant Sign On/Off feature determines whether an operator is available.
Sign Each day, the receptionist or designated StarTalk operator must sign on in the
On/Off morning, and sign off in the evening.
When your company receptionist or designated operator is available, the attendant status must be set to YES. When your company receptionist or designated operator goes for lunch, coffee breaks or leaves in the afternoon, the attendant status must be set to NO.
When the attendant status is set to NO, any caller who requests an operator is informed the operator is not available, and is transferred to the options menu to dial another extension, or leave a message.
StarTalk Set Up and Operation Guide

6 - 2 Section 6: Settina the StarTalk Status
Setting the Setting the Operator Status determines if your company receptionist or desig- Operator nated operator is available. The Operator Status should be set to YES when an
Status operator is available. To set the Operator Status:
2. Enter 0 P E R A T 0 R (67372867) Note: This is the default Operator Password. To change the operator password, refer to Changing the Operator Password, later in this section.
3. Press (OK) The display shows:
4. Press (CHNG) Note: Pressing (CHNc) changes the N to a Y. When your company receptionist or designated operator is available, the operator status should be set to Y. When an operator is not available, the operator status should be set to N.
To end this StarTalk session, press @
StarTalk Set Up and Operation Guide
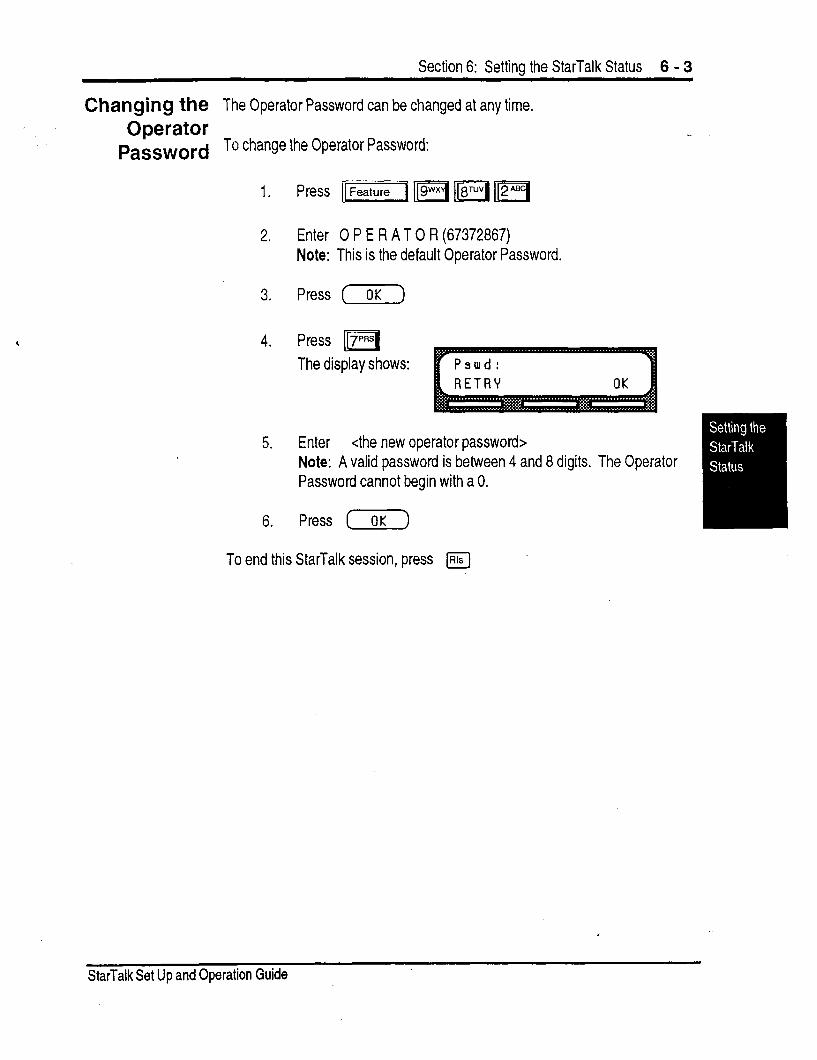
Section 6: Setting the StarTalk Status 6 - 3
Changing the The Operator Password can be changed at any time. Operator
password To change the Operator Password:
1.
2.
3.
4.
5.
6.
Press
Enter Note:
Press
Press
0 P E R A T 0 R (67372867) This is the default Operator Password.
The display shows: P 3 UJ d :
Enter <the new operator password> Note: A valid password is between 4 and 8 digits. The Operator Password cannot begin with a 0.
Press (OK)
To end this StarTalk session, press m
StarTalk Set Up and Operation Guide
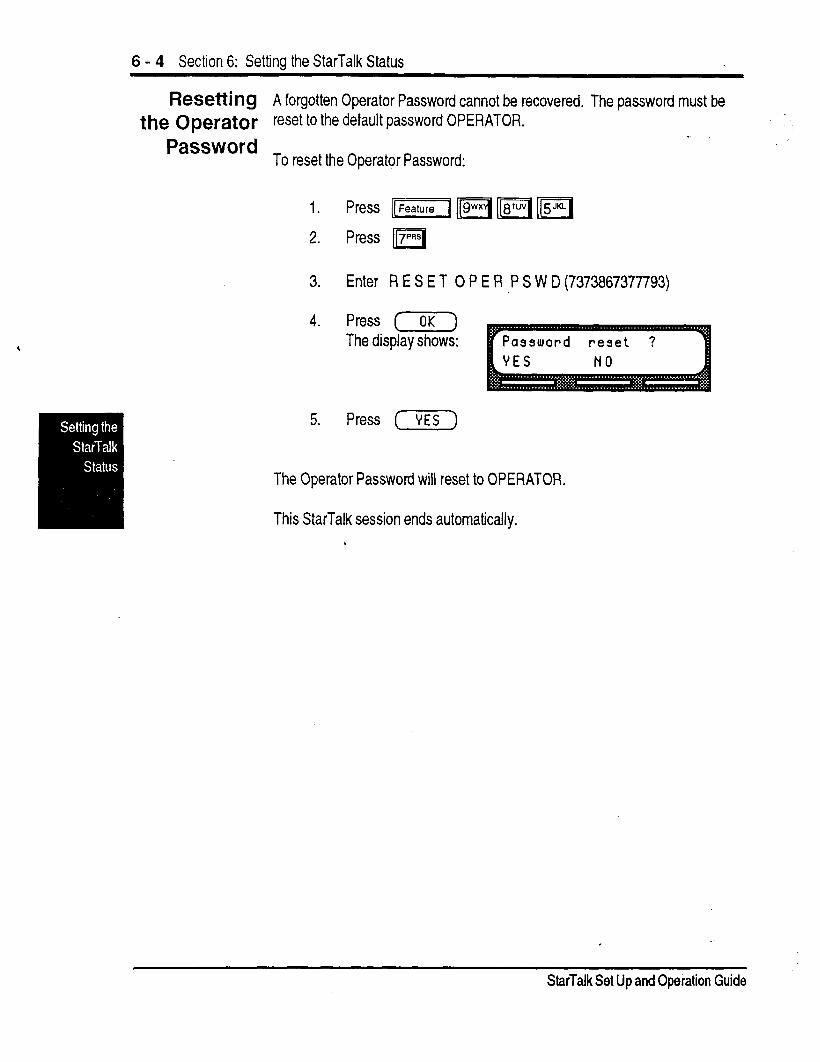
6 - 4 Section 6: Setting the StarTalk Status
Resetting A forgotten Operator Password cannot be recovered. The password must be the Operator reset to the default password OPERATOR.
Password To reset the Operator Password:
1. Press Fi m F1 ([SJKLI
2. Press m
3. Enter R E S E T 0 P E R P SW D (7373867377793)
4. Press (-CF) The display shows:
5. Press (YES)
The Operator Password will reset to OPERATOR.
This StarTalk session ends automatically.
StarTalk Set Up and Operation Guide
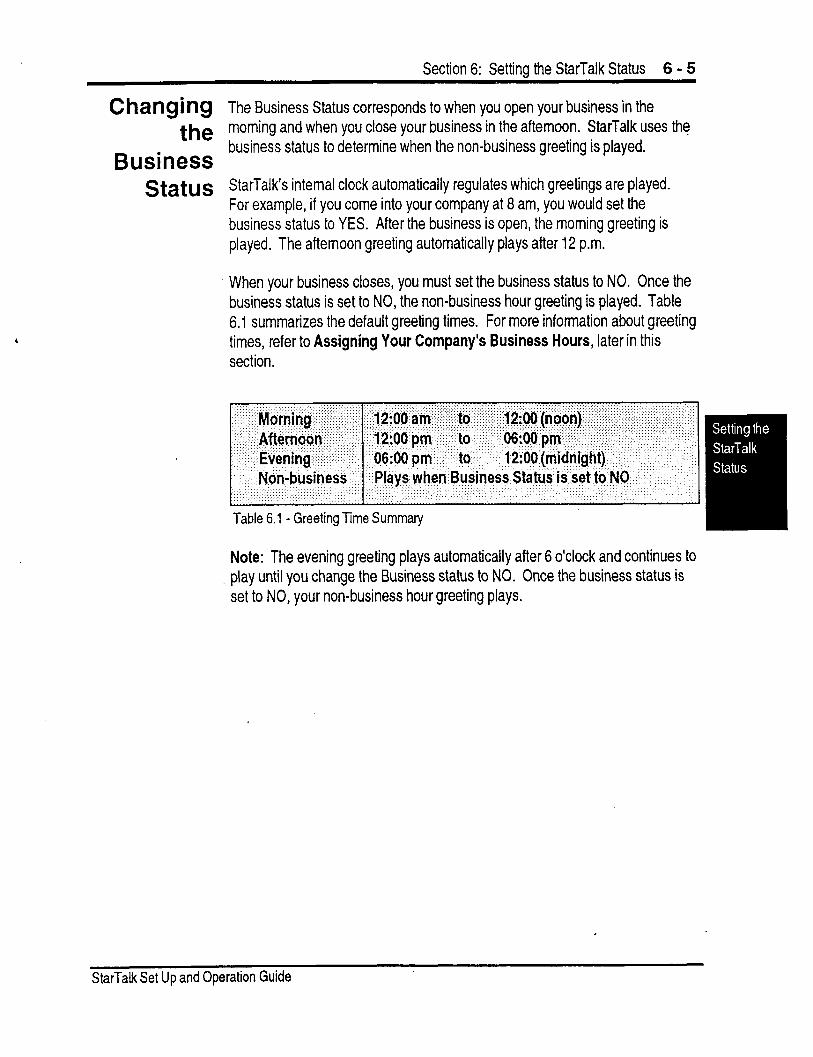
Section 6: Settina the StarTalk Status 6 - 5
C hang i ng The Business Status corresponds to when you open your business in the the morning and when you close your business in the afternoon. StarTalk uses the
Business business status to determine when the non-business greeting is played.
Status StarTalk’s internal clock automatically regulates which greetings are played. For example, if you come into your company at 8 am, you would set the business status to YES. After the business is open, the morning greeting is played. The afternoon greeting automatically plays after 12 p.m.
When your business closes, you must set the business status to NO. Once the business status is set to NO, the non-business hour greeting is played. Table 6.1 summarizes the default greeting times. For more information about greeting times, refer to Assigning Your Company’s Business Hours, later in this section.
.: .,. ;,:.. .,.....: .:. .;;.. ,, : :..:.: ;.2.., :: . ,: ;.,. 1: .: ,. Table 6.1 - Greeting Time Summary
Note: The evening greeting plays automatically after 6 o’clock and continues to play until you change the Business status to NO. Once the business status is set to NO, your non-business hour greeting plays.
StarTalk Set Up and Operation Guide
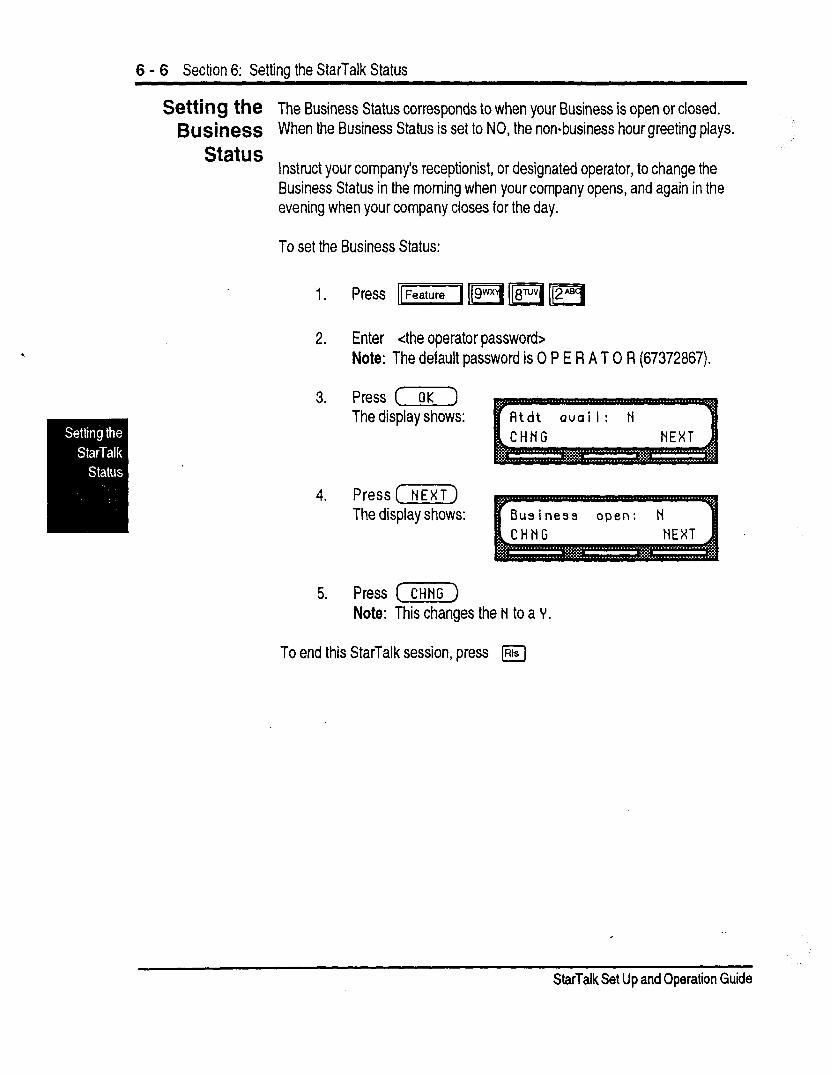
6 - 6 Section 6: Setting the StarTalk Status
Setting the The Business Status corresponds to when your Business is open or closed. Business When the Business Status is set to NO, the non-business hour greeting plays.
Status Instruct your company’s receptionist, or designated operator, to change the Business Status in the morning when your company opens, and again in the evening when your company closes for the day.
To set the Business Status:
1. Press ((Feature m m a
2. Enter <the operator password> Note: The default password is 0 P E R A T 0 R (67372867).
3. Press (FiK) The display shows:
4. Press [NEXT) The display shows:
5. Press [CHNc) Note: This changes the N to a Y.
To end this StarTalk session, press m
S&Talk Set Up and Operation Guide
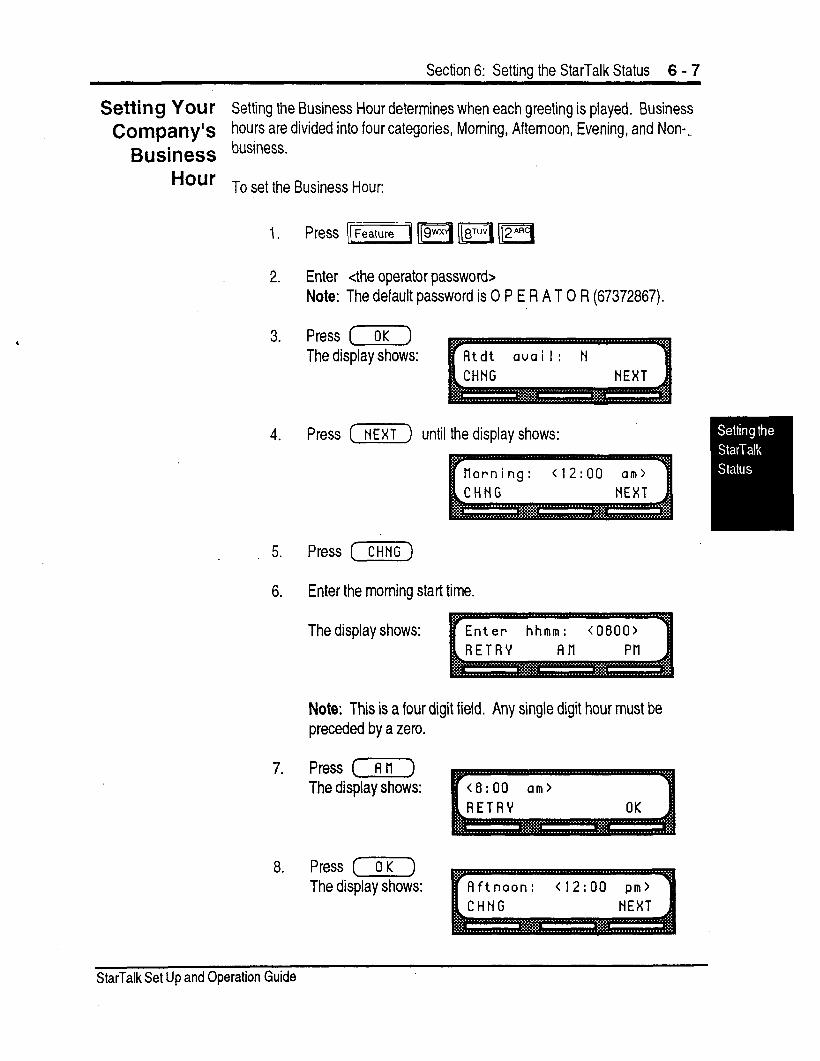
Section 6: Setting the StarTalk Status 6 - 7
Setting YOUt’ Setting the Business Hour determines when each greeting is played. Business Company’s hours are divided into four categories, Morning, Afternoon, Evening, and Non--
Business business.
Hour To set the Business Hour:
2. Enter <the operator password> Note: The default password is 0 P E R A T 0 R (67372867).
3. Press ( OK ) The display shows:
4. Press (F) until the display shows:
5. Press (CHNc)
6. Enter the morning start time.
The display shows: Enter hhmm : <oeoo> RETRV RR Ptl
Note: This is a four digit field. Any single digit hour must be preceded by a zero.
7. Press (?iF) The display shows:
8. Press (OK) The display shows:
StarTalk Set Up and Operation Guide
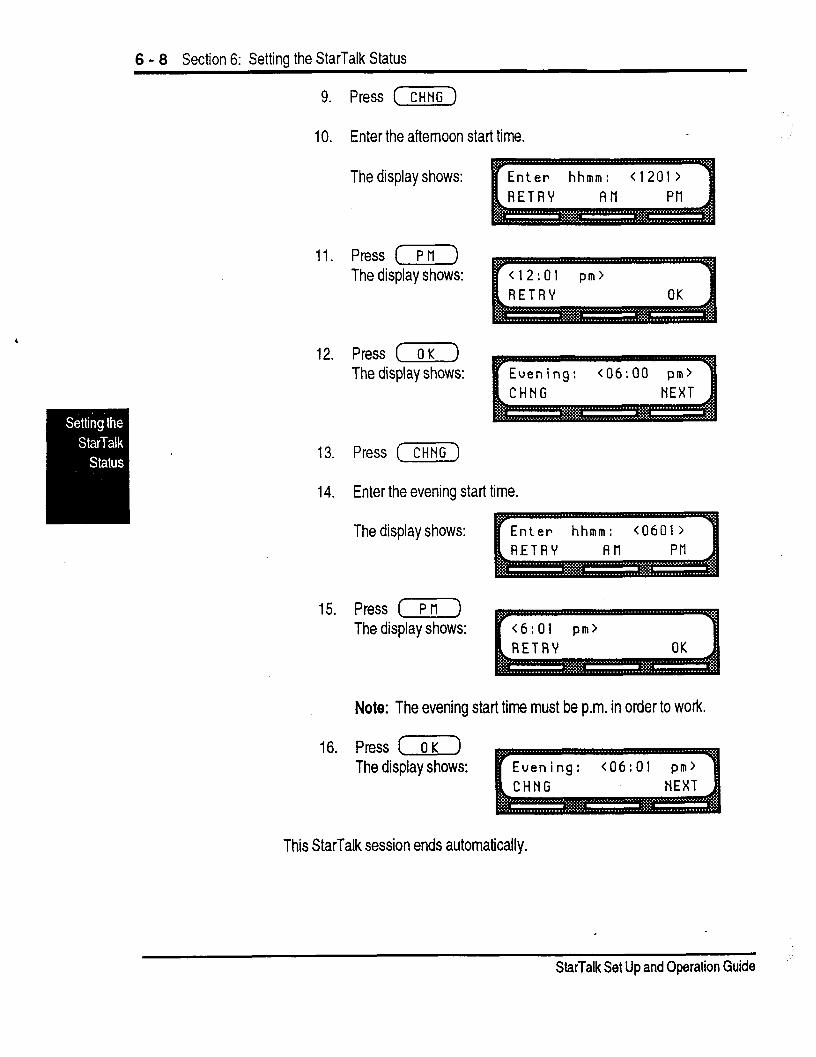
6 - 8 Section 6: Setting the StarTalk Status
9. Press (CHNc)
10. Enter the afternoon start time.
The display shows:
11. Press (-Xi-) The display shows:
Enter hhmm:
<12:01 pm> RETRY
12. Press (7) The display shows:
13. Press ( Cl-iNG )
14. Enter the evening start time.
The display shows:
15. Press (77i-) The display shows:
Note: The evening start time must be p.m. in order to work.
16. Press ( 0 K ) The display shows:
This StarTalk session ends automatically.
StarTalk Set Up and Operation Guide
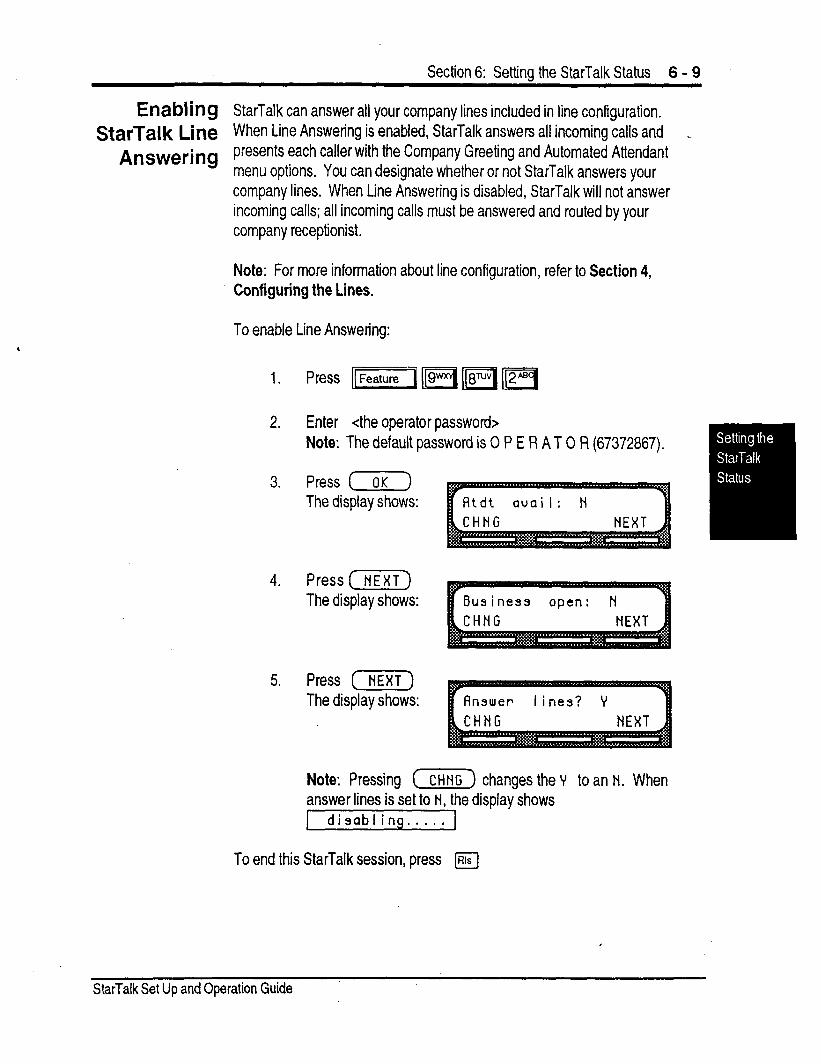
Section 6: Setting the StarTalk Status 6 - 9 .
Enabling StarTalk can answer all your company lines included in line configuration. StarTalk Line When Line Answering is enabled, StarTalk answers all incoming calls and -
Answering presents each caller with the Company Greeting and Automated Attendant menu options. You can designate whether or not StarTalk answers your company lines. When Line Answering is disabled, StarTalk will not answer incoming calls; all incoming calls must be answered and routed by your company receptionist.
Note: For more information about line configuration, refer to Section 4, Configuring the Lines.
To enable Line Answering:
2. Enter <the operator password> Note: The default password is 0 P E R AT 0 R (67372967).
3. Press (OK) The display shows:
4. Press (NE)(T) The display shows: Business open: N
5. Press (NEXT) The display shows: r I ines? Y
Note: Pressing (x) changes the Y to an N. When answer lines is set to N, the display shows
disabling., ,.,
To end this StarTalk session, press m
StarTalk Set Up and Operation Guide

6 - 10 Section 6: Settina the StarTalk Status
Changing Whenever a user requests to speak to your company receptionist, or designated the operator, StarTalk puts the request through to the operator’s extension. For
Operator example, if StarTalk is operating on a 3 digit Norstar DN length, this extension number is 221. You can change the receptionist or designated operator
D&au It extension.
Extension Note: Requesting to speak to your company receptionist or designated operator is available when the Automated Attendant voice prompt announces the option, and the Attendant availability is set to YES.
To change the operator default extension:
, 1.
2.
3.
4.
5.
Enter <the operator password> Note: The default password is 0 P E R A T 0 R (67372867).
Press ( OK ) The display shows: Atdt auai I:
Press ( NEXT ) Until the display shows:
Press (CHNc) The display shows:
StarTalk Set Up and Operation Guide

Section 6: Setting the StarTalk Status 6 - 11
6. Enter <the operator extension number> Note: This extension number must be the same digit length as the _ Norstar DN length.
To end this StarTalk session, press (Rls
The display automatically returns to the Norstar time and date. Any user requesting an operator is transferred to the new extension.
Important: Whenever the operator’s extension number is changed, you must change the extension number of the General Delivery mailbox to the new extension number of the operator.
StarTalk Set Up and Operation Guide

6 - 12 Section 6: Settina the StarTalk Status
Changing The Automated Attendant menu prompt plays after the Company Greeting, and the also after a caller leaves a message in a mailbox. The Automated Attendant
menu prompt provides a caller with a list of options such as entering a mailbox _ Automated number, accessing the company directory, or reaching the operator. You can
Attendant turn the default Automated Attendant menu prompt off at any time, and record a customized menu prompt for your company.
Status When the Return to Automated Attendant prompt is set to NO, the caller is not provided with any more options after leaving a message. Instead, after hearing the voice prompt “Message delivered”, the caller hears the voice prompt “Goodbye”, and the StarTalk session ends.
You might want to the disable the Automated Attendant prompt to prevent callers from establishing lengthy StarTalk sessions. You might also want to set the Automated Attendant prompt to NO if you are using Norstar Centrex software. For details, refer to Appendix A, StarTalWNorstar Feature Compat- ibility.
To change the Automated Attendant menu prompt status:
1. Press
Note: The first three digits represent the default mailbox number for your StarTalk System Coordinator Mailbox. The next four digits represent the default password. The password and mailbox combination varies depending on the Mailbox Number Length. Mailbox Number Lengths range from 2 to 7 digits. When the mailbox number length is 2 digits, the System Coordinator mailbox is 12. When the mailbox number length is 7 digits, the System Coordinator mailbox is 1000002. For more information about System Coordinator password and mailbox combinations, refer to Appendix B.
3. Press (-OK) The display shows:
.
StarTalk Set Up and Operation Guide
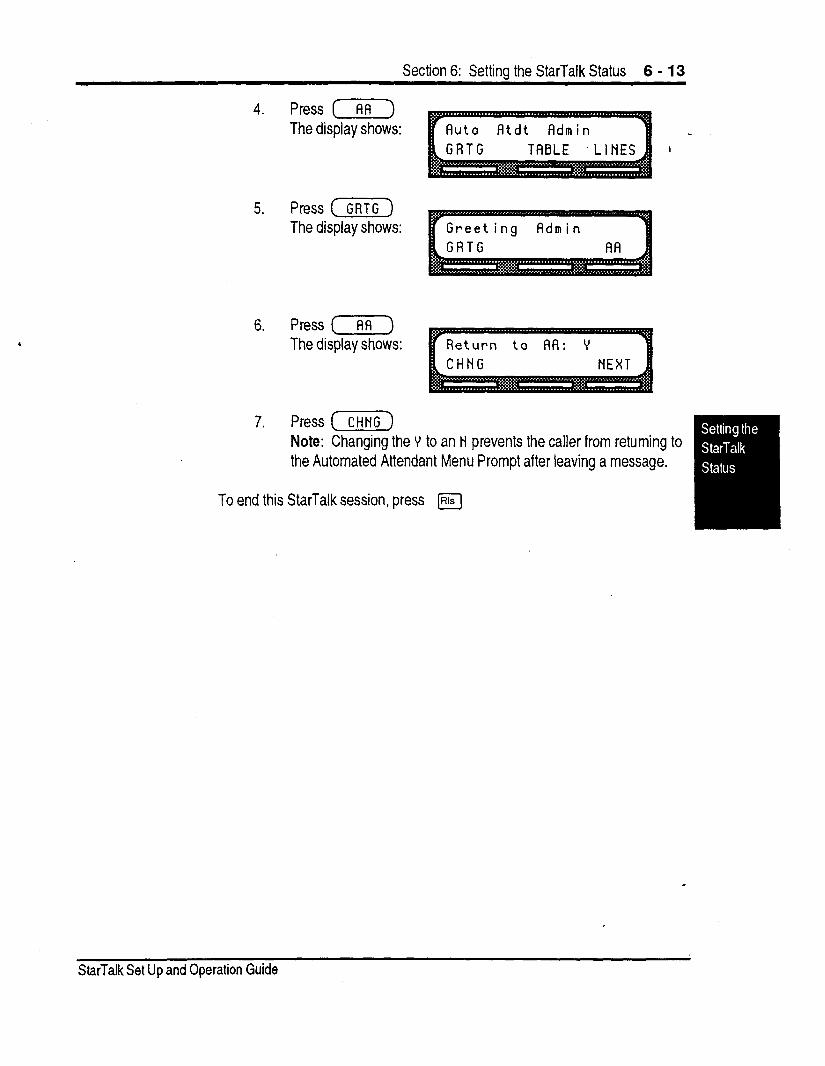
Section 6: Setting the StarTalk Status 6 - 13
4. Press [ AR ) The display shows:
5. Press (?FiiF] The display shows:
6. Press (AA) The display shows:
7. Press ( CHNG ) Note: Changing the Y to an N prevents the caller from returning to the Automated Attendant Menu Prompt after leaving a message.
To end this StarTalk session, press m
.
S&Talk Set Up and Operation Guide
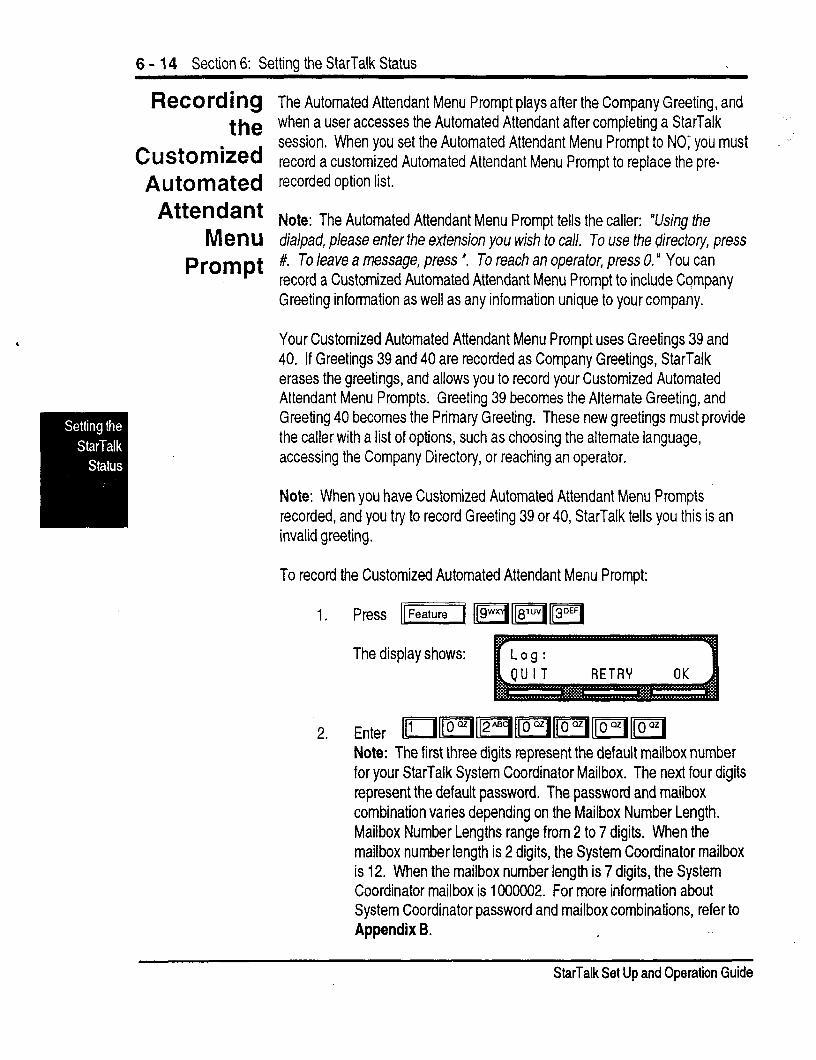
6 - 14 Section 6: Setting the StarTalk Status
Recording the
Customized Automated
Attendant Menu
Prompt
,
The Automated Attendant Menu Prompt plays after the Company Greeting, and when a user accesses the Automated Attendant after completing a StarTalk session. When you set the Automated Attendant Menu Prompt to NO; you must record a customized Automated Attendant Menu Prompt to replace the pre- recorded option list.
Note: The Automated Attendant Menu Prompt tells the caller: “Usirrg the dialpad, please enter the extension you wish to call. To use the directory, press #. To leave a message, press *. To reach an operator, press 0. ” You can record a Customized Automated Attendant Menu Prompt to include Company Greeting information as well as any information unique to your company.
Your Customized Automated Attendant Menu Prompt uses Greetings 39 and 40. If Greetings 39 and 40 are recorded as Company Greetings, StarTalk erases the greetings, and allows you to record your Customized Automated Attendant Menu Prompts. Greeting 39 becomes the Alternate Greeting, and Greeting 40 becomes the Primary Greeting. These new greetings must provide the caller with a list of options, such as choosing the alternate language, accessing the Company Directory, or reaching an operator.
Note: When you have Customized Automated Attendant Menu Prompts recorded, and you try to record Greeting 39 or 40, StarTalk tells you this is an invalid greeting.
To record the Customized Automated Attendant Menu Prompt:
1. Press m m118TuvJv]
The display shows:
Note: The first three digits represent the default mailbox number for your StarTalk System Coordinator Mailbox. The next four digits represent the default password. The password and mailbox combination varies depending on the Mailbox Number Length. Mailbox Number Lengths range from 2 to 7 digits. When the mailbox number length is 2 digits, the System Coordinator mailbox is 12. When the mailbox number length is 7 digits, the System Coordinator mailbox is 1000002. For more information about System Coordinator password and mailbox combinations, refer to Appendix B. . *
StarTalk Set Up and Operation Guide
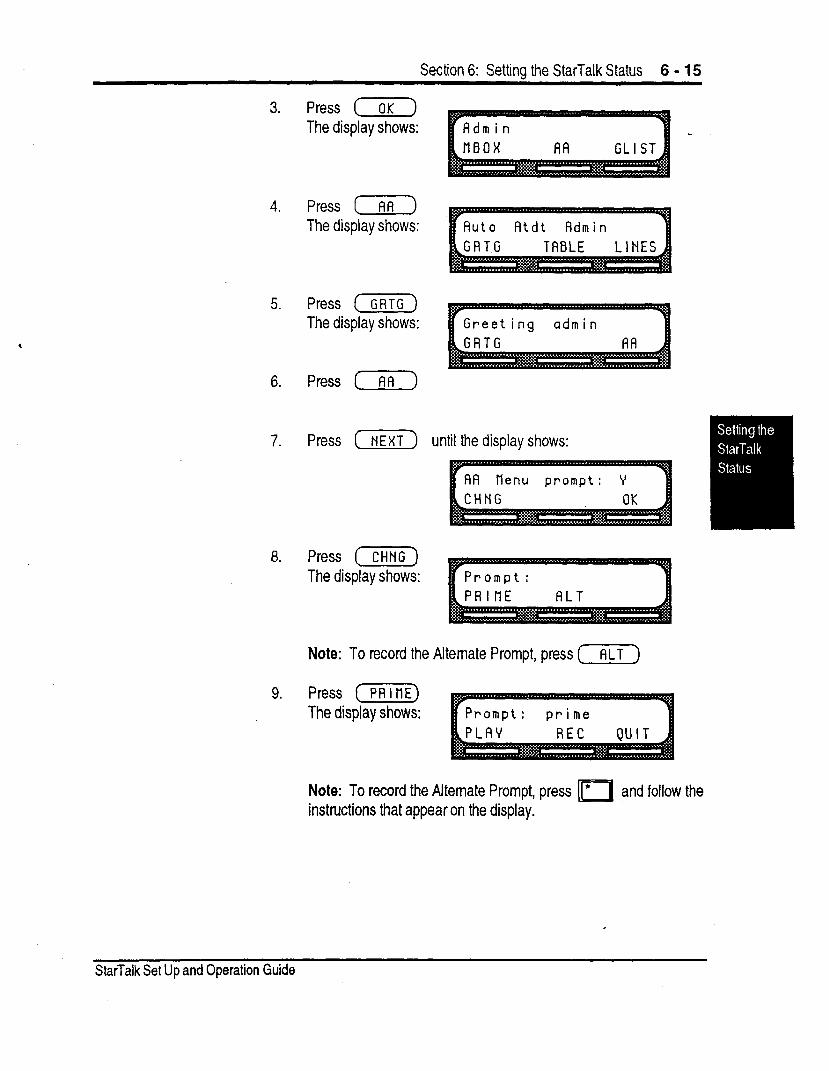
Section 6: Setting the StarTalk Status 6 - 15
3. Press ( OK )
The display shows:
4. Press (7) The display shows:
5. Press (cRTc) The display shows:
,
6. Press (RA)
7, Greeting admin
7. Press (NEXT) until the display shows:
AA tlenu prompt: Y
a. Press (CHNc) The display shows:
Note: To record the Alternate Prompt, press C ALT )
9. Press [PRlnE) The display shows:
Note: To record the Alternate Prompt, press m and follow the instructions that appear on the display.
StarTalk Set Up and Operation Guide
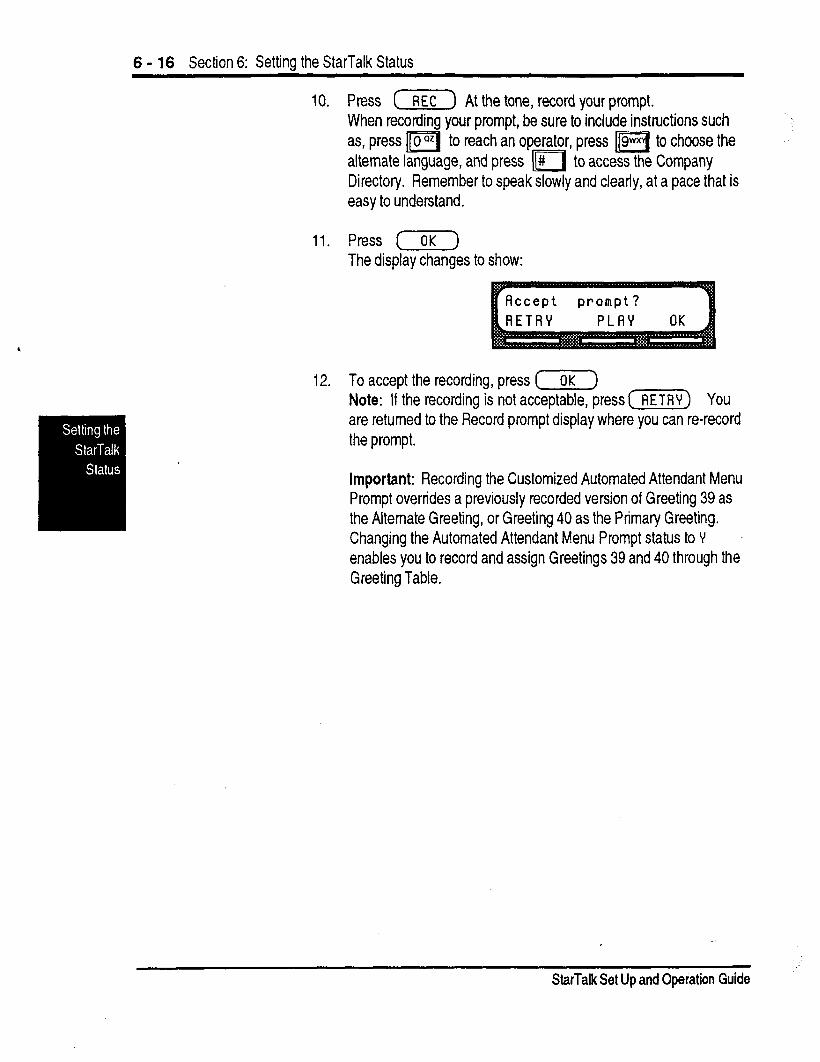
6 - 16 Section 6: Setting the StarTalk Status
.
10. Press (w) At the tone, record your prompt. When recording your prompt, be sure to include instructions such as, press I[Oazl to reach an operator, press m to choose the alternate language, and press II# to access the Company Directory. Remember to speak slowly and clearly, at a pace that is easy to understand.
11. Press (OK) The display changes to show:
12. To accept the recording, press (7) Note: If the recording is not acceptable, press (RETRY) You are returned to the Record prompt display where you can re-record the prompt.
Important: Recording the Customized Automated Attendant Menu Prompt overrides a previously recorded version of Greeting 39 as the Alternate Greeting, or Greeting 40 as the Primary Greeting. Changing the Automated Attendant Menu Prompt status to Y enables you to record and assign Greetings 39 and 40 through the Greeting Table.
StarTalk Set Up and Operation Guide
Administering the Mailboxes 7 In t rod uc t i on This section describes the steps for administering the StarTalk mailboxes.
Mailbox administration involves:
. listening to messages left in the Special Mailboxes
. replying to messages left in the Special Mailboxes
. routing messages left in the General Delivery Mailbox
. adding, changing, and deleting Personal Mailboxes
. resetting mailbox passwords
Note: If you lose the System Coordinator’s password, it can be reset. Refer to Troubleshooting ‘A mailbox owner lost the mailbox password’.
The Special Mailbox administration involves listening to messages, attending to each
Special message, and then deleting the message from the mailbox. It is very important
Mailboxes that messages left in the Special Mailboxes are attended to daily.
When a message is left in the General Delivery Mailbox for a mailbox owner, you can send the message from the General Delivery Mailbox to the owner’s mailbox.
StarTalk Set Up and Operation Guide
7 - 2 Section 7: Administering the Mailboxes
Listening to Messages Left in the
Special Mailboxes
Volume Control
Delivery Options
Messages left in the Special Mailboxes should be listened to daily. When the message has played and you have attended to the message, delete the message from the mailbox. This ensures availability of message space-in the Message Storage Pack.
..
When a message is left by a mailbox owner you can save the message, reply to the message by calling the message sender, send a reply message, or send a copy of the message with a message introduction to another mailbox.
You can adjust the volume while a message is playing in any mailbox. Press- ing [*I increases the volume by 3 dB. The volume can be increased to a maximum of 9 dB. When the volume reaches 9 dB the next time you press r], the volume returns to 3 dB.
Note: Volume control does not apply to system prompts. Messages play at the adjusted volume while the system prompts play at the preset volume.
When leaving a message in a mailbox, StarTalk provides you with four delivery options: Certified, Urgent, Private, and Normal. The Certified delivery option notifies you that your message has been received and read. The Urgent delivery option ensures a message plays before other messages in a mailbox. The Private delivery option prevents a mes.sage from being forwarded to another mailbox. The Normal delivery option sends a message to a mailbox. Normal messages are played in the order they are received. Normal messages can be forwarded to other mailboxes.
. ’
S&Talk Set Up and Operation Guide
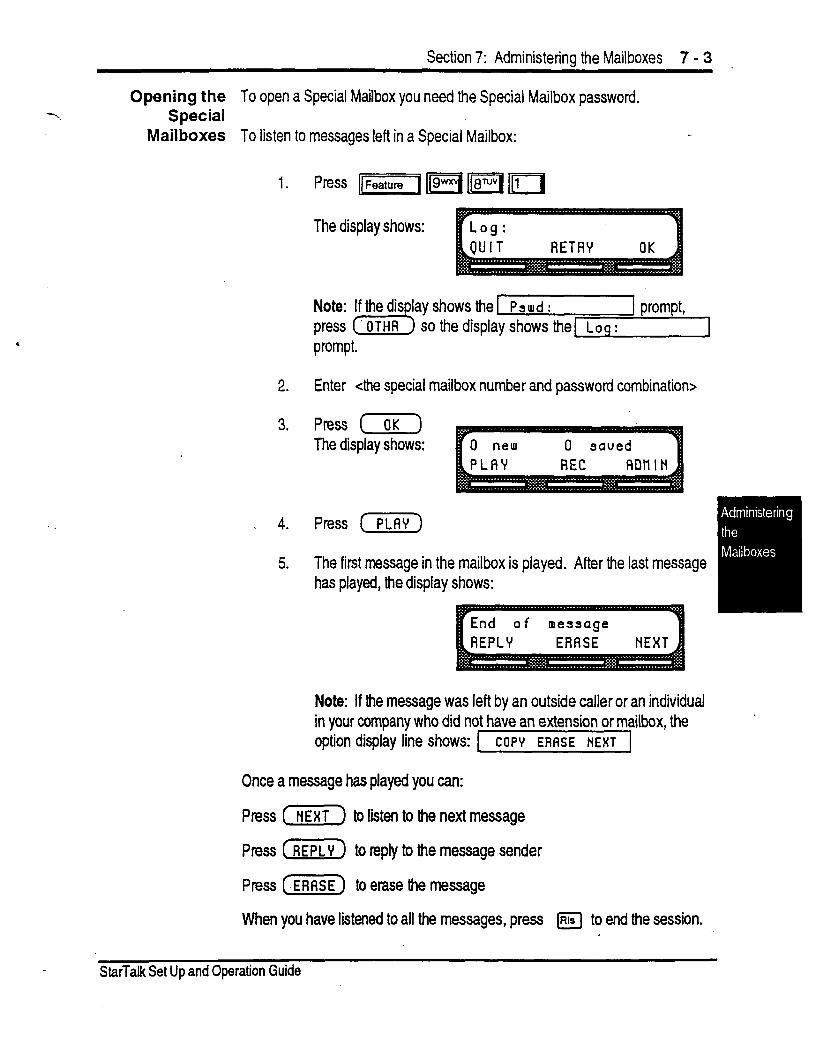
-.
Section 7: Administering the Mailboxes 7 - 3 .
Opening the To open a Special Mailbox you need the Special Mailbox password. Special
Mailboxes To listen to messages left in a Special Mailbox:
1.
2.
3.
% 4.
5.
Press [1Featurei 119-1 m 1111
The display shows:
prompt.
shows the [ P3ud : I prompt, so the display shows the 1 LO 9 :
Enter cthe special mailbox number and password combination>
Press ( OK ) The display shows:
Press (PLAV)
The first message in the mailbox is played. After the last message has played, the display shows:
Note: If the message was left by an outside caller or an individual in your company who did not have an extension or mailbox, the option display line shows: COPY ERASE NEXT
Once a message has played you can:
Press (HEXT) to listen to the next message
Press ( REPLY) to reply to the message sender
Press (KG) to erase the message
When you have listened to all the messages, press m to end the session.
StarTalk Set Up and Operation Guide
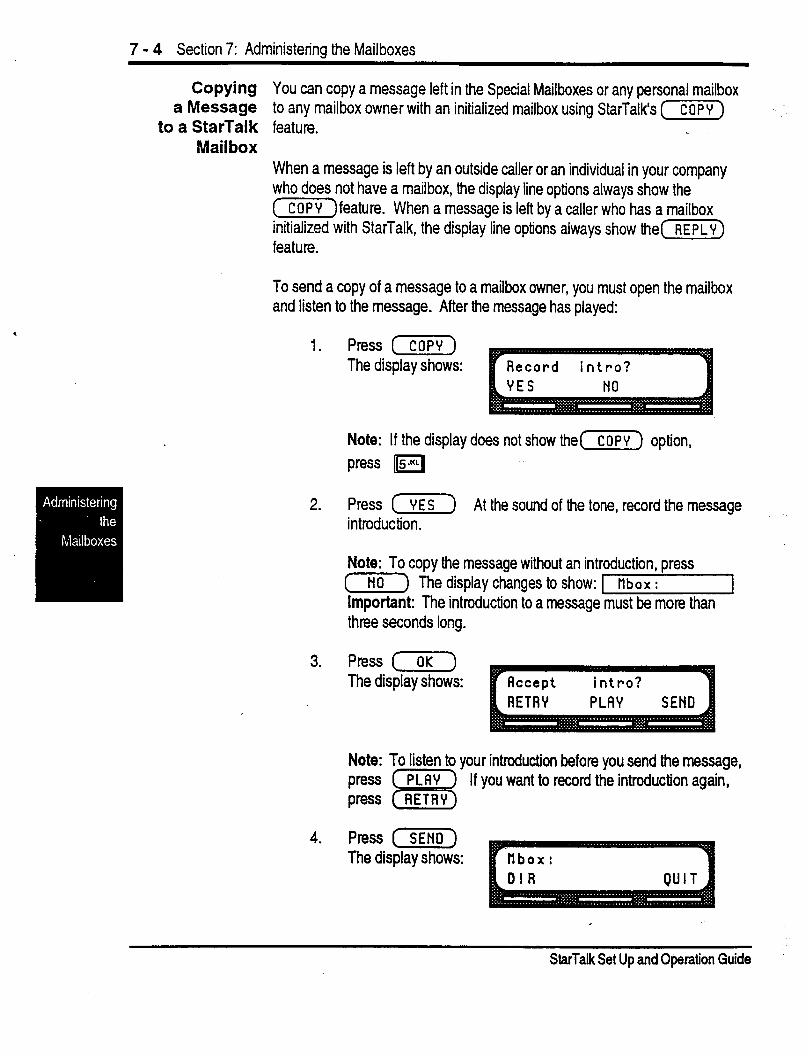
7 - 4 Section 7: Administenna the Mailboxes
Copying You can copy a message left in the Special Mailboxes or any personal mailbox a Message to any mailbox owner with an initialized mailbox using StarTalk’s (m)
to a StarTalk feature. -.
Mail box When a message is left by an outside caller or an individual in your company who does not have a mailbox, the display line options always show the (m)feature. When a message is left by a caller who has a mailbox initialized with StarTalk, the display line options always show the(‘) feature.
To send a copy of a message to a mailbox owner, you must open the mailbox and listen to the message. After the message has played:
1. Press ( COPY ) The display shows:
Note: If the display does not show the(F) option, press m
2. Press [ YES At the sound of the tone, record the message > introduction.
Note: To COPY the messacte without an introduction. press (NO) The display changes to show: 1 tl b o x i ’ I important: The introduction to a message must be more than three seconds long.
3. Press (aK) The display shows:
Note: To listen to your introduction before you send the message, If you want to record the introduction again,
4. Press (sENo) The display shows:
StarTalk Set Up and Operation Guide
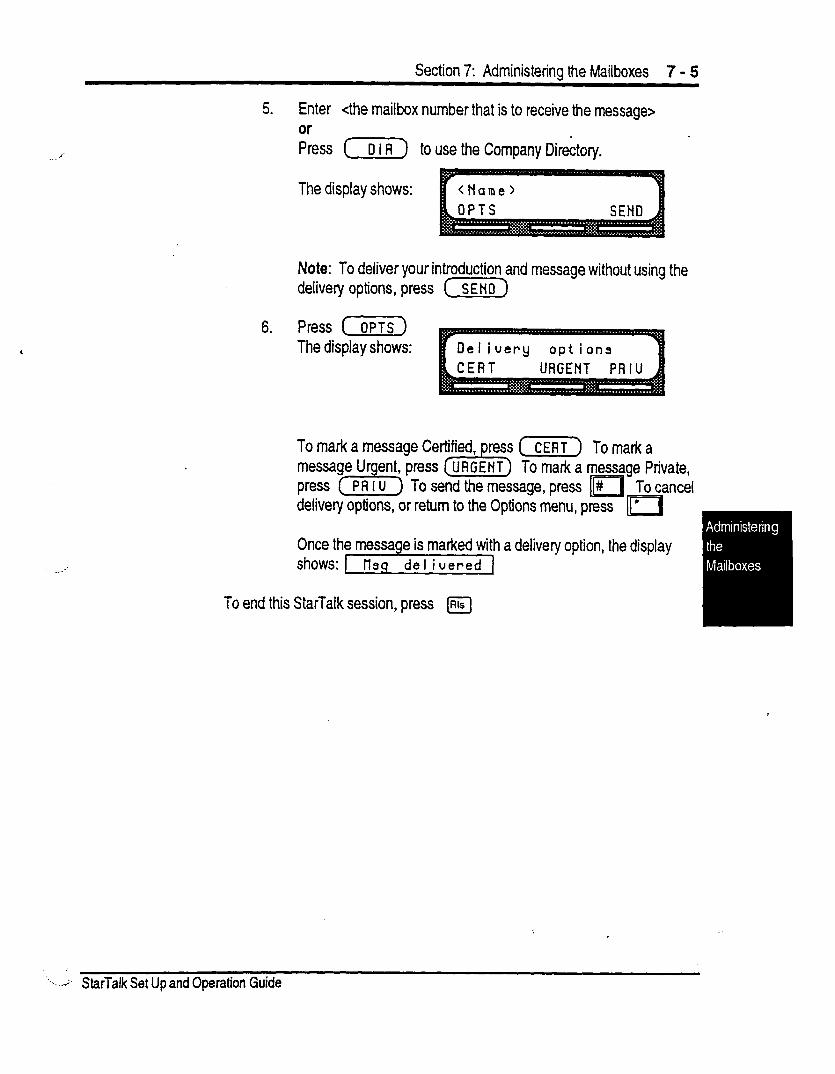
Section 7: Administering the Mailboxes 7 - 5
5. Enter <the mailbox number that is to receive the message> Or
Press (7) to use the Company Dir&tory.
The display shows:
Note: To deliver your introduction and message without using the delivery options, press (x)
6. Press (?FF) The display shows:
To mark a message To mark a message Private,
To send the message, press m To cancel zii%y options, or return to the Options menu, press [I
Once the message is marked with a delivery option, the display shows: Ilag del iuered
To end this StarTalk session, press (Rls
‘-.-.A StarTalk Set Up and Operation Guide
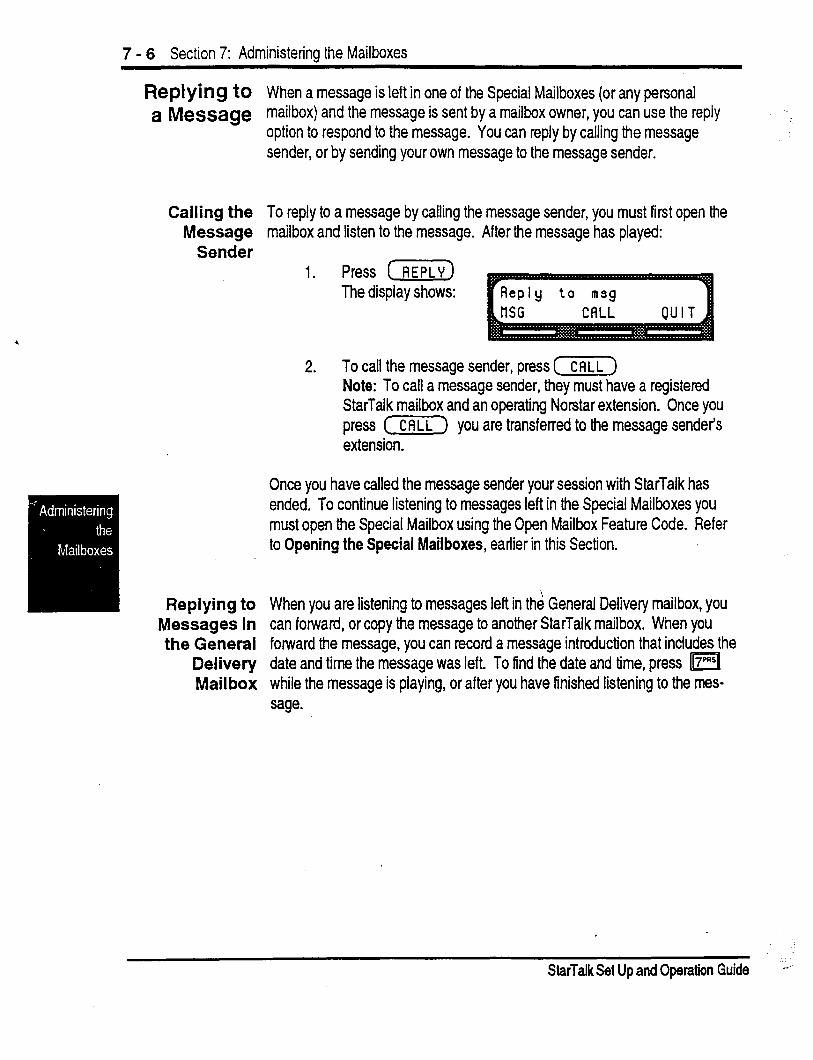
7 - 6 Section 7: Administering the Mailboxes
Replying to a Message
Calling the Message
Sender
Messages In the General
Delivery Mail box
When a message is left in one of the Special Mailboxes (or any personal mailbox) and the message is sent by a mailbox owner, you can use the reply option to respond to the message. You can reply by calling the message sender, or by sending your own message to the message sender.
--:
To reply to a message by calling the message sender, you must first open the mailbox and listen to the message. After the message has played:
1. Press (E) The display shows:
2. To call the message sender, press (CALL) Note: To call a message sender, they must have a registered StarTalk mailbox and an operating Norstar extension. Once you press (m) you are transferred to the message sender’s extension.
Once you have called the message sender your session with StarTalk has ended. To continue listening to messages left in the Special Mailboxes you must open the Special Mailbox using the Open Mailbox Feature Code. Refer to Opening the Special Mailboxes, earlier in this Section.
When you are listening to messages left in thd General Delivery mailbox, you can forward, or copy the message to another S&Talk mailbox. When you fonrvard the message, you can record a message introduction that includes the date and time the message was left. To find the date and time, press m while the message is playing, or after you have finished listening to the mes- sage.
StarTalk Set Up and Operation Guide ”

Section 7: Administerina the Mailboxes 7 - 7
Replying To reply to a message sender with a message, you must open the mailbox by Sending a using the Open Mailbox Feature Code and listen to the message. After the _
Message message has played:
1. Press (REPLY) The display shows:
2. Press (-?E-)
3. At the tone, record your message reply.
4. Press (7) to end your recording.
The display shows:
Note: To listen to your message before sending it, press (-) To record your message again, press (m]
5. Press (OK) to accept your recording
The display shows:
6. Press (-GE) The display shows:
To mark a message Certified, ress (m) To mark a To mark a message Private,
To send the message, press m To cancel delivery options, or return to the Options menu, press m
a delivery option, the display
To end this StarTalk session, press a
StarTalk Set Up and Operation Guide
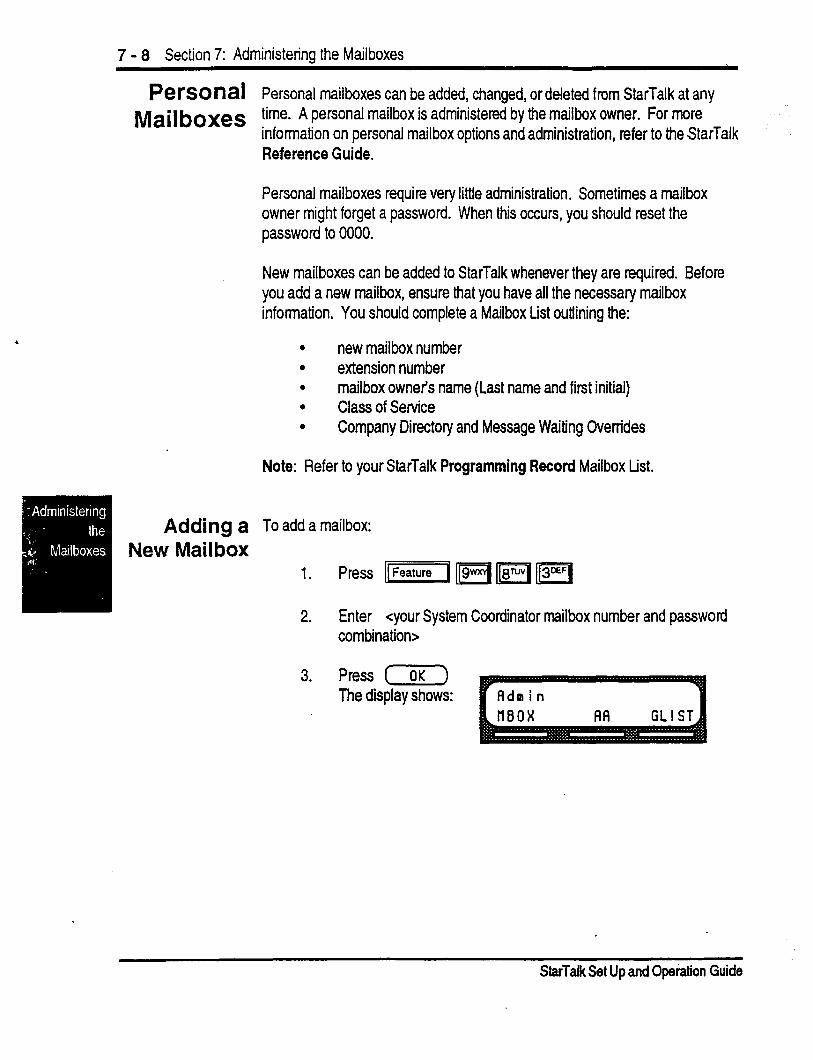
7 - 8 Section 7: Administering the Mailboxes
PerSOnal Personal mailboxes can be added, changed, or deleted from StarTalk at any
Mailboxes time. A personal mailbox is administered by the mailbox owner. For more information on personal mailbox options and administration, refer to the StarTalk Reference Guide.
Personal mailboxes require very little administration. Sometimes a mailbox owner might forget a password. When this occurs, you should reset the password to 0000.
New mailboxes can be added to StarTalk whenever they are required. Before you add a new mailbox, ensure that you have all the necessary mailbox information. You should complete a Mailbox List outlining the:
0 new mailbox number . extension number . mailbox owner’s name (Last name and first initial) b Class of Service . Company Directory and Message Waiting Overrides
Note: Refer to your StarTalk Programming Record Mailbox List.
Adding a To add a mailbox: New Mailbox
1. Press -[/5qm@q
2. Enter <your System Coordinator mailbox number and password combination>
3. Press ( OK ) The display shows:
StarTalk Set Up and Opeiation Guide
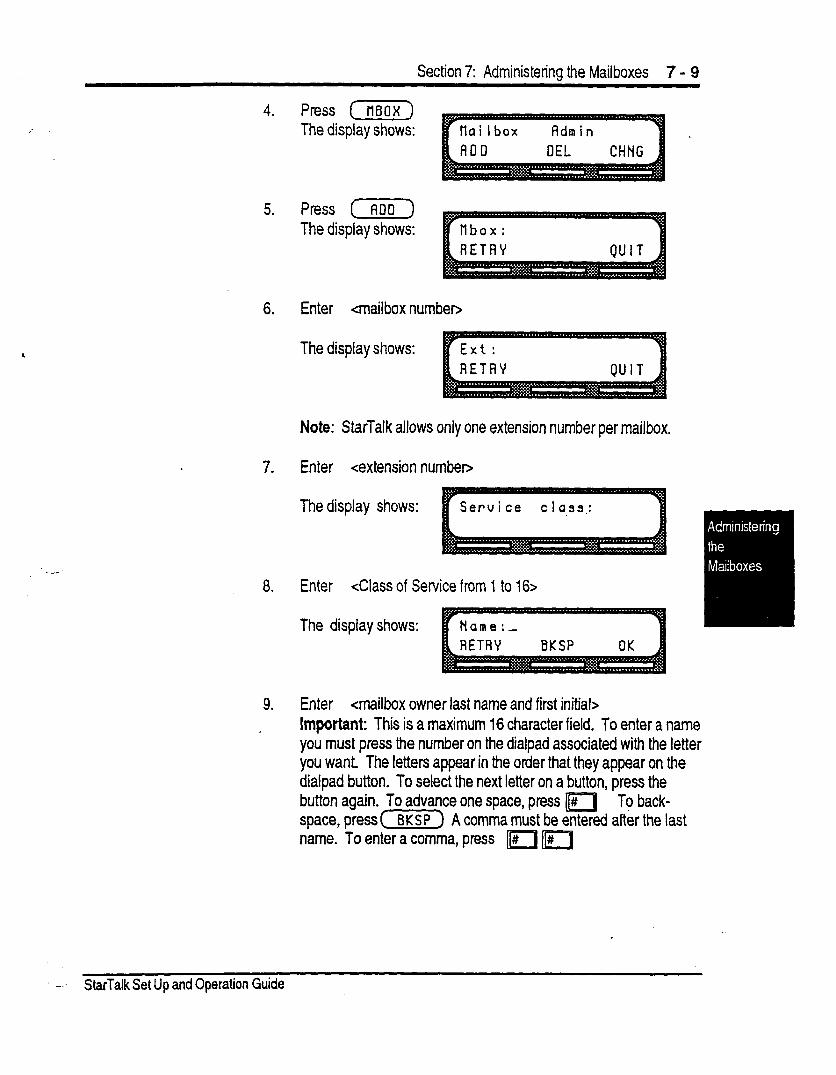
Section 7: Administering the Mailboxes 7 - 9
4. Press (nsox) The display shows:
5. Press (ROO) The display shows:
6. Enter <mailbox numben
The display shows:
Note: StarTalk allows only one extension number per mailbox.
7. Enter <extension numben
The display shows: Seru i ce c I a.33.:
8. Enter <Class of Service from 1 to 16>
The display shows:
9. Enter cmailbox owner last name and first initial> Important: This is a maximum 16 character field. To enter a name you must press the number on the dialpad associated with the letter you want. The letters appear in the order that they appear on the dialpad button. To select the next letter on a button, press the button again. To advance one space, press m To back- space, press I=) A comma must be entered after the last name. To enter a comma, press 1#1 Fl
_:’ StarTalk Set Up and Operation Guide
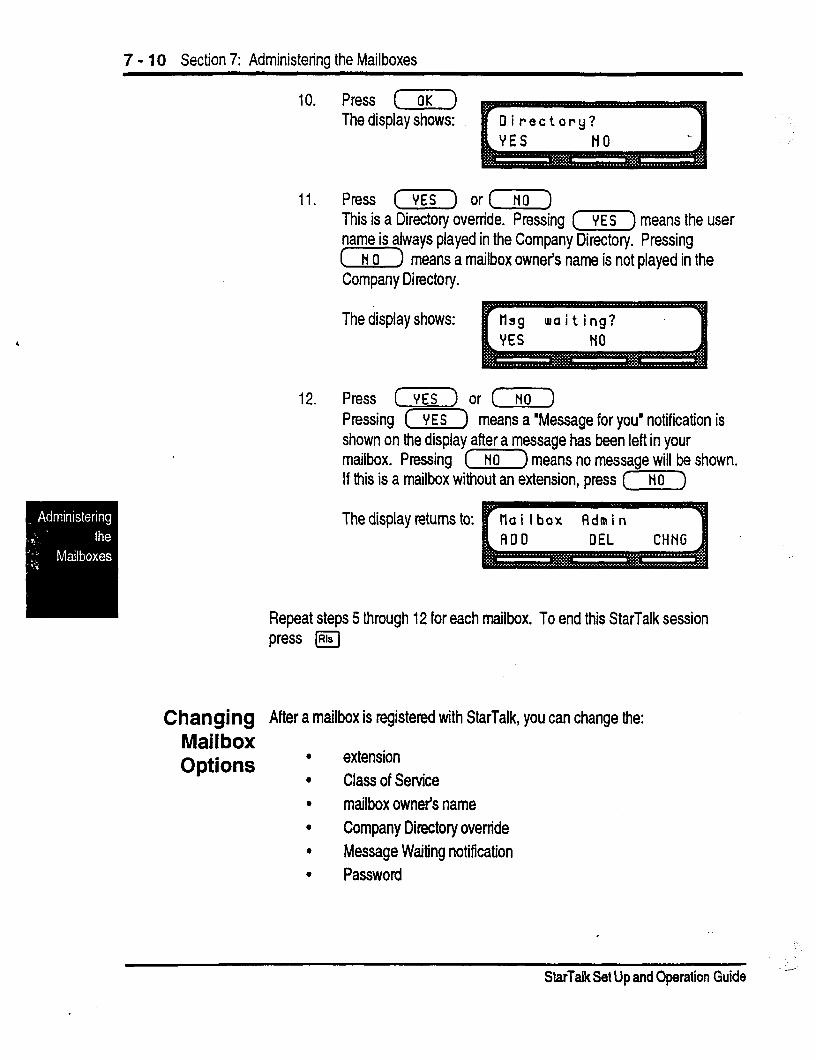
7 - 10 Section 7: Administering the Mailboxes
10. Press ( OK ) The display shows:
11. Press (YES) or (NO) This is a Directory override. Pressing (x) means the user name is always played in the Company Directory. Pressing (7) means a mailbox owner’s name is not played in the Company Directory.
The display shows:
12. Press (YES) or (NO) Pressing (YES) means a “Message for you’ notification is shown on the display after a message has been left in your mailbox. Pressing (7) means no message will be shown. If this is a mailbox without an extension, press (HO)
The display returns to:
Repeat steps 5 through 12 for each mailbox. To end this StarTalk session press /FJ
Changing After a mailbox is registered with StarTalk, you can change the: Mail box Options l
extension 0 Class of Service l mailbox owner’s name 0 Company Directory override l Message Waiting notification . Password
StarTalk Set Up and Operation Guide

Section 7: Administerina the Mailboxes 7 - 11
Changing To change the mailbox extension: a Mailbox Extension , Press -1 w ‘wj Fj
The display shows:
2. Enter <your System Coordinator mailbox number and password combination>
3. Press C-G?) The display shows:
4. Press (?iifK) The display shows:
5, Press (CHHG) The display shows:
tlai lbox fldmin f!DD DEL CHNG
6. Enter <mailbox numben
The display shows:
S&Talk Set Up and Operation Guide
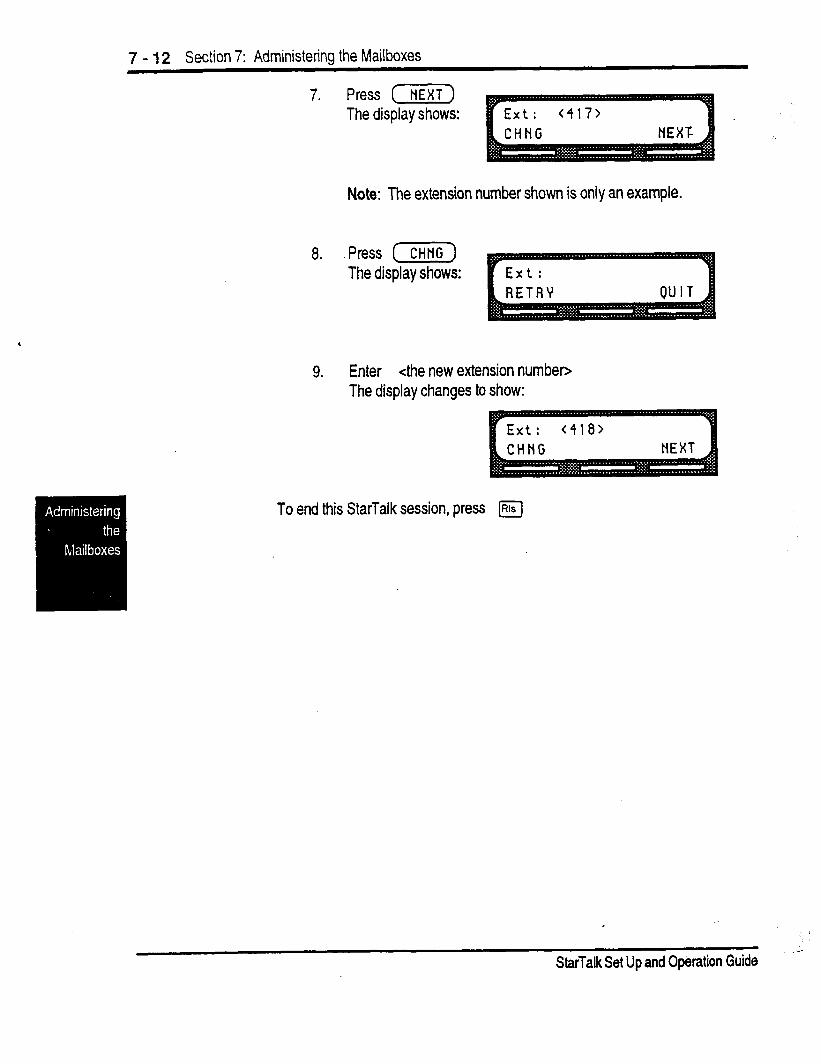
7 - 12 Section 7: Administerinq the Mailboxes
7. Press c NEXT) The display shows:
Note: The extension number shown is only an example.
8. Press (z) The display shows:
9. Enter cthe new extension numbeo The display changes to show:
To end this StarTalk session, press m
,
A &Talk Set Up and Operation Guide
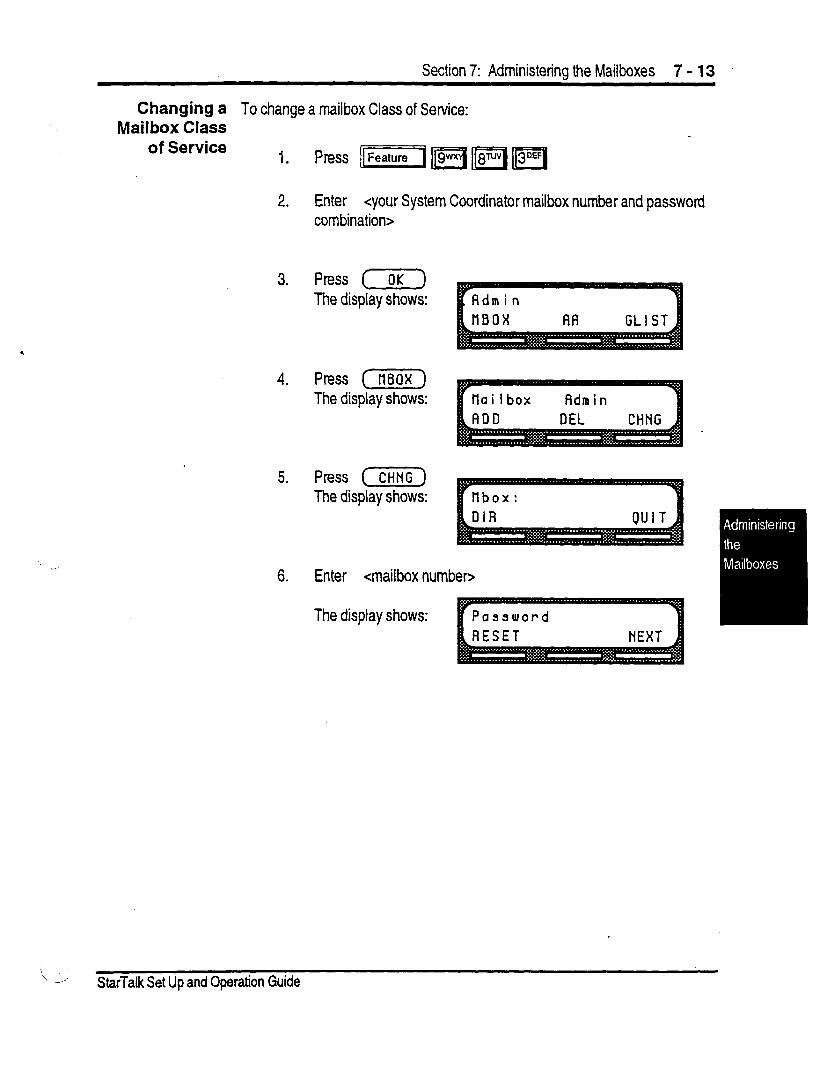
Section 7: Administerina the Mailboxes 7 - 13
Changing a To change a mailbox Class of Service: Mailbox Class
of Service
2. Enter <your System Coordinator mailbox number and password combination>
3. Press (OK) The display shows:
4. Press (-7iz-j The display shows:
5. Press (CHNG) The display shows:
tloi lbox Rdmin
rtlbox:
6. Enter <mailbox numben
The display shows:
x -.’ StarTalk Set Up and Operation Guide
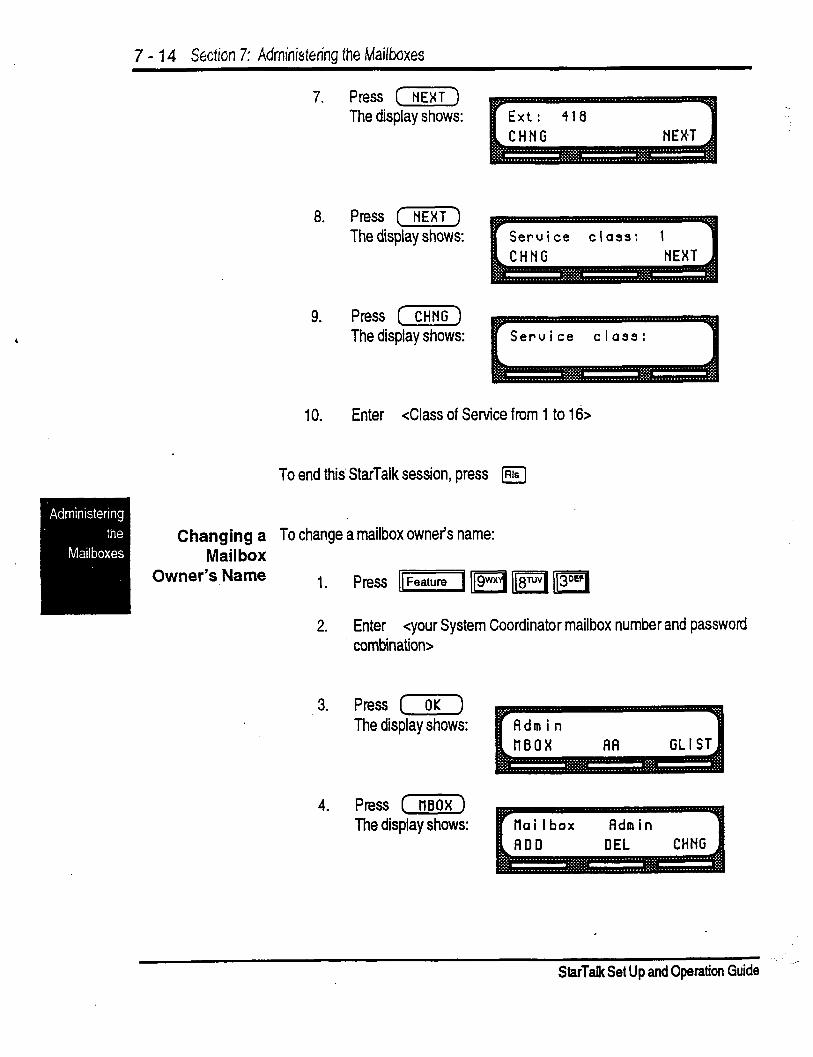
7 - 14 Section 7: kdminivtering the Mailboxes
7. Press (NEXT) The display shows:
8.
9.
10.
Press (nExT) The display shows:
Press (CHNG) The display shows:
Enter <Class of Service from 1 to 16
To end this’ StarTalk session, press m
Changing a To change a mailbox owner’s name: Mail box
Owner’s Name 1.
2.
3.
press F!/ ‘Fq ]1BTuv11130Eq
Enter <your System Coordinator mailbox number and password
4.
combination>
Press [ OK ) The display shows:
Press (nsox) The display shows:
StarTalk Set Up and Operation Guide -_
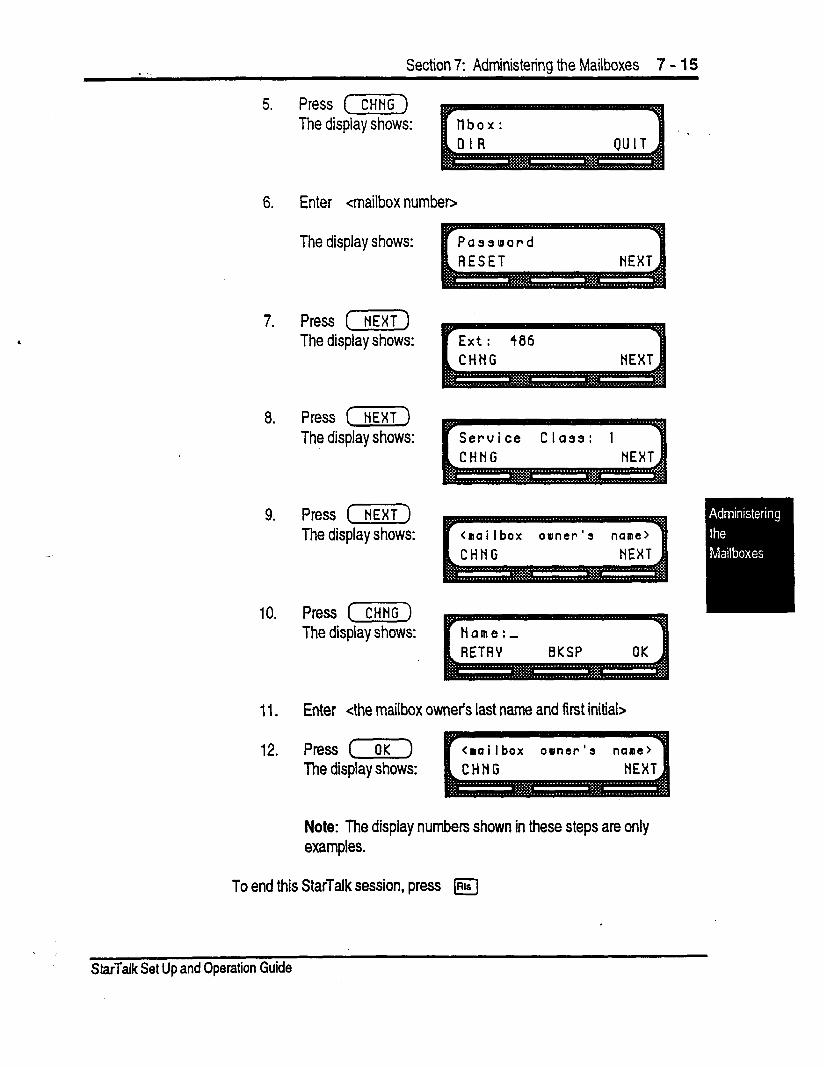
Section 7: Administering the Mailboxes 7 - 15
5. Press ( CHNG ) The display shows:
6. Enter <mailbox numbeo
The display shows:
7. Press (NEXT) The display shows:
a. Press (EtEXT) The display shows:
9.
10.
11.
12.
Press (NEXT) The display shows:
Press ( CHNG ) The display shows:
Enter <the mailbox owner‘s last name and first initial>
Press (OK) The display shows:
Note: The display numbers shown in these steps are only examples.
To end this StarTalk session, press @
StarTalk Set Up and Operation Guide
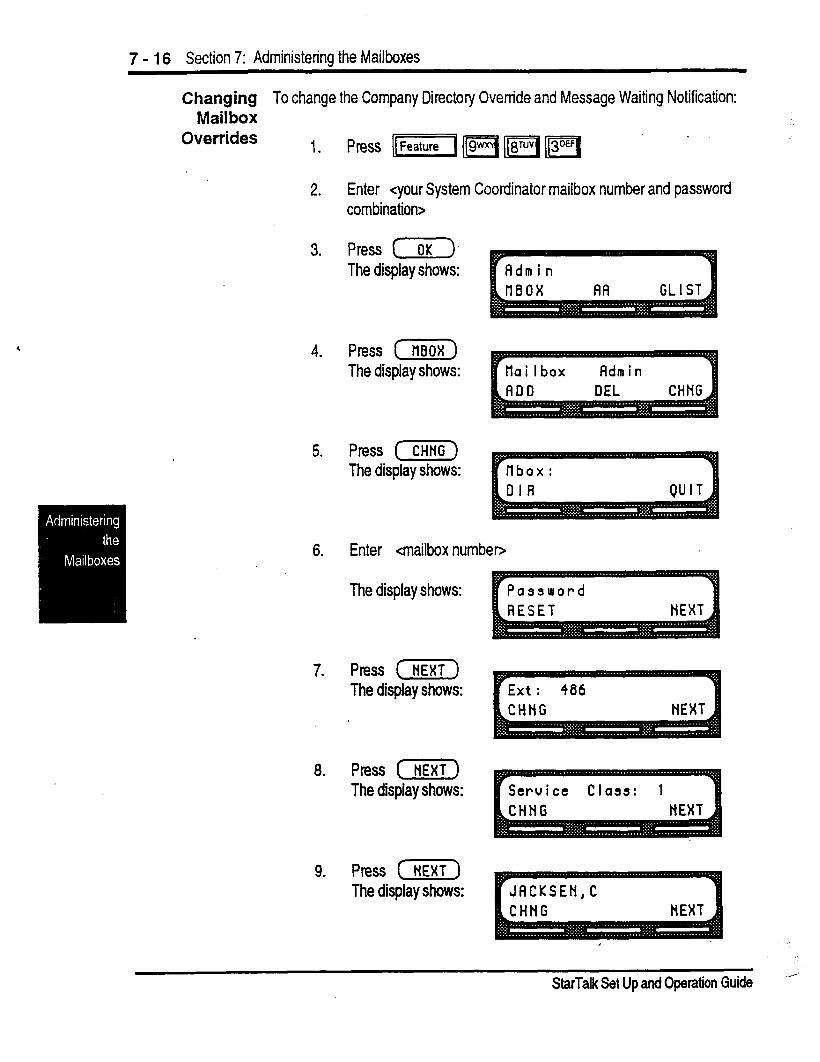
7 - 16 Section 7: Administering the Mailboxes
Changing To change the Company Directory Override and Message Waiting Notification: Mail box
Overrides 1. press [(featureI(mp(1(30EF( .
2.
3.
Enter <your System Coordinator mailbox number and password combination>
Press (OK-) The display shows:
4. Press (neox) The display shows:
5. Press [CHNG) The display shows:
6. Enter <mailbox numben
The display shows: rp assword
7. Press (X5-) The display shows:
8. Pfess (HEXT) The display shows:
9. Press (NEXT) The display shows:
Service Class: 1 1
StarTalk Set Up and Operation Guide .-l‘
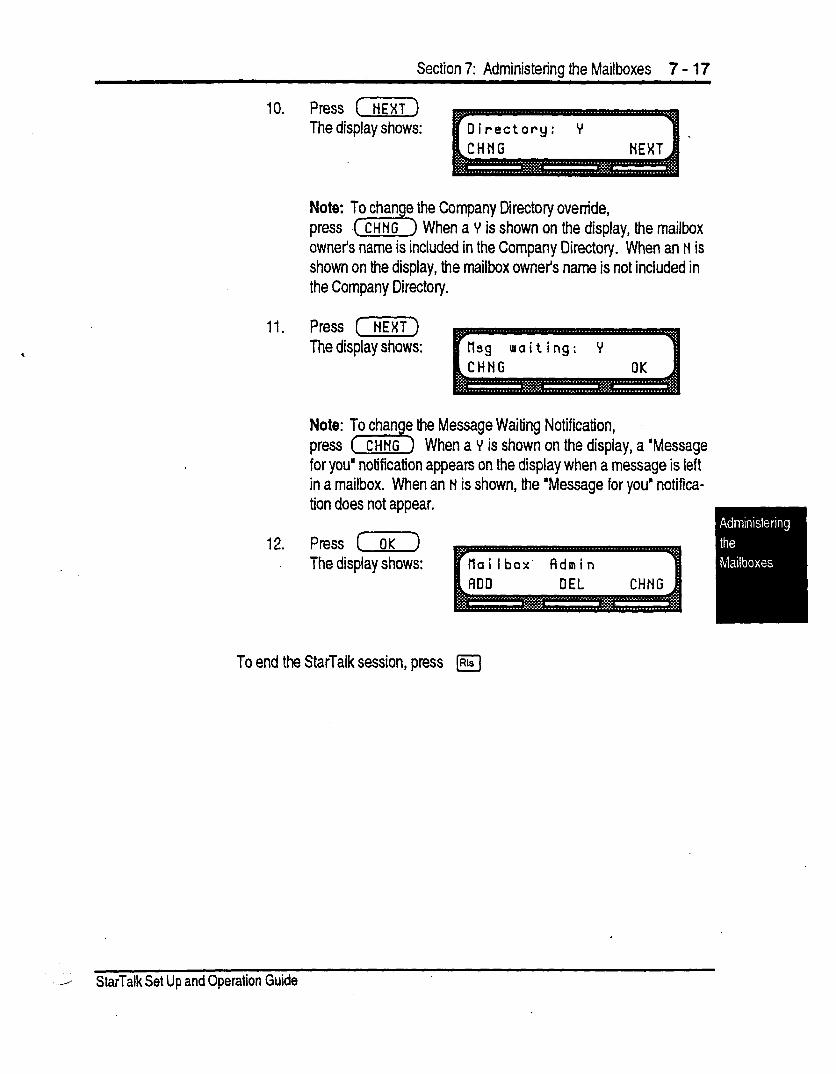
Section 7: Administering the Mailboxes 7 - 17
,
10. Press (XF) The display shows: Directory: Y
the Company Directory override, When a Y is shown on the display, the mailbox
owner’s name is included in the Company Directory. When an N is shown on the display, the mailbox owner’s name is not included in the Company Directory.
11. Press (NEXT) The display shows:
the Message Waiting Notification, When a Y is shown on the display, a “Message
for you’ notification appears on the display when a message is left in a mailbox. When an N is shown, the ‘Message for you‘ notifica- tion does not appear.
12. Press (OK) The display shows:
To end the StarTalk session, press m
. . / S&Talk Set Up and Operation Guide
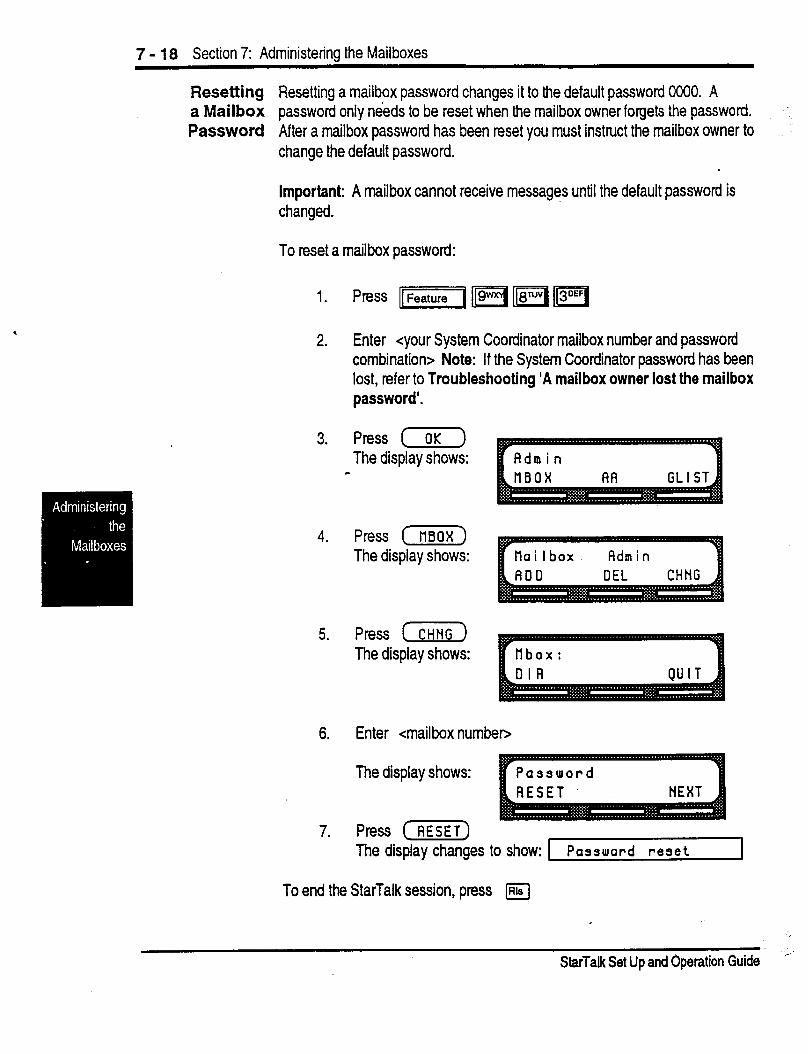
7 - 18 Section 7: Administering the Mailboxes
Resetting Resetting a mailbox password changes it to the default password 0000. A a Mailbox password only n&ds to be reset when the mailbox owner forgets the password. Password After a mailbox password has been reset you must instruct the mailbox owner to
change the default password.
important: A mailbox cannot receive messages until the default password is changed.
To reset a mailbox password:
2. Enter <your System Coordinator mailbox number and password combination> Note: If the System Coordinator password has been lost, refer to Troubleshooting ‘A mailbox owner lost the mailbox password’.
3. Press (OK) The display shows:
4. Press (FiiGF) The display shows:
5. Press ( CHNG ) The display shows:
rfldm i n 1
6. Enter <mailbox numbeo
The display shows:
7. Press (AESET) The display changes to show: [ Paaaurord reset 1
To end the StarTalk session, press m
StarTalk Set Up and Operation Guide
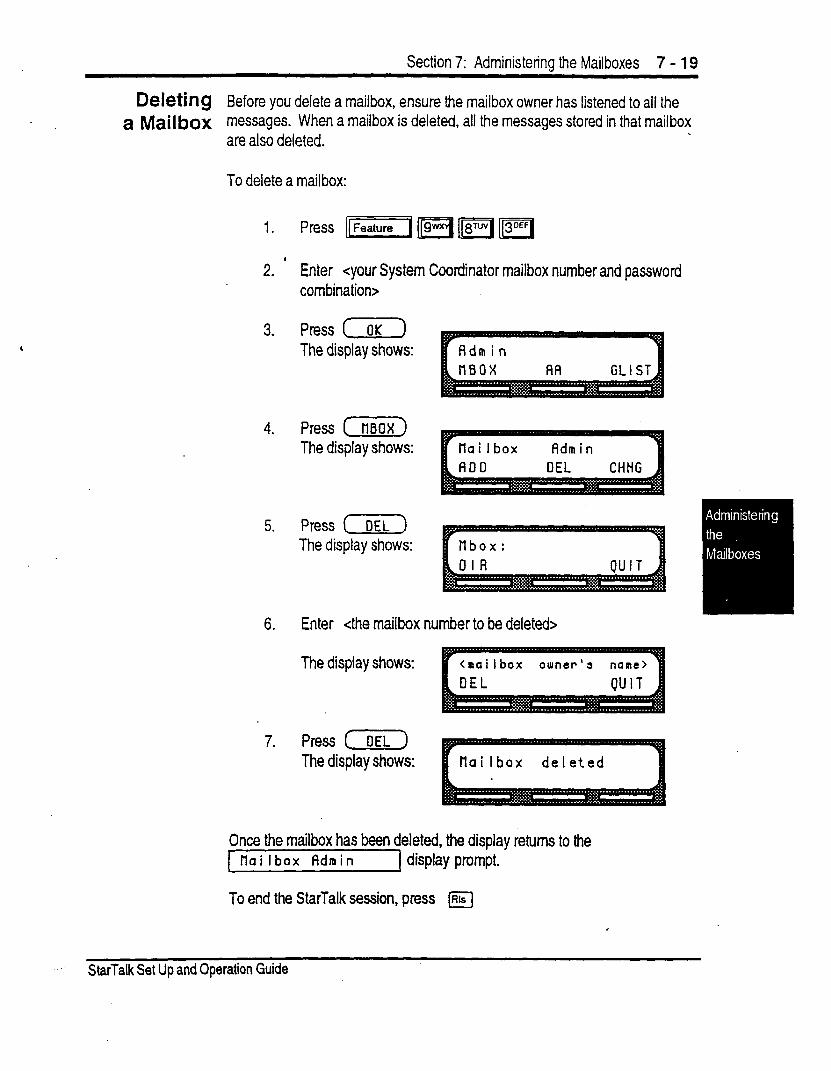
Section 7: Administerinq the Mailboxes 7 - 19
Deleting Before you delete a mailbox, ensure the mailbox owner has listened to all the a Mailbox messages. When a mailbox is deleted, all the messages stored in that mailbox
are also deleted.
To delete a mailbox:
3.
4.
5.
6.
7.
Enter <your System Coordinator mailbox number and password combination>
Press [OK) The display shows:
Press [Y%iF] The display shows:
Press ( DEL ) The display shows:
StarTalk Set Up and Operation Guide
Enter <the mailbox number to be deleted>
The display shows:
Press ( DEL ) The display shows: flailbox deleted
Once the mailbox has been deleted, the display returns to the Hoi lbox Admin 1 display prompt.
To end the StarTalk session, press m
7 - 20 Section 7: Administering the Mailboxes
StarTalk Set Up and Operation Guide
Sending a Message to More &’ than One Mailbox 8
Introduction
Broadcast Messages
When To Send a
Broadcast Message
Apart from the day to day messages that you send, there might be times when you need to send a Broadcast Message to all mailbox owners, or a Group Message to a designated group of mailboxes.
This section describes the steps you need to:
0 send a Broadcast Message . create or delete a Group List . change the members of a Group List . view the members of a Group List . send a Group Message
Broadcast Messages are recorded by you and played on all mailboxes initialized with StarTalk. A mailbox owner does not have to select a Broadcast Message to play. The message is played automatically when mailbox owners open their mailboxes.
A Broadcast Message is played only once for each mailbox owner, and cannot be interrupted. A mailbox must be initialized to receive a Broadcast Message.
A Broadcast Message ensures the same message information is delivered to each mailbox, and eliminates having to record and send the same message several times. Broadcast Messages can be sent to announce meetings, special company events, and reminders.
‘-..-A StarTalk Set Up and Operation Guide
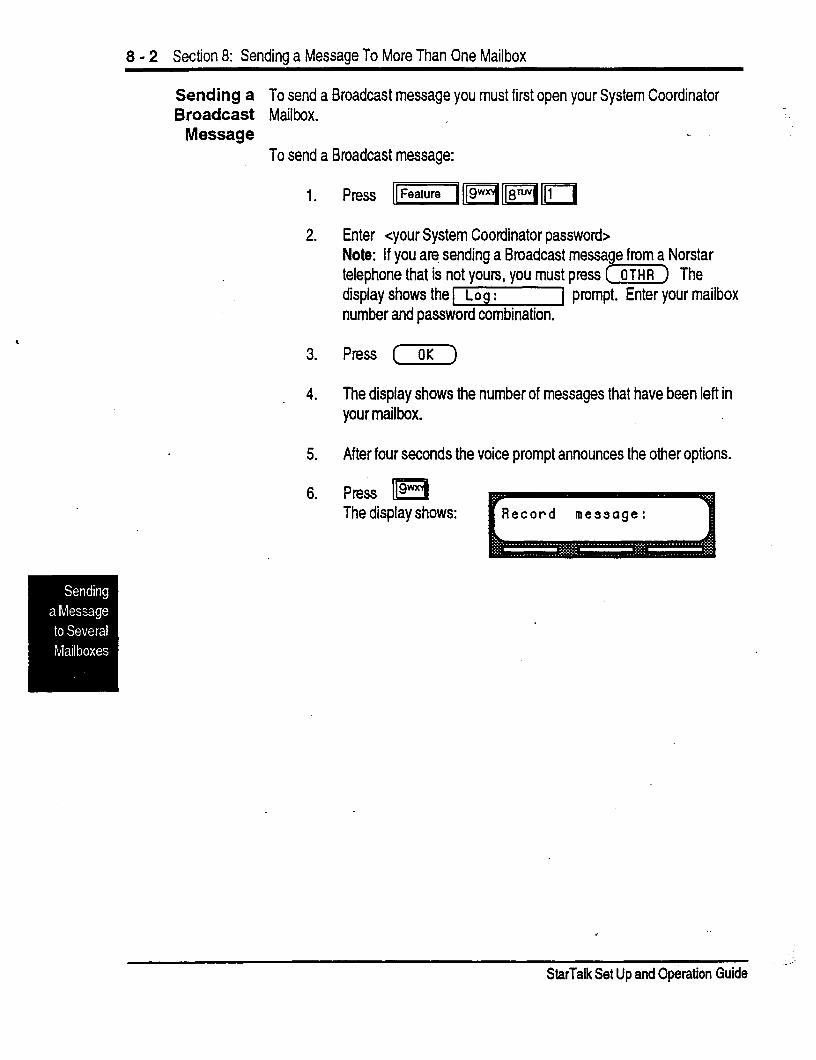
8 - 2 Section 8: Sending a Message To More Than One Mailbox
Sending a To send a Broadcast message you must first open your System Coordinator Broadcast Mailbox.
Message To send a Broadcast message:
1.
2.
3.
4.
5.
6.
Enter <your System Coordinator password> Note: If you are sending a Broadcast telephone that is not yours, you must press display shows the 1 Log : 1 prompt. Enter your mailbox number and password combination.
Press (OK)
The display shows the number of messages that have been left in your mailbox.
After four seconds the voice prompt announces the other options.
Press H The display shows:
. *
-’ StarTalk Set Up and Operation Guide

Section 8: Sendina a Messaae To More Than One Mailbox 8 - 3
7. At the sound of the tone, record your message. Note: When you record your Broadcast message, remember to - speak clearly, at a pace that is easy to understand. Do not forget to include all the important points of your message.
8. Press (-7) to end your recording.
The display shows:
9. Press (X7) to accept your recording.
Your message is delivered to all initialized mailboxes registered with StarTalk. To replay your message before ou send it, press (PLAV) To record your message again, press To end this StarTalk session, press m
Note: Depending on the number of mailboxes registered with StarTalk, it can take up to five minutes to deliver your message to all the mailboxes. During this time, access to the StarTalk features is not allowed.
StarTalk Set Up and Operation Guide

8 - 4 Section 8: Sending a Message To More Than One Mailbox
GrOU p Before you can send a group message you must first define a Group List. A
Messages Group List contains all the mailbox numbers that receive a group message. For example, you might group all mailboxes from the Accounting department into one Group List, and all mailboxes from Shipping into another.
Important: The Group List feature was enabled during installation. If this option is disabled, you must reset StarTalk to enable the feature. For instruc- tions on resetting StarTalk refer to Appendix C.
Preparing a Preparing a Group List is just like setting up a new mailbox. A Group List is Group List assigned a Group List number and name. The leading digit for Group Lists was
assigned during installation. The next two digits are automatically assigned by StarTalk when you add the Group List. The Group List numbers are assigned in sequential order. You must assign the Group List name. A Group List is set up using the StarTalk Configuration Feature Code 983.
You can have a total of 99 Group Lists. Each Group List can contain a maxi- mum of 500 mailboxes. Before you begin to add Group Lists, you must prepare a Group Mailbox Member List. This list should contain:
. Leading digit assigned during installation
. Group List name maximum 16 characters long b Mailbox numbers included in the group
Note: For more information about Groups Lists refer to Section 3, Group List Options.
A number from 0 to 9 can be assigned as the Group List leading digit. For example, if the leading digit is 0, the Group List numbers will be from 001 up to
. and including 099. Or if the leading digit is 5, the Group List numbers will be from 501 up to and including 599. The leading digit defaults to 9 when a number is not assigned. This means, the Group List default numbers are 901 up to and including 999.
Note: The Group List numbers are always three digits long. When your DN length is 3 and the leading digit is 1, the Special Mailboxes default to 200,201 and 202. For more information about the StarTalk default values, refer to Appendix 8.
.
StarTalk Set Up and Operation Guide
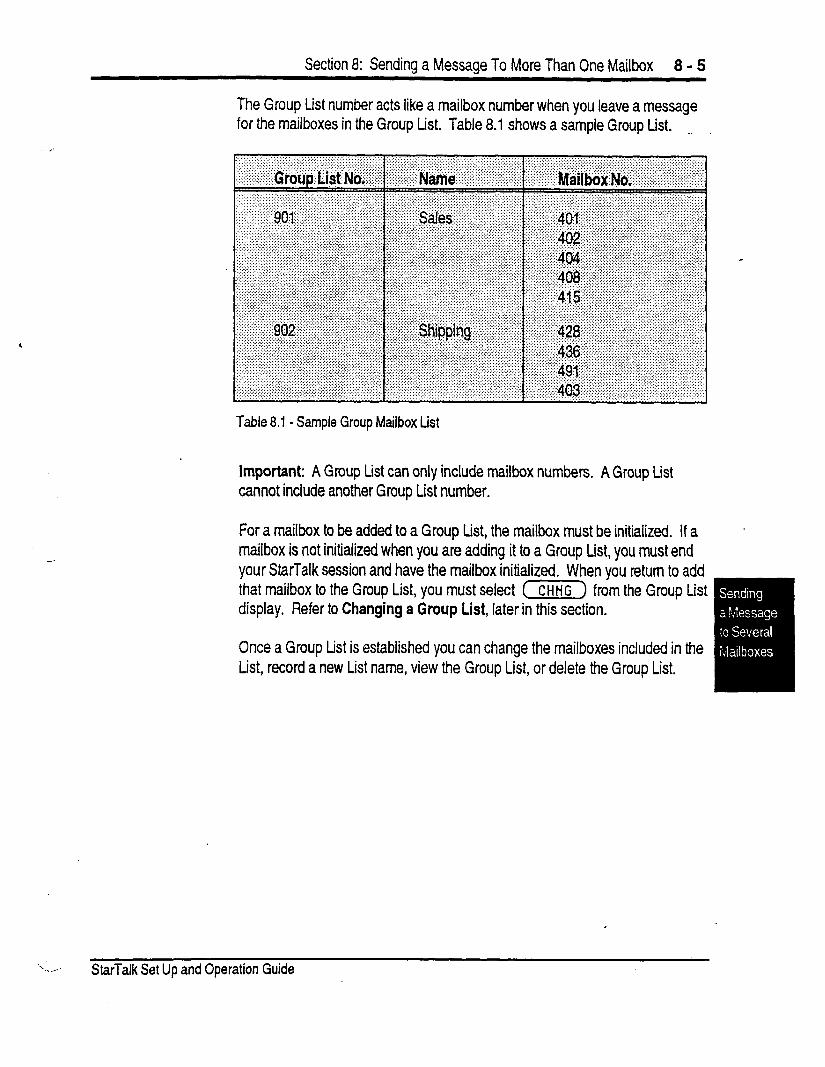
Section 8: Sending a Message To More Than One Mailbox 8 - 5
The Group List number acts like a mailbox number when you leave a message for the mailboxes in the Group List. Table 8.1 shows a sample Group List. _
c
Table 8.1 - Sample Group Mailbox List
Important: A Group List can only include mailbox numbers. A Group List cannot include another Group List number.
For a mailbox to be added to a Group List, the mailbox must be initialized. If a mailbox is not initialized when you are adding it to a Group List, you must end your StarTalk session and have the mailbox initialized. When you return to add that mailbox to the Group List, you must select (CHNc) from the Group List display. Refer to Changing a Group List, later in this section.
Once a Group List is established you can change the mailboxes included in the List, record a new List name, view the Group List, or delete the Group List.
StarTalk Set Up and Operation Guide
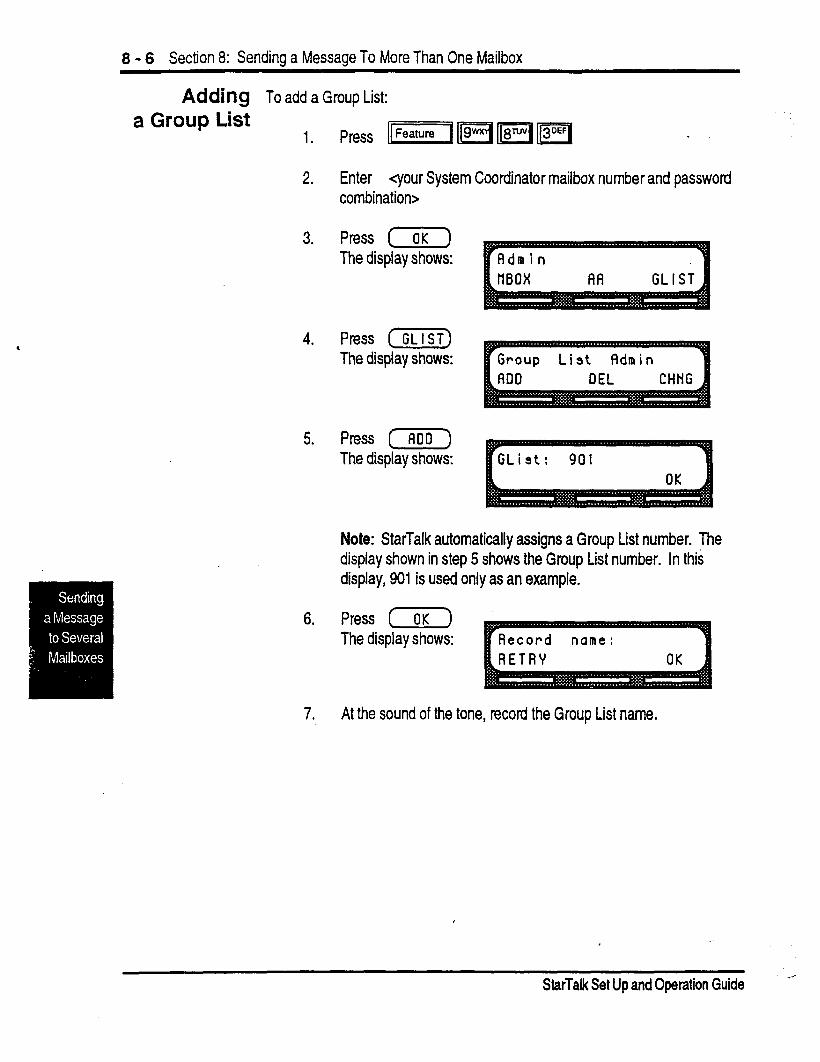
8 - 6 Section 8: Sending a Message To More Than One Mailbox
Adding To add a Group List: a Group List
1.
2.
Press ~pq~qlizq _
Enter <your System Coordinator mailbox number and password
3.
4.
5.
6. Press ( OK ) The display shows:
7. At the sound of the tone, record the Group List name.
combination>
Press (OK) The display shows:
Press (GLIST) The display shows:
Press (Ffoo) The display shows: rGList: 901
Note: StarTalk automatically assigns a Group List number. The display shown in step 5 shows the Group List number. In this display, 901 is used only as an example.
StarTalk Set Up and Operation Guide r-
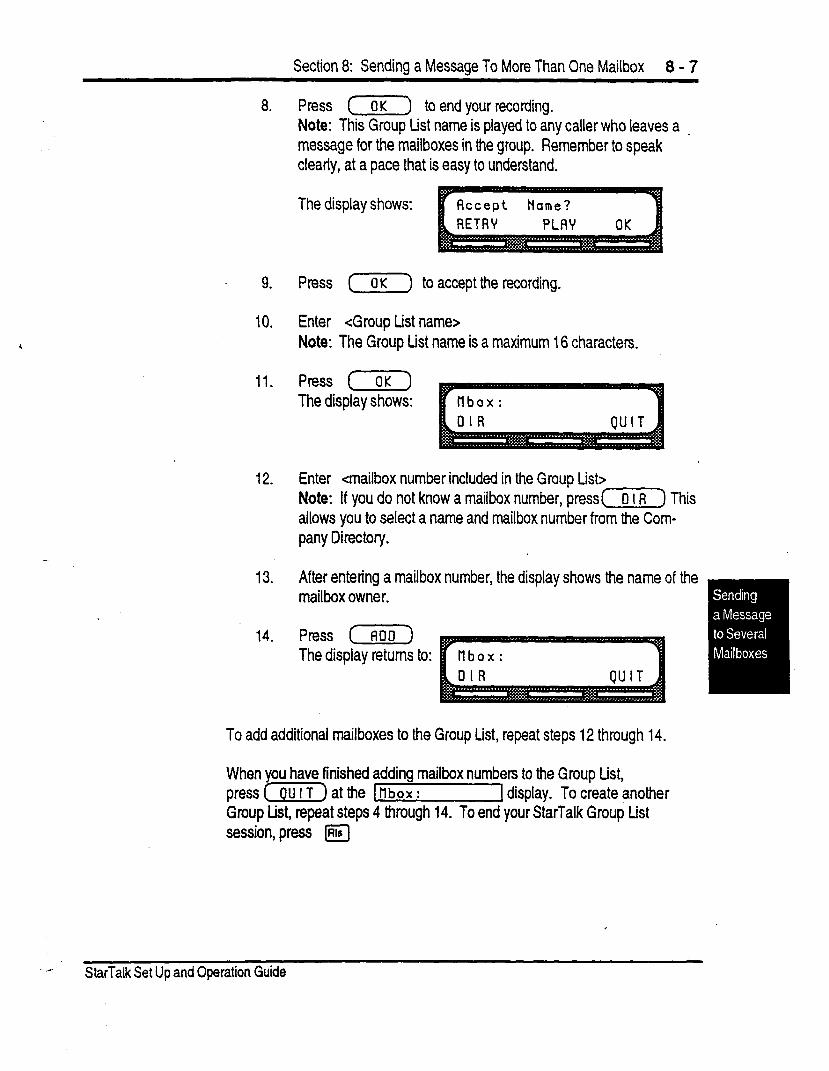
Section 8: Sending a Message To More Than One Mailbox 8 - 7
8.
9.
10.
11.
12.
13.
14.
Press (7) to end your recording. Note: This Group List name is played to any caller who leaves a _ message for the mailboxes in the group. Remember to speak cleariy, at a pace that is easy to understand.
The display shows:
Press (OK) to accept the recording.
Enter <Group List name> Note: The Group List name is a maximum 16 characters.
f’ress ( OK ) The display shows:
Enter <mailbox number included in the Group List> Note: If you do not know a mailbox number, press(x) This allows you to select a name and mailbox number from the Com- pany Directory.
After entering a mailbox number, the display shows the name of the mailbox owner,
Press (AOO) The display returns to:
To add additional mailboxes to the Group List, repeat steps 12 through 14.
When you have finished adding mailbox numbers to the Group List, press (T) at the [tlbox: ] display. To create another Group List, repeat steps 4 through 14. To end your StarTalk Group List session, press (Rls
StarTalk Set Up and Operation Guide
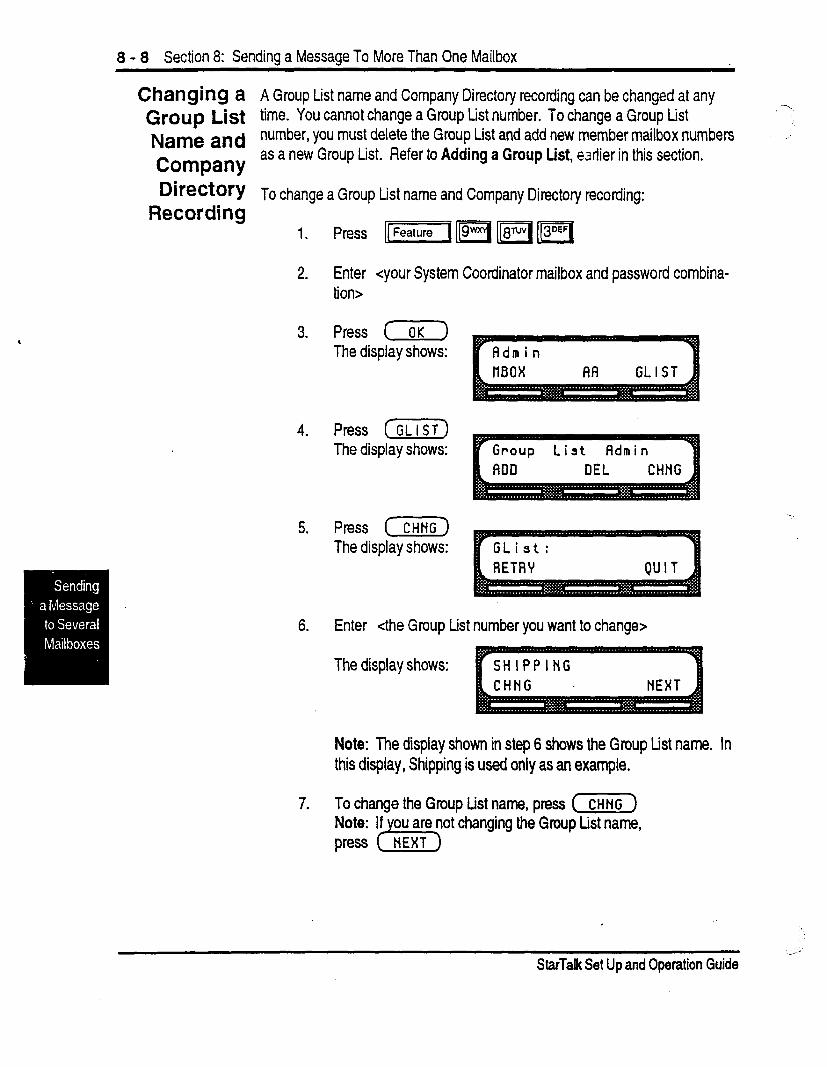
8 - 8 Section 8: Sending a Message To More Than One Mailbox
Changing a A Group List name and Company Directory recording can be changed at any Group List time. You cannot change a Group List number. To change a Group List Name and number, YOU must delete the Group List and add new member mailbox numbers
Company as a new Group List. Refer to Adding a Group List, earlier in this section.
Directory To change a Group List name and Company Directory recording: Recording
2. Enter cyour System Coordinator mailbox and password combina- tion>
3. Press ( OK ) The display shows:
4. Press CGLISf) The display shows:
5. Press ( CHNG ) The display shows:
6. Enter <the Group List number you want to change>
The display shows: . _ r S H I P P I N G
Note: The display shown in step 6 shows the Group List name. In this display, Shipping is used only as an example.
-..
7. To change the Group List name, press ( CHNG ) ou are not changing the Gmup List name,
StarTaIk Set Up and Operation Guide
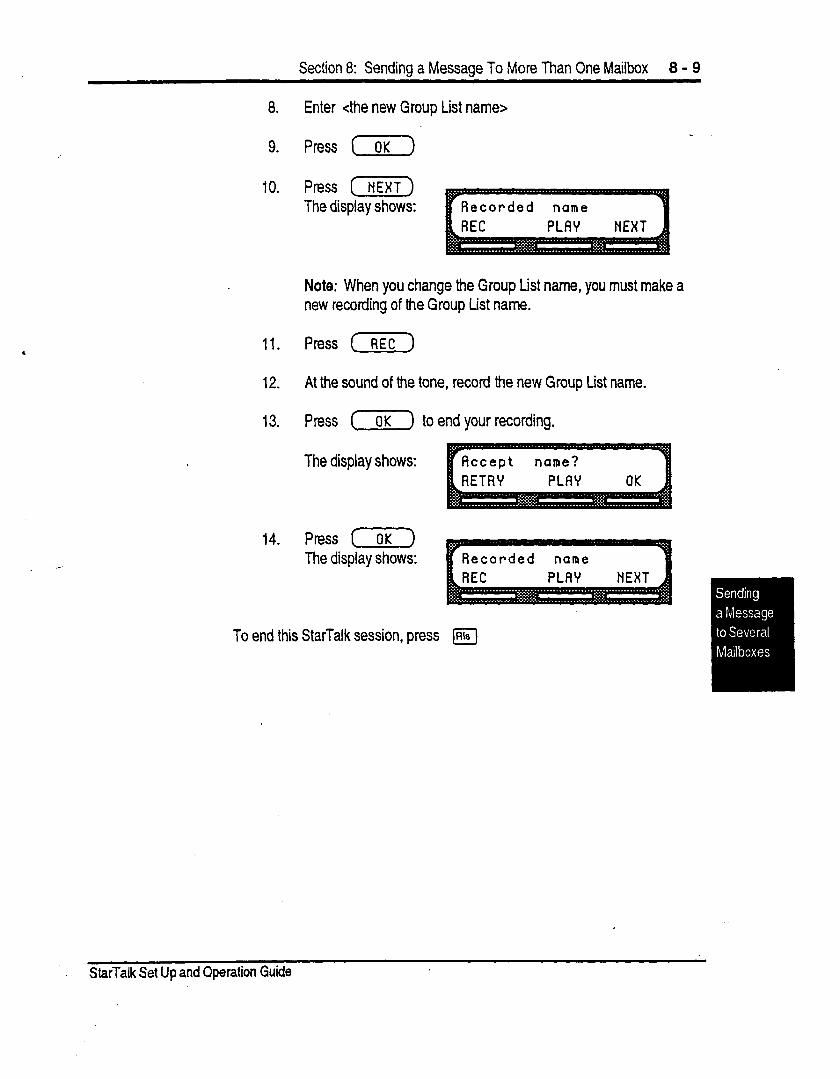
,
Section 8: Sending a Message To More Than One Mailbox 8 - 9
8. Enter <the new Group List name>
9. Press (OK)
10. Press (NEXT) The display shows:
Note: When you change the Group List name, you must make a new recording of the Group List name.
11. Press (REC)
12. At the sound of the tone, record the new Group List name.
13. Press (7) to end your recording.
The display shows:
14. Press (OK) The display shows:
To end this StarTalk session, press m
StarTalk Set Up and Operation Guide
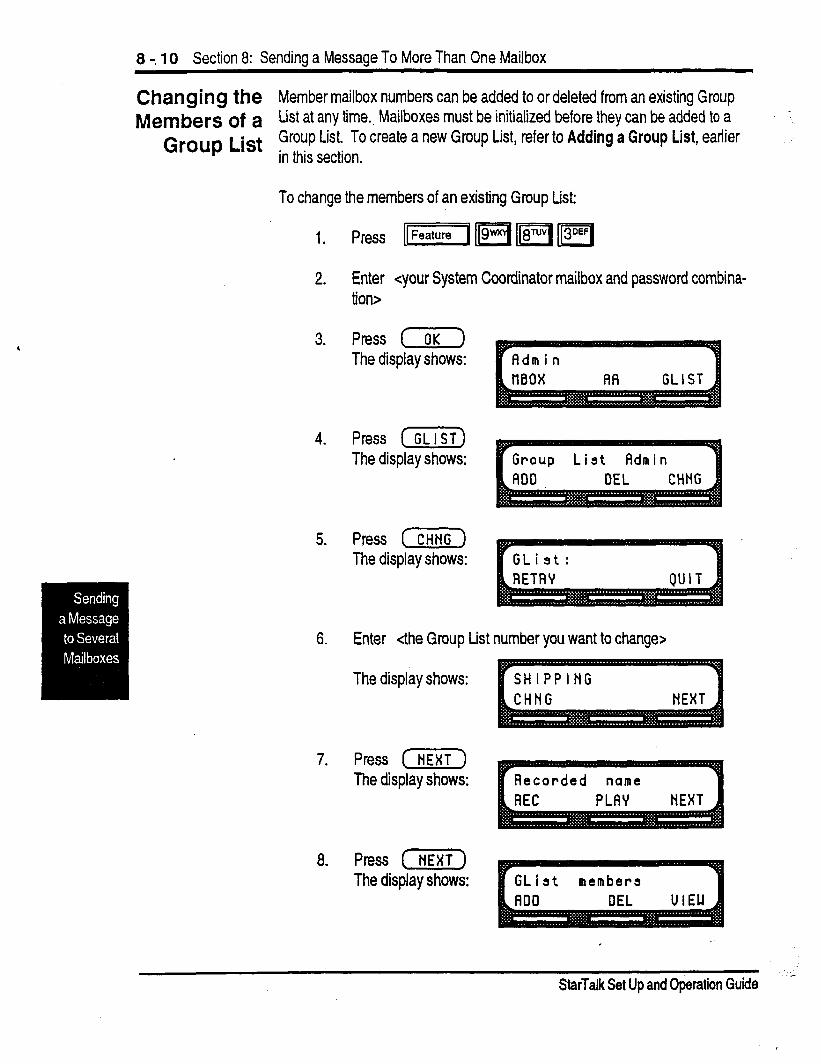
8 -. 10 Section 8: Sending a Message To More Than One Mailbox
Changing the Member mailbox numbers can be added to or deleted from an existing Group
Members of a List at any time.. Mailboxes must be initialized before they can be added to a -1
Group List Group List. To create a new Group List, refer to Adding a Group List, eariier in this section .
To change the members of an existing Group List:
2. Enter <your System Coordinator mailbox and password combina- tion>
3. Press (OK) The display shows:
4. Press (757) The display shows: Group List Admin
DEL CHNG
5. Press (==) The display shows:
6. Enter cthe Group List number you want to change>
The display shows:
7. Press (NEXT) The display shows:
8. Press CHEXT) The display shows:
StarTalk Set Up and Operation Guide
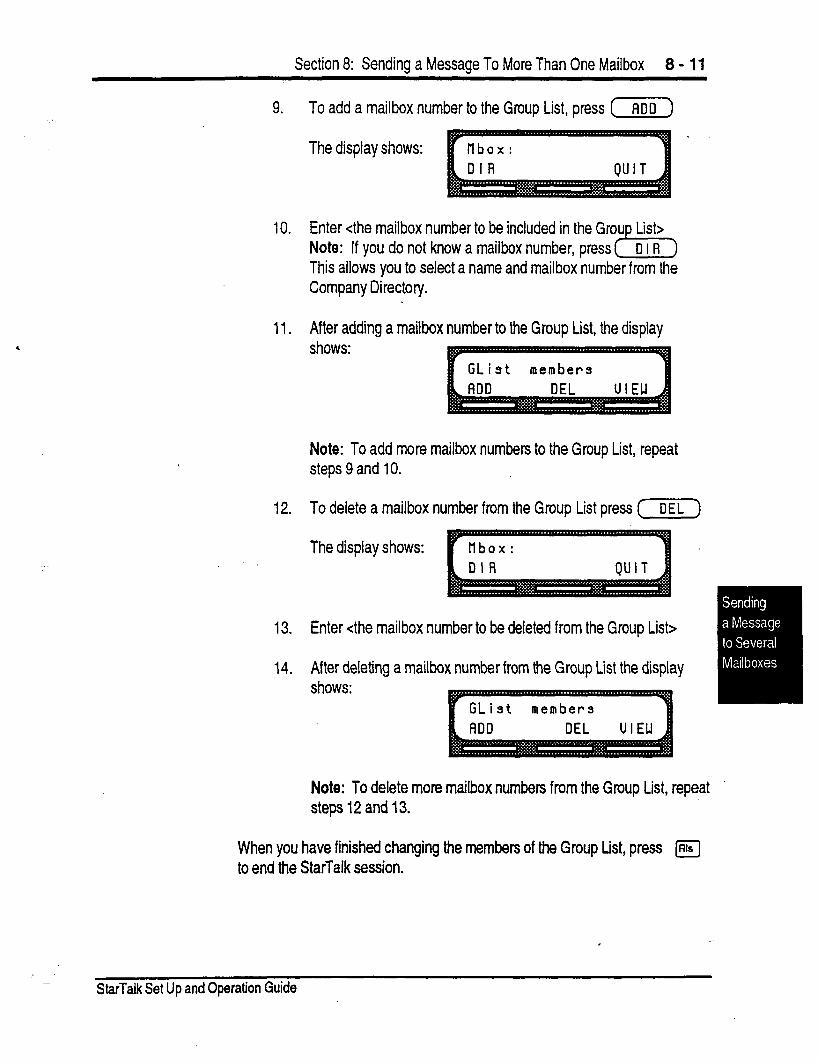
Section 8: Sending a Message To More Than One Mailbox 8 - 11
9. To add a mailbox number to the Group List, press (w)
The display shows:
10. Enter <the mailbox number to be included in the Grou List> Note: If you do not know a mailbox number, press r”7 DIR This allows you to select a name and mailbox number from the Company Directory.
11. After adding a mailbox number to the Group List, the display shows:
Note: To add more mailbox numbers to the Group List, repeat steps 9 and IO.
12. To delete a mailbox number from the Group List press [m)
The display shows:
13. Enter <the mailbox number to be deleted from the Group List>
14. After deleting a mailbox number from the Group List the display shows:
Note: To delete more mailbox numbers from the Group List, repeat steps 12 and 13.
When you have finished changing the members of the Group List, press m to end the StarTalk session.
I
. -
StarTalk Set Up and Operation Guide
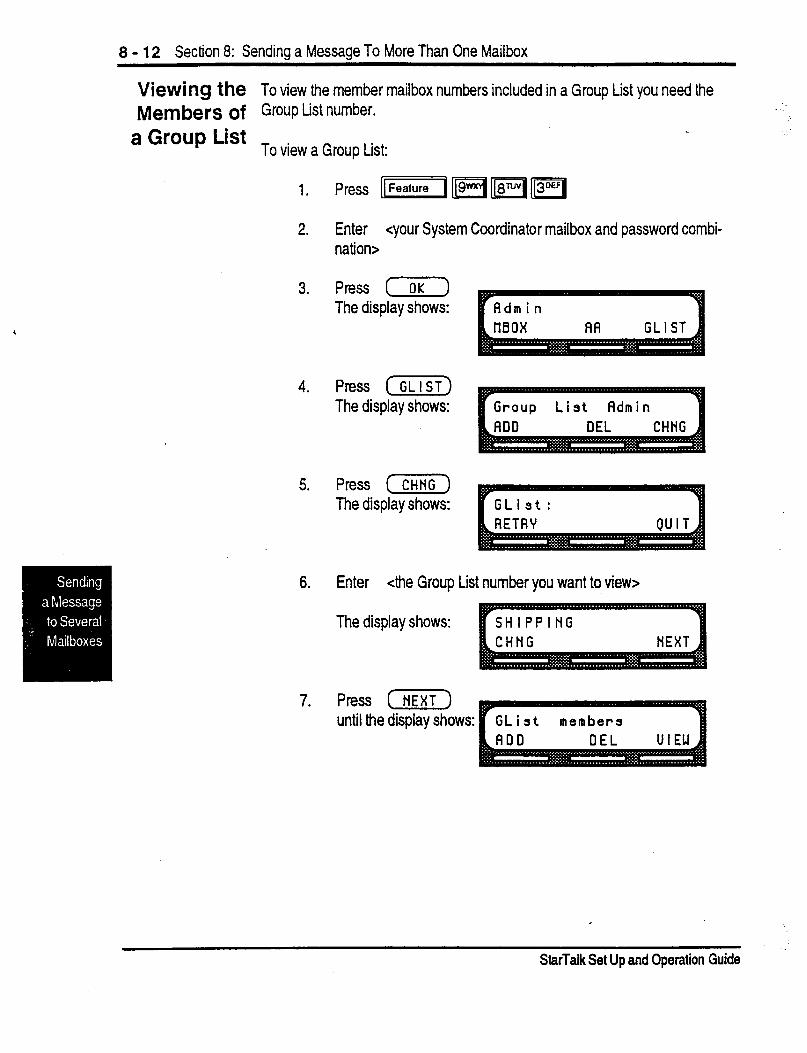
8 - 12 Section 8: Sendina a Messaae To More Than One Mailbox
Viewing the To view the member mailbox numbers included in a Group List you need the Members of Group List number.
a Group List To view a Group List:
. .
1.
2. Enter <your System Coordinator mailbox and password combi- nation>
3. Press (OK) The display shows:
4. Press (GLISi) The display shows:
5. Press (CHNc) The display shows:
6. Enter <the Group List number you want to view>
The display shows: SHIPPING ll
7. hess [ NEXT ) until the display shows:
I StarTalk Set Up and Operation Guide
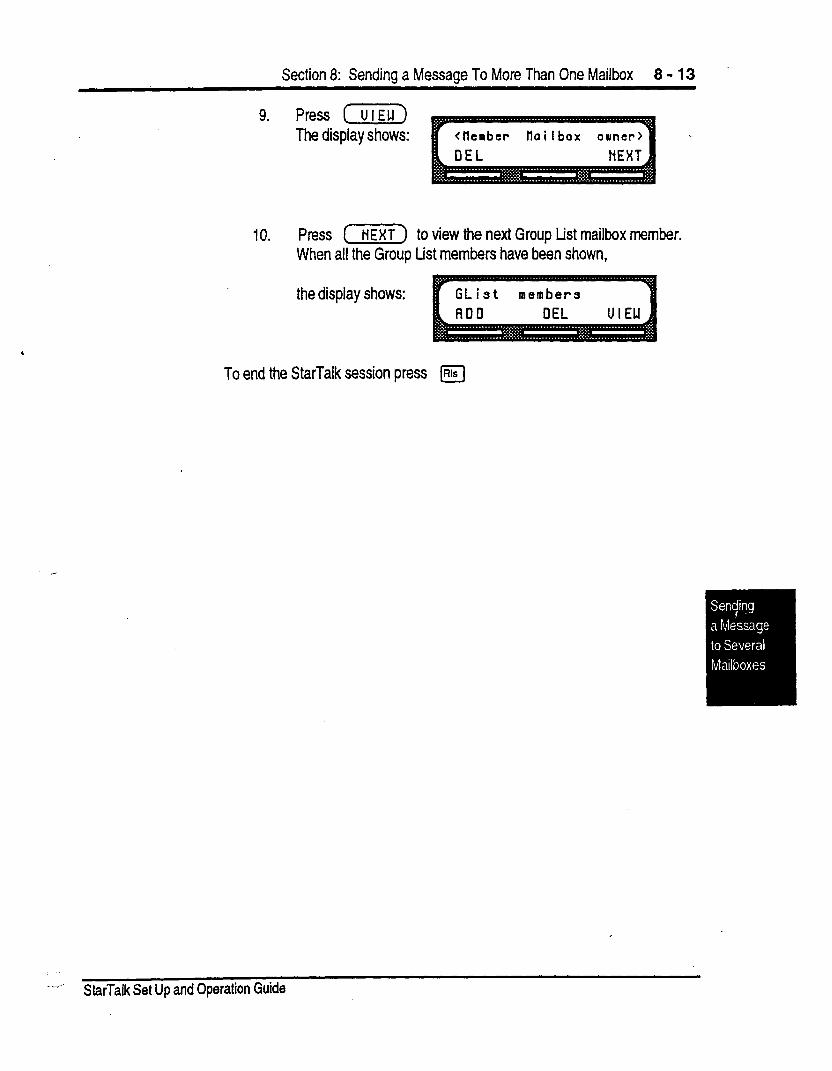
Section 8: Sendina a Messaae To More Than One Mailbox 8 - 13
9. Press (UIEU) The display shows:
10. Press (HEXT) to view the next Group List mailbox member. When all the Group List members have been shown,
the display shows:
To end the StarTalk session press m
.--. StarTalk Set Up and Operation Guide
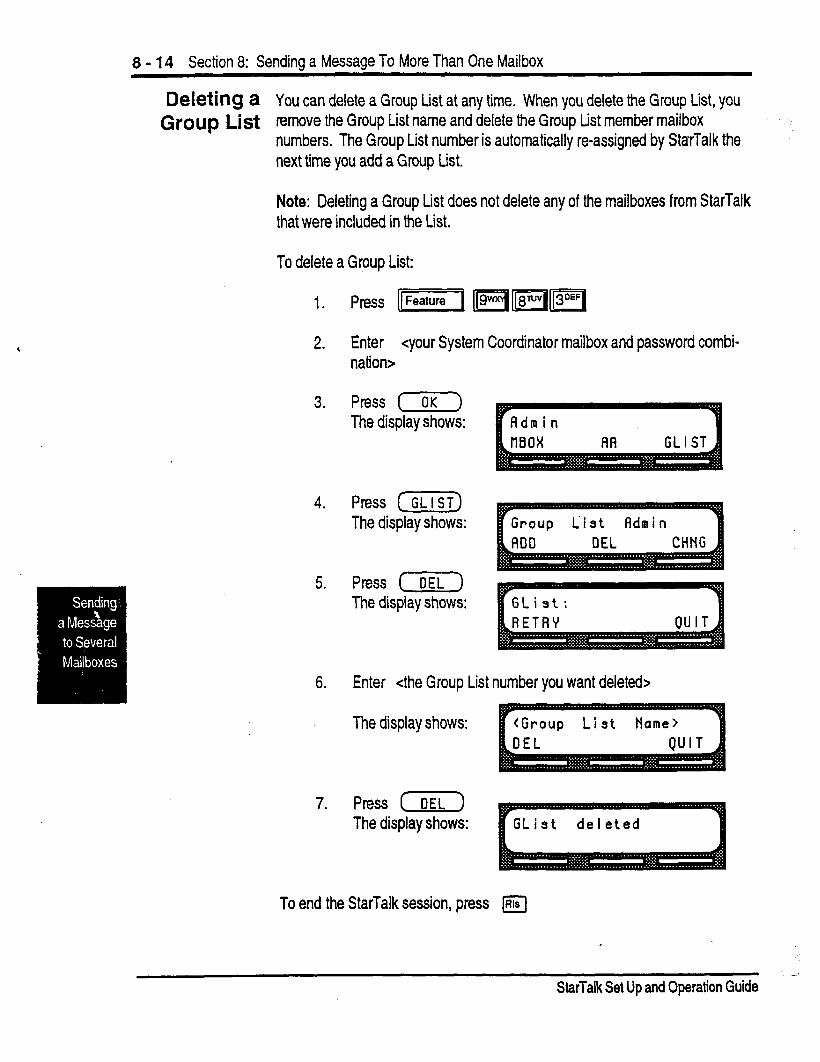
8 - I 4 Section 8: Sendina a Messaae To More Than One Mailbox
Deleting a You can delete a Group List at any time. When you delete the Group List, you Group List remove the Group List name and delete the Group List member mailbox
numbers. The Group List number is automatically reassigned by StarTalk the next time you add a Group List.
Note: Deleting a Group List does not delete any of the mailboxes from StarTalk that were included in the List.
To delete a Group List:
1. press 1-j
2. Enter <your System Coordinator mailbox and password combi- nation>
3. Press (OK) The display shows:
4. Press (GLIST) The display shows:
5. Press [ DEL ) The display shows:
6. Enter <the Group List number you want deleted>
Thedisplayshows: r<Group List Name>
7. Press (OEL) The display shows: GLiat deleted
To end the StarTalk session, press a
. . -. S&Talk Set Up and Operation Guide
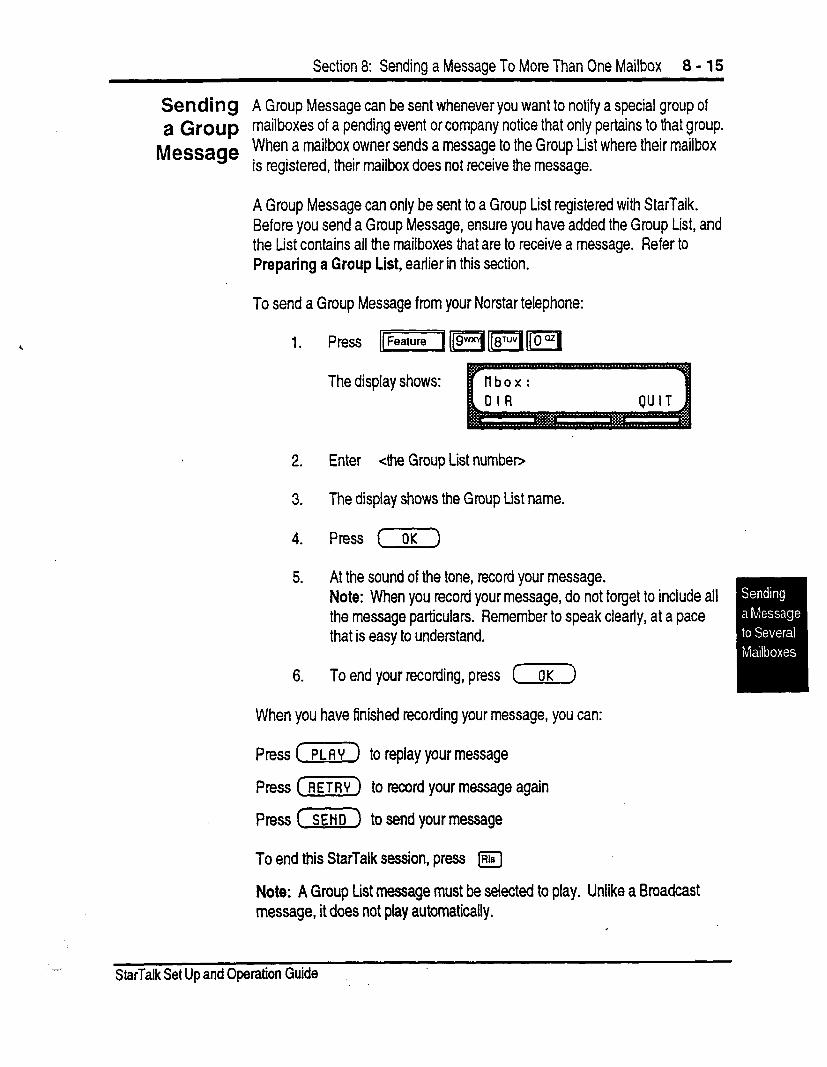
Section 8: Sending a Message To More Than One Mailbox 8 - 15
Sending A Group Message can be sent whenever you want to notify a special group of a Group mailboxes of a pending event or company notice that only pertains to that group.
Message When a mailbox owner sends a message to the Group List where their mailbox is registered, their mailbox does not receive the message.
A Group Message can only be sent to a Group List registered with StarTalk. Before you send a Group Message, ensure you have added the Group List, and the List contains ail the mailboxes that are to receive a message. Refer to Preparing a Group List, earlier in this section.
To send a Group Message from your Norstar telephone:
The display shows:
2. Enter <the Group List numben
3. The display shows the Group List name.
4. Press (OK]
5. At the sound of the tone, record your message. Note: When you record your message, do not forget to include all the message particulars. Remember to speak clearly, at a pace that is easy to understand.
6. To end your recording, press CT)
When you have finished recording your message, you can:
Press C PL A Y > to replay your message
Press c=) to record your message again
Press (sEND) to send your message
To end this StarTalk session, press @
Note: A Group List message must be selected to play. Unlike a Broadcast message, it does not play automatically.
-- StarTalk Set Up and Operation Guide
8 - 16 Section 8: Sendina a Messaae To More Than One Mailbox
. .
StarTalk Set Up and Operation Guide
StarTalk Reports
Introduction StarTalk Reports are used to view StarTalk programming and the available message time. There are five StarTalk Reports:
. Directory Report
. Numerfc Subscriber Mailbox Report
. System Group List Report l Message Usage Report 0 Mailbox Activity Report
This section describes the StarTalk Reports, and explains how to generate them.
Note: To print the StarTafk Reports, you must have a printer connected to the RS232 port on the Stat-Talk module.
StarTalk Set Up and Operation Guide

9 - 2 Section 9: StarTalk Reports
The The different reports allow you to view StarTalk storage capacity, the Company
Different Directory list, mailbox owners, Group Lists, and individual mailbox activity.
RePotis StarTalk reports are numbered from 1 to 5. Only the report number appears on the Norstar display.
Directory Report (1) This report shows the mailbox owners listed in the Company Directory. This report provides the mailbox owner’s name, mailbox, extension, whether or not mailbox owners recorded their name in the Company Directory, and if they have a greeting recorded for their mailbox. Figure 9.1 shows a sample Directory Report.
I DIRECTORY REPORT Date: 12/14/91 1
Subscriber Mailbox Extension Name Graetlng Recorded Recorded
BLACK, K 224 224 BROWN,A 223 223 DAVIES,R 333 333 GENERAL-DELIVERY,MB 100 100 GUEST, ONE 250 SMITH,E 221 221 SYSTEM-MANAGER, MB 102 102 TROUBLE, MB 101 101 WHITE,W 222 222
Figure 9.1 - Directory Report
Note: The Directory Report appears in alphabetical order.
Numeric Subscriber Mailbox Report (2) This report is a numeric list of all the mailbox owners who have a registered StarTalk mailbox. This reports shows the mailbox owner name and correspond- ing mailbox number. Figure 9.2 shows a sample Numeric Subscriber Report. v- NUMERIC SUBSCRIBER MAILBOX REPORT Date: 12/14/91 Mailbox Subscriber
loo GENERAL-DELIVERY,MB 101 TROUBLE,MB 102 SYSTEM-MANAGER,MB 221 SMITH,E 222 WHITE,W 223 BROWN,A 224 BLACK, K 227 TAYLOR,K
Figure 9.2 - Numeric Subscriber Report *
StarTalk Set Up and Operation Guide
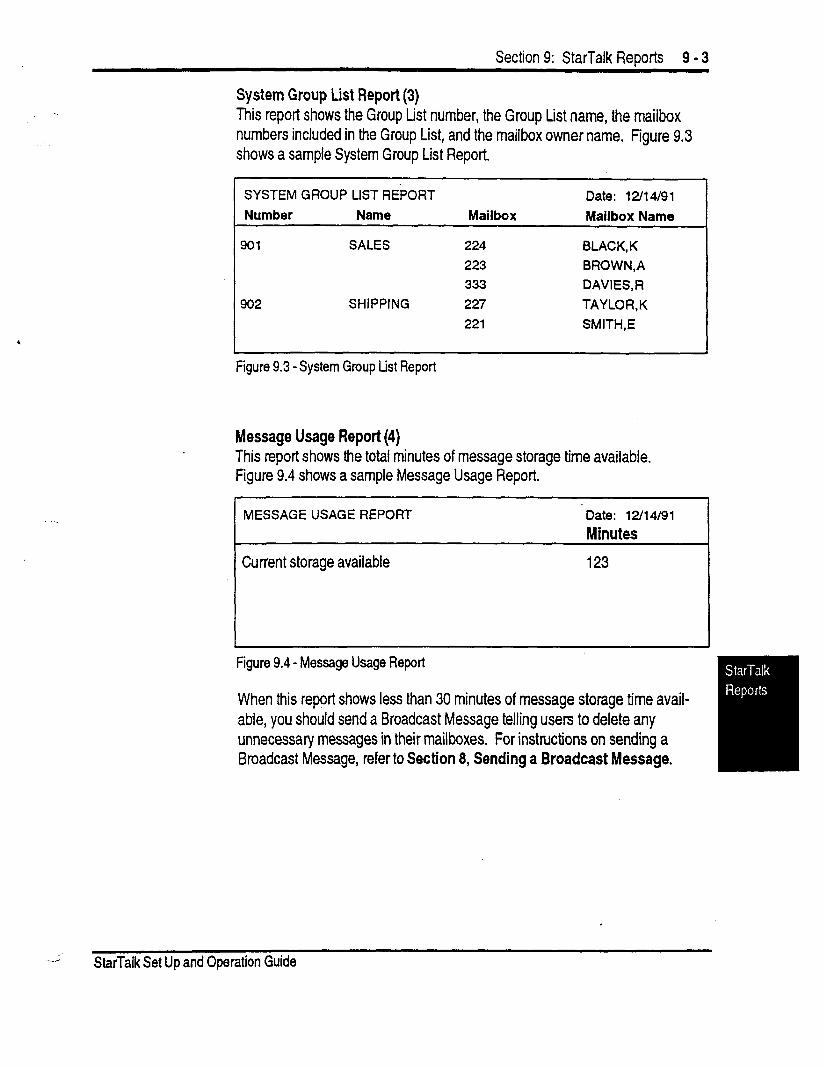
Section 9: StarTalk Reoorts 9 - 3
System Group List Report (3) This report shows the Group List number, the Group List name, the mailbox numbers included in the Group List, and the mailbox owner name. Figure 9.3 shows a sample System Group List Report.
SYSTEM GROUP LIST REPORT
Number Name Mailbox Date: 120 4/91 Mailbox Name
901 SALES 224 BLACK, K
223 BROWN,A
333 DAVIES,R
902 SHIPPING 227 TAYLOR,K 221 SMITH,E
Figure 9.3 -System Group List Report
Message Usage Report (4) This report shows the total minutes of message storage time available. Figure 9.4 shows a sample Message Usage Report.
MESSAGE USAGE REPORT
Current storage available
Date: 12/14/91 Minutes
123
Figure 9.4 - Message Usage Report
When this report shows less than 30 minutes of message storage time avail- able, you should send a Broadcast Message telling users to delete any unnecessary messages in their mailboxes. For instructions on sending a Broadcast Message, refer to Section 8, Sending a Broadcast Message.
StarTalk Set Up and Operation Guide
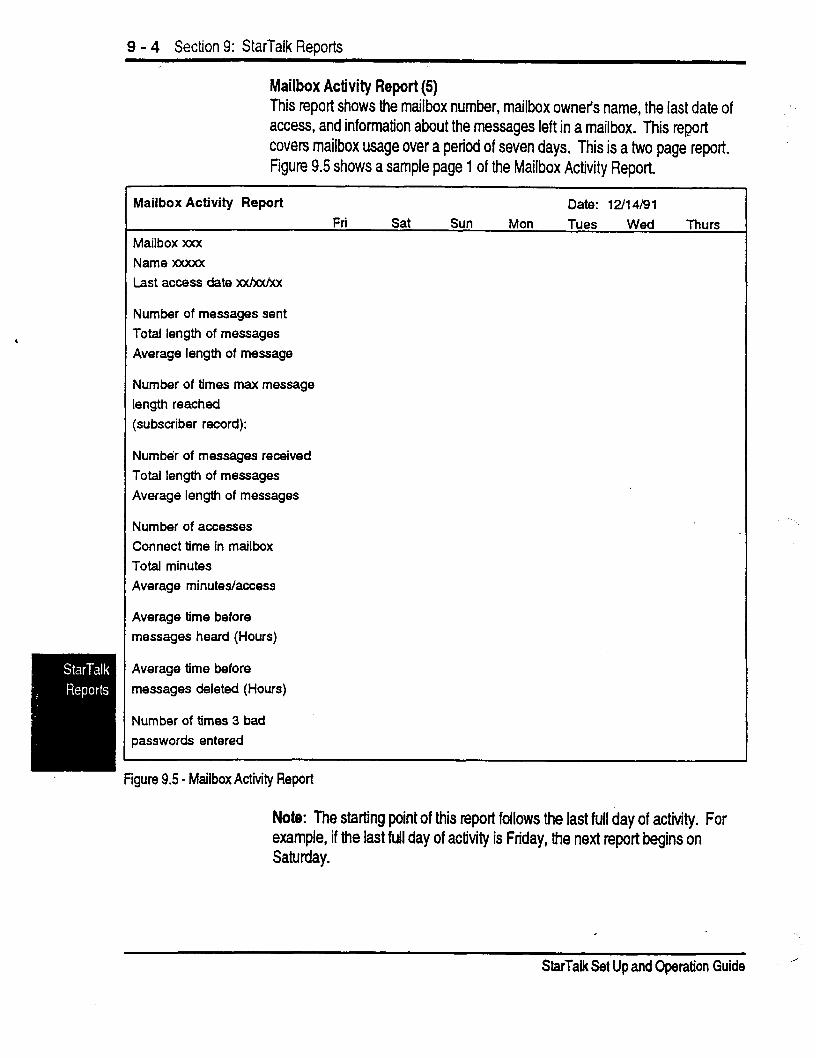
9 - 4 Section 9: StarTalk Reports
Mailbox Activity Report (5) This report shows the mailbox number, mailbox owner’s name, the last date of access, and information about the messages left in a mailbox. This report covers mailbox usage over a period of seven days. This is a two page report. Figure 9.5 shows a sample page 1 of the Mailbox Activity Report.
Mailbox Activity Report
Mailbox xxx Name xxxxx Last access date xxkkx
Fri Sat Sun Mon Date: 12/14191 Tues Wed Thurs
Number of messages sent Total length of messages Average length of message
Number of times max message length reached (subscriber record):
Numb& of messages received Total length of messages Average length of messages
Number of accesses Connect time in mailbox Total minutes Average minutes/access
Average time before messages heard (Hours)
Average time before messages deleted (Hours)
Number of times 3 bad passwords entered
figure 9.5 - Mailbox Activity Report
Note: The starting point of this report follows the last full day of activity. For example, if the last full day of activity is Friday, the next report begins on Saturday.
StarTalk Set Up and Operation Guide ”
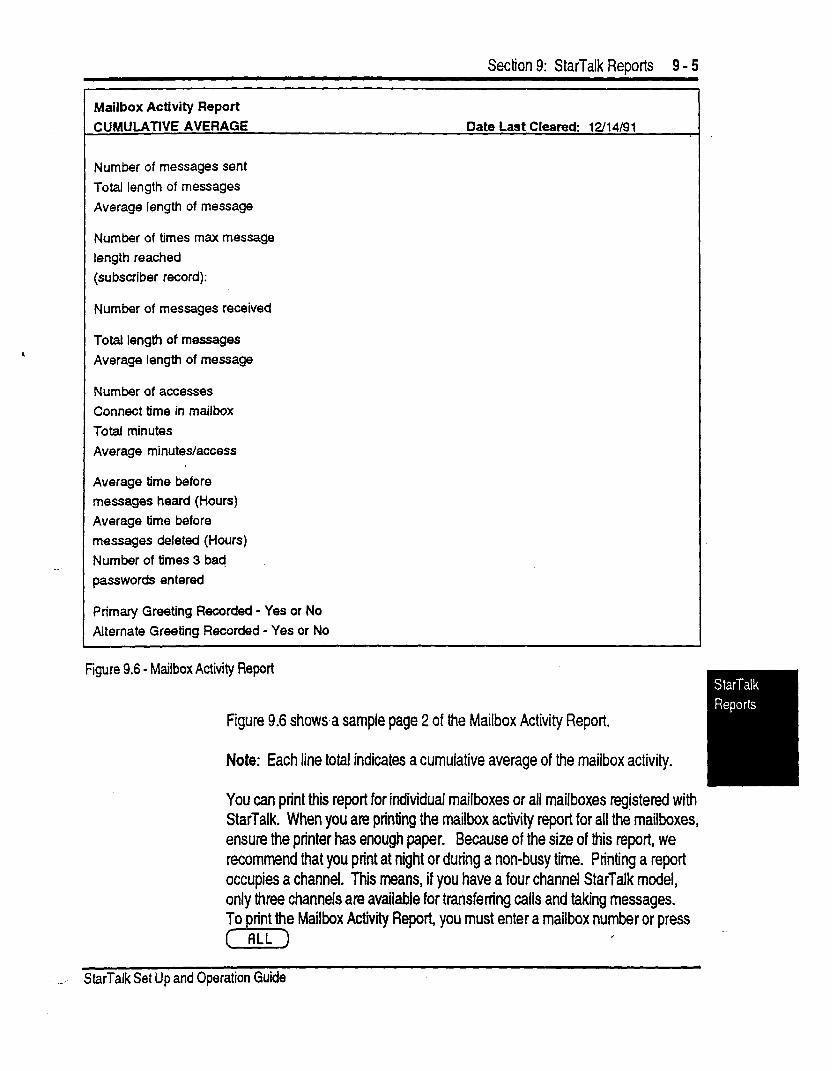
Section 9: StarTalk Reports 9 - 5
Mailbox Activity Report CUMULATIVE AVERAGE
Number of messages Sent
Total length of messages
Average length of message
Date Last Cleared: Q/14/91
Number of times max message
length reached (subscriber record):
Number of messages received
Total length of messages
Average length of message
Number of accesses
Connect time in mailbox Total minutes
Average minutes/access
Average time before
messages heard (Hours) Average time before
messages deleted (Hours) Number of times 3 bad
passwords entered
Primary Greeting Recorded - Yes or No Alternate Greeting Recorded - Yes or No
Figure 9.6 - Mailbox Activity Report
Figure 9.6 showsa sample page 2 of the Mailbox Activity Report.
Note: Each line total indicates a cumulative average of the mailbox activity.
You can print this report for individual mailboxes or all mailboxes registered with StarTalk. When you are printing the mailbox activity report for all the mailboxes, ensure the printer has enough paper. Because of the size of this report, we recommend that you print at night or during a non-busy time. Printing a report occupies a channel. This means, if you have a four channel StarTalk model, only three channels are available for transfemng calls and taking messages. To print the Mailbox Activity Report, you must enter a mailbox number or press (ALL) I
.*. StarTalk Set Up and Operation Guide
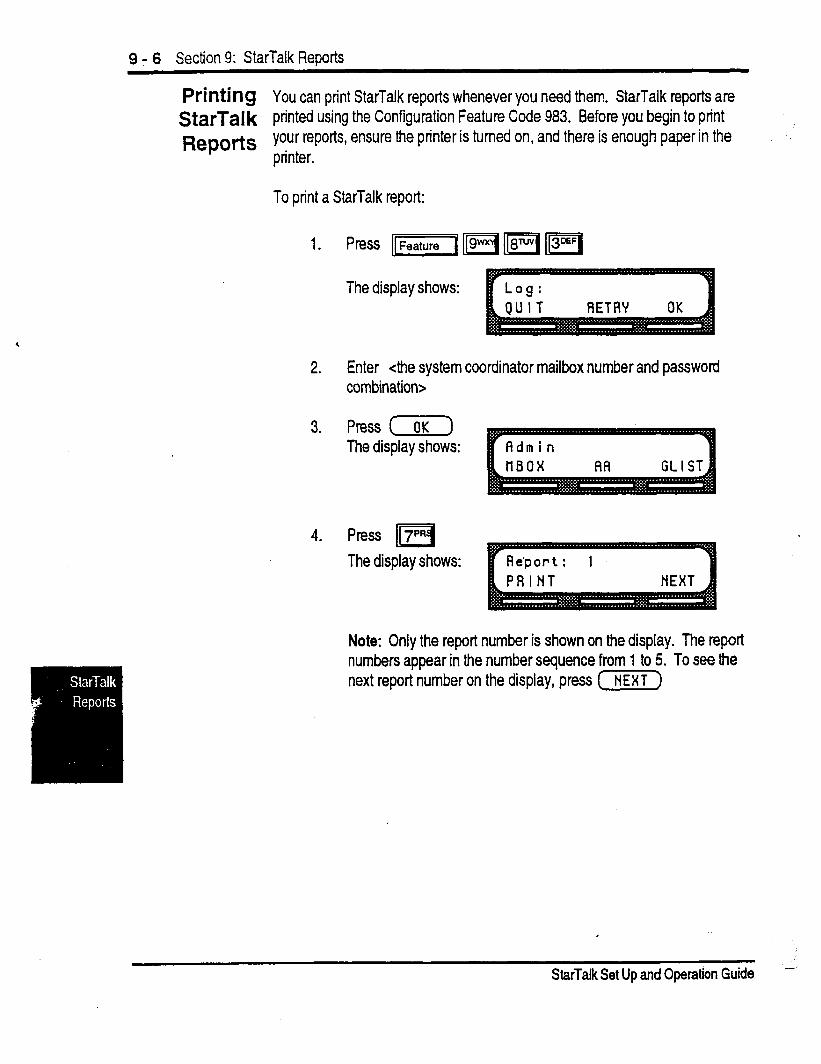
9 - 6 Section 9: StarTalk Reports
Printing You can print StarTalk reports whenever you need them. StarTalk reports are StarTalk printed using the Configuration Feature Code 983. Before you begin to print
Reports y our reports, ensure the printer is turned on, and there is enough paper in the printer.
To print a StarTalk report:
The display shows:
2. Enter <the system coordinator mailbox number and password combination>
3. Press (OK) The display shows:
4. Press F7PRg The display shows:
Note: Only the report number is shown on the display. The report numbers appear in the number seouence from I to 5. To see the next report number on the display,‘press [NEXT)
StarTalk Set Up and Operation Guide -.
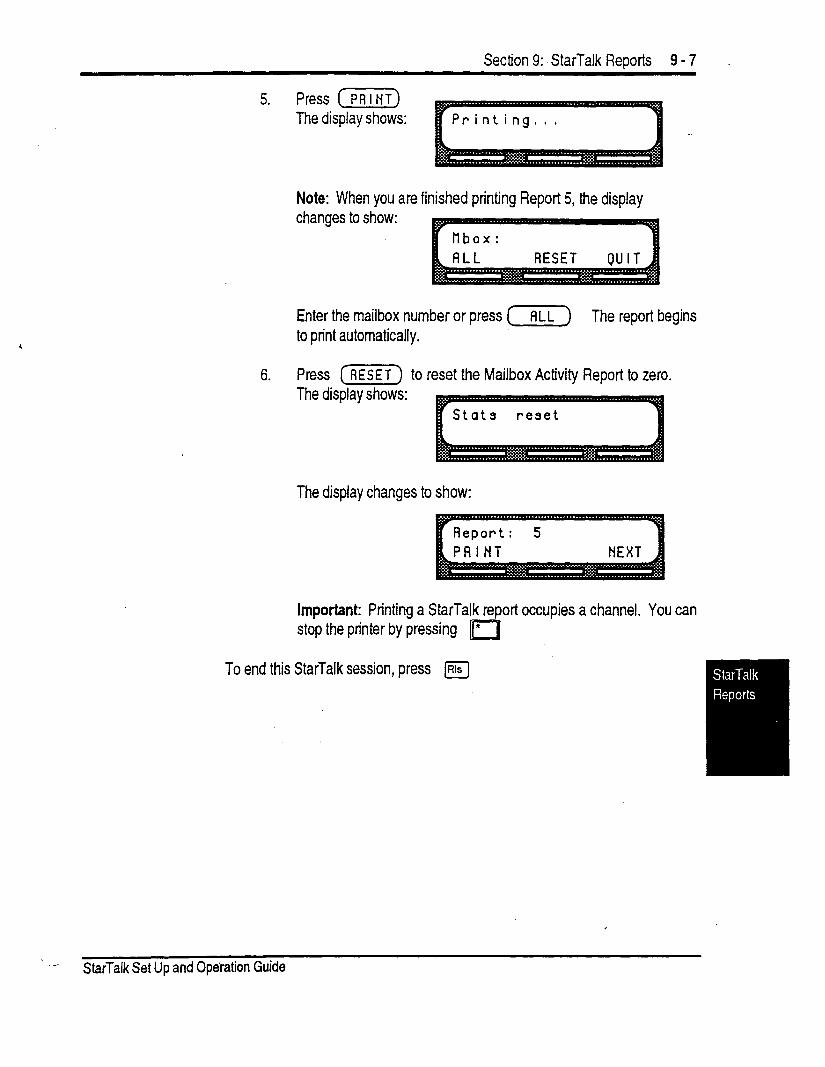
Section 9: StarTalk Reports 9 - 7
5. Press (PAINi-) The display shows:
Note: When you are finished printing Report 5, the display changes to show:
Enter the mailbox number or press (ALL) The report begins to print automatically.
6. Press (m) to reset the Mailbox Activity Report to zero. The display shows:
The display changes to show:
Important: Printing a StarTalk report occupies a channel. You can stop the printer by pressing m
To end this StarTalk session, press @
StarTalk Set Up and Operation Guide
9 - 8 Section 9: StarTalk Reports
.
StarTalk Set Up and Operation Guide

10-l
__a Troubleshooting StarTalk
Introduction- Troubleshooting StarTalk is separated into two sections:
l system trouble l operating trouble
Ensure you check the StarTalk Trouble mailbox regularly.
system System troubles are problems occurring to more than one user, and to both Trob b le intemaf and eXtemai callers.
_ _:
Automated 1. Verify that you have assigned the lines to the correct Greeting Table, Attendant does and the line is designated as Y. This means that StarTalk is set to
not answer answer the line. any calls
2. It might be that all the StarTalk channels are busy. Try calling back. Your call will be answered when a channel is available.
3. Verify that greetings 1 to 4 have been recorded. These greetings default to each of the four Greeting Tables and must be recorded for the Automated Attendant to operate. Refer to Section 4, Setting Up StarTal k.
If you find that the StarTalk channels are frequently busy, this might be a good indication that there is too much activity. Contact your sales representative.
The Automated For StarTalk to work, it requires a tone dial telephone signal and a minimum Attendant voice level. StarTdk waits for a caller to respond. If a response is not received,
transfers some the caller is transferred to the receptionist or designated operator. If the callers to the receptionist or designated operator is not available, the caller is automatically
General Delivery transferred to the General Delivery Mailbox. ‘
Star-Talk Set Up and Operation Guide
10 - 2 Section IO: Troubleshooting StarTalk
Greetings are played at the
wrong time of day
Gieetings are played on the
wrong line
A telephone cannot be
fonnrarded to StarTal k
For StarTalk to transfer calls correctly, each mailbox must have a unique extension number. if two mailboxes have the same extension number, calls to that extension are transferred to the General Delivery Mailbox. To verify that all mailboxes have unique extension numbers, print the Directory Report (Report 2). For instructions on printing reports, refer to Section 9, Printing Stat-Talk Reports.
-
There are three possible causes for this problem:
1. The Business open is set to NO. Change the Business open to YES. Refer to Section 6, Setting the Business Status.
2. StarTalk’s internal calendar/clock is not set to the correct time. Reset the StarTalk date and time. Refer to Section 4, Setting Up S&Talk.
3. It might be that the wrong greeting numbers have been assigned to the Greeting Tables.
A telephone line might be assigned to the wrong Greeting Table. To verify that your line information is correct, refer to your Programming Record. If you find the information is incorrect, you must m-assign lines to Greeting Tables. Refer to Section 4, Setting Up S&Talk.
If you are attempting to foward your telephone to StarTalk and the display shows: 1 Forward denied 1 you might be forwarding to the wrong extension. Verify that you are calling the right extension using Feature Code 985. When you enter the Intercom Number, zeros appearing before the number are not entered. For example, 0021 is entered as 21.
StarTaik Set Up and Operation Guide -’
Section 10: Troubieshootino StarTalk 10 - 3
Feature 981 Whenever the Log prompt appears on the display, it can be caused by: produces a
“LOG” prompt 1. The station might not have an assigned mailbox. If the extension does not - on the Norstar have an assigned mailbox, StarTalk will request both a mailbox number
display and a password.
2. The extension might have two or more assigned mailboxes.
3. A Guest mailbox, which normally does not have an assigned extension.
Norstar DN’s For StarTalk to operate, it must have a mailbox number length that is the same and Mailbox as the Norstar DN length. If these lengths differ, you must change the StarTalk
Numbers are Mailbox number length. Refer to Appendix C, Resetting StarTalk. different lengths
Operating The following conditions list some problems that might be encountered with the Trouble operation of StarTalk.
Mail boxes A mailbox will not accept messages when: are not
accepting 1. The mailbox is not initialized. messages A mailbox cannot receive messages until it has been initialized by the
mailbox owner. Instruct owners to initialize their mailboxes. Refer users to the StarTalk User Card, or provide instructions from Section 5 in this Guide,
2. A mailbox is full. If a mailbox is full, instruct the mailbox owner to delete all or some of the messages in the mailbox.
3. The message storage pack is full. StarTalk notifies you when the Message Storage Pack is reaching its capacity. To determine if the Message Storage Pack is full, print the Message Usage report. This report shows you the available minutes of storage remaining on StarTalk.
Note: If the StarTalk Message Storage Pack tends to become full fre- quently, perhaps it can be increased to a larger size. For more information, contact your Service Representative. ,
i.. -. StarTalk Set Up and Operation Guide
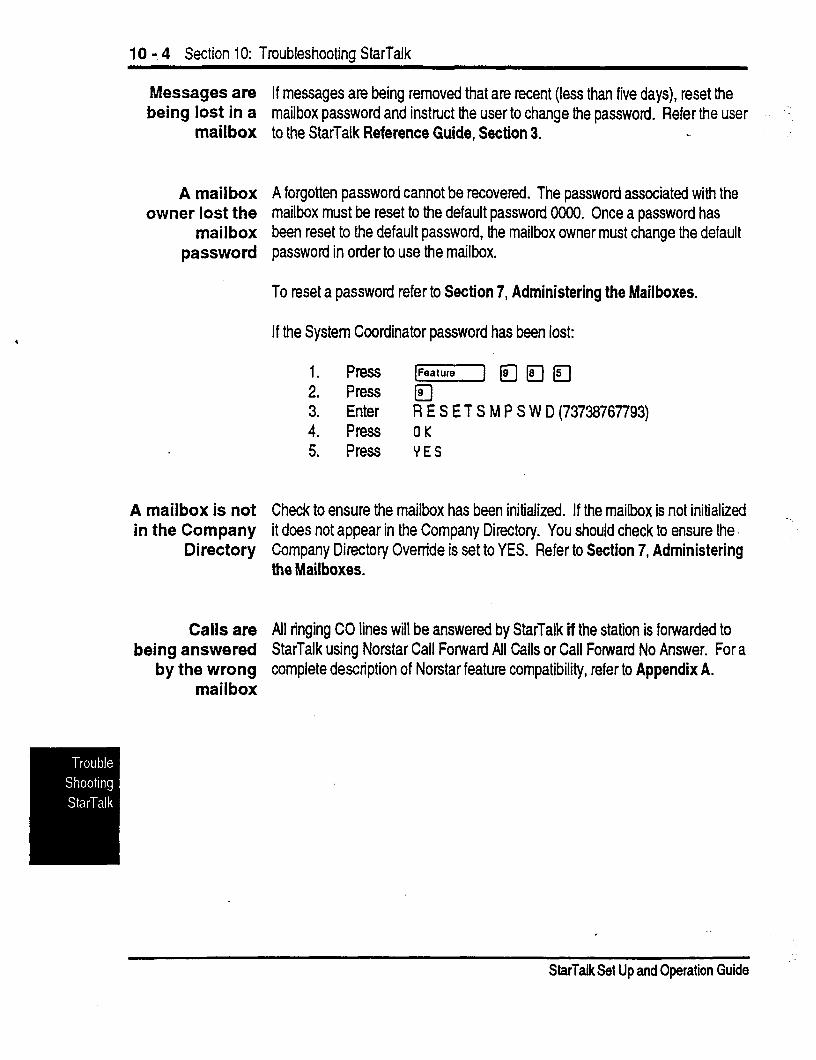
10 - 4 Section 10: Troubleshooting StarTalk
Messages are being lost in a
mailbox
A mailbox A forgotten password cannot be recovered. The password associated with the owner lost the mailbox must be reset to the default password 0000. Once a password has
mailbox been reset to the default password, the mailbox owner must change the default password password in order to use the mailbox.
A mailbox is not in the Company
Directory
Calls are being answered
by the wrong mailbox
If messages are being removed that are recent (less than five days), reset the mailbox password and insttuct the user to change the password. Refer the user to the StarTalk Reference Guide, Section 3.
To reset a password refer to Section 7, Administering the Mailboxes.
If the System Coordinator password has been lost:
1. Press [Feature] lgla(rJ 2. Press (s 3. Enter RESETSMPSWD(73736767793) 4. Press OK 5. Press YES
Check to ensure the mailbox has been initialized. If the mailbox is not initialized it does not appear in the Company Directory. You should check to ensure the. Company Directory Override is set to YES. Refer to Section 7, Administering the Mailboxes.
_,,
All ringing CO lines will be answered by StarTalk if the station is forwarded to StarTalk using Norstar Call Forward All Calls or Call Forward No Answer. For a complete description of Norstar feature compatibility, refer to Appendix A.
StarTalk Set Up and Operation Guide
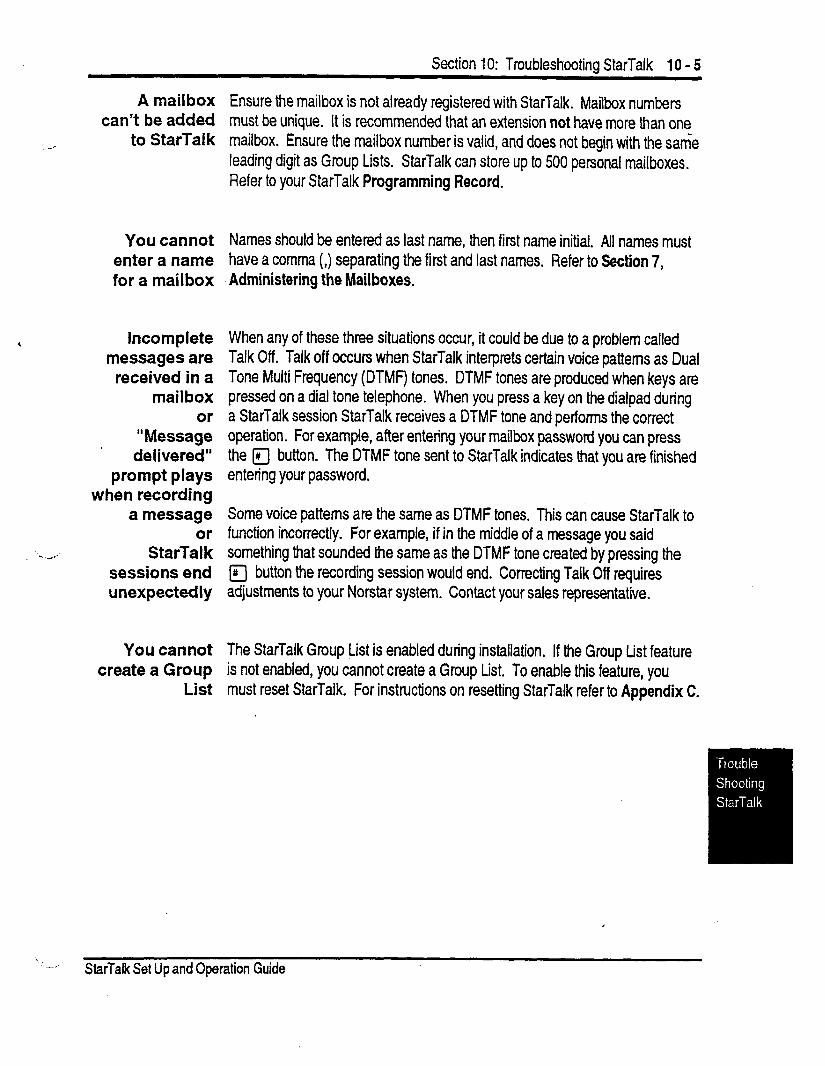
Section IO: Troubleshootina StarTalk 10 - 5
A mailbox can’t be added
-’ to StarTal k
You cannot Names should be entered as last name, then first name initial. All names must enter a name have a comma (,) separating the first and last names. Refer to Section 7, for a mailbox Administering the Mailboxes.
Incomplete messages are
received in a mailbox
or “Message delivered”
prompt plays when recording
a message or
- _,I StarTalk sessions end unexpectedly
You cannot create a Group
List
Ensure the mailbox is not already registered with StarTalk. Mailbox numbers must be unique. It is recommended that an extension not have more than one mailbox. Ensure the mailbox number is valid, and does not begin with the same leading digit as Group Lists. StarTalk can store up to 500 personal mailboxes. Refer to your StarTalk Programming Record.
When any of these three situations occur, it could be due to a problem called Talk Off. Talk off occurs when StarTalk interprets certain voice patterns as Dual Tone Multi Frequency (DTMF) tones. DTMF tones are produced when keys are pressed on a dial tone telephone. When you press a key on the dialpad during a StarTalk session StarTalk receives a DTMF tone and performs the correct operation. For example, after entering your mailbox password you can press the I# button. The DTMF tone sent to StarTalk indicates that you are finished entering your password.
Some voice patterns are the same as DTMF tones. This can cause StarTalk to function incorrectly. For example, if in the middle of a message you said something that sounded the same as the DTMF tone created by pressing the 1# button the recording session would end. Correcting Talk Off requires adjustments to your Norstar system. Contact your sales representative.
The StarTalk Group List is enabled during installation. If the Group List feature is not enabled, you cannot create a Group List. To enable this feature, you must reset StarTalk. For instructions on resetting StarTalk refer to Appendix C.
‘.:. _ / StarTalk Set Up and Operation Guide
10 - 6 Section 10: Troubleshooting StarTalk
StarTalk Set Up and Operation Guide -I

Aooendix A - 1
- Appendix A: StarTaIWNorstar Feature Compatibility
Introduction This appendix desctibes how Norstar features interact with StarTalk. The section is organized in alphabetical order, according to the Norstar feature.
Norstar Feature StarTalk Compatibilitv
Analog Terminal Adapter This type of set, working with DTMF tones, allows access to StarTalk options through the dialpad only. There is no message waiting notification availability.
Rotary dial cannot be used internally with StarTalk.
Answer Keys ‘Answer keys allow a set to answer calls sent to another set. Answer keys do not affect Star-Talk operation on external calls. External calls are sent to the called set’s mailbox. Non-ringing answer keys do not affect external calls.
For internal calls, when an answer key appears on another set and there is no CFAC or CFNA, the caller receives the mailbox of the called set.
When the set that has the answer key is CFAC to StarTalk, the caller is sent to the mailbox of the CFAC set. For example: If set A has a Ringing Answer Key for set 8 and set A is CFAC to StarTalk DN, when a caller attempts to reach set B and there is no answer, the caller is transferred to set A’s mailbox.
When the set that has the answer key is CFNA to StarTalk, the caller receives the mailbox of the called set. For example: If set A has a ringing answer key for set B and set A is CFNA 3 rings to the StarTalk DN, the call is transferred to set B and receives set B’s mailbox.
!, ‘.. StarTalk Set Up and Operation Guide
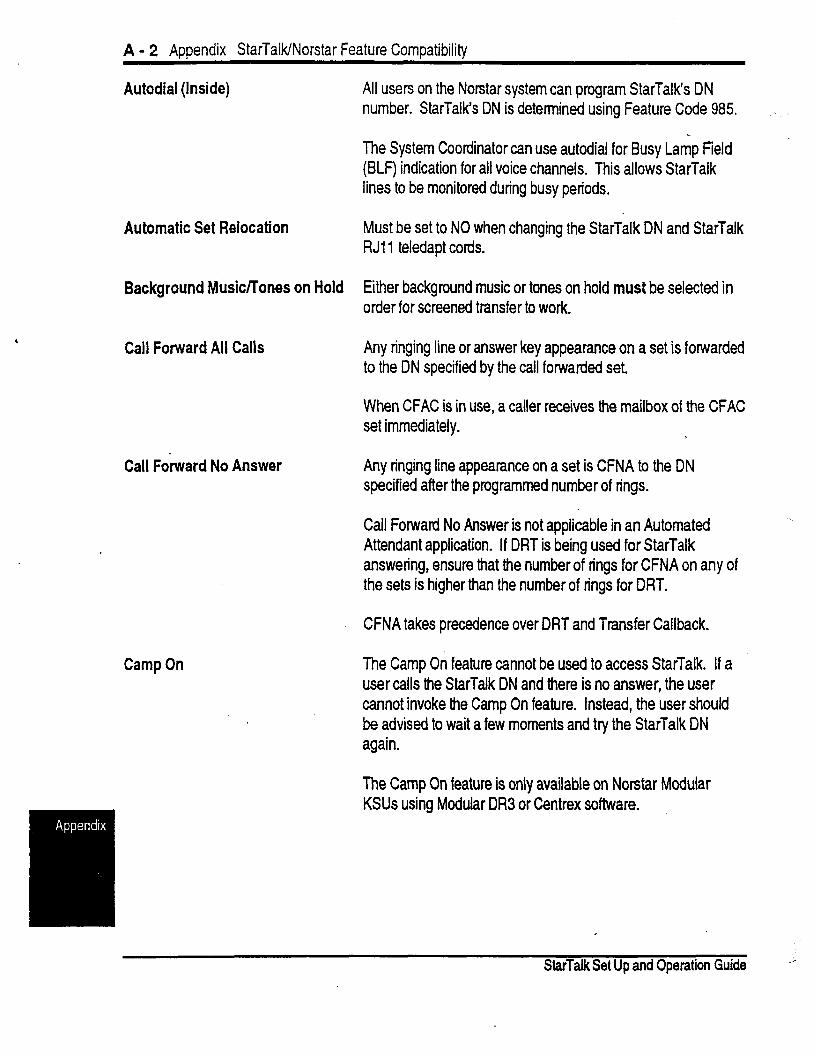
A - 2 Aooendix StarTalWNorstar Feature Comnatibilitv
Autodial (Inside)
Automatic Set Relocation
Background Mtisic/Tones on Hold
Call Foward All Calls
Call Fo-hard No Answer
Camp On
All users on the Norstar system can program StarTalk’s DN number. StarTalk’s DN is determined using Feature Code 985.
The System Coordinator can use autodial for Busy Lamp Field (BLF) indication for all voice channels. This allows StarTalk lines to be monitored during busy periods.
Must be set to NO when changing the StarTalk DN and StarTalk RJl 1 teledapt cords.
Either background music or tones on hold must be selected in order for screened transfer to work.
Any ringing line or answer key appearance on a set is forwarded to the DN specified by the call forwarded set
When CFAC is in use, a caller receives the mailbox of the CFAC set immediately.
Any ringing line appearance on a set is CFNA to the DN specified after the programmed number of rings.
Call Forward No Answer is not applicable in an Automated Attendant application. If DRT is being used for StarTalk answering, ensure that the number of rings for CFNA on any of the sets is higher than the number of rings for DRT.
CFNA takes precedence over DRT and Transfer Callback.
The Camp On feature cannot be used to access StarTalk. If a user calls the StarTalk DN and there is no answer, the user cannot invoke the Camp On feature. Instead, the user should be advised to wait a few moments and try the StarTalk DN again.
The Camp On feature is only available on Norstar Modular KSUs using Modular DR3 or Centrex software.
StarTalk Set Up and Operation Guide .r

StarTalWNorstar Feature Compatibility Appendix A - 3
Delayed Ring Transfer (DRT) To use StarTalk as a secondary line answering position, you set DRT by: 1. Assigning the StarTalk DN as the prime set for the specified-
lines that are to be DRT to StarTalk. 2. Setting the Norstar DRT to YES. 3. Setting DRT Delay from 1 to 6 (inclusive) rings. 4. Assigning a Greeting table to each line that is to be DRT to
StarTalk. 5. Setting the StarTalk Answer option to NO for the lines that
are to be DRT to StarTalk.
Note: When the StarTalk Answer option for a line is set to YES, then StarTalk answers the line immediately with Greeting Table 1.
When DRT is being used for StarTalk Answering, and Norstar sets with a Ringing tine Appearance are forwarded to StarTalk, a caller receives the mailbox of the CFAC set immediately.
Disconnect Supervision
Do Not Disturb (DND)
When a KSU has Disconnect Supervision if a caller hangs up after reaching the Automated Attendant, Norstar immediately senses this and breaks the connection. This results in fewer ‘phantom’ messages in the General Delivery Mailbox and prevents Star-Talk ports from being tied up.
The Disconnect Supervision feature is only available on Norstar Modular KSUs and trunk modules with the DS suffix on their labels.
Stops all tones and ringing to a set. When a call is transferred to a set with DND invoked, the call appears as a flashing indicator on an available line. The Automated Attendant announces to the caller that the party being called is unavail- able, and continues with a set of instructions for leaving a message in a mailbox, or reaching another person.
When a Norstar set calls another Norstar set that is using DND, the line indicator flashes until the call is CFNA to StarTalk.
Feature Timeout StarTalk has a timeout of up to three minutes. This feature is independent of the Norstar timeout.
t - -0 StarTalk Set Up and Operation Guide
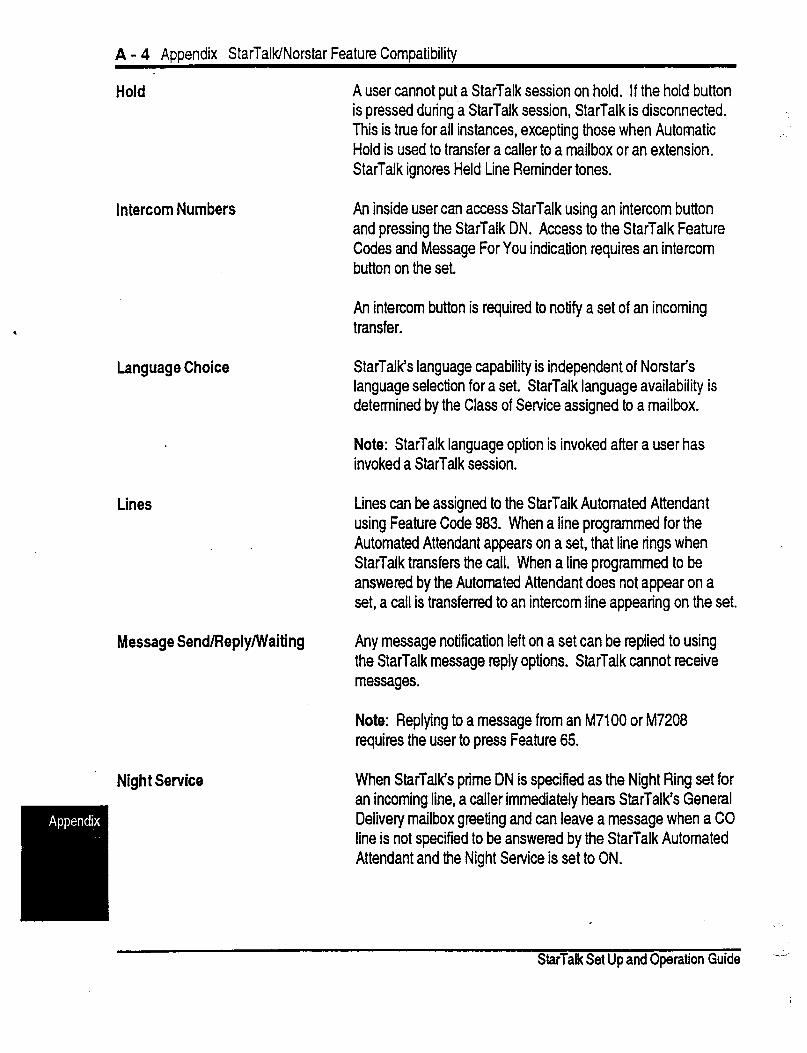
A - 4 Aooendix StarTalWNorstar Feature Comoatibiiitv
Hold A user cannot put a StarTalk session on hold. If the hold button is pressed during a StarTalk session, StarTalk is disconnected. This is true for all instances, excepting those when Automatic Hold is used to transfer a caller to a mailbox or an extension. StarTalk ignores Held Line Reminder tones.
Intercom Numbers An inside user can access StarTalk using an intercom button and pressing the StarTalk DN. Access to the StarTalk Feature Codes and Message For You indication requires an intercom button on the set.
An intercom button is required to notify a set of an incoming transfer.
Language Choice
Lines
StarTalKs language capability is independent of Norstar’s language selection for a set. StarTalk language availability is determined by the Class of Service assigned to a mailbox.
Note: StarTalk language option is invoked after a user has invoked a StarTalk session.
Lines can be assigned to the StarTalk Automated Attendant using Feature Code 983. When a line programmed for the Automated Attendant appears on a set, that line rings when StarTalk transfers the call. When a line programmed to be answered by the Automated Attendant does not appear on a set, a call is transferred to an intercom line appearing on the set.
Message Send/Reply/Waiting Any message notification left on a set can be replied to using the StarTalk message reply options. StarTalk cannot receive messages.
Note: Replying to a message from an M7100 or M7208 requires the user to press Feature 65.
Night Service When StarTalKs prime DN is specified as the Night Ring set for an incoming line, a caller immediately hears StarTalKs General Delivery mailbox greeting and can leave a message when a CO line is not specified to be answered by the StarTalk Automated Attendant and the Night Service is set to ON.
StarTalk Set Up and Operation Guide ---
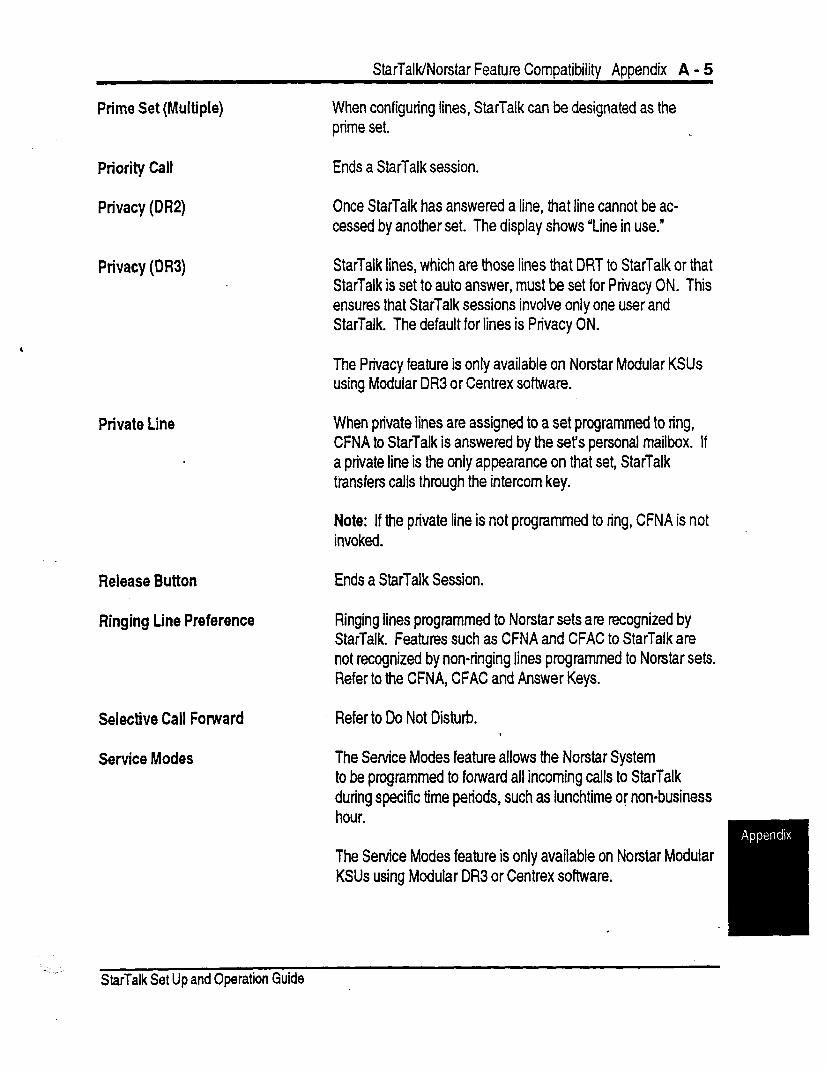
StarTalk/Norstar Feature Comoatibilitv Aobendix A - 5
Prime Set (Multiple) When configuring lines, StarTalk can be designated as the prime set.
Priority Call Ends a StarTalk session.
Privacy (DR2) Once StarTalk has answered a line, that line cannot be ac- cessed by another set. The display shows “Line in use.”
Privacy (DR3) StarTalk lines, which are those lines that DRT to StarTalk or that StarTalk is set to auto answer, must be set for Privacy ON. This ensures that StarTalk sessions involve only one user and StarTalk. The default for lines is Privacy ON.
The Privacy feature is only available on Norstar Modular KSUs using Modular DR3 or Centrex software.
Private Line
Release Button
Ringing Line Preference
Selective Call Forward Refer to Do Not Disturb.
Service Modes The Senrice Modes feature allows the Norstar System to be programmed to forward ail incoming calls to StarTalk during specific time periods, such as lunchtime or non-business hour.
When private lines are assigned to a set programmed to ring, CFNA to StarTalk is answered by the set’s personal mailbox. If a private line is the only appearance on that set, StarTalk transfers calls through the intercom key.
Note: If the private line is not programmed to ring, CFNA is not invoked.
Ends a StarTalk Session.
Ringing lines programmed to Norstar sets are recognized by StarTalk. Features such as CFNA and CFAC to StarTalk are not recognized by non-ringing lines programmed to Norstar sets. Refer to the CFNA, CFAC and Answer Keys.
The Service Modes feature is only available on Norstar Modular KSUs using Modular DR3 or Centrex software.
StarTalk Set Up and Operation Guide
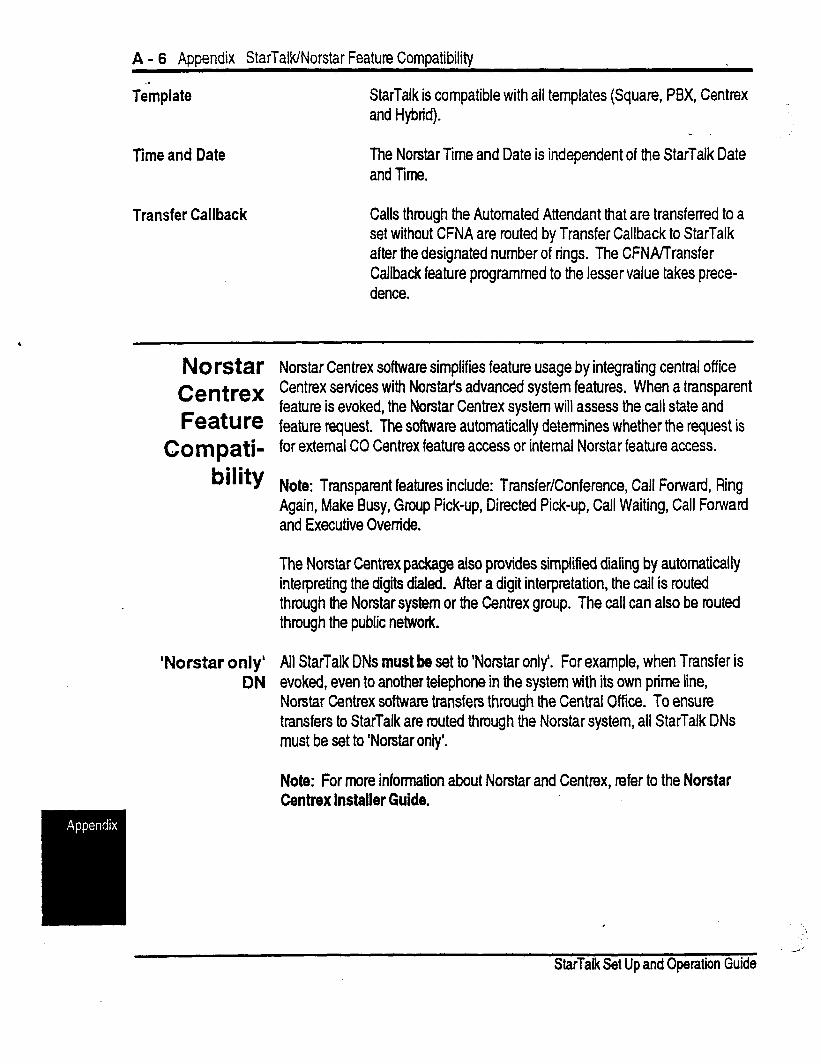
A - 6 Appendix StarTalWNorstar Feature Compatibility
Template StarTalk is compatible with all templates (Square, PBX, Centrex and Hybrid).
Time and Date The Norstar Time and Date is independent of the StarTalk Date and Time.
Transfer Callback Calls through the Automated Attendant that are transferred to a set without CFNA are routed by Transfer Callback to StarTalk after the designated number of rings. The CFN&Transfer Callback feature programmed to the lesser value takes prece- dence.
Norstar Norstar Centrex software simplifies feature usage by integrating central office Centrex Centrex services with Norstar’s advanced system features. When a transparent
Feature feature is evoked, the Norstar Centrex system will assess the call state and feature request. The software automatically determines whether the request is
Compati- for external CO Centrex feature access or internal Norstar feature access.
bi’ity Note- Transparent features include: Transfer/Conference, Call Forward, Ring . Again, Make Busy, Group Pick-up, Directed Pick-up, Call Waiting, Call Forward and Executive Ovenfde.
The Norstar Centrex package also provides simplified dialing by automatically interpreting the digits dialed. After a digit interpretation, the call is routed through the Norstar system or the Centrex group. The call can also be routed through the public network.
‘Norstar only’ All StarTalk DNs must be set to ‘Norstar only’. For example, when Transfer is DN evoked, even to another teiephone in the system with its own prime line,
Norstar Centrex software transfers through the Central Off ice. To ensure transfers to StarTalk are routed through the Norstar system, all StarTalk DNs must be set to ‘Norstar only’.
Note: For more information about Norstar and Centrex, refer to the Norstar Centrex Installer Guide.
.
StarTalk Set Up and Operation Guide
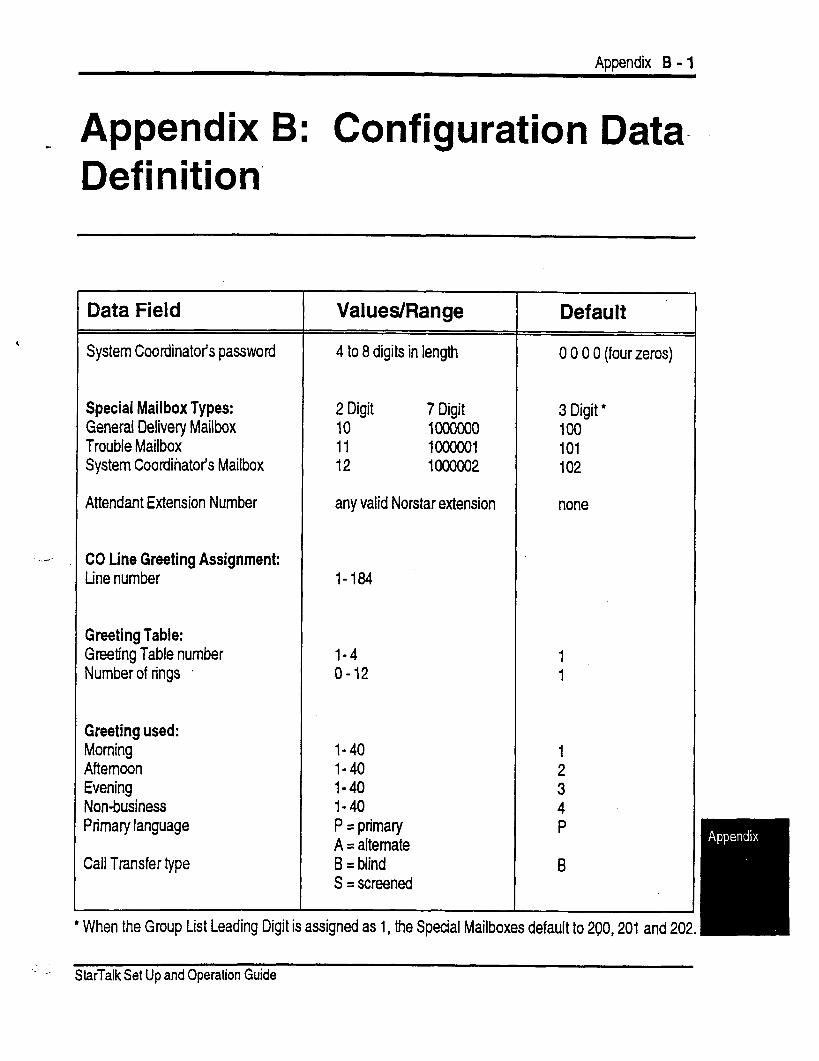
Appendix B - 1
- Appendix B: Configuration Data- Definition’
._-
Data Field Values/Range Default
System Coordinator’s password 4 to 8 digits in length 0 0 0 0 (four zeros)
Special Mailbox Types: 2 Digit 7 Digit 3 Digit l General Delivery Mailbox 10 WOOOOO loo Trouble Mailbox 11 looooO1 101 System Coordinator’s Mailbox 12 iOOOOO2 102
Attendant Extension Number any valid Norstar extension none
CO Line Greeting Assignment: tine number l-184
Greeting Table: Greeting Table number Number of rings
l-4 1 o-12 1
Greeting used: Morning Afternoon Evening Nonbusiness Primary language
Call Transfer type
l-40 l-40 l-40 l-40 P = primary A = alternate B = blind S = screened
l When the Group List Leading Digit is assigned as 1, the Special Mailboxes default to 290,201 and 202.
. StarTalk Set Up and Operation Guide
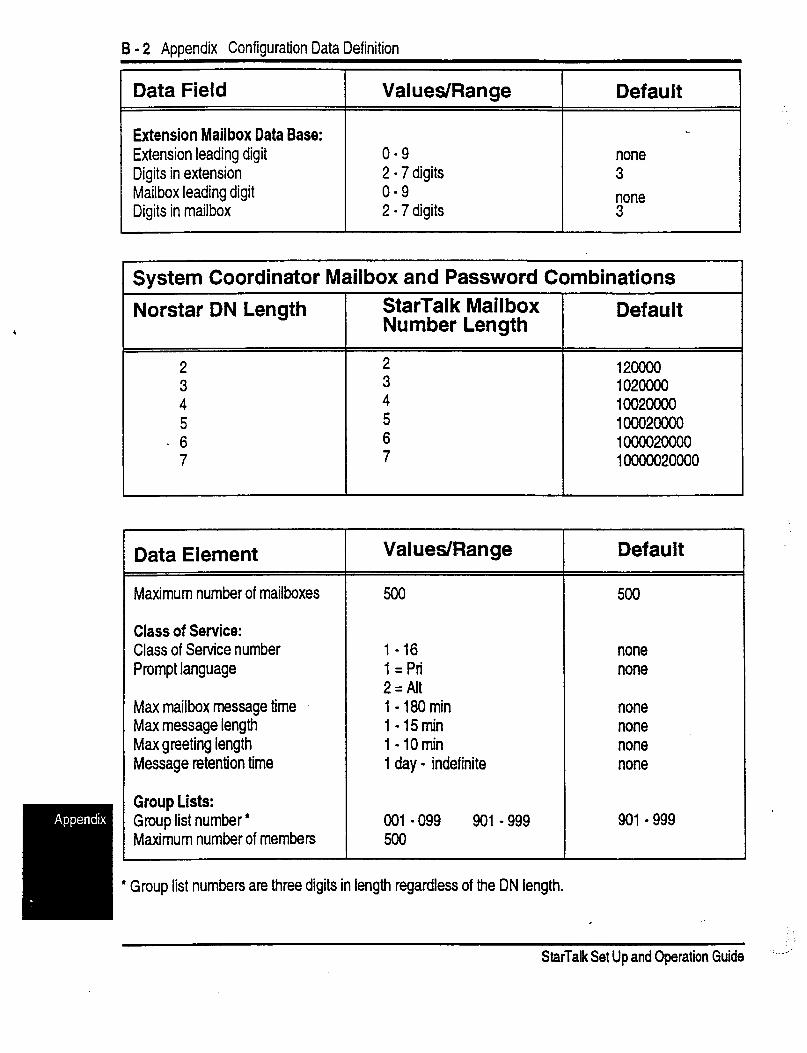
B - 2 Appendix Configuration Data Definition
Data Field Values/Range Default
Extension Mailbox Data Base: Extension leading digit Digits in extension Mailbox leading digit Digits in mailbox
o-9 2 - 7 digits o-9 2 - 7 digits
none 3 none 3
r System Coordinator Mailbox and Password Combinations
Norstar DN Length
Data Element
Maximum number of mailboxes 500
Class of Service: Class of Service number Prompt language
Max mailbox message time Max message length Max greeting length Message retention time
l-16 1 =Pri 2=Aft 1 - 180 min 1-15min 1-10min 1 day - indefinite
Group Lists: Group list number l
Maximum number of members 001 - 099 901 - 999 500
StarTalk Mail box Number Length
Default
12oooO 102oooo 1002oOoo looo2oooo lOooo2oooo 10000020000
Values/Range Default
’ Group list numbers are three digits in length regardless of the DN length.
.
500
none none
none none none none
901 - 999
S&Talk Set Up and Operation Guide
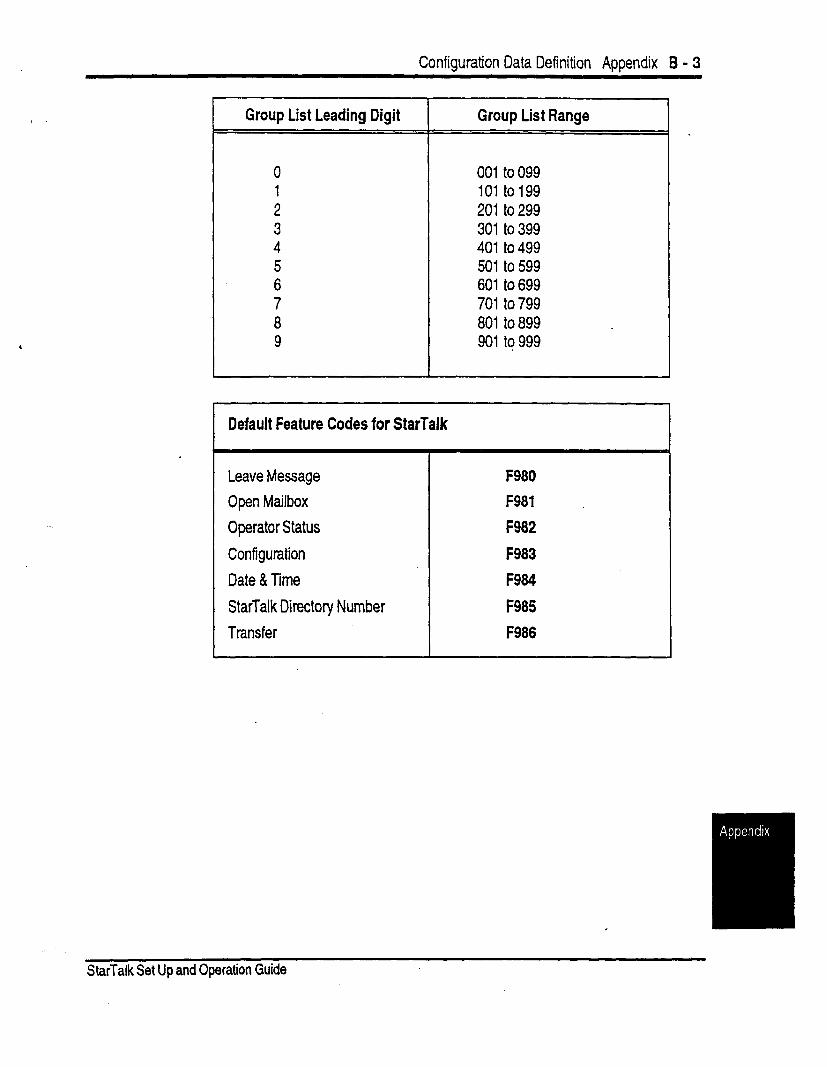
Configuration Data Definition Appendix B - 3
Group List Leading Digit
0 1 2 3 4 5 6 7 8 9
Group List Range
001t0099 101to199 201to299 301to399 401to499 501to599 601 to 699 701to799 801 to899 . 901 tq 999
Default Feature Codes for StarTalk
Leave Message F980
Open Mailbox F981
Operator Status F982
Configuration F983
Date & Time F984
StarTalk Directory Number F985
Transfer F986
StarTalkS& UpandOperation Guide
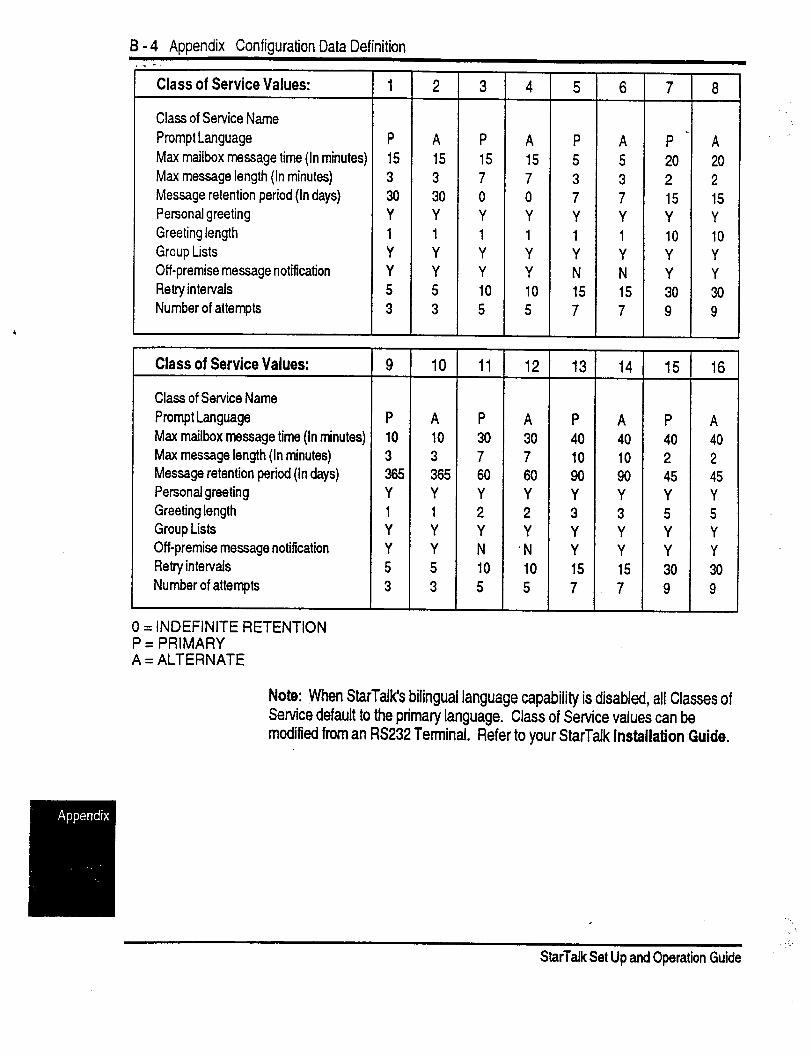
B - 4 Awendix Confiauration Data Definition x -
Class of Service Values: 1 2 3 4 5 6 7 8
Class of Service Name Prompt Language P A P A P A P-h Max mailbox time (In minutes) message 15 15 15 15 5 5 20 20
Max length (In minutes) message 3 3 7 7 3 3 2 2 Message retention period (In days) 30 30 0 0 7 7 15 15 Personal greeting Y Y Y Y Y Y Y Y Greeting length 1 1 1 1 1 1 10 10 Group Lists Y Y Y Y Y Y Y Y Off-premise message notification Y Y Y Y N N Y Y Retry intervals 5 5 10 10 15 15 30 30 Number of attempts 3 3 5 5 7 7 9 9
Class of Service Values: 9 10 11 12 13 14 15 16
Class of Service Name Prompt Language P A P A P A P A Max mailbox time (Inminutes) message 10 10 30 30 40 40 40 40 Max length (In minutes) message 3 3 7 7 10 10 2 2 Message retention period (in days) 365 365 60 60 90 !30 45 45 Personal greeting Y Y Y Y Y Y Y Y Greeting length 1 1 2 2 3 3 5 5 Group Lists Y Y Y Y Y Y Y Y Off-premise message notification Y Y N .N Y Y Y Y Retry in tervais 5 5 10 10 15 15 30 30 Number of attempts 3 3 5 5 7.7 9 9
0 = INDEFINITE RETENTION P = PRIMARY A = ALTERNATE
Note: When StarTalk’s bilingual language capability is disabled, all Classes of Setvice default to the primary language. Class of Service values can be modified from an RS232 Terminal. Refer to your StarTalk installation Guide.
StarTalk Set Up and Operation Guide
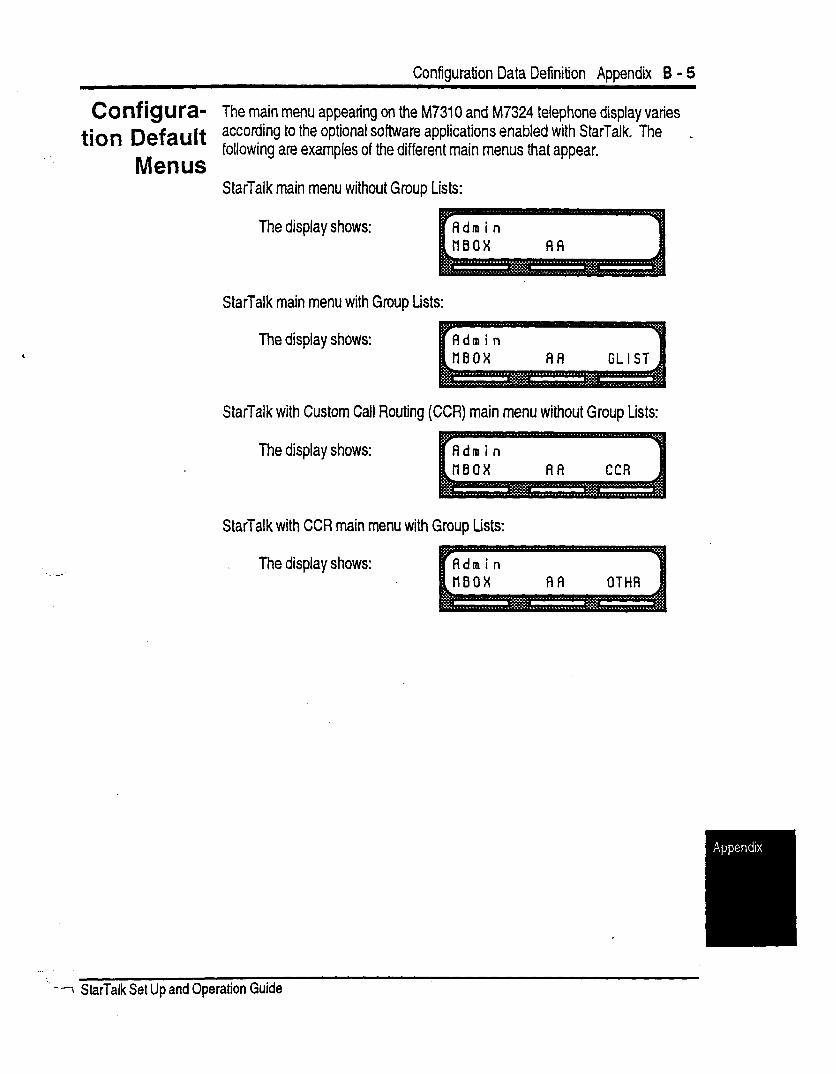
Confiauration Data Definition Aooendix 6 - 5
CO nf ig Ut’a- The main menu appearing on the M7310 and M7324 telephone display varies
tion Default according to the optional software applications enabled with StarTalk. The _
Menus following are examples of the different main menus that appear.
StarTalk main menu without Group Lists:
The display shows:
StarTalk main menu with Group Lists:
The display shows:
StarTalk with Custom Call Routing (CCR) main menu without Group Lists:
The display shows:
StarTalk with CCR main menu with Group Lists:
The display shows:
” -7 StarTalk Set Up and Operation Guide
B - 6 Appendix Configuration Data Definition
S&Talk Set Up and Operation Guide
Appendix C - 1
Appendix C: Resetting StarTalk
Introduction For StarTalk to work, the Norstar Intercom Number length must be the same as the StarTalk Mailbox Number length. If the Norstar Intercom Number length is different from the StarTalk Mailbox Number length, you must change the StarTalk Mailbox Number length.
This Appendix covers the procedures for resetting StarTalk. After you reset StarTalk you must:
l initialize StarTalk . configure your Company’s telephone lines . enter Greeting Table information . record Company Greetings . add mailboxes . initialize the Special Mailboxes
Sections 4 and 5 in this Guide cover the procedures for configuring lines, entering Greeting Table information, recording Company greetings, adding mailboxes, and initializing the Special Mailboxes.
Important: Resetting StarTalk erases all the Company greetings, Greeting Table and mailbox information. Before you reset StarTalk, ensure that you have a copy of the current StarTalk set up. Refer to your completed StarTalk Programming Record.
StarTalk Set Up and Operation Guide
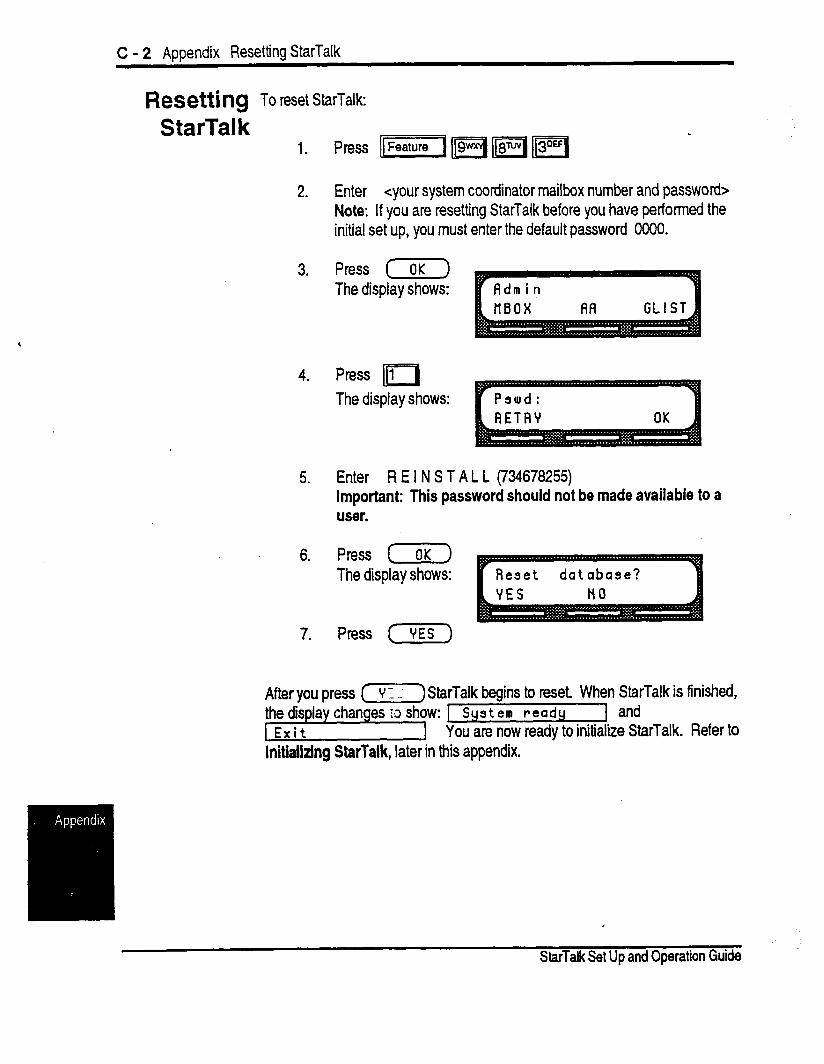
C - 2 Appendix Resetting StarTalk
Resetting To reset StarTalk:
StarTalk
2. Enter <your system coordinator mailbox number and password> Note: If you are resetting StarTalk before you have performed the initial set up, you must enter the default password 0060.
3. Press (OK) The display shows:
4. Press 1[1 The display shows:
5. Enter R E I N S T A L L (734678255) important: This password should not be made available to a user.
6. Press [ OK ) The display shows:
7. Press (YES)
After you press (r)StarTalk begins to reset When StarTalk is finished, 1 System ready 1 and You are now ready to initialize S&Talk. Refer to
Initializing StarTalk, later in this appendix.
StarTalk Set Up and Operation Guide
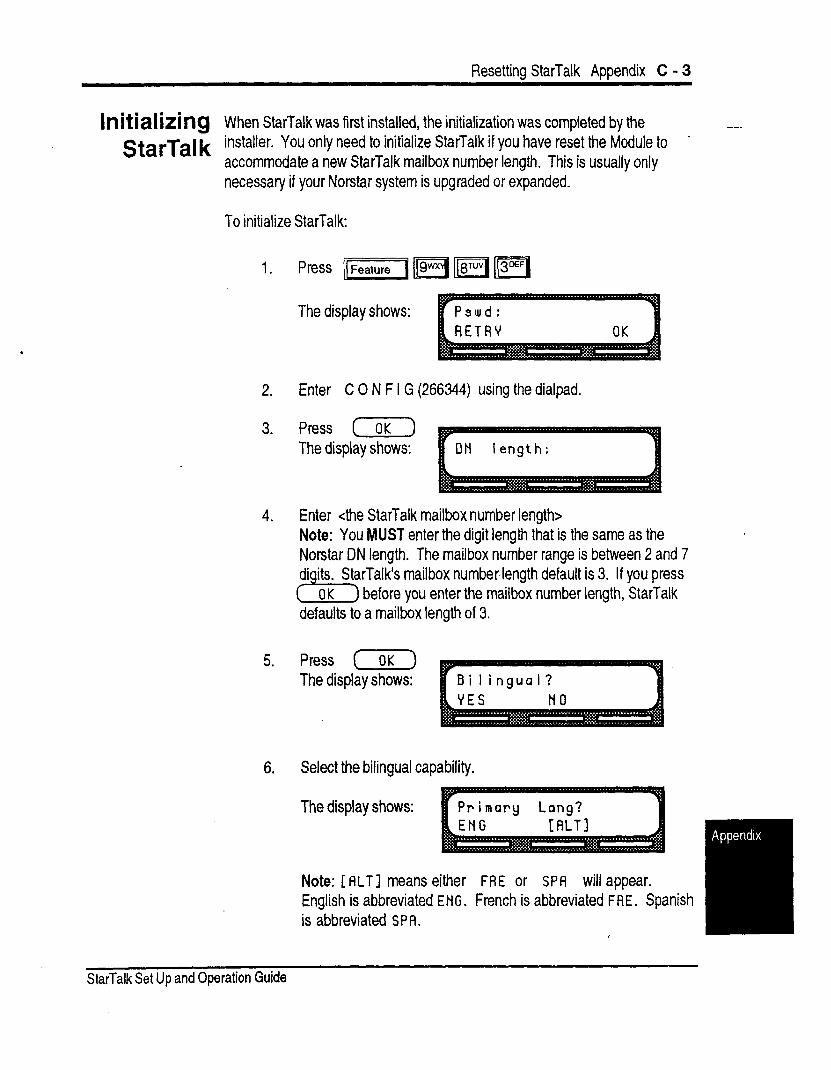
Resettina StarTalk Aooendix C - 3
lnitiali&ICJ When StarTalk was first installed, the initialization was completed by the __ StarTal k installer. You only need to initialize StarTalk if you have reset the Module to -
accommodate a new StarTalk mailbox number length. This is usually only necessary if your Norstar system is upgraded or expanded.
To initialize StarTalk:
The display shows:
2. Enter C 0 N F I G (266344) using the dialpad.
3. Press [aK) The display shows:
4. Enter <the StarTalk mailbox number length> Note: You MUST enter the digit length that is the same as the Norstar DN length. The mailbox number range is between 2 and 7 di its. StarTalk’s mailbox number length default is 3. If you press b OK before you enter the mailbox number length, StarTalk defaults to a mailbox length of 3.
5. Press (OK) The display shows:
6. Select the bilingual capability.
The display shows: Primary Lang? ENG [RLTI
Note: [FILTI means either FRE or SPA will appear. English is abbreviated ENG. French is abbreviated FRE. Spanish is abbreviated SPA.
StarTalk Set Up and Operation Guide
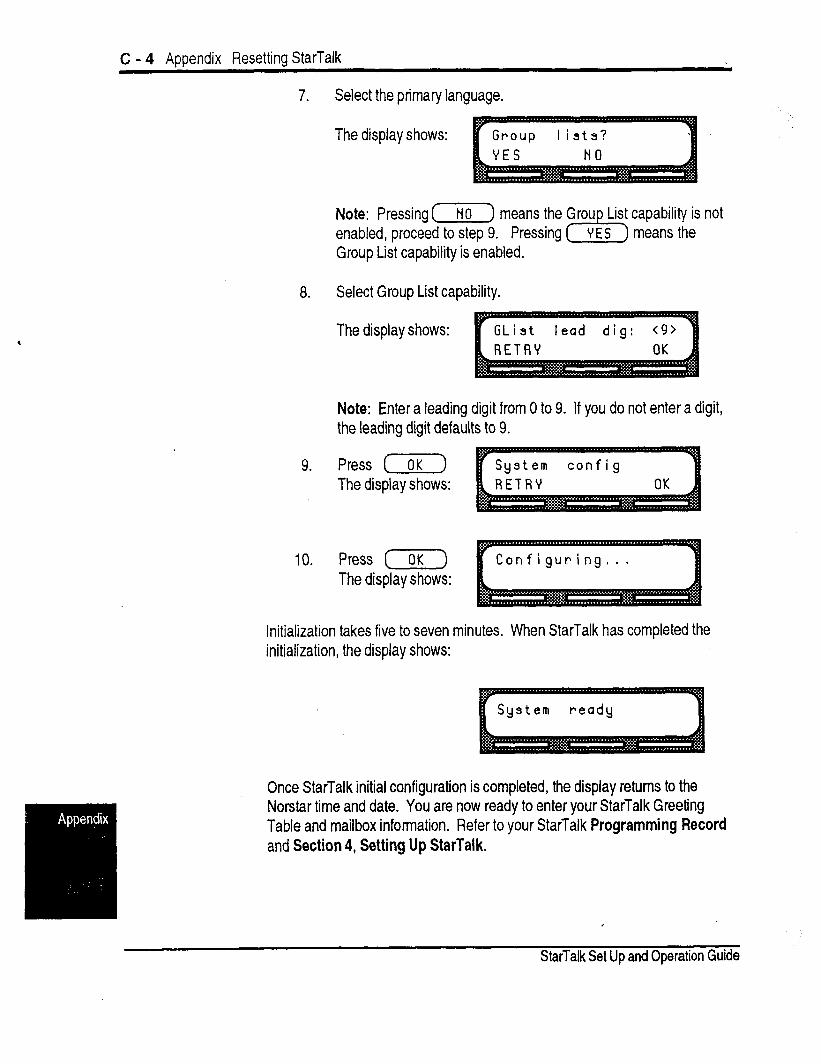
C - 4 Appendix Resetting StarTalk
7. Select the primary language.
The display shows:
Note: Pressing enabled, proceed to step 9. Group List capability is enabled.
8. Select Group List capability.
The display shows:
Note: Enter a leading digit from 0 to 9. If you do not enter a digit, the leading digit defaults to 9.
9. Press (OK) The display shows:
10. Press (OK) The display shows:
Initialization takes five to seven minutes. When StarTalk has completed the initialization, the display shows:
Once StarTalk initial configuration is completed, the display returns to the Norstar time and date. You are now ready to enter your StarTalk Greeting Table and mailbox information. Refer to your StarTalk Programming Record and Section 4, Setting Up StarTalk.
StarTalk Set Up and Operation Guide
Aooendix D - 1
Appendix D: Norstar Configuration Tips
Introduction
Ringing Lines and
Answer Keys
This appendix describes some Norstar Configuration enhancements that, if used, can maximize the efficiency of StarTalk.
If two or more telephones have a ringing line appearance of the same outside telephone line, and one of these telephones is programmed with Norstar’s Call Forward All Calls (CFAC) or Call Forward No Answer (CFNA) features, then all incoming calls on the outside line are directed to the personal mailbox of the programmed telephone.
For example, if a marketing secretary’s telephone has a ringing line appearance of the marketing director’s telephone, and the secretary’s telephone is call forwarded to StarTalk, then all incoming calls are immediately transferred into the secretary’s personal mailbox. This is also true if the secretary’s telephone is CFNA, to StarTalk and if the number of specified rings on the secretary’s telephone is less than the specified rings on the marketing directors telephone.
Note: CFAC and CFNA do not affect calls on a telephone’s non-ringing lines. For example, if a secretary’s telephone has a non-ringing appearance of another telephone’s outside line, and the secretary’s telephone is CFAC or CFNA to StarTalk, incoming calls on this line are not affected.
StarTalk Set Up and Operation Guide
D - 2 Appendix Norstar Configuration Tips
Ringing When one or more telephones have a ringing answer button for another Answer telephone, and one of these is Call Forwarded or Call Forward No Answer to
Button StarTalk, all incoming calls will be directed into the personal mailbox of the forwarded telephone.
If two or more of these telephones are CFAC to StarTalk, all calls will be directed to the personal mailbox of the telephone that is connected to the lowest numbered Station Port on the Norstar system.
Note: Norstar’s Call Forward All Calls and Call Forward No Answer features do not affect calls on a telephone’s non-tinging answer button.
Delayed StarTalk’s Automated Attendant can answer any call on specified incoming Answering telephone lines after a specified number of rings. StarTalk answers incoming
by StarTal k’s cai’s when’ Automated 1.
Attendant The telephone service representative programs StarTalk to be the prime telephone for one or more designated incoming telephone lines. Norstar’s Delay Ring Transfer (DRT) feature transfers unanswered calls on these lines to StarTalk’s Automated Attendant after the specified number of rings.
Note: Norstar’s DRT feature only applies to incoming calls on the assigned line. It does not affect any intercom calls between sets.
StarTalk Set Up and Operation Guide
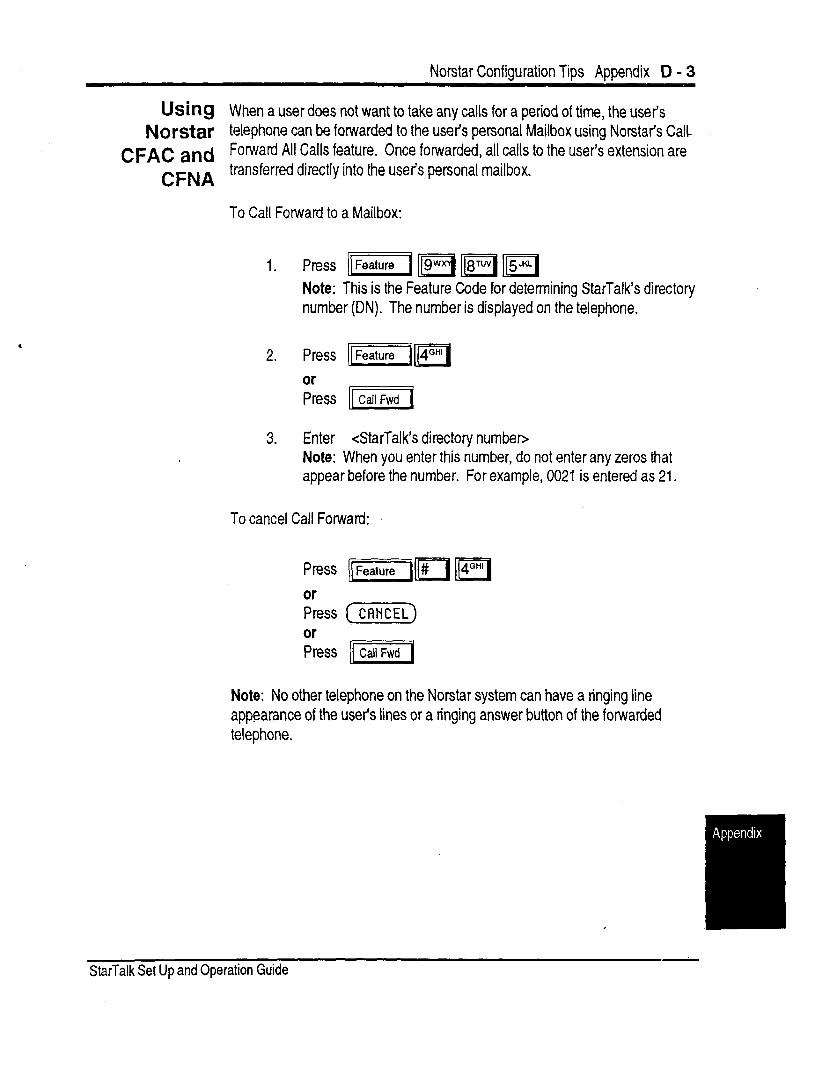
Norstar Confiouration Tips Appendix D - 3
USitIg When a user does not want to take any calls for a period of time, the user’s Norstar telephone can be forwarded to the user’s personal Mailbox using Norstar’s Calf
CFAC and Forward All Calls feature. Once forwarded, all calls to the user’s extension are CFNA transferred directly into the user’s personal mailbox.
To Call Forward to a Mailbox:
1. Press /IFeature Fq ‘pi m Note: This is the Feature Code for determining StarTalk’s directory number (DN). The number is displayed on the telephone.
2. Press I(fealurelpl
or Press I({
3. Enter <StarTalk’s directory numben Note: When you enter this number, do not enter any zeros that appear before the number. For example, 0021 is entered as 21.
To cancel Call Forward:
Press lj%ZZ=jIII# II,,,,1 or Press [CAnCEL) or Press [ICall[
Note: No other telephone on the Norstar system can have a ringing line appearance of the user’s lines or a ringing answer button of the forwarded telephone.
StarTalk Set Up and Operation Guide
D - 4 Appendix Norstar Configuration Tips
StarTalk Set Up and Operation Guide

Appendix E - 1
Appendix E: StarTalk Error Messages
Introduction This Appendix describes the error messages that are shown when an incorrect action is performed. The error messages shown here are presented in alpha- betical order.
Already a member Appears when trying to add a mailbox again to a Group List. A mailbox cannot be assigned to the same Group List twice.
too short
Appears when trying to delete a Special Mailbox. The System Coordinator, General Delivery, and Trouble mail- boxes cannot be deleted.
Appears when a Group List number is entered as a mailbox member of another Group List. A Group List number cannot be added to a Group List.
Appears when assigning more than one extension to a mailbox.
Appears when trying to assign an extension number that is already assigned to the information mailbox.
Appears when the introduction to a forwarded message is less than three seconds long. *
StarTalk Set Up and Operation Guide
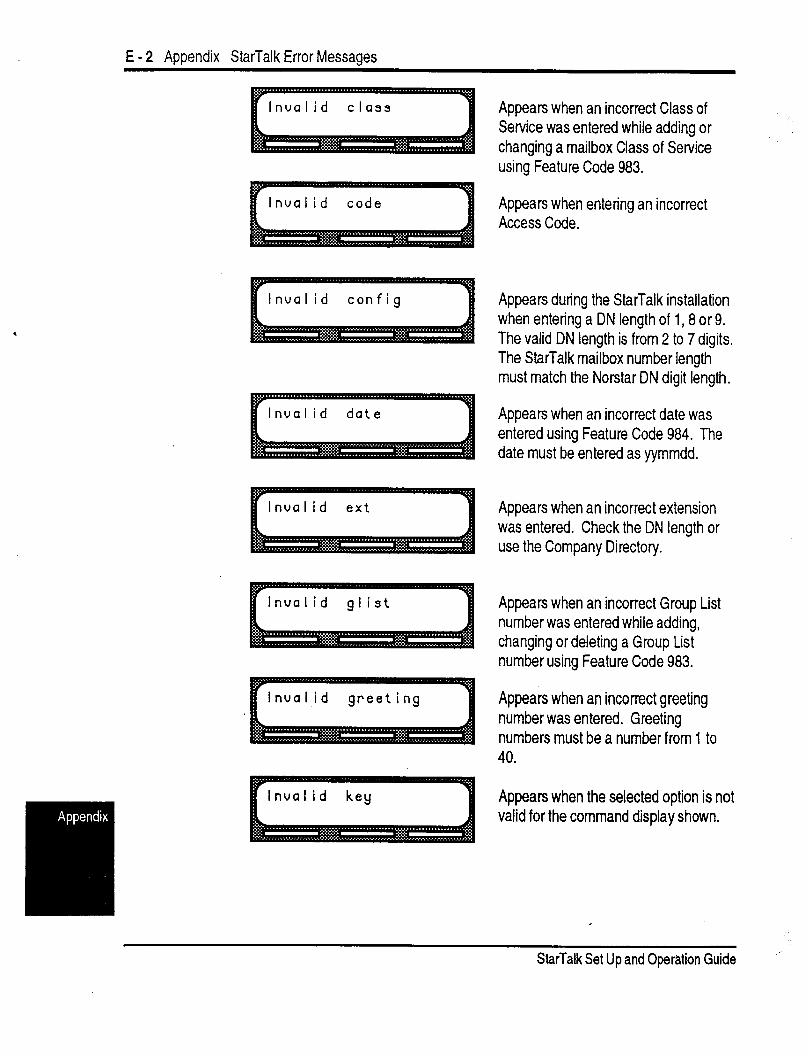
E - 2 Appendix StarTalk Error Messaoes
Invalid code
lnual id config
Invalid glist
Appears when an incorrect Class of Service was entered while adding or changing a mailbox Class of Service using Feature Code 983.
Appears when entering an incorrect Access Code.
Appears during the StarTalk installation when entering a DN length of 1,8 or 9. The valid DN length is from 2 to 7 digits. The StarTalk mailbox number length must match the Norstar DN digit length.
Appears when an incorrect date was entered using Feature Code 984. The date must be entered as yymmdd.
Appears when an incorrect extension was entered. Check the DN length or use the Company Directory.
Appears when an incorrect Group List number was entered while adding, changing or deleting a Group List number using Feature Code 983.
Appears when an incorrect greeting number was entered. Greeting numbers must be a number from 1 to 40.
Appears when the selected option is not valid for the command display shown.
StarTalk Set Up and Operation Guide
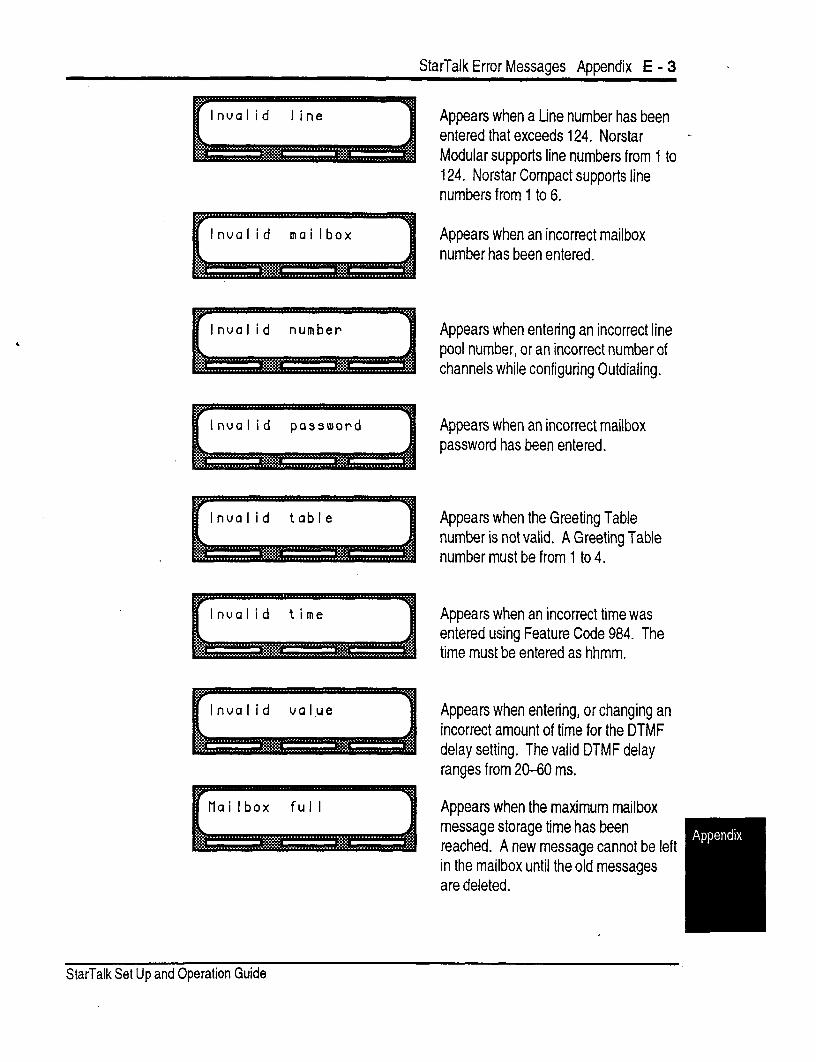
StarTalk Error Messaaes Aooendix E - 3 .
Appears when a Line number has been entered that exceeds 124. Norstar Modular supports line numbers from 124. Norstar Compact supports line numbers from 1 to 6.
1 to
Appears when an incorrect mailbox number has been entered.
Appears when entering an incorrect line pool number, or an incorrect number of channels while configuring Outdialing.
Appears when an incorrect mailbox password has been entered.
Appears when the Greeting Table number is not valid. A Greeting Table number must be from 1 to 4.
Appears when an incorrect time was entered using Feature Code 984. The time must be entered as hhmm.
Appears when entering, or changing an incorrect amount of time for the DTMF delay setting. The valid DTMF delay ranges from 2B-60 ms.
Anoears when the maximum mailbox
StarTalk Set Up and Operation Guide
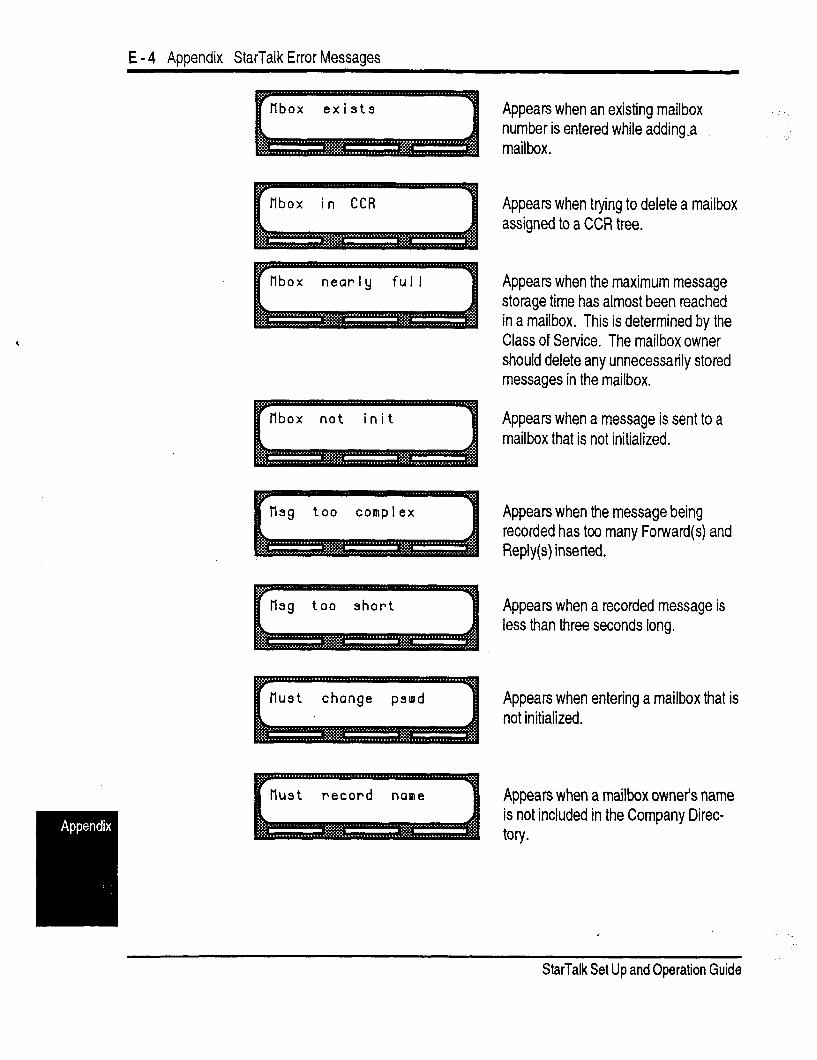
E - 4 Aooendix StarTalk Error Messages
tlbox exists Appears when an existing mailbox number is entered while adding-a mailbox.
tlbox in CCR Appears when trying to delete a mailbox assigned to a CCR tree.
Appears when the maximum message storage time has almost been reached in a mailbox. This is determined by the Class of Service. The mailbox owner should delete any unnecessarily stored messages in the mailbox.
Appears when a message is sent to a mailbox that is not initialized.
Appears when the message being recorded has too many Forward(s) and Reply(s) inserted.
llsg too short Appears when a recorded message is less than three seconds long.
/'lust change pswd
tlust record name
Appears when entering a mailbox that is not initialized.
Appears when a mail box owner’s name is not included in the Company Direc- tory.
.
StarTalk Set Up and Operation Guide
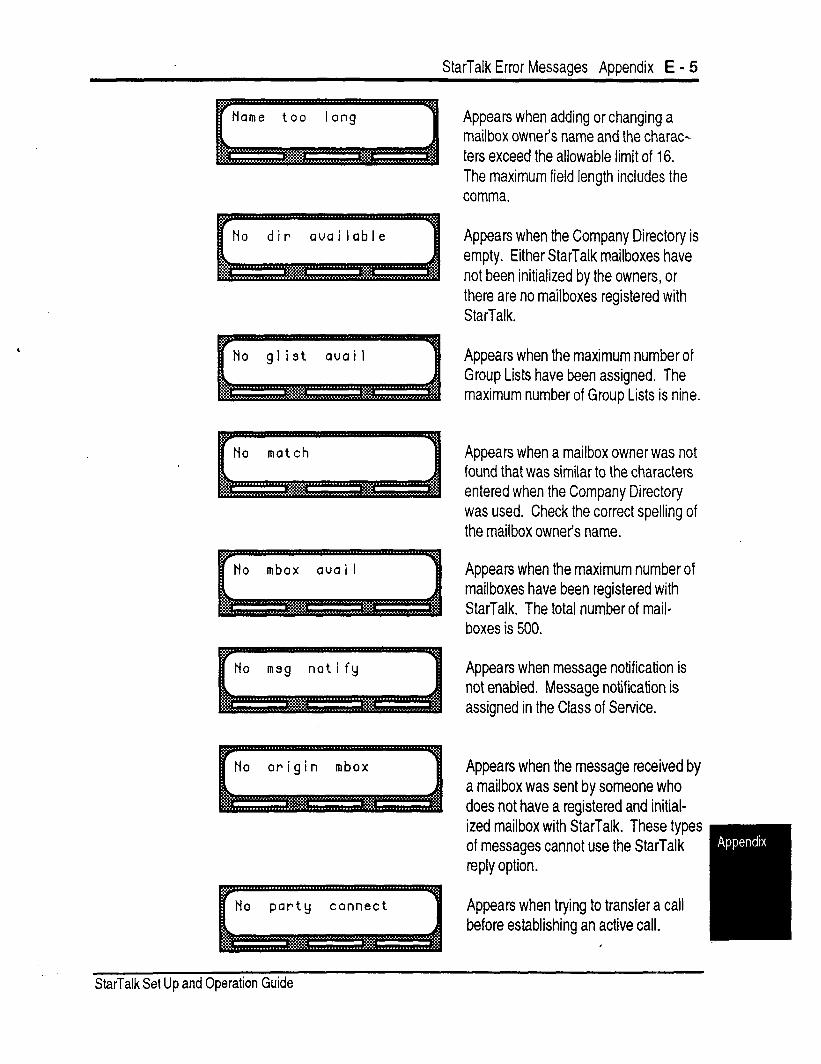
StarTalk Error Messaaes Appendix E - 5
No glist avail
StarTalk Set Up and Operation Guide
No mbox auai I
No origin mbox
No party connect
Appears when adding or changing a mailbox owner’s name and the charac- ters exceed the allowable limit of 16. The maximum field length includes the comma.
Appears when the Company Directory is empty. Either StarTalk mailboxes have not been initialized by the owners, or there are no mailboxes registered with StarTalk.
Appears when the maximum number of Group Lists have been assigned. The maximum number of Group Lists is nine.
Appears when a mailbox owner was not found that was similar to the characters entered when the Company Directory was used. Check the correct spelling of the mailbox owner’s name.
Appears when the maximum number of mailboxes have been registered with StarTalk. The total number of mail- boxes is 500.
Appears when message notification is not enabled. Message notification is assigned in the Class of Service.
Appears when the message received by a mailbox was sent by someone who does not have a registered and initial- ized mailbox with StarTalk. These types of messages cannot use the StarTalk reply option.
Appears when trying to transfer a call before establishing an active call.
I

E - 6 Appendix StarTalk Error Messages
No previous msg
Not al lowed
Appears while the first message in a mailbox is playing, and the command is etered to play the previous message.
Appears when a user is not allowed access to a Feature or Feature Code, or when a second user attempts to access the Configuration, Operator Status, or Date and Time Feature Codes.
Appears when a primary or alternate greeting is selected before it is re- corded.
Number too long Appears when entering more than the maximum number of digits allowed for a telephone number. The maximum number of digits allowed for a telephone number is 24.
Opt ion3 cancel Appears when delivery options are cancelled while sending a message.
Out of space Appears when StarTalk’s message storage pack is full. You must delete old messages from the General Delivery Mailbox and have mailbox owners delete any unnecessarily stored messages from their mailboxes.
I Paurd too long Appears when a password entered exceeded 8 digits. A password must be between 4 and 8 digits in length.
StarTalk Set Up and Operation Guide
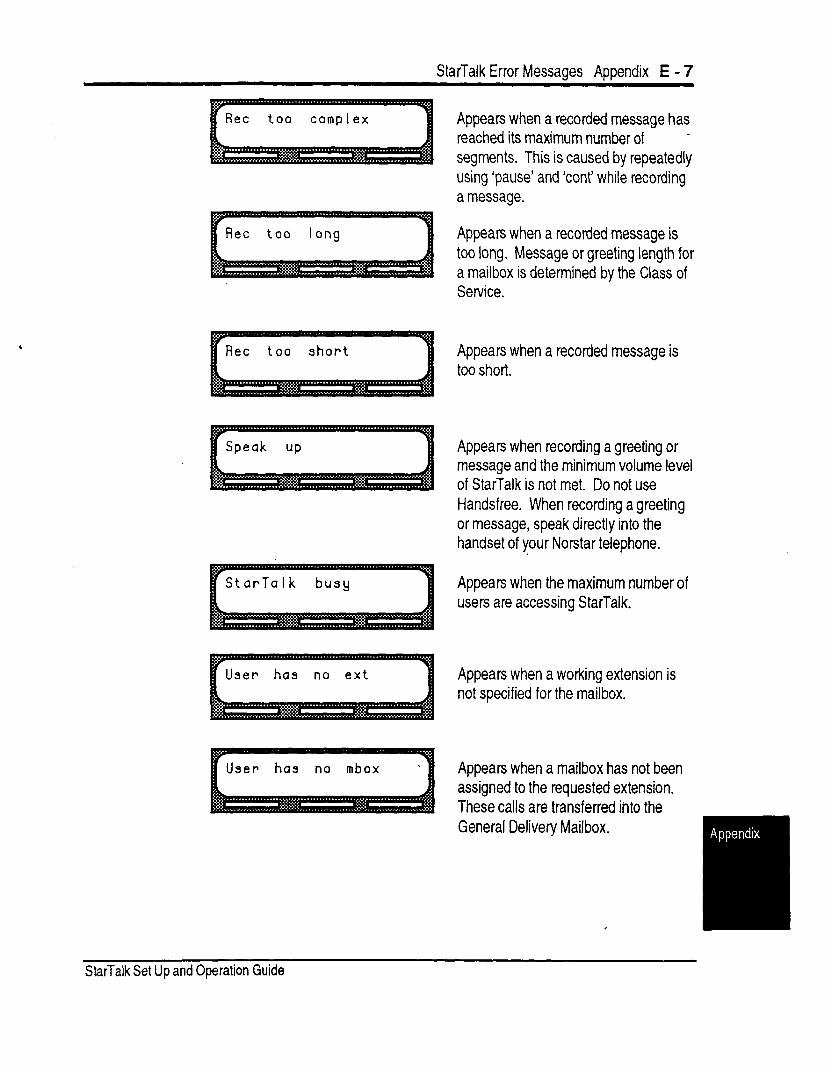
StarTalk Error Messages Appendix E - 7
Appears when a recorded message has reached its maximum number of - segments. This is caused by repeatedly using ‘pause’ and ‘cant’ while recording a message.
Appears when a recorded message is too long. Message or greeting length for a mailbox is determined by the Class of Service.
Ret too short Appears when a recorded message is too short.
Appears when recording a greeting or message and the minimum volume level of StarTalk is not met. Do not use Handsfree. When recording a greeting or message, speak directly into the handset of your Norstar telephone.
StarTalk busy
User has no ext
Appears when the maximum number of users are accessing StarTalk.
Appears when a working extension is not specified for the mailbox.
User has no mbox . Appears when a mailbox has not been assigned to the requested extension. These calls are transferred into the General Delivery Mailbox.
I
StarTalk Set Up and Operation Guide
E - 8 Appendix StarTalk Error Messages
StarTalk Set Up and Operation Guide
Appendix F - 1
Appendix F: StarTalk Samples and Tips
Sample StarTalk Set Ups
Setting Up StarTalk
in a Medium
Sized Company
There are several ways to set up StarTalk in your company. How you choose to set up StarTalk depends on the type of Norstar Business Communication System, whether or not your company uses a Private Branch Exchange (PBX) or CENTREX, and how many incoming telephone lines you use,
This sample StarTalk set up descn’bes four different StarTalk configurations. It also describes some useful application tips at the end.
The Bridge Stone Company is an engineering firm that has a Modular Norstar Business Communication system. The Norstar installer programmed both Norstar and StarTalk. The installer programmed StarTalk to be the Norstar Call Forward No Answer telephone for each extension. This means that any call not answered by a user is then transferred to the user’s StarTalk mailbox.
Each mailbox owner has buttons programmed for StarTalk’s Leave Message and Open Mailbox Feature Codes. This allows easy access to these frequently used features.
Each employee has been assigned a mailbox number that is the same as their Norstar extension number. Each mailbox owner has initialized their mailbox, and recorded and selected a personal greeting.
For the purpose of this example, we are going to look at how StarTalk and Norstar work together in call handling.
StarTalk Set Up and Operation Guide

F - 2 Appendix StarTalk Samples and Tips
The Central Receptionist Bridge Stone’s central receptionist handles all calls from Bridge Stone’s published telephone number, except when she is busy and unable to answer the telephone. When the receptionist is unable to answer the telephone within four rings, StarTalk’s Automated Attendant answers the call. She has also been appointed StarTalk’s designated operator. Whenever a caller presses Ilo to speak with StarTalk’s operator, the caller is transferred to the central receptionist.
Here is how Bridge Stone’s communication system works.
Bridge Stone’s public telephone number is 555-1234. Bridge Stone subscribes to custom calling services from their telephone company and this number forwards to any available (non-busy) line in a hunt group of eight lines. All eight lines appear on the central receptionist’s telephone.
StarTalk is the prime set for each of the eight lines. Norstar’s Delayed Ring Transfer (DRT) feature is used to forward unanswered lines to the StarTalk Automated Attendant.
Note: Delayed Ring Transfer is a Norstar system-wide call handling feature. All lines on the Norstar programmed DRT TO PRIME are forwarded after four rings. In the Norstar Configuration, this is accomplished by setting the Prime set of the line to the StarTalk DN. The DRT To Prime is set to YES, and the DRT Delay is set to 4.
StarTalk uses Greeting Table 1 to answer all calls after four rings. Depending on, the time of day, the different recorded greetings play for the Morning, Afternoon, and Evening. When the Business Status is NO, the Non-business hour greeting plays.
Greetings have been recorded by the System Coordinator and say:
Greeting No. 1 “Good Morning. You have reached BridgeStoneEngineering" (The StarTalk voice prompts play after the greeting. You can make Company Greetings up to five minutes long.)
Greeting No. 2 “Good Afternoon. You have reached Bridge Stone Engineering. ’
StarTalk Set Up and Operation Guide .-
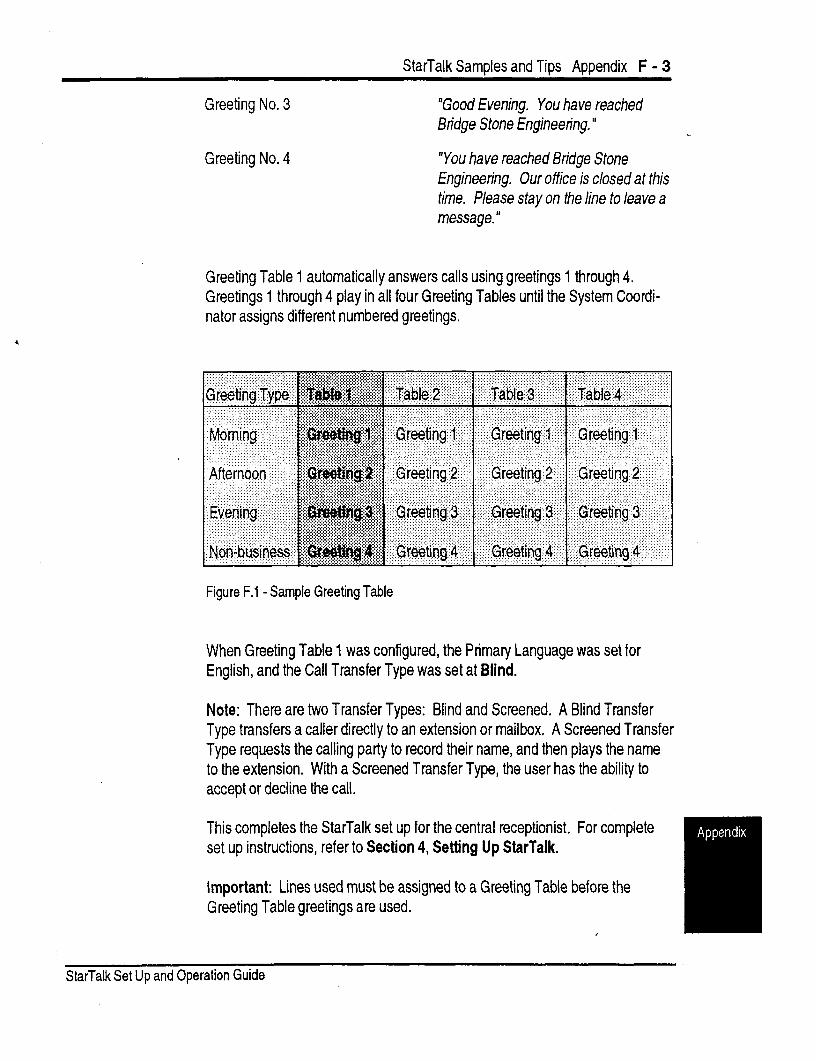
StarTalk Samoles and Ties Aooendix F - 3
Greeting No. 3 “Good Evening. You have reached Bn’dge Stone Engineering, ”
Greeting No. 4 “You have reached Brjdge Stone Engineering. Our office is closed at this time. Please stay on the line to leave a message. ”
Greeting Table 1 automatically answers calls using greetings 1 through 4. Greetings 1 through 4 play in all four Greeting Tables until the System Coordi- nator assigns different numbered greetings.
Figure F.l - Sample Greeting Table
When Greeting Table 1 was configured, the Primary Language was set for English, and the Call Transfer Type was set at Blind.
Note: There are two Transfer Types: Blind and Screened. A Blind Transfer Type transfers a caller directly to an extension or mailbox. A Screened Transfer Type requests the calling party to record their name, and then plays the name to the extension. With a Screened Transfer Type, the user has the ability to accept or decline the call.
This completes the StarTalk set up for the central receptionist. For complete set up instructions, refer to Section 4, Setting Up StarTalk.
Important: Lines used must be assigned to a Greeting Table before the Greeting Table greetings are used.
StarTalk Set Up and Operation Guide
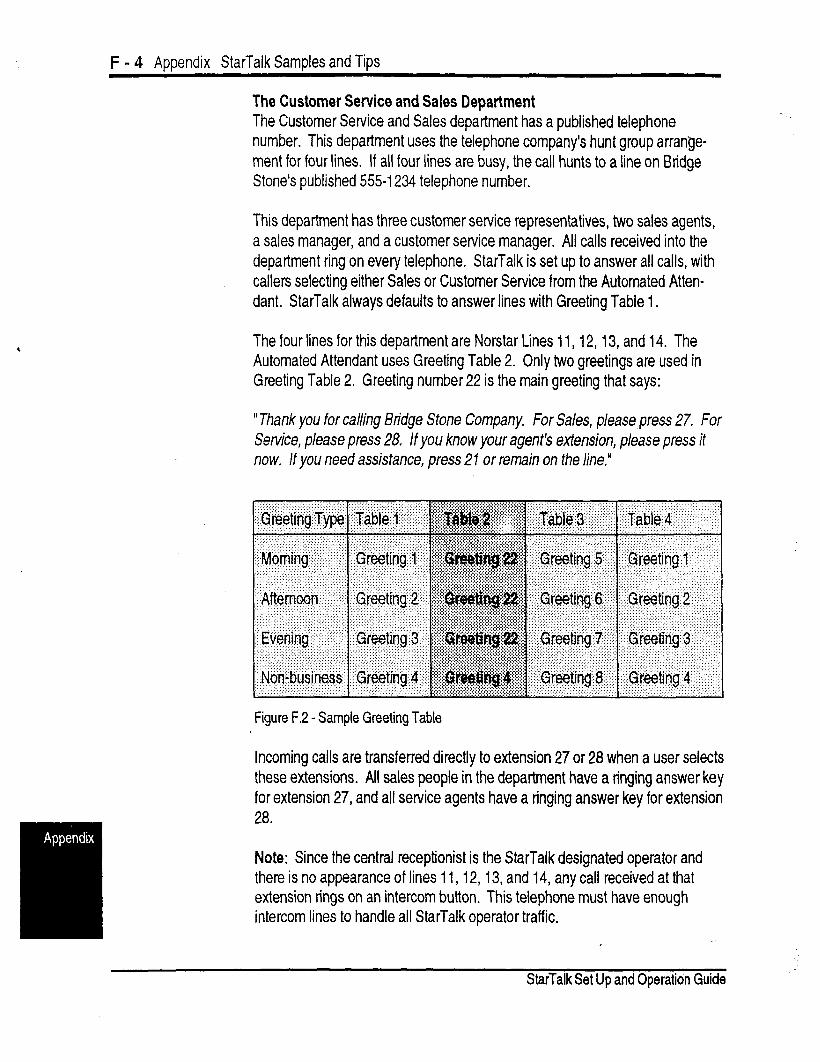
F - 4 Appendix StarTalk Samples and Tips
The Customer Service and Sales Department The Customer Service and Sales department has a published telephone number. This department uses the telephone company’s hunt group arrange- ment for four lines. If all four lines are busy, the call hunts to a line on Bridge Stone’s published 555-l 234 telephone number.
This department has three customer service representatives, two sales agents, a sales manager, and a customer service manager. All calls received into the department ring on every telephone. StarTalk is set up to answer all calls, with callers selecting either Sales or Customer Service from the Automated Atten- dant. StarTalk always defaults to answer lines with Greeting Table 1.
The four lines for this department are Norstar Lines 11,12, 13, and 14. The Automated Attendant uses Greeting Table 2. Only two greetings are used in Greeting Table 2. Greeting number 22 is the main greeting that says:
“Thank you for calling Bn’dge Stone Company. for Sales, please press 27. For Service, please press 28. If you know your agent’s extension, p/ease press if now. If you need assistance, press 21 or remain on the line.”
Figure F.2 -.Sample Greeting Table
Incoming calls are transferred directly to extension 27 or 28 when a user selects these extensions. All sales people in the department have a ringing answer key for extension 27, and all service agents have a ringing answer key for extension 28.
Note: Since the central receptionist is the StarTalk designated operator and there is no appearance of lines 11, 12, 13, and 14, any call received at that extension rings on an intercom button. This telephone must have enough intercom lines to handle all StarTalk operator traffic.
StarTalk Set Up and Operation Guide
StarTalk Samples and Tips Appendix F - 5 .
The employees in the Sales and Service department do not have personal mailboxes. Only extensions 27 and 28 have personal mailboxes. These mailboxes will be used to take messages for the entire department. Message - waiting notification is only available on these Norstar extensions.
For incoming calls, any extension can answer a call. When no one is available the Automated Attendant informs the caller that the person called is unavailable. The caller can then leave a message in the department mailbox on either extension.
When StarTalk is being used, the target sets (in this case, extensions 27 and 28) must have enough intercom lines to handle all the personnel in a depart- ment. There is no immediate recognition of an extension in a busy condition if calls are answered on answer key sets.
Important: Sales and Service cannot call forward their extensions.
The Managers Bridge Stone Managers have a personal incoming telephone line that appears on their private telephone and their secretary’s telephone. The managers have their secretaries answer all calls, and then transfer the calls to each manager’s telephone.
When the managers are unavailable to take a call, the call rings back at the secretary’s extension. The secretary handles the call by suggesting that the caller leave a voice message in the manager’s personal mailbox. When the caller wants to leave a message, the secretary transfers the caller using CONF/ TRANSFER with StarTalk’s Leave Message Feature Code.
When StarTalk is set up in this manner, Norstar’s Call Fotward No Answer for the manager’s set is not used. The secretary answers the manager’s calls and uses Norstar’s TRANSFER to transfer the caller to the manager’s telephone. Norstar’s TRANSFER CALLBACK returns the call back to the secretary’s extension when a manager is not available to take a call.
Important: The secretary’s telephone has a ringing line appearance. This telephone cannot be fomarded to another telephone.
StarTalk Set Up and Operation Guide
F - 6 Appendix StarTalk Samples and Tips
Shipping and Receiving Bridge Stone has a very large shipping and receiving department. All the employees in this department share the same Norstar telephone. This depart- ment uses one outside line that is assigned to the loading dock. This line is assigned to StarTalk’s Greeting Table 3.
Each greeting in Greeting Table 3 informs callers they have reached the shipping and receiving department. These greetings also inform callers they can press 21 for assistance or stay on the line to leave a personal voice message.
Note: Messages informing callers of immediate mailbox access should direct the caller to press @ followed by the mailbox number.
StarTalk Set Up and Operation Guide
StarTalk Samoles and Tins ADDendix F - 7
StarTal k StarTalk can be set up to be used in a number of different ways. The following
Set Up suggestions show how you can use StarTalk’s features in your company. I
TiPS Setting up a StarTalk mailbox for customer orders. You can set up a unique mailbox to handle customer orders. instead of recording a personal mailbox greeting, you can have a greeting that includes customer ordering information.
When the company greeting is recorded the customer must be informed about the mailbox availability. For instance, if a mailbox is being used to inform callers about product availability and ordering, the greeting would include:
“...for information about new product availability, press *4 18, for informafion about the Marketing Management course, press l 419...”
The individual mailbox greetings would inform callers about the particulars of the product, and also instruct callers to leave their name and telephone numbers for ordering or to receive personal attention by a company employee.
Each mailbox set up for announcements would be added to StarTalk as a Guest mailbox. These mailboxes do not have an operating Norstar extension.
Setting up a StarTalk mailbox for customer announcements. You can set up a unique mailbox to be used for announcements to clients or customers. Instead of recording a personal mailbox greeting, you can record the announcements and inform the callers to leave a message after the tone.
Assigning a special telephone number for direct access to StarTalk for company employees. You can use an existing incoming telephone line or you can have a new line added to your existing line configuration. If you will be adding a new line, contact your telephone service representative.
Assigning special incoming telephone lines to StarTalk for frequent callers. You can use an existing incoming telephone line or you can have a new line added to your existing line configuration. If you will be adding a new line, contact your telephone service representative.
StarTalk Set Up and Operation Guide
F - 8 Aooendix StarTalk Samples and Tips
Turning Off the
Automated Attendant
You can turn off the Automated Attendant at any time. The Automated Atten- dant is off when the line answer is designated as NO. When the Automated Attendant is off, you should place your General Delivery mailbox out of service.
You can place the mailbox out of service by either recording a mailbox greeting for the General Delivery mailbox saying the mailbox has been placed “out of service”, or you can assign the General Delivery mailbox number to an operat- ing extension in your company.
To turn off the Automated Attendant, refer to Section 4, Viewing and Chang- ing Line Configuration.
StarTalk Set Up and Oper’ation Guide
Glossary - 1
Glossary
Administration The tasks involved in maintaining the StarTalk mailboxes, greetings and set up configuration.
Alternate Greeting A greeting that is recorded for a personal mailbox and played only on excep- tional occasions such as absence, illness, or vacation.
Attendant Sign On/Off The task that is performed by a company receptionist or designated operator that indicates to StarTalk when an “operator” is available to answer calls.
Analog Terminal Adapter A Norstar product that allows for the connection of an analog device, such as a single line telephone or a facsimile machine, to a,Norstar KSU.
Automated Attendant The StarTalk answering service that answers incoming calls with a Company Greeting, plays a list of StarTalk options to a caller, and perfomrs call routing functions in response to a caller’s selections.
Broadcast Message A message that can only be sent by the System Coordinator. This type of message is played in all initialized Personal Mailboxes and plays immediately when the mailbox is opened by the owner. It is automatically deleted once the mailbox owner listens to the message after opening the mailbox.
Business Status A StarTalk setting that tells StarTalk whether a company is opened or closed for business.
A predetermined number designation that specifies the StarTalk options for a I
Class of Service
mailbox. .
StarTalk Set Up and Operation Guide
Glossary - 2
Company Directory An internal voice list that contains the names of users with initialized mailboxes who have been designated to appear in the Directory.
Configuration The tasks involved in setting up the different parameters of StarTalk. For example, configuring the telephone lines answered by StarTalk.
Configuring StarTalk Lines The tasks involved in determining which incoming telephone lines of a business are answered by StarTalk and which Greeting Table is assigned.
Conventions The way certain information has been described. For example, using long boxes to represent display prompt information.
Default The parameters that are preset within the StarTalk module.
Designated Operator An individual in a company who has been assigned to answer the StarTalk operator request option.
Display A one or two line screen on a Norstar telephone that shows StarTalk commands and options.
Display Buttons The three buttons that appear on a Norstar two line display. Once pressed, these buttons select the specified StarTalk option.
Display Options The choices available to a user that appear on the Norstar two line display. Options,appearing on the display can be selected using the display buttons.
Envelope Information A date and time stamp that appears on all messages left in a mailbox. When the message has been left by another mailbox owner, envelope information includes the message sender’s name.
. I
StarTalk Set Up and Operation Guide
Glossary - 3
Extensions A two to seven digit number that is used to reach a designated telephone.
Feature Code A unique three digit code that is used to access StarTalk features and options.
General Delivery Mailbox One of the three Special Mailboxes that is used to collect messages for individuals in a company who have not been assigned Personal Mailboxes.
Greetings There are two types of StarTalk greetings: Company Greetings and Personal Mailbox Greetings. Company Greetings are played by the Automated Attendant to incoming callers. Personal Mailbox Greetings are played to callers who want to leave a message in the selected mailbox.
Greeting Table A StarTalk unit for storing recorded greetings, call transfer type, and the outside line number answered by StarTalk.
Group Lists A collection of mailbox numbers that are assigned a special “Group” number by StarTalk. When a message is sent to a Group List, all mailboxes contained in the List receive the same message.
Guest Mailbox A mailbox that is assigned to a user who does not have an extension.
Initialize Mailbox Preparing a mailbox to receive messages, which includes changing a mailbox default password and recording a Company Directory name.
Information Mailbox A mailbox that provides a caller with a message describing goods or services available at your company.
Initializing StarTalk Preparing the StarTalk settings that are used in mailbox number length and language preference. This also includes setting the StarTalk date and time.
Intercom Number Length The number of digits in a Norstar extension and a StarTalk mailbox number. I The intercom number length ranges from two to seven digits.
1
StarTalk Set Up and Operation Guide

Glossarv - 4
Leave Message The StarTalk Feature Code that is used to leave messages in StarTalk mailboxes.
M7100 Telephone The Norstar model M7100 telephone that has a single line display, and one programmable button without an indicator.
M7208 Telephone The Norstar model M7208 telephone that has a single line display, and eight programmable buttons with indicators.
M7310 Telephone The Norstar model M7310 telephone that has a two line display with three display buttons, 10 programmable buttons with indicators, and 12 dual programmable buttons without indicators.
M7324 Telephone The Norstar model M7324 telephone that has a two line display with three display buttons, and 24 programmable buttons with indicators.
Mail box A storage place for messages on the StarTalk system.
Mailbox List Part of the StarTalk Programming Record that contains mailbox information which includes mailbox number, assigned extension number, user name, and directory overrides.
Mailbox Number Length The number of digits allowed in a mailbox number. The mailbox number length ranges from two to seven digits.
Message Waiting Notification A display prompt that informs a mailbox owner when a message has been left in a mailbox. This StarTalk feature is a Mailbox Override.
Off-premise Message Notification Allows you to direct your messages to a telephone number outside your business or to a pager. This StarTalk feature is part of the Class of Service.
StarTalk Set Up and Operation Guide
Glossary - 5
Operator Default Extension The receptionist or StarTalk designated operators default extension. This default is preset to none, and must be changed to any valid extension that operates on the Norstar Business Communication System.
-
Operator Status The StarTalk indicator that determines if a company’s receptionist or designated operator is available.
Option A StarTalk choice that is given to a user through voice or display prompts.
Password A four to eight digit number that is entered using the dialpad. A password is used to open mailboxes or perform configuration tasks.
Personal Mailboxes Mailboxes that are assigned to users as a place to store messages.
Primary Greeting The main greeting played in a personal mailbox to callers wanting to leave a message.
Programmable Memory Buttons Buttons on the Norstar one and two line display telephones that can store feature codes and numbers.
Programming Record The Norstar outline where StarTalk configuration information is written down.
Registering Mailboxes A System Coordinator task that adds mailboxes to StarTalk using the Configu- ration Feature Code.
Reports The five different types of reports used to view StarTalk programming, and the amount of available message storage time.
Resetting Passwords A System Coordinator task that changes a mailbox password from its current setting back to the StarTalk default setting 0000 (four zeros).
StarTalk Set Up and Operation Guide
Glossarv - 6
Resetting StarTalk Returning the StarTalkvoice module to its original default settings.
Special Mailboxes The three mailboxes that are used by the System Coordinator and designated StarTalk operator. The three Special Mailboxes are: System Coordinator, General Delivery, and Trouble.
System Coordinator The person responsible for configuring, updating, and maintaining the StarTalk Voice Module.
System Coordinator Mailbox The Special Mailbox used by the System Coordinator for sending Broadcast Messages. This is the System Coordinator’s Personal Mailbox.
Target Attendant The Target Attendant is assigned to answer a telephone when a caller opens a mailbox to leave a message and presses [0] to reach the operator.
Tone Dial Telephone A push button telephone that emits DTMF tones.
Trouble Mailbox One of the three Special Mailboxes that is used to collect messages concerning Star-Talk operation and problems.
Voice Prompts The prerecorded voice instructions that are played when accessing the different StarTalk features and options.
I
StarTalk Set Up and Operation Guide
Index
a afternoon greeting, 4-5,6-7 alternate greeting, 5-2, 5-26 alternate language, 3-3,3-l 3
greeting tables, 4-7 analog terminal adapter, 2-10 announcements, mailbox, 8-2
see also infofmafion n-G/box answer keys, see appendix d attendant sign on/off, 6-1 automated attendant, 2-2,2-5
availability, changing, 6-12 changing, 6-l 2 disabling, 6-12 language selection, 3-13 menu prompt, 2-5,6-l 2 recording, 6-14
automated attendant menu prompt, 6-14 enabling, 6-12
b bilingual capability, 3-3
disabled, 3-14 enabled, 3-14
blind transfer, 4-10 broadcast message, 8-1
sending, 8-2 business hours, 3-4
setting, 6-7 business status, 6-5
setting, 6-6 button options, 2-9
C call forward all calls, see appendix d calling message sender, 7-6 call transfer type, 34,4-l 0 centrex, see appendix a channels, outdialing, 4-27 class of service, 5-2
changing, 7-13 summary table, 59
clock, see date and time command line, display, 2-9
entering information, 2-11 company directory, 2-6
group list name, 8-8 override, 7-10 selecting from, 2-8 recording, 5-21
company greetings, 4-8 preparing, 4-6 recording, 4-8
components, 2-1 configuration, lines, 4-14
adding, 4-14 changing, 4-19 tips, see appendix d viewing, 4-19
conventions, l-4 copying messages, 74 custom call routing, 2-2 customized automated attendant prompt, . .
recording, 6-14 enabling, 6-12
.
StarTalk Set Up and Operation Guide
Index - 2
d date and time, feature code, 2-3,2-4
setting, 4-2 default values, see appendix b delayed answering, see appendix d dialpad, using, 2-8 directory number, feature code, 2-3,2-5 directory report, 9-2 display options, 2-9 documents, l-5
e entering data, 2-11 error messages, see appendix e evening greeting, 4-5,6-7, see also business hour exiting from StarTalk, 2-13 extension, mailbox, 7-10
changing, 7-I 1
operator, 6-10
f feature availability, 3-10 feature codes, 2-3
availability, 3-7 default, 3-4 descriptions, 2-4 determining, 3-7 frequently used, 3-l 1 verifying, 3-9
feature compatibility, see appendix a
9 general delivery mailbox, 2-6
messages, 7-6 greeting summary, 3-5
greetings, afternoon, 4-5,6-7, see business hour assigning to a table, 4-l 0 company, 4-8 duration, 4-7 evening, 4-5,6-7, see business hour length, 5-3 morning, 4-5,6-7, see business hour personal, 5-2 preparing, 4-6 recording, 4-8 selecting, 5-26 special mailboxes, 5-23 type, 4-5
greeting tables, assigning to lines, 4-21 changing, 4-21 information, determining, 4-6 organization, 4-5 setting up, 4-4 using alternate language, 4-4 viewing, 4-21
greeting table summary, 34 group list, enabled, 3-3 group lists, 5-3 ’
adding, 8-6 deleting, 8-74 members, changing, 8-10 preparing, 8-4 report, 9-3 viewing, 8-12
group messages, 8-4 preparing, 8-4 sending, 8-15
guest mailboxes, 2-7,5-l adding, 5-12 list, 3-5 using, 5-10
guide organization, l-1
StarTalk Set Up and Operation Guide
Index - 3
h hardware,
Norstar, 3-2 StarTalk, 3-2
i information mailboxes, 2-7,5-2
adding, 5-I 5 using, 5-14
initializing, StarTalk, see appendixc intercom number length, 3-6
,
I
language, availability, 3-13,4-25 capability, 3-l 3 changing, 4-25 class of service, 3-I 3 feature 3-14 summary, greeting table, 4-4 options, 3-3 preference, 4-I 0 prompts, 5-2
leave message, feature code, 2-3,2-4 line answering, enabling, 6-9 line configuration, 4-14
changing, 4-19 viewing, 4-19
line data verification, 3-2 line number summary, 3-5 link, 2-10
m M7100,2-9 M7208,2-9 M7310,2-9,4-i M7324,2-9,4-i
mailbox, about, 2-6 adding, 5-7 changing, 7-10 deleting, 7-I 9 greeting, 5-23 initializing, 5-20 list, 3-5, 5-5 message time, 5-2 number length, 3-3,3-6 opening, 7-3 operator, 5-28 options, 7-l 0 overrides, 5-3,5-5,7-16 owner, name, 7-14 passwords, 5-20 report, 9-4 resetting, 7-18 rules, 2-7 selecting, greeting, 5-26 sample list, 5-6
mailbox activity report, 9-4 mailbox announcements, 5-14
broadcast message, 8-2 see also information mailbox
memory button, 3-11 programming, 3-I 1
message, broadcast, 8-l copying, 7-4 delivery options, 7-2 error, see appendix e group, 8-4,8-l 5 listening to, 7-2 replying, 7-6 report, 9-3 trouble, 1 O-3, 1 O-4
message length, 5-2 retention, 5-2
message usage report, 9-3 message waiting notification, 5-3,5-5
setting for ATA, 2-10 morning greeting, 4-5,6-7, see a/so business hour
StarTalk Set Up and Operation Guide
Index - 4
n non-business hour greeting, 4-56-7, see business hour Norstar,
configuration, see appendix d feature compatibility, see appendix a hardware verification, 3-2 intercom number length, 3-6 line data, 3-2 only DN, see appendix a
number of rings, assigning, 4-I 7 changing, 4-23
numeric subscriber mailbox report, 9-2
0 off-premise message notification, 5-3 opening mailbox, 7-3 open mailbox, feature code, 2-3,2-4 operating trouble, 10-3 operation task, summary, 2-14 operator available, 6-1 operator default extension, 6-10
changing, 6-I 0 operator mailbox, 5-28 operator status, feature code, 2-3,2-4
password, 6-3 resetting password, 6-4 setting, 6-2
optional equipment, 3-2 options, selecting, 2-9 organization, guide, l-1 outdialing, 4-27 overrides, 5-5
changing, 7-I 6
P passwords, 5-20
operator, 6-3 resetting, 7-18 system coordinator password, lo-4
personal greeting, 5-2 selecting, 5-26
requirements, 4-I set up tasks, summary, 2-14 software version,
determining, 3-10 speciai greetings, 4-5 special mailboxes, 2-6,5-l 8
administering, 7-1 opening, 7-3 recording greetings, 5-23
system administration, feature code, 2-3,2-4 system coordinator mailbox, 2-6,5-i 9 system coordinator password, reset, 1 O-4
StarTalk Set Up and Operation Guide
personal mailboxes, 2-7,7-a adding, new, 7-8 initializing, 5-20
printing reports, 9-6 primary language, 3-3,3-l 3 programming memory button, 3-I 1
programming record, summary, 3-l photocopying, 3-4
r receptionist sign on, 6-I recording, greeting, 4-8
automated attendant prompt, 6-14 registering mailboxes, 5-l replying to a message, 7-6 reports, 2-13,9-l
printing, 9-6 resetting operator password, 6-4 resetting StarTalk, 3-6, see also appendix c ringing answer button, see appendix d ringing lines, see appendix d rings, assigning, 4-17
changing, 4-23 RS232, printer, 3-2 FE232 terminal, 3-2
s sample, set up, see appendix f screened transfer, 4-10 setting up,
Index - 5
system group list report, 9-3 system trouble, 1 O-1
t
time, and date, setting, 4-2 transfer type, 4-I 0 trouble mailbox, 2-6, 5-19
U user mailboxes, 5-1,7-8 users, 2-3
V voice prompts, 2-12
interrupting, 2-12 volume control, 7-2
0’
.
\
StarTalk Set Up and Operation Guide .I
index - 6
StarTalk Set Up and Operation Guide

epeUe3 U! palU!Jd
E(-J 8Y3Sl lEZL&LOd 1’O.Z UO!SJa/j !jE?lJ’i?lS :J3+UnN ijU!lapJO
~~03ajalu~aqlroN 10 symuapell ale yjelms pue 'ms10~ 'uejpyafl
StarTal k Programming Record
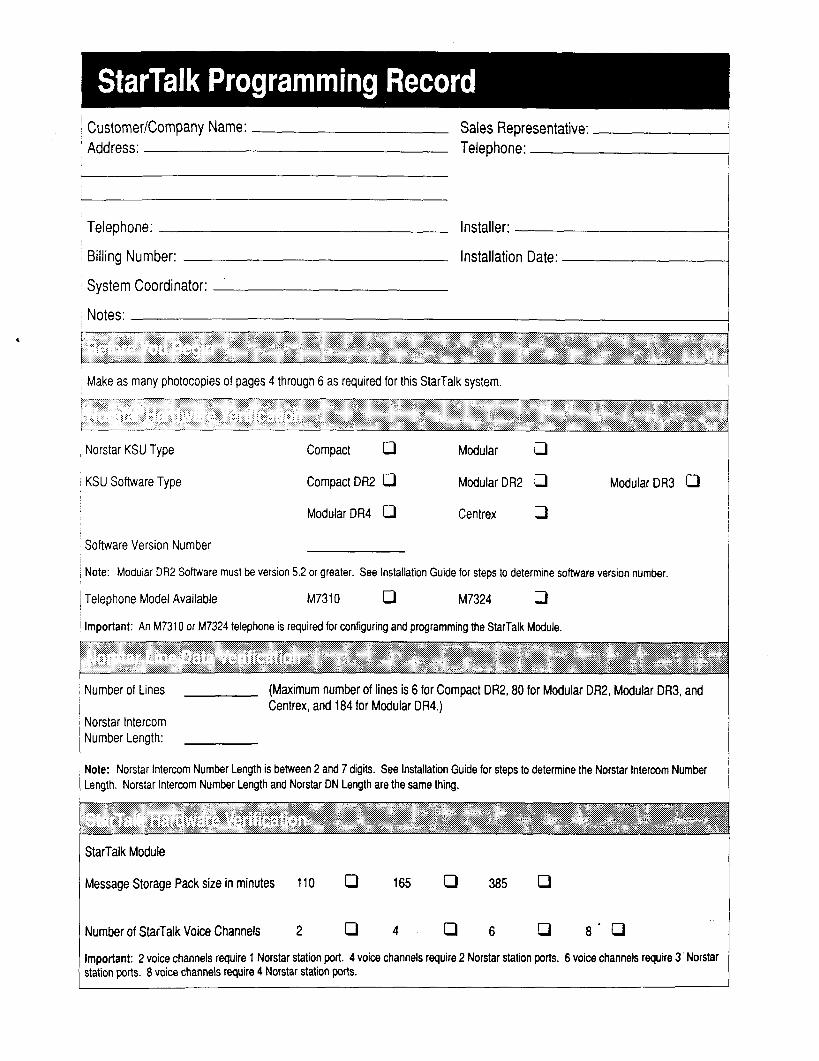
) Customer/Company Name: Sales Representative: Address: Telephone:
Telephone:
Billing Number:
System Coordinator:
Installer:
Installation Date:
Notes: ,
) Make as many photocopies of pages 4 through 6 as required for this StarTalk system.
( Norstar KSU Type
; KSU Software Type
Compact 0
Compact DR2 0
Modular DR4 0
Modular Cl
Modular DR2 0
Centrex 0
Modular DR3 0
Software Version Number
, Note: Modular DR2 Software must be version 5.2 or greater. See Installation Guide for steps to determine software version number.
; Telephone Model Available M7310 0 M7324 0
( Important: An M7310 or M7324 telephone is required for configuring and programming the StarTalk Module.
Number of Lines (Maximum number of lines is 6 for Compact DR2,80 for Modular DR2, Modular DR3, and Centrex, and 184 for Modular DR4.)
Norstar Intercom Number Length:
Note: Norstar Intercom Number Length is between 2 and 7 digits. See Installation Guide for steps to determine the Norstar Intercom Number Length. Norstar intercom Number Length and Norstar DN Length are the same thing.
StarTalk Module
Message Storage Pack size in minutes 110 0 165 0 385 0
Number of StarTalk Voice Channels 2 0 4 0 6 m 8’0
important: 2 voice channels require 1 Norstar station port. 4 voice channels require 2 Norstar station ports. 6 voice channels require 3’ Norstar station ports. 6 voice channels require 4 Norstar station ports.
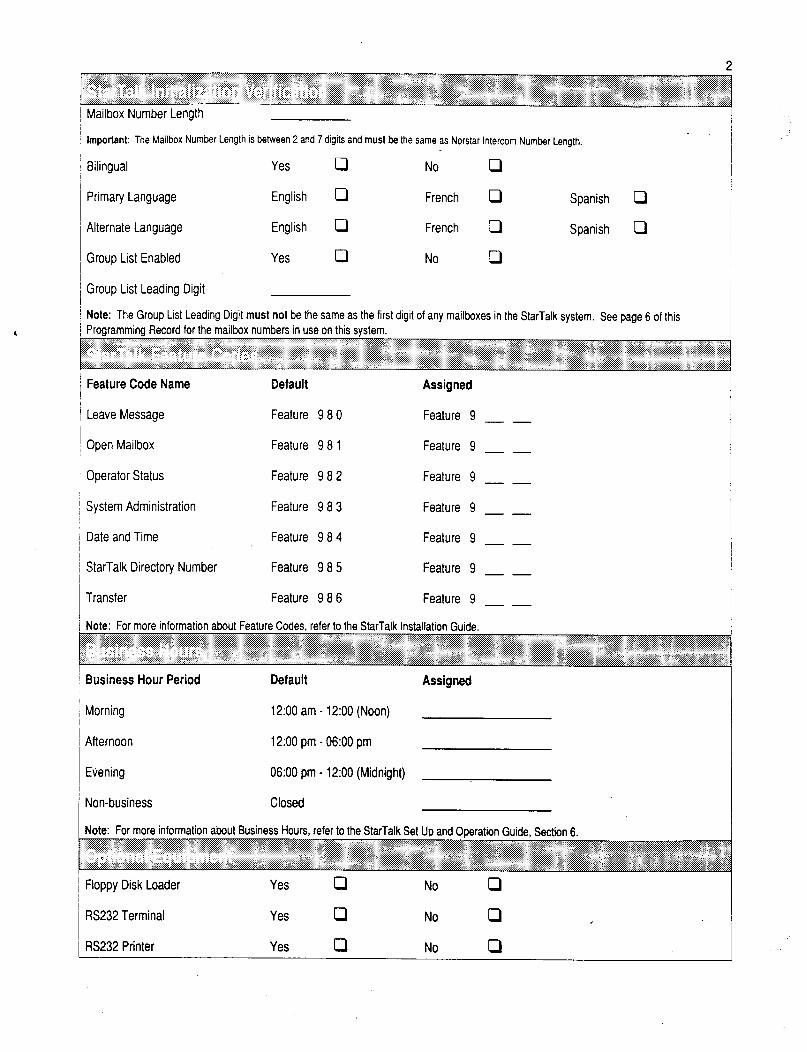
Mailbox Number Length
Important: The Mailbox Number Length iS between 2 and 7 digits and must be the same as Norstar InterCOrn Number Length.
Bilingual Yes 0 No 0
Primary Language English 0 French 0 Spanish 0
Alternate Language English 0 French 0 Spanish 0
Group List Enabled Yes 0 No 0
Group List Leading Digit
Note: The Group List Leading Digit must not be the same as the first digit of any mailboxes in the StarTalk system, See page 6 of this Programming Record for the mailbox numbers in use on this system.
! Feature Code Name
/ Leave Message
1 Open Mailbox
I Operator Status
1 System Administration
Default Assigned
Feature 9 8 0 Feature 9 _ _
Feature 9 8 1 Feature 9
Feature 9 8 2 Feature 9 _ _
Feature 9 8 3 Feature 9
Date and Time Feature 9 8 4 Feature 9
StarTalk Directory Number Feature 9 8 5 Feature 9
Transfer Feature 9 8 6 Feature 9
Note: For more information about Feature Codes, refer to the StarTalk Installation Guide. :<.: ..... i .................... .: :,.:.~:::) .: ..:.:.:.~..::~~~:~:~~~i~~..‘..:. ........ .... .. :*. ....... .:.;g ... <:.z : .;g::. t.2:; ................... Y;$:g 1.;. : 1 .:.:.:.:.: .... f .. ..:s. .:s.:: .? ....... . . . ..~..~..x. ... :.:.:.s :. ..... .:N$:~~:~.~::. m ..... : . .... .. . ... . ....... .... :::. : . . . X.< .. ........ i ......... .... .... ....:.:. ... : : : ....... ......... .. ‘::” ‘.:~+...~ .: .. .,: ., .<.
..... ,i “. I...:+ .. .:: .~;,~~~~:i~~~~~~ ......... . ..... ..: :.: ......... I .;/ .. .... ....... ..:.:.::::? .:$ ” cT :’ c i ” ,/ :. .::y ; 5;. i.6 ; j ~::,::~~~~~~~~~,~~~~~~~~~~ .:~~~~~~,,, ,,~:,~,:~~~~:~., .:,:: ,~~~~.~~, ~~,l~~~~ ;“:l~~:~.~~~~~~ , +
:.:.:: :m .~:~,~~~ar’:“‘~ r.:.: ... 2%“‘~ %z%~:: ::3...::.:: j .::::::;&$: li::,~:~~::~::i::R::~::::.:::,i:i.:::::::::: :,:, ... . . . . . . . .:..:...:;. .... . :/: :.:.:.:. ~.:.~:~,,.:,:~~ii~?: ,.,.:.:: i .:.:;~: ....... ...... r~~.:~::~:~.~:~:.., ..: .. _ ::::. ::~,~,~:~“:~:~:.~ “~:~::,s:iiiti~:~ j ... j ..................... .......... . ... < ... ....... j.. .. <. .. ..s .. < . ..<. ....... < ... : :.: ..... : _ .......................... ..... ” ..... .I:...;. ........... .. <. ...... .. .‘:;.~.$::g::::<: :: .................... .: ‘.w>$:j::::::‘.:: ....... ‘:; ::.:.:.: ................. . .......... I ........... I ......... . . v.. ...... ., .F :~~:i,:l,,~~~~~~~~~~~~ ........ .... ..... ., ........... , ‘,“>. .. . .. .
Business Hour Period Default Assigned
Morning 12:00 am - 12:00 (Noon)
Afternoon 12:OO pm - 06:OO pm
Evening 06:OO pm - 12:00 (Midnight)
Non-business Closed
Note: For more information about Business Hours, refer to the StarTalk Set Up and Operation Guide, Section 6.
Floppy Disk Loader Yes
RS232 Terminal Yes
RS232 Printer Yes
0 No cl
0 No 0 ,
0 No cl

/
j Greeting Table 1
! Morning
Afternoon
I
~ Evening
/ Non-business
~ Greeting Table 2
/ Morning
Afternoon
Evening
Non-business
F
I L
c
Greeting Table 3
Morning
Afternoon
Evening
Non-business
Greeting Table 4
Morning
Afternoon
Evening
Non-business
Blind or Screened ’
Blind or Screened
Blind or Screened
Blind or Screened
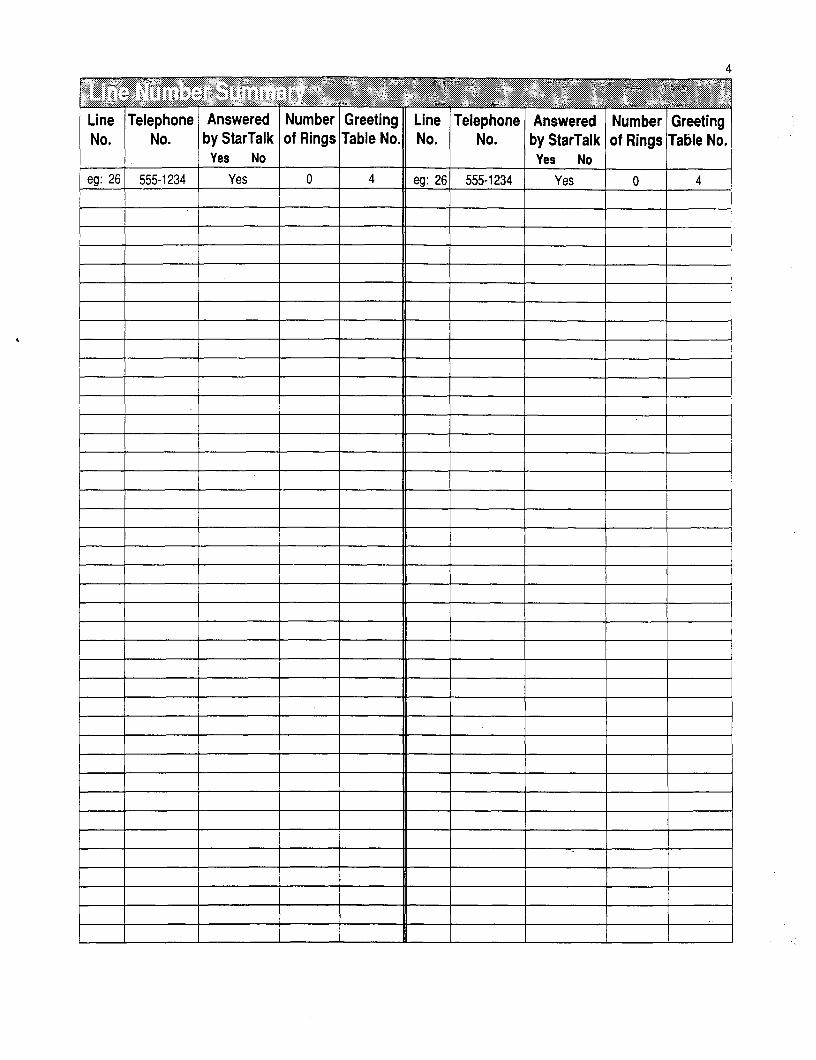
4
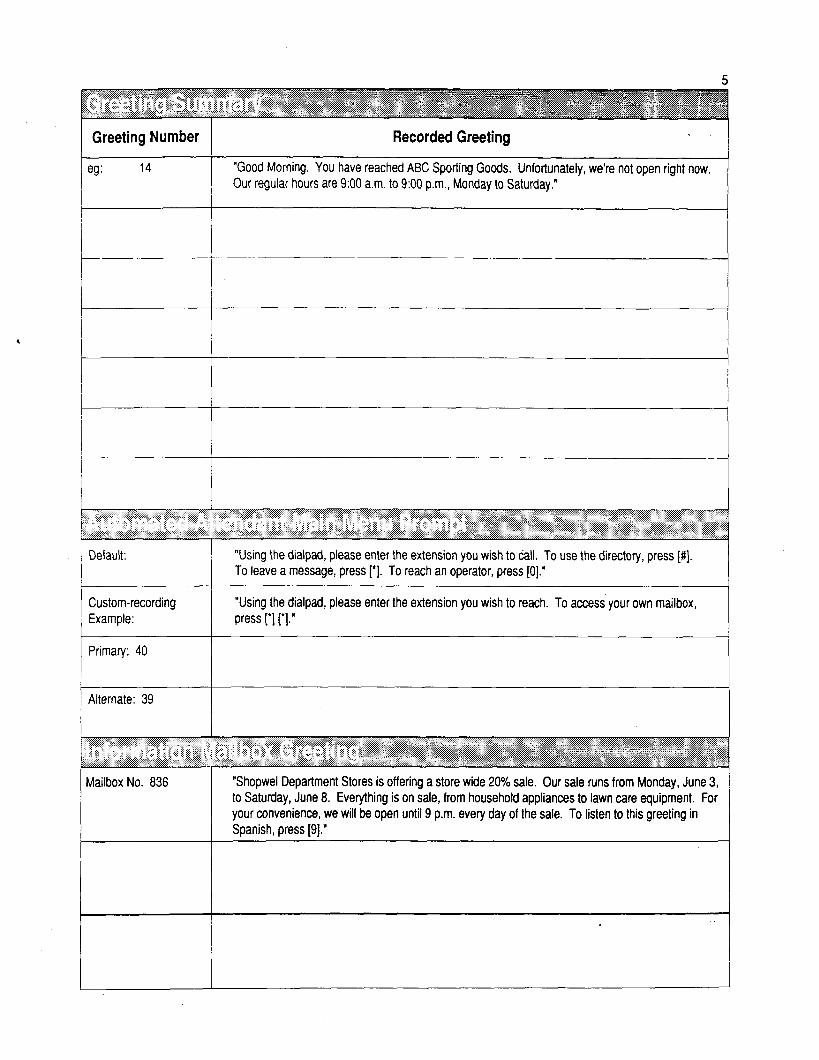
Recorded Greeting Greeting Number
I eg: 14 “Good Morning. You have reached ABC Sporting Goods. Unfortunately, we’re not open right now. Our regular hours are 9:00 a.m. to 9:00 p.m., Monday to Saturday.”
Default: “Using the dialpad, please enter the extension you wish to call. To use the directory, press [#I. To leave a message, press [‘I. To reach an operator, press [O].”
Custom-recording “Using the dialpad, please enter the extension you wish to reach. To access your own mailbox, / Example: press [‘] [‘I.”
Primary: 40
/ Alternate: 39
Mailbox No. 836 “Shopwel Department Stores is offering a store wide 20% sale. Our sale runs from Monday, June 3, to Saturday, June 8. Everything is on sale, from household appliances to lawn care equipment. For your convenience, we will be open until 9 p.m. every day of the sale. To listen to this greeting in Spanish, press 191.”
.
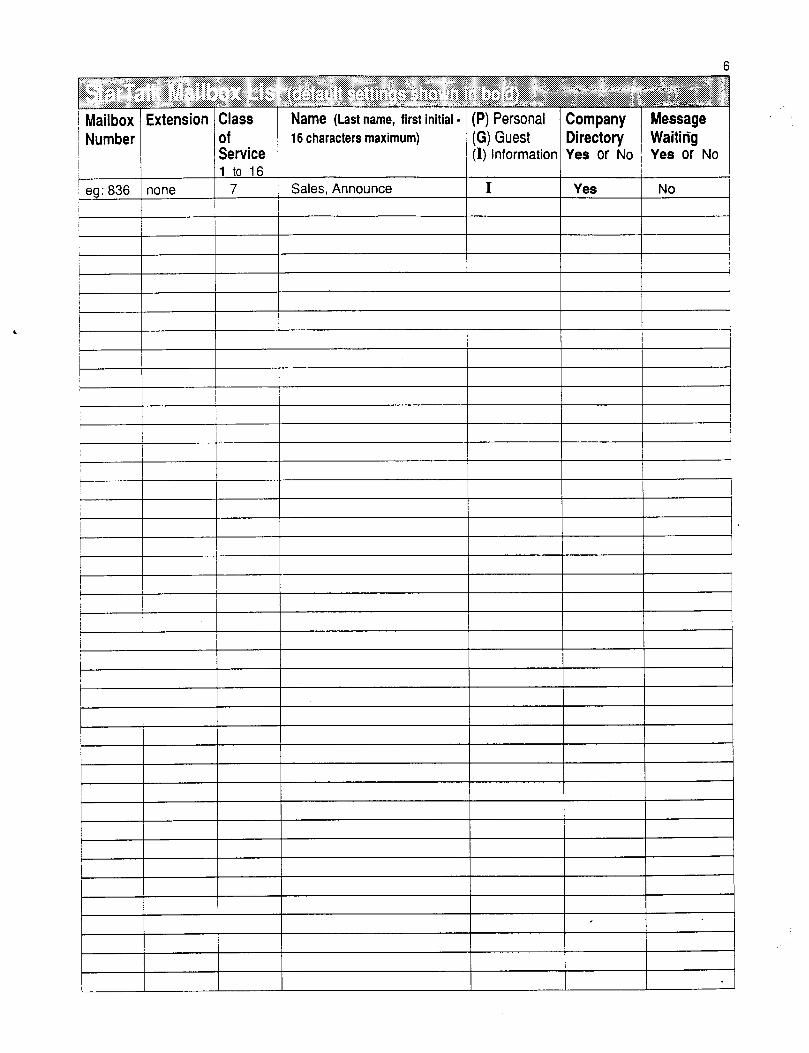
6
16 characters maximum)
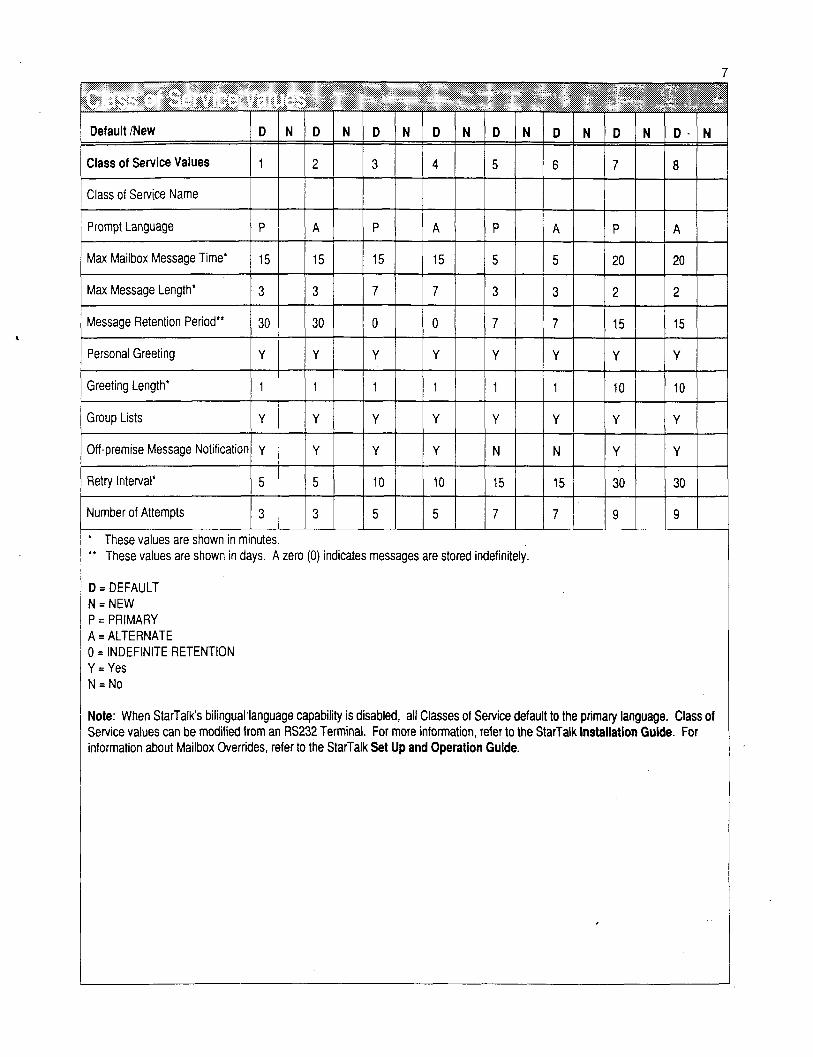
Class of Servtce
Personal Greeting Y Y Y Y Y Y Y Y
Greeting Length’ 1 1 1 1 1 1 10 10
Group Lists Y Y Y Y Y Y Y Y
Off-premise Message Notification Y Y Y Y N N Y Y
Retry Interval’ 5 5 10 10 15 15 30 30
Number of Attempts 3 3 5 5 7 7. 9 9
* These values are shown in minutes. ‘* These values are shown in days. A zero (0) indicates messages are stored indefinitely.
D = DEFAULT N=NEW P = PRIMARY A = ALTERNATE 0 = INDEFINITE RETENTION Y = Yes N = No
Note: When StarTalk’s bilingual’language capability is disabled, all Classes of Service default to the primary language. Class of Service values can be modified from an R’S232 Terminal. For more information, refer to the StarTalk installation Guide. For information about Mailbox Overrides, refer to the StarTalk Set Up and Operation Guide.
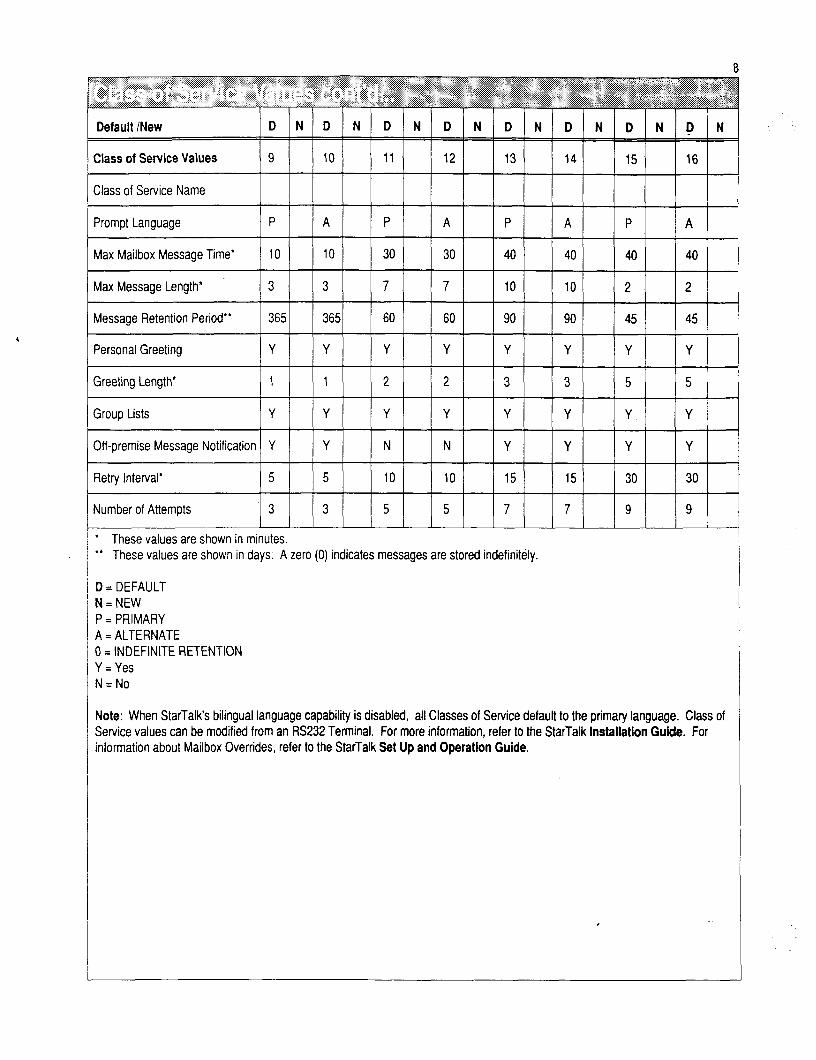
Class of Service Name
Prompt Language P A P A P A P A
Max Mailbox Message Time’ 10 10 30 30 40 40 40 40
Max Message Length’ 3 3 7 7 10 10 2 2
Message Retention Period” 365 365 60 60 90 90 45 45
Personal Greeting Y Y Y Y Y Y Y Y
Sreeting Length’ 1 1 2 2 3 3 5 5
Group Lists Y Y Y Y Y Y Y Y
Dff-premise Message Notification Y Y N N Y Y Y Y
Retry Interval* 5 5 10 10 15 15 30 30
Number of Attempts 3 3 5 5 7 7 9 9
l These values are shown in minutes. ‘* These values are shown in days: A zero (0) indicates messages are stored indefinitely.
D = DEFAULT N=NEW P = PRIMARY A = ALTERNATE 0 = INDEFINITE RETENTION Y=Yes N = No
Note: When StarTalk’s bilingual language capability is disabled, all Classes of Service default to the primary language. Class of Service values can be modified from an RS232 Terminal. For more information, refer to the StarTalk Installation Guide. For information about Mailbox Overrides, refer to the StarTalk Set Up and Operation Guide.

Meridian, Norstar, and StarTalk are Trademarks of Northern Telecom Ordering Number: StarTalk Version 2.0.1 PO731226 Issue 03 Printed in Canada


StarTal k110/165 InstallationGuide
-
-

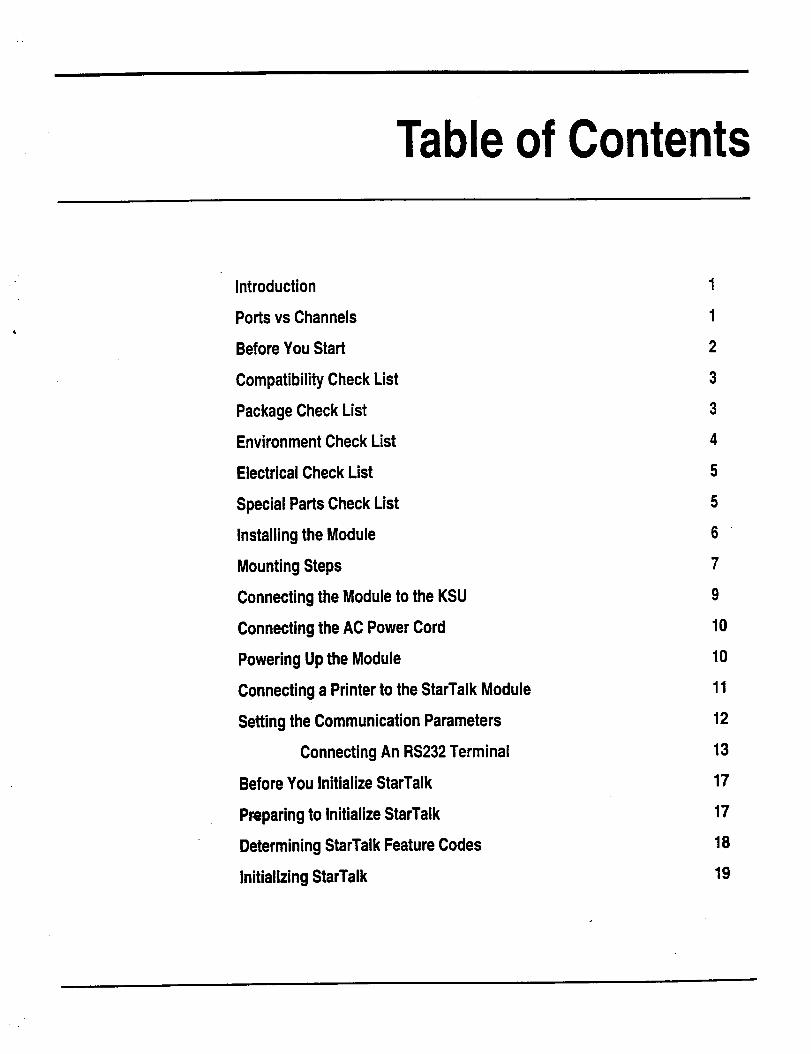
Table of Conte-nts
Introduction
Ports vs Channels
Before You Start
Compatibility Check List
Package Check List
Environment Check List
Electrical Check List
Special Parts Check List
Installing the Module
Mounting Steps
Connecting the Module to the KSU
Connecting the AC Power Cord
Powering Up the Module
Connecting a Printer to the StarTalk Module
Setting the Communication Parameters
Connecting An RS232 Terminal
Before You Initialize StarTalk
Preparing to Initialize StarTalk
Determining StarTalk Feature Codes
Initializing Stat-Talk
1
1
2
3
3
4
5
5
6
7
9
10
10
11
12
13
17
17
18
19
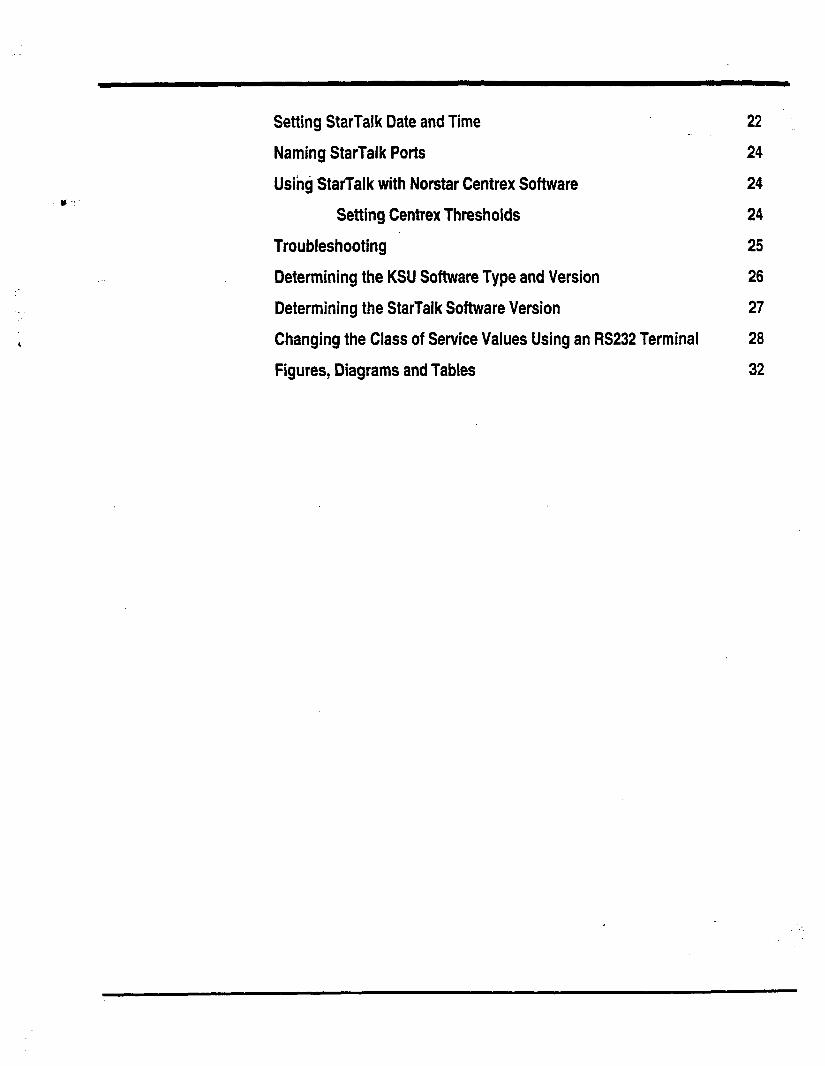
Y-
Setting StarTalk Date and Time
Naming StarTalk Ports
U&j StarTalk with Norstar Centrex Software
Setting Centrex Thresholds
Troubleshooting
Determining the KSU Software Type and Version
Determining the StarTalk Software Version
Changing the Class of Service Values Using an RS232 Terminal
Figures, Diagrams and Tables
22 ..
24
24
24
25
26
27
28
32

This digital apparatus does not exceed the Class A limits for radio noise emissions from digital apparatus set out in the Radio Interference Regulations for the Canadian Department of Communications.
FCC Regulations
Radio Frequency interference Warning: This equipment generates, uses, and can radiate radio frequency energy, and if not installed and used in accordance with the instruction manual, may cause interference to radio communications. It has been tested and found to comply with the limits for a Class A computing device pursuant to Subpart J of Part 15 of the FCC Rules and CSA specification C108.8, which are designed to provide reasonable protection against such interference when operated in a commercial environment. Operation of this equipment in a residential area is likely to cause interference in which case users will be required at their own expense to take whatever measures necessary to correct the interference.
CAUTION: The StarTalk Module contains fragile electronic parts. It weighs 10 kg (approximately 22 Ibs). DO NOT DROP OR BUMP THE MODULE.
In the event of equipment malfunction, all repairs will be performed by Northern Telecom or by one of its authorized dealers.
Address of repair facilities USA: Northern Telecom Inc. Product Senrice Center 720 Massman Drive Nashville, TN 37210 Attn. FtA#
Canada: Northern Telecom Canada Ltd. Telecom Service Division 30 Norelco Drive Weston, Ontario M9L 2X6

Warning: This Guide is required to install Audio Message Interchange Stanc ard (AMIS) and Custom Call Routing (CCR). Keep this Guide fo; installing AMIS and CCR at a later date.
:
:
:. . : :
: _-. ,
: . :_
:.
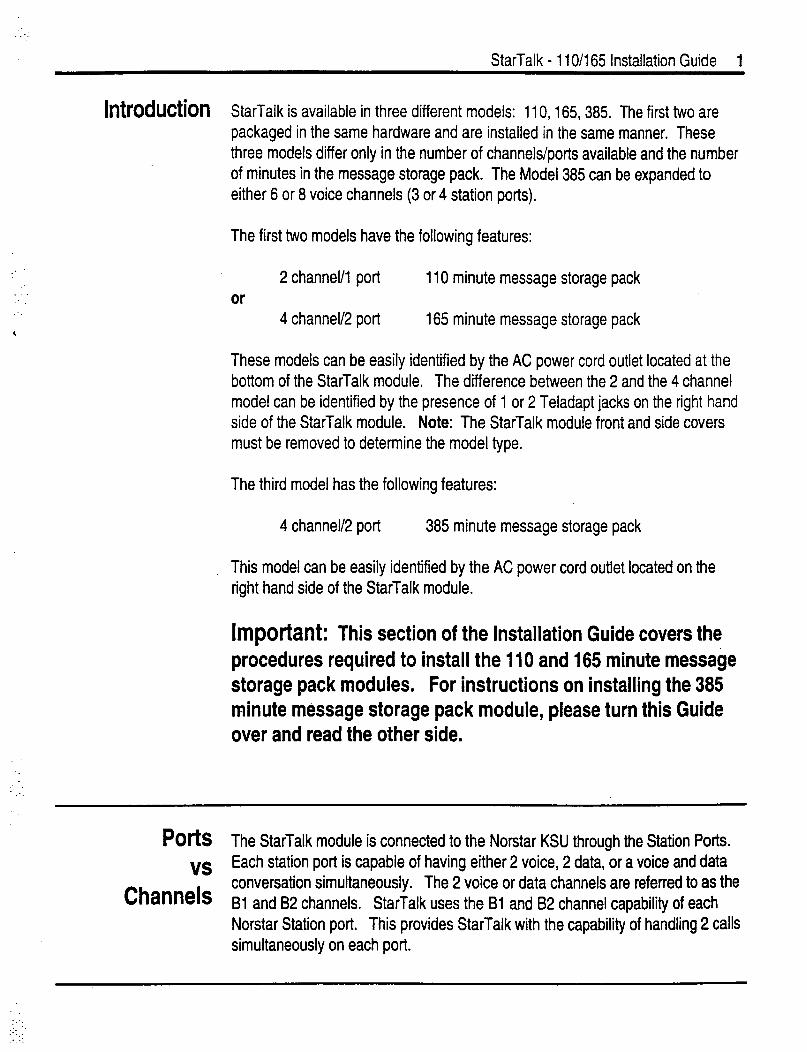
:
StarTalk - 11 O/l 65 Installation Guide 1
:
Introduction StarTalk is available in three different models: 110,165, 385. The first two are packaged in the same hardware and are installed in the same manner. These three models differ only in the number of channels/ports available and the number of minutes in the message storage pack. The Model 385 can be expanded to either 6 or 8 voice channels (3 or 4 station ports).
The first two models have the following features:
or 2 channel/l port 110 minute message storage pack
4 channel/2 port 165 minute message storage pack ,
These models can be easily identified by the AC power cord outlet located at the bottom of the StarTalk module. The difference between the 2 and the 4 channel model can be identified by the presence of 1 or 2 Teladapt jacks on the right hand side of the StarTalk module. Note: The StarTalk module front and side covers must be removed to determine the model type.
The third model has the following features:
4 channel/2 port 385 minute message storage pack
This model can be easily identified by the AC power cord outlet located on the right hand side of the StarTalk module.
h?IpOrbnt: This section of the Installation Guide covers the procedures required to install the 110 and 165 minute message storage pack modules. For instructions on installing the 385 minute message storage pack module, please turn this Guide over and read the other side.
POtiS The StarTalk module is connected to the Norstar KSU through the Station Ports. v~ Each station port is capable of having either 2 voice, 2 data, or a voice and data
Channels conversation simultaneously. The 2 voice or data channels are referred to as the Bl and B2 channels. StarTalk uses the Bl and 82 channel capability of each Norstar Station port. This provides StarTalk with the capability of handling 2 calls simultaneously on each port.
_-: : .I.
.:
2 StarTalk - 1 lo/165 installation Guide
Before Q Read this Guide.
You Start c3
0
0
0
0
0
Make sure the compatibility conditions are met. A Compatibility Check List is provided on page 3 of this Guide.
Make sure all the equipment in the package is accounted for. A Package Check List is provided on page 3 of this Guide.
Make sure the environment and electrical conditions are met. An Environment and Electrical Check List are provided on pages 4 and 5 of this Guide.
Make sure you have the necessary tools to complete the installation. A Special Parts Check List is provided on page 5 of this Guide.
Make sure you know the StarTalk Feature Codes. For more information about Feature Codes, refer to page 18 of this Guide.
Make sure Auto Set Relocation is set to NO. Refer to page 24 of this Guide for more information.
StarTalk - 11 O/l 65 Installation Guide 3
‘._
Compatibility 0 StarTalk is compatible with Norstar Compact DR2 KSUs (6 x 16). _
Check List 0 StarTalk is compatible with Norstar Modular KSUs (8 x 24), equipped with DR2 software version 5.2 or greater.
0 StarTalk is compatible with Norstar Modular KSUs (8 x 24), equipped with DR3 software.
0 StarTalk is compatible with Norstar Modular KSUs (8 x 24), equipped with DR4 or Centrex software.
Refer to page 26 of this Guide to determine the software type and version of the Norstar Modular KSU.
Package Make sure the package contains:
Check List 0 the StarTalk module
0 an AC Power Cord
0 2 RJ-11 Teladapt Connection Cords
0 a paper Wall Mount Template
0 a shrink wrapped package of documentation
2.:
:_,_ . :.
::. :.
:.. : _..
:.:_
4 StarTalk - 11 O/l 65 Installation Guide
Environment The installation area should be:
Check List o clean, free of dust, dry and well ventilated
0
0
0
4
0
0
Cl
0
0
between 0’ and 40” Celsius (approximately 32’ to 105” Fahrenheit)
non-condensing relative humidity between 8% and 85%
at least 4 m (approximately 13 ft) from equipment such as copiers, electrical motors and other equipment that could produce electromagnetic, radio frequency and electrostatic interferences
a wall area approximately ! m square (approximately 3 ft sq)
within 305 m (approximately 1000 ft) of the Not-star KSU
within 2 m (approximately 6 ft) of a 115V 3 wire grounded electrical outlet Note: The distance from an outlet is not important if the module is plugged into the power bar located in the KSU.
a minimum of 16 cm (approximately 6 in) from a corner wall or other compc nent
a minimum of 46 cm (approximately 18 in) from the floor Note: The distance from the floor should be enough to prevent water damage.
. . . :_
f:: . . ._ ._ :.

‘_ :
4
StarTalk - 11 O/l 65 Installation Guide. 5
Electrical The AC electrical requirements for the 1 IO/l65 StarTalk Voice module are:
Check List o
0 Cl 0 0
voltage 115 VAC nominal (105 to 132 volts)
frequency 50/60 Hz nominal (t or - 3 Hz) -
current 2.8 Amps maximum
3rd tiire ground
unswitched
Note: The StarTalk module does not require a dedicated circuit. DO NOT connect the module to an outlet on a circuit that is likely to be overloaded, or used by large off ice equipment or power tools.
Special Pal?S To begin an installation, you need:
Check List 0 screwdriver or power drill
0 0
0
0
0
0
0
0
0
0
Note: You need a screwdriver with a 17 cm long shah’ (approximately 6 l/2”), or a drill bit 20 cm in length (approximately 8”) to tighten the screws when mounting the module (refer to step 8 on page 8 of this Guide).
anti-static grounding strap
three #12 x 20 mm (‘12 x 3/4”) wood screws
1 or 2 modular telephone jacks
twisted pair station wire
a roll of tape (or 4 tacks) for mounting theTemplate
plywood backboard, 2 cm (3/4”) thick
1 or 2 operational Norstar station ports
surge protector (recommended)
RS232 Terminal, RS232 Printer and FE232 printer cable Note: These are only required if a printer is being connected.
Norstar Installation Guide*
Note: This equipment is not supplied with the StarTalk module. I
l You might need this Guide for instructions on installing a Norstar station port in the event there are no free station ports available at the distribution block.
.
:...:
_ ’
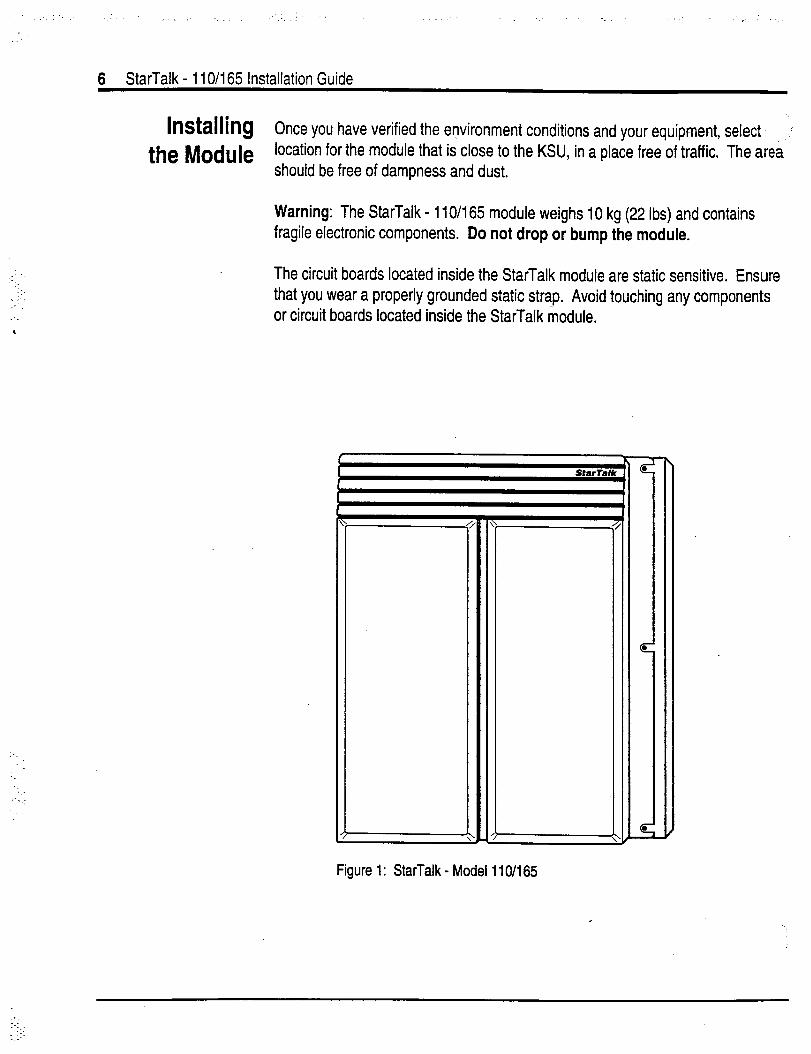
., :... :_ : :
.:
:. . ;
,
:.
._ ._ .: _-. -:
6 Stat-Talk - 110/l 65 Installation Guide
lnStalli!lg Once you have verified the environment conditions and your equipment, select ..
the Module location for the module that is close to the KSU, in a place free of traffic. The area’ should be free of dampness and dust.
Warning: The StarTalk - 110/l 65 module weighs 10 kg (22 Ibs) and contains fragile electronic components. Do not drop or bump the module.
The circuit boards located inside the StarTalk module are static sensitive. Ensure that you wear a properly grounded static strap. Avoid touching any components or circuit boards located inside the StarTalk module.
Figure 1: StarTalk - Model 1 lo/165
:‘. :. .I.
1 I.‘
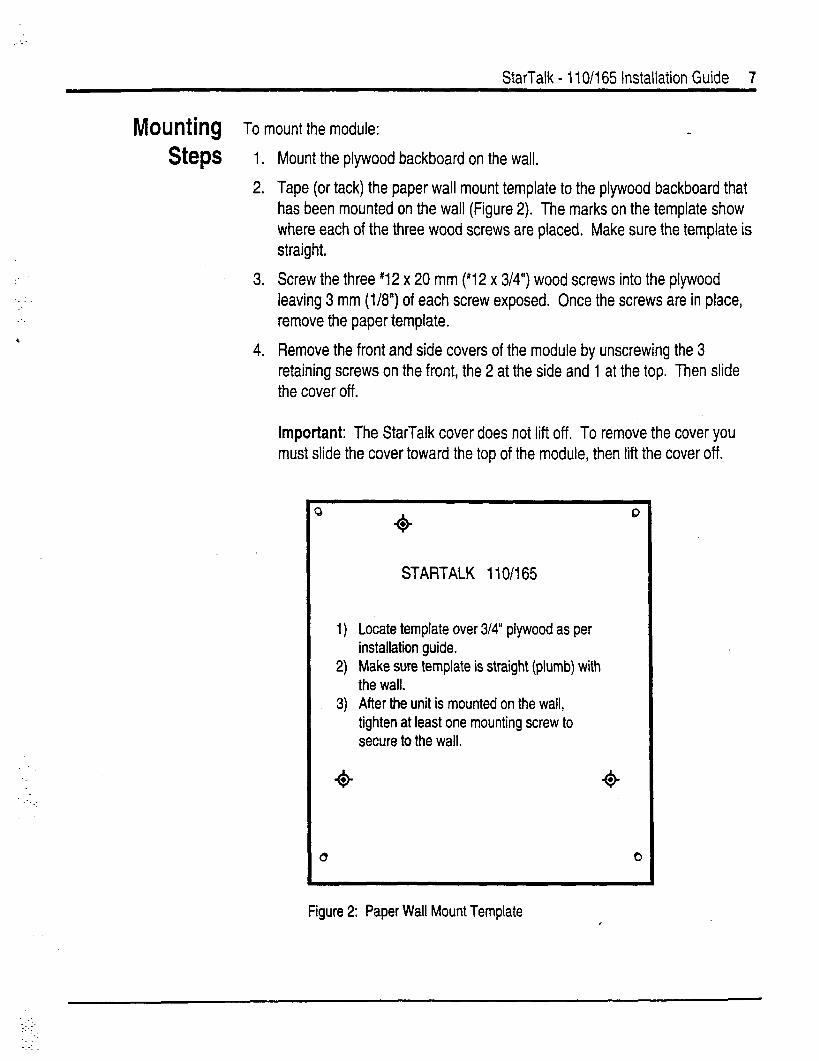
__ ‘_
._ :
,
StarTalk - 1 IO/165 Installation Guide 7
Mounting To mount the module:
Steps I.
2.
Mount the plywood backboard on the wall.
Tape (or tack) the paper wall mount template to the plywood backboard that has been mounted on the wall (Figure 2). The marks on the template show where each of the three wood screws are placed. Make sure the template is straight.
3.
4.
Screw the three #12 x 20 mm (#12 x 314”) wood screws into the plywood leaving 3 mm (I/8”) of each screw exposed. Once the screws are in place, remove the paper template.
Remove the front and side covers of the module by unscrewing the 3 retaining screws on the front, the 2 at the side and 1 at the top. Then slide the cover off.
Important: The StarTalk cover does not lift off. To remove the cover you must slide the cover toward the top of the module, then lift the cover off.
STARTALK 1101165
1) Locate template over 3/4” plywood as per installation guide.
2) Make sure template is straight (plumb) with the wail.
3) After the unit is mounted on the wail, tighten at least one mounting screw to secure to the wall.
0 0
Figure 2: Paper Wall Mount Template .
.
r:.: . . . ._
-:’
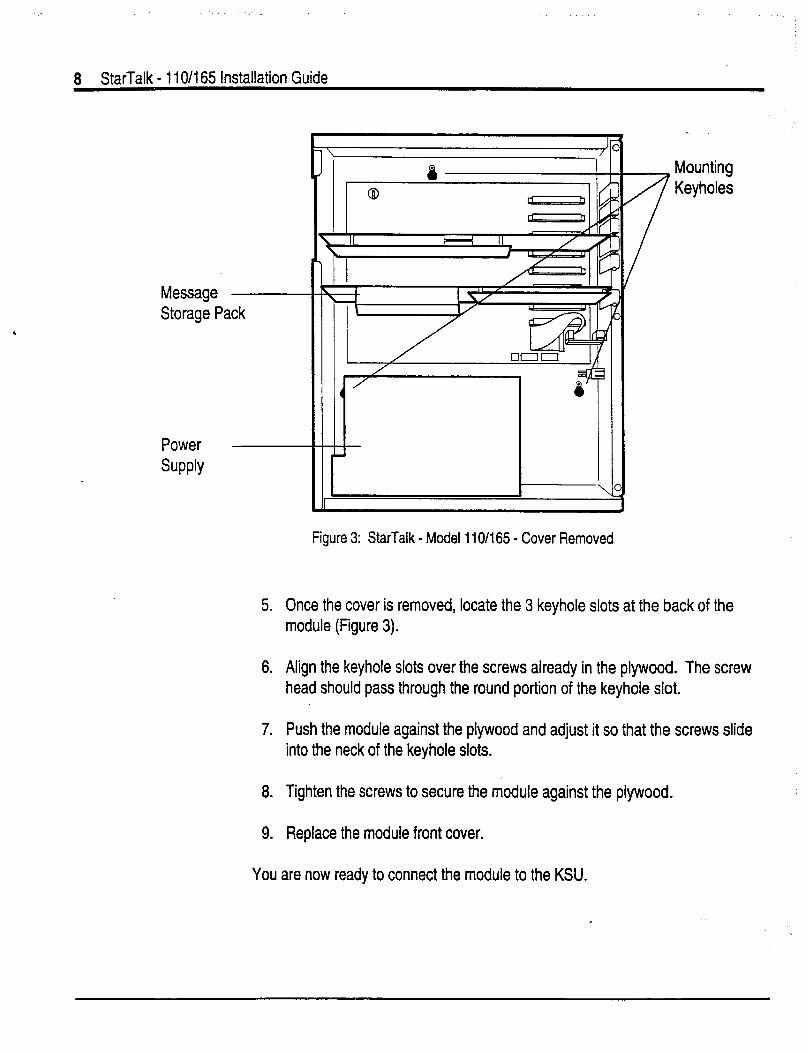
8 StarTalk - 11 O/l 65 Installation Guide
Message Storage Pack
Power SUPPlY
0 8 CL b
L b
Mounting Keyholes
Figure 3: StarTalk - Model 11 O/165 - Cover Removed
5. Once the cover is removed, locate the 3 keyhole slots at the back of the module (Figure 3).
6. Align the keyhole slots over the screws already in the plywood. The screw head should pass through the round portion of the keyhole slot.
7. Push the module against the plywood and adjust it so that the screws slide into the neck of the keyhole slots.
8. Tighten the screws to secure the module against the plywood.
9. Replace the module front cover.
You are now ready to connect the module to the KSU.
StarTalk - 1 IO/l65 Installation Guide . 9
Connecting the Before you start connecting the module, make sure 1 or 2 Norstar station ports are
Module to the available at the distribution block. For instructions on installing a station port, refer
KSU to the Norstar installation Guide that came with the Norstar KSU.
IMPORTANT: If you are installing StarTalk on a Modular DR2 KSU using software version 5.2, DO NOT connect StarTalk to Norstar station ports 107,121,312, 512, or 712. Refer to Page 26 for more information.
To wire the module:
1.
2.
Locate the distribution block.
Depending on the StarTalk model, make sure there are 1 or 2 available station ports at the distribution block. If a station port is not available, you must install one before you continue. Refer to the Norstar Installation Guide that came with the KSU for information on installing station ports.
3.
4.
Mount the RJ-11 Teladapt Jack(s) next to the distribution block.
Using twisted pair station wire, connect each Teladapt Jack to a free station port on the distribution block.
5. Test each port using a working Norstar telephone.
Important: If you are installing a Model 165, you need to know both of the StarTalk DNs so that you can set them to Norstar only (refer to page 24 of this Guide). When you test each port with a working Norstar telephone use
m rl ml to show the DN. These DNs are the 2 StarTalk DNs. Auto Set Relocation must be set to NO for this method to show the correct DNs. You must determine the StarTalk DNs before you connect the module to the KSU.
6. Connect one end of the RJ-11 Teladapt Connection Cord to the station port at the side of the module. Connect the other end to the jack at the RJ-11 Teladapt Jack. Do not use a Teladapt Cord that is longer than 4.5 m (approximately 14 ft).
7. Replace the side cover.
You are now ready to connect the AC power cord and power up the StarTalk module. I
i:: :. .
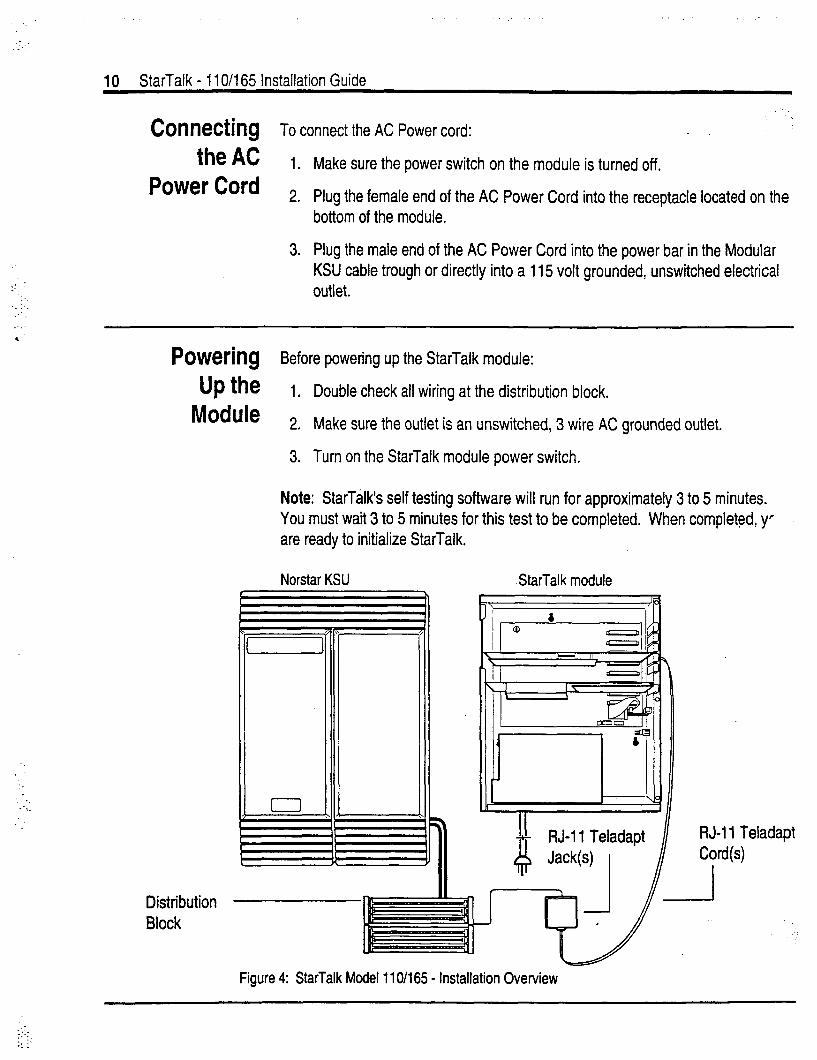
- :
. . .
10 StarTalk - 110/l 65 Installation Guide
COtlfleCtiflg TO connect the AC Power cord:
the AC 1. Power Cord 2
3.
Make sure the power switch on the module is turned off.
Plug the female end of the AC Power Cord into the receptacle located on the bottom of the module.
Plug the male end of the AC Power Cord into the power bar in the Modular KSU cable trough or directly into a 115 volt grounded, unswitched electrical outlet.
POW&g Before powering up the StarTalk module:
UP the 1. Double check all wiring at the distribution block.
Module 2. Make sure the outlet is an unswitched, 3 wire AC grounded outlet.
3. Turn on the StarTalk module power switch.
Note: StarTalk’s self testing software will run for approximately 3 to 5 minutes. You must wait 3 to 5 minutes for this test to be completed. When completed, yr are ready to initialize StarTalk.
Norstar KSU .StarTalk module
Distribution -_I Block I
u Figure 4: StarTalk Model 11 O/l 65 - Installation Overview
RJ-11 Teladapt Cord(s)
:- ::-I
: :I_:‘

StarTalk - 110/165 Installation Guide 11
COfltleCtilIg a Installing a printer is divided into two steps: connecting the printer, and setting the
Printer to the FE232 communication parameters. Before you install the printer, make sure you
StarTalk Module have an FE232 cable and an RS232 terminal. If you are connecting a printer and you want to replace the side cover of the module, we recommend using a Right Angle RS232 Connector.
Printer The printer specifications must be met before you connect the printer. These are: Check List
-0 serial printer type
0
0
Cl cable type must be straight through
Note: StarTalk does not work with a parallel printer unless a serial to parallel interface is used.
printer speeds must support 300,1200,2400, or 4800 baud
hardware and software compatibility Note: StarTalk supports xonlxoff, and carriage return line feed.
Important: You must have an RS232 terminal to set the communication param-. eters.
If you are connecting a printer on a return visit to the customer site, you must remove the StarTalk module side cover. Follow the instructions for removing the side cover on page 7 of this Guide.
To connect a printer:
1.
2.
Plug the male end of the RS232 cable into the RS232 port, located at the right side of the StarTalk module.
Plug the female end of the RS232 cable into the modem port, located at the back of the printer.
Important: The StarTalk module RS232 port is a standard RS232 connector. Make sure you use an appropriately constructed cable to connect the printer to the StarTalk module. For more information refer to page 32, Diagram 1, in this Guide.
.
1..: 1, ‘.
..I :
12 StarTalk - 1 IO/165 Installation Guide
Setting the To set the communication parameters, you must have an RS232 terminal con- Communication netted to the printer.
Parameters B f e ore you set the communication parameters, you must know the:
baud rate of the printer Note: The baud rate of the printer must match the baud rate of the StarTalk module.
. :
, 0 number of data bits
a number of stop bits
0 parity type
For the RS232 terminal to communicate with StarTalk, the terminal parameters must be set to:
l 300 baud l 7 data bits l 1 stop bit l even parity
For instructions on setting the RS232 communication parameters, refer to the instruction manual that came with the terminal.
:-: (1
StarTalk - 11 O/l 65 Installation Guide 13
Connecting an To connect the RS232 terminal to StarTalk: RS232 Terminal
1. Pin 2 on one end is connected to pin 2 on the other end, pin 3 on one end is connected to pin 3 on the other end, and pin 7 on one end is connected to pin 7 on the other end. The end of the cable attached to StarTalk must be male. For more information, refer to Figures and Diagrams on page 32.
2. Attach the RS232 cable to the StarTalk RS232 connector.
3. Attach the other end of the cable to the modem connector on the terminal.
If you are returning to a site to install a printer connection to StarTalk and do not know what the StarTalk communication parameters are:
1. Turn off the power switch to the StarTalk module.
2. Press and hold the RS232 Reset Button on the StarTalk module.
3. While holding the Reset Button, turn on the power switch to StarTalk. After 5 seconds, release the Reset Button.
The RS232 parameters are now set to the defaultparameters:
l 300 baud l 7 data bits l 1 stop bit l even parity
To set the RS232 printer communication parameters:
1. Turn on the RS232 Terminal. Note: Ensure the StarTalk module is turned on. _
2. Press [Return 1
The screen on the RS232 Terminal shows:
Password:
Note: If Password: does not appear on the screen, if other characters appear, or if nothing appears, recheck the communication parameters on . both the RS232 terminal and StarTalk. If the parameters match, verify that the terminal cable has the correct pinouts.
14 StarTalk - 1 lo/165 Installation Guide
. : ‘. : _.
:
.
3. Type S Y S M G R Note: This password must be entered in all capitals. There are no spaces entered.
4. Press [Return] The screen shows:
**************t***************************************
Northern Telecom Top-Level StarTalk Release 2.0 ******************************************************
Exit Mailbox Admin Group List Admin Class of Service Admin SystemAdminandConfiguration Reports UseFrench-Utilisez francais * Enter a choice, ?, space, or ESC:
5.
6.
*only available on English/French StarTalk-modules
Press 4
Press [Return 1
The screen shows: f
SystemAdminandConfiguration
Enable/Disable System Restart System System Date and Time RS232 CommunicationParameters DTMF Delay Backup Allow/DisallowMultipleSystemAdmin Enter a choice, ?, space, or ESC:
7. Press 4
-;:.: :.: :: ::’
StarTalk - 1 lo/165 Installation Guide 15
8. Press 1 Return 1
The screen shows:
RS232 CommunicationParameters
1 4800 baud / 8 data bits / 1 bit stop / no parity 2 2400 baud / 8 data bits / 1 stop bit / no parity 3 2400 baud / 7 data bits / 1 stop bit / even parity 4 1200 baud / 8 data bits / 1 bit stop / no parity 5 1200 baud / 7 dafa bits / 1 bit stop / even parity 6 300 baud / 8 data bits / 1 stop bit / no parity 7 300 baud / 7 data bits / 1 bit stop / even parity
,
9.
10.
11.
12.
Type <the number beside the communication parameteo The screen shows:
Change your baud rate and press return.
Change the RS232 terminal communication parameters to match the parameters selected for StarTalk in step 8. Refer to the RS232 terminal manual for information on how to change the terminal’s communication i
parameters.
Press 1 Return 1
The screen shows:
Should this change be made permanent?(y/n):[nl
Note: Default values are shown in [square] brackets.
Press y
_: . :-.,
:_ :
: :_ 4
16 StarTalk - 11 O/l 65 Installation Guide
13.
14.
15.
Press (Return1 The screen shows the RS232 communication parameters screen (step 8). .
Press ISpacebar 1
The screen shows the System Admin and Configuration screen.
Press (0 and I=( to exit. Note: This means, to exit press zero. To test the printer, you must print a StarTalk report. Refer to Section 9 in the Set Up and Operation Guide.
You have now completed installing the printer and setting the communication parameters.
. . : y:. : :-
StarTalk - 11 O/l 65 Installation Guide 17
Before YOU Important: Before you initialize StarTalk, you must check the Norstar Key Senrice Initialize Unit (KSU) DN digit length.
StarTalk f I you are installing StarTalk with a Norstar Modular KSU that is using a 2 digit DN length, we recommend that you change the DN length to 3 digits or more. To change the Norstar KSU DN length, refer to the Norstar Installation Guide.
Important: If you are using StarTalk with Norstar Centrex software, you must set the DN type of the StarTalk DN to be ‘Norstar Only’ before you initialize StarTalk. For instructions on setting the DN type, refer to the Norstar Centrex Installer Guide.
Pt’epXitlg Initializing StarTalk establishes:
to Initialize .
StarTalk the DN digit length to match the Norstar DN length
l the primary and alternate languages of the StarTalk voice prompts l if the Group List option is enabled l the leading digit for Group Lists (if the Group List option is enabled)
Before you begin:
cl
0
cl
0
0
a
Know the Norstar DN length. If you do not know the DN length, go to any Norstar telephone and press -1 m /?jl and I[ Count the number of digits shown on the display. Important: If StarTalk is being installed on a Modular Norstar KSU and the DN length is 2, we recommend changing the DN length to 3 digits or more.
Determine if the system is using the bilingual language capability.
Know the primary and alternate languages to be used.
Know if the Group List option is enabled.
Know the leading digit for Group Lists. The leading digit default is 9.
Determine the StarTalk Feature Codes.
Note: For StarTalk information, refer to the StarTalk Programming Record. TO initialize StarTalk, you must use a Norstar M7310 or M7324 telephone.
.: : ,’
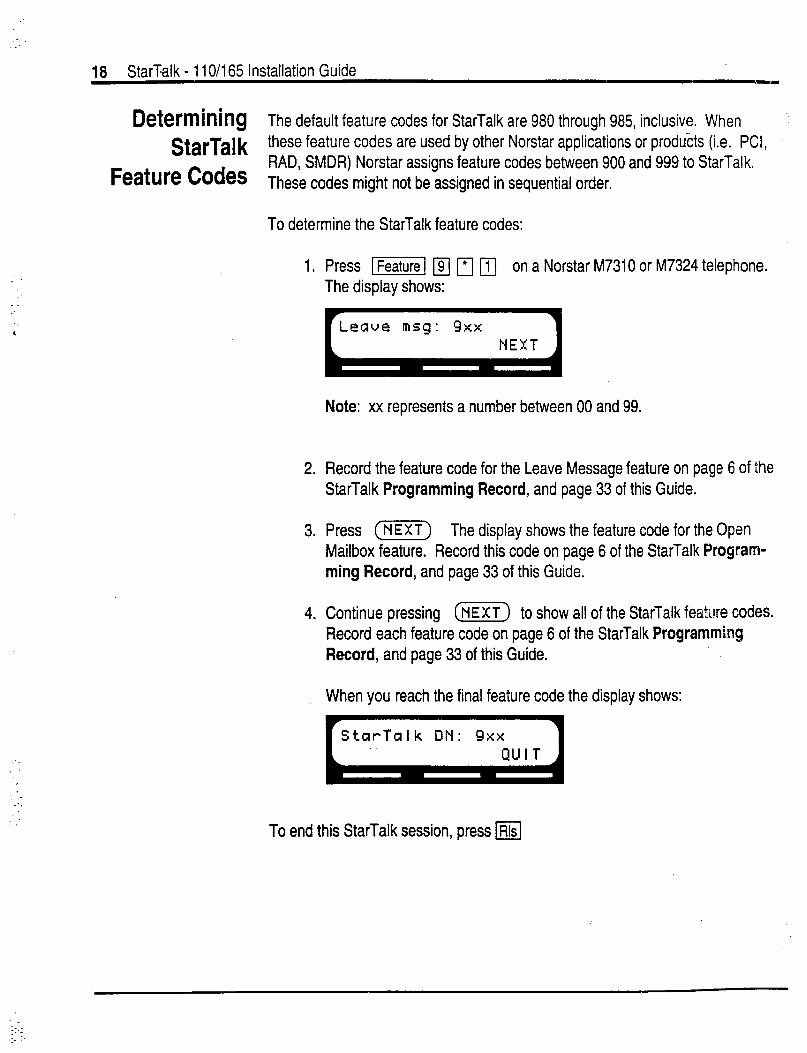
-
:.
:
18 StarTalk - 1 lo/165 Installation Guide
Determining The default feature codes for StarTalk are 980 through 985, inclusive. When StarTalk these feature codes are used by other Norstar applications or products (i.e. PCI,
Feature Codes RAD, SMDR) Norstar assigns feature codes between 900 and 999 to StarTalk. These codes might not be assigned in sequential order.
To determine the StarTalk feature codes:
1.
2.
3.
4.
Press m 191 rl /‘il on a Norstar M7310 or M7324 telephone. The display shows:
I”‘“‘“‘:
Note: xx represents a number between 00 and 99.
Record the feature code for the Leave Message feature on page 6 of the StarTalk Programming Record, and page 33 of this Guide.
Press (NEXT) The display shows the feature code for the Opan Mailbox feature. Record this code on page 6 of the StarTalk Program- ming Record, and page 33 of this Guide.
Continue pressing (NEXT) to show all of the StarTalk feature codes. Record each feature code on page 6 of the StarTalk Programming Record, and page 33 of this Guide.
When you reach the final feature code the display shows:
To end this StarTalk session, press m

StarTalk - 11 O/l 65 Installation Guide 19
hlitiakiflg TO initialize StarTalk:
StarTal k 1. Enter the System Administration Feature Code.
Note: The default code is [m m m bl The display shows:
I G (266344) using the dialpad. 2. Enter C 0 N F
3. Press (OK) The display shows:
4.
5.
Enter <the DN digit length> Note: You MUST enter the same digit length as the Norstar DN length. The allowable DN range is between 2 and 7 digits. StarTalk DN length default is 3.
Press (OK) The display shows:
. Bi I ingual? kES _ NO _ 1
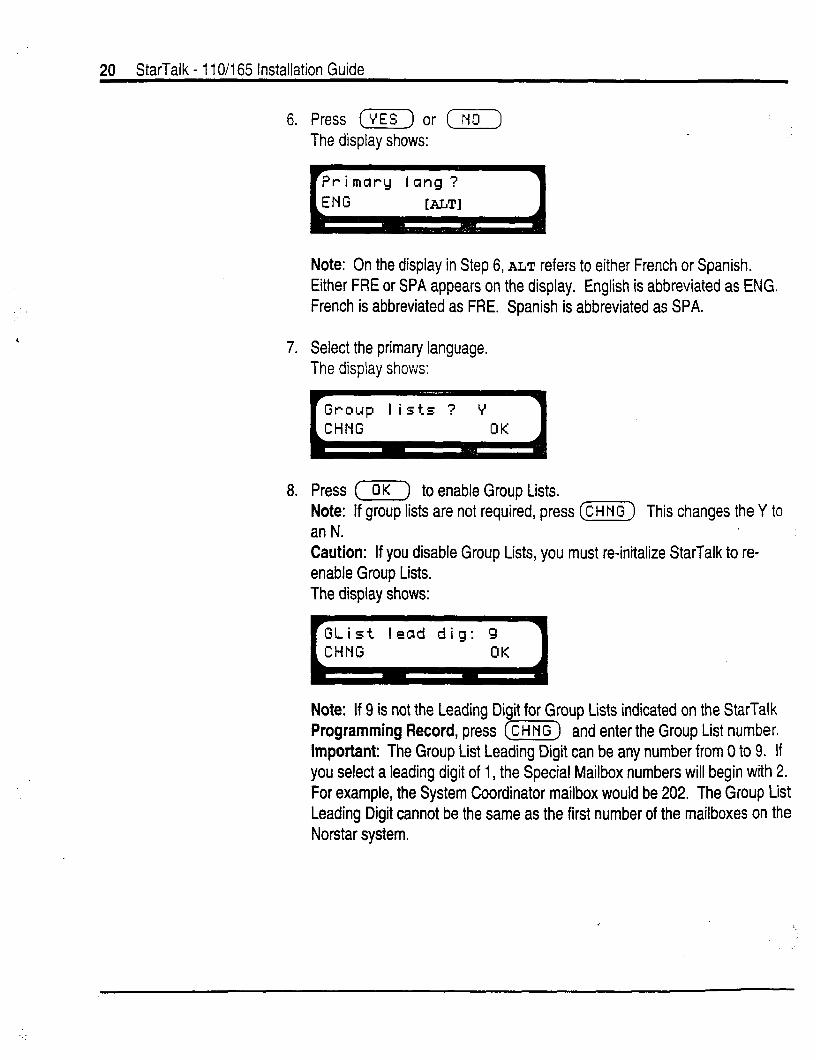
I
20 StarTalk - 11 O/l 65 Installation Guide
6.
7.
8.
Press (YES) or (NO) The display shows:
Note: On the display in Step 6, ALT refers to either French or Spanish. Either FRE or SPA appears on the display. English is abbreviated as ENG. French is abbreviated as FRE. Spanish is abbreviated as SPA.
Select the primary language. The display shows:
Press (OK) to enable Group Lists. Note: If group lists are not required, press (s) This changes the Y to an N. Caution: If you disable Group Lists, you must re-initalize StarTalk to re- enable Group Lists. The display shows:
Note: If 9 is not the Leading Digit for Group Lists indicated on the StarTalk Programming Record, press (x) and enter the Group List number. Important: The Group List Leading Digit can be any number from 0 to 9. If you select a leading digit of 1, the Special Mailbox numbers will begin with 2. For example, the System Coordinator mailbox would be 202. The Group List Leading Digit cannot be the same as the first number of the mailboxes on the Norstar system.
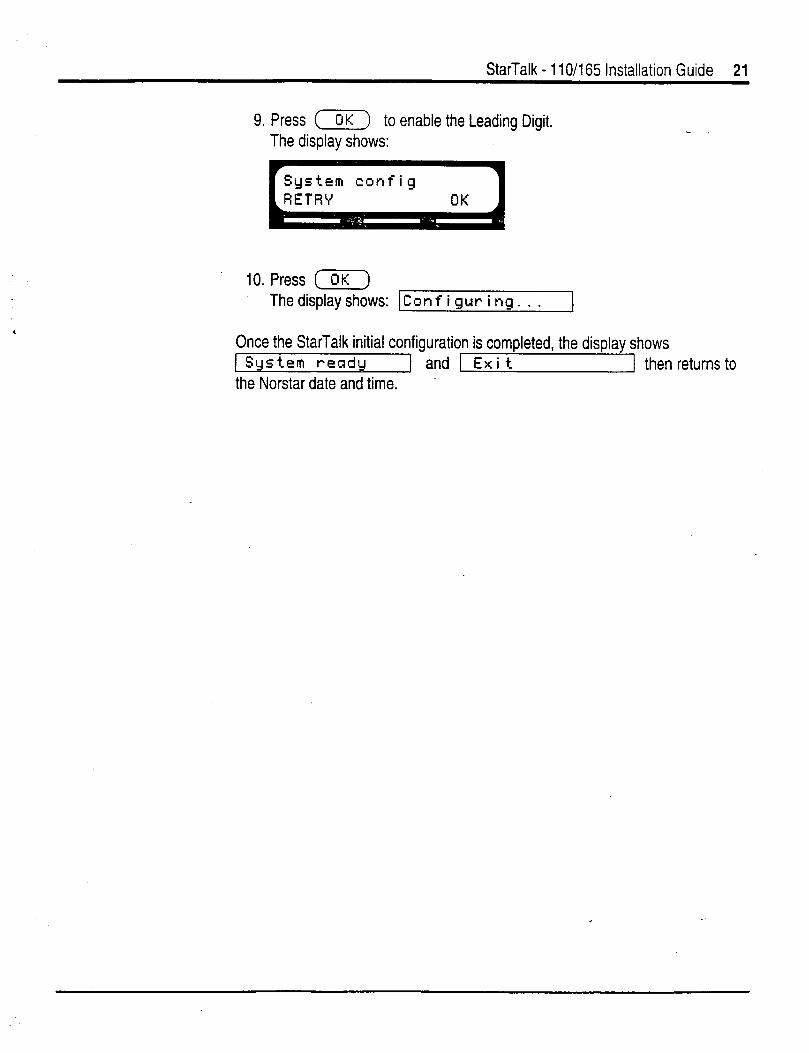
StarTalk - 110/l 65 Installation Guide 21
9. Press (y) to enable the Leading Digit. The display shows:
10. Press (OK) The display shows: [Conf i gut- i ng. . . I
Once the StarTalk initial configuration is completed, the display shows 1 System ready 1 and 1 Exit 1 then returns to the Norstar date and time.
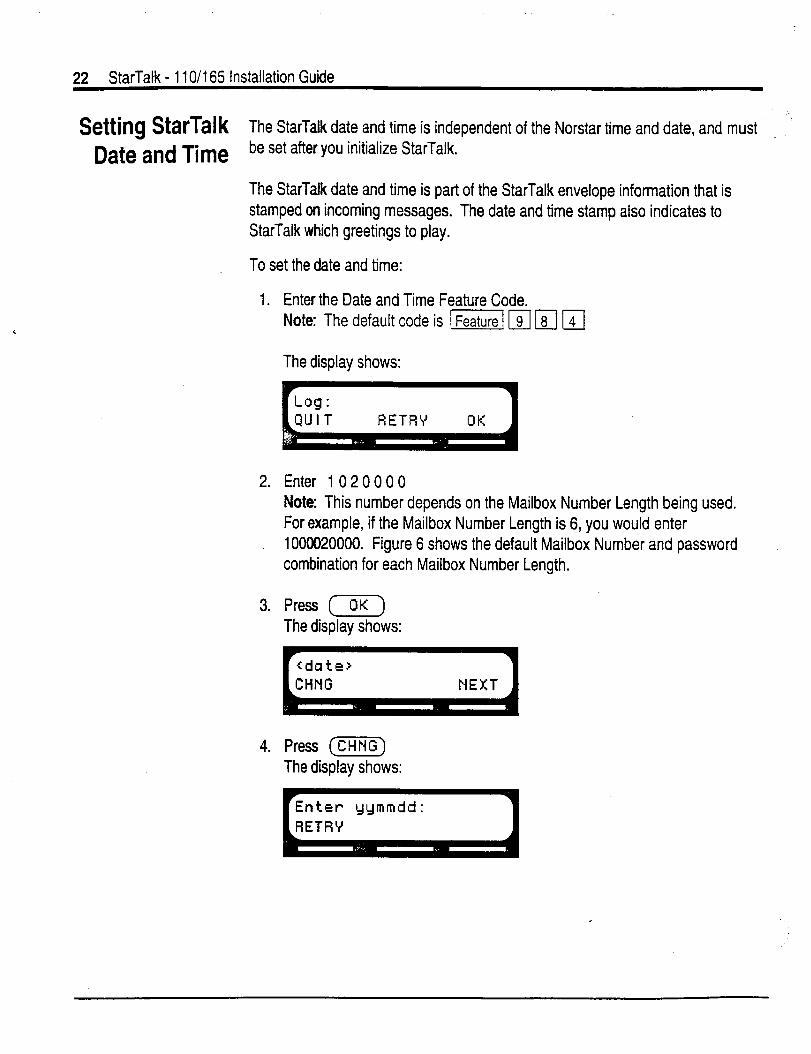
22 StarTatk - 11 O/l 65 Installation Guide
Setting StarTal k The StarTalk date and time is independent of the Norstar time and date, and must
Date and Time be set after you initialize StarTalk.
The StarTalk date and time is part of the StarTalk envelope information that is stamped on incoming messages. The date and time stamp also indicates to StarTalk which greetings to play.
To set the date and time:
1. Enter the Date and Time Feature Code. Note: The default code is (m mm rl
The display shows:
2. Enter 1 02 0 0 0 0 Note: This number depends on the Mailbox Number Length being used. For example, if the Mailbox Number Length is 6, you would enter 1000020000. Figure 6 shows the default Mailbox Number and password combination for each Mailbox Number Length.
3. Press F5k7 The display shows:
4. Press (CHNG) The display shows:

StarTalk - 11 O/l 65 Installation Guide . 23
5.
6.
7.
8.
9.
Enter <the year, the month, and the day> Note: This is a six digit field. Any single month or day must have a-zero preceding the number. For example, June 4, 1991 must be entered as 910604.
Press (NEXI) The display shows:
I;“““_ Press (CHNG) The display shows:
Enter <the time in hours and minutes> Note: This is a four digit field. Any single hour or minute must have a zero preceding the number. For example, 7:09 must be entered as 0709.
The display shows:
Press (RM) or (PM)
To end this StarTalk session, press w
Once you have initialized StarTalk, and after you have set the date and time, change Auto Set Relocation back to YES.
-
.
I
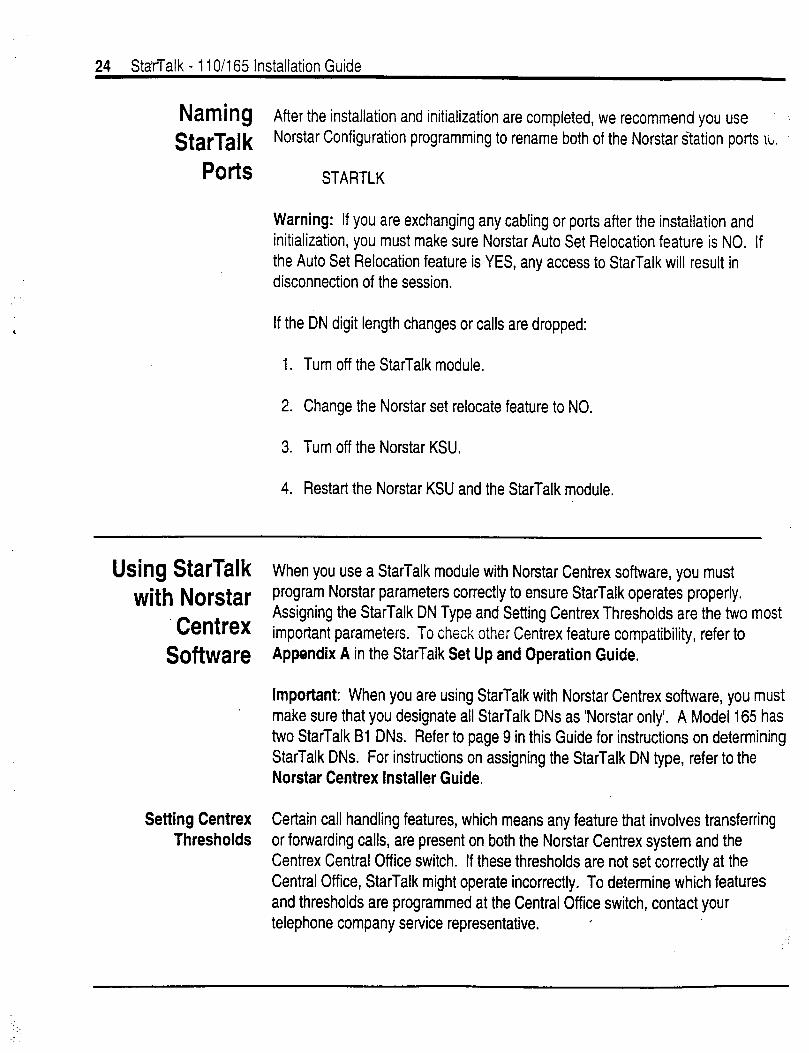
24 StarTalk - 11 O/l 65 Installation Guide
Naming After the installation and initialization are completed, we recommend you use StarTalk Norstar Configuration programming to rename both of the Norstar station ports lb.
Ports
Using StarTalk with Norstar
Centrex Software
Setting Centrex Thresholds
STARTLK
Warning: If you are exchanging any cabling or ports after the installation and initialization, you must make sure Norstar Auto Set Relocation feature is NO. If the Auto Set Relocation feature is YES, any access to StarTalk will result in disconnection of the session.
If the DN digit length changes or calls are dropped:
1. Turn off the StarTalk module.
2. Change the Norstar set relocate feature to NO.
3. Turn off the Norstar KSU.
4. Restart the Norstar KSU and the StarTalk module.
When you use a StarTalk module with Norstar Centrex software, you must program Norstar parameters correctly to ensure StarTalk operates properly. Assigning the StarTalk DN Type and Setting Centrex Thresholds are the two most important parameters. To check other Centrex feature compatibility, refer to Appendix A in the StarTalk Set Up and Operation Guide.
Important: When you are using StarTalk with Norstar Centrex software, you must make sure that you designate all StarTalk DNs as ‘Norstar only’. A Model 165 has two StarTalk Bl DNs. Refer to page 9 in this Guide for instructions on determining StarTalk DNs. For instructions on assigning the StarTalk DN type, refer to the Norstar Centrex Installer Guide.
Certain call handling features, which means any feature that involves transferring or forwarding calls, are present on both the Norstar Centrex system and the Centrex Central Office switch. If these thresholds are not set correctly at the Central Office, StarTalk might operate incorrectly. To determine which features and thresholds are programmed at the Central Office switch, contact your telephone company service representative. *
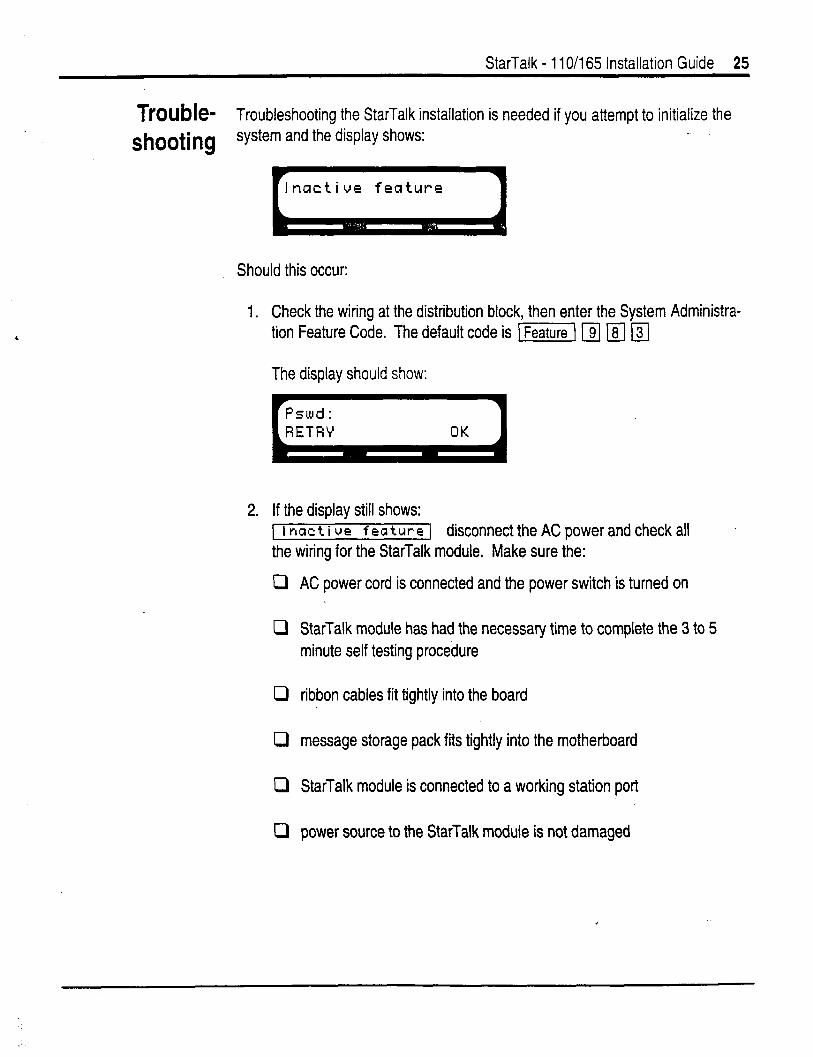
StarTalk - 1 lo/165 Installation Guide 25
Trouble- Troubleshooting the StarTalk installation is needed if you attempt to initialize the
shooting system and the display shows:
Inactive feature
Should this occur:
1.
2.
Check the wiring at the distribution block, then enter the System Administra- tion Feature Code. The default code is -1 /??j 181 b\
The display should show:
If the display still shows: 1 Inactiue feature\ disconnecttheACpowerandcheckal1 the wiring for the StarTalk module. Make sure the:
cl
0
0
0
0
0
AC power cord is connected and the power switch is turned on
StarTalk module has had the necessary time to complete the 3 to 5 minute self testing procedure
ribbon cables fit tightly into the board
message storage pack fits tightly into the motherboard
StarTalk module is connected to a working station port
power source to the StarTalk module is not damaged
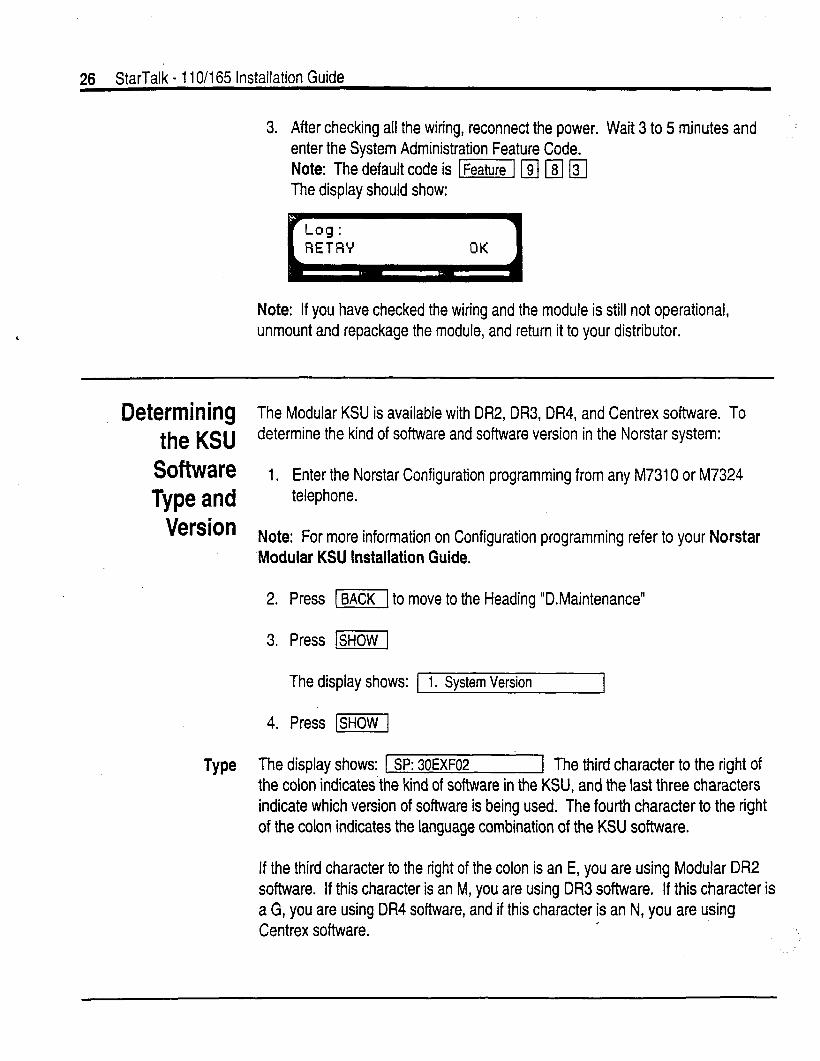
26 StarTalk - 11 O/i 65 Installation Guide
3. After checking all the wiring, reconnect the power. Wait 3 to 5 minutes and enter the System Administration Feature Code. Note: The default code is m pl I-&/ E] The display should show:
Note: If you have checked the wiring and the module is still not operational, unmount and repackage the module, and return it to your distributor.
Determining The Modular KSU is available with DR2, DR3, DR4, and Centrex software. To the KSU determine the kind of software and software version in the Norstar system:
Software 1. Enter the Norstar Configuration programming from any M7310 or M7324
Type and telephone.
Version Note: For more information on Configuration programming refer to your Norstar ‘Modular KSU Installation Guide.
2. Press (BACK1 to move to the l-leading “D.Maintenance”
3. Press WI
The display shows: 1 1. System Version
4. Press 1-1
Type The display shows: [ SP: 30EXF02 1 The third character to the right of the colon indicates.the kind of software in the KSU, and the last three characters indicate which version of software is being used. The fourth character to the right of the colon indicates the language combination of the KSU software.
If the third character to the right of the colon is an E, you are using Modular DR2 software. If this character is an M, you are using DR3 software. If this character is a G, you are using DR4 software, and if this character is an N, you are using Centrex software.
I
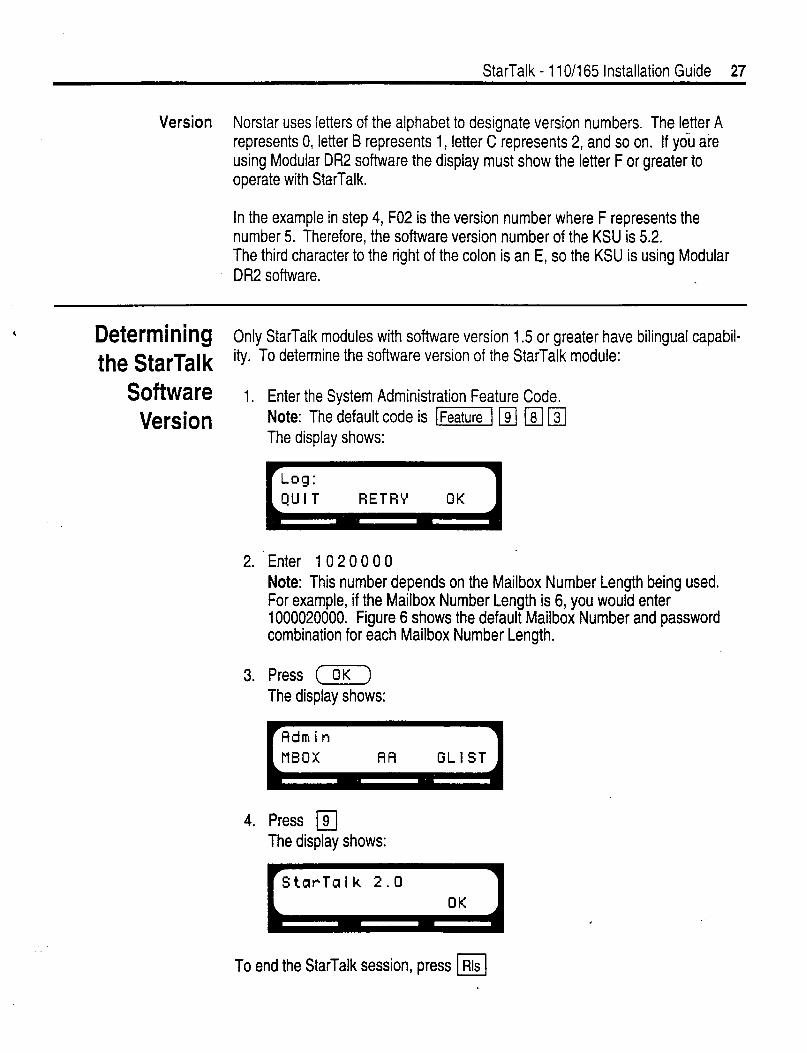
StarTalk - 1 IO/165 Installation Guide 27
Version Norstar uses letters of the alphabet to designate version numbers. The letter A represents 0, letter B represents 1, letter C represents 2, and so on. If you are using Modular DR2 software the display must show the letter F or greater to operate with StarTalk.
In the example in step 4, F02 is the version number where F represents the number 5. Therefore, the software version number of the KSU is 5.2. The third character to the right of the colon is an E, so the KSU is using Modular DR2 software.
Determining Only StarTalk modules with software version 1.5 or greater have bilingual capabil-
the StarTalk ity. To determine the software version of the StarTalk module:
Software I.
Version
2.
3.
4.
Enter the System Administration Feature Code. Note: The default code is [m b/ [F] b] The display shows:
Enter 1 0 2 0 0 0 0 Note: This number depends on the Mailbox Number Length being used. For example, if the Mailbox Number Length is 6, you hould enter 1000020000. Figure 6 shows the default Mailbox Number and password combination for each Mailbox Number Length.
Press (OK) The display shows:
Press 191 The display shows:
To end the StarTalk session, press w
: .::-
28 StarTalk - 11 O/i 65 Installation Guide
Changing the This section shows you how to change the Class of Service values. If-you are
Class of Service using an FE232 terminal to set up mailboxes and perform other system adminis-
Values Using an tration tasks, refer to the StarTalk Set Up and Operation Guide, Appendix 8.
RS232 Terminal Several StarTalk feature parameters can be changed and administered from an RS232 terminal. These include:
l Mailbox Administration l Group List Administration l Class of Service Values l System Administration and Configuration l Reports l Language Capability
Note: In most cases, the System Coordinator manages system administration changes. Refer to the StarTalk Set Up and Operation Guide for information about how StarTalk works. If you are repairing a StarTalk unit and require the use of an RS232 terminal, refer to the StarTalk Troubleshooting and Repair Manual.
All the default parameter settings for the Classes of Service are found on the StarTalk Programming Record. Refer to this Record for field parameter informa- tion.
To change the Class of Service values, you must have an RS232 terminal connected to StarTalk. Refer to Connecting An RS232 Terminal, earlier in this Guide.
To change the Class of Service parameters:
1. Turn on the RS232 terminal. Note: Make sure that the StarTalk module is turned on.
2. Press I] The screen on the RS232 terminal shows:
Password:
Note: If Password: does not appear on the screen, if other characters appear, or if nothing appears, recheck the communication parameters on both the RS232 terminal and StarTalk. If the parameters match, verify that the terminal cable has the correct pinouts.

StarTalk - 110/l 65 Installation Guide .29
3. Type SYSMGR Note: This password must be entered in all capitals. There are no-spaces entered.
4. Press 1 Return 1
The screen shows the StarTalk Main Menu:
*****************t************************************
Northern Telecom Top-Level StarTalk Release 2.0 ******************************************************
0 Exit 1 Mailbox Admin 2 Group List Admin 3 Class of Service Admin 4 SystemAdminandConfiguration 5 Reports 9 UseFrench-Utilisez francais * Enter a choice, ?, space, or ESC:
*only available on English/French StarTalk modules
5. Press 3
6. Press lReturn 1
The Class of Service Administration screen appears.
7. Enter the Class of Service Number. Note: .This can be any number from 1 to 16.
8. Press I Return I
9. Enter the Class of Service Name. Note: This could be a department within your company, such as, Sales.
10. Press 1 Return 1
11. Enter the Prompt Language. Note: 1 = the primary language, and 2 = the alternate language.
I
12. Press Fj
‘. .
30 StarTalk - 11 O/l 65 installation Guide
13. Enter the maximum mailbox message time. Note: The maximum mailbox message time is 180 minutes.
14.
15.
Press [-i%%%J
Enter the maximum mailbox message length. Note: The maximum mailbox message length is 15 minutes.
16.
17.
Press [Return ]
Enter the maximum number of days for retaining messages. Note: The maximum number of days for retaining messages is 365. If you enter zero, messages are stored in a mailbox indefinitely.
18.
19.
Press [Return 1
Designate whether personal greetings are allowed. Note: A Y indicates personal greetings are allowed, an N indicates personal greetings are not allowed. Personal greetings include both the mailbox primary and alternate greetings.
20.
21.
Press 1 Return 1
Enter the maximum greeting length. Note: *If greetings are not allowed, press (1 to skip to the next field.
22.
23.
Press (Return]
Designate whether or not Group List access is allowed. Note: A Y indicates Group List access is allowed, an N indicates Group List access is not allowed.
24. Press [Return 1
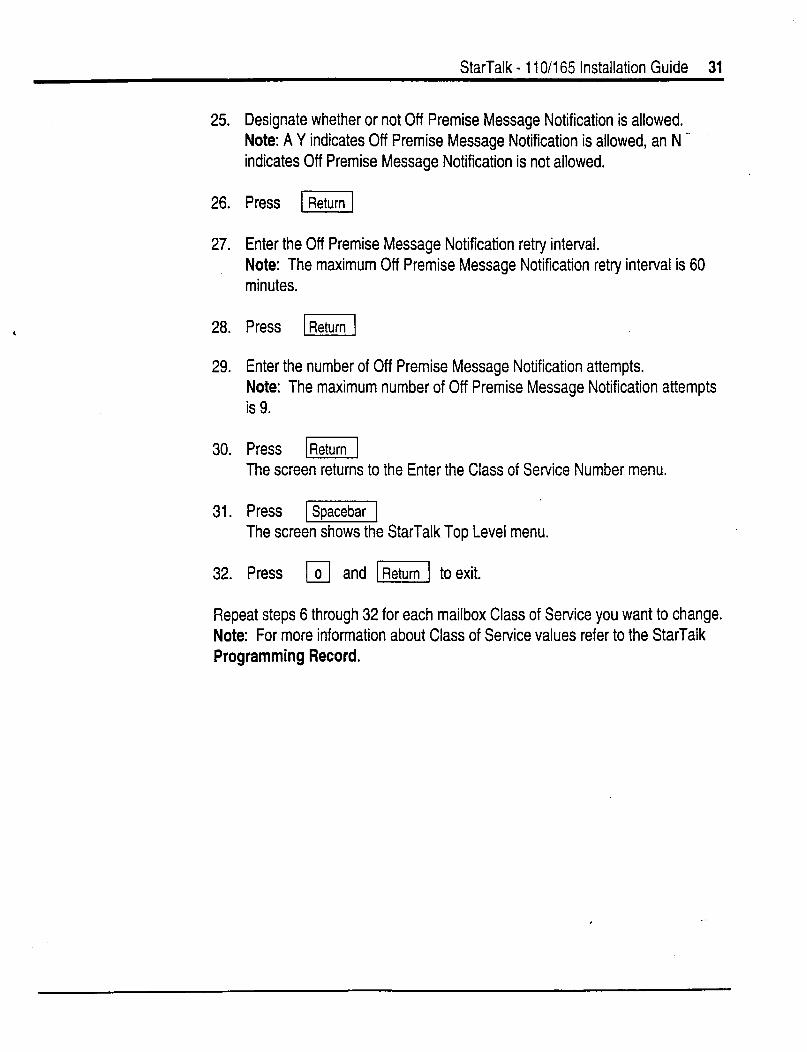
StarTalk - 110/l 65 Installation Guide 31
25.
26.
27.
Designate whether or not Off Premise Message Notification is allowed. Note: A Y indicates Off Premise Message Notification is allowed, an N -
indicates Off Premise Message Notification is not allowed.
Press [I
Enter the Off Premise Message Notification retry interval. Note: The maximum Off Premise Message Notification retry interval is 60 minutes.
28.
29.
Press [Return]
Enter the number of Off Premise Message Notification attempts. Note: The maximum number of Off Premise Message Notification attempts is 9.
30. Press =I The screen returns to the Enter the Class of Service Number menu.
31. Press [Spacebar1 The screen shows the StarTalk Top Level menu.
32. Press q and (E] to exit.
Repeat steps 6 through 32 for each mailbox Class of Service you want to change. Note: For more information about Class of Service values refer to the StarTalk Programming Record.
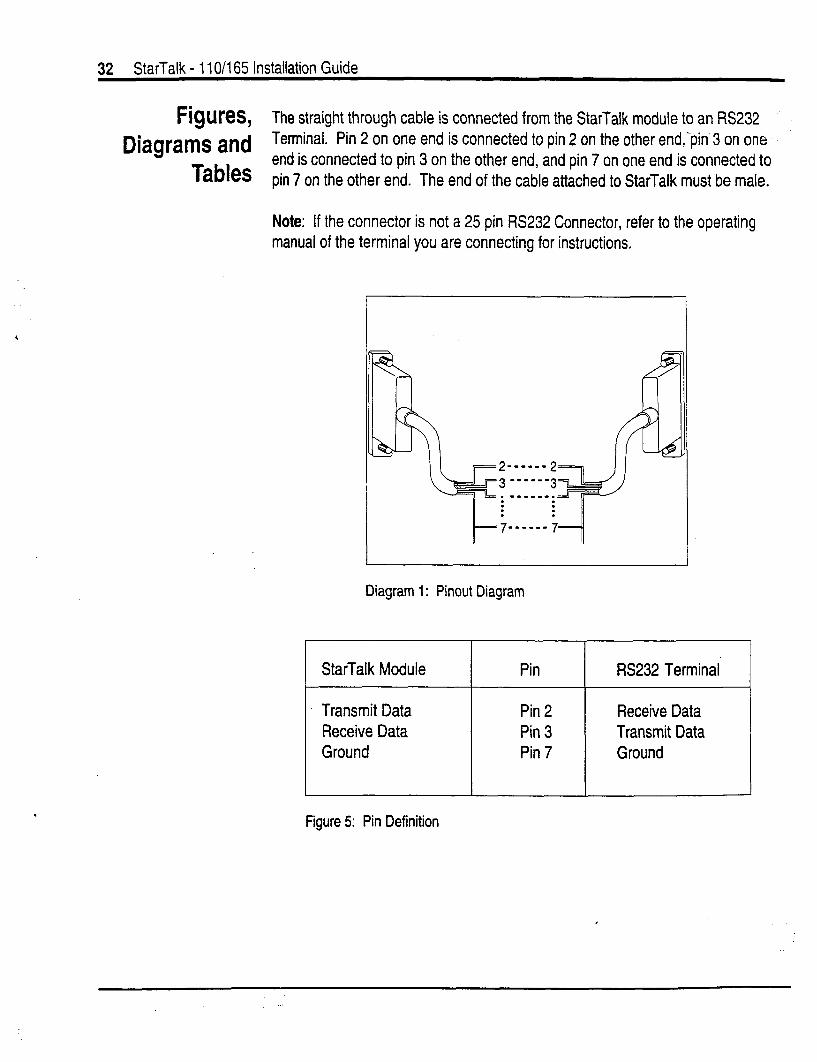
.
32 StarTalk - 11 O/l 65 Installation Guide
Figures, The straight through cable is connected from the StarTalk module to an FE232
Diagrams and Terminal. Pin 2 on one end is connected to pin 2 on the other end,pin 3 on one
Tables end is connected to pin 3 on the other end, and pin 7 on one end is connected to pin 7 on the other end. The end of the cable attached to StarTalk must be male.
Note: If the connector is not a 25 pin RS232 Connector, refer to the operating manual of the terminal you are connecting for instructions,
Diagram 1: Pinout Diagram
StarTalk Module Pin FE232 Terminal
Transmit Data Receive Data Ground
Pin 2 Pin 3 Pin 7
Receive Data Transmit Data Ground
I I I ,
Figure 5: Pin Definition
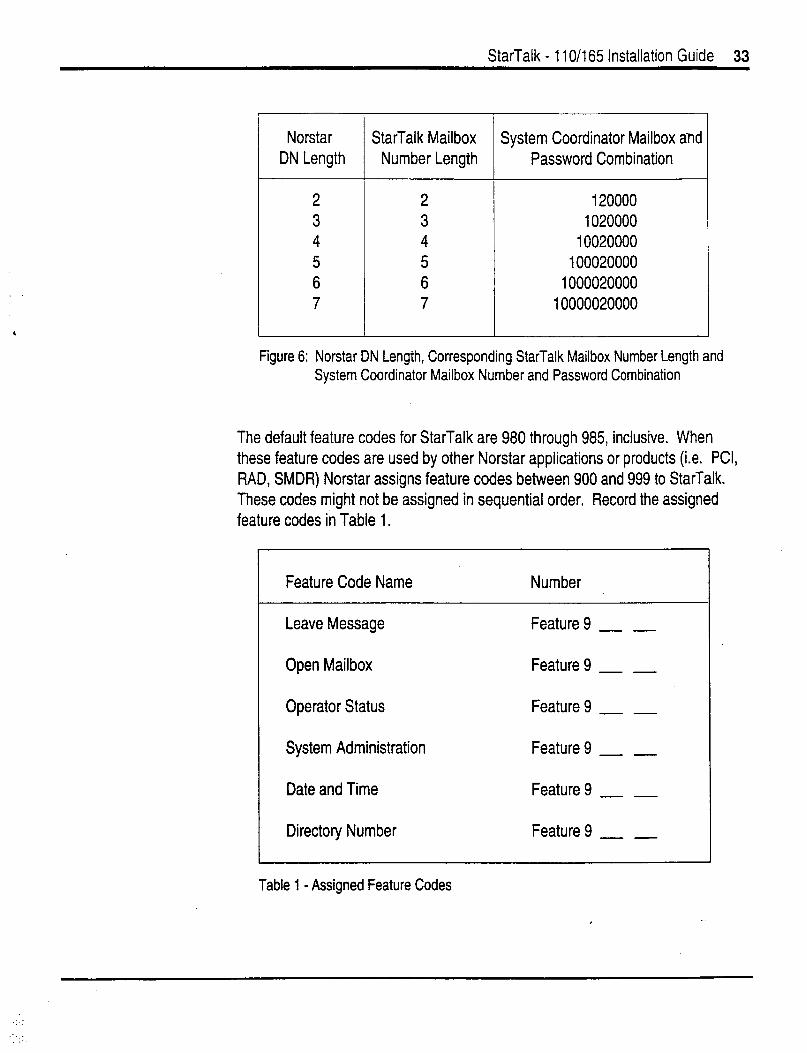
StarTalk - 1 lo/165 Installation Guide 33
Norstar StarTalk Mailbox System Coordinator Mailbox ahd DN Length Number Length Password Combination
2 2 120000 3 3 1020000 4 4 10020000 5 5 100020000 6 6 1000020000 7 7 10000020000
I
Figure 6: Norstar DN Length, Corresponding StarTalk Mailbox Number Length and System Coordinator Mailbox Number and Password Combination
The default feature codes for StarTalk are 980 through 985, inclusive. When these feature codes are used by other Norstar applications or products (i.e. PCI, RAD, SMDR) Norstar assigns feature codes between 900 and 999 to StarTalk. These codes might not be assigned in sequential order. Record the assigned feature codes in Table 1.
Feature Code Name
Leave Message
Open Mailbox
Operator Status
System Administration
Date and Time
Directory Number
Table 1 - Assigned Feature Codes
Number
Feature 9 _ _
Feature 9 _ _
Feature 9
Feature 9 _ _
Feature 9 _ _
Feature 9 _ _

34 SfarTalk - 11 O/l 65 Installation Guide

StarTal k385 InstallationGuide
-
-

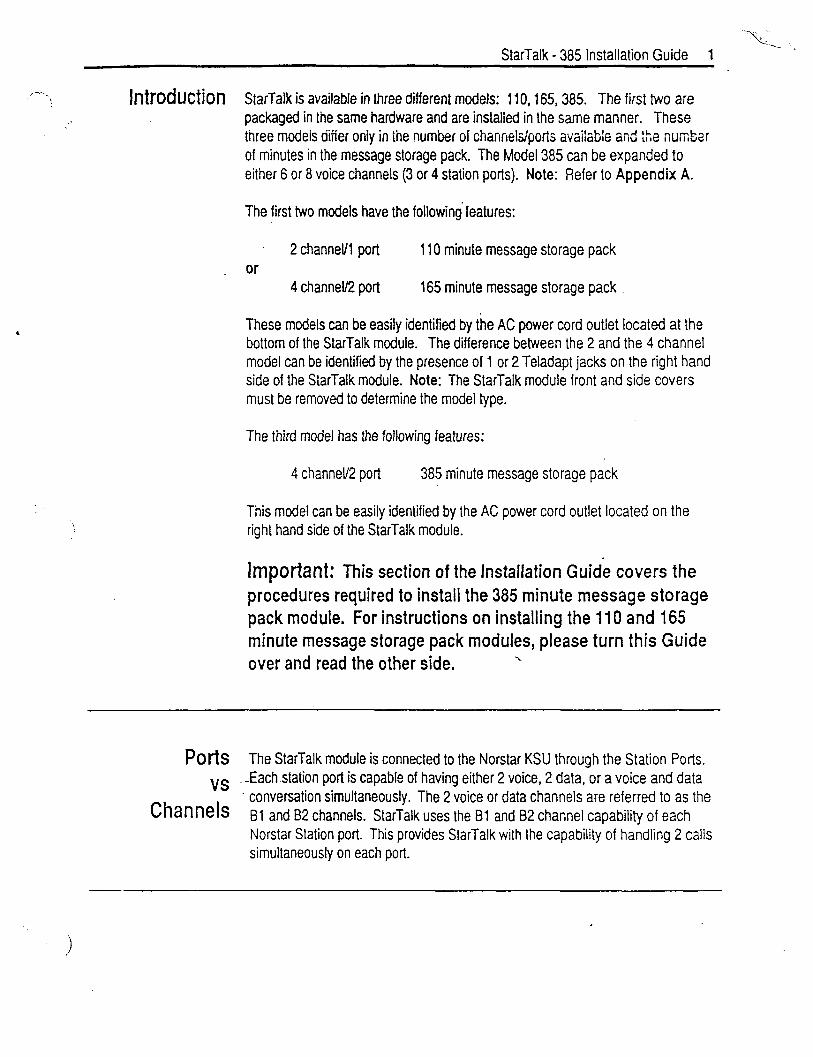
StarTalk - 385 installation Guide 1
, -:._ ‘s Introduction StarTalk is available in three different models: 110,165,385. The first two are
-1 packaged in the same hardware and are instalied in the same manner. These three models differ onfy in tine number of channels/ports available and the number of minutes in the message storage pack. The Model 385 can be expanded to either 6 or 8 voice channels (3 or 4 station ports). Note: Refer to Appendix A.
The first two models have the following features:
or 2 channeV1 port 1 IO minute message storage pack
4 channel/2 port 165 minute message storage pack
These models can be easily identified by the AC power cord outlet located at the bottom of the StarTalk module. The difference between the 2 and the 4 channel model can be identified by the presence of 1 or 2 Teladapt jacks on the right hand side of the StarTalk module. Note: The StarTalk module front and side covers must be removed to determine the model type.
The third model has the following features:
4 channel/2 port 385 minute message storage pack
This model can be easily identified by the AC power cord outlet located on the right hand side of the StarTalk module.
ImpOtiant: This section of the installation Guide covers the procedures required to install the 385 minute message storage pack module. For instructions on installing the 110 and 165 minute message storage pack modules, please turn this Guide over and read the other side. x
Ports vs
Channels
The StarTalk module is connected to the Norstar KSU through the Station Ports. .-Each station port is capable of having either 2 voice, 2 data, or a voice and data
conversation simultaneously. The 2 voice or data channels are referred to as the 61 and 92 channels. StarTalk uses the 91 and 92 channel capability of each Norstar Station port. This provides StarTalk with the capability of handling 2 calls simultaneously on each port.
2 StarTalk - 385 Installation Guide
Before 0 Read this Guide.
You Start 0 Make sure the compatibility conditions are met. A Compatibility Check List is
provided on page 3 of this Guide.
a Make sure all the equipment in the package is accounted for. A Package Check List is provided on page 3 of this Guide.
0 Make sure the environment and electrical c=onditions are met. An Environment and Electrical Check List are provided on pages 4 and 5 of this Guide.
a Make sure you have the necessary tools to complete the installation. A Special Parts Check List is provided on page 5 of this Guide.
0 Make sure you know the StarTalk operation feature codes. For more informa- tion about Feature Codes, refer to page 21 of this Guide.
0 Make sure Auto Set Relocation is set to NO. Refer to page 24 of this Guide for more information.
.
StarTalk - 385 Installation Guide 3
-. Compatibility CI
Check List cl
cl
-0
StarTalk is compatible with Norstar Compact DR2 KSUs (6 x 16).
StarTalk is compatible with Norstar Modular KSUs (8 x 24), equipped with DR2 software version 5.2 or greater.
StarTalk is compatible with Norstar Modular K&s (8 x 24), equipped with DR3 software.
StarTalk is compatible with Norstar Modular KSUs (8 x 24), equipped with DR4 of Centrex software.
Refer to page 26 of this Guide to determine the software type and version of the Norstar Modular KSU.
Package .Make sure the package contains:
Check List a the StarTalk module
0 an AC Power Cord
0 2 RJ-11 Teladapt Connection Cords
0 a paper Wall Mount Template
0 a shrink wrapped package of documentation
.
4 StarTalk - 385 Installation Guide
Environment The installation area should be:
Check List ~
0 between 0’ and 40’ Celsius (approximately 32 to 105’ Fahrenheit)
Cl non-condensing relative humidity between 8% and 85%
0
0
0
0
0
0
clean, free of dust, dry, and well ventilated
at least 4 m (approximately 13 ft) from’equipment such as copiers, electrical motors and other equipment that could produce electromagnetic, radio frequency and electrostatic interferences
a wall area approximately 1 m square (approximately 3 ft sq)
within 305 m (approximately 1000 ft) of the Norstar KSU
within 2 m (approximately 6 ft) of a 115V 3 wire grounded electrical outlet Note: The distance from an outlet is not important if the module is plugged into the power bar located in the KSU.
a minimum of 16 cm (approximately 6 in) from a corner wall or other compo- nent
a minimum of 46 cm (approximately l8fn) from the floor Note: The distance from the floor should be enough to prevent water damage.
StarTalk - 385 installation Guide 5
Electrical The AC electrical requirements for the 385 StarTalk Voice module are:
Check List 0 cl cl 0 cl
voltage 115 VAC nominal (105 to 132 volts)
frequency 50160 Hz nominal (t or - 3 Hz)
current 2.8 Amps maximum
3rd wire ground
unswftched
Note: The StarTalk module does not require a dedicated circuit. DO NOT. connect the module to an outlet on a circuit that is likely to be overloaded or used by large office equipment or power tools.
SpeCia! Paf?S To begin an installation, you need:
Check List Q
cl
0
cl
c7
cl
cl
a Cl
0
0
screwdriver or power drill Note: You need a screwdriver with a 17 cm long shaft (approximately 6 l/2”), or a drill bit 20 cm in length (approximately 8”) to tighten the screws when mounting the module (refer to step 8 on page 8 of this Guide).
anti-static grounding strap
three ‘12 x 32mm (‘12 x 1 l/4”) wood screws I
2 modular telephone jacks
twisted pair station wire
a roll of tape (or 4 tacks) for mounting the Template
plywood backboard 2 cm (3/4”) thick
2,3, or 4 operational Norstar station ports
surge protector (recommended)
RS232 Terminal, RS232 Printer and‘%232 printer cable Note: These are only required if a printer is being connected.
Norstar Installation Guide’
Note: This equipment is not supplied with the StarTalk module.
l You might need this Guide for instructions on installing a Norstar station port in the event there are no free station ports available at the distribution block.
!
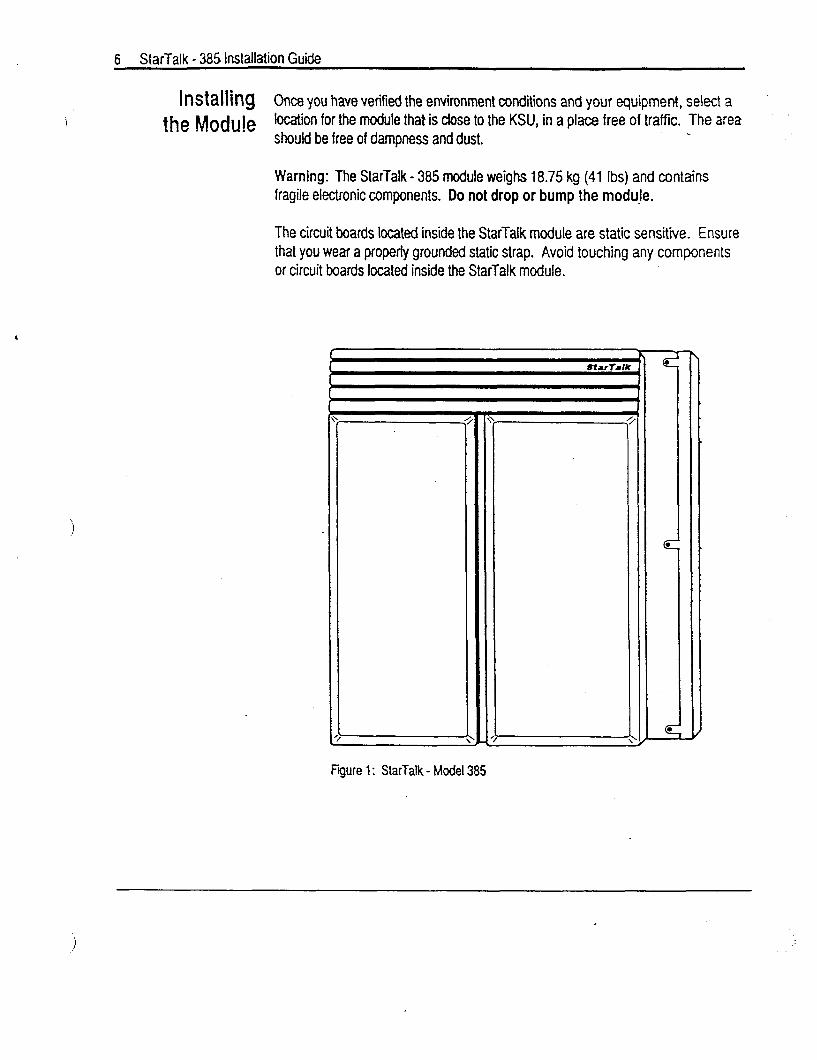
6 StarTalk - 385 It’MahtiOn Guide
lfIStaliing Once you have verified the environment conditions and your equipment, select a
the Module location for the module that is dose to the KSU, in a place free of traffic. The area ”
should be free of dampness and dust.
Warning: The StarTalk - 385 module weighs 18.75 kg (41 ibs) and contains fragile electronic components. Do not drop or bump the modu!e.
The circuit boards located inside the StarTalk module are static sensitive. Ensure that you wear a properfy grounded static strap. Avoid touching any components or circuit boards located inside the StarTalk module.
Fgure 1: StarTalk - Model 385
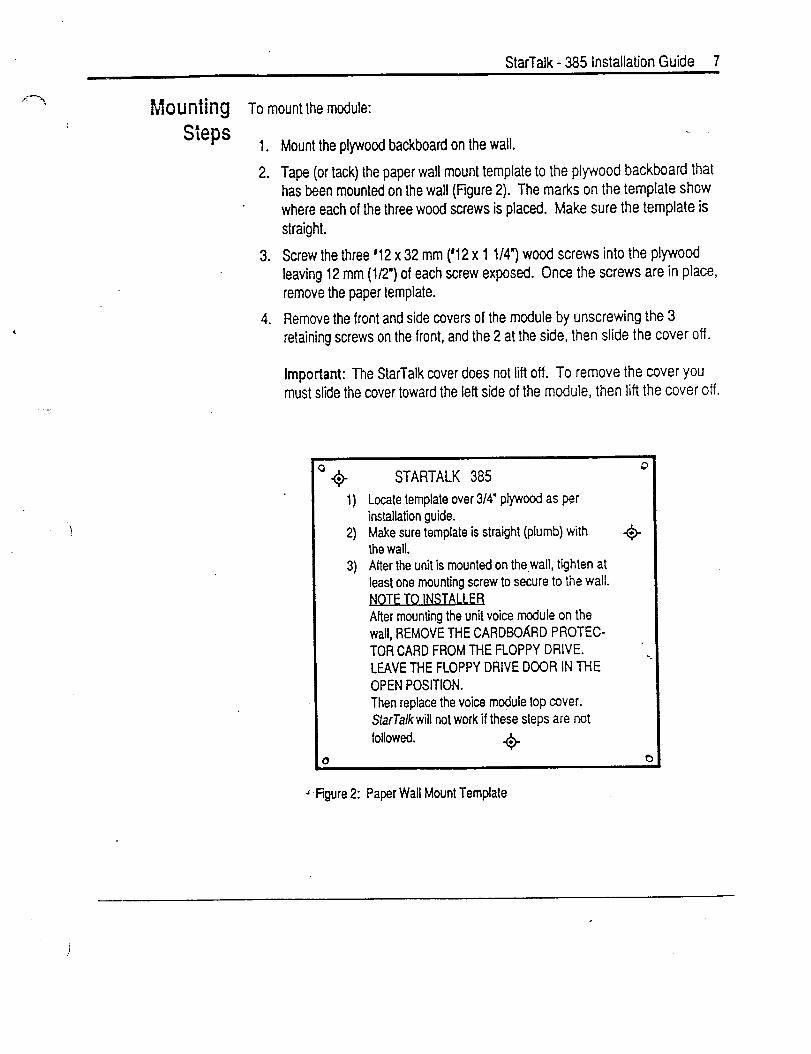
StarTalk - 385 Installation Guide 7
rvfOUntiiIg To mount the module:
Steps , . 2.
3.
4.
Mount the plywood backboard on the wail.
Tape (or tack) the paper wall mount template to the plywood backboard that has been mounted on the wall (Figure 2). The marks on the template show where each of the three wood screws is placed. Make sure the template is straight.
Screw the three ‘12 x 32 mm (‘12 x 1 l/4”) wood screws into the plywood leaving 12 mm (l/2”) of each screw exposed. Once the screws are in place, remove the paper template.
Remove the front and side covers of the module by unscrewing the 3 retaining screws on the front, and the 2 at the side, then slide the cover off.
Important: The StarTalk cover does not lift off. To remove the cover you must slide the cover toward the left side of the module, then lift the cover off.
‘Q STARTALK 385 0
1) Locate template over 3/4’ plywood as par installation guide.
2) Make sure template is straight (plumb) with + the wall.
3) After the unit is mounted on the.wall, tighten at least one mounting screw to secure to the wall. NOTF TO INSTALlES After mounting the unit voice module on the wall, REMOVE THE CARDBOARD PROTEC- TOR CARD FROM THE FLOPPY DRIVE. LEAVE THE FLOPPY DRIVE DOOR IN THE OPEN POSITION.
-_.
Then replace the voice module top cover. StarTalk will not work if these steps are not followed. +
Y t
J ,Figure 2: Paper Wall Mount Template
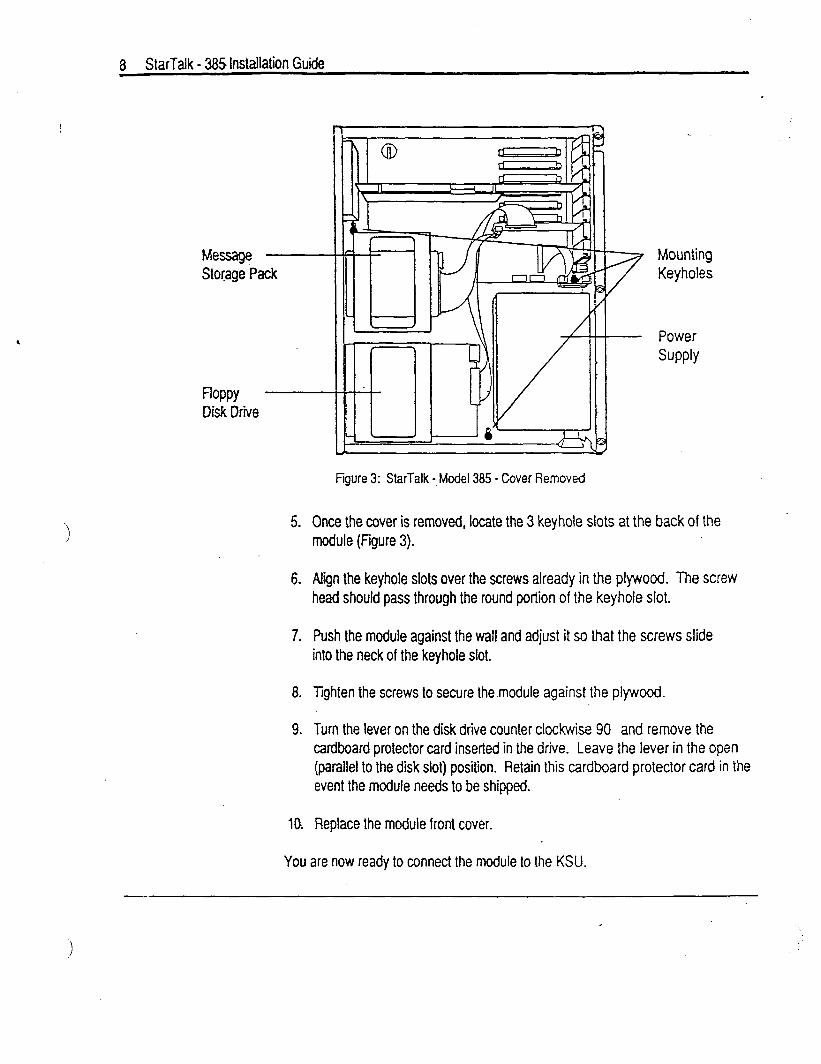
8 StarTalk - 385 Installation Guide
Message Storage Pack
floppy Disk Drive
Mounting Keyholes
Power SUPPlY
5.
6.
7.
a.
9.
Figure 3: StarTalk -,Model385 - Cover Removed
Once the cover is removed, locate the 3 keyhole slots at the back of the module (figure 3).
Align the keyhole slots over the screws already in the plywood. The screw head should pass through the round portion of the keyhole slot.
Push the module against the wall and adjust it so that the screws slide into the neck of the keyhole slot.
Tighten the screws to secure the module against the plywood.
Turn the lever on the disk drive counter clockwise 90 and remove the cardboard protector card inserted in the drive. Leave the lever in the open (parallel to the disk slot) position. Retain this cardboard protector card in the event the module needs to be shipped.
Replace the module front cover.
You are now ready to connect the module to the KSU.

StarTalk - 385 Installation Guide 9 --
(1
COnneCting the Before you start connecting the module, make sure 2 Norstar station ports are
Module to the available at !he distribution block. For instructions on installing a station port, refer
KSU to the Norstar Installation Guide that came with the Norstar KSU.
IMPORTANT: If you are installing StarTalk on a Modular DR2 KSU using software version 5.2, DO NOT connect StarTalk to Norstar station ports 107, 121,312,512, or 712. Refer to page 26 for more information.
To wire the module:
1.
2.
Locate the distribution block.
Make sure there are 2 available station portgat the distribution block. If a station port is not available, you must install one before you continue. Refer to the Norstar Installation Guide that came with the KSU for information on installing station ports.
3.
4.
Mount two RJ-11 Teladapt Jacks next to the distribution block.
Using twisted pair station wire, connect each Teladapt Jack to a free station port on the distribution block
5. Test each port using a working Norstar telephone.
Important: You need to know both of the StarTalk DNs so that you can set them to Norstar only (refer to page 24 of this Guide). When you test each port with a working Norstar telephone, use [sj rj j??j to show the DN. These DNs are the 2 StarTalk DNs. Auto Set Relocation- must be set to NO for this method to show the correct DNs. You must determine the StarTalk DNs before you connect the module to the KSU.
6. Connect one end of the RJ-11 Teladapt ConnectionCord to the station port at the side of the module. Connect the other end to the jack at the RJ-11 Teladapt Jack. Do not use a Teladapt Cord that is longer than 4.5 m (approximately 14 ft).
You are now ready to connect the AC power cord and power up the StarTalk : module.
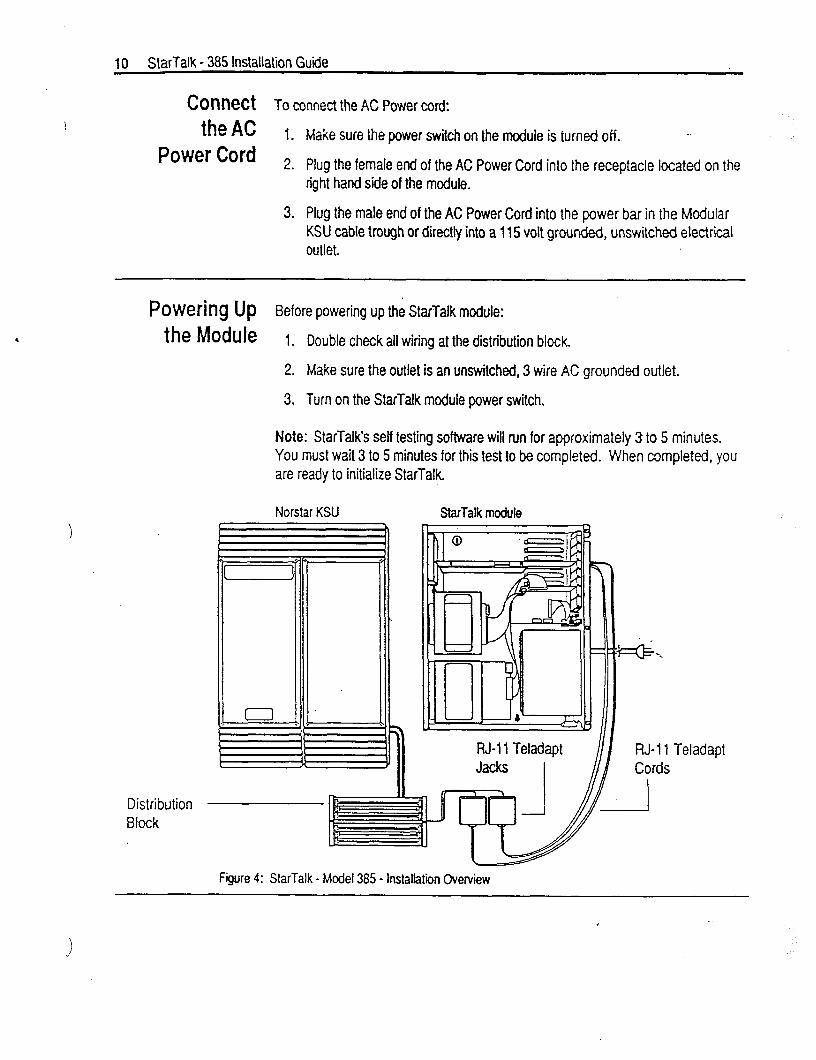
,
I o StarTalk - 385 installation Guide
CONN?Ct To connect the AC Power cord:
the AC 1. Make sure the power switch on the module is turned off. - Power Cord 2. Plug the female end of the AC Power Cord into the receptacle located on the
tight hand side of the module.
3. Plug the male end of the AC Power Cord into the power bar in the Modular KSU cable trough or directly into a 115 volt grounded, unswitched electrical outlet.
Powering up Before powering up the StarTalk module:
the MOdule 1. Double check all wiring at the distribution block.
2. Make sure the outlet is an unswitched, 3 wire AC grounded outlet.
3. Turn on the StarTalk module power switch.
Note: StarTalk’s self testing software will run for approximately 3 to 5 minutes. You must wait 3 to 5 minutes for this test to be completed. When completed, you are ready to initialize StarTalk.
Norstar KSU StarTalk module
RJ-11 Teladapt Cords
Distribution Bfock
Fwre 4: StarTalk - Model 385 - installation Overview
StarTalk - 385 Installation Guide 11
/*- . BefOre YOU Importtint: Before you initialize StarTalk, you must check the Norstar Key Service
lnitja\ize Unit DN (KSU) digit length.
StarTalk If you are installing StarTalk with a Norstar Modular KSU that is using a 2 digit DN length, we recomme,nd that you change the DN length to 3 digits or more. To change the Norstar KSU DN length, refer to the Norstar Installation Guide.
Important: If you are using StarTalk with Norstar Centrex software you must set the DN type of the StarTalk DN to be ‘Norstar Only’ before you initialize StarTalk. For instructions on setting the DN type, refer to the Norstar Centrex Installer Guide.
Pl‘eparitIg Initializing StarTalk establishes:
to Initialize l
StarTalk the DN digit length to match the Norstar DN length
l the primary and alternate languages of the StarTalk voice prompts l if the Group List option is enabled . the leading digit for Group Lists (if the Group List option is enabled)
Before you begin:
0
Cl
Cl
Cl
0
0
Know the Norstar DN length. lf you do not know the DN length, go to any Norstar telephone and press m F] a and I] Count the number of digits shown on the display. Important: If StarTalk is being installed on a Modular Norstar KSU and the DN length is 2, we recommend changing the DN length to 3 digits or more.
Determine if the system is using the bilingual language capability.
Know the primary and alternate languages to be used.
Know if the Group List option is enabled.
Know the leading digit for Group Lists. The leading digit default is 9.
Determine the StarTalk Feature Codes.
Note: For StarTalk information, refer to,the StarTalk Programming Record. TO initialize StarTalk, you must use a Norstar M7310 or M7324 telephone.
!
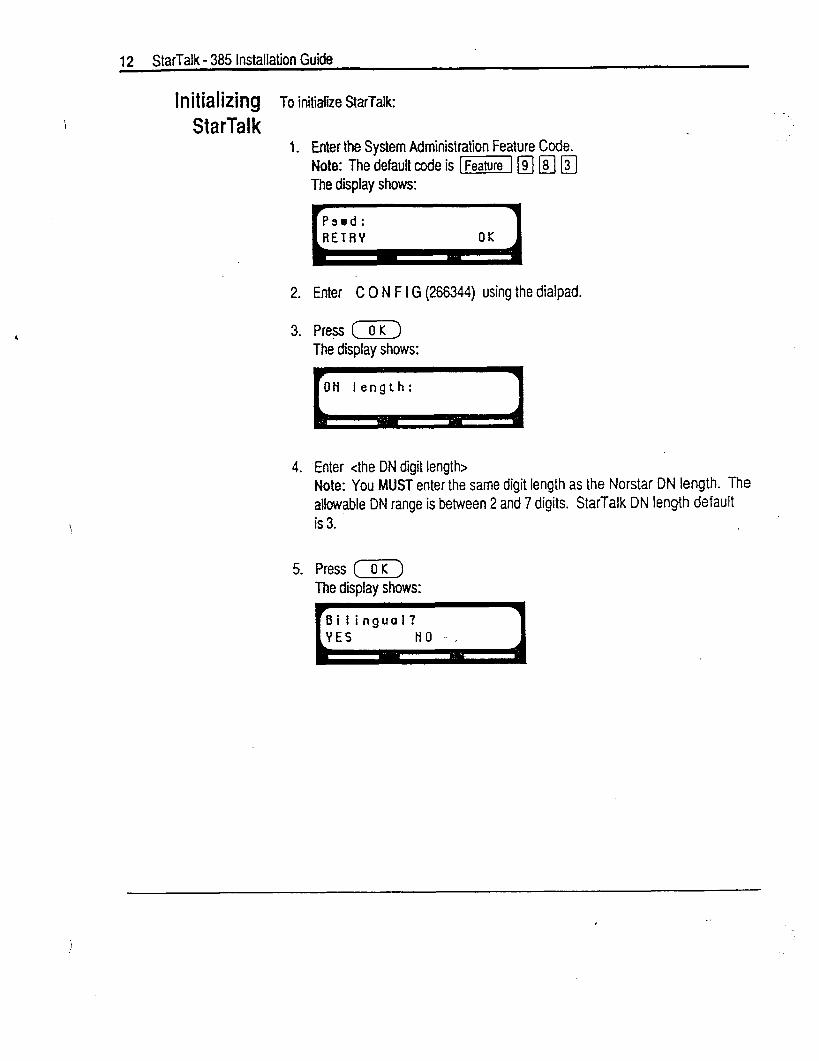
12 StarTalk - 385 installation Guide
hitidiZillg TO initiaiize StarTalk:
StarTalk 1.
2.
3.
4.
5.
Enter the System Administration Feature Code. Note: The default code is =I @-} 181 /?-j The display shows:
Enter C 0 N F I G (266344) using the dialpad.
Press ( 0 K ) The display shows:
Enter <the DN digit length> Note: You MUST enter the same digit length as the Norstar DN length. The allowable DN range is between 2 and 7 digits. StarTalk DN length default is 3.
Press (OK) The display shows:

StarTalk - 385 Installation Guide 13
r-.Y-. .t 6. Press cm) or (r)
The display shows:
; ‘<
)
Note: On the display in Step 6, ALT refers to either French or Spanish. Either FRE or SPA appears on the display. English is abbreviated as ENG. French is abbreviated as FRE. Spanish is abbreviated as SPA.
7. Select the primary language. The display shows:
Group lists ? Y
8. Press (?) to enable Group Lists. Note: If group lists are not required, press (KG) This changes the Y to an N. Caution: If you disable Group Lists, you must re-initalize StarTalk to re- enable Group Lists. The display shows:
Note: If 9 is not the Leading Digit for Group Lists indicated on the StarTalk Programmlng Record, press (5) and enter the Group List number. Important: The Group List Leading Digit can be any number from 0 to 9. If you select a leading digit of 1, the Special Mailbox numbers will begin with 2. For example, the System Coordinator mailbox would be 202. The Group List Leading Digit cannot be the same as the first number of the mailboxes on the Norstar system.
___-.
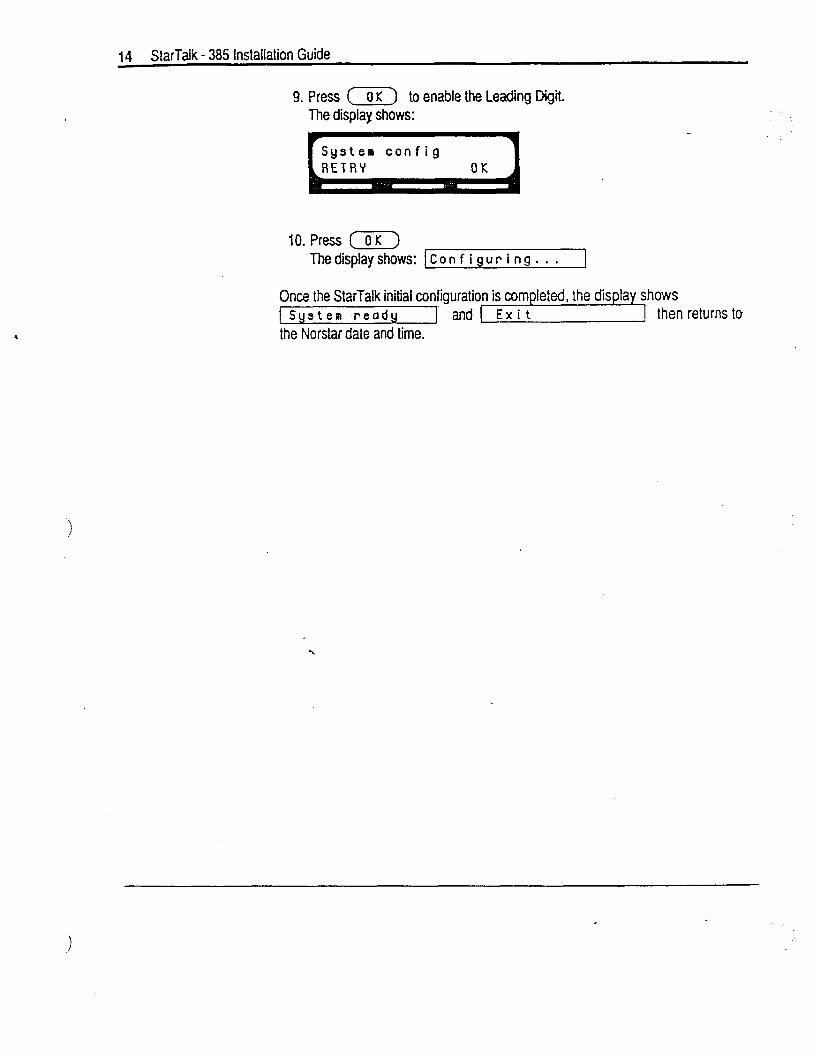
14 StarTalk - 385 installation Guide
9. Press (OK) to enable the Leading Digit. The display shows:
10. Press (-z--J Thedisplayshows: )Conf i gur i ng . . . I
Once the StarTalk initial configuration is completed, the display shows 1 System ready ]” and 1 Exit 1 then returns to the Norstar date and time.
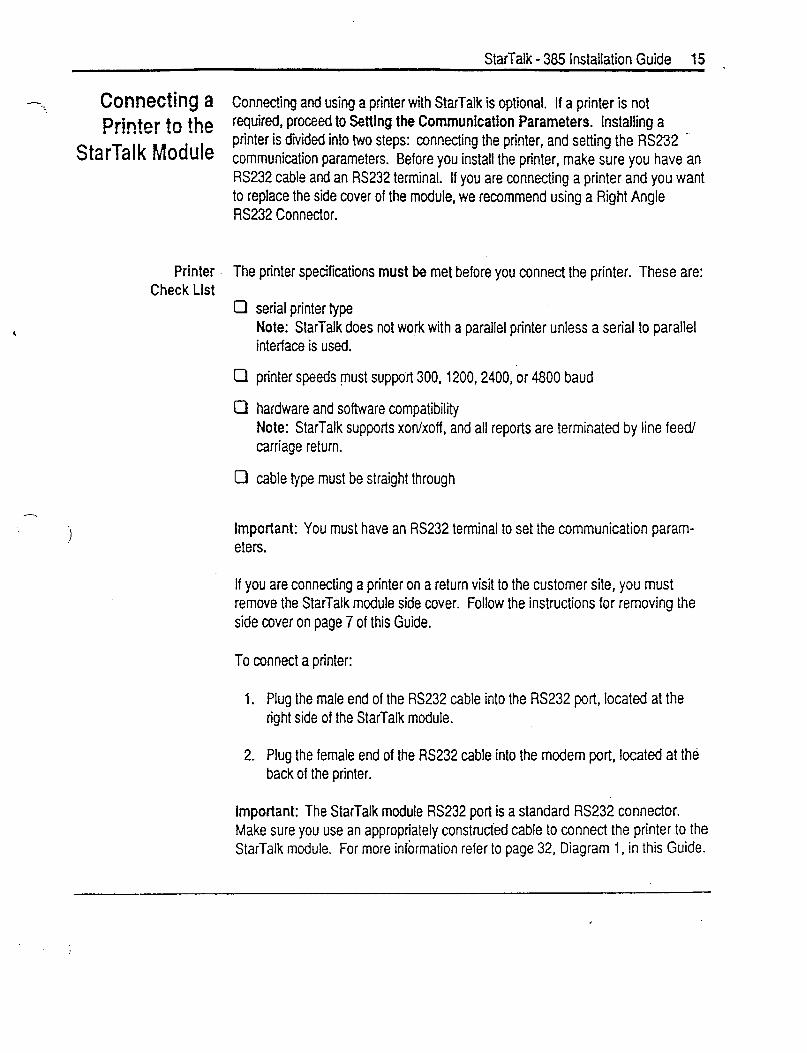
StarTalk - 385 installation Guide 15 .
-.. CO!IIlW&ICJ a Connecting and using a printer with StarTalk is optional. if a printer is not
Printer to !he r eci uired, proceed to Setting the Communication Parameters. Installing a
StarTalk Module printer is divided into two steps: connecting the printer, and setting the RS232 -
communication parameters. Before you install the printer, make sure you have an RS232 cable and an RS232 terminal. If you are connecting a printer and you want to replace the side cover of the module, we recommend using a Right Angle RS232 Connector.
Printer The printer specifications must be met before you connect the printer. These are: Check Llst
0
cl
cl
a
serial printer type Note: StarTalk does not work with a parallel printer unless a serial to parallel interface is used.
printer speeds must support 300,1200,2400, or 4800 baud
hardware and software compatibility Note: StarTalk supports xon/xoff, and all reports are terminated by line feed/ carriage return.
cable type must be straight through
Important: You must have an RS232 terminal to set the communication param- eters.
If you are connecting a printer on a return visit to the customer site, you must remove the StarTalk module side cover. Follow the instructions for removing the side cover on page 7 of this Guide.
To connect a printer:
1. Plug the male end of the RS232 cable into the RS232 port, located at the right side of the StarTalk module.
2. Plug the female end of the RS232 cable into the modem port, located at the back of the printer.
Important: The StarTalk module RS232 port is a standard RS232 connector. Make sure you use an appropriately constructed cable to connect the printer to the StarTalk module. For more information refer to page 32, Diagram 1, in this Guide.
Setting the To set the communication parameters, you must have an ~~232 terminal c=on- Communication netted to the printer.
Parameters kf ore you set the communication parameters, you must know the:
0 baud rate of the printer Note: The baud rate of the printer must match the baud rate of the StarTalk module.
0 number of data bits
Cl number of stop bits
Note: When configuring the terminal, StarTalk only supports carriage return.
For the RS232 terminal to communicate with StarTalk, the terminal parameters must be set to:
l 300 baud l 7 data bits l 1 stop bii
_ l even parity
Note: StarTalk defaults to these communication parameters when the reset button is held for five seconds during power up. These cbmmunication param- eters can be changed to meet specific company requirements.
For instructions on setting the RS232 communication parameters, refer to the instruction manual that cam&with the terminal.
StarTalk - 385 Installation Guide 17
-. Connecting an To connect the RS232 terminal to StarTalk: RS232 Terminal
1. Pin 2 on one end is connected to pin 2 on the other end, pin 3 on one endjs connected to pin 3 on the other end, and pin 7 on one end is connected to pin 7 on the other end. The end of the cable attached to StarTalk must be male. For more information refer to Figures and Diagrams on page 32.
2.. Attach the RS232 cable to the StarTalk RS232 connector.
3. Attach the other end of the cable to the modem connector on the terminal.
If you are returning to a site to install a printer connection to StarTalk and do not know what the StarTalk communication parameters are:
1. Turn off the power to the StarTalk module.
2. Press and hold the RS232 Reset Button on the StarTalk module.
3. While holding the Reset Button, turn on the power to StarTalk. After 5 seconds, release the Reset Button.
The RS232 parameters are now set to the default parameters:
l 300 baud l 7 data bits l 1 stop bit l even parity
To set the RS232 prfnter communication parameters:
1. Turn on the RS232 Terminal. Note: Ensure the StarTalk module is turned on.
2. Press I] The screen on the RS232 Terminal shows:
Password:
Note: If Password: does not appear on the screen, if other characters appear, or if nothing appears, recheck the communication parameters on both the RS232 terminal and StarTalk. If the parameters match, verify that the terminal cable has the correct pinouts.
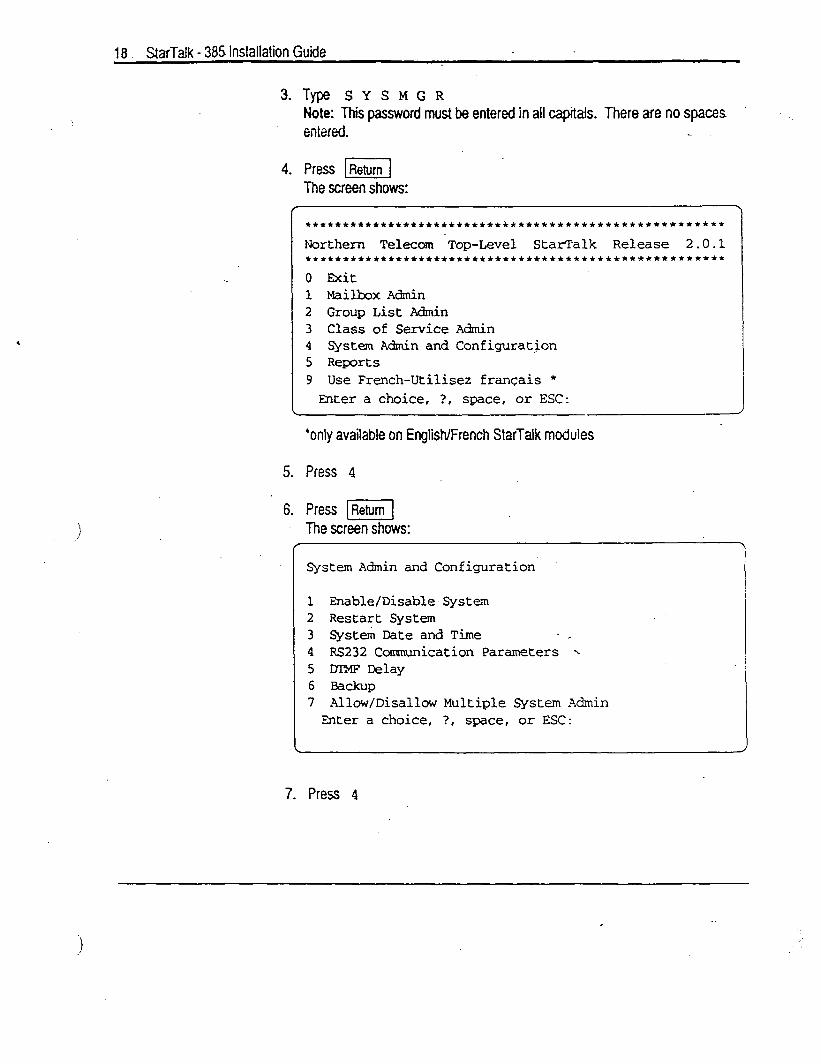
18 S&Talk - 385 Installation Guide
.
3. Type S Y S M G R Note: This password must be entered in all capitals. There are no spaces entered.
4. Press E] The screen shows:
f ***t+****t**t*t*******~~*~~******+*++~*********~*** Northern Telecom -Top-Level StarTalk Release 2.0.1 tt*t*t****tt***t**t+********C*******~***************~*** 0 Exit 1 MailboxAdmin 2 Group List Admin 3 Class of Service Admin 4 System Admin and Configurat$on 5 Reports 9 Use French-Utilisez francais * Enter a choice, ?, space, or ESC:
\
‘only available on English/French StarTalk modules
5. Press 4
6. Press FI The screen shows:
r System Admin and Configuration
1 Enable/Disable System 2 Restart Systm 3 Syst& Date and Time 4 RS232 Comnunication Parameters x 5 DTMF Delay 6 Backup 7 Allow/Disallow Multiple System Admin Enter a choice, ?, space, or ESC:
<
7. Press 4
?
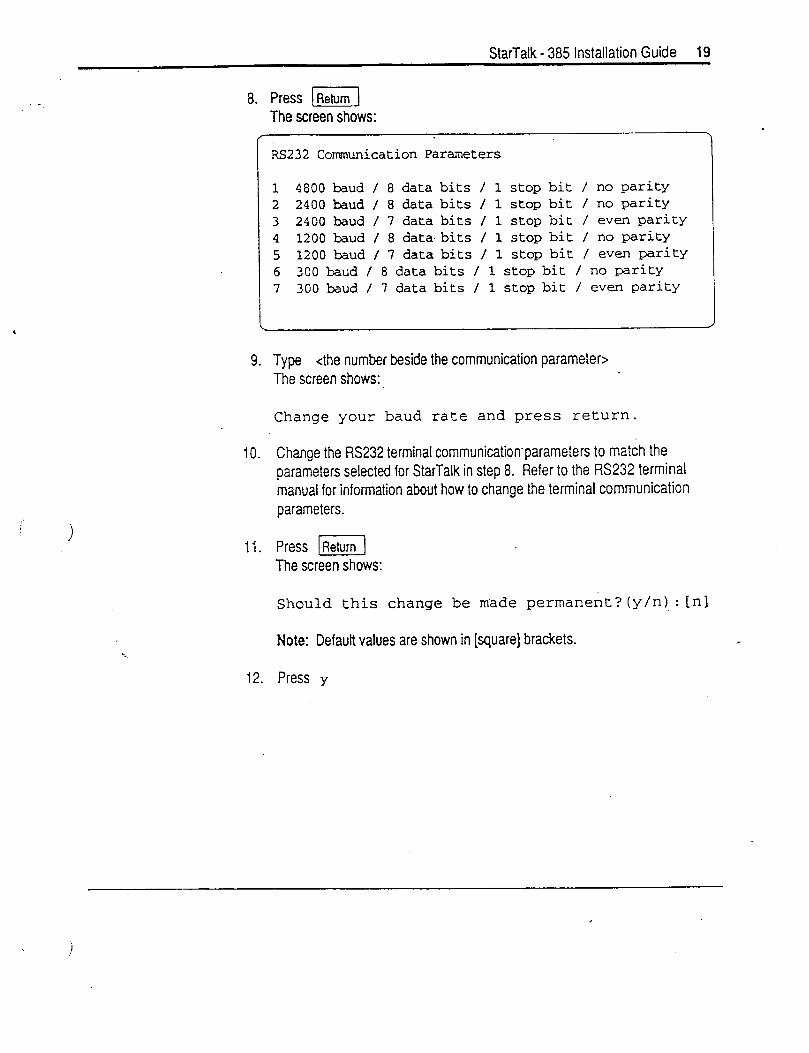
StarTalk - 385 Installation Guide 19
_’
i
-.
9.
10.
11:
12.
a. Press fi1 The screen shows:
/ RS232 Cormnunication Parameters
1 4800 baud / 8 data bits / 1 stop bit / no parity 2 2400 baud / 8 data bits / 1 stop bit / no parity 3 2400 baud / 7 data bits / 1 stop bit / even parity 4 1200 baud / 8 data bits / 1 stop bit / no parity 5 1200 baud / 7 data bits / 1 stop bit / even parity 6 300 baud / 8 data bits / 1 stop bit / no parity 7 300 baud / 7 data bits / 1 stop bit / even parity
Type <the number beside the communication parameter> The screen shows:
Change your baud rate and press return.
Change the RS232 terminal communicationparameters to match the parameters selected for StarTalk in step 8. Refer to the RS232 terminal manual for information about how to change the terminal communication parameters.
Press E] The screen shows:
Should this change be made permanent?(y/n),:[n]
Note: Default values are shown in [square] brackets.
Press y
_ -20 StarTalk - 385 Installation Guide
13. Press fij The screen shows the RS232 communication parameters screen (step 8).
14. Press (Spacebar1 The screen shows the System Admin and Configuration screen.
15. Press 11 to exit. ’
Note: This means, to exit press zero. To test the printer, you must print a StarTalk report. Refer to Section 9 in’the Set Up and Operation Guide.
You h&e now completed installing the printer and setting the communication parameters.
.
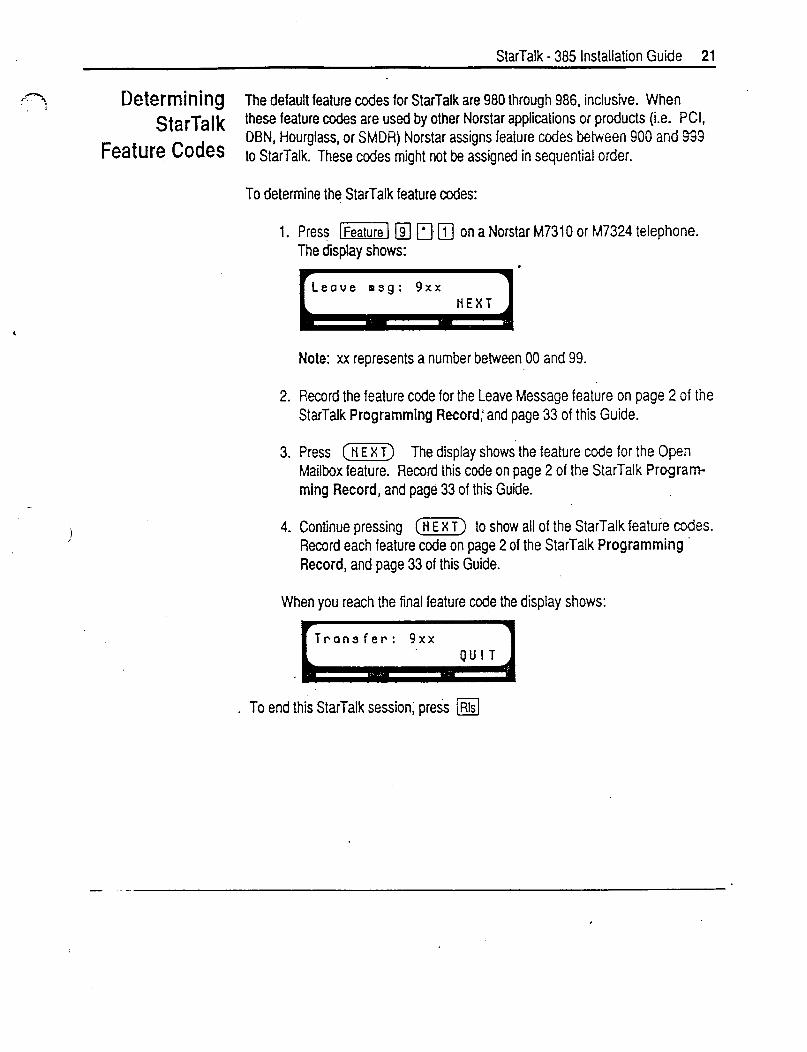
StarTalk - 385 Installation Guide 21
.-: , Determining The default feature codes for StarTalk are 980 through 986, inclusive. When starTalk these feature codes are used by other Norstar applications or products (i.e. PCI,
Feature Codes OBN, Hourglass, or SMOR) Norstar assigns feature codes between 900 and 933 to StarTalk. These codes might not be assigned in sequential order.
To determine the StarTalk feature codes:
1.
2.
3.
4.
Press jfeature] [F] F-1 fl on a Norstar M7310 or IA7324 telephone. The display shows:
Note: xx represents a number between 00 and 99.
Record the feature code for the Leave Message feature on page 2 of the StarTalk Programming Record; and page 33 of this Guide.
Press (E) The display shows the feature code for the Open Mailbox feature. Record this code on page 2 of the StarTalk Program- ming Record, and page 33 of this Guide.
Continue pressing (m) to show all of the StarTalk feature codes. Record each feature code on page 2 of the StarTalk Programming Record, and page 33 of this Guide.
When you reach the final feature code the display shows:
Transfer: 9xX
. To end this StarTalk session; press q
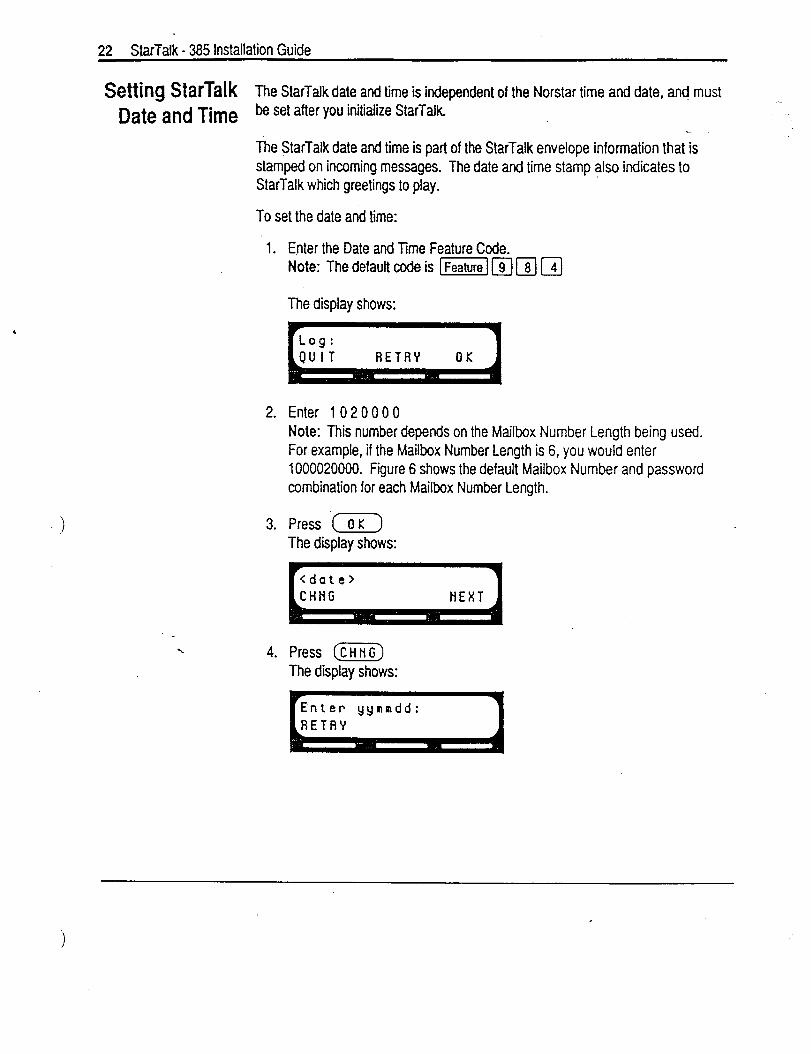
22 StarTalk - 385 Installation Guide
Setting StarTalk The StarTalk date and time is independent of the Norstar time and date, and’must
Date and Time be set after you initialize StarTalk
The StarTalk date and time is part of the StarTalk envelope information that is stamped on incoming messages. The date and time stamp also indicates to StarTalk which greetings to play.
To set the date and time:
1.
2.
3.
Enter the Date and Time Feature Code. Note: The defautt code is [=I 191181 b]
The display shows:
Enter 1 0 2 0 0 0 0 Note: This number depends on the Mailbox Number Length being used. For example, if the Mailbox Number Length is 6, you would enter 1000020000. Figure 6 shows the default Mailbox Number and password combination for each Maiibox Number Length.
Press [ 0 K > The display shows:
/- I
4. Press &HHG) The display shows:
nter yynmdd:
.
1,
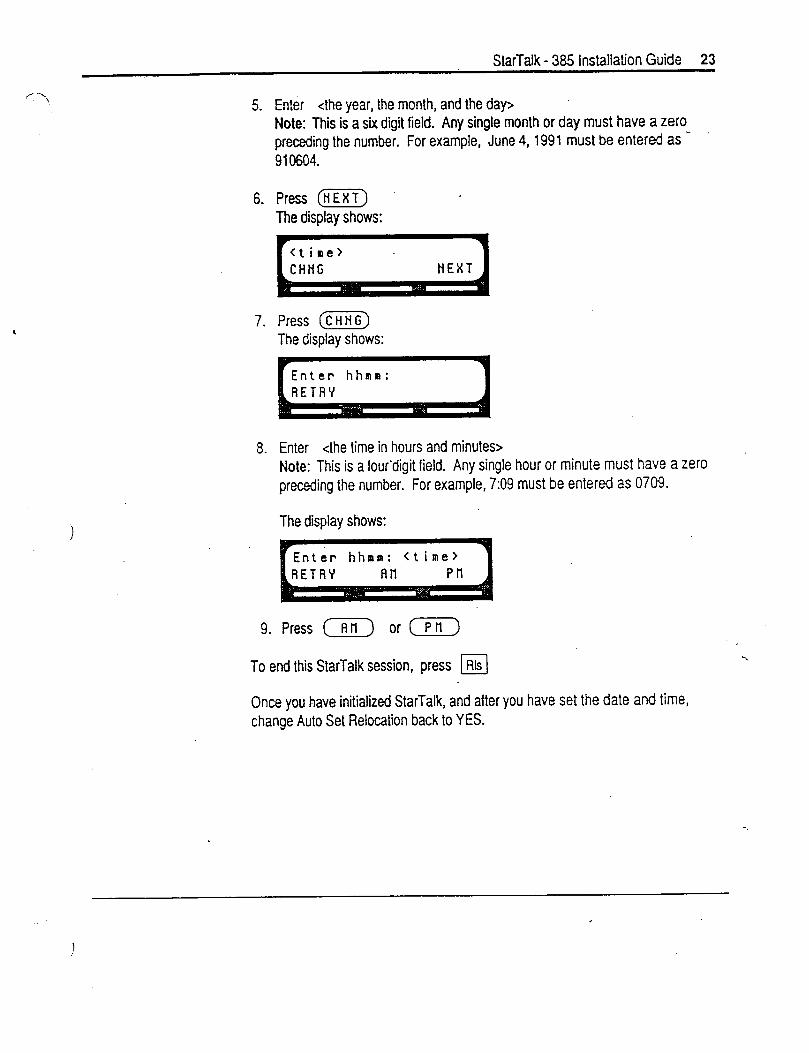
To end this StarTalk session, press u
StarTalk - 365 installation Guide 23
5. Enter <the year, the month, and the day> Note: This is a six digit field. Any single month or day must have a zero preceding the number. For example, June 4,199l must be entered as _
910604.
6. Press (m) .
The display shows:
7. Press (552) The display shows:
8. Enter <the time in hours and minutes> Note: This is a four’digit field. Any single hour or minute must have a zero preceding the number. For example, 7:09 must be entered as 0709.
The display shows:
9. Press (Rn) or (Pn)
Once you have initialized StarTalk, and after you have set the date and time, change Auto Set Relocation back to YES.
-.

24 StarTalk - 385 Installation Guide
Naming After the installation and initialization are completed, we recommend you use -
StarTalk Norstar Confruration programmingto rename both of the Norstar station ports to:
Ports STARTLK
WARNING: If you are exchanging any cabling or ports after the installation and initialization, you must make sure Norstar Auto Set Relocation feature is NO. If the Auto Set Relocation feature is YES, any access to StarTalk will result in disconnection of the session.
If the DN digit length changes or calls are dropped:
1. Turn off the StarTalk module.
2. Change the Norstar set relocate feature to NO.
3. Turn off the Norstar KSU. .
4. Restart the Norstar KSU and the StarTalk module.
Using StarTalk When you use a StarTalk module with Norstar Centrex software, you must
with Norstar program Norstar parameters correctly to ensure StarTalk operates properly. .Assigning the StarTalk DN Type and Setting Centrex Thresholds are the 2 most
Centrex important parameters. To check other Centrex feature compatibility, refer to Software Appendix A in the StarTalk Set Up and Operation Guide..
IMPORTANT: When you are using StarTalk with Norstar Centrex software, you must make sure that you designate all StarTalk DNs as ‘Norstar only’. A Model 385 has two StarTalk 81 DNs. Refer to page 9 in this Guide for instruction> on determining StarTalk DNs. For instructions on assigning the StarTalk DN type, refer to the Norstar Centrex Installer Guide.
Setting Centrex Certain call handling features, which means any feature that involves transferring Thresholds or fotwarding calls, are present on both the Norstar Centrex system and the
Centrex Central Office switch. If these thresholds are not set,correctly at the Central Office, StarTalk might operate incorrectly. To determine which features and thresholds are programmed at the Central Office switch, contact your telephone company service representative.
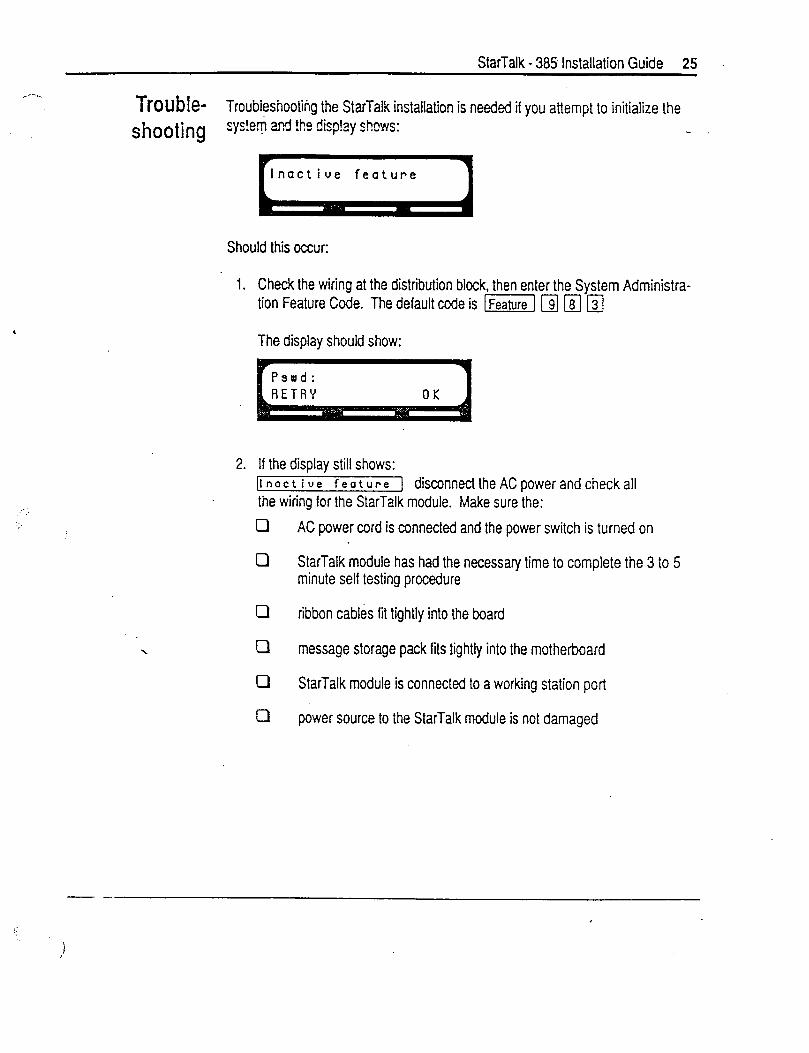
StarTalk - 385 Installation Guide 25 .
Trouble- Troubleshooting the StarTalk installation is needed if you attempt to initialize the
shooting . sys!em and !he disp!ay shows:
nact rue feature
Should this oaxr:
.
Check the wiring at the distribution block, then enter the System Administra- tion Feature Code. The default cede is I- 11 181 131
The display should show:
If the display still shows: [Inactive feature 1 disconnect the AC power and check all the wiring for the StarTalk module. Make sure the:
0 AC power cord is connected and the power switch is turned on
StarTalk module has had the necessary time to complete the 3 to 5 minute self testing procedure
cl ribbon cables fit tightly into the board
Cl message storage pack fits tightly into the motherboard
0 StarTalk module is connected to a working station port
a power source to the StarTalk module is not damaged

28 StarTalk - 385 Installation Guide
3. After checking all the wiring, reconnect the power. Wait 3 to 5 minutes and enter the System Administration Feature Code. Note: The default code is jx\b\ 18j r?i The display should show:
Note: If you have checked the wiring and the module is still not operational, unmount and repackage the module, and return it to your distributor.
Determining The Modular KSU is available with DR2, DR3, DR4, and Centrex software. To the KSU determine the kind of software and software version in the Norstar system:
Software 1. Enter the Norstar Configuration programming from any M7310 or M7324
Type and telephone.
Version Note: For more information on Configuration programming refer to your Norstar Modular KSU Installation Guide.
2. Press ml to move to the Heading “D.Maintenance”
The display shows: [ 1. SystemVersion
4. Press j%iGVJ
Type The display shows: 1 S P : 3 0 E X F 0 2 1 The third characte; to the right Of
the colon indicates the kind of software in the KSU, and the last three characters indicate which version of software is being used. The fourth character to the fight of the colon indicates the language combination of the KSU software.
If the.third character to the right of the colon is an E, you are using Modular DR2 software. If this character is an M, you are using DR3 software. If this character is a G, you are using DR4 software, and if this character is an N, you are using Centrex software.
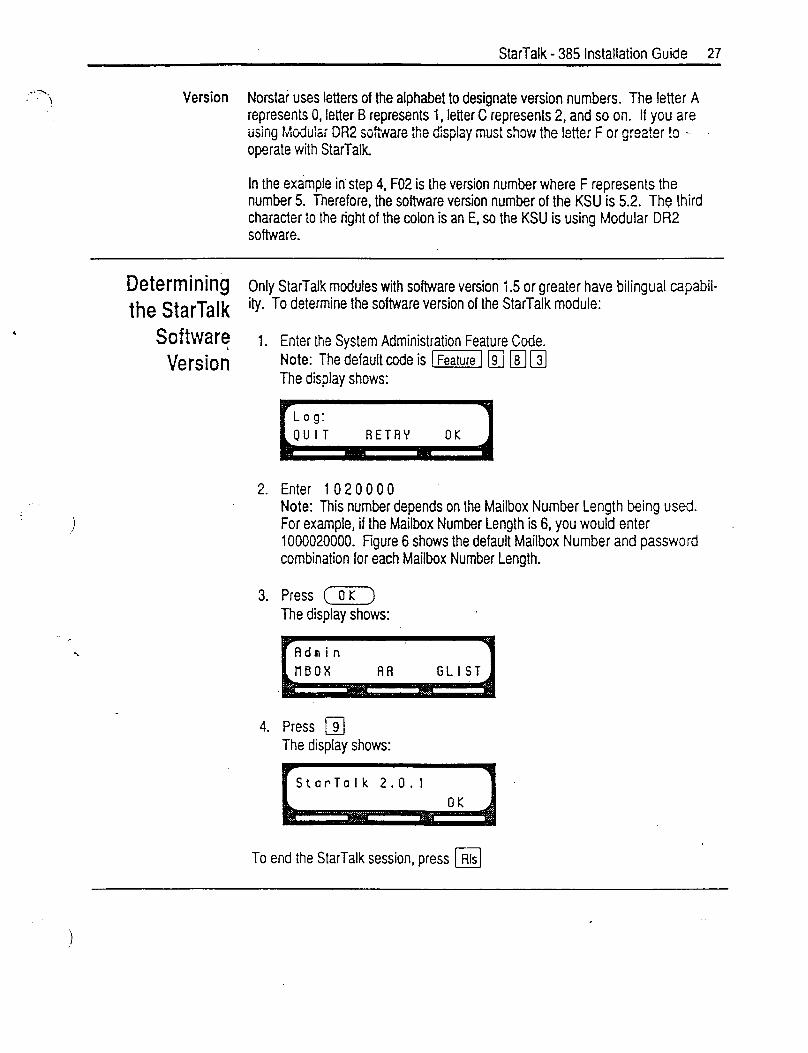
StarTalk - 385 Installation Guide 27
Version Norstai uses letters of the alphabet to designate version numbers. The letter A represents 0, letter B represents 1, letter C represents 2; and so on. If you are using Mo-dulsr DR2 s&are the display must show the letter F or grea!er !o - operate with StarTalk
In the example in step 4, F02 is the version number where F represents the number 5. Therefore, the software version number of the KSU is 5.2. The third character to the right of the colon is an E, so the KSU is using Modular DR2 software.
.
Determining Only StarTalk modules with software version I.5 or greater have bilingual capabil-
the StarTalk iv. To determine the software version of the StarTalk module:
Softwar!
Version 1. Enter the System Administration Feature Code.
Note: The default code is I- 191 181[3] The display shows:
2. Enter 1 0 20 0 0 0 Note: This number depends on the Mailbox Number Length being used. For example, if the Mailbox Number Length is 6, you would enter 1000020000. Figure 6 shows the default Mailbox Number and password combination for each Mailbox Number Length.
3. Press (DK) The display shows:
4. Press 191 The display shows:
StarTalk 2.0.1
To end the StarTalk session, press m
:)
28 StarTalk - 385 instaliatii Guide
Changing the This section shows you how to chqe the Class of Service vaiues. If you are .- Class of Service using an RS232 terminal to set up mailboxes and perform other system adminis-
Defaults Using tration tasks, refer to the StarTalk Set Up and Operation Guide, Appendix B.
an RS232 Several StarTalk feature parameters can be changed and administered from an
Terminal RS232 terminal. These include:
l Mailbox Administration l Group List Administration l Class of Service Values l System Administration and Configuration * Reports l Language Capability
Note: In most cases, the System Coordinator manages system administration changes. Refer to the StarTalk Set Up and Operation Guide for information about how StarTalk works. If you are repairing a StarTalk unit and require the use of an RS232 terminal, refer to the StarTalk Troubleshooting and Repair Manual.
All the parameter settings for the Classes of Service are found on the StarTalk Programming Record. Refer to this Record for field parameter information.
To change the Class of Service values, you must have an RS232 terminal connected to StarTalk. Refer to Connecting An RS232 Terminal, earlier in this Guide. Parameters Include in Company Directory and Message Notification cannot be changed from a terminal. Refer to the StarTalk Set Up and Operation Guide, Section 7, Changing Mailbox Overrides.
To change the Class of Service parameters:
1. Turn on the RS232 Terminal. Note: Make sure that the StarTalk module is turned on.
2. Press 1 Return 1
The screen on the RS232 Terminal shows:
Password:
Note: If Password : does not appear on the screen, if other characters appear, or if nothing appears, recheck the communication parameters on both the RS232 terminal and StarTalk. If the parameters match, verify that the terminal cable has the correct pinouts.
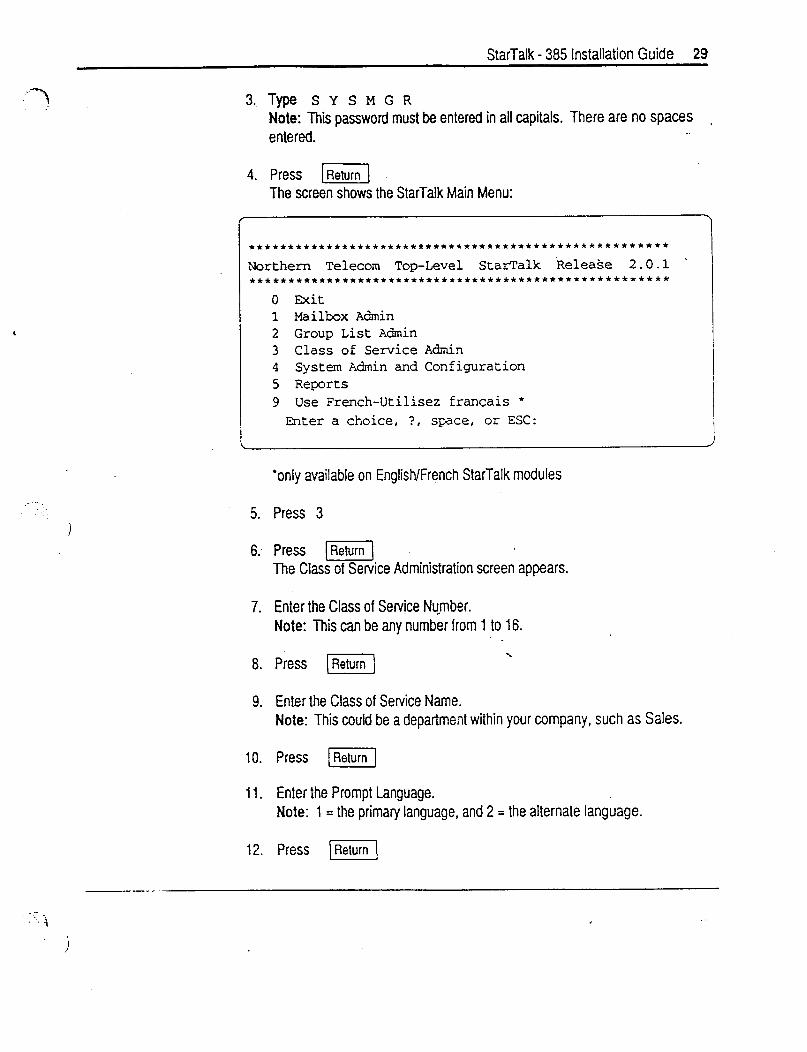
StarTalk - 385 Installation Guide 29
3,TyPe S Y SMG R Note: This password must be entered in all capitals. There are no spaces ,
entered.
4. Press El The screen shows the StarTalk Main Menu:
f
**************t****************************~****t***** Northern Telecom Top-Level StarTalk Release 2.0.1 . *****tt*********t*t****t*ttt********************~***********
0 Exit 1 Mailbox Admin 2 Group List Admin 3 Class of Service Admin 4 System Admin and Configuration 5 Reports 9 Use French-Utilisez francais * Enter a choice, ?, space, or ESC:
<
*only available on English/French StarTalk modules
5. Press 3
6: Press (Return] The Class of Service Administration screen appears.
7. Enter the Class of Service Number. Note: This can be any number from 1 to 16.
8. Press [K] \
9. Enter the Class of Service Name. Note: This could be a department within your company, such as Sales.
10. Press I]
11. Enter the Prompt Language. Note: 1 = the primary language, and 2 = the alternate language.
12. Press [Return]
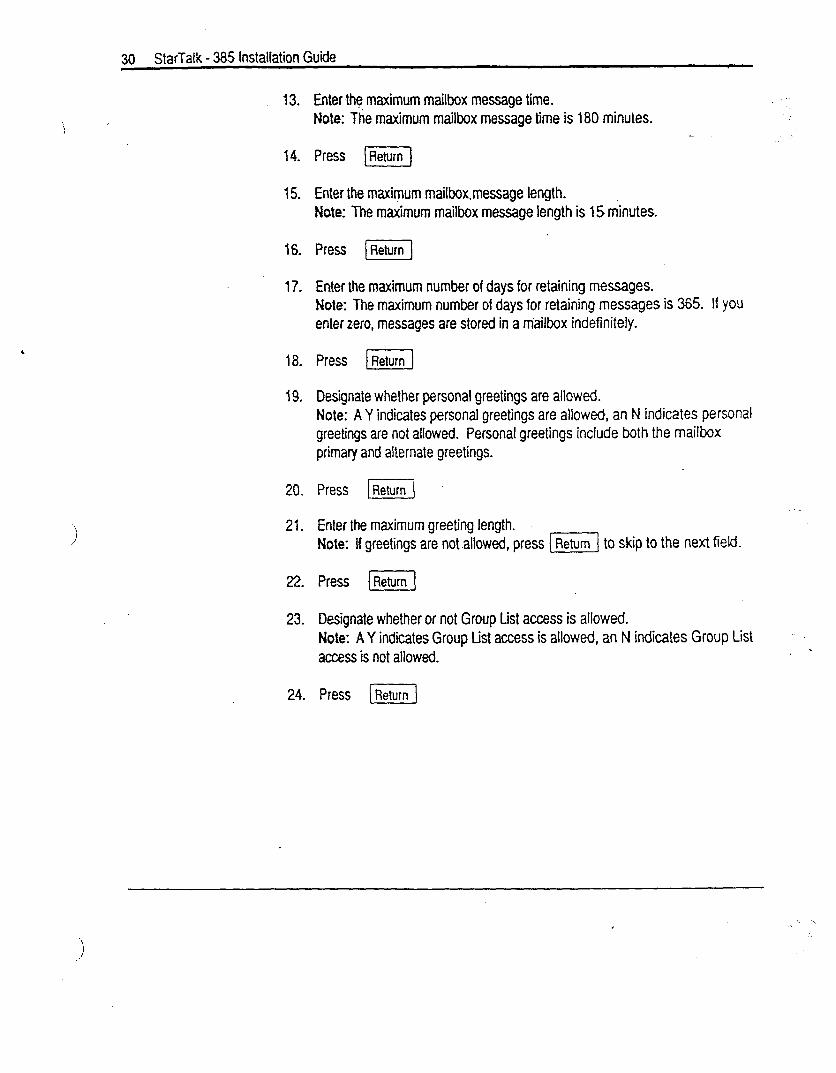
30 StarTalk - 385 installation Guide
13.
14.
15.
16.
17.
18.
19.
20.
21.
22.
23.
24.
Enter the maximum mailbox message time. Note: The maximum mailbox message time is 180 minutes.
Press [Return]
Enter the maximum mailbox.message length. Note: The maximum mailbox message length is 15 minutes.
Press [Return]
Enter the maximum number of days for retaining messages. Note: The maximum number of days for retaining messages is 365. If you enter zero, messages are stored in a mailbox indefinitely.
Press IReturn]
Designate whether personal greetings are allowed. Note: A Y indicates personal greetings are allowed, an N indicates personal greetings are not allowed. Personal greetings include both the mailbox primary and alternate greetings.
Press IReturn]
Enter the maximum greeting length. Note: ff greetings are notallowed, press [G] to skip to the next field.
Press [i%%KI
Designate whether or not Group List access is allowed. Note: A Y indicates Group List access is allowed, an N indicates Group List .
access is not allowed. -
Press [Return]
I
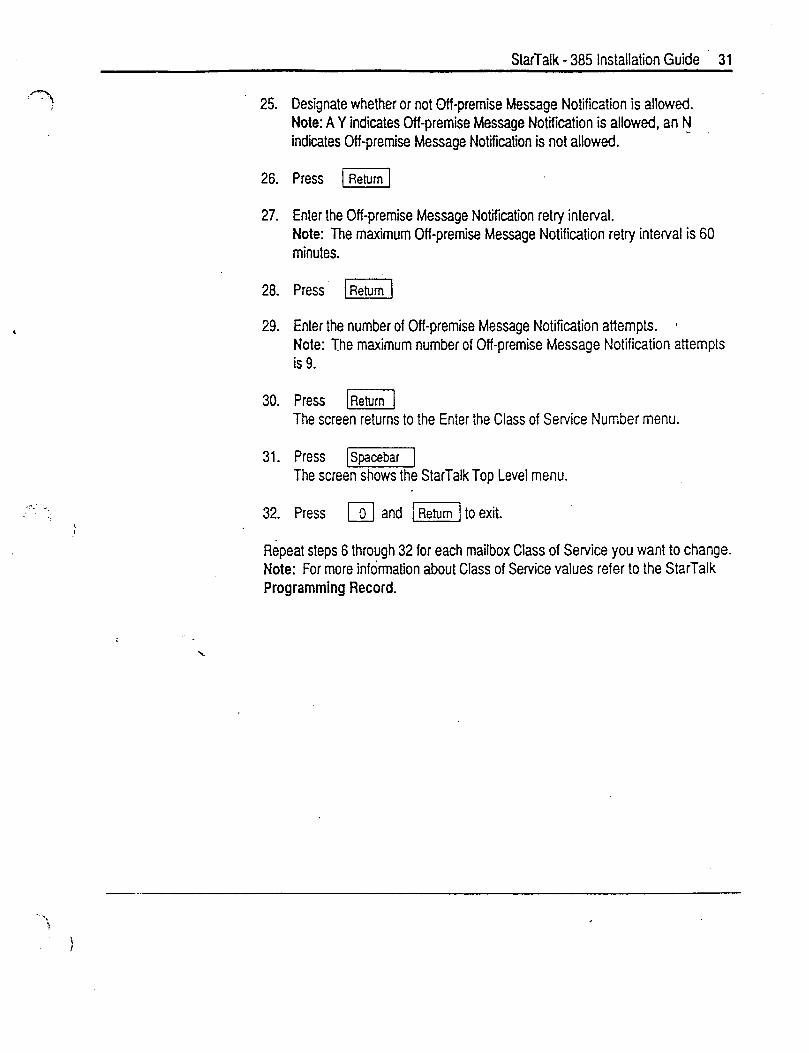
StarTalk - 385 Installation Guide 31
:J-Yj 25.
26.
27.
28.
29.
30.
31.
,:‘:“_,
-:
1 32.
Designate whether or not Off-premise Message Notification is allowed. Note: A Y indicates Off-premise Message Notification is allowed, an N indicates Off-premise Message Notification is not allowed.
Press I]
Enter the Off-premise Message Notification retry interval. Note: The maximum Off-premise Message Notification retry interval is 60 minutes.
Press. fij
Enter the number of Off-premise Message Notification attempts. 8
Note: The maximum number of Off-premise Message Notification attempts is 9.
Press [Return] The screen returns to the Enter the Class of Service Number menu.
Press [Spacebar] The screen shows the StarTalk Top Level menu.
Press m and -E] to exit.
Repeat steps 6 through 32 for each mailbox Class of Service you want to change. Note: For more information about Class of Service values refer to the StarTalk Programming Record.
.
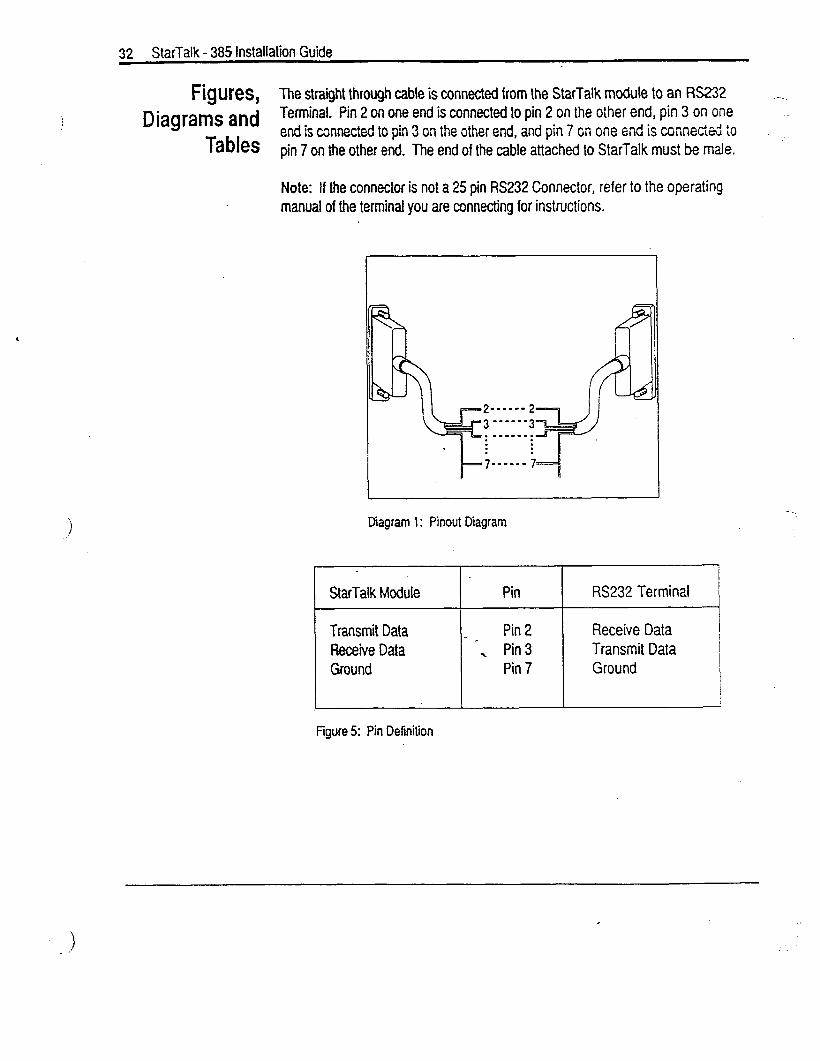
32 StarTalk - 385 Installation Guide
Figures, The straight through cable is connected from the StarTalk module to an RS232 ___
Diagrams and Terminal. Pin 2 on one end is connected to pin 2 on the other end, pin 3 on one
Tables end is connected to pin 3 on the other end, and pin 7 on one end is conrwZti to pin 7 on the other end. The end of the cable attached to StarTalk must be male.
Note: If the connector is not a 25 pin RS232 Connector, refer to the operating manual of the terminal you are connecting for instructions.
Diagram 1: Pinout Diagram
StarTalk Module Pin RS232 Terminal
Transmit Data Pin 2 Receive Data Receive Data -, Pin 3 Transmit Data Ground Pin 7 Ground
Figure 5: Pin Definition
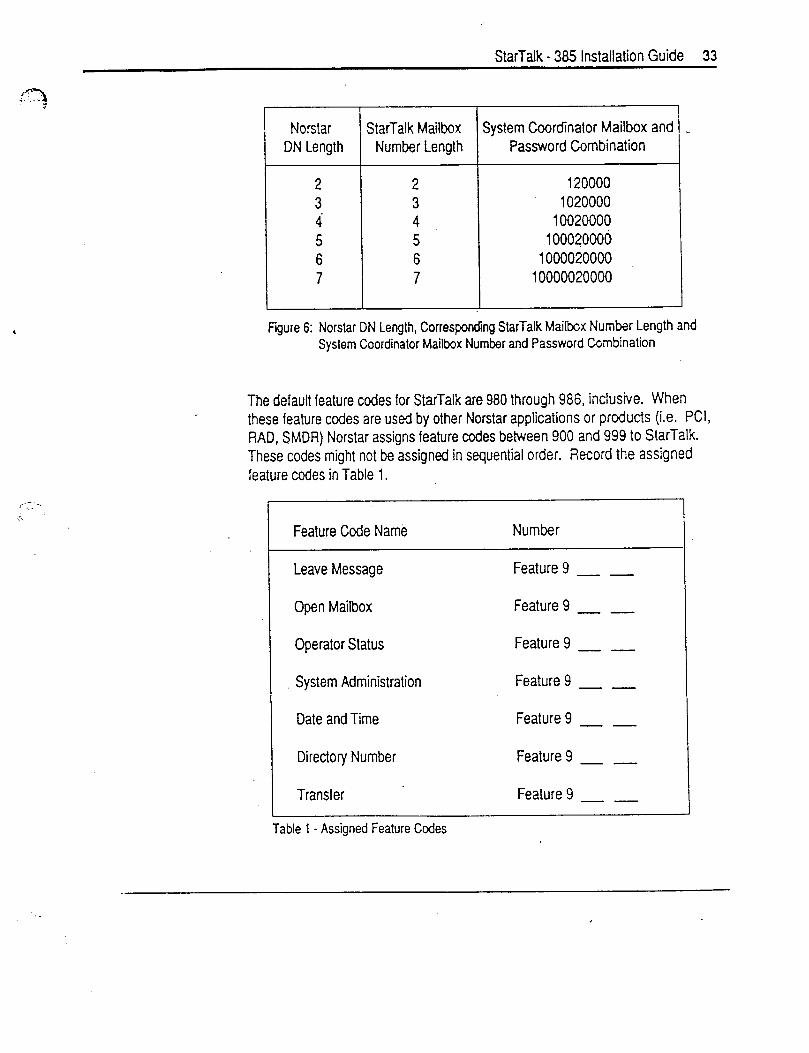
StarTatk - 385 lnstaliation Guide 33
Nors!ar StarTalk Mailbox System Coordinator Mailbox and _
DN Length Number Length Password Combination
2 2 120000 3 3 1020000 4 4 10020600 5 5 10002000~ 6 6 1000020000 7 7 10000020006
Fgure 6: Norstar DN Length, Corresponding StarTalk Mailbox Number Length and System Coordinator Mailbox Number and Password Combination
_,---_ .,-.
The default feature codes for StarTalk are 980 through 986, inclusive. When these feature codes are used by other Norstar applications or products (i.e. PCI, RAD, SMDR) Norstar assigns feature codes between 900 and 999 to StarTalk. These codes might not be assigned in sequential order. Record the assigned feature codes in Table 1.
Feature Code Name
Leave Message
Open Mailbox
Operator Status
System Administration
Date and Time
Directory Number
Transfer
Table 1 - Assigned Feature Codes
Number
Feature 9
Feature 9 _ _
Feature 9 _ _
Feature 9 _ _
Feature 9 _ _
Feature 9 _ _
Feature 9 _ _

. 34 StarTalk - 385 installation Guide
,
.

StarTal kReferenceGuide
-
-

Table of Contents-
1. How To Use This Guide l-l Introduction l-l How This Guide is Organized l-l Other Documents l-2 Knowing the Different Symbols l-3 Prerequisites l-4
2. Learning About StarTalk Introduction How StarTalk Works Who Can Use StarTalk About the StarTalk Feature Codes Determining StarTalk Feature Codes Feature Code Descriptions About the Automated Attendant About the Company Directory About the Mailboxes
The Special Mailboxes Personal Mailboxes Information Mailboxes
Mailbox Rules Using the Norstar Dialpad Using StarTalk With a Two Line Display Using StarTalk With a Single Line Display Using StarTalk With an Analog Terminal Adapter Entering Characters Into the Command Line About the StarTalk Voice Prompts
Interrupting a Voice Prompt Exiting From StarTalk Programming a Feature Code Memory Button
2-1 2-l 2-l 2-2 2-3 2-4 2-5 2-6 2-7 2-8 2-8 2-9 2-9 2-10 2-11 2-12 2-12 2-13 2-14 2-l 5 2-15 2-15 2-16
StarTalk Reference Guide
2 Table of Contents
3. Information Mailboxes 3-l Introduction 3-1 Using Information Mailboxes 3:1
Where to Begin 3-2 Recording the Information Mailbox Greeting 3-3
4. Your Personal Mailbox Introduction Personalizing Your Mailbox
Initializing Your Mailbox Your Personal Greetings
Primary Mailbox Greetings Alternate Mailbox Greetings
Recording Your Primary Greeting Recording Your Alternate Greeting
Selecting a Personal Greeting Mailbox Options
Listening to Your Messages Options While a Message is Playing Options at the End of a Message Copy Option Reply Options
Record a Message Mailbox Administration
Changing a Company Directory Name Greeting Options
Record Option Selecting a Greeting
Changing Your Mailbox Password Off -premise Message Notification
Setting Up Off -premise Message Notification Parameters Disabling Off -premise Message Notification Re-enabling Off-premise Message Notification Changing the Destination Number
Assigning the Target Attendant
4-l 4-1 4-l 4-2 4-5 4-6 4-6 4-7 4-9 4-11 4-13 4-14 4-14 4-16 4-17 4:18 4-19 4-20 4-20 4-22 4-22 4-23 4-23 4-25 4-25 4-29 4-30 4-31 4-33
StarTalk Reference Guide I
Table of Contents 3
5. StarTalk’s Leave Message Feature introduction Using the Leave Message Feature Assigning Message Delivery Options Using the Company Directory Option
Selecting the Company Directory Option Leaving a Message From a Norstar Telephone
Leave Message Options Opening Your Mailbox After Leaving a Message
Transferring a Caller to a StarTalk Mailbox Transfer Types
The Different Types of StarTalk Messages StarTalk’s Group Message
About the Group List Broadcast Messages
5-l 5-l 5-l -, 5-2 5-3 5-3 5-5 5-6 5-7 5-8 5-8 5-9 5-9 5-9 5-10
6. Telephone Etiquette 6-1 Introduction 6-l Telephone Etiquette 6-1
7. Troubleshooting Introduction Trouble Mailbox StarTalk Timeout Messages Are Cut Off Mailbox Full Too Often Wrong Prompt Language
7-l 7-l 7-l 7-3 7-3 7-3 7-3
Appendix A: Default Values For. Special Mailboxes A-l
Glossary Glossary l 1
Index Index l 1
StarTalk Reference Guide

4 Table of Contents
,
StarTalk Reference Guide I
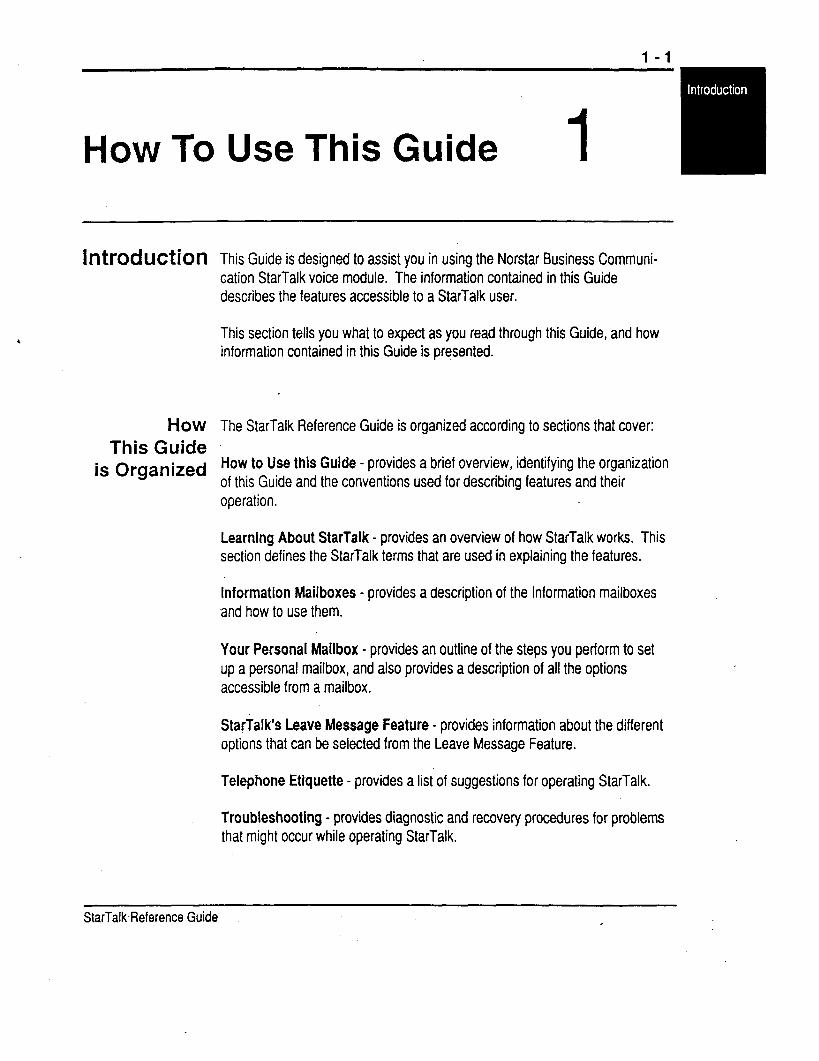
How To Use This Guide 1
Introduction
How This Guide
is Organized
This Guide is designed to assist you in using the Norstar Business Communi- cation StarTalk voice module. The information contained in this Guide describes the features accessible to a StarTalk user.
This section tells you what to expect as you read through this Guide, and how information contained in this Guide is presented.
The StarTalk Reference Guide is organized according to sections that cover:
How to Use this Guide - provides a brief overview, identifying the organization of this Guide and the conventions used for describing features and their operation.
Learning About StarTalk - provides an overview of how StarTalk works. This section defines the StarTalk terms that are used in explaining the features.
Information Mailboxes - provides a description of the Information mailboxes and how to use them.
Your Personal Mailbox - provides an outline of the steps you perform to set up a personal mailbox, and also provides a description of all the options accessible from a mailbox.
Startalk’s Leave Message Feature - provides information about the different options that can be selected from the Leave Message Feature.
Telephone Ettquette - provides a list of suggestions for operating StarTalk.
Troubleshooting - provides diagnostic and recovery procedures for problems that might occur while operating StarTalk.
StarTalk+3eference Guide I
1 - 2 Section 1: How To Use This Guide
Appendix A - provides the different possible mailbox numbers for the special mailboxes.
Glossary - defines the terms used in this Guide:
Index - provides a list of everything contained in this Guide and where the information is located. The Index is in alphabetical order. If you cannot find a term, try looking for your item according to its task.
Other For more information about StarTalk refer to the:
Documents StarTalk User Card Set Up and Operation Guide
StarTalk Reference Guide I
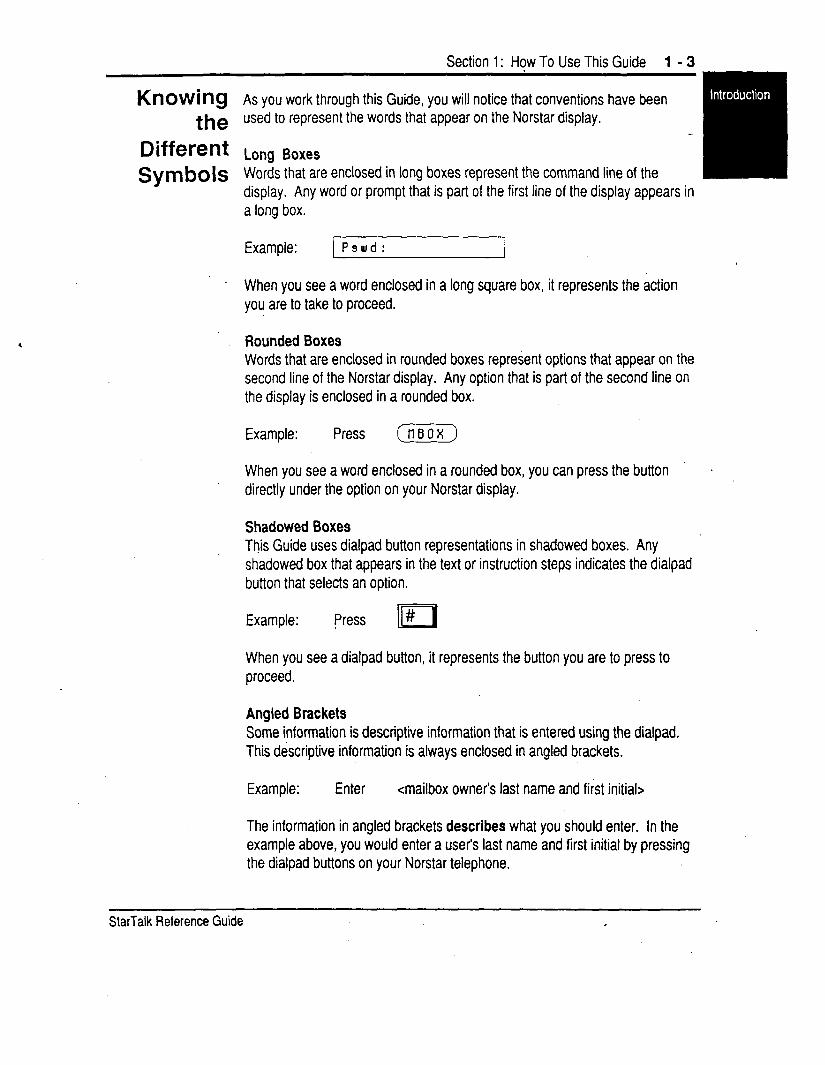
Section 1: How To Use This Guide 1 - 3
Knowing As you work through this Guide, you will notice that conventions have been the used to represent the words that appear on the Norstar display.
Different Long Boxes Symbols Words that are enclosed in long boxes represent the command line of the
display. Any word or prompt that is part of the first line of the display appears in a long box.
Example: Pswd: I
When you see a word enclosed in a long square box, it represents the action you are to take to proceed.
Rounded Boxes Words that are enclosed in rounded boxes represent options that appear on the second line of the Norstar display. Any option that is part of the second line on the display is enclosed in a rounded box.
Example: Press (-iiKK-)
When you see a word enclosed in a rounded box, you can press the button directly under the option on your Norstar display.
Shadowed Boxes This Guide uses dialpad button representations in shadowed boxes. Any shadowed box that appears in the text or instruction steps indicates the dialpad button that selects an option.
Example: Press # 11
When you see a dialpad button, it represents the button you are to press to proceed.
Angled Brackets Some information is descriptive information that is entered using the dialpad. This descriptive information is always enclosed in angled brackets.
Example: Enter <mailbox owner’s last name and first initial>
The information in angled brackets describes what you should enter. In the example above, you would enter a user’s last name and first initial by pressing the dialpad buttons on your Norstar telephone.
StarTalk Reference Guide .
1 - 4 Section 1: How To Use This Guide
Pre- Before you attempt to use StarTalk, ensure that you are familiar with how the
requisites Norstar one and two line display telephones operate. We recommend that you look through your Norstar telephone user card before proceeding. _
StarTalk Reference Guide I
2-l 1
Learning About StarTalk 2 Introduction StarTalk is a fully automated receptionist service that offers call routing and
message taking services. This section describes how StarTalk works and covers:
. basic system operation
. using the Feature Codes
. the Automated Attendant
. the Company Directory * the different mailboxes l using the dialpad . the Norstar displays . voice prompts . exiting from StarTalk . entering characters into the command line . programming a Feature Code memory button
How StarTalk
Works
StarTalk works with a Norstar Business Communication System, offering a receptionist service that routes calls and provides voice message taking capability. When enabled, StarTalk answers incoming calls and routes the calls to extensions and mailboxes within the system.
StarTalk has two main components:
. Automated Attendant
. Mailboxes (Voice Messaging)
The first component is the Automated Attendant. The Automated Attendant works like a receptionist would when answering incoming calls. The Automated Attendant plays a list of options to a caller with a voice prompt. If you know which option you want, you can interrupt the Automated Attendant by pressing your selection on the dialpad of any tone dial telephone.
l Norstar, and StarTalk are trademarks of Northern Telecom
StarTalk Reference Guide
2 - 2 Section 2: Learning About StarTalk
Once an option has been selected, the Automated Attendant responds to the command by either routing the call to an extension or mailbox within your company or directing a caller to the Company Directory or designated operator.
The second component of StarTalk is mailboxes, Mailboxes are added by the System Coordinator and then initialized by the mailbox owner. They store the voice messages left by callers. Any caller can leave a message after a mailbox is initialized.
Each mailbox owner can customize a personal mailbox with special StarTalk options. The mailbox options are:
. Primary and Alternate Greetings
. Password Selection
Who StarTalk can be used by any outside caller, and by mailbox owners in your Can Use company. Away from the office, StarTalk can be used with any tone dial
StarTalk telephone. Inside your office, StarTalk can be used from any Norstar tele- phone or tone dial telephone connected to your company’s Norstar Business Communication system.
Even outside callers using a rotary dial telephone are able to use StarTalk. When a caller uses StarTalk from a rotary dial telephone, StarTalk transfers the caller to your company receptionist or designated operator. If a receptionist or designated operator is not available to answer the call, the caller is transferred to StarTalk’s General Delivery mailbox.
StarTalk Reference Guide
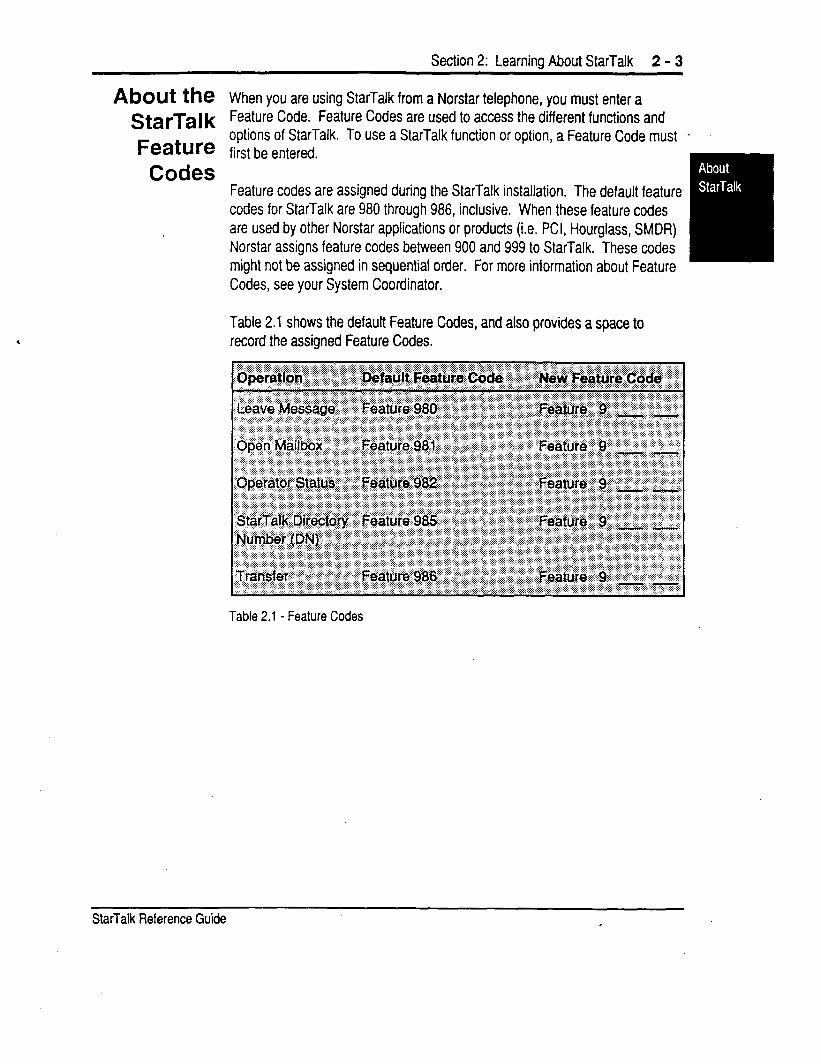
Section 2: Learnina About StarTalk 2 - 3
About the When you are using StarTalk from a Norstar telephone, you must enter a StarTalk Feature Code. Feature Codes are used to access the different functions and
options of StarTalk. To use a StarTalk function or option, a Feature Code must Feature first be entered.
Codes Feature codes are assigned during the StarTalk installation. The default feature codes for StarTalk are 980 through 986, inclusive. When these feature codes are used by other Norstar applications or products (i.e. PCI, Hourglass, SMDR) Norstar assigns feature codes between 900 and 999 to StarTalk. These codes might not be assigned in sequential order. For more information about Feature Codes, see your System Coordinator.
Table 2.1 shows the default Feature Codes, and also provides a space to record the assigned Feature Codes.
Table 2.1 - Feature Codes
StarTalk Reference Guide .
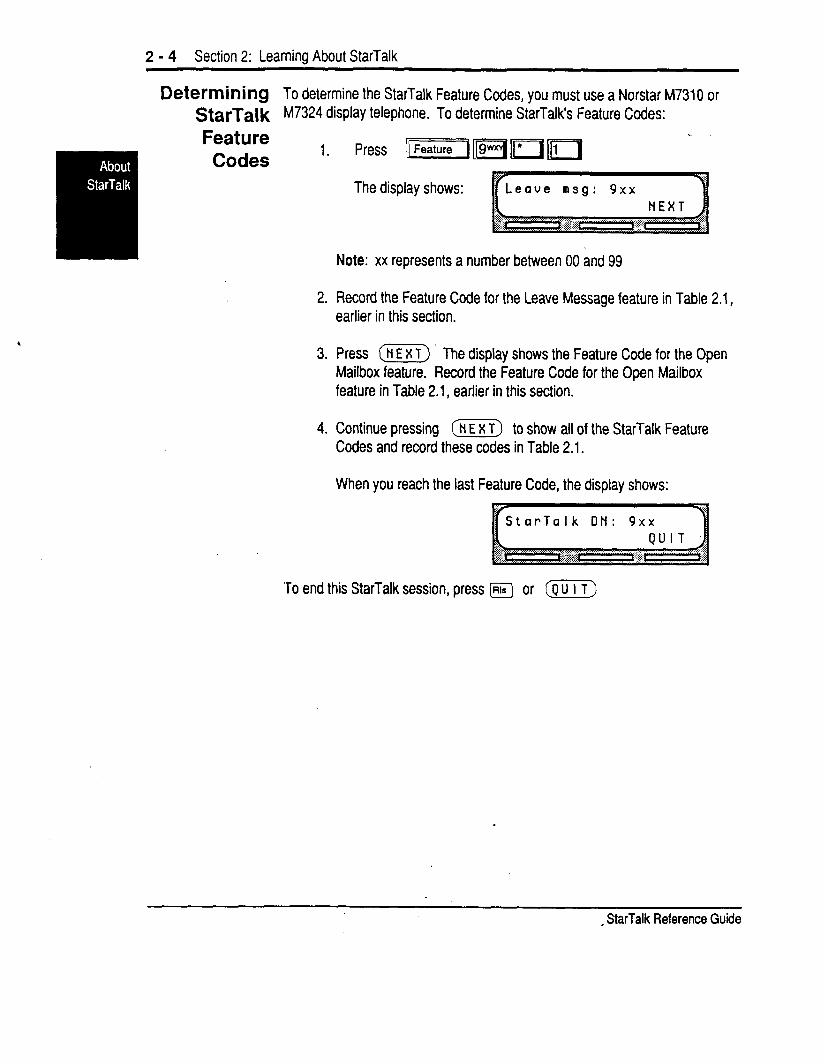
2 - 4 Section 2: Learning About StarTalk
Determining To determine the StarTalk Feature Codes, you must use a Norstar M7310 or StarTalk M7324 display telephone. To determine StarTalk’s Feature Codes:
Feature Codes ”
2.
3.
4.
Thedisplayshows:
Note: xx represents a number between 00 and 99
Record the Feature Code for the Leave Message feature in Table 2.1, earlier in this section.
Press (m) The display shows the Feature Code for the Open Mailbox feature. Record the Feature Code for the Open Mailbox feature in Table 2.1, earlier in this section.
Continue pressing (m) to show all of the StarTalk Feature Codes and record these codes in Table 2.1.
When you reach the last Feature Code, the display shows:
To end this StarTalk session, press m or (m)
, StarTalk Reference Guide
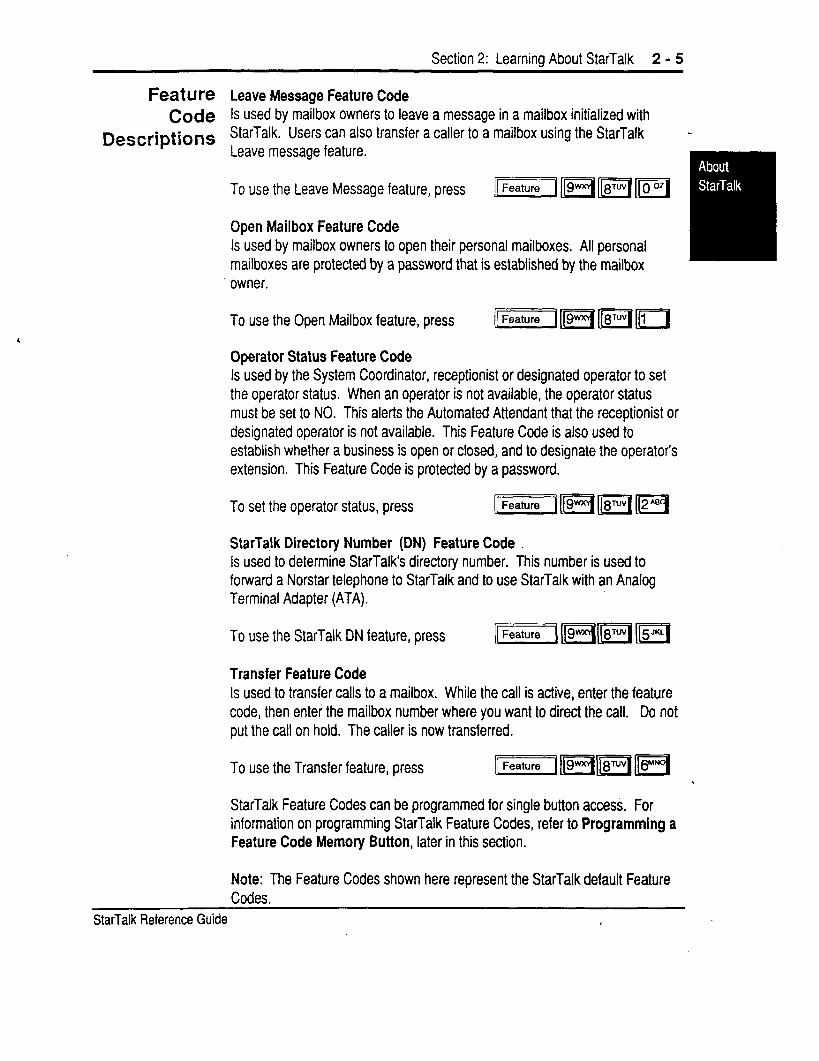
Section 2: Learning About StarTalk 2 - 5
Feature Code
Descriptions
Leave Message Feature Code Is used by mailbox owners to leave a message in a mailbox initialized with StarTalk. Users can also transfer a caller to a mailbox using the StarTalk Leave message feature.
To use the Leave Message feature, press ~]~~~~
Open Mailbox Feature Code Is used by mailbox owners to open their personal mailboxes. All personal mailboxes are protected by a password that is established by the mailbox owner.
To use the Open Mailbox feature, press Fj1[9m011[8Tuv1111(
Operator Status Feature Code Is used by the System Coordinator, receptionist or designated operator to set the operator status. When an operator is not available, the operator status must be set to NO. This alerts the Automated Attendant that the receptionist or designated operator is not available. This Feature Code is also used to establish whether a business is open or closed, and to designate the operator’s extension. This Feature Code is protected by a password.
To set the operator status, press [~]EqEq*Bq
StarTa,lk Directory Number (DN) Feature Code Is used to determine StarTalk’s directory number. This number is used to forward a Norstar telephone to StarTalk and to use StarTalk with an Analog Terminal Adapter (ATA).
To use the StarTalk DN feature, press FlI(1Smnl/(8TwjFl
Transfer Feature Code Is used to transfer calls to a mailbox. While the call is active, enter the feature code, then enter the mailbox number where you want to direct the call. Do not put the call on hold. The caller is now transferred.
To use the Transfer feature, press
StarTalk Feature Codes can be programmed for single button access. For information on programming StarTalk Feature Codes, refer to Programming a Feature Code Memory Button, later in this section.
Note: The Feature Codes shown here represent the StarTalk default Feature Codes.
StarTalk Reference Guide I
2 - 6 Section 2: Learning About StarTalk
About the The Automated Attendant is the StarTalk receptionist. When enabled, the
Automated Automated Attendant answers your company’s incoming telephone lines . .
Attendant s
according to the time of day. When the Automated Attendant is turned-on, the Automated Attendant menu prompt provides a list of options so that a caller
. can:
. reach an extension or a mailbox in your company
. leave a message in a mailbox
. select an alternate language (not a voice prompt)
. look for an extension or mailbox in the Company Directory
. reach your company receptionist or designated operator
. open a personal mailbox as a mailbox owner (not a voice prompt)
The Automated Attendant provides callers with commands to use each of these options. A caller must press the button associated with the option they want to activate. For example, to use the Company Directory, press II#
When the Automated Attendant menu prompt is turned off, the System Coordinator must record a customized Automated Attendant menu prompt. This customized prompt should provide callers with a list of options, such as leaving a message in a mailbox or reaching an operator. The customized prompt plays after the Company Greeting, and after a caller has recorded and sent a message to a mailbox.
StarTalk Reference Guide I
Section 2: Learning About StarTalk 2 - 7
About the Company Directory
The Company Directory is a list of mailbox owners registered with StarTalk. Before any mailboxes can be used, the owners must record their names in the Company Directory. If mailbox owners do not want their names to appear in the Company Directory, they can see the System Coordinator. The Company Directory can be changed at any time.
Any two line display Norstar telephone user can access the Company Directory by selecting (m) when the display shows the Directory option, The Company Directory can also be opened by pressing II# when the Automated Attendant announces the option is available.
When you have opened the Company Directory, you can enter the last name of a mailbox owner or you can press II# to view all the names. When you view the members of the Company Directory, the Norstar display shows the first name in the Directory. To see the next name, you must press 111
StarTalk Reference Guide I
2 - 8 Section 2: Learnina About StarTalk
About the There are two groups of StarTalk mailboxes:
Mai’boxes l Special Mailboxes . Personal Mailboxes
The Special The Special Mailboxes are administered by your company’s System Coordina-
Mail boxes tor. The Special mailboxes include:
. System Coordinator Mailbox
. General Delivery Mailbox
. Trouble Mailbox
The System Coordinator Mailbox This mailbox is used by your System Coordinator as a personal mailbox. You can leave messages for your company’s System Coordinator in this mailbox.
The System Coordinator Mailbox has a default mailbox number of 102. This is the number assigned when the Mailbox Number Length is set at 3. Mailbox Number Lengths range from 2 to 7 digits. For more information about the System Coordinator Mailbox numbers refer to Appendix A.
General Delivery Mailbox This mailbox is used to collect messages from callers who use a rotary dial telephone, individuals in your company who do not have personal mailboxes, and for mailbox owners whose mailboxes are full. Your company’s receptionist or System Coordinator will route messages left in the General Delivery mailbox using StarTalk’s COPY and FORWARD options.
The General Delivery Mailbox has a default mailbox number of 100. This is the number assigned when the Mailbox Number Length is set at 3. Mailbox Number Length ranges from 2 to 7 digits. For more information about the General Delivery Mailbox numbers refer to Appendix A.
StarTalk Reference Guide
Section 2: Learninn About StarTalk 2 - 9 *
Personal Mailboxes
Information Mail boxes
Trouble Mailbox This mailbox is used to report problems that might be encountered when you are using StarTalk. If you encounter a problem, report the details of the -
situation to the Trouble Mailbox. If you encounter a problem with a message, forward a copy of the message and the details of the situation to the Trouble Mailbox.
The Trouble Mailbox has a default mailbox number of 101. This is the number assigned when the Mailbox Number Length is set to 3. Mailbox Number Length ranges from 2 to 7 digits. For more information about the Trouble Mailbox Mailbox numbers, refer to Appendix A.
For more information about the Special Mailboxes, refer to the Set Up and Operation Guide. The Trouble Mailbox is described in Section 6, Trouble- shooting, later in this guide.
important: If the Group List Leading Digit is assigned as 1 and the Mailbox Number Length is 3, the Special Mailbox numbers default to 200,201 and 202.
Personal mailboxes are assigned by your System Coordinator and maintained by the mailbox owner. StarTalk can have up to 500 personal mailboxes. For more information about your personal mailbox features and options, refer to Section 3, Your Personal Mailbox.
Information mailboxes provide greetings that relay important company or department messages. Information mailboxes do not have an operating extension. To request an Information Mailbox, see your System Coordinator.
StarTalk Reference Guide I
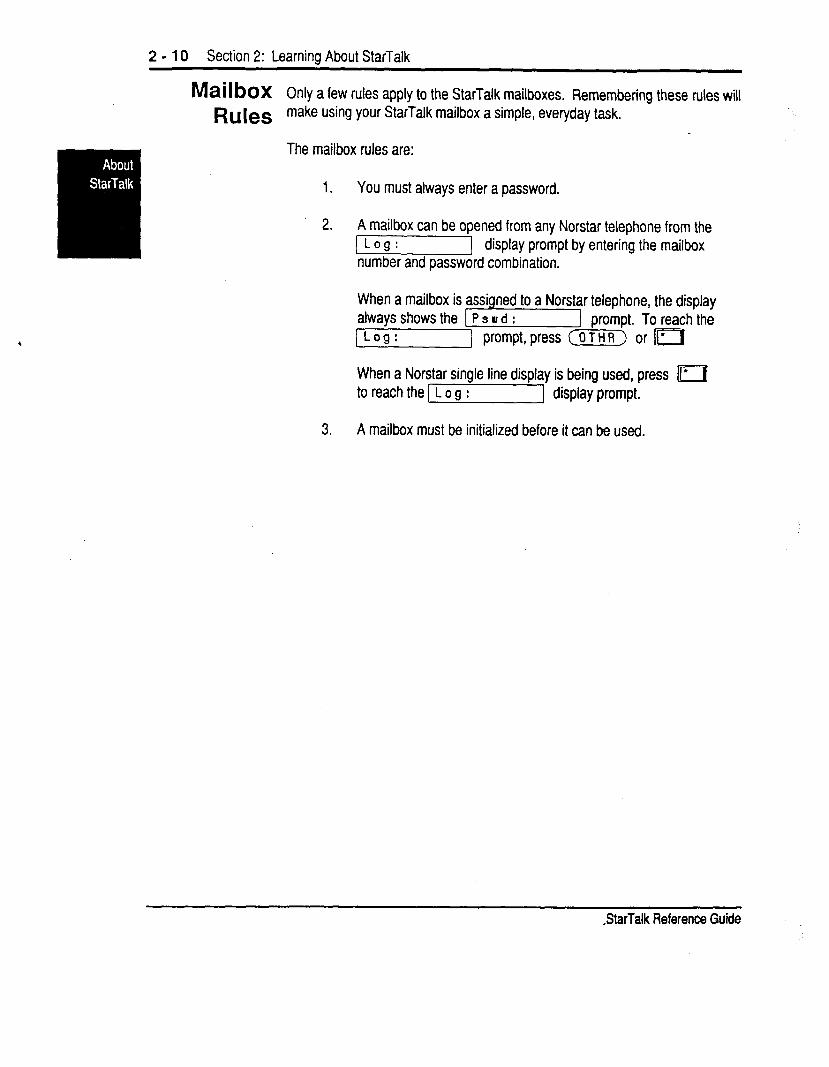
2 - 10 Section 2: Learnina About StarTalk
Mai I box Only a few rules apply to the StarTalk mailboxes. Remembering these rules wilt ~~~~~ make using your StarTalk mailbox a simple, everyday task.
The mailbox rules are:
1. You must always enter a password.
2. A mailbox can be opened from any Norstar telephone from the 1 Log: 1 display prompt by entering the mailbox number and password combination.
When a mailbox is assigned to a Norstar telephone, the display always shows the 1 P s IU d : ] prompt. To reach the 1 Log: 1 prompt, press (OTHR) or m
When a Norstar single line display is being used, press II’ to reach the 1 L o g : 1 display prompt.
3. A mailbox must be initialized before it can be used.
BarTalk Reference Guide

Section 2: Leamina About StarTalk 2 - 11 .
Using the The buttons on the dialpad act as both numbers and letters. Each button Norstar represents a number and also represents letters of the alphabet.
Dial Pad The Norstar Dialpad is shown in Figure 2.1.
Figure 2.1 - Norstar Diaipad
When you are entering a name using the Company Directory option, you need only press the number button associated with the letters of the name once. You do not need to enter a comma. For example, if you are looking for the last name Taylor, you would press:
When you are looking for a mailbox owner using the Company Directory, you can find the name by entering the first four letters of the last name. If StarTalk cannot find the name the first time, you can press (RETRY) I[’ To or view all the names in the Directory, press II#1 Then press (NEXT) or m until you find the mailbox owner you are looking for.
Note: If you are trying to find a mailbox owner with less than four letters in the last name, for example Fry, press the buttons on the dialpad that spell the entire last name, and press m
StarTalk Reference Guide
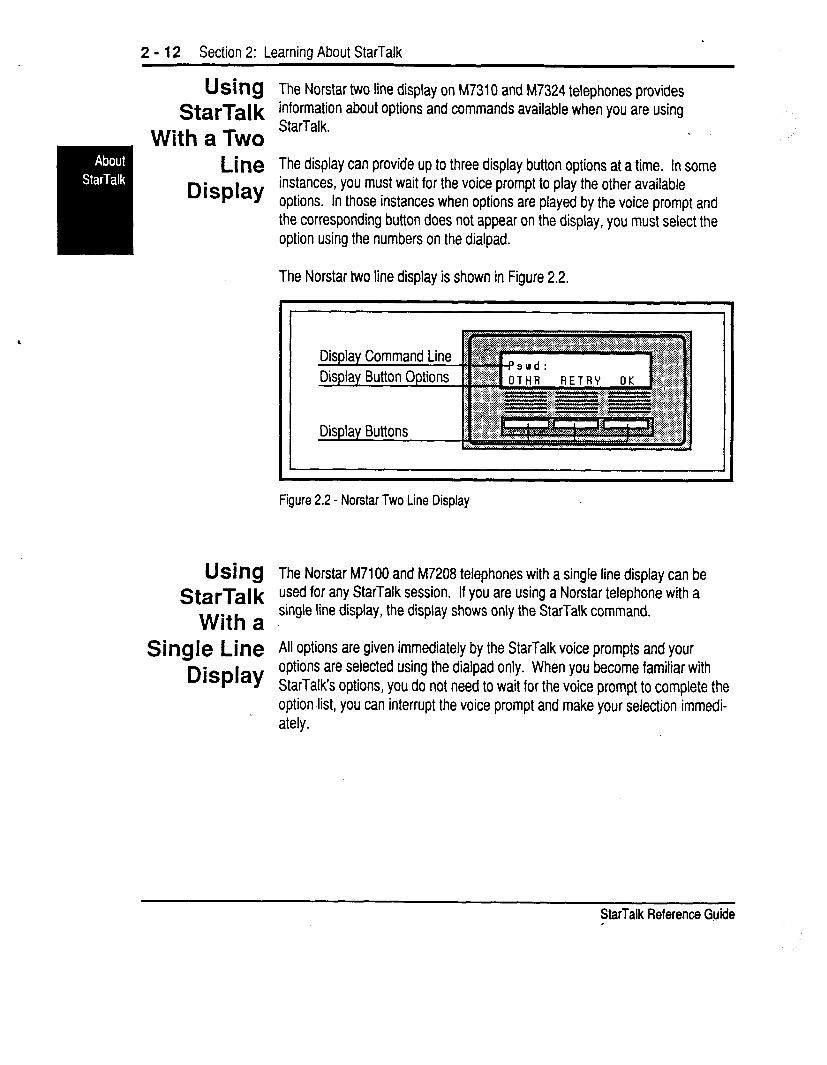
2 - 12 Section 2: Learnina About StarTalk
Using StarTalk
With a Two Line
Display
Using StarTalk
With a Single Line
Display
The Norstar two line display on M7310 and M7324 telephones provides information about options and commands available when you are using StarTalk.
The display can provide up to three display button options at a time. In some instances, you must wait for the voice prompt to play the other available options. In those instances when options are played by the voice prompt and the corresponding button does not appear on the display, you must select the option using the numbers on the dialpad.
The Norstar two line display is shown in Figure 2.2.
Display Command Line Display Button Ootions
Display Buttons
Figure 2.2 - Norstar Two Line Display
The Norstar M7100 and M7208 telephones with a single line display can be used for any StarTalk session. If you are using a Norstar telephone with a single line display, the display shows only the StarTalk command.
All options are given immediately by the StarTalk voice prompts and your options are selected using the dialpad only. When you become familiar with StarTalk’s options, you do not need to wait for the voice prompt to complete the option list, you can interrupt the voice prompt and make your selection immedi- ately.
StarTalk Reference Guide .
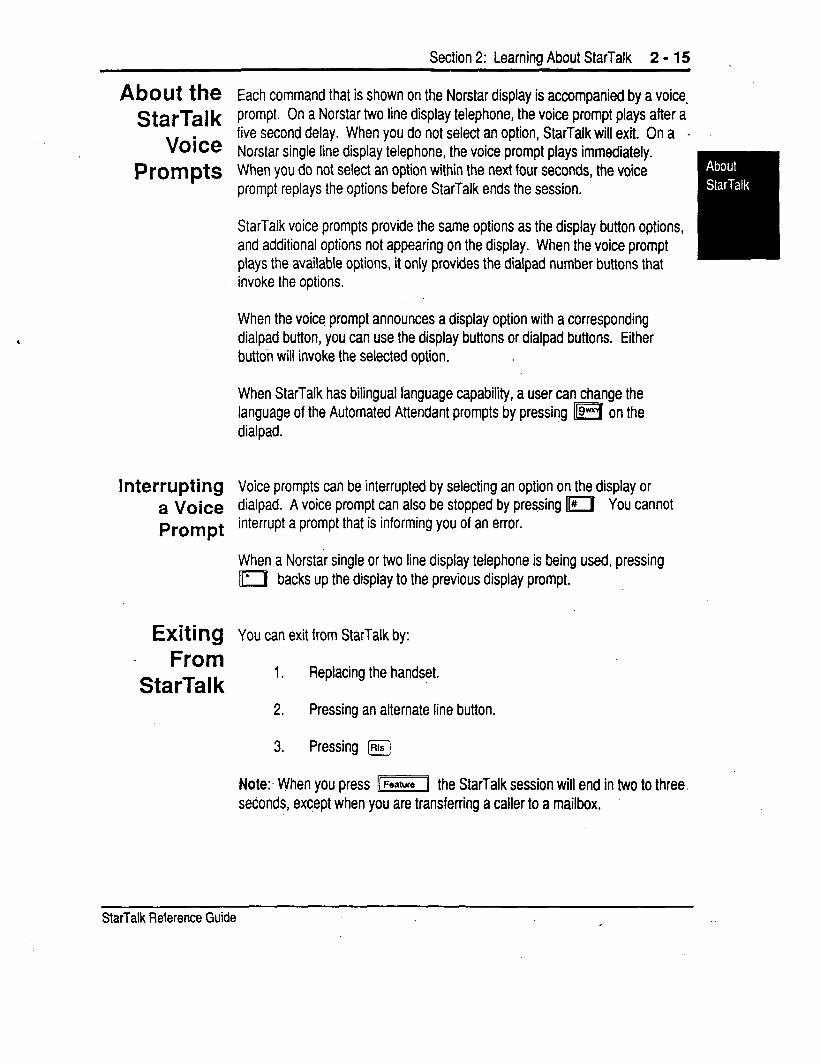
Section 2: Learning About StarTalk 2 - 15
About the StarTalk
Voice Prompts
Interrupting a Voice Prompt
Exiting From
StarTalk
Each command that is shown on the Norstar display is accompanied by a voice. prompt. On a Norstar two line display telephone, the voice prompt plays after a five second delay. When you do not select an option, StarTalk will exit. On a .
Norstar single line display telephone, the voice prompt plays immediately. When you do not select an option within the next four seconds, the voice prompt replays the options before StarTalk ends the session.
StarTalk voice prompts provide the same options as the display button options, and additional options not appearing on the display. When the voice prompt plays the available options, it only provides the dialpad number buttons that invoke the options.
When the voice prompt announces a display option with a corresponding dialpad button, you can use the display buttons or dialpad buttons. Either button will invoke the selected option. I
When StarTalk has bilingual language capability, a user can change the language of the Automated Attendant prompts by pressing m on the dialpad.
Voice prompts can be interrupted by selecting an option on the display or dialpad. A voice prompt can also be stopped by pressing Ir#l You cannot interrupt a prompt that is informing you of an error.
When a Norstar single or two line display telephone is being used, pressing m backs up the display to the previous display prompt.
You can exit from StarTalk by:
1. Replacing the handset.
2. Pressing an alternate line button.
3. Pressing @
Note:. When you press l(fsaturel the StarTalk session will end in two to three. seconds, except when you are transferring a caller to a mailbox.
StarTalk Reference Guide I
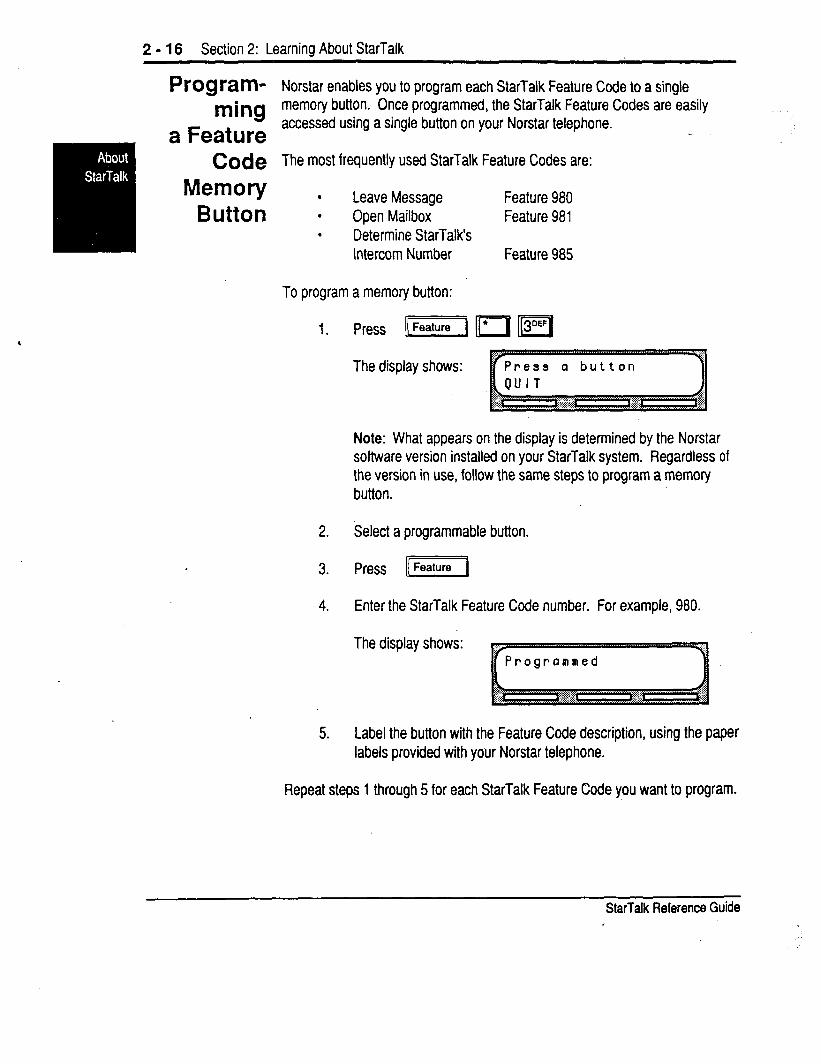
2 - 16 Section 2: Learning About StarTalk -~ ~~~
Program- Norstar enables you to program each StarTalk Feature Code to a single
ming memory button. Once programmed, the StarTalk Feature Codes are easily
a Feature accessed using a single button on your Norstar telephone.
Code The most frequently used StarTalk Feature Codes are:
Memov l Leave Message Feature 980 Button l Open Mailbox Feature 981
. Determine StarTalk’s Intercom Number Feature 985
To program a memory button:
The display shows:
Note: What appears on the display is determined by the Norstar software version installed on your StarTalk system. Regardless of the version in use, follow the same steps to program a memory button.
2. Select a programmable button.
3. Press l(fealurei
4. Enter the StarTalk Feature Code number. For example, 980.
The display shows:
5. Label the button with the Feature Code description, using the paper labels provided with your Norstar telephone.
Repeat steps 1 through 5 for each StarTalk Feature Code you want to program.
StarTalk Reference Guide

3-l
Information Mailboxes 3- Introduction This section describes the Information mailboxes, how to use them, and the
.tasks you need to perform to maintain theni.
Note: information mailboxes are set up by the System Coordinator and maintained by the user. To request an Information Mailbox, to make an Information mailbox accessible to callers, or to obtain more information about Information mailboxes, see your System Coordinator.
USitlg Information mailboxes provide messages and announcements to callers.
Information Information mailboxes can be used to:
Mailboxes . .
.
announce sales provide product lists announce special events
For example:
“On Your Ties Dance Studio proudly presents an extravaganza of dance. The entertainment begins at 8 p.m. on July 4th. Toddlers tap is in the White Room. Folk dance is in the Green Room. Classical ballet is in the Pink Room. Contemporary jazz is in the Blue Room. The Studio and Recital Rooms are locate&at 222 Main Street, Anywhere, U.S.A. ”
StarTalk Reference Guide
3 - 2 Section 3: Information Mailboxes
When you use the Information mailbox feature, you must ensure the mailboxes are accessible to callers.
Important: You must make the Information mailboxes easy for a caller to find. You can do this using your company’s operator or the StarTalk Company Directory. For details, see your System Coordinator.
If you are using a StarTalk system with bilingual capability, the Information mailbox greeting must include instructions to press m to listen to the greeting in the alternate language.
Where to Before you record your Information Mailbox greeting, you must determine what Begin the greeting is to include. When preparing your greeting, be sure to include
important times and dates. Write the greeting out and practice reading it aloud. When you are confident the greeting includes everything you want it to, record the greeting.
StarTalk Reference Guide I
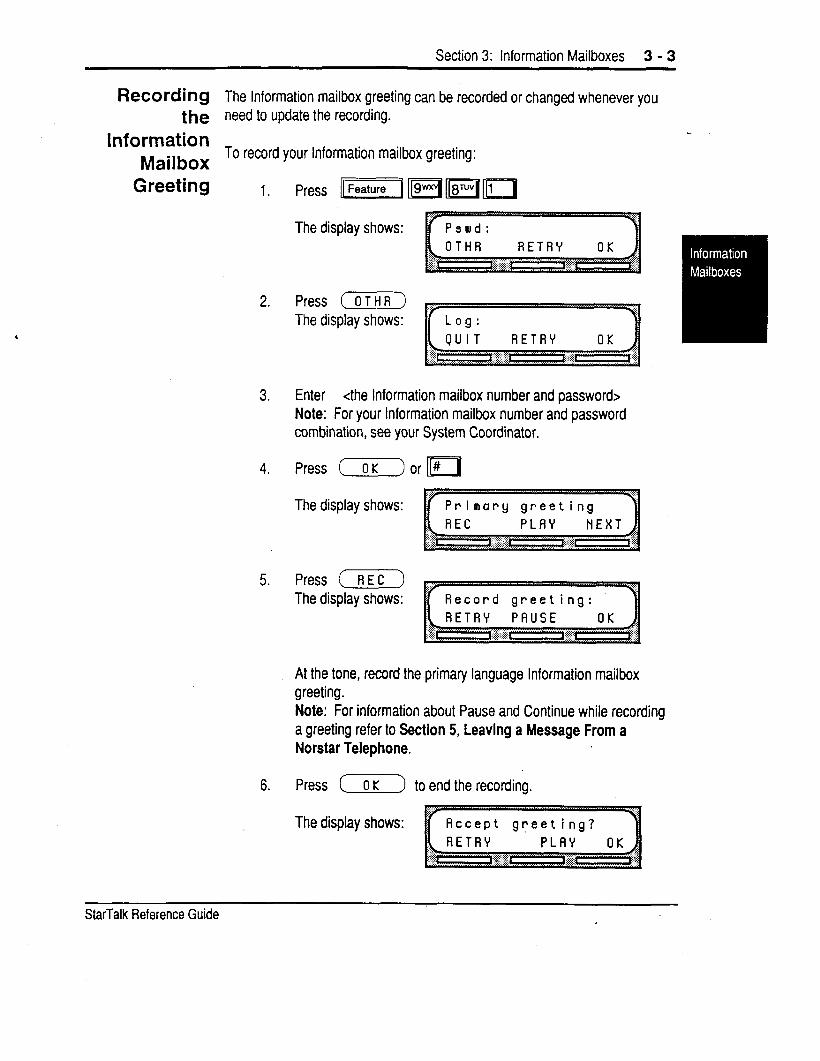
Section 3: Information Mailboxes 3 - 3
Recording The Information mailbox greeting can be recorded or changed whenever you the need to update the recording.
Information Mailbox
To record your Information mailbox greeting:
Greeting 1. Press (II lTS3l ‘KFj’T[
The display shows:
2.
3. Enter <the Information mailbox number and password> Note: For your Information mailbox number and password combination, see your System Coordinator.
4. Press (OK] or II#
Thedisplayshows:
5. Press [ R E C )
The display shows:
At the tone, record the primary language Information mailbox greeting. Note: For information about Pause and Continue while recording a greeting refer to Section 5, Leaving a Message From a Norstar Telephone.
6. Press (?) to end the recording.
The display shows:
StarTalk Reference Guide
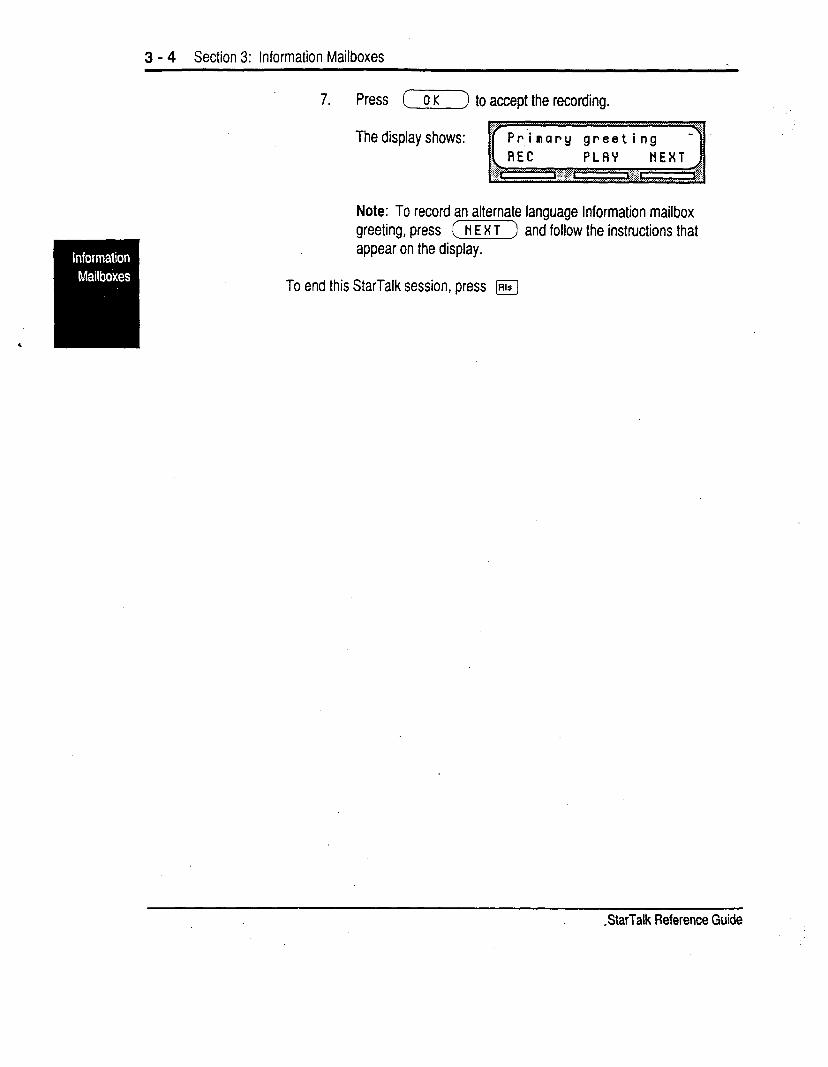
3 - 4 Section 3: Information Mailboxes
7. Press (7) to accept the recording.
The display shows:
Note: To record an alternate language Information mailbox greeting, press (E) and follow the instructions that appear on the display.
To end this StarTalk session, press (Rls
StarTalk Reference Guide

4-1
Your Personal Mailbox 4. Introduction
Personaliz- ing Your Mailbox
StarTalk is a fully automated receptionist service that offers call routing and .message taking services. This section describes how StarTalk works and covers:
. personalizing your mailbox
. initializing your mailbox
. recording your primary and alternate greetings
.
.
.
.
.
.
.
.
.
.
.
.
selecting a mailbox greeting mailbox options listening to messages recording a message mailbox administration changing a Company Directory name greeting options changing your mailbox password Off -premise Message Notification disabling Off-premise Message Notification changing the destination number assigning the Target Attendant
Personalizing your mailbox involves initializing your mailbox to receive mes- sages, recording and selecting greetings that will make your mailbox uniquely yours. Personatizing your mailbox consists of:
. initializing your mailbox
. recording your primary greeting
. recording your alternate greeting
. choosing which greeting you want StarTalk to play
StarTalk Reference Guide I
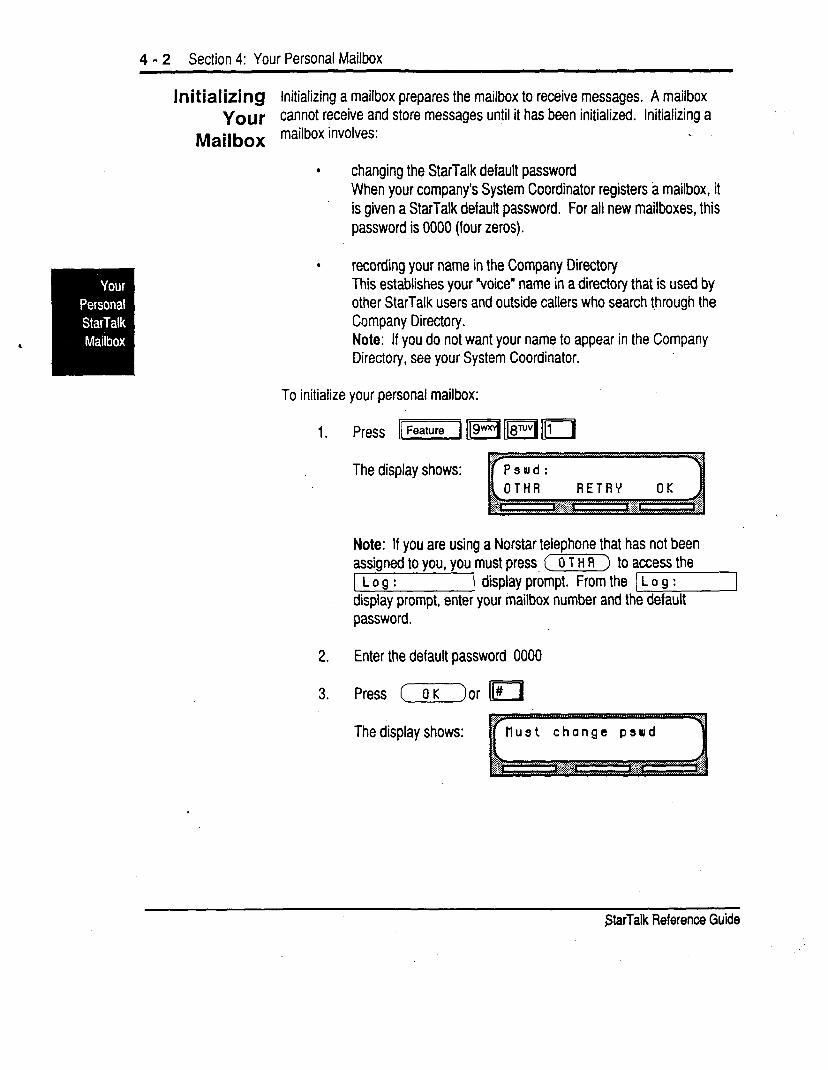
4 - 2 Section 4: Your Personal Mailbox
Initializing Initializing a mailbox prepares the mailbox to receive messages. A mailbox Your cannot receive and store messages until it has been initialized. Initializing a
Mailbox mailbox involves:
. changing the StarTalk default password When your company’s System Coordinator registers a mailbox, it is given a StarTalk default password. For all new mailboxes, this password is 0000 (four zeros).
. recording your name in the Company Directory This establishes your “voice” name in a directory that is used by other StarTalk users and outside callers who search through the Company Directory. Note: If you do not want your name to appear in the Company Directory, see your System Coordinator.
To initialize your personal mailbox:
1.
2.
3.
Press Fj ‘[19wxl1 ‘lsNVl1111
The display shows:
Note: If you are using a Norstar telephone that has not been assigned to you, you must press, (m) to access the 1 Log: 1 display prompt. From the /I display prompt, enter your mailbox number and the default password.
Enter the default password 0000
Press (OK) or
The display shows: ’ tlust change psutd I
StarTalk Reference Guide
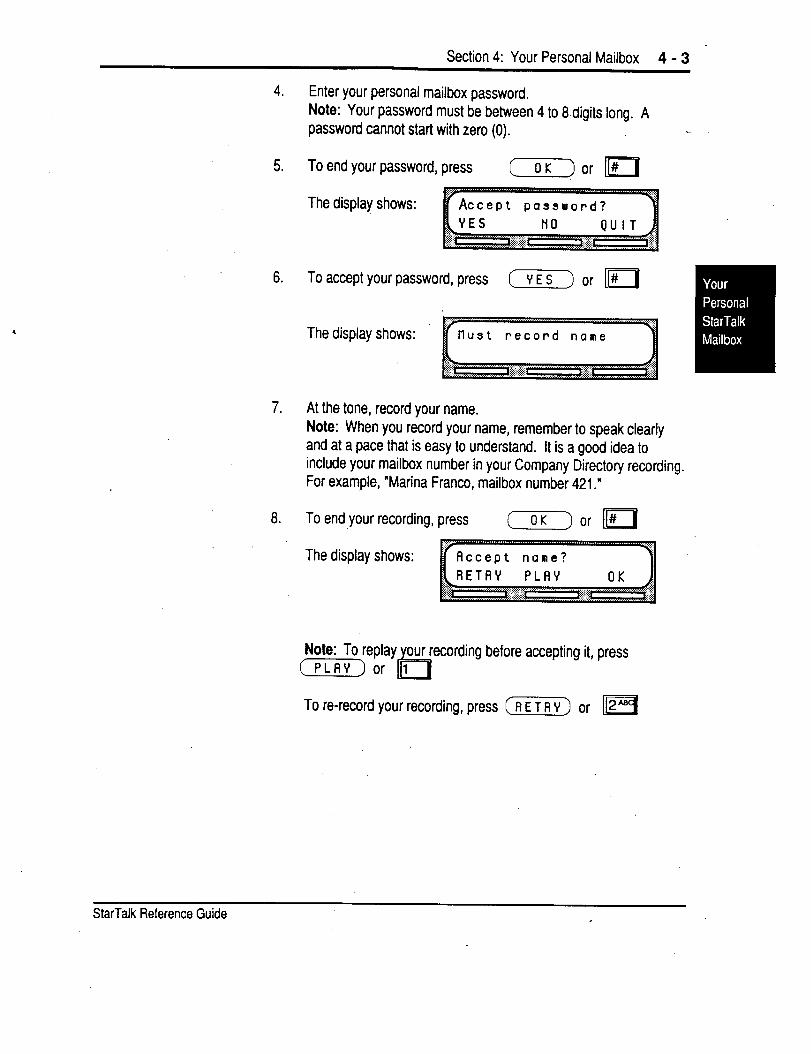
Section 4: Your Personal Mailbox 4 - 3 .
4. Enter your personal mailbox password. Note: Your password must be between 4 to 8.digits long. A password.cannot start with zero (0).
5. To end your password, press
The display shows:
(OK) or II#
6. To accept your password, press (YES) or II#
The display shows:
7. At the tone, record your name. Note: When you record your name, remember to speak clearly and at a pace that is easy to understand. It is a good idea to include your mailbox number in your Company Directory recording. For example, “Marina France, mailbox number 421.”
8. To end your recording, press (OK) or II#
The display shows:
before accepting it, press
To re-record your recording, press (RETRY) or m
StarTalk Reference Guide I
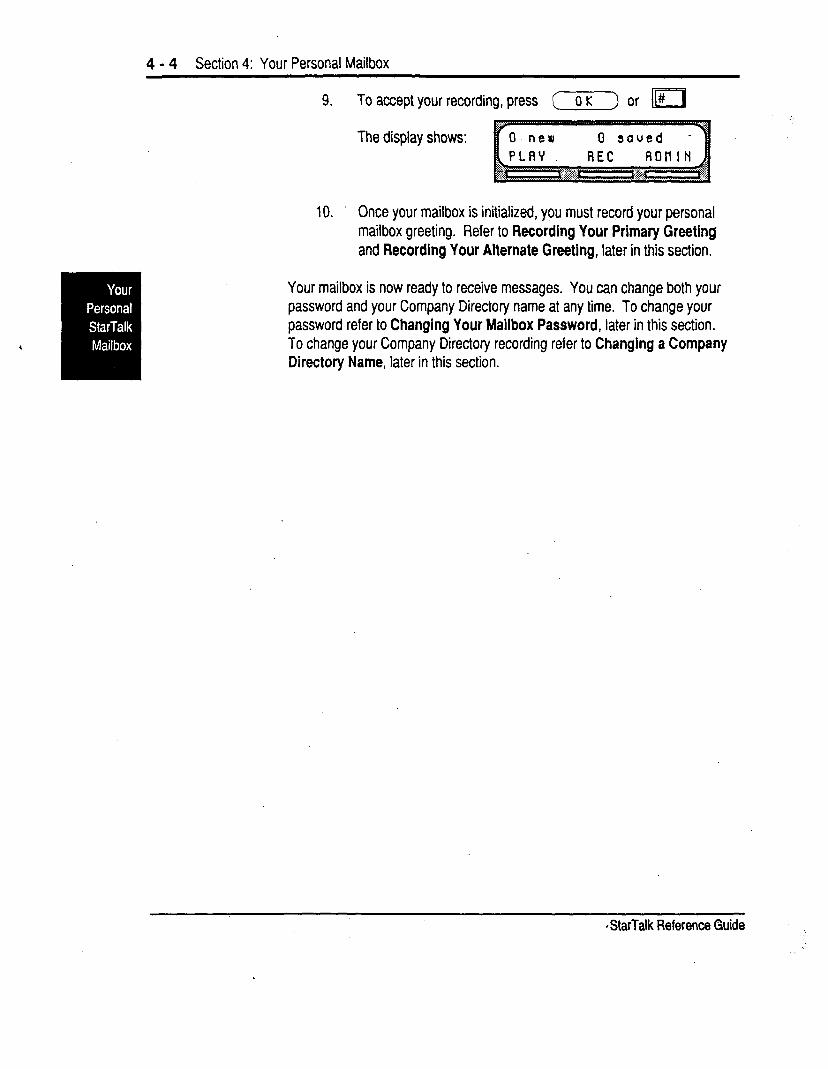
4 - 4 Section 4: Your Personal Mailbox
9. To accept your recording, press (OK) or n
The display shows:
10. Once your mailbox is initialized, you must record your personal mailbox greeting. Refer to Recording Your Primary Greeting and Recording Your Alternate Greeting, later in this section.
Your mailbox is now ready to receive messages. You can change both your password and your Company Directory name at any time. To change your password refer to Changing Your Mailbox Password, later in this section. To change your Company Directory recording refer to Changing a Company Directory Name, later in this section.
StarTalk Reference Guide
Section 4: Your Personal Mailbox 4 - 5
Your Personal I Personal greetings are played to callers who choose to leave a message in Greetings your mailbox. There are two types of personal greetings: the primary and
alternate greetings.
The purpose of both greetings is to inform callers they have reached the correct mailbox-yours-and to give callers any necessary information or instructions. You can change primary and alternate greetings at any time.
Note: If you do not record any personal greetings, your Company Directory Name recording plays to callers who reach your mailbox.
When you record your primary and alternate greetings, you should include your name, extension, and a brief explanation that you are unable to answer the call personally. You can include in your alternate mailbox greeting how long you plan to be away from your desk or office, and whether or not you are away on a business trip, vacation, or sick leave. You should also assure callers their messages will receive your prompt attention.
When recording your personal greetings, remember to speak clearly, with a pleasant voice, at a pace that is easy to understand. Do not speak too softly or too loudly, or make your greeting too lengthy. After recording a greeting, you should replay the greeting before accepting it to ensure the recording sounds the way you intended. ’
You can record or change a greeting from any Norstar telephone or, if you are away from the office, from any tone dial telephone.
Note: Whenever you are recording a greeting, do not use Norstar’s Handsfree feature. A better recording results if you speak directly into the handset.
StarTalk Reference Guide
4 - 6 Section 4: Your Personal Mailbox
Primary Your primary mailbox greeting is recorded for everyday use. This greeting .
Mailbox should include your name and a brief message explaining to callers that you Greetings are unable to answer their call. Recording your greeting with a friendly voice,
and the details of when you will be back*at your desk to take calls, encourages callers to leave you a message. For example:
“Hi. This is Paul Wayne. I’m not able to take your call fight now. Please leave me a message at the tone and I will return your call as soon as possible. ”
If you are a new mailbox owner, you should record your primary greeting immediately.
Alternate In special circumstances, such as business trips, vacation, or sick leave, you Mailbox will want to leave callers special information. For this reason, StarTalk
Greetings provides you with an alternate greeting. This greeting is called the Alternate mailbox greeting. For example:
“Hi. This is Paul Wayne. I am out of the office until Thursday, December 17. Although I am out of the office, I do check my mailbox daily. Please leave me a message at the tone and I will return your call as soon as possible. Thank you.”
Because the Alternate greeting is normally used for special circumstances, you do not have to record one until the need arises. You can select which greeting you want StarTalk to play. You can change the selection at any time, and as often as needed.
Note: After you have recorded your greetings, you must choose the greeting to be played. If you do not choose a greeting, the primary greeting plays auto- matically. Whenever you choose the alternate greeting, remember to change back to the primary greeting when your circumstances return to normal.
StarTalk Reference Guide I
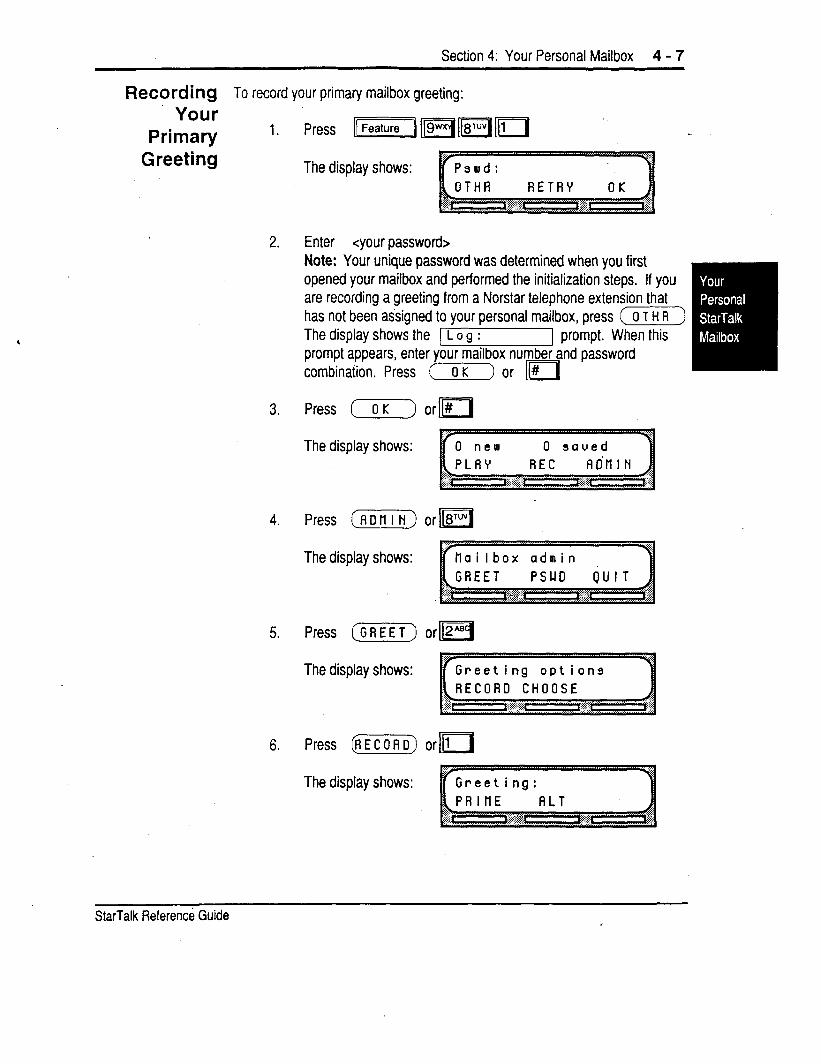
Section 4: Your Personal Mailbox 4 - 7
Recording To record your primary mailbox greeting:
Your Primary ‘-
Greeting
2.
3.
4.
5.
6.
The display shows: ;’ P s u d : P
Enter <your password> Note: Your unique password was determined when you first ,-, opened your mailbox and performed the initialization steps. if you are recording a greeting from a Norstar telephone extension that has not been assigned to your personal mailbox, press ( 0 T H R ) The display shows the [ L o g : 1 prompt. When this prompt appears, enter your mailbox num_ combination. Press (07<->
G and password or lfl
Press (OK) or I
The display shows:
Press (G) or ii
The display shows:
Press (tREET) arm
The display shows:
Press @ECORD) or m The display shows:
StarTalk Reference Guide
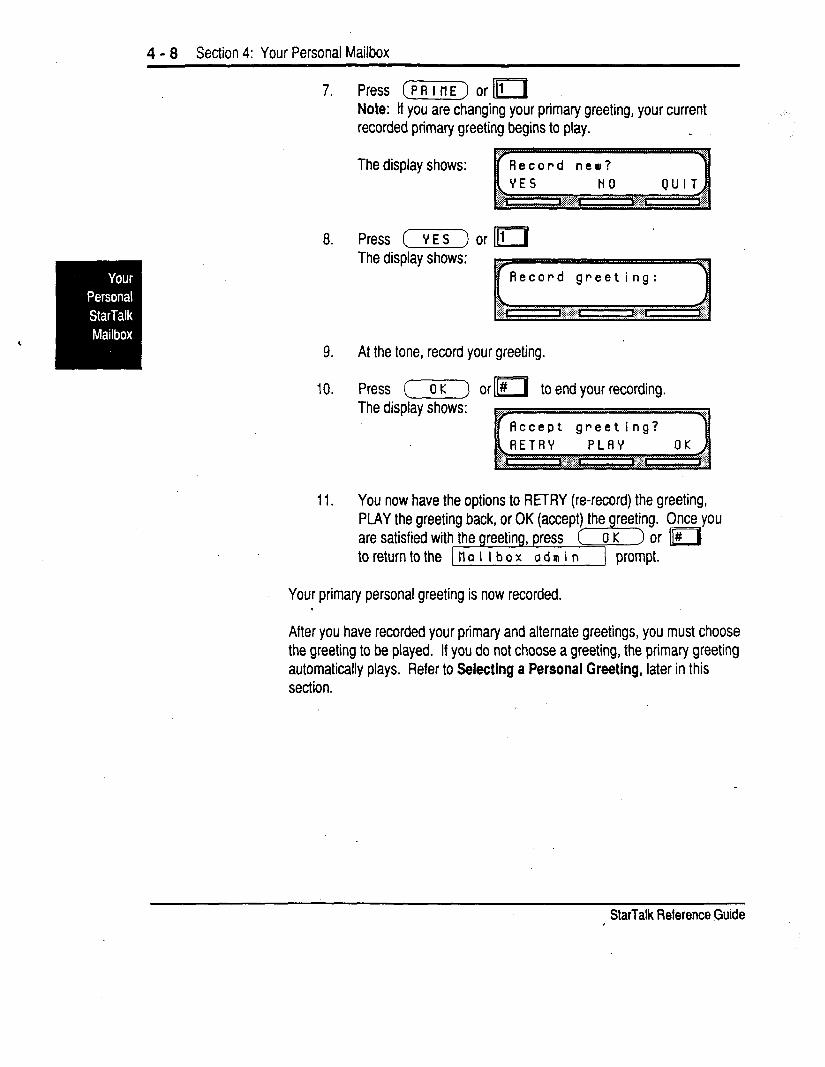
4 - 8 Section 4: Your Personal Mailbox
7. Press (PRIHE) or m Note: If you are changing your primary greeting, your current recorded primary greeting begins to play.
The display shows:
8. Press (YES) or [i!Fj The display shows:
9. At the tone, record your greeting.
10. Press (OK) or II# to end your recording. The display shows:
11. You now have the options to RETRY (re-record) the greeting, PLAY the greeting back, or OK (accept) the reeting. Once you are satisfied with the reetin to return to the
g, press [T or II# g , tl a i I box ad P i n prompt.
Your primary personal greeting is now recorded.
After you have recorded your primary and alternate greetings, you must choose the greeting to be played. If you do not choose a greeting, the primary greeting automatically plays. Refer to Selecting a Personal Greeting, later in this section.
StarTalk Reference Guide I

Section 4: Your Personal Mailbox 4 - 9
Recording To record an alternate greeting:
Your Alternate ‘*
Press l(feature/ 119_1 lFl rj
Greeting The display shows:
2. Enter <your password> Note: Your unique password was determined when you first opened your mailbox and performed the initialization steps. If you are recording a greeting from a Norstar telephone extension that has not been assigned mailbox, Dress (=I The display shows the J prompt. When this
r prompt appears, enter our mailbox number and password combination. Press (%) or 1#
3. Press
The display shows:
4. Press (Ronln) or jlSTuv( The display shows:
5. Press (tREET) or m The display shows:
StarTalk Reference Guide
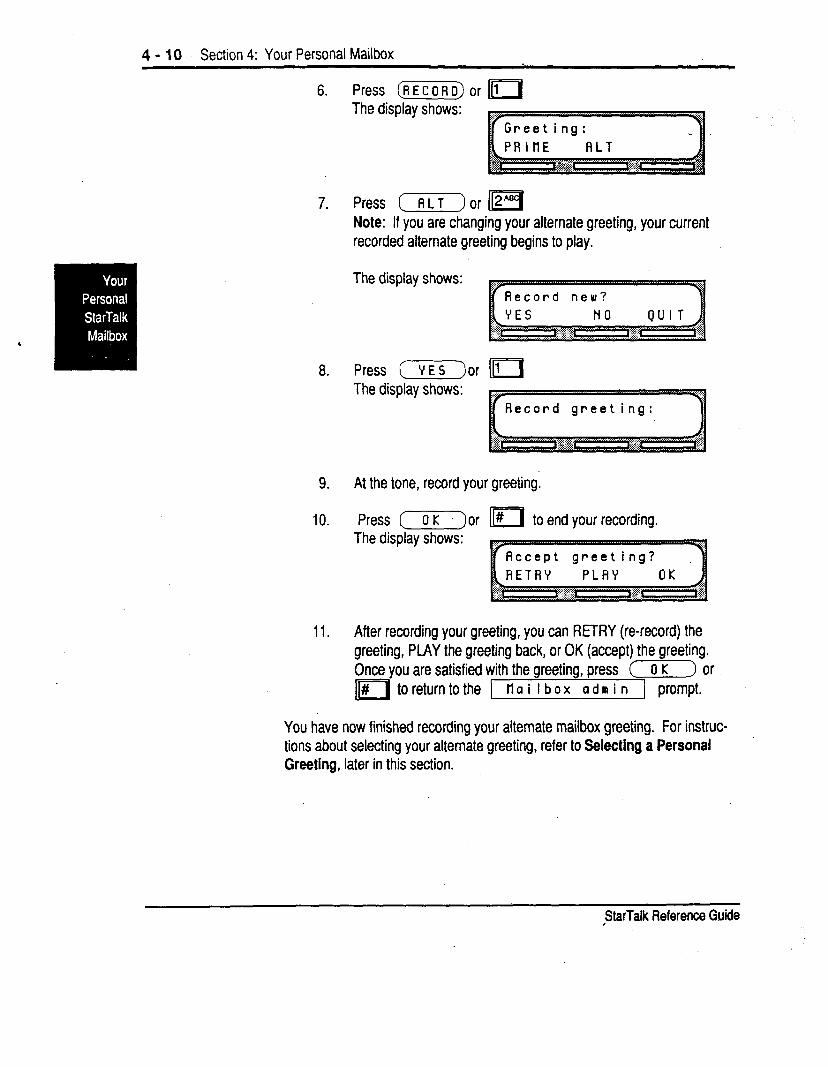
4 - IO Section 4: Your Personal Mailbox
6. Press (RECORO) or In The display shows:
7. Press (ALT) or 112”1 Note: If you are changing your alternate greeting, your current recorded alternate greeting begins to play.
The display shows: :::.. (Record new?
8. Press (_ YES )or The display shows:
lIzI 1
(i
If Record greeting:
9. At the tone, record your greeting.
10. Press (r)or II#m to end your recording. The display shows:
ETRY -PLAY - OK
11. After recording your greeting, you can RETRY (re-record) the greeting, PLAY the greeting back, or OK (accept) the greeting. Once you are satisfied with the greeting, press (OK) or
II # to return to the 1 tlailbox admin J prompt.
You have now finished recording your alternate mailbox greeting. For instruc- tions about selecting your alternate greeting, refer to Selecting a Personal Greeting, later in this section.
starTalk Reference Guide
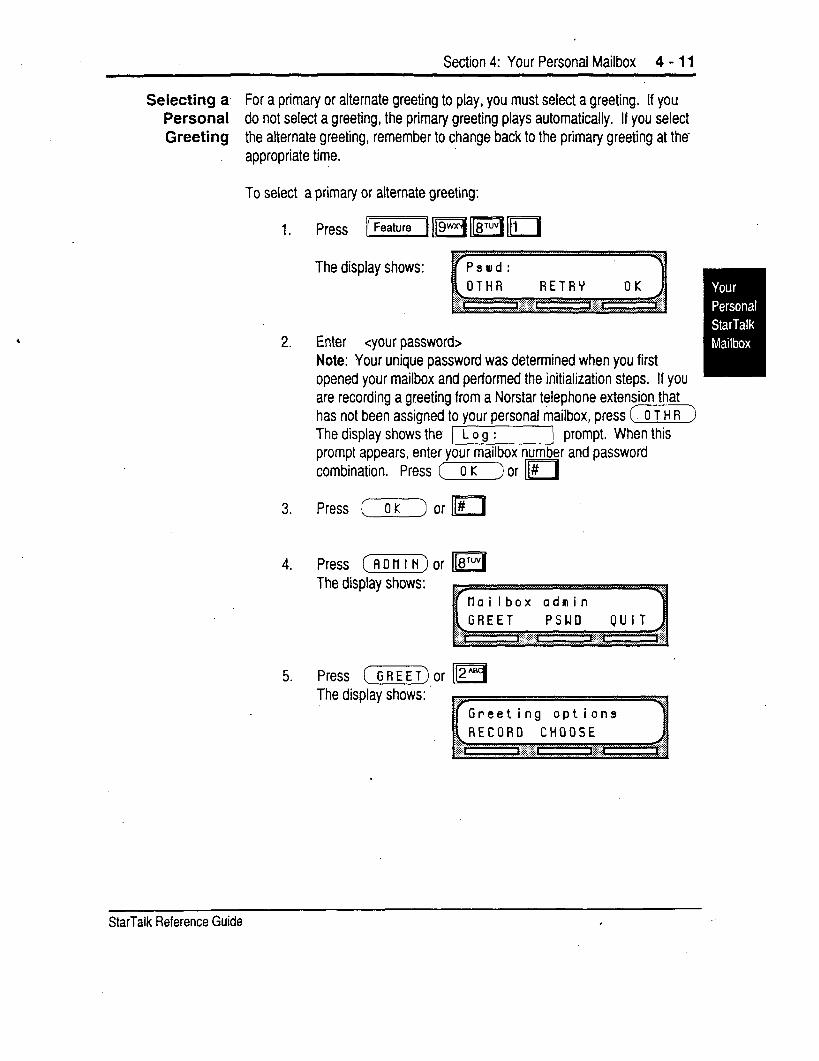
Section 4: Your Personal Mailbox 4 - 11
Selecting a- For a primary or alternate greeting to play, you must select a greeting. If you Personal do not select a greeting, the primary greeting plays automatically. If you select Greeting the alternate greeting, remember to change back to the primary greeting at the-
appropriate time.
To select a primary or alternate greeting:
The display shows:
2. Enter <your password> Note: Your unique password was determined when you first opened your mailbox and performed the initialization steps. If you are recording a greeting from a Norstar telephone extension that has not been assigned to your personal mailbox, press (K) The display shows the 1 L o g : ] prompt. When this prompt appears, enter your mailbox number and password combination. Press (OK) or li#i
II # 3. Press ( 0 K ) or
4. Press (ADnIN)or The display shows:
5. Press ( GREET) or The display shows:
.rGreeting options
StarTalk Reference Guide I
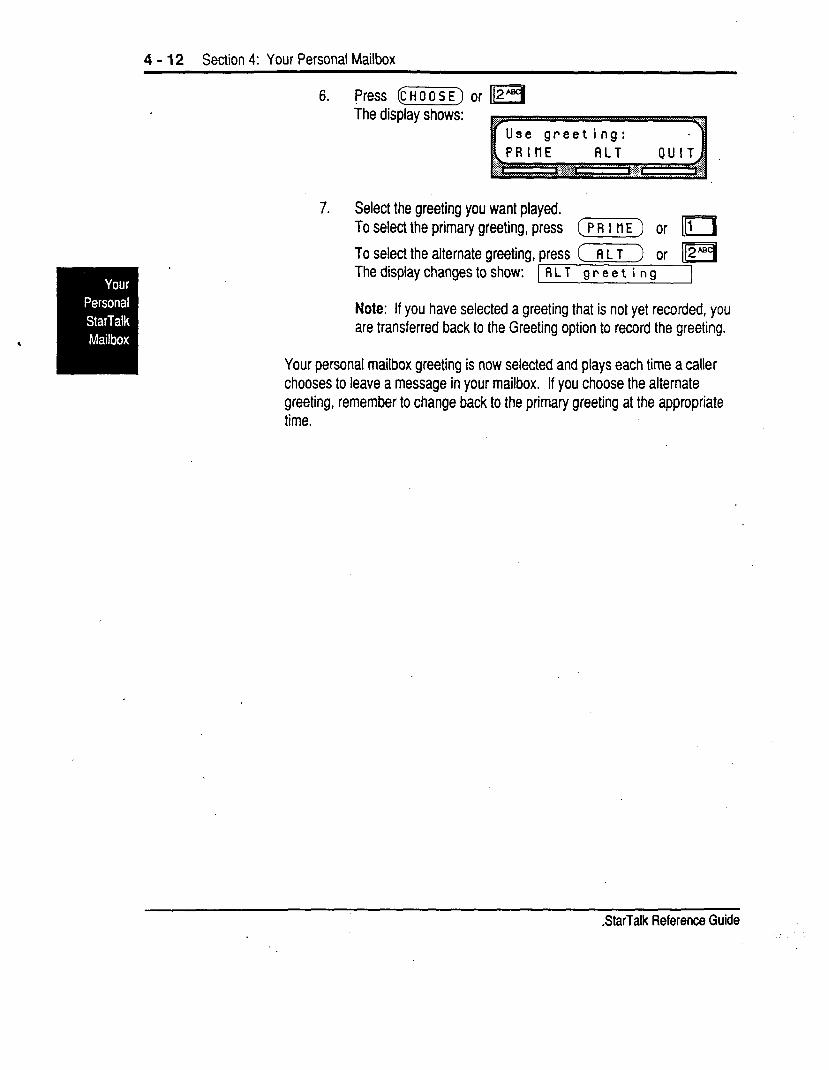
4 - 12 Section 4: Your Personal Mailbox
6. Press @i?%?Z) or m The display shows:
,
7. Select the greeting you want played. To select the primary greeting, press (E) or 111
To select the alternate greeting, press (7) m or The disolav chanaes to show: 1 P, L T Q P e e t i n Q 1
Note: If you have selected a greeting that is not yet recorded, you are transferred back to the Greeting option to record the greeting.
Your personal mailbox greeting is now selected and plays each time a caller chooses to leave a message in your mailbox. If you choose the alternate greeting, remember to change back to the primary greeting at the appropriate time.
StarTalk Reference Guide
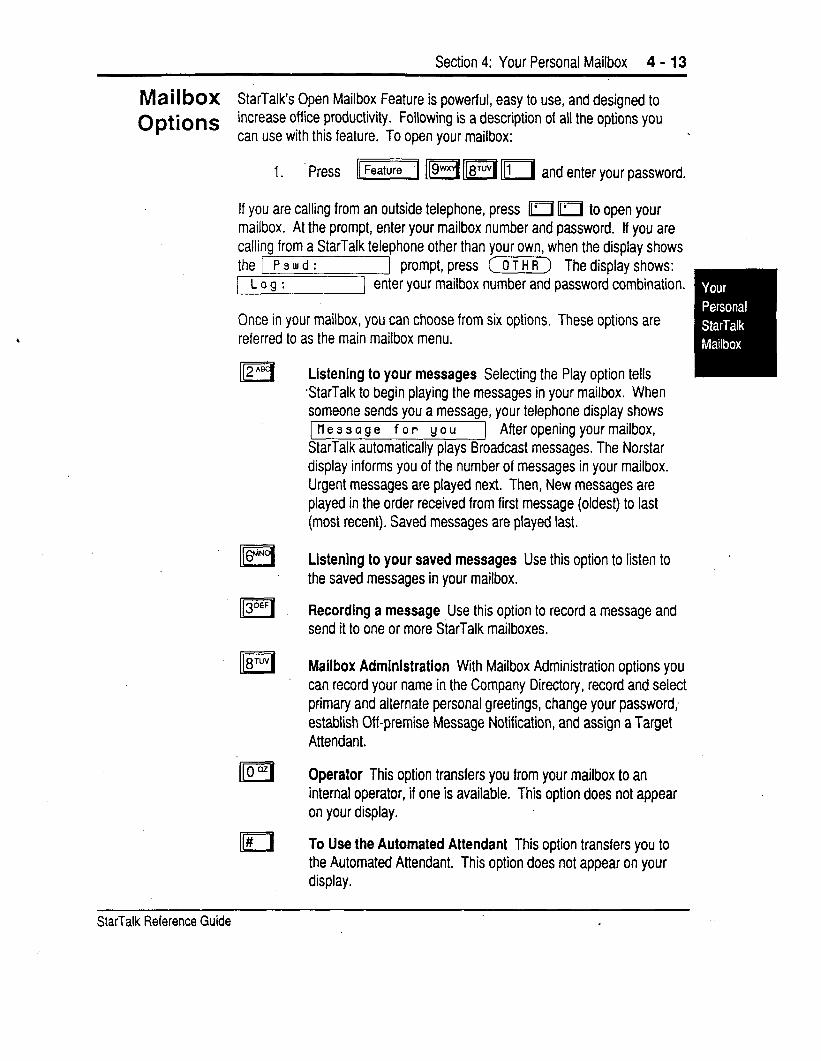
Section 4: Your Personal Mailbox 4 - 13
Mail box StarTalk’s Open Mailbox Feature is powerful, easy to use, and designed to
Options increase off ice productivity. Following is a description of all the options you can use with this feature; To open your mailbox:
1. Press [(m 119-1 m 1111 and enter your password.
If you are calling from an outside telephone, press m m to open your mailbox. At the prompt, enter your mailbox number and password. If you are calling from a StarTalk telephone other than your own, when the display shows the1 Pswd: 1 prompt, press (m) The display shows: 1 Lag: 1 enter your mailbox number and password combination.
Once in your mailbox, you can choose from six options. These options are referred to as the main mailbox menu.
Listening to your messages Selecting the Play option tells StarTalk to begin playing the messages in your mailbox. When someone sends you a message, your telephone display shows [tlessage for you J After opening your mailbox, StarTalk automatically plays Broadcast messages. The Norstar display informs you of the number of messages in your mailbox. Urgent messages are played next. Then, New messages are played in the order received from first message (oldest) to last (most recent). Saved messages are played last.
Listening to your saved messages Use this option to listen to the saved messages in your mailbox.
Recording a message Use this option to record a message and send it to one or more StarTalk mailboxes.
Mailbox Administration With Mailbox Administration options you can record your name in the Company Directory, record and select primary and alternate personal greetings, change your password, establish Off -premise Message Notification, and assign a Target Attendant.
Operator This option transfers you from your mailbox to an internal operator, if one is available. This option does not appear on your display.
To Use the Automated Attendant This option transfers you to the Automated Attendant. This option does not appear on your display.
StarTalk Reference Guide .
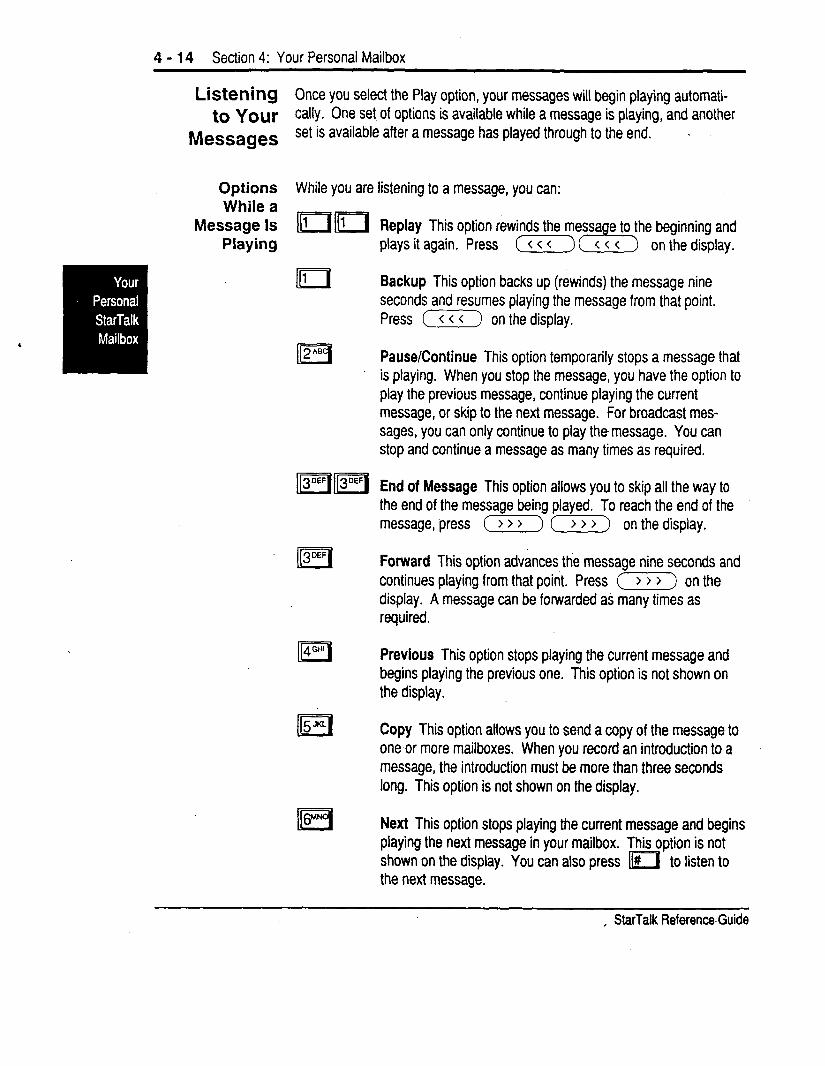
4 - 14 Section 4: Your Personal Mailbox
,
Listening Once you select the Play option, your messages will begin playing automati- to your tally. One set of options is available while a message is playing, and another
Messages set is available after a message has played through to the end. -
Options While you are listening to a message, you can:
AIZI 3DEF
5 5 JKL
11 6MN
Replay This option rewinds the plays it again. Press
beginning and on the display.
Backup This option backs up (rewinds) the message nine seconds and resumes playing the message from that point. Press (F) on the display.
Pause/Continue This option temporarily stops a message that is playing. When you stop the message, you have the option to play the previous message, continue playing the current message, or skip to the next message. For broadcast mes- sages, you can only continue to play the message. You can stop and continue a message as many times as required.
End of Message This option allows you to skip all the way to the end of the message being played. To reach the end of the message, press (7) (7) on the display.
Forward This option advances the message nine seconds and continues playing from that point. Press (-1 on the display. A message can be forwarded as many times as required.
Previous This option stops playing the current message and begins playing the previous one. This option is not shown on the display.
Copy This option alfows you to send a copy of the message to one or more mailboxes. When you record an introduction to a message, the introduction must be more than three seconds long. This option is not shown on the display.
Next This option stops playing the current message and begins playing the next message in your mailbox. This option is not shown on the display. You can also press m to listen to the next message.
, StarTalk Reference-Guide
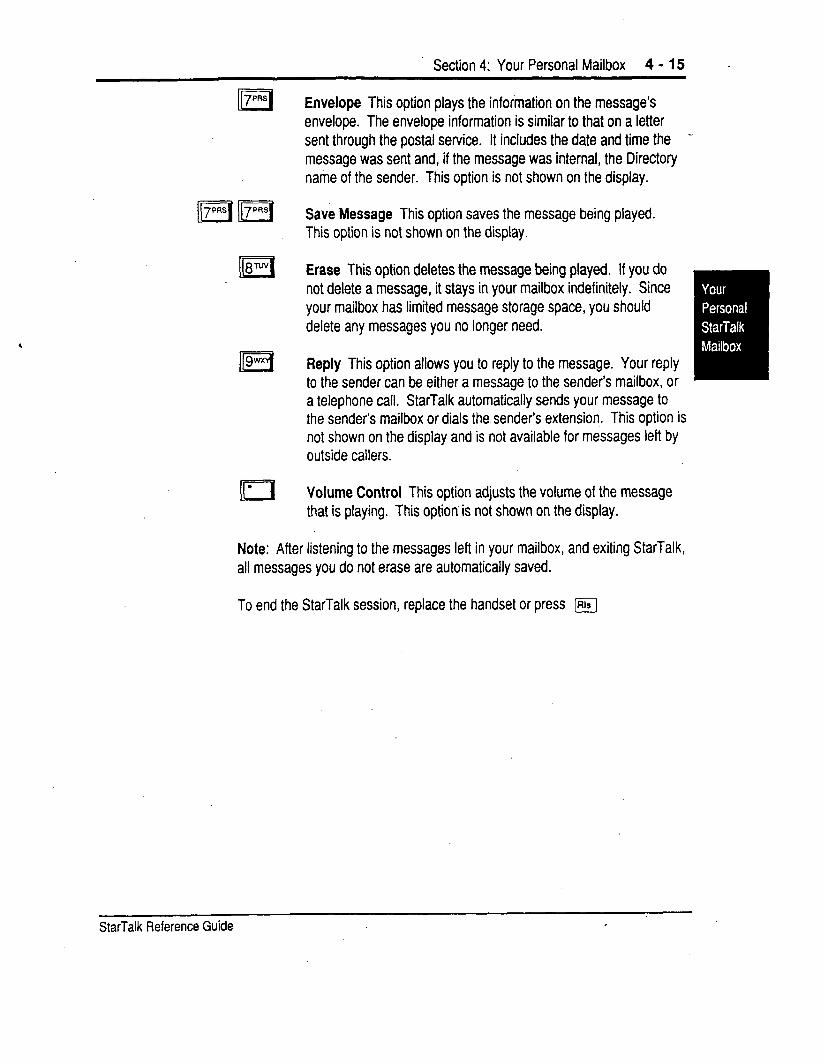
Section 4: Your Personal Mailbox 4 - 15 .
II 7 PRS
II 8”“’
II 9
Note: After listening to the messages left in your mailbox, and exiting StarTalk, all messages you do not erase are automatically saved.
To end the StarTalk session, replace the handset or press [Als
Envelope This option plays the information on the message’s envelope. The envelope information is similar to that on a letter sent through the postal service. It includes the date and time the - message was sent and, if the message was internal, the Directory name of the sender. This option is not shown on the display.
Save Message This option saves the message being played. This option is not shown on the display.
Erase This option deletes the message being played. If you do not delete a message, it stays in your mailbox indefinitely. Since your mailbox has limited message storage space, you should delete any messages you no longer need.
Reply This option allows you to reply to the message. Your reply to the sender can be either a message to the sender’s mailbox, or a telephone call. StarTalk automatically sends your message to the sender’s mailbox or dials the.sender’s extension. This option is not shown on the display and is not available for messages left by outside callers.
Volume Control This option adjusts the volume of the message that is playing. This option.is not shown on the display.
StarTalk Reference Guide
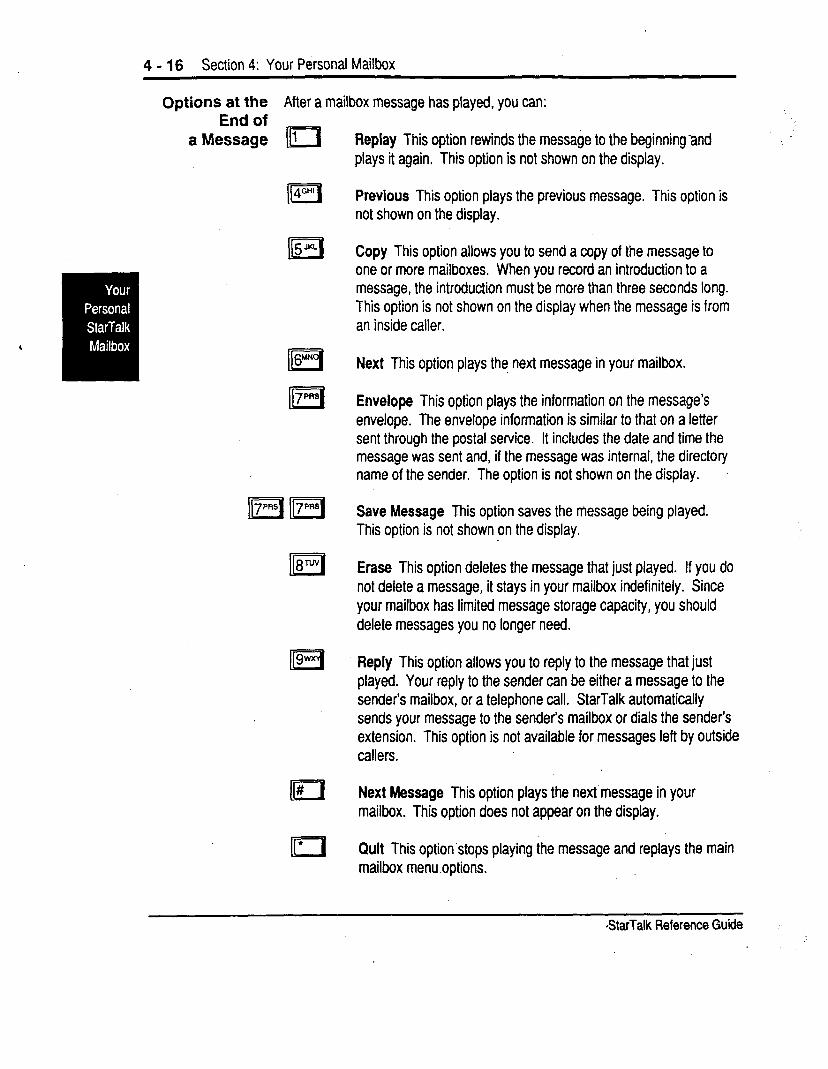
4 - 16 Section 4: Your Personal Mailbox
Options at the After a mailbox message has played, you can: End of
a Message 11 Replay This option rewinds the message to the beginning-and plays it again. This option is not shown on the display.
I( 4GHl
II Cj JKL
II 6MH
II 7PRS
I[ 8*
II 9
II #
* IEl
Previous This option plays the previous message. This option is not shown on the display.
Copy This option allows you to send a copy of the message to one or more mailboxes. When you record an introduction to a message, the introduction must be more than three seconds long. This option is not shown on the display when the message is from an inside caller.
Next This option plays the next message in your mailbox.
Envelope This option plays the information on the message’s envelope. The envelope information is similar to that on a letter sent through the postal service. It includes the date and time the message was sent and, if the message was internal, the directory name of the sender. The option is not shown on the display.
Save Message This option saves the message being played. This option is not shown on the display.
Erase This option deletes the message that just played. If you do not delete a message, it stays in your mailbox indefinitely. Since your mailbox has limited message storage capacity, you should delete messages you no longer need.
Reply This option allows you to reply to the message that just played. Your reply to the sender can be either a message to the sender’s mailbox, or a telephone call. StarTalk automatically sends your message to the senders mailbox or dials the sender’s extension. This option is not available for messages left by outside callers.
Next Message This option plays the next message in your mailbox. This option does not appear on the display.
Quit This option stops playing the message and replays the main mailbox menu.options.
8tarTalk Reference Guide
Section 4: Your Personal Mailbox 4 - 17
Copy Option When you select the option to forward a copy of a message to a mailbox, you are first asked if you want to record an introduction to the message. When the message is listened to at the other end, your introduction is played first, followed immediately by the message.
You should record an introduction to a copied message. The message introduction you record must be at least three seconds long. You cannot forward a message with an introduction that is shorter than three seconds.
When recording an introduction, you use options to indicate you have finished recording, or to erase what you have recorded so far and start over. After you finish recording the introduction, you have options to erase and re- record, play, or accept the introduction and send it, with the message, to a mailbox.
When you select SEND, you enter the mailbox number of the person you want to send the copy to. If you do not know the mailbox number, you can find the mailbox owner in the Company Directory. If you change your mind about forwarding the message, you can select the QUIT option. This returns you to the Listen to Messages menu.
When you enter the mailbox number, your introduction and a copy of the message are automatically sent to the mailbox you selected. You then have options to send an additional copy of the introduction and the message to another mailbox, or to quit and return to the Listen to Messages menu. You can forward copies to as many mailboxes as you want.
Note: Messages marked PRIVATE cannot be forwarded to another mailbox.
StarTalk Reference Guide
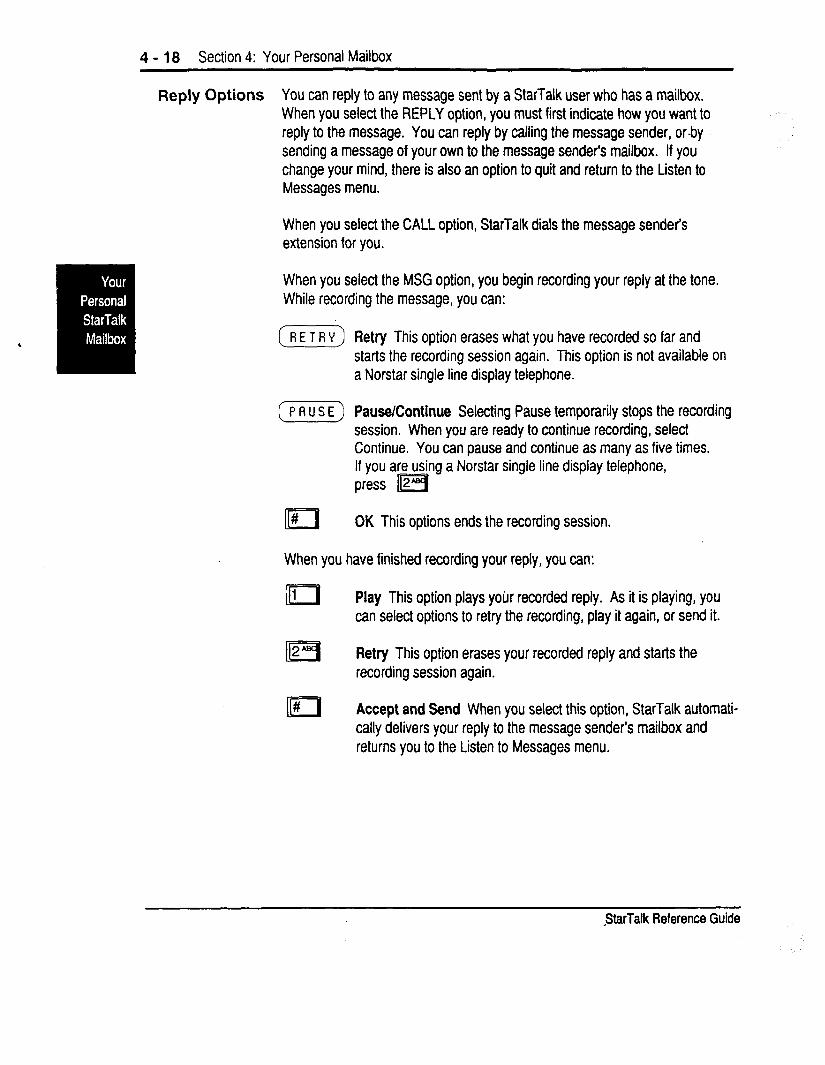
4 - 18 Section 4: Your Personal Mailbox
Reply Options You can reply to any message sent by a StarTalk user who has a mailbox. When you select the REPLY option, you must first indicate how you want to reply to the message. You can reply by calling the message sender, or.by sending a message of your own to the message sender’s mailbox. If you change your mind, there is also an option to quit and return to the Listen to Messages menu.
When you select the CALL option, StarTalk dials the message sender’s extension for you.
When you select the MSG option, you begin recording your reply at the tone. While recording the message, you can:
(EKG-)
(PAUSE)
II #
Retry This option erases what you have recorded so far and starts the recording session again. This option is not available on a Norstar single line display telephone.
Pause/Continue Selecting Pause temporarily stops the recording session. When you are ready to continue recording, select Continue. You can pause and continue as many as five times. If you are using a Norstar single line display telephone, press B
OK This options ends the recording session.
When you have finished recording your reply, you can:
il 1 Play This option plays yobr recorded reply. As it is playing, you can select options to retry the recording, play it again, or send it.
II 2 Retry This option erases your recorded reply and starts the recording session again.
II # Accept and Send When you select this option, StarTalk automati- cally delivers your reply to the message sender’s mailbox and returns you to the Listen to Messages menu.
$tarTalk Reference Guide

Section 4: Your Personal Mailbox 4 - 19
Record The Record a Message option is available on the main mailbox menu, When a Message you select this option, record your message at the tone. While recording, you
have three options:
CR E T R Y ) Retry This option erases what you have recorded so far and starts the recording session again. This option is not available on a Norstar single line display telephone.
( P A U S E] Pause/Continue Selecting Pause temporarily stops the recording session. When you are ready to continue recording, select Continue. You can pause and continue as many as five times. This option is not available on a Norstar single line display telephone.
II # OK Select this option to tell StarTalk you have finished recording your message.
When you have finished recording your message, you can:
II 1
II 2
Play This option plays your recorded message. As it is playing, you can select options to retry the recording, play it again, or send it.
Retry This option erases your recorded message and starts the recording session again.
Send This option allows you to send your recorded message to one or more mailboxes. When you select the SEND option, you enter the mailbox number of the person you want to send the message to. If you do not know the mailbox number, you can use the Company Directory option.
Delivery Options This option allows you to mark your messages CERTIFIED, URGENT, or PRIVATE before sending them. For more information about Delivery Options, refer to Section 4, Assignlng Message Delivery Options.
Quit This option erases the message and replays the Main Mailbox menu options.
After you have sent your message, you can send a copy of the message to another mailbox, or you can quit and select another option from the mailbox main menu. If you choose to send a copy of the message you recorded to another mailbox, you are asked to enter the mailbox number, as before.
StarTalk Reference Guide I
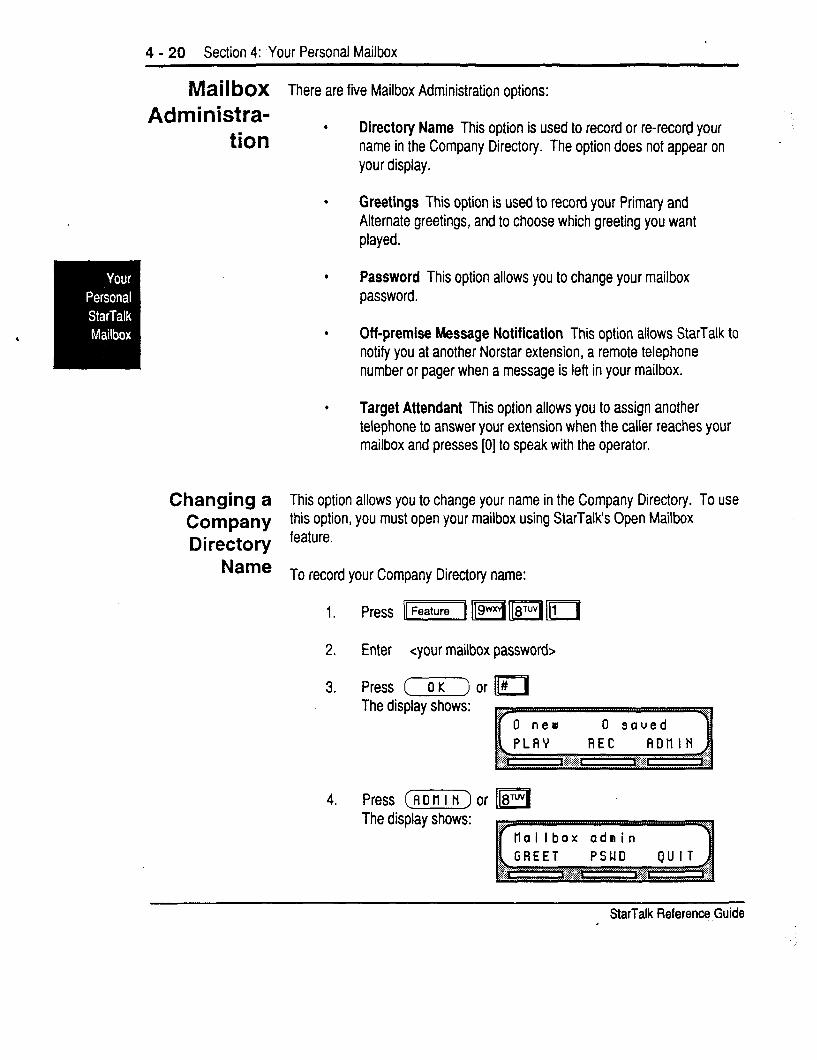
4 - 20 Section 4: Your Personal Mailbox
Mail box There are five Mailbox Administration options:
Administra- tion
. Directory Name This option is used to record or re-record your name in the Company Directory. The option does not appear on -
your display.
. Greetings This option is used to record your Primary and Alternate greetings, and to choose which greeting you want played.
. Password This option allows you to change your mailbox password.
. Off-premise Message Notification This option allows StarTalk to notify you at another Norstar extension, a remote telephone number or pager when a message is left in your mailbox.
a Target Attendant This option allows you to assign another telephone to answer your extension when the caller reaches your mailbox and presses [0] to speak with the operator.
Changing a This option allows you to change your name in the Company Directory. To use Company this option, you must open your mailbox using StarTalk’s Open Mailbox
Directory feature* Name To record your Company Directory name:
2. Enter <your mailbox password>
3. Press [OK) or The display shows:
4. Press (_ADtllN)or The display shows:
il #
II gT””
StarTalk Referen@ Guide I
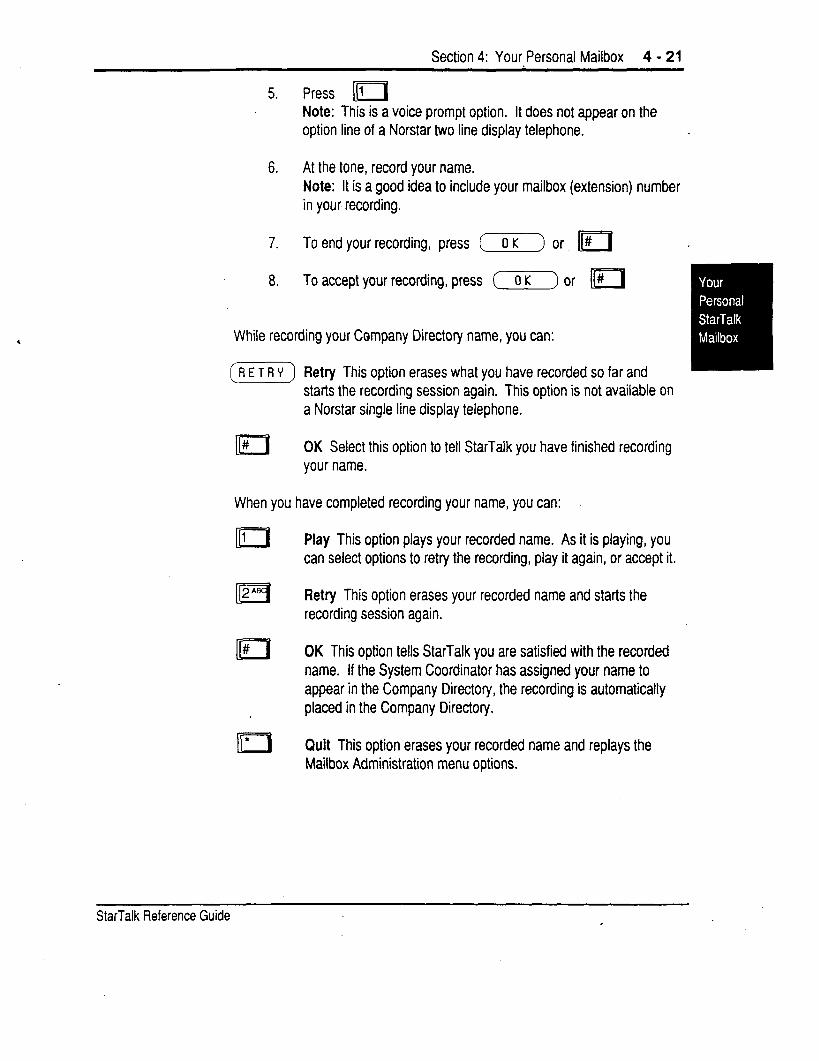
5.
Section 4: Your.Personal Mailbox 4 - 21
Press m Note: This is a voice prompt option. It does not appear on the option line of a Norstar two line display telephone.
6. At the tone, record your name. Note: It is a good idea to include your mailbox (extension) number in your recording.
7. To end your recording, press (7) or II#
8. To accept your recording, press (OK] or II#
While recording your Company Directory name, you can:
Retry This option erases what you have recorded so far and (Fiq
II #
starts the recording session again. This option is not available on a Norstar single line display telephone.
OK Select this option to tell StarTalk you have finished recording your name.
When you have completed recording your name, you can:
II 1 Play This option plays your recorded name. As it is playing, you can select options to retry the recording, play it again, or accept it.
II 2* Retry This option erases your recorded name and starts the recording session again.
II # OK This option tells StarTalk you are satisfied with the recorded name. If the System Coordinator has assigned your name to appear in the Company Directory, the recording is automatically placed in the Company Directory.
l
II Quit This option erases your recorded name and replays the Mailbox Administration menu options.
StarTalk Reference Guide I
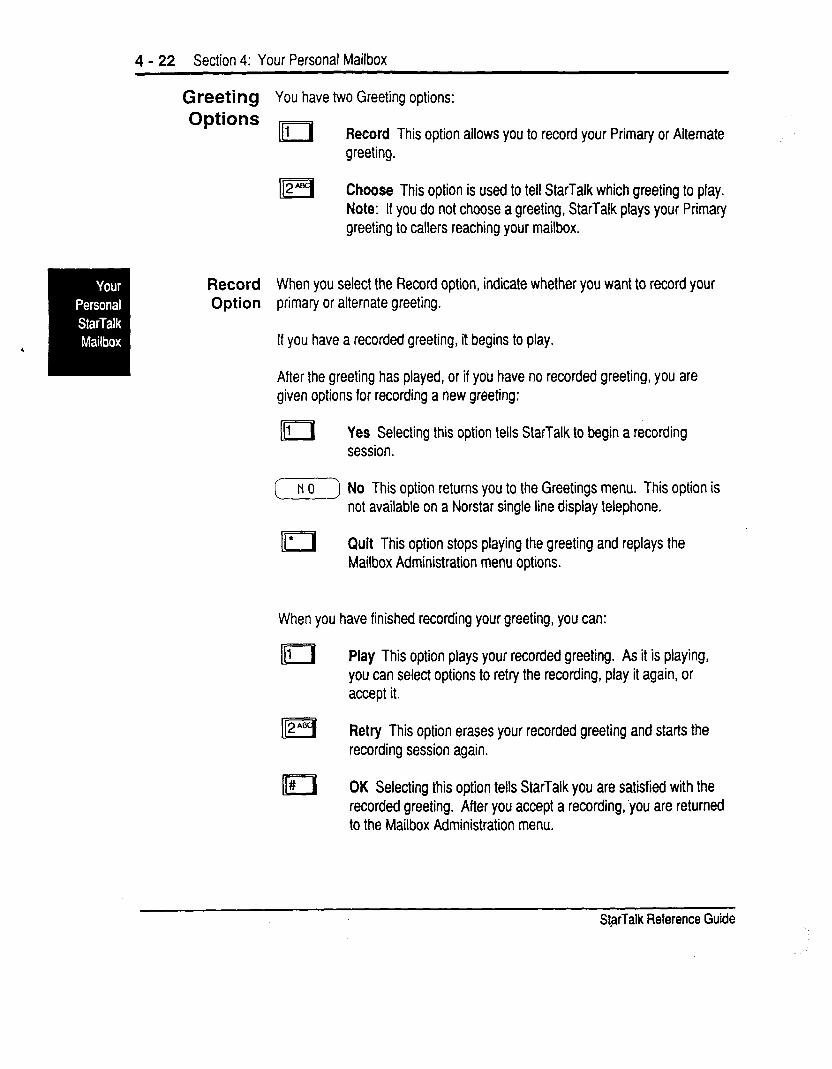
4 - 22 Section 4: Your Personal Mailbox
.
Greeting You have two Greeting options:
Options , II Record This option allows you to record your Primary or Alternate
greeting.
II 2 Choose This option is used to tell StarTalk which greeting to play. Note: If you do not choose a greeting, StarTalk plays your Primary greeting to callers reaching your mailbox.
Record When you select the Record option, indicate whether you want to record your Option primary or alternate greeting.
If you have a recorded greeting, it begins to play.
After the greeting has played, or if you have no recorded greeting, you are given options for recording a new greeting:
II 1 Yes Selecting this option tells StarTalk to begin a recording session.
m No This option returns you to the Greetings menu. This option is not available on a Norstar single line display telephone.
l
II Quit This option stops playing the greeting and replays the Mailbox Administration menu options.
When you have finished recording your greeting, you can:
II 1 Play This option plays your recorded greeting. As it is playing, you can select options to retry the recording, play it again, or accept it.
II 2A Retry This option erases your recorded greeting and starts the recording session again.
II # OK Selecting this option tells StarTalk you are satisfied with the recorded greeting. After you accept a recording, you are returned to the Mailbox Administration menu.
StgrTalk Reference Guide
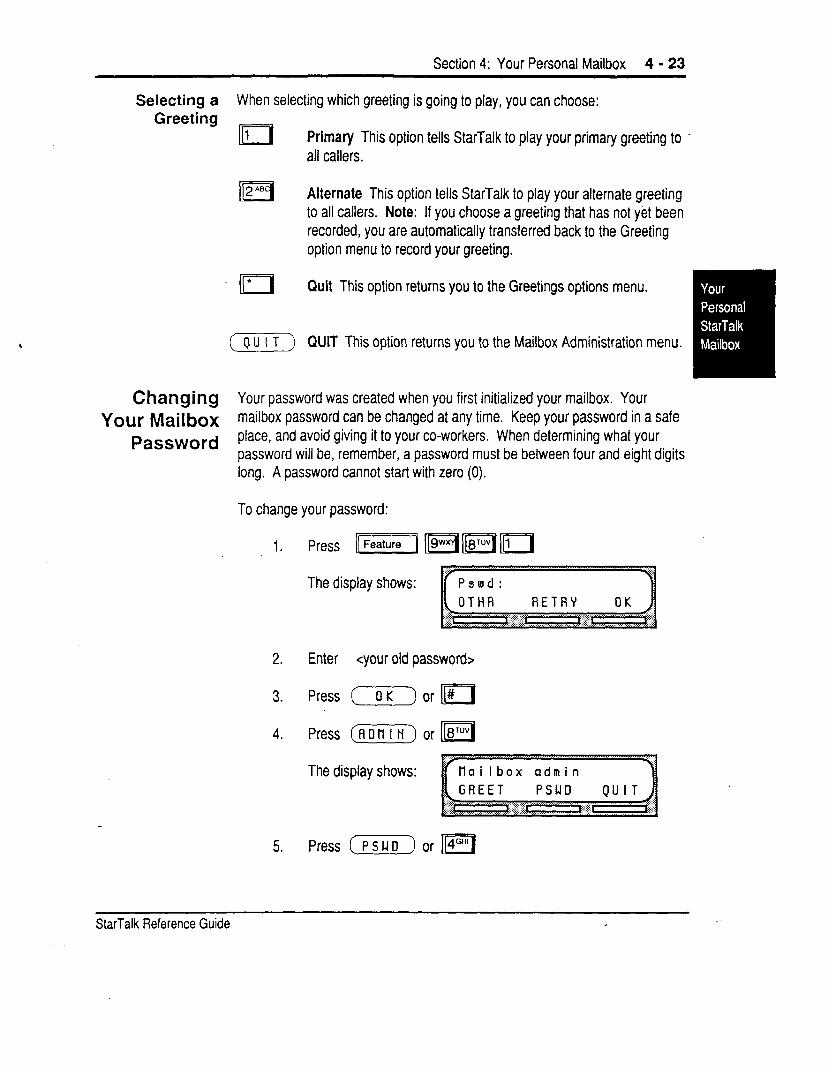
Section 4: Your Personal Mailbox 4 - 23
Selecting a When selecting which greeting is going to play, you can choose: Greeting
II 1 Primary This option tells StarTalk to play your primary greeting to I
all callers.
II 2 AEl Alternate This option tells StarTalk to play your alternate greeting to all callers. Note: If you choose a greeting that has not yet been recorded, you are automatically transferred back to the Greeting option menu to record your greeting.
l II Quit This option returns you to the Greetings options menu.
(m) QUIT This option returns you to the Mailbox Administration menu.
Changing Your password was created when you first initialized your mailbox. Your
Your Mailbox mailbox password can be changed at any time. Keep your password in a safe Password place, and avoid giving it to your co-workers. When determining what your
password will be, remember, a password must be between four and eight digits long. A password cannot start with zero (0).
To change your password:
The display shows:
2. Enter <your old password>
3. Press (OK) or II#
4. Press (R) or m
The display shows:
5. Press (psclo) or 114(3”11
StarTalk Reference Guide
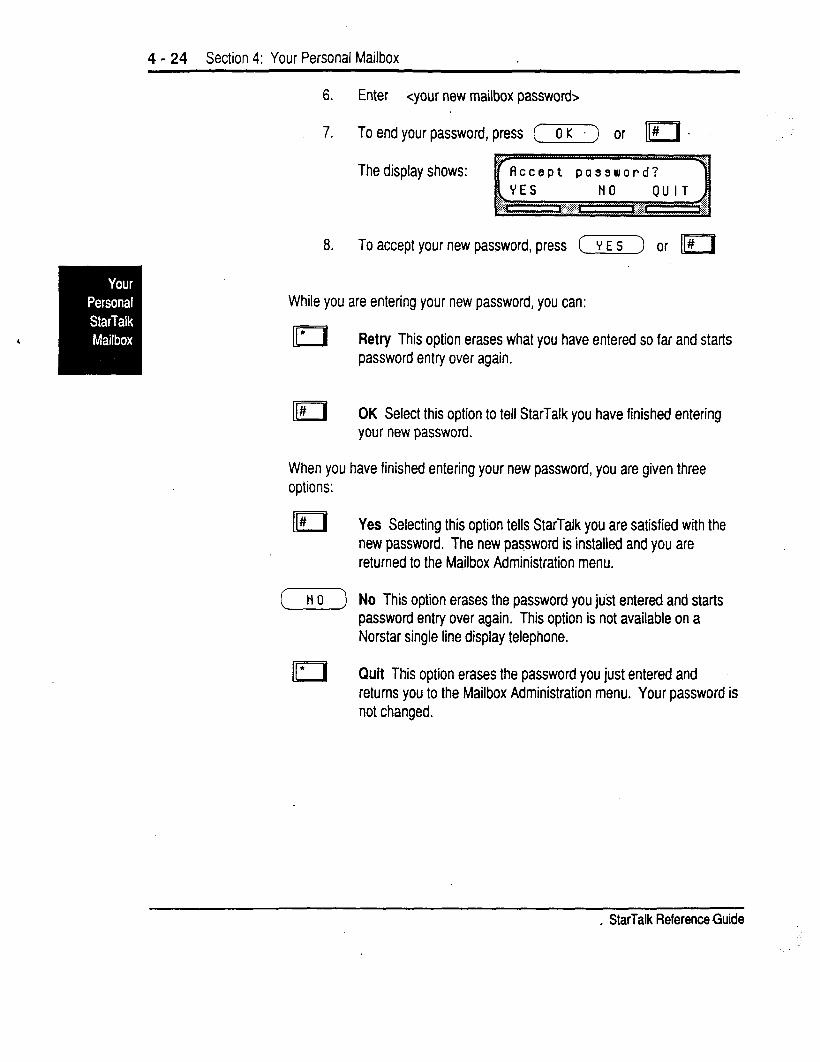
4 - 24 Section 4: Your Personal Mailbox
6.
7.
Enter <your new mailbox password>
To end your password,
The display shows:
press (OK) or 11#1 -
flccept passurord? 3
8. To accept your new password, press (71 II# or
While you are entering your new password, you can:
l
II Retry This option erases what you have entered so far and starts password entry over again.
II # OK Select this option to tell StarTalk you have finished entering your new password.
When you have finished entering your new password, you are given three options:
II #
0
t II
Yes Selecting this option tells StarTalk you are satisfied with the new password. The new password is installed and you are returned to the Mailbox Administration menu.
No This option erases the password you just entered and starts password entry over again. This option is not available on a Norstar single line display telephone.
Quit This option erases the password you just entered and returns you to the Mailbox Administration menu. Your password is not changed.
, StarTalk Reference Guide
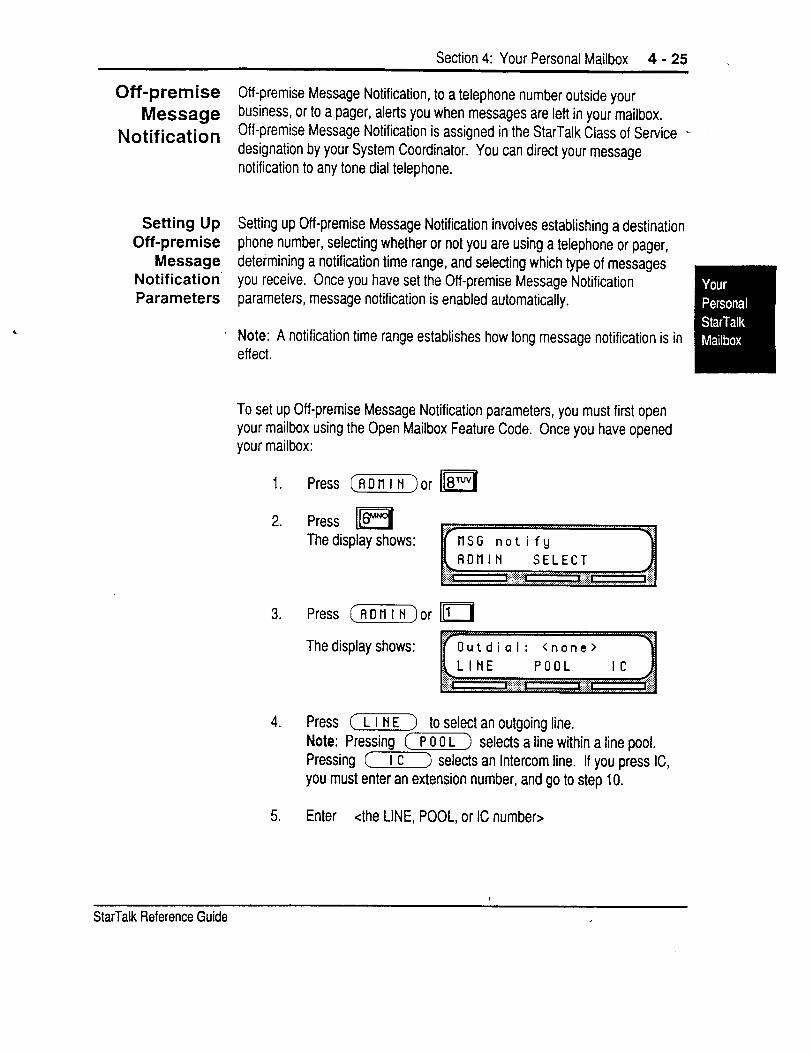
Section 4: Your Personal Mailbox 4 - 25
Off-premise Message
Notification
Setting Up Setting up Off-premise Message Notification involves establishing a destination Off-premise phone number, selecting whether or not you are using a telephone or pager,
Message Notification-
determining a notification time range, and selecting which type of messages you receive. Once you have set the Off-premise Message Notification
Parameters parameters, message notification is enabled automatically.
Off-premise Message Notification, to a telephone number outside your business, or to a pager, alerts you when messages are left in your mailbox. Off -premise Message Notification is assigned in the StarTalk Class of Service _
designation by your System Coordinator. You can direct your message notification to any tone dial telephone.
Note: A notification time range establishes how long message notification is in effect.
To set up Off-premise Message Notification parameters, you must first open your mailbox using the Open Mailbox Feature Code. Once you have opened your mailbox:
1.
2.
Press (RDnln) or
Press m The display shows:
3. Press (7ZXi-K) or
The display shows:
li 8”‘”
4. Press (I-i-Ki?) to select an outgoing line. Note: Pressing (m) selects a line within a line pool. Pressing (Ic) selects an Intercom line. If you press IC, you must enter an extension number, and go to step 10.
5. Enter <the LINE, POOL, or IC number>
StarTalk Reference Guide I
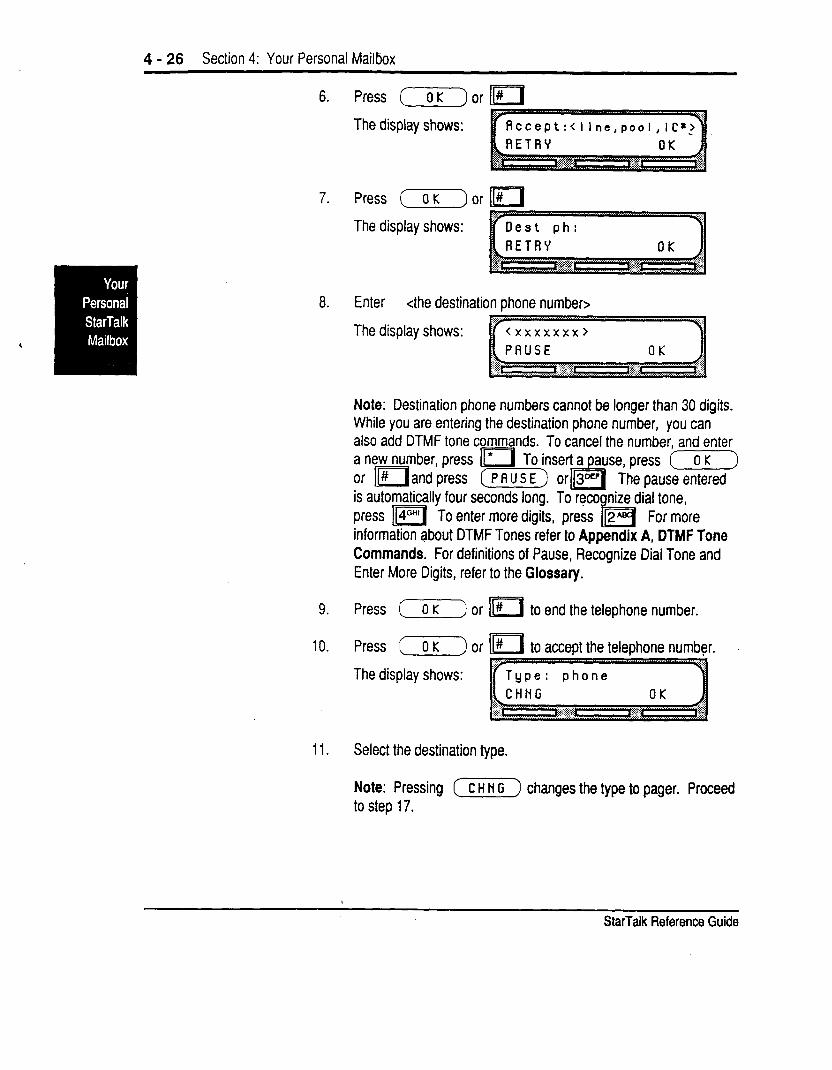
4 - 26 Section 4: Your Personal Mailbox
6. Press (OK) or II#
The display shows:
7. Press (OK) or I(#
The display shows:
a. Enter <the destination phone number>
The display shows:
Note: Destination phone numbers cannot be longer than 30 digits. While you are entering the destination phone number, you can also add DTMF tone a new number, press or II#and press is automatically four seconds long. To reco press 114”“’ To enter more digits, press information about DTMF Tones refer to Appendix A, DTMF Tone Commands. For definitions of Pause, Recognize Dial Tone and Enter More Digits, refer to the Glossary.
9. Press (OK) or II# to end the telephone number.
10. Press (7) or II# to accept the telephone number.
The display shows:
11. Select the destination type.
Note: Pressing (m) changes the type to pager. Proceed to step 17.
StarTalk Reference Guide
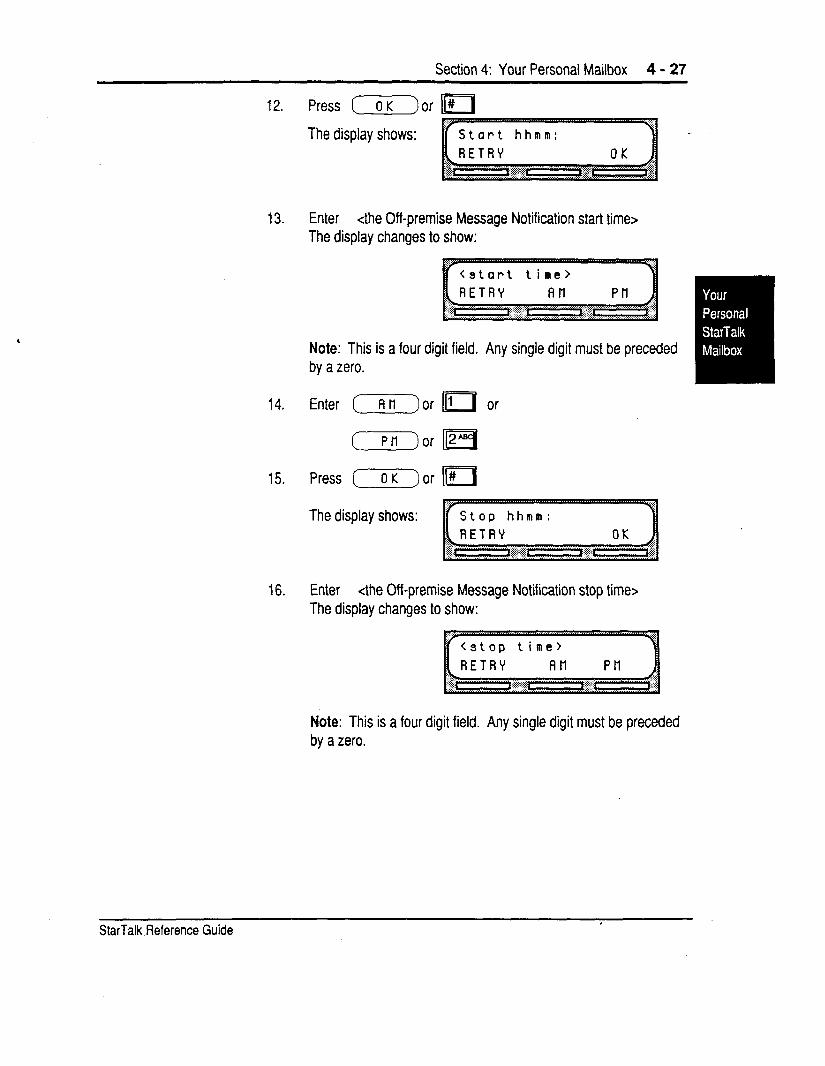
Section 4: Your Personal Mailbox 4 - 27
12.
13.
14. Enter (7) or m or
15. Press IOK) or II#
The display shows:
16. Enter <the Off -premise Message Notification stop time> The display changes to show:
Press (OK)or II#
The display shows: S t a r t h h m KI :
Enter <the Off-premise Message Notification start time> The display changes to show:
Note: This is a four digit field. Any single digit must be preceded by a zero.
Note: This is a four digit field. Any single digit must be preceded by a zero.
StarTalk Reference Guide
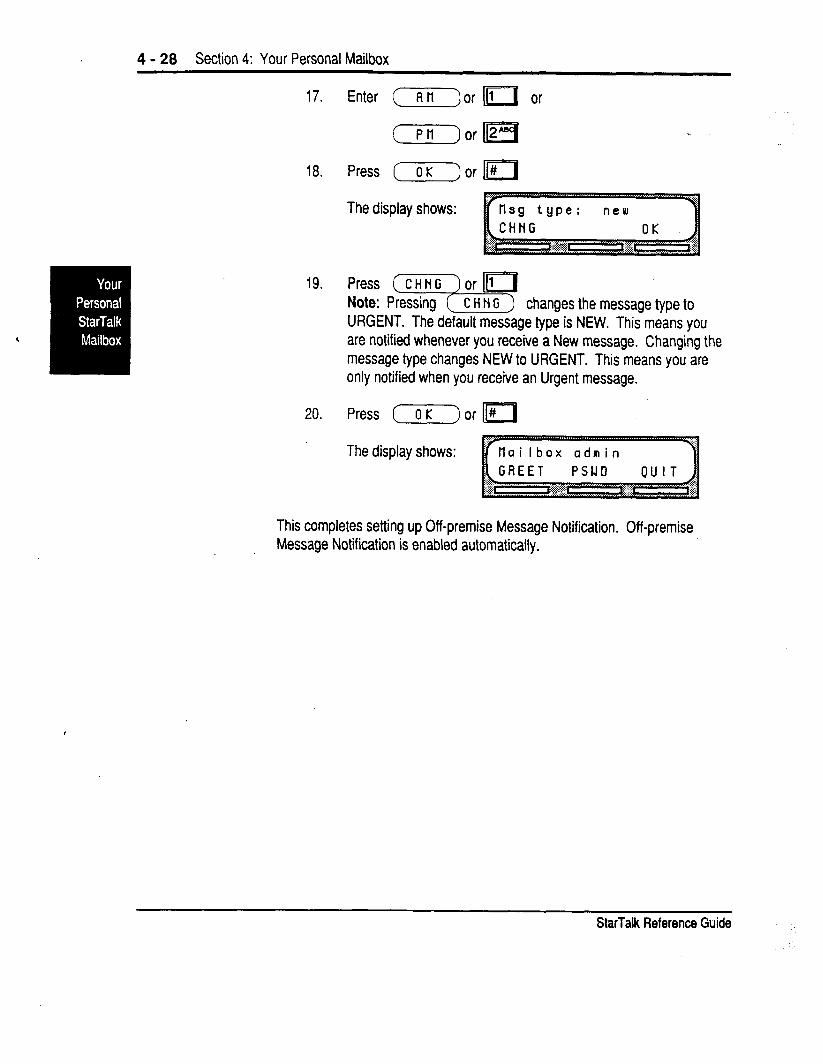
4 - 28 Section 4: Your Personal Mailbox
17. Enter (r) or 111 or
(Ti-) or IFq
18. Press (OK) or Ir#
The display shows: r tt s g t y p e : ‘G
nelil I
19. Press (CHNG )orm Note: Pressing [ C H N G ) changes the message type to URGENT. The default message type is NEW. This means you are notified whenever you receive a New message. Changing the message type changes NEW to URGENT. This means you are only notified when you receive an Urgent message.
20. Press (OK) or il#
Thedisplayshows: 1 tlai I box adm in
This completes setting up Off-premise Message Notification. Off-premise Message Notification is enabled automatically.
StarTalk Reference Guide

Section 4: Your Personal Mailbox 4 - 29
Disabling Off-premise Message Notification can be disabled when you no longer require
Off -premise this option. Disabling does not affect any of the parameters assigned to Off-
Message premise Message Notification.
Notif ication To disable Off -premise Message Notification, you must first open your mailbox using the Open Mailbox Feature Code. Once you have opened your mailbox:
1. Press (A) or us_I
2.
3. Press (SELECT) or 112”1
The display shows:
Note: Pressing (-1 allows you to verify the start and stop time parameters.
4’ L% iwzhanges the display to show:
5. Press (oulT) or l II
Off -premise Message Notification is now disabled.
StarTalk Reference Guide I
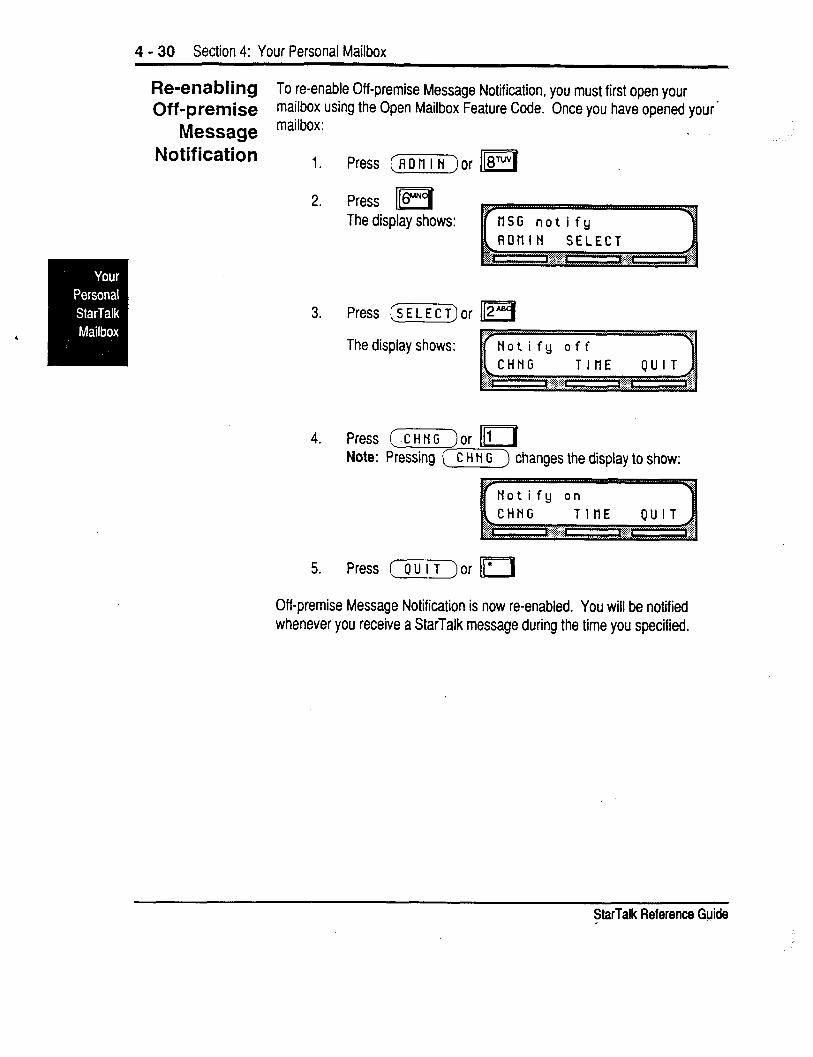
4 - 30 Section 4: Your Personal Mailbox
Re-enabling To re-enable Off-premise Message Notification, you must first open your Off-premise . mailbox using the Open Mailbox Feature Code. Once you have opened your-
Message marlbox:
Notification 1. Press (R) or
2. Press [m The display shows:
3. Press (5EE7) or
The display shows:
4. Press (_CHNG) or Ir 1 Note: Pressing (FTchanges the display to show:
5. Press (OulT) or II.
Off-premise Message Notification is now re-enabled. You will be notified whenever you receive a StarTalk message during the time you specified.
StarTalk Reference Guide
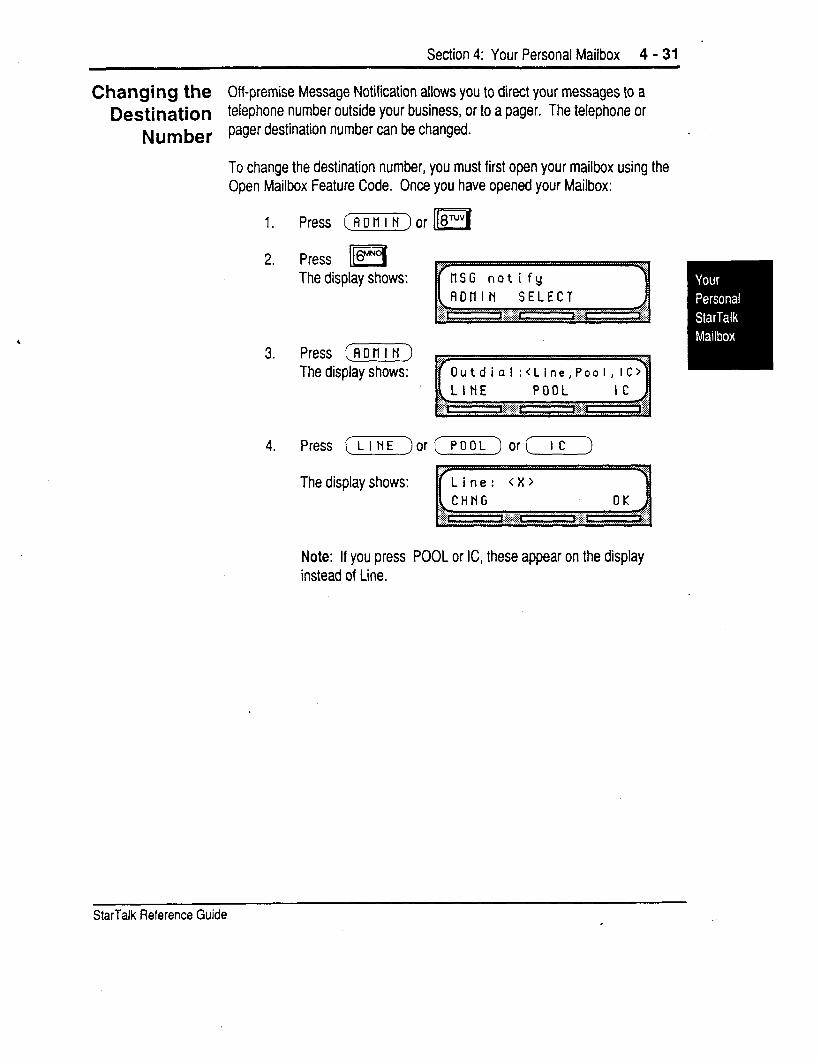
Section 4: Your Personal Mailbox 4 - 31
Changing the Off-premise Message Notification allows you to direct your messages to a
Destination telephone number outside your business, or to a pager. The telephone or Number pager destination number can be changed.
To change the destination number, you must first open your mailbox using the Open Mailbox Feature Code. Once you have opened your Mailbox:
1. Press (ADnlN) or lm
2. Press p II The display shows:
3. The display shows:
4. Press (LINE) or (-FCZC-) or (Ic)
The display shows:
Note: If you press POOL or IC, these appear on the display instead of Line.
StarTalk Reference Guide I

4 - 32 Section 4: Your Personal Mailbox
5. Press (OK) The display shows:
6. Press (CHHc) The display shows:
7. Enter the new destination number. Note: To cancel the number and enter a new number, press m To insert a pause, press (OK) or II# and press (m) or m The pause entered is
four seconds long. To recognize dial tone, To enter more digits, press m For more
information about DTMF Tones refer to Appendix A, DTMF Tone Commands.
8. Press (7) to end the new number.
9. Press ( 0 K ) to accept the new number.
The destination number is now changed. To end this StarTalk session, press [Rls
StarTalk Reference Guide I
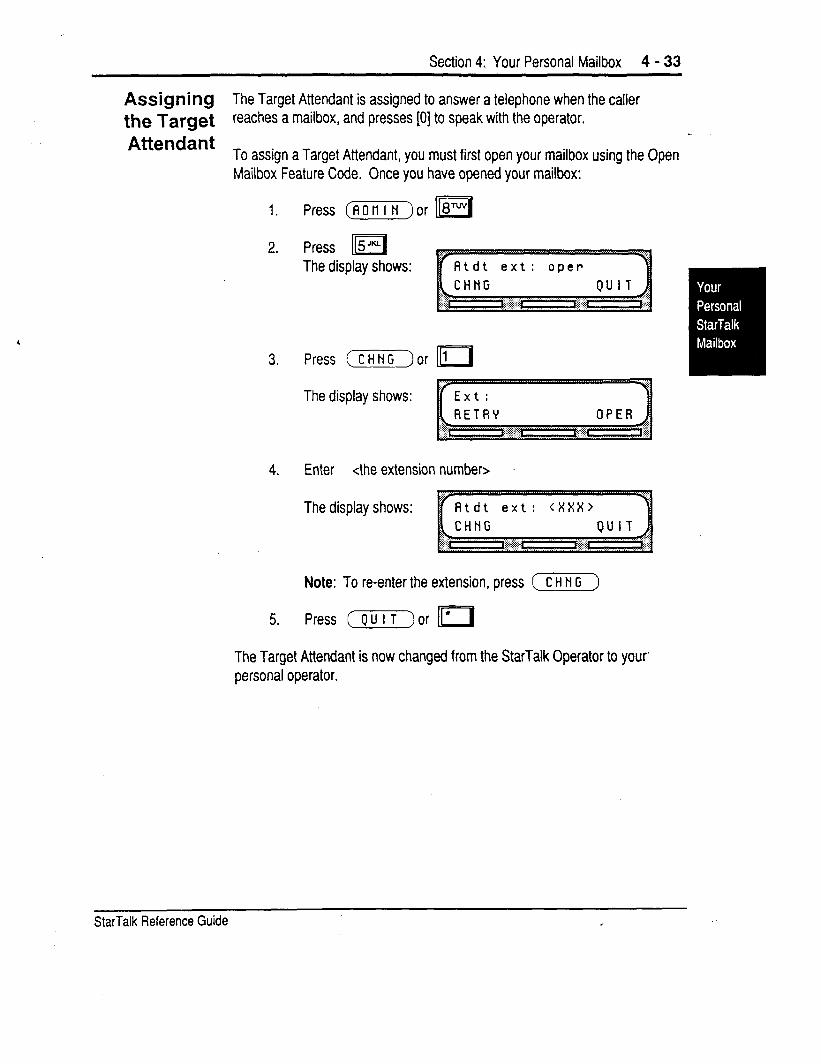
Section 4: Your Personal Mailbox 4 - 33
Assigning The Target Attendant is assigned to answer a telephone when the caller
the Target reaches a mailbox, and presses [O] to speak with the operator.
Attendant To assign a Target Attendant, you must first open your mailbox using the Open Mailbox Feature Code. Once you have opened your mailbox:
1.
2.
Press (ii) or
Press m The display shows:
3. Press (%KK) or
The display shows:
4. Enter <the extension number>
The display shows:
Note: To re-enter the extension, press (m)
5. Press (pulT) or II’
The Target Attendant is now changed from the StarTalk Operator to your’ personal operator.
StarTalk Reference Guide I

4 - 34 Section 4: Your Personal Mailbox
, StarTalk Referencg Guide
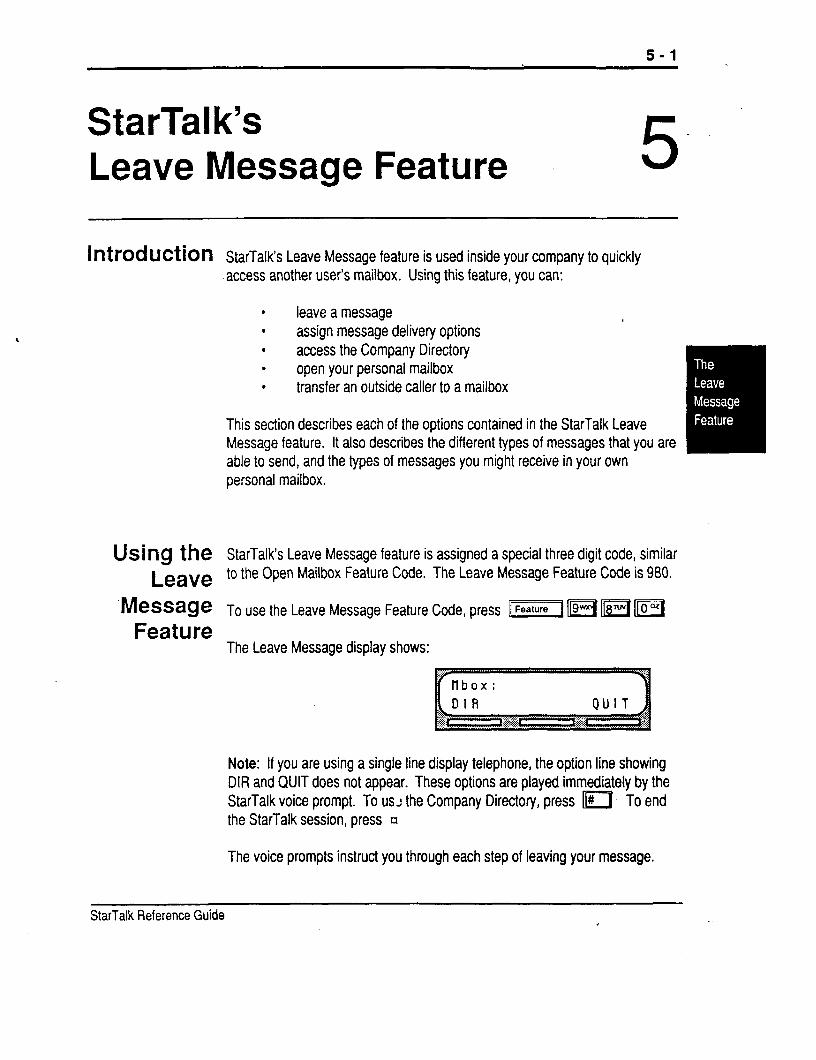
5-l
StarTalk’s Leave Message Feature
Introduction StarTalk’s Leave Message feature is used inside your company to quickly -access another user’s mailbox. Using this feature, you can:
. leave a message
. assign message delivery options
. access the Company Directory
. open your personal mailbox
. transfer an outside caller to a mailbox
This section describes each of the options contained in the StarTalk Leave Message feature. It also describes the different types of messages that you are able to send, and the types of messages you might receive in your own personal mailbox.
USitlCJ the StarTalk’s Leave Message feature is assigned a special three digit code, similar Leave to the Open Mailbox Feature Code. The Leave Message Feature Code is 980.
-Message T o use the Leave Message Feature Code, press I(= 119-3 ‘m m
Feature The Leave Message display shows:
Note: If you are using a single line display telephone, the option line showing DIR and QUIT does not appear. These options are played immediately by the StarTalk voice prompt. To USJ the Company Directory, press m To end the StarTalk session, press II
The voice prompts instruct you through each step of leaving your message.
StarTalk Reference Guide

5 - 2 Section 5: Leaving a Message
Assigning Message delivery options allow you to assign a delivery option to any message
Message that you are sending to a StarTalk mailbox. After you have recorded your
Delivery mailbox message, to access message delivery options press m To assign one of the delivery options, press the appropriate delivery option
Options number.
StarTalk provides you with four message delivery options, which are:
Certified
Urgent
Private
Normal
( CERT) or
&IRGENT) or
(_PRlU) or
(~~ti~)or
This delivery option sends you notifica- tion that your message has been received and read.
This delivery option marks the mes- sage, and plays it before playing other messages left in the mailbox.
This delivery option prevents a mes- sage from being forwarded to another mailbox.
This delivery option sends a message to a mailbox. Normal messages are listened to in the order they are received, and can be forwarded to other mailboxes.
StarTalk Reference Guide
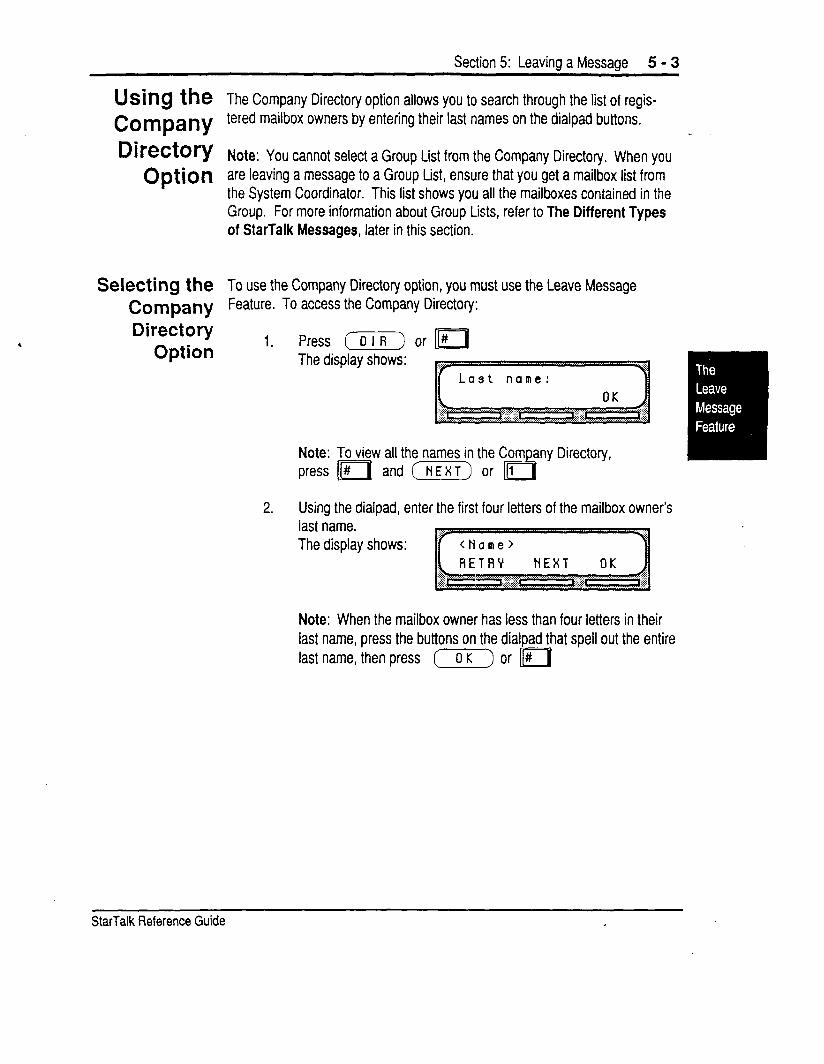
Section 5: Leavina a Messaae 5 - 3
Using the Company Directory
Option
Selecting the Company Directory
Option
The Company Directory option allows you to search through the list of regis- tered mailbox owners by entering their last names on the dialpad buttons.
Note: You cannot select a Group List from the Company Directory. When you are leaving a message to a Group List, ensure that you get a mailbox list from the System Coordinator. This list shows you all the mailboxes contained in the Group. For more information about Group Lists, refer to The Different Types of StarTalk Messages, later in this section.
To use the Company Directory option, you must use the Leave Message Feature. To access the Company Directory:
1. Press (olR) or II# The display shows:
Note: To view all the names in the Company Directory, press II# and (HEX] or 111
2. Using the dialpad, enter the first four letters of the mailbox owner’s last name. The display shows:
Note: When the mailbox owner has less than four letters in their last name, press the buttons on the dialpad that spell out the entire last name, then press (OK) or li#
StarTalk Reference Guide I
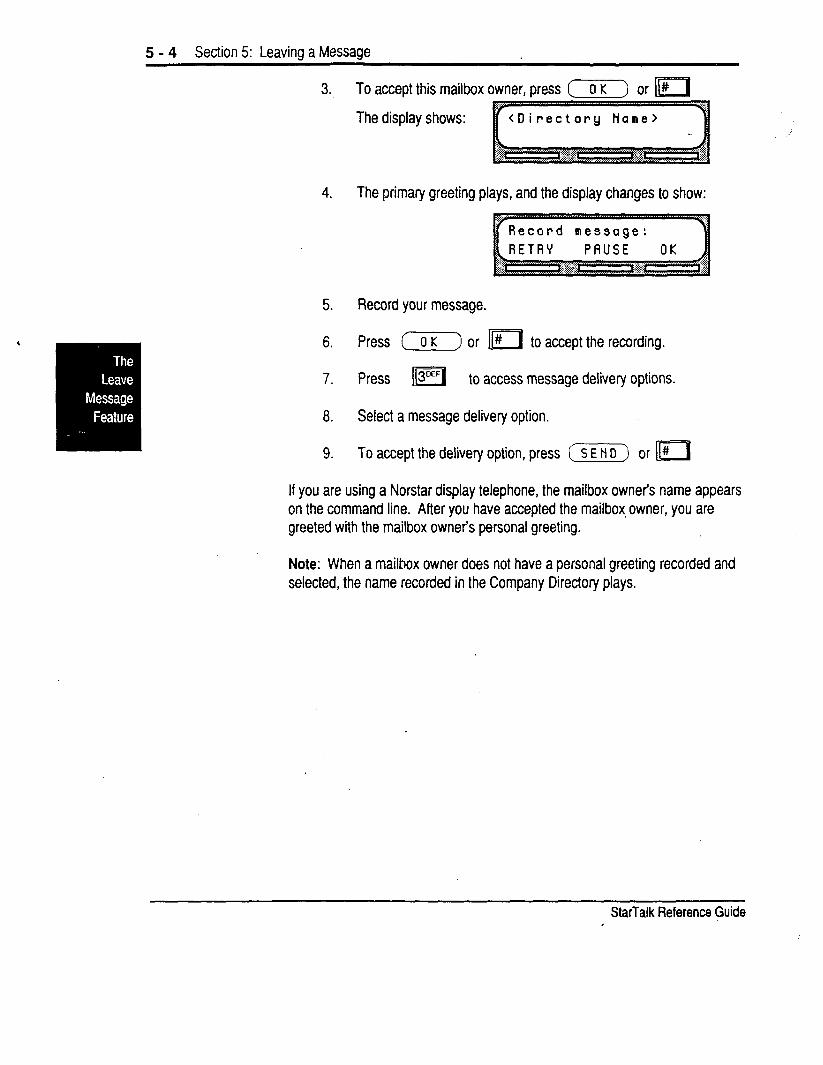
5 - 4 Section 5: Leaving a Message
3. To accept this mailbox owner, press (7) or m
The display shows:
4. The primary greeting plays, and the display changes to show:
5. Record your message.
6. Press (7) or m to accept the recording.
7. Press II 3oEF to access message delivery options.
8. Select a message delivery option.
9. To accept the delivery option, press (K) or II#
If you are using a Norstar display telephone, the mailbox owners name appears on the command line. After you have accepted the mailbox, owner, you are greeted with the mailbox owner’s personal greeting.
Note: When a mailbox owner does not have a personal greeting recorded and selected, the name recorded in the Company Directory plays.
StarTalk Reference Guide I
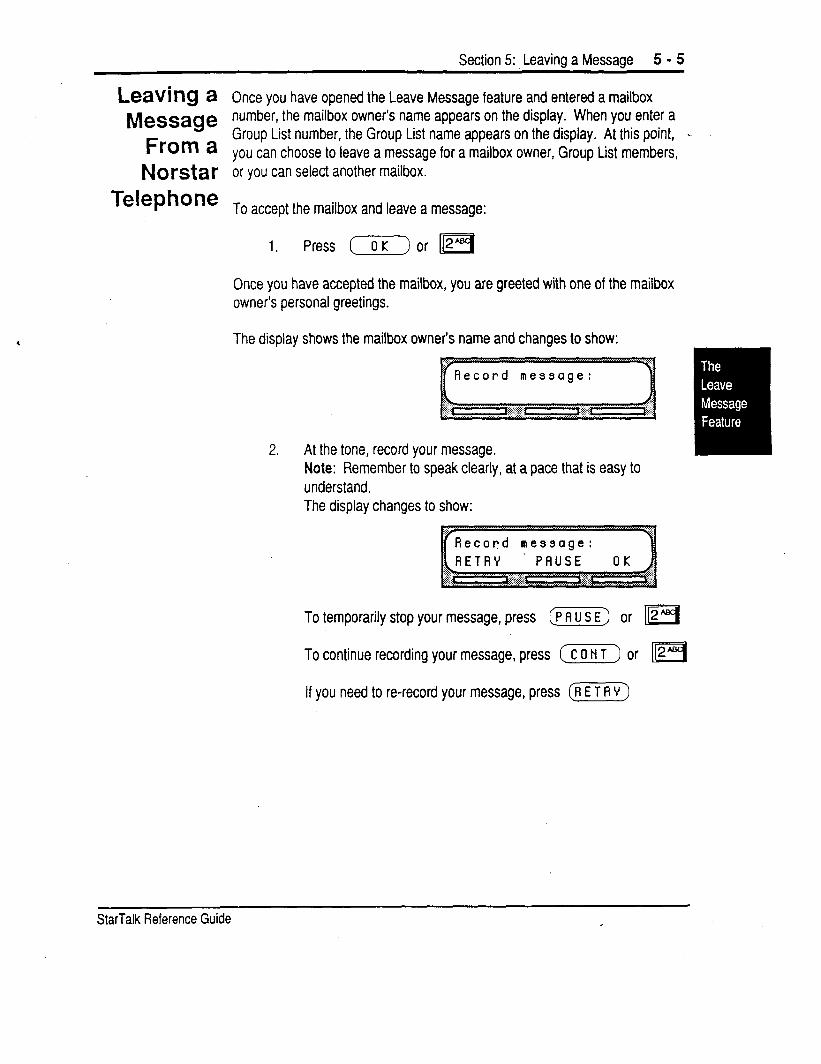
Section 5: Leaving a Message 5 - 5
Lead ng a Once you have opened the Leave Message feature and entered a mailbox
Message number, the mailbox owner’s name appears on the display. When you enter a
From a Group List number, the Group List name appears on the display. At this point, . you can choose to leave a message for a mailbox owner, Group List members,
Norstar or you can select another mailbox.
Telephone To accept the mailbox and leave a message:
1. Press (OK) or Ir2CBC(
Once you have accepted the mailbox, you are greeted with one of the mailbox owner’s personal greetings.
The display shows the mailbox owner’s name and changes to show:
~~
2. At the tone, record your message. Note: Remember to speak clearly, at a pace that is easy to understand. The display changes to show:
To temporarily stop your message, press (A] or 1m
To continue recording your message, press (F) or m
If you need to re-record your message, press (_RmY)
StarTalk Reference Guide I
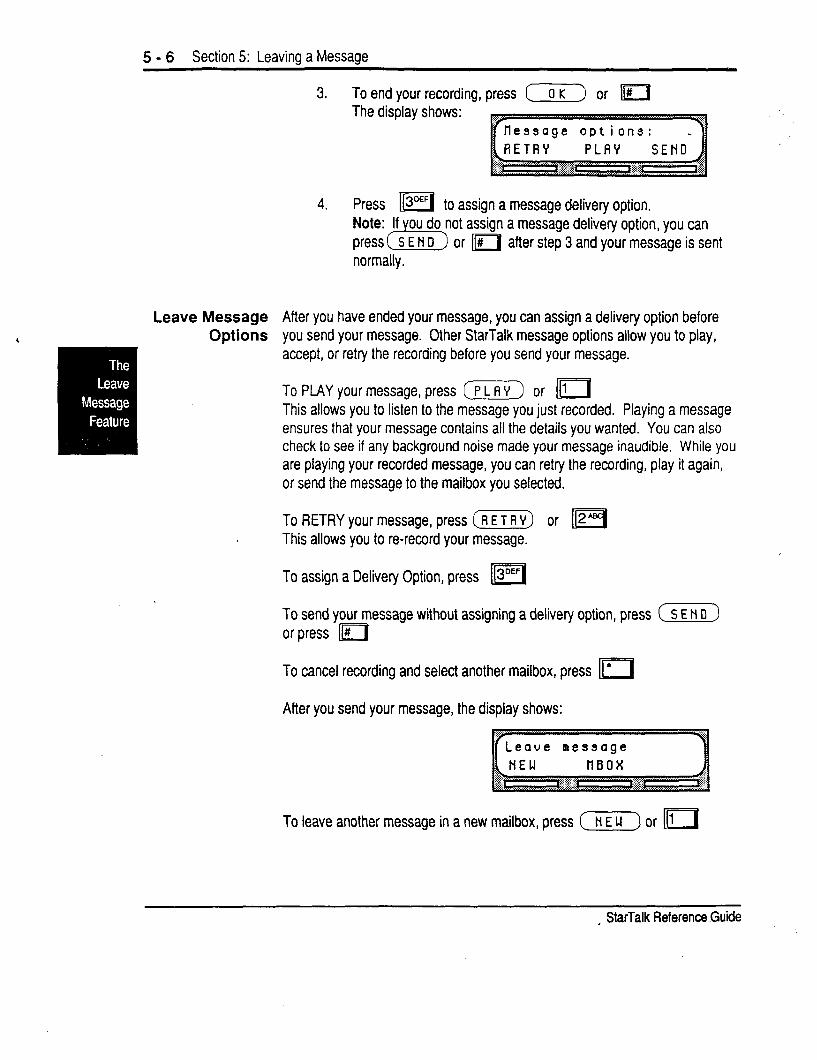
5 - 6 Section 5: Leaving a Message
Leave Message Options
3. To end your recording, press (7) or n The display shows:
4. Press m to assign a message delivery option. assign a message delivery option, you can
or II# after step 3 and your message is sent normally.
After you have ended your message, you can assign a delivery option before you send your message. Other StarTalk message options allow you to play, accept, or retry the recording before you send your message.
To PLAY your message, press (PLAY) or 111 This allows you to listen to the message you just recorded. Playing a message ensures that your message contains all the details you wanted. You can also check to see if any background noise made your message inaudible. While you are playing your recorded message, you can retry the recording, play it again, or send the message to the mailbox you selected.
To RETRY your message, press (RE] m or This allows you to re-record your message.
To assign a Delivery Option, press [m
To send your message without assigning a delivery option, press c S E N 0 ) or press II#
To cancel recording and select another mailbox, press m
After you send your message, the display shows:
To leave another message in a new mailbox, press (NEW] or 111
, StarTalk Reference Guide
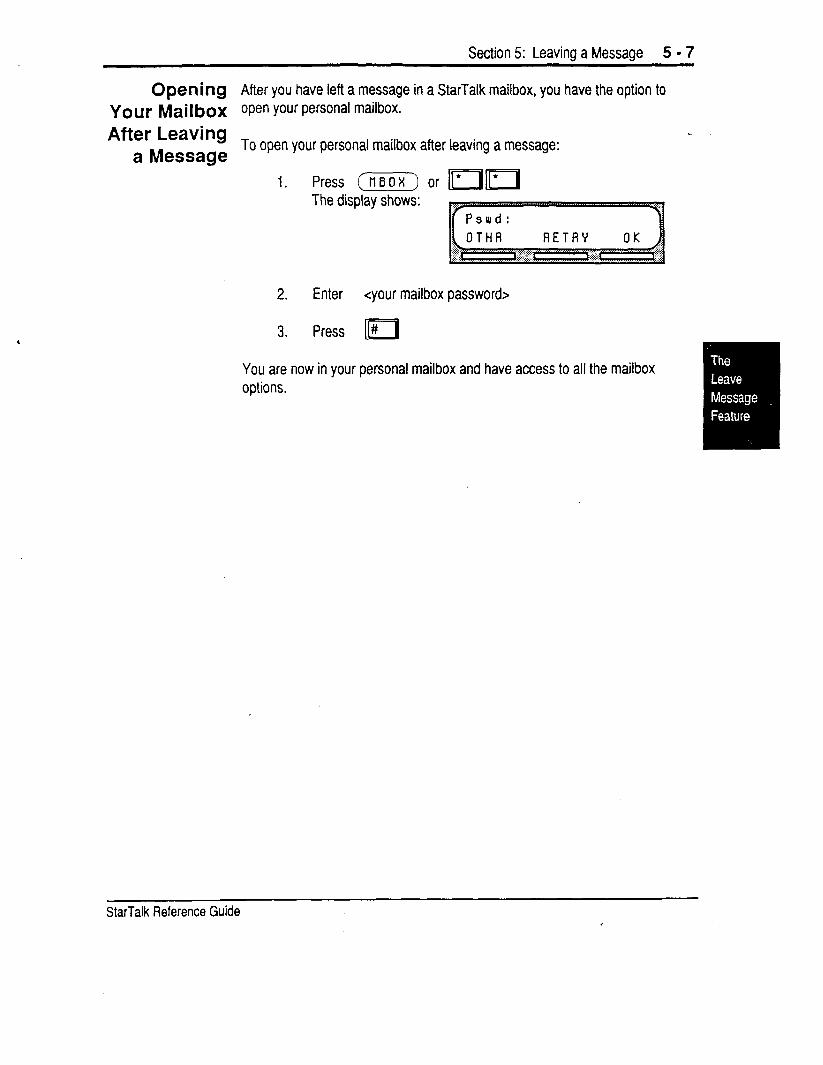
Section 5: Leaving a Message 5 - 7
OpetIing After you have left a message in a StarTalk mailbox, you have the option to Your Mailbox open your personal mailbox.
After Leaving a Message
To open your personal mailbox after leaving a message:
1. Press (neox) or mr[ The display shows:
2. Enter <your mailbox password>
3. Press II#
You are now in your personal mailbox and have access to all the mailbox options.
StarTalk Reference Guide
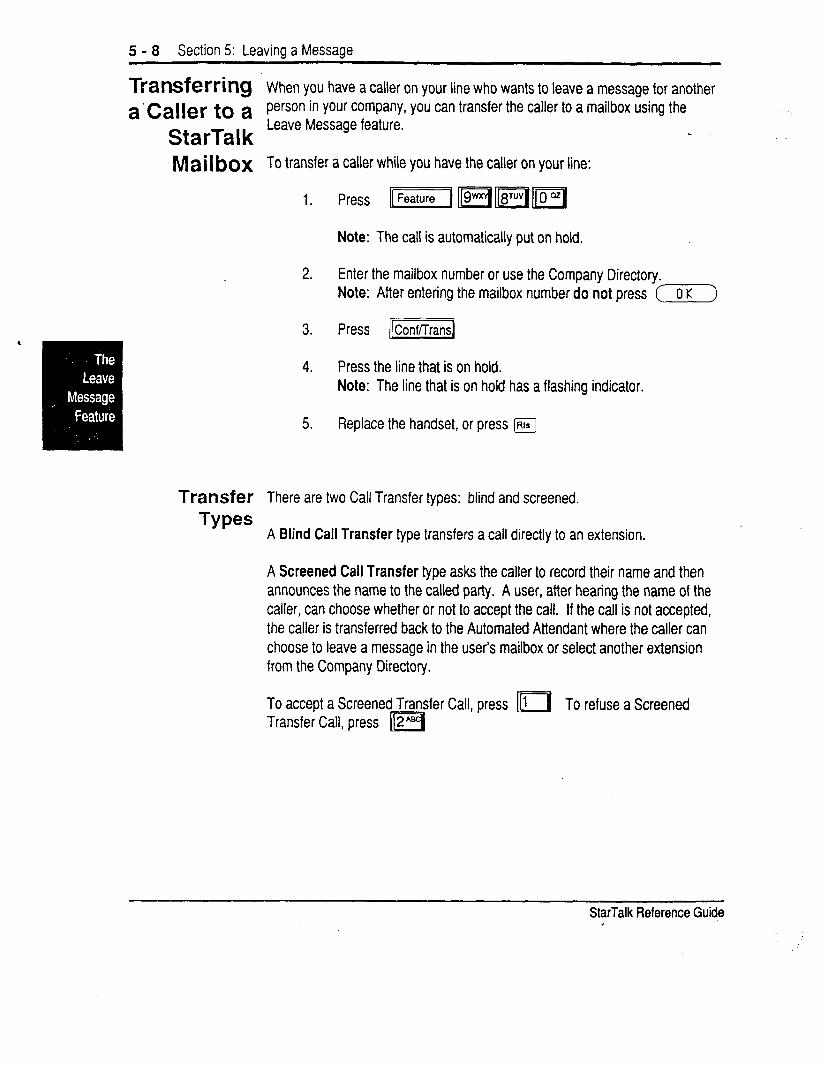
5 - 8 Section 5: Leavina a Messaae
Transferring a’caller to a
StarTalk Mailbox
Transfer TY Pes
When you have a caller on your line who wants to leave a message for another person in your company, you can transfer the caller to a mailbox using the Leave Message feature.
To transfer a caller while you have the caller on your line:
Note: The call is automatically put on hold.
2. Enter the mailbox number or use the Company Directory. Note: After entering the mailbox number do not press (-6?-)
3.
4.
5.
Press /[Conf/lransl
Press the line that is on hold. Note: The line that is on hold has a flashing indicator.
Replace the handset, or press m
There are two Call Transfer types: blind and screened.
A Blind Call Transfer type transfers a call directly to an extension.
A Screened Call Transfer type asks the caller to record their name and then announces the name to the called party. A user, after hearing the name of the caller, can choose whether or not to accept the call. If the call is not accepted, the caller is transferred back to the Automated Attendant where the caller can choose to leave a message in the users mailbox or select another extension from the Company Directory.
To accept a Screened Transfer Call, press 111 To refuse a Screened Transfer Call, press 112-1
StarTalk Reference Guide I
Section 5: Leavina a Messaae 5 - 9
The Different Types of StarTalk
Messages
StarTalk’s Group
Message
About the Group List
There are two types of messages that you can send:
. a single message to a mailbox
. a group message
Since we have already told you about sending a message and message delivery options, the following section only discusses sending the same message to several mailboxes.
A group message sends the same message to several mailboxes contained in a Group List. You can send a Group List message the same way you send all StarTalk messages. All Group Lists are created by your company’s System Coordinator.
A Group List is a collection of mailbox numbers. When you send a message to a Group List, each mailbox that is included in the Group List receives the same message. Your System Coordinator should publish a list of the mailboxes in each Group List so that each mailbox owner knows which mailboxes receive the Group List message.
Your own mailbox is the exception to this rule. When you are a member of a Group List, and you send a message to the mailboxes included in the List, your mailbox does not receive your message.
If you would like a Group List for your specific needs, ask your System Coordi- nator to create a Group List for you. When you give the System Coordinator the information, you should include:
1. All the mailbox owners’ names. 2. A list of the mailbox numbers. 3. The Group List name.
Note: You cannot send a Group List message unless your StarTalk Class of Service is enabled with this privilege. For more information, see your System Coordinator.
.
StarTalk Reference Guide
5 - 10 Section 5: Leaving- a Message .
Broadcast There might be times when you open your personal mailbox and a message Messages plays immediately. Do not be alarmed. This is a Broadcast Message left by
your System Coordinator. This special type of message can only be sent by your company’s System Coordinator. Be sure to listen to the entire message. Once it plays, the message is automatically deleted from your mailbox.
, StarTalk Reference Guide
6-1 * ,
Telephone Etiquette
Introduction StarTalk is an easy to use, powerful voice messaging system. It is designed to save you time and increase your job productivity. This section describes some easy to follow guidelines for operating StarTalk.
Telephone To take advantage of StarTalk and its many features, please follow these Etiquette SUggeStiOnS:
Listen to your messages frequently. Paying prompt attention to your messages encourages callers to use StarTalk, and reassures them that this efficient form of communication is as reliable as speaking with you personally. You do not have to be at your desk to play your messages. You can do this from any tone dial telephone, anywhere. With StarTalk, your mailbox is as close as the nearest telephone.
Clean up your mailbox. There is a limited amount of message storage space both in your mailbox, and within StarTalk. Do not save messages unless you need to listen to them again. When you are finished with a message, erase the message to free up storage space for yourself and other mailbox owners. Remember to erase new and saved messages as soon as you are finished listening to them.
Keep a record of your password In a secure place. Treat your StarTalk password just as you would a secret code. Write down your password and keep it in a safe place. Do not keep your password near your telephone. If, for any reason, you let someone else have temporary access to your mailbox, change your password afterwards. If you forget your password, the System Coordinator can reset it to the default password 0000. You can then enter a new password.
StarTalk Reference Guide .
6 - 2 Section 6: Teleohone Etiauette
When sending messages, make them short and to the point. Sending messages is a highly effective way of communicating with your co-workers. Over 75% of the time spent on a normal business telephone call consists of making small talk, pleasantries, and other socializing. Sending a message rather than making a call can save you time. Although you should avoid sounding hurried, impersonal, or rude, try to confine your messages to the essentials.
Change your primary greeting frequently. Although StarTalk’s alternate greeting feature makes it possible for you to have two recorded greetings, it is a good idea to change your primary greeting on a regular basis. Changing your greeting indicates that you listen to your messages and maintain your mailbox on a regular basis. Changing your primary greeting provides a personal touch that frequent callers will appreciate.
Make your alternate greeting specific. Choosing an alternate greeting usually means something out of the ordinary is happening. Your greeting should fully explain your situation without becoming too personal. If you are out of the office, specify when you expect to return. If you will be checking your mailbox even though you are out of the office, make that clear. If callers can reach you at another telephone number, ensure your message includes the telephone number and the length of the temporary arrangement. If you are going to be out of the office, remember to forward your telephone to StarTalk.
Take care when recording your greetings and messages. For a better quality recording, speak directly into the handset. Do not use the handsfree feature. Remember to speak clearly with a pleasant voice, at a pace that is easy to understand. Do not speak too softly or loudly or make the greeting or message too lengthy. After recording a greeting or message, you can play it back before accepting it to make sure the greeting or message sounds the way you intended.
Do not forget to use the “Copy” and “Reply” features. You can use StarTalk to send copies of messages to other mailboxes and reply to messages with a message of your own. When sending copies of messages to other people, ensure your introduction clearly explains why you are forwarding a copy of the message. Is the copy for information only? Should the message have originally been sent to the person to whom you are forwarding it? Whose responsibility is it to take action on the message?
, StarTalk Reference-Guide

Section 6: Teleohone Etiauette 6 - 3
Use Group Lists for multlple copies of messages. If you find that you regularly send the same message to several different people, ask the System Coordinator to create a Group List for you. Group Lists save time and effort. .
With a Group List, you can send the same message to all the mailboxes included in the Group List.
Encourage StarTalk use. Old habits are sometimes hard to break, and some people have difficulty accepting or even trying new technologies. Use your personal mailbox and other StarTalk features, and encourage your co-workers and frequent callers to use them too.
Report problems promptly. Should you encounter problems using StarTalk, report the trouble to the System Coordinator as soon as possible. Send a message to the System Coordinator or Trouble Mailbox and explain the problem.
StarTalk Reference Guide I
6 - 4 Section 6: Telephone Etiquette
StarTalk Reference Guide
7-1
Troubleshooting 7- Introduction
Trouble StarTalk’s Trouble Mailbox is available to any StarTalk user who encounters
Mailbox problems operating the features, options, or mailboxes.
The Automated Attendant seems to
transfer some callers to the
General Delivery Mailbox.
This section describes some problems that might occur while you are using StarTalk. This section covers:
. Trouble Mailbox * Full Mailboxes . Lost Passwords . Company Directory . Timeout
The problems you encounter while using StarTalk are usually operating problems, Sometimes a difficulty might occur that would indicate a system problem with the StarTalk module. When strange or unusual happenings occur that are not covered in this section, report them to your System Coordinator immediately.
This Special Mailbox can be used to store messages that describe what the problem was and the time it occurred. If you encounter a problem using StarTalk, immediately forward a copy of problem messages and report all the details of the situation to the Trouble Mailbox.
StarTalk requires a tone signal and a minimum voice level. If a response is not received, the caller is automatically transferred to the receptionist or designated operator. If the operator is not available, the call is transferred to the General Delivery Mailbox.
It might be possible that two mailboxes are assigned the same extension number. Inform your System Coordinator and ask to verify that the correct extension and mailbox are assigned.
StarTalk Reference Guide I
7 - 2 Section 7: Troubleshooting
My telephone If you are attempting to forward your telephone to StarTalk and the display cannot be shows 1 F o P w a P d d en i e d 1 you might be forwarding to the wrong
forwarded to extension. Verify that you are calling the right StarTalk DN using Feature _
StarTalk. Code 985.
Feature 981 produces a
‘LOG’ prompt on my Norstar
display.
My mailbox is not
accepting
I have forgotten my mailbox
password.
My name is not played in the
Company Directory.
Whenever the Log prompt appears on the display, it can be caused by:
1. The station you are using might not have an operating mailbox. If the telephone does not have a mailbox, StarTalk will request both a Mailbox Number and a password.
2. A Guest mailbox, which normally does not have an assigned extension. Ask your System Coordinator to verify that your extension number is properly assigned to your mailbox.
3. The telephone you are using might have two or more mailboxes assigned to that extension. See your System Coordinator.
A mailbox will not accept messages when:
1. A mailbox is full. When a mailbox is full, you must delete all or some of the messages in the mailbox.
2. The mailbox is not initialized. A mailbox cannot receive messages until it has been initialized by the mailbox owner. Initialize your mailbox. Refer to the StarTalk User Card, or refer to Section 4, Initializing Your Mailbox.
A forgotten password cannot be recovered. Your old password must be reset to the default password 0000. Once the System Coordinator has reset your password, you must open your mailbox and change the default password.
Check to ensure that your mailbox has been initialized. If your mailbox is not initialized, your name is not played in the Company Directory, nor can your mailbox receive any messages. If you have recorded your Directory name, ask your System Coordinator to ensure that the Company Directory Override is not set to NO.
@Talk Reference Guide
Section 7: Troubleshooting 7 - 3
StarTalk Timeout
Messages are Cut Off
Mailbox Full Too
Often
Wrong Prompt
Language
Message Notification
does not work.
StarTalk’s Timeout feature allows 5 seconds for you to make your option choice. When StarTalk does not detect an option selection, the Automated Attendant replays the option list. If an option is still not selected, StarTalk transfers the .
caller to the receptionist or designated StarTalk operator.
Note: StarTalk has minimum voice level detection. When StarTalk does not detect an audio signal, it requests the caller to speak up and provides the option to re-record. If no voice level is detected after the prompt, StarTalk ends the session.
If people need to leave long messages in your mailbox (up to 10 minutes), you can ask the System Coordinator to assign a Class of Service to your mailbox which allows a longer maximum message length.
If you find that you need more message time in your mailbox, you can ask your System Coordinator to assign a Class of Service to your mailbox that allows a longer total message time for your mailbox.
If the wrong language appears on the display of your Norstar telephone, ask the System Coordinator to change your mailbox Class of Service.
If Off -premise Message Notification does not work, ask the System Coordinator to check the notification parameters. Also, ask the System Coordinator to check your mailbox Class of Service ensuring Off -premise Message Notification is allowed. Ensure the destination number and time parameters are correct and enabled.
StarTalk Reference Guide I
7 - 4 Section 7: Troubleshooting
, StarTalk Reference Guide
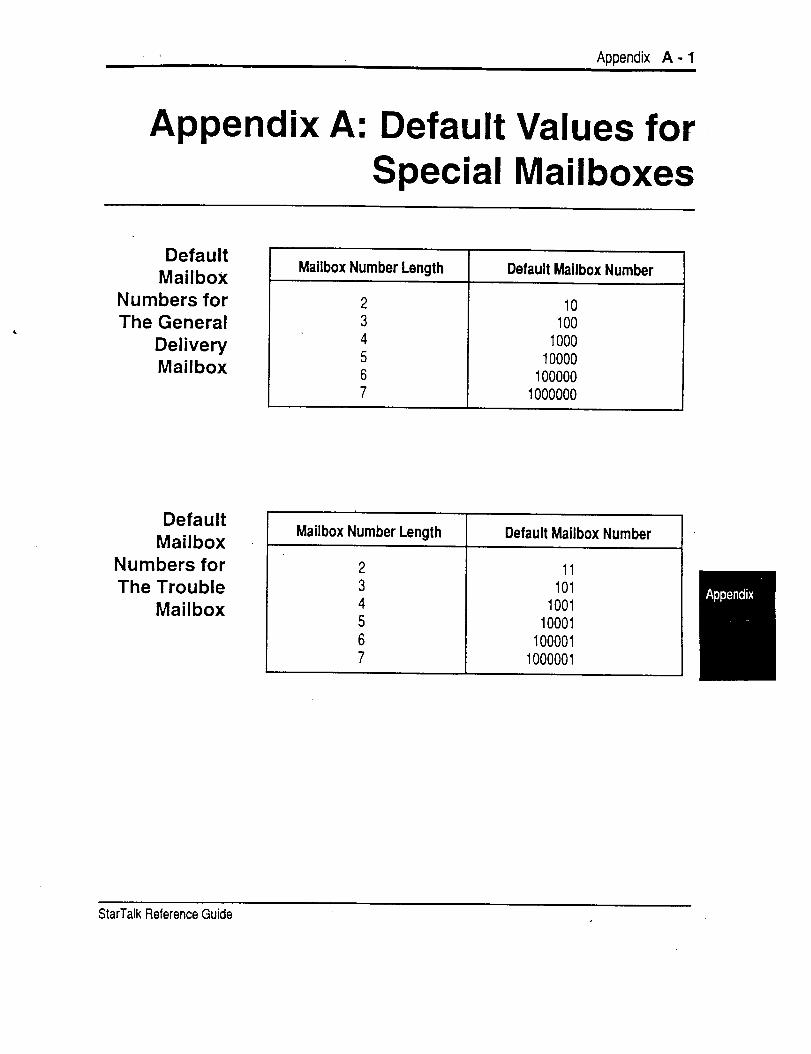
Appendix A - 1
Appendix A: Default Values for Special Mailboxes
Default Mailbox
Mailbox Number Length Default Mailbox Number
Numbers for The General I
Delivery Mailbox
10 100 1000
10000
100000
1000000
Default Mailbox
Mailbox Number Length Default Mailbox Number
Numbers for The Trouble
Mailbox
2 11 3 101 4 1001 5 10001 6 100001 7 1000001
StarTalk Reference Guide I
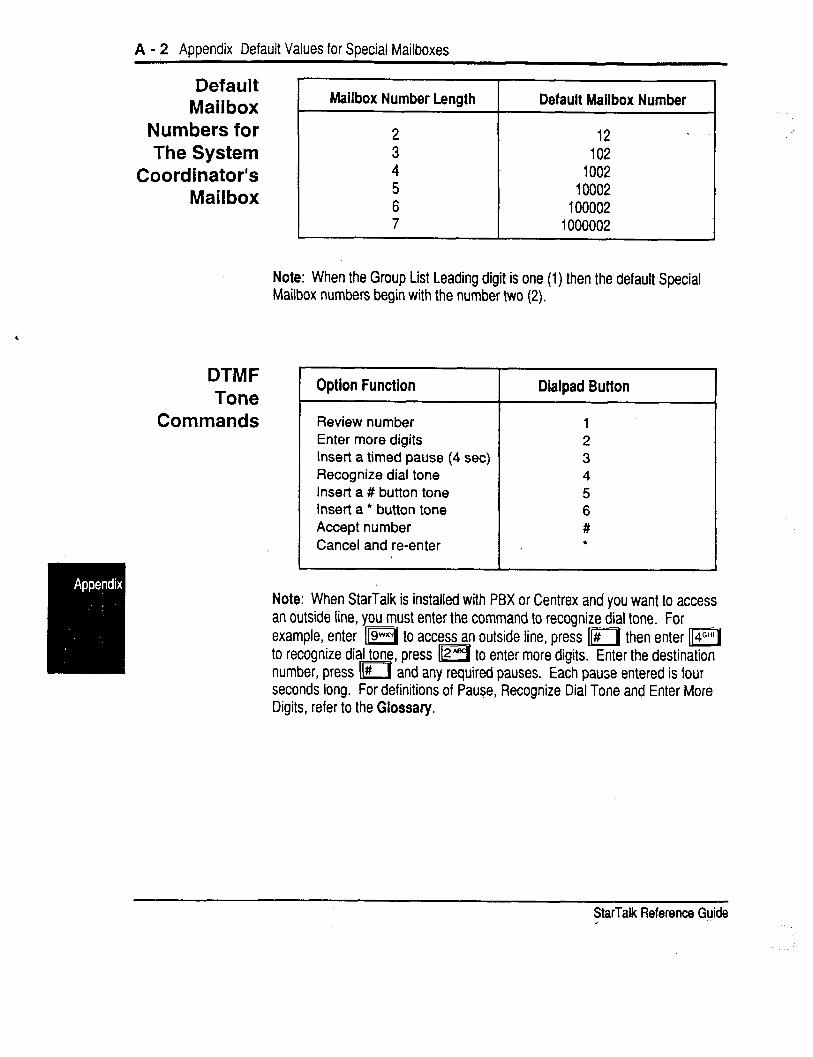
A - 2 Appendix Default Values for Special Mailboxes
Default Mail box
Numbers for The System
Coordinator’s Mailbox
DTMF Tone
Commands
Mailbox Number Length Default Mailbox Number
12 102
1002 10002
100002 1000002
Note: When the Group List Leading digit is one (1) then the default Special Mailbox numbers begin with the number two (2).
Option Function Dialpad Button
Review number Enter more digits Insert a timed pause (4 set) Recognize dial tone Insert a # button tone Insert a l button tone Accept number Cancel and re-enter
Digits, refer to the Glossary.
Note: When StarTalk is installed with PBX or Centrex and you want to access an outside line, you must enter the command to recognize &al tone. For example, enter 119-1 to access an outside line, press II# then enter 114”“’ to recognize dial tone, press m to enter more digits. Enter the destination number, press II# and any required pauses. Each pause entered is four seconds long. For definitions of PauSe, Recognize Dial Tone and Enter More
StarTalk Reference Guide

Index - 1
Index _
A Accept and Send, message option, 4-18 Administration, mailbox, 4-20 Alternate Greeting, 4-54-6
recording, 4-9 selecting, 4-11
Analog Terminal Adapter (ATA), 2-13 Angled brackets, l-3 Assigning the Target Attendant, 4-33 Automated Attendant, 2-1, 2-6
options, 4-l 3 Automated Attendant Menu Prompt, 2-6
B Backup, 4-14 .
Broadcast Messages, 5-l 0 Button Options, display, 2-12
c Call Transfer Types, 5-8 Changing your mailbox password, 4-23 Choosing a greeting, 4-11 Command Line, 2-12 Company Directory, 2-7
alphabetical, entry, 2-11 changing a name, 4-20 using, 51,5-3,5-8 recording name, 4-2
Components, 2-l Continue, message option, 4-14 Conventions, l-3 Copy, message option, 4-14, 4-17
D DTMF Tone Commands, see Appendix A Default values, Special Mailboxes, see Appendix A Destination number, changing, 4-31 Dialpad, 2-11 Directory Name, 4-20
Changing, 4-20 Disabling Off-premise Message Notification, 4-29 Display, 2-l 2 Documents, other, l-2
E End of Message, message options, 4-16 Entering Characters into the Command tine, 2-14 Envelope, message option, 4-15 Erase, message option, 4-l 5 Etiquette, 6-1 Exiting from StarTalk, 2-15
F Feature Code Buttons, Programming, 2-l 6 Feature Codes, 2-3
descriptions, 2-5 determining, 2-4
Forward, message option, 4-l 4
G General Delivery Mailbox, 2-8 Greetings, Personal, 4-5
options, 4-22 selecting, 4-11,4-23
Group Lists, 5-3,5-g Group Message, 5-9
StarTalk Reference Guide
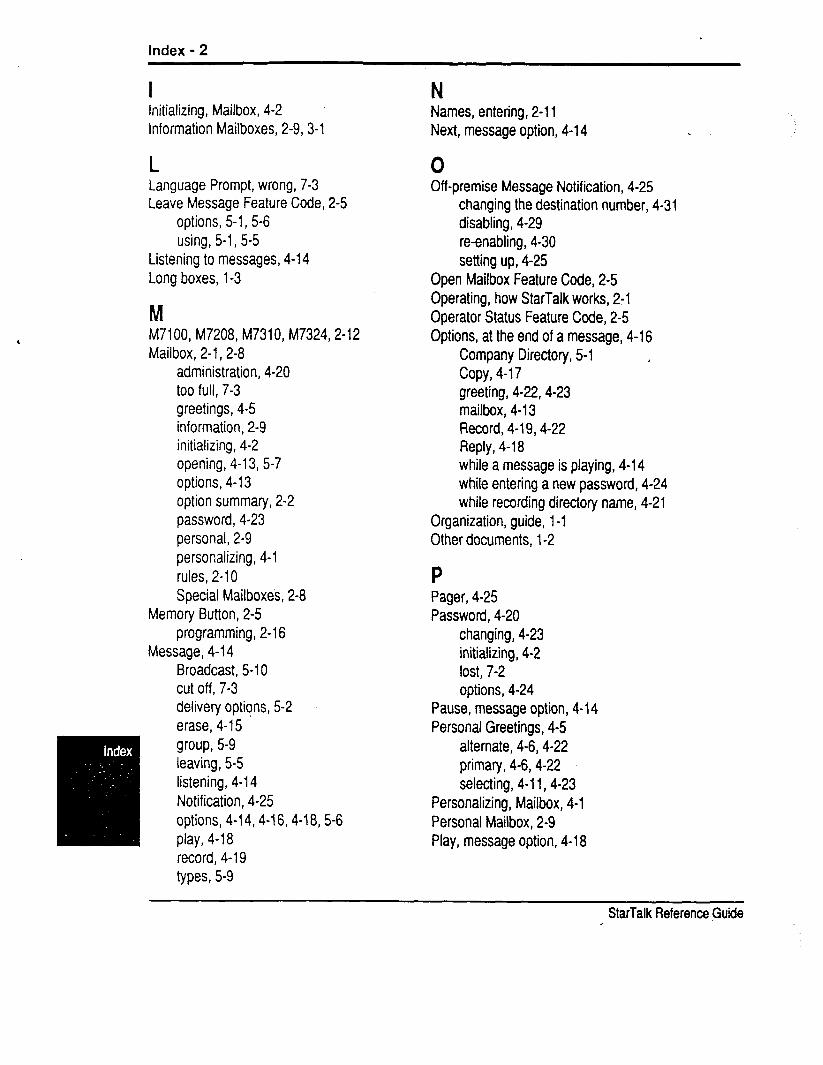
Index - 2
I Initializing, Mailbox, 4-2 Information Mailboxes, 2-9,3-l
L Language Prompt, wrong, 7-3 Leave Message Feature Code, 2-5
options, 5-1, 5-6 using, 51,5-5
Listening to messages, 4-14 Long boxes, l-3
M M7100, M7208, M7310, M7324,2-12 Mailbox, 2-1,2-8
administration, 4-20 too full, 7-3 greetings, 4-5 information, 2-9 initializing, 4-2 opening, 4-l 3, 5-7 options, 4-13 option summary, 2-2 password, 4-23 personal, 2-9 personalizing, 4-l rules, 2-l 0 Special Mailboxes, 2-8
Memory Button, 2-5 programming, 2-l 6
Message, 4-14 Broadcast, 5-l 0 cut off, 7-3 delivery options, 5-2 erase, 4-l 5
record, 4-l 9 types, 5-9
N Names, entering, 2-l 1 Next, message option, 4-l 4
0 Off-premise Message Notification, 4-25
changing the destination number, 4-31 disabling, 4-29 re-enabling, 4-30 setting up, 4-25
Open Mailbox Feature Code, 2-5 Operating, how StarTalk works, 2-l Operator Status Feature Code, 2-5 Options, at the end of a message, 4-16
Company Directory, 5-l ,
copy, 4-I 7 greeting, 4-22,4-23 mailbox, 4-l 3 Record, 4-l 9,4-22 Reply, 4-l 8 while a message is playing, 4-l 4 while entering a new password, 4-24 while recording directory name, 4-21
Organization, guide, l-1 Other documents, l-2
P Pager, 4-25 Password, 4-20
changing, 4-23 initializing, 4-2 lost, 7-2 options, 4-24
Pause, message option, 4-14 Personal Greetings, 4-5
alternate, 4-6,4-22 primary, 4-6,4-22 selecting, 4-l 1,4-23
Personalizing, Mailbox, 4-l Personal Mailbox, 2-9 Play, message option, 4-l 8
StarTalk Reference -Guide I

Index - 3
Preparing to set up Information mailboxes, 3-2 U Prerequisites, l-4 Users, 2-2 Previous, message option, 4-14 Using Information mailboxes, 3-l Primary Greeting, 4-54-6
recording, 4-7 V selecting, 4-l 1 Voice Prompt, 2-15
Programming a Feature Code Button, 2-16 interrupting, 2-15
R Recording, greetings, 4-19,4-22
Alternate, 4-9 Information mailbox, 3-3 Primary, 4-7
Record Message, 4-19 Re-enabling Off-premise Message Notification, 4-30 Replay, message option, 4-14,4-l 6 Reply, message option, 4-18 Rounded boxes, l-3 Rules, mailbox, 2-l 0
S Select a Greeting, 4-l 1,4-23 Selecting the Company Directory Option, 5-1 Shadowed boxes, 1-3 Single Line Display, 2-12 Special Mailboxes, 2-8 StarTalk Directory Number Feature Code, 2-5 Symbols, 1-3 System Coordinator Mailbox, 2-8
T Target Attendant, 4-33 Timeout, 7-3 Transfer Types, 5-8 Transferring, caller, 5-8 Trouble Mailbox, 2-9,7-l Troubleshooting, 7-1 Two Line Display, 2-12
StarTalk Reference Guide I
Index - 4
StarTalk Reference Ggide I
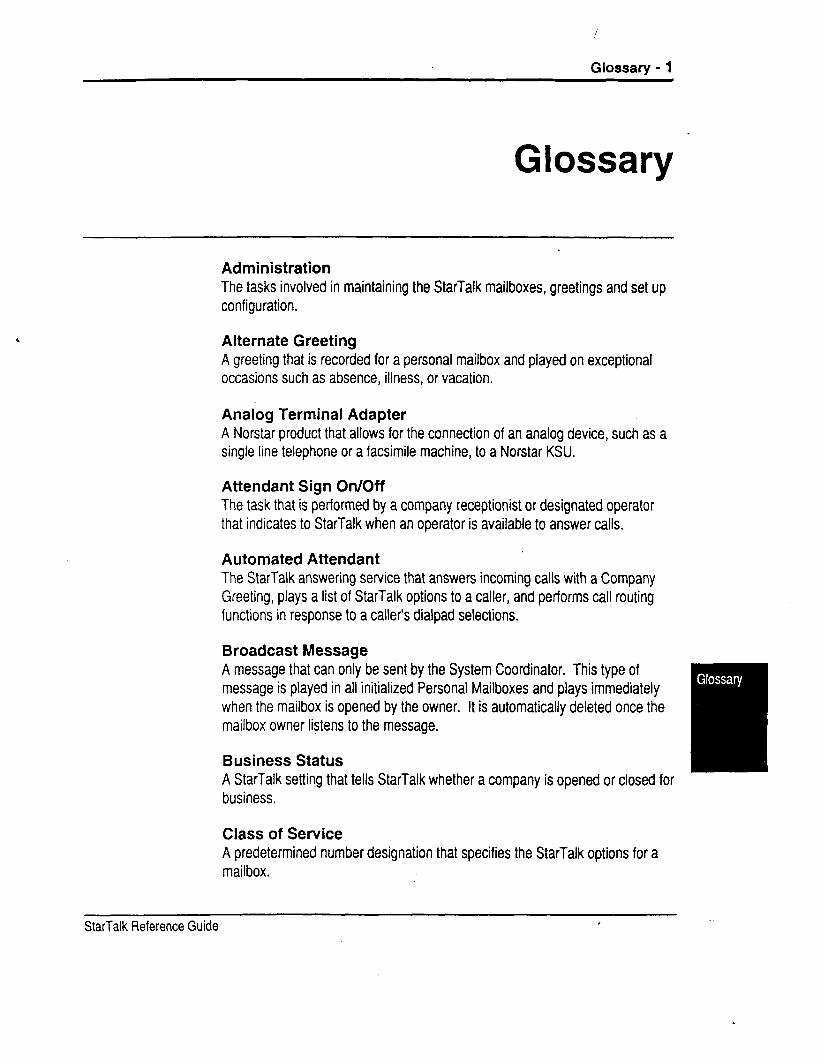
Glossaw - 1
Glossary
Administration The tasks involved in maintaining the StarTalk mailboxes, greetings and set up configuration.
Alternate Greeting A greeting that is recorded for a personal mailbox and played on exceptional occasions such as absence, illness, or vacation.
Analog Terminal Adapter A Norstar product that allows for the connection of an analog device, such as a single line telephone or a facsimile machine, to a Norstar KSU.
Attendant Sign On/Off The task that is performed by a company receptionist or designated operator that indicates to StarTalk when an operator is available to answer calls.
Automated Attendant The StarTalk answering service that answers incoming calls with a Company Greeting, plays a list of StarTalk options to a caller, and performs call routing functions in response to a callers dialpad selections.
Broadcast Message A message that can only be sent by the System Coordinator. This type of message is played in all initialized Personal Mailboxes and plays immediately when the mailbox is opened by the owner. It is automatically deleted once the mailbox owner listens to the message.
Business Status A StarTalk setting that tells StarTalk whether a company is opened or closed for business.
Class of Service A predetermined number designation that specifies the StarTalk options for a mailbox.
StarTalk Reference Guide ,
Glossary - 2 -
Company Directory An internal voice list that contains the names of users with initialized mailboxes designated to appear in the Company Directory.
Conventions The way certain information has been described. For example, using long boxes to represent display prompt information.
Default The parameters that are preset within the StarTalk module.
Designated Operator An individual in a company who has been assigned to answer the StarTalk operator request option.
Display A one or two line screen on a Norstar telephone that shows StarTalk commands and options.
Display Buttons The three buttons that appear on a Norstar two line display. Once pressed, these buttons select the specified StarTalk option.
Display Options The choices available to a user that appear on the Norstar two line display. Options appearing on the display can be selected using the display or dialpad buttons.
Enter More Digits While assigning the destination telephone number for Off-premise Message Notification, entering a Pause recognizes dial tone, then entering a allows the user to enter more digits.
Envelope Information A date and time stamp that appears on all messages that are left in a mailbox. When the message has been left by another mailbox owner, envelope informa- tion includes the message senders name.
Extensions A two to seven digit number that is used to reach a designated telephone.
Feature Code A unique three digit code that is used to access StarTalk features and options.
StarTalk Reference.Guide I

Glossaw - 3
General Delivery Mailbox One of the three Special Mailboxes used to collect messages for individuals in a company who have not been assigned a Personal Mailbox.
Greetings There are two types of StarTalk greetings: Company Greetings and Personal Mailbox Greetings. Company Greetings are played by the Automated Attendant to incoming callers. Personal Mailbox Greetings are played to callers who want to leave a message in the selected mailbox.
Group Lists A collection of mailbox numbers that are assigned a special “Group” number by StarTalk. When a message is sent to a Group List, all mailboxes contained in the List receive the same message.
Guest Mailbox A mailbox that is assigned to a user who does not have an extension.
Information Mailbox A mailbox that provides a caller with a message describing goods or services available from your company.
Initialize Mailbox Preparing a mailbox to receive messages, which includes changing a mailbox default password and recording a Company Directory name.
Leave Message The StarTalk Feature Code that is used to leave messages in StarTalk mail- boxes.
M7100 Telephone The Norstar model M7100 telephone that has a single line display, and one programmable button without an indicator.
lvl7208 Telephone The Norstar model M7208 telephone that has a single line display, and eight programmable buttons with indicators.
M7310 Telephone The Norstar model M7310 telephone that has a two line display with three display buttons, ten programmable buttons with indicators, and 12 dual programmable buttons without indicators.
StarTalk Reference Guide
Glossarv - 4
M7324 Telephone The Norstar model M7324 telephone that has a two line display with three display buttons, and 24 programmable buttons with indicators. -
Mailbox A storage place for messages on the StarTalk system.
Mailbox Number Length The number of digits allowed in a mailbox number. The mailbox number length ranges from two to seven digits.
Message Delivery Options Message sending options that are stamped onto a message. There are four message delivery options: normal, certified, urgent, and private. A message delivery option can be assigned to a message after a user has selected a mailbox, or after recording a message.
Message Waiting Notification A display prompt that informs a mailbox owner when a message has been left in a mailbox. This StarTalk feature is part of the Class of Service.
Off-premise Message Notification The StarTalk feature that fonvards calls to an internal company telephone number, or to a specified external telephone number, or pager.
Operator Status The StarTalk indicator that determines if a company’s receptionist or desig- nated operator is available.
Option A StarTalk choice that is given to a user through voice or display prompts.
Password A four to eight digit number that is entered on the dialpad. A password is used to open mailboxes or perform configuration tasks.
Pause Pause is used when setting up pager notification. Each pause entered is automatically four seconds. For voice pagers, pauses are entered after the pager number to delay the start of the StarTalk voice prompt that activates the pager. For alpha/numeric pagers, pauses are entered after the pager number and before the digits that appear on the pager display.
StarTalk Reference Guide
Glossary - 5
Personal Mailboxes Mailboxes that are assigned to users as a place to store messages.
Primary Greeting The main greeting played in a personal mailbox to callers wanting to leave a message. Programmable Memory Buttons Buttons on the Norstar one and two line display telephones that can store feature codes and numbers.
Recognize Dial Tone After accepting the Off -premise Message Notification destination telephone number, entering a adds a D to the digit string. The Norstar system uses this to recognize dial tone when an access code is required.
Resetting Passwords A System Coordinator task that changes a mailbox password from its current setting back to the StarTalk default setting 0000 (four zeros).
Screened Call An incoming call where the caller is asked to record their name and the name is played at the extension requested.
Special Mailboxes The three mailboxes that are used by the System Coordinator and designated StarTalk operator. The three Special Mailboxes are: System Coordinator, General Delivery, and Trouble.
System Coordinator The person responsible for configuring, updating, and maintaining the StarTalk Voice Module.
System Coordinator Mailbox One of the three Special Mailboxes used by the System Coordinator for sending Broadcast Messages. This is the System Coordinator’s Personal Mailbox.
Target Attendant The person assigned to answer a telephone when the caller reaches a mailbox and presses [0] to speak with the operator.
Tone Dial Telephone A push button telephone that emits DTMF tones.
StarTalk Reference Guide
Glossary - 6
Trouble Mailbox One of the three Special Mailboxes used to collect messages concerning StarTalk operation and problems.
Voice Prompts The prerecorded voice instructions that are played when accessing the different StarTalk features and options.
StarTalk Reference Guide

StarTal k2.0.1 Troubleshooting and RepairManual
-
-

Table of Contents
Section 1: How to use this manual l-l Introduction l-l How this manual is organized l-l How to use this manual l-2 How the instructions are presented 1-3 Reference aids 1-4
Section 2: StarTalk hardware configuration Introduction System overview Model 11 O/l 65 functional description Model 385 functional description Motherboard PCA TCM Interface PCAs Message Storage Pack PCA Power supply Power supply connectors Floppy disk drive W-232 serial port Locating the StarTalk components
StarTalk Model 11 O/l 65 StarTalk Model 385
Operating environment Electrical and environment requirements
Section 3: Before you begin to repair StarTalk Introduction Tools, special parts, and equipment Connecting an KS-232 terminal Using an RS-232 terminal
Powering on StarTalk Accessing the Top-level Menu
Changing the StarTalk communication parameters Setting up remote terminal access
2-1 2-1 2-l 2-2 2-3 2-4 2-4 2-4 2-5 2-6 2-6 2-6 2-7 2-7 2-8 2-l 0 2-10
StarTalk 2.0.1 Troubleshooting and Repair Manual

2 Table of Contents
Section 4: Diagnosing user problems Introduction Before you begin
Determining StarTalk Feature Codes Diagnostics and Alarms
Viewing Alarms from an RS-232 terminal Diagnosing the StarTalk problem
Hardware problems Symptom: The W-232 terminal cannot communicate with StarTalk Symptom: StarTalk does not function at all Symptom: The Power-on Diagnostics fail Symptom: The Power-on Diagnostics run, but the Download Diagnostics do not Symptom: StarTalk generates Alarm messages Symptom: StarTalk does not answer incoming calls, or answers some
calls but not all Software problems
Symptom: StarTalk does not respond properly to DTMF signals on incoming calls
Symptom: Message recording quality is poor Symptom: StarTalk stops recording in the middle of a message Symptom: The Message Notification prompt does not appear Symptom: Users cannot open their mailboxes
Software loader problems Symptom: The RS-232 terminal screen is blank Symptom: The Power-on Diagnostics appear, but the
Disk Utilities Main Menu does not Troubleshooting StarTalk modules with two TCM Interface PCAs
Section 5: Replacing StarTalk components Introduction Before you begin
Removing the module cover Replacing the module cover
Removing the TCM Interface PCA - Model 1 lo/165 and Model 385 Replacing the TCM Interface PCA - Model 1 lo/165 and Model 385 Removing the Message Storage Pack PCA - Model 11 O/l 65 Replacing the Message Storage Pack PCA - Model 11 O/l 65 Removing the Disk Controller PCA - Model 385 Replacing the Disk Controller PCA - Model 385 Removing the Message Storage Pack - Model 385 Replacing the Message Storage Pack - Model 385 Removing the floppy disk drive - Model 385 Replacing the floppy disk drive - Model 385 Removing the power supply - Model 11 O/l 65 Replacing the power supply - Model 11 O/l 65 Removing the power supply - Model 385 Replacing the power supply - Model 385 Removing the Motherboard PCA - Model 385 Replacing the Motherboard PCA - Model 385 Adding a TCM interface PCA - Model 385 Removing a TCM Interface PCA from Slot J5 - Model 385
4-1 4-l 4-l 4-2 4-3 4-3 4-4 4-4 4-5 4-7 4-7 4-7 4-8
4-8 4-9
4-9 4-10 4-10 4-11 4-l 1 4-12 4-12
4-14 /
4-15
5-l 5-l 5-l 5-2 5-3 5-3 5-5 5-6 5-7 5-9 5-l 1 5-14 5-16 5-18 5-20 5-23 5-25 5-27 5-29 5-31 5-34 5-40 5-44
StarTalk 2.0.1 Troubleshooting and Repair Manual

Table of Contents 3
Replacing a TCM Interface PCA in Slot J5 - Model 385 5-46 Removing the Clock/Calendar battery -5-48 Replacing the Clock/Calendar battery 5-48 Preparing StarTalk for travel 5-49 Testing StarTalk 5-50
Section 6: Using StarTalk Configuration software Introduction About the StarTalk menus and options
Using the RS-232 terminal keyboard Moving between menus Moving within a screen
Application software Accessing the Top-level Menu
Mailbox Administration Adding user mailboxes Changing mailbox parameters Deleting a subscriber mailbox Resetting a mailbox password
Group List Admin Menu Adding a Group List Changing a Group List Deleting a Group List
Class of Service Admin Menu System Admin and Configuration Menu
Enabling/Disabling StarTalk Restarting .StarTalk Setting the System Gate and Time Setting the RS-232 communication parameters Setting the DTMF delay parameter Backing up the Message Storage Pack Enabling/Disabling Multiple Administration Access
The StarTalk Reports Menu Viewing Subscriber Reports The Directory Report The Numeric Subscriber Report The Mailbox Activity Report The System Group List Report The Class of Service Profiles Report The Message Usage Report Reset statistics The System Parameters Report
Alarms Menu Use French
6-1 6-l 6-2 6-3 6-3 6-3 6-4 6-4 6-6 6-6 6-8 6-9 6-10 6-11 6-11 6-l 2 6-13 6-14 6-17 6-18 6-l 8 6-l 9 6-20 6-21 6-22 6-23 6-24 6-25 6-25 6-26 6-27 6-30 6-30 6-31 6-32 6-32 6-33 6-34
StarTalk 2.0.1 Troubleshooting and Repair Manual
4 Table of Contents
Section 7: Using StarTalk Disk Utilities software Introduction About the Disk Utilities software Loading the Disk Utilities software
Options available from the Disk Utilities Main Menu Formatting the Message Storage Pack: The Hard Disk Menu Option The Floppy Disk Menu Option
Formatting a floppy disk Labelling a floppy disk Viewing Directory Information Option: The Display Floppy Disk Directory Option Copying floppy disk files: The Copy Floppy Disk Option The Kernel Software Menu Option The IP Software Menu Option The Application Software Menu Option The Administration Software Menu Option The Display Text Software Menu Option The Backup and Restore User Data Menu Option The Voice Prompts Menu Option The Date & Time Menu Option The Reboot System Menu Option
Section 8: StarTalk maintenance Introduction About the backup and restore procedures Backing up user data Restoring user data
Restoring user data: Notes, Warnings, and Cautions Loading the StarTalk operating software
Backing up StarTalk disks Formatting a floppy disk Copying StarTalk software to floppy disk Copying from the Message Storage Pack to floppy disk
Section 9: Performing StarTalk upgrades introduction Performing a StarTalk hardware upgrade
Before you begin Upgrading a StarTalk Module from 110 to 165
Performing a StarTalk software upgrade Upgrading StarTalk software from 1.6 to 2.0 Upgrading StarTalk software from 2.0 to 2.0.1
7-l -7-l 7-l 7-2 7-3 7-4 7-5 7-5 7-6 7-6 7-7 7-9 7-10 7-11 7-12 7-13 7-14 7-15 7-17 7-18
8-1 8-l 8-l 8-2 8-5 8-8 8-9 8-13 8-13 8-14 8-17
9-1 9-l 9-l 9-2 9-2 9-3 9-4 9-4
StarTalk 2.0.1 Troubleshooting and Repair Manual

Table of Contents 5
Appendix A: DTMF detection A-l
Appendix 9: Spare parts list B-1
Appendix C: Alarm codes C-l
Appendix D: Diagnostics D-l
Appendix E: installing a software loader E-l
Appendix F: Norstar directory numbers F-l
Index
StarTalk 2.0.1 Troubleshooting and Repair Manual
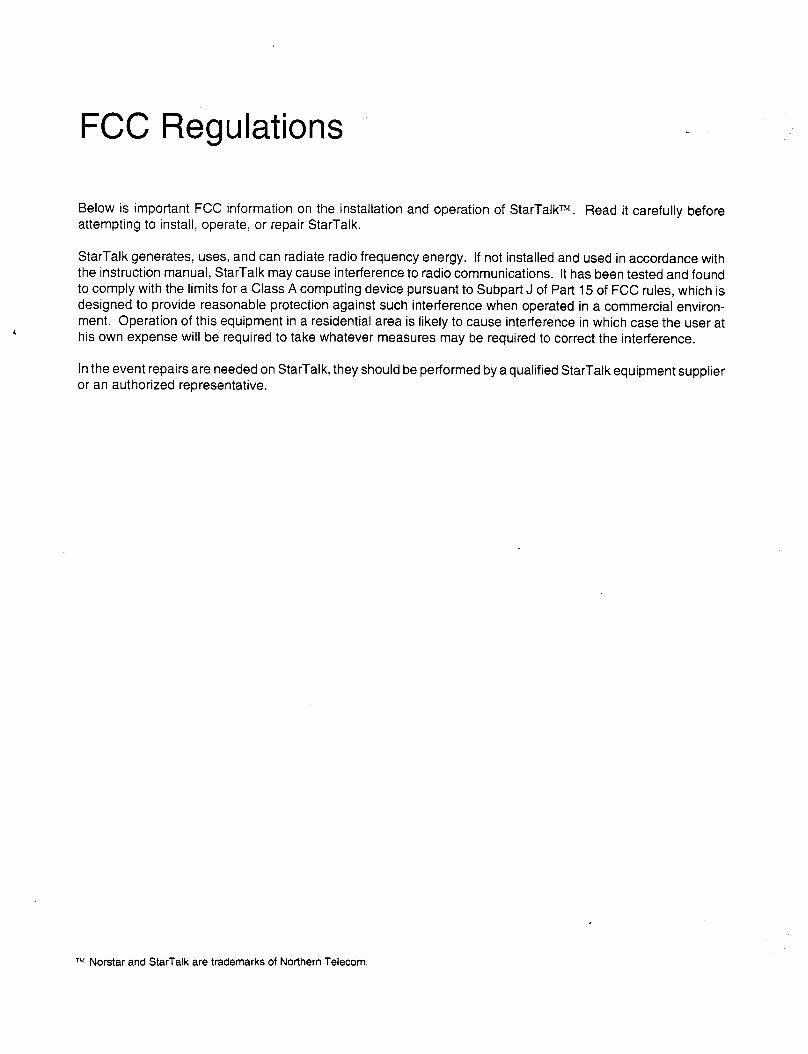
FCC Regulations
Below is important FCC information on the installation and operation of StarTalkTbj. Read it carefully before attempting to install, operate, or repair StarTalk.
StarTalk generates, uses, and can radiate radio frequency energy. If not installed and used in accordance with the instruction manual, StarTalk may cause interference to radio communications. It has been tested and found to comply with the limits for a Class A computing device pursuant to Subpart J of Part 15 of FCC rules, which is designed to provide reasonable protection against such interference when operated in a commercial environ- ment. Operation of this equipment in a residential area is likely to cause interference in which case the user at his own expense will be required to take whatever measures may be required to correct the interference.
In the event repairs are needed on StarTalk, they should be performed by a qualified StarTalk equipment supplier or an authorized representative.
TM Norstar and StarTalk are trademarks of Northern Telecom.
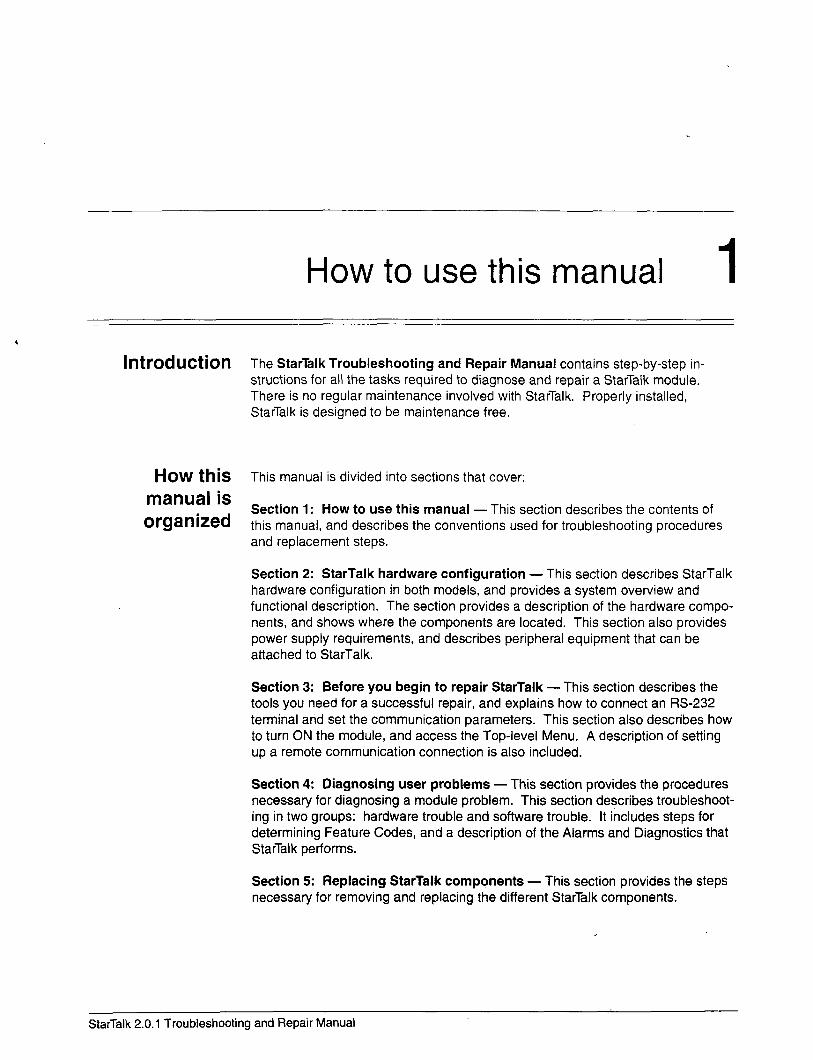
How to use this manual
Introduction
How this manual is organized
The StarTalk Troubleshooting and Repair Manual contains step-by-step in- structions for all the tasks required to diagnose and repair a StarTalk module. There is no regular maintenance involved with StarTalk. Properly installed, StarTalk is designed to be maintenance free.
This manual is divided into sections that cover:
Section 1: How to use this manual - This section describes the contents of this manual, and describes the conventions used for troubleshooting procedures and replacement steps.
Section 2: StarTalk hardware configuration - This section describes StarTalk hardware configuration in both models, and provides a system overview and functional description. The section provides a description of the hardware compo- nents, and shows where the components are located. This section also provides power supply requirements, and describes peripheral equipment that can be attached to StarTalk.
Section 3: Before you begin to repair StarTalk - This section describes the tools you need for a successful repair, and explains how to connect an RS-232 terminal and set the communication parameters. This section also describes how to turn ON the module, and access the Top-level Menu. A description of setting up a remote communication connection is also included.
Section 4: Diagnosing user problems - This section provides the procedures necessary for diagnosing a module problem. This section describes troubleshoot- ing in two groups: hardware trouble and software trouble. It includes steps for determining Feature Codes, and a description of the Alarms and Diagnostics that StarTalk performs.
Section 5: Replacing StarTalk components - This section provides the steps necessary for removing and replacing the different StarTalk components.
StarTalk 2.0.1 Troubleshooting and Repair Manual
1 - 2 Section 1: How to use this manual
Section 6: Using StarTalk Configuration software - This section describes how to use StarTalk software, navigate through the menus, and select menu options. This section describes each menu within the Configuration software, and includes steps necessary to access the menu and sub menu options. This section also provides a description of the different StarTalk Reports.
Section 7: Using StarTalk Disk Utilities software -This section describes how to use StarTalk Disk Utilities software, and provides the steps necessary to load the software and access the menus. This section also explains how to format the Message Storage Pack, format a floppy disk, and how to copy the different programs from the Disk Utilities software disk.
Section 8: StarTalk Maintenance - This section describes how and when to backup and restore user data. This section also describes how to backup and restore the operating software, including both the Configuration and Disk Utilities software.
Section 9: Performing StarTalk upgrade - This section explains the neces- sary steps to perform a StarTalk hardware and software upgrade.
Appendix A - This appendix provides information about DTMF detection parameters and how they relate to the problem of Talk Off. This section also provides steps for reducing the occurrence of Talk Off.
Appendix 6 - This appendix provides a spare parts list for ordering replace- ment components and accessories (such as disk drives-and power supplies).
Appendix C - This appendix provides a list of StarTalk Alarm messages. Included in the Alarm list, is a meaning of the Alarm, and suggested solution.
Appendix D - This appendix provides information about the diagnostic tests that StarTalk performs.
Appendix E - This appendix provides instructions for installing the software loader to use with the StarTalk Model 11 O/l 65 modules.
Appendix F - This appendix provides charts of the 61 and 82 DNs for the Norstar Compact and Modular KSU.
HOW to Use this This manual is intended for an installer who has never repaired StarTalk before.
manual If you have never repaired a StarTalk module before, you should read all of Section 2 carefully before you begin. This section provides you with a descrip- tion of the StarTalk module and where to locate the hardware components of the different modules. Knowing where the components are located can speed up repair tasks.
To use this manual, you should be:
. an experienced Norstar Key System installer/repairman
’ . familiar with Norstar and StarTalk terminology
. able to use an RS-232 terminal
StarTalk 2.0 Troubleshooting and Repair Manual
Section 1: How to use this manual 1 - b
You do not need to be familiar with using or repairing microprocessor-based electronic systems. This manual provides you with all the instructions you-need to repair a StarTalk module.
HOW the The tasks involved in repairing StarTalk are presented in the order you should
instructions perform them, and are described step by step. Most of the steps are illustrated so
are presented you can see exactly what you are supposed to do. Perform the tasks and steps in the order they are presented.
Pay particular attention to Notes, Cautions, and Warnings:
Notes: alert you to steps that are particularly complicated or critical.
v Cautions: alert you to situations where there is the possibility of damaging the equipment.
+ Warnings: alert you to situations where there is the possibility of injuring yourself.
Read the entire step, including Notes, Cautions, or Warnings, before you begin.
Some of the tasks require special tools, equipment, or parts that are not supplied with StarTalk. Section 2 provides a list of tools that are needed. Ensure you have everything you need before you begin.
Each task you perform while diagnosing and repairing StarTalk is presented in easy to follow steps. Several tasks require you to use an RS-232 service terminal to communicate with StarTalk. Most steps involve using the keyboard to select options that are presented in the different menus. Other times, you must type information. Information is entered using the keyboard. Keyboard commands are shown by the key you must press to continue. Keyboard commands are sur- rounded by a box:
Example:
1. Press @ then press (Relurn]
or
1. Press q (System Operation), then press [=I
Information that appears on the RS-232 terminal, is shown in a type similar to that of the PCS-232 terminal.
Example:
Motherboard Power-on Diagnostics Subtest : 1,2,3,4,5,6 Passed Motherboard Power-on Diagnostics
StarTalk 2.0.1 Troubleshooting and Repair Manual
1 - 4 Section 1: How to use this manual
Steps providing you with instructions involving the Norstar telephone include representations of the buttons you must press to continue.
Example:
1. Press [Feature] m m
When prompts are given on the display, they are shown in this manual in the same typeface that appears on the Norstar display.
Example:
1. The display shows: Log:
or
1. The display shows: NEXT
Reference aids When you are repairing a StarTalk module, it is useful to have a:
. StarTalk Set Up and Operation Guide
. StarTalk User Card
. StarTalk Installation Guide
. StarTalk Programming Record
. StarTalk Reference Guide
. Norstar Installation Guide (current version compatible with the Norstar KSU at the site)
StarTalk 2.0 Troubleshooting and Repair Manual
StarTalk hardware configuration 2 hltrOdUCtiOll StarTalk is a programmable, microprocessor based system used for controlling
and processing voice information. The speech fidelity of StarTalk is equivalent to that found in audio tape recording devices. Electronic digital storage allows StarTalk to store hours of voice messages, which a user can access instantly.
This section describes the different StarTalk modules. This section also describes:
. hardware configuration of both StarTalk modules
. the location of the different components
. power requirements
. other equipment such as a floppy disk drive and an RS-232 terminal
. the location of the different components
. the StarTalk operating environment
SyStel’Il StarTalk allows multiple users to access features simultaneously. The Model 110
overview is equipped with two channels (one TCM port interface). The Models 165 and 385 have four channels (two TCM port interfaces). Each TCM port allows two users to access StarTalk features. In the Models 165 and 385, which have two TCM port interfaces, up to four users can be recording or playing messages simultaneously.
The model numbers also refer to the amount of storage space available on the Message Storage Pack. The Model 110 has the smallest capacity at 110 min- utes, and the Model 385 has the largest capacity at 385 minutes.
Features available with StarTalk include Voice Messaging and Automated Attend- ant. For a description of the different StarTalk features, refer to the StarTalk Set Up and Operation Guide and the StarTalk Reference Guide.
Optional features available for StarTalk include Custom Call Routing (CCR) and Audio Message Interchange Standard (AMIS). Refer to the CCR Set Up and. Operation Guide and AMIS Set Up and Operation Guide:
StarTalk 2.0.1 Troubleshooting and Repair Manual
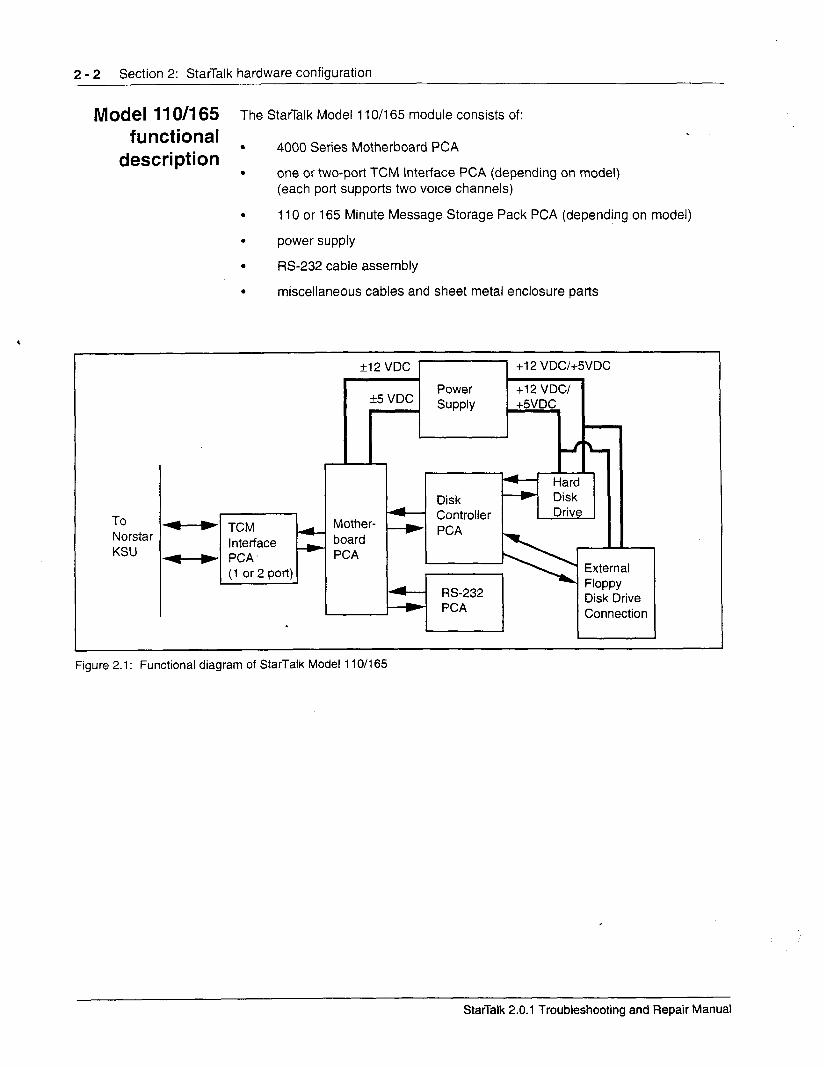
2 - 2 Section 2: StarTalk hardware configuration
Model 11 O/l 65 The StarTalk Model 11 O/l 65 module consists of:
functional . description
4000 Series Motherboard PCA
. one or two-port TCM Interface PCA (depending on model) (each port supports two voice channels)
. 110 or 165 Minute Message Storage Pack PCA (depend/rig on model)
. power supply
. RS-232 cable assembly
. miscellaneous cables and sheet metal enclosure parts
.
To Norstar KSU
512 VDC 1-f +12 VDC/+5VDC
I I Disk I... w - Controller
Mother- ---) 4- board ..-. .-.d se -
‘CA PCA 1 or 2 port)
+ RS-232 - PCA
, Drive
II
External Floppy Disk Drive Connection
Figure 2.1: Functional diagram of StarTalk Model 110/l 65
StarTalk 2.0.1 Troubleshooting and Repair Manual
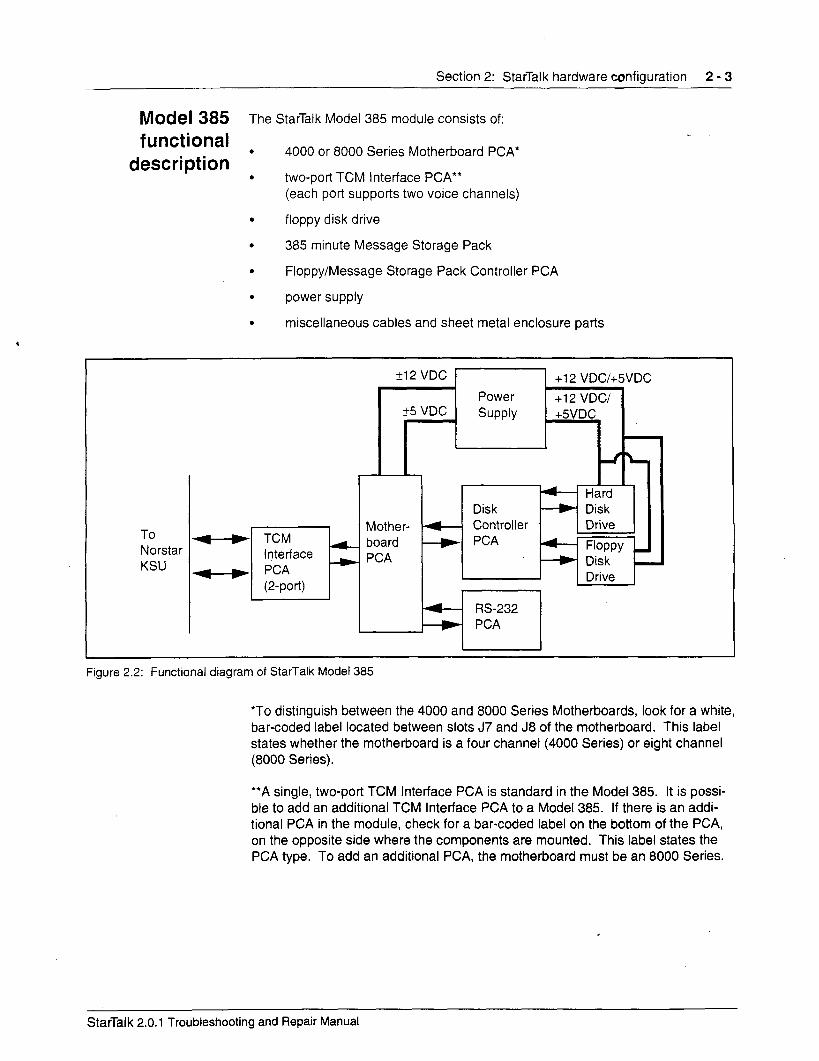
Section 2: StarTalk hardware wnfiouration 2 - 3
Model 385 The StarTalk Model 385 module consists of:
functional . description
4000 or 8000 Series Motherboard PCA*
. two-port TCM Interface PCA** (each port supports two voice channels)
. floppy disk drive
. 385 minute Message Storage Pack
. Floppy/Message Storage Pack Controller PCA
. power supply
. miscellaneous cables and sheet metal enclosure parts
To Norstar KSU
TCM ---Pi Interface PCA (2-port)
?12 VDC
+5 VDC Power SUPPlY
+12 VDC/+5VDC
+I2 VDC/ +5VDC
-
6 Hard Disk ---) Disk
Mother- b COntrOller Drive board ---) PCA -1 Floppy - PCA + Disk -
I u 1 Drive 1 I I
Figure 2.2: Functional diagram of StarTalk Model 385
‘To distinguish between the 4000 and 8000 Series Motherboards, look for a white, bar-coded label located between slots J7 and J8 of the motherboard. This label states whether the motherboard is a four channel (4000 Series) or eight channel (8000 Series).
**A single, two-port TCM Interface PCA is standard in the Model 385. It is possi- ble to add an additional TCM Interface PCA to a Model 385. If there is an addi- tional PCA in the module, check for a bar-coded label on the bottom of the PCA, on the opposite side where the components are mounted. This label states the PCA type. To add an additional PCA, the motherboard must be an 8000 Series.
StarTalk 2.0.1 Troubleshooting and Repair Manual
2 - 4 Section 2: StarTalk hardware configuration
Motherboard The Motherboard PCA is the main computing device of StarTalk. All StarTalk
PCA tasks such as answering incoming calls, playing recorded announcements, -and storing voice messages are controlled by the Motherboard PCA. It contains:
. a 6809E microprocessor
. 1 MB of Dynamic Random Access Memory (DRAM)
. 8 KB of Static Random Access Memory (SRAM)
. a Clock/Calendar Integrated Circuit (IC) and replaceable battery
. the Coders/Decoders (CODECs), which convert analog voice information to digital, and vice versa: and Adaptive Delta Pulse Code Modulators (ADPCMs), which compress digital voice information to allow hours of voice data to be stored on the Message Storage Pack. One CODEC plus one ADPCM constitute a port.
. an Erasable Programmable Read-Only Memory (EPROM) program loader that controls the initial start up and program loading of StarTalk software
TCM ltItWfaCe The TCM Interface PCA provides the port connections, and is available in a one
PCAs or two-port version (two or four voice channels respectively). It contains:
. a 6809E microprocessor
. 64 KB of Static Random Access Memory (SRAM)
The TCM Interface PCA:
. connects StarTalk to the Norstar KSU by way of a Norstar station (TCM) Pan
. translates the Norstar Functional Messaging Protocol (FUMP)
Message StarTalk uses a message storage pack with a Small Computer Systems Interface
Storage Pack (SCSI) for data storage. The Message Storage Pack stores the:
PCA . Kernel operating system
. IP software
. Custom Call Routing software
. Application and Admin software programs
. voice prompts
. display prompts
. greetings and voice messages
. Audio Message Interchange Standard (AMIS)
StarTalk 2.0.1 Troubleshooting and Repair Manual

Section 2: StarTalk hardware configuration 2 - 5
The message storage capacity of the different modules is shown in Table 2.1
Message 165
Storage Pack
385
Note: All times gven are approximate.
Table 2.1: Storage capacity by module
POWet’ SUPPlY The power supply converts AC line voltage to DC. It provides +/- 5V DC and +/- 12V DC to the Motherboard PCA, and the disk drive. Table 2.2 summarizes the power supply specifications.
Test Point Voltage Min. Max. Current (Max.)
Pl - 1 Pl -2 Pl -3 Pl-4 Pl-5 Pl -6
Power Good KEY +12v -12v COM COM
+lO.BV +13.2V 0.3A -1O.BV -13.2V 0.3A
P2 - 1 COM P2 - 2 COM P2 - 3 -5v P2 - 4 +5v P2 - 5 +5v P2 - 6 +5v
P3 - 1 +12v P3 - 2 COM P3 - 3 COM P3 - 4 +5v
P4 - 1 +12v P4 - 2 COM P4 - 3 COM P4 - 4 +5v
P5 - 1 c12v P5 - 2 COM P5 - 3 COM P5 - 4 +5v
Table 2.2: Power supply specifications
-4.5v -5.5v 0.3A +4.75v +5.25V -4A +4.75v +5.25V 4A +4.75v +5.25V 4A
+lO.BV +13.2V 1.4A
+4.75v c5.25V 1A
+lO.BV +13.2V 1.4A
+4.75v +5.25V 1A
+lO.BV +13.2V 1.4A
I
+4.75v +5.25V 1A
StarTalk 2.0.1 Troubleshooting and Repair Manual
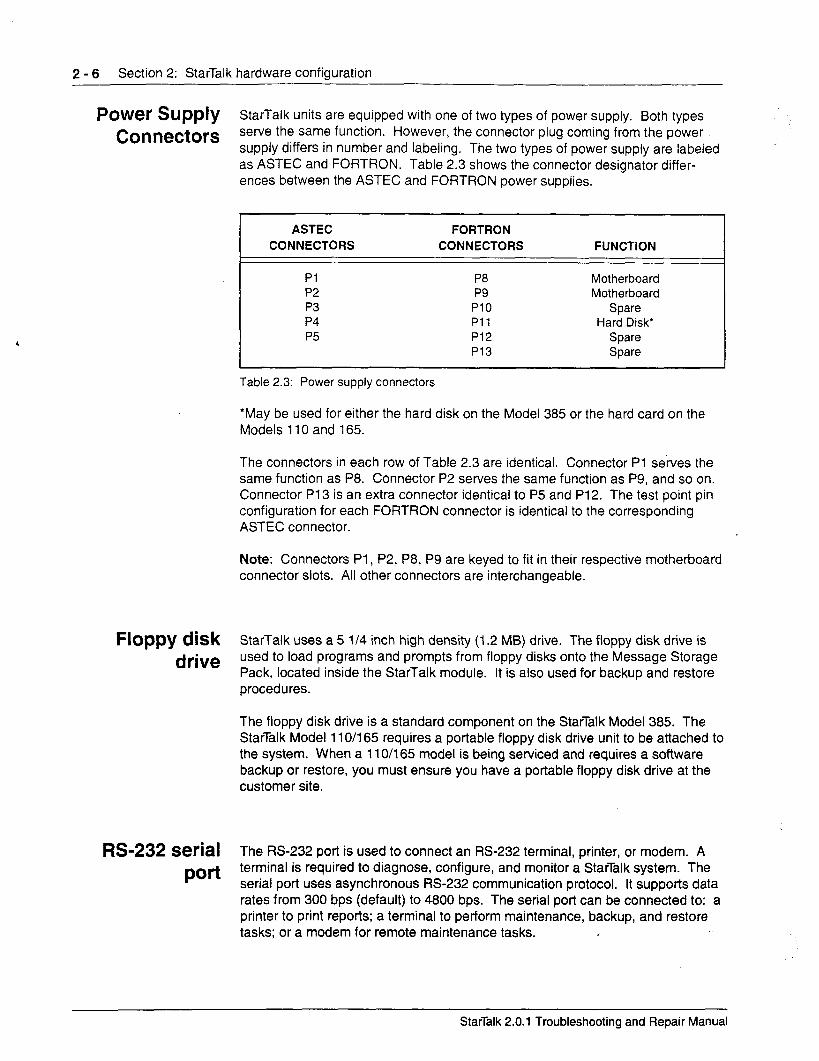
2 - 6 Section 2: StarTalk hardware configuration
Power SUPPiY StarTalk units are equipped with one of two types of power supply. Both types
Connectors serve the same function. However, the connector plug coming from the power supply differs in number and labeling. The two types of power supply are labeled as ASTEC and FORTRON. Table 2.3 shows the connector designator differ- ences between the ASTEC and FORTRON power supplies.
ASTEC FORTRON CONNECTORS CONNECTORS FUNCTION
Pl P8 Motherboard P2 P9 Motherboard P3 PlO Spare P4 PI1 Hard Disk’ P5 P12 Spare
P13 Spare
Table 2.3: Power supply connectors
‘May be used for either the hard disk on the Model 385 or the hard card on the Models 110 and 165.
The connectors in each row of Table 2.3 are identical. Connector Pl serves the same function as P8. Connector P2 serves the same function as P9, and so on. Connector P13 is an extra connector identical to P5 and P12. The test point pin configuration for each FORTRON connector is identical to the corresponding ASTEC connector.
Note: Connectors Pl, P2, P8, P9 are keyed to fit in their respective motherboard connector slots. All other connectors are interchangeable.
FlOPPY disk StarTalk uses a 5 l/4 inch high density (1.2 MB) drive. The floppy disk drive is
drive used to load programs and prompts from floppy disks onto the Message Storage Pack, located inside the StarTalk module. It is also used for backup and restore procedures.
The floppy disk drive is a standard component on the StarTalk Model 385. The StarTalk Model 11 O/l 65 requires a portable floppy disk drive unit to be attached to the system. When a 11 O/l 65 model is being serviced and requires a software backup or restore, you must ensure you have a portable floppy disk drive at the customer site.
RS-232 Serial The RS-232 port is used to connect an RS-232 terminal, printer, or modem. A
Pot-t terminal is required to diagnose, configure, and monitor a StarTalk system. The serial port uses asynchronous RS-232 communication protocol. It supports data rates from 300 bps (default) to 4800 bps. The serial port can be connected to: a printer to print reports: a terminal to perform maintenance, backup, and restore tasks; or a modem for remote maintenance tasks. I
StarTalk 2.0.1 Troubleshooting and Repair Manual
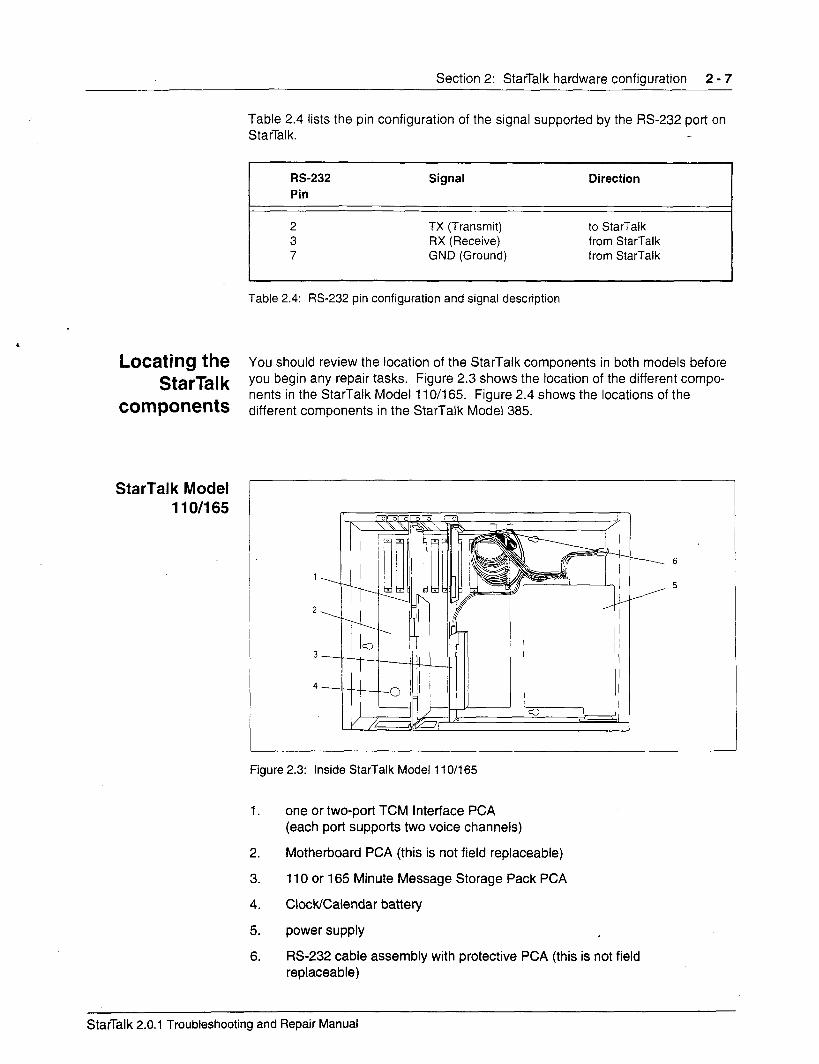
Section 2: StarTalk hardware configuration 2 - 7
,
Table 2.4 lists the pin configuration of the signal supported by the RS-232 port on StarTalk.
RS-232 Pin
Signal Direction
2 TX (Transmit) to StarTalk 3 RX (Receive) from StarTalk 7 GND (Ground) from StarTalk
Table 2.4: RS-232 pin configuration and signal description
Locating the Y ou should review the location of the StarTalk components in both models before
StarTalk Y ou begin any repair tasks. Figure 2.3 shows the location of the different compo- nents in the StarTalk Model 11 O/165. Figure 2.4 shows the locations of the
components d’ff I erent components in the StarTalk Model 385.
StarTalk Model 1 lo/165
Figure 2.3: Inside StarTalk Model 11 O/l 65
1. one or two-port TCM Interface PCA (each port supports two voice channels)
2. Motherboard PCA (this is not field replaceable)
3. 110 or 165 Minute Message Storage Pack PCA
4. Clock/Calendar battery
5. power supply I
6. RS-232 cable assembly with protective PCA (this is not field replaceable)
StarTalk 2.0.1 Troubleshooting and Repair Manual
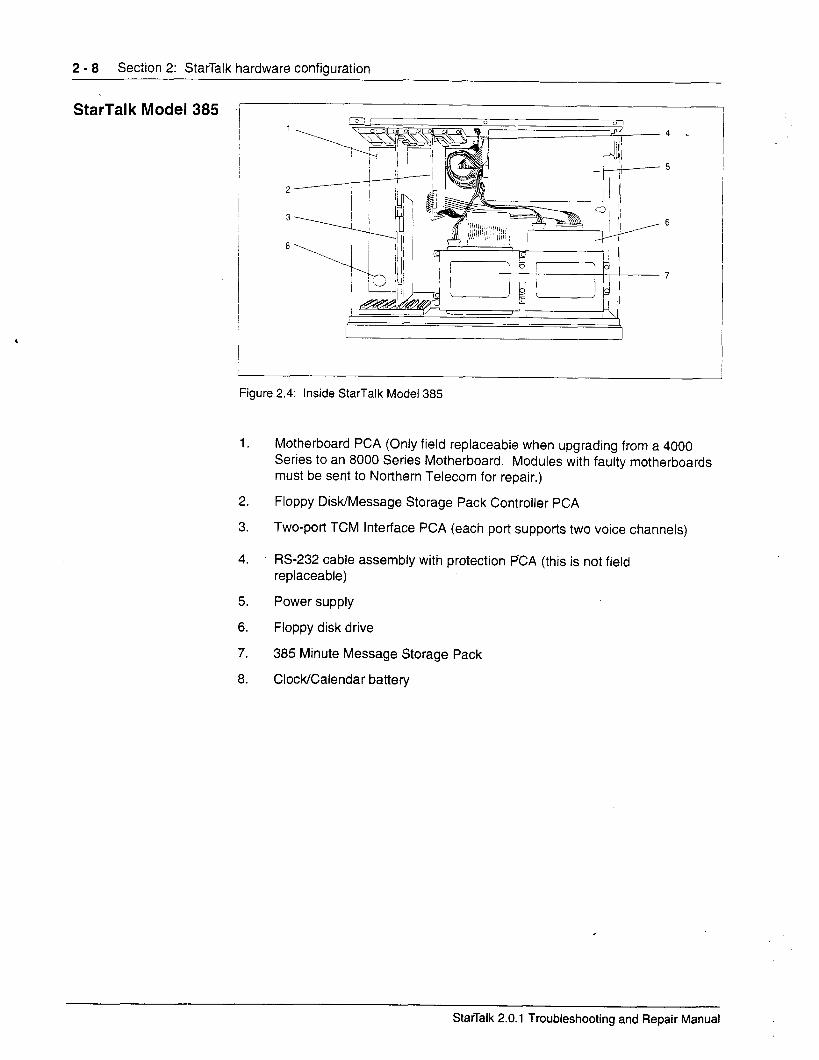
2 - 8 Section 2: StarTalk hardware configuration
StarTalk Model 385
Figure 2.4: Inside StarTalk Model 385
1. Motherboard PCA (Only field replaceable when upgrading from a 4000 Series to an 8000 Series Motherboard. Modules with faulty motherboards must be sent to Northern Telecom for repair.)
2. Floppy Disk/Message Storage Pack Controller PCA
3. Two-port TCM Interface PCA (each port supports two voice channels)
4. RS-232 cable assembly with protection PCA (this is not field replaceable)
5. Power supply
6. Floppy disk drive
7. 385 Minute Message Storage Pack
8. Clock/Calendar battery
StarTalk 2.0.1 Troubleshooting and Repair Manual
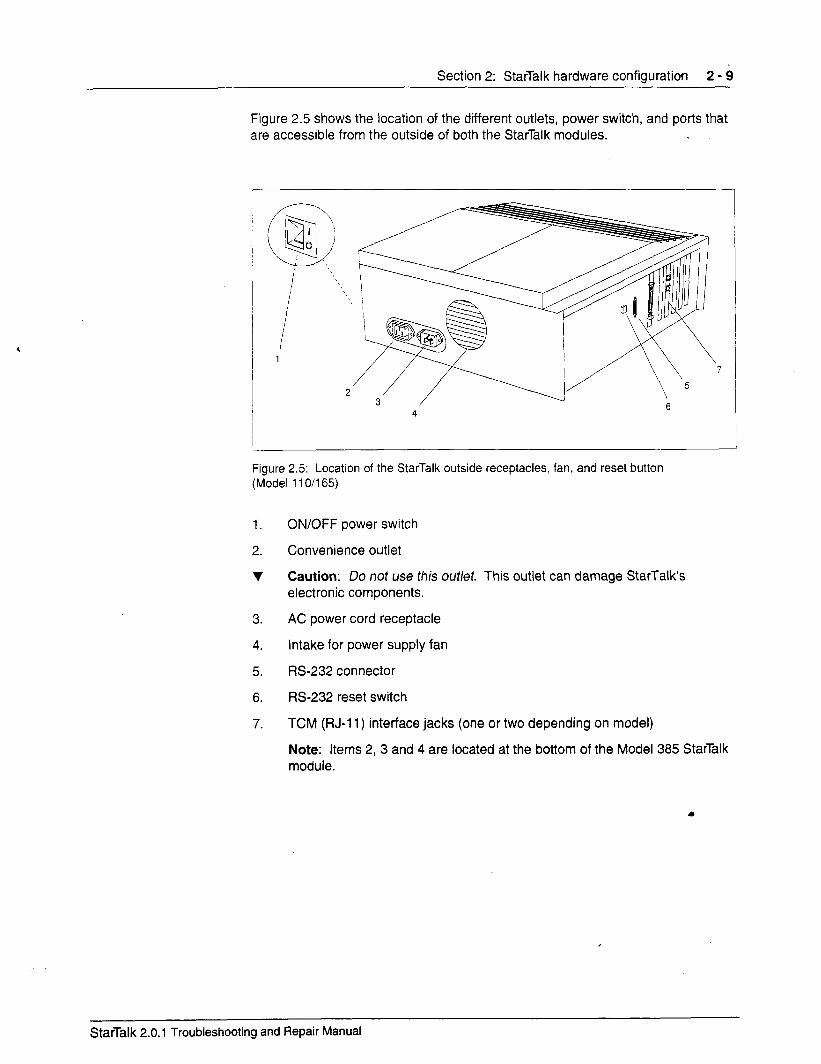
Section 2: StarTalk hardware confiouration 2 - 9
,
Figure 2.5 shows the location of the different outlets, power switch, and ports that are accessible from the outside of both the StarTalk modules.
Figure 2.5: Location of the StarTalk outside receptacles, fan, and reset button (Model 110/165)
1.
2.
v
3.
4.
5.
6.
7.
ON/OFF power switch
Convenience outlet
Caution: Do not use this outlet. This outlet can damage StarTalk’s electronic components.
AC power cord receptacle
Intake for power supply fan
W-232 connector
RS-232 reset switch
TCM (RJ-11) interface jacks (one or two depending on model)
Note: Items 2, 3 and 4 are located at the bottom of the Model 385 StarTalk module.
StarTalk 2.0.1 Troubleshooting and Repair Manual
2 - 10 Section 2: StarTalk hardware configuration
Operating StarTalk is designed to operate in any telephone switch room where telephone
Environment equipment is installed. When you visit a customer site to repair StarTalk, ensure the electrical and environment conditions are appropriate for the module. -
Electrical and l Voltage: 105 to 132 VAC
Environment . Requirements
Frequency: 50/60 Hz nominal +/- 3 Hz
. Current: 2.8 Amps
. Grounding: 3rd wire - AC ground
. Temperature: O”-40” C (32”-105’ F)
. Relative humidity: lo%-80% non-condensing
Observe the same environment precautions for StarTalk that you would observe for any other piece of electronicequipment. Keep liquids away from the module. Ensure the module is not installed in a damp or dusty area, or in a place where it might be bumped or subjected to vibration.
.
StarTalk 2.0.1 Troubleshooting and Repair Manual
Before. you begin to repair StarTalk 3 ~Il~rOdUCtiOI’l Before you begin to repair StarTalk, ensure you have the proper tools and all your
equipment is accounted for. This includes an FE-232 terminal. This section describes the special tools you require to make repairs, and also includes instruc- tions for:
. powering up the StarTalk module
. connecting an RS-232 terminal
. setting the RS-232 communication parameters
. using a modem to establish a remote connection
Important: Before you begin to diagnose a StarTalk problem, you should connect an RS-232 terminal and set the terminal communication parameters to match the StarTalk communication parameters.
TOOIS, Special This manual assumes you have the tools, parts, and equipment normally carried by a Norstar system installer/repairman.
Parts, and nee& In addition to your other equipment, you
equipment ’ . common hand tools such as screwdrivers
Note: You need a screwdriver with a shaft at least 6.5 inches long (approxi- mately 17 cm).
. Screw Holding Philips Screwdriver
. anti-static wrist strap
. a roll of 22-24 AWG twisted pair wire
. an RS-232 terminal
. an RS-232 cable to connect the terminal to StarTalk
. a working Norstar M7310 or M7324 telephone
. a Volt/Ohm multi-tester I
StarTalk 2.0.1 Troubleshooting and Repair Manual
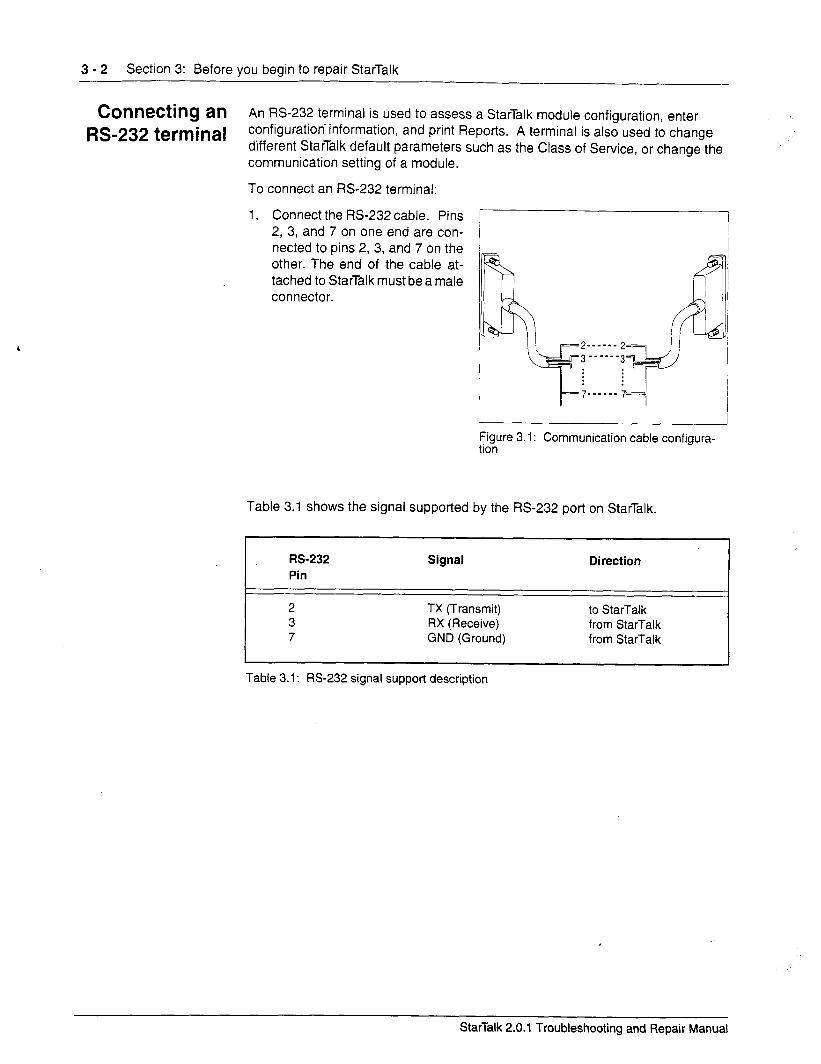
3 - 2 Section 3: Before you begin to repair StarTalk
Connecting an An RS-232 terminal is used to assess a StarTalk module configuration, enter
M-232 terminal configuration’information, and print Reports. A terminal is also used to change different StarTalk default parameters such as the Class of Service, or change the communication setting of a module.
To connect an FE-232 terminal:
1. Connect the RS-232 cable. Pins 2, 3, and 7 on one end are con- nected to pins 2, 3, and 7 on the , other. The end of the cable at- tached to StarTalk must be a male connector.
1
Figure 3.1: Communication cable configura- tion
Table 3.1 shows the signal supported by the RS-232 port on StarTalk.
RS-232 Pin
Signal Direction
2 TX (Transmit) to StarTalk 3 RX (Receive) from StarTalk 7 GND (Ground) from StarTalk
I
Table 3.1: W-232 signal support description I
StarTalk 2.0.1 Troubleshooting and Repair Manual
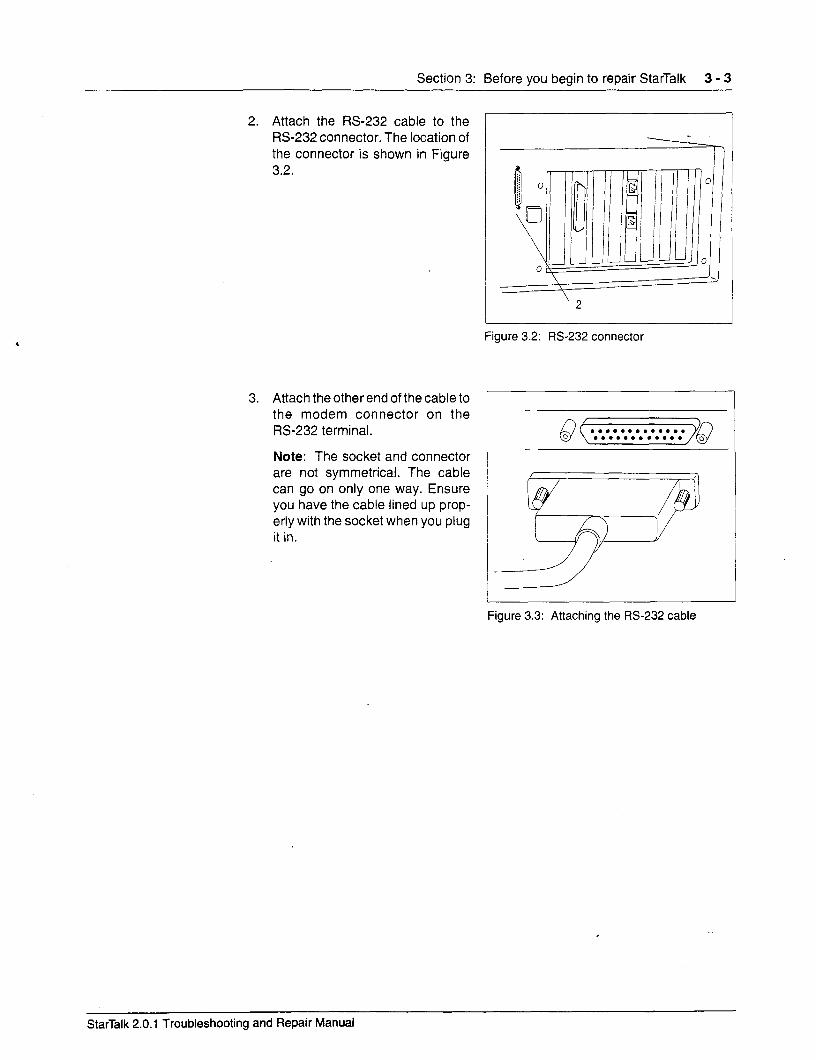
Section 3: Before you begin to repair StarTalk 3 - 3
2. Attach the W-232 cable to the RS-232 connector. The location of the connector is shown in Figure 3.2.
3. Attach the other end of the cable to the modem connector on the RS-232 terminal.
Note: The socket and connector are not symmetrical. The cable can go on only one way. Ensure you have the cable lined up prop- erly with the socket when you plug it in.
-----z-
Figure 3.2: RS-232 connector
Figure 3.3: Attaching the W-232 cable
StarTalk 2.0.1 Troubleshooting and Repair Manual

3 - 4 Section 3: Before you begin to repair StarTalk
Using an The RS-232 terminal is used to access StarTalk configuration menus. The
W-232 terminal menus provide option lists, where you can select different options that allow you to change configuration settings. Some configuration tasks require a terminal. Other configuration tasks can be performed using an M7310 or M7324 tele- phone. The diagnostic procedures shown throughout this manual show you how to establish the configuration settings using the RS-232 terminal. If you want to perform configuration tasks using an M7310 or M7324 telephone, refer to the StarTalk Set Up and Operation Guide.
Before you can use an FE-232 terminal, the StarTalk module and the RS-232 terminal must have the same communication settings. The steps in this section show you how to set the communication parameters for StarTalk only. To deter- mine the terminal communication parameters, you must refer to the user manual that came with the RS-232 terminal. The StarTalk default communication param- eters are set to:
. 300 baud
. 7 data bits
. 1 stop bit
. even parity
Important: If necessary, set the terminal communication parameters to these values. For instructions, refer to the terminal operating manual.
Powering On To power on the StarTalk module:
StarTalk , Turn on the RS-232 terminal.
2. Turn on StarTalk. (If StarTalk is already turned on, proceed to step 3.)
StarTalk 2.0.1 Troubleshooting and Repair Manual
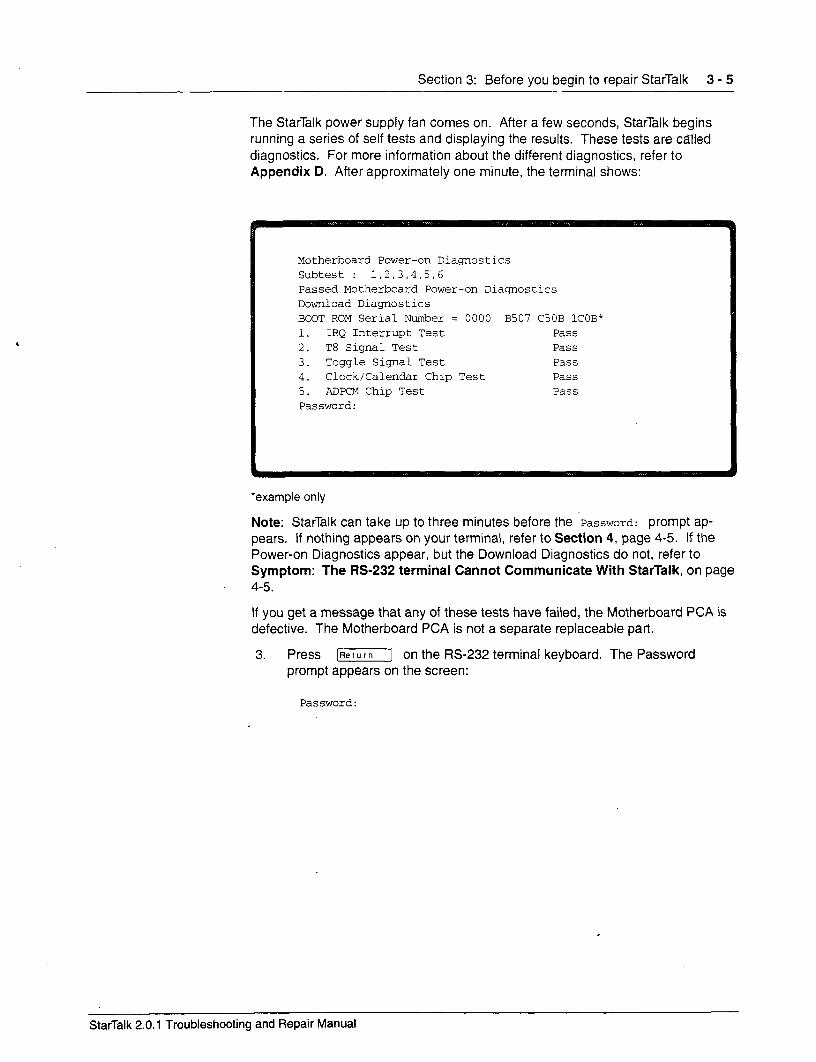
Section 3: Before you begin to repair StarTalk 3 - 5
The StarTalk power supply fan comes on. After a few seconds, StarTalk begins running a series of self tests and displaying the results. These tests are called diagnostics. For more information about the different diagnostics, refer to Appendix D. After approximately one minute, the terminal shows:
Motherboard Power-on Diagnostics Subtest : 1,2,3,4.5,6 Passed Motherboard Power-on Diagnostics Download Diagnostics BOOT ROM Serial Number = 0000 B507 C50B lCOB* 1. IRQ Interrupt Test Pass 2. T8 Signal Test Pass 3. Toggle Signal Test Pass 4. Clock/Calendar Chip Test Pass 5. ADPCM Chip Test Pass Password:
*example only
Note: StarTalk can take up to three minutes before the Password: prompt ap- pears. If nothing appears on your terminal, refer to Section 4, page 4-5. If the Power-on Diagnostics appear, but the Download Diagnostics do not, refer to Symptom: The M-232 terminal Cannot Communicate With StarTalk, on page 4-5.
If you get a message that any of these tests have failed, the Motherboard PCA is defective. The Motherboard PCA is not a separate replaceable part.
3. Press [Return] on the FE-232 terminal keyboard. The Password prompt appears on the screen:
Password:
StarTalk 2.0.1 Troubleshooting and Repair Manual
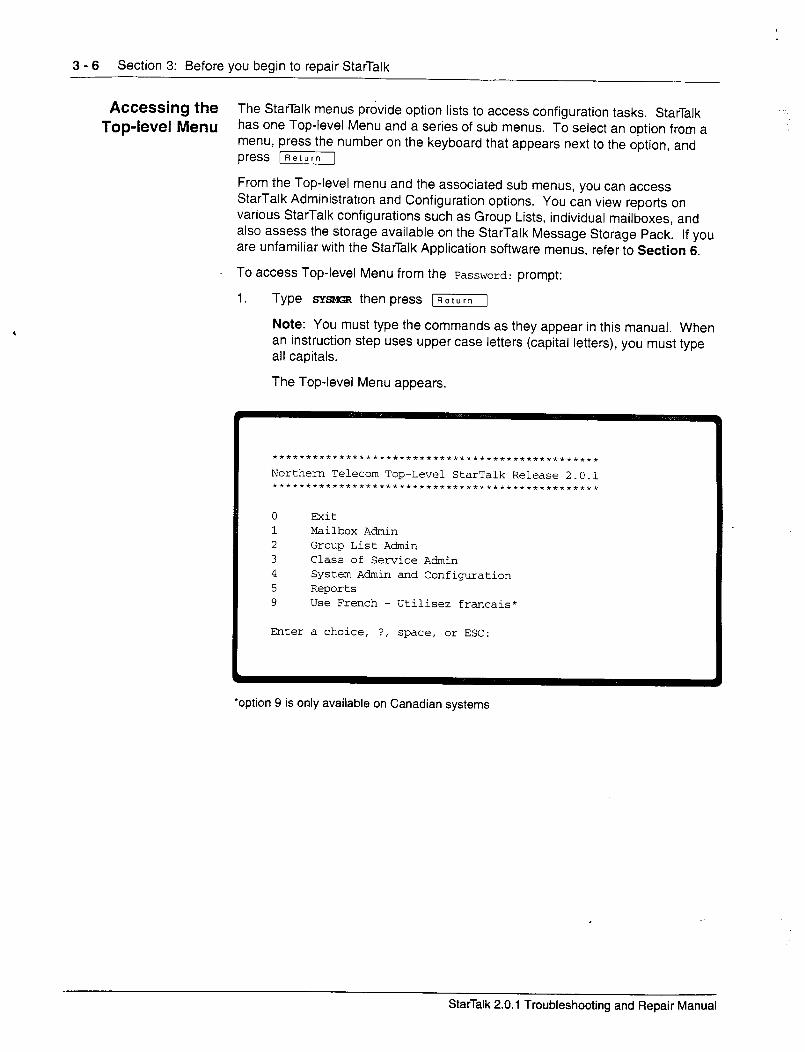
Section 3: Before you begin to repair StarTalk 3 - 7
Changing the If you need to use a different communication setting, you must change the para-
StarTal k meter setting on the StarTalk module and the RS-232 terminal. These parame-
communication ters must match for StarTalk and the terminal to communicate. The StarTalk default communication parameters are:
parameters . 300 baud
. 7 data bits
. 1 stop bit
. even parity
Before you begin, make sure the Top-level Menu appears on the monitor. Refer to Accessing the Top-level Menu, earlier in this section. To change the Stairalk W-232 communication parameters:
1. Press q (System Admin and Configuration), then press [Return\ The System Admin and Configuration Menu appears.
2. Press q (FE-232 communication parameters), then press [Return]
3. Select the number of the appropriate setting, then press [Return]
Note: This procedure sets the communication parameters for StarTalk only. It has no affect on the RS-232 terminal. The terminal and StarTalk are now out of sync. StarTalk messages no longer appear on the screen, or if they appear, they might be garbled. The terminal remains like this until you reset the communication parameters for the terminal.
4. Adjust the terminal communication parameters to match the values as-. signed to the StarTalk module. For instructions, refer to the operating manual of the RS-232 terminal.
5.
6.
?ress [Return! when you have made the appropriate changes to the RS-232 terminal communication parameters.
If you want the changes to the StarTalk communication parameters to be permanent, press q (Yes), then press [=I If you select NO and press [Return] the RS-232 setting reverts to the previously saved setting the next time the power to the StarTalk module is turned off.
StarTalk 2.0.1 Troubleshooting and Repair Manual
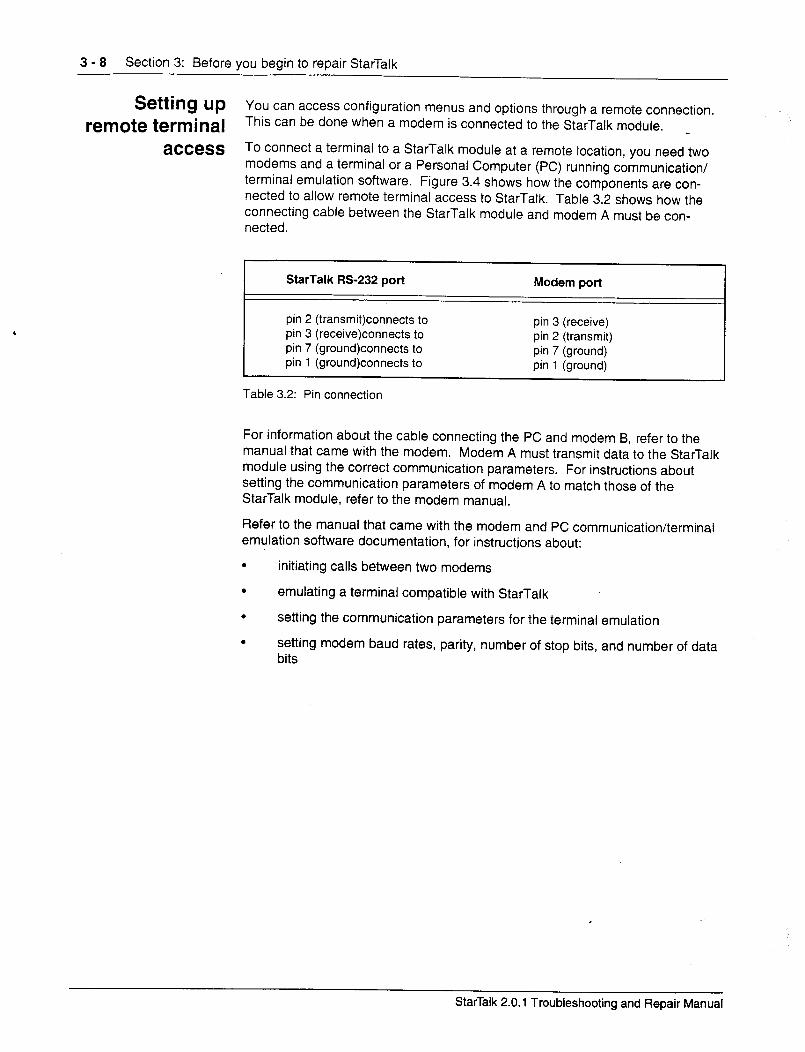
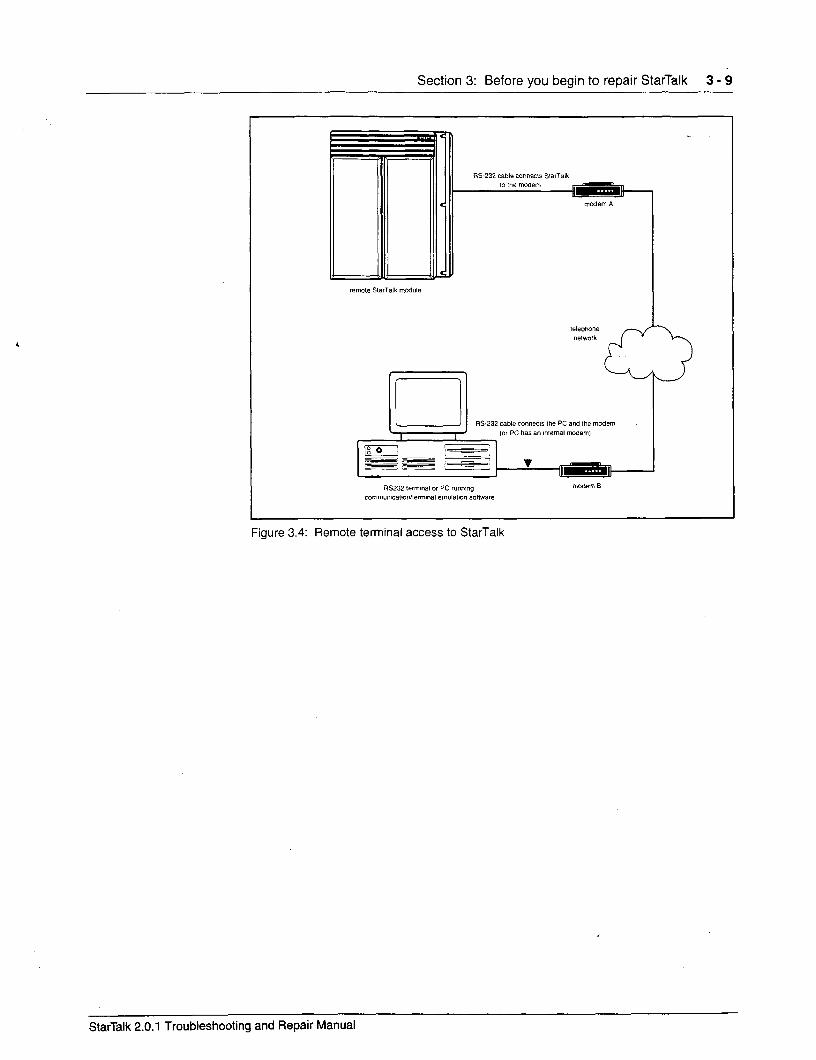
Section 3: Before you begin to repair StarTalk 3 - 9
Figure 3.4: Remote terminal access to StarTalk
StarTalk 2.0.1 Troubleshooting and Repair Manual

3 - 10 Section 3: Before you begin to repair StarTalk
,
StarTalk 2.0.1 Troubleshooting and Repair Manual
Diagnosing user problems
Introduction When a StarTalk component fails, a user notices it immediately. A failure symp- tom is always noticeable, such as StarTalk not answering calls or not responding to DTMF tones, or messages being cut off.
The first step in diagnosing the cause of a problem is to determine the symptom. The best method for determining a symptom is to ask the System Coordinator, or the person in charge of managing StarTalk. Often, when a StarTalk component malfunctions, StarTalk generates an Alarm message. Alarm messages are ex- plained later in this section.
This section describes how to diagnose a StarTalk problem, and how to:
. use StarTalk’s Diagnostics and Alarms
. assess the troubleshooting procedure to use
. determine the problem component
. correct the problem
Before YOU A user problem can be the result of more than one component failure. Diagnosing
begin a StarTalk problem involves isolating the cause, and determining whether or not the malfunction involves a failed hardware component or the StarTalk software. After you have diagnosed what is causing the problem, refer to Section 5, Re- placing StarTalk components, or Section 6, Using StarTalk Configuration software.
Important: After you have determined the cause of the problem, and corrected the problem by replacing a component or changing the software configuration parameters, you must test the module to determine whether or not it is working properly.
Before you begin, ensure you have an RS-232 terminal connected to StarTalk, and you have determined the StarTalk Feature Codes.
I
StarTalk 2.0.1 Troubleshooting and Repair Manual
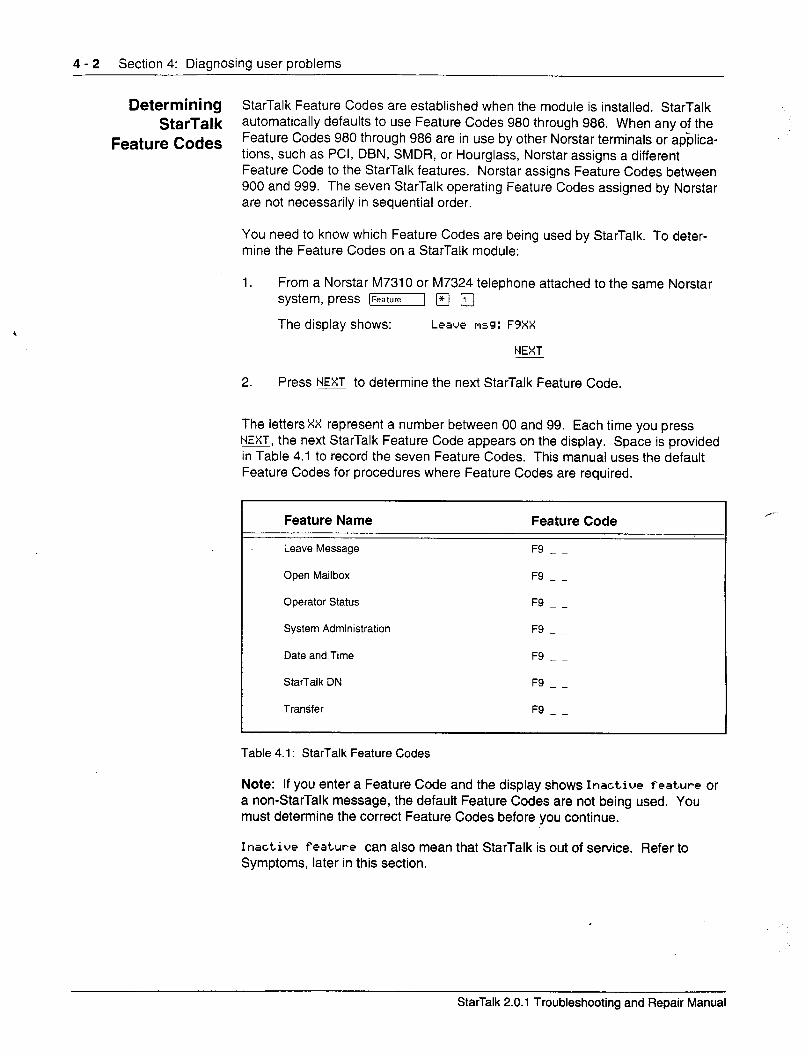
4 - 2 Section 4: Diagnosing user problems
Determining StarTalk Feature Codes are established when the module is installed. StarTalk StarTalk automatically defaults to use Feature Codes 980 through 986. When any of the
Feature Codes Feature Codes 980 through 986 are in use by other Norstar terminals or applica- tions, such as PCI, DBN, SMDR, or Hourglass, Norstar assigns a different Feature Code to the StarTalk features. Norstar assigns Feature Codes between 900 and 999. The seven StarTalk operating Feature Codes assigned by Norstar are not necessarily in sequential order.
You need to know which Feature Codes are being used by StarTalk. To deter- mine the Feature Codes on a StarTalk module:
1. From a Norstar M7310 or M7324 telephone attached to the same Norstar system, press [Feature] q q The display shows: Leave msg: FSXX
NEXT
2. Press NE to determine the next StarTalk Feature Code.
The letters XX represent a number between 00 and 99. Each time you press NEXT, the next StarTalk Feature Code appears on the display. Space is provided in Table 4.1 to record the seven Feature Codes. This manual uses the default Feature Codes for procedures where Feature Codes are required.
Feature Name
Leave Message
Open Mailbox
Operator Status
System Administration
Date and Time
StarTalk DN
Transfer
Feature Code
F9 - -
F9 - _
F9 - _
F9 - -
F9 - -
F9 - _
F9 - -
Table 4.1: StarTalk Feature Codes
Note: If you enter a Feature Code and the display shows Inactive feature or a non-StarTalk message, the default Feature Codes are not being used. You must determine the correct Feature Codes before you continue.
Inactive feature can also mean that StarTalk is out of service. Refer to Symptoms, later in this section.
StarTalk 2.0.1 Troubleshooting and Repair Manual
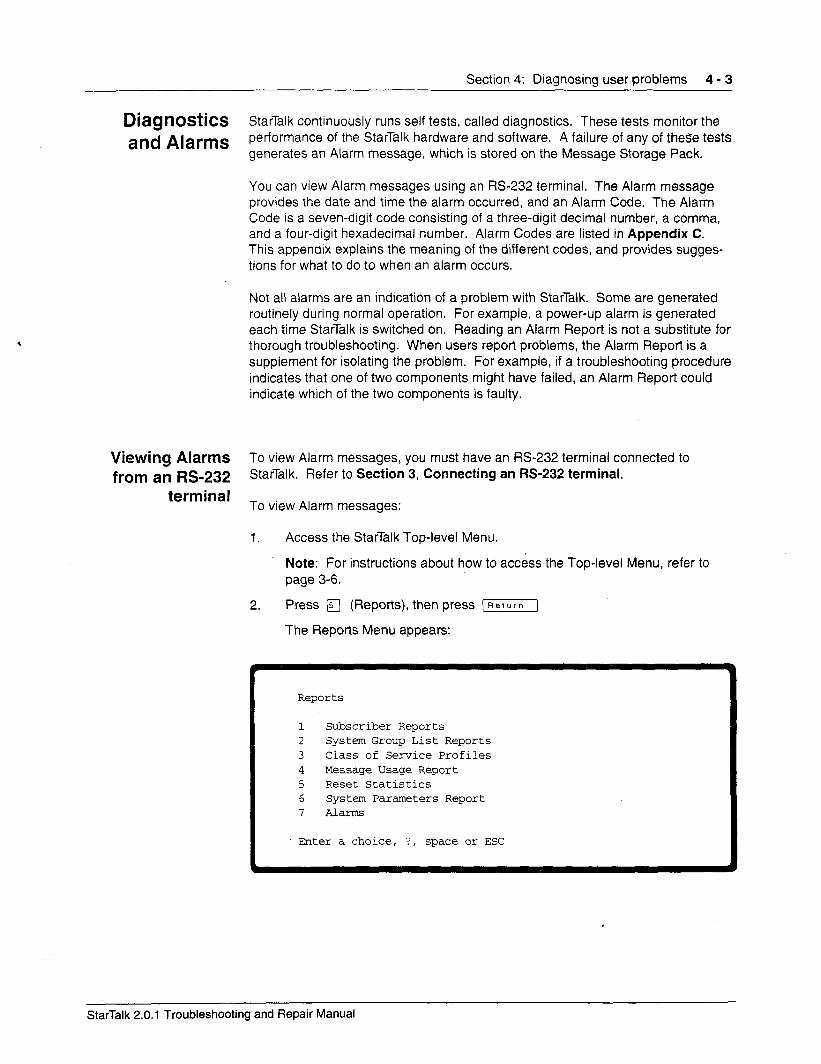
Section 4: Diagnosing user problems 4 - 3
Diagnostics StarTalk continuously runs self tests, called diagnostics. These tests monitor the
and Alarms performance of the StarTalk hardware and software. A failure of any of these tests generates an Alarm message, which is stored on the Message Storage Pack.
You can view Alarm messages using an RS-232 terminal. The Alarm message provides the date and time the alarm occurred, and an Alarm Code. The Alarm Code is a seven-digit code consisting of a three-digit decimal number, a comma, and a four-digit hexadecimal number. Alarm Codes are listed in Appendix C. This appendix explains the meaning of the different codes, and provides sugges- tions for what to do to when an alarm occurs.
Not all alarms are an indication of a problem with StarTalk. Some are generated routinely during normal operation. For example, a power-up alarm is generated each time StarTalk is switched on. Reading an Alarm Report is not a substitute for thorough troubleshooting. When users report problems, the Alarm Report is a supplement for isolating the problem. For example, if a troubleshooting procedure indicates that one of two components might have failed, an Alarm Report could indicate which of the two components is faulty.
Viewing Alarms To view Alarm messages, you must have an RS-232 terminal connected to from an ~$232 StarTalk. Refer to Section 3, Connecting an M-232 terminal.
terminal To view Alarm messages:
1. Access the StarTalk Top-level Menu.
2.
Note: For instructions about how to access the Top-level Menu, refer to page 3-6.
Press a (Reports), then press [Return]
The Repon‘s Menu appears:
Reports
1 Subscriber Reports 2 System Group List Reports 3 Class of Service Profiles 4 Message Usage Report 5 Reset Statistics 6 System Parameters Report 7 AlalTfLs
Enter a choice, ?, space or ESC
StarTalk 2.0.1 Troubleshooting and Repair Manual
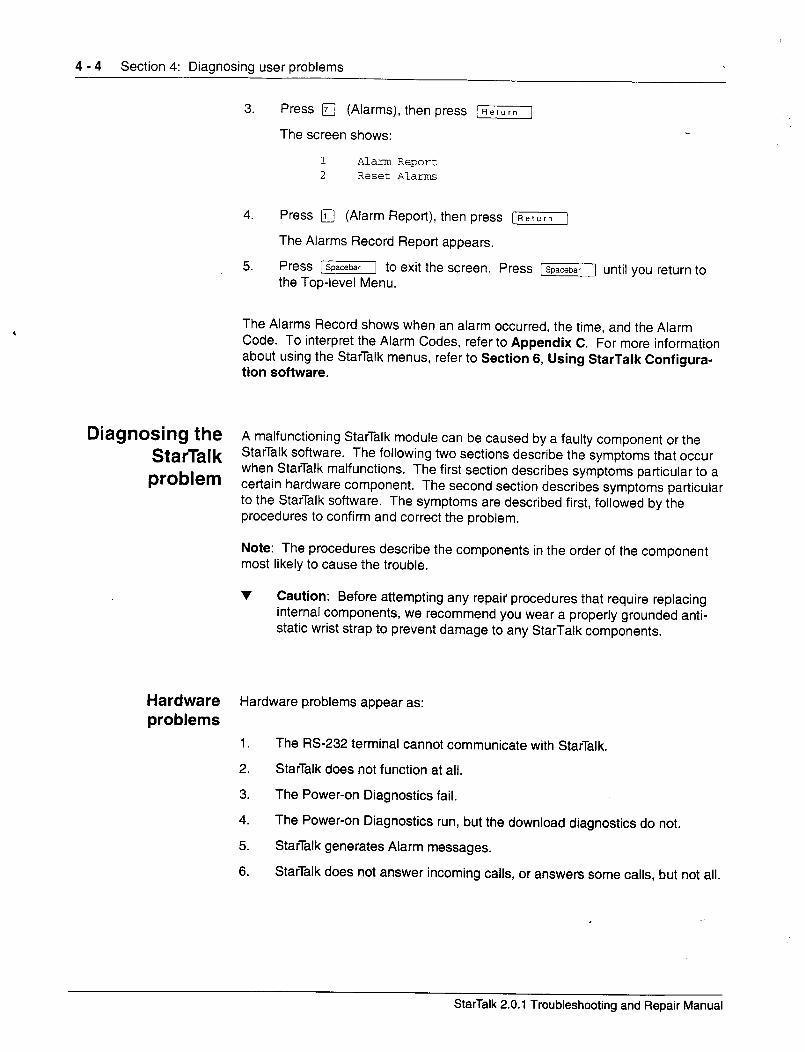
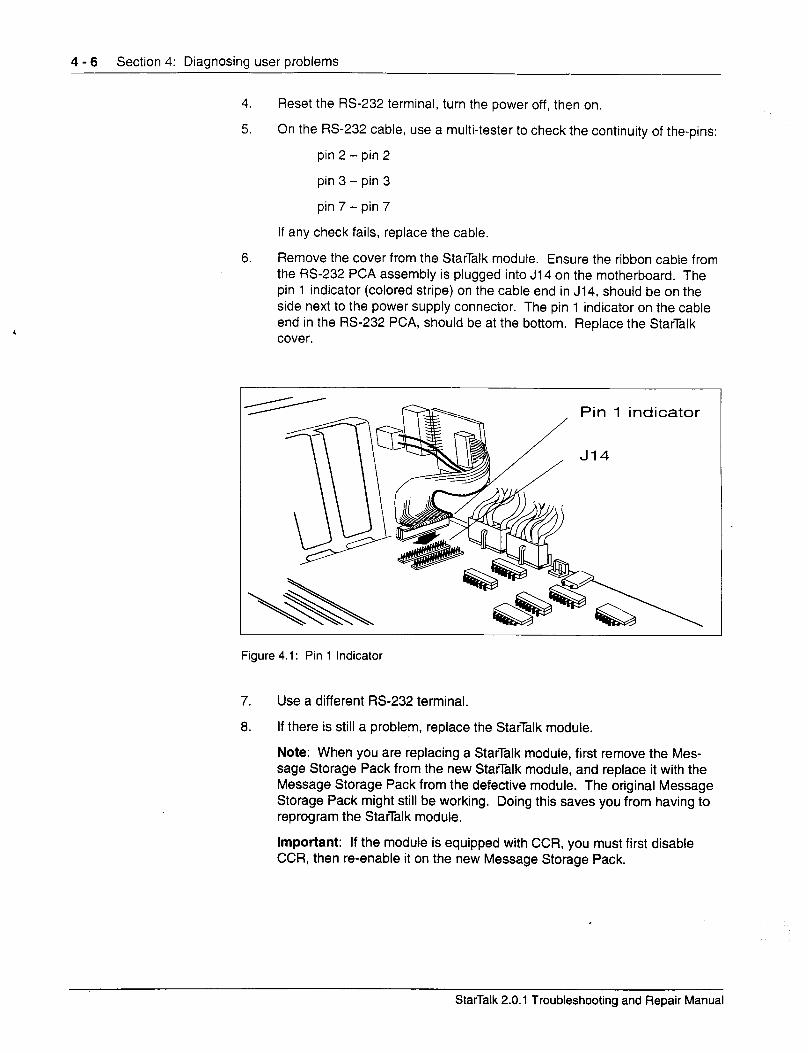
4 - 6 Section 4: Diagnosing user problems
4. Reset the RS-232 terminal, turn the power off, then on.
5. On the RS-232 cable, use a multi-tester to check the continuity of the-pins:
pin 2 - pin 2
pin 3 - pin 3
pin 7 - pin 7
If any check fails, replace the cable.
6. Remove the cover from the StarTalk module. Ensure the ribbon cable from the RS-232 PCA assembly is plugged into J14 on the motherboard. The pin 1 indicator (colored stripe) on the cable end in J14, should be on the side next to the power supply connector. The pin 1 indicator on the cable end in the RS-232 PCA, should be at the bottom. Replace the StarTalk cover.
Figure 4.1: Pin 1 Indicator
7.
6.
Use a different RS-232 terminal.
If there is still a problem, replace the StarTalk module.
Note: When you are replacing a StarTalk module, first remove the Mes- sage Storage Pack from the new StarTalk module, and replace it with the Message Storage Pack from the defective module. The original Message Storage Pack might still be working. Doing this saves you from having to reprogram the StarTalk module.
Important: If the module is equipped with CCR, you must first disable CCR, then re-enable it on the new Message Storage Pack.
StarTalk 2.0.1 Troubleshooting and Repair Manual
Section 4: Diagnosing user problems 4 - 7
Symptom: StarTalk does not
function at all
Symptom: The Power-on
Diagnostics fail
Symptom: The Power-on Diagnostics run, but the Download
Diagnostics do not
StarTalk is not functioning when there is no response from the terminal, or the Feature Codes do not appear on the Norstar display.
1. Check to ensure the:
. AC power cord is plugged in
. power switch is ON
. StarTalk module is getting AC power from the outlet
2. Turn the power off and remove the cover. On the Model 11 O/l 65, reseat the TCM Interface, the Message Storage Pack PCA, and the Floppy Disk PCA.
or
On the Model 385, reseat the TCM Interface PCA(s), and the Disk Control- ler PCA.
3. Check to ensure all ribbon cable and power supply connectors are con- nected properly.
4. Replace the cover and turn the power on.
If the Power-on Diagnostics do not appear on the terminal, refer to Symp tom: The Power-on Diagnostics fail.
If the Power-on Diagnostics do appear, but the Download Diagnostics do not, refer to Symptom: The Power-On Diagnostics run, but the Download Diagnostics do not.
One of two components could be at fault: the power supply or the motherboard. Perform these steps to correct the problem:
1. Measure the power supply voltage. Refer to the Power Supply Specifica- tions Table on page 2-5. If the voltage is out of spec, replace the power supply and retest the system.
2. Replace the StarTalk module, then reprogram and test the system.
One of several components could be at fault. To correct the problem, perform these steps:
On the Model 110/165, remove the cover and:
1. Check all cable and power supply connectors.
2. Replace the Message Storage Pack, reprogram, and test the system.
3. Replace the StarTalk module, reprogram, and test the system.
StarTalk 2.0.1 Troubleshooting and Repair Manual
4 - 8 Section 4: Diagnosing user problems
On the Model 385, remove the cover and:
1. Check all ribbon cable and power supply connectors.
2. Replace the power supply, then test the system.
3. Replace the Disk Controller PCA, then test the system.
4. Replace the Message Storage Pack, reprogram, and test the system.
5. Replace the StarTalk module, reprogram, and test the system.
Note: Whenever you are replacing a StarTalk module, first remove the Message Storage Pack from the new StarTalk module, and replace it with the Message Storage Pack from the defective module. The original Mes- sage Storage Pack might still be working. Doing this saves you having to reprogram the StarTalk module.
important: If the module is equipped with CCR, you must first disable CCR, then re-enable it on the new Message Storage Pack.
Symptom: StarTalk generates Alarm
messages
Symptom: StarTalk does not answer
incoming calls, or answers some calls
but not all
Refer to Diagnostics and Alarms earlier in this section.
This symptom is usually first detected by users who notice their telephones or company lines are not being answered.
1. Check to ensure each CO line is assigned to a Greeting Table. StarTalk does not answer an incoming call unless the line is assigned to a Greeting Table. Refer to the StarTalk Set Up and Operation Guide, Section 4. If a line is not assigned to a Table, reprogram the line to a Greeting Table. Call each CO line to verify the call is being answered.
2. Ensure a ringing signal is reaching the Norstar KSU. Assign each CO line to appear and ring at a Norstar set. Call in to each CO line, in turn, and verify the line is ringing at the Norstar set. If there is no ringing signal, the problem is with the CO line, or with the Norstar KSU. If the problem is determined to be the CO line, notify the telephone company. If the problem is with the Norstar KSU, refer to the appropriate troubleshooting procedures for the Norstar System. If each line rings at the set and StarTalk does not answer, replace the TCM Interface PCA. Refer to Section 5.
Note: If the module you are troubleshooting has more than one TCM Interface PCA, refer to Troubleshooting Star‘lslk modules with two TCM Interface PCAs. later in this section.
StarTalk 2.0.1 Troubleshooting and Repair Manual
Section 4: Diagnosing user problems 4 - 9
3. If you replaced the TCM Interface PCA and one or more lines are still not being answered, replace the StarTalk module, then reprogram and test the system.
Note: When you are replacing a StarTalk module, first remove the Message Storage Pack from the new StarTalk module, and replace it with the Mes- sage Storage Pack from the defective module. The original message storage pack might still be working. Doing this saves you having to repro- gram the StarTalk module.
Software problems Software problems are usually caused by a configuration parameter conflicting with how StarTalk operates. These symptoms appear as:
1. StarTalk does not respond properly to DTMF signals.
2. Recorded message quality is poor:
. Messages are garbled
or
. Messages are noisy or have low amplitude
3. StarTalk stops recording in the middle of messages.
4. The Message for YOU indication on a Norstar telephone does not appear when a message is left in a mailbox.
5. Users cannot open their mailboxes.
Symptom: StarTalk Before you can assess what is causing this problem, you must determine if the does not respond problem is intermittent or StarTalk is not responding to DTMF signals at all. Follow properly to DTMF the procedures listed below to correct the problem.
signals on incoming calls 1. When StarTalk does not respond at all:
Monitor an incoming call to determine if an outside call can transmit DTMF signals to StarTalk. StarTalk does not respond to signals from a rotary dial telephone. Calls received from a rotary telephone are transferred to the General Delivery mailbox. Check the messages in this mailbox.
If StarTalk is receiving DTMF signals and is not responding, replace the TCM Interface PCA. For more information, refer to Section 5.
Note: If the module has more than one TCM interface PCA, refer to Troubleshooting StarTalk Modules with two TCM Interface PCAs, later in this section.
2. StarTalk responds intermittently:
StarTalk is factory programmed to respond to DTMF tones that have a duration of at least 48 ms. This parameter can be adjusted between 20 and 60 ms. The DTMF duration parameter is explained in Appendix A. Read Appendix A before adjusting the DTMF duration parameter.
StarTalk 2.0.1 Troubleshooting and Repair Manual
4 - 10 Section 4: Diagnosing user problems
Changing the DTMF duration parameter is a trade off between improving DTMF detection, and increasing the possibility of Talk Off. As you improve one, the other might get worse. As the DTMF duration parameter gets smaller, DTMF detection is improved, but the possibility of Talk Off in- creases. As the DTMF duration parameter gets larger, the possibility of Talk Off is reduced, but the ability to detect DTMF tones of a short duration is also reduced.
Adjust the DTMF duration parameter 5 ms at a time, until you reach an accept- able balance. If StarTalk is receiving DTMF signals and is not responding, re- place the TCM Interface PCA.
Note: If the module has more than one TCM Interface PCA, refer to Trouble- shooting StarTalk Modules with two TCM interface PCAs, later in this section.
Symptom: Message Poor quality recordings can result in garbled messages, or low amplitude record- recording quality is ings.
poor 1. Check incoming calls for low amplitude transmission. Attach a telephone
test set to each CO line, in turn, and monitor an incoming call. If the calls are low amplitude, the problem is with the telephone company, not with StarTalk. Contact the telephone company.
2. If incoming calls are not low amplitude, replace the TCM Interface PCA. If there is still a problem, go to Step 3. For more information, refer to Sec- tion 5.
Note: If the module has more than one TCM interface PCA, refer to Troubleshooting StarTalk Modules with two TCM Interface PCAs, later in this section.
3. Replace the StarTalk module, then reprogram and test the system.
Note: When you are replacing a StarTalk module, first remove the Mes- sage Storage Pack from the new StarTalk module, and replace it with the Message Storage Pack from the defective module. The original Message Storage Pack might still be working. Doing this saves you having to reprogram the StarTalk module.
Symptom: StarTalk The problem could be Talk Off. This problem is explained in Appendix A. It can stops recording in the be remedied by adjusting the DTMF duration parameter. Read Appendix A
middle of a message before adjusting the DTMF duration parameter. Changing the DTMF duration parameter is a trade off between improving DTMF detection and increasing the possibility of Talk Off. As you improve one, the other can get worse.
Note: As the DTMF duration parameter gets smaller, DTMF detection is im- proved, but the possibility of Talk Off increases. As the DTMF duration param- eter gets larger, the possibility of Talk Off is reduced, but the ability to detect DTMF tones of a short duration is also reduced.
StarTalk 2.0.1 Troubleshooting and Repair Manual
Section 4: Diagnosing user problems 4 - 11
1. Adjust the DTMF duration parameter 5 ms at a time until you reach an acceptable balance.
2. Leave several messages in a mailbox and verify the messages are com- plete. To leave a message, refer to the StarTalk User Card.
3. If the problem still occurs, replace the TCM Interface PCA.
Note: If the module has more than one TCM Interface PCA, refer to Troubleshooting StarTalk Modules with two TCM interface PCAs, later in this section. Refer to Section 5 for information about replacement.
Symptom: The The Message Notification prompt is enabled through a StarTalk Class of Service. Message Notification When enabled, a prompt appears on the Norstar display each time a message is
prompt does not left in a mailbox. If Message Notification is enabled, yet the prompt does not appear appear on the telephone display, you must:
1. Check the Message Notification setting for the mailbox. Refer to Changing mailbox parameters, on page 6-8 of this manual. Use the Modify Sub- scriber Mailbox Menu to determine the mailbox options.
2. Verify there is only one mailbox assigned to the extension. Ensure the mailbox is assigned an extension that is operating on the Norstar system.
3. It could be the mailbox is full. Delete any unwanted messages from the problem mailbox.
.
4. If all sets are having this problem, replace the TCM Interface PCA.
Note: If the module has more than one TCM interface PCA, refer to Troubleshooting StarTalk Modules with two TCM Interface PCAs, later in this section. Refer to Section 5 for information about replacement.
Symptom: Users This problem might be encountered by a single user or by all users. You must cannot open their determine if all users are having the same trouble.
mailboxes 1. If all users are having the same problem opening their mailboxes from
outside the Norstar system (from a CO line), refer to software Symptom: StarTalk does not respond properly to DTMF signals on incoming calls.
2. Use the Subscriber Reports Menu to verify the user mailbox exists (refer to page 6-25 in this manual). If the mailbox does not exist, add the mailbox. Refer to page 6-6 in this-manual for information about adding a mailbox.
3. Verify that the user is entering the correct password.
4. If there is still a problem, reset the mailbox password. Refer to page 6-9 in this manual for information about resetting the mailbox password.
5. Delete the mailbox, then add a new one.
StarTalk 2.0.1 Troubleshooting and Repair Manual
4 - 12 Section 4: Diagnosing user problems
Software loader Some symptoms are only apparent when a peripheral device is attached to the
troubleshooting Stat-Talk module. The information described here deals with problems that might occur during, or after, installing a software loader (floppy disk drive), or an RS-232 terminal.
Before you begin, ensure the:
. StarTalk module is plugged in
. power switch is ON
. StarTalk module is getting AC power from the outlet
, Symptom: The 1.
W-232 terminal screen is blank
Check to ensure the RS-232 terminal communication parameters are set to 300 baud/7 data bits/l stop bit/even parity.
Note: It is possible the default StarTalk communication parameters have been changed, and no longer match those of the IRS-232 terminal. An indication of this is garbled information or unreadable characters on the RS-232 terminal screen. If you suspect this is the problem:
. Set the communication parameters on the W-232 terminal to 300 baud/7 data bits/i stop bit/even parity.
. Power OFF StarTalk. Press the RS-232 reset switch at the side of StarTalk, hold it in, and power ON StarTalk. After the power is switched on, release the RS-232 reset switch.
Note: This temporarily resets the StarTalk communication parameters to the default setting. If you power on StarTalk again, without holding in the Q-232 reset switch, the setting reverts to the previously saved value.
If this corrects the problem, reset the StarTalk communication parameters to the appropriate values.
If the original problem persists, continue with this procedure.
2. Check the W-232 cable. Ensure it is connected to the W-232 connector on StarTalk, and to the modem connector on the terminal.
3. Reset the RS-232 terminal by turning the power OFF, then ON.
StarTalk 2.0.1 Troubleshooting and Repair Manual
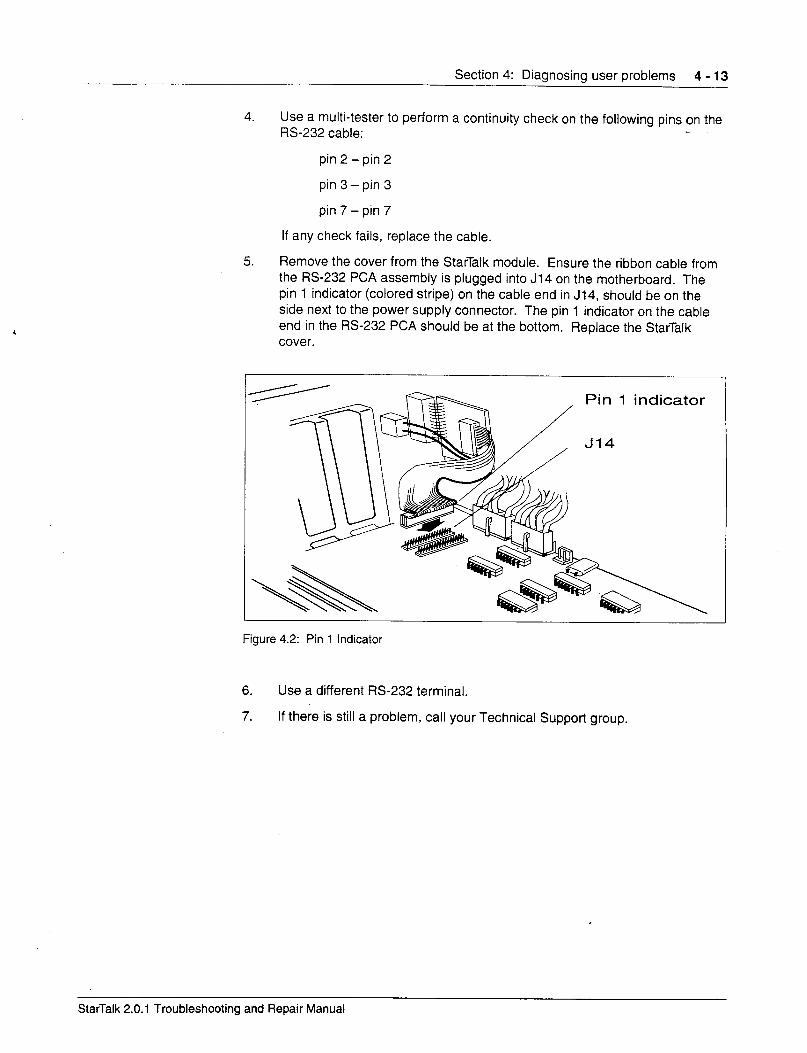
Section 4: Diagnosing user problems 4 - 13
4. Use a multi-tester to perform a continuity check on the following pins on the RS-232 cable:
pin 2 - pin 2
pin 3 - pin 3
pin 7 -pin 7
5.
If any check fails, replace the cable.
Remove the cover from the StarTalk module. Ensure the ribbon cable from the M-232 PCA assembly is plugged into J14 on the motherboard. The pin 1 indicator (colored stripe) on the cable end in J14, should be on the side next to the power supply connector. The pin 1 indicator on the cable end in the RS-232 PCA should be at the bottom. Replace the StarTalk cover.
Pin 1 indicator
Figure 4.2: Pin 1 Indicator
6. Use a different RS-232 terminal.
7. If there is still a problem, call your Technical Support group.
StarTalk 2.0.1 Troubleshooting and Repair Manual
4 - 14 Section 4: Diagnosing user problems
Symptom: The Power- 06 Diagnostics appear,
but the Disk Utilities ‘. Check to ensure the:
Main Menu does not . Disk Utilities disk is in the floppy disk drive, and is installed properly.
. drive door is closed (indicated by the vertical lever)
. ribbon cable is plugged into J2 on the Disk Controller PCA and has the colored stripe towards the Message Storage Pack.
2. Check the power cable connections to the motherboard, the Disk Controller PCA, and the software loader floppy disk drive. If these connections are working properly, you can hear the power supply fan, and the floppy and Message Storage Pack drives rotating. If the module appears to be oper- ating, go to step 3.
If the module does not appear to be operating, you must replace the power supply and retest the system. If you still cannot hear the power supply fan, call your StarTalk Technical Support group.
3. When you turn StarTalk on, the software loader disk drive light should come on momentarily. If it does not, go to step 4.
If the drive light appears, StarTalk is accessing the software loader. The software on the floppy disk could be defective. Use a backup copy of the software.
4. Check to ensure the ribbon cable from the floppy disk drive is properly connected to the Disk Controller PCA. The colored stripe should be toward the disk drive.
5. If there is still a problem, call your StarTalk Technical Support group.
StarTalk 2.0.1 Troubleshooting and Repair Manual
Section 4: Diagnosing user problems 4 - 15
Troubleshooting The first step in troubleshooting a StarTalk module with two TCM Interface PCAs is to determine if the Norstar station ports are working correctly. To determine StarTal k this.
modules with ’ two TCM 1. Check the setting of Auto Set Relocation on the Norstar System. If it is set
Interface PCAs to ON, turn it OFF. Refer to the Norstar Installation Guide for instructions.
2. Turn OFF the StarTalk module.
3. Disconnect the RJ-I 1 cord from a port on the side of the StarTalk module.
4. Use a working Norstar telephone to test the teladapt jack where the RJ-11 cord is connected. Plug the cord connecting the jack to the StarTalk mod- ule into the telephone. This allows you to test the cord and the jack. Note: When the telephone is plugged into the teladapt jack, press 1-1 m a to determine the port number connected to StarTalk. Write down the port number, and the corresponding teladapt jack number.
5.
6.
Reconnect the RJ-11 cord to the StarTalk module.
Repeat this procedure, beginning at Step 3, for each port on the StarTalk module.
If a teladapt jack is not working, check for loose connections or broken wires. Ensure the problem is not with the teladapt cord. Using a cord you know works, connect the telephone and the jack to the KSU. If neither the wiring or the cord is the problem, the KSU needs repair.
If the teladapt jacks are working, you must identify which of the two TCM Interface PCAs is not working. To do this:
1.
2.
3.
4.
i.
6.
Connect the teladapt jacks to the same ports on the StarTalk module.
If Auto Set Relocation was set to ON before you started the procedure, turn it back ON. Refer to the Norstar Installation Guide for instructions.
Turn the StarTalk module ON, and give it time to complete the diagnostics.
Using an M7310 or M7324 telephone, establish a Norstar Maintenance session using **CONFIG. Refer to the Norstar Installation Guide for instructions.
Access the 2. Port.0N Status subheading under the main heading D. Maintenance (under “CONFIG). Refer to the Norstar Installation Guide for instructions about Examining Port/DN Status.
Display the type and state of the device connected to each of the StarTalk teladapt jacks. Verify the port numbers with the ones you wrote down when you tested the jacks using the Norstar telephone.
StarTalk 2.0.1 Troubleshooting and Repair Manual
4 - 16 Section 4: Diagnosing user problems
Each port should show STKl as the device type. If any port numbers connected to StarTalk show NONE as the device type, it indicates the TCM interface PCA is not working.
Note: You can also use a BLF, or program keys on an M7310 or M7324 set, to display the working StarTalk ports. Refer to Appendix F for instructions about using this method. Once you have identified which ports are not appearing in the Port/DN Status display, trace the RJ-11 cords from the teladapt jacks to the StarTalk module. This shows you which TCM Interface PCA is not working.
Remove the module cover and ensure that:
1. An 8000 Series Motherboard is installed. This kind of board has a white, bar-coded label, located between slots J7 and J8, that reads ‘eight-channel motherboard’.
2. The main TCM card (with daughterboard attached) is securely seated in slot J4.
3. The additional TCM card (without daughterboard) is securely seated in slot J5.
4. The ribbon cable connecting the TCM cards is secure and no pins are bent.
Access **CONFIG again and see if STKl is appearing in the PorVDN Status displays. If there are still Norstar ports displaying NONE when they should be displaying STKl, replace the faulty TCM Interface PCA and retest. If both TCM Interface PCAs are faulty, replace the additional TCM Interface PCA in slot J5 first. Retest the system after replacing this TCM Interface PCA. You should confirm that the main TCM Interface PCA is still not working before you replace it. Refer to Section 5 for instructions about removing and replacing TCM Inter- face PCAs.
StarTalk 2.0.1 Troubleshooting and Repair Manual

Replacing StarTalk components 5 lIltrOdUCtiOfl This section shows you how to remove and replace the different StarTalk compo-
nents. In the event a component cannot be replaced in the field, this section also describes how to prepare StarTalk for return to the factory.
This section provides step-by-step instructions for removing and replacing the following StarTalk components:
Model 11 O/l 65
. Message Storage Pack PCA l Power supply
. TCM Interface PCA . Clock/Calendar battery
Model 385
. Disk Controller PCA . TCM Interface PCA
. Message Storage Pack l Clock/Calendar battery
. Floppy disk drive . Motherboard PCA
. Power supply
Note: For information about power supply types and connectors, refer to Section 2, Power supply connectors.
Before you Before you remove and replace any of the StarTalk components, you must first
begin remove the module front cover. After removing the cover, locate the component to be removed, and follow the procedures listed for replacing that component. The procedures required for replacing all StarTalk components are contained in this section.
Important: The procedure to add a second TCM Interface PCA to a Model 385 is included in this section. To add a second TCM Interface PCA to StarTalk, the module must have an 8000 Series Motherboard installed. The procedure for removing and replacing a Motherboard PCA is included for this purpose only. A faulty motherboard is not field replaceable.
StarTalk 2.0.1 Troubleshooting and Repair Manual
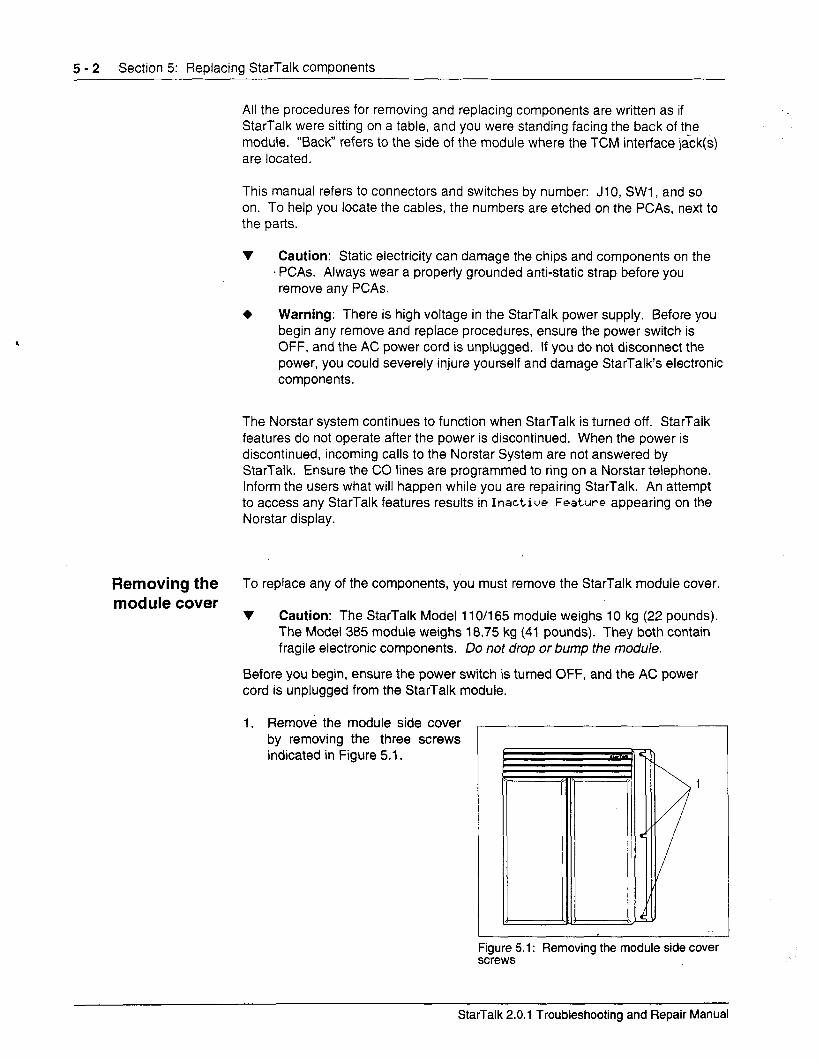
5 - 2 Section 5: Replacing StarTalk components
All the procedures for removing and replacing components are written as if StarTalk were sitting on a table, and you were standing facing the back of the module. “Back” refers to the side of the module where the TCM interface jack(s) are located.
This manual refers to connectors and switches by number: Jl 0, SW1 , and so on. To help you locate the cables, the numbers are etched on the PCAs, next to the parts.
v Caution: Static electricity can damage the chips and components on the s PCAs. Always wear a properly grounded anti-static strap before you remove any PCAs.
+ Warning: There is high voltage in the StarTalk power supply. Before you begin any remove and replace procedures, ensure the power switch is OFF, and the AC power cord is unplugged. If you do not disconnect the power, you could severely injure yourself and damage StarTalk’s electronic components.
The Norstar system continues to function when StarTalk is turned off. StarTalk features do not operate after the power is discontinued. When the power is discontinued, incoming calls to the Norstar System are not answered by StarTalk. Ensure the CO lines are programmed to ring on a Norstar telephone. Inform the users what will happen while you are repairing StarTalk. An attempt to access any StarTalk features results in Inactive Feature appearing on the Norstar display.
Removing the To replace any of the components, you must remove the StarTalk module cover.
module cover v Caution: The StarTalk Model 1 lo/l65 module weighs 10 kg (22 pounds).
The Model 385 module weighs 18.75 kg (41 pounds). They both contain fragile electronic components. Do not drop or bump the module.
Before you begin, ensure the power switch is turned OFF, and the AC power cord is unplugged from the StarTalk module.
1. Remove the module side cover , by removing the three screws indicated in Figure 5.1.
Figure 5.1: Removing the module side cover screws
StarTalk 2.0.1 Troubleshooting and Repair Manual
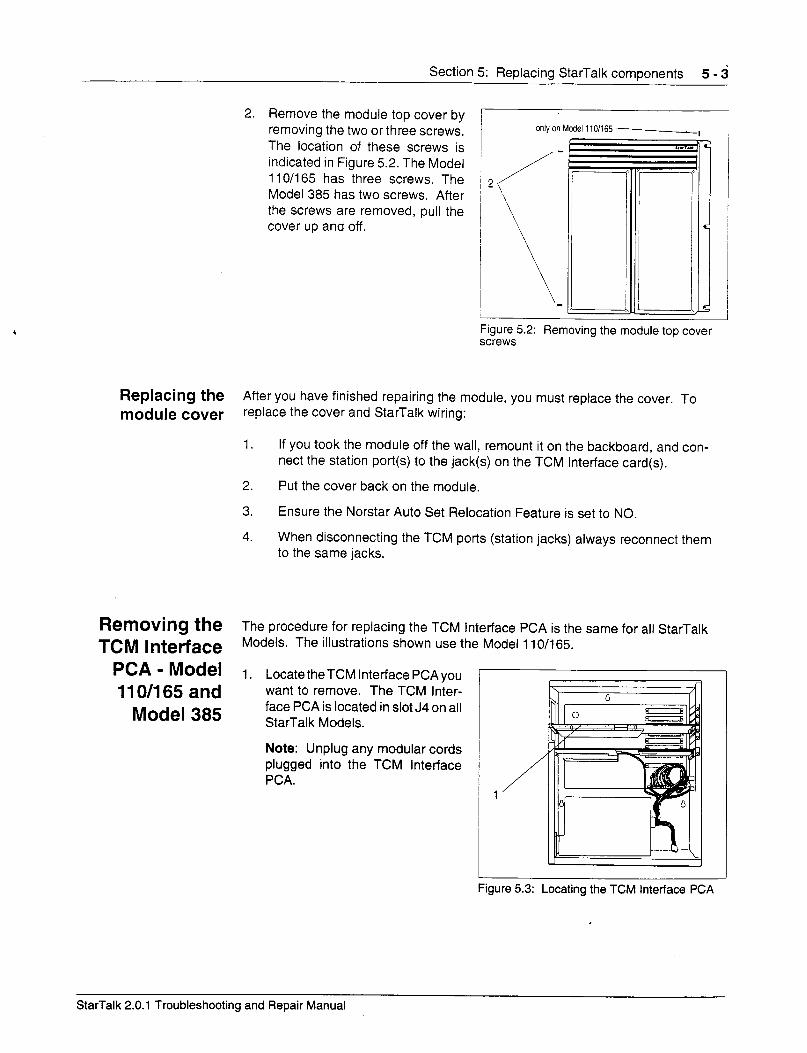
Section 5: Replacing StarTalk components 5 - 3
2. Remove the module top cover by removing the two or three screws. The location of these screws is indicated in Figure 5.2. The Model 11 O/165 has three screws. The Model 385 has two screws. After the screws are removed, pull the cover up and off.
I L
only on Model 1101165 -i ,, ,. r-7 I --.-I
Figure 5.2: Removing the module top cover screws
Replacing the After you have finished repairing the module, you must replace the cover. To module cover replace the cover and StarTalk wiring:
1. If you took the module off the wall, remount it on the backboard, and con- nect the station port(s) to the jack(s) on the TCM Interface card(s).
2. Put the cover back on the module.
3. Ensure the Norstar Auto Set Relocation Feature is set to NO.
4. When disconnecting the TCM ports (station jacks) always reconnect them to the same jacks.
Removing the The procedure for replacing the TCM Interface PCA is the same for all StarTalk
TCM Interface Models. The illustrations shown use the Model 110/165.
PCA - Model 1. LocatetheTCM Interface PCAyou
11 O/l 65 and want to remove. The TCM Inter-
Model 385 face PCA is located in slot J4 on all StarTalk Models.
Note: Unplug any modular cords plugged into the TCM Interface PCA.
Figure 5.3: Locating the TCM Interface PCA
StarTalk 2.0.1 Troubleshooting and Repair Manual
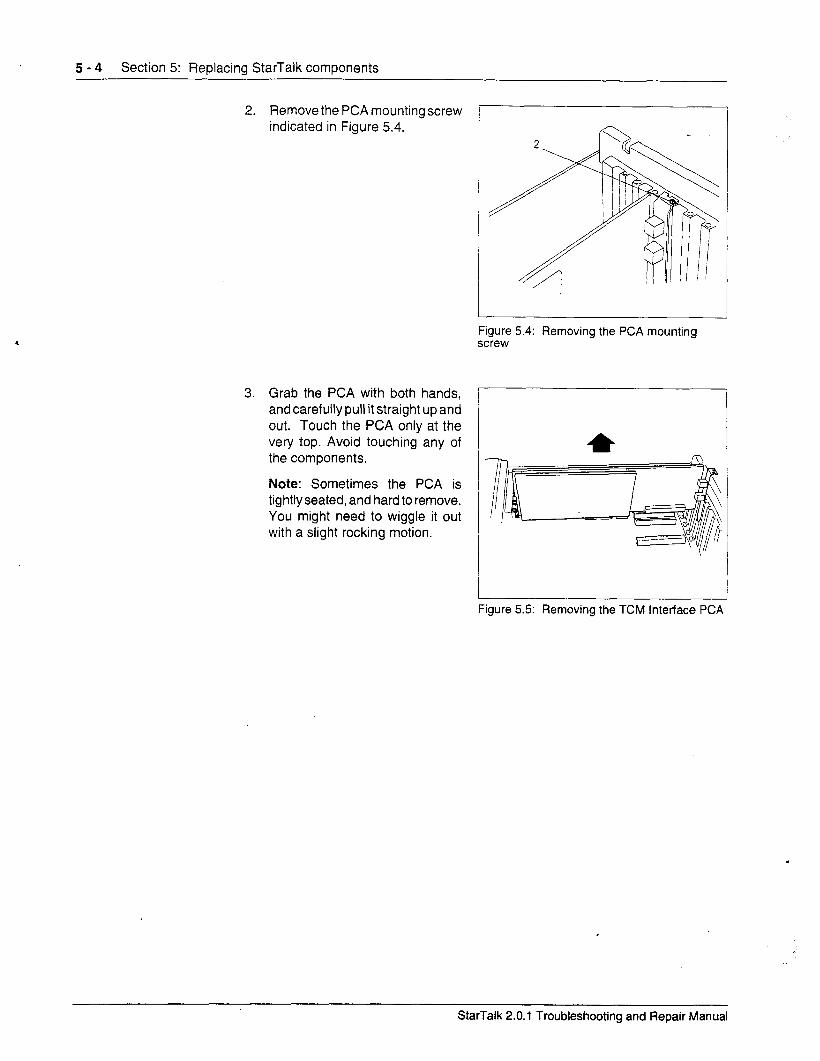
5 - 4 Section 5: Replacing StarTalk components
2. Remove the PCA mounting screw indicated in Figure 5.4.
3. Grab the PCA with both hands, and carefully pull it straight up and out. Touch the PCA only at the very top. Avoid touching any of the components.
Note: Sometimes the PCA is tightly seated, and hard to remove. You might need to wiggle it out with a slight rocking motion.
Figure 5.4: Removing the PCA mounting screw
Figure 5.5: Removing the TCM Interface PCA
.
StarTalk 2.0.1 Troubleshooting and Repair Manual
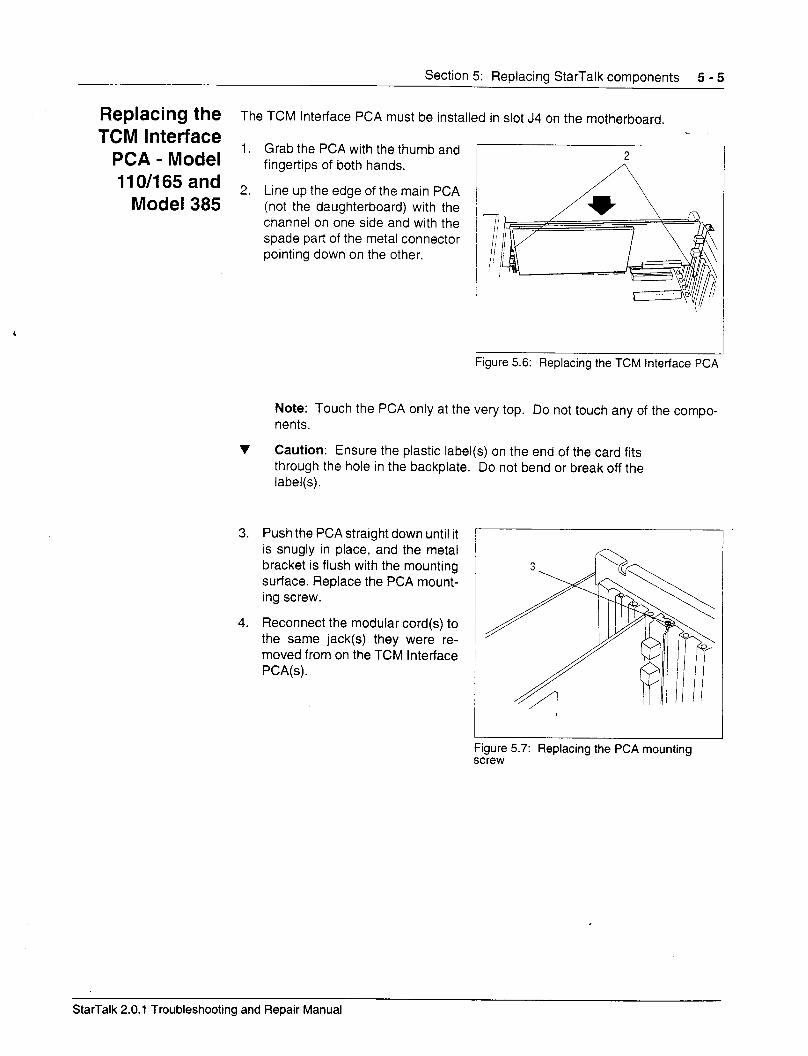
Section 5: Replacing StarTalk components 5 - 5
Replacing the The TCM Interface PCA must be installed in slot J4 on the motherboard.
TCM Interface PCA - Model
1. Grab the PCA with the thumb and / fingertips of both hands.
2
11 O/l 65 and 2. Model 385
Line up the edge of the main PCA (not the daughterboard) with the
/ /
channel on one side and with the spade part of the metal connector pointing down on the other.
Figure 5.6: Replacing the TCM Interface PCA
Note: Touch the PCA only at the very top. Do not touch any of the compo- nents.
v Caution: Ensure the plastic label(s) on the end of the card fits through the hole in the backplate. Do not bend or break off the label(s).
3. Push the PCA straight down until it is snugly in place, and the metal bracket is flush with the mounting surface. Replace the PCA mount- ing screw.
4. Reconnect the modular cord(s) to the same jack(s) they were re- moved from on the TCM Interface PCA(s).
Figure 5.7: Replacing the PCA mounting screw
StarTalk 2.0.1 Troubleshooting and Repair Manual
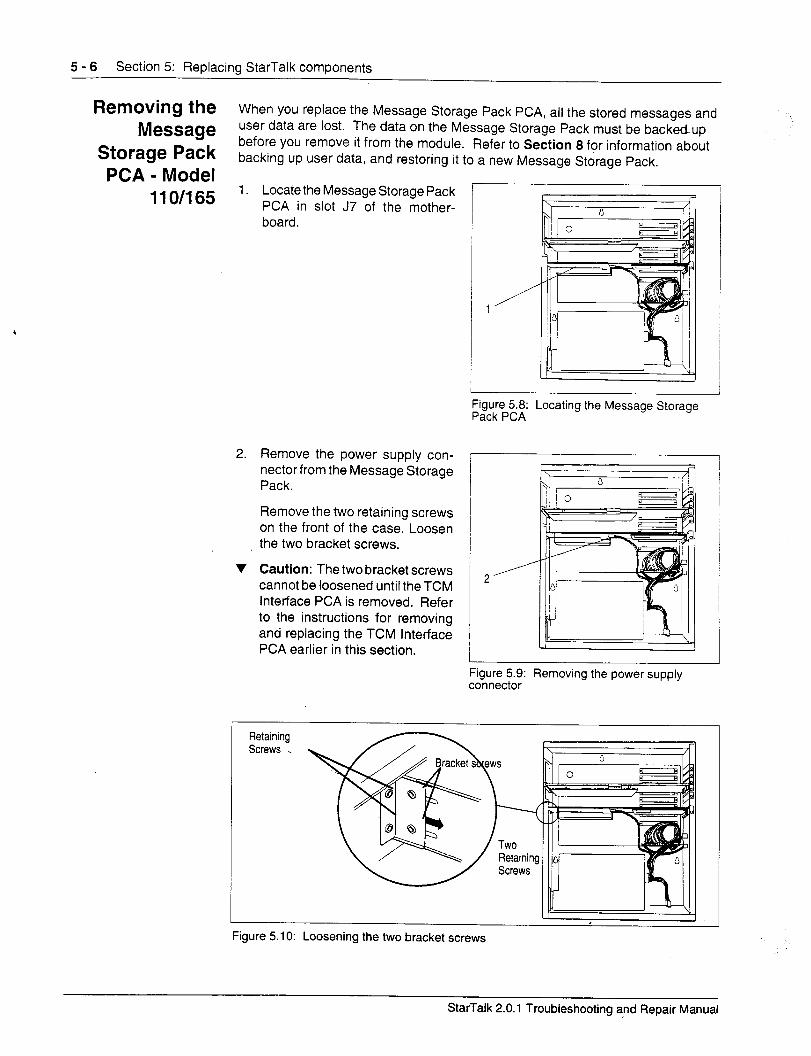
5 - 6 Section 5: Replacing StarTalk components
Removing the When you replace the Message Storage Pack PCA, all the stored messages and
Message user data are lost. The data on the Message Storage Pack must be backedup
Storage Pack before you remove it from the module. Refer to Section 8 for information about
PCA - Model backing up user data, and restoring it to a new Message Storage Pack.
110/165 1. Locate the Message Storage Pack PCA in slot J7 of the mother- board.
;~rP5.. Locating the Message Storage
2. Remove the power supply con- nector from the Message Storage Pack.
Remove the two retaining screws on the front of the case. Loosen the two bracket screws.
V Caution: The two bracket screws cannot be loosened until the TCM * Interface PCA is removed. Refer to the instructions for removing and replacing the TCM Interface PCA earlier in this section.
Figure 5.9: Removing the power supply connector
Retaining Screws .
StarTalk 2.0.1 Troubleshooting and Repair Manual
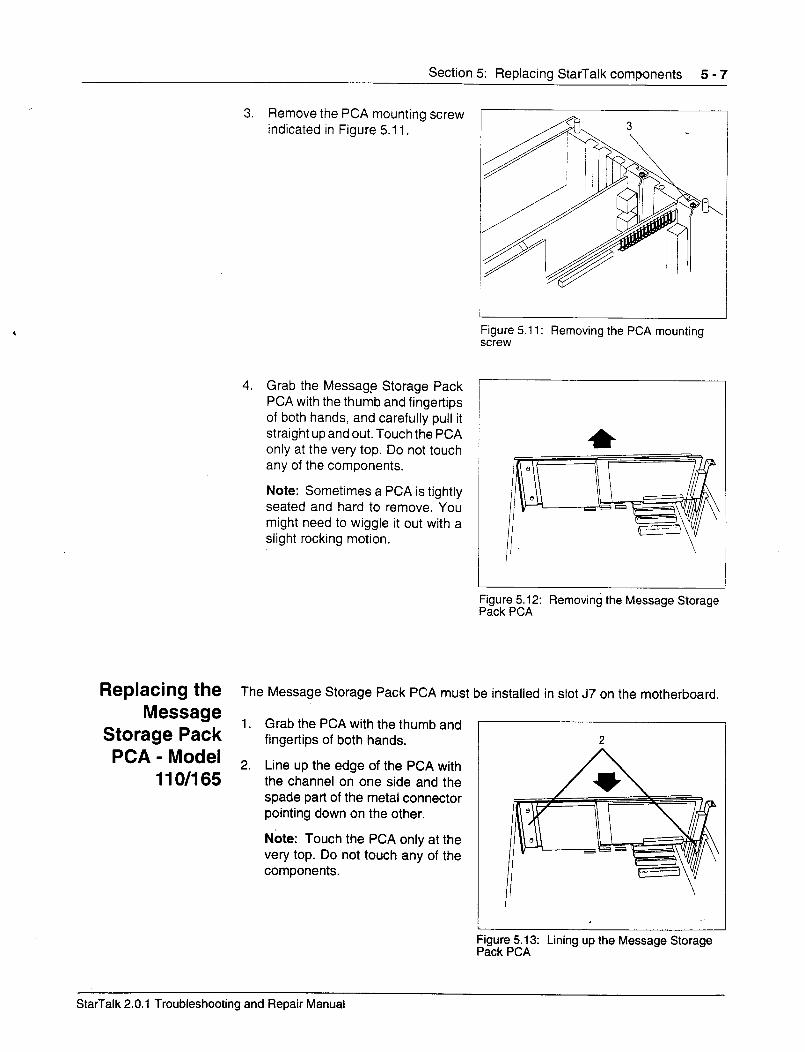
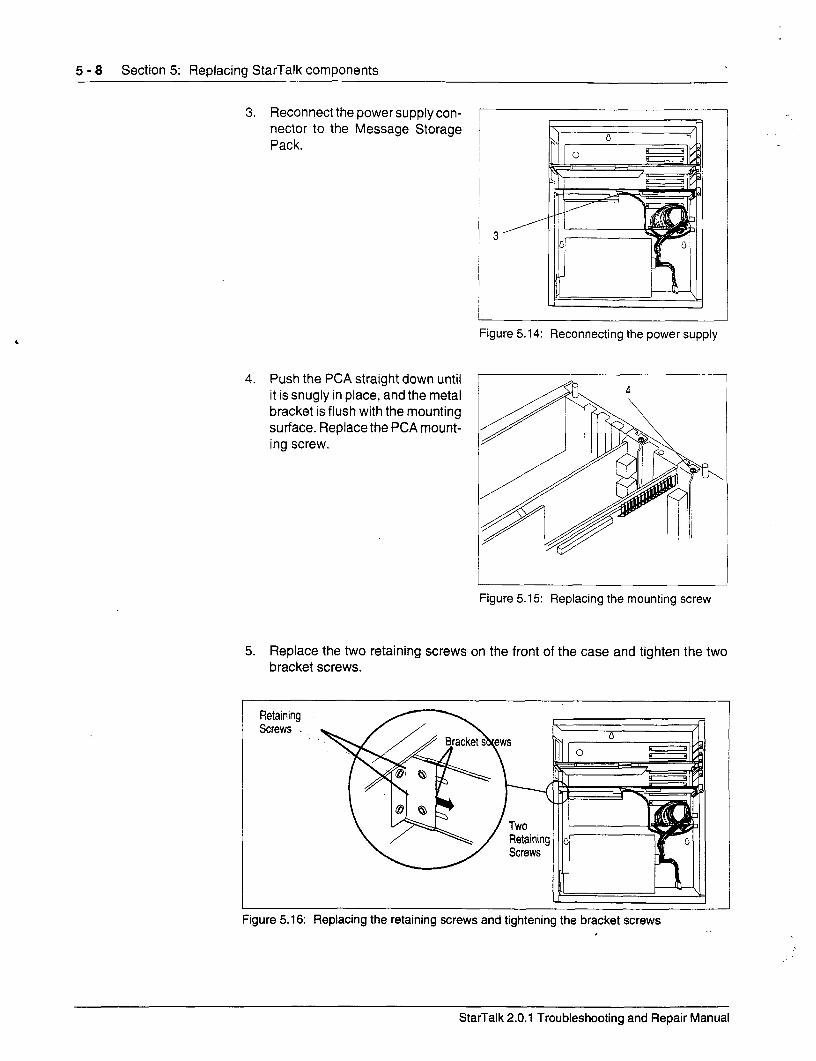
5 - 8 Section 5: Replacing StarTalk components
3. Reconnect the power supply con- nector to the Message Storage Pack.
4. Push the PCA straight down until it is snugly in place, and the metal bracket is flush with the mounting surface. Replace the PCA mount- ing screw.
3’
Figure 5.14: Reconnecting the power supply
Figure 5.15: Replacing the mounting screw
5. Replace the two retaining screws on the front of the case and tighten the two bracket screws.
Retaining Screws .
Figure 5.16: Replacing the retaining screws and tightening the bracket screws I
StarTalk 2.0.1 Troubleshooting and Repair Manual
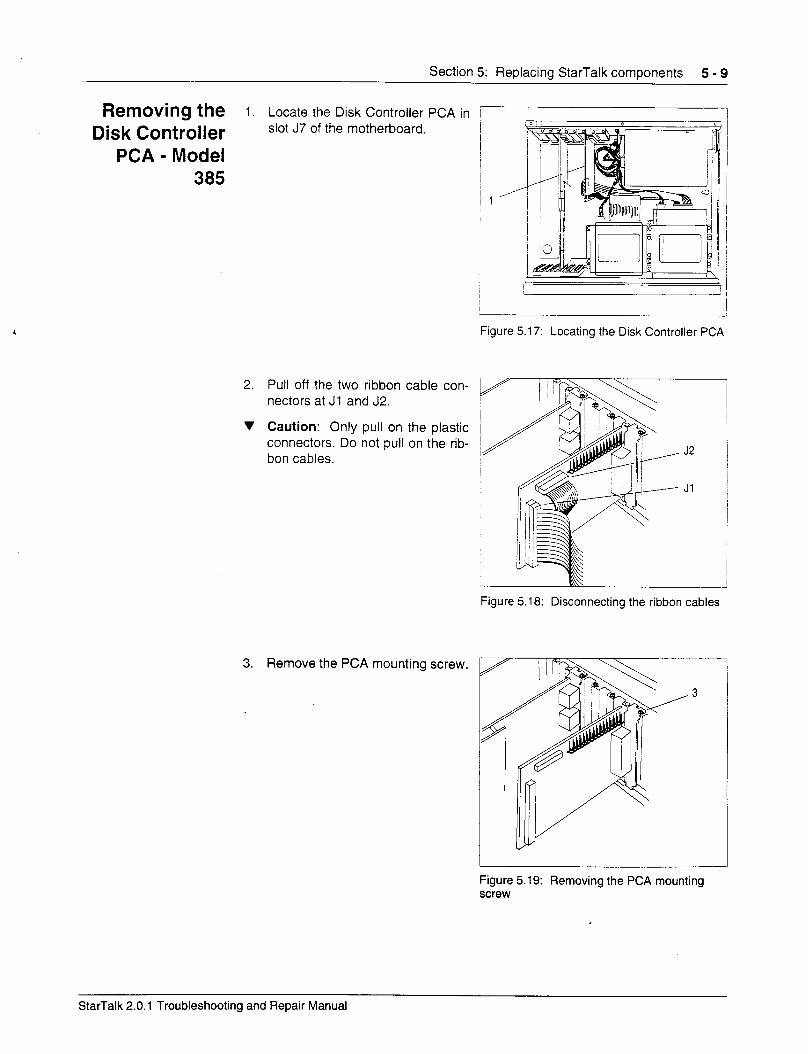
Section 5: Replacing StarTalk components 5 - 9
Removing the I. Disk Controller
PCA - Model 385
2.
v
3. Remove the PCA mounting screw.
Locate the Disk Controller PCA in slot J7 of the motherboard.
Pull off the two ribbon cable con- nectors at Jl and J2.
Caution: Only pull on the plastic connectors. Do not pull on the rib- bon cables.
1’
Figure 5.17: Locating the Disk Controller PCA
Figure 5.18: Disconnecting the ribbon cables
Figure 5.19: Removing the PCA mounting screw
StarTalk 2.0.1 Troubleshooting and Repair Manual
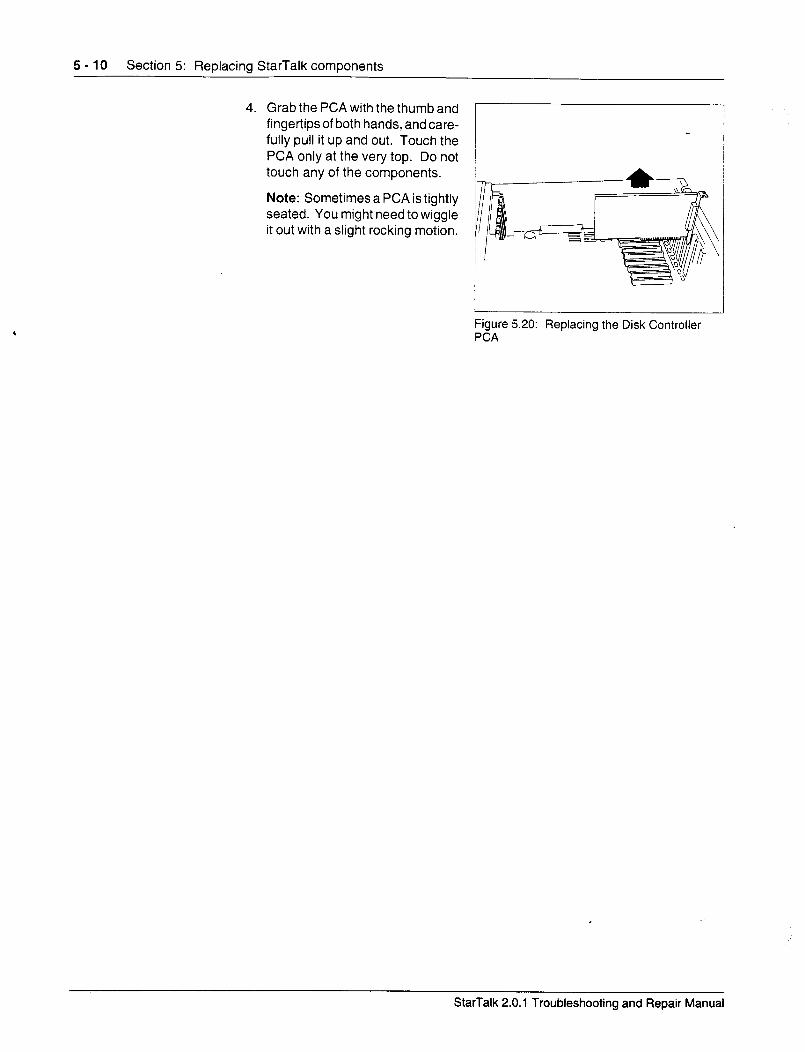

Section 5: Replacing StarTalk components 5 - 11
Replacing the The Disk Controller PCA must be installed in slot J7 on the motherboard.
Disk Controller PCA - Model 1. In slot J7, line up the PCA with the
385 spade part of the metal connector pointing down, as shown in Figure 5.21.
Note: Touch the PCA only at the very top. Do not touch any of the components.
2. When you install the PCA, ensure the spade part of the metal con- nectorslides inside the base plate, as shown in Figure 5.22.
Figure 5.21: Replacing the Disk Controller PCA
Figure 5.22: Ensuring the PCA is installed correctly
StarTalk 2.0.1 Troubleshooting and Repair Manual
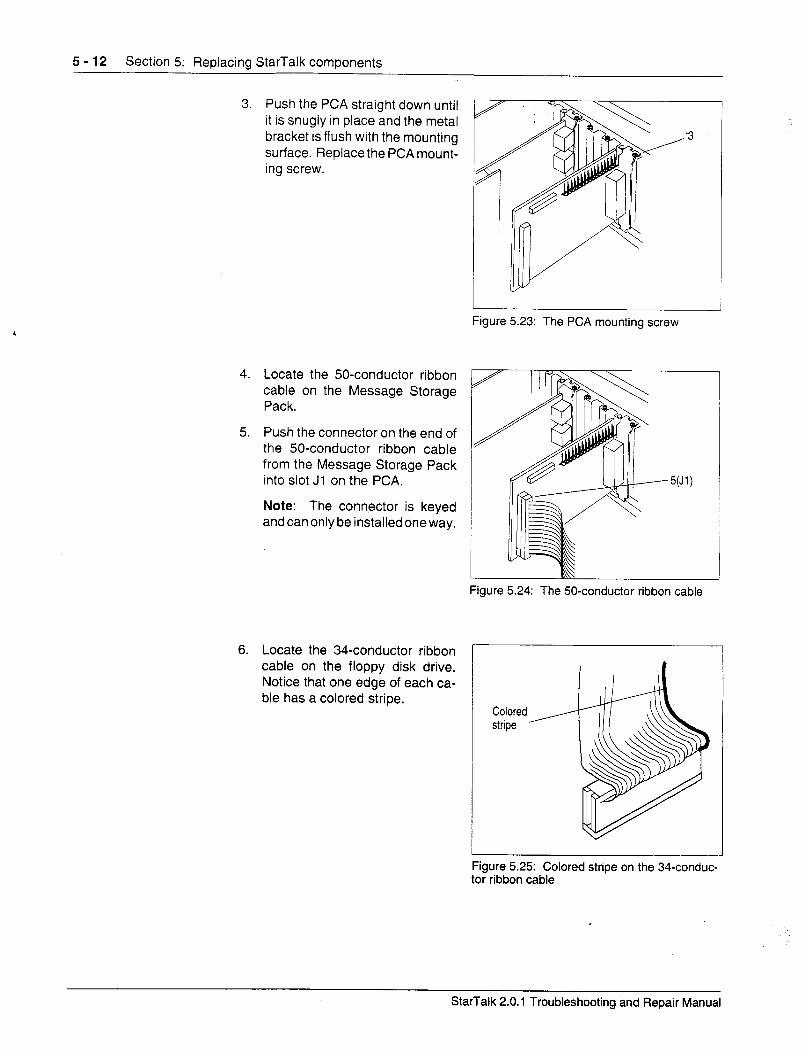
5 - 12 Section 5: Replacing StarTalk components
3. Push the PCA straight down until it is snugly in place and the metal bracket is flush with the mounting surface. Replace the PCA mount- ing screw.
Figure 5.23: The PCA mounting screw
4. Locate the 50-conductor ribbon cable on the Message Storage Pack.
5. Push the connector on the end of the 50-conductor ribbon cable from the Message Storage Pack into slot Jl on the PCA.
Note: The connector is keyed and can only be installed one way.
6. Locate the 34-conductor ribbon cable on the floppy disk drive. Notice that one edge of each ca- ble has a colored stripe.
Figure 5.24: The 50-conductor ribbon cable
Colored stripe
Figure 5.25: Colored stripe on the 34-conduc- tor ribbon cable
StarTalk 2.0.1 Troubleshooting and Repair Manual
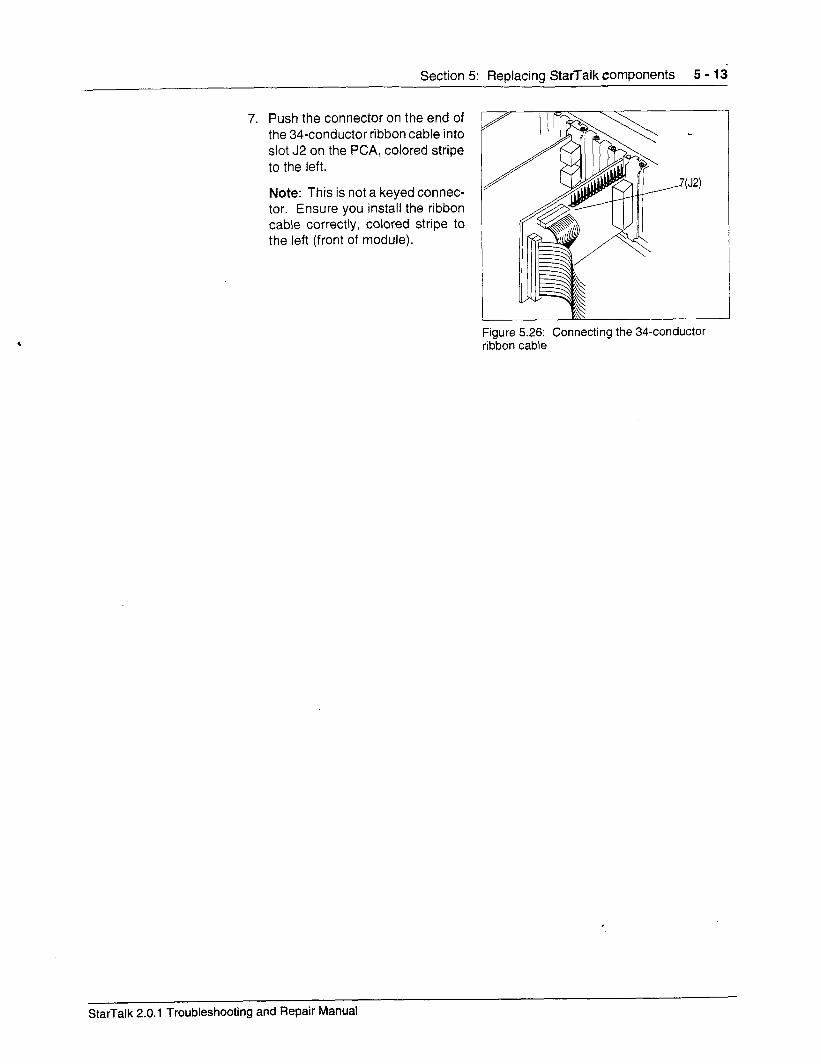
Section 5: Replacing StarTalk components 5 - 13
7. Push the connector on the end of the 34-conductor ribbon cable into slot J2 on the PCA, colored stripe to the left.
Note: This is not a keyed connec- tor. Ensure you install the ribbon cable correctly, colored stripe to the left (front of module).
Figure 5.26: Connecting the 34-conductor ribbon cable
StarTalk 2.0.1 Troubleshooting and Repair Manual
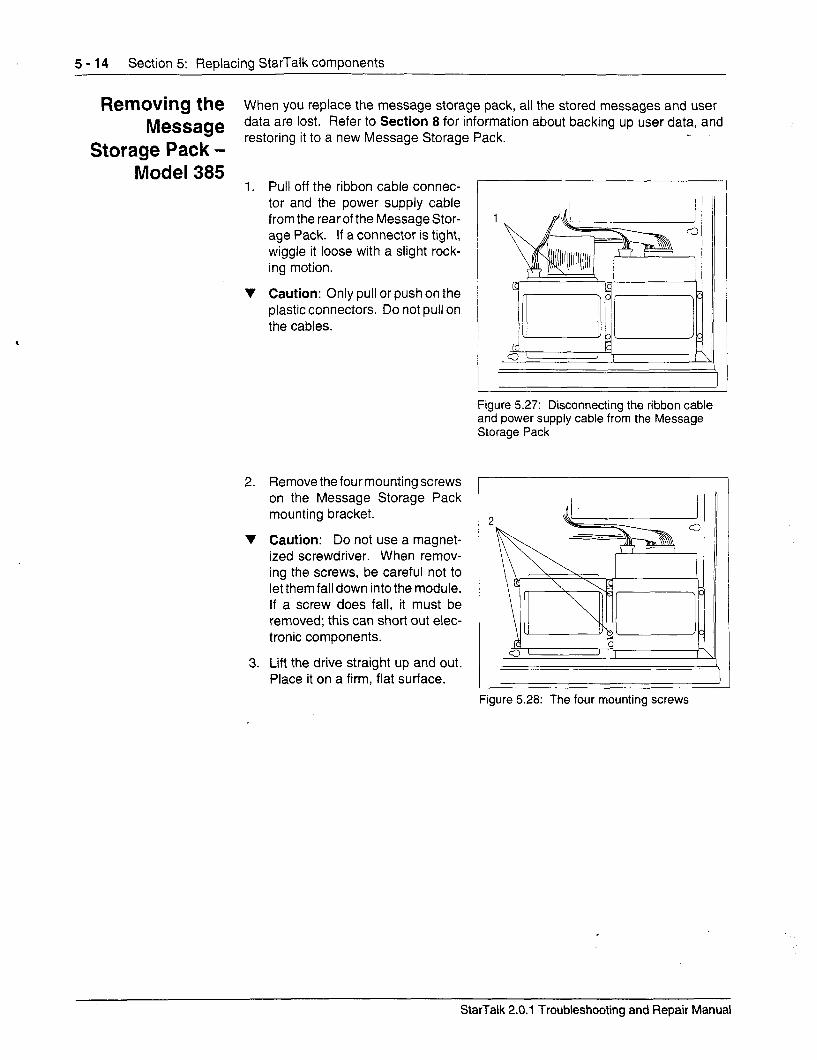
5 - 14 Section 5: Replacing StarTalk components
Removing the When you replace the message storage pack, all the stored messages and user
Message data are lost. Refer to Section 8 for information about backing up user data, and
Storage Pack - restoring it to a new Message Storage Pack.
Model 385 1. Pull off the ribbon cable connec- [ 1
tor and the power supply cable from the rearof the Message Stor- age Pack. If a connector is tight, wiggle it loose with a slight rock- ing motion.
V Caution: Only pull or push on the plastic connectors. Do not pull on the cables.
2. Remove the four mounting screws on the Message Storage Pack mounting bracket.
V Caution: Do not use a magnet- ized screwdriver. When remov- ing the screws, be careful not to let them fall down into the module. If a screw does fall, it must be removed; this can short out elec- tronic components.
3. Lift the drive straight up and out. Place it on a firm. flat surface.
1
Figure 5.27: Disconnecting the ribbon cabk and power supply cable from the Message Storage Pack
Figure 5.28: The four mounting screws
StarTalk 2.0.1 Troubleshooting and Repair Manual
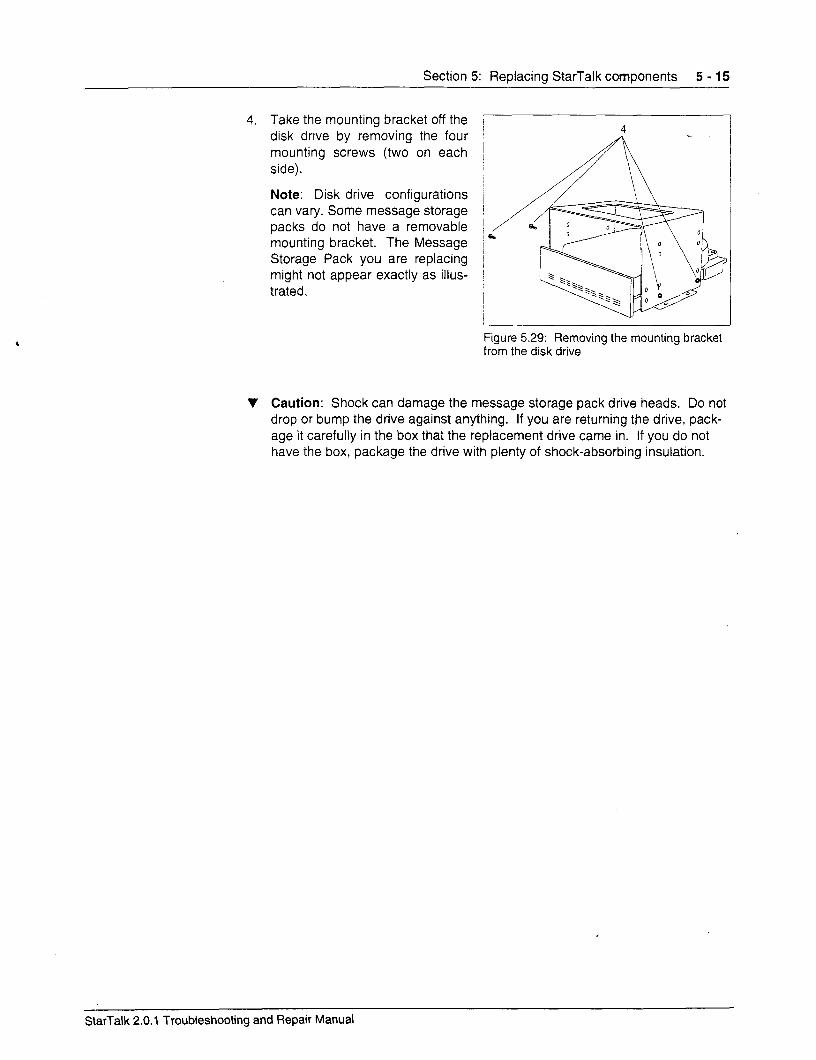
Section 5: Replacing StarTalk components 5 - 15
4. Take the mounting bracket off the disk drive by removing the four mounting screws (two on each side).
Note: Disk drive configurations can vary. Some message storage packs do not have a removable mounting bracket. The Message Storage Pack you are replacing might not appear exactly as illus- trated.
Figure 5.29: Removing the mounting bracket from the disk drive
‘I Caution: Shock can damage the message storage pack drive heads. Do not drop or bump the drive against anything. If you are returning the drive, pack- age it carefully in the box that the replacement drive came in. If you do not have the box, package the drive with plenty of shock-absorbing insulation.
StarTalk 2.0.1 Troubleshooting and Repair Manual
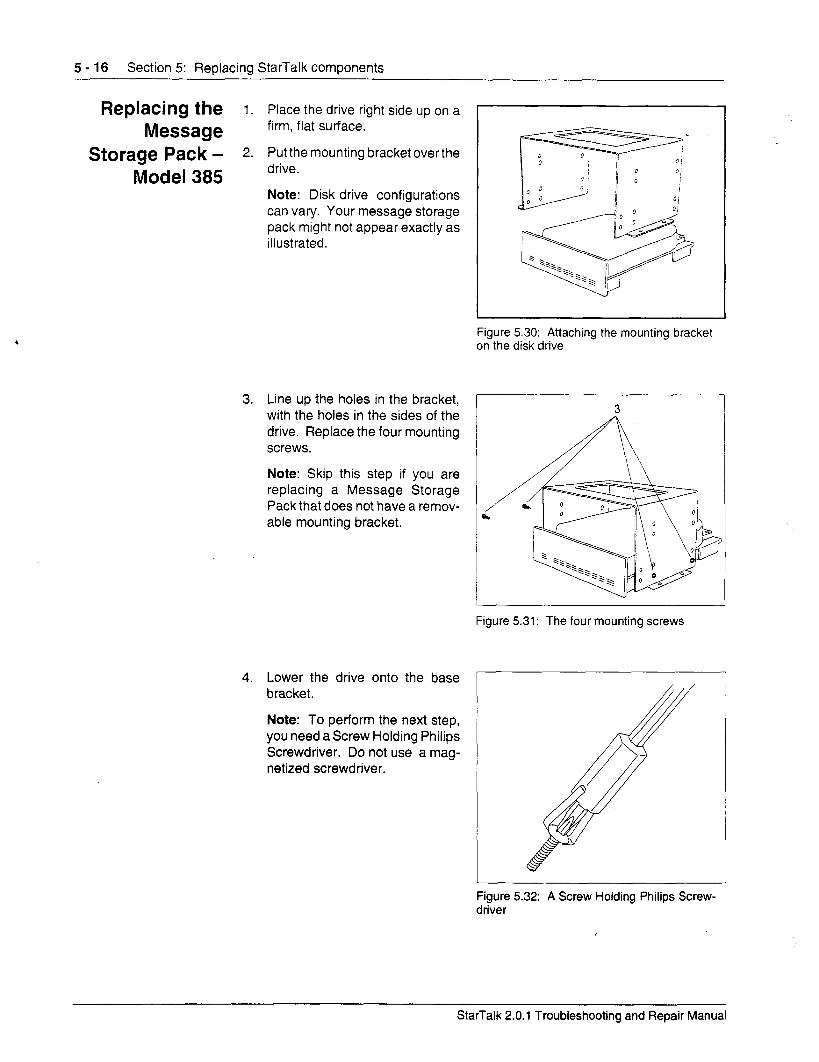
5 - 16 Section 5: Replacing StarTalk components
Replacing the 1. Place the drive right side up on a
Message firm, flat surface.
Storage Pack - 2. Put the mounting bracket overthe
Model 385 drive.
Note: Disk drive configurations can vary. Your message storage pack might not appear exactly as illustrated.
Figure 5.30: Attaching the mounting bracket on the disk drive
3. Line up the holes in the bracket, with the holes in the sides of the drive. Replace the four mounting screws.
Note: Skip this step if you are replacing a Message Storage Pack that does not have a remov- l able mounting bracket.
Figure 5.31: The four mounting screws
4. Lower the drive onto the base bracket.
Note: To perform the next step, you need a Screw Holding Philips Screwdriver. Do not use a mag- netized screwdriver.
Figure 5.32: A Screw Holding Philips Screw- driver
StarTalk 2.0.1 Troubleshooting and Repair Manual
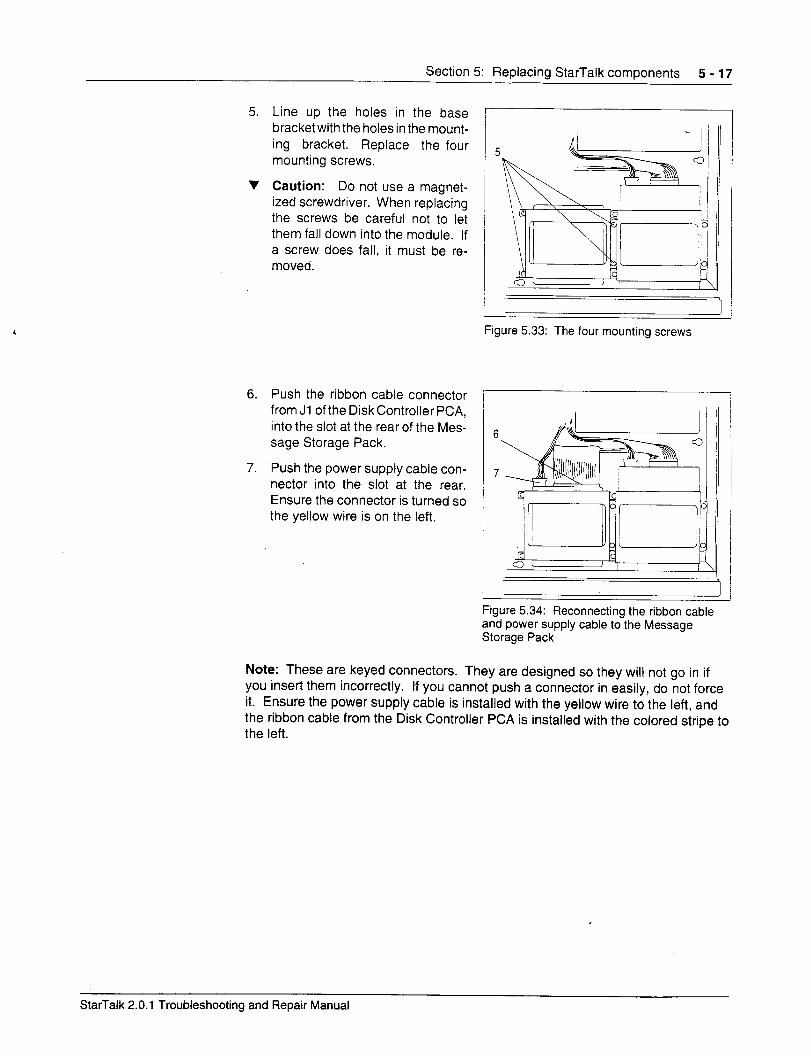
Section 5: Replacing StarTalk components 5 - 17
5. Line up the holes in the base 1 bracketwith the holes in the mount- ing bracket. Replace the four / 5 mounting screws.
V Caution: Do not use a magnet- ’ ized screwdriver. When replacing the screws be careful not to let them fall down into the module. If 1 a screw does fall, it must be re- moved.
Figure 5.33: The four mounting screws
6. Push the ribbon-cable connector from Jl of the Disk Controller PCA, into the slot at the rear of the Mes- sage Storage Pack.
7. Push the power supply cable con- nector into the slot at the rear. Ensure the connector is turned so the yellow wire is on the left.
Figure 5.34: Reconnecting the ribbon cable and power supply cable to the Message Storage Pack
Note: These are keyed connectors. They are designed so they will not go in if you insert them incorrectly. If you cannot push a connector in easily, do not force it. Ensure the power supply cable is installed with the yellow wire to the left, and the ribbon cable from the Disk Controller PCA is installed with the colored stripe to the left.
StarTalk 2.0.1 Troubleshooting and Repair Manual

5 - 18 Section 5: Replacing StarTalk components
Removing the 1. Remove the ribbon cableconnec-
Floppy-Disk Drive - Model
385
tor and the power supply cable from the rear of the floppy disk drive. If a connector is tight, wiggle it loose with a slight rock- ing motion.
V Caution: Only pull or push the plastic connectors. Do not pull on the cables.
2. Remove the four mounting screws on the disk drive bracket.
V Caution: Do not use a magnet- ized screwdriver. When remov- ing the screws, be careful not to let them fall down into the module. If a screw does fall, it must be removed.
3. Push the drive back until the drive door clears the front of the mod- ule. Liftthe drive straight up and out. Place it on a firm, flat surface.
Figure 5.35: Disconnecting the ribbon cable and power supply cable from the floppy disk drive
I I I
Figure 5.36: The four mounting screws
Message Storage Pack , / Floppy Dis k Drive
j !
Figure 5.37: Removing the floppy drive
StarTalk 2.0.1 Troubleshooting and Repair Manual
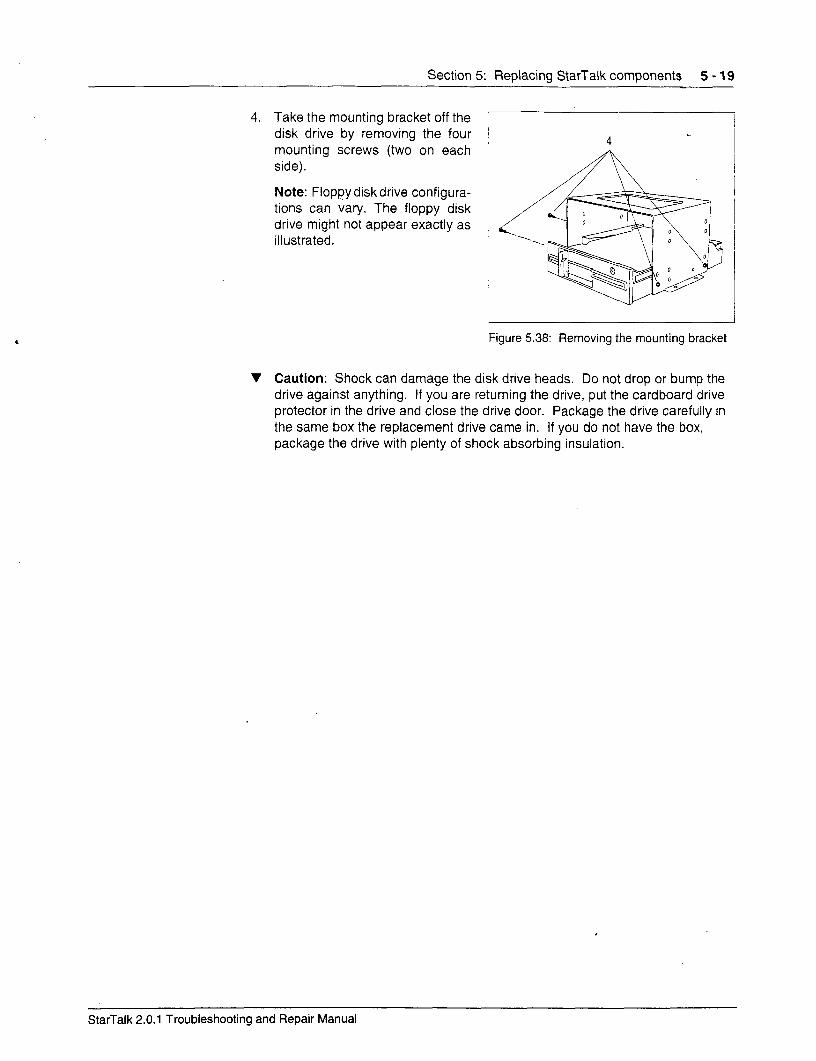
Section 5: Replacing StarTalk components 5 - 19
4. Take the mounting bracket off the disk drive by removing the four mounting screws (two on each side).
Note: Floppy disk drive configura- tions can vary. The floppy disk drive might not appear exactly as illustrated.
,
Figure 5.38: Removing the mounting bracket
V Caution: Shock can damage the disk drive heads. Do not drop or bump the drive against anything. If you are returning the drive, put the cardboard drive protector in the drive and close the drive door. Package the drive carefully in the same box the replacement drive came in. If you do not have the box, package the drive with plenty of shock absorbing insulation.
StarTalk 2.0.1 Troubleshooting and Repair Manual
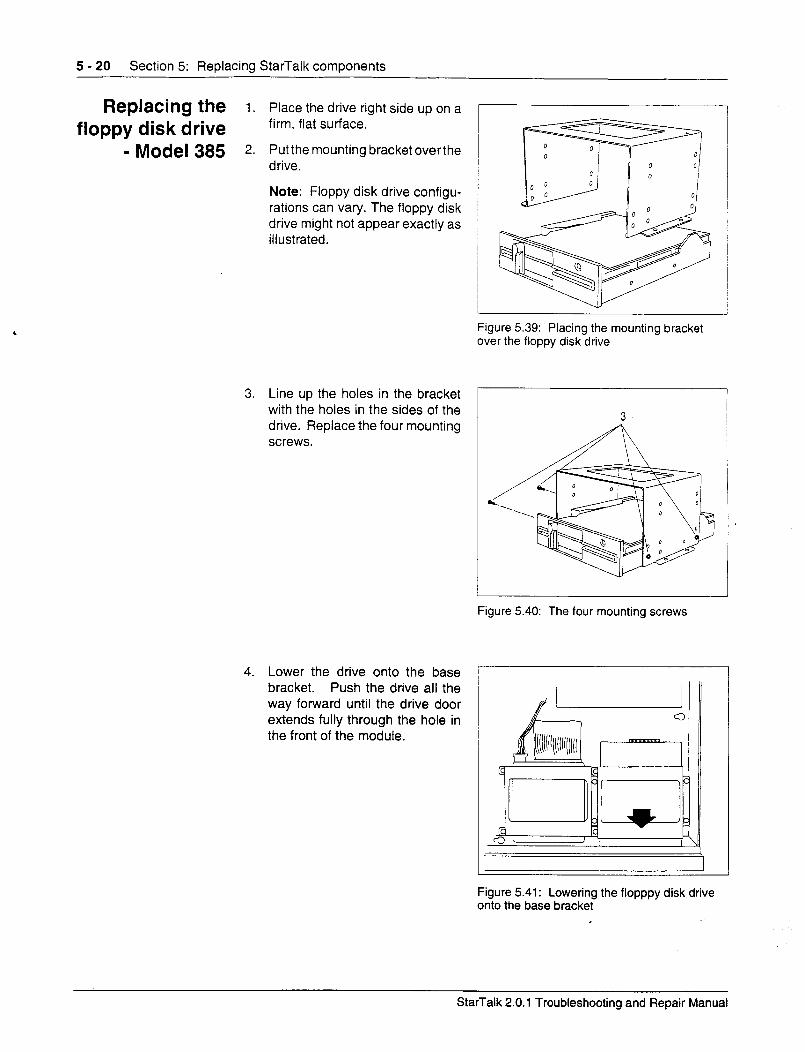
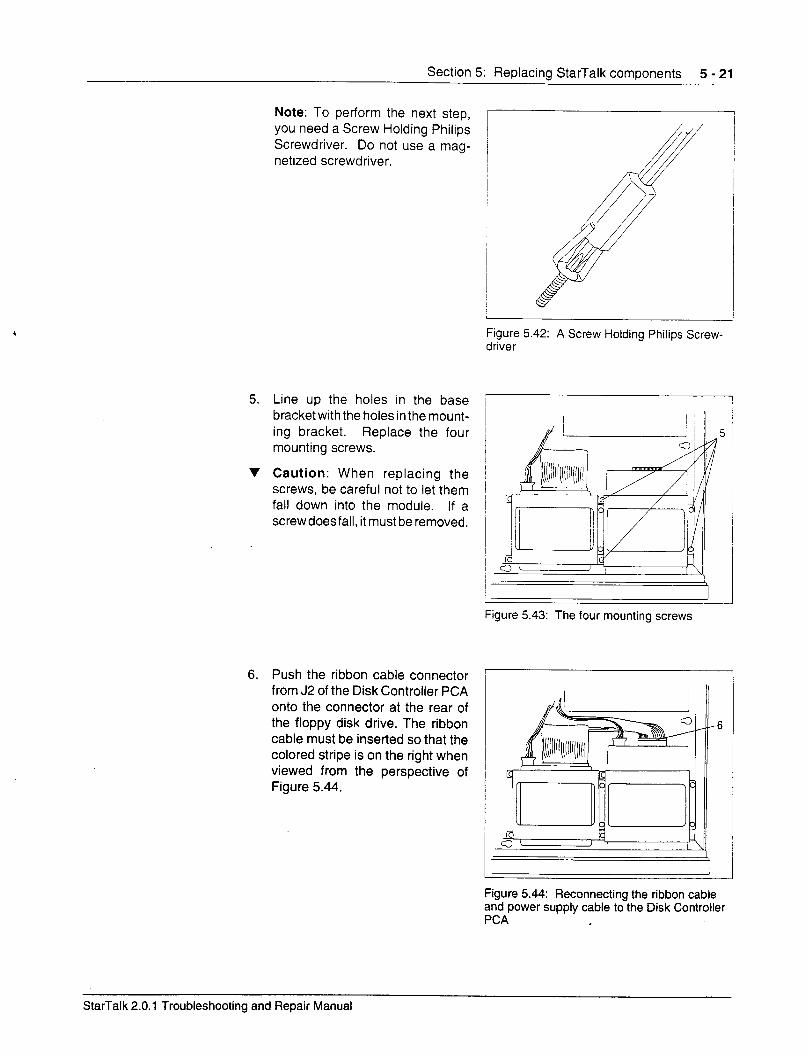
Section 5: Replacing StarTalk components 5 - 21
Note: To perform the next step, you need a Screw Holding Philips Screwdriver. Do not use a mag- netized screwdriver.
5. Line up the holes in the base bracket with the holes in the mount- ing bracket. Replace the four mounting screws.
V Caution: When replacing the screws, be careful not to let them fall down into the module. If a screw does fall, it must be removed.
6. Push the ribbon cable connector from J2 of the Disk Controller PCA onto the connector at the rear of the floppy disk drive. The ribbon cable must be inserted so that the colored stripe is on the right when viewed from the perspective of Figure 5.44.
Figure 5.42: A Screw Holding Philips Screw- driver
I I
Figure 5.43: The four mounting screws J
6
-
Figure 5.44: Reconnecting the ribbon cable and power supply cable to the Disk Controller PCA I
StarTalk 2.0.1 Troubleshooting and Repair Manual
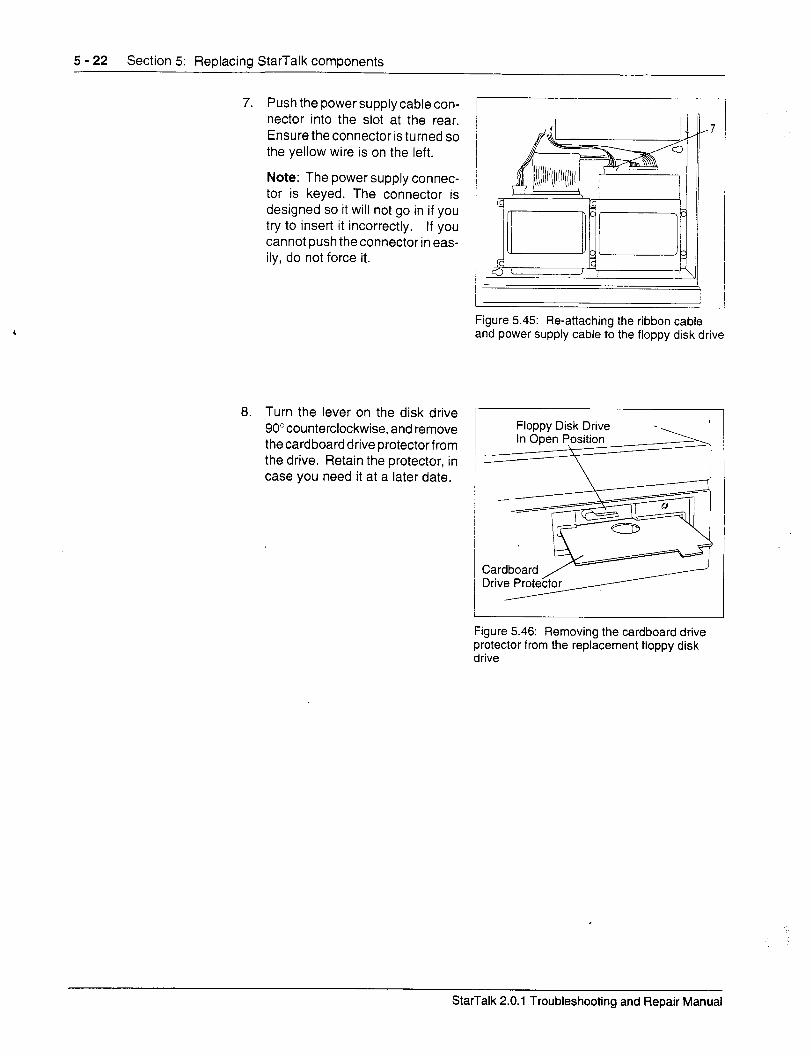
5 - 22 Section 5: Replacing StarTalk components
7. Push the power supply cable con- nector into the slot at the rear. Ensure the connector is turned so the yellow wire is on the left.
Note: The power supply connec- tor is keyed. The connector is designed so it will not go in if you try to insert it incorrectly. If you cannot push theconnectorin eas- ily, do not force it.
r
8. Turn the lever on the disk drive 90”counterclockwise, and remove thecardboarddriveprotectorfrom the drive. Retain the protector, in case you need it at a later date.
Figure 5.45: Re-attaching the ribbon cable and power supply cable to the floppy disk drive
Floppy Disk Drive z ’ In Open Position
\
/ I
Figure 5.46: Removing the cardboard drive protector from the replacement floppy disk drive
StarTalk 2.0.1 Troubleshooting and Repair Manual
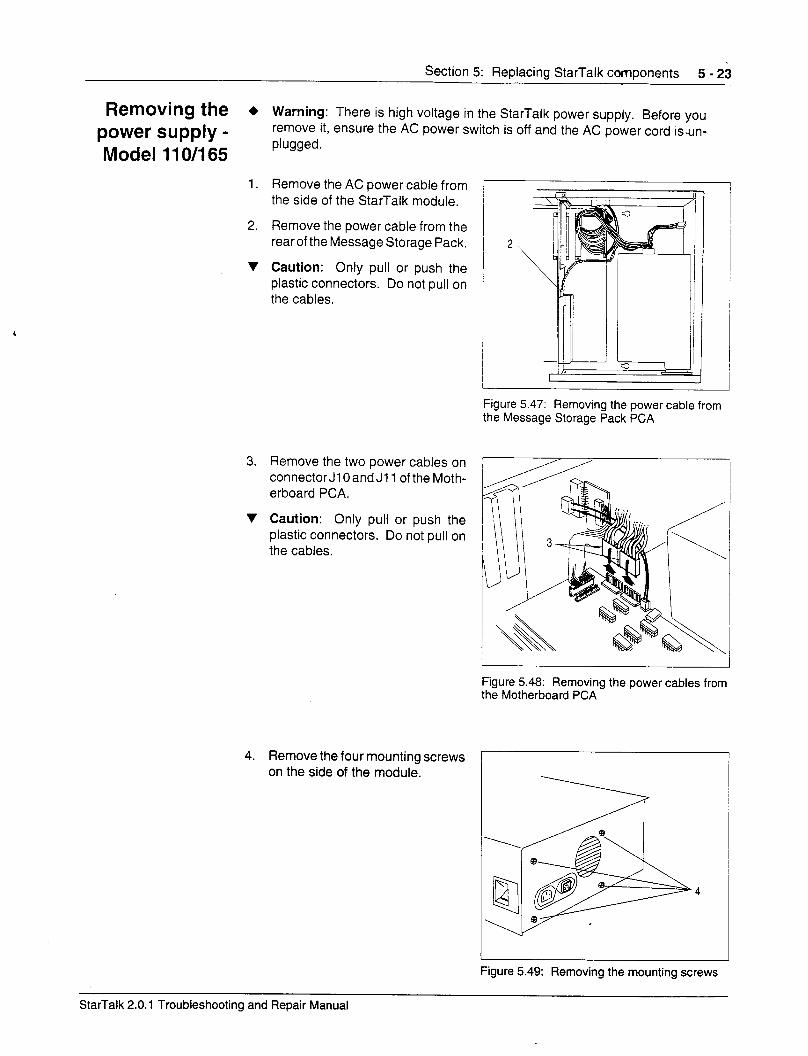
Section 5: Replacing StarTalk components 5 - 23
Removing the + Warning: There is high voltage in the StarTalk power supply. Before you
power supply - remove it, ensure the AC power switch is off and the AC power cord is-un-
Model 11 O/l 65 plugged.
1. Remove the AC power cable from the side of the StarTalk module.
2. Remove the power cable from the rear of the Message Storage Pack.
V Caution: Only pull or push the plastic connectors. Do not pull on the cables.
2
Figure 5.47: Removing the power cable from the Message Storage Pack PCA
3. Remove the two power cables on connector Jl 0 and Jl 1 of the Moth- erboard PCA.
V Caution: Only pull or push the plastic connectors. Do not pull on the cables.
Figure 5.48: Removing the power cables from the Motherboard PCA
4. Remove the four mounting screws / on the side of the module.
Figure 5.49: Removing the mounting screws
StarTalk 2.0.1 Troubleshooting and Repair Manual
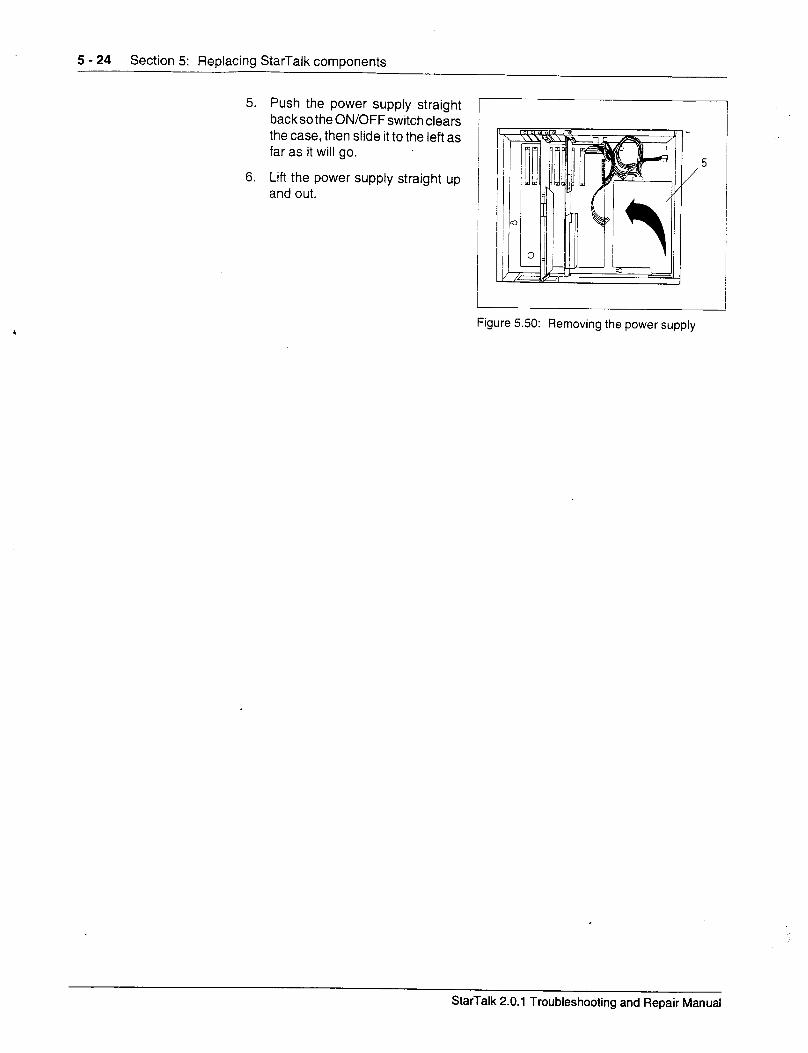
5 - 24 Section 5: Replacing StarTalk components
5. Push the power supply straight backso the ON/OFF switch clears the case, then slide it to the left as far as it will go.
6. Lift the power supply straight up and out.
Figure 5.50: Removing the power supply
StarTalk 2.0.1 Troubleshooting and Repair Manual
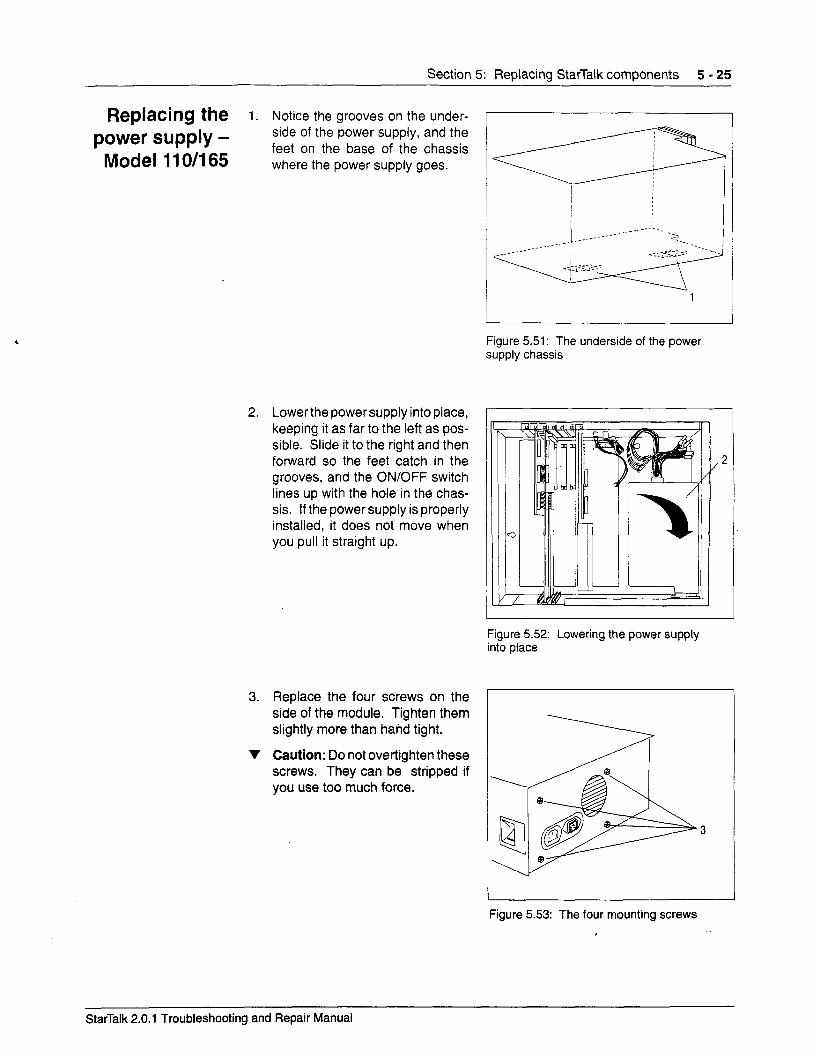
Section 5: Replacing StarTalk components 5 - 25
Replacing the 1. Notice the grooves on the under- 1
-+r supply - puvvt side of the power supply, and the
_ _ _ Model 1' 1 O/l 65
feet on the base of the chassis where the power supply goes.
fl
I I I
2. Lower the power supply into place, keeping it as far to the left as pos- sible. Slide it to the right and then forward so the feet catch in the grooves, and the ON/OFF switch lines up with the hole in the chas- sis. If the power supply is properly installed, it does not move when you pull it straight up.
3. Replace the four screws on the side of the module. Tighten them slightly more than hand tight.
V Caution: Do not overtighten these screws. They can be stripped if you use too much force.
I:::::-: 1
Figure 5.51: The underside of the power supply chassis
r
.2
Figure 5.52: Lowering the power supply into place
I
Figure 5.53: The four mounting screws
J
StarTalk 2.0.1 Troubleshooting and Repair Manual
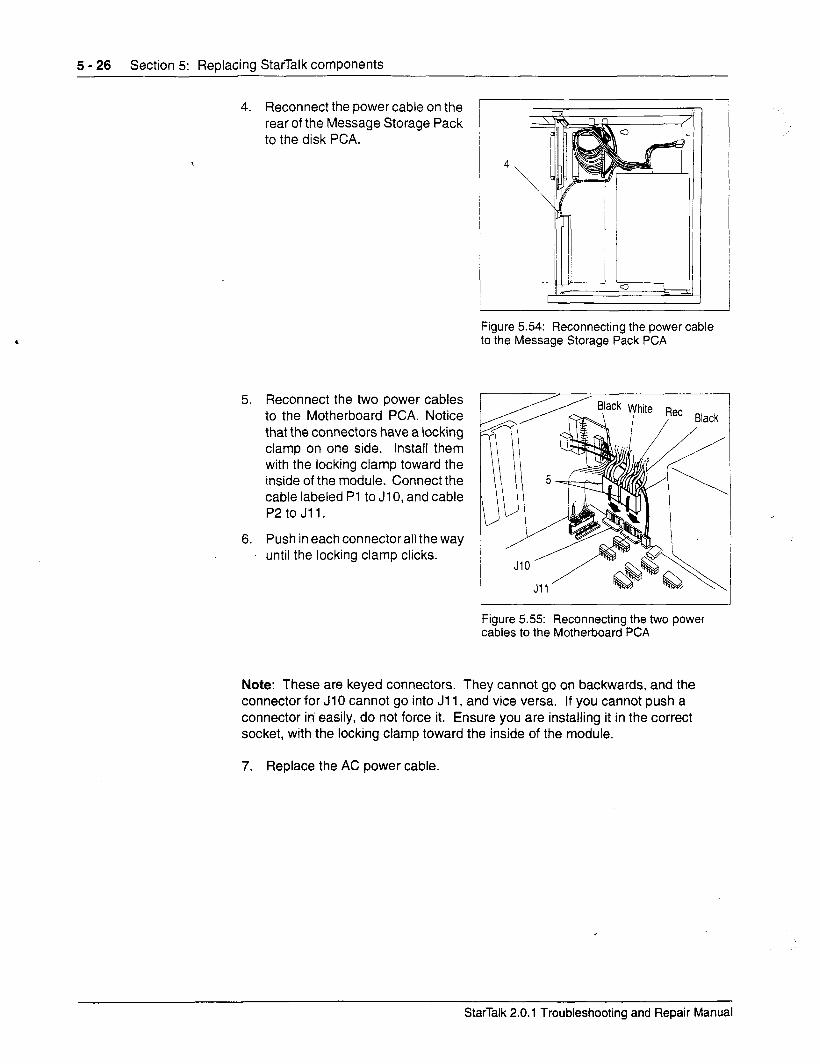
5 - 26 Section 5: Replacing StarTalk components
4. Reconnect the power cable on the rear of the Message Storage Pack to the disk PCA.
5. Reconnect the two power cables to the Motherboard PCA. Notice that the connectors have a locking clamp on one side. Install them with the locking clamp toward the inside of the module. Connect the cable labeled Pl to Jl 0, and cable P2 to Jll.
6. Push in each connector all the way until the locking clamp clicks.
4
Figure 5.54: Reconnecting the power cable to the Message Storage Pack PCA
r
Figure 5.55: Reconnecting the two power cables to the Motherboard PCA
Note: These are keyed connectors. They cannot go on backwards, and the connector for JlO cannot go into Jl 1, and vice versa. If you cannot push a connector in easily, do not force it. Ensure you are installing it in the correct socket, with the locking clamp toward the inside of the module.
7. Replace the AC power cable.
StarTalk 2.0.1 Troubleshooting and Repair Manual
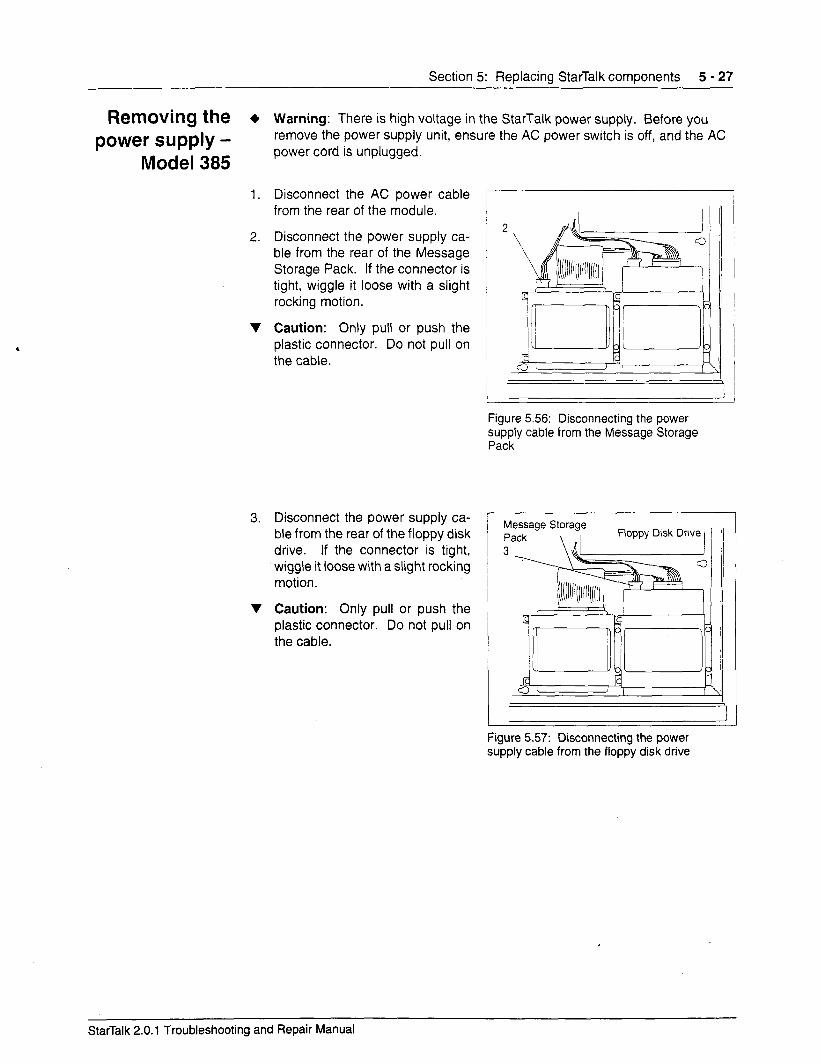
Section 5: Replacing StarTalk components 5 - 27
Removing the + Warning: There is high voltage in the StarTalk power supply. Before you
power supply - remove the power supply unit, ensure the AC power switch is off, and the AC
Model 385 power cord is unplugged.
1. Disconnect the AC power cable from the rear of the module.
2. Disconnect the power supply ca- ble from the rear of the Message Storage Pack. If the connector is tight, wiggle it loose with a slight rocking motion.
V Caution: Only pull or push the plastic connector. Do not pull on the cable.
3.
v
Disconnect the power supply ca- ble from the rear of the floppy disk drive. If the connector is tight, wiggle it loose with a slight rocking motion.
Caution: Only pull or push the plastic connector. Do not pull on the cable.
2
Figure 5.56: Disconnecting the power supply cable from the Message Storage Pack
Message Storage
Figure 5.57: Disconnecting the power supply cable from the floppy disk drive
StarTalk 2.0.1 Troubleshooting and Repair Manual
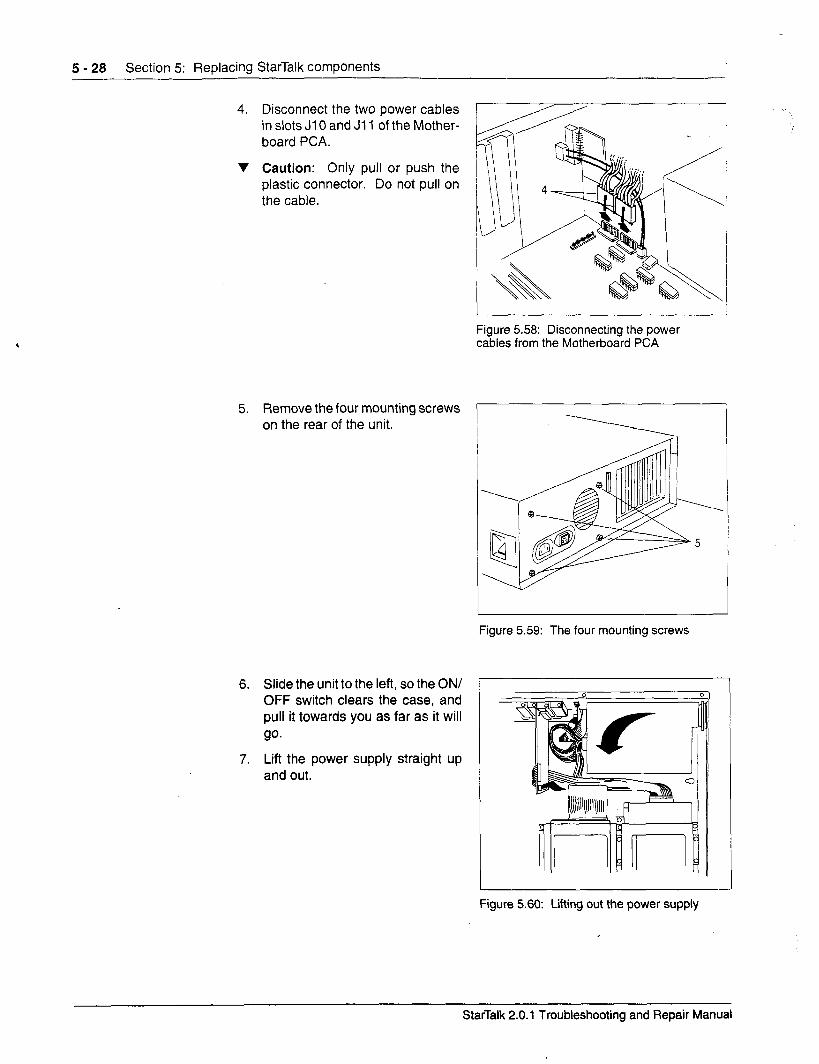
5 - 28 Section 5: Replacing StarTalk components
4. Disconnect the two power cables in slots JlO and Jl 1 of the Mother- board PCA.
V Caution: Only pull or push the plastic connector. Do not pull on the cable.
,
5. Remove the four mounting screws on the rear of the unit.
6. Slide the unit to the left, so the ON/ OFF switch clears the case, and pull it towards you as far as it will 90.
7. Lift the power supply straight up and out.
Figure 5.58: Disconnecting the power cables from the Motherboard PCA
Figure 5.59: The four mounting screws
Figure 5.60: Liiing out the power supply
StarTalk 2.0.1 Troubleshooting and Repair Manual
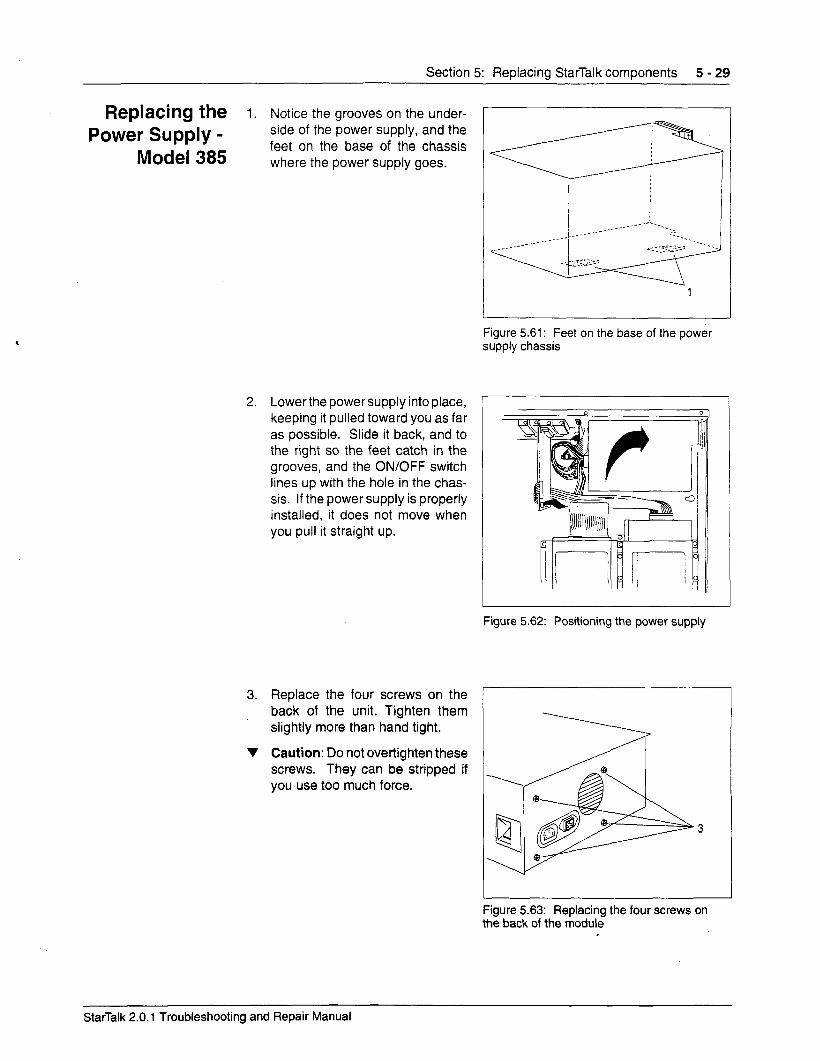
Section 5: Replacing StarTalk components 5 - 29
Replacing the 1. Notice the grooves on the under-
Power Supply - side of the power supply, and the
Model 385 feet on the base of the chassis where the power supply goes,
2. Lowerthe power supply into place, keeping it pulled toward you as far as possible. Slide it back, and to the right so the feet catch in the grooves, and the ON/OFF switch lines up with the hole in the chas- sis. If the power supply is properly installed, it does not move when you pull it straight up.
3. Replace the four screws on the back of the unit. Tighten them slightly more than hand tight.
V Caution: Do not overtighten these screws. They can be stripped if you use too much force.
Figure 5.61: Feet on the base of the power supply chassis
J
Figure 5.62: Positioning the power supply
Figure 5.63: Replacing the four screws on the back of the module
StarTalk 2.0.1 Troubleshooting and Repair Manual
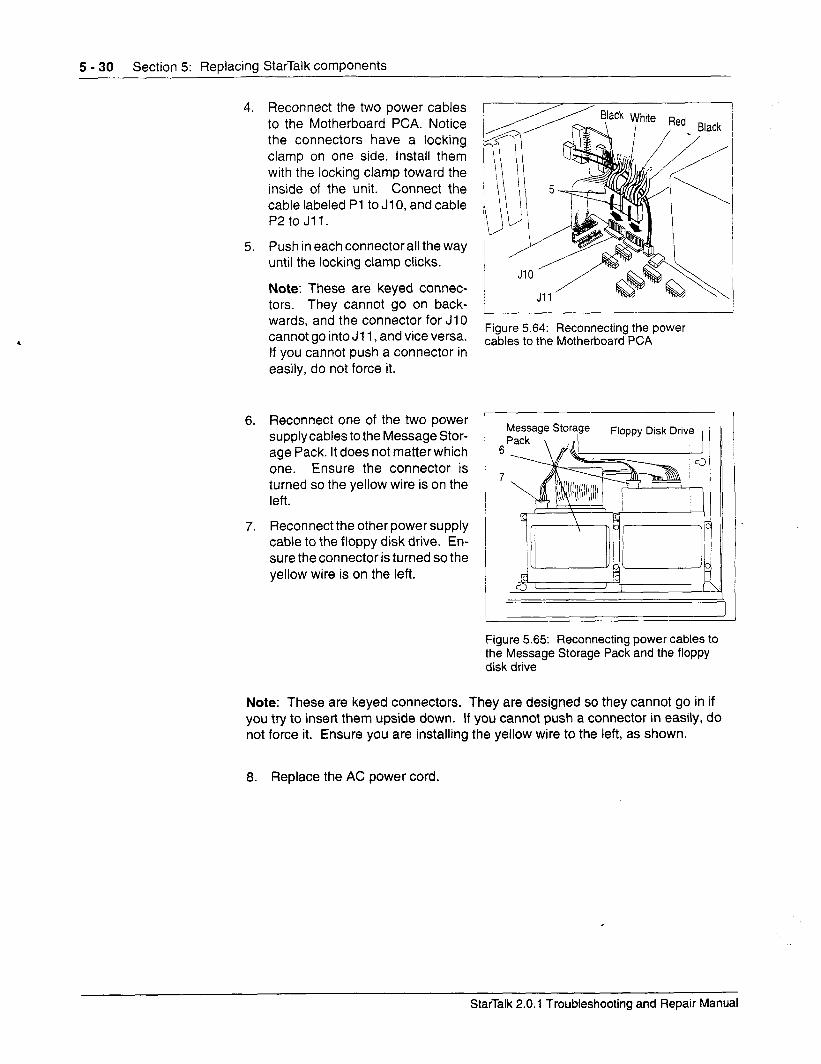
5 - 30 Section 5: Replacing StarTalk components
4. Reconnect the two power cables to the Motherboard PCA. Notice the connectors have a locking clamp on one side. Install them with the locking clamp toward the inside of the unit. Connect the cable labeled Pl to Jl 0, and cable P2 to Jll.
5. Push in each connectorall the way until the locking clamp clicks.
Note: These are keyed connec- tors. They cannot go on back- wards, and the connector for JlO cannot go into Jl 1, and vice versa.
Figure 5.64: Reconnecting the power cables to the Motherboard PCA
If you cannot push a connector in easily, do not force it.
6. Reconnect one of the two power supply cables to the Message Stor- age Pack. It does not matter which one. Ensure the connector is turned so the yellow wire is on the left.
7. Reconnect the other power supply cable to the floppy disk drive. En- sure the connector is turned so the yellow wire is on the left.
r 6 6
7 7
Figure 5.65: Reconnecting power cables to the Message Storage Pack and the floppy disk drive
Note: These are keyed connectors. They are designed so they cannot go in if you try to insert them upside down. If you cannot push a connector in easily, do not force it. Ensure you are installing the yellow wire to the left, as shown.
8. Replace the AC power cord.
StarTalk 2.0.1 Troubleshooting and Repair Manual
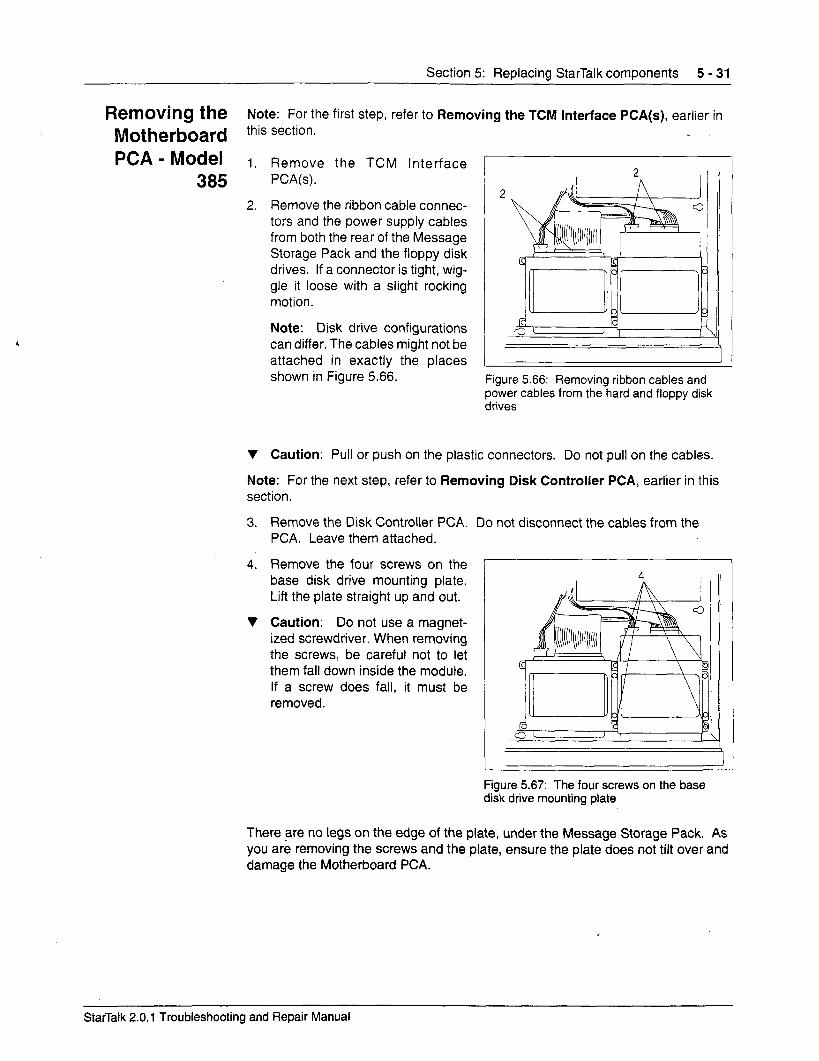
Section 5: Replacing StarTalk components 5 - 31
Ret?lOVing the Note: For the first step, refer to Removing the KM Interface PCA(s), earlier in Motherboard this section.
PCA - Model 1. Remove the TCM Interface
2.
PCA(s).
Remove the ribbon cable connec- tors and the power supply cables from both the rear of the Message Storage Pack and the floppy disk drives. If a connector is tight, wig- gle it loose with a slight rocking motion.
Note: Disk drive configurations can differ. The cables might not be attached in exactly the places shown in Figure 5.66. Figure 5.66: Removing ribbon cables and
power cables from the hard and floppy disk drives
V Caution: Pull or push on the plastic connectors. Do not pull on the cables.
Note: For the next step, refer to Removing Disk Controller PCA, earlier in this section.
3. Remove the Disk Controller PCA. Do not disconnect the cables from the PCA. Leave them attached.
4. Remove the four screws on the base disk drive mounting plate. Lift the plate straight up and out.
V Caution: Do not use a magnet- ized screwdriver. When removing the screws, be careful not to let them fall down inside the module. If a screw does fall, it must be removed.
I ,
Figure 5.67: The four screws on the base disk drive mounting plate
There are no legs on the edge of the plate, under the Message Storage Pack. As you are removing the screws and the plate, ensure the plate does not tilt over and damage the Motherboard PCA.
StarTalk 2.0.1 Troubleshooting and Repair Manual

5 - 32 Section 5: Replacing StarTalk components
5. Disconnect the two motherboard power cable connectors in slots JlO and Jll.
6. Disconnect the RS232 cable con- nector in slot J14.
7. Disconnect the RS232 reset switch connector in slot J12.
V Caution: Pull or push on the plas- tic connectors. Do not pull on the cables.
Figure 5.68: Disconnecting cables from the Motherboard PCA
StarTalk 2.0.1 Troubleshooting and Repair Manual
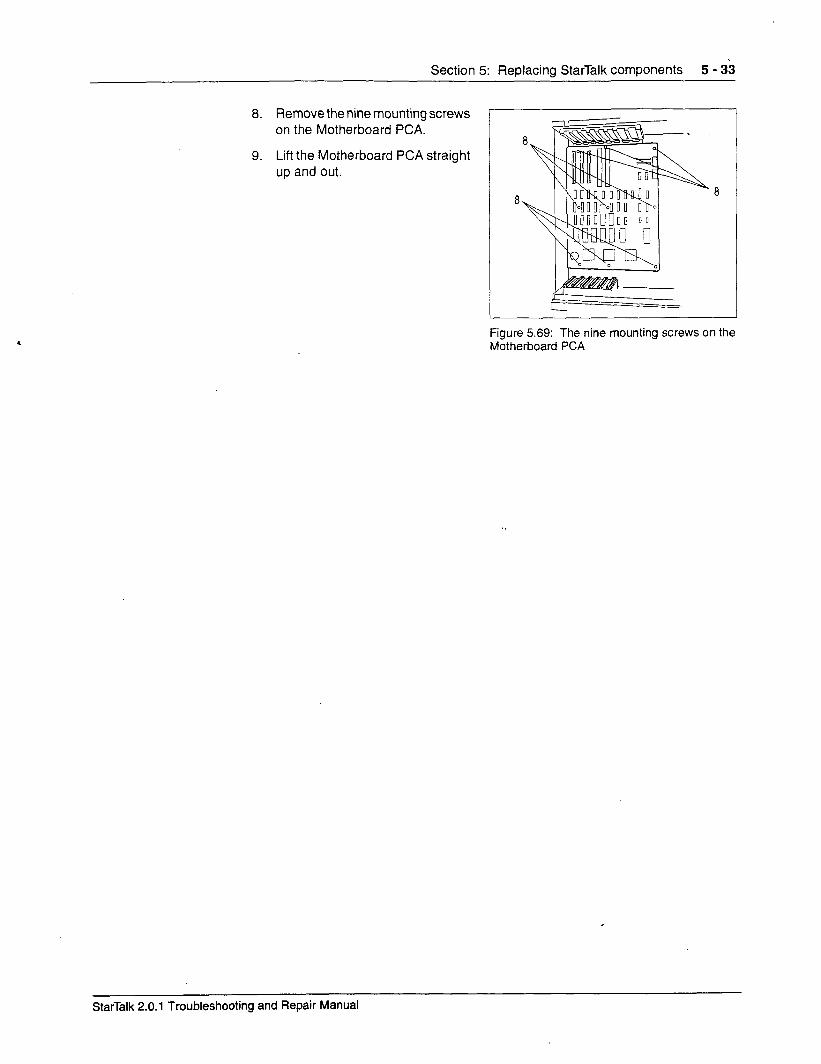
Section 5: Replacing StarTalk components 5 - 33
8. Removethe nine mounting screws on the Motherboard PCA.
9. Lift the Motherboard PCA straight up and out.
‘ Figure 5.69: The nine mounting screws on the Motherboard PCA
StarTalk 2.0.1 Troubleshooting and Repair Manual
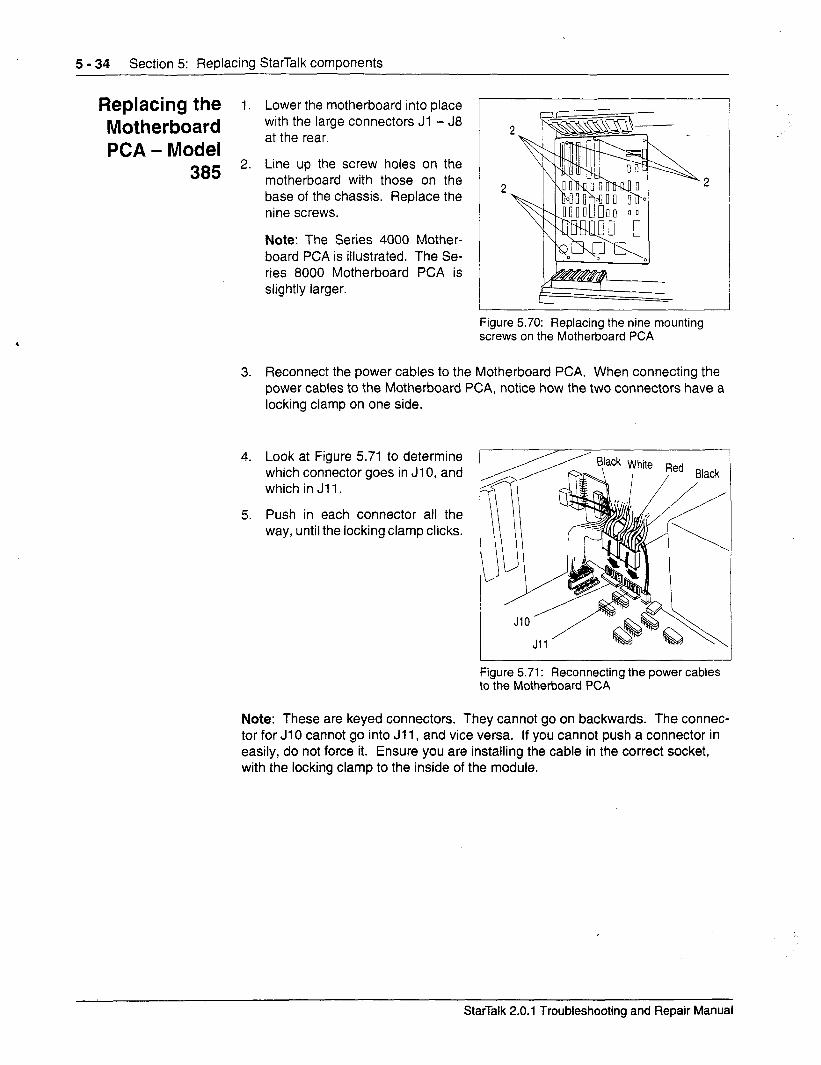
5 - 34 Section 5: Replacing StarTalk components
Replacing the I. Lower the motherboard into place
Motherboard with the large connectors Jl - J8
PCA - Model at the rear.
385 2. Line up the screw holes on the motherboard with those on the base of the chassis. Replace the nine screws.
Note: The Series 4000 Mother- board PCA is illustrated. The Se- ries 8000 Motherboard PCA is slightly larger.
Figure 5.70: Replacing the nine mounting screws on the Motherboard PCA
3. Reconnect the power cables to the Motherboard PCA. When connecting the power cables to the Motherboard PCA, notice how the two connectors have a locking clamp on one side.
4.
5.
Look at Figure 5.71 to determine which connector goes in Jl 0, and which in Jll.
Push in each connector all the way, until the locking clamp clicks.
Figure 5.71: Reconnecting the power cables to the Motherboard PCA
Note: These are keyed connectors. They cannot go on backwards. The connec- tor for JlO cannot go into Jl 1, and vice versa. If you cannot push a connector in easily, do not force it. Ensure you are installing the cable in the correct socket, with the locking clamp to the inside of the module.
StarTalk 2.0.1 Troubleshooting and Repair Manual
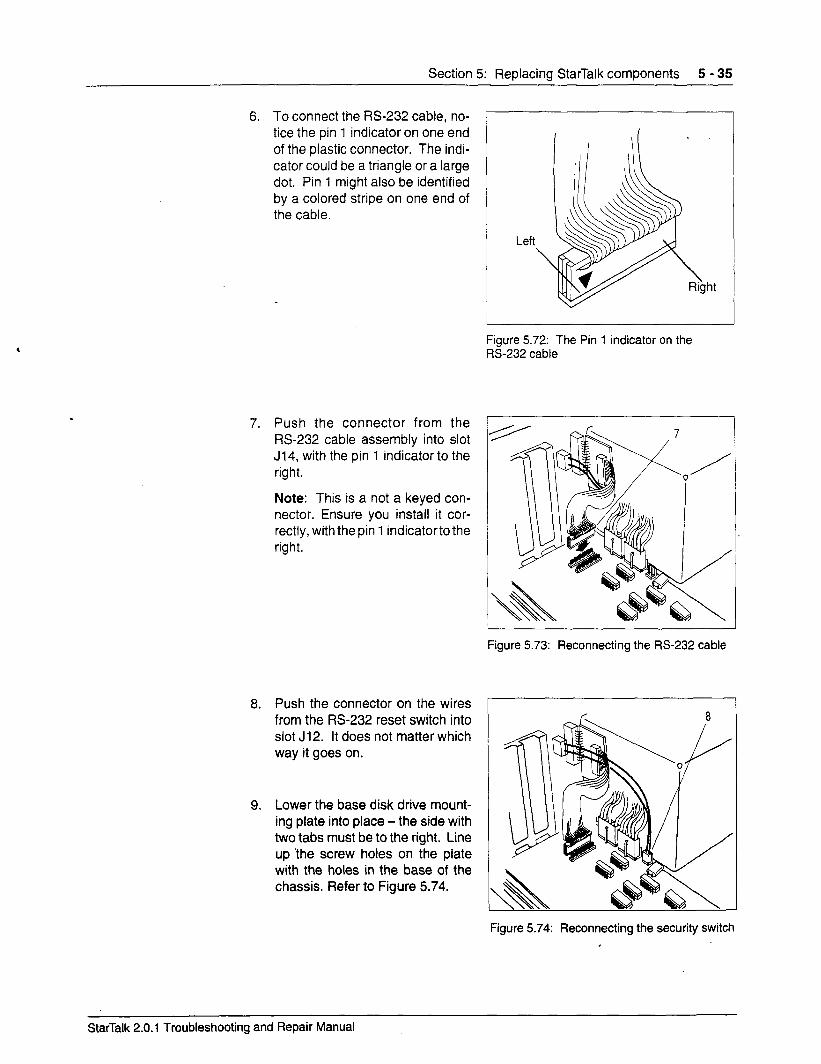
Section 5: Replacing StarTalk components 5 - 35
6. To connect the W-232 cable, no- tice the pin 1 indicator on one end of the plastic connector. The indi- cator could be a triangle or a large dot. Pin 1 might also be identified by a colored stripe on one end of the cable.
Left
ht
Figure 5.72: The Pin 1 indicator on the B-232 cable
7. Push the connector from the W-232 cable assembly into slot J14, with the pin 1 indicator to the right.
Note: This is a not a keyed con- nector. Ensure you install it cor- rectly, with the pin 1 indicatorto the right.
Figure 5.73: Reconnecting the W-232 cable
8. Push the connector on the wires from the W-232 reset switch into slot J12. It does not matter which way it goes on.
9. Lower the base disk drive mount- ing plate into place - the side with two tabs must be to the right. Line up ‘the screw holes on the plate with the holes in the base of the chassis. Refer to Figure 5.74.
Figure 5.74: Reconnecting the security switch
StarTalk 2.0.1 Troubleshooting and Repair Manual
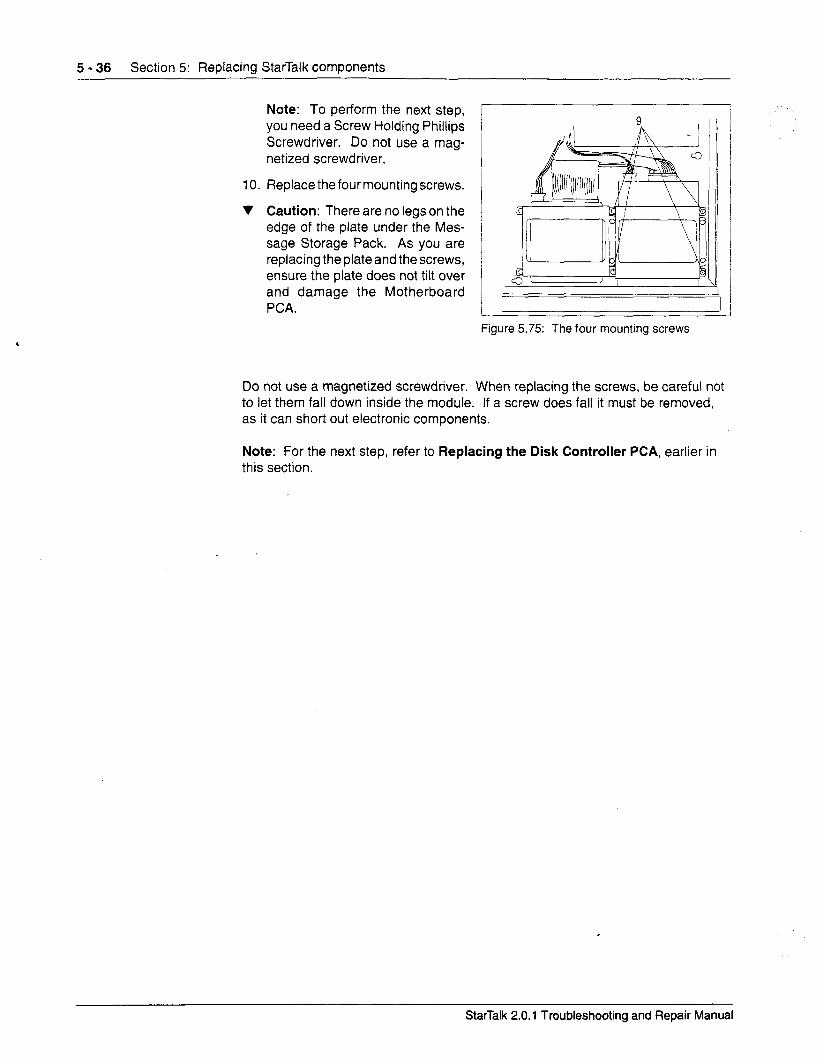
5 - 36 Section 5: Replacing StarTalk components
Note: To perform the next step, you need a Screw Holding Phillips Screwdriver. Do not use a mag- netized screwdriver.
IO. Replace the four mounting screws.
V Caution: There are no legs on the 1 edge of the plate under the Mes- sage Storage Pack. As you are
)
replacing the plate and the screws, 1 /
ensure the plate does not tilt over and damage the Motherboard PCA.
Figure 5.75: The four mounting screws
Do not use a magnetized screwdriver. When replacing the screws, be careful not to let them fall down inside the module. If a screw does fall it must be removed, as it can short out electronic components.
Note: For the next step, refer to Replacing the Disk Controller PCA, earlier in this section.
StarTalk 2.0.1 Troubleshooting and Repair Manual
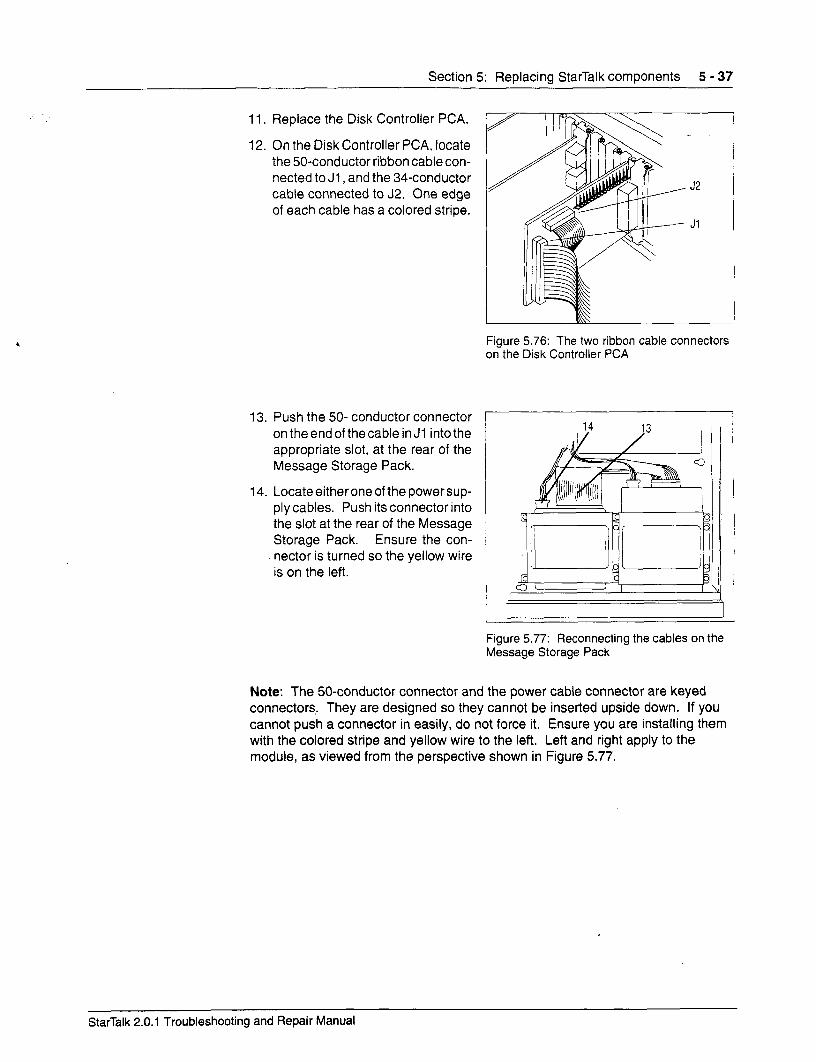
Section 5: Replacing StarTalk components 5 - 37
11. Replace the Disk Controller PCA.
12. On the Disk Controller PCA, locate the 50-conductor ribbon cable con- nected to Jl, and the 34conductor cable connected to J2. One edge of each cable has a colored stripe.
Fiaure 5.76: The two ribbon cable connectors onthe Disk Controller PCA
13. Push the 50- conductor connector on the end of thecable in Jl into the appropriate slot, at the rear of the Message Storage Pack.
14. Locate either one of the power sup- ply cables. Push its connector into the slot at the rear of the Message Storage Pack. Ensure the con- nectar is turned so the yellow wire is on the left.
Figure 5.77: Reconnecting the cables on the Message Storage Pack
Note: The 50-conductor connector and the power cable connector are keyed connectors.. They are designed so they cannot be inserted upside down. If you cannot push a connector in easily, do not force it. Ensure you are installing them with the colored stripe and yellow wire to the left. Left and right apply to the module, as viewed from the perspective shown in Figure 5.77.
StarTalk 2.0.1 Troubleshooting and Repair Manual
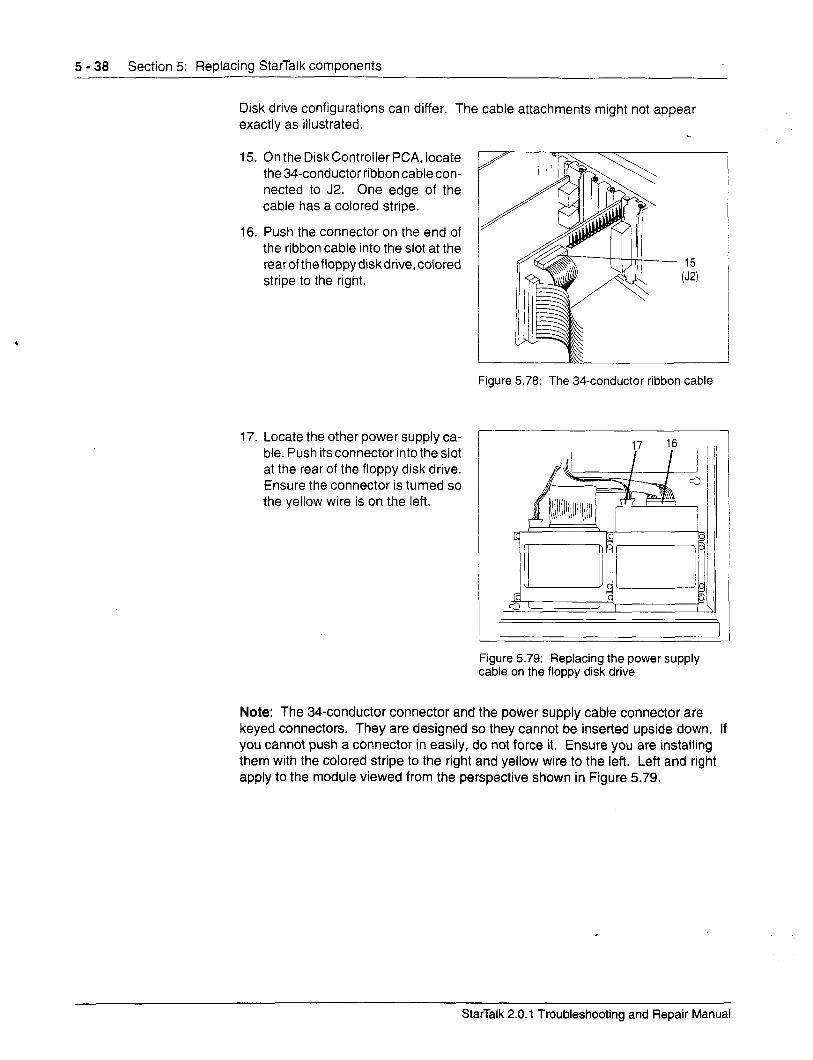
5 - 38 Section 5: Replacing StarTalk components
Disk drive configurations can differ. The cable attachments might not appear exactly as illustrated.
15. On the Disk Controller PCA, locate the 34-conductor ribbon cable con- nected to J2. One edge of the cable has a colored stripe.
16. Push the connector on the end of the ribbon cable into the slot at the rearofthefloppydiskdrive,colored stripe to the right.
Figure 5.78: The 34-conductor ribbon cable
17. Locate the other power supply ca- ble. Push itsconnector into the slot at the rear of the floppy disk drive. Ensure the connector is turned so the yellow wire is on the left.
17 16
I J -
Figure 5.79: Replacing the power supply cable on the floppy disk drive
Note: The 34-conductor connector and the power supply cable connector are keyed connectors. They are designed so they cannot be inserted upside down. If you cannot push a connector in easily, do not force it. Ensure you are installing them with the colored stripe to the right and yellow wire to the left. Left and right apply to the module viewed from the perspective shown in Figure 5.79.
StarTalk 2.0.1 Troubleshooting and Repair Manual
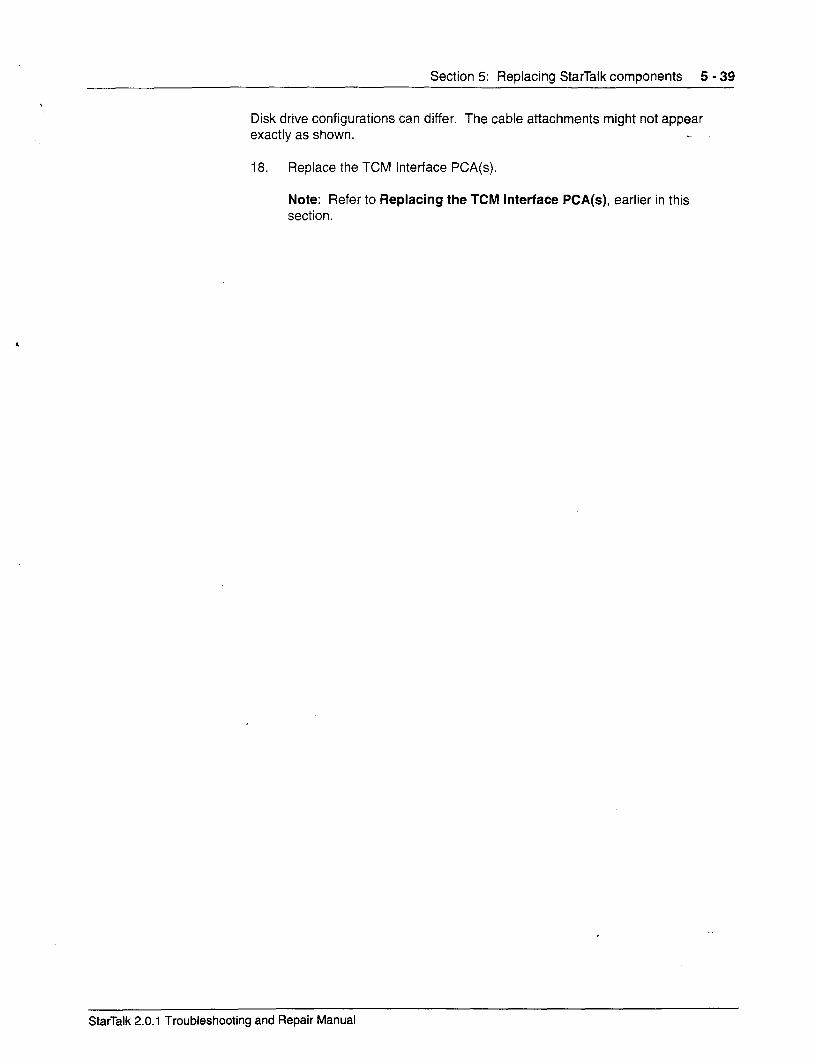
Section 5: Replacing StarTalk components 5 - 39
Disk drive configurations can differ. The cable attachments might not appear exactly as shown.
18. Replace the TCM Intetface PCA(s).
Note: Refer to Replacing the TCM interface PCA(s), earlier in this section.
,
StarTalk 2.0.1 Troubleshooting and Repair Manual
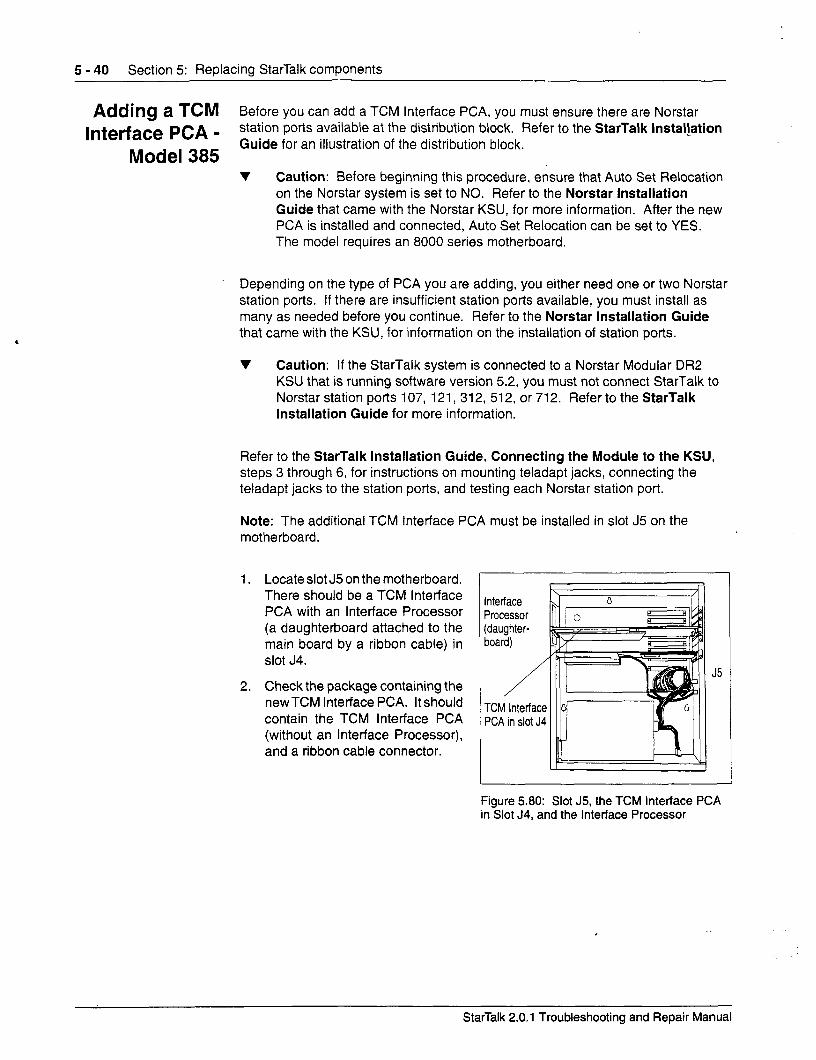
5 - 40 Section 5: Replacing StarTalk components
Adding a TCM Before you can add a TCM Interface PCA, you must ensure there are Norstar
Interface PCA - station ports available at the distribution block. Refer to the StarTalk Instal!ation
Model 385 Guide for an illustration of the distribution block.
v Caution: Before beginning this procedure, ensure that Auto Set Relocation on the Norstar system is set to NO. Refer to the Norstar Installation Guide that came with the Norstar KSU, for more information. After the new PCA is installed and connected, Auto Set Relocation can be set to YES. The model requires an 8000 series motherboard.
Depending on the type of PCA you are adding, you either need one or two Norstar station ports. If there are insufficient station ports available, you must install as many as needed before you continue. Refer to the Norstar Installation Guide that came with the KSU, for information on the installation of station ports.
v Caution: If the StarTalk system is connected to a Norstar Modular DR2 KSU that is running software version 5.2, you must not connect StarTalk to Norstar station ports 107, 121, 312, 512, or 712. Refer to the StarTalk Installation Guide for more information.
Refer to the StarTalk Installation Guide, Connecting the Module to the KSU, steps 3 through 6, for instructions on mounting teladapt jacks, connecting the teladapt jacks to the station ports, and testing each Norstar station port.
Note: The additional TCM Interface PCA must be installed in slot J5 on the motherboard.
1. Locate slot J5 on the motherboard. There should be a TCM Interface PCA with an Interface Processor (a daughterboard attached to the main board by a ribbon cable) in slot J4.
2. Check the package containing the new TCM Interface PCA. It should contain the TCM Interface PCA (without an Interface Processor), and a ribbon cable connector.
Interface h
Processor (daughter- board)
J5
TCM lnterfa PCAinilotJ4lr ‘I, 11
Figure 5.80: Slot J5, the TCM Interface PCA in Slot J4, and the Interface Processor
StarTalk 2.0.1 Troubleshooting and Repair Manual
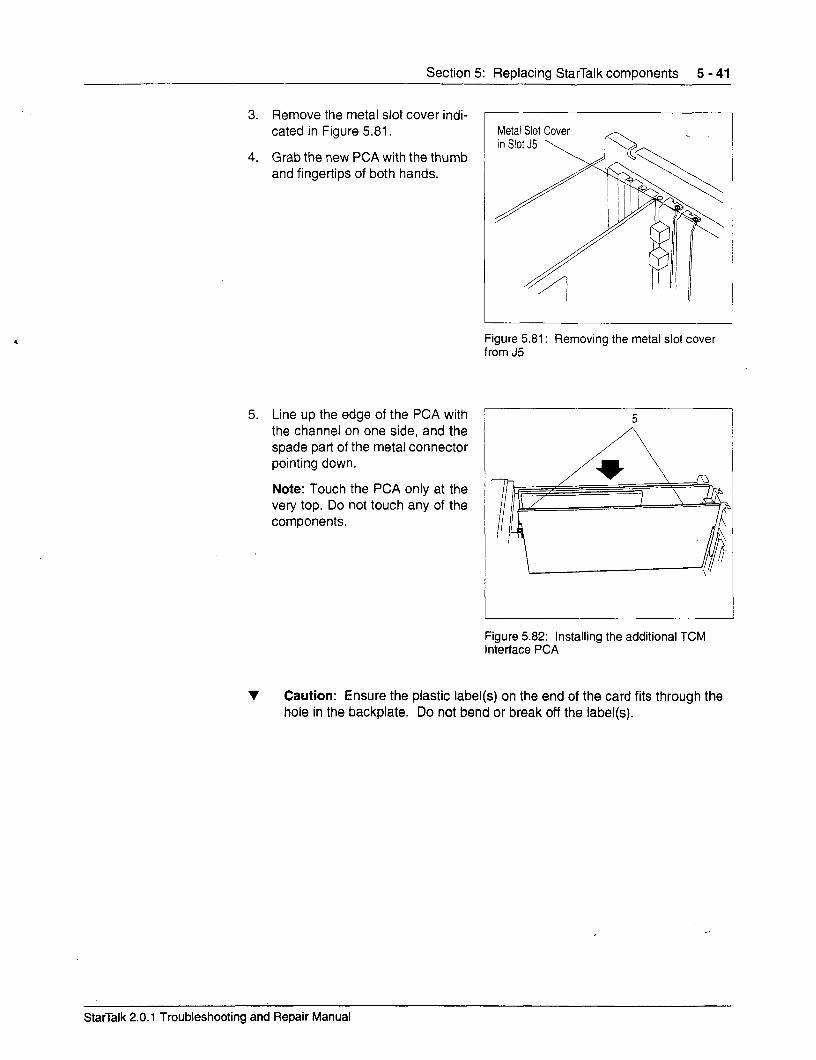
Section 5: Replacing StarTalk components 5 - 41
3. Remove the metal slot cover indi- cated in Figure 5.81.
4. Grab the new PCA with the thumb and fingertips of both hands.
5. Line up the edge of the PCA with the channel on one side, and the spade part of the metal connector pointing down.
Note: Touch the PCA only at the very top. Do not touch any of the components.
Metal Slot Cover
Figure 5.81: Removing the metal slot cover from J5
I /
Figure 5.82: Installing the additional TCM Interface PCA
v Caution: Ensure the plastic label(s) on the end of the card fits through the hole in the backplate. Do not bend or break off the label(s).
StarTalk 2.0.1 Troubleshooting and Repair Manual
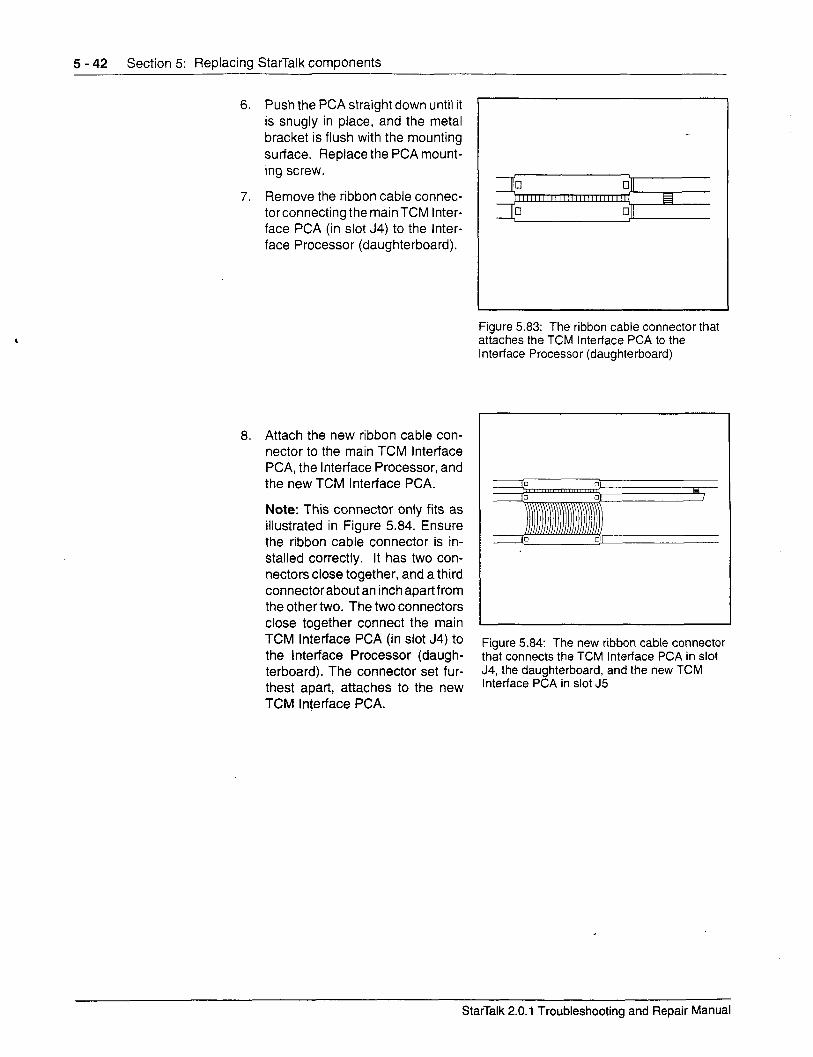
5 - 42 Section 5: Replacing StarTalk components
6. Push the PCA straight down until it is snugly in place, and the metal bracket is flush with the mounting surface. Replace the PCA mount- ing screw.
7. Remove the ribbon cable connec- torconnecting the mainTCM Inter- face PCA (in slot J4) to the Inter- face Processor (daughterboard).
8. Attach the new ribbon cable con- nector to the main TCM Interface PCA, the Interface Processor, and the new TCM Interface PCA.
Note: This connector only fits as illustrated in Figure 5.84. Ensure the ribbon cable connector is in- Stalled correctly. It has two con- nectors close together, and a third connectorabout an inch apart from the other two. The two connectors close together connect the main TCM Interface PCA (in slot J4) to the Interface Processor (daugh- terboard). The connector set fur- thest apart, attaches to the new TCM Interface PCA.
Figure 5.83: The ribbon cable connector that attaches the TCM interface PCA to the Interface Processor (daughterboard)
Figure 5.84: The new ribbon cable connector that connects the TCM Interface PCA in slot J4, the daughterboard, and the new TCM interface PCA in slot J5
StarTalk 2.0.1 Troubleshooting and Repair Manual

Section 5: Replacing StarTalk components 5 - 43
9. Connect modular cord(s) between the jack(s) on the new TCM Interface PCA and the new teladapt jacks you mounted.
You can now set Auto Set Relocation to YES on the Norstar system,
StarTalk 2.0.1 Troubleshooting and Repair Manual
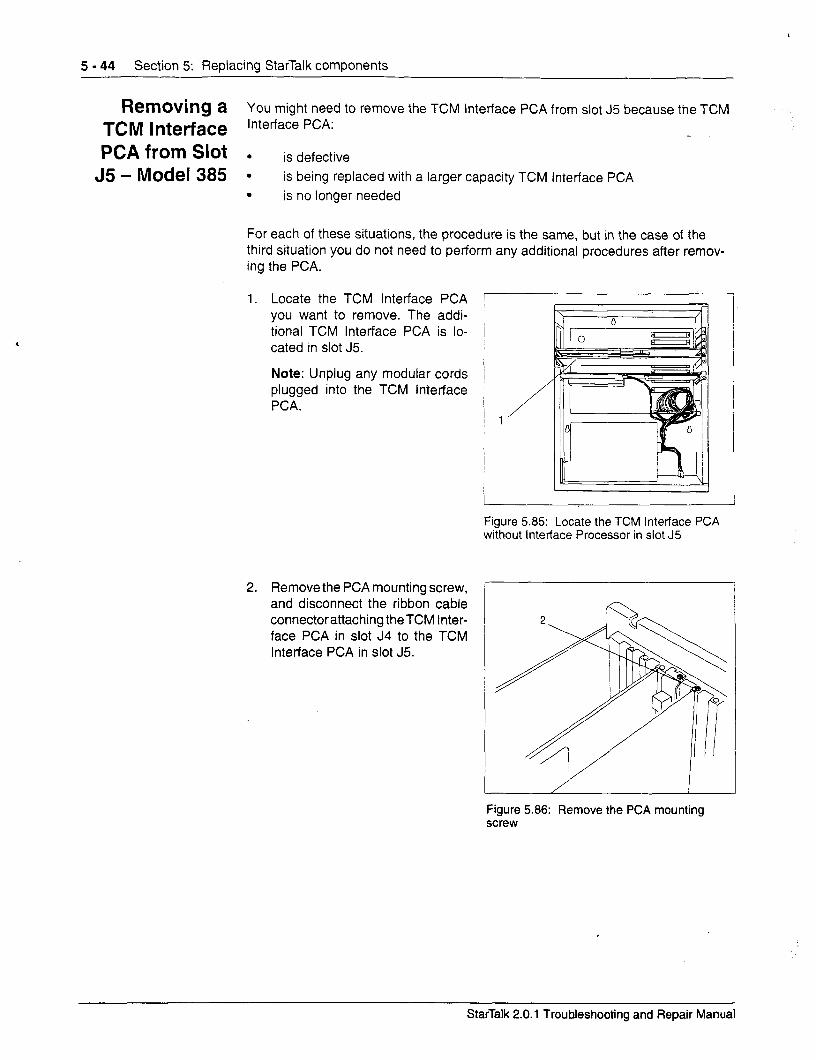
5 - 44 Section 5: Replacing StarTalk components
Removing a You might need to remove the TCM Interface PCA from slot J5 because the TCM TCM Interface Interface PCA:
PCA from Slot . is defective J5 - Model 385 l is being replaced with a larger capacity TCM Interface PCA
. is no longer needed
For each of these situations, the procedure is the same, but in the case of the third situation YOU do not need to perform any additional procedures after remov- ing the PCA. -
1. Locate the TCM Interface PCA you want to remove. The addi- tional TCM Interface PCA is lo- cated in slot J5.
Note: Unplug any modular cords plugged into the TCM Interface PCA.
r
Figure 5.85: Locate the TCM Interface PCA without interface Processor in slot J5
2. Remove the PCA mounting screw, and disconnect the ribbon cable ConnectoratIachingtheTCM Inter- face PCA in slot J4 to the TCM Interface PCA in slot J5.
Figure 5.86: Remove the PCA mounting screw
StarTalk 2.0.1 Troubleshooting and Repair Manual

Section 5: Replacing StarTalk components 5 - 45
3. Grab the PCA with both hands, and carefully pull it straight up and out. Touch the PCA only at the very top. Avoid touching any of the components.
Note: Sometimes the PCA istightly seated and hard to remove. You might need to wiggle it out, with a slight rocking motion.
Figure 5.87: Removing the TCM interface PCA
StarTalk 2.0.1 Troubleshooting and Repair Manual
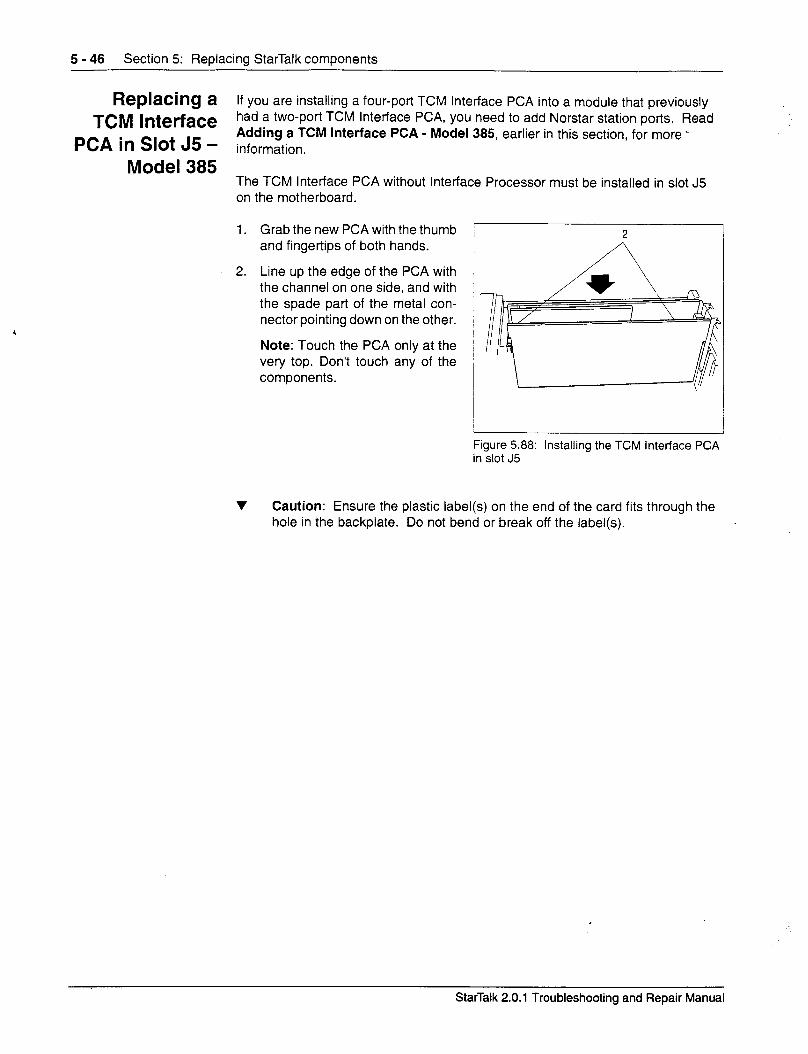
5 - 46 Section 5: Replacing StarTalk components
Replacing a If you are installing a four-port TCM Interface PCA into a module that previously
TCM Interface had a two-port TCM Interface PCA, you need to add Norstar station ports. Read
PCA in Slot J5 - Adding a TCM Interface PCA - Model 385, earlier in this section, for more - information.
Model 385 The TCM Interface PCA without Interface Processor must be installed in slot J5 on the motherboard.
1. Grab the new PCA with the thumb 2 and fingertips of both hands.
2. Line up the edge of the PCA with the channel on one side, and with the spade part of the metal con- nector pointing down on the other.
Note: Touch the PCA only at the very top. Don’t touch any of the components.
Figure 5.88: Installing the TCM interface PCA in slot J5
v Caution: Ensure the plastic label(s) on the end of the card fits through the hole in the backplate. Do not bend or break off the label(s).
StarTalk 2.0.1 Troubleshooting and Repair Manual
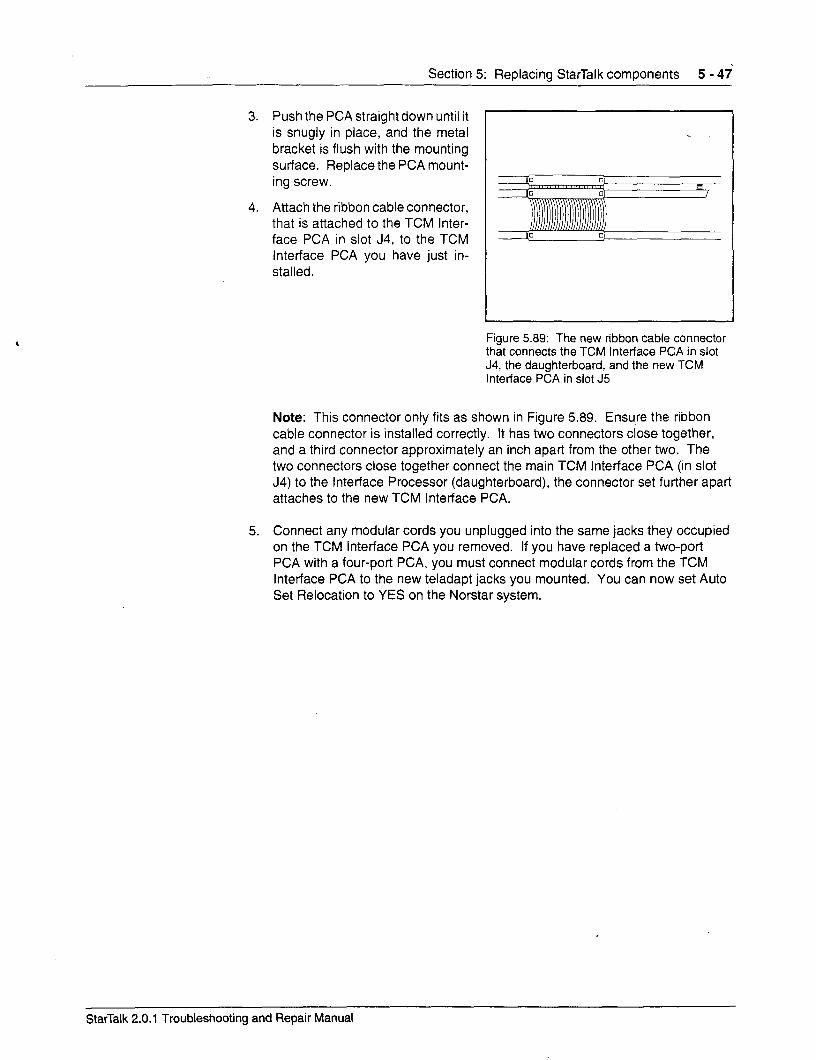
Section 5: Replacing StarTalk components 5 - 47
3. Push the PCA straight down until it is snugly in place, and the metal bracket is flush with the mounting surface. Replace the PCA mount- ing screw.
4. Attach the ribbon cable connector, that is attached to the TCM Inter- face PCA in slot J4, to the TCM Interface PCA you have just in- stalled.
Figure 5.89: The new ribbon cable connector that connects the TCM Interface PCA in slot J4, the daughterboard, and the new TCM Interface PCA in slot J5
Note: This connector only fits as shown in Figure 5.89. Ensure the ribbon cable connector is installed correctly. It has two connectors close together, and a third connector approximately an inch apart from the other two. The two connectors close together connect the main TCM Interface PCA (in slot J4) to the Interface Processor (daughterboard), the connector set further apart attaches to the new TCM Interface PCA.
5. Connect any modular cords you unplugged into the same jacks they occupied on the TCM Interface PCA you removed. If you have replaced a two-port PCA with a four-port PCA, you must connect modular cords from the TCM Interface PCA to the new teladapt jacks you mounted. You can now set Auto Set Relocation to YES on the Norstar system.
StarTalk 2.0.1 Troubleshooting and Repair Manual
5 - 48 Section 5: Replacing StarTalk components
Removing the Clock/Calendar
battery
Replacing the Clock/Calendar
battery
1. Locate the battery at the end of Slot Jl on the motherboard.
2. Using your fingers or a fiat-blade screwdriver, slightly pry the battery retain- ing clip upward. Remove the battery from its socket by sliding it away from the attached end of the clip and lifting it up and over the lip of the socket.
v Caution: Pry the retaining clip up only far enough to remove the battery. Do not deform or break the clip.
The replacement battery must be a 3V, 170 maH, lithium coin cell such as:
. Duracell DL2032
. General Electric CR2032
. Panasonic CR2032
1. Install the battery with the plus side touching the clip and the minus side down in the socket.
2. Slide the battery into the socket under the free end of the retaining clip. If necessary, slightly pry the retaining clip upward.
v Caution: Pry the retaining clip up only far enough to insert the battery. Do not deform or break the clip. When the battery is in the socket, make sure the clip is in firm contact with the top of the battery.
StarTalk 2.0.1 Troubleshooting and Repair Manual
Section 5: Replacing StarTalk components 5 - 49
Preparing If you need to move StarTalk, either to return it to the factory for service or to
StarTal k for mount it in a new location, you must:
travel 1. Notify the System Coordinator that StarTalk is going out of service, and ask the System Coordinator for the Feature 983 mailbox and password combi- nation.
2. Go to a Norstar M7310 or M7324 telephone that has access to StarTalk and access Feature 983. Enter the System Coordinator password. Press q
3. Enter the password SHUTDOWN (74883696). Press DISRBLE
This disables StarTalk channels as they become idle. Use a BLF or a set programmed with StarTalk DNs to determine when all the StarTalk chan- nels are disabled. For more information, refer to Appendix F.
4. Unplug the station port(s) from the TCM interface jack(s) on the module.
5. Wait at least 30 seconds, then set the power switch to OFF. This allows the Message Storage Pack time to automatically park the read/write heads.
6. Unplug the AC power cord from the outlet and the module, and take StarTalk off the wall.
7. If you are returning StarTalk for service, pack it in its original shipping container. If the container is not available, package the module well, with plenty of shock-absorbing, insulating material.
Note: These steps assume the StarTalk default Feature Codes are in effect. If you enter [Feature] q a q and receive an InacLiue feature or a non-StarTalk message, default Feature Codes are not in effect. Refer to the Section 4, Determining StarTalk Feature Codes.
StarTalk 2.0.1 Troubleshooting and Repair Manual
5 - 50 Section 5: Replacing StarTalk components
Testing StarTalk After repairing StarTalk, ensure everything is functioning correctly.
1. From a Norstar telephone, dial the StarTalk DN.
Verify the call is answered, and prompted with the Log: or Pswd: display prompt. If it is not, refer to Section 4.
Log on to StarTalk and verify each option. Do this by choosing an option described in the standard greeting, and seeing if StarTalk takes the appro- priate action, If it does not, refer to Section 4.
2. Verify that StarTalk can handle simultaneous connections by dialing the StarTalk DN from different Norstar telephones. You need two, four, six or eight phones depending on the number of channels available. Verify each call is answered and presented with the Los: or Pswd: display prompt, then, without hanging up, go to another Norstar phone and dial the StarTalk DN. again. Continue until all the Bl and 82 DNs are tested.
If all the DNs are not properly answered, refer to Section 4.
3. Call in to each CO line and verify that you can access the various options available to the incoming caller.
Verify that StarTalk can handle simultaneous connections by directly dialing two, four, six or eight CO line telephone numbers (depending on the StarTalk model) at the same time. You need two, four, six, or eight phones. Dial one CO line from a Norstar telephone and verify that the call is an- swered and greeted. Then without hanging up, go to another phone and call another CO line, and so on until all the CO lines are tested.
Note: To do the rest of this procedure, you need to establish and initialize a mailbox. Refer to the StarTalk Set Up and Operation Guide for instruc- tions.
4. From a Norstar telephone, enter [Feature] @ m a Leave a message in a mailbox. If you cannot leave a message, refer to Section 4.
Go to the telephone where the message was left. Verify that Message for YCU appears on the display of the telephone (if programmed). Retrieve the message. If there is a problem, refer to Section 4.
Delete the message.
Repeat this step until you have tested all the StarTalk DNs.
StarTalk 2.0.1 Troubleshooting and Repair Manual

Section 5: Replacing StarTalk components 5 - 51
Steps 5-l 0 check the date/time and test the battery backup for the clock/calendar.
5. From a Norstar telephone, press 1-J a a a
6. Leave a message in a mailbox.
7. Retrieve the message. While listening to the message, press q to check the date and time on the envelope information.
If either is incorrect, use [Feature] @ q q to set the system date or time.
a. Delete the message.
9. Turn StarTalk OFF, then back ON.
10. Repeat Steps 5-6, and again retrieve the message and check the date and the time on the envelope.
If either is wrong, replace the clock/calendar battery on the motherboard.
11. Delete the message.
StarTalk 2.0.1 Troubleshooting and Repair Manual

5 - 52 Section 5: Replacing StarTalk components
StarTalk 2.0.1 Troubleshooting and Repair Manual
Using StarTalk Application software 6 ~tltl’OdUCtiOf’l The StarTalk software contains sets of instructions, called programs, that instruct
StarTalk how to perform a specific feature. StarTalk uses two software programs. The first program, Application software, is located on the Message Storage Pack of the StarTalk module. This software was installed at the factory. When StarTalk is powered on, the Application software automatically takes control of StarTalk, and instructs it to perform its requested tasks.
The second program is called Disk Utilities software. This software must be loaded onto the Message Storage Pack from a floppy disk. The software is loaded using an external disk drive, attached to the StarTalk Model 11 O/l 65, or using the internal disk drive on the StarTalk Model 385. Refer to Section 7, Using StarTalk Disk Utilities software.
This section describes the StarTalk Application software, and shows you how to:
. use the RS-232 terminal keyboard
. move between menus
. access the Top-level Menu
. access the sub menus, using the Application software
StarTalk 2.0.1 Troubleshooting and Repair Manual
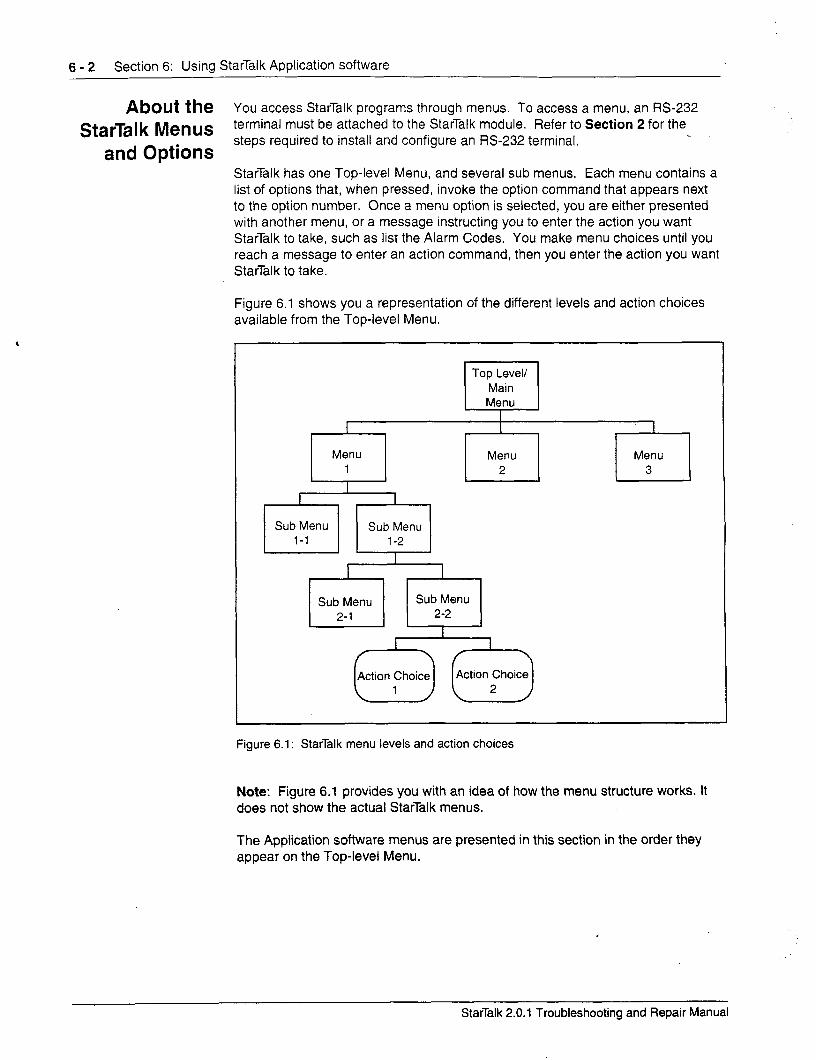
6 - 2 Section 6: Using StarTalk Application software
About the Y ou access StarTalk programs through menus. To access a menu, an W-232
StarTal k Menus terminal must be attached to the StarTalk module. Refer to Section 2 for the
and Options steps required to install and configure an RS-232 terminal.
StarTalk has one Top-level Menu, and several sub menus. Each menu contains a list of options that, when pressed, invoke the option command that appears next to the option number. Once a menu option is selected, you are either presented with another menu, or a message instructing you to enter the action you want StarTalk to take, such as list the Alarm Codes. You make menu choices until you reach a message to enter an action command, then you enter the action you want StarTalk to take.
Figure 6.1 shows you a representation of the different levels and action choices available from the Top-level Menu.
Top Level/ Main Menu
I I
I
Menu Menu 1 2
Menu 3 I
Action Choice
Figure 6.1: StarTalk menu levels and action choices
Note: Figure 6.1 provides you with an idea of how the menu structure works. It does not show the actual StarTalk menus.
The Application software menus are presented in this section in the order they appear on the Top-level Menu.
StarTalk 2.0.1 Troubleshooting and Repair Manual
Section 6: Using StarTalk Application software 6 - 3
Using the RS-232 terminal
keyboard
Moving between menus
Moving within a screen
All commands that invoke a task are entered on the RS-232 terminal keyboard. ,When selecting options, you must press the number corresponding to the option and press [Return] The screen displays the next sub menu, or the information field of the option.
For example:
1. Press l7J (System Admin and Configuration), then press [Return]
On some keyboards, the [Return] key can be labeled as [Enter] When you see instructions to press [Return] press the appropriate key.
Each set of instructions for entering StarTalk configuration information is presented in easy-to-follow, numbered steps. Where appropriate, what appears on the terminal screen is shown to provide you with orientation of where you are within in the steps, and also where you are within the software.
For example:
The screen shows:
Motherboard Power-on Diagnostics Subtest : 1,2,3,4,5,6 Passed Motherboard Power-on Diagnostics
Each time you select an option from a menu and press [Relurn] , you are presented with either an information field or the next level menu. After you make a selection and the action choice is completed, StarTalk automatically returns to the menu.
To return to a previous level menu, you must press [Spacebar] then [Return] To move up two levels, press /Spacebar] and [Relurn] twice, and so on.
Moving around a screen is easy. You can press (Tab71 to move from field to field, or you can press [Return] Most fields appear on the screen one at a time. As you complete the field and press [Return] the next information field appears. When the last field is presented, you can press 1-J to go back to the top of the screen. The cursor appears in the first information field.
In fields where input is required, default or existing values are shown inside square brackets. To change information shown in a field, enter the new informa- tion.
StarTalk 2.0.1 Troubleshooting and Repair Manual
6 - 4 Section 6: Using StarTalk Application software
Application The Application software is located on the Message Storage Pack of the StarTalk
software module, and is always ready to use from an RS-232 terminal connected to _ StarTalk. Using the Application software, you can:
.
.
.
.
.
.
.
.
.
.
.
.
.
.
.
Add, delete, or change a personal mailbox
Reset the password for a personal or special mailbox
Add, delete, or change a Group List
Change the value of a parameter associated with any of the 16 Classes of Service
Disable/enable the StarTalk system
Set the StarTalk date and time
Set the communication parameters for the StarTalk W-232 port
Set the DTMF delay of the StarTalk module
Back up user data to a special partition on the StarTalk module Message Storage Pack
Enable/Disable Multiple Administration Access
Display different reports about StarTalk configuration such as mailboxes, Group Lists, and Class of Service parameters
Reset the statistics log, used to create the mailbox activity report, to zero
Present a list of Alarms recorded during StarTalk operation
Reset the Alarm log for the StarTalk module
Change all the Application software menus to French or English (only available on Canadian systems)
Accessing the StarTalk administration tasks, like adding mailboxes, can be performed from an
Top-level Menu RS-232 terminal. This section describes how to use all of the Application software menus from the RS-232 terminal.
Important: Before you can access the Top-level Menu, an RS-232 terminal must be connected to the StarTalk module. The communication parameters of the terminal must match those of the StarTalk module. For instructions about attach- ing an RS-232 terminal to the StarTalk module, and setting the communication parameters of the StarTalk module to the RS-232 terminal, refer to pages 3-2 and 3-7.
StarTalk 2.0.1 Troubleshooting and Repair Manual
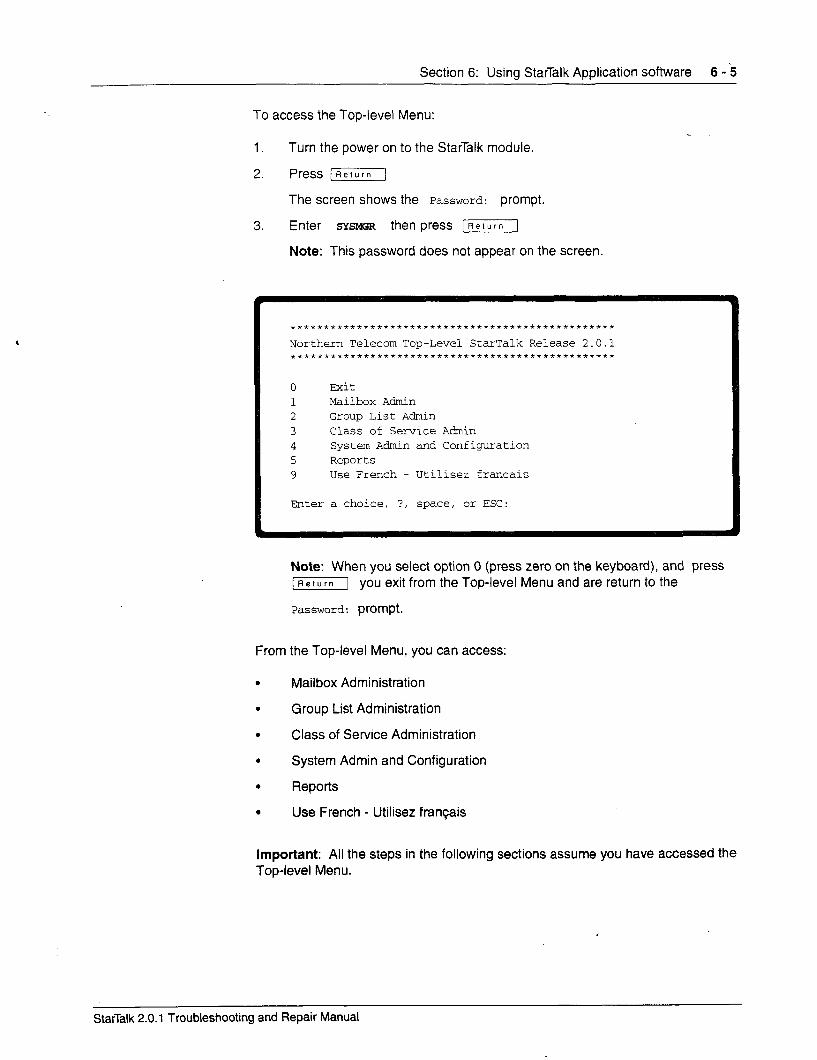
Section 6: Using StarTalk Application software 6 - ‘5
To access the Top-level Menu:
1. Turn the power on to the StarTalk module.
2. Press [Return]
The screen shows the Password: prompt.
3. Enter SY~MGR then press [Return]
Note: This password does not appear on the screen.
0 Exit 1 Mailbox Admin 2 Group List Admin 3 Class of Service A&in 4 System Admin and Configuration 5 Reports 9 Use French - Utilisez francais
Enter a choice, ?, space, or ESC:
Note: When you select option 0 (press zero on the keyboard), and press (Return] you exit from the Top-level Menu and are return to the
Password: prompt.
From the Top-level Menu, you can access:
. Mailbox Administration
. Group List Administration
. Class of Service Administration
. System Admin and Configuration
. Reports
. Use French - Utilisez francais
Important: All the steps in the following sections assume you have accessed the Top-level Menu.
StarTalk 2.0.1 Troubleshooting and Repair Manual
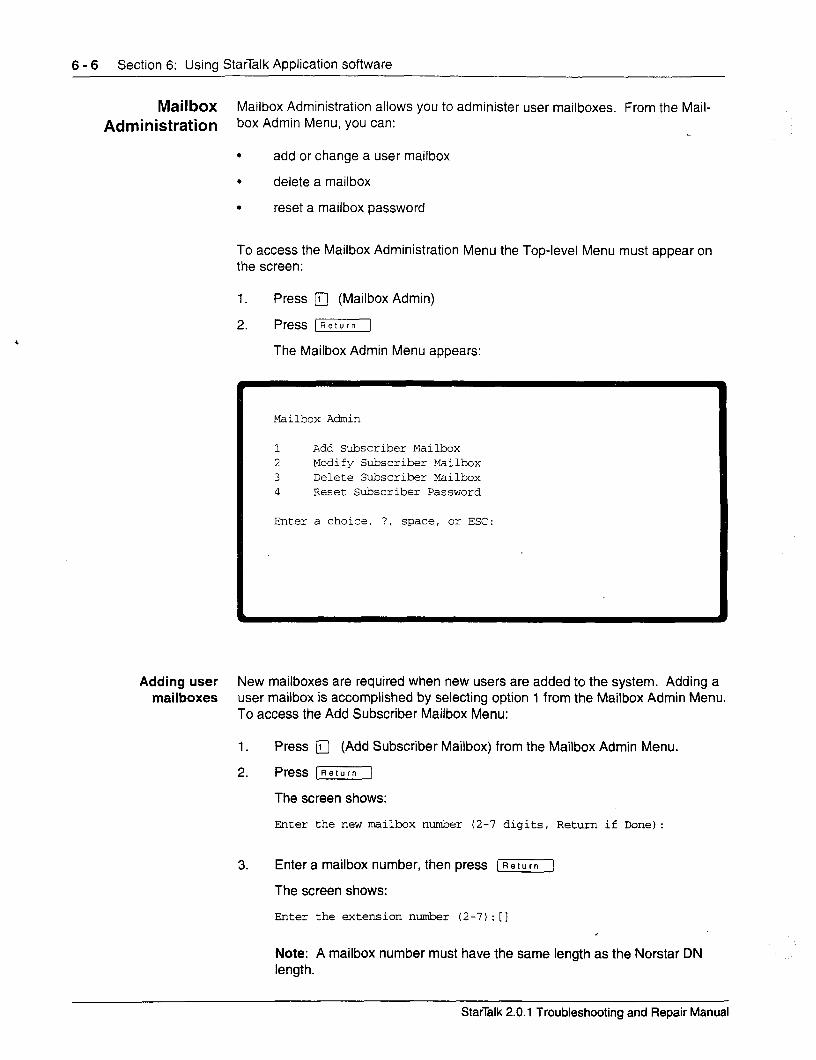
6 - 6 Section 6: Using StarTalk Application software
Mailbox Mailbox Administration allows you to administer user mailboxes. From the Mail-
Administration box Admin Menu, you can:
. add or change a user mailbox
. delete a mailbox
. reset a mailbox password
To access the Mailbox Administration Menu the Top-level Menu must appear on the screen:
1. Press l7J (Mailbox Admin)
2. Press [Return]
The Mailbox Admin Menu appears:
Mailbox Admin
1 Add Subscriber Mailbox 2 Modify Subscriber Mailbox 3 Delete Subscriber Mailbox 4 Reset Subscriber Password
Enter a choice, ?, space, or ESC:
Adding user New mailboxes are required when new users are added to the system. Adding a mailboxes user mailbox is accomplished by selecting option 1 from the Mailbox Admin Menu.
To access the Add Subscriber Mailbox Menu:
1. Press q (Add Subscriber Mailbox) from the Mailbox Admin Menu.
2. Press [Return]
The screen shows:
Enter the new mailbox number (2-7 digits, Return if Done) :
3. Enter a mailbox number, then press [ml
The screen shows:
Enter the extension number (2-7):[] ,
Note: A mailbox number must have the same length as the Norstar DN length.
StarTalk 2.0.1 Troubleshooting and Repair Manual
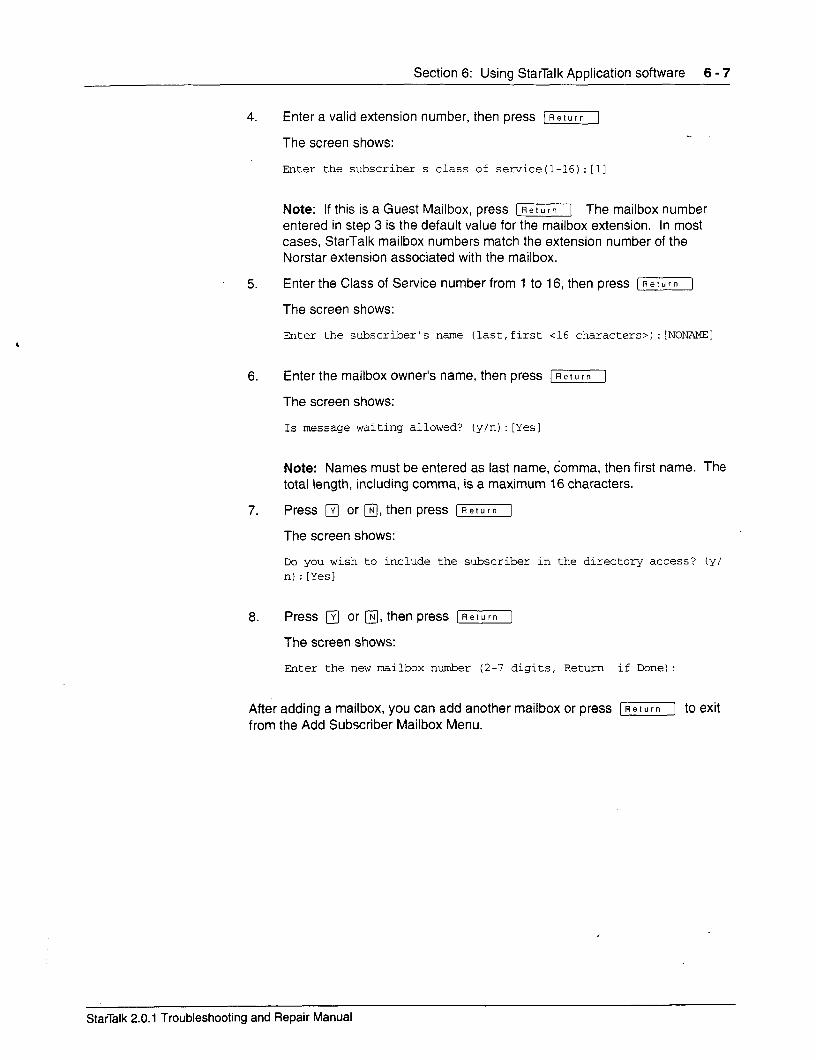
Section 6: Using StarTalk Application software 6 - 7
4. Enter a valid extension number, then press (Return]
The screen shows:
Enter the subscriber's class of servicetl-16):Lll
Note: If this is a Guest Mailbox, press [Return] The mailbox number entered in step 3 is the default value for the mailbox extension. In most cases, StarTalk mailbox numbers match the extension number of the Norstar extension associated with the mailbox.
5. Enter the Class of Service number from 1 to 16, then press [Return]
The screen shows:
Enter the subscriber's name (last,first ~16 characters>) :INONAMEl
6. Enter the mailbox owner’s name, then press [r]
The screen shows:
IS message waiting allowed? (y/n):[Yes]
Note: Names must be entered as last name, domma, then first name. The total length, including comma, is a maximum 16 characters.
7. Press a or @I, then press [Return]
The screen shows:
Do you wish to include the subscriber in the directory access? (y/ n) :[Yesl
8. Press @ or @I, then press [Relurn]
The screen shows:
Enter the new mailbox number (2-7 digits, Return if Done) :
After adding a mailbox, you can add another mailbox or press [Relurn] to exit from the Add Subscriber Mailbox Menu.
StarTalk 2.0.1 Troubleshooting and Repair Manual
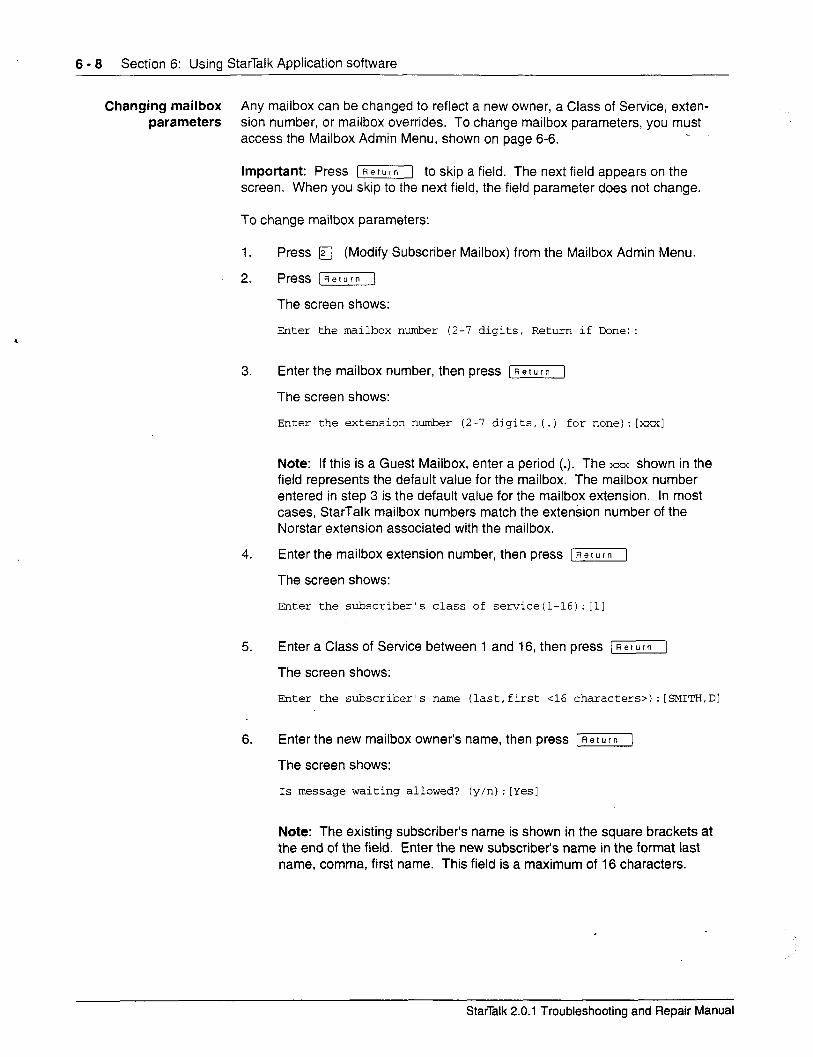
6 - 8 Section 6: Using StarTalk Application software
Changing mailbox Any mailbox can be changed to reflect a new owner, a Class of Service, exten- parameters sion number, or mailbox overrides. To change mailbox parameters, you must
access the Mailbox Admin Menu, shown on page 6-6.
Important: Press [-I to skip a field. The next field appears on the screen. When you skip to the next field, the field parameter does not change.
To change mailbox parameters:
1. Press q (Modify Subscriber Mailbox) from the Mailbox Admin Menu.
2. Press (Return]
The screen shows:
Enter the mailbox number (2-7 digits, Return if Done) :
3. Enter the mailbox number, then press [Return]
The screen shows:
Enter the extension number (2-7 digits,(.) for none):[xxx]
Note: If this is a Guest Mailbox, enter a period (.). The XXX shown in the field represents the default value for the mailbox. The mailbox number entered in step 3 is the default value for the mailbox extension. In most cases, StarTalk mailbox numbers match the extension number of the Norstar extension associated with the mailbox.
4. Enter the mailbox extension number, then press [Return]
The screen shows:
Enter the subscriber's class of service(l-16):[1]
5. Enter a Class of Service between 1 and 16, then press (Return]
The screen shows:
Enter the subscriber's name (last,first 46 characters>) :[SMITH,Dl
6. Enter the new mailbox owner’s name, then press [Return]
The screen shows:
IS message waiting allowed? (y/n):[Yesl
Note: The existing subscriber’s name is shown in the square brackets at the end of the field. Enter the new subscriber’s name in the format last name, comma, first name. This field is a maximum of 16 characters.
StarTalk 2.0.1 Troubleshooting and Repair Manual

Section 6: Usina StarTalk Aoolication software 6 - 9
7. The Message Notification Parameter currently in effect is indicated in the brackets at the end of the field. To change the parameter, press a -or m then press [Return]
The screen shows:
Do you wish to include the subscriber in the directory access? (y/ n):[Yes]
8. The present directory access parameter is shown. Press m or m then press [Aeturn]
The screen shows:
Enter the mailbox number (2-7 digits, Return if Done):
After modifying a mailbox, you can modify another mailbox, or press [Return] to exit from the Modify Subscriber Mailbox Menu.
Deleting a subscriber Deleting a mailbox is necessary for some troubleshooting procedures, and also mailbox necessary when the mailbox is no longer required. To delete a mailbox, you must
access the Mailbox Admin Menu. To access the Mailbox Admin Menu, refer to page 6-6.
1. Press q (Delete Subscriber Mailbox) from the Mailbox Admin Menu.
2. Press [Return]
The screen shows:
Enter the mailbox number to delete (2-7 digits, Return if Done):
3. Enter the number of the mailbox to be deleted, then press [Rerurn]
The screen shows:
Are you sure?(y/n):[n]
4. Press q then press [Return]
The screen shows:
Mailbox deleted.
Note: If the mailbox number entered is incorrect, press [Return] and re-enter the mailbox number.
After deleting a mailbox, you can delete another mailbox, or press [rj to exit from the Delete Subscriber Mailbox Menu.
StarTalk 2.0.1 Troubleshooting and Repair Manual
6 - 10 Section 6: Using StarTalk Application software
Resetting a mailbox Resetting a mailbox password is required when a mailbox owner forgets the password personal password. Resetting a password returns the mailbox to the default
password of four zeros. To reset a mailbox password you must access Mailbox Admin. Refer to page 6-6 for instructions about resetting passwords.
To reset a mailbox password:
1. Press n (Reset Subscriber Password) from the Mailbox Admin Menu.
2. Press /Return]
The screen shows:
Enter the mailbox number for password reset (2-7 digits, Return if Done) :
3. Enter mailbox number, then press [Return]
The screen shows:
Are you sure?(y/n):[nl
4. Press B then press jReturnj
The screen shows:
Password has been reset.
Note: If the mailbox number entered is incorrect, press [Return] and re- enter the correct mailbox number.
After resetting the password for a mailbox, you can reset the password for another mailbox, or press (RelurnI to exit from the Reset Subscriber Password Menu.
Starialk 2.0.1 Troubleshooting and Repair Manual
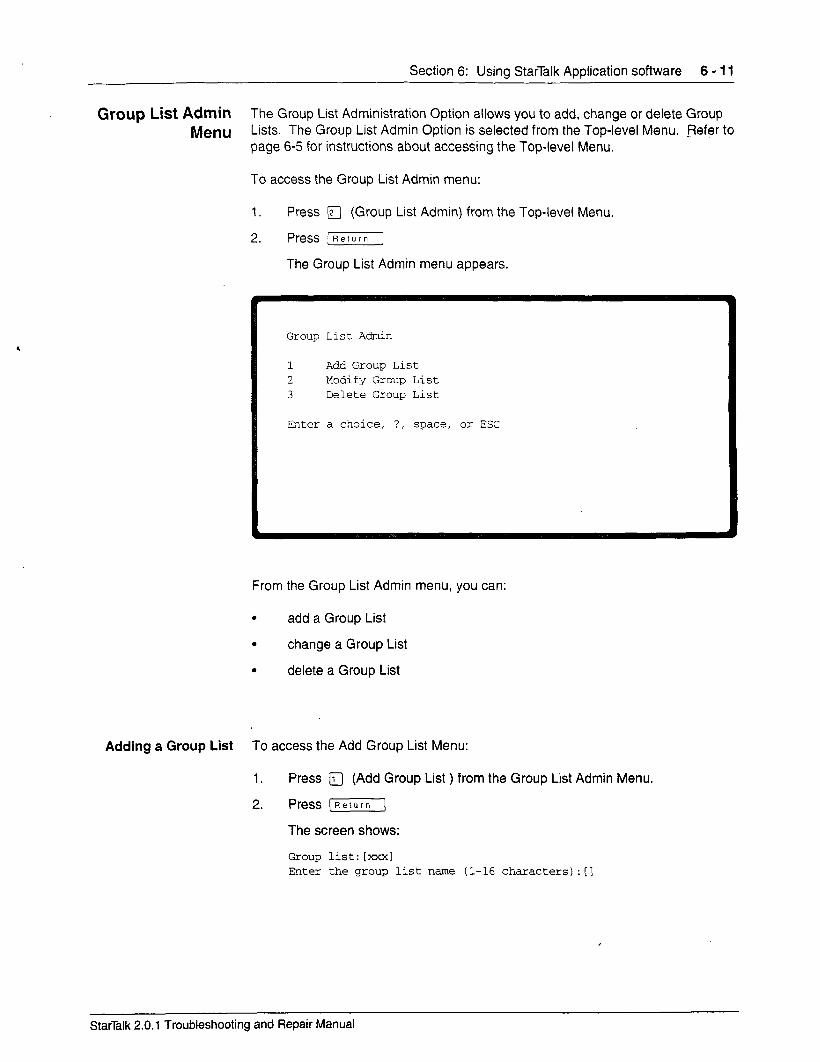
Section 6: Using StarTalk Application software 6 - 11
Group List Admin The Group List Administration Option allows you to add, change or delete Group
Menu Lists. The Group List Admin Option is selected from the Top-level Menu. pefer to page 6-5 for instructions about accessing the Top-level Menu.
To access the Group List Admin menu:
1. Press q (Group List Admin) from the Top-level Menu.
2. Press [Return]
The Group List Admin menu appears.
Group List Admin
1 Add Group List 2 Modify Group List 3 Delete Group List
Enter a choice, ?, space, or ESC
From the Group List Admin menu, you can:
. add a Group List
. change a Group List
. delete a Group List
Adding a Group List To access the Add Group List Menu:
1.
2.
Press 0 (Add Group List ) from the Group List Admin Menu.
Press [Rerurnl
The screen shows:
Group list:[xxxl Enter the group list name (l-16 characters):[]
StarTalk 2.0.1 Troubleshooting and Repair Manual
6 - 12 Section 6: Using StarTalk Application software
3. StarTalk automatically assigns a Group List number. Enter the Group List name, then press [Relurn]
The screen shows:
Enter mailbox number to add to grp. list (2-7 digits, Retwm if Done) :
4. Enter mailbox number, then press [Return]
The screen shows:
Enter mailbox number to add to grp. list (2-7 digits, Return if Done) :
Note: Only initialized mailboxes can be added to a Group List.
After adding a mailbox to a Group List, you can add another mailbox, or press 1-1 to exit from the Add Group List Menu.
Changing a Group Lists are changed as new mailboxes are added to the list, and other Group List mailboxes are removed. To change a Group List, you require the Group List
number. Ask the System Coordinator for a list of current Group List numbers.
To modify a Group List, you must first access the Group Administration Menu. Refer to page 6-l 1 for instructions. To modify a Group List:
1. Press q (Modify Group List) from the Group List Admin Menu.
2. Press (Return]
The screen shows:
Enter group list number to modify (Return if Done) :
3. Enter the Group List number, then press [Return]
The screen shows:
Enter the group list name (l-16 characters):[PRESENTNAME]
4. The existing name of the Group List is shown. Enter the new name for the Group List, then press [Return]
The screen shows:
Enter mailbox number to add to grp. list (2-7 digits, Return if Done) :
StarTalk 2.0.1 Troubleshooting and Repair Manual
Section 6: Using StarTalk Application software 6 - 13
5. Enter the number of a mailbox to be added to the Group List, then
press [Returni
Note: Only initialized mailboxes can be added to Group Lists. The screen shows:
Enter mailbox number to add to grp. list (2-7 digits, Return if Done) :
6. Continue adding mailboxes to the Group List.
7. Press IReturn) when all the mailboxes have been added to the Group List. The screen shows:
Enter mailbox number to delete from grp. list (2-7 digits, Return if Done) :
8. Enter the mailbox number to be deleted, then press [Return]
The screen shows:
Enter mailbox number to delete from grp. list (2-7 digits, Return if Done):
9. Press (Return] to return to the Group List Admin Menu.
Deleting a Group List Group Lists can be deleted at any time. Once a Group List is deleted, the Group List number is reassigned by the next time a Group List is added. To delete a Group List, you must first access the Group List Administration Menu from the Top-level Menu. Refer to page 6-11 for instructions.
To delete a Group List:
1.
2.
3.
Press q (Delete Group List) from the Group List Admin menu.
Press [Return]
The screen shows:
Enter group list number to delete (Return if Done) :
Enter the Group List number to be deleted, then press [m]
The screen shows:
Are you sure?(y/n):[nl
StarTalk 2.0.1 Troubleshooting and Repair Manual
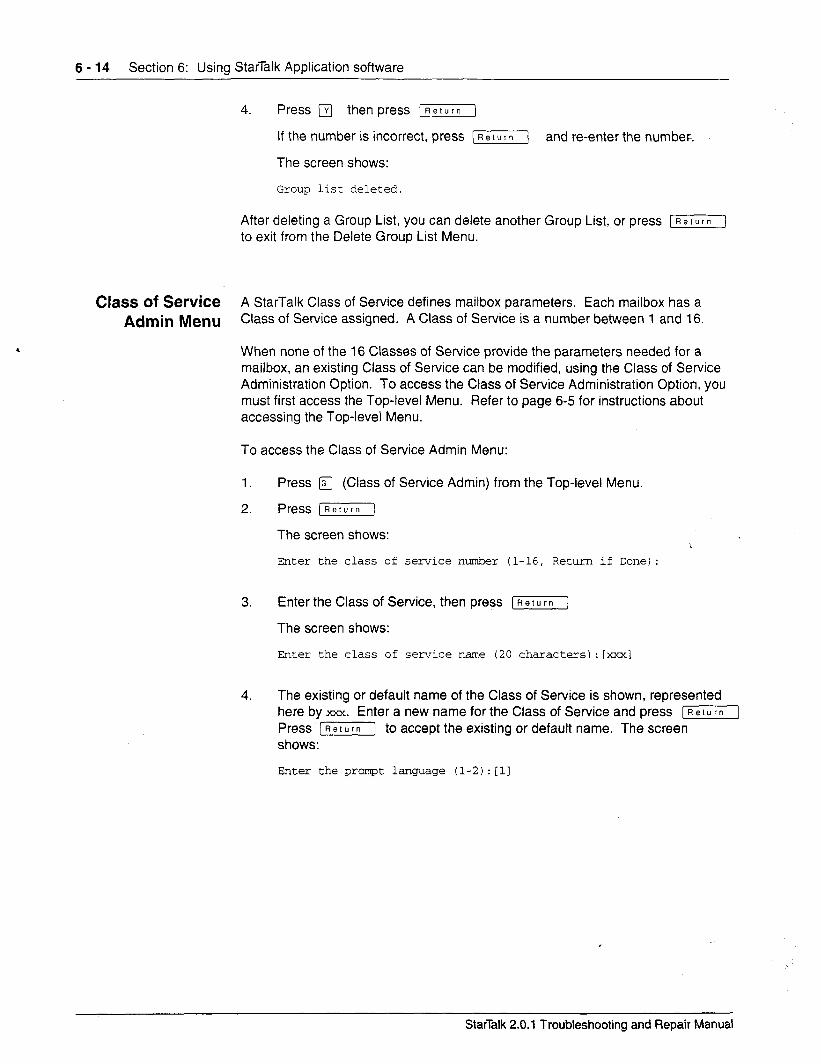
6 - 14 Section 6: Using StarTalk Application software
4. Press @ then press [Return]
If the number is incorrect, press (Relurn] and re-enter the number.
The screen shows:
Group list deleted
After deleting a Group List, you can delete another Group List, or press r-1 to exit from the Delete Group List Menu.
Class of Service A StarTalk Class of Service defines mailbox parameters. Each mailbox has a
Admin Menu Class of Service assigned. A Class of Service is a number between 1 and 16.
When none of the 16 Classes of Service provide the parameters needed for a mailbox, an existing Class of Service can be modified, using the Class of Service Administration Option. To access the Class of Service Administration Option, you must first access the Top-level Menu. Refer to page 6-5 for instructions about accessing the Top-level Menu.
To access the Class of Service Admin Menu:
1. Press a (Class of Service Admin) from the Top-level Menu.
2. Press [Return]
The screen shows:
Enter the class of service number (l-16, Return if Done) :
3. Enter the Class of Service, then press [Return]
The screen shows:
Enter the class of service name (20 characters):[mI
4. The existing or default name of the Class of Service is shown, represented here by XXX. Enter a new name for the Class of Service and press [Return] Press’ [r] to accept the existing or default name. The screen shows:
Enter the prompt language (l-2):[1]
StarTalk 2.0.1 Troubleshooting and Repair Manual
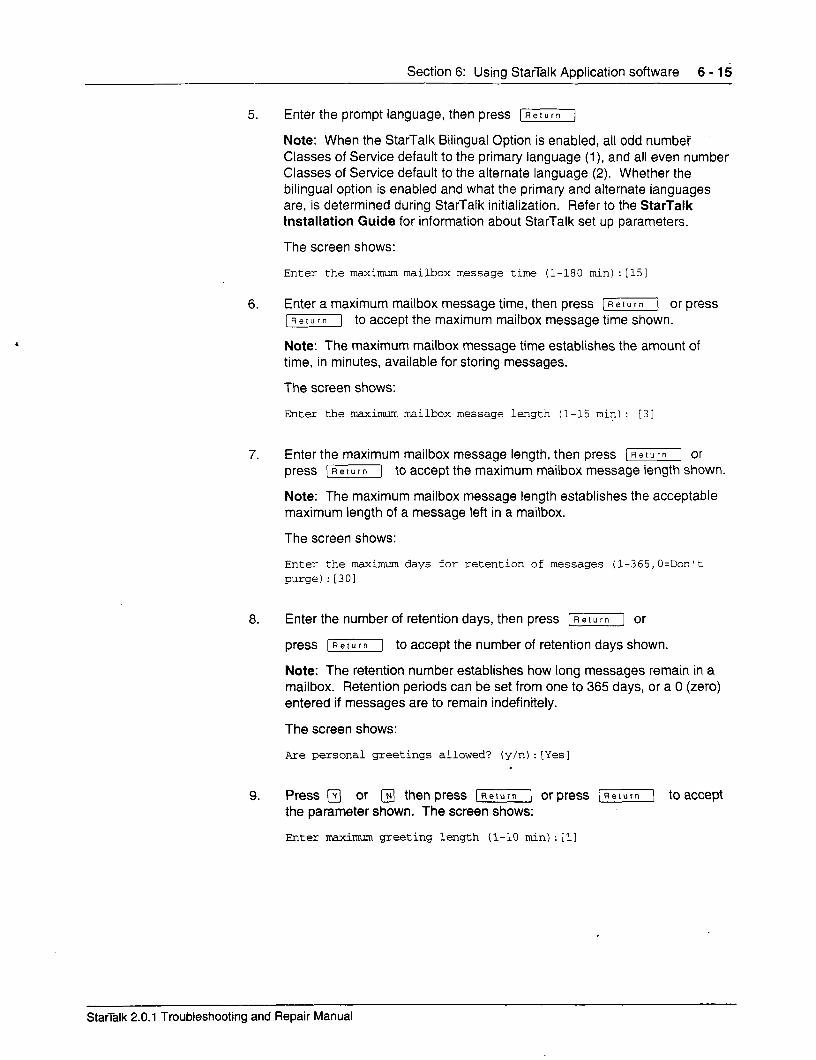
Section 6: Using StarTalk Application software 6 - 1 s
5. Enter the prompt language, then press [XZG-]
Note: When the StarTalk Bilingual Option is enabled, all odd number Classes of Service default to the primary language (l), and all even number Classes of Service default to the alternate language (2). Whether the bilingual option is enabled and what the primary and alternate languages are, is determined during StarTalk initialization. Refer to the StarTalk Installation Guide for information about StarTalk set up parameters.
The screen shows:
Enter the maximum mailbox message time (l-180 min):[15]
6. Enter a maximum mailbox message time, then press (Return] or press [Return] to accept the maximum mailbox message time shown.
Note: The maximum mailbox message time establishes the amount of time, in minutes, available for storing messages.
The screen shows:
Enter the maximum mailbox message length (l-15 min) : [3]
7. Enter the maximum mailbox message length, then press [Return] or press [Relurn) to accept the maximum mailbox message length shown.
Note: The maximum mailbox message length establishes the acceptable maximum length of a message left in a mailbox.
The screen shows:
Enter the maximum days for retention of messages (l-365,0=Don't purge):[301
a. Enter the number of retention days, then press [-J or
press [=I to accept the number of retention days shown.
Note: The retention number establishes how long messages remain in a mailbox. Retention periods can be set from one to 365 days, or a 0 (zero) entered if messages are to remain indefinitely.
The screen shows:
tie personal greetings allowed? (y/n):[Yesl
9. Press m or Q then press (Return] or press [Return] to accept the parameter shown. The screen shows:
Enter maximum greeting length (l-10 min):[l]
StarTalk 2.0.1 Troubleshooting and Repair Manual
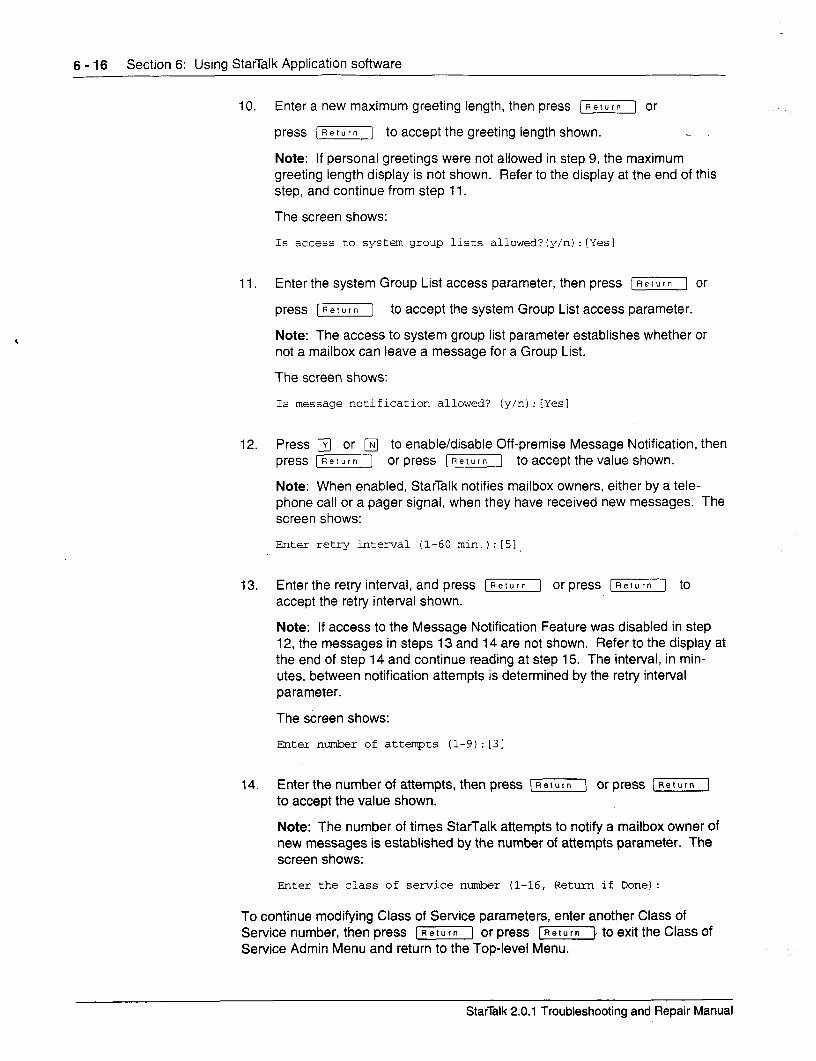
6 - 16 Section 6: Using StarTalk Application software
10. Enter a new maximum greeting length, then press IReturn] or
press [Return] to accept the greeting length shown.
Note: If personal greetings were not allowed in step 9, the maximum greeting length display is not shown. Refer to the display at the end of this step, and continue from step 11.
The screen shows:
IS access to system group lists allowed?(y/n):[Yesl
11. Enter the system Group List access parameter, then press [m] or
press [Return] to accept the system Group List access parameter.
Note: The access to system group list parameter establishes whether or not a mailbox can leave a message for a Group List.
The screen shows:
Is message notification allowed? (y/n):[Yes]
12. Press q or @ to enable/disable Off-premise Message Notification, then press (Return] or press [Re!urn] to accept the value shown.
Note: When enabled, StarTalk notifies mailbox owners, either by a tele- phone call or a pager signal, when they have received new messages. The screen shows:
Enter retry interval (l-60 min.):[51,
13. Enter the retry interval, and press [Return] or press [Return] to accept the retry interval shown.
Note: If access to the Message Notification Feature was disabled in step 12, the messages in steps 13 and 14 are not shown. Refer to the display at the end of step 14 and continue reading at step 15. The interval, in min- utes, between notification attempts is determined by the retry interval parameter.
The screen shows:
Enter number of attempts (l-9):[31
14. Enter the number of attempts, then press (Retutoj or press [Return] to accept the value shown.
Note: The number of times StarTalk attempts to notify a mailbox owner of new messages is established by the number of attempts parameter. The screen shows:
Enter the class of service number (l-16, Return if Done) :
To continue modifying Class of Service parameters, enter another Class of Service number, then press [-I or press 1-1 to exit the Class of Service Admin Menu and return to the Top-level Menu.
StarTalk 2.0.1 Troubleshooting and Repair Manual

Section 6: Using StarTalk Application software 6 - 17
System Admin The System Administration and Configuration Option allows you to access all the
and Configuration administration and configuration task options to adjust the system setup. These
Menu include:
. Enable/disable system
. Restart system
. System date and time
. RS-232 communication parameters
. DTMF delay
. Backup
. Allow/Disallow Multiple System Admin
To access the System Admin and Configuration option, the Top-level Menu must appear on the screen. For instructions about accessing the Top-level Menu, refer to page 6-5. To access System Admin and Configuration Menu Options:
1. Press q (System Admin and Configuration) from the Top-level Menu.
2. Press 1-1
The System Admin and Configuration Menu appears.
System A&in and Configuration
1 Enable/Disable System 2 Restart System 3 System Date and Time 4 RS-232 Communication Parameters 5 MMF Delay 6 Backup 7 Allow/Disallow Multiple System Admin
Enter a choice, ?, space, or ESC:
StarTalk 2.0.1 Troubleshooting and Repair Manual
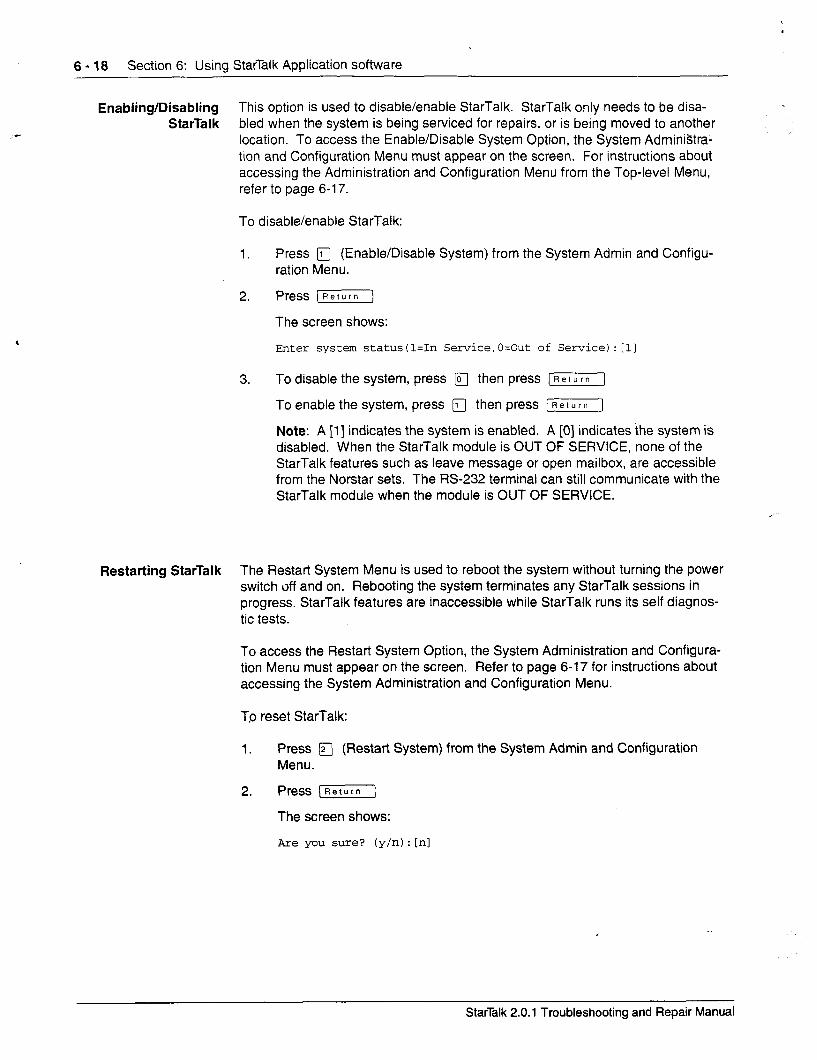
6 - 18 Section 6: Using StarTalk Application software
Enabling/Disabling This option is used to disable/enable StarTalk. StarTalk only needs to be disa- StarTalk bled when the system is being serviced for repairs, or is being moved to another
location. To access the Enable/Disable System Option, the System AdminiStra- tion and Configuration Menu must appear on the screen. For instructions about accessing the Administration and Configuration Menu from the Top-level Menu, refer to page 6-l 7.
To disable/enable StarTalk:
1. Press q (Enable/Disable System) from the System Admin and Configu- ration Menu.
2. Press IReturn]
The screen shows:
Enter system status(l=In Service,O=Out of Service): [1]
3. To disable the system, press Q then press [Refurn]
To enable the system, press q then press [Return]
Note: A [l] indicates the system is enabled. A [0] indicates the system is disabled. When the StarTalk module is OUT OF SERVICE, none of the StarTalk features such as leave message or open mailbox, are accessible from the Norstar sets. The RS-232 terminal can still communicate with the StarTalk module when the module is OUT OF SERVICE.
Restarting StarTalk The Restart System Menu is used to reboot the system without turning the power switch off and on. Rebooting the system terminates any StarTalk sessions in progress. StarTalk features are inaccessible while StarTalk runs its self diagnos- tic tests.
To access the Restart System Option, the System Administration and Configura- tion Menu must appear on the screen. Refer to page 6-17 for instructions about accessing the System Administration and Configuration Menu.
To reset StarTalk:
1. Press m (Restart System) from the System Admin and Configuration Menu.
2. Press (Return]
The screen shows:
Are you sure? (y/n):[n]
StarTalk 2.0.1 Troubleshooting and Repair Manual
Section 6: Using StarTalk Application software 6 - 19
3. To restart the system, press q then press [Aeturn)
or press [Return] to go back to the System Admin and Configuration Menu. The screen shows:
System restarting...
4. After three to five minutes, the screen shows:
Password:
This is the initial password prompt. To continue using the Application software, you must enter the password sy= and access the Top-level Menu. Refer to page 6-5 for instructions about accessing the Top-level Menu.
Setting the System The System Date and Time Option is used to set the StarTalk date and time. Date and Time StarTalk date and time are independent of the Norstar date and time. The
StarTalk date and time are stamped on all received messages, and the user can request this information (called envelope information) while listening to a received message.
To access the System Date and Time Option, the System Administration and Configuration Menu must appear on the screen. Refer to page 6-17 for instruc- tions about accessing the System Administration and Configuration Menu.
To set the date and time:
1. Press a (System Date and Time) from the System Admin and Configura- tion Menu.
2. Press [-I
The screen shows:
Enter current date (mm:dd:yy:):[May 6 19911
3. Enter a new date, then press [Return] or press (Return] to accept the date shown.
Note: The date must be entered as mm:dd:yy. Any single-digit month or day must be preceded by a zero.
The screen shows:
Enter current time (hh:mm,A or hh:nnn,P):[7:09 pm]
StarTalk 2.0.1 Troubleshooting and Repair Manual
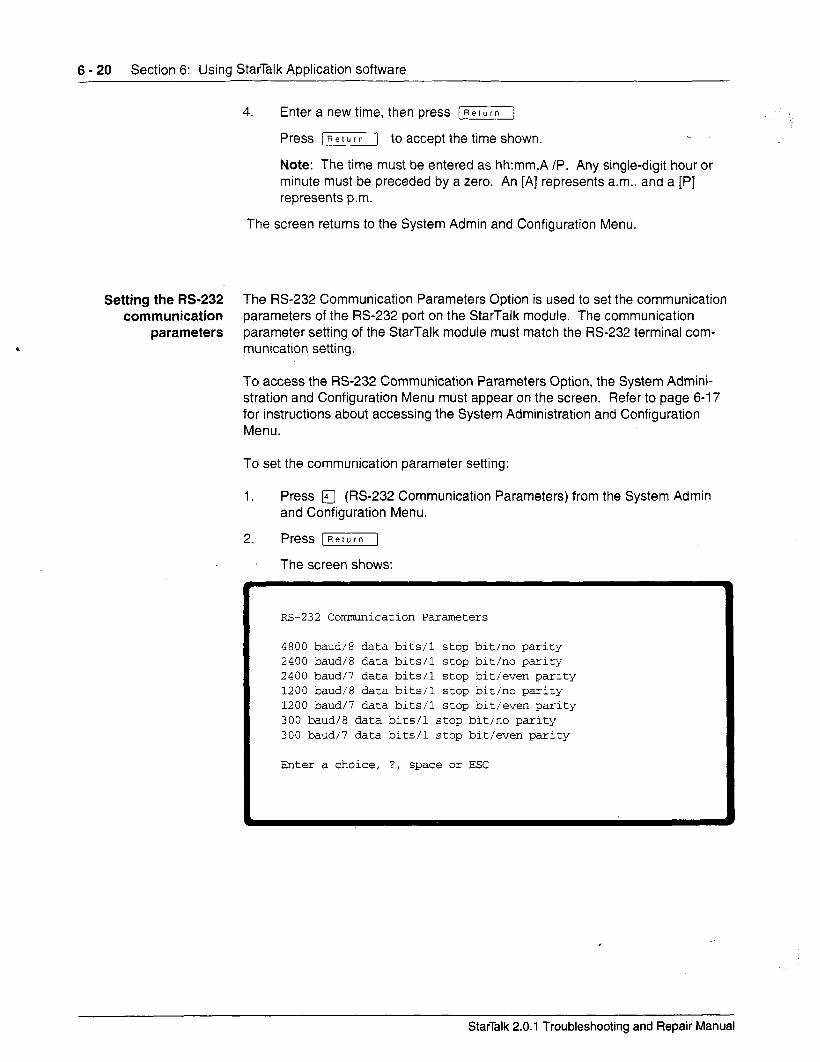
6 - 20 Section 6: Usino StarTalk Application software
4. Enter a new time, then press [Relurn/
Press r-1 to accept the time shown.
Note: The time must be entered as hh:mm,A /P. Any single-digit hour or minute must be preceded by a zero. An [A] represents a.m., and a [P] represents p.m.
The screen returns to the System Admin and Configuration Menu,
Setting the M-232 The RS-232 Communication Parameters Option is used to set the communication communication parameters of the RS-232 port on the StarTalk module. The communication
parameters parameter setting of the StarTalk module must match the RS-232 terminal com- munication setting.
To access the RS-232 Communication Parameters Option, the System Admini- stration and Configuration Menu must appear on the screen. Refer to page 6-l 7 for instructions about accessing the System Administration and Configuration Menu.
To set the communication parameter setting:
1. Press 0 (RS-232 Communication Parameters) from the System Admin and Configuration Menu.
2. Press [Return]
The screen shows:
RS-232 Comunication Parameters
4800 baud/8 data bits/l stop bit/no parity 2400 baud/8 data bits/l stop bit/no parity 2400 baud/7 data bits/l stop bit/even parity 1200 baud/8 data bits/l stop bit/no parity 1200 baud/7 data bits/l stop bit/even parity 300 baud/8 data bits/l stop bit/no parity 300 baud/7 data bits/l stop bit/even parity
Enter a choice, ?, space or ESC
StarTalk 2.0.1 Troubleshooting and Repair Manual

Section 6: Using StarTalk Application software 6 - 21
3. Select the Communication Parameter Option number, and press [W]
The default setting is option number 7.
Note: This procedure resets the communication parameters for St&Talk
only. It has no effect on the FE-232 terminal. If you choose a parameter
setting that is different from the FE-232 terminal, the terminal and StarTalk
will be out of sync. StarTalk messages will no longer appear on the screen,
or will appear garbled until you reset the communication parameters of the
RS-232 terminal.
The screen shows:
Char.,-e your jaud rate and press return.
2. Adjust the terminal communication parameters to match the value you
selected for StarTalk. Refer to the operating manual of the RS-232 terminal
for instructions about changing the communication parameters.
3. Press (Relurn] when you have made the appropriate changes to the
RS-232 terminal parameters. The screen shows:
Shocld this change be made permanent? (y/n):[n]
4. Press m then press (Return] to make the change permanent.
Or
Press @I then press r-1 to make the change temporary.
After pressing [Return] the RS-232 Communication Parameters Menu appears.
To exit from this menu and return to the System Admin and Configuration Menu,
press [Spacebar]
Setting the DTMF The DTMF Delay Option allows you to change the DTMF parameter. For more
delay parameter information on DTMF Delay, refer to Appendix A. The DTMF Delay Menu is
protected by a password that can be obtained from Technical Service personnel
at Northern Telecom. Refer to Appendix A for the phone number and address of
the Technical Service group in your area.
To access the DTMF Delay Option, the System Administration and Configuration
Menu must appear on the screen. Refer to page 6-17 for instructions about
accessing the System Administration and Configuration Menu.
.
StarTaik 2.0.1 Troubleshooting and Repair Manual.
:
6 - 22 Section 6: Using StarTalk Application software
To change the DTMF parameter setting:
1. Press q (DTMF Delay) from the System Admin and Configuration Menu.
2. Press [Relurn]
The screen shows:
Password:
3. Enter the password MAINT then press [-KZX-J
The screen shows:
Enter MT4F delay value (20-60 msec):
4. Enter a valid value between 20 and 60 milliseconds. You do not need to press [Return] to accept the value.
After entering a valid DTMF delay value, the System Admin and Configuration Menu appears on the screen.
Backing up the The Backup Option allows you to copy configuration and user data stored on the Message Storage Message Storage Pack to a backup partition. This data can also be copied to a
Pack floppy disk(s) using the Disk Utilities software.
Backup data includes:
. System operating parameters
. System, user, and Guest mailboxes
. Group Lists
. Subscriber name recordings, greetings, and messages
. Company Greetings
. User Greetings . CCR information
Note: User data does not include RS-232 communication parameters. After you perform a restore, the StarTalk communication parameters are reset to default values.
To access the Backup Option, the System Administration and Configuration Menu must appear on the screen. Refer to page 6-17 for instructions about accessing the System Administration and Configuration Menu.
.
StarTalk 2.0.1 Troubleshooting and Repair Manual
Section 6: Using StarTalk Application software 6 - 23
To complete a backup:
1. Press m (Backup) from the System Admin and Configuration Menu.
2. Press (Return]
The screen shows:
Baclxp proceduze will automatically take all lines out of service. Continue? (y/n) :[n]
3. To proceed with the backup, press m then press [Retvrnj
The screen shows:
Bac?up in progress
A series of dots move across the screen to show that the backup is in progress. After the backup is completed, the System Admin and Configuration Menu ap- pears.
Note: For instructions about making backup copies of user data and restoring it to the Message Storage Pack, refer to Section 8.
Enabling/Disabling The Allow/Disallow Multiple System Admin Option allows you to enable/disable Multiple multiple administration sessions. When Multiple System Admin is allowed,
Administration several Norstar sets can simultaneously administer a single StarTalk module. Access
To access the Multiple System Admin Menu, the System Administration and Configuration Menu must appear on the screen. Refer to page 6-l 7 for instruc- tions about accessing the System Administration and Configuration Menu.
To enable/disable muttiple administration sessions:
1. Press a (Allow/Disallow Multiple System Admin) from the System Admin and Configuration Menu.
2. Press (Return]
The screen shows:
Multiple system a&n is NOT ALLOWED. Password:
.I I
StarTalk 2.0.1 Troubleshooting and Repair Manual
*, .;: ‘. ., .’ ., : ., .‘,. ,..
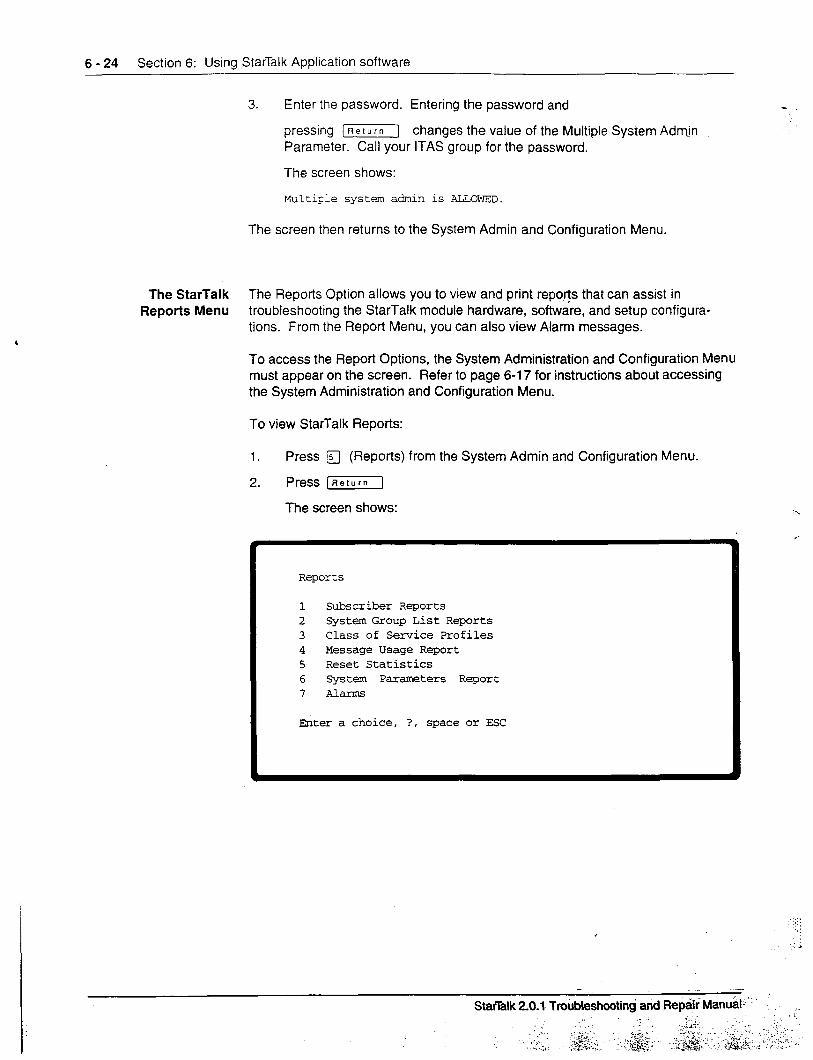
6 - 24 Section 6: Using StarTalk Application software
3. Enter the password. Entering the password and -
pressing (Return] changes the value of the Multiple System Adtin Parameter. Call your ITAS group for the password.
The screen shows:
Multiple system ddmin iS ALLOWED.
The screen then returns to the System Admin and Configuration Menu.
The StarTalk The Reports Option allows you to view and print reports that can assist in Reports Menu troubleshooting the StarTalk module hardware, software, and setup configura-
tions. From the Report Menu, you can also view Alarm messages.
To access the Report Options, the System Administration and Configuration Menu must appear on the screen. Refer to page 6-17 for instructions about accessing the System Administration and Configuration Menu.
To view StarTalk Reports:
1.
2.
Press a (Reports) from the System Admin and Configuration Menu.
Press [W]
The screen shows:
Reports
1 Subscriber Reports 2 System Group List Reports 3 Class of Service Profiles 4 Message Usage Report 5 Reset Statistics 6 System Parameters Report 7 Alarms
Enter a choice, ?, space or ESC
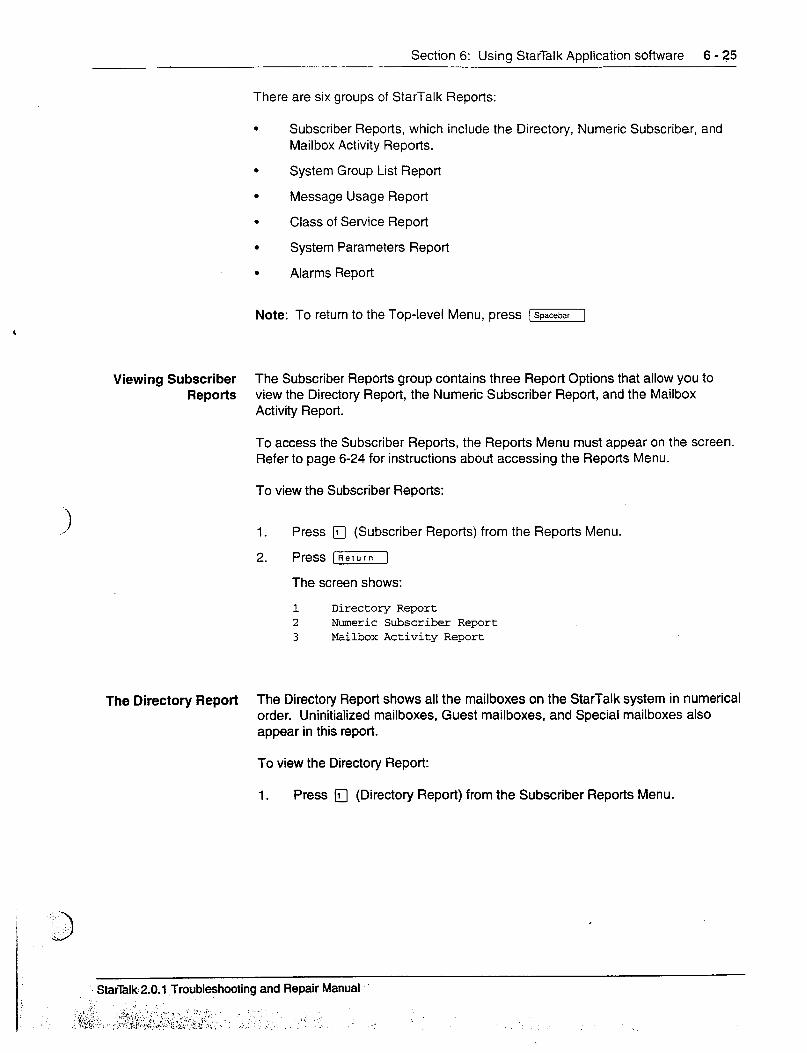
Section 6: Using StarTalk Application software 6 - 25
There are six groups of StarTalk Reports:
. Subscriber Reports, which include the Directory, Numeric Subscriber, and Mailbox Activity Reports.
. System Group List Report
. Message Usage Report
. Class of Service Report
. System Parameters Report
. Alarms Report
Note: To return to the Top-level Menu, press (Spacebar]
Viewing Subscriber The Subscriber Reports group contains three Report Options that allow you to Reports view the Directory Report, the Numeric Subscriber Report, and the Mailbox
Activity Report.
To access the Subscriber Reports, the Reports Menu must appear on the screen. Refer to page 6-24 for instructions about accessing the Reports Menu.
To view the Subscriber Reports:
1. Press q (Subscriber Reports) from the Reports Menu.
2. Press [Return]
The screen shows:
1 Directory Report 2 Numeric Subscriber Report 3 Mailbox Activity Report
The Directory Report The Directory Report shows all the mailboxes on the StarTalk system in numerical order. Uninitialized mailboxes, Guest mailboxes, and Special mailboxes also appear in this report.
To view the Directory Report:
1. Press 0 (Directory Report) from the Subscriber Reports Menu.
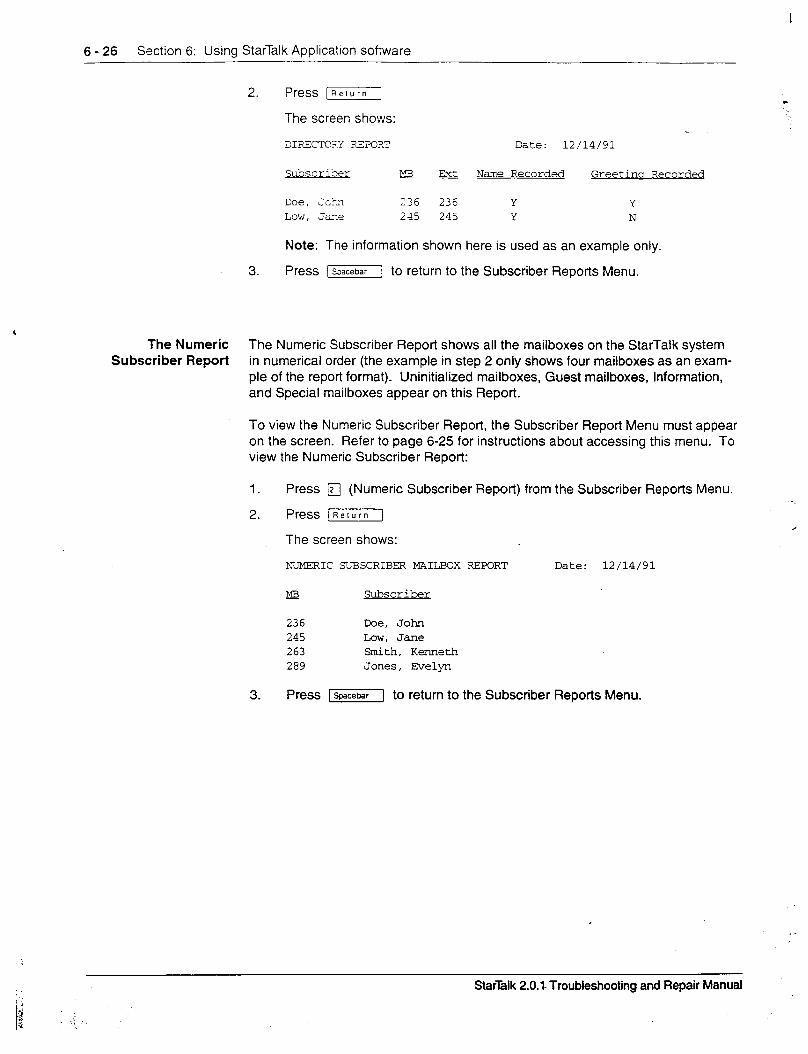
6 - 26 Section 6: Using StarTalk Application software
2. Press jRetuln
The screen shows:
Date: 12/14/91
Subscrikr Es Ex= Name Recorded Greetinu Recorded
Doe, Jc5 Low, JEe
236 236 Y Y 245 245 Y N
Note: The information shown here is used as an example only.
3. Press j to return to the Subscriber Reports Menu.
The Numeric The Numeric Subscriber Report shows all the mailboxes on the StarTalk system Subscriber Report in numerical order (the example in step 2 only shows four mailboxes as an exam-
ple of the report format). Uninitialized mailboxes, Guest mailboxes, Information, and Special mailboxes appear on this Report.
To view the Numeric Subscriber Report, the Subscriber Report Menu must appear on the screen. Refer to page 6-25 for instructions about accessing this menu. To view the Numeric Subscriber Report:
1. Press q (Numeric Subscriber Report) from the Subscriber Reports Menu. -_
2. Press jRerurn] ,
The screen shows:
h-IC SUBSCRIBER MAILBOX REPORT Date: 12/14/91
MB Subscriber
236 Doe, John 245 Low, Jane 263 Smith, Kenneth 289 Jones, Evelyn
3. Press [Spacebar] to return to the Subscriber Reports Menu.
Star’lk 2.0.1. Troubleshooting and Repair Manual
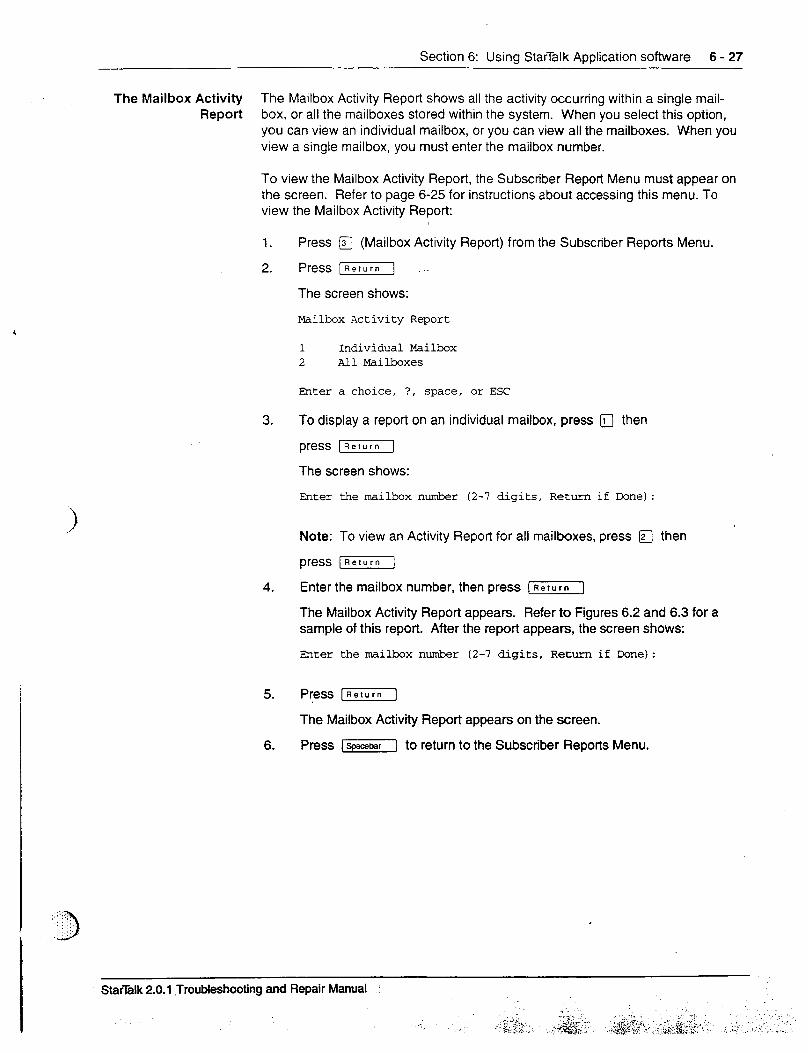
Section 6: Usinq StarTalk Aoolication software 6 - 27
The Mailbox Activity The Mailbox Activity Report shows all the activity occurring within a single mail- Report box, or all the mailboxes stored within the system. When you select this option,
you can view an individual mailbox, or you can view all the mailboxes. When you view a single mailbox, you must enter the mailbox number.
To view the Mailbox Activity Report, the Subscriber Report Menu must appear on the screen. Refer to page 6-25 for instructions about accessing this menu. To view the Mailbox Activity Report:
1.
2.
Press E (Mailbox Activity Report) from the Subscriber Reports Menu.
Press [Return]
The screen shows:
Mailbox Activity Report
1 Individual Mailbox 2 All Mailboxes
EBter a choice, ?, space, or ESC
3. To display a report on an individual mailbox, press 0 then
press [m]
The screen shows:
Enter the mailbox number (2-7 digits, Return if Done) :
4.
Note: To view an Activity Report for all mailboxes, press q then
press [Return]
Enter the mailbox number, then press (Return]
The Mailbox Activity Report appears. Refer to Figures 6.2 and 6.3 for a sample of this report. After the report appears, the screen shows:
mter the mailbox number (2-7 digits, Return if Done):
5. Press [Return]
The Mailbox Activity Report appears on the screen.
6. Press [Spacebar] to return to the Subscriber Reports Menu.
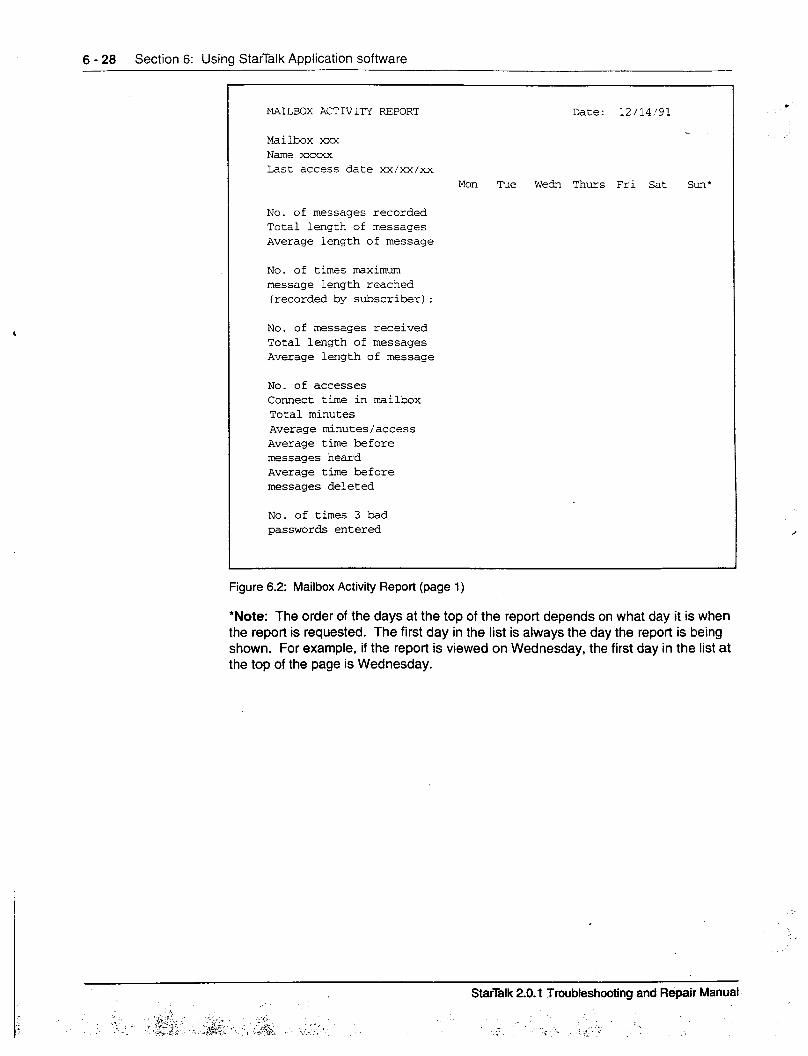
6 - 28 Section 6: Using StarTalk Application software
MAILBOX ACTIVITY REPORT Date: 12/14,/91
Mailbox xxx Name xxxxx Last access date xx/xx/xx
Mon Tue Wedn Thurs Fri Sat SIXI*
No. of messages recorded Total length of messages Average length of message
No. of times maximum message length reached (recorded by subscriber):
No. of messages received Total length of messages Average length of message
No. of accesses Connect time in mailbox Total minutes Average minutes/access Average time before messages heard Average time before messages deleted
No. of times 3 bad passwords entered
Figure 6.2: Mailbox Activity Report (page 1)
*Note: The order of the days at the top of the report depends on what day it is when the report is requested. The first day in the list is always the day the report is being shown. For example, if the report is viewed on Wednesday, the first day in the list at the top of the page is Wednesday.
c
,
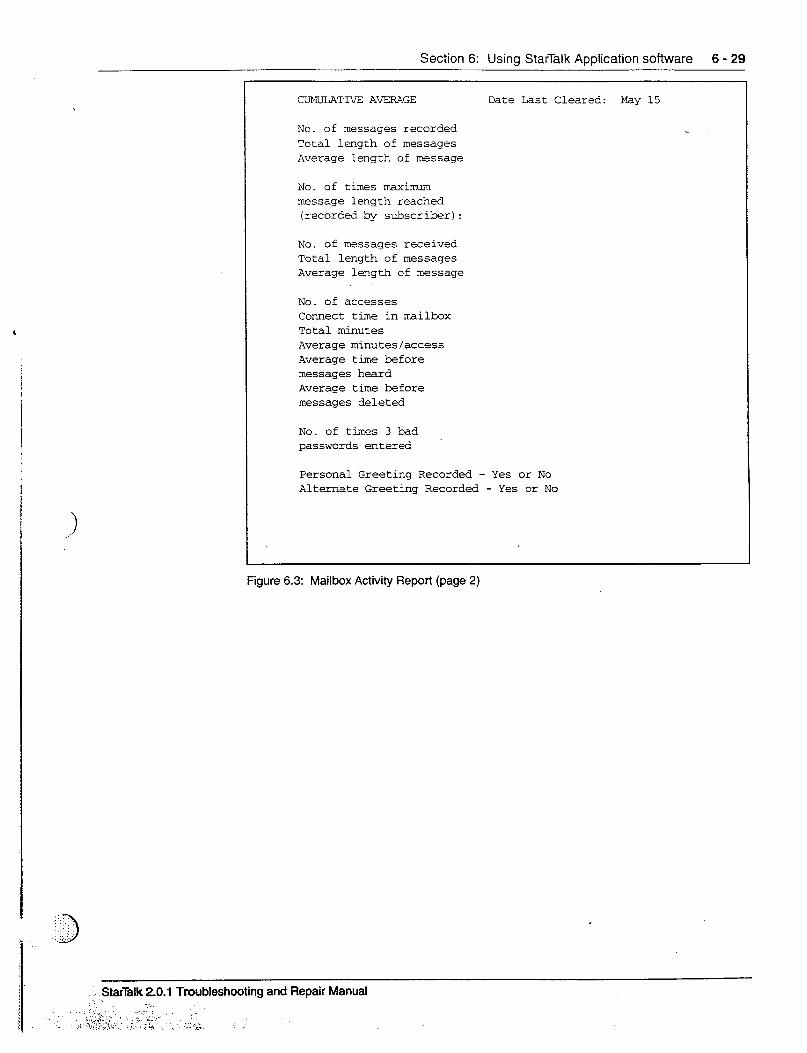
Section 6: Using StarTalk Application software 6 - 29
CUMULATrvE AVERAGE Date Last Cleared: May 15
No. of messages recorded Total length of messages Average length of message
No. of times maximum message length reached (recorded by subscriber):
No. of messages received Total length of messages Average length of message
:
No. of accesses Connect time in mailbox Total minutes Average minutes/access Average time before messages heard Average time before messages deleted
No. of times 3 bad passwords entered
Personal Greeting Recorded - Yes or No Alternate Greeting Recorded - Yes or No
Figure 6.3: Mailbox Activity Report (page 2)

6 - 30 Section 6: Using StarTalk Application software
The System Group The System Group List report shows the Group List names and numbers, the .- List Report mailbox numbers included in each Group List, and mailbox owner names.
,
To view the System Group List Report, the Subscriber Report Menu must appear on the screen. Refer to page 6-25 for instructions about accessing this menu. To view the System Group List Report:
1.
2.
Press @ (System Group List Report) from the Reports Menu.
Press [Return]
The screen shows:
SYSTEM GX3UP LIS: REF0R7 Date: 12/14/91
No Na.IE MB MB Nm
901 MKTGDEPT 606 Smith, T 609 Miller, J 610 Johnson, B
3. Press [Spacebar] to return to the Subscriber Reports Menu.
The Class of Service The Class of Service Profiles Option is used to view parameter settings for each Profiles Report of the 16 Classes of Service.
To view the Class of Service Report, the Report Menu must appear on the screen. ’ Refer to page 6-24 for instructions about accessing this menu. To view the Class of Service Profiles Report:
1. Press @ (Class of Service Profiles) from the Reports Menu.
2. Press (Return]
The report begins printing.
3. Press Spacebar] to return to the Reports Menu.
StarWk 2.0.1 Troubleshooting and Repair Manuabrc. :I 2.: : I. -2 .- . . . _. : ,1-, / ,.;,, ,.., ,.;c ., ..:, L_ ,: :.-
: ;” ::‘” .:, ,. I,. ,,$ ‘.: .Q\ ;, .- ).;;A& . . . -. ..,. >:, /. : y&;:

Section 6: Using StarTalk Arxdication software 6 - 31
The Message Usage The Message Usage Report shows the available storage space, in minutes, Report available on the StarTalk system.
To view the Message Usage Report, the Report menu must appear on the screen. Refer to page 6-24 for instructions about accessing this menu. To view the Message Usage Report:
1. Press a (Message Usage Report) from the Reports Menu.
2. Press [Return]
The screen shows:
MESSAGE USAGE REPORT Date: 12/14/91
Minutes
Current storage available 143
3. Press [?GEGF] to return to the Reports Menu.
1> I
StarGlk 2.0.1 Troubleshooting and Repair Manual . . _I . ..” . . . . . 1 ::
-, ;., ;,. ..;.:i .r,. :,>: ,. . . . ::.c -q; T ;;i-;:‘- :- .1;.3.< I, -. ‘,.. : .;:,
. 1. .&I... _.,.._ :, ..:, ,- : .-CA. : :’ ; :’ . . :I . ._ ; ‘2 ‘. ~ , ,,,’ ‘. ,i..l.,? ,,,,. I, :,, i“,.i..‘,. ,,,.+xJ : .Tl.’ :: ,~
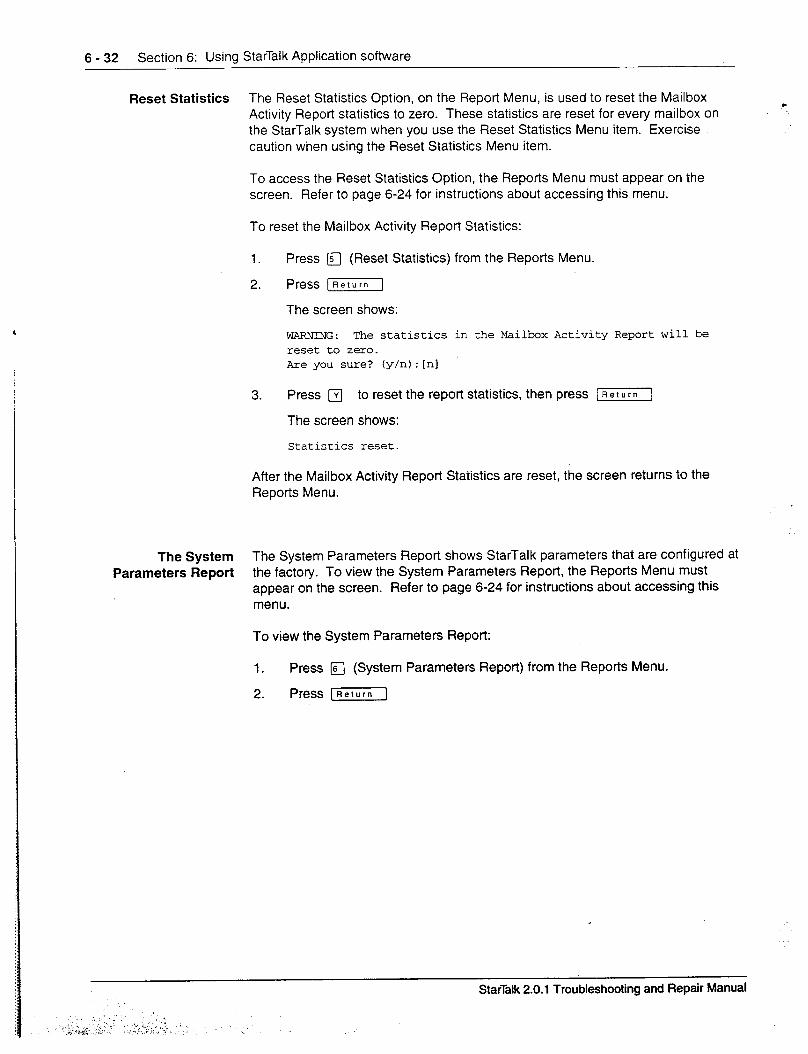
6 - 32 Section 6: Using StarTalk Application software
Reset Statistics The Reset Statistics Option, on the Report Menu, is used to reset the Mailbox c Activity Report statistics to zero. These statistics are reset for every mailbox on the StarTalk system when you use the Reset Statistics Menu item. Exercise caution when using the Reset Statistics Menu item.
To access the Reset Statistics Option, the Reports Menu must appear on the screen. Refer to page 6-24 for instructions about accessing this menu.
To reset the Mailbox Activity Report Statistics:
1. Press a (Reset Statistics) from the Reports Menu.
2. Press r-1
The screen shows:
WARNING: The statistics in the Mailbox Activity Report will be reset to zero. Are you sure? (y/n):[nI
3. Press FJ to reset the report statistics, then press [Relurn]
The screen shows:
Statistics reset.
After the Mailbox Activity Report Statistics are reset, the screen returns to the Reports Menu.
The System The System Parameters Report shows StarTalk parameters that are configured at Parameters Report the factory. To view the System Parameters Report, the Reports Menu must
appear on the screen. Refer to page 6-24 for instructions about accessing this menu.
To view the System Parameters Report:
1. Press m (System Parameters Report) from the Reports Menu.
2. Press [Refurn]
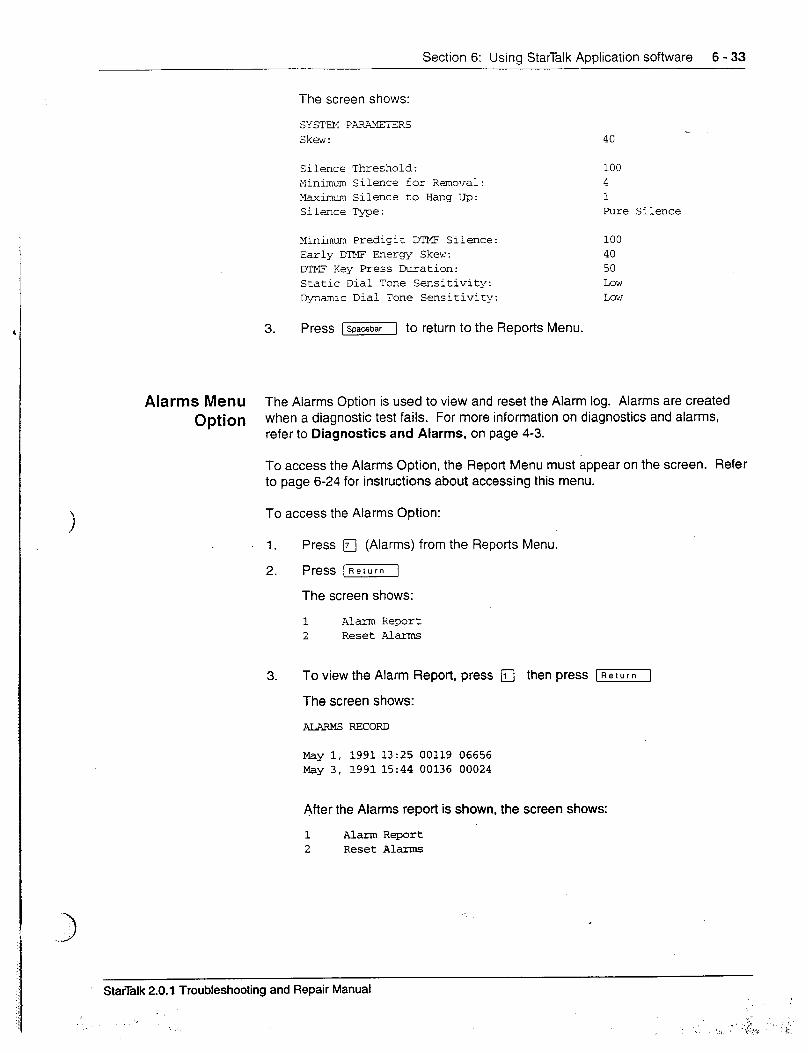
Section 6: Using StarTalk Application software 6 - 33
3.
The screen shows:
SYSTEM ?AR?JEERS Skew:
Silence Threshold: Minimum Silence for Removal: Maximum Silence to Hang Up: Silence Type:
Minimum Predigit DTMF Silence: early MW? Energy Skeyti.-: M'MF Key Press Duration: Static Dial Tone Sensitivity: Dynamic Dial Tone Sensitivity:
Press lSpacebar] to return to the Reports Menu.
40
I
Pure Silence
100 40 50 LOW LOW
Alarms Menu The Alarms Option is used to view and reset the Alarm log. Alarms are created
Option when a diagnostic test fails. For more information on diagnostics and alarms, refer to Diagnostics and Alarms, on page 4-3.
To access the Alarms Option, the Report Menu must appear on the screen. Refer to page 6-24 for instructions about accessing this menu.
To access the Alarms Option:
1. Press q (Alarms) from the Reports Menu.
2. Press [Relurn]
The screen shows:
1 Alarm Report 2 Reset Alarms
3. To view the Alarm Report, press q then press (Return]
The screen shows:
ALARMS RECORD
May 1, 199113:25 00119 06656 May 3, 199115:44 00136 00024
After the Alarms report is shown, the screen shows:
1 Alarm Report 2 Reset Alarms
.
StarTalk 2.0.1 Troubleshooting and Repair Manual
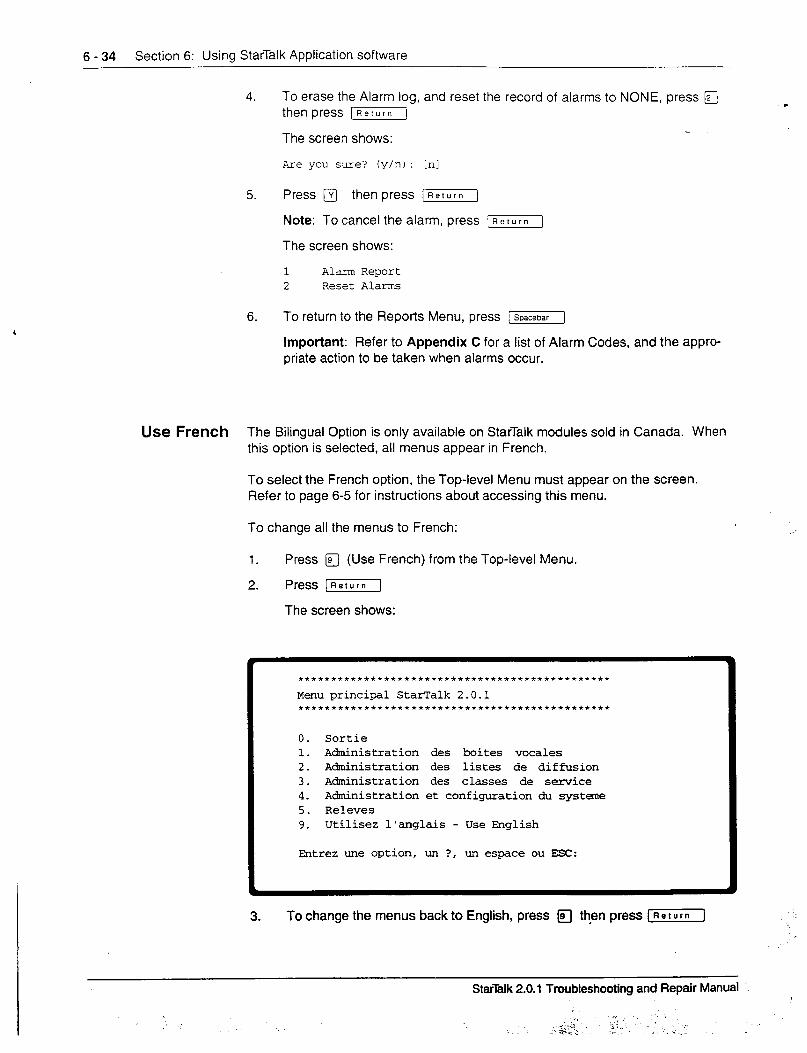
6 - 34 Section 6: Using StarTalk Application software
4. To erase the Alarm log, and reset the record of alarms to NONE, press q then press (Return
c
The screen shows:
Are you sure? (y/n): [nl
5. Press q then press [Rerurn)
Note: To cancel the alarm, press ;Return]
The screen shows:
1 A1a.m Report 2 Reset Alarms
6. To return to the Reports Menu, press iSpacebar]
Important: Refer to Appendix C for a list of Alarm Codes, and the appro- priate action to be taken when alarms occur.
Use French The Bilingual Option is only available on StarTalk modules sold in Canada. When this option is selected, all menus appear in French.
To select the French option, the Top-level Menu must appear on the screen. Refer to page 6-5 for instructions about accessing this menu.
To change all the menus to French:
1.
2.
Press q (Use French) from the Top-level Menu.
Press [Return]
The screen shows:
0. Sortie 1. Administration des boites vocales 2. Administration des listes de diffusion 3. A&ninistration des classes de service 4. Administration et configuration du systeme 5. Releves 9. Utilisez l'anglais - Use English
Entrez une option, un ?, un espace ou ESC:
3. To change the menus back to English, press q then press [ReturnI
StarTalk 2.0.1 Troubleshooting and Repair Manual
Using StarTalk Disk Utilities software 7 ~ntl’OdUCtiOfl The StarTalk Disk Utilities software allows you to access StarTalk maintenance
tasks and operating software. This program must be loaded onto the Message Storage Pack from a floppy disk.
This section describes the StarTalk Disk Utilities software, and shows you how to:
. load the Disk Utilities software from a floppy disk
. access the menus
. access the sub menus
. load the operating software from a floppy disk to the Message Storage Pack
About the Disk The options contained within the Disk Utilities software allow you to copy pro-
Utilities grams from the floppy disk to the StarTalk Message Storage Pack, or from the StarTalk Message Storage Pack to a floppy disk, set the date and time, and reboot
software the system.
Using this software, you can:
. format the StarTalk Message Storage Pack
. copy, label, and format a floppy disk
. copy the operating software, such as the Kernel software . copy voice prompts to floppy disk . backup and restore the StarTalk Message Storage Pack . set the system date and time
The Disk Utilities software is needed to perform troubleshooting tasks involving backup and restore procedures when replacing a Message Storage Pack. The instructions given in this section, show you how to access options from the Disk Utilities Main Menu. Ensure you carefully follow the instructions shown on the screen.
Important: Refer to Section 6 for instructions about moving around a screen, exiting the software menus, using the keyboard, and selecting options from . menus.
I _’ StarTalk 2.0.1 Troubleshooting and Repair Manual 1.
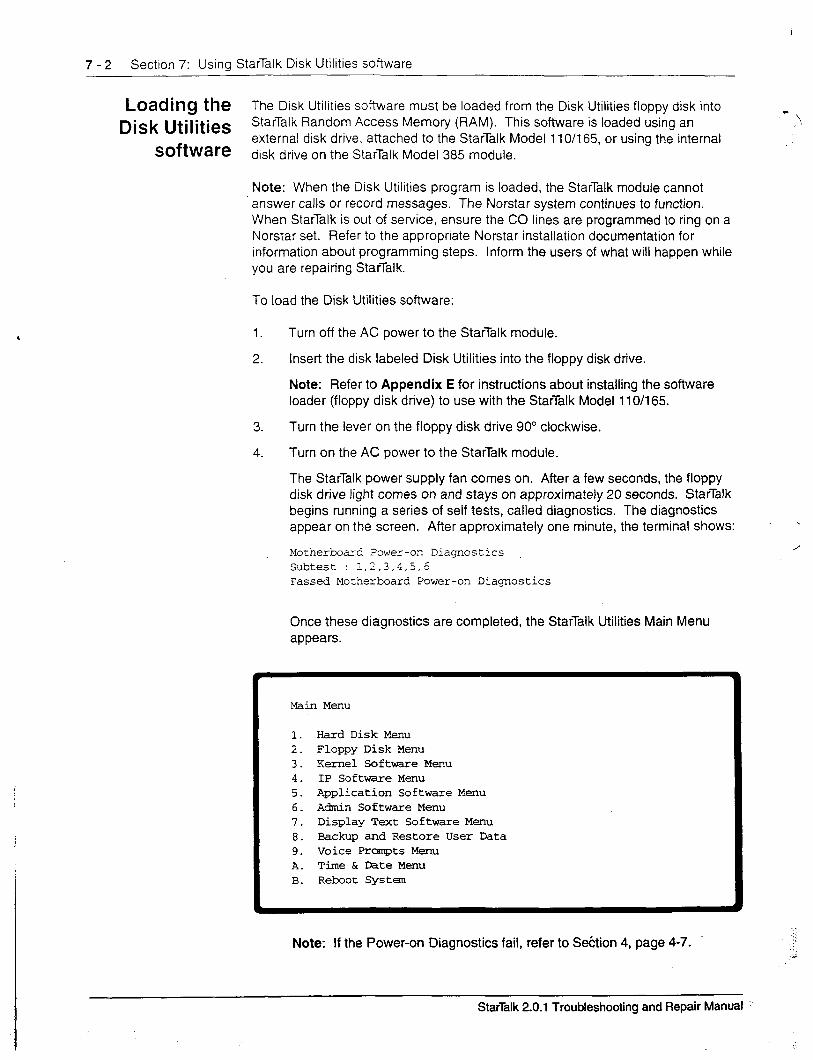
7 - 2 Section 7: Using StarTalk Disk Utilities software
Loading the The Disk Utilities software must be loaded from the Disk Utilities floppy disk into
Disk Utilities StarTalk Random Access Memory (RAM). This software is loaded using an
software external disk drive, attached to the StarTalk Model 11 O/l 65, or using the internal disk drive on the StarTalk Model 385 module.
Note: When the Disk Utilities program is loaded, the StarTalk module cannot answer calls or record messages. The Norstar system continues to function. When StarTalk is out of service, ensure the CO lines are programmed to ring on a Norstar set. Refer to the appropriate Norstar installation documentation for information about programming steps. Inform the users of what will happen while you are repairing StarTalk.
To load the Disk Utilities software:
1.
2.
3.
4.
Turn off the AC power to the StarTalk module.
insert the disk labeled Disk Utilities into the floppy disk drive.
Note: Refer to Appendix E for instructions about installing the software loader (floppy disk drive) to use with the StarTalk Model 11 O/l 65.
Turn the lever on the floppy disk drive 90” clockwise.
Turn on the AC power to the StarTalk module.
The StarTalk power supply fan comes on. After a few seconds, the floppy disk drive light comes on and stays on approximately 20 seconds. StarTalk begins running a series of self tests, called diagnostics. The diagnostics appear on the screen. After approximately one minute, the terminal shows: ’ ’
Motherboazd lower-or Diagr.ostics Subtest : 1,2,3.4,5,5 Passed Moz‘nerboard Power-on Diagnostics
Once these diagnostics are completed, the StarTalk Utilities Main Menu appears.
MainMenu
1. Hard Disk Menu 2. Floppy Disk Menu 3. Kernel SoftwareMenu 4. IP Software Menu 5. Application Software Menu 6. Admin Software Menu 7. Display Text Software Menu 8. Backup and Restore User Data 9. Voice Prompts Menu A. Time & DateMenu B. Reboot System
Note: If the Power-on Diagnostics fail, refer to Sektion 4, page 4-7.
/
j
:‘:T
;: ,:: j
StarTalk 2.0.1 Troubleshooting and Repair Manual ’
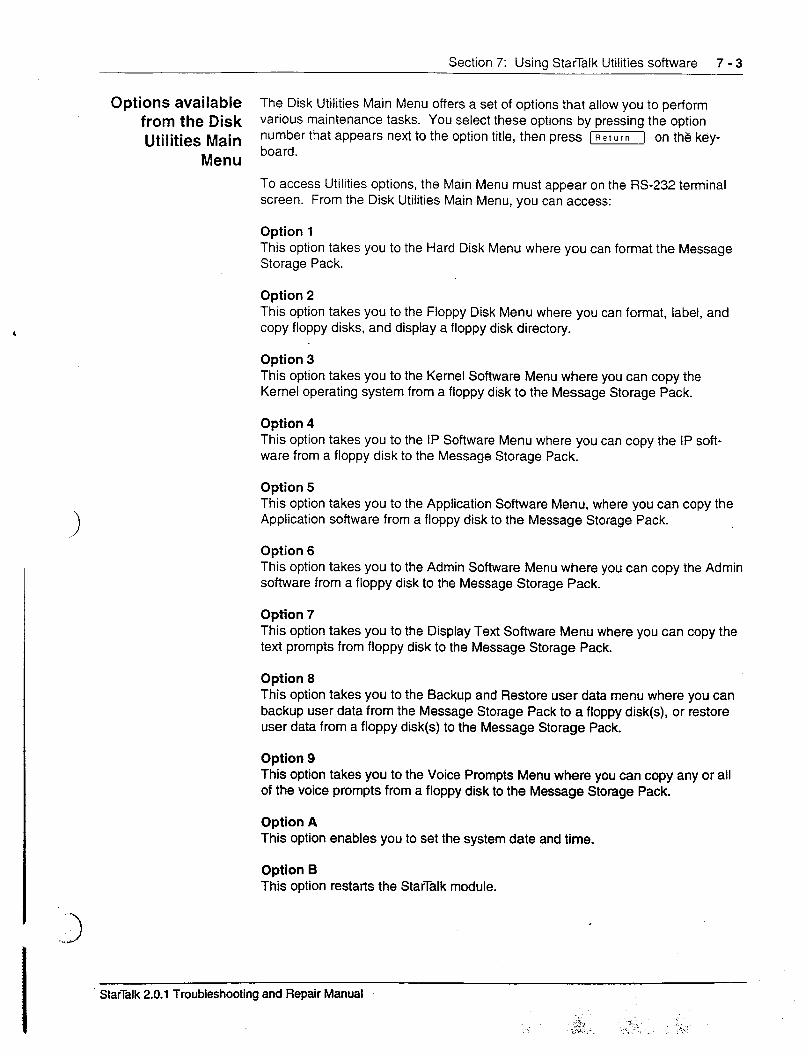
Section 7: Using StarTalk Utilities software 7 - 3
Options available The Disk Utilities Main Menu offers a set of options that allow you to perform
from the Disk various maintenance tasks. You select these options by pressing the option
Utilities Main number that appears next to the option title, then press 1-1 on the key-
Menu board’ To access Utilities options, the Main Menu must appear on the RS-232 terminal screen. From the Disk Utilities Main Menu, you can access:
Option 1 This option takes you to the Hard Disk Menu where you can format the Message Storage Pack.
Option 2 This option takes you to the Floppy Disk Menu where you can format, label, and copy floppy disks, and display a floppy disk directory.
Option 3 This option takes you to the Kernel Software Menu where you can copy the Kernel operating system from a floppy disk to the Message Storage Pack.
Option 4 This option takes you to the IP Software Menu where you can copy the IP soft- ware from a floppy disk to the Message Storage Pack.
Option 5 This option takes you to the Application Software Menu, where you can copy the Application software from a floppy disk to the Message Storage Pack.
Option 6 This option takes you to the Admin Software Menu where you can copy the Admin software from a floppy disk to the Message Storage Pack.
Option 7 This option takes you to the Display Text Software Menu where you can copy the text prompts from floppy disk to the Message Storage Pack.
Option 8 This option takes you to the Backup and Restore user data menu where you can backup user data from the Message Storage Pack to a floppy disk(s), or restore user data from a floppy disk(s) to the Message Storage Pack.
Option 9 This option takes you to the Voice Prompts Menu where you can copy any or all of the voice prompts from a floppy disk to the Message Storage Pack.
Option A This option enables you to set the system date and time.
Option B This option restarts the StarTalk module.
StarTalk 2.0.1 Troubleshooting and Repair Manual
7 - 4 Section 7: Using StarTalk Disk Utilities software
Formatting the The Hard Disk Menu Option allows you to format the Message Storage Pack on Message Storage the StarTalk module. Formatting the Message Storage Pack erases all operating
Pack: The Hard Disk software, user data, messages, greetings, and mailboxes stored in the Message Menu Option Storage Pack. Use this option with caution, once the Message Storage Pack is
formatted you cannot retrieve information.
v Caution: Formatting the Message Storage Pack erases all the StarTalk information.
To format the StarTalk Message Storage Pack, the Disk Utilities Main Menu must appear on the screen. Refer to page 7-2 for instructions about loading the soft- ware, and accessing the Main Menu.
To format the StarTalk Message Storage Pack:
1.
2.
Press a (Hard Disk Menu) from the Disk Utilities Main Menu.
Press [Rerurn]
The screen shows:
Fomt SCSI Hard Disk (Y = Yes or SPACE & PEJXPJJ to Cancel?)
3. Press I-YJ then press (Relurn)
The screen shows:
Save Baud Rate?
4. Press q or q then press [Return]
The screen shows a message stating the Message Storage Pack is being initial- ized. Once formatting is complete, you are returned to the Disk Utilities Main Menu.
J
,
StarTalk 2.0.1 Troubleshooting and Repair Mantial
Section 7: Using StarTalk Utilities software 7 - 5
The Floppy Disk Menu The Floppy Disk Menu Option allows you to: Option
. format and initialize a floppy disk
. label a floppy disk
. display a floppy disk directory
. copy a floppy disk
Formatting a floppy disk prepares the disk so that StarTalk can read and write information onto it. You cannot use any other computer to format disks for StarTalk. You must format disks if you are making copies of the StarTalk software.
v Caution: Formatting a floppy disk erases all the information stored on the disk. Ensure you do not format a StarTalk software disk.
Formatting a To format a floppy disk, the Disk Utilities Main Menu must appear on the screen. floppy disk Refer to page 7-2 for instructions about accessing this menu. To format a floppy
disk:
1. Press a (Floppy Disk Menu) from the Disk Utilities vain Menu.
2. Press [Return]
The screen shows:
Floppy Disk Menu
1. Formar, / Initalize Zloppy Disk 2. Label Zloppy 3isk 3. Display Floppy Disk Directory 4. Copy a Floppy Disk SPACE & PEN-RN for previous menu
Selection:
3. Press a then press [Returnj
The formatting process begins. During the formatting process, the disk is auto- matically initialized to receive StarTalk software and configuration information.
7 - 6 Section 7: Using StarTalk Disk Utilities software
Labeling a The Label Floppy Disk Option allows you to put an electronic label on a floppy floppy disk disk. The label name is shown when you select Option 3 (Display Floppy Disk
Directory). You should always electronically label a disk, in addition to puffing on a paper label. Should the paper label on a disk peel off or become unreadable, you can determine what kind of disk it is (application, voice prompts, and so on) by checking the electronic label using the Display Floppy Disk Directory Option.
To label a floppy disk, the Disk Utilities Main Menu must appear on the screen. Refer to page 7-2 for instructions about accessing this menu. To format a floppy disk:
1. Press q (Floppy Disk Menu) from the Disk Utilities Main Menu.
2. Press (Relurn)
The screen shows:
Floppy Disk Menu
1. Format / Initialize Floppy Disk 2. Label Floppy Disk 3. Display Floppy Disk Directory 4. Copy a Floppy Disk SPACE & RETURN for previous menu
Selection:
3. Press a then press [Rerurn)
The screen shows:
Enter Label Name or SPACE & RETURN to Cancel
4. Enter the name of the floppy disk, then press [Return1
Viewing Directory The Display Floppy Disk Directory Option shows the electronic label of the floppy Information Option: disk, the names of the files on the disk, and information about these files. For The Display Floppy voice prompt disks, it gives the ID number of the prompts on the disk, as well as
Disk Directory Option the starting and ending prompt ID numbers.
To view the disk directory information, the Floppy Disk Menu must appear on the screen. Refer to page 7-2 for instructions about accessing this menu. To view the disk directory:
1. Press a (Display Floppy Disk Directory) from the Floppy Disk Menu.
+- StarTalk 2.0.1 Troubleshooting and Repair Manual .a::
Section 7: Using StarTalk Utilities software 7 - 9
The Kernel Software Using the Kernel Software Menu Option, you can: Menu Option
. copy Kernel software from the Message Storage Pack to floppy disk
. copy Kernel software from floppy Disk to the Message Storage Pack
. delete Kernel software file from floppy disk
Option 1 This option copies (backs up) the Kernel software on the Message Storage Pack to a floppy disk. Backups of the software should be made from the original floppy disk onto another floppy.
Option 2 This option allows you to copy the Kernel software from a floppy disk onto the StarTalk Message Storage Pack.
Option 3 This option deletes the Kernel software from the floppy disk.
v Caution: Do not use this option.
To use the Kernel Software Menu Options, you must first access the Disk Utilities Main Menu. Refer to page 7-2 for instructions about accessing this menu.
To access the Kernel Software Menu Options:
1. Press q (Kernel Software Menu) from the Disk Utilities Main Menu.
2. Press [ReturnJ
The screen shows:
Kernel Software Menu
1. Copy Kernel Software from Hard Disk to Floppy Disk 2. Copy Kernel Software from Floppy Disk to Hard Disk 3. Delete Kernel Software File from Floppy Disk SPACE & FZTURN for previous menu
Selection:
3. Select the Kernel Software Option, then press [Return]
Note: Follow the instructions as they appear on the screen.
StarTalk 2.0.1 Troubleshooting and Repair Manual
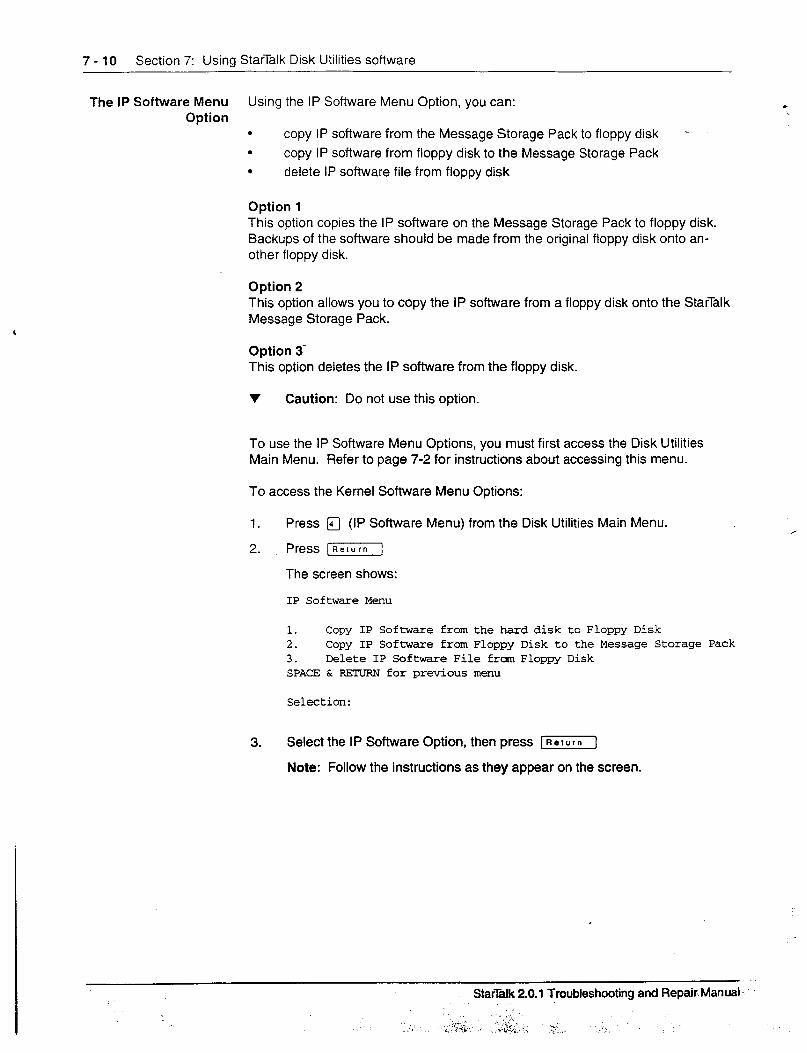
7 - 10 Section 7: Using StarTalk Disk Utilities software
The IP Software Menu Using the IP Software Menu Option, you can: Option
. copy IP software from the Message Storage Pack to floppy disk -
. copy IP software from floppy disk to the Message Storage Pack
. delete IP software file from floppy disk
Option 1 This option copies the IP software on the Message Storage Pack to floppy disk. Backups of the software should be made from the original floppy disk onto an- other floppy disk.
Option 2 This option allows you to copy the IP software from a floppy disk onto the StarTalk Message Storage Pack.
Option 3- This option deletes the IP software from the floppy disk.
v Caution: Do not use this option.
To use the IP Software Menu Options, you must first access the Disk Utilities Main Menu. Refer to page 7-2 for instructions about accessing this menu.
To access the Kernel Software Menu Options:
1. Press q (IP Software Menu) from the Disk Utilities Main Menu. / 2. Press [W]
The screen shows:
IP Software Menu
1. Copy IP Software from the hard disk to Floppy Disk 2. Copy IP Software from Floppy Disk to the Message Storage Pack 3. Delete IP Software File frcan Floppy Disk SPACE & FEKJRN for previous menu
Selection:
3. Select the IP Software Option, then press (Return]
Note: Follow the instructions as they appear on the screen.
StarBlk 2.0.1 Troubleshooting and Repair Manual.
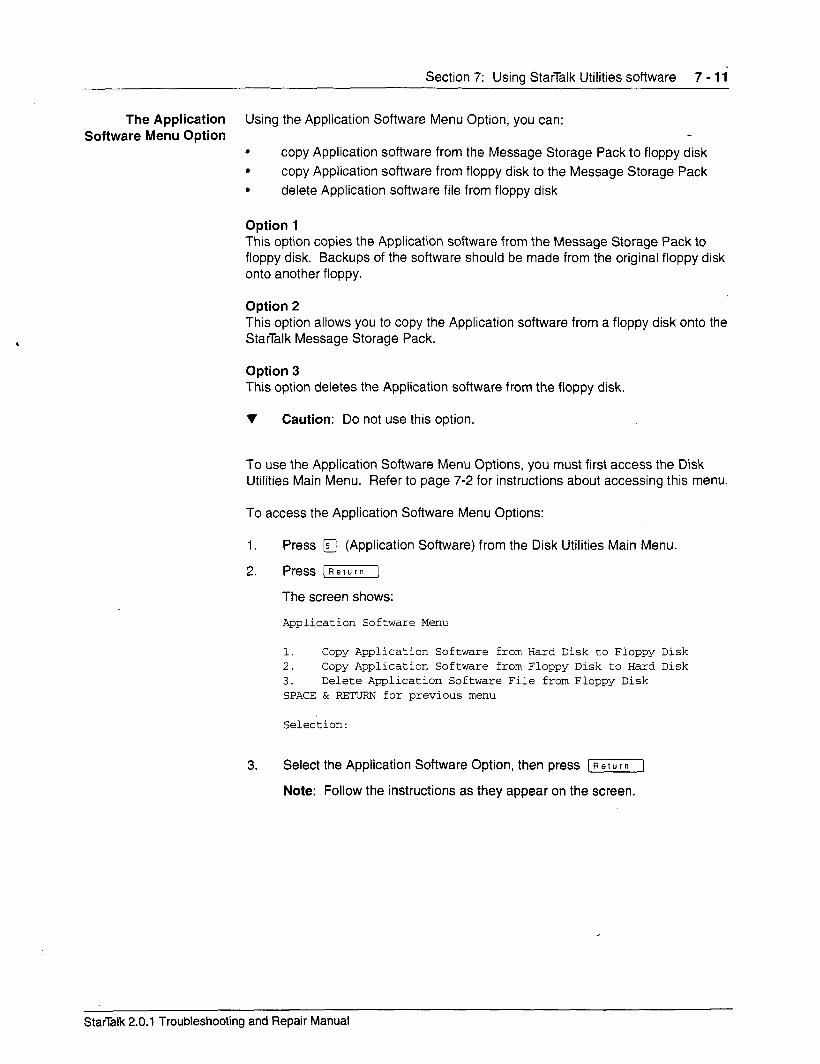
Section 7: Usina StarTalk Utilities software 7 - 1 i
The Application Using the Application Software Menu Option, you can: Software Menu Option
. copy Application software from the Message Storage Pack to floppy disk
. copy Application software from floppy disk to the Message Storage Pack
. delete Application software file from floppy disk
Option 1 This option copies the Application software from the Message Storage Pack to floppy disk. Backups of the software should be made from the original floppy disk onto another floppy.
Option 2 This option allows you to copy the Application software from a floppy disk onto the StarTalk Message Storage Pack.
Option 3 This option deletes the Application software from the floppy disk.
v Caution: Do not use this option.
To use the Application Software Menu Options, you must first access the Disk Utilities Main Menu. Refer to page 7-2 for instructions about accessing this menu.
To access the Application Software Menu Options:
1. Press q (Application Software) from the Disk Utilities Main Menu.
2. Press v]
The screen shows:
Application Software Menu
1. Copy Application Software from Hard Disk to Floppy Disk 2. Copy Application Software from Floppy Disk to Hard Disk 3. Delete Application Software File from Floppy Disk SPACE & RETURN for previous menu
Selection:
3. Select the Application Software Option, then press [Relurn]
Note: Follow the instructions as they appear on the screen.
StarTalk 2.0.1 Troubleshooting and Repair Manual
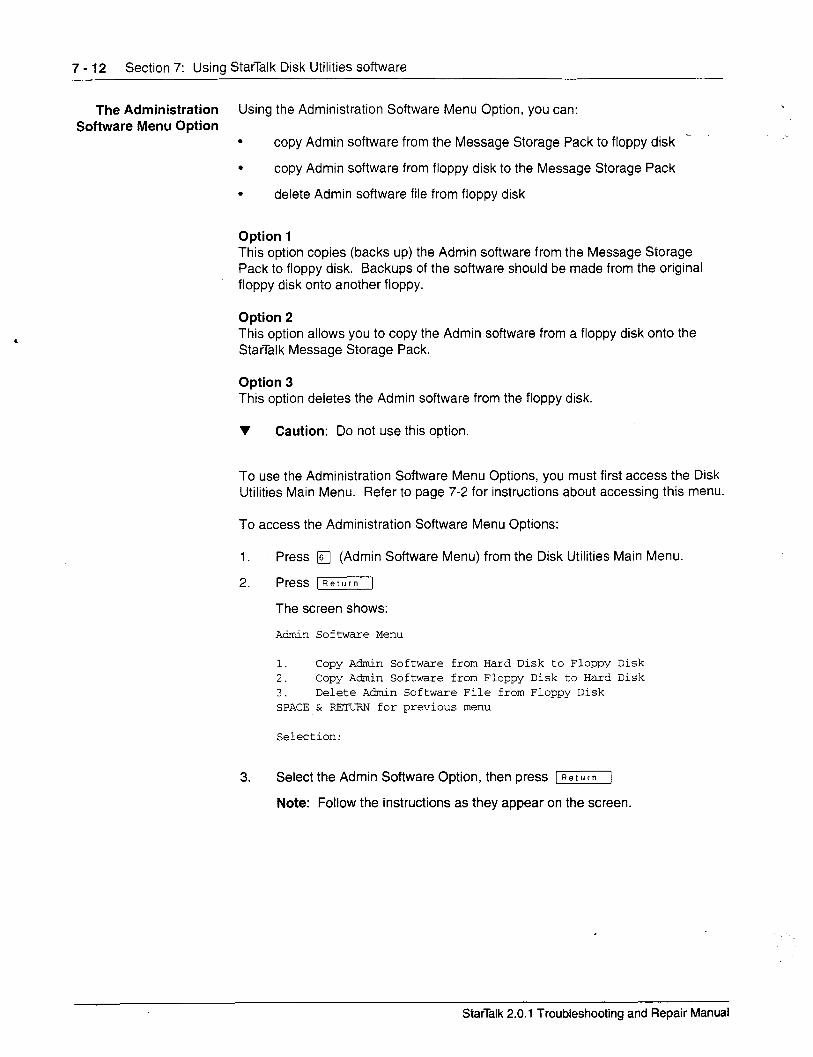
7 - 12 Section 7: Using StarTalk Disk Utilities software
The Administration Using the Administration Software Menu Option, you can: .
Software Menu Option - . copy Admin software from the Message Storage Pack to floppy disk
. copy Admin software from floppy disk to the Message Storage Pack
. delete Admin software file from floppy disk
Option 1 This option copies (backs up) the Admin software from the Message Storage Pack to floppy disk. Backups of the software should be made from the original floppy disk onto another floppy.
Option 2 This option allows you to copy the Admin software from a floppy disk onto the StarTalk Message Storage Pack.
Option 3 This option deletes the Admin software from the floppy disk.
v Caution: Do not use this option.
To use the Administration Software Menu Options, you must first access the Disk Utilities Main Menu. Refer to page 7-2 for instructions about accessing this menu.
To access the Administration Software Menu Options:
1. Press fl (Admin Software Menu) from the Disk Utilities Main Menu.
2. Press [Return]
The screen shows:
Admin Software Menu
1. Copy Admin Software from Hard Disk to Floppy Disk 2. Copy Admin Software from Floppy Disk to Hard Disk 3. Delete Admin Software File from Floppy Disk SPACE & RETUP& for previous menu
Selection:
3. Select the Admin Software Option, then press [Retutn]
Note: Follow the instructions as they appear on the screen.
StarTalk 2.0.1 Troubleshooting and Repair Manual
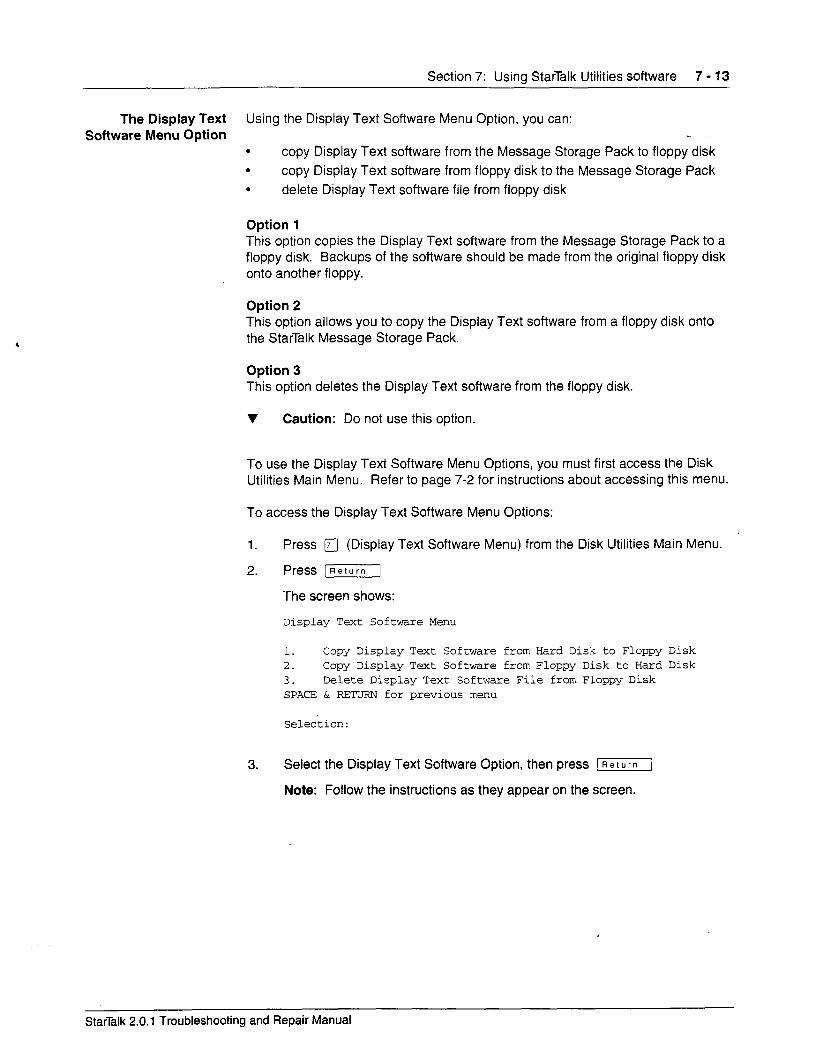
Section 7: Using StarTalk Utilities software 7 - 13
The Display Text Using the Display Text Software Menu Option, you can: Software Menu Option
. copy Display Text software from the Message Storage Pack to floppy disk
. copy Display Text software from floppy disk to the Message Storage Pack
. delete Display Text software file from floppy disk
Option 1 This option copies the Display Text software from the Message Storage Pack to a floppy disk. Backups of the software should be made from the original floppy disk onto another floppy.
Option 2 This option allows you to copy the Display Text software from a floppy disk onto the StarTalk Message Storage Pack.
Option 3 This option deletes the Display Text software from the floppy disk.
v Caution: Do not use this option.
To use the Display Text Software Menu Options, you must first access the Disk Utilities Main Menu. Refer to page 7-2 for instructions about accessing this menu.
To access the Display Text Software Menu Options:
1.
2.
Press a (Display Text Software Menu) from the Disk Utilities Main Menu.
Press [Return]
The screen shows:
Display Text Software Menu
1. Copy Display Text Software from Hard Disk to Floppy Disk 2. Copy Display Text Software from Floppy Disk to Hard Disk 3. Delete Display Text Software File from Floppy Disk SPACE & RETURN for previous menu
Selection:
3. Select the Display Text Software Option, then press (Return]
Note: Follow the instructions as they appear on the screen.
StarTalk 2.0.1 Troubleshooting and Repair Manual
7- 14 Section 7: Using StarTalk Disk Utilities software
The Backup and Using the Backup and Restore User Data Menu Option you can: Restore User Data
Menu Option l backup user information from the partition on the Message Storage Pack to floppy disk
. restore user data from floppy disk to the Message Storage Pack
. clear previous data from the backup partition on the Message Storage Pack
Option 1 This option copies the user data from the StarTalk Message Storage Pack to a floppy disk(s). The number of floppy disks required for a backup depends on the number of mailboxes and recorded user mailboxes on the Message Storage Pack. For example, a 25 mailbox system with 25 ten-second user name record- ing requires one floppy. A 200 mailbox system with 200 ten-second user name recordings requires approximately eight floppy disks.
If more than one floppy disk is required, you are prompted to remove the floppy disk and insert another. Number each disk in order. For example, 1, 2, 3, and so on. When restoring the user data, the floppy disks must be loaded in the same order. Before you begin, ensure you have an adequate number of floppy disks.
Note: This procedure does not backup customer recorded greetings, voice messages or prompts longer than six minutes.
Option 2 This option copies (restores) backed up user data from floppy disks to the Mes- sage Storage Pack.
Note: When restoring user data, the Message Storage Pack cannot have any user data on it. Refer to the StarTalk Set Up and Operation Guide for instruc- tions about resetting StarTalk. You can also refer to the Restoring User Data section of this manual for additional information.
Option 3 This option clears any previous user data from the Backup partition of the Mes- sage Storage Pack .
v Caution: This option removes all backup information from the Message Storage Pack partition.
To use the Backup and Restore User Data Menu Options, you must first access the Disk Utilities Main Menu. Refer to page 7-2 for instructions about accessing this menu.
StarTalk 2.0.1 Troubleshooting and Repair Manual
Section 7: Usina StarTalk Utilities software 7 - 15
To access the Backup and Restore User Data Menu Options:
1. Press a (Backup and Restore User Data) from the Disk Utilities Main Menu.
2. Press [Relurn]
The screen shows:
Backup and Restore User Data Menu
1. Backup User Data from Backup Area (Hard Disk) to Floppy Disk
2. Restore User Data from Floppy Disk to Backup Area (Hard Disk)
3. Clear Previous Restore from Backup Area (Hard Disk)
SPACE & RETURN for previous menu
Selection:
3. Select the Backup and Restore User Data Option, and press [Return] Note: Follow the instructions as they appear on the screen.
The Voice Prompts Using the Voice Prompts Menu Option, you can: Menu Option
. copy all the voice prompts from the Message Storage Pack to floppy disk
. copy individual prompts from the Message Storage Pack to floppy disk
. copy all the voice prompts from a floppy disk to the Message Storage Pack
. copy an individual voice prompt from a floppy disk to the Message Storage Pack
. delete all the voice prompts from floppy disk . delete an individual voice prompt from floppy disk
Option 1 This option copies all the voice prompts from the Message Storage Pack to floppy disk(s). Backups of the voice prompts should be made from the original floppy disks onto another floppy disk.
Option 2 This option allows you to copy an individual voice prompt from the Message Storage Pack to floppy disk. Backups of the voice prompts should be made from the original floppy disks onto another floppy disk.
Option 3 This option allows you to copy all the voice prompts from floppy disks onto the StarTalk Message Storage Pack.
StarTalk 2.0.1 Troubleshooting and Repair Manual
7 - 16 Section 7: Using StarTalk Disk Utilities software
Option 4 This option allows you to copy selected voice prompts from floppy disk ontothe StarTalk Message Storage Pack. You must know the number of the prompt you want to copy.
Option 5 This option deletes all the voice prompts from the floppy disk.
Option 6 This option deletes an single voice prompt from the floppy disk.
To use the Voice Prompts Menu Options, you must first access the Disk Utilities Main Menu. Refer to page 7-2 for instructions about accessing this menu.
To access the Voice Prompts Menu Options:
1. Press n (Voice Prompts) from the Disk Utilities Main Menu.
2. Press [Return)
The screen shows:
Voice Prompts Menu
1. Copy All Voice Prompts from Hard Disk to Floppy Disk 2. Copy an Individual Prompt from Hard Disk to Floppy Disk 3. Copy All Voice Prompts from Floppy Disk to Hard Disk 4. Copy an Individual Voice Prompt from Floppy Disk to Hard
Disk 5. Delete All Voice Prompts from Floppy Disk 6. Delete an Individual Voice Prompt from Floppy Disk SPACE & RETURN for previous menu
Selection:
3. Select a Voice Prompt Menu Option, then press [Relurnj
Note: Follow the instructions as they appear on the screen.
Important: Although the voice prompts are numbered, not all of them are used. Do not be alarmed if some voice prompts are not copied, or if they appear out of order.
StarTalk 2.0.1 Troubleshooting and Repair Manual
Section 7: Using StarTalk Utilities software 7 - 17
The Time & Date Using the Time & Date Menu Option, you can: Menu Option
. view the current date and time
. view the time
. view the date
Note: The StarTalk date and time are independent of the Norstar date and time.
Option 1 This option shows the current StarTalk date and time.
Option 2 This option takes you to the Time Menu where you can set the StarTalk time (hour and minute). You set the time using a 24-hour clock.
Option 3 This option takes you to the Date Menu where you can set the StarTalk date (day, month, and year).
To use the Time & Date Menu Option, you must first access the Disk Utilities Main Menu. Refer to page 7-2 for instructions about accessing this menu.
To access the Time & Date Menu Option:
1. Press a (Time & Date) from the Disk Utilities Main Menu.
2. Press [Return]
The screen shows:
Time & Date Prompts Menu
1. Display Current Date and Time 2. Time 3. Date SPACE & RETUFW for previous menu
Selection:
‘3. Select the Time & Date Menu Option, then press [Return]
Note: Follow the instructions as they appear on the screen.
StarTalk 2.0.1 Troubleshooting and Repair Manual
7 - 18 Section 7: Using StarTalk Disk Utilities software
The Reboot System The Reboot System Menu Option restarts the StarTalk module. This option is the Menu Option same as turning the AC power to the StarTalk module Off and then On again.
Important: Whenever you restart the StarTalk system, all user features are temporarily suspended.
To use the Reboot System Menu Option, you must first access the Disk Utilities Main Menu. Refer to page 7-2 for instructions about accessing this menu.
To access the Reboot System Menu Option:
1. Press @ (Reboot System) from the Disk Utilities Main Menu.
2. Press LReturn]
The screen shows:
Reboot System - Are you sure(Y=YES or SPACE & RETURN to CdrICel)?
3. Press FJ
The restart process begins.
StarTalk 2.0.1 Troubleshooting and Repair Manual
StarTalk maintenance 8 Introduction
About the backup and
restore procedures
StarTalk maintenance primarily involves backing up and restoring user data from the Message Storage Pack to floppy disks. StarTalk maintenance tasks also include loading the StarTalk operating software, and copying and formatting StarTalk disks. Both the Stairalk Disk Utilities and Application software are used to perform StarTalk maintenance procedures,
This section describes the procedures necessary for backing up user data, and then restoring the information back to the StarTalk Message Storage Pack. This section also provides instructions for:
. formatting a floppy disk
. backing up and loading the operating software 0’ copying information from the Message Storage Pack to floppy disk
important: Refer to Section 6 for instructions about how to move around within a screen, exiting the software menus, using the keyboard, and selecting options from menus. Refer to Section 7 for instructions about accessing the Disk Utilities Software Menus.
If the Message Storage Pack of the StarTalk module fails, all greeting and mailbox information is lost. To prevent losing StarTalk data, a backup of the Message Storage Pack should be made on a regular basis. You also need to perform a backup when you are replacing a Message Storage Pack in a StarTalk module.
When a Message Storage Pack failure occurs, you must use the StarTalk configu- ration backup copy on the floppy disks, and return it to the Message Storage Pack. This is called restoring user information data.
StarTalk 2.0.1 Troubleshooting and Repair Manual
8 - 2 Section 8: StarTalk maintenance
Backing up P eriodic backups of the user data should be made. This ensures the configura-
user data tion information can be restored in the event that the Message Storage Pack fails.
Backing up user data copies:
. System configuration parameters
. Company Greetings
. Mailbox programming
. User Greetings
. Directory Name recordings
. Group Lists
. CCR information including CCR trees, CCR paths, and CCR prompts
Important: Voice messages cannot be backed up.
If a CCR backup is being restored on a new StarTalk module, a new CCR Ena- bling Disk is required. For a replacement disk, return the old Enabling Disk to Northern Telecom.
Before data can be backed up onto floppy disk, it must first be backed up to a partition on the StarTalk Message Storage Pack. Backing up user data is a two- step procedure. The first step copies the user data onto a backup partition on the Message Storage Pack. This backup is performed using the option from the Application Software Top-level Menu. The second step involves copying the data from the Message Storage Pack partition to floppy disk(s). This backup is per- formed using the Disk Utilities Software Options.
To backup user data you must first access the StarTalk Top-level Menu. Refer to page 6-5 for instructions about accessing the Top-level Menu.
To backup user data:
1. Press a (System Admin and Configuration) from the Top-level Menu.
2. Press [Returnj
The System Admin and Configuration Menu appears.
3. Press i?J (Backup), then press (Return]
The screen shows:
Waiting for calls to complete.....
Note: Before the backup procedure can begin, all StarTalk channels must be idle. StarTalk automatically disables each channel as it becomes idle.
When the backup is complete, a confirmation message appears. This procedure can take several minutes, depending on the number of mail- boxes, greetings, and the amount of other information stored on the Mes- sage Storage Pack. A series of dots appear across the screen to indicate the information is being backed up. 1
StarTalk 2.0.1 Troubleshooting and Repair Manual
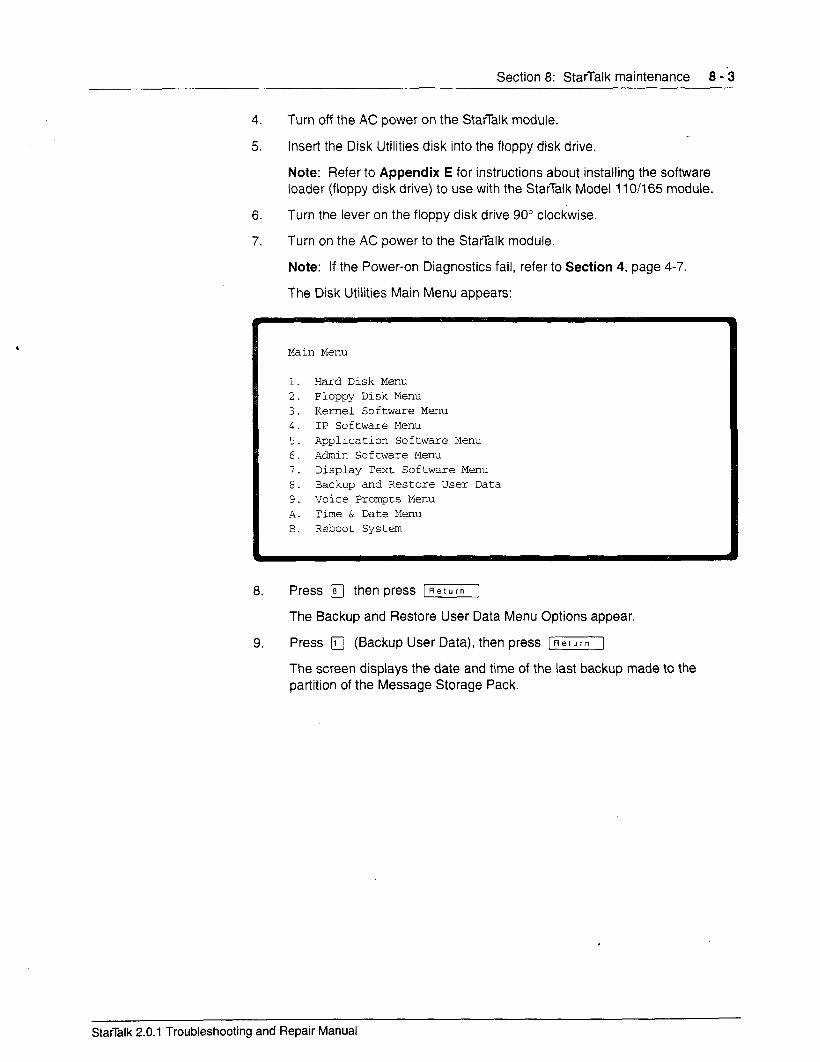
Section 8: StarTalk maintenance 8 - 3
4. Turn off the AC power on the StarTalk module.
5. Insert the Disk Utilities disk into the floppy disk drive.
Note: Refer to Appendix E for instructions about installing the software loader (floppy disk drive) to use with the StarTalk Model 1 lo/165 module.
6. Turn the lever on the floppy disk drive 90” clockwise.
7. Turn on the AC power to the StarTalk module.
Note: If the Power-on Diagnostics fail, refer to Section 4, page 4-7.
The Disk Utilities Main Menu appears:
Main Menu
1. Hard Disk Menu 2. Floppy Disk Menu 3. Kernel Software Menu 4. IP Software Menu 5. Application Software Menu 6. Admin Software Menu I. Display Text Software Menu 8. Backup and Restore User Data 9. Voice Prompts Menu A. Time & Date Menu B. Reboot System
8. Press q then press [Return]
The Backup and Restore User Data Menu Options appear.
9. Press FJ (Backup User Data), then press [Return]
The screen displays the date and time of the last backup made to the partition of the Message Storage Pack.
StarTalk 2.0.1 Troubleshooting and Repair Manual

8 - 4 Section 8: StarTalk maintenance
10. Press q then press [Return] if the backup date and time are recent.
The screen shows:
1. Backup All User Data 2. Backup All User Data Except For Prompts 3. Backup All User Data Except For Custom Call
Routing Tables 4. Backup Gne or More Custom Call Routing Tables
Enter Your Choice:
important: If the date and time of the last backup is not recent, press @ (No) then exit from the Disk Utilities Menu. Repeat step 1 to make a more recent backup of the user data, then resume with steps 2 through 11.
11. Press q (Backup All User Data), then press (Return]
Note: You must always select option one.
12. Remove the Disk Utilities disk, and insert a blank, formatted floppy disk in the floppy disk drive, and close the disk drive. If the disk is not formatted, a directory listing of the contents of the floppy disk appears. You are then given the option to format the floppy disk.
V Caution: You must use High Density disks when backing up user data. Any other kind of diskette, such as double density, does not work.
The screen shows:
New disk recognized
Backing up system/user data.......... Successful Eacking up greetings and directory entries . . . . . . . . . . . . . . . . . . . . . . . . . . . . . . . . . . . . . Successful Backing up Custom Call Routing Table 01 prompts.............................. Successful
Each message indicates a file has been successfully copied. If the system is configured for a large number of mailboxes, the mailbox, Group Lists, and user mailbox names data can take several minutes to copy. A series of dots slowly appear across the screen to indicate the information is being copied. The Backing up Custom Call Routing Table message is shown for each Custom Call Routing tree on the StarTalk system.
StarTalk 2.0.1 Troubleshooting and Repair Manual
Section 8: StarTalk maintenance 8 - 5
If the backup requires more than one disk, you are prompted to remove the current disk, and insert another one. As you remove disks, label them sequen- tially, user data #l, user data #2, and so on. When you restore the user data, you must copy the floppy disks to the Message Storage Pack in the same order.
Note: If StarTalk detects a problem with a floppy disk, an error message appears. If files cannot be copied onto the disk, use another disk and discard the defective one. When a problem is encountered in the middle of copying to a floppy disk (one or more files were copied but the disk is not full), remove the disk, label it, and insert another blank disk. The partially filled disk is a part of the backup, and must be included with the other disks when you restore the data.
Restoring Before you restore user data, ensure:
user data ,. If the Message Storage Pack is not formatted or loaded, you format it to ensure there is no remaining data, and load the operating software. Refer to page 7-4 for instructions about formatting the Message Storage Pack, and page 8-9 for loading the operating software. If the message pack is format- ted and initialized, go to step 3.
2. If the system is initialized, you must go to step 5. If the system is not initialized, you must first reset the module.
3. You follow the procedures in this section to restore the data.
4. You reboot the system after the restoration is completed. These instruc- tions follow the Restoring User Data procedures.
5. You load the StarTalk operating software. This procedure is found on page 8-9.
You can only restore user data to a Message Storage Pack that has been format- ted. Before you restore user data, refer to page 7-4 for instructions about format- ting the Message Storage Pack.
If you are restoring user data to a StarTalk Message Storage Pack that is initial- ized, you must first erase the user data on the disk. Refer to Resetting StarTalk in the StarTalk Set Up and Operation Guide for instructions about resetting and erasing the user data from the StarTalk Message Storage Pack.
Restoring user data copies the data from floppy disk(s) to the Message Storage Pack. This information includes:
. System configuration parameters
. Company Greetings . Mailbox programming . User Greetings . Directory Name recordings . Group lists . CCR information including CCR trees, CCR paths, and CCR prompts
StarTalk 2.0.1 Troubleshooting and Repair Manual
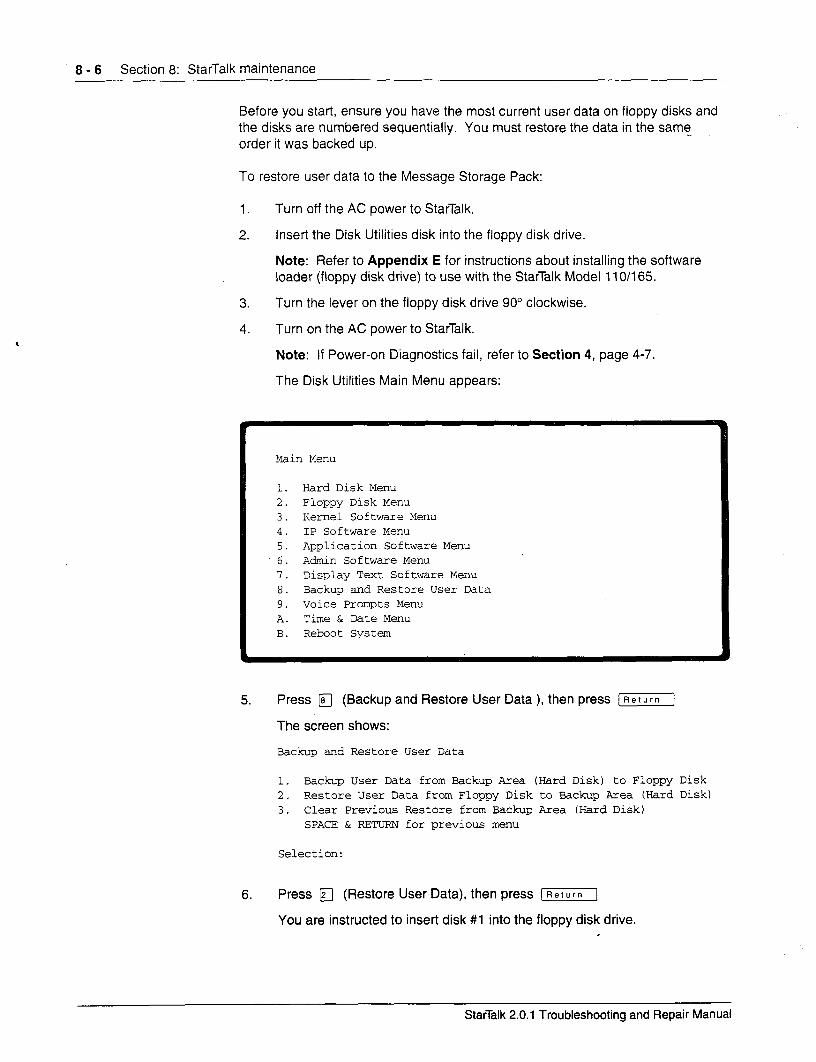
8 - 6 Section 8: StarTalk maintenance
Before you start, ensure you have the most current user data on floppy disks and the disks are numbered sequentially. You must restore the data in the same order it was backed up.
To restore user data to the Message Storage Pack:
1.
2.
3.
4.
Turn off the AC power to StarTalk.
Insert the Disk Utilities disk into the floppy disk drive.
Note: Refer to Appendix E for instructions about installing the software loader (floppy disk drive) to use with the StarTalk Model 11 O/l 65.
Turn the lever on the floppy disk drive 90” clockwise.
Turn on the AC power to StarTalk.
Note: If Power-on Diagnostics fail, refer to Section 4, page 4-7.
The Disk Utilities Main Menu appears:
Main Menu
1. Hard Disk Menu 2. Floppy Disk Menu 3. Kernel Software Menu 4. IP Software Menu 5. Application Software Menu 6. Admin Software Menu I. Display Text Software Menu 8. Backup and Restore User Data 9. Voice Prompts Menu A. Time & Date Menu B. Reboot System
5. Press a (Backup and Restore User Data ), then press [Return]
The screen shows:
Backup and Restore User Data
1. Backup User Data from Backup Area (Hard Disk) to Floppy Disk 2. Restore User Data from Floppy Disk to Backup Area (Hard Disk) 3. Clear Previous Restore from Backup Area (Hard Disk)
SPACE & RE'I'UFW for previous menu
Selection:
6. Press m (Restore User Data), then press [WI
You are instructed to insert disk #l into the floppy disk drive. .
StarTalk 2.0.1 Troubleshooting and Repair Manual

Section 8: StarTalk maintenance 8 - 7
7. Insert the backup disk labeled disk #l in the floppy disk drive, then press [Return] The screen displays the contents of the disk and then shows:
1. Restore All User Data 2. Restore One Or More Custom Call Routing Tables 3. Restore All User Data Except For Custom Call
Routing Tables SPACE & RETURN for previous menu
Selection:
8. Press q (Restore All User Data), then press [Aeturn]
v Caution: Do not use Options 2 or 3 in this menu. They do not restore all of the user data.
The screen shows the messages as it restores the user data:
Restoring System/User Data................Successfu 1 Restoring Messages........................Successfu 1 Restoring CCR Table 01 To Slot Ol.........Successfu 1
Please load floppy disk number 02 from your backup set Press Return when ready. Enter ESC to abort the restore process:
Note: Each message indicates a file has been successfully copied. When the module is configured for a large number of mailboxes, the mailbox, Group Lists, and user mailbox name data can take several minutes to copy.
The Restoring CCR Table message is displayed for all five possible CCR trees, whether they were established on’the backed up system or not.
If user data is on more than one disk, you are prompted to remove the current disk and insert the next one.
9. After the prompt to load another disk, insert the disk, then
press [Return]
10. Repeat step 9 for each backed up disk containing user data.
11. Once all the floppy disks have been copied, the screen shows a Restore complete message, and the Backup and Restore User Data Menu appears.
StarTalk 2.0.1 Troubleshooting and Repair Manual
8 - 8 Section 8: StarTalk maintenance
12. Remove the diskette from the floppy disk drive.
13. Press (Spacebar then [Return] to return to the Disk Utilities Main Menu.
14. Press q (Reboot), then press [Return1
15. Press q then press [Return] to reboot the module.
When the restoration process is complete, the Password: prompt appears on the screen.
As the restoration begins, StarTalk runs its diagnostic tests, and a series of dots appear on the screen. This indicates the user data is being copied from the backup area on the Message Storage Pack to the data area on the Message Storage Pack.
Restoring user If Alarm 136 appears after rebooting, it can indicate there is existing user data on
data: Notes, the Message Storage Pack. User data must be erased from the Message Stor-
Warnings, and age Pack by resetting StarTalk using Feature 983. Refer to the StarTalk Set Up
Cautions and Operation Guide for instructions about resetting the module.
If Alarm 136 appears, but StarTalk was reset prior to beginning the restore proce- dure, try restoring the data from the disks again.
‘I Warning: Do not reboot the StarTalk module during the restore procedure. You must turn the power OFF, and then ON.
If dots do not appear on the terminal screen to indicate the data is being restored, the terminal has lost communication with the StarTalk module. When restoring user data, the StarTalk module communication parameters return to the default setting. StarTalk parameters might not match the setting of the terminal, and must be reset before you continue.
if StarTalk does lose contact with the terminal, reset the terminals communication parameters to StarTalk default values. Refer to the user guide that came with the terminal.
Star%lk 2.0.1 Troubleshooting and Repair Manual
Section 8: StarTalk maintenance 8 - 9
Loading the After the user data has been restored to the Message Storage Pack, you must
StarTalk operating load the StarTalk operating software. The StarTalk operating software includes:
software . Kernel software . IP software . Application software . Admin software . Display Text software . Voice prompts
The operating software is loaded using the Disk Utilities software. Section 7, Using the Disk Utilities software describes how to use this software. Refer to this section for instructions about how to perform the procedures found in the following section.
Before you can restore the operating software, you must first insert the Disk Utilities into the floppy disk drive and close the drive door. You must then access the Disk Utilities Main menu. Refer to page 7-2 for instructions about loading the Disk Utilities software and accessing the Main menu.
To load the operating software from the Disk Utilities Main Menu:
1.
2.
3.
Remove the Disk Utilities disk and insert the disk labeled KER-NT, IP-NT. This disk contains the Kernel and IP software programs.
Press a (Kernel Software Menu), then press [r]
The Kernel Software Menu appears.
Press a (Copy Kernel Software from Floppy Disk to Hard Disk), then press m] The screen shows:
mter the file name:
4. Type KER-IW then press [Aeturn]
Note: Uppercase letters must be entered as upper case and lower case letters as lowercase.
StarTalk copies the Kernel software to the Message Storage Pack. This takes several minutes. As the copying progresses, the screen shows:
Copying Page 001 Copying Page 002 Copying Page 003
Cbpying Page 253 Copying Page 254
After the Kernel software is copied onto the Message Storage Pack, the Kernel Software menu appears.
I
StarTalk 2.0.1 Troubleshooting and Repair Manual
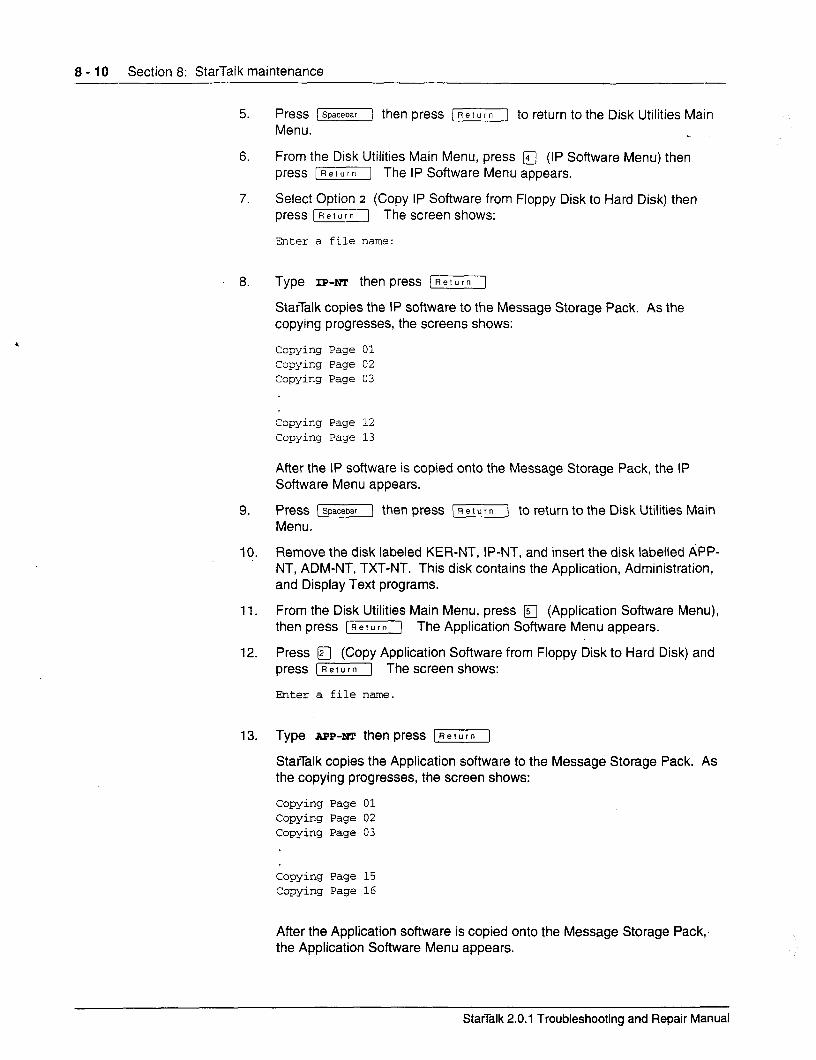
8 - 10 Section 8: StarTalk maintenance
5.
6.
7.
8.
9.
10.
11.
12.
13.
Press (Spacebar] then press [Return] to return to the Disk Utilities Main Menu.
From the Disk Utilities Main Menu, press q (IP Software Menu) then press [Return] The IP Software Menu appears.
Select Option 2 (Copy IP Software from Floppy Disk to Hard Disk) then press [Relurn] The screen shows:
Enter a file name:
Type IP-m then press [Return]
StarTalk copies the IP software to the Message Storage Pack. As the copying progresses, the screens shows:
Copying Page 01 Copying Page 02 Copying Page 03
Copying Page 12 Copying Page 13
After the IP software is copied onto the Message Storage Pack, the IP Software Menu appears.
Press [Spacebar) then press r/ to return to the Disk Utilities Main Menu.
Remove the disk labeled KER-NT, IP-NT, and insert the disk labelled APP- NT, ADM-NT, TXT-NT. This disk contains the Application, Administration, and Display Text programs.
From the Disk Utilities Main Menu, press q (Application Software Menu), then press [Rerurn) The Application Software Menu appears.
Press q (Copy Application Software from Floppy Disk to Hard Disk) and press [Return] The screen shows:
Enter a file name.
Type APP-m then press [m]
StarTalk copies the Application software to the Message Storage Pack. As the copying progresses, the screen shows:
Copying Page 01 Copying Page 02 Copying Page 03
Copying Page 15 Copying Page 16
After the Application software is copied onto the Message Storage Pack,- the Application Software Menu appears.
StarTalk 2.0.1 Troubleshooting and Repair Manual
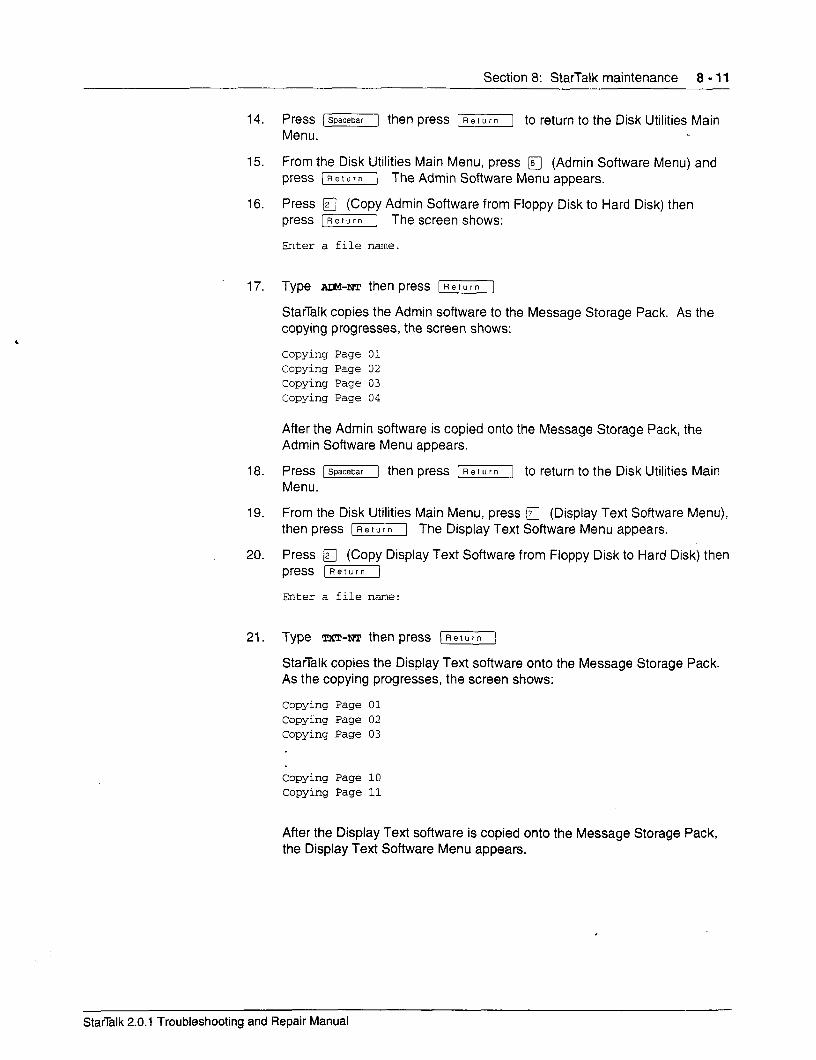
Section 8: StarTalk maintenance 8 - 11
14.
15.
16.
17.
18.
19.
20.
21.
Press lSpacebar] then press [Return] to return to the Disk Utilities Main Menu.
From the Disk Utilities Main Menu, press m (Admin Software Menu) and press [Return) The Admin Software Menu appears.
Press EJ (Copy Admin Software from Floppy Disk to Hard Disk) then press [Return] The screen shows:
hter a file name.
Type AIWIW then press [Return
StarTalk copies the Admin software to the Message Storage Pack. As the copying progresses, the screen shows:
Copying Page 01 Copying Page 02 Copying Page 03 Copying Page 04
After the Admin software is copied onto the Message Storage Pack, the Admin Software Menu appears.
Press [Spacebar] then press [Relurn] to return to the Disk Utilities Main Menu.
From the Disk Utilities Main Menu, press q (Display Text Software Menu), then press [Relurn] The Display Text Software Menu appears.
Press a (Copy Display Text Software from Floppy Disk to Hard Disk) then press [Relurnj
Enter a file name:
Type TXT-NT then press [Return)
StarTalk copies the Display Text software onto the Message Storage Pack. As the copying progresses, the screen shows:
Copying Page 01 Copying Page 02 Copying Page 03
Copying Page 10 Copying Page 11
After the Display Text software is copied onto the Message Storage Pack, the Display Text Software Menu appears.
StarTalk 2.0.1 Troubleshooting and Repair Manual

8 - 12 Section 8: StarTalk maintenance
22.
23.
24.
25.
26.
27.
Press [Spacebar] then press jRelurn/ to return to the Disk Utilities Main Menu.
Remove the APP-NT, ADM-NT, TXT-NT disk from the floppy disk drive.
insert the first Voice Prompt disk in the floppy disk drive and close the drive door.
From the Disk Utilities Main Menu, press a (Voice Prompts Menu), then press [Return] The Voice Prompts Menu appears.
Press m (Copy All Voice Prompts from Floppy Disk to Hard Disk), then press [Return]
StarTalk copies the voice prompts onto the Message Storage Pack. As each prompt is copied, the screen shows:
Copying Prompt xxx
Note: X)(X represents the number of the voice prompt.
When all the prompts have been copied, the Voice Prompts Menu appears.
Insert the second Voice Prompts disk into the drive. Repeat step 26 until you have copied all the Voice Prompt disks.
Note: Although the voice prompts are numbered sequentially, not all of them are used. Do not be alarmed if some voice prompts are not copied.
StarTalk 2.0.1 Troubleshooting and Repair Manual
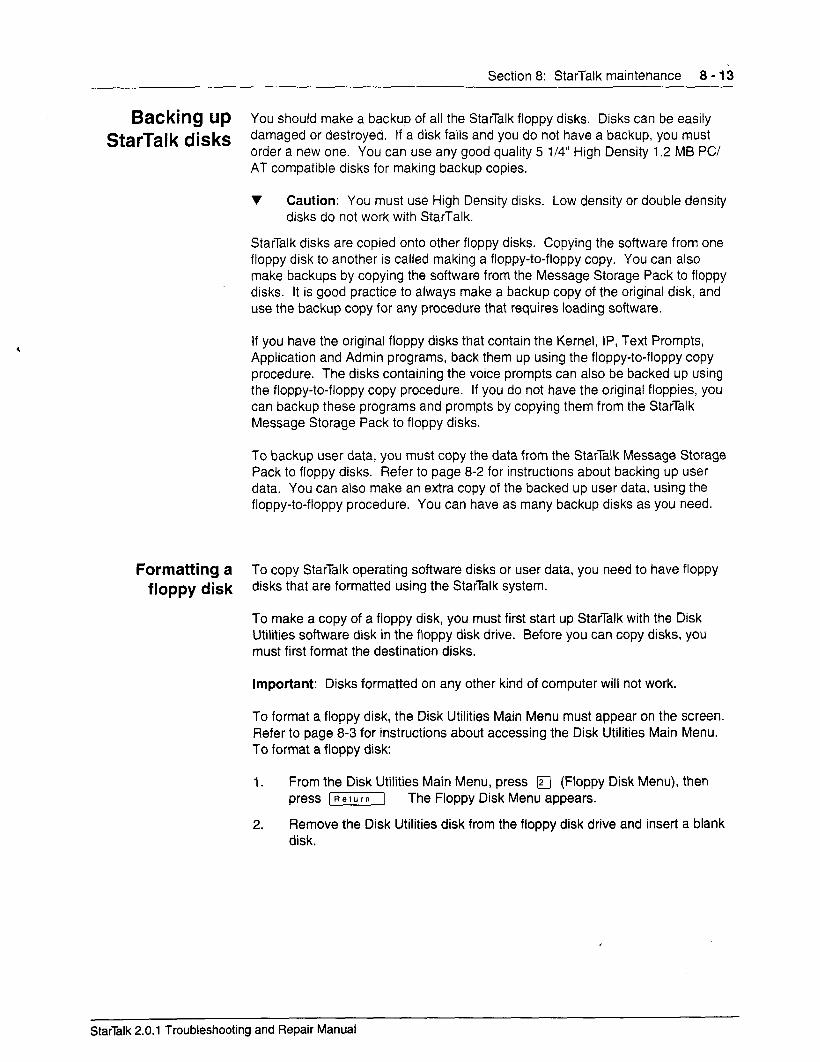
Section 8: StarTalk maintenance 8 - 13
Backing Up You should make a backup of all the StarTalk floppy disks. Disks can be easily
StarTalk disks damaged or destroyed. If a disk fails and you do not have a backup, you must order a new one. You can use any good quality 5 l/4” High Density 1.2 MB PC/ AT compatible disks for making backup copies.
v Caution: You must use High Density disks. Low density or double density disks do not work with StarTalk.
StarTalk disks are copied onto other floppy disks. Copying the software from one floppy disk to another is called making a floppy-to-floppy copy. You can also make backups by copying the software from the Message Storage Pack to floppy disks. It is good practice to always make a backup copy of the original disk, and use the backup copy for any procedure that requires loading software.
If you have the original floppy disks that contain the Kernel, IP, Text Prompts, Application and Admin programs, back them up using the floppy-to-floppy copy procedure. The disks containing the voice prompts can also be backed up using the floppy-to-floppy copy procedure. If you do not have the original floppies, you can backup these programs and prompts by copying them from the StarTalk Message Storage Pack to floppy disks.
To backup user data, you must copy the data from the StarTalk Message Storage Pack to floppy disks. Refer to page 8-2 for instructions about backing up user data. You can also make an extra copy of the backed up user data, using the floppy-to-floppy procedure. You can have as many backup disks as you need.
Formatting a To copy StarTalk operating software disks or user data, you need to have floppy floppy disk disks that are formatted using the StarTalk system.
To make a copy of a floppy disk, you must first start up StarTalk with the Disk Utilities software disk in the floppy disk drive. Before you can copy disks, you must first format the destination disks.
important: Disks formatted on any other kind of computer will not work.
To format a floppy disk, the Disk Utilities Main Menu must appear on the screen. Refer to page 8-3 for instructions about accessing the Disk Utilities Main Menu. To format a floppy disk:
1.
2.
From the Disk Utilities Main Menu, press m (Floppy Disk Menu), then press [Relurn] The Floppy Disk Menu appears.
Remove the Disk Utilities disk from the floppy disk drive and insert a blank disk.
StarTalk 2.0.1 Troubleshooting and Repair Manual
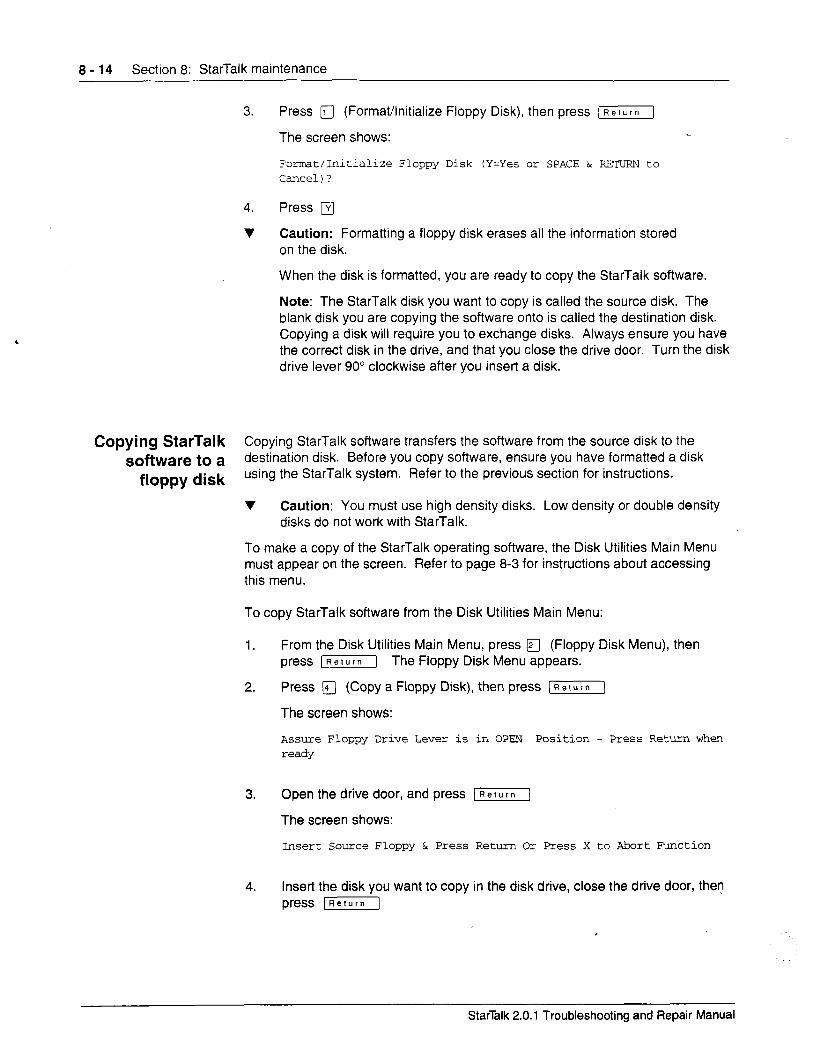
8 - 14 Section 8: StarTalk maintenance
3. Press q (Format/Initialize Floppy Disk), then press [m]
The screen shows:
Format/Initialize Floppy Disk (Y=Yes or SPACE & RETURN to Cancel) ?
4. Press a
v Caution: Formatting a floppy disk erases all the information stored on the disk.
When the disk is formatted, you are ready to copy the StarTalk software.
Note: The StarTalk disk you want to copy is called the source disk. The blank disk you are copying the software onto is called the destination disk. Copying a disk will require you to exchange disks. Always ensure you have the correct disk in the drive, and that you close the drive door. Turn the disk drive lever 90” clockwise after you insert a disk.
Copying StarTalk Copying StarTalk software transfers the software from the source disk to the
software to a destination disk. Before you copy software, ensure you have formatted a disk
floppy disk using the StarTalk system. Refer to the previous section for instructions.
v Caution: You must use high density disks. Low density or double density disks do not work with StarTalk.
To make a copy of the StarTalk operating software, the Disk Utilities Main Menu must appear on the screen. Refer to page 8-3 for instructions about accessing this menu.
To copy StarTalk software from the Disk Utilities Main Menu:
1. From the Disk Utilities Main Menu, press m (Floppy Disk Menu), then press (Return] The Floppy Disk Menu appears.
2. Press a (Copy a Floppy Disk), then press (Return]
The screen shows:
Assure Floppy Drive Lever is in OPEN Position - Press Return when ready
3. Open the drive door, and press [Return]
The screen shows:
Insert Source Floppy & Press Return Or Press X to Abort Function
4. Insert the disk you want to copy in the disk drive, close the drive door, then press (Return]
StarTalk 2.0.1 Troubleshooting and Repair Manual
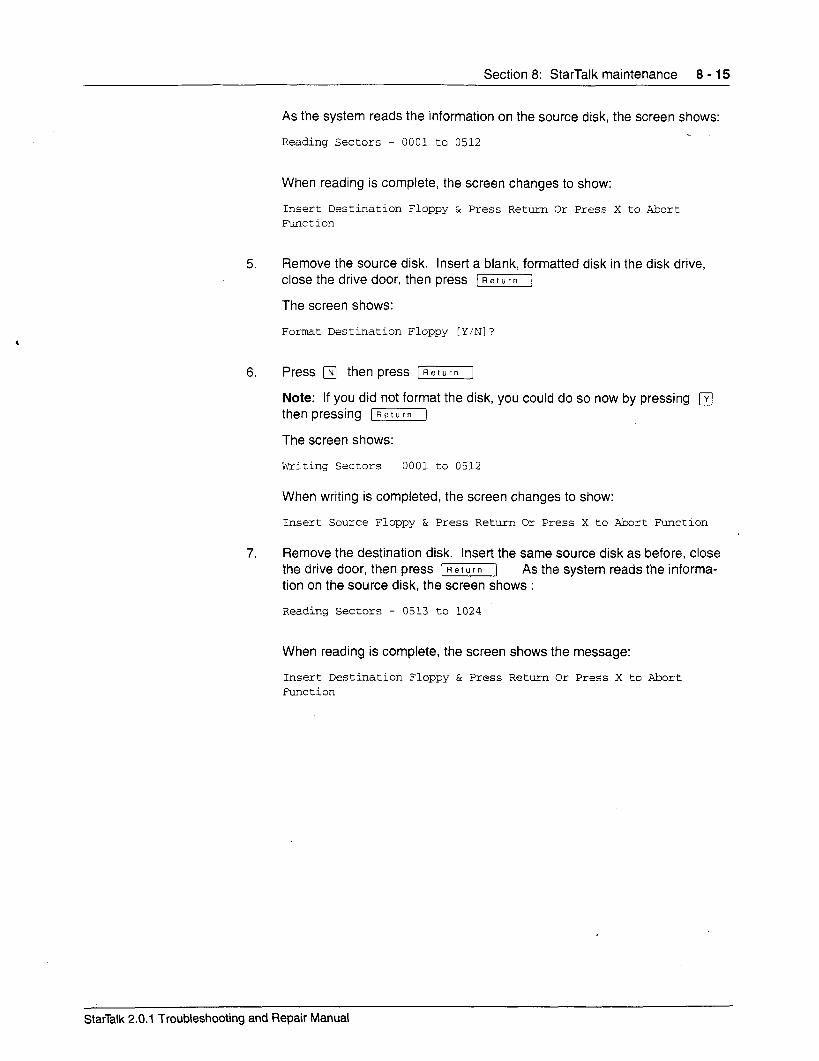
Section 8: StarTalk maintenance 8 - 15
As the system reads the information on the source disk, the screen shows:
Reading Sectors - 0001 to 0512
When reading is complete, the screen changes to show:
Insert Destination Floppy & Press Return Or Press X to Abort Function
5. Remove the source disk. Insert a blank, formatted disk in the disk drive, close the drive door, then press [Return1
The screen shows:
Format Destination Floppy [Y/N]?
6. Press q then press [Aeturn]
Note: If you did not format the disk, you could do so now by pressing m then pressing [Returnj
The screen shows:
Writing Sectors - 0001 to 0512
When writing is completed, the screen changes to show:
Insert Source Floppy & Press Return Or Press X to Abort Function
7. Remove the destination disk. Insert the same source disk as before, close the drive door, then press [Return] As the system reads the informa- tion on the source disk, the screen shows :
Reading Sectors - 0513 to 1024
When reading is complete, the screen shows the message:
Insert Destination Floppy & Press Return Or Press X to Abort Function
StarTalk 2.0.1 Troubleshooting and Repair Manual
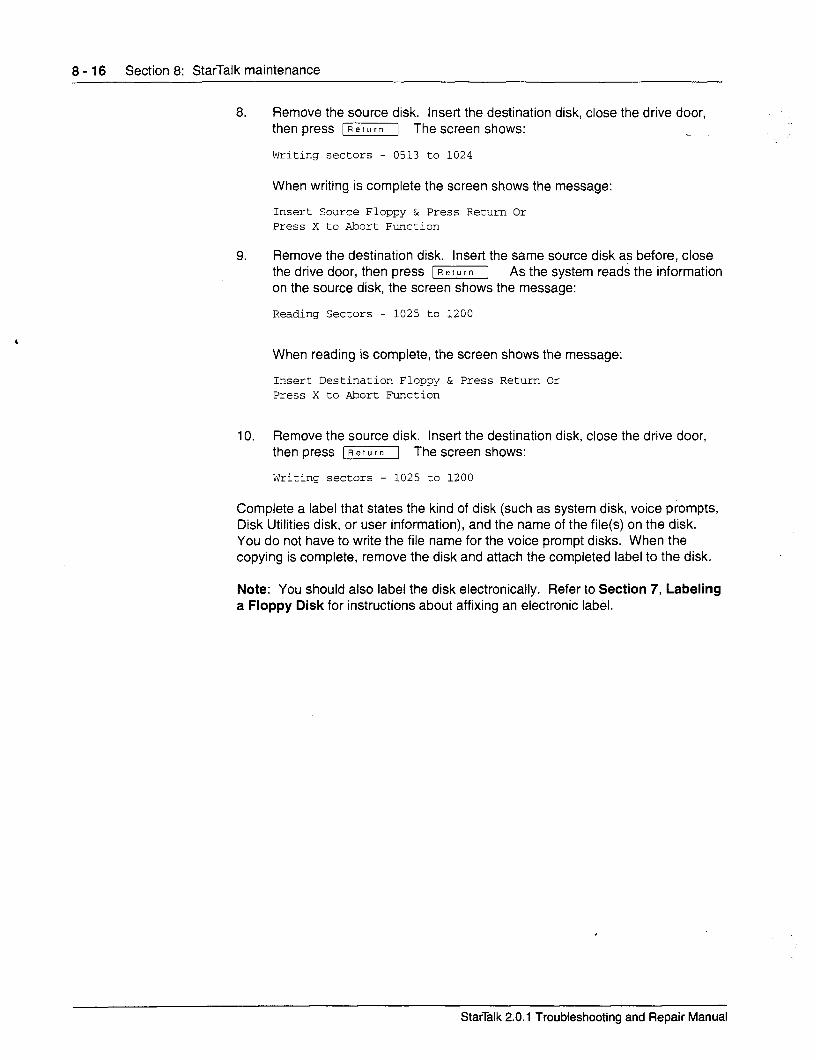
8 - 16 Section 8: StarTalk maintenance
8. Remove the source disk. Insert the destination disk, close the drive door, then press [Relurnj The screen shows:
Writing sectors - 0513 to 1024
When writing is complete the screen shows the message:
Insert Source Floppy & Press Return Or Press X to Abort Function
9. Remove the destination disk. Insert the same source disk as before, close the drive door, then press [Return] As the system reads the information on the source disk, the screen shows the message:
Reading Sectors - 1025 to 1200
When reading is complete, the screen shows the message:
Insert Destination Floppy & Press Return Or Press X to Abort Function
10. Remove the source disk. Insert the destination disk, close the drive door, then press 1-1 The screen shows:
Writing sectors - 1025 to 1200
Complete a label that states the kind of disk (such as system disk, voice piompts, Disk Utilities disk, or user information), and the name of the file(s) on the disk. You do not have to write the file name for the voice prompt disks. When the copying is complete, remove the disk and attach the completed label to the disk.
Note: You should also label the disk electronically. Refer to Section 7, Labeling a Floppy Disk for instructions about affixing an electronic label.
StarTalk 2.0.1 Troubleshooting and Repair Manual
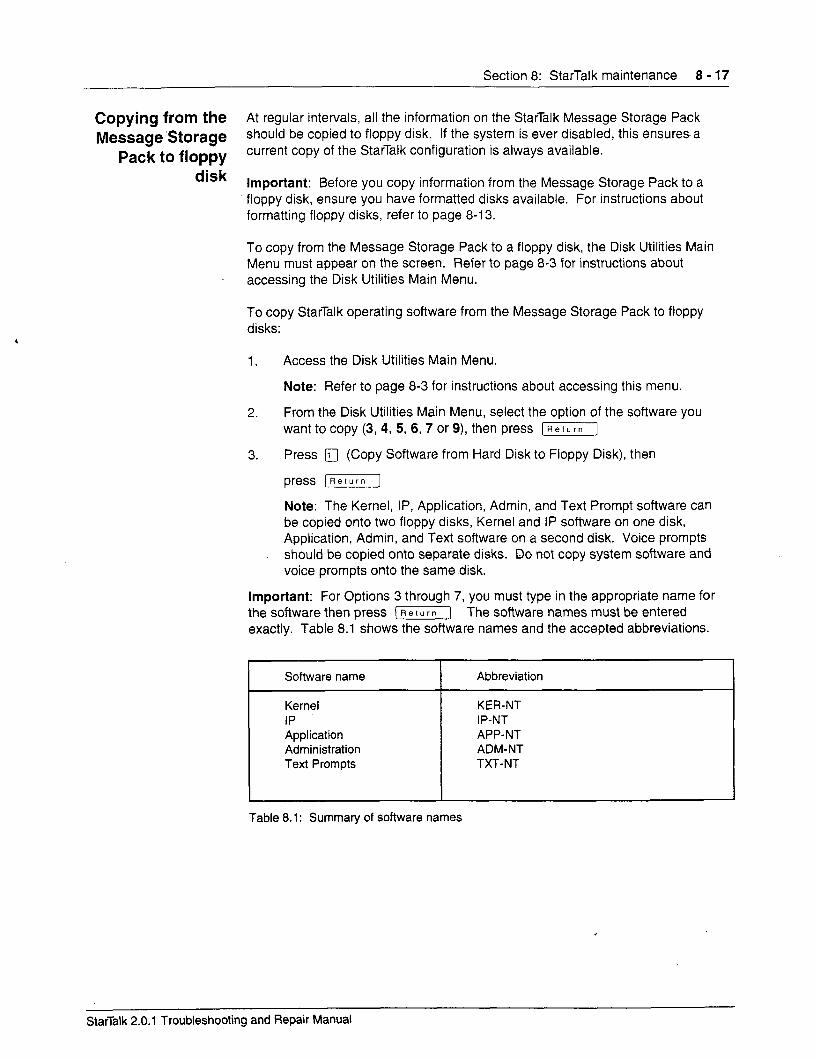
Section 8: StarTalk maintenance 8 - 17
Copying from the At regular intervals, all the information on the StarTalk Message Storage Pack
Message ‘Storage should be copied to floppy disk. If the system is ever disabled, this ensures a
Pack to floppy current copy of the StarTalk configuration is always available.
disk important: Before you copy information from the Message Storage Pack to a floppy disk, ensure you have formatted disks available. For instructions about formatting floppy disks, refer to page 8-l 3.
To copy from the Message Storage Pack to a floppy disk, the Disk Utilities Main Menu must appear on the screen. Refer to page 8-3 for instructions about accessing the Disk Utilities Main Menu.
To copy StarTalk operating software from the Message Storage Pack to floppy disks:
1. Access the Disk Utilities Main Menu.
Note: Refer to page 8-3 for instructions about accessing this menu.
2. From the Disk Utilities Main Menu, select the option of the software you want to copy (3,4, 5, 6,7 or 9) then press [Return]
3. Press q (Copy Software from Hard Disk to Floppy Disk), then
press [ReturnJ
Note: The Kernel, IP, Application, Admit-r, and Text Prompt software can be copied onto two floppy disks, Kernel and IP software on one disk, Application, Admit-r, and Text software on a second disk. Voice prompts should be copied onto separate disks. Do not copy system software and voice prompts onto the same disk.
important: For Options 3 through 7, you must type in the appropriate name for the software then press 1-1 The software names must be entered exactly. Table 8.1 shows the software names and the accepted abbreviations.
I Software name I Abbreviation
I Kernel KER-NT IP IP-NT Application APP-NT Administration ADM-NT Text Prompts TXT-NT
Table 8.1: Summary of software names
StarTalk 2.0.1 Troubleshooting and Repair Manual
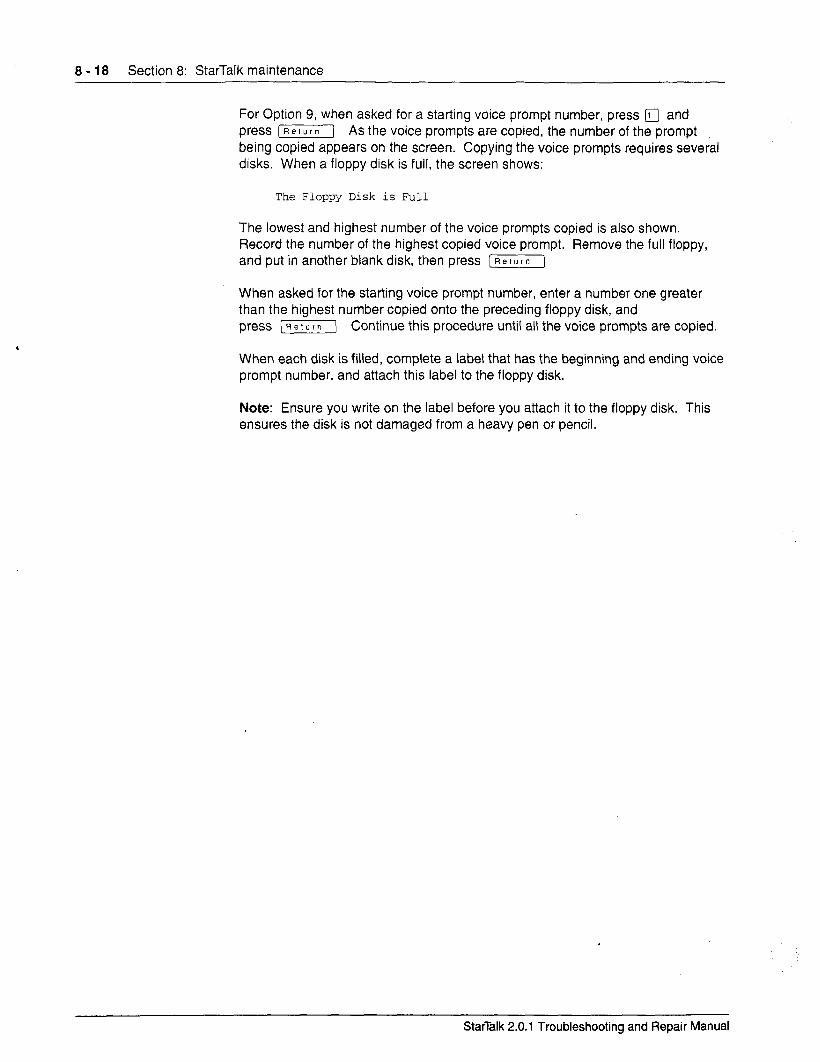
8 - 18 Section 8: Starlalk maintenance
For Option 9, when asked for a starting voice prompt number, press fl and press [Return] As the voice prompts are copied, the number of the prompt being copied appears on the screen. Copying the voice prompts requires several disks. When a floppy disk is full, the screen shows:
The Floppy Disk is Full
The lowest and highest number of the voice prompts copied is also shown. Record the number of the highest copied voice prompt. Remove the full floppy, and put in another blank disk, then press [Return]
When asked for the starting voice prompt number, enter a number one greater than the highest number copied onto the preceding floppy disk, and press LReturn] Continue this procedure until all the voice prompts are copied.
When each disk is filled, complete a label that has the beginning and ending voice prompt number, and attach this label to the floppy disk.
Note: Ensure you write on the label before you attach it to the floppy disk. This ensures the disk is not damaged from a heavy pen or pencil.
StarTalk 2.0.1 Troubleshooting and Repair Manual
Performing StarTalk upgrades 9 ltltrOC!UCtiOIl There are two kinds of StarTalk upgrades. The first kind of upgrade is the hard-
ware upgrade from a module 110 to 165 minute Message Storage Pack. The second kind of upgrade is updating StarTalk operating software. This section describes the procedures necessary to complete a StarTalk upgrade from a Model 110 to 165, and also describes the procedures necessary to upgrade StarTalk software.
PerfOtTTlil’lg a A StarTalk Hardware Upgrade kit contains:
StarTalk . hardware .
two-port (four-channel) TCM Inter-face PCA 165 Minute Message Storage Pack PCA
upgrade . a copy of the StarTalk Troubleshooting and Repair Manual
Ensure the Upgrade kit contains all the items in the above list.
To complete a StarTalk hardware upgrade you require:
common hand tools such as screwdrivers Note: You need a screwdriver with a shaft at least 6.5 inches long (approxi- mately 17 cm). anti-static wrist strap an RS-232 terminal an W-232 printer (if using StarTalk software below version 1 S) an W-232 cable to connect the terminal or printer to StarTalk a StarTalk software loader high density floppy disk(s) (number depends on StarTalk configuration) Note: You must use high density disks. Other types of disks, such as double density, will not work. an RJ-11 line cord a Canadian (English/French) or American (English/Spanish) software package. Refer to Appendix B for ordering information.
.
StarTalk 2.0.1 Troubleshooting and Repair Manual
9 - 2 Section 9: Performing StarTalk upgrades
Before you begin Before you begin an upgrade from a Model 110 to a Model 165, ensure you have all the necessary tools and the Upgrade kit is complete. You must also remo-ve the cover of the StarTalk module. Refer to page 3-3 for instructions about remov- ing the cover.
Important: Backing up and restoring user data can only be performed on StarTalk modules using software version 1.5 or greater. Refer to the StarTalk Set Up and Operation Guide for instructions about determining the StarTalk software version. You must use the current operating software version to perform a backup of StarTalk operating software and user data. When you restore the data, you must use the latest software version being installed on the system. For example, if you are backing up a system that uses 1.6 software, you must use the 1.6 software utilities to perform the backup. You must then restore the operating software to the new Message Storage Pack using 2.0.1 software.
If you are upgrading from version 1 S, you must first upgrade to version 1.6 and then upgrade to version 2.0.1. When the module you are upgrading is running software version 1.5, you must re-record and re-program all the user data after the upgrade is completed. Before you begin the upgrade on these modules, print the Numeric Mailbox Owner Report (Report 2) and System Group List Report (Report 3). This provides you with a listing of mailboxes and Group Lists so that you can restore them manually after step 7. Refer to the StarTalk Set Up and Operation Guide for instructions about printing reports.
Upgrading a To complete a StarTalk upgrade, you must: StarTalk Module from 110 to 165 ‘. Back up the user data on the existing Model 110 to floppy disk using the
procedure Backing Up User Data on page 8-2.
Before performing step 2, you must remove the software loader from the module. Refer to Appendix E.
2. Remove the TCM interface PCA from slot J4 of the Model 110 module using the procedure Removing TCM Interface PCA - Model 11 O/165 and Model 385 on page 5-3.
3. Install the new two-port TCM Interface PCA into slot J4 on the Model 110 module using the procedure Replace TCM Interface PCA - Model 1101 165 and Model 385 on page 5-5.
4. Remove the Message Storage Pack PCA from the Model 110 module using the procedure Remove Message Storage Pack PCA - Model 11 O/l 85 on page 5-6.
5. Install the 165 minute Message Storage Pack PCA in the Model 110 mod- ule using the procedure Replace Message Storage Pack PCA - Model 11 O/165 on page 5-7.
6. Format the new Message Storage Pack using the procedure Formatting the Message Storage Pack on page 7-4.
Important: To format the Message Storage Pack, the StarTalk 2.0 Disk Utilities version and the software version you are instailing must be the same.
StarTalk 2.0.1 Troubleshooting and Repair Manual
Section 9: Performing StarTalk upgrades 9 - 3
7.
8.
Load the StarTalk operating software onto the Message Storage Pack using the procedure Loading the StarTalk operating software on page 8’9.
Restore the user data to the Message Storage Pack using the procedure Restoring user data on page 8-5.
9. Replace the module cover using the procedure, Removing the module cover, on page 5-2.
10. Test that StarTalk is functioning using the procedure Testing StarTalk on pages 5-50 and 5-51.
Note: For more information about Feature Codes, refer to Operating Feature Codes and Determining StarTalk Feature Codes.
Pet’fOt’mitlg a The StarTalk software upgrade updates the StarTalk operating software from a
StarTal k current version to the new version 2.0.1. The Software Upgrade kit contains:
software . Disk Utilities software 2.0.1
upgrade l Operating software 2.0.1 . Voice Prompt software 2.0.1 . Disk Utilities version 1.6 or 2.0
Ensure the Upgrade kit contains all the items in the above list.
Note: The number of disks contained within the two software upgrade kits vary. Refer to Appendix B for more information between the American and Canadian Software Upgrade Kits.
To complete a StarTalk software upgrade you require:
. floppy disk drive (software loader) Note: A floppy disk drive is required for all StarTalk Modules 110 and 165.
. an RS-232 terminal or printer
StarTalk 2.0.1 Troubleshooting and Repair Manual
9 - 4 Section 9: Performing StarTalk upgrades
Upgrading To perform a StarTalk software upgrade:
StarTalk software from 1.6 to 2.0.1 ‘. Back up the user data using the Disk Utilities software version 1.6. Refer to
page 8-2 for information about backing up user data.
Note: If you are performing a backup, the StarTalk 2.0 Disk Utilities version and the software version you are upgrading must be the same.
2. Format the Message Storage Pack using Disk Utilities software version 2.0.1. Refer to Formatting the Message Storage Pack on page 7-4.
3. Load the StarTalk operating software onto the formatted Message Storage Pack. Refer to Loading the StarTalk operating software procedure on page 8-9.
4. Restore the user data to the Message Storage Pack using StarTalk soft- ware 2.0.1. Refer to the Restoring user data procedure on page 8-5.
5. Test to ensure StarTalk is functioning using the procedure Testing StarTalk on pages 5-50 and 5-51.
Note: For more information about Feature Codes, refer to Operating Feature Codes and Determining StarTalk Feature Codes.
Upgrading Upgrading StarTalk involves loading the Kernel, IP, Application, Administration,
StarTal k software and Display Text software. All disks are labeled. Refer to the appropriate disk
from 2.0 to 2.0.1 when selecting software files. Each file must be loaded individually with the corresponding file name. These include:
I Software File name Main Menu Option number
Kernel KER-NT IP IP-NT Application APP-NT Administration ADM-NT Display,Text TXT-NT
Option 3 Option 4 Option 5 Option 6 Option 7
Important: The file names shown here must be entered exactly as shown when the terminal prompts for the file name. File names must be entered in capital letters.
To upgrade StarTalk 2.0.1 for Feature 986:
1. Turn off the power to the StarTalk Module.
or
At the Password prompt, type SY~ and reboot the system.
StarTalk 2.0.1 Troubleshooting and Repair Manual
Section 9: Performing StarTalk upgrades 9 - i
2.
3.
4.
5.
6.
7.
a.
9.
10.
11.
12.
13.
14.
insert the StarTalk 2.0.1 Utilities Disk into the floppy disk drive.
Turn on the power to StarTalk. After the Power-on Diagnostics, the-Disk Utilities Main Menu appears.
Remove the Utilities Disk from the floppy drive.
Insert the disk labeled Control Program KER-NT, IP-NT.
Press q then press I]
Press q then press (Return]
Type KER-WI-
Press 1-1
The SCreWI shows: New Disk Recognized...Copying Page 01
Press [Spacebar] to return to the Main Menu.
Repeat steps 7 through 11 for each of the software files. For example, to load the IP software you would press option 4 in step 7. In step 8 you would type IP-NT and continue with the remaining steps.
Important: You must complete steps 7 through 11 for each of the software files.
After the upgrade is performed the customized Automated Attendant prompt must be re-recorded.
Reboot StarTalk.
Test to ensure StarTalk is functioning using the procedure Testing StarTalk on pages 5-50 and 5-51.
StarTalk 2.0.1 Troubleshooting and Repair Manual
9 - 6 Section 9: Performing StarTalk upgrades
StarTalk 2.0.1 Troubleshooting and Repair Manual
Appendix A: DTMF detection
lIltt’OdUCtiOtl Dual Tone Multi-frequency (DTMF), is a signal generated by tone dial telephones. These telephones are sometimes referred to as Touch Tone or Digitone. StarTalk responds to the tones generated by this kind of telephone with an appropriate feature implementation. Human speech can sometimes sound just like a DTMF signal to StarTalk. For example, a caller could leave a message beginning “Hi Barbara. This is Jeff...” and StarTalk could hear “Hi Barbara. Thi...” followed by the DTMF tone for “end of message”. The frequency in the voice tone duplicates a DTMF tone that StarTalk interprets as a signal command. This problem is referred to as “Talk Off”.
DTMF duration StarTalk uses a tone duration to distinguish between digital tone signals and voice tones. StarTalk is programmed to respond only to DTMF tones having a minimum duration of 48 ms. This duration was determined from extensive testing by Northern Telecom engineering.
The ability to change this value has been added because some models of Cellular telephones and PBXs send a tone shorter than 48 ms duration. The minimum industry specification for DTMF tone duration is 80 ms.
v Caution: Changing the duration of the DTMF parameter is a trade off between improving the ability to detect a shorter DTMF tone and increasing the possibility of Talk Off. As you improve one, the other gets worse.
StarTalk 2.0.1 Troubleshooting and Repair Manual
A - 2 Appendix A: DTMF detection
To change the DTMF tone duration parameter: -.
1. From any M7310, M7324, or M7900 telephone,
press [FeatureJmaa
The display shows: Lug:
2. Enter the System Coordinator Mailbox and password combination.
Note: The System Coordinator mailbox and password combination varies, depending on the DN length of the Norstar system. If you do not know the System Coordinator mailbox and password combination, ask the System Coordinator or refer to StarTalk Set Up and Operation Guide, Section 10, resetting the System Coordinators password.
3. Press a
The display shows: Pswd:
4. Enter the password, and press OK or q Note: Contact your Northern Telecom support representative for the password that is entered in Step 4.
In the United States contact:
(615) 883-9220
or Phone toll free l-800-321 -2649
In Canada contact:
Installation Technical Assistance Service (ITAS)
Northern Telecom Canada Ltd.
Private Networks Calgary
370535th Street N.E.
Calgary, Alberta
TlY 6C2
CANADA
Phone toll free: l -800-NO1 -ITAS (l-800-661 -4827)
5. The display will show the current DTMF value in milliseconds (ms).
6. Press CZ
7. Enter the new value (20 - 60).
8. Press m to end the StarTalk session.
StarTalk 2.0.1 Troubleshooting and Repair Manual
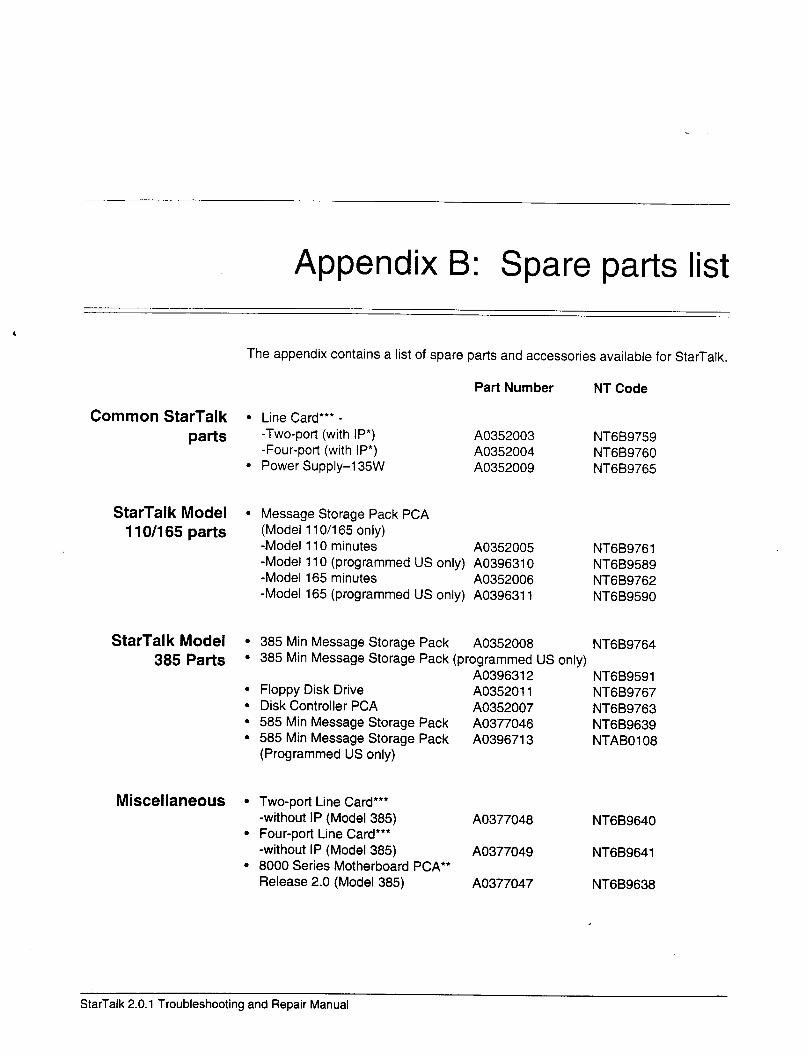
Appendix B: Spare parts list
Common StarTal k parts
StarTalk Model 11 O/l 65 parts
StarTal k Model 385 Parts
Miscellaneous
The appendix contains a list of spare parts and accessories available for StarTalk.
Part Number NT Code
l Line Card*** - -Two-port (with IP*) -Four-port (with IP*)
l Power Supply-l 35W
A0352003 NT6B9759 A0352004 NT6B9760 A0352009 NT6B9765
l Message Storage Pack PCA (Model 11 O/l 65 only) -.Model 110 minutes A0352005 -Model 110 (programmed US only) A039631 0 -Model 165 minutes A0352006 -Model 165 (programmed US only) A039631 1
NT6B9761 NT6B9589 NT6B9762 NT6B9590
l 385 Min Message Storage Pack A0352008 NT6B9764 l 385 Min Message Storage Pack (programmed US only)
l Floppy Disk Drive l Disk Controller PCA
l 585 Min Message Storage Pack l 585 Min Message Storage Pack
(Programmed US only)
l Two-port Line Card*** -without IP (Model 385)
l Four-port Line Card*** -without IP (Model 385)
l 8000 Series Motherboard PCA** Release 2.0 (Model 385)
A039631 2 A035201 1 A0352007 A0377046 A039671 3
A0377048
A0377049
A0377047
NT6B9591 NT689767 NT6B9763 NT6B9639 NTABO108
NT6B9640
NT6B9641
NT6B9638
StarTalk 2.0.1 Troubleshooting and Repair Manual
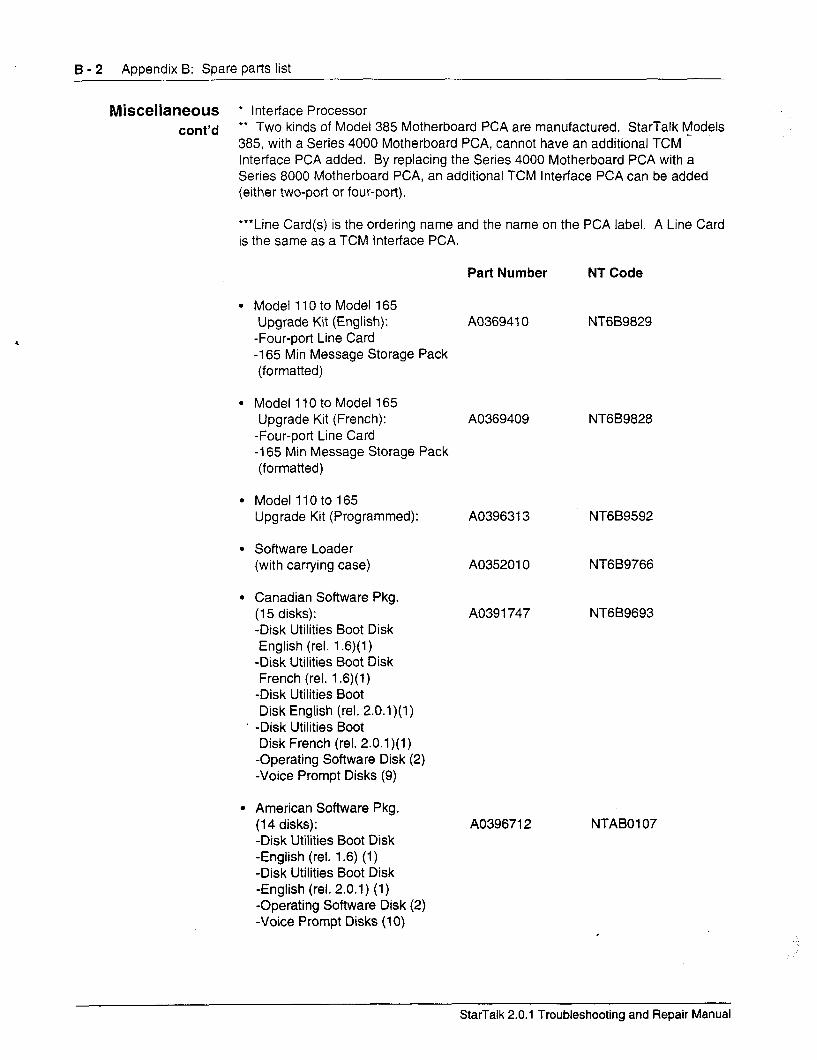
B - 2 Aooendix B: Spare Park list
Miscellaneous * Interface Processor
cont’d ** Two kinds of Model 385 Motherboard PCA are manufactured. StarTalk Models 385, with a Series 4000 Motherboard PCA, cannot have an additional TCM - interface PCA added. By replacing the Series 4000 Motherboard PCA with a Series 8000 Motherboard PCA, an additional TCM Interface PCA can be added (either two-port or four-port).
***Line Card(s) is the ordering name and the name on the PCA label. A Line Card is the same as a TCM Interface PCA.
Part Number NT Code
9 Model 110 to Model 165 Upgrade Kit (English): A036941 0 NT6B9829 -Four-port Line Card -165 Min Message Storage Pack (formatted)
l Model 110 to Model 165 Upgrade Kit (French): A0369409
-Four-port Line Card -165 Min Message Storage Pack (formatted)
l Model 110 to 165 Upgrade Kit (Programmed): A039631 3
l Software Loader (with carrying case) A035201 0
l Canadian Software Pkg. (15 disks): -Disk Utilities Boot Disk English (rel. 1.6)(l)
-Disk Utilities Boot Disk French (rel. 1.6)(l)
-Disk Utilities Boot Disk English (rel. 2.0.1)(l)
. -Disk Utilities Boot Disk French (rel. 2.0.1)(l)
-Operating Software Disk (2) -Voice Prompt Disks (9)
A039 1747
l American Software Pkg. (14 disks): -Disk Utilities Boot Disk -English (rel. 1.6) (1) -Disk Utilities Boot Disk -English (rel. 2.0.1) (1) -Operating Software Disk (2) -Voice Prompt Disks (10)
A039671 2
NT6B9828
NT6B9592
NT6B9766
NT6B9693
NTABO107
StarTalk 2.0.1 Troubleshooting and Repair Manual
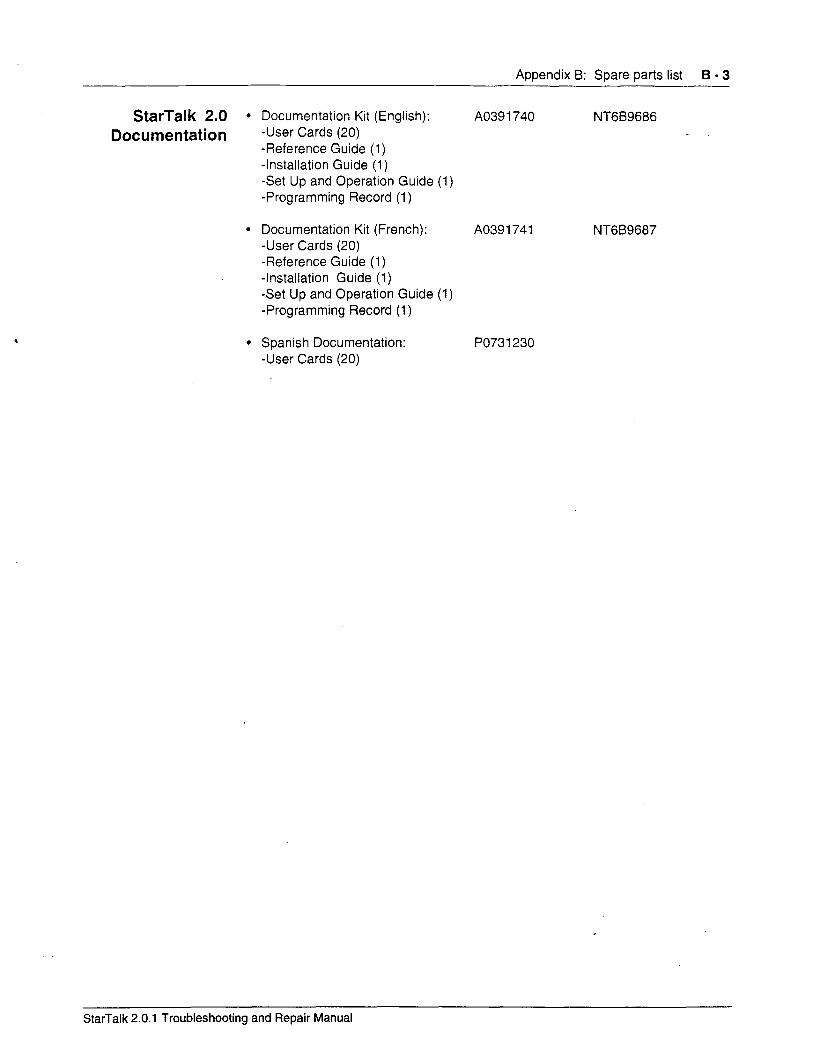
Appendix B: Spare parts list B - 3
StarTal k 2.0 l Documentation Kit (English):
Documentation -User Cards (20) -Reference Guide (1) -Installation Guide (1) -Set Up and Operation Guide (1) -Programming Record (1)
l Documentation Kit (French): -User Cards (20) -Reference Guide (1) -Installation Guide (1) -Set Up and Operation Guide (1) -Programming Record (1)
l Spanish Documentation: -User Cards (20)
A0391 740 NT6B9686
A0391 741 NT689687
PO731 230
StarTalk 2.0.1 Troubleshooting and Repair Manual
6 - 4 Appendix B: Spare parts list
StarTalk 2.0.1 Troubleshooting and Repair Manual
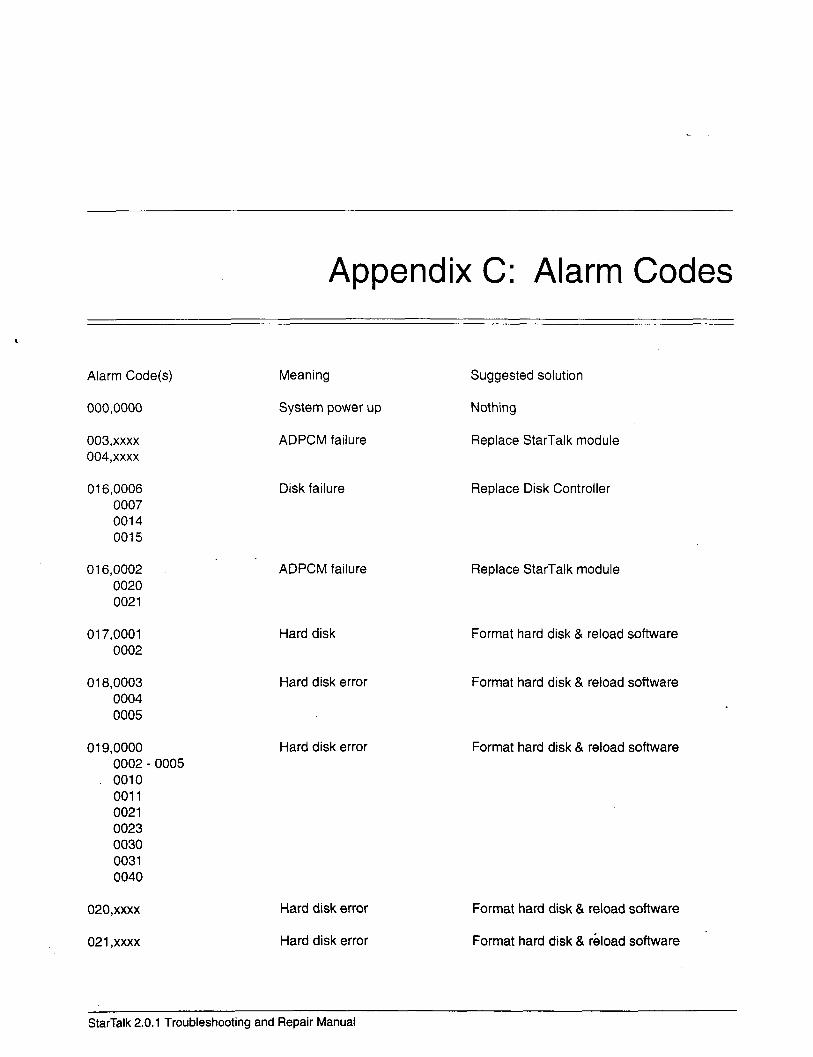
Appendix C: Alarm Codes
Alarm Code(s) Meaning Suggested solution
ooo,oooo System power up Nothing
003,xxxx 004.xxxx
ADPCM failure Replace StarTalk module
016,0006 0007 0014 0015
Disk failure Replace Disk Controller
016,0002 0020 0021
ADPCM failure Replace StarTalk module
017,0001 0002
018,0003 0004 0005
019,0000 0002 - 0005 0010 0011 0021 0023 0030 0031 0040
020,xxxx
021 ,xxxx
Hard disk Format hard disk & reload software
Hard disk error Format hard disk & reload software
Hard disk error Format hard disk & reload software
Hard disk error
Hard disk error
Format hard disk & reload software
Format hard disk & reload software
StarTalk 2.0.1 Troubleshooting and Repair Manual
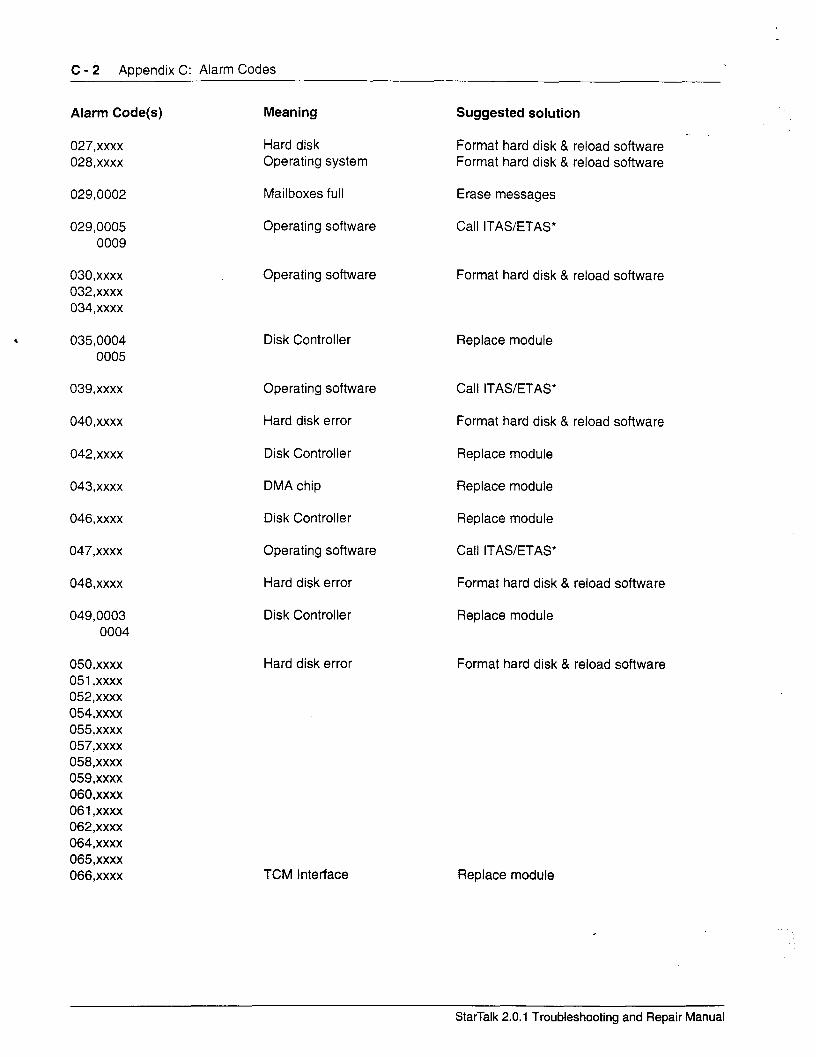
C - 2 Appendix C: Alarm Codes
Alarm Code(s) Meaning Suggested solution
027,xxxx 028,xxxx
Hard disk Operating system
Format hard disk & reload software Format hard disk & reload software
029,0002 Mailboxes full Erase messages
029,0005 0009
Operating software Call ITAS/ETAS*
030,xxxx 032,xxxx 034,xxxx
Operating software Format hard disk & reload software
, 035,0004 0005
039,xxxx
040,xxxx
042,xxxx
043,xxxx
046,xxxx
047,xxxx
048,xxxx
049,0003 0004
050,xxxx 051 ,xxxx 052,xxxx 054,xxxx 055,xxxx 057,xxxx 058,xxxx 059,xxxx 060,xxxx 061 ,xxxx 062,xxxx 064,xxxx 065,xxxx 066,xxxx
Disk Controller Replace module
Operating software Call ITAS/ETAS*
Hard disk error Format hard disk & reload software
Disk Controller Replace module
DMA chip Replace module
Disk Controller Replace module
Operating software Call ITAS/ETAS*
Hard disk error Format hard disk & reload software
Disk Controller Replace module
Hard disk error Format hard disk & reload software
TCM Interface Replace module
StarTalk 2.0.1 Troubleshooting and Repair Manual
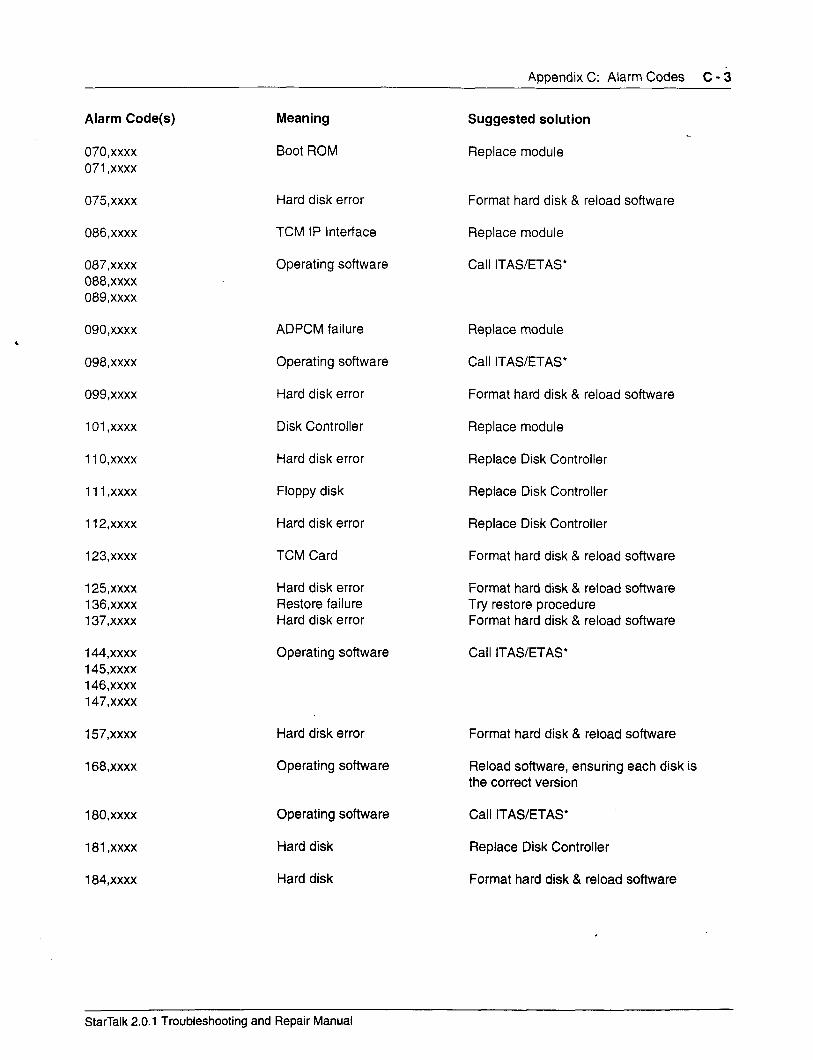
Appendix C: Alarm Codes C - 3
Alarm Code(s)
070,xxxx 071 ,xxxx
075,xxxx
086,xxxx
087,xxxx 088,xxxx 089,xXxX
090,xxxx
098,xXxX
099,xxxx
101 .xXxX
110,xxxx
111 .xxxx
112,xxxx
123.xxxx
125,xxxx 136,xxxx 137,xxxx
144,xxxx 145,xxxx 146,xxxx 147,xxxx
157.xxxx
168,xxxx
180,xxxx
181 ,xxxx
184,xxxx
Meaning
Boot ROM
Hard disk error
TCM IP Interface
Operating software
ADPCM failure
Operating software
Hard disk error
Disk Controller
Hard disk error
Floppy disk
Hard disk error
TCM Card
Hard disk error Restore failure Hard disk error
Operating software
Hard disk error
Operating software
Operating software
Hard disk
Hard disk
Suggested solution
Replace module
Format hard disk & reload software
Replace module
Call ITASETAS’
Replace module
Call ITAS/ETAS*
Format hard disk & reload software
Replace module
Replace Disk Controller
Replace Disk Controller
Replace Disk Controller
Format hard disk & reload software
Format hard disk & reload software Try restore procedure Format hard disk & reload software
Call ITAS/ETAS*
Format hard disk & reload software
Reload software, ensuring each disk is the correct version
Call ITAS/ETAS*
Replace Disk Controller
Format hard disk & reload software
StarTalk 2.0.1 Troubleshooting and Repair Manual
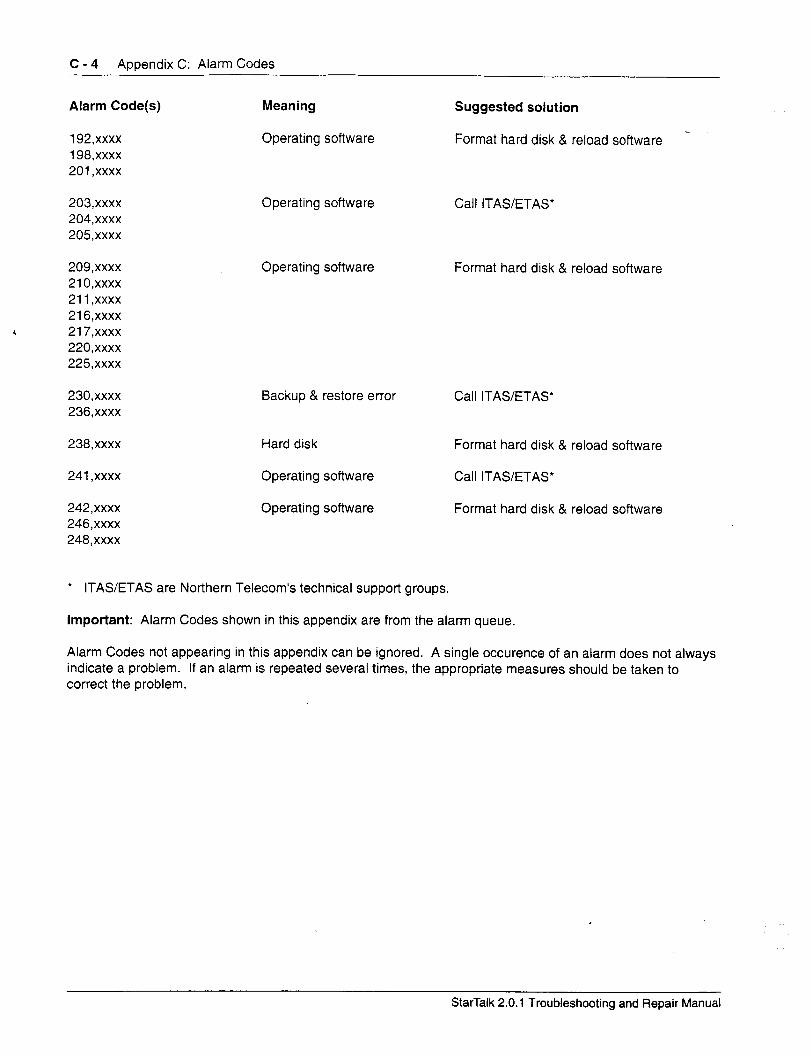
C - 4 Appendix C: Alarm Codes
Alarm Code(s) Meaning Suggested solution
192,xxxx 198,xxxx 201 ,xxxx
Operating software - Format hard disk & reload software
203,xxxx 204,xxxx 205,xxxx
Operating software Call ITAS/ETAS*
209,xxxx Operating software Format hard disk & reload software 210,xxxx 211 ,xxxx 216,xxxx
, 217,xxxx 220,xxxx 225,xxxx
230,xxxx 236,xxxx
238,xxxx
241 ,xxxx
242,xxxx 246,xxxx 248,xxxx
Backup & restore error
Hard disk
Operating software
Operating software
Call ITAS/ETAS*
Format hard disk & reload software
Call ITAS/ETAS*
Format hard disk & reload software
* ITAWETAS are Northern Telecom’s technical support groups.
Important: Alarm Codes shown in this appendix are from the alarm queue.
Alarm Codes not appearing in this appendix can be ignored. A single occurence of an alarm does not always indicate a problem. If an alarm is repeated several times, the appropriate measures should be taken to correct the problem.
StarTalk 2.0.1 Troubleshooting and Repair Manual

Appendix D: Diagnostics
lntt’OdUCtiOIl StarTatk automatically performs diagnostic tests on the hardware and software. There are two diagnostic tests performed when the StarTalk module is first turned on: Power-on Diagnostics and Down-load Diagnostics.
Power-on Diagnostics are run from the Boot ROM located on the StarTalk mother- board, while the Down-load Diagnostics are run from a program stored on the hard disk.
Once StarTalk is up and running, diagnostics run continually, testing both the hardware and software. When problems are encountered, they are reported with an Alarm code. A complete list of Alarm codes can be found in Appendix C.
Power-Oil The motherboard Power-on Diagnostics consist of six tests. These are:
Diagnostics 1. ROM Check Sum Test This test computes a 16 bit sum of the Diagnostic code, and then compares it with the stored check sum in the ROM. When the computed sum is different from the stored check sum, the test fails.
2. ACIA Test This test issues a hardware reset to the ACIA chip, and then initializes the chip. After the initialization, if the chip does not indicate the transmit and receive buffers are empty, the test fails.
3. Memory Map Set Register Test This test writes a test pattern to the memory map set register. If any of the data read back from the memory map register differs from the test pattern, the test fails.
4. Memory Map SRAM Test This test uses a test pattern to verify the test can address each of the map set, and then writes a test pattern to the memory map SRAM. If any of the data read back from the memory map SRAM differs from the test pattern, the test fails.
StarTalk 2.0.1 Troubleshooting and Repair Manual
D - 2 Appendix D: Diagnostics
5. ADPCM Channel Buffer SRAM Test This test writes a test pattern to the ADPCM buffer SRAM. If any of the data-read back from ADPCM channel buffer SRAM differs from the pattern, the test fails.
Note: Because of boot test timing, this test might fail intermittently. A single failure does not mean the ADPCM chip is defective. If the test fails after succes- sive reboots, then the chip is likely defective.
6. DRAM Patter Test This test writes a test pattern to the entire 1 Megabyte of DRAM. If any of the data read back from the DRAM differs from the pattern, the test fails. If any of the Power-on Diagnostics fail, one of the following error messages appear and the boot process stops.
1. Boot ROM check sum test failed. 2. ACIA test failed. 3. Memory Map register test failed. 4. Memory Map Set SRAM test failed. 5. ADPCM channel buffer test failed. 6. DRAM test failed.
If any of the Power-on Diagnostics fail, the recommended troubleshooting proce- dure is to first check the power supply voltage. If any are out of spec, replace the power supply. If the voltage is in spec, replace the StarTalk module.
StarTalk 2.0.1 and Repair Manual

Appendix D: Diagnostics D - 3
Download When all Power-on Diagnostics run successfully, the Boot ROM starts from the
Diagnostics hard disk and runs the Download Diagnostics. The Download Diagnostics con- sists of five tests:
1. IRQ Interrupt Test Tests for the occurrence of the Motherboard IRQ (Interrupt Request) signal within 1 millisecond. This tests one of the primary timing signals required for proper StarTalk operation.
2. T8 Signal Test Test for the occurrence of the Motherboard T8 signal state change within approxi- mately 40 microseconds. This tests one of the primary timing signals required for proper StarTalk operation.
3. Toggle Signal Test Test for the occurrence of the Motherboard channel buffer swat (toggle) within approximately 65 milliseconds. This tests one of the primary timing signals required for proper StarTalk operation.
4. Clock/Calendar Chip Test Test to ensure the StarTalk clock/calendar circuitry is working. This test includes save clock/calendar chip content, set clock/calendar to one second before mid- night, wait one second, test all values for proper roll over, and then restore the original date and time.
5. ADPCM Chip Test Tests the ADPCMs for initialization to encode mode and decode mode. If any of the Down-load Diagnostics fail, one of. the following error messages appear, and the boot process is stopped.
1. IRQ Interrupt test failed. 2. T8 Signal test failed. 3. Toggle Signal test failed. 4. Clock/Calendar Chip test failed. 5. ADPCM Chip test failed.
If any of the Download Diagnostics fail to load from the hard disk, the Mother- board Power-On Diagnostics recycles forever. This is an indication that the StarTalk power supply, or the hard disk/disk controller sub assemblies are defec- tive. In this case, the recommended troubleshooting procedure is to check the power supply voltage. If any are out of spec, replace the power supply. If the voltage is in spec, replace the hard disk/disk controller sub assemblies.
StarTalk 2.0.1 Troubleshooting and Repair Manual

D - 4 Appendix D: Diagnostics
StarTalk 2.0.1 and Repair Manual
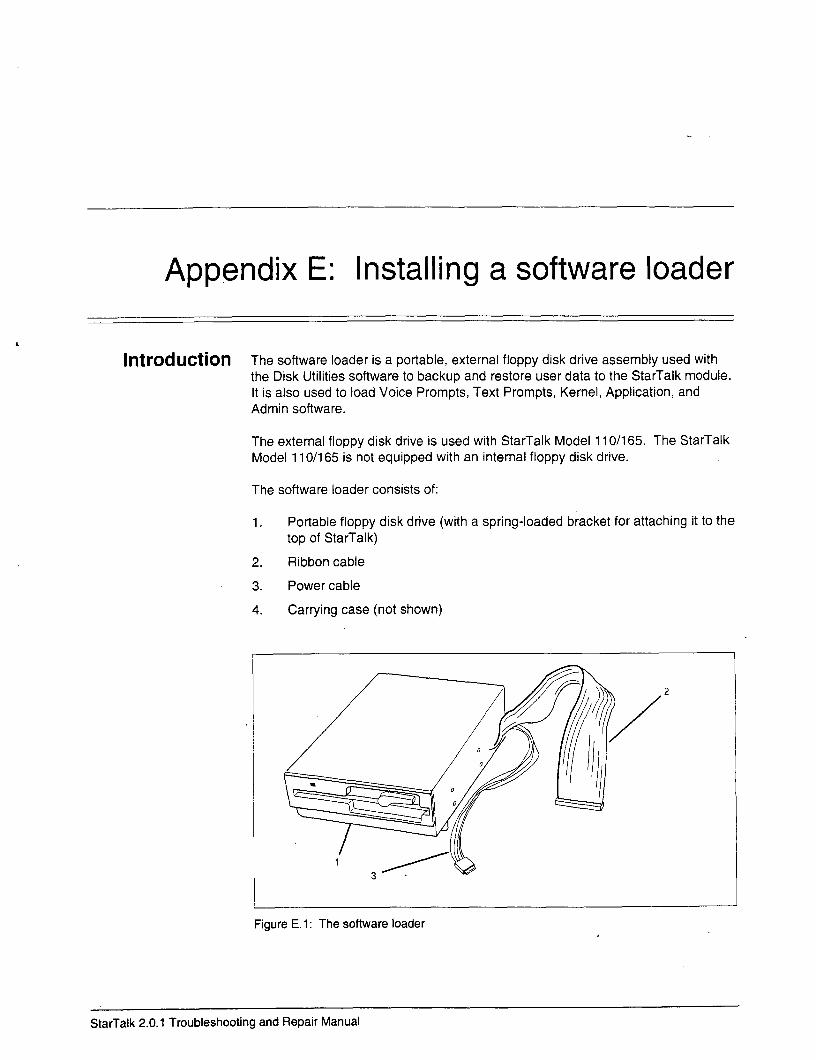
Appendix E: Installing a software loader
Intt’OdUCtiOtl The software loader is a portable, external floppy disk drive assembly used with the Disk Utilities software to backup and restore user data to the StarTalk module. It is also used to load Voice Prompts, Text Prompts, Kernel, Application, and Admin software.
The external floppy disk drive is used with StarTalk Model 11 O/l 65. The StarTalk Model 11 O/l 65 is not equipped with an internal floppy disk drive.
The software loader consists of:
1. Portable floppy disk drive (with a spring-loaded bracket for attaching it to the top of StarTalk)
2. Ribbon cable
3. Power cable
4. Carrying case (not shown)
I
2
I
Figure E. 1: The software loader
StarTalk 2.0.1 Troubleshooting and Repair Manual
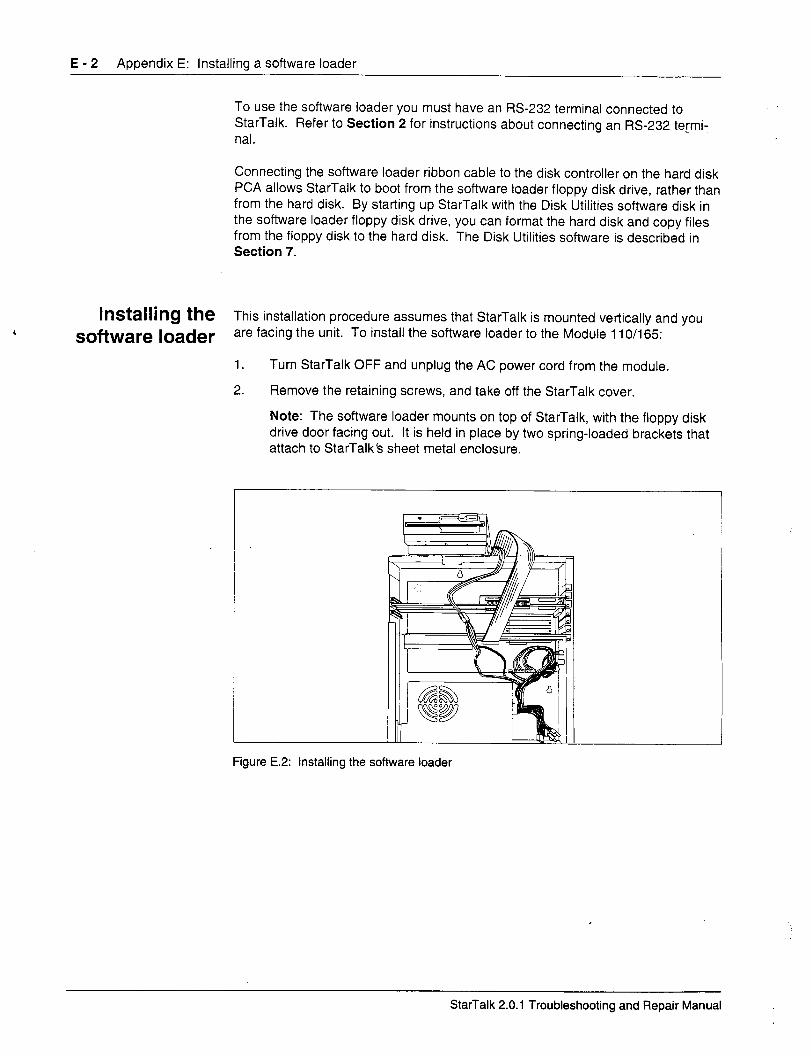
E - 2 Appendix E: Installing a software loader
To use the software loader you must have an W-232 terminal connected to StarTalk. Refer to Section 2 for instructions about connecting an W-232 termi- nal.
Connecting the software loader ribbon cable to the disk controller on the hard disk PCA allows StarTalk to boot from the software loader floppy disk drive, rather than from the hard disk. By starting up StarTalk with the Disk Utilities software disk in the software loader floppy disk drive, you can format the hard disk and copy files from the floppy disk to the hard disk. The Disk Utilities software is described in Section 7.
lflStalliIlg the This installation procedure assumes that StarTalk is mounted vertically and you
software loader are facing the unit. To install the software loader to the Module 11 O/l 65:
1. Turn StarTalk OFF and unplug the AC power cord from the module.
2. Remove the retaining screws, and take off the StarTalk cover.
Note: The software loader mounts on top of StarTalk, with the floppy disk drive door facing out. It is held in place by two spring-loaded brackets that attach to StarTalk’s sheet metal enclosure.
Figure E.2: Installing the software loader
StarTalk 2.0.1 Troubleshooting and Repair Manual
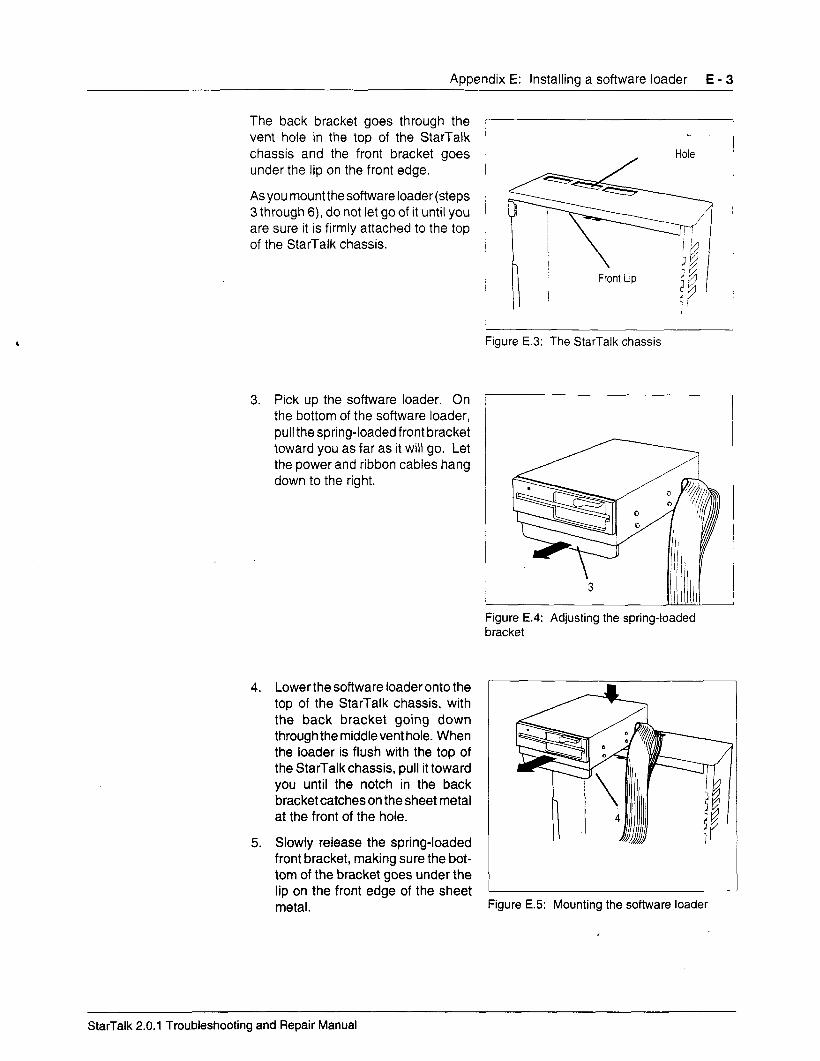
Appendix E: Installing a software loader E - 3
The back bracket goes through the vent hole in the top of the StarTalk chassis and the front bracket goes under the lip on the front edge.
As you mount the software loader (steps 3 through 6), do not let go of it until you are sure it is firmly attached to the top of the StarTalk chassis.
Figure E.3: The StarTalk chassis
3. Pick up the software loader. On the bottom of the software loader, pull the spring-loaded front bracket toward you as far as it will go. Let the power and ribbon cables hang down to the right.
Figure E.4: Adjusting the spring-loaded bracket
4. Lower the software loader onto the top of the StarTalk chassis, with the back bracket going down through the middlevent hole. When the loader is flush with the top of the StarTalk chassis, pull it toward you until the notch in the back bracket catches on the sheet metal at the front of the hole.
5. Slowly release the spring-loaded front bracket, making sure the bot- tom of the bracket goes under the lip on the front edge of the sheet metal. Figure E.5: Mounting the software loader
StarTalk 2.0.1 Troubleshooting and Repair Manual
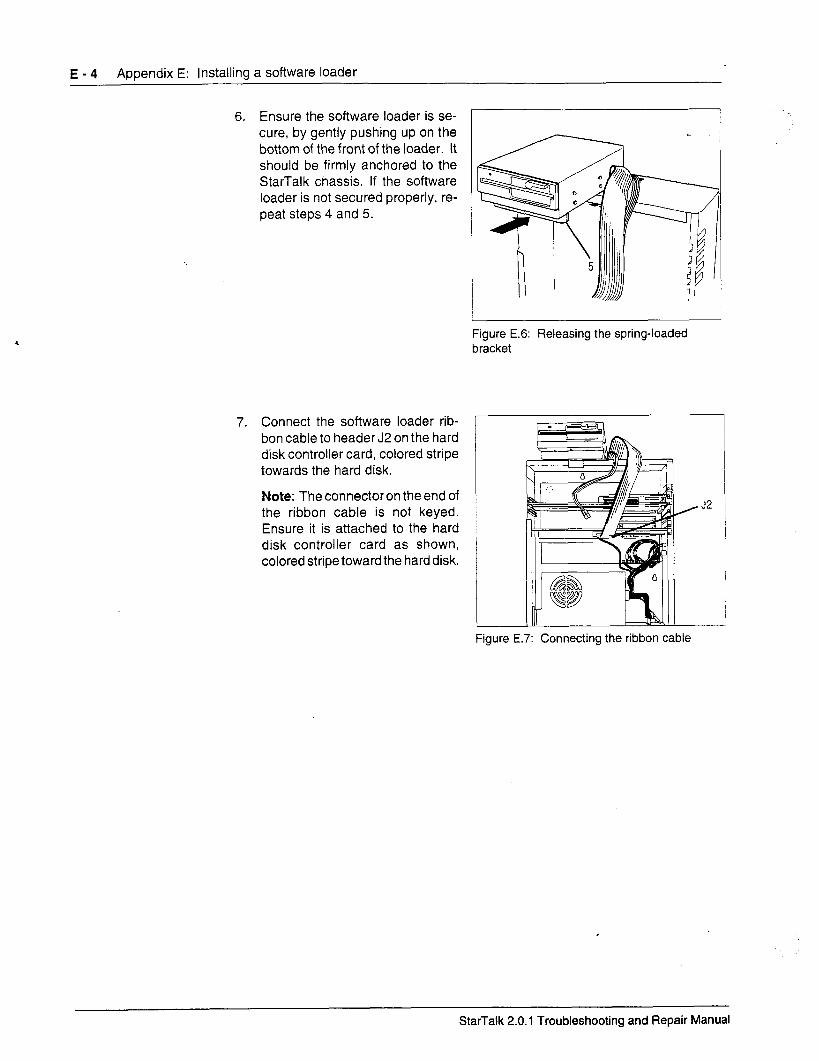
E - 4 Appendix E: Installing a software loader
6. Ensure the software loader is se- cure, by gently pushing up on the bottom of the front of the loader. It should be firmly anchored to the StarTalk chassis. If the software loader is not secured properly, re- peat steps 4 and 5.
Figure E.6: Releasing the spring-loaded bracket
7. Connect the software loader rib- bon cable to header J2 on the hard disk controller card, colored stripe towards the hard disk.
Note: The connector on the end of the ribbon cable is not keyed. Ensure it is attached to the hard disk controller card as shown, colored stripe toward the hard disk.
Figure E.7: Connecting the ribbon cable
StarTalk 2.0.1 Troubleshooting and Repair Manual

Appendix E: Installing a software loader E - 5
8. There are several power cables coming from the StarTalk power supply. Locate one that is not being used. Plug the cord connec- tor into the connector on the end of the software loader power cable.
Figure E.8: Connecting power to the software loader
9. Replace the StarTalk AC power cord.
10. Open the floppy disk drive door on the software loader, and remove the cardboard drive protector.
Il. Connect an W-232 terminal to StarTalk. Refer to Section 2 for instructions about connecting a terminal and setting the communication parameters.
StarTalk 2.0.1 Troubleshooting and Repair Manual
E - 6 Appendix E: Installing a software loader
Removing the To remove the software loader:
software loader ,
2.
3.
v
4.
v
5.
6.
7.
a.
Turn StarTalk OFF, and unplug the AC power cord from the unit.
Place the cardboard drive protector in the software loader floppy disk drive, and close the drive door.
Unplug the software loader power cable from the StarTalk power supply cable.
Caution: Only pull on the plastic connector. Do not pull on the cable.
Pull the software loader ribbon cable off of header J2 on the hard disk controller card.
Caution: Only pull on the plastic connector. Do not pull on the cable,
On the bottom of the software loader, pull the spring-loaded front bracket toward you as far as it will go.
With the brackets fully separated, push the software loader straight back until the rear bracket is free of the sheet metal. Lift the software loader straight up and off the StarTalk chassis.
Put StarTalk’s cover on and replace the retaining screws.
Replace the StarTalk AC power cord, and turn the power ON.
StarTalk 2.0.1 Troubleshooting and Repair Manual
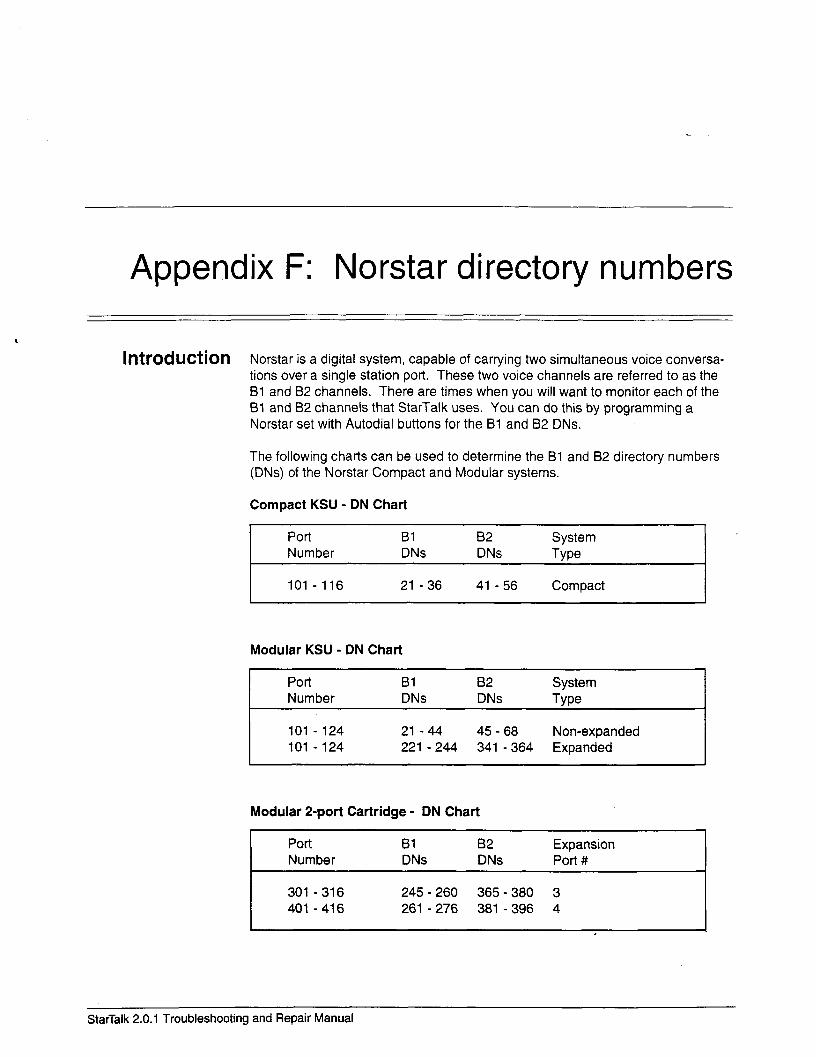
Appendix F: Norstar directory numbers
llltt’OdUCtiOtl Norstar is a digital system, capable of carrying two simultaneous voice conversa- tions over a single station port. These two voice channels are referred to as the Bl and B2 channels. There are times when you will want to monitor each of the Bl and B2 channels that StarTalk uses. You can do this by programming a Norstar set with Autodial buttons for the Bl and 82 DNs.
The following charts can be used to determine the Bl and B2 directory numbers (DNs) of the Norstar Compact and Modular systems.
Compact KSU - DN Chart
Port Bl Number DNs
82 DNs
System Type
101 - 116 21 -36 41 - 56 Compact I
Modular KSU - DN Chart
Port Number
Bl DNs
B2 DNs
System Twe
101 - 124 21-44 45 - 68 Non-expanded 101 - 124 221 - 244 341 - 364 Expanded
Modular P-port Cartridge - DN Chart
Port Number
Bl DNs
B2 DNs
Expansion Port #
301 - 316 245 - 260 365 - 380 3 401 - 416 261 - 276 381 - 396 4
StarTalk 2.0.1 Troubleshooting and Repair Manual
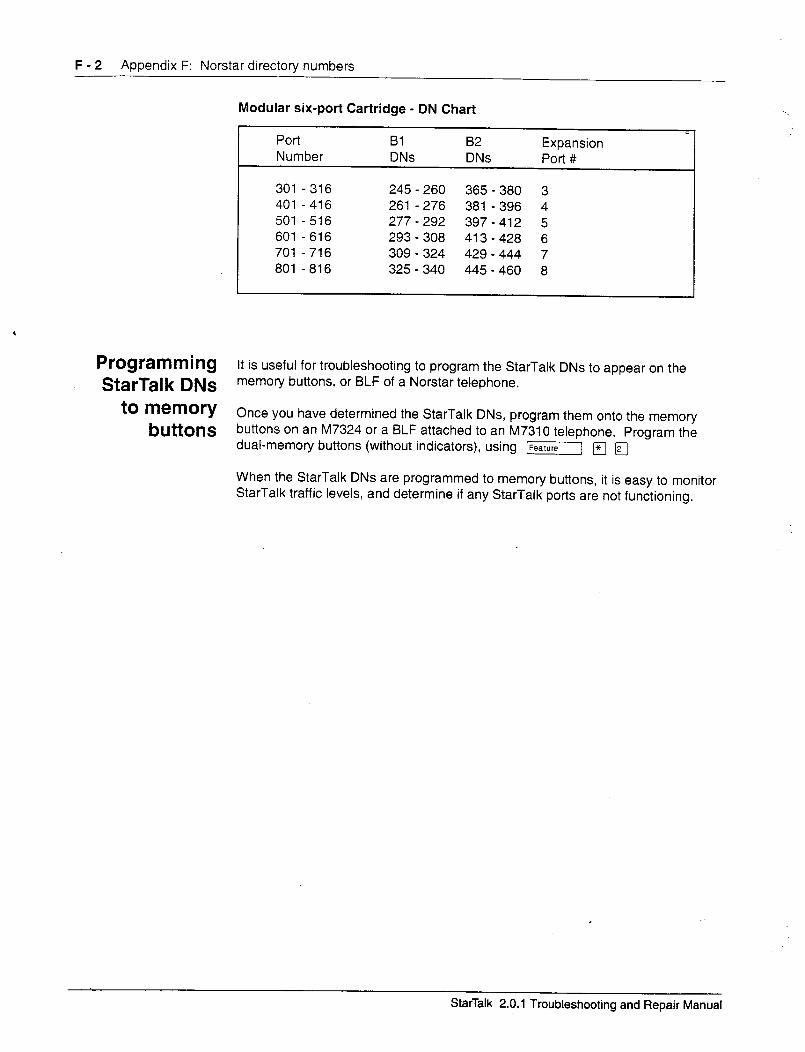

Index
A AC power cord receptacle, location, 2-9 Administration, multiple access, 6-23
loading, 8-9 software menu, 7-l 3
Aids, 1-4 Alarm codes, see appendix c Alarms, 4-3
menu, 6-33 Application software, 6-1
description, 6-4 loading, 8-9 menu, 7-12
Automated Attendant, 2-1
B Backup and restore, menu, 7-15
procedures, see section 8 Backup, see section 7 and 8
user data, 8-2 Baud rate, 3-7 Bilingual, 6-34
C Capacity, messaging, 11 O/l 65, 385, 2-1 Class of Service Admin, 6-14 Class of Service Report, 6-30 Coders/decoders (CODEC), 2-4 Components,
Model 11 O/l 65, 2-7 Model 385, 2-8
Communication parameters, 3-4 changing, 3-7 setting 6-20
connecting an RS-232 terminal, 3-2 Configuration, system admin, 6-17
Convenience outlet, location, 2-9 Conventions, l-3 Copying, see section 7 and 8
floppy disk, 7-7 from hard disk, 8-17 software, 8-l 4
Cover, removing, 5-2 Current, 2-l 0
D Data bits, 3-7 Date and time, setting, 6-19
menu, 7-17 Description of Features, 2-1 Diagnosing user problems, see section 4 Diagnostics, 4-3, also see appendix d Directory Report, 6-25 Disable, StarTalk, 6-l 8 Disk directory, viewing, 7-6 Disk, formatting, 8-13 Disk utilities software, see section 7
loading, 7-2, 8-9 Display text, menu, 7-13 DTMF delay, setting, 6-21, see also appendix a
duration, a-l Dynamic random access memory (DRAM), 2-4
E Electrical requirements, 2-10 Enabling, StarTalk, 6-18 Environment, 2-l 0 Equipment, special, 3-l
F Feature Codes, 4-2
StarTalk 2.0.1 Troubleshooting and Repair Manual

\ i
R Reboot. Menu O~IKX --; 8 deference alds. 1 -J
aemote termtnal aCCEjS 3-a Removing componenis s-ee section 5
D!sk Controller !.‘;del 1 1 O/l 65. 5-g Hard Disk PCA L.lodel 1 lOU6.5, 5-6 TCM Interface PCA Model 110/165, 5-3
Replacing components. see section 5 Hard Disk PCA hlodel 110/165, 5-7 TCM Interface PCA Model 110/165, 5-5
Reports. 6-24 Class of Service. 6-30 dtrectory, 6-25 Group List, 6-30 mallbox activity. 6-27 Message Usage. 6-31 numeric subscnber, 6-26 subscriber, 6-25 system parameters, 6-32
Resetting, StarTalk, 8-5 Reset statistics, 6-32 Restart, StarTalk, 6-18 Restore, procedures, 8-5
Notes, Warnings, Caution, 8-8 RS-232 terminal,
connecting, 3-2 connector, location, 2-9 default parameters, 3-l pin configuration, 2-6 reset switch, location, 2-9 serial port, 2-6 signal, 3-2 using, 3-4
S Small Computer Systems Interface (SCSI), 2-4 Software,
copying, 8-14 ’ description, see section 6 and 7 Disk Utilities, 7-1 loading, 7-2, 8-9 Options, disk utilities, 7-3 symptoms, troubleshooting, 4-9 upgrade, 9-3
Software loader, 4-l 2, see appendix e for installation Special parts, repair, 3-1 Static random access memory (SRAM), 2-4 Stop bit, 3-7 Storage capacity, 2-5 System admin, configuration, 6-17 System, overview, 2-1
date and time, setring, 6 .19
T Talk of see appendix a
cause. 4-l 0 TCM In!erface PCAs. 2-4
jacks. location, 2-9 troubleshooting. 4-l 5. L-1 6
Temperature. 2-1 o Terminal. remote, 3-8
RS-232. see FE-232 termtnal - Time, and date, 6-19
Menu, 7-17 Tools. 3-1 Top-level Menu, 3-6
accessing, 6-4 sample, 6-5
U Upgrade.
hardware, 9-2 software, 9-3
User maiiboxes, 6-6 adding, 6-6
v Voice messaging, 2-l Voice prompts, 7-3
loading, 8-9 menu, 7-16
Voltage, 2-l 0
StarTalk 2.0.1 Troubleshooting and Repair Manual

‘