Setup Instructions - GVERSE GeoGraphix
79
Setup Instructions
-
Upload
khangminh22 -
Category
Documents
-
view
3 -
download
0
Transcript of Setup Instructions - GVERSE GeoGraphix

Setup Instructions


iii
Table Of Contents Introduction ............................................................................................................................................................................ 1
Before You Begin Installation ................................................................................................................................................ 3
System Requirements............................................................................................................................................................ 5
System Requirements ........................................................................................................................................................ 5
System Requirements - Workstation: Discovery................................................................................................................ 5
Additional Requirements and Recommendations .......................................................................................................... 6
System Requirements: Discovery Server........................................................................................................................... 7
Additional Requirements and Recommendations .......................................................................................................... 7
Networking...................................................................................................................................................................... 8
Database Cache............................................................................................................................................................. 8
Storage ........................................................................................................................................................................... 8
Network Attached Storage (NAS), Storage Area Networks (SAN), and Other Non-Windows Storage Solutions .......... 8
Prerequisites ...................................................................................................................................................................... 8
Microsoft .NET Framework 3.5, Service Pack 1 ................................................................................................................ 8
ESRI ArcGIS 9.3.1 Runtime Engine................................................................................................................................... 9
Microsoft DirectX 10 March End-User Runtimes ............................................................................................................... 9
Installation............................................................................................................................................................................ 11
Installation ........................................................................................................................................................................ 11
Discovery 5000.0.2.0 Download from the Landmark Software Manager......................................................................... 11
Download Instructions .................................................................................................................................................. 11
End User Installation ........................................................................................................................................................ 12
End User Installation..................................................................................................................................................... 12
End User Installation STEP 1- Getting Started with Landmark LSM Download or Release DVD................................ 12
End User Installation STEP 2 - InstallShield Wizard Startup........................................................................................ 14
End User Installation STEP 3 - License Agreement..................................................................................................... 21
End User Installation STEP 4 - Customer Information ................................................................................................. 22
End User Installation STEP 5 - Setup Type (Typical vs. Custom)............................................................................... 23
Typical .......................................................................................................................................................................... 25
Custom ......................................................................................................................................................................... 28
Product Licensing............................................................................................................................................................. 36
License Wizard ............................................................................................................................................................. 36
Network Administrator Installation.................................................................................................................................... 38
Network Administrator Installation ................................................................................................................................ 38
Network License Server (LAM)..................................................................................................................................... 39
Workstation Installation ................................................................................................................................................ 39
Discovery Project Server (Optional) ............................................................................................................................. 48
Landmark Connectivity Installation .................................................................................................................................. 64
Landmark Connectivity Installation............................................................................................................................... 64
OpenWorks for Windows 5000.0.2.7............................................................................................................................ 64
Setup Instructions
iv
Preparing the SeisXchange Environment..................................................................................................................... 65
Utilities ................................................................................................................................................................................. 67
Utilities.............................................................................................................................................................................. 67
Utilities - Install PRIZM Chart Utility ................................................................................................................................. 69
Utilities - Install SeisVision SEG-Y Trace Viewer ............................................................................................................. 70
Uninstalling .......................................................................................................................................................................... 71
Uninstalling Discovery 5000.0.2.0 .................................................................................................................................... 71
Windows Vista.................................................................................................................................................................. 71
Uninstalling Discovery 5000.0.2.0 in Windows Vista (uninstall steps can also be used with Windows XP and Windows 7)................................................................................................................................................................................... 71
Uninstall Discovery in Windows XP - STEP 1 - Stopping GeoGraphix Services in Control Panel Services ............... 71
Uninstall Discovery in Windows Vista - STEP 2 - Getting Started with Programs and Features in Control Panel...... 73
Uninstall Discovery in Windows Vista - STEP 3 - Removing Discovery Software (FINAL STEP)............................... 74
Contacting Technical Support.............................................................................................................................................. 75

1
Introduction
Welcome to the 5000.0.2.0 release of the Discovery ™ , Landmark ® Connectivity, and Seismic Modeling software.
Discovery includes the GESXplorer ™ 5000.0.2.0, PRIZM ™ 5000.0.2.0, smartSECTION ® 5000.0.2.0 and SeisVision ™ 5000.0.2.0 software.
Landmark Connectivity includes the WellXchange ™ , GridXchange and SeisXchange ™ software.
Seismic Modeling includes the LogM ™ 5000.0.2.0 and STRUCT ™ 5000.0.2.0 software.
Discovery software is available through the Landmark Software Manager (LSM) or, on request, on a DVD.
Caution:
General Installation Requirements - please refer to the System Requirements for a complete list
The following conditions must be met before you can install the Discovery, Landmark Connectivity, and Seismic Modeling software:
You must have Administrative Rights to the local computer that will run the install.
Must have Internet Explorer 6.0 or higher installed.
Microsoft .NET 3.5, SP1 must be installed.
Must have networking installed including the TCP/IP protocol.
This software should only be installed on Windows ® XP Professional 32 bit, Windows ® XP Professional 64 bit, Windows ® Vista Business 32 bit, Windows ® Vista Enterprise 32 bit, Windows ® Vista Ultimate 32 bit, Windows ® Vista 64 bit, Windows ® Server2003 Standard 32 bit, Windows ® Server2003 Enterprise 32 bit, Windows ® Server 2003 Standard 64 bit, or Windows ® Server 2003 Enterprise 64 bit operating systems.
If using Discovery on OpenWorks, OpenWorks for Windows 5000.0.1.6 must be installed. OpenWorks for Windows has two install options; you can use either the Full install option (recommended) or the Basic install option.
If working in a network environment, do not forget that for all computers to continue to work together in shared projects, ALL computers (clients and servers alike) must be updated to the same version of Discovery if any of them are updated. It is intentional that computers with different versions of the Discovery software can not (in normal circumstances) and should not (in any case) be connected with each other.
The Welcome Guide document included with the download from LSM or on your DVD contains information on exciting new enhancements and features in the Discovery 5000.0.2.0 release.
This document includes very important information that you should read before installation:
Before You Begin Installation
System Requirements
Installation Overview and Step-by-Step Instructions
Utilities
Uninstalling Discovery Software

Setup Instructions
2
If you have any questions or issues with installation, don't hesitate to contact Technical Support.
You can print this installation guide:
From the Contents page to the left, select the desired book- or topic- .
Click the Print button on the toolbar.
When the Print Topics dialog box appears, select one of the two options.
Click OK when the Print dialog appears.

3
Before You Begin Installation
Before you start the installation process, GeoGraphix recommends that you follow these guidelines.
1. If you are working in a network environment, install the LAM license server on one computer to be used by all client computers. The LAM license server setup is available from LSM.
2. Obtain your new license file. In almost all cases, a new release requires a new/updated license file.
3. Make sure you have the current install obtained from LSM or on the DVD and the most recent software update files (if applicable) at the time of install.
4. Make complete backups or archives of all your projects. This is a very important step, DO NOT SKIP THIS STEP. Remember, a backup (such as from a tape) is only as good as the last time it was tested.
5. Backup any customized files from the Data directory such as custom libraries, symbols, and coordinate system files. Do this only if there is ANY chance of going back to the previous version.
6. Test any project updates or functionality if desired in a non-production environment.
7. Make sure that the prerequisites have been installed.
Note: If working in a network environment, do not forget that for all computers to continue to work together in shared projects, ALL computers (clients and servers alike) must be updated to the same version of Discovery if any of them are updated. It is intentional that computers with different versions of the GeoGraphix software can not (in normal circumstances) and should not (in any case) be connected with each other.


5
System Requirements
System Requirements
System requirements for all Discovery applications are provided as general guidelines. Hardware requirements will vary considerably depending on types of projects, project sizes, number of users, and network infrastructure/traffic. Contact your technical sales representative or technical support to discuss your requirements.
Workstation: Discovery
Geologic Suite (DataManager, GESXplorer, and PRIZM)
Geophysical Suite (SeisVision, pStaX, and SCAN)
Caution:
Landmark Connectivity or using Discovery 5000.0.2.0 with Discovery OpenWorks projects requires the 5000.0.2.7 version of OpenWorks for Windows.
Project Server: Discovery
Geologic Suite (DataManager, GESXplorer, and PRIZM)
Geophysical Suite (SeisVision, pStaX, and SCAN)
Next: Installation
Return to: Introduction
System Requirements - Workstation: Discovery
Operating system requirements
Supported Operating system RAM CPU
Windows® 7 Professional x64
Or
Windows® 7 Enterprise x64
Or
Windows® 7 Ultimate x64
2 GB Minimum
8 GB Recommended
Pentium 4 class or better
Dual processors/cores
Windows® XP Professional 64 bit 2 GB Minimum
4 GB Recommended
Pentium 4 x 64 class or better
Dual processors/cores
Notes
Note 1 – We recommend using the latest Microsoft service packs and security patches.
Note 4 – Actual available RAM on 32 bit platforms will generally be less than 4 GB due to OS limitations.

Setup Instructions
6
Graphics Hardware Requirements
Application Support Level Required Operating System Required Graphics Hardware
All Discovery Applications including Discovery 3D
Supported Windows® 7 DirectX 10 (see note 2) or DirectX 11 capable hardware
Discovery Applications except for Discovery 3D
All Supported All Supported
Notes
Note 1 – Microsoft DirectX End-User Runtime (August 2009) is required to run Discovery 3D.
Note 2 – Most DirectX 10 capable hardware can run Discovery 3D provided they support “Compute Shader 4.0.” Windows Vista requires SP2 or later and the Platform Update for Windows Vista. Installing this update enables selected DirectX 11 technologies on Windows Vista. Both Windows Vista and Windows 7 systems may need to install the latest display drivers for the hardware.
Additional Requirements and Recommendations
Download install available through Landmark Software Manager (LSM). DVD-ROM required for media install.
DCOM configured to allow remote access. Only necessary if sharing projects.
Microsoft .NET Framwork 3.5, SP1 is required.
Optional Software Requirements
For spreadsheet Import Utility in WellBase, SeisBase, and LeaseMap
Excel 2003 or 2007
For Selected Help Files Adobe Reader
For Discovery on OpenWorks, GridXchange, SeisXchange
OpenWorks for Windows 5000.0.2.7 – Basic or Full (recommended) Install available on LSM.
And SeisWorks 5000.0.2.0 (for seismic workflows) See notes below.
For Georeferenced raster images and CAD files in ArcObjects layers in GeoAtlas
ESRI ArcGIS Runtime Engine 9.3.1 (On Discovery DVD or downloaded from LSM - Discovery 3rd Party Installer)
For LogARC™ Version 3.2.1.00 access in smartSECTION
To use the LOGarc™ feature the LOGarc™ Version 3.2.1.00 software must be downloaded from IHS LogTech Canada, LTD and a valid account must be in place. You must have administrator rights to the computer you will load the software to.
For TracPlanner Xpress for Discovery
WellPlanning for Discovery 5000.0.2.0 (contained within the DecisionSpace 5000.0.2.0 software, which is available on LSM).
Oracle Express Client or Oracle 10g Client 10.2.0.4 (32 bit)
Note: The OpenWorks Full install requires Hummingbird Exceed. The Oracle client installation in use with the OpenWorks Full installation requires that the “Administrator” option be selected. The “Administrator” option type includes the SQL Plus and the Oracle Database Utilities components, which are needed to run Discovery on OpenWorks, as part of the total OpenWorks package.

System Requirements
7
Note: Hummingbird Exceed is not required for the OpenWorks Basic install. If OpenWorks Basic installation is used, the Oracle client installation can use the “Administrator” option, which will include all of the needed components. Or, the Oracle client installation for the OpenWorks Basic installation can use the “Custom” installation type. However, with this install type these utilities are needed:
Oracle Database Utilities 10.2.1.0
SQL *Plus 10.2.1.0
Oracle JDBC/THIN Interfaces 10.2.1.0
Oracle Net 10.2.1.0
After these Oracle components are installed, run the upgrade patch to Oracle 10g 10.2.0.4 (32 bit).
System Requirements: Discovery Server
Note: A project server may have a workstation or server operating system.
Operating system requirements
Supported Operating system RAM CPU
Windows® Server 2008 R2 Standard x64
or
Windows® Server 2008 R2 Enterprise x64
4 GB Minimum
8 - 16 GB Recommended
Pentium 4x 64 class or better
Multiple (2-4) processors/cores
Windows® Server 2003 Standard x64
or
Windows® Server 2003 Enterprise x64
4 GB Minimum
8-16 GB Recommended
Pentium 4 x 64 class or better
Multiple (2-4) processors/cores
Notes
Note 1 – Memory recommendations beyond 4 GB are only beneficial when running a large (>2 GB) cache size for the database engine.
Note 2 – Client applications (e.g. WellBase) are not supported on server OS versions.
Note3 – We recommend using the latest Microsoft service packs and security patches.
Additional Requirements and Recommendations
Download install available through Landmark Software Manager (LSM). A DVD-ROM is required for media install.
DCOM configured to allow remote access.
Server performance is subject to a large number of variables. It is impossible to give specific recommendations here, but these are some guiding principals to use. In general, multi-user performance of a GeoGraphix Project Server is best when the server is dedicated to GeoGraphix and not shared with other applications, especially database applications. In addition, consideration should be made for the number of GeoGraphix users and the size and number of concurrently

Setup Instructions
8
accessed projects. At some point having multiple project servers becomes a better solution than having all users on one server. Generally, somewhere between 10 and 20 users is when a second server might be suggested.
Networking
Networking performance depends on the number of users trying to access a server simultaneously as well as the bandwidth requirements for those users. Recommendations for server bandwidth typically specify server connectivity at a higher bandwidth than an individual user. For instance, users running at 100 Mbit should be accessing a server running on a 1 Gbit backbone. If users are at 1 Gbit, consider running multiple 1 Gbit connections on the server.
Database Cache
A large database cache is an important factor to consider when dealing with multiple users accessing large databases. A cache size of up to 1.8 GB is available using basic database startup settings. Larger cache sizes are available but these require special configuration.
Storage
A great deal of Discovery's access patterns on a server deal with file I/O. Database access, raster images and seismic data are examples of files that benefit substantially from a fast disk sub-system. Server environments also place a high importance on data integrity and reliability. At a minimum, consider using a RAID 5 (striped with parity) array. As the size of disks increase, you may also want to consider a hot swap drive and/or RAID 6 (striped with dual parity). Using a controller card with its own cache can also help improve performance.
Network Attached Storage (NAS), Storage Area Networks (SAN), and Other Non-Windows Storage Solutions
There are two typical methods used for accessing external storage devices from a project server; iSCSI and CIFS.
iSCSI allocates a block of storage on the external device and makes it appear to be a physical disk on the project server. This has the advantage of a 100% compliant file system. However since the external device sees the allocation as one big file, it makes backup and restore of individual files using the external device's capabilities problematic. Standard backup and restore from the server still work.
Using CIFS for external storage devices depends greatly on the vendor’s implementation of the CIFS protocol used by the Windows platform. In general, a 100% compliant implementation of CIFS for a performant system is required. In particular, vendor's implementation of the "File Change/Notify" functionality has been problematic. Devices based on Windows Storage Server should be 100% compatible since it shares its components with Windows. Implementations based on UNIX/Linux are where problems occur due to the fact that the kernel level support is not there.
Prerequisites
Discovery 5000.0.2.0 has several prerequisites that are required to run the software as well as prerequisites that are used to enhance the software.
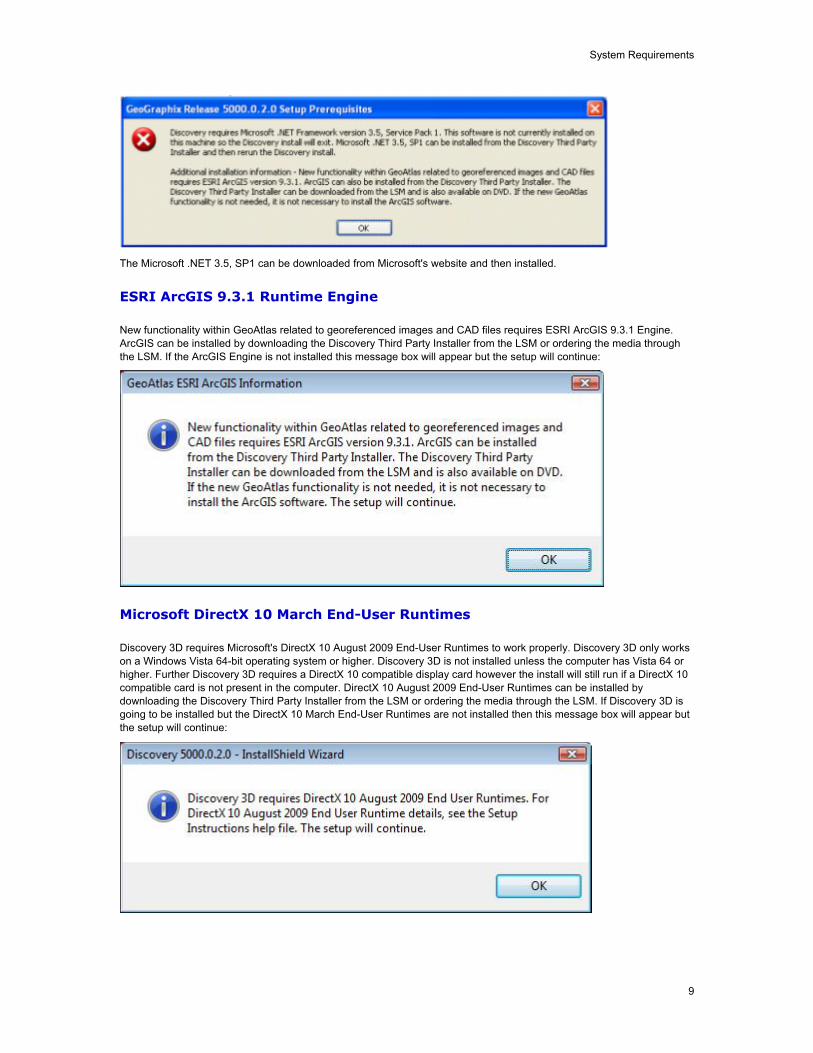
Microsoft .NET Framework 3.5, Service Pack 1
Discovery 5000.0.2.0 must have Microsoft's .NET 3.5, SP1 installed first otherwise this message box will appear and the setup will end:
System Requirements
9
The Microsoft .NET 3.5, SP1 can be downloaded from Microsoft's website and then installed.
ESRI ArcGIS 9.3.1 Runtime Engine
New functionality within GeoAtlas related to georeferenced images and CAD files requires ESRI ArcGIS 9.3.1 Engine. ArcGIS can be installed by downloading the Discovery Third Party Installer from the LSM or ordering the media through the LSM. If the ArcGIS Engine is not installed this message box will appear but the setup will continue:
Microsoft DirectX 10 March End-User Runtimes
Discovery 3D requires Microsoft's DirectX 10 August 2009 End-User Runtimes to work properly. Discovery 3D only works on a Windows Vista 64-bit operating system or higher. Discovery 3D is not installed unless the computer has Vista 64 or higher. Further Discovery 3D requires a DirectX 10 compatible display card however the install will still run if a DirectX 10 compatible card is not present in the computer. DirectX 10 August 2009 End-User Runtimes can be installed by downloading the Discovery Third Party Installer from the LSM or ordering the media through the LSM. If Discovery 3D is going to be installed but the DirectX 10 March End-User Runtimes are not installed then this message box will appear but the setup will continue:


11
Installation
Installation
Discovery utilizes Microsoft Windows ® Installer technology for installing the Discovery applications. Windows ® Installer technology provides powerful features for installation and component configuration, network installations (distribution\deployment) and software removal\uninstall.
Note: Have you read System Requirements?
This installation guide provides step-by-step instructions for End User or Network Administrator installations:
End User Installation - Install Discovery Applications to a Single Workstation.
Network Administrator Installation - Create LAM License Service Server for Multiple Workstations.
- Install the Discovery Applications to Multiple Workstations.
- Create a Discovery Project Server (optional).
Discovery 5000.0.2.0 Download from the Landmark Software Manager
Download Instructions
Follow the instructions below to download Discovery 5000.0.2.0 to your system using the Landmark Software Manager (LSM).
1. Within the Available Downloads Page on the Releases tab of the LSM highlight the Release Type Discovery 5000.0.2.0 and the Discovery 5000.0.2.0. DVD Utilities.
Note: If you do not need any of the Discovery Utilities or Extras then it is not necessary to download the Discovery DVD Utilities.
2. Select the Down Arrow to move the items down to the My Download Cart page on the Download Cart tab.
3. Highlight the download(s) and then select the Download Now button.
4. Click OK at the Preferences dialog box. Note that the default download for the file(s) will be C:\Landmark\LSM\Landmark.
5. Click on the AGREE button for the LANDMARK GRAPHICS CORPORATION LICENSE AGREEMENT.
6. Once the file(s) have been downloaded click on the Close button to close the Download Discovery progress bar. (Ignore the Opening Folder button.)
To install the Discovery 5000.0.2.0 software go to the C:\Landmark\LSM\Landmark\GGX\Discovery5000Win folder and double click on the Discovery5000.0.2.0Setup.exe file to start the setup. (The install will first need to extract the setup files to the local drive.)
See the GeoGraphix Discovery 5000.0.2.0 Read Me for DVD Utilities to install the Utilities. Click on the Install Guide
button on LSM to open the GeoGraphix Discovery 5000.0.2.0 Read Me for DVD Utilities file.

Setup Instructions
12
End User Installation
End User Installation
This installation will add the Discovery Applications to a Single Workstation.
Caution:
General Installation Requirements - please refer to the System Requirements for a complete list
The following conditions must be met before you can install the Discovery 5000.0.2.0 software:
You must have Administrative Rights to the local computer that will run the install.
Must have Internet Explorer 6.0 or higher installed.
Microsoft .NET 3.5, SP1 must be installed.
Must have networking installed including the TCP/IP protocol.
This software should only be installed on Windows ® XP Professional 64 bit, Windows ® Vista 64 bit, Windows ® Server 2003 Standard 64 bit, Windows ® Server 2003 Enterprise 64 bit, Windows® 7 or Windows ® Server 2008 operating systems.
There are 8 or 10 installation steps depending upon whether you perform a typical or custom install:
STEP 1 - Getting Started with Discovery 5000.0.2.0 Release
STEP 2 - InstallShield Wizard Startup
STEP 3 - License Agreement
STEP 4 - Customer Information
STEP 5 - Setup Type (Typical vs. Custom)
Typical STEP 6 - Select Log Units of Measurement
Typical STEP 7 - Ready to Install the Program
Typical STEP 8 - InstallShield Wizard Completed
Custom STEP 6 - Custom Setup
Custom STEP 7 - Local Projects Folder
Custom STEP 8 - Log Units of Measurement
Custom STEP 9 - Ready to Install the Program
Typical STEP 10 - InstallShield Wizard Completed
Note: Landmark licenses are now installed after the above Discovery master installation steps. When Discovery applications are started through the Desktop shortcuts or Start Menu Programs, a licensing check is performed on the workstation. Please refer to the Product Licensing topic for further details.
Go to STEP 1: Getting Started with Discovery 5000.0.2.0 LSM download or Release DVD
End User Installation STEP 1- Getting Started with Landmark LSM Download or Release DVD
Before starting installation, make sure that all open applications are closed.

Installation
13
If you have downloaded Discovery 5000.0.2.0 from LSM, go to the C:\Landmark\LSM\Landmark\GGX\Discovery5000Win folder and double click on the Discovery5000.0.2.0Setup.exe file to begin. You will proceed directly to STEP 2 - InstallShield Wizard Setup.
If you have ordered the Discovery 5000.0.2.0 DVD, continue through this step.
Insert the Discovery/Landmark Connectivity/Seismic Modeling DVD-ROM into the DVD-Drive. The GeoGraphix splash screen appears for a few seconds ....
Note: If the GeoGraphix splash screen does not appear automatically, go to the Start menu, and choose Run. In the Run dialog box, browse to the appropriate DVD-drive and select the Install.exe file. Click OK.
then the GeoGraphix install window appears .....

Setup Instructions
14
Click the first option, to proceed to the next step in End User Installation.
Go to STEP 2: InstallShield Wizard Startup
Return to Beginning: End User Installation
End User Installation STEP 2 - InstallShield Wizard Startup
After clicking Install Discovery, Landmark Connectivity, and Modeling in the previous step, the InstallShield wizard is started....

Installation
15
Note: Microsoft Visual C++ 2005 Redistributable -x86 8.050727.4053 and Microsoft Visual C++ 2008 Redistributable - x86 9.0.30729.4148 must be installed to use Discovery.

Setup Instructions
16
Click the Install button to install the Microsoft Visual C++ Redistributables. The 2005 Redistributable (8.00.50727.4053) must be installed to use Discovery 5000.0.2.0. If the Redistributable has already been installed or will be installed later No can be selected and the setup will continue. Click Yes to install the 2005 Redistributable.
Click Yes to accept the Microsoft Visual C++ 2005 SP1 Redistributable Package License
The 2005 Redistributable will now install and finish.

Installation
17
The 2008 Redistributable (9.0.30729.4148) must be installed to use Discovery 5000.0.2.0. If the Redistributable has already been installed or will be installed later No can be selected and the setup will continue. Click Yes to install the 2008 Redistributable.
Click Next at the Welcome to Microsoft Visual C++ 2008 Redistributable Setup.
Select the I have read and accept the license terms. check box and then click the Install button.

Setup Instructions
18
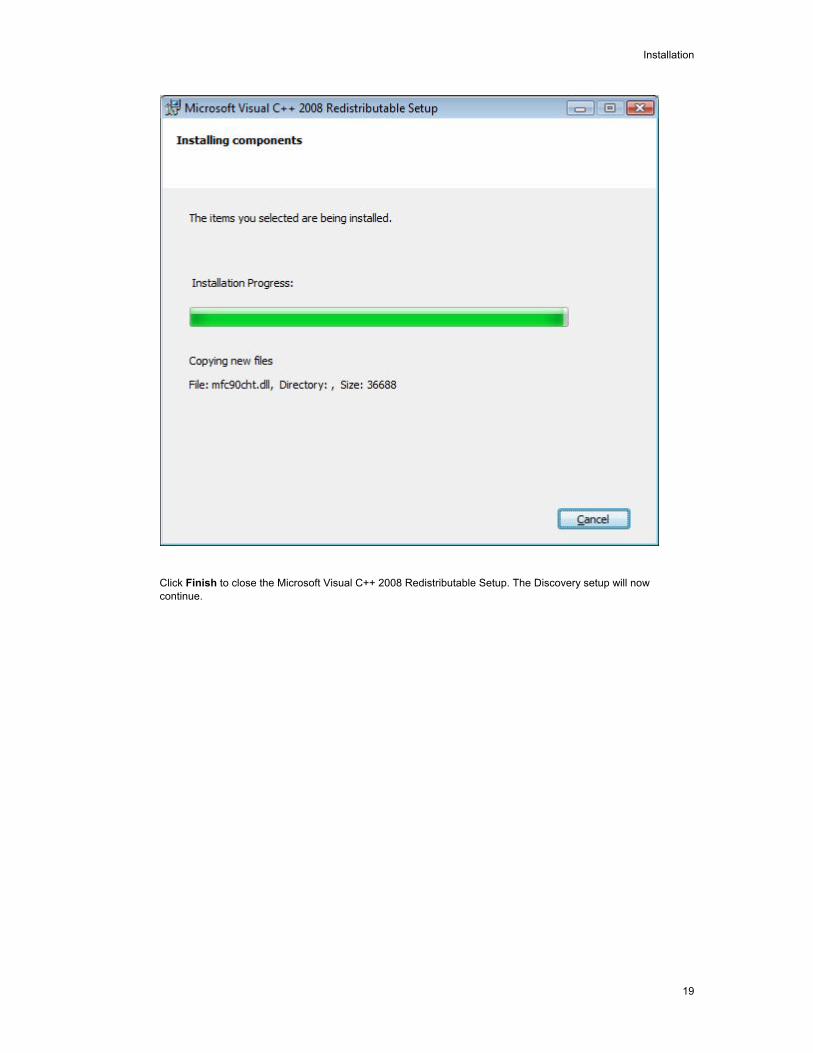
The 2008 Redistributable will now install components.
Installation
19
Click Finish to close the Microsoft Visual C++ 2008 Redistributable Setup. The Discovery setup will now continue.

Setup Instructions
20
The Welcome to the InstallShield Wizard for Discovery 5000.0.2.0 appears on your screen.

Installation
21
Click the Next button to proceed to License Agreement step of wizard.
Note: Clicking the Help button will open the Discovery Installation Guide help window (this documentation).
Go to STEP 3: License Agreement
Return to STEP 1: Getting Started with GeoGraphix Release DVD
Return to Beginning: End User Installation
End User Installation STEP 3 - License Agreement
The software license agreement is displayed in this step of wizard.

Setup Instructions
22
Select the "I accept the terms in the license agreement" option.
Click Next to proceed to the Customer Information step of the wizard.
Go to STEP 4: Customer Information
Return to STEP 2: InstallShield Wizard Startup
Return to Beginning: End User Installation
End User Installation STEP 4 - Customer Information
Customer Information appears in this step of the wizard.

Installation
23
Enter your User Name and Company Name.
Click Next to proceed to the Setup Type step of the wizard.
Go to STEP 5: Setup Type
Return to STEP 3: License Agreement
Return to Beginning: End User Installation
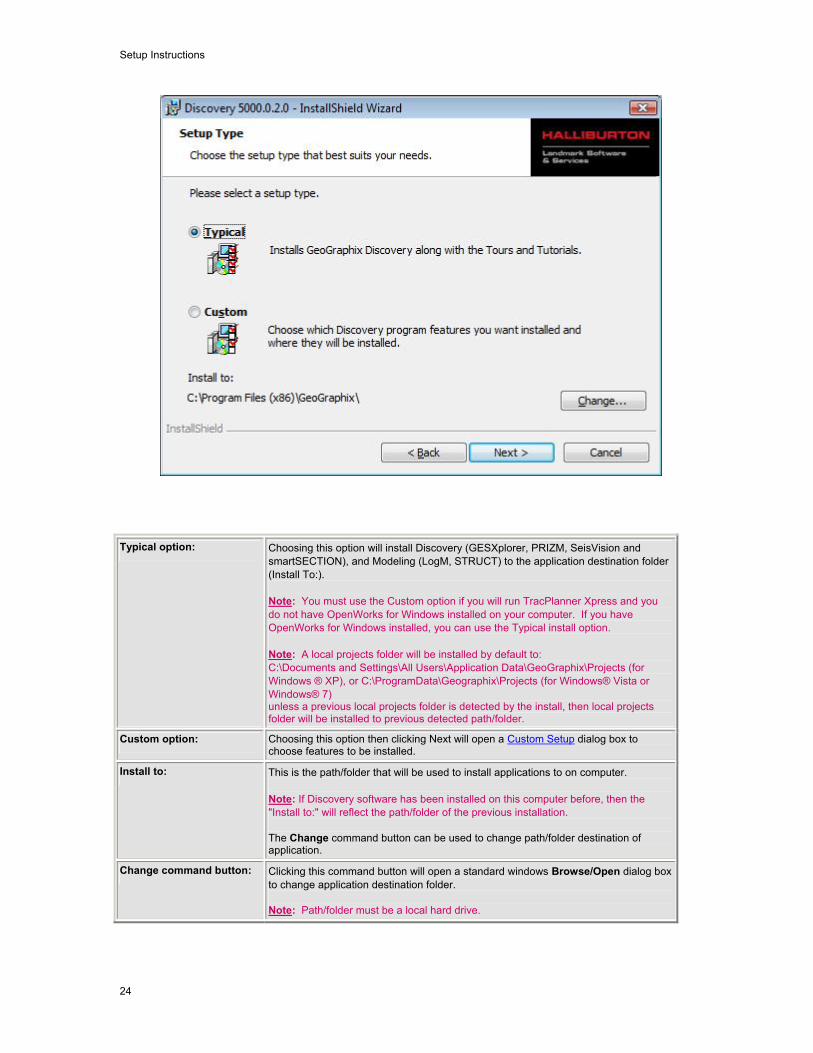
End User Installation STEP 5 - Setup Type (Typical vs. Custom)
The type of setup (Typical vs. Custom) and application destination folder is selected in this step of the wizard.
Setup Instructions
24
Typical option: Choosing this option will install Discovery (GESXplorer, PRIZM, SeisVision and smartSECTION), and Modeling (LogM, STRUCT) to the application destination folder (Install To:). Note: You must use the Custom option if you will run TracPlanner Xpress and you do not have OpenWorks for Windows installed on your computer. If you have OpenWorks for Windows installed, you can use the Typical install option. Note: A local projects folder will be installed by default to: C:\Documents and Settings\All Users\Application Data\GeoGraphix\Projects (for Windows ® XP), or C:\ProgramData\Geographix\Projects (for Windows® Vista or Windows® 7) unless a previous local projects folder is detected by the install, then local projects folder will be installed to previous detected path/folder.
Custom option: Choosing this option then clicking Next will open a Custom Setup dialog box to choose features to be installed.
Install to: This is the path/folder that will be used to install applications to on computer. Note: If Discovery software has been installed on this computer before, then the "Install to:" will reflect the path/folder of the previous installation. The Change command button can be used to change path/folder destination of application.
Change command button: Clicking this command button will open a standard windows Browse/Open dialog box to change application destination folder. Note: Path/folder must be a local hard drive.

Installation
25
If Typical option is selected, click Next to proceed to the Select Log Units of Measurement step of wizard.
If Custom option is selected, click Next to proceed to the Custom Setup step of wizard.
Go to Typical STEP 6: Select Log Units of Measurement
Go to Custom STEP 6: Custom Setup
Return to STEP 4: Customer Information
Return to Beginning: End User Installation
Typical
End User Installation Typical STEP 6 - Select Log Units of Measurement
This step of wizard determines what default log units will be setup for PRIZM and XSection.
Note: The units can be changed in PRIZM and XSection after installation.
Click Next to proceed to the Ready to Install the Program step of the wizard.
Go to Typical STEP 7: Ready to Install the Program
Return to STEP 5: Setup Type
Return to Beginning: End User Installation
Setup Instructions
26
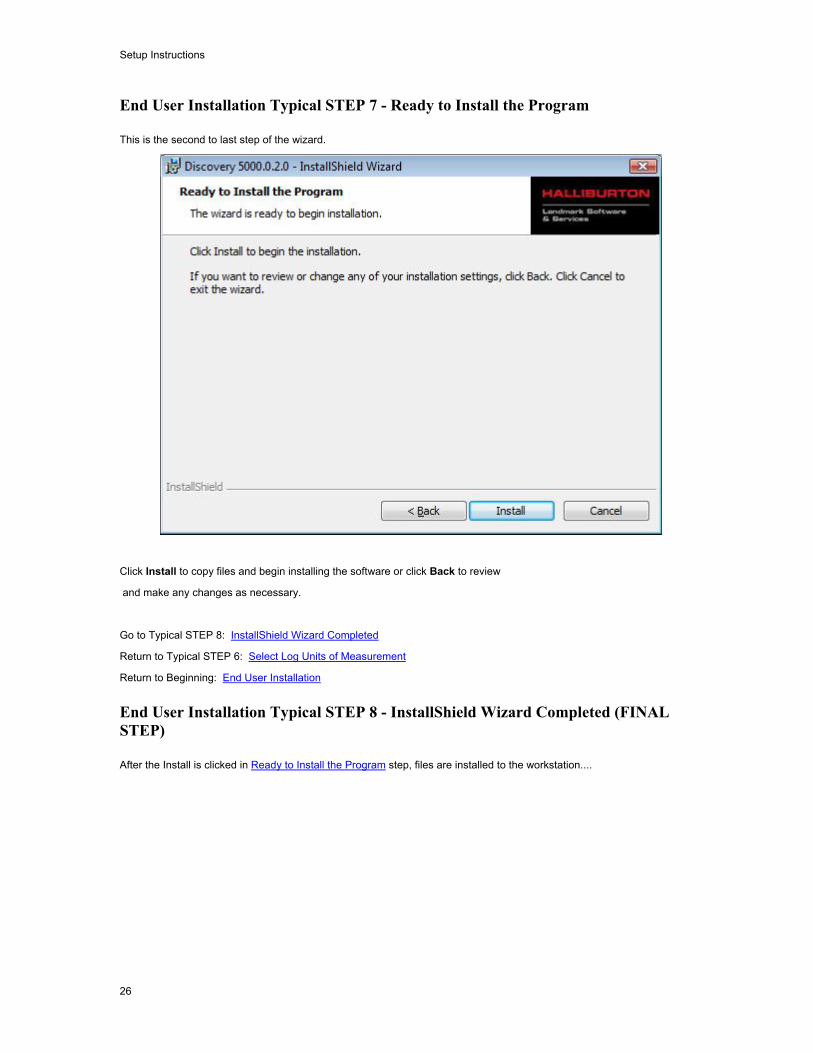
End User Installation Typical STEP 7 - Ready to Install the Program
This is the second to last step of the wizard.
Click Install to copy files and begin installing the software or click Back to review
and make any changes as necessary.
Go to Typical STEP 8: InstallShield Wizard Completed
Return to Typical STEP 6: Select Log Units of Measurement
Return to Beginning: End User Installation
End User Installation Typical STEP 8 - InstallShield Wizard Completed (FINAL STEP)
After the Install is clicked in Ready to Install the Program step, files are installed to the workstation....

Installation
27
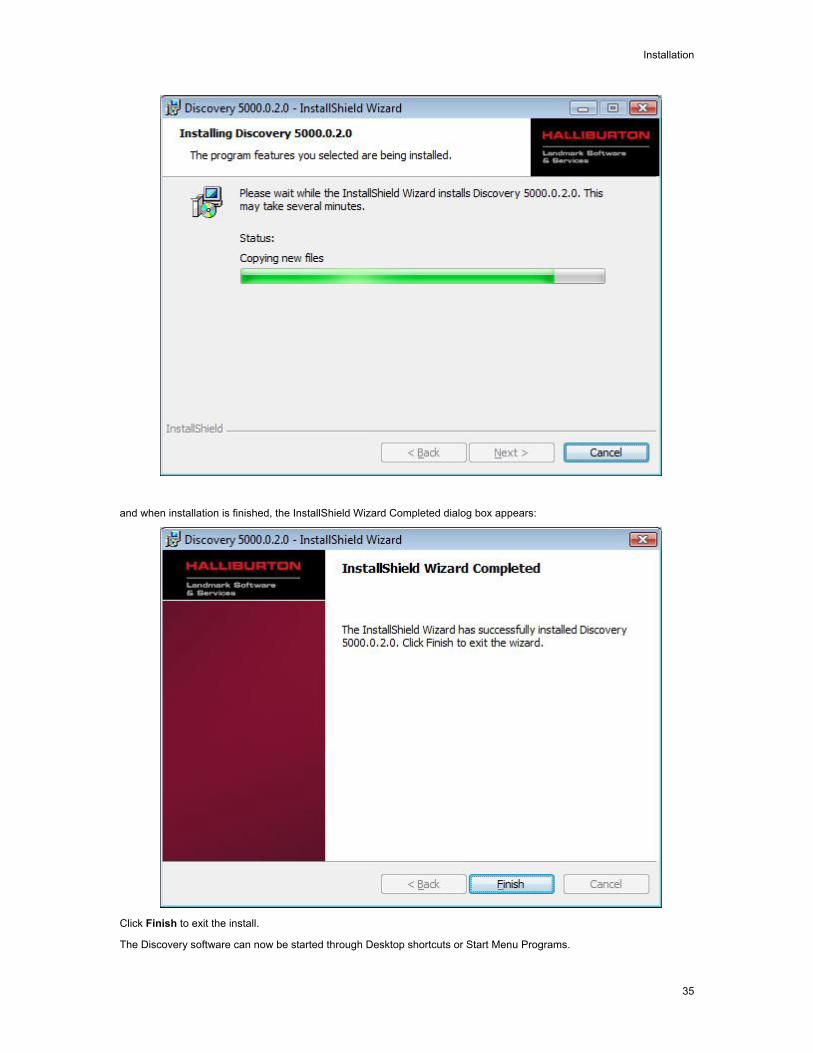
and when the installation is finished, the InstallShield Wizard Completed dialog box appears:
Click Finish to complete the install. The Discovery software can now be started through Desktop shortcuts or Start Menu Programs.

Setup Instructions
28
Note: Landmark licenses are now installed after the Discovery master installation steps. When the Discovery applications are started through Desktop shortcuts or Start Menu Programs, a licensing check is performed on the workstation. Please refer to the Product Licensing topic for further details.
Return to Typical STEP 7: Ready to Install the Program
Return to Beginning: End User Installation
Custom
End User Installation Custom STEP 6 - Custom Setup
This step of the wizard can be used to select certain features to be installed and change the application destination directory.
List Box and Feature
When a feature is selected in the list box, a description of the feature will appear at right in the Feature Description box.

Installation
29
Project Services feature cannot be disabled. Selecting Project Services feature by itself can be used to setup a network project server.
Description:
Setup Instructions
30
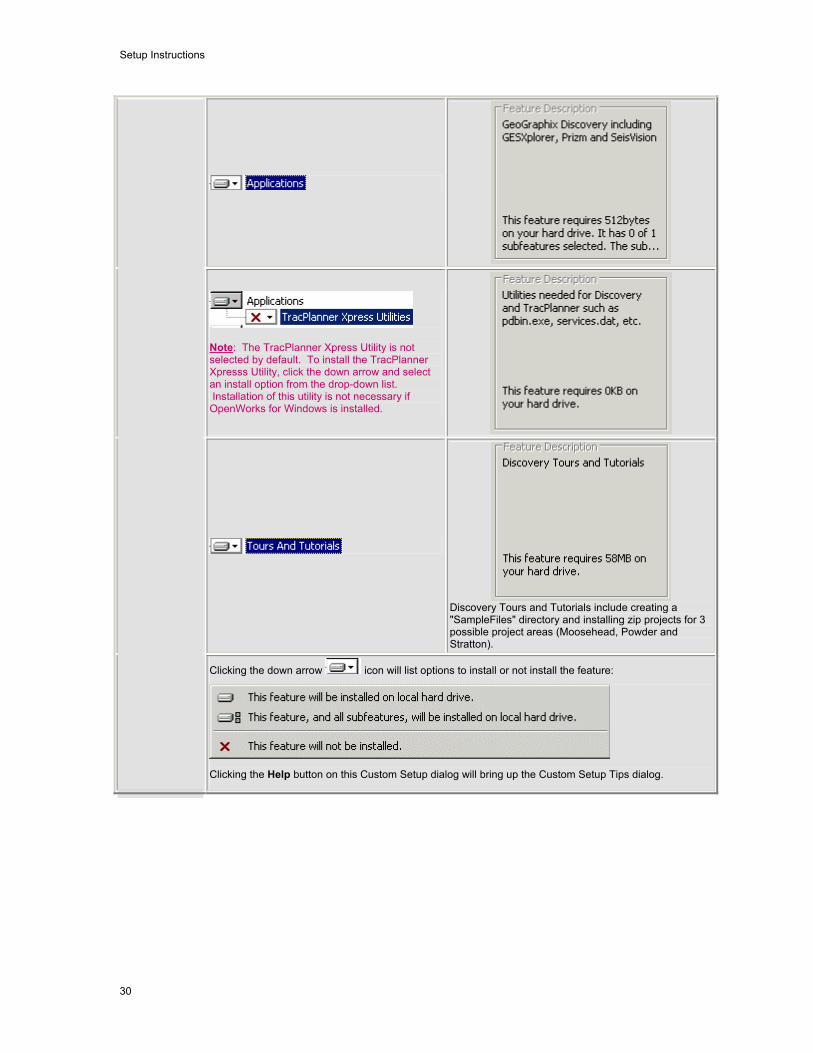
Note: The TracPlanner Xpress Utility is not selected by default. To install the TracPlanner Xpresss Utility, click the down arrow and select an install option from the drop-down list. Installation of this utility is not necessary if OpenWorks for Windows is installed.
Discovery Tours and Tutorials include creating a "SampleFiles" directory and installing zip projects for 3 possible project areas (Moosehead, Powder and Stratton).
Clicking the down arrow icon will list options to install or not install the feature:
Clicking the Help button on this Custom Setup dialog will bring up the Custom Setup Tips dialog.

Installation
31
Install to: This is the path/folder that will be used to install the applications to on the computer. Note: If GeoGraphix software has been installed on this computer before, then the "Install to:" description will reflect the path/folder of the previous installation. The Change command button can be used to change the path/folder destination of the application.
Change command button:
Clicking this command button will open a standard Windows Browse/Open dialog box to change the application destination folder.
Select features to be installed and click Next to proceed to the Local Projects Folder step of the wizard.
Go to Custom STEP 7: Local Projects Folder
Return to STEP 5: Setup Type
Return to Beginning: End User Installation
End User Installation Custom STEP 7 - Local Projects Folder
This step of the wizard determines where the local projects folder (path/folder) will be created during the installation.

Setup Instructions
32
Clicking the Change command button will open a standard Windows Browse/Open dialog box to change the application destination folder.
Note: Local Projects Path/Folder must be a local hard drive.
Click Next to proceed the Log Units of Measurement step of the wizard.
Go to Custom STEP 8: Log Units of Measurement
Return to Custom STEP 6: Custom Setup
Return to Beginning: End User Installation
End User Installation Custom STEP 8 - Log Units of Measurement
This step of the wizard determines what default log units will be setup for PRIZM and XSection.

Installation
33
Note: The units can be changed in PRIZM and XSection after installation.
Select the appropriate Units option and click Next to proceed to the Ready to Install the Program step of the wizard.
Go to Custom STEP 9: Ready to Install the Program
Return to Custom STEP 7: Local Projects Folder
Return to Beginning: End User Installation
End User Installation Custom STEP 9 - Ready to Install the Program
This is the second to last step of the wizard.

Setup Instructions
34
Click Install to copy files and begin installing the software or click Back to review
and make any changes as necessary.
Go to Custom STEP 10: InstallShield Wizard Completed
Return to Custom STEP 8: Log Units of Measurement
Return to Beginning: End User Installation
End User Installation Custom STEP 10 - InstallShield Wizard Completed (FINAL STEP)
After the Install is clicked in Ready to Install the Program step, files are installed to the workstation....
Installation
35
and when installation is finished, the InstallShield Wizard Completed dialog box appears:
Click Finish to exit the install.
The Discovery software can now be started through Desktop shortcuts or Start Menu Programs.

Setup Instructions
36
Note: Landmark licenses are now installed after the Discovery master installation steps. When the Discovery applications are started through Desktop shortcuts or Start Menu Programs, a licensing check is performed on the workstation. Please refer to the Product Licensing topic for further details.
Return to Typical STEP 9: Ready to Install the Program
Return to Beginning: End User Installation
Product Licensing
When you launch Discovery 5000.0.2.0 for the first time after installation, the License Wizard will appear, giving you the choice to request a product license, browse to a license file, or connect to a network license server.
If you are working in a standalone situation, all you need to do is obtain a new license file, place it anywhere on your computer, and use the install license option in the License Wizard to browse to the file location.
If you are working in a network situation, you will first need to set up a new Landmark (LAM) License Server (the LAM License Server Setup is on the LSM). After the server is set up, when the License Wizard runs on the client machine, choose the Connect to a Network License Server option and input the required information.
License Wizard
After the software is installed and a Discovery application is started through Desktop shortcuts or Start Menu Programs, a licensing check is performed on the workstation.
If no Landmark licenses are detected then the GeoGraphix Product Licensing dialog box appears:
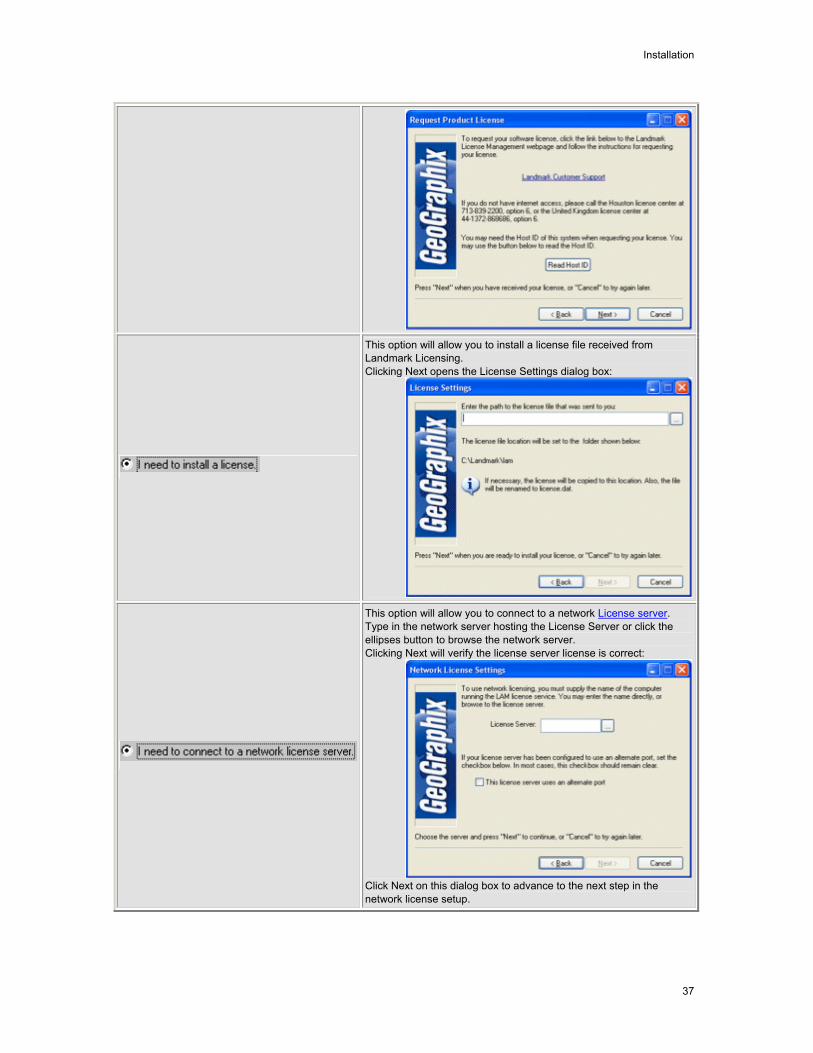
One of three options are available for GeoGraphix Product Licensing:
This option will direct you to the Landmark License Management Internet site or telephone numbers to request a product license. Clicking Next opens the Request Product License dialog box:
Installation
37
This option will allow you to install a license file received from Landmark Licensing. Clicking Next opens the License Settings dialog box:
This option will allow you to connect to a network License server. Type in the network server hosting the License Server or click the ellipses button to browse the network server. Clicking Next will verify the license server license is correct:
Click Next on this dialog box to advance to the next step in the network license setup.
Setup Instructions
38
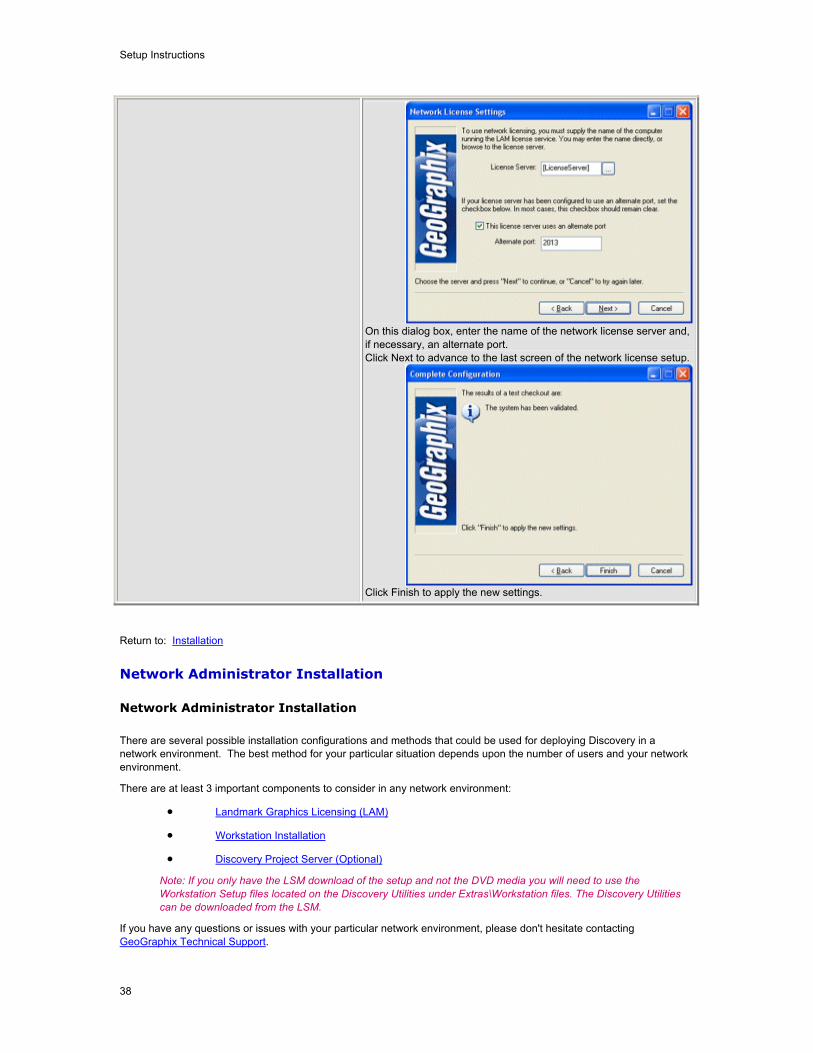
On this dialog box, enter the name of the network license server and, if necessary, an alternate port. Click Next to advance to the last screen of the network license setup.
Click Finish to apply the new settings.
Return to: Installation
Network Administrator Installation
Network Administrator Installation
There are several possible installation configurations and methods that could be used for deploying Discovery in a network environment. The best method for your particular situation depends upon the number of users and your network environment.
There are at least 3 important components to consider in any network environment:
Landmark Graphics Licensing (LAM)
Workstation Installation
Discovery Project Server (Optional)
Note: If you only have the LSM download of the setup and not the DVD media you will need to use the Workstation Setup files located on the Discovery Utilities under Extras\Workstation files. The Discovery Utilities can be downloaded from the LSM.
If you have any questions or issues with your particular network environment, please don't hesitate contacting GeoGraphix Technical Support.

Installation
39
Network License Server (LAM)
Landmark Graphics License Server (LAM) must be installed to use Discovery in a network environment. Download LAM from the LSM and follow the installation instructions.
After the server is set up, when the License Wizard runs on the client machine, choose the Connect to a Network License Server option and input the required information.
For more information on the license wizard see the Product Licensing topic.
Workstation Installation
Network Administrator Installation - Workstation Installation
Caution:
General Installation Requirements - please refer to the System Requirements for a complete list
The following conditions must be met before you can install the Discovery 5000.0.2.0 software:
o You must have Administrative Rights to the local computer that will run the install.
o Must have Internet Explorer 6.0 or higher installed.
o Microsoft .NET 3.5, SP1 must be installed.
o Must have networking installed including the TCP/IP protocol.
o This software should only be installed on Windows ® XP Professional 64 bit, Windows ® Vista 64 bit, Windows® 7, Windows ® Server 2003 Standard 64 bit, Windows ® Server 2003 Enterprise 64 bit or Windows ® Server 2008 operating system.
The workstation installation in a network environment can be initiated from the Discovery 5000.0.2.0 LSM download or directly from the Release DVD or by creating an Application Distribution site:
Using LSM download or Release DVD
Using Application Distribution Site
Go to STEP 1: Using LSM download or Release DVD
Go to STEP 1: Using Application Distribution Site
Return to: Network Administrator Installation
Workstation Installation - Using LSM Download or Release DVD
Workstation installations directly from the Discovery 5000.0.2.0 LSM download or the Release DVD are quite acceptable if you don't mind configuring the installation at each workstation. The installation could be shared on a network drive or carried from workstation to workstation.
The installation procedure for workstation installations directly from LSM or the release DVD is identical to the End User Installation.
Note: Licensing will be need to be configured on each workstation to find the Network License Server (LAM). The configuration can be set with the Product Licensing screen that appears after a Discovery application is started.

Setup Instructions
40
Go to STEP 1: Getting Started with the Discovery LSM Download or Release DVD
Return to: Workstation Installation
Return to: Network Administrator Installation
Using Application Distribution Site
Workstation Installation - Using Application Distribution Site
Workstation Installations with an Application Distribution Site can save considerable configuration time at the workstation and can even be automated to create unattended, silent installations for the workstation.
There are 6 steps involved with performing Workstation Installations using an Application Distribution Site:
STEP 1: Administrative Install - Start >> Run
STEP 2: Administrative Install - InstallShield Wizard Startup
STEP 3: Administrative Install - Network Location
STEP 4: Administrative Install - InstallShield Wizard Completed
STEP 5: Configure Application Distribution Site
STEP 6: Install to Workstations
Go to STEP 1: Administrative Install - Start >> Run
Return to: Workstation Installation
Return to: Network Administrator Installation
Create Application Distribution Site STEP 1 - Administrative Install - Start >> Run
An administrative install is generally started with a Run "setup.exe" command containing the "/a" parameter.
A Run command can be configured in the standard Windows Run dialog box. This dialog box can be accessed from the Windows Taskbar Start menu and Start >> Run.
If the Discovery 5000.0.2.0 DVD is in a DVD-Drive with assigned drive letter of "E" then the command line would be like the following in the Run dialog box:
Go to STEP 2: Administrative Install - InstallShield Wizard Startup
Return to Beginning: Workstation Installation - Using Application Distribution
Create Application Distribution Site STEP 2 - Administrative Install - InstallShield Wizard Startup
After configuring the Run command in STEP 1 - Administrative Install - Start >> Run, the InstallShield wizard is started....

Installation
41
and the Welcome to the InstallShield Wizard for Discovery 5000.0.2.0 appears on your screen.
Click Next to proceed to the Network Location step of the wizard.

Setup Instructions
42
Note: Clicking the Help button will open the Discovery Installation Guide help window (this documentation).
Go to STEP 3: Administrative Install - Network Location
Return to STEP 1: Administrative Install - Start >> Run
Return to Beginning: Workstation Installation - Using Application Distribution
Create Application Distribution Site STEP 3 - Administrative Install - Network Location
This step of the wizard determines where the distribution site will be created on the network.
In this particular example, a network server share of "Apps on CorpServer1" is mapped to the "X" drive. The Application Distribution Site will be created in a folder and subfolder called GGraphix\Distrib.
Network location:
Specify the network mapped drive/path or UNC path where the distribution site will be created. Note: A User running an administrative installation must have permissions to write to the designated Network location. Discovery Release Setup contents will be copied and decompressed to this network location.
Change command button:
Clicking this command button will open the Change Current Destination Folder dialog box where you can change the network location destination folder.

Installation
43
Click the Down Arrow in the Look in list box to navigate to a new destination folder.
Note: The New Folder command button can be used to create new folders. When a new destination is set, click OK to return to the Network Location dialog box.
Click Install to copy files and create network distribution site.
Go to STEP 4: Administrative Install - InstallShield Wizard Completed
Return to STEP 2: Administrative Install - InstallShield Wizard Startup
Return to Beginning: Workstation Installation - Using Application Distribution
Create Application Distribution Site STEP 4 - Administrative Install - InstallShield Wizard Completed
After Install is clicked in the Network Location step, installation files are decompressed and copied to the network location that was designated in STEP 3 - Administrative Install - Network Location...
and when the installation is finished, the InstallShield Wizard Completed dialog box appears:

Setup Instructions
44
The Network Application Distribution Site should contain the following folders and files at this point:
In the next step, the application distribution site's setup.ini will be configured for distribution to the workstations.

Installation
45
Note: Running the setup.exe in the application distribution site could be used at a workstation to install Discovery software but configuring the setup.ini can save time and even be automated to create an unattended, silent installation for the workstations.
Go to STEP 5: Configure Application Distribution Site
Return to STEP 3: Administrative Install - Network Location
Return to Beginning: Workstation Installation - Using Application Distribution
Create Application Distribution Site STEP 5 - Configure Application Distribution Site
After all the necessary files have been copied and decompressed to the Application Distribution Site with the Administrative Install in the previous steps, the Application Distribution site needs to be configured for your particular network environment.
Note: If you only have the LSM download of the setup and not the DVD media you will need to use the Workstation Setup files located on the Discovery Utilities under Extras\Workstation files. The Discovery Utilities can be downloaded from the LSM.
This involves editing some of the existing command variables (e.g. User Name, Company Name, etc.) or adding commands along with variables to the "Setup.ini" file on the Application Distribution Site.
Look for the [Startup] section in the "Setup.ini":
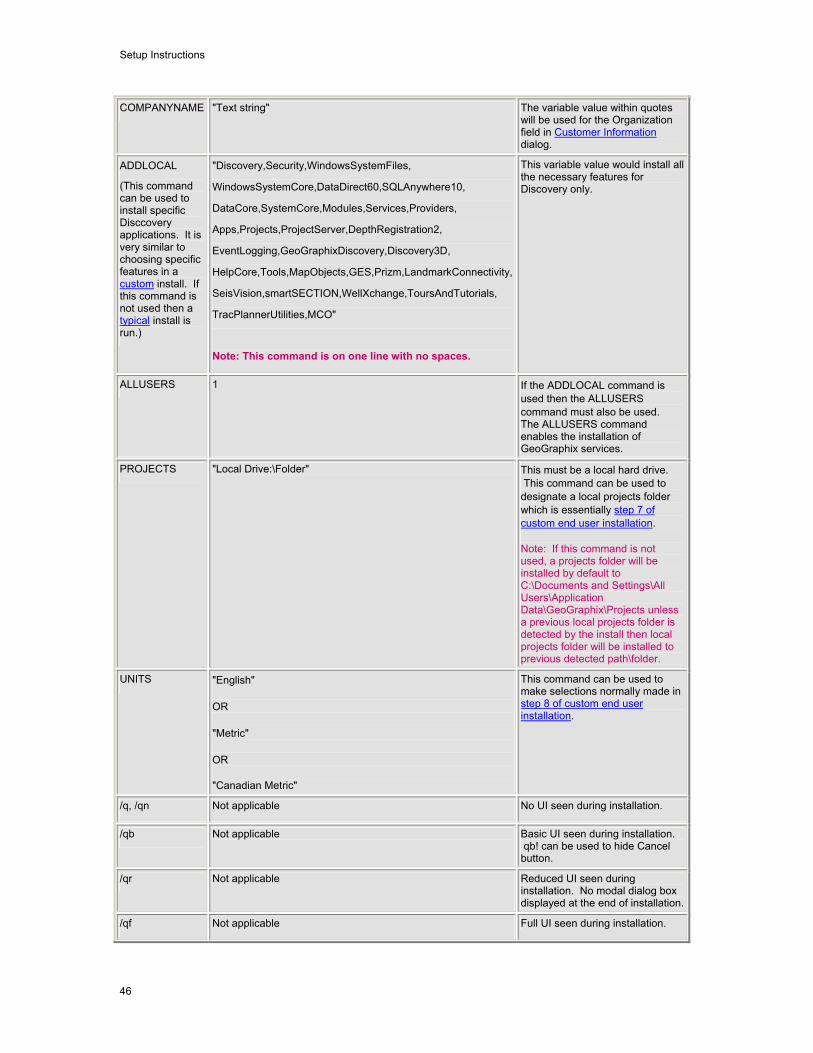
The following table lists some commands and variables that may be used on the CmdLine in the "Setup.ini":
Command Variable (quotes required where shown)
Description
USERNAME "Text string" The variable value within quotes will be used for the User Name field in the Customer Information dialog.
Setup Instructions
46
COMPANYNAME "Text string" The variable value within quotes will be used for the Organization field in Customer Information dialog.
ADDLOCAL
(This command can be used to install specific Disccovery applications. It is very similar to choosing specific features in a custom install. If this command is not used then a typical install is run.)
"Discovery,Security,WindowsSystemFiles,
WindowsSystemCore,DataDirect60,SQLAnywhere10,
DataCore,SystemCore,Modules,Services,Providers,
Apps,Projects,ProjectServer,DepthRegistration2,
EventLogging,GeoGraphixDiscovery,Discovery3D,
HelpCore,Tools,MapObjects,GES,Prizm,LandmarkConnectivity,
SeisVision,smartSECTION,WellXchange,ToursAndTutorials,
TracPlannerUtilities,MCO"
Note: This command is on one line with no spaces.
This variable value would install all the necessary features for Discovery only.
ALLUSERS 1 If the ADDLOCAL command is used then the ALLUSERS command must also be used. The ALLUSERS command enables the installation of GeoGraphix services.
PROJECTS "Local Drive:\Folder" This must be a local hard drive. This command can be used to designate a local projects folder which is essentially step 7 of custom end user installation. Note: If this command is not used, a projects folder will be installed by default to C:\Documents and Settings\All Users\Application Data\GeoGraphix\Projects unless a previous local projects folder is detected by the install then local projects folder will be installed to previous detected path\folder.
UNITS "English" OR "Metric" OR "Canadian Metric"
This command can be used to make selections normally made in step 8 of custom end user installation.
/q, /qn Not applicable No UI seen during installation.
/qb Not applicable Basic UI seen during installation. qb! can be used to hide Cancel button.
/qr Not applicable Reduced UI seen during installation. No modal dialog box displayed at the end of installation.
/qf Not applicable Full UI seen during installation.

Installation
47
/qn+ Not applicable No UI seen during installation except for a modal dialog box displayed at the end of installation.
/qb+ Not applicable Basic UI with a modal dialog box seen at end of installation. qb+! or qb!+ can be used to hide Cancel button.
/qb-- Not applicable Basic UI with no modal dialog boxes seen during installation.
After removing comment sign (";") and editing or adding variables in CmdLine, your "Setup.ini" CmdLine may look similar (other commands can exist) to the following example:
Note: Only a small portion of the "Setup.ini" is displayed above.
Go to STEP 6: Install to Workstations
Return to STEP 4: Administrative Install - InstallShield Wizard Completed
Return to Beginning: Workstation Installation - Using Application Distribution
Using Application Distribution Site - STEP 6 - Install to Workstations (FINAL STEP)
After the application distribution site is configured for your network environment, Discovery applications can now be deployed to the workstations.
You can deploy Discovery applications to the workstations by sharing application distribution site to workstations and running "setup.exe" in the application distribution site (similar to End User Installation).
OR
You may want to utilize scripts or 3rd party tools such as Microsoft ® SMS or InstallShield ® AdminStudio that take advantage of Microsoft ® Windows Installer technology for workstation deployment.

Setup Instructions
48
This is the last step in a Workstation Installation using an Application Distribution Site.
Return to STEP 5: Configure Application Distribution Site
Return to Beginning: Workstation Installation - Using Application Distribution
Return to: Network Administrator Installation
Discovery Project Server (Optional)
Create Discovery Project Server (Optional)
Creating a Discovery Project Server is an optional third component in a network administrator installation. It is a very important consideration if you want to store Discovery projects on a central server, then share those projects across the network for multiple users.
Note: A Workstation Installation will create a local projects folder on every workstation with GeoGraphix Discovery installed so all workstations can create and store projects on their local hard drive. Local projects can also be shared between users on the network if the project properties in ProjectExplorer are set to network access. Please refer to the ProjectExplorer Help files for more information on local projects versus network projects.
A Discovery Project Server can be created with a custom installation using the Discovery 5000.0.2.0 LSM download or Release DVD.
Note: This installation must be performed on the server that will become the Discovery Project Server. This server must have access to the Network License Server (LAM) (this server may also be the LAM Server).
There are 10 steps involved with creating a Discovery Project Server:
STEP 1 - Getting Started with The Discovery LSM download or Release DVD
STEP 2 - InstallShield Wizard Startup
STEP 3 - License Agreement
STEP 4 - Customer Information
STEP 5 - Setup Type (Typical vs. Custom)
STEP 6 - Custom Setup
STEP 7 - Local Projects Folder
STEP 8 - Log Units of Measurement
STEP 9 - Ready to Install the Program
STEP 10 - InstallShield Wizard Completed
Go to STEP 1: Getting Started with GeoGraphix Release DVD
Return to: Network Administrator Installation
Discovery Project Server - STEP 1 - Getting Started with the Discovery LSM Download or Release DVD

Installation
49
Before starting the installation, make sure that all open applications are closed.
If you have downloaded Discovery5000.0.2.0 from LSM, go to the C:\Landmark\LSM\Landmark\GGX\Discovery5000Win folder and double click on the Discovery5000.0.2.0Setup.exe file to begin. You will proceed directly to STEP 2 - InstallShield Wizard Setup.
If you have ordered the Discovery 5000.0.2.0 DVD, continue through this step.
Insert the Discovery/Landmark Connectivity/Seismic Modeling DVD-ROM into the DVD-Drive. The GeoGraphix splash screen appears for a few seconds ....
Note: If the GeoGraphix splash screen does not appear automatically, go to the Start menu, and choose Run. In the Run dialog box, browse to the appropriate DVD-ROM drive and select the Install.exe file. Click OK.
then the GeoGraphix install window appears .....

Setup Instructions
50
Click the first option, to proceed to the next step in the Discovery Project Server Installation. Go to STEP 2: InstallShield Wizard Startup
Return to Beginning: Create Discovery Project Server
Discovery Project Server - STEP 2 - InstallShield Wizard Startup
After clicking Install Discovery, Landmark Connectivity, and Modeling in the previous step, the InstallShield wizard is started....

Installation
51
and the Welcome to the InstallShield Wizard for Discovery 5000.0.2.0 appears on your screen.
Setup Instructions
52
Click the Next button to proceed to the License Agreement step of the wizard.
Note: Clicking the Help button will open the Discovery Installation Guide help window (this documentation).
Go to STEP 3: License Agreement
Return to STEP 1: Getting Started with the Discovery LSM Download or Release DVD
Return to Beginning: Create Discovery Project Server
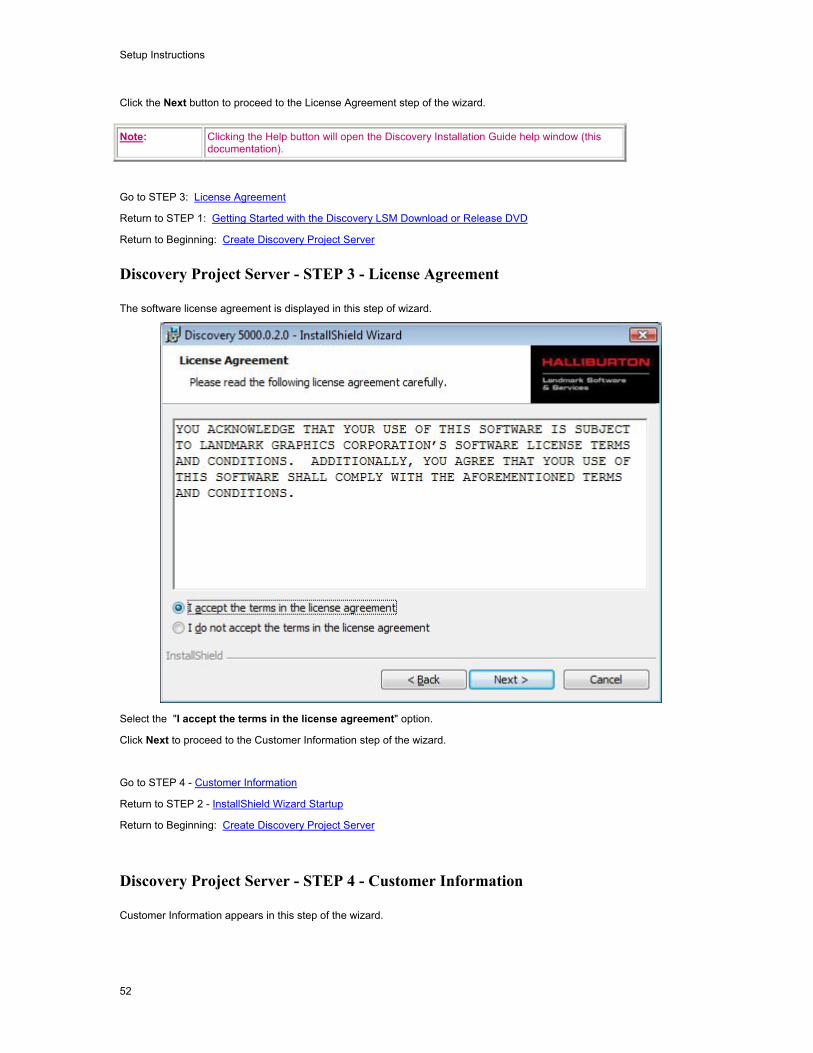
Discovery Project Server - STEP 3 - License Agreement
The software license agreement is displayed in this step of wizard.
Select the "I accept the terms in the license agreement" option.
Click Next to proceed to the Customer Information step of the wizard.
Go to STEP 4 - Customer Information
Return to STEP 2 - InstallShield Wizard Startup
Return to Beginning: Create Discovery Project Server
Discovery Project Server - STEP 4 - Customer Information
Customer Information appears in this step of the wizard.

Installation
53
Enter your User Name and Company Name.
Click Next to proceed to the Setup Type step of the wizard.
Go to STEP 5: Setup Type (Typical vs. Custom)
Return to STEP 3: License Agreement
Return to Beginning: Create Discovery Project Server
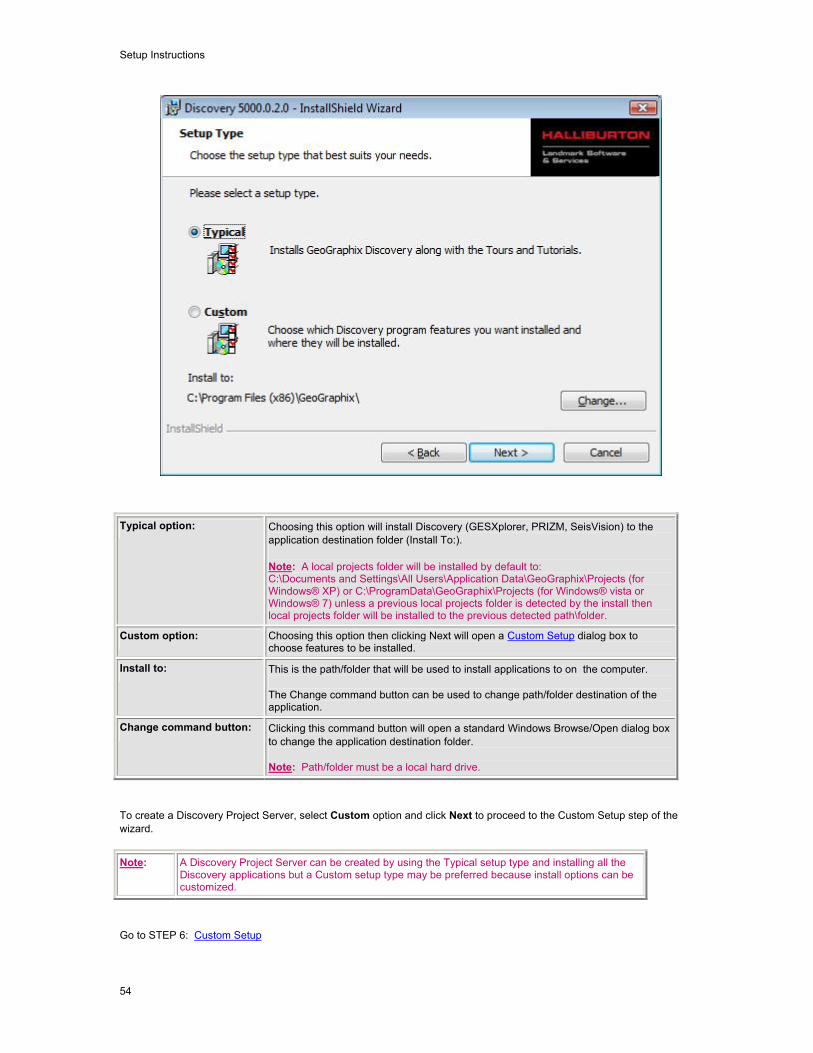
Discovery Project Server - STEP 5 - Setup Type (Typical vs. Custom)
The type of setup (Typical vs. Custom) and application destination folder is selected in this step of the wizard.
Setup Instructions
54
Typical option: Choosing this option will install Discovery (GESXplorer, PRIZM, SeisVision) to the application destination folder (Install To:). Note: A local projects folder will be installed by default to: C:\Documents and Settings\All Users\Application Data\GeoGraphix\Projects (for Windows® XP) or C:\ProgramData\GeoGraphix\Projects (for Windows® vista or Windows® 7) unless a previous local projects folder is detected by the install then local projects folder will be installed to the previous detected path\folder.
Custom option: Choosing this option then clicking Next will open a Custom Setup dialog box to choose features to be installed.
Install to: This is the path/folder that will be used to install applications to on the computer. The Change command button can be used to change path/folder destination of the application.
Change command button: Clicking this command button will open a standard Windows Browse/Open dialog box to change the application destination folder. Note: Path/folder must be a local hard drive.
To create a Discovery Project Server, select Custom option and click Next to proceed to the Custom Setup step of the wizard.
Note: A Discovery Project Server can be created by using the Typical setup type and installing all the Discovery applications but a Custom setup type may be preferred because install options can be customized.
Go to STEP 6: Custom Setup
Installation
55
Return to STEP 4: Customer Information
Return to Beginning: Create Discovery Project Server
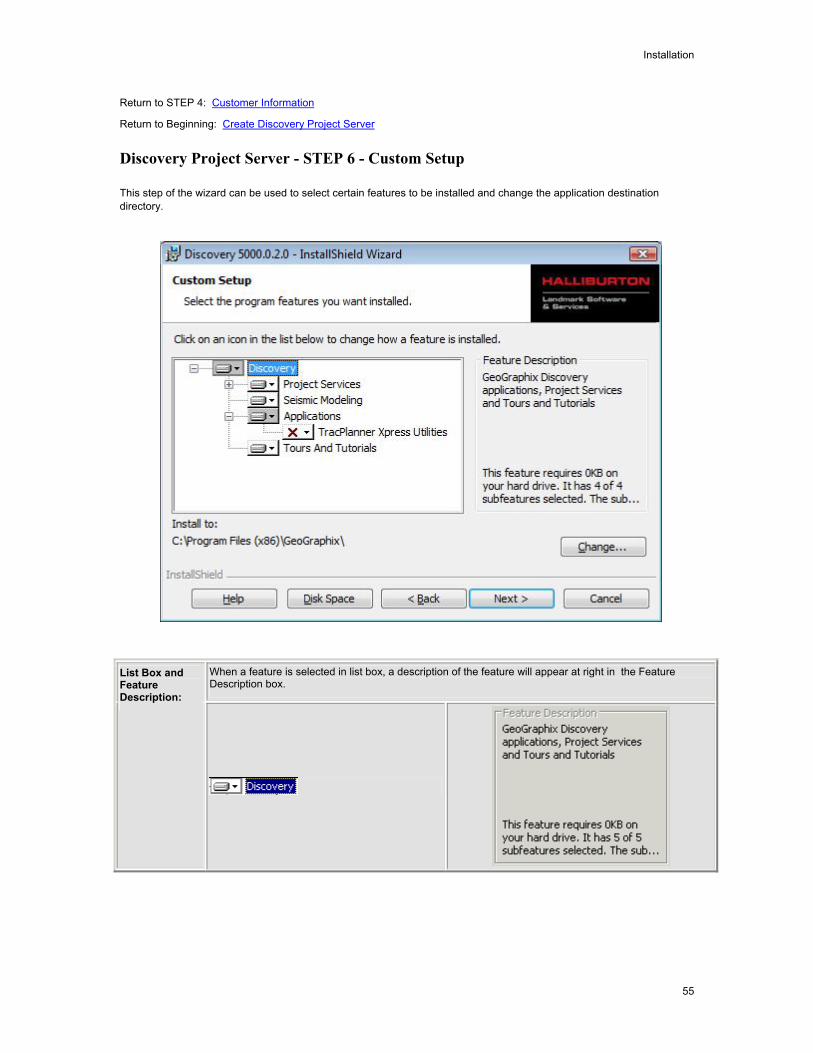
Discovery Project Server - STEP 6 - Custom Setup
This step of the wizard can be used to select certain features to be installed and change the application destination directory.
When a feature is selected in list box, a description of the feature will appear at right in the Feature Description box.
List Box and Feature Description:

Setup Instructions
56
Project Services feature cannot be disabled. Selecting Project Services feature by itself can be used to setup a network project server.
Installation
57
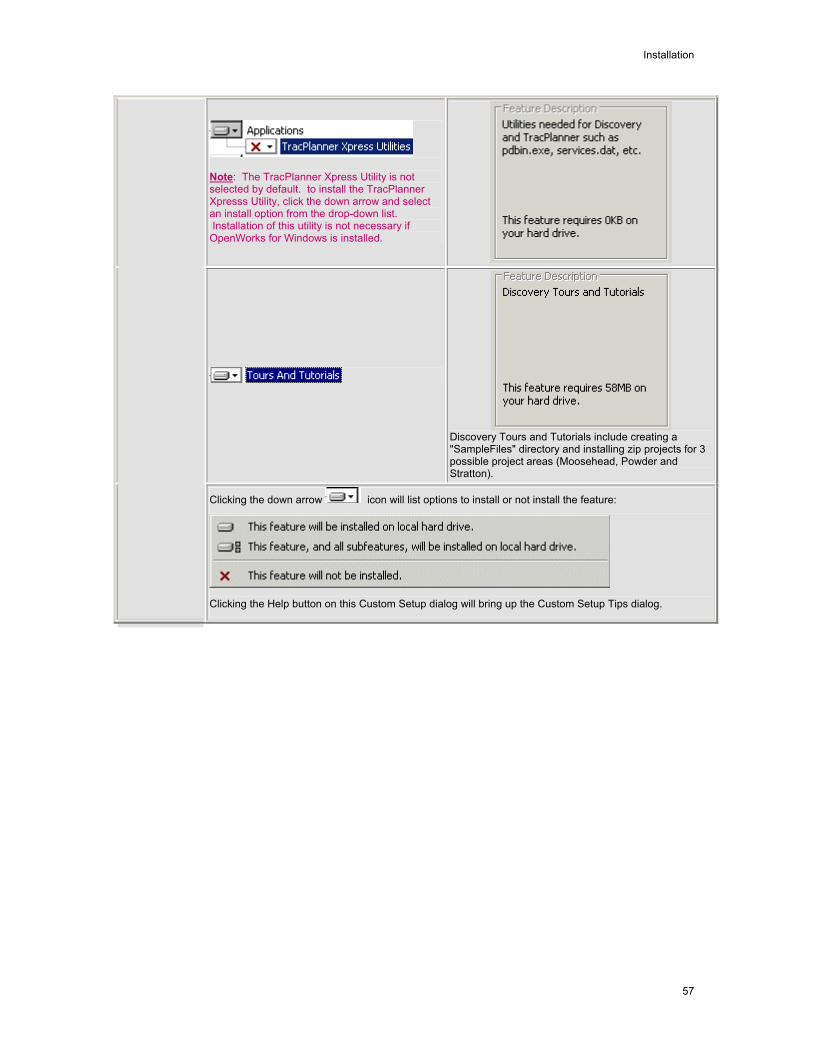
Note: The TracPlanner Xpress Utility is not selected by default. to install the TracPlanner Xpresss Utility, click the down arrow and select an install option from the drop-down list. Installation of this utility is not necessary if OpenWorks for Windows is installed.
Discovery Tours and Tutorials include creating a "SampleFiles" directory and installing zip projects for 3 possible project areas (Moosehead, Powder and Stratton).
Clicking the down arrow icon will list options to install or not install the feature:
Clicking the Help button on this Custom Setup dialog will bring up the Custom Setup Tips dialog.

Setup Instructions
58
Install to: This is the path/folder that will be used to install applications to on computer. The Change command button can be used to change the path/folder destination of the application.
Change command button:
Clicking this command button will open a standard Windows Browse/Open dialog box to change the application destination folder.
Select Project Services as the only feature to be installed (disable all other features):

Installation
59
Click Next to proceed to the Local Projects Folder step of the wizard.
Go to STEP 7: Local Projects Folder
Return to STEP 5: Setup Type (Typical vs. Custom)
Return to Beginning: Create Discovery Project Server
Discovery Project Server - STEP 7 - Local Projects Folder
This step of the wizard determines where the local projects folder (path/folder) will be created during the installation.

Setup Instructions
60
Clicking the Change command button will open a Change Current Destination Folder dialog box where you can change the application destination folder.
Note: Local Projects Path\Folder must be a local hard drive.
After installation is complete (as text in dialog box indicates), projects on Discovery Project Server can be organized in Homes using ProjectExplorer >> File >> New >> Home. More information regarding network projects can be found in the ProjectExplorer Help files. Click Next to proceed the Log Units of Measurement step of the wizard.
Go to STEP 8: Log Units of Measurement
Return to STEP 6: Custom Setup
Return to Beginning: Create Discovery Project Server
Discovery Project Server - STEP 8 - Log Units of Measurement
This step of the wizard determines what default log units will be setup for PRIZM and XSection.

Installation
61
Note: The units can be changed in PRIZM and XSection after installation.
Select the appropriate Units option and click Next to proceed to the Ready to Install the Program step of the wizard.
Go to STEP 9: Ready to Install the Program
Return to STEP 7: Local Projects Folder
Return to Beginning: Create Discovery Project Server
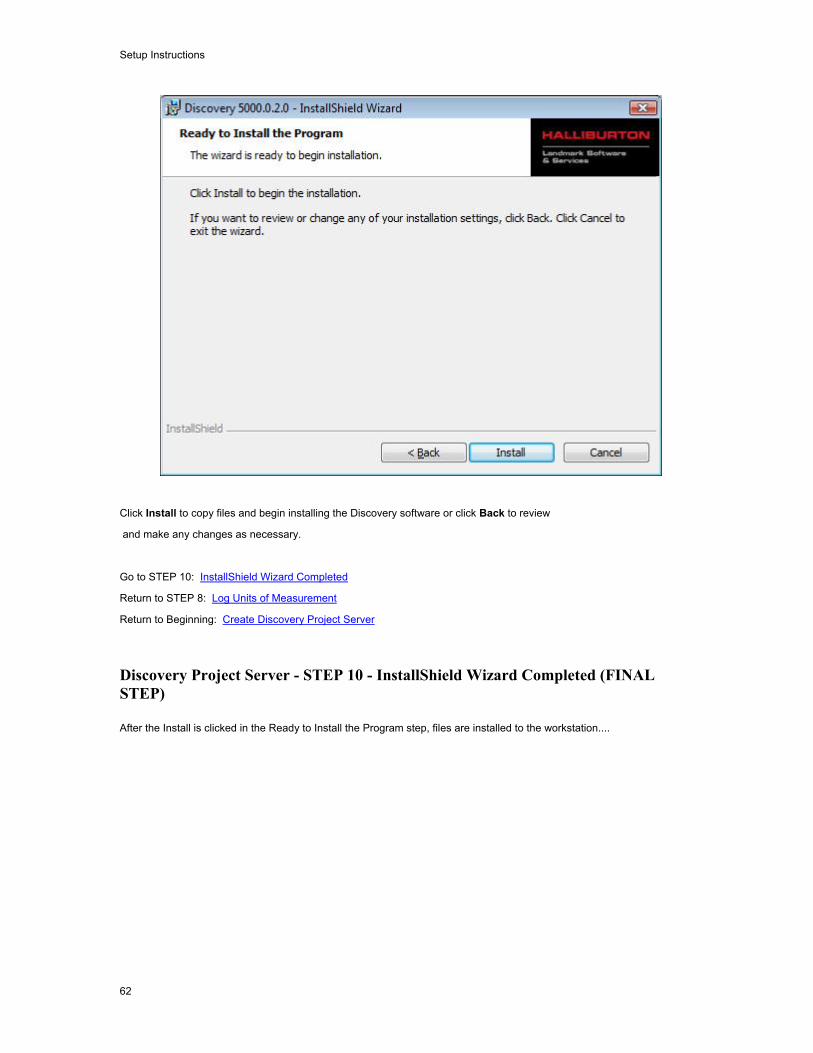
Discovery Project Server - STEP 9 - Ready to Install the Program
This is the second to last step of the wizard.
Setup Instructions
62
Click Install to copy files and begin installing the Discovery software or click Back to review
and make any changes as necessary.
Go to STEP 10: InstallShield Wizard Completed
Return to STEP 8: Log Units of Measurement
Return to Beginning: Create Discovery Project Server
Discovery Project Server - STEP 10 - InstallShield Wizard Completed (FINAL STEP)
After the Install is clicked in the Ready to Install the Program step, files are installed to the workstation....

Installation
63
and when the installation is finished, the InstallShield Wizard Completed dialog box appears:

Setup Instructions
64
Discovery can now be started through the desktop shortcuts or start menu.
Note: The Discovery Project Server must now be configured to connect to Landmark Graphics Licensing (LAM). When the Discovery application is started through desktop shortcuts or start menu, a licensing check is performed on computer. During this licensing check, the connection to LAM can be established. Please refer to Product Licensing topic for further details.
This is the final step in creating a Discovery Project Server. If necessary, other components in a Network Administrator Installation (e.g. Workstation Installations) may now be installed.
Return to STEP 9: Ready to Install the Program
Return to Beginning: Create Discovery Project Server
Return to: Network Administrator Installation
Landmark Connectivity Installation
Landmark Connectivity Installation
Installing Landmark Connectivity will install the following Discovery applications\features:
WellXchange
GridXchange
SeisXchange
Landmark Connectivity will be installed by default with the Discovery Typical setup type installation or can be custom installed by selecting the Landmark Connectivity feature in the Discovery Custom setup type of the installation.
Caution: Note: To run Seisxchange, and GridXchange, Landmark OpenWorks for Windows 5000.0.2.7 and it's associated software components must also be installed.
In addition, if you are utilizing SeisXchange, an NFS application such as Hummingbird ® NFS Maestro must also be installed and the configuration of several components to access SeisWorks will be necessary. (does not apply to WellXchange-OpenWorks Connect or GridXchange).
Please refer to Preparing the SeisXchange Environment for further information if you will be utilizing SeisXchange and SeisVision on OpenWorks.
Go to: OpenWorks for Windows
Go to: Preparing the SeisXchange Environment
Return to: Installation
OpenWorks for Windows 5000.0.2.7
Note: Discovery on OpenWorks projects, GridXchange, and SeisXchange require OpenWorks for Windows.
Please refer to the OpenWorks 5000.0.2.7 Installation Procedures in Landmark OpenBooks 5000.0.2.0 for detailed, step-by-step instructions for installing OpenWorks for Windows 5000.0.2.7.
Installation
65
The Landmark OpenBooks 5000.0.2.0 will discuss installing all the software components associated with OpenWorks for Windows 5000.0.2.7:
Oracle® Enterprise 10g Client 10.2.0.3g.
X-Server (OpenWorks for Windows 5000.0.2.7 is certified with Hummingbird Exceed® v8.0)
Adobe® Acrobat Reader 5.x
OpenWorks for Windows 5000.0.2.7
Note: The OpenWorks full install requires Hummingbird Exceed. The Oracle client installation in use with OpenWorks Full requires that the "Administrator" option be selected. The "Administrator" option type includes the SQL Plus, the Oracle Database Utilities, and other components necessary to run Discovery on OpenWorks
Note: Hummingbird exceed is not required for the OpenWorks Basic install. If Openworks Basic installation is used, the Oracle client can be installed with "Administrator" installation type, which will include all of the needed components. Or, the Oracle client installation for the OpenWorks Basic installation can use the "Custom" install type however, the following components must be installed:
Oracle Database Utilities 10.2.0.1.0
SQL *Plus 10.2.0.1.0
Oracle JDBC/THIN Interfaces 10.2.0.1.0
Oracle Net 10.2.0.1.0
After these Oracle components are installed, run the upgrade patch to Oracle 10g 10.2.0.4 (32 bit).
Preparing the SeisXchange Environment
Once OpenWorks for Windows along with Discovery are in place, the installation and configuration of an NFS application along with configuration of the dir.dat file to access SeisWorks will be necessary if SeisXchange or SeisVision on OpenWorks will be utilized:
1. Install and configure NFS application as necessary.
2. Export the required UNIX ® /LINUX ® SeisWorks file systems for NFS.
3. Verify that all the required NFS daemons are running on the UNIX ® /LINUX ® machine.
4. Configure Windows ® environment variable OW_CONF_DIR which defaults to $OWHOME/conf, where ithe district.dat file is located, which will point to the location of the dir.dat file associated with the district.
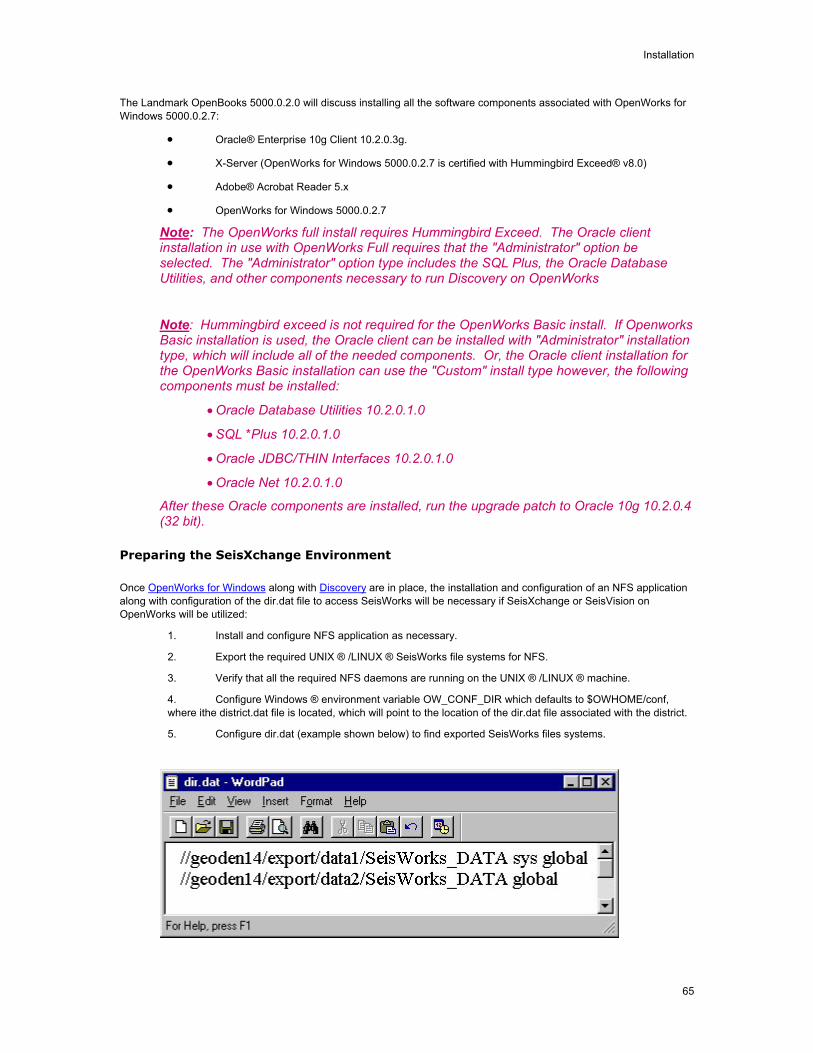
5. Configure dir.dat (example shown below) to find exported SeisWorks files systems.


67
Utilities
Utilities
You can install Discovery 5000.0.2.0 Utilities from the download of the Discovery5000.0.2.0 Software from LSM or from the Discovery 5000 Release DVD.
If you have downloaded Discovery5000.0.2.0 from LSM, See the GeoGraphix Discovery 5000.0.2.0 Utilities Read Me
to install the Utilities. Click on the Install Guide button on LSM to open the GeoGraphix Discovery 5000.0.2.0 Utilities Read Me file.
If you have downloaded Discovery5000.0.2.0 from LSM, go to the C:\Program Files (x86)\GeoGraphix\Utilities folder (for XP 64 bit Operating Systems), or the folder you specified to save the Utilities folder during the download, and double click on the specific Utility executable file to begin.
If you have ordered the Discovery 5000.0.2.0 DVD, continue through this step.
Insert the Discovery/Landmark Connectivity/Seismic Modeling DVD-ROM into the DVD-Drive.
If you have ordered the Discovery 5000.0.2.0DVD, Insert the Discovery/Landmark Connectivity/Seismic Modeling DVD-ROM into the DVD-Drive. The GeoGraphix splash screen appears for a few seconds.
Note: If the GeoGraphix splash screen does not appear automatically, go to the Start menu, and choose Run. In the Run dialog box, browse to the appropriate DVD-ROM drive and select the Install.exe file. Click OK.

Setup Instructions
68
then an install option window appears .....
Click the second option, . The Utilities screen appears.....

Utilities
69
There are three utilities available on the Utilities screen:
Install PRIZM Chart Utility
Install SeisVision SEG-Y Trace Viewer
Utilities - Install PRIZM Chart Utility
If you have downloaded the Discovery 5000.0.2.0 Utilities and used the default settings the PRIZM Chart Utility folder will be in the C:\Program Files (x86)\GeoGraphix\Utilities folder (for a typical download on Windows ® XP 64 bit operating systems). If you have not used the default settings during the download, navigate to the folder specified for saving the Utilities. Clicking Setup.exe in the Prizm Chart Utility folder will open the Prizm Chart Utility dialog box.
If you have the Discovery 5000.0.2.0 DVD, insert the DVD into the DVD drive and select
on the Utilities screen of the Discovery install screen or the release DVD to launch the PRIZM Chart Utility Setup program.

Setup Instructions
70
Utilities - Install SeisVision SEG-Y Trace Viewer
IIf you have the Discovery 5000.0.2.0 DVD, insert the DVD into the DVD drive and select
on the Utilities screen of the Discovery install screen or the release DVD to launch the SeisVision SEG-Y Trace Viewer Setup program.

71
Uninstalling
Uninstalling Discovery 5000.0.2.0
Similar to uninstalling other Windows ® applications, Discovery 5000.0.2.0 can be removed from a computer using Add/Remove Programs in Control Panel.
Windows ® XP, Windows® Vista, and Windows® 7
Windows Vista
Uninstalling Discovery 5000.0.2.0 in Windows Vista (uninstall steps can also be used with Windows XP and Windows 7)
There are 3 simple steps to removing Discovery 5000.0.2.0 on a Windows ® Vista computer:
Note: All Discovery applications should be closed or exited before completing the following steps.
STEP 1 - Stopping GeoGraphix Services in Control Panel Services
STEP 2 - Getting Started with Add/Remove Programs in Control Panel
STEP 3 - Removing Discovery Software
Uninstall Discovery in Windows XP - STEP 1 - Stopping GeoGraphix Services in Control Panel Services
From Windows ® XP Taskbar, use Start >> Control Panel >> Administrative Tools >> Services to open the Services applet window.
There are three GeoGraphix Services that should be stopped before removing GeoGraphix software:
GGX Database Service
GGX List Service (v2)
GGX Network Access Service

Setup Instructions
72
If a Service is not stopped, highlight the Service then right-click and choose Stop to stop the Service. All 3 Services should be stopped:

Uninstalling
73
Note: It is recommended that the above GeoGraphix Services are stopped before removing Discovery software but if the Services are not stopped, the Discovery Uninstall program will stop Services during the uninstall/removal process.
Go to STEP 2: Getting Started with Add/Remove Programs in Control Panel
Return to Beginning: Uninstalling Discovery 5000.0.2.0
Uninstall Discovery in Windows Vista - STEP 2 - Getting Started with Programs and Features in Control Panel
To start uninstall/removal of Discovery software, open the Programs and Features applet using Start >> Control Panel >> Programs and Features (for XP use Add/Remove Programs).
In the Programs and Features window, highlight Discovery 5000.0.2.0. Click the Uninstall button to remove Discovery or select the Change or Repiar buttons to modify or repair a Discovery install.
Note: The Change button can be used to modify or repair Discovery installations. Modify can be used to add or remove specific Discovery features. Repair will re-install the Discovery software repairing any files or registry entries that may be missing or damaged.
Click the Remove button to proceed to the next step of removing/uninstalling Discovery software.
Setup Instructions
74
Go to STEP 3: Removing Discovery Software
Return to STEP 1: Stopping GeoGraphix Services in Control Panel Services
Return to Beginning: Uninstalling Discovery 5000.0.2.0
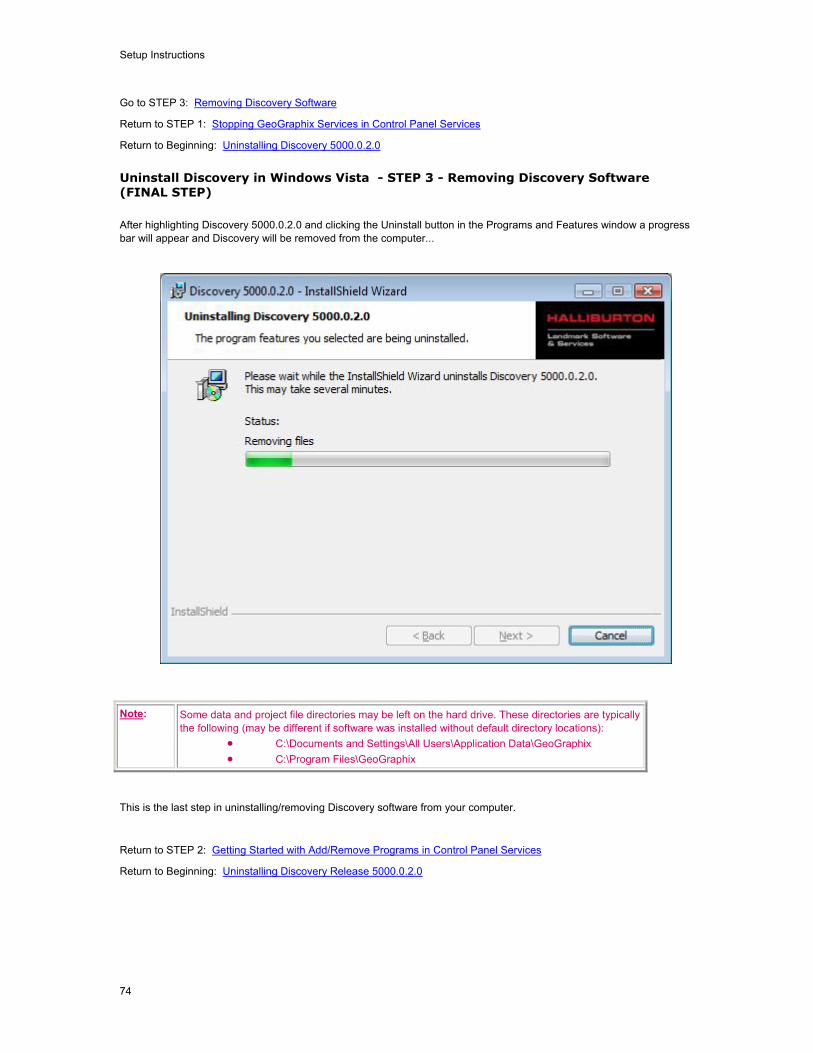
Uninstall Discovery in Windows Vista - STEP 3 - Removing Discovery Software (FINAL STEP)
After highlighting Discovery 5000.0.2.0 and clicking the Uninstall button in the Programs and Features window a progress bar will appear and Discovery will be removed from the computer...
Note: Some data and project file directories may be left on the hard drive. These directories are typically the following (may be different if software was installed without default directory locations):
C:\Documents and Settings\All Users\Application Data\GeoGraphix
C:\Program Files\GeoGraphix
This is the last step in uninstalling/removing Discovery software from your computer.
Return to STEP 2: Getting Started with Add/Remove Programs in Control Panel Services
Return to Beginning: Uninstalling Discovery Release 5000.0.2.0

75
Contacting Technical Support
If you have questions or issues that cannot be answered by the GeoGraphix Help Systems, you can contact GeoGraphix Customer Support at various worldwide office locations.
Write:
Halliburton Digital and Consulting Solutions Shea Center II Suite 400 1805 Shea Center Drive Highlands Ranch, Colorado 80129
Telephone:
Office hours are 7:00 AM to 5:30 PM Monday to Thursday and 7:00 AM to 5:00 PM on Friday, Mountain Time.
1-877-435-7542 - Toll Free U.S. and Canada
1-713-839-2200 - Local Houston and International
E-mail:
Issues, questions or comments:
Website:
General information on products and services:
www.geographix.com
Support site including latest updates and technical bulletins:
http://css.lgc.com/CustomerSupport/CustomerSupportHome.jsp