fagor-duo-pressure-cooker-instruction-manual.pdf - Visit Saida
Upload
khangminh22Category
view
0download
0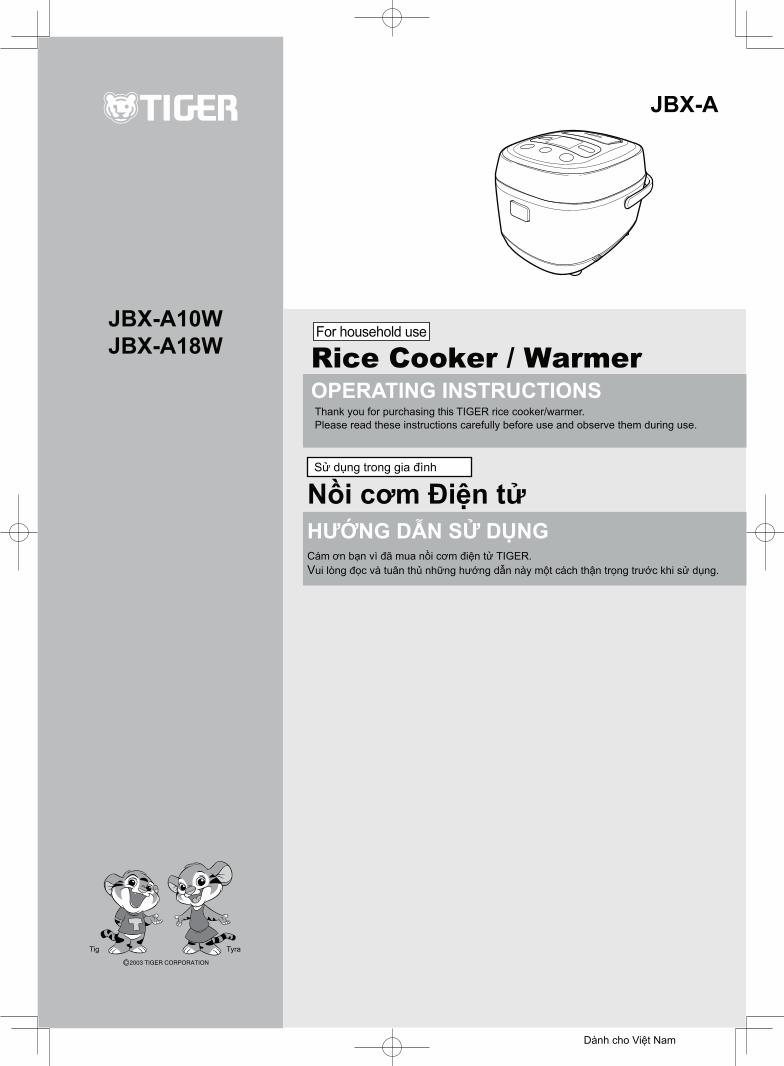
JBX-A
JBX-A10WJBX-A18W Rice Cooker / Warmer
OPERATING INSTRUCTIONSThank you for purchasing this TIGER rice cooker/warmer.Please read these instructions carefully before use and observe them during use.
For household use
シンガポール向け
Sử dụng trong gia đình
Nồi cơm Điện tửHƯỚNG DẪN SỬ DỤNGCám ơn bạn vì đã mua nồi cơm điện tử TIGER. Vui lòng đọc và tuân thủ những hướng dẫn này một cách thận trọng trước khi sử dụng.
Dành cho Việt Nam
2
IMPORTANT SAFEGUARDSWhen using the appliance, basic safety precautions should always be followed including the following:
1. Read all instructions.2. Do not touch hot surfaces. Use handles or knobs.3. To protect against electrical shock, do not immerse cord or plug in water or other liquid.4. Close supervision is necessary when the appliance is used by or near children.5. Unplug from outlet when not in use and before cleaning. Allow to cool before putting on or
taking off parts.6. Do not operate the appliance with a damaged cord or plug or after the appliance
malfunctions or has been damaged in any manner. Return appliance to the nearestauthorized service facility for examination, repair, or adjustment.
7. The use of accessory attachments not recommended by the appliance manufacturer maycause injuries.
8. Do not use outdoors.9. Do not let cord hang over edge of table or counter, or touch hot surfaces.10. Do not place the appliance on or near a hot gas or electric burner, or in a heated oven.11. Extreme caution must be used when moving the appliance containing hot oil or other hot
liquids.12. Always attach plug to the appliance first, then plug cord into the wall outlet.
To disconnect, turn any control to “off”, then remove plug from wall outlet.13. Do not use the appliance for other than intended use.14. Risk of electric shock, cook only in removable container.
SAVE THESE INSTRUCTIONSServicing should be performed by an authorized service representative.This appliance is intended for household use.
1. A short power cord (or detachable power cord) is provided to reduce the risks of becomingentangled in or tripping over a longer cord.
2. Longer detachable power cords or extension cords are available and may be used if careis exercised in their use.
3. If a longer detachable power cord or extension cord is used:a. The marked electrical rating of the extension cord should be at least as great as the
electrical rating of the appliance.b. The extension cord should be arranged so that it will not drape over the countertop or
tabletop where it can be pulled by children or tripped over unintentionally.
The appliance is not intended for use by persons (including children) with reduced physical, sensory or mental capabilities, or lack of experience and knowledge, unless they have been given supervision or instruction concerning use of the appliance by a person responsible for their safety.Children should be supervised to ensure that they do not play with the appliance.
The following instructions are applicable to 220 V only:This appliance has a polarized plug (one blade is wider than the other). To reduce the risk of electrical shock, this plug is intended to fit into a polarized outlet in only one way. If the plug does not fit fully into the outlet, reverse the plug. If it still does not fit, contact a qualified electrician. Do not attempt to defeat this safety feature.

3
English
Contents1 Important Safeguards ................................................................................................. 42 Names and Functions of Component Parts ............................................................. 9
Menu options and features .......................................................................................11Tips on making delicious rice .................................................................................. 12
3 Before Cooking Rice ................................................................................................. 144 How to Cook Rice ..................................................................................................... 16
Cooking time guidelines .......................................................................................... 175 Once Rice Is Finished Cooking ............................................................................... 186 Using the Timer Function ......................................................................................... 197 Keeping Rice Warm .................................................................................................. 218 Cooking Rice and Side Dishes Together ................................................................ 229 Slow Cooking ............................................................................................................ 2510 Steaming Food .......................................................................................................... 2711 Making Cakes ............................................................................................................ 3012 Cleaning and Maintenance ....................................................................................... 3213 If Rice Does Not Cook Properly .............................................................................. 3714 If Synchro-Cooking Does Not Work As Expected ................................................. 3915 If Food Is Not Cooked or Steamed or Cakes Are Not Made as Expected ........... 4016 Troubleshooting ....................................................................................................... 41
If this indication appears .......................................................................................... 42Setting the current time ............................................................................................ 43
............................................................................................................ 44When a power outage occurs or the appliance plug is disconnected ................. 44Purchasing consumables and optional accessories ............................................ 44
Warranty on Tiger Microcomputer Controlled rice cooker ......................................... 90Free-of-charge repair (Replacement*) policy ............................................................... 91
4
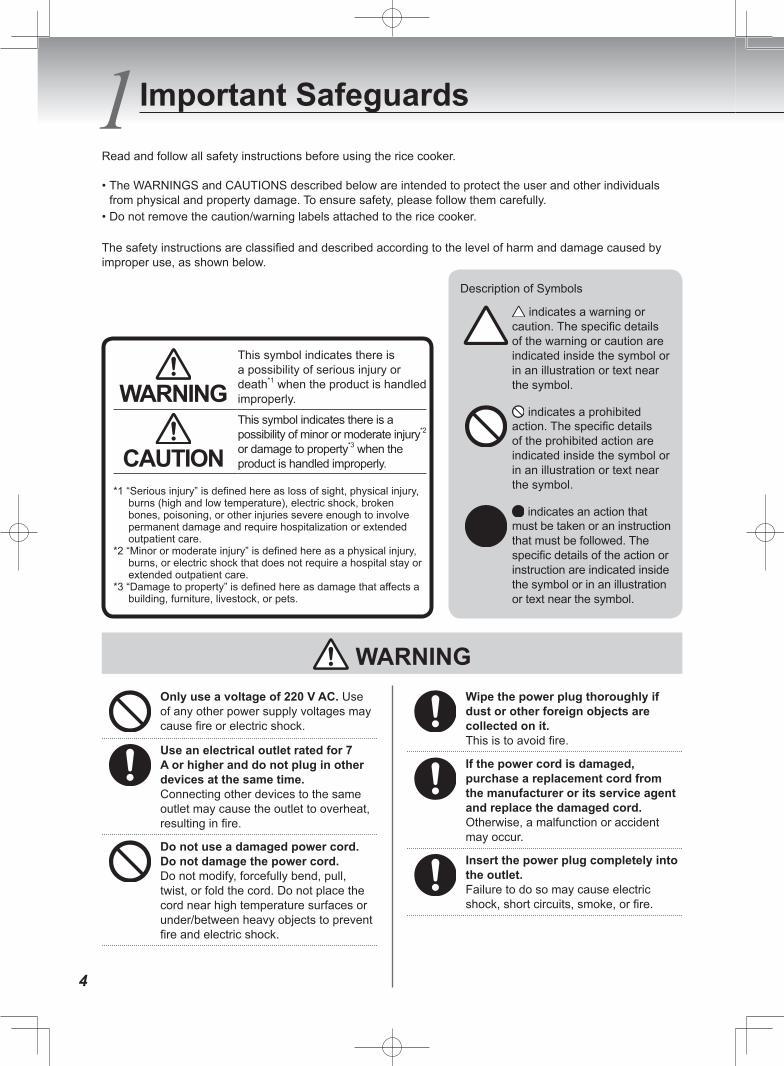
Only use a voltage of 220 V AC. Use of any other power supply voltages may cause fire or electric shock.
Use an electrical outlet rated for 7 A or higher and do not plug in other devices at the same time.Connecting other devices to the same outlet may cause the outlet to overheat, resulting in fire.
Do not use a damaged power cord. Do not damage the power cord.Do not modify, forcefully bend, pull, twist, or fold the cord. Do not place the cord near high temperature surfaces or under/between heavy objects to prevent fire and electric shock.
Wipe the power plug thoroughly if dust or other foreign objects are collected on it.This is to avoid fire.
If the power cord is damaged, purchase a replacement cord from the manufacturer or its service agent and replace the damaged cord.Otherwise, a malfunction or accident may occur.
Insert the power plug completely into the outlet.Failure to do so may cause electric shock, short circuits, smoke, or fire.
Read and follow all safety instructions before using the rice cooker.
• The WARNINGS and CAUTIONS described below are intended to protect the user and other individualsfrom physical and property damage. To ensure safety, please follow them carefully.
• Do not remove the caution/warning labels attached to the rice cooker.
The safety instructions are classified and described according to the level of harm and damage caused by improper use, as shown below.
WARNING
1 Important Safeguards
WARNINGThis symbol indicates there is a possibility of serious injury or death*1 when the product is handled improperly.
CAUTIONThis symbol indicates there is a possibility of minor or moderate injury*2 or damage to property*3 when the product is handled improperly.
*1 “Serious injury” is defined here as loss of sight, physical injury,burns (high and low temperature), electric shock, broken bones, poisoning, or other injuries severe enough to involve permanent damage and require hospitalization or extended outpatient care.
*2 “Minor or moderate injury” is defined here as a physical injury,burns, or electric shock that does not require a hospital stay or extended outpatient care.
*3 “Damage to property” is defined here as damage that affects abuilding, furniture, livestock, or pets.
Description of Symbols
indicates a warning or caution. The specific details of the warning or caution are indicated inside the symbol or in an illustration or text near the symbol.
indicates a prohibited action. The specific details of the prohibited action are indicated inside the symbol or in an illustration or text near the symbol.
indicates an action that must be taken or an instruction that must be followed. The specific details of the action or instruction are indicated inside the symbol or in an illustration or text near the symbol.

5
EnglishKeep the appliance plug out of the reach of small children.Do not allow them to place the appliance plug in their mouths.Doing so may cause electric shock, short circuits, or fire.
Keep the appliance plug away from metal objects, such as pins, or dust.This is to avoid electric shock, short circuits, or fire.
Be sure to use the specified power cord only. Do not use the power cord for any other devices.Doing so may cause malfunction or fire.
Do not use the rice cooker when the power cord or the power plug is damaged or the plug is loose in the outlet.Doing so may cause electric shock, short circuits, or fire.
Do not touchthe unit withwet hands
Do not handle the power plug with wet hands.Doing so may cause electric shock or injury.
Never open the lid during cooking.Doing so may cause burns.
Do not touch
Do not place your face or hands near the steam vent.Doing so may cause burns. Never allow small children near the steam vent.
Do not allow children to use the rice cooker by themselves or do not use the rice cooker within the reach of small children.Doing so may cause burns, electric shock, or injury.
Never immersethe unit in wateror other liquid
Do not immerse the rice cooker in water or splash water over the rice cooker.Doing so may cause short circuits and electric shock.
Do not expose the power plug to steam.Doing so may cause electric shock or fire. When using the rice cooker on a sliding table, be careful not to expose the power plug to steam.
Do not insert any metal objects, such as pins, wires, etc., into any gaps between the parts.Doing so may cause electric shock or malfunction.
Disassemblyis prohibited
Do not attempt to modify the rice cooker. Disassembly or repairs should be performed only by an authorized service representative.Otherwise, fire, electric shock, or injury may occur.
Do not use the rice cooker in any way not described in the instruction manual (supplied COOKBOOK).Steam or contents may spray out, causing burns or other injuries.Examples:• Heating ingredients and seasonings
inside of plastic cooking bags, etc.• Using parchment paper to cover food
in the rice cooker.
Household use only.This appliance is intended to be used in household and similar applications such as:• staff kitchen areas in shops, offices
and other working environments• farm houses• by clients in hotels, motels and other
residential type environments• bed and breakfast type environments
WARNING
66
1 Important Safeguards
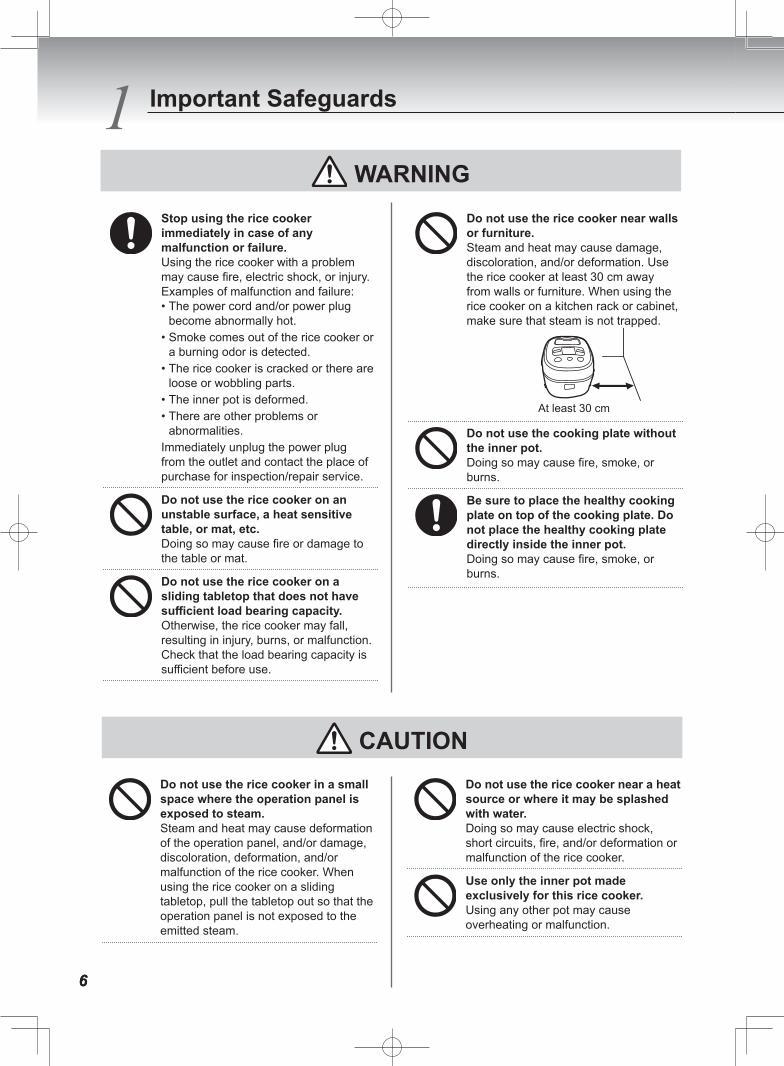
Stop using the rice cooker immediately in case of any malfunction or failure.Using the rice cooker with a problem may cause fire, electric shock, or injury.Examples of malfunction and failure:• The power cord and/or power plug
become abnormally hot.• Smoke comes out of the rice cooker or
a burning odor is detected.• The rice cooker is cracked or there are
loose or wobbling parts.• The inner pot is deformed.• There are other problems or
abnormalities.Immediately unplug the power plug from the outlet and contact the place of purchase for inspection/repair service.
Do not use the rice cooker on an unstable surface, a heat sensitive table, or mat, etc.Doing so may cause fire or damage to the table or mat.
Do not use the rice cooker on a sliding tabletop that does not have sufficient load bearing capacity.Otherwise, the rice cooker may fall, resulting in injury, burns, or malfunction.Check that the load bearing capacity is sufficient before use.
Do not use the rice cooker near walls or furniture.Steam and heat may cause damage, discoloration, and/or deformation. Use the rice cooker at least 30 cm away from walls or furniture. When using the rice cooker on a kitchen rack or cabinet, make sure that steam is not trapped.
At least 30 cm
Do not use the cooking plate without the inner pot.Doing so may cause fire, smoke, or burns.
Be sure to place the healthy cooking plate on top of the cooking plate. Do not place the healthy cooking plate directly inside the inner pot.Doing so may cause fire, smoke, or burns.
CAUTION
WARNING
Do not use the rice cooker in a small space where the operation panel is exposed to steam.Steam and heat may cause deformation of the operation panel, and/or damage, discoloration, deformation, and/or malfunction of the rice cooker. When using the rice cooker on a sliding tabletop, pull the tabletop out so that the operation panel is not exposed to the emitted steam.
Do not use the rice cooker near a heat source or where it may be splashed with water.Doing so may cause electric shock, short circuits, fire, and/or deformation or malfunction of the rice cooker.
Use only the inner pot made exclusively for this rice cooker.Using any other pot may cause overheating or malfunction.
77
English
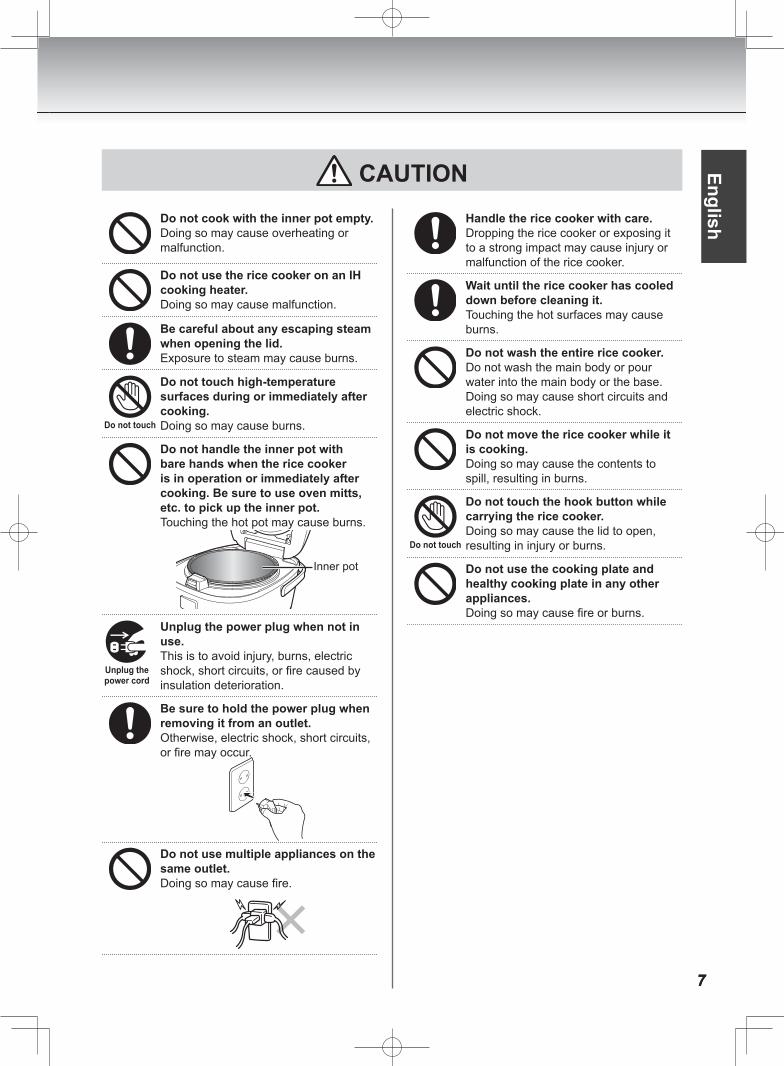
CAUTIONDo not cook with the inner pot empty.Doing so may cause overheating or malfunction.
Do not use the rice cooker on an IH cooking heater.Doing so may cause malfunction.
Be careful about any escaping steam when opening the lid.Exposure to steam may cause burns.
Do not touch
Do not touch high-temperature surfaces during or immediately after cooking.Doing so may cause burns.
Do not handle the inner pot with bare hands when the rice cooker is in operation or immediately after cooking. Be sure to use oven mitts, etc. to pick up the inner pot.Touching the hot pot may cause burns.
Inner pot
Unplug thepower cord
Unplug the power plug when not in use.This is to avoid injury, burns, electric
insulation deterioration.
Be sure to hold the power plug when removing it from an outlet.Otherwise, electric shock, short circuits,
Do not use multiple appliances on the same outlet.
Handle the rice cooker with care.Dropping the rice cooker or exposing it to a strong impact may cause injury or malfunction of the rice cooker.
Wait until the rice cooker has cooled down before cleaning it.Touching the hot surfaces may cause burns.
Do not wash the entire rice cooker.Do not wash the main body or pour water into the main body or the base. Doing so may cause short circuits and electric shock.
Do not move the rice cooker while it is cooking.Doing so may cause the contents to spill, resulting in burns.
Do not touch
Do not touch the hook button while carrying the rice cooker.Doing so may cause the lid to open, resulting in injury or burns.
Do not use the cooking plate and healthy cooking plate in any other appliances.
888
1 Important Safeguards
� Follow the safety instructions in order to use your rice cooker safely for many years.
● Remove any cooked rice or remaining grains of rice.Failure to do so may cause steam to leak or contents to boil over. This may cause malfunction or improperly cooked rice.
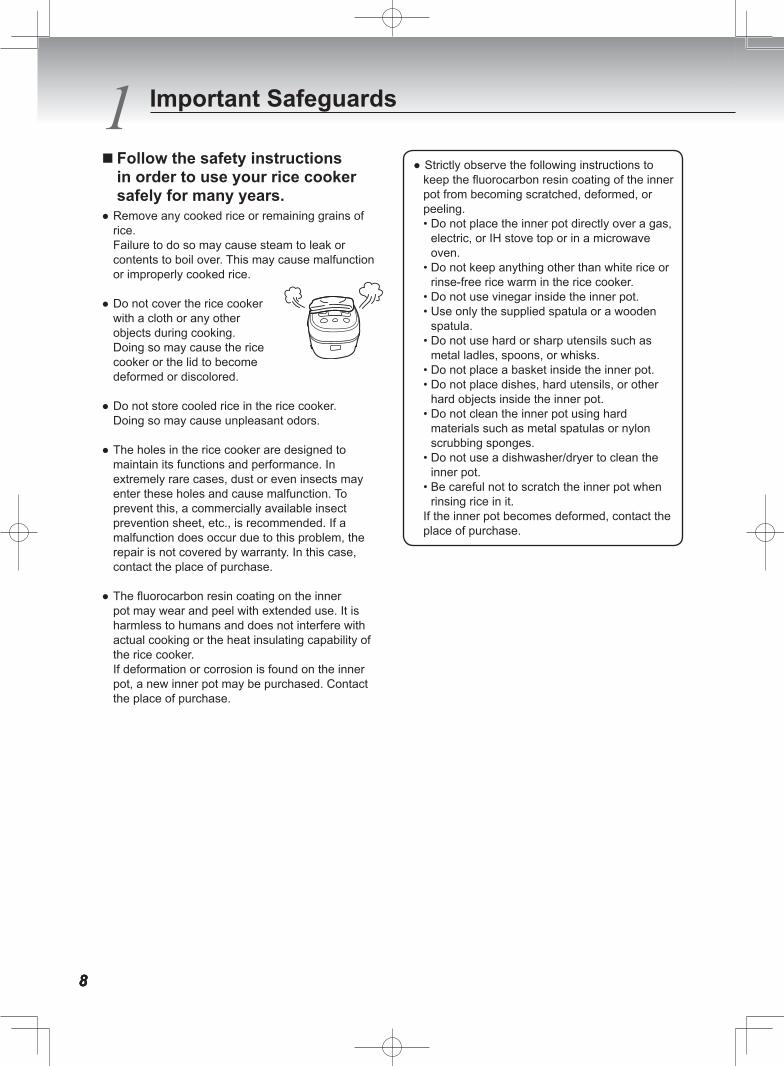
● Do not cover the rice cooker with a cloth or any other objects during cooking.Doing so may cause the rice cooker or the lid to become deformed or discolored.
● Do not store cooled rice in the rice cooker.Doing so may cause unpleasant odors.
● The holes in the rice cooker are designed to maintain its functions and performance. In extremely rare cases, dust or even insects may enter these holes and cause malfunction. To prevent this, a commercially available insect prevention sheet, etc., is recommended. If a malfunction does occur due to this problem, the repair is not covered by warranty. In this case, contact the place of purchase.
● The fluorocarbon resin coating on the inner pot may wear and peel with extended use. It is harmless to humans and does not interfere with actual cooking or the heat insulating capability of the rice cooker.If deformation or corrosion is found on the inner pot, a new inner pot may be purchased. Contact the place of purchase.
● Strictly observe the following instructions to keep the fluorocarbon resin coating of the inner pot from becoming scratched, deformed, or peeling.• Do not place the inner pot directly over a gas,
electric, or IH stove top or in a microwave oven.
• Do not keep anything other than white rice orrinse-free rice warm in the rice cooker.
• Do not use vinegar inside the inner pot.• Use only the supplied spatula or a wooden
spatula.• Do not use hard or sharp utensils such as
metal ladles, spoons, or whisks.• Do not place a basket inside the inner pot.• Do not place dishes, hard utensils, or other
hard objects inside the inner pot.• Do not clean the inner pot using hard
materials such as metal spatulas or nylonscrubbing sponges.
• Do not use a dishwasher/dryer to clean theinner pot.
• Be careful not to scratch the inner pot whenrinsing rice in it.
If the inner pot becomes deformed, contact the place of purchase.
99
English
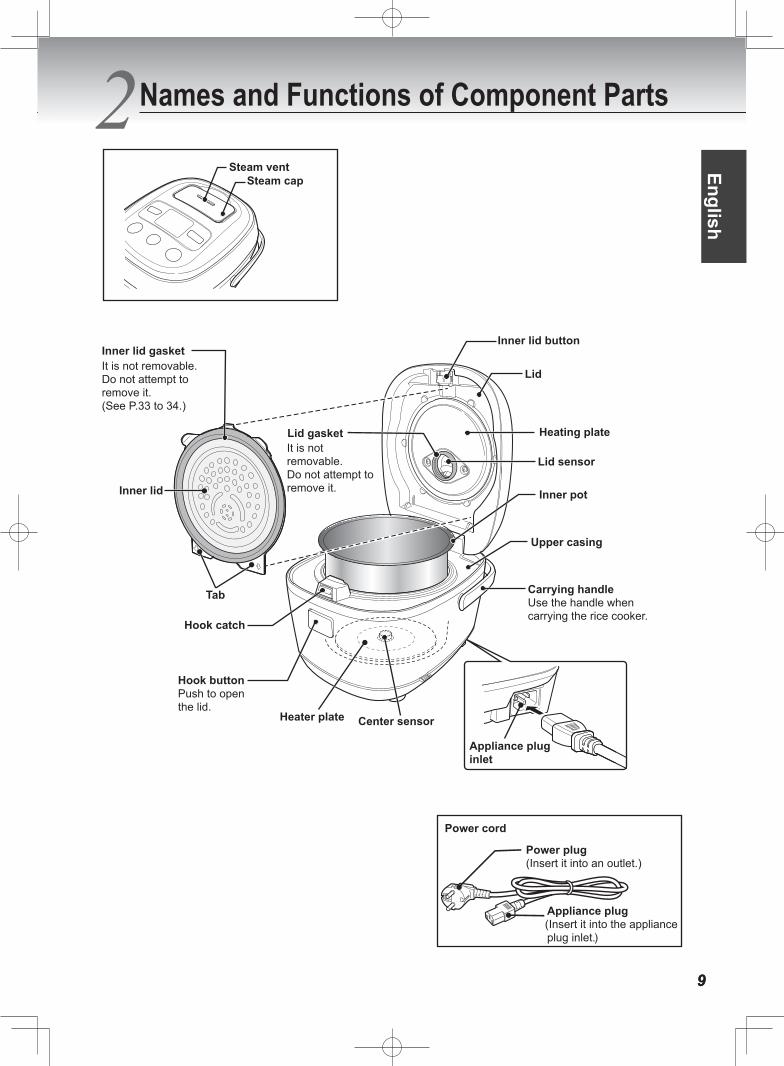
2 Names and Functions of Component Parts
Lid
Heating plateLid gasket
Carrying handleUse the handle when carrying the rice cooker.
Center sensor
Inner pot
Upper casing
Hook buttonPush to open the lid.
Steam vent
Heater plate
Power plug(Insert it into an outlet.)
Power cord
Appliance plug(Insert it into the appliance plug inlet.)
Appliance plug inlet
Steam cap
Inner lid
Inner lid gasketInner lid button
It is not removable.Do not attempt to remove it.(See P.33 to 34.)
It is not removable.Do not attempt to remove it.
Tab
Lid sensor
Hook catch
1010
2 Names and Functions of Component Parts
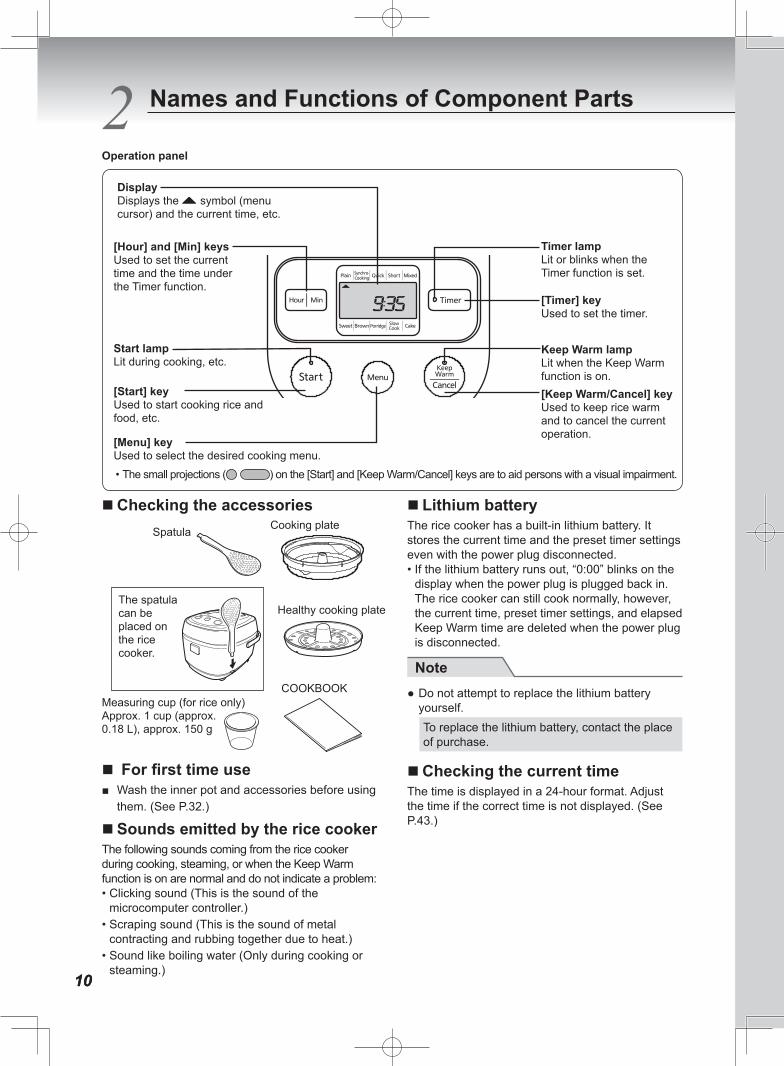
Operation panel
[Hour] and [Min] keysUsed to set the current time and the time under the Timer function.
[Menu] keyUsed to select the desired cooking menu.
Keep Warm lampLit when the Keep Warm function is on.[Keep Warm/Cancel] keyUsed to keep rice warm and to cancel the current operation.
DisplayDisplays the symbol (menu cursor) and the current time, etc.
[Start] keyUsed to start cooking rice and food, etc.
• The small projections ( ) on the [Start] and [Keep Warm/Cancel] keys are to aid persons with a visual impairment.
Start lampLit during cooking, etc.
�Checking the accessoriesSpatula
COOKBOOK
Cooking plate
Measuring cup (for rice only)Approx. 1 cup (approx. 0.18 L), approx. 150 g
Healthy cooking plateThe spatula can be placed on the rice cooker.
� For first time use ■ Wash the inner pot and accessories before using
them. (See P.32.)
�Sounds emitted by the rice cookerThe following sounds coming from the rice cooker during cooking, steaming, or when the Keep Warm function is on are normal and do not indicate a problem:• Clicking sound (This is the sound of the
microcomputer controller.)• Scraping sound (This is the sound of metal
contracting and rubbing together due to heat.)• Sound like boiling water (Only during cooking or
steaming.)
� Lithium batteryThe rice cooker has a built-in lithium battery. It stores the current time and the preset timer settings even with the power plug disconnected.• If the lithium battery runs out, “0:00” blinks on the
display when the power plug is plugged back in.The rice cooker can still cook normally, however,the current time, preset timer settings, and elapsedKeep Warm time are deleted when the power plugis disconnected.
Note ● Do not attempt to replace the lithium battery yourself.To replace the lithium battery, contact the place of purchase.
�Checking the current timeThe time is displayed in a 24-hour format. Adjust the time if the correct time is not displayed. (See P.43.)
[Timer] keyUsed to set the timer.
Timer lampLit or blinks when the Timer function is set.

111111
English
Menu options and features
MenuTimer
function availability
Keep Warm
function availability
Feature
Plain Cooks white rice (long-grain rice).
Synchro-Cooking – * Cooks rice and side dishes together using the cooking plate.
Quick – Quickly cooks white rice (long-grain rice).
Short Cooks white rice (short-grain rice).
Mixed – Cooks seasoned rice.
Sweet – Cooks steamed glutinous rice.
Brown Cooks brown rice or multigrain brown rice (brown rice mixed with other grains).
Porridge Cooks porridge.
See P.44 for cooking capacities.: Available–: Not available: Do not use the Keep Warm function to ensure the maximum flavor of cooked rice.* Remove the cooking plate from the rice cooker before using the Keep Warm function.
Note ● When using the “Porridge” menu, porridge can become pasty if kept warm for too long. Serve it as soon as possible.

12
Tips on making delicious rice
Select quality rice and a good storage location.• Choose freshly polished, glossy rice with a
uniform grain size.• Store rice in a cool, dark, well-ventilated place.
Carefully measure the rice using the supplied measuring cup.1 cup (level filling) is approximately 0.18 L.Use the supplied measuring cup for rinse-free rice as well.
Rinse the rice quickly.Pour rice in the inner pot and add plenty of water. Lightly stir the rice and discard the water quickly.Use cold water and quickly rinse the rice by hand so that the rice does not absorb the starchy water.
Cooking rinse-free rice• Add rinse-free rice and water, and then stir well
from the bottom so that every individual grain of rice becomes immersed in the water. Merely adding water to the rice prevents it from soaking in the water and may cause improperly cooked rice.
• If the added water turns white, we recommendyou rinse the rice thoroughly by replacing the water once or twice. The water turning white is due to starch in the rice and not its bran. However, cooking the rice with the starch left in the water may lead to burned rice, the contents boiling over, or improperly cooked rice.
Adding other ingredients to riceThe total amount of ingredients should be no more than approximately 70 g per cup of rice. Mix seasonings well and then add other ingredients on top of the rice. If other ingredients are to be added to the rice, be sure to use no more than the acceptable maximum amount (see the table below).
Menu 1.0 L (5.5-cup) type
1.8 L (10-cup) type
Mixed 3 cups 6 cupsSweet 3 cups 5 cupsBrown 3 cups 5 cups• Do not open the lid during cooking to add other
ingredients.
• Add water prior to adding the ingredients.Adding water after the ingredients results in thecooked rice being too firm.
• The following cases may result in improperlycooked or burned rice.
• When too much of seasonings such as soysauce, sweet cooking rice wine, etc. areadded
• When seasonings are settled at the bottom• When ketchup or tomato sauce is added• When other ingredients are mixed with rice
• When adding ingredients to porridge, addwater to the rice so that the water level after theingredients are added is not over the top line forporridge.
Add water according to the type of rice and your personal preference. Amount of water to addIf adding more or less water than the recommended amount, do not deviate from that amount by any more than 1/3 of one line. Doing so may cause the contents to boil over.
MenuCorresponding scale (Use the
corresponding scale on the inner pot as a reference.)
Plain “Plain” scaleSynchro-Cooking “Plain” scaleQuick “Plain” scaleShort “Plain” scaleMixed “Plain” scaleSweet (sweet rice) “Sweet” scale
Sweet (sweet rice and non-glutinous rice)
Between the “Plain” and “Sweet” scales
Brown “Brown” scale
Porridge Hard porridge: “Porridge • hard” scaleSoft porridge: “Porridge • soft” scale
• When cooking rinse-free rice, use the “Plain”scale as a reference but add a little extra water(until it just covers the corresponding line).
• When cooking germinated brown rice, wholerice, semi-polished rice, barley rice,or multigrainrice, use the “Plain” scale as a reference.
• If the amount of water to add is specified on apackage of germinated brown rice or multigrainbrown rice, follow the directions on the packageand add water according to your personalpreference.
Read P.14 to15 for preparations before cooking rice and P.16 to 20 for how to cook rice.
13
English
Cooking semi-polished rice, whole rice, barley rice, germinated brown rice, or multigrain• Select the “Short” menu.• When cooking porridge, select the “Porridge”
menu.
Cooking brown rice or multigrain brown rice mixed in with white rice• Multigrain brown rice is a mixture of brown rice
and multigrain.• If the rice to be cooked includes more brown rice
or multigrain brown rice than white rice, selectthe “Brown” menu.
• If there is an equal amount of brown rice ormultigrain brown rice and white rice, or there ismore white rice than brown rice or multigrainbrown rice, select the “Plain” menu. (See P.11.)(Soak the brown rice separately for 1 to 2 hoursbefore cooking.)
Cooking multigrain together with white rice• The amount of multigrain should be less than
20% of the volume of the white rice.• The maximum acceptable amount for the
combination of white rice and multigrain is 4cups for the 1.0 L type and 8 cups for the 1.8 Ltype.
• Place the multigrain on top of the white rice.Mixing them together may result in improperlycooked food.
• If the multigrain is too hard, soak it separatelyfor approximately 1 hour prior to cooking andthen place it on top of the white rice.
• Small grained multigrain, especially amaranth,can expand and stick to the inner lid.
Cooking multigrain together with brown rice• Be sure to select the “Brown” menu.• The maximum acceptable amount for the
combination of brown rice and multigrain is 3.5cups for the 1.0 L type and 6 cups for the 1.8 Ltype.
Cooking short-grain rice• When cooking short-grain rice, select the “Short”
menu. When cooking seasoned rice with variousingredients using short-grain rice, select the“Mixed” menu. Dark brown crisp rice may beformed when cooking short-grain rice. Selectingany other menu may result in improperly cookedfood.
14
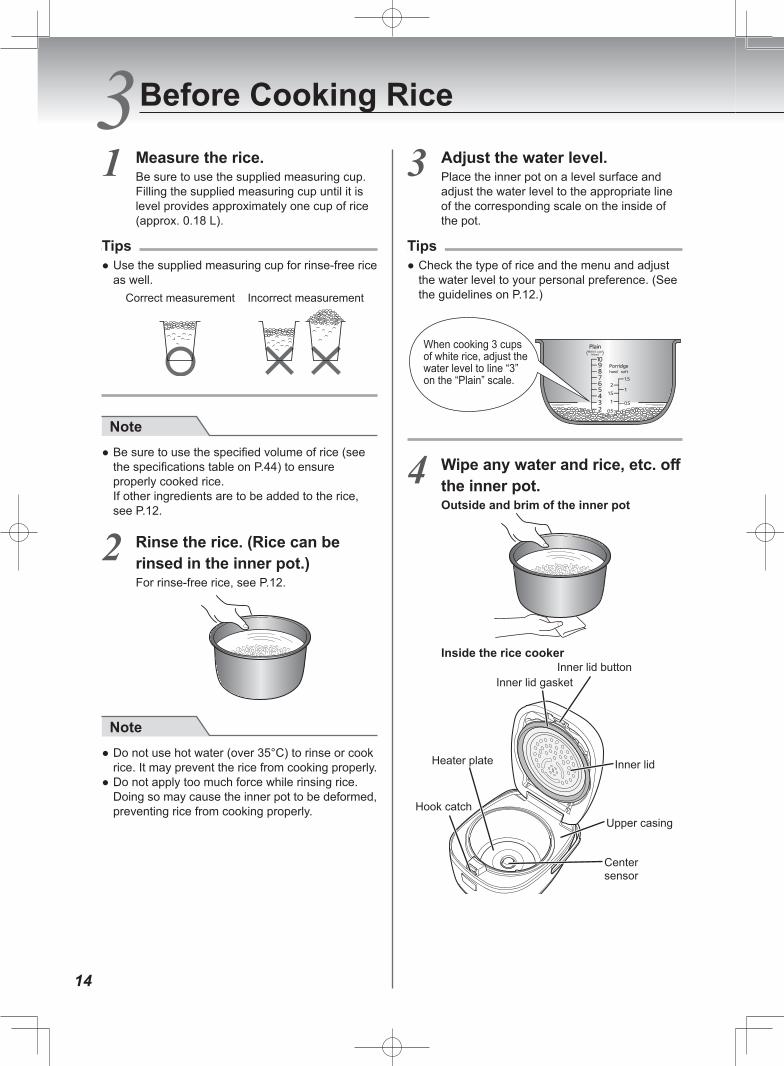
1 Measure the rice.Be sure to use the supplied measuring cup.Filling the supplied measuring cup until it is level provides approximately one cup of rice (approx. 0.18 L).
Tips ● Use the supplied measuring cup for rinse-free rice as well.
Correct measurement Incorrect measurement
Note ● Be sure to use the specified volume of rice (see the specifications table on P.44) to ensure properly cooked rice.If other ingredients are to be added to the rice, see P.12.
2 Rinse the rice. (Rice can be rinsed in the inner pot.)For rinse-free rice, see P.12.
Note ● Do not use hot water (over 35°C) to rinse or cook rice. It may prevent the rice from cooking properly.
● Do not apply too much force while rinsing rice. Doing so may cause the inner pot to be deformed, preventing rice from cooking properly.
3 Adjust the water level.Place the inner pot on a level surface and adjust the water level to the appropriate line of the corresponding scale on the inside of the pot.
Tips ● Check the type of rice and the menu and adjust the water level to your personal preference. (See the guidelines on P.12.)
When cooking 3 cups of white rice, adjust the water level to line “3” on the “Plain” scale.
4 Wipe any water and rice, etc. off the inner pot.Outside and brim of the inner pot
Inside the rice cooker
Inner lid gasket
Upper casingHook catch
Center sensor
Heater plate Inner lid
Inner lid button
3 Before Cooking Rice
15
English
Caution● Be sure to remove any cooked rice or grains
of rice on and around the heater plate, centersensor, lid sensor, upper casing, and hook catch.(See P.33.)Any rice that is not removed can prevent thelid from closing, allow steam to leak out duringcooking, or enable the lid to open and thecontents to spray out, resulting in burns or injury.
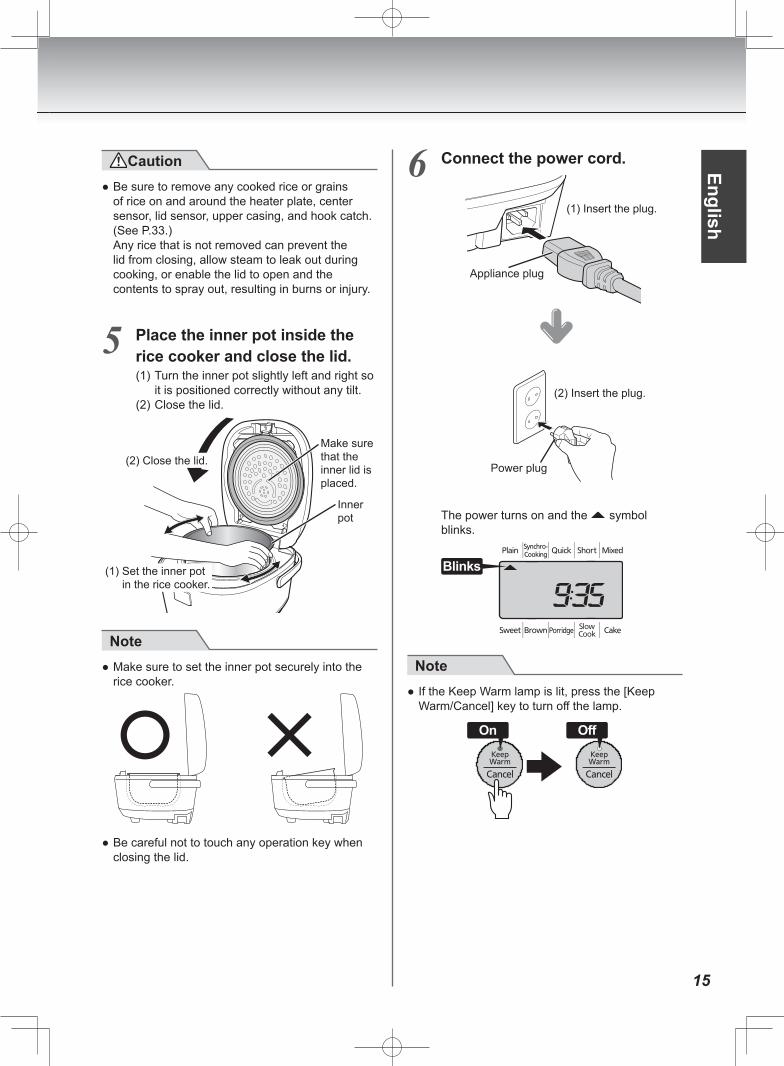
5 Place the inner pot inside the rice cooker and close the lid.(1) Turn the inner pot slightly left and right so
it is positioned correctly without any tilt.(2) Close the lid.
(1) Set the inner pot in the rice cooker.
(2) Close the lid.
Inner pot
Make sure that the inner lid is placed.
Note● Make sure to set the inner pot securely into the
rice cooker.
● Be careful not to touch any operation key whenclosing the lid.
6 Connect the power cord.
Appliance plug
(1) Insert the plug.
(2) Insert the plug.
Power plug
The power turns on and the symbol blinks.
Blinks
Note● If the Keep Warm lamp is lit, press the [Keep
On
16
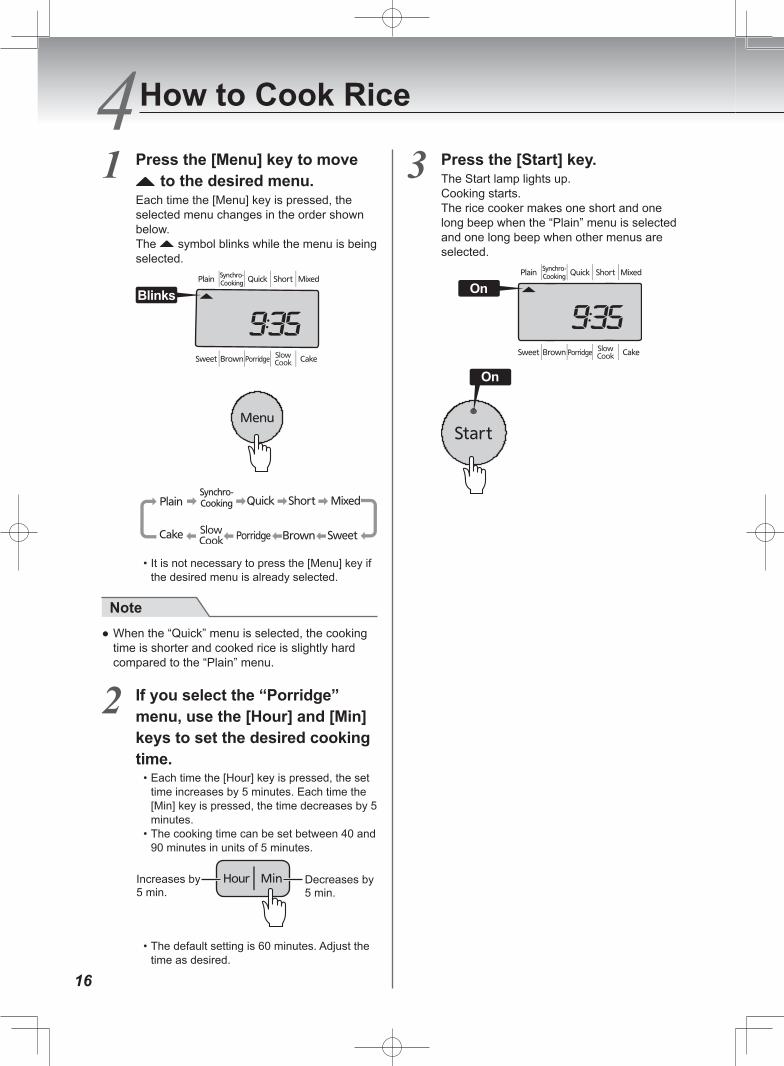
4 1 Press the [Menu] key to move
to the desired menu.Each time the [Menu] key is pressed, the selected menu changes in the order shown below.The symbol blinks while the menu is being selected.
Blinks
• It is not necessary to press the [Menu] key ifthe desired menu is already selected.
Note ● When the “Quick” menu is selected, the cooking time is shorter and cooked rice is slightly hard compared to the “Plain” menu.
2 If you select the “Porridge” menu, use the [Hour] and [Min] keys to set the desired cooking time.
• Each time the [Hour] key is pressed, the settime increases by 5 minutes. Each time the [Min] key is pressed, the time decreases by 5 minutes.
• The cooking time can be set between 40 and90 minutes in units of 5 minutes.
Increases by 5 min.
Decreases by 5 min.
• The default setting is 60 minutes. Adjust thetime as desired.
3 Press the [Start] key.The Start lamp lights up.Cooking starts.The rice cooker makes one short and one long beep when the “Plain” menu is selected and one long beep when other menus are selected.
On
On
How to Cook Rice

17
English
Cooking time guidelinesMenu
Unit sizePlain Synchro-Cooking Quick Short
1.0 L (5.5-cup) type 32 to 43 min 37 to 48 min 24 to 36 min 43 to 58 min
1.8 L (10-cup) type 32 to 46 min 46 to 58 min 24 to 42 min 44 to 59 min
MenuUnit size
Mixed Sweet Brown
1.0 L (5.5-cup) type 31 to 46 min 35 to 46 min 68 to 86 min
1.8 L (10-cup) type 32 to 55 min 42 to 57 min 68 to 86 min
• The above times indicate the amount of time until the end of steaming after cooking is completed whenrice is not soaked and the Timer function is not set. (Voltage: 220 V, Room temperature: 23°C, Watertemperature: 23°C, Water level: Normal)
• Cooking times vary somewhat depending on the amount of rice being cooked, the type of rice, the type andquantity of ingredients, the room temperature, the water temperature, the amount of water, the electricalvoltage, and whether the Timer function is used or not, etc.
1818
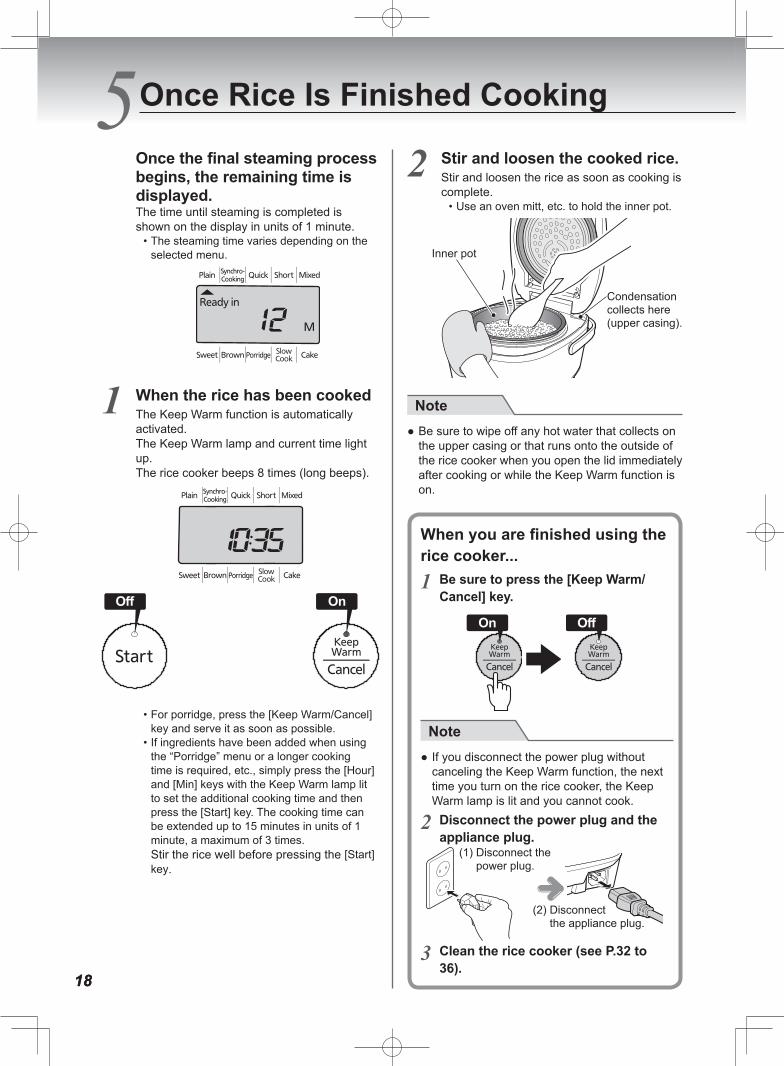
5 begins, the remaining time is displayed.The time until steaming is completed is shown on the display in units of 1 minute.
• The steaming time varies depending on theselected menu.
1 When the rice has been cookedThe Keep Warm function is automatically activated. The Keep Warm lamp and current time light up.The rice cooker beeps 8 times (long beeps).
On
• For porridge, press the [Keep Warm/Cancel]key and serve it as soon as possible.
• If ingredients have been added when usingthe “Porridge” menu or a longer cookingtime is required, etc., simply press the [Hour]and [Min] keys with the Keep Warm lamp litto set the additional cooking time and thenpress the [Start] key. The cooking time canbe extended up to 15 minutes in units of 1minute, a maximum of 3 times.Stir the rice well before pressing the [Start]key.
2 Stir and loosen the cooked rice.Stir and loosen the rice as soon as cooking is complete.
• Use an oven mitt, etc. to hold the inner pot.
Condensation collects here (upper casing).
Inner pot
Note ●the upper casing or that runs onto the outside of the rice cooker when you open the lid immediately after cooking or while the Keep Warm function is on.
rice cooker...1 Be sure to press the [Keep Warm/
Cancel] key.
On
Note● If you disconnect the power plug without
canceling the Keep Warm function, the nexttime you turn on the rice cooker, the KeepWarm lamp is lit and you cannot cook.
2 Disconnect the power plug and theappliance plug.
(1) Disconnect the power plug.
(2) Disconnect the appliance plug.
3 Clean the rice cooker (see P.32 to36).
Once Rice Is Finished Cooking
1919
English
6 2
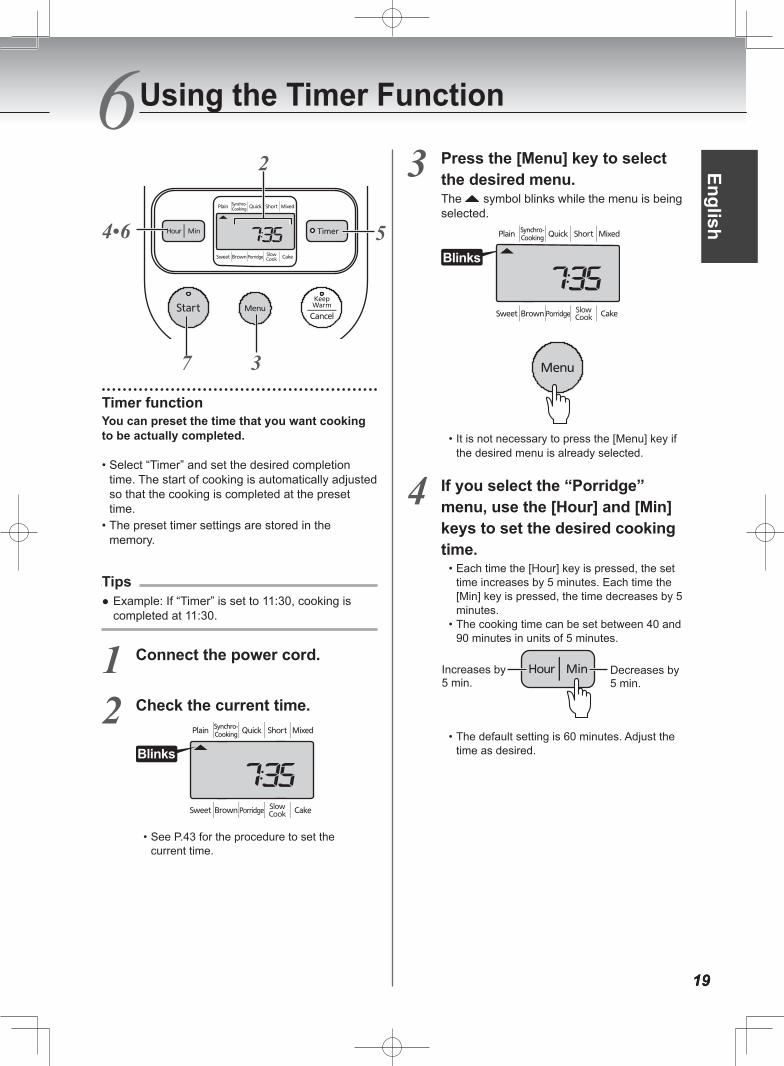
4•6 5
37
Timer functionYou can preset the time that you want cooking to be actually completed.
• Select “Timer” and set the desired completiontime. The start of cooking is automatically adjustedso that the cooking is completed at the presettime.
• The preset timer settings are stored in thememory.
Tips ● Example: If “Timer” is set to 11:30, cooking is completed at 11:30.
1 Connect the power cord.
2 Check the current time.
Blinks
• See P.43 for the procedure to set thecurrent time.
3 Press the [Menu] key to select the desired menu.The symbol blinks while the menu is being selected.
Blinks
• It is not necessary to press the [Menu] key ifthe desired menu is already selected.
4 If you select the “Porridge” menu, use the [Hour] and [Min] keys to set the desired cooking time.
• Each time the [Hour] key is pressed, the settime increases by 5 minutes. Each time the[Min] key is pressed, the time decreases by 5minutes.
• The cooking time can be set between 40 and90 minutes in units of 5 minutes.
Increases by 5 min.
Decreases by 5 min.
• The default setting is 60 minutes. Adjust thetime as desired.
Using the Timer Function

202020
6 Using the Timer Function
5 Press the [Timer] key.The Timer lamp blinks.
BlinksBlinks
• The previously preset time is displayed. It isnot necessary to set the timer again whensetting the Timer function at the same time.
Note ● The Timer function is not available in the following cases.• When the “Synchro-Cooking”, “Quick”, “Mixed”,
“Sweet”, “Slow Cook”, or “Cake” menu is selected
• When “0:00” is blinking on the display ● If the Keep Warm lamp is lit, press the [Keep Warm/Cancel] key to turn off the lamp. (The Timer function is not available while the Keep Warm lamp is lit.)
● Dark brown crisp rice may be formed when the timer setting is extended. If this is an issue, thoroughly rinse the rice, barley, etc.
Timer setting guidelines for each menu(The following table can be used for rinse-free rice as well.)
Menu Timer setting guidelinePlain 50 minutes or moreShort 1 hour or moreBrown 1 hour and 30 minutes or morePorridge Cooking time + 2 minutes or more• When the preset time is less than the timer
setting guideline, cooking may not be completedat the preset time.
�Sounds emitted by the rice cooker ● If you do not operate the rice cooker within 30 seconds after pressing the [Timer] key, the rice cooker beeps 2 times (short beeps).
● If the [Timer] key is pressed while the rice cooker is in a state where the Timer function is not available, the rice cooker beeps 2 times (short beeps).
6 Use the [Hour] and [Min] keys to set the desired completion time.Press the [Hour] key to set the time in units of 1 hour and the [Min] key to set it in units of 10 minutes.Hold down the corresponding key to change the time more rapidly.
Blinks
Note ● Do not set the timer to more than 12 hours, as it may result in spoiled rice.
7 Press the [Start] key.The Timer lamp lights up and the Timer function is set.The rice cooker makes one short and one long beep when the “Plain” menu is selected and one long beep when other menus are selected.
OnOn
• If you make a mistake or otherwise wantto reset the timer, press the [Keep Warm/Cancel] key and repeat the procedure fromstep 3 on P.19.
2121
English
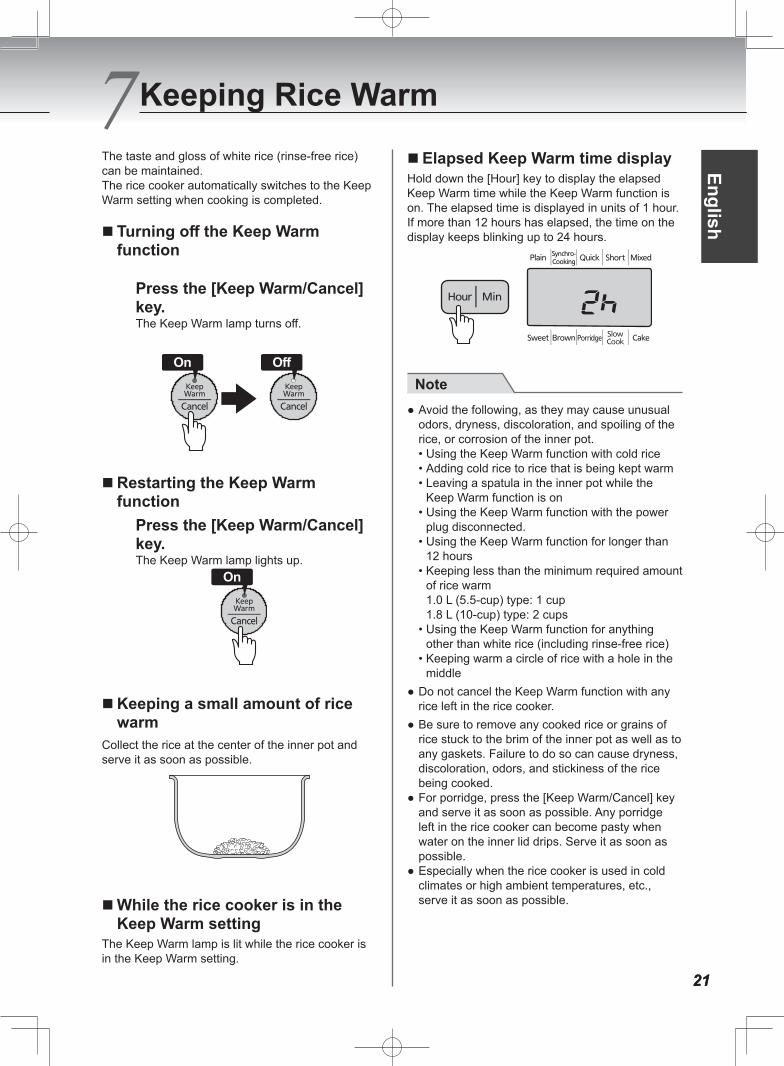
7 The taste and gloss of white rice (rinse-free rice) can be maintained.The rice cooker automatically switches to the Keep Warm setting when cooking is completed.
� Turning off the Keep Warm function
Press the [Keep Warm/Cancel] key.The Keep Warm lamp turns off.
On Off
�Restarting the Keep Warm function
Press the [Keep Warm/Cancel] key.The Keep Warm lamp lights up.
On
�Keeping a small amount of rice warm
Collect the rice at the center of the inner pot and serve it as soon as possible.
�While the rice cooker is in the Keep Warm setting
The Keep Warm lamp is lit while the rice cooker is in the Keep Warm setting.
�Elapsed Keep Warm time displayHold down the [Hour] key to display the elapsed Keep Warm time while the Keep Warm function is on. The elapsed time is displayed in units of 1 hour.If more than 12 hours has elapsed, the time on the display keeps blinking up to 24 hours.
Note ● Avoid the following, as they may cause unusual odors, dryness, discoloration, and spoiling of the rice, or corrosion of the inner pot.• Using the Keep Warm function with cold rice• Adding cold rice to rice that is being kept warm• Leaving a spatula in the inner pot while the
Keep Warm function is on• Using the Keep Warm function with the power
plug disconnected.• Using the Keep Warm function for longer than
12 hours• Keeping less than the minimum required amount
of rice warm1.0 L (5.5-cup) type: 1 cup1.8 L (10-cup) type: 2 cups
• Using the Keep Warm function for anythingother than white rice (including rinse-free rice)
• Keeping warm a circle of rice with a hole in themiddle
● Do not cancel the Keep Warm function with any rice left in the rice cooker.
● Be sure to remove any cooked rice or grains of rice stuck to the brim of the inner pot as well as to any gaskets. Failure to do so can cause dryness, discoloration, odors, and stickiness of the rice being cooked.
● For porridge, press the [Keep Warm/Cancel] key and serve it as soon as possible. Any porridge left in the rice cooker can become pasty when water on the inner lid drips. Serve it as soon as possible.
● Especially when the rice cooker is used in cold climates or high ambient temperatures, etc., serve it as soon as possible.
Keeping Rice Warm
22
You can use the cooking plate to cook side dishes described in the supplied COOKBOOK at the same time as you cook rice.See the supplied COOKBOOK for directions.
Note ● Do not cook with a greater volume of ingredients than that indicated in the supplied COOKBOOK.Doing so may cause the contents to boil over or result in improperly cooked rice.
● When cooking dishes with a strong odor, the odor may adhere to the cooking plate.
● When cooking ingredients with a strong color, the color may be transferred to the cooking plate and healthy cooking plate through the broth, etc.
● Do not use sharp utensils such as kitchen knives, table knives, or forks inside the cooking plate and healthy cooking plate.
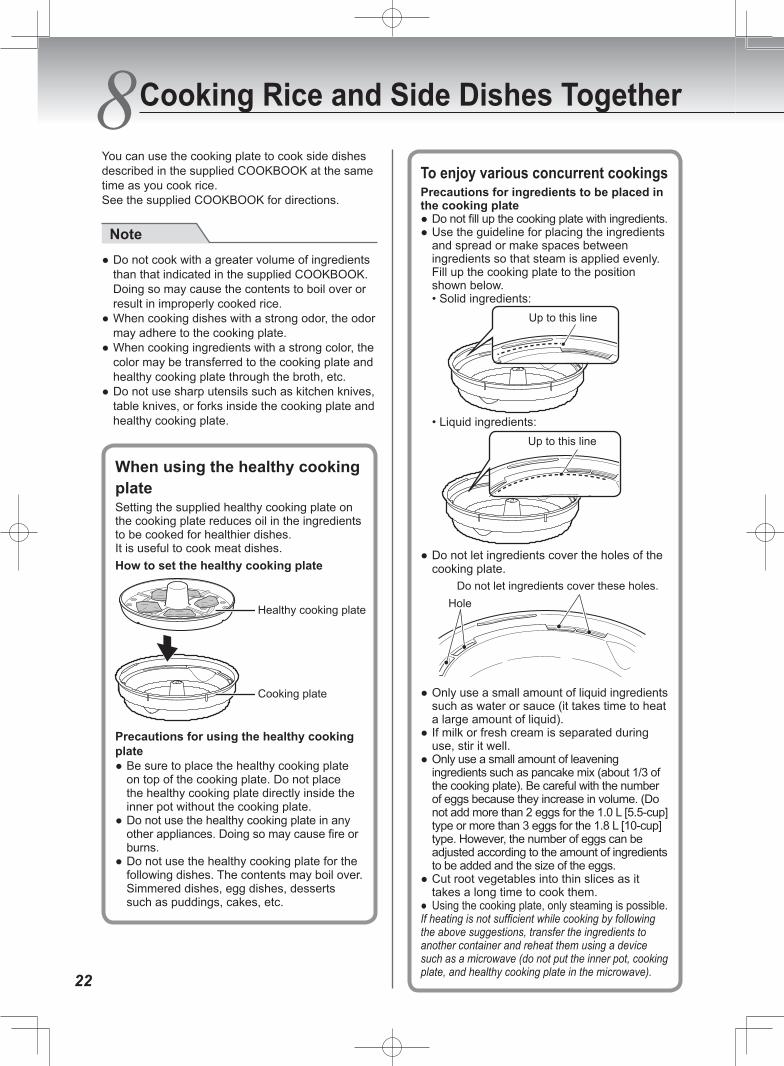
When using the healthy cooking plateSetting the supplied healthy cooking plate on the cooking plate reduces oil in the ingredients to be cooked for healthier dishes.It is useful to cook meat dishes.How to set the healthy cooking plate
Healthy cooking plate
Cooking plate
Precautions for using the healthy cooking plate
● Be sure to place the healthy cooking plate on top of the cooking plate. Do not place the healthy cooking plate directly inside the inner pot without the cooking plate.
● Do not use the healthy cooking plate in any other appliances. Doing so may cause fire or burns.
● Do not use the healthy cooking plate for the following dishes. The contents may boil over. Simmered dishes, egg dishes, desserts such as puddings, cakes, etc.
To enjoy various concurrent cookingsPrecautions for ingredients to be placed in the cooking plate
● Do not fill up the cooking plate with ingredients. ● Use the guideline for placing the ingredients and spread or make spaces between ingredients so that steam is applied evenly. Fill up the cooking plate to the position shown below.• Solid ingredients:
Up to this line
• Liquid ingredients:Up to this line
● Do not let ingredients cover the holes of the cooking plate.
Do not let ingredients cover these holes.Hole
● Only use a small amount of liquid ingredients such as water or sauce (it takes time to heat a large amount of liquid).
● If milk or fresh cream is separated during use, stir it well.
● Only use a small amount of leavening ingredients such as pancake mix (about 1/3 of the cooking plate). Be careful with the number of eggs because they increase in volume. (Do not add more than 2 eggs for the 1.0 L [5.5-cup] type or more than 3 eggs for the 1.8 L [10-cup] type. However, the number of eggs can be adjusted according to the amount of ingredients to be added and the size of the eggs.
● Cut root vegetables into thin slices as it takes a long time to cook them.
● Using the cooking plate, only steaming is possible.If heating is not sufficient while cooking by following the above suggestions, transfer the ingredients to another container and reheat them using a device such as a microwave (do not put the inner pot, cooking plate, and healthy cooking plate in the microwave).
8 Cooking Rice and Side Dishes Together

23
English
1 Prepare ingredients and place them in the cooking plate.
• Spread the ingredients entirely across thecooking plate instead of stacking them on top of each other. Doing so may cause the contents to boil over or result in improperly cooked rice.
Note● See P.22 when using the healthy cooking plate.
2 Make the necessary preparations for cooking rice (see P.14).
Note● See the following table for the acceptable
amounts of rice that can be cooked concurrentlywith other food. Do not cook more than theacceptable maximum or less than the minimumrequired amounts. Doing so may cause the contentsto boil over or result in improperly cooked rice.
1.0 L type 1.8 L typeMaximum Minimum Maximum Minimum
2 cups 1 cup 4 cups 2 cups
3 Place the cooking plate inside the inner pot and close the lid.(1) Turn the inner pot slightly left and right so
it is positioned correctly without any tilt.(2) Place the cooking plate.(3) Close the lid.
(2)
(3)
(1)Inner pot
Cooking plate
Note● Be sure to place the cooking plate inside the inner pot.● Make sure that the cooking plate is level (not set
at an angle).
4 Connect the power cord.
Appliance plug
(1) Insert the plug.
(2) Insert the plug.
Power plug
Note● If the Keep Warm lamp is lit, press the [Keep
5 Use the [Menu] key to select the “Synchro-Cooking” menu.The symbol blinks while the menu is being selected.
Blinks
Be sure to select the “Synchro-Cooking” menu when cooking concurrently.
242424
8 Cooking Rice and Side Dishes Together
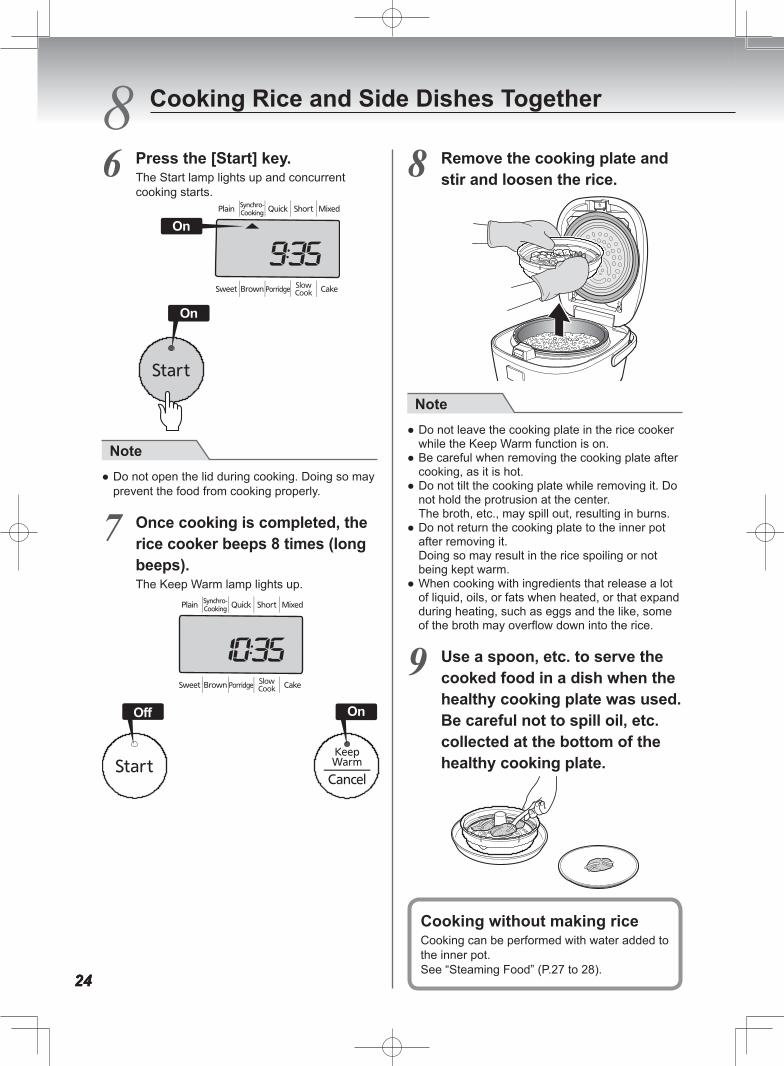
6 Press the [Start] key.The Start lamp lights up and concurrent cooking starts.
On
On
Note ● Do not open the lid during cooking. Doing so may prevent the food from cooking properly.
7 Once cooking is completed, the rice cooker beeps 8 times (long beeps).The Keep Warm lamp lights up.
OnOff
8 Remove the cooking plate and stir and loosen the rice.
Note ● Do not leave the cooking plate in the rice cooker while the Keep Warm function is on.
● Be careful when removing the cooking plate after cooking, as it is hot.
● Do not tilt the cooking plate while removing it. Do not hold the protrusion at the center.The broth, etc., may spill out, resulting in burns.
● Do not return the cooking plate to the inner pot after removing it.Doing so may result in the rice spoiling or not being kept warm.
● When cooking with ingredients that release a lot of liquid, oils, or fats when heated, or that expand during heating, such as eggs and the like, some of the broth may overflow down into the rice.
9 Use a spoon, etc. to serve the cooked food in a dish when the healthy cooking plate was used. Be careful not to spill oil, etc. collected at the bottom of the healthy cooking plate.
Cooking without making riceCooking can be performed with water added to the inner pot.See “Steaming Food” (P.27 to 28).
2525
English
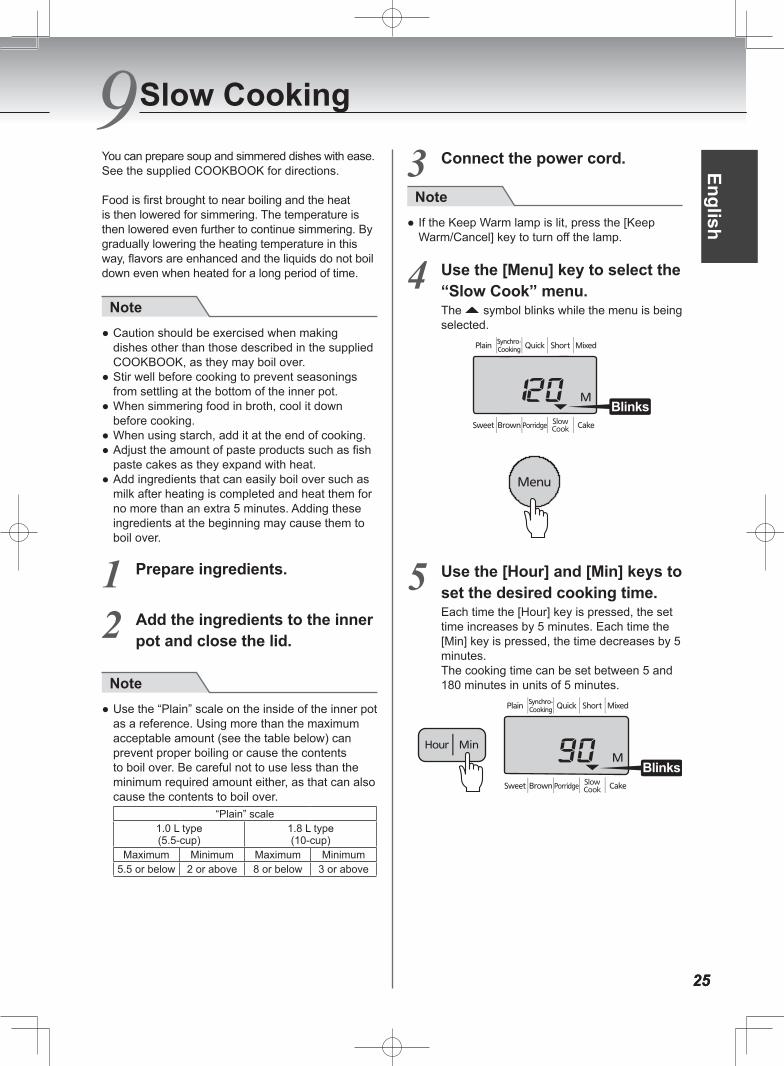
9 You can prepare soup and simmered dishes with ease. See the supplied COOKBOOK for directions.
Food is first brought to near boiling and the heat is then lowered for simmering. The temperature is then lowered even further to continue simmering. By gradually lowering the heating temperature in this way, flavors are enhanced and the liquids do not boil down even when heated for a long period of time.
Note ● Caution should be exercised when making dishes other than those described in the supplied COOKBOOK, as they may boil over.
● Stir well before cooking to prevent seasonings from settling at the bottom of the inner pot.
● When simmering food in broth, cool it down before cooking.
● When using starch, add it at the end of cooking. ● Adjust the amount of paste products such as fish paste cakes as they expand with heat.
● Add ingredients that can easily boil over such as milk after heating is completed and heat them for no more than an extra 5 minutes. Adding these ingredients at the beginning may cause them to boil over.
1 Prepare ingredients.
2 Add the ingredients to the inner pot and close the lid.
Note ● Use the “Plain” scale on the inside of the inner pot as a reference. Using more than the maximum acceptable amount (see the table below) can prevent proper boiling or cause the contents to boil over. Be careful not to use less than the minimum required amount either, as that can also cause the contents to boil over.
“Plain” scale1.0 L type(5.5-cup)
1.8 L type(10-cup)
Maximum Minimum Maximum Minimum5.5 or below 2 or above 8 or below 3 or above
3 Connect the power cord.
Note ● If the Keep Warm lamp is lit, press the [Keep Warm/Cancel] key to turn off the lamp.
4 Use the [Menu] key to select the “Slow Cook” menu.The symbol blinks while the menu is being selected.
Blinks
5 Use the [Hour] and [Min] keys to set the desired cooking time.Each time the [Hour] key is pressed, the set time increases by 5 minutes. Each time the [Min] key is pressed, the time decreases by 5 minutes.The cooking time can be set between 5 and 180 minutes in units of 5 minutes.
Blinks
Slow Cooking
262626
9 Slow Cooking
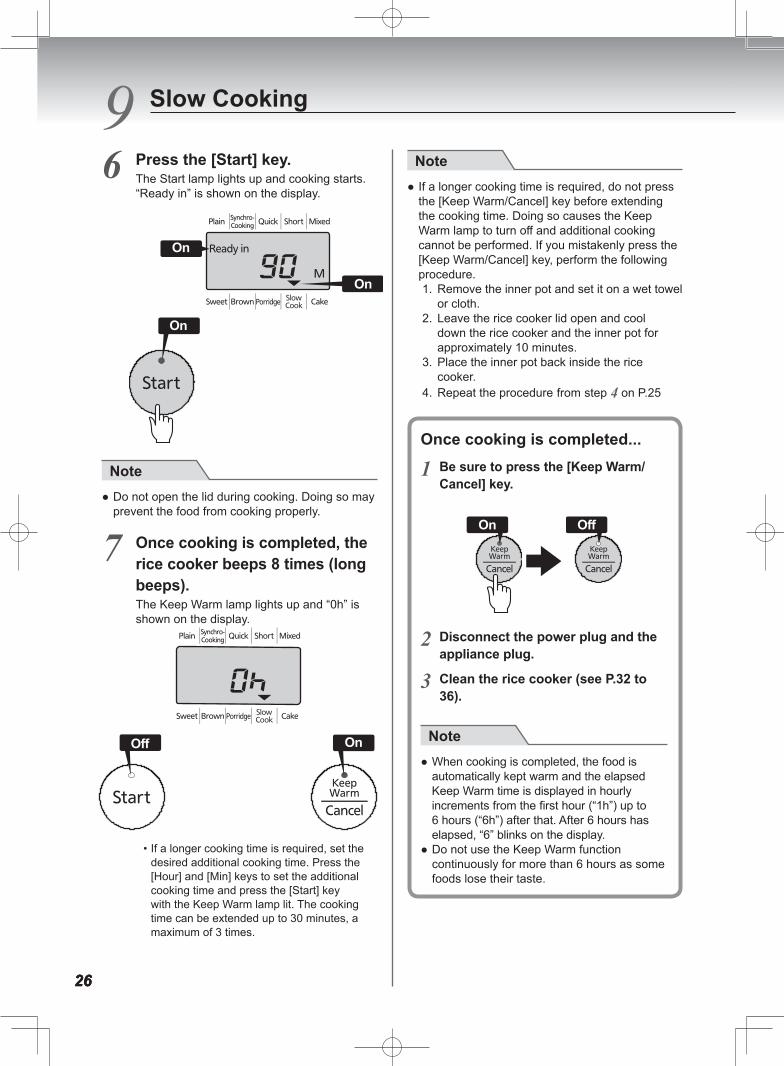
6 Press the [Start] key.The Start lamp lights up and cooking starts.“Ready in” is shown on the display.
On
On
On
Note ● Do not open the lid during cooking. Doing so may prevent the food from cooking properly.
7 Once cooking is completed, the rice cooker beeps 8 times (long beeps).The Keep Warm lamp lights up and “0h” is shown on the display.
OnOff
• If a longer cooking time is required, set thedesired additional cooking time. Press the[Hour] and [Min] keys to set the additionalcooking time and press the [Start] keywith the Keep Warm lamp lit. The cookingtime can be extended up to 30 minutes, amaximum of 3 times.
Note ● If a longer cooking time is required, do not press the [Keep Warm/Cancel] key before extending the cooking time. Doing so causes the Keep Warm lamp to turn off and additional cooking cannot be performed. If you mistakenly press the [Keep Warm/Cancel] key, perform the following procedure.1. Remove the inner pot and set it on a wet towel
or cloth.2. Leave the rice cooker lid open and cool
down the rice cooker and the inner pot forapproximately 10 minutes.
3. Place the inner pot back inside the ricecooker.
4. Repeat the procedure from step 4 on P.25
Once cooking is completed...
1 Be sure to press the [Keep Warm/Cancel] key.
On Off
2 Disconnect the power plug and theappliance plug.
3 Clean the rice cooker (see P.32 to36).
Note ● When cooking is completed, the food is automatically kept warm and the elapsed Keep Warm time is displayed in hourly increments from the first hour (“1h”) up to 6 hours (“6h”) after that. After 6 hours has elapsed, “6” blinks on the display.
● Do not use the Keep Warm function continuously for more than 6 hours as some foods lose their taste.

272727
English
10 You can also perform steam cooking by adding water to the inner pot without making rice.
1 Add ingredients to the cooking plate.
2 Add water to the inner pot, place the cooking plate inside, and close the lid.See the following guideline for the amount of water to add.
• 1.0 L (5.5-cup) type: 3.5 cups (630 mL)• 1.8 L (10-cup) type: 4.5 cups (810 mL)
Place the cooking plate.
Use the supplied measuring cup to add water.
Note ● Be sure to add an appropriate amount of water in the inner pot. Do not allow the inner pot to run out of water or the cooking plate to become immersed in water during steaming.
Water
Cooking plate
3 Connect the power cord.
Note ● If the Keep Warm lamp is lit, press the [Keep Warm/Cancel] key to turn off the lamp.
4 Use the [Menu] key to select the “Slow Cook” menu.The symbol blinks while the menu is being selected.
Blinks
5 Press the [Hour] and [Min] keys to set the desired steaming time.Each time the [Hour] key is pressed, the set time increases by 5 minutes. Each time the [Min] key is pressed, the time decreases by 5 minutes.The steaming time can be set between 5 and 60 minutes.
Blinks
6 Press the [Start] key.The Start lamp lights up and steaming starts.“Ready in” is shown on the display.
On
On
On
Steaming Food
282828
10 Steaming Food
Note ● Do not open the lid during cooking. Doing so may prevent the food from cooking properly.
7 Once the steaming is completed, the rice cooker beeps 8 times (long beeps) (the Start lamp turns off).The Keep Warm lamp lights up and “0h” is shown on the display.
OnOff
• To steam the food further, use the [Hour] and[Min] keys to set the additional steaming timeand then press the [Start] key. The cookingtime can be extended up to 30 minutes, amaximum of 3 times.
Caution• Be careful not to be burned by the escaping steam
when opening the lid.
Note ● Be sure to add water for additional steaming to prevent the inner pot from running dry.
● If a longer steaming time is required, do not press the [Keep Warm/Cancel] key before extending the steaming time. Doing so causes the Keep Warm lamp to go out and additional steaming cannot be performed. If you mistakenly press the [Keep Warm/Cancel] key, perform the following procedure.1. Remove the inner pot and add water.
For the amount of water, see step 2 on P.27.2. Leave the rice cooker lid open and cool
down the rice cooker and the inner pot forapproximately 10 minutes.
3. Place the inner pot back inside the ricecooker.
4. Repeat the procedure from step 4 on P.27.
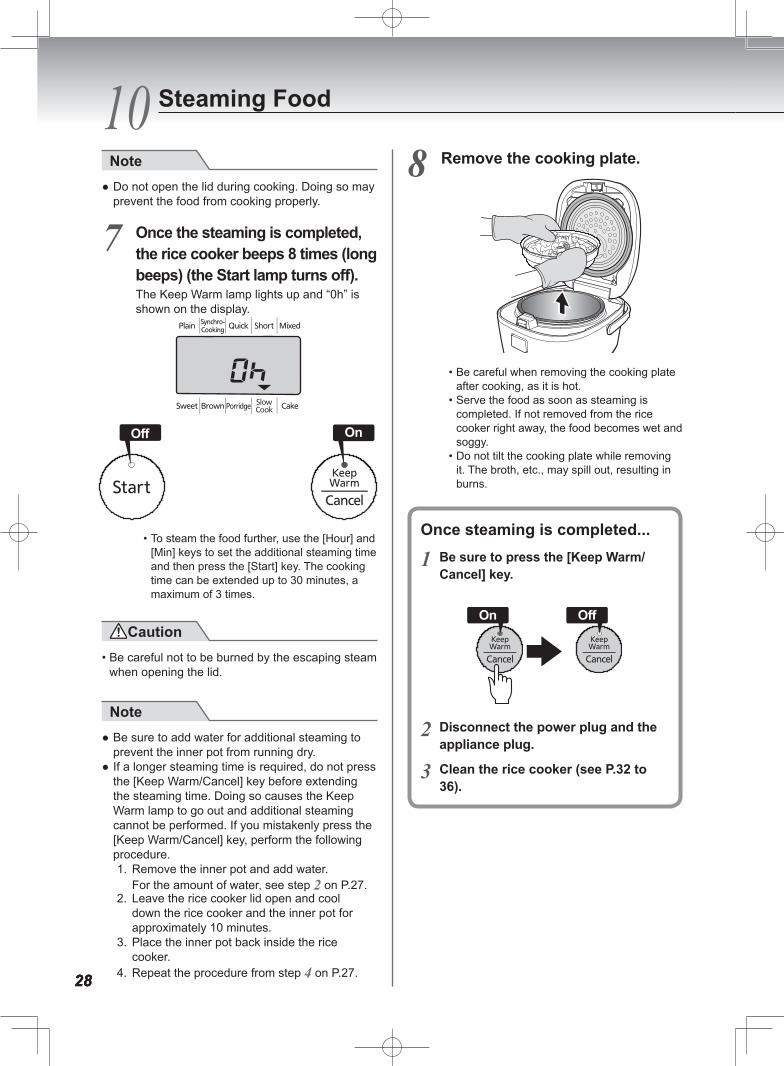
8 Remove the cooking plate.
• Be careful when removing the cooking plateafter cooking, as it is hot.
• Serve the food as soon as steaming iscompleted. If not removed from the ricecooker right away, the food becomes wet andsoggy.
• Do not tilt the cooking plate while removingit. The broth, etc., may spill out, resulting inburns.
Once steaming is completed...
1 Be sure to press the [Keep Warm/Cancel] key.
On Off
2 Disconnect the power plug and theappliance plug.
3 Clean the rice cooker (see P.32 to36).
292929
English
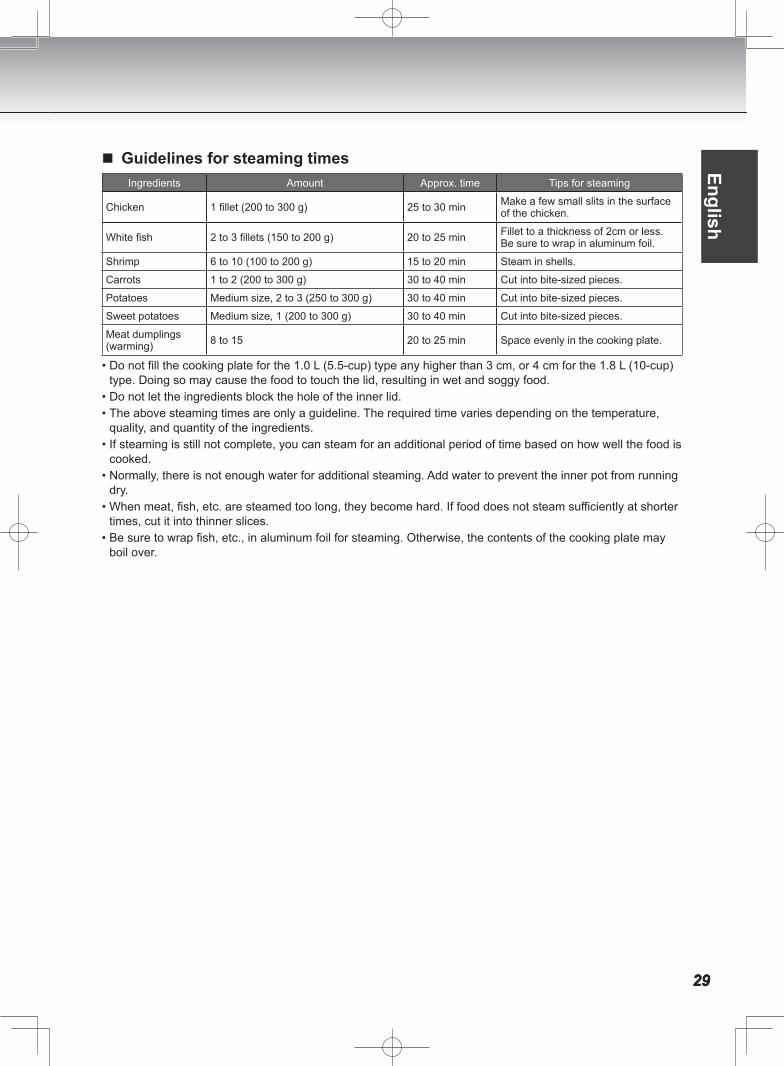
� Guidelines for steaming timesIngredients Amount Approx. time Tips for steaming
Chicken 1 fillet (200 to 300 g) 25 to 30 min Make a few small slits in the surface of the chicken.
White fish 2 to 3 fillets (150 to 200 g) 20 to 25 min Fillet to a thickness of 2cm or less.Be sure to wrap in aluminum foil.
Shrimp 6 to 10 (100 to 200 g) 15 to 20 min Steam in shells.
Carrots 1 to 2 (200 to 300 g) 30 to 40 min Cut into bite-sized pieces.
Potatoes Medium size, 2 to 3 (250 to 300 g) 30 to 40 min Cut into bite-sized pieces.
Sweet potatoes Medium size, 1 (200 to 300 g) 30 to 40 min Cut into bite-sized pieces.
Meat dumplings (warming) 8 to 15 20 to 25 min Space evenly in the cooking plate.
• Do not fill the cooking plate for the 1.0 L (5.5-cup) type any higher than 3 cm, or 4 cm for the 1.8 L (10-cup)type. Doing so may cause the food to touch the lid, resulting in wet and soggy food.
• Do not let the ingredients block the hole of the inner lid.• The above steaming times are only a guideline. The required time varies depending on the temperature,
quality, and quantity of the ingredients.• If steaming is still not complete, you can steam for an additional period of time based on how well the food is
cooked.• Normally, there is not enough water for additional steaming. Add water to prevent the inner pot from running
dry.• When meat, fish, etc. are steamed too long, they become hard. If food does not steam sufficiently at shorter
times, cut it into thinner slices.• Be sure to wrap fish, etc., in aluminum foil for steaming. Otherwise, the contents of the cooking plate may
boil over.
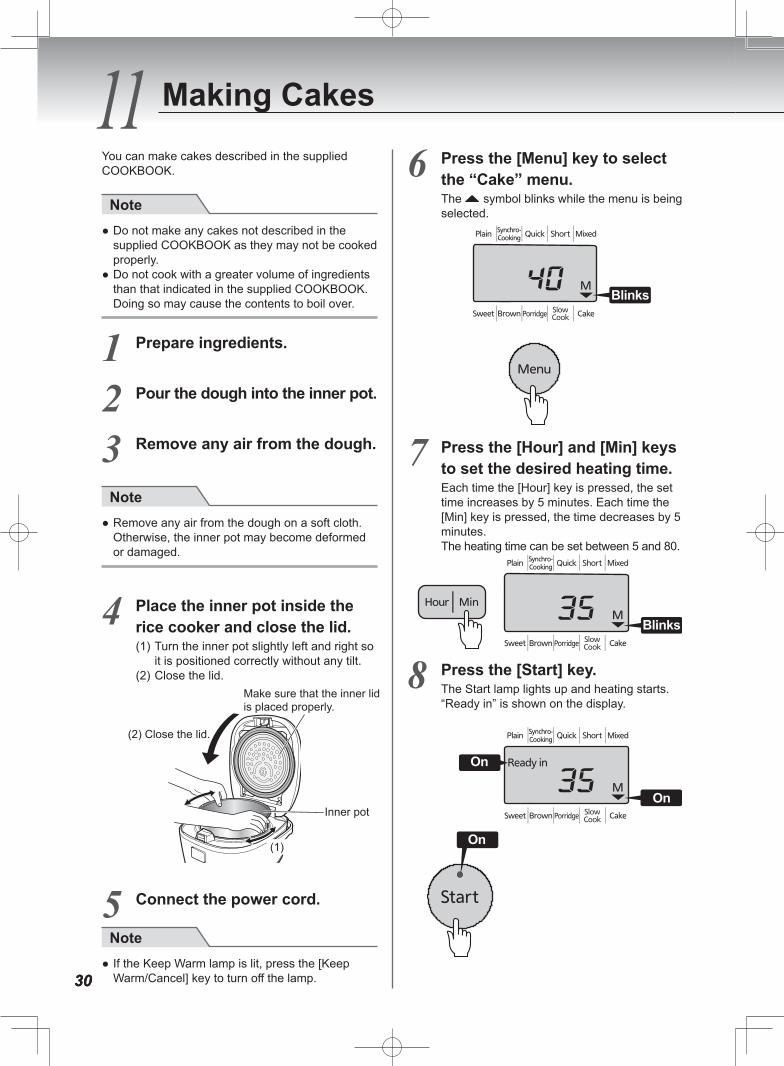
3030
11 You can make cakes described in the supplied COOKBOOK.
Note ● Do not make any cakes not described in the supplied COOKBOOK as they may not be cooked properly.
● Do not cook with a greater volume of ingredients than that indicated in the supplied COOKBOOK. Doing so may cause the contents to boil over.
1 Prepare ingredients.
2 Pour the dough into the inner pot.
3 Remove any air from the dough.
Note ● Remove any air from the dough on a soft cloth. Otherwise, the inner pot may become deformed or damaged.
4 Place the inner pot inside the rice cooker and close the lid.(1) Turn the inner pot slightly left and right so
it is positioned correctly without any tilt.(2) Close the lid.
(2) Close the lid.
(1)
Inner pot
Make sure that the inner lid is placed properly.
5 Connect the power cord.
Note ● If the Keep Warm lamp is lit, press the [Keep Warm/Cancel] key to turn off the lamp.
6 Press the [Menu] key to select the “Cake” menu.The symbol blinks while the menu is being selected.
Blinks
7 Press the [Hour] and [Min] keys to set the desired heating time.Each time the [Hour] key is pressed, the set time increases by 5 minutes. Each time the [Min] key is pressed, the time decreases by 5 minutes.The heating time can be set between 5 and 80.
minutes.
Blinks
8 Press the [Start] key.The Start lamp lights up and heating starts.“Ready in” is shown on the display.
On
On
On
Making Cakes

3131
English
9 Once the heating is completed, the rice cooker beeps 8 times (long beeps).The Keep Warm lamp and “0” in the display blink.
BlinksOff
Blinks
(1) Open the lid and insert a toothpick into the center of the cake (if it comes out clean, the cake is ready).• If the toothpick has streaks of dough, press the
[Hour] key to set the additional heating time andpress the [Start] key with the Keep Warm lampblinking. (The heating time can be extended upto 15 minutes, a maximum of 3 times.)
Note ● Do not press the [Keep Warm/Cancel] key before extending the heating time. Doing so causes the Keep Warm lamp to go out and additional heating cannot be performed. If you mistakenly press the [Keep Warm/Cancel] key, perform the following procedure.1. Remove the inner pot and set it on a wet towel
or cloth.2. Leave the rice cooker lid open and cool
down the rice cooker and the inner pot forapproximately 10 minutes.
3. Place the inner pot back inside the ricecooker.
4. Select the “Cake” menu and set the additionalheating time.
(2) Remove the inner pot and the cake and cool down the cake.
Note ● Do not handle the inner pot with bare hands when the rice cooker has recently been in operation. Be sure to use oven mitts to pick up the inner pot. Directly touching the inner pot while it is hot may cause burns.
● Remove the cake as soon as heating is completed. A cake left in the rice cooker can become soggy when water on the inner lid drips.
Once cake making is completed...
1 Be sure to press the [Keep Warm/Cancel] key.
Blinks Off
2 Disconnect the power plug and theappliance plug.
3 Clean the rice cooker (see P.32 to36).
Making Cakes
3232
12 Any other servicing should be performed by an authorized service representative.
To maintain cleanliness, be sure to clean the rice cooker on the same day it is used.The rice cooker should also be cleaned on the day that it is used in order to remove any odors that remain from cooking food or making cakes. (See P.36.)
Note ● Be sure to disconnect the power plug and allow the rice cooker, inner pot, inner lid, and steam cap to cool down before cleaning.
● Always keep the inner pot and lid clean to prevent corrosion and odors. ● Do not clean the rice cooker or its parts using thinner, cleanser, bleach, disposable cloths, metal sponges, nylon scrubbing sponges, or the like.
● Clean each part separately. ● Do not use a dishwasher/dryer to clean the rice cooker or its parts. Doing so may cause the rice cooker and/or its parts to become deformed or discolored.
● When cleaning the rice cooker using a detergent, use only a mild dishwashing detergent (for dishes and kitchen utensils). Rinse the parts thoroughly since detergent remaining on them may cause deterioration and discoloration of parts materials such as resin. Using any detergent other than mild detergents can cause discoloration, corrosion, etc.
● Use a soft sponge or cloth. ● Do not remove the gaskets.
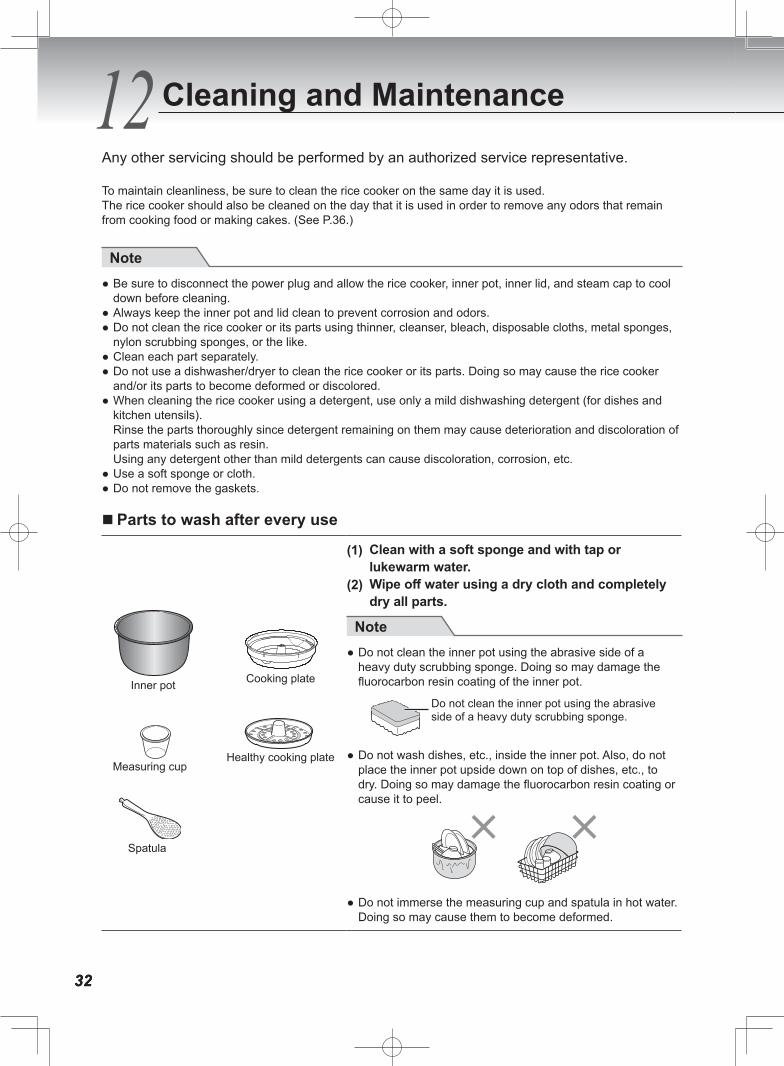
�Parts to wash after every use
Inner pot
Spatula
Cooking plate
Measuring cupHealthy cooking plate
(1) Clean with a soft sponge and with tap or lukewarm water.
(2) Wipe off water using a dry cloth and completely dry all parts.
Note ● Do not clean the inner pot using the abrasive side of a heavy duty scrubbing sponge. Doing so may damage the fluorocarbon resin coating of the inner pot.
Do not clean the inner pot using the abrasive side of a heavy duty scrubbing sponge.
● Do not wash dishes, etc., inside the inner pot. Also, do not place the inner pot upside down on top of dishes, etc., to dry. Doing so may damage the fluorocarbon resin coating or cause it to peel.
● Do not immerse the measuring cup and spatula in hot water. Doing so may cause them to become deformed.
Cleaning and Maintenance
3333
English
Steam cap(Separate it into 2 parts. See P.35)
The steam cap can be rinsed.(1) Clean with a soft sponge and with tap or lukewarm
water.(2) Immediately wipe off water using a dry cloth and
completely dry it.
Note ● Avoid the following, as the steam cap may become deformed.• Rinsing with hot water• Soaking in water• Rinsing while the cap is hot immediately after cooking
● Be sure to clean the steam cap after cooking rice with multigrain rice (with amaranth, etc.), barley, etc. Otherwise, the steam cap may be clogged, causing a problem in which the lid does not open or rice cannot be cooked properly.
● Wipe off water using a dry cloth immediately after cleaning the steam cap. Otherwise, water drops may leave marks on the steam cap.
Inner lid
(1) Clean with a soft sponge and with tap or lukewarm water.
(2) Wipe off water using a dry cloth and completely dry the inner lid.Condensation can be formed more easily on the dirty inner lid.
Inner lid gasketClean the gasket on the inner lid.
Note ● Be sure to remove any cooked rice or grains of rice on the inner lid. Any rice on the inner lid can prevent the lid from closing, allow steam to leak out during cooking, or enable the lid to open and the contents to spray out, resulting in burns or other injury.
● Be sure to clean the inner lid after cooking rice with multigrain rice (with amaranth, etc.), barley, etc. Otherwise, the inner lid may be clogged, causing a problem in which the inner lid does not open or rice cannot be cooked properly.
● Thoroughly wipe the inner lid using a dry cloth after cleaning it so that no moisture remains in any gaps. Otherwise, water drops may leave marks on the inner lid.
● If this is an issue, soak the inner lid in lukewarm water.
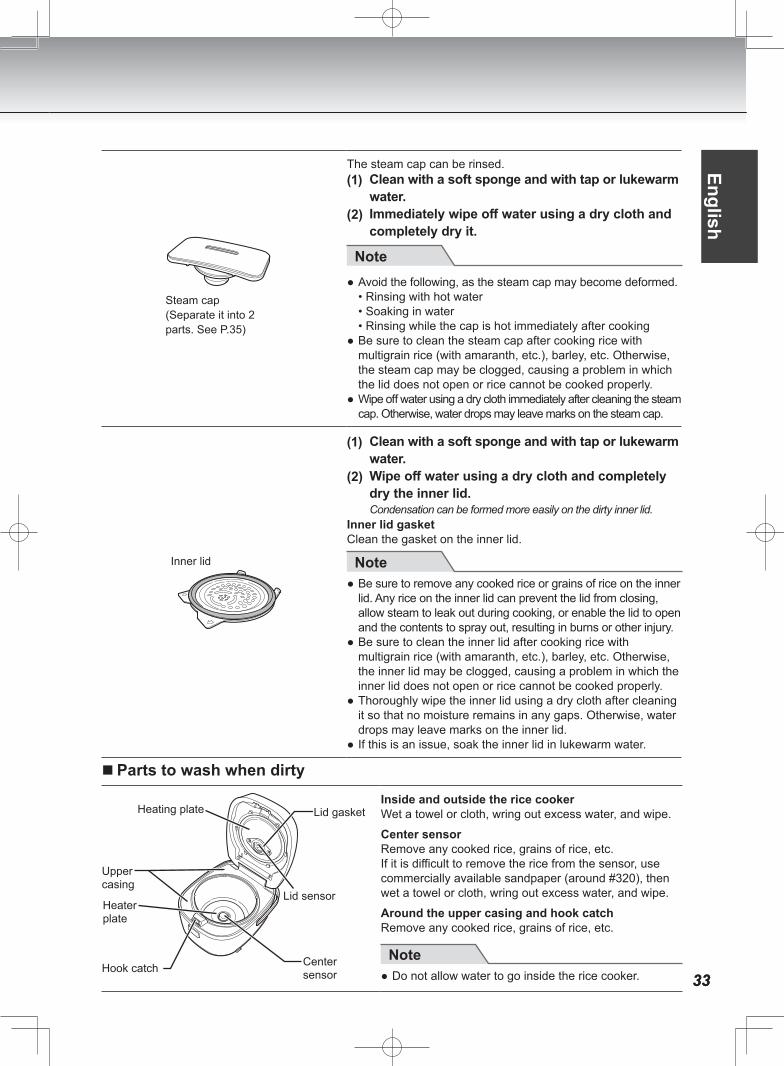
�Parts to wash when dirty
Hook catch
Upper casing
Heating plate
Center sensor
Heater plate
Lid gasket
Lid sensor
Inside and outside the rice cookerWet a towel or cloth, wring out excess water, and wipe.Center sensorRemove any cooked rice, grains of rice, etc.If it is difficult to remove the rice from the sensor, use commercially available sandpaper (around #320), then wet a towel or cloth, wring out excess water, and wipe.Around the upper casing and hook catchRemove any cooked rice, grains of rice, etc.
Note ● Do not allow water to go inside the rice cooker.
343434
12 Cleaning and Maintenance
Power cord Wipe it using a dry cloth.
Note● Do not immerse the power cord in or splash it with
water. Doing so may cause short circuits, electric shock, or malfunction.
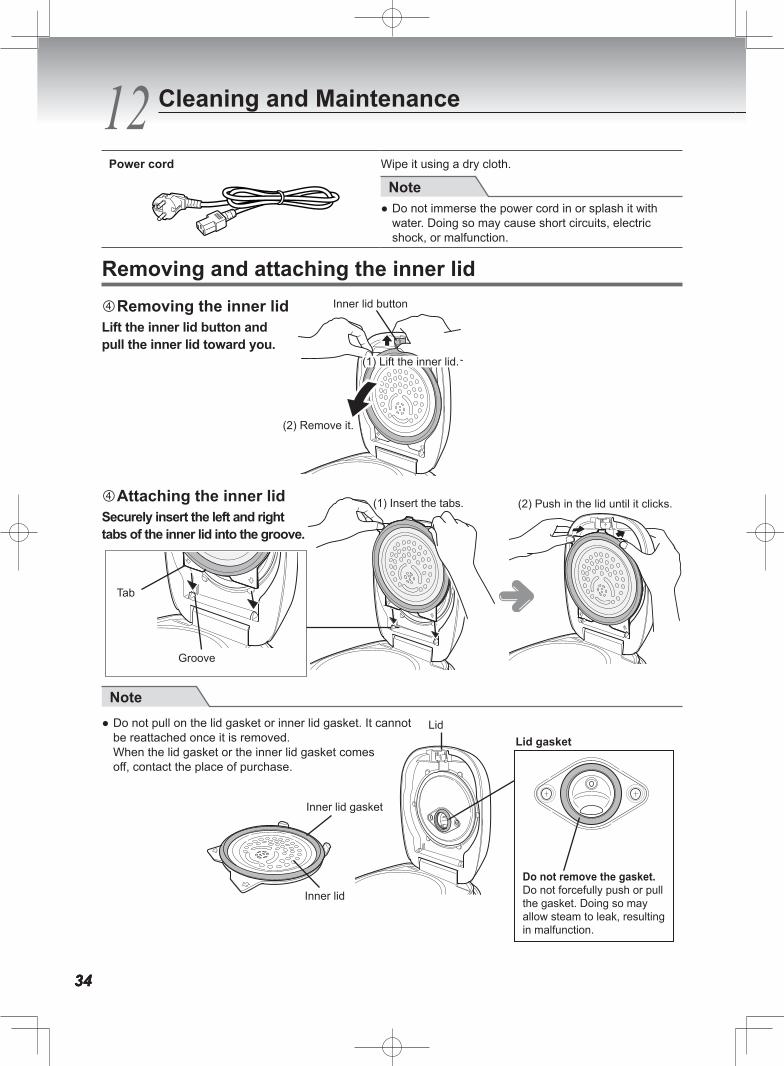
Removing and attaching the inner lid Removing the inner lid
Lift the inner lid button and pull the inner lid toward you.
Attaching the inner lidSecurely insert the left and right tabs of the inner lid into the groove.
Note● Do not pull on the lid gasket or inner lid gasket. It cannot
be reattached once it is removed.When the lid gasket or the inner lid gasket comes
Inner lid button
(1) Lift the inner lid.
(2) Remove it.
(1) Insert the tabs. (2) Push in the lid until it clicks.
Tab
Groove
Inner lid gasket
Inner lid
LidLid gasket
Do not remove the gasket.Do not forcefully push or pull the gasket. Doing so may allow steam to leak, resulting in malfunction.
353535
English
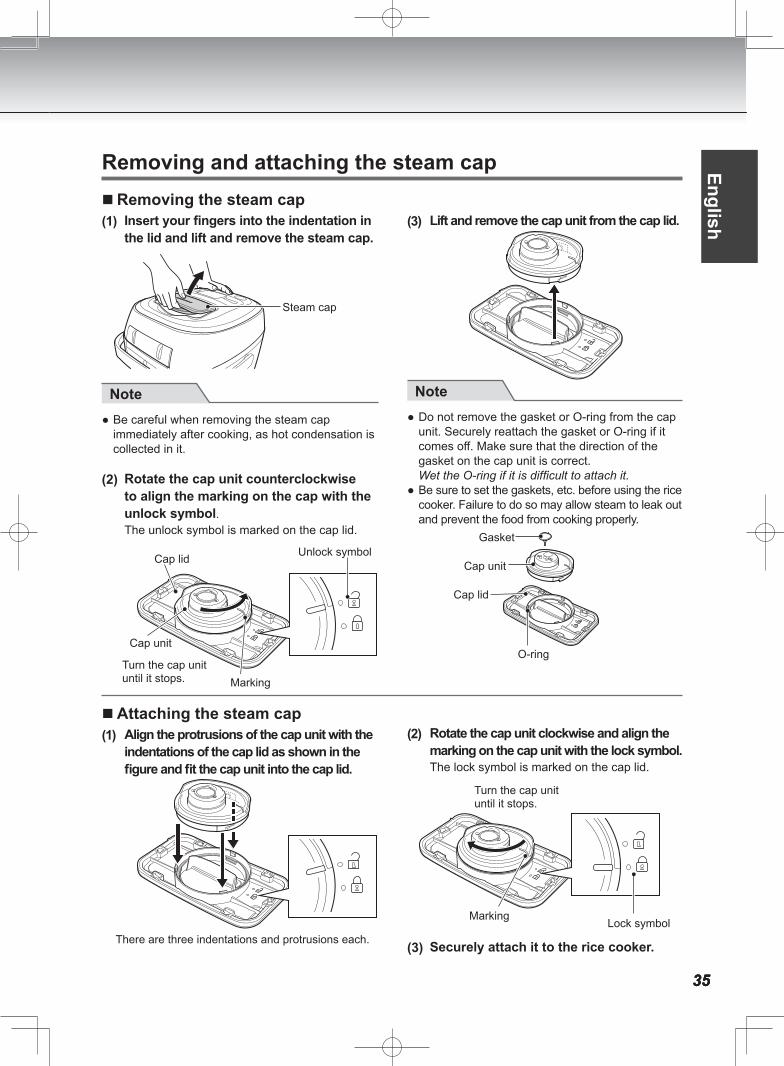
Removing and attaching the steam cap �Removing the steam cap
(1) Insert your fingers into the indentation in the lid and lift and remove the steam cap.
Steam cap
Note ● Be careful when removing the steam cap immediately after cooking, as hot condensation is collected in it.
(2) Rotate the cap unit counterclockwise to align the marking on the cap with the unlock symbol.The unlock symbol is marked on the cap lid.
Cap lid
Cap unit
Unlock symbol
Turn the cap unit until it stops. Marking
(3) Lift and remove the cap unit from the cap lid.
Note ● Do not remove the gasket or O-ring from the cap unit. Securely reattach the gasket or O-ring if it comes off. Make sure that the direction of the gasket on the cap unit is correct.Wet the O-ring if it is difficult to attach it.
● Be sure to set the gaskets, etc. before using the rice cooker. Failure to do so may allow steam to leak out and prevent the food from cooking properly.
O-ring
Cap unit
Cap lid
Gasket
�Attaching the steam cap(1) Align the protrusions of the cap unit with the
indentations of the cap lid as shown in the figure and fit the cap unit into the cap lid.
There are three indentations and protrusions each.
(2) Rotate the cap unit clockwise and align the marking on the cap unit with the lock symbol.The lock symbol is marked on the cap lid.
Marking Lock symbol
Turn the cap unit until it stops.
(3) Securely attach it to the rice cooker.
36363636
12 Cleaning and Maintenance
Removing odorsThe following procedure should be performed each time after cooking, or if odors become an issue.
Note ● Be careful with the rice cooker, inner pot, cooking plate, and healthy cooking plate during cleaning as they are hot. Otherwise, burns may be caused by hot surfaces.
�Rice cookerDo not place the cooking plate inside the inner pot.
(1) Fill the inner pot up to about 80% with water, select the “Plain” menu, and press the [Start] key.
(2) Press the [Keep Warm/Cancel] key when the Keep Warm lamp lights up.
Note ● If odors become an issue, use citric acid (approx. 20 g) added to the water for more effective deodorizing.It may be impossible to remove some odors completely. In this case, contact the place of purchase.
(3) Clean the inner pot, inner lid, and steam cap using a mild dishwashing detergent, and then rinse them sufficiently with water.
(4) Allow the rice cooker and all parts to dry in a well-ventilated location.
�Cooking plate and healthy cooking plate
Immerse the cooking plate and the healthy cooking plate in hot water and soak them for approximately 1 hour.
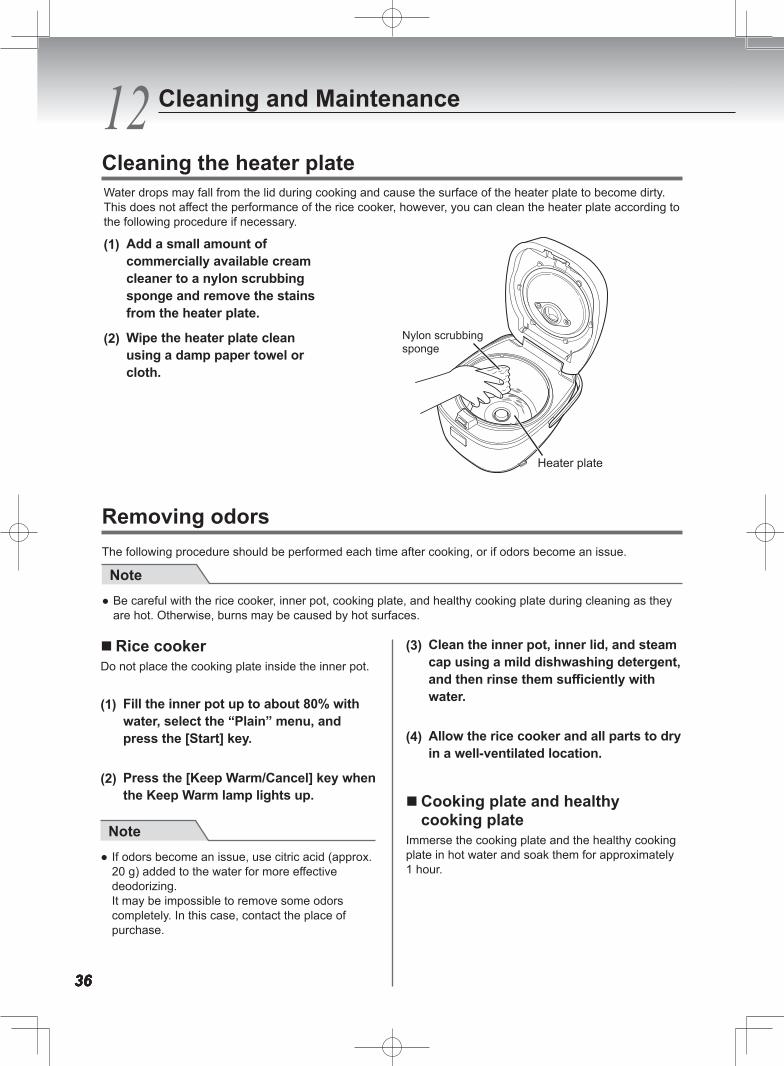
Cleaning the heater plateWater drops may fall from the lid during cooking and cause the surface of the heater plate to become dirty.This does not affect the performance of the rice cooker, however, you can clean the heater plate according to the following procedure if necessary.
(1) Add a small amount of commercially available cream cleaner to a nylon scrubbing sponge and remove the stains from the heater plate.
(2) Wipe the heater plate clean using a damp paper towel or cloth.
Nylon scrubbing sponge
Heater plate

373737
English
13 Check the following if you experience a problem with the cooked rice or with the operation of the rice cooker, etc.
Check point
Problem
Was the am
ount of rice, ingredients, and w
ater, or the ratio of m
ultigrain correct?
Was m
ore than the maxim
um
acceptable amount cooked?
Was the rice cooked w
ith alkaline ionized w
ater (pH 9
or higher)?
Was the rice cooked w
ith hard w
ater like mineral w
ater?
Was the correct m
enu selected?
Was the Tim
er function used?
Was the [Start] key pressed
after cooking without turning
off the Keep Warm
function?
Are there grains of rice, cooked rice, or water drops on the outside bottom
of the inner pot, heater plate, and center sensor or on the lid sensor?
Is the inner pot deformed?
Was the rice stirred and
loosened well?
Was the appliance plug
removed or w
as there a power
outage during cooking?
Cooked rice
Too hard
Too soft
Not cooked completely
Has a hard center
Burned
During cooking
Steam leaks
Boils over
The cooking time is excessively long
Reference page12 to 13, 44
44 – – 16 – 18 14, 32 to 33 – 18 44
Check point
Problem
Are there any cooked rice or grains of rice stuck to the gaskets or the brim
of the inner pot, etc.?
Was the rice (other than
rinse-free rice) rinsed well?
Was hot w
ater (35°C or higher)
used to rinse the rice or adjust the w
ater level?
Was the rice left soaking in
water too long after rinsing?
Was the rice left after rinsing and
draining?
Was the lid closed securely?
Was the rice m
ixed with other
ingredients, barley, or multigrain?
Were seasonings stirred w
ell?
Were there a lot of cracked
grains of rice?
Was cooking continued
imm
ediately after the initial cooking?
Were the rice cooker and its
parts cleaned sufficiently?
Cooked rice
Too hard
Too soft
Not cooked completely
Has a hard center
Burned
Smells like rice bran
During cooking
Steam leaks
Boils over
The cooking time is excessively long
Reference page15,
32 to 33
12, 14 14 – – 15,
33 12 – – 32 to 36
If Rice Does Not Cook Properly
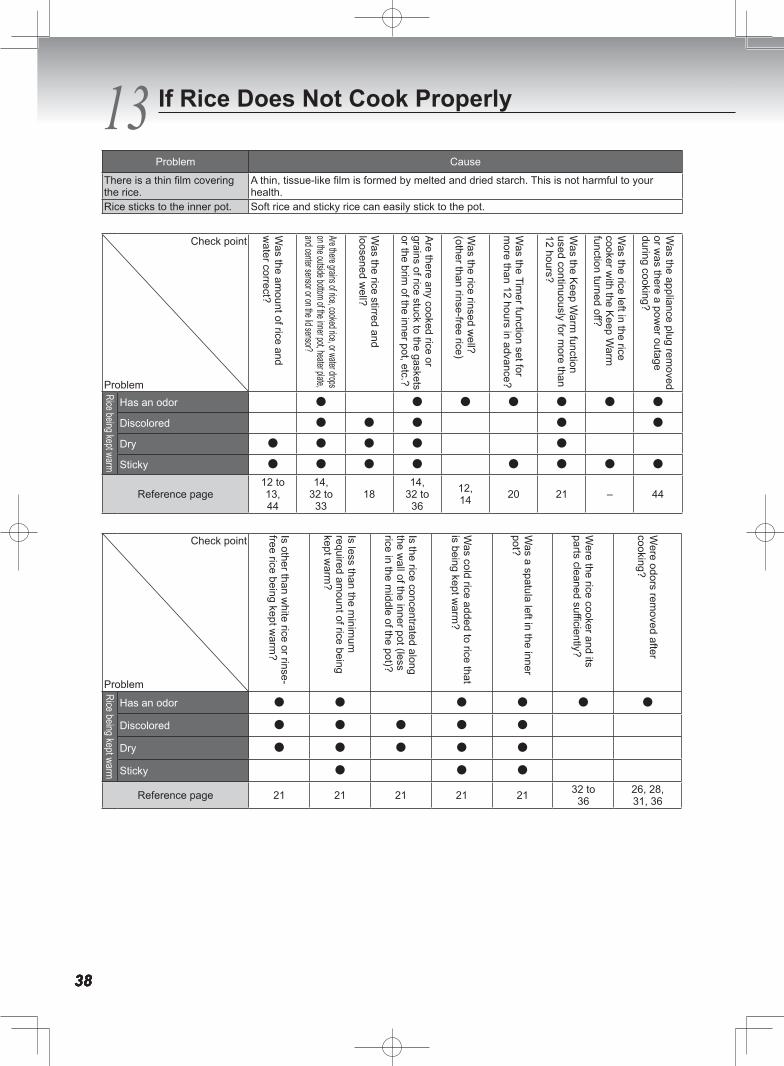
38383838
13 If Rice Does Not Cook Properly
Problem Cause
There is a thin film covering the rice.
A thin, tissue-like film is formed by melted and dried starch. This is not harmful to your health.
Rice sticks to the inner pot. Soft rice and sticky rice can easily stick to the pot.
Check point
Problem
Was the am
ount of rice and w
ater correct?
Are there grains of rice, cooked rice, or water drops on the outside bottom of the inner pot, heater plate, and center sensor or on the lid sensor?
Was the rice stirred and
loosened well?
Are there any cooked rice or grains of rice stuck to the gaskets or the brim
of the inner pot, etc.?
Was the rice rinsed w
ell?(other than rinse-free rice)
Was the Tim
er function set for m
ore than 12 hours in advance?
Was the Keep W
arm function
used continuously for more than
12 hours?
Was the rice left in the rice
cooker with the Keep W
arm
function turned off?
Was the appliance plug rem
oved or w
as there a power outage
during cooking?
Rice being kept warm
Has an odor
Discolored
Dry
Sticky
Reference page12 to 13, 44
14, 32 to 33
1814,
32 to 36
12, 14 20 21 – 44
Check point
Problem
Is other than white rice or rinse-
free rice being kept warm
?
Is less than the minim
um
required amount of rice being
kept warm
?
Is the rice concentrated along the w
all of the inner pot (less rice in the m
iddle of the pot)?
Was cold rice added to rice that
is being kept warm
?
Was a spatula left in the inner
pot?
Were the rice cooker and its
parts cleaned sufficiently?
Were odors rem
oved after cooking?
Rice being kept warm
Has an odor
Discolored
Dry
Sticky
Reference page 21 21 21 21 21 32 to 36
26, 28, 31, 36
393939
14 Check the following when you experience a problem with food cooked concurrently using the cooking plate.
Check point
Problem
Were m
ore ingredients and seasonings used than indicated in the C
OO
KBOO
K?
Were the ingredients arranged
unevenly in the cooking plate?
Was m
ore than the acceptable m
aximum
amount or less than
the minim
um am
ount of rice cooked?
Was a m
enu other than “Synchro-C
ooking” used?
Was the food cooked according
to the precautions for ingredients to be placed in the cooking plate?
Was the appliance plug rem
oved or w
as there a power outage
during cooking?
Cooked rice
Too hard
Too soft
Not cooked completely
Has a hard center
Burned
Has an odor
Sticky
Cooked food
Too hard
Too soft
Not fully heated
Overflows into the rice
During cooking
Steam leaks
Boils over
The cooking time is excessively long
Reference page 22 22 23 23 22 44
If Synchro-Cooking Does Not Work As Expected English
404040
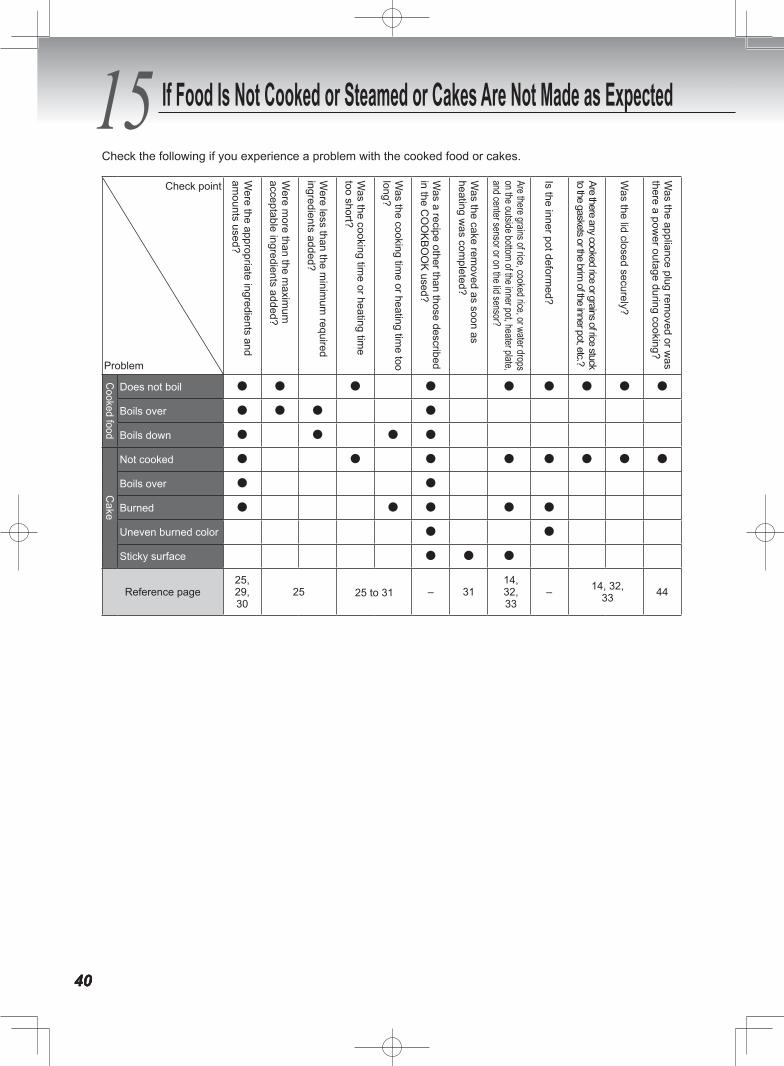
15 Check the following if you experience a problem with the cooked food or cakes.
Check point
Problem
Were the appropriate ingredients and
amounts used?
Were m
ore than the maxim
um
acceptable ingredients added?
Were less than the m
inimum
required ingredients added?
Was the cooking tim
e or heating time
too short?
Was the cooking tim
e or heating time too
long?
Was a recipe other than those described
in the CO
OKBO
OK used?
Was the cake rem
oved as soon as heating w
as completed?
Are there grains of rice, cooked rice, or water drops on the outside bottom of the inner pot, heater plate, and center sensor or on the lid sensor?
Is the inner pot deformed?
Are there any cooked rice or grains of rice stuck to the gaskets or the brim
of the inner pot, etc.?
Was the lid closed securely?
Was the appliance plug rem
oved or was
there a power outage during cooking?
Cooked food
Does not boil
Boils over
Boils down
Cake
Not cooked
Boils over
Burned
Uneven burned color
Sticky surface
Reference page25, 29, 30
25 25 to 31 – 3114,32,33
– 14, 32, 33 44
If Food Is Not Cooked or Steamed or Cakes Are Not Made as Expected

414141
English
16 Check the following before requesting repairs.
Symptom Check point Action Reference page
The rice is not cooked at all.The food is not cooked at all.
Is the appliance plug properly connected to the appliance plug inlet of the rice cooker and the power plug connected to an outlet?
Be sure to connect the appliance plug to the appliance plug inlet and the power plug to an outlet. 15
The rice is not cooked completely at the preset time.
Was the [Start] key pressed? The Timer function cannot be set unless the [Start] key is pressed. 16
Does the display show the correct present time?
Set the correct present time. 43
Check P.37 “The cooking time is excessively long” and take the necessary action. 37
When the preset time is less than the timer setting guideline, cooking may not be completed at the preset time. 20
The Timer function cannot be set. Is “0:00” blinking on the display? Set the current time before setting the preset time. 43
Was the “Synchro-Cooking”, “Quick”, “Mixed”, “Sweet”, “Slow Cook”, or “Cake” menu selected?The Timer function is not available under those menus.
20
The display is foggy. Is the outer surface of the inner pot wet?
Wipe the outer surface using a dry cloth. 14,
32 to 36
Are there any cooked rice or grains of rice stuck to the gaskets or the brim of the inner pot, etc.?
Completely remove all remaining rice.
Sounds can be heard during cooking, steaming, or while the Keep Warm function is on.
Do you hear a clicking sound?That is the sound of the microcomputer controller. It is not a malfunction.
10Do you hear a scraping sound?This is the sound of metal contracting and rubbing together due to heat. It is not a malfunction.Do you hear a sound like boiling water? (Only during cooking or steaming)It is not a malfunction. 10
Do you hear a completely different sound from the above?
Contact the place of purchase to request repairs. –
The rice cooker beeps 2 times (short beeps) when the Timer function is set.
The rice cooker beeps if no operation is performed within approximately 30 seconds after pressing the [Timer] key, however, the Timer function can be set without interruption.
20
Water or rice has entered the main body of the rice cooker.
Water or rice inside the main body may cause problems. Contact the place of purchase to request repairs. –
When the time is set, pressing the [Hour] or [Min] key does not access the time setting mode.
The time cannot be set during cooking, when the Keep Warm function is on, or when the Timer function is in use. 43
The Keep Warm lamp blinks. Is the “Cake” menu selected? The Keep Warm function cannot be set when the “Cake” menu is selected. The cake becomes sticky when it is left. Serve it as soon as possible.
21, 31
“12” blinks on the display when the [Hour] key is pressed while the Keep Warm function is on.
Was the Keep Warm function used continuously for more than 12 hours?After the Keep Warm function has been on for more than 12 hours, “12” blinks on the display.
21
“6” blinks while the Keep Warm function is on.
Was the Keep Warm function used continuously for more than 6 hours after cooking was completed?After 6 hours has elapsed, “6” blinks on the display. (Using the Keep Warm function for longer than 6 hours)
26
Troubleshooting If Food Is Not Cooked or Steamed or Cakes Are Not Made as Expected

42424242
16 Troubleshooting
Symptom Check point Action Reference page
“0:00” blinks on the display when the power plug is connected.
Are the current time, preset timer settings, and elapsed Keep Warm time lost when the power plug is connected again?
The lithium battery has run out, however, normal cooking can be performed.Contact the place of purchase to request services for lithium battery replacement.
10
The [Keep Warm/Cancel] key and [Timer] key were pressed simultaneously.
Set the correct present time.43
Condensation collects in the upper casing.
Condensation may collect in the upper casing immediately after rice is cooked or while the Keep Warm function is on but it is not a malfunction. Wipe the upper casing using a dry cloth when condensation collects.
18
Nothing happens when a key is pressed.
Is the appliance plug properly connected to the appliance plug inlet of the rice cooker and the power plug connected to an outlet?
Be sure to connect the appliance plug to the appliance plug inlet and the power plug to an outlet. 15
Is the Keep Warm lamp lit? Press the [Keep Warm/Cancel] key to turn off the Keep Warm function and then try the operation again.
15
The lid does not close or opens during cooking.
Are there any cooked rice or grains of rice on the upper casing and inner lid gasket, or around the hook button?
Completely remove all remaining rice. 14,
32 to 33Is the inner lid set in the rice cooker? Set the inner lid.
There is a smell of plastic. Such smells may occur when the rice cooker is first used, however, they should go away over time. –
There are stripes or waves on plastic parts.
Such stripes and waves are produced when the resin is being molded. They do not affect the performance of the rice cooker. –
Food sticks to the lid during concurrent cooking.
When cooking with ingredients that expand during heating, such as eggs and the like, some of the ingredients may stick to the inner lid. If this is an issue, reduce the amount of the ingredients.
22
If this indication appears
Display Action Reference page
A code starting with “E” appears on the display.
There is a possibility of malfunction. Disconnect the power plug and contact the place of purchase to request repairs.
–
Plastic partsPlastic parts that are exposed to heat or steam may deteriorate over time. In this case, contact the place of purchase.
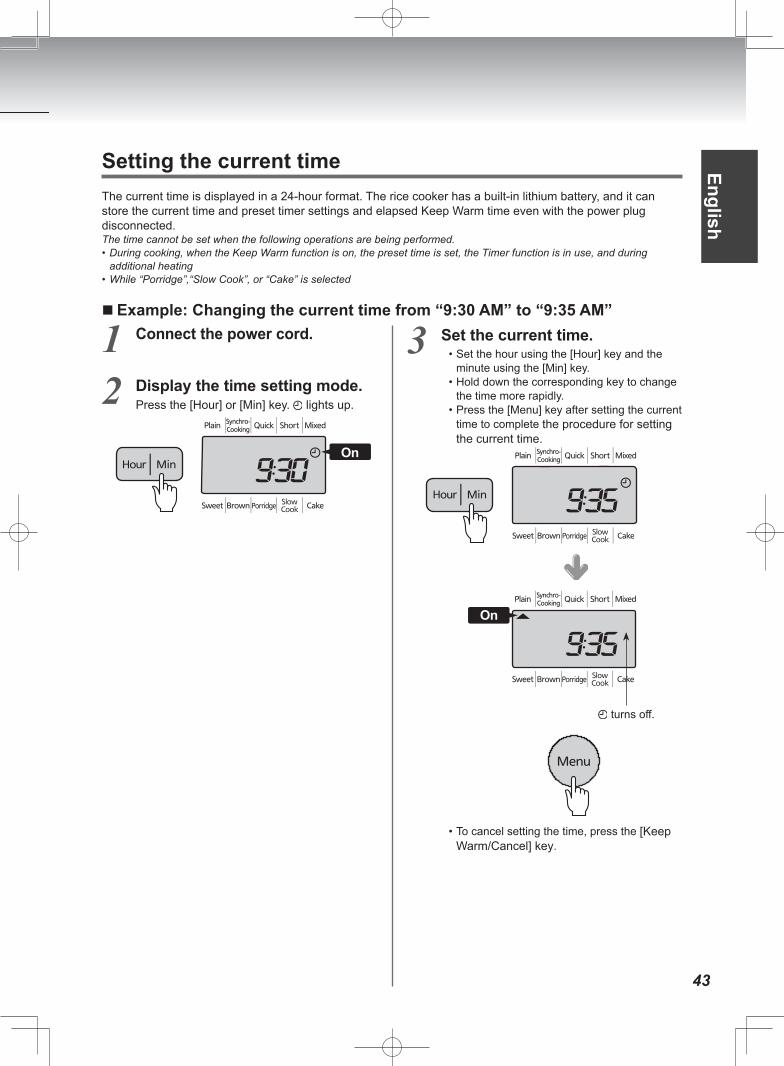
43
English
1 Connect the power cord.
2 Display the time setting mode.Press the [Hour] or [Min] key. lights up.
On
3 Set the current time.• Set the hour using the [Hour] key and the
minute using the [Min] key.• Hold down the corresponding key to change
the time more rapidly.• Press the [Menu] key after setting the current
time to complete the procedure for settingthe current time.
On
turns off.
• To cancel setting the time, press the [KeepWarm/Cancel] key.
Setting the current timeThe current time is displayed in a 24-hour format. The rice cooker has a built-in lithium battery, and it can store the current time and preset timer settings and elapsed Keep Warm time even with the power plug disconnected.The time cannot be set when the following operations are being performed.• During cooking, when the Keep Warm function is on, the preset time is set, the Timer function is in use, and during
additional heating• While “Porridge”,“Slow Cook”, or “Cake” is selected
�Example: Changing the current time from “9:30 AM” to “9:35 AM”
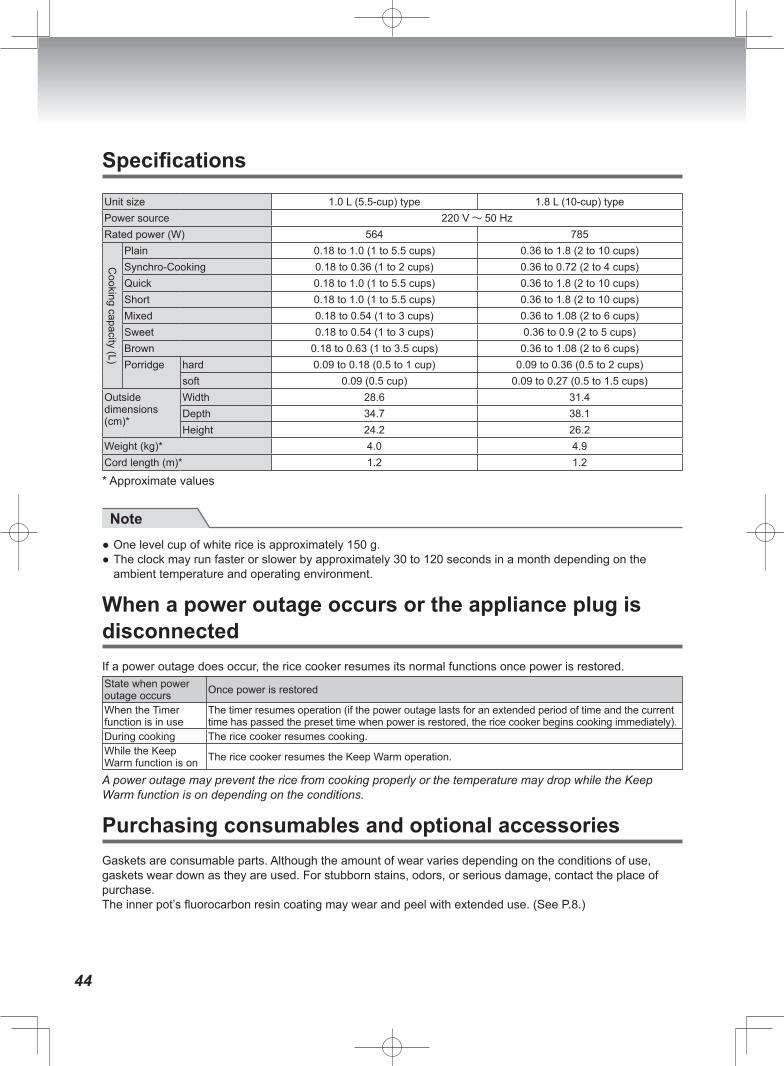
44
SpecificationsUnit size 1.0 L (5.5-cup) type 1.8 L (10-cup) typePower source 220 V 50 HzRated power (W) 564 785
Cooking capacity (L)
Plain 0.18 to 1.0 (1 to 5.5 cups) 0.36 to 1.8 (2 to 10 cups)Synchro-Cooking 0.18 to 0.36 (1 to 2 cups) 0.36 to 0.72 (2 to 4 cups)Quick 0.18 to 1.0 (1 to 5.5 cups) 0.36 to 1.8 (2 to 10 cups)Short 0.18 to 1.0 (1 to 5.5 cups) 0.36 to 1.8 (2 to 10 cups)Mixed 0.18 to 0.54 (1 to 3 cups) 0.36 to 1.08 (2 to 6 cups)Sweet 0.18 to 0.54 (1 to 3 cups) 0.36 to 0.9 (2 to 5 cups)Brown 0.18 to 0.63 (1 to 3.5 cups) 0.36 to 1.08 (2 to 6 cups)Porridge hard 0.09 to 0.18 (0.5 to 1 cup) 0.09 to 0.36 (0.5 to 2 cups)
soft 0.09 (0.5 cup) 0.09 to 0.27 (0.5 to 1.5 cups)Outside dimensions (cm)*
Width 28.6 31.4Depth 34.7 38.1Height 24.2 26.2
Weight (kg)* 4.0 4.9Cord length (m)* 1.2 1.2
* Approximate values
Note ● One level cup of white rice is approximately 150 g. ● The clock may run faster or slower by approximately 30 to 120 seconds in a month depending on the ambient temperature and operating environment.
When a power outage occurs or the appliance plug is disconnectedIf a power outage does occur, the rice cooker resumes its normal functions once power is restored.State when power outage occurs Once power is restored
When the Timer function is in use
The timer resumes operation (if the power outage lasts for an extended period of time and the current time has passed the preset time when power is restored, the rice cooker begins cooking immediately).
During cooking The rice cooker resumes cooking.While the Keep Warm function is on The rice cooker resumes the Keep Warm operation.
A power outage may prevent the rice from cooking properly or the temperature may drop while the Keep Warm function is on depending on the conditions.
Purchasing consumables and optional accessoriesGaskets are consumable parts. Although the amount of wear varies depending on the conditions of use, gaskets wear down as they are used. For stubborn stains, odors, or serious damage, contact the place of purchase.The inner pot’s fluorocarbon resin coating may wear and peel with extended use. (See P.8.)
45
Tiếng Việt
Nội dung1 Các biện pháp an toàn quan trọng .........................................................................................462 Tên và chức năng của các bộ phận cấu tạo ..........................................................................51 Các tùy chọn và tính năng của menu .....................................................................................53 Mẹo để nấu cơm ngon .............................................................................................................543 Trước khi nấu cơm ..................................................................................................................564 Cách nấu cơm ..........................................................................................................................58 Hướng dẫn về thời gian nấu ...................................................................................................595 Khi cơm được nấu xong .........................................................................................................606 Cài đặt hẹn giờ .........................................................................................................................617 Hâm nóng cơm .........................................................................................................................638 Nấu cơm và các món ăn đồng thời ........................................................................................649 Nấu chậm ..................................................................................................................................6710 Hấp thức ăn ..............................................................................................................................6911 Làm bánh ..................................................................................................................................7212 Vệ sinh và bảo dưỡng .............................................................................................................7413 Nếu gạo không được nấu chín ...............................................................................................7914 Nếu việc nấu đồng thời không như mong đợi ......................................................................8115 Nếu thức ăn không được nấu, hấp chín hoặc bánh được làm như mong đợi ..................8216 Khắc phục sự cố ......................................................................................................................83 Nếu những dấu hiệu này xuất hiện ........................................................................................84 Cài đặt thời gian hiện tại .........................................................................................................85 Thông số kỹ thuật ....................................................................................................................86 Trong trường hợp mất điện hoặc phích cắm của thiết bị bị ngắt kết nối ...........................86 Mua linh kiện thay thế và các phụ kiện tùy chọn ..................................................................86Bảo hành đối với nồi cơm điện tử ................................................................................................90Chính sách sửa chữa (thay thế*) miễn phí ..................................................................................91
Dành cho Việt Nam
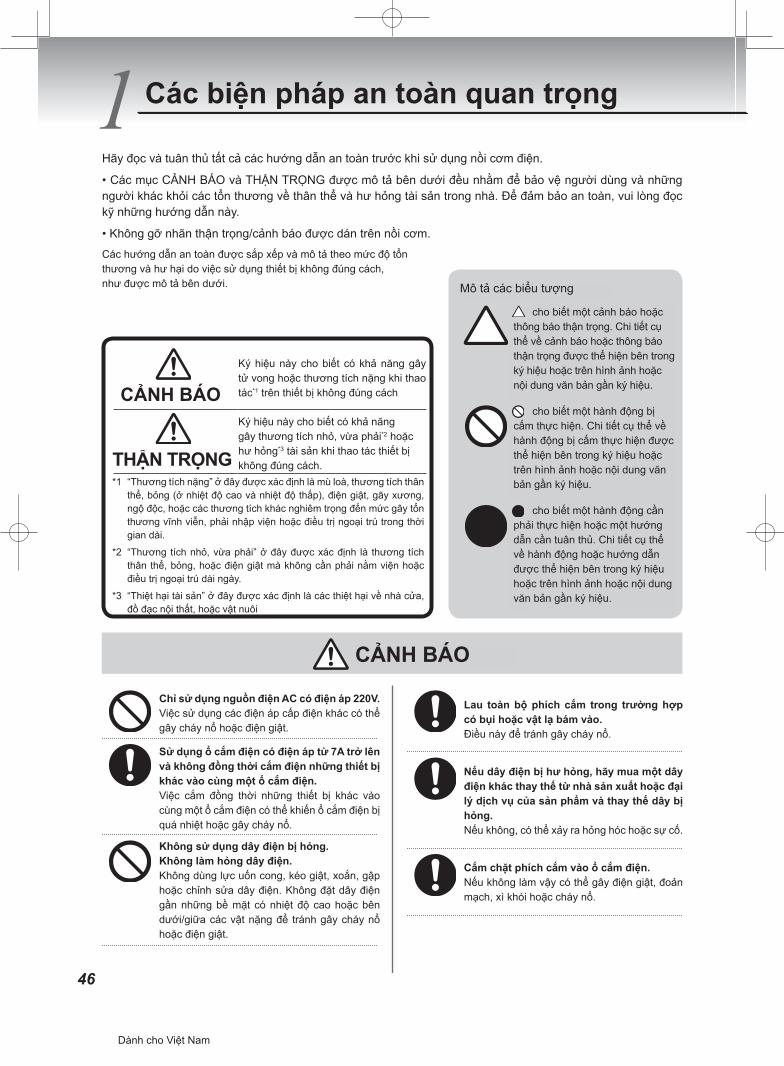
46
Only use a voltage of 230 V AC.Use of any other power supply voltages may cause fire or electric shock.
Use an electrical outlet rated for 7 A or higher and do not plug in other devices at the same time.Connecting other devices to the same outlet may cause the outlet to overheat, resulting in fire.
Do not use a damaged power cord. Do not damage the power cord.Do not modify, forcefully bend, pull, twist, or fold the cord. Do not place the cord near high temperature surfaces or under/between heavy objects to prevent fire and electric shock.
Wipe the power plug thoroughly if dust or other foreign objects are collected on it.This is to avoid fire.
If the power cord is damaged, purchase a replacement cord from the manufacturer or its service agent and replace the damaged cord.Otherwise, a malfunction or accident may occur.
Insert the power plug completely into the outlet.Failure to do so may cause electric shock, short circuits, smoke, or fire.
Read and follow all safety instructions before using the rice cooker.
• The WARNINGS and CAUTIONS described below are intended to protect the user and other individuals from physical and property damage. To ensure safety, please follow them carefully.
• Do not remove the caution/warning labels attached to the rice cooker.
The safety instructions are classified and described according to the level of harm and damage caused by improper use, as shown below.
WARNING
1 Important Safeguards
WARNING
This symbol indicates there is a possibility of serious injury or death*1 when the product is handled improperly.
CAUTION
This symbol indicates there is a possibility of minor or moderate injury*2 or damage to property*3 when the product is handled improperly.
*1 “Serious injury” is defined here as loss of sight, physical injury, burns (high and low temperature), electric shock, broken bones, poisoning, or other injuries severe enough to involve permanent damage and require hospitalization or extended outpatient care.
*2 “Minor or moderate injury” is defined here as a physical injury, burns, or electric shock that does not require a hospital stay or extended outpatient care.
*3 “Damage to property” is defined here as damage that affects a building, furniture, livestock, or pets.
Description of Symbols
indicates a warning or caution. The specific details of the warning or caution are indicated inside the symbol or in an illustration or text near the symbol.
indicates a prohibited action. The specific details of the prohibited action are indicated inside the symbol or in an illustration or text near the symbol.
indicates an action that must be taken or an instruction that must be followed. The specific details of the action or instruction are indicated inside the symbol or in an illustration or text near the symbol.
シンガポール向け
Các biện pháp an toàn quan trọng
Hãy đọc và tuân thủ tất cả các hướng dẫn an toàn trước khi sử dụng nồi cơm điện.
• Các mục CẢNH BÁO và THẬN TRỌNG được mô tả bên dưới đều nhằm để bảo vệ người dùng và những người khác khỏi các tổn thương về thân thể và hư hỏng tài sản trong nhà. Để đảm bảo an toàn, vui lòng đọc kỹ những hướng dẫn này.
• Không gỡ nhãn thận trọng/cảnh báo được dán trên nồi cơm.
Các hướng dẫn an toàn được sắp xếp và mô tả theo mức độ tổn thương và hư hại do việc sử dụng thiết bị không đúng cách, như được mô tả bên dưới. Mô tả các biểu tượng
cho biết một cảnh báo hoặc thông báo thận trọng. Chi tiết cụ thể về cảnh báo hoặc thông báo thận trọng được thể hiện bên trong ký hiệu hoặc trên hình ảnh hoặc nội dung văn bản gần ký hiệu.
cho biết một hành động bị cấm thực hiện. Chi tiết cụ thể về hành động bị cấm thực hiện được thể hiện bên trong ký hiệu hoặc trên hình ảnh hoặc nội dung văn bản gần ký hiệu.
cho biết một hành động cần phải thực hiện hoặc một hướng dẫn cần tuân thủ. Chi tiết cụ thể về hành động hoặc hướng dẫn được thể hiện bên trong ký hiệu hoặc trên hình ảnh hoặc nội dung văn bản gần ký hiệu.
CẢNH BÁO
Chỉ sử dụng nguồn điện AC có điện áp 220V.Việc sử dụng các điện áp cấp điện khác có thể gây cháy nổ hoặc điện giật.
Lau toàn bộ phích cắm trong trường hợp có bụi hoặc vật lạ bám vào. Điều này để tránh gây cháy nổ.
Cắm chặt phích cắm vào ổ cắm điện.Nếu không làm vậy có thể gây điện giật, đoản mạch, xì khói hoặc cháy nổ.
Nếu dây điện bị hư hỏng, hãy mua một dây điện khác thay thế từ nhà sản xuất hoặc đại lý dịch vụ của sản phẩm và thay thế dây bị hỏng.Nếu không, có thể xảy ra hỏng hóc hoặc sự cố.
Sử dụng ổ cắm điện có điện áp từ 7A trở lên và không đồng thời cắm điện những thiết bị khác vào cùng một ổ cắm điện.Việc cắm đồng thời những thiết bị khác vào cùng một ổ cắm điện có thể khiến ổ cắm điện bị quá nhiệt hoặc gây cháy nổ.
Không sử dụng dây điện bị hỏng.Không làm hỏng dây điện.Không dùng lực uốn cong, kéo giật, xoắn, gập hoặc chỉnh sửa dây điện. Không đặt dây điện gần những bề mặt có nhiệt độ cao hoặc bên dưới/giữa các vật nặng để tránh gây cháy nổ hoặc điện giật.
Dành cho Việt Nam
CẢNH BÁO
THẬN TRỌNG
Ký hiệu này cho biết có khả năng gây tử vong hoặc thương tích nặng khi thao tác*1 trên thiết bị không đúng cách
Ký hiệu này cho biết có khả năng gây thương tích nhỏ, vừa phải*2 hoặc hư hỏng*3 tài sản khi thao tác thiết bị không đúng cách.
*1 “Thương tích nặng” ở đây được xác định là mù loà, thương tích thân thể, bỏng (ở nhiệt độ cao và nhiệt độ thấp), điện giật, gãy xương, ngộ độc, hoặc các thương tích khác nghiêm trọng đến mức gây tổn thương vĩnh viễn, phải nhập viện hoặc điều trị ngoại trú trong thời gian dài.
*2 “Thương tích nhỏ, vừa phải” ở đây được xác định là thương tích thân thể, bỏng, hoặc điện giật mà không cần phải nằm viện hoặc điều trị ngoại trú dài ngày.
*3 “Thiệt hại tài sản” ở đây được xác định là các thiệt hại về nhà cửa, đồ đạc nội thất, hoặc vật nuôi
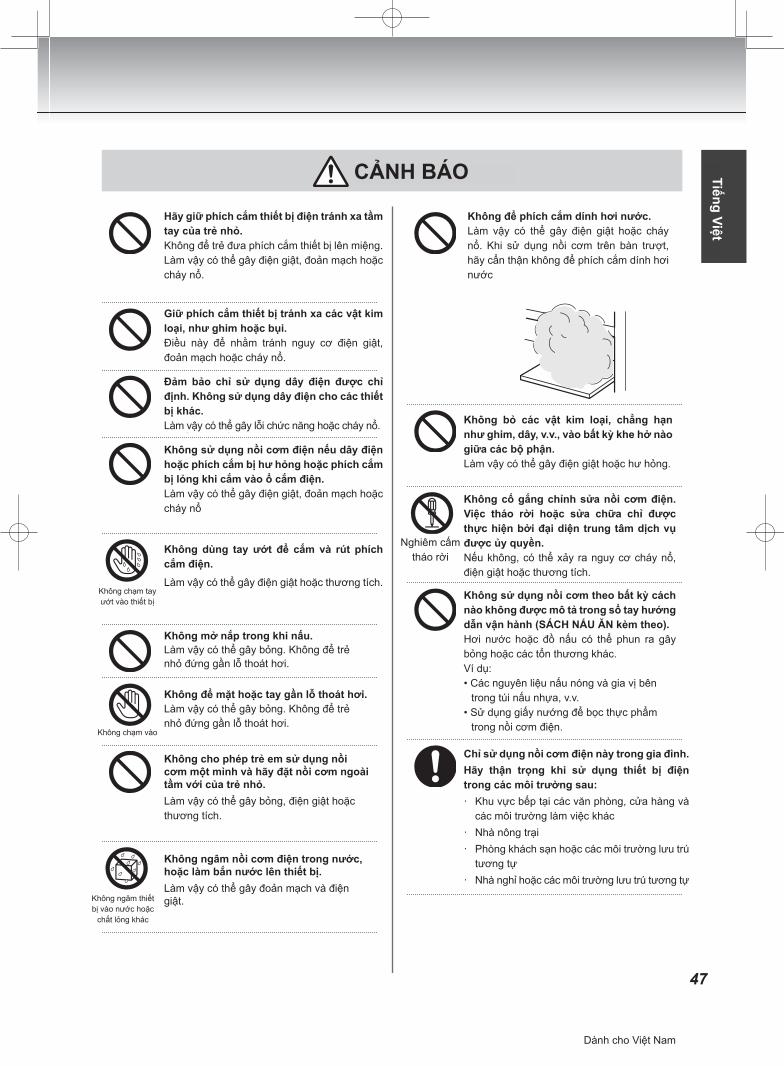
47
EnglishKeep the appliance plug out of the reach of small children.Do not allow them to place the appliance plug in their mouths.Doing so may cause electric shock, short circuits, or fire.
Keep the appliance plug away from metal objects, such as pins, or dust.This is to avoid electric shock, short circuits, or fire.
Be sure to use the specified power cord only. Do not use the power cord for any other devices.Doing so may cause malfunction or fire.
Do not use the rice cooker when the power cord or the power plug is damaged or the plug is loose in the outlet.Doing so may cause electric shock, short circuits, or fire.
Do not touchthe unit withwet hands
Do not handle the power plug with wet hands.Doing so may cause electric shock or injury.
Never open the lid during cooking.Doing so may cause burns.
Do not touch
Do not place your face or hands near the steam vent.Doing so may cause burns. Never allow small children near the steam vent.
Do not allow children to use the rice cooker by themselves or do not use the rice cooker within the reach of small children.Doing so may cause burns, electric shock, or injury.
Never immersethe unit in wateror other liquid
Do not immerse the rice cooker in water or splash water over the rice cooker.Doing so may cause short circuits and electric shock.
Do not expose the power plug to steam.Doing so may cause electric shock or fire. When using the rice cooker on a sliding table, be careful not to expose the power plug to steam.
Do not insert any metal objects, such as pins, wires, etc., into any gaps between the parts.Doing so may cause electric shock or malfunction.
Disassemblyis prohibited
Do not attempt to modify the rice cooker. Disassembly or repairs should be performed only by an authorized service representative.Otherwise, fire, electric shock, or injury may occur.
Do not use the rice cooker in any way not described in the instruction manual (supplied COOKBOOK).Steam or contents may spray out, causing burns or other injuries.Examples:• Heating ingredients and seasonings
inside of plastic cooking bags, etc.• Using parchment paper to cover food
in the rice cooker.
Household use only.This appliance is intended to be used in household and similar applications such as:• staff kitchen areas in shops, offices
and other working environments• farm houses• by clients in hotels, motels and other
residential type environments• bed and breakfast type environments
WARNING
シンガポール向け
CẢNH BÁO
Hãy giữ phích cắm thiết bị điện tránh xa tầm tay của trẻ nhỏ.Không để trẻ đưa phích cắm thiết bị lên miệng.Làm vậy có thể gây điện giật, đoản mạch hoặc cháy nổ.
Giữ phích cắm thiết bị tránh xa các vật kim loại, như ghim hoặc bụi. Điều này để nhằm tránh nguy cơ điện giật, đoản mạch hoặc cháy nổ.
Đảm bảo chỉ sử dụng dây điện được chỉ định. Không sử dụng dây điện cho các thiết bị khác.Làm vậy có thể gây lỗi chức năng hoặc cháy nổ.
Không sử dụng nồi cơm điện nếu dây điện hoặc phích cắm bị hư hỏng hoặc phích cắm bị lỏng khi cắm vào ổ cắm điện.Làm vậy có thể gây điện giật, đoản mạch hoặc cháy nổ
Không dùng tay ướt để cắm và rút phích cắm điện. Làm vậy có thể gây điện giật hoặc thương tích.
Không mở nắp trong khi nấu.Làm vậy có thể gây bỏng. Không để trẻnhỏ đứng gần lỗ thoát hơi.
Không để mặt hoặc tay gần lỗ thoát hơi. Làm vậy có thể gây bỏng. Không để trẻnhỏ đứng gần lỗ thoát hơi.
Không cho phép trẻ em sử dụng nồi cơm một mình và hãy đặt nồi cơm ngoài tầm với của trẻ nhỏ. Làm vậy có thể gây bỏng, điện giật hoặc thương tích.
Không ngâm nồi cơm điện trong nước, hoặc làm bắn nước lên thiết bị.Làm vậy có thể gây đoản mạch và điện giật.
Không chạm tay ướt vào thiết bị
Không chạm vào
Không ngâm thiết bị vào nước hoặc
chất lỏng khác
Không để phích cắm dính hơi nước.Làm vậy có thể gây điện giật hoặc cháy nổ. Khi sử dụng nồi cơm trên bàn trượt, hãy cẩn thận không để phích cắm dính hơi nước
Không bỏ các vật kim loại, chẳng hạn như ghim, dây, v.v., vào bất kỳ khe hở nào giữa các bộ phận.Làm vậy có thể gây điện giật hoặc hư hỏng.
Không cố gắng chỉnh sửa nồi cơm điện. Việc tháo rời hoặc sửa chữa chỉ được thực hiện bởi đại diện trung tâm dịch vụ được ủy quyền. Nếu không, có thể xảy ra nguy cơ cháy nổ, điện giật hoặc thương tích.
Không sử dụng nồi cơm theo bất kỳ cách nào không được mô tả trong sổ tay hướng dẫn vận hành (SÁCH NẤU ĂN kèm theo).Hơi nước hoặc đồ nấu có thể phun ra gây bỏng hoặc các tổn thương khác.Ví dụ:• Các nguyên liệu nấu nóng và gia vị bên
trong túi nấu nhựa, v.v.• Sử dụng giấy nướng để bọc thực phẩm
trong nồi cơm điện.
Nghiêm cấm tháo rời
Chỉ sử dụng nồi cơm điện này trong gia đình.Hãy thận trọng khi sử dụng thiết bị điện trong các môi trường sau:· Khu vực bếp tại các văn phòng, cửa hàng và
các môi trường làm việc khác· Nhà nông trại· Phòng khách sạn hoặc các môi trường lưu trú
tương tự· Nhà nghỉ hoặc các môi trường lưu trú tương tự
Tiếng Việt
Dành cho Việt Nam

48
1 Important Safeguards
Stop using the rice cooker immediately in case of any malfunction or failure.Using the rice cooker with a problem may cause fire, electric shock, or injury.Examples of malfunction and failure:• The power cord and/or power plug
become abnormally hot.• Smoke comes out of the rice cooker or
a burning odor is detected.• The rice cooker is cracked or there are
loose or wobbling parts.• The inner pot is deformed.• There are other problems or
abnormalities.Immediately unplug the power plug from the outlet and contact the place of purchase for inspection/repair service.
Do not use the rice cooker on an unstable surface, a heat sensitive table, or mat, etc.Doing so may cause fire or damage to the table or mat.
Do not use the rice cooker on a sliding tabletop that does not have sufficient load bearing capacity.Otherwise, the rice cooker may fall, resulting in injury, burns, or malfunction.Check that the load bearing capacity is sufficient before use.
Do not use the rice cooker near walls or furniture.Steam and heat may cause damage, discoloration, and/or deformation. Use the rice cooker at least 30 cm away from walls or furniture. When using the rice cooker on a kitchen rack or cabinet, make sure that steam is not trapped.
At least 30 cm
Do not use the cooking plate without the inner pot.Doing so may cause fire, smoke, or burns.
Be sure to place the healthy cooking plate on top of the cooking plate. Do not place the healthy cooking plate directly inside the inner pot.Doing so may cause fire, smoke, or burns.
CAUTION
WARNING
Do not use the rice cooker in a small space where the operation panel is exposed to steam.Steam and heat may cause deformation of the operation panel, and/or damage, discoloration, deformation, and/or malfunction of the rice cooker. When using the rice cooker on a sliding tabletop, pull the tabletop out so that the operation panel is not exposed to the emitted steam.
Do not use the rice cooker near a heat source or where it may be splashed with water.Doing so may cause electric shock, short circuits, fire, and/or deformation or malfunction of the rice cooker.
Use only the inner pot made exclusively for this rice cooker.Using any other pot may cause overheating or malfunction.
シンガポール向け
Dừng sử dụng nồi cơm ngay lập tức khi có trục trặc hay sự cố.
Việc sử dụng nồi cơm khi gặp vấn đề có thể gây cháy nổ, điện giật hoặc thương tích. Ví dụ về trục trặc hoặc sự cố:
• Dây điện hoặc phích cắm nóng bất thường.
• Khói phát ra từ nồi cơm điện hoặc phát hiện có mùi cháy khét.
• Nồi cơm điện bị nứt hoặc có bộ phận bị lỏng hoặc lung lay.
• Ruột nồi bị biến dạng.
• Có các sự cố hoặc tình trạng bất thường khác.
Hãy rút phích cắm ra khỏi ổ cắm ngay lập tức và liên hệ với đại lý bán hàng để kiểm tra/sửa chữa.
Không sử dụng nồi cơm trên bề mặt không ổn định, hoặc trên bàn, thảm không chịu nhiệt, v.v.Làm vậy có thể gây cháy nổ hoặc làm hỏng bàn, thảm.
Không sử dụng nồi cơm gần tường hoặc đồ nội thất.Hơi nước và nhiệt có thể gây hư hỏng, mất màu hoặc biến dạng. Hãy sử dụng nồi cơm cách tường hoặc đồ nội thất ít nhất 30cm. Khi sử dụng nồi cơm trên giá hoặc tủ bếp, hãy chắc chắn rằng hơi nước hoặc nhiệt không bị chắn.
Không sử dụng khay nấu khi không có ruột nồi.Làm vậy có thể gây cháy nổ, xì khói, hoặc bỏng.
Không sử dụng nồi cơm điện gần nguồn nhiệt hoặc nơi có thể bị bắn nước.Làm như vậy có thể gây điện giật, đoản mạch, cháy nổ, biến dạng hoặc hư hỏng nồi cơm điện.
Đảm bảo đặt thực phẩm tươi lên trên khay nấu. Không đặt thực phẩm tươi trực tiếp bên trong ruột nồi.Làm vậy có thể gây cháy nổ, xì khói, hoặc bỏng.
Ít nhất 30 cm
Các biện pháp an toàn quan trọng
CẢNH BÁO
THẬN TRỌNG
Không sử dụng nồi cơm điện trong không gian nhỏ, nơi bảng điều khiển bị tiếp xúc với hơi nước.Hơi nước và nhiệt có thể khiến bảng điều khiển bị biến dạng hoặc khiến nồi cơm điện bị hư hỏng, mất màu, biến dạng, hoặc lỗi chức năng. Khi sử dụng nồi cơm điện trên mặt bàn trượt, hãy kéo mặt bàn ra để bảng điều khiển không bị tiếp xúc với hơi nước thoát ra.
Dành cho Việt Nam
Không sử dụng nồi cơm điện trên mặt bàn trượt không thể chịu được trọng lượng của nồi.Nồi có thể bị rơi khỏi mặt bàn và gây thương tích, bỏng hoặc lỗi chức năng. Trước khi sử dụng nồi cơm điện, hãy kiểm tra xem liệu mặt bàn trượt có đủ khả năng chịu được trọng lượng của nồi hay không.
Chỉ sử dụng ruột nồi được sản xuất dành riêng cho nồi cơm điện này. Việc sử dụng bất kỳ loại ruột nồi nào khác có thể khiến nồi bị quá nhiệt hoặc hư hỏng.
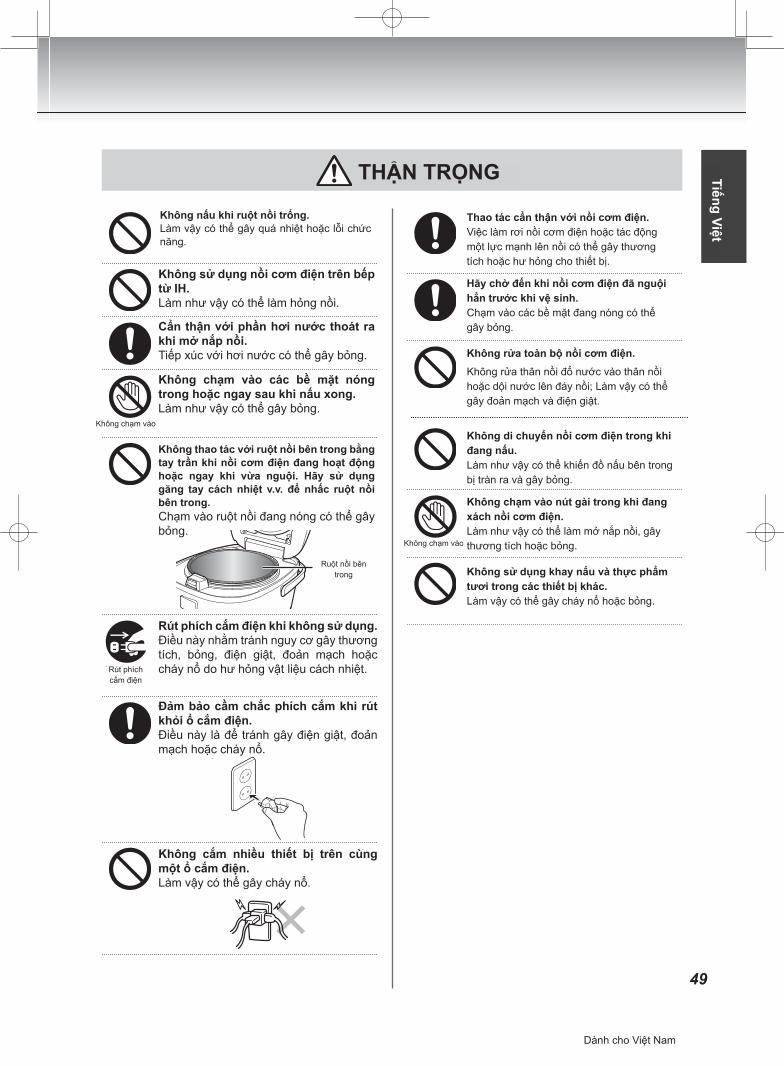
49
English
CAUTIONDo not cook with the inner pot empty.Doing so may cause overheating or malfunction.
Do not use the rice cooker on an IH cooking heater.Doing so may cause malfunction.
Be careful about any escaping steam when opening the lid.Exposure to steam may cause burns.
Do not touch
Do not touch high-temperature surfaces during or immediately after cooking.Doing so may cause burns.
Do not handle the inner pot with bare hands when the rice cooker is in operation or immediately after cooking. Be sure to use oven mitts, etc. to pick up the inner pot.Touching the hot pot may cause burns.
Inner pot
Unplug thepower cord
Unplug the power plug when not in use.This is to avoid injury, burns, electric shock, short circuits, or fire caused by insulation deterioration.
Be sure to hold the power plug when removing it from an outlet.Otherwise, electric shock, short circuits, or fire may occur.
Do not use multiple appliances on the same outlet.Doing so may cause fire.
Handle the rice cooker with care.Dropping the rice cooker or exposing it to a strong impact may cause injury or malfunction of the rice cooker.
Wait until the rice cooker has cooled down before cleaning it.Touching the hot surfaces may cause burns.
Do not wash the entire rice cooker.Do not wash the main body or pour water into the main body or the base. Doing so may cause short circuits and electric shock.
Do not move the rice cooker while it is cooking.Doing so may cause the contents to spill, resulting in burns.
Do not touch
Do not touch the hook button while carrying the rice cooker.Doing so may cause the lid to open, resulting in injury or burns.
Do not use the cooking plate and healthy cooking plate in any other appliances.Doing so may cause fire or burns.
シンガポール向け
Không nấu khi ruột nồi trống. Làm vậy có thể gây quá nhiệt hoặc lỗi chức năng.
Không chạm vào các bề mặt nóng trong hoặc ngay sau khi nấu xong.Làm như vậy có thể gây bỏng.
Rút phích cắm điện khi không sử dụng.Điều này nhằm tránh nguy cơ gây thương tích, bỏng, điện giật, đoản mạch hoặc cháy nổ do hư hỏng vật liệu cách nhiệt.
Đảm bảo cầm chắc phích cắm khi rút khỏi ổ cắm điện.Điều này là để tránh gây điện giật, đoản mạch hoặc cháy nổ.
Không cắm nhiều thiết bị trên cùng một ổ cắm điện.Làm vậy có thể gây cháy nổ.
Cẩn thận với phần hơi nước thoát ra khi mở nắp nồi.Tiếp xúc với hơi nước có thể gây bỏng.
Không sử dụng nồi cơm điện trên bếp từ IH.Làm như vậy có thể làm hỏng nồi.
THẬN TRỌNG Tiếng Việt
Không chạm vào
Không chạm vào
Ruột nồi bên trong
Rút phích cắm điện
Thao tác cẩn thận với nồi cơm điện. Việc làm rơi nồi cơm điện hoặc tác động một lực mạnh lên nồi có thể gây thương tích hoặc hư hỏng cho thiết bị.
Hãy chờ đến khi nồi cơm điện đã nguội hẳn trước khi vệ sinh.Chạm vào các bề mặt đang nóng có thể gây bỏng.
Không rửa toàn bộ nồi cơm điện. Không rửa thân nồi đổ nước vào thân nồi hoặc dội nước lên đáy nồi; Làm vậy có thể gây đoản mạch và điện giật.
Không di chuyển nồi cơm điện trong khi đang nấu.Làm như vậy có thể khiến đồ nấu bên trong bị tràn ra và gây bỏng.
Không chạm vào nút gài trong khi đang xách nồi cơm điện.Làm như vậy có thể làm mở nắp nồi, gây thương tích hoặc bỏng.
Không sử dụng khay nấu và thực phẩm tươi trong các thiết bị khác.Làm vậy có thể gây cháy nổ hoặc bỏng.
Dành cho Việt Nam
Không thao tác với ruột nồi bên trong bằng tay trần khi nồi cơm điện đang hoạt động hoặc ngay khi vừa nguội. Hãy sử dụng găng tay cách nhiệt v.v. để nhấc ruột nồi bên trong.Chạm vào ruột nồi đang nóng có thể gây bỏng.
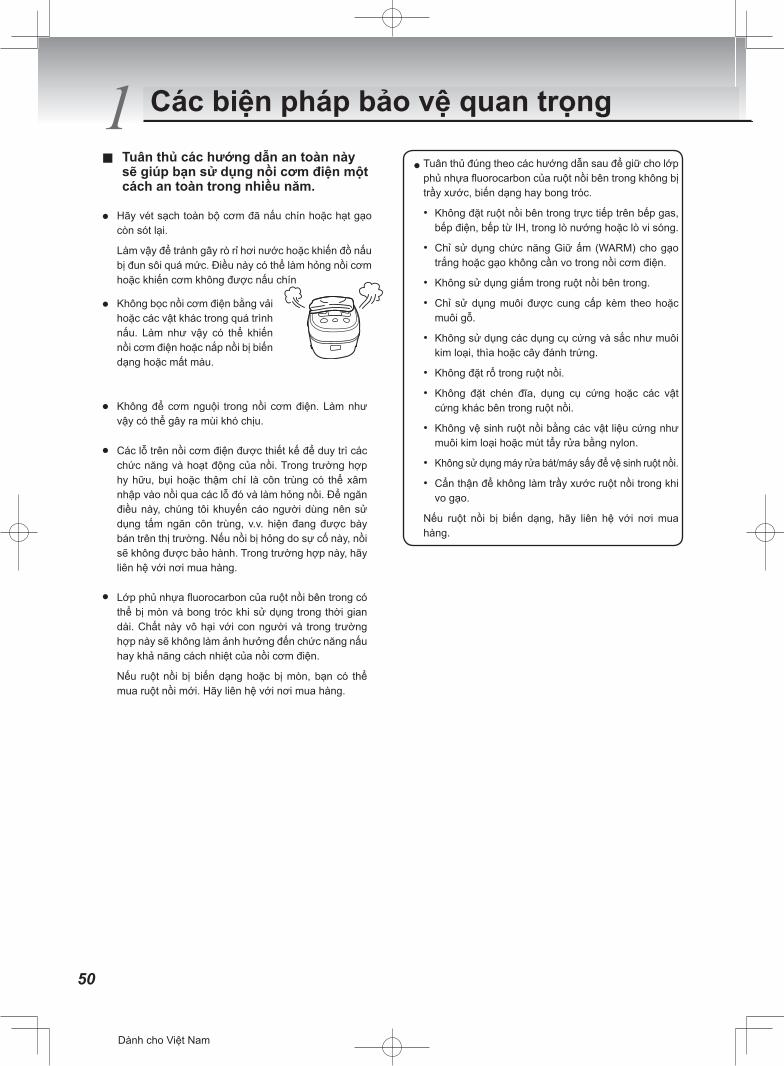
50
1 Important Safeguards
� Follow the safety instructions in order to use your rice cooker safely for many years.
● Remove any cooked rice or remaining grains of rice.Failure to do so may cause steam to leak or contents to boil over. This may cause malfunction or improperly cooked rice.
● Do not cover the rice cooker with a cloth or any other objects during cooking.Doing so may cause the rice cooker or the lid to become deformed or discolored.
● Do not store cooled rice in the rice cooker.Doing so may cause unpleasant odors.
● The holes in the rice cooker are designed to maintain its functions and performance. In extremely rare cases, dust or even insects may enter these holes and cause malfunction. To prevent this, a commercially available insect prevention sheet, etc., is recommended. If a malfunction does occur due to this problem, the repair is not covered by warranty. In this case, contact the place of purchase.
● The fluorocarbon resin coating on the inner pot may wear and peel with extended use. It is harmless to humans and does not interfere with actual cooking or the heat insulating capability of the rice cooker.If deformation or corrosion is found on the inner pot, a new inner pot may be purchased. Contact the place of purchase.
● Strictly observe the following instructions to keep the fluorocarbon resin coating of the inner pot from becoming scratched, deformed, or peeling.• Do not place the inner pot directly over a gas,
electric, or IH stove top or in a microwave oven.
• Do not keep anything other than white rice or rinse-free rice warm in the rice cooker.
• Do not use vinegar inside the inner pot.• Use only the supplied spatula or a wooden
spatula.• Do not use hard or sharp utensils such as
metal ladles, spoons, or whisks.• Do not place a basket inside the inner pot.• Do not place dishes, hard utensils, or other
hard objects inside the inner pot.• Do not clean the inner pot using hard
materials such as metal spatulas or nylon scrubbing sponges.
• Do not use a dishwasher/dryer to clean the inner pot.
• Be careful not to scratch the inner pot when rinsing rice in it.
If the inner pot becomes deformed, contact the place of purchase.
シンガポール向け
Các biện pháp bảo vệ quan trọng Tuân thủ các hướng dẫn an toàn này sẽ giúp bạn sử dụng nồi cơm điện một cách an toàn trong nhiều năm.
Hãy vét sạch toàn bộ cơm đã nấu chín hoặc hạt gạo còn sót lại.
Làm vậy để tránh gây rò rỉ hơi nước hoặc khiến đồ nấu bị đun sôi quá mức. Điều này có thể làm hỏng nồi cơm hoặc khiến cơm không được nấu chín
Không bọc nồi cơm điện bằng vải hoặc các vật khác trong quá trình nấu. Làm như vậy có thể khiến nồi cơm điện hoặc nắp nồi bị biến dạng hoặc mất màu.
Không để cơm nguội trong nồi cơm điện. Làm như vậy có thể gây ra mùi khó chịu.
Các lỗ trên nồi cơm điện được thiết kế để duy trì các chức năng và hoạt động của nồi. Trong trường hợp hy hữu, bụi hoặc thậm chí là côn trùng có thể xâm nhập vào nồi qua các lỗ đó và làm hỏng nồi. Để ngăn điều này, chúng tôi khuyến cáo người dùng nên sử dụng tấm ngăn côn trùng, v.v. hiện đang được bày bán trên thị trường. Nếu nồi bị hỏng do sự cố này, nồi sẽ không được bảo hành. Trong trường hợp này, hãy liên hệ với nơi mua hàng.
Lớp phủ nhựa fluorocarbon của ruột nồi bên trong có thể bị mòn và bong tróc khi sử dụng trong thời gian dài. Chất này vô hại với con người và trong trường hợp này sẽ không làm ảnh hưởng đến chức năng nấu hay khả năng cách nhiệt của nồi cơm điện.
Nếu ruột nồi bị biến dạng hoặc bị mòn, bạn có thể mua ruột nồi mới. Hãy liên hệ với nơi mua hàng.
Tuân thủ đúng theo các hướng dẫn sau để giữ cho lớp phủ nhựa fluorocarbon của ruột nồi bên trong không bị trầy xước, biến dạng hay bong tróc.
• Không đặt ruột nồi bên trong trực tiếp trên bếp gas, bếp điện, bếp từ IH, trong lò nướng hoặc lò vi sóng.
• Chỉ sử dụng chức năng Giữ ấm (WARM) cho gạo trắng hoặc gạo không cần vo trong nồi cơm điện.
• Không sử dụng giấm trong ruột nồi bên trong.
• Chỉ sử dụng muôi được cung cấp kèm theo hoặc muôi gỗ.
• Không sử dụng các dụng cụ cứng và sắc như muôi kim loại, thìa hoặc cây đánh trứng.
• Không đặt rổ trong ruột nồi.
• Không đặt chén đĩa, dụng cụ cứng hoặc các vật cứng khác bên trong ruột nồi.
• Không vệ sinh ruột nồi bằng các vật liệu cứng như muôi kim loại hoặc mút tẩy rửa bằng nylon.
• Không sử dụng máy rửa bát/máy sấy để vệ sinh ruột nồi.
• Cẩn thận để không làm trầy xước ruột nồi trong khi vo gạo.
Nếu ruột nồi bị biến dạng, hãy liên hệ với nơi mua hàng.
Dành cho Việt Nam
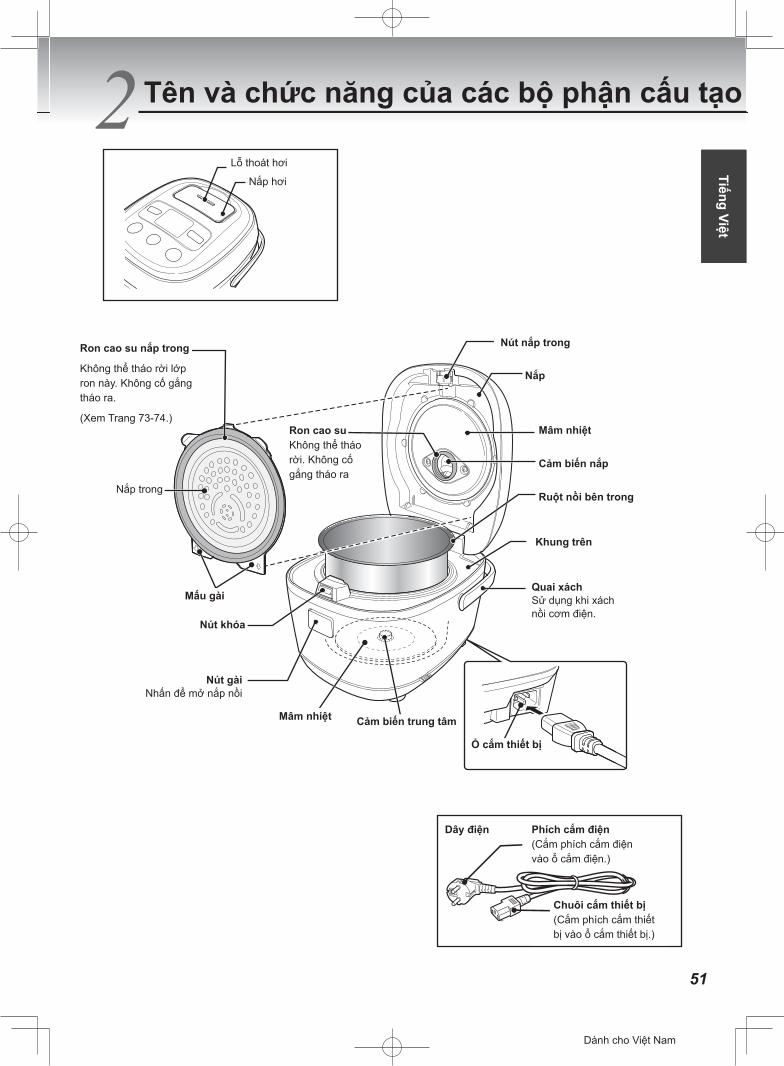
51
English
2 Names and Functions of Component Parts
Lid
Heating plateLid gasket
Carrying handleUse the handle when carrying the rice cooker.
Center sensor
Inner pot
Upper casing
Hook buttonPush to open the lid.
Steam vent
Heater plate
Power plug(Insert it into an outlet.)
Power cord
Appliance plug(Insert it into the appliance plug inlet.)
Appliance plug inlet
Steam cap
Inner lid
Inner lid gasketInner lid button
It is not removable.Do not attempt to remove it.(See P.33 to 34.)
It is not removable.Do not attempt to remove it.
Tab
Lid sensor
Hook catch
シンガポール向け
Tên và chức năng của các bộ phận cấu tạo
Lỗ thoát hơi
Nắp hơi
rom cao su nắp trongKhông thể tháo rời lớp ron này
Không cố gắng tháo ra.(Xem Trang 33-34.)
rom cao suKhông thể tháo rời.Không cố gắngtháo ra.
Nút nắp trong
Nắp
Mâm nhiệt
Cảm biến nắp
Ruột nồi bên trongNắp trong
Nút khóa
Mâm nhiệtCảm biến trung tâm
Dây điện
Ổ phích cắm thiết bị
Núi gàiNhấn để mở nắp nồi
Khung trên
Quai xáchSử dụng khi xách nồi cơm điện.
Tiếng Việt
Dành cho Việt Nam
Phích cắm điện(Cắm phích cắm điện vào ổ cắm.)
Phích cắm thiết bị(Cắm phích cắm thiết bị vào ổ cắm thiết bị.)
Mấu gài
Ron cao su nắp trong
Không thể tháo rời lớp ron này. Không cố gắng tháo ra.
(Xem Trang 73-74.)
Nắp trong
Nút nắp trong
Nắp
Mâm nhiệt
Cảm biến nắp
Ruột nồi bên trong
Khung trên
Quai xáchSử dụng khi xách nồi cơm điện.
Nút gài Nhấn để mở nắp nồi
Nút khóa
Mấu gài
Mâm nhiệt Cảm biến trung tâm Ổ cắm thiết bị
Dây điện
Ron cao suKhông thể tháo rời. Không cố gắng tháo ra
Phích cắm điện(Cắm phích cắm điện vào ổ cắm điện.)
Chuôi cắm thiết bị(Cắm phích cắm thiết bị vào ổ cắm thiết bị.)
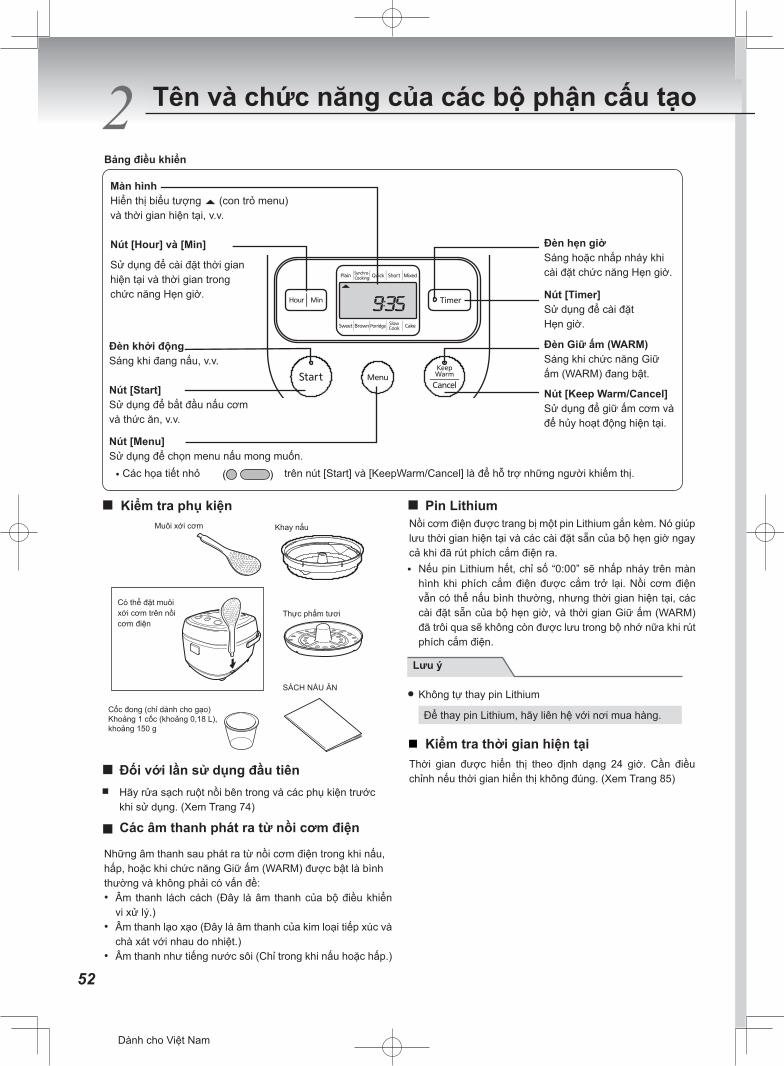
52
2 Names and Functions of Component Parts
Operation panel
[Hour] and [Min] keysUsed to set the current time and the time under the Timer function.
[Menu] keyUsed to select the desired cooking menu.
Keep Warm lampLit when the Keep Warm function is on.[Keep Warm/Cancel] keyUsed to keep rice warm and to cancel the current operation.
DisplayDisplays the symbol (menu cursor) and the current time, etc.
[Start] keyUsed to start cooking rice and food, etc.
• The small projections ( ) on the [Start] and [Keep Warm/Cancel] keys are to aid persons with a visual impairment.
Start lampLit during cooking, etc.
�Checking the accessoriesSpatula
COOKBOOK
Cooking plate
Measuring cup (for rice only)Approx. 1 cup (approx. 0.18 L), approx. 150 g
Healthy cooking plateThe spatula can be placed on the rice cooker.
� For first time use ■ Wash the inner pot and accessories before using
them. (See P.32.)
�Sounds emitted by the rice cookerThe following sounds coming from the rice cooker during cooking, steaming, or when the Keep Warm function is on are normal and do not indicate a problem:• Clicking sound (This is the sound of the
microcomputer controller.)• Scraping sound (This is the sound of metal
contracting and rubbing together due to heat.)• Sound like boiling water (Only during cooking or
steaming.)
� Lithium batteryThe rice cooker has a built-in lithium battery. It stores the current time and the preset timer settings even with the power plug disconnected.• If the lithium battery runs out, “0:00” blinks on the
display when the power plug is plugged back in. The rice cooker can still cook normally, however, the current time, preset timer settings, and elapsed Keep Warm time are deleted when the power plug is disconnected.
Note ● Do not attempt to replace the lithium battery yourself.To replace the lithium battery, contact the place of purchase.
�Checking the current timeThe time is displayed in a 24-hour format. Adjust the time if the correct time is not displayed. (See P.43.)
[Timer] keyUsed to set the timer.
Timer lampLit or blinks when the Timer function is set.
シンガポール向け
Tên và chức năng của các bộ phận cấu tạo
Lưu ý
Bảng điều khiển
Nút [Hour] và [Min]
Sử dụng để cài đặt thời gian hiện tại và thời gian trong chức năng Hẹn giờ.
Đèn khởi độngSáng khi đang nấu, v.v.
Nút [Start]Sử dụng để bắt đầu nấu cơm và thức ăn, v.v.
Nút [Menu]Sử dụng để chọn menu nấu mong muốn.
Các họa tiết nhỏ trên nút [Start] và [KeepWarm/Cancel] là để hỗ trợ những người khiếm thị.
Đèn hẹn giờSáng hoặc nhấp nháy khi cài đặt chức năng Hẹn giờ.
Nút [Timer]Sử dụng để cài đặt Hẹn giờ.
Đèn Giữ ấm (WARM)Sáng khi chức năng Giữ ấm (WARM) đang bật.
Nút [Keep Warm/Cancel] Sử dụng để giữ ấm cơm và để hủy hoạt động hiện tại.
Kiểm tra phụ kiện Pin Lithium
Đối với lần sử dụng đầu tiên
Các âm thanh phát ra từ nồi cơm điện
Nồi cơm điện được trang bị một pin Lithium gắn kèm. Nó giúp lưu thời gian hiện tại và các cài đặt sẵn của bộ hẹn giờ ngay cả khi đã rút phích cắm điện ra.
Nếu pin Lithium hết, chỉ số “0:00” sẽ nhấp nháy trên màn hình khi phích cắm điện được cắm trở lại. Nồi cơm điện vẫn có thể nấu bình thường, nhưng thời gian hiện tại, các cài đặt sẵn của bộ hẹn giờ, và thời gian Giữ ấm (WARM) đã trôi qua sẽ không còn được lưu trong bộ nhớ nữa khi rút phích cắm điện.
Không tự thay pin Lithium
Muôi xới cơm Khay nấu
Thực phẩm tươi
SÁCH NẤU ĂN
Có thể đặt muôi xới cơm trên nồi cơm điện
Cốc đong (chỉ dành cho gạo) Khoảng 1 cốc (khoảng 0,18 L), khoảng 150 g
Hãy rửa sạch ruột nồi bên trong và các phụ kiện trước khi sử dụng. (Xem Trang 74)
Những âm thanh sau phát ra từ nồi cơm điện trong khi nấu, hấp, hoặc khi chức năng Giữ ấm (WARM) được bật là bình thường và không phải có vấn đề:• Âm thanh lách cách (Đây là âm thanh của bộ điều khiển
vi xử lý.)• Âm thanh lạo xạo (Đây là âm thanh của kim loại tiếp xúc và
chà xát với nhau do nhiệt.)• Âm thanh như tiếng nước sôi (Chỉ trong khi nấu hoặc hấp.)
Dành cho Việt Nam
Màn hìnhHiển thị biểu tượng (con trỏ menu) và thời gian hiện tại, v.v.
Để thay pin Lithium, hãy liên hệ với nơi mua hàng.
Kiểm tra thời gian hiện tạiThời gian được hiển thị theo định dạng 24 giờ. Cần điều chỉnh nếu thời gian hiển thị không đúng. (Xem Trang 85)
1111
English
Menu options and features
MenuTimer
function availability
Keep Warm
function availability
Feature
Plain Cooks white rice (long-grain rice).
Synchro-Cooking – * Cooks rice and side dishes together using the cooking plate.
Quick – Quickly cooks white rice (long-grain rice).
Short Cooks white rice (short-grain rice).
Mixed – Cooks seasoned rice.
Sweet – Cooks steamed glutinous rice.
Brown Cooks brown rice or multigrain brown rice (brown rice mixed with other grains).
Porridge Cooks porridge.
See P.44 for cooking capacities.: Available–: Not available: Do not use the Keep Warm function to ensure the maximum flavor of cooked rice.* Remove the cooking plate from the rice cooker before using the Keep Warm function.
Note ● When using the “Porridge” menu, porridge can become pasty if kept warm for too long. Serve it as soon as possible.
シンガポール向け
53
Các tùy chọn và tính năng của menu
Tính năngChức năng
hẹn giờ sẵn có
Chức năng Giữ ấm sẵn có
Lưu ý
Chọn khi nấu gạo trắng (gạo hạt dài).
Chọn khi sử dụng khay nấu để nấu cơm và các món ăn với nhau.
Chọn khi nấu gạo trắng nhanh (gạo hạt dài).
Chọn khi nấu gạo trắng (gạo hạt ngắn).
Chọn khi nấu xôi.
Chọn khi đồ xôi.Chọn khi nấu gạo lứt hoặc gạo lứt ngũ cốc (gạo lứt trộn với các loại ngũ cốc khác).Chọn khi nấu cháo.
Khi sử dụng menu “Porridge”, cháo sẽ trở nên đặc sệt nếu Giữ ấm (WARM) trong thời gian quá lâu. Hãy dùng càng sớm càng tốt.
Xem Trang 86 để biết dung tích nấu.Khả dụngKhông khả dụngKhông sử dụng chức năng Giữ ấm (WARM) để giữ tối đa hương vị của cơm.Lấy khay nấu ra khỏi nồi cơm điện trước khi sử dụng chức năng Giữ ấm (WARM).
Tiếng Việt
Dành cho Việt Nam
Tips on making delicious rice
Select quality rice and a good storage location.• Choose freshly polished, glossy rice with a
uniform grain size.• Store rice in a cool, dark, well-ventilated place.
Carefully measure the rice using the supplied measuring cup.1 cup (level filling) is approximately 0.18 L.Use the supplied measuring cup for rinse-free rice as well.
Rinse the rice quickly.Pour rice in the inner pot and add plenty of water. Lightly stir the rice and discard the water quickly.Use cold water and quickly rinse the rice by hand so that the rice does not absorb the starchy water.
Cooking rinse-free rice• Add rinse-free rice and water, and then stir well
from the bottom so that every individual grain of rice becomes immersed in the water. Merely adding water to the rice prevents it from soaking in the water and may cause improperly cooked rice.
• If the added water turns white, we recommend you rinse the rice thoroughly by replacing the water once or twice. The water turning white is due to starch in the rice and not its bran. However, cooking the rice with the starch left in the water may lead to burned rice, the contents boiling over, or improperly cooked rice.
Adding other ingredients to riceThe total amount of ingredients should be no more than approximately 70 g per cup of rice. Mix seasonings well and then add other ingredients on top of the rice. If other ingredients are to be added to the rice, be sure to use no more than the acceptable maximum amount (see the table below).
Menu 1.0 L (5.5-cup) type
1.8 L (10-cup) type
Mixed 3 cups 6 cupsSweet 3 cups 5 cupsBrown 3 cups 5 cups• Do not open the lid during cooking to add other
ingredients.
• Add water prior to adding the ingredients. Adding water after the ingredients results in the cooked rice being too firm.
• The following cases may result in improperly cooked or burned rice.• When too much of seasonings such as soy
sauce, sweet cooking rice wine, etc. are added
• When seasonings are settled at the bottom• When ketchup or tomato sauce is added• When other ingredients are mixed with rice
• When adding ingredients to porridge, add water to the rice so that the water level after the ingredients are added is not over the top line for porridge.
Add water according to the type of rice and your personal preference. Amount of water to addIf adding more or less water than the recommended amount, do not deviate from that amount by any more than 1/3 of one line. Doing so may cause the contents to boil over.
MenuCorresponding scale (Use the
corresponding scale on the inner pot as a reference.)
Plain “Plain” scaleSynchro-Cooking “Plain” scaleQuick “Plain” scaleShort “Plain” scaleMixed “Plain” scaleSweet (sweet rice) “Sweet” scale
Sweet (sweet rice and non-glutinous rice)
Between the “Plain” and “Sweet” scales
Brown “Brown” scale
Porridge Hard porridge: “Porridge • hard” scaleSoft porridge: “Porridge • soft” scale
• When cooking rinse-free rice, use the “Plain” scale as a reference but add a little extra water (until it just covers the corresponding line).
• When cooking germinated brown rice, whole rice, semi-polished rice, barley rice,or multigrain rice, use the “Plain” scale as a reference.
• If the amount of water to add is specified on a package of germinated brown rice or multigrain brown rice, follow the directions on the package and add water according to your personal preference.
Read P.14 to15 for preparations before cooking rice and P.16 to 20 for how to cook rice.
シンガポール向け
54
Đọc Trang 56-57 để biết cách chuẩn bị trước khi nấu cơm, và Trang 58-62 để biết cách nấu cơm.
Chọn loại gạo chất lượng cao và cất giữ ở nơi thoáng mát.• Chọn gạo vừa mới xay xát, hạt bóng với kích thước
đồng đều.• Bảo quản ở nơi mát mẻ, tối và thông thoáng
Đong gạo một cách cẩn thận với cốc đong đi kèm.
• Đổ thêm nước trước khi bỏ thêm các nguyên liệu khác vào gạo. Việc thêm nước sau khi bỏ thêm các nguyên liệu khác vào gạo sẽ khiến cơm quá cứng.
• Các trường hợp sau đây có thể khiến cơm không chín hoặc bị khét.- Khi bỏ thêm quá nhiều gia vị như nước tương,
rượu nếp, v.v.- Khi gia vị bị lắng ở đáy nồi- Khi thêm nước sốt cà chua nấm hoặc nước sốt cà
chua- Khi trộn thêm các nguyên liệu khác vào gạo
• Khi bỏ thêm các nguyên liệu khác vào cháo, hãy đổ thêm nước vào gạo để mực nước sau khi các thành phần được bỏ thêm vào không quá vạch trên cùng dành cho chức năng nấu cháo.
Một cốc (mức đong) tương đương khoảng 0,18 L.
Cũng sử dụng cốc đong gạo cung cấp kèm theo cho gạo không cần vo.
Vo gạo nhanh.Cho gạo vào ruột nồi và đổ nhiều nước. Khuấy nhẹ gạo và chắt nước nhanh. Sử dụng nước lạnh và vo gạo nhanh bằng tay để gạo không ngấm nước chứa tinh bột.
Bỏ thêm các nguyên liệu khác vào gạoTổng khối lượng các nguyên liệu không được quá 70g mỗi cốc gạo. Khuấy đều mọi gia vị và sau đó bỏ thêm các nguyên liệu bổ sung lên trên gạo. Nếu muốn bỏ thêm các nguyên liệu khác vào gạo, hãy chắc rằng không sử dụng quá khối lượng nguyên liệu tối đa cho phép (tham khảo bảng dưới đây).
Đổ thêm nước theo loại gạo và sở thích cá nhân của bạn.• Lượng nước cần thêm
Nếu đổ thêm nhiều hơn hoặc ít hơn lượng nước được khuyến nghị, mức độ chênh lệch không được vượt quá 1/3 khoảng cách vạch đo. Làm như vậy có thể khiến đồ nấu bên trong bị sôi bùng lên.
Thang đo tương ứng (Tham khảo thang đo tương ứng trên ruột nồi bên trong.)
Mức “Plain”Mức “Plain”Mức “Plain”Mức “Plain”Mức “Plain”
Mức “Sweet”
Giữa mức “Plain” và “Sweet”
Mức “Brown”
Cháo cứng: Mức “Porridge • hard”Cháo mềm: Mức “Porridge • soft”
PlainSynchro-CookingQuickShortMixed
Sweet (gạo nếp)
Sweet (gạo nếp và gạo tẻ)
Brown
Porridge
• Khi nấu gạo không cần vo, hãy sử dụng mức “Plain” làm tham chiếu nhưng hãy thêm một chút nước (cho đến khi nước chỉ vừa đến vạch tương ứng).
• Khi nấu gạo lứt nảy mầm, gạo nguyên hạt hoặc gạo nguyên cám, sử dụng mức “Plain” làm tham chiếu.
• Nếu lượng nước thêm vào được quy định trên bao bì gói chứa gạo lứt nảy mầm hoặc gạo lứt ngũ cốc, hãy tuân thủ theo các hướng dẫn trên bao bì và thêm nước theo sở thích cá nhân của bạn.
• Không mở nắp nồi trong khi nấu để bỏ thêm các thành phần khác.
Loại 1,8 L(10 cốc)
6 cốc5 cốc5 cốc
Loại 1,0 L (5,5 cốc)
3 cốc3 cốc3 cốc
Dành cho Việt Nam
Mẹo để nấu cơm ngon
Nấu gạo không cần vo• Thêm gạo không cần vo và nước vào, sau đó
khuấy đều từ dưới đáy nồi để từng hạt gạo ngập trong nước. Chỉ đổ thêm nước vào gạo để tránh khiến gạo bị trương và có thể khiến cơm không chín.
• Nếu nước đổ vào chuyển màu trắng, chúng tôi khuyên bạn nên vo gạo thật sạch bằng cách thay nước một hoặc hai lần. Nước chuyển sang màu trắng là do tinh bột trong gạo, chứ không phải do cám gạo.
• Tuy nhiên, nấu cơm với gạo còn sót tinh bột trong nước có thể khiến cơm bị cháy, đồ bên trong trào ra khi sôi, hoặc cơm không được nấu chín.
English
Cooking semi-polished rice, whole rice, barley rice, germinated brown rice, or multigrain• Select the “Short” menu.• When cooking porridge, select the “Porridge”
menu.
Cooking brown rice or multigrain brown rice mixed in with white rice• Multigrain brown rice is a mixture of brown rice
and multigrain.• If the rice to be cooked includes more brown rice
or multigrain brown rice than white rice, select the “Brown” menu.
• If there is an equal amount of brown rice or multigrain brown rice and white rice, or there is more white rice than brown rice or multigrain brown rice, select the “Plain” menu. (See P.11.)(Soak the brown rice separately for 1 to 2 hours before cooking.)
Cooking multigrain together with white rice• The amount of multigrain should be less than
20% of the volume of the white rice.• The maximum acceptable amount for the
combination of white rice and multigrain is 4 cups for the 1.0 L type and 8 cups for the 1.8 L type.
• Place the multigrain on top of the white rice. Mixing them together may result in improperly cooked food.
• If the multigrain is too hard, soak it separately for approximately 1 hour prior to cooking and then place it on top of the white rice.
• Small grained multigrain, especially amaranth, can expand and stick to the inner lid.
Cooking multigrain together with brown rice• Be sure to select the “Brown” menu.• The maximum acceptable amount for the
combination of brown rice and multigrain is 3.5 cups for the 1.0 L type and 6 cups for the 1.8 L type.
Cooking short-grain rice• When cooking short-grain rice, select the “Short”
menu. When cooking seasoned rice with various ingredients using short-grain rice, select the “Mixed” menu. Dark brown crisp rice may be formed when cooking short-grain rice. Selecting any other menu may result in improperly cooked food.
シンガポール向け
Tiếng Việt
55
Nấu gạo nguyên cám, gạo nguyên hạt, gạo lúa mạch, gạo lứt nảy mầm hoặc gạo ngũ cốc• Chọn menu “Short”.
• Khi nấu cháo, hãy chọn menu “Porridge”.
Nấu gạo lứt hoặc gạo lứt ngũ cốc trộn với gạo trắng• Gạo lứt ngũ cốc là hỗn hợp của gạo lức và hạt ngũ
cốc.
• Nếu gạo sẽ nấu bao gồm nhiều gạo lứt hoặc gạo lứt ngũ cốc hơn gạo trắng, hãy sử dụng menu “Brown”.
• Nếu lượng gạo lứt hoặc gạo lứt ngũ cốc và gạo trắng bằng nhau, hoặc lượng gạo trắng nhiều hơn gạo lứt hoặc gạo lứt ngũ cốc, hãy sử dụng menu “Plain”. (Xem Trang 53).
(Cần ngâm riêng gạo lứt trong 1-2 tiếng trước khi nấu.)
Nấu ngũ cốc cùng với gạo trắng• Lượng ngũ cốc phải ít hơn 20% lượng gạo trắng.
• Lượng trộn gạo trắng và ngũ cốc tối đa cho phép là 4 cốc với cốc loại 1,0 L và 8 cốc với cốc loại 1,8 L.
• Đặt ngũ cốc lên trên gạo trắng. Việc trộn chúng lại với nhau có thể khiến thức ăn không chín.
• Nếu bạn cảm thấy ngũ cốc được nấu quá cứng, hãy ngâm riêng ngũ cốc trong khoảng 1 tiếng trước khi nấu và sau đó đặt lên trên gạo trắng.
• Ngũ cốc hạt nhỏ, đặc biệt là hạt dền, có thể nở ra và dính vào nắp nồi bên trong.
Nấu ngũ cốc cùng với gạo lứt• Luôn sử dụng menu “Brown”.
• Lượng trộn gạo lứt và ngũ cốc tối đa cho phép là 3,5 cốc với cốc loại 1,0 L và 6 cốc với cốc loại 1,8 L.
Nấu gạo hạt ngắn• Khi nấu gạo hạt ngắn, hãy chọn menu “Short”. Khi
nấu xôi với nhiều nguyên liệu khác nhau và gạo hạt ngắn, hãy chọn menu “Mixed”. Cháy giòn màu nâu đậm có thể xuất hiện khi nấu gạo hạt ngắn. Việc chọn bất kỳ menu nào khác có thể khiến thức ăn không chín
Dành cho Việt Nam
56
1 Measure the rice.Be sure to use the supplied measuring cup.Filling the supplied measuring cup until it is level provides approximately one cup of rice (approx. 0.18 L).
Tips ● Use the supplied measuring cup for rinse-free rice as well.
Correct measurement Incorrect measurement
Note ● Be sure to use the specified volume of rice (see the specifications table on P.44) to ensure properly cooked rice.If other ingredients are to be added to the rice, see P.12.
2 Rinse the rice. (Rice can be rinsed in the inner pot.)For rinse-free rice, see P.12.
Note ● Do not use hot water (over 35°C) to rinse or cook rice. It may prevent the rice from cooking properly.
● Do not apply too much force while rinsing rice. Doing so may cause the inner pot to be deformed, preventing rice from cooking properly.
3 Adjust the water level.Place the inner pot on a level surface and adjust the water level to the appropriate line of the corresponding scale on the inside of the pot.
Tips ● Check the type of rice and the menu and adjust the water level to your personal preference. (See the guidelines on P.12.)
When cooking 3 cups of white rice, adjust the water level to line “3” on the “Plain” scale.
4 Wipe any water and rice, etc. off the inner pot.Outside and brim of the inner pot
Inside the rice cooker
Inner lid gasket
Upper casingHook catch
Center sensor
Heater plate Inner lid
Inner lid button
3 Before Cooking Rice
シンガポール向け
Trước khi nấu cơm
Lưu ý
Lưu ý
Đong gạo.Luôn dùng cốc đong gạo được cung cấp kèm theo nồi cơm điện. Mỗi vạch đong gạo trên cốc đong gạo cung cấp kèm theo tương đương khoảng 1 cốc gạo (khoảng 0,18 L).
Điều chỉnh mực nước.Đặt ruột nồi bên trong lên một mặt phẳng cân bằng và điều chỉnh lượng nước theo vạch chia tương ứng ở bên trong ruột nồi.
Mẹo Mẹo
● Chọn loại gạo, menu nấu và điều chỉnh mực nước theo sở thích cá nhân của bạn. (Xem hướng dẫn trên Trang 54.)
Khi nấu 3 cốc gạo trắng, hãy điều chỉnh
mực nước đến vạch “3” trên mức “Plain”.
● Cũng sử dụng cốc đong gạo cung cấp kèm theo cho gạo không cần vo.
Đong gạo chính xác Đong gạo không chính xác
Lau sạch hết nước và gạo, v.v. ruột nồi bên trong.Mặt ngoài và vành của ruột nồi bên trong
Vo gạo (Có thể vo gạo trong ruột nồi.) Đối với gạo không cần vo, xem Trang 54.
Bên trong nồi cơm điện
Ron cao su nắp trongNút nắp trong
Mâm nhiệt
Nút gài
Nắp trong
Khung trên
Cảm biến trung tâm
● Không sử dụng nước nóng (trên 35°C) để vo gạo hoặc nấu cơm vì như vậy có thể khiến cơm không chín.
● Không dùng lực quá mạnh khi vo gạo. Làm như vậy có thể khiến ruột nồi bên trong bị biến dạng và cơm không chín.
Luôn sử dụng lượng gạo theo quy định (xem Bảng “Thông số Kỹ thuật” ở Trang 86) để đảm bảo nấu cơm đúng cách.
Nếu các nguyên liệu khác được thêm vào gạo, xem Trang 54.
Dành cho Việt Nam
57
English
Caution ● Be sure to remove any cooked rice or grains of rice on and around the heater plate, center sensor, lid sensor, upper casing, and hook catch. (See P.33.)Any rice that is not removed can prevent the lid from closing, allow steam to leak out during cooking, or enable the lid to open and the contents to spray out, resulting in burns or injury.
5 Place the inner pot inside the rice cooker and close the lid.(1) Turn the inner pot slightly left and right so
it is positioned correctly without any tilt.(2) Close the lid.
(1) Set the inner pot in the rice cooker.
(2) Close the lid.
Inner pot
Make sure that the inner lid is placed.
Note ● Make sure to set the inner pot securely into the rice cooker.
● Be careful not to touch any operation key when closing the lid.
6 Connect the power cord.
Appliance plug
(1) Insert the plug.
(2) Insert the plug.
Power plug
The power turns on and the symbol blinks.
Blinks
Note ● If the Keep Warm lamp is lit, press the [Keep Warm/Cancel] key to turn off the lamp.
On Off
シンガポール向け
Tiếng Việt
Thận trọng
Lưu ý
Lưu ý
Nhấp nháy
Bật Tắt
Hãy chắc chắn đã vét hết toàn bộ cơm cũ hoặc hạt gạo dính trên và xung quanh mâm nhiệt, cảm biến trung tâm, cảm biến nắp nồi, khung trên và nút gài. (Xem Trang 75)
Hạt cơm chưa được lấy ra có thể gây cản trở cho việc đóng nắp, khiến hơi nước bị rò rỉ ra ngoài trong khi nấu, hoặc nắp nồi bị bung ra khiến đồ nấu bên trong bị bắn ra ngoài, dẫn đến bỏng hoặc các thương tích khác.
Kết nối dây điện.
(1) Ổ cắm thiết bị
(2) Ổ cắm điện
Nguồn sẽ bật và biểu tượng sẽ nhấp nháy.
Chuôi cắm thiết bị
Phích cắm
Nếu đèn Giữ ấm (WARM) đang sáng, hãy nhấn nút [Keep Warm/Cancel] để tắt đèn.
Hãy cẩn thận không chạm vào bất kỳ phím thao tác nào khi đóng nắp.
Đảm bảo đặt ruột nồi vào đúng vị trí trong nồi cơm điện.
Đặt ruột nồi vào nồi cơm điện.
Ruột nồi bên trong
Đảm bảo nắp trong được đặt đúng vị trí
(2) Đóng nắp
Đặt ruột nồi vào trong nồi cơm điện và đóng nắp.(1) Xoay ruột nồi bên trong hơi chếch sang trái
và phải để đặt nồi vào đúng vị trí mà không bị nghiêng.
(2) Đóng nắp.
Dành cho Việt Nam
Phích cắm điện
Nhấp nháy
58
4 1
Nhấp
•
Note ●
2
3
Bật
Tắt
シンガポール向け
Cách nấu cơm
Nhấn nút [Menu] để chọn menu
Nếu bạn chọn menu “Porridge”, hãy sử dụng các nút [Hour] và [Min] để cài đặt thời gian nấu mong muốn.
Nhấn nút [Start].Đèn Khởi động sẽ bật sáng. Quá trình nấu sẽ bắt đầu.
Nồi cơm điện sẽ phát ra tiếng bíp một ngắn, một dài khi menu “Plain” được chọn và một tiếng bíp dài khi các menu khác được chọn.
Không cần nhấn nút [Menu] nếu menu mong muốn đã được chọn.
Lưu ý
Khi menu “Quick” được chọn, thời gian nấu sẽ ngắn hơn và hạt cơm sẽ hơi cứng so với khi được nấu với menu “Plain”.
• Mỗi lần nhấn nút [Hour], thì thời gian cài đặt sẽ tăng 5 phút. Mỗi lần nhấn nút [Min], thì thời gian cài đặt sẽ giảm 5 phút.
• Thời gian nấu có thể được cài đặt để tăng thêm cứ 5 phút trong khoảng từ 40 đến 90 phút.
• Cài đặt mặc định là 60 phút. Hãy điều chỉnh thời gian như mong muốn.
Dành cho Việt Nam
Bật
Tăng 5 phút Giảm 5 phút
Mỗi lần nhấn nút [Menu], thì menu được chọn sẽ thay đổi theo thứ tự hiển thị dưới đây.
Biểu tượng sẽ nhấp nháy khi menu đang được chọn
mong muốn.
Nhấp nháy
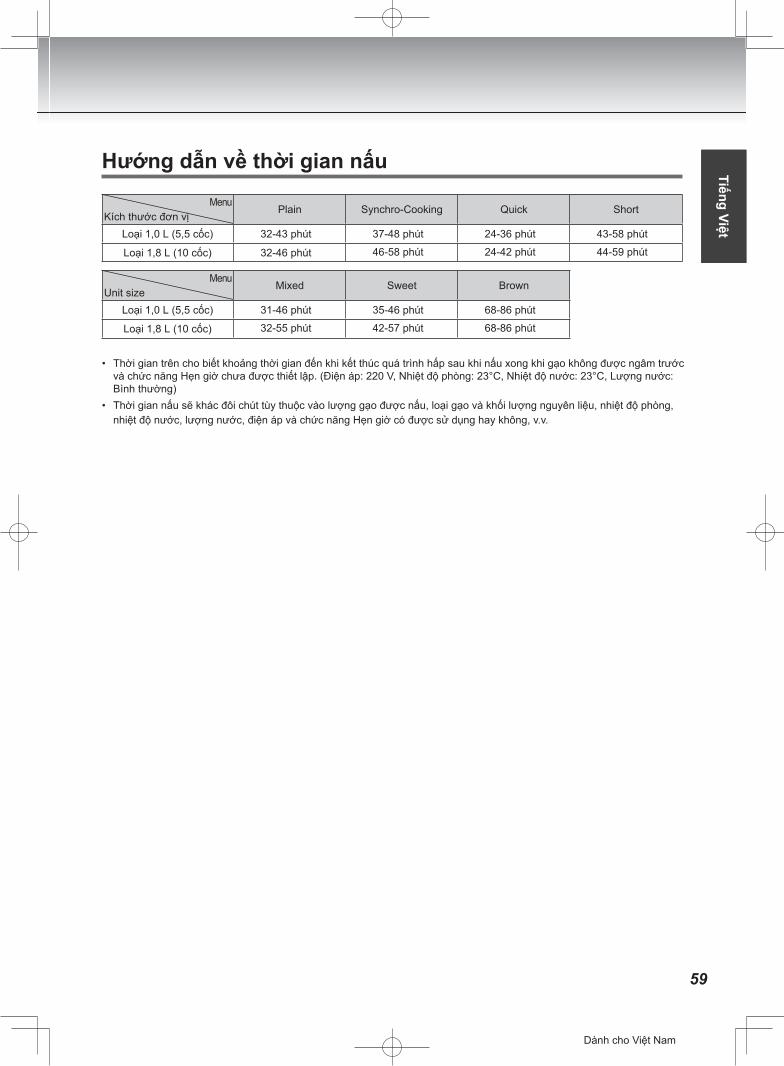
59
English
Hướng dẫn về thời gian nấuMenu
Kích thước đơn vịPlain Synchro-Cooking Quick Short
Loại 1,0 L (5,5 cốc) 32-43 phút 37-48 phút46-58 phút
24-36 phút24-42 phút
43-58 phút44-59 phútLoại 1,8 L (10 cốc) 32-46 phút
MenuUnit size
Mixed Sweet Brown
Loại 1,0 L (5,5 cốc) 31-46 phút32-55 phút
35-46 phút42-57 phút
68-86 phút68-86 phútLoại 1,8 L (10 cốc)
シンガポール向け
Tiếng Việt
• Thời gian trên cho biết khoảng thời gian đến khi kết thúc quá trình hấp sau khi nấu xong khi gạo không được ngâm trước và chức năng Hẹn giờ chưa được thiết lập. (Điện áp: 220 V, Nhiệt độ phòng: 23°C, Nhiệt độ nước: 23°C, Lượng nước: Bình thường)
• Thời gian nấu sẽ khác đôi chút tùy thuộc vào lượng gạo được nấu, loại gạo và khối lượng nguyên liệu, nhiệt độ phòng, nhiệt độ nước, lượng nước, điện áp và chức năng Hẹn giờ có được sử dụng hay không, v.v.
Dành cho Việt Nam
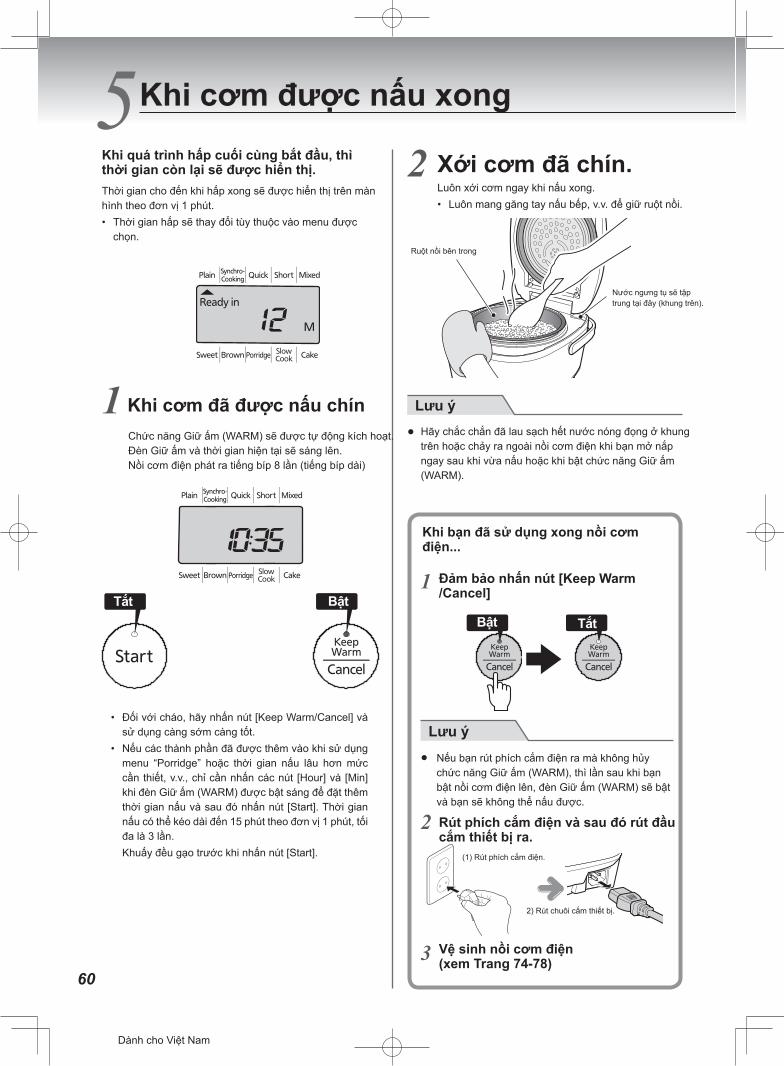
60
5
1
Bật
2
Lưu ý ●
1
BậtTắt
Tắt
Lưu ý ●
2
3
Khi cơm được nấu xong
シンガポール向け
Khi quá trình hấp cuối cùng bắt đầu, thì thời gian còn lại sẽ được hiển thị.Thời gian cho đến khi hấp xong sẽ được hiển thị trên màn hình theo đơn vị 1 phút.• Thời gian hấp sẽ thay đổi tùy thuộc vào menu được
chọn.
Xới cơm đã chín.
Khi cơm đã được nấu chín
Luôn xới cơm ngay khi nấu xong.• Luôn mang găng tay nấu bếp, v.v. để giữ ruột nồi.
Ruột nồi bên trong
Nước ngưng tụ sẽ tập trung tại đây (khung trên).
Hãy chắc chắn đã lau sạch hết nước nóng đọng ở khung trên hoặc chảy ra ngoài nồi cơm điện khi bạn mở nắp ngay sau khi vừa nấu hoặc khi bật chức năng Giữ ấm (WARM).
Nếu bạn rút phích cắm điện ra mà không hủy chức năng Giữ ấm (WARM), thì lần sau khi bạn bật nồi cơm điện lên, đèn Giữ ấm (WARM) sẽ bật và bạn sẽ không thể nấu được.
(1) Rút phích cắm điện.
(2) Rút chuôi cắm thiết bị.
Chức năng Giữ ấm (WARM) sẽ được tự động kích hoạt.Đèn Giữ ấm và thời gian hiện tại sẽ sáng lên.Nồi cơm điện phát ra tiếng bíp 8 lần (tiếng bíp dài)
• Đối với cháo, hãy nhấn nút [Keep Warm/Cancel] và sử dụng càng sớm càng tốt.
• Nếu các thành phần đã được thêm vào khi sử dụng menu “Porridge” hoặc thời gian nấu lâu hơn mức cần thiết, v.v., chỉ cần nhấn các nút [Hour] và [Min] khi đèn Giữ ấm (WARM) được bật sáng để đặt thêm thời gian nấu và sau đó nhấn nút [Start]. Thời gian nấu có thể kéo dài đến 15 phút theo đơn vị 1 phút, tối đa là 3 lần.
Khuấy đều gạo trước khi nhấn nút [Start].
Khi bạn đã sử dụng xong nồi cơm điện...
Đảm bảo nhấn nút [Keep Warm /Cancel]
Rút phích cắm điện và sau đó rút đầu cắm thiết bị ra.
Vệ sinh nồi cơm điện (xem Trang 74-78)
Dành cho Việt Nam
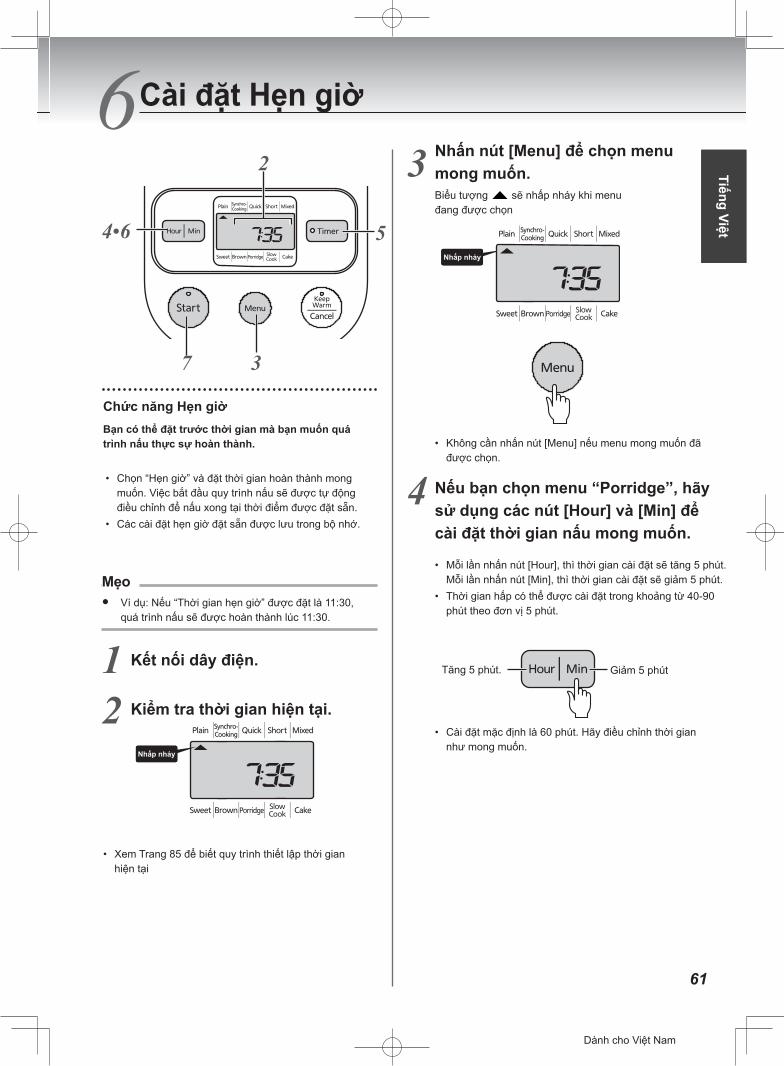
61
6 2
4•6 5
37
Mẹo●
1 2
Nhấp
3
Nhấp
4
Tăng 5 phút. Giảm 5 phút
Cài đặt Hẹn giờ
シンガポール向け
Biểu tượng sẽ nhấp nháy khi menu đang được chọn
Tiếng Việt
Kiểm tra thời gian hiện tại.
Kết nối dây điện.
Nếu bạn chọn menu “Porridge”, hãy sử dụng các nút [Hour] và [Min] để cài đặt thời gian nấu mong muốn.
• Không cần nhấn nút [Menu] nếu menu mong muốn đã được chọn.
Chức năng Hẹn giờBạn có thể đặt trước thời gian mà bạn muốn quá trình nấu thực sự hoàn thành.
• Chọn “Hẹn giờ” và đặt thời gian hoàn thành mong muốn. Việc bắt đầu quy trình nấu sẽ được tự động điều chỉnh để nấu xong tại thời điểm được đặt sẵn.
• Các cài đặt hẹn giờ đặt sẵn được lưu trong bộ nhớ.
Ví dụ: Nếu “Thời gian hẹn giờ” được đặt là 11:30, quá trình nấu sẽ được hoàn thành lúc 11:30.
• Mỗi lần nhấn nút [Hour], thì thời gian cài đặt sẽ tăng 5 phút. Mỗi lần nhấn nút [Min], thì thời gian cài đặt sẽ giảm 5 phút.
• Thời gian hấp có thể được cài đặt trong khoảng từ 40-90 phút theo đơn vị 5 phút.
• Cài đặt mặc định là 60 phút. Hãy điều chỉnh thời gian như mong muốn.
• Xem Trang 85 để biết quy trình thiết lập thời gian hiện tại
Dành cho Việt Nam
Nhấn nút [Menu] để chọn menu mong muốn.Biểu tượng sẽ nhấp nháy khi menu đang được chọn
Nhấp nháy
Nhấp nháy
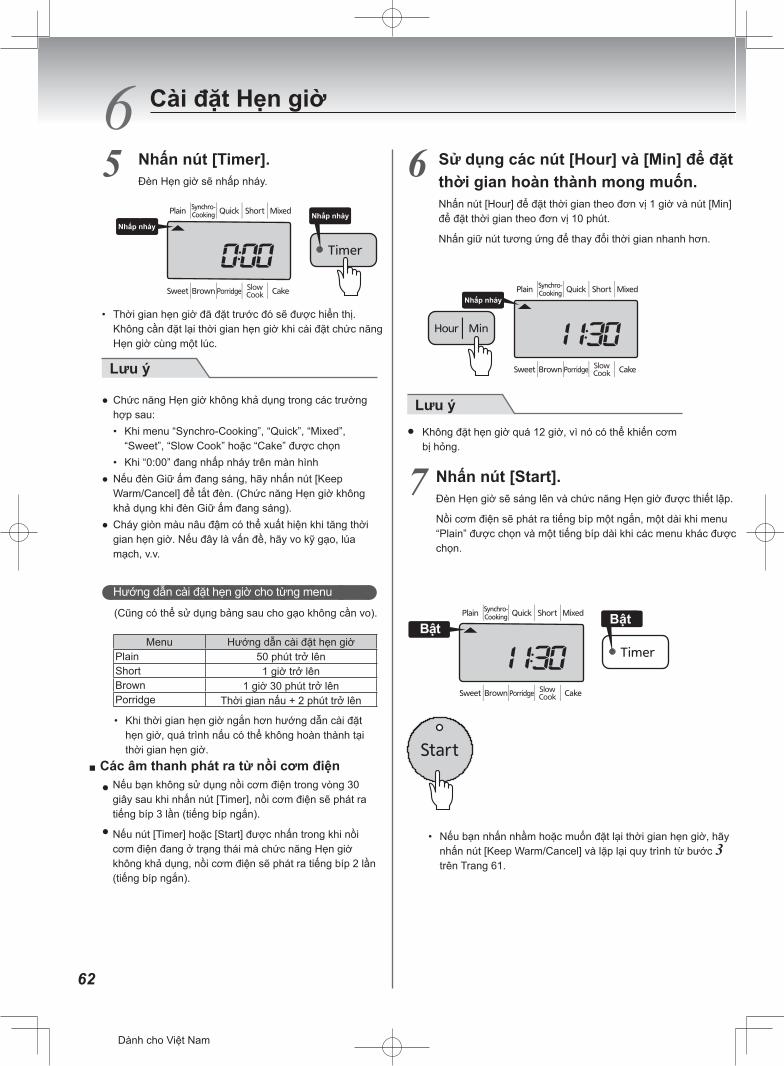
62
6 Cài đặt Hẹn giờ
5 Nhấp
Nhấp
Lưu ý
Hướng dẫn cài đặt hẹn giờ cho từng menu
Menu Hướng dẫn cài đặt hẹn giờ50 phút trở lên1 giờ trở lên
1 giờ 30 phút trở lênThời gian nấu + 2 phút trở lên
PlainShortBrownPorridge
●
●
6
Nhấp
Lưu ý ●
7
BậtTắt
シンガポール向け
Nhấn nút [Timer].Đèn Hẹn giờ sẽ nhấp nháy.
Sử dụng các nút [Hour] và [Min] để đặt thời gian hoàn thành mong muốn.Nhấn nút [Hour] để đặt thời gian theo đơn vị 1 giờ và nút [Min] để đặt thời gian theo đơn vị 10 phút.
Nhấn giữ nút tương ứng để thay đổi thời gian nhanh hơn.
Nhấn nút [Start].Đèn Hẹn giờ sẽ sáng lên và chức năng Hẹn giờ được thiết lập.
Nồi cơm điện sẽ phát ra tiếng bíp một ngắn, một dài khi menu “Plain” được chọn và một tiếng bíp dài khi các menu khác được chọn.
• Thời gian hẹn giờ đã đặt trước đó sẽ được hiển thị. Không cần đặt lại thời gian hẹn giờ khi cài đặt chức năng Hẹn giờ cùng một lúc.
Không đặt hẹn giờ quá 12 giờ, vì nó có thể khiến cơm bị hỏng.
● Chức năng Hẹn giờ không khả dụng trong các trường hợp sau:• Khi menu “Synchro-Cooking”, “Quick”, “Mixed”,
“Sweet”, “Slow Cook” hoặc “Cake” được chọn• Khi “0:00” đang nhấp nháy trên màn hình
● Nếu đèn Giữ ấm đang sáng, hãy nhấn nút [Keep Warm/Cancel] để tắt đèn. (Chức năng Hẹn giờ không khả dụng khi đèn Giữ ấm đang sáng).
● Cháy giòn màu nâu đậm có thể xuất hiện khi tăng thời gian hẹn giờ. Nếu đây là vấn đề, hãy vo kỹ gạo, lúa mạch, v.v.
(Cũng có thể sử dụng bảng sau cho gạo không cần vo).
• Khi thời gian hẹn giờ ngắn hơn hướng dẫn cài đặt hẹn giờ, quá trình nấu có thể không hoàn thành tại thời gian hẹn giờ.
Các âm thanh phát ra từ nồi cơm điệnNếu bạn không sử dụng nồi cơm điện trong vòng 30 giây sau khi nhấn nút [Timer], nồi cơm điện sẽ phát ra tiếng bíp 3 lần (tiếng bíp ngắn).
Nếu nút [Timer] hoặc [Start] được nhấn trong khi nồi cơm điện đang ở trạng thái mà chức năng Hẹn giờ không khả dụng, nồi cơm điện sẽ phát ra tiếng bíp 2 lần (tiếng bíp ngắn).
• Nếu bạn nhấn nhầm hoặc muốn đặt lại thời gian hẹn giờ, hãy nhấn nút [Keep Warm/Cancel] và lặp lại quy trình từ bước 3 trên Trang 61.
Bật
Dành cho Việt Nam
Nhấp nháyNhấp nháy
Nhấp nháy
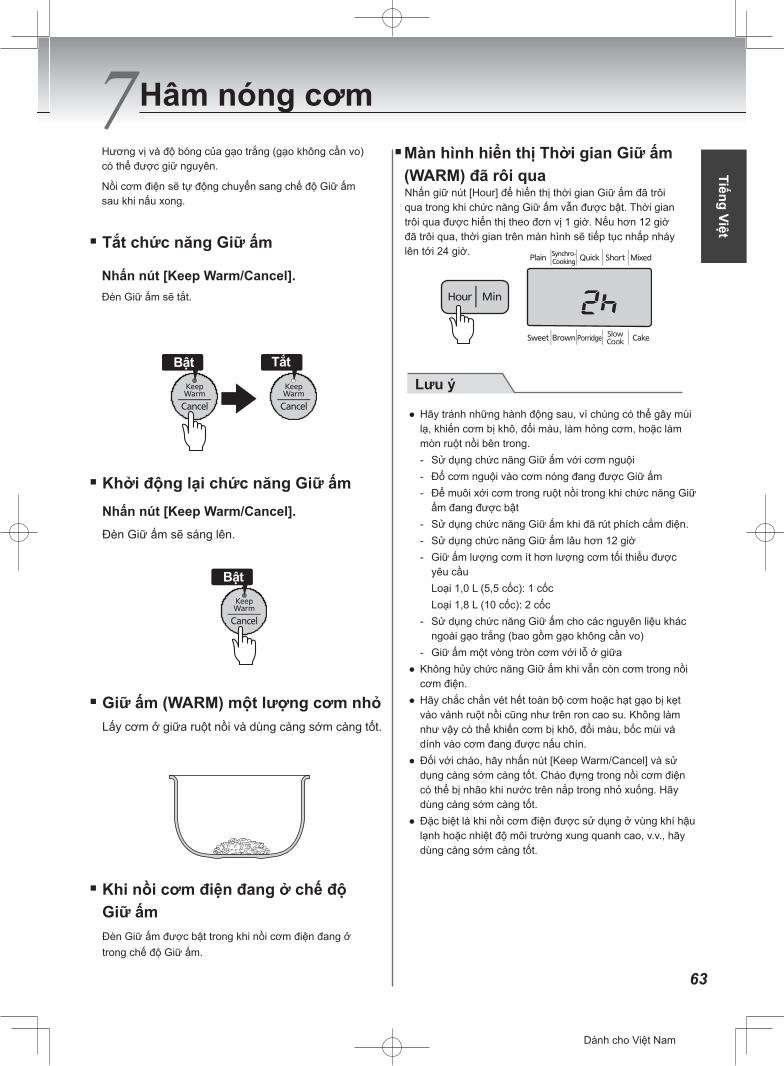
63
English
7
Bật Tắt
Bật
Lưu ý
Hâm nóng cơm
シンガポール向け
Tiếng Việt
Tắt chức năng Giữ ấm
Khi nồi cơm điện đang ở chế độ Giữ ấm Đèn Giữ ấm được bật trong khi nồi cơm điện đang ở trong chế độ Giữ ấm.
Giữ ấm (WARM) một lượng cơm nhỏLấy cơm ở giữa ruột nồi và dùng càng sớm càng tốt.
Khởi động lại chức năng Giữ ấmNhấn nút [Keep Warm/Cancel].Đèn Giữ ấm sẽ sáng lên.
Màn hình hiển thị Thời gian Giữ ấm (WARM) đã rôi qua
Hương vị và độ bóng của gạo trắng (gạo không cần vo) có thể được giữ nguyên.
Nồi cơm điện sẽ tự động chuyển sang chế độ Giữ ấm sau khi nấu xong.
Nhấn nút [Keep Warm/Cancel].Đèn Giữ ấm sẽ tắt.
Nhấn giữ nút [Hour] để hiển thị thời gian Giữ ấm đã trôi qua trong khi chức năng Giữ ấm vẫn được bật. Thời gian trôi qua được hiển thị theo đơn vị 1 giờ. Nếu hơn 12 giờ đã trôi qua, thời gian trên màn hình sẽ tiếp tục nhấp nháy lên tới 24 giờ.
● Hãy tránh những hành động sau, vì chúng có thể gây mùi lạ, khiến cơm bị khô, đổi màu, làm hỏng cơm, hoặc làm mòn ruột nồi bên trong.- Sử dụng chức năng Giữ ấm với cơm nguội- Đổ cơm nguội vào cơm nóng đang được Giữ ấm- Để muôi xới cơm trong ruột nồi trong khi chức năng Giữ
ấm đang được bật- Sử dụng chức năng Giữ ấm khi đã rút phích cắm điện.- Sử dụng chức năng Giữ ấm lâu hơn 12 giờ- Giữ ấm lượng cơm ít hơn lượng cơm tối thiểu được
yêu cầu Loại 1,0 L (5,5 cốc): 1 cốc Loại 1,8 L (10 cốc): 2 cốc- Sử dụng chức năng Giữ ấm cho các nguyên liệu khác
ngoài gạo trắng (bao gồm gạo không cần vo)- Giữ ấm một vòng tròn cơm với lỗ ở giữa
● Không hủy chức năng Giữ ấm khi vẫn còn cơm trong nồi cơm điện.
● Hãy chắc chắn vét hết toàn bộ cơm hoặc hạt gạo bị kẹt vào vành ruột nồi cũng như trên ron cao su. Không làm như vậy có thể khiến cơm bị khô, đổi màu, bốc mùi và dính vào cơm đang được nấu chín.
● Đối với cháo, hãy nhấn nút [Keep Warm/Cancel] và sử dụng càng sớm càng tốt. Cháo đựng trong nồi cơm điện có thể bị nhão khi nước trên nắp trong nhỏ xuống. Hãy dùng càng sớm càng tốt.
● Đặc biệt là khi nồi cơm điện được sử dụng ở vùng khí hậu lạnh hoặc nhiệt độ môi trường xung quanh cao, v.v., hãy dùng càng sớm càng tốt.
Dành cho Việt Nam
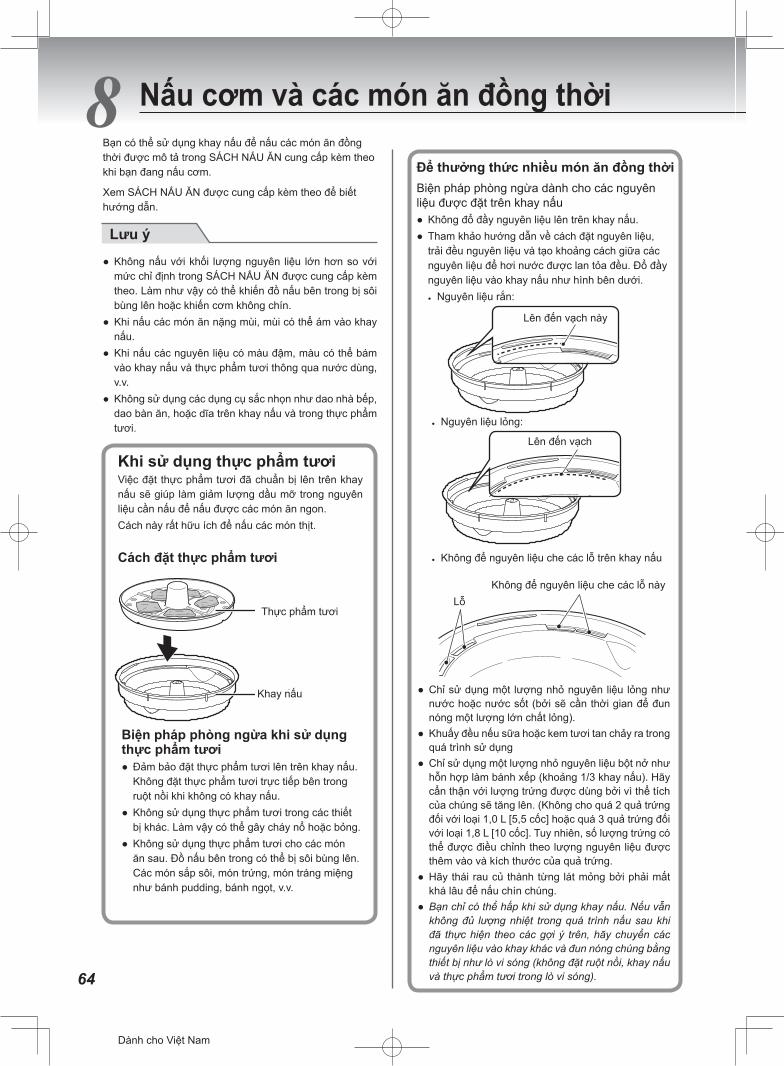
64
Lưu ý
Lên đến vạch này
Lên đến vạch
Nấu cơm và các món ăn đồng thời
シンガポール向け
Không để nguyên liệu che các lỗ này
Thực phẩm tươi
Đĩa nấu
Lỗ
8Bạn có thể sử dụng khay nấu để nấu các món ăn đồng thời được mô tả trong SÁCH NẤU ĂN cung cấp kèm theo khi bạn đang nấu cơm.
Xem SÁCH NẤU ĂN được cung cấp kèm theo để biết hướng dẫn.
Để thưởng thức nhiều món ăn đồng thờiBiện pháp phòng ngừa dành cho các nguyên liệu được đặt trên khay nấu● Không đổ đầy nguyên liệu lên trên khay nấu.● Tham khảo hướng dẫn về cách đặt nguyên liệu,
trải đều nguyên liệu và tạo khoảng cách giữa các nguyên liệu để hơi nước được lan tỏa đều. Đổ đầy nguyên liệu vào khay nấu như hình bên dưới.
● Nguyên liệu rắn:
● Không nấu với khối lượng nguyên liệu lớn hơn so với mức chỉ định trong SÁCH NẤU ĂN được cung cấp kèm theo. Làm như vậy có thể khiến đồ nấu bên trong bị sôi bùng lên hoặc khiến cơm không chín.
● Khi nấu các món ăn nặng mùi, mùi có thể ám vào khay nấu.
● Khi nấu các nguyên liệu có màu đậm, màu có thể bám vào khay nấu và thực phẩm tươi thông qua nước dùng, v.v.
● Không sử dụng các dụng cụ sắc nhọn như dao nhà bếp, dao bàn ăn, hoặc dĩa trên khay nấu và trong thực phẩm tươi. ● Nguyên liệu lỏng:
● Không để nguyên liệu che các lỗ trên khay nấu
Khay nấu
Khi sử dụng thực phẩm tươiViệc đặt thực phẩm tươi đã chuẩn bị lên trên khay nấu sẽ giúp làm giảm lượng dầu mỡ trong nguyên liệu cần nấu để nấu được các món ăn ngon.Cách này rất hữu ích để nấu các món thịt.
Cách đặt thực phẩm tươi
Biện pháp phòng ngừa khi sử dụng thực phẩm tươi● Đảm bảo đặt thực phẩm tươi lên trên khay nấu.
Không đặt thực phẩm tươi trực tiếp bên trong ruột nồi khi không có khay nấu.
● Không sử dụng thực phẩm tươi trong các thiết bị khác. Làm vậy có thể gây cháy nổ hoặc bỏng.
● Không sử dụng thực phẩm tươi cho các món ăn sau. Đồ nấu bên trong có thể bị sôi bùng lên. Các món sắp sôi, món trứng, món tráng miệng như bánh pudding, bánh ngọt, v.v.
● Chỉ sử dụng một lượng nhỏ nguyên liệu lỏng như nước hoặc nước sốt (bởi sẽ cần thời gian để đun nóng một lượng lớn chất lỏng).
● Khuấy đều nếu sữa hoặc kem tươi tan chảy ra trong quá trình sử dụng
● Chỉ sử dụng một lượng nhỏ nguyên liệu bột nở như hỗn hợp làm bánh xếp (khoảng 1/3 khay nấu). Hãy cẩn thận với lượng trứng được dùng bởi vì thể tích của chúng sẽ tăng lên. (Không cho quá 2 quả trứng đối với loại 1,0 L [5,5 cốc] hoặc quá 3 quả trứng đối với loại 1,8 L [10 cốc]. Tuy nhiên, số lượng trứng có thể được điều chỉnh theo lượng nguyên liệu được thêm vào và kích thước của quả trứng.
● Hãy thái rau củ thành từng lát mỏng bởi phải mất khá lâu để nấu chín chúng.
● Bạn chỉ có thể hấp khi sử dụng khay nấu. Nếu vẫn không đủ lượng nhiệt trong quá trình nấu sau khi đã thực hiện theo các gợi ý trên, hãy chuyển các nguyên liệu vào khay khác và đun nóng chúng bằng thiết bị như lò vi sóng (không đặt ruột nồi, khay nấu và thực phẩm tươi trong lò vi sóng).
Dành cho Việt Nam
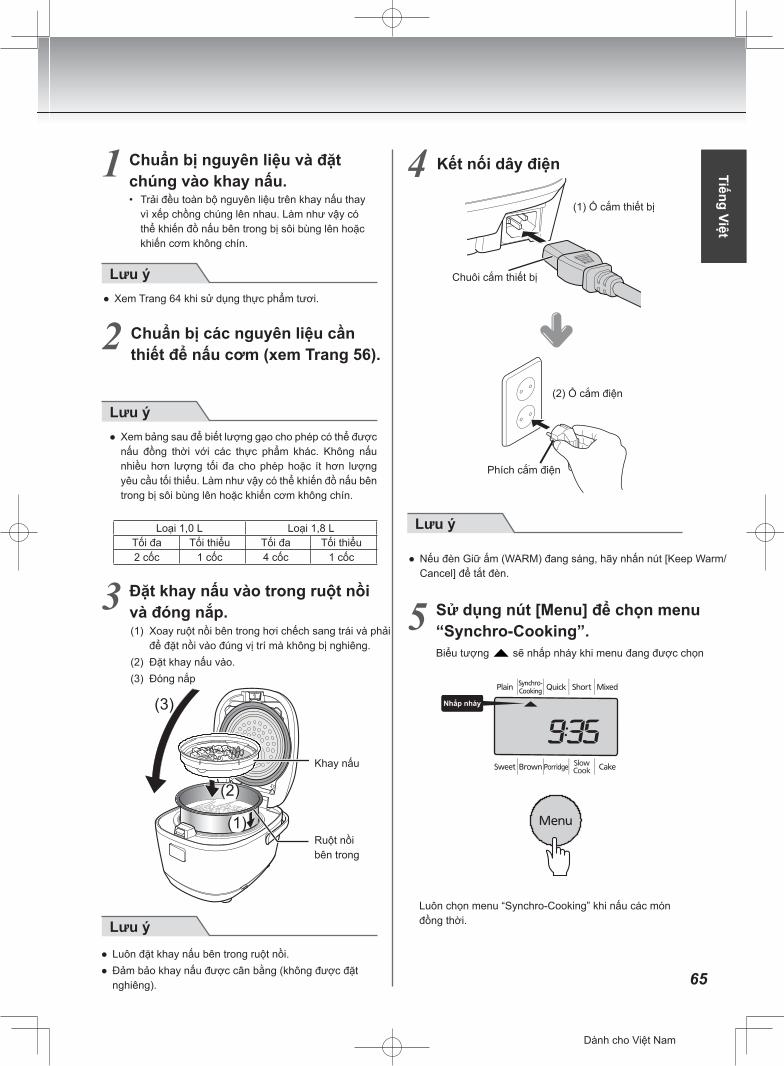
65
English
1
Lưu ý
2
Lưu ý
Loại 1,0 L Loại 1,8 LTối đa2 cốc
Tối thiểu1 cốc
Tối đa4 cốc
Tối thiểu1 cốc
3
(2)
(3)
(1)
Lưu ý
4
(2) Cắm phích
Phích cắm
Lưu ý
5
Nhấp
シンガポール向け
Biểu tượng sẽ nhấp nháy khi menu đang được chọn.
Tiếng Việt
Chuẩn bị nguyên liệu và đặt chúng vào khay nấu.• Trải đều toàn bộ nguyên liệu trên khay nấu thay
vì xếp chồng chúng lên nhau. Làm như vậy có thể khiến đồ nấu bên trong bị sôi bùng lên hoặc khiến cơm không chín.
Kết nối dây điện
Sử dụng nút [Menu] để chọn menu “Synchro-Cooking”.
Đặt khay nấu vào trong ruột nồi và đóng nắp.
● Xem Trang 64 khi sử dụng thực phẩm tươi.
Chuẩn bị các nguyên liệu cần thiết để nấu cơm (xem Trang 56).
● Xem bảng sau để biết lượng gạo cho phép có thể được nấu đồng thời với các thực phẩm khác. Không nấu nhiều hơn lượng tối đa cho phép hoặc ít hơn lượng yêu cầu tối thiểu. Làm như vậy có thể khiến đồ nấu bên trong bị sôi bùng lên hoặc khiến cơm không chín.
(1) Ổ cắm thiết bị
Chuôi cắm thiết bị
● Nếu đèn Giữ ấm (WARM) đang sáng, hãy nhấn nút [Keep Warm/Cancel] để tắt đèn.
(1) Xoay ruột nồi bên trong hơi chếch sang trái và phải để đặt nồi vào đúng vị trí mà không bị nghiêng.
(2) Đặt khay nấu vào.(3) Đóng nắp
Luôn chọn menu “Synchro-Cooking” khi nấu các món đồng thời.
● Luôn đặt khay nấu bên trong ruột nồi.● Đảm bảo khay nấu được cân bằng (không được đặt
nghiêng).
Khay nấu
Ruột nồi bên trong
Dành cho Việt Nam
(2) Ổ cắm điện
Biểu tượng sẽ nhấp nháy khi menu đang được chọn
Phích cắm điện
Nhấp nháy

66
8 Nấu cơm và các món ăn đồng thời
6 Nhấn nút [Start].Đèn Khởi động sáng lên và bắt đầu nấu đồng thời
On
On
Lưu ý ● Do not open the lid during cooking. Doing so may prevent the food from cooking properly.
7 Once cooking is completed, the rice cooker beeps 8 times (long beeps).The Keep Warm lamp lights up.
BậtTắt
8 Lấy đĩa nấu ra và xới đều cơm.
Lưu ý
9
Nấu ăn mà không nấu cơm
シンガポール向け
Quá trình nấu ăn có thể được thực hiện bằng cách đổ thêm nước vào ruột nồi.
Xem “Hấp thức ăn” (Trang 69-70)
Bật
Bật
Lấy khay nấu ra và xới đều cơm.
Dành cho Việt Nam
● Không để khay nấu trong nồi cơm điện khi chức năng Giữ ấm (WARM) đang được bật.
● Cẩn thận khi tháo khay nấu sau khi nấu, vì nó đang nóng.
● Không nghiêng khay nấu trong khi lấy ra. Không để phần lồi ở chính giữa.
Nước cơm, v.v., có thể trào ra ngoài và gây bỏng.
● Không đặt lại khay nấu vào ruột nồi sau khi lấy ra.
Làm như vậy có thể khiến cơm bị hỏng hoặc không Giữ ấm (WARM) được.
● Khi nấu với các thành phần tiết ra nhiều chất lỏng, dầu hoặc mỡ khi đun nóng hoặc nở ra trong quá trình hâm nóng, chẳng hạn như trứng và các loại thực phẩm tương tự, một phần nước dùng có thể tràn vào cơm.
Hãy sử dụng muôi, v.v. để múc thức ăn chín vào khay khi nấu bằng thực phẩm tươi. Cẩn thận không để tràn dầu mỡ, v.v. bị lắng ở đáy khay thực phẩm tươi.
9
Sau khi nấu xong, nồi cơm điện sẽ phát ra tiếng bíp 8 lần (tiếng bíp dài).Đèn Giữ ấm (WARM) sẽ sáng lên
● Không mở nắp trong khi nấu. Làm như vậy có thể khiến thực phẩm không chín.
7
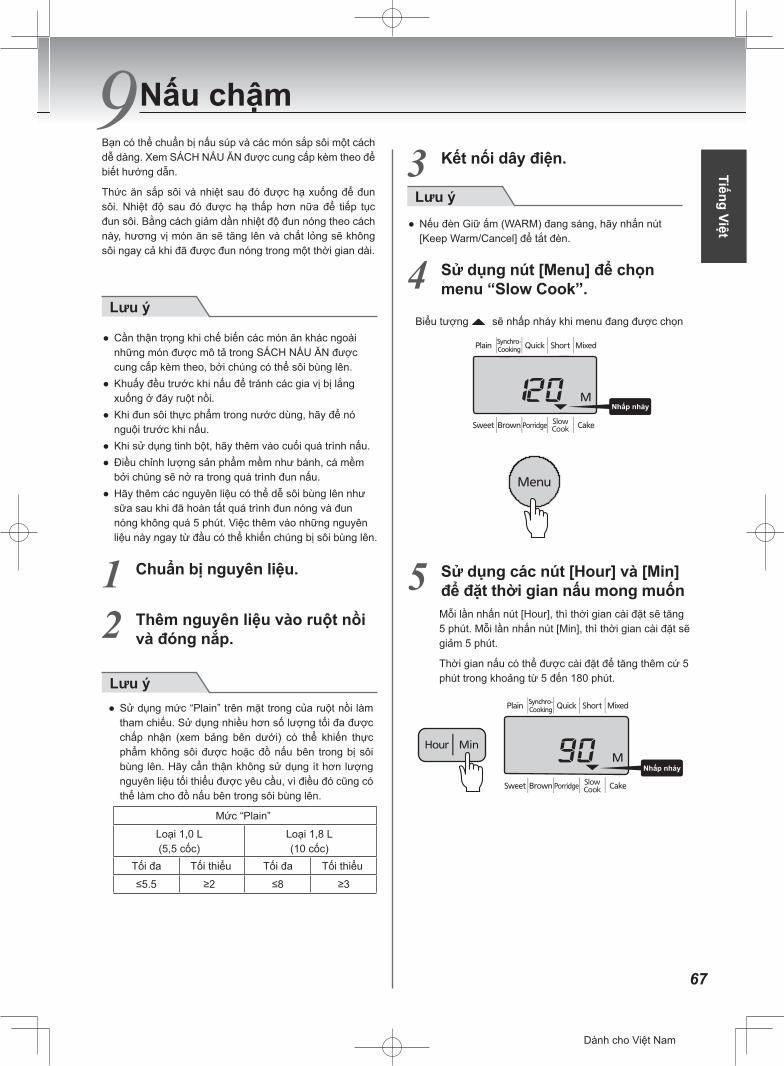
67
English
9
Lưu ý
1 Chuẩn bị nguyên liệu.
2 Thêm nguyên liệu vào ruột nồi và đóng nắp.
Lưu ý
Mức “Plain”
Loại 1,0 L(5,5 cốc)
Loại 1,8 L(10 cốc)
Tối đa Tối thiểu Tối đa Tối thiểu
≤5.5 ≥2 ≤8 ≥3
3 Kết nối dây điện.
Lưu ý
4 Sử dụng nút [Menu] để chọn menu “Slow Cook”.
Blinks
5 Sử dụng các nút [Hour] và [Min] để đặt thời gian nấu mong muốn
Blinks
Nấu chậm
シンガポール向け
Biểu tượng sẽ nhấp nháy khi menu đang được chọn
Tiếng Việt
Bạn có thể chuẩn bị nấu súp và các món sắp sôi một cách dễ dàng. Xem SÁCH NẤU ĂN được cung cấp kèm theo để biết hướng dẫn.
Thức ăn sắp sôi và nhiệt sau đó được hạ xuống để đun sôi. Nhiệt độ sau đó được hạ thấp hơn nữa để tiếp tục đun sôi. Bằng cách giảm dần nhiệt độ đun nóng theo cách này, hương vị món ăn sẽ tăng lên và chất lỏng sẽ không sôi ngay cả khi đã được đun nóng trong một thời gian dài.
● Nếu đèn Giữ ấm (WARM) đang sáng, hãy nhấn nút [Keep Warm/Cancel] để tắt đèn.
● Cần thận trọng khi chế biến các món ăn khác ngoài những món được mô tả trong SÁCH NẤU ĂN được cung cấp kèm theo, bởi chúng có thể sôi bùng lên.
● Khuấy đều trước khi nấu để tránh các gia vị bị lắng xuống ở đáy ruột nồi.
● Khi đun sôi thực phẩm trong nước dùng, hãy để nó nguội trước khi nấu.
● Khi sử dụng tinh bột, hãy thêm vào cuối quá trình nấu.● Điều chỉnh lượng sản phẩm mềm như bánh, cá mềm
bởi chúng sẽ nở ra trong quá trình đun nấu.● Hãy thêm các nguyên liệu có thể dễ sôi bùng lên như
sữa sau khi đã hoàn tất quá trình đun nóng và đun nóng không quá 5 phút. Việc thêm vào những nguyên liệu này ngay từ đầu có thể khiến chúng bị sôi bùng lên.
Mỗi lần nhấn nút [Hour], thì thời gian cài đặt sẽ tăng 5 phút. Mỗi lần nhấn nút [Min], thì thời gian cài đặt sẽ giảm 5 phút.
Thời gian nấu có thể được cài đặt để tăng thêm cứ 5 phút trong khoảng từ 5 đến 180 phút.
● Sử dụng mức “Plain” trên mặt trong của ruột nồi làm tham chiếu. Sử dụng nhiều hơn số lượng tối đa được chấp nhận (xem bảng bên dưới) có thể khiến thực phẩm không sôi được hoặc đồ nấu bên trong bị sôi bùng lên. Hãy cẩn thận không sử dụng ít hơn lượng nguyên liệu tối thiểu được yêu cầu, vì điều đó cũng có thể làm cho đồ nấu bên trong sôi bùng lên.
Dành cho Việt Nam
Nhấp nháy
Nhấp nháy
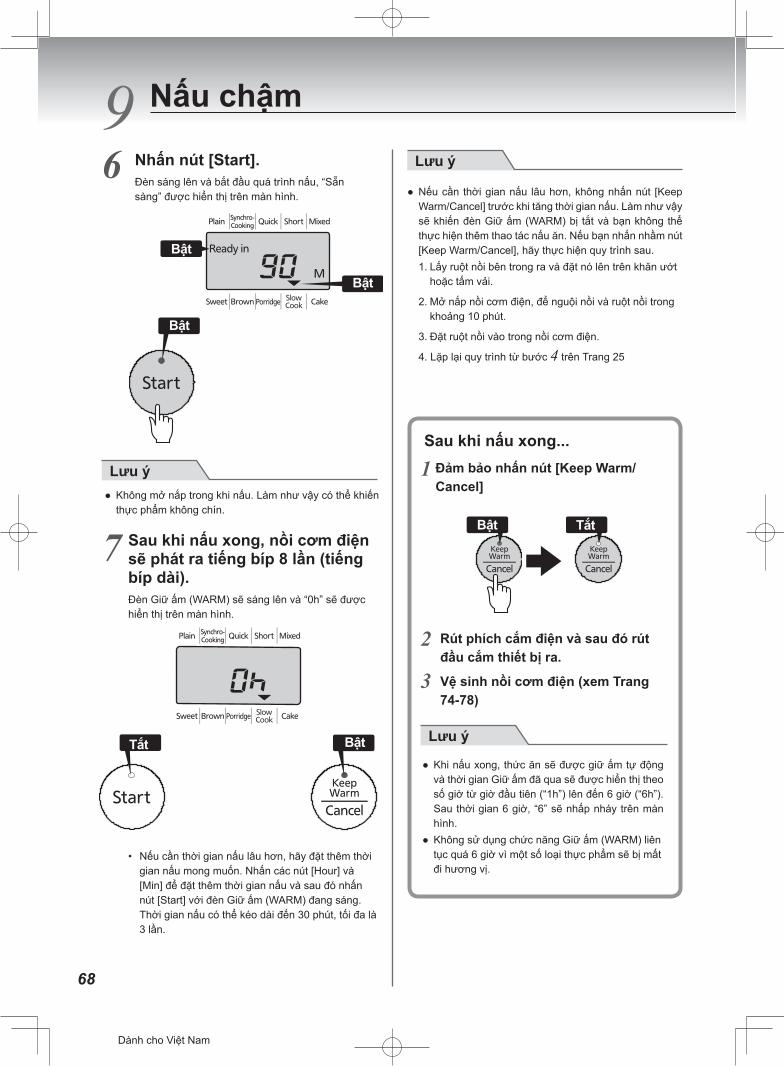
68
9 Nấu chậm
6
Lưu ý
7
BậtTắt
Lưu ý
1
2
3
Lưu ý
シンガポール向け
TắtBật
Bật
Bật
Bật
Nhấn nút [Start].Đèn sáng lên và bắt đầu quá trình nấu, “Sẵn sàng” được hiển thị trên màn hình. ● Nếu cần thời gian nấu lâu hơn, không nhấn nút [Keep
Warm/Cancel] trước khi tăng thời gian nấu. Làm như vậy sẽ khiến đèn Giữ ấm (WARM) bị tắt và bạn không thể thực hiện thêm thao tác nấu ăn. Nếu bạn nhấn nhầm nút [Keep Warm/Cancel], hãy thực hiện quy trình sau.1. Lấy ruột nồi bên trong ra và đặt nó lên trên khăn ướt
hoặc tấm vải.
2. Mở nắp nồi cơm điện, để nguội nồi và ruột nồi trong khoảng 10 phút.
3. Đặt ruột nồi vào trong nồi cơm điện.
4. Lặp lại quy trình từ bước 4 trên Trang 25
Sau khi nấu xong...Đảm bảo nhấn nút [Keep Warm/Cancel]
Rút phích cắm điện và sau đó rút đầu cắm thiết bị ra.
Vệ sinh nồi cơm điện (xem Trang 74-78)
● Không mở nắp trong khi nấu. Làm như vậy có thể khiến thực phẩm không chín.
Sau khi nấu xong, nồi cơm điện sẽ phát ra tiếng bíp 8 lần (tiếng bíp dài).Đèn Giữ ấm (WARM) sẽ sáng lên và “0h” sẽ được hiển thị trên màn hình.
● Khi nấu xong, thức ăn sẽ được giữ ấm tự động và thời gian Giữ ấm đã qua sẽ được hiển thị theo số giờ từ giờ đầu tiên (“1h”) lên đến 6 giờ (“6h”). Sau thời gian 6 giờ, “6” sẽ nhấp nháy trên màn hình.
● Không sử dụng chức năng Giữ ấm (WARM) liên tục quá 6 giờ vì một số loại thực phẩm sẽ bị mất đi hương vị.
• Nếu cần thời gian nấu lâu hơn, hãy đặt thêm thời gian nấu mong muốn. Nhấn các nút [Hour] và [Min] để đặt thêm thời gian nấu và sau đó nhấn nút [Start] với đèn Giữ ấm (WARM) đang sáng. Thời gian nấu có thể kéo dài đến 30 phút, tối đa là 3 lần.
Dành cho Việt Nam

69
English
1
2
Lưu ý
3 Lưu ý
4
Nhấp
5
Nhấp
6
Bật
Bật
Bật
Hấp thức ăn
シンガポール向け
Biểu tượng sẽ nhấp nháy khi menu đang được chọn
10Tiếng Việt
Bạn cũng có thể thực hiện hấp thức ăn bằng cách đổ thêm nước vào ruột nồi khi không nấu cơm.
Thêm nguyên liệu vào khay nấu.
Thêm nước vào ruột nồi, đặt khay nấu vào bên trong và đậy nắp nồi lại.
Sử dụng nút [Menu] để chọn menu “Slow Cook”.
Nhấn các nút [Hour] và [Min] để đặt thời gian hấp mong muốn.Mỗi lần nhấn nút [Hour], thì thời gian cài đặt sẽ tăng 5 phút. Mỗi lần nhấn nút [Min], thì thời gian cài đặt sẽ giảm 5 phút.
Thời gian hấp có thể được thiết đặt trong khoảng từ 5 đến 60 phút.
Xem hướng dẫn sau đây để biết lượng nước cần thêm vào.
• Loại 1,0 L (5,5 cốc): 3,5 cốc (630 mL)
• Loại 1,8 L (10 cốc): 4,5 cốc (810 mL)
Đặt khay nấu vào
Sử dụng cốc đong được cung cấp kèm theo để thêm nước.
Nhấn nút [Start].Đèn sáng lên và bắt đầu quá trình hấp, “Sẵn sàng” được hiển thị trên màn hình.
● Nhớ thêm một lượng nước thích hợp vào nồi trong. Không để nồi trong bị cạn nước hoặc khay nấu bị ngập trong quá trình hấp.
Kết nối dây điện.
● Nếu đèn Giữ ấm (WARM) đang sáng, hãy nhấn nút [Keep Warm/Cancel] để tắt đèn.
Khay nấu
Nước
Dành cho Việt Nam
Nhấp nháy
Nhấp nháy

70
10 Hấp thức ăn
Lưu ý
7
On
Thận trọng
Lưu ý
8 Lấy đĩa nấu ra.
Sau khi hấp xong...
1 Đảm bảo nhấn nút [Keep Warm/Cancel]
Rút phích cắm điện và sau đó rút đầu cắm thiết bị ra.
Vệ sinh nồi cơm điện (xem Trang 74-78).
Bật Tắt
2
3
シンガポール向け
● Không mở nắp trong khi nấu. Làm như vậy có thể khiến thực phẩm không chín.
• Cẩn thận khi lấy khay nấu sau khi nấu, vì nó đang nóng.• Dùng thức ăn ngay khi hấp xong. Nếu không được lấy
ra khỏi nồi cơm điện ngay lập tức, thức ăn sẽ bị ướt và nhũn.
• Không nghiêng khay nấu trong khi lấy ra. Nước cơm, v.v., có thể trào ra ngoài và gây bỏng.
• Để hấp thức ăn lâu hơn, hãy sử dụng các nút [Hour] và [Min] để đặt thêm thời gian hấp và sau đó nhấn nút [Start]. Thời gian nấu có thể kéo dài đến 30 phút, tối đa là 3 lần.
• Cẩn thận để không bị bỏng bởi hơi nước thoát ra khi mở nắp.
● Hãy chắc chắn đổ thêm nước khi hấp thêm để ngăn ruột nồi bên trong không bị cháy khô.
● Nếu cần thêm thời gian hấp lâu hơn, không nhấn nút [Keep Warm/Cancel] trước khi kéo dài thời gian hấp. Làm như vậy sẽ khiến đèn Giữ ấm (WARM) bị tắt và bạn không thể tiến hành hấp thêm. Nếu bạn nhấn nhầm nút [Keep Warm/Cancel], hãy thực hiện quy trình sau.
1. Lấy ruột nồi bên trong ra và đổ thêm nước. Để biết lượng nước, hãy xem bước 2 trên
Trang 69. 2. Mở nắp nồi cơm điện và để nồi cơm điện, ruột nồi nguội trong khoảng 10 phút. 3. Đặt ruột nồi vào trong nồi cơm điện. 4. Lặp lại quy trình từ bước 4 trên Trang 69.
Dành cho Việt Nam
Lấy khay nấu ra.
Sau khi hoàn tất quá trình hấp, nồi cơm điện sẽ phát ra tiếng bíp 8 lần (tiếng bíp dài) (đèn khởi động sẽ tắt).Đèn Giữ ấm (WARM) sẽ sáng lên và “0h” sẽ được hiển thị trên màn hình.
7
Tắt Bật
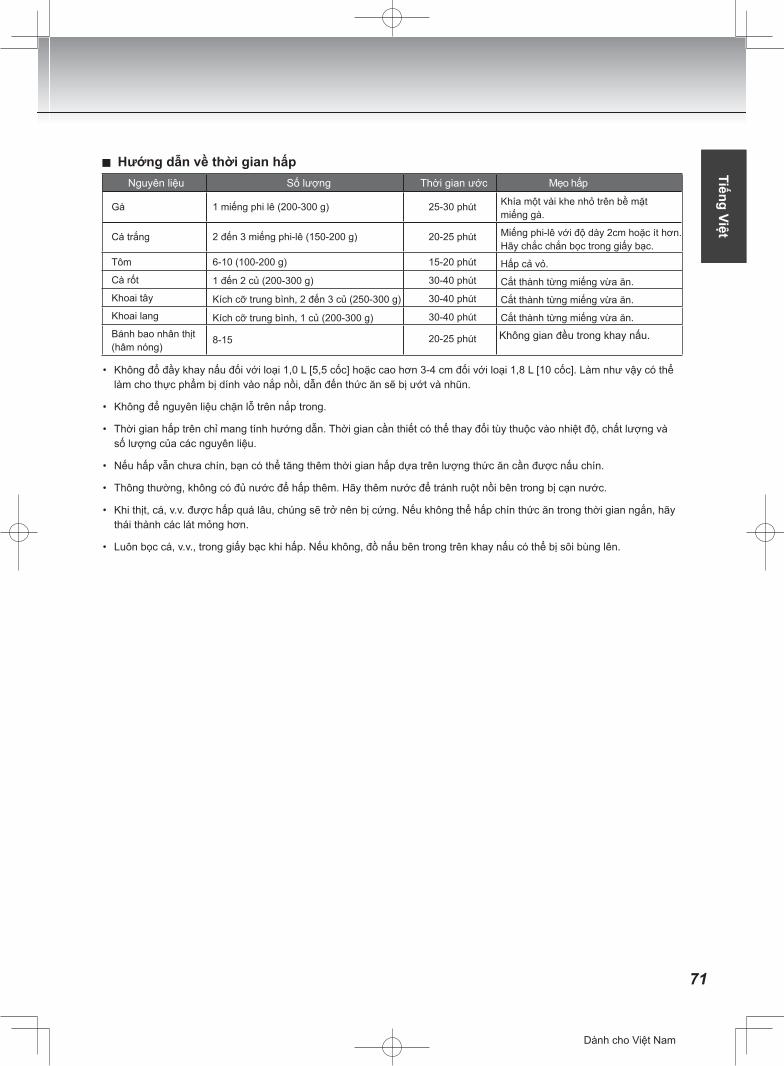
71
English
Nguyên liệu Số lượng Thời gian ước Mẹo hấp
Khía một vài khe nhỏ trên bề mặt miếng gà.
Miếng phi-lê với độ dày 2cm hoặc ít hơn. Hãy chắc chắn bọc trong giấy bạc.
Hấp cả vỏ.
Cắt thành từng miếng vừa ăn.
Cắt thành từng miếng vừa ăn.
Cắt thành từng miếng vừa ăn.
Không gian đều trong đĩa nấu.
25-30 phút
20-25 phút
15-20 phút
30-40 phút
30-40 phút
30-40 phút
20-25 phút
1 miếng phi lê (200-300 g)
2 đến 3 miếng phi-lê (150-200 g)
6-10 (100-200 g)
1 đến 2 củ (200-300 g)
Kích cỡ trung bình, 2 đến 3 củ (250-300 g)
Kích cỡ trung bình, 1 củ (200-300 g)
8-15
Gà
Cá trắng
Tôm
Cà rốt
Khoai tây
Khoai lang
Bánh bao nhân thịt (hâm nóng)
シンガポール向け
Hướng dẫn về thời gian hấp Tiếng Việt
• Không đổ đầy khay nấu đối với loại 1,0 L [5,5 cốc] hoặc cao hơn 3-4 cm đối với loại 1,8 L [10 cốc]. Làm như vậy có thể làm cho thực phẩm bị dính vào nắp nồi, dẫn đến thức ăn sẽ bị ướt và nhũn.
• Không để nguyên liệu chặn lỗ trên nắp trong.
• Thời gian hấp trên chỉ mang tính hướng dẫn. Thời gian cần thiết có thể thay đổi tùy thuộc vào nhiệt độ, chất lượng và số lượng của các nguyên liệu.
• Nếu hấp vẫn chưa chín, bạn có thể tăng thêm thời gian hấp dựa trên lượng thức ăn cần được nấu chín.
• Thông thường, không có đủ nước để hấp thêm. Hãy thêm nước để tránh ruột nồi bên trong bị cạn nước.
• Khi thịt, cá, v.v. được hấp quá lâu, chúng sẽ trở nên bị cứng. Nếu không thể hấp chín thức ăn trong thời gian ngắn, hãy thái thành các lát mỏng hơn.
• Luôn bọc cá, v.v., trong giấy bạc khi hấp. Nếu không, đồ nấu bên trong trên khay nấu có thể bị sôi bùng lên.
Không gian đều trong khay nấu.
Dành cho Việt Nam
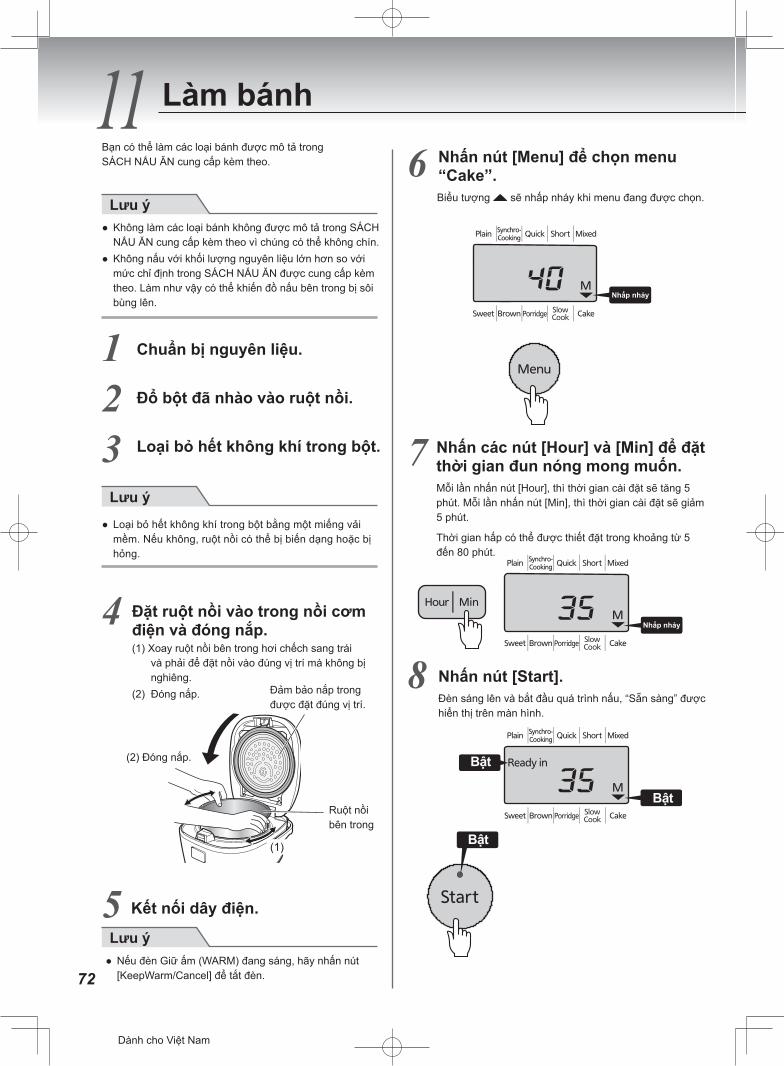
72
11
Lưu ý
1 2 3 Lưu ý
4
(1)
5 Lưu ý
6
Nhấp
7
.setunim
Nhấp
8
Bật
Bật
Bật
Làm bánh
シンガポール向け
Biểu tượng sẽ nhấp nháy khi menu đang được chọn
Bạn có thể làm các loại bánh được mô tả trong SÁCH NẤU ĂN cung cấp kèm theo. Nhấn nút [Menu] để chọn menu
“Cake”.
Nhấn các nút [Hour] và [Min] để đặt thời gian đun nóng mong muốn.Mỗi lần nhấn nút [Hour], thì thời gian cài đặt sẽ tăng 5 phút. Mỗi lần nhấn nút [Min], thì thời gian cài đặt sẽ giảm 5 phút.
Thời gian hấp có thể được thiết đặt trong khoảng từ 5 đến 80 phút.
Chuẩn bị nguyên liệu.
Đổ bột đã nhào vào ruột nồi.
Loại bỏ hết không khí trong bột.
● Không làm các loại bánh không được mô tả trong SÁCH NẤU ĂN cung cấp kèm theo vì chúng có thể không chín.
● Không nấu với khối lượng nguyên liệu lớn hơn so với mức chỉ định trong SÁCH NẤU ĂN được cung cấp kèm theo. Làm như vậy có thể khiến đồ nấu bên trong bị sôi bùng lên.
● Loại bỏ hết không khí trong bột bằng một miếng vải mềm. Nếu không, ruột nồi có thể bị biến dạng hoặc bị hỏng.
Nhấn nút [Start].Đèn sáng lên và bắt đầu quá trình nấu, “Sẵn sàng” được hiển thị trên màn hình.
Kết nối dây điện.
● Nếu đèn Giữ ấm (WARM) đang sáng, hãy nhấn nút [KeepWarm/Cancel] để tắt đèn.
Đặt ruột nồi vào trong nồi cơm điện và đóng nắp.(1) Xoay ruột nồi bên trong hơi chếch sang trái
và phải để đặt nồi vào đúng vị trí mà không bị nghiêng.
(2) Đóng nắp. Đảm bảo nắp trong được đặt đúng vị trí.
(2) Đóng nắp.
Ruột nồi bên trong
Dành cho Việt Nam
Biểu tượng sẽ nhấp nháy khi menu đang được chọn.
Nhấp nháy
Nhấp nháy
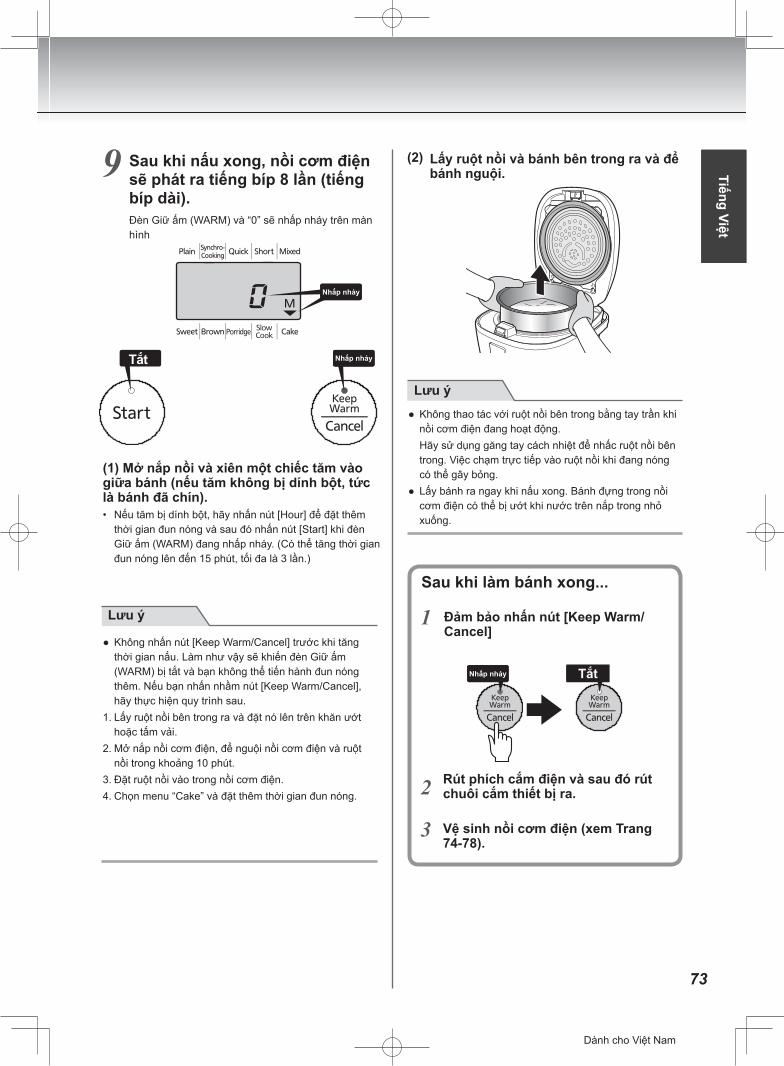
73
English
9
Nhấp Tắt
Nhấp
Note
(2)
Note
1
2
3
シンガポール向け
Nhấp Tắt
Tiếng Việt
Sau khi nấu xong, nồi cơm điện sẽ phát ra tiếng bíp 8 lần (tiếng bíp dài).Đèn Giữ ấm (WARM) và “0” sẽ nhấp nháy trên màn hình
Lấy ruột nồi và bánh bên trong ra và để bánh nguội.
(1) Mở nắp nồi và xiên một chiếc tăm vào giữa bánh (nếu tăm không bị dính bột, tức là bánh đã chín).• Nếu tăm bị dính bột, hãy nhấn nút [Hour] để đặt thêm
thời gian đun nóng và sau đó nhấn nút [Start] khi đèn Giữ ấm (WARM) đang nhấp nháy. (Có thể tăng thời gian đun nóng lên đến 15 phút, tối đa là 3 lần.)
● Không thao tác với ruột nồi bên trong bằng tay trần khi nồi cơm điện đang hoạt động.
Hãy sử dụng găng tay cách nhiệt để nhấc ruột nồi bên trong. Việc chạm trực tiếp vào ruột nồi khi đang nóng có thể gây bỏng.
● Lấy bánh ra ngay khi nấu xong. Bánh đựng trong nồi cơm điện có thể bị ướt khi nước trên nắp trong nhỏ xuống.
Sau khi làm bánh xong...
Đảm bảo nhấn nút [Keep Warm/Cancel]
Rút phích cắm điện và sau đó rút chuôi cắm thiết bị ra. Vệ sinh nồi cơm điện (xem Trang 74-78).
● Không nhấn nút [Keep Warm/Cancel] trước khi tăng thời gian nấu. Làm như vậy sẽ khiến đèn Giữ ấm (WARM) bị tắt và bạn không thể tiến hành đun nóng thêm. Nếu bạn nhấn nhầm nút [Keep Warm/Cancel], hãy thực hiện quy trình sau.
1. Lấy ruột nồi bên trong ra và đặt nó lên trên khăn ướt hoặc tấm vải.
2. Mở nắp nồi cơm điện, để nguội nồi cơm điện và ruột nồi trong khoảng 10 phút.
3. Đặt ruột nồi vào trong nồi cơm điện.4. Chọn menu “Cake” và đặt thêm thời gian đun nóng.
Tắt
Lưu ý
Lưu ý
Dành cho Việt Nam
Nhấp nháy
Nhấp nháy
Nhấp nháy
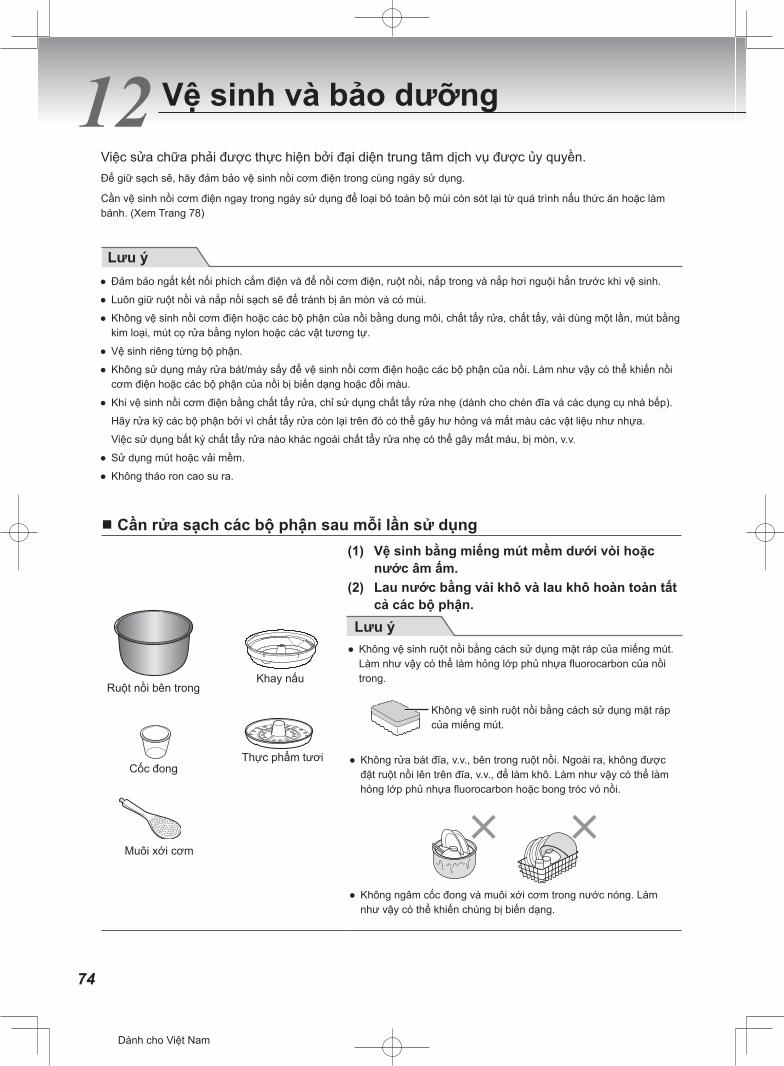
74
Lưu
Ruột nồi bên trong
Muôi xới cơm
Khay nấu
Cốc đongThực phẩm tươi
Lưu
Vệ sinh và bảo dưỡng
シンガポール向け
12Việc sửa chữa phải được thực hiện bởi đại diện trung tâm dịch vụ được ủy quyền.Để giữ sạch sẽ, hãy đảm bảo vệ sinh nồi cơm điện trong cùng ngày sử dụng.
Cần vệ sinh nồi cơm điện ngay trong ngày sử dụng để loại bỏ toàn bộ mùi còn sót lại từ quá trình nấu thức ăn hoặc làm bánh. (Xem Trang 78)
● Đảm bảo ngắt kết nối phích cắm điện và để nồi cơm điện, ruột nồi, nắp trong và nắp hơi nguội hẳn trước khi vệ sinh.
● Luôn giữ ruột nồi và nắp nồi sạch sẽ để tránh bị ăn mòn và có mùi.
● Không vệ sinh nồi cơm điện hoặc các bộ phận của nồi bằng dung môi, chất tẩy rửa, chất tẩy, vải dùng một lần, mút bằng kim loại, mút cọ rửa bằng nylon hoặc các vật tương tự.
● Vệ sinh riêng từng bộ phận.
● Không sử dụng máy rửa bát/máy sấy để vệ sinh nồi cơm điện hoặc các bộ phận của nồi. Làm như vậy có thể khiến nồi cơm điện hoặc các bộ phận của nồi bị biến dạng hoặc đổi màu.
● Khi vệ sinh nồi cơm điện bằng chất tẩy rửa, chỉ sử dụng chất tẩy rửa nhẹ (dành cho chén đĩa và các dụng cụ nhà bếp).
Hãy rửa kỹ các bộ phận bởi vì chất tẩy rửa còn lại trên đó có thể gây hư hỏng và mất màu các vật liệu như nhựa.
Việc sử dụng bất kỳ chất tẩy rửa nào khác ngoài chất tẩy rửa nhẹ có thể gây mất màu, bị mòn, v.v.
● Sử dụng mút hoặc vải mềm.
● Không tháo ron cao su ra.
Cần rửa sạch các bộ phận sau mỗi lần sử dụng(1) Vệ sinh bằng miếng mút mềm dưới vòi hoặc
nước âm ấm.(2) Lau nước bằng vải khô và lau khô hoàn toàn tất
cả các bộ phận.
● Không vệ sinh ruột nồi bằng cách sử dụng mặt ráp của miếng mút. Làm như vậy có thể làm hỏng lớp phủ nhựa fluorocarbon của nồi trong.
Không vệ sinh ruột nồi bằng cách sử dụng mặt ráp của miếng mút.
● Không rửa bát đĩa, v.v., bên trong ruột nồi. Ngoài ra, không được đặt ruột nồi lên trên đĩa, v.v., để làm khô. Làm như vậy có thể làm hỏng lớp phủ nhựa fluorocarbon hoặc bong tróc vỏ nồi.
● Không ngâm cốc đong và muôi xới cơm trong nước nóng. Làm như vậy có thể khiến chúng bị biến dạng.
Dành cho Việt Nam
Lưu ý
Lưu ý
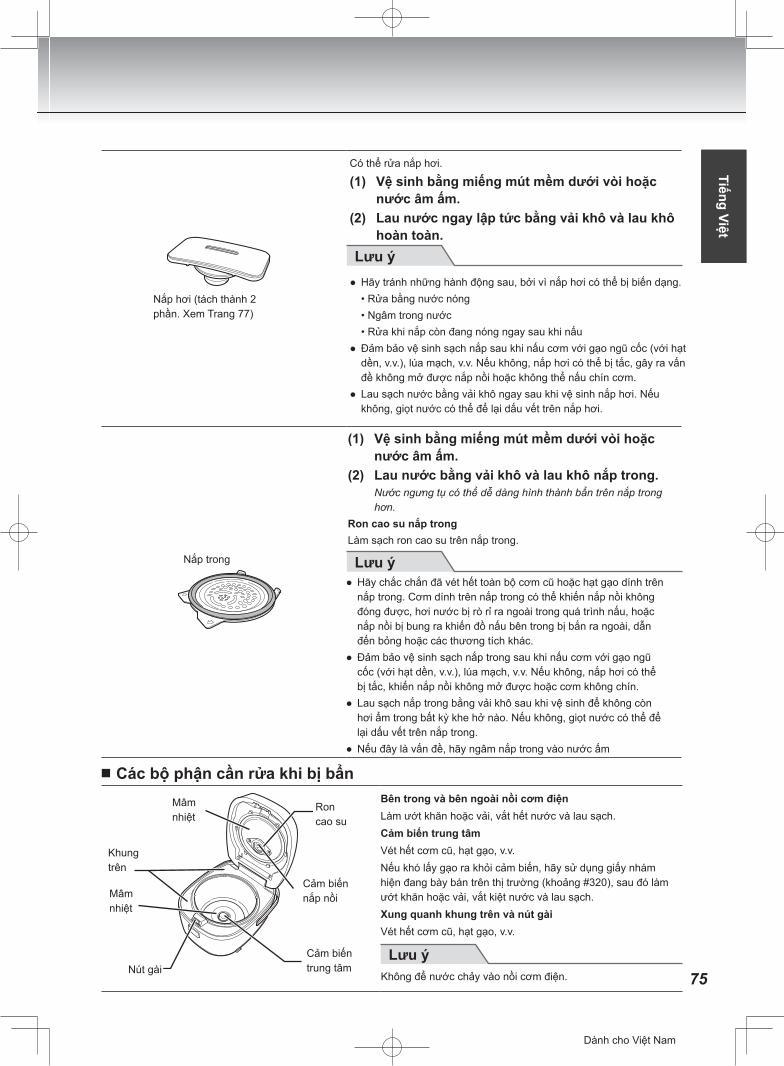
75
English
Lưu ý
Lưu ý
Lưu ý
シンガポール向け
Tiếng Việt
Các bộ phận cần rửa khi bị bẩn
Ron cao su
Cảm biến nắp nồi
Cảm biến trung tâmNút gài
Mâm nhiệt
Khung trên
Mâm nhiệt
Nắp trong
Nắp hơi (tách thành 2 phần. Xem Trang 77)
(1) Vệ sinh bằng miếng mút mềm dưới vòi hoặc nước âm ấm.
(2) Lau nước bằng vải khô và lau khô nắp trong.Nước ngưng tụ có thể dễ dàng hình thành bẩn trên nắp trong hơn.
Ron cao su nắp trongLàm sạch ron cao su trên nắp trong.
● Hãy chắc chắn đã vét hết toàn bộ cơm cũ hoặc hạt gạo dính trên nắp trong. Cơm dính trên nắp trong có thể khiến nắp nồi không đóng được, hơi nước bị rò rỉ ra ngoài trong quá trình nấu, hoặc nắp nồi bị bung ra khiến đồ nấu bên trong bị bắn ra ngoài, dẫn đến bỏng hoặc các thương tích khác.
● Đảm bảo vệ sinh sạch nắp trong sau khi nấu cơm với gạo ngũ cốc (với hạt dền, v.v.), lúa mạch, v.v. Nếu không, nắp hơi có thể bị tắc, khiến nắp nồi không mở được hoặc cơm không chín.
● Lau sạch nắp trong bằng vải khô sau khi vệ sinh để không còn hơi ẩm trong bất kỳ khe hở nào. Nếu không, giọt nước có thể để lại dấu vết trên nắp trong.
● Nếu đây là vấn đề, hãy ngâm nắp trong vào nước ấm
Có thể rửa nắp hơi.
(1) Vệ sinh bằng miếng mút mềm dưới vòi hoặc nước âm ấm.
(2) Lau nước ngay lập tức bằng vải khô và lau khô hoàn toàn.
● Hãy tránh những hành động sau, bởi vì nắp hơi có thể bị biến dạng. • Rửa bằng nước nóng • Ngâm trong nước • Rửa khi nắp còn đang nóng ngay sau khi nấu● Đảm bảo vệ sinh sạch nắp sau khi nấu cơm với gạo ngũ cốc (với hạt
dền, v.v.), lúa mạch, v.v. Nếu không, nắp hơi có thể bị tắc, gây ra vấn đề không mở được nắp nồi hoặc không thể nấu chín cơm.
● Lau sạch nước bằng vải khô ngay sau khi vệ sinh nắp hơi. Nếu không, giọt nước có thể để lại dấu vết trên nắp hơi.
Bên trong và bên ngoài nồi cơm điệnLàm ướt khăn hoặc vải, vắt hết nước và lau sạch.Cảm biến trung tâmVét hết cơm cũ, hạt gạo, v.v.Nếu khó lấy gạo ra khỏi cảm biến, hãy sử dụng giấy nhám hiện đang bày bán trên thị trường (khoảng #320), sau đó làm ướt khăn hoặc vải, vắt kiệt nước và lau sạch.Xung quanh khung trên và nút gàiVét hết cơm cũ, hạt gạo, v.v.
Dành cho Việt Nam
Không để nước chảy vào nồi cơm điện.
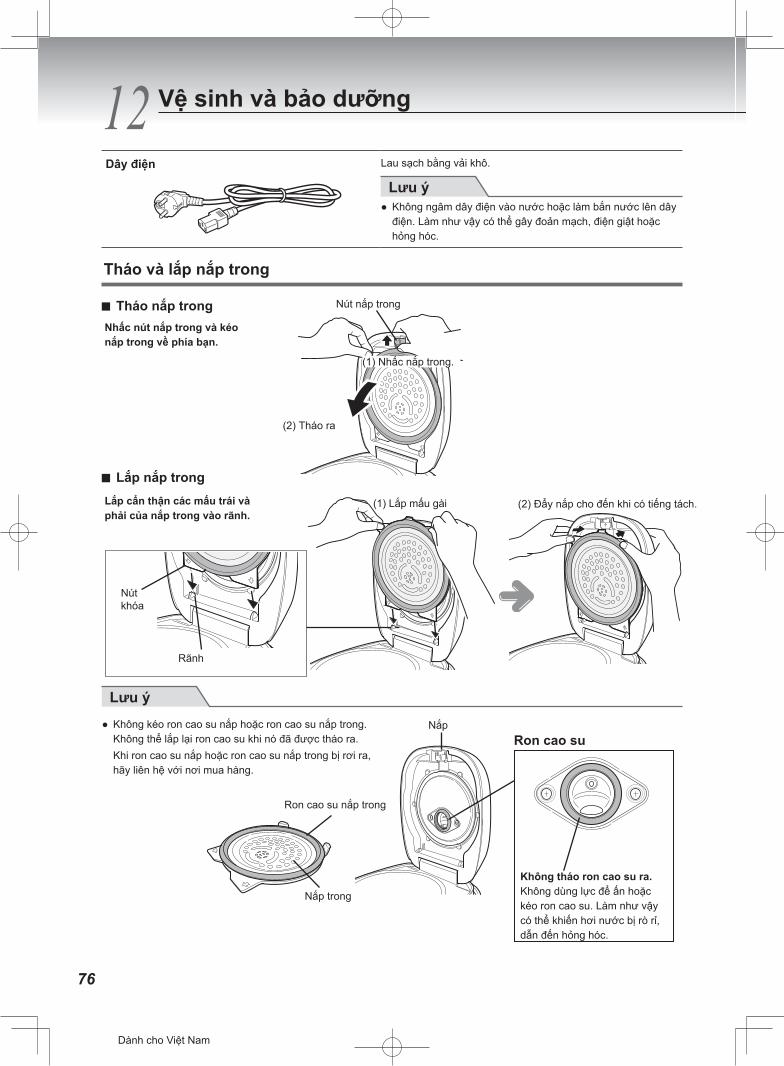
76
12 Vệ sinh và bảo dưỡng
Dây điện
Lưu ý
Lưu ý
Nút nắp trong
(1) Nhấc nắp trong.
(2) Tháo ra
(1) Lắp mấu gài (2) Đẩy nắp cho đến khi có tiếng tách.
Nút khóa
Rãnh
Gioăng cao su nắp trong
Nắp trong
Nắpioăng cao su
シンガポール向け
Dây điện Lau sạch bằng vải khô.
● Không ngâm dây điện vào nước hoặc làm bắn nước lên dây điện. Làm như vậy có thể gây đoản mạch, điện giật hoặc hỏng hóc.
Tháo và lắp nắp trong
Tháo nắp trong
Lắp nắp trong
Nhấc nút nắp trong và kéo nắp trong về phía bạn.
Lắp cẩn thận các mấu trái và phải của nắp trong vào rãnh.
● Không kéo ron cao su nắp hoặc ron cao su nắp trong. Không thể lắp lại ron cao su khi nó đã được tháo ra.
Khi ron cao su nắp hoặc ron cao su nắp trong bị rơi ra, hãy liên hệ với nơi mua hàng.
Không tháo ron cao su ra. Không dùng lực để ấn hoặc kéo ron cao su. Làm như vậy có thể khiến hơi nước bị rò rỉ, dẫn đến hỏng hóc.
Lau sạch bằng vải khô.
Dành cho Việt Nam
Ron cao su
Ron cao su nắp trong

77
English
Nắp hơi
Lưu ý
Nắp
Nắp thiết bị
Biểu tượng Mở khóa
Xoay nắp thiết bịcho đến khi nó dừng lại. Marking
Lưu ý
Vòng chữ O
thiết bị
Nắp
Nắp
Đánh dấuBiểu tượng khóa
Xoay nắp thiết bị cho đến khi nó dừng lại.
シンガポール向け
Có ba phần lồi và phần lõm.
Tiếng Việt
Gắn nắp hơi
Tháo nắp hơi
(3) Lắp đúng vị trí trong nồi cơm điện.
(2) Xoay nắp thiết bị theo chiều kim đồng hồ và điều chỉnh đánh dấu trên nắp thiết bị với biểu tượng khóa.
Biểu tượng khóa được đánh dấu trên nắp.
(1) Căn chỉnh lại phần lồi của nắp thiết bị với phần lõm của nắp như được minh họa trong hình và lắp bộ phận nắp thiết bị vào nắp.
(1) Đưa ngón tay của bạn vào chỗ lõm trong nắp nồi, nhấc lên và tháo nắp hơi ra.
(3) Nhấc và tháo nắp thiết bị ra khỏi nắp
● Không tháo ron cao su hoặc vòng chữ O khỏi nắp thiết bị. Lắp chặt ron cao su hoặc vòng chữ O nếu nó bị rơi ra. Đảm bảo hướng của ron cao su trên nắp thiết bị là chính xác.
Làm ướt vòng chữ O nếu khó lắp vào.● Đảm bảo đặt ron cao su, v.v. vào đúng vị trí trước khi sử
dụng nồi cơm điện. Không làm như vậy có thể khiến hơi nước bị rò rỉ ra ngoài và thực phẩm không chín.
● Hãy cẩn thận khi tháo nắp hơi ngay sau quá trình nấu, vì nước nóng có thể đọng bên trong nắp hơi.
(2) Xoay nắp thiết bị ngược chiều kim đồng hồ để điều chỉnh đánh dấu trên nắp với biểu tượng mở khóa.
Biểu tượng mở khóa được đánh dấu trên nắp.
Tháo và gắn nắp hơi
Dành cho Việt Nam
Đánh dấu
Ron cao su
Nắp thiết bị
Xoay nắp thiết bị cho đến khi nó dừng lại.
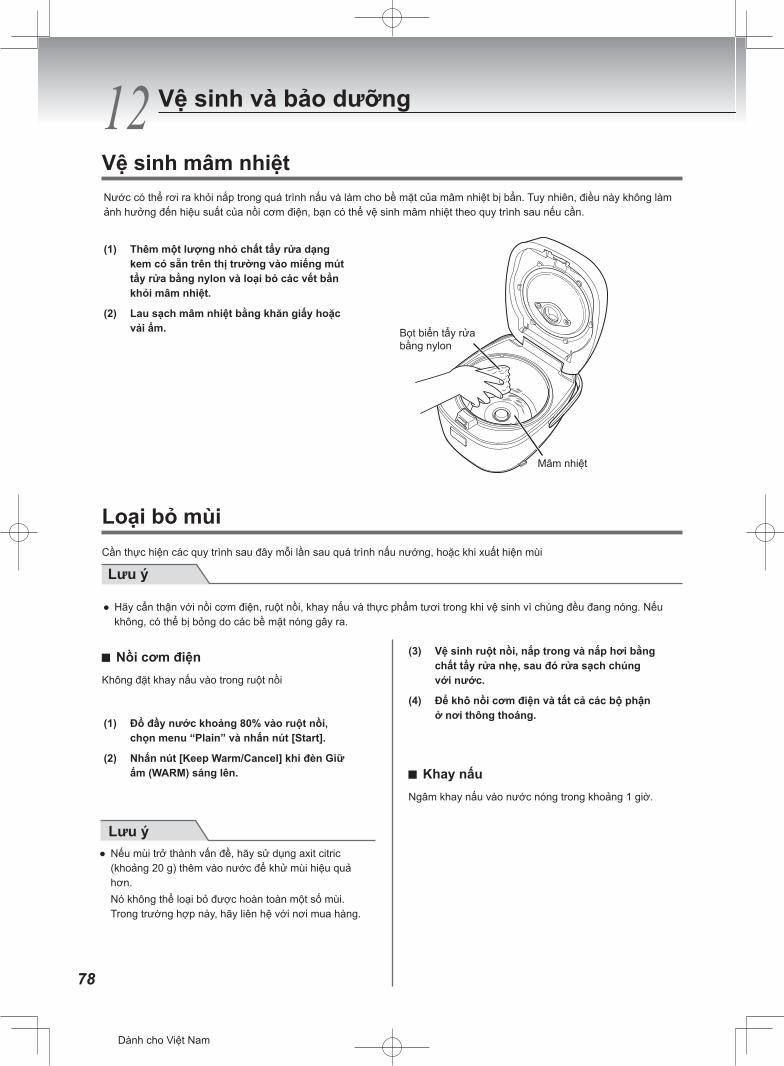
78
12 Vệ sinh và bảo dưỡng
Loại bỏ mùiCần thực hiện các quy trình sau đây mỗi lần sau quá trình nấu nướng, hoặc khi xuất hiện mùi
Lưu
Lưu ý
Vệ sinh mâm nhiệt
Bọt biển tẩy rửa bằng nylon
Mâm nhiệt
シンガポール向け
Nước có thể rơi ra khỏi nắp trong quá trình nấu và làm cho bề mặt của mâm nhiệt bị bẩn. Tuy nhiên, điều này không làm ảnh hưởng đến hiệu suất của nồi cơm điện, bạn có thể vệ sinh mâm nhiệt theo quy trình sau nếu cần.
(1) Thêm một lượng nhỏ chất tẩy rửa dạng kem có sẵn trên thị trường vào miếng mút tẩy rửa bằng nylon và loại bỏ các vết bẩn khỏi mâm nhiệt.
(2) Lau sạch mâm nhiệt bằng khăn giấy hoặc vải ẩm.
(1) Đổ đầy nước khoảng 80% vào ruột nồi, chọn menu “Plain” và nhấn nút [Start].
(2) Nhấn nút [Keep Warm/Cancel] khi đèn Giữ ấm (WARM) sáng lên.
(3) Vệ sinh ruột nồi, nắp trong và nắp hơi bằng chất tẩy rửa nhẹ, sau đó rửa sạch chúng với nước.
(4) Để khô nồi cơm điện và tất cả các bộ phận ở nơi thông thoáng.
● Hãy cẩn thận với nồi cơm điện, ruột nồi, khay nấu và thực phẩm tươi trong khi vệ sinh vì chúng đều đang nóng. Nếu không, có thể bị bỏng do các bề mặt nóng gây ra.
Nồi cơm điện
Khay nấu
Không đặt khay nấu vào trong ruột nồi
Ngâm khay nấu vào nước nóng trong khoảng 1 giờ.
● Nếu mùi trở thành vấn đề, hãy sử dụng axit citric (khoảng 20 g) thêm vào nước để khử mùi hiệu quả hơn.
Nó không thể loại bỏ được hoàn toàn một số mùi. Trong trường hợp này, hãy liên hệ với nơi mua hàng.
Lưu ý
Dành cho Việt Nam
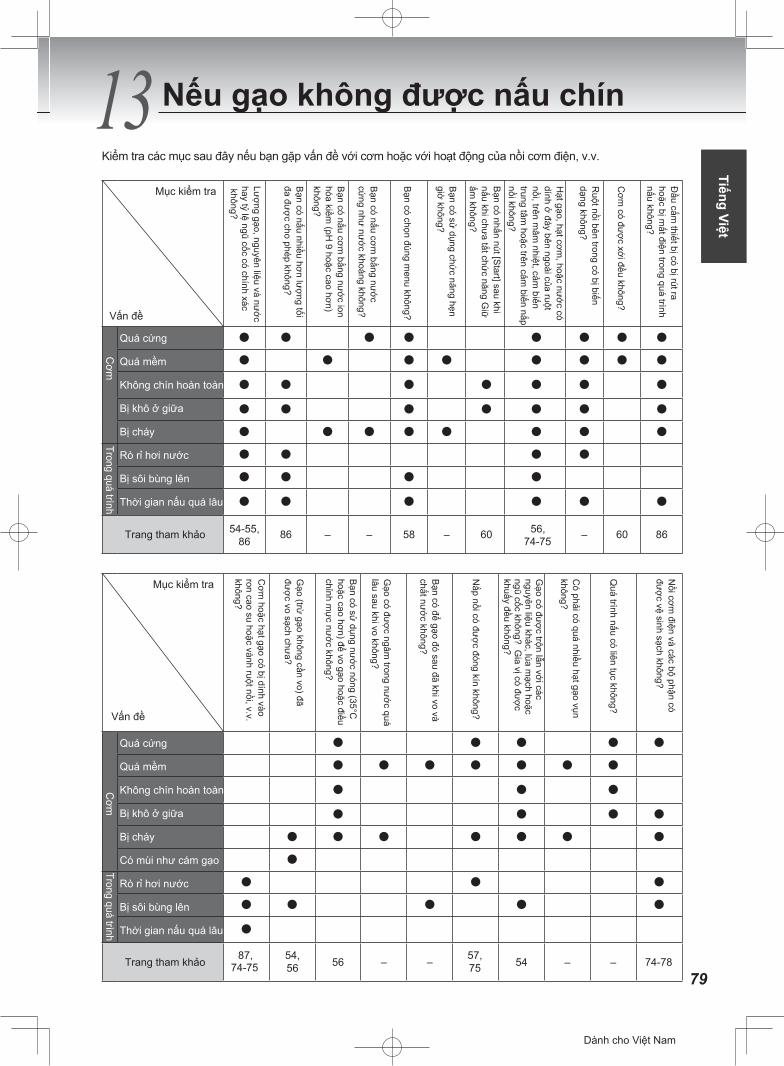
79
English
13 Kiểm tra các mục sau đây nếu bạn gặp vấn đề với cơm hoặc với hoạt động của nồi cơm điện, v.v.
Mục kiểm tra
Cơm
Quá cứng
Quá mềm
Không chín hoàn toàn
Bị khô ở giữa
Bị cháy
Rò rỉ hơi nước
Bị sôi bùng lên
Thời gian nấu quá lâu
Trong quá trình
Trang tham khảo 54-55,86
87,74, 75
54,56
57,75
56,84, 87
86 – – 58 – 60 – 60 86
Mục kiểm tra
Vấn đề
Vấn đề
Cơm
Quá cứng
Quá mềm
Không chín hoàn toàn
Bị khô ở giữa
Bị cháy
Có mùi như cám gạo
Rò rỉ hơi nước
Bị sôi bùng lên
Thời gian nấu quá lâu
Trang tham khảo 56 – – 54 – – 74-78
Nếu gạo không được nấu chín
シンガポール向け
Đầu cắm
thiết bị có bị rút ra hoặc bị m
ất điện trong quá trình nấu không?
Cơm
có được xới đều không?
Ruột nồi bên trong có bị biến
dạng không?
Bạn có sử
dụng chức năng hẹn
giờ không?
Bạn có chọn đúng m
enu không?
Bạn có nấu cơm
bằng nước
cứng như
nước khoáng không?
Bạn có nấu cơm
bằng nước ion
hóa kiềm (pH
9 hoặc cao hơn) không?
Bạn có nấu nhiều hơn lư
ợng tối đa đư
ợc cho phép không?
Lượng gạo, nguyên liệu và nư
ớc hay tỷ lệ ngũ cốc có chính xác không?
Bạn có nhấn nút [S
tart] sau khi nấu khi chư
a tắt chức năng G
iữ
ấm không?
Hạt gạo, hạt cơm
, hoặc nước có
dính ở đáy bên ngoài của ruột nồi, trên m
âm nhiệt, cảm
biến trung tâm
hoặc trên cảm biến nắp
nồi không?
Nồi cơm
điện và các bộ phận có đư
ợc vệ sinh sạch không?
Quá trình nấu có liên tục không?
Có phải có quá nhiều hạt gạo vụn
không?
Gạo có đư
ợc trộn lẫn với các nguyên liệu khác, lúa m
ạch hoặc ngũ cốc không? G
ia vị có được
khuấy đều không?
Nắp nồi có đư
ợc đóng kín không?
Bạn có để gạo đó sau đã khi vo và
chắt nước không?
Gạo có đư
ợc ngâm trong nư
ớc quá lâu sau khi vo không?
Bạn có sử
dụng nước nóng (35°C
hoặc cao hơn) để vo gạo hoặc điều chỉnh m
ực nư
ớc không?
Gạo (trừ
gạo không cần vo) đã đư
ợc vo sạch chưa?
Cơm
hoặc hạt gạo có bị dính vào ron cao su hoặc vành ruột nồi, v.v. không?
Trong quá trình
Tiếng Việt
Dành cho Việt Nam
74-75
74-75
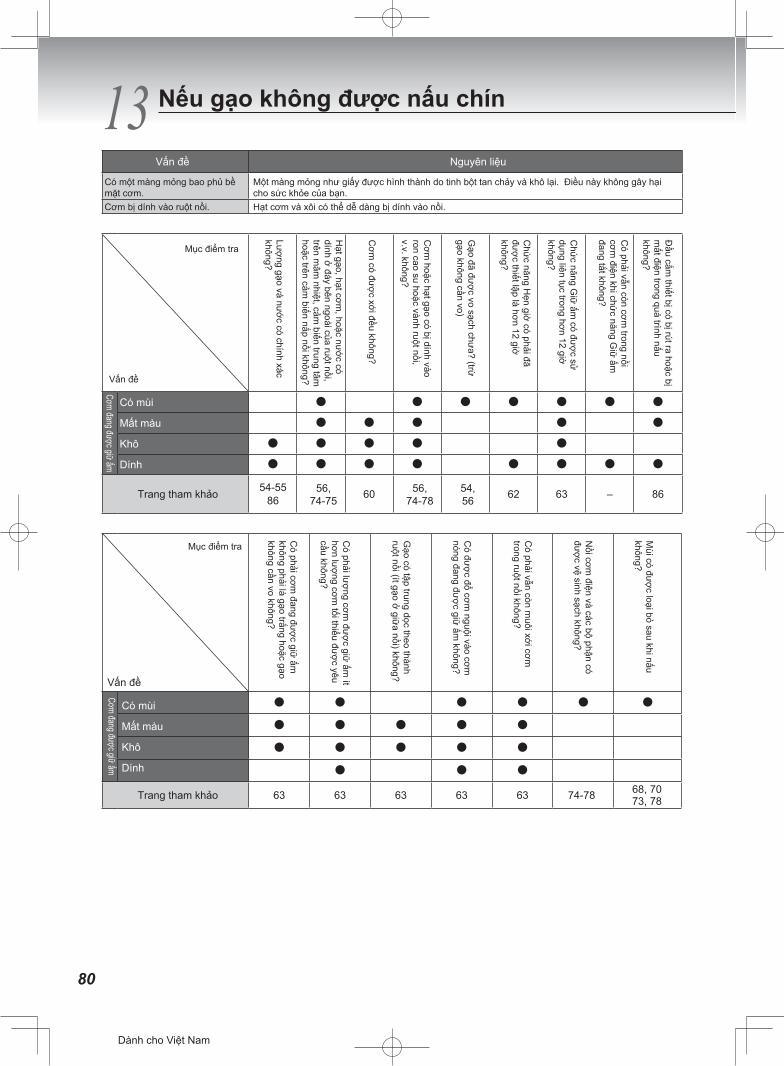
80
13 Nếu gạo không được nấu chín
Vấn đề Nguyên liệu
Cơm đang được giữ ấm
Có mùi
Mất màu
Khô
Dính
Trang tham khảo 54,55, 86
56,74-75
56,74-7860 54,
56 62 63 – 86
Mục điểm tra
Vấn đề
Trang tham khảo 63 63 63 63 63 74-78 68, 70 73, 78
シンガポール向け
Có một màng mỏng bao phủ bề mặt cơm.Cơm bị dính vào ruột nồi.
Một màng mỏng như giấy được hình thành do tinh bột tan chảy và khô lại. Điều này không gây hại cho sức khỏe của bạn. Hạt cơm và xôi có thể dễ dàng bị dính vào nồi.
Mục điểm tra
Vấn đề
Cơm đang được giữ ấm
Có mùi
Mất màu
Khô
Dính
Đầu cắm
thiết bị có bị rút ra hoặc bị m
ất điện trong quá trình nấu không?
Có phải vẫn còn cơm
trong nồi cơm
điện khi chức năng G
iữ ấm
đang tắt không?
Chứ
c năng Giữ
ấm có đư
ợc sử
dụng liên tục trong hơn 12 giờ không?
Chứ
c năng Hẹn giờ có phải đã
được thiết lập là hơn 12 giờ
không?
Gạo đã đư
ợc vo sạch chưa? (trừ
gạo không cần vo)
Cơm
hoặc hạt gạo có bị dính vào ron cao su hoặc vành ruột nồi, v.v. không?
Cơm
có được xới đều không?
Hạt gạo, hạt cơm
, hoặc nước có
dính ở đáy bên ngoài của ruột nồi, trên m
âm nhiệt, cảm
biến trung tâm
hoặc trên cảm biến nắp nồi không?
Lượng gạo và nư
ớc có chính xác không?
Mùi có đư
ợc loại bỏ sau khi nấu không?
Nồi cơm
điện và các bộ phận có đư
ợc vệ sinh sạch không?
Có phải vẫn còn m
uôi xới cơm
trong ruột nồi không?
Có đư
ợc đổ cơm nguội vào cơm
nóng đang được giữ
ấm không?
Gạo có tập trung dọc theo thành
ruột nồi (ít gạo ở giữa nồi) không?
Có phải lư
ợng cơm đư
ợc giữ ấm
ít hơn lư
ợng cơm tối thiểu đư
ợc yêu cầu không?
Có phải cơm
đang được giữ
ấm
không phải là gạo trắng hoặc gạo không cần vo không?
Dành cho Việt Nam
54-5586
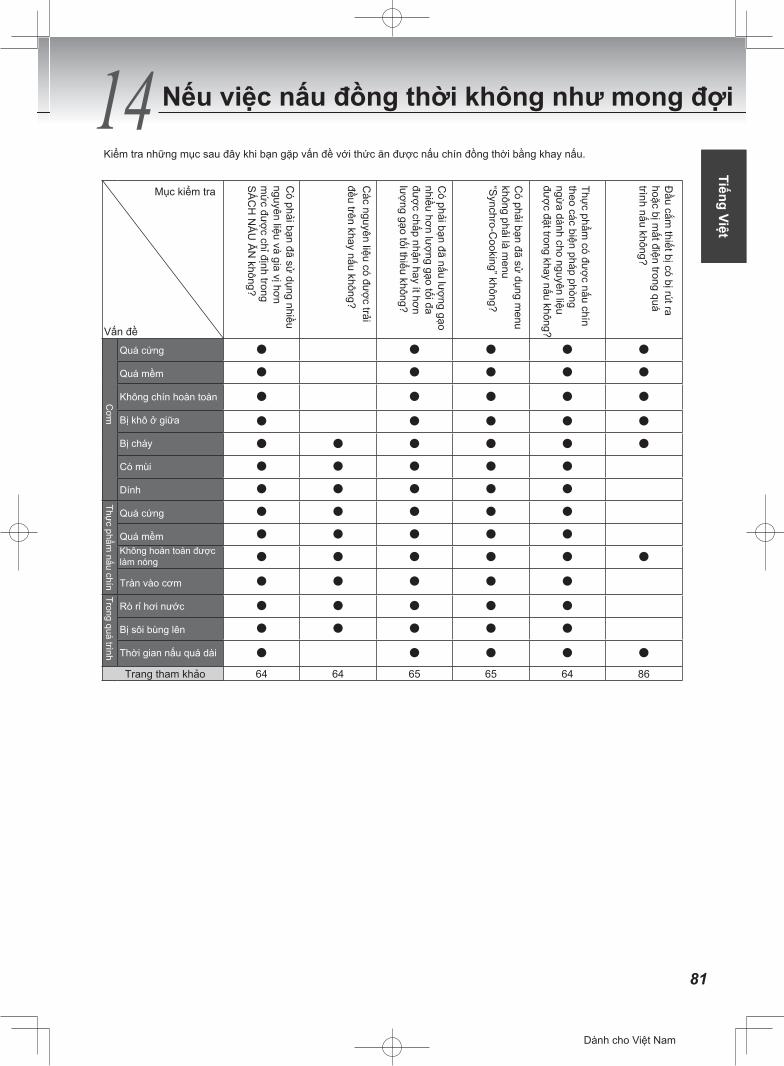
81
14 Kiểm tra những mục sau đây khi bạn gặp vấn đề với thức ăn được nấu chín đồng thời bằng đĩa nấu.
Mục kiểm tra
Vấn đề
Cơm
Thực phẩm
nấu chín Trong quá trình
Quá cứng
Quá mềm
Không chín hoàn toàn
Bị khô ở giữa
Bị cháy
Có mùi
Dính
Quá cứng
Quá mềm Không hoàn toàn được làm nóng
Tràn vào cơm
Rò rỉ hơi nước
Bị sôi bùng lên
Thời gian nấu quá dài
Trang tham khảo 64 64 65 65 64 86
Nếu việc nấu đồng thời không như mong đợiEnglish
シンガポール向け
Đầu cắm
thiết bị có bị rút ra hoặc bị m
ất điện trong quá trình nấu không?
Thực phẩm
có được nấu chín
theo các biện pháp phòng ngừ
a dành cho nguyên liệu được đặt trong khay nấu không?
Có phải bạn đã sử
dụng menu
không phải là menu
“Synchro-C
ooking” không?
Có phải bạn đã nấu lư
ợng gạo nhiều hơn lư
ợng gạo tối đa đư
ợc chấp nhận hay ít hơn lư
ợng gạo tối thiểu không?
Các nguyên liệu có đư
ợc trải đều trên đĩa nấu không?
Có phải bạn đã sử
dụng nhiều nguyên liệu và gia vị hơn m
ức đư
ợc chỉ định trong S
ÁC
H N
ẤU
ĂN
không?
Tiếng Việt
Kiểm tra những mục sau đây khi bạn gặp vấn đề với thức ăn được nấu chín đồng thời bằng khay nấu.
đều trên khay nấu không?
Dành cho Việt Nam
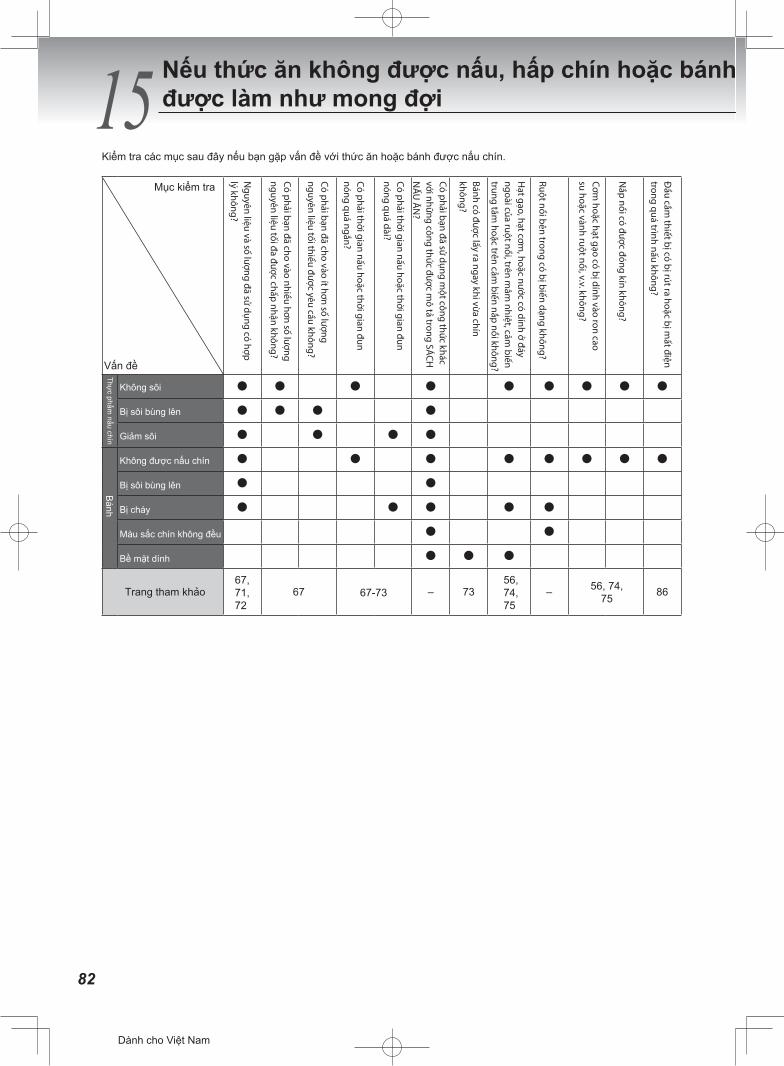
82
15 Kiểm tra các mục sau đây nếu bạn gặp vấn đề với thức ăn hoặc bánh được nấu chín.
Mục kiểm tra
Vấn đề
Thực phẩm
nấu chín
Không sôi
Bị sôi bùng lên
Giảm sôi
Không được nấu chín
Bị sôi bùng lên
Bị cháy
Màu sắc chín không đều
Bề mặt dính
Bánh
Trang tham khảo67,71,72
67 67-73 – 7356,74,75
– 56, 74,75 86
Nếu thức ăn không được nấu, hấp chín hoặc bánh được làm như mong đợi
シンガポール向け
Đầu cắm
thiết bị có bị rút ra hoặc bị mất điện
trong quá trình nấu không?
Nắp nồi có được đóng kín không?
Cơm hoặc hạt gạo có bị dính vào ron cao
su hoặc vành ruột nồi, v.v. không?
Ruột nồi bên trong có bị biến dạng không?
Hạt gạo, hạt cơm
, hoặc nước có dính ở đáy ngoài của ruột nồi, trên m
âm nhiệt, cảm
biến trung tâm
hoặc trên cảm biến nắp nồi không?
Bánh có được lấy ra ngay khi vừa chín không?
Có phải bạn đã sử dụng một công thức khác
với những công thức được mô tả trong SÁCH
N
ẤU Ă
N?
Có phải thời gian nấu hoặc thời gian đun nóng quá dài?
Có phải thời gian nấu hoặc thời gian đun nóng quá ngắn?
Có phải bạn đã cho vào ít hơn số lượng nguyên liệu tối thiểu được yêu cầu không?
Có phải bạn đã cho vào nhiều hơn số lượng nguyên liệu tối đa được chấp nhận không?
Nguyên liệu và số lượng đã sử dụng có hợp
lý không?
Dành cho Việt Nam
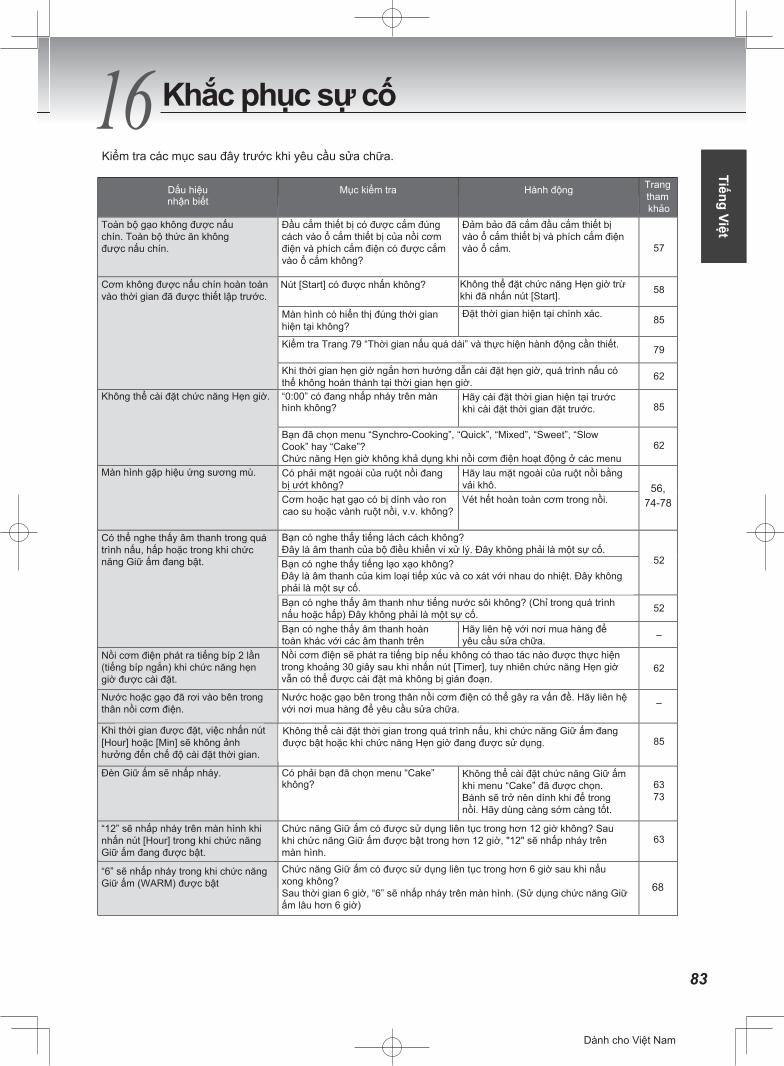
83
English
16 Kiểm tra các mục sau đây trước khi yêu cầu sửa chữa.
Khắc phục sự cốAre Not Made as Expected
シンガポール向け
Dấu hiệu nhận biết
Mục kiểm tra Hành động Trang tham khảo
Toàn bộ gạo không được nấu chín. Toàn bộ thức ăn không được nấu chín.
Đầu cắm thiết bị có được cắm đúng cách vào ổ cắm thiết bị của nồi cơm điện và phích cắm điện có được cắm vào ổ cắm không?
Đảm bảo đã cắm đầu cắm thiết bị vào ổ cắm thiết bị và phích cắm điện vào ổ cắm.
57
Cơm không được nấu chín hoàn toàn vào thời gian đã được thiết lập trước.
Không thể đặt chức năng Hẹn giờ trừ khi đã nhấn nút [Start]. 58
Màn hình có hiển thị đúng thời gian hiện tại không?
Đặt thời gian hiện tại chính xác. 85
Kiểm tra Trang 79 “Thời gian nấu quá dài” và thực hiện hành động cần thiết. 79
Khi thời gian hẹn giờ ngắn hơn hướng dẫn cài đặt hẹn giờ, quá trình nấu có thể không hoàn thành tại thời gian hẹn giờ. 62
Không thể cài đặt chức năng Hẹn giờ. “0:00” có đang nhấp nháy trên màn hình không?
Hãy cài đặt thời gian hiện tại trướckhi cài đặt thời gian đặt trước. 85
Bạn đã chọn menu “Synchro-Cooking”, “Quick”, “Mixed”, “Sweet”, “Slow Cook” hay “Cake”? Chức năng Hẹn giờ không khả dụng khi nồi cơm điện hoạt động ở các menu này:
62
Màn hình gặp hiệu ứng sương mù. Có phải mặt ngoài của ruột nồi đang bị ướt không?
Hãy lau mặt ngoài của ruột nồi bằng vải khô. 56,
74-78
Cơm hoặc hạt gạo có bị dính vào ron cao su hoặc vành ruột nồi, v.v. không?
Vét hết hoàn toàn cơm trong nồi.
Có thể nghe thấy âm thanh trong quá trình nấu, hấp hoặc trong khi chức năng Giữ ấm đang bật.
Bạn có nghe thấy tiếng lách cách không? Đây là âm thanh của bộ điều khiển vi xử lý. Đây không phải là một sự cố.
52Bạn có nghe thấy tiếng lạo xạo không? Đây là âm thanh của kim loại tiếp xúc và chà xát với nhau do nhiệt. Đây không phải là một sự cố. Bạn có nghe thấy âm thanh như tiếng nước sôi không? (Chỉ trong quá trình nấu hoặc hấp) Đây không phải là một sự cố. 52
Bạn có nghe thấy âm thanh hoàn toàn khác với các âm thanh trên không?
Hãy liên hệ với nơi mua hàng để yêu cầu sửa chữa. –
Nồi cơm điện phát ra tiếng bíp 2 lần (tiếng bíp ngắn) khi chức năng hẹn giờ được cài đặt.
Nồi cơm điện sẽ phát ra tiếng bíp nếu không có thao tác nào được thực hiện trong khoảng 30 giây sau khi nhấn nút [Timer], tuy nhiên, bạn vẫn có thể cài đặt chức năng Hẹn giờ mà không làm gián đoạn.
62
Nước hoặc gạo đã rơi vào bên trong thân nồi cơm điện.
Nước hoặc gạo bên trong thân nồi cơm điện có thể gây ra vấn đề. Hãy liên hệ với nơi mua hàng để yêu cầu sửa chữa. –
t đặt thời gian, việc nhấn nút [Hour] hoặc [Min] sẽ không ảnh hưởng đến chế độ cài đặt thời gian.
Không thể thiết đặt thời gian trong quá trình nấu, khi chức năng Giữ ấm đang được bật hoặc khi chức năng Hẹn giờ đang được sử dụng.
85
Đèn Giữ ấm sẽ nhấp nháy. Có phải bạn đã chọn menu “Cake” không?
Không thể cài đặt chức năng Giữ ấm khi menu “Cake” đã được chọn. Bánh sẽ trở nên dính khi để trong nồi. Hãy dùng càng sớm càng tốt.
6373
“12” sẽ nhấp nháy trên màn hình khi nhấn nút [Hour] trong khi chức năng Giữ ấm đang được bật.
Chức năng Giữ ấm có được sử dụng liên tục trong hơn 12 giờ không? Sau khi chức năng Giữ ấm được bật trong hơn 12 giờ, "12" sẽ nhấp nháy trên màn hình.
63
“6” sẽ nhấp nháy khi chức năng Giữ ấm được bật.
Chức năng Giữ ấm có được sử dụng liên tục trong hơn 6 giờ sau khi nấu xong không? Sau thời gian 6 giờ, “6” sẽ nhấp nháy trên màn hình. (Sử dụng chức năng Giữ ấm lâu hơn 6 giờ)
78
Nút [Start] có được nhấn không?
Khi thời gian được đặt, việc nhấn nút
“6” sẽ nhấp nháy trong khi chức năng Giữ ấm (WARM) được bật
Bạn có nghe thấy tiếng lạo xạo không?Đây là âm thanh của kim loại tiếp xúc và co xát với nhau do nhiệt. Đây khôngphải là một sự cố.
Nồi cơm điện sẽ phát ra tiếng bíp nếu không có thao tác nào được thực hiệntrong khoảng 30 giây sau khi nhấn nút [Timer], tuy nhiên chức năng Hẹn giờ vẫn có thể được cài đặt mà không bị gián đoạn.
Không thể cài đặt thời gian trong quá trình nấu, khi chức năng Giữ ấm đangđược bật hoặc khi chức năng Hẹn giờ đang được sử dụng.
Tiếng Việt
Dành cho Việt Nam
56, 74-78
68
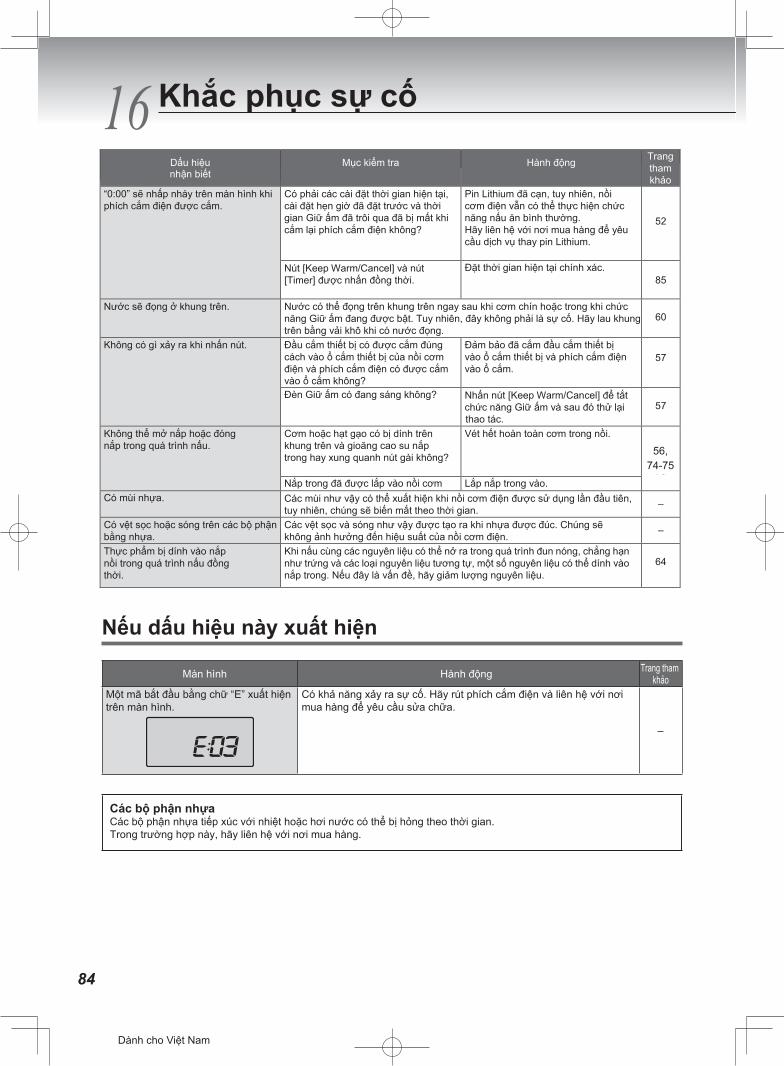
84
16 Khắc phục sự cố
Nếu dấu hiệu này xuất hiện
Màn hình Hành động Trang tham khảo
Một mã bắt đầu bằng chữ “E” xuất hiệntrên màn hình.
Có khả năng xảy ra sự cố. Hãy rút phích cắm điện và liên hệ với nơi mua hàng để yêu cầu sửa chữa.
–
Các bộ phận nhựaCác bộ phận nhựa tiếp xúc với nhiệt hoặc hơi nước có thể bị hỏng theo thời gian. Trong trường hợp này, hãy liên hệ với nơi mua hàng.
シンガポール向け
Dấu hiệu nhận biết
Mục kiểm tra Hành động
“0:00” sẽ nhấp nháy trên màn hình khi phích cắm điện được cắm.
Có phải các cài đặt thời gian hiện tại, cài đặt hẹn giờ đã đặt trước và thời gian Giữ ấm đã trôi qua đã bị mất khi cắm lại phích cắm điện không?
Pin Lithium đã cạn, tuy nhiên, nồi cơm điện vẫn có thể thực hiện chức năng nấu ăn bình thường. Hãy liên hệ với nơi mua hàng để yêu cầu dịch vụ thay pin Lithium.
Nút [Keep Warm/Cancel] và nút [Timer] được nhấn đồng thời.
Đặt thời gian hiện tại chính xác.
Nước sẽ đọng ở khung trên. Nước có thể đọng trên khung trên ngay sau khi cơm chín hoặc trong khi chức năng Giữ ấm đang được bật. Tuy nhiên, đây không phải là sự cố. Hãy lau khung trên bằng vải khô khi có nước đọng.
Không có gì xảy ra khi nhấn nút. Đầu cắm thiết bị có được cắm đúng cách vào ổ cắm thiết bị của nồi cơm điện và phích cắm điện có được cắm vào ổ cắm không?
Đảm bảo đã cắm đầu cắm thiết bị vào ổ cắm thiết bị và phích cắm điện vào ổ cắm.
Đèn Giữ ấm có đang sáng không? Nhấn nút [Keep Warm/Cancel] để tắt chức năng Giữ ấm và sau đó thử lạithao tác.
Không thể mở nắp hoặc đóng nắp trong quá trình nấu.
Cơm hoặc hạt gạo có bị dính trên khung trên và gioăng cao su nắp trong hay xung quanh nút gài không?
Vét hết hoàn toàn cơm trong nồi.
Nắp trong đã được lắp vào nồi cơm điện chưa?
Lắp nắp trong vào. Có mùi nhựa. Các mùi như vậy có thể xuất hiện khi nồi cơm điện được sử dụng lần đầu tiên,
tuy nhiên, chúng sẽ biến mất theo thời gian. Có vệt sọc hoặc sóng trên các bộ phận bằng nhựa.
Các vệt sọc và sóng như vậy được tạo ra khi nhựa được đúc. Chúng sẽ không ảnh hưởng đến hiệu suất của nồi cơm điện.
Thực phẩm bị dính vào nắp nồi trong quá trình nấu đồng thời.
Khi nấu cùng các nguyên liệu có thể nở ra trong quá trình đun nóng, chẳng hạn như trứng và các loại nguyên liệu tương tự, một số nguyên liệu có thể dính vào nắp trong. Nếu đây là vấn đề, hãy giảm lượng nguyên liệu.
52
85
60
57
57
56,74,75
–
–
64
Trangthamkhảo
Dành cho Việt Nam
56, 74-75
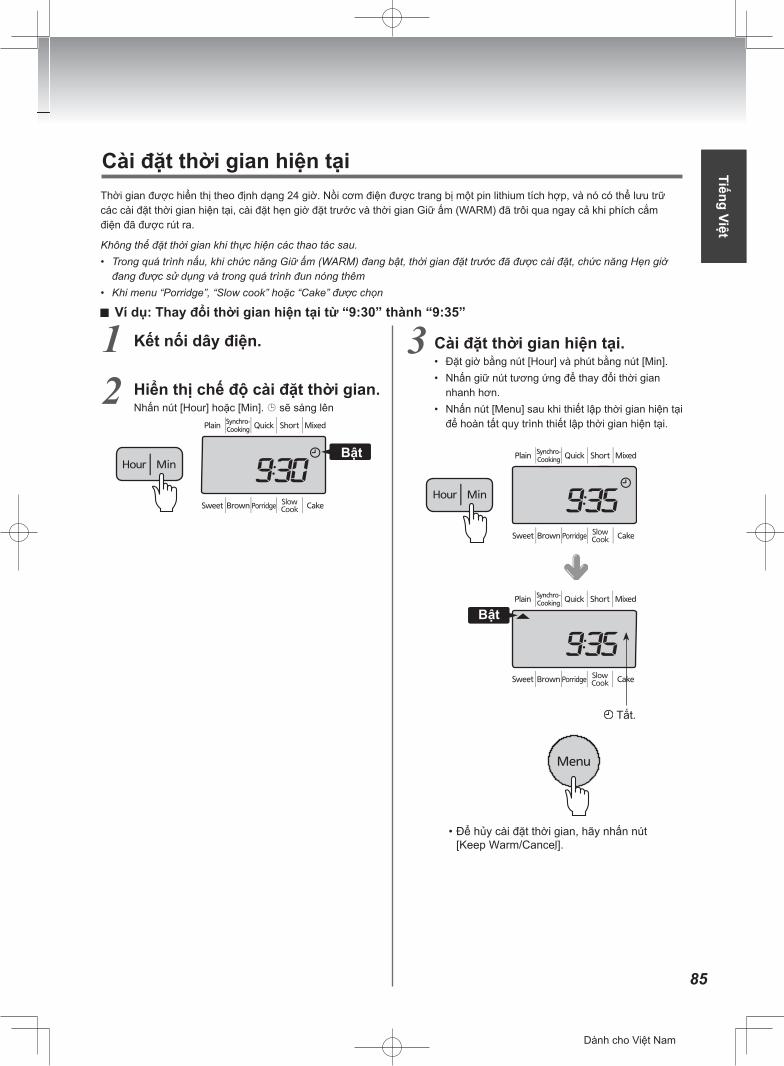
85
English
12
Bật
3
• Để hủy cài đặt thời gian, hãy nhấn nút [Keep Warm/Cancel]..
Cài đặt thời gian hiện tại
シンガポール向け
Tắt.
Bật
Tiếng Việt
Thời gian được hiển thị theo định dạng 24 giờ. Nồi cơm điện được trang bị một pin lithium tích hợp, và nó có thể lưu trữ các cài đặt thời gian hiện tại, cài đặt hẹn giờ đặt trước và thời gian Giữ ấm (WARM) đã trôi qua ngay cả khi phích cắm điện đã được rút ra.
Không thể đặt thời gian khi thực hiện các thao tác sau.• Trong quá trình nấu, khi chức năng Giữ ấm (WARM) đang bật, thời gian đặt trước đã được cài đặt, chức năng Hẹn giờ
đang được sử dụng và trong quá trình đun nóng thêm• Khi menu “Porridge”, “Slow cook” hoặc “Cake” được chọn
Ví dụ: Thay đổi thời gian hiện tại từ “9:30” thành “9:35”
Kết nối dây điện.
Hiển thị chế độ cài đặt thời gian.Nhấn nút [Hour] hoặc [Min]. sẽ sáng lên
Cài đặt thời gian hiện tại.• Đặt giờ bằng nút [Hour] và phút bằng nút [Min].• Nhấn giữ nút tương ứng để thay đổi thời gian
nhanh hơn.• Nhấn nút [Menu] sau khi thiết lập thời gian hiện tại
để hoàn tất quy trình thiết lập thời gian hiện tại.
Dành cho Việt Nam
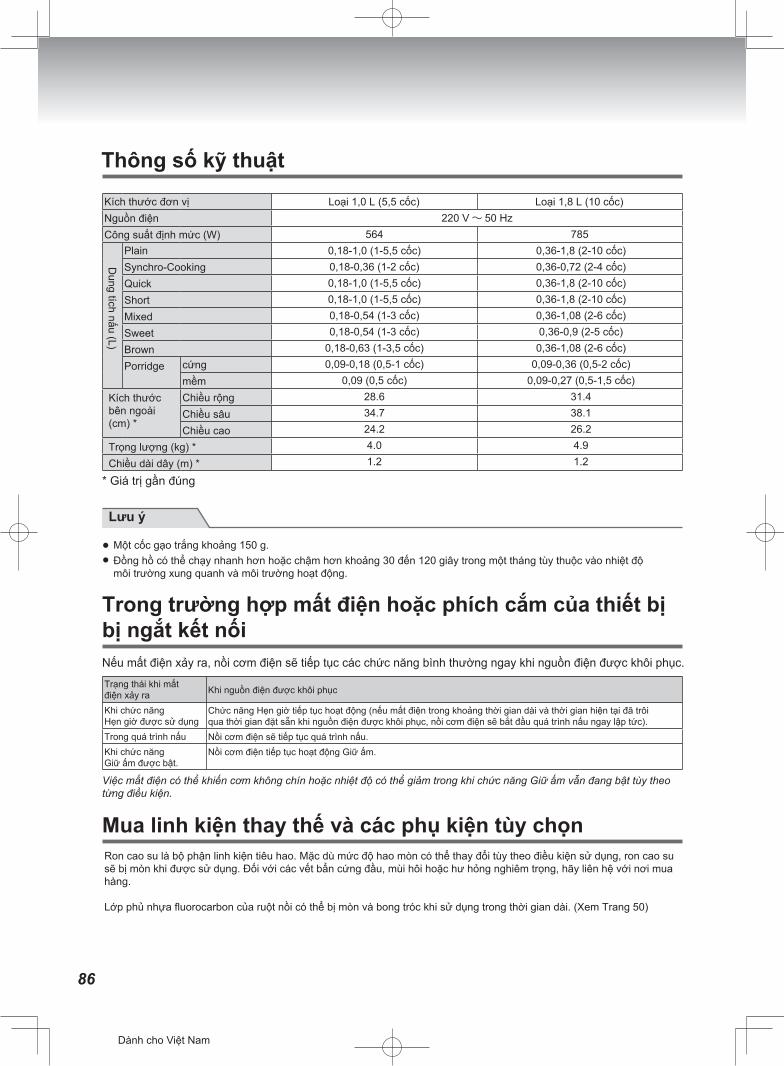
86
Kích thước đơn vịNguồn điệnCông suất định mức (W)
Loại 1,0 L (5,5 cốc) Loại 1,8 L (10 cốc)220 V 50 Hz
564 785
Dung tích nấu (L)
PlainSynchro-CookingQuickShortMixedSweetBrownPorridge
0,18-1,0 (1-5,5 cốc)0,18-0,36 (1-2 cốc)0,18-1,0 (1-5,5 cốc)0,18-1,0 (1-5,5 cốc)0,18-0,54 (1-3 cốc)0,18-0,54 (1-3 cốc)
0,18-0,63 (1-3,5 cốc)0,09-0,18 (0,5-1 cốc)
0,09 (0,5 cốc)28.634.724.24.01.2
0,36-1,8 (2-10 cốc)0,36-0,72 (2-4 cốc)0,36-1,8 (2-10 cốc)0,36-1,8 (2-10 cốc)0,36-1,08 (2-6 cốc)0,36-0,9 (2-5 cốc)0,36-1,08 (2-6 cốc)
0,09-0,36 (0,5-2 cốc)0,09-0,27 (0,5-1,5 cốc)
31.438.126.24.91.2
cứngmềmChiều rộngChiều sâuChiều cao
* Giá trị gần đúng
Lưu ● Một cốc gạo trắng khoảng 150 g.Đồng hồ có thể chạy nhanh hơn hoặc chậm hơn khoảng 30 đến 120 giây trong một tháng tùy thuộc vào nhiệt độ môi trường xung quanh và môi trường hoạt động.
●
Trong trường hợp mất điện hoặc phích cắm của thiết bị bị ngắt kết nốiNếu mất điện xảy ra, nồi cơm điện sẽ tiếp tục các chức năng bình thường ngay khi nguồn điện được khôi phục.
Trạng thái khi mấtđiện xảy raKhi chức năng Hẹn giờ được sử dụngTrong quá trình nấuKhi chức năng Giữ ấm được bật.
Khi nguồn điện được khôi phục
Chức năng Hẹn giờ tiếp tục hoạt động (nếu mất điện trong khoảng thời gian dài và thời gian hiện tại đã trôi qua thời gian đặt sẵn khi nguồn điện được khôi phục, nồi cơm điện sẽ bắt đầu quá trình nấu ngay lập tức).Nồi cơm điện sẽ tiếp tục quá trình nấu.Nồi cơm điện tiếp tục hoạt động Giữ ấm.
Việc mất điện có thể khiến cơm không chín hoặc nhiệt độ có thể giảm trong khi chức năng Giữ ấm vẫn đang bật tùy theo từng điều kiện.
Mua linh kiện thay thế và các phụ kiện tùy chọn
シンガポール向け
Thông số kỹ thuật
Kích thước bên ngoài (cm) *
Trọng lượng (kg) *Chiều dài dây (m) *
Ron cao su là bộ phận linh kiện tiêu hao. Mặc dù mức độ hao mòn có thể thay đổi tùy theo điều kiện sử dụng, ron cao su sẽ bị mòn khi được sử dụng. Đối với các vết bẩn cứng đầu, mùi hôi hoặc hư hỏng nghiêm trọng, hãy liên hệ với nơi mua hàng.
Lớp phủ nhựa fluorocarbon của ruột nồi có thể bị mòn và bong tróc khi sử dụng trong thời gian dài. (Xem Trang 50)
Lưu ý
Dành cho Việt Nam
87

88

89
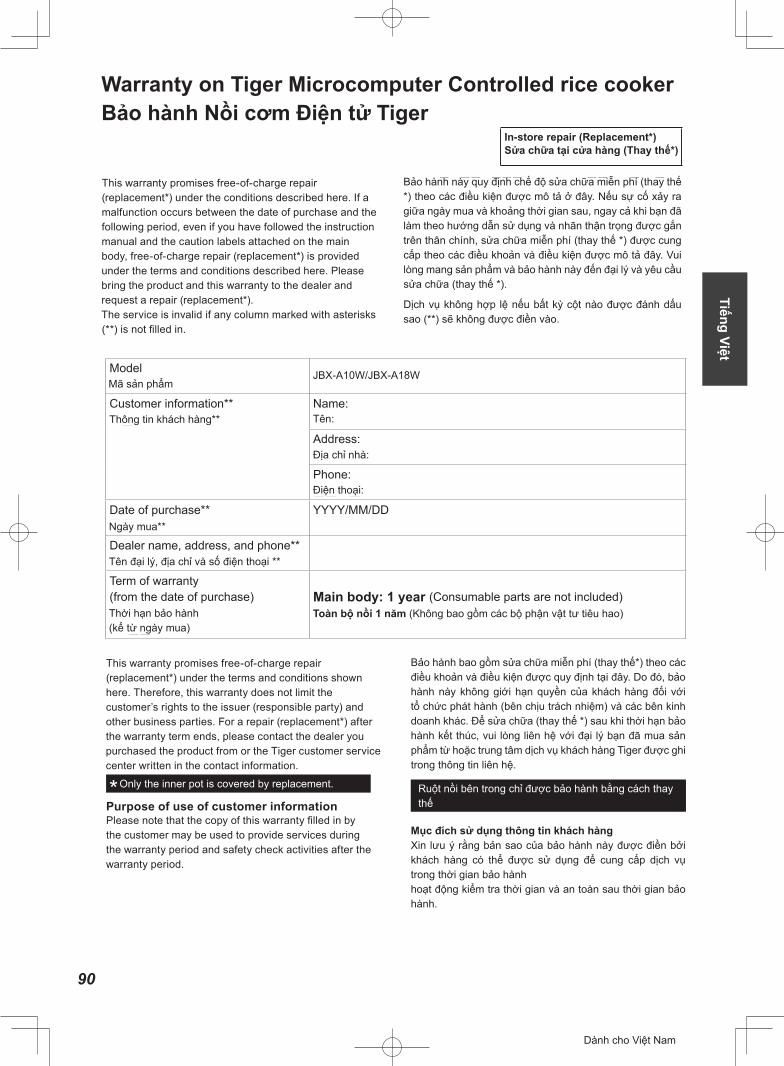
Tiếng Việt
Warranty on Tiger Microcomputer Controlled rice cookerTIGER
In-store repair (Replacement*)*)
This warranty promises free-of-charge repair (replacement*) under the conditions described here. If a malfunction occurs between the date of purchase and the following period, even if you have followed the instruction manual and the caution labels attached on the main body, free-of-charge repair (replacement*) is provided under the terms and conditions described here. Please bring the product and this warranty to the dealer and request a repair (replacement*).The service is invalid if any column marked with asterisks
*)。、本体所
*),*)。
**
ModelJBX-A10S/JBX-A18S
Customer information****
Name:姓名 :
Address:住址 :
Phone::
Date of purchase****
YYYY/MM/DD年月日
Dealer name, address, and phone****
Term of warranty (from the date of purchase)保修期限:
Main body: 1 year (Consumable parts are not included)本体:1年 (消耗品除外)
This warranty promises free-of-charge repair (replacement*) under the terms and conditions shown here. Therefore, this warranty does not limit the customer’s rights to the issuer (responsible party) and other business parties. For a repair (replacement*) after the warranty term ends, please contact the dealer you purchased the product from or the Tiger customer service center written in the contact information.
Only the inner pot is covered by replacement.
Purpose of use of customer information
the customer may be used to provide services during the warranty period and safety check activities after the warranty period.
*律上的权利,
*“ ”中 的 TIGER
シンガポール向け
Mô hình
Thông tin khách hàng** Tên:
JBX-A10W/JBX-A18W
Địa chỉ nhà:
Điện thoại:
Ngày mua**
Tên đại lý, địa chỉ và số điện thoại **
Thời hạn bảo hành(kể từ ngày mua)
Toàn bộ nồi 1 năm (Không bao gồm các bộ phận vật tư tiêu hao)
In-store repair (Replacement*)Sửa chữa tại cửa hàng (Thay thế*)
Warranty on Tiger Microcomputer Controlled rice cookerTIGER
In-store repair (Replacement*)*)
This warranty promises free-of-charge repair (replacement*) under the conditions described here. If a malfunction occurs between the date of purchase and the following period, even if you have followed the instruction manual and the caution labels attached on the main body, free-of-charge repair (replacement*) is provided under the terms and conditions described here. Please bring the product and this warranty to the dealer and request a repair (replacement*).The service is invalid if any column marked with asterisks
*)。、本体所
*),*)。
**
ModelJBX-A10S/JBX-A18S
Customer information****
Name:姓名 :
Address:住址 :
Phone::
Date of purchase****
YYYY/MM/DD年月日
Dealer name, address, and phone****
Term of warranty (from the date of purchase)保修期限:
Main body: 1 year (Consumable parts are not included)本体:1年 (消耗品除外)
This warranty promises free-of-charge repair (replacement*) under the terms and conditions shown here. Therefore, this warranty does not limit the customer’s rights to the issuer (responsible party) and other business parties. For a repair (replacement*) after the warranty term ends, please contact the dealer you purchased the product from or the Tiger customer service center written in the contact information.
Only the inner pot is covered by replacement.
Purpose of use of customer information
the customer may be used to provide services during the warranty period and safety check activities after the warranty period.
*律上的权利,
*“ ”中 的 TIGER
シンガポール向け
Mã sản phẩm
Thông tin khách hàng** Tên:
JBX-A10W/JBX-A18W
Địa chỉ nhà:
Điện thoại:
Ngày mua**
Tên đại lý, địa chỉ và số điện thoại **
Thời hạn bảo hành(kể từ ngày mua)
Toàn bộ nồi 1 năm (Không bao gồm các bộ phận vật tư tiêu hao)
Bảo hành này quy định chế độ sửa chữa miễn phí (thay thế *) theo các điều kiện được mô tả ở đây. Nếu sự cố xảy ra giữa ngày mua và khoảng thời gian sau, ngay cả khi bạn đã làm theo hướng dẫn sử dụng và nhãn thận trọng được gắn trên thân chính, sửa chữa miễn phí (thay thế *) được cung cấp theo các điều khoản và điều kiện được mô tả đây. Vui lòng mang sản phẩm và bảo hành này đến đại lý và yêu cầu sửa chữa (thay thế *).
Dịch vụ không hợp lệ nếu bất kỳ cột nào được đánh dấu sao (**) sẽ không được điền vào.
Bảo hành bao gồm sửa chữa miễn phí (thay thế*) theo các điều khoản và điều kiện được quy định tại đây. Do đó, bảo hành này không giới hạn quyền của khách hàng đối với tổ chức phát hành (bên chịu trách nhiệm) và các bên kinh doanh khác. Để sửa chữa (thay thế *) sau khi thời hạn bảo hành kết thúc, vui lòng liên hệ với đại lý bạn đã mua sản phẩm từ hoặc trung tâm dịch vụ khách hàng Tiger được ghi trong thông tin liên hệ.
Mục đích sử dụng thông tin khách hàngXin lưu ý rằng bản sao của bảo hành này được điền bởi khách hàng có thể được sử dụng để cung cấp dịch vụ trong thời gian bảo hànhhoạt động kiểm tra thời gian và an toàn sau thời gian bảo hành.
Ruột nồi bên trong chỉ được bảo hành bằng cách thay thế
Dành cho Việt Nam
Warranty on Tiger Microcomputer Controlled rice cookerBảo hành Nồi cơm Điện tử Tiger
90
Your rice cooker will last many years. But be sure to inspect it!
Does the rice cooker happen to have the following symptoms?
● The power cord and the plug get extremely hot. ● Smoke or burnt odor comes out from the rice cooker. ● Part of the rice cooker is cracked or loose, or is rattling. ● The inner pot is warped. ● Another abnormality or malfunction occurs.
Stop using the rice cooker and be sure to request an inspection by the dealer to prevent breakdown or accident.
Free-of-charge repair (Replacement*) policy1.
request free-of-charge repair (replacement*) (for example, because you have moved or because you received the product as a present), please contact the Tiger customer service center written in the instruction manual.
2. Note that you will be charged for repair service (replacement*) in the following cases.(a) Malfunction and damage are the result of misuse, improper repair
and tampering on the part of the user.(b) Malfunction and damage are the result of the user changing the
installation position of the product, or transporting or dropping it after purchase.
(c) Mastrike, or other natural disasters or abnormal electric voltage.
(d) Malfunction and damage are the result of usage outside of a general household (for example, long-term commercial usage, or usage in a vehicle or ship).
(e) Malfunction is caused by an intrusion of insects.(f) In case this warranty is not presented.(g) In case the purchase date, customer’s name, and dealer name is not
written in this warranty, or if these have been altered.(h) Replacement of the consumable parts(i) Pu
the inner pot.
• If the inner pot is put on a gas cooker or used in electromagnetic cookers, or microwaves.
• If the Keep Warm function is used not for white rice or rinse-free rice (for example, for seasoned rice).
• If vinegar is used in the inner pot.• If hard materials such as metal ladles, spoons, eggbeaters, or
tableware are put inside or used in the inner pot.• If hard materials such as metal spatulas or hard brushes are used
to clean the product.• In case chemicals (thinners, cleansers, chlorine-based bleaches,
etc.) other than dishwashing detergent (for plates and cooking utensils) are used for the product.
• If strainers, etc. are placed on top of the inner pot.• Dents caused by dropping and carrying the product after purchase.• In addition, if the product is used in a manner not following the
instruction manual, caution sticker, or other written instructions.3. This warranty is valid only in the Philippines.4. This warranty cannot be reissued. Be sure to keep it safe so as not to
lose it.
Only the inner pot is covered by replacement.
Purpose of use of customer informationperiod and safety check activities after the warranty period.
43
Nồi cơm điện của bạn sẽ kéo dài trong nhiều năm. Nhưng hãy chắc ch
Nồi cơm điện có xảy ra
các triệu chứng sau
đây không?
● ● ● ● ●
Dây nguồn và phích cắm cực nóng.Khói hoặc mùi cháy phát ra từ nồi cơm điện.Một phần của nồi cơm điện bị nứt hoặc lỏng, hoặc bị rách.Nồi trong bị biến dạng.Một sự bất thường hoặc sự cố khác xảy ra.
Ngừng sử dụng nồi cơm điện và đảm bảo yêu cầu kiểm tra bởi đại lý để ngăn ngừa sự cố hoặc tai nạn.
Chính sách sửa chữa miễn phí (Thay thế *)
3. Giấy bảo hành này chỉ có hiệu lực tại Philippines.Không thể cấp lại giấy bảo hành này. Hãy luôn cất giữ nó ở nơi an toàn để không làm mất.
4.
Ruột nồi bên trong chỉ được bảo hành bằng cách thay thế.
Bảo hành Nồi cơm Điện tử TigerSửa chữa tại cửa hàng (Thay thế*)
Mô hìnhThông tin khách hàng**
JBX-B10W/JBX-B18WTên:
Địa chỉ nhà:
Điện thoại:
Ngày mua**
Tên đại lý, địa chỉ và số điện thoại **
Thời hạn bảo hành (kể từ ngày mua)
YYYY/MM/DD
Toàn bộ nồi: 1 năm (Không bao gồm các bộ phận vật tư tiêu hao)
Ruột nồi bên trong chỉ được bảo hành bằng
Mục đích sử dụng thông tin khách hàng
フィリピン向け
Bảo hành bao gồm sửa chữa miễn phí (thay thế*) theo các điều khoản và điều kiện được quy định tại đây. Do đó, bảo hành này không giới hạn quyền của khách hàng đối với tổ chức phát hành (bên chịu trách nhiệm) và các bên kinh doanh khác. Để sửa chữa (thay thế *) sau khi thời hạn bảo hành kết thúc, vui lòng liên hệ với đại lý bạn đã mua sản phẩm từ hoặc trung tâm dịch vụ khách hàng Tiger được ghi trong thông tin liên hệ.
Xin lưu ý rằng bản sao của bảo hành này được điền bởi khách hàng có thể được sử dụng để cung cấp dịch vụ trong thời gian bảo hành hoạt động kiểm tra thời gian và an toàn sau thời gian bảo hành.
• Nếu ruột nồi được đặt trên bếp ga hoặc được sử dụng trong bếp điện từ hay lò vi sóng.
• Nếu chức năng Giữ ấm không được sử dụng cho gạo trắng hoặc gạo không cần vo (ví dụ: đối với gạo nếp).
• Nếu giấm được sử dụng trong ruột nồi.• Nếu các vật liệu cứng như muỗng kim loại, muôi, cây đánh trứng, hoặc
bộ đồ ăn được đặt bên trong hoặc được sử dụng trong ruột nồi.• Nếu vật liệu cứng như muỗng kim loại hoặc bàn chải cứng được sử
dụng để vệ sinh sản phẩm.• Trong trường hợp sử dụng các hóa chất (dung dịch pha loãng, chất tẩy
rửa, chất tẩy trắng có clo, v.v.) không phải là nước rửa chén (đối với đĩa và các dụng cụ nấu nướng) cho sản phẩm.
• Nếu dụng cụ lọc, v.v. được đặt trên miệng ruột nồi.• • Ngoài ra, nếu sản phẩm được sử dụng theo cách không tuân thủ
hướng dẫn sử dụng, nhãn dán thận trọng hoặc các hướng dẫn bằng văn bản khác.
1. Nếu bạn gặp khó khăn khi liên hệ với đại lý được chỉ định trong bảo hành này để yêu cầu sửa chữa miễn phí (thay thế *) (ví dụ: vì bạn đã chuyển hoặc vì bạn đã nhận được sản phẩm như một món quà), vui lòng liên hệ với trung tâm dịch vụ khách hàng Tiger trong sách hướng dẫn.
2. Lưu ý rằng bạn sẽ bị tính phí cho dịch vụ sửa chữa (thay thế*) trong các trường hợp sau.
(a) Sự cố và hỏng hóc do sử dụng sai cách, sửa chữa không đúng cách và can thiệp một phần của người dùng.
(b) Sự cố và hỏng hóc do người dùng thay đổi vị trí lắp đặt sản phẩm, vận chuyển hoặc làm rơi sau khi mua.
(c) Sự cố và hỏng hóc do hỏa hoạn, động đất, sét đánh, các thiên tai khác hoặc điện áp bất thường.
(d) Sự cố và hỏng hóc do sử dụng bên ngoài nhà (ví dụ: sử dụng lâu dài cho mục đích thương mại hoặc sử dụng trong xe, trên tàu).
(e) Sự cố do côn trùng xâm nhập.(f) Trong trường hợp không xuất trình được giấy bảo hành.(g) Trong trường hợp ngày mua, tên khách hàng và tên đại lý không
được ghi trong giấy bảo hành này, hoặc khi các thông tin đã bị thay đổi.
(h) Thay thế các bộ phận tiêu hao(i) Bong tróc lớp phủ fluorine của ruột nồi, hoặc cong vênh ruột nồi
bên trong.
Mục đích sử dụng thông tin khách hàng
Dành cho Việt Nam
Your rice cooker will last many years. But be sure to inspect it!
Does the rice cooker happen to have the following symptoms?
The power cord and the plug get extremely hot. Smoke or burnt odor comes out from the rice cooker. Part of the rice cooker is cracked or loose, or is rattling. The inner pot is warped. Another abnormality or malfunction occurs.
Stop using the rice cooker and be sure to request an inspection by the dealer to prevent breakdown or accident.
Free-of-charge repair (Replacement*) policy1.
request free-of-charge repair (replacement*) (for example, because you have moved or because you received the product as a present), please contact the Tiger customer service center written in the instruction manual.
2. Note that you will be charged for repair service (replacement*) in the following cases.(a) Malfunction and damage are the result of misuse, improper repair
and tampering on the part of the user.(b) Malfunction and damage are the result of the user changing the
installation position of the product, or transporting or dropping it after purchase.
(c) Mastrike, or other natural disasters or abnormal electric voltage.
(d) Malfunction and damage are the result of usage outside of a general household (for example, long-term commercial usage, or usage in a vehicle or ship).
(e) Malfunction is caused by an intrusion of insects.(f) In case this warranty is not presented.(g) In case the purchase date, customer’s name, and dealer name is not
written in this warranty, or if these have been altered.(h) Replacement of the consumable parts(i) Pu
the inner pot.
• If the inner pot is put on a gas cooker or used in electromagnetic cookers, or microwaves.
• If the Keep Warm function is used not for white rice or rinse-free rice (for example, for seasoned rice).
• If vinegar is used in the inner pot.• If hard materials such as metal ladles, spoons, eggbeaters, or
tableware are put inside or used in the inner pot.• If hard materials such as metal spatulas or hard brushes are used
to clean the product.• In case chemicals (thinners, cleansers, chlorine-based bleaches,
etc.) other than dishwashing detergent (for plates and cooking utensils) are used for the product.
• If strainers, etc. are placed on top of the inner pot.• Dents caused by dropping and carrying the product after purchase.• In addition, if the product is used in a manner not following the
instruction manual, caution sticker, or other written instructions.3. This warranty is valid only in the Philippines.4. This warranty cannot be reissued. Be sure to keep it safe so as not to
lose it.
Only the inner pot is covered by replacement.
Purpose of use of customer informationperiod and safety check activities after the warranty period.
Mục đích sử dụng thông tin khách hàng
Dành cho Việt Nam
91
TIGER CORPORATIONHead Office: 3-1 Hayami-cho, Kadoma City, Osaka 571-8571, Japan
シンガポール向け
Trụ sở chính: 3-1 Hayami-cho, Kadoma City, Osaka 571-8571, Nhật Bản
Dành cho Việt Nam
Copyright © 2022 FDOKUMEN