Free-Standing Double Oven Electric Cooker with Induction ...
Upload
khangminh22Category
view
0download
0
Electric Micom Rice Cooker
マイコン炊飯ジャー
OPERATING INSTRUCTIONS
For household use only.
取扱説明書このたびは、タイガー炊飯ジャーをお買い上げいただきまことにありがとうございます。ご使用になる前に、この取扱説明書を最後までお読みください。
Tig Tyra
Thank you for purchasing this TIGER rice cooker/warmer.Please read these instructions carefully before use and observe them during use.
微電腦炊飯電子鍋
感謝您購買 TIGER(虎牌)炊飯電子鍋。使用前請務必仔細閱讀本操作說明的全部內容。
Cuiseur à riz électriqueMODE D'EMPLOI
Pour usage domestique
Nous vous remercions d'avoir fait l'achat d'un cuiseur à riz/chau�e-riz de marque TIGER.Veuillez lire attentivement ces instructions avant d'utiliser l'appareil et respectez-lesattentivement.
JAJ-A55U

2
IMPORTANT SAFEGUARDS
1. Read all instructions.2. Do not touch hot surfaces. Use handles or knobs.3. To protect against electrical shock, do not immerse cord or plug in water or other liquid.4. Close supervision is necessary when the appliance is used by or near children.5. Unplug from outlet when not in use and before cleaning. Allow to cool before putting on or
taking off parts.6. Do not operate the appliance with a damaged cord or plug or after the appliance
malfunctions or has been damaged in any manner. Return appliance to the nearest authorized service facility for examination, repair, or adjustment.
7. The use of accessory attachments not recommended by the appliance manufacturer may cause injuries.
8. Do not use outdoors.9. Do not let cord hang over edge of table or counter, or touch hot surfaces.
10. Do not place the appliance on or near a hot gas or electric burner, or in a heated oven.11. Extreme caution must be used when moving the appliance containing hot oil or other hot
liquids.12.
13.
SAVE THESE INSTRUCTIONSServicing should be performed by an authorized service representative.This appliance is intended for household use.
The following instructions are applicable to 120V only:This appliance has a polarized plug (one blade is wider than the other). To reduce the risk of electrical shock, this plug is intended to fit into a polarized outlet in only one way. If the plug does not fit fully into the outlet, reverse the plug. If it still does not fit, contact a qualified electrician. Do not attempt to defeat this safety feature.
Do not use the appliance for other than intended use.14. CAUTIONS: Risk of electric shock, cook only in removable container.
When using the appliance, basic safety precautions should always be followed including the following:
Always attach plug to the appliance first, then plug cord into the wall outlet. To disconnect, turn any control to "off", then remove plug from wall outlet.
The appliance is not intended for use by persons (including children) with reduced physical, sensory or mental capabilities, or lack of experience and knowledge, unless they have been given supervision or instruction concerning use of the appliance by a person responsible for their safety.Children should be supervised to ensure that they do not play with the appliance.
1. A short power cord (or detachable power cord) is provided to reduce the risks of becoming entangled in or tripping over a longer cord.
2. Longer detachable power cords or extension cords are available and may be used if care is exercised in their use.
3. If a longer detachable power cord or extension cord is used:a. The marked electrical rating of the extension cord should be at least as great as the
electrical rating of the appliance.b. The extension cord should be arranged so that it will not drape over the countertop or
tabletop where it can be pulled by children or tripped over unintentionally.

English
3
GARANTIES DE SÉCURITÉ IMPORTANTES
1. Lire toutes les instructions. 2. Ne pas toucher les surfaces chaudes. Utiliser des poignées ou des boutons. 3.
4.
Pour se protéger contre toute électrocution, ne pas immerger le cordon ou la fiche dans l’eau ou dans tout autre liquide.L’utilisation de l’appareil par des enfants ou à proximité d’eux doit être sous stricte supervision.
5. Débrancher l’appareil de la prise murale lorsqu’il n’est pas utilisé ou avant de le nettoyer. Le laisser refroidir avant d’ajouter ou d’enlever des pièces.
6.
7. L’utilisation d’accessoires supplémentaires non recommandés par le fabricant de l'appareil risque de provoquer des blessures.
8. Ne pas utiliser l’appareil à l’extérieur. 9. Ne pas laisser le cordon pendre sur le bord d’une table ou d’un comptoir ou toucher des
surfaces chaudes. .01
11. .21
.31
Ne pas placer l’appareil sur ou à proximité d’une cuisinière à gaz ou électrique, ou dans un four chaud.Faire très attention en déplaçant l’appareil contenant de l’huile chaude ou d’autres liquides chauds.Branchez toujours l’appareil en premier, puis branchez le cordon dans la prise murale. Pour débrancher, mettez tous les boutons sur “arrê”, puis retirez la fiche de la prise murale.Ne pas utiliser l .41 Attention : Pour réduire le risque de secousse eléctrique, cuire le riz uniquement dans le contenant amovible.
’appareil à d’autres fins que celles prévues.
SAUVEGARDER CES INSTRUCTIONSToute réparation doit être effectuée par un réparateur autorisé.
Les instructions suivantes sont applicables à 120V seulement :Cet appareil possède une fiche polarisée (avec une broche plus large qu’une autre). Pour réduire tout risque d’électrocution, cette fiche se branche dans une prise polarisée d’une seule manière. Si la fiche ne rentre pas entièrement dans la prise, la tourner. Si elle ne branche toujours pas, contacter un électricien qualifié. Ne pas forcer cette fonction de sécurité.
Lors de l’utilisation des appareils, vous devez suivre les précautions de sécurité de base à tout moment, y compris les points suivants :
Ne pas utiliser l’appareil avec un cordon ou une prise endommagés ou après un dysfonctionnement de l’appareil ou s’il a été endommagé de quelque manière que ce soit. Retournez l’appareil au centre de service agréé le plus proche pour examen, réparation ou réglage.
Cet appareil est destiné à un usage domestique.
L’appareil n’est pas conçu pour être utilisé par des personnes (y compris des enfants) ayant une déficience physique, sensorielle ou mentale réduite, ou un manque d’expérience et de connaissances, à moins qu’elles soient sous surveillance ou qu’elles aient reçu des instruc-tions concernant l’utilisation de l’appareil par une personne responsable de leur sécurité.Les enfants doivent être surveillés pour s’assurer qu’ils ne jouent pas avec l’appareil.
1. Un cordon d'alimentation court (ou détachable) est fourni pour réduire les risques d'enchevêtrement ou de trébuchement sur un cordon plus long.
2. Des cordons d'alimentation détachables plus longs ou des rallonges sont disponibles et peuvent être utilisés avec prudence.
3. Si un cordon d'alimentation détachable plus long ou une rallonge doit être utilisé :a. La tension nominale marquée sur la rallonge doit être au moins aussi élevée que la
puissance électrique de l'appareil.b. La rallonge doit être disposée de manière à ne pas pendre du plan de travail ou de la
table, où elle pourrait être tirée par des enfants ou vous faire trébucher involontairement.

4

Contents1 Important Safeguards. . . . . . . . . . . . . . . . . . . . . . . . . . . . . . . . . . . . . . . . . . . . . . . . . . . . . . 62 Part Names and Functions. . . . . . . . . . . . . . . . . . . . . . . . . . . . . . . . . . . . . . . . . . . . . . . . 10
Menu options and features. . . . . . . . . . . . . . . . . . . . . . . . . . . . . . . . . . . . . . . . . . . . . . . . 12Tips on making delicious rice. . . . . . . . . . . . . . . . . . . . . . . . . . . . . . . . . . . . . . . . . . . . . . 13
3 Before Cooking Rice. . . . . . . . . . . . . . . . . . . . . . . . . . . . . . . . . . . . . . . . . . . . . . . . . . . . . . 144 Cooking Rice. . . . . . . . . . . . . . . . . . . . . . . . . . . . . . . . . . . . . . . . . . . . . . . . . . . . . . . . . . . . 165 Once the Rice Is Done Cooking. . . . . . . . . . . . . . . . . . . . . . . . . . . . . . . . . . . . . . . . . . . . 176 Cooking Using the Timer. . . . . . . . . . . . . . . . . . . . . . . . . . . . . . . . . . . . . . . . . . . . . . . . . . 187 Keeping the Rice Warm. . . . . . . . . . . . . . . . . . . . . . . . . . . . . . . . . . . . . . . . . . . . . . . . . . . 208 Reheating Cooked Rice. . . . . . . . . . . . . . . . . . . . . . . . . . . . . . . . . . . . . . . . . . . . . . . . . . . 219 Cooking Rice (Soup) and Side Dishes Together ("Synchro-Cooking" Menu). . . . 2310 Making a Stew ("Stew•Soup" Menu). . . . . . . . . . . . . . . . . . . . . . . . . . . . . . . . . . . . . . . . 2611 Baking a Cake ("Cake" Menu). . . . . . . . . . . . . . . . . . . . . . . . . . . . . . . . . . . . . . . . . . . . . . 2912 Cleaning and Maintenance. . . . . . . . . . . . . . . . . . . . . . . . . . . . . . . . . . . . . . . . . . . . . . . . 3113 Cooking Is Not Performed Properly. . . . . . . . . . . . . . . . . . . . . . . . . . . . . . . . . . . . . . . . 3414 Stew Cooking or Cake Baking Does Not Go As Expected. . . . . . . . . . . . . . . . . . . . . 3715 Troubleshooting. . . . . . . . . . . . . . . . . . . . . . . . . . . . . . . . . . . . . . . . . . . . . . . . . . . . . . . . . 38
Others. . . . . . . . . . . . . . . . . . . . . . . . . . . . . . . . . . . . . . . . . . . . . . . . . . . . . . . . . . . . . . . . . . . 40Setting the present time. . . . . . . . . . . . . . . . . . . . . . . . . . . . . . . . . . . . . . . . . . . . . . . . . . . 40Specifications. . . . . . . . . . . . . . . . . . . . . . . . . . . . . . . . . . . . . . . . . . . . . . . . . . . . . . . . . . . . 40In case of a power outage. . . . . . . . . . . . . . . . . . . . . . . . . . . . . . . . . . . . . . . . . . . . . . . . . 41Purchasing replacement parts and optional accessories. . . . . . . . . . . . . . . . . . . . . 41
5
English

The WARNINGS and CAUTIONS described beloware intended to protect the user and other individualsfrom physical harm and household damage. Toensure safety, please follow carefully.Do not remove the caution/warning seal attached tothe appliance.
Safety instructions are classified and describedaccording to the level of harm and damage causedby improper use, as shown below.
This symbol indicates there is apossibility of death or serious injury*1
when the unit is improperly handled.
This symbol indicates there is apossibility of injury*2 or damage toproperty*3 when the unit isimproperly handled.
*1 "Serious injury" is defined here as loss of sight, burns (highand low temperature), electric shock, broken bones,poisoning, or other injuries severe enough to requirehospitalization or extended outpatient care.
*2 "Minor or moderate injury" is defined here as a physical injury,burn, or electric shock which will not require hospital stay orextended outpatient care.
*3 "Damage to property" is defined here as damage towards abuilding, furniture, or pets.
Description of SymbolsThe symbol indicates a warningor caution.The specific details of thewarning or caution are indicatedinside the symbol or in an illustrationor text near the symbol.
The symbol indicates a prohibitedaction.The specific details of theprohibited action are indicatedinside the symbol or in an illustrationor text near the symbol.
The symbol indicates an actionthat must be taken or an instructionthat must be followed. The specificdetails of the action or instructionare indicated inside the symbol or inan illustration or text near thesymbol.
WarningDo not use any other power supply than therated voltage.Otherwise it could cause fire or electric shock.
Use an electrical outlet rated 7A or higher anddo not plug in other devices at the same time.Connecting other devices in the same outlet maycause the outlet to overheat or result in fire.
Do not damage or use a damaged power cord.Do not forcefully bend, twist, fold, or modify thecord. Do not place near high temperature surfacesor under/between heavy objects. A damagedpower cord can cause fire or electric shock.
Wipe the plug thoroughly in the case dust orother foreign objects are collected.This is to avoid fire.
Firmly insert the plug into the outlet to avoidelectric shock, shorting, smoke, or fire.
If the supply cord is damaged, it must bereplaced by a special cord or assemblyavailable from the manufacturer or its serviceagent.
If the supply cord is damaged, it must bereplaced by the manufacturer, its service agentor similarly qualified persons in order to avoida hazard.
Do not plug in or unplug with wet hands.This is to avoid electric shock or injury.
1 Important SafeguardsRead and follow all safety instructions before using the rice cooker.
6

Never open the lid duringcooking.Doing so may result inburns.
Do not place your face or hands near the steamvent.Doing so may result in burns. Be especially carefulto keep out of reach of infants and children.
Do not allow children to use the appliance bythemselves and do not put within reach ofinfants or toddlers.Failing to do so may result in burns, electric shock,or injury.
Do not immerse the appliance in water, or pourwater into the appliance.This is to avoid short circuits, electric shocks, andmalfunctions.
Do not attempt to disassemble, repair, ormodify the product.Repairs should only be performed by aqualified service representative.Doing so may result in fire, electric shock, or injury.
Do not insert any metal objects into any gapsbetween the parts.Doing so may result in electric shock ormalfunction.
When closing the lid, make sure you removeany rice and so on that has stuck around theupper casing and the hook, and that you hearthe lid click shut.If it is not shut, steam may leak out or the lid mayopen and contents may spray out causing burns orother injuries.
Stop using the appliance immediately if youincur any malfunction or trouble.Not doing so may result in fire, electric shock, orinjury.Examples of trouble:
The power cord and/or plug become abnormallyhot.Smoke is emitted from the rice cooker or aburning odor is detected.The rice cooker is cracked or there are loose orrattling parts.The inner pot is deformed.There are other problems or abnormalities.
Immediately unplug the power cord from the outletand contact your local dealer for servicing.
Do not use this product in anyway notdescribed in the operating instructions orsupplied cookbook.Steam or contents may spray out causing burns orother injuries.(Examples)
Heating ingredients inside of plastic cookingbags, etc.Using parchment paper to cover food in the ricecooker.
CautionDo not use on an unstable surface, or on atable or rug that is vulnerable to heat.Doing so may result in fire or damage to the tableor mat.
Do not use near thewall or furniture.Steam and heat maycause damage,discoloration and/ordeformation. Use the ricecooker at least 11.8inches (30 cm) away from walls or furniture. Whenusing the appliance on a kitchen rack or cabinet,make sure the steam or heat is not trapped.
Do not use theappliance in a smallspace that forcessteam onto theoperation panel.Steam and heat maycause damage,discoloration and/or deformation to the operationpanel and the main body. When using the producton a sliding table, pull the table out so that thesteam is not trapped.
Do not expose the plugto steam.Doing so may result inelectric shock or fire.When using the producton a sliding table, becareful not to expose theproduct to steam.
7
English

Do not use the appliance on a sliding table thatis not strong enough to support its weight.If the appliance falls, it could result in injuries,burns, or a malfunction. Make sure the table isstrong enough to support the appliance's weightbefore use.
Do not use therice cookernear a heatsource orwhere it may besplashed withwater.Doing so may result in electric shock,short-circuiting, fire, or deformation or malfunctionof the rice cooker.
Use only the inner pot made exclusively for thisrice cooker.Using any other pot may result in overheating ormalfunction.
Only use the cooking plate supplied with thisrice cooker.Using another cooking plate may result in fire orburns.
Do not cook when the inner pot is empty.Doing so may result in overheating or malfunction.
Be careful of escapingsteam when opening the lid.Exposure to steam may resultin burns.
Do not touch hot parts during or immediatelyafter cooking.Doing so may result in burns.
Unplug power cord when not in use.This is to avoid injury, scalds, electric shock, or firecaused by a short-circuit.
Be sure to firmly holdthe plug when removingfrom an outlet.This is to avoid electricshock, shorting, or fire.
Do not use multiple outletreceptacles.This is to avoid fire.
Handle the rice cooker with care.Dropping the rice cooker or exposing it to a strongimpact may result in injury or malfunction of theunit itself.
Wait until the appliance has cooled downbefore performing maintenance.This is to avoid burns from hot surfaces.
Do not wash the entire appliance.Do not pour water into the appliance or into thebase of the appliance. This is to avoid short circuitsand electric shocks.
Do not move the rice cooker while it is stillcooking.Doing so may cause the contents to spill andcause burns.If the plug is disconnected, rice is not cooked.
Do not touch the open button while carryingthe rice cooker.Doing so may cause the lid to open, resulting ininjury or burns.
Do not use the appliance on an IH cookingheater.This is to avoid malfunction.
1 Important Safeguards
8

Cautions towards enabling the long-term use of this rice cookerRemove any burnt rice or remaining grains of rice.Failure to do so may cause steam to leak or contents to boil over. This may result in malfunction orimproperly cooked rice.Do not cover the rice cooker with a cloth or other object during cooking.Doing so may cause the rice cooker or the lid to become deformed or discolored.Do not reheat (keep warm) cooked rice that has cooled down.This is to avoid malfunctions or fire.The holes on the rice cooker are designed to maintain its functions and performance. In extremely rare cases, dustor even insects may enter these holes and cause malfunction. To prevent this, a commercially available insectprevention sheet, etc., is recommended. If a malfunction does occur due to this problem, it will not be covered bywarranty. Contact the JAPAN TIGER CORPORATION.The inner pot's fluorocarbon resin coating may wear and peel with extended use. This material is harmless tohumans and this situation presents no hindrance to actual cooking or to the rice cooker's heat insulating capability. Inthe case you would like to purchase a new inner pot, you can do so by contacting the JAPAN TIGERCORPORATION.Strictly observe the following instructions to keep the fluorocarbon resin coating from scratching or peeling.
Do not place the inner pot directly over gas, electric, or IH stove top. Do not place in the microwave or oven.Use the Keep Warm function for white rice only. Do not use for mixed or seasoned rice, etc.Do not use vinegar inside the inner pot.Use only the supplied spatula or a wooden spatula.Do not use hard utensils such as metal ladles, spoons, or whisks.Do not place a basket inside inner pot.Do not place tableware and other hard utensils or objects inside the inner pot.Do not clean the inner pot with hard materials such as metal spatulas or nylon scouring sponges.Do not use a dishwasher/dryer to clean the inner pot.Be careful not to scratch the inner pot when washing rice.If the inner pot becomes deformed, contact the store where you purchased the JAPAN TIGER CORPORATION.
9
English

2 Part Names and Functions
10

Accessories<Spatula>
<Measuring cup>About 1 cup (about 0.18 L)About 5.29 oz (150 g)
<Cooking plate> <Cookbook>
Sounds emitted by the rice cookerThe following sounds coming from the rice cookerduring cooking, steaming, reheating, or when the KeepWarm function is on are normal and do not indicate aproblem:
Ticking sound (sound from the microcomputercontroller)Popping sound (the sound of metal contracting due toheat)Water bubbling sound (only while cooking rice andsteaming)
The lithium batteryThe rice cooker has a built-in lithium battery that storesthe present time and preset timer settings even with thepower plug disconnected.
This lithium battery has a four-to-five-year lifeexpectancy with the power plug disconnected.If the lithium battery runs out, "0:00" will blink on thedisplay when the power cord is plugged back in.Normal cooking is still possible, but the present time,preset timer settings, and elapsed Keep Warm timeare no longer stored in the memory when the powerplug is disconnected.
Note Do not attempt to replace the lithiumbattery yourself.To replace the lithium battery, contact theJAPAN TIGER CORPORATION.
Checking the present timeThe time is displayed in a 12-hour format. It should beadjusted if the correct time is not displayed.(See p.40)
11
English
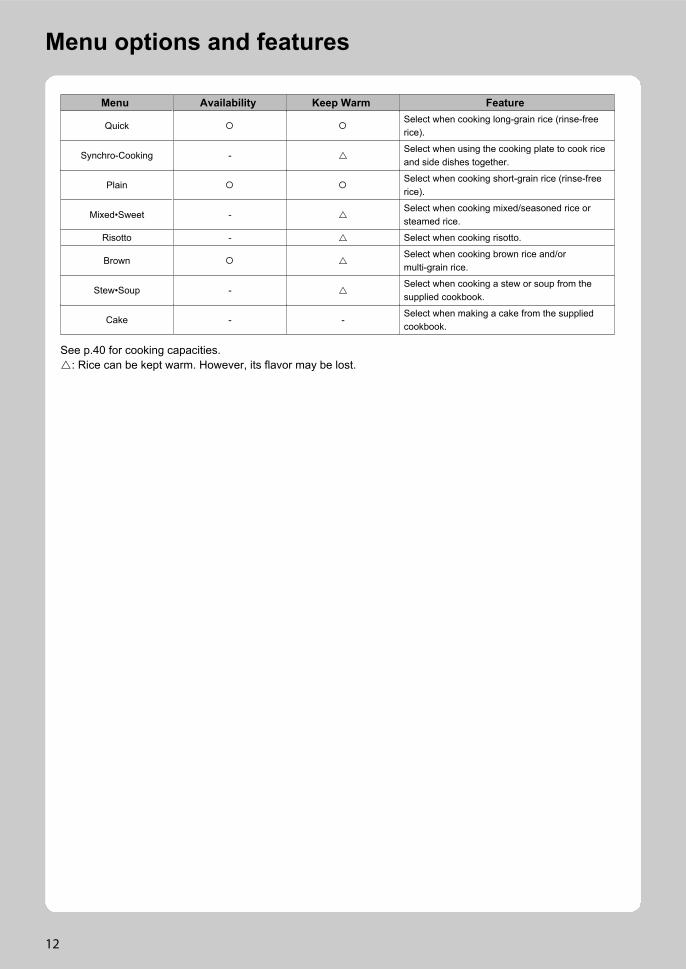
Menu Availability Keep Warm Feature
QuickSelect when cooking long-grain rice (rinse-freerice).
Synchro-Cooking -Select when using the cooking plate to cook riceand side dishes together.
PlainSelect when cooking short-grain rice (rinse-freerice).
Mixed•Sweet -Select when cooking mixed/seasoned rice orsteamed rice.
Risotto - Select when cooking risotto.
BrownSelect when cooking brown rice and/ormulti-grain rice.
Stew•Soup -Select when cooking a stew or soup from thesupplied cookbook.
Cake - -Select when making a cake from the suppliedcookbook.
See p.40 for cooking capacities.: Rice can be kept warm. However, its flavor may be lost.
Menu options and features
12

See page 14 for preparations before cooking rice,and pages 16, 17, and 18 for rice cookinginstructions.
Select high quality rice and storeit in a cool location.Choose freshly polished, glossy rice with a uniformgrain size. Store in a cool, dark, well ventilatedlocation.
Carefully measurethe rice with thesuppliedmeasuring cup.One cup equals about 5.29oz (0.18 L) .
Use the suppliedmeasuring cup for rinse-free rice as well.
Wash therice quickly.Stir the rice aroundwith your hand in agenerous amount ofwater, pour out thewater, and repeatuntil the waterremains clear.
When cooking semi-polishedrice, whole rice, rice boiled withbarley, germinated brown rice,and rice mixed with grains, selectthe "Plain" menu.
When cooking mixed grain with white rice, placethe mixed grain on top of the white rice.There may be more scorched rice than whencompared to polished rice.
Cooking rinse-free riceAdd the rinse-free rice and water, and then stir wellfrom the bottom so that every individual grain ofrice becomes immersed in the water.(Merelyadding water to the rice will prevent it from soakingin the water and may result in improperly cookedrice.)
If the added water turns white, we recommend youwash the rice thoroughly by replacing the wateronce or twice.(The water turning white is due to thestarch in the rice and not its bran; however,cooking it with the starch left in the water mayresult in burnt rice, the contents boiling over, orimproperly cooked rice.)
Add water according to the type ofrice and your personal preference.If you choose to use more or less water than therecommended amount, do not deviate from thatamount by any more than 1/3 of one line.
Amount of water to add
MenuWater scale
(Use the corresponding scale on theinner pot as a guide)
QuickSynchro-CookingPlainMixed
Use the "Plain" scale.
Sweet (sticky rice) Use the "Sweet" scale.
Sweet (sticky riceand regular rice)
Between the "Plain" and "Sweet"scales.
Risotto Use the "Risotto" scale.
Brown Use the "Brown" scale.
For rinse-free rice, make sure the water is added up toslightly over the scale (with the line just covered by thesurface of the water).When cooking semi-polished rice, whole rice, rice boiledwith barley, germinated brown rice, and rice mixed withgrains, use the "Plain" scale as a reference.If the amount of water to add is specified on a package ofgerminated brown rice or multigrain rice, follow thosedirections and add water according to your personalpreference.
Adding other ingredients to thericeThe total amount of ingredients should be no morethan 2.5 oz (70 g) per cup of rice. Stir in anyseasoning well and then add the extra ingredients ontop of the rice. If other ingredients are to be added tothe rice, be sure to use no more than the acceptablemaximum amount (see the following table).
Mixed•Sweet 2 cups or less
Risotto 1 cup or less
Brown 1.5 cups or less
Cooking risottoAfter washing the rice, cook the risotto immediatelywithout draining in a colander. Otherwise the texturecould be spoiled.
Tips on making delicious rice
13
English
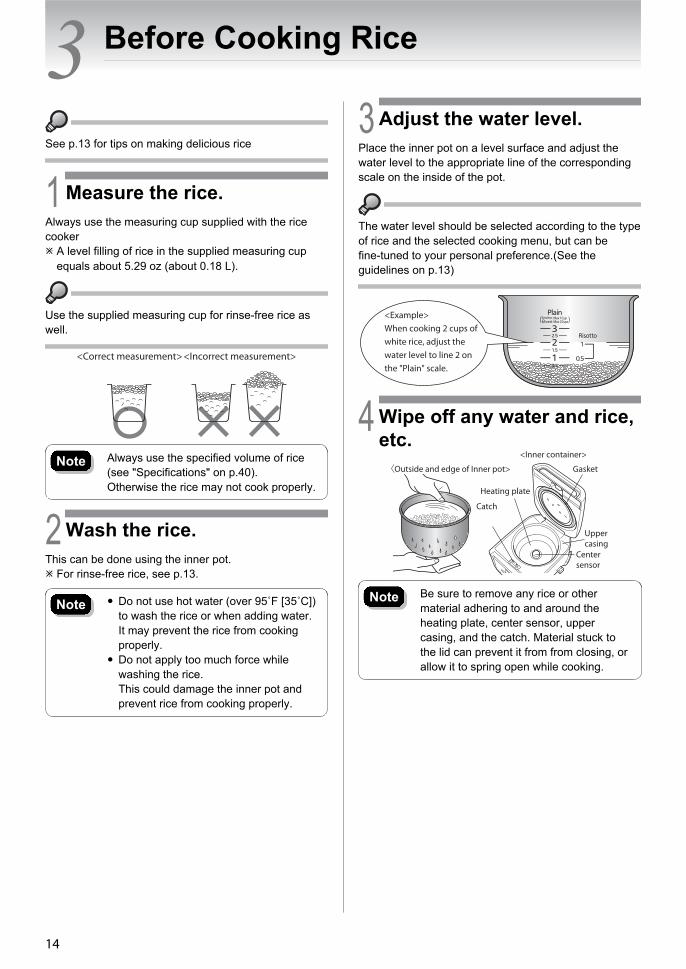
See p.13 for tips on making delicious rice
1 Measure the rice.Always use the measuring cup supplied with the ricecooker
A level filling of rice in the supplied measuring cupequals about 5.29 oz (about 0.18 L).
Use the supplied measuring cup for rinse-free rice aswell.
Note Always use the specified volume of rice(see "Specifications" on p.40).Otherwise the rice may not cook properly.
2 Wash the rice.This can be done using the inner pot.
For rinse-free rice, see p.13.
Note Do not use hot water (over 95˚F [35˚C])to wash the rice or when adding water.It may prevent the rice from cookingproperly.Do not apply too much force whilewashing the rice.This could damage the inner pot andprevent rice from cooking properly.
3 Adjust the water level.Place the inner pot on a level surface and adjust thewater level to the appropriate line of the correspondingscale on the inside of the pot.
The water level should be selected according to the typeof rice and the selected cooking menu, but can befine-tuned to your personal preference.(See theguidelines on p.13)
4 Wipe off any water and rice,etc.
Note Be sure to remove any rice or othermaterial adhering to and around theheating plate, center sensor, uppercasing, and the catch. Material stuck tothe lid can prevent it from from closing, orallow it to spring open while cooking.
3 Before Cooking Rice
14

5 Place the inner pot in themain body and close the lid.
❶Be sure to placethe inner potcorrectly and notat an angle.
❷Close the lid.
Note Make sure the inner pot is placedcorrectly.
6 Insert the power plug to anoutlet.
Note If the Keep Warm light is on, press the[Keep Warm/Cancel] key to turn off thelight.
15
English

See p.13 for tips on making delicious rice
1 Open the panel cover.
Do not apply excess force to the panel cover, or placeanything on it.If any water or cooking material adhere to the insideof the panel cover, wipe it off immediately.
2 Press the [Menu] key tomove the ▲ to the desiredmenu.
Each time the [Menu] key is pressed, the selected menuchanges in the order shown below.
You do not need to press the [Menu] key if thedesired menu is already selected.
Note When "Quick" is selected, the cookingtime is shorter than compared to "Plain".
3 Press the [Start] key.Rice cooking starts.
4 Close the panel cover.
Do not press the keys on the panel cover.
Note Do not place anything susceptible tomagnetism near the rice cooker as thepanel cover contains a built-in magnet.
Cooking time guidelinesQuick Synchro-Cooking Plain Mixed•Sweet
26 to 36 min 31 to 41 min 40 to 50 min 27 to 45 min
Risotto Brown
26 to 36 min 68 to 82 min
The above times indicate the amount of time to the end of steaming after cooking is completed when the rice is not soaked prior to cooking.(Voltage: 120 V, Room temperature: 73.4˚F [23˚C], Water temperature: 73.4˚F [23˚C], Amount of water: normal level)Cooking times will differ somewhat depending upon the amount being cooked, the type of rice, the type and quantity of ingredients, the roomtemperature, the water temperature, the amount of water, electrical voltage, and whether the Timer function is used or not, etc.
4 Cooking Rice
16

When the steaming process starts…The time until steaming is complete is shown on thedisplay in 1-minute increments.Steaming times vary depending upon the selectedmenu. During steaming the time remaining is displayed.("Quick": 7 min / "Plain": 10 min)
When cooking is complete.The Keep Warm function starts automatically.For "Risotto", the Keep Warm light blinks when cookingis complete.
When the "Risotto" menu is selectedAfter the risotto is cooked, you need to reheat whenadding tomato sauce or white sauce. Do not press the[Keep Warm/Cancel] key immediately after cooking;reheat the risotto instead.(See p.22)
Stir and loosen the cooked rice.Be sure to stir and loosen the rice as soon as cooking iscomplete.
Due to the shape of the inner pot, the rice is slightlysunken at the center when cooking is finished.Hold the inner pot firmly with an oven mitt etc.
Note Be sure to wipe off any hot water thatcollects on the upper casing or that runsonto the outside of the rice cooker whenyou open the lid immediately aftercooking or while the Keep Warm functionis on.
When you are done using the rice cooker…
1 Press the [Keep Warm/Cancel] key.
2 Disconnect the power plug.
3 Clean the rice cooker (see p.31 to32).
5 Once the Rice Is Done Cooking
17
English

Using the Timer functionYou can preset the time that you want cooking toactually be complete.The current timer settings are stored in the memory.
Example setting: If the timer is set to 6:30 AM,cooking will be completed at 6:30 AM.
1 Open the panel cover.
2 Check the present time.Make sure the present time is correct, or cooking willnot be completed on time. See p.40 for theprocedure to set the present time.The time is displayed in a 12-hour format.
3 Press the [Timer] key.
6 Cooking Using the Timer(For the "Quick", "Plain", "Brown" menus only.)
18

4 Use the [Hour] and [Min]keys to set the desiredcooking time.
The time is displayed in a 12-hour format.
Press the [Hour] key to change the set time in 1-hourincrements. Press the [Min] key to change that time in10-minute increments.Hold down the corresponding key to change the timemore rapidly.
Note Do not set the timer to more than 12hours, as it may result in spoiled rice.
5 Press the [Menu] key tomove the ▲ to the desiredmenu.
You do not need to press the [Menu] key if thedesired menu is already selected.
6 Press the [Start] key.The timer is set.
If you make a mistake or otherwise want to reset thetimer, press the [Keep Warm/Cancel] key and repeatthe procedure from step 3 on p.18.
7 Close the panel cover.
Note The Timer function is not available inthe following cases.
When the "Synchro-Cooking","Mixed•Sweet", "Risotto","Stew•Soup", or "Cake" menu isselected.When the preset time is less thanthat indicated in the following table.
Menu Minimum preset time
Quick 55 min
Plain 1 h 5 min
Brown 1 h 35 min
When "0:00" is blinking on thedisplay.
If the Keep Warm light is on, press the[Keep Warm/Cancel] key to turn offthe light.(The Timer function is notavailable while the Keep Warm light ison.)
If you do not operate the ricecooker within about 30 secondsafter pressing the [Timer] key, analarm sounds (3 beeps).If the [Timer] or [Start] key ispressed while the rice cooker is in astate where the Timer function isnot available, an alarm sounds (3beeps).
When not changing the Timer or the MenuYou can make settings even when the panel cover isclosed.❶Check the present time.❷Press the [Timer] key.❸Press the [Start] key.
19
English

When cooking is complete, the rice cooker automaticallyswitches to the Keep Warm function.
Turning off the Keep Warm functionPress the [Keep Warm/Cancel] key.(The Keep Warm light turns off)
Restarting the Keep Warm functionPress the [Keep Warm/Cancel] key.(The Keep Warm light turns on)
Keeping a small amount of rice warmGather the rice at thecenter of the inner pot andserve as soon as possible.
Operations during Keep WarmThe Keep Warm light turns on during Keep Warm.
Elapsed Keep Warm time displayHold down the [Hour] key to display the elapsed KeepWarm time. The elapsed time is displayed in 1-hourincrements.After 12 hours, the display blinks up until 24 hours.
After 24 hours have elapsed, "24" blinks.
Note Avoid the following, as they may resultin unusual odors, dryness,discoloration, or corrosion of the innerpot.
Using the Keep Warm function withcold riceAdding cold rice to rice that is beingkept warmLeaving a spatula in the inner potwhile the Keep Warm function is onUsing the Keep Warm function withthe power plug disconnectedUsing the Keep Warm function forlonger than 12 hoursKeeping less than the minimumrequired amount of rice warm (0.5cup)Using the Keep Warm function foranything other than white rice(including rinse-free rice)
Do not leave the cooking plate or foodcooked using the cooking plate insidethe rice cooker while the Keep Warmfunction is on.Be sure to remove any grains of ricethat adhere to the brim of the inner potas well as the gasket. Failure to do socan result in dryness, discoloration,odors, and stickiness of the rice beingcooked.For "Risotto", the Keep Warm lightblinks when cooking is complete. Sinceit can become pasty if kept warm fortoo long, and condensation can dripfrom the inner lid, serve as soon aspossible.For "Cake", the Keep Warm light blinkswhen baking is complete. Sincecondensation can drip from the innerlid, serve as soon as possible.Serve cooked rice as soon as possiblein severe weather conditions such ascold climates and high temperatureenvironments.If the Keep Warm temperature is toolow, reheat the rice (see p.21).
7 Keeping the Rice Warm
20

For the "Quick"/"Plain" menuFor piping hot rice, reheat the rice that is being keptwarm before serving it.
Note Rice will not be fully heated if morethan half of the inner pot is full.The rice will dry out if reheated underany of the following conditions.
The rice is still hot, such asimmediately after cooking.There is less than the minimumrequired amount of rice (0.5 cup).The rice is reheated 3 times or more.
1 Stir and loosen the rice thatwas being kept warm.
2 Add 1 to 2 teaspoons ofwater evenly over the rice.
Adding water will prevent the rice from drying out andresult in plumper rice.
3 Make sure the Keep Warmlight is on.
Reheating is not available if the Keep Warm light isnot on. If the light is not on, press the [Keep Warm/Cancel] key.(See p.20)
4 Press the [Start] key.
To stop reheating, press the [Keep Warm/Cancel]key.
Reheating is not available if the rice istoo cold (131˚F [55˚C]). In this case, arepeated beeping alarm will sound.
5 Stir and loosen the reheatedrice well, and even it out inthe inner pot.
Hold the inner pot firmly with an oven mitt etc.
8 Reheating Cooked Rice
21
English

When adding tomato sauce or white sauce for the "Risotto" menu
1 Add tomato sauce or whitesauce as soon as cooking iscomplete, and mix well.
2 Make sure the Keep Warmlight is blinking.
Reheating is not availableif the Keep Warm light isnot blinking.
3 Press the [Start] key.
Note Make sure you press the [Start] key.(Since pressing the [Keep Warm/Cancel]key prevents reheating, do not press it.)
If reheating is not performed soon after cooking, itmay not be cooked properly.
8 Reheating Cooked Rice
22

You can use the cooking plate to cook side dishes at thesame time as you cook rice (soup).You can also add water to the inner pot and cook sidedishes without making rice.See the supplied Cookbook for instructions.
Note Do not cook with a greater volume ofingredients than as indicated in thesupplied cookbook. Doing so maycause the contents to boil over or resultin improperly cooked food.When cooking dishes with a strongodor, the odor may remain on thecooking plate.When cooking ingredients with a strongcolor, that color may be transferred tothe cooking plate through the broth,etc.Do not use sharp instruments likekitchen knives, table knives, or forksinside the cooking plate.
For the best synchro-cooking experience
<Notes on ingredients for the cooking plate>Do not overfill the cooking plate.Arrange ingredients evenly in the base of thecooking plate, and leave enough space for steam toescape from each ingredient (use the level shownin the following illustration as a guide).
Use as little water or soup as you can (if there is toomuch liquid, it may not be heated sufficiently).Make sure that milk, fresh cream, etc. are mixedwell.When cooking food that expands, such as ahotcake mix, only use a small amount (about 1/3 ofthe depth of the cooking plate as a guide). Sinceeggs also expand, only cook one or two at once.As this also depends on the amount of otheringredients used and the size of the eggs, adjustthe amount as necessary.Slice up ingredients that are difficult to cookthoroughly, such as root vegetables.The cooking plate is designed for steam cookingonly. It cannot be used to fry or bake.
Note If ingredients are insufficiently cookedeven after following the points above,move them into another container andheat in a microwave etc. (the inner potand the cooking plate cannot be placed ina microwave).
Basic steps for synchro-cooking
1 Prepare the ingredients andplace them in the cookingplate.
Spread ingredients over the whole of the cookingplate and avoid stacking them. Doing so may causethe contents to boil over or result in improperlycooked food.
2 Make the necessarypreparations for cookingrice or soup.
(See p.14 1 to 4)
Note <When cooking rice>See the following table for the acceptableamounts of rice that can be cookedconcurrently with food. Do not cook morethan the acceptable maximum or lessthan the minimum required amounts.Doing so may cause the contents to boilover or result in improperly cooked food.
Maximum Minimum
1 cup 0.5 cup
<When making soup>Use the "Plain" scale on the inner pot tomeasure the ingredients for the soup asshown in the following table. Adding morethan the maximum may cause thecontents to boil over or result inimproperly cooked food. If the ingredientsare less than the minimum, they mayburn.
Maximum Minimum
1.5 or less on thePlain scale
1 or more on thePlain scale
9 Cooking Rice (Soup) and Side Dishes Together ("Synchro-Cooking" Menu)
23
English

3 Place the cooking plateinside the inner pot andclose the lid.
Note Always place the cooking plate insidethe inner pot.Make sure that the cooking plate islevel (not set at an angle).Tilt the carrying handle of the cookingplate outward before closing the lid.
4 Insert the power plug to anoutlet.
Note If the Keep Warm light is on, press the[Keep Warm/Cancel] key to turn off thelight.
5 Open the panel cover.
6 Select a Menu.<When cooking rice and another dish at the sametime>Press the [Menu] key and select "Synchro-Cooking".
<When cooking soup and another dish at the sametime>❶Press the [Menu] key and select "Stew•Soup".
❷Set the cooking time at 20 to 30 minutes.(See p.26)
Note When cooking rice and another dish,select "Synchro-Cooking". When makingsoup and another dish, select"Stew•Soup".
9 Cooking Rice (Soup) and Side Dishes Together ("Synchro-Cooking" Menu)
24

7 Press the [Start] key.Synchro-cooking starts.
Note Do not open the lid while cooking.
8 Close the panel cover.
9 When cooking is completeThe Keep Warm function starts automatically.
10 Remove the cooking plate.
Note Do not leave the cooking plate in therice cooker while the Keep Warmfunction is on.Be careful when removing the cookingplate after cooking, as it will be hot.Doing so may result in burns.Do not tilt the cooking plate whileremoving it.The broth, etc., may spill out and resultin burns.Do not return the cooking plate to theinner pot after removing it.Doing so may result in the rice spoilingor not being kept warm.When making soup and another dish,ingredients may adhere to the bottomof the cooking plate, so be carefulwhen placing it on a table etc.
When cooking with ingredients that release a lot ofliquid, oils or fats when heated, or that expand duringheating, such as eggs etc., some of the broth mayoverflow into the inner pot.
Adding water to the inner pot and cooking❶Add water up to 1 on the Plain scale, place the
cooking plate inside the inner pot, and close the lid.❷Select the "Stew•Soup" menu.❸Set the cooking time at 20 to 30 minutes.(See p.26)❹When cooking is complete, press the [Keep Warm/
Cancel] key, and then remove the cooking plate.
When synchro-cooking iscomplete…
1 Press the [Keep Warm/Cancel] key.
2 Remove any odors. See p.33.
25
English

You can prepare the following dishes with ease. See thesupplied Cookbook for instructions.With this menu, food is first brought to near boiling, theheat is then lowered to about 199˚F (93˚C) and the foodleft to simmer. The temperature is then lowered evenfurther to about 190˚F (88˚C) and simmering iscontinued. By gradually lowering the heatingtemperature in this way, flavors are enhanced and theliquids do not boil down even when heated for a longperiod of time.
Menu examplesStewed Pork Cubes and Tofu Skins in Brown Sauce;Gobo and Yamaimo Soup
For how to cook "Stewed Pork Cubes and Tofu Skins inBrown Sauce" and "Gobo and Yamaimo Soup", see thesupplied cookbook.
Note Stir well before cooking to preventseasonings from settling at the bottom ofthe inner pot.
Basic steps for cooking
1 Prepare the ingredients.
2 Add ingredients to the innerpot and close the lid.
Note Use the "Plain" scale on the inside of theinner pot as a reference. Using more thanthe maximum acceptable amount (seethe table below) can prevent properboiling or cause the contents to boil over.Be careful also not to use less than theminimum required amount, as that canalso cause the contents to boil over.
Maximum Minimum
3 or less on the Plainscale
1 or more on thePlain scale
3 Insert the power plug to anoutlet.
Note If the Keep Warm light is on, press the[Keep Warm/Cancel] key to turn off thelight.
4 Open the panel cover.
5 Press the [Menu] key andselect "Stew•Soup".
6 Set the cooking time.Use the [Hour] and [Min] keys to set the cooking time.The cooking time can be set to any 5-minute incrementbetween 5 and 120 minutes.
Each time the [Hour] key is pressed, the set time willincrease by 5 minutes. Each time the [Min] key ispressed, that time will decrease by 5 minutes.
10 Making a Stew ("Stew•Soup" Menu)
26

7 Press the [Start] key.Cooking starts.
Note Do not open the lid while cooking.
8 Close the panel cover.
9 When cooking is completeThe Keep Warm light turns on and "0h" is displayed.
<When food is not sufficiently cooked>When the Keep Warm light is on, press the [Hour] keyto add extra cooking time, and then press the [Start]key.(The cooking time can be extended up to 30minutes a maximum of 3 times.)
Note When food is not sufficiently cooked, donot press the [Keep Warm/Cancel] keybefore adding extra cooking time. Doingso will cause the Keep Warm light to goout and additional cooking will not bepossible. If you pressed it accidentally,follow the steps below.❶Remove the inner pot and place it on a
wet towel or cloth.❷Leave the main body lid open and cool
down the main body and the inner potfor about 10 minutes.
❸Place the inner pot back inside themain body.
❹Repeat the procedure from step 4 onp.26.
<Reheating cooked rice>If you want food that is being kept warm to be piping hotbefore serving it, press the [Start] key when the KeepWarm light is on in order to reheat that food. Theremaining reheating time is displayed and an alarm (3long beeps) sounds when the operation is complete.After reheating, the Keep Warm light turns on and theelapsed Keep Warm time is displayed.
27
English

When cooking is complete…
1 Press the [Keep Warm/Cancel] key.
Press the [Keep Warm/Cancel] key to turn off theKeep Warm lamp.
2 Remove any odors. See p.33.
If the [Keep Warm/Cancel] key is not pressedwhen cooking is complete, the Keep Warmfunction automatically engages and the elapsedKeep Warm time is displayed in hourly incrementsfrom the first hour (1h) up to 6 hours (6h) after that.After 6 hours has elapsed, "6" blinks.
Note Do not use the Keep Warmfunction continuously as somefoods will lose their taste.Do not use the Keep Warmfunction for longer than 6 hours.
10 Making a Stew ("Stew•Soup" Menu)
28

You can bake cakes as described in the suppliedcookbook.
Note Do not try to bake types of cake otherthan those described in the suppliedcookbook.Do not bake with a greater volume ofingredients than as indicated in thesupplied cookbook. Otherwise,ingredients may boil over.
1 Prepare the ingredients.
2 Pour the dough into theinner pot.
3 Press the air out of thedough.
Note When squeezing the air out of the doughbefore baking, do so with a soft cloth.Otherwise the inner pot could bedeformed or damaged.
4 Place the inner pot insidethe main body and close thelid.
5 Insert the power plug to anoutlet.
6 Open the panel cover, andthen press the [Menu] key toselect "Cake".
7 Set the cooking time.Use the [Hour] and [Min] keys to set the cooking time.The cooking time can be set to any 1-minute incrementbetween 1 and 60 minutes.
Each time the [Hour] key is pressed, the set time willincrease by 1 minutes. Each time the [Min] key ispressed, that time will decrease by 1 minutes.
11 Baking a Cake ("Cake" Menu)
29
English

8 Press the [Start] key.Baking starts.
9 Close the panel cover.
10 When baking iscomplete…
The Keep Warm light blinks.
❶Open the lid and poke the center of the cake with awooden skewer.(If no raw dough comes out, thecenter of the cake is baked.)<If dough comes out>While the Keep Warm light is blinking, press the[Hour] key to add extra baking time, and then pressthe [Start] key.(The cooking time can be extendedup to 30 minutes a maximum of 3 times.)
Note Do not press the [Keep Warm/Cancel] key before adding extrabaking time. Doing so will cause theKeep Warm light to go out andadditional baking will not be possible.If you pressed it accidentally, followthe steps below.❶Remove the inner pot and place it
on a wet towel or cloth.❷Leave the main body lid open and
cool down the main body and theinner pot for about 10 minutes.
❸Place the inner pot back inside themain body.
❹Select "Cake", and then setadditional baking time.
❷Remove the inner pot, take out the cake and let itcool.
Note Wear oven mitts, etc. when removingthe inner pot and careful not to touch itwith your bare hands. Doing so mayresult in burns.Remove the cake as soon as baking iscomplete. If it is left in the rice cooker,condensation on the inner lid will driponto the cake, making it sticky.
When baking the cake is complete…
1 Press the [Keep Warm/Cancel] key.
2 Remove any odors. See p.33.
11 Baking a Cake ("Cake" Menu)
30

Perform cleaning and maintenance procedures as described on pages 31 to 33. Any other servicing should beperformed by an authorized service representative.To maintain cleanliness, always clean the rice cooker on the same day it is used. You should also clean the ricecooker at regular intervals.The rice cooker should also be cleaned on the day that it is used in order to remove any odors that remain fromcooking.(See p.33)
Note Be sure to disconnect the power plug and allow the main body, inner pot, inner lid, and cooking plate tocool down before cleaning.
When cleaning the product, use only dishwashing liquid or detergent.Rinse the parts thoroughly since detergent remaining on them may result in deterioration and discoloration ofmaterials such as resin.Clean with a soft sponge or cloth.
Parts to wash after every use
❶Clean with a soft sponge and with tap or lukewarm water.❷Wipe off the water with a dry cloth to dry the parts thoroughly.
Note Do not clean the inner pot withthe abrasive side of aheavy-duty scrubbing sponge.Doing so may damage thefluorocarbon resin coating. Do not wash dishes, etc., inside the inner pot. Doingso may damage thefluorocarbon resin coating orcause it to peel. Also, do notplace the inner pot upsidedown on top of dishes, etc., todry.
Parts to clean when dirty
Wet a towel or cloth, wring out the excess water, and then wipe theinside and outside of the main body and the panel cover.Wipe the power cord with a dry cloth.Remove burnt rice and any other adhering grains of rice that haveadhered to the heating plate and center sensor.If adhering objects are hard to remove, use commercially availablesandpaper (around #320), then wet a towel or cloth, wring outexcess water, and wipe.Remove any grains of rice that have adhered to the upper casing.If the inside of the light hole on the Panel cover is dirty, wipe it witha cotton swab.
Note Do not allow water to get inside the main body.Do not immerse the power cord in water, or splashit with water.Doing so may result in short-circuiting or electricshock.
12 Cleaning and Maintenance
31
English

Note Do not pull the lid gasket.Always keep the inner pot and inner lid cleanto prevent corrosion and odors.Do not use harmful materials such as thinner,cleanser, bleach, chemically-treated wipingcloths, metal scrubbers, or nylon scrubbers.Always clean each part separately.
Do not immerse the measuring cup orspatula in hot water.Doing so may cause them to becomedeformed.Do not use a dishwasher/dryer to clean theinner pot. Doing so may cause them tobecome deformed.Always clean the inner lid after cooking withgrains (amaranths, etc.). The steam vent onthe inner lid may clog and cause problems,such as preventing the lid from opening,resulting in improperly cooked food.
Removing and attaching the inner lidRemoving the inner lid
Pull to the front to remove.
Attaching the inner lidInsert the inner lidinto the hole on thelid as shown in thefollowing figure.
Note Do not pull the lid gasket. Once itis detached, it cannot bereattached.
12 Cleaning and Maintenance
32

Removing odors (When odors remain in the rice cooker and/or cooking plate)Main body
❶Add water up to 70 to 80% of the inner pot, and then with the"Plain" menu selected, press the [Start] key.Do not place the cooking plate inside the inner pot.When the Keep Warm light is on, press the [Keep Warm/Cancel] key.
If odors become bothersome, use about 20 g of citric acidadded to the water for more effective deodorizing.
It may be impossible to remove some odors completely. Inthis case, contact the JAPAN TIGER CORPORATION.
❷Wash the inner pot and inner lid with a standard kitchendetergent, and then rinse thoroughly with water.
❸Allow the main body and all parts to dry in a well-ventilatedlocation.
Note Be careful when handling theinner pot and main body aftercleaning as they become hot.Touching them may result inburns.Be careful when handling thecooking plate after soaking as itbecomes hot.Touching it may result in burns.
Cooking plateImmerse the cooking plate in hot water and allow it to soak for about 1 hour.
Cleaning the heating plateDuring use, condensation runs off the lid and may stain the heating plate.This does not affect the the rice cooker's operations, but if it does concern you, clean asshown below.❶Apply a small amount of commercially available cream cleanser to a nylon scrubbing
brush, and lightly scrub the stained areas on the heating plate.❷Wipe away any dirt with damp kitchen paper or a cloth.
33
English

Check the following points if you experience a problem with the cooked rice or with the operation of the rice cooker,etc.
Check point
When
Shared cooking menu
Was the am
ount of rice,ingredients, and w
atercorrect?
Was cooking done w
ithalkaline ionized w
ater (pH 9
or higher)?
Was cooking done w
ith hardw
ater such as mineral
water?
Was the correct m
enuselected?
Was a key pressed after
cooking without turning off
the Keep W
arm function?
Are there grains of burnt rice
or water drops etc. adhering
to the exterior base innerpot, the heating plate, or thecenter sensor?
Is the inner pot deformed?
Was there a prolonged
power outage?
Was the rice stirred and
loosened well?
Was m
ore than them
aximum
amount of rice
used?
Cooked rice
Is too hard ● ● ● ● ● ● ● ●
Is too soft ● ● ● ● ● ● ●
Is not cookedcompletely
● ● ● ● ● ● ●
Has a hard center ● ● ● ● ● ● ●
Is burned ● ● ● ● ● ●
During cooking
Steam leaks ● ● ● ●
Boils over ● ● ● ●
Cooking time is toolong
● ● ● ● ● ●
Reference page 13•14 - - 16•19 14•17 14•31 - 33 - 41 17 13•40
Check point
When
Shared cooking menu
Are there any grains of rice
adhering to the gasket or thebrim
of the inner pot, etc.?
Was the rice (other than rinse
free rice) washed sufficiently?
Was hot w
ater (over 95°F[35˚C
]) used to wash the rice
or adjust the water level?
Was the rice left soaking in the
water too long after w
ashing?
Was the rice left in a colander
after washing?
Was the lid closed securely?
Was the rice m
ixed with other
ingredients or multi-grain rice?
Were seasonings stirred w
ell?
Were there a lot of cracked
grains of rice?
Was cooking continued
imm
ediately after the initialcooking?
Was the rice cooker and its
parts cleaned sufficiently?
Cooked rice
Is too hard ● ● ● ●
Is too soft ● ● ● ● ● ● ●
Is not cookedcompletely
● ● ●
Has a hard center ● ● ● ●
Is burned ● ● ● ● ● ●
Smells like rice bran ●
During cooking
Steam leaks ● ● ●
Boils over ● ● ● ● ●
Cooking time is toolong
● ●
Reference page 14•31 13•14 14 - - 14 13 - - 31 - 33
13 Cooking Is Not Performed Properly
34

Check point
When
Plainmenu
Risotto menu Synchro-cooking using the cooking plate
Was the tim
er functionused?
Was tom
ato sauce etc.added before cooking?
Was reheating
performed after adding
tomato sauce etc.
Did you forget to add
tomato sauce
imm
ediately aftercooking?
Were m
ore than them
aximum
or less thanthe m
inimum
amounts of
ingredients andseasonings used thanindicated in thecookbook?
Were the ingredients
arranged unevenly in thecooking plate?
Was a m
enu other than"S
ynchro-Cooking" or
"Stew
•Soup" used?
Was there a prolonged
power outage?
Cooked rice
Is too hard ● ● ● ●
Is too soft ● ● ● ● ● ●
Is not cookedcompletely
● ● ● ●
Has a hardcenter
● ● ●
Is burned ● ● ● ● ●
Has an odor ● ● ● ● ●
Is sticky ● ● ● ● ●
Cooked food
Is too hard ● ● ●
Is too soft ● ● ● ●
Is not fullyheated
● ● ●
Overflows intothe rice
● ● ●
During cooking
Steam leaks ● ● ●
Boils over ● ● ● ●
Cooking time istoo long
● ● ●
Reference page - 22 22 22 23 23 23~25 41
Problem Cause
There is a thin film covering the rice. A thin, tissue-like film is formed by melted and dried starch. This is not harmful to your health.
Rice sticks to the inner pot. Soft rice and sticky rice can easily stick to the pot.
Check point
When
Was the am
ount of rice,ingredients, and w
atercorrect?
Are there grains of burned
rice or water drops etc.
adhering to the exteriorbase inner pot, the heatingplate, or the centersensor?
Was there a prolonged
power outage?
Was the rice stirred and
loosened well?
Are there any grains of
rice adhering to the gasketor the brim
of the innerpot, etc.?
Was the rice (other than
rinse free rice) washed
sufficiently?
Was the rice or food
reheated 3 or more tim
es?
Was the Tim
er function setfor m
ore than 12 hours inadvance?
Was the K
eep Warm
function used continuouslyfor m
ore than 12 hours?
Rice being kept w
arm
Has an odor ● ● ● ● ● ●
Is discolored ● ● ● ● ●
Is dry ● ● ● ● ● ● ●
Is sticky ● ● ● ● ● ●
Reheated rice is dry ● ● ● ●
Reference page 13•14 14•31 - 33 41 17 14•31 13•14 21•22 18•19 20
35
English

Check point
When
Is anything other thanw
hite rice or rinse free ricebeing kept w
arm?
Was less than the
minim
um required am
ountof rice being kept w
arm or
reheated?
Is the rice concentratedaround the outer portionsof the inner pot (less ricein the m
iddle of the pot)?
Was cold rice added?
Was a spatula left in the
inner pot?
Did you try to reheat rice
that was just cooked and
was still hot?
Was the rice cooker and
its parts cleanedsufficiently?
Were odors rem
oved aftercooking or cake baking?
Was rice left in the rice
cooker with the K
eepW
arm function turned off?
Rice being kept w
arm
Has an odor ● ● ● ● ● ● ●
Is discolored ● ● ● ● ●
Is dry ● ● ● ● ●
Is sticky ● ● ● ● ● ●
Reheated rice is dry ● ● ● ●
Reference page 20 20 20 20 20 21•22 31 - 3328•30•25•33
20
13 Cooking Is Not Performed Properly
36

Check the following points if you experience a problem with the "Stew•Soup" or "Cake" menus
Check point
When
Were the appropriate
ingredients and amounts
used?
Were m
ore than them
aximum
acceptableingredients added?*
Were less than the
minim
um required
ingredients added?*
Was the cooking or bread
baking time too short?
Was the cooking or bread
baking time too long?
Are there any grains of
rice adhering to the gasketor the brim
of the innerpot, etc.?
Was the lid closed
securely?
Was there a prolonged
power outage?
Does not boil/Does not bakeenough
● ● ● ● ● ●
Boils over ● ● ●
Boils down/burns ● ● ●
Reference page 26•29 26 - 30 26•29•31 41
* "Stew•Soup" menu only
14 Stew Cooking or Cake Baking Does Not Go As Expected
37
English

Check the following before requesting repair service.
Problem Check point ActionReference
page
The rice has not been cooked.The food has not been cooked.
Is the power plug properly connected toan outlet?
Insert the power plug fully into an outlet. 6•14•25•26•29•40
Rice was not cookedcompletely by the preset time.
Does the display show the correct presenttime?
Set the correct present time.40
Check "Cooking time is too long" on p.38 and take the necessary action.
An alarm (3 beeps) sounds andthe Timer function cannot beset.
Does the display show the correct presenttime?
Set the correct present time.40
Is "0:00" blinking on the display? Set the present time.
Was the "Synchro-Cooking","Mixed•Sweet", "Risotto", "Stew•Soup", or"Cake" menu selected?
The Timer function is not available for the"Synchro-Cooking", "Mixed•Sweet","Risotto", "Stew•Soup", or "Cake" menus. 18•19
Was an unacceptable time set? Set a time that is acceptable under theTimer function.
An alarm (3 beeps) soundswhen the Timer function is set.
An alarm sounds if you do not operate therice cooker within about 30 seconds afterpressing the [Timer] key.
Continue setting the Timer function.18•19
The display is blurred. Are there any grains of burned rice or anyother remaining grains of rice adhering tothe gasket or the brim of the inner pot?
Completely remove all remaining rice.
14•31 - 33
Is the outer surface of the inner pot wet? Wipe with a dry cloth.
Sound is heard during cooking,steaming, reheating, or whenthe Keep Warm function is on.
Do you hear a ticking sound? This is the sound from the microcomputercontroller. This is not a malfunction.
11Do you hear a popping sound? This is the sound of metal contracting due
to heat. This is not a malfunction.
Do you hear a water bubbling sound?(During cooking and steaming only)
This is not a malfunction.
Do you hear a completely different soundfrom the above?
Contact the JAPAN TIGERCORPORATION.
-
Reheating is disabled. Does an alarm (3 beeps) sound when youpress the [Start] key?
The rice is cold. Rice below approximately131ºF (55ºC) cannot be reheated.
21•22Is the Keep Warm light off? Press the [Keep Warm/Cancel] key andcheck that the Keep Warm light turns on.Then, press the [Start] key again.
Food adheres to the inner lidduring synchro-cooking.
When cooking with ingredients that expand during heating, such as eggs etc., somemay adhere to the inner lid. If it is bothersome, reduce the amount of the ingredients.
-
Baking a cake takes a longtime.
If the power voltage is low, it may take longer than the standard time to completelybake a cake. Extend the baking time if it is not completely baked.
30
Water or rice has entered themain body.
Water or rice inside the main body may cause problems. Contact the JAPAN TIGERCORPORATION.
-
When setting the present time,pressing the [Hour] or [Min]key does not access the timesetting mode.
The time cannot be set during cooking, when the Keep Warm function is on, when theTimer function is in use, or during reheating.
40
The Keep Warm light isblinking.
When the "Risotto" or "Cake" menu is selected, the Keep Warm light blinks whencooking is complete.
17•20•30
The elapsed Keep Warm time isblinking.
Was the Keep Warm function usedcontinuously for more than 12 hours?
The elapsed Keep Warm time will blinkwhen the Keep Warm function has beenon for more than 12 hours.
20
Was a stew kept warm for more than 6hours?
The elapsed Keep Warm time will blinkwhen the Keep Warm function has beenon for more than 6 hours.
28
15 Troubleshooting
38

Problem Check point ActionReference
page
The present time, preset timersettings, and elapsed KeepWarm time are lost when thepower plug is disconnected.
Does "0:00" blink on the display when thepower plug is connected again?
The lithium battery has run out. Contactthe JAPAN TIGER CORPORATION.
11
The lid will not open, or itopens during cooking.
Are there any grains of rice adhering tothe upper casing?
Completely remove all remaining rice.14•31
Nothing happens when a key ispressed.
Is the power plug properly connected toan outlet?
Insert the power plug fully into an outlet. 6•14•25•26•29•40
Is the Keep Warm light on? Press the [Keep Warm/Cancel] key toturn off the Keep Warm function, then trythe operation again.
14•20
There is a smell of plastic etc. Such odors may occur when the rice cooker is first used, but they should disappearover time.
-
Some lines and waves appearon the plastic parts.
These traces occurred during molding and do not affect the proper functioning of theproduct.
-
Indications appear
Display ActionReference
page
" " appears on the display and a longlasting or continuous beeping alarm sounds.
A malfunction has occurred in the main body. Disconnect the powerplug, and then contact the JAPAN TIGER CORPORATION.
-
Plastic partsPlastic parts that come into contact with heat or steam deteriorate over time. Contact the JAPAN TIGER CORPORATION.
39
English

Setting the present timeThe time is displayed in a 12-hour format.
The time cannot be set during cooking, when the Keep Warm function is on, when the Timer function is in use, orduring reheating.
Example: Changing the present time from "9:30" to "9:35"
1 Open the panel cover.
2 Insert the power plug to anoutlet (see p.15).
3 Display the time settingmode.
Press the [Hour] or [Min] key to display .
4 Set the present time.Set the hour with the [Hour] key and the minute withthe [Min] key.Hold down the corresponding key to change the timemore rapidly.When you have finished setting the time, press the[Min] key.
To cancel setting the time, press the [Keep Warm/Cancel] key.
5 Close the panel cover.
SpecificationsUnit size 0.54 L (3 cups) type
Rating 120V 60Hz
Electric Consumption (W) 458
Cooking capacity (L)
Quick 0.09 to 0.54 (0.5 to 3 cups [2.65 to 15.87 oz])
Synchro-Cooking 0.09 to 0.18 (0.5 to 1 cup [2.65 to 5.29 oz])
Plain 0.09 to 0.54 (0.5 to 3 cups [2.65 to 15.87 oz])
Mixed 0.09 to 0.36 (0.5 to 2 cups [2.65 to 10.58 oz])
Sweet 0.09 to 0.36 (0.5 to 2 cups [2.65 to 10.58 oz])
Risotto 0.09 to 0.18 (0.5 to 1 cup [2.65 to 5.29 oz])
Brown 0.09 to 0.36 (0.5 to 2 cups [2.65 to 10.58 oz])
External Dimensions*(in)
Width 8.7 (22.0 cm)
Depth 10.8 (27.3 cm)
Height 7.5 (19.1 cm)
Weight* (lbs) 6.4 (2.9 kg)
Depending on the room temperature and usage, a time discrepancy of 30 to 120 seconds may occur over the courseof a month.One cup is about 5.29 oz (150 g).
* Approximate values.
40

In case of a power outageIf a power outage does occur, the rice cooker will resume its normal functions once power is restored.
State when power outage occurs Once power is restored
While the Timer function is set The timer will resume operation.(If the power outage lasts for anextended period of time and the preset time has passed when poweris restored, the rice cooker will immediately begin cooking.)
During cooking/reheating The rice cooker will resume cooking/reheating.
While the Keep Warm function is on The Keep Warm function is cancelled in case of a power outage forover 30 minutes.
Depending on the conditions, rice may not be cooked properly, or the Keep Warm temperature may drop.
Purchasing replacement parts and optional accessoriesThe inner pot's fluorocarbon resin coating may wear and peel with extended use.(See p.9)For stubborn dirt, odors, or serious damage, contact the JAPAN TIGER CORPORATION.
41
English

42

Table des matières1 Mesures importantes de sécurité. . . . . . . . . . . . . . . . . . . . . . . . . . . . . . . . . . . . . . . . . . 442 Noms des pièces et fonctions. . . . . . . . . . . . . . . . . . . . . . . . . . . . . . . . . . . . . . . . . . . . . 48
Options du menu et fonctionnalités. . . . . . . . . . . . . . . . . . . . . . . . . . . . . . . . . . . . . . . . 50Conseils pour faire du riz délicieux. . . . . . . . . . . . . . . . . . . . . . . . . . . . . . . . . . . . . . . . . 51
3 Avant la cuisson du riz . . . . . . . . . . . . . . . . . . . . . . . . . . . . . . . . . . . . . . . . . . . . . . . . . . . 524 Cuisson du riz. . . . . . . . . . . . . . . . . . . . . . . . . . . . . . . . . . . . . . . . . . . . . . . . . . . . . . . . . . . 545 Une fois que le riz est cuit. . . . . . . . . . . . . . . . . . . . . . . . . . . . . . . . . . . . . . . . . . . . . . . . . 566 Cuisson avec la minuterie. . . . . . . . . . . . . . . . . . . . . . . . . . . . . . . . . . . . . . . . . . . . . . . . . 577 Maintenir le riz chaud. . . . . . . . . . . . . . . . . . . . . . . . . . . . . . . . . . . . . . . . . . . . . . . . . . . . . 598 Réchauffer le riz cuit. . . . . . . . . . . . . . . . . . . . . . . . . . . . . . . . . . . . . . . . . . . . . . . . . . . . . . 609 Cuisson du riz (soupe) et accompagnements ensemble ( menu « Synchro-
Cooking » ). . . . . . . . . . . . . . . . . . . . . . . . . . . . . . . . . . . . . . . . . . . . . . . . . . . . . . . . . . . . . . 6210 Faire un ragoût (menu « Stew•Soup »). . . . . . . . . . . . . . . . . . . . . . . . . . . . . . . . . . . . . . 6611 Cuisson d'un gâteau (menu « Cake »). . . . . . . . . . . . . . . . . . . . . . . . . . . . . . . . . . . . . . 6912 Nettoyage et entretien. . . . . . . . . . . . . . . . . . . . . . . . . . . . . . . . . . . . . . . . . . . . . . . . . . . . 7213 La cuisson n'est pas effectuée correctement. . . . . . . . . . . . . . . . . . . . . . . . . . . . . . . . 7514 La cuisson du ragoût ou du gâteau n’est pas réussie.. . . . . . . . . . . . . . . . . . . . . . . . 7915 Dépannage. . . . . . . . . . . . . . . . . . . . . . . . . . . . . . . . . . . . . . . . . . . . . . . . . . . . . . . . . . . . . . 80
Autres. . . . . . . . . . . . . . . . . . . . . . . . . . . . . . . . . . . . . . . . . . . . . . . . . . . . . . . . . . . . . . . . . . . 82Régler l'heure actuelle. . . . . . . . . . . . . . . . . . . . . . . . . . . . . . . . . . . . . . . . . . . . . . . . . . . . 82Spécifications. . . . . . . . . . . . . . . . . . . . . . . . . . . . . . . . . . . . . . . . . . . . . . . . . . . . . . . . . . . . 82En cas de panne de courant . . . . . . . . . . . . . . . . . . . . . . . . . . . . . . . . . . . . . . . . . . . . . . 83Achat de pièces de rechange et accessoires en option.. . . . . . . . . . . . . . . . . . . . . . 83
43
Français

Les AVERTISSEMENTS et MISES EN GARDEdécrites ci-dessous ont pour but de protégerl'utilisateur et autres personnes du danger physique etdes dommages matériels. Pour assurer la sécurité,veuillez les suivre attentivement.Ne pas retirer le sceau de mise en garde/avertissement fixé à partie principale.
Les consignes de sécurité sont classées et décritesen fonction du niveau des dommages causés parune mauvaise utilisation, tel que démontréci-dessous.
Avertissement
Ce symbole indique qu'il y a unrisque de blessures graves, voiremortelles*1 lorsque l'appareil est malmanipulé par l'utilisateur.
Mise en garde
Ceci indique qu'il y a un risque deblessures*2 ou de dommage à lapropriété *3si l'appareil est malmanipulé par l'utilisateur.
*1 Une « blessure grave » est définie ici comme la perte de lavue, des brûlures (de haute et basse température), uneélectrocution, des fractures, une intoxication ou d'autresblessures assez graves pour nécessiter une hospitalisationou des soins ambulatoires.
*2 Une « blessure mineure ou modérée » est définie ici commeune blessure physique, une brûlure ou une électrocution quine nécessitent pas d'hospitalisation ou de soinsambulatoires.
*3 Des « dommages à la propriété » sont définis ici comme desdommages à un immeuble, du mobilier ou des animauxdomestiques.
Description des symbolesLe symbole indique un avertisse-ment ou une mise en garde. Les dé-tails spécifiques de l'avertissementou du symbole sont indiqués à l'inté-rieur du symbole ou dans une imageou un texte à côté du symbole.
Le symbole indique une action in-terdite. Les détails spécifiques del'interdiction sont indiqués dans lesymbole, l'illustration ou le texte àcôté du symbole.
Le symbole indique une actionqui doit être prise ou une directivequi doit être suivie. Les détails spé-cifiques de l'action ou de la directivesont indiqués dans le symbole oul'illustration ou le texte à côté dusymbole.
AvertissementN'utiliser aucune autre alimentation que la ten-sion nominale.Sinon, cela pourrait provoquer un incendie ou uneélectrocution.
Utiliser une prise électrique nominale 7A ouplus et ne pas brancher d'autres appareils enmême temps.Le raccordement d'autres appareils dans la mêmeprise peut entraîner une surchauffe de la prise ouprovoquer un incendie.
Ne pas endommager ou utiliser un cordon d'ali-mentation endommagé.Ne pas courber, tordre, plier ou modifier le cordon.Ne pas placer à proximité de surfaces à haute tem-pérature ou sous/entre des objets lourds. Un cor-don d'alimentation endommagé peut provoquer unincendie ou une électrocution.
Essuyer la fiche électrique complètement aucas où de la poussière ou d'autres corps étran-gers se soient accumulés.Ceci afin d'éviter un incendie.
Insérer fermement la fiche électrique dans laprise pour éviter une électrocution, uncourt-circuit, de la fumée ou un incendie.
Si le cordon d'alimentation est endommagé, ildoit être remplacé par un cordon spécial dispo-nible auprès du fabricant ou de son agent deservice.
1 Mesures importantes de sécuritéLire et suivre toutes les directives de sécurité avant d'utiliser l'appareil.
44

Si le cordon d'alimentation est endommagé, ildoit être remplacé par le fabricant, son techni-cien de service après-vente ou un technicienqualifié afin d'éviter tout danger.
Ne pas fiche électrique ou débrancher avec lesmains mouillées.Ceci afin d'éviter une électrocution ou une blessu-re.
Ne jamais ouvrir le couver-cle en cours de cuisson.Cela peut entraîner des brû-lures.
Ne placez pas votre visage ou vos mains prèsde l'évent de vapeur.Cela peut entraîner des brûlures. Portez une atten-tion particulière à tenir hors de portée des nourris-sons et des enfants.
Ne pas laisser les enfants utiliser l'appareil pareux-mêmes et ne pas le placer dans des lieux àla portée des enfants ou nourrissons;Sinon, cela peut entraîner des brûlures, des élec-trocutions ou des blessures.
Ne pas plonger l'appareil dans l'eau ou verserde l'eau dans l'appareil.Ceci afin d'éviter les courts-circuits, les électrocu-tions et les défaillances.
Ne pas tenter de démonter, réparer ou modifierle produit.Les réparations doivent être effectuées par untechnicien qualifié.Cela pourrait provoquer un incendie, une déchargeélectrique ou une blessure.
Ne pas insérer d'objets métalliques dans lesfentes entre les parties.Cela pourrait provoquer une électrocution ou unedéfaillance.
Lors de la fermeture du couvercle, assu-rez-vous d'enlever tout riz ou autre aliment quia collé autour du partie supérieure du boîtier etdu crochet, et d'entendre le clic après avoir re-fermé le couvercle.S'il n'est pas bien fermé, la vapeur peut s'échapperou le couvercle peut s'ouvrir et le contenu peut jail-lir et causer des brûlures ou autres blessures.
Arrêter immédiatement d'utiliser l'appareil sivous constatez toute défaillance ou problème.Sinon, cela pourrait provoquer un incendie, uneélectrocution ou une blessure.Exemples de problèmes :
Le fiche électrique ou la prise deviennentanormalement chauds.De la fumée est émise par le cuiseur à riz ou uneodeur de brûlé est détectée.Le cuiseur à riz est fissuré ou il y a des piècesdétachées ou des cliquetis.La casserole intérieure est déformée.Il y a d'autres problèmes ou anomalies.
Débrancher immédiatement le cordon d'alimenta-tion de la prise et contacter un revendeur localpour l'entretien.
Ne pas utiliser ce produit de toute autre façonn'ayant pas été décrite dans les directives d'uti-lisation ou le livre de recettes fourni.De la vapeur ou le contenu peuvent jaillir et causerdes brûlures ou d'autres blessures.(Exemples)
Chauffer des ingrédients à l'intérieur de sacs decuisson en plastique, etc.Utiliser du papier parchemin pour couvrir lesaliments dans le cuiseur à riz.
Mise en gardeNe pas utiliser sur une surface instable ou surune table ou un tapis qui est vulnérable à lachaleur.Cela pourrait provoquer un incendie ou des dom-mages à la table ou au tapis.
45
Français

Ne pas utiliser prèsd'un mur ou de meu-bles.La vapeur et la chaleurpeuvent causer desdommages, une décolo-ration ou une déforma-tion. Utilisez le cuiseur à riz à moins de 30 cm(11,8 pouces) des murs ou meubles. Lors de l'utili-sation de l'appareil sur une étagère de cuisine ouune armoire, assurez-vous que la vapeur ou lachaleur ne sont pas piégées.
Ne pas utiliser l'appa-reil dans un espacerestreint qui force lavapeur sur le tableaude commande.La vapeur et la chaleurpeuvent causer desdommages, une décoloration ou une déformationdu tableau de commande et la partie principale.Lorsque vous utilisez le produit sur une table cou-lissante, tirez la table de sorte que la vapeur nesoit pas coincée.
Ne pas exposer la ficheélectrique à la vapeur.Cela pourrait causer desélectrocutions ou un in-cendie. Lors de l'utilisa-tion du produit sur une ta-ble coulissante, veillez àne pas exposer le produità la vapeur.
Ne pas utiliser l'appareil sur une table coulis-sante qui n'est pas assez solide pour supporterson poids.Si l'appareil tombe, il peut entraîner des blessures,des brûlures ou une défaillance. Assurez-vous quela table est assez solide pour supporter le poids del'appareil avant de l'utiliser.
Ne pas utiliserle cuiseur à rizprès d'unesource de cha-leur ou à un en-droit où il peutêtre éclabousséd'eau.Cela pourrait entraîner une électrocution, uncourt-circuit, un incendie ou une déformation ouune défaillance du cuiseur à riz.
Utilisez uniquement la casserole intérieure faiteexclusivement pour ce cuiseur à riz.L'utilisation de toute autre casserole peut entraînerune surchauffe ou une défaillance.
N'utilisez que le plateau de cuisson fourni avecce cuiseur à riz.L'utilisation d'un autre plateau de cuisson peut pro-voquer un incendie ou des brûlures.
Ne pas faire chauffer lorsque la casserole intér-ieure est vide.Cela pourrait entraîner une surchauffe ou une dé-faillance.
Attention à la vapeur quis'échappe lors de l'ouvertu-re du couvercle.L'exposition à la vapeur peutcauser des brûlures.
Ne pas toucher aux pièces chaudes pendant ouimmédiatement après la cuisson.Cela peut entraîner des brûlures.
Débrancher le fiche électrique lorsque l'appa-reil n'est pas utilisé.Ceci afin d'éviter les blessures, les brûlures, lesélectrocutions ou un incendie dus à un court-cir-cuit.
Veillez à tenir fermementla fiche électrique lors-que vous la retirez de laprise.Ceci est afin d'éviter uneélectrocution, un court-cir-cuit ou un incendie.
Ne pas utiliser d'appareils àprises multiples.Ceci afin d'éviter un incendie.
Manipulez le cuiseur à riz avec soin.Si vous échappez le cuiseur à riz ou l'exposez à unchoc violent, ceci peut entraîner des blessures ouune défaillance de l'appareil.
Attendez jusqu'à ce que l'partie principale soitrefroidi avant d'effectuer l'entretien;Ceci afin d'éviter les brûlures causées par les sur-faces chaudes.
Ne pas laver l'appareil entier.Ne pas verser d'eau dans l'partie principale ou lesocle de l'partie principale, afin d'éviter lescourts-circuits et les électrocutions.
1 Mesures importantes de sécurité
46

Ne déplacez pas le partie principale lorsqu'il esten mode de cuisson.Sinon, les aliments peuvent déborder et causerdes brûlures.Si la prise est débranchée, le riz ne cuira pas.
Ne touchez pas au bouton d'ouverture si vousdéplacez le cuiseur à riz.Cela peut provoquer l'ouverture du couvercle, en-traînant des blessures ou des brûlures.
Ne pas utiliser le cuiseur sur un appareil decuisson à chauffage par induction.Ceci, afin d'éviter une défaillance.
Précautions pour l'utilisation à long terme de ce cuiseur à rizRetirez tout le riz brûlé ou les grains restants.Sinon, cela peut causer une fuite de vapeur ou un débordement du contenu. Cela peut entraîner unedéfaillance ou du riz mal cuit.Ne couvrez pas le cuiseur à riz avec un chiffon ou tout autre objet en cours de cuisson.Cela peut faire en sorte que le cuiseur à riz ou le couvercle se déforment ou se décolorent.Ne réchauffez pas (réchaud) du riz cuit qui a refroidi.Ceci afin d'éviter une défaillance ou un incendie.Les trous sur le cuiseur à riz sont conçus pour maintenir ses fonctions et sa performance. Dans des casextrêmement rares, de la poussière ou même les insectes peuvent entrer dans ces trous et provoquer unedéfaillance. Afin d'éviter cela, les feuilles d'insectifuge disponibles dans le commerce sont recommandées. Si unedéfaillance se produit en raison de ce problème, celle-ci ne sera pas couverte par la garantie. Contactez JAPONTIGER CORPORATION.Le revêtement de résine fluorocarbonée de la casserole intérieure peut s'user et se décoller avec une utilisationprolongée. Ce matériau est inoffensif pour les humains et cette situation ne présente aucun obstacle à la cuissonproprement dite ou à la capacité d'isolation thermique du cuiseur à riz. Dans le cas où vous souhaitez acheter unenouvelle casserole intérieure, vous pouvez le faire en communiquant avec JAPON TIGER CORPORATION.Respectez scrupuleusement les directives suivantes pour éviter que le revêtement de résine fluorocarbonée nes'égratigne ou se décolle.
Ne placez pas la casserole intérieure directement sur le gaz, sur une cuisinière électrique ou à cuisson parinduction. Ne pas placer dans le micro-ondes ou au four.Utilisez la fonction de réchaud (maintien au chaud) pour le riz blanc seulement. Ne pas utiliser pour du rizmélangé ou assaisonné, etc.Ne pas mettre de vinaigre dans la casserole intérieure.Utilisez uniquement la spatule fournie ou une spatule en bois.Ne pas utiliser des ustensiles durs tels que des louches, cuillères, ou fouets en métal.Ne placez pas un panier dans la casserole intérieure.Ne placez pas de vaisselle ou autres ustensiles ou objets dans la casserole intérieure.Ne pas nettoyer la casserole intérieure avec des matériaux durs comme les spatules métalliques ou des tamponsà récurer en nylon.Ne pas utiliser un lave-vaisselle/séchoir pour nettoyer la casserole intérieure.Veillez à ne pas égratigner la casserole intérieure lors du lavage du riz.Si la casserole intérieure se déforme, contactez le magasin où vous avez acheté le produit ou JAPON TIGERCORPORATION.
47
Français

2 Noms des pièces et fonctions
48

Accessoires<Spatule>
<Tasse à mesurer> Environ 1 tasse (environ0,18 L)Environ 5,29 oz (150 g)
<plateau de cuisson> <COOKBOOK>
Sons émis par le cuiseur à rizLes sons suivants provenant du cuiseur à riz lors de lacuisson à l'eau ou la vapeur, le réchauffage, ou lorsquela fonction de maintien au chaud est utilisée sontnormaux et n'indiquent pas un problème :
Tic-tac (son provenant du microcontrôleur)Claquement (le bruit du métal se contractant à lachaleur)Son de bouillonnement de l'eau (seulement pendantla cuisson du riz à l'eau et à la vapeur)
Pile au lithiumLe cuiseur à riz possède une pile au lithium intégrée quimaintient l'heure actuelle et les réglages prédéfinis de laminuterie même lorsque la fiche d'alimentationdébranchée.
Cette pile au lithium a une espérance de vie de quatreà cinq ans avec la fiche d'alimentation débranchée.Si la pile au lithium s'épuise, « 0:00 » clignotera àl'écran lorsque le cordon d'alimentation est rebranché.La cuisson normale est toujours possible, mais l'heureactuelle, les réglages de minuterie prédéfinis, et letemps de réchaud écoulé ne sont plus stockés dansla mémoire lorsque le cordon d'alimentation estdébranché.
Note Ne pas tenter de remplacer la pile aulithium vous-même.Pour remplacer la pile au lithium,contactez JAPON TIGERCORPORATION.
Vérification de l'heure actuelleL'heure est affichée dans un format de 12 heures. Elledoit être ajustée si l'heure affichée est incorrecte. (voirp.82)
49
Français

Menu Disponibilité Réchaud Fonction
QuickSélectionnez lors de la cuisson du riz à grainslongs (riz sans rinçage).
Synchro-Cooking -Sélectionnez lors de l'utilisation du plateau decuisson pour cuire du riz et les plats d'accompa-gnement ensemble.
PlainSélectionnez lors de la cuisson du riz à grainscourts (riz sans rinçage).
Mixed•Sweet -Sélectionnez lors de la cuisson du riz mélangé/assaisonné ou du riz cuit à la vapeur.
Risotto - Sélectionnez lors de la cuisson du risotto.
BrownSélectionnez lors de la cuisson du riz brun oumultigrains.
Stew•Soup -Sélectionnez lors de la cuisson d'un ragoût oud'une soupe du livre de recettes fourni.
Cake - -Sélectionnez lors de la préparation d'un gâteaudu livre de recettes fourni.
Voir p.82 pour les capacités de cuisson.: Le riz peut être maintenu au chaud. Cependant, la saveur peut être atténuée.
Options du menu et fonctionnalités
50

Voir la page 52 pour les préparations avant lacuisson du riz, et les pages 54, 56, et 57 pourles directives de cuisson du riz.
Sélectionnez du riz de qualitésupérieure et conservez-le dansun endroit frais.Choisissez du riz fraîchement poli, brillant, avec desgrains de taille uniforme. Conservez dans un endroitfrais, sombre et bien aéré.
Bien mesurer leriz avec la tasse àmesurer fournie.Une tasse équivaut à environ5,29 oz (0,18 L).
Utilisez la tasse à mesurerfournie pour le riz sansrinçage également.
Laverrapidementle riz.Brasser le riz avecvotre main dans unegénéreuse quantitéd'eau, verser l'eau, etrépéter jusqu'à ceque l'eau reste claire.
Lors de la cuisson du rizsemi-poli, le riz complet, le rizbouilli avec de l'orge, le riz brungermé, et le riz mélangé avec desgrains, sélectionnez le menu «Plain ».
Lors de la cuisson de grains mélangés avec du rizblanc, placez le grain mélangé au-dessus du rizblanc.Il peut y avoir plus de riz brûlé que par rapport auriz poli.
Cuisson du riz sans rinçageAjoutez le riz sans rinçage et de l'eau, puis bienmélanger le fond de sorte que chaque grain de rizindividuel soit immergé dans l'eau. (L'ajout d'eauau riz l'empêchera de tremper dans l'eau et peutavoir comme résultat que le riz soit mal cuit.)
Si l'eau ajoutée devient blanche, nous vousrecommandons de très bien laver le riz enremplaçant l'eau une ou deux fois. (L'eau devientblanche dû à l'amidon dans le riz et non le son;cependant, la cuisson sans l'amidon dans l'eaupeut brûler le riz, le contenu peut déborder, ou leriz peut être mal cuit.)
Ajoutez de l'eau selon le type de rizet vos préférences personnelles.Si vous choisissez d'utiliser plus ou moins d'eau quela quantité recommandée, ne vous écartez pas d'untiers (1/3) de la ligne.
Quantité d'eau à ajouter
MenuMesure de l'eau
(Utilisez les mesures de la casseroleintérieure comme guide)
QuickSynchro-CookingPlainMixed
Utilisez la mesure « Plain ».
Sweet (Riz collant) Utilisez la mesure « Sweet ».
Sweet (riz collantet riz ordinaire)
Entre les mesures « Plain » et «Sweet ».
Risotto Utilisez la mesure « Risotto ».
Brown Utilisez la mesure « Brown ».
Pour le riz sans rinçage, assurez-vous que l'eau estseulement un peu au-dessus de chaque mesure (avec laligne juste recouverte par la surface de l'eau).Lors de la cuisson du riz semi-poli, le riz complet, le rizbouilli avec de l'orge, le riz brun germé, et le riz mélangéavec des grains, sélectionnez la mesure « Plain » commeréférence.Si la quantité d'eau à ajouter est spécifiée sur un paquetde riz brun germé ou multigrains, suivez ces directives etajoutez de l'eau en fonction de vos préférencespersonnelles.
Ajout d'autres ingrédients au rizLa quantité totale des ingrédients ne devrait pas êtreplus de 2,5 oz (70 g) par tasse de riz. Ajoutez desassaisonnements et brassez bien, puis ajoutez lesingrédients supplémentaires sur le dessus du riz. Sid'autres ingrédients doivent être ajoutés au riz,assurez-vous de ne pas utiliser plus que la quantitémaximale acceptable (voir le tableau suivant).
Mixed•Sweet 2 tasses ou moins
Risotto 1 tasse ou moins
Brown 1,5 tasses ou moins
Cuisson du risottoAprès avoir lavé le riz, cuire immédiatement le risottosans vider dans une passoire. Sinon, la texturepourrait être gâchée.
Conseils pour faire du riz délicieux
51
Français

Voir p.51 pour des conseils pour faire du riz délicieux
1 Mesurer le riz.Toujours utiliser la tasse à mesurer fournie avec lecuiseur à riz
Un remplissage ras de riz dans la tasse à mesurerfournie est égal à environ 5,29 onces (environ 0,18 L).
Utilisez la tasse à mesurer fournie pour le riz sansrinçage également.
Note Utilisez toujours le volume spécifié de riz(voir « Spécifications » à la p.82).Sinon, le riz peut ne pas cuirecorrectement.
2 Lavez le riz.Cela peut être fait en utilisant la casserole intérieure.
Pour le riz sans rinçage, voir p.51.
Note Ne pas utiliser d'eau chaude (à plus de95˚ F [35˚ C]) pour laver le riz ou lorsde l'ajout d'eau.Ceci peut empêcher le riz de cuirecorrectement.Ne pas appliquer trop de force enlavant le riz.Ceci pourrait endommager la casseroleintérieure et empêcher que le riz cuisecorrectement.
3 Réglez le niveau de l'eau.Placez la casserole intérieure sur une surface plane etajustez le niveau de l'eau à la ligne de mesurecorrespondante à l'intérieur de la casserole.
Le niveau d'eau doit être choisi en fonction du type deriz et du menu de cuisson sélectionné, mais peut êtreajusté à vos préférences personnelles. (voir les lignesdirectrices à la p.51)
4 Essuyer l'eau et le riz, etc.
Note Veillez à retirer tout riz ou autre nourritureadhérant à la plaque chauffante ou autourde celle-ci, au capteur central, au partiesupérieure du boîtier, et à la loquet. Lanourriture collée au couvercle peutl'empêcher de se fermer, ou lui permettres'ouvrir soudainement lors de la cuisson.
3 Avant la cuisson du riz
52

5 Placez la casseroleintérieure dans la partieprincipale et fermez lecouvercle.
❶Assurez-vous deplacer lacasseroleintérieurecorrectement etnon en angle.
❷Refermez lecouvercle.
Note Assurez-vous que la casserole intérieureest placée correctement.
6 Branchez le cordond'alimentation dans uneprise.
Note Si le voyant du réchaud est allumé,appuyez sur la touche [Keep Warm/Cancel] pour l'éteindre.
53
Français

Voir p.51 pour des conseils pour faire du riz délicieux
1 Ouvrez le couvercle dupanneau.
Ne pas appliquer une force excessive au couvercledu panneau, ou placer quelque chose dessus.Si de l'eau ou de la nourriture adhère à l'intérieur ducouvercle du panneau , essuyez immédiatement.
2 Appuyez sur la touche[Menu] pour déplacer le ▲vers le menu souhaité.
Chaque fois que la touche [Menu] est enfoncée, lemenu sélectionné change dans l'ordre indiquéci-dessous.
Vous n'avez pas besoin d'appuyer sur la touche[Menu] si le menu souhaité est déjà sélectionné.
Note Lorsque « Quick » est sélectionné, letemps de cuisson est plus court que pour« Plain ».
3 Appuyez sur la touche[Start].
La cuisson du riz commence.
4 Fermez le couvercle dupanneau.
Ne pas appuyer sur les touches du couvercle dupanneau.
Note Ne rien placer qui soit sensible aumagnétisme près du cuiseur à riz car lecouvercle du panneau contient un aimantintégré.
4 Cuisson du riz
54

Lignes directrices de cuissonQuick Synchro-Cooking Plain Mixed•Sweet
26 à 36 min 31 à 41 min 40 à 50 min 27 à 45 min
Risotto Brown
26 à 36 min 68 à 82 min
Les temps ci-dessus indiquent le temps jusqu'à la fin de la cuisson à la vapeur une fois que la cuisson est achevée lorsque le riz n'est pastrempé au préalable (tension : 120 V, température de la pièce : 73,4˚ F [23˚ C], température de l'eau: 73,4˚ F [23˚ C], quantité d'eau: niveaunormal)Les temps de cuisson peuvent varier quelque peu en fonction de la quantité en cours de cuisson, le type de riz, le type et la quantité desingrédients, la température ambiante, la température de l'eau, la quantité d'eau, la tension électrique, et si la fonction de minuterie estutilisée ou non, etc.
55
Français

Lorsque le processus de cuisson à la vapeur commence…Le temps requis jusqu'à ce que la cuisson à la vapeursoit complétée est affiché à l'afficheur en incrémentsd'une (1) minute.Les temps de cuisson à la vapeur varient en fonction dumenu sélectionné. Lors de la cuisson, le temps restantest affiché.("Quick": 7 min / "Plain": 10 min)
Lorsque la cuisson est terminée.La fonction de maintien au chaud démarreautomatiquement.Pour le « Risotto », le voyant du réchaud clignotelorsque la cuisson est terminée.
Lorsque le menu « Risotto » est sélectionnéUne fois que le Risotto est cuit, vous devez réchaufferlors de l'ajout de la sauce tomate ou blanche.N'appuyez pas sur la touche [Keep Warm/Cancel]immédiatement après la cuisson; réchauffez plutôt lerisotto. (Voir p.61)
Remuez et détachez les grains de riz cuit.Assurez-vous de brasser et de détacher le riz dès quela cuisson est terminée.
En raison de la forme de la casserole intérieure, le rizest légèrement affaissé au centre lorsque la cuisson estterminée.Tenez la casserole intérieure fermement avec unemitaine de four ou autre.
Note Assurez-vous d'essuyer l'eau chaude quis'accumule sur le partie supérieure duboîtier ou qui déborde sur l'extérieur ducuiseur à riz lorsque vous ouvrez lecouvercle immédiatement après lacuisson ou pendant le maintien au chaudest en fonction.
Une fois l'utilisation du cuiseur à riz… terminée
1 Appuyez sur la touche [KeepWarm/Cancel].
2 Débranchez le fiche électrique.
3 Nettoyez le cuiseur à riz (voir p.72à 73).
5 Une fois que le riz est cuit
56

Utilisation de la minuterieVous pouvez prédéfinir le temps de cuisson.Les réglages de la minuterie sont stockés dans lamémoire.
Exemple de réglage: Si la minuterie est réglée à 6:30AM.la cuisson sera terminée à 06h30.
1 Ouvrez le couvercle dupanneau.
2 Vérifiez l'heure actuelleAssurez-vous que l'heure actuelle est correcte, ou lacuisson ne sera pas achevée à temps. Voir p.82pour la procédure pour régler l'heure actuelle.L'heure est affichée au format 12 heures.
3 Appuyez sur la touche[Timer].
6 Cuisson avec la minuterie(Pour la cuisson avec les menus « Quick », « Plain », « Brown » seulement.)
57
Français

4 Utilisez les touches [Hour]et [Min] pour régler le tempsde cuisson désiré.
L'heure est affichée au format 12 heures.
Appuyez sur la touche [Hour] pour modifier le réglagedu temps en incréments d'une (1) heure. Appuyez surla touche [Min] pour modifier ce temps en incrémentsde 10 minutes.Maintenez la touche correspondante pour modifier letemps plus rapidement.
Note Ne pas régler la minuterie à plus de 12heures, car le riz pourrait se gâter.
5 Appuyez sur la touche[Menu] pour déplacer le ▲vers le menu souhaité.
Vous n'avez pas besoin d'appuyer sur la touche[Menu] si le menu souhaité est déjà sélectionné.
6 Appuyez sur la touche[Start].
La minuterie est réglée.
Si vous faites une erreur ou que vous souhaitezréinitialiser le compteur, appuyez sur la touche [KeepWarm/Cancel] et répétez la procédure de l'étape 3 à
la p.57.
7 Fermez le couvercle dupanneau.
Note La fonction minuterie n'est pasdisponible dans les cas suivants.
Lorsque les menus «Synchro-Cooking », «Mixed•Sweet », « Risotto », «Stew•Soup », ou « Cake » sontsélectionnés.Lorsque le temps prédéterminé estinférieur à celui indiqué dans letableau suivant.
MenuTemps minimum pré-
défini
Quick 55 min
Plain 1 h 5 min
Brown 1 h 35 min
Lorsque « 0:00 » clignote surl'afficheur.
Si le voyant du réchaud est allumé,appuyez sur la touche [Keep Warm/Cancel] pour éteindre le voyantlumineux. (La fonction de minuterien'est pas disponible lorsque le voyantdu réchaud est allumé.)
Son Si vous n'utilisez pas le cuiseur àriz pendant environ 30 secondesaprès avoir appuyé sur la touche[Timer], une alarme retentit (3bips).Si les touches [Timer] ou [Start]sont enfoncées alors que lafonction de minuterie n'est pasdisponible, une alarme retentit (3bips).
Lorsque vous ne changez pas la minuterie ou le menuVous pouvez effectuer des réglages, même lorsque lecouvercle du panneau est fermé.❶Vérifiez l'heure actuelle❷Appuyez sur la touche [Timer].❸Appuyez sur la touche [Start].
6 Cuisson avec la minuterie
58

Lorsque la cuisson est terminée, le cuiseur à riz passeautomatiquement à la fonction de maintien au chaud.
Désactivation de la fonction demaintien au chaud
Appuyez sur la touche [Keep Warm/Cancel].(La lumière du voyant du réchaud s'éteint)
Réactivation de la fonction demaintien au chaud
Appuyez sur la touche [Keep Warm/Cancel].(La lumière du voyant du réchaud s'allume)
Maintenir une petite quantité de riz chaudAmener le riz au centre dela casserole intérieure etservir dès que possible.
Fonctionnement lors du mode réchaudLe voyant du réchaud s'allume lorsque le mode est enfonction.
Affichage du temps de réchaudAppuyez et maintenez la touche [Hour] enfoncée pourafficher le temps de réchaud écoulé. Le temps écouléest affiché par incréments d'une (1) heure.Après 12 heures, l'affichage clignote jusqu'à 24 heures.
Une fois que les 24 heures se sont écoulées, letémoin clignote "24".
Note Évitez les éléments suivants quipeuvent causer des odeursinhabituelles, de la sécheresse, de ladécoloration ou de la corrosion de lacasserole intérieure.
Utilisation de la fonction de maintienau chaud avec du riz froidAjout de riz froid au riz qui estmaintenu au chaudLaisser une spatule dans lacasserole intérieure tandis que lemaintien au chaud est en fonctionUtilisation de la fonction de maintienau chaud avec le cordond'alimentation débranchéUtilisation de la fonction de maintienau chaud pour plus de 12 heuresGarder une quantité de riz chaudinférieure au minimum (0,5 tasse)Utilisation de la fonction de maintienau chaud pour tout autre aliment quele riz blanc (y compris le riz sansrinçage)
Ne laissez pas le plateau de cuisson oudes aliments cuits avec le plateau decuisson à l'intérieur du cuiseur à rizalors que le maintien au chaud est enfonction.Veillez à retirer tous les grains de rizqui adhèrent à bord de la casseroleintérieure et du joint d'étanchéité.Sinon, il peut y avoir de la sécheresse,de la décoloration, des odeurs et unetexture collante du riz qui cuit.Pour le « Risotto », le voyant duréchaud clignote lorsque la cuisson estcomplétée. Comme il peut devenirpâteux s'il est maintenu au chaud troplongtemps, et que de la condensationpeut se former sur le couvercleintérieur, servir dès que possible.Pour « Cake », le voyant du réchaudclignote lorsque la cuisson estcomplétée. Puisque de la condensationpeut ruisseler du couvercle intérieur,servir dès que possible.Servir le riz cuit dès que possible dansdes conditions météorologiquesextrêmes telles que les climats froids etdes environnements à hautetempérature.Si la température de maintien au chaudest trop faible, réchauffer le riz (voirp.60).
7 Maintenir le riz chaud
59
Français

Pour le menu « Quick »/« Plain »Pour du riz très chaud, réchauffer le riz maintenu auchaud avant de le servir.
Note Le riz ne sera pas entièrement chauffési plus de la moitié de la casseroleintérieure est pleine.Le riz se dessèchera s'il est réchauffésous l'une des conditions suivantes.
Le riz est encore chaud, par exempleimmédiatement après la cuisson.Il y a une quantité de riz chaudinférieure au minimum (0,5 tasse)Le riz est réchauffé trois fois ou plus.
1 Remuez et décollez le riz quia été maintenu au chaud.
2 Ajoutez 1 à 2 cuillérées àthé d’eau uniformément surle riz.
L'ajout de l'eau permettra d'éviter au riz de sécher etde devenir soufflé.
3 S'assurer que le voyant duréchaud est allumé.
Le réchauffage n'est pas disponible si le voyant duréchaud n'est pas allumé. S'il n'est pas allumé,appuyez sur la touche [Keep Warm/Cancel].(voir p.59)
4 Appuyez sur la touche[Start].
Pour arrêter le réchauffage, appuyez sur la touche[Keep Warm/Cancel].
Son Le réchauffage n'est pas disponible sile riz est trop froid (131˚ F [55˚ C]) .Dans ce cas, une alarme sonoreretentira.
5 Remuez bien et desserrez leriz réchauffé et égalisez-ledans la casserole intérieure.
Tenez la casserole intérieure fermement avec unemitaine de four ou autre.
8 Réchauffer le riz cuit
60

Lors de l'ajout de sauce tomate ou de sauce blanche pour le menu « Risotto »
1 Ajoutez la sauce tomate oula sauce blanche dès que lacuisson est terminée, etbien mélanger.
2 S'assurer que le voyant duréchaud clignote.
Le réchauffage n'est pasdisponible si le voyant duréchaud ne clignote pas.
3 Appuyez sur la touche[Start].
Note Appuyez sur la touche [Start]. (Puisque latouche [Keep Warm/Cancel] empêche leréchauffage, n'appuyez pas sur cettetouche.)
Si le réchauffage n'est pas effectué peu de tempsaprès la cuisson, le riz peut ne pas être cuitcorrectement.
61
Français

Vous pouvez utiliser le plateau de cuisson pour cuiredes plats d'accompagnement en même temps que le riz(soupe).Vous pouvez également ajouter de l'eau à la casseroleintérieure et cuire des plats d'accompagnement sansfaire de riz.Voir le livre de recettes fourni pour les directives.
Note Ne pas faire cuire avec un plus grandvolume d'ingrédients que ce qui estindiqué dans le livre de recettes. Sinon,les aliments peuvent déborder ou nepas être bien cuits.Lors de la cuisson des plats avec uneforte odeur, l'odeur peut rester sur leplateau de cuisson.Lors de la cuisson d'ingrédients avecd'une couleur dense, celle-ci peut setransférer au plateau de cuisson par lebouillon, etc.Ne pas utiliser d'instruments tranchantscomme des couteaux de cuisine, descouteaux de table, ou fourchettes àl'intérieur du plateau de cuisson.
Pour les meilleurs résultats decuisson-synchro
<Notes sur les ingrédients pour le plateau decuisson>
Ne pas surcharger le plateau de cuisson.Disposez les ingrédients uniformément dans labase du plateau de cuisson, et laissezsuffisamment d'espace pour que la vapeurs'échappe de chaque ingrédient (utilisez le niveauindiqué dans l'illustration suivante comme guide).
Utiliser aussi peu d'eau ou de soupe que possible(s'il est trop liquide, il peut ne pas être suffisammentchauffé).Assurez-vous que le lait, la crème fraîche, etc. sontbien mélangés.Lors de la cuisson d'aliments qui prennent del'expansion, comme le mélange à crêpes, utilisezuniquement une petite quantité (environ 1/3 de laprofondeur du contenant à cuisson comme guide).Puisque les oeufs prennent aussi d’expansion, encuire un ou deux à la fois.Comme cela dépend également de la quantité desautres ingrédients utilisés et la taille des œufs,ajustez la quantité selon les besoins.Tranchez les ingrédients qui sont difficiles à bienfaire cuire, comme les légumes racines.Le plateau de cuisson est conçu pour la cuisson àla vapeur seulement. Il ne peut pas être utilisé pourfrire ou cuire comme au four.
Note Si les ingrédients ne sont passuffisamment cuits, même après avoirsuivi les points ci-dessus, déplacez-lesdans un autre récipient et chauffez aumicro-ondes, etc. (la casserole intérieureet le plateau de cuisson ne vont pas aumicro-ondes).
9 Cuisson du riz (soupe) et accompagnements ensemble ( menu « Synchro-Cooking » )
62

Étapes de base pour lasynchro-cooking
1 Préparez les ingrédients etplacez-les dans le plateaude cuisson.
Étalez les ingrédients sur l'ensemble du plateau decuisson et évitez de les empiler. Sinon, les alimentspeuvent déborder ou ne pas être bien cuits.
2 Faites les préparatifsnécessaires pour la cuissondu riz ou la soupe.
(Voir p.52 1 à 4)
Note <Lors de la cuisson du riz>Consultez le tableau suivant pour lesquantités acceptables de riz qui peut êtrecuit avec des aliments. Ne pas cuire plusque le maximum acceptable ou moinsque le minimum requis. Sinon, lesaliments peuvent déborder ou ne pas êtrebien cuits.
Maximum Minimum
1 tasse 0,5 tasse
<Pour faire de la soupe>Utilisez la mesure « Plain » sur lacasserole intérieure pour mesurer lesingrédients pour la soupe comme indiquédans le tableau suivant. L'ajout de plusd'aliments que le maximum peut faire ensorte que ceux-ci débordent ou soientmal cuits. Si la quantité est inférieure, lesaliments peuvent brûler.
Maximum Minimum
1,5 ou moins sur lamesure Plain
1 ou plus sur la me-sure Plain
3 Placez le plateau de cuissonà l'intérieur de la casseroleintérieure et fermez lecouvercle.
Note Placez le plateau de cuisson àl'intérieur de la casserole intérieure.Assurez-vous que le plateau decuisson soit au niveau (pas en angle).Inclinez la poignée du plateau decuisson vers l'extérieur avant de fermerle couvercle.
4 Branchez le cordond'alimentation dans uneprise.
Note Si le voyant du réchaud est allumé,appuyez sur la touche [Keep Warm/Cancel] pour l'éteindre.
5 Ouvrez le couvercle dupanneau.
63
Français

6 Sélectionnez un Menu.<Lors de la cuisson du riz avec d'autres aliments>Appuyez sur la touche [Menu] et sélectionnez «Synchro-Cooking ».
<Lors de la cuisson de soupe et d'autres alimentsen même temps>❶Appuyez sur la touche [Menu] et sélectionnez «
Stew•Soup ».
❷Réglez le temps de cuisson de 20 à 30 minutes.(voir p.66)
Note Lors de la cuisson du riz avec un autreplat, sélectionnez « Synchro-Cooking ».Pour de la soupe et un autre plat,sélectionnez « Stew•Soup ».
7 Appuyez sur la touche[Start].
La synchro-cooking commence.
Note Ne pas ouvrir le couvercle pendant lacuisson.
8 Fermez le couvercle dupanneau.
9 Lorsque la cuisson estterminée
La fonction de maintien au chaud démarreautomatiquement.
9 Cuisson du riz (soupe) et accompagnements ensemble ( menu « Synchro-Cooking » )
64

10 Retirez le plateau decuisson.
Note Ne laissez pas le plateau de cuisson àl'intérieur du cuiseur à riz alors que lemaintien au chaud est en fonction.Soyez prudent lorsque vous retirez leplateau de cuisson après la cuisson,car il sera chaud. Sinon, cela peutprovoquer des brûlures.Ne pas incliner le plateau de cuissonlors de son retrait.Le bouillon, etc., peut se répandre etprovoquer des brûlures.Ne remettez pas le plateau de cuissondans la casserole intérieure aprèsl'avoir retiré.Sinon, le riz peut se gâter ou ne pasêtre maintenu au chaud.Lors de la cuisson de soupe et d'unautre plat, les ingrédients peuventadhérer au fond du plateau de cuisson,alors soyez prudent lorsque vous lesplacez sur une table, etc.
Lorsque vous cuisinez avec des ingrédients quilibèrent beaucoup de liquides, huiles ou graisseslorsque chauffés, ou qui prennent de l'expansion encours de cuisson, tels que les œufs, etc., un peu debouillon peut déborder dans la casserole intérieure.
Ajout d'eau à la casserole intérieure et cuisson❶Ajoutez de l'eau jusqu'à 1 de la mesure « plain »,
placez le plateau de cuisson à l'intérieur de lacasserole intérieure, et fermez le couvercle.
❷Sélectionnez le menu « Stew•Soup ».❸Réglez le temps de cuisson de 20 à 30 minutes. (Voir
p. 66)❹Lorsque la cuisson est terminée, appuyez sur la
touche [Keep Warm/Cancel], puis retirez le plateaude cuisson.
Lorsque la synchro-cookingest terminée…
1 Appuyez sur la touche [KeepWarm/Cancel].
2 Éliminez toutes les odeurs. Voirp.74.
65
Français

Vous pouvez préparer les plats suivants avec le livre derecettes fourni. Voir les directives dans le livre.Avec ce menu, la nourriture est d'abord portée presqueà ébullition, la chaleur est ensuite abaissée à environ199˚ F (93˚ C) et la nourriture est laissée à mijoter. Latempérature est alors abaissée encore à environ 190˚ F(88˚ C) et la nourriture continue de mijoter. En abaissantprogressivement la température de cette manière, lessaveurs sont améliorées et les liquides ne se réduisentpas même lorsque le tout est chauffé pendant unelongue période de temps.
Exemples de menusCubes de porc mijotés et feuilles de tofu en saucebrune; Gobo et soupe Yamaimo
Pour savoir comment faire des « Cubes de porc mijotéset feuilles de tofus en sauce brune » et la « Soupe Goboet Yamaimo », voir le livre de recettes fourni.
Note Remuez bien avant la cuisson pour éviterque les assaisonnements ne collent aufond de la casserole intérieure.
Étapes de base pour la cuisson
1 Préparez les ingrédients.
2 Ajoutez les ingrédients dansla casserole intérieure etfermez le couvercle.
Note Utilisez la mesure « Plain » de lacasserole intérieure comme référence.Utiliser plus que la quantité maximaleacceptable (voir le tableau ci-dessous)peut empêcher l'ébullition ou faire ensorte que les aliments débordent. Ne pasutiliser moins que la quantité minimalerequise car cela peut faire déborder lesaliments.
Maximum Minimum
3 ou moins sur lamesure Plain
1 ou plus sur la me-sure Plain
3 Branchez le cordond'alimentation dans uneprise.
Note Si le voyant du réchaud est allumé,appuyez sur la touche [Keep Warm/Cancel] pour l'éteindre.
4 Ouvrez le couvercle dupanneau.
5 Appuyez sur la touche[Menu] et sélectionnez «Stew•Soup ».
6 Réglez le temps de cuisson.Utilisez les touches [Hour] et [Min] pour régler le tempsde cuisson.Le temps de cuisson peut être réglé en incréments de 5minute entre 5 et 120 minutes.
Chaque fois que la touche [Hour] est enfoncée, letemps réglé augmentera de 5 minutes. Chaque foisque la touche [Min] est enfoncée, le temps diminuerade 5 minute.
10 Faire un ragoût (menu « Stew•Soup »)
66

7 Appuyez sur la touche[Start].
La cuisson démarre.
Note Ne pas ouvrir le couvercle pendant lacuisson.
8 Fermez le couvercle dupanneau.
9 Lorsque la cuisson estterminée
Le voyant du réchaud s'allume et "0h" est affiché.
<Lorsque la nourriture n'est pas suffisammentcuite>Lorsque le voyant du réchaud est allumé, appuyez surla touche [Hour] pour ajouter du temps de cuissonsupplémentaire, puis appuyez sur la touche [Start]. (Letemps de cuisson peut être prolongé jusqu'à 30 minutesau maximum 3 fois.)
Note Lorsque la nourriture n'est pas assezcuite, n'appuyez pas sur la touche [KeepWarm/Cancel] avant d'ajouter du tempssupplémentaire. Sinon, le voyant duréchaud s'éteindra et le temps de cuissonsupplémentaire ne sera pas effectif. Sivous avez appuyé accidentellement,suivez les étapes ci-dessous.❶Retirez la casserole intérieure et
placez-la sur une serviette ou unchiffon humide.
❷Laissez le couvercle de la partieprincipale ouvert pour refroidir la partieprincipale et la casserole intérieurependant environ 10 minutes.
❸Placez la casserole intérieure àl'intérieur de la partie principale.
❹Répétez la procédure de l'étape 4 de lapage.66.
<Réchauffer le riz cuit>Si vous désirez que la nourriture qui est maintenue auchaud soit très chaude avant de la servir, appuyez surla touche [Start] lorsque le voyant du réchaud estallumé pour réchauffer la nourriture. Le temps deréchauffage restant est affiché et une alarme (3 bipslongs) retentit lorsque l'opération est complétée. Aprèsle réchauffage, le voyant du réchaud s'allume et letemps de réchaud écoulé est affiché.
67
Français

Lorsque la cuisson est terminée…
1 Appuyez sur la touche [KeepWarm/Cancel].
Appuyez sur la touche [Keep Warm/Cancel] pouréteindre le voyant du réchaud.
2 Éliminez toutes les odeurs. Voirp.74.
Si la touche [Keep Warm/Cancel] n'est pasenfoncée lorsque la cuisson est terminée, lafonction de maintien au chaud s'enclencheraautomatiquement et le temps écoulé de réchauds'affichera par incréments d'une (1) heure à partirde la première heure (1h) jusqu'à 6 heures (6h)par la suite. Après que les six heures sontécoulées, le « 6 » clignotera.
Note Ne pas utiliser la fonction demaintien au chaud en continucomme certains aliments peuventperdre leur goût.Ne pas utiliser la fonction demaintien au chaud pendant plusde 6 heures
10 Faire un ragoût (menu « Stew•Soup »)
68

Vous pouvez faire cuire des gâteaux tel que décrit dansle livre de recettes fourni.
Note Ne pas essayer de faire des types degâteaux autres que ceux décrits dansle livre de recettes fourni.Ne pas faire cuire avec un plus grandvolume d'ingrédients que ce qui estindiqué dans le livre. Sinon, lesingrédients peuvent déborder.
1 Préparez les ingrédients.
2 Verser la pâte dans lacasserole intérieure.
3 Presser l'air hors de la pâte.
Note Pour presser l'air de la pâte avant lacuisson, utilisez un chiffon doux. Sinon, lacasserole intérieure pourrait êtredéformée ou endommagée.
4 Placez la casseroleintérieure dans la partieprincipale et fermez lecouvercle.
5 Branchez le cordond'alimentation dans uneprise.
6 Ouvrez le couvercle dupanneau, puis appuyez surla touche [Menu] poursélectionner « Cake ».
7 Réglez le temps de cuisson.Utilisez les touches [Hour] et [Min] pour régler le tempsde cuisson.Le temps de cuisson peut être réglé en incréments de 1minute entre 1 et 60 minutes.
Chaque fois que la touche [Hour] est enfoncée, letemps réglé augmentera de 1 minutes. Chaque foisque la touche [Min] est enfoncée, le temps diminuerade 1 minute.
11 Cuisson d'un gâteau (menu « Cake »)
69
Français

8 Appuyez sur la touche[Start].
La cuisson commence.
9 Fermez le couvercle dupanneau.
10 Lorsque la cuisson estterminée…
Le voyant du réchaud clignote.
❶Ouvrez le couvercle et piquez le centre du gâteauavec une brochette en bois. (Si aucune pâte crue n'enressort, le centre du gâteau est cuit.)<Si de la pâte ressort>Lorsque le voyant du réchaud clignote, appuyez surla touche [Hour] pour ajouter du temps de cuissonsupplémentaire, puis appuyez sur la touche [Start].(Le temps de cuisson peut être prolongé jusqu'à 30minutes au maximum 3 fois.)
Note N'appuyez pas sur la touche [KeepWarm/Cancel] avant d'ajouter dutemps supplémentaire. Sinon, levoyant du réchaud s'éteindra et letemps de cuisson supplémentaire nesera pas effectif. Si vous avez appuyéaccidentellement, suivez les étapesci-dessous.❶Retirez la casserole intérieure et
placez-la sur une serviette ou unchiffon humide.
❷Laissez le couvercle de la partieprincipale ouvert pour refroidir lapartie principale et la casseroleintérieure pendant environ 10minutes.
❸Placez la casserole intérieure àl'intérieur de la partie principale.
❹Sélectionnez « Cake », puis réglezle temps de cuissonsupplémentaire.
❷Retirez la casserole intérieure, sortez le gâteau etlaissez-le refroidir.
Note Portez des mitaines de four ou autreprotection lors du retrait de la casseroleintérieure et faites attention de ne pasla toucher avec vos mains nues carvous pourriez vous brûler.Retirez le gâteau dès que la cuissonest terminée. S'il est laissé dans lecuiseur à riz, de la condensation sur lecouvercle intérieur peut ruisseler sur legâteau et le rendre collant.
11 Cuisson d'un gâteau (menu « Cake »)
70

Lorsque la cuisson du gâteau est terminée…
1 Appuyez sur la touche [KeepWarm/Cancel].
2 Éliminez toutes les odeurs. Voirp.74.
71
Français

Suivez les procédures de nettoyage et d'entretien tel que décrites aux pages 72 à 74. Tout autre entretien doit êtreeffectué par un représentant de service autorisé.Pour maintenir la propreté, toujours nettoyer le cuiseur à riz la même journée qu'il est utilisé. Vous devez égalementnettoyer le cuiseur à riz à intervalles réguliers.Le cuiseur à riz doit être nettoyé le jour où il est utilisé afin d'éliminer les odeurs de cuisson qui restent. (Voir p.74)
Note Assurez-vous de débrancher le fiche électrique et permettre à la partie principale, à la casseroleintérieure, au couvercle intérieur, et au plateau de cuisson de refroidir avant de les nettoyer.
Pour nettoyer le produit, n'utilisez que du liquide à vaisselle ou du détergent.Rincez les pièces à fond puisque des résidus de détergent peuvent entraîner une détérioration et une décolorationdes matériaux tels que la résine.Nettoyez avec une éponge ou un chiffon doux.
Pièces à nettoyer après chaque utilisation
❶Nettoyer avec une éponge douce et avec de l'eau du robinet tiède.❷Essuyez l'eau avec un chiffon sec pour sécher les pièces
complètement.
Note Ne pas nettoyer la casserole in-térieure avec le côté abrasif d'untampon à récurer. Sinon, le revê-tement de résine fluorocarbonéepeut être endommagé.Ne pas laver de vaisselle ou autre dans la casseroleintérieure. Cela pourrait endommager le revêtementde résine fluorocarbonée ou le faire se décoller. Deplus, ne placez pas la casserole intérieure à l'enverssur le dessus de vaisselle ou autres pour les sécher.
Pièces à nettoyer lorsqu'elles sont sales
Mouillez une serviette ou un chiffon, essorez l'excès d'eau, puisessuyez l'intérieur et l'extérieur de la partie principale et le couvercledu panneau.Essuyez le cordon d'alimentation avec un chiffon sec.Retirez le riz brûlé et les autres grains de riz qui ont adhéré à laplaque chauffante et au capteur central.Si des objets adhérents sont difficiles à enlever, utilisez du papiersablé disponible dans le commerce (env. # 320), puis mouillez uneserviette ou un chiffon, essorez l'excès d'eau, puis essuyez.Retirez tous les grains de riz qui ont adhéré au partie supérieure duboîtier.Si l'intérieur du trou du couvercle du panneau avec la lumière estsale, essuyez-le avec un coton-tige.
Note Ne pas laisser d'eau pénétrer à l'intérieur de lapartie principale.Ne plongez pas le cordon d'alimentation dans l'eauou l'asperger avec de l'eau.Cela peut provoquer un court-circuit ou uneélectrocution.
12 Nettoyage et entretien
72

Note Ne tirez pas sur le joint d'étanchéité ducouvercle.Gardez toujours la casserole intérieure et lecouvercle intérieur propres pour éviter lacorrosion et les odeurs.Ne pas utiliser de produits nocifs tels que dudiluant, nettoyant, eau de javel, chiffonstraités chimiquement, tampon à récurer enmétal ou en nylon.Nettoyez toujours chaque pièce séparément.
Ne pas immerger la tasse à mesurer ou laspatule dans de l'eau chaude.Sinon, elles pourraient se déformer.Ne pas utiliser un lave-vaisselle/séchoir pournettoyer la casserole intérieure. Sinon, ilspourraient se déformer.Toujours nettoyer le couvercle intérieur aprèsla cuisson avec des grains (amarantes, etc.).L'évent de vapeur sur le couvercle intérieurpeut se boucher et causer des problèmes,tels qu'empêcher le couvercle de s'ouvrir etque les aliments soient mal cuits.
Retirer et fixer le couvercle intérieurRetirer le couvercle intérieur
Tirez vers l'avant pour le retirer.
Fixer le couvercle intérieurInsérez le couvercleintérieur dans letrou du couvercle telqu'indiqué dans l'il-lustration suivante.
Note Ne tirez pas sur le joint d'étanchéi-té du couvercle. Une fois qu'il estenlevé, il ne peut pas être remisen place.
73
Français

Élimination des odeurs (lorsque les odeurs persistent dans le cuiseur à riz ou le plateau de cuisson)Partie principale
❶Remplissez la casserole intérieure avec de l'eau jusqu'à 70%à 80%, et ensuite avec le menu « Plain » sélectionné,appuyez sur la touche [Start].Ne placez pas le plateau de cuisson à l'intérieur de lacasserole intérieure.Lorsque le voyant du réchaud est allumé, appuyez sur latouche [Keep Warm/Cancel].
Si les odeurs sont désagréables, utilisez environ 20 g d'acidecitrique ajoutés à l'eau pour une désodorisation plus efficace.
Il peut être impossible d'éliminer des odeurscomplètement. Dans ce cas, contactez JAPON TIGERCORPORATION.
❷Nettoyez la casserole intérieure et le couvercle intérieur avecun détergent de cuisine standard, puis rincez abondamment àl'eau.
❸Laissez la partie principale et toutes les pièces sécher dansun endroit bien ventilé.
Note Soyez prudent lorsque vous mani-pulez la casserole intérieure et lapartie principale après le nettoya-ge, car ils seront brûlants.Si vous les touchez, vous pourriezvous brûler.Soyez prudent lorsque vous mani-pulez le plateau de cuisson aprèsle trempage car il sera brûlant.Si vous lui touchez, vous pourriezvous brûler.
Plateau de cuissonPlongez le plateau de cuisson dans l'eau chaude et laissez tremper pendant environ 1 heure.
Nettoyage de la plaque chauffanteLors de l'utilisation, de la condensation s'écoule du couvercle et peut tacher la plaquechauffante.Cela n'affecte pas le fonctionnement du cuiseur à riz, mais si vous le désirez, nettoyezcomme indiqué ci-dessous.❶Appliquez une petite quantité de nettoyant crème disponible dans le commerce à une
brosse à récurer en nylon et frottez légèrement les zones tachées sur la plaquechauffante.
❷Essuyez toute saleté avec du papier absorbant humide ou un chiffon.
12 Nettoyage et entretien
74

Vérifiez les points suivants si vous rencontrez un problème avec le riz cuit ou le fonctionnement du cuiseur à riz, etc.
Point de contrôle
Lorsque
Menu cuisine partagée
Les quantités de riz, d'ingrédients,et d'eau étaient-elles correctes?
La cuisson a-t-elle été faite avec del'eau ionisée alcaline (pH
9 ouplus)?
La cuisson a-t-elle été faite avec del'eau dure com
me de l'eau m
inéra-le?
Le bon menu a-t-il été sélectionné?
Avez-vous appuyé sur une touche
après la cuisson sans avoir éteint lafonction du réchaud?
Y a-t-il des grains de riz brûlé ou
des gouttes d'eau qui adhèrent à labase extérieure de la casserole in-térieure ou à la plaque chauffanteou au capteur central?
La casserole intérieure est-elle déformée?
Est-il survenu une panne de cou-
rant prolongée?
Le riz a-t-il été bien brassé et déta-ché?
Y avait-il plus de riz que la quantité
maxim
ale?
Riz cuit
Est trop dur ● ● ● ● ● ● ● ●
Est trop mou ● ● ● ● ● ● ●
N'est pas cuit com-plètement
● ● ● ● ● ● ●
Contiens un noyaudur
● ● ● ● ● ● ●
Est brûlé ● ● ● ● ● ●
Pendant la cuisson,
il y a des fuites devapeur
● ● ● ●
Débordement ● ● ● ●
Le temps de cuissonest trop long
● ● ● ● ● ●
Page de référence 51•52 - - 54•58 52•56 52•72 - 74 - 83 56 51•82
13 La cuisson n'est pas effectuée correctement
75
Français

Point de contrôle
Lorsque
Menu cuisine partagée
Y a-t-il des grains de riz adhérant au joint
d'étanchéité ou au rebord de la casserole in-térieure, etc.?
Le riz (autres que le riz sans rinçage) a-t-ilété lavé suffisam
ment?
Est-ce que de l'eau chaude (plus de 95° F
[35˚ C]) a été utilisée pour laver le riz ou
ajuster le niveau de l'eau?
Le riz a-t-il été laissé à tremper dans l'eau
trop longtemps après le lavage?
Le riz a-t-il été laissé dans une passoireaprès le lavage?
Le couvercle était-il fermé en toute sécurité?
Le riz a-t-il été mélangé avec d'autres ingré-
dients ou du riz multigrains?
Les assaisonnements ont-ils été bien bras-
sés?
Y avait-il beaucoup de grains de riz fissurés?
La cuisson a-t-elle été continuée imm
édiate-m
ent après la cuisson initiale?
Le cuiseur à riz et ses pièces ont-ils été net-toyés suffisam
ment?
Riz cuit
Est trop dur ● ● ● ●
Est trop mou ● ● ● ● ● ● ●
N'est pas cuit com-plètement
● ● ●
Contiens un noyaudur
● ● ● ●
Est brûlé ● ● ● ● ● ●
Sent le son de riz ●
Pendant la cuisson,
il y a des fuites devapeur
● ● ●
Débordement ● ● ● ● ●
Le temps de cuissonest trop long
● ●
Page de référence 52•72 51•52 52 - - 52 51 - - 72 - 74
13 La cuisson n'est pas effectuée correctement
76

Point de contrôle
Lorsque
MenuPlain
Menu Risotto Synchro-cooking avec le plateau de cuisson
La fonction de minuterie a-t-elle été utilisée?
Est-ce que de la sauce tom
ate, etc. a étéajoutée avant la cuisson?
Le réchauffage a-t-il été fait après l'ajout desauce tom
ate, etc.?
Avez-vous oublié d'ajouter la sauce tom
ateim
médiatem
ent après la cuisson?
Est-ce que les quantités d'alim
ents et d'as-saisonnem
ent étaient plus que le maxim
umou m
oins que le minim
um indiqué dans le li-
vre de recettes?
Est-ce que les ingrédients ont été disposés
de manière inégale dans le plateau de cuis-
son?
Est-ce qu'un m
enu autre que « Syn-
chro-Cooking » ou « S
tew•Soup » a été sé-
lectionné?
Est-il survenu une panne de courant prolon-
gée?
Riz cuit
Est trop dur ● ● ● ●
Est trop mou ● ● ● ● ● ●
N'est pas cuitcomplètement
● ● ● ●
Contiens unnoyau dur
● ● ●
Est brûlé ● ● ● ● ●
A une odeur ● ● ● ● ●
Est collant ● ● ● ● ●
L'aliment cuit
Est trop dur ● ● ●
Est trop mou ● ● ● ●
N'est pas entiè-rement chauffé
● ● ●
Déborde dans leriz
● ● ●
Pendant la cuisson,
il y a des fuitesde vapeur
● ● ●
Débordement ● ● ● ●
Le temps decuisson est trop
long● ● ●
Page de référence - 61 61 61 62 62 62~65 83
Problème Cause
Il y a une fine couche qui recouvre leriz.
Un très fine couche s'est formée par de l'amidon fondu et séché. Ceci n'est pas dangereux pour lasanté.
Le riz colle à la casserole intérieure. Le riz sucré et le riz collant peuvent facilement coller à la casserole.
77
Français

Point de contrôle
Lorsque
Les quantités de riz, d'ingrédients, et d'eauétaient-elles correctes?
Y at-il des grains de riz brûlé ou des gouttes
d'eau qui adhèrent à la base extérieure de lacasserole intérieure ou à la plaque chauffan-te ou au capteur central?
Est-il survenu une panne de courant prolon-
gée?
Le riz a-t-il été bien brassé et détaché?
Y a-t-il des grains de riz adhérant au joint
d'étanchéité ou au rebord de la casserole in-térieure, etc.?
Le riz (autres que le riz sans rinçage) a-t-ilété lavé suffisam
ment?
Le riz ou de la nourriture ont-ils été réchauf-fés 3 fois ou plus?
La fonction de minuterie a-t-elle été réglée
pour plus de 12 heures à l'avance?
La fonction de maintien au chaud a-t-elle été
utilisée en continu pendant plus de 12 heu-res?
Le riz maintenu au chaud
A une odeur ● ● ● ● ● ●
Est décoloré ● ● ● ● ●
Est sec ● ● ● ● ● ● ●
Est collant ● ● ● ● ● ●
Le riz réchauffé estsec
● ● ● ●
Page de référence 51•52 52•72 - 74 83 56 52•72 51•52 60•61 57•58 59
Point de contrôle
Lorsque
Est qu'autre chose que du riz blanc ou du riz
sans rinçage sont maintenus au chaud?
Est-ce que la quantité m
inimale requise de
riz a été maintenue au chaud ou a été ré-
chauffée?
Est-ce que le riz est concentré autour des
parties externes de la casserole (moins de
riz au milieu du pot)?
Est-ce que du riz froid a été ajouté?
Est-ce qu'une spatule a été laissée dans la
casserole?
Avez-vous tenté de réchauffer du riz qui
vient d'être cuit et est encore chaud?
Le cuiseur à riz et ses pièces ont-ils été net-toyés suffisam
ment?
Est-ce que les odeurs ont été éliminées après
la cuisson
ou après
avoir fait
un gâteau?
Est-ce que du riz a été laissé dans le cuiseur
à riz avec la fonction de maintien au chaud
désactivée?
Le riz maintenu au chaud
A une odeur ● ● ● ● ● ● ●
Est décoloré ● ● ● ● ●
Est sec ● ● ● ● ●
Est collant ● ● ● ● ● ●
Le riz réchauffé estsec
● ● ● ●
Page de référence 59 59 59 59 59 60•61 73•7468•71•65•74
59
13 La cuisson n'est pas effectuée correctement
78

Vérifiez les points suivants si vous rencontrez un problème avec les menus « Stew•Soup » ou « Cake »
Point de contrôle
Lorsque
Est-ce que les ingrédients et les quantités
appropriées ont été utilisés?
Est-ce que le m
aximum
acceptable d'ingré-dients a été utilisé? *
Est-ce que le m
inimum
acceptable d'ingré-dients a été utilisé? *
Est-ce que le tem
ps de cuisson d'aliments
ou du pain était trop court?
Est-ce que le tem
ps de cuisson d'aliments
ou du pain était trop long?
Y a-t-il des grains de riz adhérant au joint
d'étanchéité ou au rebord de la casserole in-térieure, etc.?
Le couvercle était-il fermé en toute sécurité?
Est-il survenu une panne de courant prolon-
gée?
Ne bouille pas/Ne cuit passuffisamment
● ● ● ● ● ●
Débordement ● ● ●
Bouille à sec/brûle ● ● ●
Page de référence 66•69 66 - 71 66•69•72 83
* Menu « Stew•Soup » seulement
14 La cuisson du ragoût ou du gâteau n’est pas réussie.
79
Français

Vérifiez les points suivants avant de placer une demande de réparation.
Problème Point de contrôle ActionPage de réfé-
rence
Le riz n'a pas été cuit.Les aliments n'ont pas étécuits.
Le fiche électrique est-il correctementconnecté à une prise de courant?
Branchez le cordon d'alimentation com-plètement dans une prise.
44•52•66•69•65•82
Le riz n'a pas été complètementcuit pendant le temps prédéfini.
Est-ce que l'écran affiche la bonne heureactuelle?
Réglez l'heure actuelle.82
Consultez la section « Le temps de cuisson est trop long », p.80 et prenez les mesures nécessaires.
Une alarme (3 bips) retentit etla fonction de minuterie nepeut pas être réglée.
Est-ce que l'écran affiche la bonne heureactuelle?
Réglez l'heure actuelle.82
Est-ce que « 0:00 » clignote à l'écran? Réglez l'heure actuelle.
Est-ce que les menus « Synchro-Cook-ing », « Mixed•Sweet », « Risotto », «Stew•Soup », ou « Cake » sont sélection-nés?
La fonction minuterie n'est pas disponiblepour les menus « Synchro-Cooking », «Mixed•Sweet », « Risotto », «Stew•Soup », ou « Cake » 57•58
Est-ce qu'un temps inacceptable a été ré-glé?
Réglez un temps qui est acceptable à lafonction de minuterie.
Une alarme (3 bips) retentitlorsque la minuterie est réglée.
Si vous n'utilisez pas le cuiseur à riz pen-dant environ 30 secondes après avoir ap-puyé sur la touche [Timer], une alarmeretentit.
Continuez de régler la fonction de minute-rie.
57•58
L'afficheur est flou. Y a-t-il des grains de riz adhérant au jointd'étanchéité ou au rebord de la casseroleintérieure?
Enlevez complètement tout le riz restant.
52•72•73Est-ce que la surface extérieure de lacasserole intérieure est mouillée?
Essuyez avec un chiffon sec.
Vous entendez un ou des sonspendant la cuisson, la cuissonà la vapeur, le réchauffage, oulorsque la fonction de maintienau chaud est activée.
Entendez-vous un tic-tac? Il s'agit du son d'un micro-ordinateur con-trôleur et ceci n'est pas une défaillance.
49
Entendez-vous un bruit d'éclatement? Il s'agit du bruit du métal se contractant àla chaleur. Ceci n'est pas une défaillance.
Entendez-vous un bruit de bouillonne-ment d'eau? (Pendant la cuisson et la cuisson à la va-peur uniquement)
Ceci n’est pas un mauvais fonctionne-ment.
Entendez-vous un son totalement diffé-rent de ce qui a été décrit ci-dessus?
Contactez JAPON TIGER CORPORA-TION.
-
Le réchauffage est désactivé. Est-ce qu'une alarme (3 bips) retentit lors-que vous appuyez sur la touche [Start]?
Le riz est froid. Le riz d'une températureinférieure à environ 131º F (55 º C) nepeut pas être réchauffé.
60•61La lumière réchaud est-elle éteinte? Appuyez sur la touche [Keep Warm/Can-cel] et vérifiez que le voyant du réchaudest allumé. Ensuite, appuyez sur la tou-che [Start] à nouveau.
Des aliments adhèrent au cou-vercle intérieur pendant syn-chro-cooking.
Lorsque vous cuisinez avec des ingrédients qui prennent de l'expansion en cours dechauffage, tels que les œufs, etc., ils peuvent adhérer au couvercle intérieur. Si vousle désirez, réduisez la quantité des ingrédients.
-
La cuisson du gâteau prendbeaucoup de temps.
Si la tension d'alimentation est faible, le temps de cuisson peut être plus long que letemps standard pour cuire complètement un gâteau. Augmentez le temps de cuissonsi le gâteau n'est pas complètement cuit.
71
De l'eau ou du riz sont entrésdans la partie principale.
De l'eau ou du riz à l'intérieur de la partie principale peuvent causer des problèmes.Contactez JAPON TIGER CORPORATION.
-
15 Dépannage
80

Problème Point de contrôle ActionPage de réfé-
rence
Lors du réglage de l'heure ac-tuelle, la touche [Hour] ou [Min]n'entre pas en mode de réglagede l'heure.
L'heure ne peut pas être réglée pendant la cuisson, lorsque la fonction de maintien auchaud est activée, lorsque la fonction de minuterie est en cours d'utilisation, ou pen-dant le réchauffage.
82
Le voyant du réchaud clignote. Lorsque le menu « Risotto » Z ou « Cake » est sélectionné, le voyant du réchaudclignote lorsque la cuisson est terminée.
56•59•71
Le temps de réchaud écouléclignote.
La fonction de maintien au chaud a-t-elleété utilisée en continu pendant plus de 12heures?
Le temps de réchaud écoulé clignote lors-que la fonction de maintien au chaud estactivée pendant plus de 12 heures.
59
Un ragoût a-t-il été maintenu au chaudpendant plus de 6 heures?
Le temps de réchaud écoulé clignote lors-que la fonction de maintien au chaud estactivée pendant plus de 6 heures.
68
L'heure actuelle, les réglagesde minuterie prédéfinis et letemps de réchaud écoulé s'ef-facent lorsque le cordon d'ali-mentation est débranché.
Est-ce que « 0:00 » clignote sur l'afficheurlorsque le cordon d'alimentation est con-necté à nouveau?
La pile est usée. Pour remplacer la pileau lithium, contactez JAPON TIGERCORPORATION. 49
Le couvercle ne s'ouvre pas,ou il ouvre pendant la cuisson.
Y a-t-il des grains de riz qui ont adhéré aupartie supérieure du boîtier?
Enlevez complètement tout le riz restant.52•72
Rien ne se passe quand unetouche est enfoncée.
Le fiche électrique est-il correctementconnecté à une prise de courant?
Branchez le cordon d'alimentation com-plètement dans une prise.
44•52•65•66•69•82
La lumière réchaud est-elle allumée? Appuyez sur la touche [Keep Warm/Can-cel] pour désactiver la fonction de main-tien au chaud, puis recommencez l'opéra-tion.
52•59
Il y a une odeur de plastiqueetc.
Ces odeurs peuvent se produire lorsque le cuiseur à riz est utilisé pour la premièrefois, mais elles devraient disparaître avec le temps.
-
Des lignes et des vagues appa-raissent sur les pièces en ma-tière plastique.
Ces traces se sont créées lors du moulage et n'affectent pas le bon fonctionnementdu produit. -
Des indications apparaissent
Écran d'affichage ActionPage de réfé-
rence
« » apparaît sur l'écran d'affichage et unlong bip en continu retentit.
Une défaillance s'est produite dans la partie principale. Débranchezle cordon d'alimentation et contactez JAPON TIGER CORPORA-TION.
-
Pièces en plastiqueLes pièces en plastique qui entrent en contact avec la chaleur ou de la vapeur se détériorent au fil du temps. Contactez JAPON TIGERCORPORATION.
81
Français

Régler l'heure actuelleL'heure est affichée au format 12 heures.
L'heure ne peut pas être réglée pendant la cuisson, lorsque la fonction de maintien au chaud est activée, lorsque lafonction de minuterie est en cours d'utilisation, ou pendant le réchauffage.
Changer l'heure actuelle de « 9:30 » à « 9:35 »
1 Ouvrez le couvercle dupanneau.
2 Branchez le cordond'alimentation dans uneprise (voir p. 53).
3 Afficher le mode de réglagede l'heure.
Appuyez sur la touche [Hour] ou [Min] pour afficher .
4 Réglez l'heure actuelle.Régler l'heure avec la touche [Hour] et les minutesavec la touche [Min].Maintenez la touche correspondante pour modifier letemps plus rapidement.Lorsque vous avez terminé de régler l'heure, appuyezsur la touche [Min].
Pour annuler le réglage de l'heure, appuyez sur[Keep Warm/Cancel].
5 Fermez le couvercle dupanneau.
SpécificationsTaille de l'unité 0,54 L (3 tasses)
Classement 120V 60Hz
Consommation électrique (W) 458
Capacité de cuisson (L)
Quick 0,09 à 0,54 (0,5 à 3 tasses [2,65 à 15,87 oz])
Synchro-Cooking 0,09 à 0,18 (0,5 à 1 tasse [2,65 à 5,29 oz])
Plain 0,09 à 0,54 (0,5 à 3 tasses [2,65 à 15,87 oz])
Mixed 0,09 à 0,36 (0,5 à 2 tasses [2,65 à 10,58 oz])
Sweet 0,09 à 0,36 (0,5 à 2 tasses [2,65 à 10,58 oz])
Risotto 0,09 à 0,18 (0,5 à 1 tasse [2,65 à 5,29 oz])
Brown 0,09 à 0,36 (0,5 à 2 tasses [2,65 à 10,58 oz])
Dimensions externes*(po.)
Largeur 8,7 (22,0 cm)
Profondeur 10,8 (27,3 cm)
Hauteur 7,5 (19,1 cm)
Poids* (lbs) 6,4 (2,9 kg)
En fonction de la température de la pièce et de l'utilisation, une différence de temps de 30 à 120 secondes peut seproduire au cours d'un mois.Une tasse est environ 5,29 oz (150 g).
* approximatives.
82

En cas de panne de courantSi une panne de courant se produit, le cuiseur à riz reprendra ses fonctions normales une fois le courant rétabli.
État lorsqu'une panne de courant se produit Une fois le courant rétabli
Lorsque la fonction de minuterie est réglée La minuterie reprendra son fonctionnement. (Si la panne dure pen-dant une longue période de temps et le temps prédéfini s'est écoulélorsque le courant est rétabli, le cuiseur à riz commencera immédia-tement à cuire.)
Pendant la cuisson/le réchauffage Le cuiseur à riz reprendra la cuisson/le réchauffage.
Loraque la fonction de maintien au chaud est activée La fonction de maintien au chaud est annulée en cas de panne decourant pendant plus de 30 minutes.
Selon les conditions, le riz peut ne pas être bien cuit ou la température de maintien au chaud peut baisser.
Achat de pièces de rechange et accessoires en option.Le revêtement de résine fluorocarbonée de la casserole intérieure peut s'user et se décoller avec une utilisationprolongée. (Voir p.47)
Pour des saletés tenaces, odeurs, ou de graves dommages, contactez JAPON TIGER CORPORATION.
83
Français

84

目錄
1 安全須知................................................................ 86
2 各部名稱及用途........................................................... 89
從選單可選的功能與特點................................................... 91
煮出美味可口米飯的秘訣................................................... 92
3 煮飯前的準備............................................................ 93
4 煮飯方法................................................................ 94
5 米飯煮好後.............................................................. 95
6 定時煮飯的預約煮熟方法................................................... 96
7 保溫.................................................................... 98
8 再次加熱的方法........................................................... 99
9 米飯(湯品)與料理同時烹調([Synchro-Cooking]功能選單).................... 101
10 燉煮料理的作法(「Stew·Soup」選單).................................... 104
11 蛋糕的作法(「Cake」選單).............................................. 106
12 清潔保養方法............................................................ 108
13 無法將飯煮好時.......................................................... 110
14 覺得“Stew”或“Cake”做不好時.......................................... 113
15 故障排除............................................................... 114
其他................................................................... 116
時間的調整方法.......................................................... 116
規格................................................................... 116
停電時................................................................. 117
購買耗材及選購配件...................................................... 117
85
繁體中文

此處所顯示的注意事項旨在防止對使用者或他人造成
人身傷害或財產損害。屬於有關安全方面的重要內容,
請務必遵守。
請勿撕下產品上所黏貼有關注意事項的貼紙。
透過以下內容,將因疏忽注意事項而錯誤操作,導致危害
及損害的程度,加以區分說明。
表示假設操作不當時,可能導致使用
者死亡或重傷*1的內容。
表示假設操作不當時,可能會造成使
用者受到傷害*2,或者出現財物損害*3
的內容。
*1所謂重傷是指由於失明、受傷、燙傷(高溫、低溫)、觸電、骨
折、中毒等留下後遺症,以及需要住院治療甚至長期複診的情況。
*2所謂傷害是指不需要入院治療或長期複診的燙傷或觸電等情況。
*3所謂物資損害是指波及到建築物、家產以及家畜、寵物等的連帶
損害。
所用圖形符號的說明
符號表示警告、注意。具體注意內容會在圖形符號裡或者旁邊以圖片或文字表示。
符號表示該行為屬於禁止行為。具體禁止內容會在圖形符號裡或者旁邊以圖片或文字表示。
符號表示強制行為或指示行為的內容。具體指示內容會在圖形符號裡或者旁邊以圖片或文字表示。
警告
請勿使用額定電壓以外的電源。
可能會導致火災、觸電或故障。
請單獨使用額定7A以上的插座。
如果與其他器具並用,多孔插座可能出現異常發熱、
燒熔等現象,可能會導致火災。
電源線如果出現破損,請勿繼續使用。此外,請勿破
壞電源線。
(加工、過度彎曲、靠近高溫處、拉扯、扭動、捆束、
重壓、夾入物體等)可能會導致火災或觸電。
電源插頭如果附著了灰塵,請立即擦拭乾淨。
可能造成火災發生。
使用時請將電源線插頭完全緊密插入插座,不可有鬆
動情況。
若電源線損壞時,必須從製造廠商或其服務處取得的
特別電源線或配件加以更換。
若電源線損壞時,必須由製造廠商或其服務處或具有
相關資格的人員加以更換以避免危險。
請勿在手潮濕的情況下插拔電源線插頭。
可能會導致觸電或受傷。
煮飯過程中,請勿打開鍋蓋。
否則可能會造成燙傷。
請勿將臉或手靠近蒸氣孔。
否則可能會造成燙傷。特別是不要讓嬰幼兒碰觸。
請勿讓兒童單獨使用本產品,也不要在幼兒可觸摸範
圍內使用。
可能導致燙傷、觸電或受傷。
請勿用水浸泡或淋濕本產品。
否則可能導致短路或觸電。
1 安全須知使用前請仔細閱讀並遵守。
86

不可改造。
請勿讓非本公司專業維修技術人員,對本產品進行分
解或維修。
可能會導致火災、觸電或受傷。
請勿在吸、排氣孔或空隙間插入異物,例如別針、鐵
絲等金屬物體。
否則可能導致觸電或異常情況對人身產生傷害。
關閉鍋蓋時,請先確實清除附著在上框或卡扣部位附
近的飯粒、米粒等髒污後,再蓋緊鍋蓋直至聽
到"嚓"一聲。
否則恐造成蒸氣外洩,或是鍋蓋開啟而導致裡面的食
材噴出,造成受傷或燙傷事故。
發生異常或故障時,請立即停止使用。
如果繼續使用,可能會導致火災、觸電或人身傷害。
<異常、故障範例>
使用過程中,電源線或電源線插頭異常發熱。
電子鍋冒煙或出現焦味。
電子鍋的某個部位出現破裂、鬆動或晃動。
內鍋變形。
出現其他異常或故障。
立即拔下電源線插頭,並洽詢原購買處進行檢查、維
修。
請勿將產品用於使用說明書(隨附的COOKBOOK烹調指
南)未記載的其他用途。
如果有蒸氣或米飯、食材噴出,則可能會導致燙傷或
受傷。
(禁止進行的烹調範例)
將食材或調味料放入塑膠袋中進行加熱的烹調方
法。
將烹飪紙取代鍋蓋使用的烹調方法。
注意
請勿在不穩定場所、耐熱性差的桌子、墊子或地毯上
面使用。
可能導致火災,或傷到桌子、墊子或地毯。
請勿在靠近牆壁或傢俱的
位置使用。
蒸氣或者高溫可能會導致
損傷、變色或變形,因此
請離牆壁或傢俱
11.8inch/30cm以上。使用
廚房專用收納櫃等時,請
注意切勿在蒸氣無法散發的環境中使用。
請勿在蒸氣不易散發,可
能接觸到控制面板的狹小
空間中使用本產品。
以免因蒸氣熱度,而導致
控制面板變形或本產品損
傷、變色、變形、故障。
在滑動式桌子上使用時,
請將桌子完全拉出,避免產品接觸到蒸氣。
電源線插頭請勿接觸到蒸
氣。
可能會導致火災、觸電或著
火。在滑動式桌子上使用
時,電源線插頭請勿在蒸氣
影響範圍內使用。
請勿在承重強度不足的邊桌(滑動式桌子)使用本產
品。
以免產品掉落造成受傷、燙傷或故障。使用前請確認
承重強度足夠。
請勿在蒸氣不易
散發,可能接觸到
控制面板的狹小
空間中使用本產
品。
以免因蒸氣熱度,
而導致控制面板
變形或本產品損傷、變色、變形、故障。在移動式桌
子上使用時,請將桌子完全拉出,避免產品接觸到蒸
氣。
87
繁體中文

請勿使用非專用內鍋。
可能導致過熱或異常情況。
請勿在其他產品上使用本產品的料理盤。
可能導致燒熔、火災或燙傷。
請勿空燒。
可能導致故障、過熱或異常情況。
打開鍋蓋時請注意蒸氣。
可能導致燙傷。
使用時或使用後請勿觸碰高溫表面。
可能導致燙傷。
不使用時,請將電源線插頭從插座上拔下。
防止由於短路而造成人身傷害,或因電源線材劣化,
導致觸電、漏電或火災。
取下電源線時請務必握緊
插頭。
否則可能導致觸電或短路,
從而導致火災。
禁止同時使用多孔插座。
可能導致火災。
請小心操作。
如果掉落或強大撞擊,可能導致傷害或故障。
待本產品冷卻之後再進行清潔保養,
高溫表面可能導致燙傷。
請勿將本產品整機清洗。
以免本產品或底部浸水,可能導致短路和觸電。
請勿在煮飯過程中移動電子鍋。
可能導致燙傷或米湯溢出。
或是裝置用插頭脫落而停止煮飯。
搬運本產品時,請勿觸摸開蓋按鍵。
否則鍋蓋打開,可能會導致受傷或燙傷。
請勿在IH調理器的上方使用本產品。
可能會導致產品故障。
1 安全須知
88

今後使用時的注意事項
請清除本產品上所附著之燒焦飯粒、米粒等。
可能導致蒸氣外洩、米湯溢出或發生故障、或不美味等。
煮飯過程中,請勿用布等覆蓋電子鍋。
否則可能導致本體或鍋蓋出現變形或
變色。
請勿將已冷卻的米飯重新保溫。
否則無法啟動。
為了維持本產品的功能與性能,產品中設有專用孔洞,
但偶爾會有昆蟲等進入該孔洞內,使產品發生故障。請
注意可以使用市面上銷售的防蟲產品。另外,如果爬入
了蟲子造成了產品故障,需自費維修。請聯絡JAPAN
TIGER CORPORATION報修。
內鍋屬於消耗品,其氟素塗層隨著使用會逐漸損耗,有
時會出現剝落,不過其對人體無害,也不會影響煮飯或
保溫性能。如果您介意出現以上情況或者出現了變形、
腐蝕時,您可以重新購買。請先洽詢JAPAN TIGER
CORPORATION後,再進行購買。
內鍋的氟素塗層出現膨脹或剝落會導致變形,因此請務
必遵守下列使用方法。
請勿將內鍋直接放置於瓦斯爐上加熱,或在電磁爐、
微波爐等器具中使用。
請勿將白米以外的米飯(什錦飯等)進行保溫。
請勿在內鍋中使用醋。
請勿使用隨附或木製品以外的飯匙。
請勿使用金屬製的勺子、湯匙、打蛋器等堅硬物體。
請勿在內鍋中放入一般市售蒸籠、蒸架等…非標準配
件物品。
請勿在內鍋中放入餐具等堅硬物體。
請勿使用金屬鏟或菜瓜布等堅硬物體進行清潔保養。
請勿放入洗碗機或烘碗機等產品清洗。
洗米時請勿對內鍋過度施加壓力。
內鍋變形或損傷時,請洽詢JAPAN TIGER
CORPORATION後,再購買替換品。
2 各部名稱及用途
89
繁體中文

配件
<飯匙>
<量杯>約1杯(大約0.18L)約5.29oz(150g)
<料理盤> <COOKBOOK(烹調指南)>
關於聲響
煮飯過程中、燜飯期間、保溫期間、再次加熱期間發出的
下列聲響並不屬於異常。
「咔嚓咔嚓」的聲響(微電腦控制的聲音)
「嗶滋嗶滋」的聲響(金屬受熱收縮的摩擦聲響。)
潑水的聲響(僅限煮飯過程中與燜飯期間)
關於鋰電池
電子鍋內建鋰電池,因此即使拔下電源線插頭,時間或預
約時間也會持續記憶。
在拔下電源線插頭的狀態下,鋰電池有4~5年的使用壽
命。
鋰電池電量耗盡後,如果插入電源線插頭,“0﹕00”
將開始閃爍。此時雖然可以進行一般的煮飯,但是一旦
拔下電源線插頭,現在時間或預約時刻、保溫經過時間
等記憶內容就會立刻消失。
注意 請勿自行更換鋰電池,可能會造成事故或故
障。
如果需要更換新的鋰電池,請委託JAPAN
TIGER CORPORATION進行修理(自費)。
確認時間
時間以12小時制顯示。如果時間不準確,請根據現在時間
調整對時。(參照P.116)
2 各部名稱及用途
90

菜單 預約選擇 保溫 特點
Quick 希望快速炊煮白米(免洗米)時選擇。
Synchro-Cooking - 使用料理盤,同時烹煮米飯與料理時選擇。
Plain 炊煮白米(免洗米)時選擇。
Mixed·Sweet - 炊煮什錦飯和糯米飯時選擇。
Risotto - 炊煮義大利燉飯時選擇。
Brown煮糙米、什穀米(糙米與什穀雜糧混合的米)時選
擇。
Stew·Soup -炊煮隨附的COOKBOOK記載的燉煮料理或湯品時選
擇。
Cake - - 製作隨附的COOKBOOK記載的蛋糕時選擇。
煮飯容量參照P.116。
:可以保溫,但可能會影響原有的美味。
從選單可選的功能與特點
91
繁體中文

煮飯前準備請參照第93頁,煮飯方法請參照第
94·95·96頁。
選擇優質白米,保存在陰涼處請選擇碾米日較近,顆粒
飽滿有光澤之白米。請存
放在通風良好、陰暗涼爽
處。
使用隨附的量杯正確量米1杯約5.29oz(0.18L)。
免洗米也可以用隨附的量
杯進行計量。
迅速洗米用足夠的水快速攪動
洗米,以免造成米糠異
味殘留,直至水變得清
澈。
炊煮精米、胚芽米、麥飯、發芽糙米、什穀米時,請選擇「Plain」功能選單。
將什穀混入白米中炊煮時,請將其放置於白米上炊
煮。
否則恐出現鍋巴顏色較白米深的情況。
炊煮免洗米時加入免洗米與水後,為了讓每一粒米都充分吸水,請
從底部開始仔細攪拌。(僅從上面倒水,米就無法充
分吸水,導致無法將飯煮好。)
若加入的水出現白色渾濁,建議更換1到2次的水。雖
然是因澱粉質而變白,並非米糠造成,但會導致底部
焦黃、溢出或無法將飯煮好。
根據米的種類或個人喜好加減水量如果水量超過或少於標準的水量刻度,請避免超過三分
之一水量刻度的增減。
加減水量的標準表
米飯種類
加減水量的標準
(依照內鍋的水量刻度線,按照個人喜好調
整。)
Quick
Synchro-Cookin
g
Plain
Mixed
依照「Plain」的刻度線按照個人喜好調整。
Sweet(糯米) 「Sweet」的刻度線
Sweet(糯米與梗
米)
「Plain」與「Sweet」的刻度線之間
Risotto 「Risotto」的水量刻度線
Browm 「Browm」的水量刻度線
如為免洗米,請務必將水加到稍微滿過刻度(刻度線隱藏在
水面下的程度)。
胚芽米、麥飯、發芽糙米、精米、什穀米,請以「Plain」的
水量刻度為標準加減水量。
有些市面上銷售的發芽糙米、什穀米袋子上會記載加減水量,
此時可根據該內容及自己喜好加減水量。
加入配料煮飯時1杯米要控制配料約在2.5oz(70g)以下。仔細攪勻調味
料,將配料放到米上。加入配料烹調時,請務必遵 守
大煮飯量(下表)。
Mixed·Sweet 2杯以下
Risotto 1杯以下
Brown 1.5杯以下
關於義大利燉飯製作義大利燉飯時,洗米後請勿過篩,直接立即炊煮。
否則恐造成口感不佳。
煮出美味可口米飯的秘訣
92

煮出美味可口米飯的秘訣請參數P.92
1量米
請務必用隨附的量杯計量。
隨附的量杯平口盛滿一杯約為5.29oz(約0.18L)。
免洗米也請用隨附的量杯進行計量。
注意 請勿超過規定煮飯量標準(請參照P.116的
規格表)煮飯。以免導致無法將飯煮好。
2洗米
可用內鍋洗米。
使用免洗米時,請參照P.92。
注意 請勿使用溫熱水(95℉[35℃]以上)洗米
或加減水量。
可能會無法煮出美味可口的米飯。
請勿用力洗米。
否則將導致內鍋變形而無法煮出美味可
口的米飯。
3加減水量
請將內鍋水平放置,對照內鍋內側的水量刻度加減水量。
確認米的種類、選單後根據喜好加減水量。(請參照P.92
的標準表)
4擦拭乾淨水滴、米粒等
注意 加熱板、中央感應器、上框、扣槽附近所附
著的飯粒、米粒等,請務必加以清除。如果
鍋蓋沒有確實關上密合,可能會導致煮飯鍋
程中蒸氣外洩,鍋蓋打開時米飯或食材溢
出,造成燙傷或受傷。
5將內鍋放置在本體內,關閉鍋蓋。
❶將內鍋朝左右轉
動,確保正確放
置,不要使其傾
斜。
❷關閉鍋蓋。
注意 內鍋需確實的放置成正確狀態。
6連接電源線
注意 保溫燈亮燈時,請按一下[Keep Warm/
Cancel]鍵使其熄滅。
3 煮飯前的準備
93
繁體中文

煮出美味可口米飯的秘訣請參數P.92
1打開面板蓋
請勿用力按壓面板蓋,或於上方放置物品。
面板蓋內側附著水分或食材時,請立即擦拭乾淨。
2按下[Menu]鍵,將▲對準希望煮飯的選單。
每按一下時,選單就會依次切換。
如果已經選擇了想要煮飯的選單,就無需再次選擇選
單。
注意 「Quick」的煮飯時間較「Plain」短,因此
煮好的米飯會偏硬。
3按下[Start]鍵。
開始煮飯。
4關閉面板蓋
請勿按到面板蓋的按鍵。
注意 面板蓋的凸出部位內設有磁鐵,請避免將不
可接觸磁力的東西靠近該處。
煮飯所需的時間
Quick Synchro-Cooking Plain Mixed·Sweet
26〜36分 31〜41分 40〜50分 27〜45分
Risotto Brown
26〜36分 68〜82分
上述時間為馬上開始煮飯到燜好飯的時間。(電壓120V、室溫73.4℉[23℃]、水溫73.4℉[23℃]、水量為標準水位)
煮飯時間會根據煮飯量、米的種類、配料種類及份量、室溫、水溫、加減水量、電壓、使用定時等情況有些許差異。
4 煮飯方法
94

開始燜飯時,會顯示剩餘時間顯示螢幕會以分為單位,顯示到燜好飯為止的剩餘時間。
選單不同,燜飯時間也不同。燜飯時間會顯示在顯示螢幕
上。
(「Quick」:7分、「Plain」:10分)
煮好飯後將會自動保溫。
義大利燉飯完成時,保溫燈將會閃爍。
選擇「Risotto」選單時
若要在完成後,於義大利燉飯中加入番茄醬或白醬,必須
重新加熱。完成後請勿立即按下[Keep Warm/ Cancel]鍵,
改進行重新加熱操作。(参照P.100)
攪拌米飯煮好後,請立刻將米飯攪拌均勻。
因內鍋形狀特徵的關係,米飯的中央會略微凹陷
攪拌米飯時,請以隔熱手套等物品按住內鍋。
注意 如果在煮飯後或保溫過程中打開鍋蓋,蒸氣
水流到上框或外面時,請擦拭乾淨。
電子鍋使用完畢後…
1 按下[Keep Warm/Cancel]鍵
2 拔下插頭
3 清潔保養(參照P.108·109)
5 米飯煮好後
95
繁體中文

定時煮飯的預約
可以按照用餐的時間煮好米飯。
只要設定好時刻,會直接被記憶。
設為「6:30 AM」,米飯就會在上午6時30分煮好。
1打開面板蓋
2確認現在時間
現在時間不正確時,將無法在正確時間煮好。要調整現
在時間時,請參照P.116。
時間以12小時制顯示。
3按下[Timer]鍵。
6 定時煮飯的預約煮熟方法(僅適用「Quick」、「Plain」、「Brown」選單)
96

4按下[Hour]鍵或[Min]鍵調整想煮好飯的時間。
時間以12小時制顯示。
[Hour]鍵為1小時單位,[Min]鍵為10分鐘單位,調整是
以10分鐘為單位。
持續按壓,可快速變換時間。
注意 為了防止食物變質,請將定時預約時間設定
在12小時之內。
5按下[Menu]鍵,將▲對準希望煮飯的選單。
如果已經選擇了想要煮飯的選單,就無需再次選擇選
單。
6按下[Start]鍵。
預約完成。
定時器設定錯誤時,可按下[Keep Warm/Cancel]鍵,從
P.96的步驟3開始重新設定。
7關閉面板蓋
注意 在下列情況下無法進行炊煮預約設定。
「Synchro-Cooking」「Mixed·Sweet」
「Risotto」「Stew·Soup」「Cake」的
情況。
下表所示時間不足時。
菜單不可進行定時設定的時
間
Quick 55分以內
Plain 1小時5分以內
Brown 1小時35分以內
顯示螢幕的時間在「0:00」閃爍時。
保溫燈點亮時,請按下[Keep Warm/
Cancel]鍵使其熄滅。(若保溫燈亮,則
無法預約。)
按下[Timer]鍵後,如果30秒之間不
做任何操作,就會發出“嗶嗶嗶”的
提示音。
在無法定時煮飯的狀態下設定時,如
果按下[Timer]鍵或者是[Start]鍵,
就會發出“嗶嗶嗶”的提示音。
不須變更預約時間與選單時
亦可在面板蓋關閉的狀態下進行操作。
❶確認現在時間。
❷按下[Timer]鍵。
❸按下[Start]鍵。
97
繁體中文
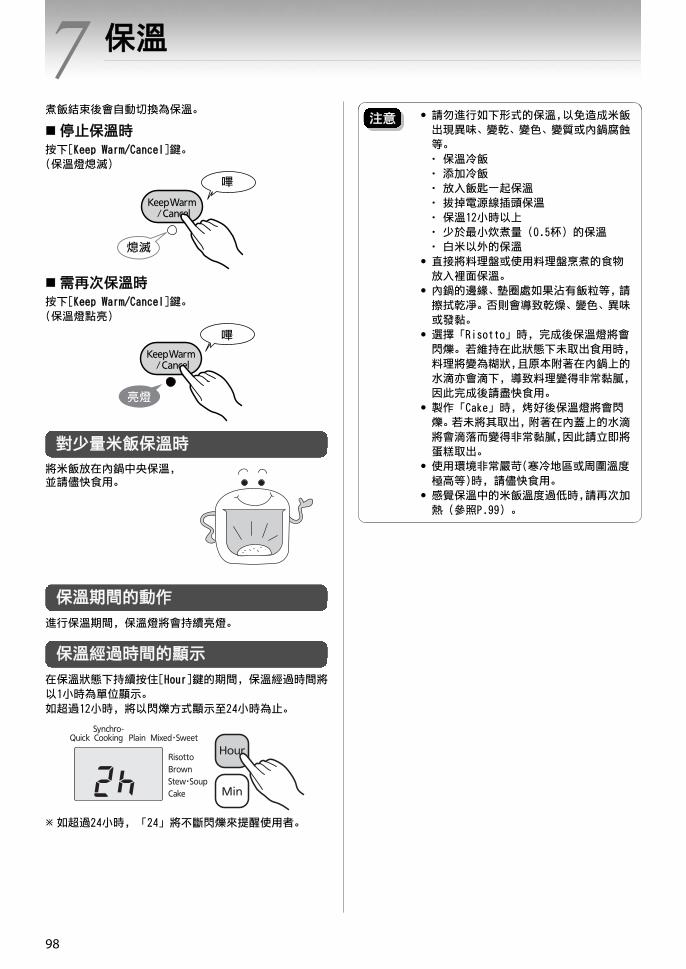
煮飯結束後會自動切換為保溫。
停止保溫時按下[Keep Warm/Cancel]鍵。
(保溫燈熄滅)
需再次保溫時按下[Keep Warm/Cancel]鍵。
(保溫燈點亮)
對少量米飯保溫時
將米飯放在內鍋中央保溫,並請儘快食用。
保溫期間的動作
進行保溫期間,保溫燈將會持續亮燈。
保溫經過時間的顯示
在保溫狀態下持續按住[Hour]鍵的期間,保溫經過時間將
以1小時為單位顯示。
如超過12小時,將以閃爍方式顯示至24小時為止。
如超過24小時,「24」將不斷閃爍來提醒使用者。
注意 請勿進行如下形式的保溫,以免造成米飯
出現異味、變乾、變色、變質或內鍋腐蝕
等。
保溫冷飯
添加冷飯
放入飯匙一起保溫
拔掉電源線插頭保溫
保溫12小時以上
少於 小炊煮量(0.5杯)的保溫
白米以外的保溫
直接將料理盤或使用料理盤烹煮的食物
放入裡面保溫。
內鍋的邊緣、墊圈處如果沾有飯粒等,請
擦拭乾凈。否則會導致乾燥、變色、異味
或發黏。
選擇「Risotto」時,完成後保溫燈將會
閃爍。若維持在此狀態下未取出食用時,
料理將變為糊狀,且原本附著在內鍋上的
水滴亦會滴下,導致料理變得非常黏膩,
因此完成後請盡快食用。
製作「Cake」時,烤好後保溫燈將會閃
爍。若未將其取出,附著在內蓋上的水滴
將會滴落而變得非常黏膩,因此請立即將
蛋糕取出。
使用環境非常嚴苛(寒冷地區或周圍溫度
極高等)時,請儘快食用。
感覺保溫中的米飯溫度過低時,請再次加
熱(參照P.99)。
7 保溫
98

使用「Plain」/「Quick」選單時
食用之前將保溫中的米飯重新加熱,便可吃到熱騰騰的米
飯。
注意 如果米飯超過內鍋一半以上,則由於米飯
的量太多,可能無法充分加熱。
在下列狀況下如果再次加熱,米飯就會變
得乾硬。
在剛煮完飯後或米飯還很溫熱的時候。
未滿米飯的 小炊煮量(0.5杯)時。
3次以上重複加熱時。
1攪拌保溫中的米飯
2灑入1~2大匙的水,再均勻翻動。
灑水後,可防止米飯變乾,使米飯鬆軟可口。
3確認保溫燈點亮
如果保溫燈沒有點亮,則不可再次加熱。如果沒有點亮
時,請按下[Keep Warm/Cancel]鍵。
(參照P.98)
4按下[Start]鍵。
想放棄再次加熱時,就按下[Keep Warm/Cancel]鍵。
米飯較涼(約131℉[55℃]以下)時,
不能再次加熱。將以「嗶嗶嗶…」聲音
提示。
5將加熱後的米飯攪拌均勻
攪拌米飯時,請以隔熱手套等物品按住內鍋。
8 再次加熱的方法
99
繁體中文

選擇「Risotto」選單並希望加入番茄醬或白醬時
1完成後立即加入番茄醬或白醬,並充分攪拌均勻。
2確認保溫燈是否閃爍。
保溫燈未閃爍時,無法重新加熱。
3按下[Start]鍵
注意 務必需按下[Start]鍵。(請勿按下[Keep
Warm/Cancel]鍵,否則將無法重新加熱。)
未在完成後立即加熱時,可能會造成料理不好吃。
8 再次加熱的方法
100

使用料理盤,可同時烹煮料理與米飯(湯品)。
不煮米飯時,也可直接在內鍋中裝水烹煮料理。
料理的烹飪方法請參照隨附的COOKBOOK。
注意 烹調量請勿超過隨附COOKBOOK上規定的
標準。以免發生米飯、食材溢出或烹調的
料理不夠美味。
如果烹調氣味較重的食物,則料理盤上可
能殘留氣味。
如果烹調顏色較深的食物,則湯汁等可能
使料理盤染色,
請勿在料理盤內使用菜刀、刀叉等銳利的
器具。
享受同時烹煮樂趣的要訣〈食材放入料理盤時的注意事項〉
請勿在料理盤上擺滿大量食材。
為了讓食材接觸到蒸氣,食材請均勻平鋪,或在食材
之間保留縫隙(建議高度勿超過料理盤的下圖位置)。
減少水或調味醬汁等液體份量(量太多時將不易加
熱)。
使用牛奶、鮮奶油等發生分離時,請充分攪拌。
鬆餅粉等會膨脹的食材請斟酌份量(建議為料理盤深
度的1/3)。雞蛋也會膨脹,請注意份量(建議勿超過2
顆雞蛋)。
請依據一起放入得食材份量與雞蛋大小自行調整。
根莖類等不易熟透的蔬菜請切薄。
使用料理盤進行料理時,僅可使用蒸煮料理,不可烹
煮炒拌或燒烤料理。
注意 若已留意上述幾點,卻仍發生加熱不足的現
象時,請將食材移至其他容器後,利用微波
爐等重新加熱(內鍋、料理盤不可放入微波
爐)。
同時烹煮時的基本操作步驟
1事先將食材配置好後放入料理盤
盡量避免重疊放置食材,請排列平均鋪於料理盤內。以
免發生米飯、食材溢出或烹調的料理不夠美味。
2煮飯與烹煮湯品前的準備
(參照P.93「1」~「4」)
注意 〈煮飯時〉
同時烹調時的煮飯量請參照下表。煮飯時請
不要超過規定的 大量或少於規定的 小
量以免發生米飯、食材溢出或烹調的料理不
夠美味。
大量 小量
1杯 0.5杯
〈烹煮湯品時〉
以內鍋內側的「Plain」刻度線為標準,放
入湯品的材料(參照下表)。份量超過 大
量時,將出現無法烹煮或食材溢出的情況。
份量低於 小量時,則可能會燒焦。
大量 小量
「Plain」刻度線1.5以
下「Plain」刻度線1以上
9 米飯(湯品)與料理同時烹調([Synchro-Cooking]功能選單)
101
繁體中文

3將料理盤安裝到內鍋上,關閉鍋蓋。
注意 請務必將料理盤安裝到內鍋上。
安裝料理盤時,請注意不要傾斜。
請在蓋上鍋蓋之前,將料理盤的提把倒向
外側平放。
4連接電源線
注意 保溫燈點亮時,請按下[Keep Warm/Cancel]
鍵使其熄滅。
5打開面板蓋
6功能選擇
〈同時烹煮米飯與菜餚時〉
按下[Menu]鍵,選擇「Synchro-Cooking」。
〈同時烹煮湯品與菜餚時〉
❶按下[Menu]鍵,選擇「Stew·Soup」。
❷根據料理種類,請將烹調時間設為20~30分鐘。
(參照P.104)
注意 與米飯同時烹煮時,請務必選擇
「Synchro-Cooking」,與湯品同時烹煮時,
請務必選擇「Stew·Soup」。
9 米飯(湯品)與料理同時烹調([Synchro-Cooking]功能選單)
102

7按下[Start]鍵。
開始同時烹煮。
注意 烹煮期間請勿開啟鍋蓋。
8關閉面板蓋
9煮好後
將會自動保溫。
10 取出料理盤
注意 不可在安裝著料理盤的狀態下保溫。
蒸煮後取出料理盤時,請注意料理盤高
溫。可能導致燙傷。
取出料理盤時不要使其傾斜。
以免湯汁等溢出造成燙傷。
不要將取出的料理盤放回鍋內保溫。
會造成食物變質或是米飯無法達到保溫
效果。
同時烹煮湯品與菜餚時,料理盤的底部將
會附著髒污,放置於桌上等處時請小心注
意。
烹煮經加熱後會產生大量水分或油分的食材及加熱中
會膨脹的雞蛋等食材時,湯汁可能會滴落至內鍋上。
在內鍋裝水烹調時
❶加水至Plain刻度線1的高度後,將料理盤放置於內鍋
上,關閉鍋蓋。
❷選擇「Stew·Soup」選單
❸根據料理種類,請將烹調時間設為20~30分鐘。(參照
P.104)
❹煮好後按下[Keep Warm/Cancel]鍵,取出料理盤。
同時烹煮完成後…
1 按下[Keep Warm/Cancel]鍵
2 以P.109的要領去除異味
103
繁體中文

可輕鬆烹煮下列料理。料理的烹飪方法請參照隨附的
COOKBOOK。
初在接近沸騰溫度的高溫下炊煮後,待溫度降至約
199℉[93℃]時再燜煮一段時間。然後,待降至約
190℉[88℃]左右時再進行燉煮。透過慢慢地降低加熱溫
度進行燉煮後,不僅食物會更加入味,即便長時間加熱,
也無需擔心湯汁煮乾。
選單範例
紅燒肉、牛蒡山藥湯
隨附的COOKBOOK中有介紹「紅燒肉」與「牛蒡山藥湯」的
製作方法。
注意 烹調時請充分攪拌,以免調味料沉澱到內鍋
鍋底。
烹煮時的基本操作步驟
1準備材料
2將食材放入內鍋,關閉鍋蓋。
注意 放入食材時,要以內鍋內側的[Plain]水量
刻度為標準。(參照下表)超過 大量時可
能會出現無法煮飯或溢出現象。此外,就算
是少於 小量,有時也會出現溢出現象,請
多加注意。
大量 小量
「Plain」刻度線3以下 「Plain」刻度線1以上
3連接電源線
注意 保溫燈點亮時,請按下[Keep Warm/Cancel]
鍵使其熄滅。
4打開面板蓋
5按下[選擇]鍵,選擇「Stew·Soup」。
6調整炊煮時間
炊煮時間須使用[Hour][Min]鍵調整。
可在5~120分鐘範圍內以5分鐘為單位進行設定。
每按1次[Hour]鍵,就增加5分鐘,每按1次[Min]鍵,就
會減少5分鐘。
7按下[Start]鍵。
開始烹調。
注意 烹煮期間請勿開啟鍋蓋。
10 燉煮料理的作法(「Stew·Soup」選單)
104

8關閉面板蓋
9煮好後
保溫燈點亮,在顯示螢幕顯示「0h」。
〈烹調時間不足時〉
請在保溫 燈點亮的狀態下,按下[Hour]鍵調整追加烹調
時間後,再按下[Start]鍵。( 多可追加3次,每次追加
30分鐘。)
注意 烹調時間不足時,請不要在追加烹調時間前
按下[Keep Warm/Cancel]鍵。保溫燈熄滅了
就無法繼續烹調。如果已經按下了,請按照
以下步驟烹調。
❶取出內鍋,放在濕布上。
❷打開本體鍋蓋,放置10分鐘,冷卻本體與
內鍋。
❸再次將內鍋放置在本體中。
❹以P.104的步驟4開始的要領烹調
(再次加熱的方法)
在烹調保溫期間想要再次加溫時(想要加溫到可口的溫度
時),可在保溫燈點亮時按下[Start]鍵再次加熱。此時
會顯示再次加熱剩餘時間,當再次加熱結束後,會發出3
次(嗶嗶嗶)聲。再次加熱後,保溫燈點亮,繼續顯示保
溫時間。
烹調結束後…
1 按下[Keep Warm/Cancel]鍵
按下[Keep Warm/Cancel]鍵後,保溫燈將會熄滅。
2 以P.109的要領去除異味
烹調結束後如果不按下[Keep Warm/Cancel]鍵,就會
持續保溫,會以每小時為單位顯示從1小時(1h)至
6小時(6h)的時間範圍。如果超過6小時,「6」會
開始閃爍。
注意 部分種類的料理可能會在持續保溫
後出現味道變差的情況。
請勿保溫超過6小時
105
繁體中文

可製作隨附的COOKBOOK中記載的蛋糕。
注意 請勿製作隨附之COOKBOOK未記載的蛋糕
類型。
製作量請勿超過隨附COOKBOOK上規定的
標準。材料可能會溢出。
1準備材料
2將麵糊倒入內鍋中
3排出2的麵糊中的空氣
注意 於加熱前排出麵糊的空氣時,請墊在柔軟的
布巾上作業。否則恐造成內鍋變形或損壞。
4將內鍋放置在本體內,關閉鍋蓋。
5連接電源線
6打開面板蓋,按下[Menu]鍵選擇「Cake」。
7調整加熱時間
加熱時間須使用[Hour][Min]鍵調整。
可在1~60分鐘範圍內以1分鐘為單位進行設定。
每按1次[Hour]鍵,就增加1分鐘,每按1次[Min]鍵,就
會減少1分鐘。
8按下[Start]鍵。
開始加熱。
9關閉面板蓋
11 蛋糕的作法(「Cake」選單)
106

10 烘烤完成後…
保溫燈閃爍。
❶打開鍋蓋,試著用竹籤刺入蛋糕中央。 (若竹籤上未
附著麵團時,代表蛋糕內部已完全烤熟。)
〈附著麵糊時,表示未烤熟〉
請在保溫燈閃爍的狀態下,按下[Hour]鍵調整追加烘
烤時間後,再按下[Start]鍵。( 多可追加3次,每
次追加30分鐘。)
注意 追加烘烤前,請勿按下[Keep Warm/
Cancel]鍵。保溫燈熄滅了就無法繼續烘
烤。如果已經按下了,請按照以下步驟
烘烤。
❶取出內鍋,放在濕布上。
❷打開本體鍋蓋,放置10分鐘,冷卻本
體與內鍋。
❸再次將內鍋放置在本體中。
❹選擇「Cake」,並設定追加時間進行
烘烤。
❷取出內鍋後,將蛋糕取出與冷卻。
注意 取出內鍋時,請務必使用隔熱手套等工
具,注意避免手掌直接觸摸內鍋。否則可
能會造成燙傷。
烤好後請立即將蛋糕取出。未取出時,附
著在內鍋上的水滴將會滴落而變得非常
黏膩。
做好蛋糕後…
1 按下[Keep Warm/Cancel]鍵
2 以P.109的要領去除異味
107
繁體中文

清潔保養的方法,請參照P108~109所記載的方法進行。其他維修等事宜請委託合格之維修技術人員。
使用後,為了保持鍋體乾凈,請務必在當天進行清潔保養。此外,還要定期進行清潔保養。
在烹調完成後,容易留下異味,因此請務必在當天之內去除異味。(參照P.109)
注意 請務必拔出插頭,並等到本體、內鍋、內蓋、料理盤冷卻後,再進行清潔。
請勿將本產品浸在水中,或向本產品沖水。請勿將本產品整體清洗。
如果殘留清潔劑成分的話,會造成樹脂劣化、變色。請確實將清潔劑沖洗乾淨。
僅限使用乾淨、柔軟的材料,如布、海綿或紙巾。
每次使用後必須清潔的零件
❶用海綿沾水或溫水進行清洗。
❷用乾布將零件徹底擦乾。
注意 請勿用菜瓜布面清洗內鍋。以
免導致氟素塗層脫落。
請勿將餐具類放入內鍋中,及把內鍋當做洗碗池使
用。以免劃傷氟素塗層,或造成剝離。此外在晾乾
內鍋時,請勿與餐具重疊放置。
髒污時必須清潔的零件
本體的外側、內側、面板蓋的外側與內側的污垢,請用擰乾水的布擦拭。
電源線請用乾布擦拭。
加熱板、中央感應器沾有燒焦的飯粒、米粒等時,請擦拭乾淨。
無法順利清除時,可使用市面上銷售的砂紙(320號左右)擦拭,再用
擰乾水的布擦拭。
上框沾有飯粒或米粒等時,請擦拭乾淨。
面板蓋內側的燈孔髒污時,請用棉花棒等工具擦拭乾淨。
注意 本體內部嚴禁進水。
請勿將電源線浸入水中或沾上水。
以免導致短路、觸電及故障。
注意 請勿拆下墊圈類。
為了防止變質或產生異味,請保持內鍋及內蓋的清
潔。
請勿使用稀釋劑、去汙粉類、漂白劑、化學布料或
金屬或尼龍刷..等。
請務必拆卸各零部件後再進行清潔保養。
請勿將量杯、飯匙浸入熱水。
以免發生變形。
以上所有配件,請勿放入洗碗機、烘碗機內清洗,
以免造成變色、變形、刮傷等故障。
與什穀(莧籽等)混合炊煮後,請務必清潔保養內
蓋。以免發生因內蓋的蒸氣孔堵塞,而導致鍋蓋打
不開等故障,或無法煮 出美味可口的米飯。
12 清潔保養方法
108

安裝或拆卸內蓋
拆卸方法以往外拉的方式進行卸除。
安裝方法將內蓋對準鍋蓋開孔,如圖般確實嵌入。
注意 不要拉扯內蓋的墊圈。一旦拆下,就
沒辦法再次裝上。
異味的去除方法(當電子鍋或料理盤上有異味殘留時)
本體❶將水加入內鍋至七八分滿,在[Plain]選單按下[Start]鍵。
(請勿將料理盤安裝到內鍋上)
切換成保溫後,按下[Keep Warm/Cancel]鍵。
烹調後或感覺有異味時,可在水中加入檸檬酸(約20g),即可
有效清除異味。
有的異味無法徹底去除乾淨。如果無法徹底去除,請洽詢
JAPAN TIGER CORPORATION。
❷使用廚房專用清潔劑清洗內鍋、內蓋後,充分沖洗乾淨
❸在通風良好的地方晾乾本體與各零部件。
注意 保養後,內鍋、本體會變熱,請多
加注意。
否則可能會造成燙傷。
浸泡後料理盤會變熱,請多加注意。
否則可能會造成燙傷。
料理盤請將料理盤放入熱水中,浸泡約1小時。
去除加熱板髒污的方法
使用期間可能會有蒸氣水等水分由鍋蓋流下,在加熱板上形成污漬般的髒污。
此情況不會影響性能,但非常在意時,請使用以下方式清潔。
❶使用尼龍清潔刷沾少量市售清潔劑,刷洗加熱板的污漬處。
❷使用沾水的廚房紙巾或抹布擦掉污垢。
109
繁體中文

如果感到炊煮出來的米飯或者電子鍋作業異常,請確認以下幾點。
調查
問題
煮飯選單共同情況
米量及配料量、加減水量錯誤
使用鹼離子水(pH
9以上)
進行煮飯
使用礦泉水等高硬度水進行
煮飯
選單選擇錯誤
使用電子鍋後,沒有取消保溫
就直接按了按鍵。
內鍋內側、加熱板、中央感應
器上沾有燒焦的飯粒或水滴
等 內鍋變形
中途曾停電
沒有攪拌均勻
炊煮時超過了
大煮飯量
煮好的米飯
太硬 ● ● ● ● ● ● ● ●
太軟 ● ● ● ● ● ● ●
米飯不熟 ● ● ● ● ● ● ●
米心過硬 ● ● ● ● ● ● ●
出現鍋巴 ● ● ● ● ● ●
煮飯過程中
蒸氣外漏 ● ● ● ●
米湯溢出 ● ● ● ●
煮飯時間長 ● ● ● ● ● ●
參考頁面 92·93 - - 94·97 93·95 93·108 - 109 - 117 9592·
116
調查
問題
煮飯選單共同情況
墊圈類或內鍋邊緣沾有米飯
粒等
未充分洗米(免洗米除外)
使用溫熱水(
95℉
[35℃]以上)
洗米或加減水量
洗完米後長時間在水中浸泡
洗完米後一直放在漏皿上
沒有確實蓋緊鍋蓋
混合了配料、雜糧煮飯
調味料沒有充分混合攪拌
混合了很多碎米
飯煮好後馬上又開始繼續煮
飯 清潔保養不夠
煮好的米飯
太硬 ● ● ● ●
太軟 ● ● ● ● ● ● ●
米飯不熟 ● ● ●
米心過硬 ● ● ● ●
出現鍋巴 ● ● ● ● ● ●
有米糠的氣味 ●
煮飯過程中
蒸氣外漏 ● ● ●
米湯溢出 ● ● ● ● ●
煮飯時間長 ● ●
參考頁面 93·108 92·93 93 - - 93 93 - -108·
109
13 無法將飯煮好時
110

調查
問題
「Plain
」選單
「Risotto」選單 使用料理盤進行同時烹煮
使用了預約煮飯
在炊飯前即加入番茄醬等
食材
加入番茄醬等食材後未重
新加熱
未在完成後立即加入番茄
醬 煮飯時放入材料或調味料
等食材後的份量,超越
COOKBOOK
記載的
大量或
少於
小量。
未將材料均勻的擺放在料
理盤上,而是重疊放入。
使用「S
ynchro-
Cooking
」
「Soup
·Stew
」以外的選單
進行同時烹煮
中途曾停電
煮好的米飯
太硬 ● ● ● ●
太軟 ● ● ● ● ● ●
米飯不熟 ● ● ● ●
米心過硬 ● ● ●
出現鍋巴 ● ● ● ● ●
異味 ● ● ● ● ●
發黏 ● ● ● ● ●
烹調食物
太硬 ● ● ●
太軟 ● ● ● ●
加熱不夠 ● ● ●
湯汁滴落至米飯
上● ● ●
煮飯過程中
電烤箱中有蒸氣
冒出● ● ●
米湯溢出 ● ● ● ●
煮飯時間長 ● ● ●
參考頁面 - 100 100 100 101 101 101〜103 117
有下述情況時 理由
產生一層薄膜 米紙狀薄膜是澱粉融解乾燥後形成的,對人體無害。
米飯黏內鍋 偏柔軟一些的米飯和有粘性的米飯有時會很容易沾到上面。
111
繁體中文

調查
問題
米量及配料量、加減水量錯
誤 內鍋內側、加熱板、中央感
應器上沾有燒焦的飯粒或
水滴等
中途曾停電
沒有攪拌均勻
墊圈類或內鍋邊緣沾有米
飯粒等
未充分洗米(免洗米除外)
進行了3次以上重複加熱
定時煮飯的預約設定12小
時以上
保溫持續12小時以上
保溫中的米飯
異味 ● ● ● ● ● ●
變色 ● ● ● ● ●
變乾 ● ● ● ● ● ● ●
發黏 ● ● ● ● ● ●
再次加熱的米飯變乾
硬● ● ● ●
參考頁面 92·93 93·108·109 117 95 93·108 92·9399·
10096·97 98
調查
問題
對白米、免洗米以外的食物
進行保溫
對小於
小煮飯量的米飯
進行了保溫或再次加熱
少量米飯保溫時呈環狀
添加了冷飯
飯匙放入電子鍋中一起保
溫 煮好後的熱米飯直接再次
加熱
清潔保養不夠
進行烹調或製作蛋糕後,沒
有去除異味
內鍋放入米飯情況下取消
保溫
保溫中的米飯
異味 ● ● ● ● ● ● ●
變色 ● ● ● ● ●
變乾 ● ● ● ● ●
發黏 ● ● ● ● ● ●
再次加熱的米飯變乾
硬● ● ● ●
參考頁面 98 98 98 98 98 99·100 109·109105·107·
103·10998
13 無法將飯煮好時
112
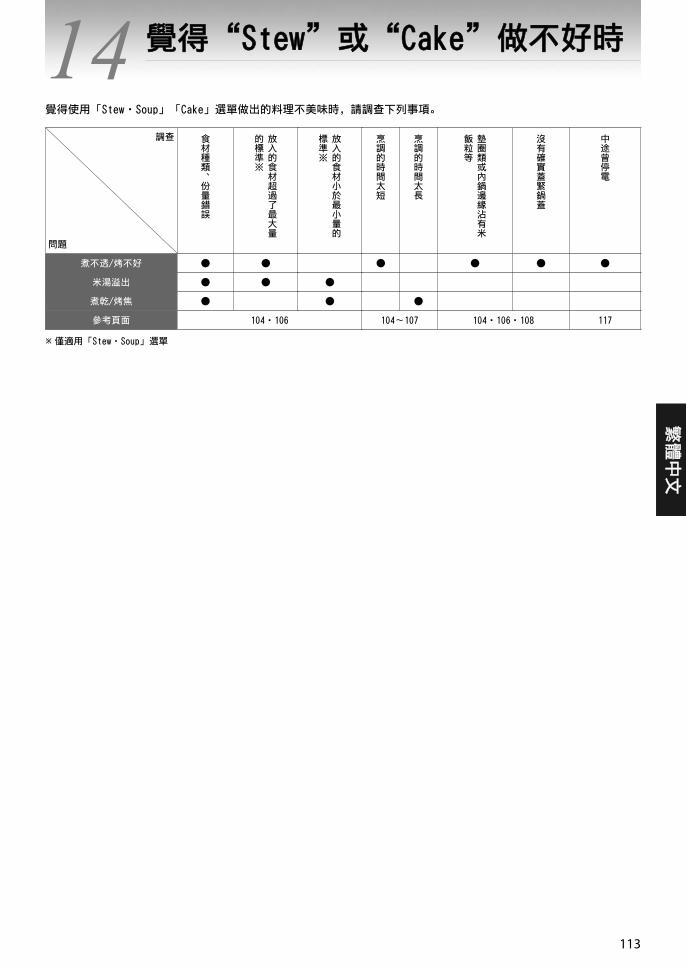
覺得使用「Stew·Soup」「Cake」選單做出的料理不美味時,請調查下列事項。
調查
問題
食材種類、份量錯誤
放入的食材超過了
大量
的標準※
放入的食材小於
小量的
標準※
烹調的時間太短
烹調的時間太長
墊圈類或內鍋邊緣沾有米
飯粒等
沒有確實蓋緊鍋蓋
中途曾停電
煮不透/烤不好 ● ● ● ● ● ●
米湯溢出 ● ● ●
煮乾/烤焦 ● ● ●
參考頁面 104·106 104~107 104·106·108 117
僅適用「Stew·Soup」選單
14 覺得“Stew”或“Cake”做不好時
113
繁體中文

在委託維修前,請先確認以下項目
問題 檢查 對策 參考頁面
米飯未煮好、
無法烹調
插頭有無插入電源插座中。 請將插頭牢固的插入。 86·93·104·
106·103·116
未在設定的時間煮好 設定的現在時間是否正確。 請正確設定時間。 116
確認114頁的「煮飯時間長」項目,並進行適當處理。
進行定時煮飯的預約時發出“嗶嗶
嗶”的聲響,無法進行設定。
設定的現在時間是否正確。 請正確設定時間。116
顯示時間在“0﹕00”是否閃爍。 請設定現在的時間。
是否沒有選擇「Synchro-Cooking」「Quick」
「Mixed·Sweet」「Risotto」「Stew·Soup」
「Cake」
「Synchro-Cooking」「Quick」
「Mixed·Sweet」「Risotto」「Stew·Soup」
「Cake」無法進行定時設定。 96·97
是否選擇了無法進行定時設定的時間。 請在可進行定時設定的時間內進行定時煮
飯設定。
預約定時煮飯時發出“嗶嗶嗶”的
聲響。
按下[Timer]鍵後,如果有大約30秒鐘時間
沒有任何動作,就會出現聲音提醒。
請繼續進行定時,完成預約。96·97
顯示螢幕模糊 墊圈類或內鍋邊緣是否沾有燒焦的飯粒、米
粒。
請清除乾淨。
93·108·109
內鍋外側是否浸濕。 請用乾布擦拭。
炊飯中、燜飯中、保溫中、再次加
熱中有聲音
是否聽到「咔嚓咔嚓」的聲響? 那是微電腦控制的聲音。並不屬於故障。
90
是否聽到「嗶滋嗶滋」的聲響? 那是金屬受熱收縮的摩擦聲。並不屬於故
障。
潑水的聲響。
(僅在煮飯期間與燜飯期間發生)
並不屬於故障。
是否聽到了與上述聲響完全不同的聲音。 請委託JAPAN TIGER CORPORATION進行修
理。-
無法再次加熱 按下[Start]鍵後,產生「嗶嗶嗶···」
的警示音。
米飯是涼的。約131℉[55℃]以下的米飯無
法再次加熱。99·
保溫燈是否熄滅? 按下[Keep Warm/Cancel]鍵,確認保溫燈亮
燈後,請再次按下[Start]鍵。
同時烹煮食物時內蓋附著食物 烹調以雞蛋為食材的料理或蒸麵包等食物時,加熱後發生膨脹的食材會附著到內蓋。請
酌量減少可能造成影響的食材量。-
烘烤蛋糕的時間太長 如有使用的電源電壓過低等情況,可能會造成烘烤時間較標準時間長的情況。烘烤程度
不足時,請追加烘烤。107
電子鍋主體內進了水或白米 可能會造成故障,請委託JAPAN TIGER CORPORATION進行修理。 -
在調整時間時,即使按[Hour]鍵或
[Min]鍵,也無法轉換成時間設定模
式。
煮飯期間、保溫期間、預約定時期間、再次加熱期間,無法進行時間調整。
116
保溫燈閃爍 製作「Risotto」「Cake」選單時,烤好後保溫燈將會閃爍 95·98·107
保溫經過時間閃爍 是否持續保溫了12小時以上。 保溫時間超過12小時以後,保溫經過的時間
會閃爍以提醒。98
燉煮料理是否保溫6小時以上。 保溫時間超過6小時以後,保溫經過的時間
會閃爍以提醒。105
如果拔下電源線插頭,現在的時間、
預約時刻或保溫經過時間的記憶就
會消失
在插入電源線插頭時,顯示螢幕處是否閃
爍“0﹕00”。
鋰電池沒電了。請委託JAPAN TIGER
CORPORATION進行修理。 90
鍋蓋無法蓋上,或者是鍋蓋在煮飯
期間打開
確認上框是否沾有飯粒、米粒等。 請清除乾淨。93·108
按鍵無反應 插頭是否已插入電源插座中。 請將插頭牢固的插入。 86·93·104·
106·103·116
保溫燈是否亮燈? 請按下[Keep Warm/Cancel]鍵取消保溫後,
再進行操作。93·98
有樹脂等異味 在剛開始使用時,可能會聞到樹脂等異味,隨著您使用次數增多就會減少。 -
塑膠部位出現線狀或波紋狀痕跡。 這是製模過程中產生的痕跡,不會影響產品的正常功能。 -
15 故障排除
114

出現下列顯示訊息時
顯示 請如此處置 參考頁面
顯示「 」,持續鳴「嗶ーーー」音,或者「嗶
嗶嗶嗶嗶嗶…」音。
本體異常。請拔掉電源線插頭,洽詢JAPAN TIGER CORPORATION。
-
有關樹脂密封圈消耗品零件
如果樹脂或密封圈零件受熱或因蒸氣受熱,可能因長期使用出現老化、損傷。請洽詢JAPAN TIGER CORPORATION。
115
繁體中文

時間的調整方法
時間以12小時制顯示。
煮飯期間、保溫期間、預約定時期間、再次加熱期間,無法進行時間調整。
例如﹕將「9﹕30」調整為「9﹕35」
1打開面板蓋
2連接電源線(參照P.93)
3設為時間設定模式
按下[Hour]鍵或[Min]鍵後,將顯示 。
4調整時間
按下[Hour]鍵調整「小時」,按下[Min]鍵調整「分鐘」。
持續按壓,可快速變換時間。
調整好時間後,按下[Min]鍵結束調整時間。
調整時間過程中想放棄調整時,請按下[Keep Warm/
Cancel]鍵。
5關閉面板蓋
規格
尺寸 0.54L(3杯)型
電源 120V 60Hz
額定消耗電力(W) 458
煮飯容量(L)
Quick 0.09~0.54(0.5~3杯[2.65 to 15.87 oz])
Synchro-Cooking 0.09~0.18(0.5~1杯[2.65 to 5.29 oz])
Plain 0.09~0.54(0.5~3杯[2.65 to 15.87 oz])
Mixed 0.09~0.36(0.5~2杯[2.65 to 10.58 oz])
Sweet 0.09~0.36(0.5~2杯[2.65 to 10.58 oz])
Risotto 0.09〜0.18(0.5〜1杯[2.65〜5.29oz])
Brown 0.09~0.36(0.5~2杯[2.65 to 10.58 oz])
外部尺寸*(in)
寬度 8.7 (22.0 cm)
深度 10.8 (27.3 cm)
高度 7.5 (19.1 cm)
主體重量*(lbs) 6.4 (2.9 kg)
時鐘可能會因室溫或使用方式的因素,而產生每月約30秒至120秒的誤差。
1杯=約5.29oz (150g)
*約略值
116

停電時
即使發生停電,待電力恢復後也不會影響各部功能的正常運作。
停電 電力恢復後
定時設定中 定時器會繼續工作。(如果長時間停電,且已過了設定時間,則立即開
始煮飯。)
煮飯、再次加熱中 持續煮飯、再次加熱。
保溫中 曾停電超過30分鐘時,將中止保溫。
在某些條件下,可能會出現煮好的米飯不美味,或是保溫溫度過低的情況。
購買耗材及選購配件
內鍋的氟素塗層,會隨著使用年限而損耗,並且剝落。(參照P.89)
當消耗品有髒汙、異味或破損嚴重時,請洽詢JAPAN TIGER CORPORATION。
117
繁體中文

118

목차
1 안전상의 주의사항.. . . . . . . . . . . . . . . . . . . . . . . . . . . . . . . . . . . . . . . . . . . . . . . . . . . . . . 120
2 부품 명칭 및 각종 기능.. . . . . . . . . . . . . . . . . . . . . . . . . . . . . . . . . . . . . . . . . . . . . . . . . . 124
메뉴 옵션 및 기능.. . . . . . . . . . . . . . . . . . . . . . . . . . . . . . . . . . . . . . . . . . . . . . . . . . . . . . . 126
맛있는 밥을 짓는 요령.. . . . . . . . . . . . . . . . . . . . . . . . . . . . . . . . . . . . . . . . . . . . . . . . . . . 127
3 취사를 시작하기 전에.. . . . . . . . . . . . . . . . . . . . . . . . . . . . . . . . . . . . . . . . . . . . . . . . . . . 128
4 취사하기.. . . . . . . . . . . . . . . . . . . . . . . . . . . . . . . . . . . . . . . . . . . . . . . . . . . . . . . . . . . . . . 130
5 취사가 완료되었을 때.. . . . . . . . . . . . . . . . . . . . . . . . . . . . . . . . . . . . . . . . . . . . . . . . . . . 131
6 타이머를 이용해서 조리하기.. . . . . . . . . . . . . . . . . . . . . . . . . . . . . . . . . . . . . . . . . . . . . . 132
7 보온하기.. . . . . . . . . . . . . . . . . . . . . . . . . . . . . . . . . . . . . . . . . . . . . . . . . . . . . . . . . . . . . . 134
8 밥 재가열하기.. . . . . . . . . . . . . . . . . . . . . . . . . . . . . . . . . . . . . . . . . . . . . . . . . . . . . . . . . . 135
9 밥(국)과 반찬을 함께 조리하기("Synchro-Cooking" 메뉴). . . . . . . . . . . . . . . . . . . . 137
10 스튜 만들기 ("Stew·Soup" 메뉴). . . . . . . . . . . . . . . . . . . . . . . . . . . . . . . . . . . . . . . . . 140
11 케이크 만들기 ("Cake" 메뉴). . . . . . . . . . . . . . . . . . . . . . . . . . . . . . . . . . . . . . . . . . . . . . 142
12 세척 및 유지보수.. . . . . . . . . . . . . . . . . . . . . . . . . . . . . . . . . . . . . . . . . . . . . . . . . . . . . . . 144
13 조리가 제 로 되지 않을 경우.. . . . . . . . . . . . . . . . . . . . . . . . . . . . . . . . . . . . . . . . . . . . 146
14 스튜나 케이크 만들기가 예상 로 되지 않습니다.. . . . . . . . . . . . . . . . . . . . . . . . . . . . 148
15 문제해결.. . . . . . . . . . . . . . . . . . . . . . . . . . . . . . . . . . . . . . . . . . . . . . . . . . . . . . . . . . . . . . 149
기타.. . . . . . . . . . . . . . . . . . . . . . . . . . . . . . . . . . . . . . . . . . . . . . . . . . . . . . . . . . . . . . . . . . 151
현재 시간 설정하기.. . . . . . . . . . . . . . . . . . . . . . . . . . . . . . . . . . . . . . . . . . . . . . . . . . . . . 151
사양.. . . . . . . . . . . . . . . . . . . . . . . . . . . . . . . . . . . . . . . . . . . . . . . . . . . . . . . . . . . . . . . . . . 151
정전이 발생할 경우.. . . . . . . . . . . . . . . . . . . . . . . . . . . . . . . . . . . . . . . . . . . . . . . . . . . . . 152
교체 부품이나 옵션 액세서리 구입하기.. . . . . . . . . . . . . . . . . . . . . . . . . . . . . . . . . . . . . 152
119
한국
어

여기에 나타낸 주의사항은 사용하실 사람이나 다른사
람들에 한 위해 및 재산피해를 미연에 방지하기위
한 것입니다 . 안전에 관한 중요한 내용이므로 반드시
지켜 주시기 바랍니다 .
본체에 부착되어 있는 주의에 관한 스티커는 떼지 마
십시오 .
표시 내용을 무시하여 잘못된 사용을 하였을 때발생하는 위해 및손해의 정도는 아래와 같은 표시로 구분하여 설명되어 있습니다 .
잘못 취급했을 경우 , 사용자가 사망
또는 중상*1을 입을 것이 예상되는내
용을 나타냅니다 .
잘못 취급했을 경우 , 사용자가 상
해*2를 입을 것이 예상되거나 , 또는
물적손해*3의 발생이 예상되는 내용
을 나타냅니다 .
*1 중상이란 실명이나 부상 , 화상 ( 고온·저온 ), 감전 , 골절 ,
중독 등으로 후유증이 남는 것 및 치료에 입원이나 장기간의
통원을 요하는 것을 가리킵니다 .
*2 상해란 치료에 입원이나 장기간의 통원을 요하지 않는 부상
이나 화상 , 감전 등을 가리킵니다 .
*3 물적 손해란 가옥·가재 및 가축·애완동물 등과 관계된 확
손해를 가리킵니다 .
그림기호의 설명
기호는 경고 , 주의를 나타냅니다 . 구체적인 주의 내용은 그림기호안이나 가까이에그림과 문장으로 표시됩니다 .
기호는 금지된 행위임을 나타냅니다. 구체적인 금지 내용은 그림기호안이나 가까이에그림과 문장으로 표시됩니다 .
기호는 행위를 강제하거나지시하는 내용을 나타냅니다 .구체적인 지시 내용은 그림기호 안이나 가까이에 그림과문장으로 표시됩니다 .
경고
정격 전압이 이외의 전원을 사용하지 마십
시오.이 규정을 지키지 않을 경우 화재나 감전의 위험이
있습니다.
정격 7A의 전기 콘센트를 사용하고 다른
기기를 동시에 연결하지 마십시오.동일한 콘센트에 다른 기기를 연결할 경우 콘센트
가 과열되어 화재가 발생할 수 있습니다.
전원 코드를 손상시키거나 손상된 전원 코
드를 사용하지 마십시오.코드를 세게 구부리거나 비틀거나 접거나 개조하지
마십시오. 뜨거운 표면 근처나 무거운 물체 아래/무
거운 물체 사이에 코드를 두지 마십시오. 전원 코드
가 손상될 경우 화재나 감전의 위험이 있습니다.
먼지나 이물질이 쌓였을 경우 플러그의 먼
지나 이물질을 깨끗하게 닦아내십시오.그래야 화재의 위험을 피할 수 있습니다.
감전, 단락, 연기 발생 또는 화재를 피하려
면 플러그를 콘센트 끝까지 밀어넣어 끼우
십시오.
전원 코드가 손상된 경우 제품 제조업체나
서비스 센터에서 구입할 수 있는 특수 코드
나 어셈블리로 교체해야 합니다.
전원 코드가 손상된 경우 위험을 피하려면
제품 제조업체나 서비스 센터 또는 이에 준
하는 전문 기술자가 교체 작업을 담당해야
합니다.
젖은 손으로 플러그를 끼우거나 빼지 마십
시오.그래야 감전이나 부상의 위험을 피할 수 있습니다.
조리가 진행되는 동안
절 로 뚜껑을 열지 마
십시오.화상을 입을 위험이 있습니
다.
1 안전상의 주의사항사용하시기 전에 잘 읽어 보시고 반드시 지켜 주십시오 .
120

얼굴이나 손을 증기 배출구 가까이에 지
마십시오.그럴 경우 화상의 위험이 있습니다. 유아나 영아의
손에 닿지 않도록 특별히 조심하십시오.
어린이가 혼자서 기기를 취급하지 않도록
하고 영아의 손이 닿는 곳에 기기를 놓지
마십시오.그러지 않을 경우 화상이나 감전 또는 부상의 위험
이 있습니다.
기기를 물에 담그거나 기기에 물을 붓지 마
십시오.그래야 단락, 감전, 오작동을 피할 수 있습니다.
제품을 분해, 수리 또는 개조하려고 하지
마십시오.
수리는 반드시 전문 기술자에게 의뢰해야
합니다.직접 수리할 경우 화재나 감전 또는 부상의 위험이
있습니다.
부품 사이 공간에 금속 물질을 집어넣지 마
십시오.그럴 경우 감전되거나 기기가 오작동할 수 있습니
다.
뚜껑을 닫을 때 테두리과 후크 사이에 끼여
있는 밥알 등을 제거해서 뚜껑이 딸깍 소리
를 내며 닫히도록 해야 합니다.딸깍 소리를 내며 닫히지 않을 경우 스팀이 새거나
뚜껑이 열려서 내용물이 튀어나오면서 화상이나 기
타 부상을 입을 수 있습니다.
기기가 오작동하거나 이상이 있을 경우 즉
시 사용을 중단하십시오.그러지 않을 경우 화재나 감전 또는 부상의 위험이
있습니다.
이상이 생긴 경우의 예:
전원 코드 및/또는 플러그가 지나치게 뜨거워진
다.
밥솥에서 연기가 나오거나 타는 냄새가 난다.
밥솥에 금이 가거나 느슨하게 풀리거나 덜컹거리
는 부품이 있다.
내솥의 모양이 변형되었다.
그밖의 이상이 나타난다.
즉시 콘센트에서 플러그를 뽑은 다음 해당 지역 서
비스 센터에 연락하십시오.
이 제품을 함께 제공된 작동 지침서나 요리
책에 나와 있지 않은 방법으로 사용하지 마
십시오.스팀이나 내용물이 튀어 나와서 화상이나 기타 부
상을 입을 수 있습니다.
(예)
플라스틱 쿠킹 백 등에 넣은 음식 재료를 가열할
경우.
유산지를 이용해서 밥솥 안의 음식을 덮을 경우.
주의
평평하지 않은 표면 또는 가열에 취약한 테
이블이나 매트 위에 기기를 올려놓고 사용
하지 마십시오.그럴 경우 화재가 발생하거나 테이블이나 매트가
손상될 수 있습니다.
벽이나 가구 근처에
서 기기를 사용하지
마십시오.스팀이나 열로 인해 벽이
나 가구가 손상, 변색 및/
또는 변형될 수 있습니
다. 밥솥을 벽이나 가구로부터 적어도 11.8 인치
(30 cm) 떨어진 곳에서 사용하십시오. 주방 싱크
나 찬장에 놓고 사용할 경우 스팀이나 열이 고이
지 않도록 주의하십시오.
조작 패널에 스팀이
닿을 수 밖에 없는 좁
은 공간에서 기기를
사용하지 마십시오..스팀이나 열이 닿으면 조
작 패널과 본체가 손상,
탈색 및/또는 변형될 수 있습니다. 제품을 슬라이딩
테이블에 올려놓고 사용할 경우 스팀이 고이지 않
도록 테이블을 당겨 빼십시오.
플러그에 스팀이 닿지
않도록 주의하십시오.그럴 경우 감전이나 화재
가 발생할 수 있습니다.
슬라이딩 테이블에 올려
놓고 사용할 경우 제품이
스팀에 노출되지 않도록
주의하십시오.
121
한국
어

제품의 무게를 지탱할만큼 튼튼하지 않은
슬라이딩 테이블에 제품을 올려놓고 사용
하지 마십시오.기기가 떨어질 경우 부상이나 화상을 입거나 기기
가 오작동할 수 있습니다. 기기를 올려놓기 전에 테
이블이 기기의 무게를 지탱할만큼 튼튼한지 확인하
십시오.
밥솥을 열원
근처나 물이
튀길 수 있는
장소에서 사
용하지 마십
시오.그럴 경우 감전, 단락, 화재 등이 발생하거나 기기
가 변형되거나 오작동할 수 있습니다.
본 제품 전용 내솥만 사용하십시오.다른 내솥을 사용할 경우 기기가 과열되거나 오작
동할 수 있습니다.
이 밥솥과 함께 제공된 쿠킹 플레이트만 사
용하십시오.다른 쿠킹 플레이트를 사용할 경우 화재나 발생하
거나 화상을 입을 수 있습니다.
내솥이 빈 상태에서 취사하지 마십시오.그럴 경우 기기가 과열되거나 오작동할 수 있습니
다.
뚜껑을 열 때 나오는 스팀
에 유의하십시오.스팀을 쐴 경우 화상을 입을 수
있습니다.
취사하는 동안이나 취사가 끝난 직후 뜨거
운 부분을 만지지 마십시오.화상을 입을 위험이 있습니다.
사용하지 않을 때는 전원 코드를 뽑으십시
오.그래야 부상, 화상, 감전 또는 단락에 의한 화재를
피할 수 있습니다.
콘센트에서 플러그를
꽉 잡은 채 뽑으십시
오.그래야 감전이나 단락 또
는 화재의 위험을 피할 수
있습니다.
멀티 콘센트 소켓을 사용
하지 마십시오.그래야 화재의 위험을 피할 수
있습니다.
밥솥을 조심해서 다루십시오.밥솥을 떨어뜨리거나 밥솥에 강한 충격을 가할 경
우 부상을 입거나 밥솥이 오작동할 수 있습니다.
유지보수 작업을 시작하기 전에 본체가 완
전히 식을 때까지 기다리십시오.그래야 뜨거운 표면으로부터 화상을 입지 않습니
다.
기기 전체를 세척하지 마십시오.본체 내부나 본체 밑바닥에 물을 붓지 마십시오. 그
래야 단락이나 감전의 위험을 피할 수 있습니다.
취사 도중에는 밥솥을 옮기지 마십시오.그럴 경우 내용물이 쏟아져서 화상을 입을 수 있습
니다.
플러그가 뽑혀 있으면 취사가 되지 않습니다.
밥솥을 옮기는 도중에 후크버튼을 누르지
마십시오.그럴 경우 뚜껑이 열려서 부상이나 화상을 입을 수
있습니다.
밥솥을 IH 쿠킹 히터에서 사용하지 마십시
오.그래야 기기의 오작동을 피할 수 있습니다.
1 안전상의 주의사항
122

밥솥의 수명을 늘리기 위한 주의사항
탄 밥이나 밥알 찌꺼기를 제거하십시오.
그러지 않을 경우 스팀이 새거나 내용물이 넘칠 수 있습니다. 이런 찌꺼기는 기기의 오작동이나 취
사가 제 로 되지 않는 원인이 될 수 있습니다.
취사가 되는 동안 밥솥을 천이나 기타 물체로 덮지 마십시오.
그럴 경우 밥솥이나 뚜껑이 변형 또는 변색될 수 있습니다.
식힌 밥을 재가열(보온)하지 마십시오.
그래야 기기의 오작동이나 화재의 위험을 피할 수 있습니다.
밥솥에 있는 구멍은 밥솥의 각종 기능과 성능을 유지시키는 역할을 합니다. 극히 드문 경우지만 구멍으로 먼지나 벌
레 등이 들어가서 오작동을 일으키기도 합니다. 이같은 현상을 방지하려면 시중에서 구입할 수 있는 방충 시트 등을
이용할 것을 권장합니다. 이런 문제로 인한 기기의 오작동은 보증의 상이 되지 않습니다. JAPAN TIGER
CORPORATION에 문의하십시오.
내솥의 불소 수지 코팅은 장기간 사용하면 마모되어 벗겨질 수 있습니다. 이 물질은 인체에 무해하며 코팅이 벗겨져
도 실제 취사 작업에 지장이 있거나 밥솥의 단열 성능이 저하되지는 않습니다. JAPAN TIGER CORPORATION에
문의해서 내솥을 새로 구입해도 됩니다.
불소 수지 코팅에 흠집이 생기거나 벗겨지는 것을 방지하려면 다음 지시사항을 철저히 지키십시오.
내솥을 가스 레인지, 전기 레인지 또는 IH 스토브 상판에 직접 올려놓지 마십시오. 내솥을 전자 레인지나 오븐에
넣지 마십시오.
백미의 경우에만 보온 기능을 사용하십시오. 혼합쌀이나 양념한 쌀 등에는 사용하지 마십시오.
내솥 안에 식초를 넣지 마십시오.
제품과 함께 제공된 주걱이나 나무 주걱만 사용하십시오.
쇠국자, 숟가락 또는 거품기와 같은 딱딱한 취사기구를 내솥에 사용하지 마십시오.
내솥 안에 바구니를 넣지 마십시오.
내솥에 식기류나 기타 딱딱한 취사기구나 물체 등을 넣지 마십시오.
내솥을 쇠국자 나일론 수세미와 같이 거친 소재로 닦지 마십시오.
내솥 세척에 식기 세척기나 식기 건조기를 사용하지 마십시오.
쌀을 씻을 때 내솥에 흠집이 생기지 않도록 주의하십시오.
내솥이 변형되면 구매한 JAPAN TIGER CORPORATION 리점에 문의하십시오.
123
한국
어

2 부품 명칭 및 각종 기능
124

액세서리
<주걱>
<계량컵>약 1컵 (약 0.18 L)약 5.29온스 (150 g)
<쿠킹 플레이트> <COOKBOOK(요리책)>
밥솥에서 나는 소리
조리, 찜, 재가열하는 동안 또는 보온 기능이 켜져 있는
동안 밥솥에서 다음과 같은 소리가 나는 것은 정상적인
현상이며 이상이 생긴 것이 아닙니다.
똑딱 소리(마이크로컴퓨터 컨트롤러에서 나는 소리)
펑 소리(열로 인해 금속이 수축하면서 나는 소리)
보글보글 소리(취사나 찜 요리 중에만 소리가 남)
리튬 배터리
이 밥솥에는 리튬 배터리가 내장되어 있어서 전원 플러
그를 빼두었을 때도 현재 시간과 사전설정된 타이머 설
정이 저장됩니다.
이 리튬 배터리의 기매 수명은 전원 플러그를 빼두었
을 때를 기준으로 4~5년입니다.
리튬 배터리가 방전되면 전원 코드를 도로 꽂을 때 디
스플레이에 "0:00" 표시가 깜박거립니다. 일반 취사
는 여전히 가능하지만 전원 플러그를 빼면 현재 시간,
사전설정된 타이머 설정 및 경과한 보온 시간은 더 이
상 저장되지 않습니다.
참고 리튬 배터리를 직접 교체하려고 하지 마
십시오.
리튬 배터리 교체는 JAPAN TIGER
CORPORATION에 문의하십시오.
현재 시간 확인하기
시간이 12시간 형식으로 표시됩니다. 올바른 시간이 표
시되지 않을 경우 시간을 조정해야 합니다(151페이지
참조).
125
한국
어

메뉴 가용성 보온 기능
Quick낱알이 길쭉한 쌀을 조리할 때 선택합니다(씻어
나온 쌀).
Synchro-Cooking -쿠킹 플레이트를 사용해서 밥과 반찬을 함께 조
리할 때 선택합니다.
Plain낱알이 짧은 쌀을 조리할 때 선택합니다(씻어 나
온 쌀).
Mixed·Sweet -잡곡/양념된 쌀 또는 찐 쌀을 조리할 때 선택합니
다.
Risotto - 리조토를 조리할 때 선택합니다.
Brown 현미 및/또는 잡곡을 조리할 때 선택합니다.
Stew·Soup -제품과 함께 제공된 요리책에 있는 찌게나 국 종
류를 조리할 때 선택합니다.
Cake -제품과 함께 제공된 요리책에 나와 있는 케이크
를 만들 때 선택합니다.
조리 용량은 151페이지를 참조하십시오.
: 밥을 보온할 수 있습니다. 그러나 밥맛이 다소 떨어질 수 있습니다.
메뉴 옵션 및 기능
126

취사를 시작하기 전 준비 과정은 128를, 취사에 관
한 지시사항은 130, 131 및 132페이지를 참조하
십시오.
좋은 질의 쌀을 선택해서 서늘한 곳에 보관합니다.쌀알 크기가 고르고 갓 도정한 윤기나는 쌀을 선택합
니다. 서늘하고 어둡고 환기가 잘 되는 장소에 보관
합니다.
함께 제공된 계량컵으로 쌀을 정확하게계량합니다.한 컵의 양은 략 5.29 온스
(0.18 L)입니다.
씻어 나온 쌀에도 이 계량
컵을 사용해도 됩니다.
쌀을 빠른 동작으로 씻습니다.물이 맑아질 때까지
물을 넉넉하게 붓고
손으로 쌀을 저어서
씻은 다음 물을 따라
버리는 동작을 반복
합니다.
반도정 쌀이나 통쌀, 보리를 섞어서끓인 쌀, 발아 현미, 잡곡을 섞은 쌀을 조리할 때는 "Plain" 메뉴를 선택합니다.
흰 쌀과 잡곡을 섞어서 조리할 경우 흰 쌀을 먼저
넣고 그 위에 잡곡을 넣습니다.
도정한 쌀에 비해서 밥이 눌 수 있습니다.
씻어 나온 쌀로 취사하기씻어 나온 쌀에 물을 첨가한 다음 쌀알이 전부 물에
잠기도록 해서 밑바닥부터 잘 저어줍니다.(물의 양
이 너무 적으면 쌀이 물에 잠기지 않아서 취사가 제
로 되지 않을 수 있습니다).
물이 하얀색으로 바뀌면 물을 한 두 번 갈아서 쌀을
깨끗하게 씻을 것을 권장합니다(이것은 쌀에 함유
된 전분 때문이며 겨가 아닙니다. 그러나 전분이
있는 쌀을 그 로 조리할 경우 밥이 타거나 내용물
이 넘치거나 취사가 제 로 되지 않을 수 있습니
다.).
쌀의 품종이나 개인적 취향에 맞춰서 물을 첨가하십시오.권장량보다 물의 양을 늘리거나 줄이고 싶을 경우 각
각 눈금 한 개의 1/3을 넘지 않도록 하십시오.
첨가해야 할 물의 양
메뉴
물 눈금
(내솥에 표시된 해당 눈금을 참고용
으로 사용하십시오)
Quick
Synchro-Cooking
Plain
Mixed
"Plain" 눈금에 맞춥니다.
Sweet (찰진 밥) "Sweet" 눈금에 맞춥니다.
Sweet (찹쌀 밥과 중
간 밥)
"Plain" 눈금과 "Sweet" 눈금 중간
에 맞춥니다.
Risotto "Risotto" 눈금에 맞춥니다.
Brown "Brown" 눈금에 맞춥니다.
안 씻어도 되는 쌀의 경우, 눈금을 약간 넘도록 (물의 표면
아래 라인이 약간 잠길 정도로) 물을 채우십시오.
반도정 쌀이나 통쌀, 보리를 섞어서 끓인 쌀, 발아 현미, 잡
곡을 섞은 쌀을 조리할 때는 "백미" 눈금을 참고용으로 사
용하십시오.
발아 현미나 잡곡 포장지에 첨가해야 할 물의 양이 명시되
어 있을 경우 이에 맞춰서 물을 붓고 개인 취향에 따라 물
의 양을 추가하십시오.
쌀에 다른 재료 첨가하기재료의 총 양이 쌀 한 컵당 2.5온스 (70 g)를 초과하
면 안됩니다. 양념을 잘 섞은 다음 쌀 위쪽에 추가 재
료를 첨가합니다. 다른 재료를 쌀에 첨가해야 할 경
우 최 허용량을 초과하지 않도록 하십시오(아래 표
참조).
Mixed·Sweet 2컵 이하
Risotto 1컵 이하
Brown 1.5컵 이하
리조토 조리하기쌀을 씻은 다음 체에 받쳐서 물을 빼지 말고 곧바로
조리하십시오. 그러지 않을 경우 식감이 손실될 수
있습니다.
맛있는 밥을 짓는 요령
127
한국
어

맛있는 밥을 짓는 요령은 127페이지를 참조하십시오.
1 쌀을 계량합니다.
반드시 밥솥과 함께 제공된 계량컵을 사용하십시오.
계량컵의 용량은 약 5.29온스 (약 0.18 L)입니다.
씻어 나온 쌀에도 이 계량컵을 사용해도 됩니다.
참고 반드시 정해진 양의 쌀을 넣으십시오
(151페이지의 "사양" 참조). 그러지 않을
경우 취사가 제 로 되지 않을 수 있습니
다.
2 쌀을 씻습니다.
쌀을 씻을 때 내솥을 사용해도 됩니다.
씻어 나온 쌀의 경우 127페이지를 참조하십시오.
참고 쌀을 씻거나 내솥에 물을 부을 때 뜨거
운 물(95℉ [35℃] 이상)을 사용하지
마십시오.
취사가 제 로 되지 않을 수 있습니다.
지나치게 힘을 가해서 쌀을 씻지 마십
시오.
내솥이 손상되거나 취사가 제 로 되지
않을 수 있습니다.
3 수위를 조절합니다.
내솥을 넣은 다음 내솥 안쪽에 있는 눈금의 해당 선에
맞춰서 수위를 조절합니다.
쌀의 품종이나 선택한 조리 메뉴에 따라 수위를 조절해
야 하지만 개인 취향 로 약간 조정해도 됩니다(127페
이지의 지침 참조).
4 물기나 쌀알 등을 닦아냅니다.
참고 방열판, 중앙 센서, 테두리, 걸쇠 주변에
붙어 있는 쌀알이나 기타 이물질을 제거
해야 합니다. 뚜껑에 이물질이 붙어 있을
경우 잘 닫히지 않거나 취사 도중에 갑자
기 열릴 수 있습니다.
3 취사를 시작하기 전에
128

5 내솥을 본체에 넣고 뚜껑을 닫습니다.
❶내솥이 기울지
않도록 똑바로
넣어야 합니다.
❷뚜껑을 닫습니
다.
참고 내솥이 제 위치에 놓여 있는지 확인하십
시오.
6 전원 코드를 콘센트에 꽂습니다.
참고 보온 램프에 불이 켜져 있으면 [Keep
Warm/Cancel] 키를 누르면 램프가 꺼집
니다.
129
한국
어

맛있는 밥을 짓는 요령은 127페이지를 참조하십시오.
1 패널 커버를 엽니다.
패널 커버에 힘을 지나치게 가하거나 커버 위에 물건
을 올려놓지 마십시오.
패널 커버 안쪽에 물기나 음식 찌꺼기 등이 달라붙어
있을 경우 즉시 닦아내십시오.
2 [Menu] 키를 누르면 ▲ 표시를 원하는 메뉴로 이동할 수있습니다.
[Menu] 키를 누를 때마다 선택한 메뉴가 아래 그림과
같이 바뀝니다.
원하는 메뉴가 선택되면 [Menu] 키를 누르지 않아도
됩니다.
참고 "Quick" 메뉴를 선택하면 "Plain" 메뉴에
비해 취사 시간이 단축됩니다.
3 [Start] 키를 누릅니다.
취사가 시작됩니다.
4 패널 커버를 닫습니다.
패널 커버에 있는 키를 누르지 마십시오.
참고 패널 커버에는 자석이 내장되어 있으므로
자력에 민감한 물체를 밥솥 가까이 두지
마십시오.
조리 시간에 관한 지침
Quick Synchro-Cooking Plain Mixed·Sweet
26분~36분 31분~41분 40분~50분 27분~45분
Risotto Brown
26분~36분 68분82분
위의 시간은 쌀을 불리지 않은 채 취사한 경우를 기준으로 취사가 완료된 다음 뜸이 끝날 때까지 걸린 시간을 나타냅니다(전압: 120 V, 실
내 온도 73.4℉ [23℃], 물 온도: 73.4℉ [23℃], 물의 양: 일반 수준).
조리 시간은 조리할 양, 재료의 종류나 양, 실내 온도, 물의 온도, 물의 양, 전압, 타이머 기능 사용 여부 등에 따라 약간의 차이가 있습니다.
4 취사하기
130

뜸 들이는 과정이 시작됩니다…뜸이 완료될 때까지 남은 시간이 1분 단위로 표시부에
표시됩니다.
뜸에 걸리는 시간은 선택한 메뉴에 따라 달라집니다. 뜸
을 들이는 동안 남은 시간이 표시됩니다.
("Quick": 7 분 / "Plain": 10 분)
취사가 완료되었습니다.보온 기능이 자동으로 시작됩니다.
"Risotto"의 경우 취사가 완료되면 보온 램프가 깜박거
립니다.
"Risotto" 메뉴를 선택한 경우
Risotto 메뉴의 경우 토마토 소스나 화이트 소스를 첨가
할 때 재가열해야 합니다. 취사가 끝난 다음 곧바로
[Keep Warm/Cancel] 키를 누르지 말고 리조토를 재가
열하십시오(136페이지 참조).
다 된 밥을 골고루 젓습니다.취사가 완료되자마자 밥을 골고루 저어주십시오.
내솥의 모양상 취사가 끝났을 때 밥의 가운데 부분이 약
간 움푹 들어가게 됩니다.
오븐용 장갑 등으로 내솥을 꽉 잡으십시오.
참고 테두리에 고이거나 취사 직후 또는 보온
기능이 켜진 상태에서 뚜껑을 열 때 밥솥
바깥으로 흐르는 뜨거운 물을 닦어내십시
오.
밥솥…을 사용해서 조리할 경우
1 [Keep Warm/Cancel] 키를 누릅니다.
2 삽입 플러그를 뽑습니다.
3 밥솥을 닦습니다(144 ~ 145페이지참조).
5 취사가 완료되었을 때
131
한국
어

타이머 기능 사용법
조리가 완료되기를 원하는 시간을 사전설정하면 됩니
다.
현재의 타이머 설정 내용이 메모리에 저장됩니다.
6:30 AM으로 설정할 경우 6:30 AM에 취사가 완료됩
니다.
1 패널 커버를 엽니다.
2 현재 시간을 확인합니다.
현재 시간이 맞는지 확인하십시오, 맞지 않을 경우 취
사가 제 시간에 완료되지 않습니다. 현재 시간을 설정
하는 방법은 151페이지를 참조하십시오.
시간은 12시간 형식으로 표시됩니다.
3 [Timer] 키를 누른 다.
6 타이머를 이용해서 조리하기("Quick","Plain", "Brown" 메뉴만 해당.)
132

4 [Hour]와 [Min] 키를 눌러서원하는 조리 시간을 설정합니다.
시간은 12시간 형식으로 표시됩니다.
[Hour] 키를 누르면 1시간 단위로 설정 시간이 변경
됩니다. [Min] 키를 누르면 10분 단위로 설정 시간이
변경됩니다.
해당 키를 누르고 있으면 시간이 고속으로 변경됩니
다.
참고 12시간 넘게 타이머를 설정하지 마십시
오. 밥맛이 변질될 수 있습니다.
5 [Menu] 키를 누르면 ▲ 표시를 원하는 메뉴로 이동할 수있습니다.
원하는 메뉴가 선택되면 [Menu] 키를 누르지 않아도
됩니다.
6 [Start] 키를 누릅니다.
타이머가 설정되었습니다.
잘못 설정했거나 타이머를 초기화하고 싶을 경우
[Keep Warm/Cancel] 키를 누른 다음 132페이지의
3단계를 반복하십시오.
7 패널 커버를 닫습니다.
참고 다음 경우에는 타이머 기능을 사용할
수 없습니다.
"Synchro-Cooking",
"Mixed·Sweet", "Risotto",
"Stew·Soup", "Cake" 메뉴를 선택
한 경우.
사전설정된 시간이 다음 표에 나와
있는 것보다 짧을 경우.
메뉴 최소 사전설정 시간
Quick 55분
Plain 1시간 5분
Brown 1시간 35분
표시부에서 "0:00" 표시가 깜박거릴
경우.
보온 램프가 켜져 있을 경우 [Keep
Warm/Cancel] 키를 누르면 램프가 꺼
집니다.(보온 램프가 켜져 있으면 타이
머 기능을 사용할 수 없습니다.)
[Timer] 키를 누르고 30초 이내에
밥솥을 작동시키지 않으면 알람이
울립니다(삐 소리 3번).
타이머 기능을 사용할 수 없는 상태
에서 [Timer] 키나 [Start] 키를 누
르면 알람이 울립니다(삐 소리 3
번).
타이머나 메뉴를 변경할 수 없을 경우
패널 커버가 닫혀 있을 때도 설정을 할 수 있습니다.
❶현재 시간을 확인합니다.
❷[Timer] 키를 누른니다.
❸[Start] 키를 누릅니다.
133
한국
어

취사가 완료되면 자동으로 보온 기능으로 전환됩니다.
보온 기능 끄기[Keep Warm/Cancel] 키를 누릅니다.
(보온 램프가 꺼집니다)
보온 기능 다시 시작하기[Keep Warm/Cancel] 키를 누릅니다.
(보온 램프가 켜집니다)
적은 양 보온하기
밥을 내솥 가운데로 모으고 가능한 한 빨리 먹습니다.
보온 중임을 알리는 표시
보온이 되는 동안 보온 램프에 불이 들어옵니다.
경과된 보온 시간 표시
[Hour] 키를 누르고 있으면 경과된 보온 시간이 표시됩
니다. 경과된 시간이 1시간 단위로 표시됩니다.
12시간이 경과하면 디스플레이가 최 24시간까지 깜
박거립니다.
24시간이 경과하면 "24"가 깜박거립니다.
참고 밥에서 이상한 냄새가 나거나 밥이 마
르거나 색이 변하거나 또는 내솥이 부
식되는 것을 방지하려면 다음을 주의하
십시오.
찬밥에 보온 기능을 사용지 마십시
오.
보온 중인 밥에 찬밥을 첨가하지 마
십시오.
보온 기능이 켜져 있는 중에 내솥에
주걱을 넣어두지 마십시오.
전원 플러그를 뺀 채로 보온 기능을
사용하지 마십시오.
12시간 이상 보온 기능을 사용하지
마십시오.
보온에 필요한 최소량(0.5컵) 보온하
지 마십시오.
백미(씻어 나온 쌀 포함) 보온 기능을
사용하지 마십시오.
보온 기능이 켜져 있는 동안 쿠킹 플레
이트나 쿠킹 플레이트로 조리한 음식을
내솥에 남겨두지 마십시오.
내솥의 테두리나 속뚜껑 고무패킹에 들
러붙은 밥알을 제거하십시오. 그러지
않을 경우 밥이 마르거나 변색되거나
이상한 냄새가 나거나 끈적하게 취사될
수 있습니다.
"Risotto" 메뉴의 경우 취사가 완료되면
보온 램프가 깜박거립니다. 너무 오래
보온하면 밥이 눅눅해져서 내솥 뚜껑에
서 물방울이 떨어질 수 있으므로 가능
한 한 빨리 드시는 것이 좋습니다.
"Cake" 메뉴의 경우, 취사가 완료되면
보온 램프가 깜박거립니다. 내솥 뚜껑
에서 물방울이 떨어질 수 있으므로 가
능한 한 빨리 드시는 것이 좋습니다.
지나치게 춥거나 더운 날씨 조건에서는
취사한 밥을 가능한 한 빨리 드십시오.
보온 온도가 너무 낮을 경우 을 재가열
하십시오(135페이지 참조).
7 보온하기
134

"Quick"/"Plain" 메뉴만 해당
아주 뜨거운 밥을 원할 경우 드시기 전에 보온 중인 밥
을 재가열하십시오.
참고 내솥의 절반 이상이 채워져 있으면 밥
이 충분히 가열되지 않습니다.
다음 상황에서 재가열할 경우 밥이 마
르게 됩니다.
취사 직후와 같이 밥이 아직 뜨거울
때.
밥의 양이 재가열에 필요한 최소량
(0.5컵)보다 적을 때.
밥을 3번 이상 재가열할 때.
1 보온 중이던 밥을 골고루 젓습니다.
2 1~2 테이블 스푼의 물을 밥 위에 골고루 뿌려 줍니다.
물이 뿌려주면 밥이 마르는 것을 방지해서 밥이 더 통
통해집니다.
3 보온 램프가 켜져 있는지 확인합니다.
보온 램프가 켜져 있지 않을 경우 재가열을 할 수 없
습니다. 램프가 켜져 있지 않을 경우 [Keep Warm/
Cancel] 키를 누르십시오.
(134페이지 참조)
4 [Start] 키를 누릅니다.
재가열을 중지하려면 [Keep Warm/Cancel] 키를 누
르십시오.
밥이 너무 차가우면(131℉ [55℃]) 재
가열을 할 수 없습니다. 이 경우 알람
삐 소리가 반복해서 울립니다.
5 재가열한 밥을 잘 저어서 펴줍니다.
오븐용 장갑 등으로 내솥을 꽉 잡으십시오.
8 밥 재가열하기
135
한국
어

"Risotto" 메뉴에서 토마토 소스나 화이트 소스를 첨가할 때
1 취사가 완료되는 즉시 토마토소스나 화이트 소스를 첨가한다음 잘 섞어줍니다.
2 보온 램프가 깜박거리는지 확인합니다.
보온 램프가 깜박거리지않으면 재가열을 할 수없습니다.
3 [Start] 키를 누릅니다.
참고 [Start] 키를 누릅니다.([Keep Warm/
Cancel] 키를 누를 경우 재가열할 수 없
으므로 이 키를 누르지 마십시오.)
취사 후에 곧바로 재가열을 할 수 없다면, 취사가 제
로 되지 않았을 수 있습니다.
8 밥 재가열하기
136

쿠킹 플레이트를 사용하면 밥(국)을 조리할 때 반찬을
함께 조리할 수 있습니다.
내솥에 물을 첨가한 다음 밥을 짓지 않고 반찬을 조리해
도 됩니다.
함께 제공된 요리책의 지시사항을 참조하십시오.
참고 요리책에 제시된 양보다 많은 양의 재
료로 조리하지 마십시오. 그럴 경우 내
용물이 끓어 넘치거나 조리가 제 로
되지 않을 수 있습니다.
냄새가 강한 음식을 조리할 경우 냄새
가 쿠킹 플레이트에 밸 수 있습니다.
색이 짙은 식재료로 조리할 경우 음식
국물을 통해 쿠킹 플레이트에 색상이
물들 수 있습니다.
주방 칼, 식탁용 나이프 또는 포크와 같
이 날카로운 주방기구를 쿠킹 플레이트
에 사용하지 마십시오.
동시조리로최상의 결과를 얻으려면<쿠킹 플레이트에 사용할 재료에 한 참고사항>
쿠킹 플레이트에 지나치게 가득 채우지 마십시오.
쿠킹 플레이트 바닥에 재료를 고르게 배열하고 각각
의 재료에서 스팀이 빠져나올 공간을 남겨 두십시오
(아래 그림에 나와 있는 재료 높이를 참조하십시
오).
물이나 국물은 최소한만 사용하십시오(물이 너무
많으면 충분히 가열되지 않을 수 있습니다).
우유, 생크림 등의 재료는 잘 섞어 주어야 합니다.
핫케이크 믹스처럼 부풀어오르는 음식을 조리할 경
우 소량만 사용하십시오(쿠킹 플레이트 깊이의
1/3). 달걀도 부풀어 오르므로 한 번에 한 개나 두
개만 조리하십시오.
그러나 함께 사용하는 다른 재료나 달걀의 크기에
따라 달라질 수 있으므로 적절하게 양을 조절하십시
오.
뿌리 채소처럼 완전히 익히기 어려운 재료의 경우
썰어서 넣으십시오.
쿠킹 플레이트는 스팀 조리 전용으로 제작되었습니
다. 튀기거나 굽는 용도로는 사용할 수 없습니다.
참고 위의 지시사항을 준수했는데도 재료가 충
분하게 조리되지 않은 경우 재료를 다른
그릇에 옮겨서 전자 레인지 등에 가열하
십시오(내솥과 쿠킹 플레이트는 전자 레
인지에 넣으면 안됩니다).
동시조리의 기본 순서
1 재료를 준비한 다음 쿠킹 플레이트에 담습니다.
재료가 겹치지 않도록 쿠킹 플레이트 전체에 골고루
펴주십시오. 이렇게 하지 않을 경우 내용물이 끓어 넘
치거나 조리가 제 로 되지 않을 수 있습니다.
2 밥이나 국을 조리하는 데 필요한 준비를 합니다.
(128페이지 1 ~ 4 참조)
참고 <밥을 지을 때>
다른 음식과 동시에 조리하기에 적절한
쌀의 양은 아래 표를 참조하십시오. 허용
최 량을 초과하거나 조리에 필요한 최소
량에 미달되지 않도록 하십시오.그럴 경
우 내용물이 끓어 넘치거나 조리가 제
로 되지 않을 수 있습니다.
최 량 최소량
1컵 0.5컵
<국물 음식을 조리할 때>
내솥에 표시된 "Plain" 눈금을 참조해서
다음 표의 내용 로 국물 음식에 사용할
재료를 계량하십시오.허용 최 량을 초과
할 경우 내용물이 끓어 넘치거나 조리가
제 로 되지 않을 수 있습니다. 조리에 필
요한 최소량에 미달될 경우 음식이 탈 수
있습니다.
최 량 최소량
1.5 또는 Plain 눈금
보다 낮게
1 또는 Plain 눈금보
다 높게
9 밥(국)과 반찬을 함께 조리하기("Synchro-Cooking" 메뉴)
137
한국
어

3 쿠킹 플레이트를 내솥에 넣은다음 뚜껑을 닫습니다.
참고 반드시 쿠킹 플레이트를 내솥에 넣으십
시오.
쿠킹 플레이트가 수평 상태인지 확인하
십시오 (기울어지지 않도록).
뚜껑을 닫기 전에 쿠킹 플레이트의 손
잡이를 바깥쪽으로 펴주십시오.
4 전원 플러그를 콘센트에 꽂습니다.
참고 보온 램프에 불이 켜져 있으면 [Keep
Warm/Cancel] 키를 누르면 램프가 꺼집
니다.
5 패널 커버를 엽니다.
6 뉴를 선택합니다.
<밥과 다른 음식을 동시에 조리할 때>[Menu] 키를 누른 다음 "Synchro-Cooking"를 선택합
니다.
<국물 음식과 다른 음식을 동시에 조리할 때>❶[Menu] 키를 누른 다음 "Stew·Soup"을 선택합니
다.
❷조리 시간을 20분~30분으로 설정합니다.
(140페이지 참조)
참고 밥을 지으면서 다른 음식을 동시에 조리
하려면 "Synchro-Cooking" 메뉴를 선
택하십시오. 국물 음식과 다른 음식을 동
시에 조리하려면 "Stew·Soup" 메뉴를
선택하십시오.
9 밥(국)과 반찬을 함께 조리하기("Synchro-Cooking" 메뉴)
138

7 [Start] 키를 누릅니다.
동시조리가 시작됩니다.
참고 조리가 진행되는 동안 절 로 뚜껑을 열
지 마십시오.
8 패널 커버를 닫습니다.
9 취사가 완료되었습니다
보온 기능이 자동으로 시작됩니다.
10 쿠킹 플레이트를 뺍니다.
참고 보온 기능이 켜져 있는 동안 쿠킹 플레
이트를 밥솥 안에 남겨두지 마십시오.
조리가 끝난 다음 쿠킹 플레이트를 뺄
때 뜨거울 수 있으니 조심하십시오. 화
상을 입을 수 있습니다.
빼내는 동안 쿠킹 플레이트를 기울이지
마십시오.
국물 등이 흘러 나오서 화상을 입을 수
있습니다.
한 번 뺀 후에는 쿠킹 플레이트를 내솥
에 도로 넣지 마십시오.
그럴 경우 밥맛이 떨어지거나 보온이
되지 않을 수 있습니다.
국물 음식과 다른 음식을 조리하면 음
식물이 쿠킹 플레이트 바닥에 달라붙을
수 있습니다. 그러므로 쿠킹 플레이트
를 테이블 등에 올려 놓을 때 주의하십
시오.
가열하면 액체나 기름기가 나오는 재료나 예를 들어
달걀처럼 조리하는 동안 부풀어오르는 재료를 조리할
경우 국물이 약간 내솥으로 넘쳐 흐를 수 있습니다.
내솥에 물을 넣고 조리하기
❶백미 눈금으로 최 1까지 물을 넣고 쿠킹 플레이트를
내솥에 넣은 다음 뚜껑을 닫습니다.
❷"Stew·Soup" 메뉴를 선택합니다.
❸조리 시간을 20분~30분으로 설정합니다(140페이지
참조).
❹조리가 완료되면 [Keep Warm/Cancel] 키를 누르고
쿠킹 플레이트를 빼냅니다.
동시조리가 완료되었습니다…
1 [Keep Warm/Cancel] 키를 누릅니다.
2 음식 냄새를 제거합니다. 145페이지를 참조하십시오.
139
한국
어

다음과 같은 각종 음식을 쉽게 준비할 수 있습니다. 지
시사항은 함께 제공된 요리책을 참조하십시오.
이 메뉴의 경우 우선 음식이 끓어야 합니다. 가열 온도
를 약 199℉ (93℃)로 낮춰서 음식을 끓게 둡니다. 그런
다음 온도를 약 190℉ (88℃)로 낮춰서 계속 끓입니다.
이런 식으로 온도를 조금씩 낮추면 맛이 좋아지고 장시
간 끓여도 국물이 졸아들지 않습니다.
메뉴의 예
브라운 소스를 곁들인 포크 큐브 스튜와 유부 요리;
고보 및 야마이모 스프
"브라운 소스를 곁들인 포크 큐브 스튜와 유부 요리" 및
"고보 및 야마이모 스프" 조리법은 함께 제공된 요리책
을 참조하십시오.
참고 양념이 내솥 밑바닥에 가라앉지 않도록
하려면 조리하기 전에 잘 저어주십시오.
조리의 기본 순서
1 재료를 준비합니다.
2 재료를 내솥에 넣고 뚜껑을 닫습니다.
참고 내솥 안쪽에 표시된 Plain 눈금을 참조용
으로 사용하십시오. 허용 최 량을 초과
할 경우 내용물이 끓어 넘치거나 조리가
제 로 되지 않을 수 있습니다. 조리에 필
요한 최소량에 미달될 경우 음식이 탈 수
있습니다.
최 량 최소량
3 또는 Plain 눈금보
다 낮게
1 또는 Plain 눈금보
다 높게
3 전원 플러그를 콘센트에 꽂습니다.
참고 보온 램프에 불이 켜져 있으면 [Keep
Warm/Cancel] 키를 누르면 램프가 꺼집
니다.
4 패널 커버를 엽니다.
5 [Menu] 키를 누른 다음"Stew·Soup"을 선택합니다.
6 조리 시간을 설정합니다.
[Hour]와 [Min] 키를 눌러서 조리 시간을 설정합니다.
조리 시간은 5분~120분 범위 내에서 5분 단위로 설정
할 수 있습니다.
[Hour] 키를 누를 때마다 설정 시간이 5분씩 늘어납
니다. [Min] 키를 누를 때마다 설정 시간이 5분씩 줄
어듭니다.
10 스튜 만들기 ("Stew·Soup" 메뉴)
140

7 [Start] 키를 누릅니다.
조리가 시작됩니다.
참고 조리가 진행되는 동안 절 로 뚜껑을 열
지 마십시오.
8 패널 커버를 닫습니다.
9 취사가 완료되었습니다
보온 램프에 불이 들어오고 "0h"가 표시됩니다.
<음식이 충분히 조리되지 않았을 때>보온 램프가 켜져 있는 상태에서 [Hour] 키를 눌러서
시간을 추가한 다음 [Start] 키를 누르십시오(조리 시간
은 최 3번 30분까지 늘릴 수 있습니다).
참고 음식이 충분히 조리되지 않은 경우 조리
시간을 추가하기 전에 [Keep Warm/
Cancel] 키를 누르지 마십시오. 보온 램
프가 꺼지면서 추가 조리를 할 수 없게 됩
니다. 실수로 이 키를 눌렀을 경우 다음
순서를 따르십시오.
❶내솥을 빼서 젖은 수건이나 천 위에 올
려 놓습니다.
❷본체 뚜껑을 열어서 본체와 내솥을 10
분 동안 식혀줍니다.
❸내솥을 도로 본체에 넣습니다.
❹ 140페이지의 4단계를 반복합니다.
<밥 재가열하기>보온 중인 음식을 드시기 전에 아주 뜨겁게 드시려면 보온
램프가 켜진 상태에서[Start] 키를 눌러서 음식을 재가열하
면 됩니다. 남은 재가열 시간이 표시되고 재가열이 완료되
면 알람(삐 소리 길게 3번)이 울립니다. 재가열이 끝나면
보온 램프가 켜지고 경과된 보온 시간이 표시됩니다.
취사가 완료되었습니다.…
1 [Keep Warm/Cancel] 키를 누릅니다.
보온 램프를 끄려면 [Keep Warm/Cancel] 키를 누
르십시오.
2 음식 냄새를 제거합니다. 145페이지를 참조하십시오.
조기라 완료된 다음 [Keep Warm/Cancel] 키를
누르지 않을 경우 보온 기능이 자동으로 시작되고
경과된 보온 시간이 1시간(1h)에서 6시간(6h) 범
위 내에서 1시간 단위로 표시됩니다. 6시간이 경과
되면 "6"이 깜박거립니다.
참고 음식의 맛이 떨어질 수 있으므로
보온 기능을 연속해서 사용하지 마
십시오.
6시간 이상 보온 기능을 사용하지
마십시오.
141
한국
어

함께 제공된 요리책의 설명에 따라 케이크를 만들면 됩
니다.
참고 제공된 요리책에 나와 있지 않은 케이
크 종류를 만들려고 시도하지 마십시
오.
요리책에 나와 있는 재료의 양보다 많
은 양을 만들지 마십시오. 내용물이 끓
어 넘칠 수 있습니다.
1 재료를 준비합니다.
2 내솥에 반죽을 붓습니다.
3 반죽을 눌러서 공기를 뺍니다.
참고 반죽에서 공기를 빼낼 때 부드러운 천을
이용하십시오. 그러지 않을 경우 내솥이
변형되거나 손상될 수 있습니다.
4 내솥을 본체에 넣고 뚜껑을 닫습니다.
5 전원 코드를 콘센트에 꽂습니다.
6 패널 커버를 연 다음 [Menu]키를 눌러서 "Cake"를 선택합니다.
7 조리 시간을 설정합니다.
[Hour]와 [Min] 키를 눌러서 조리 시간을 설정합니다.
조리 시간은 1분~60분 범위 내에서 1분 단위로 설정할
수 있습니다.
[Hour] 키를 누를 때마다 설정 시간이 1분씩 늘어납
니다. [Min] 키를 누를 때마다 설정 시간이 1분씩 줄
어듭니다.
11 케이크 만들기 ("Cake" 메뉴)
142

8 [Start] 키를 누릅니다.
베이킹이 시작됩니다.
9 패널 커버를 닫습니다.
10 베이킹이 완료되었습니다…
보온 램프가 깜박거립니다.
❶뚜껑을 열고 나무 꼬치로 케이크 가운데를 찌릅니다
(덜 익은 반죽이 묻어나오지 않으면 케이크가 구워진
것입니다).
<덜 익은 반죽이 묻어나올 경우>
보온 램프가 깜박거리는 상태에서 [Hour] 키를 눌러
서 시간을 추가한 다음 [Start] 키를 누르십시오(조리
시간은 최 3번 30분까지 늘릴 수 있습니다).
참고 조리 시간을 추가하기 전에 [Keep
Warm/Cancel] 키를 누르지 마십시
오. [Keep Warm] 램프가 꺼지면서
추가 조리를 할 수 없게 됩니다. 실수
로 이 키를 눌렀을 경우 다음 순서를
따르십시오.
❶내솥을 빼서 젖은 수건이나 천 위에
올려 놓습니다.
❷본체 뚜껑을 열어서 본체와 내솥을
10분 동안 식혀줍니다.
❸내솥을 도로 본체에 넣습니다.
❹"Cake"를 선택한 다음 추가 베이킹
시간을 설정합니다.
❷내솥을 들어내서 케이크를 뺀 다음 식힙니다.
참고 내솥을 뺄 때 오븐용 장갑을 착용해서
맨 손에 내솥이 닿지 않도록 조심하십
시오. 화상을 입을 수 있습니다.
베이킹이 완료되는 즉시 케이크를 빼내
십시오. 밥솥에 그 로 둘 경우 내솥 뚜
껑에서 물방울이 떨어져서 케이크가 눅
눅해질 수 있습니다.
케이크 만들기가 완료되었습니다…
1 [Keep Warm/Cancel] 키를 누릅니다.
2 음식 냄새를 제거합니다. 145페이지를 참조하십시오.
143
한국
어

144 ~ 145페이지에 나와 있는 절차에 따라 세척 및 유지보수 작업을 하십시오. 그밖의 수리는 전문 기술자에게 의
뢰해야 합니다.
제품을 깨끗한 상태로 유지하려면 항상 사용한 당일에 밥솥을 세척하십시오. 정기적인 주기를 정해서 세척해도 됩
니다.
음식 냄새가 남지 않도록 하려면 조리한 당일 밥솥을 세척해야 합니다(145페이지 참조).
참고 세척하기 전에 삽입 플러그를 뽑고 본체, 내솥, 내솥 뚜껑 및 쿠킹 플레이트를 식혀주십시오.
반드시 식기 세정제나 세제를 사용해서 세척하십시오.
세제 찌꺼기가 제품에 남아 있으면 수지 등의 재료의 성능이 저하되거나 변색될 수 있으므로 깨끗하게 행궈내십시
오.
부드러운 스폰지나 천을 사용하십시오.
사용한
다음
세척해야
할
부품
❶부드러운 스폰지와 흐르는 물 또는 미지근한 물로 닦으십시오.
❷마른 천으로 부품의 물기를 완전히 닦아내십시오.
참고 스폰지의 거친 쪽으로 내솥을 닦
지 마십시오. 불소 수지 코팅이
벗겨질 수 있습니다.
내솥에 접시 등을 넣고 닦지 마십시오. 그럴 경우 불
소 수지 코팅이 손상되어 벗겨
질 수 있습니다. 내솥을 접시
등의 그릇 위에 뒤집어 놓고 건
조시키지 마십시오.
더러워졌을
때
세척해야 할
부품
수건이나 천을 적셔서 물기를 짜낸 다음 본체와 패널 커버 안쪽과
바깥쪽을 닦아주십시오.
마른 천으로 전원 코드의 오염을 닦아내십시오.
방열판과 중앙 센서에 달라붙어 있는 마른 밥풀 등을 제거하십시오.
달라붙은 이물질이 쉽게 제거되지 않을 경우 시중에서 구입할 수 있
는 샌드페이퍼(#320)로 문지른 다음 적셔서 물기를 짜낸 수건이나
천으로 닦아내십시오.
테두리에 달라붙어 있는 밥풀을 제거하십시오.
패널 커버의 램프 구멍 안쪽이 더러워진 경우 면봉으로 닦으십시오.
참고 본체 내부로 물이 들어가지 않도록 하십시오.
전원 코드를 물에 담그거나 물을 튀기지 마십시오.
그럴 경우 단락이나 감전의 위험이 있습니다.
참고 뚜껑 속뚜껑 고무패킹을 잡아당기지 마십시오.
부식되거나 냄새가 배는 것을 방지하려면 내솥과
내솥 뚜껑를 항상 청결한 상태로 유지하십시오.
시너, 클렌저, 화학 처리된 수세미 천이나 쇠수세
미 또는 나일론 수세미와 같이 유해성 물질을 사
용하지 마십시오.
반드시 각 부품을 따로 세척하십시오.
계량컵이나 주걱을 뜨거운 물에 담그지 마십시
오.
그럴 경우 변형될 수 있습니다.
내솥을 세척하는 데 식기 세척기나 건조기를 사
용하지 마십시오. 그럴 경우 변형될 수 있습니다.
각종 곡물(아마란스 등)로 조리한 다음에는 반드
시 내솥을 세척하십시오. 내솥 뚜껑의 증기 배출
구가 막혀서 뚜껑이 열리지 않거나 조리가 제
로 되지 않는 등 이상이 발생할 수 있습니다.
12 세척 및 유지보수
144

내솥 뚜껑 분리하기/부착하기
클린 커버 분리하기앞쪽으로 당겨서 빼십시오.
클린 커버 부착하기
아래 그림의 표시로 내솥 뚜껑를 뚜껑에 있는 구멍 안에끼우십시오.
참고 뚜껑 속뚜껑 고무패킹을 잡아당기
지 마십시오.한번 분리되면 도로
부착할 수 없습니다.
냄새 제거하기(밥솥 및/또는 쿠킹 플레이트)
본체❶내솥에 물을 붓고 7분에서 8분 정도 두었다가 "Plain" 메뉴를 선택한 다
음 [Start] 키를 누릅니다.
쿠킹 플레이트를 내솥에 넣지 마십시오.
보온 램프에 불이 켜져 있으면 [Keep Warm/Cancel] 키를 누릅니다.
냄새가 심할 경우 구연산 20g 정도를 물에 타서 사용하면 보
다 효과적으로 냄새를 제거할 수 있습니다.
완전히 제거하기 힘든 냄새가 있을 수 있습니다. 그럴 경우
JAPAN TIGER CORPORATION에 문의하십시오.
❷내솥과 내솥 뚜껑를 일반 주방용 세제로 닦은 다음 물로 깨끗
하게 헹구십시오.
❸본체와 모든 부품은 환기가 잘 되는 곳에 두어 건조시키십시오.
참고 세척한 후에는 내솥이나 본체가
뜨거워질 수 있으므로 조심해서
다루십시오.
만질 경우 화상을 입을 위험이 있
습니다.
쿠킹 플레이트를 담가두면 뜨거워
질 수 있으므로 조심해서 다루십
시오.
만질 경우 화상을 입을 위험이 있
습니다.
쿠킹 플레이트쿠킹 플레이트를 뜨거운 물에 1시간 정도 담가두십시오.
방열판 세척하기
사용하는 동안 뚜껑에서 물방울이 떨어져서 방열판에 얼룩이 생길 수 있습니다.
이것은 밥솥의 효능에 영향을 미치지 않지만 세척하기를 원할 경우 아래 그림과 같이 세
척하십시오.
❶시중에서 구입할 수 있는 크림 타입 클렌저를 나일론 브러시에 소량 묻힌 다음 방열판
의 얼룩진 부위를 살살 문질러 닦습니다.
❷키진 타올이나 천 등으로 오염을 닦아냅니다.
145
한국
어

취사된 밥이나 밥솥 작동 등에 이상이 생길 경우 아래 사항을 점검하십시오.
체크포인트
다음과 같은 경우
공유 조리 메뉴
쌀,
재료
및
물의
양이
정확합
니까?
이온
알칼리수(p
H 9
이상)
로
조리했습니까?
미네랄
워터와
같은
경수로
조
리했습니까?
올바른
메뉴를
선택했습니까?
조리가
끝난
다음
보온
기능을
끄지
않고
누른
키가
있습니
까? 내솥,
방열판 또는
중앙
센서
에
곡물알갱이나 마른
밥풀이
달라붙어
있거나 물방울이
있
습니까?
내솥이 변형되었습니까?
장시간
정전되었습니까?
밥을
잘
저어서
부드럽게
풀어
주었습니까?
취사에
사용한
쌀의
양이
허용
최
량보다
많습니까?
취사된
밥이
너무 딱딱합니다 ● ● ● ● ● ● ● ●
너무 질척합니다 ● ● ● ● ● ● ●
완전히 익지 않았습
니다● ● ● ● ● ● ●
가운데가 딱딱합니다 ● ● ● ● ● ● ●
탔습니다 ● ● ● ● ● ●
조리하는
동안
스팀이 샙니다 ● ● ● ●
끓어 넘칩니다 ● ● ● ●
조리 시간이 너무 깁
니다● ● ● ● ● ●
참조할 페이지127·
128- -
130·
133128·131 128·144·145 - 152 130
127·
151
체크포인트
다음과 같은 경우
공유 조리 메뉴
속뚜껑
고무패킹이나
내솥
테
두리
등에
곡물
알갱이가
들러
붙어
있습니까?
쌀(
씻어
나온
쌀
제외)
을
충분
히
씻었습니까?
쌀을
씻을
때
뜨거운
물(95
℉
[35
℃]
이상)
을
사용하거나
수
위를
조절했습니까?
쌀을
씻은
다음
너무
오래
물
에
담가두지
않았습니까?
쌀을
씻은
다음
체에
담아
두
었습니까?
뚜껑이
꽉
닫혔습니까?
쌀에
다른
재료나
잡곡이
섞여
있습니까?
양념을
잘
저었습니까?
부서진
쌀알이
많이
섞여
있지
않습니까?
처음
조리한
다음
곧바로
이어
서
조리했습니까?
밥솥과
부품을
깨끗하게
세척
했습니까?
취사된
밥이
너무 딱딱합니다 ● ● ● ●
너무 질척합니다 ● ● ● ● ● ● ●
완전히 익지 않았습
니다● ● ●
가운데가 딱딱합니다 ● ● ● ●
탔습니다 ● ● ● ● ● ●
뜬내가 납니다 ●
조리하는
동안
스팀이 샙니다 ● ● ●
끓어 넘칩니다 ● ● ● ● ●
조리 시간이 너무 깁
니다● ●
참조할 페이지 128·144 127·128 128 - - 128 128 - -144·
145
13 조리가 제 로 되지 않을 경우
146

체크포인트
다음과 같은 경우
Plain
메뉴
Risotto 메뉴 쿠킹 플레이트를 이용한 동시조리
타이머
기능을
사용했
습니까?
조리하기
전에
토마토
소스
등을
첨가했습니
까? 토마토
소스
등을
첨가
한
다음
재가열했습니
까? 조리
직후에
토마토
소
스를
첨가하는
것을
잊
었습니까?
요리책에
나와
있는
재
료나
양념의
허용
최
량을
초과하거나
최소
량에
미달되지
않았습
니까?
쿠킹
플레이트에
재료
를
고르게 배열하지
않
았습니까?
"Syn
chro
-C
ookin
g"
나 "Ste
w
·Soup"
이
아
닌
다른
메뉴를
선택했
습니까?
장시간
정전되었습니
까?
취사된
밥이
너무 딱딱합니다 ● ● ● ●
너무 질척합니다 ● ● ● ● ● ●
완전히 익지 않
았습니다● ● ● ●
가운데가 딱딱합
니다● ● ●
탔습니다 ● ● ● ● ●
냄새가 납니다 ● ● ● ● ●
끈적거립니다 ● ● ● ● ●
조리된
음식이
너무 딱딱합니다 ● ● ●
너무 질척합니다 ● ● ● ●
완전히 가열되지
않았습니다● ● ●
밥으로 넘쳐 흐
릅니다● ● ●
조리하는
동안
스팀이 샙니다 ● ● ●
끓어 넘칩니다 ● ● ● ●
조리 시간이 너
무 깁니다● ● ●
참조할 페이지 - 136 136 136 137 137 137〜139 152
문제점 원인
밥에 얇은 막이 덥혀져 있습니다. 얇고 섬유 같은 막은 전분이 녹았다가 마르면서 생긴 것입니다. 건강에 해롭지는 않습니다.
밥이 내솥에 달라붙습니다. 질거나 찰진 밥은 솥에 달라붙기 쉽습니다.
체크포인트
다음과 같은 경우
쌀,
재료
및
물의
양이
정확합니까?
내솥,
방열판
또는
중앙
센서에
곡물알갱이나
마른
밥풀이
달라붙어
있거나
물방울이
있습
니까?
장시간
정전되었습니
까? 밥을
잘
저어서
부드럽
게
풀어
주었습니까?
속뚜껑
고무패킹이나
내솥
테두리
등에
곡물
알갱이가
들러붙어
있
습니까?
쌀(
씻어
나온
쌀
제외)
을
충분히
씻었습니까?
법이나
음식을 3
분
이
상
재가열했습니까?
타이머
기능을
미리 1
2
시간
이상으로
설정해
두었습니까?
보온
기능을 1
2
시간
이
상
켜두었습니까?
보온
중인
밥이
냄새가 납니다 ● ● ● ● ● ●
변색되었습니다 ● ● ● ● ●
말랐습니다 ● ● ● ● ● ● ●
끈적거립니다 ● ● ● ● ● ●
재가열한 밥이 말랐
습니다● ● ● ●
참조할 페이지 127·128 128·144·145 152 131 128·144 127·128135·
136132·133 134
147
한국
어

체크포인트
다음과 같은 경우
백미나
씻어
나온
쌀
이외
의
음식을
보온
중입니까?
보온이나
재가열에
필요한
최소량보다
양이
적습니
까? 내솥
둘레(
밥솥
가운데는
밥이
적게
있고)
에
밥이
몰
려
있습니까?
찬밥을
첨가했습니까?
내솥에
주걱을
넣어
두었
습니까?
방금
취사가
끝나서
아직
뜨거운
밥을
재가열했습니
까? 밥솥과
부품을 깨끗하게
세척했습니까?
조리하거나
케이크를
만든
다음 냄새를
제거했습니까?
보온
기능을
끈
채로
밥솥
에
밥을
넣어
두었습니까?
보온
중인
밥이
냄새가 납니다 ● ● ● ● ● ● ●
변색되었습니다 ● ● ● ● ●
말랐습니다 ● ● ● ● ●
끈적거립니다 ● ● ● ● ● ●
재가열한 밥이 말랐
습니다● ● ● ●
참조할 페이지 134 134 134 134 134 135·136 145·145
141·
143·
139·
145
134
14 스튜나 케이크 만들기가 예상 로 되지 않습니다
"Stew·Soup"이나 "Cake" 메뉴로 조리할 때 문제가 생기면 다음 사항을 점검하십시오.
체크포인트
다음과 같은 경우
적절한
재료와
적당한
양
을
사용했습니까?
재료의
양이
허용
최
량
을
초과했습니까?
※
재료의
양이
허용
최소량
에
미달되었습니까?
※
조리
시간이나
베이킹
시
간이
너무
짧았습니까?
조리
시간이나
베이킹
시
간이
너무
길었습니까?
속뚜껑
고무패킹이나
내솥
테두리
등에
곡물
알갱이
가
들러붙어
있습니까?
뚜껑이
꽉
닫혔습니까?
장시간
정전되었습니까?
끓지 않습니다/케이크가 충분
히 익지 않았습니다● ● ● ● ● ●
끓어 넘칩니다 ● ● ●
음식이 졸아듭니다/탑니다 ● ● ●
참조할 페이지 140·142 140〜143 140·142·144 152
"Stew·Soup" 메뉴만 해당
14 스튜나 케이크 만들기가 예상 로 되지 않습니다
148

서비스 센터에 문의하기 전에 다음 사항을 점검하십시오.
문제점 체크포인트 조치 참조할 페이지
밥이 조리되지 않았습니다.
음식이 조리되지 않았습니
다.
삽입 플러그를 콘센트에 올바르게 꽂았습
니까?
전원 플러그를 콘센트에 꽉 꽂으십시오. 120·128·
139·140·
142·151
사전설정한 시간까지 취사
가 완료되지 않았습니다.
디스플레이에 표시되어 있는 현재 시간이
정확합니까?
현재 시간을 정확하게 설정하십시오.151
149페이지의 "조리 시간이 너무 깁니다" 부분을 참조해서 필요한 조치를 취하십시오.
알람(삐 소리 3번)이 울리고
타이머 기능을 설정할 수 없
습니다.
디스플레이에 표시되어 있는 현재 시간이
정확합니까?
현재 시간을 정확하게 설정하십시오.
151디스플레이에서 "0:00" 표시가 깜박거립
니까?
현재 시간을 설정합니다.
"Synchro-Cooking", "Mixed·Sweet",
"Risotto", "Stew·Soup", "Cake" 메뉴
를 선택했습니까?
"Synchro-Cooking","Mixed·Sweet",
"Risotto", "Stew·Soup", "Cake" 메뉴
를 선택한 경우 타이머 기능을 사용할 수
없습니다.132·133
허용되는 범위 내에서 시간을 설정했습니
까?
타이머 기능에 허용되는 시간으로 설정하
십시오.
타이머 기능을 설정할 때 알
람(삐 소리 3번)이 울립니
다.
[Timer] 키를 누르고 30초 이내에 밥솥을
작동시키지 않으면 알람이 울립니다.
타이머 기능 설정을 계속 진행하십시오.
132·133
표시부가 흐릿합니다. 속뚜껑 고무패킹이나 내솥 테두리 등에 말
라붙은 밥풀이나 곡물 알갱이가 들러붙어
있습니까?
밥풀 찌꺼기를 전부 제거하십시오.
128·144·
145
내솥의 바깥쪽 표면이 젖어 있습니까? 마른 천으로 닦으십시오.
취사, 뜸, 재가열 중이나 보
온 기능이 켜져 있을 때 소
리가 납니다.
똑딱 소리가 납니까? 이것은 마이크로컴퓨터 컨트롤러가 작동
하는 소리이므로 오작동이 아닙니다.
125펑 소리가 납니까? 이것은 열 때문에 금속 부분이 수축하면서
나는 소리이므로 오작동이 아닙니다.
부글부글 소리가 납니까?
(취사나 뜸 중에만 해당)
이것은 오작동이 아닙니다.
위에 설명한 소리와 완전히 다른 소리가
납니까?
JAPAN TIGER CORPORATION에 문의
하십시오.-
재가열을 할 수 없습니다. [Start] 키를 누를 때 알람(삐 소리 3번)이
울립니까?
밥이 차갑습니다. 131℉ (55℃)보다 온도
가 낮은 밥은 재가열할 수 없습니다.
135·136보온 램프가 깜박거립니까? [Keep Warm/Cancel] 키를 누르고 보온
램프가 켜지는지 확인하십시오. 그런 다
음 [Start] 키를 다시 누르십시오.
동시조리 중에 내솥 뚜껑 커
버에 음식이 들러붙습니다.
달걀과 같이 가열하는 동안 팽창하는 재료로 조리하면 내솥 뚜껑에 들러붙을 수 있습
니다. 들러붙는 것을 방지하려면 재료의 양을 줄이십시오.-
케이크가 익는 데 시간이 오
래 걸립니다.
전압이 약할 경우 케이크가 완전히 익을 때까지 시간이 더 걸릴 수 있습니다. 완전히
익지 않았을 경우 베이킹 시간을 늘리십시오.143
본체에 물이나 쌀이 들어갔
습니다.
물이나 쌀이 본체에 들어가면 고장을 일으킬 수 있습니다. JAPAN TIGER
CORPORATION에 문의하십시오.-
현재 시간을 설정할 때
[Hour]나 [Min] 키를 눌러
도 시간 설정 모드를 시작할
수 없습니다.
조리 중이나 보온 기능이 켜져 있을 때 또는 타이머 기능을 사용하는 중이나 재가열
중에는 시간을 설정할 수 없습니다.151
보온 램프가 깜박거립니다. "Risotto" 메뉴나 "Cake" 메뉴를 선택한 경우 조리가 완료되면 보온 램프가 깜박거립
니다.
131·134·
143
15 문제해결
149
한국
어

문제점 체크포인트 조치 참조할 페이지
경과된 보온 시간이 깜박거
립니다.
보온 기능을 12시간 이상 연속해서 사용
했습니까?
보온 기능을 12시간 이상 사용하면 경과
된 보온 시간이 깜박거립니다.134
스튜를 6시간 이상 보온했습니까? 보온 기능을 6시간 이상 사용하면 경과된
보온 시간이 깜박거립니다.141
현재 시간, 사전설정된 타이
머 설정, 경과된 보온 시간
은 전원 플러그를 뽑으면 지
워집니다.
전원 플러그를 다시 연결할 때 표시부의
"0:00" 표시가 깜박거립니까?
리튬 배터리가 방전되었습니다. JAPAN
TIGER CORPORATION에 문의하십시오.125
뚜껑이 닫히지 않거나 취사
중에 열립니다.
테두리에 밥풀 찌꺼기가 들러붙어 있습니
까?
밥풀 찌꺼기를 전부 제거하십시오.128·144
키를 눌러도 반응이 없습니
다.
삽입 플러그를 콘센트에 올바르게 꽂았습
니까?
전원 플러그를 콘센트에 꽉 꽂으십시오. 120·128·
139·140·
142·151
보온 램프가 켜져 있습니까? [Keep Warm/Cancel] 키를 눌러서 보온
기능을 취소한 다음 다시 시도하십시오.128·134
플라스틱 냄새가 납니다. 이것은 새 제품에서 나는 냄새이므로 시간이 지나면 없어집니다. -
플라스틱 부품에 줄무늬와
물결 무늬가 보입니다.
이같은 자국은 주조 과정에서 생긴 것이며 제품의 기능성에는 영향을 미치지 않습니
다.-
메시지가 표시될 경우
디스플레이 조치 참조할 페이지
" "가 디스플레이에 표시되고 지속적
또는 연속적으로 알람이 울립니다.
본체에 고장이 발생했습니다. 전원 플러그를 뽑고 JAPAN TIGER
CORPORATION에 연락하십시오.
-
플라스틱 부품열이나 스팀과 접촉하는 플라스틱 부품은 시간이 지나면 성능이 저하됩니다. JAPAN TIGER CORPORATION에 문의하십시오.
15 문제해결
150

현재 시간 설정하기
시간은 12시간 형식으로 표시됩니다.
조리 중이나 보온 기능이 켜져 있을 때 또는 타이머 기능을 사용하는 중이나 재가열 중에는 시간을 설정할 수 없습니
다.
예: 현재 시간을 "9:30"에서 "9:35"로 변경할 경우
1 패널 커버를 엽니다.
2 전원 코드를 콘센트에 꽂습니다(129페이지 참조).
3 시간 설정 모드를 선택합니다.
[Hour] 또는 [Min] 키를 누르면 아이콘이 표시됩니
다.
4 현재 시간을 설정합니다.
[Hour] 키를 눌러서 시간을, [Min] 키를 눌러서 분을
설정합니다.
해당 키를 누르고 있으면 시간이 고속으로 변경됩니
다.
시간 설정이 완료되면 [Min] 키를 누릅니다.
시간 설정을 중지하려면 [Keep Warm/Cancel] 키를
누르십시오.
5 패널 커버를 닫습니다.
사양
크기 0.54 L (3 컵) 타입
정격 전압 120V 60Hz
소비 전력 (W) 458
조리 용량 (L)
Quick 0.09 ~ 0.54 (0.5 ~ 3 컵 [2.65 ~ 15.87 온스])
Synchro-Cooking 0.09 ~ 0.18 (0.5 ~ 1 컵 [2.65 ~ 5.29 온스])
Plain 0.09 ~ 0.54 (0.5 ~ 3 컵 [2.65 ~ 15.87 온스])
Mixed 0.09 ~ 0.36 (0.5 ~ 2 컵 [2.65 ~ 10.58 온스])
Sweet 0.09 ~ 0.36 (0.5 ~ 2 컵 [2.65 ~ 10.58 온스])
Risotto 0.09 ~ 0.18 (0.5 ~ 1 컵 [2.65 ~ 5.29 온스])
Brown 0.09 ~ 0.36 (0.5 ~ 2 컵 [2.65 ~ 10.58 온스])
바깥 치수*(인치)
폭 8.7 (22.0 cm)
깊이 10.8 (27.3 cm)
높이 7.5 (19.1 cm)
무게*(lbs) 6.4 (2.9 kg)
실내 온도나 사용 환경에 따라 한 달 사이에 30초에서 120초 정도의 시간 차이가 생길 수 있습니다.
한 컵은 5.29 온스(150 g)입니다.
* 략적인 값.
151
한국
어

정전이 발생할 경우
정전이 발생할 경우 전력이 복구되면 밥솥이 다시 정상적으로 작동됩니다.
정전이 발생한 상태 전력이 복구된 상태
타이머 기능이 설정되어 있을 경우 타이머가 다시 작동을 시작합니다(정전 상태가 장시간 지속되어서
전력이 복구되었을 때 사전설정된 시간이 이미 지났을 경우 밥솥이
곧바로 취사를 시작합니다.).
조리/재가열이 진행 중인 경우 밥솥이 조리/재가열을 다시 시작합니다.
보온 기능이 켜져 있을 경우 정전 기간이 30분을 초과하면 보온 기능이 취소됩니다.
상황에 따라서는 취사가 제 로 되지 않거나 보온 온도가 떨어질 수 있습니다.
교체 부품이나 옵션 액세서리 구입하기
내솥의 불소 수지 코팅은 장기간 사용하면 마모되어 벗겨질 수 있습니다(123페이지 참조).
제거하기 힘든 냄새나 오염, 심한 손상은 JAPAN TIGER CORPORATION에 문의하십시오.
152

目次1 安全上のご注意. . . . . . . . . . . . . . . . . . . . . . . . . . . . . . . . . . . . . . . . . . . . . . . . . . . . . . . . . 1542 各部のなまえとはたらき. . . . . . . . . . . . . . . . . . . . . . . . . . . . . . . . . . . . . . . . . . . . . . . . . 158メニューの選べる機能と特長. . . . . . . . . . . . . . . . . . . . . . . . . . . . . . . . . . . . . . . . . . . . . 160ごはんをおいしく炊くためのコツ. . . . . . . . . . . . . . . . . . . . . . . . . . . . . . . . . . . . . . . . . 161
3 ごはんを炊く前の準備. . . . . . . . . . . . . . . . . . . . . . . . . . . . . . . . . . . . . . . . . . . . . . . . . . . 1624 ごはんの炊きかた. . . . . . . . . . . . . . . . . . . . . . . . . . . . . . . . . . . . . . . . . . . . . . . . . . . . . . . 1635 ごはんが炊きあがったら. . . . . . . . . . . . . . . . . . . . . . . . . . . . . . . . . . . . . . . . . . . . . . . . . 1646 炊きあがり予約タイマー炊飯のしかた. . . . . . . . . . . . . . . . . . . . . . . . . . . . . . . . . . . . . 1657 保温について. . . . . . . . . . . . . . . . . . . . . . . . . . . . . . . . . . . . . . . . . . . . . . . . . . . . . . . . . . . 1678 再加熱のしかた. . . . . . . . . . . . . . . . . . . . . . . . . . . . . . . . . . . . . . . . . . . . . . . . . . . . . . . . . 1689 ごはん(スープ)とおかずを同時に作る(「Synchro-Cooking」メニュー). . . . 17010 煮込み料理の作りかた(「Stew・Soup」メニュー). . . . . . . . . . . . . . . . . . . . . . . . 17311 ケーキの作りかた(「Cake」メニュー). . . . . . . . . . . . . . . . . . . . . . . . . . . . . . . . . . . 17512 お手入れのしかた. . . . . . . . . . . . . . . . . . . . . . . . . . . . . . . . . . . . . . . . . . . . . . . . . . . . . . . 17713 うまく炊けない?と思ったら. . . . . . . . . . . . . . . . . . . . . . . . . . . . . . . . . . . . . . . . . . . . . 17914 煮込み料理やケーキがうまく作れない?と思ったら. . . . . . . . . . . . . . . . . . . . . . . . . . 18215 故障かな?と思ったら. . . . . . . . . . . . . . . . . . . . . . . . . . . . . . . . . . . . . . . . . . . . . . . . . . . 183その他. . . . . . . . . . . . . . . . . . . . . . . . . . . . . . . . . . . . . . . . . . . . . . . . . . . . . . . . . . . . . . . . . 185現在時刻の合わせかた. . . . . . . . . . . . . . . . . . . . . . . . . . . . . . . . . . . . . . . . . . . . . . . . . . . 185仕様. . . . . . . . . . . . . . . . . . . . . . . . . . . . . . . . . . . . . . . . . . . . . . . . . . . . . . . . . . . . . . . . . . . 185停電があったとき. . . . . . . . . . . . . . . . . . . . . . . . . . . . . . . . . . . . . . . . . . . . . . . . . . . . . . . 186消耗品・別売品のお買い求めについて. . . . . . . . . . . . . . . . . . . . . . . . . . . . . . . . . . . . . 186
153
日本語

※ここに表した注意事項は、お使いになる人や他の人々への危害や財産への損害を未然に防止するためのものです。安全に関する重要な内容ですので、必ずお守りください。
※本体に貼付しているご注意に関するシールは、はがさないでください。表示内容を無視して、誤った使いかたをしたときに生じる危害や損害の程度を、以下の表示で区分して説明しています。
取り扱いを誤った場合、使用者が死亡または重傷*1を負うことが想定される内容を示します。
取り扱いを誤った場合、使用者が傷害*2を負うことが想定されるか、または物的損害*3の発生が想定される内容を示します。
*1 重傷とは、失明や、けが、やけど(高温・低温)、感電、骨折、中毒などで後遺症が残るものおよび治療に入院・長期の通院を要するものをさします。
*2 傷害とは、治療に入院・長期の通院を要さないけがややけど、感電などをさします。
*3 物的損害とは、家屋・家財および家畜・ペットなどにかかわる拡大損害をさします。
図記号の説明記号は、警告、注意を示します。具体的な注意内容は図記号の中や近くに絵や文章で表します。記号は、禁止の行為であることを示します。具体的な禁止内容は図記号の中や近くに絵や文章で表します。記号は、行為を強制したり指示したりする内容を示します。具体的な指示内容は図記号の中や近くに絵や文章で表します。
警告定格電圧以外では使わない。火災・感電の原因。
定格7A以上のコンセントを単独で使う。他の器具と併用すると、分岐コンセント部が異常発熱して、発火するおそれ。
電源コードは、破損したまま使わない。また、電源コードを傷つけない。(加工する・無理に曲げる・高温部に近づける・引っ張る・ねじる・たばねる・重いものをのせる・挟み込むなど)火災・感電の原因。
差込プラグにほこりが付着している場合は、よくふき取る。火災の原因。
差込プラグは根元まで確実に差し込む。
電源コードが傷んだ場合、販売店でお買い求めの上交換する。
電源コードが傷んだ場合、必ず修理技術者が交換する。
ぬれた手で、差込プラグの抜き差しをしない。感電やけがをするおそれ。
炊飯中は、絶対にふたを開けない。やけどをするおそれ。
蒸気孔に顔や手を近づけない。やけどをするおそれ。特に乳幼児には、さわらせないように注意する。
1 安全上のご注意ご使用前によくお読みの上、必ずお守りください。
154

子供だけで使わせたり、幼児の手が届くところで使わない。やけど・感電・けがをするおそれ。
水につけたり、水をかけたりしない。ショート・感電のおそれ。
改造はしない。修理技術者以外の人は、分解したり修理をしない。火災・感電・けがの原因。
すき間にピンや針金などの金属物や、異物を入れない。感電や異常動作によるけがのおそれ。
ふたを閉めるときは、上枠やフック部付近に付着したごはんつぶ・米つぶなどを取り除き、「カチッ」と音がするまで確実に閉める。蒸気がもれたり、ふたが開いて内容物がふき出し、やけどやけがをするおそれ。
異常・故障時には、直ちに使用を中止する。そのまま使用すると、火災・感電・けがのおそれ。〈異常・故障例〉●ご使用中、電源コード、差込プラグが異常に熱くなる。
●炊飯ジャーから煙が出たり、こげくさいにおいがする。
●炊飯ジャーの一部に割れ、ゆるみ、がたつきがある。
●内なべが変形している。●その他の異常や故障がある。すぐにプラグを抜いて、販売店へ点検・修理を依頼する。
取扱説明書(付属のクックブックを含む)に記載以外の用途には使わない。蒸気や内容物が噴出し、やけどやけがをするおそれ。〈してはいけない調理例〉●ポリ袋などに具材や調味料を入れて加熱する●クッキングシートなどを落としぶた代わりに使用する
注意不安定な場所や、熱に弱いテーブル・敷物などの上では使わない。火災やテーブル・敷物を傷める原因。
壁や家具の近くでは使わない。蒸気や熱で、傷み・変色・変形の原因になるため、壁や家具からは11.8インチ/30cm以上はなして使う。キッチン用収納棚などを使用する際は、中に蒸気がこもらないように注意する。
11.8 インチ /30cm以上
操作パネル部に蒸気があたるような狭い空間で使わない。蒸気や熱で、操作パネル部の変形や本体の傷み・変色・変形・故障の原因。スライド式テーブルでは、蒸気があたらないように引き出して使用する。
差込プラグに蒸気をあてない。火災・感電・発火のおそれ。スライド式テーブルでは、差込プラグに蒸気があたらない位置で使用する。
荷重強度が不足しているスライドテーブルでは使わない。落下によるけが・やけど・故障の原因。使用する前に、荷重強度が充分に満足していることを確認する。
水のかかるところや、火気の近くでは使わない。感電や漏電・本体の変形や火災・故障の原因。
専用内なべ以外は使わない。過熱、異常動作の原因。
155
日本語

クッキングプレートはこの製品以外には使わない。火災・やけどのおそれ。
カラだきをしない。故障や過熱、異常動作の原因。
ふたを開けるときは、蒸気に注意する。やけどのおそれ。
使用中や使用直後は、高温部にふれない。やけどの原因。
使用時以外は、差込プラグをコンセントから抜く。けがややけど、絶縁劣化による感電・漏電火災の原因。
必ず差込プラグを持って引き抜く。感電やショートして発火するおそれ。
タコ足配線はしない。火災のおそれ。
取り扱いはていねいに。落としたり、強い衝撃を加えたりすると、けがや故障の原因。
お手入れは、本体が冷えてから行う。高温部にふれることによるやけどのおそれ。
丸洗いはしない。本体を丸洗いしたり、本体内部や底部に水を入れたりしない。ショート・感電のおそれ。
炊飯中は本体を移動しない。やけどやふきこぼれの原因。器具用プラグがはずれて、ごはんが炊けない原因。
本体を持ち運ぶ際は、フックボタンにふれない。ふたが開いてけがや、やけどをするおそれ。
IHクッキングヒーターの上で使わない。故障の原因。
1 安全上のご注意
156

末永くご使用いただくために、必ずお守りください●こげついたごはんつぶ、米つぶなどは取り除く。蒸気もれ・ふきこぼれ・故障やおいしく炊けない原因。
●炊飯中、本体に布などをかけない。本体やふたの変形・変色の原因。
●冷めたごはんを、再加熱(保温)しない。故障や火災の原因。
●機能・性能を維持するため、製品に穴を設けておりますが、この穴からまれに虫等が入り故障することがあります。市販の防虫シートを使用する等、ご注意ください。また、虫等が入り故障した場合は、有償修理になります。JAPANTIGER CORPORATIONにお申し込みください。
●内なべのフッ素加工は、ご使用にともない消耗し、はがれることがありますが、人体には無害で、炊飯や保温性能も問題ありません。気になる場合や、変形・腐食した場合は、お買い求めできます。JAPAN TIGER CORPORATIONにお問合せの上、お買い求めください。
●内なべのフッ素加工面のふくれやはがれ、変形の原因になるため、必ずお守りください。・内なべをガス火にかけたり、電磁調理器・電子レンジなどに使用しない。・白米・無洗米以外のごはん(炊込みなど)を保温しない。・内なべの中で酢を使用しない。・付属品か木製品以外のしゃもじを使用しない。・金属製のおたまやスプーン、泡立て器など、かたいものを使用しない。・内なべにざるなどをのせない。・内なべに食器類など、かたいものを入れない。・金属へらやナイロンたわしなど、かたいものでお手入れしない。・食器洗浄機や食器乾燥器などの使用はしない。・洗米時、内なべに強い力を加えない。・内なべが変形した場合は、JAPAN TIGER CORPORATIONにお問合せの上、お買い求めください。
157
日本語

ふた
上枠
熱板
内ぶた
内なべ洗米できます。
センターセンサー
パッキン
操作パネル部
パネルカバー
フック受け
フック
放熱板
本体
差込プラグ(コンセントに差し込む)
取りはずしできないので、無理に引っ張らない。
[Hour] [Min] キー
[Timer] キー
予約 ランプ炊飯ランプ
[Keep Warm/ Cancel] キー
保温ランプ
[Start] キー
[Menu] キー
表示部
操作パネル部
パネルカバー
[Keep Warm/ Cancel] キー保温 ランプ
[Start] キー
[Timer] キー
予約 ランプ
炊飯 ランプ
フックボタン 蒸気孔押すとふたが開きます。
※[Start]キー・[Keep Warm/Cancel]キーの中の凸部( )は、目の不自由な方に配慮したものです。
※パネルカバーを閉めた状態でも [Keep Warm/Cancel] [Start] [Timer]の各キーは、操作パネル部の各キーと同じように操作できます。
2 各部のなまえとはたらき
158

付属品<しゃもじ>
しゃもじを差し込んでおけます
<計量カップ>約1カップ(約0.18L)約5.29oz(150g)
<クッキングプレート>とっ手
<クックブック>
音について炊飯中・むらし中・保温中・再加熱中にする下記の音は、異常ではありません。●「カチカチ」という音(マイコン制御の音)●「ピチピチ」という音(熱により金属が収縮してこすれ合う音。)
●水のはじける音(炊飯中・むらし中のみ)
リチウム電池についてリチウム電池を内蔵していますので、電源コードのプラグを抜いても現在時刻や予約時刻を記憶し続けます。●リチウム電池は、電源コードのプラグを抜いた状態で4~5年の寿命があります。
●リチウム電池が切れると、電源コードのプラグを差し込むと「0:00」が点滅します。通常の炊飯はできますが、現在時刻や予約時刻、保温経過時間の記憶は、プラグを抜くと消えてしまいます。
ご注意 リチウム電池は、お客様ご自身では交換できません。新しいリチウム電池との交換は、JAPANTIGER CORPORATIONに修理をご依頼ください(有償)。
時刻の確認時刻は12時間で表示されます。時刻が合っていないときは、現在時刻に合わせてください。(P.185参照)
159
日本語

メニュー 予約 保温 特長Quick ○ ○ 長粒米(無洗米)を炊くときに選びます。
Synchro-Cooking - △クッキングプレートを使ってごはんとおかずを同時に作るときに選びます。
Plain ○ ○ 短粒米(無洗米)を炊くときに選びます。Mixed・Sweet - △ 炊込みごはんやおこわを作るときに選びます。Risotto - △ リゾットを作るときに選びます。
Brown ○ △玄米・雑穀米(玄米と雑穀が混ざっているお米)を炊くときに選びます。
Stew・Soup - △付属のCOOKBOOKに記載の煮込み料理やスープを作るときに選びます。
Cake - -付属のCOOKBOOKに記載のケーキを作るときに選びます。
炊飯容量は、P.185参照。△:保温できますが、ご飯のおいしさが損なわれることがあります。
メニューの選べる機能と特長
160

ワンポイント
炊く前の準備は162ページ、炊きかたは163・164・165・ページをお読みください。
良いお米を選び、涼しい場所に保存精米日の新しい、粒のそろったつやのあるお米を選びましょう。保存は、風通しの良い、涼しくて暗い場所に。
付属の計量カップで正確にはかる1カップは約5.29oz(0.18L)です。※無洗米も付属の計量カップではかりましょう。
洗米は手早くたっぷりの水で手早くかき混ぜ水を捨て、水が澄むまで手早く洗いましょう。
分づき米・胚芽米・麦飯・発芽玄米・雑穀米を炊くときは「Plain」メニューを選びましょう※雑穀を白米に混ぜて炊くときは、白米の上にのせて炊いてください。
※白米に比べて、おこげが濃くつく場合があります。
無洗米を炊くとき●無洗米と水を入れた後、ひと粒ひと粒が水になじむように、底からよくかき混ぜてください。(上から水を入れただけだと、お米が水になじまず、うまく炊けない原因になります。)
●水を入れて白くにごるときは、1~2回水を入れ替えてすすぐことをおすすめします。(白くなるのは米のでんぷん質でぬかではありませんが、そのまま炊くと、こげたり、ふきこぼれや、うまく炊けない原因になります。)
お米の種類やお好みに合わせて水加減しましょう基準の目盛より水量を増やしたり、減らしたりする場合、1/3目盛以上の増減はお避けください。●水加減の目安表
メニュー水加減の目安
(内なべ内側の目盛に合わせる)QuickSynchro-CookingPlainMixed
「Plain」の目盛を目安にお好みで。
Sweet(もち米) 「Sweet」の目盛Sweet(もち米とうるち米)
「Plain」と「Sweet」の目盛の間
Risotto 「Risotto」の目盛を目安にお好みで。
Brown 「Brown」の目盛を目安にお好みで。
※無洗米はそれぞれの目盛を目安に少し多め(目盛線が水面に隠れる程度)に水加減してください。※胚芽米・麦飯・発芽玄米・分づき米・雑穀米は、「Plain」の目盛を目安に水加減してください。※発芽玄米・雑穀米は市販の袋に水加減などの記載があるときは、その内容に従い、お好みで水加減してください。
具を入れて炊くとき1カップに対して具は約2.5oz(70g)以下。調味料はよくかき混ぜ、具はお米の上にのせます。具を入れて炊く場合の最大炊飯量(下表)は必ず守りましょう。Mixed・Sweet 2合以下Risotto 1合以下Brown 1.5合以下
リゾットについてリゾットは洗米後、ざる上げしないで、すぐに炊いてください。食感をそこなうおそれがあります。
ごはんをおいしく炊くためのコツ
161
日本語

ワンポイント
おいしく炊くためのコツはP.161参照
1お米をはかる必ず付属の計量カップではかります。※付属の軽量カップすりきり一杯で約5.29oz(0.18L)
ワンポイント
無洗米も付属の計量カップではかってください。
〈正しい計量例〉 〈間違った計量例〉
ご注意 指定の炊飯量(P.185の仕様表参照)以外で炊くとうまく炊けない場合があるので注意する。
2お米を洗う内なべで洗米できます※無洗米の場合は、P.161参照。
ご注意 ●お湯(95℉[35℃])で洗米や水加減しない。うまく炊けない原因。
●強い力で洗米しない。内なべが変形してうまく炊けない原因。
3水加減する内なべを水平に置き、内なべ内側の目盛に合わせて水加減します。
ワンポイント
お米の種類・メニューを確かめてお好みで水加減してください。(P.161の目安表を参照)
〈例〉2カップの白米を炊く場合は「Plain」の目盛2に合わせる
4水滴・米つぶなどをふき取る〈内なべ外側や縁〉 〈本体内側〉
熱板
上枠
フック受け
センターセンサー
パッキン
ご注意 熱板やセンターセンサー・上枠・フック受け付近に付着したごはんつぶ・米つぶなどは必ず取り除く。ふたが閉まらなくなったり、炊飯中にふたが開く原因。
5内なべを本体にセットしてふたを閉める
❶内なべを左右にまわし、傾きがないように正しく確実にセットします。❷ふたを閉めます。
内ぶたが正しくセットされていることを確認する
内なべ
❷
❶
ご注意 内なべは正しく確実にセットする。
内なべ
6電源コードを接続する
差込プラグ
差し込む
ご注意 保温ランプが点灯している場合は、[KeepWarm/ Cancel]キーを1回押して、消灯させる。
3 ごはんを炊く前の準備
162

ワンポイント
おいしく炊くためのコツはP.161参照
1パネルカバーを開く
パネルカバー
ゆっくり開く
※パネルカバーは強く押したり、ものをのせたりしない。
※パネルカバーの内側に、水や調理物がついた場合は、すぐにふき取る。
2 [Menu]キーを押して、炊きたいメニューに▲を合わせる
押すごとに、メニューが順に切り替わります。
点滅ピッ
※あらかじめメニューが選ばれている場合は、メニュー選択の必要はありません。
ご注意 「Quick」は、「Plain」に比べて、炊飯時間が短いので、かために炊きあがります。
3 [Start]キーを押す炊飯が開始されます。
「Quick」以外は
「Quick」は
点灯
ピッピー
ピー
4パネルカバーを閉める
パネルカバー
ゆっくり閉める
凸部
※パネルカバーのキーを押さない。
ご注意 パネルカバーの凸部には磁石を内蔵しているので、磁気に弱いものを近づけない。
炊飯時間の目安Quick Synchro-Cooking Plain Mixed・Sweet
26~36分 31~41分 40~50分 27~45分
Risotto Brown26~36分 68~82分
※上記の時間は、すぐに炊いた場合のむらしあがりまでの時間です。(電圧120V、室温73.4℉[23℃]、水温73.4℉[23℃]、水加減は標準水位)※炊飯時間は、炊飯量、お米の種類、具の種類や量、室温、水温、水加減、電圧、炊きあがり予約タイマーを使用したときなどにより多少異なります。
4 ごはんの炊きかた
163
日本語

「むらし」になると…表示部にむらしあがるまでの残り時間を1分きざみで表示します。メニューによってむらし時間が異なります。むらし時間は、表示部に表示されます。(Quick:7分/Pain:10分)
炊きあがると自動的に保温します。「リゾット」は、できあがったら保温ランプが点滅します。
消灯
ピーピーピー…(8回鳴る)
点滅 点灯「リゾット」は 「リゾット」以外は
「Risotto」メニューを選んでいるとき炊きあがってから、リゾットにトマトソースやホワイトソースを加える場合、再加熱が必要です。炊きあがり後すぐに[Keep Warm/ Cancel]キーを押さずに再加熱を行ってください。(P.169参照)
ごはんをほぐす炊きあがったら、必ずすぐにごはん全体をほぐしてください。
内なべ
つゆがたまる部分(上枠)
内なべの形状による特徴で、ごはんの中央部がややくぼむことがあります。内なべを、ミトンなどで押さえて行います。
ご注意 炊飯直後や保温中にふたを開けて、つゆが上枠や外などに流れ落ちた場合は、ふき取る。
炊飯ジャーを使い終わったら…
1 [Keep Warm/ Cancel]キーを押す
消灯
ピッ
2 差込プラグを抜く
抜く
3 お手入れする(P.177・178参照)
5 ごはんが炊きあがったら
164

〈操作パネル部〉
4
3
5
6
2
ワンポイント
炊きあがり予約タイマーについて食べたい時刻に炊きあげることができます。一度設定した時刻はそのまま記憶します。
例えば、「6:30 AM」に設定すると、午前6時30分に炊きあがります。
1パネルカバーを開く2現在時刻を確認する※現在時刻が合っていないと時間通りに炊けません。現在時刻の合わせかたは、P.185参照。
※時刻は12時間で表示されます。
点滅
3 [Timer] キーを押す
点滅
ピッ
点滅
6 炊きあがり予約タイマー炊飯のしかた(「Quick」、「Plain」、「Brown」メニューのみ)
165
日本語

4 [Hour][Min]キーを押して、炊きあげたい時刻を合わせる
※時刻は12時間で表示されます。
ピッ
点滅
●[Hour]キーは1時間単位、[Min]キーは10分単位で合わせることができます。
●押し続けると、早送りができます。
ご注意 腐敗の原因になるため、タイマー予約は12時間以内にする。
5 [Menu]キーを押して、炊きたいメニューに▲を合わせる
※あらかじめメニューが選ばれている場合は、メニュー選択の必要はありません。
点滅
ピッ
6 [Start]キーを押す予約完了です。
点灯「Quick」以外は
「Quick」は
ピッピー
ピー
※タイマーセットを間違えたときは、[Keep Warm/Cancel]キーを押して、P.165の 3 からセットし直す。
7パネルカバーを閉めるご注意 ● 下記の場合は、炊きあがり予約ができ
ません。・「Synchro-Cooking「Mixed・Sweet」「Risotto」「Stew・Soup」「Cake」の場合。・下表の時間未満の場合。
メニュータイマーセットができ
ない時間Quick 55分未満Plain 1時間5分未満Brown 1時間35分未満
・表示部の時計が「0:00」で点滅している場合。
●保温ランプが点灯している場合は、 [Keep Warm/Cancel]キーを押して消灯させる。(点灯していると、予約できません。)
●[Timer]キーを押した後、約30秒間何もしないと「ピピピ」と音でお知らせします。
●炊きあがり予約タイマー炊飯ができない状態にセットされているときに、[Timer]キーまたは[Start]キーを押すと、「ピピピ」と音でお知らせします。
予約時刻とメニューを変更しないときパネルカバーを閉めた状態でも操作できます。❶現在時刻を確認する。❷[Timer]キーを押す。❸[Start]キーを押す。
6 炊きあがり予約タイマー炊飯のしかた
166

炊飯が終了すると、自動的に保温に切り替わります。
■保温を中止するとき[Keep Warm/ Cancel]キーを押す。(保温ランプが消灯)
消灯
ピッ
■再度保温するとき[Keep Warm/ Cancel]キーを押す。(保温ランプが点灯)
点灯
ピッ
少量のごはんを保温するときごはんを内なべの中央に寄せて保温し、できるだけ早くお召し上がりください。
保温中の作動について保温中は保温ランプが点灯します。
保温経過時間の表示について保温中に[Hour]キーを押している間は、保温経過時間が1時間単位で表示されます。12時間を超えると、24時間まで点滅表示されます。
※24時間を超えると、「24」が点滅してお知らせします。
ご注意 ●におい・パサつき・変色・腐敗や内なべの腐食などの原因になるため、下記のような保温はしない。・冷やごはんの保温・冷やごはんのつぎ足し・しゃもじを入れたままの保温・プラグを抜いての保温・12時間以上の保温・最小炊飯量(0.5合)以下の保温・白米(無洗米)以外の保温
●クッキングプレートや、クッキングプレートで調理したものを入れたまま保温しない。
●内なべの縁・パッキン類にごはんつぶなどがついたときは、取り除く。 乾燥・変色・におい・ベタつきの原因。
●「Risotto」の場合、できあがったら保温ランプが点滅します。そのままにしておくと、のり状になったり、内ぶたについたつゆが落ちてきてベタついたりしますので、早めにお召し上がりください。
●「Cake」の場合、焼きあがったら保温ランプが点滅します。そのままにしておくと、内ぶたについたつゆが落ちてベタつきますので、すぐに取り出す。
●ご使用環境の厳しい状況の場合(寒冷地や周囲の温度が高い場合など)は、早めにお召し上がりください。
●保温中のごはんの温度が低いと感じた場合は、再加熱(P.168参照)する。
7 保温について
167
日本語

「Quick」/「Plain」メニューの場合保温中のごはんは、食べる前に再加熱すると熱々のごはんになります。
ご注意 ●ごはんが内なべの半分以上あるときは、量が多すぎて、充分にあたためられません。
●下記のような状況で再加熱すると、ごはんがパサつきます。・炊きあがり直後など、ごはんが熱いとき。
・ごはんが最小炊飯量(0.5合)以下のとき。
・3回以上くり返して再加熱したとき。
1保温中のごはんをほぐす2小さじ1~2杯の打ち水を均一に行う
ワンポイント
※打ち水をすると、パサつきを抑え、ふっくらと仕上がります。
3保温ランプの点灯を確認する点灯
※保温ランプが点灯していないと、再加熱ができません。点灯していないときは、[Keep Warm/ Cancel]キーを押す。(P.167参照)
4 [Start]キーを押す
残り時間を表示
点滅
点滅
消灯点灯
ピーピーピー(3回鳴る)
ピー
※再加熱をやめたい場合は、[Keep Warm/ Cancel]キーを押す。
ごはんが冷たい(131℉[55℃]以下)ときは、再加熱ができません。「ピピピ…」と音でお知らせします。
5加熱したごはん全体をよくほぐし、均一にする
※内なべを、ミトンなどで押さえて行います。
8 再加熱のしかた
168

「Risotto」メニューでトマトソースやホワイトソースを加える場合
1炊きあがったらすぐにトマトソースやホワイトソースを加えてよく混ぜる
2保温ランプの点滅を確認する※保温ランプが点滅していないと、再加熱できません。
点滅
3 [Start]キーを押すご注意 必ず[Start]キーを押すこと。(再加熱でき
なくなるので[Keep Warm/Cancel]キーを押さない。)
残り時間を表示
点滅
点滅
消灯点灯
ピーピーピー(3回鳴る)
ピー
※炊きあがり後、すぐに再加熱しないと、うまく調理できないおそれがあります。
169
日本語

クッキングプレートを使って、おかずとごはん(スープ)を同時に作ることができます。ごはんを炊かずに、内なべに水を入れて調理することもできます。お料理の作りかたは、付属のクックブックをご参照ください。
ご注意 ●付属のクックブックに記載されている量を超えて調理しない。 ふきこぼれたり、うまく調理できないおそれ。
●においの強いものを調理した場合は、においが残るおそれ。
●色の強いものを調理した場合は、煮汁などでクッキングプレートに色がうつるおそれ。
●クッキングプレートの中で、包丁、ナイフ、フォークなど鋭利なものを使わない。
■同時調理のアレンジを楽しんでいただくために
〈クッキングプレートに入れる具材のご注意〉●調理物を、クッキングプレートいっぱいに入れない。●調理物に蒸気があたるように、低くまんべんなく並べるか、すき間をあけて並べる(高さは、クッキングプレートの下図の位置までが目安)。
調理物の量はとっ手のつけ根の下までが目安
●水やソースなどの液体は少なめにする(量が多いとあたたまりにくい)。●牛乳、生クリームなどを使用して分離したときは、よくかき混ぜる。●ホットケーキミックスなど、ふくらむものは分量を控えめにする(クッキングプレートの深さの1/3が目安)。卵もふくらむので、分量に注意する(1~2個以内)。一緒に入れる具の量、卵の大きさにもよりますので加減してください。●根菜など、火が通りにくいものは、うすく切る。●クッキングプレートを使っての調理は、蒸し調理ですので、炒めたり焼いたりできません。
ご注意 上記の点に注意しても加熱不足のときは、調理物を別の容器に移して電子レンジなどであたため直す(内なべ・クッキングプレートは電子レンジに入れない)。
同時調理するときの基本的な操作手順
1材料の下ごしらえをして、クッキングプレートに材料を入れる
※できるだけ積み重ねずに、クッキングプレート全体に広げて並べるようにする。ふきこぼれたり、うまく調理できないおそれ。
2ごはんを炊いたり、スープを作る前の準備をする
(P.162「1」~「4」参照)
ご注意 〈ごはんを炊く場合〉同時調理を行うときの炊飯量は、下記の表を参照。最大量を超えたり最小量より少ない量で炊飯しない。ふきこぼれたり、うまく調理できないおそれ。
最大量 最小量1合 0.5合
〈スープを作る場合〉スープの材料は、内なべ内側の「Plain」の目盛を目安に入れる(下記の表を参照)。最大量より多いと、煮えなかったりふきこぼれたりします。また、最小量より少ないと、こげつく場合があります。
最大量 最小量Plain目盛1.5以下 Plain目盛1以上
9 ごはん(スープ)とおかずを同時に作る(「Synchro-Cooking」メニュー)
170
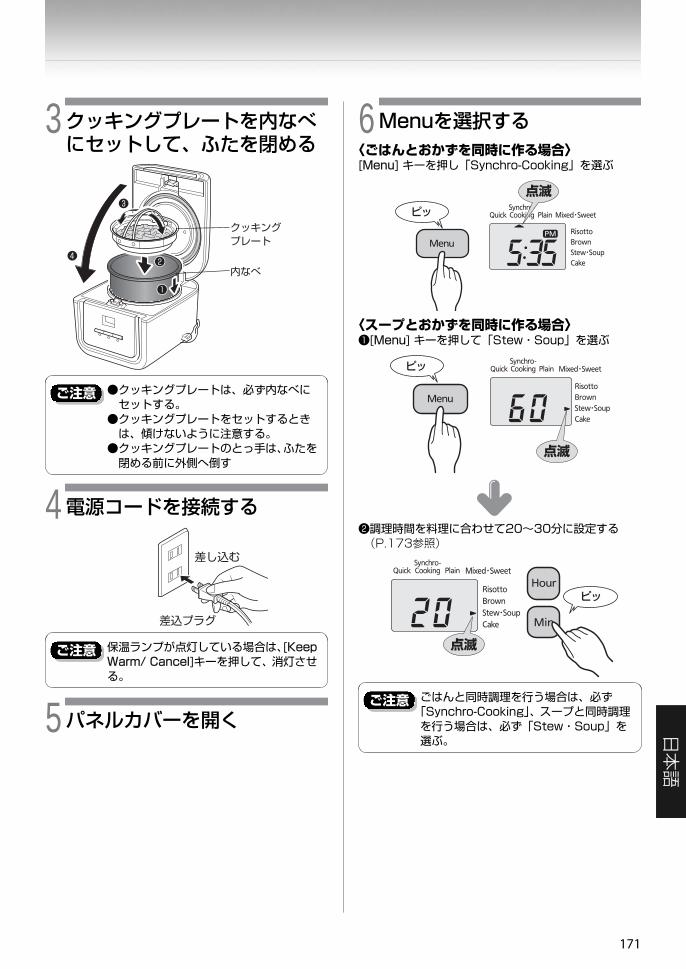
3クッキングプレートを内なべにセットして、ふたを閉める
内なべ
クッキングプレート
❶
❷❹
❸
ご注意 ●クッキングプレートは、必ず内なべにセットする。
●クッキングプレートをセットするときは、傾けないように注意する。
●クッキングプレートのとっ手は、ふたを閉める前に外側へ倒す
4電源コードを接続する
差込プラグ
差し込む
ご注意 保温ランプが点灯している場合は、[KeepWarm/ Cancel]キーを押して、消灯させる。
5パネルカバーを開く
6Menuを選択する〈ごはんとおかずを同時に作る場合〉[Menu] キーを押し「Synchro-Cooking」を選ぶ
点滅ピッ
〈スープとおかずを同時に作る場合〉❶[Menu] キーを押して「Stew・Soup」を選ぶ
点滅
ピッ
❷調理時間を料理に合わせて20~30分に設定する(P.173参照)
点滅
ピッ
ご注意 ごはんと同時調理を行う場合は、必ず「Synchro-Cooking」、スープと同時調理を行う場合は、必ず「Stew・Soup」を選ぶ。
171
日本語

7 [Start] キーを押す同時調理がはじまります。
点灯
ピー
ご注意 途中でふたを開けない。
8パネルカバーを閉める9できあがったら自動的に保温します。
点灯消灯
ピーピーピー…(8回鳴る)
10クッキングプレートを取り出す
ご注意 ●クッキングプレートを入れたまま保温しない。
●調理後、クッキングプレートを取り出すときは、熱くなっているので注意する。やけどの原因。
●クッキングプレートを取り出すときに傾けない。 煮汁などがこぼれてやけどの原因。
●取り出したクッキングプレートは、内なべに戻さない。 腐敗やごはんが保温できない原因。
●スープとおかずを同時に作った場合、クッキングプレートの底が汚れるので、テーブルなどに置くときは注意する。
※加熱すると多量の水分や油が出る食材や、卵など加熱中に膨張する食材を調理したときは、煮汁の一部が内なべに流れ落ちる場合があります。
内なべに水を入れて調理するとき❶白米の目盛1まで水を入れ、内なべにクッキングプレートをセットして、ふたを閉める。❷「Stew・Soup」メニューを選ぶ。❸調理時間を料理に合わせて20~30分に、設定する。(P.173参照)❹できあがったら[Keep Warm/ Cancel]キーを押して、クッキングプレートを取り出す。
同時調理が終わったら…
1 [Keep Warm/ Cancel]キーを押す
消灯
ピッ
2 P.178の要領でにおいを取り除く
9 ごはん(スープ)とおかずを同時に作る(「Synchro-Cooking」メニュー)
172

下記のようなお料理を手軽に作ることができます。お料理の作りかたは、付属のクックブックをご参照ください。最初は沸とう温度に近い高温で煮た後、約199F°(93℃)に温度を下げてしばらく煮込みます。その後さらに約190F°(88℃)に温度を下げて引き続き煮込みます。徐々に加熱温度を下げて煮込むことによって味のしみ込みをよくし、長時間加熱しても煮詰まる心配がありません。
メニュー例豚角煮、ごぼうと山芋のスープ
ワンポイント
「豚角煮」「ごぼうと山芋のスープ」の作りかたについては、付属のクックブックでご紹介しています。
ご注意 調味料が内なべの底にたまらないように、よくかき混ぜてから調理する。
調理するときの、基本的な操作手順
1材料の下ごしらえをする2内なべに材料を入れ、ふたを閉めるご注意 材料は、内なべ内側の「Plain」の目盛を
目安に入れる。(下記の表を参照)最大量より多いと煮えなかったり、ふきこぼれたりします。また、最小量より少なくてもふきこぼれる場合があるので注意する。
最大量 最小量Plain目盛3以下 Plain目盛1以上
3電源コードを接続する
差込プラグ
差し込む
ご注意 保温ランプが点灯している場合は、[KeepWarm/ Cancel]キーを押して、消灯させる。
4パネルカバーを開く5 [Menu]キーを押して「Stew・Soup」を選ぶ
点滅
6調理時間を合わせる調理時間は、[Hour] [Min]キーで合わせます。5~120分まで5分単位で設定できます。※[Hour] キーを押すごとに5分ずつ増え、[Min] キーを押すごとに5分ずつ減ります。
点滅
ピッ
7 [Start] キーを押す調理がはじまります。
点灯
ピー
ご注意 途中でふたを開けない。
10 煮込み料理の作りかた(「Stew・Soup」メニュー)
173
日本語

8パネルカバーを閉める9できあがったら保温ランプが点灯し、表示部に「0h」が表示されます。
0hが表示
点灯 消灯
ピーピーピー…(8回鳴る)
〈調理が足りない場合〉保温 ランプが点灯している状態で[Hour]キーを押して追加の調理時間を合わせ、[Start]キーを押す。(最大30分を3回まで追加できます。)
ご注意 調理が足りない場合、追加で調理する前に[Keep Warm/ Cancel]キーを押さない。保温ランプの点灯が消え、引き続き調理できなくなります。押してしまった場合は、下記の手順で調理する。❶内なべを取り出して、ぬらした布の上に置く。
❷本体のふたを開けたまま10分ほど放置し、本体と内なべを冷ます。
❸再度、内なべを本体にセットする。❹P.173の 4 からの要領で調理する。
〈再加熱のしかた〉調理の保温中にあたため直したいとき(食べ頃温度にしたいとき)は、保温ランプ点灯時に[Start]キーを押して再加熱する。再加熱の残り時間を表示し、再加熱が終了すると「ピーピーピー」と3回音が鳴ります。再加熱後は、保温ランプが点灯して保温時間を継続して表示します。
調理が終わったら…
1 [Keep Warm/ Cancel]キーを押す
[Keep Warm/ Cancel]キーを押すと、保温ランプが消灯します。
消灯
ピッ
2 P.178の要領でにおいを取り除く
※調理が終わって[Keep Warm/ Cancel]キーを押さなければ、そのまま保温を続け、1時間単位で1時間(1h)から6時間(6h)まで表示されます。6時間を超えると、「6」が点滅します。
ご注意 ●料理によっては、保温を続けると風味が落ちてくる場合があるので注意する。
●6時間以上の保温はしない。
10 煮込み料理の作りかた(「Stew・Soup」メニュー)
174

付属のクックブックに記載されているケーキを作ることができます。
ご注意 ●付属のクックブックに記載されているメニュー以外は作らない。
●付属のクックブックに記載されている量を超えて作らない。 ふきこぼれるおそれ。
1材料の下ごしらえをする2内なべに生地を流し入れる3 2の生地の空気を抜くご注意 加熱前に生地の空気を抜く場合、やわらか
い布の上で行ってください。内なべの変形や破損のおそれがあります。
4内なべを本体にセットして、ふたを閉める
内なべ
❷
❶
5電源コードを接続する
差込プラグ
差し込む
6パネルカバーを開き、[Menu]キーを押して「Cake」を選ぶ
点滅
7加熱時間を合わせる加熱時間は、[Hour] [Min] キーで合わせます。1~60分まで1分単位で設定できます。※[Hour]キーを押すごとに1分ずつ増え、[Min] キーを押すごとに1分ずつ減ります。
点滅
ピッ
8 [Start] キーを押す加熱がはじまります。
点灯
点灯ピー
9パネルカバーを閉める
11 ケーキの作りかた(「Cake」メニュー)
175
日本語

10焼きあがったら…保温ランプが点滅します。
点滅 消灯
ピーピーピー…(8回鳴る)
❶ふたを開け、ケーキの中央に竹串を刺してみる。 (生地がついてこなければ中まで焼けています。)〈生地がついてくる場合〉保温ランプが点滅している状態で[Hour] キーを押して追加の焼きあげ時間を合わせ、[Start] キーを押す。(最大30分を3回まで追加できます。)
ご注意 追加で焼く前に[Keep Warm/Cancel]キーを押さない。保温ランプの点滅が消え、引き続き焼けなくなります。押してしまった場合は、下記の手順で焼く。❶内なべを取り出して、ぬらした布の上に置く。
❷本体のふたを開けたまま10分ほど放置し、本体と内なべを冷ます。
❸再度、内なべを本体にセットする。❹「Cake」を選択し、追加時間をセットして焼く。
❷内なべを取り出してケーキを取り出し、冷ます。
内なべ
ご注意 ●内なべを取り出すときは、必ずミトンなどを使い、直接手をふれないよう注意する。やけどをするおそれ。
●焼きあがったら、すぐにケーキを取り出す。 そのままにしておくと、内ぶたについたつゆが落ちてベタつきます。
ケーキ作りが終わったら…
1 [Keep Warm/ Cancel]キーを押す
消灯
ピッ
2 P.178の要領でにおいを取り除く
11 ケーキの作りかた(「Cake」メニュー)
176

●お手入れは、P177~178に記載の方法でおこなってください。その他の修理等は認可された修理技術者にご依頼ください。
●ご使用後は、いつまでも清潔にご使用いただくために、必ずその日のうちにお手入れしてください。また、お手入れは定期的に行ってください。
●調理後は、においが残りやすいので、必ずその日のうちに、においを取り除いてください。(P.178参照)
ご注意 必ず差込プラグを抜いて、本体・内なべ・内ぶた・クッキングプレートが冷えてからお手入れする。
●洗剤でお手入れするときは、台所用合成洗剤(食器用・調理器具用)を使う。※洗剤分が残っていると、樹脂などの劣化・変色の原因になるので、充分に洗い流す。●スポンジ・布はやわらかいものを使う。
使うたびに洗うもの
蒸気孔内なべ
計量カップ しゃもじ
内ぶた
クッキングプレート
❶水またはぬるま湯で、スポンジで洗う。❷乾いた布で水分をふき取り、充分に乾燥させる。
ご注意 ●内なべは、スポンジの研磨粒子部分で洗わない。フッ素加工面がはがれる原因。
● 内なべに食器類などを入れ、洗いおけとして使わない。フッ素加工面が傷ついたり、はがれたりする原因。また、内なべを乾燥させるときに食器類の上にかぶせるなどして重ね置きしない。
研磨粒子部分で洗わない。
汚れるたびにお手入れする箇所
本体
電源コード
放熱板
上枠
センターセンサー
熱板
パネルカバー
●本体の外側・内側、パネルカバーの外側・内側の汚れは、かたくしぼった布でふき取る。
●電源コードは乾いた布でふく。●熱板やセンターセンサーに、こげついたごはんつぶ・米つぶなどがついている場合は取り除く。
※取れにくい場合は、市販のサンドペーパー(320番程度)で取り除き、かたくしぼった布でふき取る。
●上枠に付着したごはんつぶ・米つぶなどは取り除く。●パネルカバーの内側のランプ穴が汚れた場合は、綿棒などでふき取る。
ご注意 ●本体内部へは、絶対に水が入らないようにする。●電源コードを水につけたり、水をかけたりしない。ショート・感電・故障のおそれ。
ご注意 ●パッキン類は、はずさない。●腐食やにおいを防ぐため、内なべや内ぶたはいつも清潔にする。
●シンナー類・クレンザー・漂白剤・化学ぞうきん・金属へら・ナイロンたわしなどは使わない。
●各部を取りはずした後、お手入れする。
●計量カップ・しゃもじを熱湯に浸さない。変形のおそれ。
●食器洗浄機や食器乾燥器などの使用はしない。変形するおそれ。
●雑穀(アマランサスなど)を混ぜて炊いた後は、必ず内ぶたをお手入れする。内ぶたの蒸気孔が目詰まりして、ふたが開かなくなるなど故障のおそれや、うまく炊けない原因。
12 お手入れのしかた
177
日本語

内ぶたの取りはずし・取りつけ■取りはずしかた手前に引いてはずす。
■取りつけかた内ぶたをふたの穴に合わせて、図のようにはめ込む。
内ぶた
ふた
穴
ご注意 ふたのパッキンは引っ張らない。はずすと、再度取りつけられなくなります。
パッキン
においの取り除きかた(炊飯ジャーやクッキングプレートに、においがついた場合)■本体❶内なべに水を7~8分目入れて、「Plain」メニューで[Start]キーを押す。(クッキングプレートは内なべにセットしない) 保温に切り替わったら、[Keep Warm/ Cancel]キーを押す。
ワンポイント
調理後やにおいが気になるときは、水にクエン酸(約20g)を入れてかき混ぜてから行うと、よりにおいが取り除かれます。※においによっては、完全に落ちない場合があります。完全に落ちない場合は、JAPAN TIGERCORPORATIONにご相談ください。
❷内なべ・内ぶたを、台所用合成洗剤で洗った後、充分に水洗いする。
❸風通しの良い場所で本体、各部を乾燥させる。
ご注意 ●洗浄後は、内なべ・本体が熱くなっているので注意する。 やけどをするおそれ。
●つけおき後は、クッキングプレートが熱くなっているので注意する。やけどをするおそれ。
■クッキングプレートクッキングプレートを熱湯に入れて、約1時間つけおきする。
熱板の汚れの取り除きかたご使用中、ふたなどからつゆが流れ落ち、熱板にシミのような汚れがつくことがあります。性能上、支障はありませんが、汚れが気になる場合は下記のようにお手入れしてください。❶ナイロンたわしに市販のクリームクレンザーを少量つけ、熱板のシミができた箇所を磨く。
❷湿らせたキッチンペーパーや布で、汚れをふき取る。
ナイロンたわし
熱板
12 お手入れのしかた
178

炊きあがったごはん、炊飯ジャーの動作などがおかしいときは、次の点をお調べください。
お調べいただくこと
こんなとき
炊飯メニュー共通
お米の量や具の量、水加減
を間違えた
アルカリイオン水(pH 9
以上)を使って炊飯した
ミネラルウォーターなど
硬度の高い水を使って炊
飯した
メニュー選択を間違えた
炊飯ジャーを使用後、保温
を取り消さずにキーを押
した
内なべの裏・熱板・セン
ターセンサーにこげつい
たごはんつぶや水滴など
がついている
内なべが変形している
途中で停電があった
よくほぐさなかった
最大炊飯容量を超えて炊
飯した
炊き上がったごはん
かたすぎる ● ● ● ● ● ● ● ●
やわらかすぎる ● ● ● ● ● ● ●
生煮えになる ● ● ● ● ● ● ●
しんがある ● ● ● ● ● ● ●
おこげができる ● ● ● ● ● ●
炊飯中
蒸気がもれる ● ● ● ●
ふきこぼれる ● ● ● ●
炊飯時間が長い ● ● ● ● ● ●
参照ページ161・162
- -163・166
162・164
162・177・178
- 186 163161・185
お調べいただくこと
こんなとき
炊飯メニュー共通
パッキン類や内なべの縁
にごはんつぶなどがつい
ている
充分洗米しなかった(無洗
米は除く)
お湯(95℉[35℃]以上)
で洗米や水加減をした
洗米後、長時間水に浸した
洗米後、ざる上げ放置した
ふたが確実に閉まってい
ない
具、雑穀を混ぜ込んで炊いた
調味料をよくかき混ぜなかった
割れ米が多く混ざってい
る 炊きあがった後、続けてす
ぐに炊飯した
お手入れが不充分
炊き上がったごはん
かたすぎる ● ● ● ●
やわらかすぎる ● ● ● ● ● ● ●
生煮えになる ● ● ●
しんがある ● ● ● ●
おこげができる ● ● ● ● ● ●
ぬか臭い ●
炊飯中
蒸気がもれる ● ● ●
ふきこぼれる ● ● ● ● ●
炊飯時間が長い ● ●
参照ページ162・177
161・162
162 - - 162 162 - -177・178
13 うまく炊けない?と思ったら
179
日本語

お調べいただくこと
こんなとき
Plainメニュー
Risottoメニュー クッキングプレートを使った同時調理
予約炊飯した
トマトソースなどを炊飯
前に加えた
トマトソースなどを加え
た後再加熱しなかった
炊きあがり後すぐにトマ
トソースを加えなかった
クックブックに記載の量
以上の材料や調味料など
を入れた最大量を超えた
り、最小量より少ない量で
炊飯した
クッキングプレートに材
料を均一に並べずに積み
重ねて入れた
「Synchro-Cooking」
「Soup・Stew」メニュー
以外で同時調理した
途中で停電があった
炊き上がったごはん
かたすぎる ● ● ● ●
やわらかすぎる ● ● ● ● ● ●
生煮えになる ● ● ● ●
しんがある ● ● ●
おこげができる ● ● ● ● ●
におう ● ● ● ● ●
ベタつく ● ● ● ● ●
調理物
かたすぎる ● ● ●
やわらかすぎる ● ● ● ●
加熱が不十分 ● ● ●
ごはんに流れ落ちる
● ● ●
炊飯中
蒸気がもれる ● ● ●
ふきこぼれる ● ● ● ●
炊飯時間が長い ● ● ●
参照ページ - 169 169 169 170 170 170~172 186
こんなときは 理由うすい膜ができる オブラート状のうすい膜は、でんぷんが溶けて乾燥したもので害はありません。ごはんが内なべにこびりつく やわらかいごはんや、ねばりけがあるごはんは、つきやすいことがあります。
お調べいただくこと
こんなとき
お米の量や具の量、水加減
を間違えた
内なべの裏・熱板・セン
ターセンサーにこげつい
たごはんつぶや水滴など
がついている
途中で停電があった
よくほぐさなかった
パッキン類や内なべの縁
にごはんつぶなどがつい
ている
充分洗米しなかった(無洗
米は除く)
再加熱を3回以上行った
12時間以上の炊きあがり
予約タイマーセットをし
た 保温を12時間以上続けて
いる
保温中のごはん
におう ● ● ● ● ● ●
変色する ● ● ● ● ●
パサつく ● ● ● ● ● ● ●
ベタつく ● ● ● ● ● ●
再加熱したごはんがパサつく
● ● ● ●
参照ページ161・162
162・177・178
186 164162・177
161・162
168・169
165・166 167
13 うまく炊けない?と思ったら
180

お調べいただくこと
こんなとき
白米・無洗米以外を保温し
た 最小炊飯量以下で保温ま
たは再加熱した
少量のごはんをドーナッ
ツ状に保温した
冷やごはんのつぎ足しを
した
しゃもじを入れたままで
保温した
炊きあがり直後の熱いご
はんで再加熱した
お手入れが不充分
調理・ケーキ作りを行った
後においを取り除かな
かった
ごはんを入れたまま保温
を取り消した
保温中のごはん
におう ● ● ● ● ● ● ●
変色する ● ● ● ● ●
パサつく ● ● ● ● ●
ベタつく ● ● ● ● ● ●
再加熱したごはんがパサつく
● ● ● ●
参照ページ 167 167 167 167 167 168・169178・178
174・176・172・178
167
181
日本語

「Stew・Soup」「Cake」メニューで調理したものがおかしいときは、次の点をお調べください。
お調べいただくこと
こんなとき
材料の種類・分量を間違え
た 材料を最大量の目安より
多く入れた※
材料を最小量の目安より
少なく入れた※
調理時間が短かった
調理時間が長かった
パッキン類や内なべの縁
にごはんつぶなどがつい
ている
ふたが確実に閉まってい
ない
途中で停電があった
煮えない/焼けない ● ● ● ● ● ●
ふきこぼれる ● ● ●
煮詰まる/こげる ● ● ●
参照ページ 173・175 173~176 173・175・177 186
※「Stew・Soup」メニューのみ
14 煮込み料理やケーキがうまく作れない?と思ったら
182

修理を依頼される前に、ご確認ください。こんなときは ここを確認して こう処置してください 参照ページ
ごはんが炊きあがらない・調理できない
差込プラグがコンセントに差し込まれていますか。
プラグを確実に差し込む。 154・162・172・173・175・185
セットした時刻に炊きあがっていない
現在の時刻が正しくセットされていますか。
時刻を正しくセットする。185
183ページの「炊飯時間が長い」の項目を確認して、処置する。
炊きあがり予約タイマーのセット中に、「ピピピ」と音がしてセットできない
現在の時刻が正しくセットされていますか。
時刻を正しくセットする。
185表示時間が「0:00」で点滅していませんか。
現在時刻をセットする。
「Synchro-Cooking」「Quick」「Mixed・Sweet」「Risotto」「Stew・Soup」「Cake」を選択していませんか。
「Synchro-Cooking」「Quick」「Mixed・Sweet」「Risotto」「Stew・Soup」「Cake」はタイマーセットできません。 165・166
タイマーセットができない時間を選択していませんか。
タイマーセットの可能な時間でタイマー炊飯する。
炊きあがり予約タイマー炊飯の予約をしているときに、「ピピピ」と音がする
[Timer]キーを押してから、約30秒間何もしないと音でお知らせします。
続けてタイマーセットを行い、予約を完了させる。 165・166
表示部がくもる パッキン類や内なべの縁に、こげついたごはんつぶ・米つぶなどがついていませんか。
きれいに取り除く。162・177・
178内なべの外側がぬれていませんか。 乾いた布でふき取る。
炊飯中・むらし中・保温中・再加熱中に音がする
「カチカチ」という音。 マイコン制御の音です。故障ではありません。
159「ピチピチ」という音。 熱により金属が収縮してこすれ合う音で
す。故障ではありません。水のはじける音。(炊飯中・むらし中のみ)
故障ではありません。
上記の音とはまったく異なった音がする。 JAPAN TIGER CORPORATIONに修理をご依頼ください。
-
再加熱できない [Start]キーを押したら「ピピピ・・・」と音がする
ごはんが冷めています。約131℉[55℃]以下のごはんは再加熱できません。
168・169保温ランプが消灯していませんか。 [Keep Warm/Cancel]キーを押し、保温ランプの点灯を確認してから、再度[Start]キーを押す。
同時調理すると内ぶたに調理物が付着する
卵を使った料理や蒸しパンなどを調理すると、加熱によりふくらんだ食材が内ぶたに付着することがあります。気になる場合は材料の量を減らす。 -
ケーキの焼きあがりに時間がかかる
ご使用の電源の電圧が低い場合など、目安の時間よりも焼きあがりまでの時間が長くなることがあります。焼き足りないときは追加で焼く。 176
本体内に、水や米が入ってしまった
故障の原因になりますので、JAPAN TIGER CORPORATIONに修理をご依頼ください。 -
時刻合わせの際、[Hour]または[Min]キーを押しても時刻セットモードにならない
炊飯中・保温中・タイマー予約中・再加熱中は、時刻合わせできません。
185
保温ランプが点滅する 「Risotto」「Cake」メニューを選択した場合は、できあがったら保温ランプが点滅します。
164・167・176
保温経過時間が点滅する ごはんを12時間以上保温していませんか。
保温の時間が12時間を超えると、保温経過時間が点滅してお知らせします。
167
煮込み料理を6時間以上保温していませんか。
保温の時間が6時間を超えると、保温経過時間が点滅してお知らせします。
174
15 故障かな?と思ったら
183
日本語

こんなときは ここを確認して こう処置してください 参照ページ
電源コードのプラグを抜くと、現在時刻や予約時刻、保温経過時間の記憶が消える
プラグを差し込んだときに、表示部に「0:00」が点滅していませんか。
リチウム電池が切れています。JAPANTIGER CORPORATIONに修理をご依頼ください。
159
ふたが閉まらない、または炊飯中にふたが開く
上枠にごはんつぶ・米つぶなどが付着していませんか。
きれいに取り除く。162・177
キーを押しても反応しない 差込プラグがコンセントに差し込まれていますか。
プラグを確実に差し込む。 154・162・172・173・175・185
保温ランプが点灯していませんか。 [Keep Warm/Cancel]キーを押し、保温を取り消してから操作する。
162・167
樹脂などのにおいがする 使いはじめのうちは、樹脂などのにおいがすることがありますが、ご使用とともに少なくなります。
-
プラスチック部分に線状や波状の箇所がある
樹脂成形時に発生する跡で、使用上の品質に支障はありません。-
こんな表示が出たときは表 示 こう処置してください 参照ページ
「 」が表示され、「ピーーー」と音が鳴り続いたり、「ピピピピピピ…」という音が
する
本体の異常です。プラグを抜いた後、JAPAN TIGERCORPORATIONにご相談ください。
-
樹脂部品について熱や蒸気にふれる樹脂部品は、ご使用にともない傷んでくる場合があります。JAPAN TIGER CORPORATIONにお問合せください。
15 故障かな?と思ったら
184

現在時刻の合わせかた時刻は12時間で表示されます。※炊飯中・保温中・タイマー予約中・再加熱中は、時刻合わせできません。
例:「9:30」を「9:35」に合わせる場合
1パネルカバーを開く2電源コードを接続する(P.162参照)
3時刻セットモードにする[Hour]または[Min]キーを押すと、 が表示されます。
表示
ピッ
4時刻を合わせる●「時」は[Hour]キー、「分」は[Min]キーを押して合わせます。●押し続けると早送りになります。●時刻を合わせ終わってから、[Min]キーを押して、時刻合わせ完了です。
が消える
ピッ
ピッ
※時刻合わせを途中でやめたいときは[Keep Warm/Cancel]キーを押す。
5パネルカバーを閉める仕様
サイズ 0.54L(3カップ)タイプ電 源 120V 60Hz
定格電力(W) 456
炊飯容量(L)
Quick 0.09~0.54(0.5~3カップ[2.65~15.87oz])Synchro-Cooking 0.09~0.18(0.5~1カップ[2.65~5.29oz])
Plain 0.09~0.54(0.5~3カップ[2.65~15.87oz])Mixed 0.09~0.36(0.5~2カップ[2.65~10.58oz])Sweet 0.09~0.36(0.5~2カップ[2.65~10.58oz])Risotto 0.09~0.18(0.5~1カップ[2.65~5.29oz])Brown 0.09~0.36(0.5~2カップ[2.65~10.58oz])
外形寸法*(inch)幅 8.7(22.0cm)奥 行 10.8(27.3cm)高 さ 7.5(19.1cm)
本体質量*(lbs) 6.4(2.9kg)
●時計は、室温・使いかたによって1カ月に約30秒から120秒の差が生じる場合があります。●1カップ=約5.29oz(約150g)です。*およその数値です。
185
日本語

停電があったとき万一停電があっても再び通電されると機能は正常にはたらきます。停電になったら 再び通電されるとタイマーセット中 そのままタイマーが作動します。(停電している時間が長く、セット
時刻を過ぎている場合は、すぐ炊き始めます。)炊飯中・再加熱中 炊飯・再加熱を続けます。保温中 30分以上の停電があったときは保温を中止します。
※条件によっては、ごはんがうまく炊けなかったり、 保温の温度が低下することがあります。
消耗品・別売品のお買い求めについて内なべのフッ素加工は、ご使用にともない消耗し、はがれることがあります。(P.157参照)消耗品について、汚れやにおい・破損がひどくなったときは、JAPAN TIGER CORPORATIONにご相談ください。
186

Head Office:3-1 Hayamicho, Kadoma City, Osaka 571-8571, Japan
URL:http://www.tiger.jp/global.html
PARTS & SERVICE SUPPORTFor United States and Canada
USA 1-866-55-TIGER(84437) CANADA 1-866-9090-TCD(823) Website:www.japantigercorp.com
For All Other CountriesPlease contact nearest Tiger Customer Service in your area,or the dealer where original purchase was made.
Model Number:Trade Name:TIGERResponsible party: Japan Tiger Corporation of U.S.AAddress:2730 Monterey Street Suite 105 Torrance,CA90503Telephone number:(310)787-1985
JAJ-A55U
Copyright © 2022 FDOKUMEN