Quick Start Guide - Strumenti Musicali
42
1 Quick Start Guide
-
Upload
khangminh22 -
Category
Documents
-
view
1 -
download
0
Transcript of Quick Start Guide - Strumenti Musicali
1
Quick Start Guide

Congratulations!
If this is your first Hammond, Welcome to the Hammond Family! If
you are already one of us, Welcome Home!
This "Quick Start Guide" for the HAMMOND XK 5 is intended to get
you �up and running� as quickly as possible on your new axe. The
greatest feature of the XK 5 is its ability to be molded into your
�dream� Hammond, regardless of genre. Follow this Guide closely
and you�ll be able to lift your XK 5 out of its box and hit the stage
directly with confidence.
Even though you may be well versed in setting up Musical Gear, and
perhaps even be a previous Hammond owner, stay with us as we go
step by step; so you can devote your attention to playing and not be
concerned with learning your way around.
1
HERE ARE THE THINGS YOU NEED TO KNOW AND DO
TO GET STARTED RIGHT AWAY!
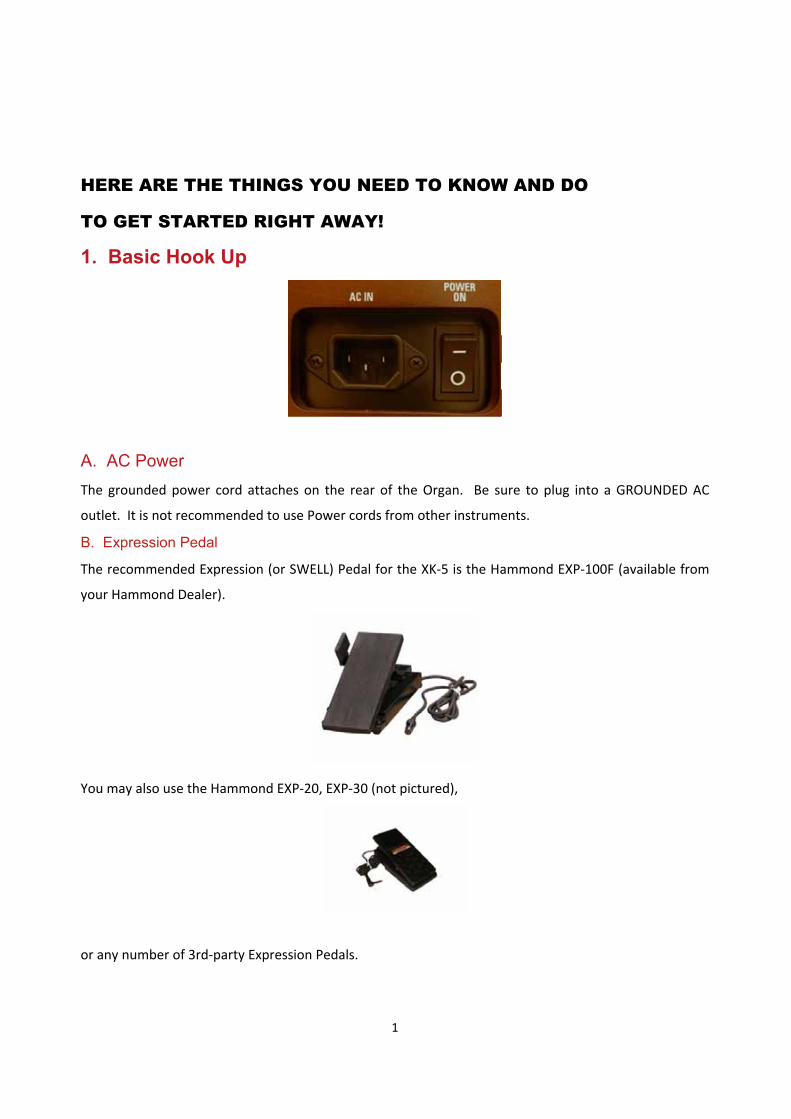
1. Basic Hook Up
A. AC Power The grounded power cord attaches on the rear of the Organ. Be sure to plug into a GROUNDED AC
outlet. It is not recommended to use Power cords from other instruments.
B. Expression Pedal
The recommended Expression (or SWELL) Pedal for the XK 5 is the Hammond EXP 100F (available from
your Hammond Dealer).
You may also use the Hammond EXP 20, EXP 30 (not pictured),
or any number of 3rd party Expression Pedals.
2
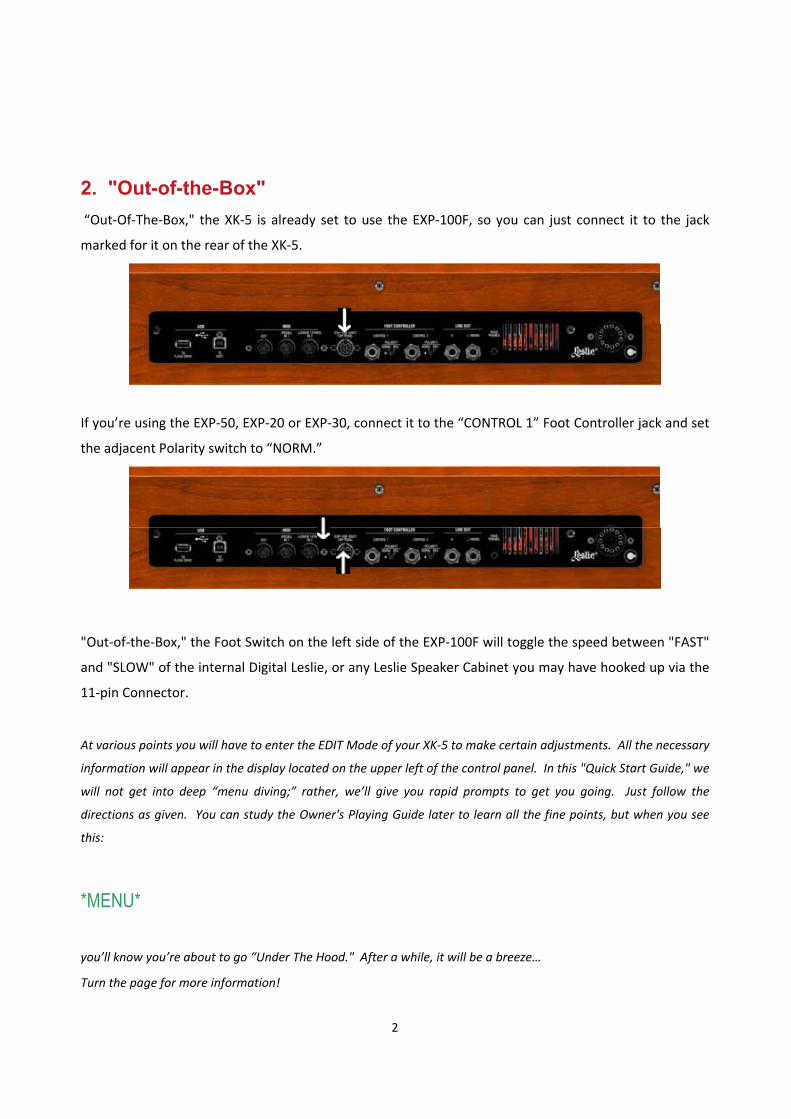
2. "Out-of-the-Box" �Out Of The Box," the XK 5 is already set to use the EXP 100F, so you can just connect it to the jack
marked for it on the rear of the XK 5.
If you�re using the EXP 50, EXP 20 or EXP 30, connect it to the �CONTROL 1� Foot Controller jack and set
the adjacent Polarity switch to �NORM.�
"Out of the Box," the Foot Switch on the left side of the EXP 100F will toggle the speed between "FAST"
and "SLOW" of the internal Digital Leslie, or any Leslie Speaker Cabinet you may have hooked up via the
11 pin Connector.
At various points you will have to enter the EDIT Mode of your XK 5 to make certain adjustments. All the necessary
information will appear in the display located on the upper left of the control panel. In this "Quick Start Guide," we
will not get into deep �menu diving;� rather, we�ll give you rapid prompts to get you going. Just follow the
directions as given. You can study the Owner's Playing Guide later to learn all the fine points, but when you see
this:
*MENU*
you�ll know you�re about to go �Under The Hood." After a while, it will be a breeze�
Turn the page for more information!

3
3. INFORMATION CENTER
In order to get the most out of your XK 5, you�ll want to master the basic controls that help you navigatethrough the settings which will transform the XK 5 into your DREAM HAMMOND.
1. INFORMATION DISPLAY:This is like your Computer Monitor. All your information is going to appear here, and plenty of it. Thescreen is Organic L.E.D. type (or OLED) so you�ll have no trouble seeing it in any lighting condition,indoors or out. You�ll never need to adjust it you�ll see it clearly from any angle.
2. PLAY Touch Button:The PLAY Touch Button is like a �Take me back home� button. Let's say you press the wrong button andsee unfamiliar stuff in the Display, or find yourself in the middle of tweaking a parameter, but need toget back to �regular� mode quickly. Pressing the PLAY Touch Button escapes the display from whereveryou may have brought yourself in the editing mode and puts you right back at �home base."You can also �toggle� the Display to show the Drawbar Registrations as graphic �bars� showing the exactsetting of the Drawbars, or you can go �old school� and see the �number value� of the Drawbars. Thesound will NOT change with each press�only the display changes.
3. MENU/EXIT Touch Button:Use this Touch Button to enter MENU mode. This is for when you want to change something, such asthe way the Drawbars sound, the way the Percussion sounds, setting the instrument up for MIDI, oranything else "out of the ordinary." Consult the Owner's Playing Guide for a complete explanation of allthe MENU EDIT Modes and what you can make the organ do using them.
4. NAVIGATION Touch ButtonsThese Touch Buttons allow you to navigate through the display pages, and once you�re there, selectwhich parameter you wish to adjust. Up Down Left Right.
5. VALUE Rotary KnobThis is an all purpose control which allows you to adjust whichever parameter is �current." It is of the�Continuous Turn� variety there is no �stop." Turn it �clockwise� to increase and �counter clockwise�to decrease. You�ll use this for all the adjustments you don�t �press a button� for.
6. ENTER Touch ButtonThis Touch Button �confirms� the edit or action you just performed. It doesn�t �happen� until you press it at theend of each editing session.
4
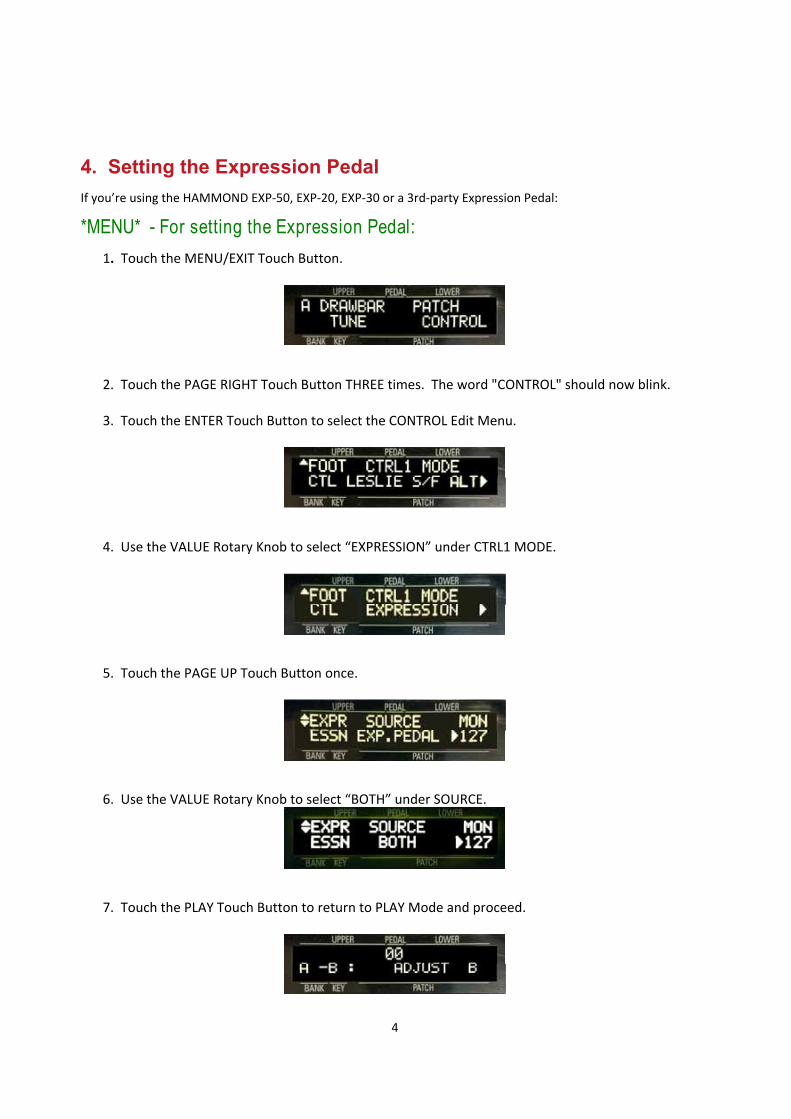
4. Setting the Expression Pedal If you�re using the HAMMOND EXP 50, EXP 20, EXP 30 or a 3rd party Expression Pedal:
*MENU* - For setting the Expression Pedal: 1. Touch the MENU/EXIT Touch Button.
2. Touch the PAGE RIGHT Touch Button THREE times. The word "CONTROL" should now blink.
3. Touch the ENTER Touch Button to select the CONTROL Edit Menu.
4. Use the VALUE Rotary Knob to select �EXPRESSION� under CTRL1 MODE.
5. Touch the PAGE UP Touch Button once.
6. Use the VALUE Rotary Knob to select �BOTH� under SOURCE.
7. Touch the PLAY Touch Button to return to PLAY Mode and proceed.
5
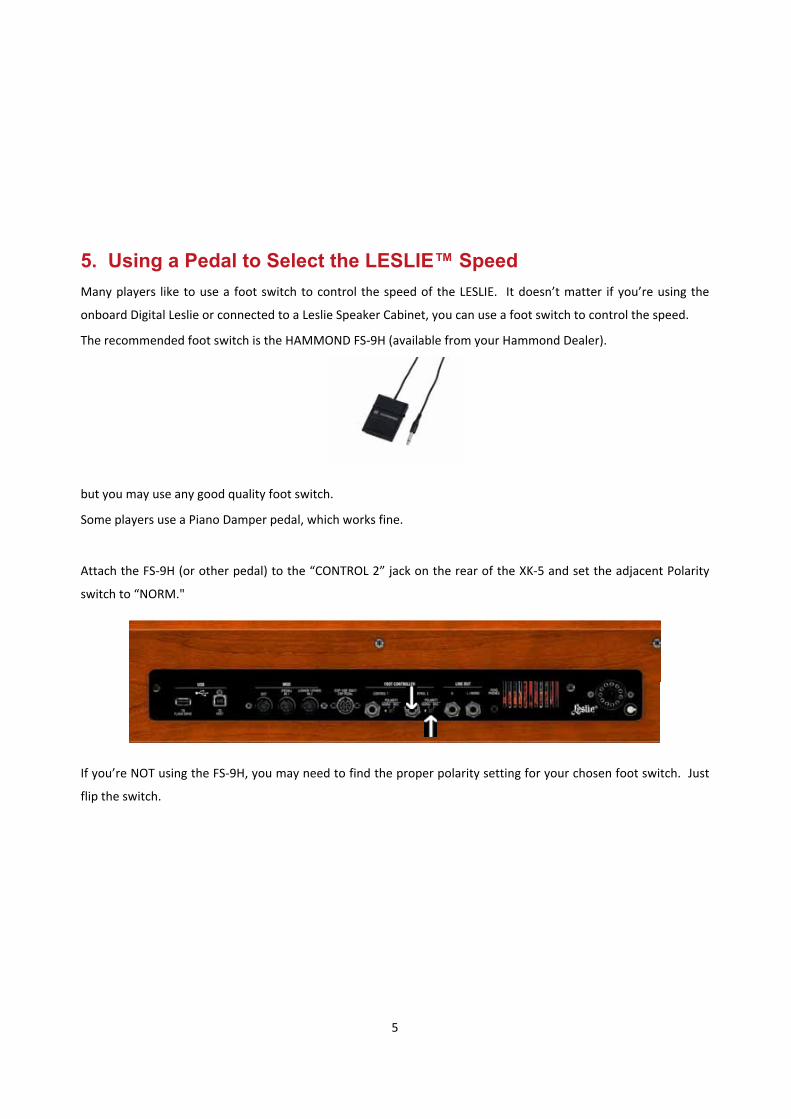
5. Using a Pedal to Select the LESLIE™ Speed Many players like to use a foot switch to control the speed of the LESLIE. It doesn�t matter if you�re using the
onboard Digital Leslie or connected to a Leslie Speaker Cabinet, you can use a foot switch to control the speed.
The recommended foot switch is the HAMMOND FS 9H (available from your Hammond Dealer).
but you may use any good quality foot switch.
Some players use a Piano Damper pedal, which works fine.
Attach the FS 9H (or other pedal) to the �CONTROL 2� jack on the rear of the XK 5 and set the adjacent Polarity
switch to �NORM."
If you�re NOT using the FS 9H, you may need to find the proper polarity setting for your chosen foot switch. Just
flip the switch.
6
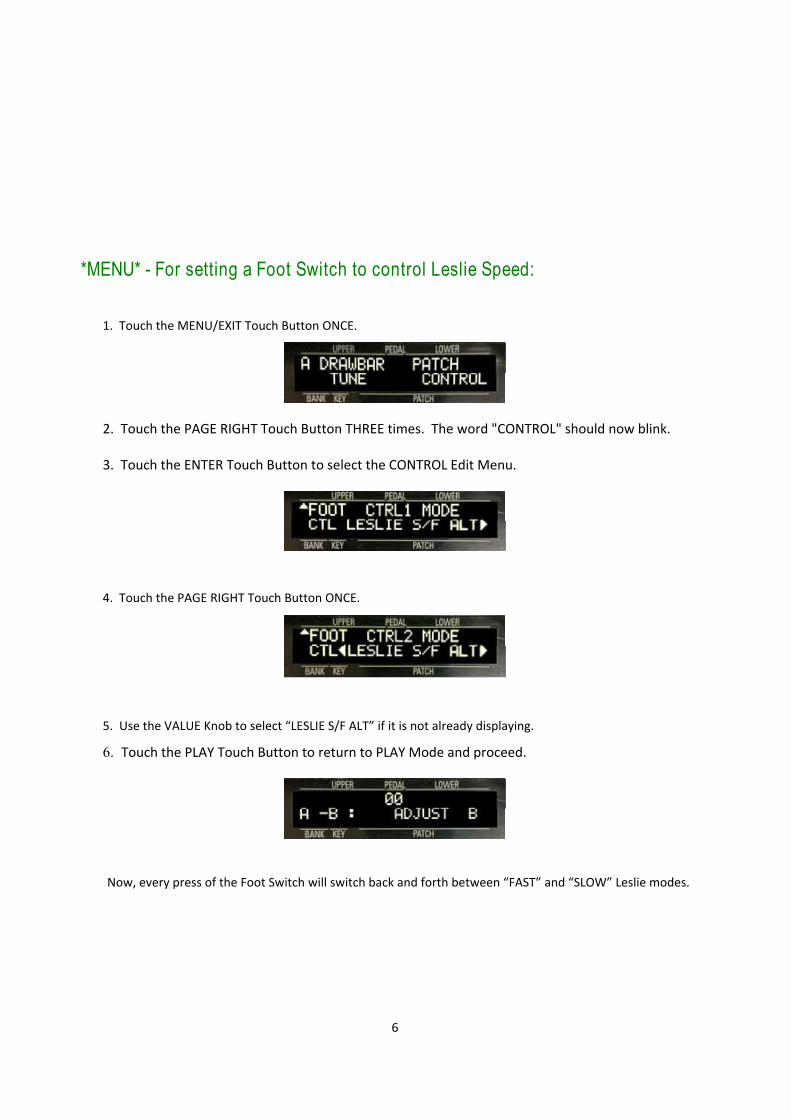
*MENU* - For setting a Foot Switch to control Leslie Speed:
1. Touch the MENU/EXIT Touch Button ONCE.
2. Touch the PAGE RIGHT Touch Button THREE times. The word "CONTROL" should now blink.
3. Touch the ENTER Touch Button to select the CONTROL Edit Menu.
4. Touch the PAGE RIGHT Touch Button ONCE.
5. Use the VALUE Knob to select �LESLIE S/F ALT� if it is not already displaying.
6. Touch the PLAY Touch Button to return to PLAY Mode and proceed.
Now, every press of the Foot Switch will switch back and forth between �FAST� and �SLOW� Leslie modes.
7
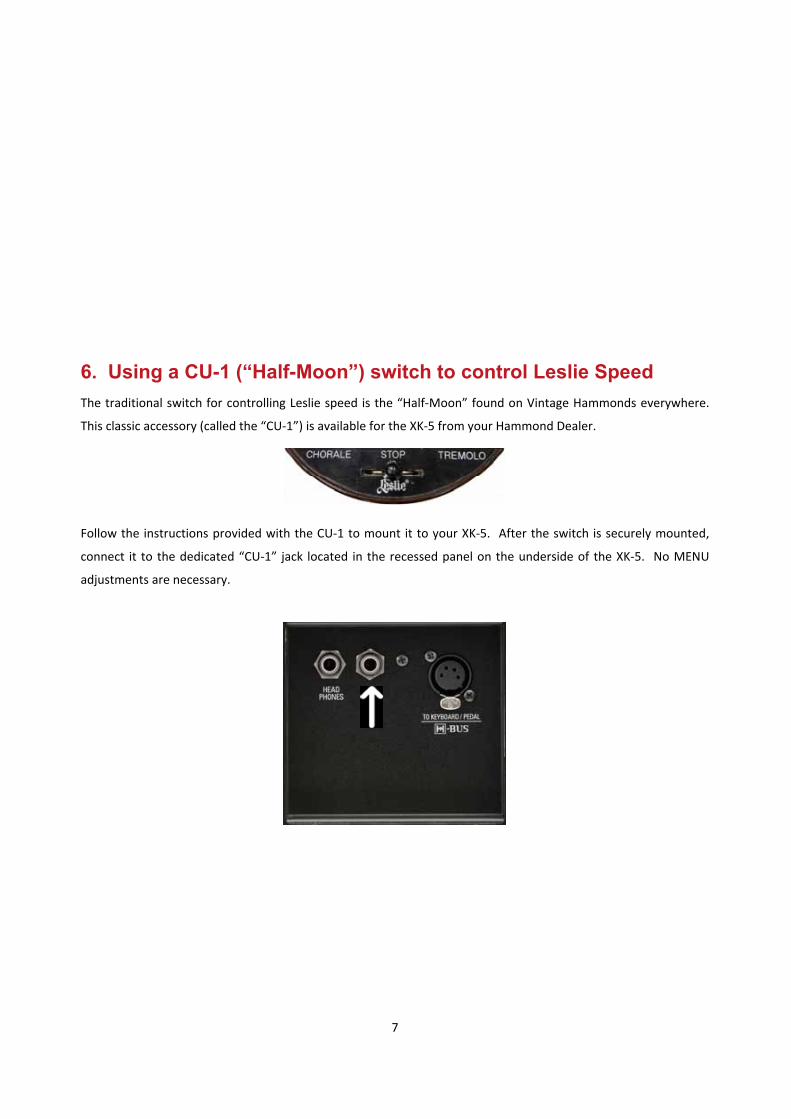
6. Using a CU-1 (“Half-Moon”) switch to control Leslie Speed The traditional switch for controlling Leslie speed is the �Half Moon� found on Vintage Hammonds everywhere.
This classic accessory (called the �CU 1�) is available for the XK 5 from your Hammond Dealer.
Follow the instructions provided with the CU 1 to mount it to your XK 5. After the switch is securely mounted,
connect it to the dedicated �CU 1� jack located in the recessed panel on the underside of the XK 5. No MENU
adjustments are necessary.
8
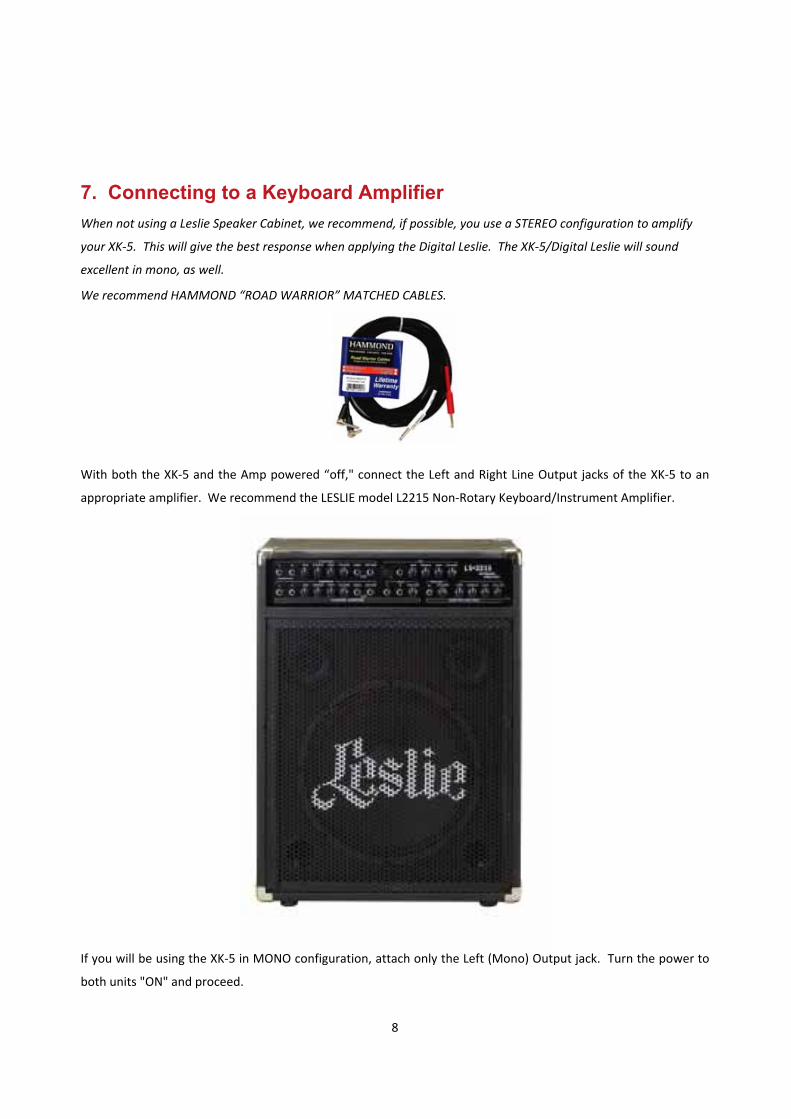
7. Connecting to a Keyboard Amplifier When not using a Leslie Speaker Cabinet, we recommend, if possible, you use a STEREO configuration to amplify
your XK 5. This will give the best response when applying the Digital Leslie. The XK 5/Digital Leslie will sound
excellent in mono, as well.
We recommend HAMMOND �ROAD WARRIOR� MATCHED CABLES.
With both the XK 5 and the Amp powered �off," connect the Left and Right Line Output jacks of the XK 5 to an
appropriate amplifier. We recommend the LESLIE model L2215 Non Rotary Keyboard/Instrument Amplifier.
If you will be using the XK 5 in MONO configuration, attach only the Left (Mono) Output jack. Turn the power to
both units "ON" and proceed.
9
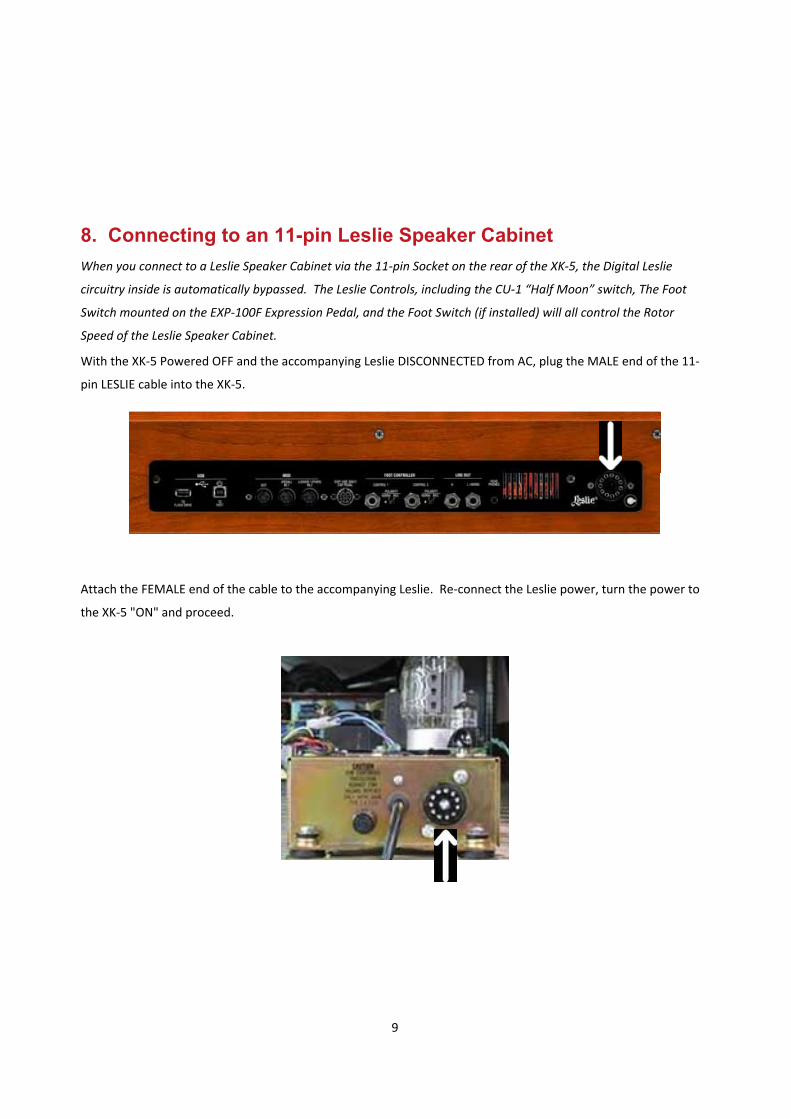
8. Connecting to an 11-pin Leslie Speaker Cabinet When you connect to a Leslie Speaker Cabinet via the 11 pin Socket on the rear of the XK 5, the Digital Leslie
circuitry inside is automatically bypassed. The Leslie Controls, including the CU 1 �Half Moon� switch, The Foot
Switch mounted on the EXP 100F Expression Pedal, and the Foot Switch (if installed) will all control the Rotor
Speed of the Leslie Speaker Cabinet.
With the XK 5 Powered OFF and the accompanying Leslie DISCONNECTED from AC, plug the MALE end of the 11
pin LESLIE cable into the XK 5.
Attach the FEMALE end of the cable to the accompanying Leslie. Re connect the Leslie power, turn the power to
the XK 5 "ON" and proceed.

10
You can use the XK 5 with a large variety of Vintage Leslie Speaker Cabinets, but you will need the appropriate�Kit� to allow the 11 pin XK 5 to communicate with a Vintage Leslie. Contact your Hammond Dealer.
If you are using an old style "Leslie Combo Pre amp" (such as the one shown below) to connect to a vintage LeslieSpeaker Cabinet, you can use 1/4" cables .
Attach a cable from the LEFT/MONO jack on the XK 5 to the appropriate input on the Combo Pre amp. MAKESURE to turn the BYPASS Touch Button "ON."
This sends a �raw� signal out, bypassing the Internal Digital Leslie Circuitry. This prevents an unpleasant effectwhere an already effected signal is processed through the Leslie Speaker Cabinet. When you use a Leslie ComboPre amp, the Leslie speed controls for the XK 5 (the Touch Tabs and/or CU 1 switch).have no effect on theconnected cabinet. You must use the foot switches mounted on the Leslie Combo Pre amp.
11
NOW THAT YOU'RE ALL HOOKED UP, YOU'RE READY TO START
MAKING MUSIC!
First, let's get "oriented" to the XK-5 with some Basic Hammond Knowledge.
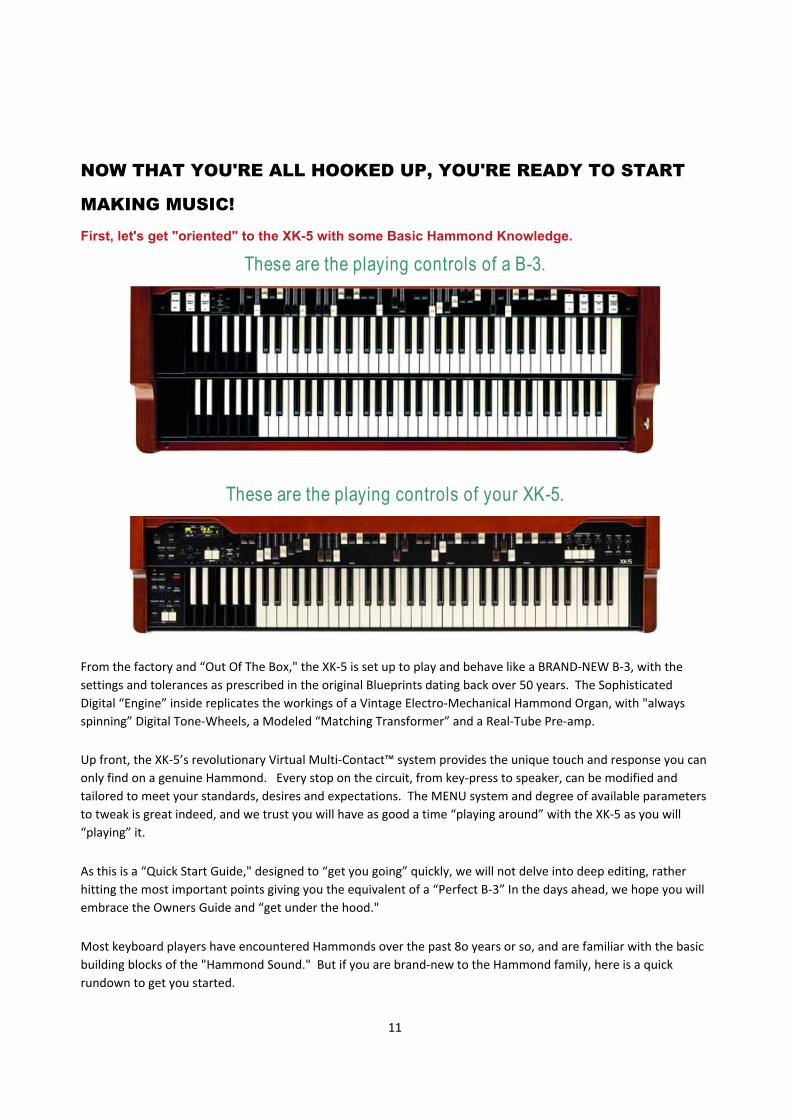
These are the playing controls of a B-3.
These are the playing controls of your XK-5.
From the factory and �Out Of The Box," the XK 5 is set up to play and behave like a BRAND NEW B 3, with thesettings and tolerances as prescribed in the original Blueprints dating back over 50 years. The SophisticatedDigital �Engine� inside replicates the workings of a Vintage Electro Mechanical Hammond Organ, with "alwaysspinning� Digital Tone Wheels, a Modeled �Matching Transformer� and a Real Tube Pre amp.
Up front, the XK 5�s revolutionary Virtual Multi Contact� system provides the unique touch and response you canonly find on a genuine Hammond. Every stop on the circuit, from key press to speaker, can be modified andtailored to meet your standards, desires and expectations. The MENU system and degree of available parametersto tweak is great indeed, and we trust you will have as good a time �playing around� with the XK 5 as you will�playing� it.
As this is a �Quick Start Guide," designed to �get you going� quickly, we will not delve into deep editing, ratherhitting the most important points giving you the equivalent of a �Perfect B 3� In the days ahead, we hope you willembrace the Owners Guide and �get under the hood."
Most keyboard players have encountered Hammonds over the past 8o years or so, and are familiar with the basicbuilding blocks of the "Hammond Sound." But if you are brand new to the Hammond family, here is a quickrundown to get you started.

12
1. Drawbars
Some people call them �sliders� some call them �tonebars," but the array in front of you, the Hammond HarmonicDrawbars�, are the �heart and soul� of the Hammond Organ. They are the tools by which you create your tone.
There are reasons for the numbers and colors, but for now let�s just say there are 2 sets of 9 for the Upper (or�Swell�) Manual, 2 sets of 9 for the Lower (or �Great�) Manual and 2 Drawbars for the Bass (or �Pedal�). Each barrepresents a �Harmonic� that goes from a low pitch on the left, to high pitch on the right. Although there aremany recognized standard settings, the rule is: move the Drawbars around until it sounds good to you. It is alsook to pull them all out, but it might be a little loud. The other rule is, the fewer Drawbars out, the softer andgentler the sound. With more Drawbars out, and the sound gets denser and more complex. Adjust accordingly.
2. Preset Keys
The reverse color keys to the left are your Preset Keys, similar as the presets you�d find on a synthesizer. Theydon�t play notes, but call up combinations of Drawbars to give different sounds. The Drawbars won�t move whenyou call a Patch with the Preset Keys, just as they didn�t on Vintage Hammonds, but the sounds changenonetheless.
�Out Of The Box� the XK 5 Presets match the �Factory� (or �Liturgical�) set as was shipped from 1935 to 1974 oneach B 3 leaving the Hammond Factory. If you�re a longtime Hammond Player you will immediately recognizethese sounds. The Patches begin on C# and continue to �A." The Patches go from soft to loud the further you go�up� the Preset Keys. The low �C� is a �Cancel� which renders that particular Manual silent.

13
There are different sounds for each Manual. Whereas the Vintage Hammond�s Preset Keys locked down whenyou pressed them, the XK 5�s do not. Instead, there are indicator LED�s at the head of each key. A Red lightindicates the current UPPER preset, and a Green light indicates the current LOWER preset. If you see a mix ofboth colors, that means both UPPER and LOWER preset keys are the same. (example: Upper �A� and Lower �A�selected simultaneously). The NAMES of the PATCHES will appear in the display, along with the Bank and PresetKey information. Of course, if you�re using the single manual XK 5, you�ll be primarily sticking to the UPPERManual Patches, but know you can �Split� the Manual to effect playing a double manual instrument (more on thatlater in this Guide).
3. Adjust Preset Keys
The �A#� and �B� Preset keys affect their corresponding set of Drawbars allowing you to create your own sound.The legend printed on the small ledge in front of the Drawbars shows you which set of Drawbars is controlled bywhich Preset key. Having two separate settings available allows you to make a quick change between sounds.And if you go to one of the other preset keys other than A# or B, when you come back to those Presets, yourDrawbar settings will be intact, unless of course, you move them while you are on another Preset. This time whenyou come back, the new setting will be reflected. Neat Feature!
4. Preset Banks
The Vintage Hammonds had only one set of Presets, but the modern Hammond has multiple banks. As we said,the �stock� set is the vintage one, but there is a new and different set of 9 presets under the "C" to "A" PresetKeys for a total of 90 separate Patches.
It�s easy to select a Bank.
1. Find the BANK Touch Button immediately to the left of the Manual. Press and hold it you will see a red lightglow over the corresponding Bank's Preset Key.
2. Select the bank you wish (from C to A) and press that key. The Patches from that Bank are now loaded undereach Preset Key. (NOTE! Your "A#" and "B" settings stay the same. As many Parameters are saved with eachbank, the entire nature of the Organ changes with the selection of each BANK. Looking for different sounds? Goto the BANKS!!)

14
5. PRESET SELECTOR Touch Buttons
When using the XK 5 as a �single manual� instrument, you have only ONE set of Preset Keys. If you wish to splitthe Manual, how can you select the LOWER presets? Easy! Look to the left of the Manual and find the PRESETSELECTOR Touch Buttons. Touch the UPPER Tab to make the Preset Keys active for the UPPER part, and touch theLOWER button to make them active for the LOWER part. Touch them both and you will register BOTH the Upperand Lower with each press. This is helpful if you are using a 3rd Party MIDI controller as a second Manual.
6. VIBRATO and CHORUS Controls
B-3 Vibrato and Chorus Controls XK-5 Vibrato & Chorus Controls
One of the hallmarks of the Hammond Organ is its distinctive �Chorus/Vibrato� effect.�Vibrato� is the small cyclical variance in pitch you hear in Vocalists, Violinists, Guitarists and Horn Players.Vibrato gives movement to the sound and adds richness.
You may be familiar with �Chorus� pedals, popular for Electric Pianos and Guitars, etc.. Although the �Chorus�effect was first found here on Hammond Organs; Hammond�s version of it is quite different than what you mightbe accustomed to. The effect is unlike anything else in the realm of Musical Instruments. It adds a shimmeringlayer on top of the original tone.
There are Tabs to turn the effect �On/Off� for each Manual. (The Bass Pedals follow the LOWER assignment, in
this case.) There are three depths/intensities available for the Vibrato and Chorus, controlled by the round knob
adjacent to the �Chorus /Vibrato." The VIBRATO settings are marked V 1,V 2,V 3; and the CHORUS C 1,C 2,C 3.
The indicator LED�s encircling the knob indicate which setting is current. Selection of Patches may change the
setting (the LED�s will change), but not the physical position of the knob. This is normal. If you should adjust the
knob, however, the settings will change correspondingly.
15
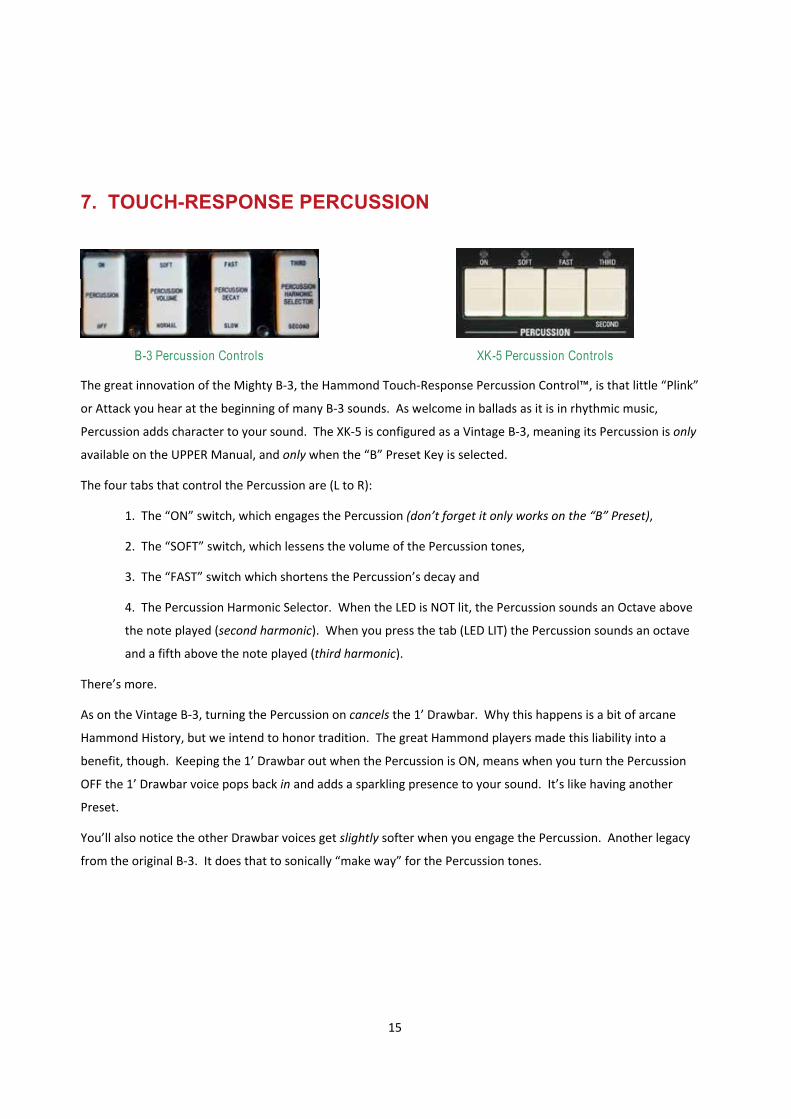
7. TOUCH-RESPONSE PERCUSSION
B-3 Percussion Controls XK-5 Percussion Controls
The great innovation of the Mighty B 3, the Hammond Touch Response Percussion Control�, is that little �Plink�
or Attack you hear at the beginning of many B 3 sounds. As welcome in ballads as it is in rhythmic music,
Percussion adds character to your sound. The XK 5 is configured as a Vintage B 3, meaning its Percussion is only
available on the UPPER Manual, and only when the �B� Preset Key is selected.
The four tabs that control the Percussion are (L to R):
1. The �ON� switch, which engages the Percussion (don�t forget it only works on the �B� Preset),
2. The �SOFT� switch, which lessens the volume of the Percussion tones,
3. The �FAST� switch which shortens the Percussion�s decay and
4. The Percussion Harmonic Selector. When the LED is NOT lit, the Percussion sounds an Octave above
the note played (second harmonic). When you press the tab (LED LIT) the Percussion sounds an octave
and a fifth above the note played (third harmonic).
There�s more.
As on the Vintage B 3, turning the Percussion on cancels the 1� Drawbar. Why this happens is a bit of arcane
Hammond History, but we intend to honor tradition. The great Hammond players made this liability into a
benefit, though. Keeping the 1� Drawbar out when the Percussion is ON, means when you turn the Percussion
OFF the 1� Drawbar voice pops back in and adds a sparkling presence to your sound. It�s like having another
Preset.
You�ll also notice the other Drawbar voices get slightly softer when you engage the Percussion. Another legacy
from the original B 3. It does that to sonically �make way� for the Percussion tones.
16
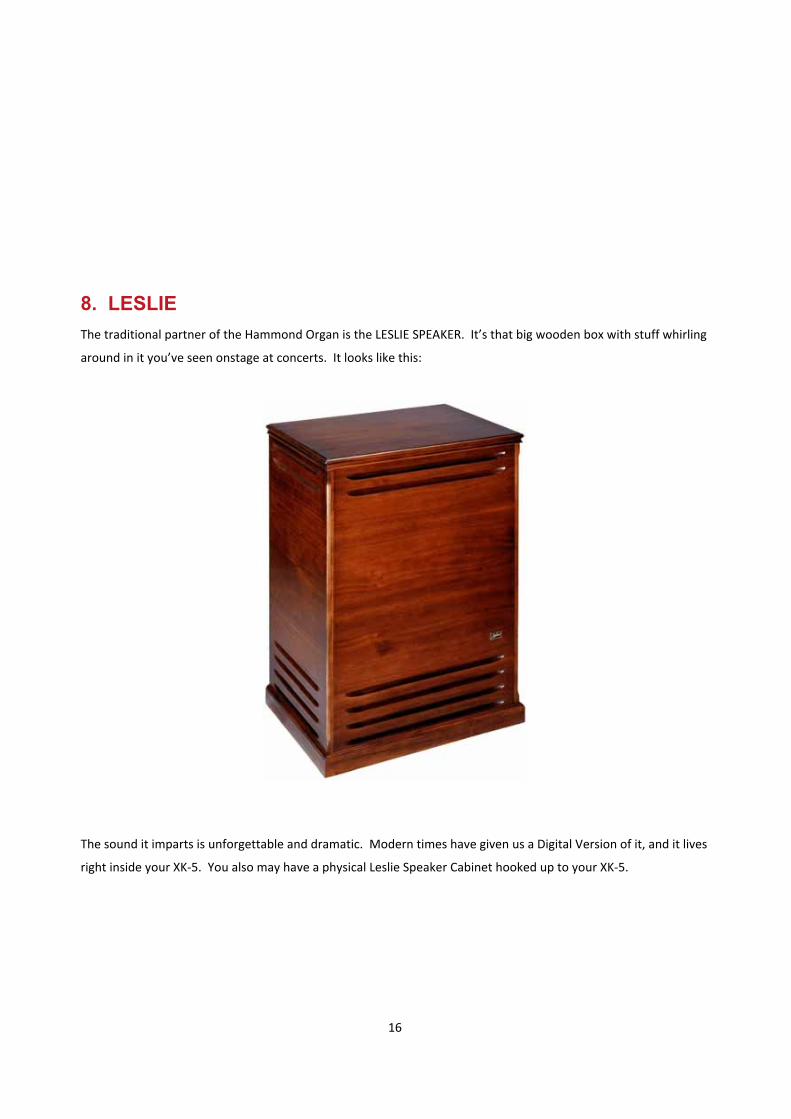
8. LESLIE The traditional partner of the Hammond Organ is the LESLIE SPEAKER. It�s that big wooden box with stuff whirling
around in it you�ve seen onstage at concerts. It looks like this:
The sound it imparts is unforgettable and dramatic. Modern times have given us a Digital Version of it, and it lives
right inside your XK 5. You also may have a physical Leslie Speaker Cabinet hooked up to your XK 5.
17
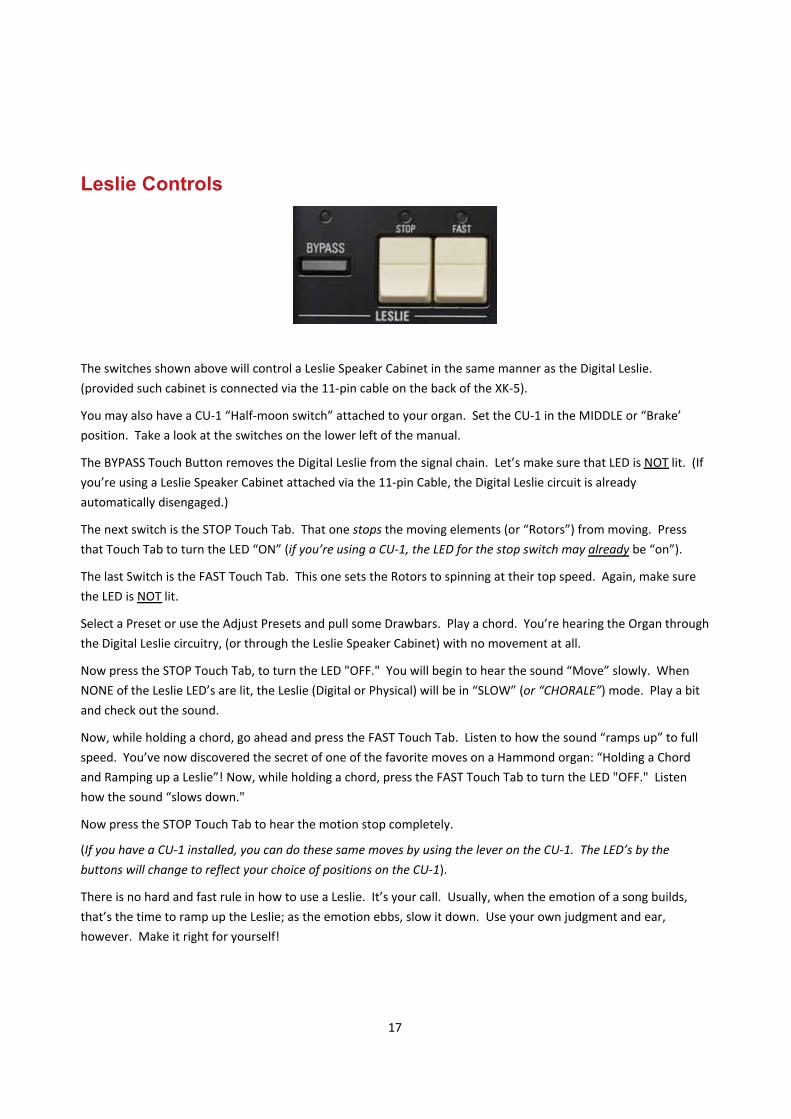
Leslie Controls
The switches shown above will control a Leslie Speaker Cabinet in the same manner as the Digital Leslie.(provided such cabinet is connected via the 11 pin cable on the back of the XK 5).
You may also have a CU 1 �Half moon switch� attached to your organ. Set the CU 1 in the MIDDLE or �Brake�position. Take a look at the switches on the lower left of the manual.
The BYPASS Touch Button removes the Digital Leslie from the signal chain. Let�s make sure that LED is NOT lit. (Ifyou�re using a Leslie Speaker Cabinet attached via the 11 pin Cable, the Digital Leslie circuit is alreadyautomatically disengaged.)
The next switch is the STOP Touch Tab. That one stops the moving elements (or �Rotors�) from moving. Pressthat Touch Tab to turn the LED �ON� (if you�re using a CU 1, the LED for the stop switch may already be �on�).
The last Switch is the FAST Touch Tab. This one sets the Rotors to spinning at their top speed. Again, make surethe LED is NOT lit.
Select a Preset or use the Adjust Presets and pull some Drawbars. Play a chord. You�re hearing the Organ throughthe Digital Leslie circuitry, (or through the Leslie Speaker Cabinet) with no movement at all.
Now press the STOP Touch Tab, to turn the LED "OFF." You will begin to hear the sound �Move� slowly. WhenNONE of the Leslie LED�s are lit, the Leslie (Digital or Physical) will be in �SLOW� (or �CHORALE�) mode. Play a bitand check out the sound.
Now, while holding a chord, go ahead and press the FAST Touch Tab. Listen to how the sound �ramps up� to fullspeed. You�ve now discovered the secret of one of the favorite moves on a Hammond organ: �Holding a Chordand Ramping up a Leslie�! Now, while holding a chord, press the FAST Touch Tab to turn the LED "OFF." Listenhow the sound �slows down."
Now press the STOP Touch Tab to hear the motion stop completely.
(If you have a CU 1 installed, you can do these same moves by using the lever on the CU 1. The LED�s by thebuttons will change to reflect your choice of positions on the CU 1).
There is no hard and fast rule in how to use a Leslie. It�s your call. Usually, when the emotion of a song builds,that�s the time to ramp up the Leslie; as the emotion ebbs, slow it down. Use your own judgment and ear,however. Make it right for yourself!
18
NOW THAT YOU'RE ACCLIMATED TO THE SOUNDS AND
CONTROLS, LET'S PERSONALIZE YOUR SOUND!
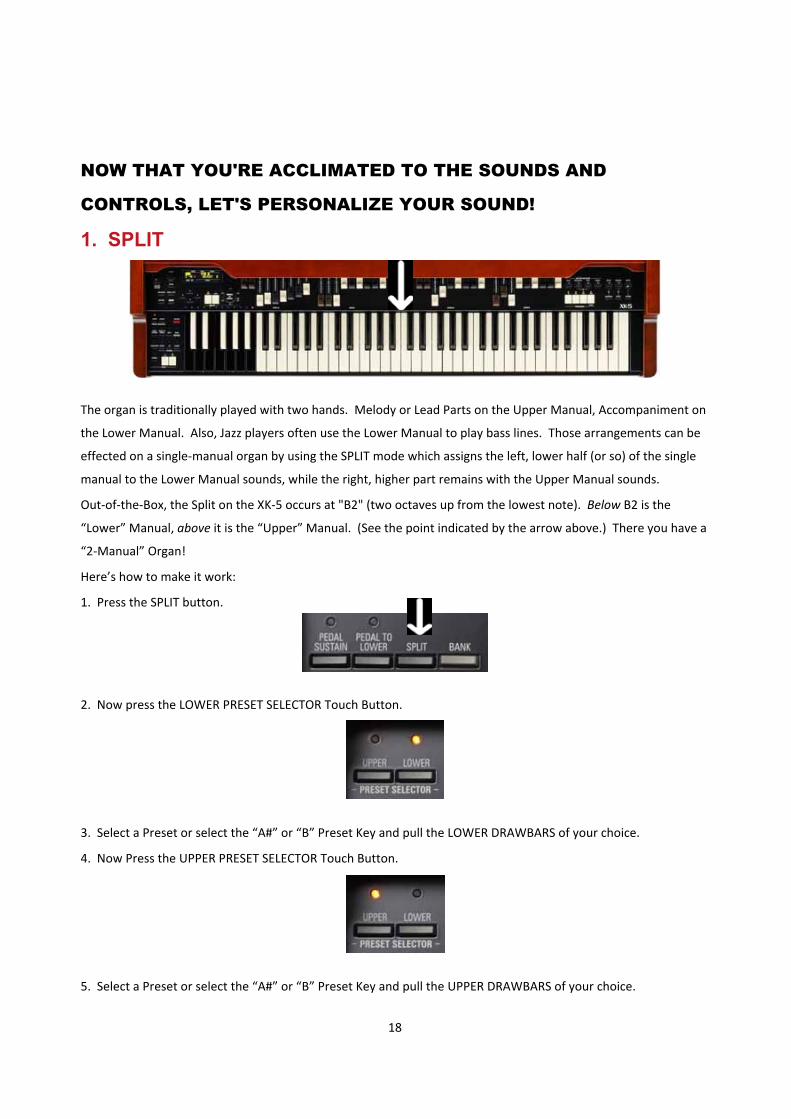
1. SPLIT
The organ is traditionally played with two hands. Melody or Lead Parts on the Upper Manual, Accompaniment on
the Lower Manual. Also, Jazz players often use the Lower Manual to play bass lines. Those arrangements can be
effected on a single manual organ by using the SPLIT mode which assigns the left, lower half (or so) of the single
manual to the Lower Manual sounds, while the right, higher part remains with the Upper Manual sounds.
Out of the Box, the Split on the XK 5 occurs at "B2" (two octaves up from the lowest note). Below B2 is the
�Lower� Manual, above it is the �Upper� Manual. (See the point indicated by the arrow above.) There you have a
�2 Manual� Organ!
Here�s how to make it work:
1. Press the SPLIT button.
2. Now press the LOWER PRESET SELECTOR Touch Button.
3. Select a Preset or select the �A#� or �B� Preset Key and pull the LOWER DRAWBARS of your choice.
4. Now Press the UPPER PRESET SELECTOR Touch Button.
5. Select a Preset or select the �A#� or �B� Preset Key and pull the UPPER DRAWBARS of your choice.
19
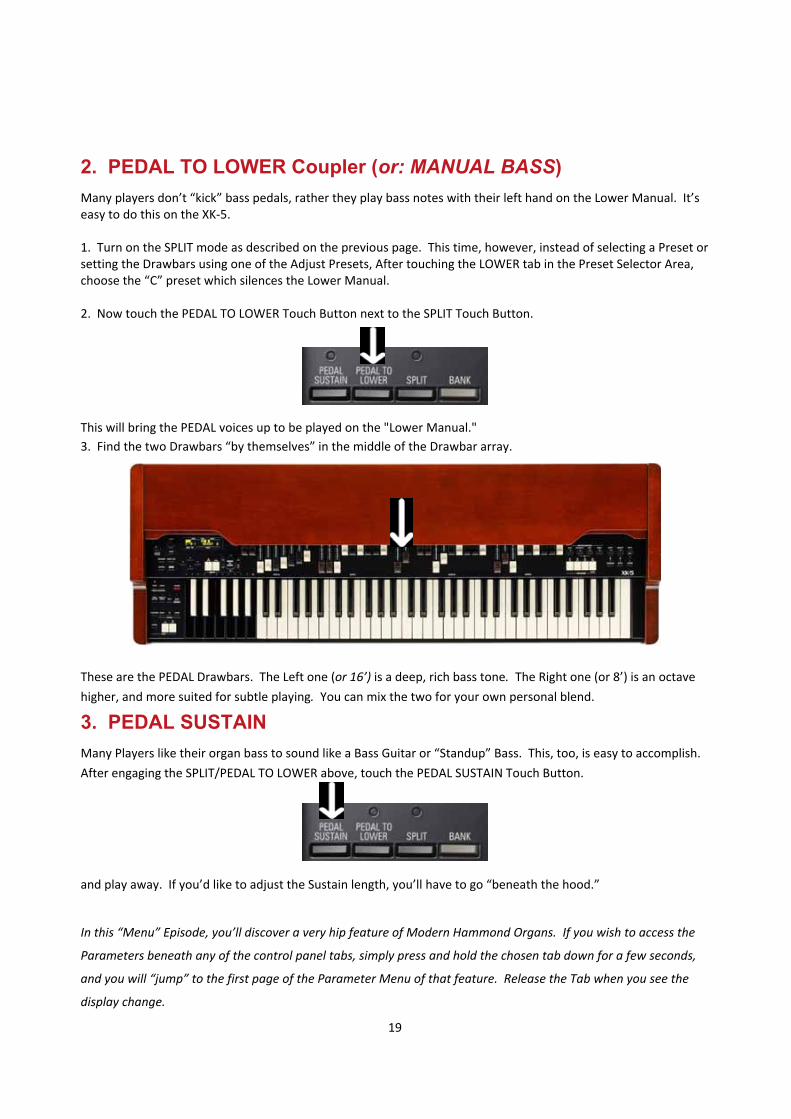
2. PEDAL TO LOWER Coupler (or: MANUAL BASS) Many players don�t �kick� bass pedals, rather they play bass notes with their left hand on the Lower Manual. It�seasy to do this on the XK 5.
1. Turn on the SPLIT mode as described on the previous page. This time, however, instead of selecting a Preset orsetting the Drawbars using one of the Adjust Presets, After touching the LOWER tab in the Preset Selector Area,choose the �C� preset which silences the Lower Manual.
2. Now touch the PEDAL TO LOWER Touch Button next to the SPLIT Touch Button.
This will bring the PEDAL voices up to be played on the "Lower Manual."3. Find the two Drawbars �by themselves� in the middle of the Drawbar array.
These are the PEDAL Drawbars. The Left one (or 16�) is a deep, rich bass tone. The Right one (or 8�) is an octavehigher, and more suited for subtle playing. You can mix the two for your own personal blend.
3. PEDAL SUSTAIN Many Players like their organ bass to sound like a Bass Guitar or �Standup� Bass. This, too, is easy to accomplish.After engaging the SPLIT/PEDAL TO LOWER above, touch the PEDAL SUSTAIN Touch Button.
and play away. If you�d like to adjust the Sustain length, you�ll have to go �beneath the hood.�
In this �Menu� Episode, you�ll discover a very hip feature of Modern Hammond Organs. If you wish to access the
Parameters beneath any of the control panel tabs, simply press and hold the chosen tab down for a few seconds,
and you will �jump� to the first page of the Parameter Menu of that feature. Release the Tab when you see the
display change.
20
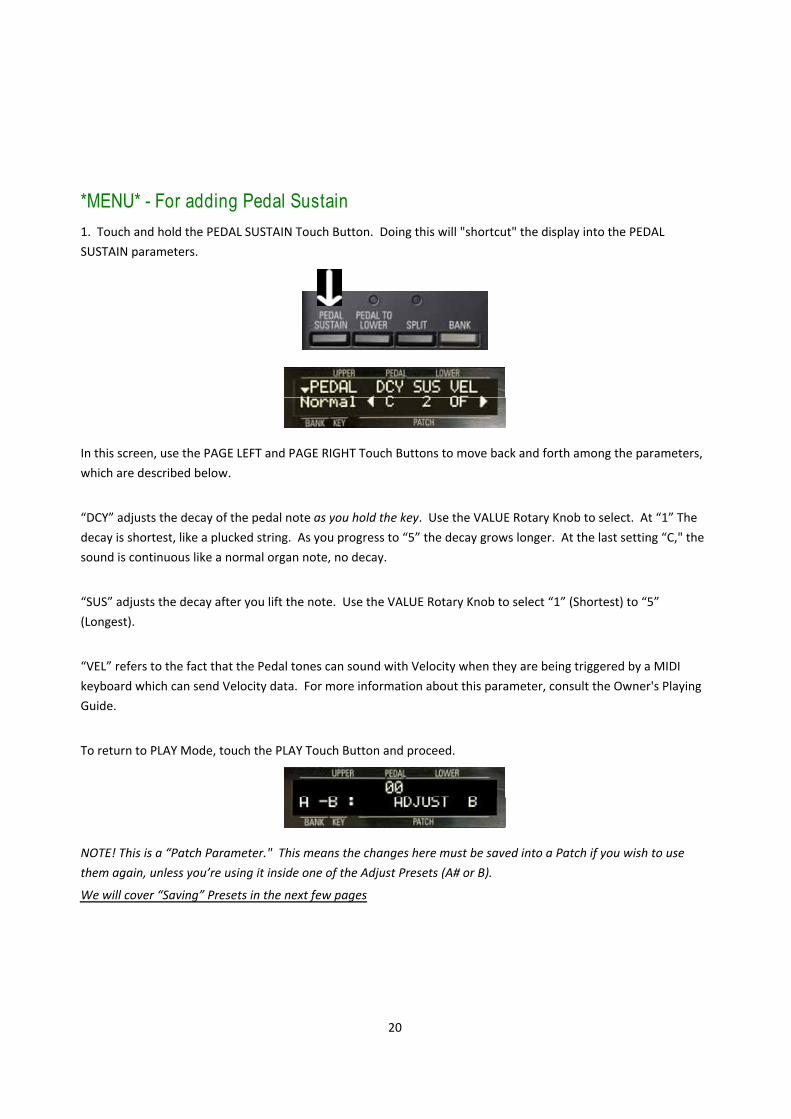
*MENU* - For adding Pedal Sustain 1. Touch and hold the PEDAL SUSTAIN Touch Button. Doing this will "shortcut" the display into the PEDALSUSTAIN parameters.
In this screen, use the PAGE LEFT and PAGE RIGHT Touch Buttons to move back and forth among the parameters,which are described below.
�DCY� adjusts the decay of the pedal note as you hold the key. Use the VALUE Rotary Knob to select. At �1� Thedecay is shortest, like a plucked string. As you progress to �5� the decay grows longer. At the last setting �C," thesound is continuous like a normal organ note, no decay.
�SUS� adjusts the decay after you lift the note. Use the VALUE Rotary Knob to select �1� (Shortest) to �5�(Longest).
�VEL� refers to the fact that the Pedal tones can sound with Velocity when they are being triggered by a MIDIkeyboard which can send Velocity data. For more information about this parameter, consult the Owner's PlayingGuide.
To return to PLAY Mode, touch the PLAY Touch Button and proceed.
NOTE! This is a �Patch Parameter." This means the changes here must be saved into a Patch if you wish to usethem again, unless you�re using it inside one of the Adjust Presets (A# or B).
We will cover �Saving� Presets in the next few pages

21
4. Transposition Occasionally, players need to �shift� the key in which the Organ is sounding to be something different than the
key they are playing in, such as when accompanying a vocalist, soloist or choir.
Here�s how to do it:
1. Touch and Hold the TRANSPOSE Touch Button.
2. While touching and holding the TRANSPOSE Touch Button, use the adjacent UP and DOWN Touch
Buttons to shift the sounding range of the organ +/ 6 semitones. For example, to shift the pitch "UP" 6
semitones, touch the UP Touch Button 6 times.
3. Release the TRANSPOSE Touch Button.
When the orange LED above the TRANSPOSE Touch Button is lit, this indicates that the Organ is
"TRANSPOSED�
To return the Organ to its Normal Tuning:
1. Touch and hold the TRANSPOSE Touch Button.2. While keeping the TRANSPOSE Touch Button pressed, touch both the UP and DOWN Touch
Buttons together to return the Transpose value to �0.�3. Release the TRANSPOSE Touch Button (LED OFF).
NOTE! This is a �GLOBAL� parameter, and will affect every preset while it is engaged. These settings can NOT be
saved to a Preset.
22
5. Key Click The XK 5�s �Virtual Multi Contact�� keying system provides the classic Hammond �Feel." On Vintage Hammonds,
the metal on metal contacts beneath each key yielded that unique, essential morsel of noise so beloved by all
who lay their hands on the King Of Instruments. Each one had their own voice. Here is how to dial in exactly how
much of this noble imperfection you desire.
The Key click Parameters are �Patch� Parameters, they are unique to each Patch. You will need to select the
Patch you wish to adjust the Key click on. If you are using the Adjust Presets, you will need to select either of
the UPPER ones, and pull the Drawbars to your liking. Play as you adjust to arrive at your desired sound.
Outside of the Adjust Presets, you will need to SAVE your edited Patch. The procedure for doing so is outlined
starting on page 29 of this Guide.
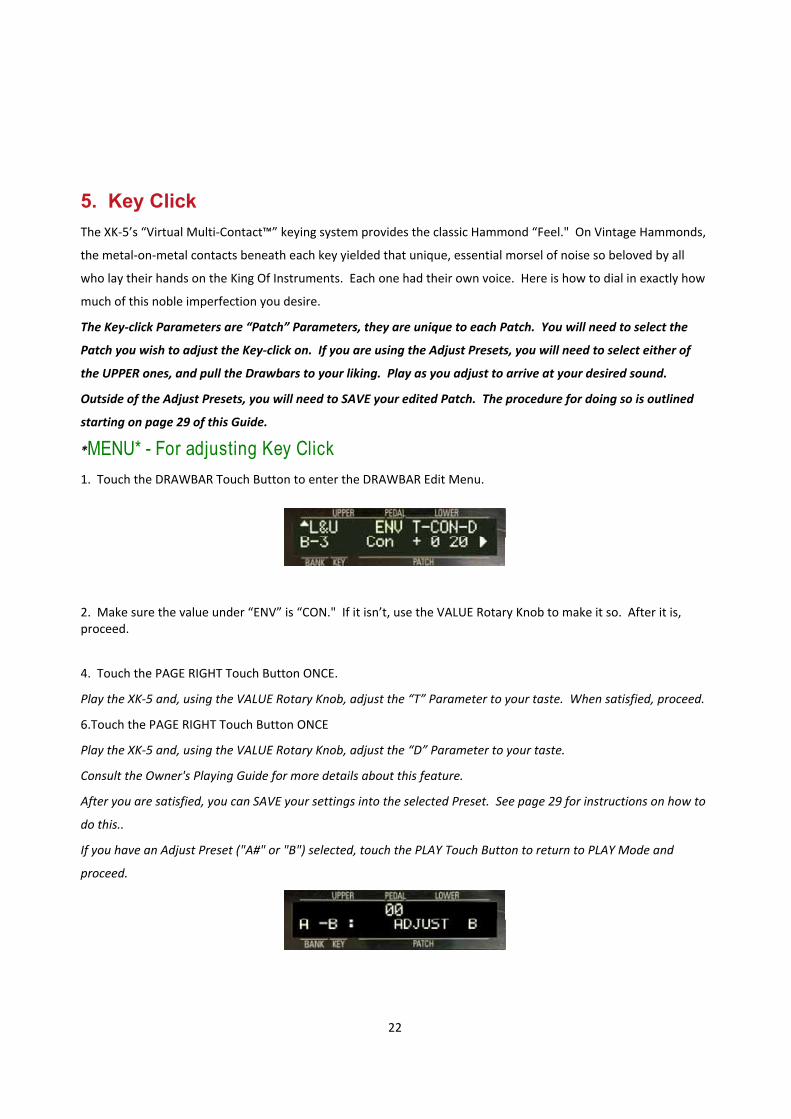
*MENU* - For adjusting Key Click1. Touch the DRAWBAR Touch Button to enter the DRAWBAR Edit Menu.
2. Make sure the value under �ENV� is �CON." If it isn�t, use the VALUE Rotary Knob to make it so. After it is,proceed.
4. Touch the PAGE RIGHT Touch Button ONCE.
Play the XK 5 and, using the VALUE Rotary Knob, adjust the �T� Parameter to your taste. When satisfied, proceed.
6.Touch the PAGE RIGHT Touch Button ONCE
Play the XK 5 and, using the VALUE Rotary Knob, adjust the �D� Parameter to your taste.
Consult the Owner's Playing Guide for more details about this feature.
After you are satisfied, you can SAVE your settings into the selected Preset. See page 29 for instructions on how to
do this..
If you have an Adjust Preset ("A#" or "B") selected, touch the PLAY Touch Button to return to PLAY Mode and
proceed.
23
6. Real Tube Preamp and Overdrive The XK 5�s Tonal Path closely follows that of Vintage Hammonds, but in the Digital realm. This includes theModeled MATCHING TRANSFORMER. Helping the sophisticated Digital Circuitry are two REAL Vacuum Tubes.The sound of an �overdriven� Hammond Organ is evocative, and there are many �flavors� of Overdrive. TheTubes here are not intended for Ultra High Gain Distortion as you might expect, but are here to duplicate the�Warm� sound of Vintage Hammonds. Still, you are able to �push� the tubes for that indescribable �grind� of aVintage Hammond. For those who want more, our OVERDRIVE circuit lets you dial in the precise amount andstyle of �Crunch� you desire.
NOTE: BOTH the Tube and Overdrive Parameters are �Patch� Parameters, they are unique to each Patch. Youwill need to select the patch you wish to adjust these Parameters on. If you are using the Adjustable Presets,you will need to select either of the UPPER ones, and pull the Drawbars to your liking. You will need to play asyou adjust to arrive at your desired sound.Outside of the Adjustable Presets, you will need to SAVE your edited Patch. The procedure for doing so is
outlined later in this document
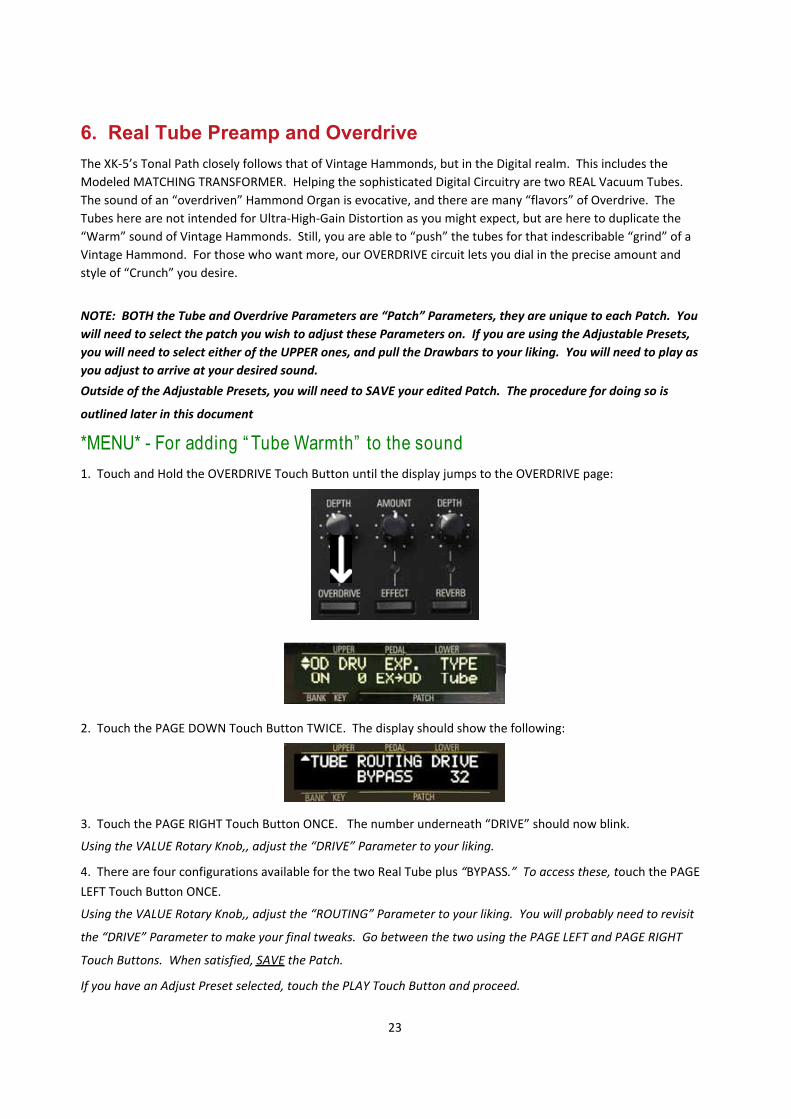
*MENU* - For adding “ Tube Warmth” to the sound 1. Touch and Hold the OVERDRIVE Touch Button until the display jumps to the OVERDRIVE page:
2. Touch the PAGE DOWN Touch Button TWICE. The display should show the following:
3. Touch the PAGE RIGHT Touch Button ONCE. The number underneath �DRIVE� should now blink.
Using the VALUE Rotary Knob,, adjust the �DRIVE� Parameter to your liking.
4. There are four configurations available for the two Real Tube plus �BYPASS.� To access these, touch the PAGELEFT Touch Button ONCE.
Using the VALUE Rotary Knob,, adjust the �ROUTING� Parameter to your liking. You will probably need to revisit
the �DRIVE� Parameter to make your final tweaks. Go between the two using the PAGE LEFT and PAGE RIGHT
Touch Buttons. When satisfied, SAVE the Patch.
If you have an Adjust Preset selected, touch the PLAY Touch Button and proceed.
24
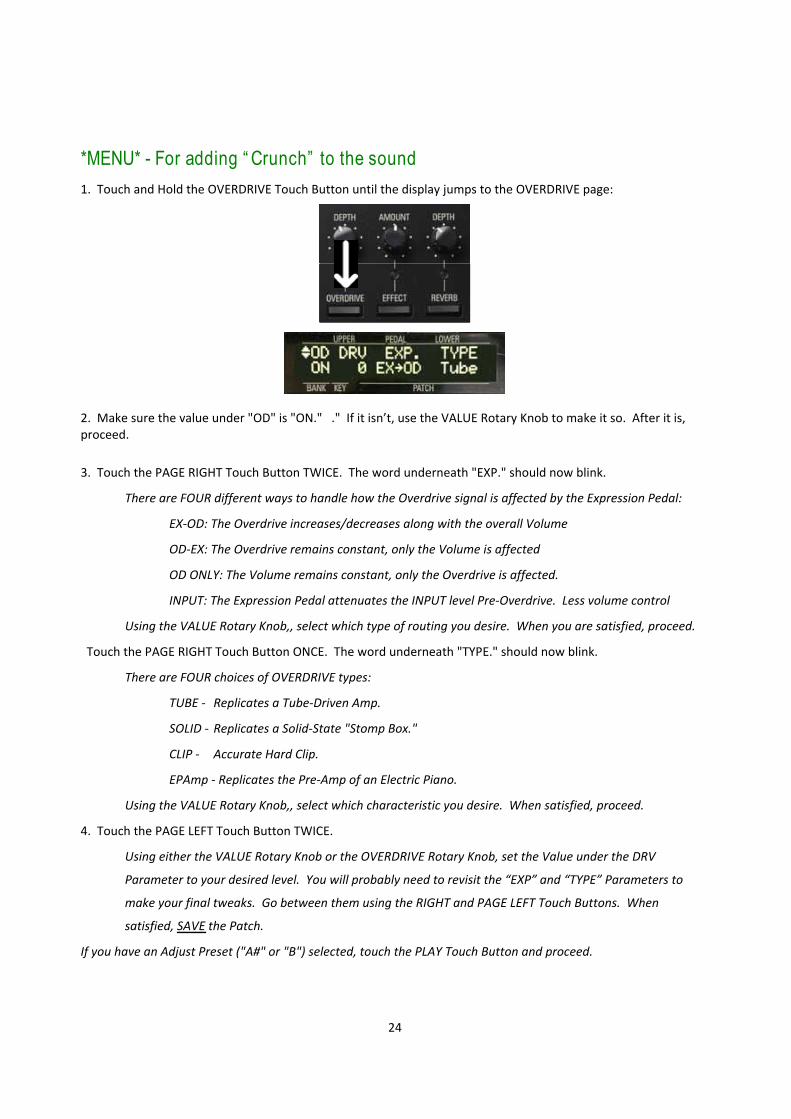
*MENU* - For adding “ Crunch” to the sound 1. Touch and Hold the OVERDRIVE Touch Button until the display jumps to the OVERDRIVE page:
2. Make sure the value under "OD" is "ON." ." If it isn�t, use the VALUE Rotary Knob to make it so. After it is,proceed.
3. Touch the PAGE RIGHT Touch Button TWICE. The word underneath "EXP." should now blink.
There are FOUR different ways to handle how the Overdrive signal is affected by the Expression Pedal:
EX OD: The Overdrive increases/decreases along with the overall Volume
OD EX: The Overdrive remains constant, only the Volume is affected
OD ONLY: The Volume remains constant, only the Overdrive is affected.
INPUT: The Expression Pedal attenuates the INPUT level Pre Overdrive. Less volume control
Using the VALUE Rotary Knob,, select which type of routing you desire. When you are satisfied, proceed.
Touch the PAGE RIGHT Touch Button ONCE. The word underneath "TYPE." should now blink.
There are FOUR choices of OVERDRIVE types:
TUBE Replicates a Tube Driven Amp.
SOLID Replicates a Solid State "Stomp Box."
CLIP Accurate Hard Clip.
EPAmp Replicates the Pre Amp of an Electric Piano.
Using the VALUE Rotary Knob,, select which characteristic you desire. When satisfied, proceed.
4. Touch the PAGE LEFT Touch Button TWICE.
Using either the VALUE Rotary Knob or the OVERDRIVE Rotary Knob, set the Value under the DRV
Parameter to your desired level. You will probably need to revisit the �EXP� and �TYPE� Parameters to
make your final tweaks. Go between them using the RIGHT and PAGE LEFT Touch Buttons. When
satisfied, SAVE the Patch.
If you have an Adjust Preset ("A#" or "B") selected, touch the PLAY Touch Button and proceed.
25
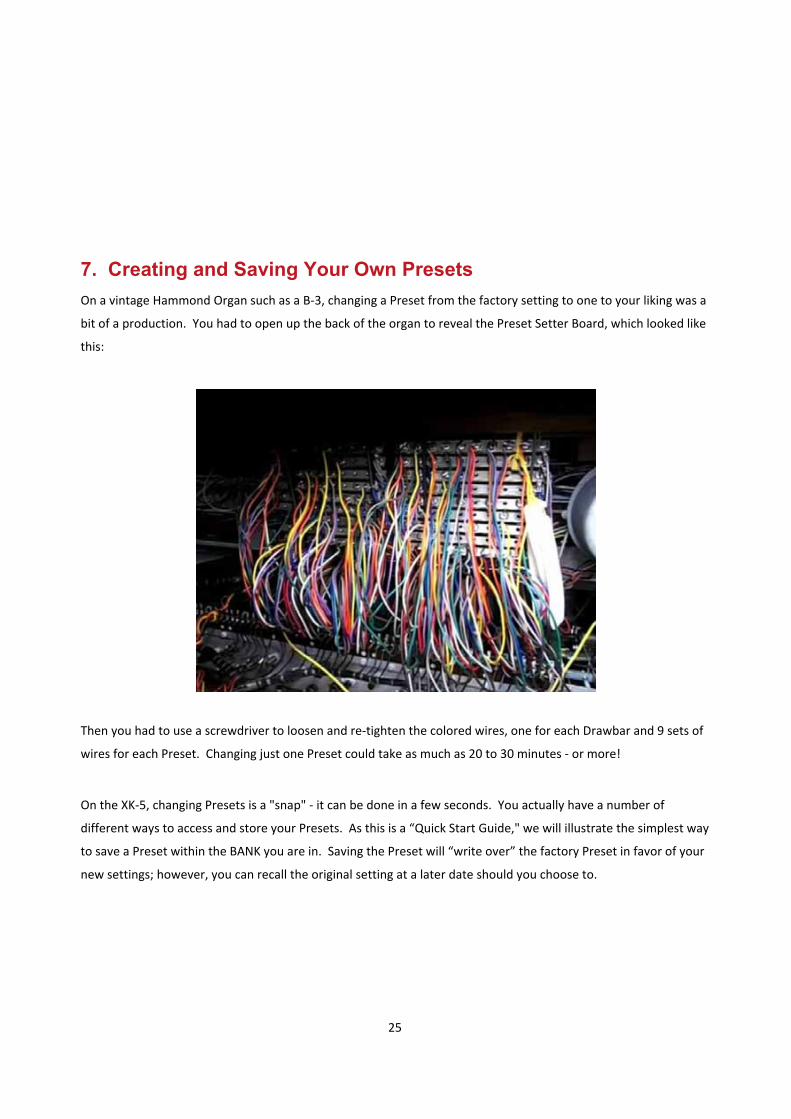
7. Creating and Saving Your Own Presets On a vintage Hammond Organ such as a B 3, changing a Preset from the factory setting to one to your liking was a
bit of a production. You had to open up the back of the organ to reveal the Preset Setter Board, which looked like
this:
Then you had to use a screwdriver to loosen and re tighten the colored wires, one for each Drawbar and 9 sets of
wires for each Preset. Changing just one Preset could take as much as 20 to 30 minutes or more!
On the XK 5, changing Presets is a "snap" it can be done in a few seconds. You actually have a number of
different ways to access and store your Presets. As this is a �Quick Start Guide," we will illustrate the simplest way
to save a Preset within the BANK you are in. Saving the Preset will �write over� the factory Preset in favor of your
new settings; however, you can recall the original setting at a later date should you choose to.
26
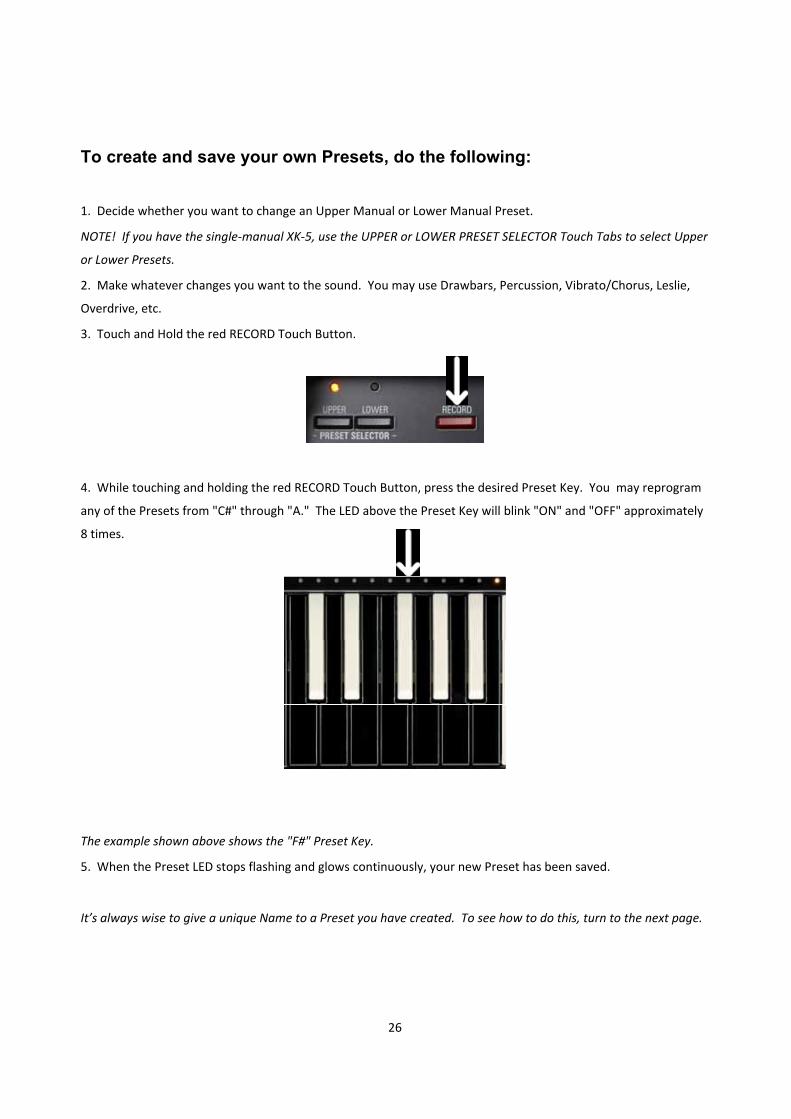
To create and save your own Presets, do the following:
1. Decide whether you want to change an Upper Manual or Lower Manual Preset.
NOTE! If you have the single manual XK 5, use the UPPER or LOWER PRESET SELECTOR Touch Tabs to select Upper
or Lower Presets.
2. Make whatever changes you want to the sound. You may use Drawbars, Percussion, Vibrato/Chorus, Leslie,
Overdrive, etc.
3. Touch and Hold the red RECORD Touch Button.
4. While touching and holding the red RECORD Touch Button, press the desired Preset Key. You may reprogram
any of the Presets from "C#" through "A." The LED above the Preset Key will blink "ON" and "OFF" approximately
8 times.
The example shown above shows the "F#" Preset Key.
5. When the Preset LED stops flashing and glows continuously, your new Preset has been saved.
It�s always wise to give a unique Name to a Preset you have created. To see how to do this, turn to the next page.

27
8. Naming your Preset
1. Touch the MENU/EXIT Touch Button ONCE.
2. Touch the PAGE RIGHT Touch Button TWICE. The word "PATCH" should now blink.
3. Touch the ENTER Touch Button
You arrive at the UPPER Patch Name area.
Use the PAGE LEFT and PAGE RIGHT Touch Buttons to move the cursor to the character to be edited.
Turn the VALUE Rotary Control to the right to scroll forward through the characters.
Turn the VALUE Rotary Control to the left to scroll backward through the characters.
The available characters include: Punctuation Marks (space . � &), Numeric Characters (0 ~ 9), Upper case
Letters (�A ~ Z�), and Lower case Letters (�a ~ z�).
If you need to re name a LOWER Preset:
After Step 3 above, Touch the PAGE UP Touch Button ONCE to arrive at the LOWER Patch name area
In either case, when you are done editing the name to your desire:
4. Touch and Hold the red RECORD Touch Button.
5. While touching and holding the red RECORD Touch Button, press the desired Preset Key. The LED
above the Preset Key will blink "ON" and "OFF" approximately 8 times.
6. When the Preset LED stops flashing and glows continuously, your Preset has been updated with your
new Name.

28
9. REVERB
The Reverb (controls in the upper right portion of the control panel) is set Out of the Box� to a general Reverb
�flavor." Just touch the REVERB Touch Button and dial in as much as you need.
Consult the Owner's Playing Guide to learn further Reverb tailoring tips.
10. EQUALIZER
The Equalizer has �shelf� Lows and Highs, with a �Sweepable� MID setting. This Equalizer is a GLOBAL effect, and
is not affected by Preset changes � the equalization always remains at the settings indicated by the Rotary Knobs.
Use this Equalizer in the event your stage/venue has any pronounced tonal anomalies like �Too Much Bass�, etc..
The center detent is �Flat."
Consult the Owner's Playing Guide for more details about the Equalizer.
29
ADDENDUM: GETTING THAT “RIGHT” SOUND
The HAMMOND XK 5 leads a �double life." You can turn it on, adjust the Drawbars, Chorus, and Percussion just
like a Vintage B 3, and you�re on your way.
OR
You can go �under the hood� and fine tune nearly every aspect of the instrument to create the Hammond Of Your
Dreams. The Menus are deep, and the possibilities are endless.
So far in this �Quick Start Guide,� we have helped you tweak the things that many in the Hammond Family have
found to be of immediate importance. In the interest of getting you started �right away� we have not delved into
the �why�s� and �wherefores� concerning the edits you made we were just concerned with �getting you there."
If you�re going to sculpt your �personal� instrument, you should set a bit of time aside to learn more about the XK
5. We have included a comprehensive Owner's Playing Guide which covers every parameter and control. Start on
Page One, and don�t skip a thing. Try every control and learn what it does. (It�s actually easier than it sounds).
You�ll be an expert in no time.
But if you can�t wait�
Here are a few tweaks, twiddles and tips that you can do right now to get some very popular sounds.
STOP! You are about to perform some �Major Surgery� on your XK 5. Change ONLY the Parameters
indicated here. As you learn more, twiddle more, but for now only change the Menu parameters we
indicate. (It�s always OK to change the Drawbars and everything else on the top panel.)
IMPORTANT! MAKE SURE YOU HAVE EITHER THE UPPER �A#� OR �B� ADJUST PRESET SELECTED!
30
�GOSPEL�
MENU:
Custom Tone Wheel:
1. Touch the MENU/EXIT Touch Button2. Touch the PAGE UP Touch Button ONCE3. TONEWHEEL FLASHING Touch the [ENTER] Touch Button4. Using the VALUE Rotary Knob, select �B 3�5. Touch the PAGE UP Touch Button ONCE6. Using the VALUE Rotary Knob, select �U2:Rumbless�7. Touch the PLAY Touch Button to return to PLAY Mode.
Custom Contact:
1. Touch the MENU/EXIT Touch Button2. Touch the PAGE UP Touch Button ONCE3. Touch the PAGE RIGHT Touch Button ONCE4. CONTACT FLASHING Touch the [ENTER] Touch Button5. Using the VALUE Rotary Knob, select �U1:B 3 #A27563�6. Touch the PLAY Touch Button to return to PLAY Mode.
Custom LESLIE Cabinet*Omit this step if using a physical Leslie Speaker Cabinet
1. Press and hold any of the LESLIE Touch Tabs until the display jumps to the LESLIE Edit Menu.2. Using the VALUE Rotary Knob, select [U5:147 Wild]3. Touch the PLAY Touch Button to return to PLAY Mode.
Custom Pedal Registration
1. Touch the MENU/EXIT Touch Button2. Touch the PAGE UP Touch Button ONCE3. Touch the PAGE RIGHT Touch Button THREE times4. PED. REG FLASHING Touch the [ENTER] Touch Button5. Using the VALUE Rotary Knob, select �U1:B 3 #A27563�6. Touch the PLAY Touch Button to return to PLAY Mode.
Register the Organ as follows
Upper A#:80 8808 008
Upper B:08 8865 500
Lower A#:00 8400 000
Lower B:00 8802 012
Pedal: 80
Chorus: N/A
Percussion:N/A
Overdrive:N/A
Set the LESLIE to FAST Speed

31
�CLEAN�
MENU:
Custom Tone Wheel:
1. Touch the MENU/EXIT Touch Button2. Touch the PAGE UP Touch Button ONCE3. TONEWHEEL FLASHING Touch the [ENTER] Touch Button4. Using the VALUE Rotary Knob, select �Mellow�5. Touch the PAGE UP Touch Button ONCE6. Using the VALUE Rotary Knob, select �U1:Full Flats�7. Touch the PLAY Touch Button to return to PLAY Mode.
Custom Contact:
1. Touch the MENU/EXIT Touch Button2. Touch the PAGE UP Touch Button ONCE3. Touch the PAGE RIGHT Touch Button ONCE4. CONTACT FLASHING Touch the [ENTER] Touch Button5. Using the VALUE Rotary Knob, select �U2:Regular�6. Touch the PLAY Touch Button to return to PLAY Mode.
Custom LESLIE Cabinet*Omit this step if using a physical Leslie Speaker Cabinet
1. Press and hold any of the LESLIE Touch Tabs until the display jumps to the LESLIE Edit Menu.2. Using the VALUE Rotary Knob, select [U1: 122 Gentle]3. Touch the PLAY Touch Button to return to PLAY Mode.
Custom Pedal Registration
1. Touch the MENU/EXIT Touch Button2. Touch the PAGE UP Touch Button ONCE3. Touch the PAGE RIGHT Touch Button THREE times4. PED. REG FLASHING Touch the [ENTER] Touch Button5. Using the VALUE Rotary Knob, select �U1:B 3 #A27563�6. Touch the PLAY Touch Button to return to PLAY Mode.
Register the Organ as follows
Upper A#:80 8808 000
Upper B:80 0000 008
Lower A#:00 8600 000
Lower B:00 6654 300
Pedal: 73
Chorus: N/A
Percussion:N/A
Overdrive:N/A
Set the LESLIE to FAST Speed

32
�JAZZ�
MENU:
Custom Tone Wheel:1. Touch the MENU/EXIT Touch Button2. Touch the PAGE UP Touch Button ONCE3. TONEWHEEL FLASHING Touch the [ENTER] Touch Button4. Using the VALUE Rotary Knob, select �B 3�5. Touch the PAGE UP Touch Button ONCE6. Using the VALUE Rotary Knob, select �U1:B 3 Normal�7. Touch the PLAY Touch Button to return to PLAY Mode.
Custom Contact:1. Touch the MENU/EXIT Touch Button2. Touch the PAGE UP Touch Button ONCE3. Touch the PAGE RIGHT Touch Button ONCE4. CONTACT FLASHING Touch the [ENTER] Touch Button5. Using the VALUE Rotary Knob, select �U2:Regular�6. Touch the PLAY Touch Button to return to PLAY Mode.
Custom LESLIE Cabinet*Omit this step if using a physical Leslie Speaker Cabinet
1. Press and hold any of the LESLIE Touch Tabs until the display jumps to the LESLIE Edit Menu.2. Using the VALUE Rotary Knob, select [U1: 122 Gentle]3. Touch the PLAY Touch Button to return to PLAY Mode.
Custom Pedal Registration1. Touch the MENU/EXIT Touch Button2. Touch the PAGE UP Touch Button ONCE3. Touch the PAGE RIGHT Touch Button THREE times4. PED. REG FLASHING Touch the [ENTER] Touch Button5. Using the VALUE Rotary Knob, select �U1:B 3 #A27563�6. Touch the PLAY Touch Button to return to PLAY Mode.
Register the Organ as follows
Upper A#:88 8888 888
Upper B:88 8000 001
Lower A#:00 8800 000
Lower B:83 8000 000
Pedal: 50
Chorus:1. Touch [Vibrato Upper] Button2. Set [Chorus and Vibrato] knob so �C 3� LED is ON
Percussion:1. Touch ALL FOUR Percussion buttons
Overdrive:N/A
Select LESLIE speeds Ad Lib.
33
�ROCK�
MENU:
Custom Tone Wheel:1. Touch the MENU/EXIT Touch Button2. Touch the PAGE UP Touch Button ONCE3. TONEWHEEL FLASHING Touch the [ENTER] Touch Button4. Using the VALUE Rotary Knob, select �B 3�5. Touch the PAGE UP Touch Button ONCE6. Using the VALUE Rotary Knob, select �U3:Mixture�7. Touch the PLAY Touch Button to return to PLAY Mode.
Custom Contact:1. Touch the MENU/EXIT Touch Button2. Touch the PAGE UP Touch Button ONCE3. Touch the PAGE RIGHT Touch Button ONCE4. CONTACT FLASHING Touch the [ENTER] Touch Button5. Using the VALUE Rotary Knob, select �U1 B 3 #A27653�6. Touch the PLAY Touch Button to return to PLAY Mode.
Custom LESLIE Cabinet:*Omit this step if using a physical Leslie Speaker Cabinet
1. Press and hold any of the LESLIE Touch Tabs until the display jumps to the LESLIE Edit Menu.2. Using the VALUE Rotary Knob,, select [U2:122 Wild]3. Touch the PLAY Touch Button to return to PLAY Mode.
Custom Pedal Registration1. Touch the MENU/EXIT Touch Button2. Touch the PAGE UP Touch Button ONCE3. Touch the PAGE RIGHT Touch Button THREE times4. PED. REG FLASHING Touch the [ENTER] Touch Button5. Using the VALUE Rotary Knob, select �U1:B 3 #A27563�6. Touch the PLAY Touch Button to return to PLAY Mode.
Register the Organ as follows
Upper A#:88 8800 000Upper B:88 0800 000Lower A#:00 8800 000Lower B:88 8888 888Pedal: 80
Chorus:1. Touch [Vibrato Upper] Button2. Set [Chorus and Vibrato] knob so �C 2� LED is ON
Percussion:1. Touch Percussion [ON] Button2. Touch Percussion [Soft] Button3. Touch Percussion [Fast] Button
Overdrive:1. Touch [Overdrive] Button2. Using [Overdrive Depth] knob set value to �80�
Select LESLIE speeds Ad Lib.

34
FEELING CONFIDENT? This set is a bit more complex. Take your time and you’ll “Go back in time!” �OLD SCHOOL�MENU:Custom ToneWheel:
1. Touch the MENU/EXIT Touch Button2. Touch the PAGE UP Touch Button ONCE3. TONEWHEEL FLASHING Touch the [ENTER] Touch Button4. Using the VALUE Rotary Knob, select �C 3�5. Touch the PAGE UP Touch Button ONCE6. Using the VALUE Rotary Knob, select �U3:Mixture�7. Touch the PLAY Touch Button to return to PLAY Mode.
Key Click and Leakage1. Touch the MENU/EXIT Touch Button2. Touch the [ENTER] Touch Button3. Touch the PAGE RIGHT Touch Button TWICE4. Using the [VALUE] Rotary Knob select �52�5. Touch the PAGE RIGHT Touch Button ONCE6. Using the [VALUE] Rotary Knob select �28�7. Touch the PAGE RIGHT Touch Button THREE times8. Using the [VALUE] Rotary Knob select �127�
Custom Contact:1. Touch the MENU/EXIT Touch Button2. Touch the PAGE UP Touch Button ONCE3. Touch the PAGE RIGHT Touch Button ONCE4. CONTACT FLASHING Touch the [ENTER] Touch Button5. Using the VALUE Rotary Knob, select �U1 B 3 #A27653�6. Touch the PLAY Touch Button to return to PLAY Mode.
Custom LESLIE Cabinet*Omit this step if you are using a physical Leslie Speaker Cabinet
1. Press and hold any of the LESLIE Touch Tabs until the display jumps to the LESLIE Edit Menu.2. Using the VALUE Rotary Knob, select [U5: 147 Wild]3. Touch the PLAY Touch Button to return to PLAY Mode.
Custom Pedal Registration1. Touch the MENU/EXIT Touch Button2. Touch the PAGE UP Touch Button ONCE3. Touch the PAGE RIGHT Touch Button THREE times4. PED. REG FLASHING Touch the [ENTER] Touch Button5. Using the VALUE Rotary Knob, select �U1:B 3 #A27563�6. Touch the PLAY Touch Button to return to PLAY Mode.
Register the Organ as followsUpper A#:88 8888 888Upper B:88 8000 000Lower A#:00 8800 000Lower B:88 8888 888Pedal: 80

35
Chorus:1. Touch and Hold [Vibrato Upper] Button until Display jumps to �Chorus/Vibrato� Menu2. Using the VALUE Rotary Knob, select ��55 57�3. Touch the PAGE UP Touch Button ONCE4. Using the VALUE Rotary Knob, select �D21�5. Touch [PLAY]
Percussion:
Touch ALL FOUR Percussion buttons �on�
Overdrive:
1. Touch and hold the [Overdrive] Button until Display jumps to �Overdrive� Menu. LED forOverdrive should be Lit
2. Touch the PAGE RIGHT Touch Button ONCE3. Using VALUE Rotary Knob set value to �0�
(NOTE: The �0� value is correct. In this instance, we wish the signal to pass through the �Tube�model of the Overdrive to add warmth without increasing the gain to induce distortion)
4. Touch the PAGE RIGHT Touch Button ONCE5. Using VALUE Rotary Knob set value to �EX OD�6. Touch the PAGE RIGHT Touch Button ONCE7. Using VALUE Rotary Knob set value to �TUBE�8. Touch the [DOWN] Arrow TWICE9. Using VALUE Rotary Knob set value to �U7 to U7�10. Touch the PAGE RIGHT Touch Button ONCE11. Using the VALUE Rotary Knob set value to �115�
Select LESLIE speeds Ad Lib.

36
SPECIAL SECTION:
1. Using the XK-5 with the XLK-3 Lower Manual If you have a Hammond XK SYSTEM and you want to use an XK 5 in place of the XK 3c Drawbar Keyboard, you can
do so. The XLK 3 Lower Manual will work in conjunction with the XK 5. However, there are two things you should
know:
1. The XLK 3 is a single contact manual. Therefore, all the Drawbar tones will sound simultaneously you won't
hear the individual harmonics play one after the other. For this effect, you will need the XLK 5 Lower Manual
designed for use with the XK 5.
2. There is also a small set up procedure to allow the XLK 3 to work correctly with the XK 5. Do the following:
A. Touch the MENU/EXIT Touch Button once.
B. Touch the PAGE UP Touch Button THREE Times.
C. Touch the PAGE RIGHT Touch Button THREE Times. The word "MIDI should now blink.
D. Touch the ENTER Touch Button to select the MIDI Edit Menu.
E. Use the VALUE Rotary Knob to select �2or3 KBD�
F. Touch the ENTER Touch Button to select the MIDI Template.
G. After you have made your selection, Touch the PLAY Touch Button to return to PLAY Mode.
Doing the above will affect the performance of the XK 5 in three ways:
1. The SPLIT feature is disabled. The Lower Manual Drawbars will play from the XLK 3.
2. The PEDAL TO LOWER function will work on the XLK 3.
3. The Preset Keys on the XLK 3 will recall the Lower Manual Presets (including Pedal registrations)
independently of the Upper Manual Presets.
NOTE: If you use the XK 5 with an XLK 3 Lower Manual, be advised that the Wood Grains may not match
completely the Walnut finish on the XLK 3 may be a little lighter than the dark walnut finish of the XK 5.
37
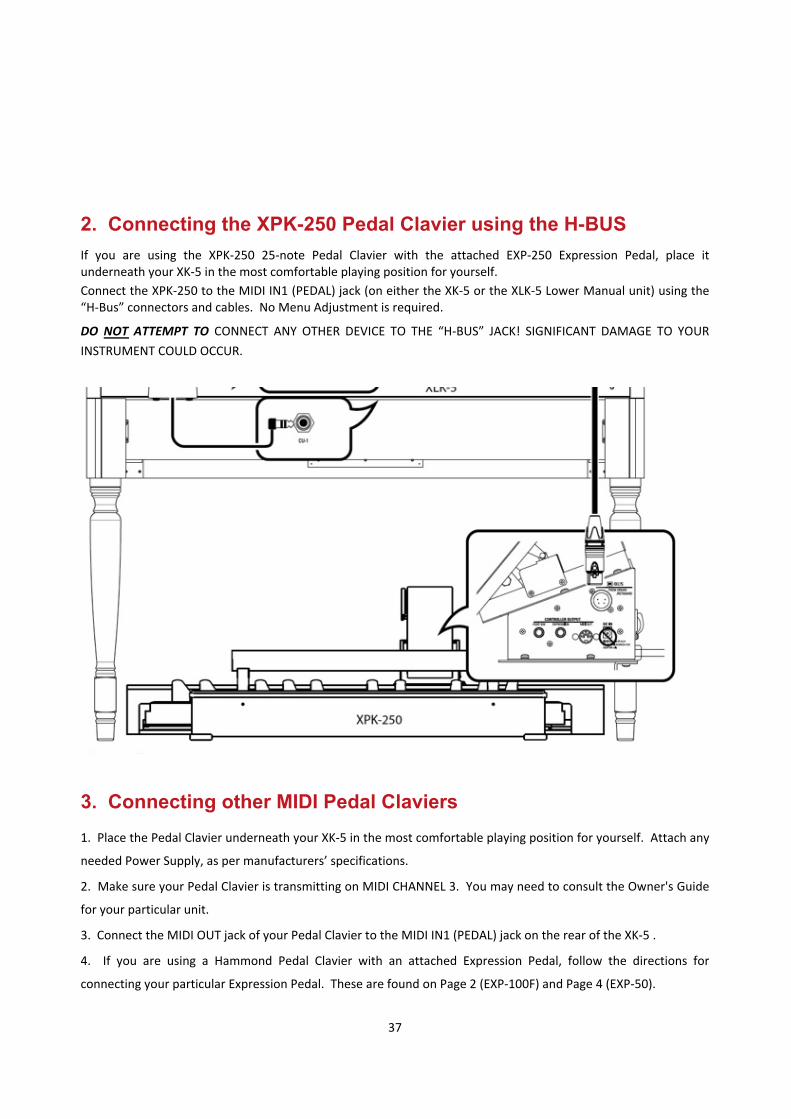
2. Connecting the XPK-250 Pedal Clavier using the H-BUSIf you are using the XPK 250 25 note Pedal Clavier with the attached EXP 250 Expression Pedal, place itunderneath your XK 5 in the most comfortable playing position for yourself.Connect the XPK 250 to the MIDI IN1 (PEDAL) jack (on either the XK 5 or the XLK 5 Lower Manual unit) using the�H Bus� connectors and cables. No Menu Adjustment is required.
DO NOT ATTEMPT TO CONNECT ANY OTHER DEVICE TO THE �H BUS� JACK! SIGNIFICANT DAMAGE TO YOURINSTRUMENT COULD OCCUR.
3. Connecting other MIDI Pedal Claviers 1. Place the Pedal Clavier underneath your XK 5 in the most comfortable playing position for yourself. Attach any
needed Power Supply, as per manufacturers� specifications.
2. Make sure your Pedal Clavier is transmitting on MIDI CHANNEL 3. You may need to consult the Owner's Guide
for your particular unit.
3. Connect the MIDI OUT jack of your Pedal Clavier to the MIDI IN1 (PEDAL) jack on the rear of the XK 5 .
4. If you are using a Hammond Pedal Clavier with an attached Expression Pedal, follow the directions for
connecting your particular Expression Pedal. These are found on Page 2 (EXP 100F) and Page 4 (EXP 50).

38
*MENU* - For connecting other Pedal Claviers to the XK-51. Touch the MENU/EXIT Touch Button once.
2. Touch the PAGE UP Touch Button THREE Times
3. Touch the PAGE RIGHT Touch Button THREE Times. The word "MIDI should now blink.
4. Touch the ENTER Touch Button to select the MIDI Edit Menu.
If you are using Pedals with the XK 5 as a single manual Instrument,
Use the VALUE Rotary Knob to select �BASIC�
If you are using the XK 5 with expanded keyboards:
Use the VALUE Rotary Knob to select �2or3 KBD�
6. Touch the ENTER Touch Button to select the MIDI Template.
7. After you have made your selection, Touch the PLAY Touch Button to return to PLAY Mode and proceed.

39

40
This "Quick Start Guide" barely scratches the surface of the many features of you new Hammond XK-5.
Please consult the Owner' Playing Guide to learn more.
For 81 years, Hammond has been The Sound, The Soul, The One!
FM2326 0916 V1.00
Hammond Europe B.V.Hammond.eu


![Strumenti musicali nelle collezioni siciliane [Musical instrumentas in Sicilian collections], in Strumenti musicali in Sicilia, ed. by G. P. Di Stefano, S. G. Giuliano, S. Proto, Palermo,](https://static.fdokumen.com/doc/165x107/63377df2d102fae1b607646b/strumenti-musicali-nelle-collezioni-siciliane-musical-instrumentas-in-sicilian.jpg)